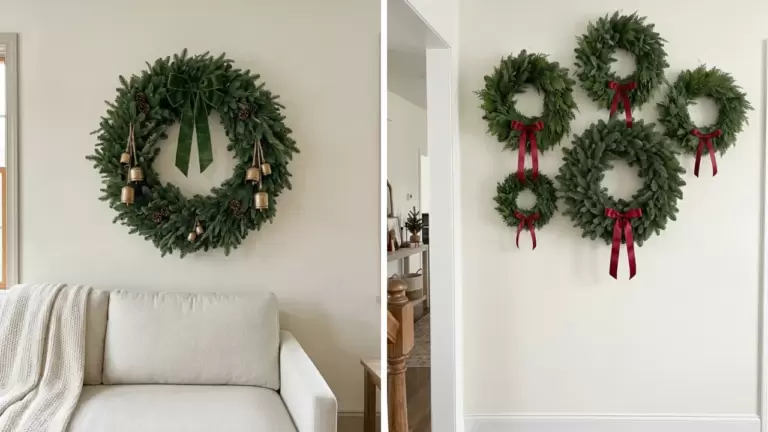
50 Easy DIY Christmas Wreath Ideas

This post may contain affiliate links: full affiliate disclosure.
Creating your own holiday decor is a rewarding way to welcome guests and express your personal seasonal style. These fifty projects range from classic evergreen designs to modern paper and yarn creations, ensuring there is a style for every home and skill level.
Most use simple techniques like wiring, gluing, or tying to achieve professional-looking results without a major time commitment.
CLASSIC EASY CHRISTMAS WREATHS
1. Easy Evergreen Christmas Wreath

Use a pre-made faux evergreen wreath to skip the difficult step of weaving fresh branches yourself.
Secure clusters of bright red berries and natural pinecones to the greenery using thin floral wire to ensure they stay in place throughout the season. Adding a large, pre-tied red bow at the top or bottom provides a professional finishing touch with minimal effort. This project is perfect for beginners who want a traditional holiday look without complex assembly.
- Overlap berry stems with evergreen needles to hide the wire connections
- Fluff the faux branches outward before decorating to add volume
- Choose wire-edged ribbon for the bow so it holds its shape against winter winds
Use green floral wire specifically to blend seamlessly with the evergreen needles.
2. Simple Pine and Red Berry Wreath
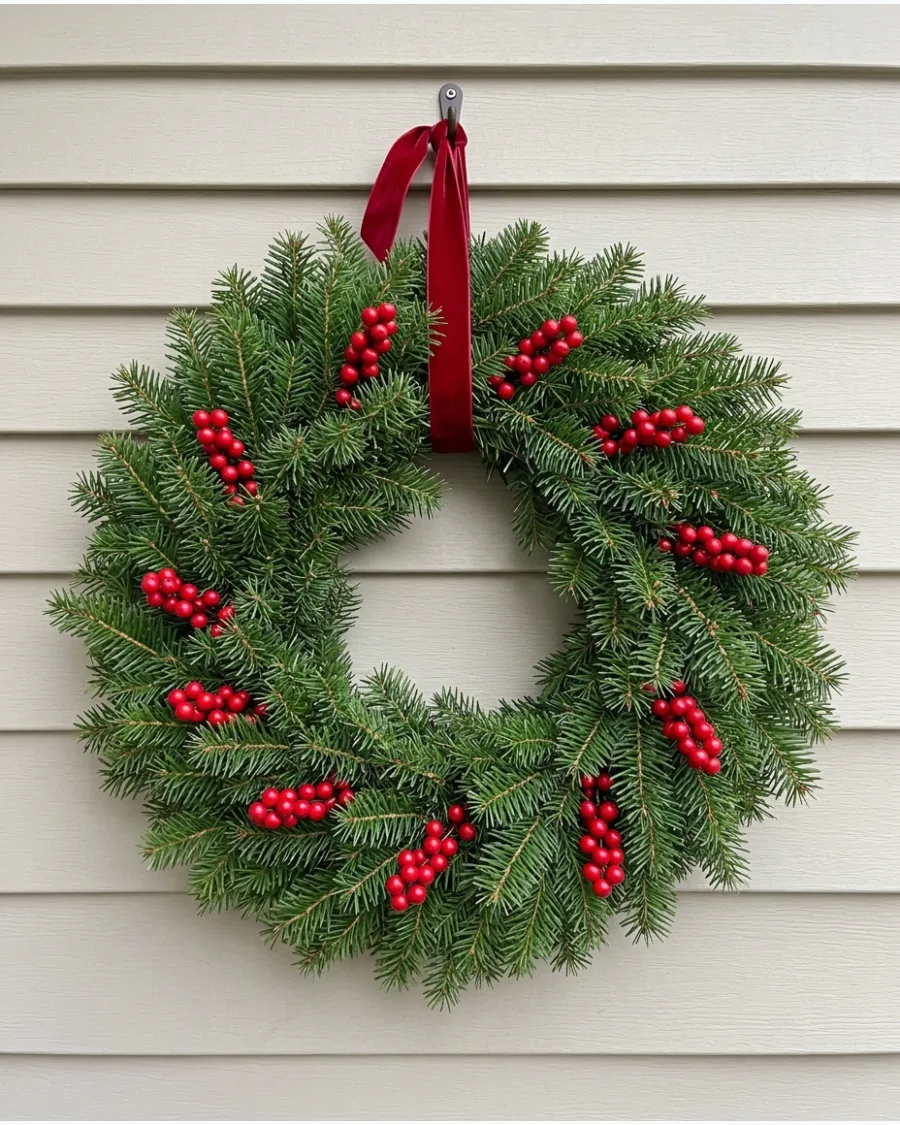
This minimalist approach focuses on the vibrant contrast between dark green pine and vivid red berries. Tuck small clusters of faux berries deep into the evergreen branches, spacing them evenly around the entire circumference of the wreath. A simple velvet ribbon tied in a classic loop at the top adds texture and elegance.
It is a quick way to refresh a plain store-bought wreath for a timeless Christmas aesthetic.
- Group berries in clusters of three for a more natural and balanced appearance
- Use waterproof velvet ribbon if the wreath will be exposed to winter humidity
- Vary the depth of the berry placements to create a three-dimensional effect
A light mist of spray adhesive and a sprinkle of faux snow can add a wintry touch to the berries.
3. Easy Pinecone Christmas Wreath
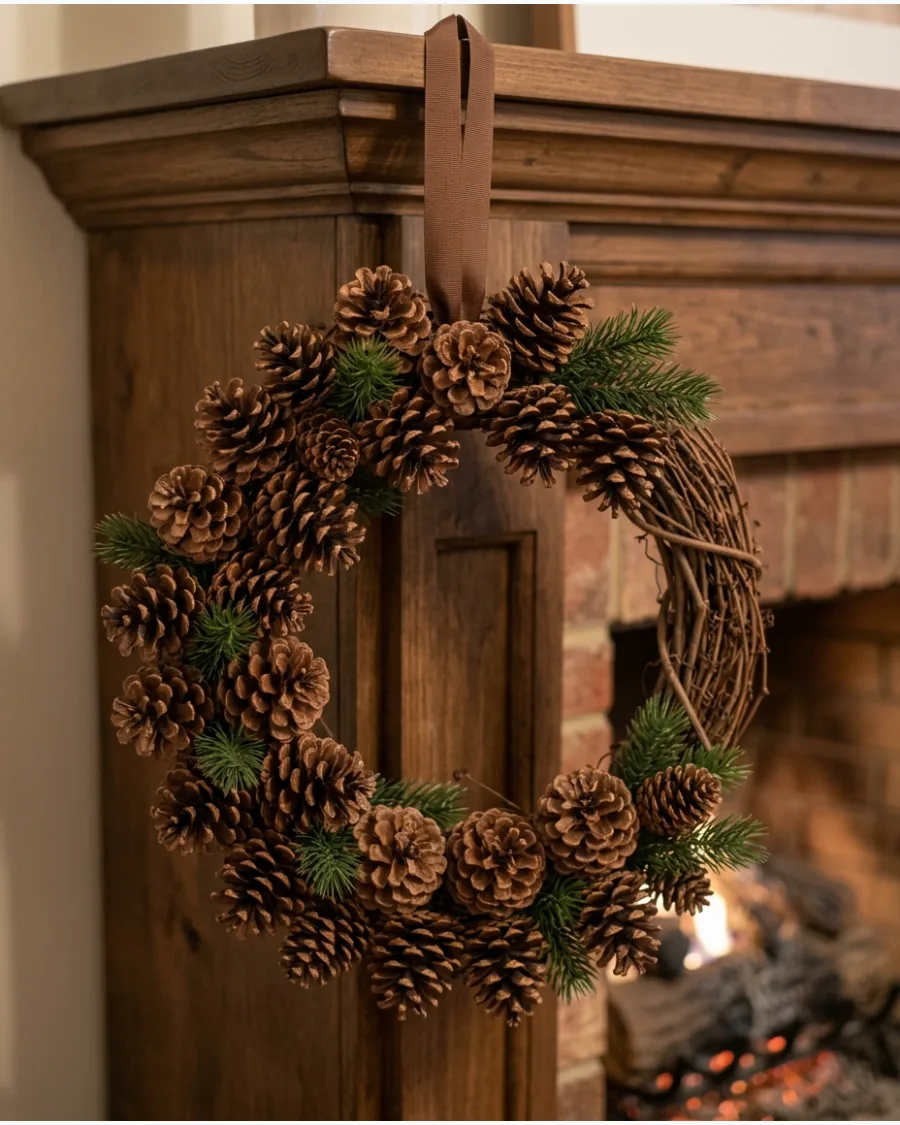
Natural pinecones offer a rustic charm that fits perfectly with woodland or farmhouse holiday decor. Attach varying sizes of pinecones to a grapevine or evergreen base using floral wire, filling in any noticeable gaps with small sprigs of fresh pine. This layered texture makes the wreath look full and custom-designed.
A simple ribbon hanger serves as a sturdy and inconspicuous way to display the piece.
- Bake natural pinecones at a low temperature to remove moisture and pests before use
- Mix frosted and natural pinecones to add visual interest and depth
- Secure the largest pinecones first to establish the main weight of the wreath
Dry-brush the tips of the pinecones with white acrylic paint to mimic a light dusting of snow.
4. Easy Red Bow Christmas Wreath

An oversized bow acts as a powerful focal point, allowing the rest of the wreath to remain understated. Place a single, large red velvet bow at either the six o'clock or twelve o'clock position on a lush evergreen base. While the bow is the star, you can subtly enhance the design by nestling a few small silver bells or berry sprigs near the knot.
This style is ideal for modern or traditional homes that value clean lines and bold color.
- Select a ribbon width of at least 2.5 inches to ensure the bow has presence
- Trim the ribbon tails into a dovetail shape for a high-end, polished look
- Ensure the bow is tied tightly around the frame so it does not sag
Use a pipe cleaner to attach the bow; it is easier to twist and grip than thin floral wire.
5. Easy Christmas Bell Wreath
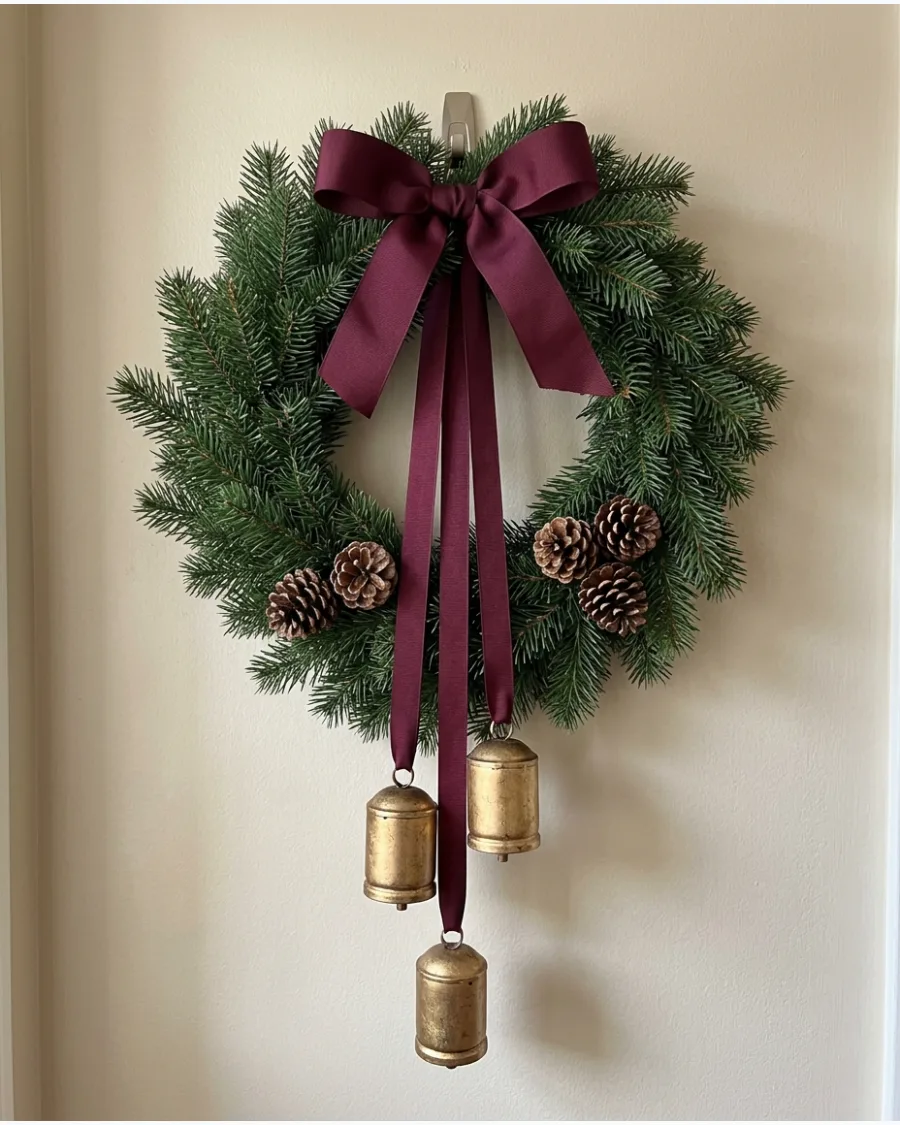
Incorporating metallic elements like bells adds a sophisticated sound and shine to your front door. Suspend two or three gold or brass bells from the lower center of an evergreen wreath using a coordinated fabric ribbon. Complement the metallic tones with a few scattered pinecones and a ribbon in a deep holiday shade like burgundy or forest green.
This arrangement creates a high-end look using very simple, affordable components.
- Vary the lengths of the ribbons holding the bells to create a tiered visual effect
- Choose bells with an antiqued finish for a more vintage, expensive feel
- Lightly wire the bells to the frame to prevent them from hitting the door repeatedly
Use a high-quality satin or grosgrain ribbon to elevate the overall texture of the DIY project.
6. Easy Cedar Christmas Wreath

Faux cedar is ideal for beginners because the floppy stems naturally hide the wreath base without requiring perfect precision. Focus on overlapping the stems in a single direction to mimic the way a real cedar tree grows.
Secure the stems to a wire or grapevine frame using green floral wire, making sure the ends of each branch are tucked under the previous layer for a seamless look. Finish the piece with a simple velvet ribbon tied at the bottom to provide a pop of color without cluttering the greenery.
- Choose cedar stems with wire cores so you can bend the tips slightly outward for extra volume.
- Keep the velvet ribbon thin—about one inch wide—to maintain the elegant, minimalist aesthetic.
- Use a grapevine base if you want any visible gaps to look like natural wood rather than industrial wire.
Gently shake the wreath once finished to identify any loose stems that need an extra twist of floral wire.
7. Easy Holly Berry Christmas Wreath

Use a grapevine or wire frame as a sturdy base to secure a dense layer of faux holly foliage. Concentrate the red berry stems in tight clusters of three to five instead of scattering them individually to create a more professional and intentional design. Once the greenery and berries are secured with floral wire, finish the look by attaching a large traditional red velvet bow to the bottom center.
- Overlap the holly leaves in a single clockwise direction to create a sense of natural movement and flow.
- Use green floral wire to anchor berry clusters deeply into the frame so they do not sag when the wreath is mounted.
- Select berries with a glossy or frosted finish to provide a high-contrast texture against the matte green leaves.
Group holly leaves in small fans of three before wiring them to the frame to speed up the coverage process and ensure even fullness.
8. Easy Pinecone and Berry Christmas Wreath

This traditional wreath relies on a ready-made evergreen base to save time while providing a lush foundation for decorations. By layering natural elements, you create texture and visual depth that mimics professional florist designs without complex assembly.
Secure large pinecones at staggered intervals around the wreath frame using thin floral wire before tucking in the berry stems. This structural approach ensures the heaviest items remain stable even when the door is frequently opened and closed.
- Group red berry picks in clusters of three to create vibrant focal points rather than scattering single berries thinly.
- Angle the pinecones slightly outward and inward to add dimension to the profile of the wreath.
- Select a wide wired ribbon for the final bow to ensure the loops hold their shape against outdoor wind or humidity.
Apply a small bead of hot glue to the stems of the berry picks before inserting them into the evergreen needles for a permanent, budge-proof hold.
9. Easy Plaid Christmas Wreath

Plaid is a timeless holiday pattern that adds instant warmth and a farmhouse feel to standard greenery. By wrapping wide ribbon through the branches, you create a cohesive base that does not require complex floral arranging.
Secure the end of a wired red-and-green plaid ribbon to the back of the wreath frame and loop it loosely through the needles at even intervals. Finish the look by wiring a large, multi-loop bow at the bottom or top center to establish a clear focal point.
- Choose wired ribbon to help loops hold their shape against the weight of the evergreen branches.
- Space the wraps roughly four to five inches apart to ensure the green foliage remains visible between the plaid sections.
- Tuck three to five small pinecones near the base of the bow to add organic texture without distracting from the pattern.
Use a pipe cleaner in a matching green shade to anchor the ribbon to the frame, making it easy to remove and reuse next season.
10. Easy Traditional Red and Gold Christmas Wreath

This classic design relies on a timeless color palette to create a high-impact look with very little effort. By starting with a pre-made evergreen base, you can focus entirely on the placement of your decorative accents.
Thread floral wire through the loops of shatterproof red and gold ornaments to secure them firmly into the pine needles. This method ensures the decorations stay in place even if the door is opened and closed frequently.
- Cluster different sizes of baubles together in groups of three to create visual focal points.
- Tuck artificial red berry sprigs behind the ornaments to fill in any gaps and add texture.
- Position a large red velvet bow at either the top or the bottom center to anchor the design.
Use ornaments with different finishes, like matte, shiny, and glitter, to add depth without needing extra colors.
ORNAMENT AND RIBBON CHRISTMAS WREATHS
11. Easy Christmas Ornament Wreath

Transform a basic foam ring into a vibrant holiday statement using only shatterproof ornaments and glue. This project avoids the mess of greenery and provides a clean, modern aesthetic.
Glue the largest ornaments to the center and sides of the foam form first to establish the main shape before filling smaller gaps. Once the foam is completely covered, add a wide ribbon loop to the top for easy hanging.
- Use shatterproof plastic ornaments to prevent breakage if the wreath is bumped
- Incorporate at least three different sizes of ornaments for better coverage
- Attach a sturdy wire or ribbon loop to the form before gluing ornaments
Use a low-temperature hot glue gun to prevent the heat from melting or warping the foam wreath form.
12. Red and Gold Ornament Wreath
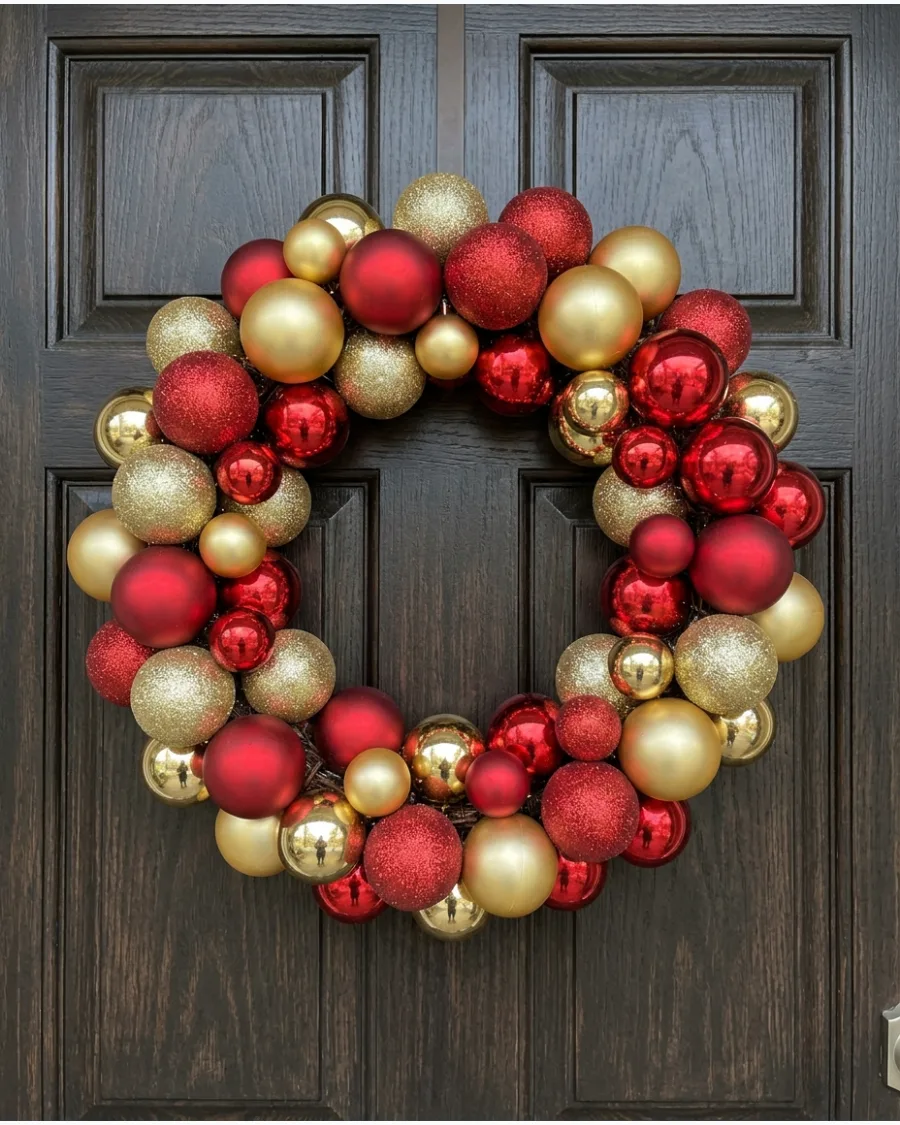
Create a classic holiday look by limiting your palette to two sophisticated colors. By mixing different finishes, you can make a simple color scheme look professionally designed.
Alternate between matte, shiny, and glittery red and gold ornaments to add visual depth without adding extra colors. This method works well on either a foam or wire base depending on your preference for glue or wire attachment.
- Select a mix of matte, shiny, and glitter-coated baubles
- Focus on a strict red and gold color palette for a traditional feel
- Layer the ornaments so some sit higher than others to create dimension
Remove the ornament caps and glue the neck directly to the form for a more secure and seamless bond.
13. White and Gold Ornament Wreath
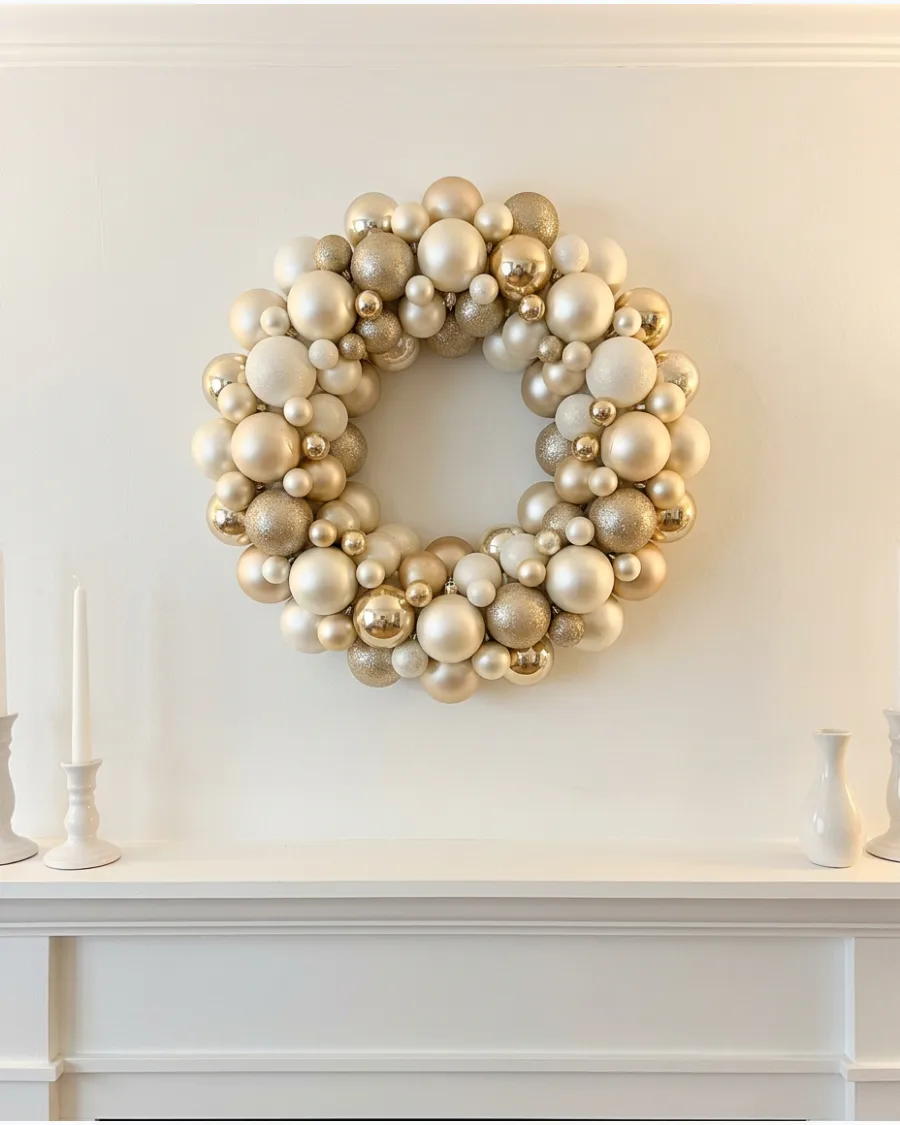
For a softer, more elegant approach to holiday decor, skip the traditional red and green.
This wreath relies on the subtle contrast between creamy whites and warm metallics. Tightly pack white, champagne, and gold ornaments of various sizes onto a white foam base to create a lush, jewel-like texture. The monochromatic base helps the wreath appear cohesive even if the ornament sizes vary wildly.
- Include champagne tones to bridge the gap between white and bright gold
- Use a white foam base to ensure any tiny gaps between ornaments are less noticeable
- Mix in textured or faceted ornaments to catch the light elegantly
Start by gluing ornaments to the inner and outer circumferences of the ring before filling the top face for a professional finish.
14. Colorful Vintage Ornament Wreath
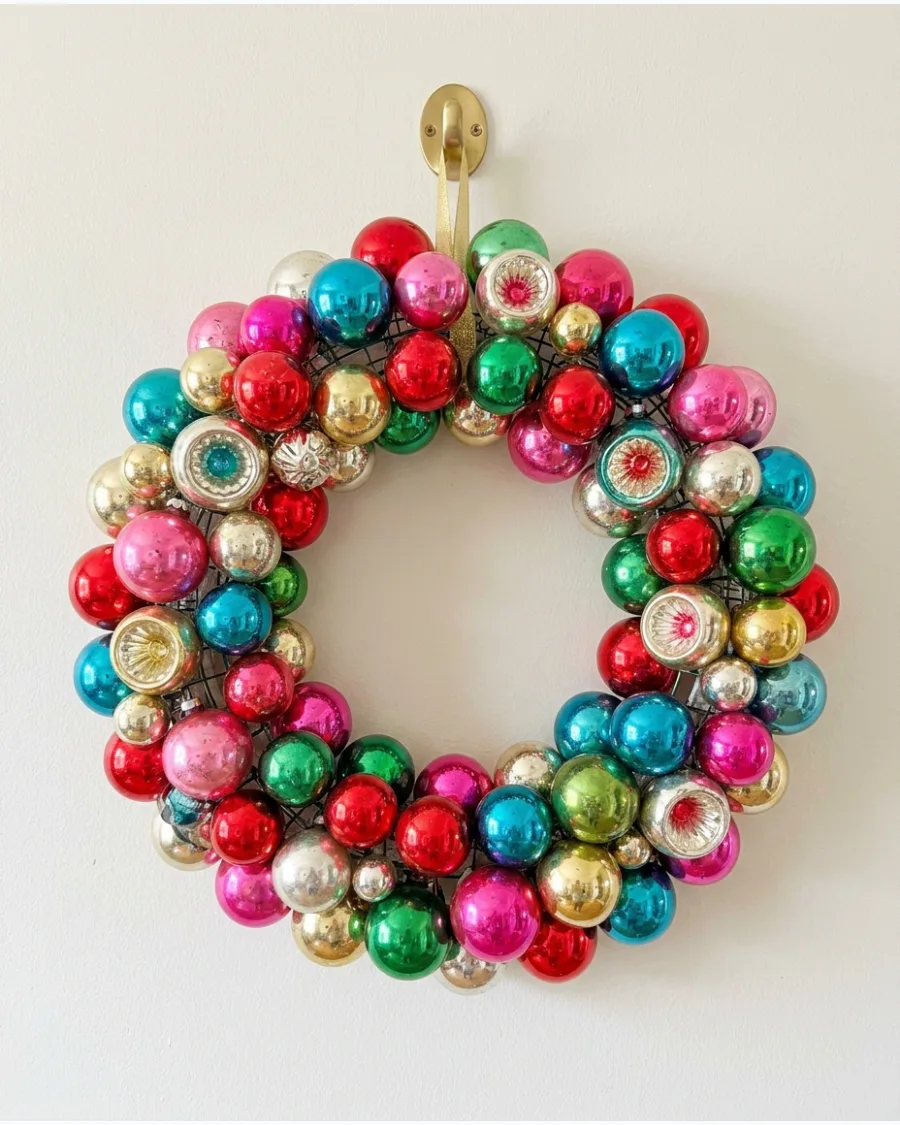
Embrace a retro Christmas aesthetic by combining a rainbow of vibrant colors. This style mimics the look of mid-century holiday decorations and adds a cheerful, eclectic vibe to your home.
Intersperse small vintage-style ornaments or unique shapes like indents between standard round baubles to give the wreath a collected-over-time appearance. Using shatterproof versions of these classic shapes provides the vintage look without the fragility of old glass.
- Combine at least five bright colors like pink, blue, green, gold, and red
- Add teardrop or finial-shaped ornaments to break up the circular pattern
- Use silver ornaments to add extra light-reflecting 'tinsel' vibes
Spray paint your wreath form with silver or gold paint before starting so that any gaps between ornaments look like intentional metallic accents.
15. Easy Ribbon Christmas Wreath

If you want a wreath that is soft to the touch and completely glue-free, a ribbon-tied design is the perfect solution. By using a wire frame, you have a sturdy structure to tie numerous short strips of fabric.
Tie 6-inch strips of wired Christmas ribbon in double knots around each ring of a wire wreath frame until the entire metal structure is hidden. The wired edges of the ribbon allow you to fluff the ends, creating a full, voluminous look that holds its shape.
- Use wired ribbon to ensure the 'petals' of the wreath stay upright and full
- Mix two or three patterns like plaid and solid red for a dynamic look
- Cut the ribbon ends into 'V' shapes or use pinking shears for a decorative finish
Cut all your ribbon strips to length before you start tying to make the assembly process much faster and more consistent.
16. Candy Cane Ribbon Wreath
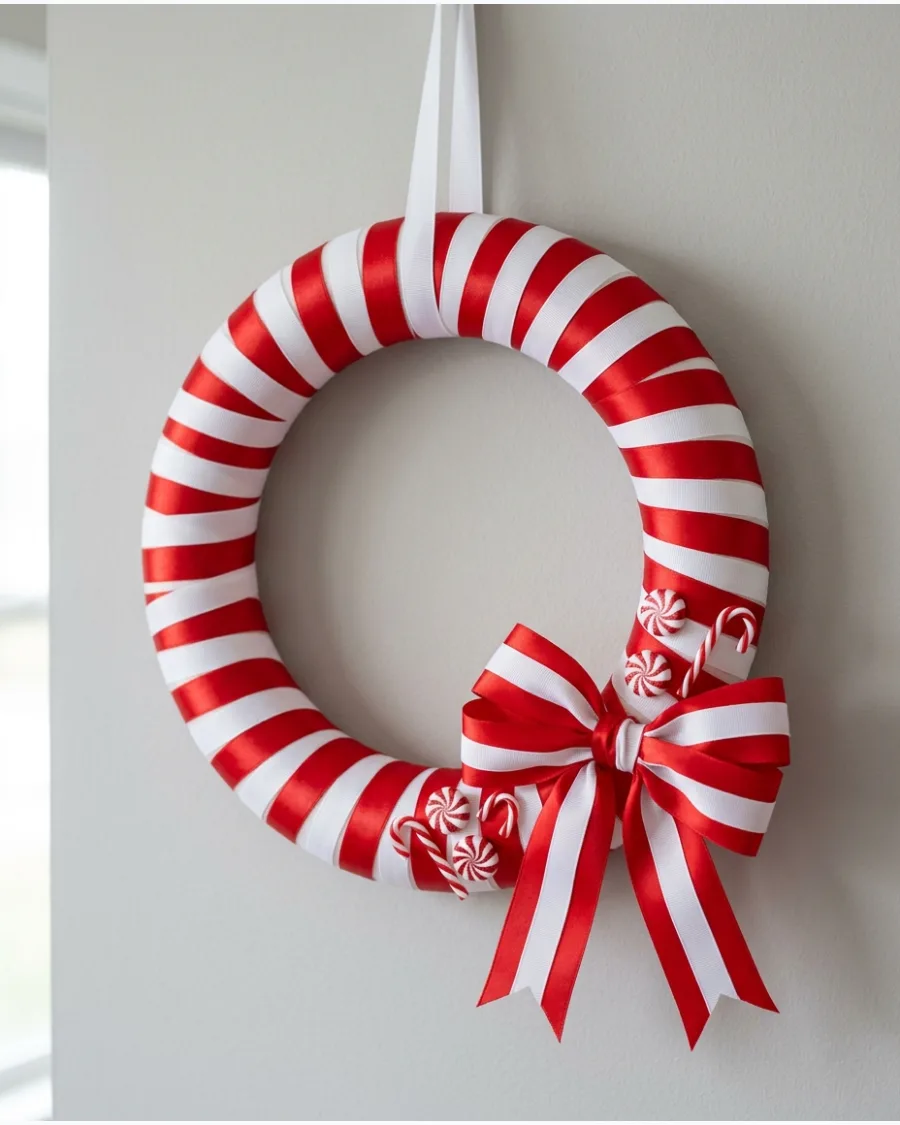
Create a sweet holiday look by wrapping a flat or foam wreath form with wide ribbon in alternating red and white stripes. Secure the ends of the ribbon with hot glue on the backside of the form to ensure a seamless candy-cane appearance. This method provides a graphic, high-contrast base that requires very little additional decor.
Finish the piece by attaching a pre-made red bow and a few faux peppermint candies for an easy theme.
- Use 2-inch wide grosgrain or satin ribbon for better coverage of the base
- Angle the ribbon as you wrap to create the signature diagonal candy-cane stripes
- Add a clear glitter spray to the finished wreath for a sugar-coated effect
Use a foam wreath base for a smooth, rounded surface that perfectly mimics the cylindrical shape of a candy cane.
17. Buffalo Plaid Ribbon Wreath
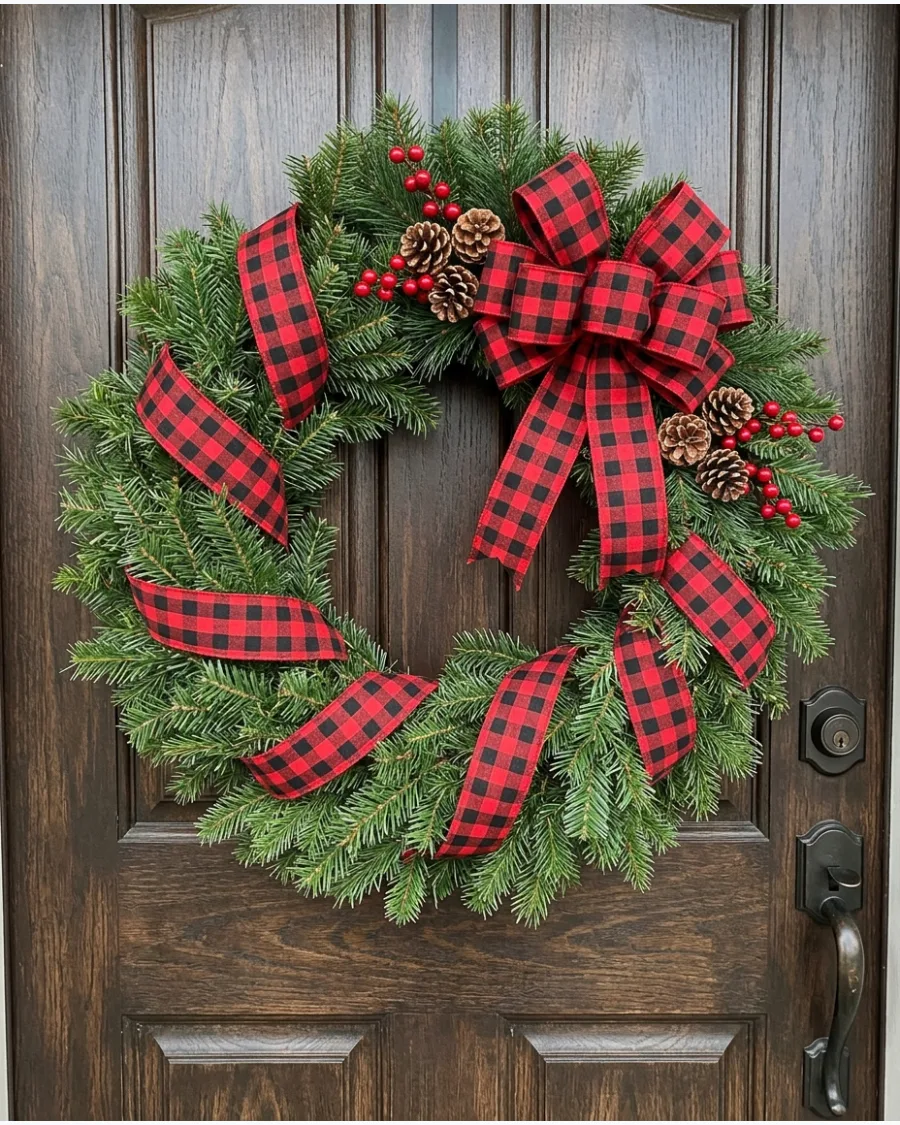
Buffalo plaid is a staple of farmhouse holiday decor that adds instant warmth to a front door. Loosely wrap a pre-lit or plain evergreen wreath with wide red-and-black plaid ribbon, allowing the greenery to peek through between the loops. This layering creates texture and depth without requiring expensive materials.
Complete the look by wiring on a few clusters of pinecones and bright red berry sprigs to highlight the rustic pattern.
- Choose wired ribbon to help the large bow maintain its shape against the wind
- Group three pinecones together for a more intentional design focal point
- Use florist wire to secure the bow firmly to the wreath frame through the branches
If using a foam base instead of evergreen, wrap the entire form in a solid dark fabric first so the white foam doesn't show through the plaid gaps.
18. Green Velvet Ribbon Wreath

For an elegant and understated aesthetic, use tonal colors that blend beautifully with natural foliage. Tie several small bows from forest-green velvet ribbon and space them evenly around the circumference of a fresh or faux cedar wreath. The velvet material provides a luxurious texture that contrasts subtly with the needle-thin leaves.
This monochromatic approach feels modern while remaining very easy to assemble.
- Accent the deep green with small brass bells to add a vintage metallic shine
- Use cream-colored ornaments to provide a soft light contrast against the dark velvet
- Choose velvet ribbon with a finished edge to prevent fraying over time
Leave the ribbon tails long so they drape naturally through the branches for a more relaxed, organic look.
19. Burgundy Bow Christmas Wreath

A single large focal point can make a simple evergreen wreath look professionally designed with minimal effort. Attach one oversized burgundy velvet bow at the bottom of the wreath and let long tails cascade down past the greenery. This traditional color palette feels sophisticated and timeless for any home exterior.
The addition of gold accents creates a rich finish that catches the light during the day.
- Tuck antique-gold bells into the greens near the bow knot to draw the eye
- Use 4-inch wide ribbon for the central bow to ensure it has enough visual weight
- Mix in natural pinecones to add a rustic element to the velvet
Dovetail the ends of the ribbon by folding the end in half and cutting at an angle toward the fold for a professional, finished look.
20. Scrap Ribbon Christmas Wreath
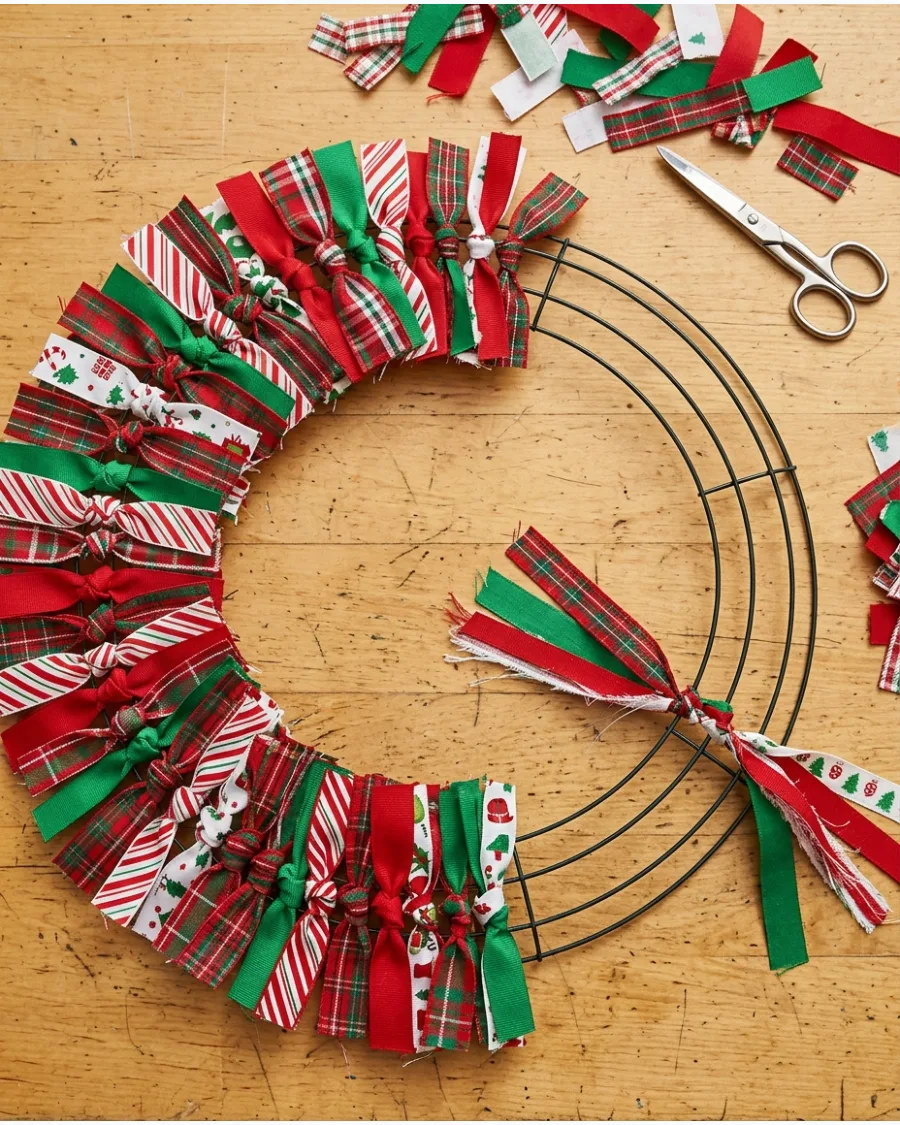
Turn your leftover gift-wrapping supplies into a festive piece of decor by tying ribbon remnants to a wire frame. Cut various Christmas ribbons into 6-inch strips and tie them with a simple double knot around the different tiers of a wire wreath form. Using a consistent color palette of red, green, and white ensures the final product looks intentional.
The more ribbons you add, the fuller and more textured the wreath becomes.
- Mix textures like grosgrain, satin, and burlap to create visual interest
- Slide the knots close together to hide the wire frame completely
- Use pinking shears to cut the ends if you want a decorative zig-zag edge
Vary the patterns by mixing stripes, polka dots, and solid colors within the same color family for a playful, eclectic look.
NATURAL AND FARMHOUSE CHRISTMAS WREATHS
21. Easy Grapevine Christmas Wreath
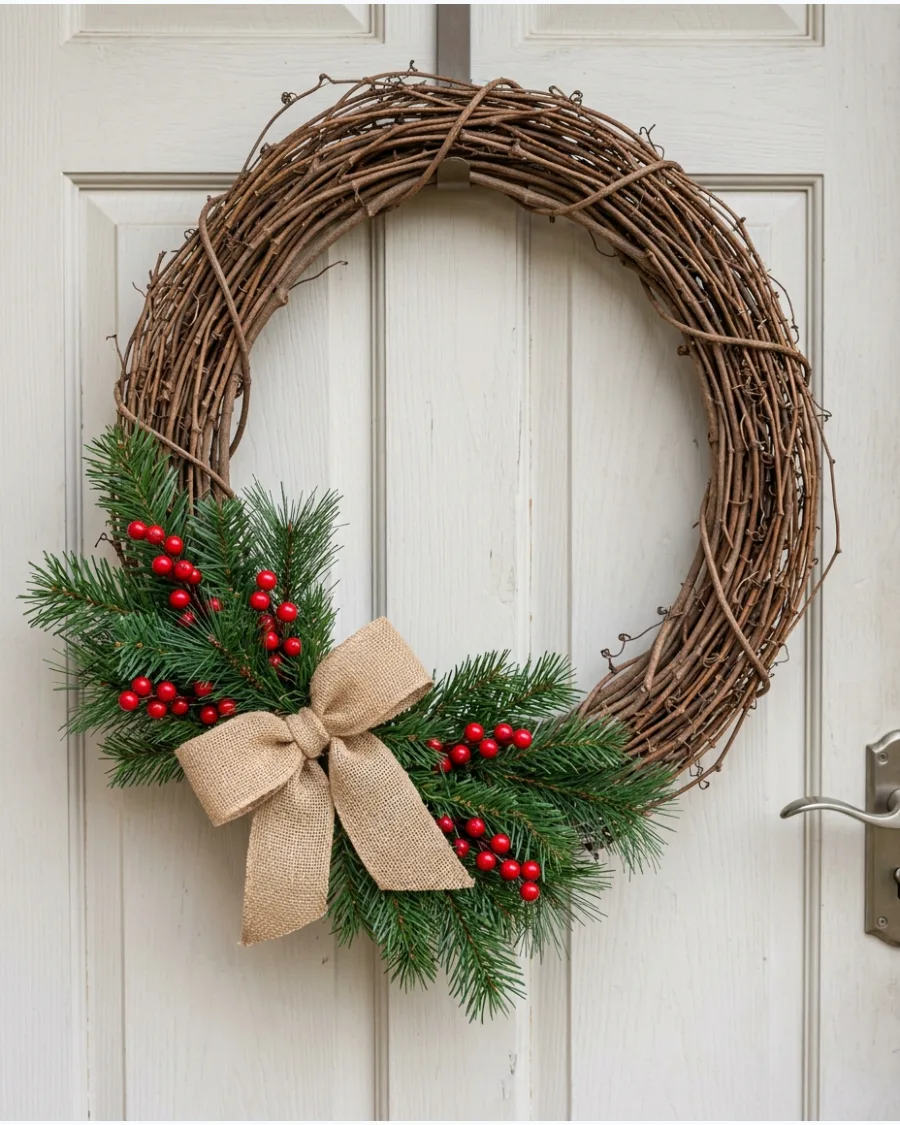
Grapevine wreaths provide a sturdy, textured base that requires very little coverage to look finished. This design leaves the majority of the wood visible to celebrate its natural, rustic aesthetic.
Concentrate your pine branches, red berries, and a single ribbon bow on the bottom left or right corner of the wreath frame. This asymmetrical approach is faster than full-coverage designs and creates a sophisticated modern farmhouse look.
- Insert stems directly into the grapevine weave to secure them without excessive glue
- Use florist wire to anchor heavier pine branches if they feel loose
- Choose a contrasting ribbon color like cream or forest green to make the corner pop
Layer the longest pine sprigs first at the bottom and work inward with smaller pieces to create a natural tapering effect.
22. Pinecone Grapevine Wreath
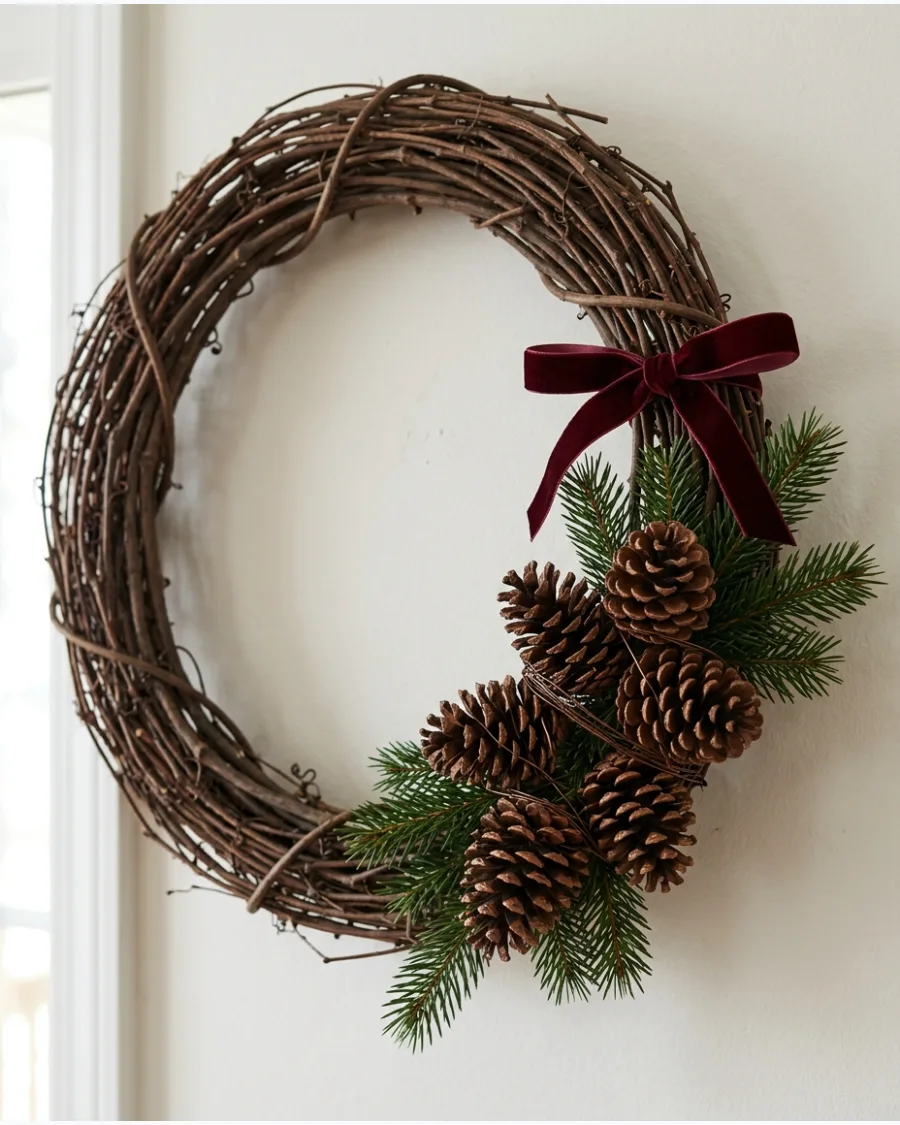
This minimalist project highlights the texture of natural forest elements against a dark grapevine base. Wire a small cluster of varied pinecones to one side of the wreath and tuck evergreen sprigs behind them for depth. By keeping the materials limited, you create a rustic focal point that doesn't overwhelm a smaller entryway.
A simple velvet or burlap ribbon tied at the very top or bottom completes the earthy theme.
- Wrap floral wire around the base scales of the pinecones to hide the attachment point
- Mix different sizes of pinecones to create a more organic, collected appearance
- Spray the pinecones with a light dusting of faux snow for a wintery touch
Use an odd number of pinecones, such as three or five, to create a more visually balanced cluster.
23. Dried Orange Christmas Wreath

Dried citrus adds a bright, translucent pop of color and a traditional scent to your holiday decor. Distribute dried orange slices evenly around an evergreen wreath, securing them with thin wire or ornament hooks. Complement the warm orange tones with small bundles of cinnamon sticks and natural pinecones for a classic Victorian-inspired look.
The sunlight passing through the orange slices creates a stained-glass effect if hung in a bright area.
- Pair orange slices with dark green foliage to make the citrus color stand out
- Intersperse pinecones to add a rough texture that balances the smooth orange slices
- Use thin 24-gauge floral wire to thread through the center of the fruit slices
If drying oranges at home, slice them thin and bake at 200°F for 3-4 hours, turning occasionally until fully dehydrated.
24. Cinnamon Stick Christmas Wreath

Bundle together groups of three to four cinnamon sticks to create aromatic accents for a simple evergreen base. Tie the sticks with twine or thin wire and nestle them into the branches alongside dried oranges and pinecones. This combination creates a multi-sensory decoration that looks cozy and smells like the holidays.
Finish the design with a neutral linen ribbon at the top for a understated, handmade farmhouse feel.
- Use varying lengths of cinnamon sticks in each bundle for a more rustic look
- Hide the wire used to attach bundles by tucking it deep into the evergreen needles
- Space the bundles at regular intervals (roughly every 4-5 inches) around the frame
Apply a drop of cinnamon essential oil to the back of the sticks once a week to refresh the holiday fragrance.
25. Rustic Burlap Christmas Wreath

Transform a basic metal wire frame into a textured farmhouse staple using inexpensive burlap. Wrap wide burlap ribbon loosely around the wire form, overlapping the edges to ensure the metal is completely hidden. Once the base is covered, attach evergreen branches and pinecones to the bottom half to provide weight and color.
A large, multi-loop burlap bow placed at the very bottom creates a traditional silhouette that fits any rustic holiday theme.
- Use floral pins or hot glue to secure the start and end of the burlap wrap
- Pinch and pleat the burlap as you wrap to add extra volume and texture
- Add small clusters of red berries to the greenery to provide a pop of color against the tan fabric
If the burlap frays, spray the edges with a bit of clear-drying fabric stiffener or hairspray before wrapping.
26. Woodland Christmas Wreath
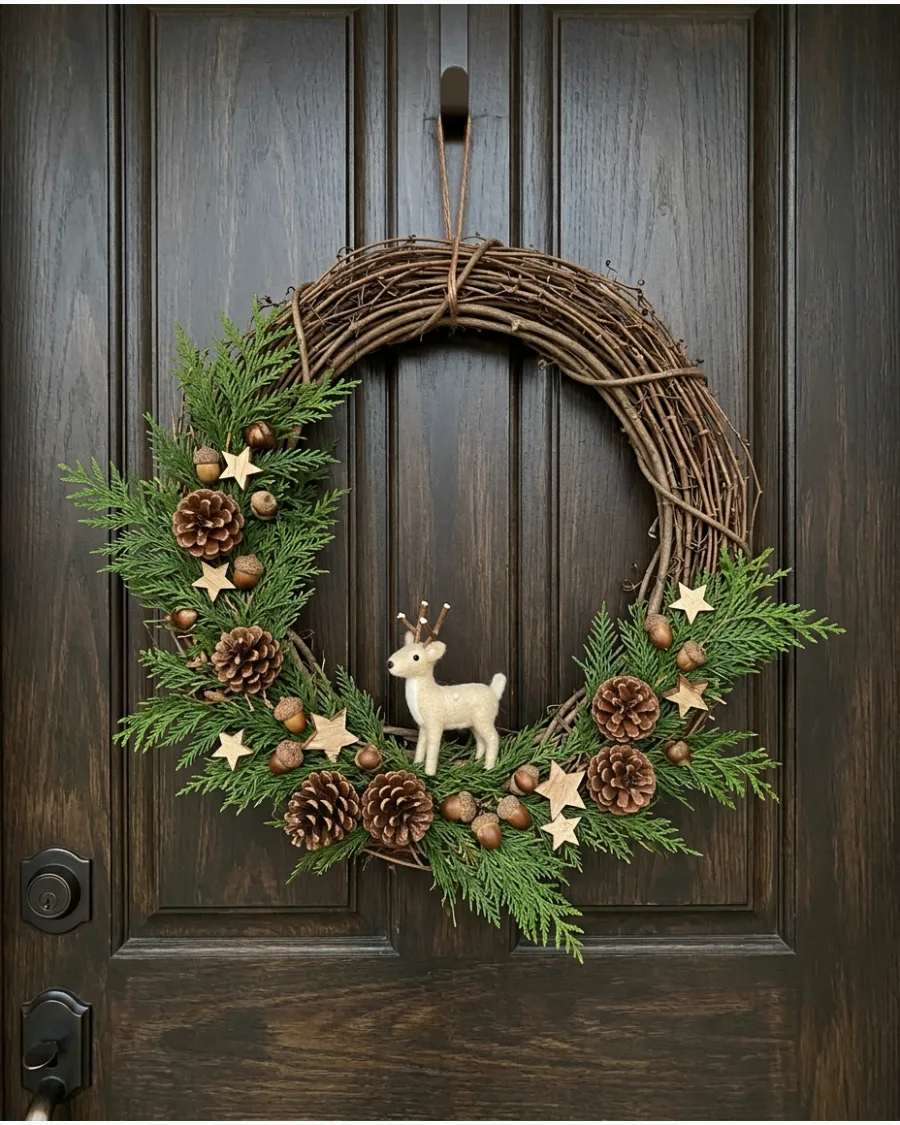
This design brings the charm of a winter forest to your home using a mix of natural textures. Secure cedar branches and pinecones to a grapevine base using floral wire, then tuck in small wooden stars and acorns for variety. Finish the look by nestling one small woodland animal ornament, such as a fox or deer, among the greenery.
Stick to a palette of deep green, earthy brown, and cream to maintain the serene forest aesthetic.
- Use floral wire instead of hot glue for a more secure hold on heavy pinecones and thick branches.
- Mix different sizes of wooden stars to create a sense of depth and visual interest across the grapevine.
- Arrange the cedar branches in one consistent direction to create a sense of natural growth movement.
Lightly dust the tips of the pinecones with cream-colored acrylic paint to mimic a light dusting of forest frost.
27. Eucalyptus Christmas Wreath
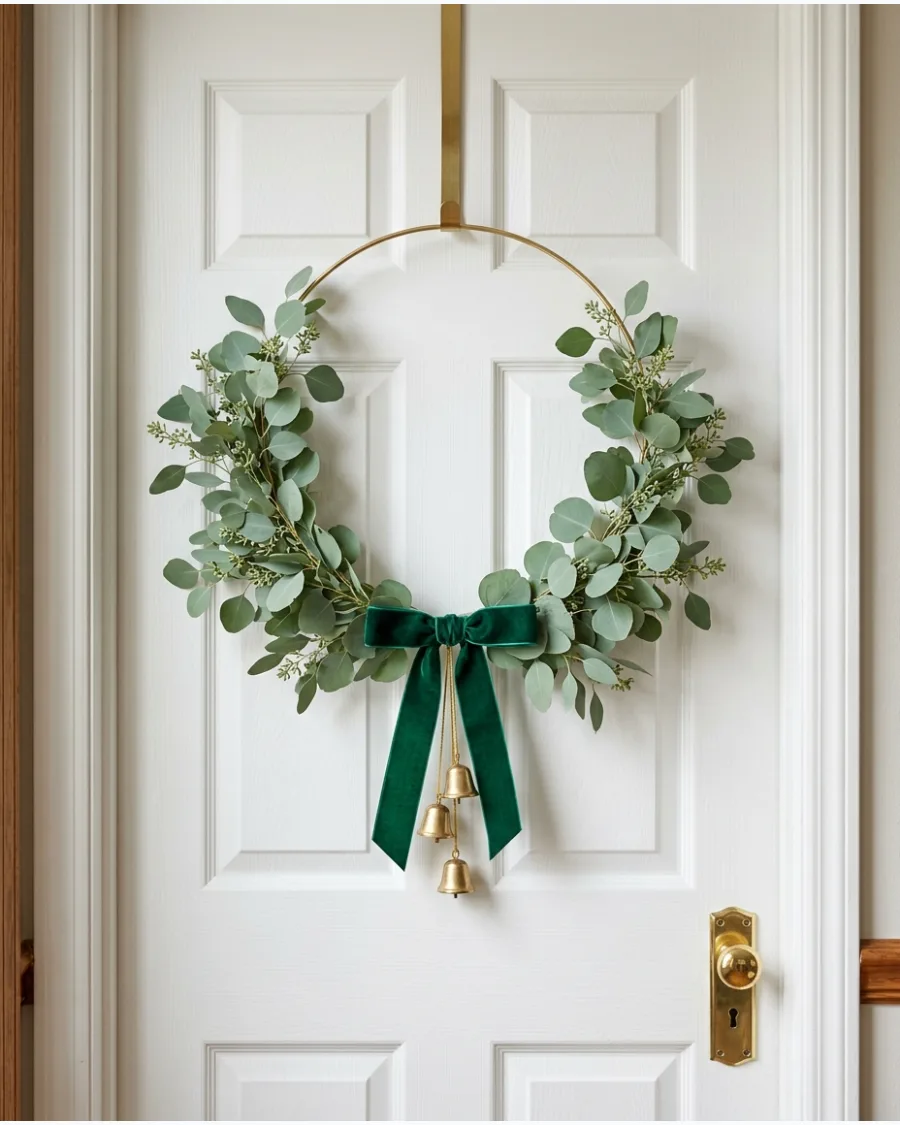
For a modern take on holiday decor, swap traditional stiff pines for the flowing lines of eucalyptus. Wire eucalyptus and evergreen stems around a minimalist metal hoop or a slim grapevine wreath to create a light, airy base. Adding a velvet bow in a rich jewel tone provides a luxurious texture contrast against the silvery leaves.
Finish with a few small bells to give the piece a festive sound whenever the door moves.
- Combine seeded eucalyptus with silver dollar eucalyptus for varied leaf shapes and better visual texture.
- Place the bow at the bottom center or slightly to one side for an updated, asymmetrical look.
- Use thin floral wire in a color that matches your hoop to keep the mechanics of the wreath invisible.
If using fresh eucalyptus, it will dry beautifully in place, allowing the wreath to last through the entire holiday season.
28. Rosemary Christmas Wreath

A rosemary wreath is a perfect addition to a kitchen because of its fresh, culinary fragrance and delicate appearance. Bundle small sprigs of rosemary and secure them to a wire wreath form with green floral tape or wire, overlapping them to hide the frame completely. Keep the embellishments minimal to let the natural herb take center stage.
A thin red ribbon and a cluster of tiny bells add just enough holiday spirit without overwhelming the foliage.
- Scale this project down to a 6-inch or 8-inch hoop for a charming window or kitchen cabinet decoration.
- Use faux rosemary if you want a wreath that won't dry out or drop needles over several weeks in a warm kitchen.
- Ensure all rosemary sprigs point in the same clockwise or counter-clockwise direction for a clean, professional finish.
When using fresh rosemary, mist it with water every few days to keep the leaves vibrant and prolong the herbal scent.
29. Farmhouse Christmas Wreath With Bells

This asymmetrical design captures the relaxed, rustic feel of modern farmhouse style. Focus your decorating efforts on the bottom third of a grapevine wreath by layering cedar branches, pinecones, and a cluster of aged brass bells. The bare grapevine at the top provides a beautiful contrast to the lush arrangement concentrated at the base.
Tie the elements together with a wide cream-colored ribbon that drapes naturally downward.
- Use 'aged' or 'antique' brass bells to avoid a shiny look that might clash with the rustic grapevine.
- Secure the heavier bells first with sturdy wire to ensure the wreath remains balanced and doesn't tilt when hung.
- Fluff the cedar branches to hide the wire attachments and create a full, professional appearance.
To get the aged look on new bells, apply a tiny amount of black acrylic paint and wipe it off immediately to highlight the metal's texture.
30. Wood Slice Christmas Wreath
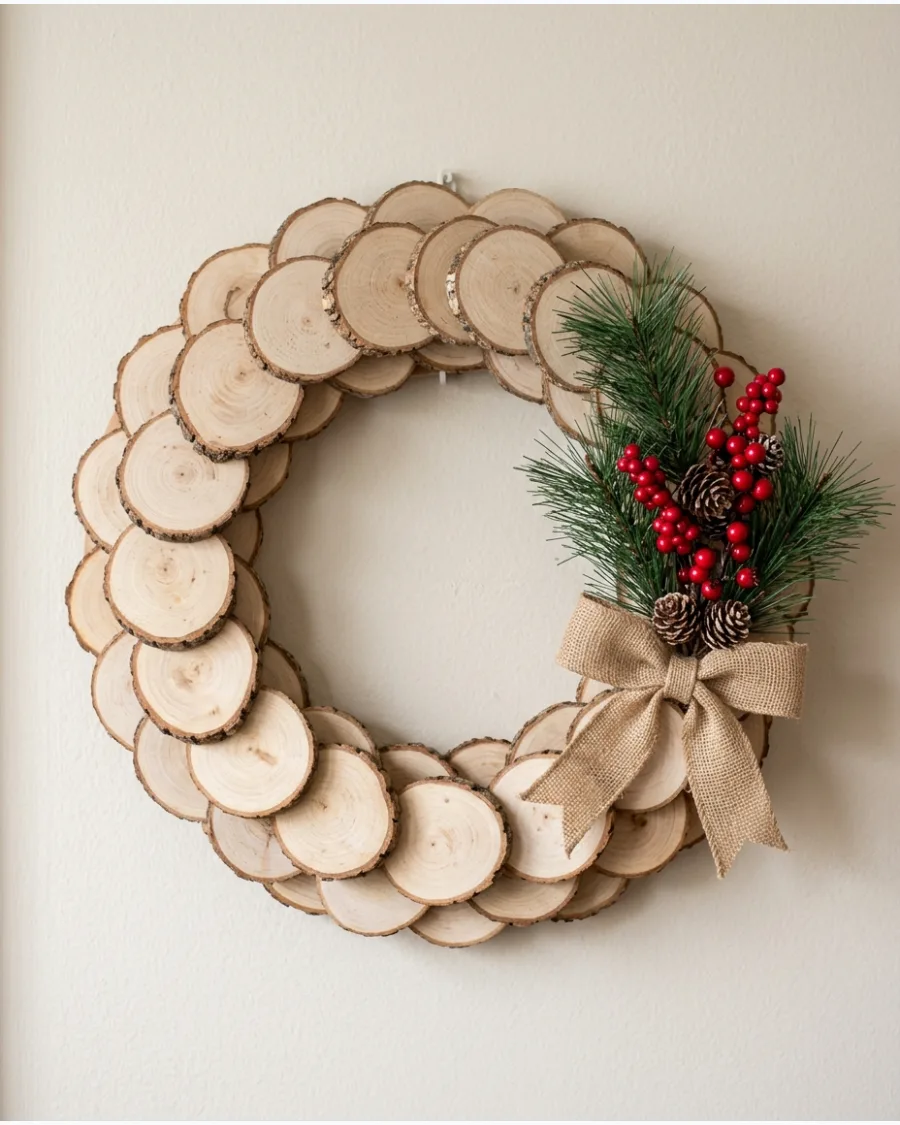
This project uses natural wood textures to create a sturdy, handcrafted look perfect for cabins or rustic homes. Glue small, unfinished wood slices onto a flat wooden or cardboard wreath form, overlapping them slightly to cover the base completely. Add small accents like pine sprigs and bright red berries to one side for a pop of traditional Christmas color.
Leave most of the wood surface exposed to highlight the unique rings and bark of the slices.
- Use a high-temperature hot glue gun or wood glue for a permanent, secure bond between the slices and the base.
- Vary the diameters of the wood slices to fill in small gaps and create a more organic, textured surface.
- Sand the back of the wreath base if it feels rough to prevent it from scratching your door or interior wall.
Select wood slices with the bark still attached (live edge) to maximize the rustic, outdoorsy appeal of the finished wreath.
PAPER, YARN AND BUDGET CHRISTMAS WREATHS
31. Easy Paper Christmas Wreath

This budget-friendly project uses basic craft supplies to create a charming, lightweight decoration. You can customize the size by cutting your own cardboard ring from a shipping box and choosing any green paper you have on hand.
Layer the paper leaves in a consistent clockwise or counter-clockwise pattern to ensure the cardboard base is completely hidden. Use a simple paper bow as a focal point to finish the design without adding heavy weight.
- Use 65lb cardstock to help the leaves maintain their shape without drooping over time
- Vary the size of the paper leaves slightly to mimic the natural irregularity of foliage
- Attach a loop of twine to the back of the cardboard base before gluing the leaves
Fold each paper leaf down the center before gluing to give the wreath a more three-dimensional, realistic texture.
32. Paper Loop Christmas Wreath
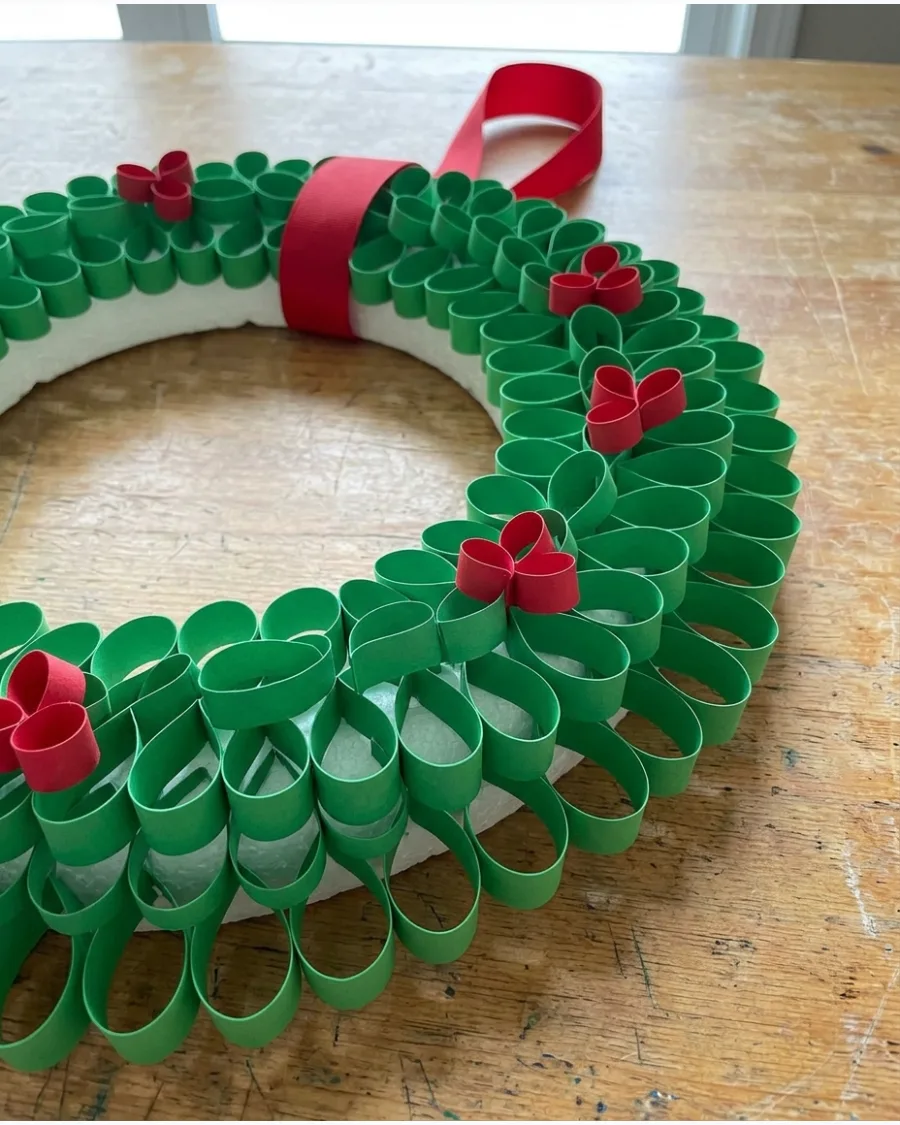
Creating a looped effect gives this wreath a modern, geometric feel that is incredibly easy to assemble. By using strips of cardstock, you create uniform volume that looks professional despite the simple materials.
Bend each cardstock strip into a soft teardrop shape and glue the ends together before attaching them to the wreath form. This technique works best with a foam or cardboard base that allows for easy adhesion.
- Cut strips to exactly 1 inch by 6 inches for a consistent loop size across the entire wreath
- Use a hot glue gun for a quick, secure bond between the paper loops and the base
- Intersperse a few red loops or small red paper circles to provide a festive contrast
Use a stapler to close the paper loops quickly before gluing them to the base to save time and finger burns.
33. Paper Holly Christmas Wreath
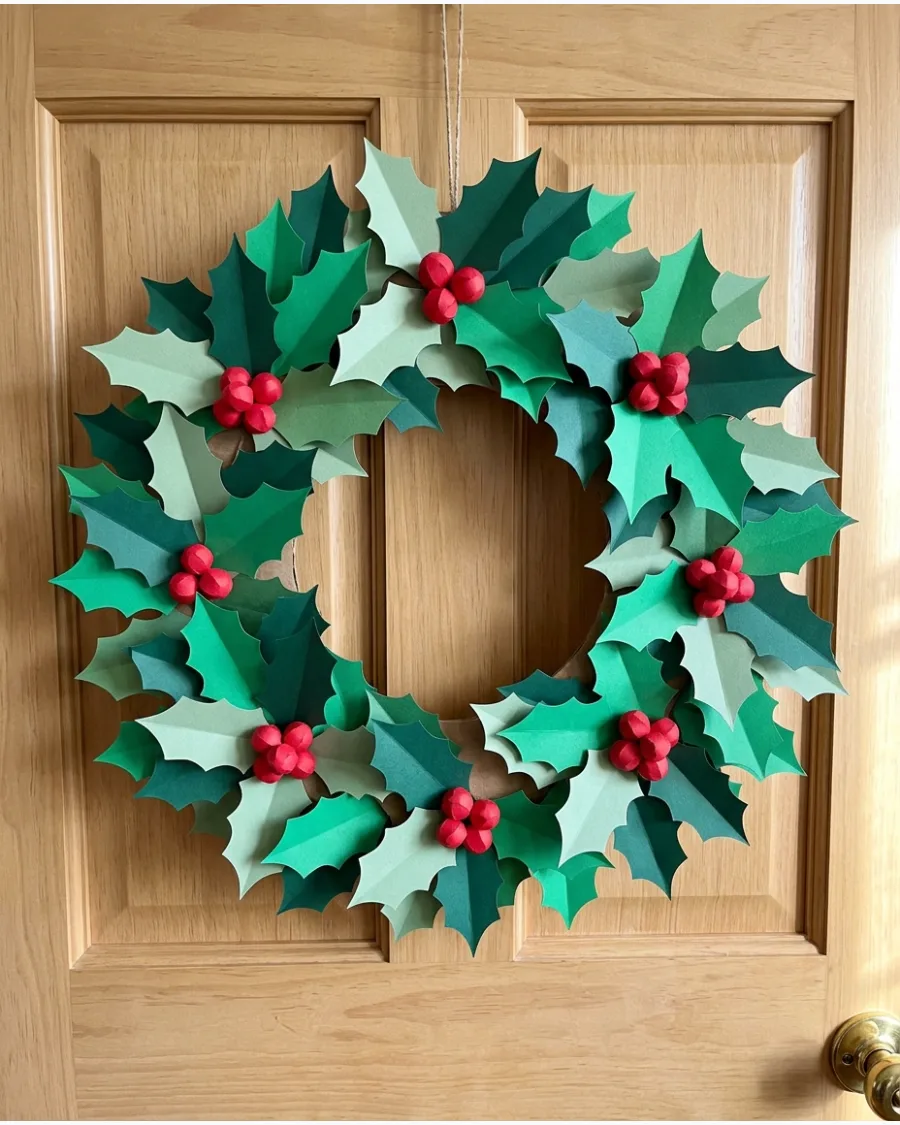
This wreath uses classic holly leaf shapes to create a traditional holiday silhouette using only paper. Using multiple shades of green adds depth and mimics the way light hits real holly leaves.
Overlap the pointed holly leaves in dense clusters, mixing different shades of green to create a natural, dimensional look. It is a perfect project for those who want a classic aesthetic on a strict budget.
- Create a simple cardstock template for the holly leaf to ensure consistent shapes
- Add small clusters of three red paper circles as berries to serve as visual anchors
- Arrange leaves so the points face outward to create a dynamic, jagged border
Score a line down the center of each leaf with a dull butter knife to make them easier to fold for a realistic center vein.
34. Paper Snowflake Christmas Wreath

Celebrate the beauty of winter with a wreath made from delicate paper snowflakes. This design creates a soft, airy look that is perfect for minimalist or Scandinavian-style decor.
Secure the largest paper snowflakes to the cardboard base first, then layer smaller ones on top to create a full, frosted appearance. The varying sizes provide visual interest and help hide the support ring completely.
- Use white office paper for easy cutting and a clean, bright finish
- Incorporate silver paper or glitter accents on a few snowflakes for subtle holiday shimmer
- Glue snowflakes only at their centers to allow the edges to lift slightly for a 3D effect
Iron your hand-cut paper snowflakes on a low, dry setting to flatten any stubborn fold lines before gluing.
35. Paper Bag Christmas Wreath
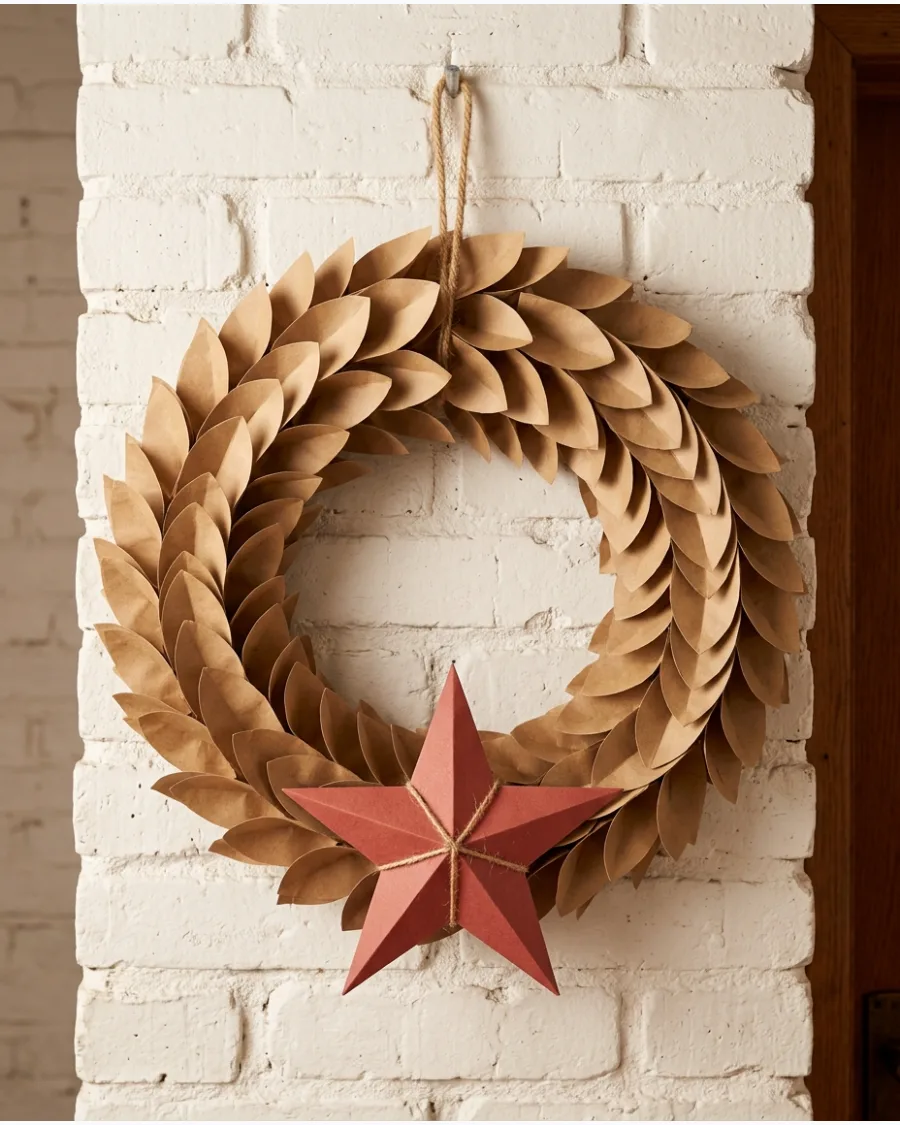
Repurposing kraft paper bags creates a rustic, eco-friendly wreath with a beautiful neutral tone. This project is ideal for those who love a natural, farmhouse look without the mess of real greenery.
Cut repeating shapes from flattened kraft paper bags and connect them at the edges to form a sturdy, circular wreath structure. A single red bow or a paper star provides the perfect amount of holiday color against the brown paper.
- Crumple the paper shapes before unfolding them to add a leather-like texture to the wreath
- Use double-sided tape or hot glue for a clean assembly that won't show through the paper
- Ensure the paper is clean and free of logos or ink by cutting from the inside of the bags
Use pinking shears when cutting your shapes to give the edges of the kraft paper a decorative, zigzag finish.
36. Easy Yarn Wrapped Christmas Wreath
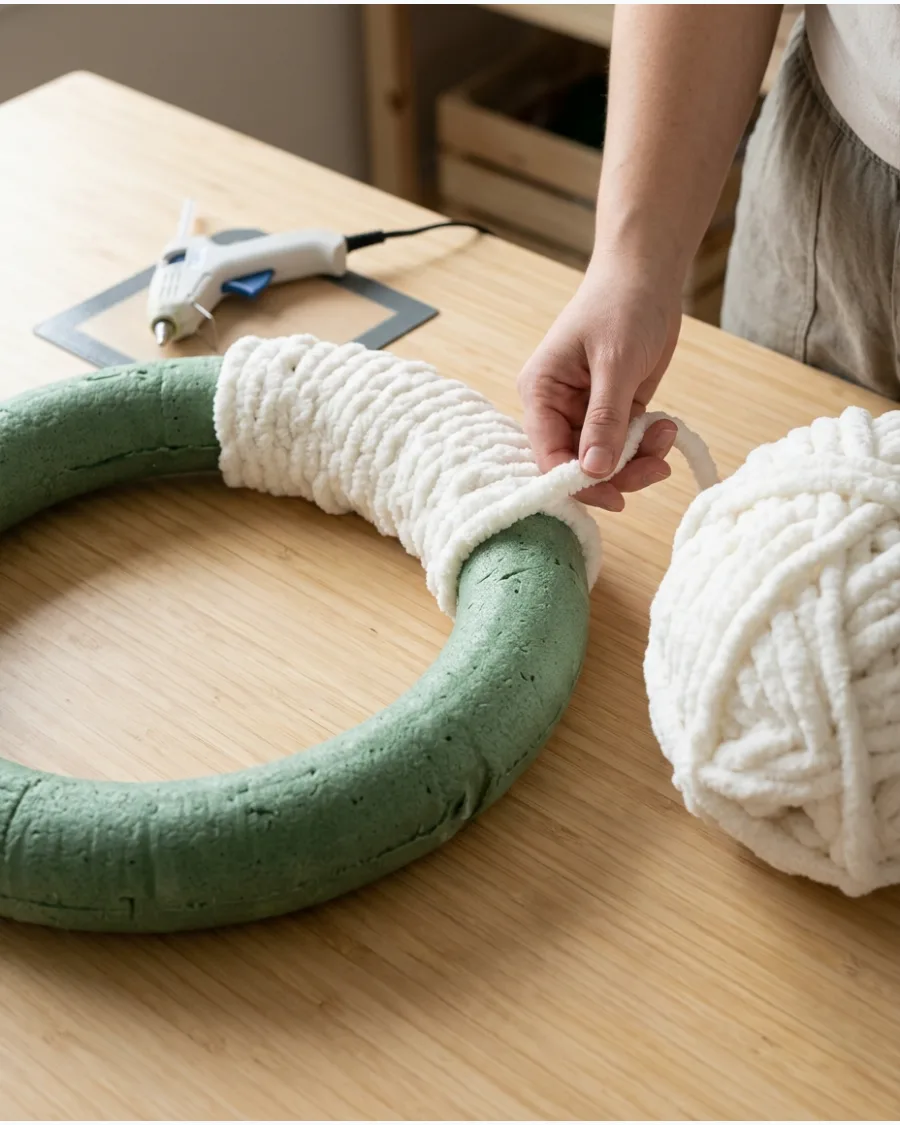
Use chunky yarn to create a soft, modern base that feels cozy for the winter holidays. Wrap a foam wreath form completely with chunky white, red, or green yarn and secure the ends at the back with hot glue. This method provides an even color and a tactile surface that hides the base material perfectly.
Once the form is covered, you can personalize the front with small seasonal accents.
- Use a low-temperature glue gun to avoid melting the foam form while securing the yarn ends.
- Overlap the yarn slightly as you wrap to ensure no foam peeks through the strands.
- Apply a single cluster of pine needles and faux berries off-center for a minimalist look.
Push a floral pin through the yarn and into the foam to anchor heavy greenery clusters without using excess glue.
37. Red and White Yarn Candy Cane Wreath

This playful design uses alternating colors to mimic a classic holiday candy cane pattern. Alternate sections of red and white yarn around a foam or wire wreath form to create distinct candy-cane stripes. The high contrast makes it a great choice for a child's bedroom door or a whimsical kitchen accent.
Finish the look with a bold festive element to anchor the design.
- Measure and mark equal segments on the wreath form beforehand to keep your stripes symmetrical.
- Choose a thick, matte yarn to provide better coverage and a more traditional appearance.
- Attach a large red bow or a peppermint-shaped ornament at the bottom center to hide the final seam.
When switching colors, knot the new yarn to the old yarn on the back of the wreath to keep the transition seamless on the front.
38. Pom-Pom Christmas Wreath
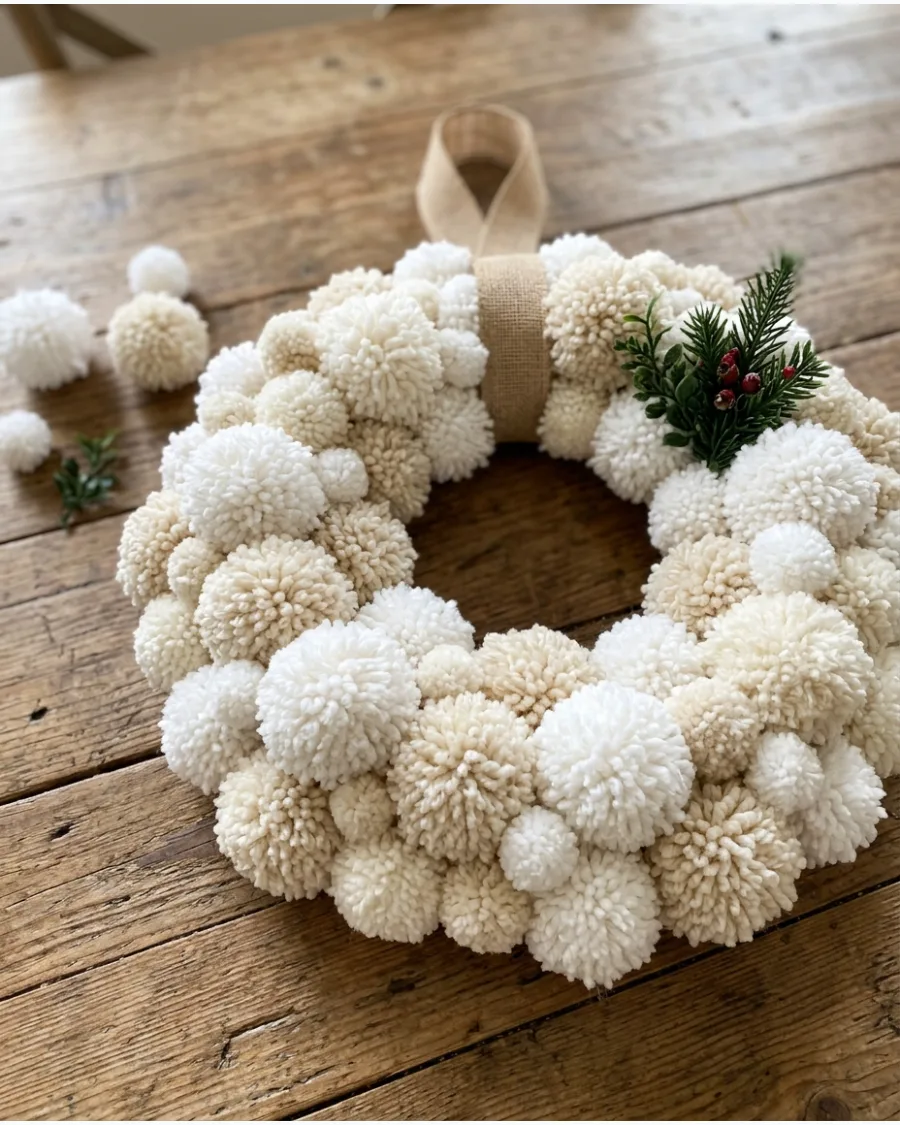
Pom-poms offer a plush, high-texture finish that looks high-end but is very simple to assemble.
Cover a foam wreath form with store-bought or homemade yarn pom-poms in white, red, green, or neutral colors. Using different sizes of pom-poms helps to fill in gaps and creates a more organic, bubbly silhouette. It is an ideal indoor project that adds a warm, tactile element to your mantel or wall.
- Mix different yarn textures, like tinsel yarn and standard wool, to add visual depth to the wreath.
- Use a ribbon loop or a sturdy wire hook attached to the back of the foam for easy hanging.
- Tuck in a few sprigs of artificial cedar or boxwood between the poms for a natural touch.
If using store-bought poms, buy them in multi-packs of varying sizes to ensure you have small ones to fill the tiny holes between larger spheres.
39. Tinsel Christmas Wreath

Tinsel wreaths are a quick way to achieve a retro, high-shine look on a very small budget. Wrap inexpensive Christmas tinsel tightly around a foam or wire wreath form until the base is completely hidden. This project is incredibly fast because the bulk of the tinsel covers large areas in seconds.
It provides a sparkling backdrop that catches the light beautifully in hallways or entryways.
- Secure the start of the tinsel with a zip tie or floral wire to prevent it from unraveling during wrapping.
- Select extra-thick tinsel to minimize the number of passes needed to cover the form.
- Add a few vintage-style ornaments and a large, stiff ribbon bow for a mid-century aesthetic.
Run a string of battery-operated fairy lights through the tinsel before hanging to make the metallic strands glow from within.
40. Dollar Store Ornament Wreath

This project turns affordable supplies into a lush, designer-style holiday statement. Group shatterproof ornaments in several sizes and use greenery to hide gaps so the finished wreath looks fuller while staying budget-friendly. By varying the scale of the ornaments, you create a professional-looking composition that hides the underlying structure.
It is a durable option that can be used indoors or in protected outdoor areas.
- Remove the plastic hangers from the ornaments and glue the caps on securely before attaching them to the wreath.
- Start with the largest ornaments as a base layer and fill the remaining spaces with smaller balls.
- Integrate sprigs of faux holly or pine to soften the edges and add a traditional holiday feel.
Use a pool noodle taped into a circle as a large-scale, ultra-cheap wreath form for oversized ornament displays.
FUN AND CREATIVE EASY CHRISTMAS WREATHS
41. Gingerbread Christmas Wreath

Transform a basic evergreen base into a sweet holiday treat using faux gingerbread elements. Secure oversized gingerbread people and cookie shapes evenly around the wreath using floral wire to ensure they stay in place against the greenery. Add miniature candy canes and a classic red-and-white ribbon for a cohesive, playful look.
This design is perfect for kitchen doors or dining rooms where food-themed decor feels right at home.
- Use faux cookies made of clay or foam to prevent real food from crumbling or attracting pests.
- Choose gingerbread figures that are at least 5 inches tall for better visibility from across the room.
- Mix in sprigs of frosted berries or white accents to break up the brown tones of the cookies.
Spritz the wreath with a cinnamon or gingerbread scented spray to match the visual theme with a festive holiday aroma.
42. Peppermint Christmas Wreath
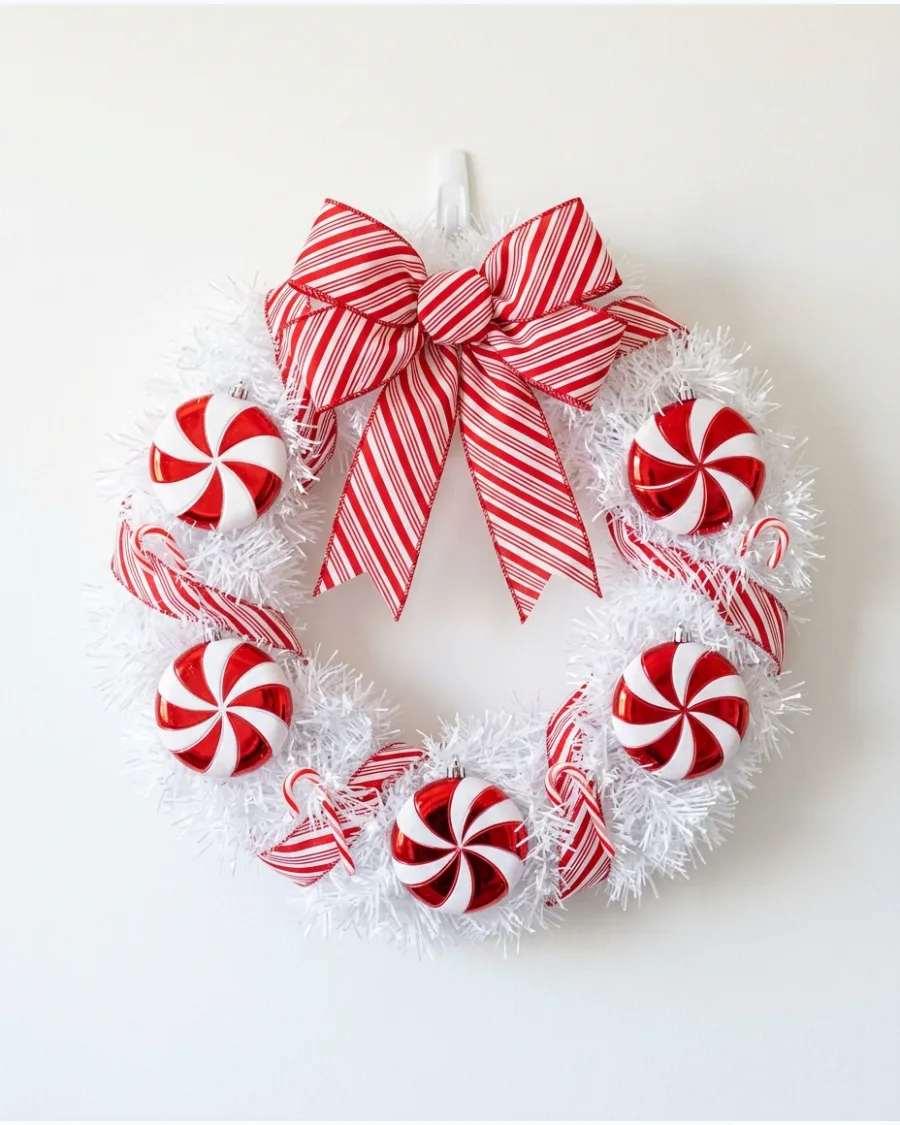
Create a bold and bright holiday statement by focusing on a peppermint candy motif. Glue oversized red-and-white peppermint disc ornaments onto a white tinsel wreath base for immediate visual impact. Weave a matching striped ribbon throughout the branches to tie the colors together and add a few small candy canes for extra detail.
This theme works exceptionally well for a 'Candyland' aesthetic that adds a whimsical touch to interior spaces.
- Alternate between matte and glitter-finished peppermint discs to add depth and catch the light.
- Place the largest peppermint decorations at the 10, 2, and 6 o'clock positions to establish a balanced visual triangle.
- Use high-temperature hot glue for a permanent bond if the wreath will be exposed to fluctuating indoor temperatures.
If using a white base, wrap the wreath form in a white feather boa before adding candies to give it a soft, snow-like appearance.
43. Candy Cane Christmas Wreath
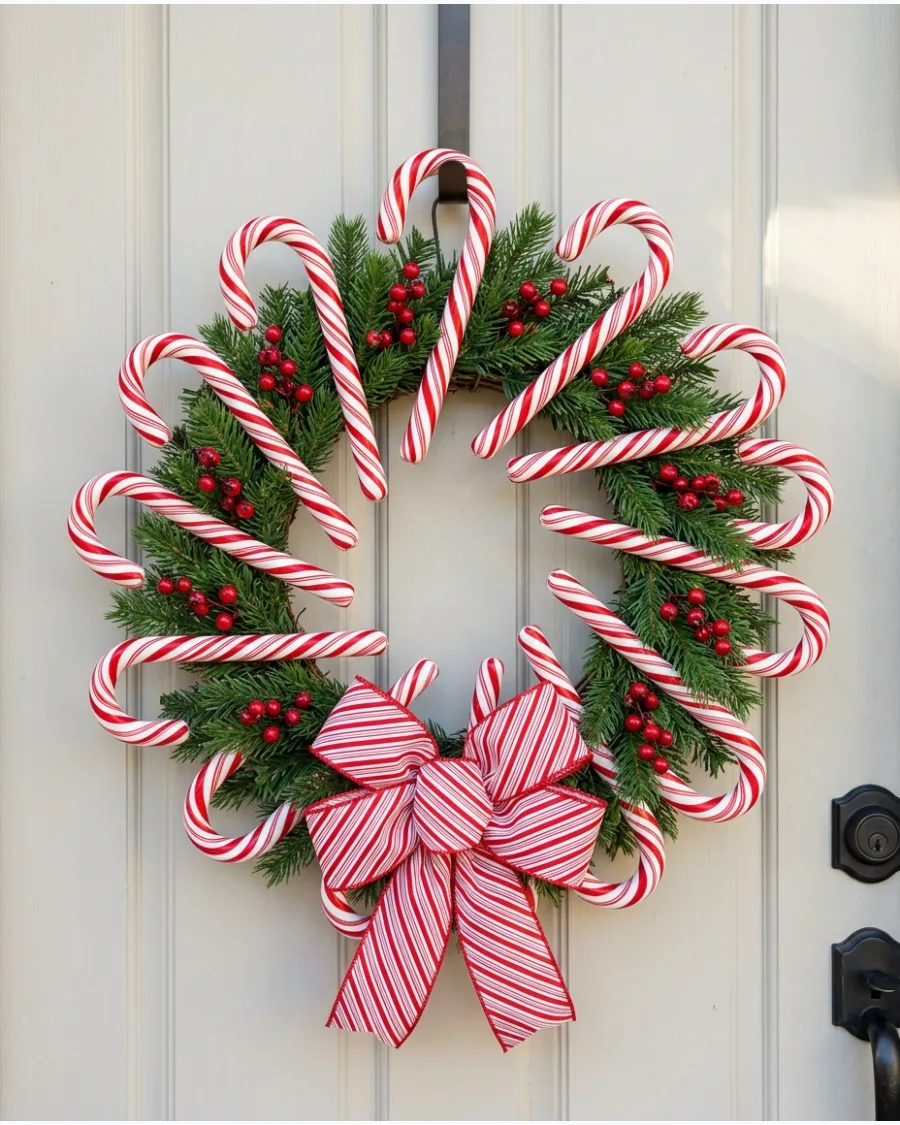
Utilize the iconic J-shape of candy canes to build a structured, graphic wreath. Arrange large faux candy canes in a radial pattern around a round frame, securing them with wire so the hooks all face the same direction. Fill the gaps between the canes with small sprigs of fresh or faux greenery to hide the base and add a natural touch.
Finish the look with a massive red-and-white striped bow at the bottom to anchor the design and make the theme instantly recognizable.
- Position the candy canes so they slightly overlap the inner and outer edges of the wreath form for a fuller silhouette.
- Opt for plastic or wooden candy canes rather than real ones to ensure the wreath lasts the entire season without breaking or sticking.
- Use dark green floral wire to blend in with the greenery accents and keep the attachments invisible.
Angle the candy canes outward at a 45-degree angle to create a 'sunburst' effect that looks more professional and custom.
44. Snowman Christmas Wreath

Build a friendly winter character by combining two wreath forms into a vertical snowman shape. Attach a smaller white wreath to the top of a larger one using heavy-duty zip ties to create the head and body. Once the structure is stable, wrap a real winter scarf around the 'neck' junction and add a small top hat or beanie to the head.
This project is a great way to create a whimsical focal point that children and guests will find charming.
- Glue black buttons or large pom-poms down the center of the bottom wreath to represent coal buttons.
- Insert two sturdy, branch-like twigs into the sides of the larger wreath to act as the snowman's arms.
- Ensure the zip ties are hidden behind the scarf or deep within the wreath fibers for a clean finish.
If the snowman feels top-heavy, add a small counterweight or a secondary command hook to the bottom wreath to keep it flush against the door.
45. Santa Christmas Wreath
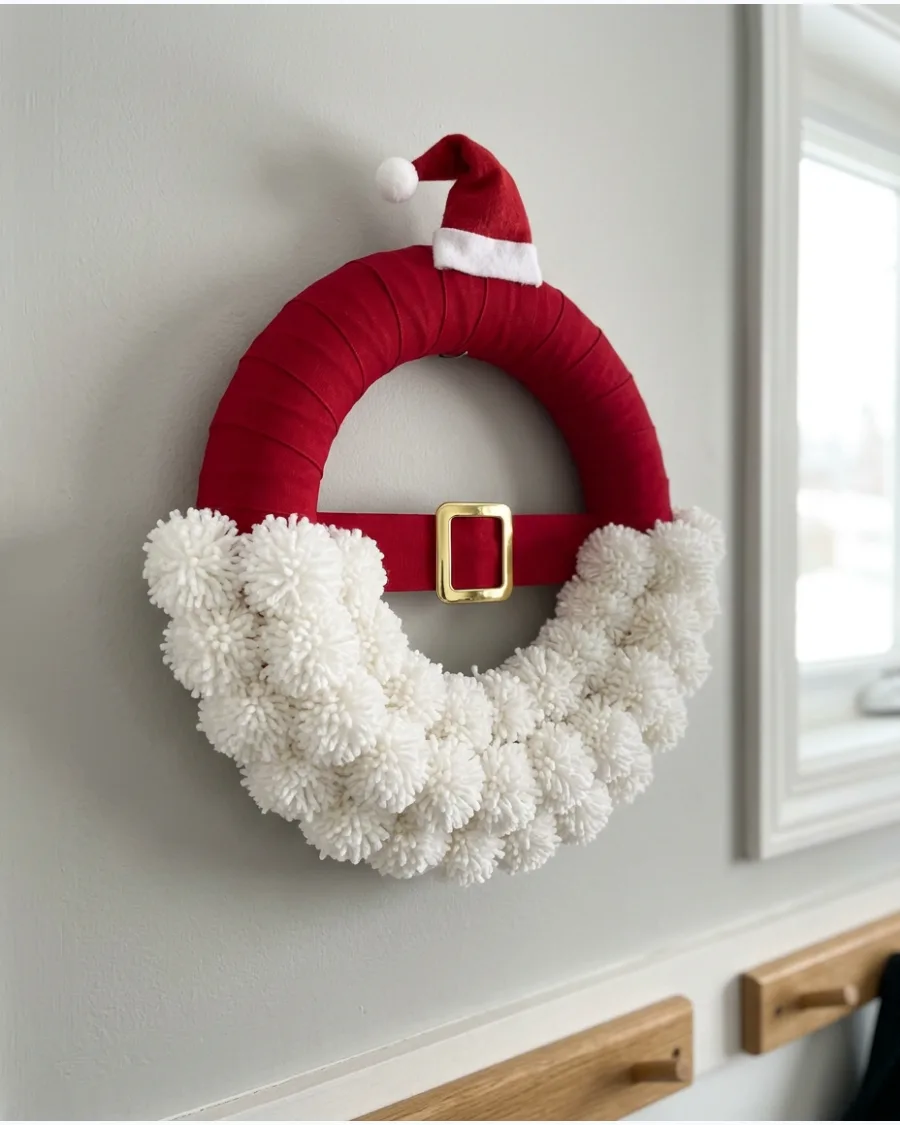
Craft a minimalist Santa figure using simple color blocking on a round wreath form. Wrap the top half of a wreath in wide red ribbon and cover the bottom half with thick white yarn or fluffy white pom-poms to mimic a beard. Add a small Santa hat at a jaunty angle on the top and a gold buckle in the center of the red section.
This beginner-friendly design relies on texture rather than complex assembly, making it a quick and rewarding afternoon craft.
- Use 'sherpa' or 'fleece' style fabric for the bottom section to create a more realistic, cozy beard texture.
- Secure a large gold craft buckle or a square of yellow felt to the red 'suit' area to serve as Santa's belt buckle.
- Keep the yarn loops tight and overlapping to hide the base material of the wreath form completely.
Use a hot glue gun to attach the pom-poms in layers, starting from the bottom and working upward for the best 'beard' volume.
46. Grinch Christmas Wreath

Capture the mischievous spirit of the holidays by using bright lime green deco mesh or yarn to cover a standard wire wreath frame. This vibrant base provides the perfect backdrop for traditional holiday colors and character elements.
Secure a Grinch-inspired sign or plush character to the side and accent the rest of the circle with red baubles and candy-cane striped ribbon. The high-contrast color scheme ensures the theme is recognizable even from a distance.
- Use floral wire to cinch the deco mesh every few inches to create a textured, ruffly appearance.
- Incorporate ornaments with different finishes like matte, shiny, and glitter to add depth to the green background.
- Position the character piece slightly off-center to maintain visual balance while allowing the green mesh to show.
Add a pair of oversized, lime-green stuffed elf legs dangling from the bottom of the wreath to enhance the whimsical character theme.
47. Nutcracker Christmas Wreath
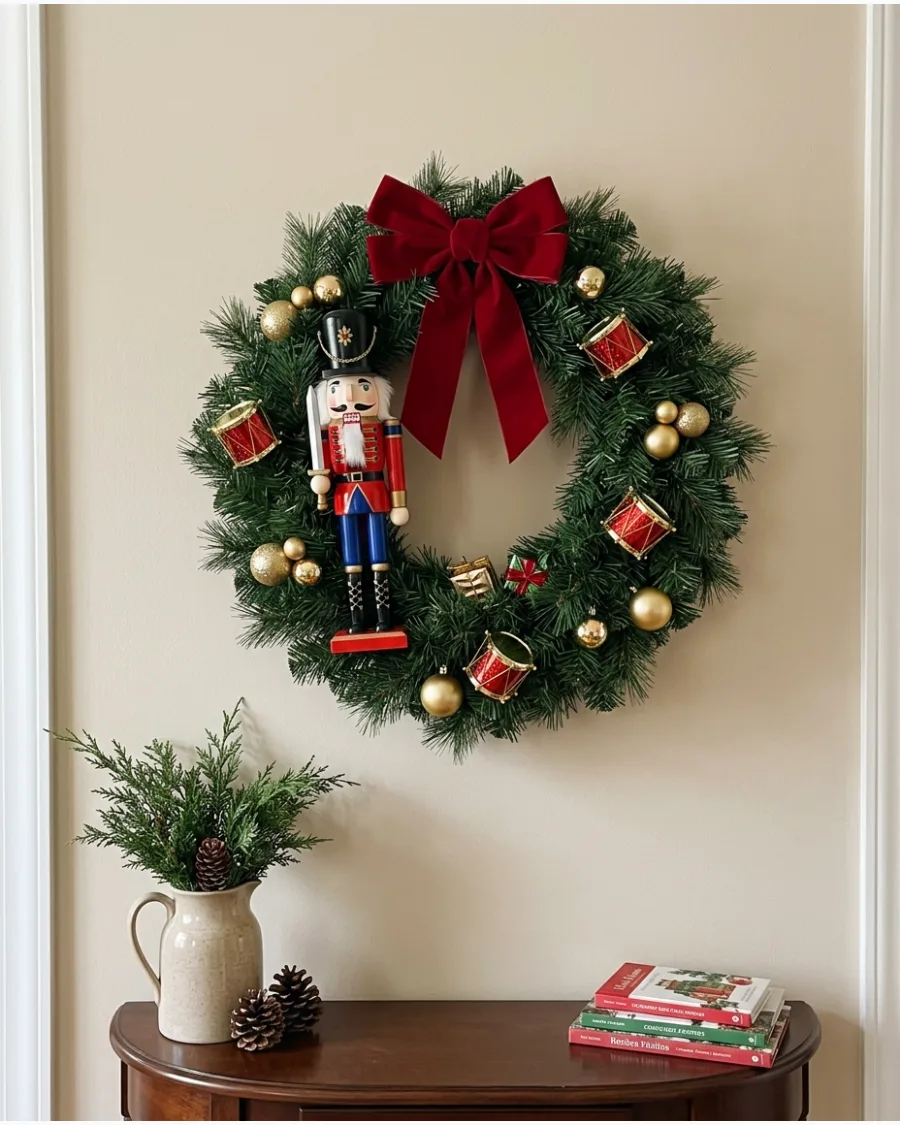
Transform a basic evergreen wreath into a classic toy-soldier display using traditional Christmas accents. Incorporate a lightweight nutcracker and miniature toy drums to create a sense of nostalgia and structure.
Mount the nutcracker figure slightly off-center using zip ties or heavy-gauge floral wire to ensure it stays upright when the door moves. Fill the gaps with red velvet ribbon bows and shiny gold ornaments to complete the regal aesthetic.
- Use tiny wrapped boxes or craft store miniatures to mimic small gifts tucked into the pine needles.
- Distribute gold ornaments in clusters of three to create professional-looking focal points throughout the greenery.
- Ensure the nutcracker figure is hollow plastic or lightweight wood to prevent the wreath from becoming too heavy.
Lightly mist the evergreen branches with gold glitter spray before adding decorations to give the whole piece a subtle shimmer.
48. Christmas Village Wreath
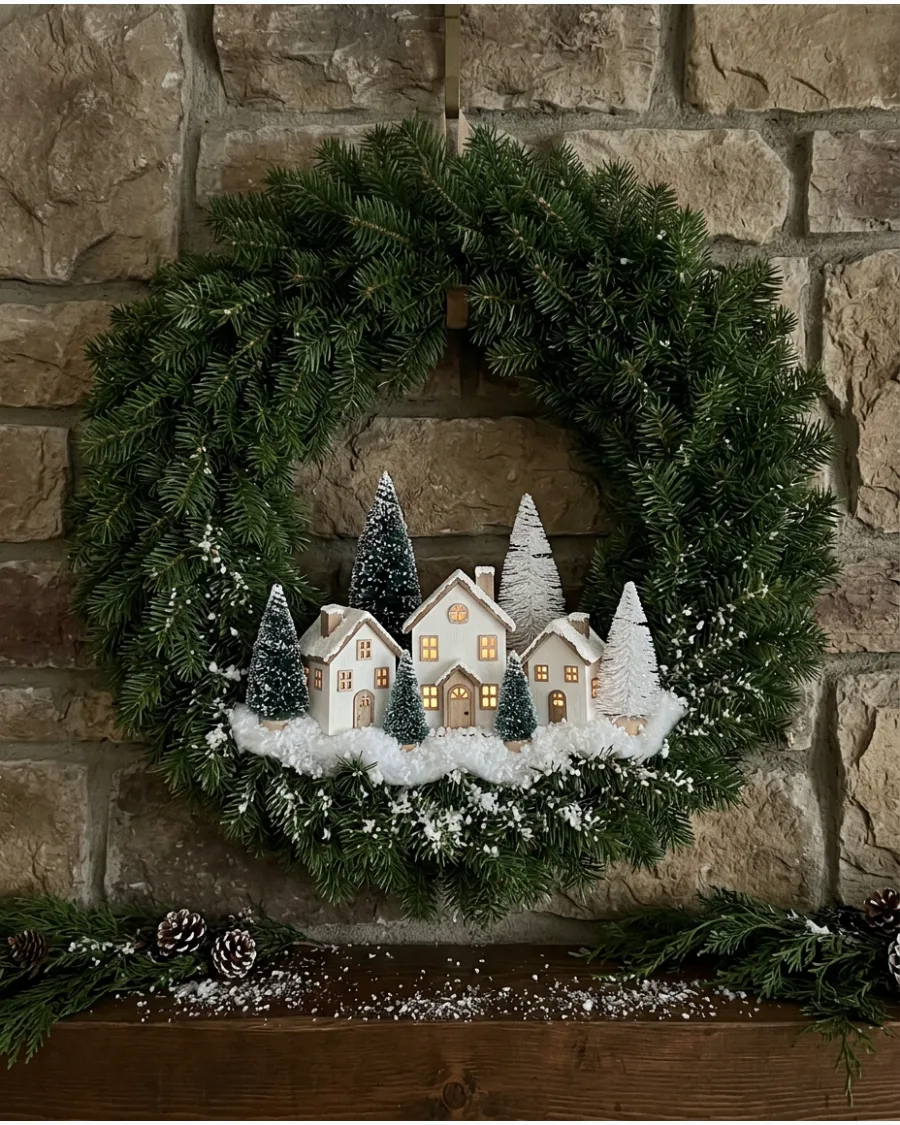
Creating a miniature winter wonderland is simple when you concentrate small architectural details on the lower half of a sturdy wreath. Use a base of faux pine or grapevine that can support the weight of tiny structures and scenery.
Glue a few lightweight cardboard or plastic miniature houses to the bottom curve and surround them with tiny bottle-brush trees and a dusting of faux snow. This concentrated arrangement creates a charming narrative without cluttering the entire circle.
- Secure the houses with a generous amount of hot glue or wire through the windows to prevent them from tilting.
- Add a string of battery-operated fairy lights behind the houses to make the windows glow warmly at night.
- Use varied heights of bottle-brush trees to create a realistic sense of depth in your miniature forest scene.
Lightly brush the tips of the evergreen branches with white acrylic paint to mimic fresh snowfall around your village.
49. Minimalist Metal Hoop Christmas Wreath

For those who prefer a modern and clean aesthetic, a metal hoop wreath offers a fast and stylish alternative to bulky traditional designs. This look focuses on asymmetry and negative space, allowing the metallic finish of the frame to show.
Fasten a small bundle of mixed evergreen and eucalyptus branches to the lower third of the hoop using thin floral wire. Finish the piece with a single, long-tailed velvet ribbon bow to add a soft texture to the industrial frame.
- Mix different foliage textures, such as silver dollar eucalyptus and cedar, to create visual interest in a small area.
- Keep the floral wire hidden by wrapping your velvet ribbon directly over the attachment point of the greens.
- Choose a hoop in gold, black, or copper to coordinate with your home's existing hardware and decor.
Use fresh greenery for this design, as the open hoop style makes it easy to replace branches if they dry out mid-season.
50. Personalized Family Christmas Wreath
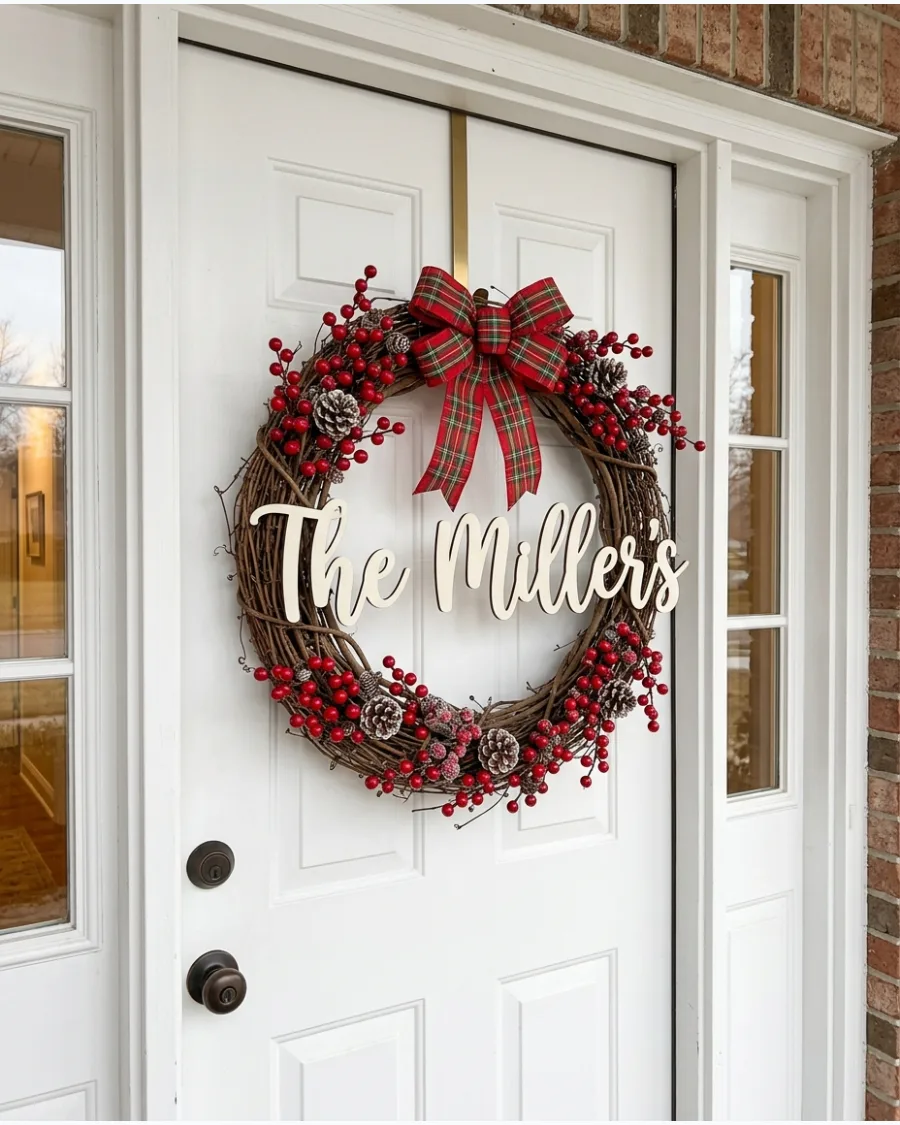
Make your holiday decor feel truly unique by centering your family’s name as the focal point of your front door display. You can use almost any base, though a dense evergreen or rustic grapevine wreath provides the best support for a central sign.
Attach a lightweight wooden or acrylic name cutout across the center opening using clear fishing line or thin wire. Add a few coordinated ornaments and a large bow at the top to frame the name without obstructing the letters.
- Paint the name sign in a high-contrast color like white or gold so it stands out clearly against the dark green needles.
- Ensure the sign is large enough to be legible from the sidewalk but small enough to fit within the wreath's inner diameter.
- Use weather-resistant materials for the sign if the wreath will be hung on an exterior door exposed to moisture.
Hang the sign so it floats slightly forward from the back of the wreath to create a shadow effect that improves readability.
Frequently Asked Questions
What is the most beginner-friendly wreath base to use?
Foam rings and pre-made faux evergreen wreaths are often the easiest for beginners. Foam is ideal for projects involving glue, such as ornament or yarn wreaths, while faux evergreen bases provide built-in structure that makes it simple to wire or tuck in additional decorations.
How do I ensure heavy decorations stay attached to the wreath?
For heavier items like large pinecones, thick wood slices, or ceramic bells, use 22-gauge or 24-gauge floral wire. Wrap the wire securely around the item and then through the wreath frame or base, twisting the ends tightly at the back to prevent the decoration from sagging or falling off when the door moves.
Which DIY wreath materials are best for outdoor use?
Evergreen, grapevine, and plastic ornaments are the most durable materials for outdoor exposure. Avoid using paper, delicate yarn, or dried citrus on doors that are not protected by a porch or storm door, as moisture and humidity can cause these materials to warp, mold, or lose their shape.
How can I hang a handmade wreath without drilling holes in my door?
Over-the-door metal hooks are a popular choice for most standard doors. Alternatively, you can use a damage-free adhesive hook placed upside down on the interior side of the door; loop a ribbon from the wreath over the top of the door and secure it to the interior hook to hold the wreath in place on the front.
What is the best way to store a DIY wreath for the following year?
To prevent crushing and dust, store your wreath in a dedicated hard-shell wreath box or a large plastic bin. If the wreath features organic materials like dried orange slices or cinnamon sticks, keep it in a cool, dry place rather than a humid basement to ensure the elements remain preserved.