50 Paper Christmas Decorations to Make

This post may contain affiliate links: full affiliate disclosure.
Using paper for holiday decorating offers a versatile and budget-friendly way to transform your home into a festive winter wonderland. From intricate Scandinavian stars to charming tabletop villages, these lightweight designs provide high visual impact without the need for heavy hardware.
This collection explores various folding and cutting techniques that suit any aesthetic, whether you prefer minimalist neutrals or traditional holiday colors.
PAPER STAR AND SNOWFLAKE CHRISTMAS DECORATIONS
1. Oversized Scandinavian Paper Stars
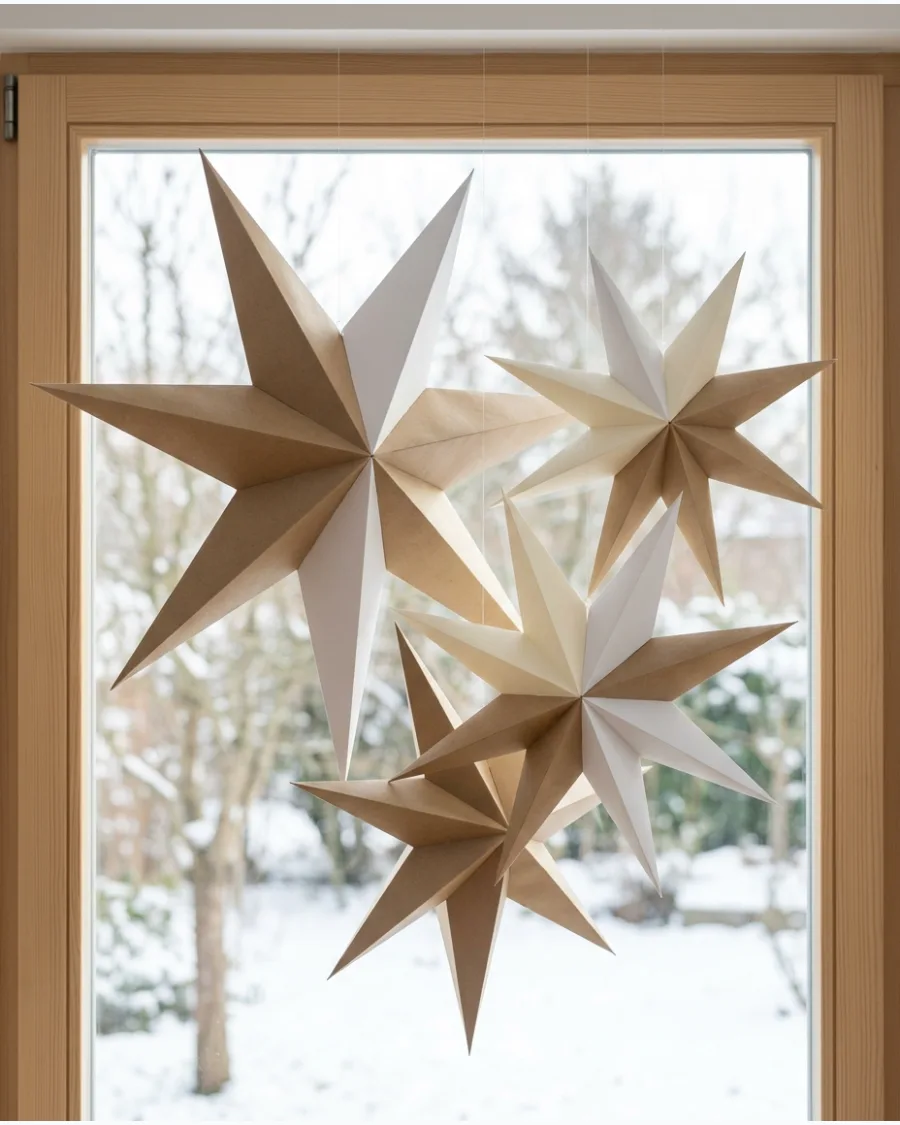
Large paper stars provide a high-impact, lightweight focal point for holiday styling without the weight of traditional wreaths. These three-dimensional ornaments capture the light beautifully when placed near a window or above a dining area.
Fold heavy cardstock or specialized craft paper into pointed geometric stars to achieve a crisp, professional-looking structure. Grouping them in odd numbers creates a more natural, balanced composition for your wall or ceiling.
- Use 100lb cardstock or heavier to ensure the points of the stars remain rigid and do not sag over time.
- Secure the stars with transparent fishing line to create a floating effect against a window or neutral wall.
- Mix matte finishes with one or two subtle metallic accents to add depth to the monochrome Scandinavian palette.
If you are hanging stars in a window, use a small piece of double-sided tape on the bottom-most point to keep them from spinning or hitting the glass.
2. Paper Bag Christmas Stars
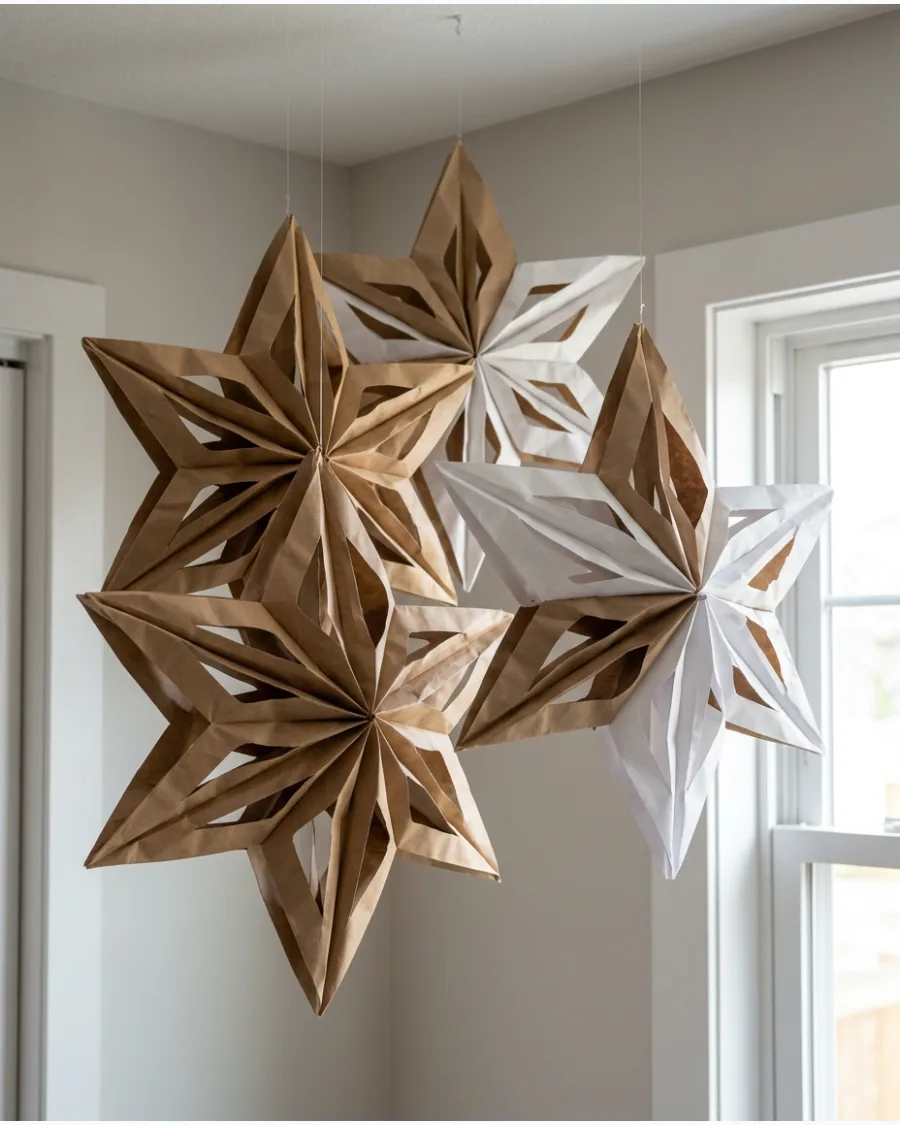
Transform standard paper lunch bags into large, three-dimensional stars by layering and bonding them with adhesive. After cutting a specific pointed or notched pattern into the top of the stacked bags, you can fan them open into a full circular shape.
Secure the final flap with a paperclip or adhesive to lock the star's structure before hanging it from the ceiling. These oversized ornaments provide a high-impact visual for a very low cost.
- Stack seven to nine bags per star to ensure the accordion folds can expand fully into a complete circle.
- Apply a T-shape pattern of glue down the center and across the bottom of each bag to maintain structural integrity.
- Experiment with different edge cuts, such as rounded peaks or deep side notches, to create unique snowflake patterns.
Use white paper bags for a modern, snowy look or kraft brown bags for a rustic, Scandinavian-inspired aesthetic.
3. White Paper Snowflake Window Display
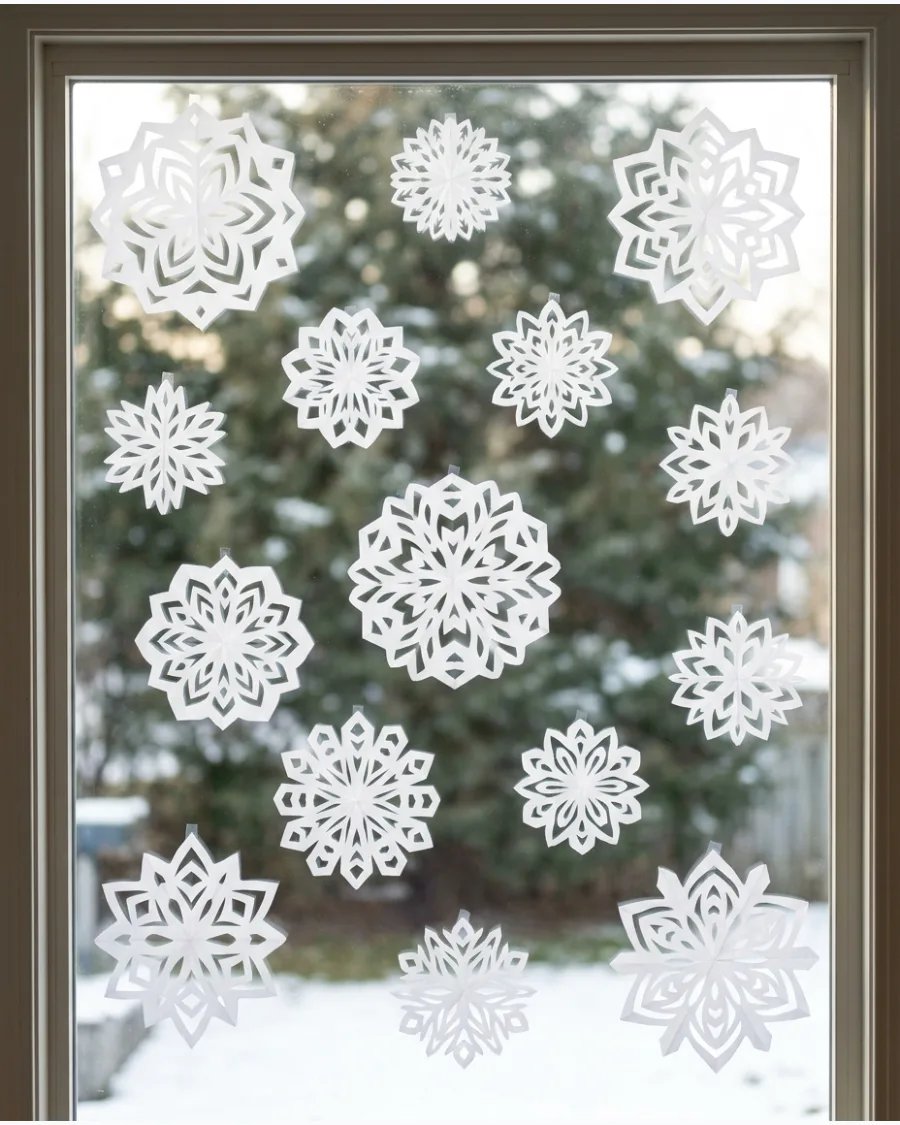
Create a winter wonderland by cutting various geometric snowflakes from plain white printer paper or cardstock. Varying the diameter of each piece ensures a more organic look rather than a repetitive pattern.
Affix the finished snowflakes to the glass using small pieces of clear double-sided tape or a tiny dab of glue stick for easy removal later. This method allows natural light to filter through the delicate cutouts while providing a subtle layer of privacy.
- Fold paper into triangles and cut various notches to ensure no two snowflakes are identical.
- Mix large 8-inch snowflakes with tiny 2-inch versions to create depth and visual interest across the pane.
- Focus the densest clusters at the bottom or top corners of the window to mimic natural drifting snow.
Use a warm iron on a low setting to flatten folded snowflakes before hanging so they sit perfectly flush against the glass.
4. 3D Paper Snowflake Decorations
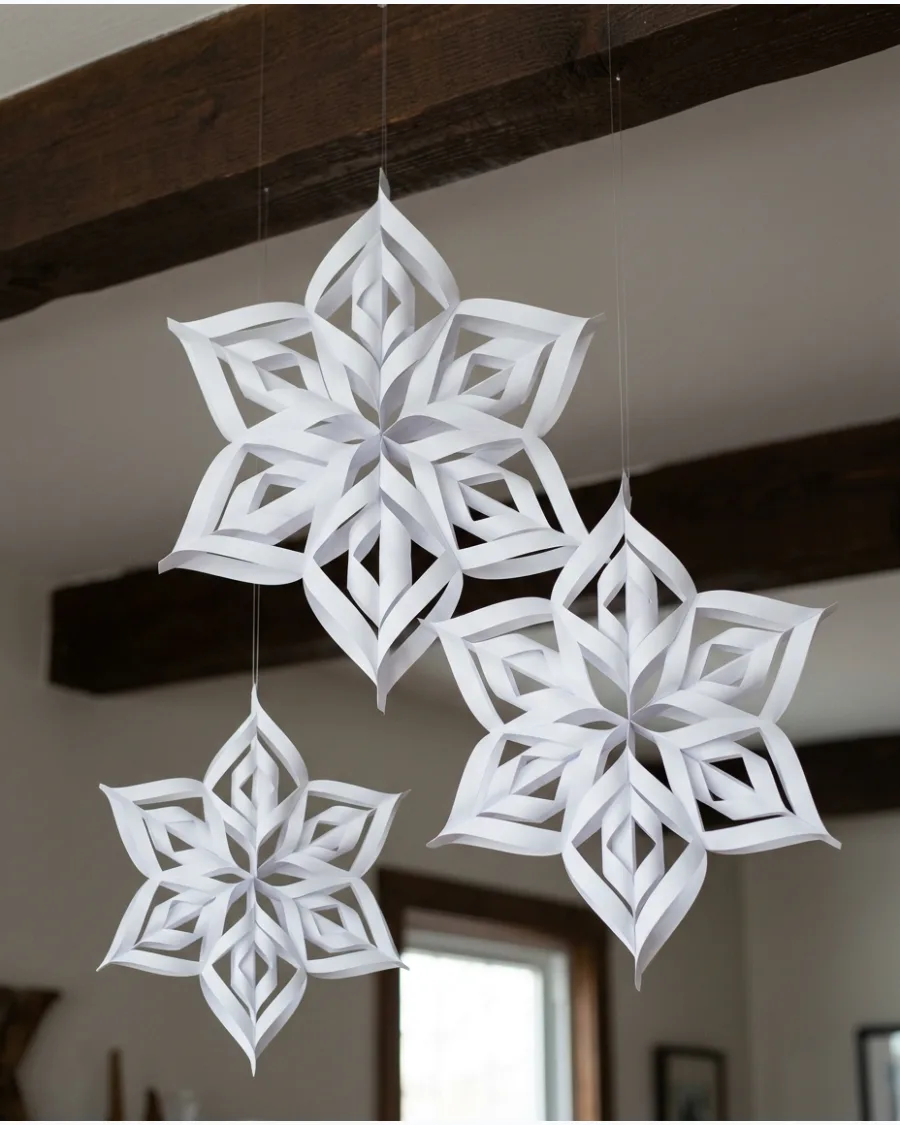
These oversized flakes add depth to your holiday decor by using multiple pieces of paper to build a single sculptural ornament. Secure six identical square pieces of paper with strategic folds and slits, then staple the central and outer points together to form the robust 3D structure. Unlike traditional flat cutouts, these maintain their volume and look impressive when viewed from any direction.
They are particularly effective when suspended in clusters at varying heights to create a falling snow effect.
- Use 65lb cardstock for flakes larger than 12 inches to prevent the points from sagging over time.
- Fasten the internal joints with double-sided tape or a miniature stapler for a clean, professional finish.
- Attach clear monofilament fishing line to the top point to give the illusion that the decorations are floating in mid-air.
If hanging these near a window, use iridescent or metallic paper to catch and reflect natural winter sunlight throughout the room.
5. Folded Paper Star Garland
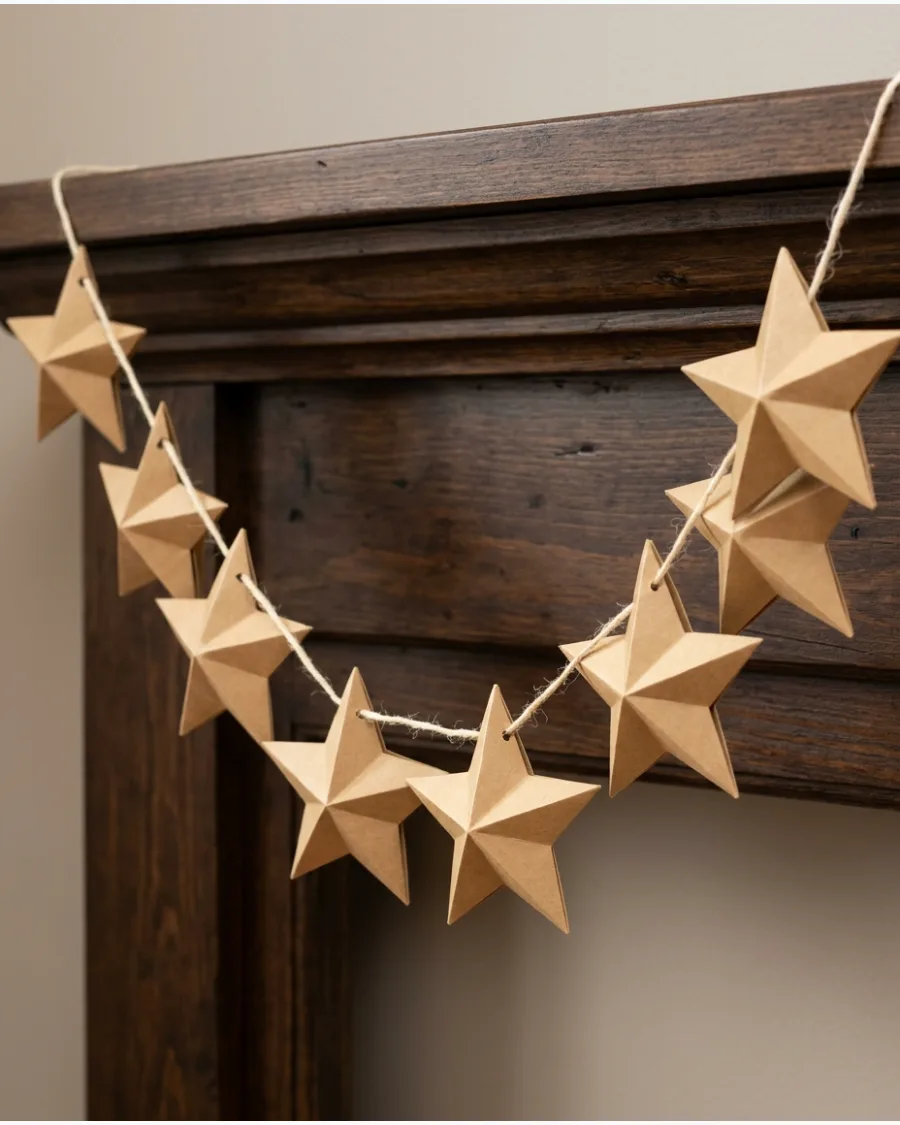
Create a sustainable holiday accent by folding individual stars from strips of cardstock or vintage book pages. These 3D shapes offer more texture than flat cutouts and can be reused for years if stored carefully in a rigid box.
Thread a needle with thin jute twine or metallic ribbon and pierce the center of each star to space them evenly along the strand.
- Choose double-sided patterned paper so the stars look consistent even if they spin on the string.
- Secure the stars in place with a small dab of clear-drying craft glue at the entry and exit points of the twine.
- Mix different paper weights or colors to add visual depth to a long mantel or doorway display.
If using thick cardstock, lightly score the fold lines with a bone folder to ensure sharp, crisp points on every star.
6. Red and White Paper Star Decorations
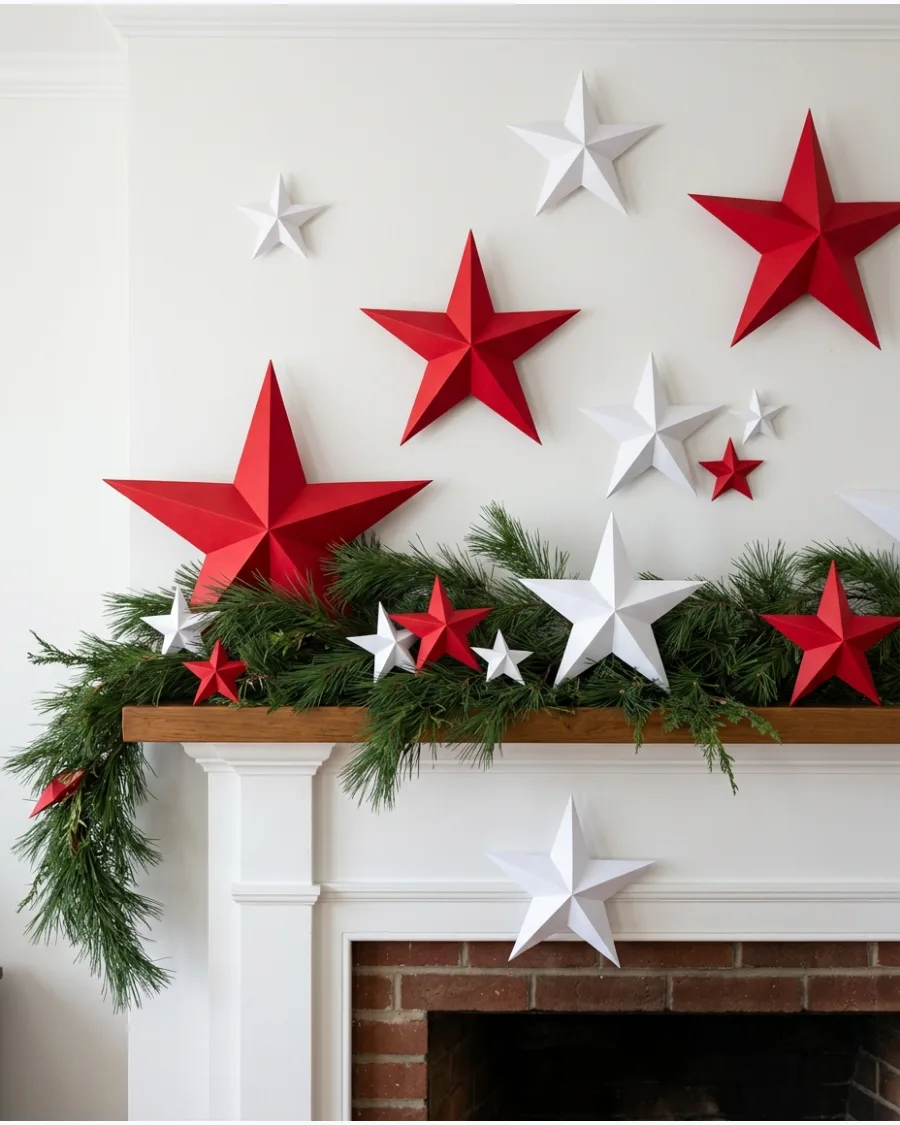
Mix red and white stars in different sizes for a traditional holiday look that feels fresh and graphic. Arrange a variety of red and white folded paper stars across a mantle or wall to create a high-contrast focal point. These colors pop effectively against dark evergreen garlands or neutral paint.
The sharp geometry of the stars adds a modern crispness to a classic Christmas palette.
- Use heavy cardstock to prevent the sharp star points from curling or drooping over time
- Vary the star diameters between 4 and 12 inches to create a layered, professional display
- Secure the stars to the wall or greenery with small adhesive putty or hooks hidden behind the central folds
Fold the stars using a bone folder or a ruler edge to ensure every crease is perfectly sharp and professional.
7. Kraft Paper Christmas Stars
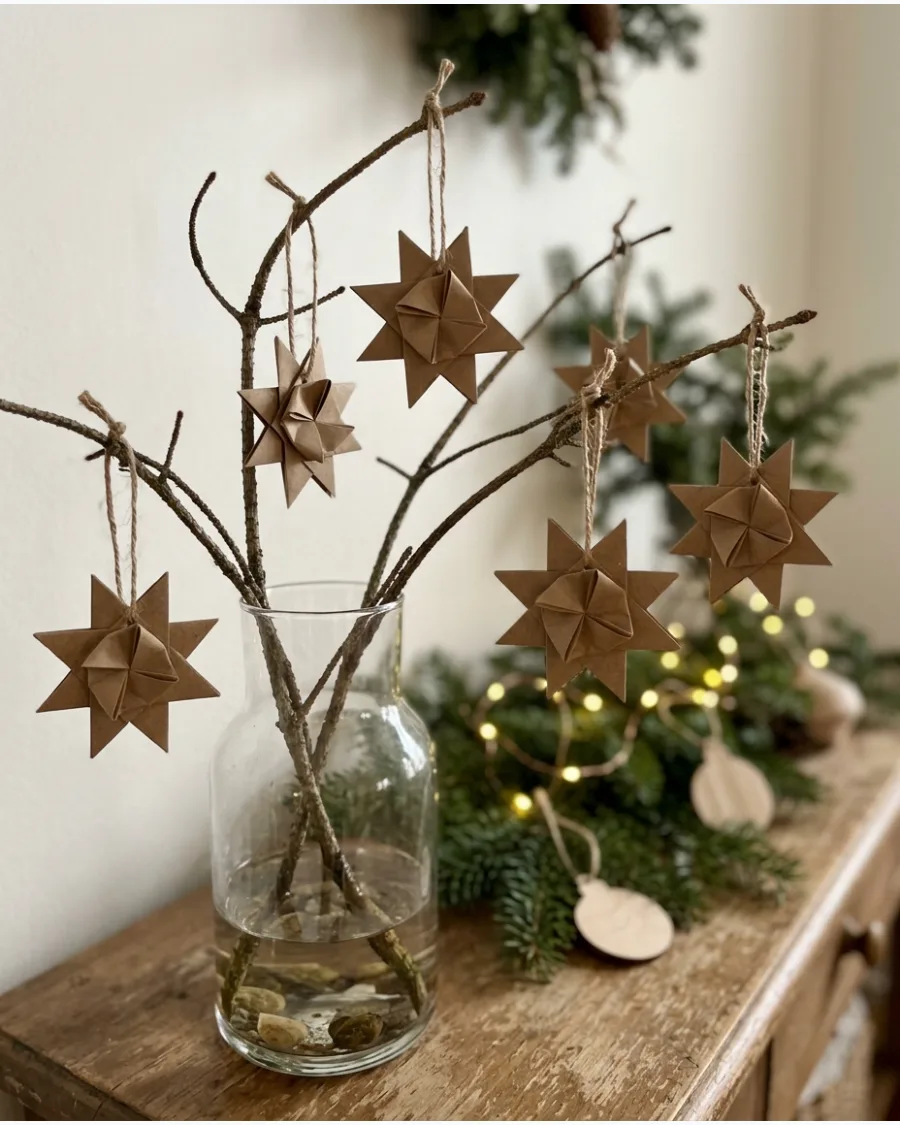
Brown kraft paper offers a rustic, organic feel that grounds delicate holiday decorations. Combine hand-folded kraft paper stars with natural evergreen branches and wooden ornaments for a cohesive, earthy aesthetic. This look works well for those who prefer a Scandinavian or farmhouse Christmas style.
The warm brown tones look particularly cozy when paired with soft yellow ambient lighting.
- Use recycled packing paper or heavy-duty grocery bags for a budget-friendly and sustainable material
- Accent the star edges with a light dusting of white acrylic paint to simulate a light snow coating
- Tie the stars to branches using natural twine or jute to maintain the rustic theme
Iron wrinkled kraft paper on a low setting before folding to achieve a smooth, high-quality finish.
8. Patterned Paper Christmas Stars
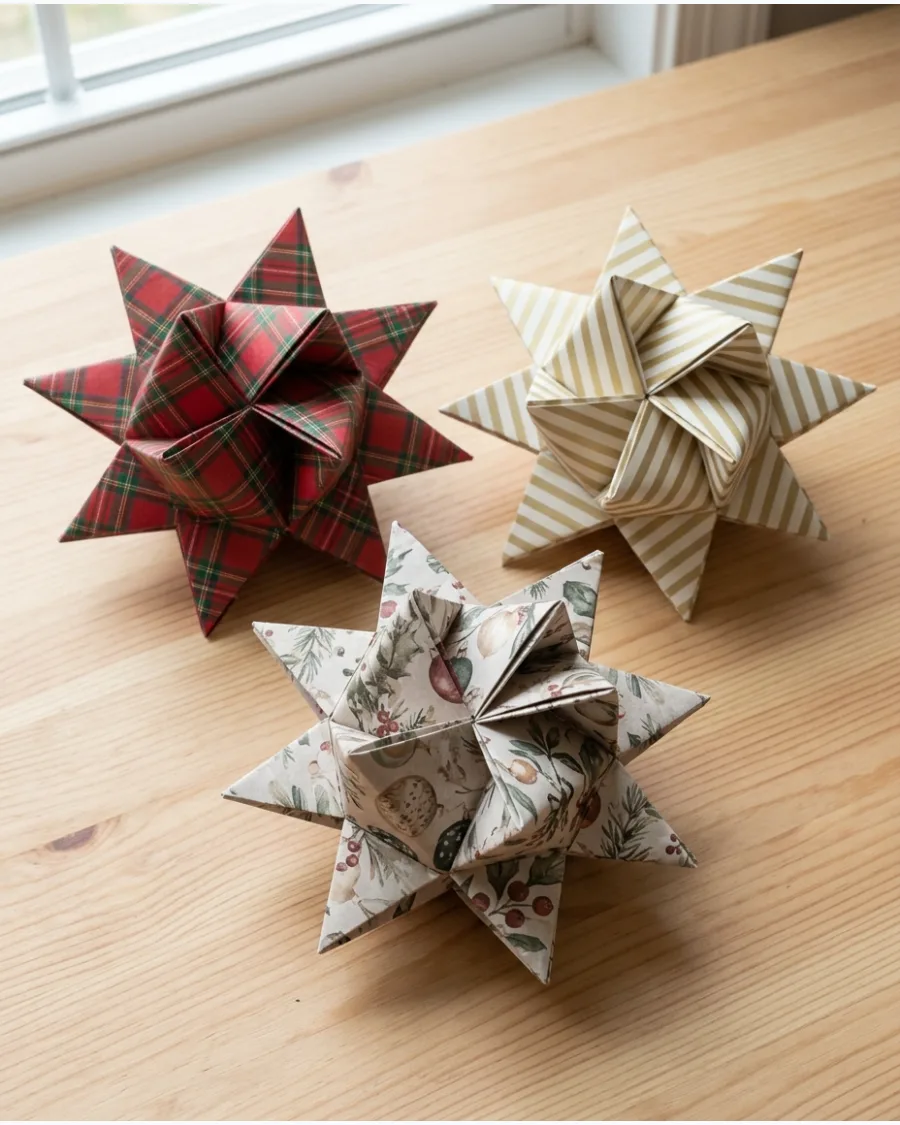
Using patterned paper instead of solid colors adds significant depth and texture to your holiday display.
Select two or three complementary patterns, such as plaid and thin stripes, to create dimensional stars that feel coordinated rather than cluttered. Patterns like floral or vintage newsprint provide a nostalgic touch. This method allows you to match your paper decorations perfectly to your existing room colors or upholstery.
- Choose double-sided scrapbooking paper so the star looks finished and professional from every angle
- Mix one busy pattern with a simpler geometric one to balance the visual weight of the cluster
- Apply a small dab of hot glue at the center of the folds to keep the dimensional shape rigid and stable
Look for paper pads with pre-coordinated designs to ensure your star cluster matches perfectly without guesswork.
9. Hanging Paper Star Cluster
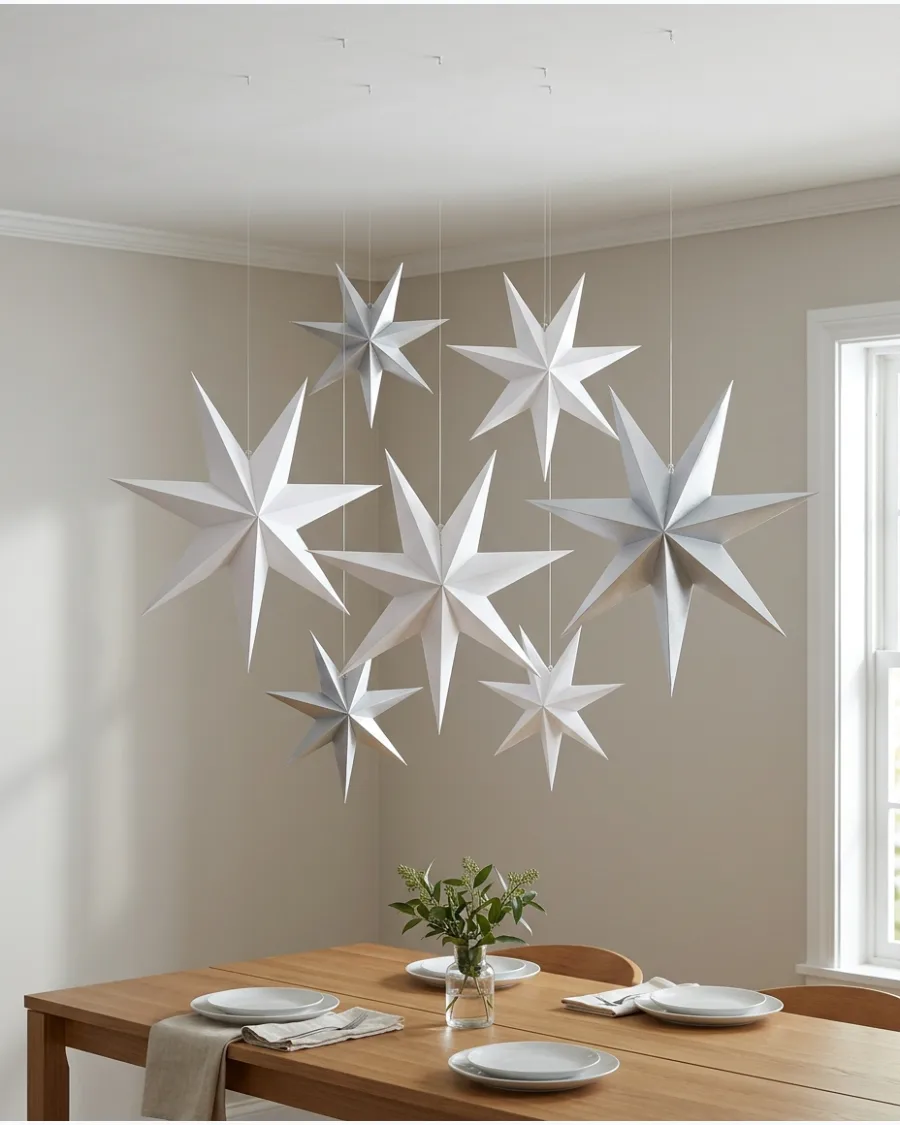
A floating installation transforms an empty ceiling space into a magical Christmas display. Suspend five to seven paper stars at varying heights using clear fishing line to create a sense of movement and depth. This cluster works beautifully over a dining table or tucked into a corner above a cozy armchair.
Mixing large and small stars mimics a natural constellation and draws the eye upward.
- Use transparent adhesive ceiling hooks to hang the stars without damaging your paint or ceiling texture
- Space the stars at least 6 inches apart horizontally so they do not tangle if there is a breeze in the room
- Vary the vertical drop by 4 to 8 inches between each star for the most balanced visual composition
Thread the fishing line through the thickest part of the paper fold to prevent the weight of the star from tearing the paper.
10. Illuminated Paper Advent Star
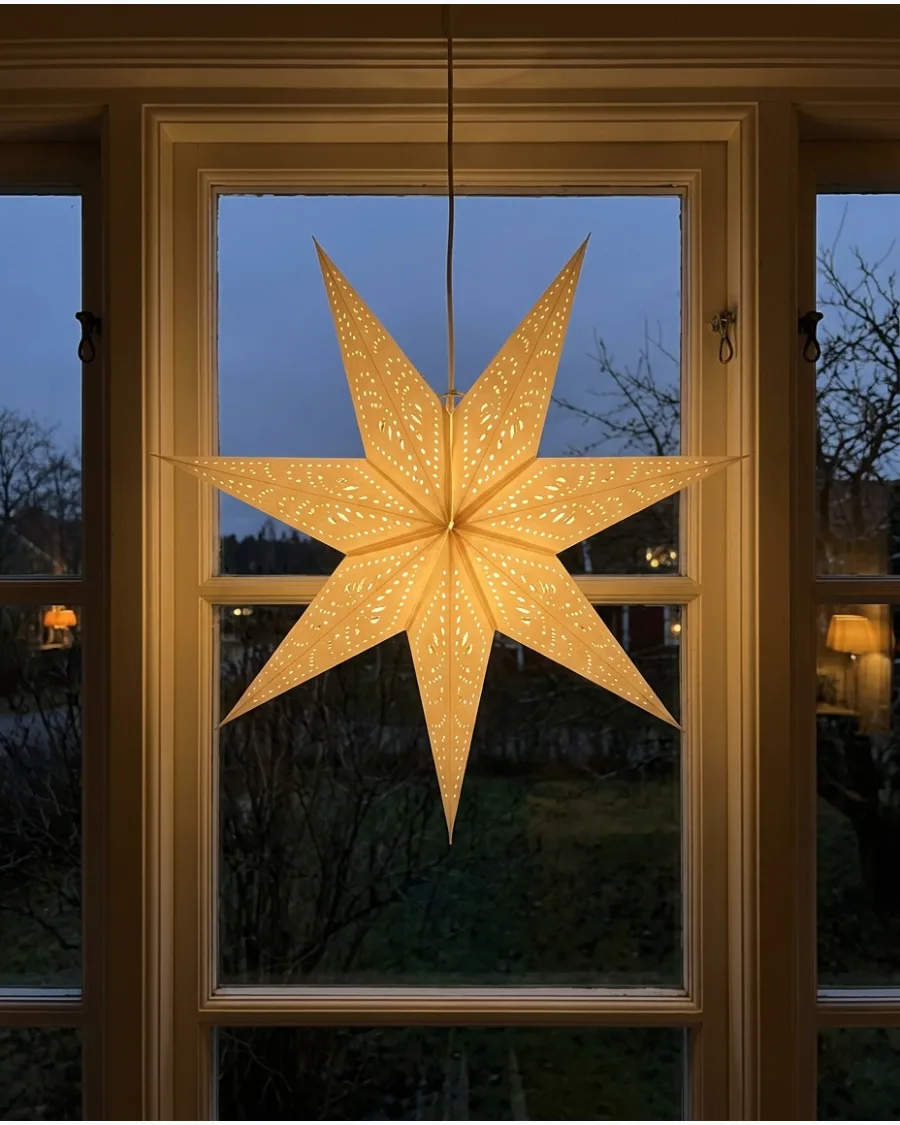
An illuminated star creates a welcoming glow that is visible from both the interior and exterior of the home. Hang a large, perforated paper star in a central window and place a battery-operated LED light inside to highlight the intricate cutout patterns. The perforations cast decorative shadows onto nearby walls, adding a layer of atmosphere to the room after dark.
This single, oversized piece serves as a powerful minimalist statement.
- Use 'cool-to-the-touch' LED bulbs or battery-powered fairy lights to ensure safety inside the paper structure
- Opt for a star with a pre-cut lace or geometric design to maximize the light output and shadow play
- Ensure the star is centered in the window frame for a classic, symmetrical look when viewed from the street
Use a light with a built-in timer so the star automatically glows every evening at dusk without manual switching.
PAPER CHRISTMAS TREE DECORATIONS
11. Honeycomb Paper Christmas Trees
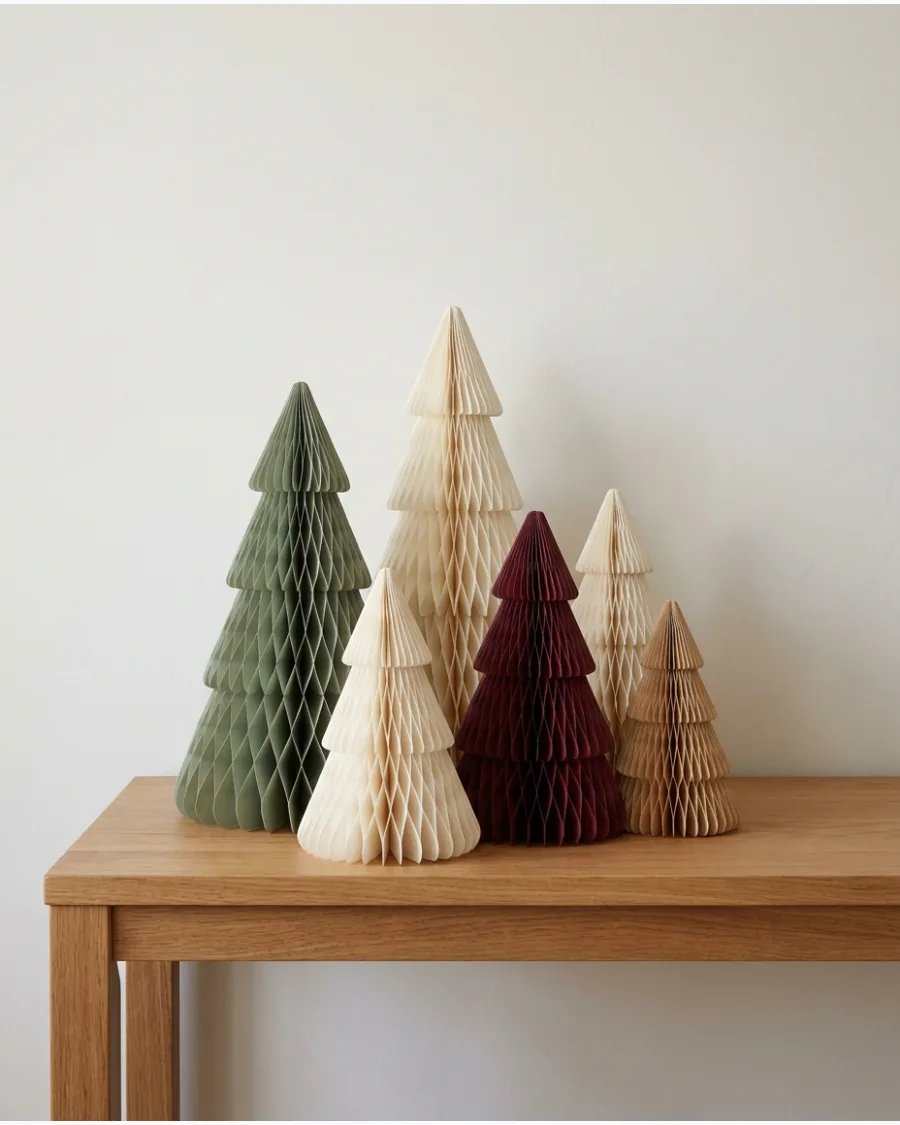
Honeycomb paper trees offer a sophisticated, sculptural look that is significantly lighter and easier to store than ceramic or wooden alternatives. These decorations arrive flat and unfold into a full 360-degree conical shape, typically secured by small integrated magnets or adhesive strips.
Arrange a cluster of these trees in varying heights and muted tones like cream, sage green, and burgundy to create a modern forest scene on a flat surface. They are ideal for narrow areas like mantels or entryway consoles because they provide vertical impact without requiring much depth.
- Mix visual textures by combining smooth matte paper trees with versions featuring delicate glitter-dusted edges.
- Select at least three different heights, ranging from 6 to 15 inches, to create a dynamic and natural-looking silhouette in the grouping.
- Store the trees flat in a heavy-duty envelope after the season to prevent the delicate honeycomb cells from being crushed.
If your trees use adhesive strips for assembly, use small clear paper clips instead so you can fold them back down without tearing the paper for reuse next year.
12. Accordion Fold Paper Christmas Trees
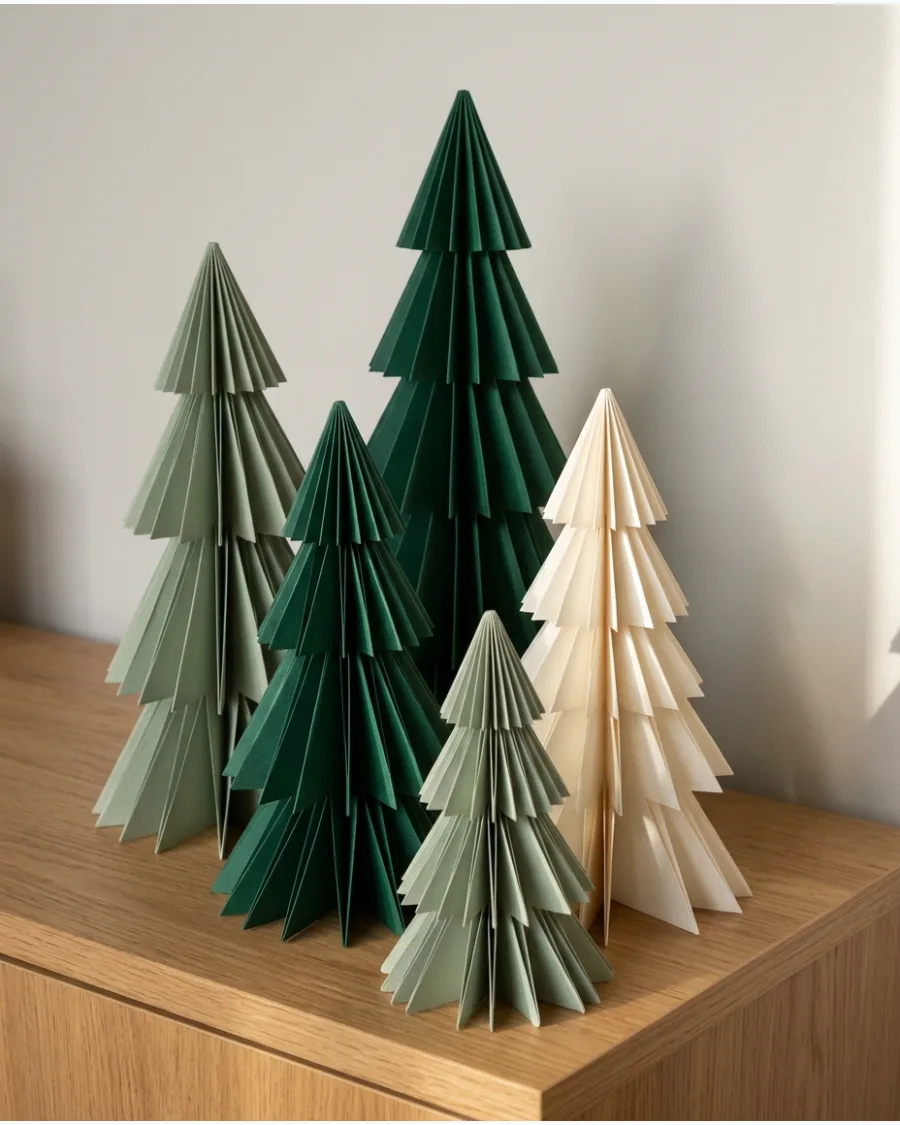
Create a miniature tabletop forest using heavy cardstock or decorative paper to add a sculptural element to your holiday display. You can achieve this look by folding long strips of paper into tight zig-zags and then expanding them into a conical or triangular tree shape.
Fold cardstock or heavy paper into accordion shapes and secure the edges to create standing Christmas trees. These simple structures are lightweight and easy to store flat once the season ends.
- Mix different shades of forest green, sage, and metallic gold for a sophisticated monochromatic palette.
- Vary the height of your trees between 4 and 12 inches to create visual depth and variety in your forest.
- Use a small bead of hot glue or double-sided tape along the interior seam to keep the accordion shape from springing open too wide.
Score your paper with a bone folder or the back of a butter knife before folding to ensure perfectly crisp, professional-looking edges.
13. Layered Paper Christmas Trees
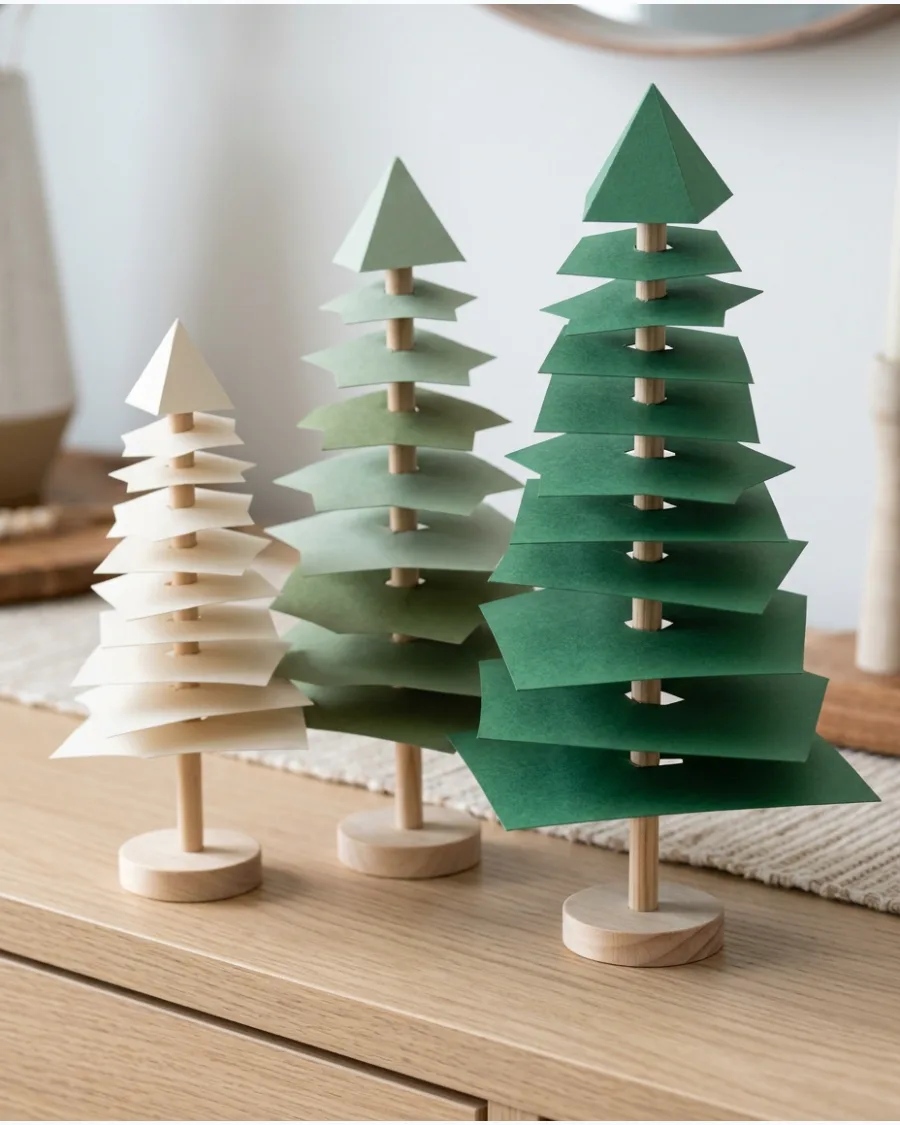
These dimensional trees offer a sculptural alternative to traditional ornaments and look stunning on a mantle or side table. By cutting circles or classic evergreen silhouettes in varying sizes, you can build height through a simple stacking method.
Thread the cardstock layers onto a thin wooden dowel or a bamboo skewer to maintain a perfect vertical alignment. This technique allows you to experiment with monochromatic gradients or a mix of festive patterns to match your decor.
- Use 65lb to 80lb cardstock to ensure the layers hold their shape without drooping over time.
- Place small spacers like wooden beads or foam squares between layers to create visible air gaps and depth.
- Secure the central dowel into a heavy base, such as a small wooden block or a cross-section of a branch, for stability.
Gently curl the edges of the paper layers upward with a pencil before stacking to mimic the natural curve of real pine needles.
14. Rolled Paper Christmas Tree
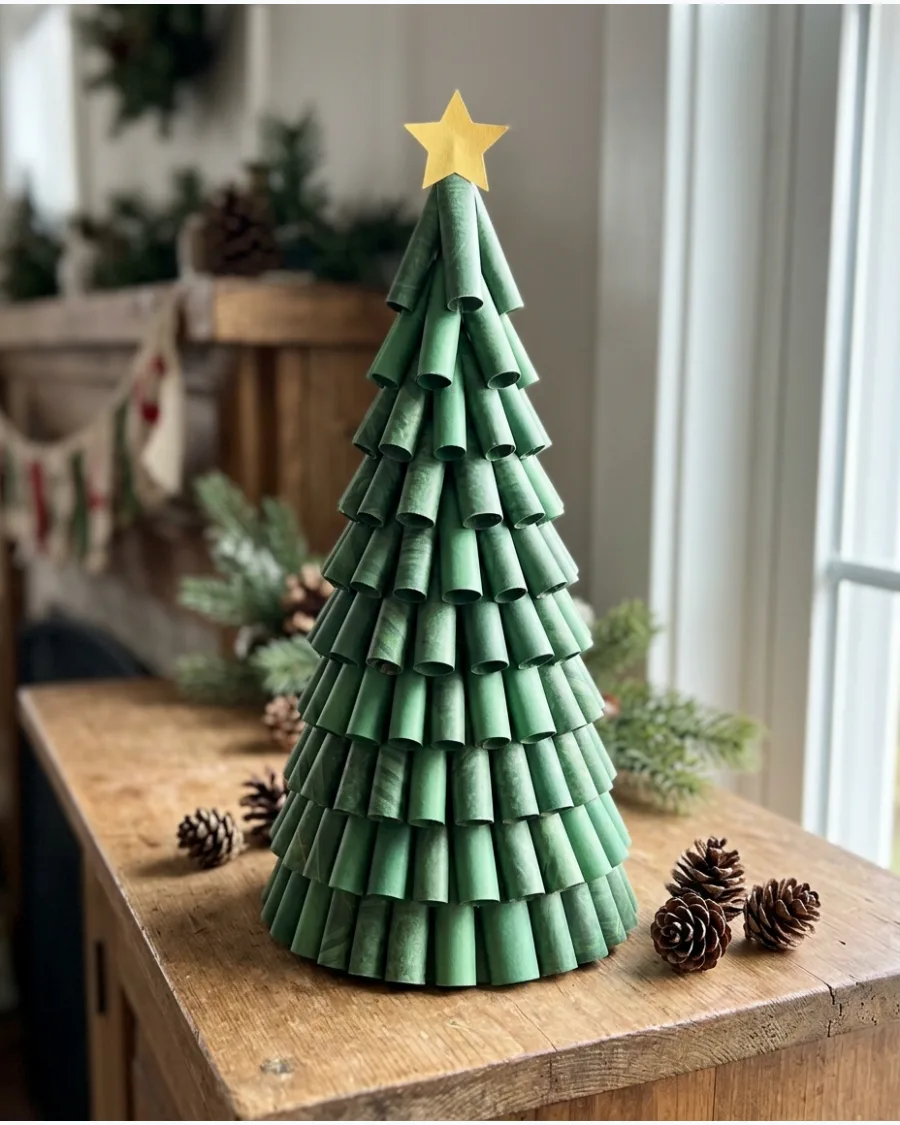
Build a textural tabletop display by assembling a tree from dozens of small cylinders of decorative paper. Glue individual paper rolls onto a cardboard cone base in horizontal rows, starting from the bottom and overlapping each layer slightly to hide the attachment points. This method allows you to use up small scraps of holiday wrapping or craft paper for a cohesive, colorful look.
Finish the piece with a simple hand-cut paper star at the apex for a completely paper-based decoration.
- Cut paper into uniform squares before rolling to ensure the height of each tier remains consistent.
- Alternate between solid colors and subtle patterns to create a variegated foliage effect that mimics natural pine.
- Apply glue only to the seam of the roll and the point where it touches the cone to maintain a clean finish without visible drips.
Curl the paper slightly with the edge of a pair of scissors before rolling to make it more pliable and prevent stiff paper from creasing.
15. Paper Christmas Tree Wall Display
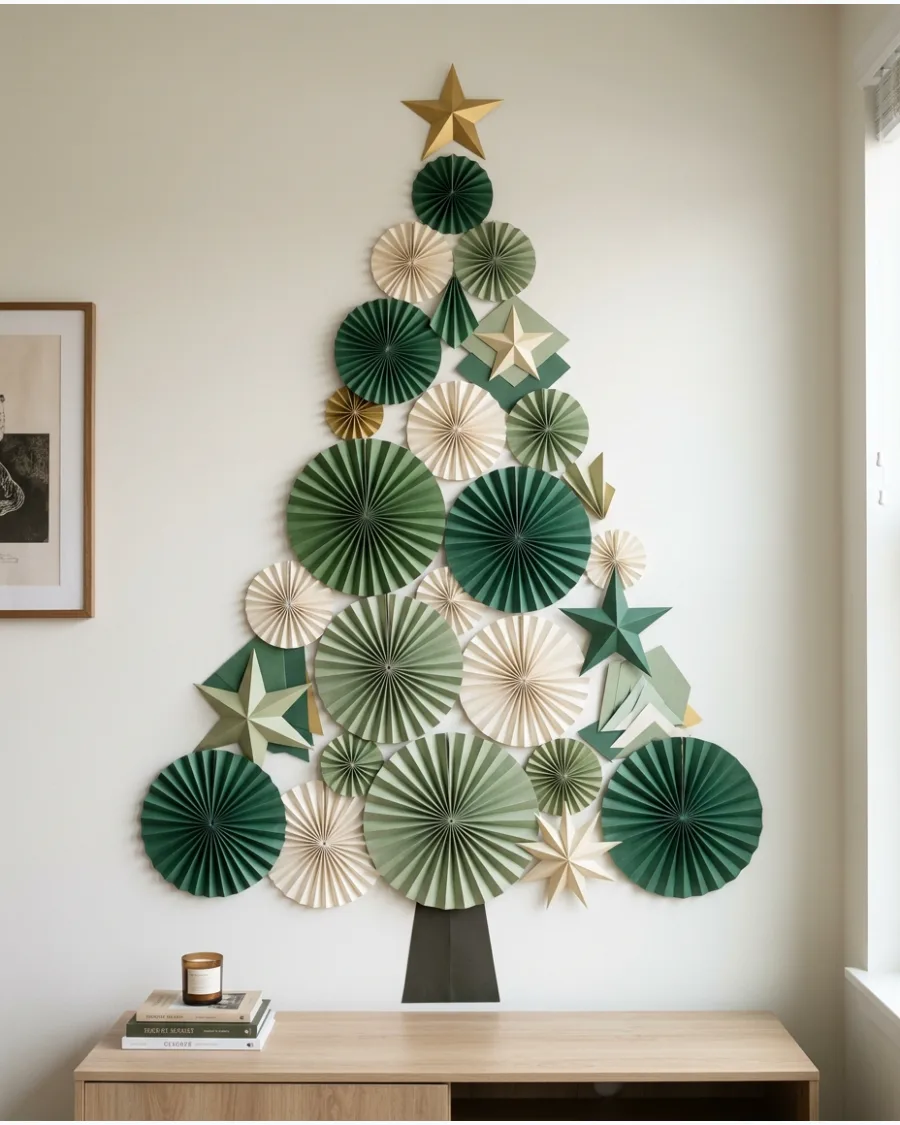
Create a vertical holiday focal point without taking up floor space by arranging paper elements in a triangular silhouette. Using a mix of textures like accordion fans and flat stars adds depth to the two-dimensional layout.
Map out the tree's height and width on the wall using painter's tape before attaching individual paper pieces to ensure a symmetrical shape. This method is ideal for renters who want a festive impact without the need for bulky storage or heavy hardware.
- Mix different paper finishes like matte cardstock and metallic vellum to create visual variety within a single color palette.
- Use removable adhesive putty or clear mounting strips to secure pieces without damaging the paint or drywall.
- Stagger the depth of the elements by mounting some flat against the wall and using small foam spacers for others.
Incorporate a few small paper pockets into the design to hold lightweight holiday cards or small ornaments.
16. Mini Paper Christmas Tree Village
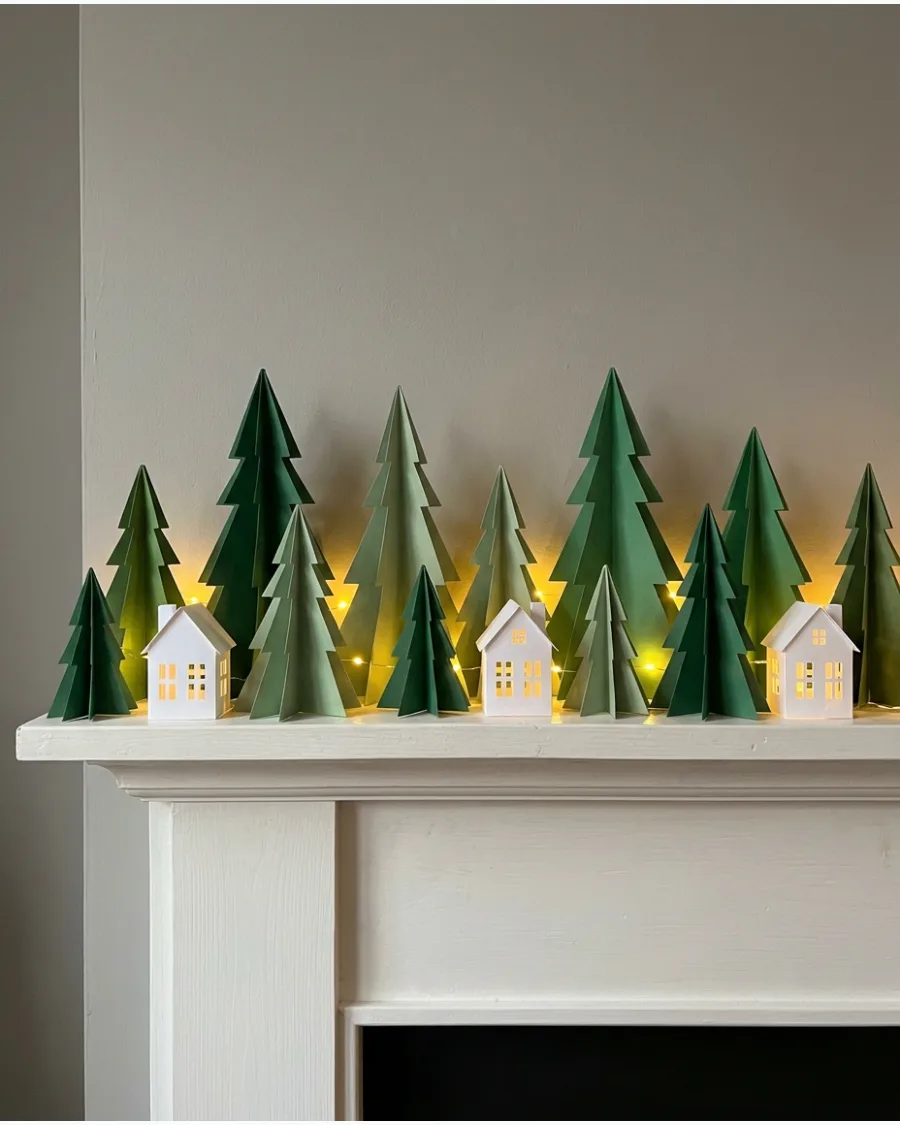
Build a miniature landscape by grouping various folded paper elements into a charming festive scene. Arrange folded paper trees of different heights and colors alongside small paper house silhouettes to create visual depth on a mantel or tabletop. This setup works best when layers are staggered to mimic a natural forest edge, providing a sophisticated alternative to traditional bulky village sets.
Using battery-operated fairy lights adds a warm glow that safely illuminates the paper from within.
- Mix different paper weights, such as cardstock for sturdy houses and thinner origami paper for delicate trees, to vary the texture.
- Vary the green tones from sage to emerald and forest green for a more organic, natural appearance.
- Tuck the battery packs for your LED strings behind the larger paper houses to keep the display tidy and the wires hidden.
Use a small dot of removable poster putty under the base of taller, lightweight trees to prevent them from tipping over if someone walks by.
17. Newspaper Christmas Tree
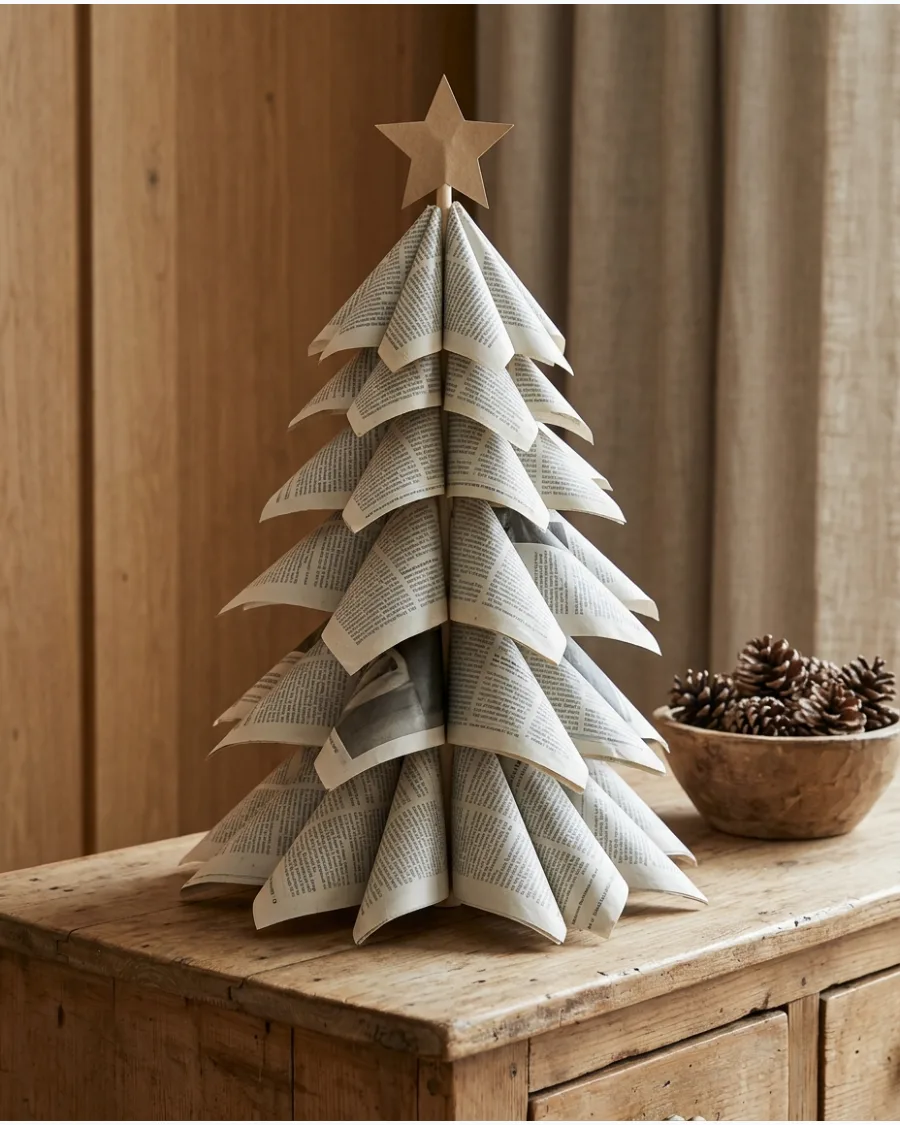
Transform old newspapers into a charming, eco-friendly centerpiece for your holiday table or mantel. By layering or folding the pages, you create a textured conical shape that celebrates a vintage, recycled aesthetic.
Stack circular newspaper cutouts of decreasing size onto a central wooden dowel to create a sturdy, tiered tabletop tree. This approach works beautifully with neutral color palettes and rustic holiday themes.
- Brush the edges of the newspaper with gold or silver paint for a subtle festive shimmer.
- Use a heavy cardboard base or a small wooden block to ensure the dowel remains upright and stable.
- Select pages with mostly text and minimal bright advertisements to maintain a cohesive vintage look.
Wet the edges of the newspaper slightly and let them dry to create a naturally curled, well-loved book effect.
18. Book Page Christmas Trees
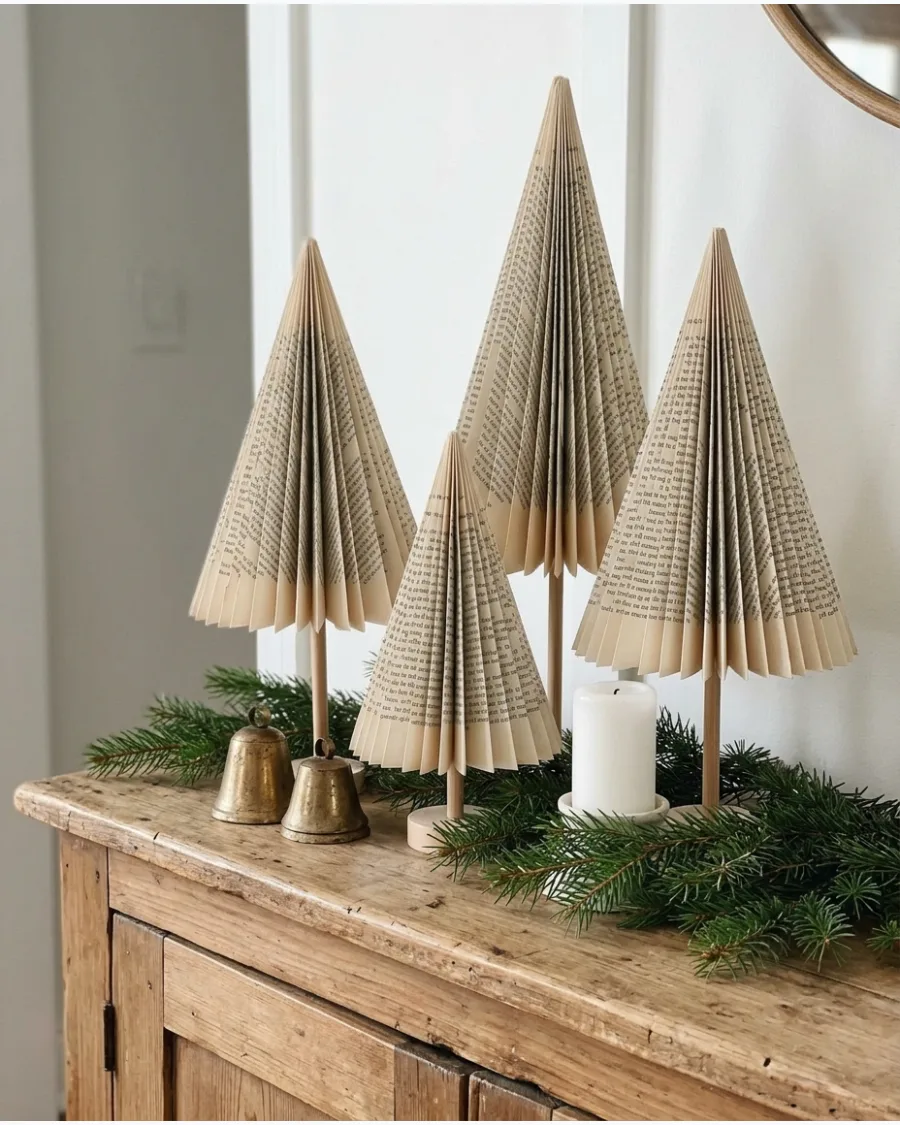
Repurpose damaged books or vintage sheets into charming tabletop accents that celebrate typography and texture. These trees rely on precise accordion or circular folding to create a conical shape that highlights the aged paper and printed text.
Secure the folded book pages to a central wooden dowel or an intact book spine to ensure the tree stands upright and stable on your holiday mantel. This approach adds a nostalgic, intellectual feel to your decor while keeping the project budget-friendly.
- Choose books with yellowed or deckled edges to naturally enhance the antique aesthetic without staining.
- Lightly sand the outer edges of the pages after assembly to create a softer, more feathered texture on the branch tips.
- Incorporate vintage-style brass bells and sprigs of dried greenery around the base to complete the vignette.
Use a bone folder or the smooth edge of a credit card to get crisp, professional-looking creases on every fold.
19. Pleated Paper Christmas Trees
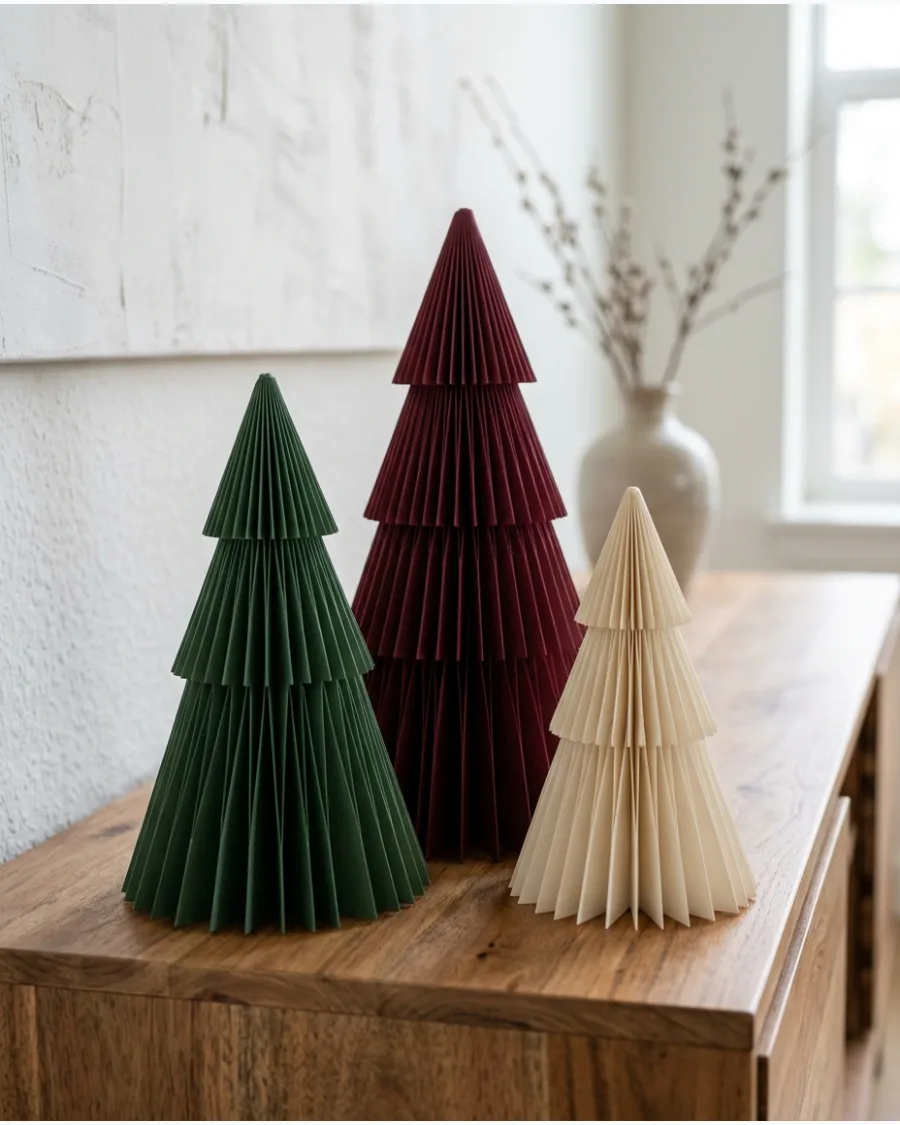
These sophisticated trees rely on dense, tight pleating to create a structural 3D form that looks high-end despite its simple material. Score long strips of heavyweight paper at quarter-inch intervals and fold them into a tight accordion before gluing the ends together into a circular cone. Using deep tones like forest green or burgundy adds a moody, modern touch to a mantel or sideboard.
The repetition of the pleats catches light and shadow, giving the paper a sculptural, architectural quality.
- Use a bone folder or a scoring board to ensure every pleat is crisp and perfectly vertical for a uniform finish.
- Mix different heights by varying the width of your paper strips to create a varied forest arrangement.
- Secure the inner center with a small bead of hot glue to prevent the pleated structure from springing open at the base.
For a metallic edge, lightly brush the very tips of the pleats with gold acrylic paint or a metallic wax finish after the tree is assembled.
20. Oversized Paper Christmas Tree
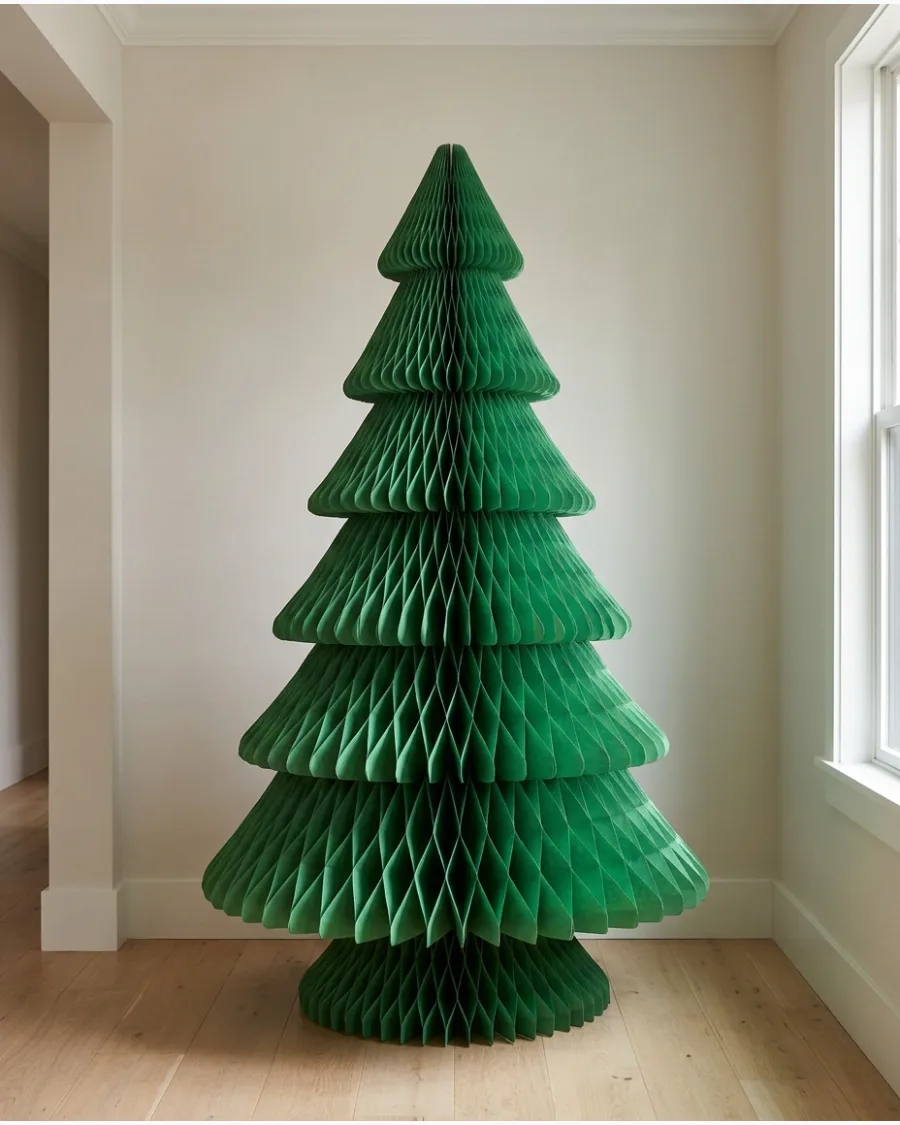
An oversized paper tree serves as a sculptural focal point that can fill a large space without the mess of real needles. Using thick, heavy-duty honeycomb or accordion-pleated paper ensures the structure maintains its shape and stands upright on its own.
Place the tree in a foyer or a bare corner where its geometric silhouette can be appreciated from multiple angles. Keep the surrounding floor space clear of small clutter to emphasize the tree's scale and clean lines.
- Choose cardstock or specialized honeycomb paper with a weight of at least 200gsm for structural integrity.
- Secure the base with a weighted internal support or discreet double-sided mounting tape if used in high-traffic areas.
- Combine multiple trees of varying heights to create a more dynamic and layered landscape.
Use magnetic closures along the vertical seam so you can collapse the tree completely flat for easy storage after the holidays.
PAPER CHRISTMAS TREE ORNAMENTS
21. Honeycomb Paper Baubles
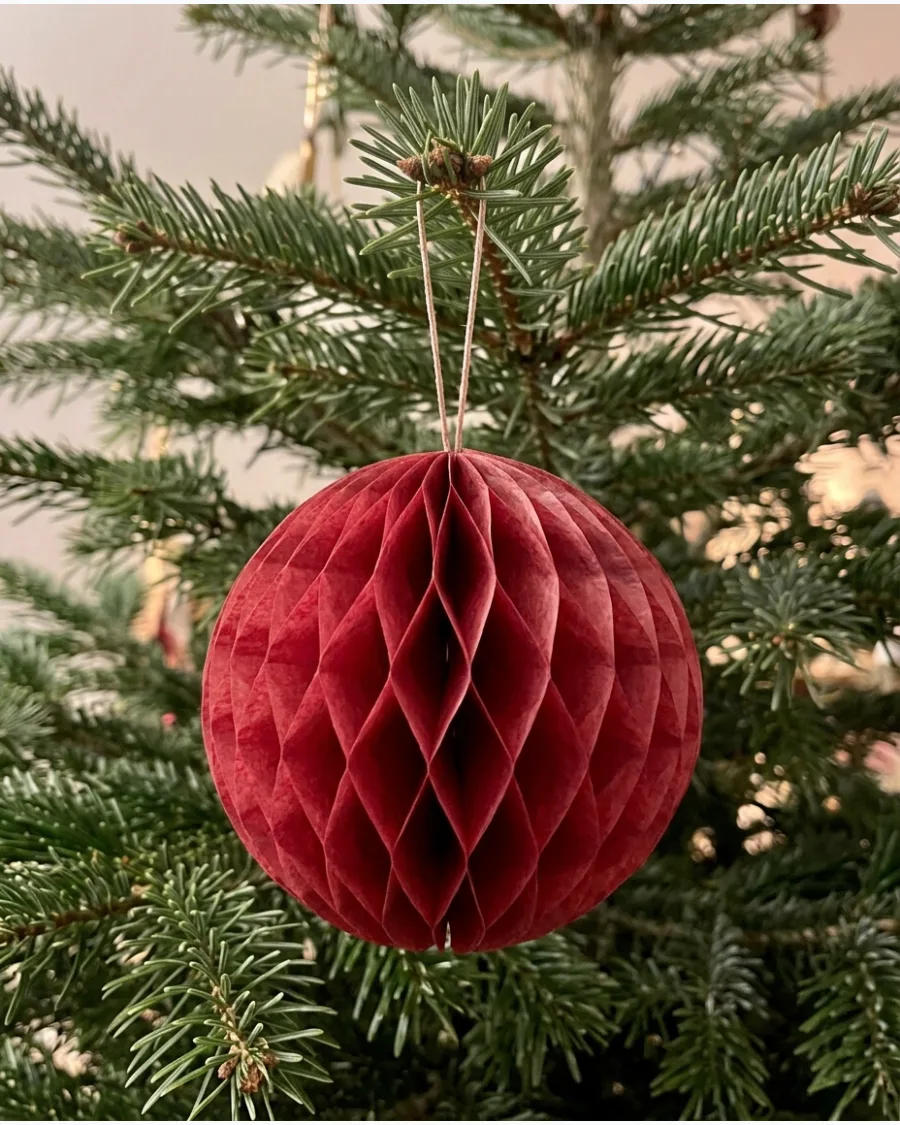
Layered tissue paper creates a delicate honeycomb structure that transforms into a full 3D sphere when opened. These ornaments provide significant visual volume on the tree without adding heavy weight to the branches.
Gently pull the sides of the folded honeycomb stack apart and secure the edges with a small piece of double-sided tape or a paperclip. Once the holidays are over, they fold completely flat for compact storage.
- Use tissue paper for a traditional airy look or lightweight kraft paper for a rustic vibe.
- Vary the diameters between three and six inches to create visual depth throughout the tree.
- Secure the opening with a magnetic closure or paperclip if you want to reuse them without adhesive wear.
Use a dot-glue runner to apply adhesive in a staggered pattern on the paper stack to ensure the honeycomb cells open evenly.
22. Folded Paper Bauble Ornaments
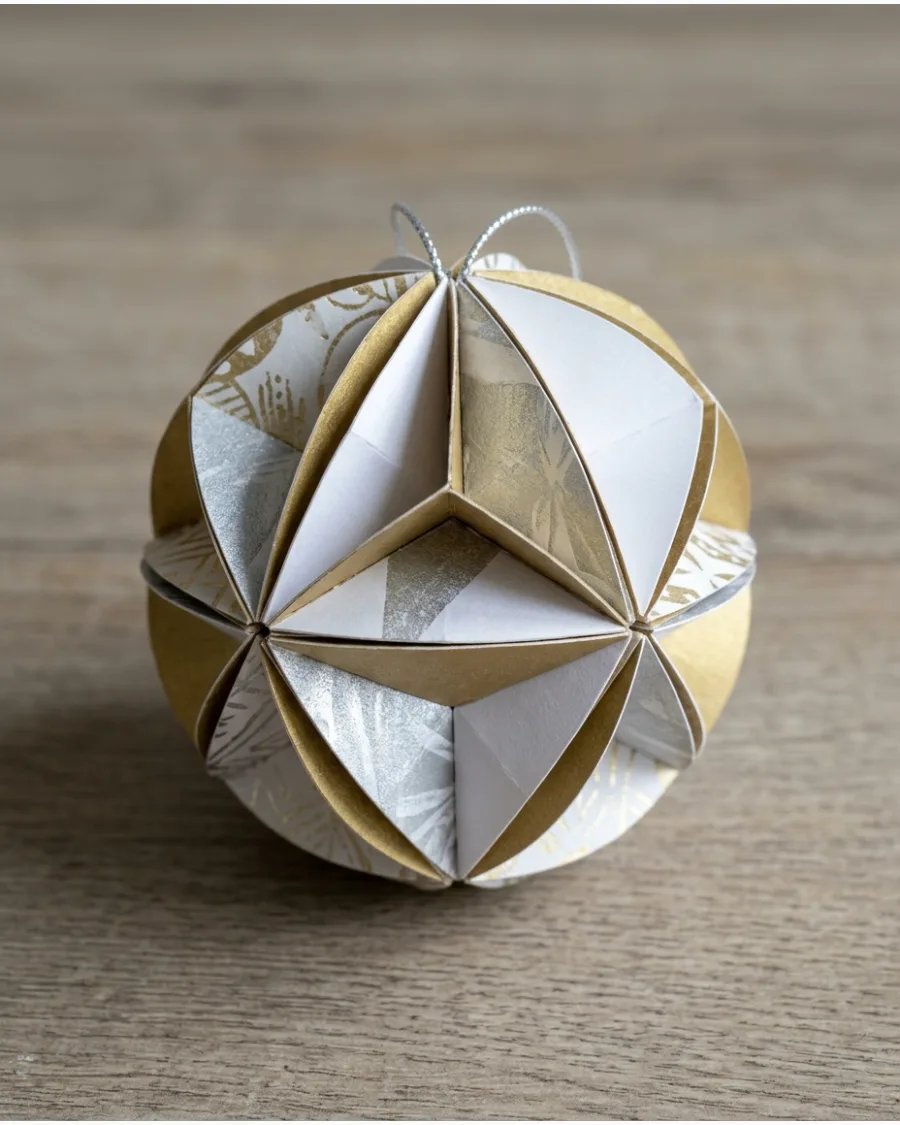
These geometric baubles are constructed by joining multiple circles of cardstock to create a multi-faceted 3D shape. Using cardstock ensures the ornament maintains its structural integrity and crisp edges during assembly and display.
Cut twenty identical circles from patterned or solid cardstock and fold each into an equilateral triangle before gluing the flaps together. The result is a sophisticated, architectural ornament that looks professional and custom-made.
- Choose cardstock with a metallic or pearlescent finish to help reflect the Christmas tree lights.
- Use a bone folder to create sharp, precise creases for a cleaner geometric finish.
- Experiment with different circle sizes to create a diverse collection of ornaments for a larger tree.
Use a circle punch instead of scissors to ensure every piece is perfectly identical for easier alignment.
23. Paper Fan Christmas Ornaments

Accordion-folded paper strips can be easily transformed into elegant, circular fans that resemble vintage rosettes. These ornaments are ideal for using up leftover wrapping paper or colorful scrapbook sheets.
Fold a long strip of paper into even pleats, then bend it in half and glue the inner edges to form a complete circle. A ribbon loop attached to the center or the outer edge makes them easy to hang on any branch.
- Cover the center join with a decorative button, a glittery star, or a small paper circle for a finished look.
- Use double-sided patterned paper so the ornament looks finished from both the front and back.
- Adjust the width of the paper strip to determine the overall diameter of the finished fan.
Use a scoring board to mark the pleats at regular intervals for perfectly uniform folds and a balanced circle.
24. Origami Christmas Ornaments
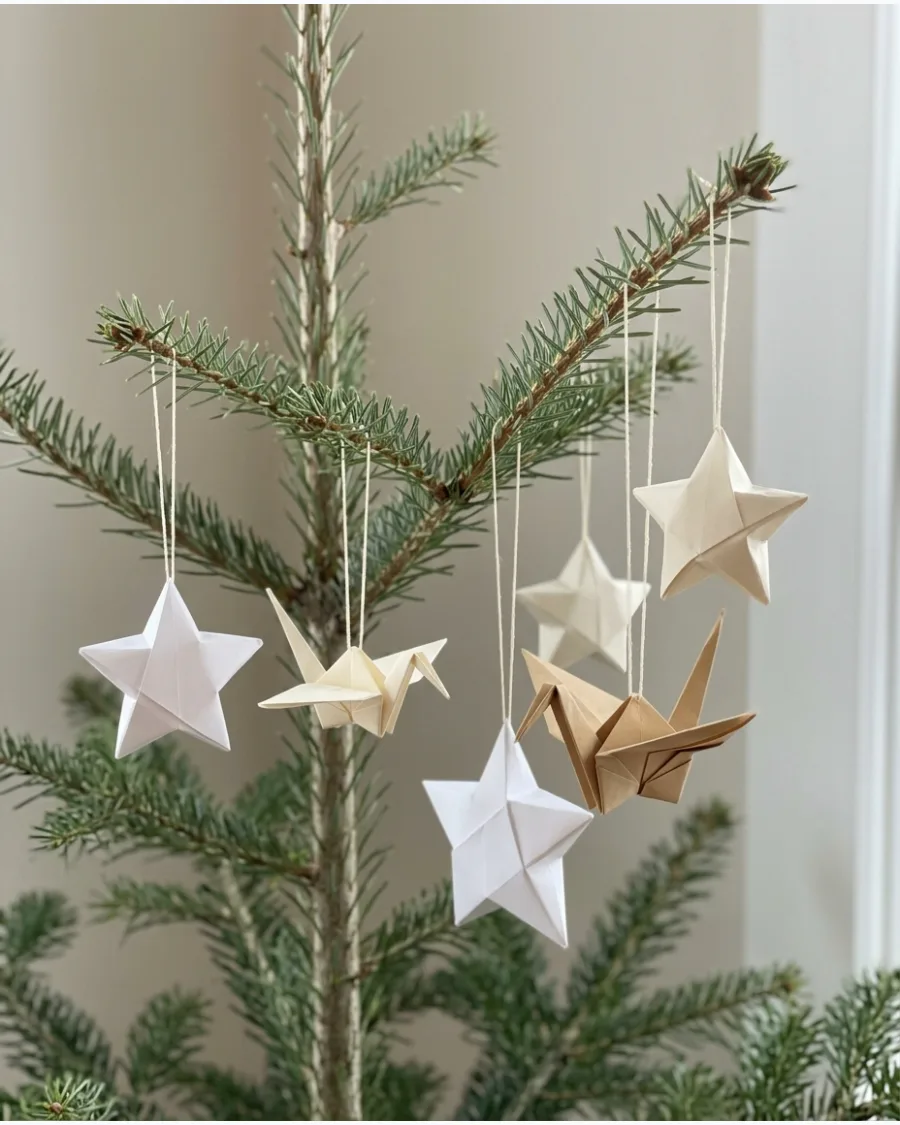
Origami allows you to create complex shapes from a single square of paper without the need for glue or scissors. Focusing on one or two specific shapes, like a crane or a star, creates a cohesive and meditative theme across your tree.
Choose a medium-weight origami paper that holds its shape well and follow a pattern to fold a series of uniform stars or birds. These ornaments are lightweight and durable, making them perfect for homes with pets or small children.
- Select paper with a different color on each side to highlight the intricate folds of the design.
- String several origami stars together on a single thread to create vertical drops between tree branches.
- Use washi paper for a traditional aesthetic that adds texture and subtle patterns.
Practice with scrap paper first to master the folding sequence before moving on to your decorative holiday paper.
25. Paper Angel Christmas Ornaments
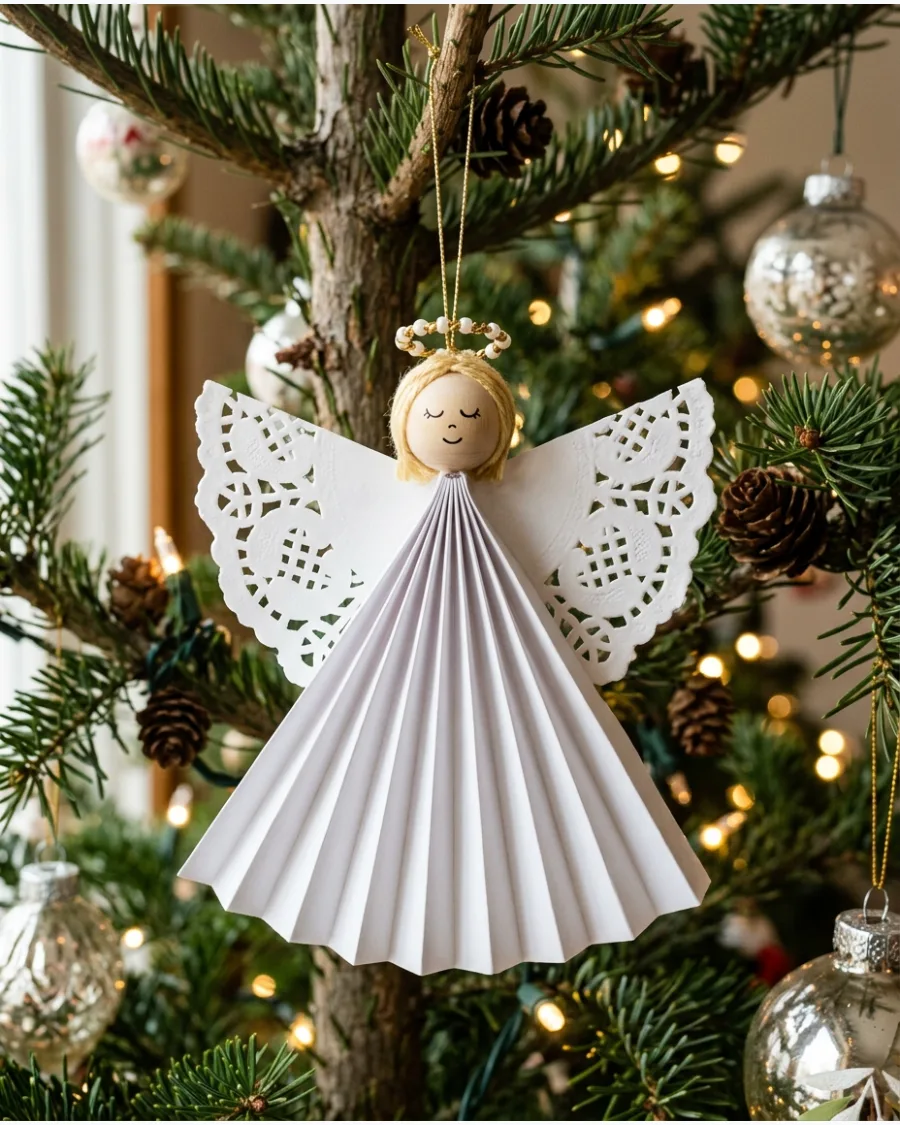
These charming angels combine simple paper-folding techniques with basic craft materials for a nostalgic holiday look. The body is formed by a pleated skirt, while the wings and head give the figure its iconic silhouette.
Fold a piece of cardstock accordion-style to create a sturdy skirt, then glue a wooden bead or a small paper circle to the top to serve as the head. These can be customized with halos made from gold wire or twine for a finishing touch.
- Use paper doilies for the wings to add a delicate, lace-like texture to the angel's design.
- Paint a simple face on the wooden bead or leave it natural for a more minimalist, Scandinavian style.
- Hang these near the top of the tree to create a celestial themed display.
A drop of hot glue is the most effective way to secure the wooden bead head to the paper pleats securely.
26. Paper Christmas Bell Ornaments

Constructing three-dimensional bells from paper adds a classic, lightweight charm to your tree without the risk of breakage. You can create these by cutting circular arcs and joining the ends to form a cone shape with a flared rim.
Thread a small paper bead or a folded paper teardrop onto a string to act as the clapper inside the bell. Secure a thin ribbon loop through the top of the cone for easy hanging.
- Use heavy cardstock or metallic paper to help the bell maintain its flared shape under its own weight.
- Layer two different colors of paper together before folding for a contrasting interior and exterior look.
- Trim the bottom edge with pinking shears or decorative craft scissors for a scalloped finish.
Dip the very edges of the paper bells in white craft glue and then into fine glitter to mimic a frosted wintry effect.
27. Paper House Christmas Ornaments
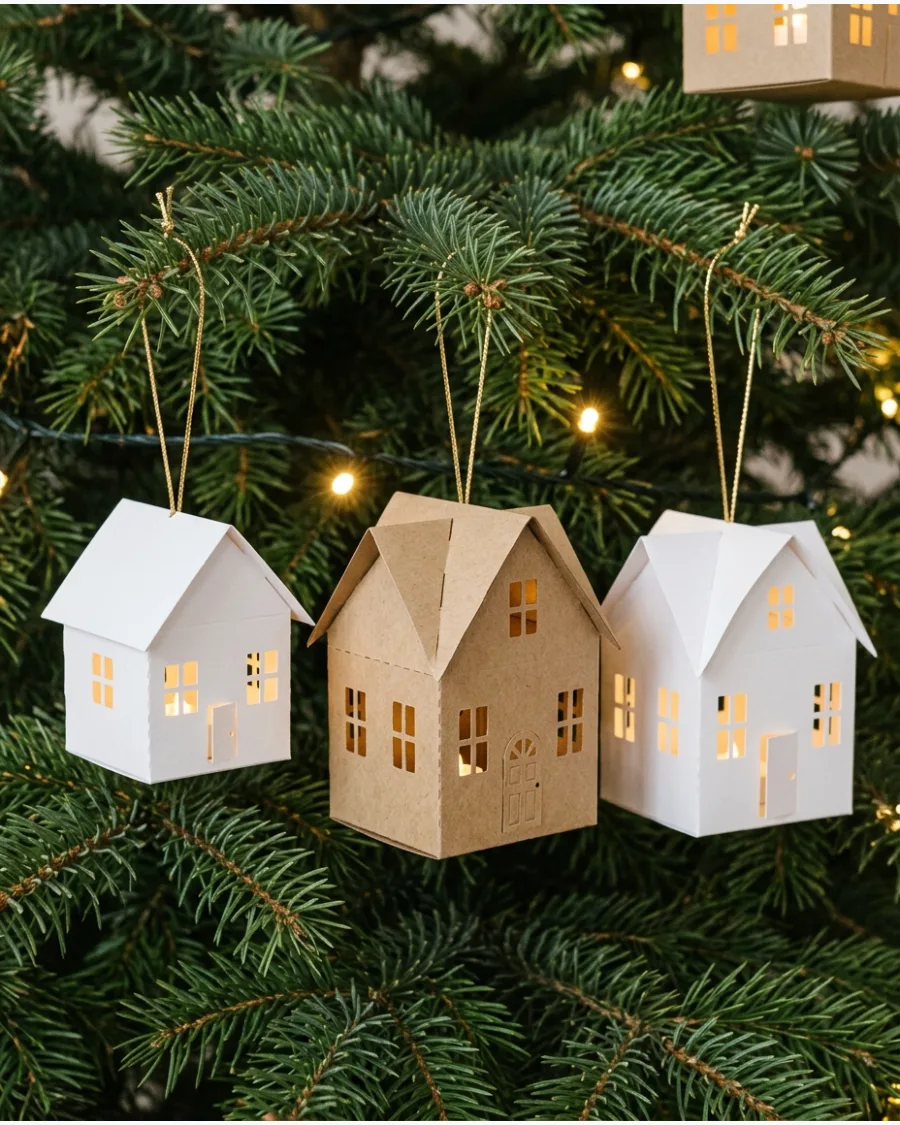
Construct charming miniature dwellings by cutting and folding cardstock into small house shapes with distinct architectural features. These lightweight ornaments allow for intricate details like cut-out windows and contrasting roof colors that add variety to your tree.
Thread a thin metallic cord through a small hole at the roof peak to create a secure hanging loop for each ornament. Position the houses near warm white LED string lights to give the windows a cozy, glowing appearance from within.
- Use a bone folder to create crisp, sharp creases for a professional and structural architectural look.
- Mix textures by using corrugated paper for the roofs and smooth, matte cardstock for the walls.
- Incorporate tiny paper chimneys or window boxes to add depth and character to each individual house design.
Apply a thin layer of iridescent glitter glue to the roof eaves to mimic the look of fresh snow catching the light.
28. Paper Star Christmas Tree Ornaments
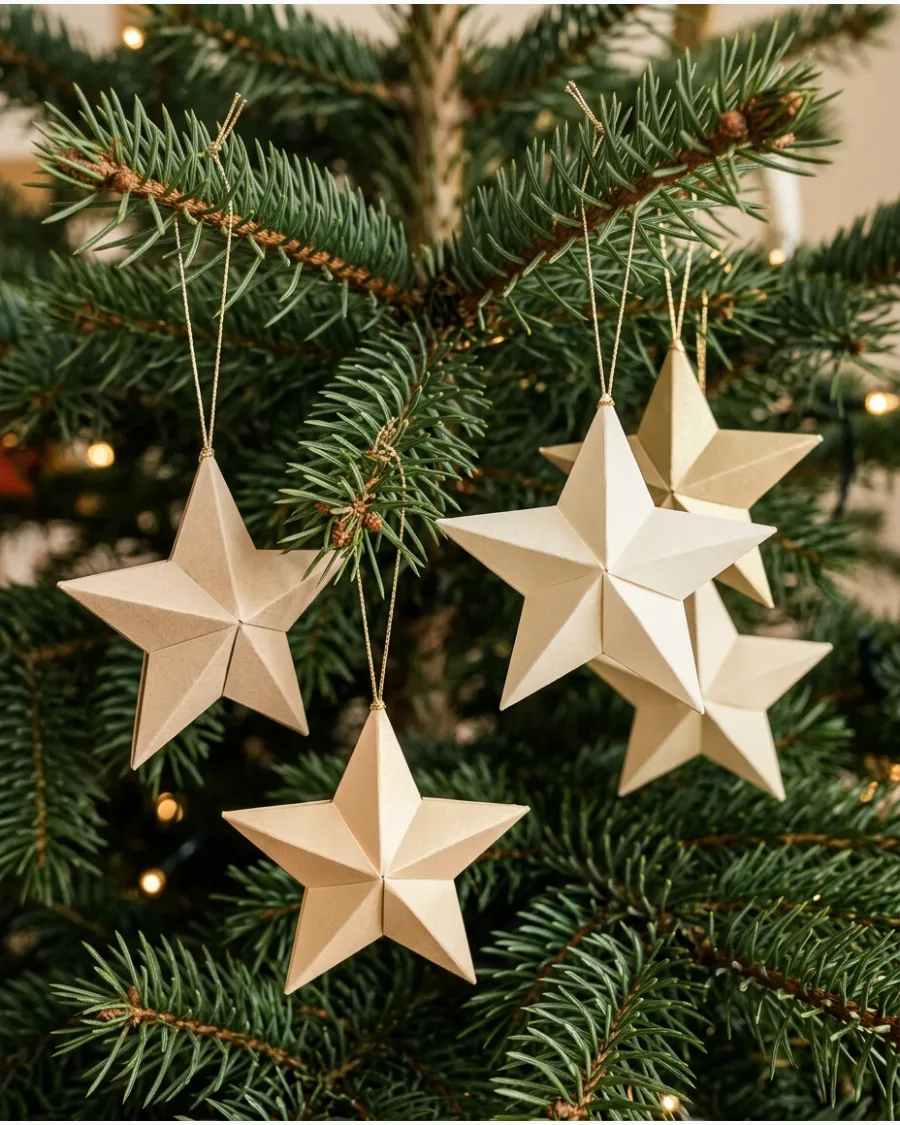
These dimensional stars are created by folding and gluing cardstock to achieve a crisp, multi-pointed geometric shape. Using cardstock instead of thin paper ensures the ornaments maintain their structure and hold up against the evergreen branches.
Distribute the finished stars throughout the tree, tucking some deeper into the inner branches to create a sense of visual depth. Mixing related tones like cream, champagne, and soft gold creates a sophisticated, cohesive look that avoids the monotony of a single color.
- Choose a heavy-weight cardstock of at least 65lb to ensure the points do not bend or warp over time.
- Apply a small dab of clear-drying craft glue to the interior tabs of each fold for a permanent, secure bond.
- Attach a thin metallic thread or clear monofilament loop to the top point for a nearly invisible hanging method.
Use a bone folder or the back of a butter knife to score your fold lines before folding to get perfectly sharp, professional-looking star points.
29. Paper Heart Christmas Ornaments
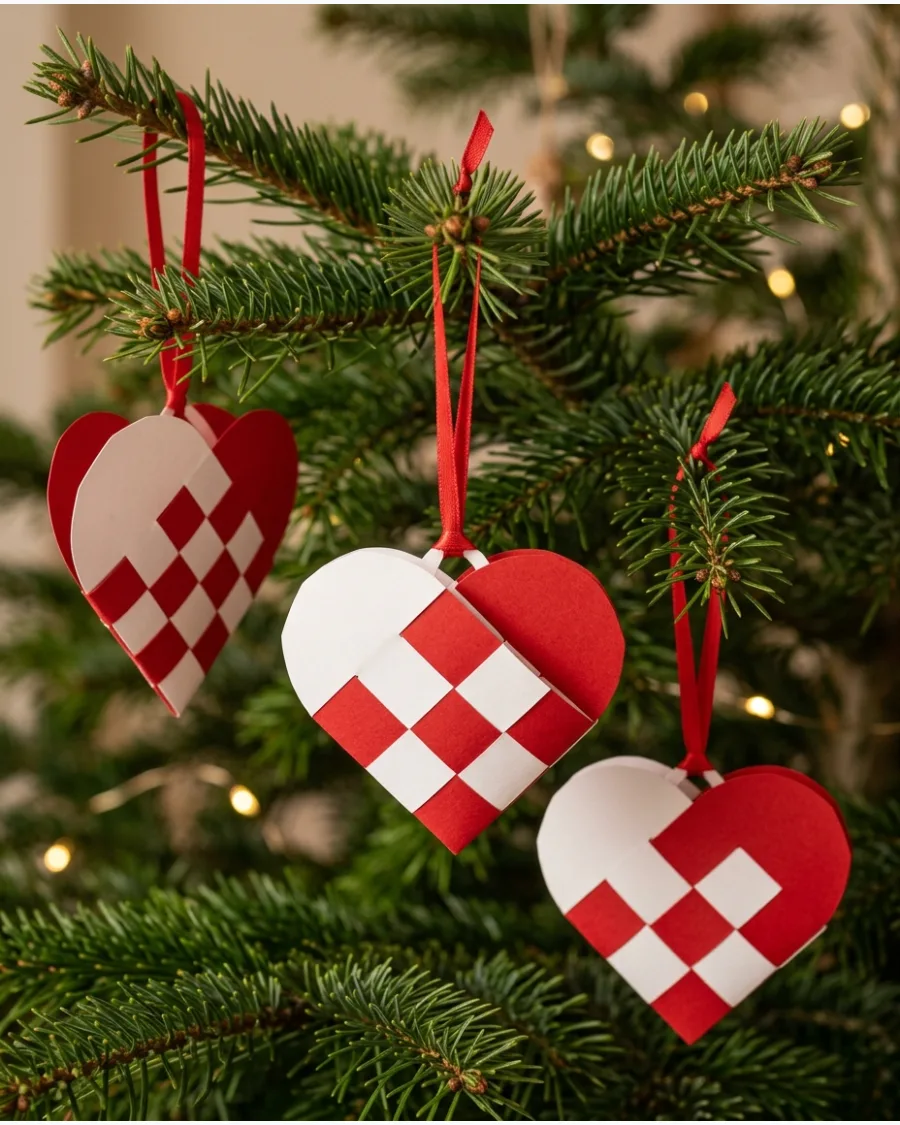
These woven paper hearts, known as julekurver, are a classic Scandinavian holiday staple that adds a charming handmade touch to your tree. You can create them by interlocking two U-shaped paper strips to form a functional pocket or opt for a modern dimensional fold using thick cardstock.
Weave the paper strips together to create a checkered heart pattern before attaching a narrow ribbon loop for hanging. Use traditional red and white for a bold contrast, or choose kraft paper for a more rustic, muted aesthetic.
- Choose a medium-weight paper like cardstock to ensure the woven pockets hold their shape without tearing.
- Cut three to four slits into each U-shape template to determine the complexity of the checkered pattern.
- Fill the finished heart pockets with lightweight items like paper-wrapped candies or small sprigs of dried greenery.
If using slick or glossy paper, secure the final weave with a tiny dot of glue on the inside to prevent the strips from shifting over time.
30. Mini Wrapped Present Paper Ornaments
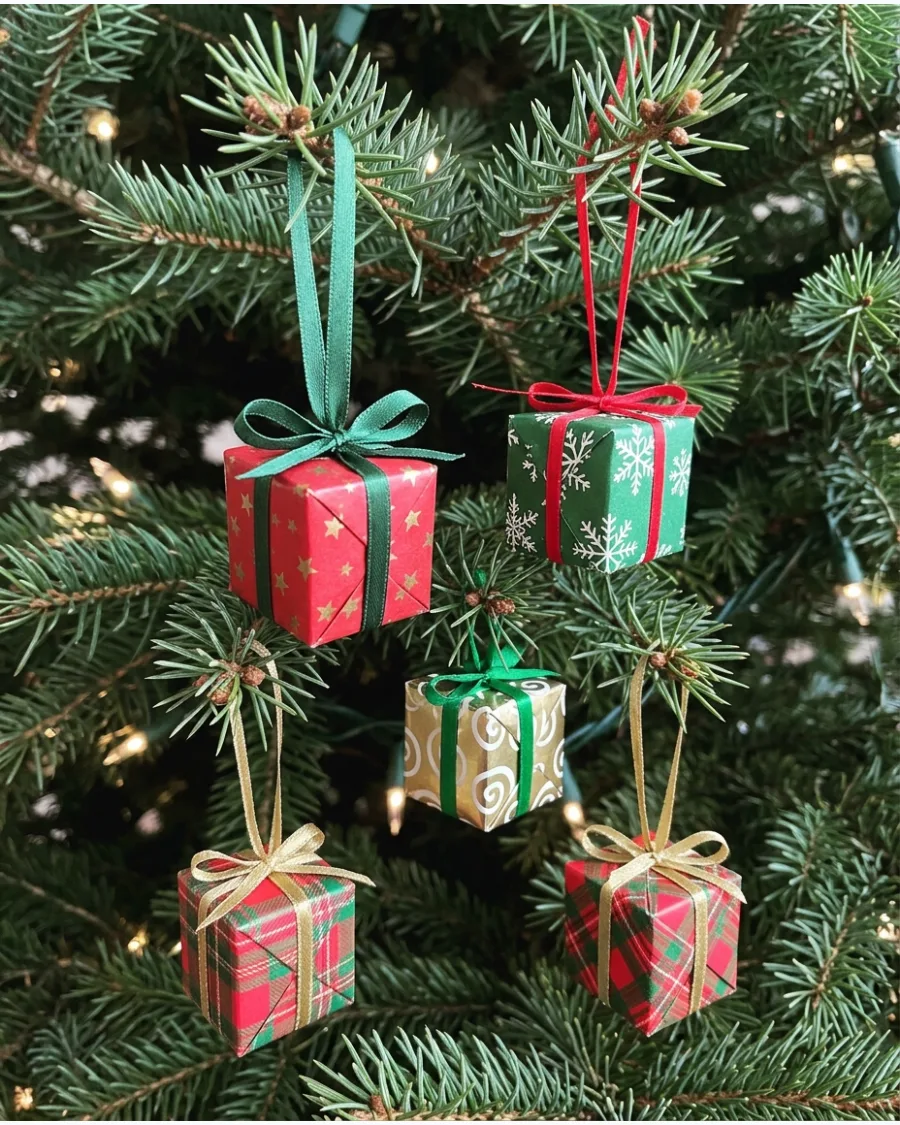
Use leftover holiday gift wrap to transform small cardboard boxes or foam cubes into miniature present ornaments. These lightweight decorations add a traditional, festive touch to your tree while making use of tiny paper scraps that would otherwise be discarded.
Secure the paper with double-sided tape for a clean, seamless finish before tying a thin ribbon around the box to form a hanging loop. They are perfect for filling gaps in tree branches without adding significant weight.
- Match the ribbon color to a secondary hue in the wrapping paper for a coordinated look.
- Use empty matchboxes or jewelry boxes to create different shapes and sizes of presents.
- Add a tiny hand-written tag to each mini gift to enhance the realistic aesthetic.
Use a small dot of glue where the ribbon crosses on the bottom of the box to prevent it from slipping off the corners.
PAPER GARLANDS AND HANGING CHRISTMAS DECORATIONS
31. Classic Paper Christmas Chain
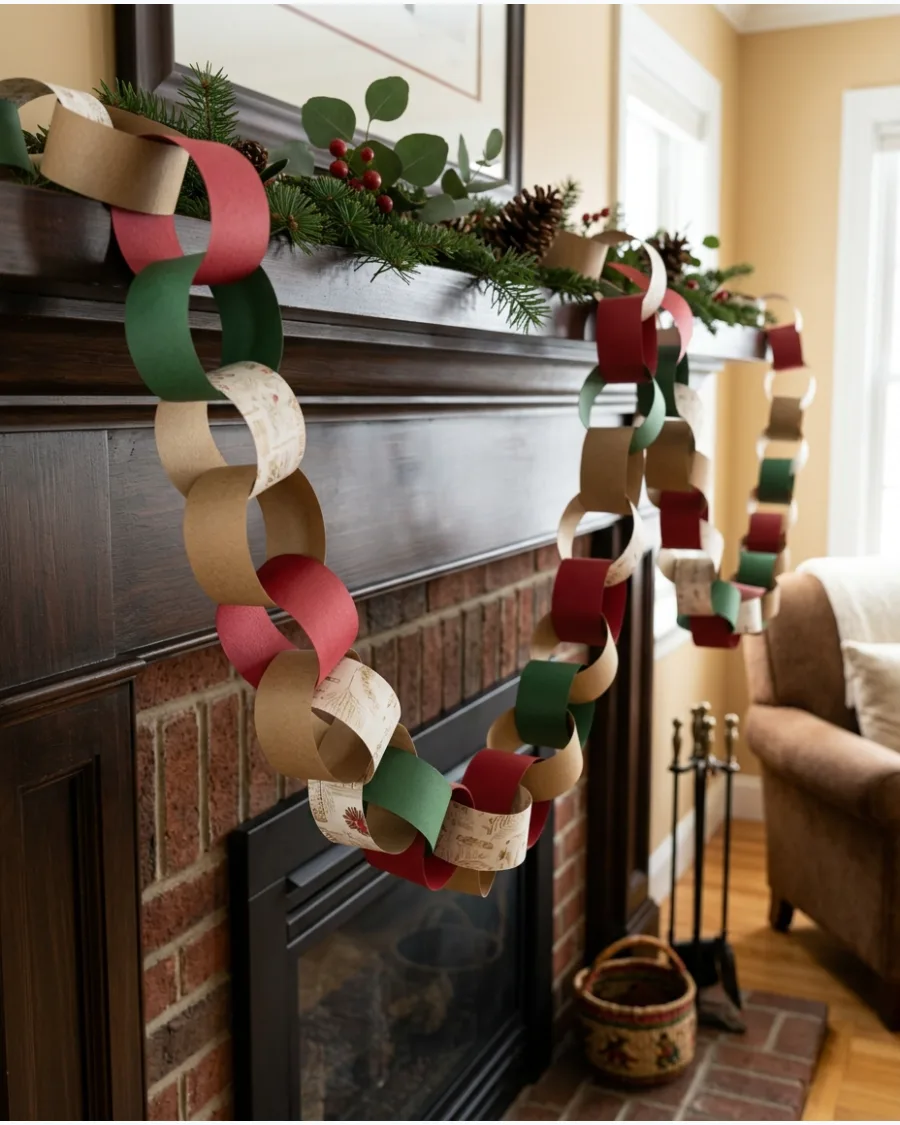
Create a nostalgic atmosphere by crafting a traditional paper chain to drape throughout your home. This project works best with medium-weight construction paper or cardstock that holds a crisp circular shape without sagging.
Cut paper strips into equal widths and lengths, then glue or staple the ends together to form interlocking loops. Mixing solid colors with subtle patterns or kraft paper adds a sophisticated twist to this vintage-style holiday craft.
- Standardize strip sizes, typically one inch wide by six inches long, using a paper trimmer for a uniform look.
- Use a glue stick or double-sided tape for a cleaner finish that avoids the visible metal of staples.
- Alternate two or three shades of the same color, such as forest green and sage, to create a modern ombre effect.
If hanging the chain on a Christmas tree, start from the top and work downward in a spiral to prevent the loops from snagging on heavy branches.
32. Modern Neutral Paper Chain
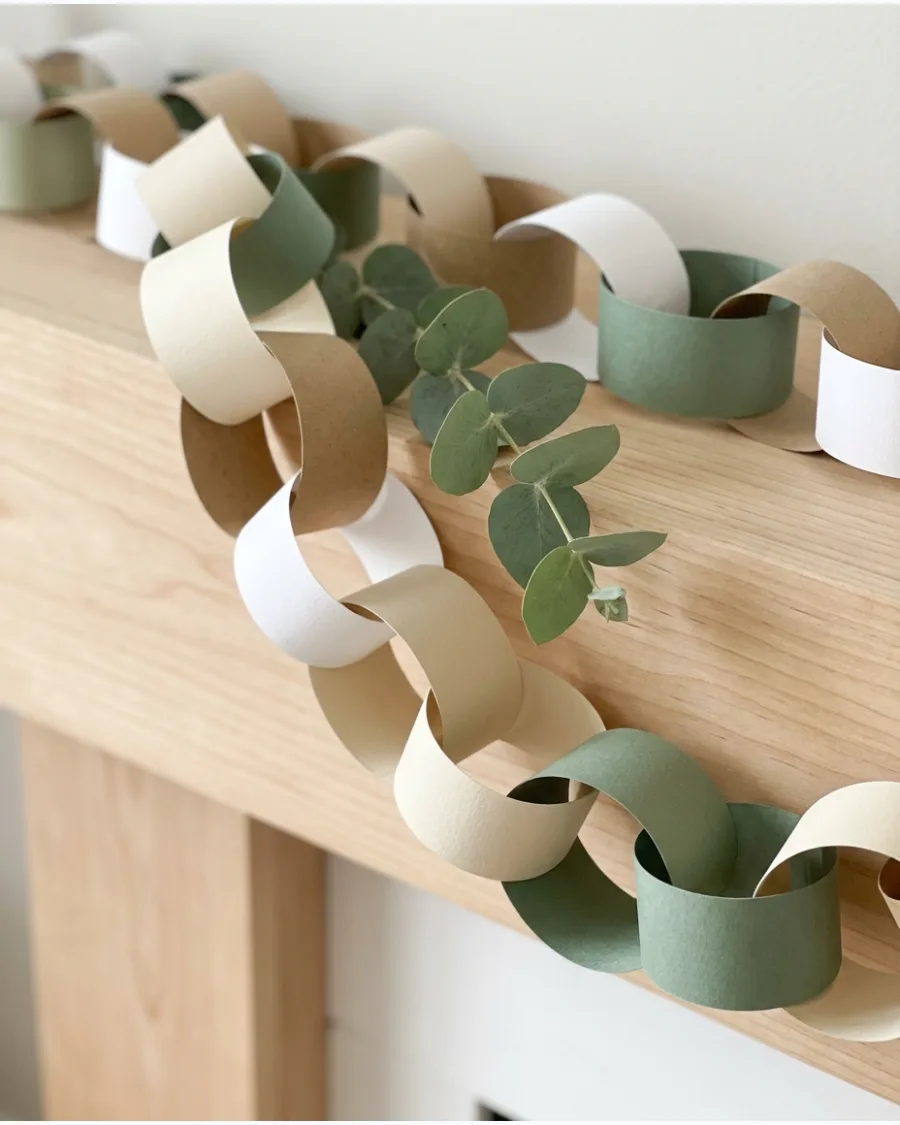
Modernize the classic classroom paper chain by swapping primary colors for a sophisticated, earthy palette. Interlock 1-inch strips of cream, kraft, and muted green paper to create a long, textural garland that feels organic rather than juvenile. Drape the finished chain along a fireplace mantel or staircase railing, weaving it through sprigs of fresh or faux eucalyptus.
The combination of matte paper textures and soft greenery provides a minimalist holiday aesthetic that suits contemporary interiors.
- Cut strips to a uniform size, approximately 1 inch by 6 inches, using a paper trimmer for clean, professional edges.
- Secure the loops with a tiny dab of clear-drying craft glue or double-sided tape instead of metal staples for a seamless look.
- Mix different paper weights; heavier cardstock holds a crisp circular shape, while lighter paper creates a softer, more fluid drape.
Vary the length of the loops slightly or use multiple shades of the same color family to add subtle depth and visual interest to the strand.
33. Paper Snowflake Garland
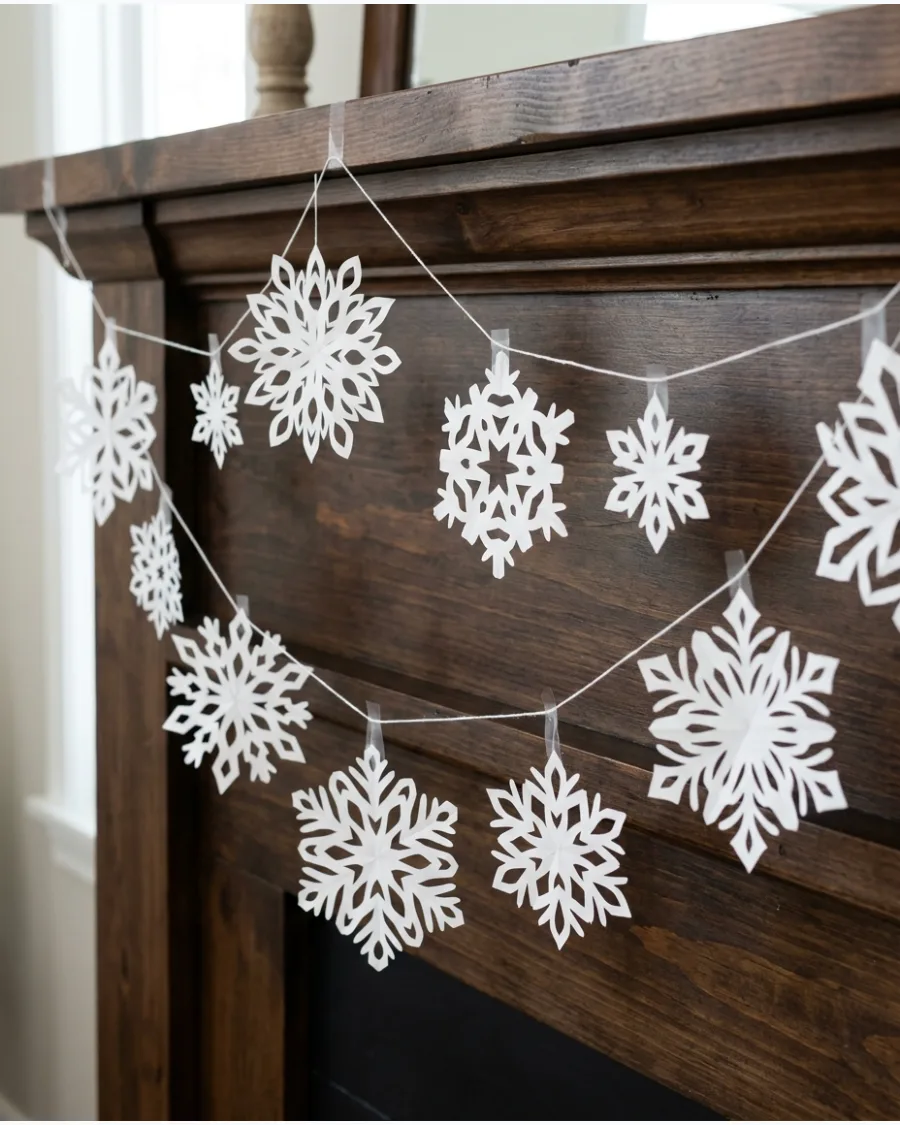
Transform simple white paper cutouts into an elegant winter display by mimicking the look of a natural snow shower. Thread each individually cut snowflake onto a fine white string or clear fishing line to create a continuous horizontal strand. These lightweight decorations are ideal for adding a festive touch to surfaces where heavy ornaments might slip or fall.
- Use paper squares ranging from 3 to 5 inches to ensure a varied and organic appearance.
- Secure the thread to the back of each snowflake using a tiny piece of transparent tape to prevent sliding.
- Space the cutouts at irregular intervals to better replicate the random pattern of falling snow.
Opt for heavyweight cardstock instead of standard printer paper if hanging the garland near a drafty window to keep the shapes from curling over time.
34. Paper Christmas Tree Garland
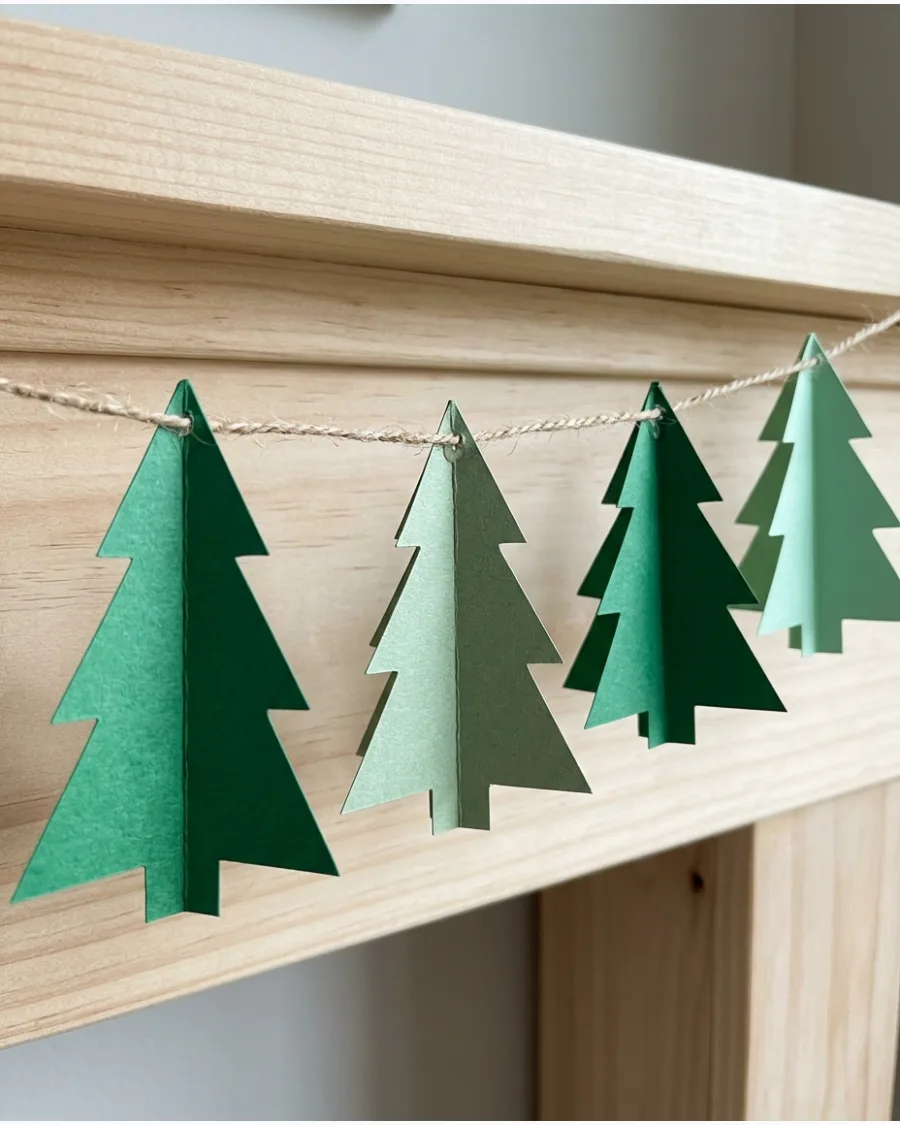
Use colored cardstock to create a repeating forest of miniature trees that adds vertical interest to mantels or walls. By folding the trees down the center, you can give the flat paper shapes a dimensional look that catches the light.
Secure each paper tree to a length of natural jute twine using a small drop of hot glue or by punching two holes near the top for threading. This simple repetition creates a cohesive holiday look that works well in modern or rustic settings.
- Select three different shades of green cardstock to create a forest-like gradient across the length of the twine.
- Space the trees approximately four inches apart to ensure the garland looks full without tangling.
- Use 65-pound cardstock to provide enough rigidity for the trees to hold their shape without weighing down the string.
To make the trees perfectly symmetrical, fold your paper in half before cutting the triangle shape so both sides are identical.
35. Paper Gingerbread Garland
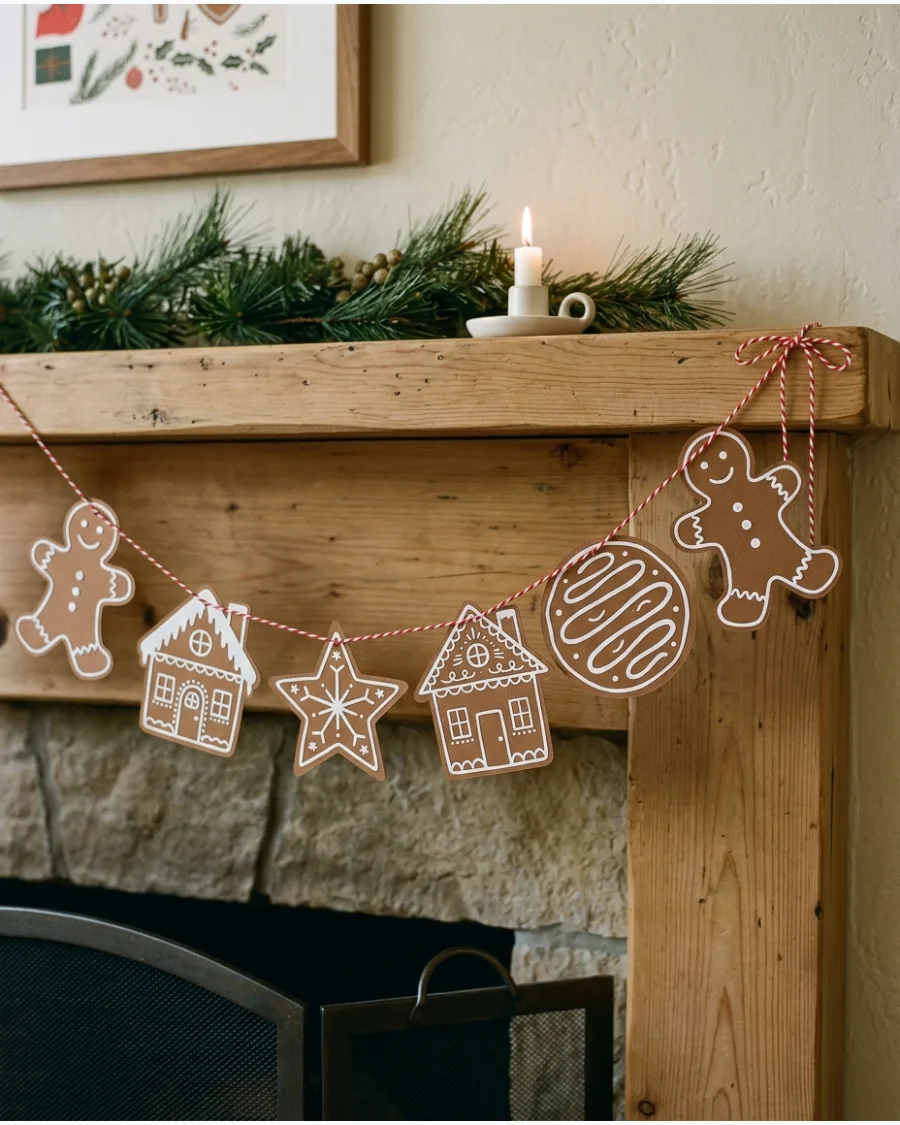
This lightweight garland mimics the look of traditional holiday cookies without the weight or mess of real dough. Cut various shapes like gingerbread people, stars, and small houses from heavy brown cardstock to form the base of each piece. Use white paint pens or thin strips of white paper to create icing-style borders and decorative swirls.
Once the designs are dry, punch small holes in the top of each shape and thread them onto baker's twine for a charming kitchen or mantel display.
- Select a matte, warm brown cardstock to best replicate the color and texture of baked gingerbread.
- Space the shapes approximately 3 to 4 inches apart on the twine to ensure each individual design is visible.
- Vary the sizes of the paper cookies to create a more whimsical and handcrafted aesthetic across the length of the garland.
Use a white opaque gel pen or an acrylic paint marker for the icing details to achieve crisp, controlled lines that will not bleed into the paper fibers.
36. Paper Ornament Garland
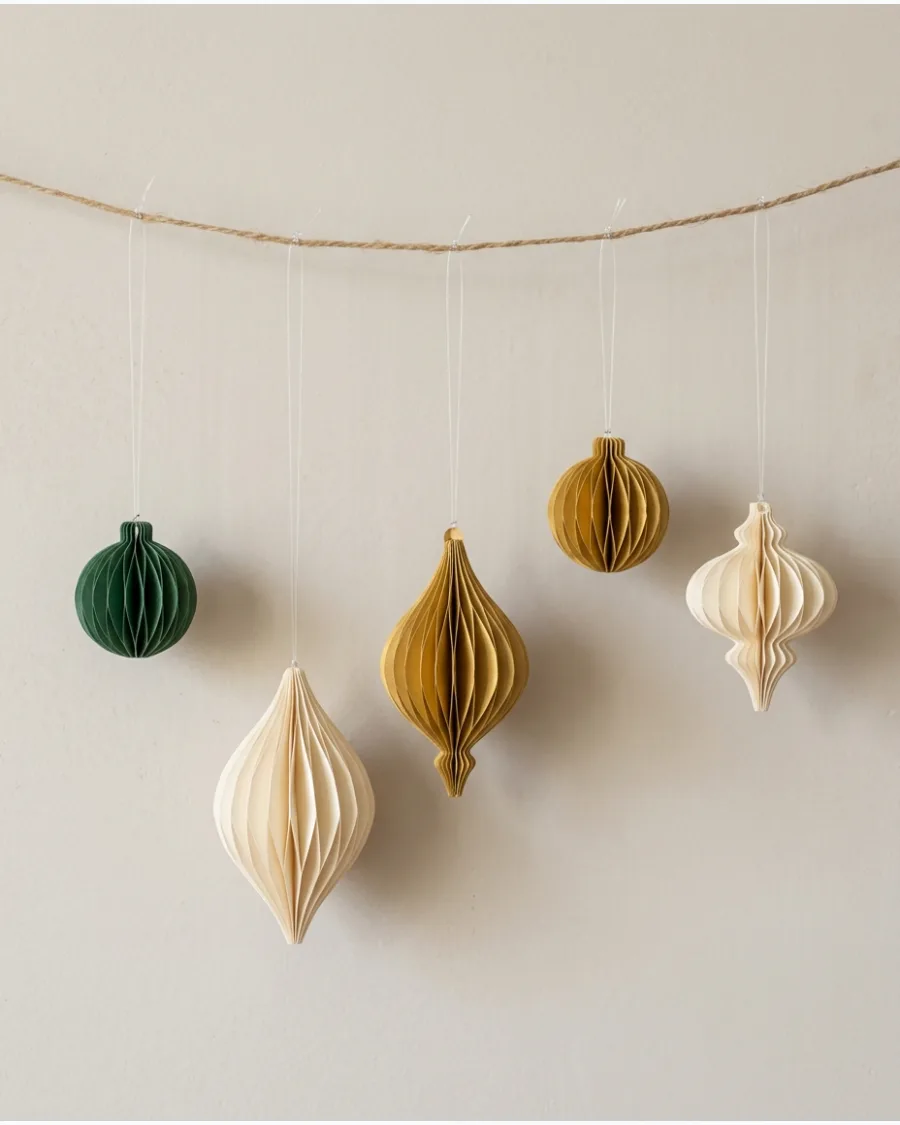
This garland uses a variety of folded paper bauble shapes to create a sophisticated, lightweight alternative to glass ornaments. You can adapt the style by choosing specific shapes like round, teardrop, or finial designs in a coordinated color palette.
Assemble these three-dimensional paper shapes and suspend them at staggered lengths from a main horizontal cord to add visual interest to a wall or mantel.
- Use cardstock with a metallic or pearlescent finish to catch the light like traditional ornaments.
- Secure the vertical strings to the main horizontal line with small slip knots for easy spacing adjustments.
- Vary the vertical drop lengths between 3 and 10 inches to create a dynamic, waterfall-like silhouette.
Use clear fishing line for the vertical drops to make the paper ornaments appear as if they are floating in mid-air.
37. Paper Leaf Christmas Garland
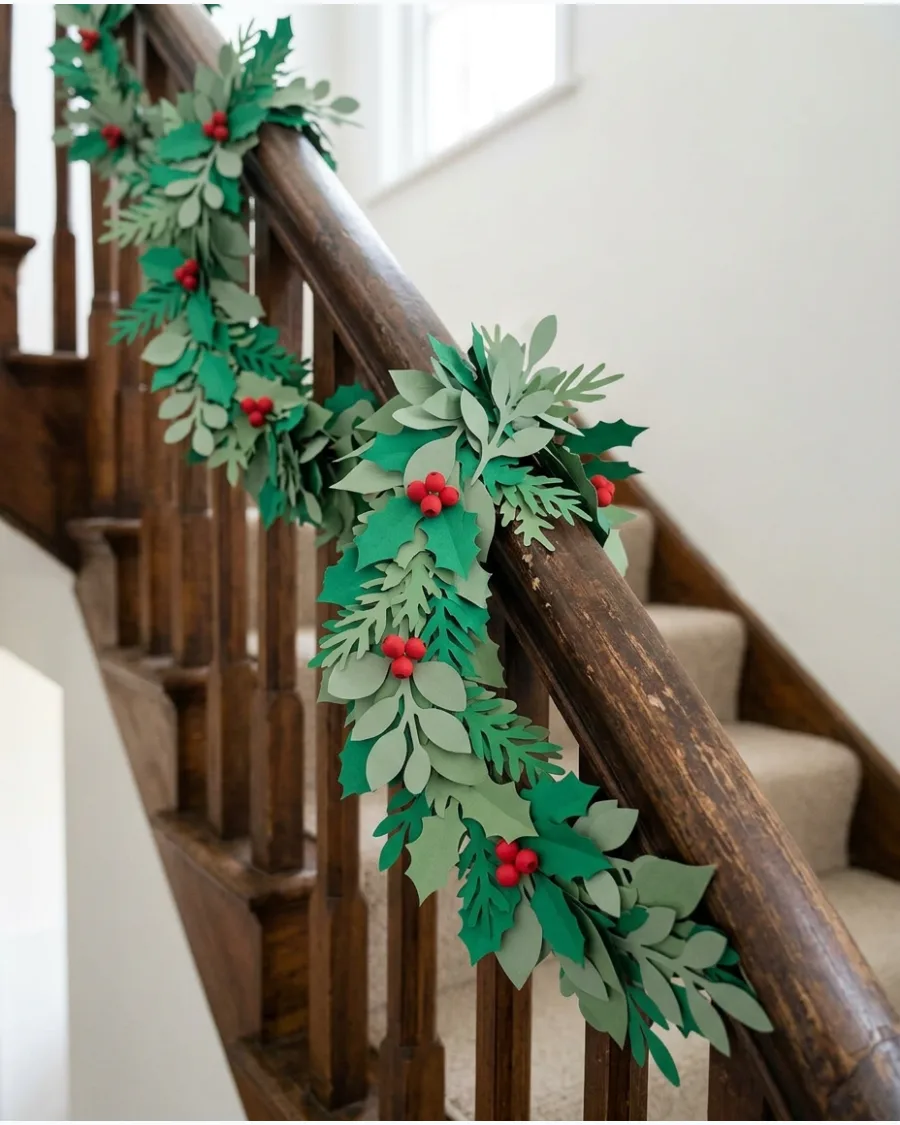
Construct a lush, botanical-style garland using multiple paper leaf silhouettes such as holly, cedar, and eucalyptus. By layering different shades of green and adding small paper berries, you create a full-bodied decoration that never wilts.
Layer the various leaf shapes along a flexible wire base to build a dense and realistic paper alternative to traditional evergreen foliage.
- Mix matte, satin, and textured papers to mimic the varied sheens found in natural greenery.
- Attach leaf clusters to a thin gauge floral wire so the garland can be easily shaped around architectural features.
- Incorporate small red paper circles in clusters of three to simulate classic holly berries.
Use a fringe scissor on long green strips to quickly create the needle-like texture of cedar or pine branches.
38. Paper Holly Garland
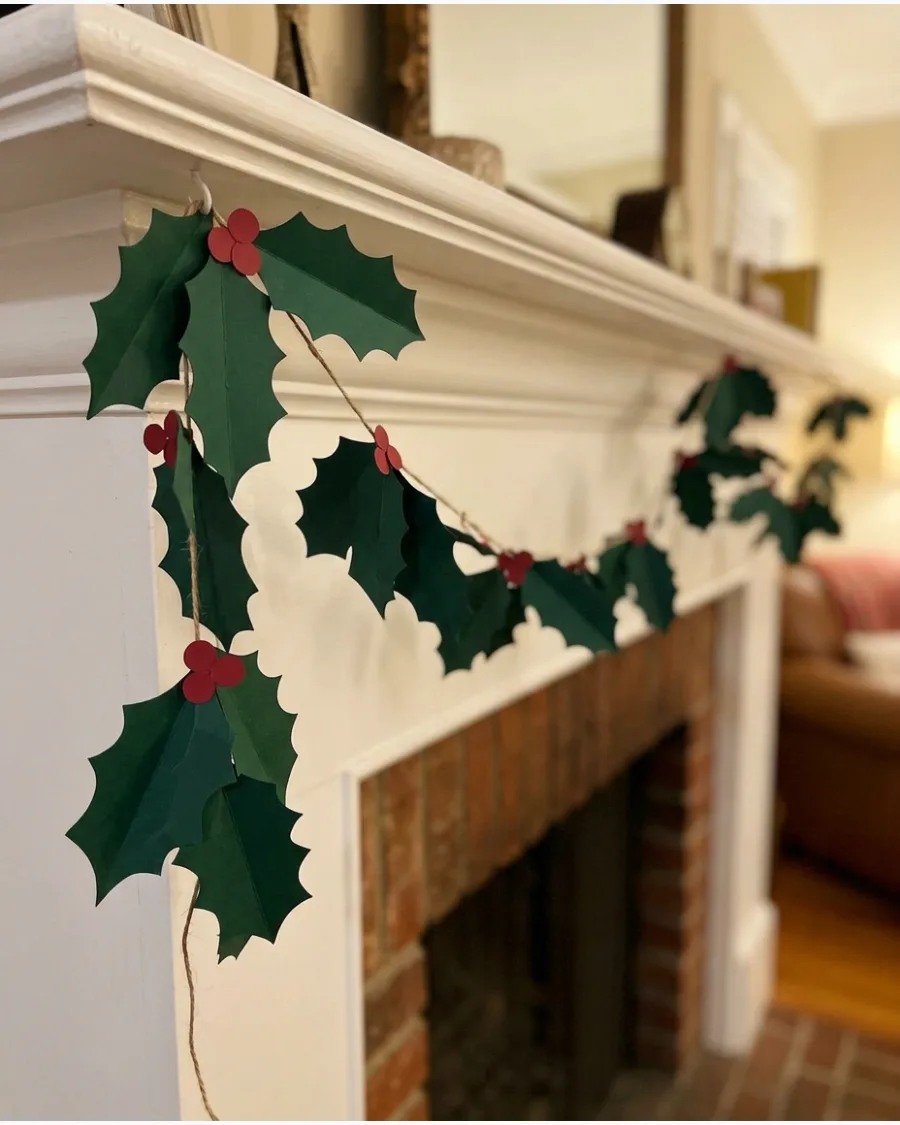
This classic holiday garland uses pointed holly leaves cut from dark green cardstock paired with bright red berries. To prevent the decoration from looking flat, scoring the center of each leaf provides necessary dimension.
Score the center of each paper leaf with a bone folder or dull edge to create a crisp crease that mimics the structure of real holly.
- Space the holly leaf clusters approximately 5 inches apart for a clean, traditional aesthetic.
- Use a heavy cardstock (65lb or higher) to ensure the leaves hold their creased shape throughout the season.
- Thread twine through small punched holes at the base of each leaf to secure them without using messy adhesives.
Apply a coat of clear gloss or glitter glaze to the red berries to give them a festive, 'frosted' appearance.
39. Paper Candy Cane Garland
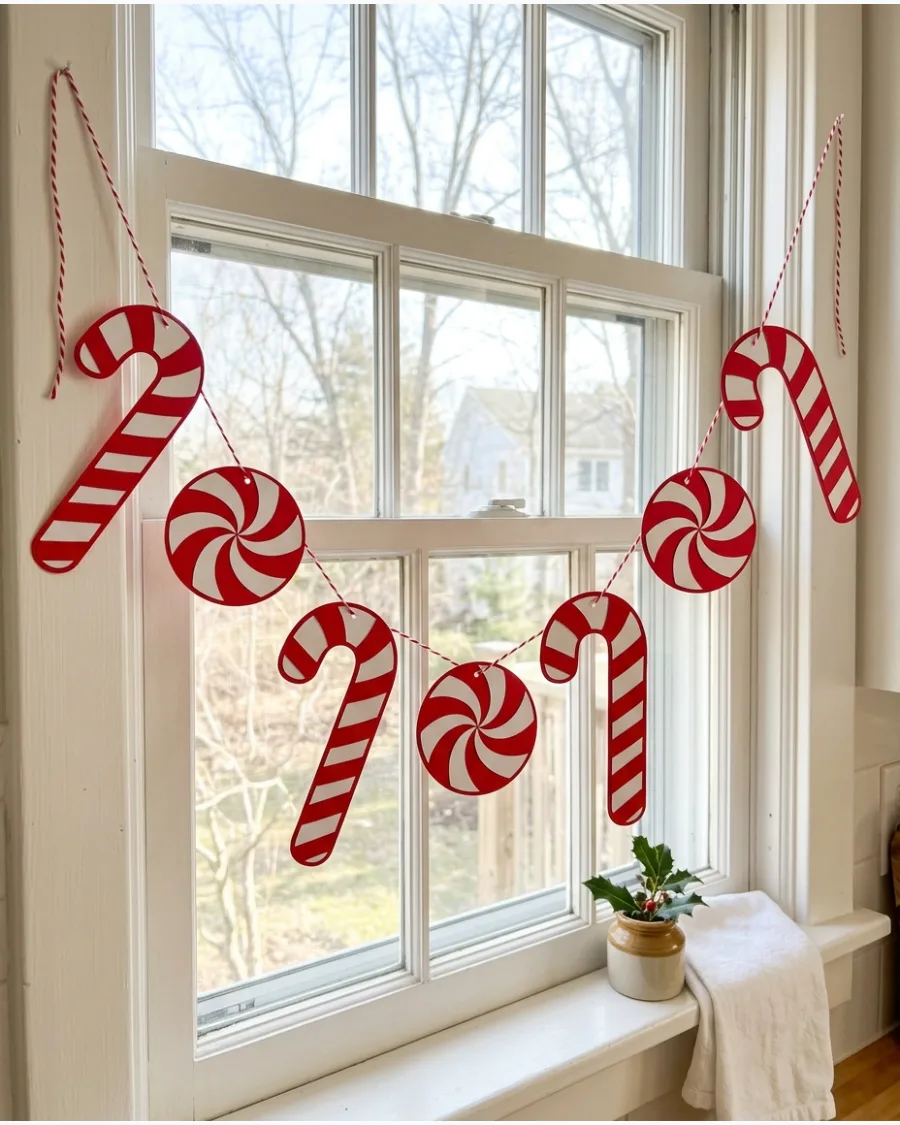
Bright and whimsical, this garland features red-and-white striped candy canes and round peppermint circles. It is an ideal decoration for high-traffic or kid-friendly areas because it is shatterproof and easy to hang.
Alternate between the candy cane shapes and peppermint discs to create a playful rhythmic pattern that enhances a kitchen window or playroom wall.
- Glue thin white cardstock strips onto a solid red candy cane base for a textured, layered look.
- Use red and white baker's twine as the stringing material to perfectly complement the candy theme.
- Add a small white paper 'swirl' to the center of the peppermint circles for a realistic candy design.
If hanging in a kitchen, consider laminating the paper shapes or using a clear spray sealer to protect them from steam.
40. Hanging Honeycomb Paper Decorations
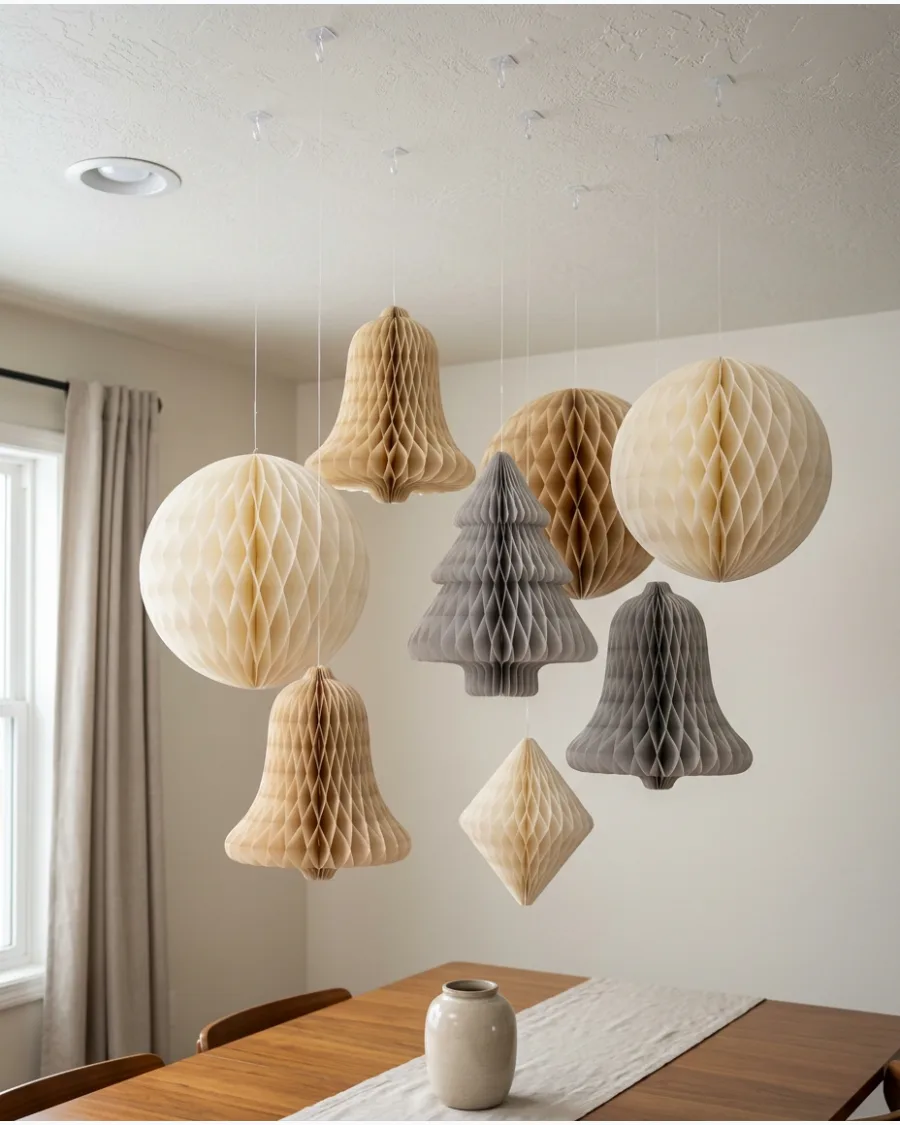
Honeycomb decorations like balls, bells, and trees offer a bold, sculptural look that fills vertical space effectively. To keep the display looking like high-end holiday decor rather than a birthday party, stick to a limited or monochromatic color palette.
Suspend a variety of honeycomb shapes from the ceiling at different heights to create a striking, textured installation above a dining table or in a room corner.
- Use clear adhesive ceiling hooks to hang the decorations without damaging paint or drywall.
- Vary the sizes of the honeycomb pieces, mixing 6-inch and 12-inch versions for an organic feel.
- Choose sophisticated neutral tones like cream, sage, or slate to ensure the display looks modern and elegant.
Cluster the decorations closely together in one area to create a single dramatic focal point rather than spreading them thin across the whole ceiling.
PAPER WREATHS, VILLAGES AND TABLE DECORATIONS
41. Layered Paper Christmas Wreath
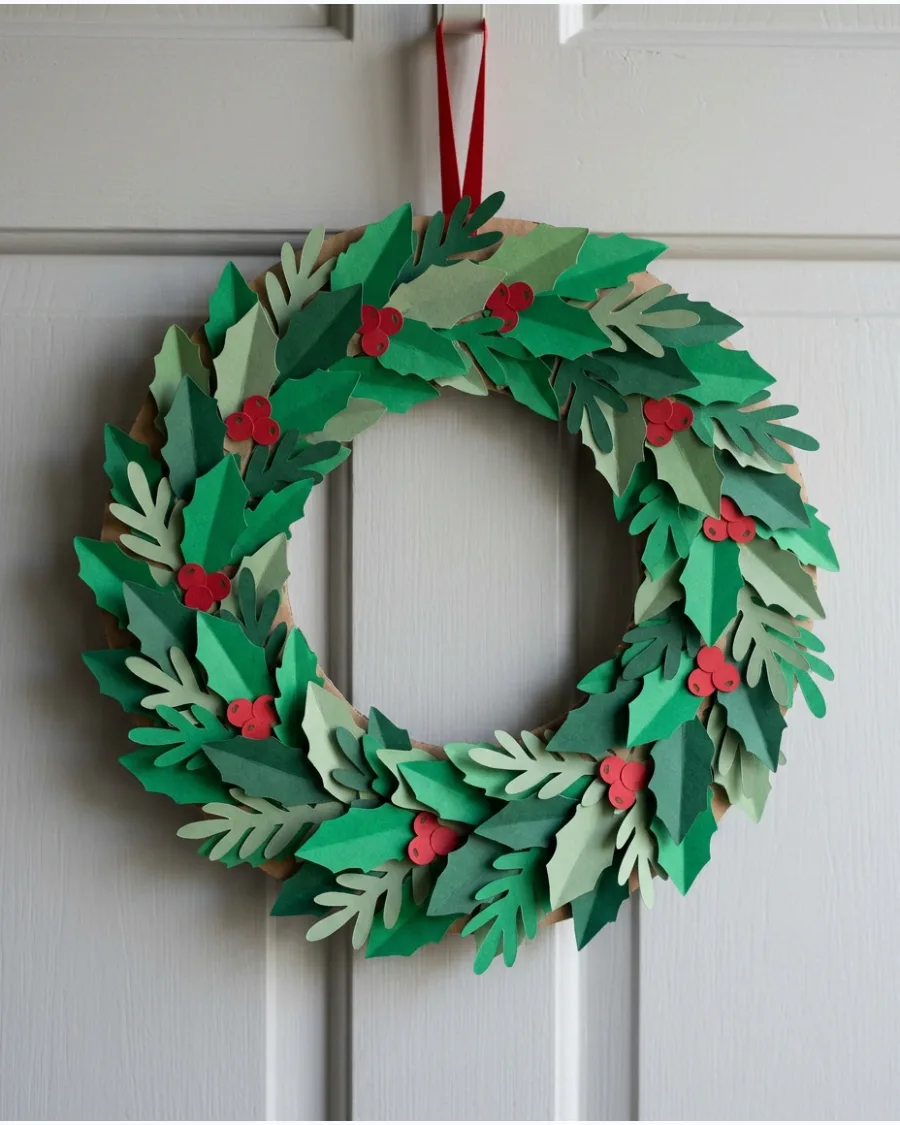
Create a lush, evergreen look using various shades of green cardstock to mimic the depth of a real fir wreath. Glue the leaf shapes in a consistent overlapping pattern around a circular base to ensure the structural ring is completely hidden. This lightweight alternative is ideal for internal doors where a heavy traditional wreath might slide or cause damage.
- Use a mix of sage, forest, and emerald green paper for a realistic color palette
- Add a large paper bow or a cluster of paper stars at the bottom for a traditional focal point
- Cut varying leaf sizes to fill in small gaps and add visual volume to the perimeter
Use a large dinner plate to trace a perfectly circular cardboard base for the wreath's foundation.
42. Paper Holly Christmas Wreath
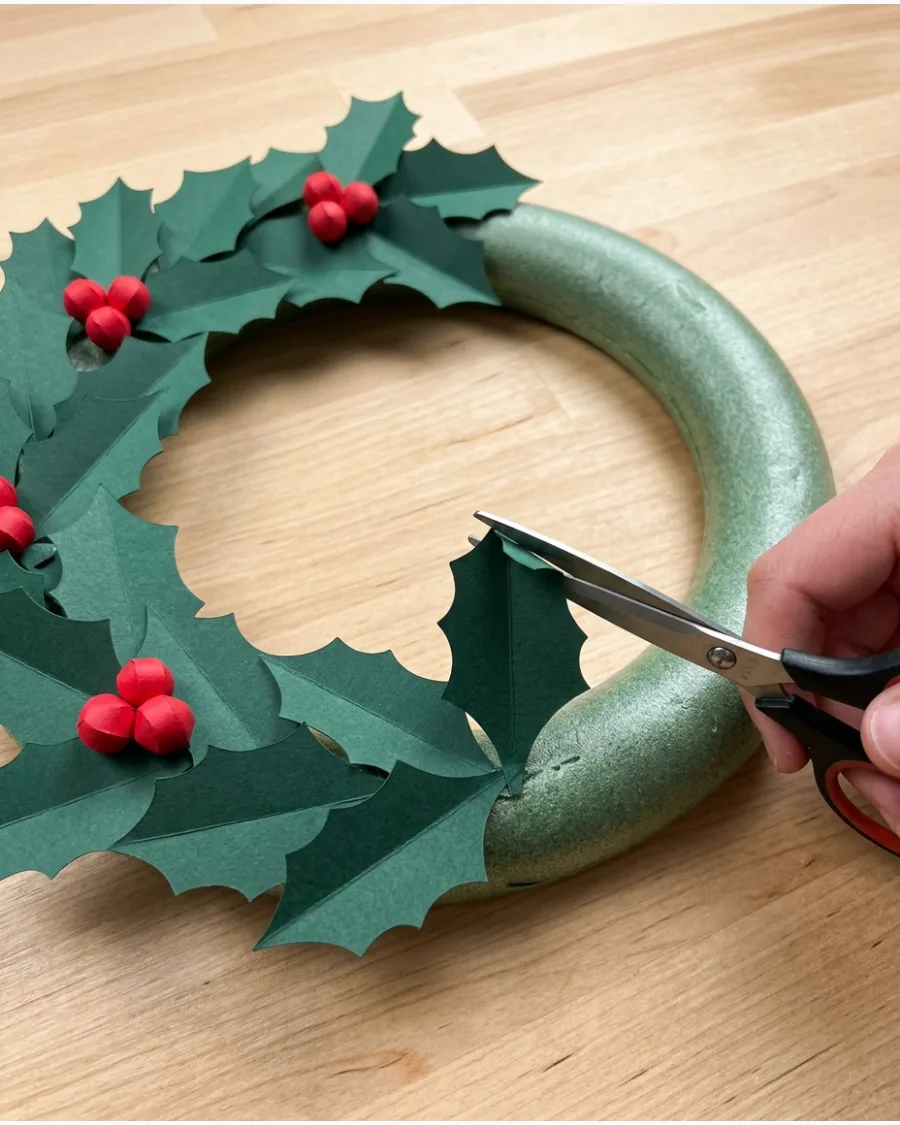
Holly leaves look most effective when they have a natural curve rather than sitting flat against the wreath form. Gently run the edge of a pair of scissors along the center of each paper leaf to create a realistic dimensional crease before gluing. Group small circles of red cardstock in clusters of three to mimic traditional holly berries across the surface.
- Secure the leaves with a hot glue gun for a quick, durable bond to the wreath form
- Use a foam or thick cardboard ring as the hidden structural support for the paper elements
- Space the red berry clusters evenly to balance the visual weight of the wreath
Use two slightly different shades of dark green cardstock to make the holly leaves look more vibrant and layered.
43. White Paper Snowflake Wreath
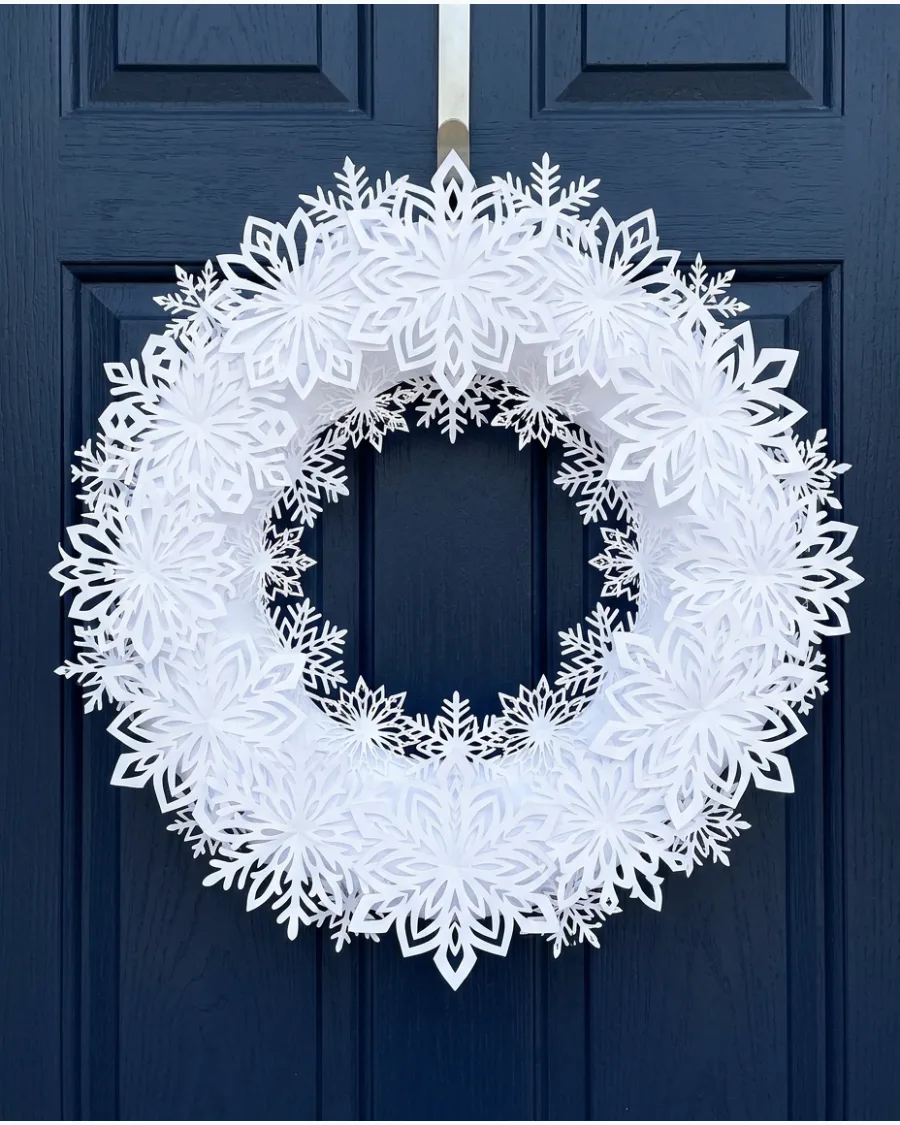
This monochromatic wreath captures the delicate beauty of falling snow using simple paper cutouts layered in a circle. Overlap snowflakes of varying diameters so the intricate lacy edges peek out from behind one another for maximum depth. The resulting high-contrast piece looks stunning when hung against a dark-colored door or placed over a window.
- Mix hand-cut paper snowflakes with precise die-cut versions for a variety of complex patterns
- Use a white foam ring as the base so the support remains invisible through any snowflake gaps
- Apply a touch of silver glitter or iridescent spray to some edges for a subtle winter shimmer
Lay out all your snowflakes on a flat surface to plan the arrangement before applying any permanent adhesive.
44. Paper Christmas Village
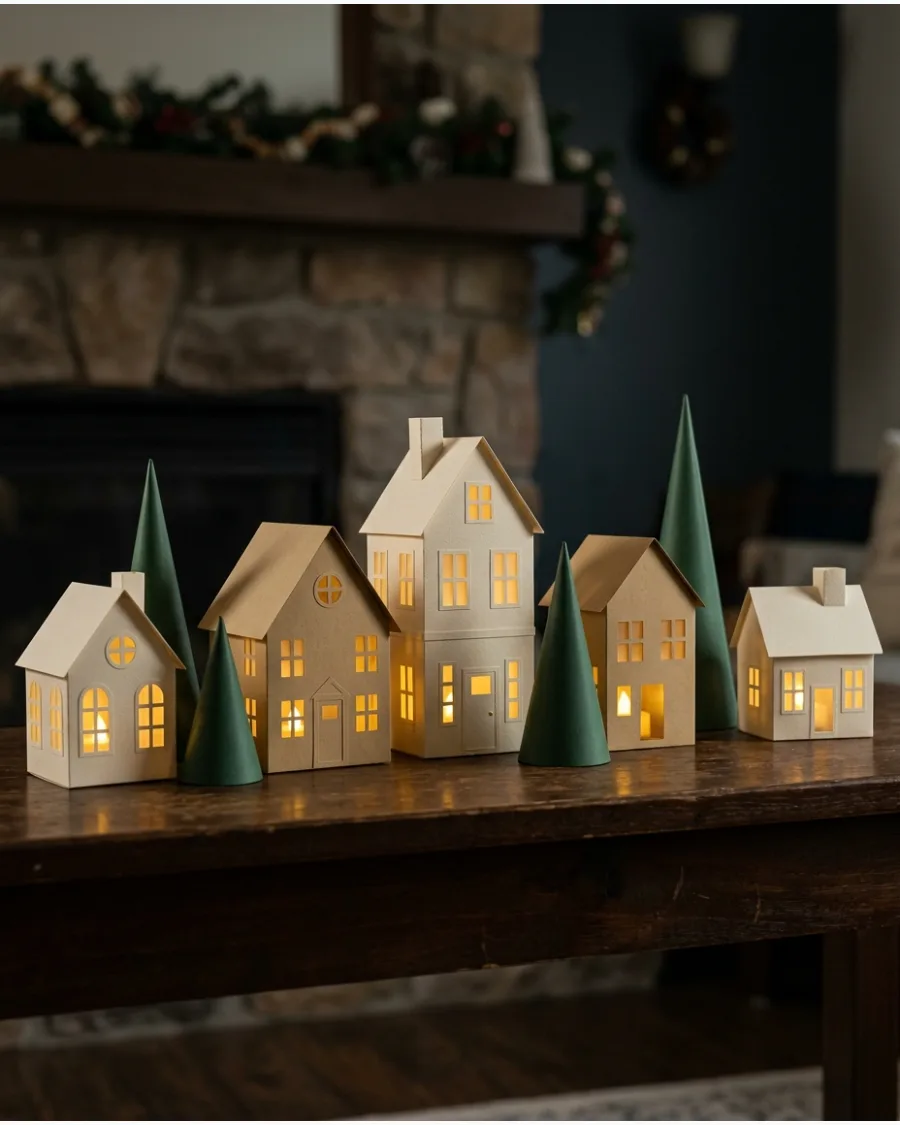
Build a custom tabletop scene by crafting several small houses from sturdy cardstock with individual doors and chimneys. Place battery-operated LED tea lights inside each building to let the light shine through the window cutouts for a cozy glow. Complete the landscape by adding cone-shaped paper trees and a scattering of artificial snow or white fabric across the mantel.
- Glue small squares of vellum paper inside the window cutouts to soften and diffuse the internal light
- Vary the heights and roof styles of the houses to create a more interesting architectural skyline
- Use a white table runner or cotton batting to simulate a snowy ground for the village to sit on
Score the fold lines of the cardstock with a ruler and a dull edge to ensure perfectly crisp, straight corners on the houses.
45. White Paper Christmas Village
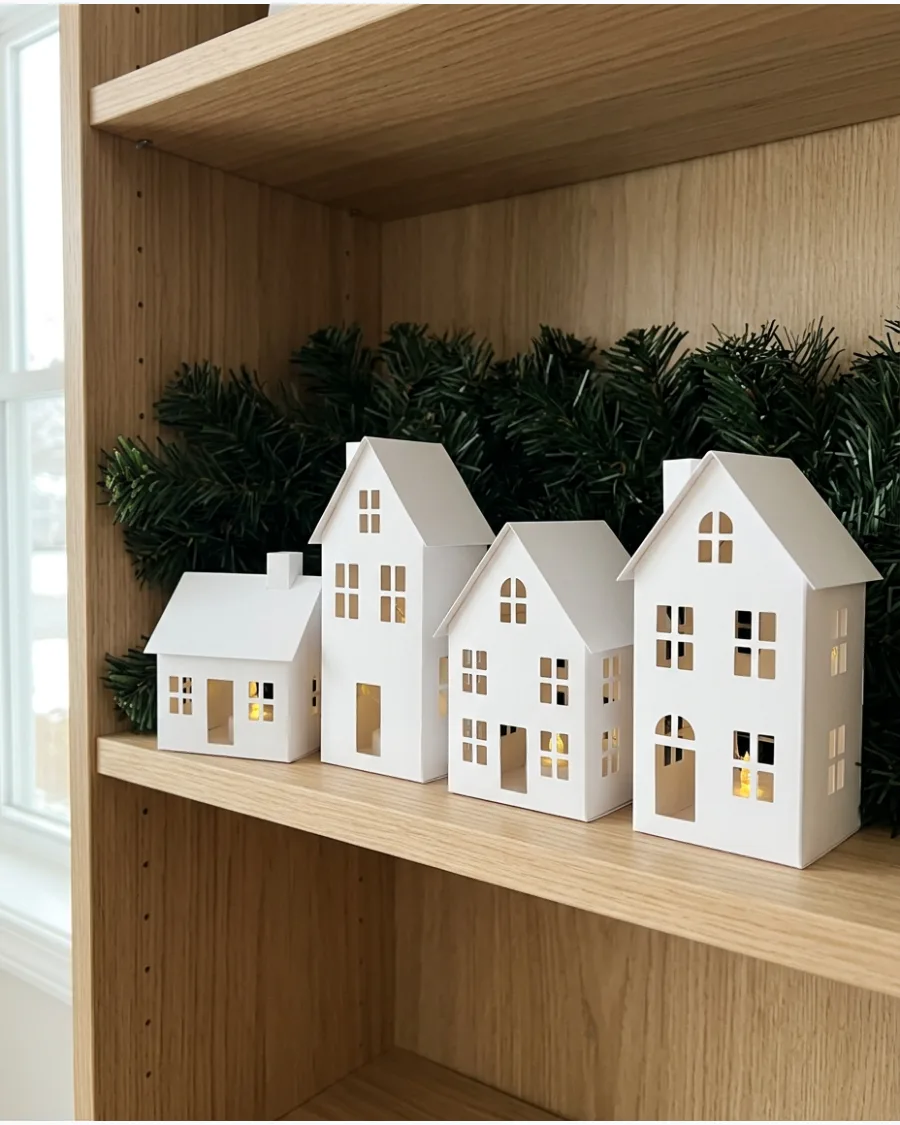
A monochrome village provides a clean, modern aesthetic that fits perfectly into minimalist holiday decor. Set these crisp white paper houses against a backdrop of dark evergreen branches or a warm wooden shelf to make their silhouettes stand out. By focusing on the structural shapes rather than color, you create a sophisticated display that looks professionally designed.
- Use heavy-weight white cardstock (at least 80lb) to ensure the miniature buildings maintain their structure without sagging
- Leave the roofs plain white or add a slight texture with a white-on-white embossed pattern for detail
- Keep the arrangement asymmetrical to create a natural, organic village feel rather than a rigid line
Use small adhesive glue dots for the assembly tabs to avoid the moisture-induced warping that liquid glue can cause on white paper.
46. Kraft Paper Christmas Village
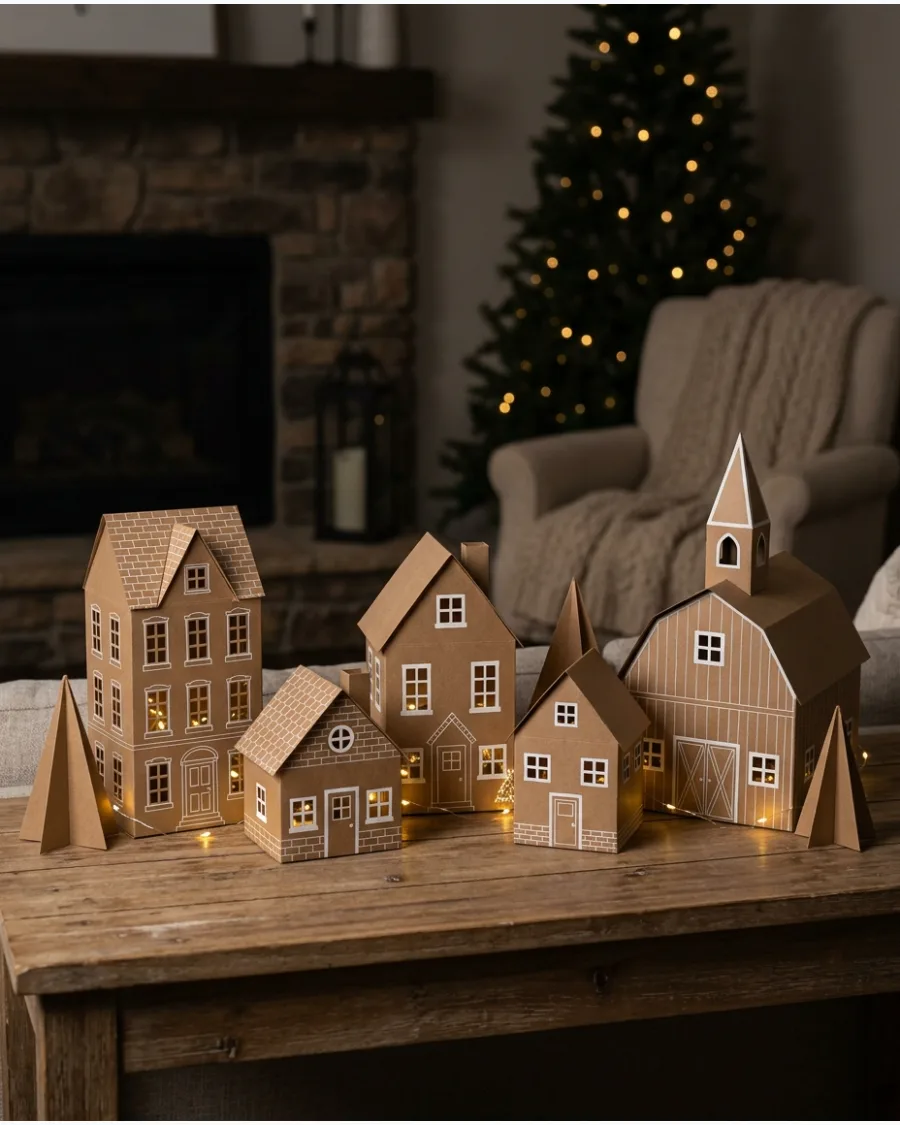
Build a charming miniature town using thick kraft cardstock for a sturdy, rustic foundation. Trace house templates onto the paper and use white opaque markers to draw delicate window frames, roof shingles, and snowy accents. This natural aesthetic pairs beautifully with Scandinavian-style decor.
Place battery-operated fairy lights inside the hollow structures to make the white details glow at night.
- Use heavy-weight kraft cardstock of at least 65lb to ensure the houses maintain their shape without sagging
- Cut out tiny window panes with a precision craft knife for a clean and professional finish
- Accent the scene with small cones of kraft paper to represent minimalist evergreen trees
Use a white gel pen or paint marker for the snow details to get the most vibrant contrast against the brown paper.
47. Paper Christmas Table Trees
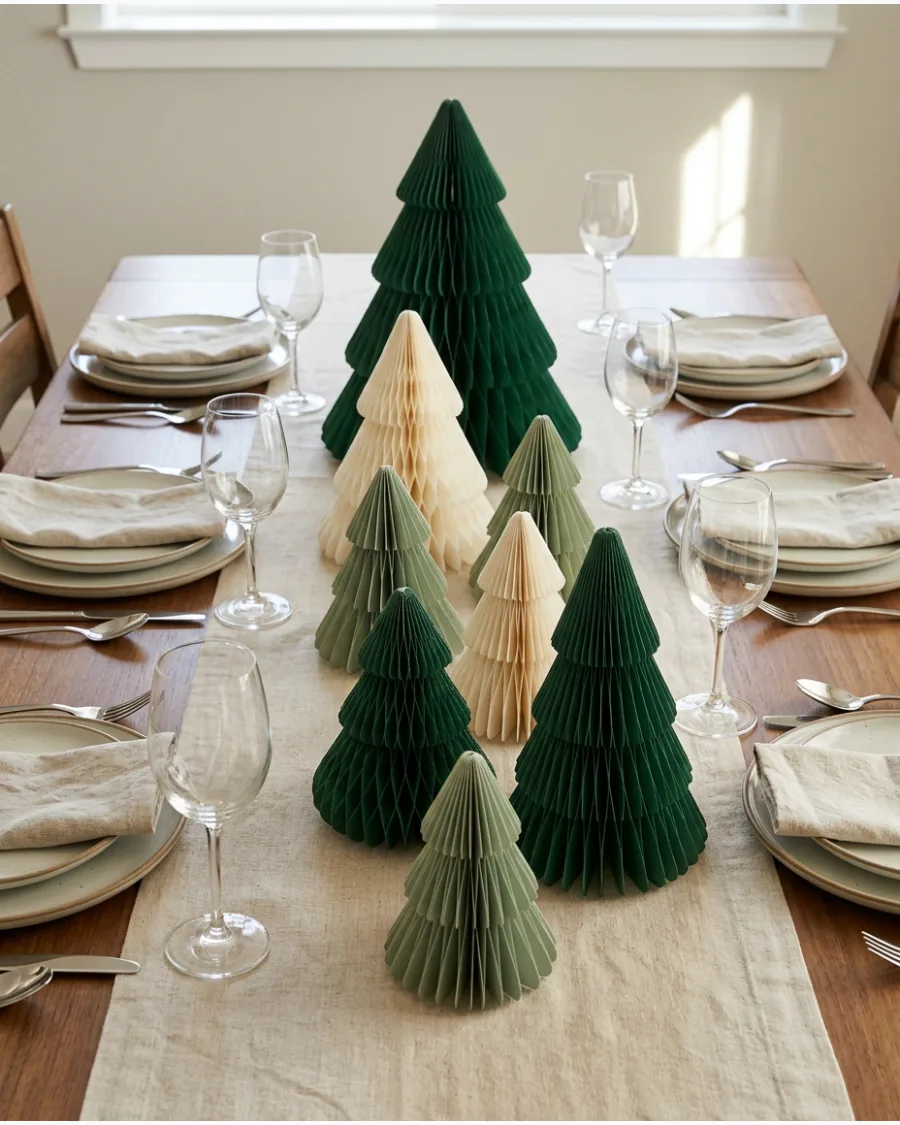
Dress up your holiday dining area by arranging a variety of paper trees down the center of the table. Combine honeycomb, accordion-fold, and simple cone trees in varying heights to create a dynamic but cohesive centerpiece. Keep the tallest trees under 12 inches so they do not obstruct the view or conversation between guests.
This lightweight arrangement is easy to move when it is time to serve large platters.
- Mix textures by using both matte cardstock and delicate tissue paper honeycomb trees
- Stick to a monochromatic palette like forest green or varying shades of cream for an elegant look
- Space the trees evenly between place settings to allow room for glassware and candles
Use a small dot of museum wax or double-sided tape on the bottom of each tree to keep them from tipping over if the table is bumped.
48. Paper Christmas Place Cards
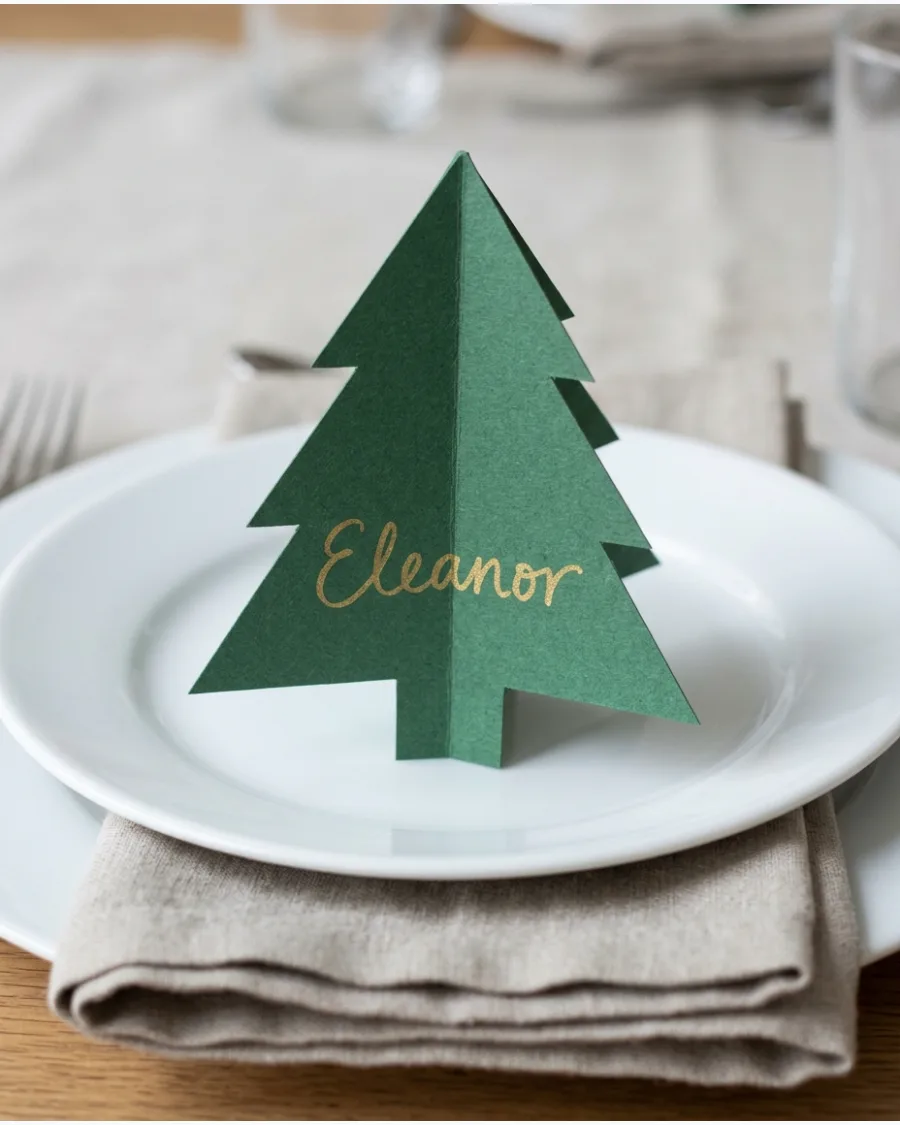
Personalize your holiday table with handmade paper shapes that guide guests to their seats. Cut out festive silhouettes like stars or small houses from high-quality cardstock and write each guest's name in metallic ink. These 3D shapes stand upright on the plate or just above the cutlery, adding a decorative layer to the table setting.
They serve as both a practical navigation tool and a small keepsake for guests to take home.
- Use a scoring tool on the center fold to ensure the cardstock stands perfectly straight without creasing
- Choose a paper color that contrasts with your napkins for maximum visibility
- Punch a small hole in the top and tie a thin ribbon or piece of twine for a more detailed look
Use a calligraphy pen or a fine-tip gold marker to make the names feel more formal and festive.
49. Paper Christmas Candle Wraps
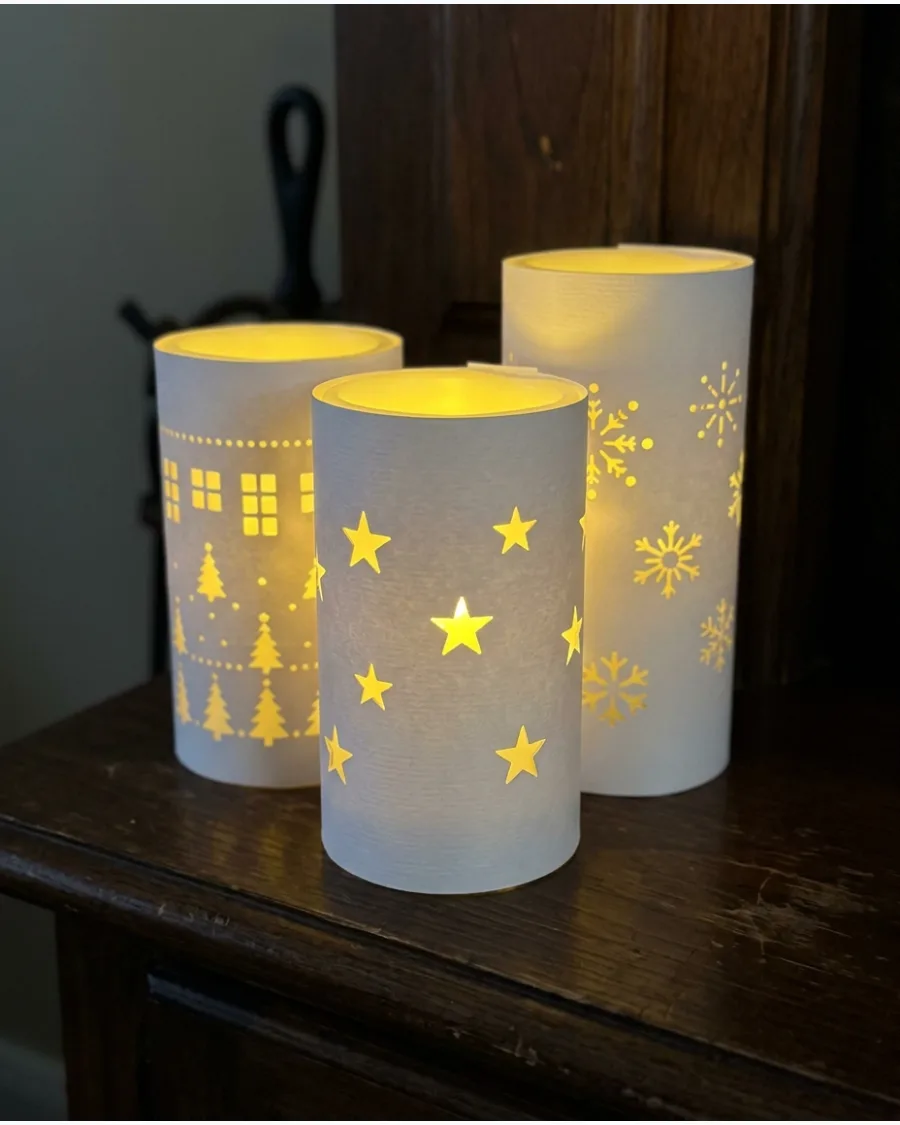
Transform ordinary flameless candles into festive light features using custom paper sleeves. Measure the circumference of your LED pillars and cut cardstock strips that wrap around them, securing the ends with clear tape. Use a craft punch or a precision knife to create patterns like stars or snowflakes that allow the light to flicker through.
This technique creates a soft, ambient glow while keeping the paper a safe distance from any heat source.
- Only use these wraps with cool-to-the-touch LED candles or glass-encased votives to prevent fire hazards
- Use a thick, opaque paper like navy or charcoal cardstock to make the illuminated patterns stand out
- Vary the heights of the wraps to create a tiered glowing display on a shelf or mantel
Use a decorative edge punch on the top rim of the paper wrap for an extra layer of detail.
50. Paper Christmas Mantel Display
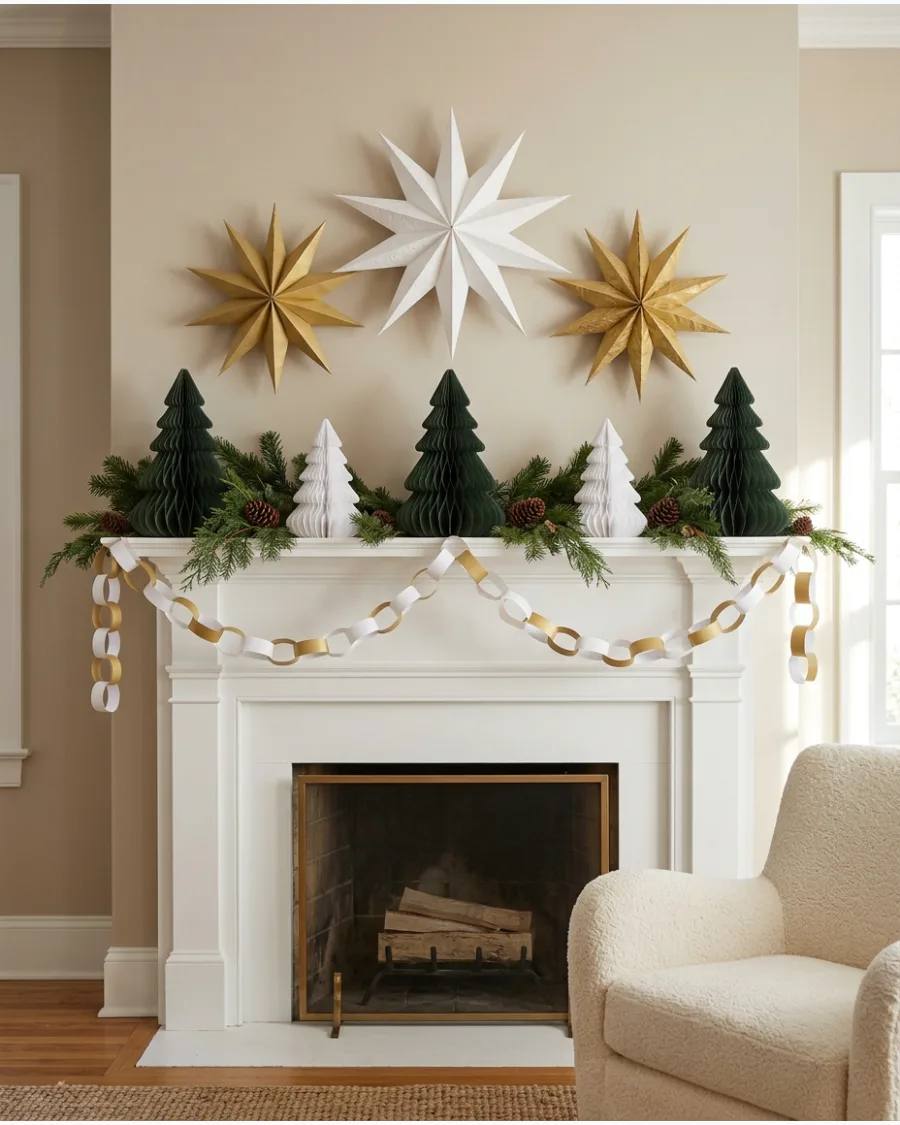
Curate a sophisticated mantel scene by layering various paper decorations with natural elements. Mix oversized paper stars and honeycomb trees with a simple paper garland draped across the front of the mantel. To keep the look intentional rather than cluttered, stick to a restricted color palette such as white, gold, and deep green.
Tucking in a few real or faux evergreen branches provides a textural contrast to the crisp edges of the paper.
- Vary the heights of the decorations by placing smaller paper trees on top of books or small wooden blocks
- Secure large stars to the wall above the mantel using removable adhesive hooks for a floating effect
- Intersperse a few folded paper ornaments among the greenery to tie the whole arrangement together
Use different weights of paper to create depth; heavier cardstock for large stars and light tissue for honeycombs.
Frequently Asked Questions
What is the best type of paper for structural decorations like stars and trees?
Heavyweight cardstock is ideal for 3D structures because it maintains its shape and provides crisp, clean folds. For more delicate decorations like snowflakes or fanned window displays, standard printer paper or specialized origami paper is preferred for its flexibility and ease of cutting.
How can I hang paper decorations on walls without damaging the paint?
Use painter's tape or removable adhesive dots to secure lightweight paper items to walls or mantels. For window displays, a small amount of clear double-sided tape or a tiny dab of glue stick works well and can be easily cleaned off the glass with a damp cloth after the holidays.
What is the safest way to illuminate paper lanterns and stars?
Always use battery-operated LED lights, such as tea lights or fairy strings, because they generate minimal heat. Never use traditional incandescent bulbs or open flames inside or near paper decorations, as these pose a significant fire risk.
How should I store paper decorations to reuse them next year?
Store paper items in a rigid, airtight plastic bin to protect them from moisture and crushing. Decorations that fold flat, like honeycomb balls or accordion trees, should be collapsed and layered with acid-free tissue paper to prevent the colors from transferring or the edges from fraying.
How can I achieve professional-looking cuts for intricate paper designs?
For straight lines and geometric shapes, use a sharp craft knife and a metal ruler on a self-healing cutting mat. For curved or detailed patterns like snowflakes, use small precision embroidery scissors which allow for more control than standard kitchen or craft scissors.