99 Halloween Decorations You Can Make

This post may contain affiliate links: full affiliate disclosure.
Creating a spooky atmosphere doesn't require a huge budget or professional staging. Using everyday materials like paper, fabric, and rope can transform a standard entry into a festive focal point.
These projects focus on high-impact visuals that are easy to build and even easier to take down when the season ends.
DIY Halloween Door Decorations
1. Mummy Front Door
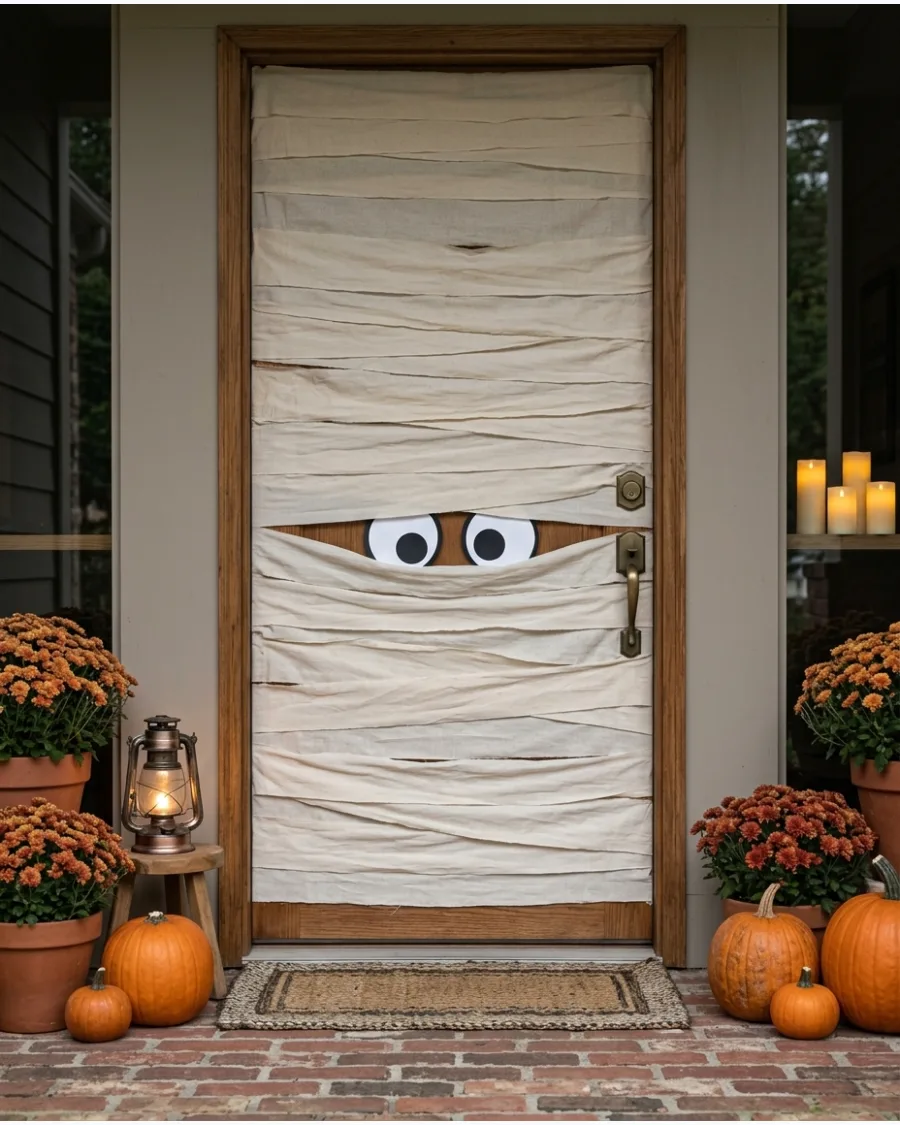
Layering white fabric or paper across the door creates a textured, wrapped look. Leave a small gap near the top for two large cardstock eyes to peek through.
Secure the ends of the fabric on the inside of the door frame with masking tape to keep the exterior clean and damage-free. Using strips of varying widths makes the mummy look more authentic and less like a uniform bandage.
- Muslin fabric and tape for $15.
- 30-minute setup time.
- Use removable painter's tape for renter-friendly removal.
Quick win: Shred the edges of the fabric slightly for an ancient, weathered appearance.
2. Giant Monster Door
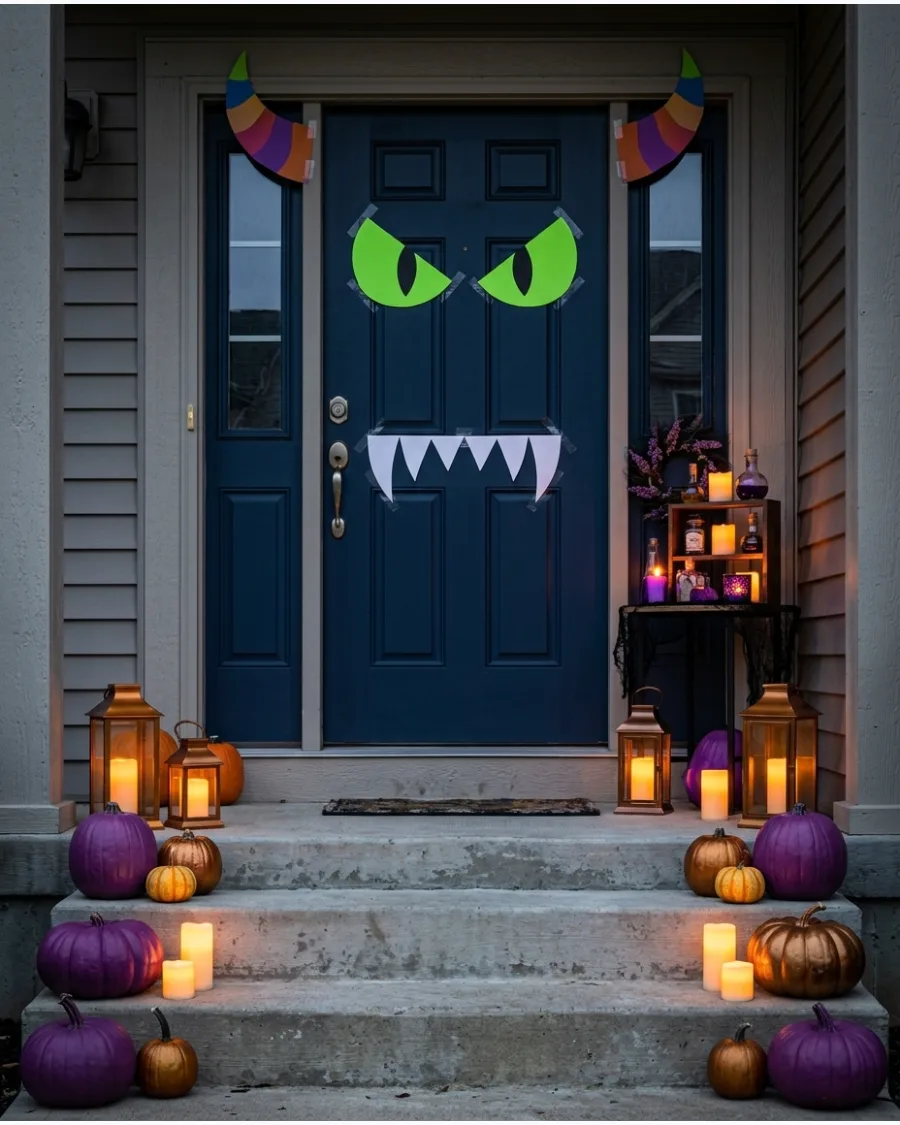
Cardstock and double-sided tape turn any door into a friendly or scary monster face. Cut out giant circles for eyes and jagged shapes for teeth to fill the door's surface.
Position the monster’s mouth around the door handle to make it look like the handle is a tongue or a tooth. Bright colors like lime green or purple stand out much better against dark door paint than traditional black.
- Multi-color cardstock pack for $10.
- 45-minute assembly time.
- Scale the facial features up for double doors.
Best shortcut: Use a dinner plate as a template for perfectly round monster eyes.
3. Paper Bat Swarm
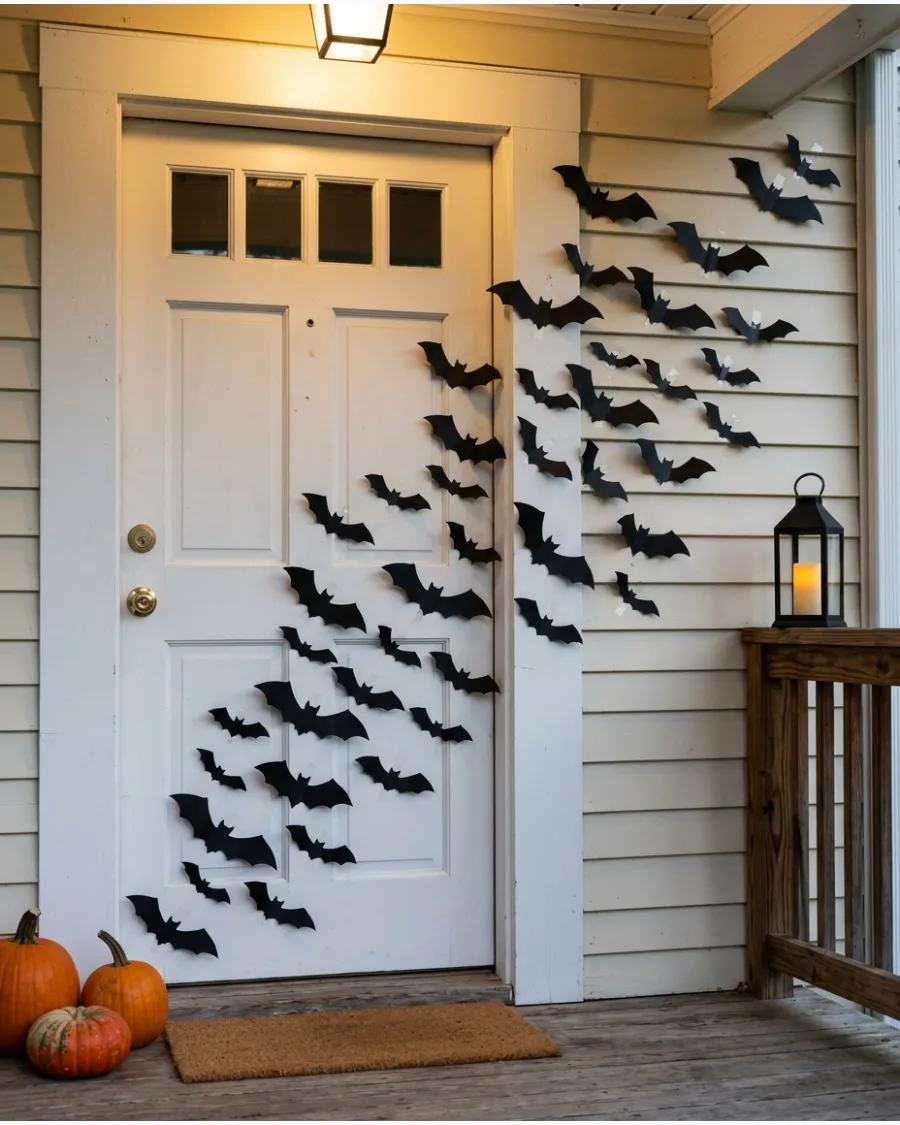
A cluster of black cardstock bats creates a sense of motion across the entryway. Fold the wings slightly to give them a three-dimensional look as they fly from the door onto the siding.
Use varying bat sizes to create a forced perspective that makes the swarm look like it is moving toward the viewer. Sticking to a single color like matte black keeps the display looking sophisticated rather than cluttered.
- Black cardstock and adhesive dots for $8.
- 1-hour cutting and placement time.
- Use weather-resistant plastic sheets if the porch is uncovered.
Most people skip this: Vary the wing fold angles to make every bat look unique in the light.
4. Cheesecloth Ghost Wreath
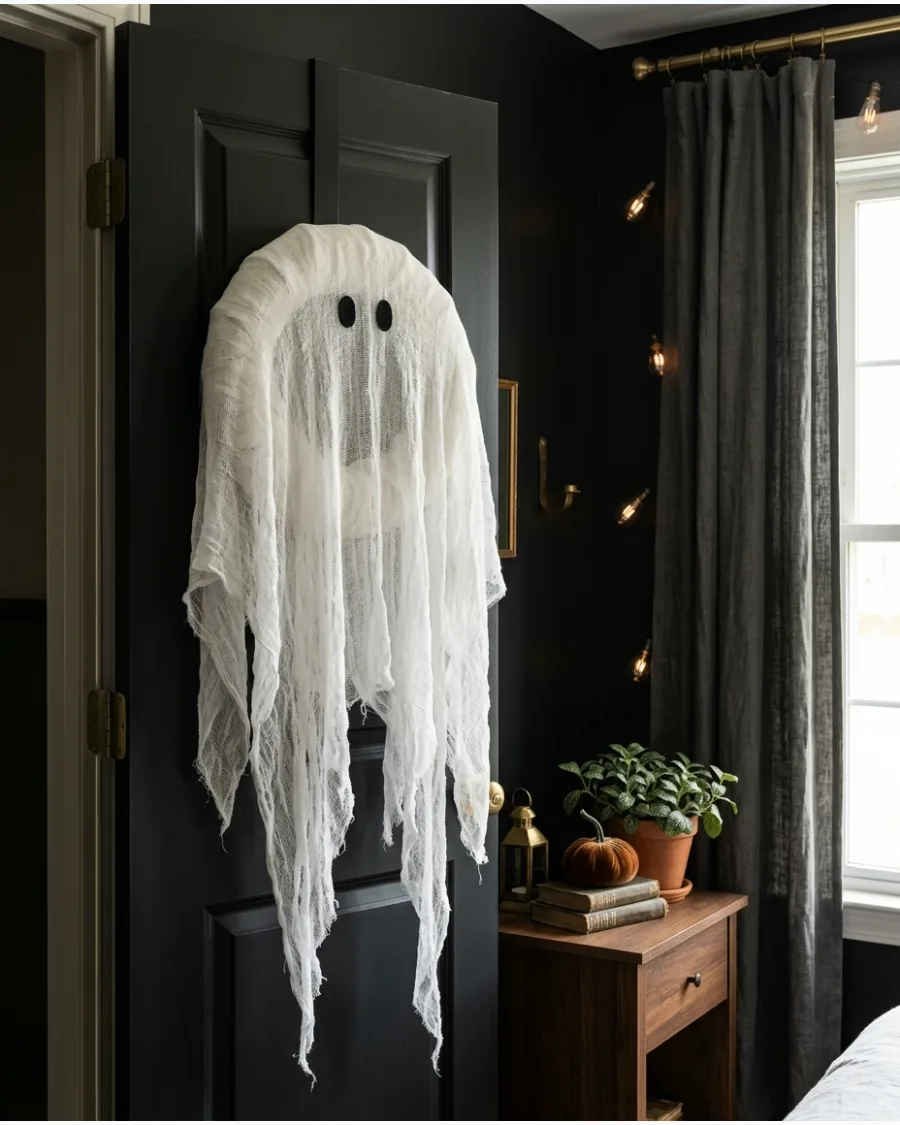
This wreath uses layers of gathered cheesecloth to mimic a tattered, ethereal spirit. Attach the fabric to a foam or wire base and let long strands dangle freely to catch the breeze.
Dip the bottom edges of the cheesecloth in tea or coffee to give the ghost a dusty, aged look that feels more realistic. A simple pair of felt eyes is all you need to give the form a recognizable face.
- Cheesecloth and wreath form for $12.
- 20-minute assembly time.
- Add a battery-powered puck light behind the fabric for a night glow.
Quick win: Use fabric stiffener on the head area to keep the ghost shape from flattening over time.
5. Black Twig Wreath
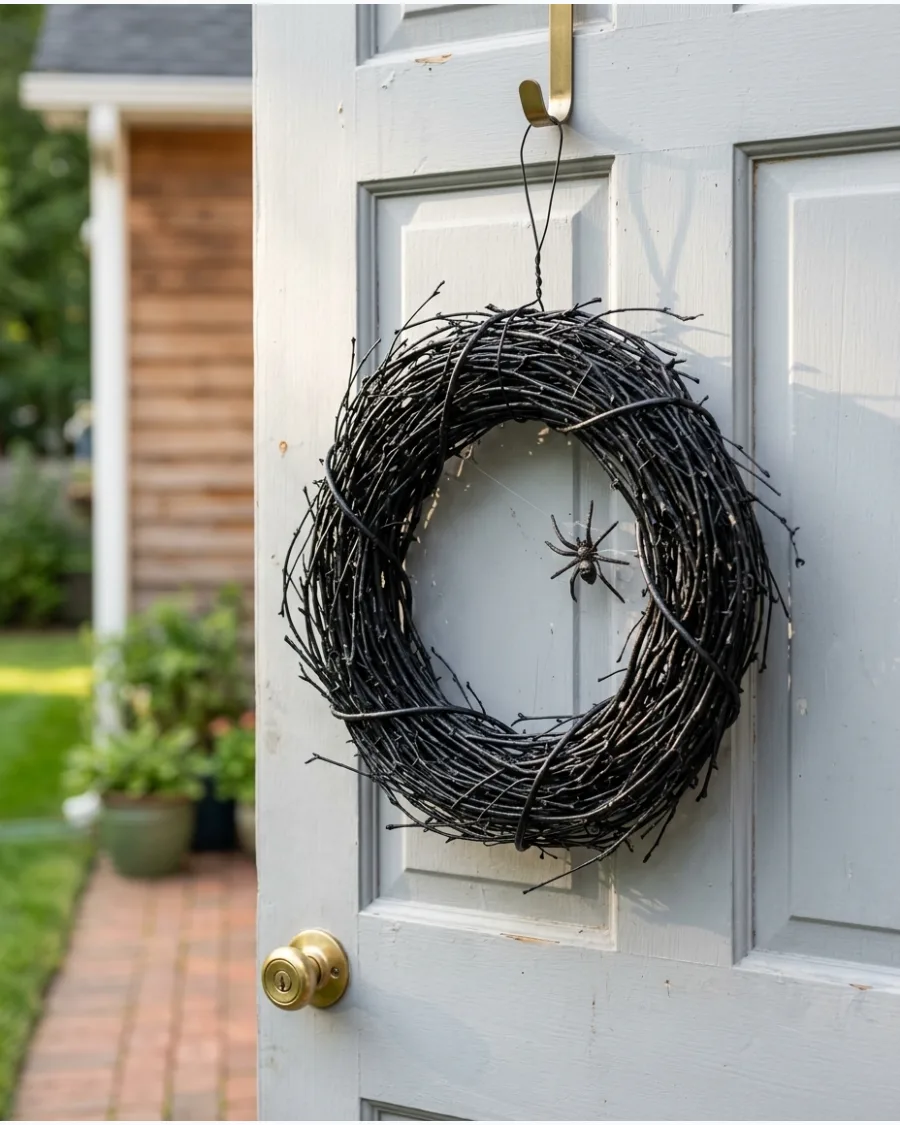
Natural branches gathered from the yard provide a perfect, jagged texture for a spooky wreath. Once the twigs are wired to a base, a coat of matte black spray paint unifies the different wood types.
Glue small plastic spiders or a single faux raven into the branches to create a focal point within the dark texture. This setup works well because the shadows between the twigs add natural depth that store-bought plastic wreaths lack.
- Free twigs and $6 spray paint.
- 45-minute project time.
- Swap the spiders for dark silk roses for a Victorian look.
Best shortcut: Use hot glue for small twigs and floral wire for the heavy main branches.
6. DIY Pumpkin Door Arch
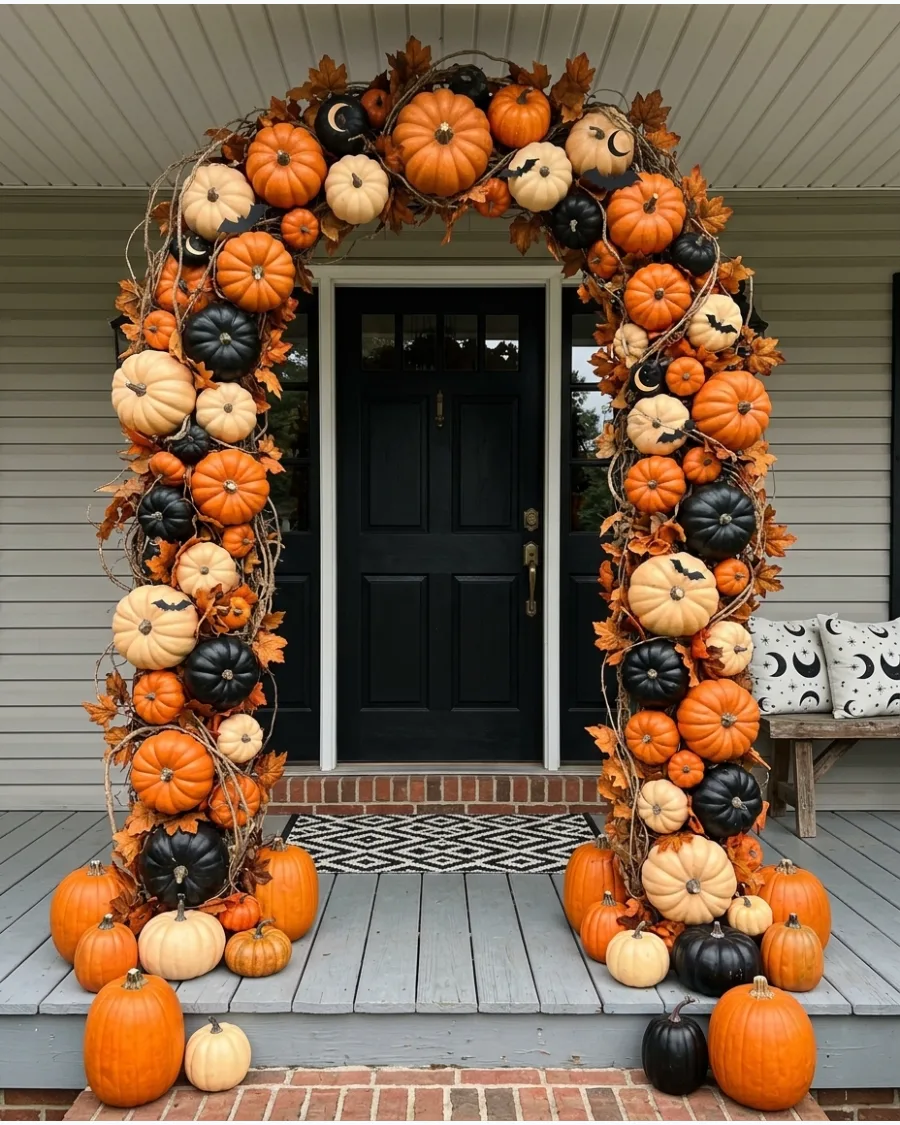
Frame the entrance with a mix of faux pumpkins and fall foliage for a lush, seasonal look. Secure the pumpkins to a garland or a temporary wood frame using heavy-duty zip ties.
Place the largest pumpkins at the base of the arch to ground the design and prevent the top from looking too heavy. Mixing matte and glossy finishes on the pumpkins creates a professional, layered appearance that draws the eye.
- Faux pumpkins and zip ties for $40 or more.
- 2-hour installation time.
- Use Command hooks to secure the arch to the siding without nails.
Most people skip this: Spray the faux pumpkins with a UV-resistant clear coat to prevent sun fading.
7. Witch Broom Parking Display
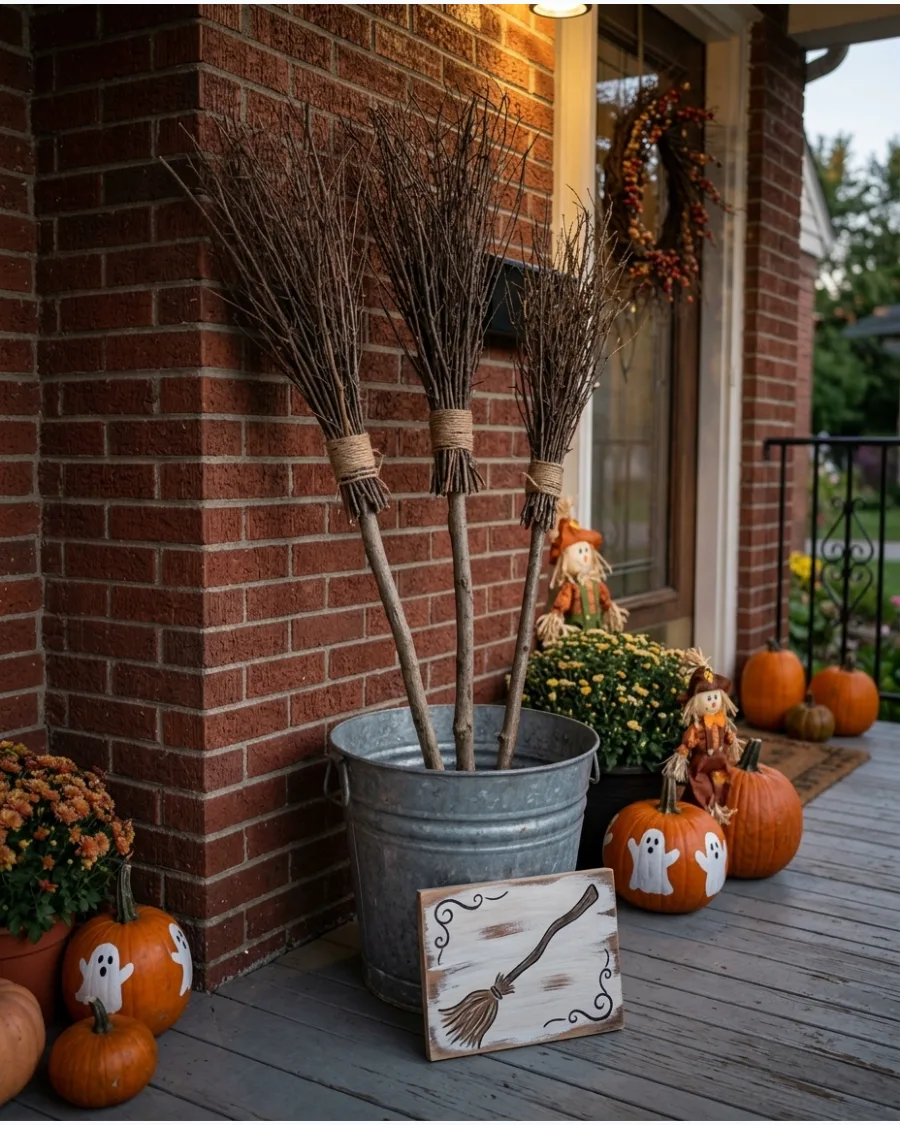
A collection of handmade brooms adds a whimsical touch to a porch corner. Use sturdy fallen branches for the handles and bundles of dried grass or smaller twigs for the bristles.
Lean the brooms at different angles inside a vintage bucket or crate to make the display look like a busy parking lot for witches. This vertical element fills empty space next to the door without blocking the path.
- Free natural materials.
- 30-minute assembly time.
- Tie the bristles with twine for a rustic, handmade feel.
Quick win: Wrap the broom handles in black electrical tape or dark ribbon for a polished look.
8. Floating Witch Hats
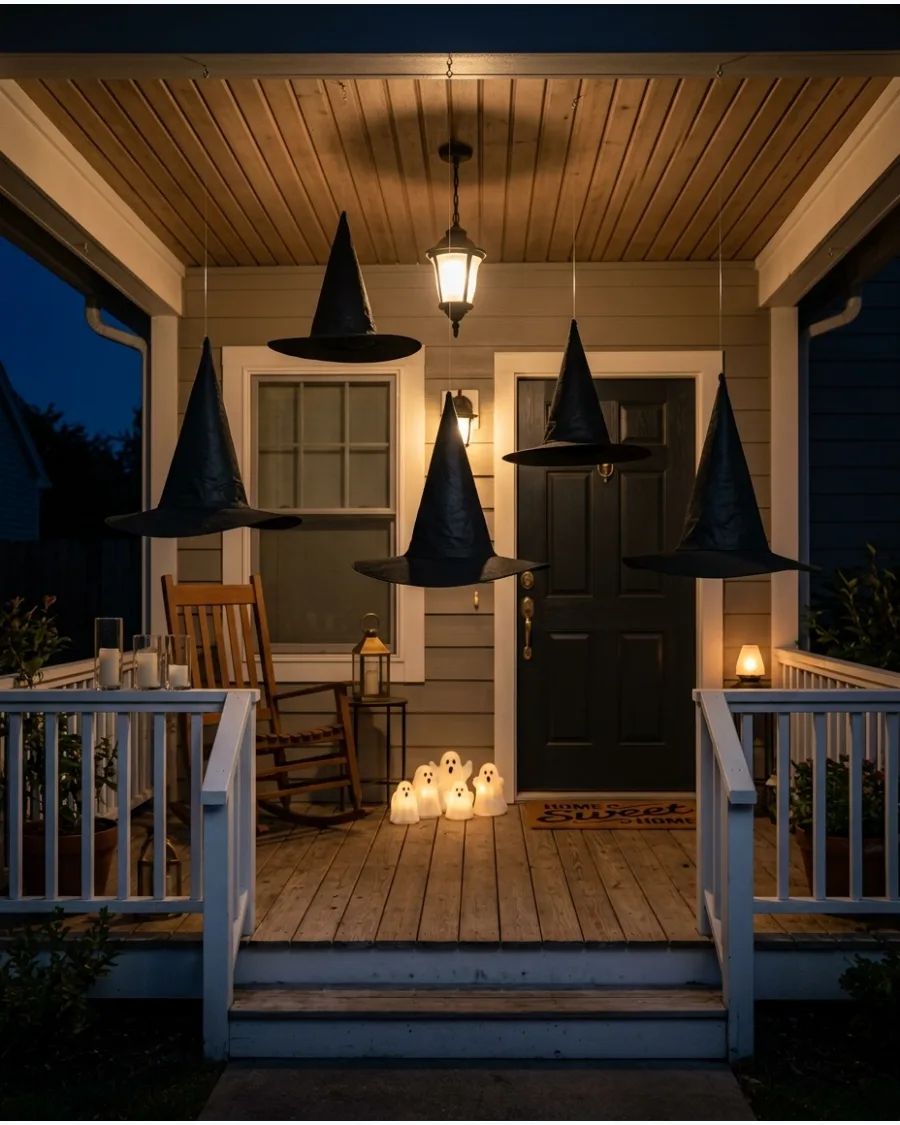
Suspending hats from the porch ceiling creates a magical, floating effect that surprises visitors. Use clear fishing line and small adhesive hooks to hang the hats at varying heights.
Tuck a small LED tea light or glow stick inside each hat to make them light up from within during trick-or-treat hours. Lightweight nylon hats are best because they move gently with the wind.
- Multi-pack of witch hats for $15.
- 40-minute hanging time.
- Use outdoor-rated adhesive hooks to avoid damaging the ceiling.
Best shortcut: Thread the fishing line through a needle and go directly through the tip of the hat for the most secure hold.
9. Spiderweb Porch Columns
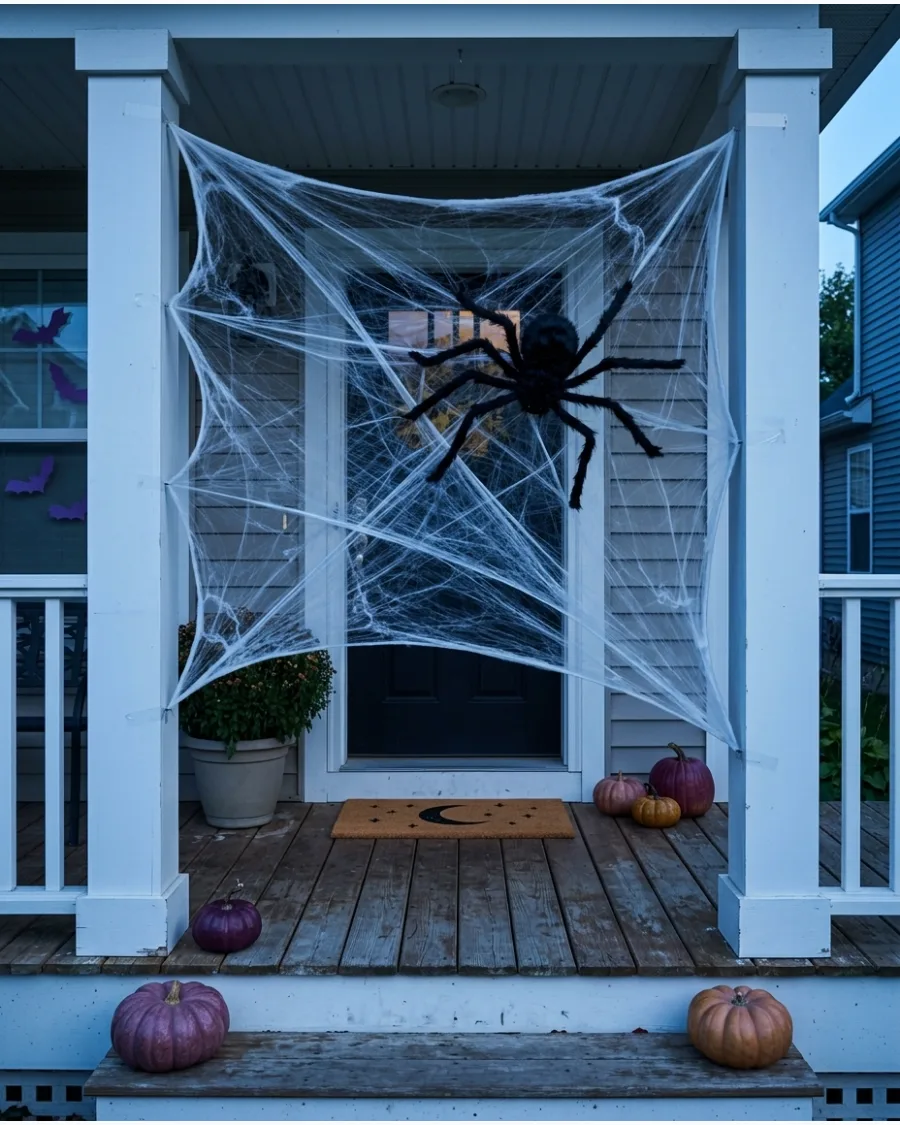
Stretchy faux webbing is a classic way to add a spooky layer to architectural features. Pull the webbing extremely thin until it looks like real silk, then wrap it around porch pillars or railings.
Snag the webbing on the rough surfaces of the columns or use tiny clear clips to keep it from sliding down. Adding a few oversized plastic spiders helps the web look intentional rather than just messy.
- Bag of faux webbing for $5.
- 15-minute setup time.
- Pull the webbing much thinner than you think to get the most realistic look.
Most people skip this: Always pull webbing horizontally and vertically to avoid a stringy look that gives away the fake material.
10. Giant Rope Spiderweb
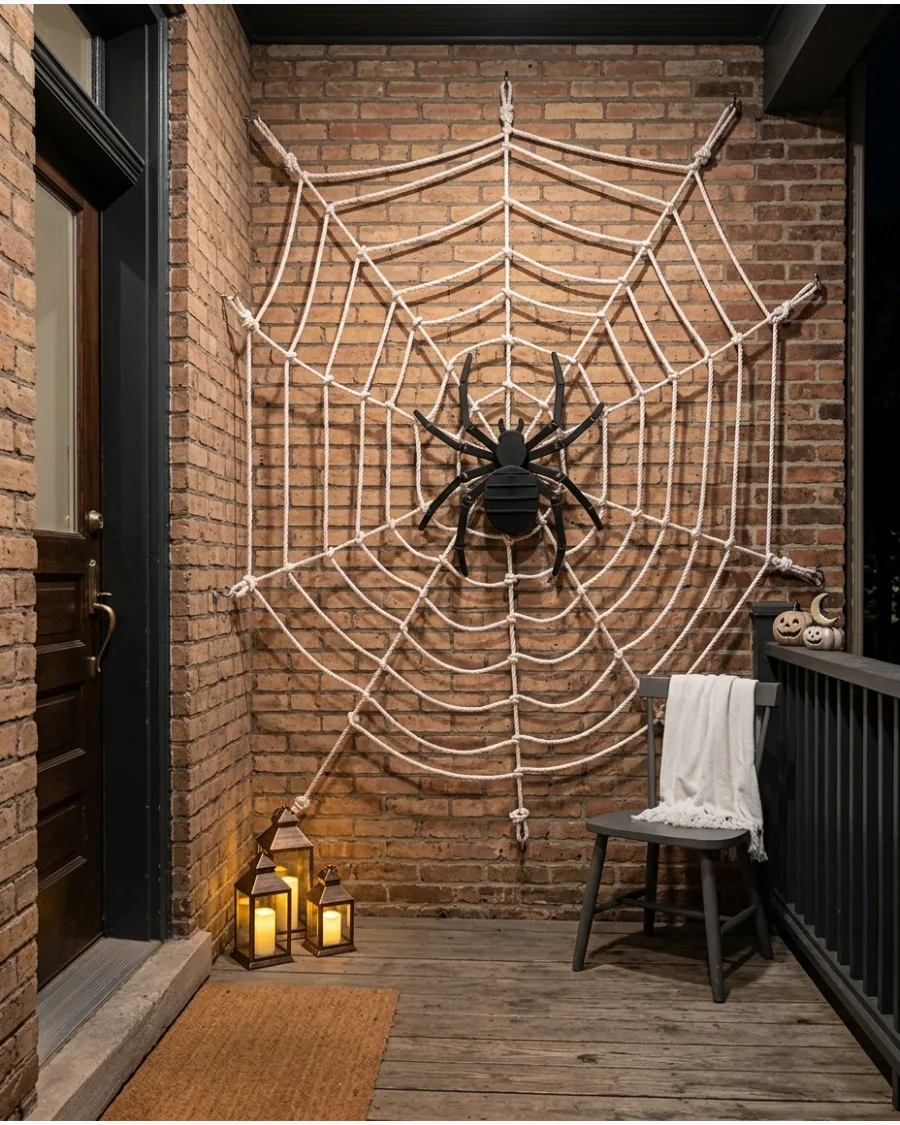
A large-scale web made from thick rope provides a bold graphic element for a porch wall. Create a star shape with long rope segments first, then tie concentric circles of rope to form the web pattern.
Use black rope against a light-colored wall or white rope against brick to ensure the pattern is visible from the street. This sturdy decoration handles wind much better than flimsy store-bought webbing.
- 50 feet of cotton rope for $15.
- 1-hour construction time.
- Use simple slip knots to make the web easy to take apart and store.
Quick win: Use a larks head knot to attach the rings to the spokes for a clean, professional look.
11. Halloween Lantern Cluster
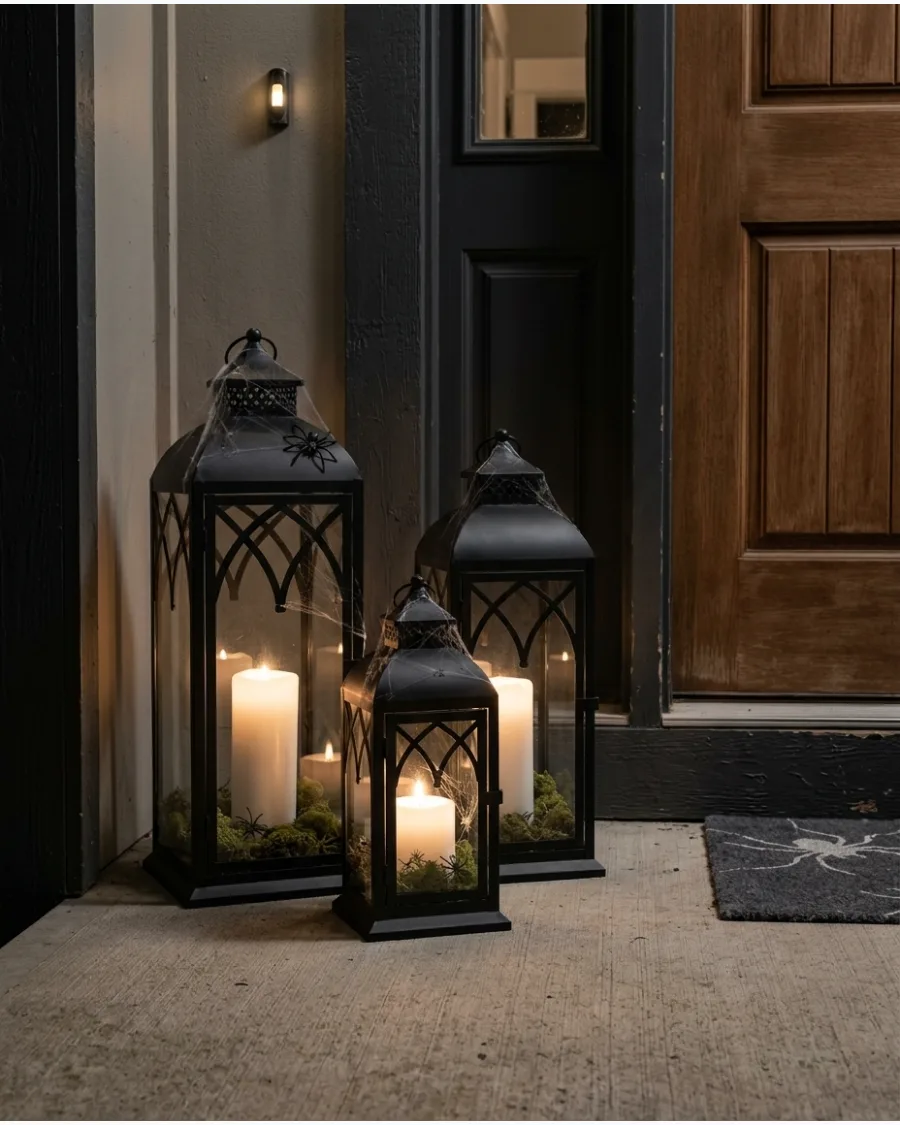
Group black lanterns of varying heights beside the front door to create a layered look. Fill the glass boxes with a mix of battery-operated candles, green moss, and small plastic skulls or pumpkins.
Arrange the lanterns in an asymmetrical grouping on one side of the doorstep to create a curated and professional display. Lanterns provide a safe way to add height and light without the mess of real wax or the risk of an open flame.
- Sourcing and budget: Buy lanterns at discount home stores or thrift shops for under twenty dollars each.
- Setup and logistics: Use outdoor-rated battery candles with built-in timers so the display glows automatically at sunset.
- Adaptation: For a smaller entry, use just two lanterns and place them on a small wooden crate to save floor space.
Quick win: Mix different candle heights inside a single large lantern to create more visual depth and a brighter glow.
12. Haunted Window Silhouettes
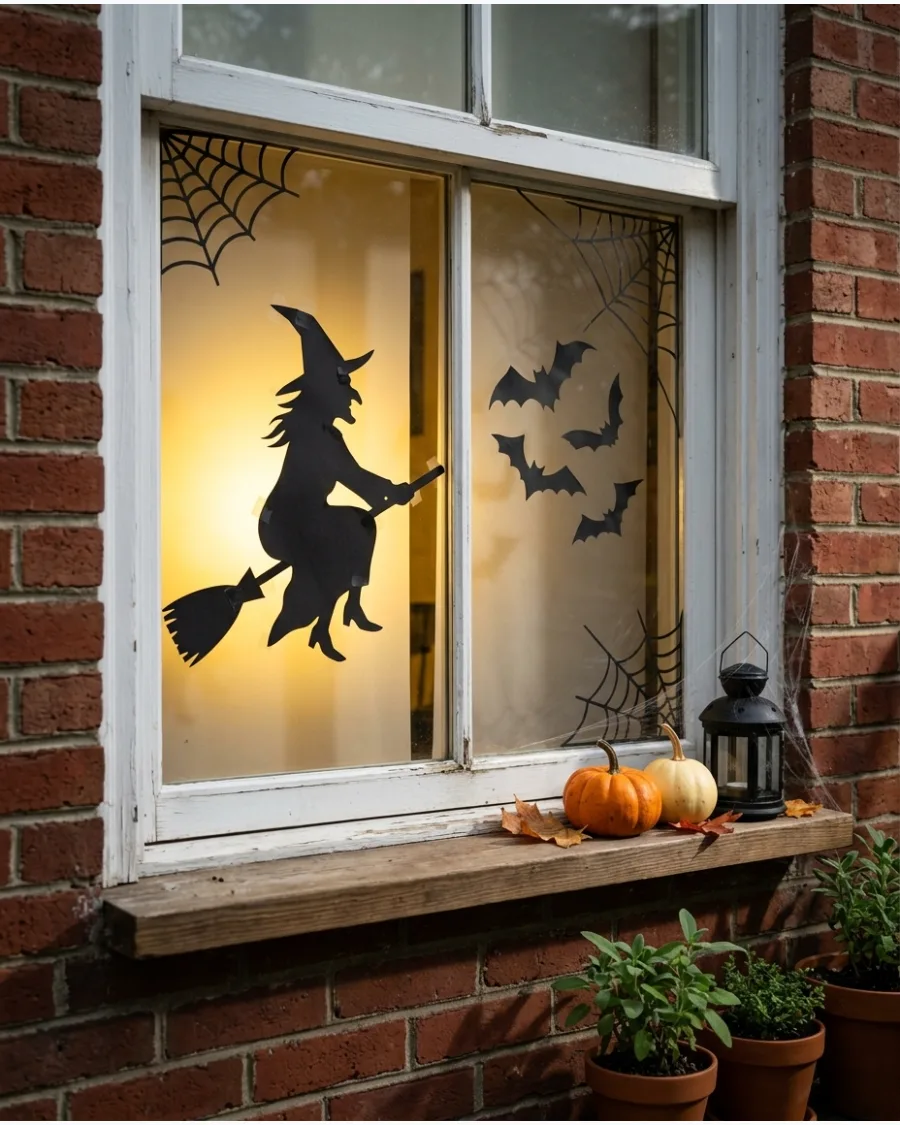
Cut classic spooky shapes like bats, cats, or witches from heavy black cardstock or poster board. Secure the cutouts to the inside of the window glass using clear double-sided tape for a clean look from the street. When the indoor lights are turned on at night, the shapes create a high-contrast shadow effect.
This method is an excellent way to decorate large areas with very little storage space required after the holiday.
- Sourcing and budget: Use black poster board from a craft store for a project cost of less than five dollars.
- Setup and logistics: Trace shapes using a projector or free online templates to ensure the scale looks right from the sidewalk.
- Adaptation: Renters can use static-cling black vinyl instead of tape to avoid any sticky residue on the glass.
Most people skip this: Clean the window glass thoroughly before taping to ensure the silhouettes stay flat and do not peel off.
13. Ghostly Porch Curtains
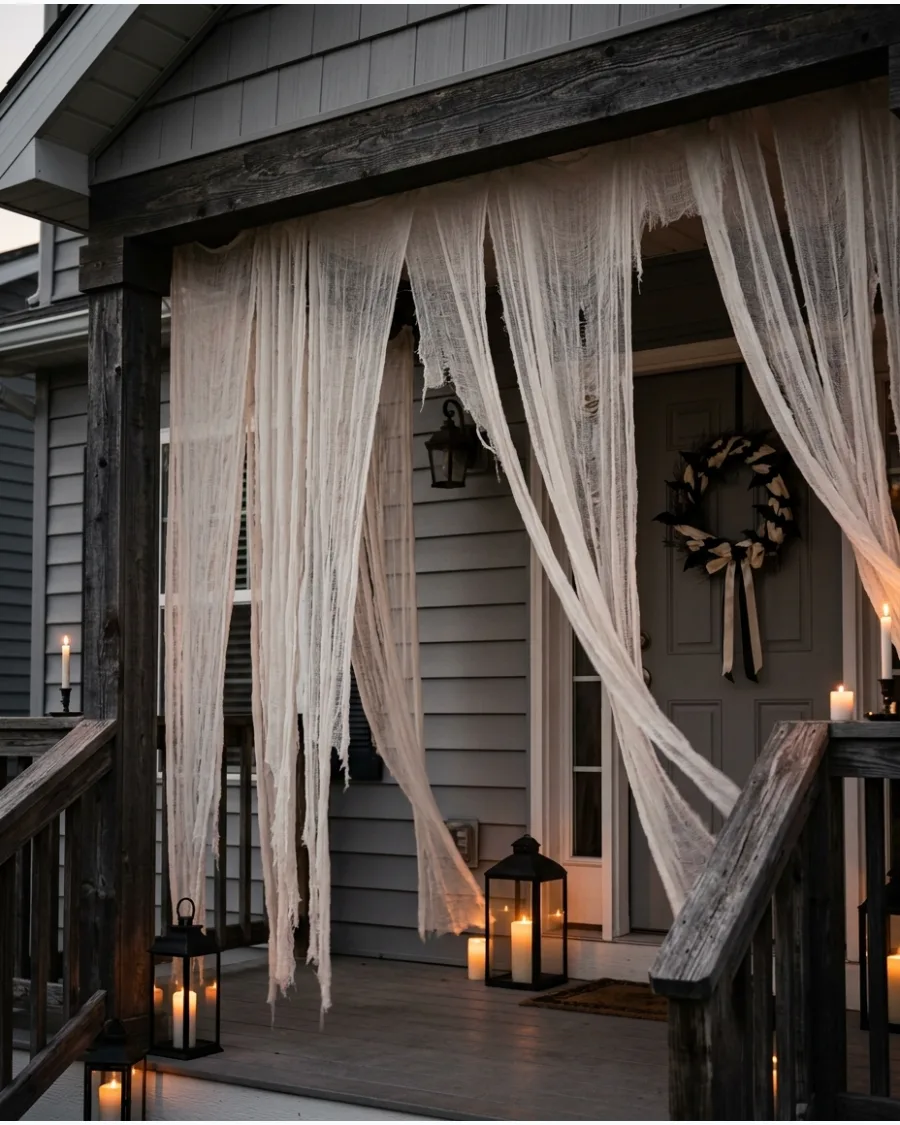
Hang long strips of white cheesecloth or lightweight muslin from the porch ceiling or around the door frame. Shred the bottom edges of the fabric with a wire brush or scissors to create a naturally tattered and weathered appearance. The thin material moves with the slightest breeze, adding an eerie sense of motion to the home.
It is a soft, textural way to frame the entryway without blocking the path.
- Sourcing and budget: Purchase cheesecloth in bulk rolls online to cover a standard porch for under fifteen dollars.
- Setup and logistics: Use small tension rods or removable adhesive hooks to hang the fabric without drilling into the ceiling.
- Adaptation: Dip the bottom of the fabric in a bucket of weak tea to give it an aged, tea-stained look for a more vintage style.
Best shortcut: Use a spray bottle with water to dampen the fabric after hanging so it drapes more naturally instead of looking stiff.
14. Skeleton Welcome Committee
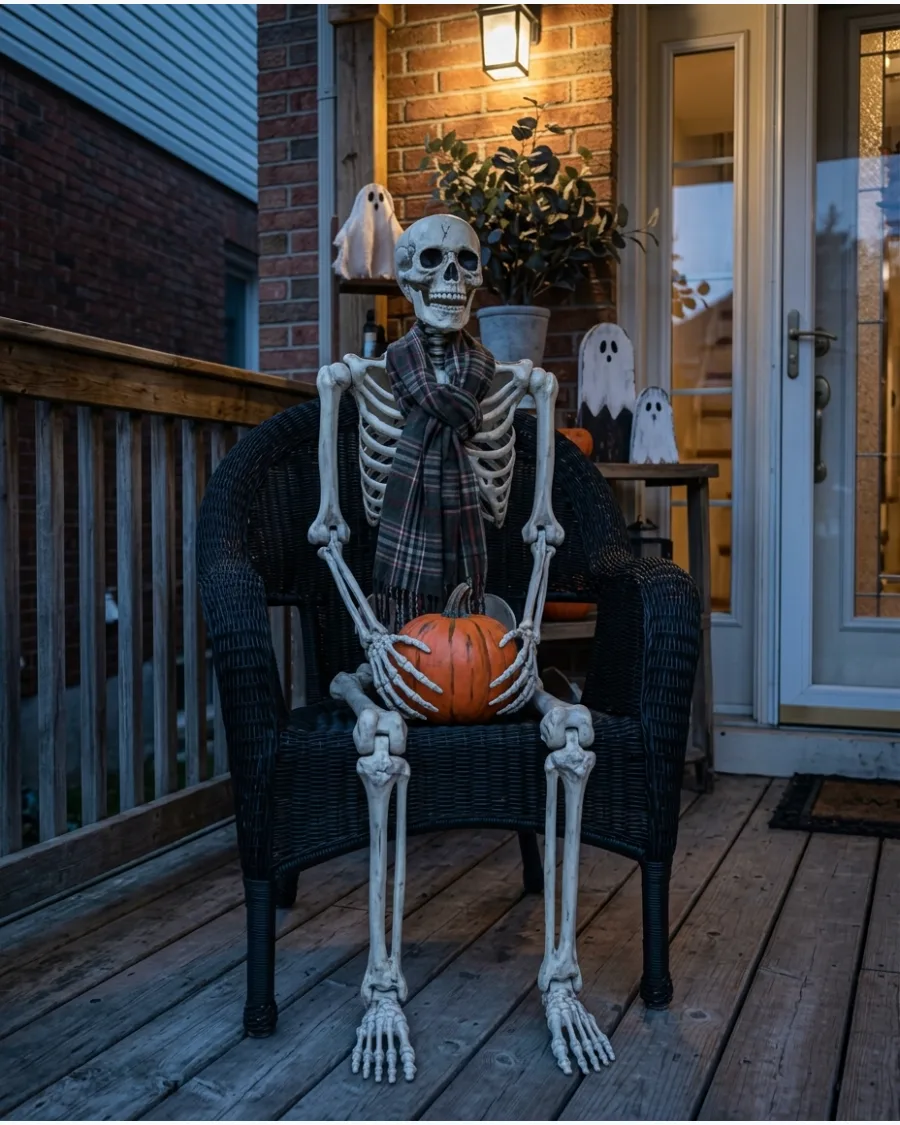
Position a poseable skeleton in a porch chair or on a bench to greet visitors as they arrive. Prop a book, a bowl of candy, or a small pumpkin in the skeleton's lap to give the display a humorous and lived-in feel. Adding simple accessories like a hat or a scarf makes the decoration feel intentional rather than scary.
Giving the bones a specific task or pose tells a story that delights neighbors and trick-or-treaters.
- Sourcing and budget: A high-quality five-foot poseable skeleton usually costs between forty and sixty dollars.
- Setup and logistics: Use clear zip ties around the spine and the chair back to keep the skeleton from sliding off in the wind.
- Adaptation: If you do not have a chair, pose the skeleton so it appears to be climbing up a porch pillar or railing.
Quick win: Tighten the screws at the skeleton's joints with a screwdriver to help it hold more complex poses throughout the season.
15. Haunted Mailbox
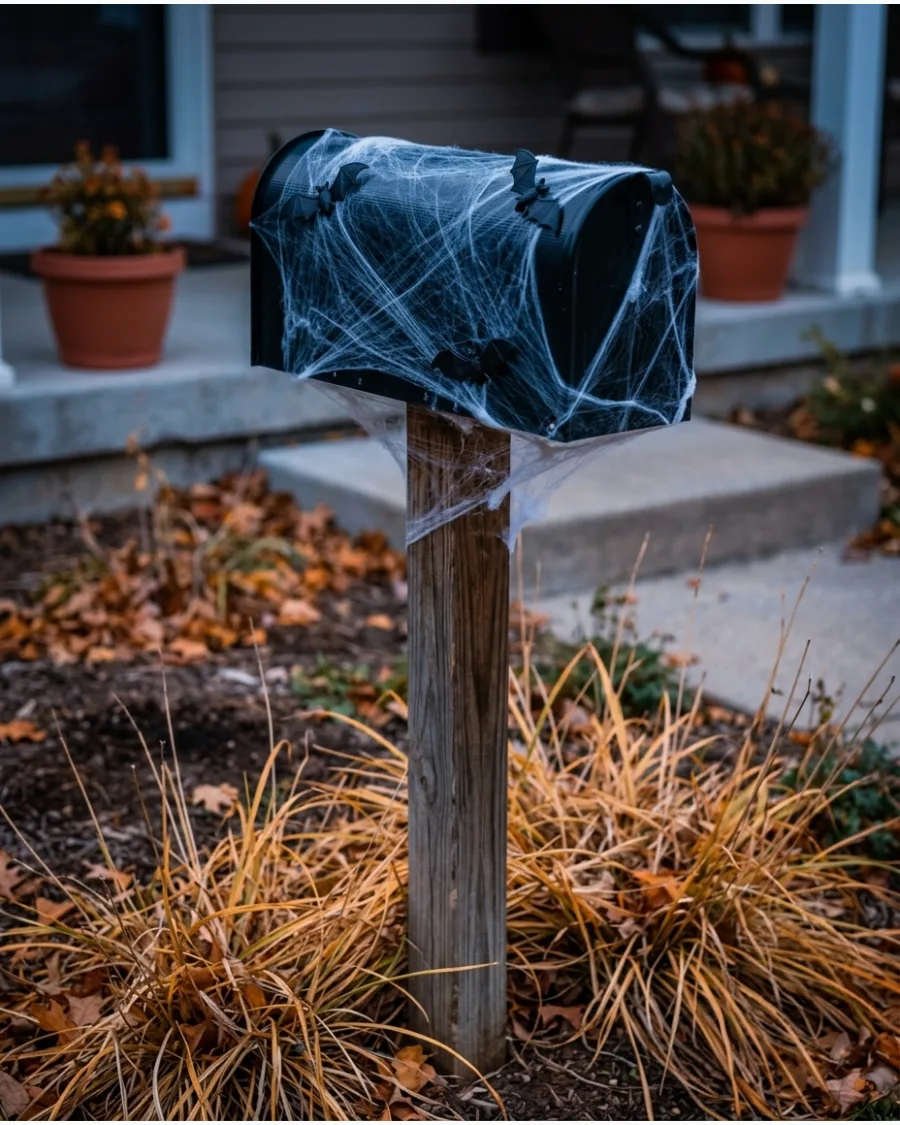
Transform the mailbox into a spooky focal point using removable black paper and faux cobwebs. Attach small plastic bats to the sides of the mailbox using weather-resistant adhesive or strong magnets for a 3D effect. This extends the holiday theme all the way to the curb and creates a cohesive look for the entire property.
It is an often-overlooked spot that provides a great first impression for guests.
- Sourcing and budget: This project uses scraps from other DIYs and typically costs less than three dollars in new materials.
- Setup and logistics: Ensure the mailbox flag and door remain fully functional so mail delivery is not interrupted.
- Adaptation: Use a white paint pen to write a spooky name or 'Ghost Mail' on the side for a custom touch.
Most people skip this: Check with your local post office or carrier to make sure the decorations do not obscure the house number.
DIY Outdoor Halloween Decorations
16. Homemade Cemetery Tombstones
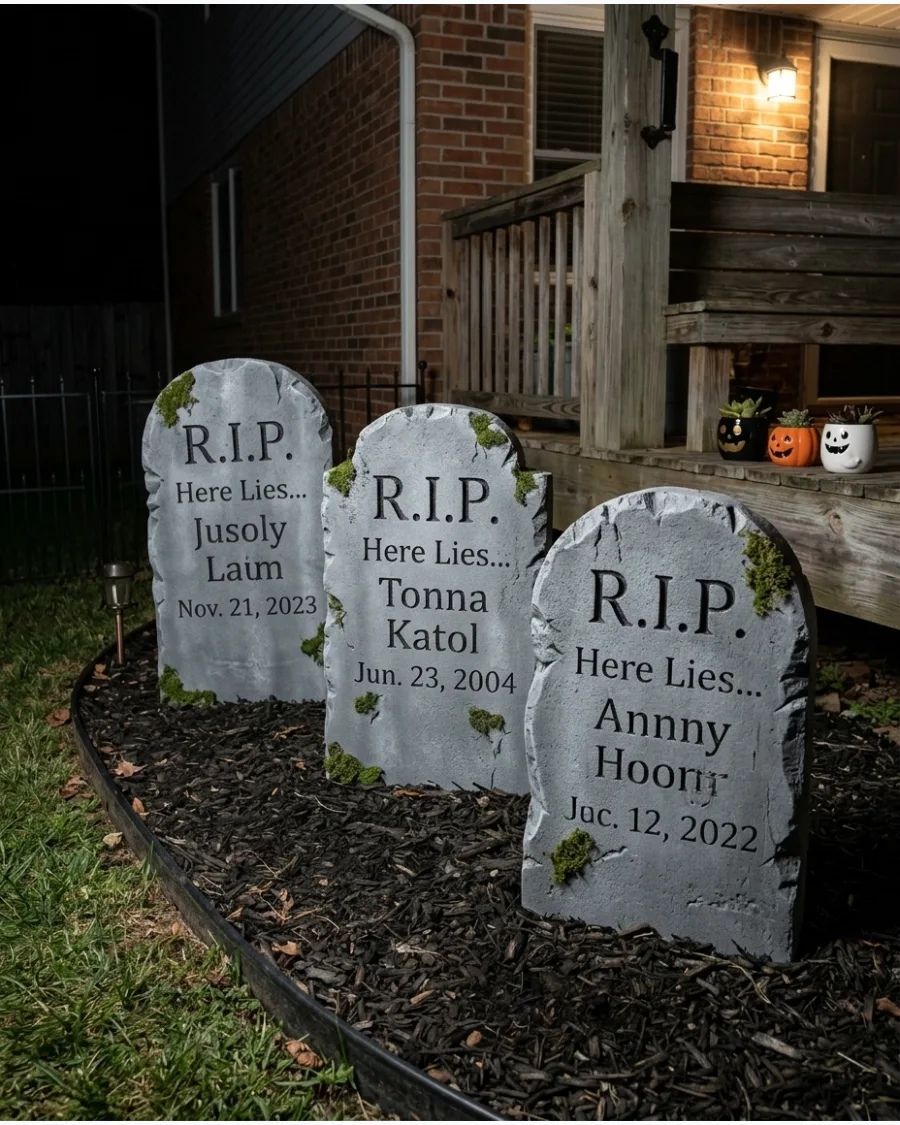
Create a custom graveyard by cutting tombstone shapes out of thick foam insulation board. Apply a coat of textured gray stone spray paint to the foam to give the surface a realistic granite finish. Use a wood-burning tool or a knife to carve names and dates before painting to create depth in the letters.
These lightweight props look heavy and authentic once they are settled into the lawn.
- Sourcing and budget: One sheet of foam board from a hardware store can make four to five tombstones for around twenty dollars.
- Setup and logistics: Insert two wooden dowels or metal garden stakes into the bottom of the foam to anchor them firmly into the ground.
- Adaptation: For a more whimsical look, use pun-filled names like 'Barry M. Deep' or 'Ivanna B. Back' on the inscriptions.
Best shortcut: Rub a little dark green or brown acrylic paint into the carved cracks to simulate natural moss and aging.
17. Temporary Cemetery Fence
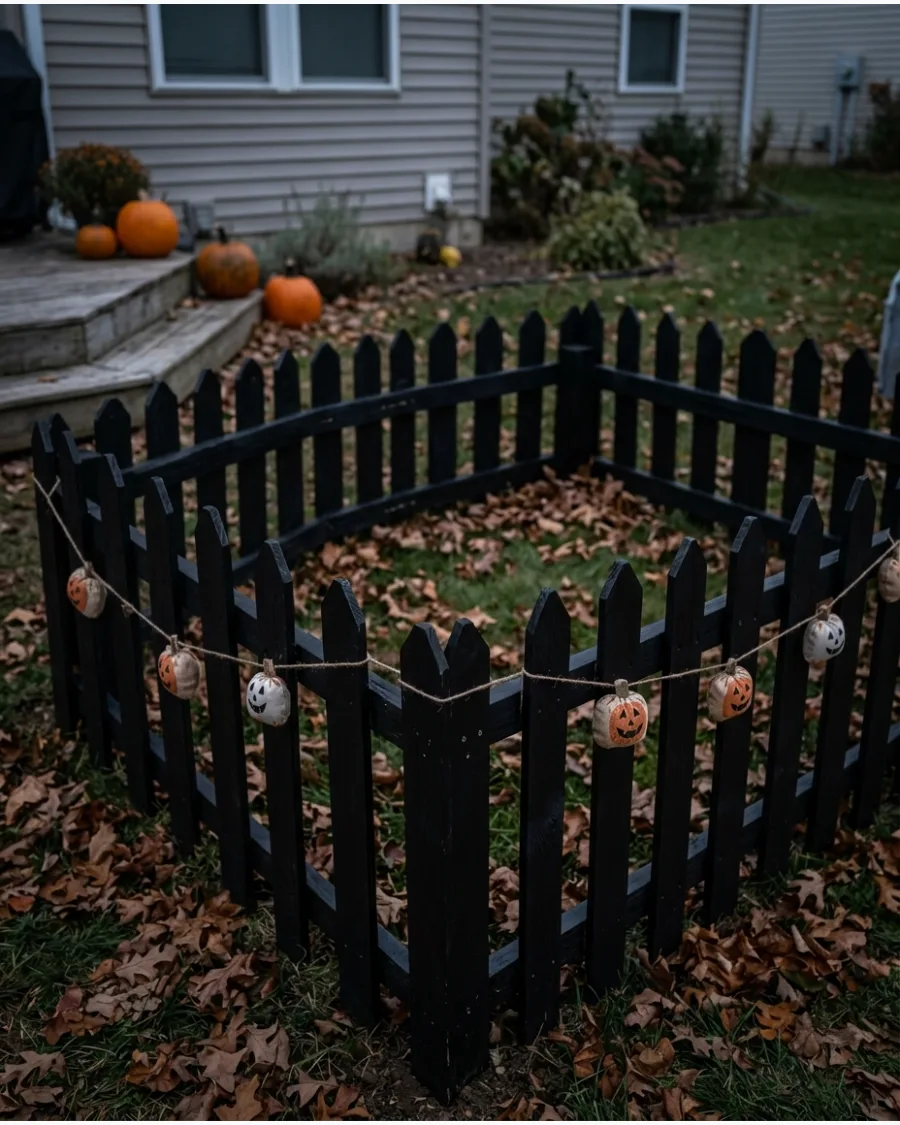
Define the boundaries of a yard display with a lightweight fence made from wood strips or PVC pipes. Hammer the vertical posts directly into the ground before attaching the horizontal rails to ensure the structure stays upright during autumn storms. Painting the entire fence matte black gives it a classic wrought-iron appearance.
This adds a sense of structure to the yard and keeps foot traffic away from delicate decorations.
- Sourcing and budget: Use lath strips or thin furring strips from the lumber yard for a budget-friendly build under thirty dollars.
- Setup and logistics: Keep the fence height between 18 and 24 inches so it frames the display without blocking the view.
- Adaptation: Wrap orange string lights around the top rail to make the fence visible and festive at night.
Quick win: Use black zip ties instead of nails to connect the pieces for a faster assembly and easier teardown in November.
18. Skeleton Hand Yard Stakes
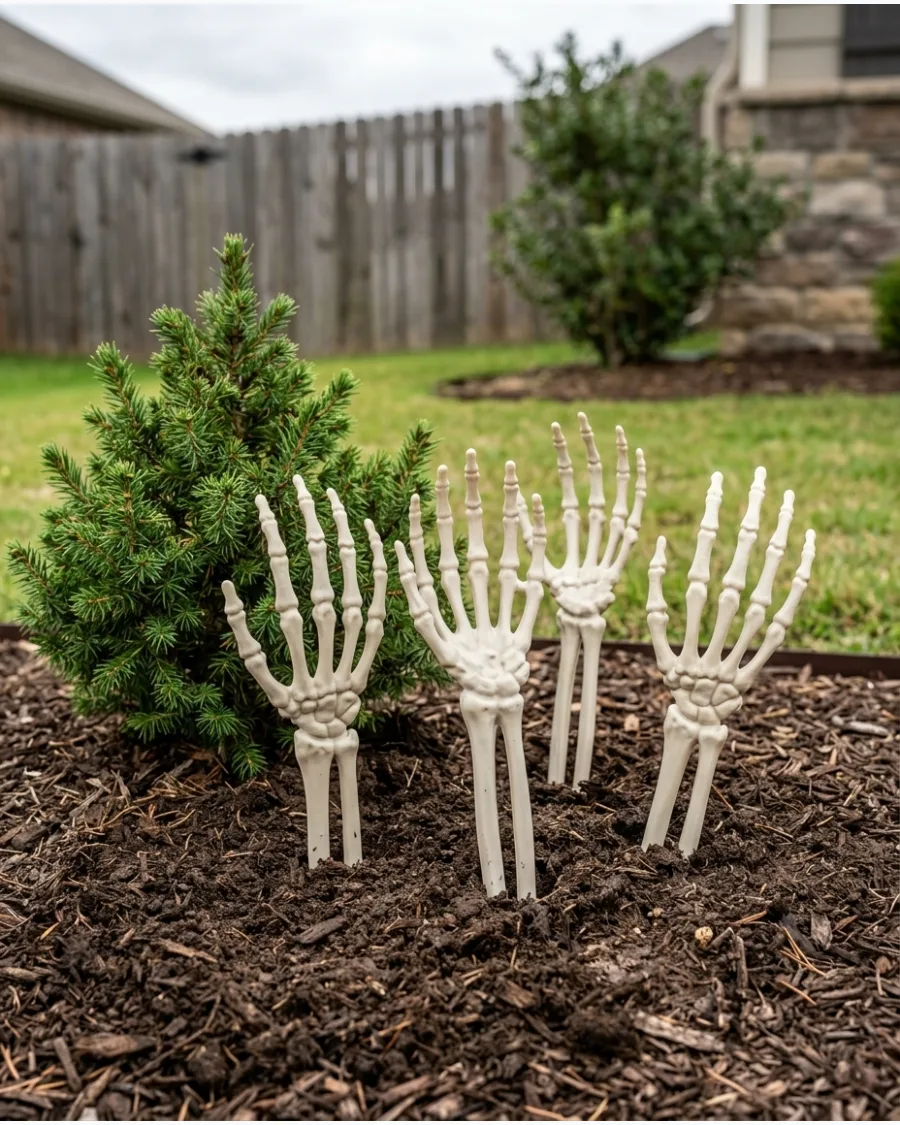
Place plastic skeleton hands throughout flower beds or along the edge of the lawn. Angle the hands at different directions and heights so they look like multiple figures are reaching up out of the soil. This is a simple way to fill empty gaps in the landscaping after summer flowers have faded.
The hands create a creepy, interactive element that is visible during the day and night.
- Sourcing and budget: Plastic skeleton hands are widely available in multi-packs for ten to fifteen dollars.
- Setup and logistics: Tape the hands to sturdy bamboo garden stakes using black electrical tape to keep them secure in the dirt.
- Adaptation: Place a few hands inside large outdoor planters to bring the graveyard theme up onto the porch.
Most people skip this: Group the hands near the base of a tombstone or a tree trunk to make the 'crawling out' effect more believable.
19. Mini Pumpkin Walkway Lights
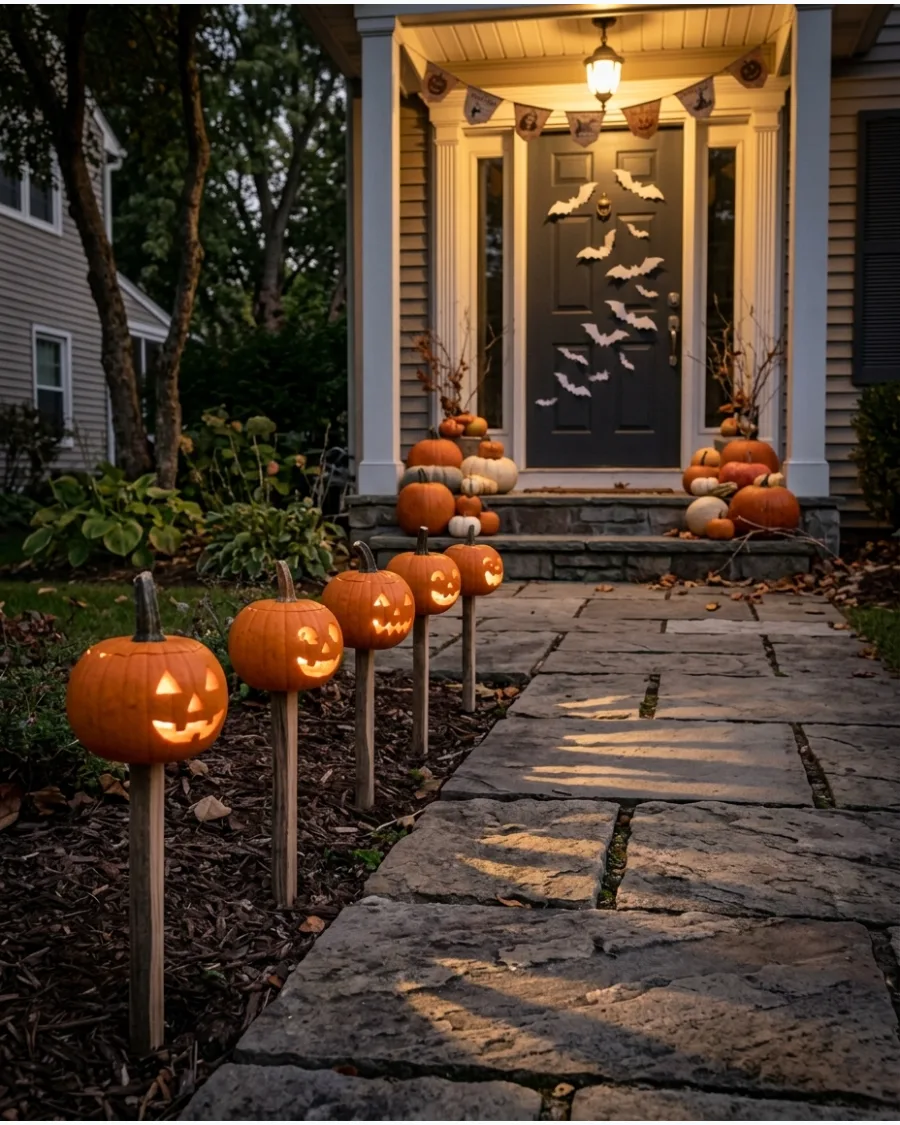
Line your front path with small pumpkins featuring simple carved faces or patterns. Insert a high-lumen battery-operated tea light into each mini pumpkin to ensure the glow is bright enough to guide trick-or-treaters. Faux pumpkins are a great choice for this project because they will not rot or attract pests over several weeks.
This creates a warm, welcoming light that leads guests safely to the front door.
- Sourcing and budget: Faux mini pumpkins can be found at craft stores for three to five dollars each.
- Setup and logistics: Space the pumpkins about two feet apart to provide consistent lighting along the entire walkway.
- Adaptation: Use white pumpkins with purple or green LED lights for a more modern and colorful color palette.
Best shortcut: Use a drill with a large spade bit to quickly create perfectly round 'eyes' in the pumpkins without manual carving.
20. Ghost Walkway Markers
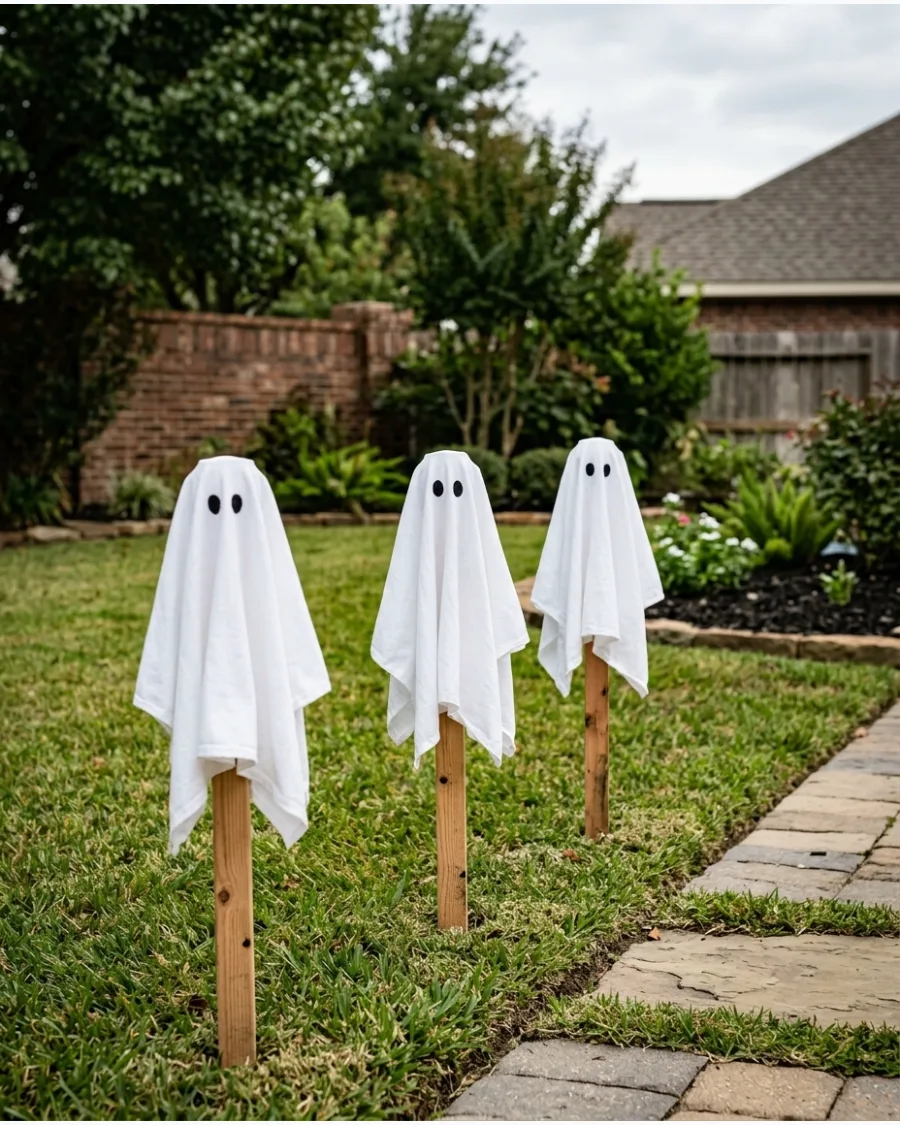
Create a fleet of small ghosts using white fabric draped over foam balls. Tie a piece of twine or white ribbon around the base of the foam ball to define the ghost's head and secure the fabric in place. Attach the finished ghosts to short garden stakes and line them up along the driveway or lawn edge.
The lightweight fabric catches the wind, making the ghosts look like they are dancing as people walk by.
- Sourcing and budget: Use old white bedsheets and foam balls for a nearly free project, or buy craft fabric for under ten dollars.
- Setup and logistics: Use a black permanent marker to draw simple oval eyes on the fabric for a classic ghost expression.
- Adaptation: Place a small glow stick inside the fabric head right before a party for a temporary neon glow.
Quick win: Use pinking shears to cut the bottom edge of the fabric to prevent fraying and add a decorative zigzag texture.
21. Giant Eyes in the Bushes
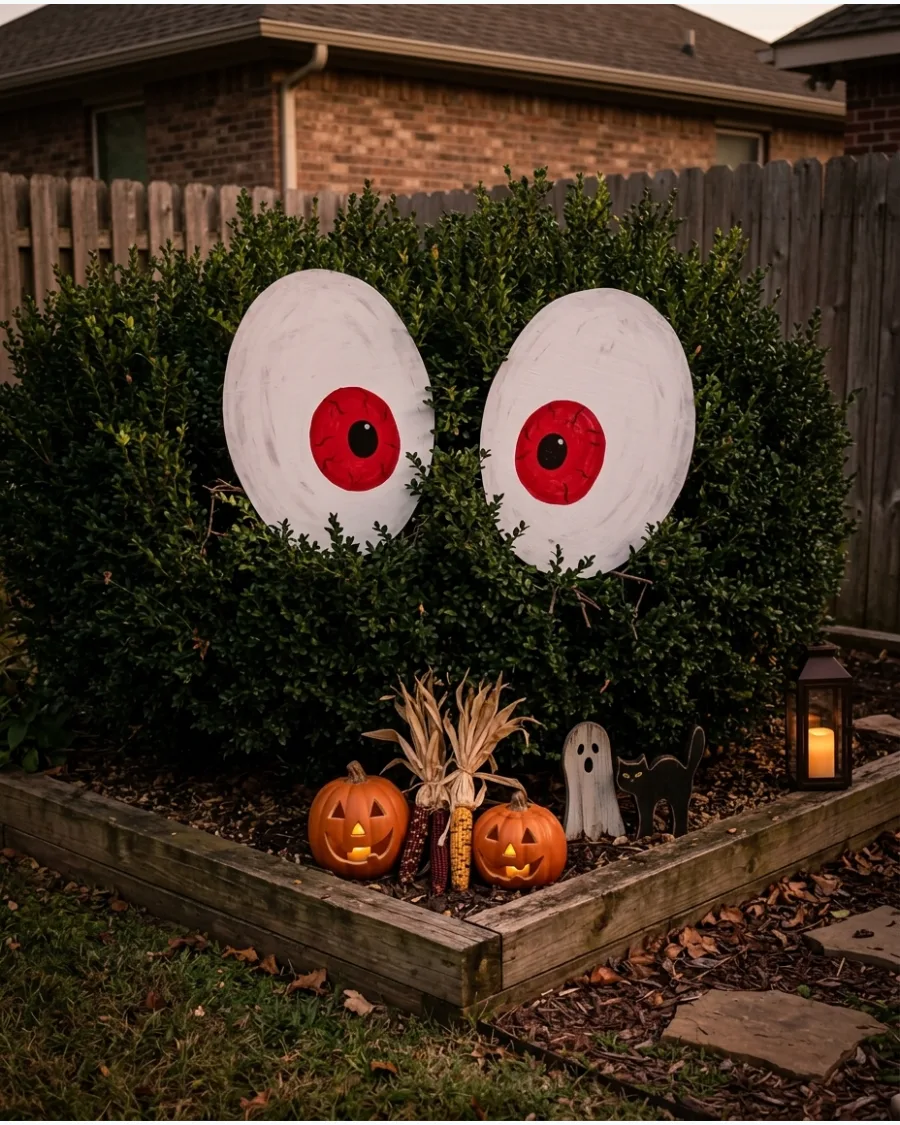
Cut large eye shapes from weather-resistant material and paint them white with colorful pupils.
Tuck these pairs deep into thick evergreen shrubs so they appear to peer out at passersby. This simple trick turns ordinary landscaping into a watchful monster. Most people forget to use a matte finish paint to prevent a cheap plastic glare under streetlights.
- Use white plastic plates or Coroplast sheets for weather resistance.
- Secure the eyes to inner branches using green zip ties to keep them hidden.
- Paint the pupils with neon colors to make them pop against dark leaves.
Quick win: Use reflective tape for the pupils so they catch the headlights of passing cars at night.
22. Haunted Tree Faces
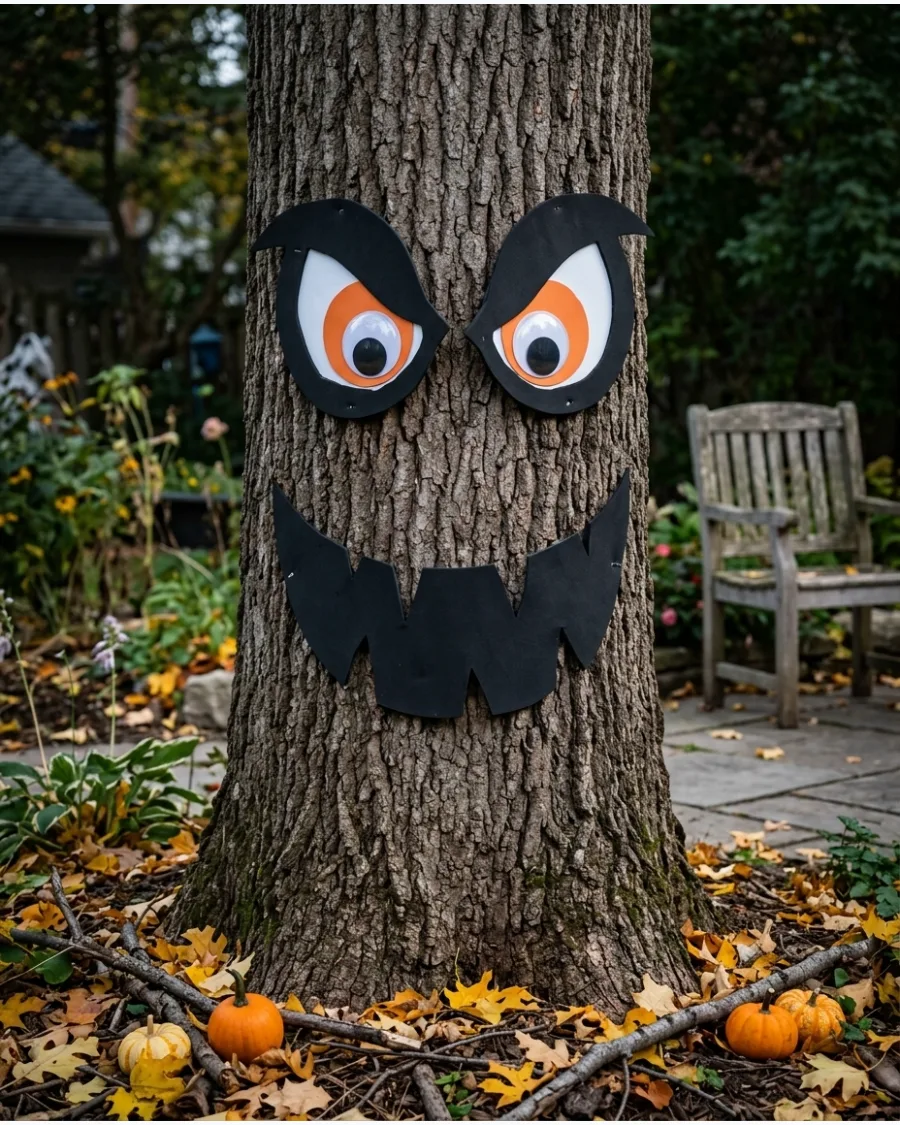
Cut expressive eyes and mouths from lightweight foam or cardboard to give your yard some personality. Attach the pieces to a wide tree trunk using heavy-duty outdoor mounting tape that won't damage the bark. This creates a focal point that looks like the tree itself is coming to life.
It works best on trees with smooth bark where the shapes can sit flush against the surface.
- Choose black foam board for a shadow-like appearance against the wood.
- Use a utility knife for clean, sharp edges on the mouth and eye shapes.
- Apply mounting tape to the highest points of the bark for the best grip.
Best shortcut: Use a black bungee cord hidden behind the trunk to hold the mouth piece in place without using adhesives.
23. Black Cat Lawn Silhouettes
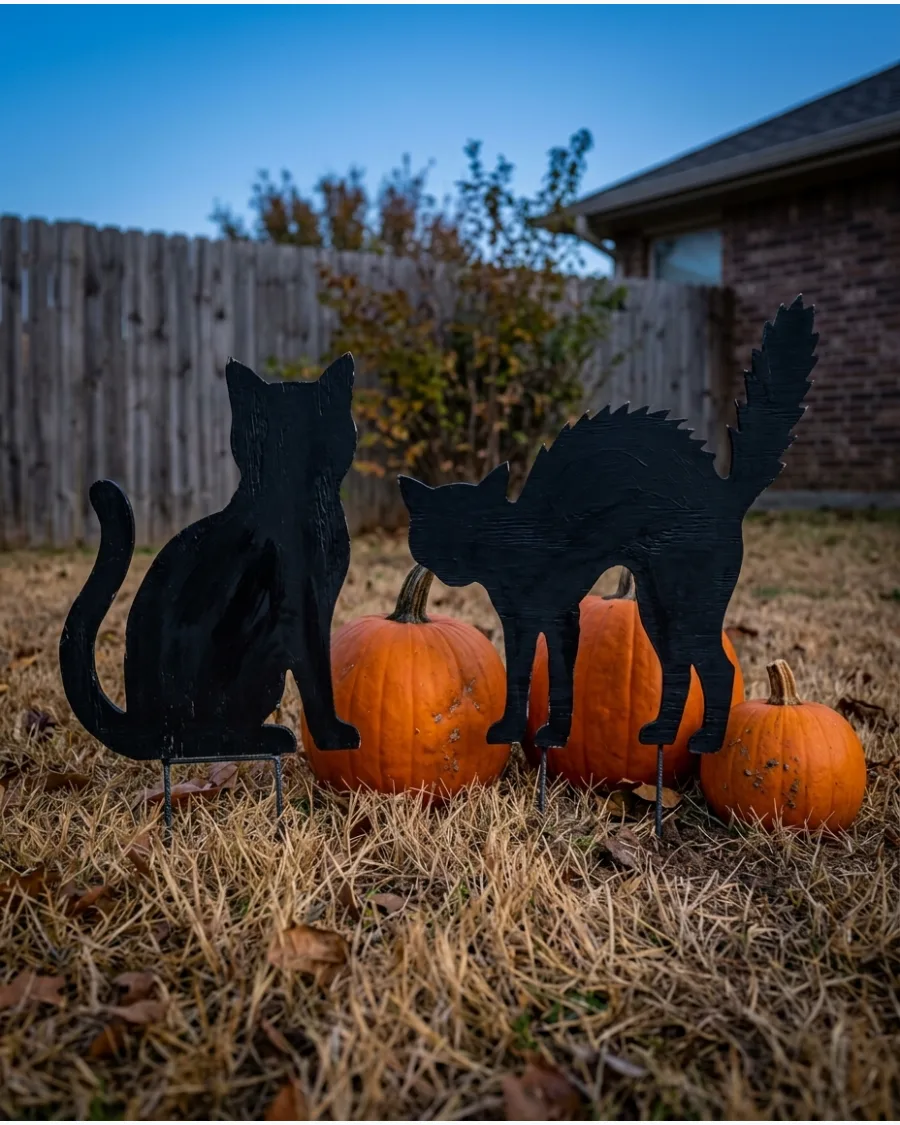
Cut arched black cats from thin plywood or corrugated plastic for a classic spooky look. Secure these silhouettes to garden stakes and place them in the tall grass or next to a cluster of pumpkins. Their flat profile makes them look like real shadows moving through the yard at dusk.
Painting the edges black ensures no raw wood or white plastic shows from the side.
- Use 1/4 inch plywood for a sturdy display that can be reused for years.
- Attach wooden garden stakes to the back of the cats with short screws.
- Spray with a clear outdoor sealant to prevent the material from warping.
Most people skip this: Paint the eyes with glow-in-the-dark paint so the cats look like they are watching the sidewalk at night.
24. Flying Bat Yard Stakes
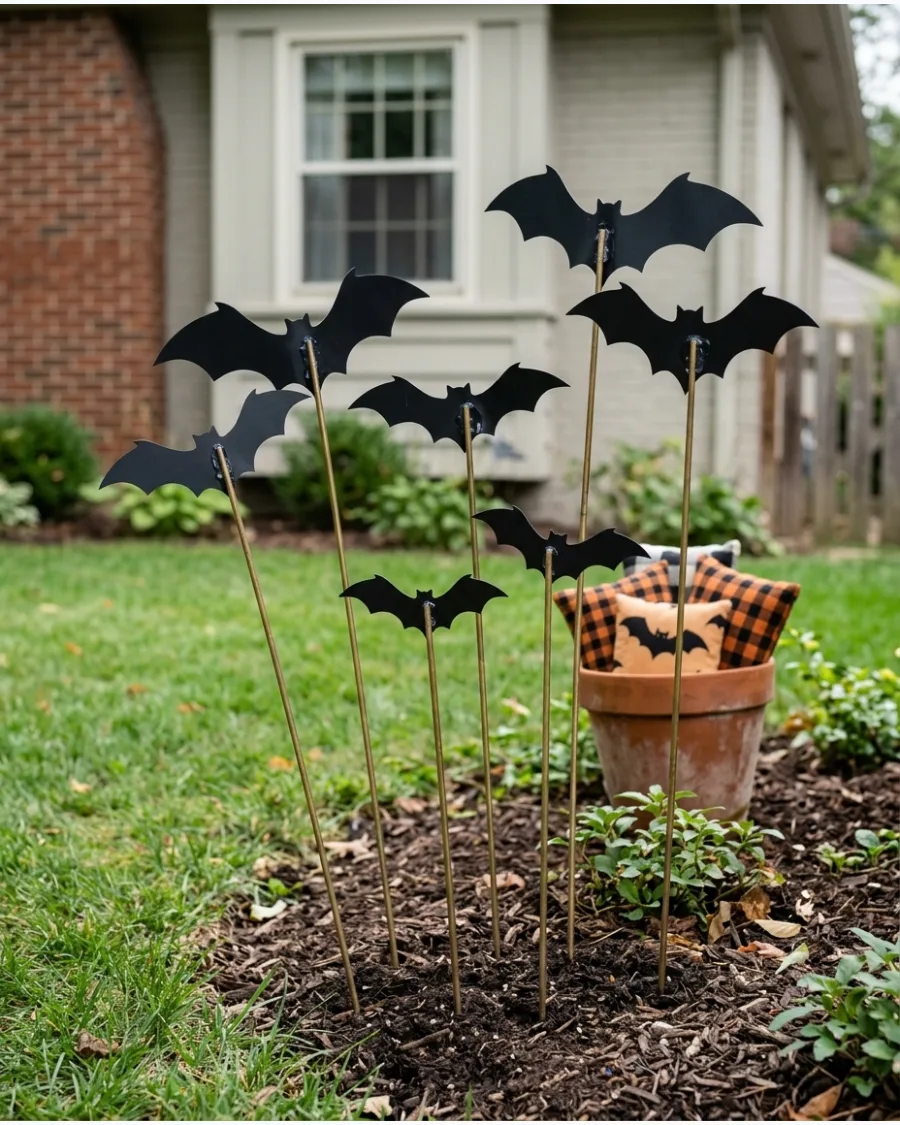
Create bat silhouettes with spread wings and attach them to garden stakes at different heights. Arrange the bats in a diagonal line across the lawn to mimic a colony taking flight from the ground. This adds a sense of movement to a static yard display.
Using varying stake heights creates a 3D effect that looks much more realistic than a flat row.
- Cut bats from black plastic sheets or stiff felt to withstand moisture.
- Use thin metal garden stakes to make the supports look invisible at night.
- Space the stakes about two feet apart for the best visual flow.
Quick win: Slightly bend the wings of plastic bats to create a more realistic, non-flat appearance when the wind blows.
25. Bubbling Witch Cauldron
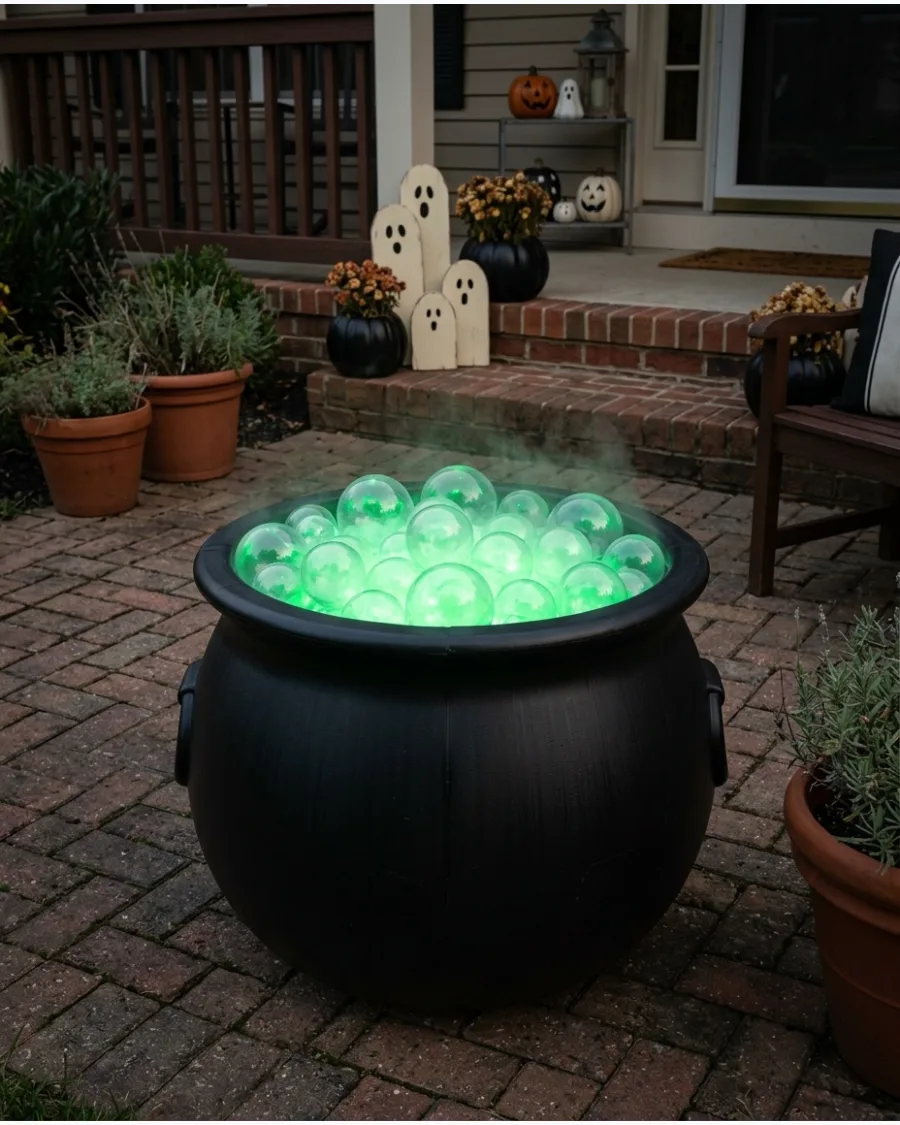
Fill a black cauldron with clear plastic ornaments or iridescent balls to look like a brewing potion. Place a strand of green battery-operated LED lights at the bottom of the pot to make the bubbles glow from within. This project creates a high-impact glowing effect without the mess of real water or fog machines.
It looks especially effective when tucked into a dark corner of a porch or garden bed.
- Use clear plastic Christmas ornaments in various sizes for realistic bubbles.
- Ensure the lights are battery-powered to avoid running cords across the yard.
- Add a layer of iridescent cellophane between the balls to catch the light.
Best shortcut: Use a handful of iridescent cellophane wrap between the ornaments to catch the light and add extra shimmer.
26. Skeleton Garden Bed
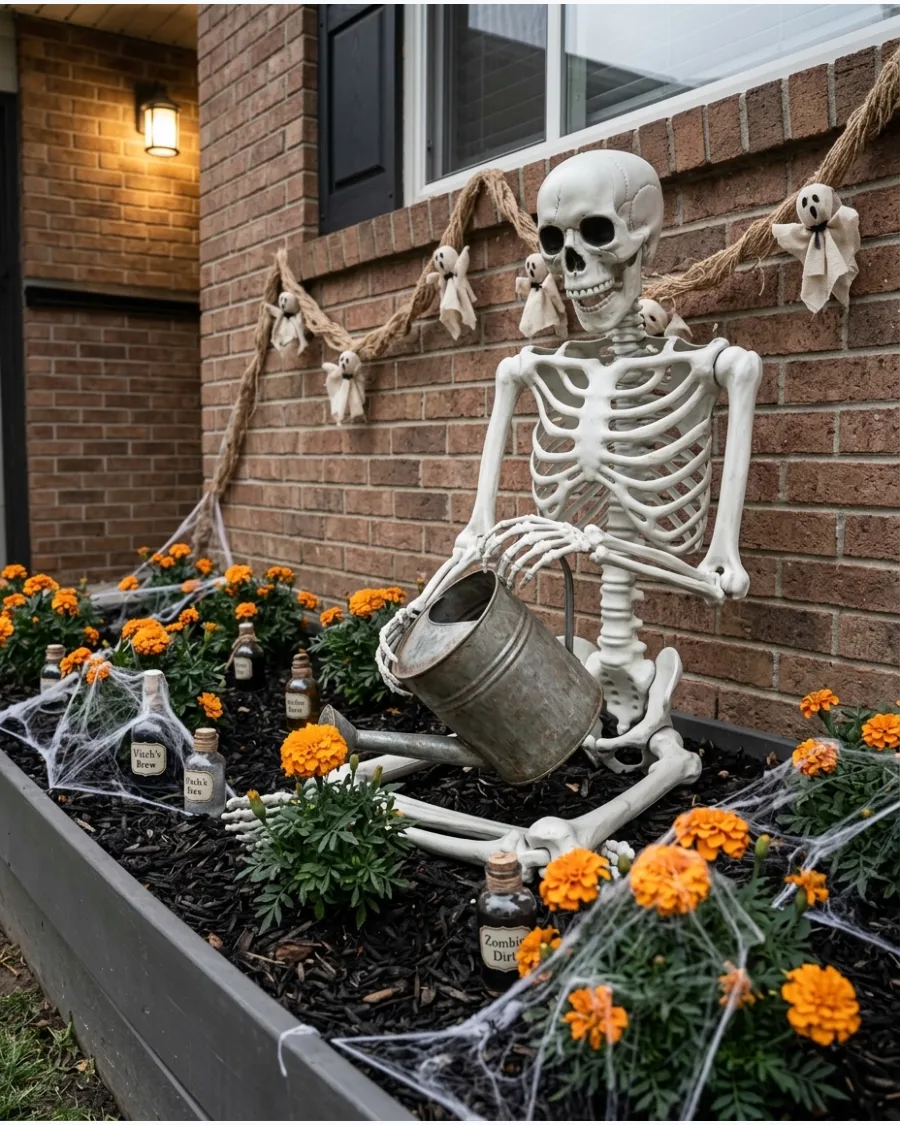
Position a poseable skeleton among your plants and partially cover it with leaves or moss. Give the skeleton a small watering can or a hand trowel to create a funny scene that looks like a gardener who never left. This adds a touch of humor to the spooky theme and makes use of existing garden tools.
It works best in a mulched flower bed where the bones stand out against the dark soil.
- Use a 5-foot poseable plastic skeleton for a life-sized impact.
- Anchor the skeleton into the ground with U-shaped landscape staples.
- Mix in real dried leaves or craft moss to make the scene look aged.
Most people skip this: Secure the skeleton's joints with clear fishing line so it stays in its pose even during high winds.
27. Haunted Pumpkin Scarecrow
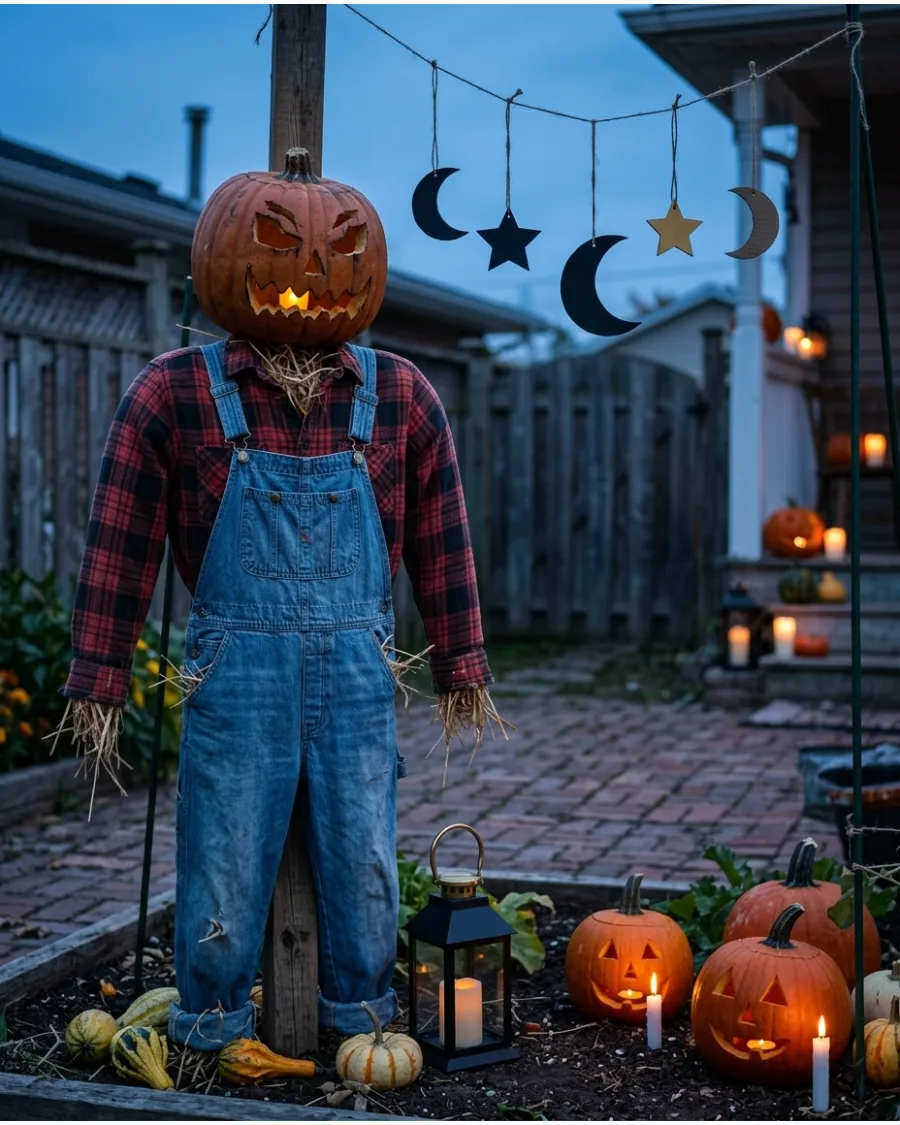
Build a scarecrow using old clothing, straw, and a faux pumpkin head for a traditional harvest look. Secure the entire figure to a strong garden post or a wooden cross-frame so it doesn't slump over in the rain. A pumpkin head is much more durable than the traditional burlap bag and allows for a carved or painted expression.
Using real straw for the hands and neck gives it an authentic, rustic texture.
- Use a faux carvable pumpkin to keep the head lightweight and rot-free.
- Stuff the clothes with straw or plastic bags to create a full shape.
- Mount the cross-frame on a 2×4 wooden board for maximum stability.
Quick win: Stuff the arms and legs with plastic grocery bags first, then add straw only at the ends to save on weight and materials.
28. DIY Monster Plant
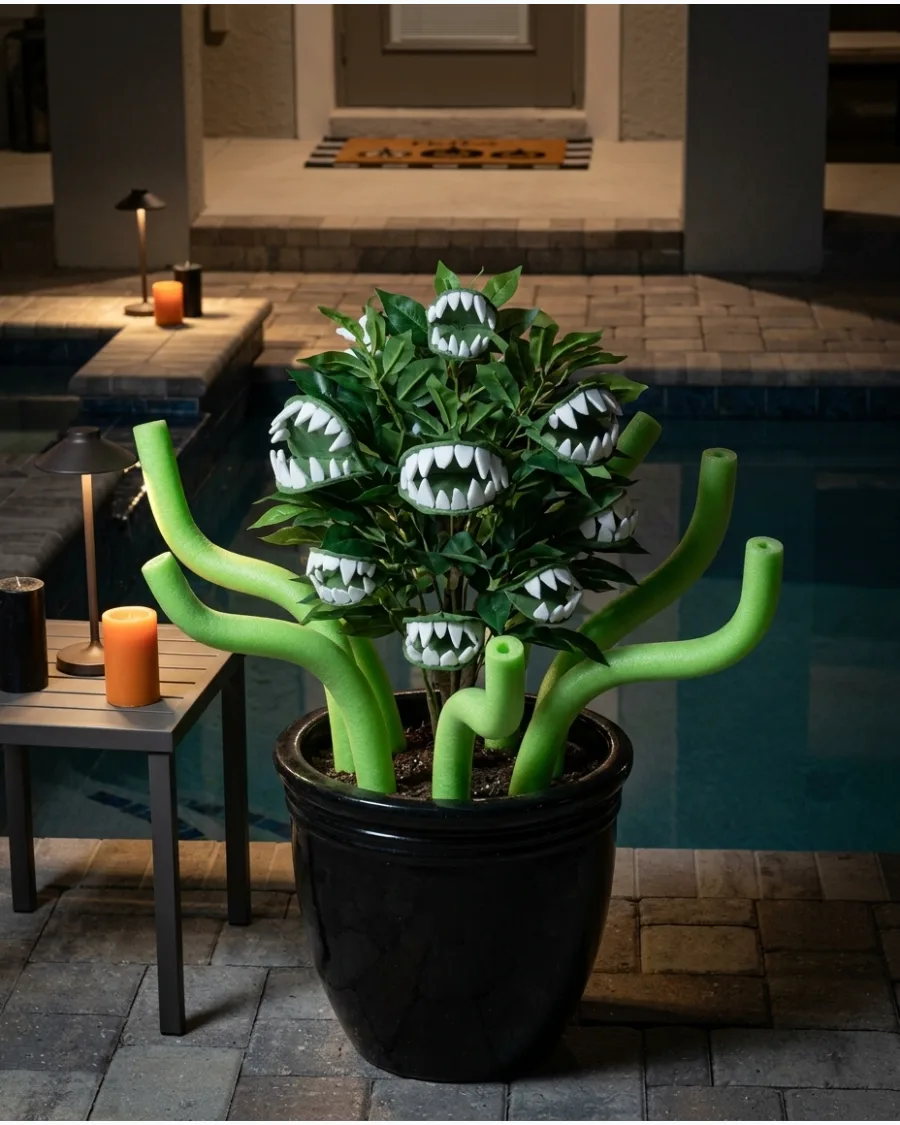
Transform a large planter into a carnivorous Halloween plant using foam leaves and painted cardboard teeth. Tuck thick green pool noodles or vines into the soil to act as reaching tentacles. This turns a standard porch planter into an unexpected creature that surprises guests as they approach the door.
Large, jagged teeth cut from white foam make the mouth of the plant look dangerous but playful.
- Use a large porch planter as the base for the creature.
- Cut jagged teeth from white craft foam and hot glue them to leaf edges.
- Bend green pool noodles into curved shapes to mimic vines.
Best shortcut: Use red spray paint on the edges of the teeth to give the monster plant a more menacing, hungry appearance.
29. Full-Moon Yard Backdrop
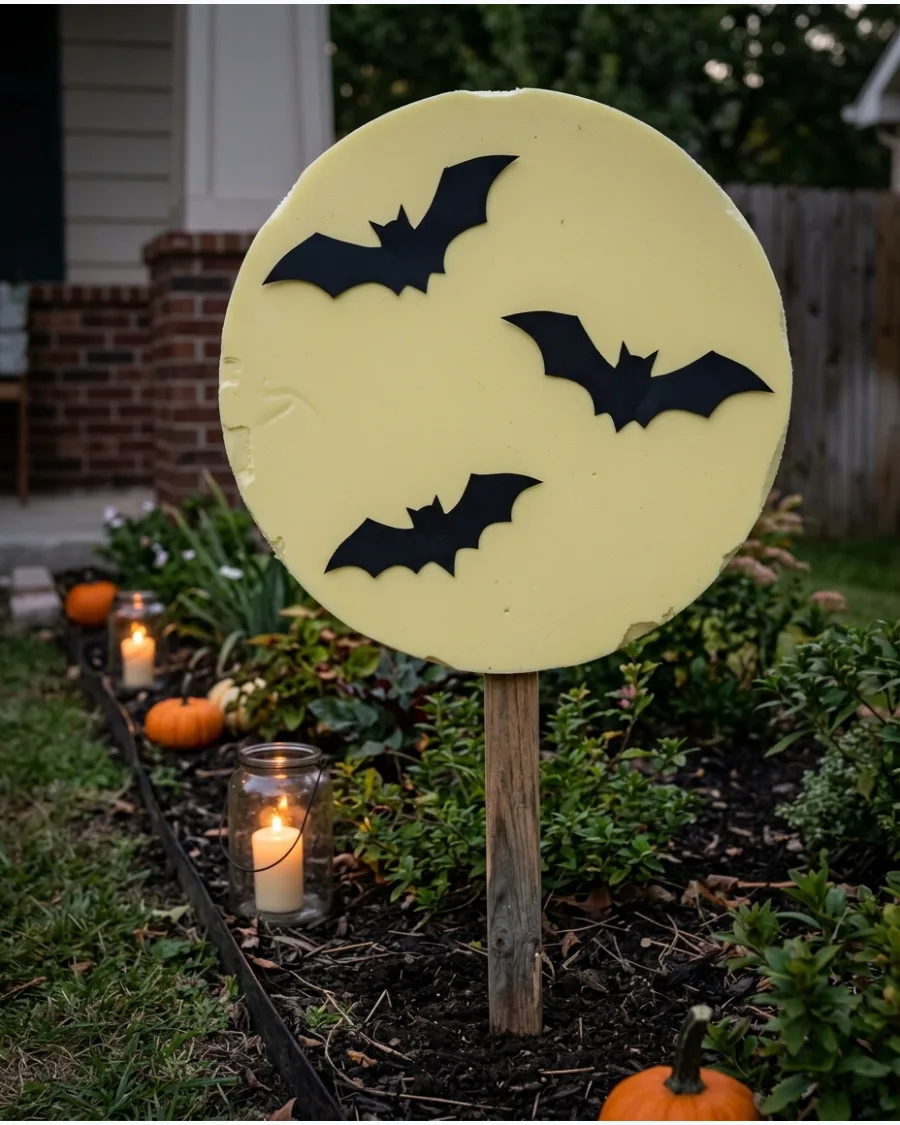
Cut a large circle from lightweight foam board and paint it pale gray or yellow to act as a moon. Place black silhouettes of bats or a flying witch directly onto the moon surface to create a striking silhouette effect. This provides a perfect backdrop for other yard decorations and looks great in photos.
Positioning a small spotlight on the ground pointing up at the moon makes it visible from the street.
- Use a 48-inch foam board or plywood for a large-scale moon.
- Paint a few faint gray craters on the yellow surface for added texture.
- Mount the moon on a wooden garden stake driven deep into the soil.
Most people skip this: Paint a few faint gray craters on the yellow circle to give the moon a more realistic, textured look.
30. Haunted Yard Shadow Screen
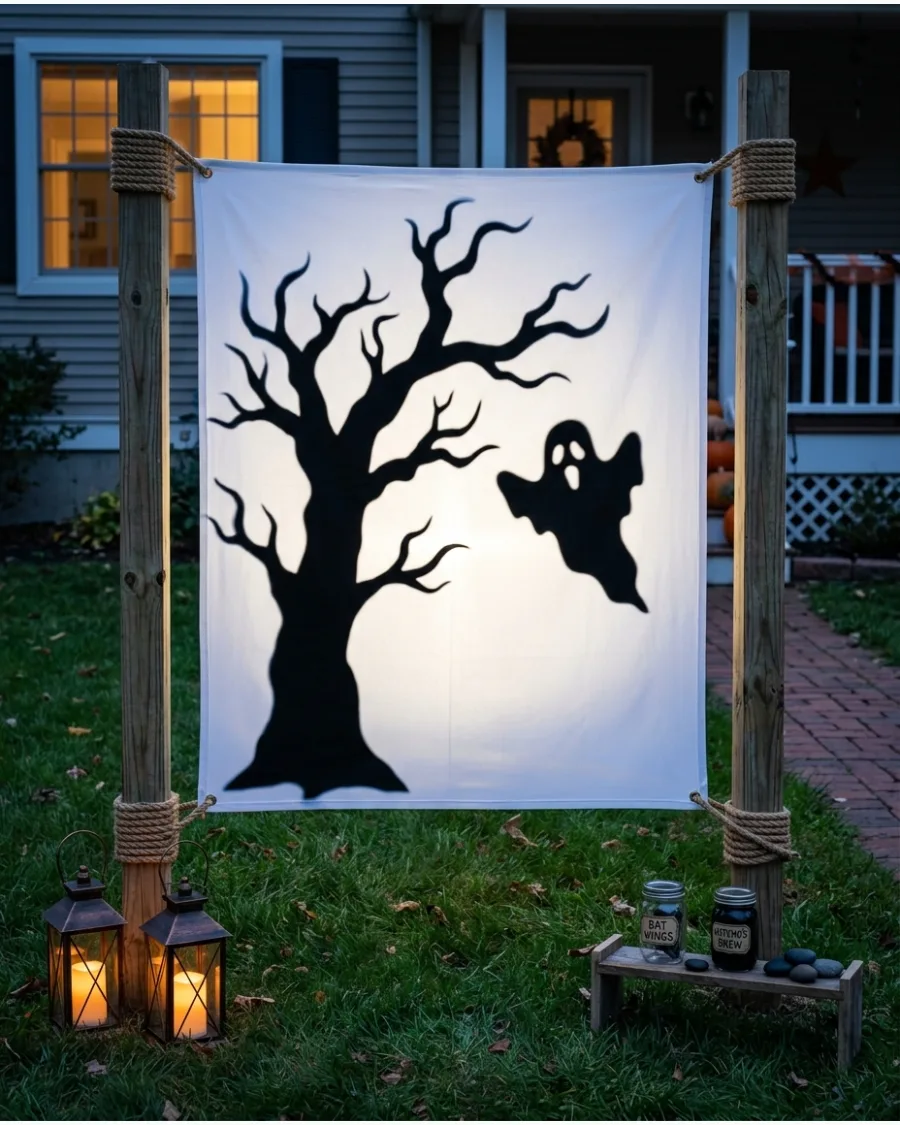
Stretch a white sheet or translucent fabric across a secure frame to create a screen. Place a bright light source behind handmade silhouettes to cast large, spooky shadows onto the fabric. This technique allows you to create massive scenes like a graveyard or a giant spider without building heavy structures.
It works best when the screen is placed in an open area of the lawn where there is no competing light.
- Use a white flat bedsheet as the projection surface.
- Build a simple frame using 1×2 wooden furring strips for stability.
- Position a bright LED floodlight about 5 feet behind the silhouettes.
Quick win: Use a colored light bulb, like purple or orange, behind the screen to give the shadows a more atmospheric and eerie glow.
DIY Ghost Decorations
31. Classic Sheet Ghosts
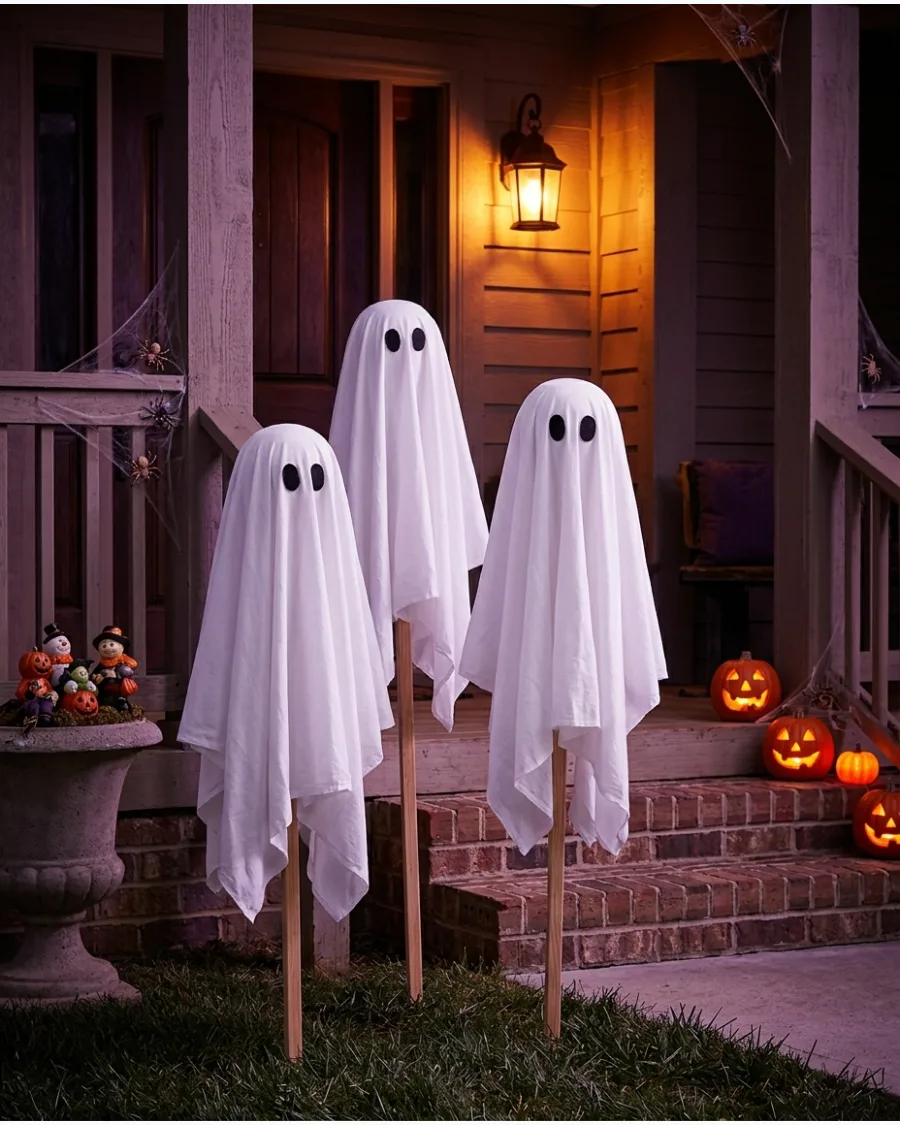
Use old white cotton sheets over tall wooden garden stakes to create life-sized figures for the yard. Stagger the heights of the stakes to make the group look like a moving crowd rather than a static line. Plain cotton drapes much better than polyester blends, which tend to look too shiny and unnatural outdoors.
These figures work best when clustered in groups of three or more to create a sense of scale.
- Budget: Under $10 using old linens from home.
- Placement: Group in a corner of the yard to create a focused scene.
- Style: Use tea-stained sheets for a weathered or vintage look.
Quick win: Use safety pins on the inside to secure the sheet to the top of the stake so it doesn't blow away in the wind.
32. Hanging Cheesecloth Ghosts
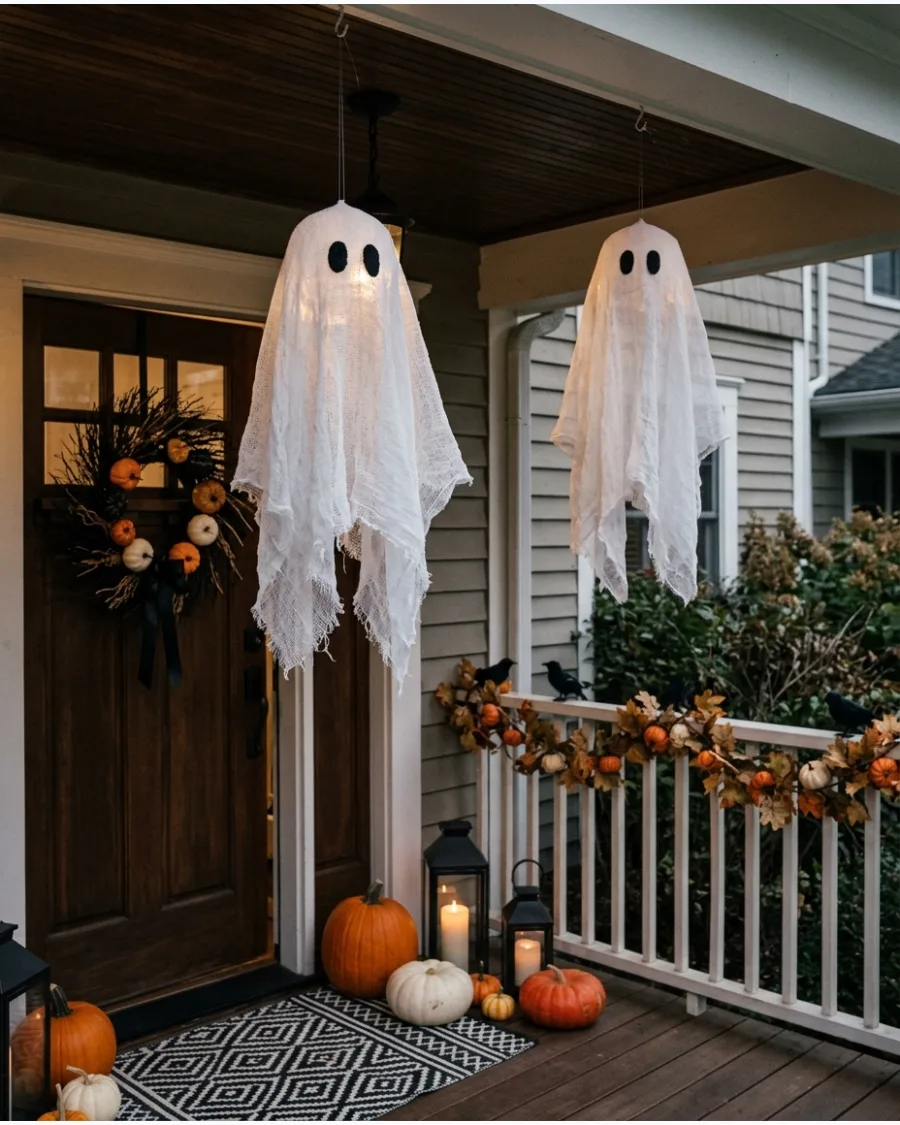
Dip cheesecloth in a mixture of fabric stiffener and water before draping it over a balloon to dry. Once the material is completely stiff, pop the balloon to leave behind a hollow, translucent shell that holds its shape. These ghosts are incredibly lightweight and catch the slightest breeze when hung.
Keep them in protected areas like a porch because moisture will cause the stiffener to soften.
- Time: 24 hours for the fabric to dry completely.
- Setup: Hang from porch rafters using small screw hooks or clear line.
- Renter tip: Use adhesive ceiling hooks instead of screws to avoid damage.
Best shortcut: Shred the bottom edges of the cheesecloth with scissors before it dries for a more tattered, ethereal appearance.
33. Yarn Ghost Garland
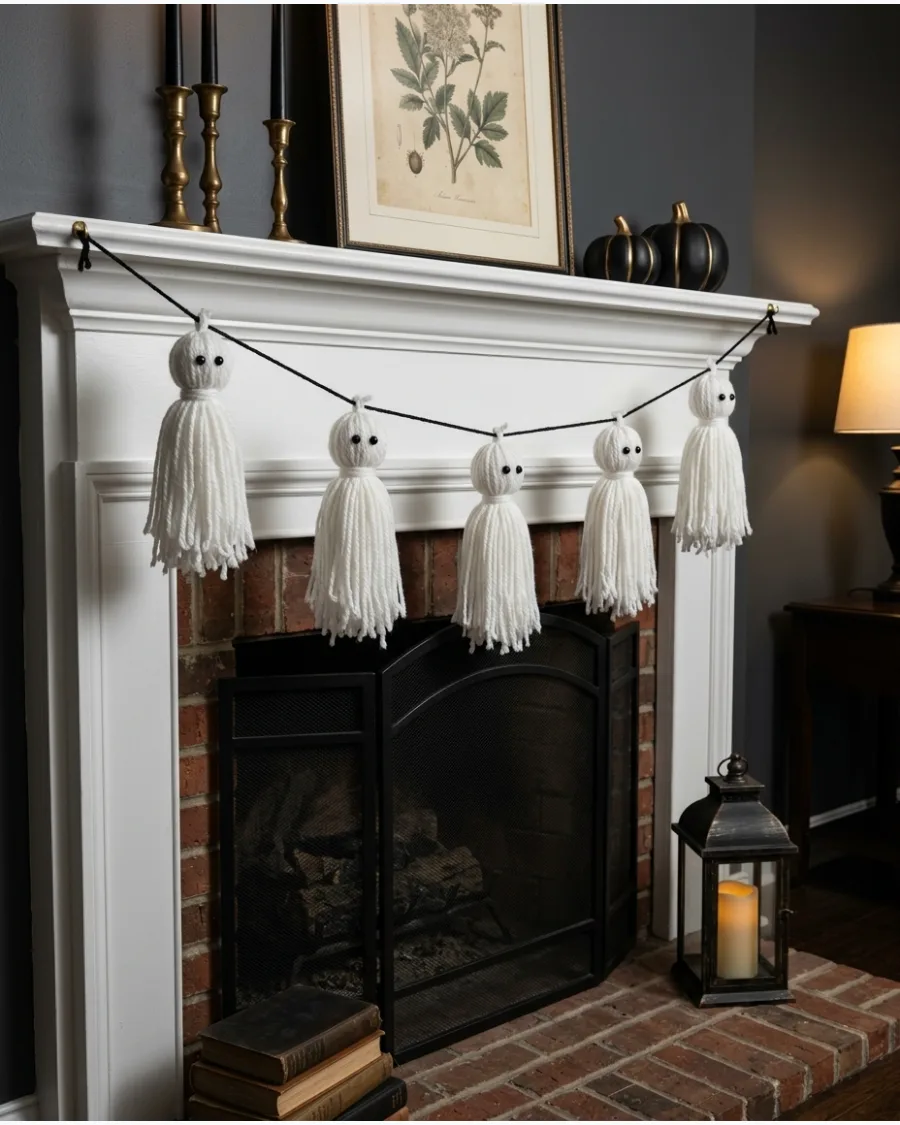
Wrap white yarn around a piece of cardboard to create thick tassels that look like tiny spirits. Tie a black string through the top loops of each tassel to ensure they hang straight on the main garland cord. This project is an excellent way to use up leftover craft supplies without spending extra money.
It adds a soft, handmade texture to a mantel or shelf display.
- Budget: Free if using scrap yarn from previous projects.
- Placement: Drape over a mirror, along a bookshelf edge, or across a headboard.
- Style: Mix in silver or gold yarn for a modern, festive touch.
Most people skip this: Use a pet brush or wide-tooth comb to fluff the bottom of the yarn tassels for a softer, fuller look.
34. Macramé Rope Ghosts
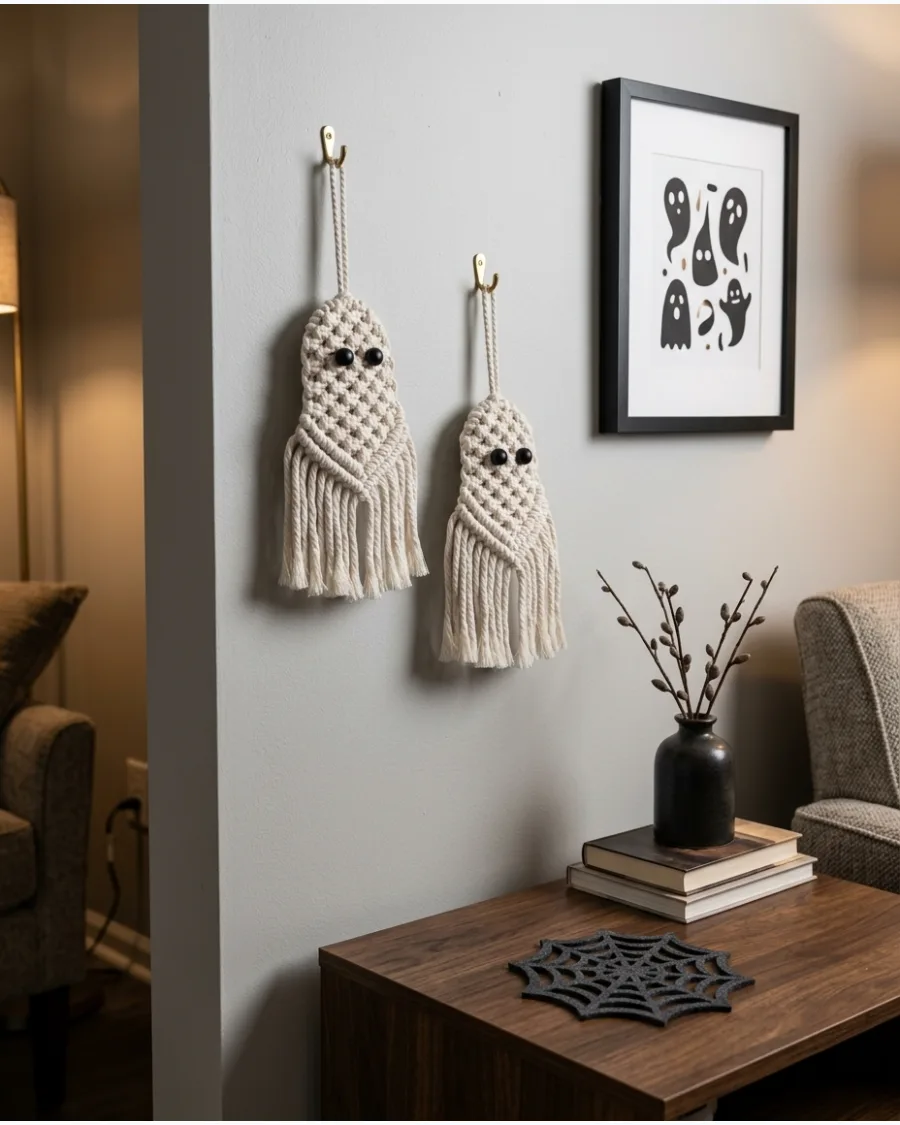
Form small loops with white cotton rope and secure them with a simple knot at the neck area. Brush out the bottom strands of the rope with a fine-tooth comb to create a full, fringed tail that adds visual interest. These small accents fit perfectly into a gallery wall or on a tiered tray for a minimalist look.
They offer a sophisticated, bohemian take on traditional spooky decor.
- Materials: Cotton macramé cord and small black beads for eyes.
- Setup: Attach to walls with small finishing nails or clear adhesive strips.
- Style: Ideal for minimalist or boho-themed home interiors.
Quick win: Dip the very tips of the rope fringe in light gray fabric dye to give the ghosts a dusty or aged effect.
35. Balloon Ghost Family
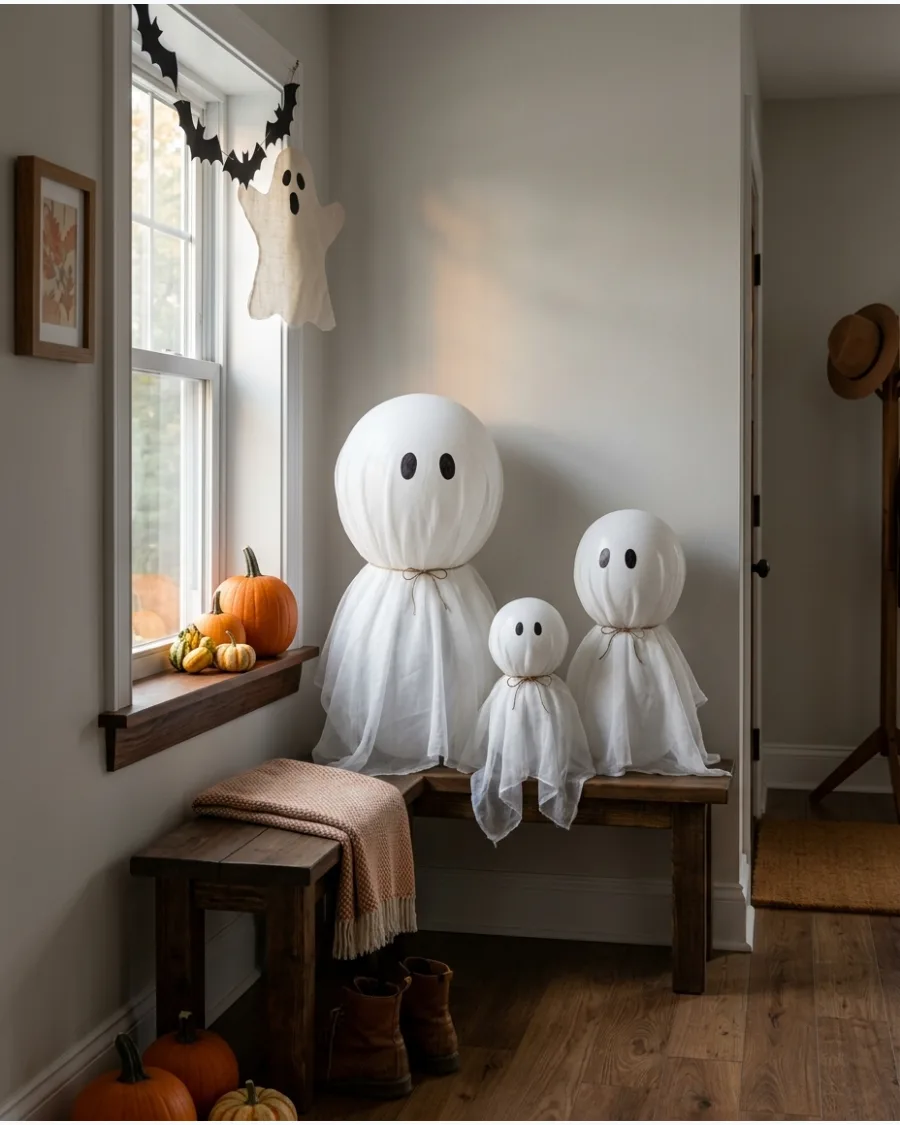
Inflate white balloons to various sizes and drape them with lightweight white fabric or tissue paper. Draw the faces directly onto the fabric with a permanent marker so the features do not shift or disappear. Grouping different sizes together creates an instant focal point that feels intentional and playful in an entryway.
It is a high-impact way to fill a large empty corner quickly.
- Budget: Under $15 for a pack of balloons and basic fabric.
- Placement: Keep away from sharp corners or direct heat sources.
- Setup: Use a small piece of double-sided tape on the bottom to keep them from rolling.
Best shortcut: Use helium if you want them to float, but tie them to a heavy weight like a painted rock hidden under the fabric.
36. Tomato Cage Ghost
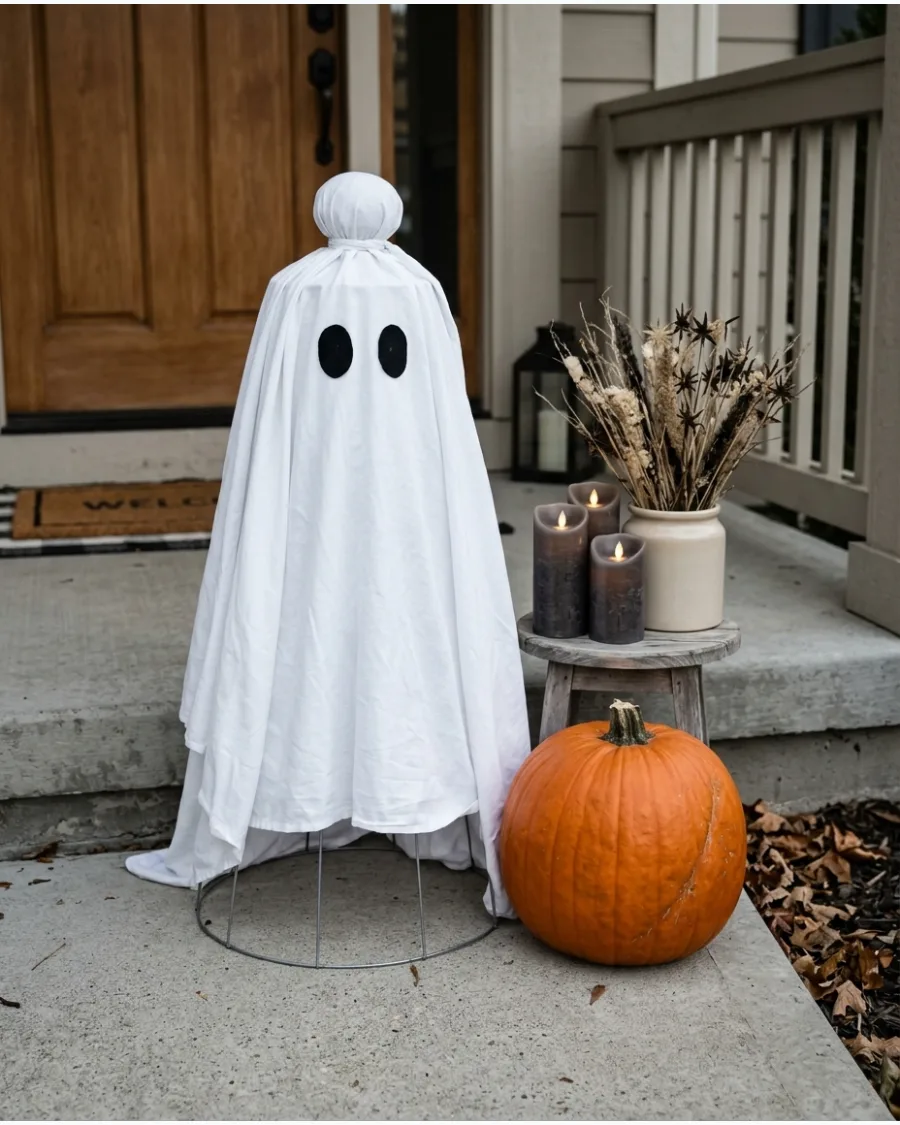
Flip a wire tomato cage upside down and zip-tie the legs together to create a sturdy cone frame. Place a large foam ball on the top point to give the ghost a rounded head before draping it with a white sheet. This is the most effective way to create a large-scale decoration that will not tip over in the wind.
Adding battery-operated lights inside makes the entire figure glow from within.
- Materials: 3-foot tomato cage, foam ball, and a white twin sheet.
- Setup: Place a heavy brick on the bottom wire ring for extra stability outdoors.
- Storage: Fold the sheet and stack the cages inside each other for easy storage.
Quick win: Thread a string of battery-operated orange or purple lights inside the cage for a spooky internal glow at night.
37. Glowing Ghost Jars
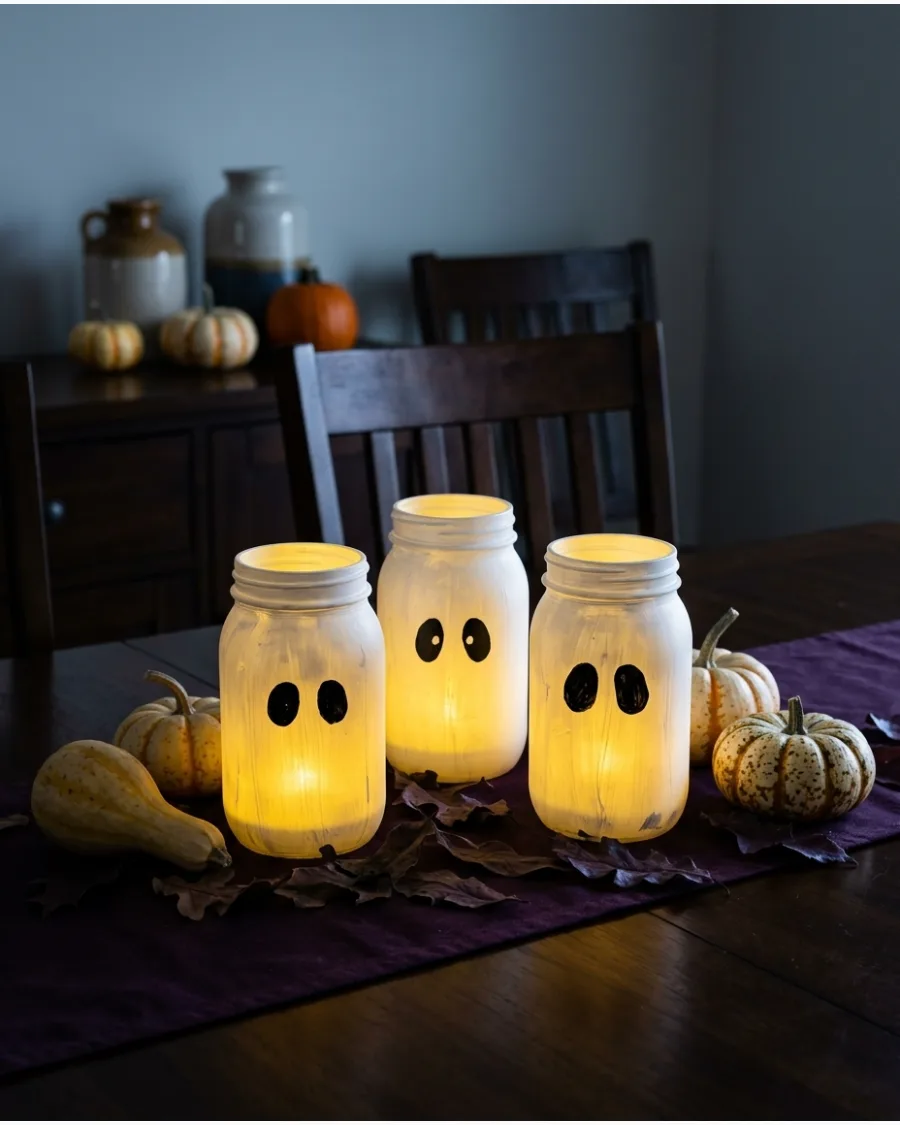
Clean out old glass jars and apply a thin layer of white matte paint or white tissue paper to the exterior. Draw simple black oval eyes on the front and drop a battery-operated tea light inside to make the entire jar emit a soft glow. These look best when lined up on a windowsill or used as a centerpiece for a dining table.
It is a great way to recycle household glass into functional holiday lighting.
- Budget: Nearly free when using recycled pickle or mason jars.
- Placement: Line them up on a windowsill, kitchen counter, or fireplace hearth.
- Safety: Use only LED tea lights to avoid overheating the glass or melting the paint.
Most people skip this: Use frosted glass spray paint instead of regular acrylic paint for a more professional and even finish.
38. Paper Ghost Garland
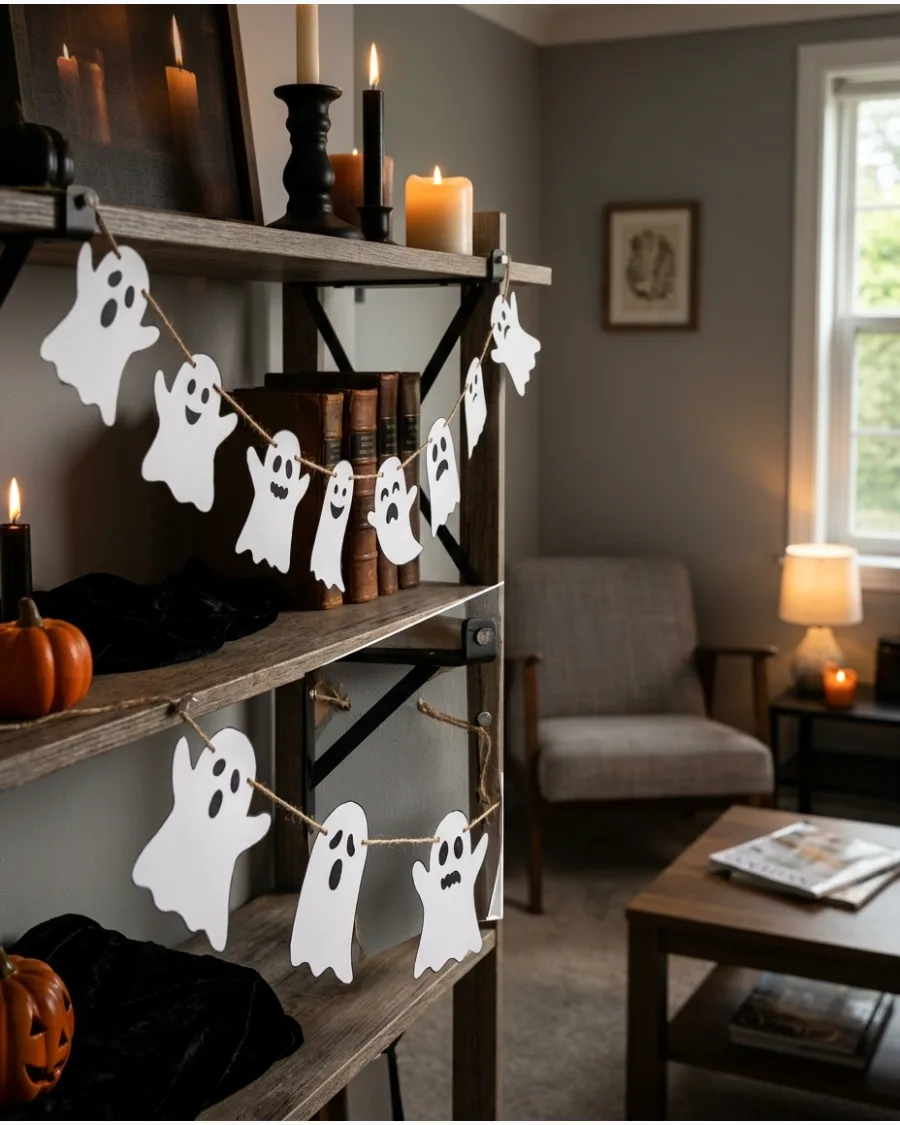
Trace ghost shapes onto heavy white cardstock and cut them out with sharp scissors. Punch two small holes in the arms of each ghost to thread the string through so they stay upright and do not flip over. This project is simple enough for a quick afternoon activity but still looks clean and modern.
Using a thick black twine provides a nice contrast against the white paper shapes.
- Materials: White cardstock, black twine, and a hole punch.
- Setup: Use clear tape or small command hooks to secure the ends to furniture.
- Adaptation: Use black cardstock with white ink for a unique negative ghost look.
Best shortcut: Use a decorative circle hole punch for the eyes to get perfectly uniform and clean circles every time.
39. No-Sew Ghost Pillows
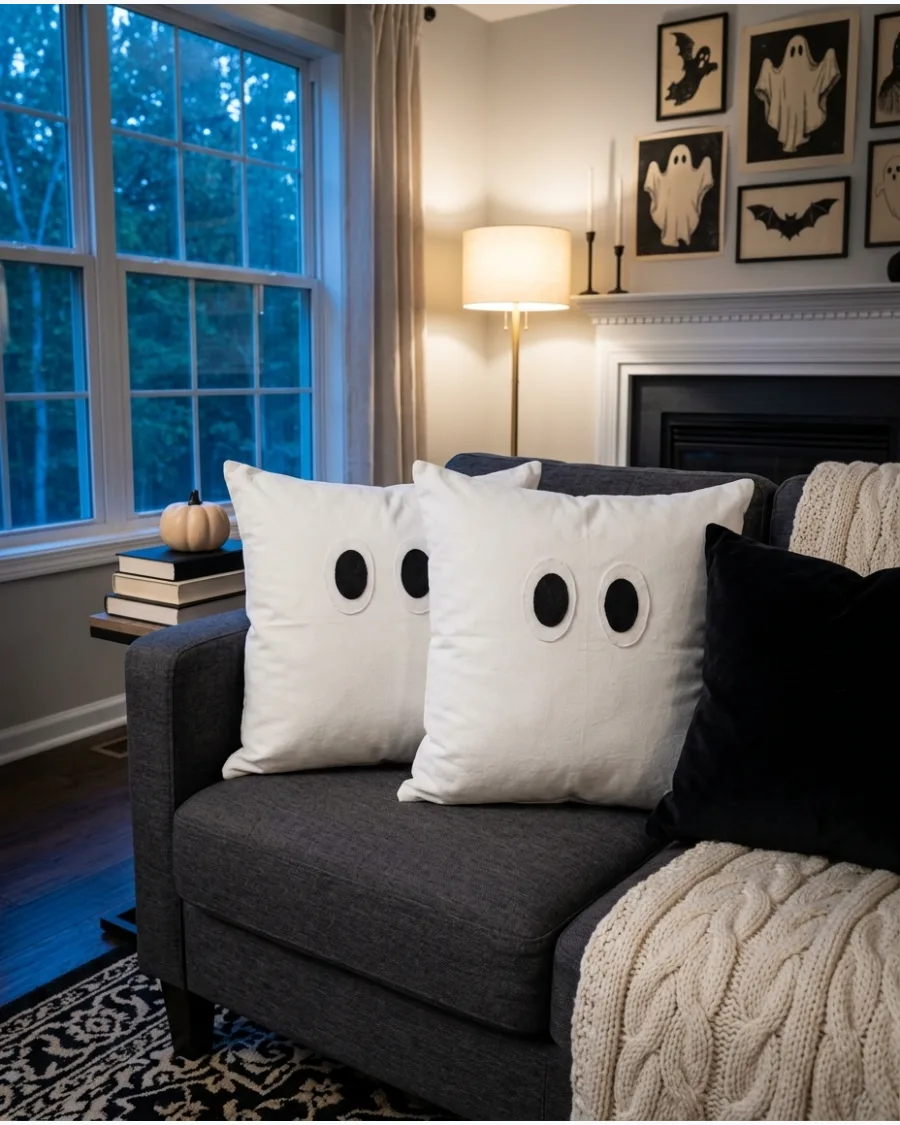
Wrap existing throw pillows in white fabric and secure the back with safety pins or fabric-safe tape. Cut large eyes and a mouth out of black felt and press them onto the front using temporary adhesive strips. This method allows for festive decorating without the need to store bulky seasonal pillows for the rest of the year.
It works best on square pillows for a clean, uniform appearance.
- Time: 10 minutes per pillow for a quick room transformation.
- Placement: Use on a sofa, armchair, or bed for a subtle holiday touch.
- Renter tip: Use peel-and-stick felt for easy removal without leaving residue.
Quick win: Use a stretchy white t-shirt material for the cover to get a smooth, wrinkle-free fit over the pillow.
40. Framed Vintage Ghost Portraits
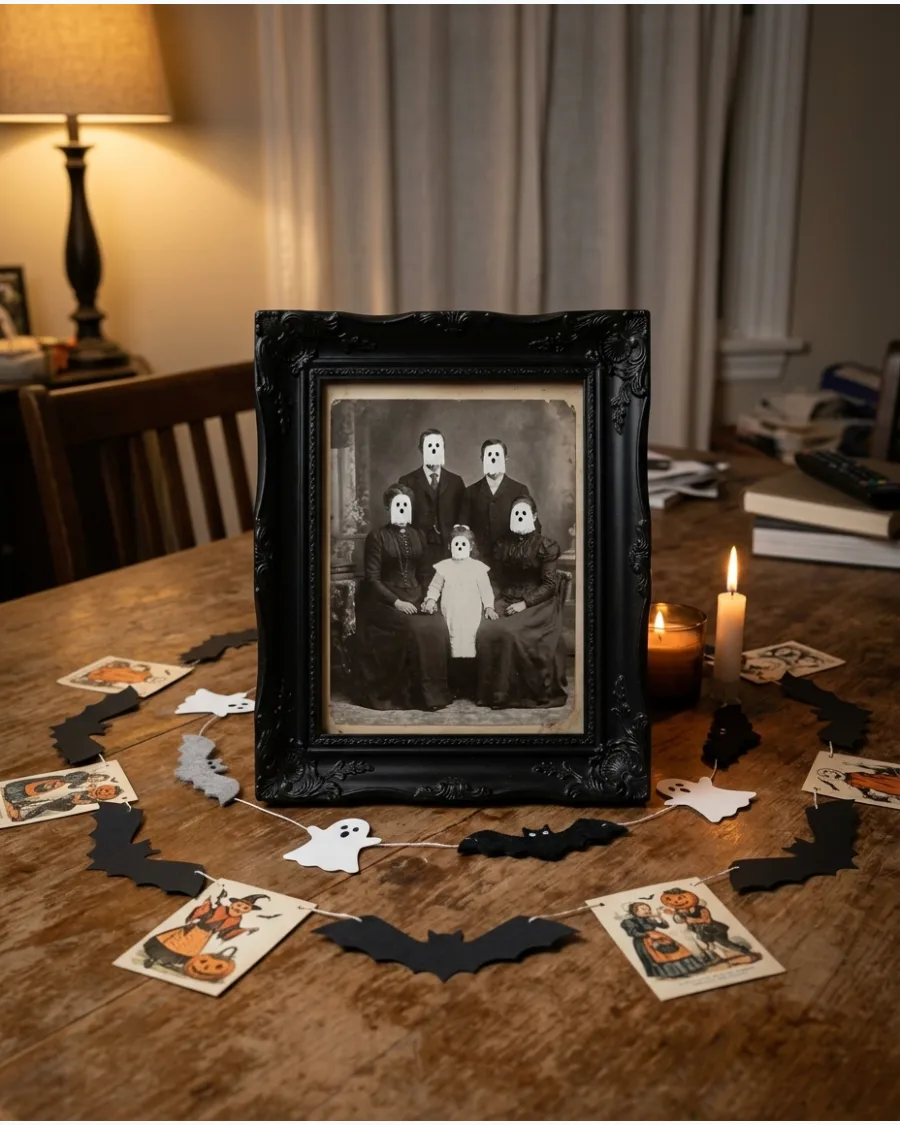
Print out black and white vintage photos and use a white paint pen to draw simple ghost shapes over the figures. Place the modified photos in dark, ornate frames to make them look like authentic haunted family heirlooms. Mixing these in with regular family photos creates a subtle and sophisticated spookiness that guests will notice upon closer inspection.
It is an easy way to add a gothic vibe to a side table.
- Budget: Use thrift store frames to achieve an authentic aged look.
- Placement: Prop on a mantel or hang within a hallway gallery wall.
- Style: Spray paint mismatched frames matte black for a cohesive, spooky look.
Most people skip this: Use a matte finish spray on the frame glass to reduce glare and make the ghosts look like they are part of the original photo.
41. Ghost Halloween Tree
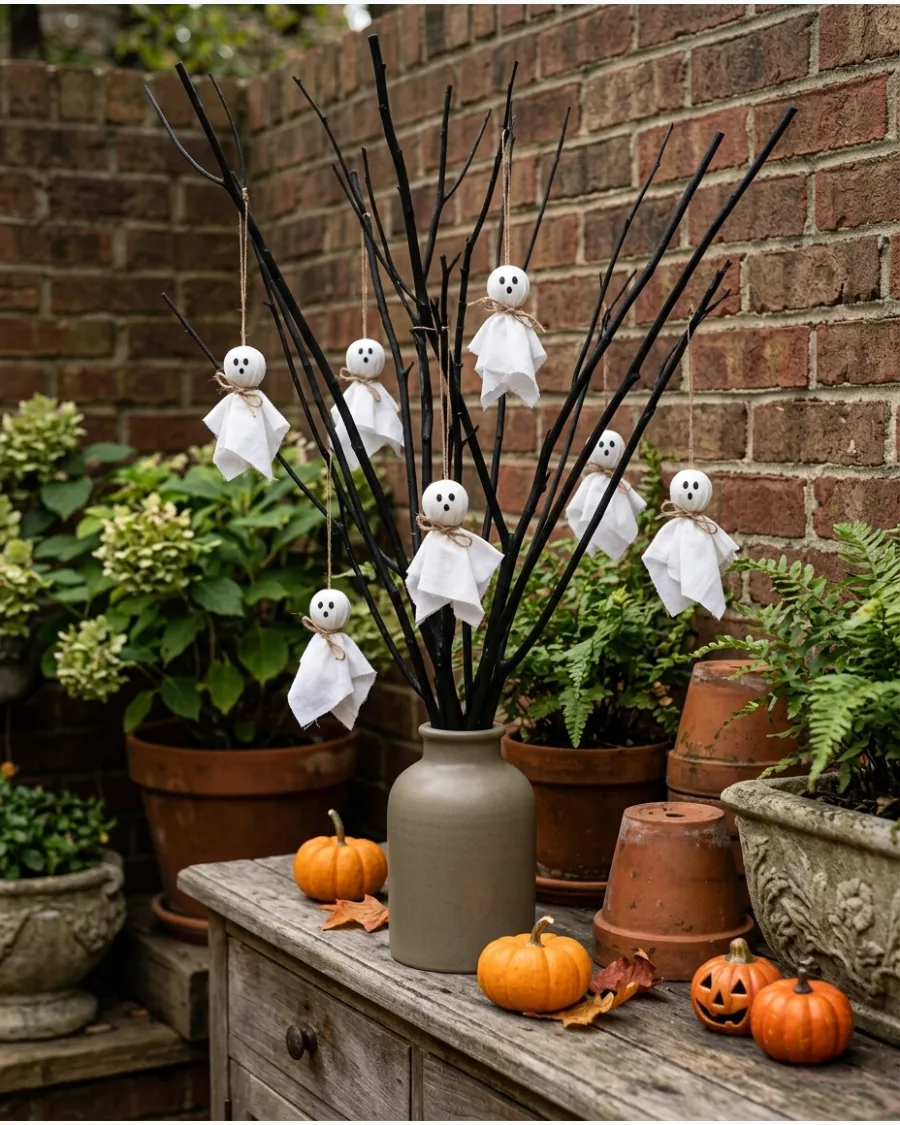
Use bare branches painted matte black to create a spooky centerpiece. Hang tiny ghosts made from white fabric scraps or clay using clear fishing line.
Vary the heights of the ghosts to make the tree look like it is swarming with spirits. Natural branches found in the yard provide the best organic shapes for a hauntingly realistic look.
- Budget: Five dollars for paint and scrap fabric.
- Set branches in heavy floral foam to keep the vase from tipping.
- Swap fabric for white air-dry clay for a more modern look.
Quick win: Use a textured black spray paint to give the branches a more realistic, charred appearance.
DIY Witch Decorations
42. Tomato Cage Witch
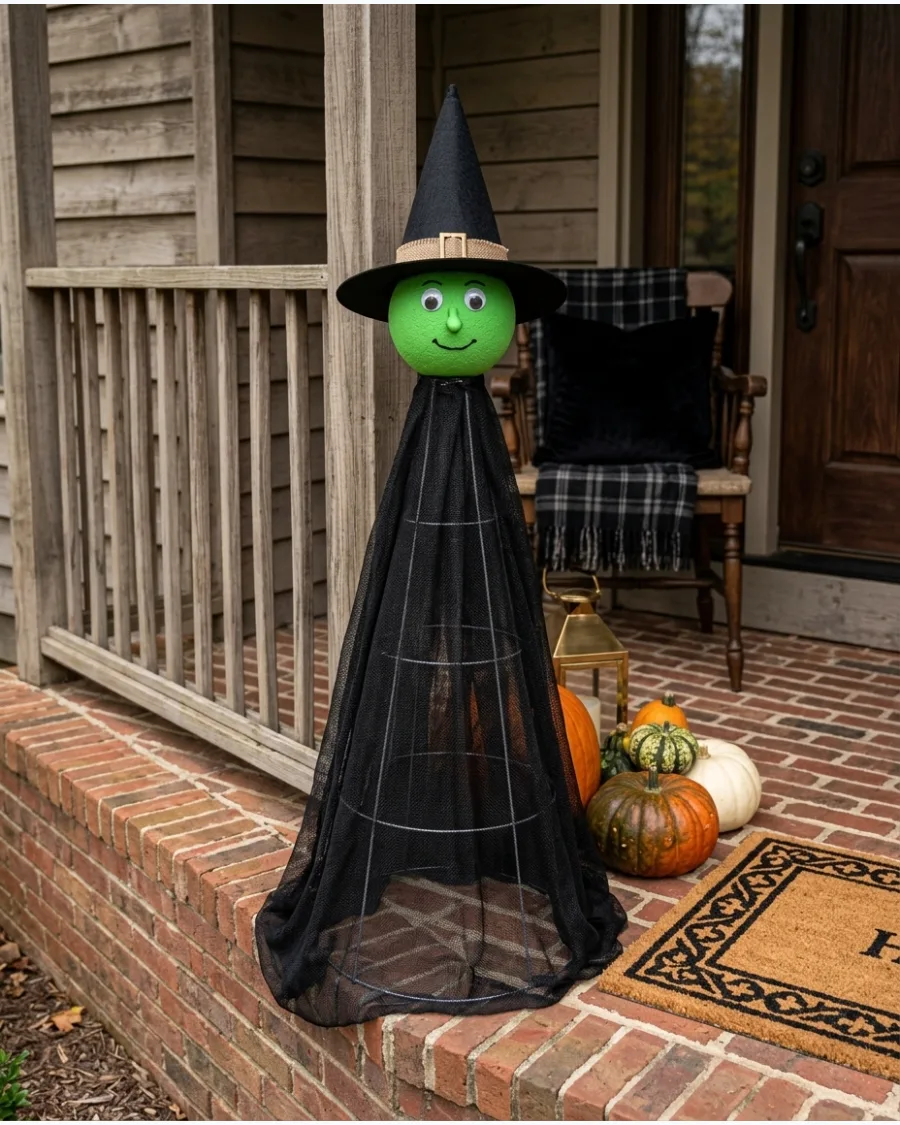
Flip a metal tomato cage upside down and zip-tie the top prongs together to create a conical body. Draping black landscape fabric or an old skirt over the frame creates a sturdy, weather-resistant figure.
Secure a foam ball to the top and top it with a cheap witch hat to finish the silhouette. Using a wire frame ensures the figure won't collapse in the wind on a porch.
- Sourcing: Re-use garden tomato cages or buy them for four dollars each.
- Anchor the bottom of the cage with a heavy brick or garden stake.
- Add battery-powered purple string lights underneath the fabric for a glow.
Most people skip this: Stuff the sleeves with crumpled newspaper to give the figure more realistic bulk.
43. Witch Legs in a Planter
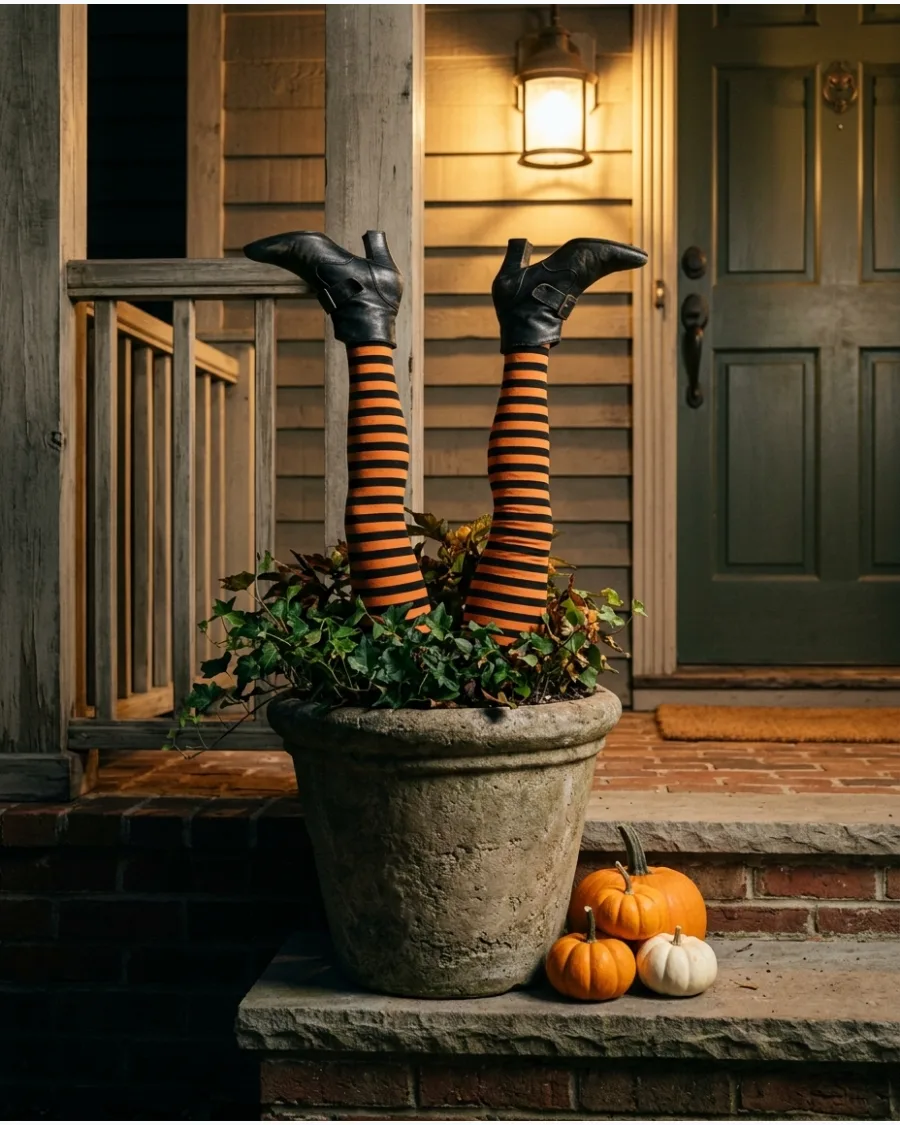
Stuff a pair of striped tights with polyester batting or pool noodles to create firm legs. Insert the open ends into an existing porch planter and add a pair of thrifted pointed boots.
Tuck the edges of the tights deep into the soil or moss to hide the transition. This project works best in wide, heavy pots that can support the weight of the legs without falling over.
- Timing: Twenty minutes once materials are gathered.
- Use pool noodles inside the tights to keep the legs from flopping over.
- Add dried moss or faux cobwebs around the base to hide the entry point.
Best shortcut: Use a pair of child-sized boots so the legs don't become top-heavy and tip the pot.
44. Witch Broom Wreath
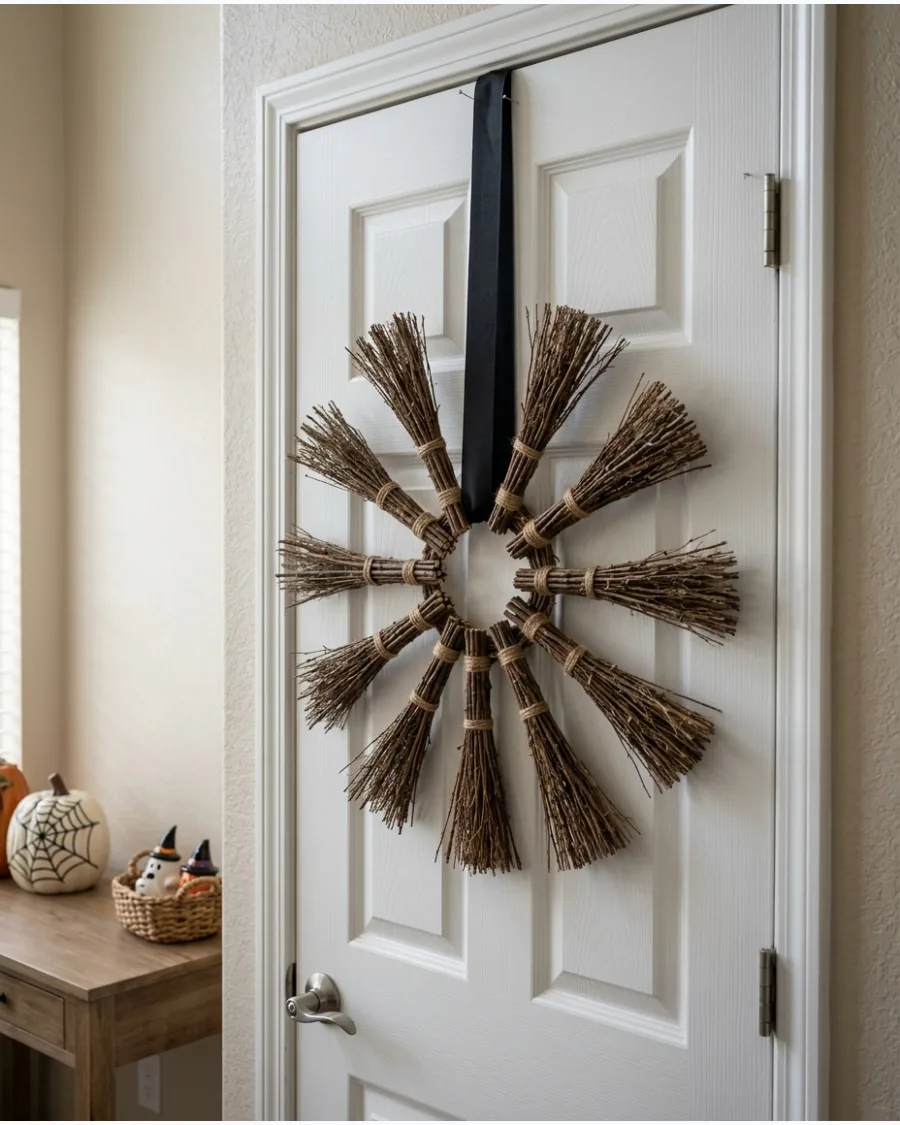
Glue miniature cinnamon brooms or twig bundles around a flat wooden wreath form. Add a central focal point like a small witch hat or a cluster of dried orange slices.
Overlap the broom handles so they all point in a clockwise direction for a sense of movement. Natural twig brooms add a pleasant scent to an entryway while looking much more high-end than plastic versions.
- Budget: Fifteen dollars for miniature brooms and a wreath base.
- Use hot glue for the brooms and wire for the heavy ribbon.
- Scale the broom size to the door; six-inch brooms work best for standard doors.
Quick win: Lightly singe the ends of the broom bristles with a lighter for a more authentic, used look.
45. Glowing Potion Bottle Display
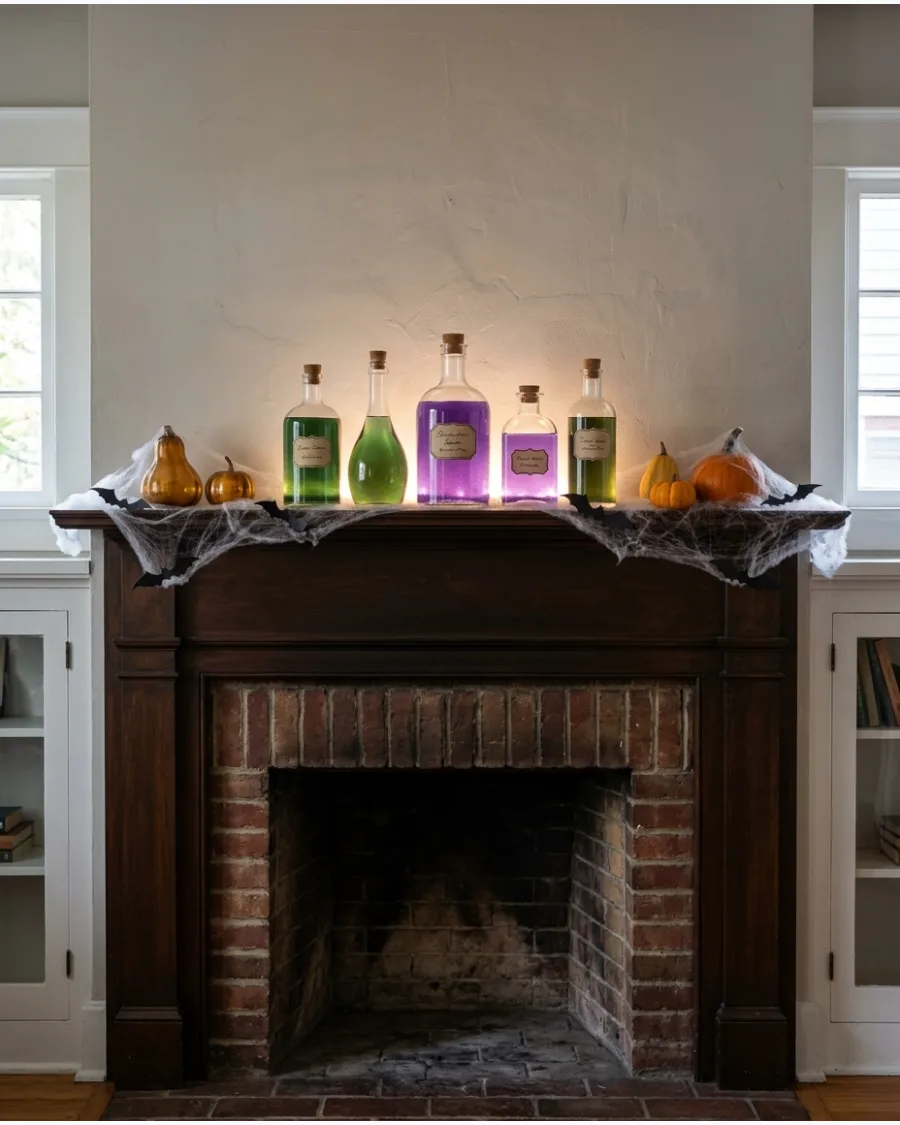
Upcycle glass jars of different shapes by filling them with water and a single drop of food coloring. Print or hand-draw aged labels and tea-stain them for a weathered look.
Hide a small LED puck light or glow stick behind the bottles to make the liquid shimmer. Grouping bottles in odd numbers creates a more professional, curated look on a shelf.
- Sourcing: Save condiment jars and wine bottles for a zero-cost base.
- Use a glue stick for labels so they can be easily removed after the holiday.
- Add a pinch of mica powder to the water for a swirling, magical effect.
Most people skip this: Use tonic water instead of regular water; it glows bright blue under a blacklight.
46. Overflowing Cauldron Bubbles
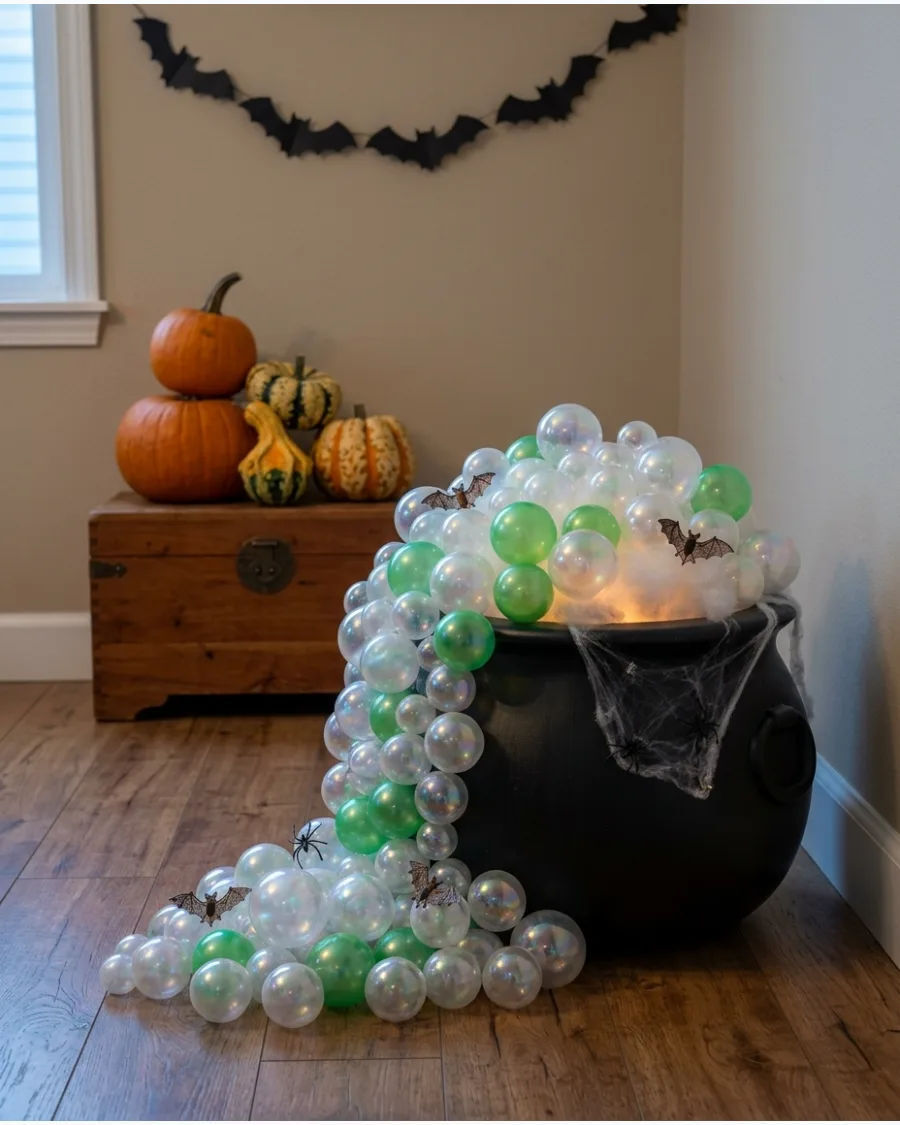
Fill a plastic cauldron with crumpled paper to create height, then hot glue various sizes of plastic ornaments to the top. Use a mix of clear, iridescent, and lime green balls to mimic a frothing potion.
Let several ornaments spill over the side and onto the floor or table for a dynamic effect. This technique provides a much cleaner look than using real dry ice or liquid.
- Budget: Ten dollars for a cauldron and a bag of multi-sized ornaments.
- Use low-temp hot glue to avoid melting the plastic ornaments or the cauldron.
- Place a purple spotlight nearby to enhance the bubbles at night.
Best shortcut: Use clear iridescent ball pit balls to get a large volume of bubbles for a very low price.
47. Oversized Spellbook Stack
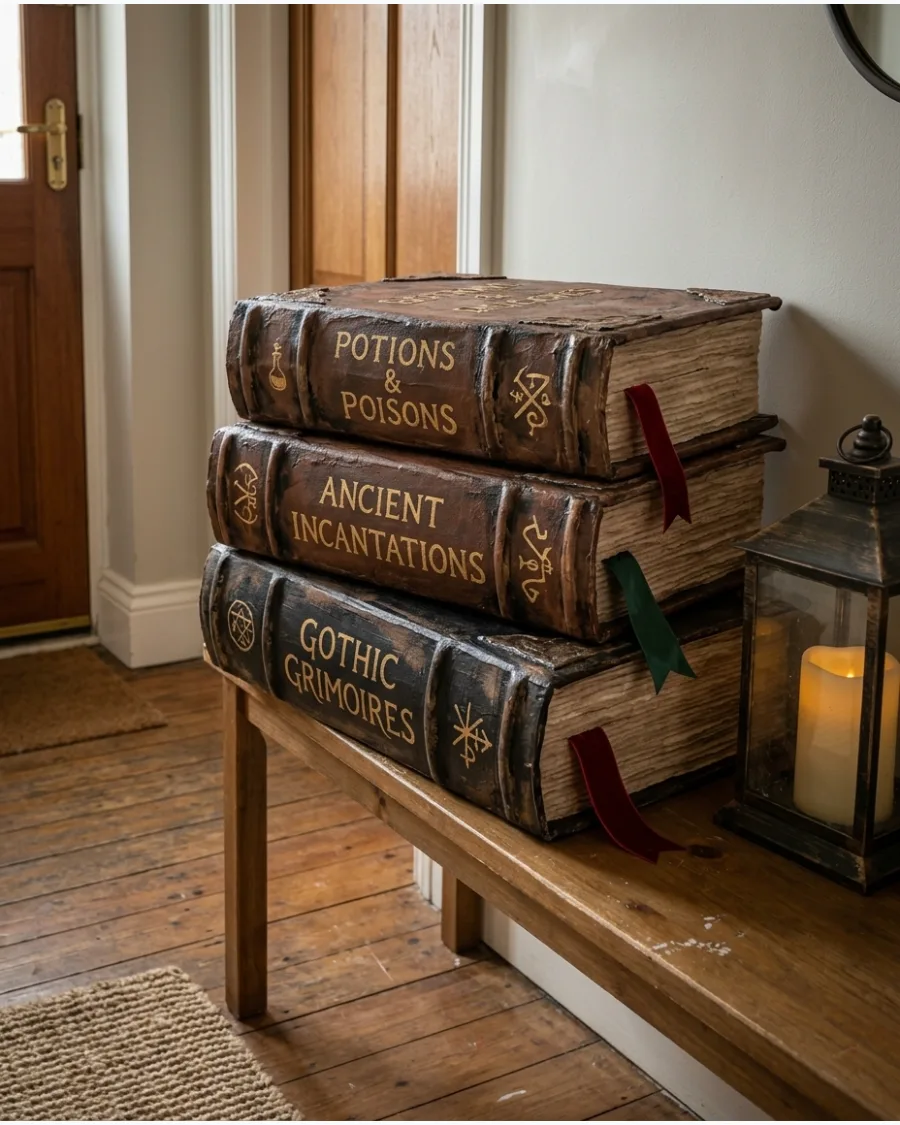
Stack three different sized shipping boxes and wrap them in dark brown or black kraft paper. Use a hot glue gun to draw raised designs on the spines before painting over them to look like embossed leather.
Paint the edges of the pages with gold or off-white acrylic paint to mimic old paper. Cardboard is the best material here because it is lightweight and easy to stack without needing heavy-duty shelving.
- Timing: One hour for assembly plus drying time.
- Use a dry-brush technique with tan paint to make the leather look aged.
- Add a plastic spider or a faux crow on top of the stack for extra detail.
Quick win: Use paper towel rolls cut in half vertically to create the curved spines of the books.
48. Mini Witch Hat Garland
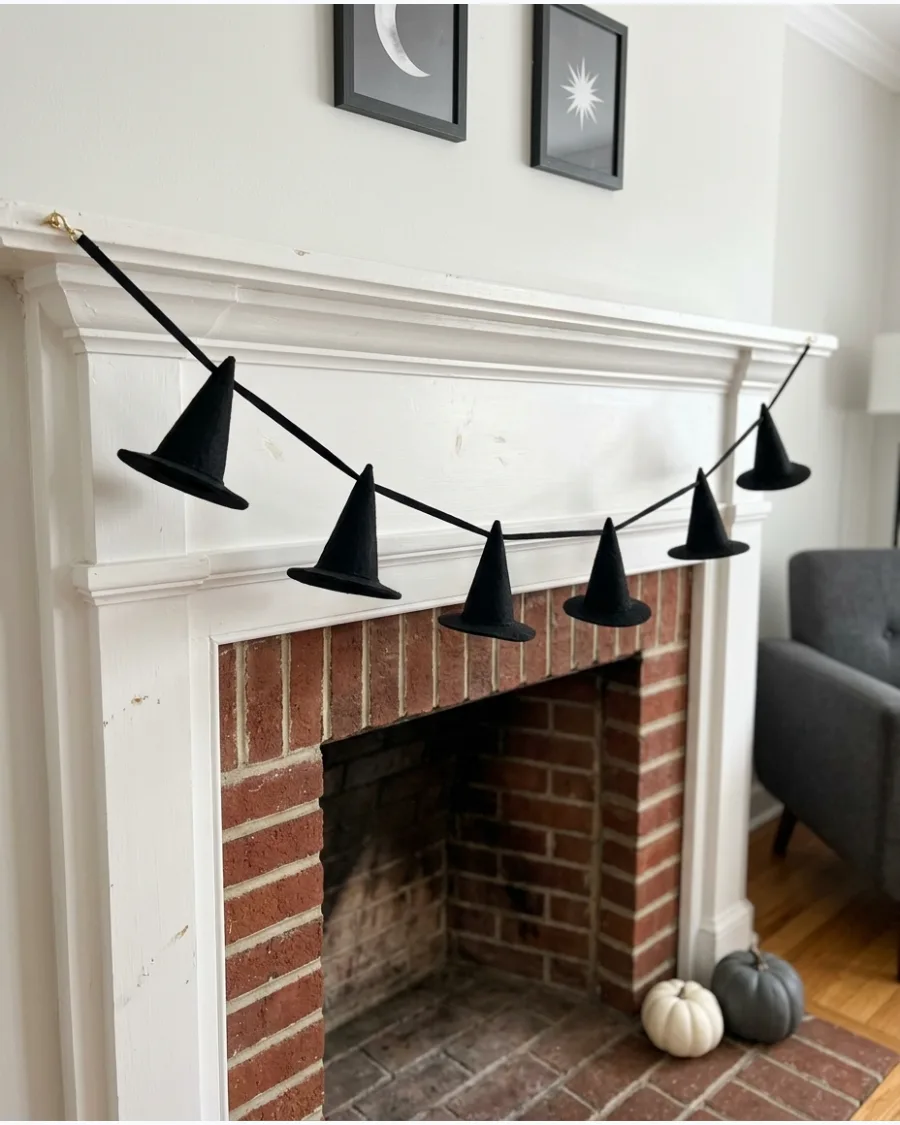
Cut circles from black felt and roll smaller triangles into cones to assemble tiny hats. String them together using a needle and black embroidery thread or twine.
Add a tiny buckle made from gold glitter paper to each hat for a pop of contrast. Felt is a better choice than paper for this project because it hangs better and does not crease.
- Budget: Five dollars for felt sheets and thread.
- Space the hats eight inches apart to ensure the garland doesn't look cluttered.
- Secure the ends of the garland with removable adhesive hooks to protect walls.
Most people skip this: Stuff the inside of the felt cones with a cotton ball so they keep their shape while hanging.
49. Crescent Moon Witch Wreath
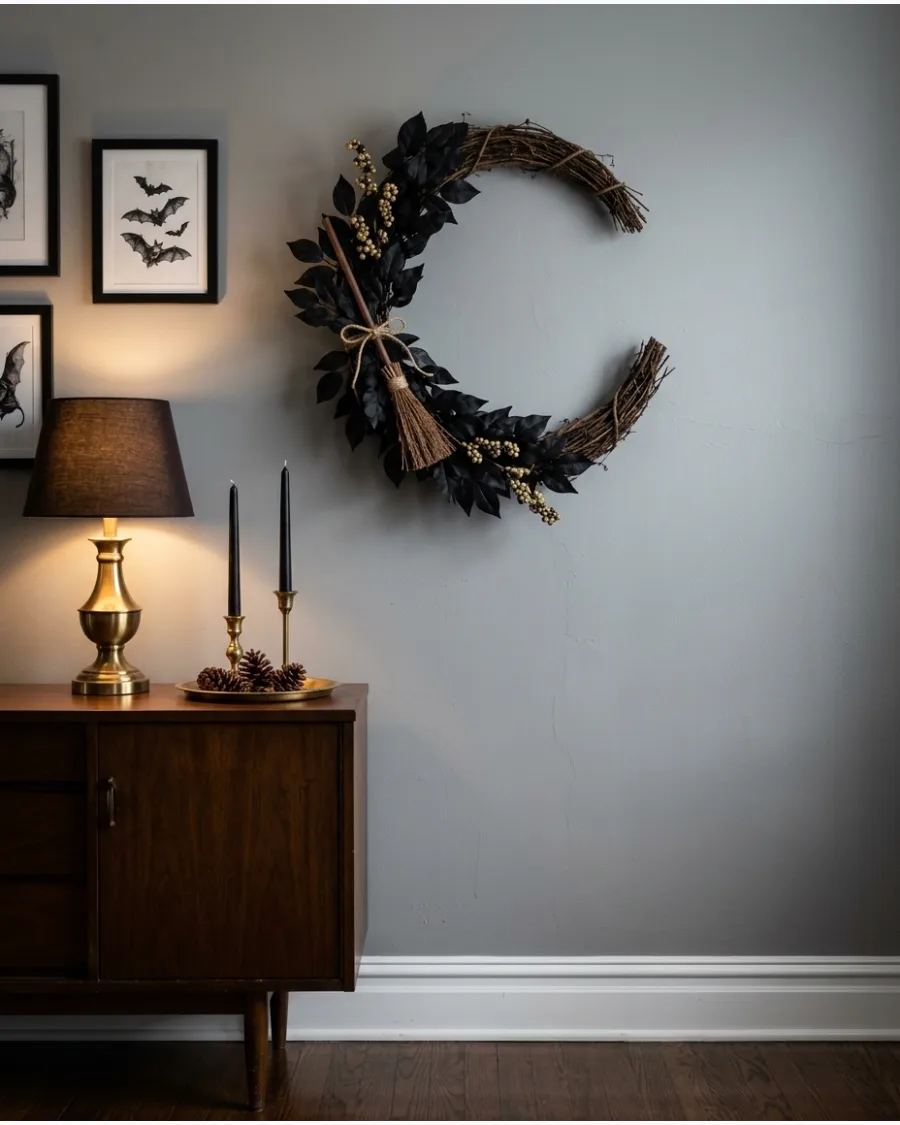
Use a wire cutter to remove a section of a grapevine wreath to create a crescent shape. Fill the inner curve with dark faux eucalyptus or black silk roses and a few silver stars.
Attach a miniature broom horizontally across the bottom curve to anchor the theme. A crescent shape feels more sophisticated and modern than a standard round wreath.
- Sourcing: Buy a standard 12-inch grapevine wreath for under ten dollars.
- Use black zip ties to secure the greenery so it stays invisible against the dark wood.
- Add a small battery-powered fairy light string for a starry glow.
Best shortcut: Use a cardboard cake board cut into a crescent shape as a base if you do not want to cut a wooden wreath.
Outdoor Decor
50. Witch's Air-Dry Laundry Line
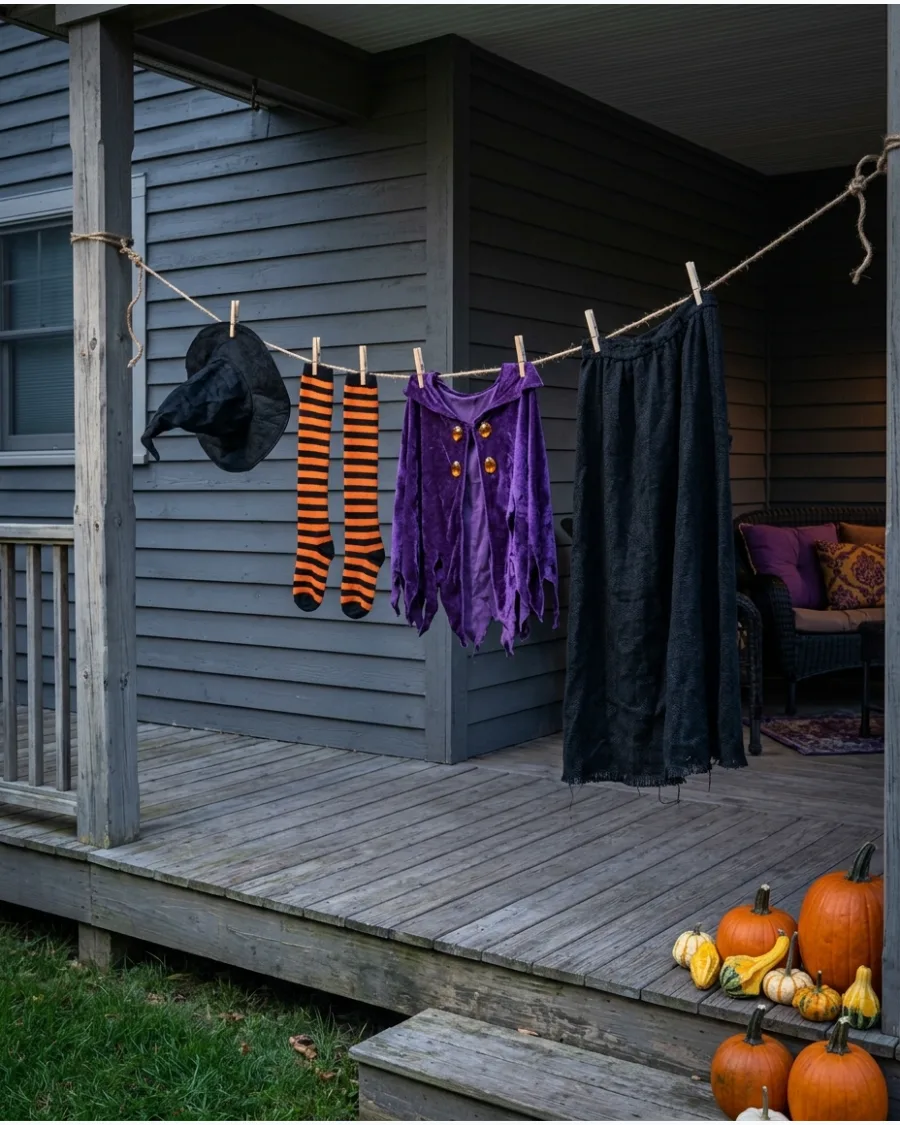
A suspended clothesline of tattered witch garments adds a whimsical, lived-in feel to a front porch or garden. This display suggests a supernatural resident has just finished her chores, creating a narrative without the need for expensive animatronics.
Thread a thick jute rope between two sturdy anchor points and use oversized wooden clothespins to secure a pointed hat, striped stockings, and a dark cloak. It is much more effective to use real fabric that moves in the breeze than plastic versions which often look stiff and artificial.
- Source vintage-style clothing from thrift stores or repurpose old black bedsheets during the first week of October.
- Ensure the line is high enough to clear head height but low enough to catch the wind for natural movement.
- Swap the classic black accessories for purple or green versions to coordinate with a specific exterior house color palette.
Quick win: Stuff the stockings with crumpled newspaper or plastic grocery bags to give them a three-dimensional, realistic shape.
DIY Witch Decorations
51. Witch Apothecary Shelf
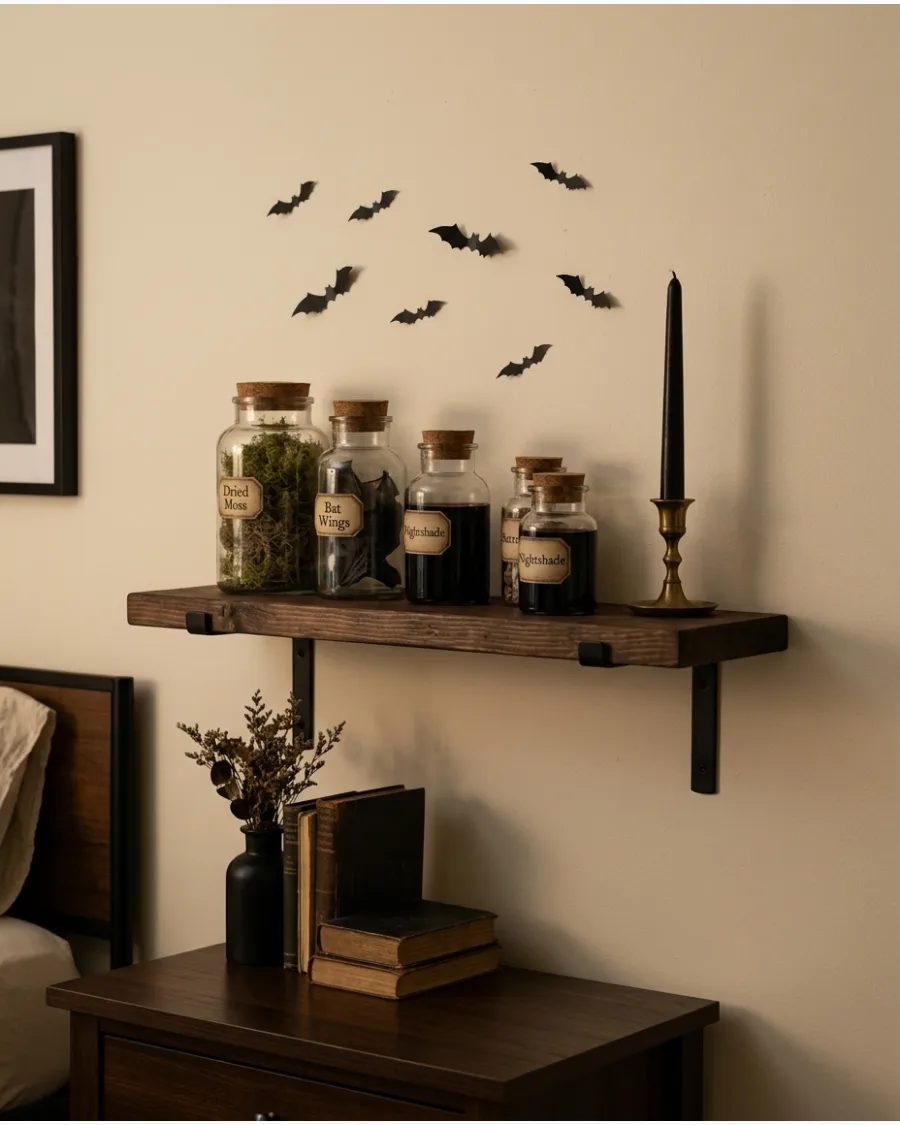
Transform a plain bookshelf or wall ledge into a mysterious laboratory by grouping mismatched glass containers. Fill jars with colored water, dried botanicals, and small plastic trinkets to mimic rare ingredients.
Use tea-stained paper and a black marker to create weathered labels for every bottle. Adding a few dripping taper candles creates height and instant atmosphere. Grouping items in odd numbers makes the display look intentional rather than cluttered.
- $10-20 for thrifted glassware and craft paper; 1 hour.
- Arrange tallest items in the back and smaller jars in the front for depth.
- Use battery-operated candles if placing the shelf near curtains or low-hanging decor.
Quick win: Use soy sauce or food coloring to tint water for an authentic aged look.
52. Flying Witch Silhouette
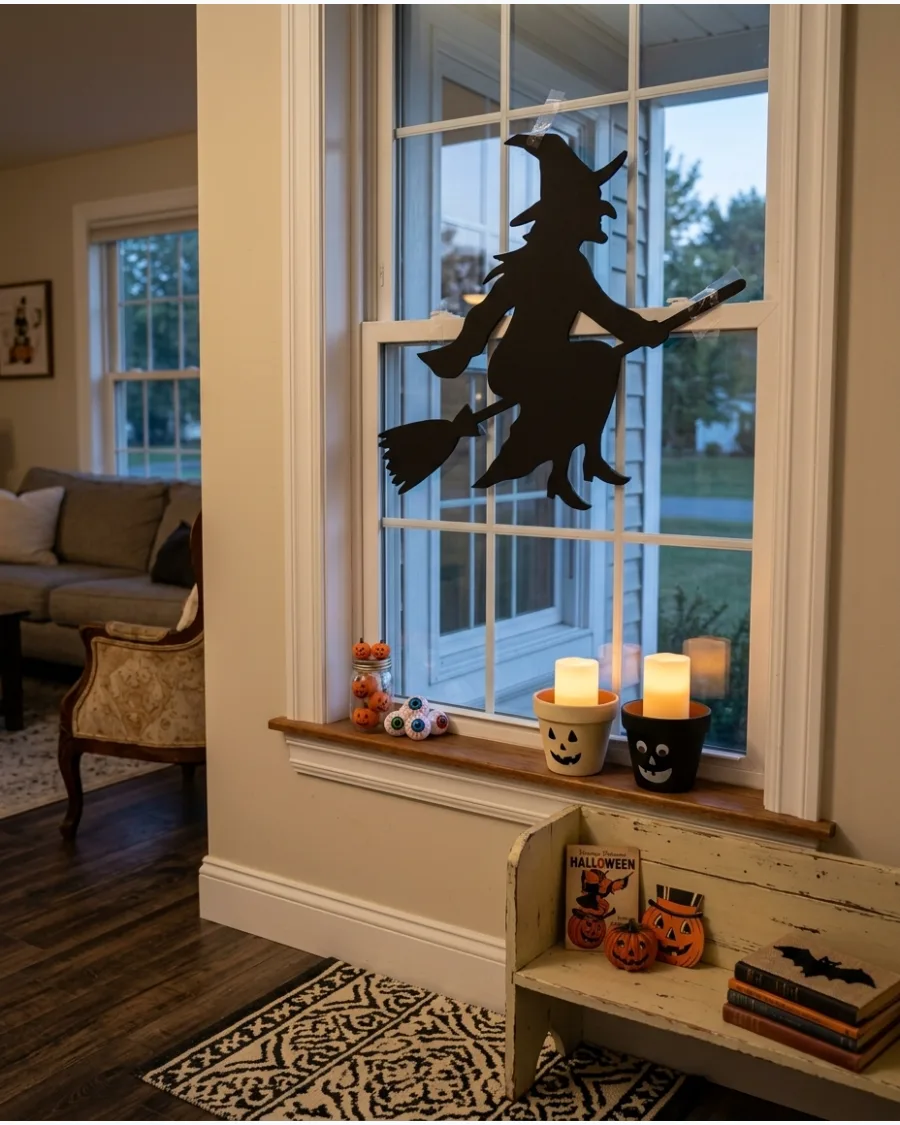
A large-scale silhouette creates a striking focal point against a bright window or a pale exterior wall. Cut the shape from black foam board or corrugated plastic to ensure it stays rigid in the wind.
Mount the figure using heavy-duty adhesive or fishing line to make it appear as though it is gliding through the air. This works best when backlit by a porch light or an indoor lamp.
Sharp, clean edges on the cutout are the difference between a professional look and a messy craft project.
- Under $15 for foam board and adhesive; 45 minutes.
- Trace the shape on the back of the board to avoid visible pencil marks on the front.
- Swap the black board for reflective vinyl if the silhouette will face a dark street.
Best shortcut: Use a projector to cast a witch shape onto your board for perfect proportions.
DIY Skeleton and Graveyard Decorations
53. Skeleton Planter
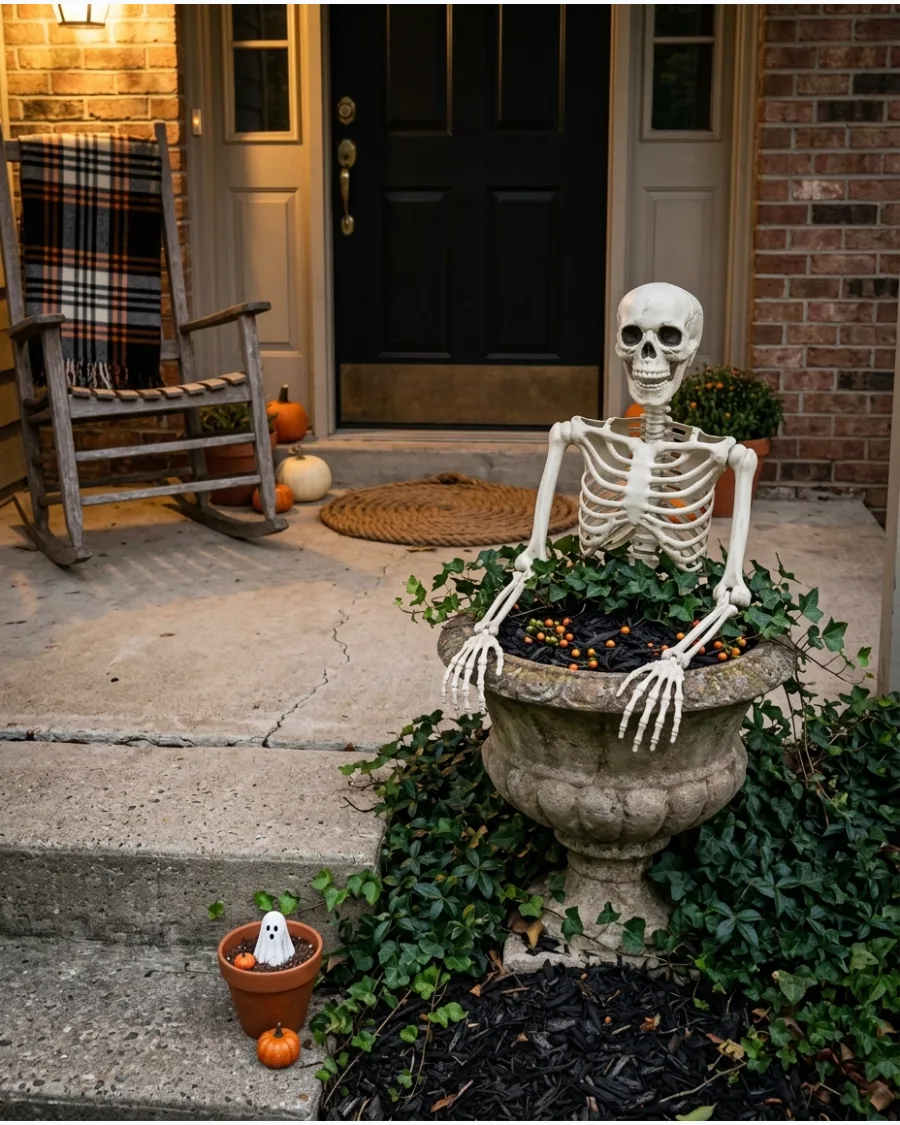
Give a standard porch planter a macabre makeover by tucking a plastic skeleton inside the potting soil. Drape the arms over the rim and weave faux vines or dark purple flowers around the ribcage.
Stick a sturdy garden stake behind the spine to keep the torso upright throughout the season. This adds a surprising element of height to your entryway without needing extra floor space. Mixing natural elements like real soil with plastic bones makes the scene feel much more grounded.
- $20-40 depending on skeleton size; 30 minutes.
- Secure the skeleton with floral wire to prevent it from tipping during autumn storms.
- Use a smaller skeleton for indoor tabletop planters or window boxes.
Quick win: Rub a little brown acrylic paint into the bone crevices to make the plastic look weathered.
54. Climbing Skeletons
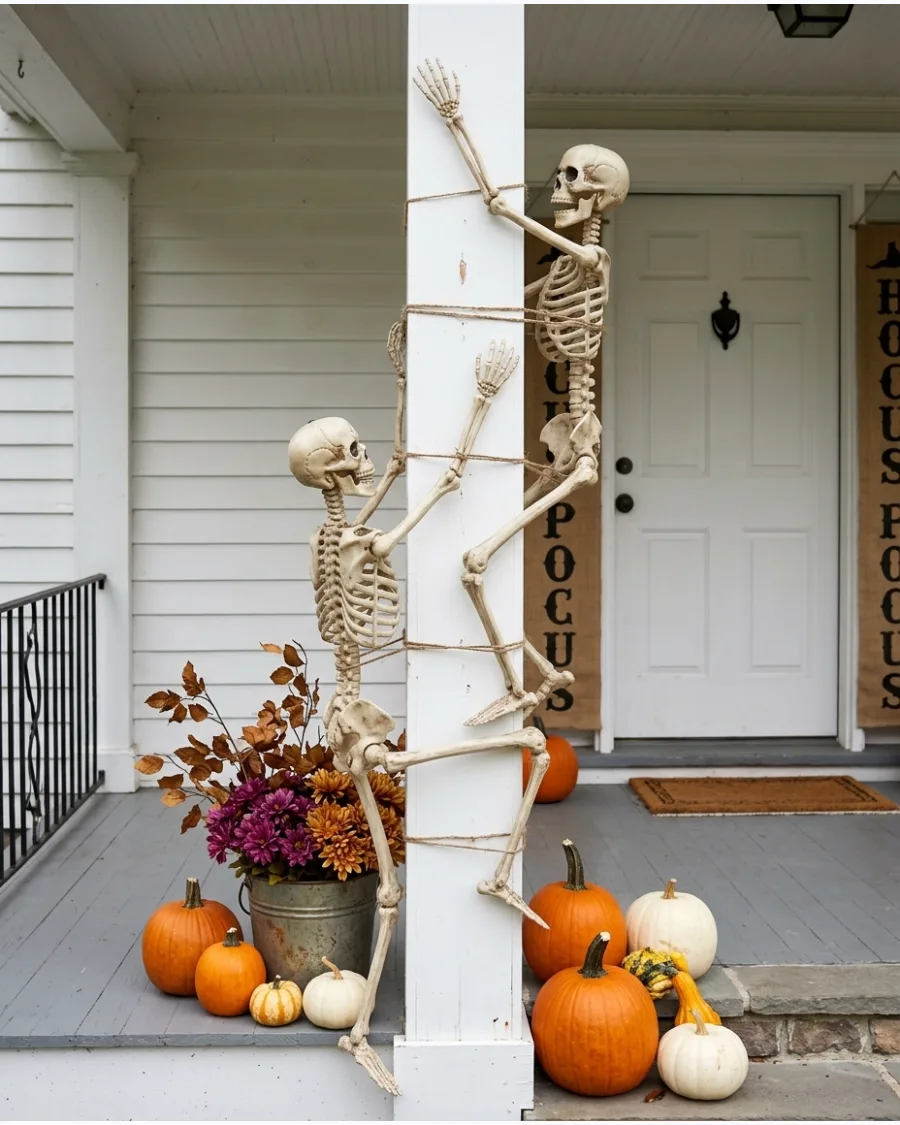
Turn the exterior of a home into a scene from a horror movie by mounting skeletons as if they are scaling the walls. Use clear zip ties to attach the hands and feet to porch railings, gutters, or window trim.
Angle the heads upward and stagger the limbs to mimic a realistic climbing motion. This high-impact display is visible from the street and uses vertical space effectively. Placing one skeleton slightly higher than the other creates a sense of movement that draws the eye upward.
- $50-80 for multiple skeletons; 1-2 hours.
- Use UV-resistant zip ties so the sun doesn't snap the plastic before Halloween.
- Scale down with mini-skeletons for an indoor version on a floor-to-ceiling bookshelf.
Most people skip this: Tighten the joints with a screwdriver so the limbs don't go limp in the wind.
55. Skeleton Dinner Party
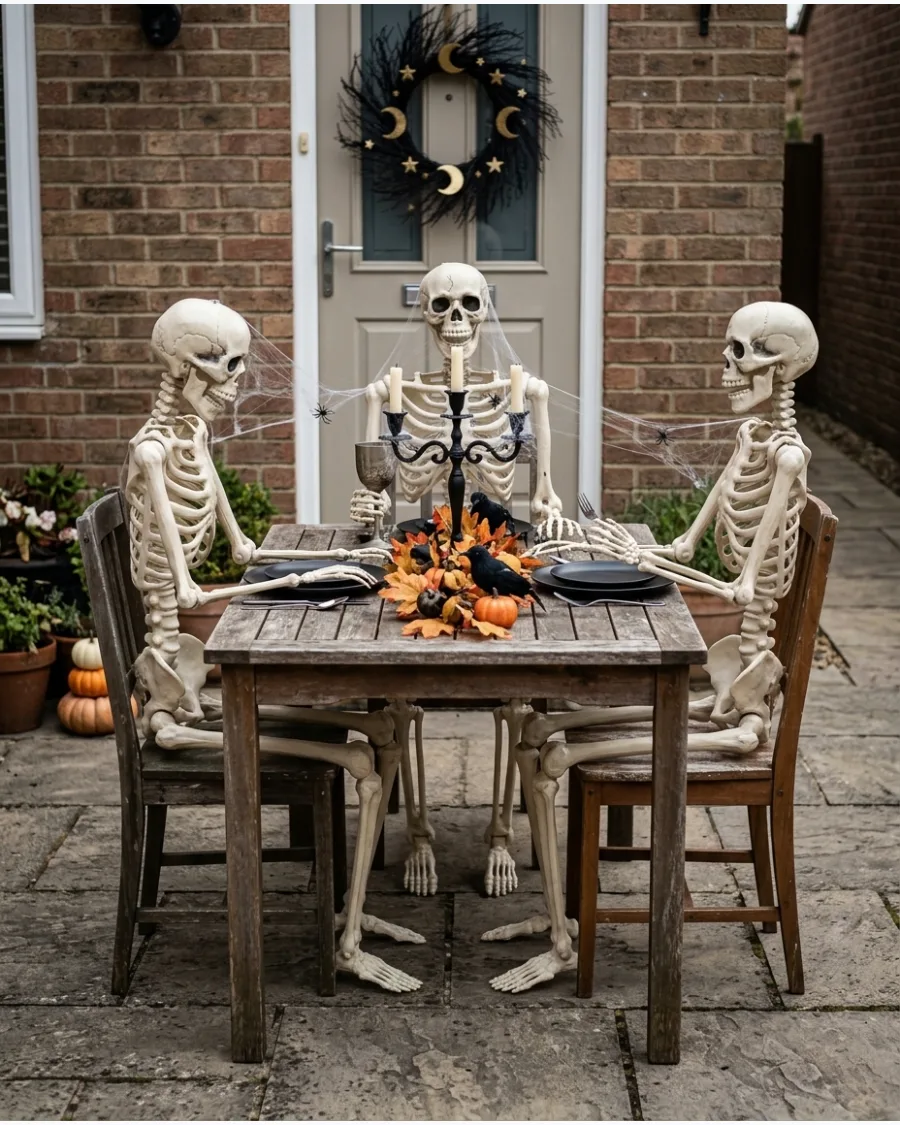
Create a humorous and haunting scene by arranging skeletons in a seated position around a dining table. Set the table with dark linens, plastic goblets, and a centerpiece of faux rotted fruit or black roses.
Use fishing line to tie the skeletons' hands to the chairs or table edge so they stay upright. This setup works equally well on a front porch or in a formal dining room.
Adding small accessories like a top hat or a pearl necklace gives the skeletons distinct personalities.
- Cost varies based on existing furniture; 2 hours.
- Weight the pelvis of each skeleton with small sandbags to keep them from sliding off the chairs.
- For smaller spaces, set a tea party for two skeletons on a bistro set.
Best shortcut: Use sticky tack to keep plastic silverware and glasses firmly in the skeletons' hands.
56. Skeleton Gardeners
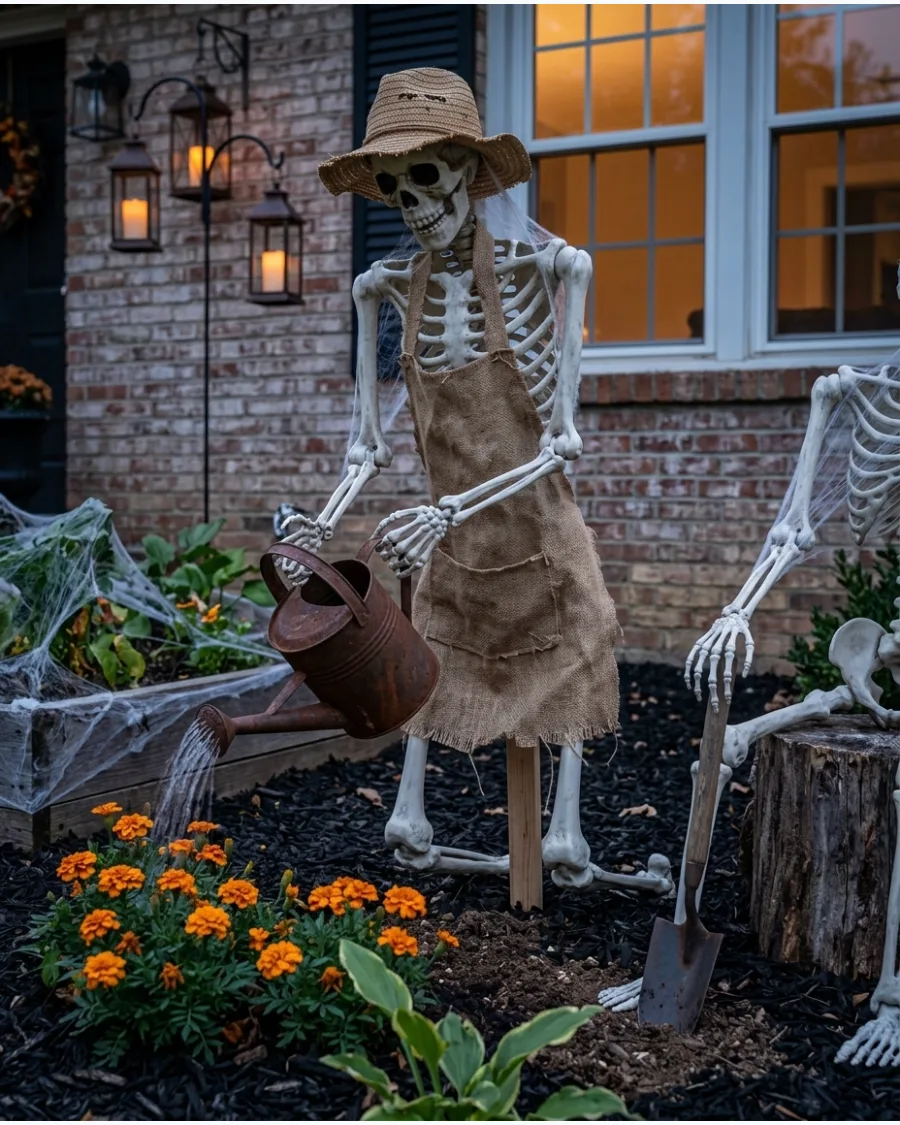
Place skeletons in the yard holding actual gardening tools to give the impression of a never-ending chore. Pose one pushing a wheelbarrow and another planting plastic bones in a flower bed.
Drive rebar or wooden stakes into the ground behind the skeletons to provide hidden support for standing poses. It turns a traditional garden into a playful, spooky landscape. Using real, weathered tools makes the plastic skeletons feel like part of the permanent landscape.
- $30-50 for skeletons and stakes; 1 hour.
- Position figures away from high-traffic paths to prevent tripping hazards.
- Swap heavy metal tools for lightweight plastic versions if the skeletons struggle to hold the weight.
Quick win: Put old gardening gloves and a floppy sun hat on the skeleton for a more lifelike appearance.
57. Skull Flowerpots
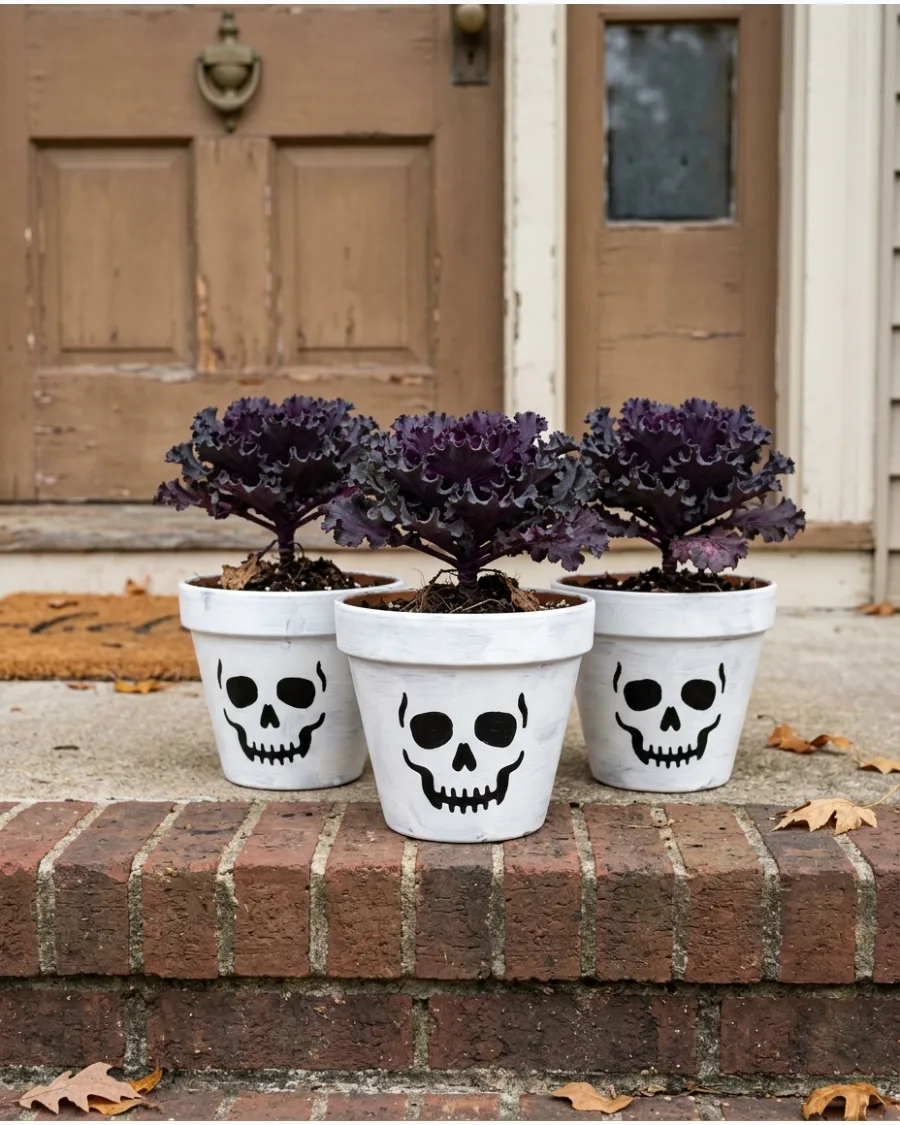
Give ordinary terracotta pots a skeletal upgrade by painting them white and adding black facial features. For a more 3D effect, glue lightweight plastic skull masks to the front of large planters.
Fill the pots with spiky black grass or trailing purple succulents to act as creepy hair. These look best when grouped in clusters of three on a staircase or mantel. Matte paint works better than glossy for this project because it mimics the texture of real bone.
- Under $15 for paint and brushes; 1 hour plus drying time.
- Use outdoor-grade acrylic paint to ensure the faces don't wash away in the rain.
- Scale the idea down using mini pots for succulent party favors or table place cards.
Best shortcut: Use a black permanent marker instead of paint for more control over the fine details of the skull face.
58. Graveyard Lantern Path
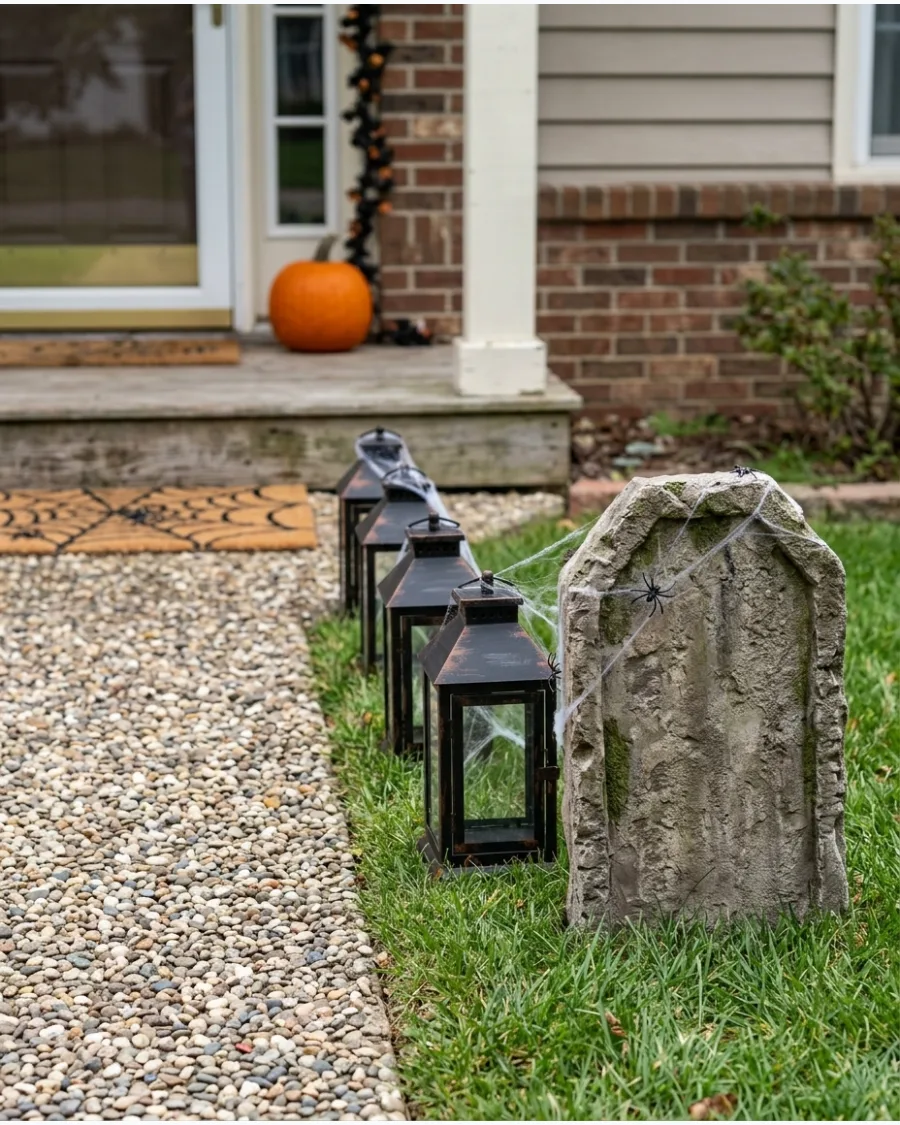
Guide guests to the front door with a path lined by tombstones and glowing lanterns. Space the lanterns evenly between the grave markers to ensure the walkway is well-lit and safe.
Set the lanterns to a flickering mode to mimic the look of real candlelight without the fire risk. This creates a classic cemetery aesthetic that feels atmospheric. Black lanterns provide a sharp contrast against gray tombstones and green grass.
- $40-100 for a full set of lanterns; 30 minutes.
- Use battery-operated candles with timers so the path lights up automatically at dusk.
- For narrow walkways, hang the lanterns from shepherd's hooks to keep the ground clear.
Most people skip this: Clean the glass on the lanterns to ensure the light shines through clearly and looks polished.
DIY Halloween Decorations
59. Weathered Mossy Graveyard Stones
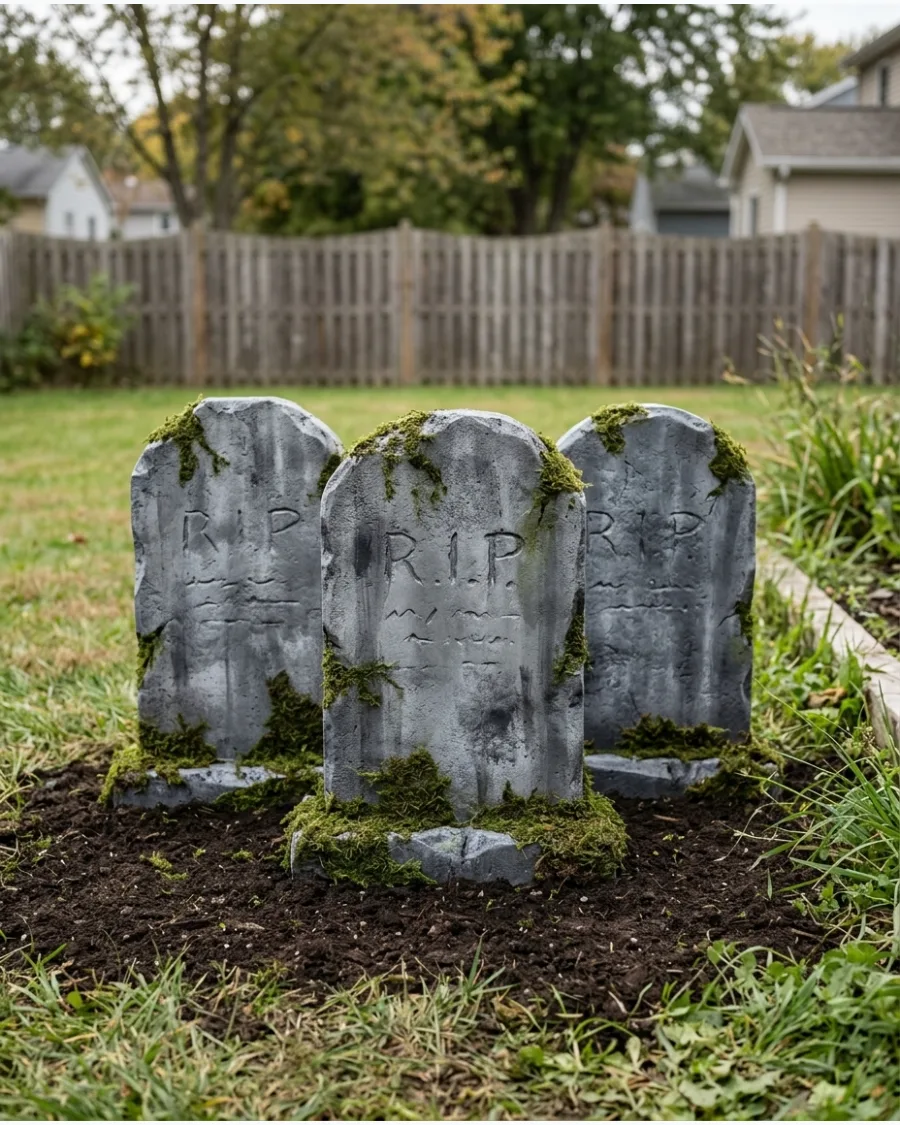
High-density foam insulation transforms into realistic stone markers when textured with a wire brush and matte gray paint. Apply patches of preserved sheet moss and liquid adhesive to give the appearance of centuries-old decay. This technique adds organic texture that standard plastic store-bought versions often lack.
Using multiple shades of green moss creates a more authentic, layered look that mimics natural growth.
- Sourcing: Rigid foam insulation boards from hardware stores cost under $25 and yield several large markers.
- Setup: Insert long wooden dowels into the base of the foam to anchor the stones firmly into the ground against wind.
- Adaptation: Mix in faux ivy or tangled twigs to create the look of a completely reclaimed garden space.
Quick win: Spritz the finished stone with a mixture of dark gray paint and water to create 'rain streaks' that settle into the cracks for instant age.
DIY Skeleton and Graveyard Decorations
60. Gothic Skull Wreath
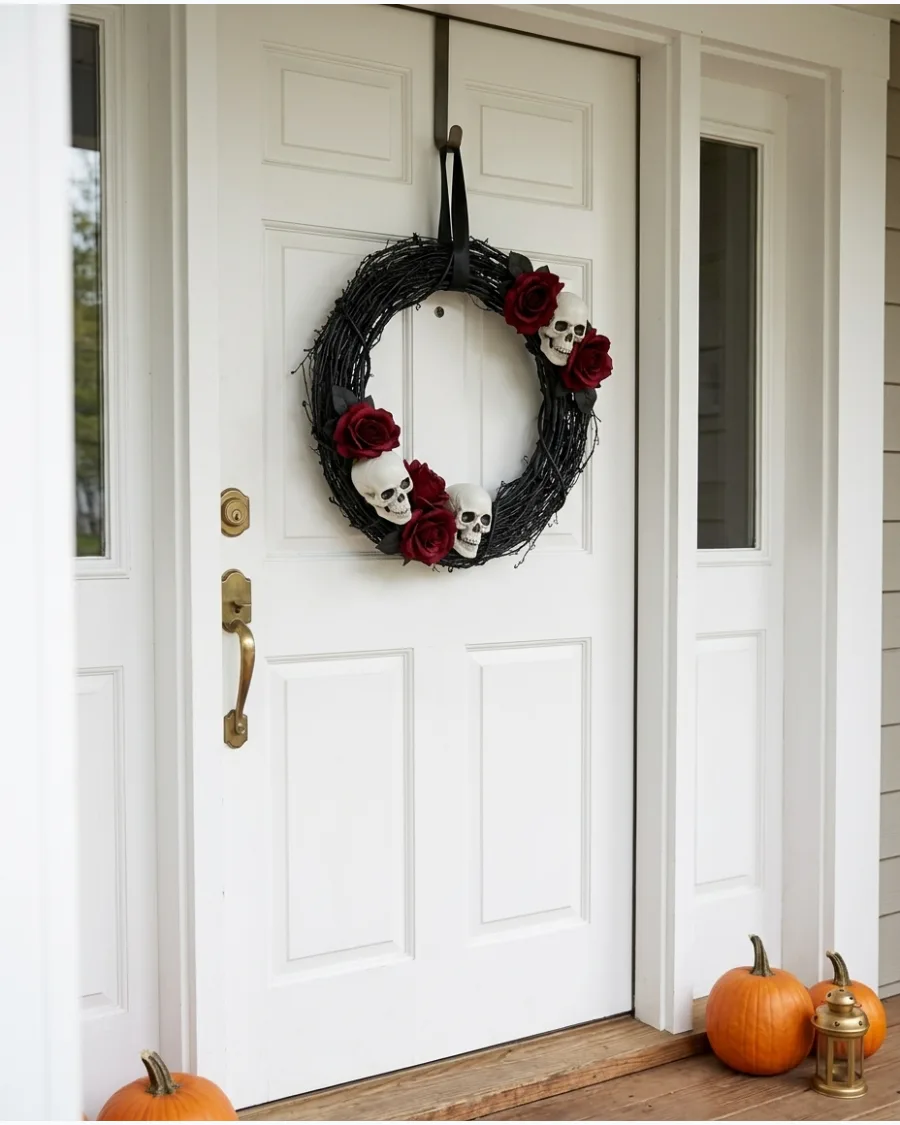
Create a sophisticated but spooky greeting by building a wreath around a black grapevine or tinsel base.
Wire several mini plastic skulls into the frame, spacing them evenly or clustering them at the bottom. Tuck in dark silk roses and black feathers to soften the look and add a Victorian touch. It provides a dramatic contrast against a light-colored front door.
Using a variety of textures like smooth plastic and rough vines makes the wreath look expensive.
- $25-45 for materials; 1.5 hours.
- Use floral wire instead of hot glue so you can reposition the skulls as you build.
- For a renter-friendly option, hang the wreath using an over-the-door hook to avoid nails.
Most people skip this: Paint the back of the skulls black so they don't stand out if the wreath shifts on the door.
61. Skeleton Reflection Mirror
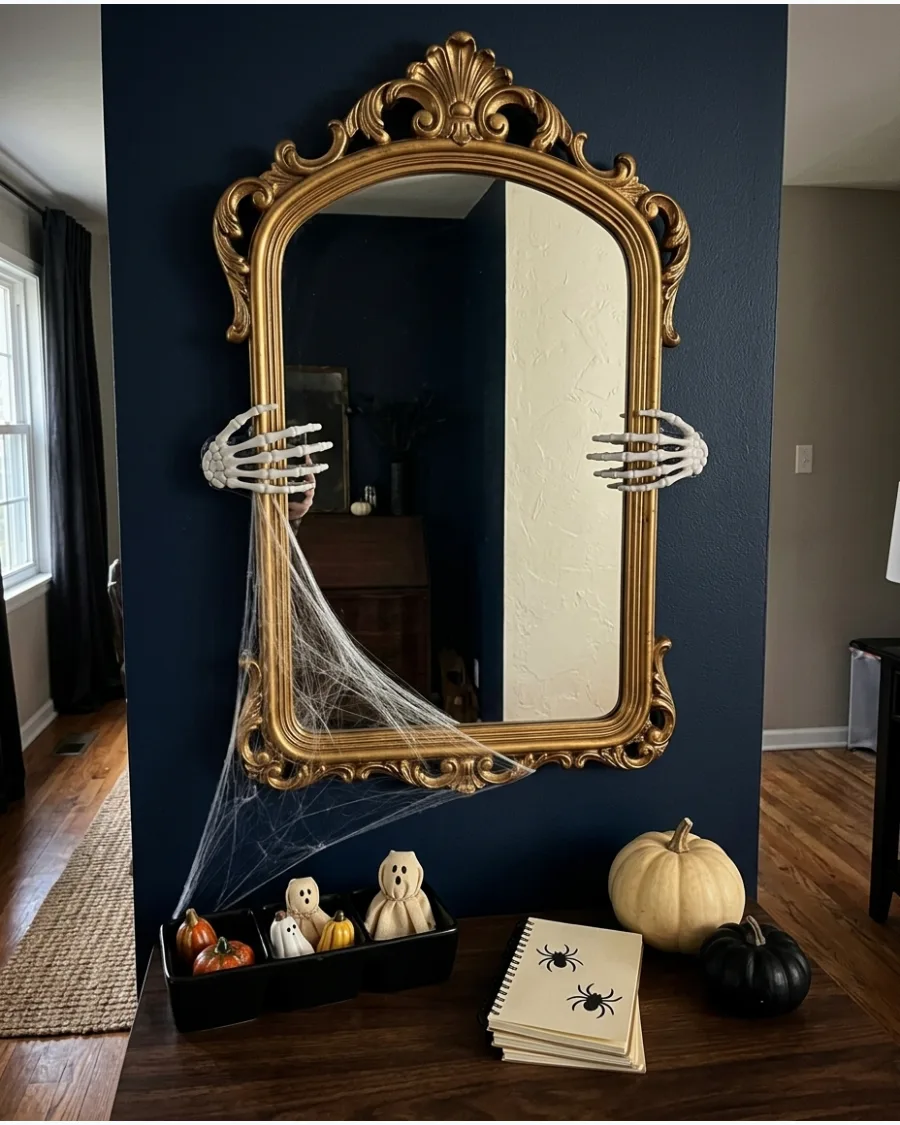
Attach skeleton hands around an old mirror frame so they appear to be reaching toward the glass. Add removable cobwebs and small spiders around the corners.
Secure the hands with strong adhesive putty to avoid damaging the mirror's finish. This project works best with ornate, dark-framed mirrors that already feel a bit gothic.
- Low budget project using an existing wall mirror.
- Use removable adhesive putty for easy cleanup.
- Place in a hallway or entryway to surprise guests.
Best shortcut: Use clear command strips to hold the hands so you can reuse the mirror without any residue after October.
62. Skeleton Bat Mobile
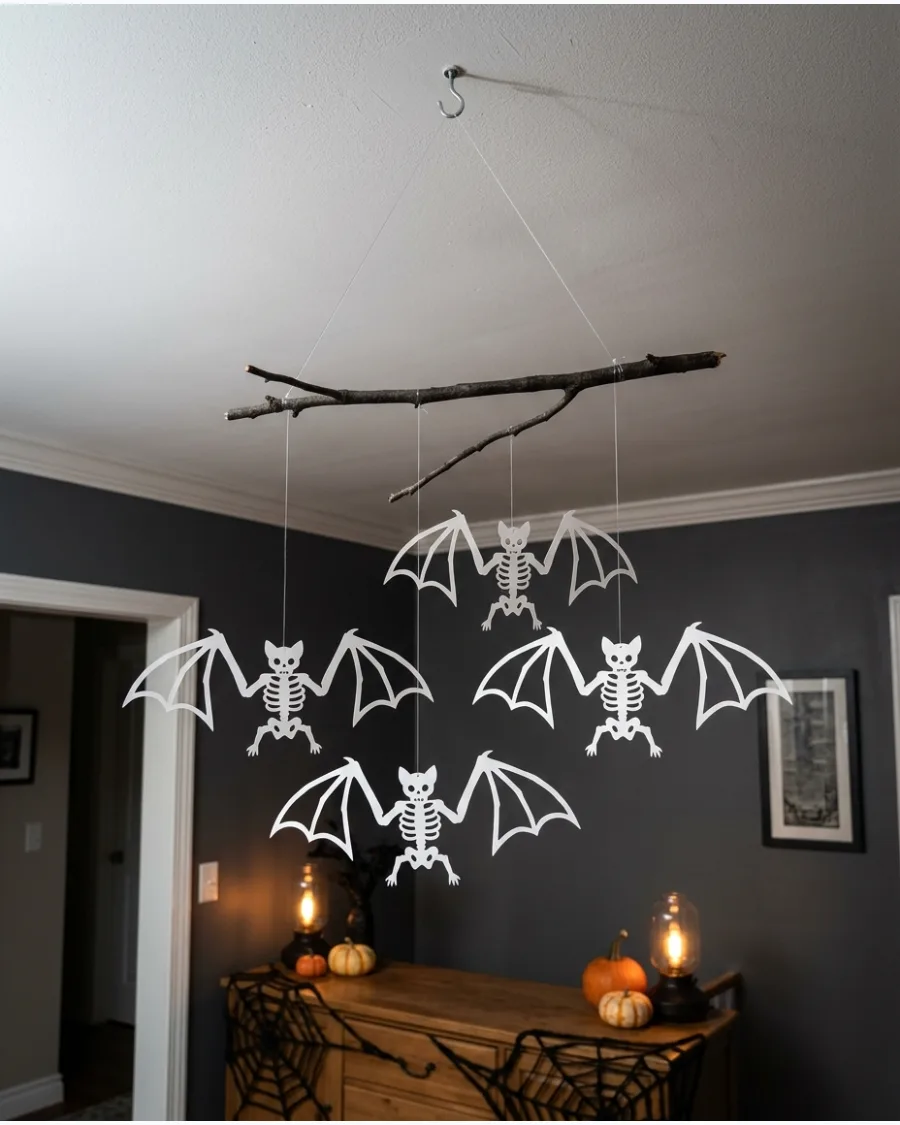
Create skeletal bats from white cardstock or lightweight craft pieces. Suspend them from branches at different heights to form a spooky mobile.
Vary the lengths of the clear fishing line to give the bats more movement in a breeze. Lightweight materials ensure the mobile stays balanced without sagging.
- Under $10 using cardstock and a found branch.
- Hang from a ceiling hook or doorway corner.
- Use a real branch to add natural texture to the display.
Most people skip this: Paint the branch matte black to make the white skeletal bats pop against the dark wood.
63. Coffin-Shaped Welcome Sign
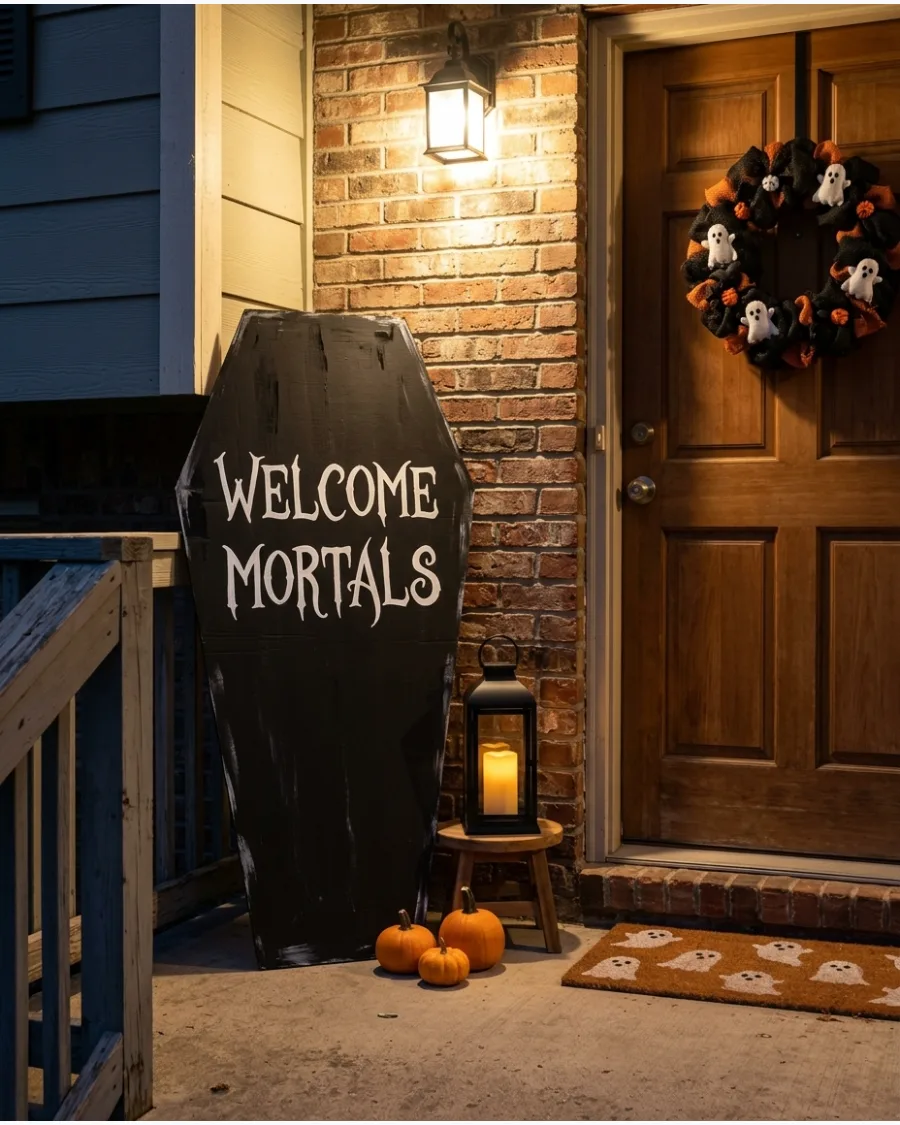
Cut a coffin shape from wood, foam board, or heavy cardboard. Paint it black and add a message such as Enter If You Dare or Welcome, Mortals.
Use a white paint pen for the lettering to get crisp lines on the dark surface. Foam board is a great choice because it is light enough to hang with simple tape but looks solid from a distance.
- $15 or less for foam board and paint.
- Place in a covered entryway to protect the material.
- Use weather-resistant paint if placing it in an uncovered area.
Quick win: Sand the edges of the foam board after cutting to remove any jagged bits for a professional finish.
DIY Pumpkin Decorations
64. Stacked Pumpkin Topiary
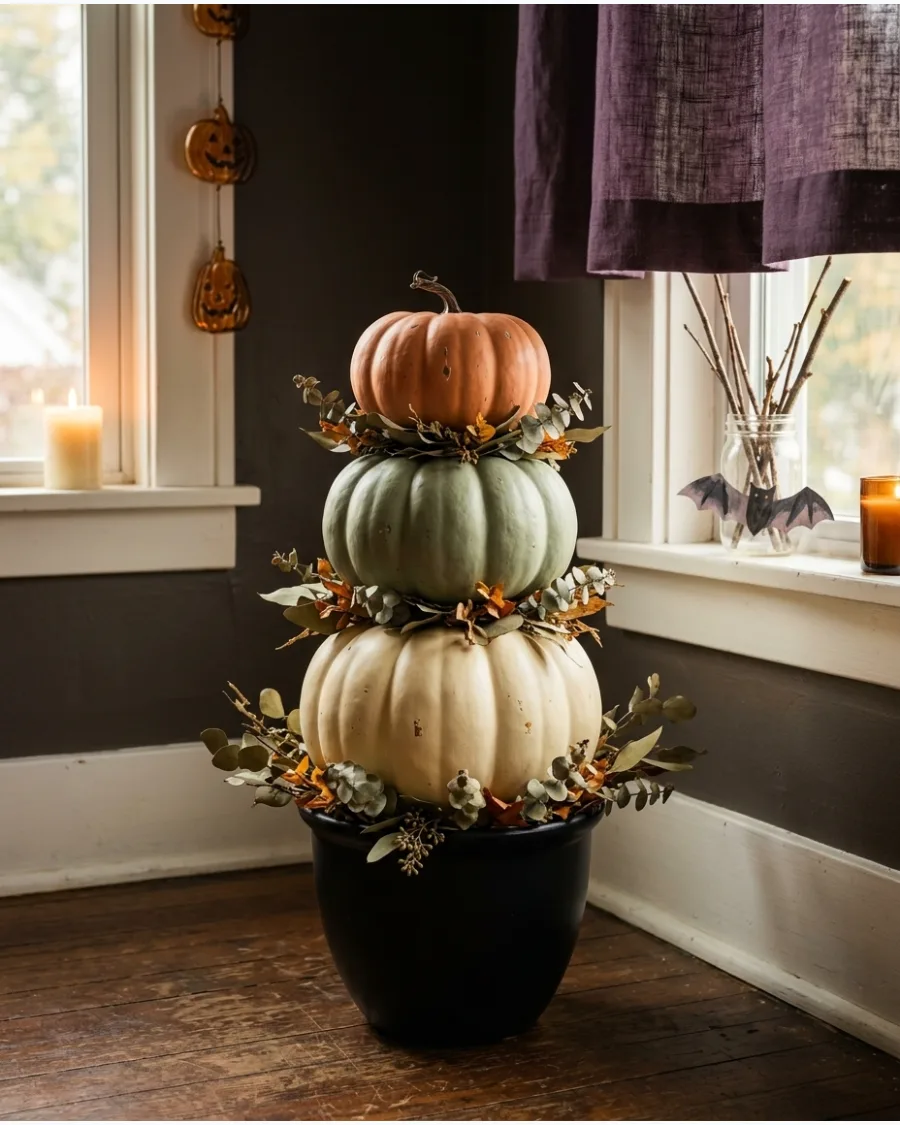
Stack three faux pumpkins from largest to smallest inside a tall planter. Paint them in coordinating colors and add leaves, ribbon, or branches between each layer.
Thread a sturdy wooden dowel through the center of all three pumpkins to keep them from tipping over. Mixing different textures like velvet and matte paint makes the display look more expensive.
- Moderate budget for faux pumpkins and a planter.
- Place in an entryway corner to save floor space.
- Use faux pumpkins for a multi-year investment.
Best shortcut: Use hot glue between the pumpkins if you do not want to drill holes for a support dowel.
65. Checkerboard Painted Pumpkins
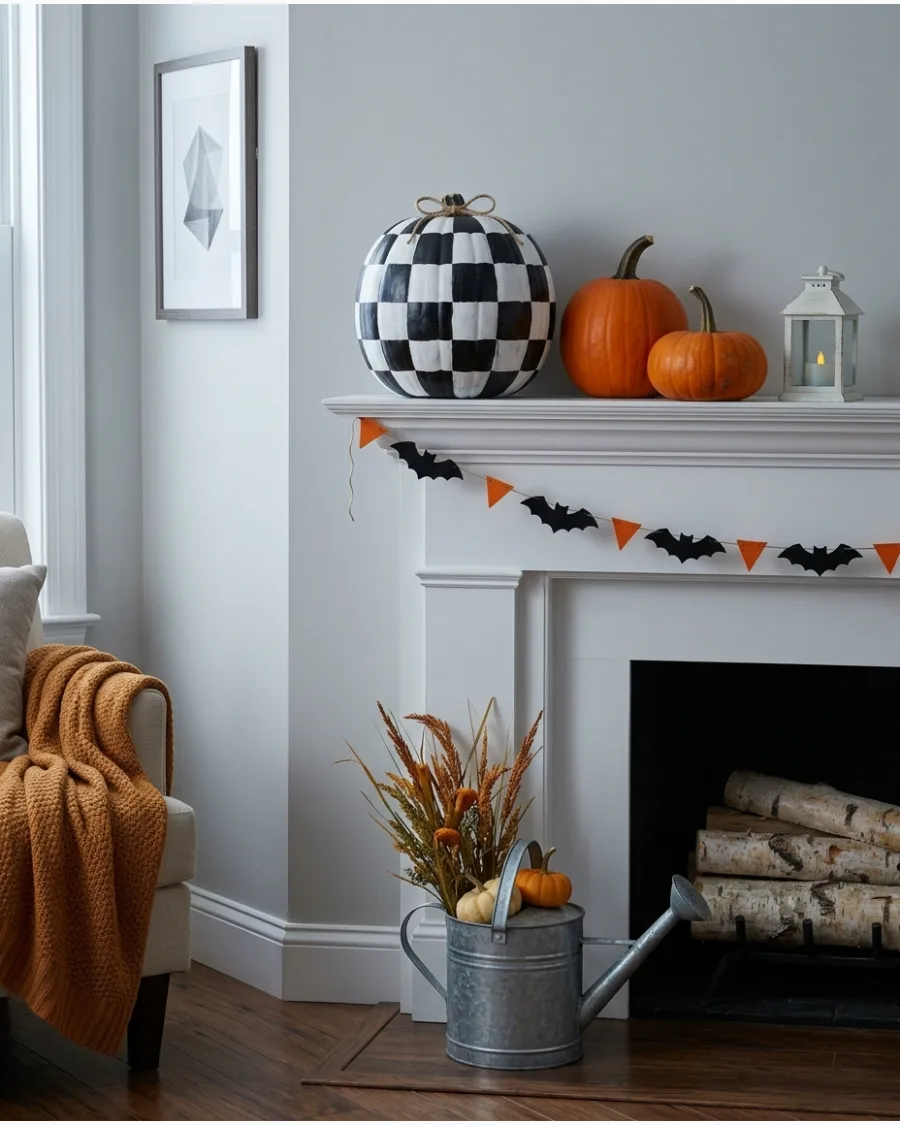
Paint faux pumpkins with black-and-white checkerboard patterns. Mix them with solid orange pumpkins to create a bold modern display.
Use painter's tape to mark off the squares for perfectly straight edges. This high-contrast pattern draws the eye immediately and balances out more traditional orange decor.
- Low cost using acrylic craft paint and tape.
- Works for both indoor shelf styling and outdoor porch decor.
- Mix with solid colors to keep the pattern from feeling overwhelming.
Most people skip this: Seal the paint with a matte clear coat to prevent it from chipping during storage.
66. Mirrored Disco Pumpkins

Cover small faux pumpkins with adhesive mirror squares. Display them with black candles and silver stars for a glamorous Halloween arrangement.
Apply the mirror tiles in vertical rows to accommodate the natural curves of the pumpkin. These reflect light beautifully in a dim room and add a surprising party vibe to the holiday.
- $20 budget for adhesive tiles and small pumpkins.
- Place on a dining table or shelf to catch reflections.
- Best for indoor use to protect the adhesive.
Quick win: Buy self-adhesive mirror sheets to save time instead of gluing individual tiny tiles.
67. Floral Pumpkins
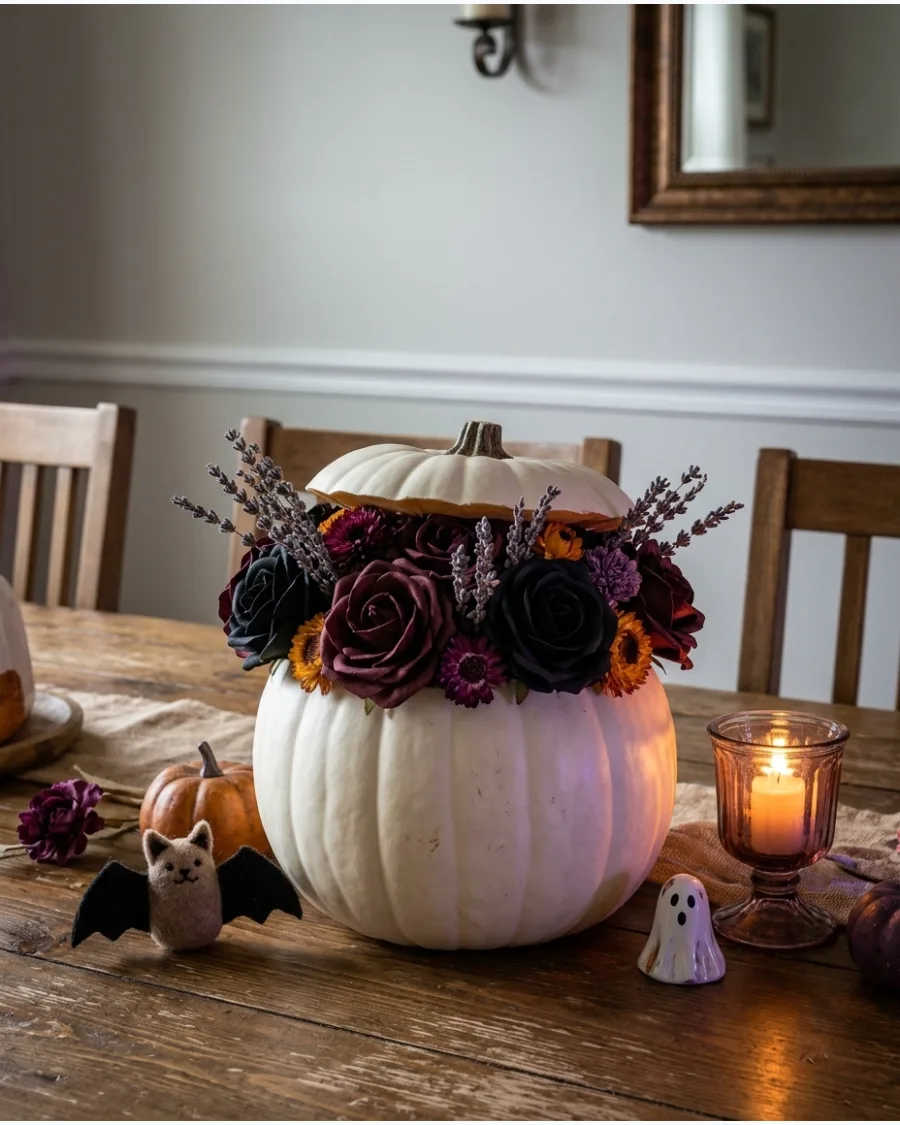
Remove the stem from a faux pumpkin and insert artificial flowers around the opening. Choose black, burgundy, purple, orange, or muted antique-style blooms.
Trim the flower stems short so they sit flush against the pumpkin surface. Using deep, moody colors keeps the floral look festive rather than just seasonal.
- $25 budget for silk flowers and a craft pumpkin.
- Use as a centerpiece for a Halloween dinner party.
- Swap flowers easily for different seasonal looks.
Best shortcut: Use a foam pumpkin so you can easily poke the wire stems directly into the top without needing glue.
68. Moss-Covered Pumpkins
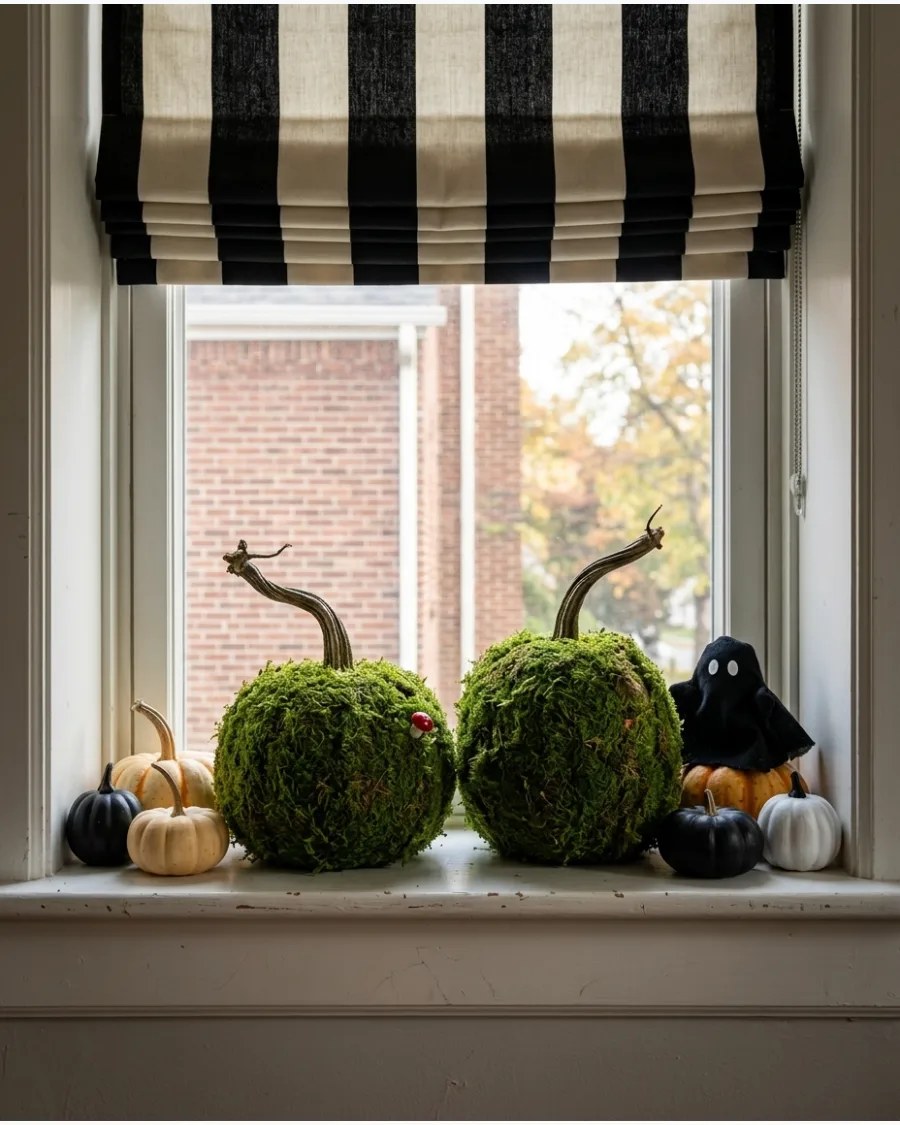
Cover foam pumpkins with preserved or artificial moss. Add twisted stems, mushrooms, or vines for a haunted-garden appearance.
Use a spray adhesive to apply the base layer of moss quickly and evenly. The organic texture looks fantastic when grouped with smooth, painted pumpkins for contrast.
- Low budget using sheet moss and spray glue.
- Use sheet moss for faster coverage and less mess.
- Perfect for a rustic or haunted forest theme.
Most people skip this: Mix different shades of green and brown moss to give the pumpkin a more realistic, aged look.
69. Vintage Paper Pumpkins
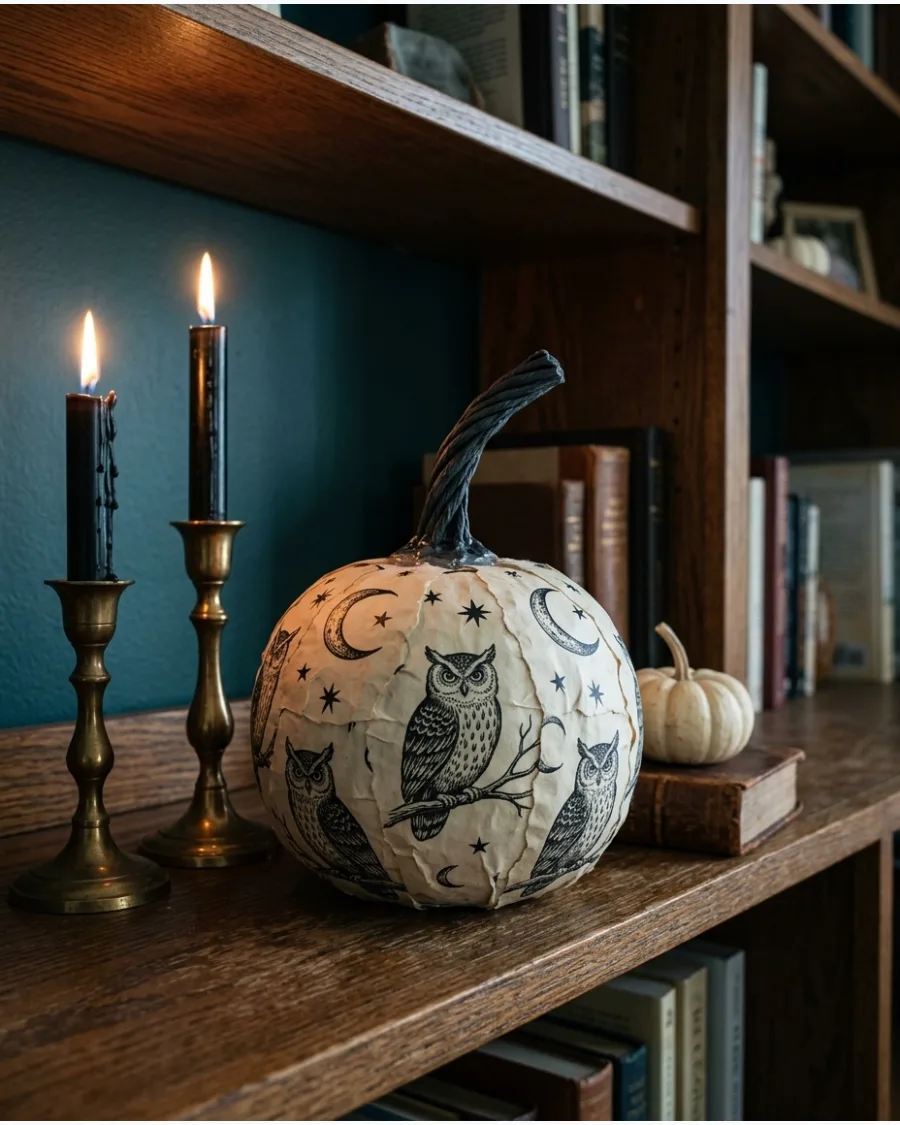
Apply vintage-inspired Halloween illustrations or patterned paper to faux pumpkins using decoupage adhesive. Finish them with dark painted stems.
Smooth out air bubbles with a flat craft stick while the glue is still wet. This technique is a great way to use up leftover scrapbooking paper or old book pages.
- Very low cost using paper scraps and glue.
- Use matte decoupage glue for an authentic vintage feel.
- Works best on smooth faux pumpkins without deep ridges.
Quick win: Rip the paper into small, irregular strips to help it lay flat on the curved surface of the pumpkin.
70. Dripping Paint Pumpkins
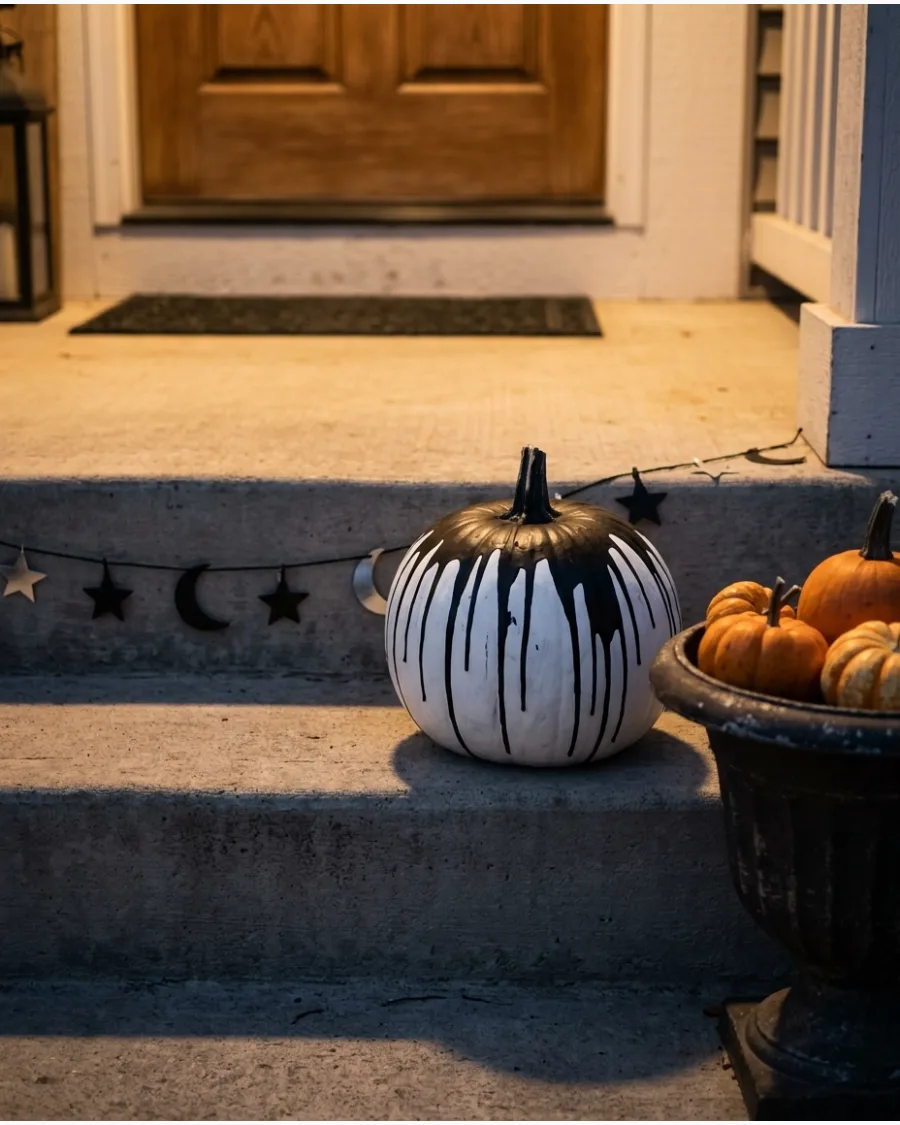
Pour black, white, pink, purple, or metallic paint around the top of a pumpkin. Allow the paint to drip naturally down the sides.
Work on a protected surface like a cardboard box to catch the excess paint. The messy, organic drips create a look that is both artistic and slightly unsettling.
- Low cost using leftover house paint or craft paint.
- Use heavy-body acrylic paint for thicker, more dramatic drips.
- Allow 24 hours for the paint to dry completely before moving.
Best shortcut: Use a squeeze bottle to apply the paint precisely around the stem for more control over the drip pattern.
71. Celestial Moon and Star Pumpkins
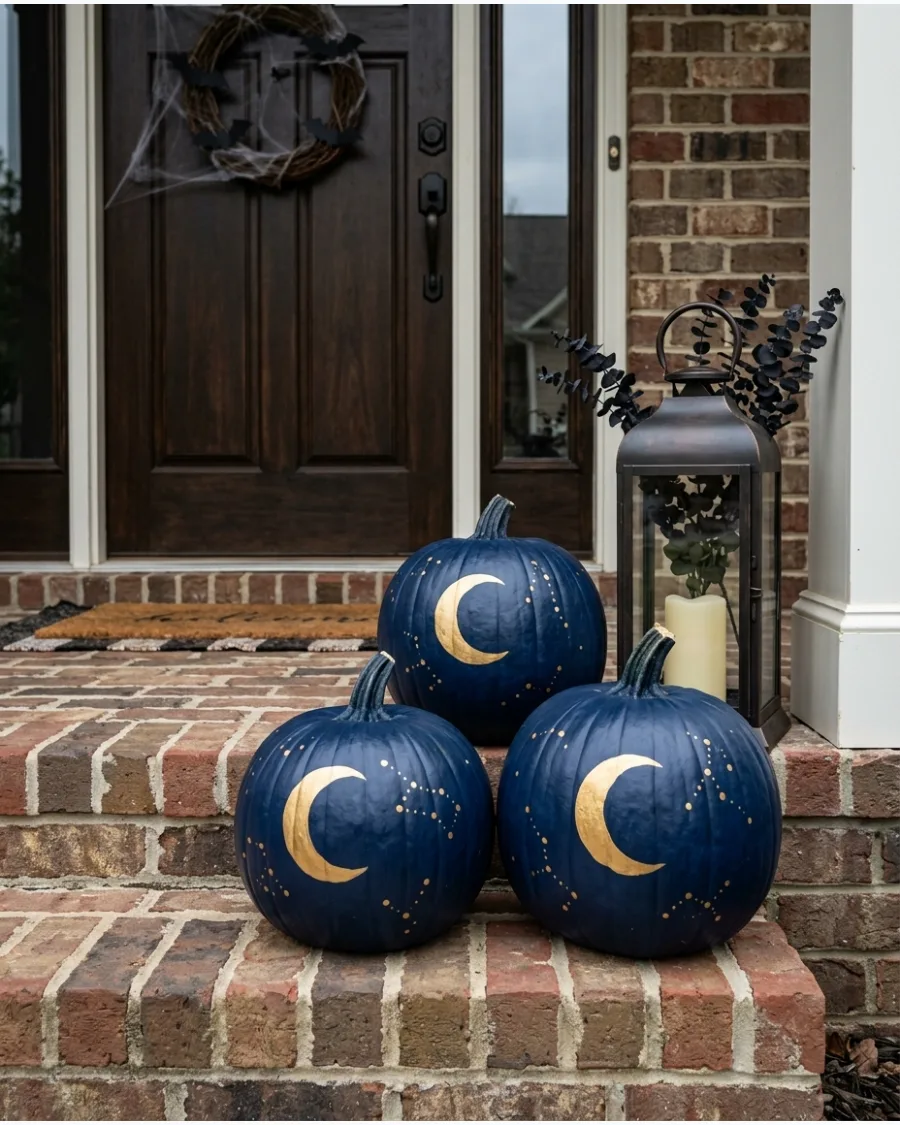
Paint pumpkins in midnight blue or black and decorate them with gold moons, stars, and constellations. Group several designs together on a porch step to create a mystical celestial display. A metallic paint pen is much easier to control than a brush for drawing fine constellation lines.
- $15-$20 for paint and pens; 1 hour.
- Arrange on porch steps or a side table.
- Use faux pumpkins to reuse this design every year.
Best shortcut: Use star-shaped stickers as stencils to get perfectly sharp edges without a steady hand.
72. White Ghost Pumpkins
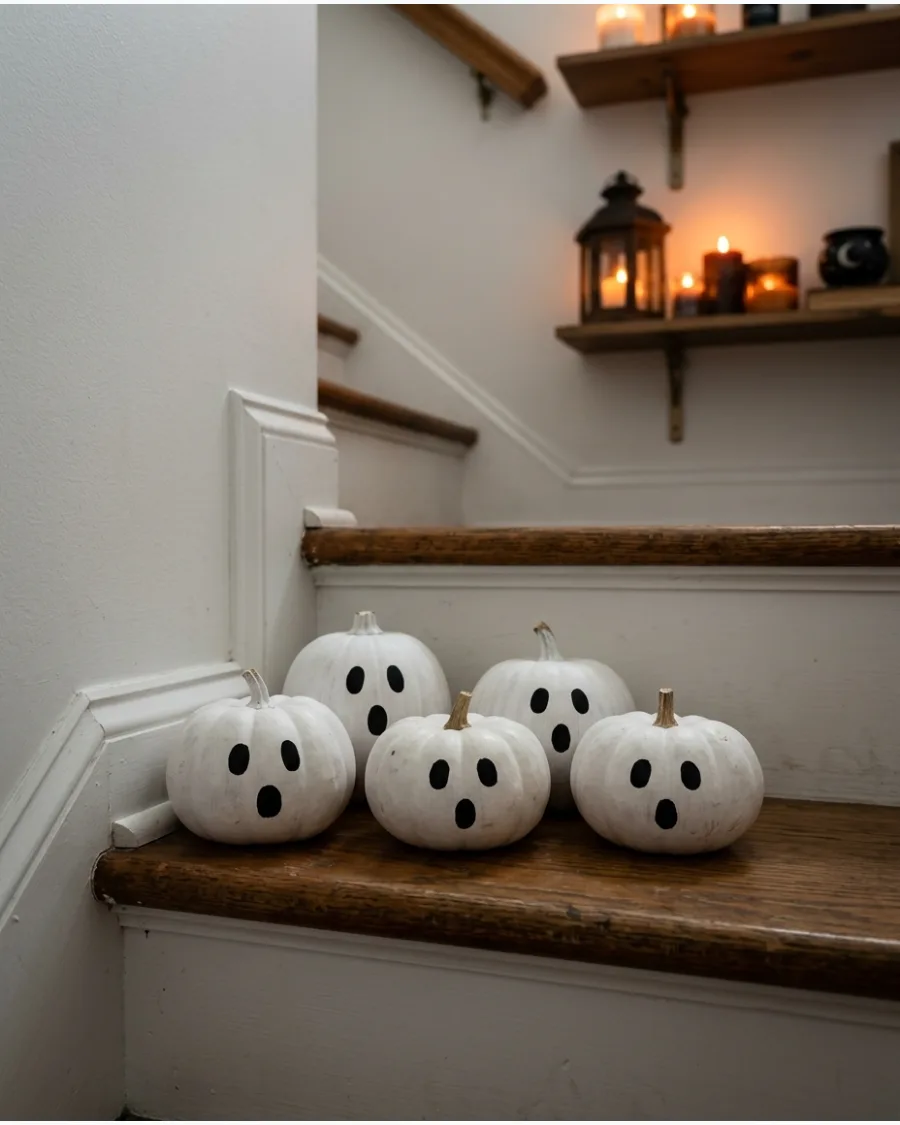
Paint small pumpkins white and add simple black ghost faces using a permanent marker or acrylic paint. Arrange these together on a staircase or shelf to lead guests toward the party area. Matte paint looks more sophisticated than gloss and helps hide any natural bumps on the pumpkin skin.
- Under $10; 30 minutes.
- Space them 12 inches apart on stair treads.
- Use real pumpkins for a natural, varied look in height and width.
Quick win: Wipe the pumpkins with a damp cloth before painting to ensure the color sticks without peeling.
73. Black Cat Pumpkins
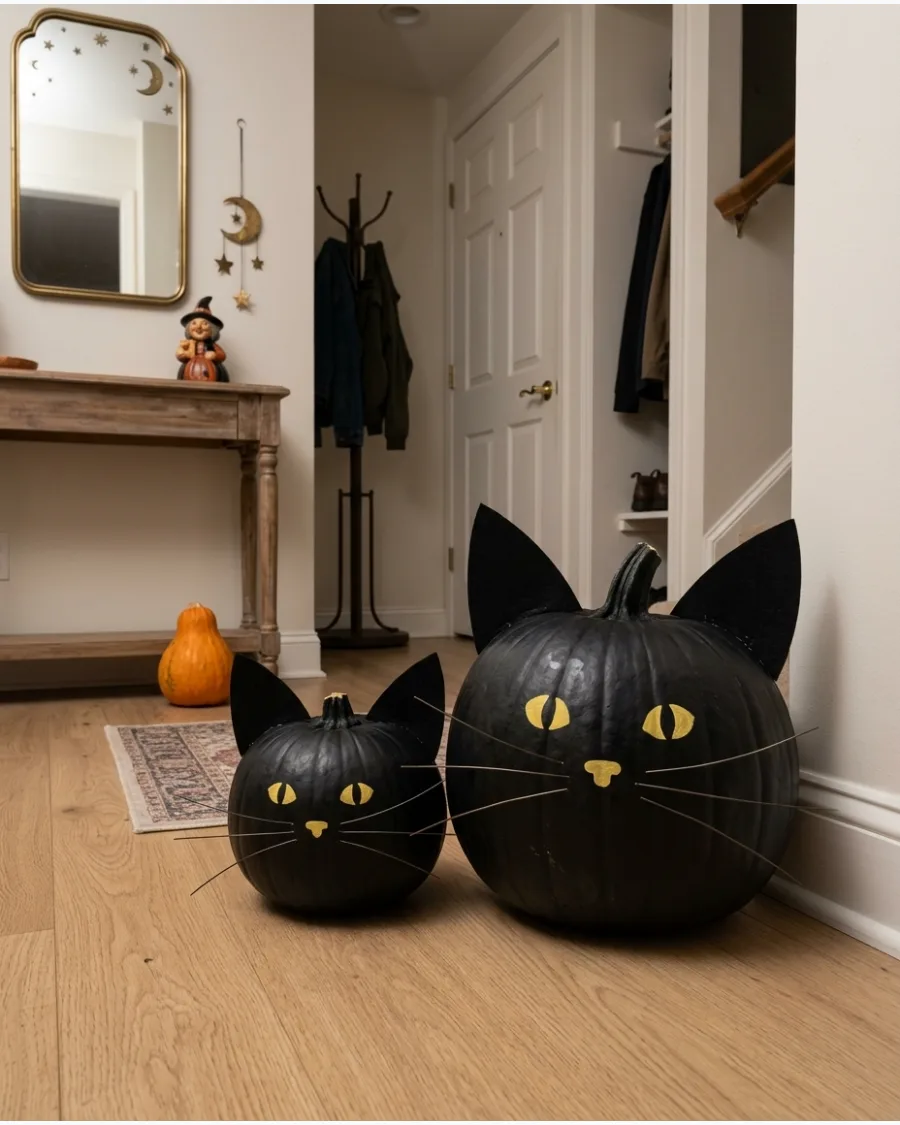
Paint pumpkins black and attach cardstock ears, whiskers, and tails to create a family of cats. Use different pumpkin sizes to vary the heights and shapes of each character.
Tuck these into a corner of the entryway to greet people as they walk inside. Stiff felt holds its shape better than paper for the ears and won't wilt in humid weather.
- $12; 45 minutes.
- Place in a corner or under an entryway bench.
- Use yellow reflective tape for eyes to make them glow when lights hit them.
Most people skip this: Reinforce the felt ears with toothpicks so they don't flop over after a few days.
74. Colorful Monster Pumpkins
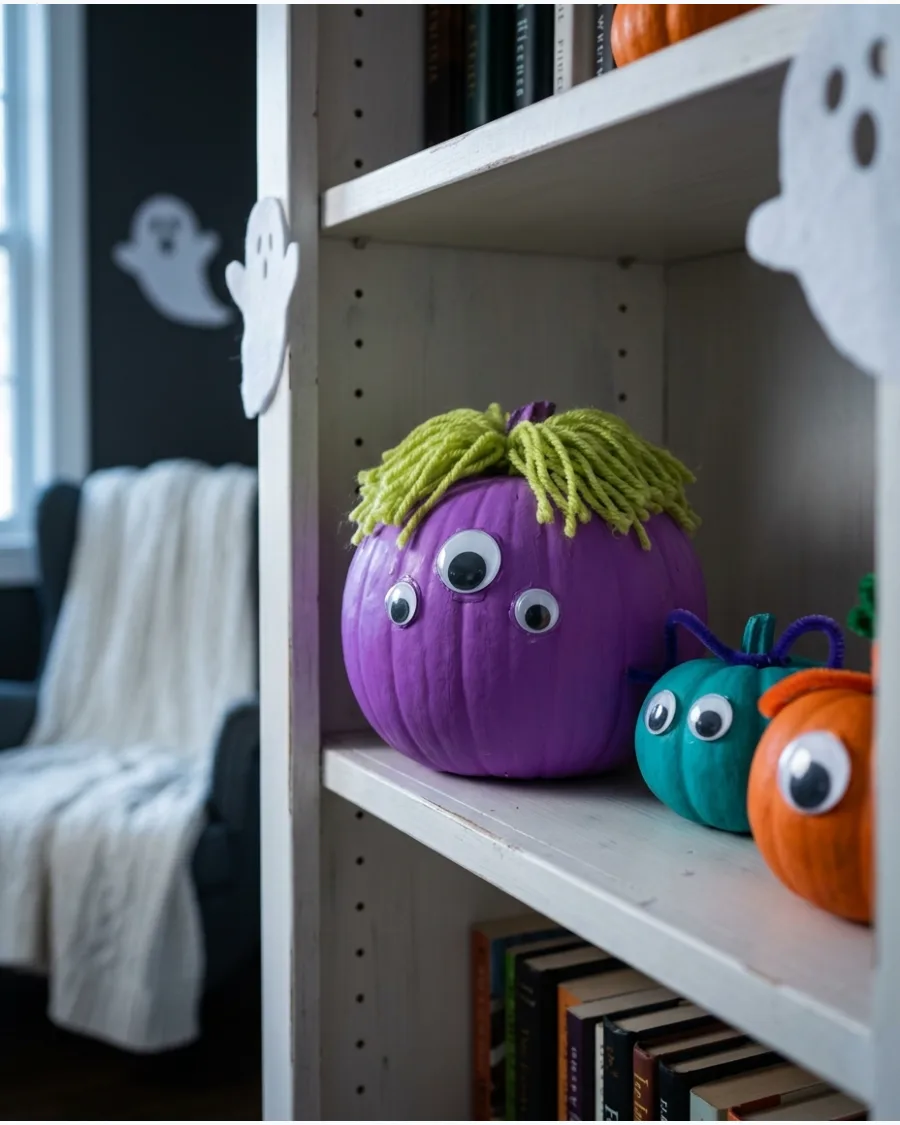
Paint pumpkins in bright green, purple, or orange and add foam horns, felt teeth, and large googly eyes. Place these colorful monsters on a low shelf or coffee table to brighten up a dark room. Yarn hair adds a messy, fun texture that makes each character feel unique and handmade.
- $20 for craft supplies; 1 hour.
- Set on a bookshelf or playroom table.
- Swap felt for foam sheets if these will be displayed in a humid area.
Best shortcut: Use a hot glue gun on a low-heat setting to avoid melting the foam or burning the pumpkin skin.
75. Mini Pumpkin Garland
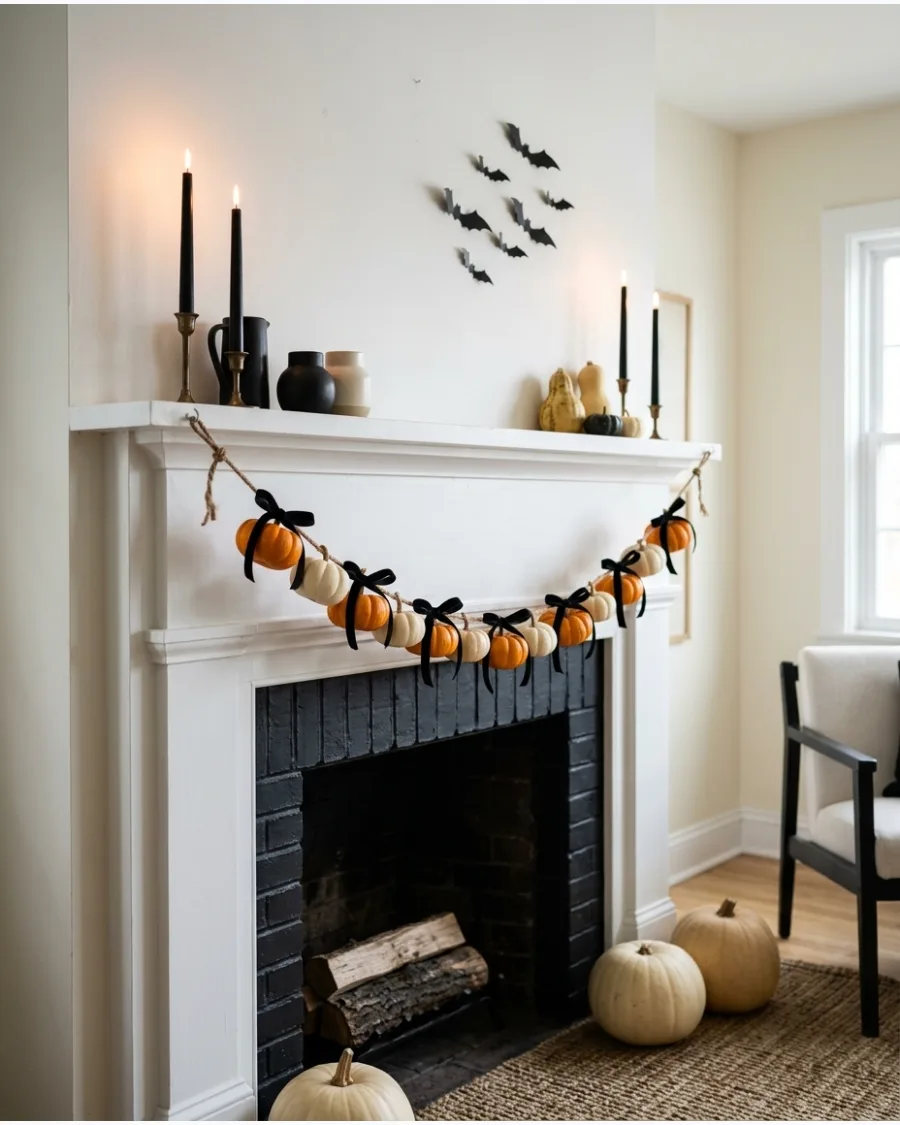
Attach lightweight mini pumpkins to a sturdy garland base with leaves and black ribbon. Drape the finished garland across a fireplace mantel or around a doorway for a classic harvest look. Battery-operated lights tucked into the greens will make the pumpkins glow after the sun goes down.
- $15; 45 minutes.
- Secure to the mantel with clear adhesive hooks.
- Space pumpkins 6 inches apart to prevent the string from sagging too much.
Quick win: Use faux mini pumpkins to keep the garland lightweight and prevent it from pulling on the wall hooks.
DIY Indoor Halloween Decorations
76. Paper Bat Feature Wall
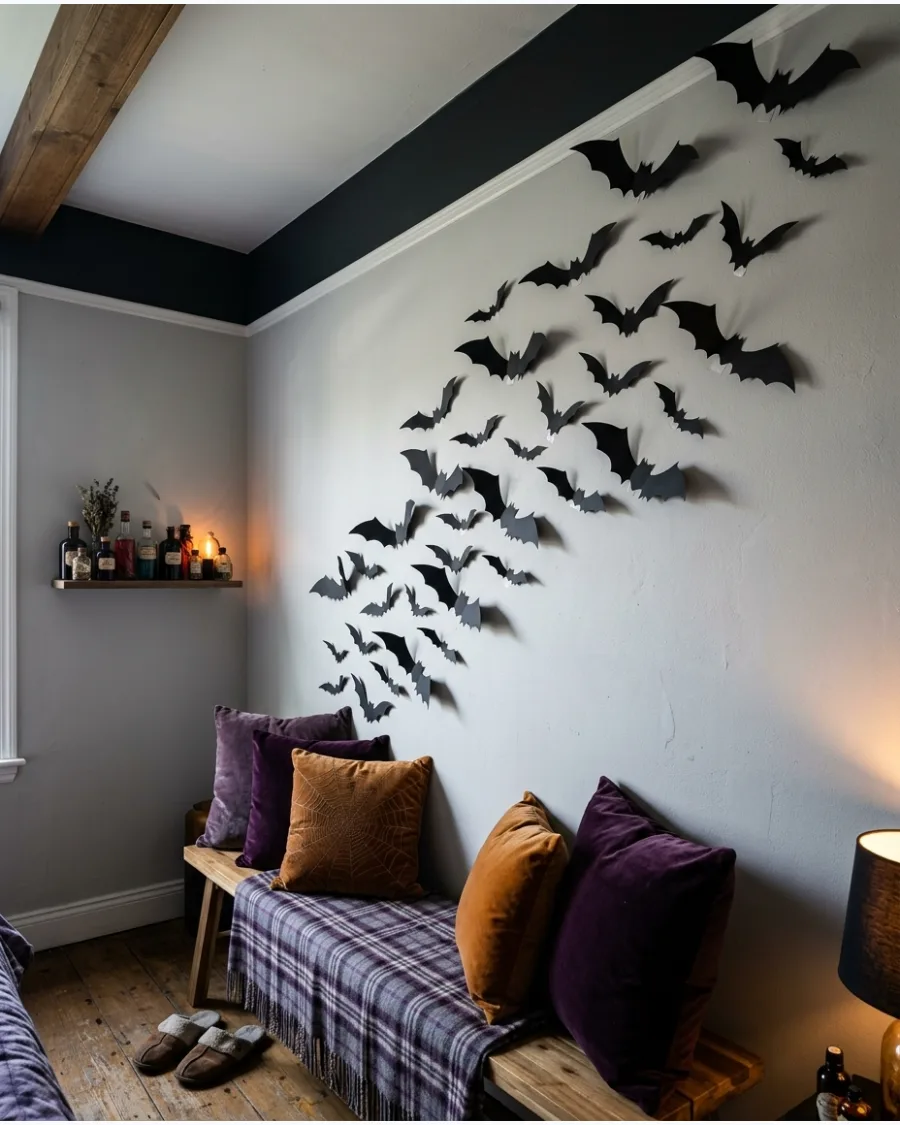
Cut bats in several sizes from black cardstock and fold the wings to create a 3D effect. Arrange them in a sweeping pattern across a wall or mirror to imply a swarm in motion. Using removable mounting putty allows for layout adjustments without damaging the wall paint.
- $5 for cardstock; 1 hour.
- Apply to a large blank wall or around a doorway.
- Vary the sizes of the bats to create a realistic sense of depth.
Most people skip this: Fold each bat wing at a different angle to make the swarm look more natural and less uniform.
77. Dripping LED Candle Bottles
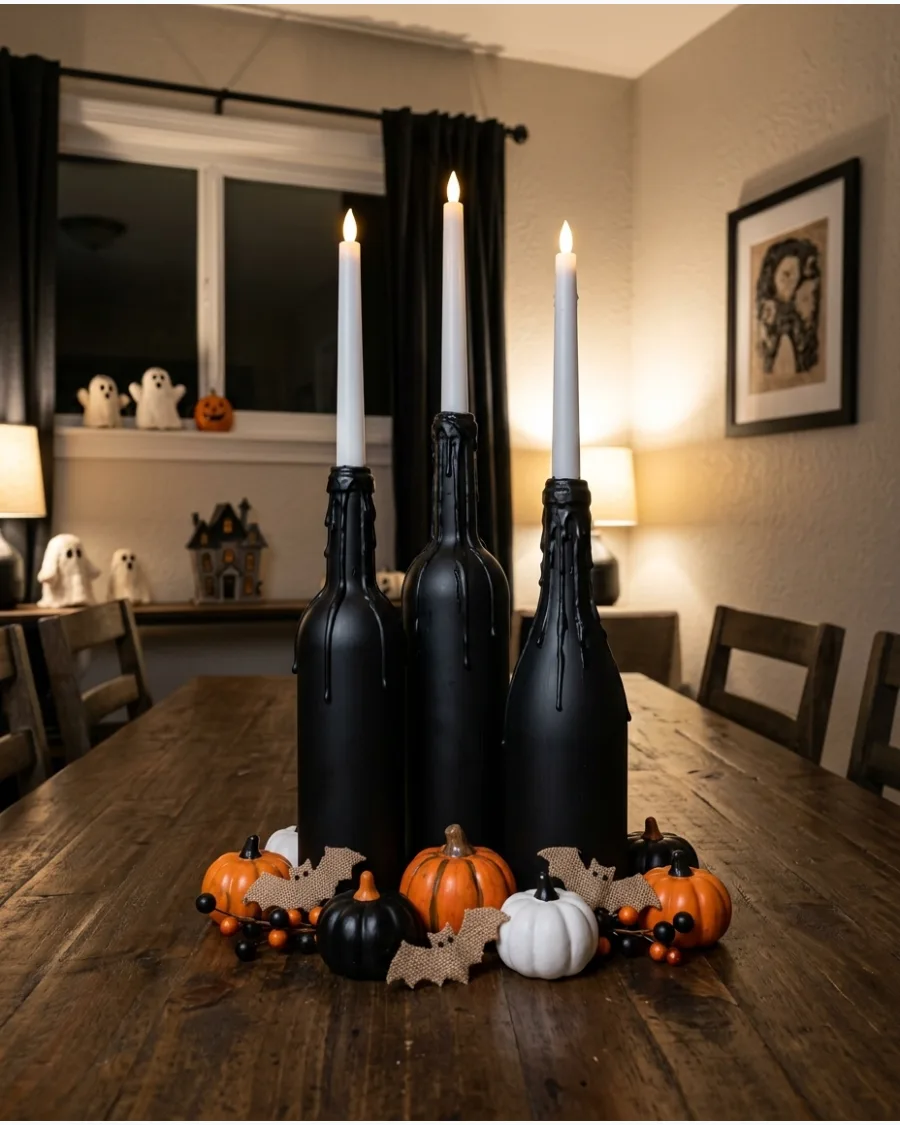
Paint empty glass bottles matte black and place battery-operated taper candles inside their openings. Add craft glue around the tops to create a dripping wax effect before the final coat of paint.
Group these in odd numbers on a dining table to create a gothic centerpiece. The glue drips look most realistic when they vary in length and thickness.
- $0 (using recycled bottles); 1 hour.
- Arrange as a centerpiece or on a sideboard.
- Ensure the candle base fits snugly into the bottle neck to prevent tilting.
Best shortcut: Paint the glue drips after they dry so they match the bottle color perfectly.
78. Framed Halloween Silhouettes
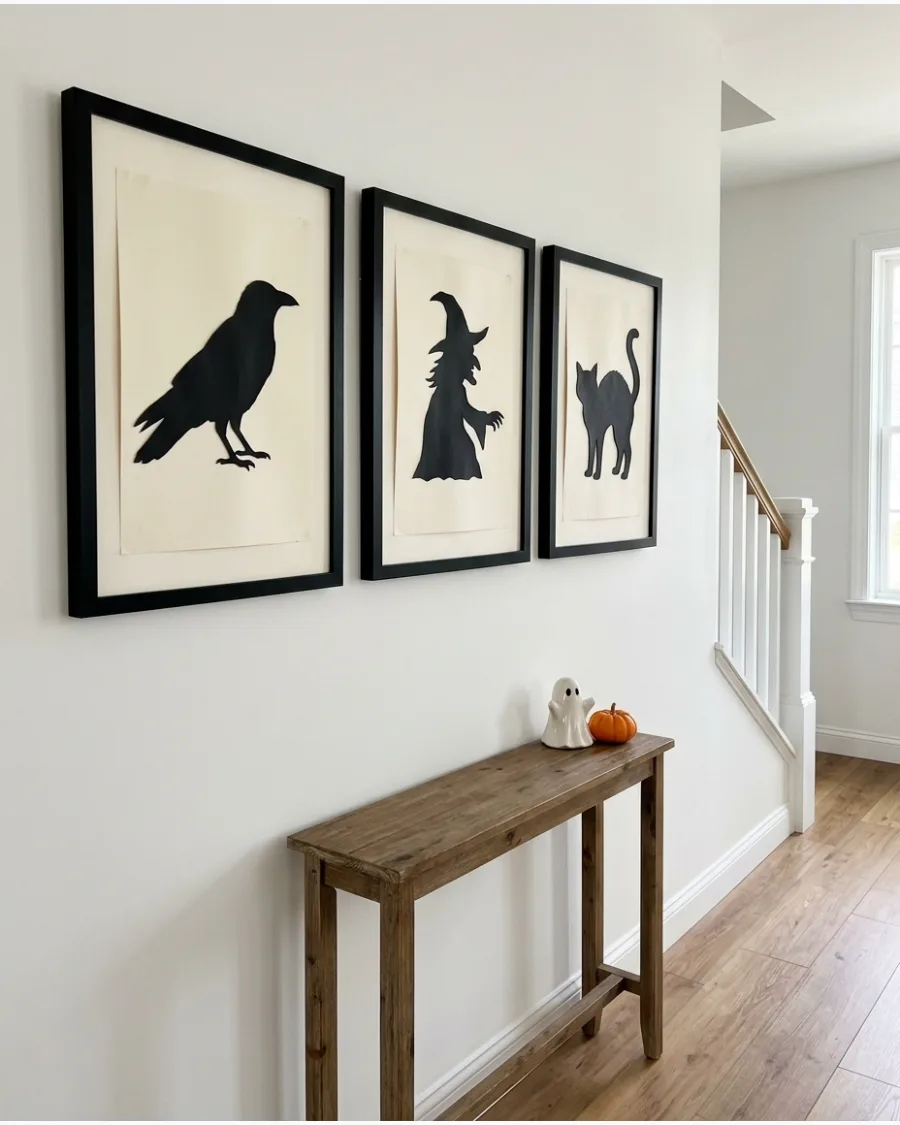
Cut witch, ghost, or raven silhouettes from black paper and display them against cream or orange backgrounds. Hang a row of three matching frames in a hallway to create a sophisticated holiday gallery. High-contrast images work best for clear visibility from a distance.
- $10; 45 minutes.
- Hang in a hallway or entry at eye level.
- Use thrift store frames and spray paint them black for a cohesive look.
Quick win: Use a glue stick instead of liquid glue to prevent the paper from wrinkling inside the frame.
79. Haunted Portrait Gallery
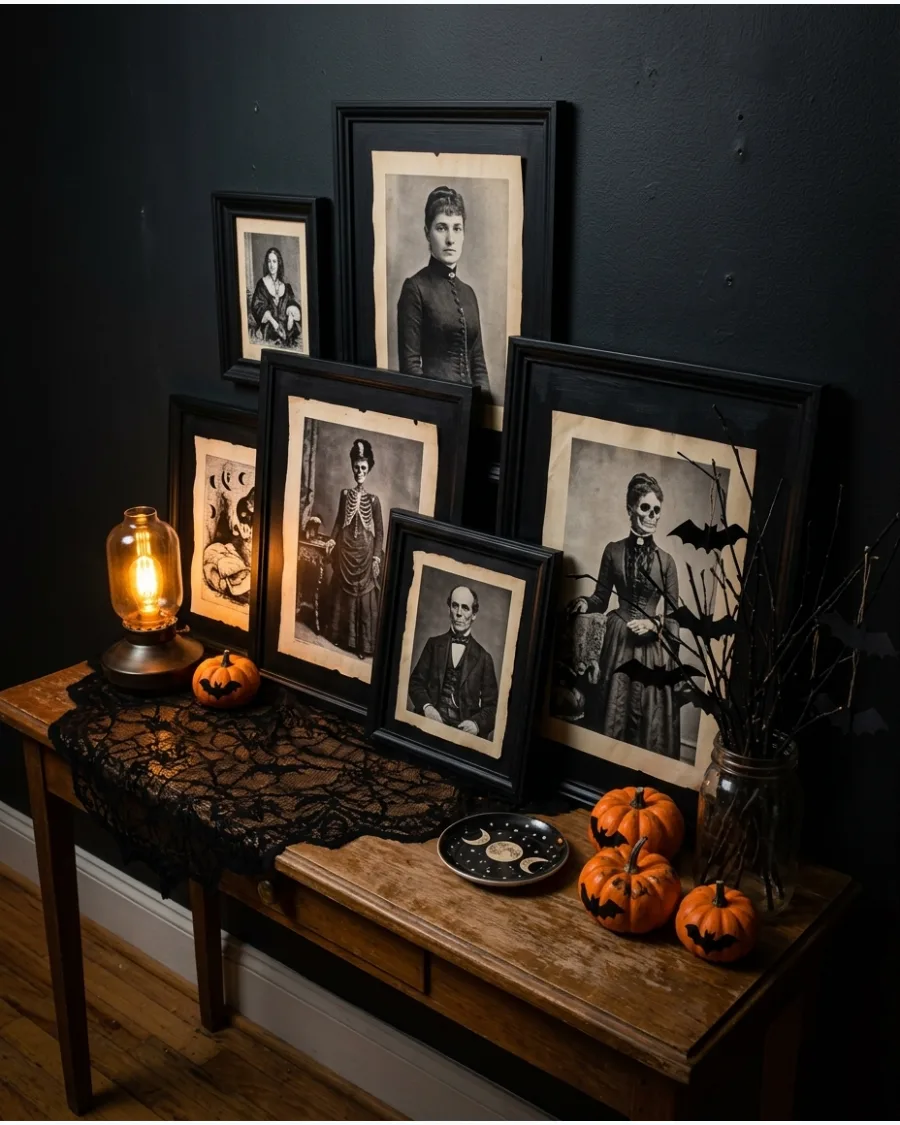
Create a gallery wall using old frames and spooky portraits of skeletons or Victorian figures. Lean several large frames against a wall on a console table for a layered and moody look. Adding a thin layer of grey cheesecloth over the frames mimics the look of old, dusty cobwebs.
- $10 for prints; 30 minutes.
- Layer frames on a mantel, shelf, or table.
- Mix different frame styles and sizes to make it look like an old estate collection.
Most people skip this: Use matte photo paper for the prints to avoid glare from nearby lights.
80. Floating LED Candles
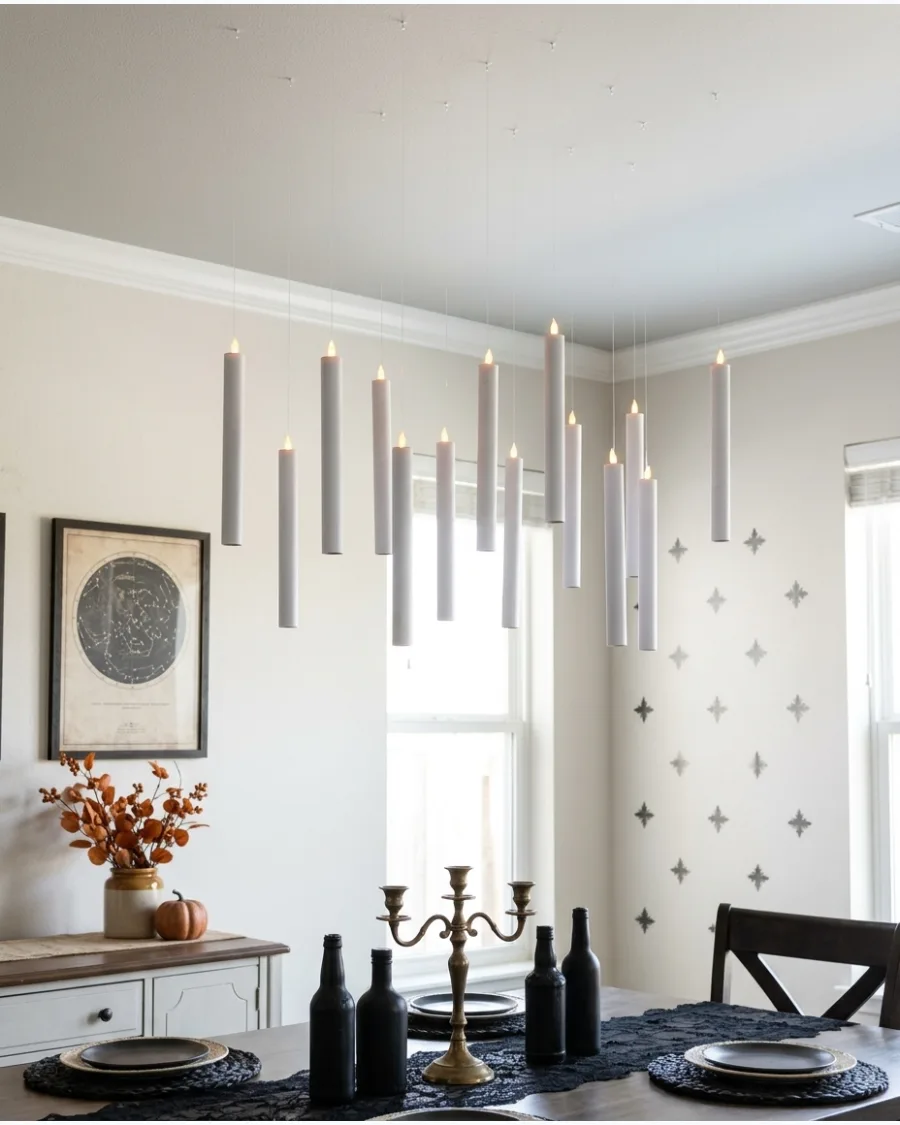
Create lightweight candle sleeves from white paper tubes and insert battery-operated tea lights at the top. Suspend them securely from the ceiling with clear fishing line at various heights.
Hang these over a dining table or in a dark corner for a magical floating effect. The flickering LED flame provides a safe glow without the risk of real fire.
- $15; 2 hours.
- Secure to the ceiling with small clear adhesive hooks.
- Space them out so they don't tangle when people walk by.
Best shortcut: Use a needle to poke a hole through the paper tube near the top for a secure and balanced hanging point.
81. Spiderweb Mirror
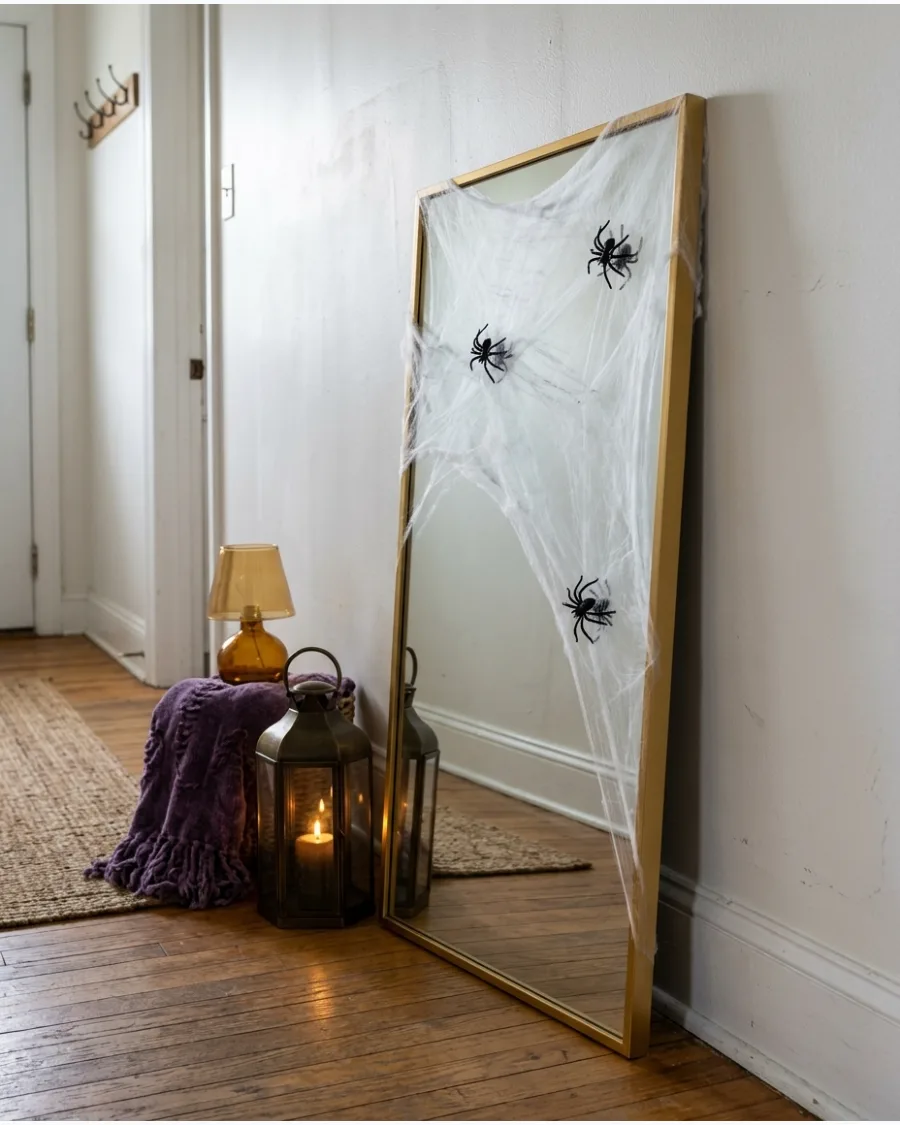
Stretch removable faux cobweb material across an old mirror to create an abandoned look. Add lightweight spiders around the frame and corners to complete the effect.
Pull the webbing as thin as possible to make it look realistic rather than like a clump of cotton. A mirror with an ornate frame adds a great gothic touch to an entryway without requiring any permanent changes.
- Costs about $5 for webbing and spiders and takes 10 minutes.
- Clean the glass first so the webbing sticks better to the frame edges.
- Use black webbing for a more modern, high-contrast look on white frames.
Quick win: Use a toothpick to snag and pull individual strands for a finer, more natural web pattern.
82. Black Branch Centerpiece
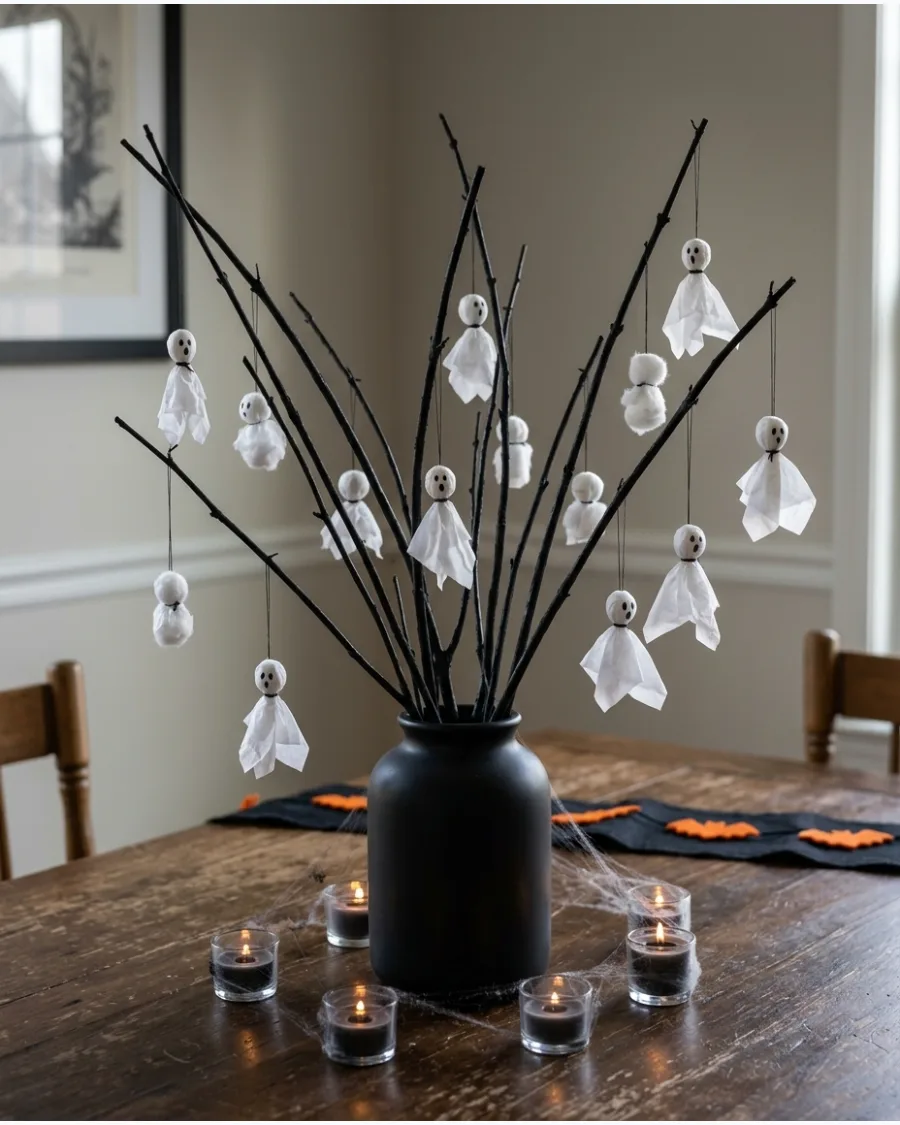
Paint collected branches black and arrange them inside a tall vase for a dramatic table display. Decorate them with paper bats, ravens, ghosts, or miniature pumpkins for added detail.
Use a heavy vase or add stones to the bottom to prevent the top-heavy branches from tipping over. High-contrast black branches look best when placed against a neutral wall or a bright window.
- Use free branches from the yard and about $6 for spray paint.
- Secure branches with floral foam or large pebbles inside the vase for stability.
- Swap ghosts for orange mini-pumpkins for a more traditional color palette.
Most people skip this: Spray the branches with a matte sealer to prevent the black paint from chipping onto your tabletop.
83. Cardboard Halloween Village
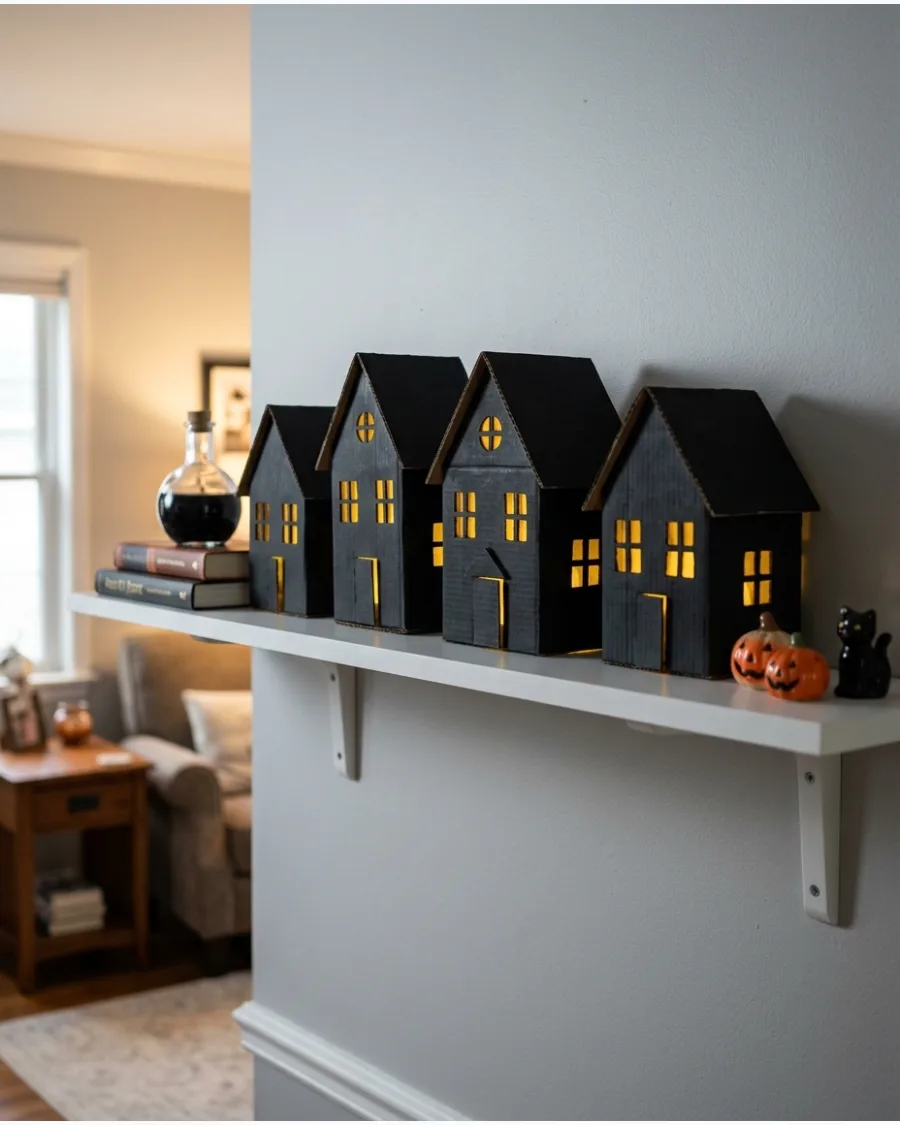
Turn small shipping boxes into haunted houses using black paint and paper roofs. Place battery-operated lights inside to illuminate the cutout windows for an eerie evening display.
Line the window cutouts with yellow tissue paper to create a warm, haunting glow. Cardboard is the perfect medium because it is easy to cut and holds its shape well on a shelf.
- Uses recycled boxes and roughly $10 for lights and paint.
- Use a sharp utility knife for clean window edges and straight roof lines.
- Paint the houses dark navy or deep purple for a softer, whimsical look.
Best shortcut: Use empty cracker or cereal boxes to get different house heights without any extra construction.
84. Ghost-Themed Bookshelf
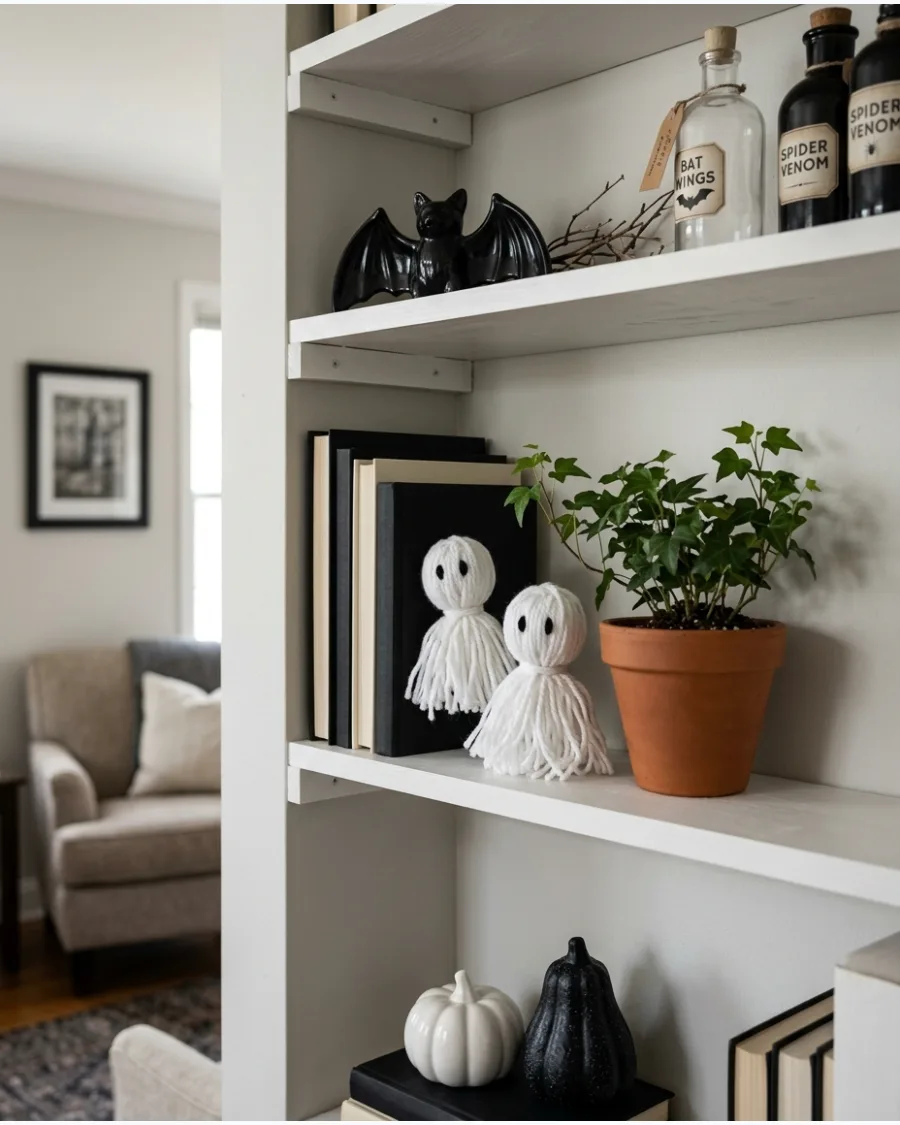
Add small handmade ghosts between books, plants, and frames to liven up your library. Create the figures using clay, fabric, yarn, or folded paper in different poses.
Vary the heights of the ghosts by placing some on top of book stacks and others on the shelf surface. Mixing textures like soft yarn and hard clay keeps the display visually interesting.
- Costs about $10 for craft supplies and takes 1 hour.
- Keep the ghosts small to ensure they do not block the titles on your book spines.
- Add tiny black top hats to a few ghosts for a vintage character feel.
Quick win: Use white felt scraps to make flat ghosts that can peek out from behind picture frames.
85. Cobweb Chandelier
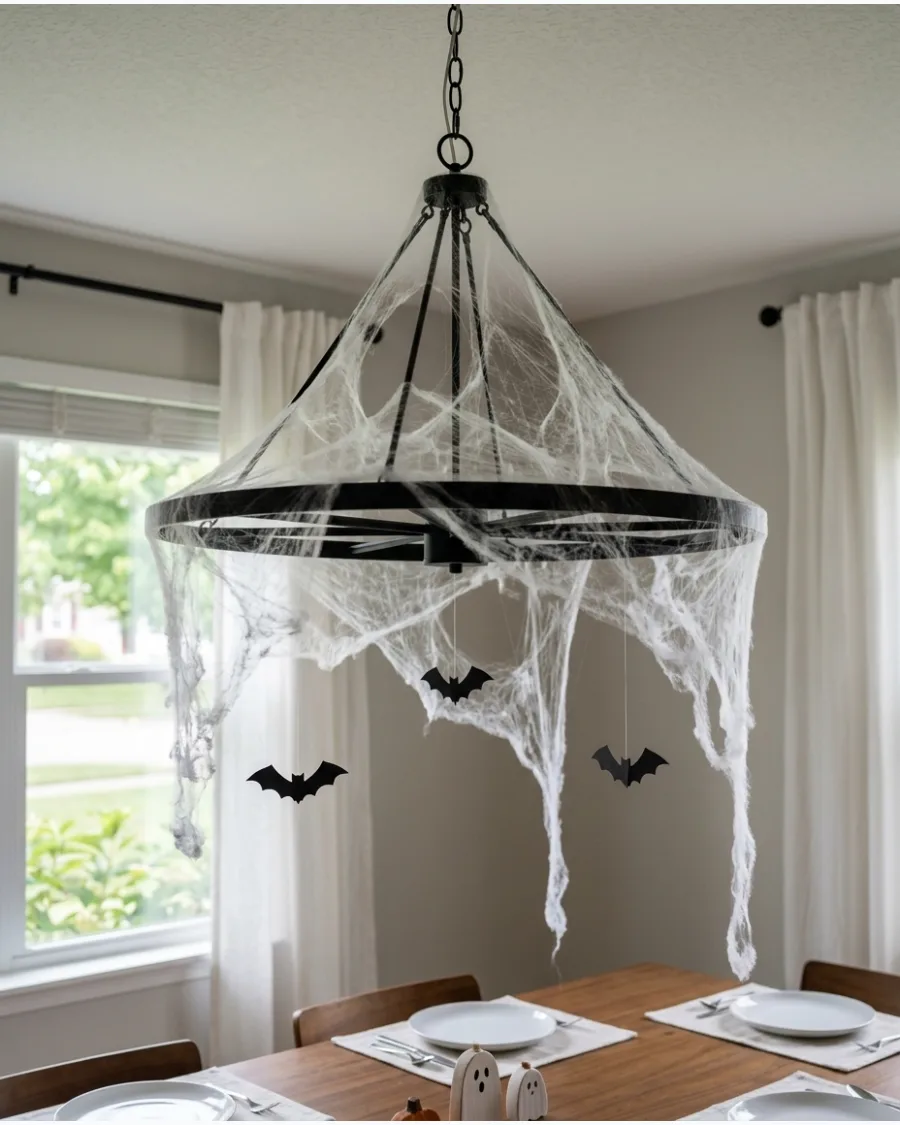
Decorate a chandelier with removable cobwebs, paper bats, and hanging spiders for a spooky overhead feature. Keep all materials away from bulbs and use clear line to hang the accents.
Drape the webbing loosely so it sags naturally between the arms of the light fixture. This turns a standard dining room light into a spooky focal point instantly without cluttering the table.
- Costs $8 for webbing and bats and takes 20 minutes.
- Use clear fishing line to hang bats so they appear to be flying in mid-air.
- Only use this on LED bulbs that stay cool to the touch for safety.
Most people skip this: Take a photo of the chandelier before you start so you know exactly where to put everything back when the season ends.
86. DIY Halloween Tree
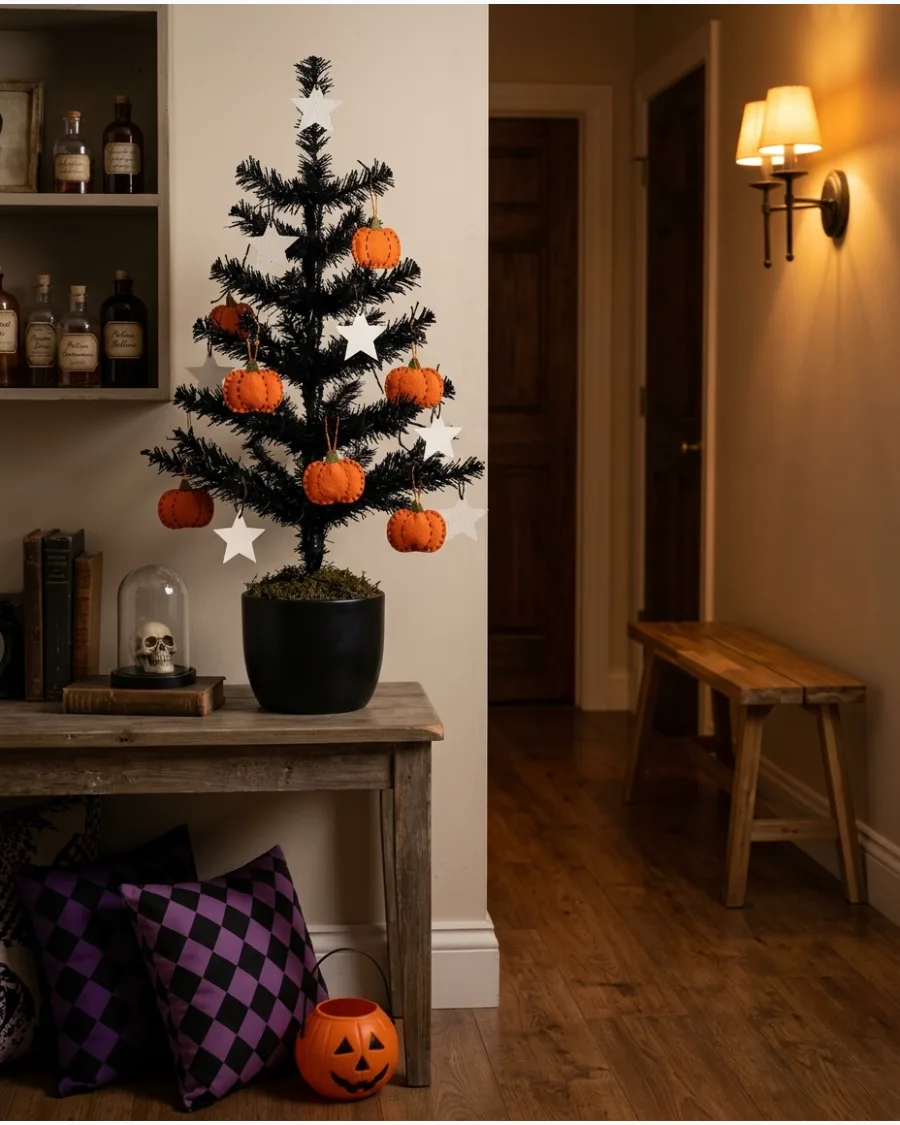
Place black branches inside a large vase or use a reusable tabletop tree as a festive base. Decorate it with handmade pumpkins, ghosts, and vintage-style ornaments.
Stick to a two-color palette like black and orange to keep the tree from looking cluttered. A tabletop tree works perfectly in an entryway or on a small side table.
- Budget is $15 to $30 depending on the tree size.
- Use a heavy base to keep the tree stable if you have pets or high foot traffic.
- Add a string of orange fairy lights for a glow that highlights the ornaments.
Best shortcut: Buy a cheap green tinsel tree and spray paint it matte black for a custom look.
87. Layered Halloween Mantel Garland
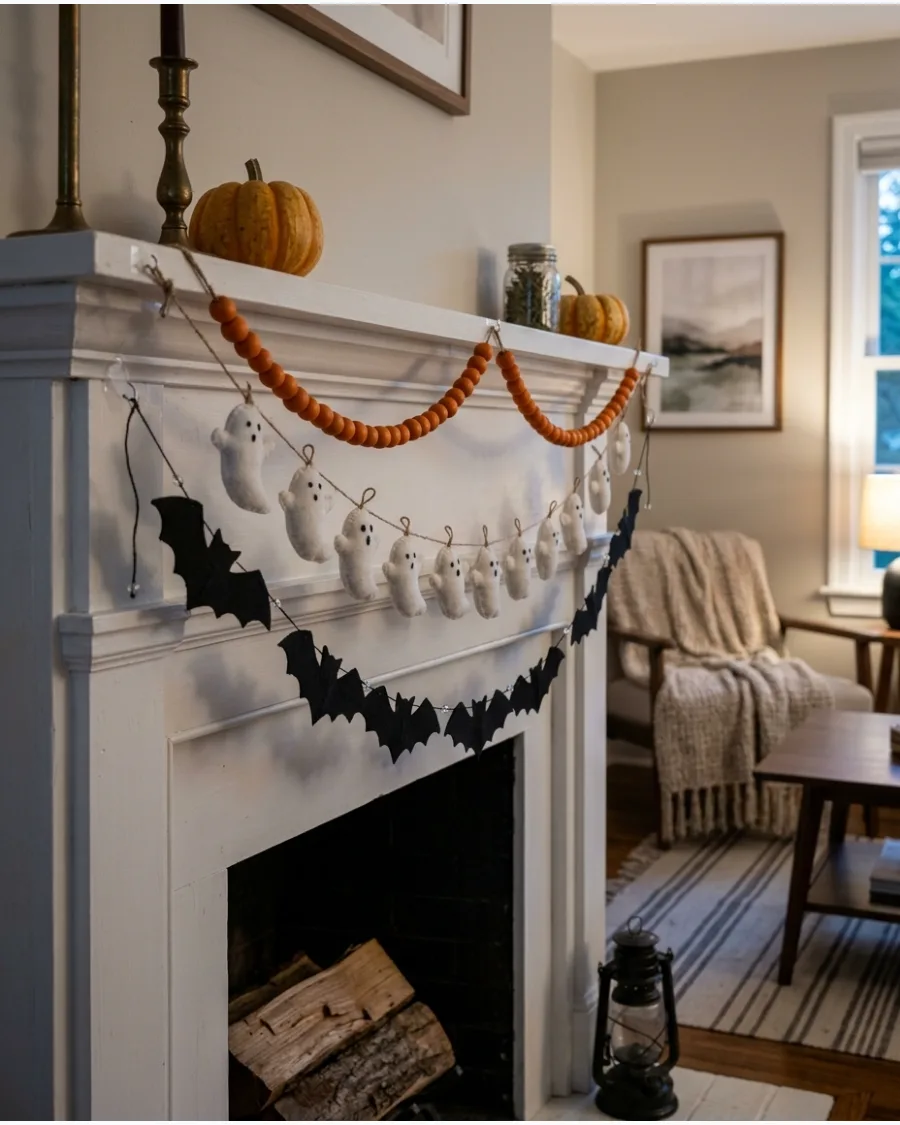
Combine paper bats, felt ghosts, and mini pumpkins into a multi-layered display across your fireplace. Layer several simple garlands instead of relying on one oversized decoration to build depth.
Space the layers at different heights to cover the entire front of the mantel. Using different materials like wood and felt adds a high-end, curated look to the living room.
- Costs about $20 for various garland materials.
- Use clear adhesive hooks on the top of the mantel to hide the attachment points.
- Mix in a strand of eucalyptus or autumn leaves to bridge the gap between fall and Halloween.
Quick win: Use different string types, like twine for the beads and black ribbon for the bats, to add more texture.
DIY Gothic and Haunted-Garden Decorations
88. Gothic Floral Arrangement
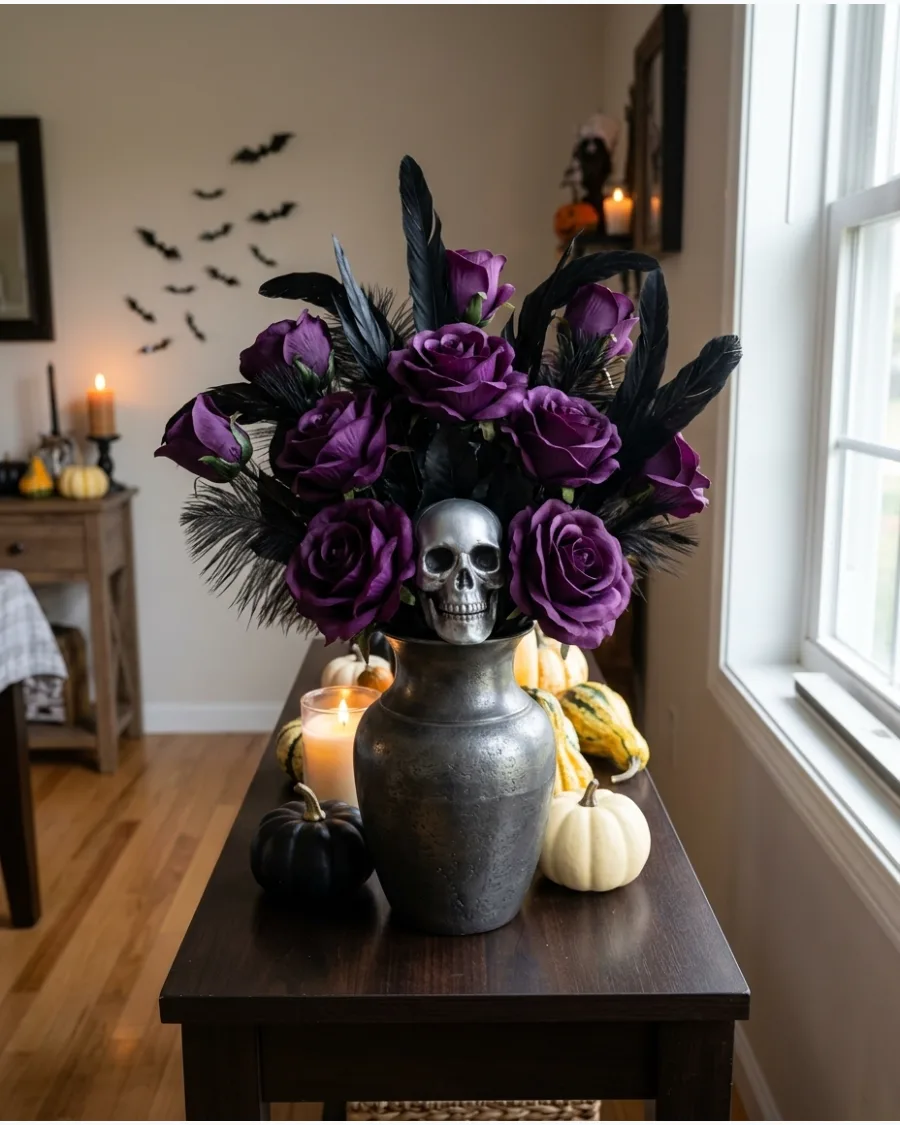
Arrange black, dark red, and purple faux flowers inside an antique-style vase for a moody centerpiece. Add feathers, branches, or small skulls to give the arrangement more character.
Mix in some dried, crunchy leaves to give the arrangement a decaying but elegant feel. Faux florals are better than real ones because they will not wilt or smell over the month.
- Budget is $25 for silk flowers and accessories.
- Use floral foam to keep the heavier branches and feathers exactly where you want them.
- Choose a vase with a tarnished or matte finish to match the gothic aesthetic.
Best shortcut: Lightly spray the edges of red silk flowers with black spray paint to create a burnt or decaying look.
89. Mossy Skull Terrarium
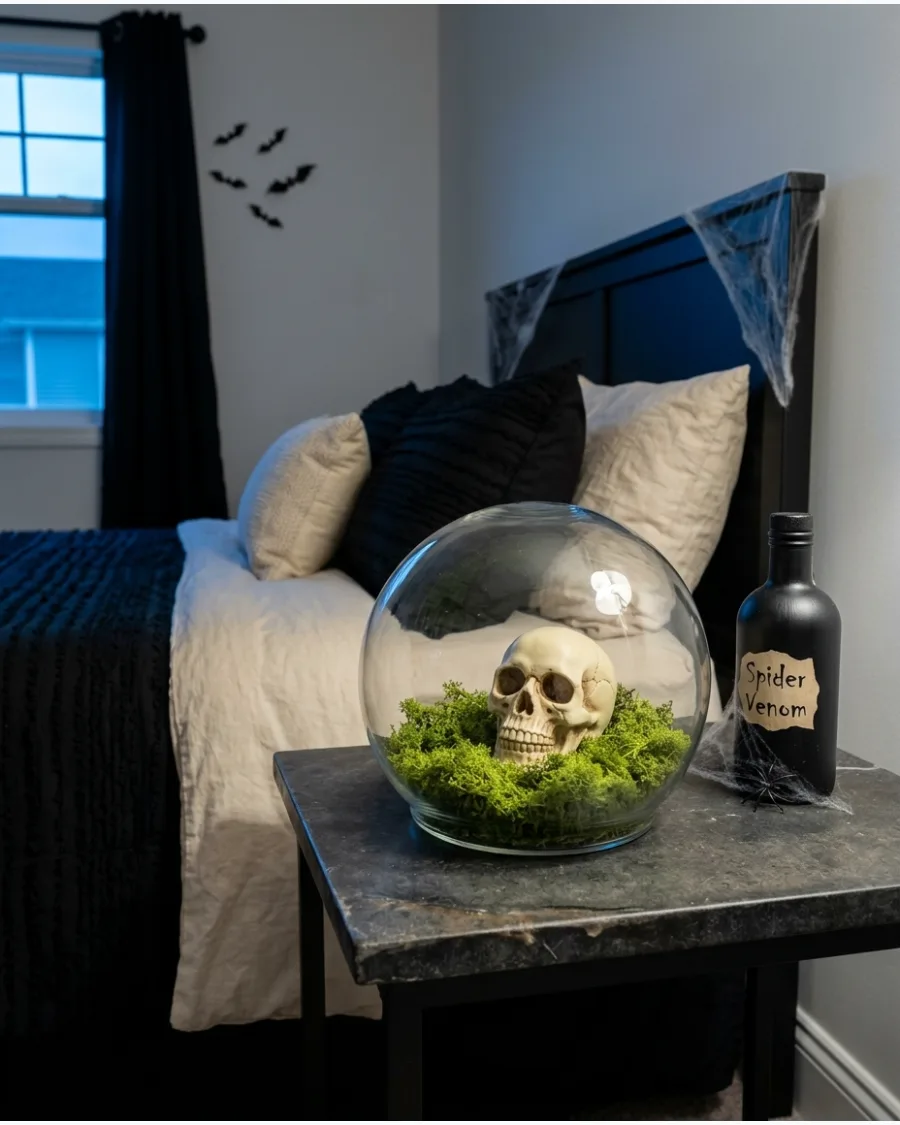
Place a lightweight skull inside a large glass cloche or jar. Surround it with artificial moss, twigs, and stones to create a miniature haunted landscape.
Position the skull at a slight angle to make the scene look more like a discovered ruin. A glass cloche makes the display look like a museum specimen rather than just a toy.
- Costs $15 for moss and the skull; takes 15 minutes to assemble.
- Use preserved moss rather than fresh moss to avoid moisture buildup inside the glass.
- Add a few small battery-powered fairy lights under the moss for a magical evening effect.
Most people skip this: Glue the moss to a piece of cardboard cut to fit the bottom of the jar so you can lift the whole scene out easily later.
90. Haunted Botanical Frames
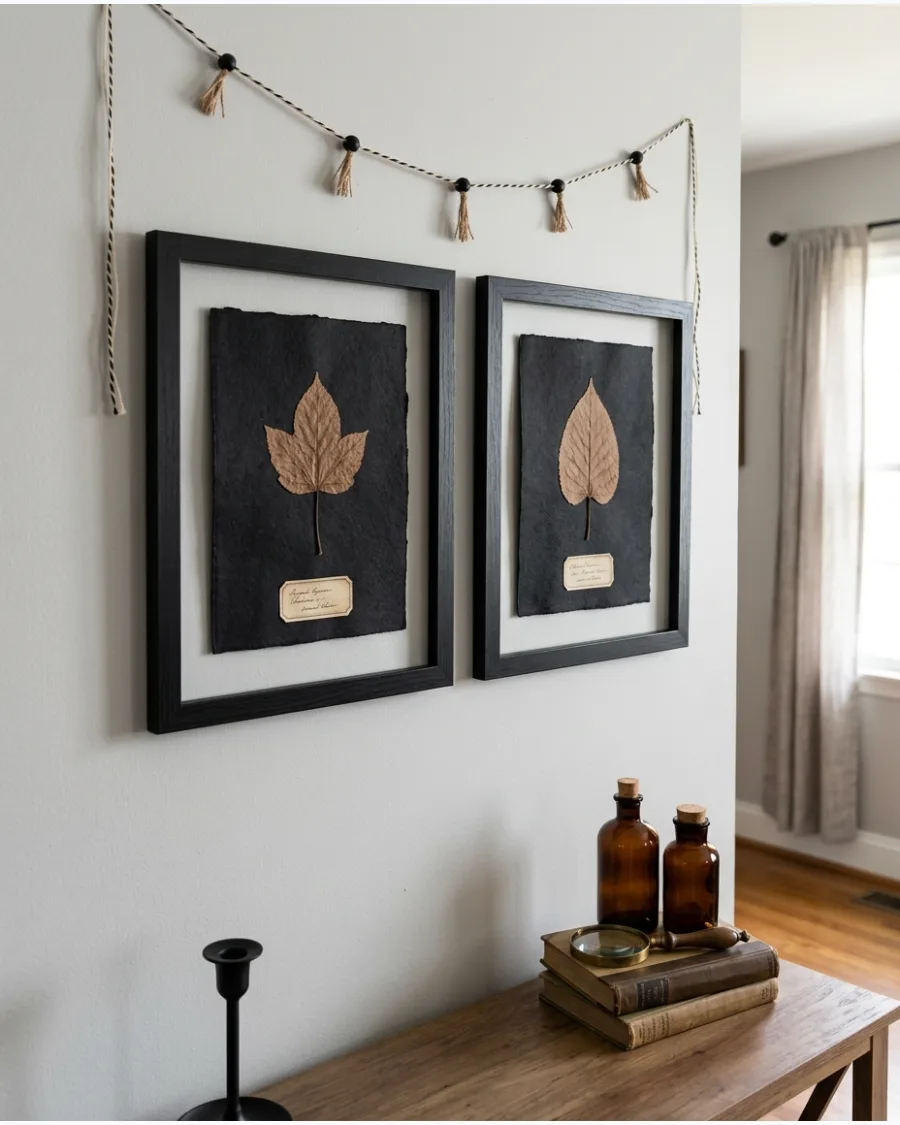
Press artificial leaves or paper plant shapes against dark backgrounds inside simple frames. Add handwritten labels with mysterious plant names to mimic an old apothecary collection.
Use black or dark charcoal paper as the backing to make the botanical shapes pop. Grouping three or four of these frames together creates a spooky scientist’s study vibe on any wall.
- Costs $10 for frames and paper; takes 45 minutes.
- Use a gold or white gel pen to write the labels for a high-contrast look.
- Lightly singe the edges of the paper labels with a lighter for an antique appearance.
Quick win: Use names like Nightshade or Wolfsbane on the labels to lean into classic spooky folklore.
91. Raven Branch Display
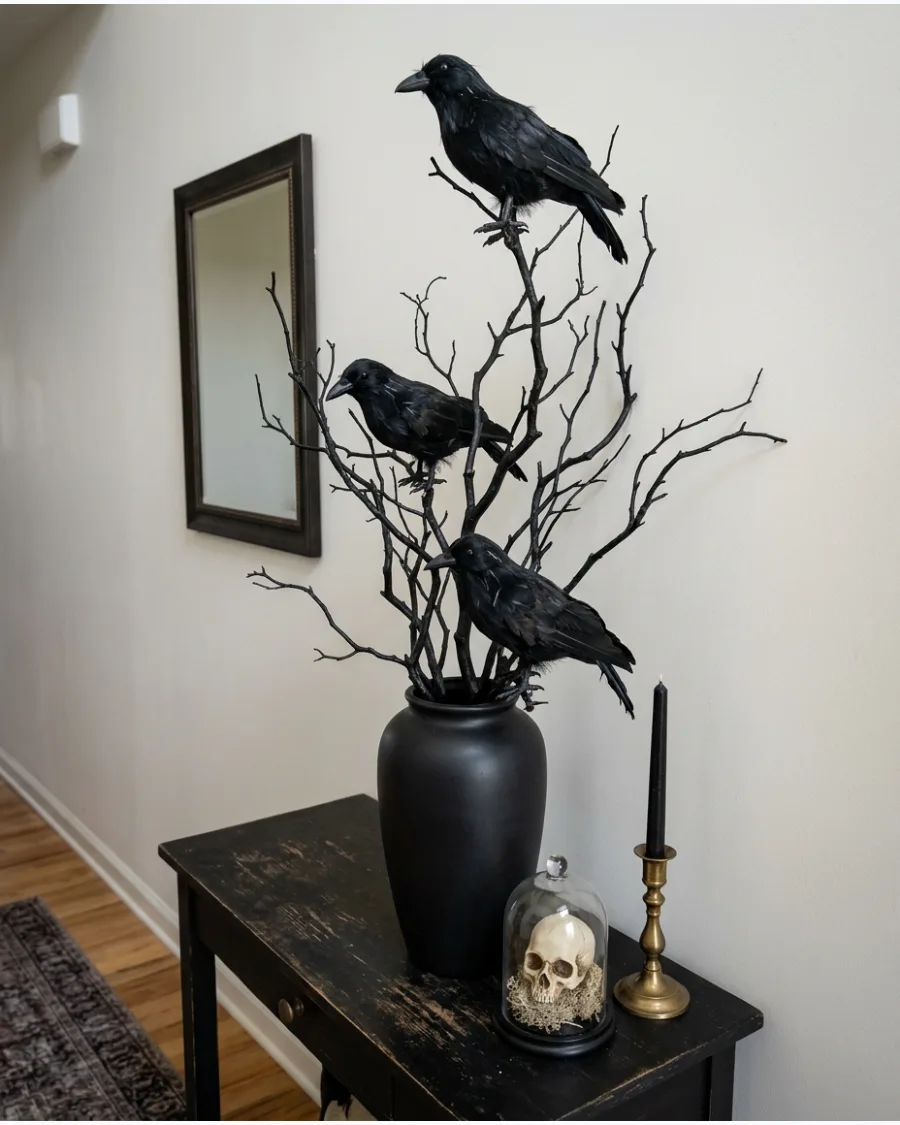
Use tall, dry branches from the yard and spray them with matte black paint to create a moody silhouette. Secure lightweight faux ravens to the twigs using thin floral wire or the clips attached to their feet.
Anchor the branches in a heavy ceramic vase filled with river stones to prevent the display from tipping over. This arrangement adds vertical height to a porch table or entryway without taking up much floor space.
- Sourcing: Gather free branches from the yard and buy a pack of 3-6 faux ravens for under $15.
- Setup: Use wire cutters to trim branches to size and secure birds in a natural, staggered pattern.
- Adaptation: For small apartments, use a single branch in a wall-mounted bud vase.
Best shortcut: Use branches with lots of tiny offshoots to give the ravens more places to sit naturally.
92. Victorian-Inspired Candle Display
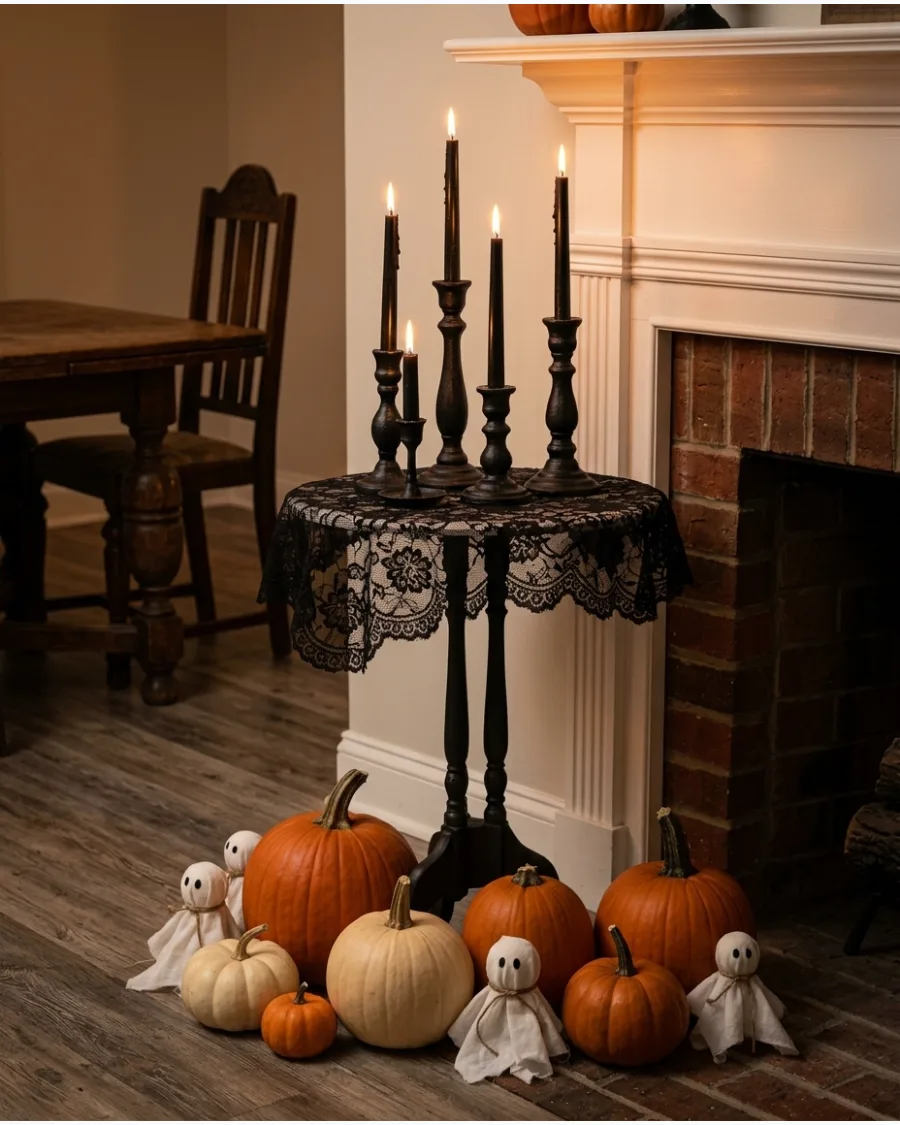
Gather mismatched brass or wood candleholders from thrift stores and unify them with a coat of metallic gold or flat black paint. Arrange them in a cluster on a mantel or dining table, varying the heights for visual interest.
Drape a piece of black lace fabric underneath the holders to catch the eye and add a soft, gothic texture to the hard surfaces. Stick to flameless pillars to keep the lace and old books safe from heat.
- Sourcing: Look for heavy metal candleholders at local thrift shops or garage sales.
- Setup: Paint in a well-ventilated area and allow 24 hours to dry before placing on furniture.
- Adaptation: Use battery-operated taper candles with a flickering flame effect for a realistic look.
Quick win: Rub a little bit of silver wax over the black paint to make the ornate details pop.
93. DIY Stained-Glass Halloween Art
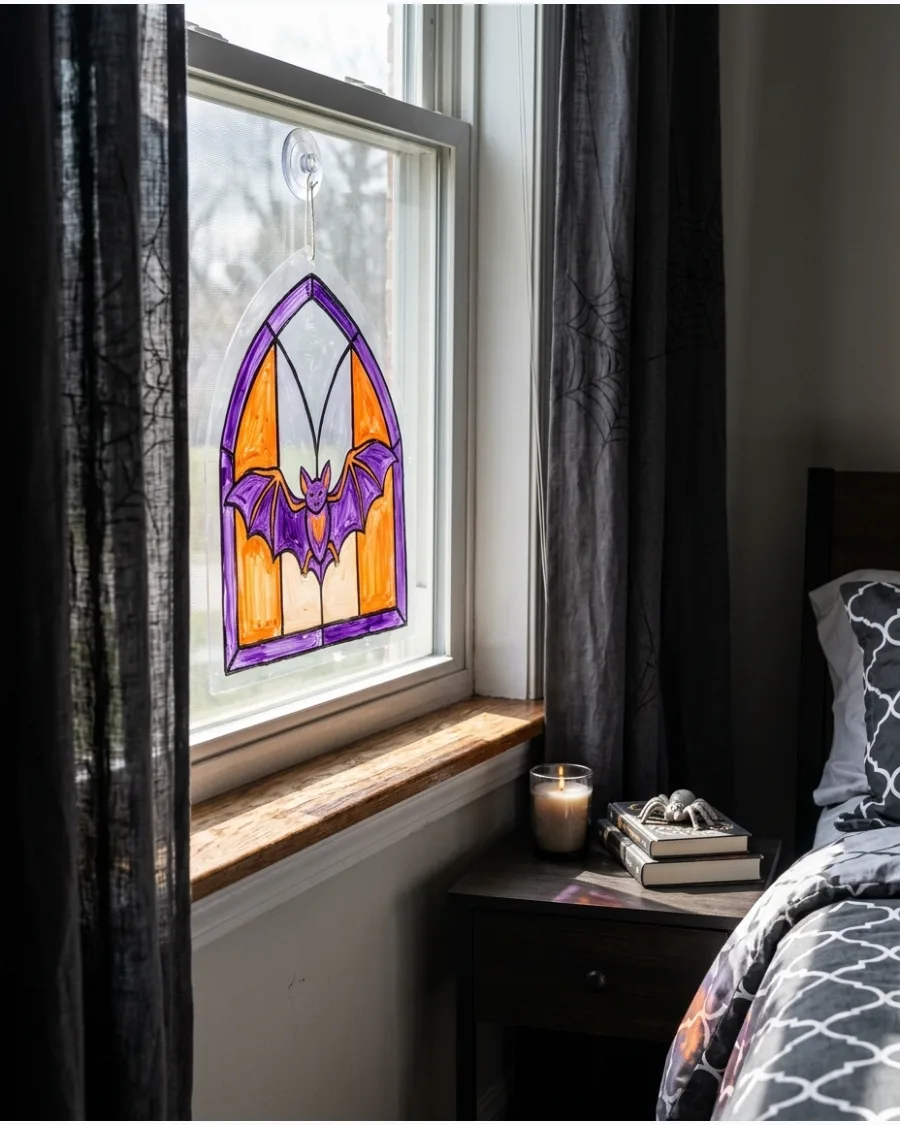
Transform a plain window by creating faux stained-glass panels using clear acrylic sheets and translucent glass gallery paint. Outline gothic shapes like pointed arches or bats with thick black liquid lead paint before filling the centers with deep purples and oranges.
Secure the panels to the inside of your window frame using small pieces of clear mounting tape for a non-permanent holiday look. The colors will glow beautifully when the sun hits them during the day.
- Sourcing: Acrylic sheets are available at hardware stores and glass paint is at most craft shops.
- Setup: Lay the acrylic sheet flat over a printed stencil to trace the design accurately.
- Adaptation: Scale the project down by using small clear plastic frames from a dollar store.
Most people skip this: Let the black outlines dry completely for at least four hours before adding the colored paint to prevent bleeding.
DIY Halloween Table and Party Decorations
94. Potion Bottle Centerpiece
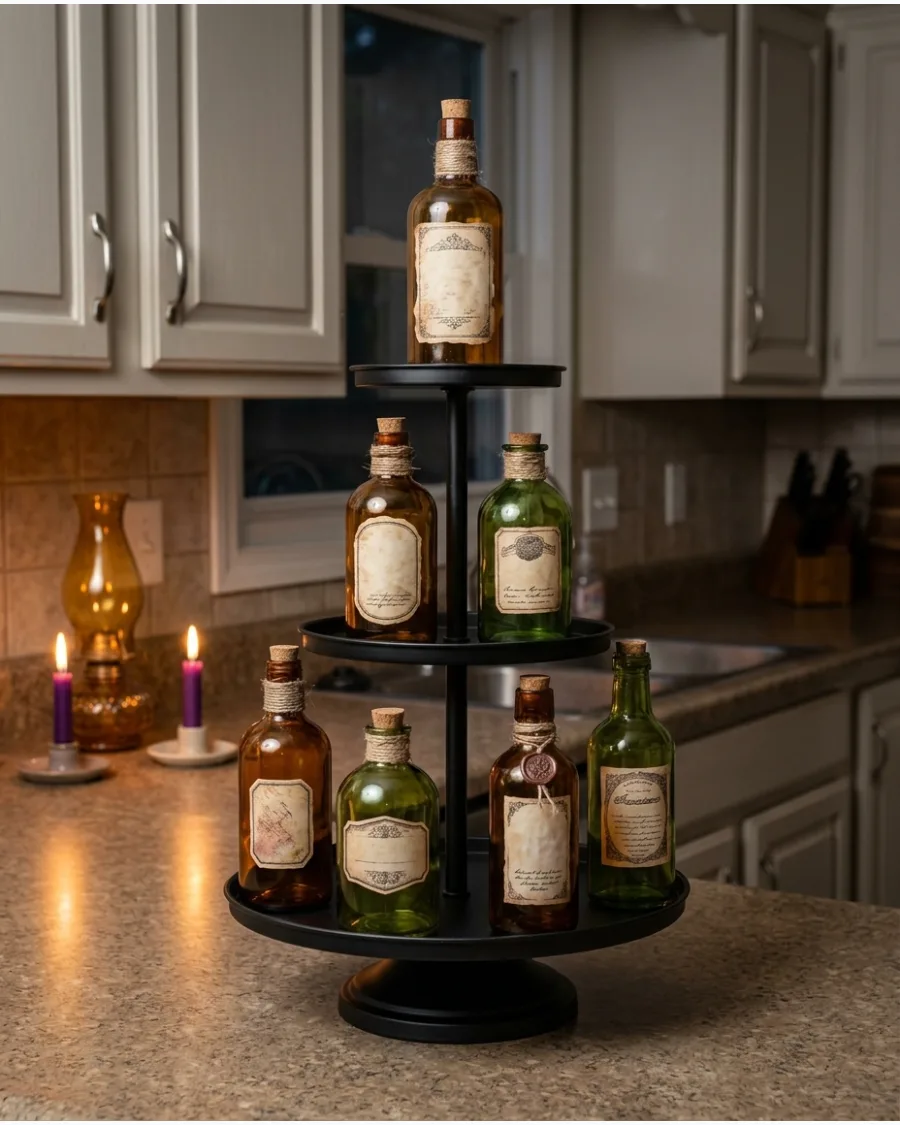
Turn empty glass jars and bottles into an apothecary display by adding custom labels and tinted water. Place the bottles on a tiered cake stand to create different levels and tuck clumps of dried green moss around the bases.
Thread a thin string of battery-operated fairy lights behind the glass to make the colored liquids glow from within. This setup works perfectly as a focal point for a kitchen island or a buffet table.
- Sourcing: Reuse wine bottles, olive oil jars, or spice containers for a variety of shapes.
- Setup: Print labels on sticker paper or use tea-stained paper and white glue to attach them.
- Adaptation: Use cork stoppers and sealing wax to make the bottles look authentic and antique.
Quick win: Use a few drops of food coloring and a tiny bit of cornstarch in the water to make the potions look murky and old.
95. Mini Pumpkin Place Cards
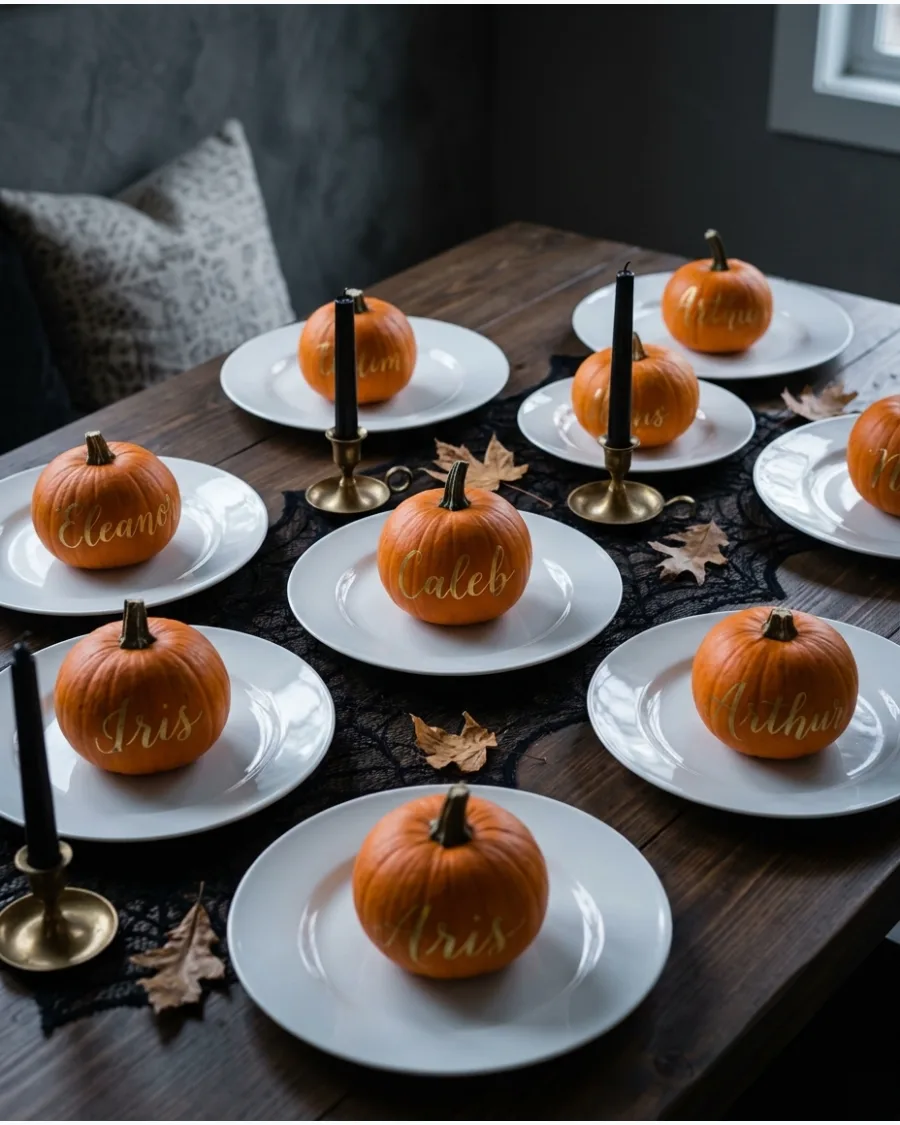
Use real or high-quality foam miniature pumpkins as personalized markers for your dinner guests. Write names directly onto the skin with a gold metallic paint pen or tie a small kraft paper tag to the stem with twine.
Select pumpkins with flat bottoms so they sit securely on top of plates or napkins without rolling around. These small details make a holiday meal feel more intentional and give guests a tiny favor to take home.
- Sourcing: Buy mini pumpkins in bulk from a grocery store or garden center in October.
- Setup: Clean the surface of the pumpkin with a damp cloth before writing to ensure the ink stays.
- Adaptation: Use white pumpkins for a modern look or black-painted ones for a gothic theme.
Best shortcut: If using real pumpkins, wipe them down with a mix of water and vinegar first so the paint pen sticks better to the waxy skin.
96. Ghost Napkin Decorations
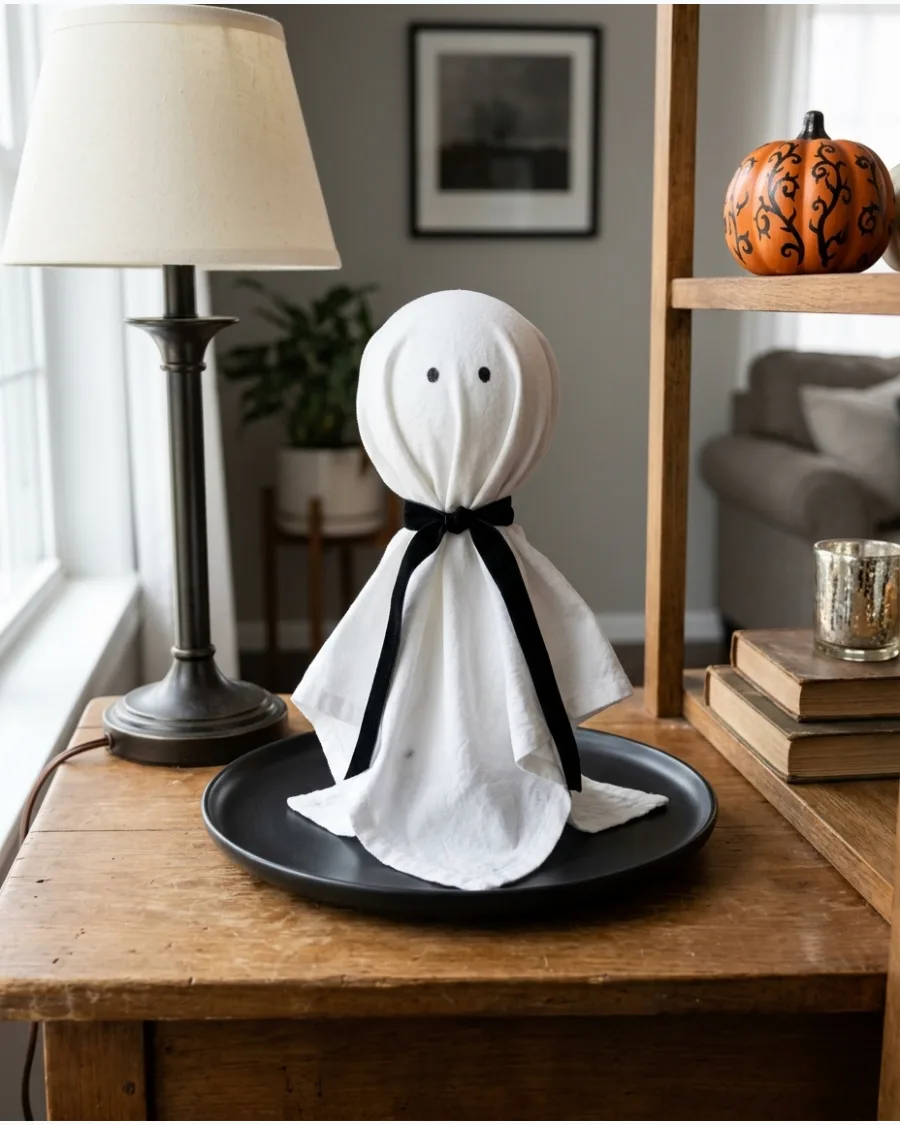
Create charming table ghosts by wrapping square white cloth napkins over round objects like large lollipops or small balls. Tie a piece of black ribbon or twine just below the head to secure the fabric and create a ruffled base.
Use small circles of black felt with adhesive backing to add eyes so you can easily remove them after the party without damaging the napkins. Set one at each place setting for an instant spooky theme that requires no sewing.
- Sourcing: Use existing white napkins or buy a budget-friendly set of cotton linens.
- Setup: Place a small piece of tissue paper inside the head to help it keep a perfectly round shape.
- Adaptation: Swap the black ribbon for orange twine to add a pop of traditional Halloween color.
Quick win: Use oversized napkins to ensure the skirt of the ghost is long enough to drape elegantly over the edge of the plate.
97. Spiderweb Table Runner
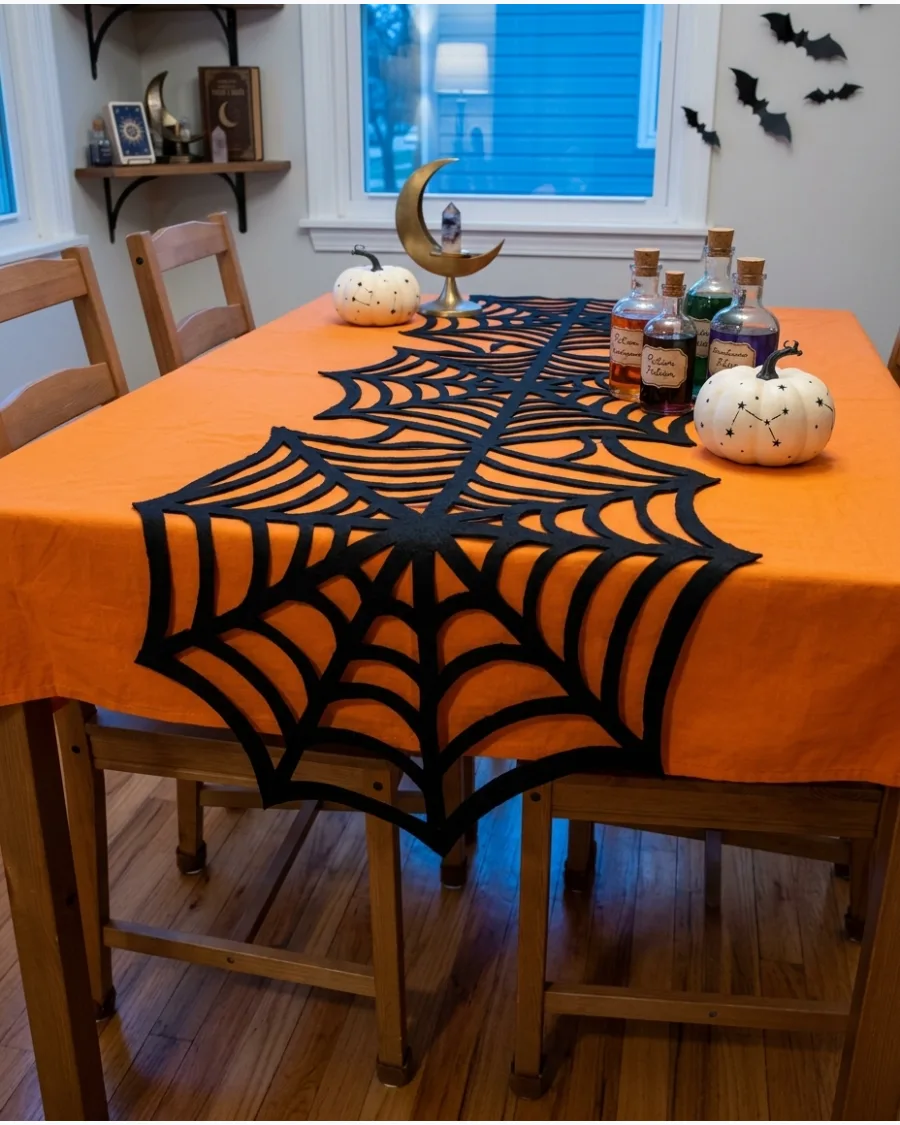
Cut a custom spiderweb runner from a long roll of black felt to fit the exact length of your dining table. Use a white chalk pencil to sketch the radial lines and connecting arcs before cutting them out with sharp fabric scissors.
Lay the black felt over a bright orange or white tablecloth to make the intricate web pattern stand out clearly. Since felt doesn't fray, there is no need to hem the edges, making this a quick afternoon project.
- Sourcing: Felt is sold by the yard at fabric stores and is very inexpensive.
- Setup: Fold the felt in half or quarters before cutting to ensure the web pattern is symmetrical.
- Adaptation: Make smaller versions to use as individual placemats or coasters.
Most people skip this: Use a few small dots of poster tack on the corners to keep the lightweight felt from sliding around during dinner.
98. Candy Cauldron Display
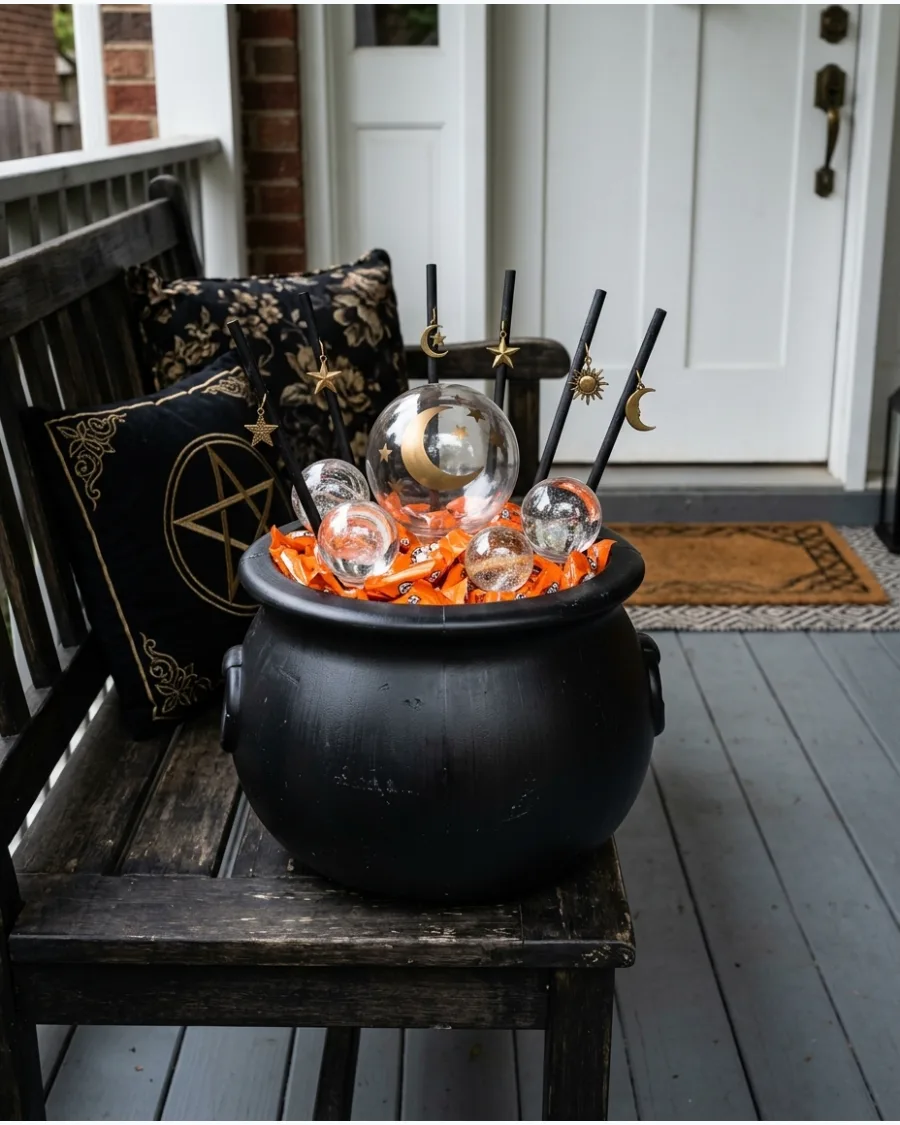
Transform a large plastic planter into a bubbling cauldron by painting it with a textured matte black spray paint. Fill the bottom with crumpled paper or floral foam to take up space, then top it with a generous layer of wrapped candies.
Hot glue iridescent clear Christmas ornaments around the top rim to look like shimmering bubbles frozen in time. Place this on a side table near the front door for an easy and festive way to hand out treats.
- Sourcing: Use a cheap plastic garden pot or a dedicated plastic cauldron from a party store.
- Setup: Apply two thin coats of spray paint for full coverage and let it cure for a full day.
- Adaptation: Add a small fog machine inside for a more dramatic, misty effect during a party.
Best shortcut: Place a small battery-operated green light inside the cauldron under the candy to give the bubbles an eerie glow.
99. Paper Bag Halloween Luminarias
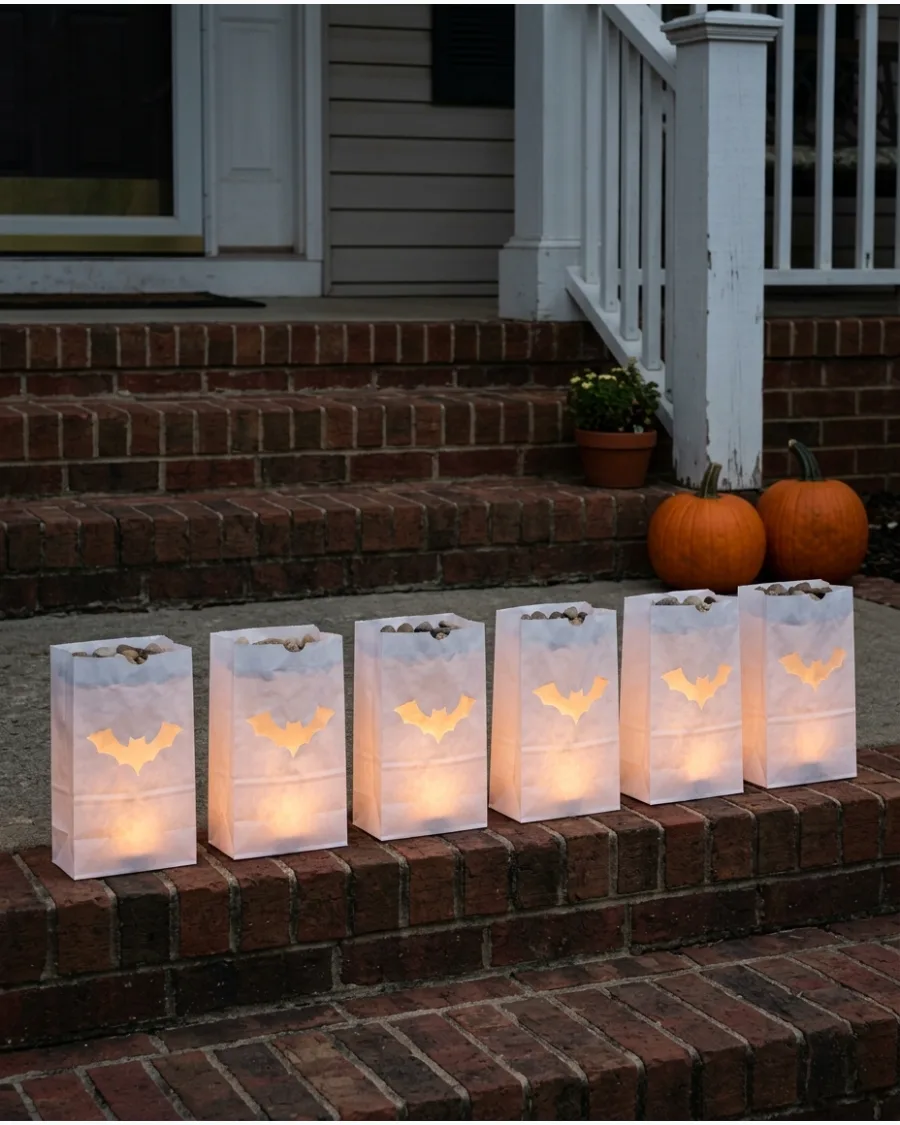
Line your walkway or porch steps with custom luminarias made from simple white or brown paper bags. Use a craft punch or a stencil to cut out shapes like stars, bats, or ghosts, allowing the light to shine through the openings.
Fill the bottom of each bag with two inches of sand or gravel to keep them from blowing away in the wind. Always use LED tea lights instead of real candles to prevent the paper from catching fire.
- Sourcing: Standard paper lunch bags are available at any grocery store for a few dollars.
- Setup: Space the bags about 18 inches apart to create a clear, safe path for visitors.
- Adaptation: Use colored paper bags like orange or purple to match a specific party theme.
Quick win: Fold the top inch of the bag over twice to create a reinforced rim that helps the bag stay open and hold its shape.
Frequently Asked Questions
What are the best budget-friendly materials for DIY Halloween decor?
You can create amazing decorations using common household items like cardboard boxes, black trash bags, and cheesecloth. Thrifted finds such as old bedsheets or vintage picture frames are also perfect for crafting spooky ghosts or haunted gallery walls on a budget.
How do I make my outdoor DIY decorations weather-proof?
To protect your creations from the elements, apply a clear waterproof sealant and use heavy weights or stakes to prevent wind damage. Opt for naturally water-resistant materials like plastic or treated wood to ensure your outdoor displays last all season long.
What are some 'classy' or 'minimalist' DIY Halloween ideas?
Achieve a sophisticated look by sticking to a monochromatic color palette and using clean, simple silhouettes. Incorporating natural elements like painted dried branches or white pumpkins creates a stylish, minimalist atmosphere that feels both festive and modern.
How can I create large-scale props without spending a lot of money?
Large-scale props are easy to build using free appliance boxes to mimic wooden planks or stone walls. For structural items, affordable PVC pipes and foam pipe insulation work perfectly for constructing oversized skeletons or giant spider legs.
What are the easiest DIY Halloween projects for beginners?
Beginners can start with simple projects like cutting out paper bat decals for a wall or crafting floating candles from paper towel rolls. Painting mason jars to create glowing lanterns is another quick and effective way to add a spooky touch to your home.