75 Hutch Decorating Ideas
This post may contain affiliate links: full affiliate disclosure.
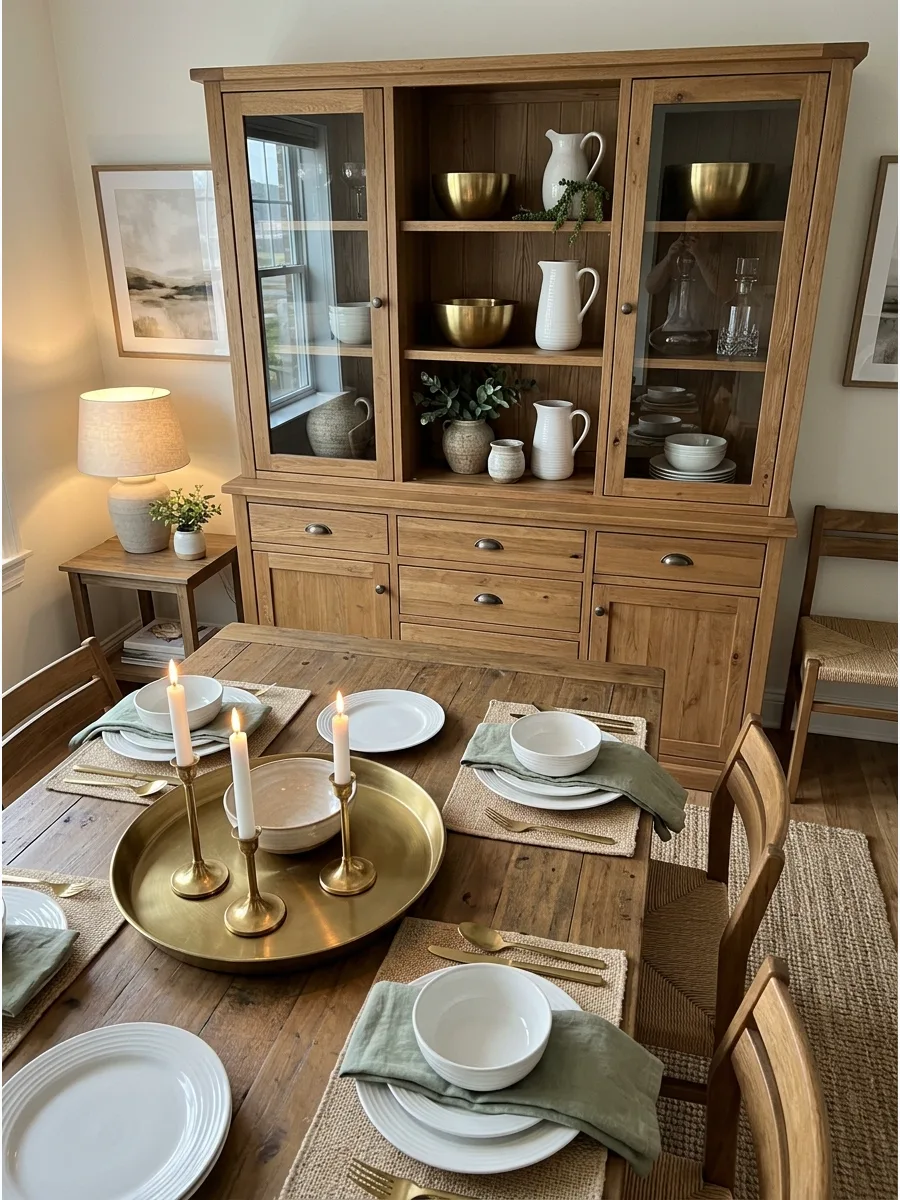
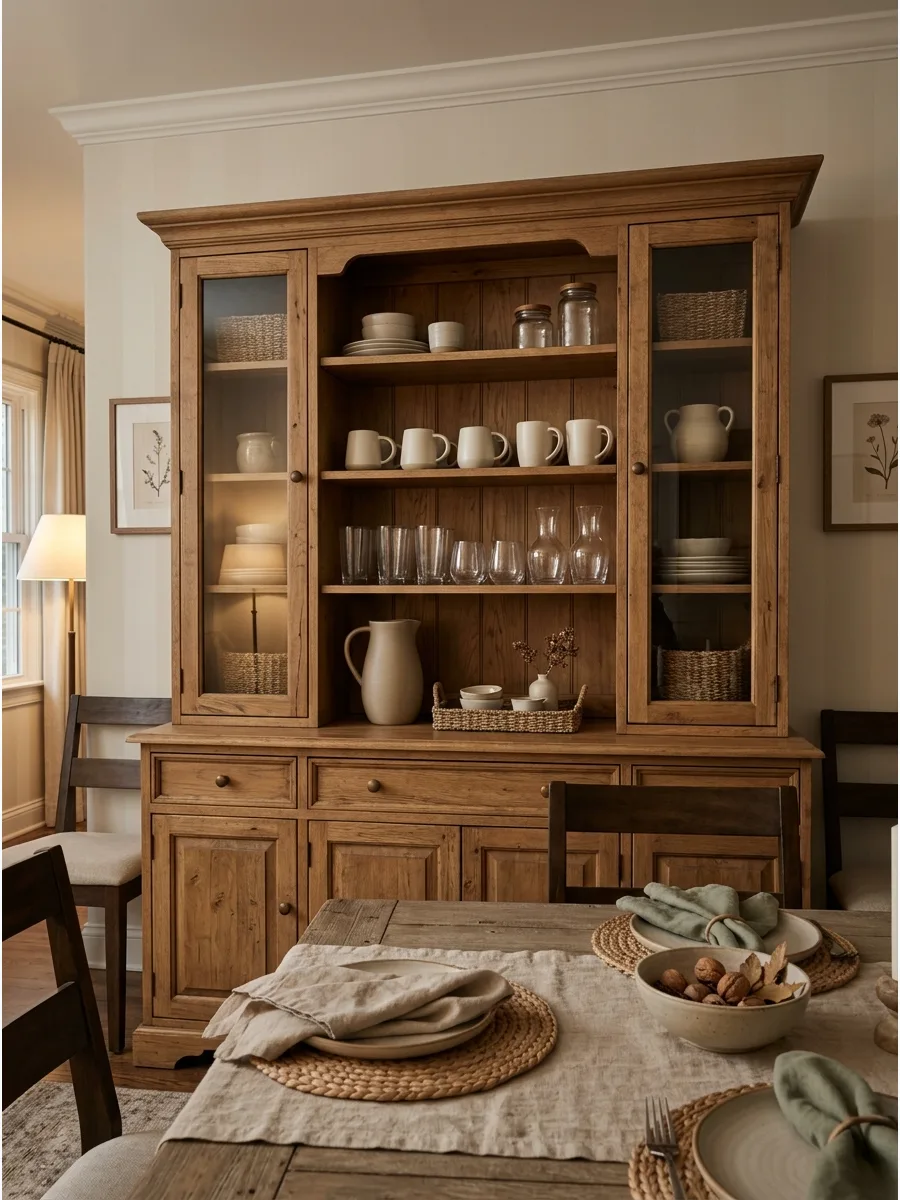
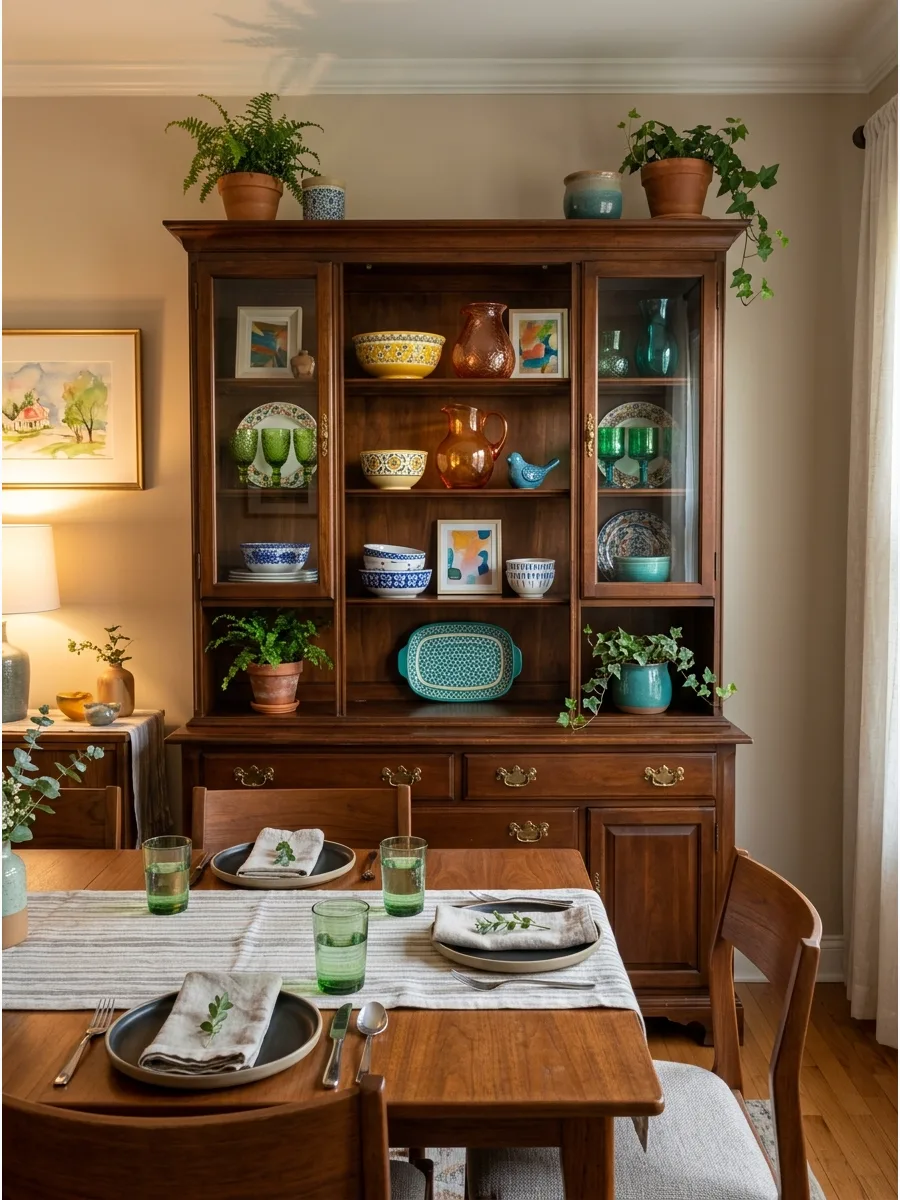
A well-styled hutch serves as the visual anchor of a dining room or kitchen. Balancing functional dishware with decorative accents creates a curated look that feels intentional rather than cluttered.
Everyday Hutch Styling Ideas
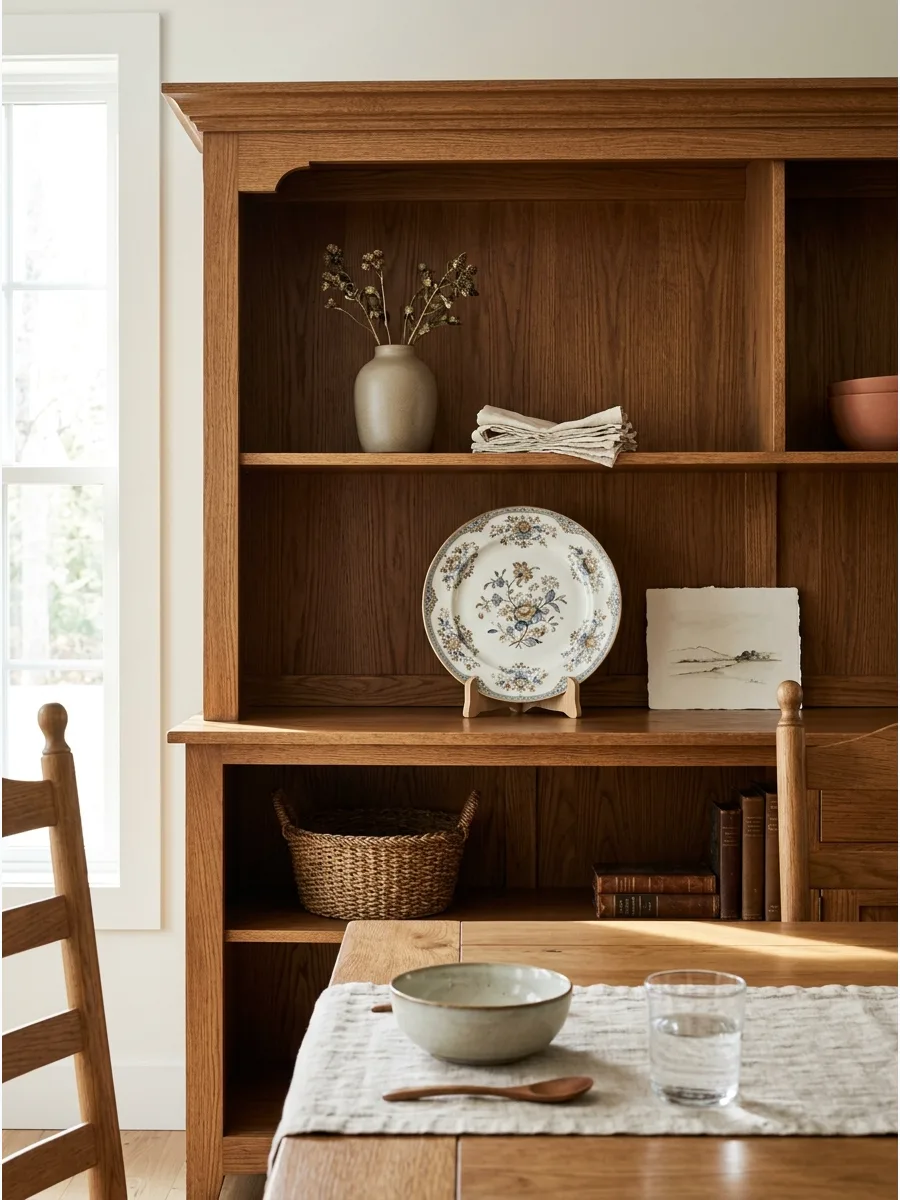
1. Arrange Plates Upright Behind Smaller Dishes
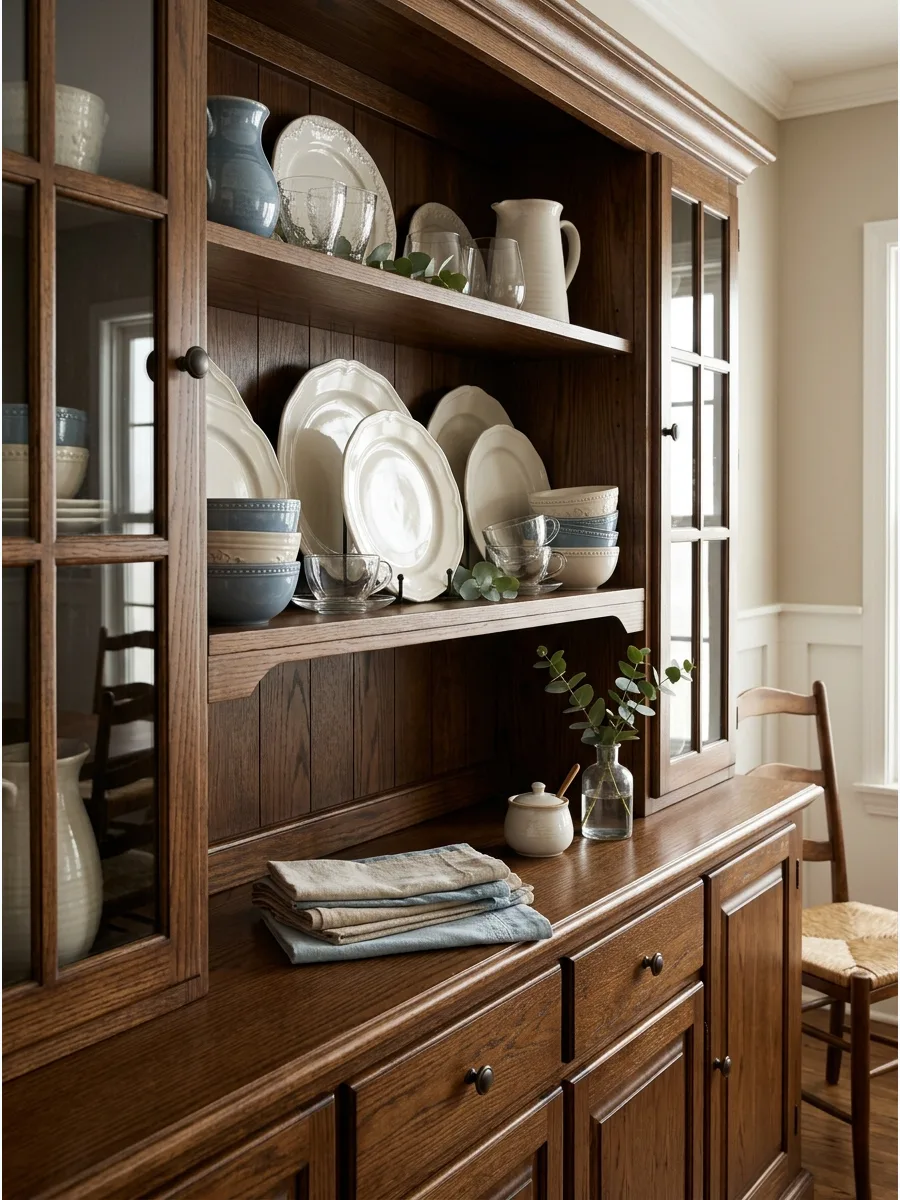
Place large dinner plates or decorative platters on stands at the back of each shelf to create a strong vertical backdrop. Layering bowls, cups, and smaller serving pieces in front adds immediate depth to the display.
Vertical plates maximize the impact of beautiful patterns that would otherwise be hidden in a stack. Depth makes a hutch look curated rather than just like storage.
- Budget-friendly wire plate stands cost under five dollars.
- Position the largest plates in the center of the middle shelf for the best focal point.
- Swap plates seasonally to change the color palette without buying new furniture.
Quick win: Use adhesive museum putty on the bottom of plate stands to prevent them from sliding on smooth wooden shelves.
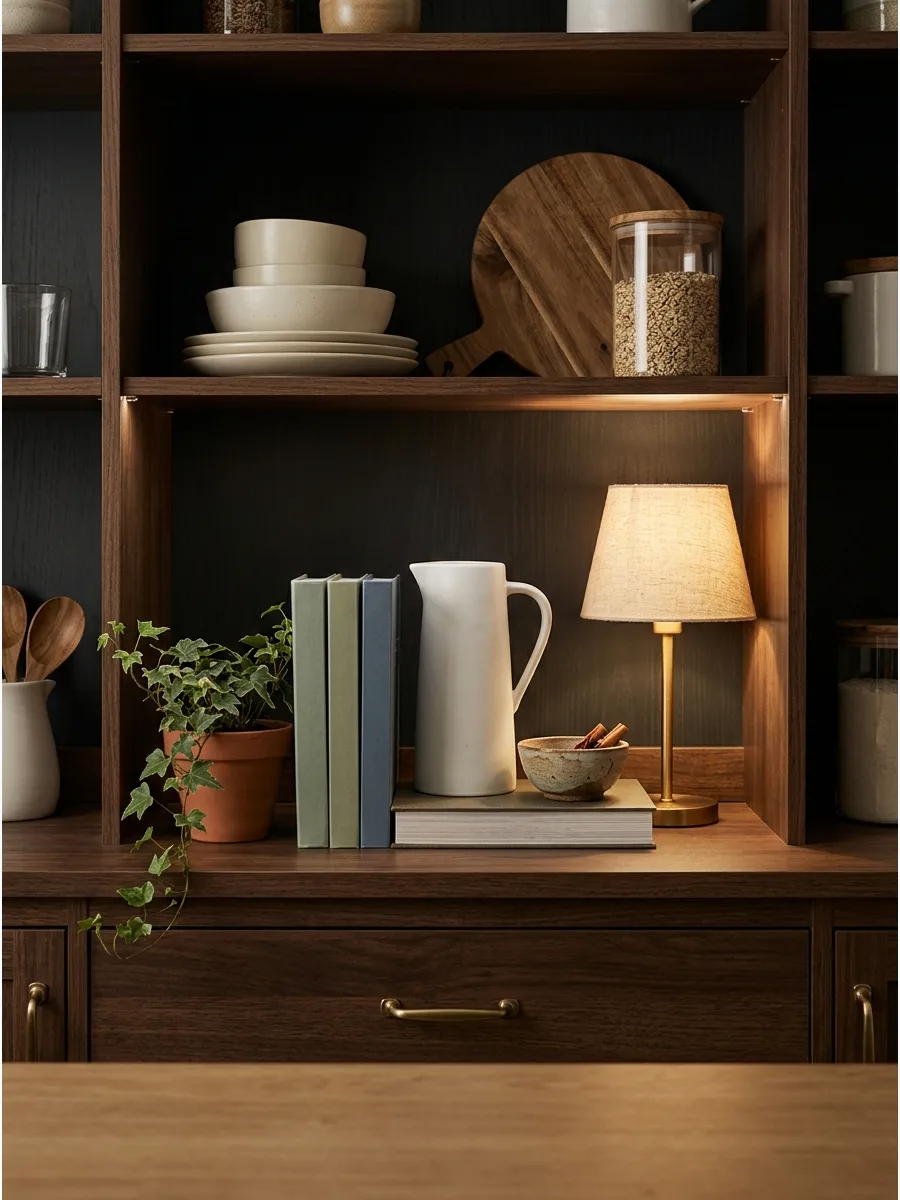
2. Create a Balanced Three-Piece Display
Style one shelf with a tall pitcher, an upright plate, and a low bowl to create a classic triangular composition. These three different heights fill the vertical space without crowding the shelf.
The three-piece arrangement prevents the display from looking cluttered or sparse by providing clear visual levels. This 'rule of three' is the easiest way to ensure a shelf looks finished.
- Sourcing a tall pitcher provides the necessary vertical height for the arrangement.
- Place the tallest item on the left or right side rather than the exact center for a relaxed feel.
- Adapt this for small hutches by using three mini versions of these items like a creamer, saucer, and salt cellar.
Most people skip this: Measure the height between shelves before buying a pitcher to ensure at least two inches of clearance at the top.
3. Alternate Stacked and Upright Dishes
Place short stacks of bowls or dessert plates between vertically displayed dishes to break up the lines. Alternating the direction of the pieces makes the hutch feel decorative rather than like ordinary cabinet storage.
Varying the orientation of your dishes keeps the eye moving across the shelf instead of stopping at one long row. It also makes it easier to grab a stack for actual use.
- Keep stacks to four items or fewer to maintain a decorative look.
- Use a stack of bowls to prop up a smaller plate if you lack a metal stand.
- Mix solid colored stacks with patterned upright plates for a high-contrast look.
Best shortcut: Place a small piece of felt between stacked plates to prevent scratches and dampen noise when removing them.
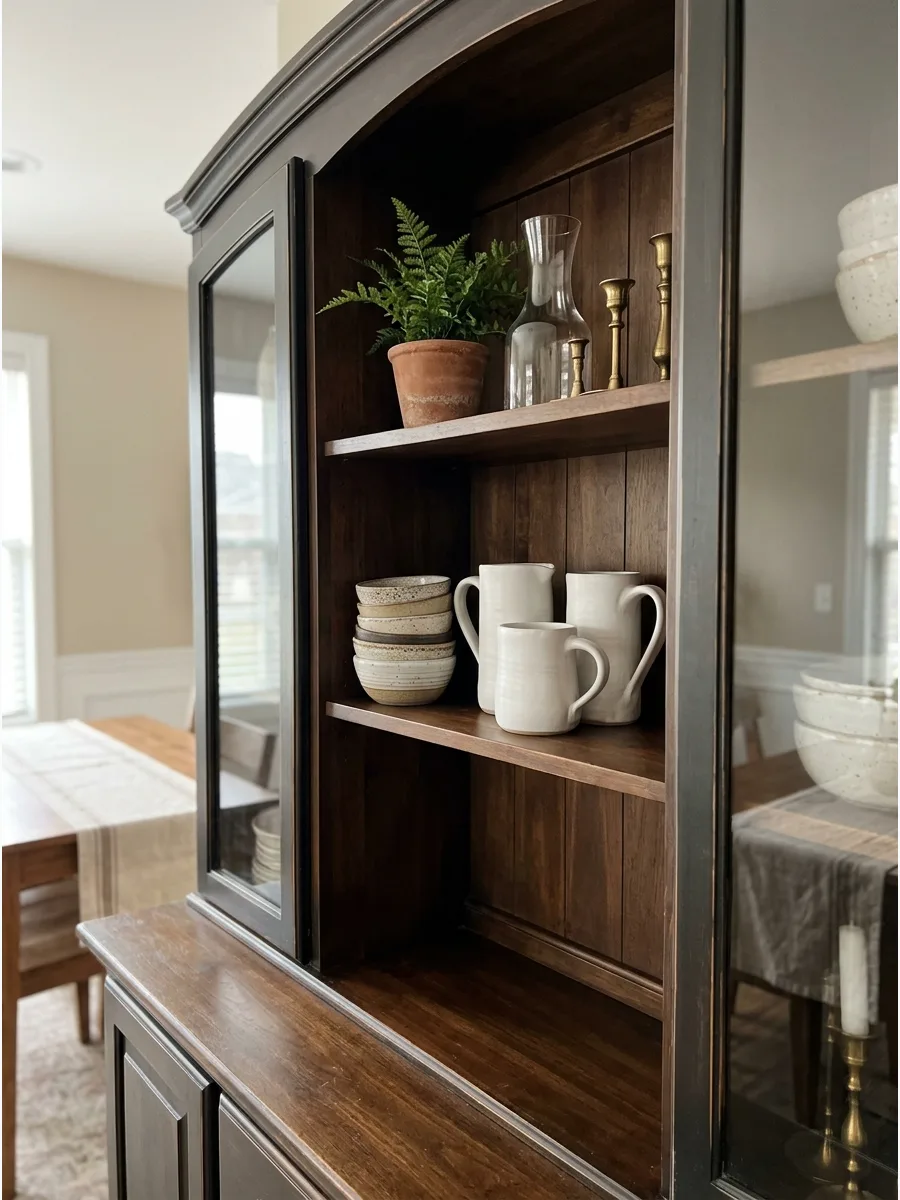
4. Use a Large Tureen as the Focal Point
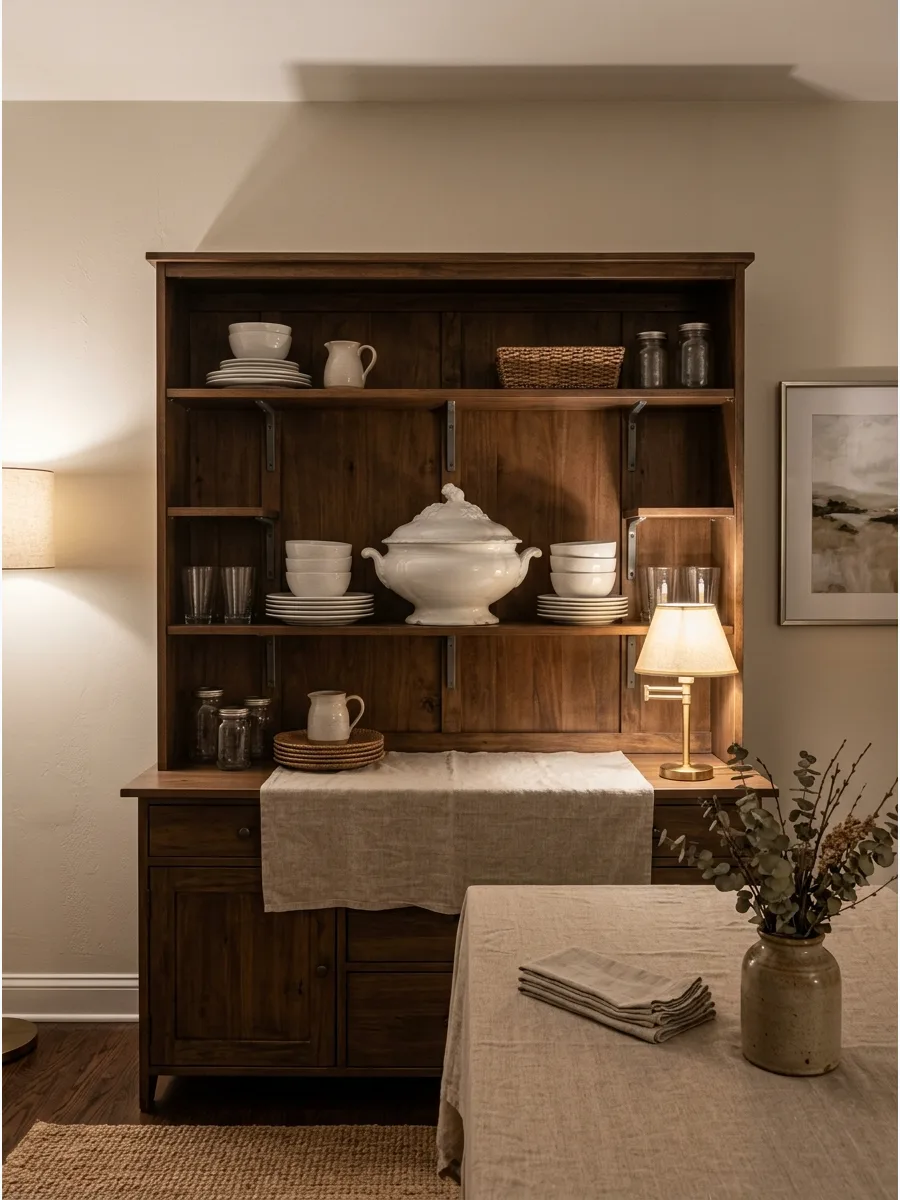
Position a soup tureen or covered serving dish in the center of the most visible shelf. Surround it with simpler plates and glasses so the larger piece remains the main attraction.
A single heavy piece anchors the entire hutch and gives the eye a clear place to rest. This works particularly well for heirloom pieces that deserve center stage.
- Check antique malls for unique tureens that add character to a modern hutch.
- Center the tureen at eye level for the most dramatic impact.
- Use a tureen to hide small, less attractive items like extra napkins or candle lighters.
Quick win: If the tureen has a lid, place it slightly ajar or store it inside to change the silhouette and look less formal.
5. Style Each Shelf With a Different Purpose
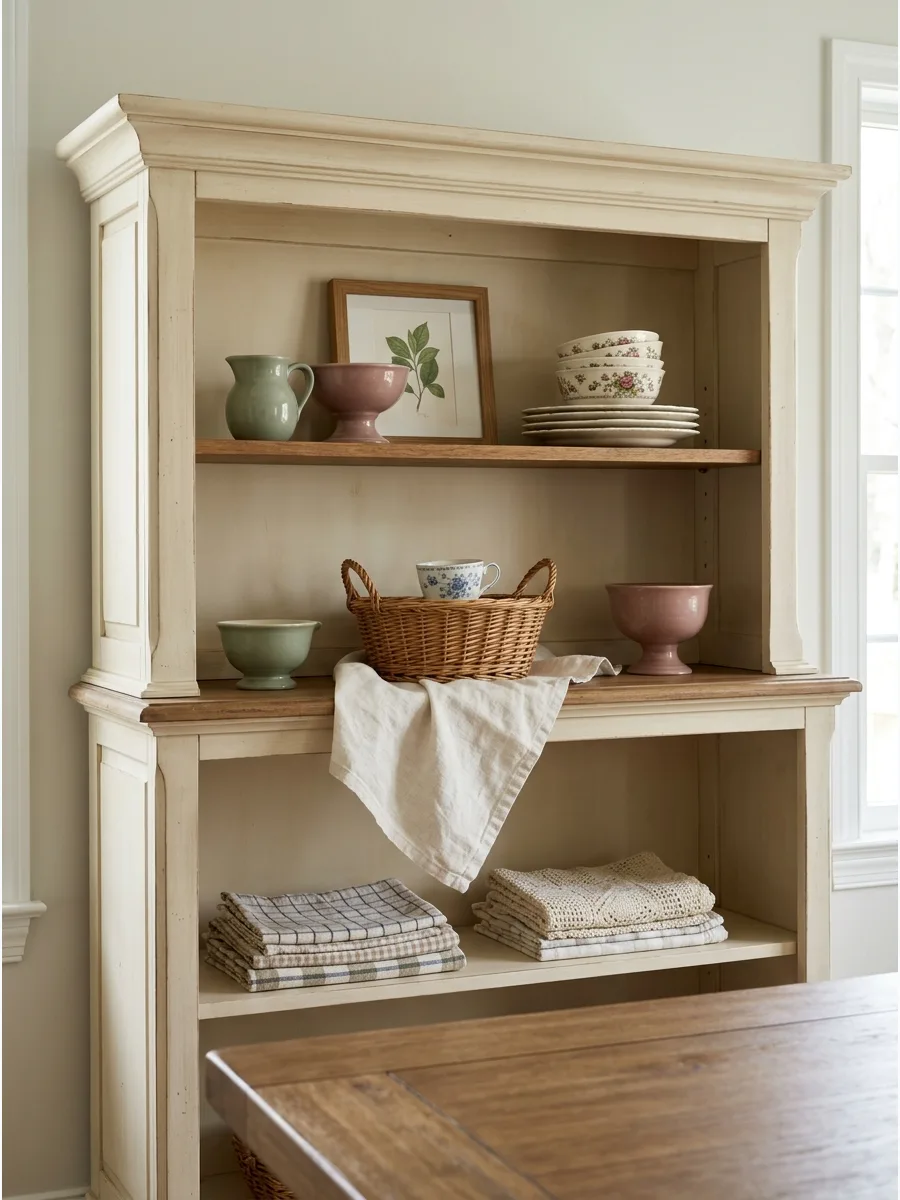
Use the upper shelf for purely decorative pieces, the middle shelves for dishes, and the lower section for baskets. This creates visual variety while keeping the hutch organized and functional.
Assigning a specific purpose to every level prevents the piece from looking like a random collection of objects. It also makes it much easier to find what you need during a dinner party.
- Use sturdy woven baskets on the bottom shelf to store heavy linens or seasonal tablecloths.
- Reserve the highest shelf for items you rarely use, like delicate glass vases.
- Maintain a consistent color palette across all levels to keep the distinct zones feeling unified.
Most people skip this: Use the lowest visible shelf for items kids can safely reach, like sturdy melamine bowls or napkins.
6. Repeat One Color Across Every Shelf
Choose one connecting color and include it in a few pieces on every level of the hutch. The repeated color helps a mixed collection of wood, glass, and ceramic feel coordinated.
Color repetition is the most effective way to make mismatched items look like an intentional collection. It creates a 'trail' for the eye to follow from top to bottom.
- Select a color already present in your dining room rug or curtains for a cohesive room feel.
- Distribute the color in a 'zigzag' pattern across the shelves rather than a straight vertical line.
- Start with three items in your chosen color for a subtle but effective look.
Best shortcut: If you lack colored dishes, add the accent color using small clusters of faux fruit or rolled-up cloth napkins.
7. Leave Open Space Around Special Objects
Avoid placing an accessory in every available gap on the shelf. Open space around an heirloom plate or a handmade vase allows the object to be noticed more easily.
Negative space is just as important as the objects themselves for highlighting the quality of your collection. Overcrowding makes even expensive items look like clutter.
- Aim for about twenty percent empty space on each shelf for a high-end look.
- Group items in the center and leave the edges of the shelf bare to create a focused display.
- Use this technique specifically for items with intricate details or unusual shapes.
Quick win: If a shelf feels too busy, remove one item and see if the remaining pieces 'breathe' better; usually, the simplest version wins.
8. Arrange Objects in Odd-Numbered Groups
Group three cups, five small bowls, or three decorative vessels together in one section. Odd-numbered arrangements often feel more relaxed while still giving each section a clear structure.
Pairs of items often look too stiff or formal, whereas odd numbers create a more natural visual flow. Vary the heights within these groups for even better results.
- Keep the items in the group close together so they read as one single unit.
- Use items of the same material but different shapes to keep the group interesting.
- For larger hutches, a group of five objects can act as a significant focal point.
Most people skip this: When grouping three items, place the tallest one in the back and the two shorter ones slightly forward to create depth.
9. Create an Asymmetrical Hutch Display
Place a tall pitcher on one side, a medium plate near the center, and a low stack of bowls on the opposite side. Balance the visual weight through repeated colors rather than matching the objects exactly.
Asymmetry creates a modern, lived-in feel that looks less like a showroom and more like a home. The key is ensuring neither side feels 'heavier' than the other.
- Balance a large, dark object on one side with two or three smaller, lighter objects on the other.
- Use a tray to ground a group of smaller items on one side of the shelf.
- Step back frequently while styling to ensure the 'weight' of the shelf feels even.
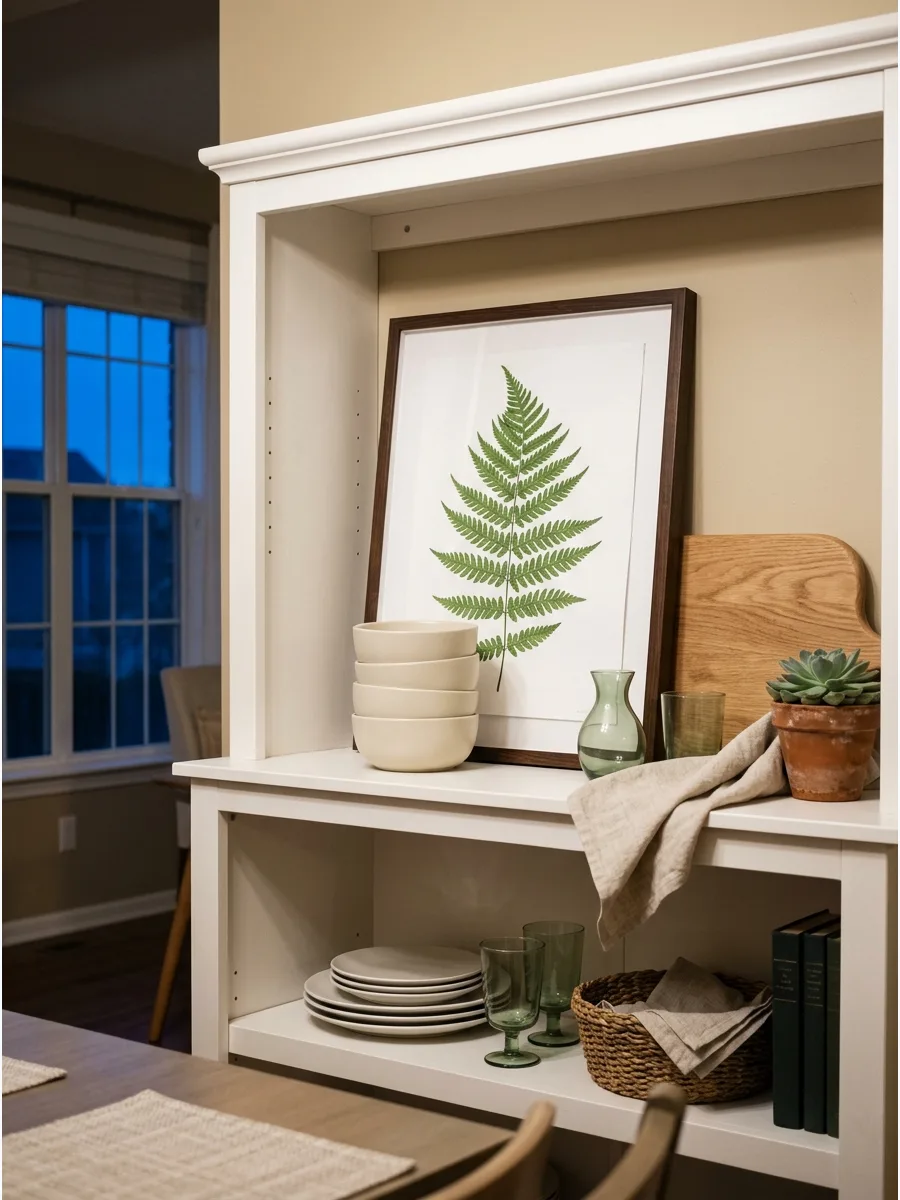
Best shortcut: If one side looks too light, add a small stack of books or a decorative box to provide instant visual mass.
10. Build a Symmetrical Formal Display
Place matching plates or candlesticks on both sides of a central tureen, vase, or platter. This structured arrangement works especially well in a traditional dining room or for holiday settings.
Symmetry creates a sense of calm and order that immediately elevates the formality of a room. It is the most foolproof way to style a hutch for beginners.
- Ensure the central object is significantly larger or taller than the flanking items.
- Use identical pairs of items, like matching lamps or ginger jars, for the most impact.
- This style works best on the middle shelf, which is at the direct eye level of seated guests.
Quick win: If you don't have identical pairs, use two items of the same height and color to mimic the effect of symmetry.
11. Use Hidden Risers to Add Height
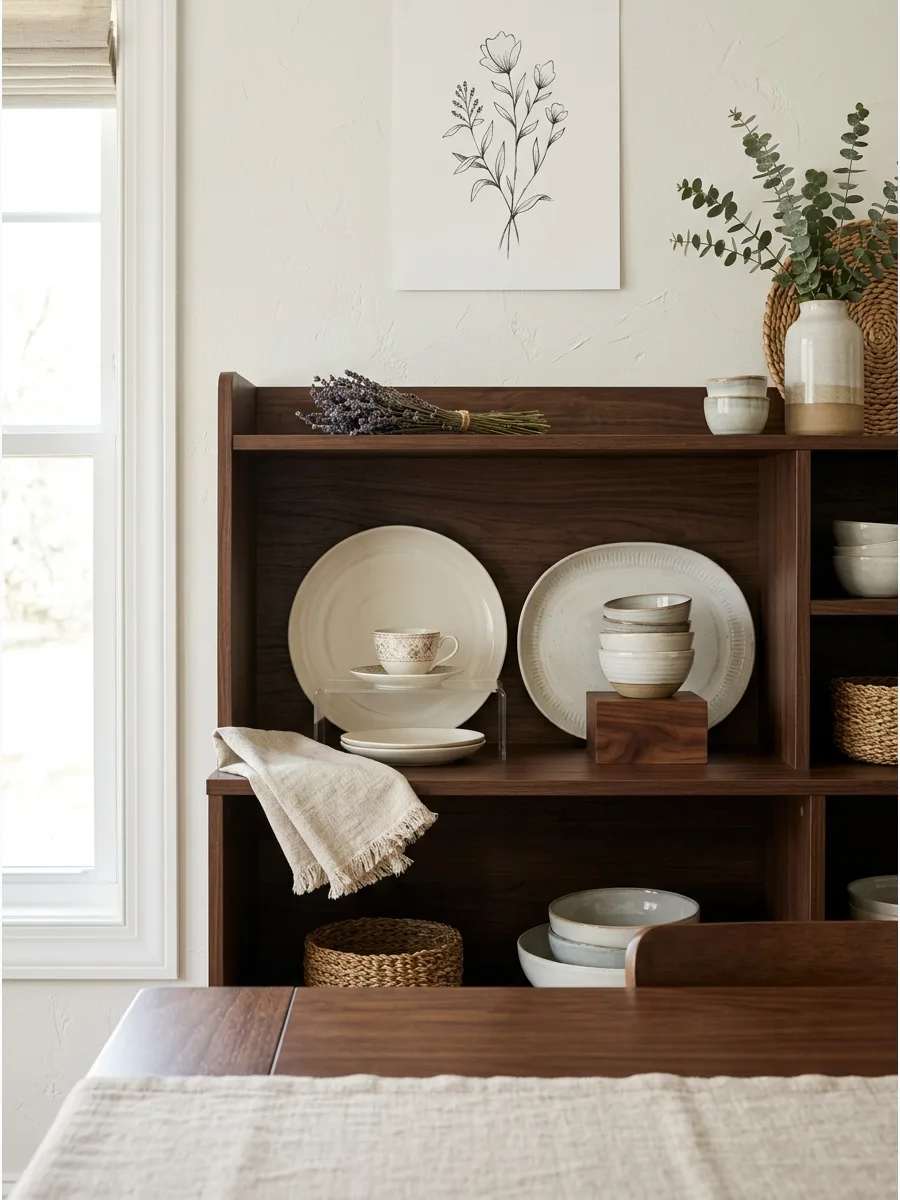
Raise smaller bowls, cups, and decorative objects on concealed boxes or acrylic stands. Different levels prevent shorter items from disappearing behind larger dishes or getting lost on deep shelves.
Height variation is the secret to a professional-looking display that feels layered and three-dimensional. Use the risers to ensure every piece is visible.
- Acrylic risers are virtually invisible and won't distract from your beautiful dishes.
- Small wooden boxes can serve as risers while adding a warm texture to the shelf.
- Place the tallest items on risers at the very back to create a tiered effect.
Most people skip this: Use a stack of small, pretty appetizer plates as a functional riser for a decorative bowl or cream pitcher.
12. Mix Round and Rectangular Shapes
Combine circular plates and bowls with rectangular frames, trays, and books. The variation in shape makes the shelves feel more dynamic and prevents a repetitive look.
Mixing shapes breaks up the monotony of round dishware and gives the hutch a more sophisticated, curated vibe. It also allows you to incorporate non-kitchen items like art.
- Lean a rectangular cutting board against the back to provide a flat backdrop for round bowls.
- Use small rectangular picture frames to add a personal touch among the dishes.
- Stack round bowls on top of a rectangular platter to save space and add interest.
Best shortcut: A rectangular linen napkin draped over the edge of a shelf can soften the hard lines of round plates.
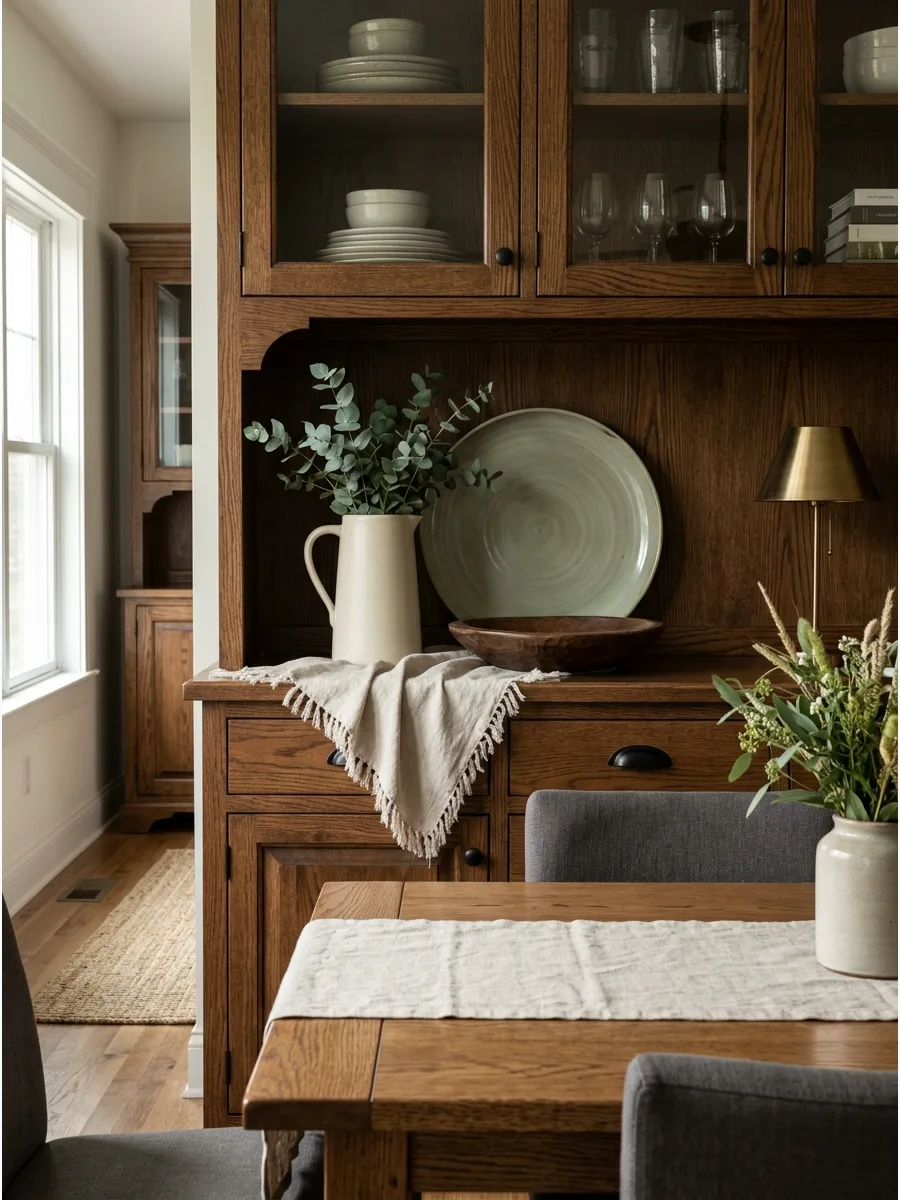
13. Display Serving Platters Like Artwork
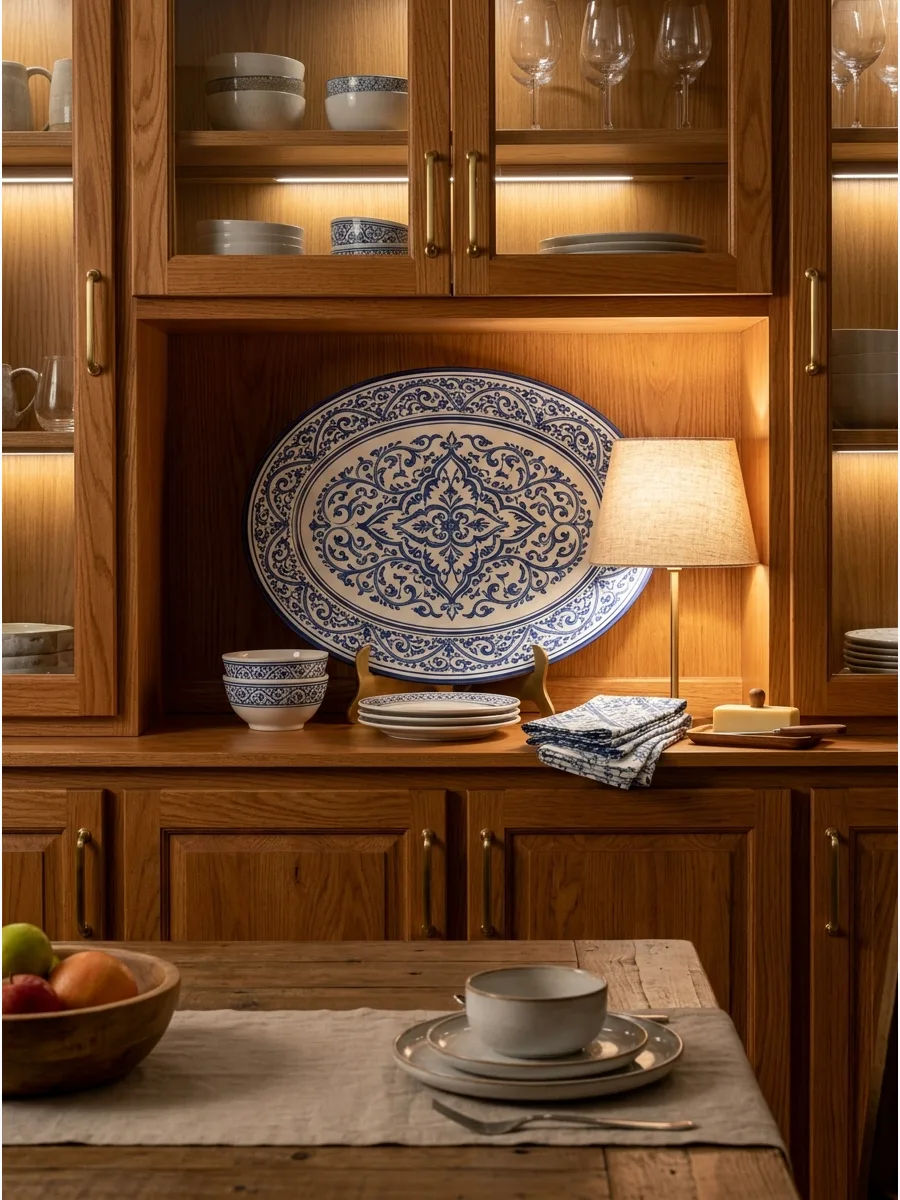
Stand large oval, rectangular, or round platters against the back of the hutch using sturdy stands. Their decorative borders and patterns can function like artwork behind everyday dishes.
Large platters cover significant surface area and act as a beautiful, textured wallpaper for your shelves. This is a great way to store bulky items that don't fit in standard cabinets.
- Choose platters with interesting rims or hand-painted details for the most visual interest.
- Layer a smaller, contrasting plate in front of the platter for a tiered look.
- Ensure the stand is heavy-duty enough to support the weight of stoneware or porcelain.
Quick win: If your hutch has a 'plate rail' groove, use it to lean platters securely without needing separate stands.
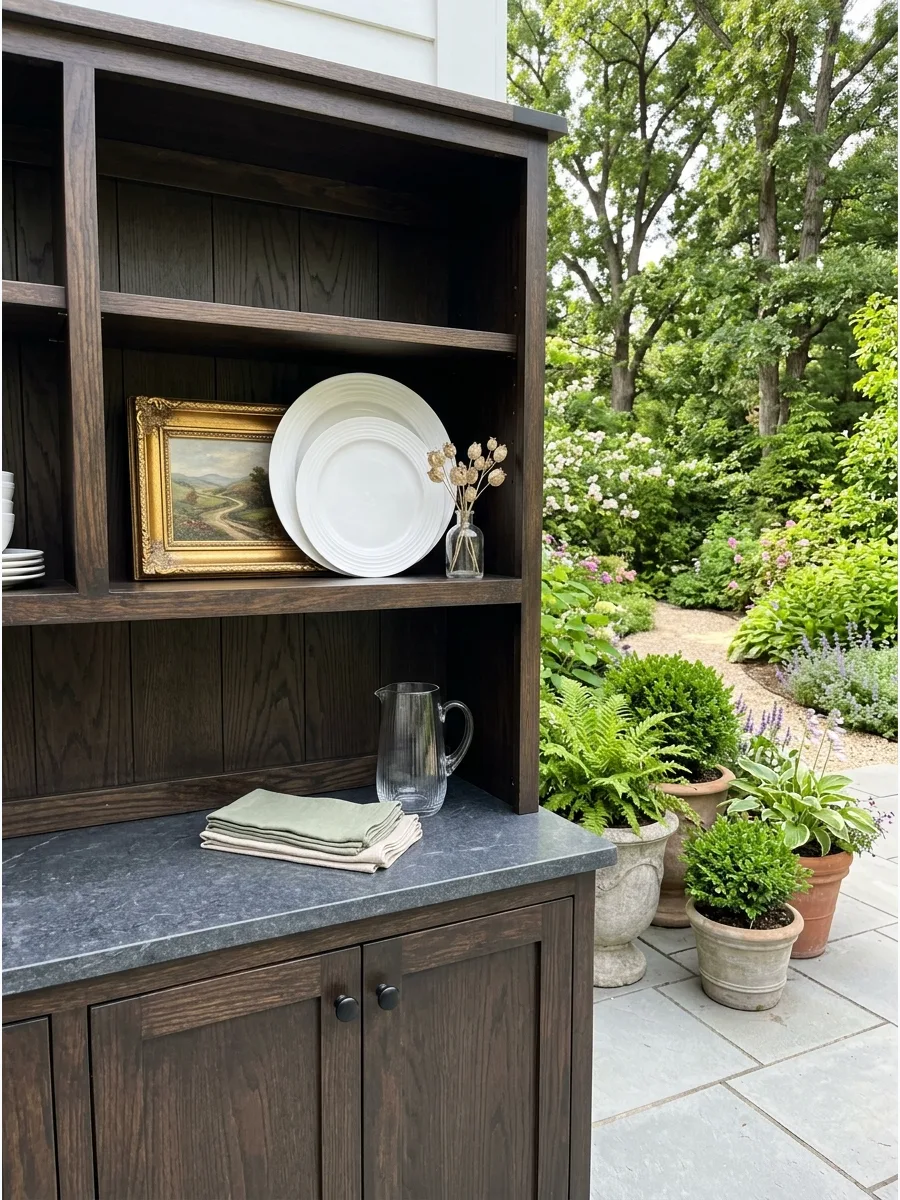
14. Style the Hutch From Largest to Smallest
Begin by placing the largest platters, pitchers, and baskets before adding smaller dishes and accessories. This helps establish a clear structure and prevents the temptation to overcrowd the shelves with small knick-knacks.
Placing big items first ensures you have enough room for the essential 'bones' of the display. Once the big pieces are set, filling in the gaps is easy.
- Start with the bottom shelf and work your way up to balance the visual weight.
- Space the largest items out across different levels rather than clustering them on one shelf.
- Use the largest item as the 'anchor' for each shelf and build the rest of the group around it.
Most people skip this: If the hutch feels top-heavy, move the largest, darkest objects to the lowest visible shelf to ground the piece.
15. Connect the Hutch to the Dining Table
Repeat two or three materials from the hutch on the nearby dining table, such as white ceramics or brass candleholders. This repetition connects both displays without making them look like a matching set.
Linking the hutch to the table makes the entire dining area feel like a cohesive, professionally designed suite. It helps the hutch feel integrated into the room's daily life.
- Use the same style of cloth napkins in the hutch as you do on the table setting.
- Repeat a specific flower type or greenery in both locations for a seasonal connection.
- Keep the finishes consistent, like using all matte black or all polished silver accents.
Best shortcut: Take one item from the hutch and place it on the table during a meal to instantly tie the two areas together.
Dining-Room Hutch Decorating Ideas
16. Display a Complete Dinnerware Collection
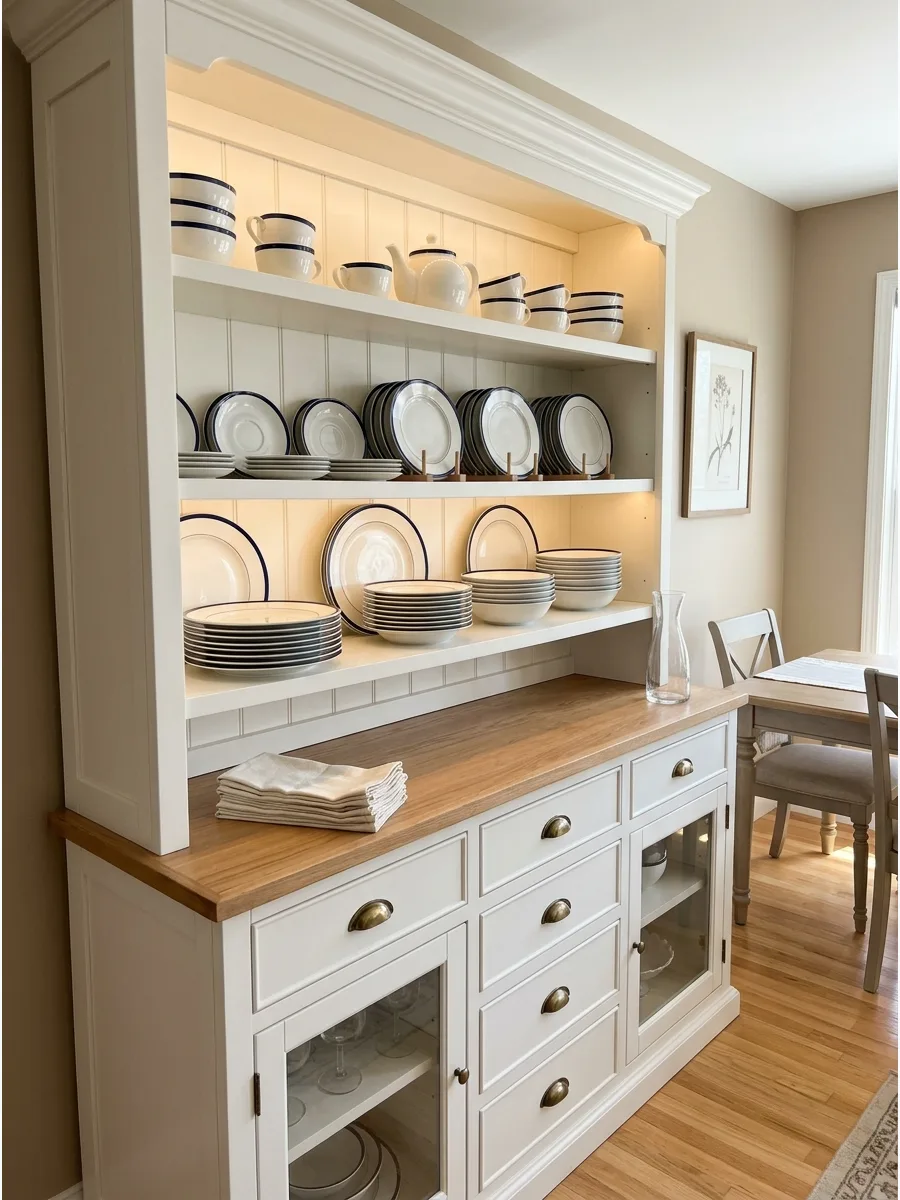
Arrange dinner plates, salad plates, bowls, cups, saucers, and serving pieces from one set across several shelves. Distributing the collection allows each type of dish to remain visible.
Spreading the set across the entire hutch prevents a single shelf from looking too heavy or crowded. A full set feels intentional and high-end when every piece has breathing room.
- Budget: $100 to $500 for full sets.
- Place largest plates at the back and stack bowls in front.
- Works for any style from modern to traditional.
Quick win: Use plate stands to keep the back row of plates perfectly upright and secure.
17. Mix Coordinating China Patterns
Combine two or three patterns that share a color, floral motif, or metallic border. Repeat each pattern in several areas so the arrangement appears collected rather than random.
Keep the color palette tight to ensure the different patterns look like they belong together. Mixing patterns is the best way to make a new hutch feel like it has been curated over many years.
- Budget: $20 to $80 per piece.
- Alternate patterns on every other shelf for visual rhythm.
- Best for eclectic or cottagecore dining rooms.
Most people skip this: Ensure the 'white' base of each different pattern matches so the mix looks intentional.
18. Create a Blue-and-White Hutch
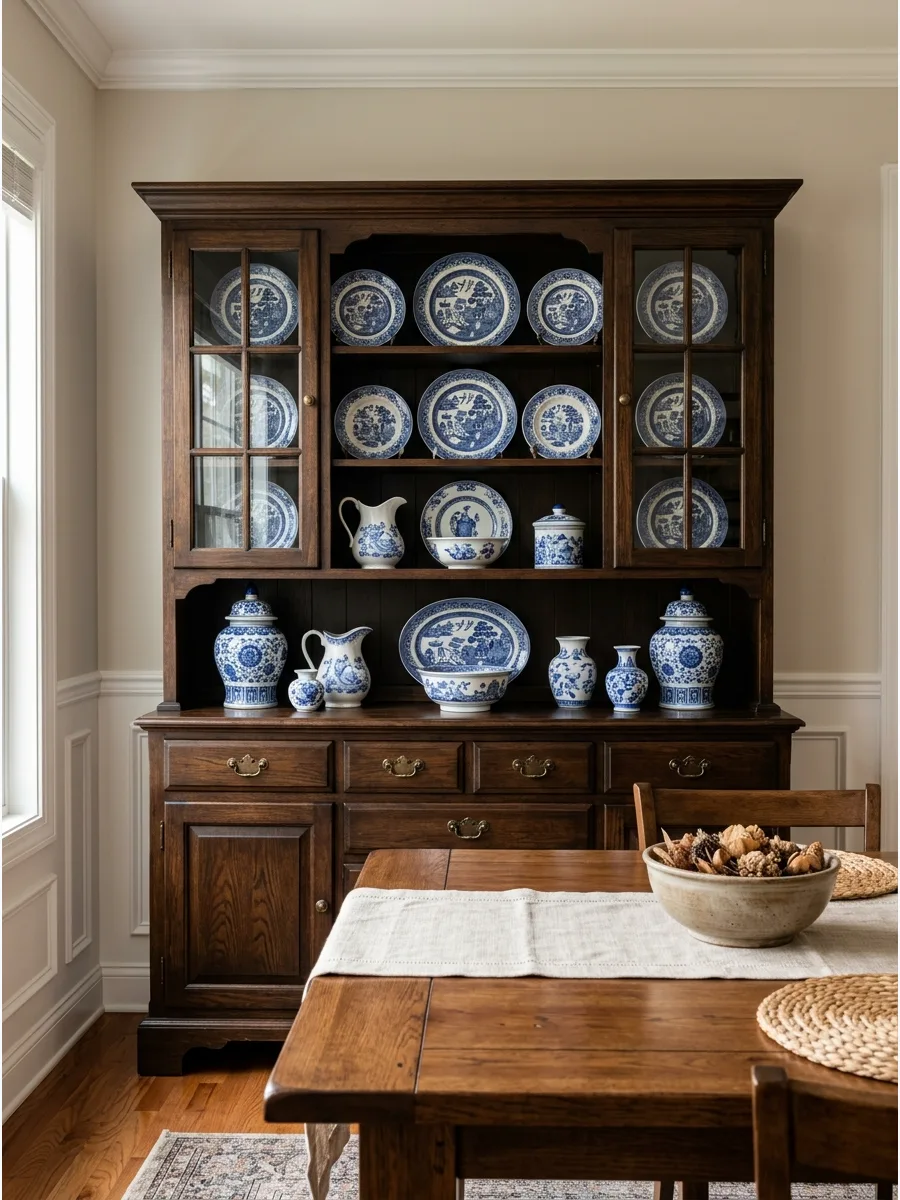
Display blue-and-white plates, bowls, ginger jars, and pitchers against a warm wood or painted background. Mix small and large patterns to prevent the display from looking overly uniform.
Use a dark wood hutch to make the crisp blue and white colors pop against the back panel. This classic combination never goes out of style and works in almost any kitchen or dining room.
- Budget: $15 to $150 per item.
- Place ginger jars on the lowest shelf for visual weight.
- Use plate stands to show off the most intricate patterns.
Best shortcut: Group three small ginger jars of different heights to fill a corner perfectly.
19. Decorate With Brown Transferware
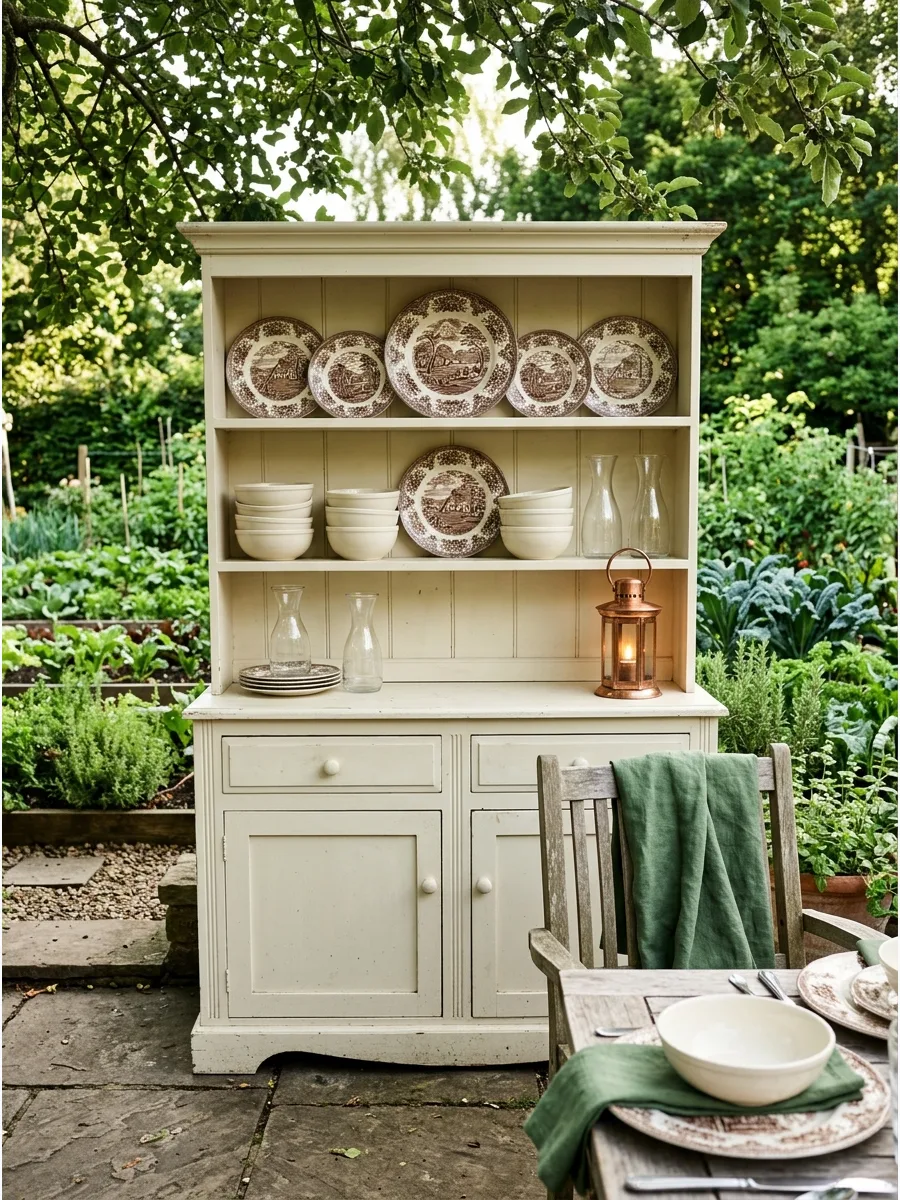
Arrange brown transferware plates and serving dishes with cream pottery and clear glass. The solid-colored pieces provide visual rest between the detailed patterns.
Layer brown plates behind plain cream bowls to highlight the intricate landscape scenes on the ceramic. Brown transferware adds a warm, earthy feel that makes a formal hutch feel more approachable.
- Budget: $10 to $40 per plate.
- Mix with natural wood elements like a small wooden cutting board.
- Ideal for fall or farmhouse styling.
Quick win: Use brown transferware in a room with warm wood floors to tie the furniture to the architecture.
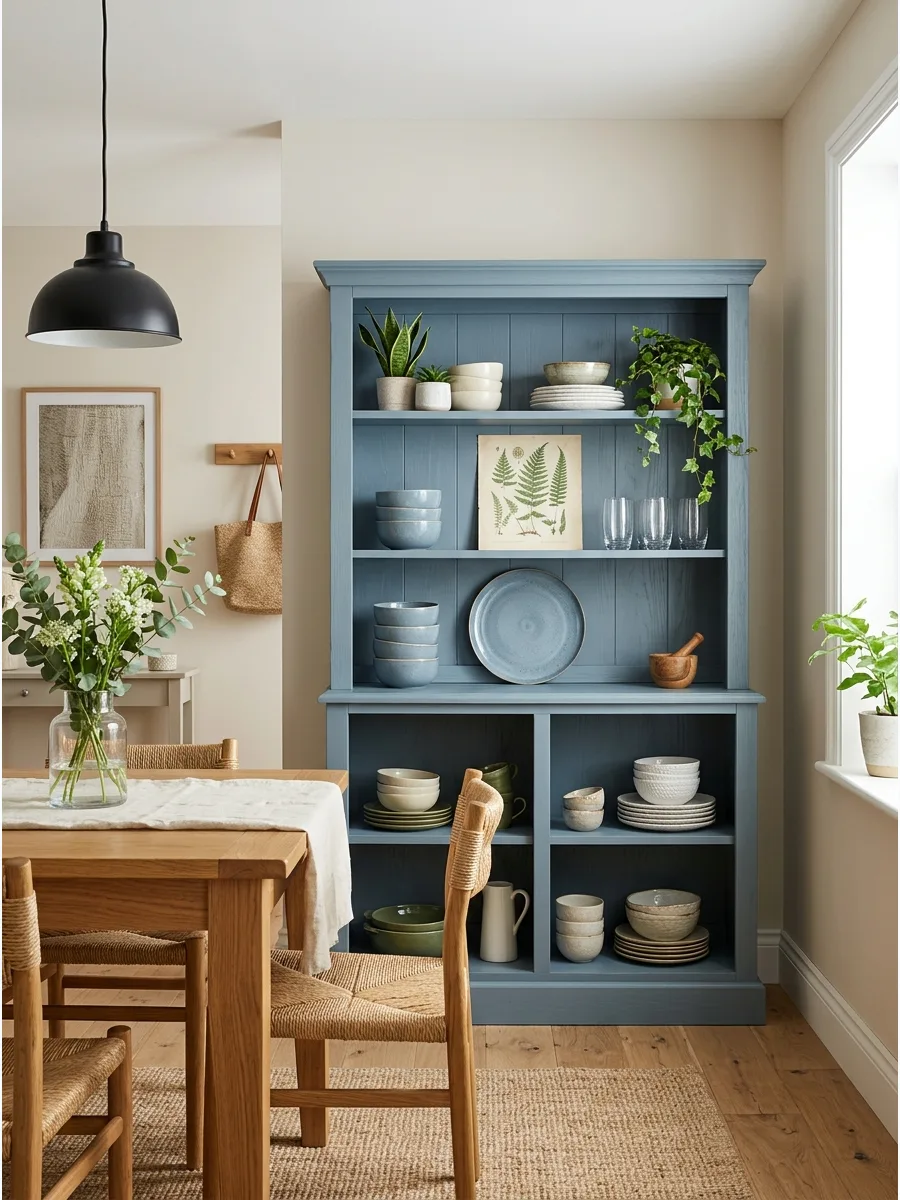
20. Build a Green Botanical Display
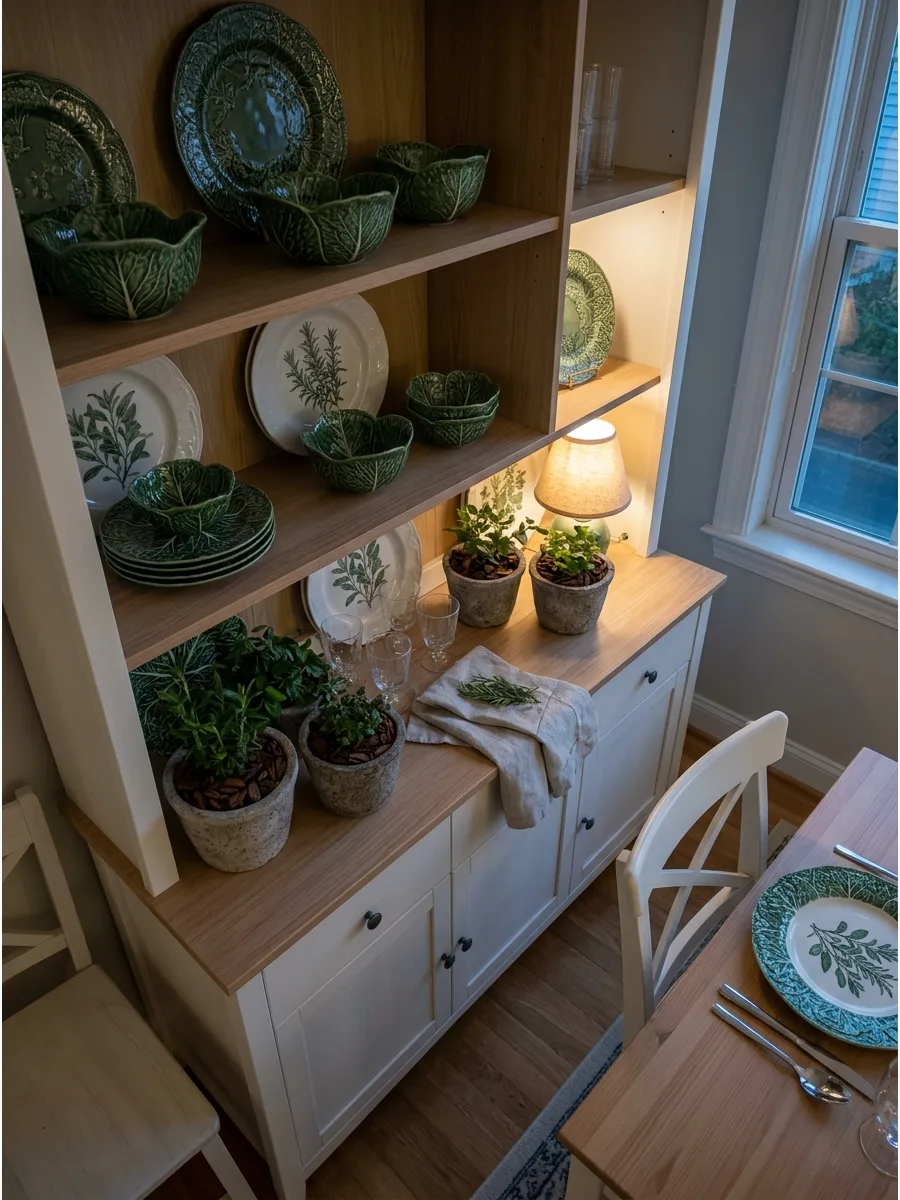
Combine green transferware, cabbageware, botanical plates, and clear glassware. Use natural wood or warm-white shelves to complement the garden-inspired colors.
Group various shades of green together to create a lush, cohesive look that mirrors the outdoors. Botanical themes are perfect for breakfast nooks because they feel fresh and energizing in the morning.
- Budget: $15 to $60 per piece.
- Intersperse clear glass tumblers to keep the look light.
- Add a small potted ivy for extra organic texture.
Most people skip this: Mix matte green ceramics with shiny glazed pieces to add depth to the monochrome look.
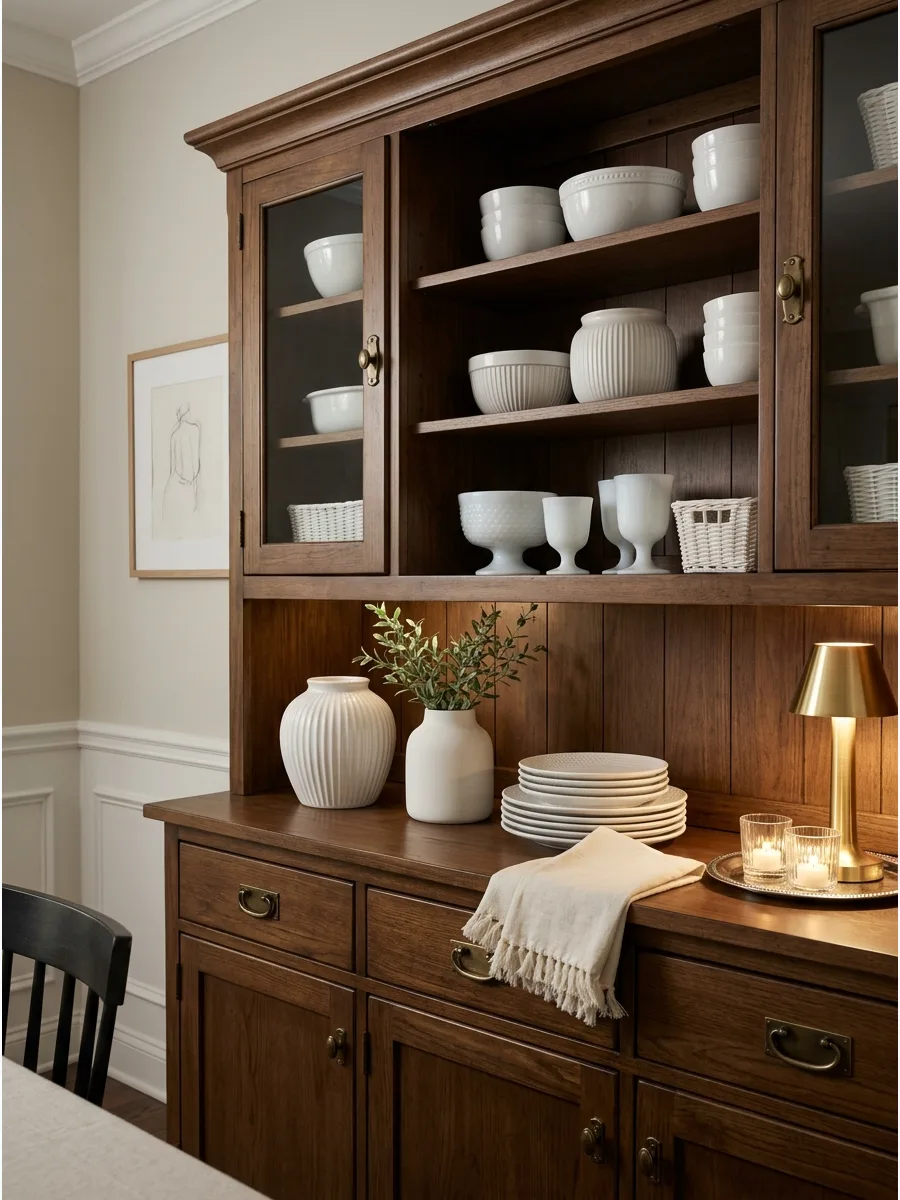
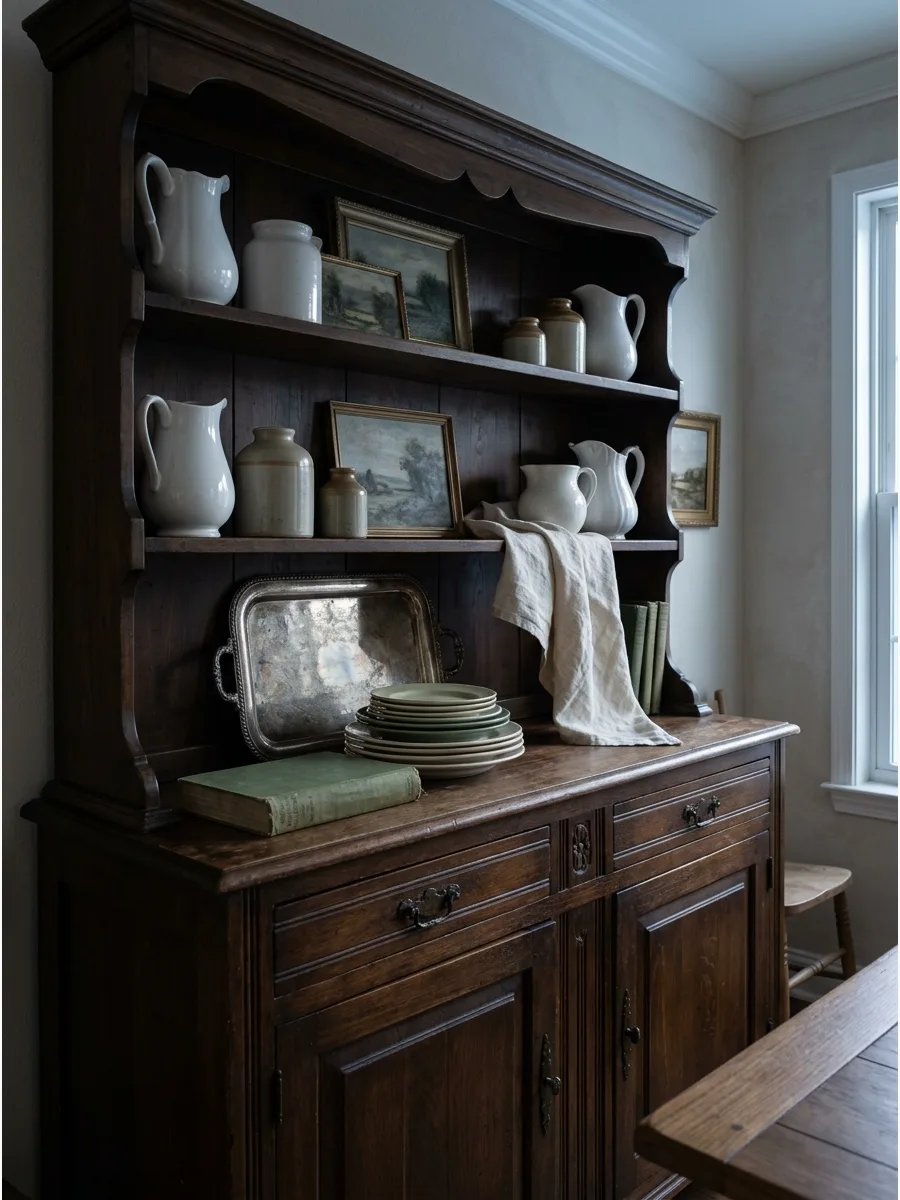
21. Display White Ironstone
Group white pitchers, tureens, bowls, and platters in different shapes. Add wood boards, linen, or woven baskets to give the all-white collection more texture.
Vary the heights of the white pitchers to keep the monochrome display from looking flat. Ironstone is a workhorse for decorators because it matches every wall color and holiday theme.
- Budget: $25 to $200 for vintage pieces.
- Tuck a folded linen napkin under a bowl for softness.
- Great for minimalist or rustic interiors.
Best shortcut: If you have a dark hutch interior, white ironstone is the fastest way to brighten up the room.
22. Create a Teacup and Saucer Collection
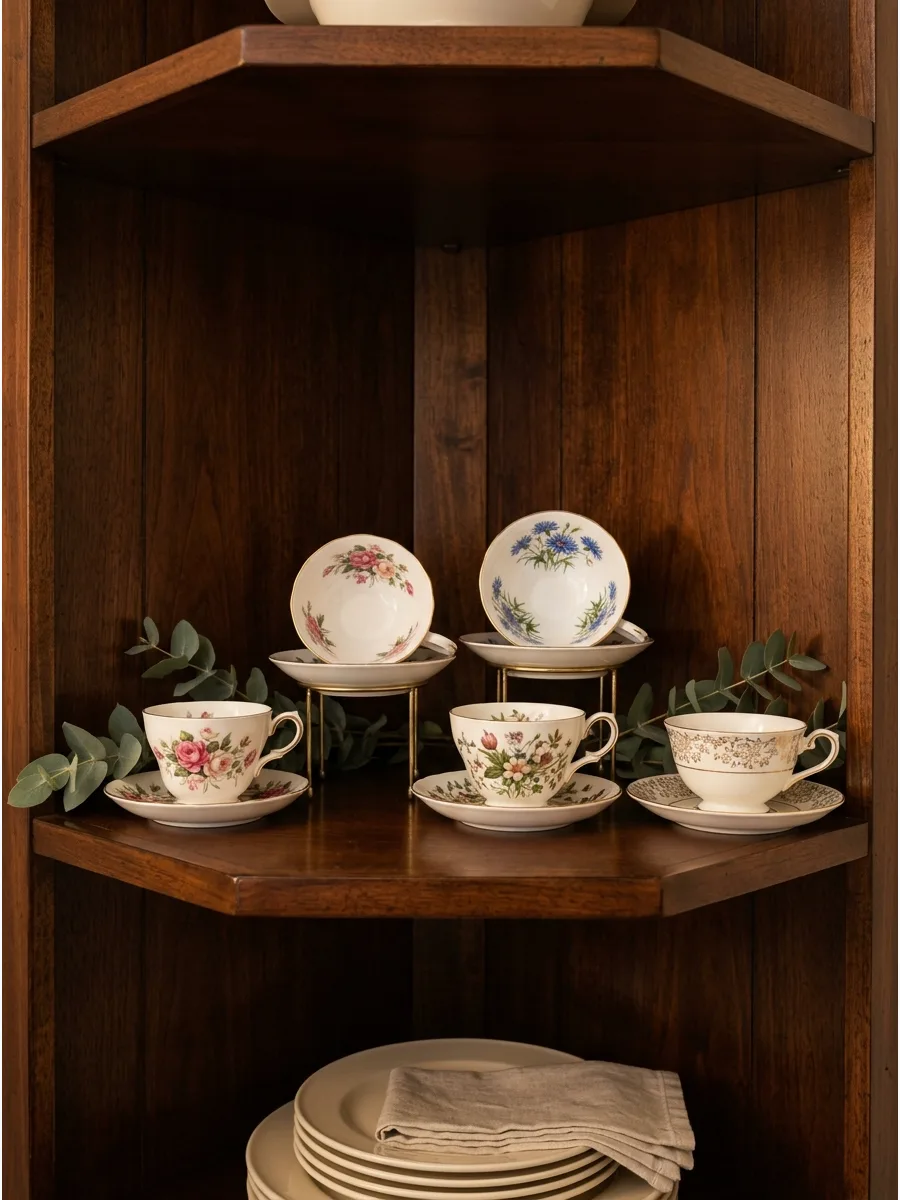
Place individual teacups on their matching saucers and raise selected cups on small stands. Avoid stacking them too deeply so their patterns remain visible.
Set teacups at a slight angle on their saucers to show off the interior designs. Teacups are small enough to fill tight gaps on upper shelves where larger plates will not fit.
- Budget: $5 to $30 per set.
- Use acrylic stands to elevate the back row of cups.
- Perfect for small hutches or corner units.
Quick win: Place a teacup and saucer set on top of a small stack of dessert plates to create height.
23. Style an Afternoon Tea Hutch
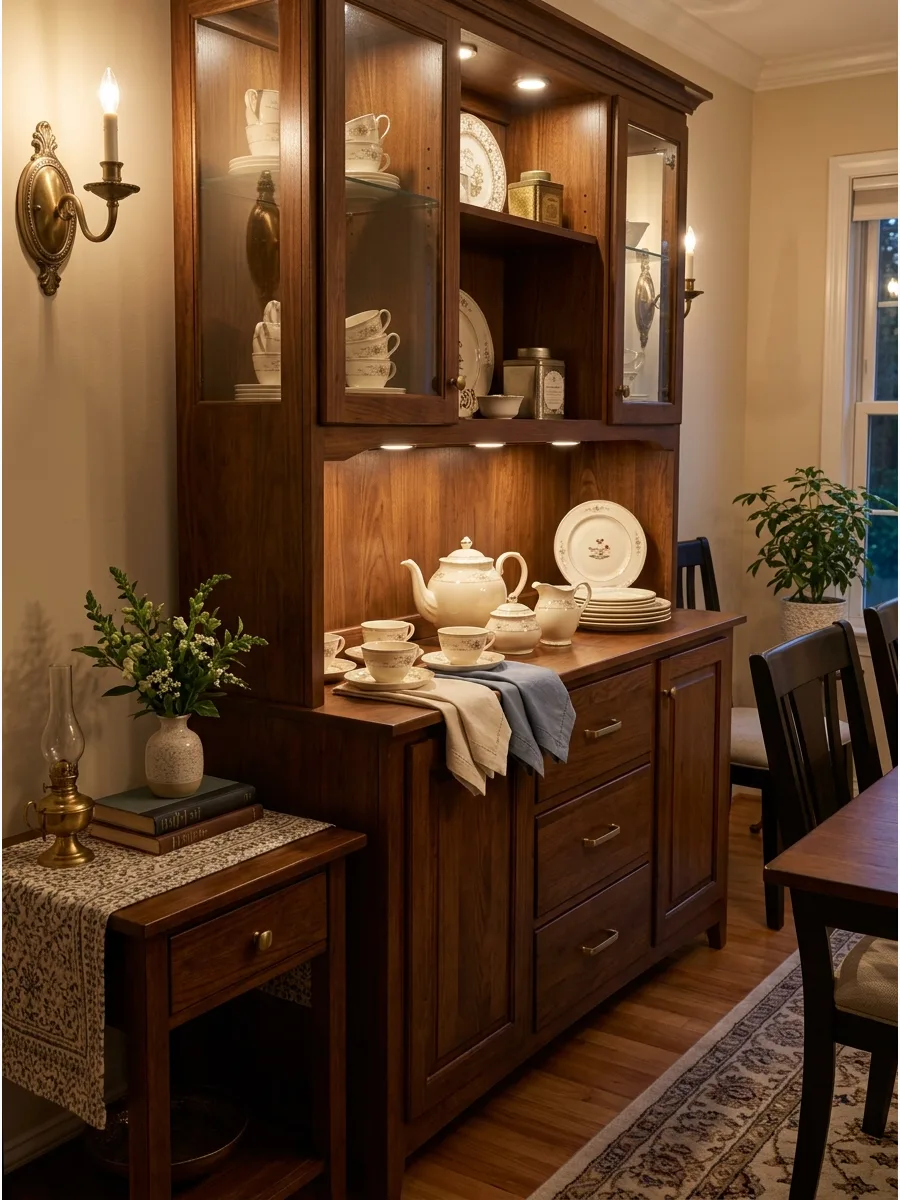
Arrange a teapot, teacups, cake plates, creamer, sugar bowl, and folded napkins together. The display should look attractive while keeping the pieces ready for actual use.
Place the teapot in the center of the middle shelf to act as the primary focal point of the tea set. Functional decor is the best kind because it saves cabinet space while looking beautiful.
- Budget: $50 to $150 for a full set.
- Keep napkins and spoons in a small basket nearby.
- Seasonal linens can change the look of the shelf instantly.
Most people skip this: Leave a small gap between the teapot and other items so you can easily grab it by the handle.
24. Showcase Vintage Teapots
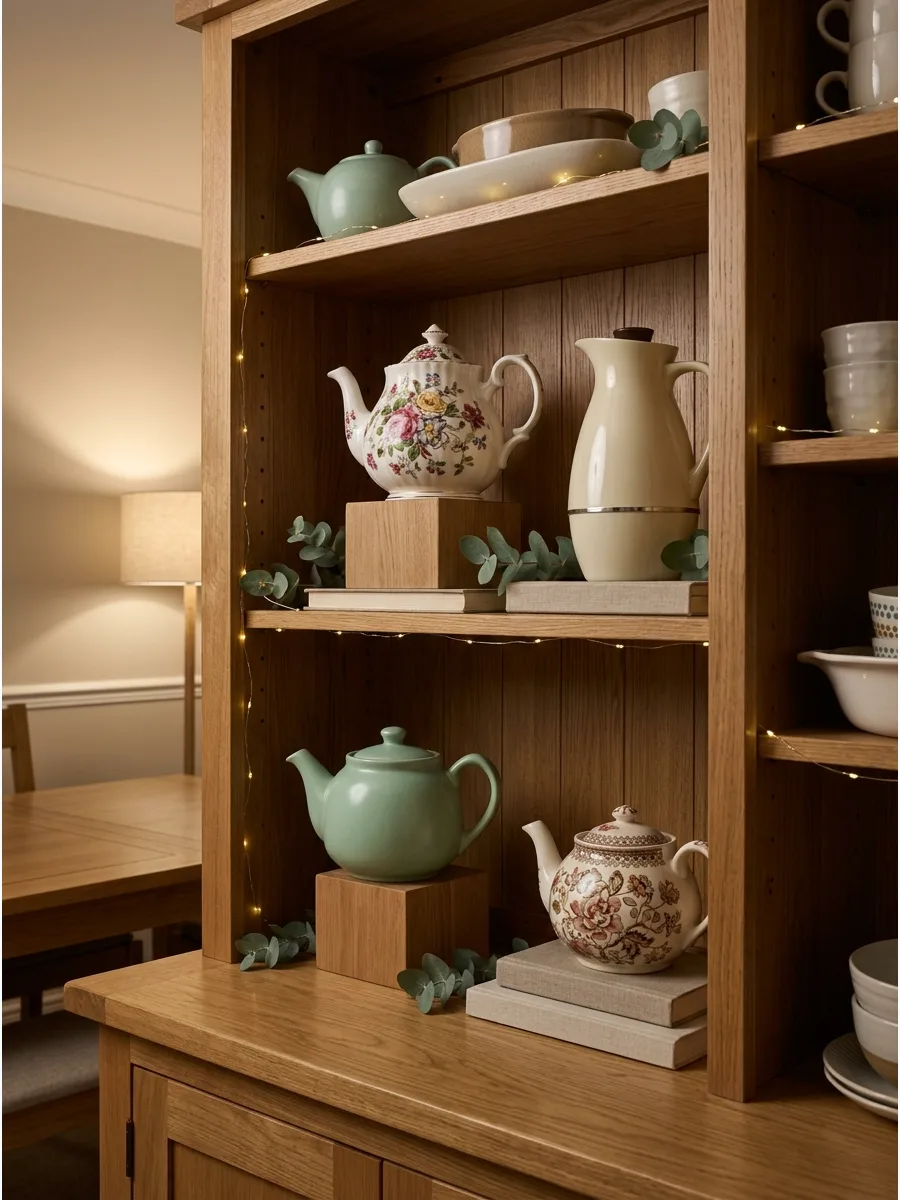
Place teapots at different heights using concealed risers or small books. Keep the surrounding accessories simple so the variety of teapot shapes becomes the focus.
Turn the teapot spouts in the same direction to create a sense of movement and order across the shelf. Mixing different eras of teapots adds a lot of personality and tells a story about your collection.
- Budget: $20 to $100 per teapot.
- Use books with neutral spines as decorative risers.
- Focus on varied silhouettes like round, tall, and square shapes.
Best shortcut: Group teapots by material, like all ceramic or all metal, for a cleaner look.
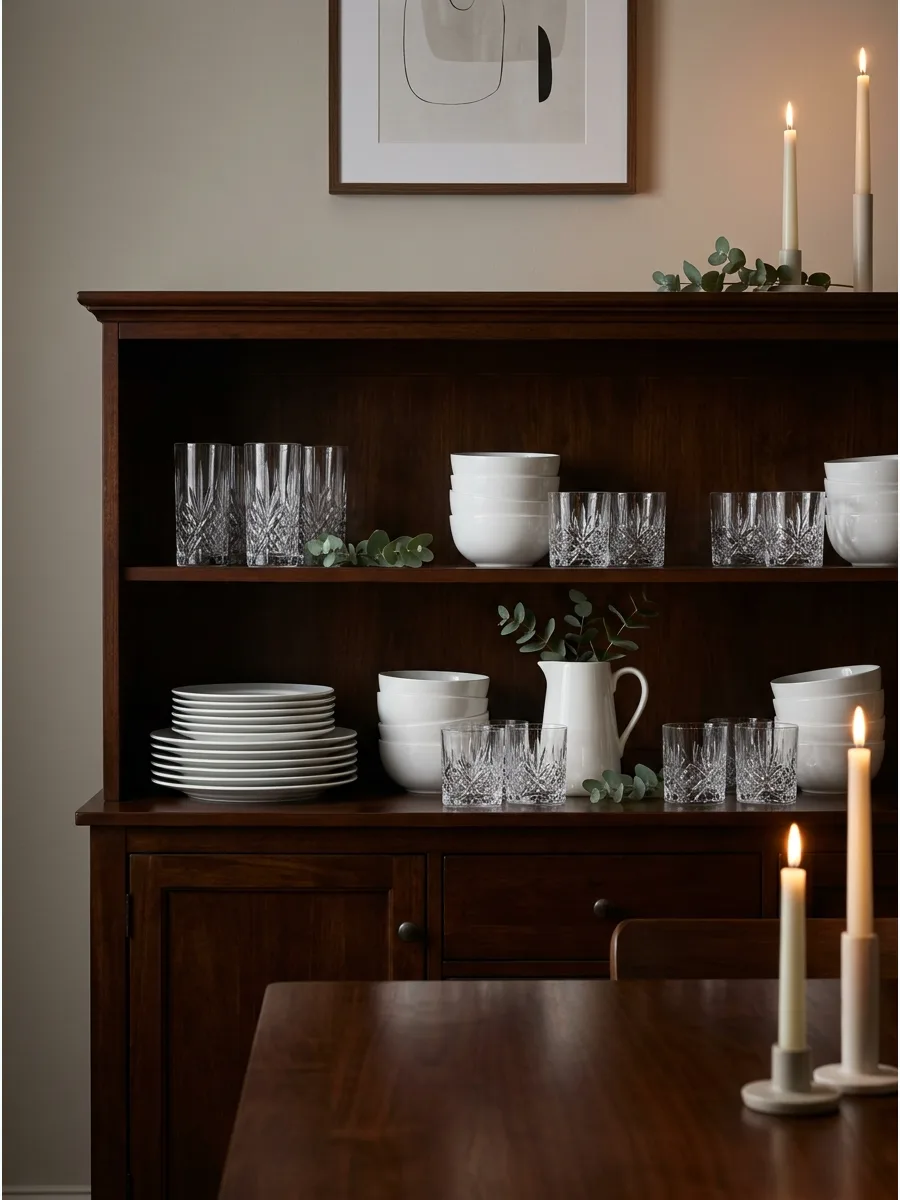
25. Create a Crystal Stemware Shelf
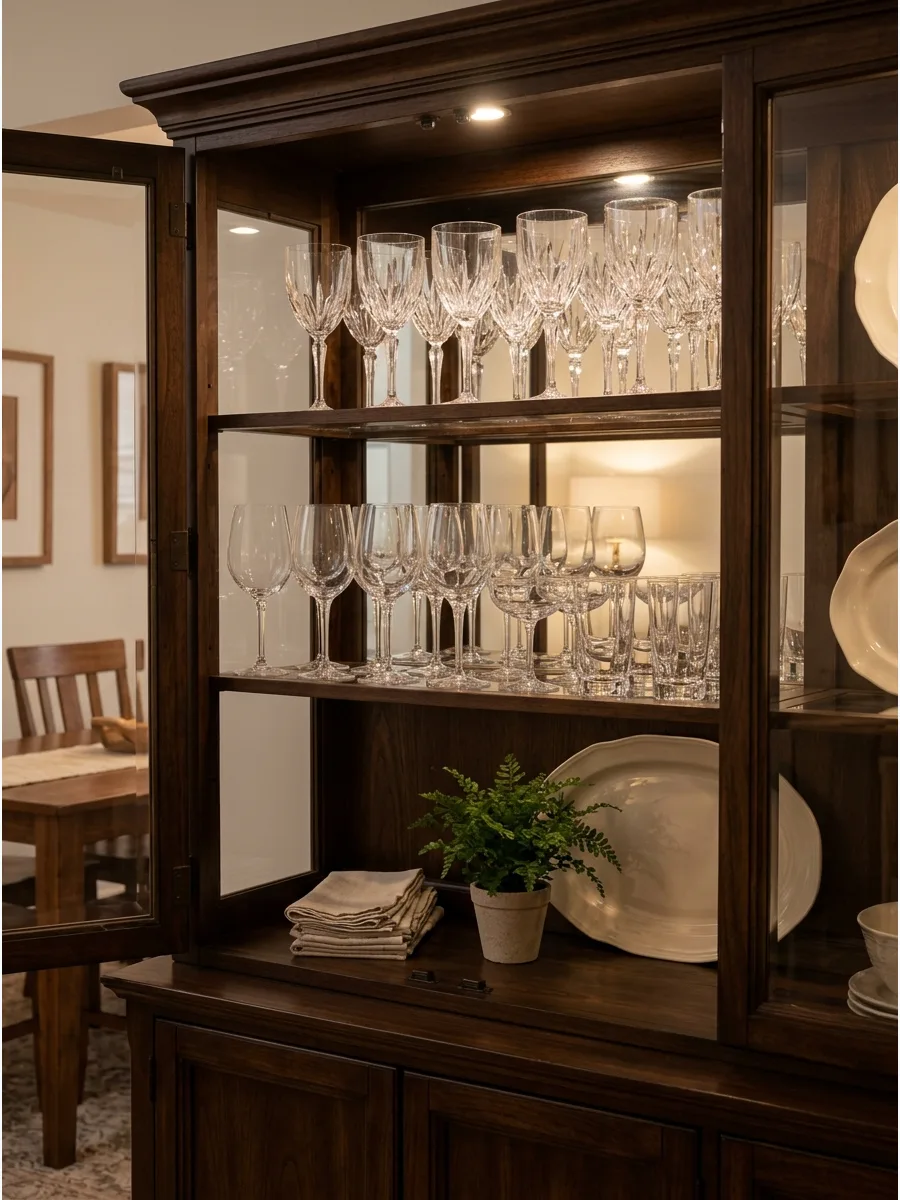
Dedicate one shelf to wine glasses, champagne coupes, and water goblets. Leave enough room between the glasses to remove them without knocking neighboring pieces.
Organize the glasses by height with the tallest wine glasses in the back and shorter tumblers in the front. Crystal adds a necessary layer of sparkle that reflects light and makes the whole hutch glow.
- Budget: $40 to $120 for a set of six.
- Space items at least one inch apart for safety.
- Use a soft microfiber cloth to remove fingerprints before display.
Quick win: Place a small battery-operated puck light on the shelf above crystal to make it sparkle at night.
26. Display Colored Vintage Glass
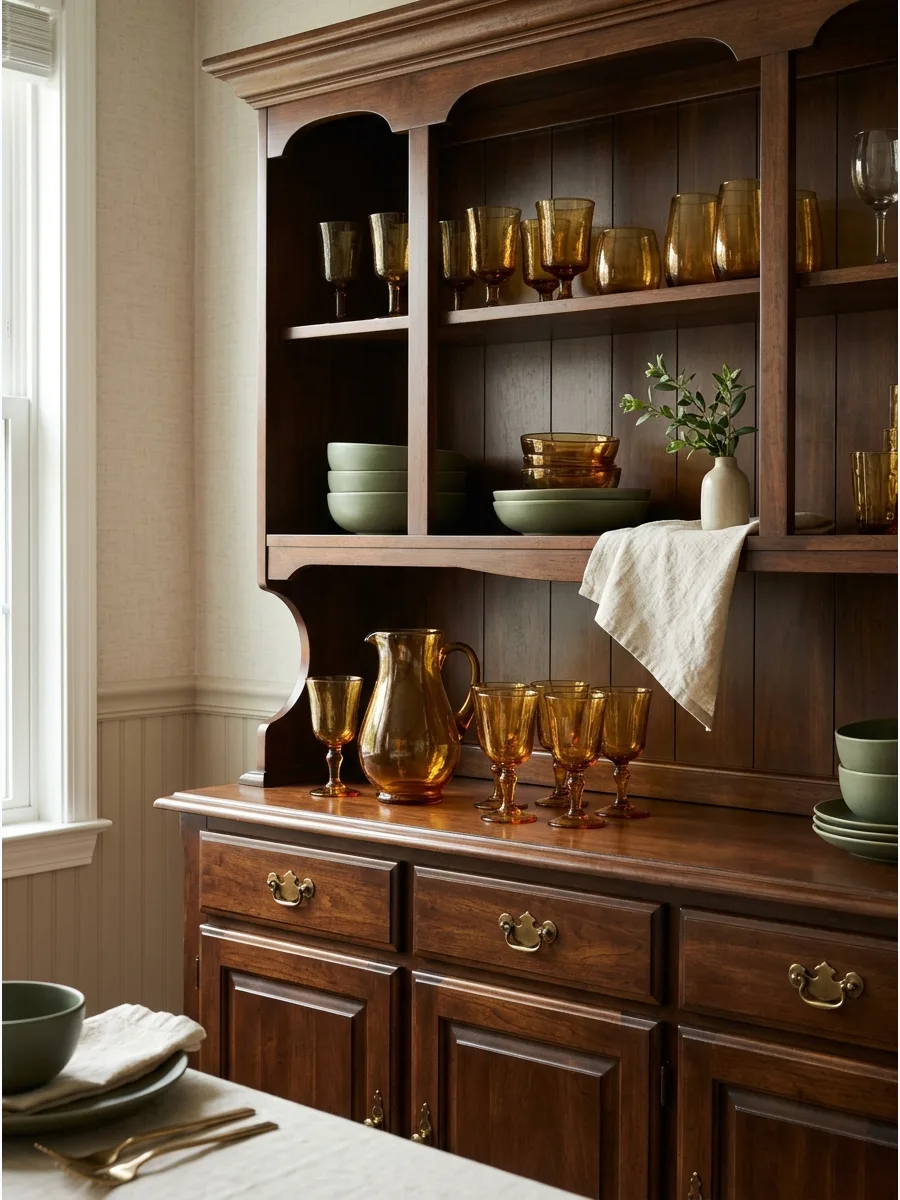
Arrange amber, green, blue, pink, or smoked glassware where light can pass through it. Colored glass is especially suited to glass-front hutches because it introduces personality without requiring many additional decorations.
Place colored glass pieces near the front of the shelf to catch the most natural light. A few pieces of colored glass can instantly modernize a traditional dark wood hutch.
- Budget: $10 to $40 per glass.
- Mix different colors for a bohemian look.
- Hand-wash only to preserve the vintage finish.
Most people skip this: Match the glass color to a minor color in your rug or curtains to pull the room together.
27. Arrange Glassware in a Color Gradient
Begin with clear glass at one end and gradually move through pale and deeper colors. Keep the shelf relatively uncluttered so the change in color remains noticeable.
Line up the glasses in a single row to make the transition from light to dark colors clear and striking. This technique works best with simple glass shapes so the color is the main attraction.
- Budget: $5 to $15 per glass.
- Use glasses of the same height for a cleaner gradient.
- Works well in modern or coastal kitchens.
Best shortcut: If you do not have enough colors, use clear glasses filled with colored water for a temporary party display.
28. Create a Vintage Barware Shelf

Group cocktail glasses, a decanter, an ice bucket, and a small serving tray. Giving the shelf one entertaining-related purpose helps the display remain organized.
Set the decanter and glasses on a small metal tray to define the bar area within the hutch. A dedicated bar shelf makes hosting easier because everything is already staged and ready to go.
- Budget: $30 to $200 for bar sets.
- Keep a small cocktail recipe book on the shelf for styling.
- Place this on a waist-high shelf for the easiest access.
Quick win: Add a small bowl of faux lemons or limes to the tray for a pop of color and realism.
29. Mix Crystal With White Dinnerware
Place clear glasses between white plates, bowls, and pitchers. The crystal adds shine and detail without introducing another strong color.
Alternate white ceramic stacks with groups of clear glassware to break up the solid blocks of white. This is the safest way to style a hutch if you want a clean, airy look that does not feel cold.
- Budget: $10 to $50 per piece.
- Use clear glass for a timeless, high-end look.
- Ensure the white shades of all the ceramics match.
Most people skip this: Use textured or cut crystal rather than plain glass to add more visual interest to the white dishes.
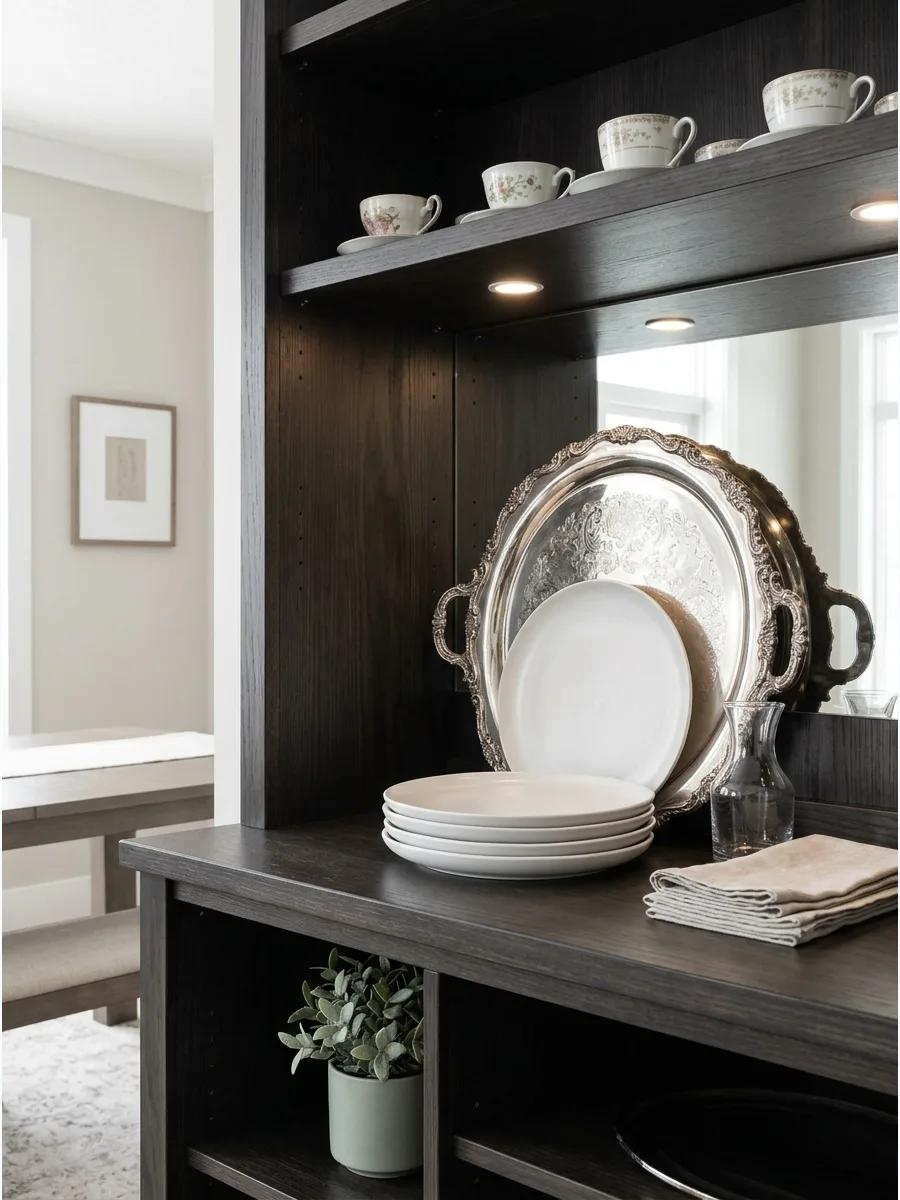
30. Display Silver Serving Pieces
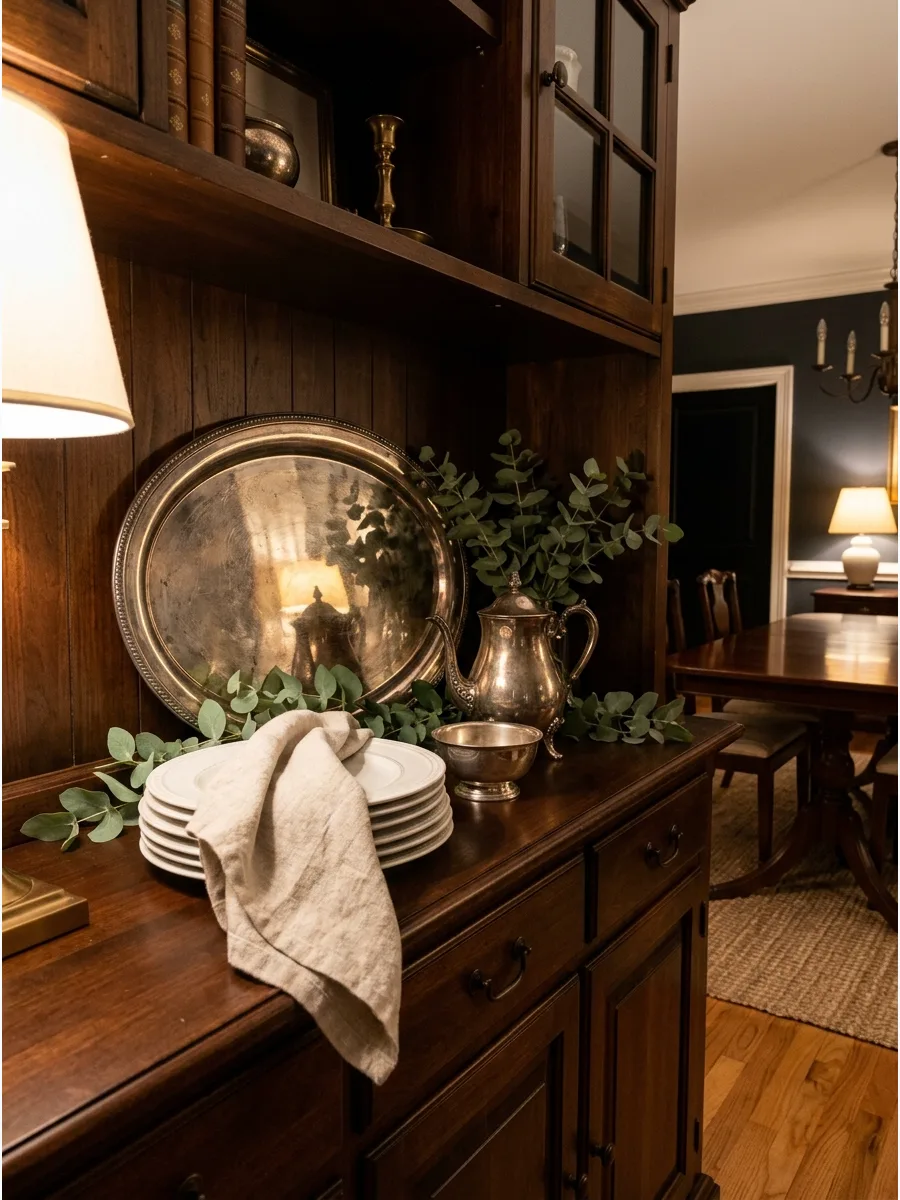
Arrange silver trays, teapots, bowls, or candlesticks with simple dishes. Slightly aged or patinated metal gives the hutch character and complements the renewed interest in vintage metalwork.
Prop a large silver tray against the back of the hutch to act as a reflective backdrop for smaller items. Silver adds a sense of history and weight that makes any furniture piece feel more substantial.
- Budget: $20 to $150 for vintage silver.
- Polish only the highlights to keep some of the aged patina.
- Mix with matte ceramics to balance the shine.
Best shortcut: Use a small piece of museum wax under the base of silver trays to keep them from sliding forward.
Kitchen Hutch Decorating Ideas
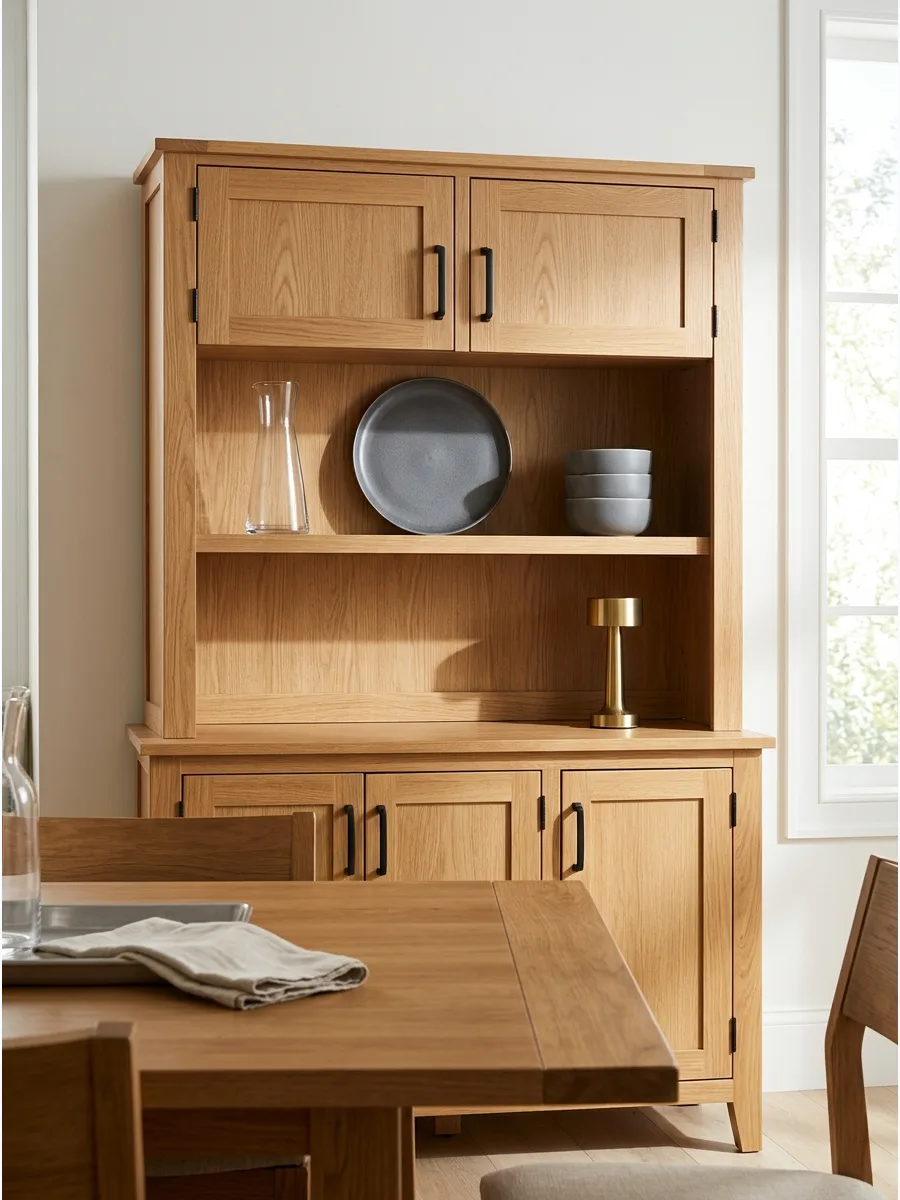
31. Create a Practical Everyday-Dish Hutch
Store frequently used plates, bowls, mugs, and glasses on the easiest-to-reach shelves. Keep decorative pieces toward the back or upper levels so the hutch remains useful.
Place the heaviest stacks of plates on the lowest shelf to keep the piece stable and easy to access. High shelves are perfect for items used only on holidays or special occasions.
- Ceramic plates and glassware
- Stack plates by size in the center
- Use bottom shelves for heavy items
Quick win: Use plate liners between your favorite dishes to prevent scratching during daily use.
32. Style a Kitchen Baking Hutch
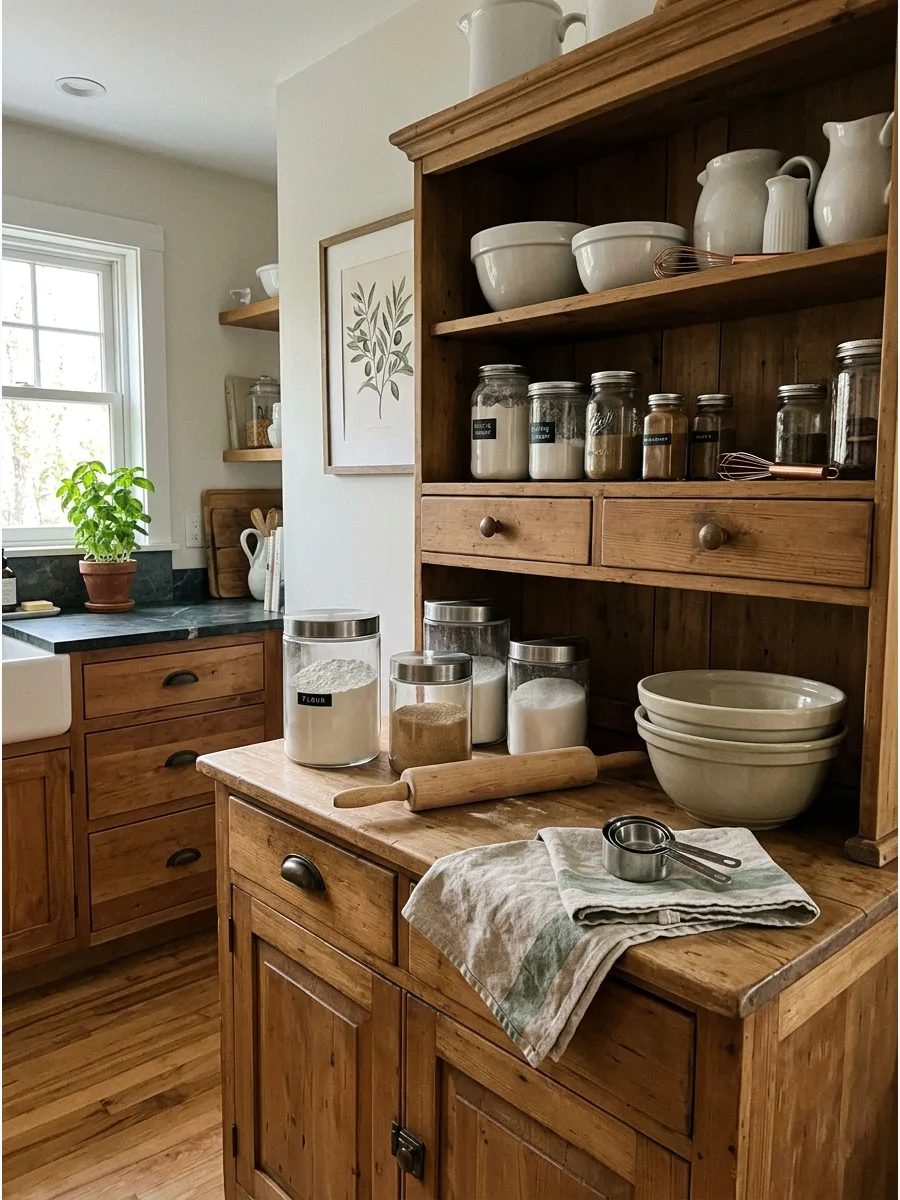
Display mixing bowls, measuring cups, a rolling pin, flour canisters, and folded tea towels. Use decorative objects sparingly so the supplies remain accessible for baking.
Arrange glass canisters by height to make finding ingredients fast and effortless during a project. This setup turns a standard hutch into a functional baking station.
- Glass canisters and wooden rolling pin
- Group items by frequency of use
- Keep flour and sugar in airtight containers
Best shortcut: Hang measuring spoons on small hooks inside the hutch frame to save shelf space.
33. Build a Coffee-Station Hutch
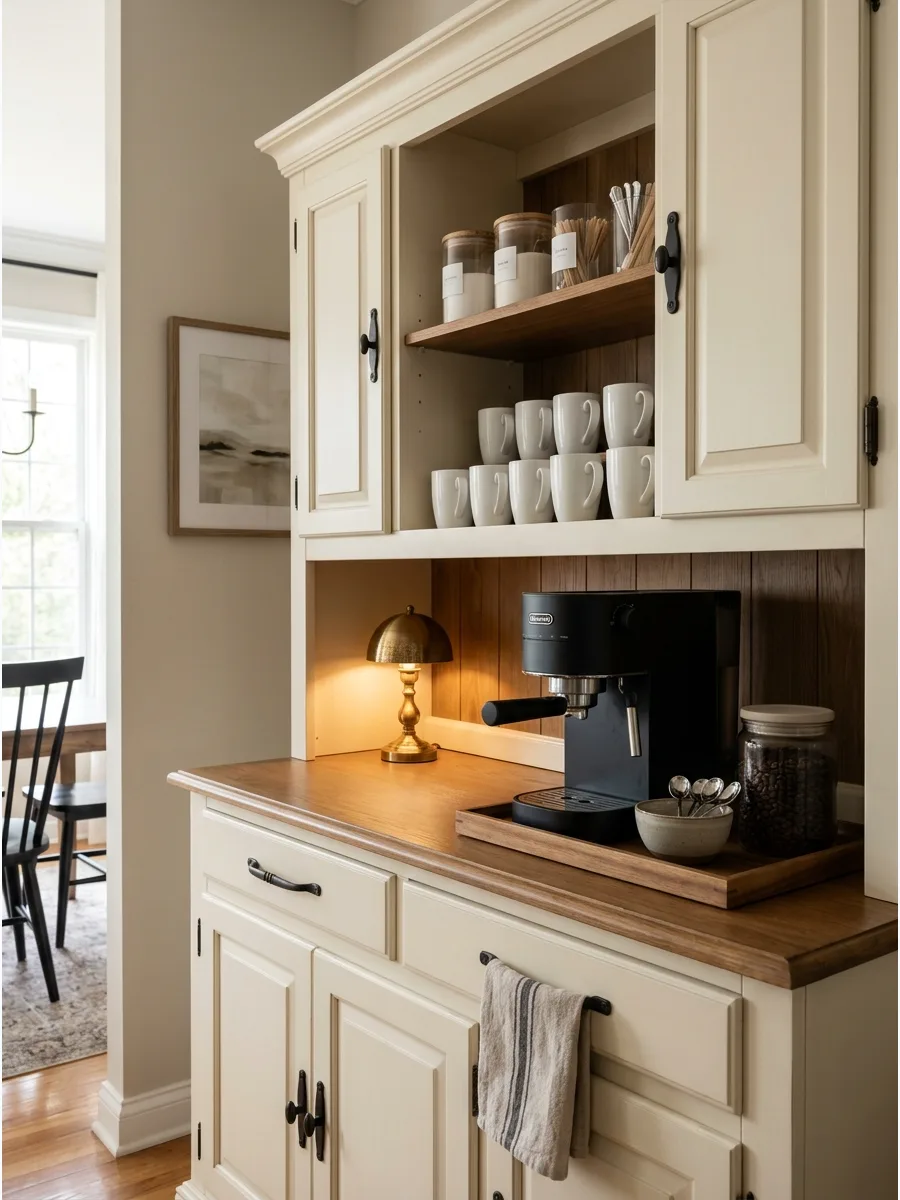
Arrange mugs, coffee beans, sugar, spoons, and an electric coffee maker on the counter section. Store extra cups and supplies on the shelves above to create a complete beverage area.
Position the coffee maker near the side of the hutch to leave the center open for prep work. This keeps the morning routine organized in one dedicated spot.
- Coffee maker and ceramic mugs
- Set everything on a tray to protect the wood surface
- Keep mugs on the shelf directly above
Most people skip this: Place a small silicone mat under the coffee maker to catch drips and protect the finish.
34. Create a Tea-Station Hutch
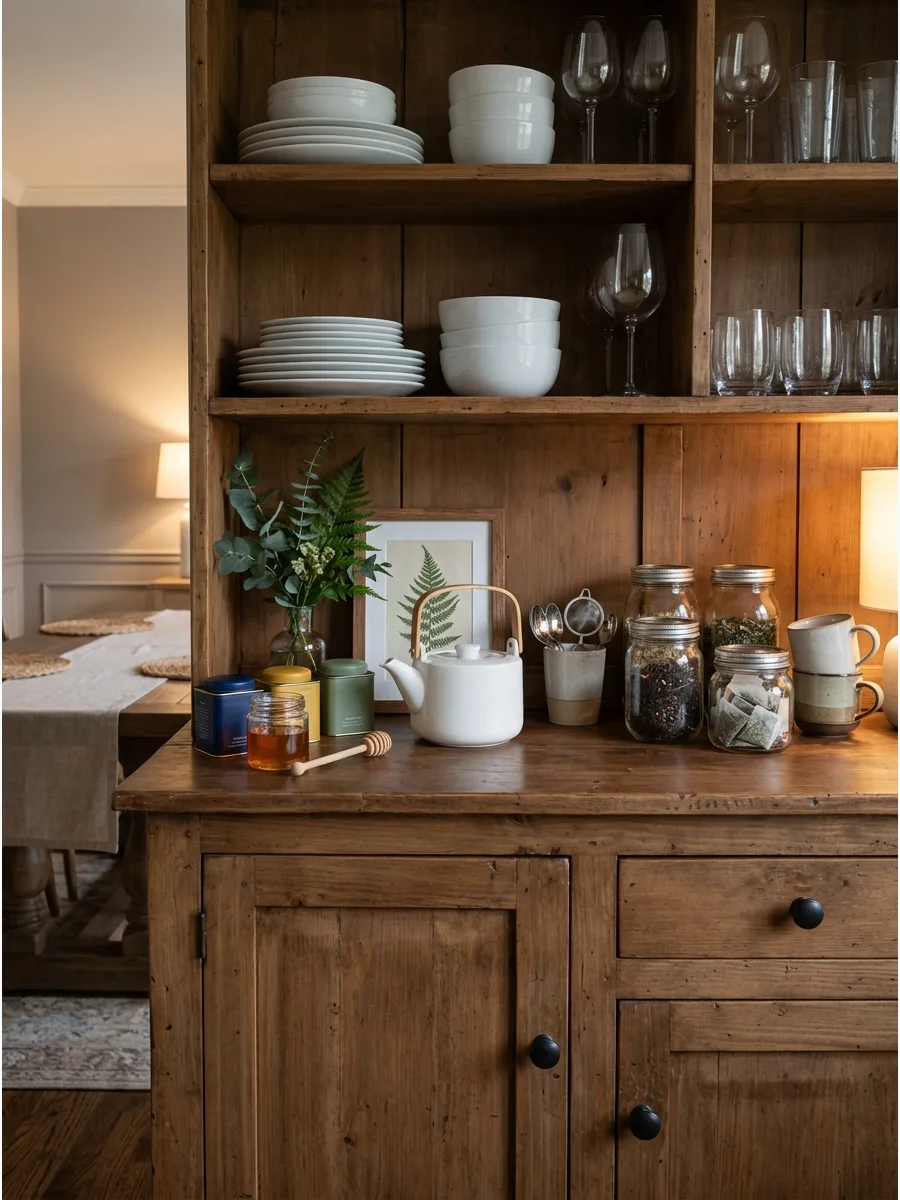
Group teapots, tea tins, mugs, strainers, honey, and small spoons together. Add one framed botanical print or a short vase of greenery without reducing the practical serving space.
Store tea bags in clear glass jars so guests can see the choices without opening every tin. It makes the hutch feel like a cozy, inviting cafe corner.
- Teapot and tea tins
- Organize tins by color or tea type
- Add a small botanical print in the background
Quick win: Use a small tiered riser for tea tins so you can see the labels in the back row.
35. Add a Hot-Chocolate Station
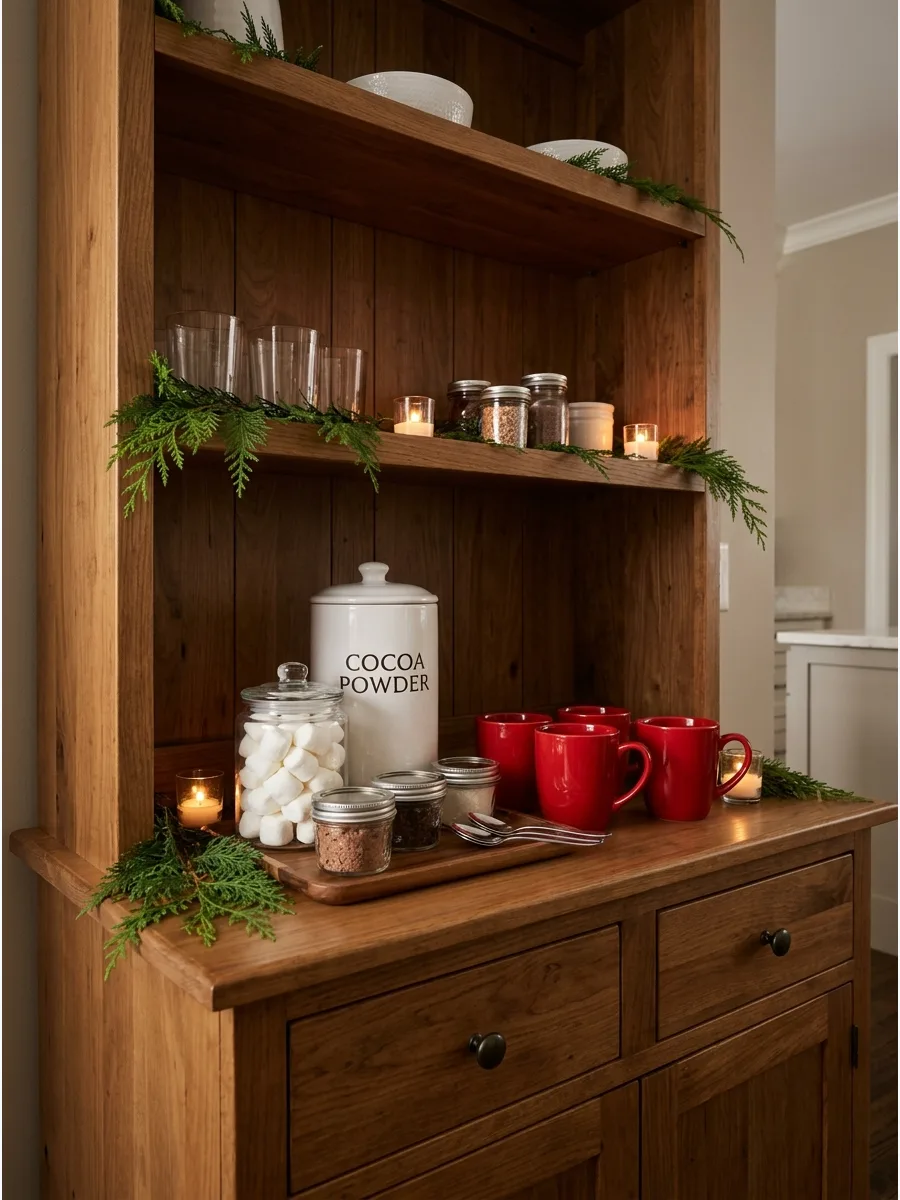
Use canisters for cocoa, marshmallows, and toppings, then display mugs and spoons nearby. Keep the arrangement concentrated on one shelf or the hutch counter so it can be changed seasonally.
Layer tall canisters behind shorter jars of toppings to create a sense of depth. This is a perfect way to bring a festive feel to the kitchen during colder months.
- Canisters and seasonal mugs
- Group all cocoa supplies on a single shelf
- Swap colors for different holidays
Best shortcut: Keep a small jar of cinnamon or peppermint sticks nearby for an easy flavor boost.
36. Display Cookbooks With Kitchenware
Stand cookbooks upright beside bowls, pitchers, or canisters. Lay one book horizontally and place a small serving piece on top to create varied height.
Group books with similar spine colors together to make the shelf look organized and intentional. Mixing books with dishes makes the hutch feel lived-in and practical.
- Cookbooks and ceramic pitcher
- Use heavy books as a base for smaller items
- Face spines outward for easy reading
Most people skip this: Use cookbooks with neutral covers if the dishware is very colorful to avoid visual clutter.
37. Lean Cutting Boards Behind Dishes
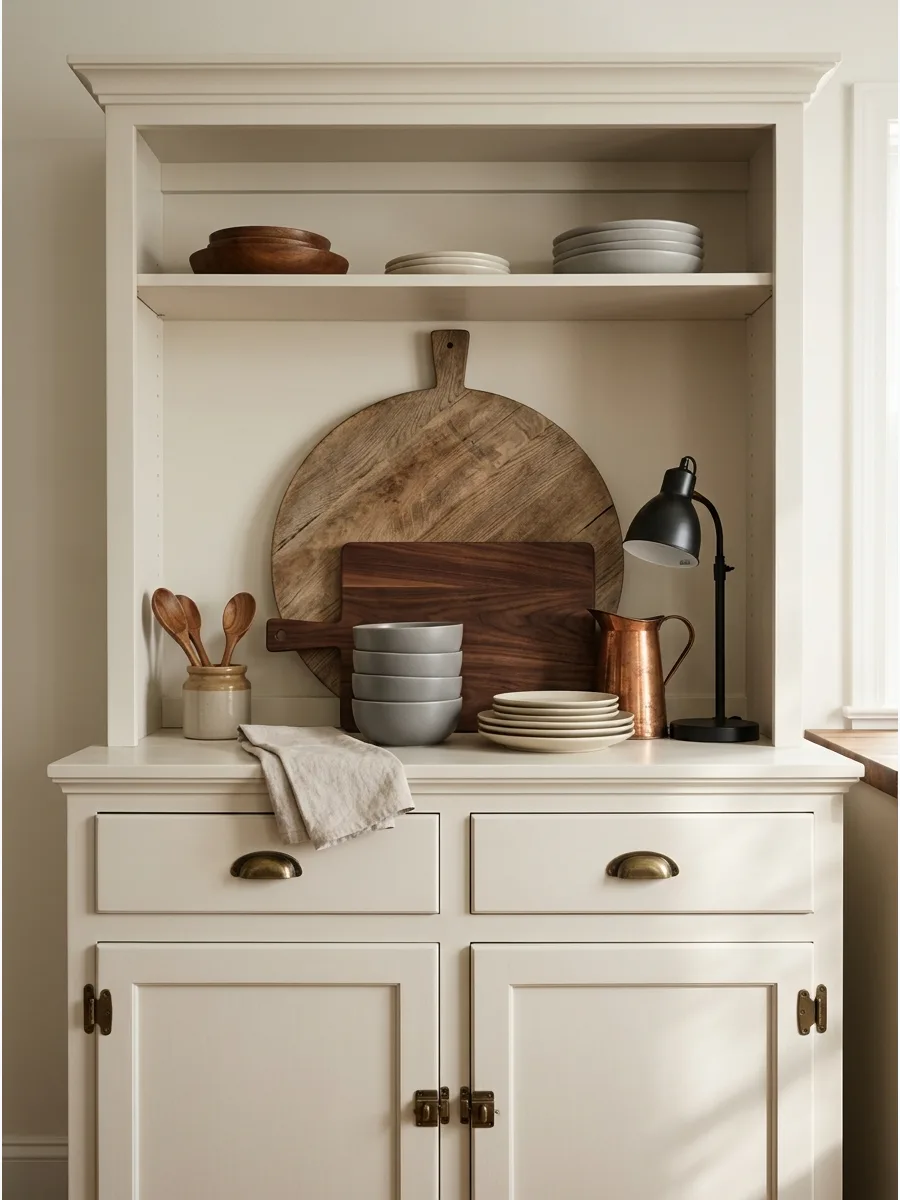
Use round and rectangular cutting boards as warm wooden backdrops. Layer pottery, bowls, and small kitchen accessories in front while leaving enough of the boards visible.
Overlap two different sized boards to create a tiered effect that adds texture to the back of the hutch. The wood tones bring a natural, earthy feel to the display.
- Wooden cutting boards and ceramic bowls
- Lean the largest board first against the back wall
- Use boards of different wood grains for contrast
Quick win: Apply a fresh coat of food-grade mineral oil to boards before displaying them to make the grain pop.
38. Arrange Stoneware Crocks and Pitchers
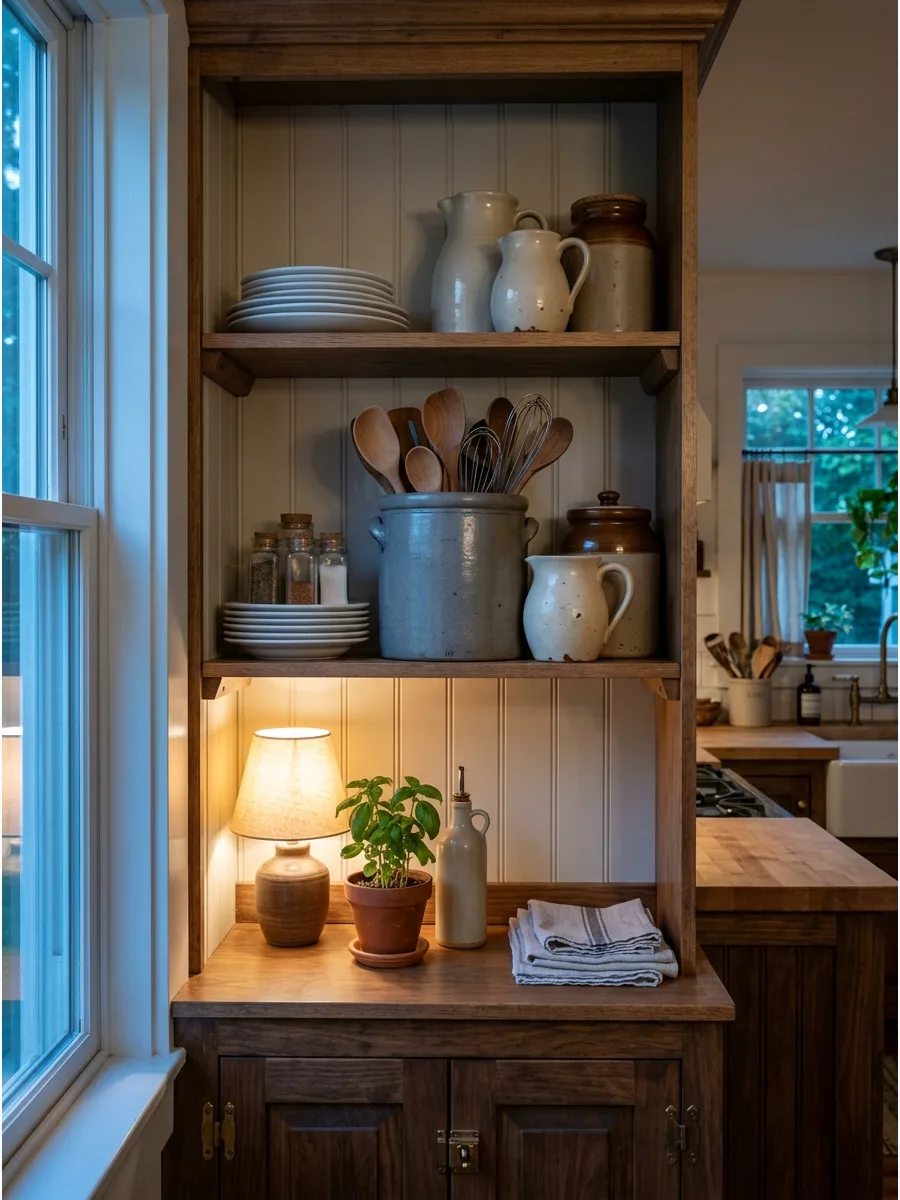
Combine brown, cream, gray, and salt-glazed stoneware in different sizes. Fill one crock with wooden utensils or dried stems to give the display a practical focal point.
Place the largest, heaviest crock in the center of the shelf to anchor the arrangement. Stoneware adds a classic, timeless look that works in any kitchen style.
- Stoneware crocks and wooden spoons
- Mix different heights of pitchers
- Use one crock for functional utensil storage
Best shortcut: If a crock is too deep for your utensils, fill the bottom with dry beans to lift the spoons higher.
39. Create a Copper and Ceramic Hutch
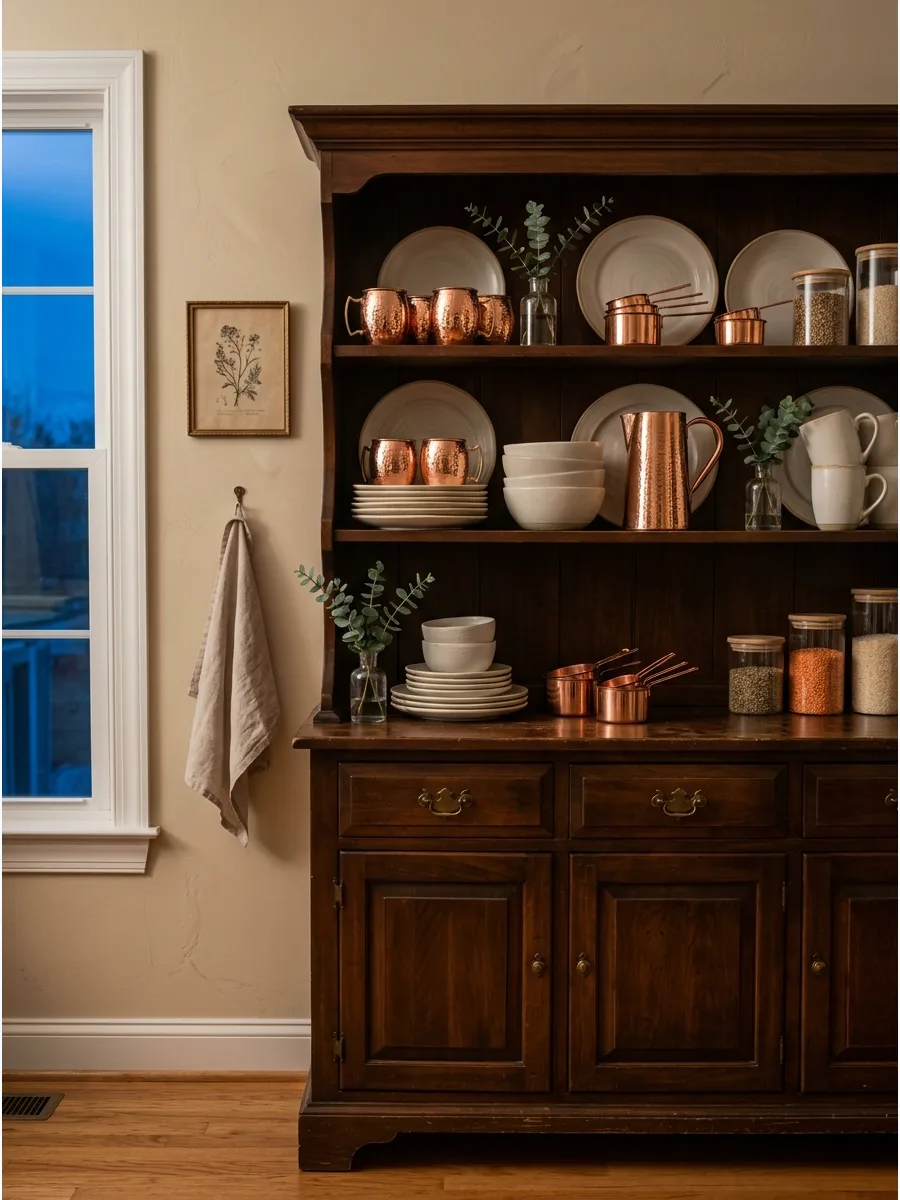
Mix copper mugs, pans, measuring cups, or pitchers with cream ceramics and wood. The warm metal makes the kitchen hutch feel inviting while remaining functional.
Intersperse copper pieces throughout the shelves so the metallic shine is balanced from top to bottom. This combination creates a high-end look with everyday items.
- Copper mugs and cream ceramics
- Polish the copper to a high shine for a focal point
- Balance the metal with matte ceramic textures
Most people skip this: Place copper items away from direct sunlight to slow down the natural tarnishing process.
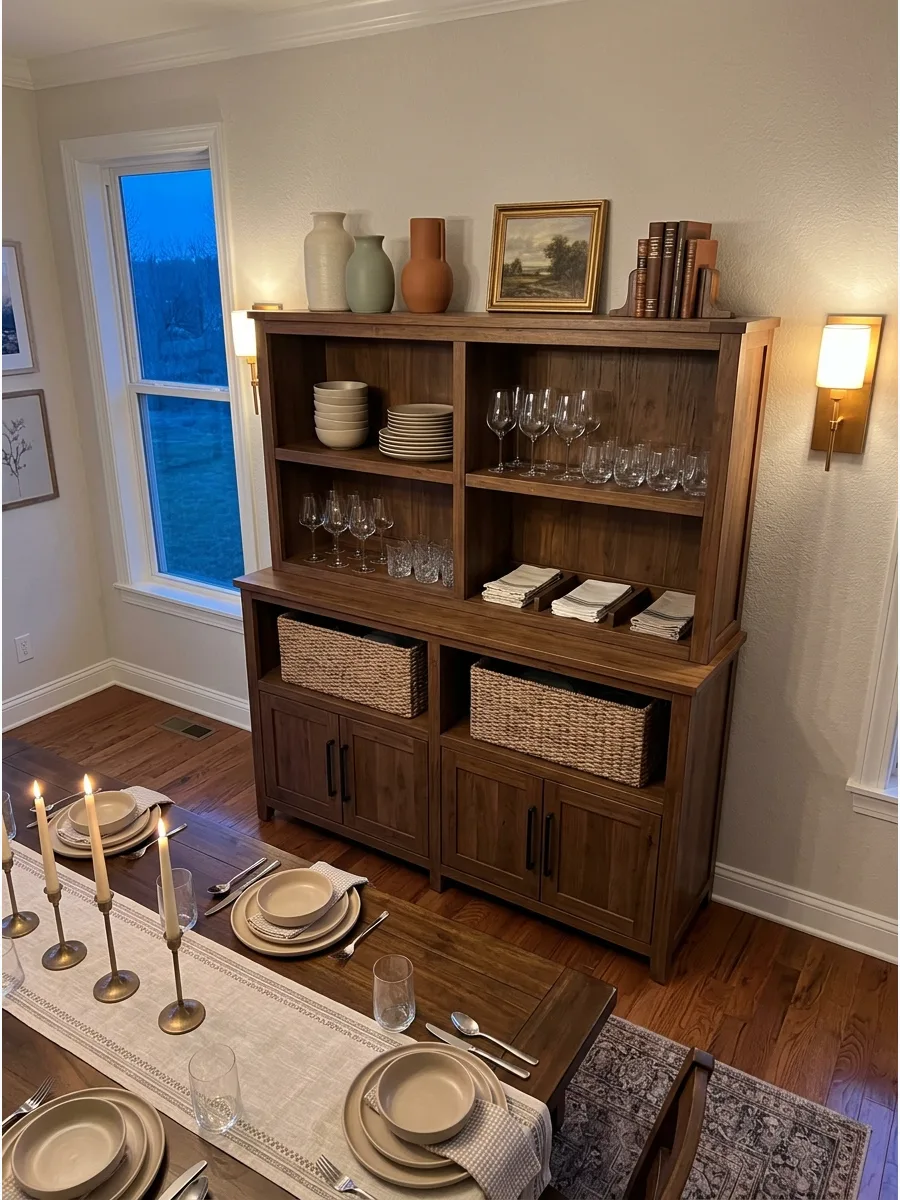
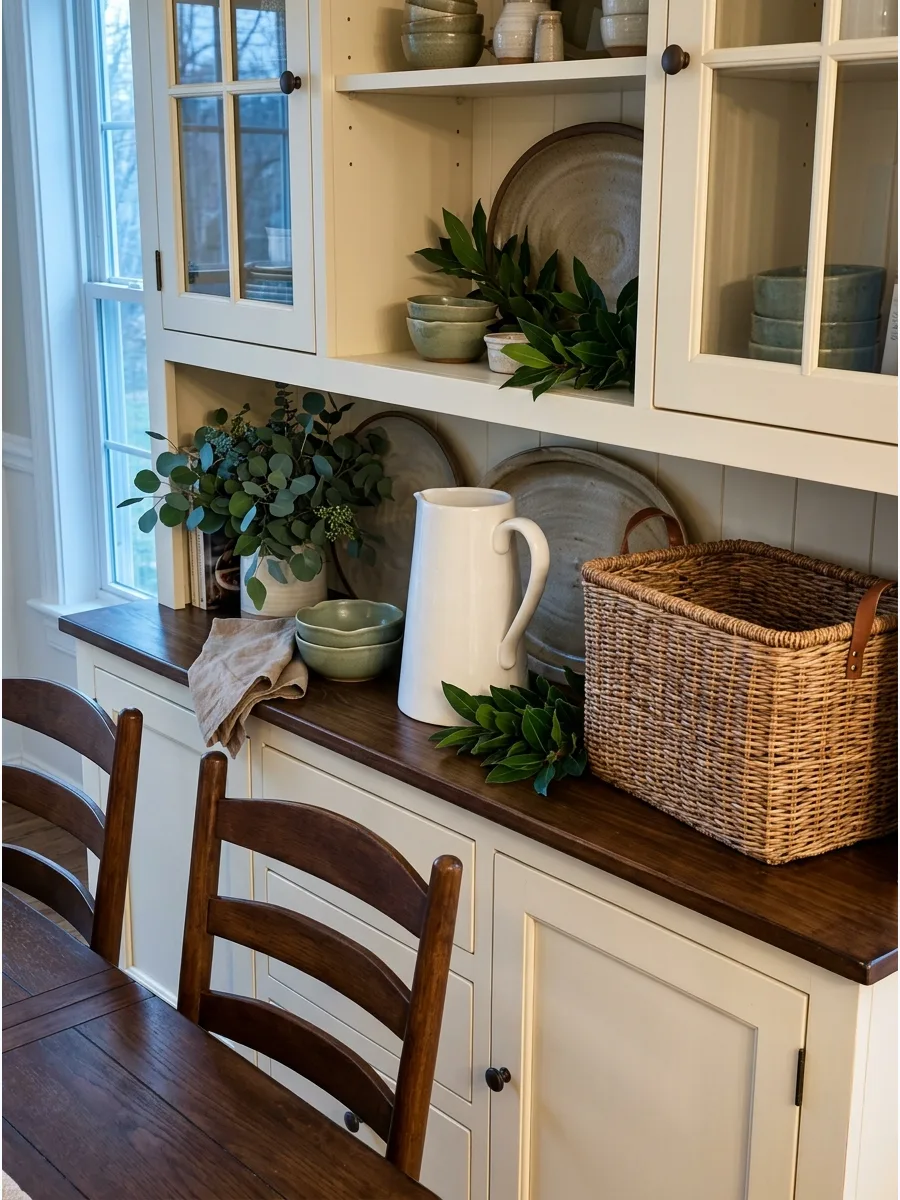
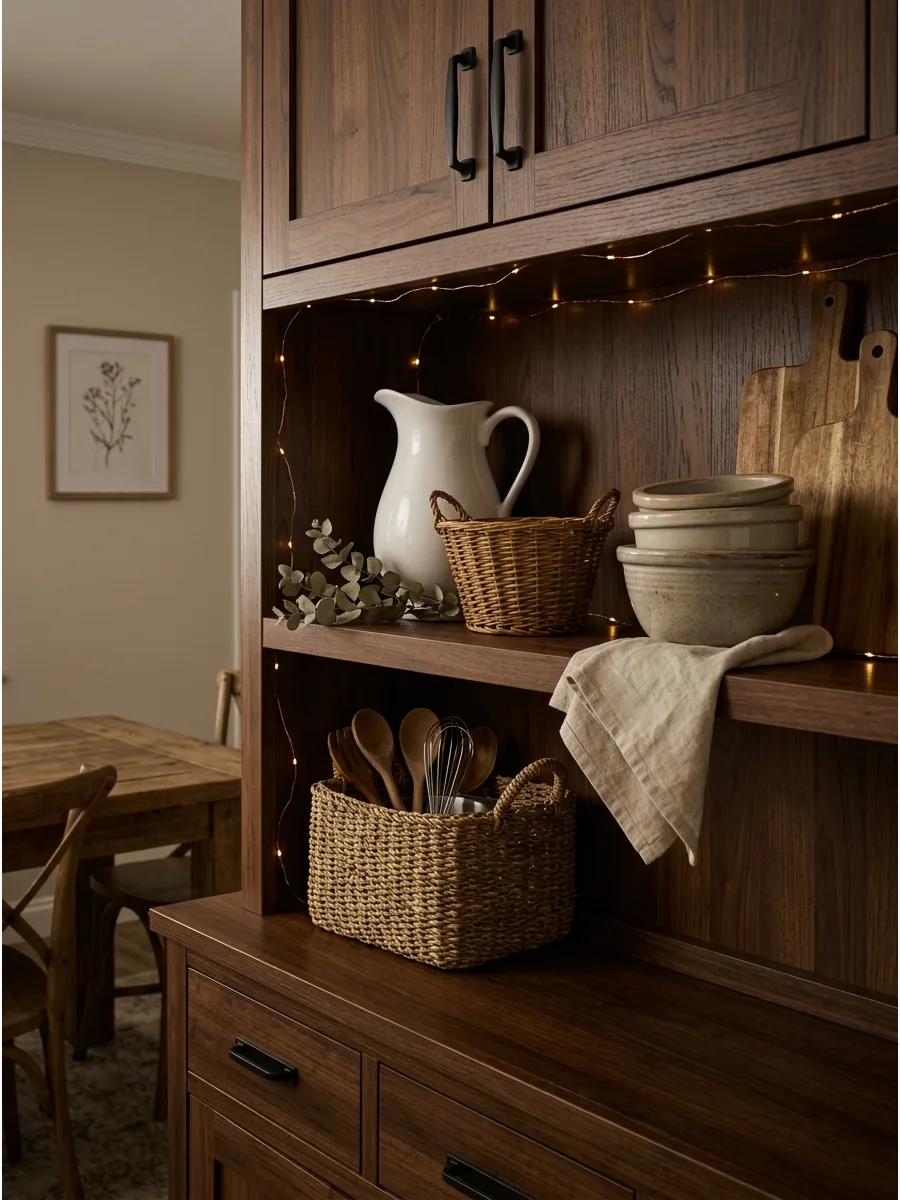
40. Use Baskets for Hidden Kitchen Storage
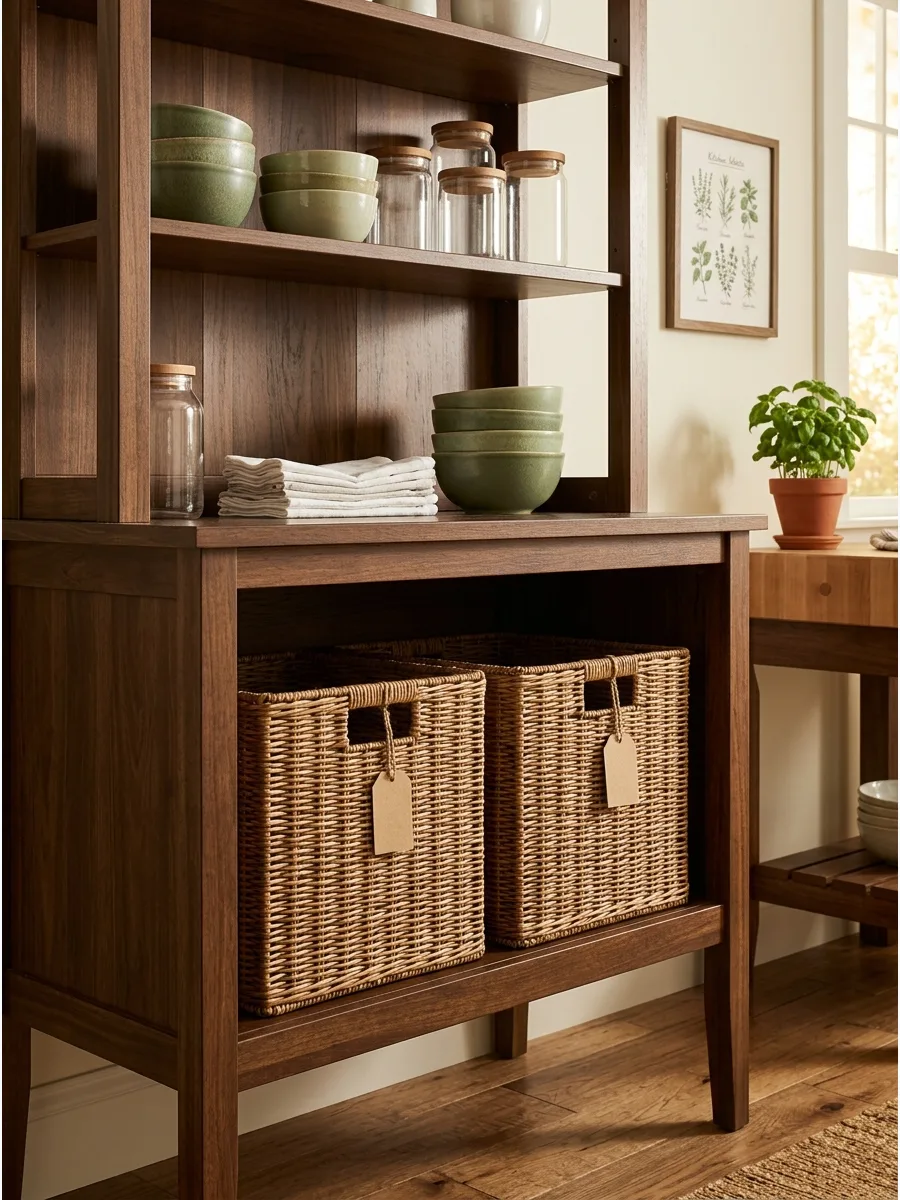
Place napkins, table linens, baking tools, or extra supplies inside woven baskets. Use similar basket materials so the storage looks deliberate rather than improvised.
Label each basket with a small tag to keep the contents organized and easy to find for the whole family. Baskets add a soft texture that contrasts beautifully with hard dishware.
- Wicker baskets and linen napkins
- Choose baskets that fit the shelf height perfectly
- Use them to hide cluttered items like plastic lids
Quick win: Line baskets with a simple fabric cloth to prevent wicker from snagging delicate linens.
41. Display Seasonal Produce
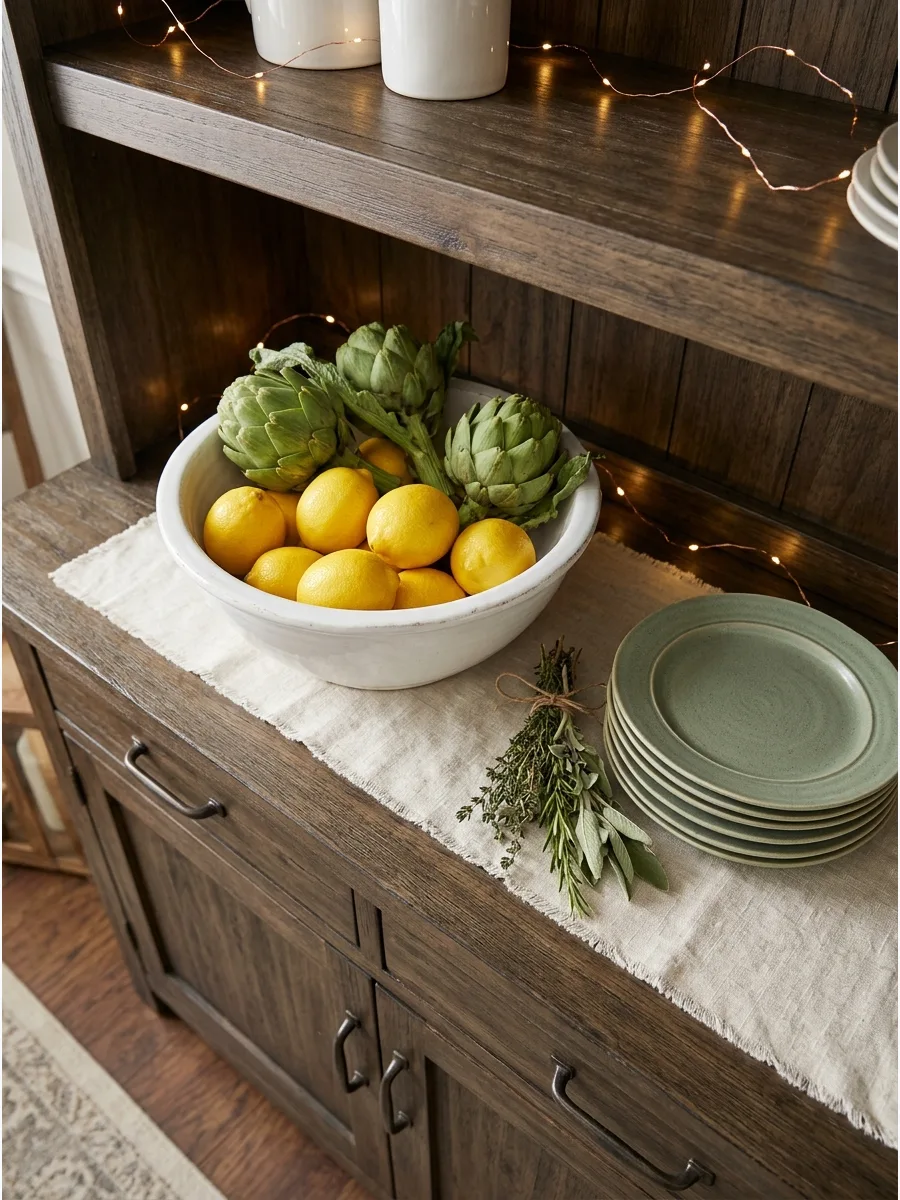
Fill a bowl or basket with apples, pears, citrus fruit, or other seasonal produce. The natural color refreshes the hutch without adding objects that require long-term storage.
Choose fruit with long shelf lives like lemons or artichokes to keep the display looking fresh for weeks. This is the easiest way to change the look of a hutch for the seasons.
- Fresh fruit and ceramic bowl
- Change the fruit type to match the current season
- Use a low bowl so the produce is visible
Best shortcut: Use high-quality realistic faux fruit if you want the look without worrying about spoilage.
42. Add a Small Herb Collection
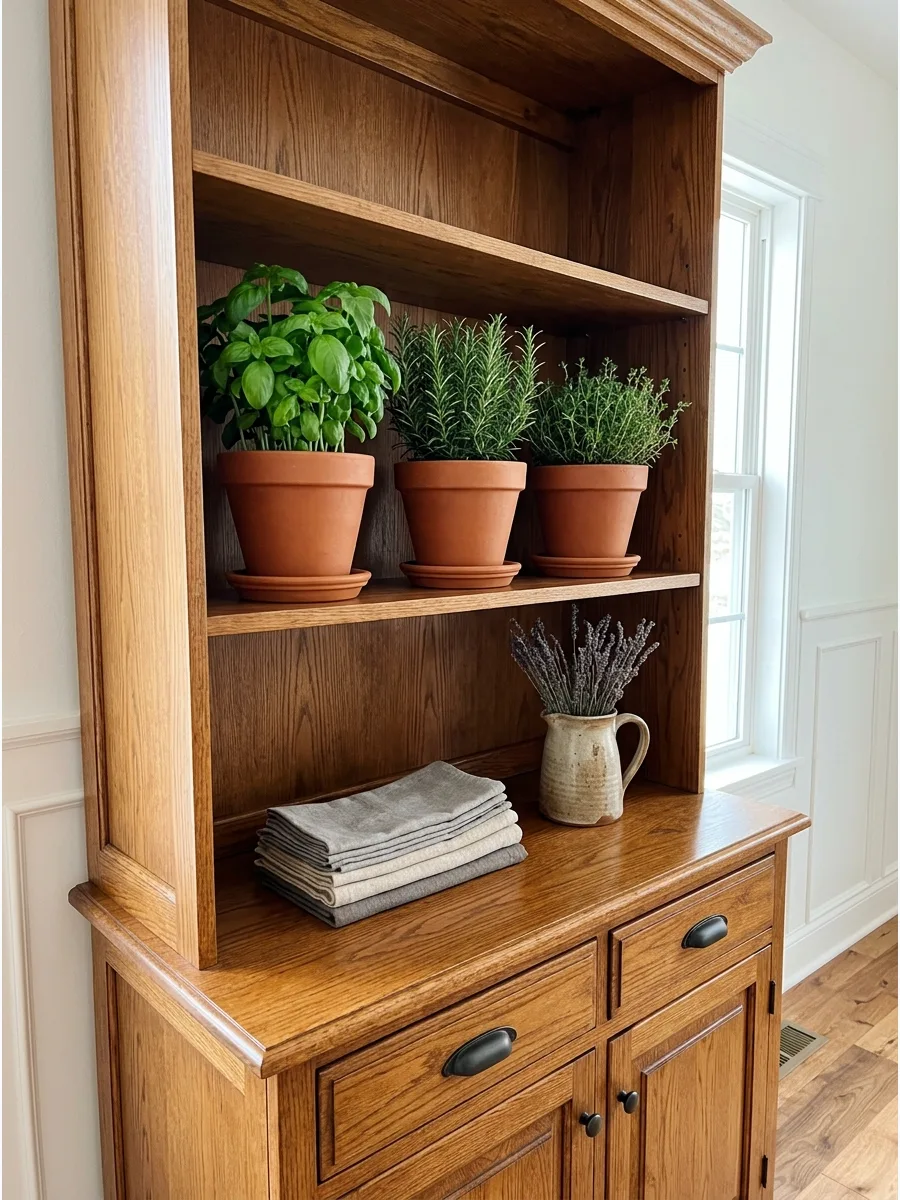
Place several potted herbs on a bright, open hutch near a suitable window. Use waterproof saucers and avoid positioning plants directly above dishes that could be affected during watering.
Group three different herbs in matching terracotta pots to create a cohesive, mini indoor garden. Fresh greenery brings life and a pleasant scent to the kitchen area.
- Potted herbs and terracotta pots
- Ensure the hutch gets enough natural light for the plants
- Use saucers to protect the hutch wood
Most people skip this: Rotate the pots every few days so the herbs grow evenly toward the light.
Color-Based Hutch Decorating Ideas
43. Create a Warm-Neutral Hutch
Combine cream dishes, beige stoneware, clear glass, woven baskets, and natural wood. Use differences in finish and texture to prevent the restrained palette from feeling flat.
Mix matte ceramics with glossy glassware to add visual interest without needing bright colors. This style creates a calm, sophisticated atmosphere in the dining room.
- Cream dishes and woven tray
- Stick to a palette of white, beige, and tan
- Layer different textures like wood and glass
Quick win: Add one piece of dark wood, like a small bowl, to give the neutral palette a bit of weight.
44. Style a Black-and-White Hutch
Mix white dishes with black bowls, dark frames, and striped textiles. Spread the black pieces across different shelves so one section does not look visually heavier.
Use a pattern like black-and-white stripes on napkins to tie the two solid colors together. The high contrast makes the hutch a bold focal point in a modern home.
- White plates and black bowls
- Alternate black and white items on each shelf
- Include a patterned textile for variety
Best shortcut: Use black metal plate stands to hold white plates for an instant pop of contrast.
45. Decorate With Burgundy and Brass
Combine burgundy pottery or glass with cream dishes and aged-brass accessories. The deep red and warm metal create a sophisticated display that suits the richer 2026 color direction.
Place a brass candlestick or tray near burgundy items to make the deep red tones feel warmer. This color scheme feels elegant and expensive.
- Burgundy glassware and brass tray
- Use brass accents to brighten the dark red tones
- Pair with cream dishes to keep it from looking too dark
Most people skip this: Look for vintage brass pieces with a bit of patina to give the hutch a more collected feel.
46. Use Olive Green and Natural Wood
Arrange olive ceramics, botanical plates, and clear glasses against a wood backdrop. Add cream pieces to keep the earthy palette from becoming too dark.
Place dark olive pieces next to light cream saucers to make the green pop. Earthy palettes need light colors to stay fresh and modern.
- Pick up olive ceramic pieces at home goods stores or pottery studios for $15-$40.
- Alternate the placement of dark green items and light wood items on each shelf.
- Swap the cream saucers for white ones if the hutch wood is very dark.
Quick win: Use a few sprigs of real eucalyptus to pull the green tones together naturally.
47. Create a Rust and Terracotta Display
Mix terracotta pots, rust-colored dishes, amber glass, and warm wood. Include a few cream or white pieces to break up the similar earthy tones.
Tuck small amber glass votives between heavy pots to catch the light. Mixing textures prevents a monochromatic look from feeling flat and boring.
- Use standard terracotta garden pots for an affordable $5 decorative element.
- Group amber glassware in the center of the shelf where it can catch natural light.
- Add a matte white bowl to the stack of rust plates to create high contrast.
Most people skip this: Clean terracotta pots with a dry cloth to keep the orange color vibrant.
48. Style a Muted Blue Hutch
Use dusty-blue dishes, faded botanical art, warm wood, and clear glass. The softened blue feels more relaxed than a sharp navy-and-white palette.
Lean a small framed print behind a stack of plates for a layered look. Blue tones act as a neutral in many dining rooms because they pair well with wood.
- Search for 'stoneware' instead of 'china' to find the best dusty blue finishes.
- Place the largest blue platters on the bottom shelf to ground the display.
- Use silver-framed art instead of wood if you want a more formal, cool-toned look.
Best shortcut: Use clear glass carafes to break up the blue and keep the shelves feeling light.
49. Build a Jewel-Tone Glass Display
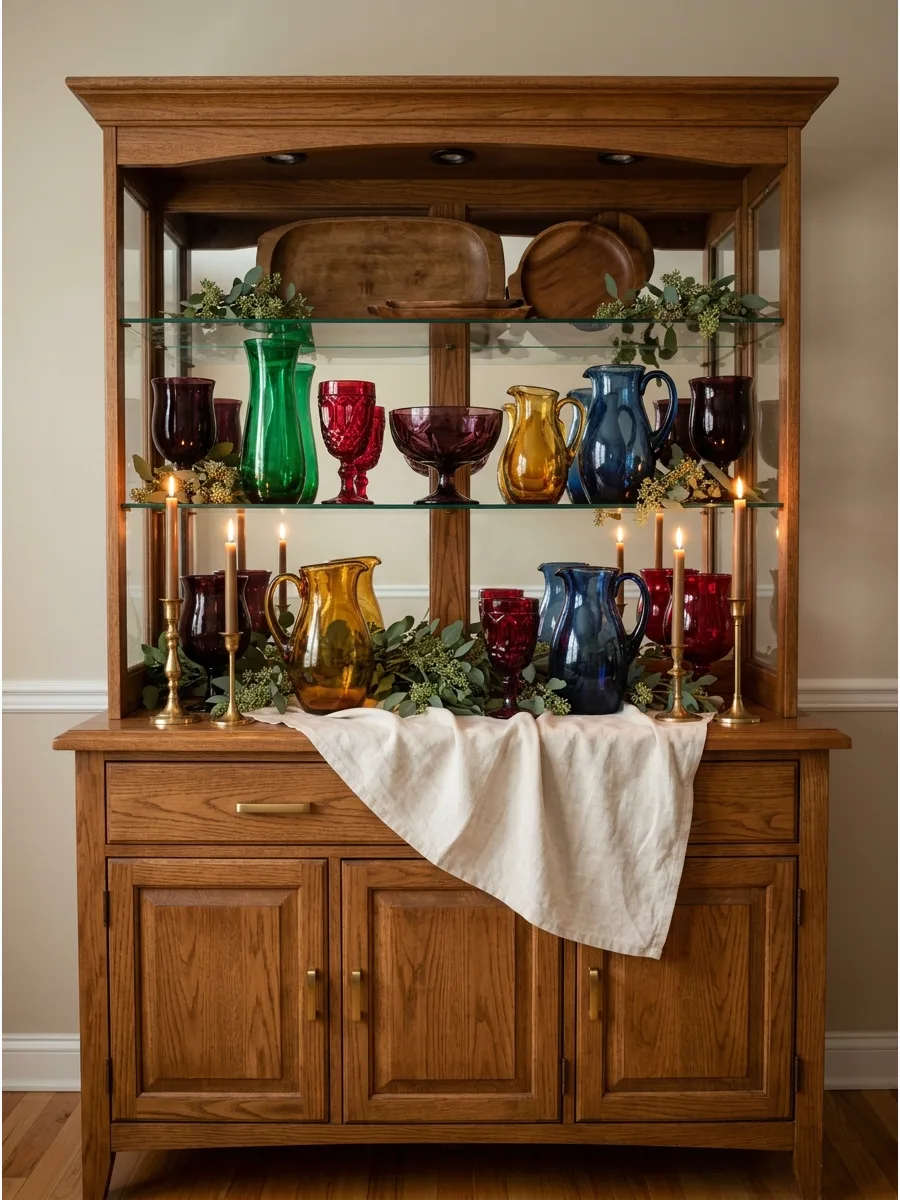
Combine emerald, amber, ruby, plum, and deep-blue glassware. Leave noticeable space between the pieces so each saturated color remains distinct.
Set darker plum and ruby pieces at the ends of the shelf for a grounded feel. Jewel tones look best when light can pass through them, so avoid over-crowding.
- Look for vintage colored glassware at thrift stores or estate sales for $5-$10 a piece.
- Position the glass pieces in front of a mirror or window to maximize the sparkle.
- Stick to just two jewel tones if the full rainbow feels too busy for the room.
Quick win: Use a battery-operated puck light on the shelf to make the colored glass glow at night.
50. Create an All-White Textured Hutch
Display white dishes, ribbed pottery, glass, linen, and woven accents. Vary the surfaces and silhouettes so the monochromatic arrangement still has depth.
Mix glossy white bowls with matte ribbed vases to keep the look interesting. Texture is more important than color in an all-white display to prevent it from looking flat.
- Budget for $20-$50 for a set of new textured white serving pieces.
- Stack smooth plates under bowls with a raised pattern to create visible layers.
- Add a single wood bowl to the white collection for a touch of warmth.
Most people skip this: Mix different shades of white, like cream and eggshell, to add extra dimension.
Style-Based Hutch Decorating Ideas
51. Design a Collected Vintage Hutch
Combine inherited dishes, thrifted pottery, aged books, artwork, and metal accessories from different eras. Repeat several colors throughout so the mixed pieces appear intentional.
Group items by color rather than age to make a random collection feel unified. A shared color makes mismatched eras feel like a deliberate set.
- Scour flea markets for unique metal trays or brass candlesticks under $25.
- Place heavy books horizontally to serve as a base for smaller vintage figurines.
- Limit the collection to three main materials, like glass, metal, and ceramic, to avoid clutter.
Best shortcut: Remove dust jackets from old books to reveal the beautiful linen or leather covers.
52. Create a Modern Organic Hutch
Use handmade ceramics, sculptural bowls, warm wood, stone, and a few clear glasses. Keep the arrangement asymmetrical and leave generous open space around each grouping.
Leave several inches of empty space between groups to highlight the unique shapes. Breathing room around objects makes them feel more expensive and curated.
- Invest in one or two 'hero' handmade ceramic pieces for $60-$100.
- Use a low stone tray to group smaller items like salt cellars or small glasses.
- Add a small air plant or a smooth river rock to enhance the organic feel.
Quick win: Use a matte finish spray on shiny ceramics to give them a modern, earthy look.
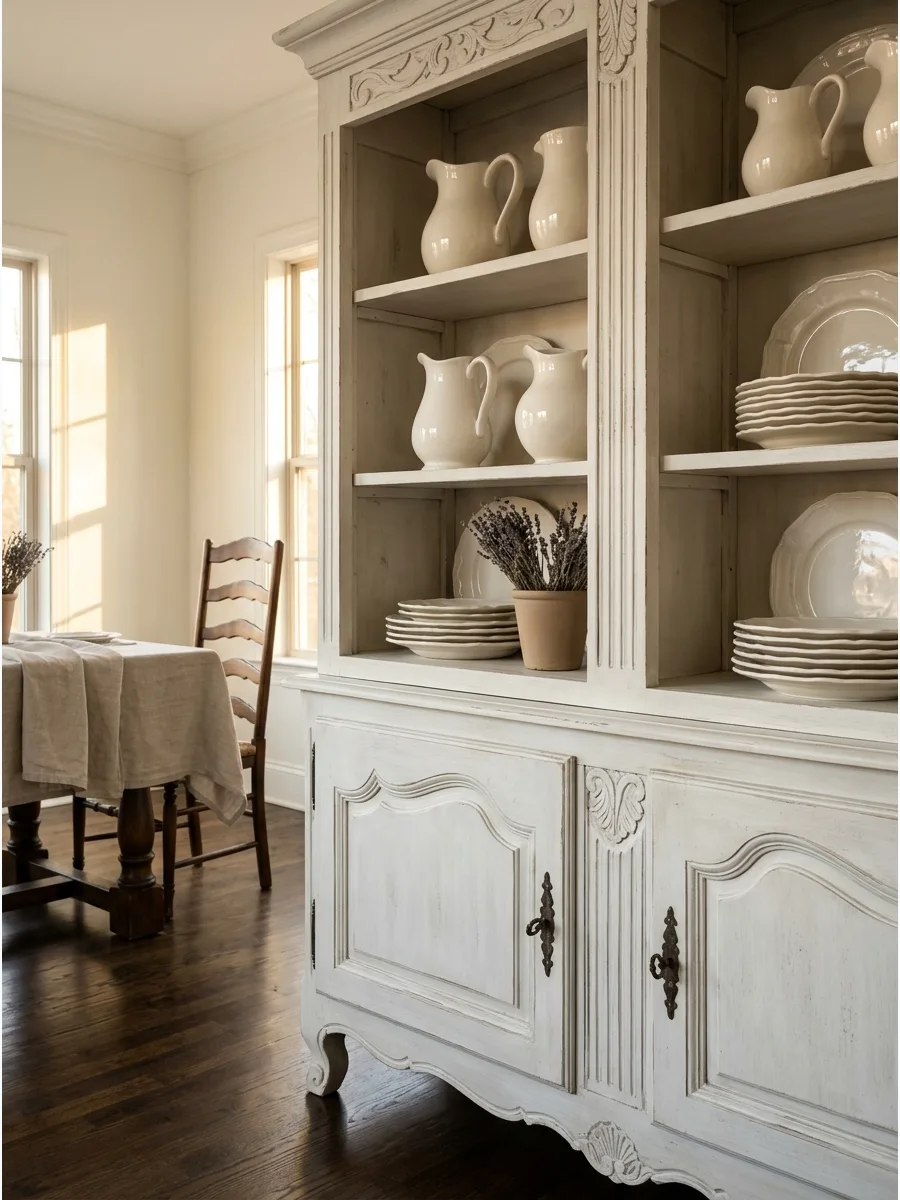
53. Style a Farmhouse Hutch
Combine white ironstone, wood boards, stoneware crocks, woven baskets, and simple greenery. Use practical serving pieces instead of filling the shelves with decorative signs.
Use a woven basket on a lower shelf to store less attractive kitchen tools. Real farmhouse style prioritizes utility over decoration for an authentic feel.
- Find antique ironstone pitchers at antique malls for $30-$75 depending on size.
- Lean a large wooden cutting board against the back of the hutch as a rustic backdrop.
- Swap the greenery for dried lavender or cotton stems to change the seasonal look.
Most people skip this: Use white ironstone with small chips or crazing to add character and history.
54. Build a Cottage-Style Hutch
Mix floral china, painted pottery, baskets, vintage linens, and small botanical artwork. Soft colors and slightly mismatched pieces create a relaxed, garden-inspired result.
Drape a linen napkin over the edge of a shelf to soften the hard lines. Soft fabrics help balance the hard wood and ceramic surfaces of the hutch.
- Buy individual floral plates at thrift stores for $2-$5 to create a mismatched set.
- Place a small basket of dried flower petals on a shelf for a subtle, natural scent.
- Use a plate stand to display your favorite floral pattern front-and-center.
Best shortcut: Tie a small ribbon around a stack of plates to add an instant cottage-style detail.
55. Create a Traditional Formal Hutch
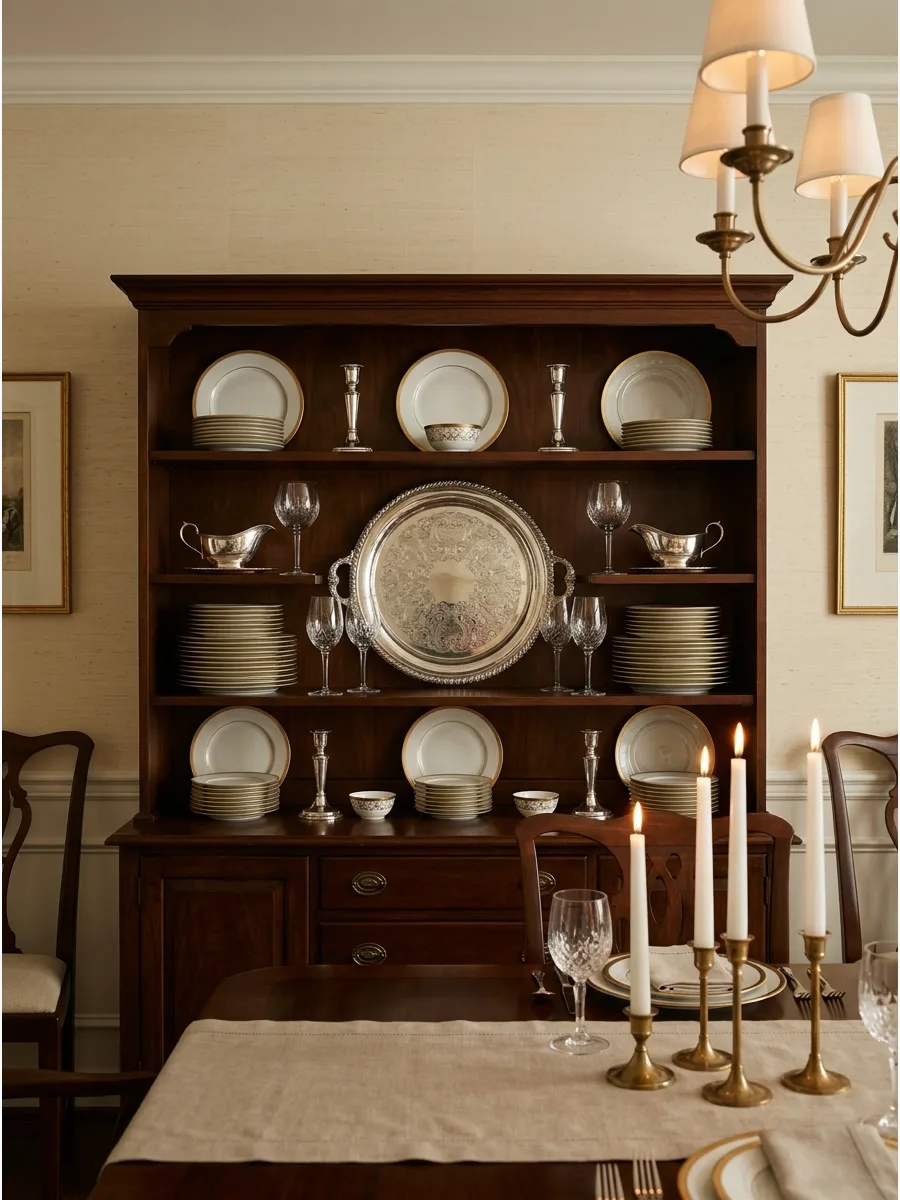
Arrange matching china, crystal, silver serving pieces, and symmetrical plate displays. Position the most ornate pieces on the central shelves where they are easiest to see.
Center your largest silver platter on the middle shelf to act as an anchor. Symmetry creates a sense of calm and order in a formal dining room.
- Budget for a high-quality silver polish to keep the serving pieces shining.
- Place identical wine glasses in a straight line to emphasize the formal symmetry.
- Use white lace doilies under silver pieces to prevent scratches on the wood.
Quick win: Use clear museum wax on the bottom of crystal pieces to keep them perfectly aligned.
56. Design a Scandinavian Hutch
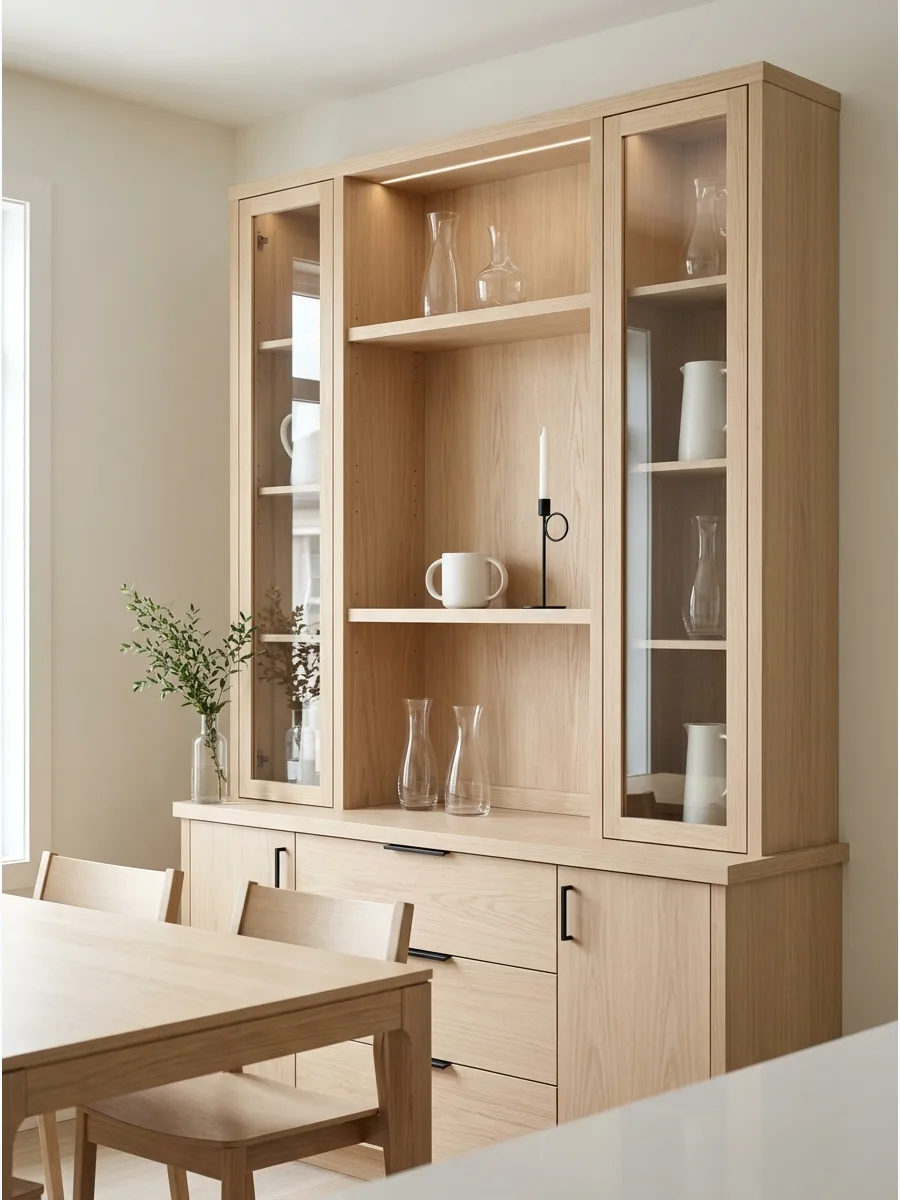
Use pale wood, warm-white ceramics, clear glass, and a few black accents. Keep the shelves lightly styled so the display feels calm and functional.
Stick to a palette of three colors to keep the minimal look from feeling messy. Minimalist styling works best when you focus on high-quality materials and simple shapes.
- Choose ceramics with a matte or satin finish rather than a high gloss.
- Keep only the items you use daily on the most accessible middle shelf.
- Use a single black tray to unify a group of white mugs or glasses.
Most people skip this: Leave one entire shelf section empty to emphasize the minimalist aesthetic.
57. Style a Midcentury Hutch
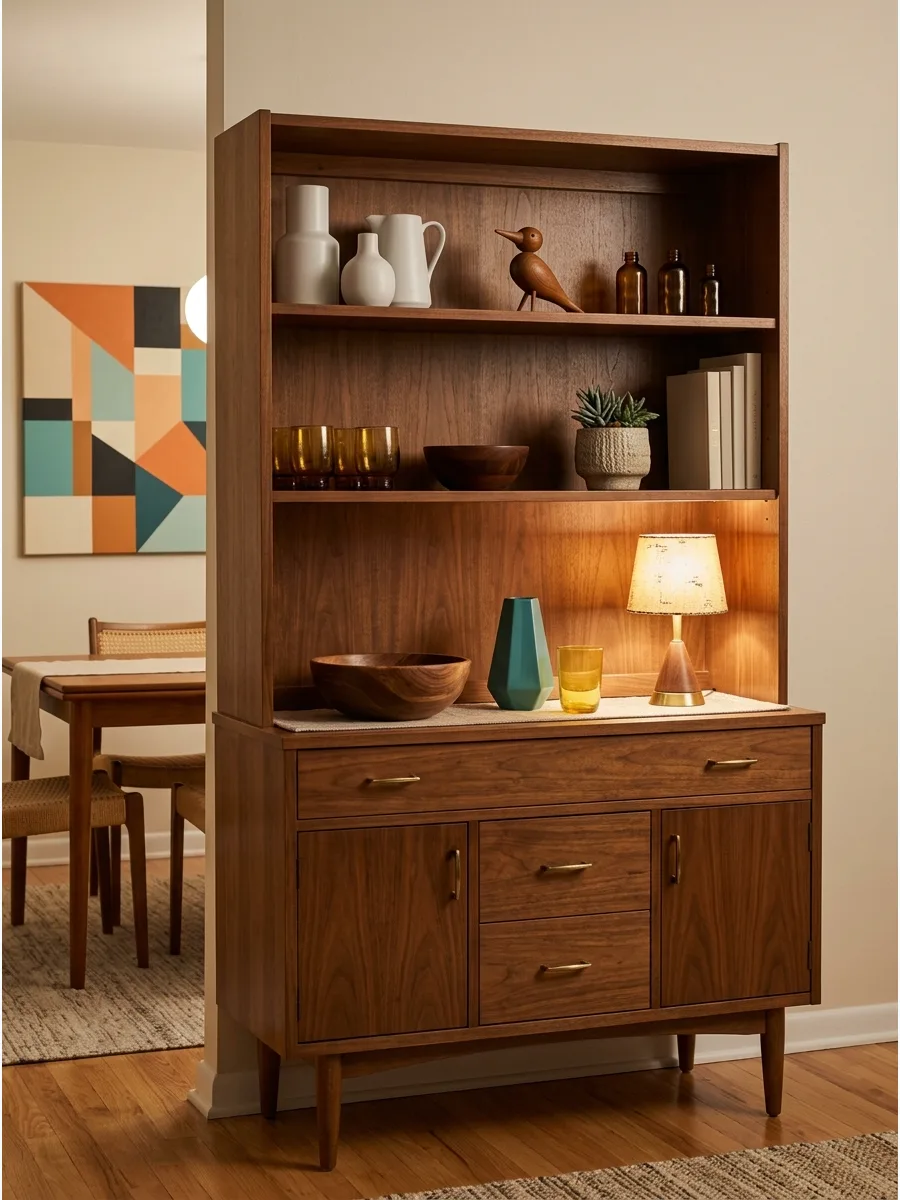
Combine simple ceramics, colored glass, geometric serving pieces, and walnut or teak accessories. Use clean arrangements that emphasize shape instead of ornate details.
Choose one bold geometric piece to serve as the main focal point. Midcentury design is all about interesting silhouettes and functionality.
- Look for 'atomic' or 'tapered' shapes when shopping for vases and pitchers.
- Use a wooden tray with a distinct grain pattern to add warmth to the display.
- Incorporate one pop of mustard yellow or teal to keep the look authentic to the era.
Best shortcut: Use a small wooden easel to display a single, brightly colored plate.
Furniture Styling
58. Layered French Country Monochromes
French country style relies on texture rather than color to create a sense of history. Fill a hutch with a collection of cream ironstone pitchers and scalloped plates to establish a cohesive base. This monochromatic approach allows the eye to focus on the carved wood details of the cabinet itself.
Mixing in small bundles of dried lavender adds a subtle organic element that feels intentional without being cluttered. High-gloss finishes on ceramics provide a necessary contrast against matte, weathered wood surfaces.
- Source vintage ironstone from thrift stores or estate sales over several months to achieve a varied, non-matching look.
- Group items by height, placing the tallest pitchers in the back corners and smaller bowls in the front.
- Swap out dried herbs for fresh eucalyptus or seasonal greenery to shift the mood for different holidays.
Most people skip this: Lining the back of the hutch with a subtle linen-textured wallpaper or fabric creates a soft backdrop that makes white ceramics pop.
Style-Based Hutch Decorating Ideas
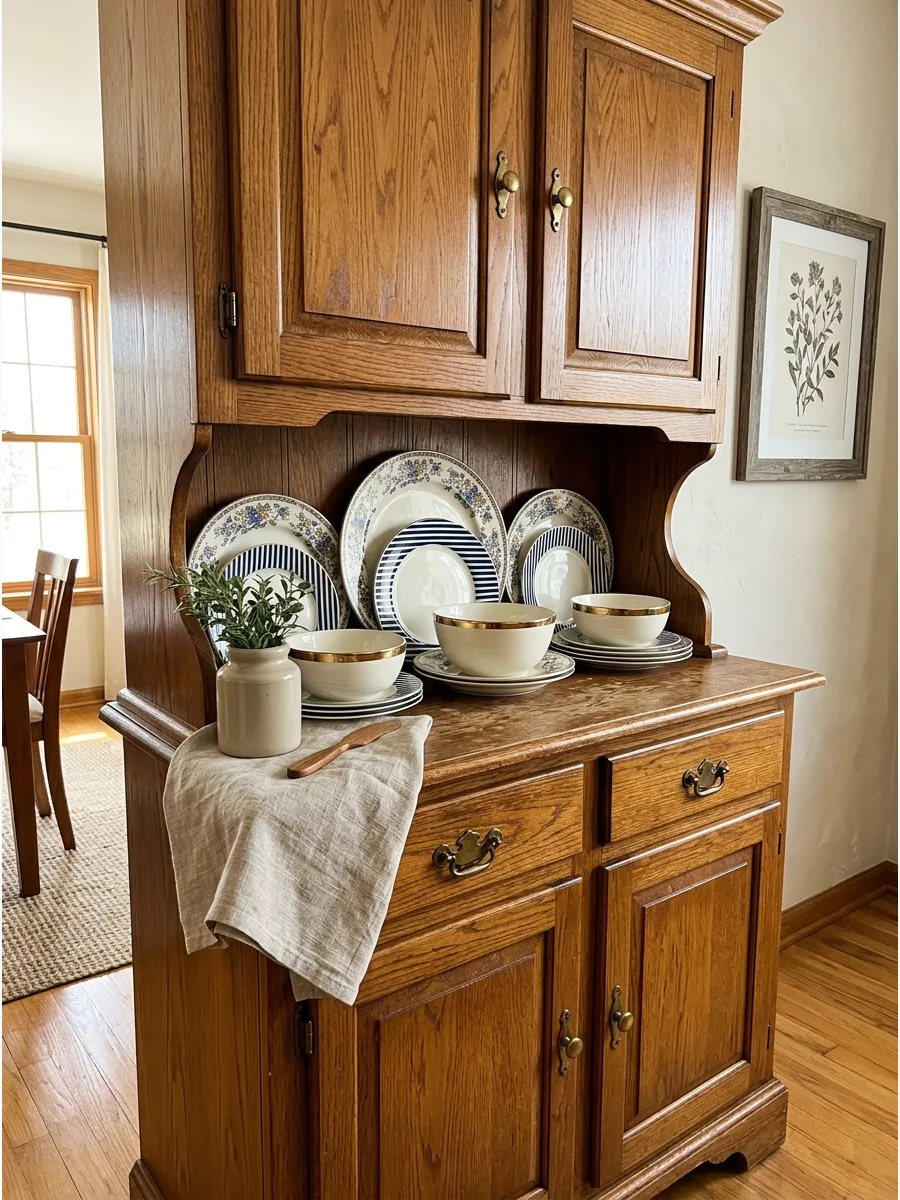
59. Build an English-Cottage Hutch
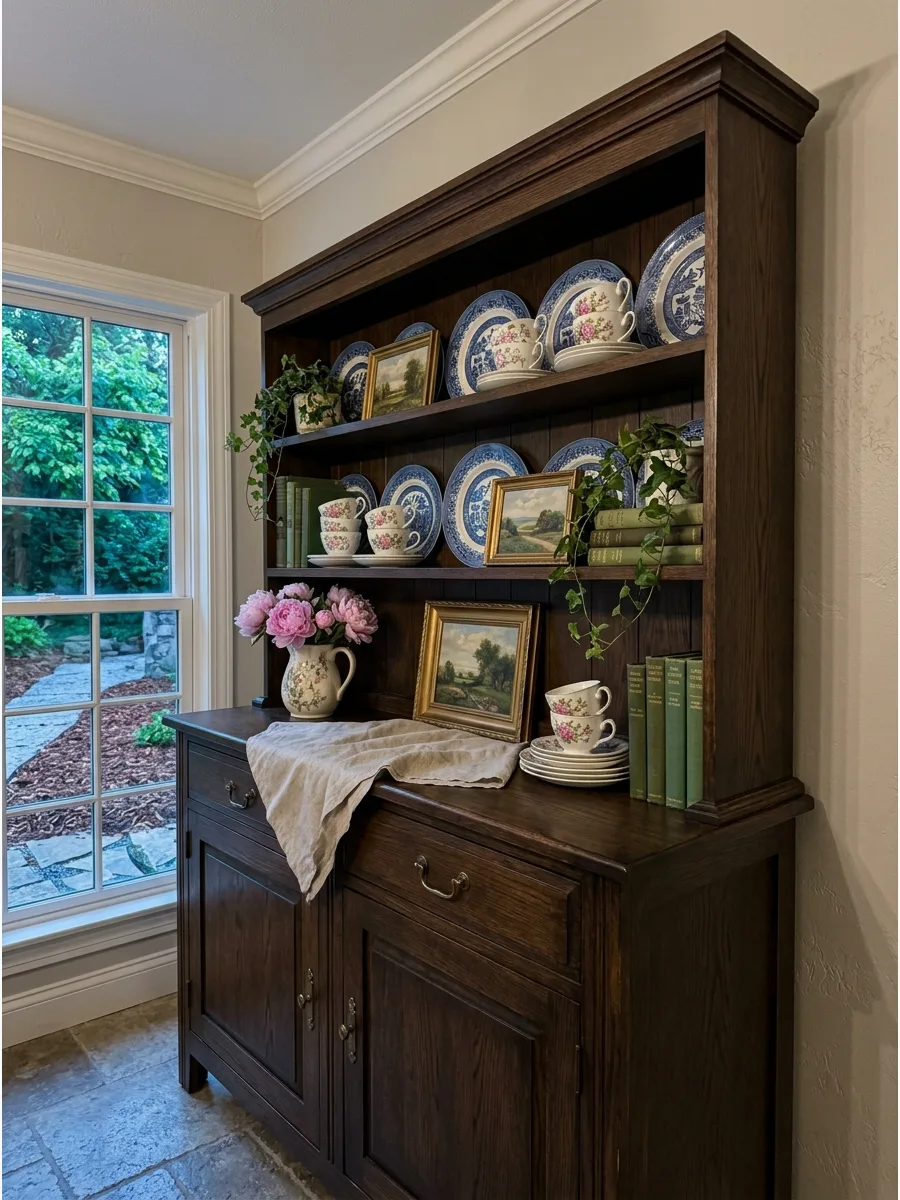
Mix transferware, floral teacups, old books, small paintings, and gathered garden flowers. Allow the shelves to feel comfortably full while keeping clear groupings.
Stack teacups two-high to create height without needing extra risers. Height variations prevent a full shelf from looking like a cluttered mess.
- Budget $10-$25 for vintage transferware plates at antique shops.
- Group teacups by color to keep the busy floral patterns from overwhelming the eye.
- Use a small silver spoon tucked into a teacup for a charming, lived-in detail.
Most people skip this: Use a small stack of vintage postcards to add height to tiny objects.
60. Create an Eclectic Colorful Hutch
Combine patterned dishes, colored glass, artwork, and handmade objects in a controlled palette. Repeat each main color several times so the variety feels deliberate.
Repeat the most vibrant color in three different spots to guide the eye. Deliberate repetition makes an eclectic mix look professional rather than random.
- Pick three primary colors and stick to them to avoid a chaotic look.
- Mix one solid-colored piece for every two patterned pieces to balance the energy.
- Use a neutral tray to ground a very colorful group of small objects.
Best shortcut: Use a colorful tea towel as a shelf liner to add a bold base for your display.
Personal and Decorative Hutch Ideas
61. Mix Family Heirlooms With Everyday Dishes
Combining antique silver or delicate china with modern daily-use plates keeps the hutch from looking like a museum. It makes the space feel lived-in and approachable rather than stiff.
Place a heavy heirloom silver tray behind a stack of matte white ceramic dinner plates to ground the arrangement. Mixing eras adds instant character to any room.
- Sourcing: Search family attics or local estate sales for silver pieces.
- Setup: Lean heavy items directly against the back wall for maximum stability.
- Adaptation: Mix gold-rimmed china with wooden bowls for a casual, modern look.
Most people skip this: Use museum wax on the bottom of delicate heirlooms to keep them from sliding on smooth shelves.
62. Display a Framed Family Recipe
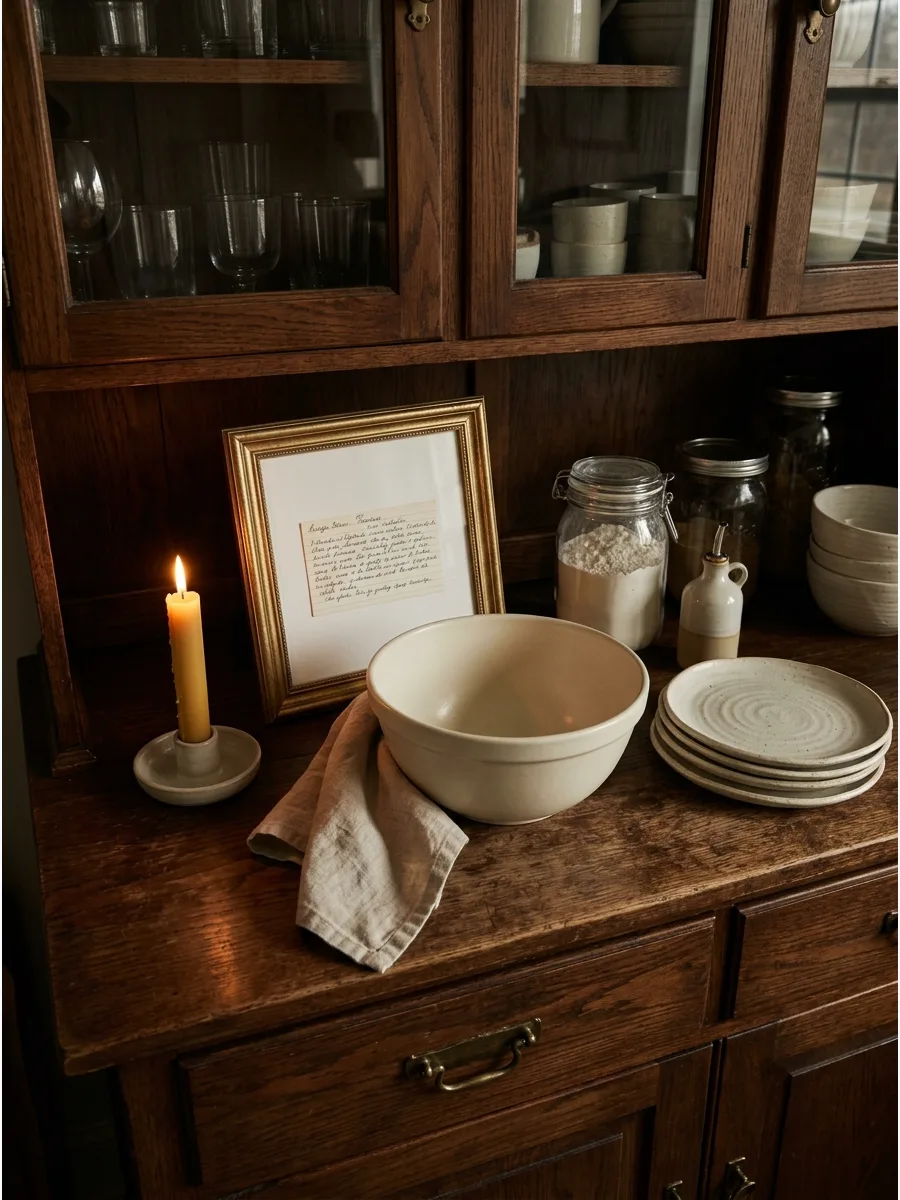
A handwritten recipe card adds a layer of history to a functional display. It works best when tucked near the tools or dishes used to make that specific meal.
Use a simple wood or gold frame to protect the paper from dust while making it a focal point. This keeps family memories visible without cluttering the kitchen counter.
- Sourcing: Look through old family cookbooks or recipe boxes.
- Setup: Place the frame at eye level on a middle shelf for easy reading.
- Adaptation: Scan and print a copy if the original paper is too fragile for light exposure.
Quick win: Match the frame color to the hardware on your hutch for a coordinated look.
Hutch Decorating Ideas
63. Layer Miniature Vintage Art
Small oil paintings or sketches bring an unexpected sense of history to a modern hutch. Placing these pieces behind stacks of plates or leaning against the back panel creates a curated, lived-in depth that solid objects lack.
Lean small landscapes or floral still lifes against the hutch backboard to break up rows of ceramic dishware. Ornate gold frames provide a sophisticated contrast to simple white porcelain. Choosing frames with a bit of patina ensures the display feels collected over time rather than purchased all at once.
- Scour local thrift shops or online auctions for mini frames under 5×7 inches to keep the budget manageable.
- Secure the bottom of the frame with a small piece of museum putty to prevent it from sliding on smooth shelves.
- Switch out the artwork seasonally, opting for moody portraits in winter and bright florals in spring.
Most people skip this: Remove the kickstand from the back of the frame so the art sits flush against the hutch wall for a cleaner, more integrated look.
Personal and Decorative Hutch Ideas
64. Include Meaningful Travel Souvenirs

Integrating items from trips makes the hutch a conversation starter. Select objects that share the same scale and material as your existing decor to maintain a cohesive look.
Tuck a small hand-painted tile or a stone sculpture next to a stack of coordinating salad plates. Keeping the number of items low prevents the shelf from looking like a souvenir shop.
- Sourcing: Use small items collected during vacations or local travels.
- Setup: Group the souvenir with dishes of a similar color to create a theme.
- Adaptation: Use a small acrylic riser to give tiny objects more visibility among large plates.
Quick win: Choose souvenirs made of natural materials like stone, ceramic, or wood for a high-end feel.
65. Decorate With Handmade Pottery

The organic shapes and unique glazes of artisan pottery bring warmth to a factory-made collection. These pieces provide a tactile quality that smooth china lacks.
Arrange a group of three mismatched handmade mugs on a lower shelf for easy access and visual interest. Imperfect edges are exactly what make these items feel custom and expensive.
- Sourcing: Look for pieces at local craft markets or from independent potters.
- Setup: Group items by color rather than shape for a more curated feel.
- Adaptation: Mix one handmade pitcher into a set of standard white dishes for a subtle update.
Most people skip this: Use pottery with matte finishes to contrast against shiny glass or polished silver.
66. Add Botanical Artwork
Botanical prints bring a sense of the outdoors into the dining area. They pair beautifully with green glassware or natural wood tones.
Layer a framed fern print behind a stack of neutral bowls to add height and a pop of color. This is an easy way to fill vertical space that often goes unused in deep cabinets.
- Sourcing: Buy digital print downloads or use pages from an old nature book.
- Setup: Match the frame style to your hutch finish for a seamless look.
- Adaptation: Use real pressed flowers from your garden in a glass frame for a personal touch.
Best shortcut: Use a command strip on the back of the frame to keep it from shifting when you move dishes.
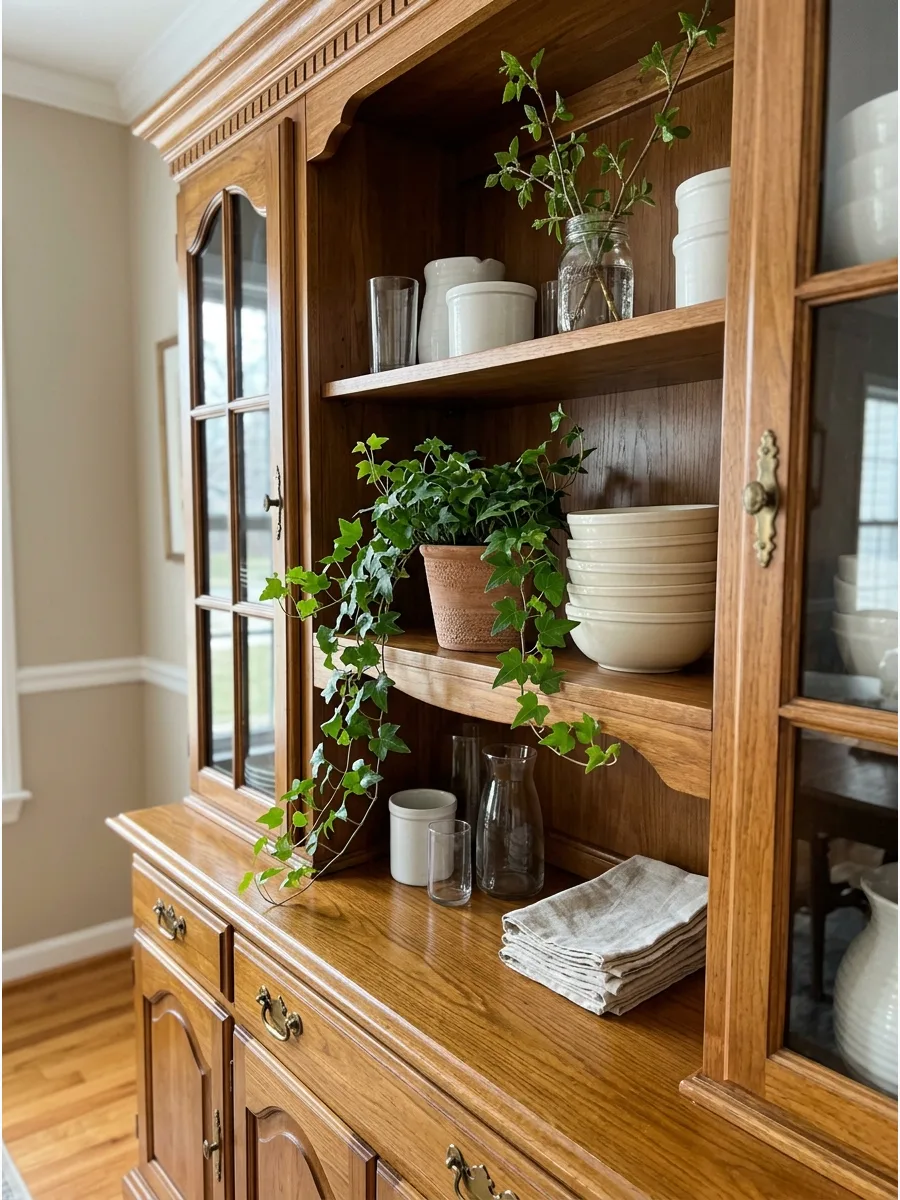
67. Include One Small Plant or Greenery Arrangement
A touch of living green softens the hard lines of a wooden hutch and ceramic dishes. It provides a fresh contrast that makes the whole display feel more vibrant.
Place a small potted ivy or a simple glass jar with a single branch on the corner of a middle shelf. Real plants look best, but a high-quality faux stem works well in low-light rooms.
- Sourcing: Visit a local nursery for small, slow-growing indoor plants.
- Setup: Use a cork or ceramic saucer under the pot to protect the wood from moisture.
- Adaptation: Swap for a sprig of dried eucalyptus for a fragrant, low-maintenance option.
Most people skip this: Choose trailing plants like ivy or pothos to add movement and break up straight shelf lines.
Seasonal Hutch Decorating Ideas
68. Refresh One Shelf for Each Season
Changing an entire hutch can be overwhelming, so focusing on just one area is a smart shortcut. Update the most visible shelf with items that reflect the current time of year.
Swap everyday white plates for a few seasonal accent pieces to give the room a fresh look without a full redesign. This keeps the decor feeling current with very little effort.
- Sourcing: Use items from your seasonal decor storage bins.
- Setup: Choose the shelf at eye level to ensure the update has the most impact.
- Adaptation: Use a seasonal runner on the hutch counter instead of changing the shelves.
Quick win: Keep a small box of seasonal textiles like napkins to easily swap colors each month.
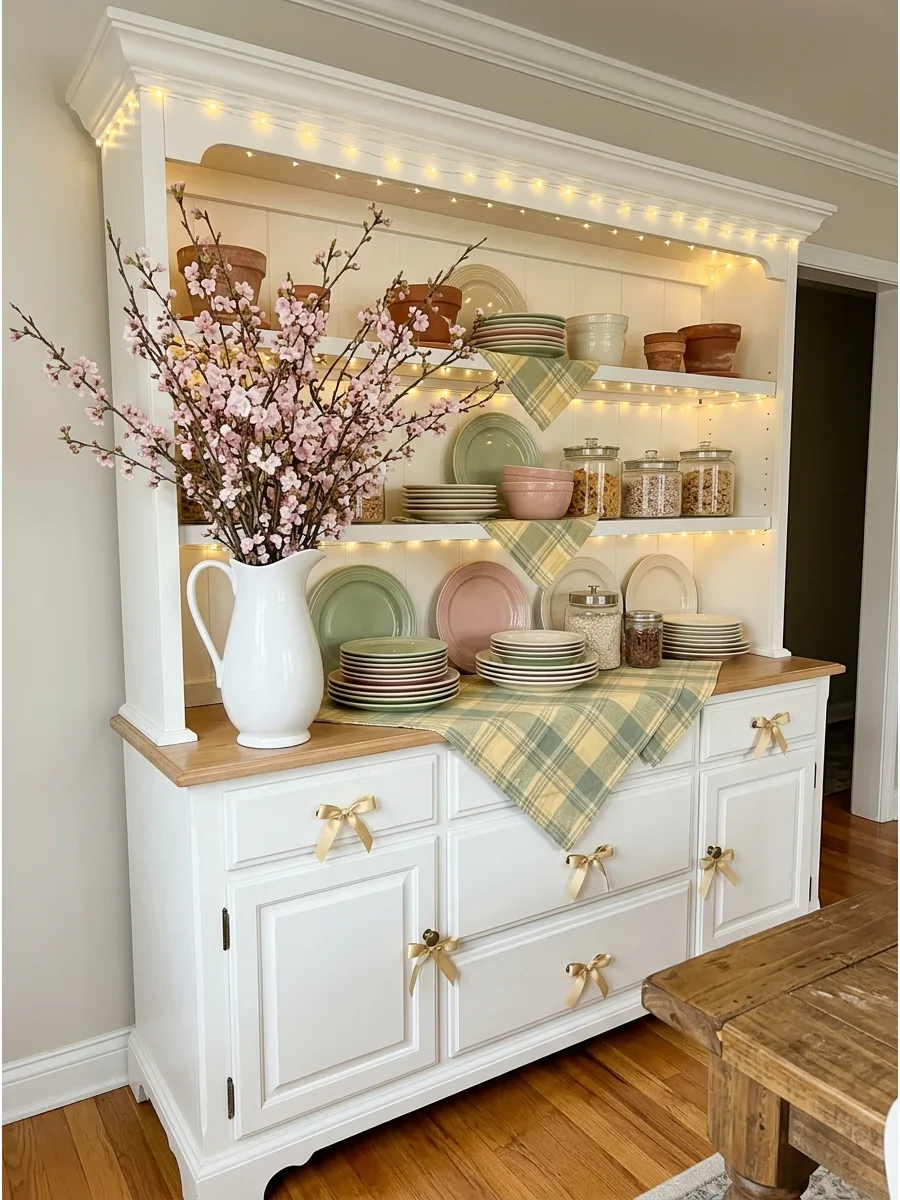
69. Create a Spring Hutch Display
Spring calls for light colors and delicate textures that mimic new growth. Use pastels and floral patterns to brighten the dining space after winter.
Fill a white pitcher with flowering branches like cherry blossoms or forsythia to add height and life. Keeping the arrangement airy prevents the hutch from feeling heavy as the weather warms up.
- Sourcing: Clip branches from your backyard or buy fresh stems from a florist.
- Setup: Keep the water level low to prevent heavy spills when opening hutch doors.
- Adaptation: Use pastel-colored glassware if fresh flowers are not available.
Best shortcut: Faux flowering branches look incredibly realistic and last for years without any mess.
70. Style the Hutch for Summer

Summer styling should feel breezy and relaxed, using materials like glass and wicker. Incorporating bright fruit adds a natural, temporary pop of color to the room.
Place a large wooden bowl filled with lemons or limes on the center shelf for an instant summer vibe. Leave plenty of open space between items to keep the display feeling cool and uncluttered.
- Sourcing: Buy fresh fruit during your weekly grocery trip.
- Setup: Use a bowl with a flat base to ensure it stays secure on the shelf.
- Adaptation: Substitute real fruit with high-quality faux fruit for a permanent, no-maintenance look.
Most people skip this: Use clear glass pitchers and bowls in summer to let light pass through and keep the hutch feeling airy.
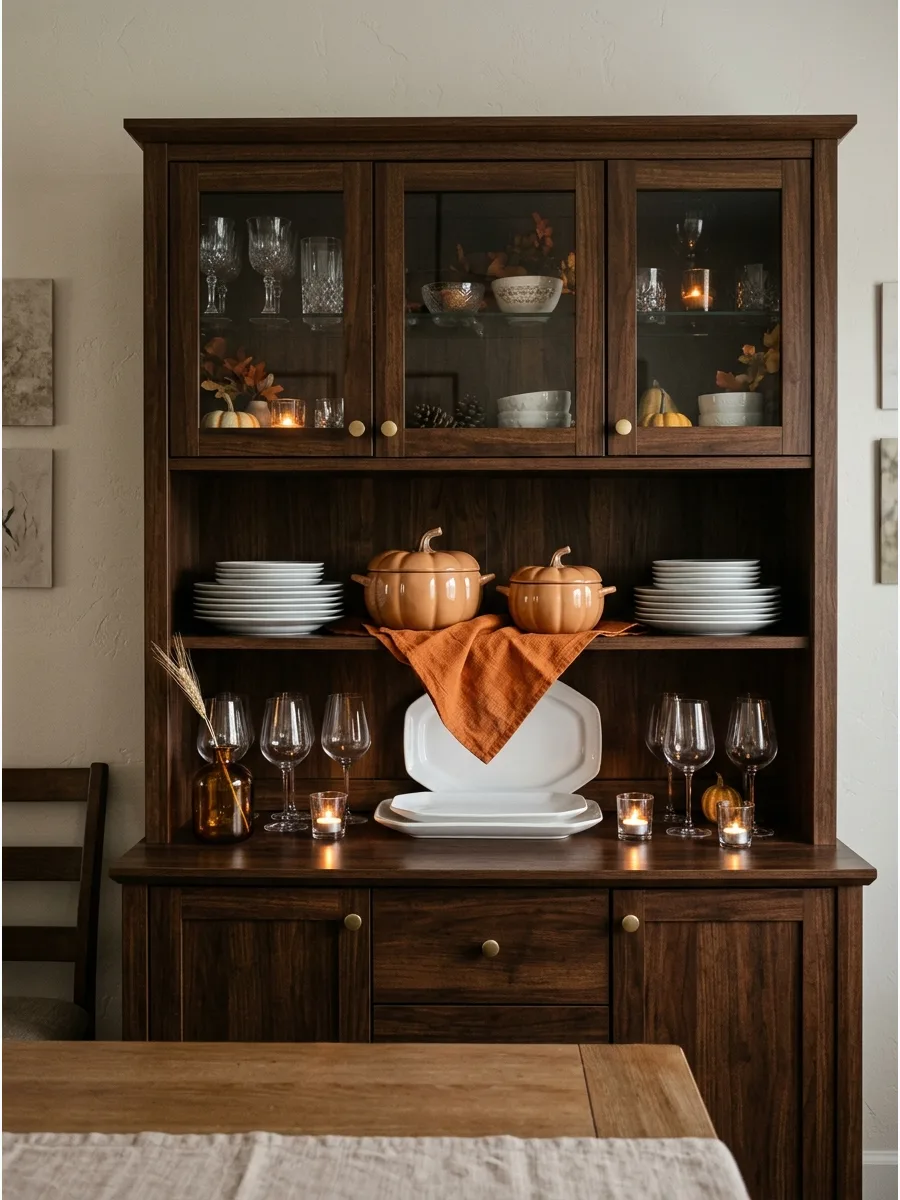
71. Decorate the Hutch for Fall
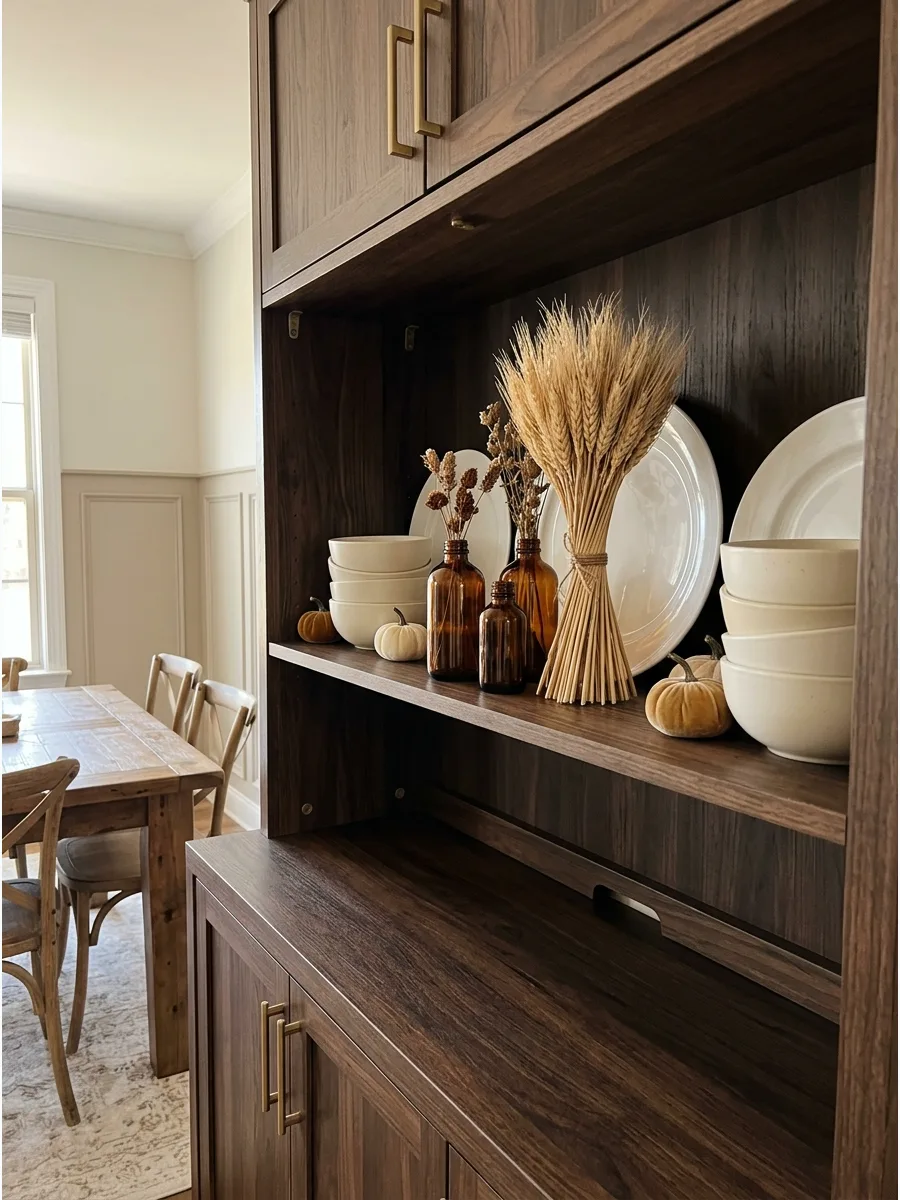
Fall decor is all about warmth and texture, moving toward deeper tones and natural elements. Amber glass and dried foliage create a cozy atmosphere perfect for shorter days.
Incorporate a few small velvet pumpkins or dried wheat stalks into the existing dish arrangement for a subtle seasonal touch. The goal is to complement your dishes, not hide them.
- Sourcing: Find dried wheat and pumpkins at craft stores or local farms.
- Setup: Group items in clusters of three to create a balanced, professional look.
- Adaptation: Place cinnamon sticks in a small bowl to add a natural seasonal scent to the area.
Quick win: Use warm-toned copper mugs to add a metallic shine that feels perfect for autumn.
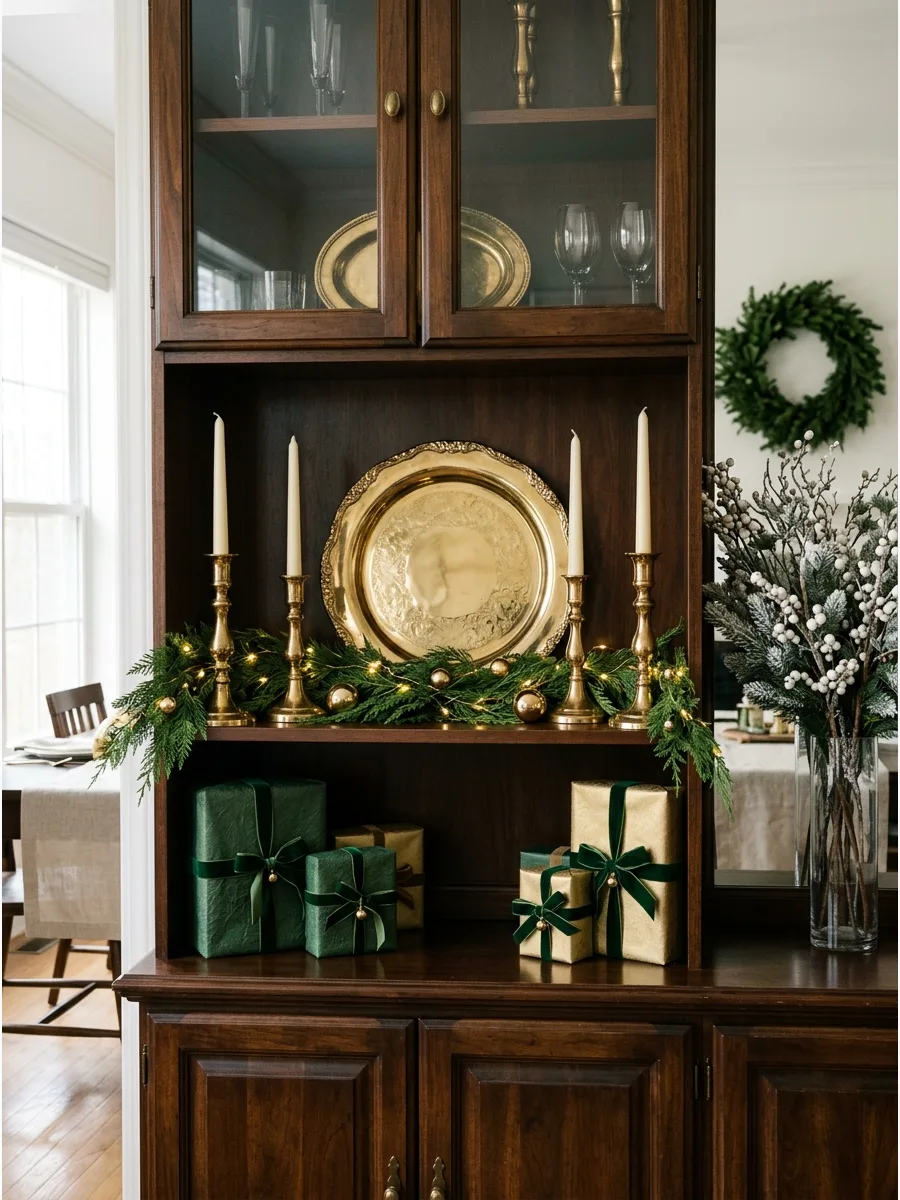
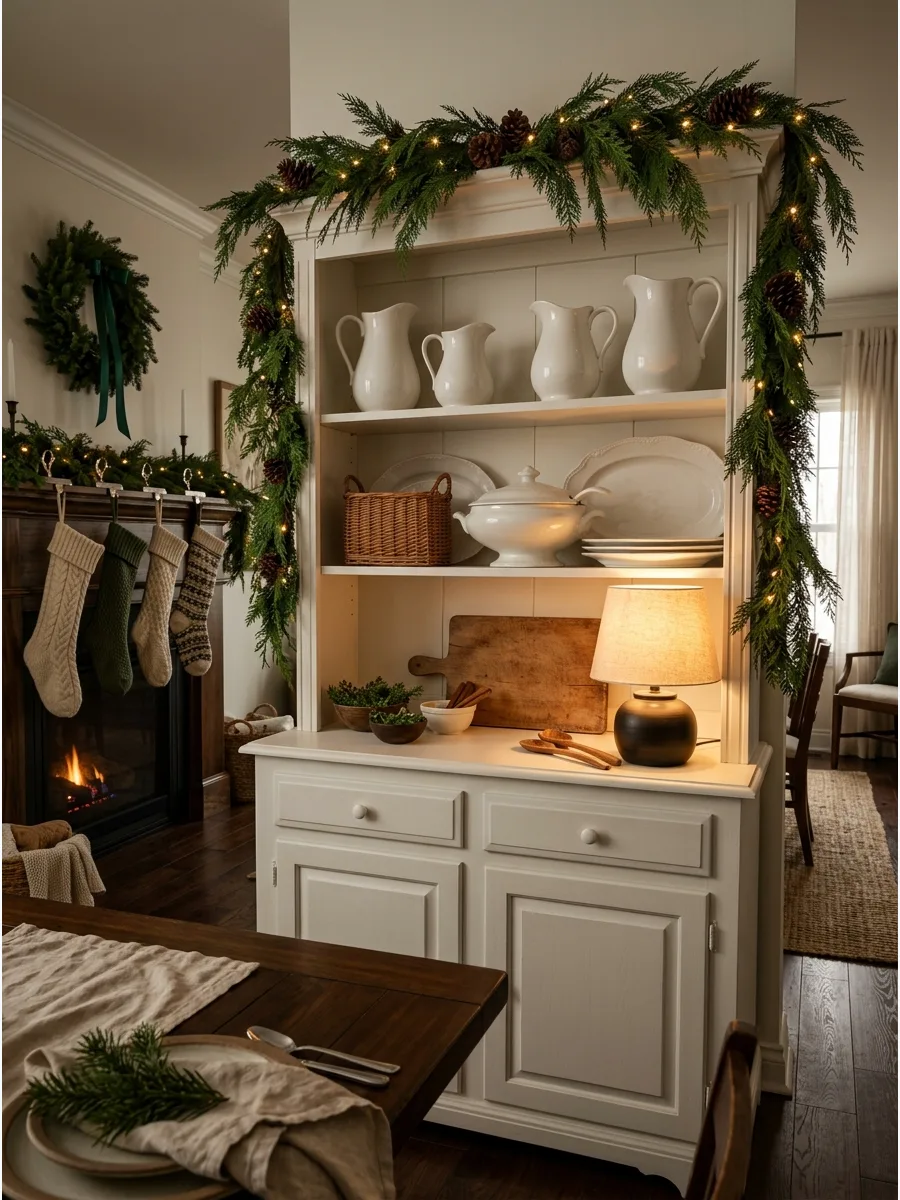
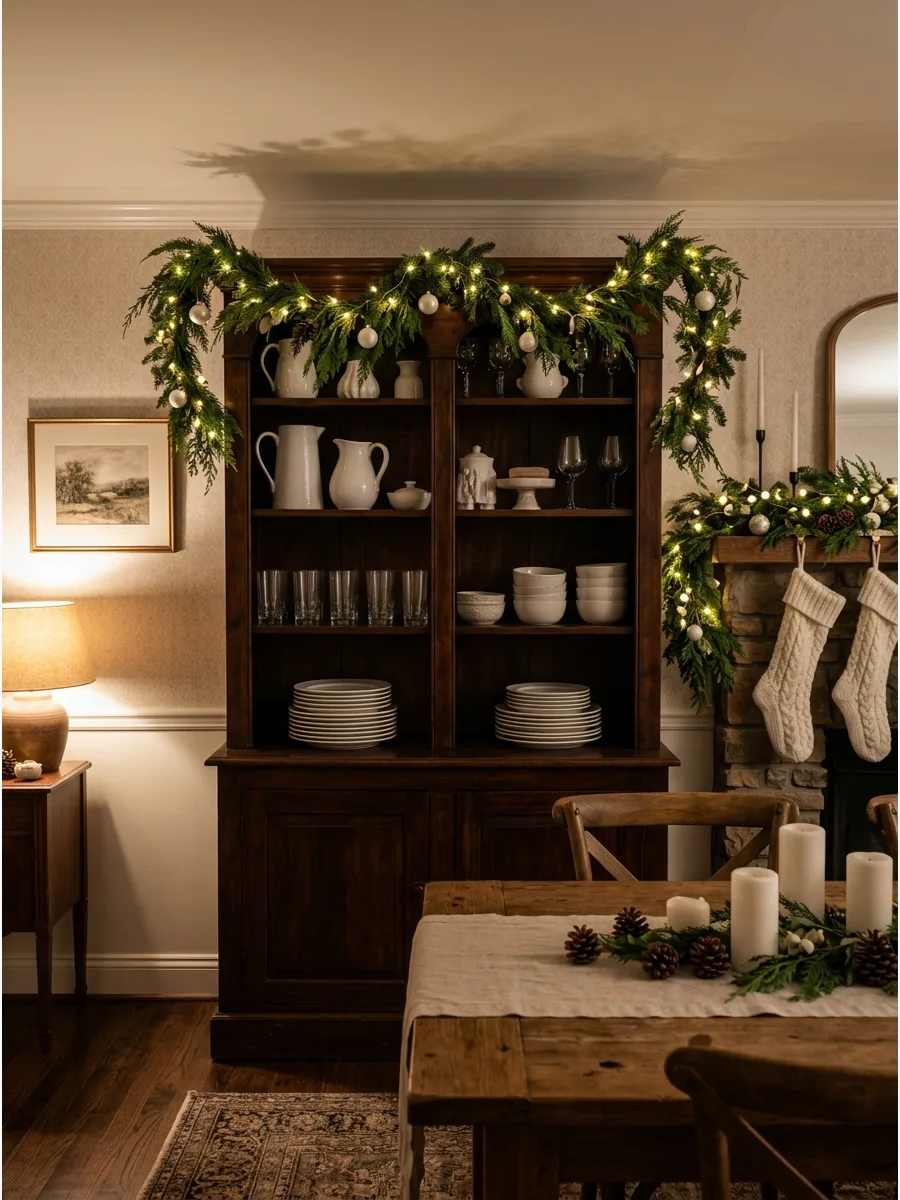
72. Build a Christmas Hutch Display
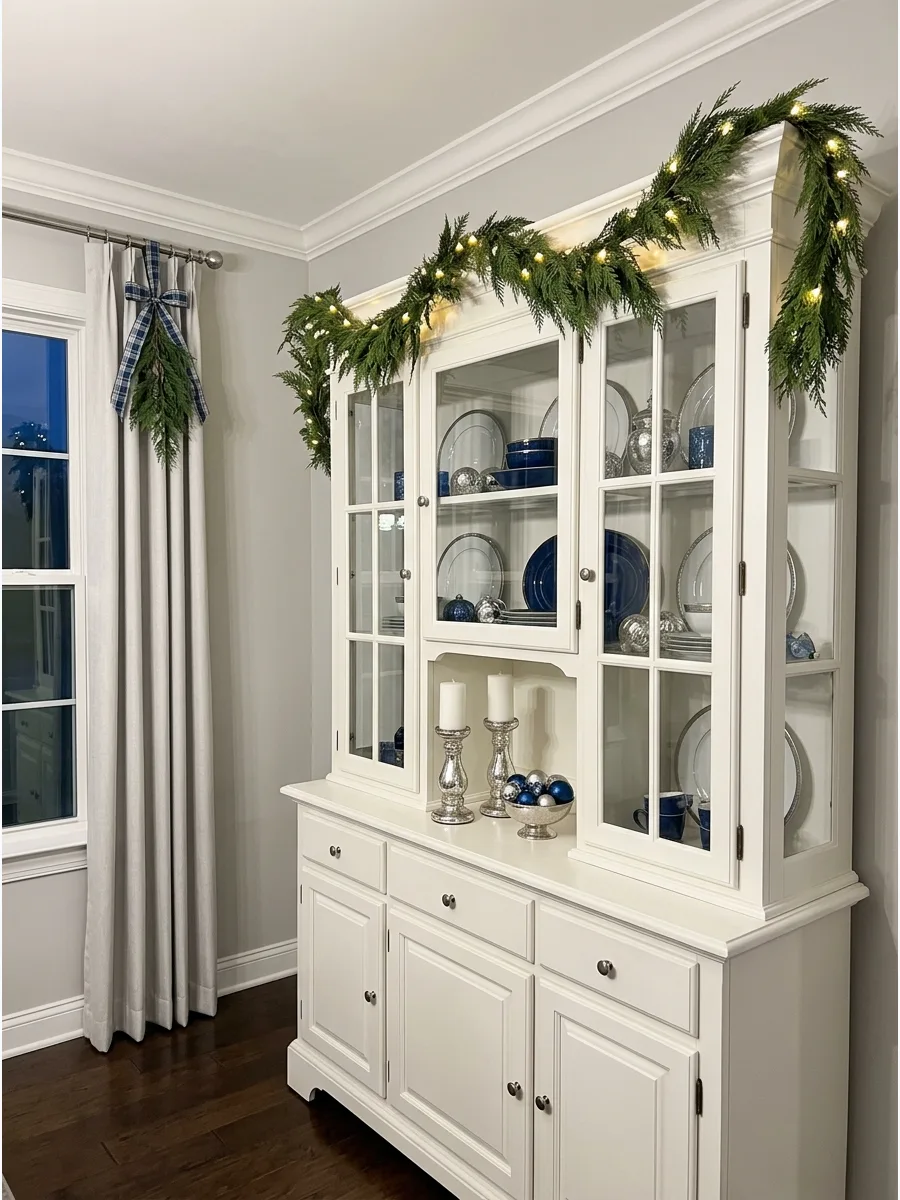
A holiday hutch can be festive without being messy if you stick to a tight color palette. Use greenery and small metallic accents to bridge the gap between your dishes and the holiday spirit.
Drape a simple cedar garland across the top of the hutch to frame the entire display beautifully. A few well-placed ornaments inside the cabinet add sparkle without taking up valuable storage space.
- Sourcing: Get fresh garland from a tree farm or high-quality faux garland from a home store.
- Setup: Secure the garland with small, clear adhesive hooks to avoid damaging the wood.
- Adaptation: Use a strand of battery-operated fairy lights for an extra evening glow.
Best shortcut: Tie small velvet ribbons to the handles of your hutch for an instant festive touch.
Hutch Makeover and Finishing Ideas
73. Paint the Interior Back Panel
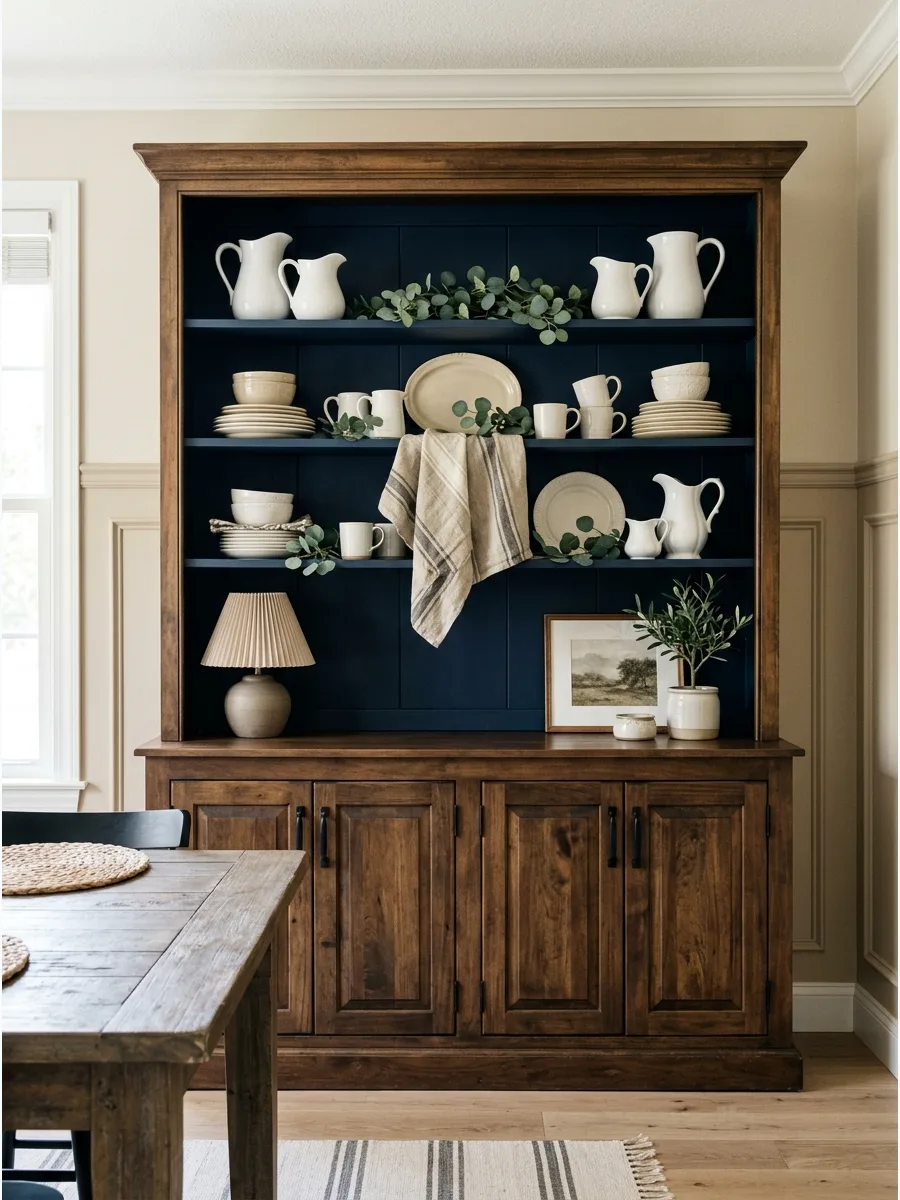
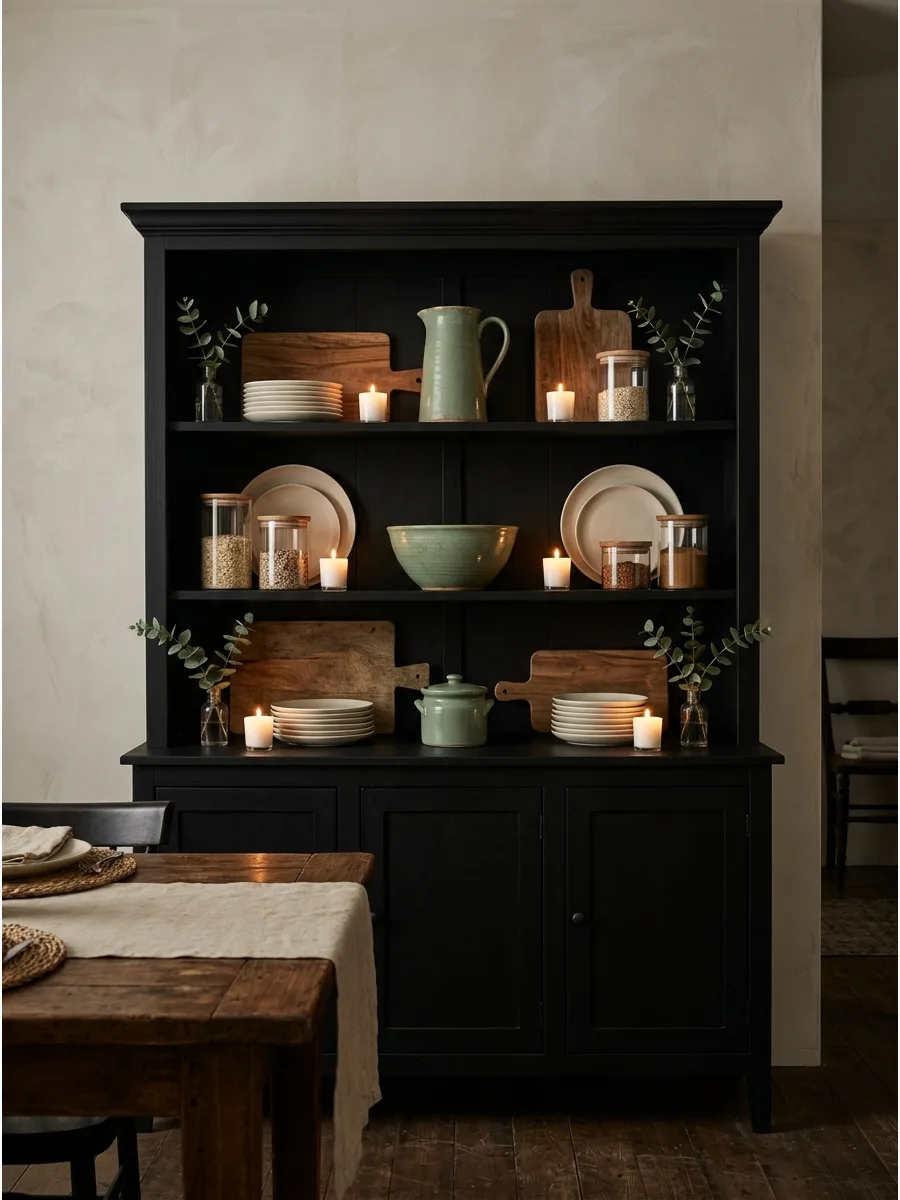
Painting the back of the hutch is the fastest way to make a collection stand out. A dark color behind light dishes creates a high-contrast look that feels very custom.
Apply two coats of a muted navy or charcoal paint to the back panel to make white ironstone or porcelain pop. It defines the space and hides small imperfections in the wood.
- Sourcing: Buy a small sample pot of paint from a local hardware store.
- Setup: Remove all shelves before painting to ensure a clean, professional finish.
- Adaptation: Use a foam roller rather than a brush for a perfectly smooth surface without marks.
Most people skip this: Choose a matte or eggshell finish to prevent light from bouncing off the back and distracting from the dishes.
74. Add Removable Wallpaper
Removable wallpaper allows for pattern and texture without a permanent commitment to the furniture. Choose a small-scale print like a pinstripe or a subtle floral so it does not overwhelm the dishes.
Measure and cut the wallpaper to fit the back panels exactly for a seamless, high-end look. This is a great solution for renters or anyone who likes to change their style often.
- Sourcing: Order peel-and-stick wallpaper samples to check the pattern scale first.
- Setup: Use a plastic smoothing tool during installation to remove air bubbles.
- Adaptation: Use high-quality gift wrap and double-sided tape for a very low-budget temporary fix.
Quick win: Wipe the back panel with a damp cloth and let it dry completely before applying wallpaper for the best grip.
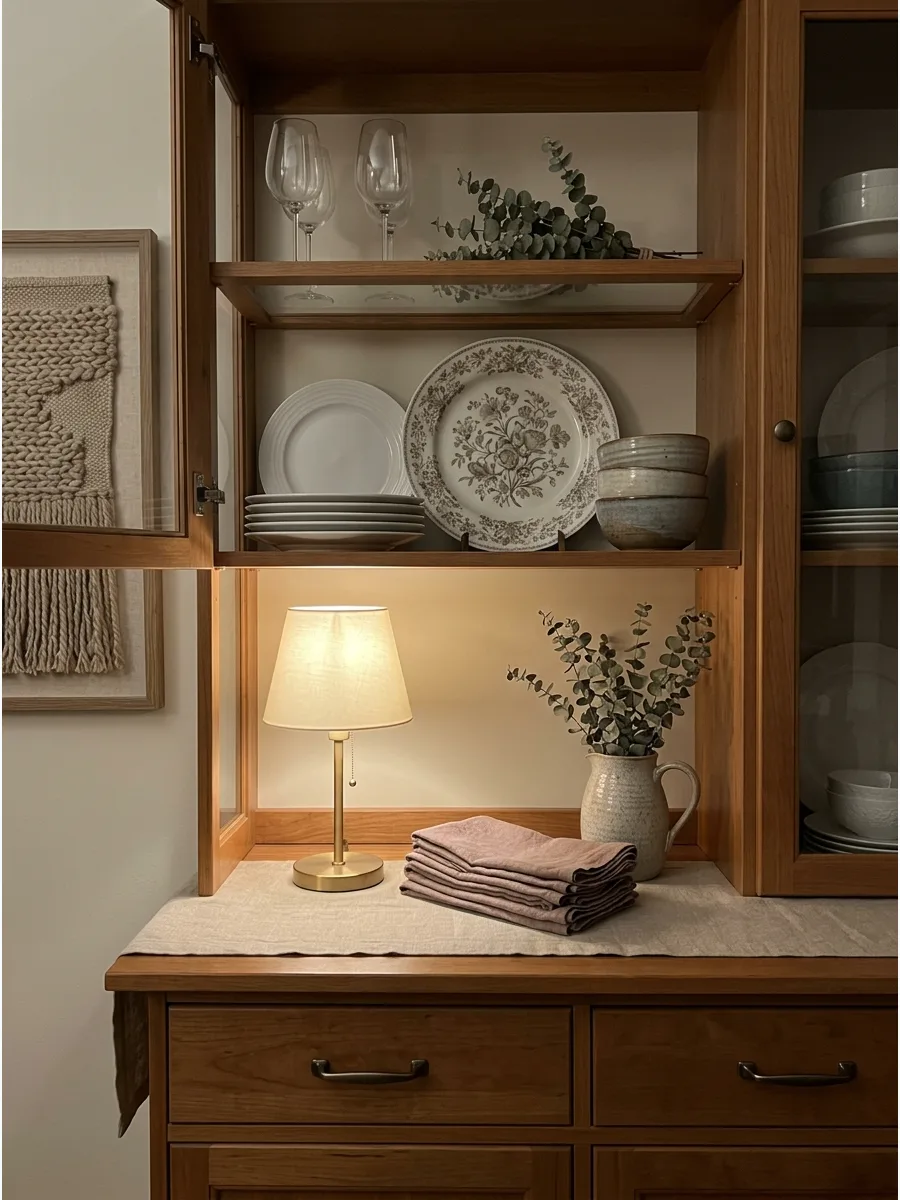
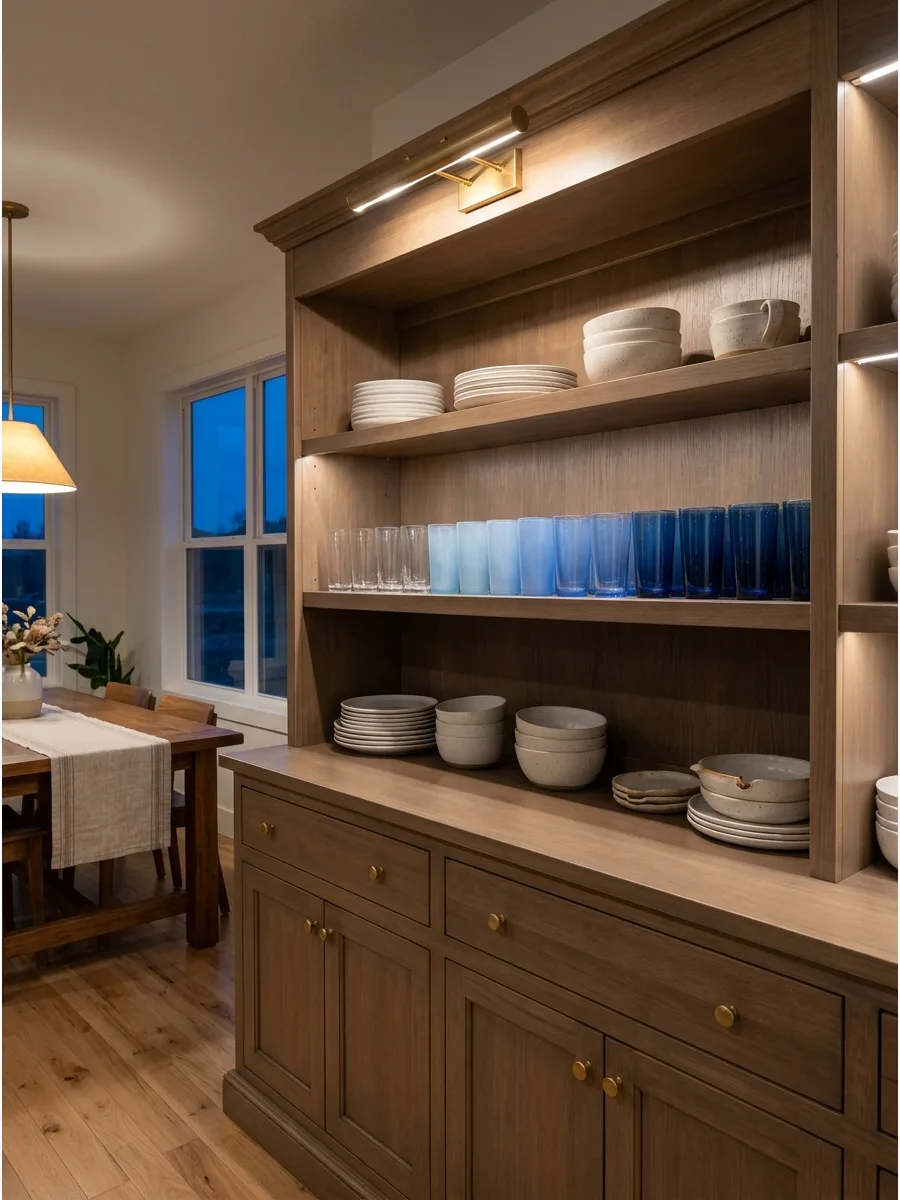
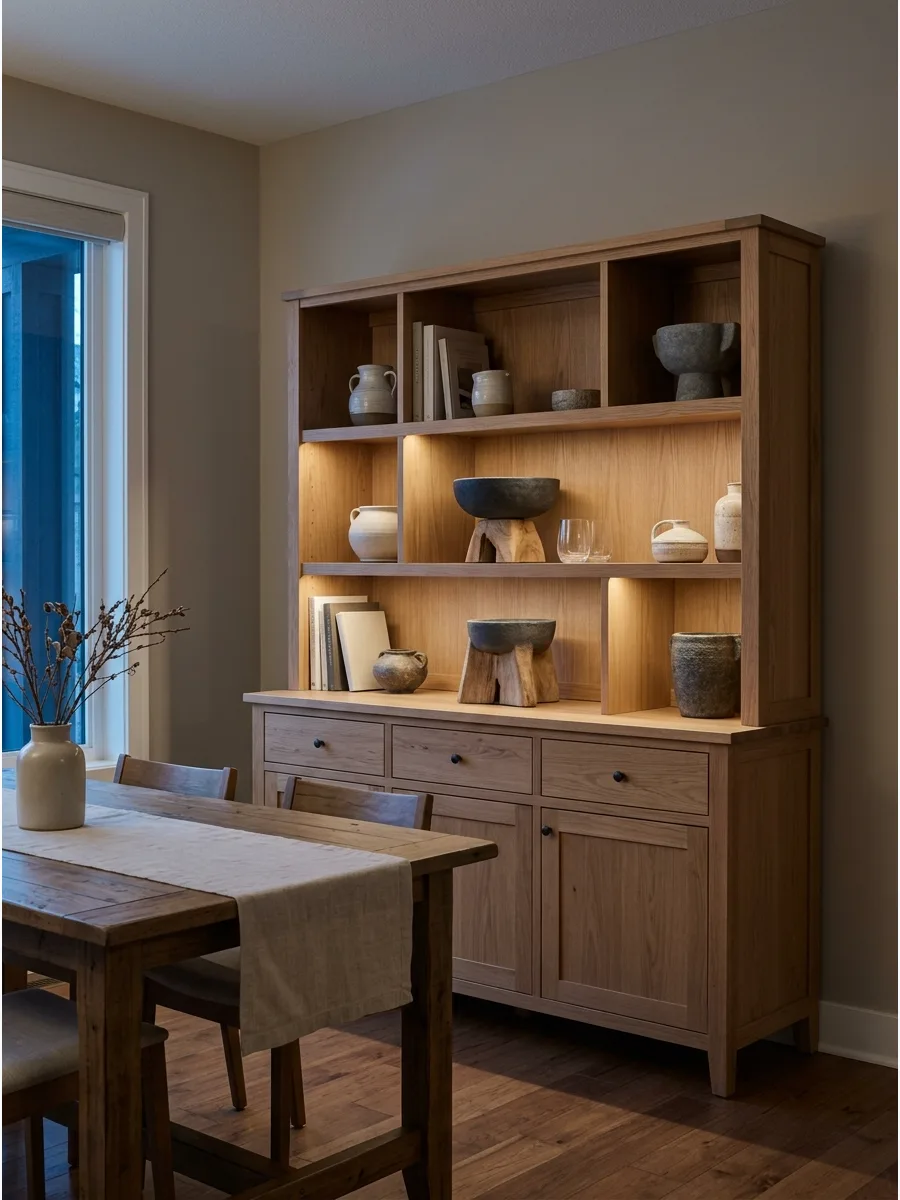
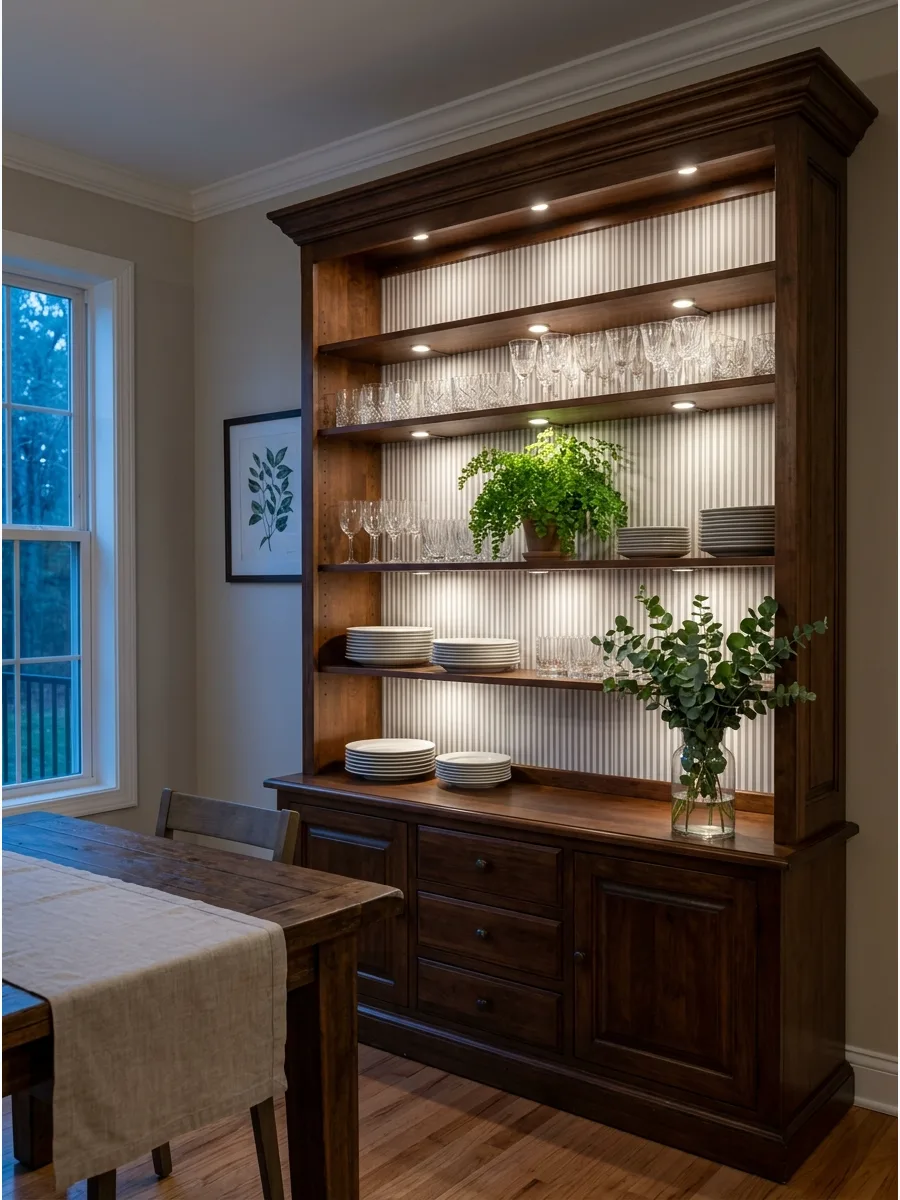
75. Install Warm Display Lighting
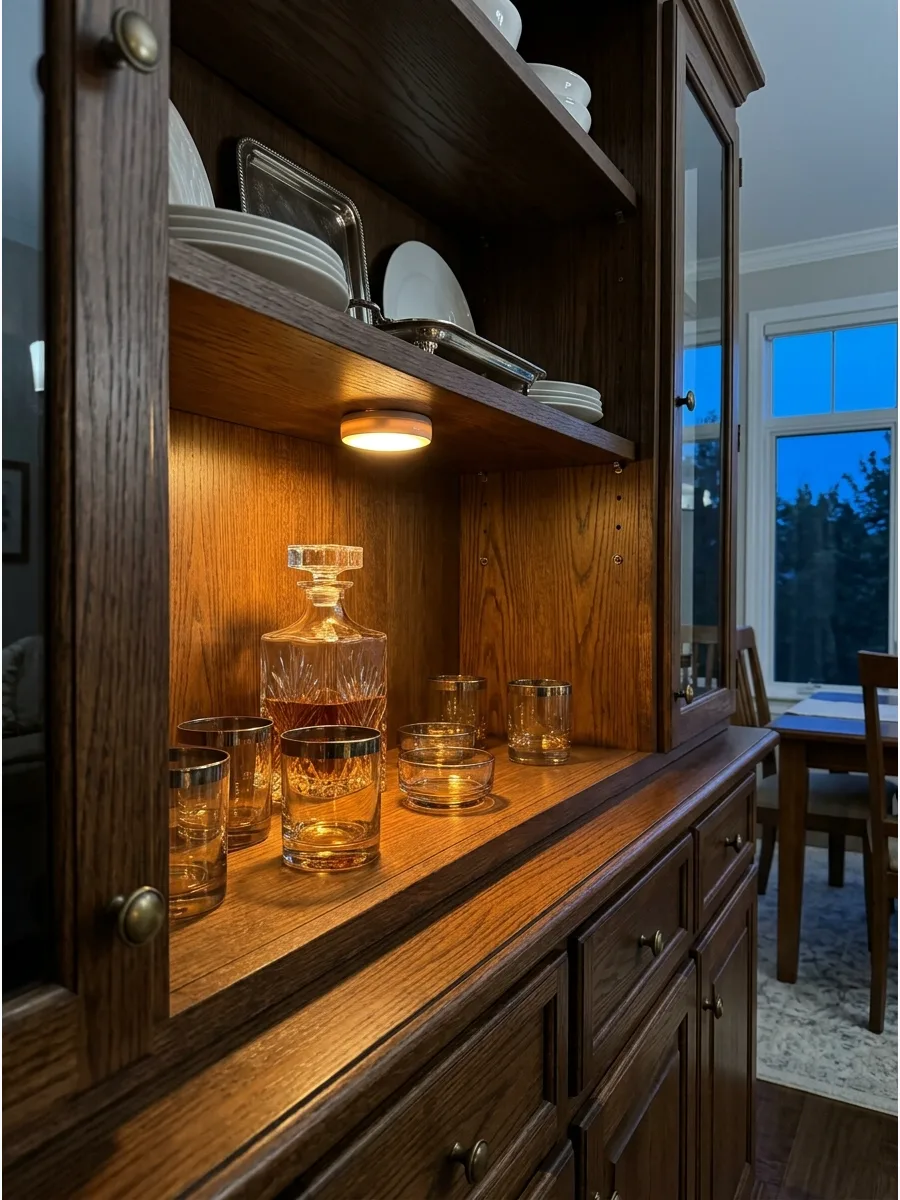
Proper lighting transforms a hutch from a storage unit into a glowing focal point in the evening. Warm-toned lights highlight the textures of pottery and the sparkle of glassware.
Mount battery-operated puck lights under each shelf to illuminate your favorite pieces without the need for complex wiring. It adds a layer of sophistication to the room's overall ambiance.
- Sourcing: Find wireless lighting kits at a hardware store or online retailer.
- Setup: Place lights toward the front of the shelf to avoid creating harsh shadows against the back wall.
- Adaptation: Use a motion-sensor version so the lights turn on automatically when you enter the room.
Best shortcut: Choose lights with a remote control so you can dim them to set the perfect mood for dinner.
Frequently Asked Questions
How do I prevent my hutch from looking cluttered?
To avoid a cluttered look, prioritize "white space" by leaving intentional gaps between your items. This negative space gives the eye a place to rest and ensures each curated piece stands out rather than getting lost in a crowd.
What is the best way to layer plates and bowls?
Start by leaning your largest platters against the back wall to create a beautiful backdrop for smaller pieces. Use plate stands to add height and dimension, then stack bowls or smaller plates in front to build a layered, professional look.
Should I remove the glass doors from my hutch?
Removing glass doors creates an airy, open-shelving feel that makes grabbing items easy, though it does require more frequent dusting. Keeping the glass provides a more formal look and protects your delicate collectibles from dust and debris.
How do I mix everyday items with decorative pieces?
Try a simple formula by grouping functional stacks of bowls or pitchers alongside non-functional items like small art prints or potted plants. This balance keeps the hutch practical for daily use while adding personality and visual interest through varied textures.
How do I style a hutch for different seasons without a total overhaul?
Instead of a full redesign, simply swap out a few "anchor" pieces like seasonal linens, fresh greenery, or specific colored ceramics. These small changes instantly update the vibe of the entire display to match the time of year with minimal effort.