50 Small Kids Reading Nook Ideas

This post may contain affiliate links: full affiliate disclosure.
Creating a dedicated reading spot helps children focus and builds a lifelong love for books. These small-scale solutions work in any corner of the home without requiring a full room renovation by focusing on accessible storage and comfortable seating.
SMALL KIDS READING NOOK IDEAS
1. Floor Cushion Reading Corner
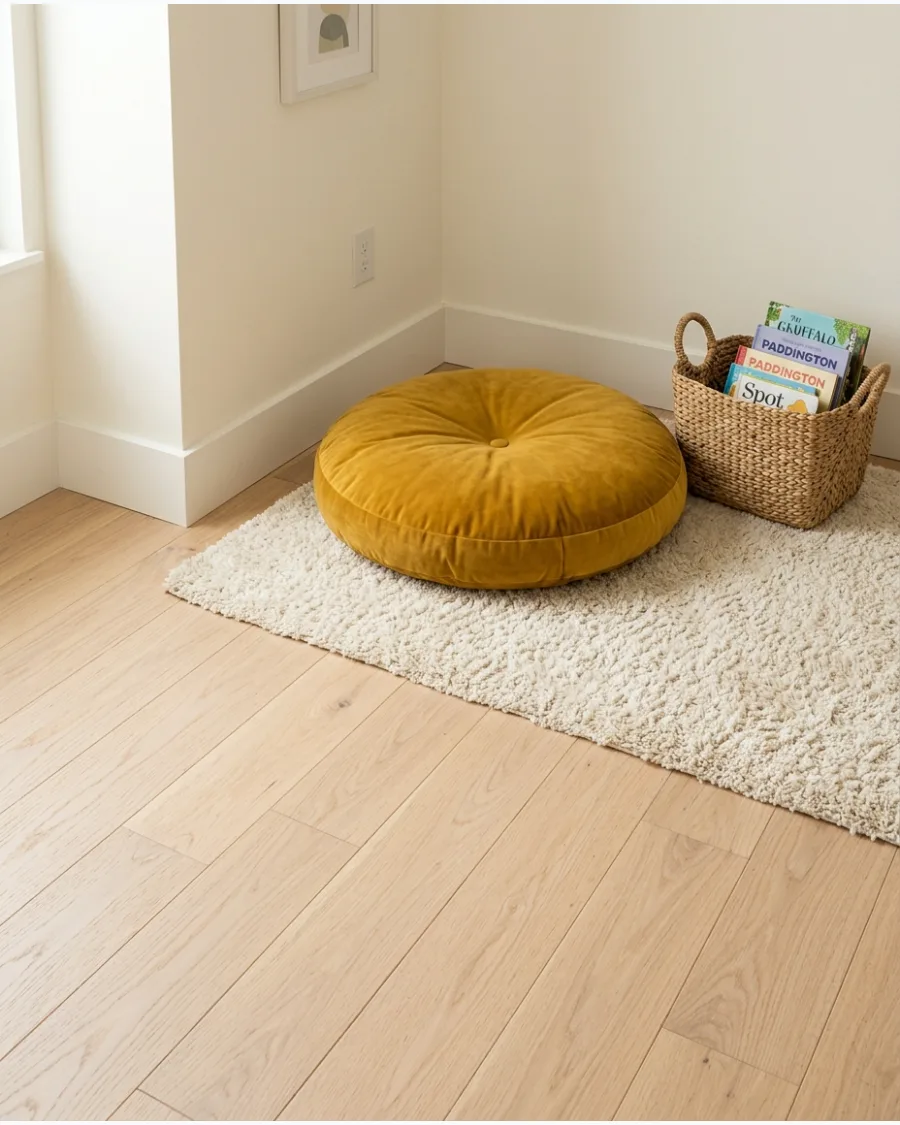
One oversized floor cushion in an empty bedroom corner creates an instant retreat. Adding a small basket for favorites keeps the area tidy and reachable for little hands.
Tuck a thick, plush rug underneath the cushion to provide extra insulation from cold floors. Baskets are often better than shelves for toddlers because they make cleanup a three-second task.
- Expect to spend $40 to $80 for a quality cushion and basket.
- Place the cushion against two walls to provide sturdy back support.
- Swap the cushion for a stack of bed pillows if working with a tight budget.
Quick win: Choose a cushion with a removable, machine-washable cover to handle spills and snacks.
2. Corner Beanbag Reading Nook
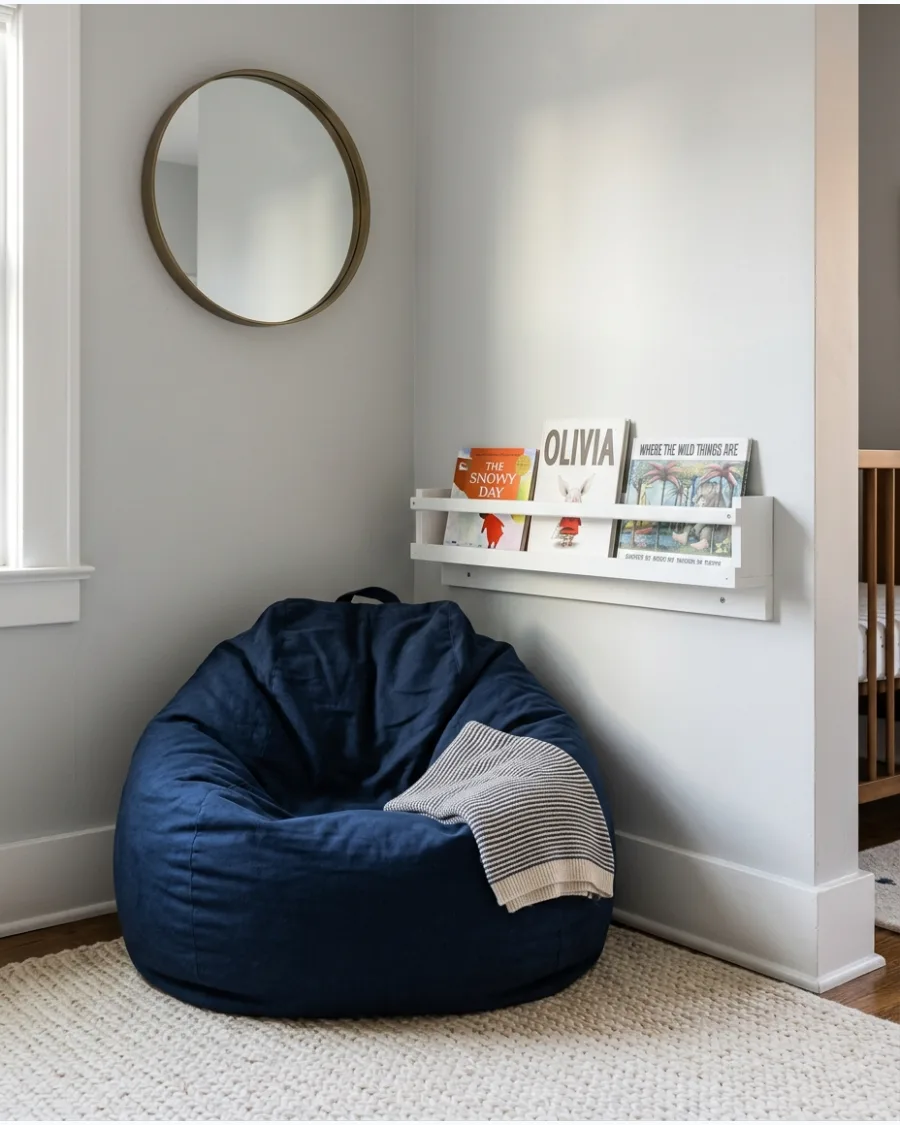
A beanbag chair offers flexible seating that molds to a child's body for long reading sessions. Mounting a narrow picture ledge nearby keeps current reads visible and off the floor.
Install the ledge at the child's seated eye level so they can see the book covers easily. Beanbags are the best choice for kids who move around a lot while they read.
- Budget $60 to $120 for a durable chair and a standard wall ledge.
- Secure the ledge into wall studs to prevent it from pulling out if a child leans on it.
- Use a beanbag with a safety zipper to prevent accidental bead leaks.
Most people skip this: Check the fill level every six months and add more beans to maintain proper back support.
3. Small Bedroom Reading Corner
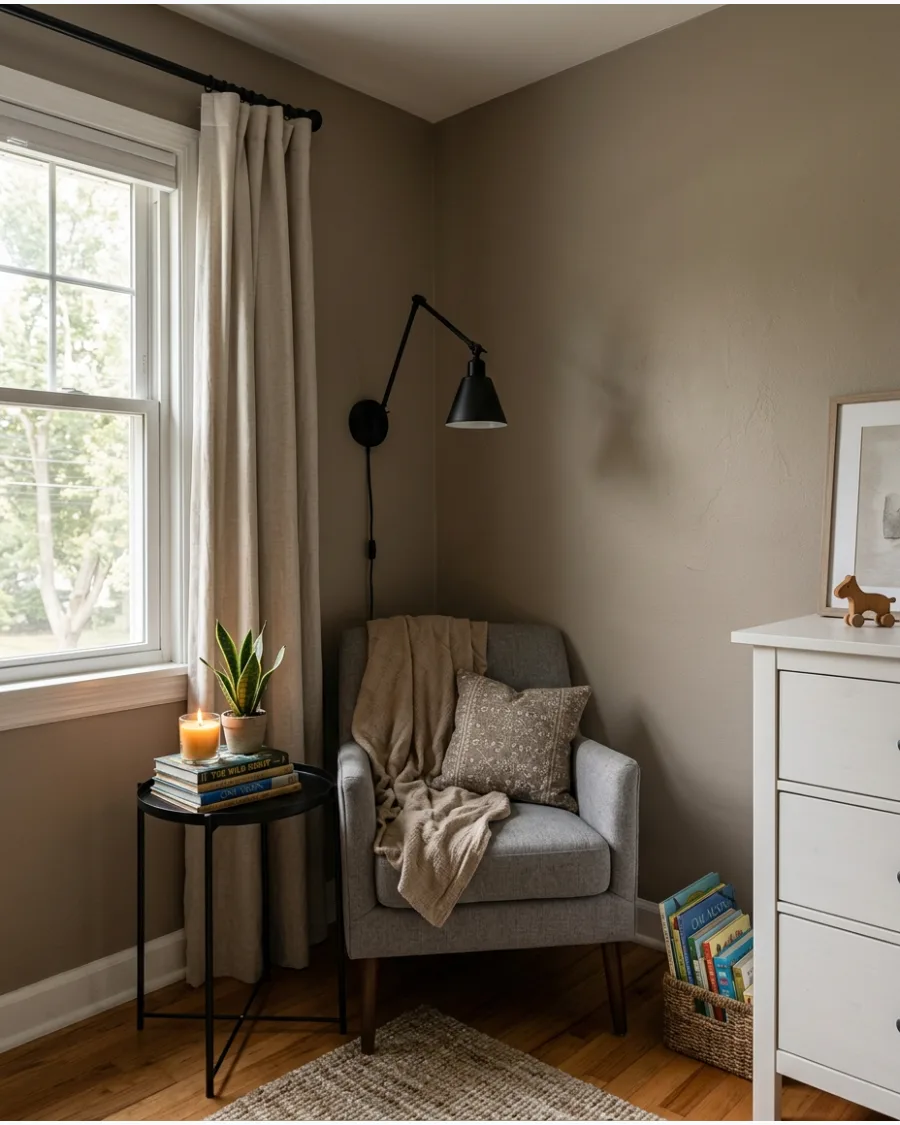
The narrow gap next to a dresser often goes to waste but fits a compact setup perfectly.
A small chair and a wall lamp turn this awkward spot into a purposeful zone. Choose a wall-mounted light with a swing arm to save surface space on a tiny side table. Keeping the footprint small prevents the bedroom from feeling cramped or cluttered.
- Plan for a $100 to $200 investment for a quality chair and lighting fixture.
- Ensure the chair placement doesn't block dresser drawers from opening fully.
- Use a cord cover to hide wires for a cleaner look and better safety.
Best shortcut: Use a battery-operated puck light in a hardwired-style sconce to avoid hiring an electrician.
4. Reading Nook Behind the Bedroom Door
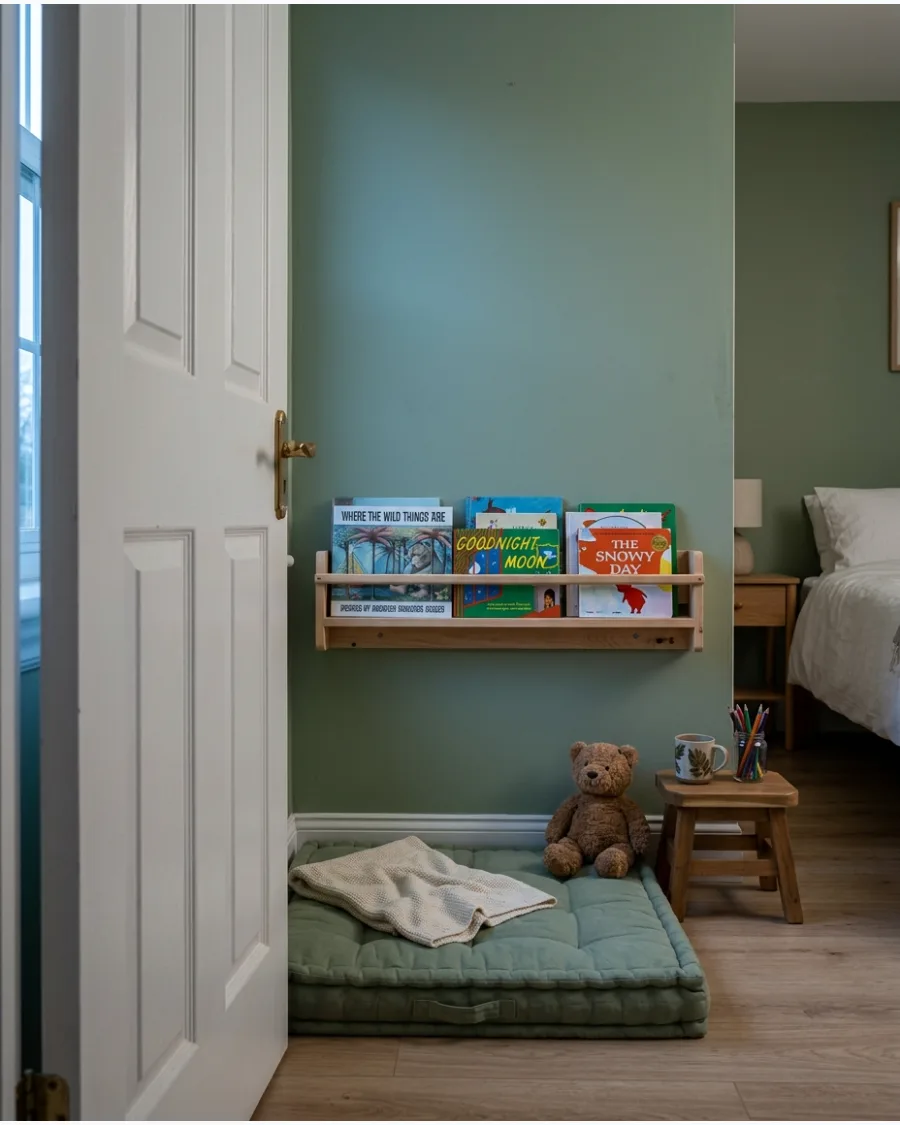
The wall space behind an open door is a hidden gem for vertical storage. A slim book ledge and a flat floor cushion utilize this dead space without interfering with the room's flow.
Check the door's swing radius first to ensure the cushion doesn't stop the door from opening fully. This is a smart way to add a library to a tiny bedroom.
- This project costs $20 to $50 for a basic ledge and a simple mat.
- Use a heavy-duty door stopper to protect the wall and the books from impact.
- Select a mat thin enough to slide under the door gap if needed.
Quick win: Use Command strips for the book ledge if you are renting and want to avoid making wall holes.
5. Bedside Reading Nook
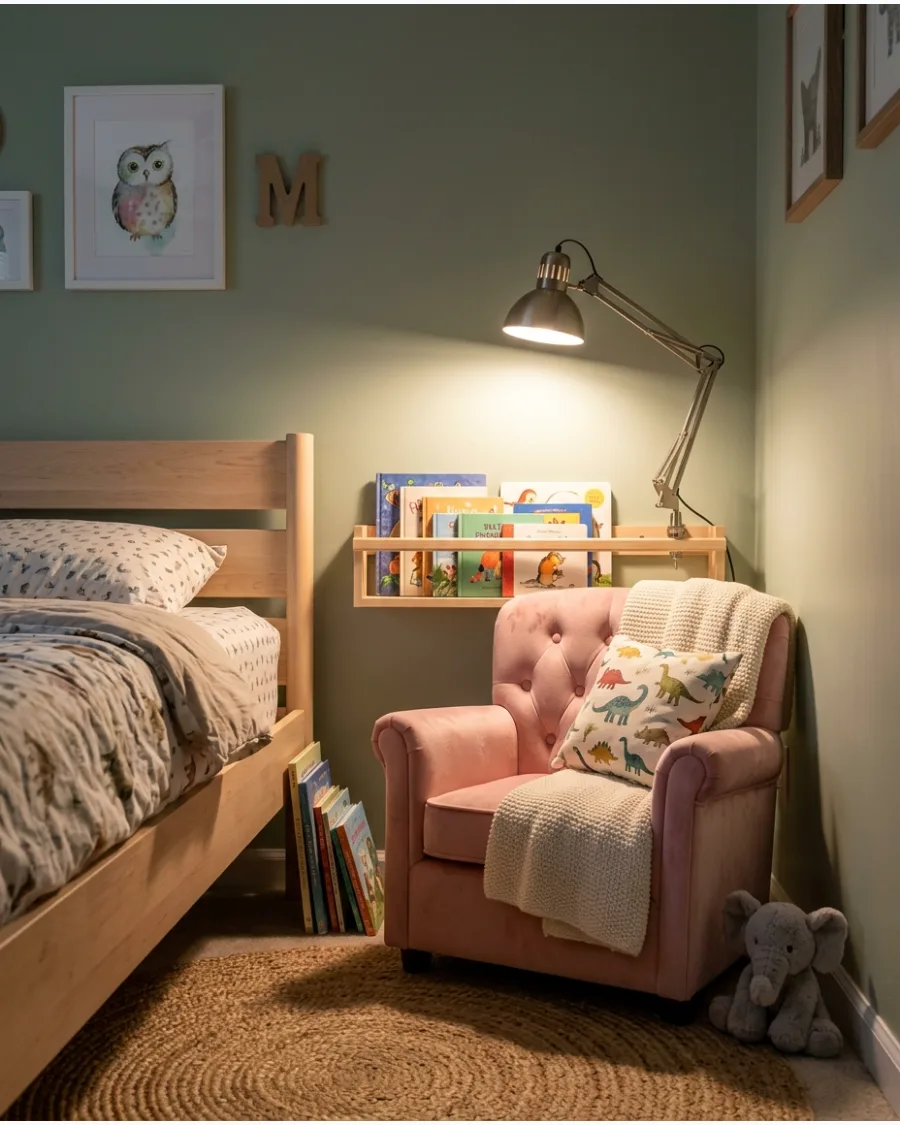
Placing a chair right next to the bed makes the transition from playtime to bedtime reading seamless. A tiny side table holds a lamp and a water cup to keep the child settled.
Opt for a chair with high arms to give the child a sense of being tucked in while they read. This layout encourages reading as a natural part of the nightly routine.
- A small table and chair set typically ranges from $80 to $150.
- Position the chair within reach of the bed's headboard for a cohesive look.
- Use a clip-on light if there is no floor space for a side table.
Most people skip this: Leave at least 18 inches of walking space between the chair and the bed to avoid trips.
6. Narrow Wall Reading Bench
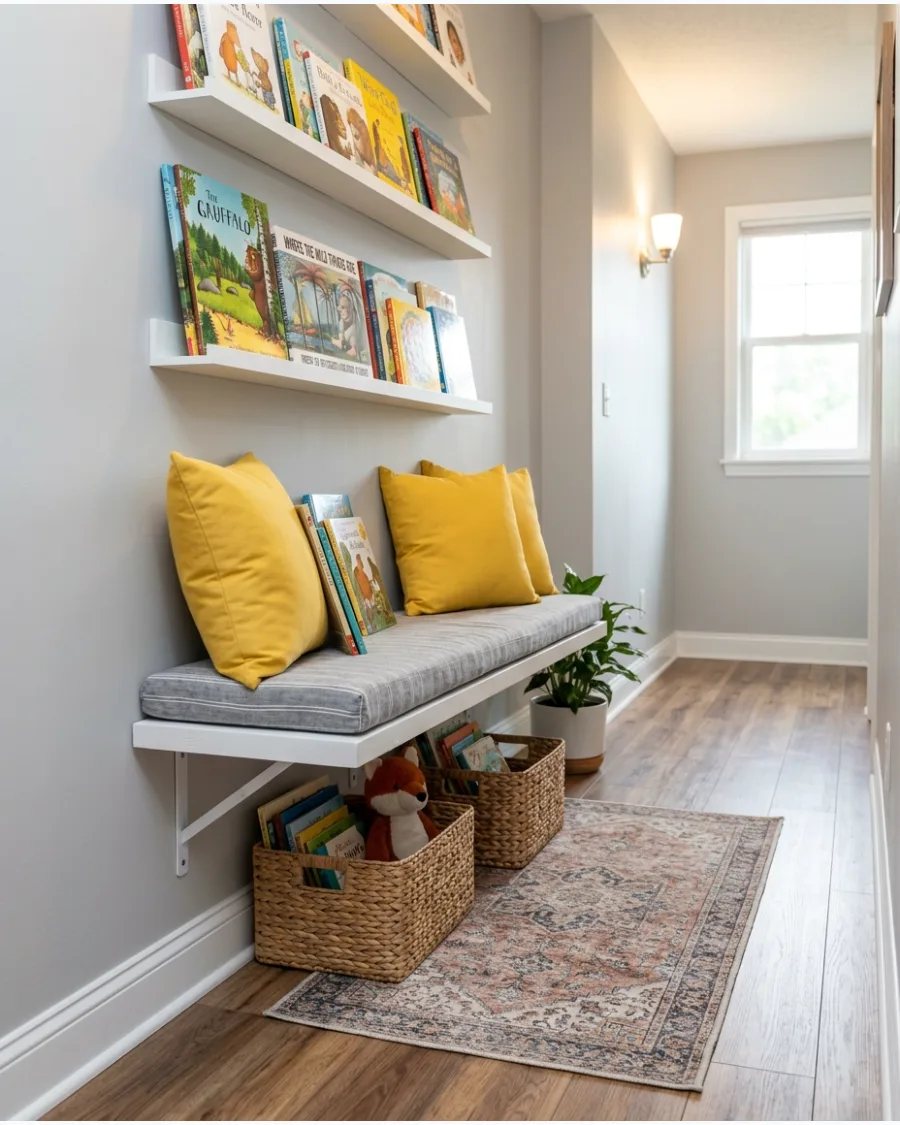
A shallow wall-mounted bench provides seating without the bulk of a traditional chair. Adding a custom-cut foam cushion and some throw pillows makes the hard surface much more inviting.
Mount the bench at a height that allows the child's feet to touch the floor comfortably. This setup works exceptionally well in hallways or narrow entryways.
- Materials for a DIY wall bench usually cost $50 to $100.
- Use heavy-duty L-brackets to support the weight of an active child.
- Add a small basket underneath the bench for shoe or book storage.
Best shortcut: Buy a pre-made storage cubby and lay it on its side to act as a bench with built-in shelves.
7. Bookshelf Corner Hideaway
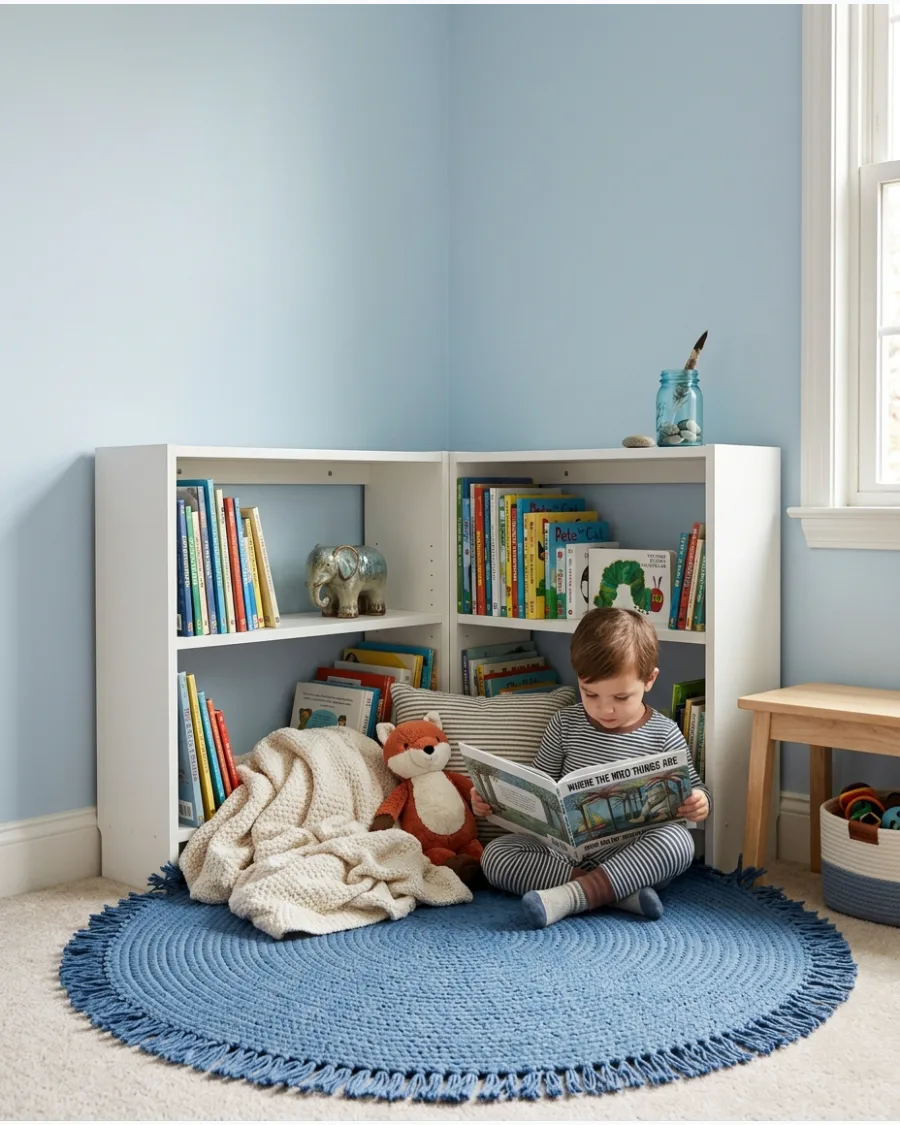
Two low bookcases placed in an L-shape create a semi-private fort for reading. A soft mat or rug placed in the center defines the space as a special zone.
Use bookcases that are no taller than 30 inches to keep the area feeling open rather than boxed in. This room within a room feel helps children concentrate on their stories.
- Expect to pay $60 to $120 for two basic bookcases.
- Anchor both bookcases to the wall for safety to prevent tipping.
- Place the most colorful books on the top shelves to draw immediate interest.
Quick win: Line the back of the bookcases with patterned wallpaper to add a pop of color to the nook.
8. Foldable Reading Nook
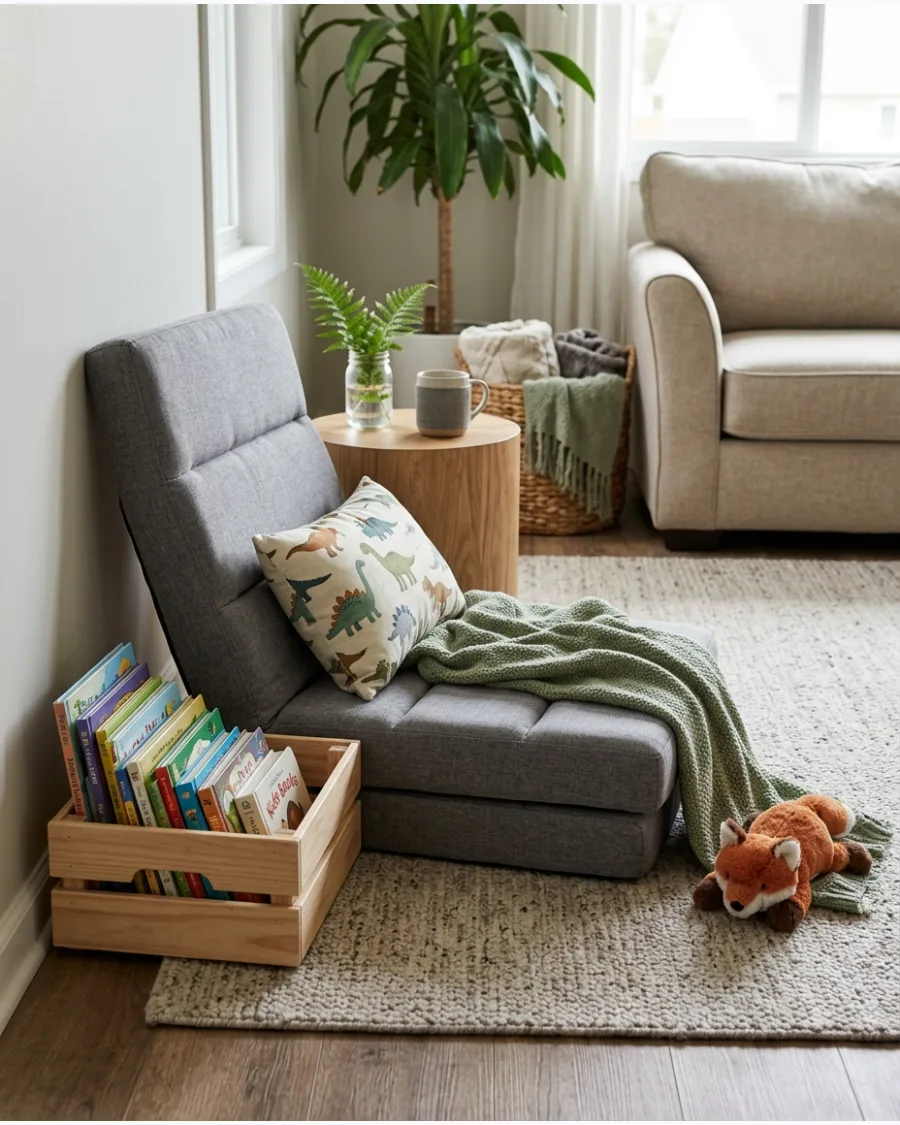
For multi-purpose rooms, foldable seating is the best way to keep the floor clear for other activities. A collapsible floor chair provides back support but can be tucked under a bed when not in use.
Pair the chair with a portable book bin that can be moved from room to room. This flexibility is perfect for families without a dedicated playroom.
- Foldable floor chairs usually cost between $30 and $70.
- Choose a chair with a built-in handle for easy carrying between rooms.
- Look for water-resistant fabrics if the chair will be used on the floor frequently.
Most people skip this: Store the reading bin in the same spot every time so the child knows exactly where to find their books.
9. Reading Basket and Pillow Setup
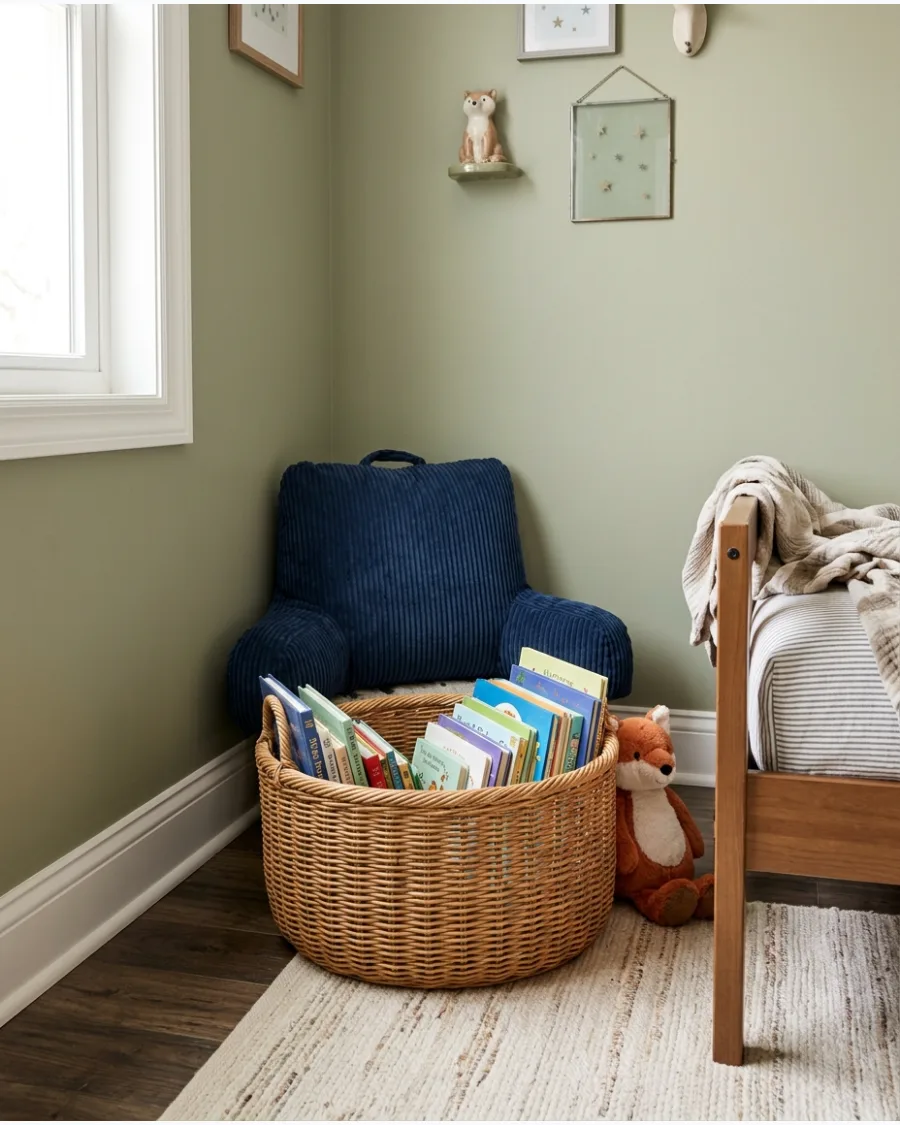
A large woven basket filled with books is the simplest way to start a reading habit. Placing it next to a large, supportive pillow creates a destination without needing any furniture.
Choose a basket with handles so the child can shop for books and bring them to their favorite spot. This is the most budget-friendly way to organize a growing collection.
- This setup is very affordable, costing around $20 to $40.
- Rotate the books in the basket every month to keep the selection fresh.
- Use a non-slip pad under the pillow to keep it from sliding on hard floors.
Best shortcut: Use a laundry basket you already have and line it with a soft blanket for a quick storage fix.
10. Wall-Mounted Reading Corner
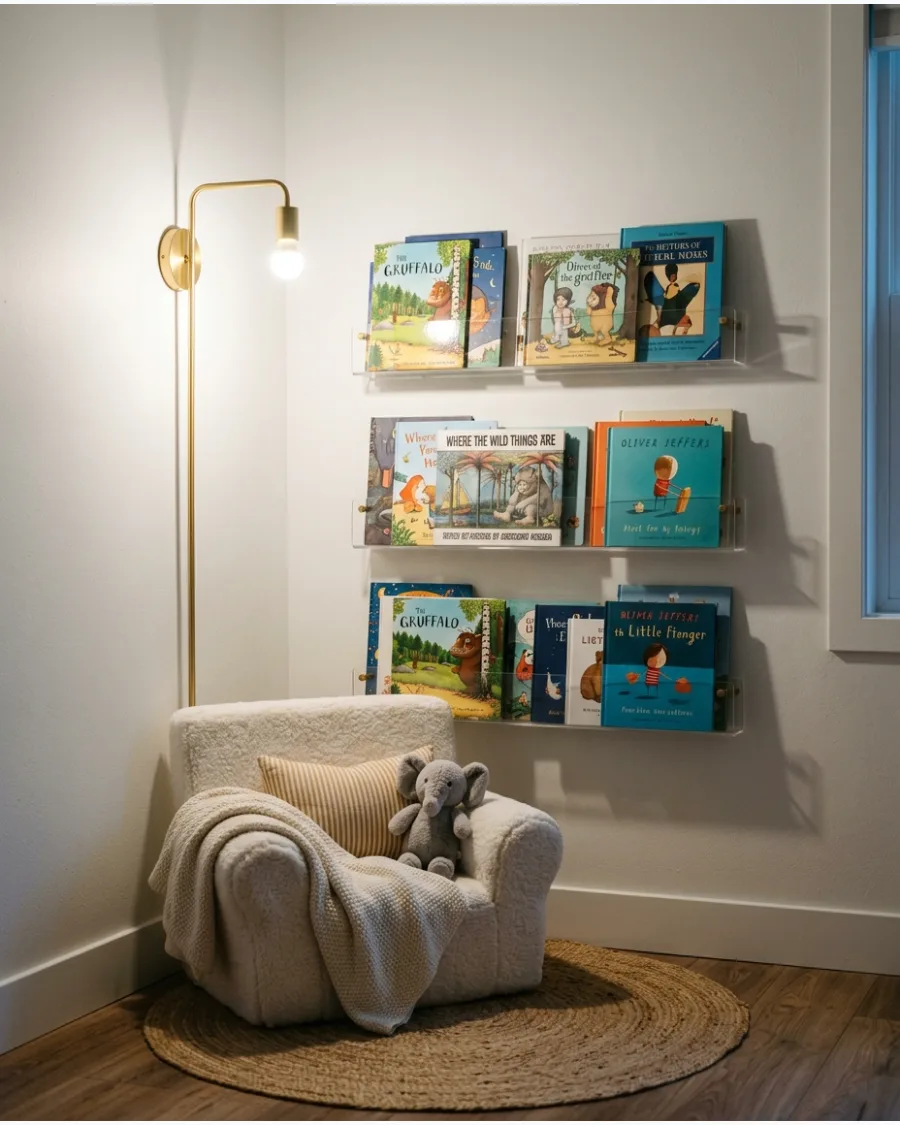
Vertical space is the best friend of a small room. Using floating ledges and wall lamps keeps the floor entirely clear for playing or walking.
Place a single padded mat or a thin rug on the floor to mark the reading spot without adding bulk. This minimalist approach makes even the smallest room feel organized and airy.
- A full wall setup typically costs $50 to $100 depending on the shelves.
- Space the shelves at least 12 inches apart to accommodate taller picture books.
- Use clear acrylic shelves to make the books look like they are floating.
Quick win: Group books by color on the shelves to create a rainbow effect that doubles as wall art.
WINDOW READING NOOK IDEAS
11. Cushioned Window Seat
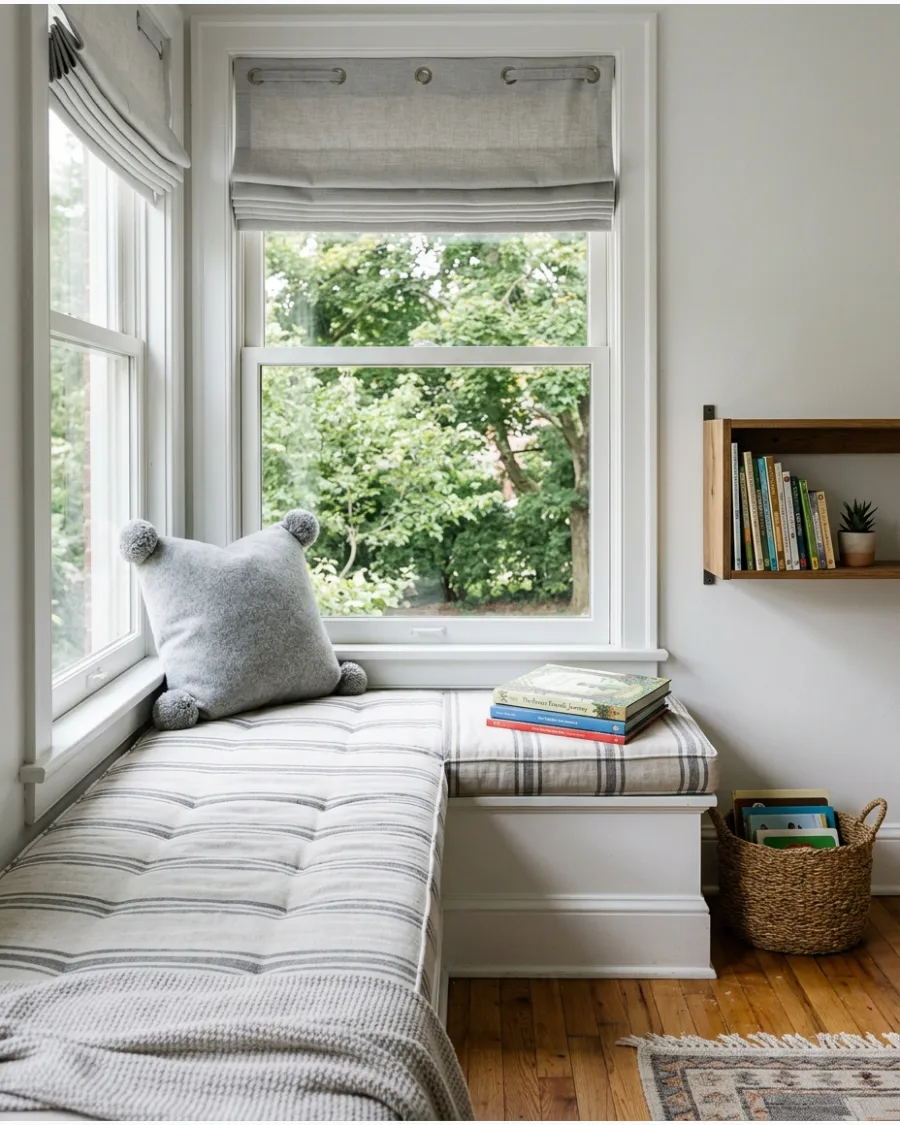
Transform a deep window ledge into a cozy retreat by adding a custom-sized foam cushion. The natural light makes it the perfect spot for daytime reading without needing extra lamps.
Measure the depth of the ledge twice before ordering foam to ensure a snug fit that won't slide around. High-density foam wrapped in a durable, washable fabric is the best choice for high-traffic areas.
- $40-$100 depending on fabric choices.
- 1 hour to measure and place.
- Use non-slip rug padding under the cushion for safety.
Quick win: Use a zippered cover so you can toss it in the wash after spills or snacks.
12. Built-In Window Reading Nook
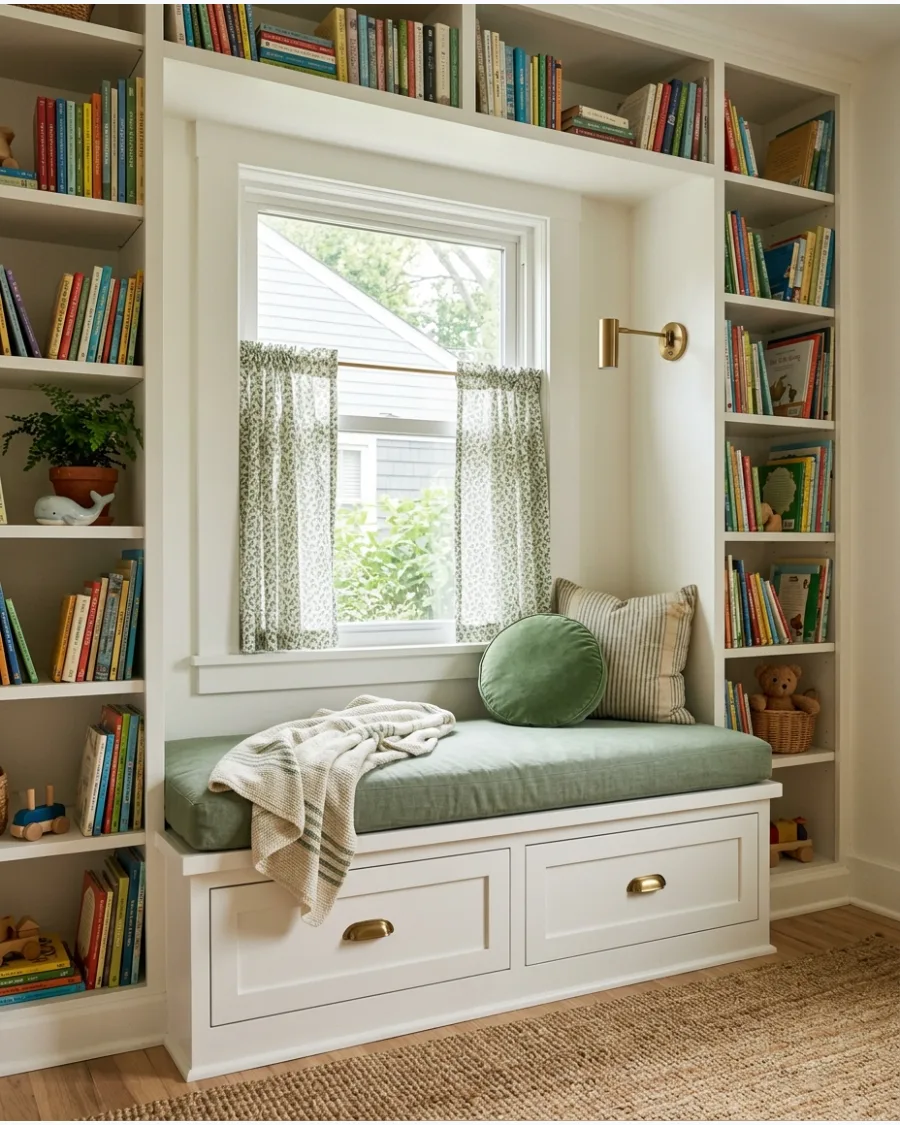
Frame a window with custom shelving to create a library feel in a small footprint. The space under the seat serves as a prime location for deep drawers to hide bulky blankets.
Paint the built-in the same color as the walls to make the room feel larger and more cohesive. This setup turns an ordinary window into a functional architectural feature.
- $500-$2,000 for custom carpentry.
- Weekend project for advanced DIYers.
- Install a recessed light in the top bridge for evening reading.
Most people skip this: Add an outlet inside one of the shelves for charging reading tablets or plugging in a small lamp.
13. Bay Window Book Nook
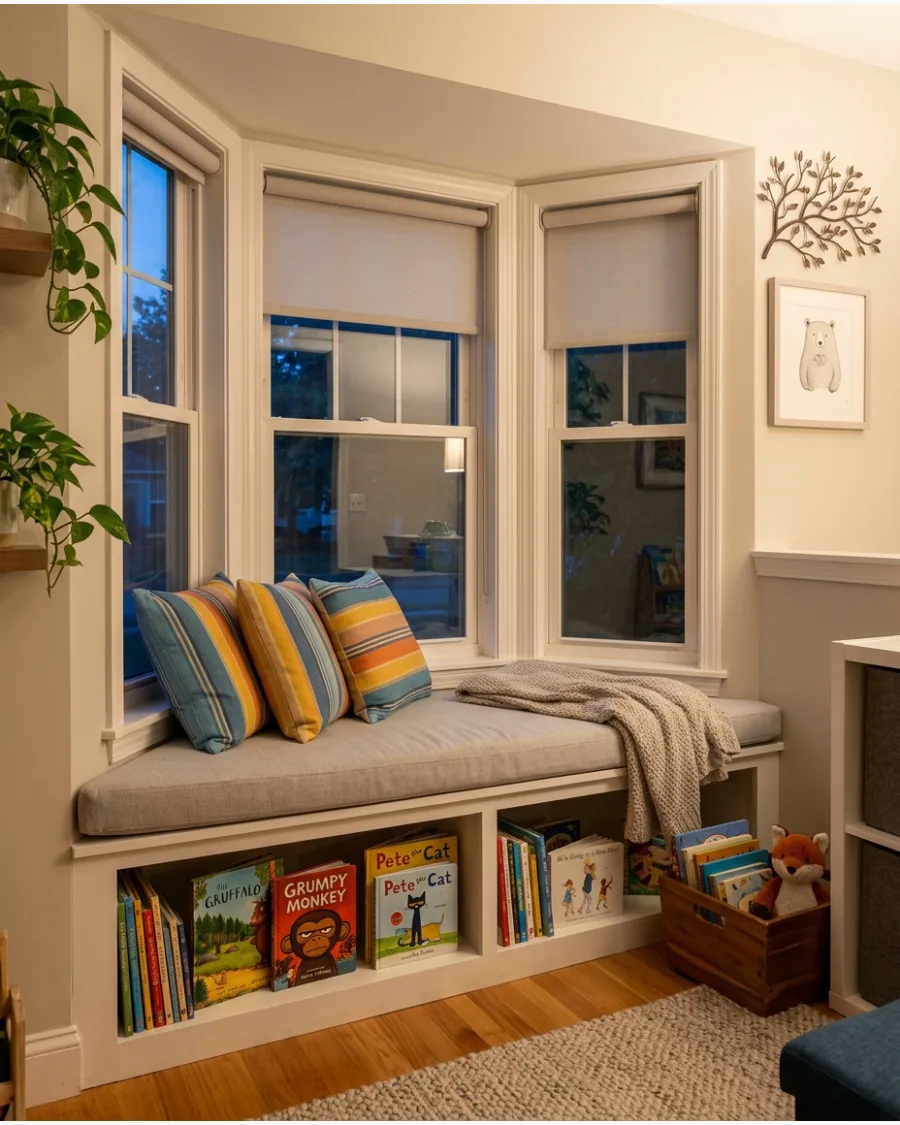
Bay windows offer extra depth that is perfect for a made-to-measure reading zone. Use the angled sides to prop up large pillows, creating a semi-enclosed space that feels like a hug.
Stick to a neutral cushion color and use vibrant throw pillows to change the look as the child grows. It is the most efficient way to use a floor plan that otherwise stays empty.
- $150-$400 for cushions and pillows.
- 2 hours to style and organize.
- Choose outdoor-rated fabrics to prevent sun fading from the window.
Best shortcut: If a custom cushion is too pricey, use three standard square floor pillows lined up side-by-side.
14. Low Bench Under the Window
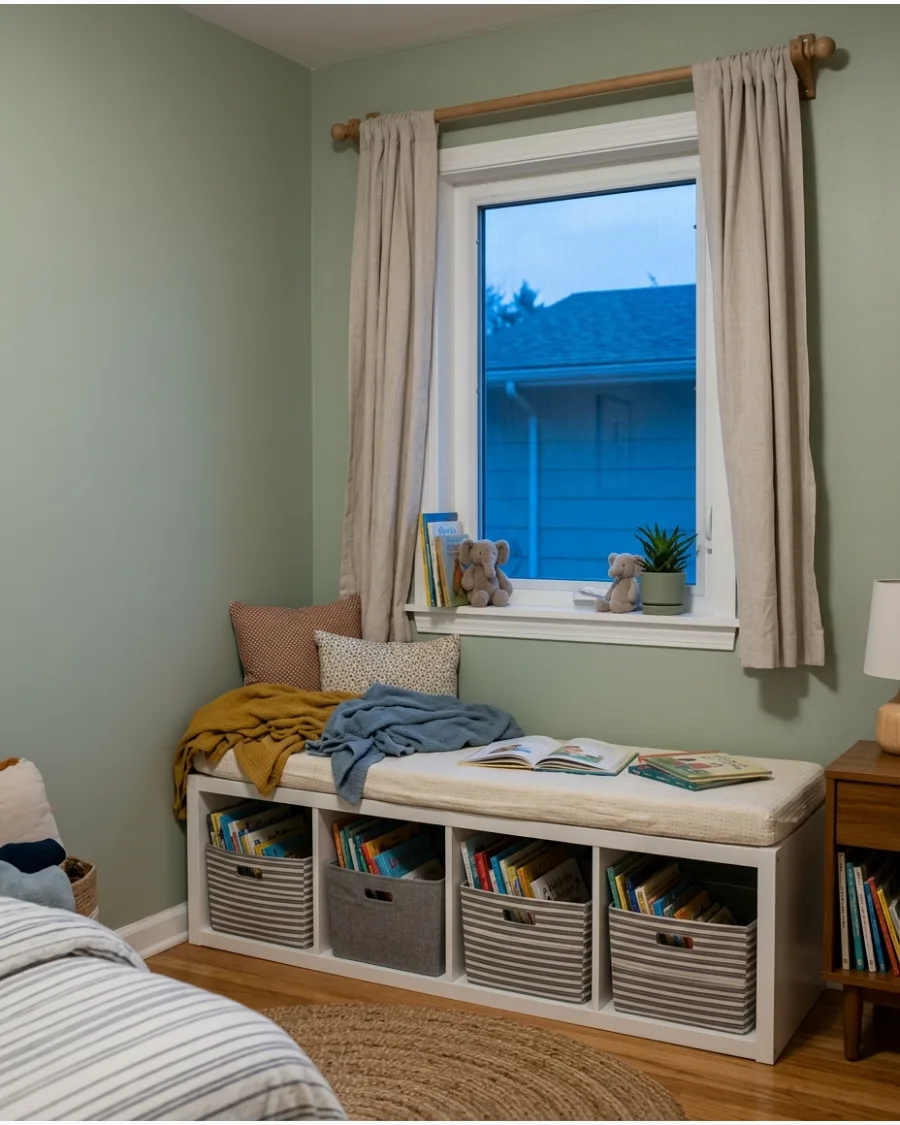
A low-profile storage bench provides a seat without obstructing the view or the light. This is a great solution for younger children who need a seat that is easy to climb onto safely.
Look for a bench with open cubbies so kids can see their favorite book covers at eye level. It keeps the room feeling airy while adding much-needed organization.
- $60-$150.
- 30 minutes for assembly.
- Secure the bench to the wall with a safety bracket to prevent tipping.
Quick win: Label the bins with pictures of book types so kids know exactly where to put things back.
15. Window Nook With Bookcases
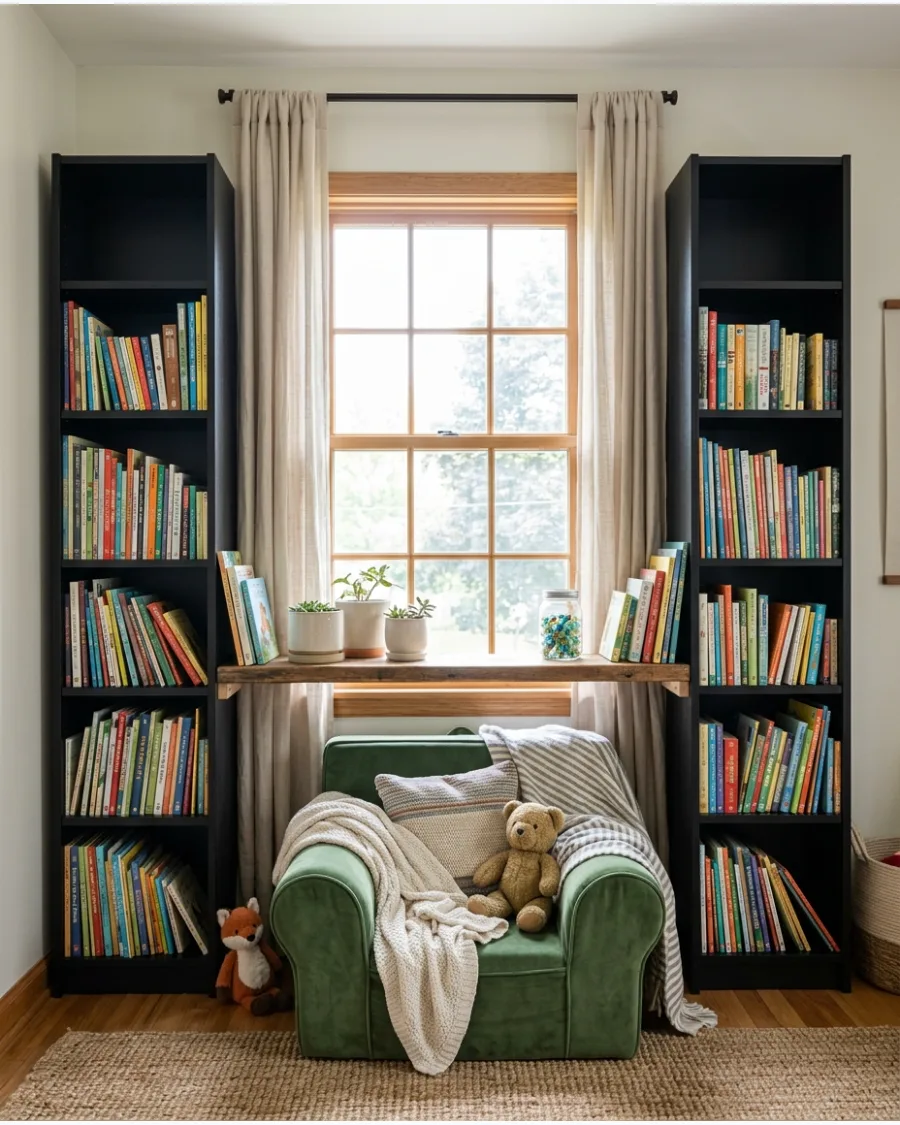
Symmetrically placing two narrow bookcases on either side of a window creates an instant nook effect. This layout draws the eye toward the window and provides a massive amount of vertical storage.
Connect the two bookcases with a simple wooden plank across the top to create a finished, built-in look. It is a budget-friendly way to get the look of custom cabinetry.
- $200-$500.
- 3 hours to assemble and align.
- Use shims to level the bookcases on carpeted floors.
Most people skip this: Leave a two-inch gap between the bookcase and the window trim to allow curtains to move freely.
Kids Reading Nook Ideas
16. Windowsill Nature Observation Corner
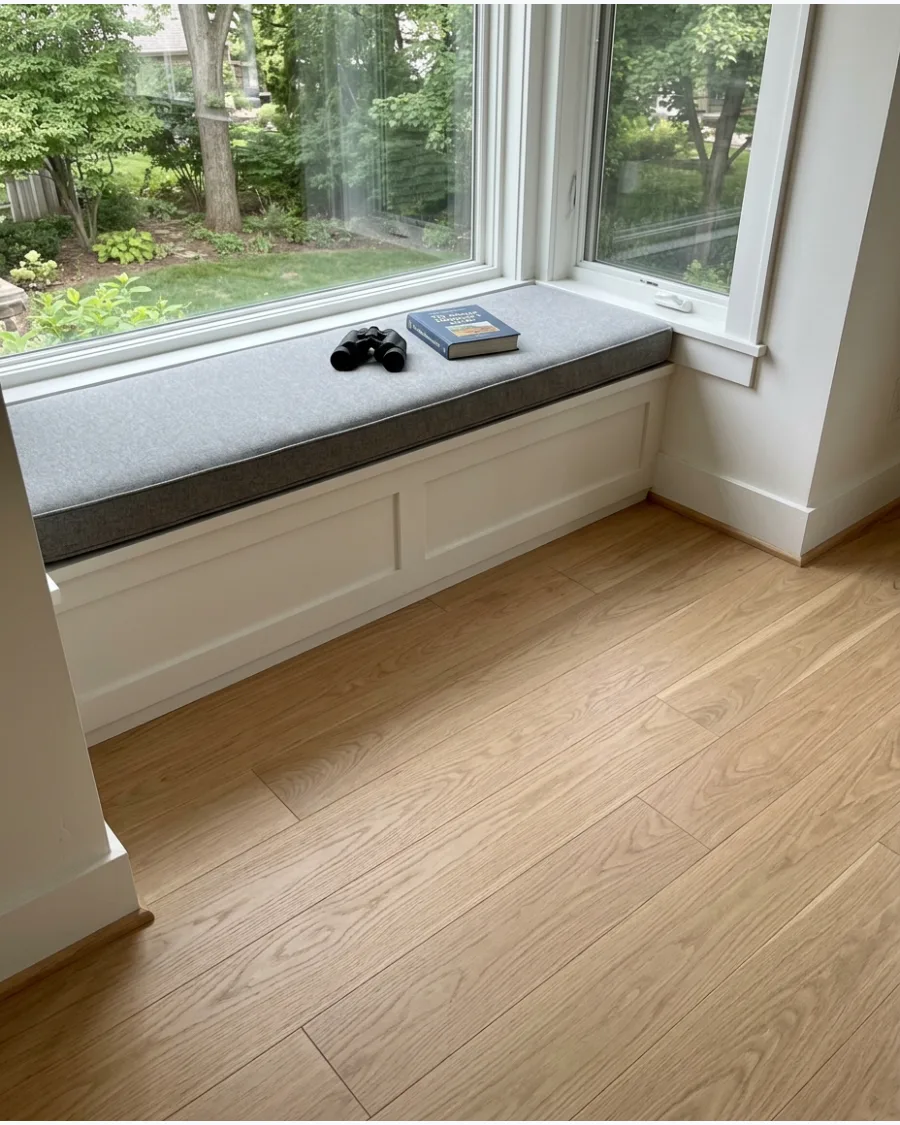
A windowsill nook turns a standard bedroom window into a portal for birdwatching and reading. Low-profile floor cushions and a sturdy ledge provide a comfortable base for hours of quiet observation.
Place a small basket of local field guides and binoculars directly on the sill to encourage immediate engagement. Natural light reduces eye strain during long reading sessions. Thick velvet curtains help dampen outside noise while maintaining a cozy, enclosed feel.
- Source a custom-cut foam bench pad online for under $50 to fit any standard window width.
- Install a simple floating shelf below the window if no deep sill exists to hold books at eye level.
- Swap heavy pillows for breathable cotton bolsters during summer months to prevent overheating in direct sun.
Most people skip this: adding a bird feeder just outside the glass creates a dynamic live backdrop that keeps kids coming back to the spot daily.
WINDOW READING NOOK IDEAS
17. Window Nook With Storage Drawers
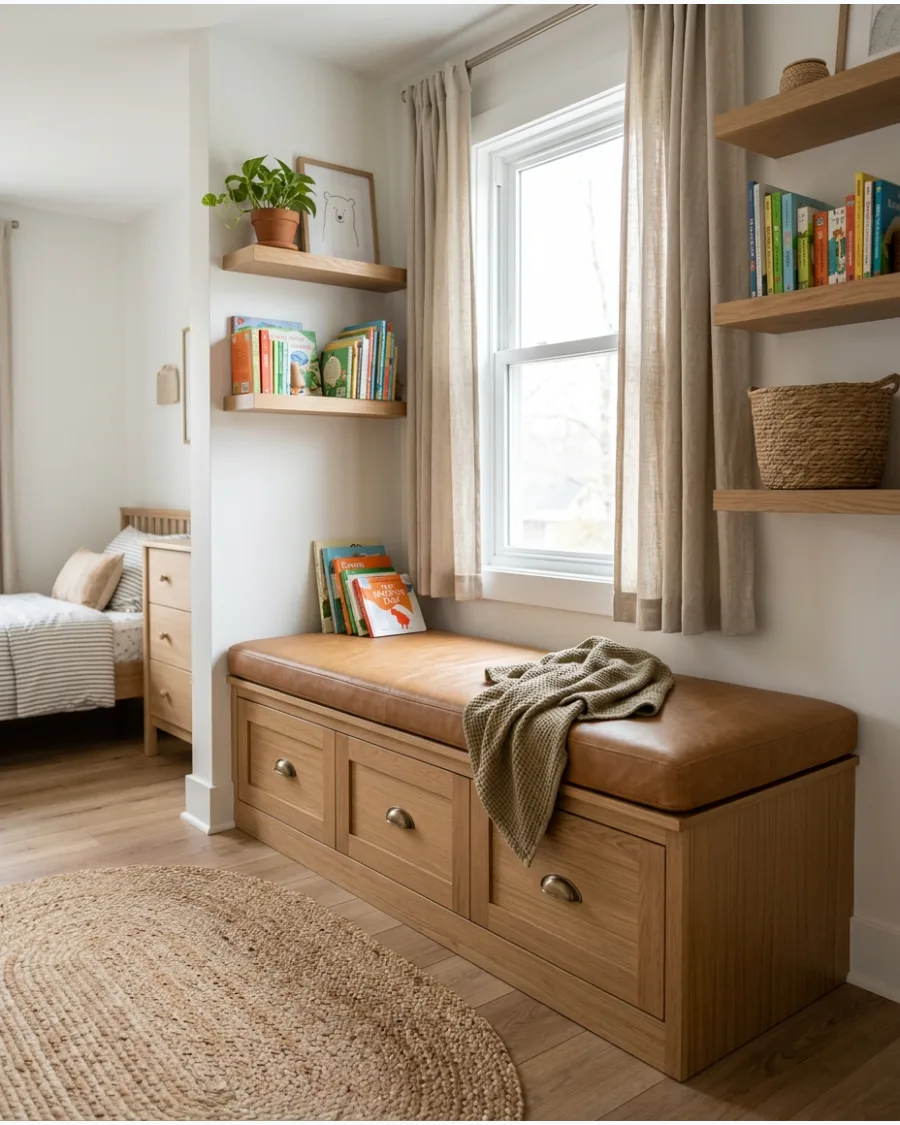
Deep drawers under a window seat are the ultimate clutter killers for a bedroom. They provide a home for bulky items like sleeping bags or board games that do not fit on standard shelves.
Choose hardware with rounded edges to prevent any painful bumps while kids are playing on the floor. The flat top of the bench remains a dedicated spot for quiet reading.
- $300-$800.
- Professional installation recommended.
- Opt for soft-close drawer slides to protect little fingers.
Quick win: Line the drawers with scented paper or cedar to keep stored blankets smelling fresh.
18. Sunny Breakfast-Room Reading Corner
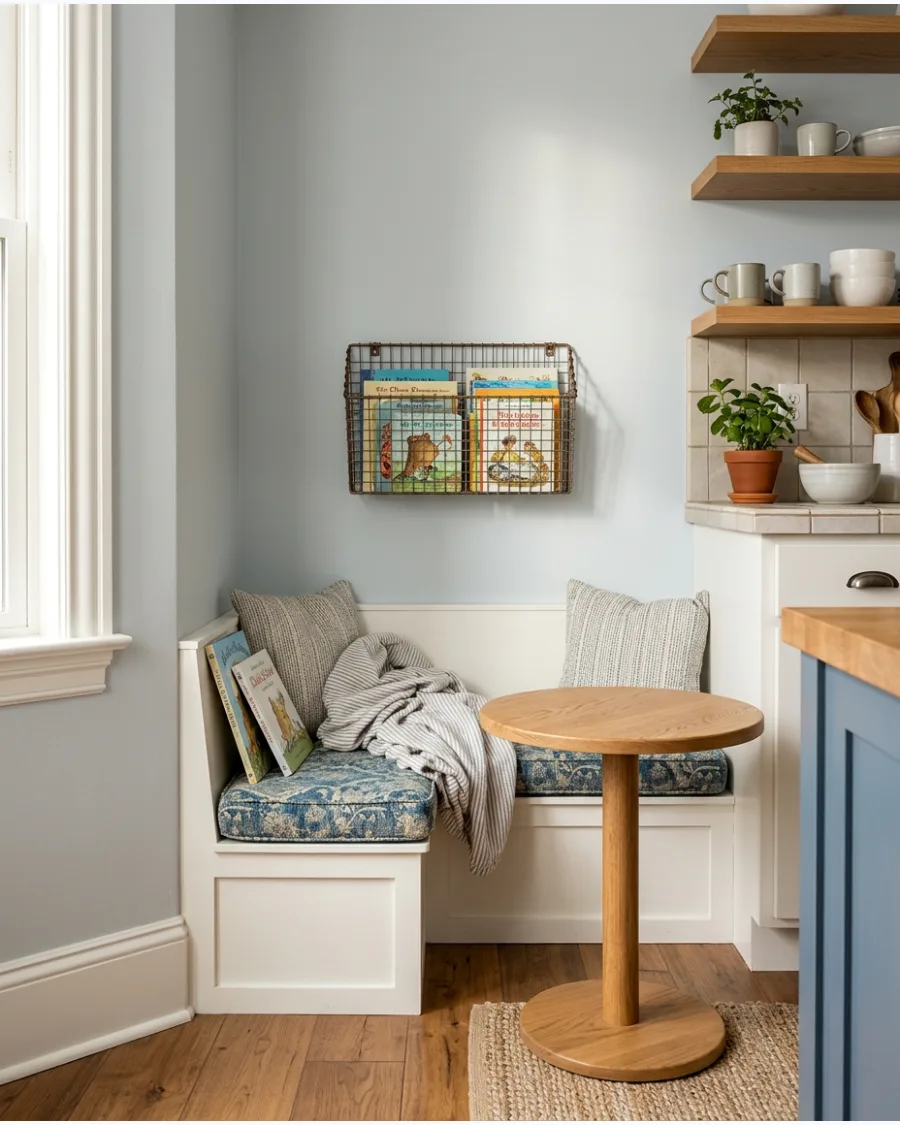
Placing a reading spot in the kitchen area keeps kids engaged while the rest of the house is busy. It turns a dead corner into a productive zone that feels more inclusive than a bedroom.
Select a wipeable vinyl or leather cushion to handle the inevitable kitchen spills and crumbs. This setup makes it easy to supervise reading time while preparing meals.
- $100-$300.
- 1 hour to style.
- Use a washable rug under the seat to define the space.
Best shortcut: A simple wooden crate on the floor is a great mobile library for kitchen reading spots.
BUILT-IN KIDS READING NOOKS
19. Arched Built-In Reading Nook
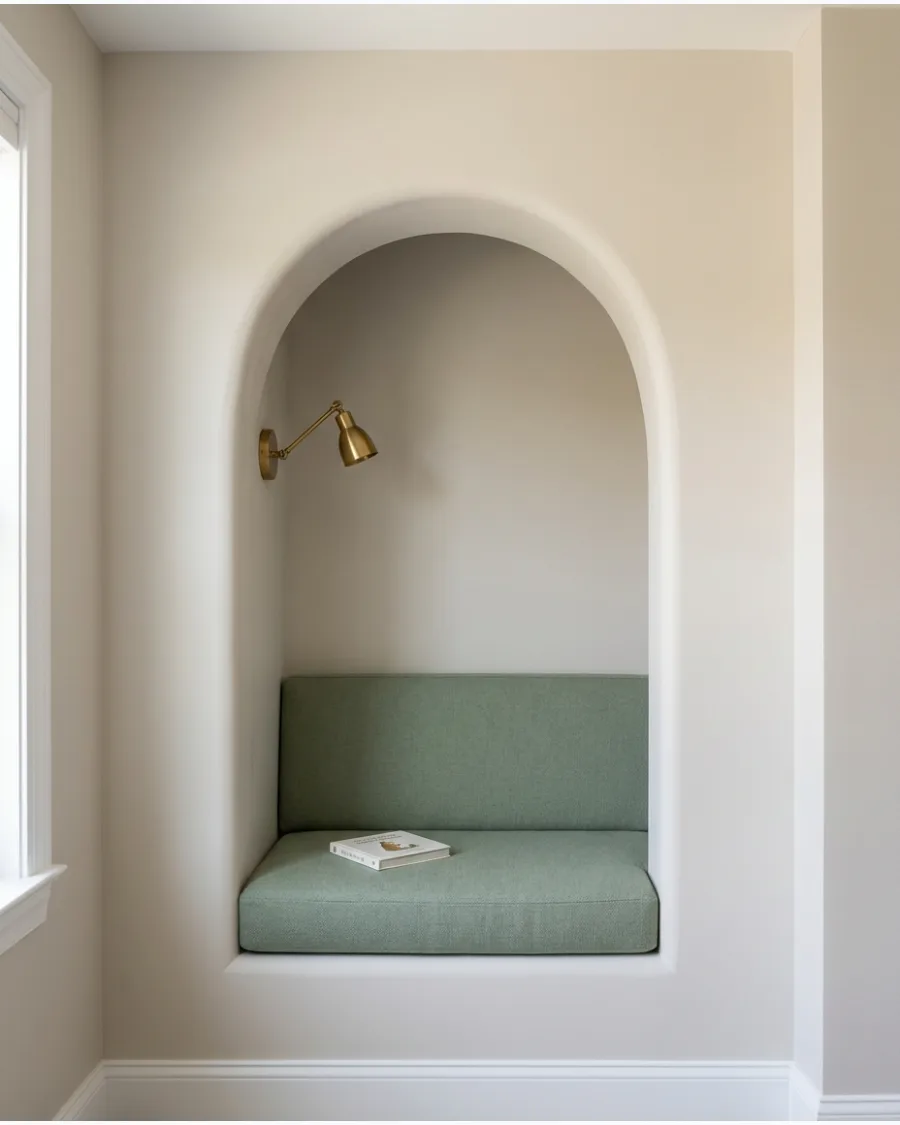
An arched opening adds a whimsical, storybook feel that makes the nook feel like a secret hideout. Integrated LED strip lighting hidden behind the arch provides a warm, magical glow for evening stories.
Line the interior walls of the arch with a subtle wallpaper pattern to add depth and personality. It is a high-impact design choice that defines the reading zone as a special destination.
- $800-$2,500.
- Requires framing and drywall work.
- Install a dimmer switch to adjust the light for bedtime.
Most people skip this: Use battery-powered puck lights if you do not want to hire an electrician for the wiring.
20. Built-In Bookcase Bench
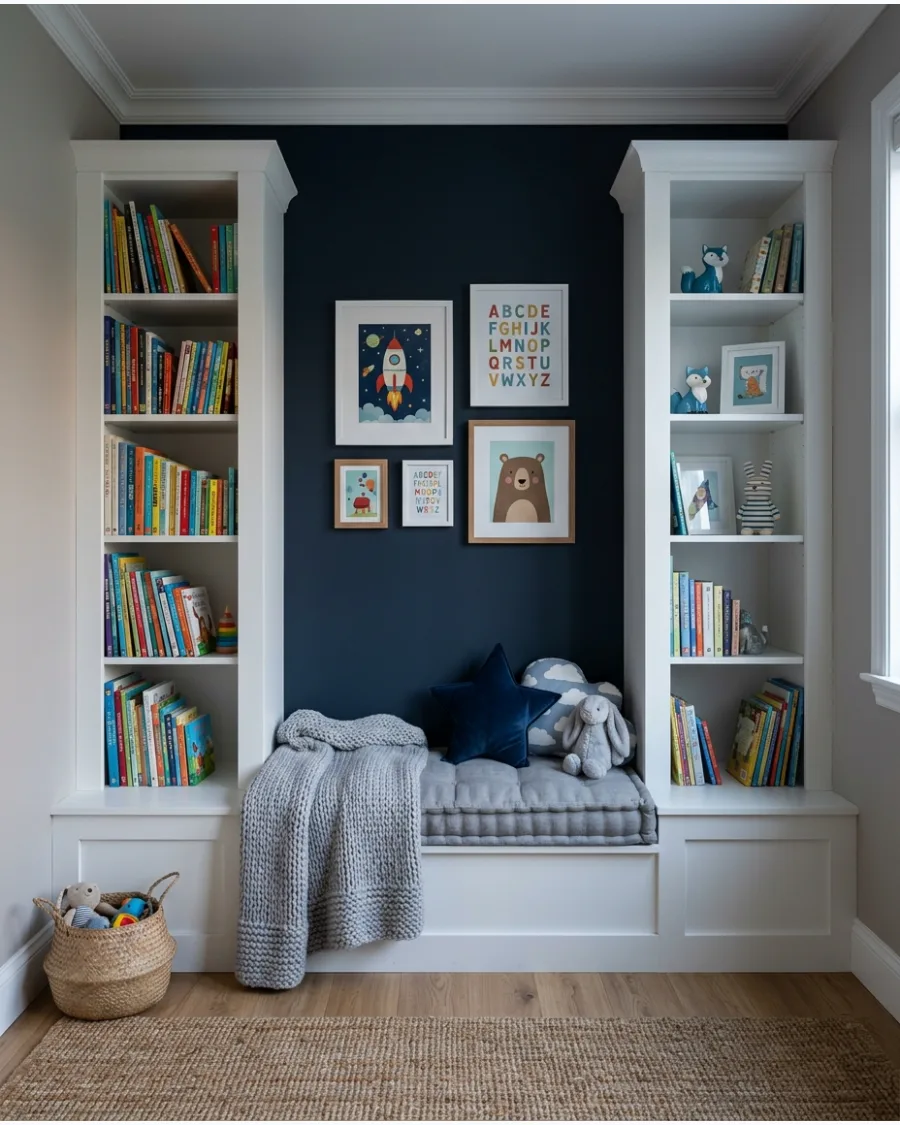
Installing a padded bench between two floor-to-ceiling bookcases maximizes every inch of wall space. This bridge design creates a cozy alcove that feels protected and quiet.
Place the most colorful books at the child's height to encourage them to grab a story independently. It provides enough storage to last from the toddler years through high school.
- $400-$1,200.
- Weekend DIY project.
- Bolt both bookcases to wall studs for maximum stability.
Quick win: Use the very top shelves for fragile keepsakes or books that are too advanced for the child's current age.
21. Reading Alcove With Storage
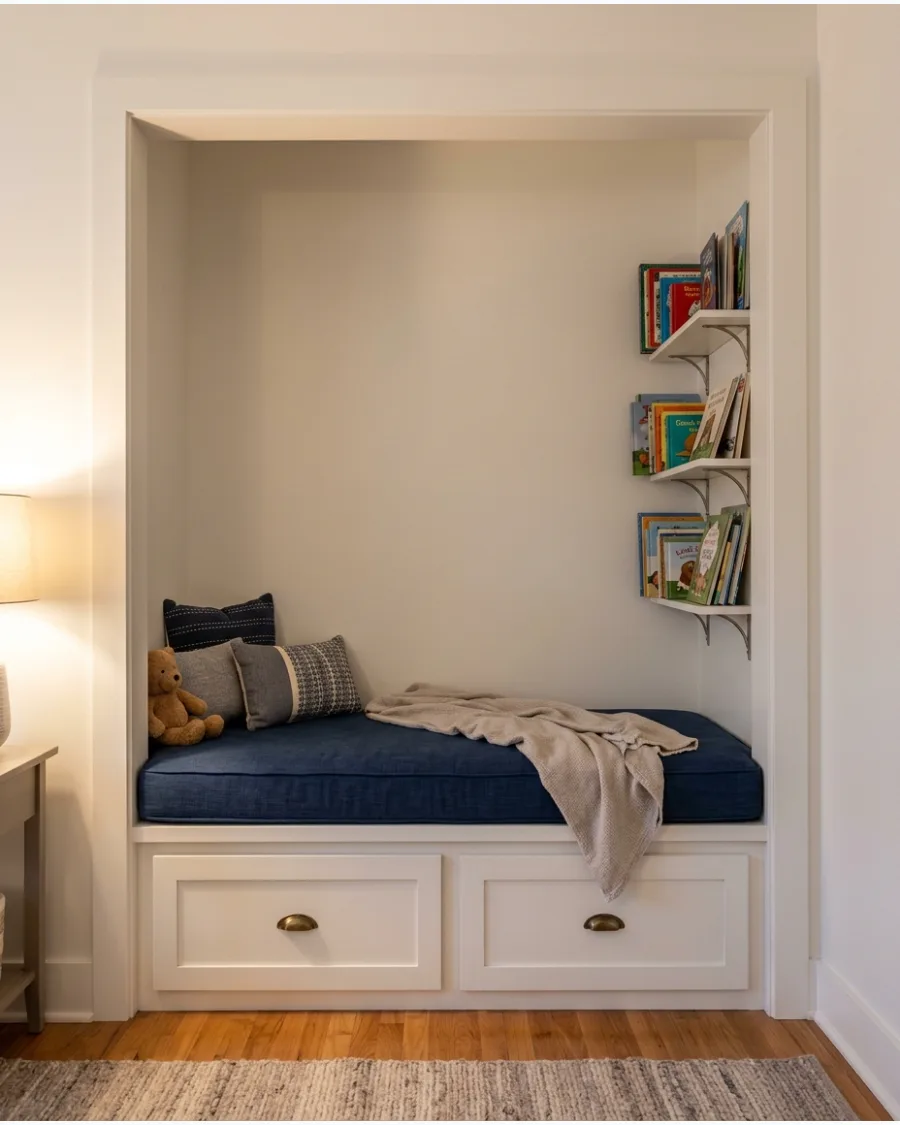
Transform a shallow wall recess into an upholstered reading alcove. Add drawers underneath and small shelves inside the nook to maximize every inch.
Install the interior shelves high enough that they do not hit a child's head when they sit up. Use durable upholstery fabric that can handle frequent use.
- Custom cabinetry or pre-fab inserts
- Secure drawers with soft-close slides
- Use outdoor-grade fabric for the bench pad
Quick win: Use a velvet-look performance fabric to hide small stains and lint.
22. House-Shaped Reading Nook
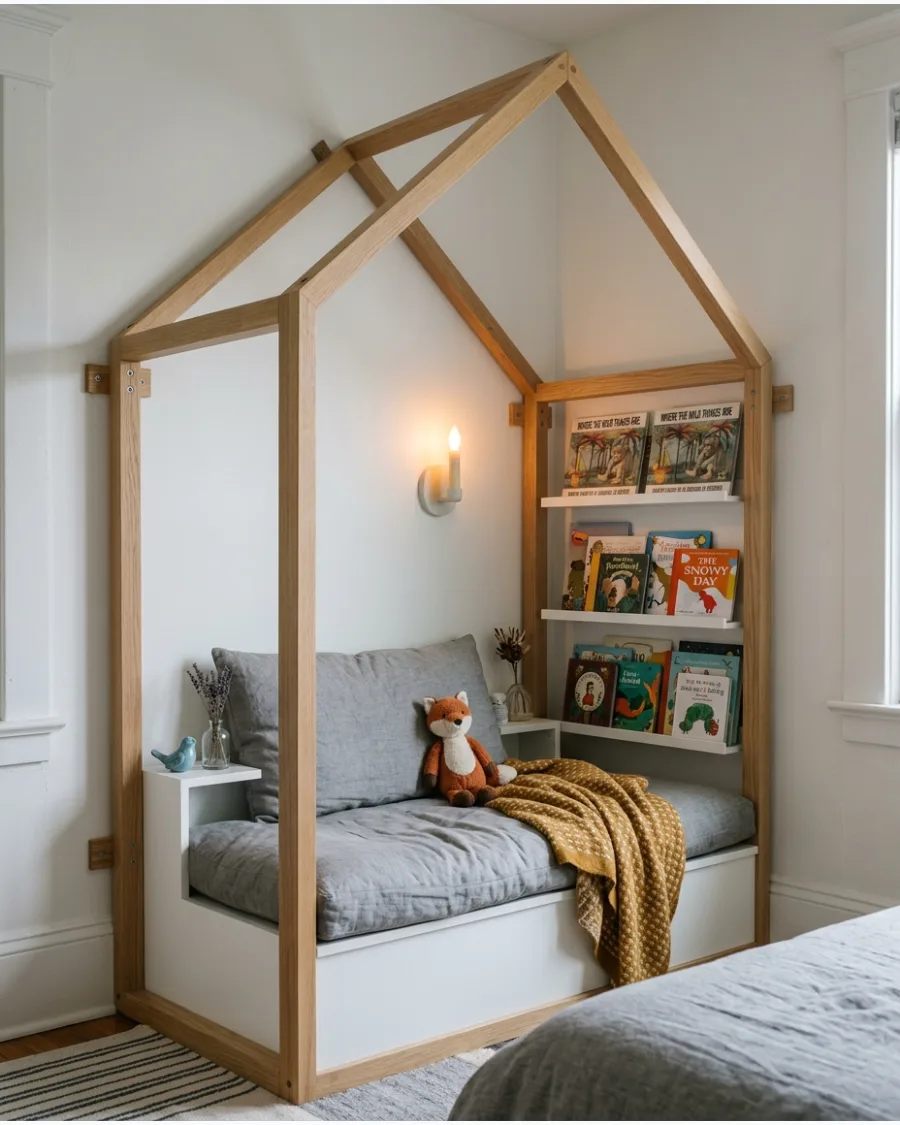
Frame a built-in bench with a simple house-shaped outline. The playful shape creates an imaginative feature without relying on decor that children may quickly outgrow.
Keep the wood frame natural or paint it to match the wall for a seamless look. It offers a clear boundary for the reading zone while looking architectural.
- 2×4 lumber or plywood strips
- Paint the interior wall a soft accent color
- Add a battery-operated puck light to the peak
Most people skip this: Sand every corner of the house frame to a smooth, rounded finish to prevent splinters.
23. Built-In Daybed Reading Nook
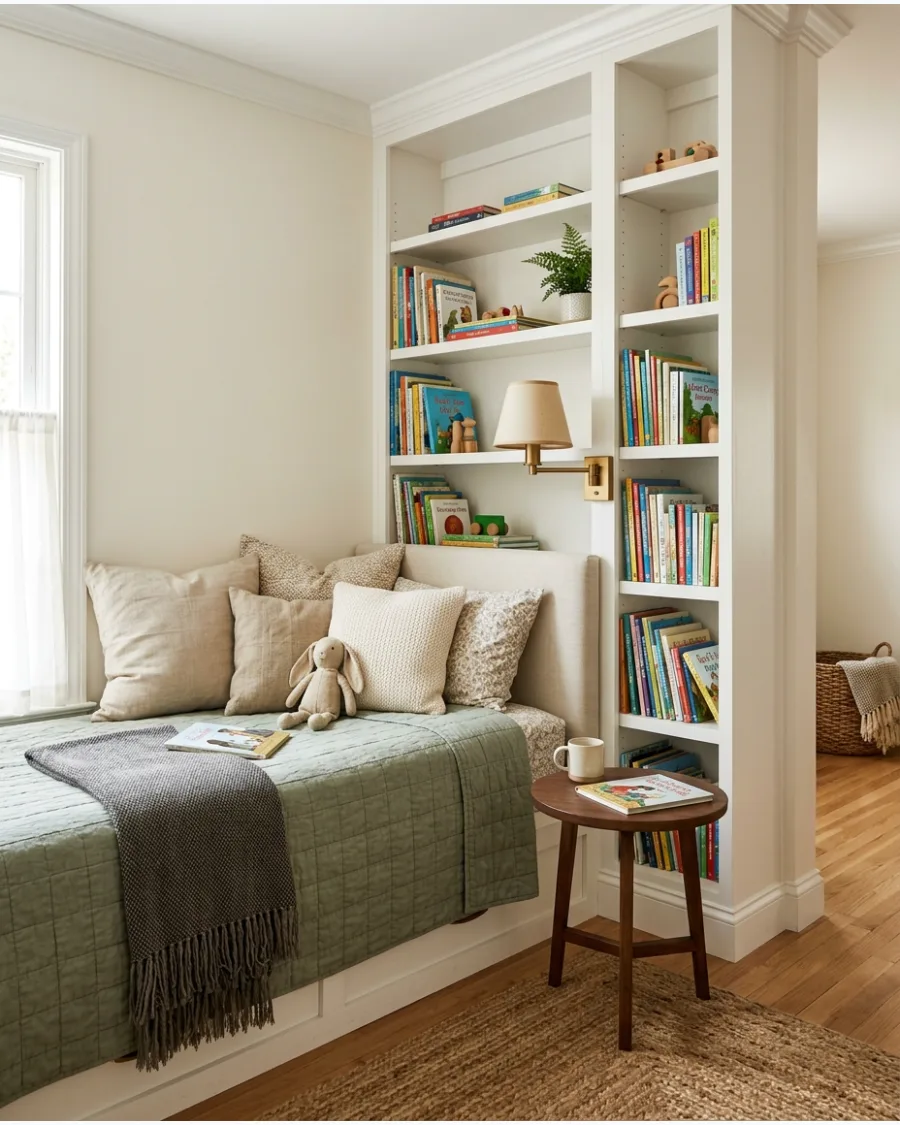
Use a small daybed as both a reading lounge and an occasional sleeping space. Surround it with bookshelves and washable cushions for a comfortable multipurpose setup.
Choose a twin-size mattress instead of a custom cushion to make finding fitted sheets much easier. This setup transitions perfectly into a teen room later.
- Twin mattress and frame
- Position books at the head or foot of the bed
- Use large backrest pillows for upright reading
Best shortcut: Layer a waterproof mattress protector under the decorative cover to save the bed from juice spills.
24. Double Reading Nook
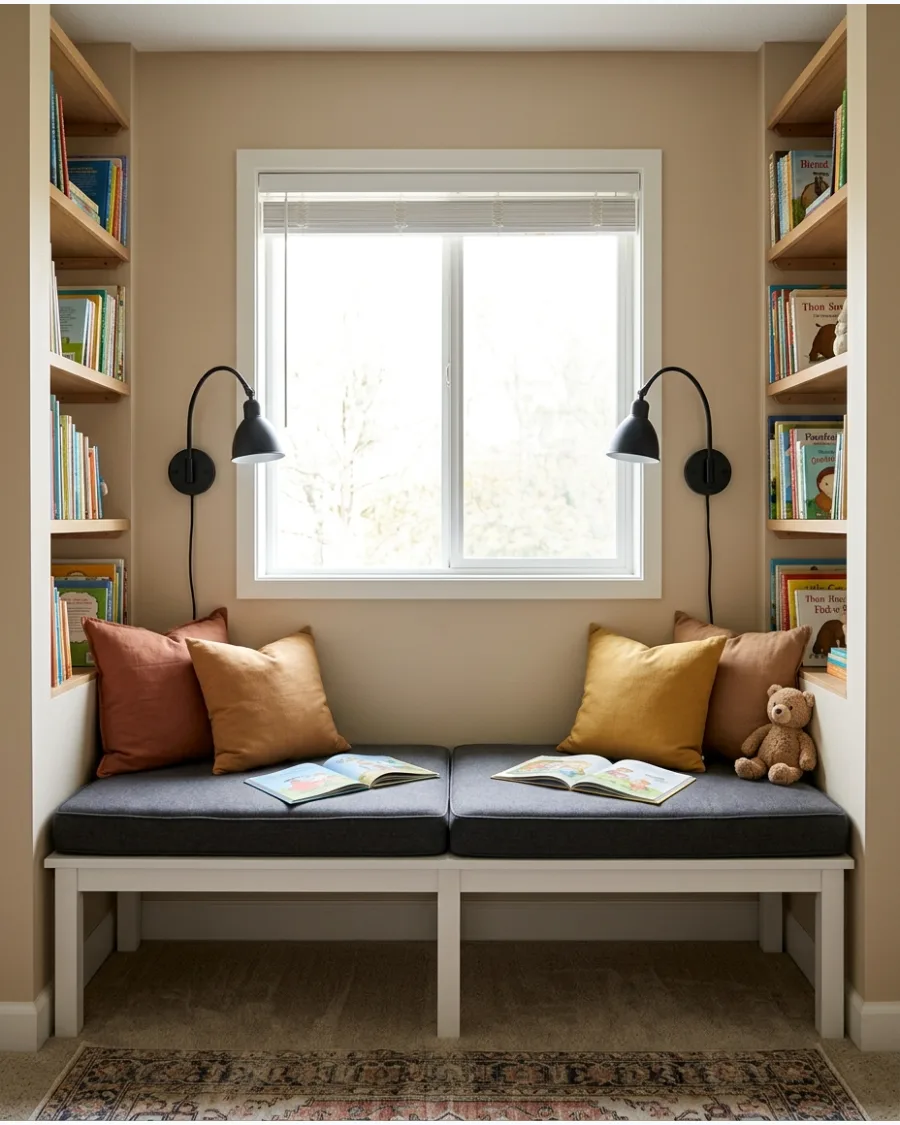
Create a wide built-in bench with enough room for siblings or friends to read together. Include separate lights or book niches so each child has a personal section.
Divide the seating area with a small central armrest or a shared book basket to keep the space organized. This encourages social reading while providing enough personal room.
- Extra-wide bench or two joined units
- Dual wall-mounted sconces
- Separate storage bins for each child
Quick win: Label each child's storage bin with their name to prevent book-sharing arguments.
25. Built-In Nook Between Wardrobes
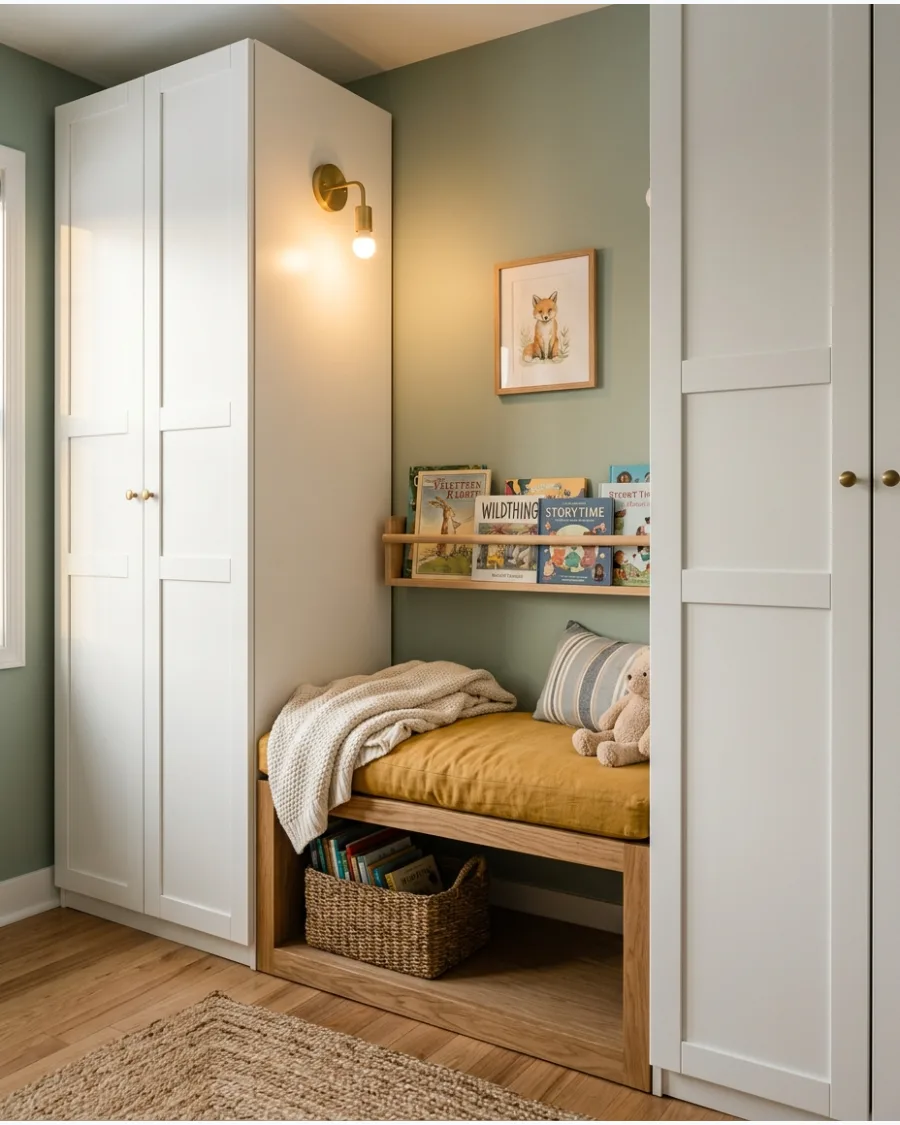
Leave an open seating area between two fitted wardrobes instead of filling the entire wall with cabinets.
The wardrobes provide storage while the center becomes a cozy reading bench. Add a thick foam pad to the bench to make the hard surface comfortable for long sessions. It breaks up the visual weight of large furniture.
- Standard closet wardrobes
- 3-inch thick high-density foam
- Floating shelves for the middle wall
Most people skip this: Paint the wall behind the bench a dark color to create a "cave" effect that feels cozy and deep.
26. Under-Bunk Reading Nook
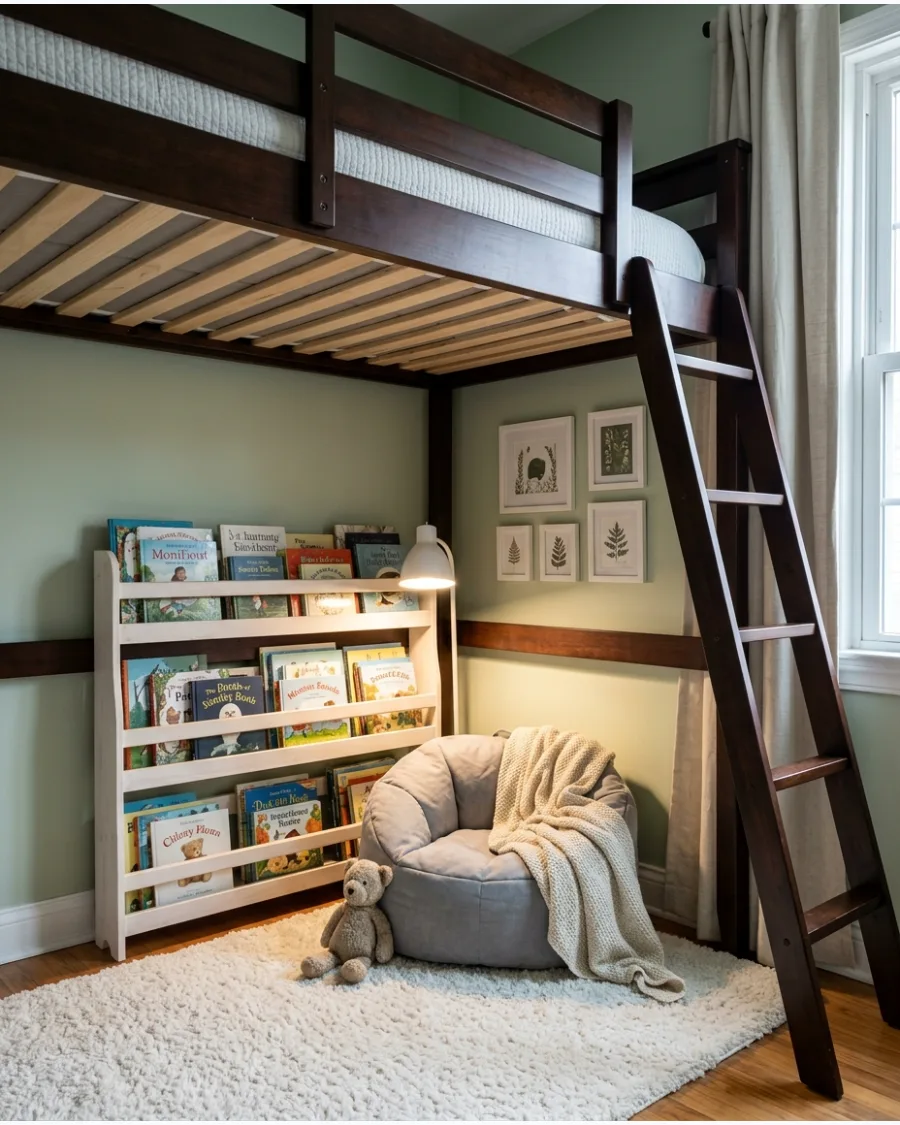
Turn the area beneath a loft or raised bunk bed into a book-filled hideaway. Add low shelves, soft seating, and a lamp that provides enough focused light.
Mount a small fan or ensure the space has plenty of airflow since the area under a bed can get warm. It uses a footprint that usually goes to waste.
- Loft bed frame
- Battery-operated LED strip lights
- Low-profile seating like a floor lounger
Best shortcut: Use adhesive LED strips along the bed slats above to light the whole area without taking up floor space.
27. Attic-Eaves Reading Nook
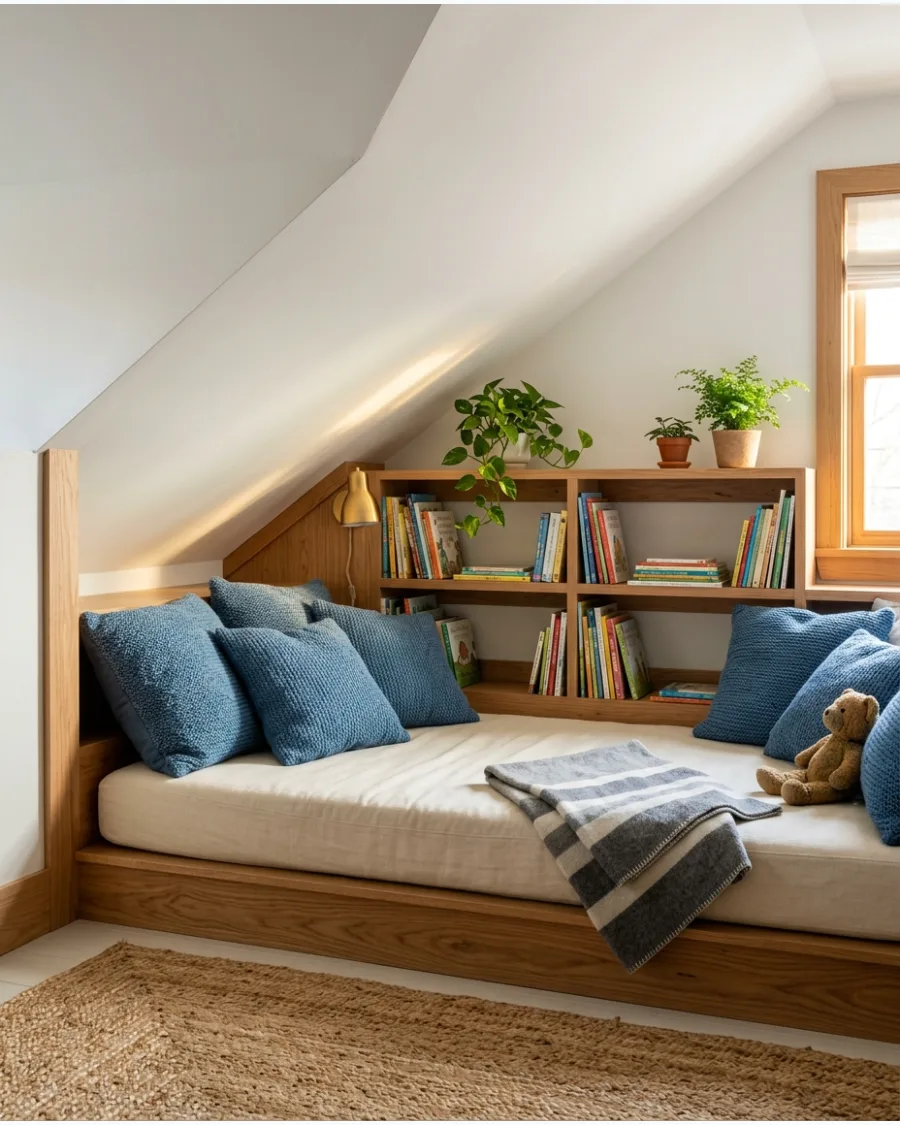
Use the low area beneath a sloped attic ceiling for a built-in bench or floor-level mattress. This awkward space can become one of the coziest parts of the room.
Measure the lowest point of the ceiling carefully before building to ensure there is enough clearance for a child to sit upright. It turns architectural challenges into a secret getaway.
- Platform base or floor mattress
- Built-in wall niches for book storage
- Recessed lighting in the slope
Quick win: Hang a small mirror on the vertical wall to make the tight eave space feel twice as large.
CLOSET READING NOOK IDEAS
28. Converted Closet Reading Nook
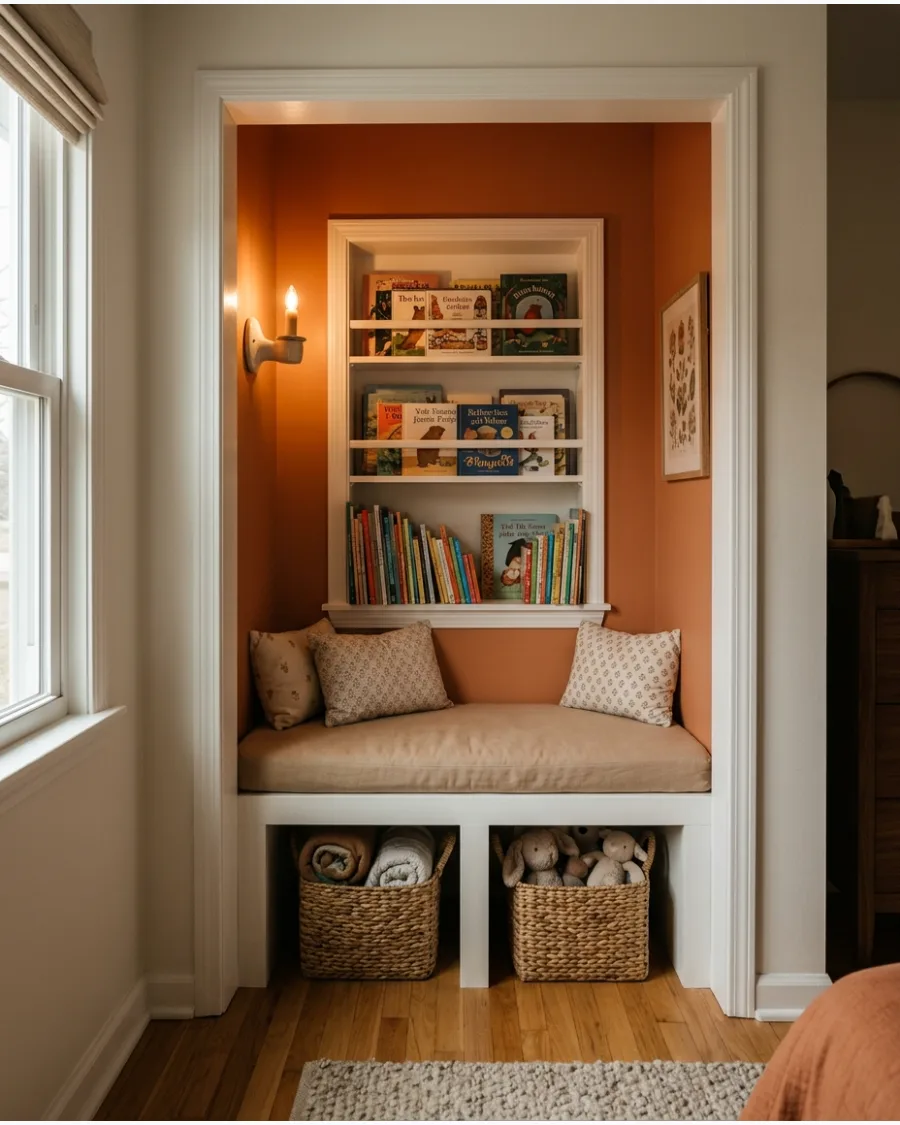
Remove the doors from an unused closet and turn the interior into a cushioned reading space. Paint the inside a contrasting color to give the nook its own identity.
Install a sturdy wooden base that is flush with the floor to keep the transition smooth. This creates a dedicated room-within-a-room.
- Standard bedroom closet
- Sand and paint the interior trim
- Plywood bench on a 2×4 frame
Most people skip this: Remove the metal closet rod and fill the holes with wood putty before painting for a clean look.
29. Closet Nook With Wallpaper
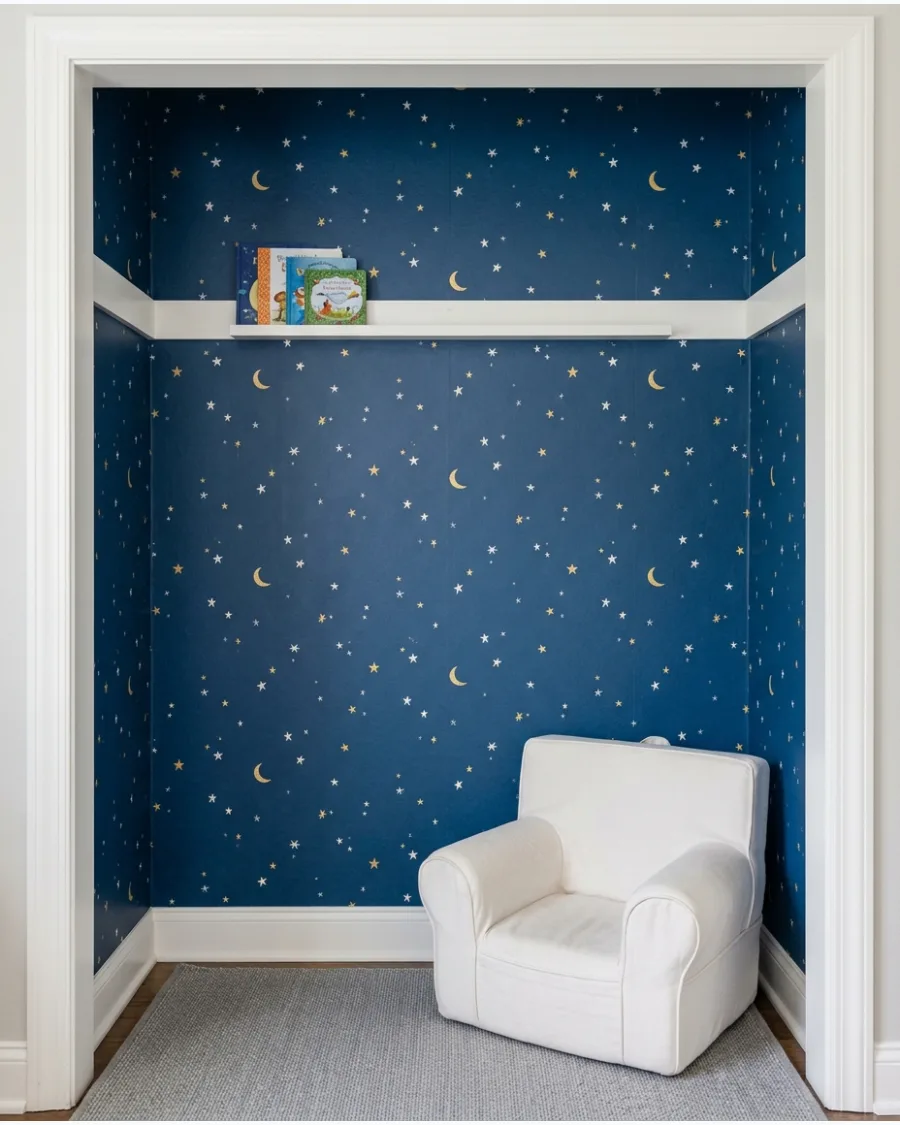
Cover the back wall of a converted closet with woodland, floral, star, or storybook wallpaper. Keep the surrounding room simpler so the patterned nook becomes the focal point.
Use peel-and-stick wallpaper so you can easily update the look as your child’s interests change. It adds a whimsical touch to a small, contained area.
- Peel-and-stick wallpaper
- Squeegee for installation
- Coordinating solid-colored seat cushion
Best shortcut: Only wallpaper the back wall to save money and time while still making a big impact.
30. Closet Reading Nook With Curtains
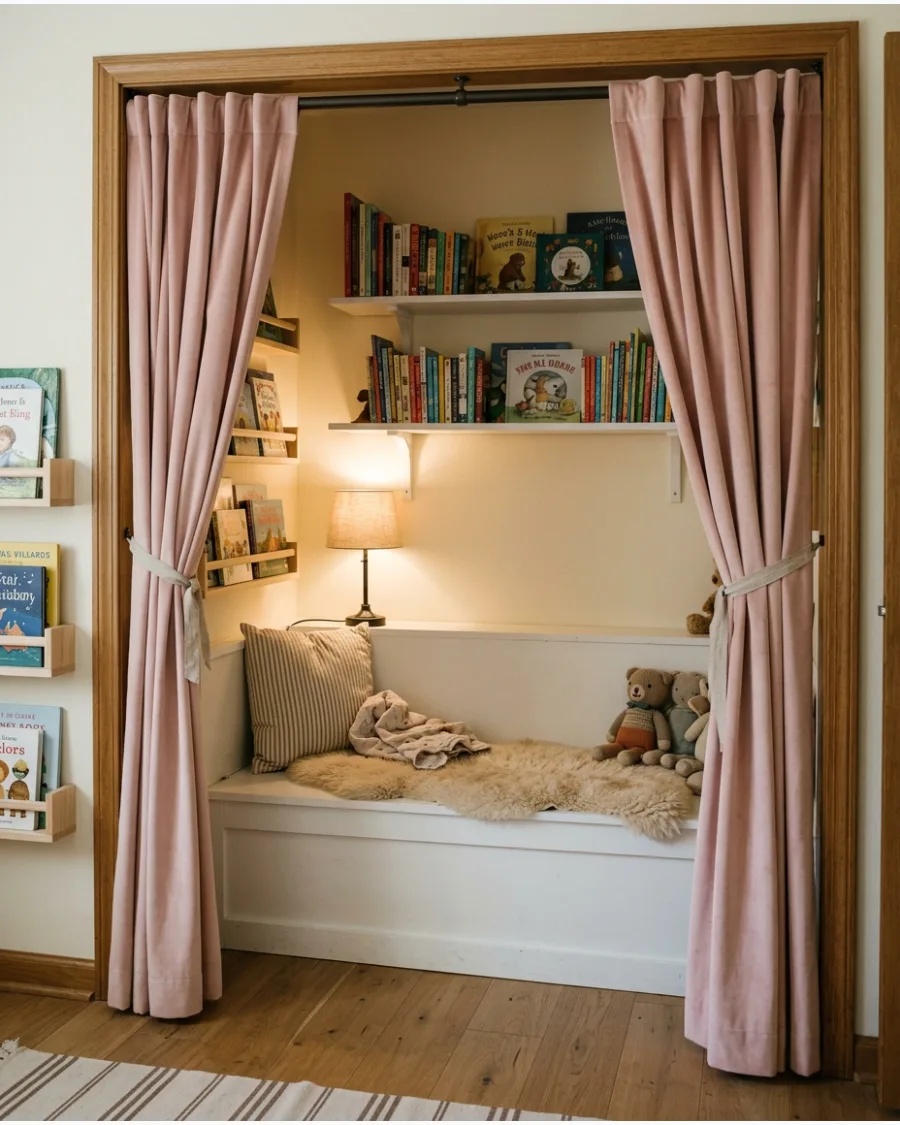
Replace closet doors with soft curtains that children can open or close. The curtains add privacy and make the reading area feel like a secret hideaway.
Choose a heavy, blackout-style fabric to block out the room’s main light for a cozy atmosphere. It is a much softer alternative to bulky wooden doors.
- Tension rod or ceiling track
- Velvet or heavy cotton curtains
- Tie-backs to keep curtains open during the day
Quick win: Use a tension rod instead of drilling holes to make this a renter-friendly closet upgrade.
31. Closet Bench With Drawers
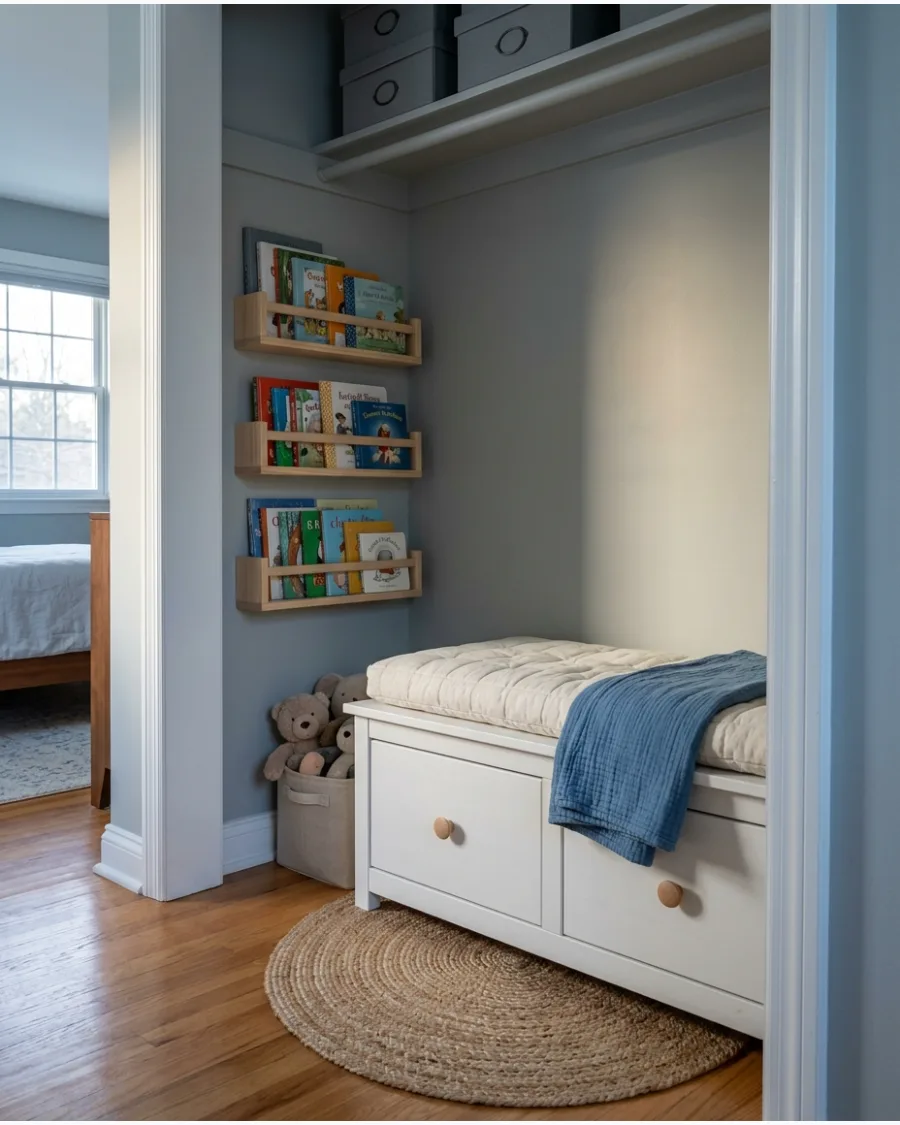
Build a small bench inside a closet and include drawers underneath to maximize every inch of the footprint. Add wall-mounted book ledges so the floor remains clear and easy to clean.
Installing ledges at different heights lets children of various ages reach their favorite stories without help. Floating storage keeps the floor space open for a small, soft rug.
- Sourcing: Use pre-made kitchen base cabinets or custom-cut plywood for the bench.
- Setup: Anchor the bench frame directly into wall studs for maximum safety.
- Adaptation: Use adhesive-backed ledges in rental homes to avoid drilling into the closet walls.
Quick win: Label the drawers with small picture icons so kids know exactly where to put their books away.
32. Shared Closet Reading Corner
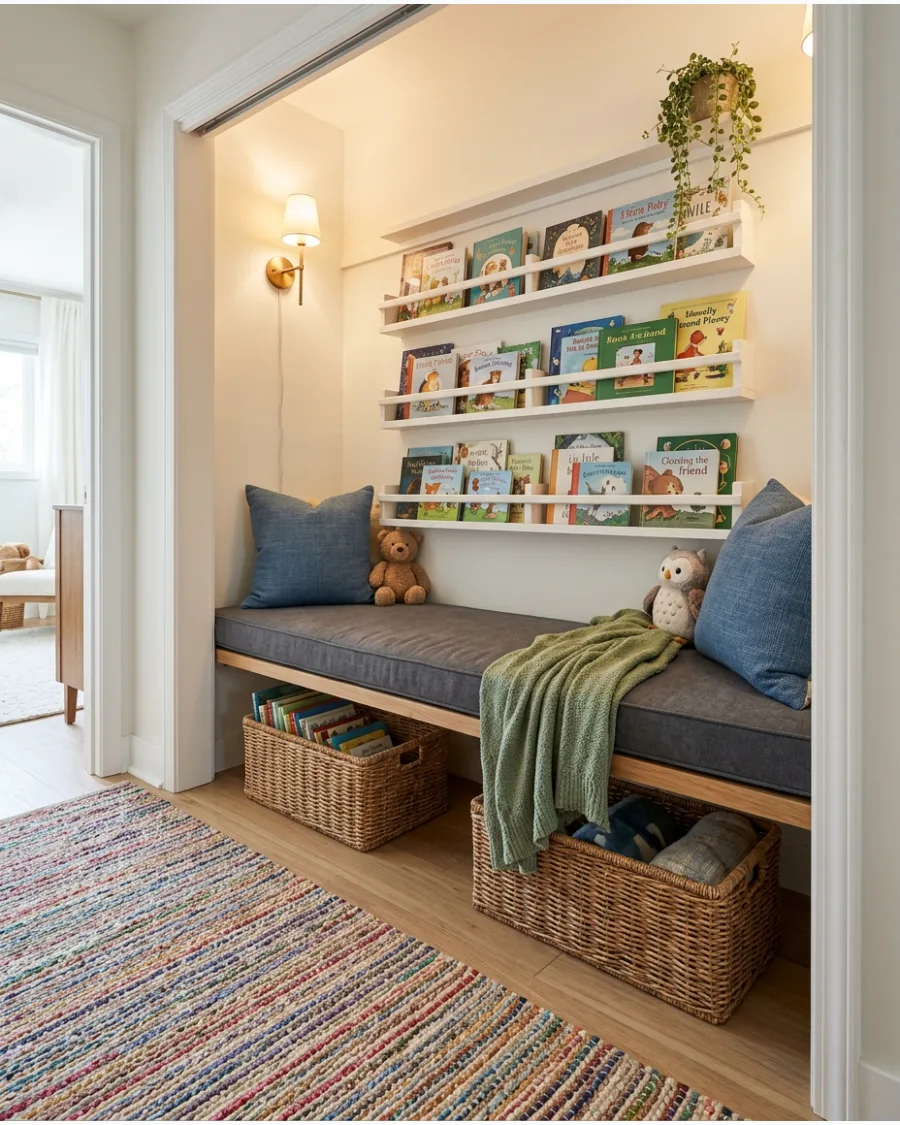
Create a wider closet nook with two cushions or one long bench for siblings to read together. Use baskets on opposite sides to give each child a personal book collection.
Symmetry in a shared space prevents arguments over who owns which book or pillow. This layout works best in a standard double-door closet where the middle divider has been removed.
- Sourcing: Look for oversized floor cushions or high-density foam at craft stores.
- Setup: Place a small shared table or divider in the center to hold drinks or snacks.
- Adaptation: Swap the built-in bench for two separate beanbags if you want a non-permanent setup.
Most people skip this: Install a dual-head wall lamp so each child has their own directed light source for reading.
DIY AND BUDGET READING NOOKS
33. DIY Crate Bookshelf Nook
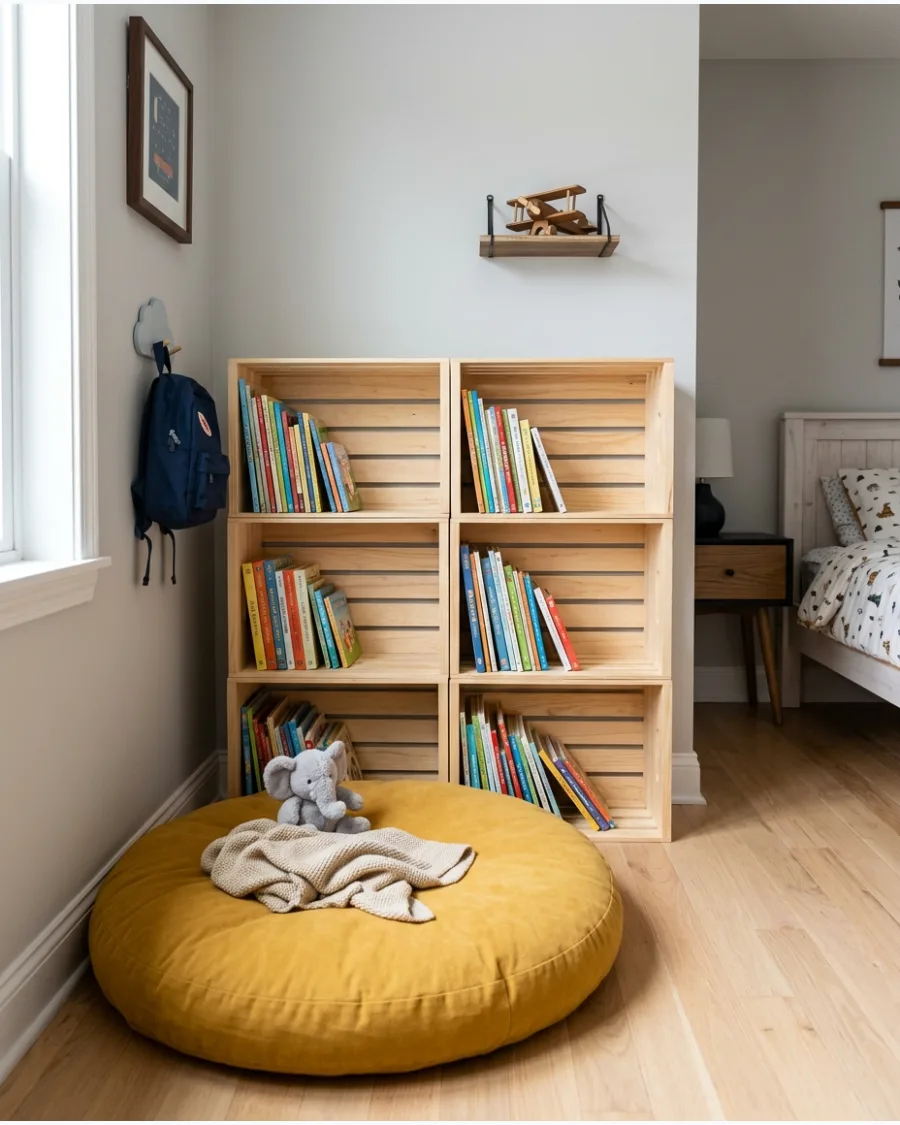
Stack securely fastened wooden crates to create low book storage beside a floor cushion. Paint or stain the crates to coordinate with the child’s room.
Sanding every edge of the crates is the most important step to prevent splinters during quiet time. This modular setup allows for easy expansion as the book collection grows over the years.
- Sourcing: Buy unfinished pine crates from local craft or hardware stores.
- Setup: Use wood screws to join the crates together before anchoring the entire unit to the wall.
- Adaptation: Paint the inside of each crate a different bright color for a playful, rainbow effect.
Quick win: Add felt pads to the bottom of the crates to protect hardwood or laminate floors from scratches.
34. Mattress Reading Nook
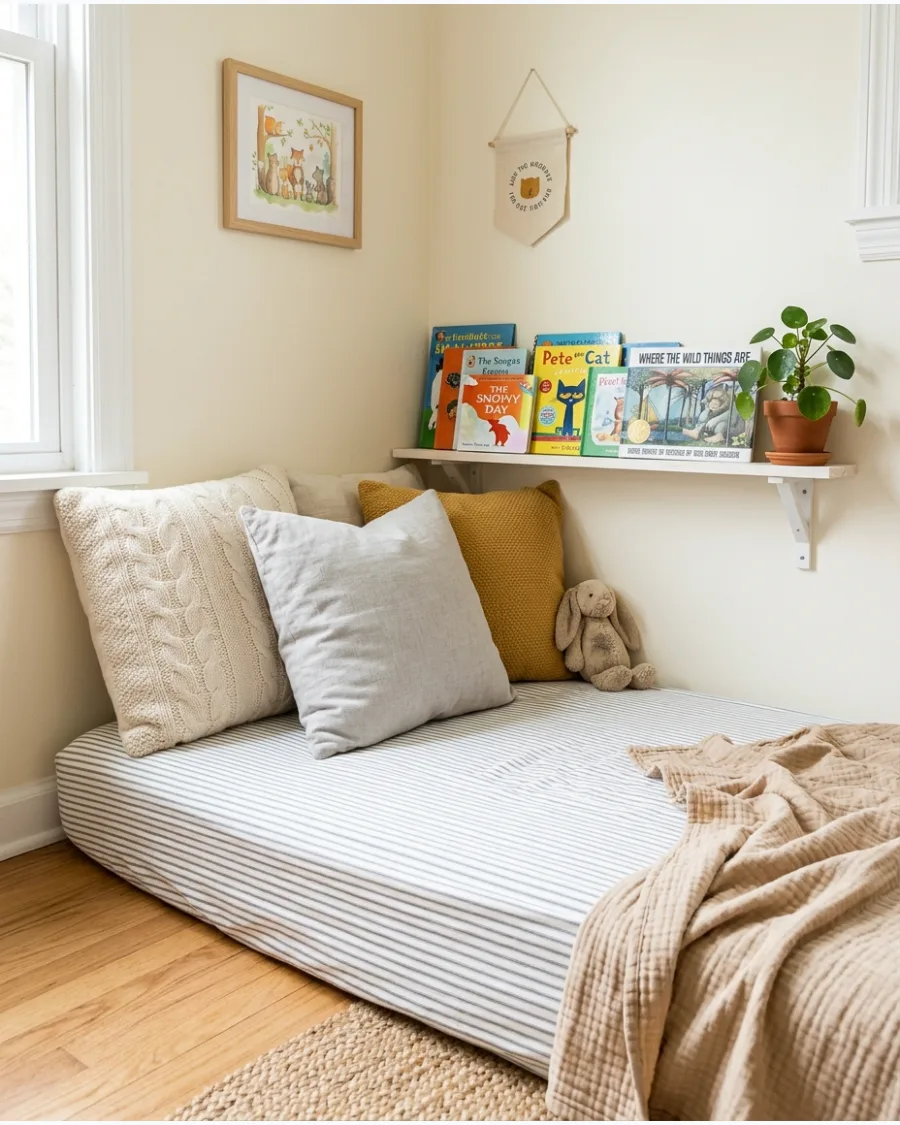
Place a small crib mattress or padded mat directly on the floor to create an affordable lounging area. Add removable covers that can be washed easily after everyday use.
Standard crib sheets fit most small mattresses perfectly and offer endless pattern options for a quick room update. This low-profile design is very safe for toddlers who might roll off a traditional chair.
- Sourcing: Repurpose an old crib mattress or buy a thick foam mattress topper.
- Setup: Lean the mattress against a corner to provide instant back support for the reader.
- Adaptation: Place a waterproof mattress protector under the sheet to handle accidental spills.
Best shortcut: Place a non-slip rug pad under the mattress to keep it from sliding on smooth floors.
35. Pallet-Style Reading Bench
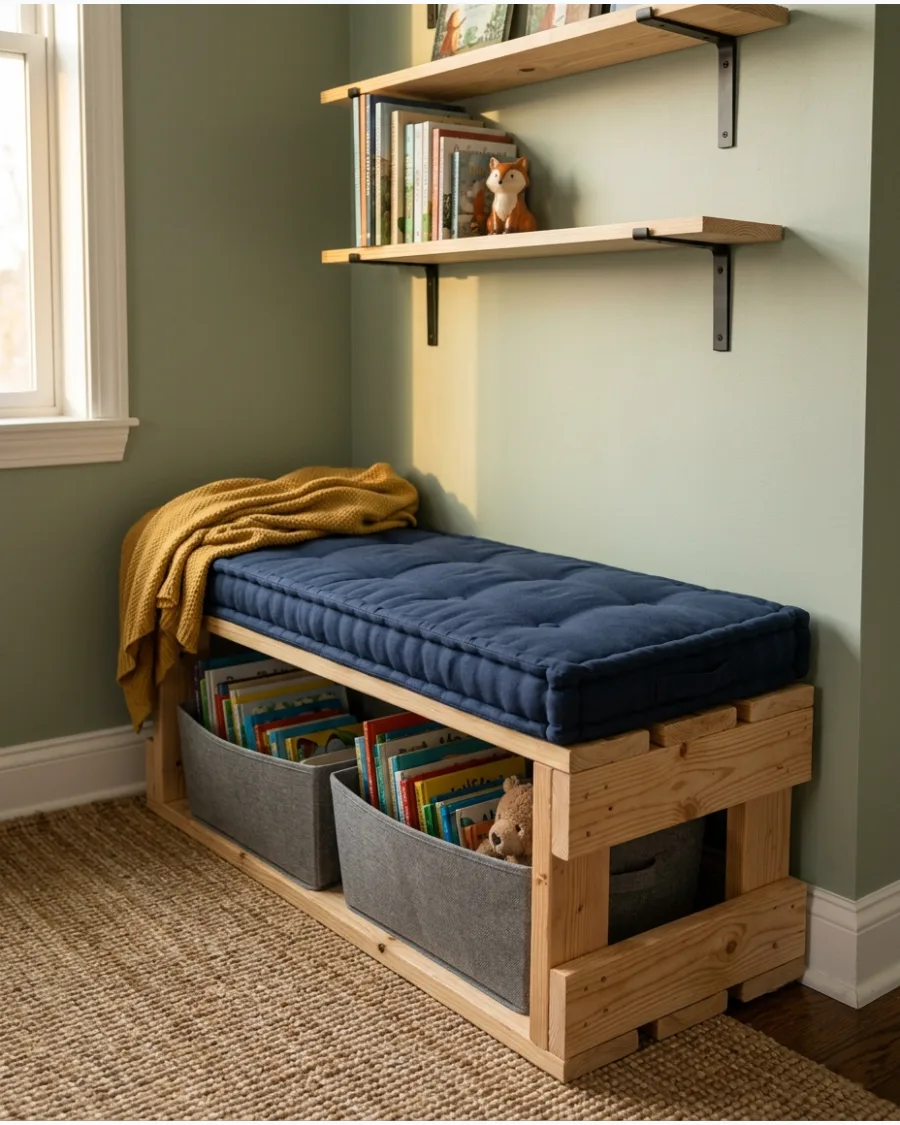
Build a low, smooth-edged wooden bench with storage space underneath for bins or loose books. Finish all surfaces carefully and top the bench with a thick fitted cushion.
Using new lumber instead of old shipping pallets ensures the wood is free of harmful chemicals and pests. This sturdy piece can also double as a step stool for reaching higher wall shelves.
- Sourcing: Purchase pine or cedar boards from a local hardware store for a clean look.
- Setup: Use countersunk screws and wood filler for a smooth, professional finish.
- Adaptation: Add heavy-duty casters with locks to make the bench mobile for cleaning.
Most people skip this: Apply a clear water-based polyurethane coat to make the wood easy to wipe clean with a damp cloth.
36. Repurposed Toy Storage Bench
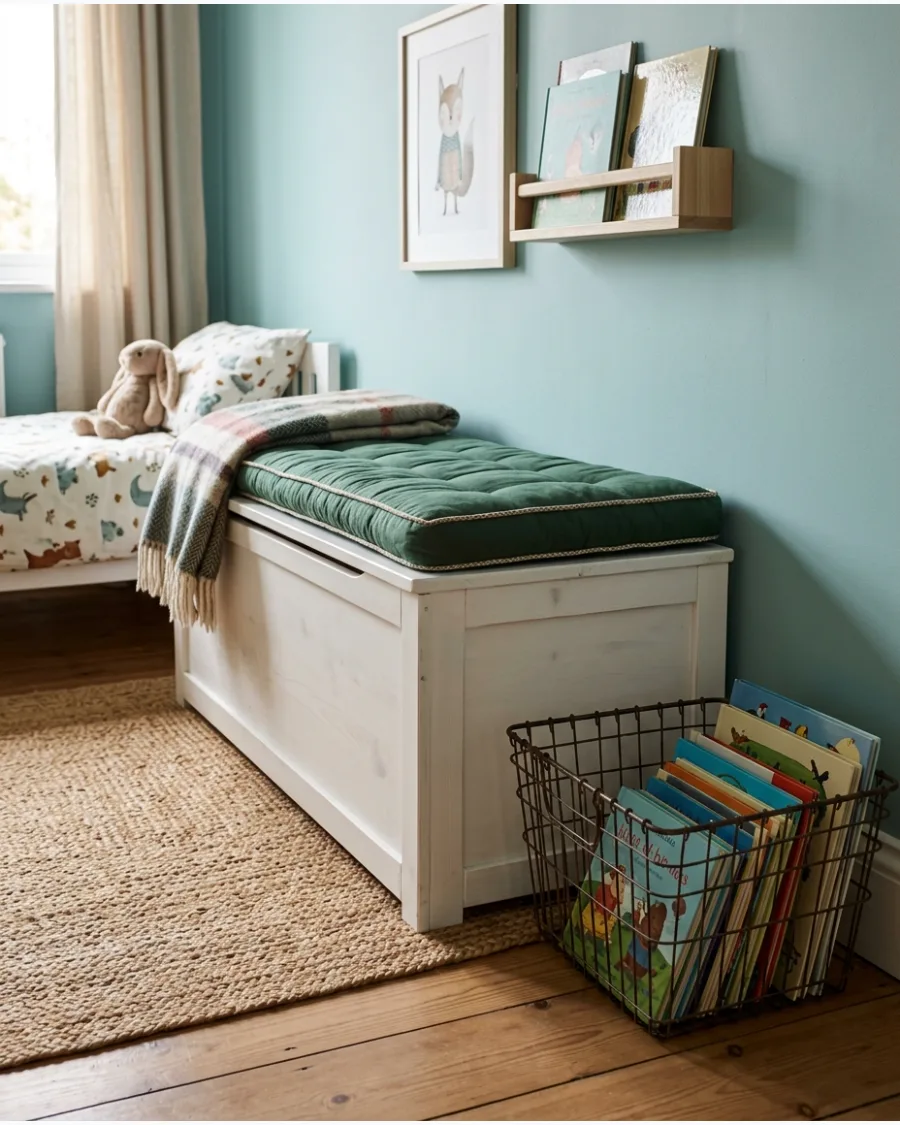
Turn an existing toy chest or storage bench into a reading seat by adding a padded top. Keep frequently read books in an open basket beside it for easy access.
A heavy lid should always have a safety hinge to prevent it from slamming on small fingers. This dual-purpose furniture saves valuable floor space in small bedrooms.
- Sourcing: Use standard toy boxes or sturdy entryway benches you already own.
- Setup: Secure the cushion with adhesive velcro strips to keep it from sliding off the lid.
- Adaptation: If the chest is too tall for a toddler, add a small non-slip footstool.
Quick win: Choose a cushion with a zippered cover so it can be tossed in the laundry regularly.
37. Curtain Canopy Reading Corner
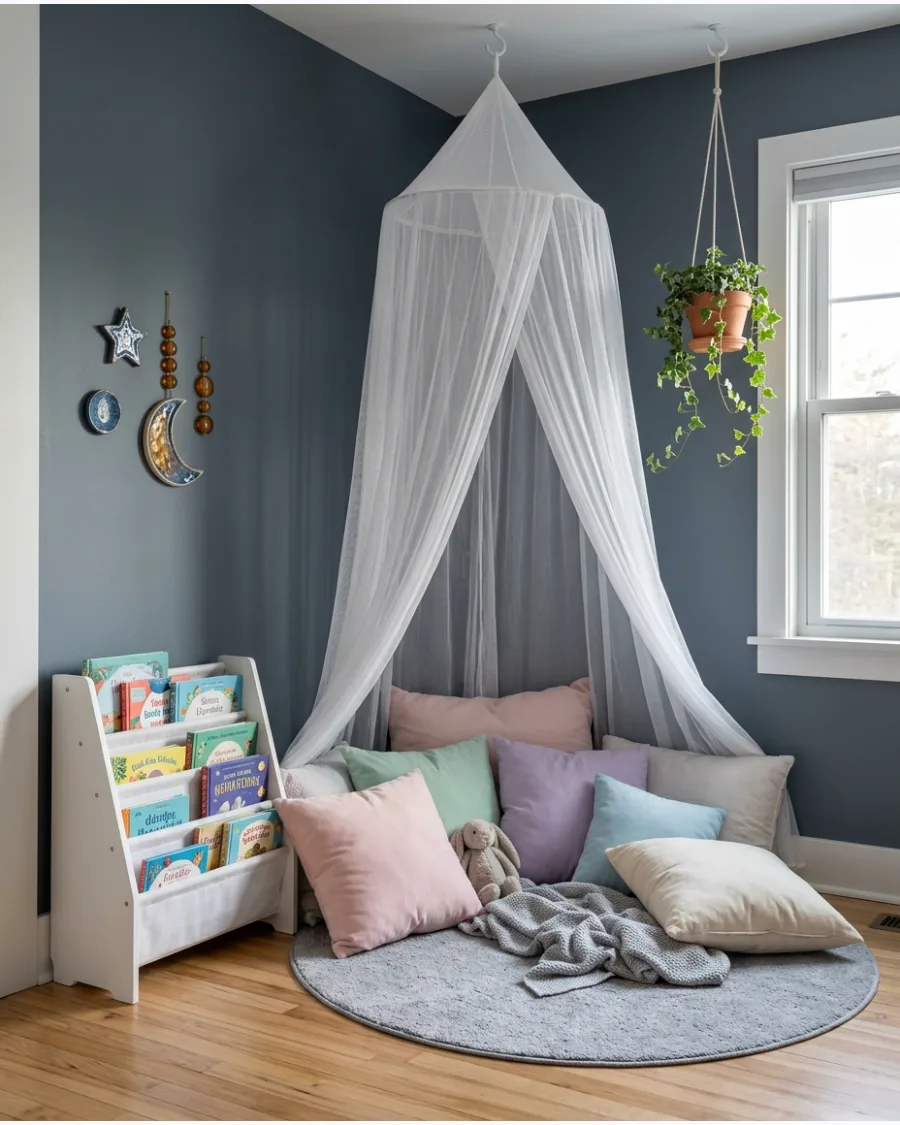
Suspend a lightweight canopy above a cushion-filled corner to create an inexpensive sense of enclosure. Keep the fabric away from lamps and choose an arrangement that remains easy to enter and exit.
Sheer fabrics allow light to filter through so the space doesn't feel too dark for reading. The ceiling-mounted design adds height to the room's decor.
- Sourcing: Use standard bed canopies or long sheer curtain panels and a hoop.
- Setup: Ensure the ceiling hook is screwed into a joist or use a heavy-duty toggle anchor.
- Adaptation: Use a hula hoop to create the circular frame for a custom DIY fabric version.
Best shortcut: Use a battery-powered puck light with a remote inside the canopy for cord-free illumination.
38. Painted Arch Reading Nook
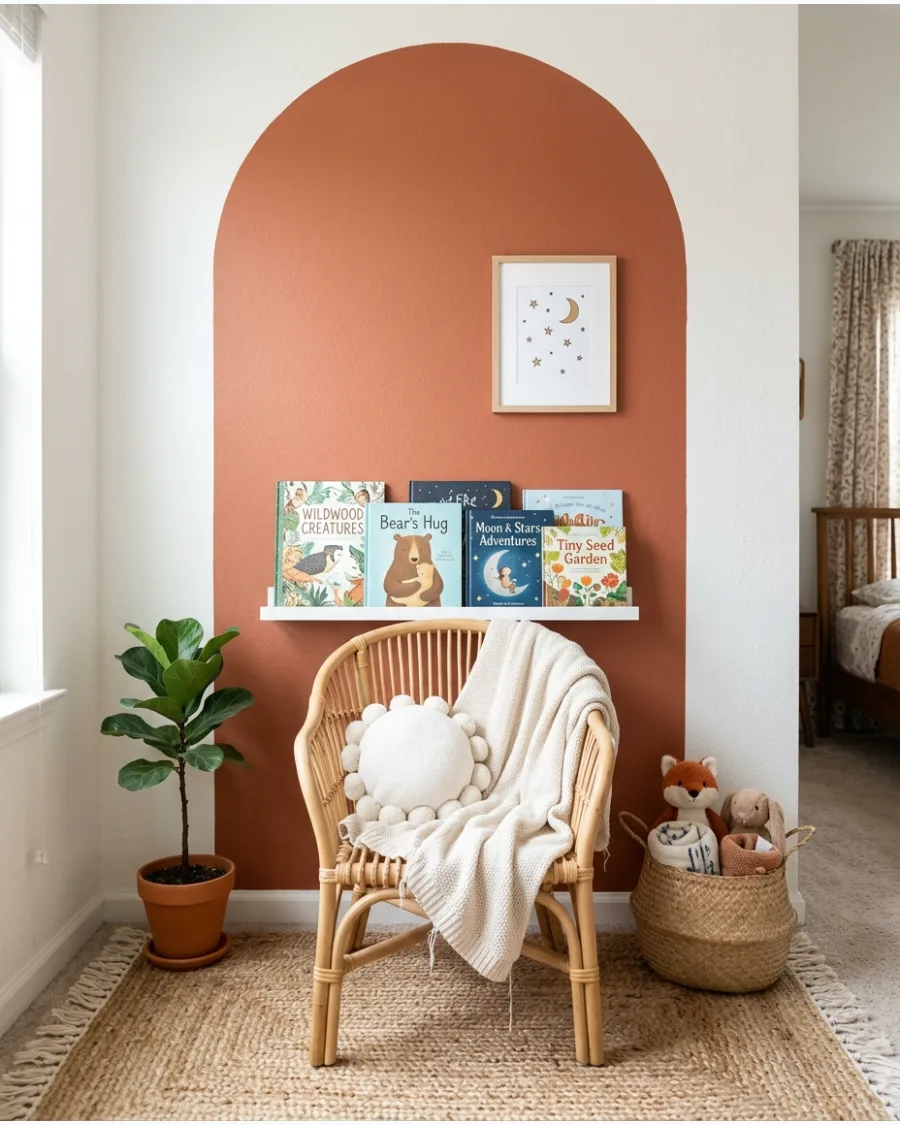
Paint a large arch behind a chair or floor cushion to visually define the reading area. Sage green, dusty blue, warm clay, or muted yellow can add color without requiring construction.
The arch shape naturally draws the eye and makes a simple chair feel like a special destination. This is a great way to use up leftover paint from previous home projects.
- Sourcing: Use sample-sized paint cans from a home center for a low-cost project.
- Setup: Use a string and a pencil to trace a perfect semi-circle for the top of the arch.
- Adaptation: Use a large removable wall decal if you are renting and cannot paint the walls.
Quick win: Paint the arch slightly wider than the furniture to create a more balanced and intentional look.
39. Picture-Ledge Library
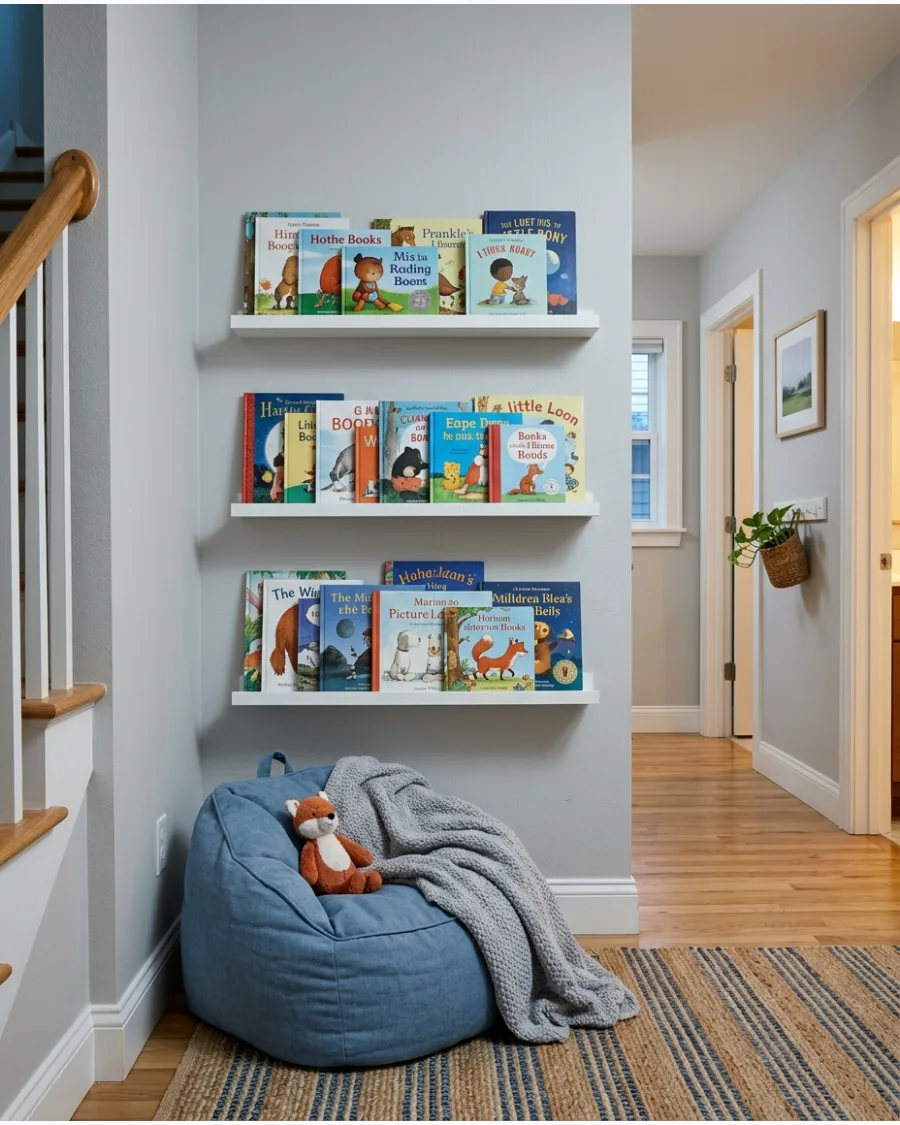
Install several shallow picture ledges so books can be displayed with their covers facing forward. This creates colorful wall decor and helps younger children choose books independently.
Arranging books by color on these thin shelves turns a messy collection into a striking visual feature. The slim profile makes this ideal for narrow hallways or spaces behind doors.
- Sourcing: Standard 24-inch or 45-inch picture ledges from home decor stores.
- Setup: Space the shelves at least 12 inches apart to accommodate taller picture books.
- Adaptation: Mix in small framed photos or art prints between the books for a gallery feel.
Most people skip this: Always check the weight limit of the ledges to ensure they can hold heavy hardcover books safely.
40. Rolling Book Cart Nook
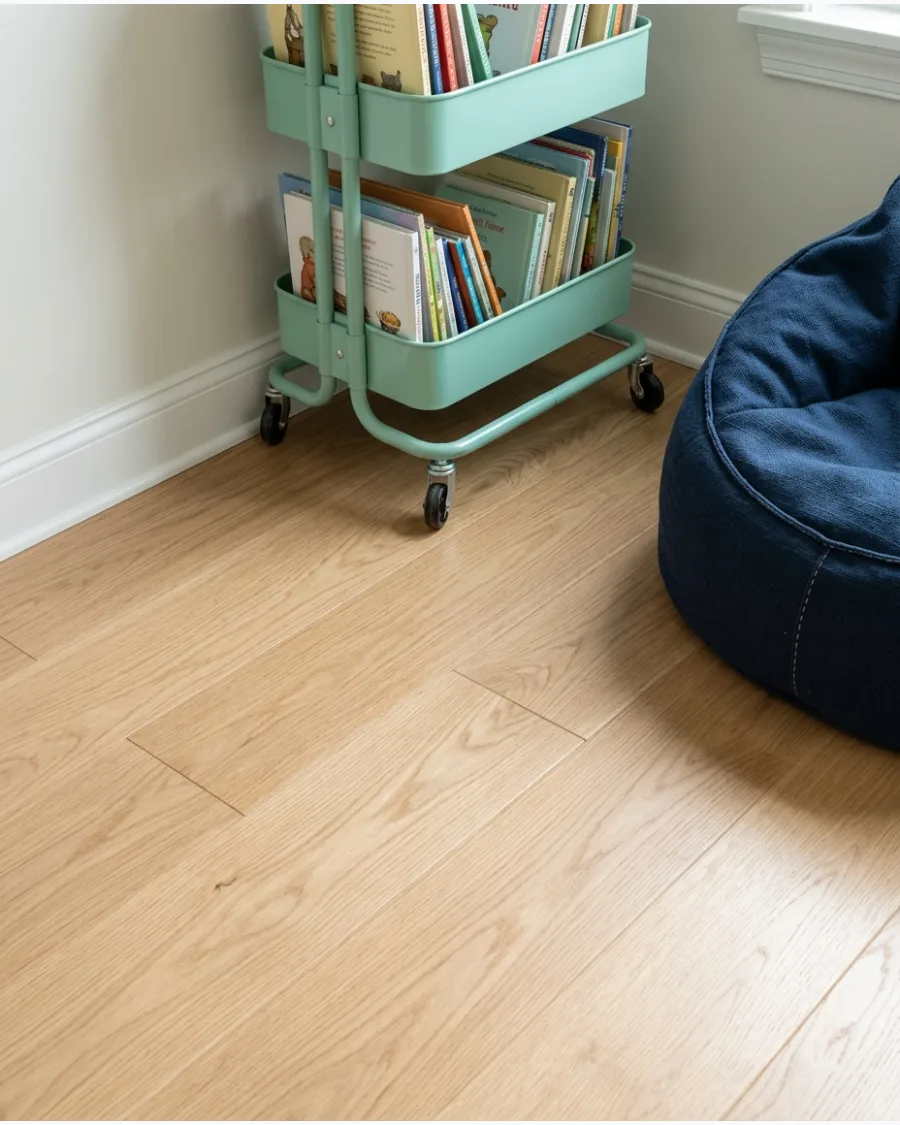
Place a small rolling book cart beside a beanbag or floor cushion for a mobile reading setup.
The cart can move between a bedroom, living room, and playroom whenever a temporary reading area is needed. Metal utility carts are incredibly durable and can be wiped down in seconds if they get dusty. The multi-tier design keeps various reading levels organized and accessible.
- Sourcing: Look for metal kitchen or craft utility carts with three tiers.
- Setup: Organize books by height or genre on different tiers to help kids find what they want.
- Adaptation: Add magnetic hooks to the side of the cart to hold headphones or a clip-on light.
Quick win: Use a cart with locking wheels so it stays firmly in place while the child is reaching for a book.
IMAGINATIVE AND THEMED READING NOOKS
41. Woodland Reading Nook
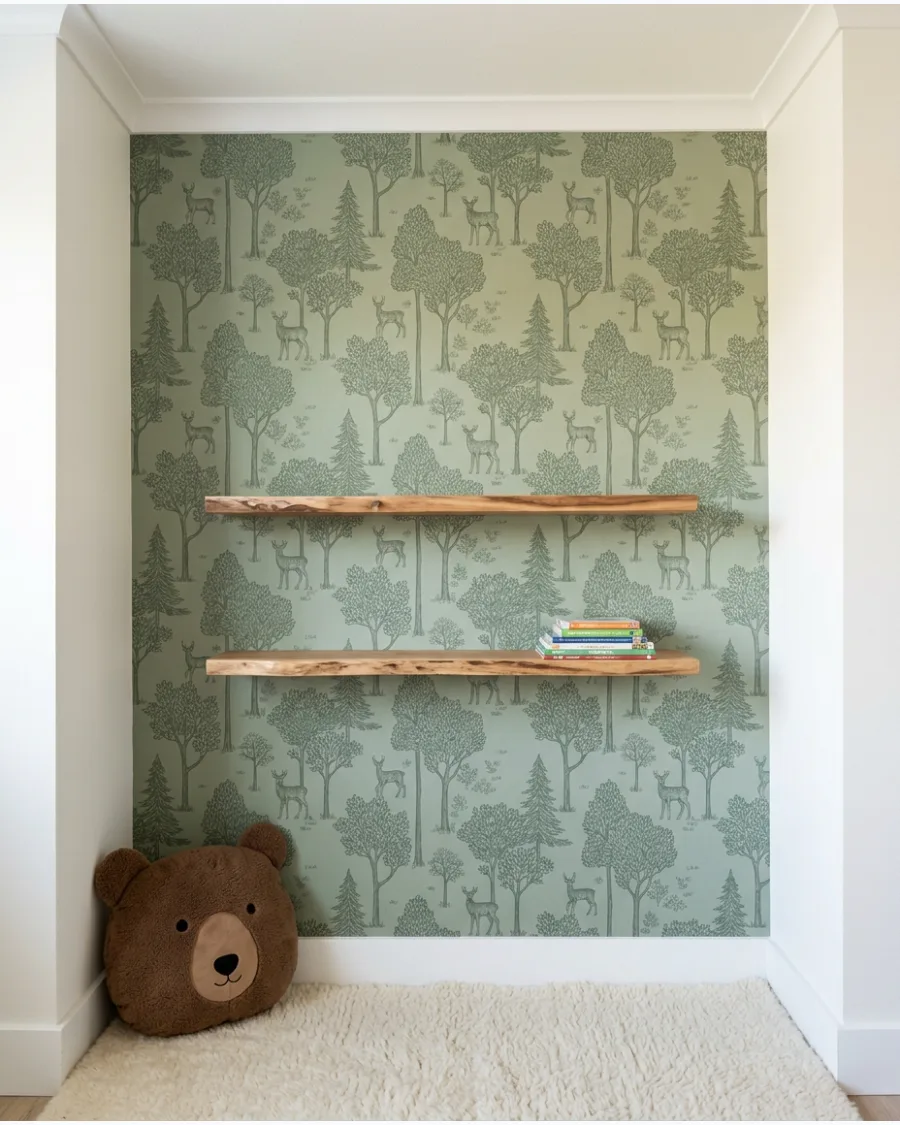
Decorate a corner with forest-themed wallpaper and sturdy wooden shelves to bring the outdoors inside. Animal-shaped pillows add a touch of character without overcomplicating the floor plan.
Mount natural wood shelves at child-height to keep the woodland theme functional for daily use. High-quality peel-and-stick wallpaper allows the theme to change easily as the child gets older.
- Budget: $50–$150 for wallpaper and shelving.
- Installation: Apply peel-and-stick wallpaper to one corner and mount shelves using a level.
- Adaptation: Use removable wall decals instead of full wallpaper for a smaller budget.
- Quick win: Use a tree stump stool as a small side table for books and water bottles.
Quick win: Use a tree stump stool as a small side table for books and water bottles.
42. Enchanted Garden Book Corner
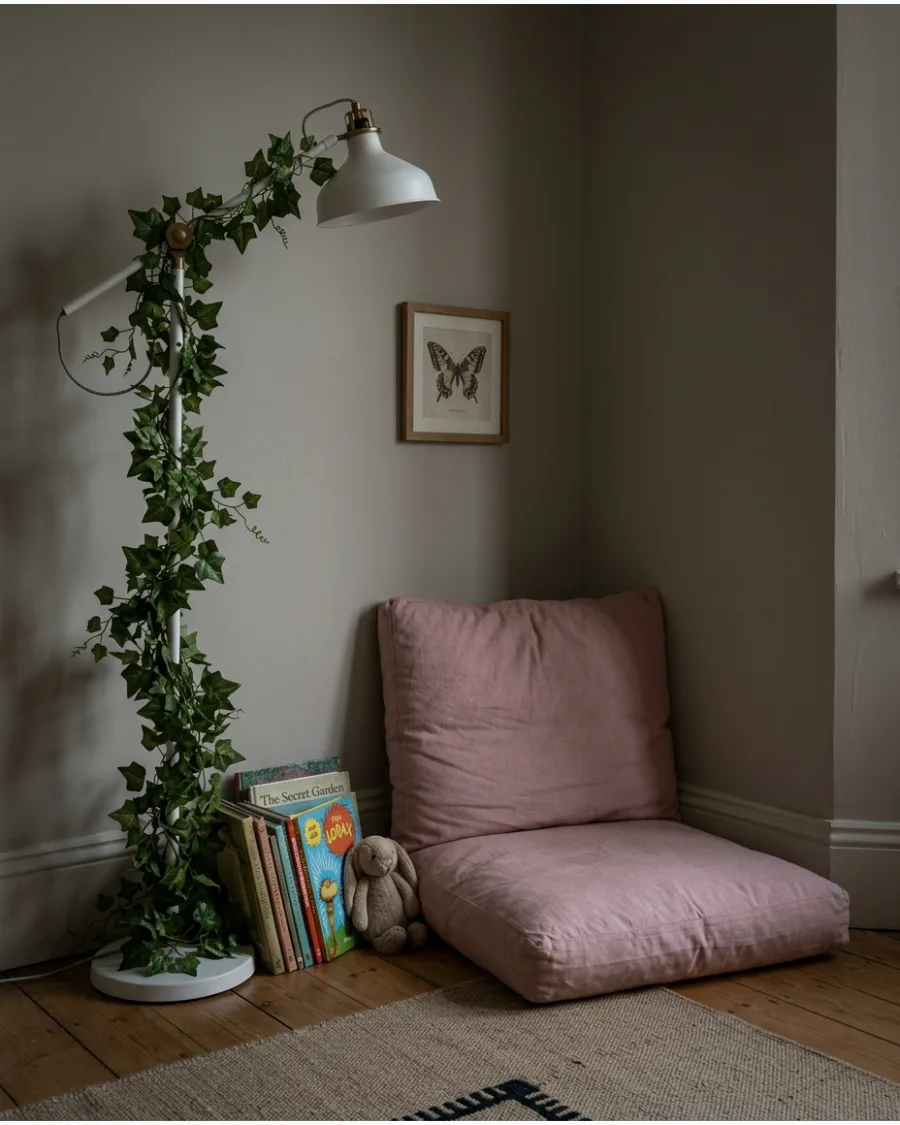
Use soft floral details and leafy garlands to create a garden-inspired reading space. A pale green or blush cushion grounds the area and provides a soft place to sit.
Wrap silk ivy around a simple floor lamp to bring the garden theme into the vertical space without cluttering the floor. This setup encourages imaginative play alongside reading time.
- Sourcing: Silk garlands and floral prints from craft or home stores.
- Placement: Position near a window to maximize the natural garden feel.
- Style: Pair with a lightweight floral throw blanket for extra texture.
- Most people skip this: Secure silk vines with clear zip ties so they stay in place on the lamp pole.
Most people skip this: Secure silk vines with clear zip ties so they stay in place on the lamp pole.
43. Space-Themed Reading Nook
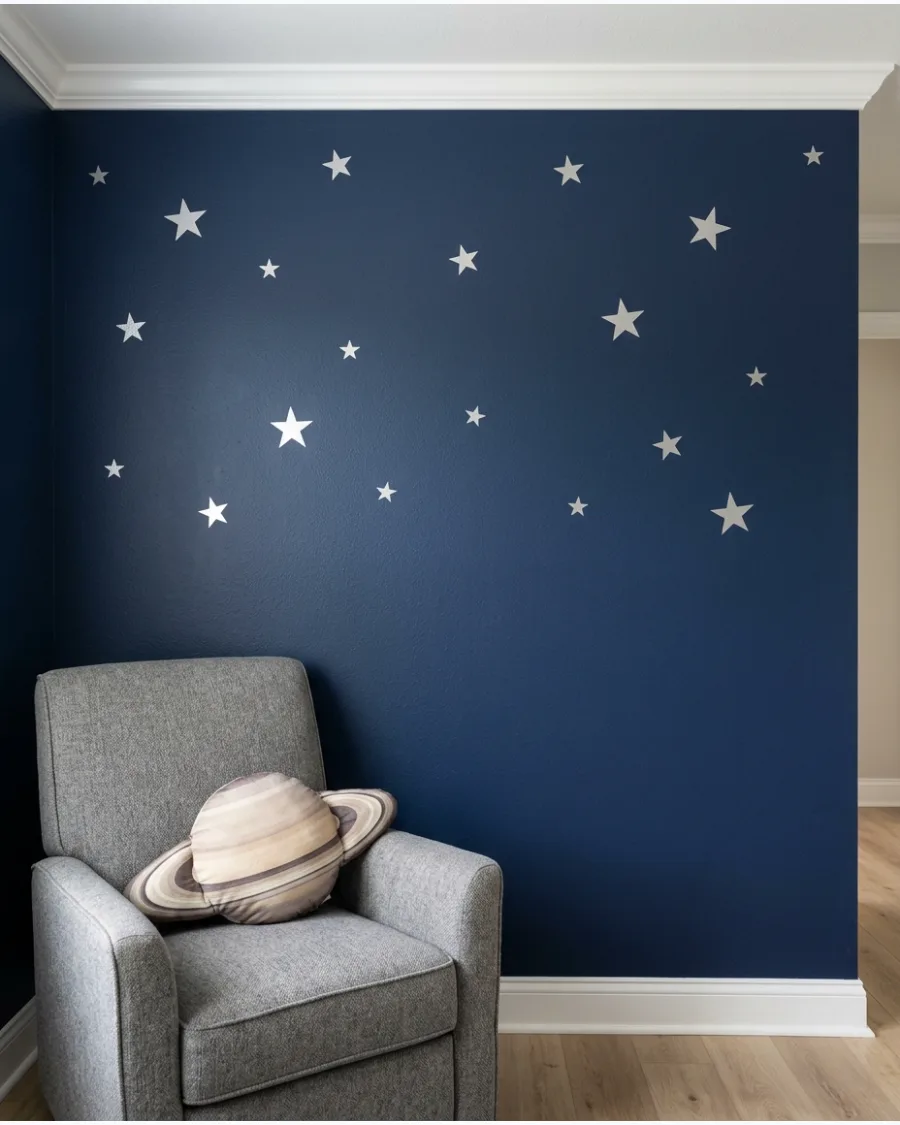
Add a dark blue accent wall and star decals to set a celestial mood. Planet-shaped pillows around a comfortable chair make the space feel cozy and themed.
Use glow-in-the-dark star stickers on the ceiling above the chair to create an immersive experience during evening reading sessions. Displaying space books on open ledges keeps the child’s interests at the center of the design.
- Timing: 1–2 hours to apply decals and set up the chair.
- Logistics: Place the chair first to ensure there is enough room for the decals to be visible.
- Budget: Affordable planet pillows and vinyl decals transform a standard chair.
- Best shortcut: Use a navy blue bedsheet as a temporary backdrop if you cannot paint the wall.
Best shortcut: Use a navy blue bedsheet as a temporary backdrop if you cannot paint the wall.
44. Coastal Reading Nook
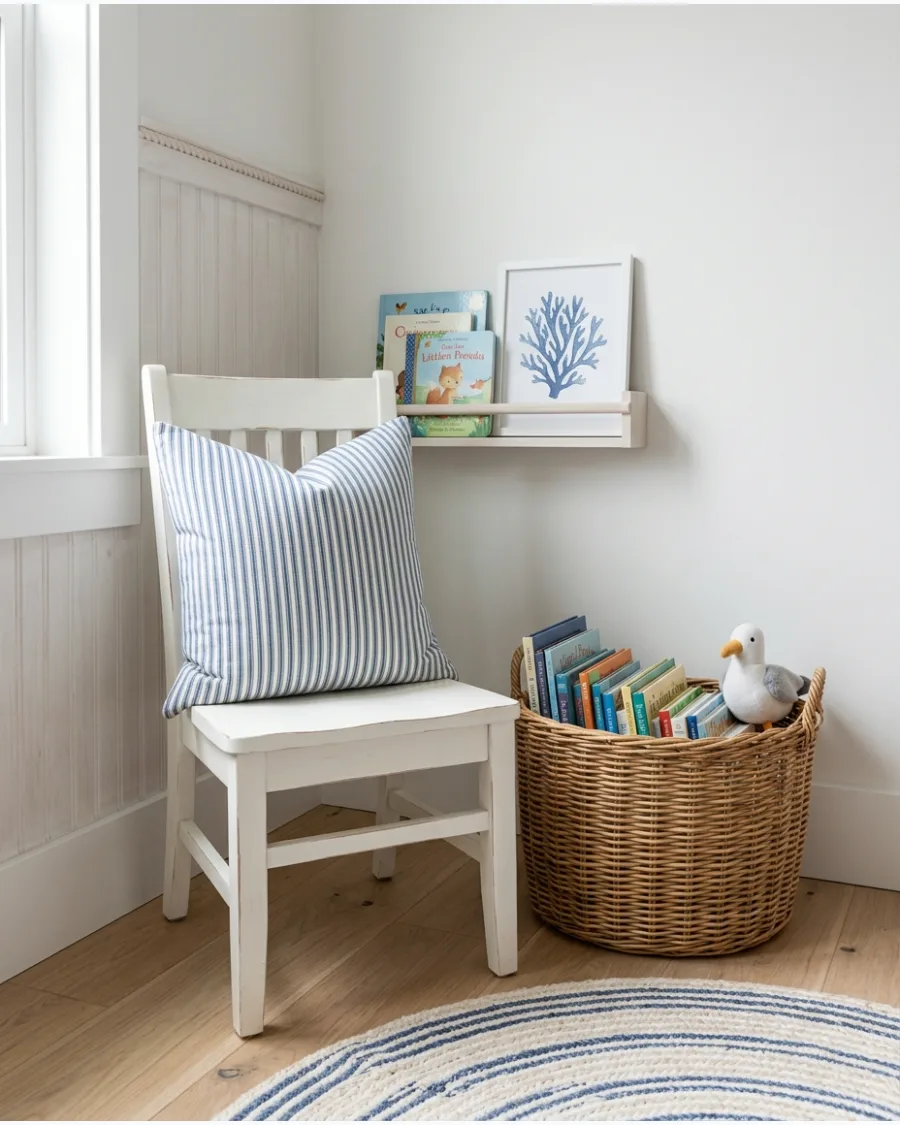
Combine pale blue, sandy beige, and natural wood for a relaxed coastal theme. Striped cushions and light wood furniture keep the vibe airy and bright.
Incorporate a wicker basket for book storage to add a texture that mimics beach grass while keeping the floor tidy. Ocean and adventure books complete the thoughtfully curated look.
- Materials: Wicker, cotton, and light-finished wood.
- Storage: Use the basket for oversized picture books that do not fit on standard shelves.
- Style: Keep the wall color neutral to let the blue accents pop.
- Quick win: Toss a small cream-colored knit blanket over the chair for a sea-foam look.
Quick win: Toss a small cream-colored knit blanket over the chair for a sea-foam look.
45. Camping Tent Reading Nook
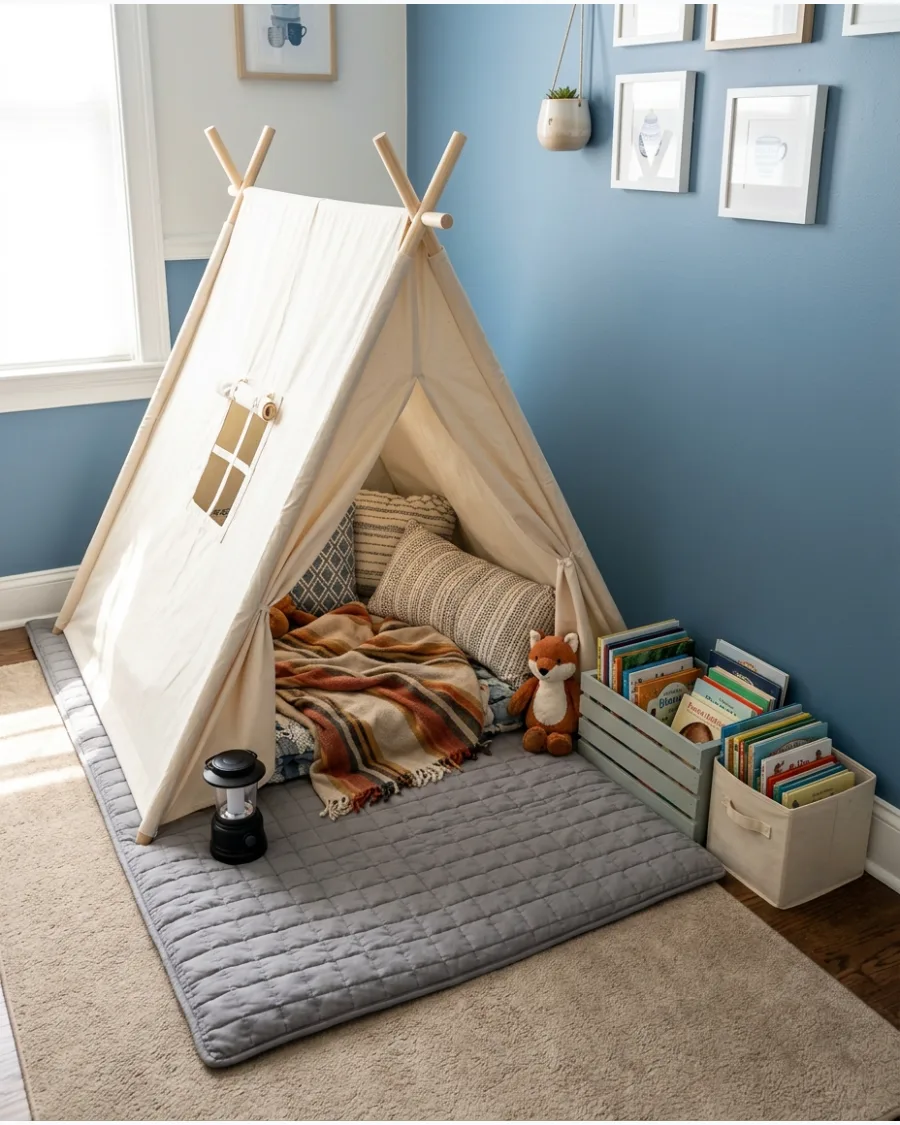
Set up a small fabric tent with a padded floor to create an adventurous reading hideaway. A basket of books kept just outside the entrance makes for easy access.
Place a battery-operated lantern inside the tent to provide focused light that does not require a nearby wall outlet. The enclosed shape is perfect for children who need a private space to focus.
- Assembly: Choose a collapsible tent for easy storage when not in use.
- Safety: Ensure the floor mat is thick enough to cushion the floor for long reading sessions.
- Adaptation: Use a sheer fabric tent for a lighter, more open feel in a small room.
- Most people skip this: Put a small rug under the tent to prevent it from sliding on hard floors.
Most people skip this: Put a small rug under the tent to prevent it from sliding on hard floors.
46. Storybook Castle Nook
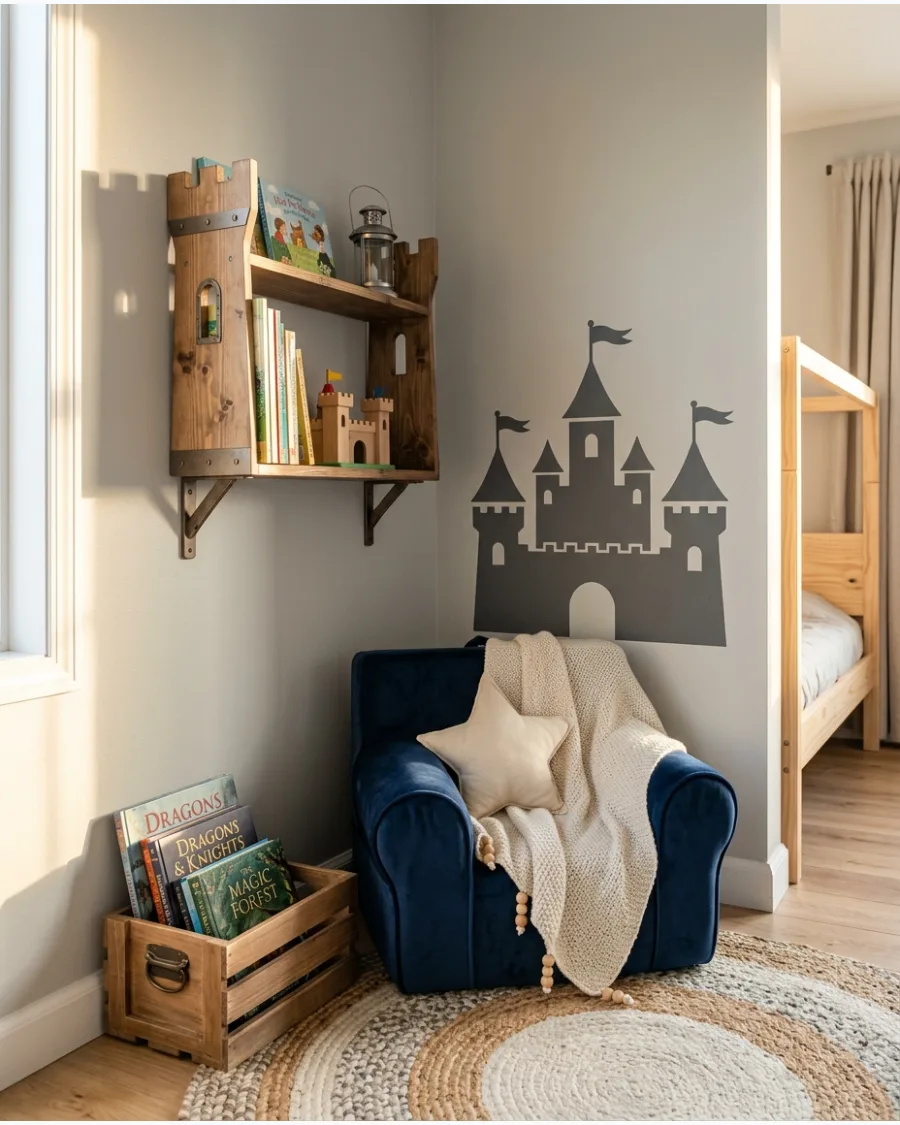
Use a painted castle outline or turret-shaped shelf to create a fantasy-inspired corner for reading. Avoid filling the area with too many decorations so children still have room to sit comfortably.
Apply a simple vinyl castle silhouette to the wall to define the zone without taking up any actual floor space. A single fabric banner can add color without adding clutter.
- Budget: Vinyl decals are a low-cost alternative to custom murals.
- Setup: Center the seating in front of the wall decal for a balanced look.
- Adaptation: For renters, use a castle-shaped headboard or a large piece of framed art.
- Best shortcut: Use blue painter's tape to map out the decal placement before committing.
Best shortcut: Use blue painter's tape to map out the decal placement before committing.
47. Rainbow Reading Corner
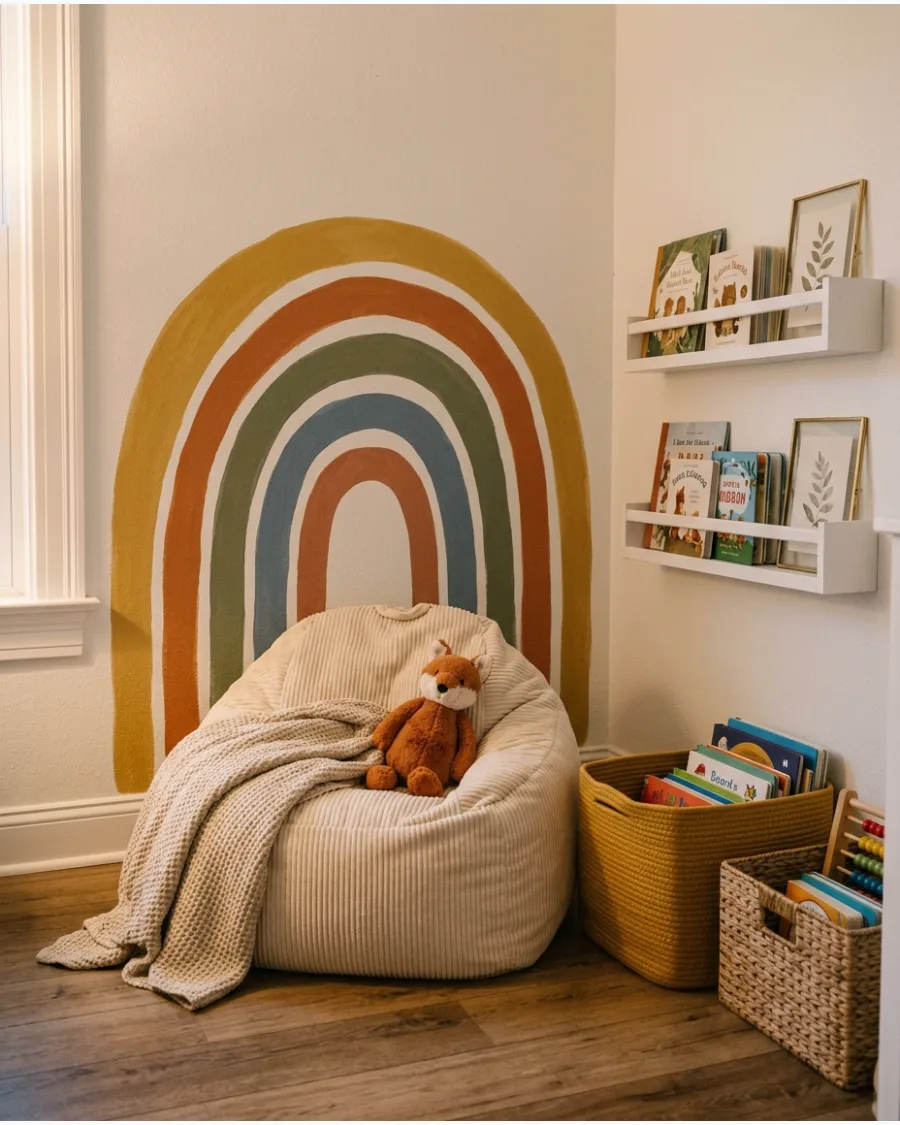
Add a muted rainbow mural above a neutral chair or bench to create a cheerful focal point. Repeat two or three of the rainbow colors in the pillows and storage baskets for a coordinated look.
Choose a rainbow design with earthy tones like mustard and terracotta to ensure the space feels sophisticated as the child grows. Coordination prevents the bright colors from feeling too busy.
- Sourcing: Look for large-scale wall decals for a professional mural look without the paint.
- Placement: Keep the mural at the center of the nook to anchor the seating.
- Style: Use solid-colored pillows to avoid clashing with the rainbow pattern.
- Quick win: Organize books by spine color to create a 'rainbow' on the shelf.
Quick win: Organize books by spine color to create a 'rainbow' on the shelf.
48. Vintage Library Reading Nook
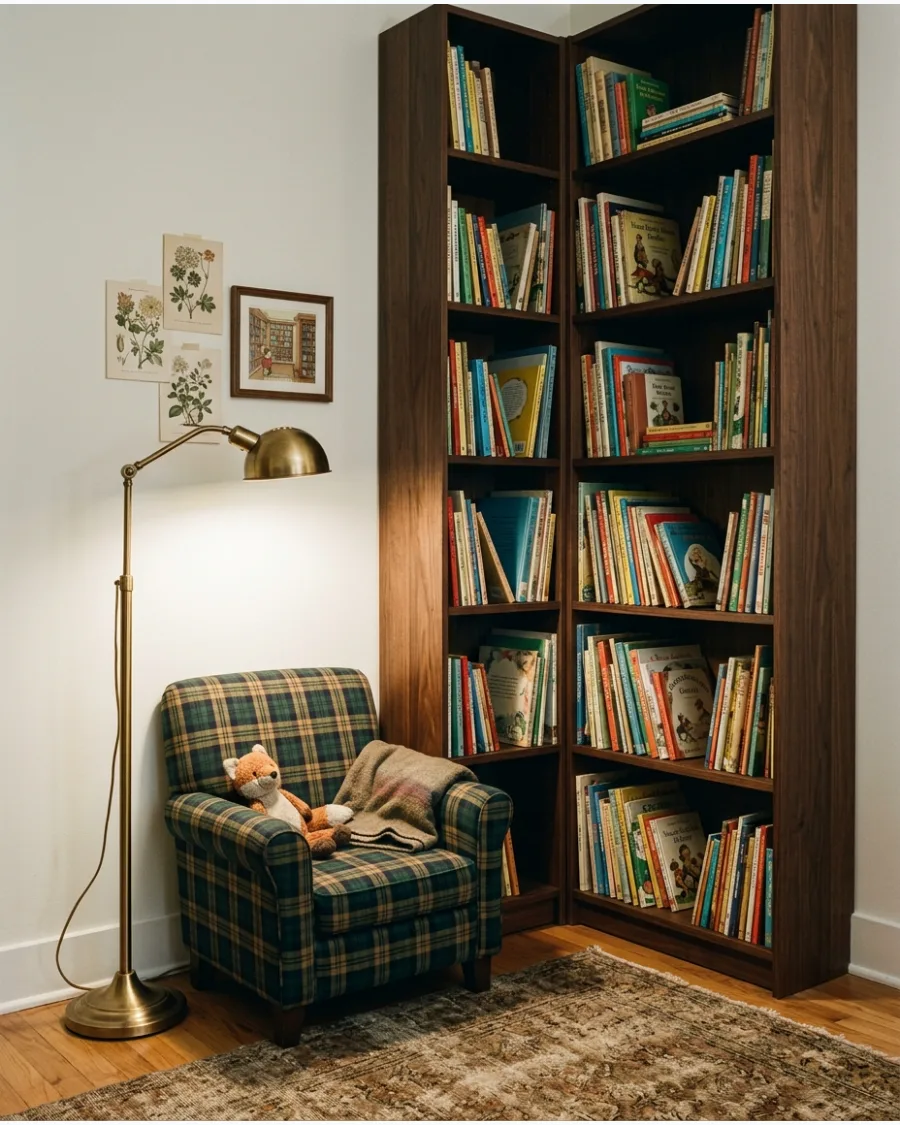
Combine dark wood shelves and plaid cushions for a traditional, studious appearance. A classic reading lamp provides warm, focused light for evening sessions.
Hang framed vintage book illustrations at the child's eye level to make the space feel like a curated gallery. Balancing the deeper tones with a light wall or rug keeps the space welcoming.
- Sourcing: Check thrift stores for unique frames and vintage-style lamps.
- Lighting: Choose a warm-toned LED bulb to enhance the vintage atmosphere.
- Adaptation: Use a dark-stained crate if a full bookshelf is too large for the room.
- Most people skip this: Use museum putty on the bottom of frames to keep them straight in high-traffic areas.
Most people skip this: Use museum putty on the bottom of frames to keep them straight in high-traffic areas.
CALM AND FLEXIBLE READING SPACES
49. Sensory-Friendly Reading Nook
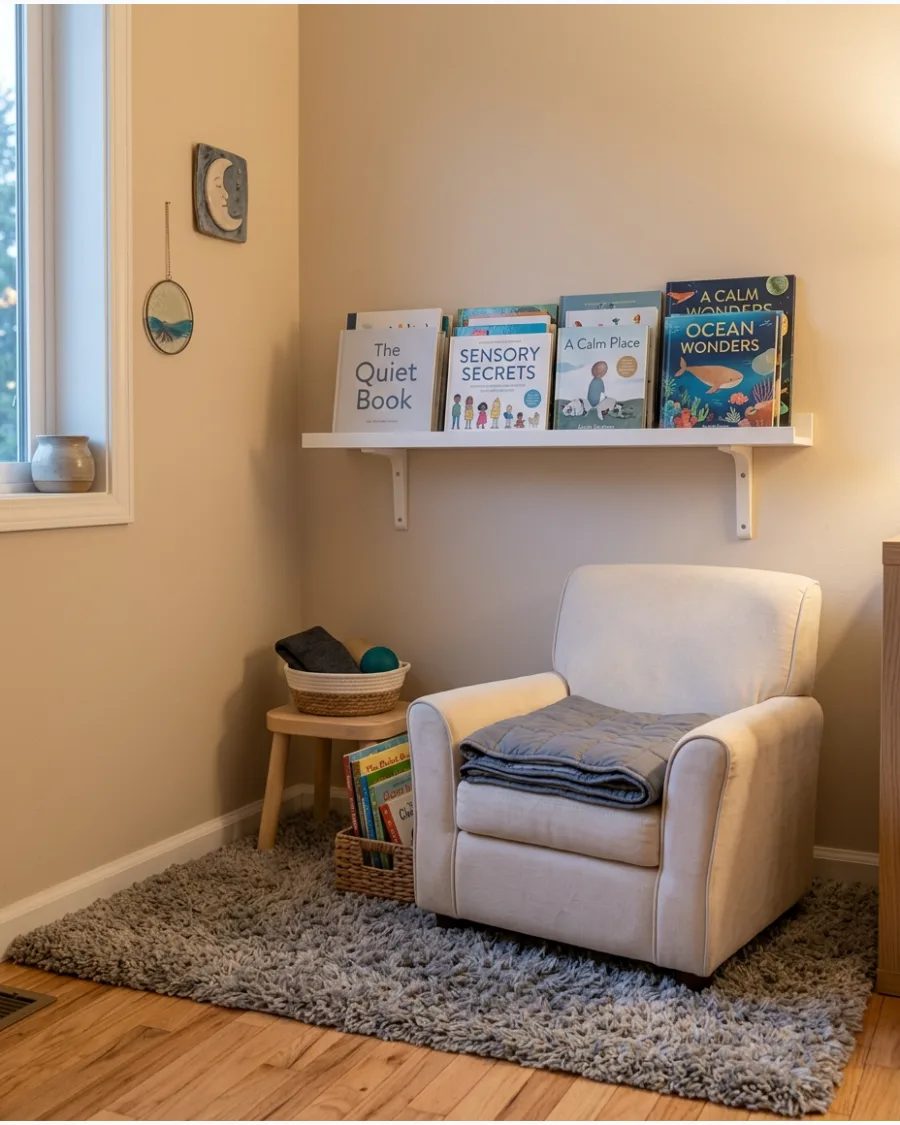
Create a low-stimulation corner with soft textures and muted colors to encourage quiet time. Organized book storage and adjustable lighting help reduce visual and environmental clutter.
Install a dimmable LED strip behind a shelf to provide soft, indirect lighting that will not cause eye strain. This environment supports focus for children who need a calm break.
- Materials: Shag rugs, weighted blankets, and soft cotton fabrics.
- Lighting: Use dimmable lamps or smart bulbs to control brightness.
- Storage: Use opaque bins to hide colorful book spines that might be overstimulating.
- Best shortcut: A white noise machine nearby can help block out household distractions.
Best shortcut: A white noise machine nearby can help block out household distractions.
50. Reading Nook That Grows With the Child
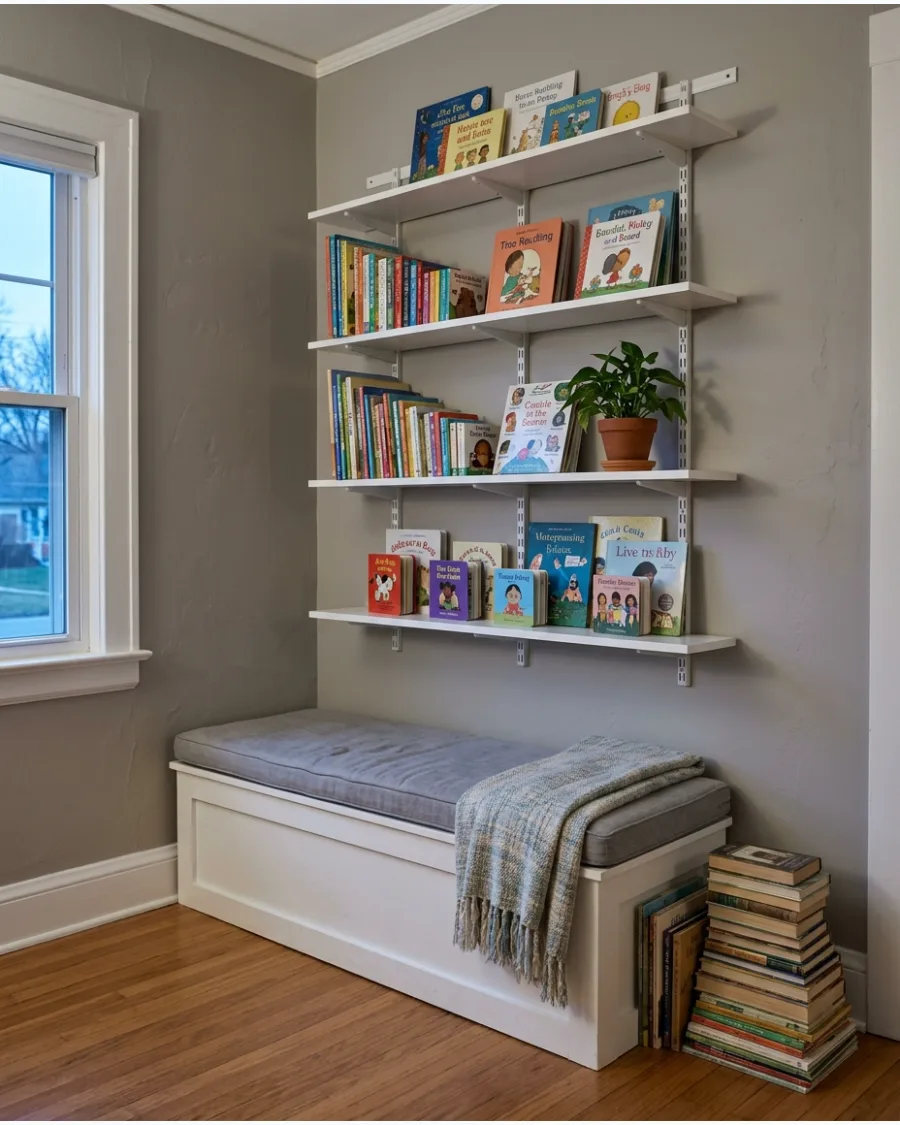
Choose a simple bench and adjustable shelves that can be adapted as the child's needs change. Washable cushions and removable decorations allow for easy updates over time.
Invest in a sturdy wooden bench with a removable cushion so you can change the fabric pattern as the child's style evolves. A flexible foundation allows the corner to work for picture books now and chapter books later.
- Sourcing: Look for modular shelving units that can be expanded.
- Maintenance: Use outdoor-rated fabrics for cushions to ensure they are easy to clean.
- Logistics: Mount shelves with enough vertical space to accommodate taller chapter books later.
- Quick win: Use command hooks for decor so you do not leave permanent holes in the wall.
Quick win: Use command hooks for decor so you do not leave permanent holes in the wall.
Frequently Asked Questions
How do I create a reading nook in a very small bedroom?
Maximize limited square footage by utilizing vertical wall space with floating ledges or transforming an underused closet corner. You can also take advantage of 'dead' space behind a door to install slim shelving that keeps the floor clear.
What is the best lighting for a kids' reading corner?
The best setup layers natural light with warm-toned LED sconces or adjustable clip-on lights to create a cozy environment. Proper layering ensures the space is bright enough to prevent eye strain during evening story sessions.
How can I encourage my child to actually use the nook?
Keep the area engaging by rotating book selections frequently and choosing seating that is comfortable enough for an adult to sit with them. When you make the nook a shared space for bonding, children are naturally more drawn to it.
What are the best budget-friendly seating options?
Oversized floor pillows and bean bags are excellent, low-cost choices that provide immediate comfort. For a more structured look, DIY upholstered crates offer a budget-friendly seating solution that doubles as extra storage.
Should I organize books by color or by category?
Rainbow shelving offers a beautiful visual appeal that can excite younger children about their collection. However, organizing by series or reading level is often more practical for helping older kids find their favorite stories independently.