50 Stylish Hanging Plates On The Wall Ideas

This post may contain affiliate links: full affiliate disclosure.
Turning a collection of plates into wall art is a sophisticated way to add texture and color to a room. This guide explores how to arrange ceramics with intention to create a polished look that feels curated rather than cluttered.
CLASSIC PLATE WALL ARRANGEMENTS
1. Symmetrical Plate Wall
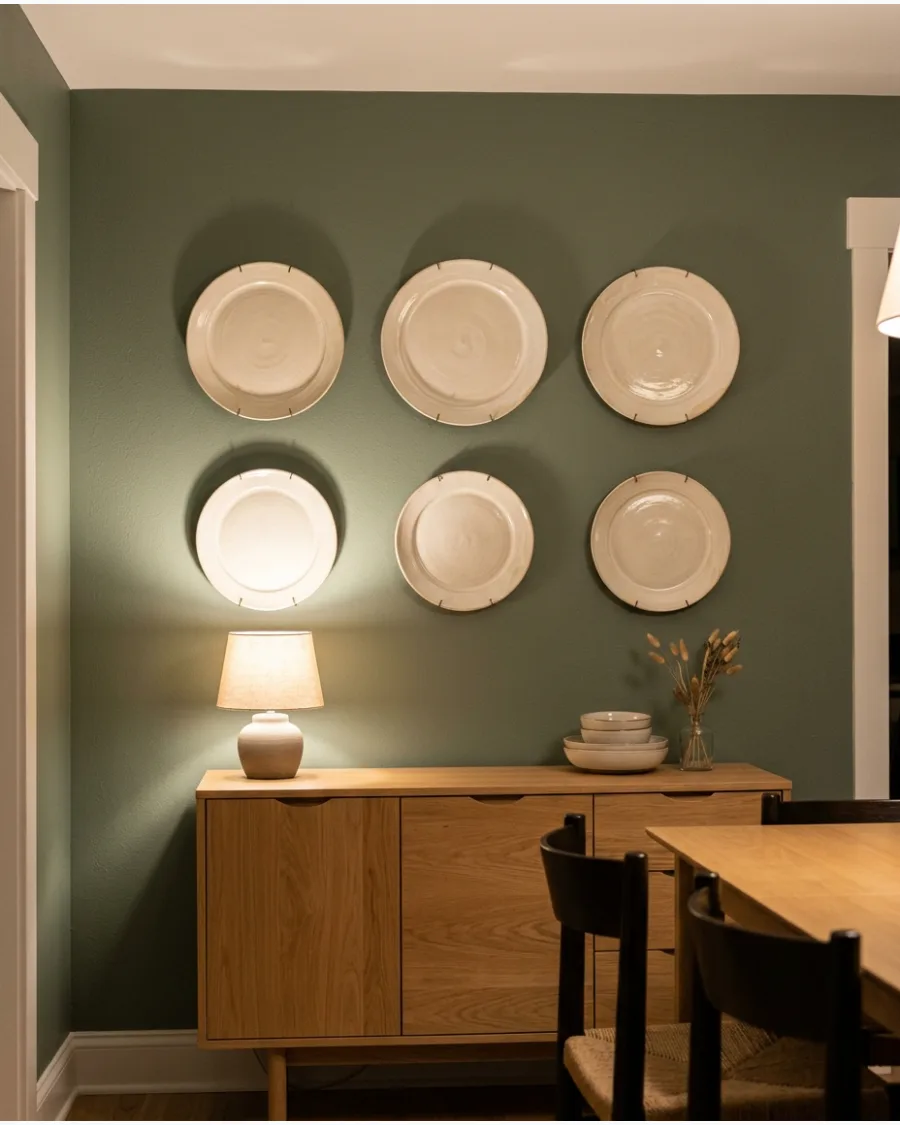
Symmetrical arrangements create a sense of order and calm in a busy dining room. Use a level and a ruler to ensure the gap between each plate remains identical throughout the display.
Measure the distance from the center of each plate to keep the grid perfectly aligned. A symmetrical layout is the safest bet for making mismatched plates look like a cohesive collection.
- Budget: $20 for hangers plus the cost of plates.
- Setup: Use paper templates to test spacing before hammering nails into the wall.
- Adaptation: Swap ceramic plates for woven baskets to introduce a softer texture to the room.
Quick win: Use adhesive plate hangers to avoid visible wire hooks for a cleaner, floating look.
2. Circular Plate Arrangement
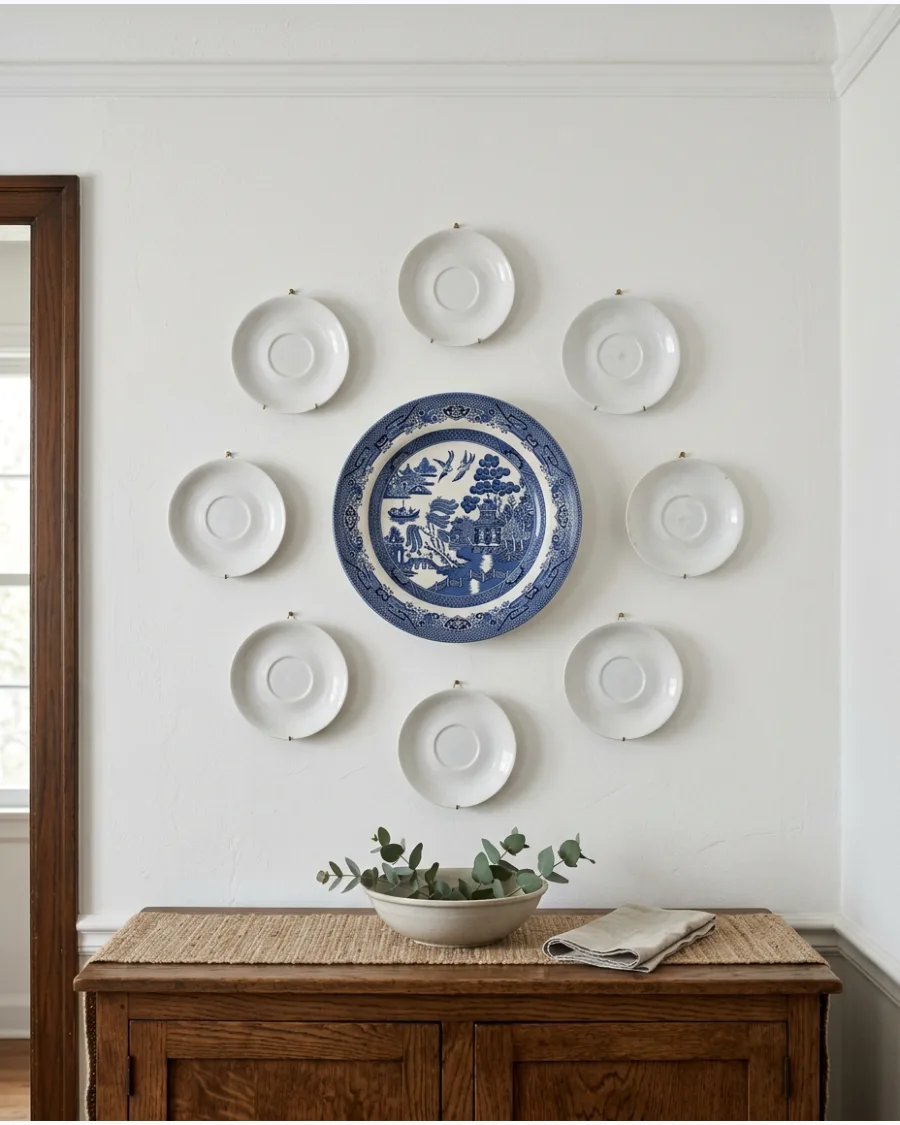
A circular layout draws the eye inward and creates a strong focal point on a large wall. Start by mounting the largest plate in the middle and then radiate the smaller pieces outward.
Keep the spacing tight between the plates to ensure the overall shape looks like a solid circle from a distance. Large circles work best on wide walls where the arrangement has plenty of room to breathe.
- Sourcing: Search for sets of decorative plates at antique shops or home decor stores.
- Setup: Trace the plates on paper and tape them to the wall first to visualize the circle.
- Adaptation: Use different shades of one color for a modern ombré effect within the circle.
Best shortcut: Use a string and a thumbtack to lightly pencil a circle on the wall to guide your placement.
3. Diamond-Shaped Plate Display
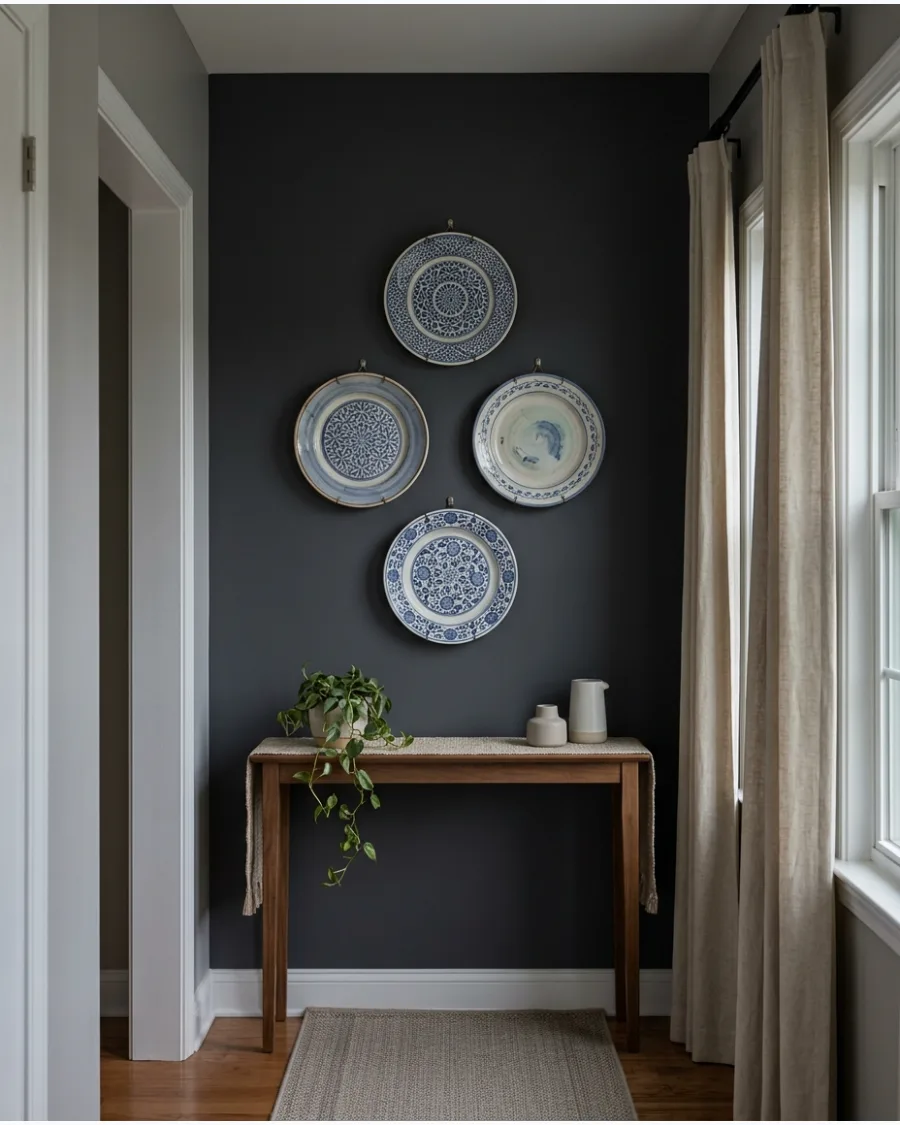
Diamond shapes add a sense of height to a room by drawing the eye upward. Place the most intricate or largest plate in the center and taper the edges with smaller pieces at the top and bottom.
Align the vertical center of every plate to maintain a sharp diamond silhouette. This structured look is perfect for narrow wall sections between windows or doors.
- Timing: Expect to spend about one hour measuring and hanging a four-plate diamond.
- Setup: Start from the center plate and work your way out to the top and bottom points.
- Adaptation: Mix square and round plates to add more geometric interest to the diamond shape.
Most people skip this: Check the side profile of the plates to ensure they all sit at the same depth from the wall.
4. Oval Plate Wall
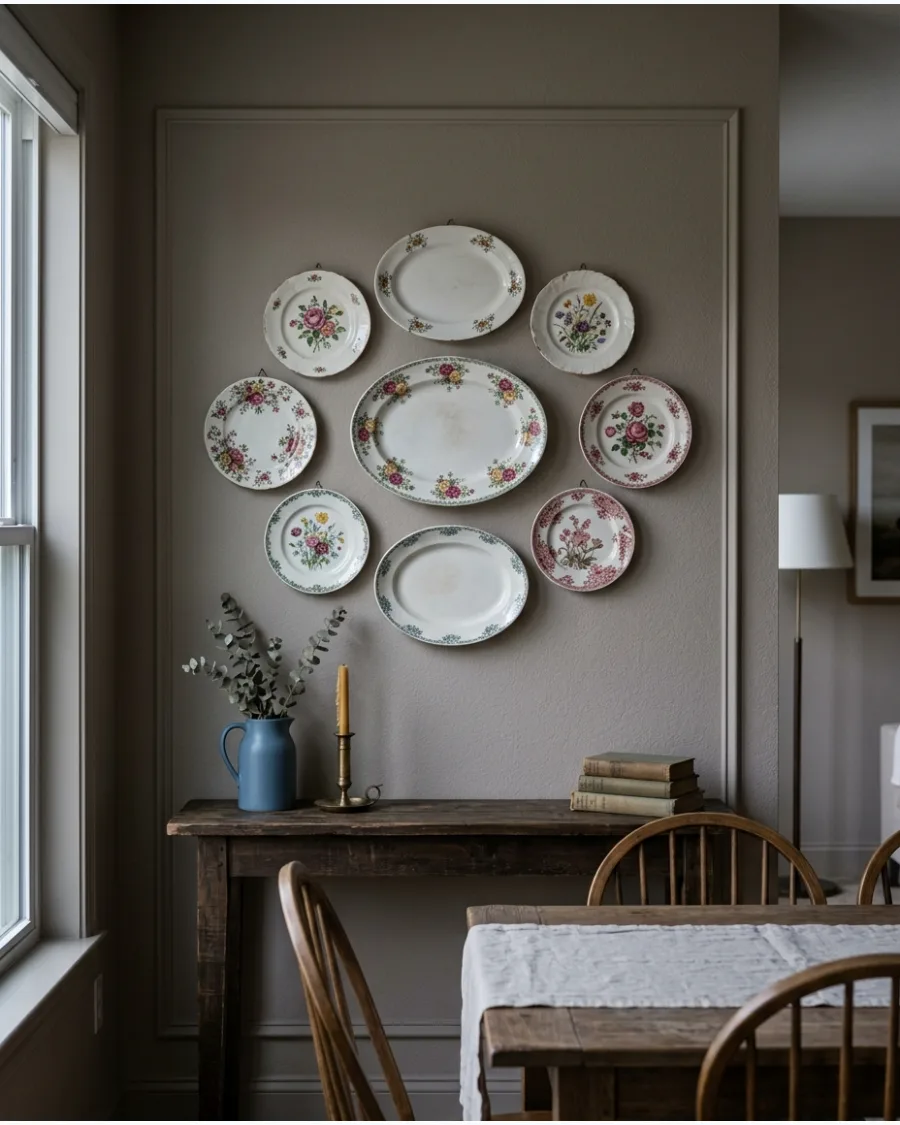
Oval arrangements feel more organic and relaxed than strict grids or squares. Mix round plates with actual oval platters to create a soft, elongated shape that mimics the curves of your furniture.
Position the longest platters horizontally to help the arrangement feel grounded over a sideboard. Soft shapes like this are ideal for breaking up the hard lines of a rectangular dining table.
- Sourcing: Thrift stores are excellent places to find unique oval platters for $5 to $15.
- Setup: Group plates by color family to make a large oval look more intentional.
- Adaptation: Use heavy-duty hooks specifically designed for larger, heavier platters.
Quick win: Use a laser level to find the horizontal center line for your oval grouping.
5. Grid of Matching Plates
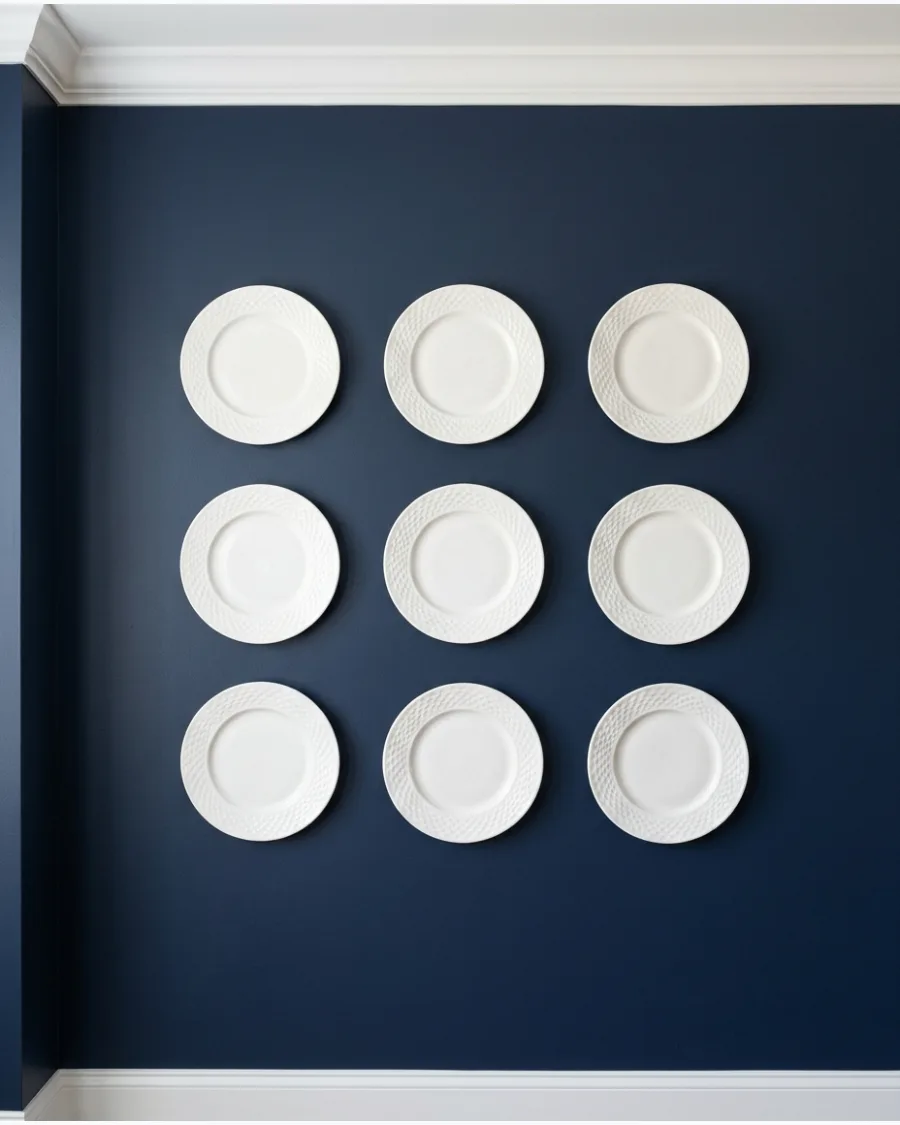
A precise grid of identical plates creates a bold, architectural statement that mimics high-end wallpaper. This look works best with plain white or solid-colored plates that emphasize texture over pattern.
Ensure every plate is the exact same size and shape to maintain the integrity of the grid. Grids are the most effective way to fill a large wall without it feeling cluttered or messy.
- Budget: Bulk sets of white plates can be found for $30 to $60 at restaurant supply stores.
- Setup: Use a spacer block of wood to keep the gap between plates consistent across the wall.
- Adaptation: Use black plates on a white wall for a high-contrast modern look.
Best shortcut: Buy plates from a restaurant supply store to get perfectly matching sets for a low price.
6. Trio of Statement Plates
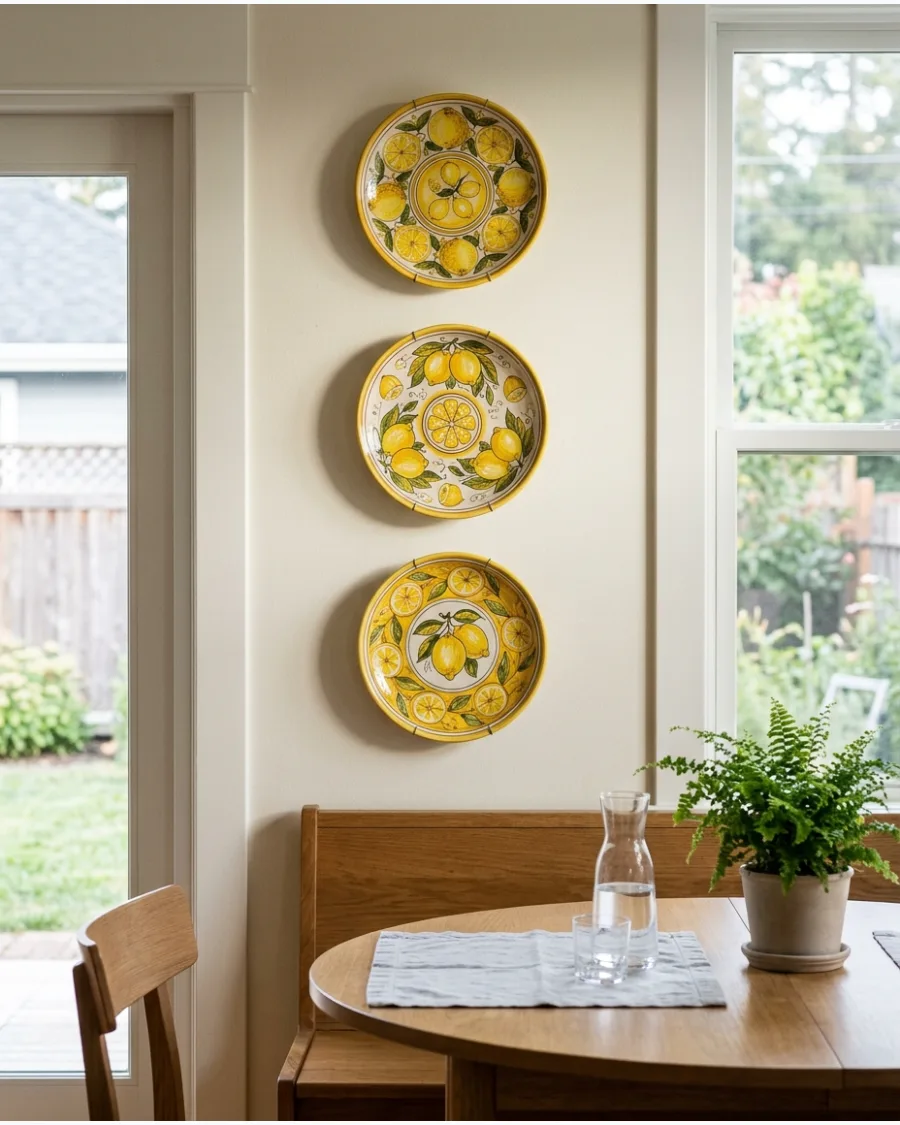
Three large plates can make just as much impact as a full wall of smaller pieces. Arrange them in a simple row to highlight their unique designs or colors.
Space the plates about three inches apart to keep the trio feeling like one unified piece of art. A small grouping like this is a great way to fill the space above a small bar cart or entry table.
- Sourcing: Look for artisan-made plates that feature bold colors or hand-painted details.
- Setup: Hang the middle plate at eye level first and then space the others relative to it.
- Adaptation: Hang the trio horizontally to make a narrow wall feel wider.
Most people skip this: Use spring-loaded hangers for larger plates to ensure they stay snug against the wall.
7. Nine-Plate Square Layout
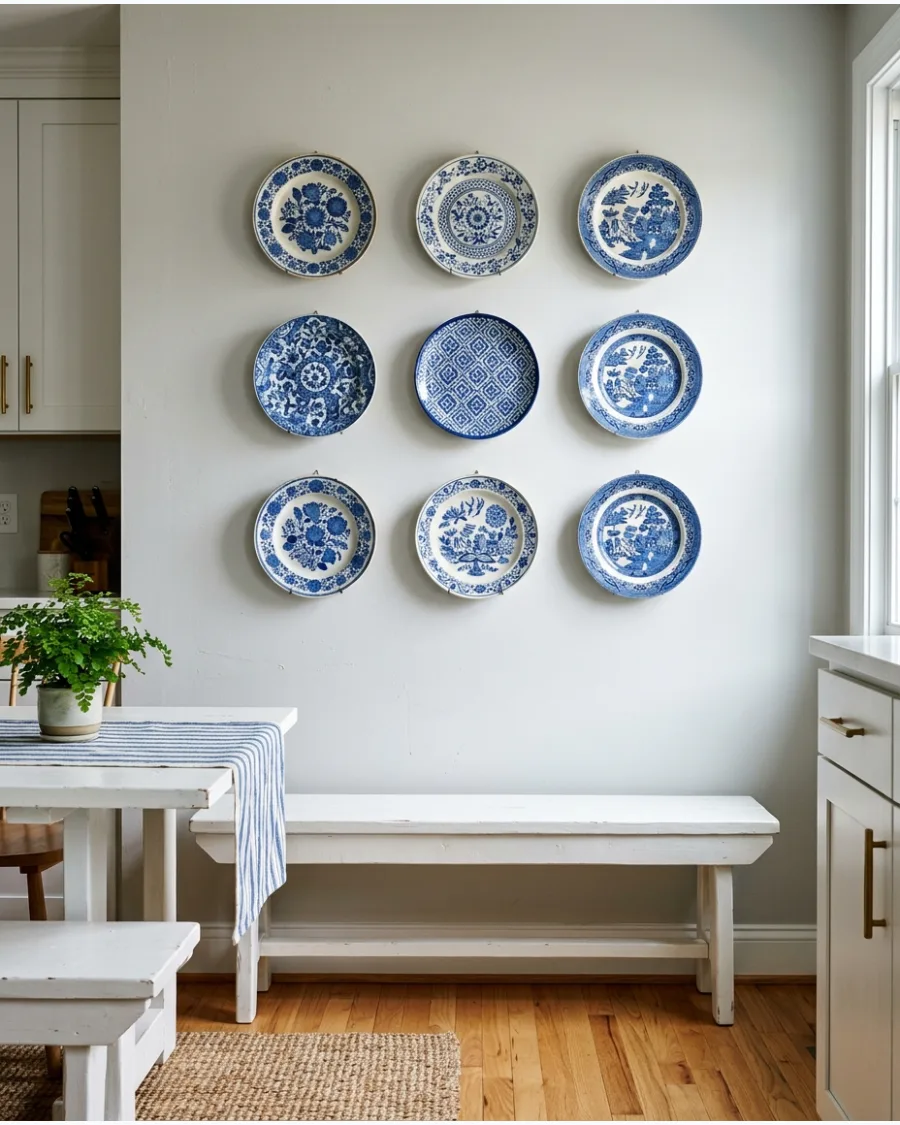
A square layout of nine plates provides a clean, balanced look that fits perfectly in traditional homes. Use plates of the same size to create a solid block of color or pattern.
Center the entire square over your furniture to anchor the room's design. Squares are incredibly versatile and work well in both kitchens and formal dining rooms.
- Sourcing: Sets of nine matching or coordinating plates cost $50 to $120.
- Setup: Lay the plates on the floor first to find the best color balance before hanging.
- Adaptation: Mix patterns but keep the color palette consistent for a curated look.
Quick win: Use small pieces of museum putty on the bottom edges to keep plates from tilting.
Home Decor
8. Symmetrical Mirrored Plate Gallery
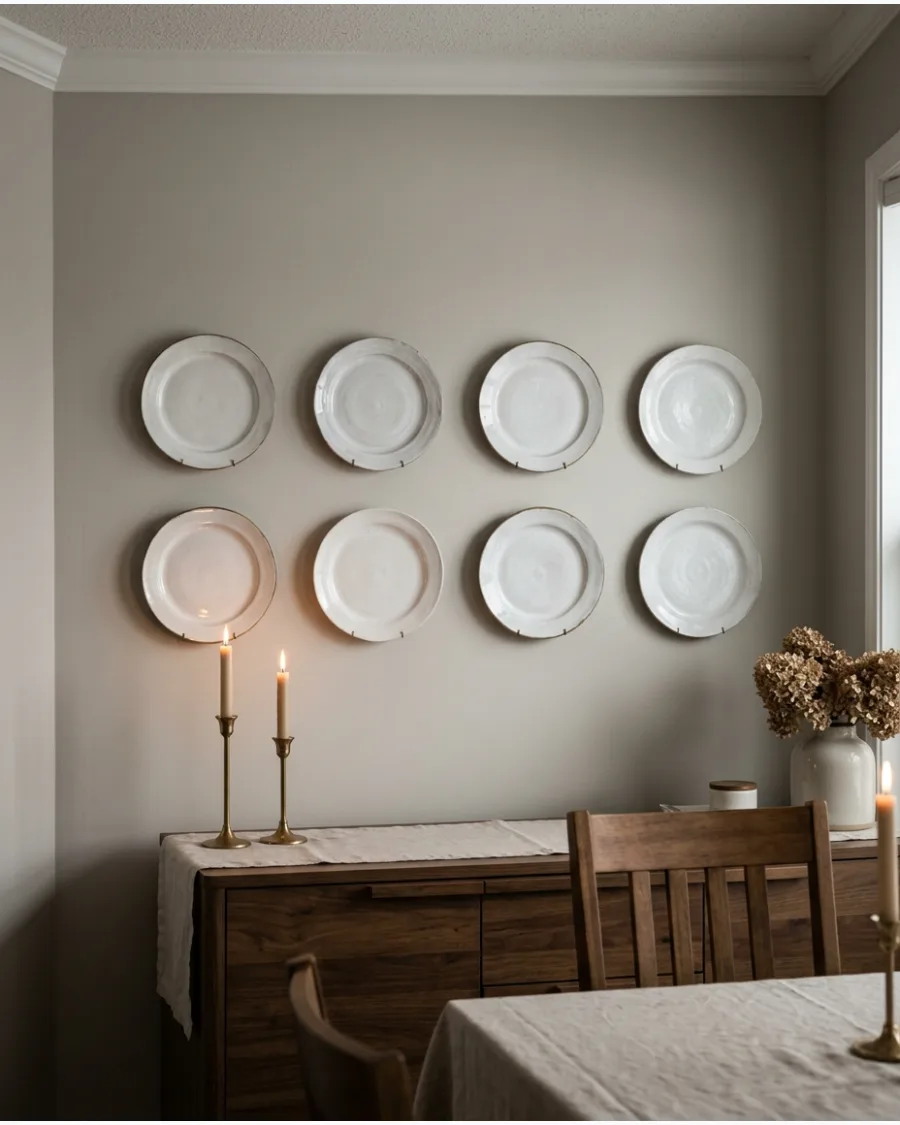
A mirrored arrangement uses pairs of identical plates to create a sense of formal balance and architectural order. This technique works best in dining rooms or entryways where visual structure feels grounding.
Trace each plate onto kraft paper and tape the templates to the wall to test the spacing before driving any nails. While many prefer eclectic mixes, a strictly symmetrical grid offers a more sophisticated, high-end look that feels intentional rather than cluttered.
- Sourcing vintage pairs from thrift stores or buying two identical sets of four maintains the mirror effect on a budget.
- Use adhesive disc hangers for a clean look that keeps the plates flush against the wall without visible wire claws.
- Swap the central pair for a different color or texture to create a subtle focal point within the symmetrical grid.
Most people skip this: use a laser level to ensure the horizontal lines are perfectly straight across the entire grouping.
CLASSIC PLATE WALL ARRANGEMENTS
9. Formal China Plate Wall
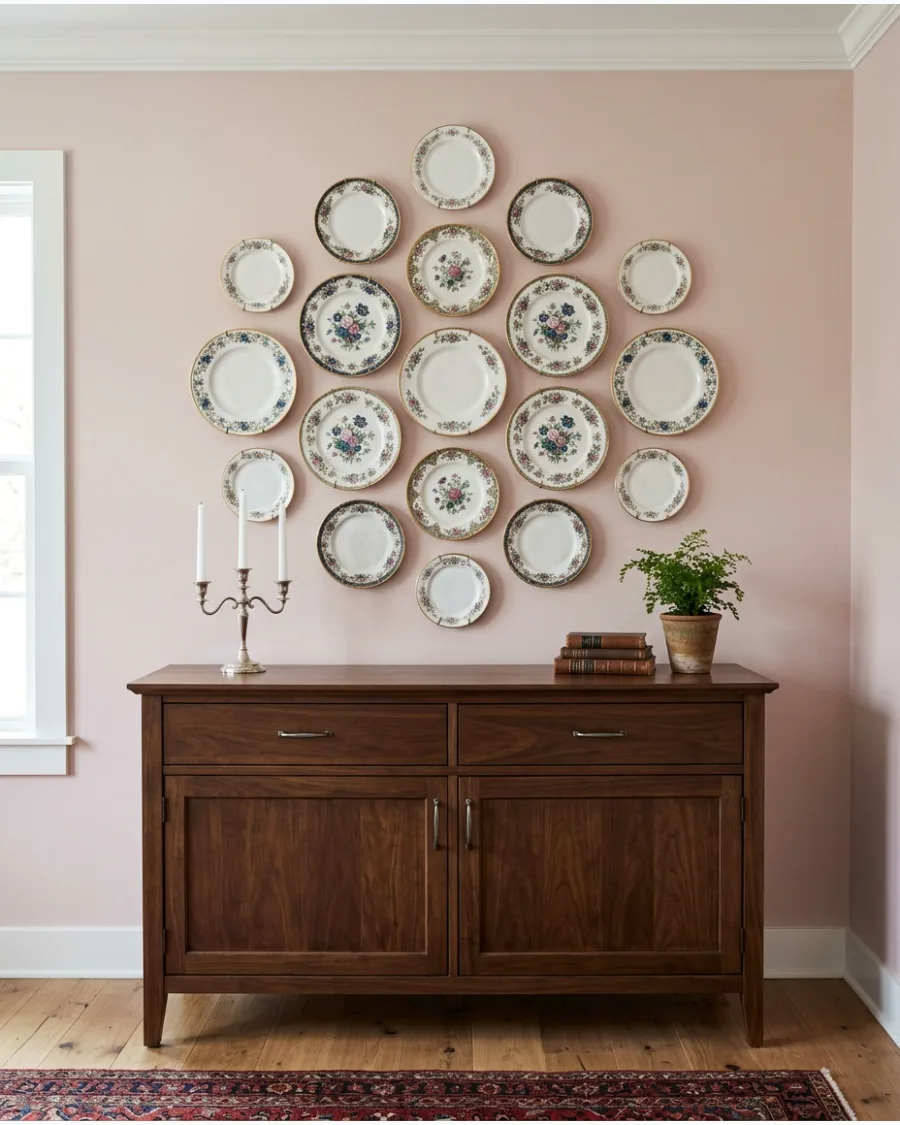
Take heirloom china out of the cabinet and turn it into a beautiful wall display. Mix different sizes like dinner plates and small saucers to add visual interest while keeping the pattern consistent.
Layer smaller plates slightly above larger ones to create a sense of depth and movement. This is the best way to enjoy family treasures every day instead of hiding them in a box.
- Sourcing: Use existing heirloom sets or look for individual pieces at antique shops.
- Setup: Use disc hangers to avoid damaging delicate gold rims on older china.
- Adaptation: Group by pattern type rather than size for a more eclectic feel.
Most people skip this: Check the weight of older china plates before choosing your hanging hardware.
10. Plate Wall Inside Decorative Molding
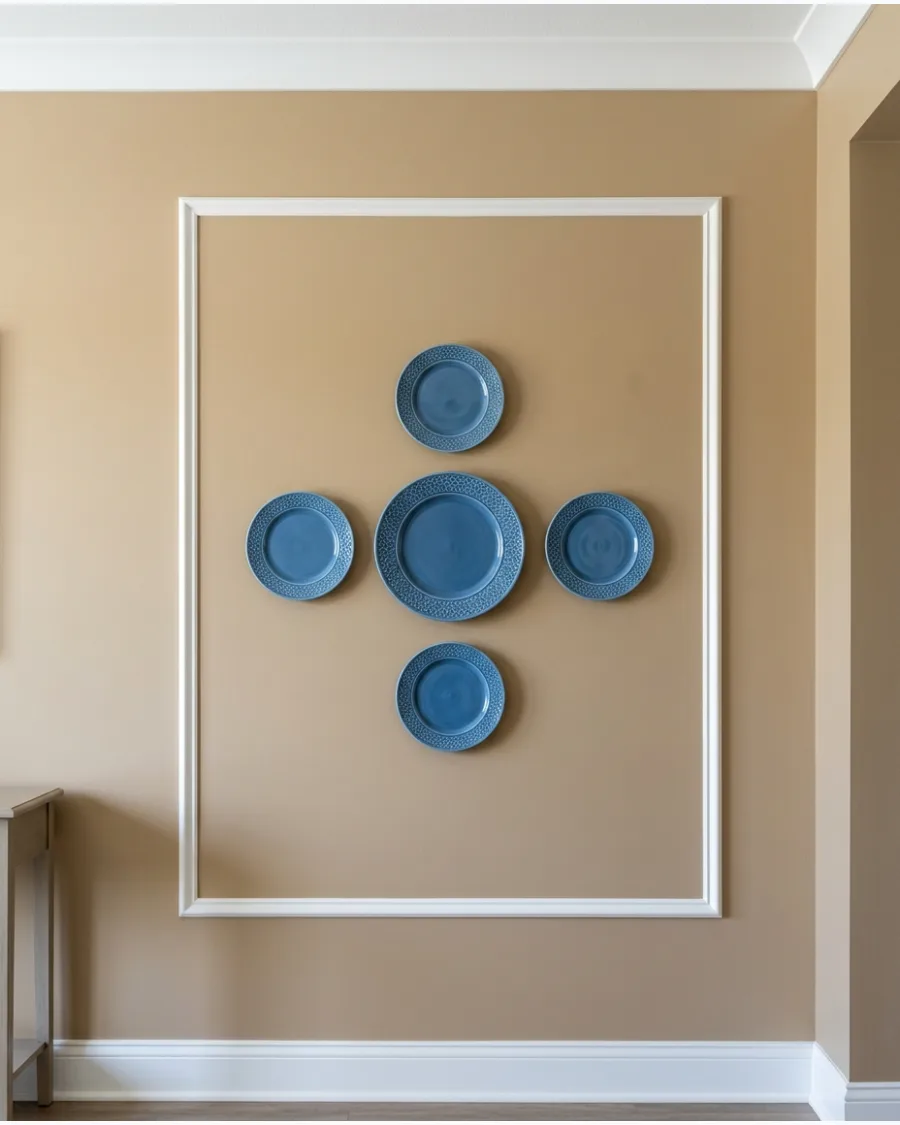
Hanging plates inside wall molding turns a simple display into a high-end architectural feature. The trim acts as a frame, making the collection of plates feel like a single, intentional piece of art.
Keep the plates contained within the borders of the molding to maintain a clean and organized look. This technique works exceptionally well in dining rooms with wainscoting or picture frame molding.
- Sourcing: Picture frame molding kits are available for $20 to $50 at most home centers.
- Setup: Center the entire plate arrangement within the molding box for a balanced look.
- Adaptation: Paint the inside of the molding a different color to make the plates stand out.
Quick win: Paint the plate hangers the same color as the wall to make them disappear inside the molding.
COLLECTED AND ECLECTIC PLATE WALLS
11. Mismatched Vintage Plate Collection
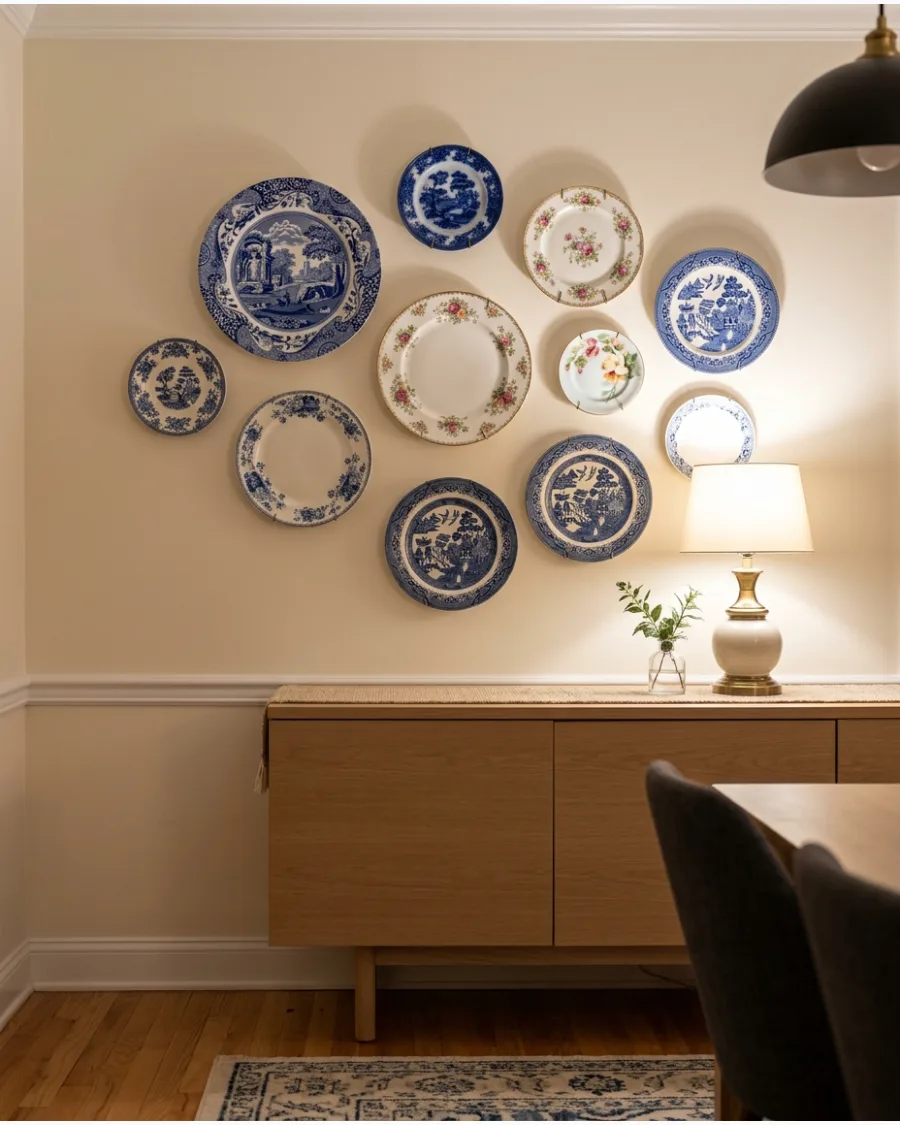
Mix floral patterns, blue transferware, and colorful thrifted plates in one relaxed gallery wall. Repeating a few core colors throughout the collection helps connect the different patterns and shapes.
Lay the plates on the floor first to test the color balance before putting any holes in the wall. A mix of various textures makes the entire display feel intentional and lived-in.
- Thrift stores, flea markets, and antique malls are the best places to find individual pieces for under five dollars.
- Clean the back of each plate with rubbing alcohol to ensure a strong bond for adhesive hangers.
- For a modern look, choose plates with different patterns but only two colors, like black and white.
Most people skip this: Trace each plate onto newspaper and tape the shapes to the wall to visualize the layout first.
12. Collected-Over-Time Plate Wall
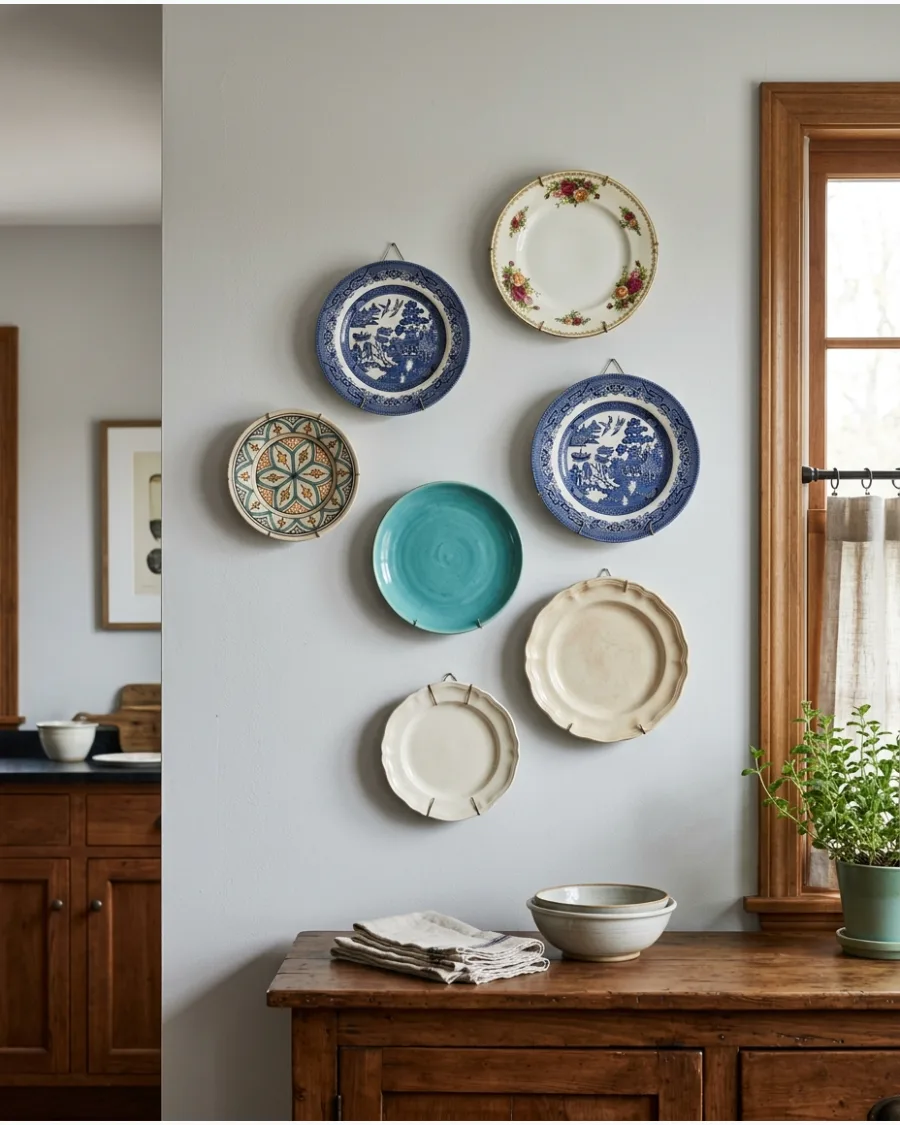
Start with a few meaningful pieces and gradually add new finds from markets or travels. This organic growth feels more authentic than buying a pre-made set at once.
Leave at least three inches of open space around the edges of your current group to allow for future additions. This prevents the wall from looking finished too early and lets the story evolve.
- This project can take months or years to complete as you find pieces that truly resonate with your style.
- Start the arrangement at eye level and work outward in all directions to keep the center of gravity balanced.
- Use heavy-duty adhesive strips for smaller plates to avoid damaging the walls in a rental home.
Quick win: Take a photo of your layout before hanging so you do not forget the exact spacing between pieces.
13. Mixed Plates and Platters
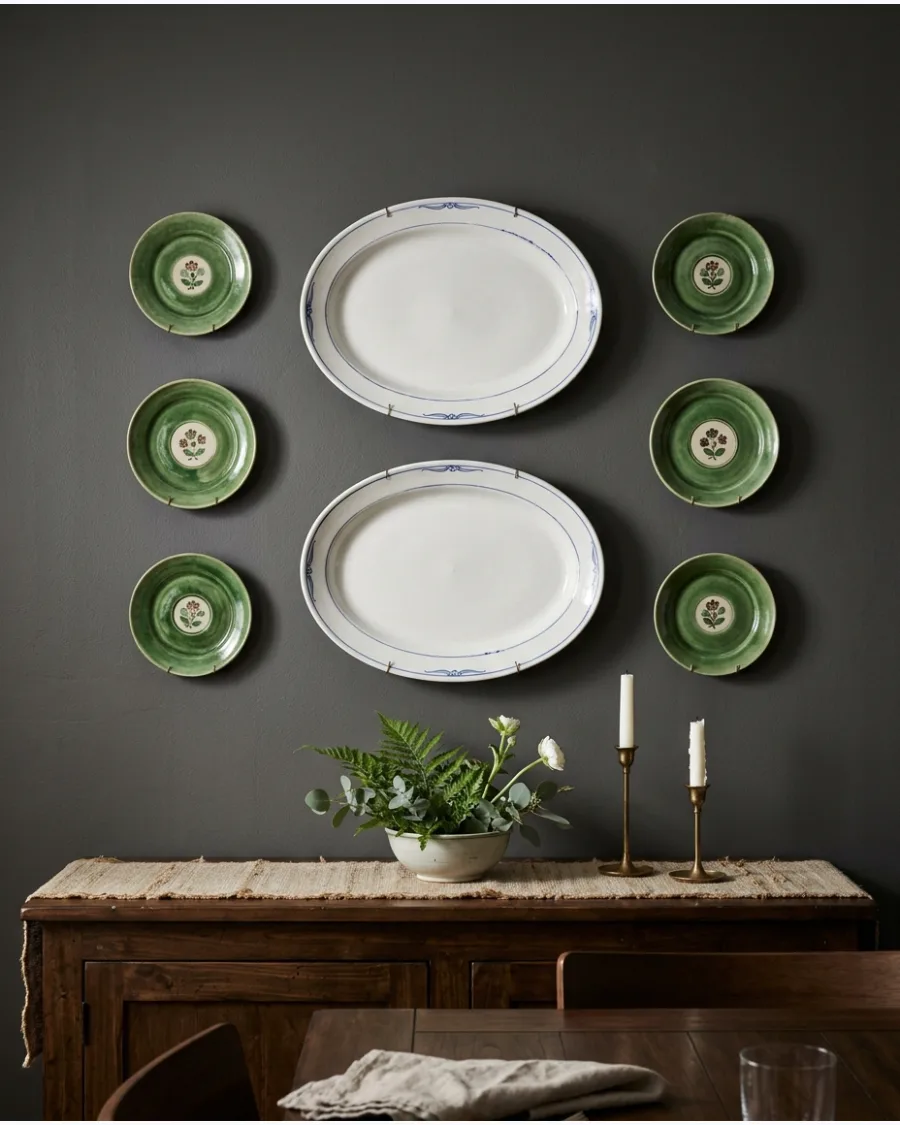
Combine small saucers with larger serving platters to create a varied composition with high-end scale. Use the largest platter as an anchor and arrange the smaller dishes around its perimeter.
Position the heaviest platter at the center or bottom of the arrangement to ground the visual weight. Heavy-duty spring hangers are essential for larger, heavier pieces to ensure they stay secure.
- Large platters can be expensive, so check discount home stores for high-quality factory seconds.
- Use a stud finder to ensure the heaviest platters are mounted into a solid wall support or use heavy-duty anchors.
- If you have a small space, use one large platter and two small saucers for a high-impact mini-display.
Best shortcut: Use heavy-duty spring hangers for any plates or platters over ten inches wide.
14. Plates Mixed With Framed Art
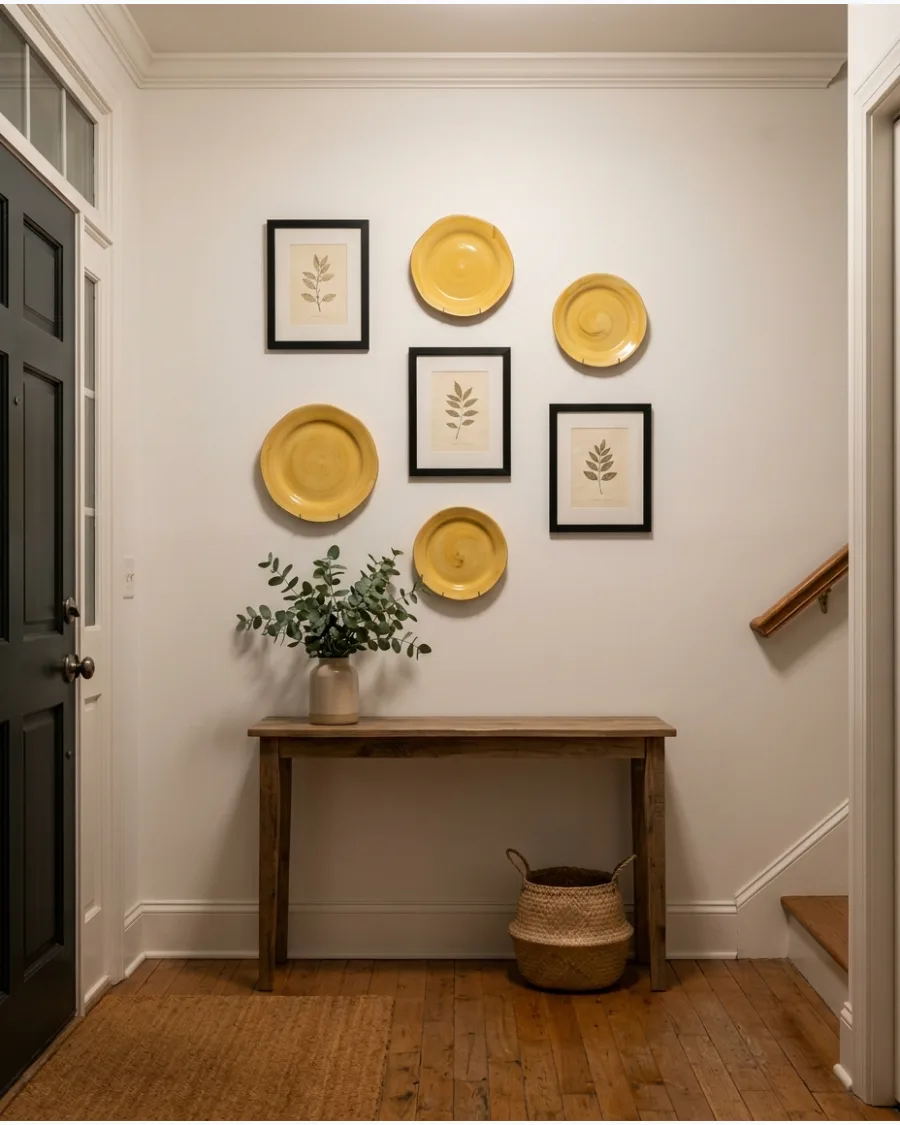
Integrate decorative plates with paintings, prints, and small framed photographs for a gallery wall feel. A shared color palette helps the different materials and shapes work together instead of competing.
Tuck smaller plates into the gaps between rectangular frames to soften the sharp corners of the artwork. This adds a three-dimensional element to a traditionally flat wall.
- Use existing frames you already have and swap the art to match the colors found in the plate patterns.
- Keep the spacing between the plates and frames consistent, about two to three inches apart for a clean look.
- Use black-and-white photos for a sophisticated look that will not compete with colorful ceramic patterns.
Quick win: Match the frame color to one of the secondary colors in the plate patterns for a cohesive look.
15. Plates Mixed With Woven Baskets
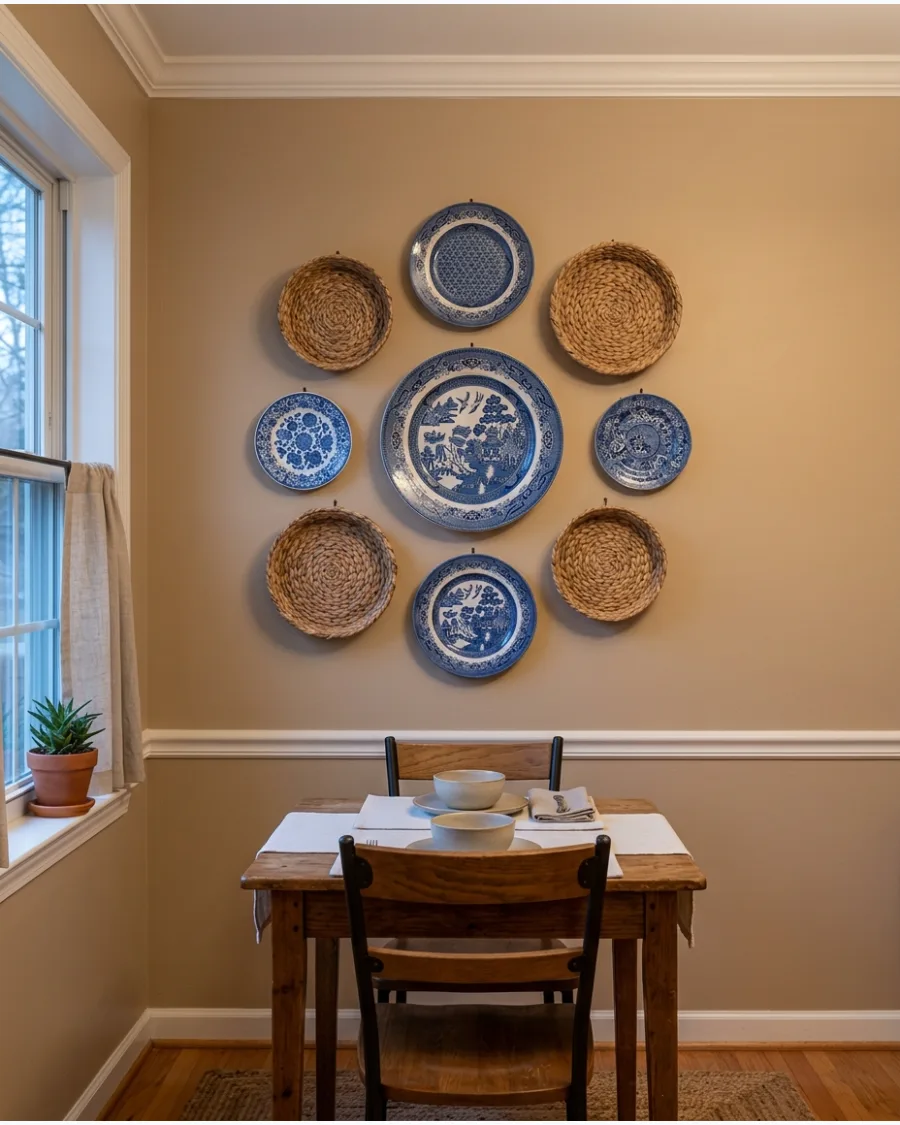
Combine shiny glazed plates with matte woven baskets for a layered, organic display. The contrast between smooth ceramic and textured fibers adds significant depth to a room.
Alternate between a plate and a basket to ensure the different materials are evenly distributed across the wall. This grouping works perfectly in relaxed spaces like breakfast nooks or sunrooms.
- Woven baskets are widely available at craft stores or import shops for a very low cost.
- Use clear fishing line to hang baskets if they do not have a built-in hanging loop on the back.
- Swap the baskets for seasonal items like small holiday wreaths to change the look throughout the year.
Most people skip this: Use small finishing nails for baskets since they are much lighter than ceramics and leave smaller holes.
16. Plates Mixed With Small Mirrors
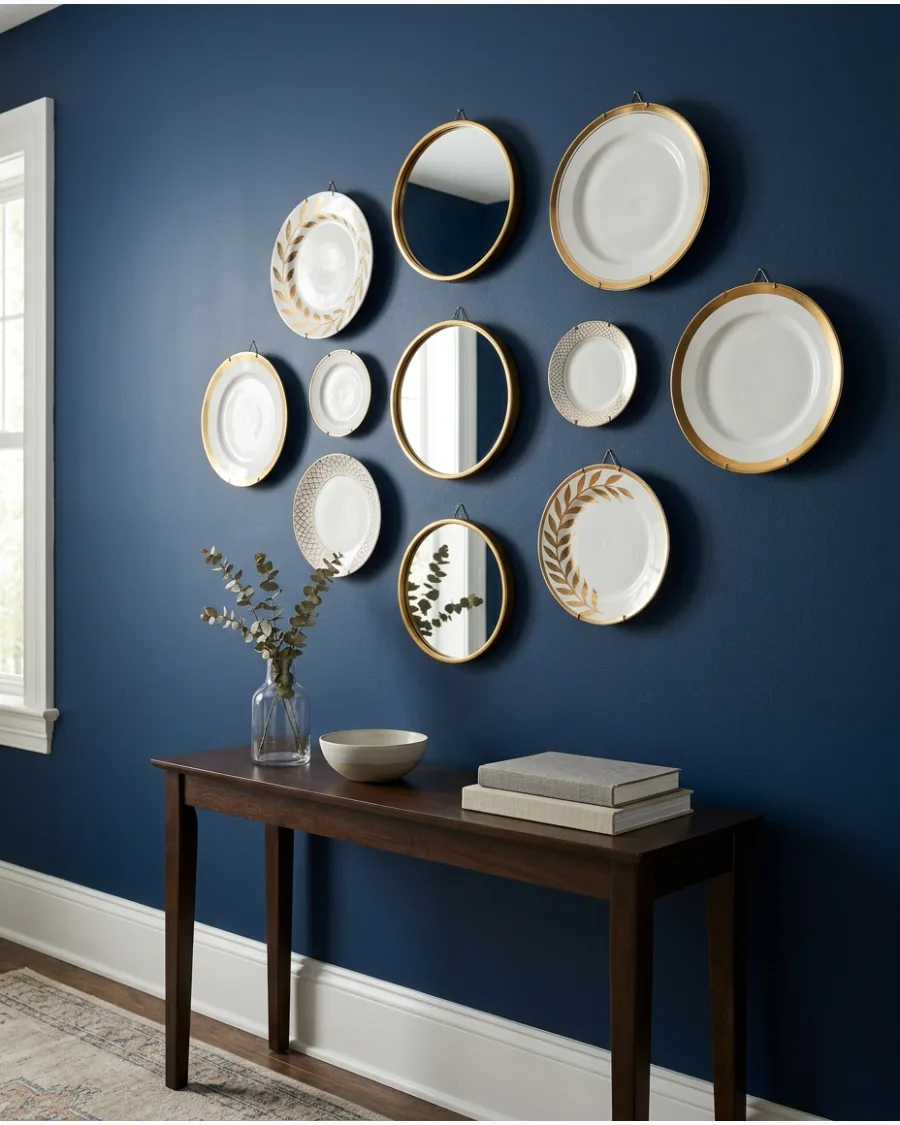
Place small decorative mirrors between groups of plates to reflect light and break up the solid ceramic shapes. Choose mirrors with simple frames so they do not distract from the detailed patterns on your plates.
Choose mirrors that are roughly the same size as your medium plates to keep the scale consistent. It is an excellent way to brighten up a dark hallway or a windowless dining corner.
- Look for small mirrors at dollar stores or craft shops and paint the frames if they do not match your decor.
- Scatter the mirrors randomly throughout the plate grouping to prevent one area from being too reflective.
- Use mirrors with antiqued or foxed glass to match the vintage feel of old plates.
Best shortcut: Use command strips for small mirrors to avoid making extra holes in the wall.
17. Antique Plate Gallery Wall
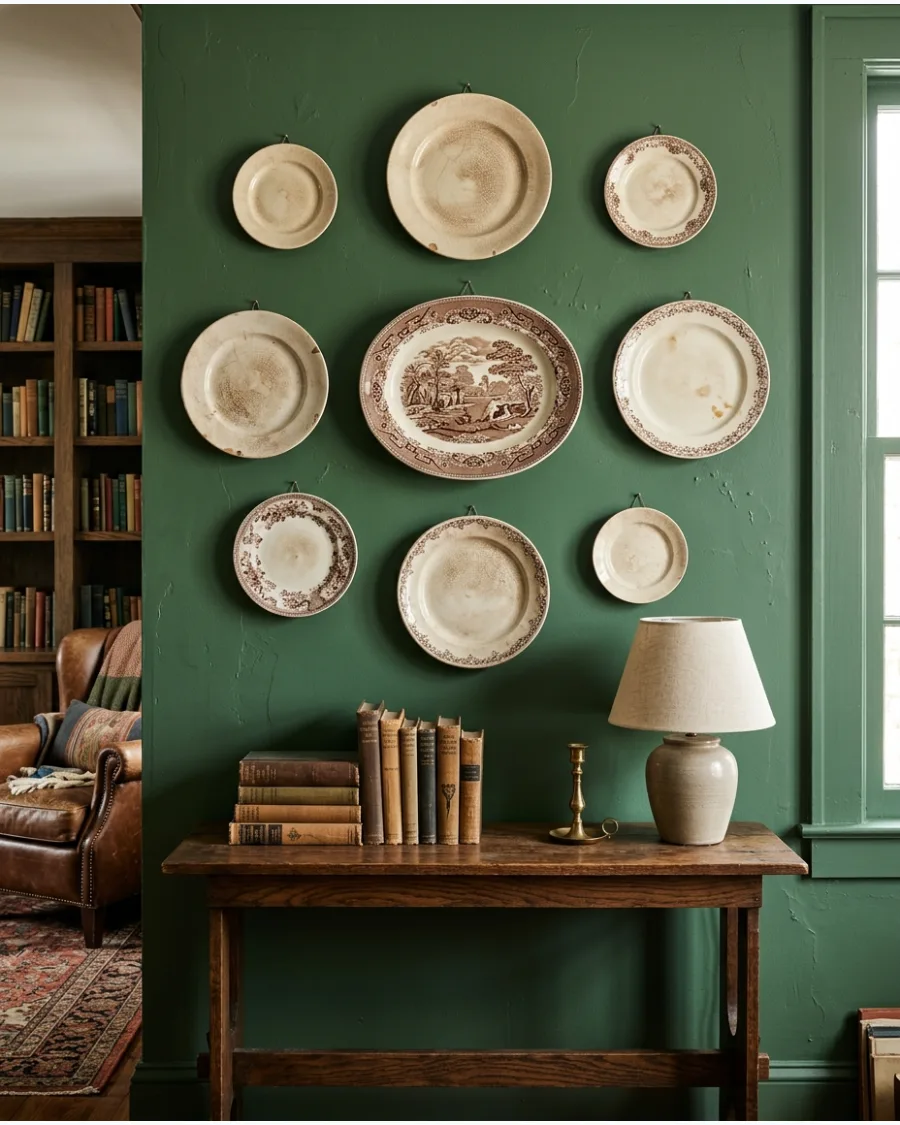
Focus on aged plates with faded designs, worn edges, or visible patina. These historical details add a sense of character and history that brand-new plates simply lack.
Mount antique plates on a dark or moody wall color to make the weathered details and light glazes pop. It turns a collection of old dishes into a sophisticated and focused art piece.
- Real antiques can cost more, but pieces with small chips are often discounted and still look great on a wall.
- Group these on a wall away from high-traffic areas to protect the fragile edges of older ceramics.
- Lean into the aged look by mixing in a few tarnished silver spoons or small brass objects.
Quick win: Test the strength of old wire hangers before trusting them with heavy or valuable antiques.
18. Handmade Pottery Plate Wall
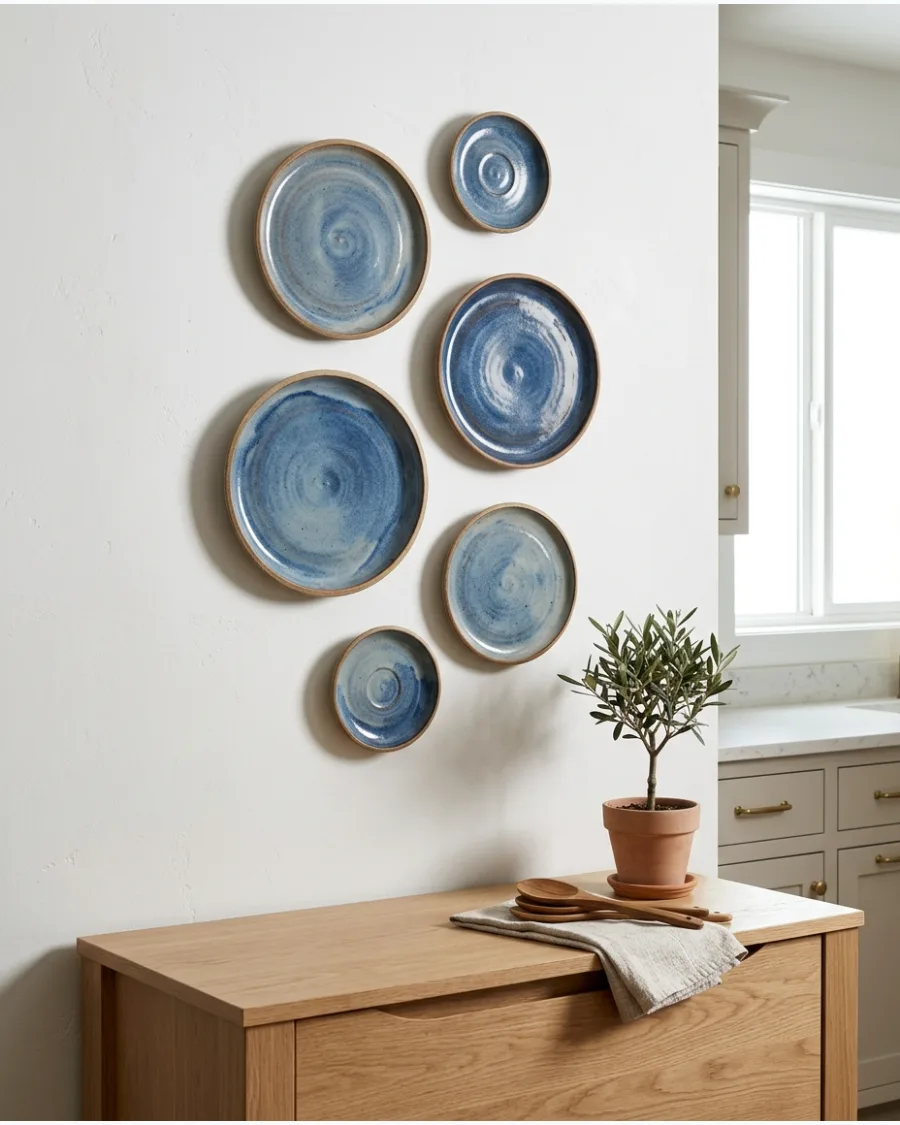
Hang handmade ceramic plates that feature irregular edges, visible brushstrokes, and natural glazing. The raw, organic feel of artisan pottery adds warmth and a human touch to modern spaces.
Group pieces with similar glaze colors but different shapes to emphasize the unique artisan quality. This celebrates the beauty of imperfection and craftsmanship.
- Local pottery fairs and artisan websites like Etsy are perfect for finding one-of-a-kind handmade dishes.
- Measure the depth of the plates, as handmade pottery is often thicker than standard factory dishes.
- Pair these with natural wood furniture and linen textiles to lean into the organic, earthy vibe.
Most people skip this: Check that the back of the handmade plate is flat enough for an adhesive disc hanger before buying.
19. Travel Souvenir Plate Display
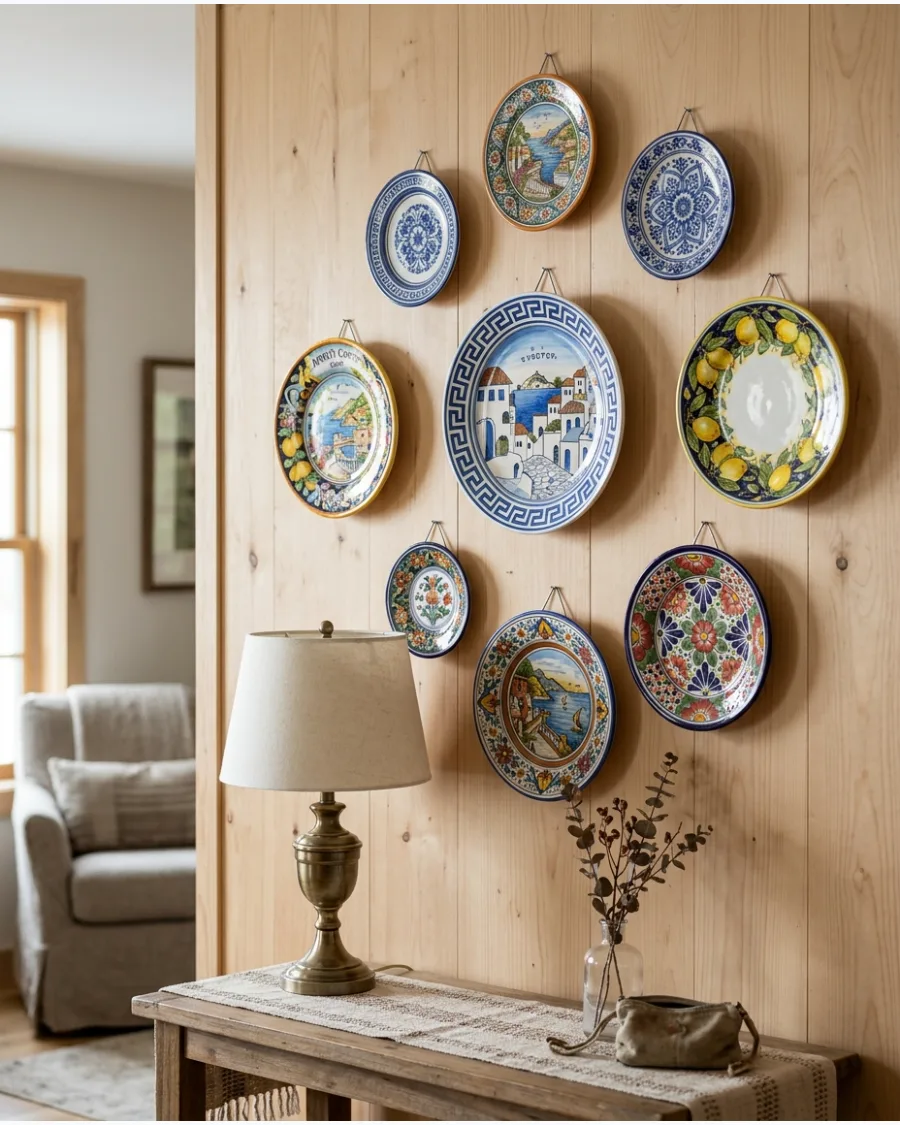
Create a wall using dishes collected from different cities, countries, or vacations. Mixing styles from various regions creates a unique, global aesthetic that acts as a visual travel log.
Label the back of each plate with the date and location before hanging it so the history is not lost. It serves as a fantastic conversation starter for guests.
- Buy one plate from every major city visited to build a meaningful collection over time.
- Arrange the plates in a loose wave pattern to mimic the feeling of movement and travel.
- If travel is limited, source plates from international grocery stores to get a global look.
Best shortcut: Group plates by region or country to create mini-stories within the larger wall arrangement.
20. Family Heirloom Plate Wall
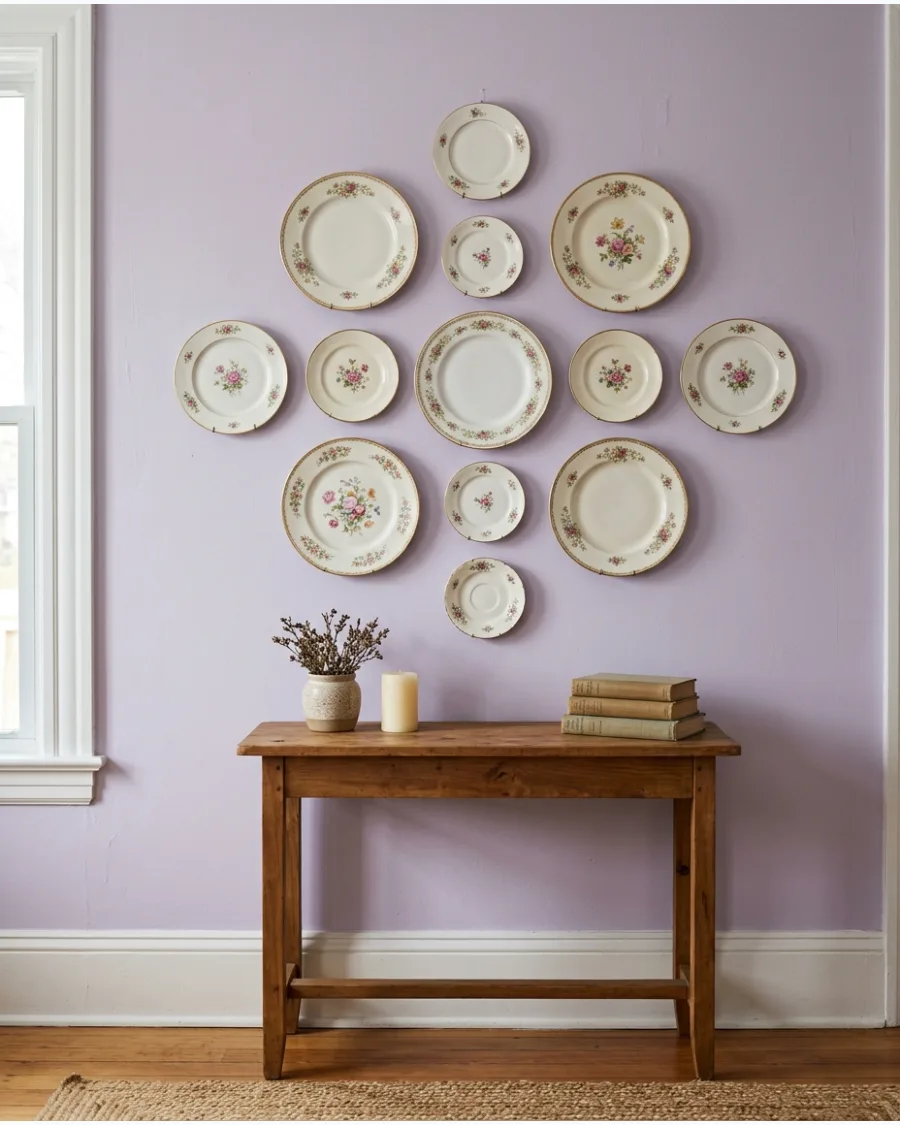
Bring inherited china out of storage and display it as meaningful wall decor. Combining pieces from different relatives creates a personal collection that tells a family story across generations.
Use adhesive disc hangers for delicate heirlooms to avoid the visible metal claws of traditional spring hangers. This honors the past while giving the pieces a modern use.
- Check with family members for sets with missing pieces that they no longer use for formal dining.
- Document the origin of each piece on a small card and keep it in a nearby drawer for reference.
- If the china is too ornate, mix in a few plain white plates to give the eyes a place to rest.
Quick win: Clean the plates with mild soap and water before hanging to remove years of storage dust.
COLORFUL PLATE WALL IDEAS
21. Blue and White Plate Wall
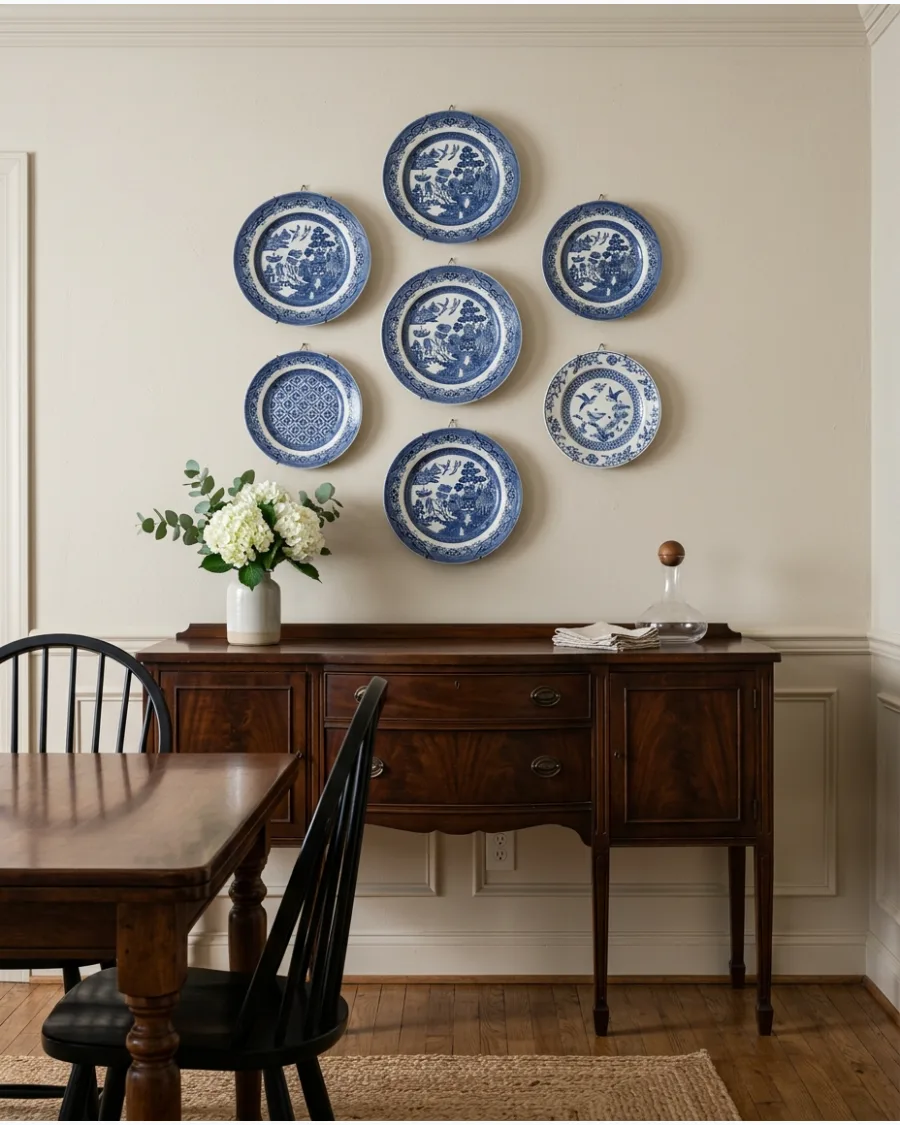
Blue and white porcelain offers a timeless look that fits any room style. Mixing different patterns like florals and landscapes keeps the collection from looking too rigid.
Lay the plates on the floor first to test the spacing before putting any holes in the wall. A mix of small saucers and large dinner plates creates the best visual flow.
- $50 to $200 budget depending on antique finds.
- Allow one hour to measure and mark placement.
- Works well in coastal, traditional, or farmhouse dining rooms.
Quick win: Use adhesive disk hangers to hide the mounting hardware completely for a cleaner look.
22. Green Botanical Plate Collection
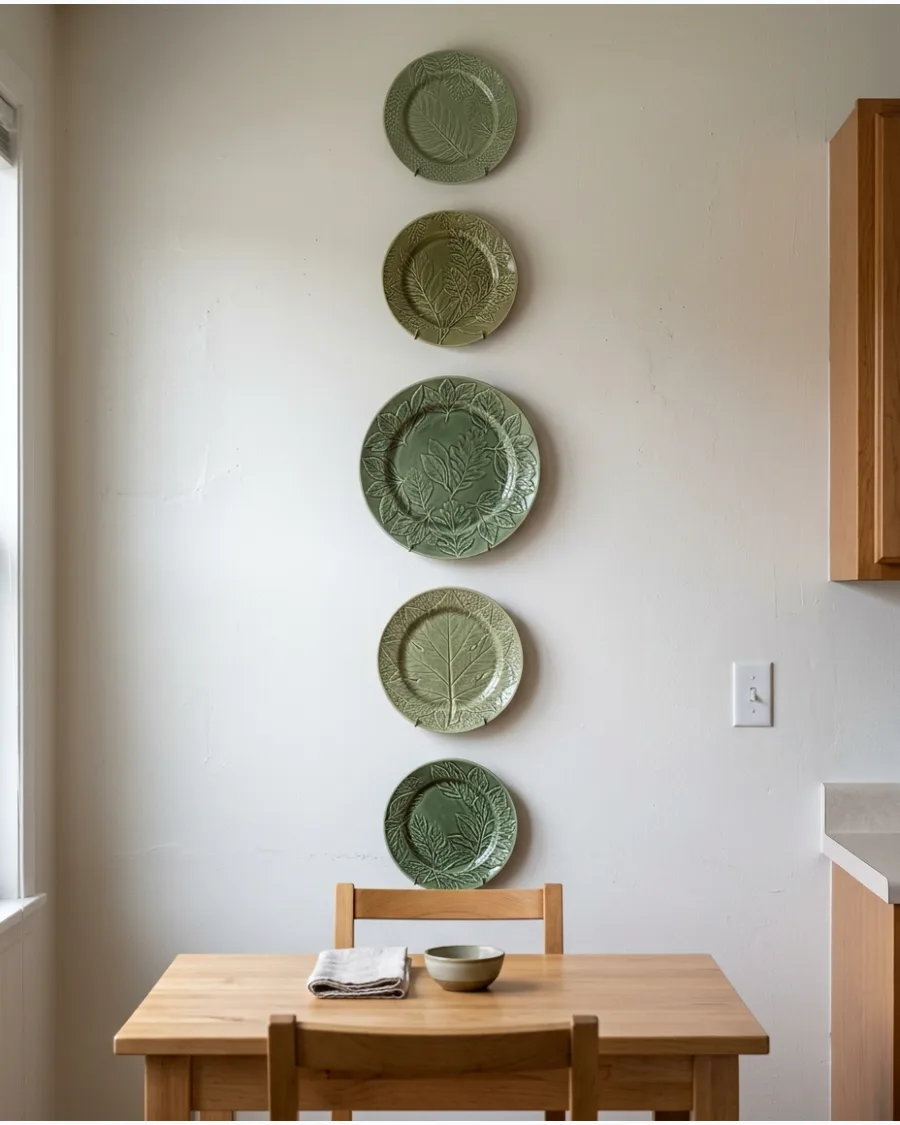
Botanical patterns bring an organic, garden-inspired feeling into a dining space or kitchen. Green hues look particularly vibrant against a warm white or soft neutral backdrop.
Trace each plate onto paper and tape the templates to the wall to perfect the layout. This approach makes a large wall feel more intimate and curated.
- $40 to $150 budget for a set of six.
- Space plates three inches apart for a balanced look.
- Adapt for a bathroom by using smaller botanical saucers.
Most people skip this: Check the weight of the plates before choosing between wire hangers and adhesive disks.
23. Multicolored Maximalist Plate Wall
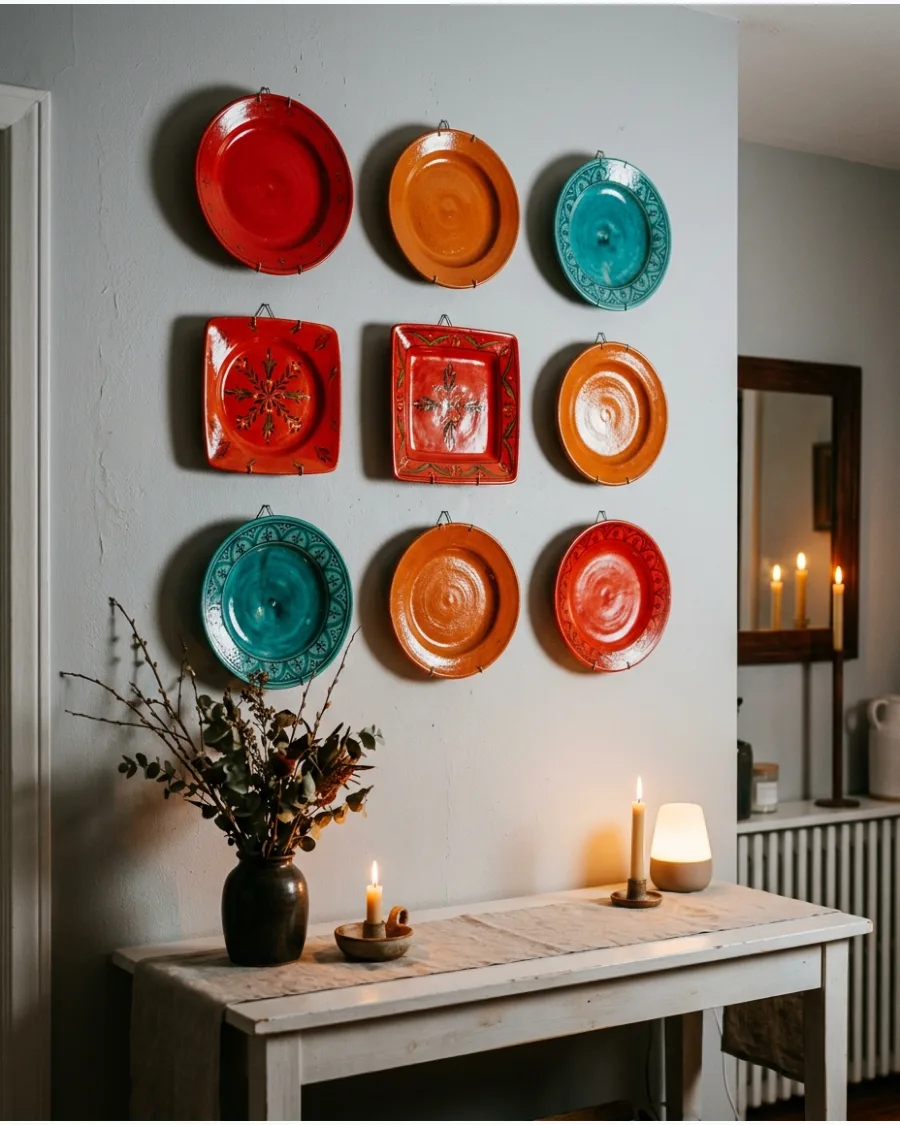
A bold mix of colors turns a plain wall into a high-energy focal point. Repeating specific colors across the arrangement helps the different patterns feel like a single unit.
Balance the heaviest or darkest colored plates toward the bottom of the group to ground the display. It works best in rooms with neutral furniture to avoid color clashing.
- $60 to $250 budget for a diverse collection.
- Start the arrangement at eye level for the best impact.
- Swap colors seasonally to refresh the room's energy.
Best shortcut: Start with the largest plate in the center and build the arrangement outward to keep the group centered.
24. Monochromatic White Plate Wall
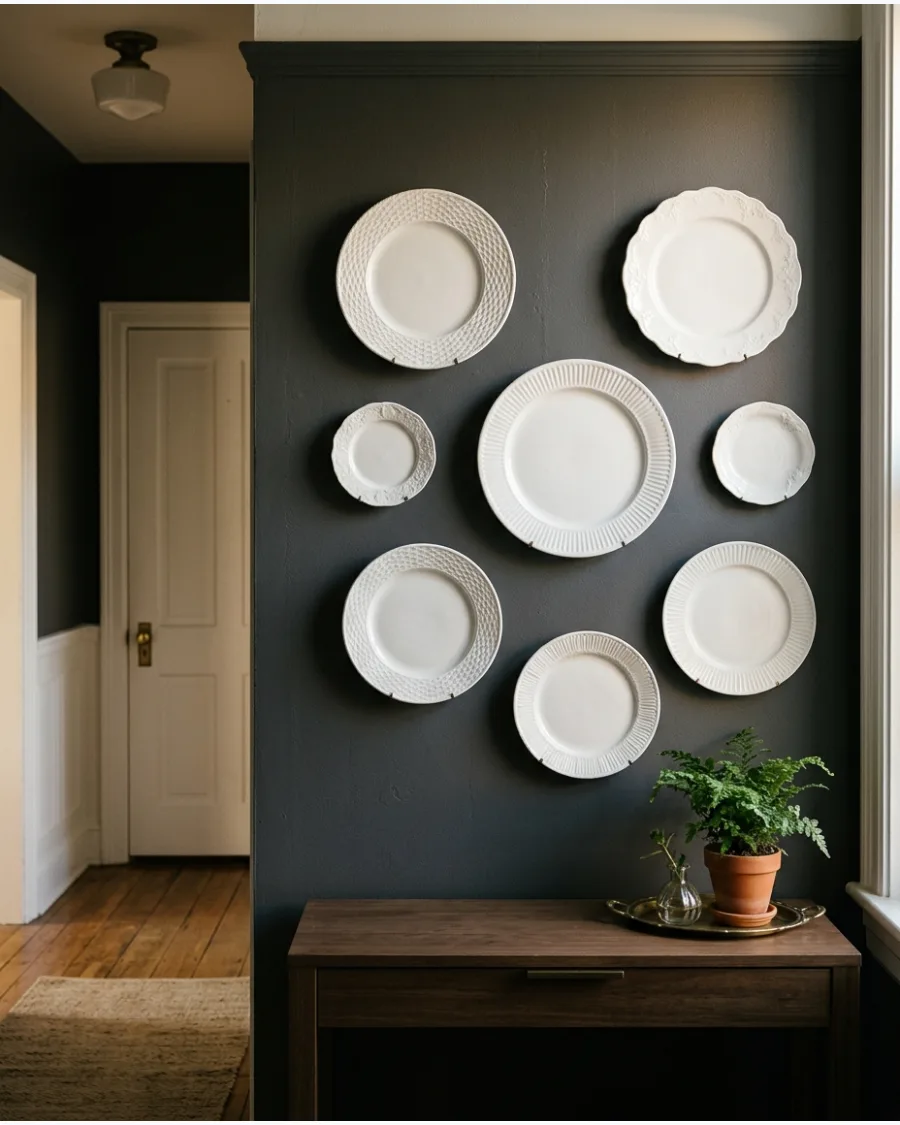
White plates rely on texture and shape rather than color to grab attention. Mixing scalloped edges with smooth surfaces adds a sophisticated layer of detail to a minimalist room.
Vary the depths of the plates so some sit closer to the wall than others for a 3D effect. This monochromatic look keeps a small room feeling open and airy.
- $30 to $120 budget using common dinnerware.
- Use a laser level to keep rows perfectly straight.
- Perfect for modern, farmhouse, or Scandinavian styles.
Quick win: Use a laser level to ensure the top edges of the plates stay perfectly aligned for a professional finish.
25. Black and White Plate Display
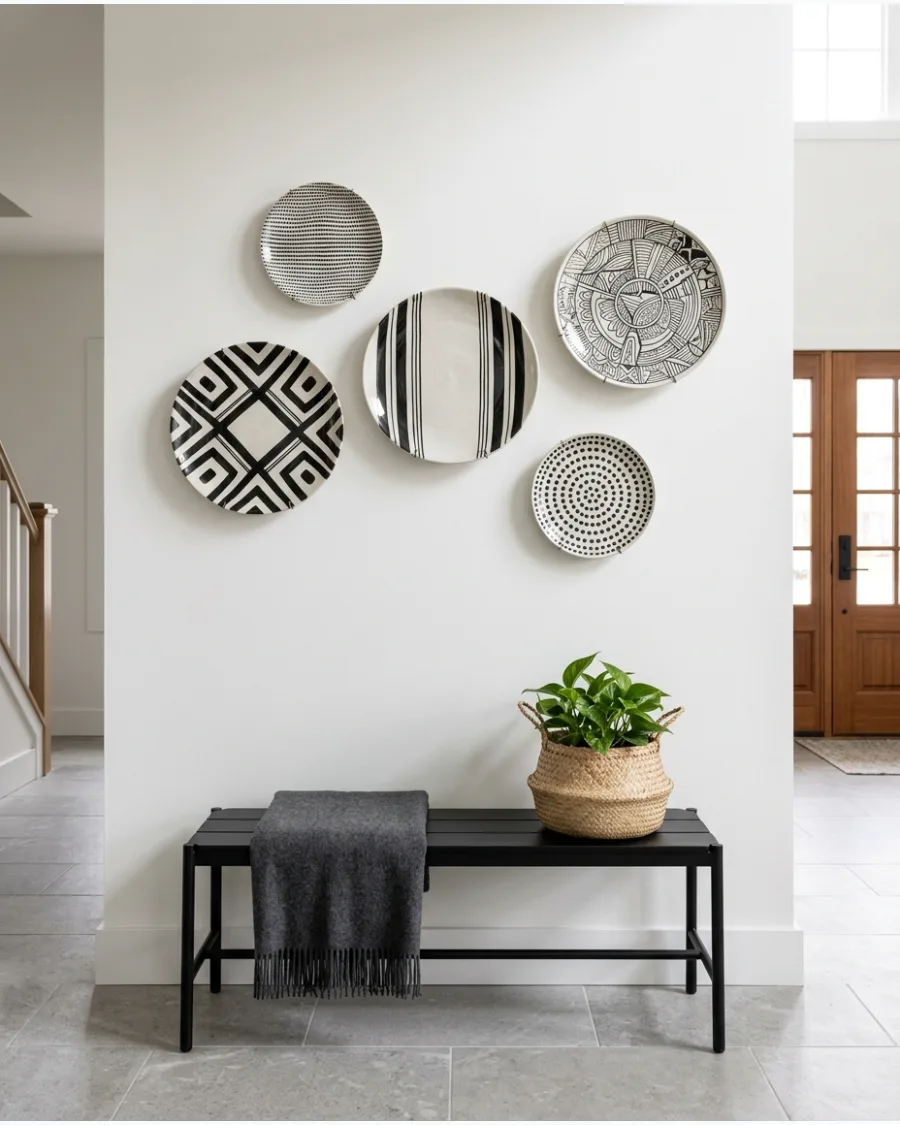
High-contrast black and white plates create a sharp, modern aesthetic that stands out. Mixing stripes with organic illustrations prevents the display from looking too stiff.
Keep the spacing between plates consistent at two inches to maintain a clean and intentional look. It is an easy way to add drama to an entryway or hallway.
- $40 to $180 budget for a five-piece set.
- Use black wire hangers to blend with the plate patterns.
- Suits contemporary, industrial, or minimalist spaces.
Most people skip this: Clean the back of each plate with rubbing alcohol before applying adhesive hangers for a better bond.
26. Terracotta and Cream Plate Wall
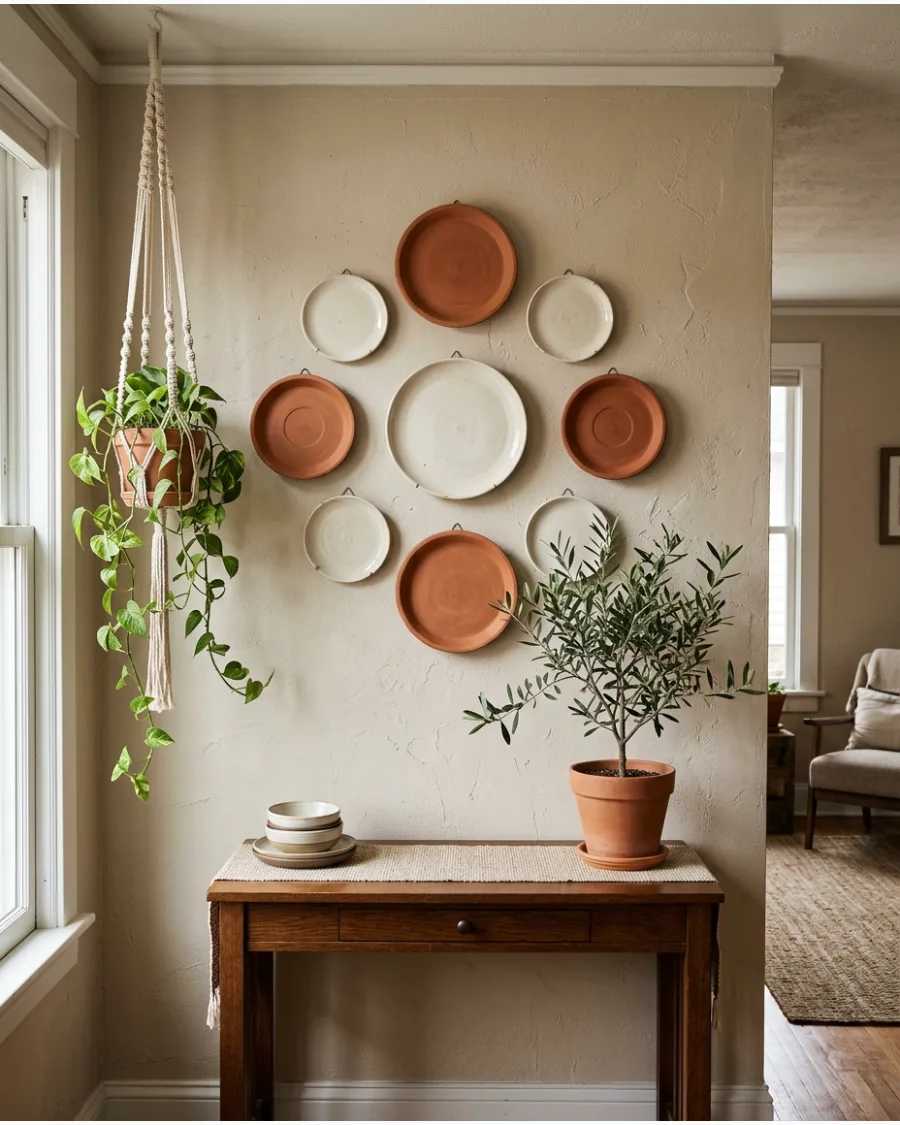
The mix of earthy terracotta and smooth cream ceramics creates a warm, Mediterranean vibe. Natural variations in the clay add a handcrafted feel that softens a room.
Group the plates in odd numbers like five or seven to create a more natural and relaxed composition. This palette pairs beautifully with indoor plants and natural wood tones.
- $35 to $100 budget for handmade pieces.
- Mount plates using heavy-duty hooks for unglazed ceramics.
- Ideal for boho, rustic, or Mediterranean-style kitchens.
Best shortcut: Use a template kit to mark nail holes accurately without measuring every single time.
27. Pink and Red Plate Collection
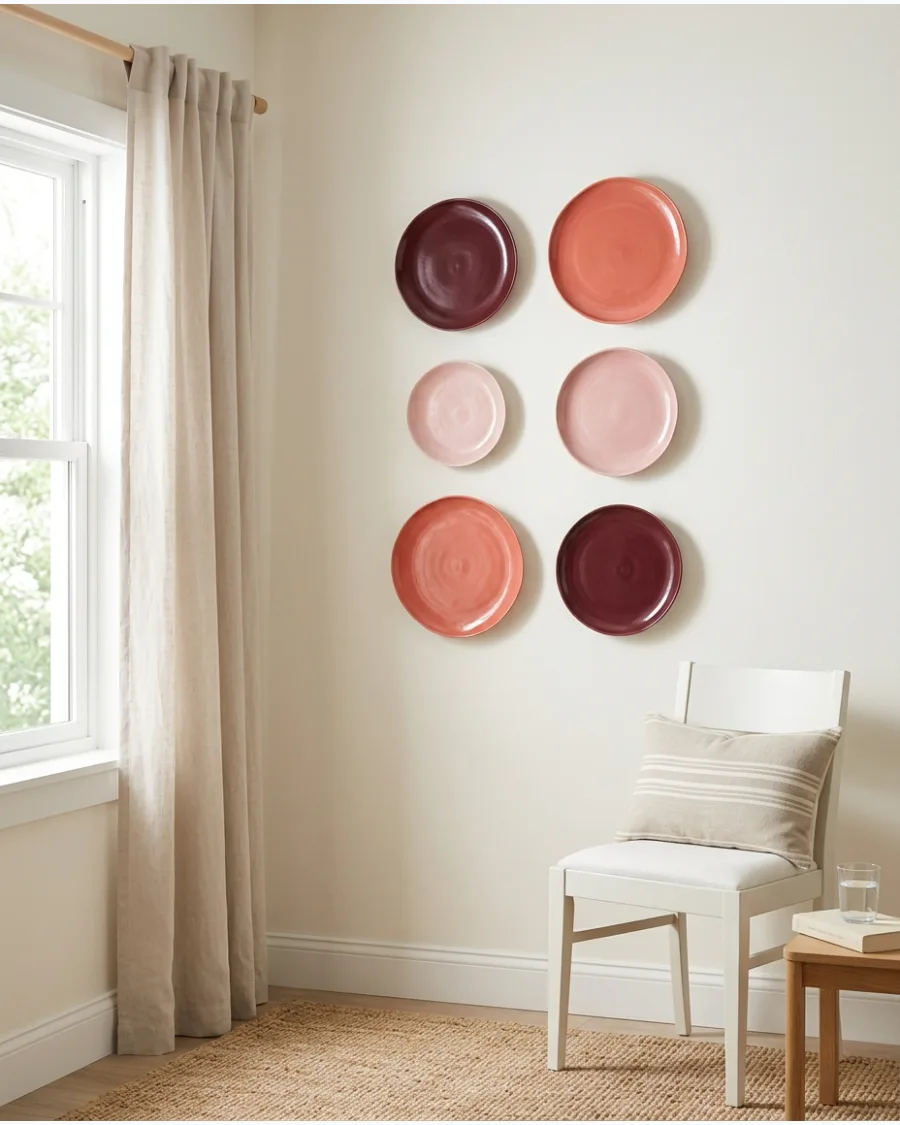
Combining shades of pink and red creates a vibrant and cheerful display. Mixing solid colors with floral patterns adds variety while keeping the theme cohesive.
Place the largest red plate as the anchor and surround it with smaller blush-colored pieces. This look adds a pop of personality to a breakfast nook or bedroom wall.
- $50 to $150 budget for a mixed collection.
- Allow 45 minutes for layout planning and hanging.
- Works for romantic, cottagecore, or eclectic styles.
Quick win: Check thrift stores for individual plates in these shades to save money on a large collection.
28. Earth-Tone Ceramic Wall
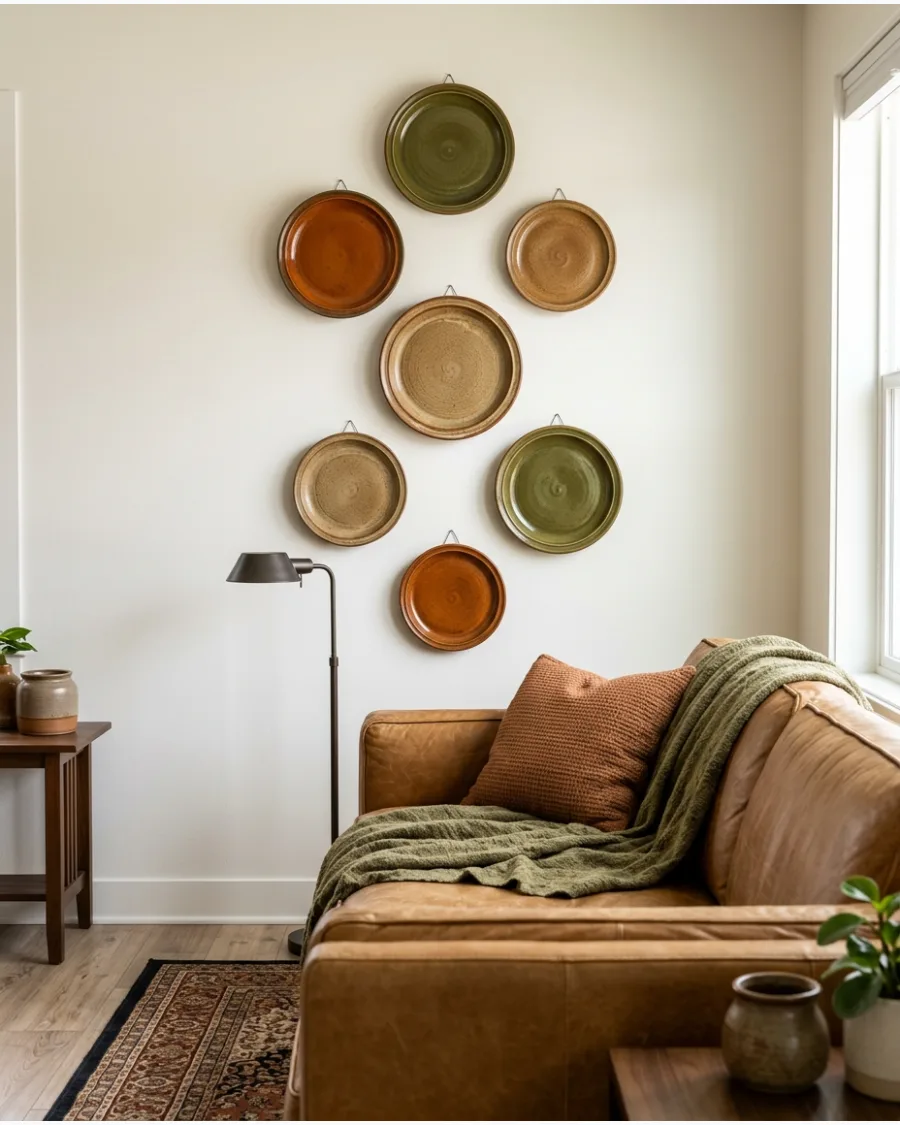
Olive, rust, and chocolate brown plates create a grounded and cozy atmosphere. These colors work well to fill a large wall without overwhelming the rest of the decor.
Use plates with matte finishes to emphasize the natural, stony texture of the ceramics. This style complements leather furniture and woven rugs perfectly.
- $60 to $200 budget for stoneware sets.
- Space larger plates at least four inches apart to avoid clutter.
- Perfect for organic modern or southwestern interiors.
Most people skip this: Ensure the wall anchors are rated for the weight of heavy stoneware to prevent falling.
29. Pastel Plate Wall
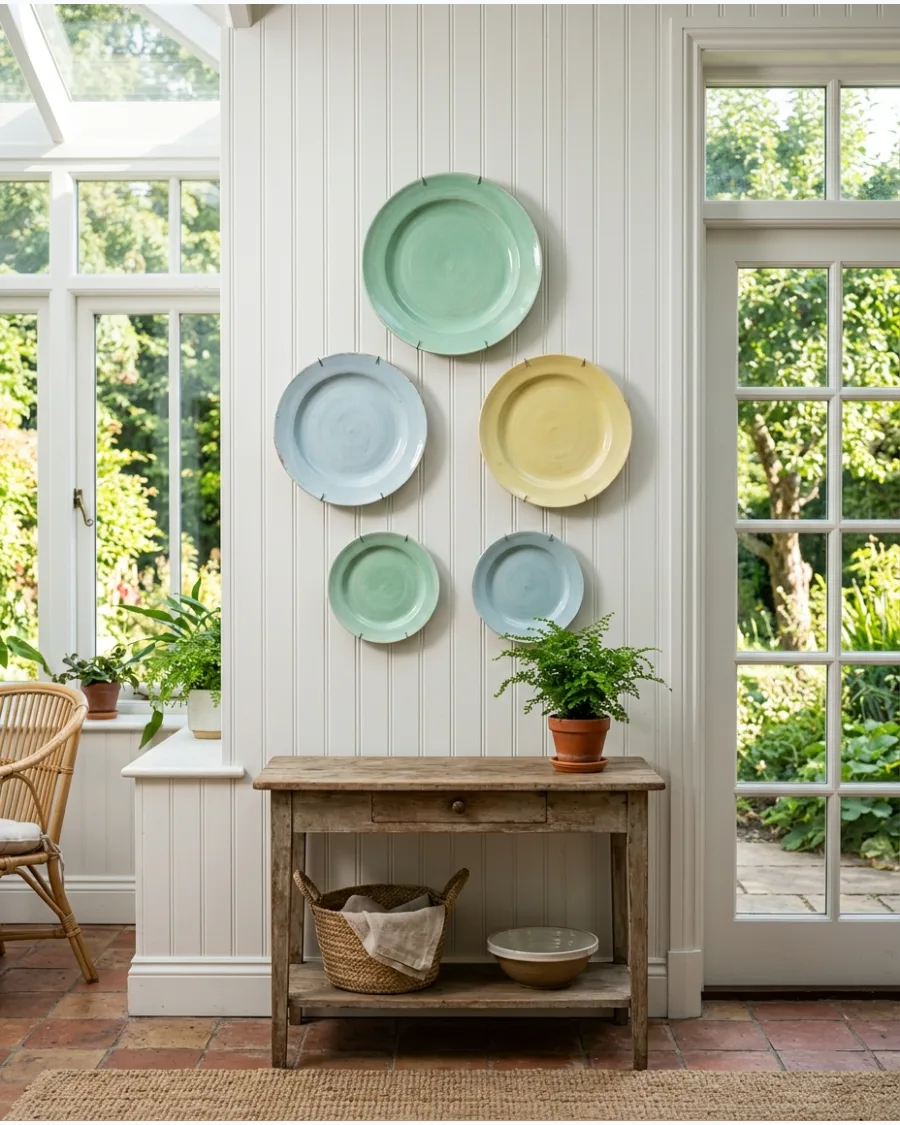
Soft pastels like mint, lavender, and pale yellow create a light and airy feel. Keeping the patterns subtle allows the gentle colors to be the main focus of the display.
Arrange the plates in a soft curve to mimic the movement of the colors across the wall. It is a great way to decorate a nursery or a sunny kitchen corner.
- $30 to $90 budget for a five-plate group.
- Use white wire hangers to keep the hardware discreet.
- Suits cottage, shabby chic, or traditional sunrooms.
Best shortcut: Use spring-loaded wire hangers for plates with very thick or irregular edges.
30. Color-Gradient Plate Arrangement
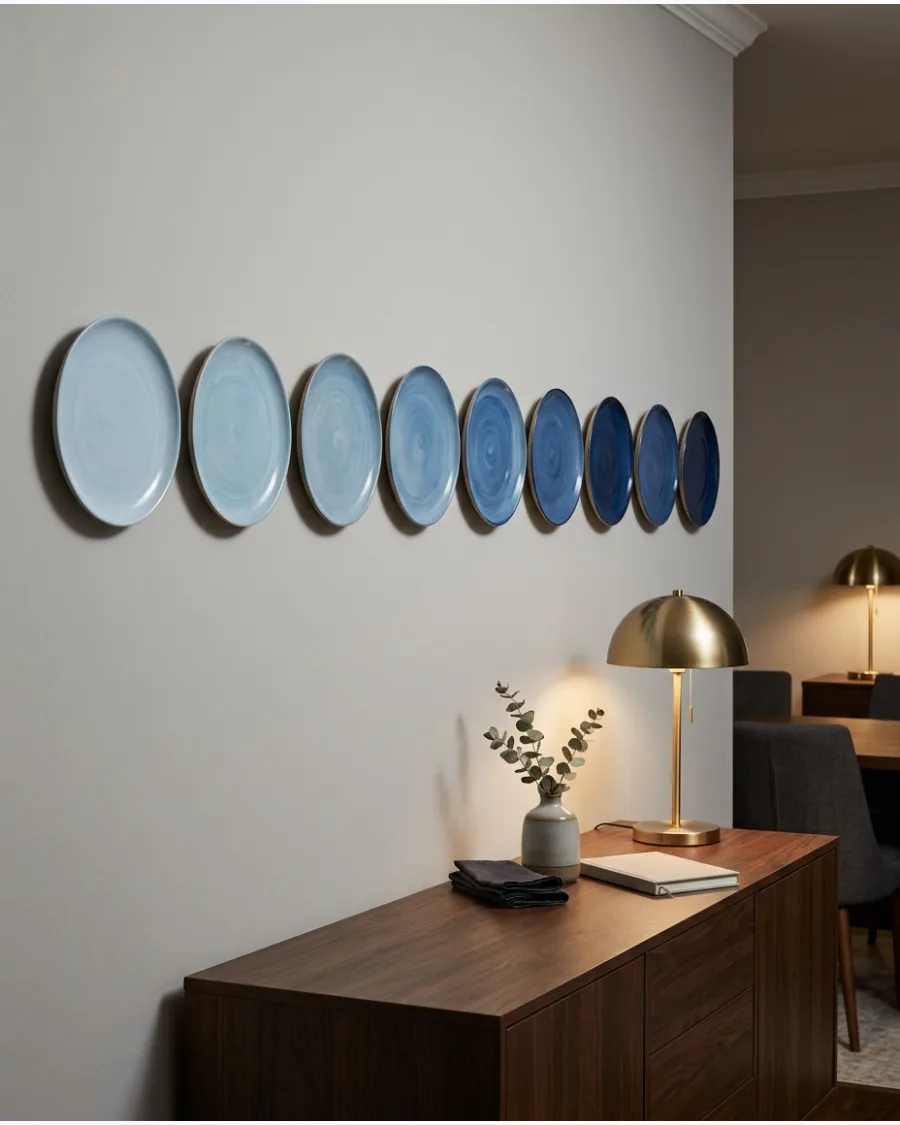
A color gradient adds a sense of motion and professional design to a wall. Moving from light to dark creates a sophisticated ombre effect that draws the eye across the room.
Select plates that share a similar shape to keep the focus on the changing colors. This arrangement works best on long, horizontal walls over a sideboard.
- $80 to $300 budget for a full gradient set.
- Mark a straight line with painter's tape to align the plates.
- Ideal for a polished, modern, or contemporary look.
Quick win: Take a photo of the plates in the store to see if the colors blend smoothly before buying them.
MODERN PLATE WALL IDEAS
31. Minimalist Ceramic Plate Trio
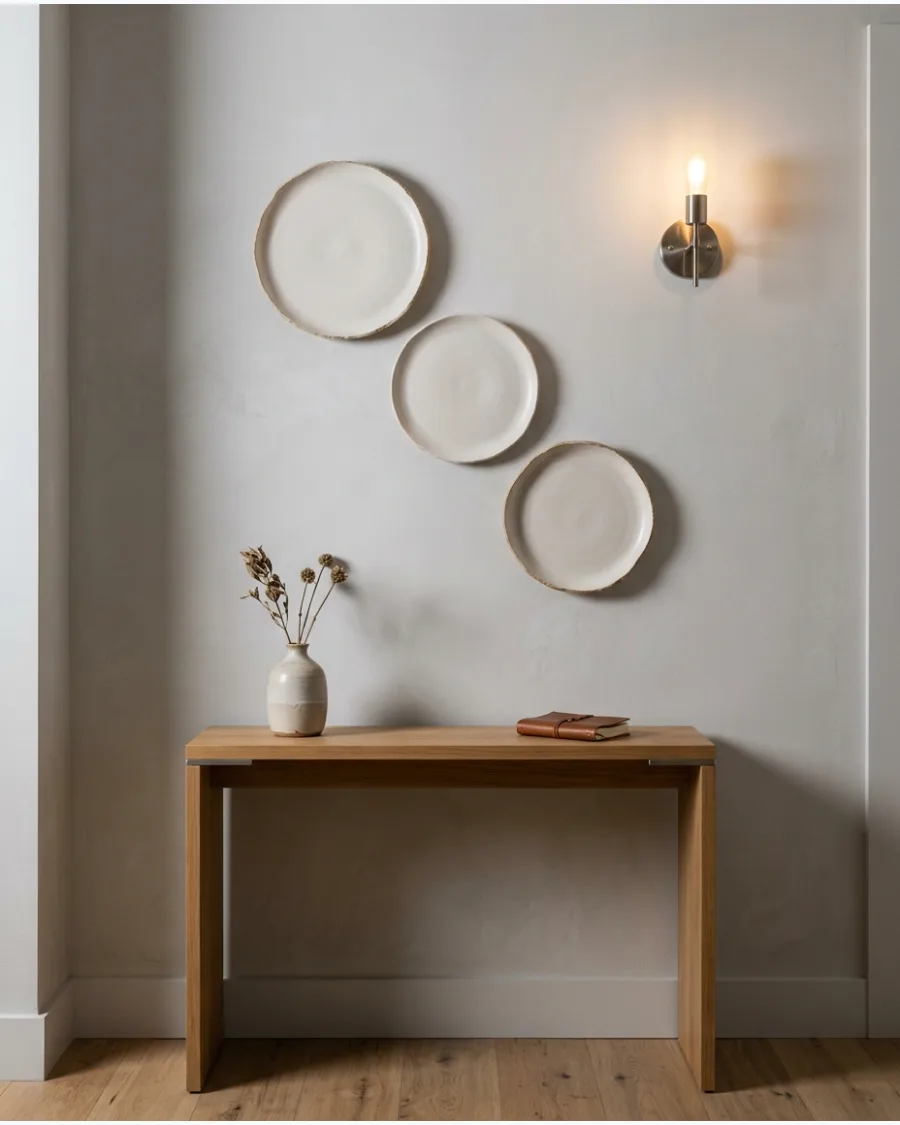
Choose three sculptural ceramic plates with simple glazes and irregular shapes. Space the plates at least six inches apart to give each piece enough visual breathing room. This layout focuses on the quality of the ceramics rather than the quantity.
Highlighting handmade pieces with unique edges is a great way to add texture to a room without adding clutter.
- $40-$100 for artisan plates and one hour of time.
- Measure the distance from the top plate to the bottom to center the middle one perfectly.
- Use adhesive disc hangers to keep the focus on the plate shape without visible wires.
Quick win: Use a level to ensure the center points of the plates align even if the edges are uneven.
32. Abstract Art Plate Wall
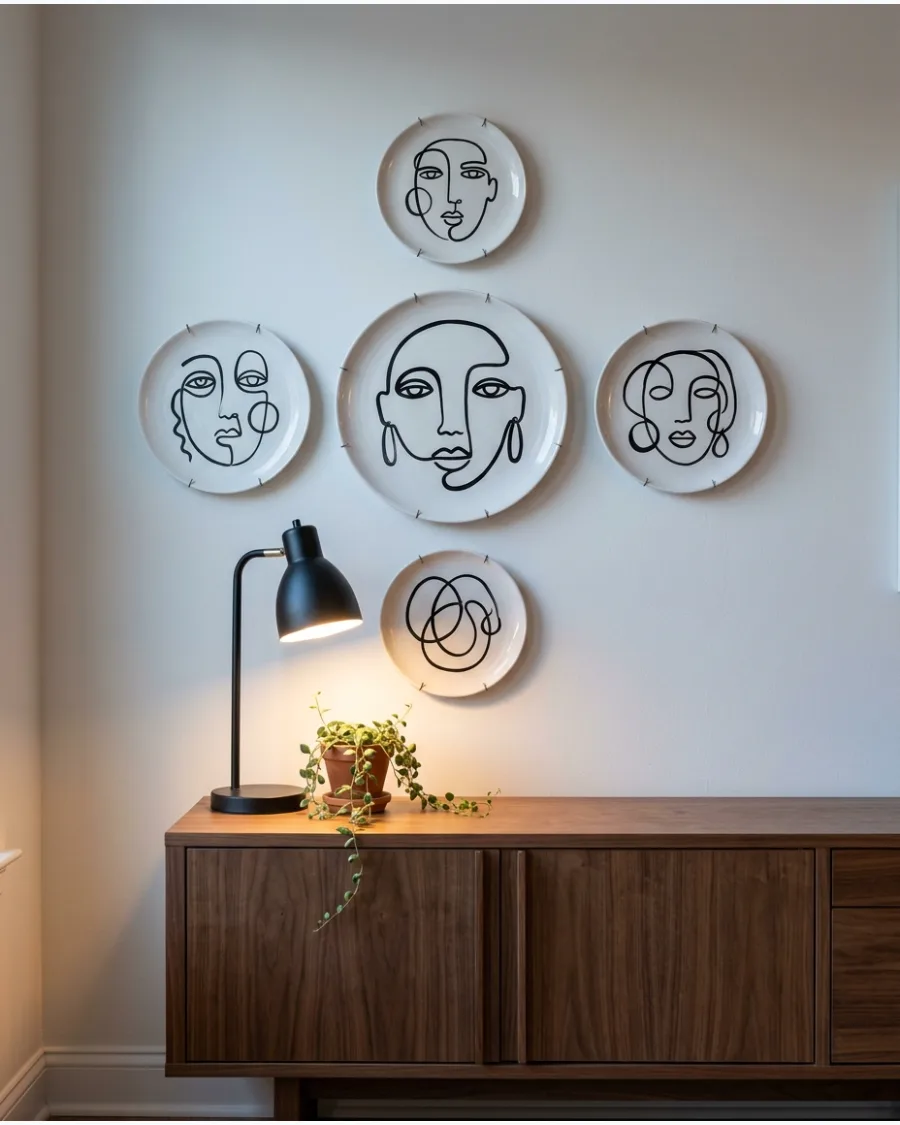
Display contemporary plates decorated with abstract lines, faces, or geometric shapes. Mix different artistic styles like faces and brushstrokes to create a curated, high-end gallery look. Treat each plate as a small piece of original artwork by keeping the surrounding wall space clear.
These work best when they share a similar color palette to keep the arrangement cohesive.
- $15-$30 per plate at decor shops or online boutiques.
- Trace the plates on paper and tape them to the wall to test the layout before drilling.
- Grouping the plates tightly makes them look like one large piece of art rather than scattered objects.
Most people skip this: Check that the light in the room does not create a glare on the glaze that hides the artwork.
33. Asymmetrical Plate Cluster
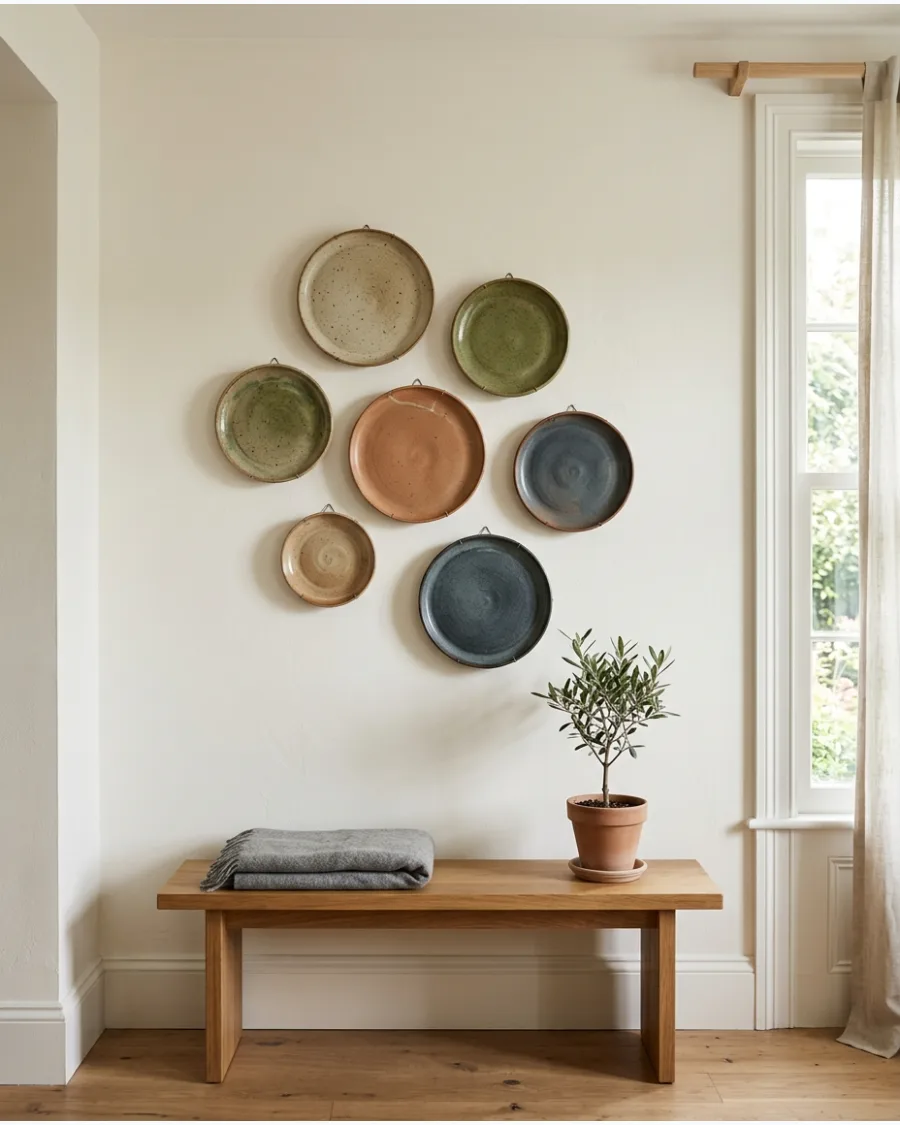
Arrange plates in a loose cluster that extends more heavily toward one side. Start with the largest plate slightly off-center and build out with smaller pieces in one direction. The uneven shape creates movement and gives the display a relaxed modern character.
It is the perfect solution for walls where a window or door prevents a centered layout.
- $50-$150 depending on the number of plates used.
- Use spring-loaded wire hangers for heavier stoneware to ensure they stay secure on the wall.
- Overlap the visual weight by placing darker or larger plates at the bottom of the cluster.
Best shortcut: Take a photo of your arrangement on the floor first to see if the lean looks intentional.
34. Vertical Plate Column
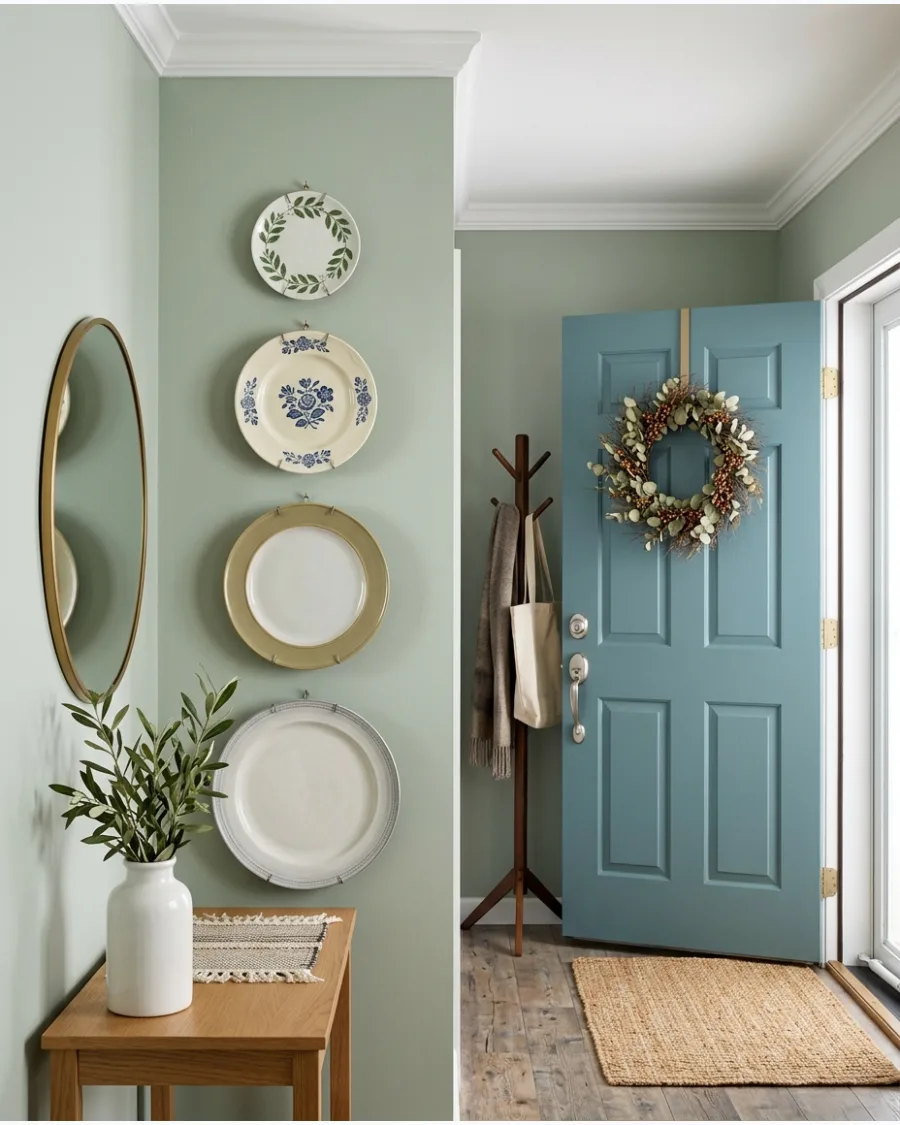
Hang plates in a single vertical line on a narrow wall. Vary the sizes slightly from the largest at the bottom to the smallest at the top to make the simple arrangement feel more interesting. This draws the eye upward and makes low ceilings feel taller.
It is a smart way to use narrow wall strips that feel too cramped for standard picture frames.
- $30-$80 for a set of four to five coordinating plates.
- Use a plumb line or a long level to keep the column perfectly straight during installation.
- Space plates about two inches apart for a tight, professional look that mimics a single art piece.
Quick win: Align the plates by their vertical center line rather than their left or right edges.
35. Horizontal Plate Row
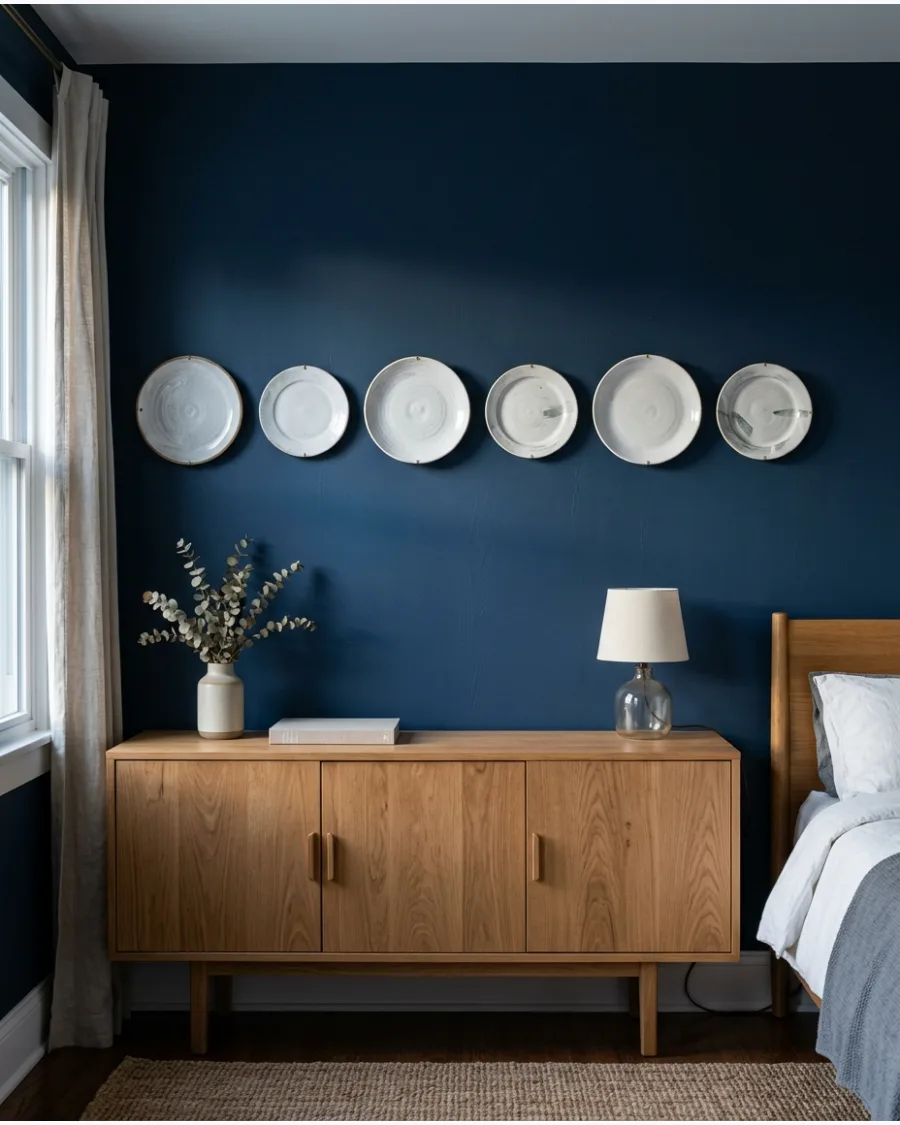
Create a long horizontal row of plates above a dining bench, headboard, or console table. Align the center points of every plate along a single horizontal line even when the plates have different diameters. This arrangement grounds a room and works best when the plates share a common texture.
Using plates with different finishes but the same color keeps the row from looking too busy.
- $60-$120 for a set of six high-quality textured plates.
- Measure the total width of the furniture and center the entire row over it for balance.
- Use a laser level to ensure the line stays perfectly flat across the length of the wall.
Most people skip this: Leave at least eight to ten inches between the bottom of the plates and the top of the furniture.
36. Modern Neutral Plate Wall
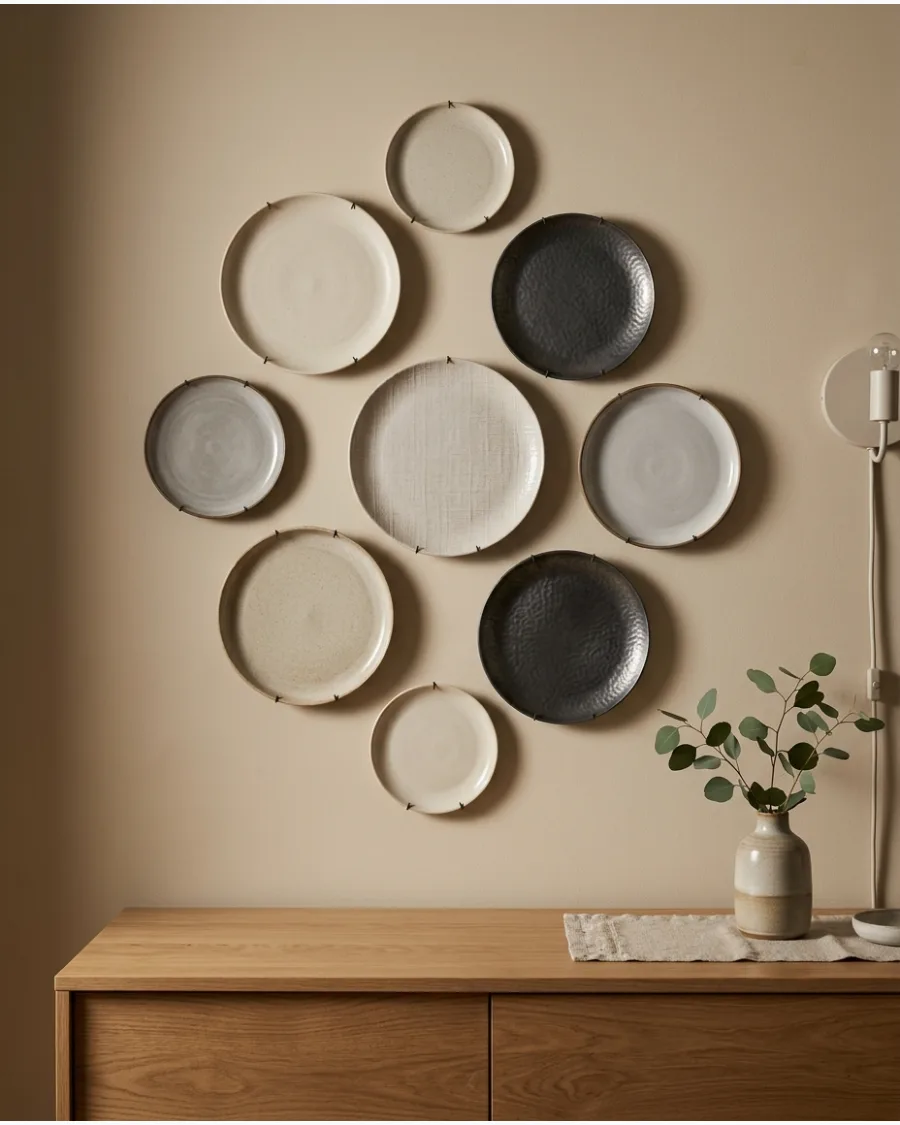
Combine cream, beige, taupe, gray, and soft brown ceramics. Focus on texture and unusual shapes like squares or hexagons instead of strong colors or detailed patterns. This tonal approach feels sophisticated and fits easily into any modern home.
It turns the plates into a subtle architectural feature rather than a loud statement.
- $10-$25 per plate at home goods stores or thrift markets.
- Mix matte and glossy finishes in the same color family to add depth to the display.
- Group different shapes to break up the monotony of a single-color wall.
Best shortcut: Use blue painter's tape to mark the exact spot for each nail once your paper templates are in place.
37. Sculptural Plates on a Dark Wall
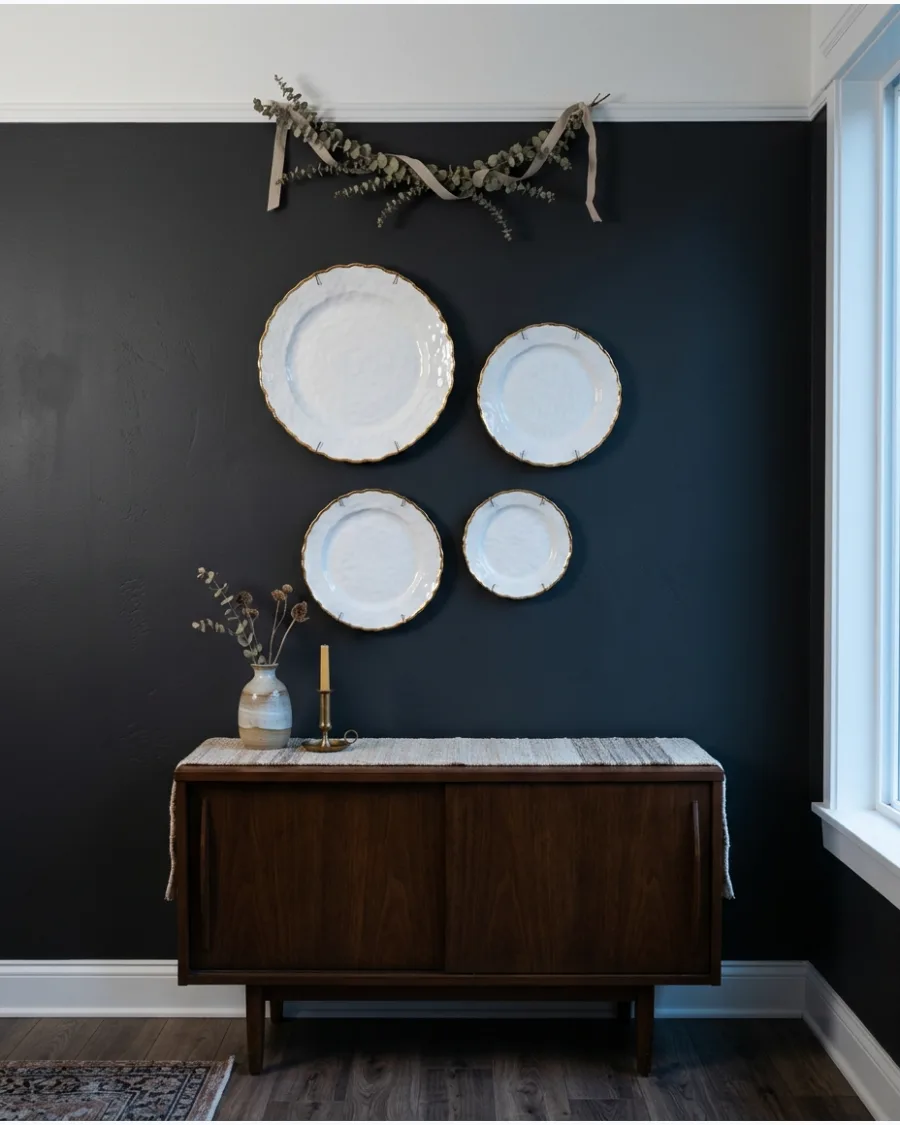
Hang pale or colorful ceramic plates against navy, charcoal, forest green, or chocolate brown paint. Select plates with high-contrast glazes or metallic rims to catch the light against the moody background. The depth of the wall color makes the silhouettes of the plates much sharper.
This setup is a great way to make inexpensive white plates look like a high-end art installation.
- $5-$15 per plate plus the cost of a small can of accent paint.
- Use white or gold hangers to match the plate details and blend into the design.
- Ensure the wall has a matte finish to prevent distracting reflections behind the plates.
Quick win: Use a damp cloth to remove any finger oils from the plates after hanging to keep the glaze sparkling.
38. Oversized Statement Plate
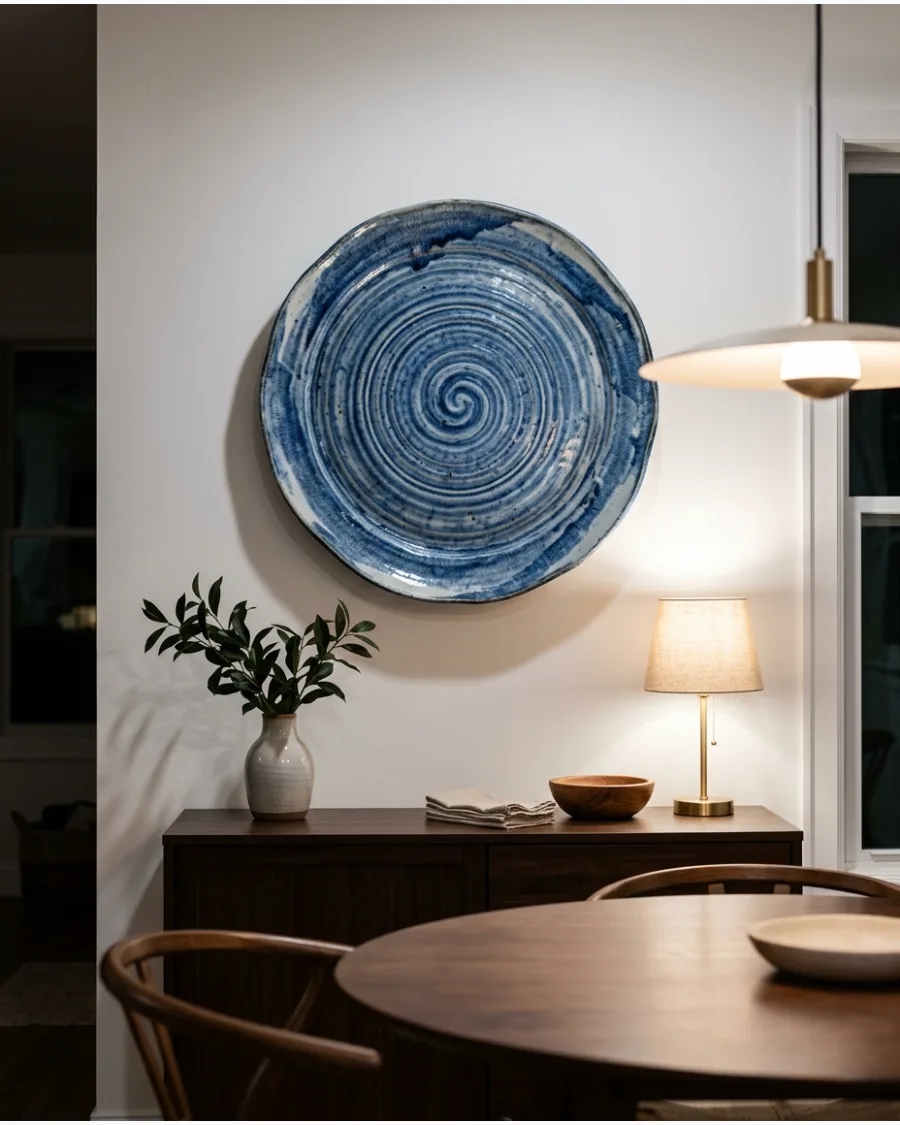
Use one extra-large decorative platter as the main focal point. Hang the oversized piece at eye level to act as the primary visual anchor for the entire wall. Surround it with only a few small plates or allow it to stand alone for a simpler, minimalist look.
This works exceptionally well in a small entryway or centered over a café table.
- $50-$200 for a large statement platter from an artisan maker.
- Use a heavy-duty wall anchor to support the weight of a large ceramic piece safely.
- Check the weight limit on your hanger before purchasing to avoid breakage.
Most people skip this: Make sure the hanger is rated for at least double the weight of the platter for long-term safety.
39. Organic Flowing Plate Arrangement
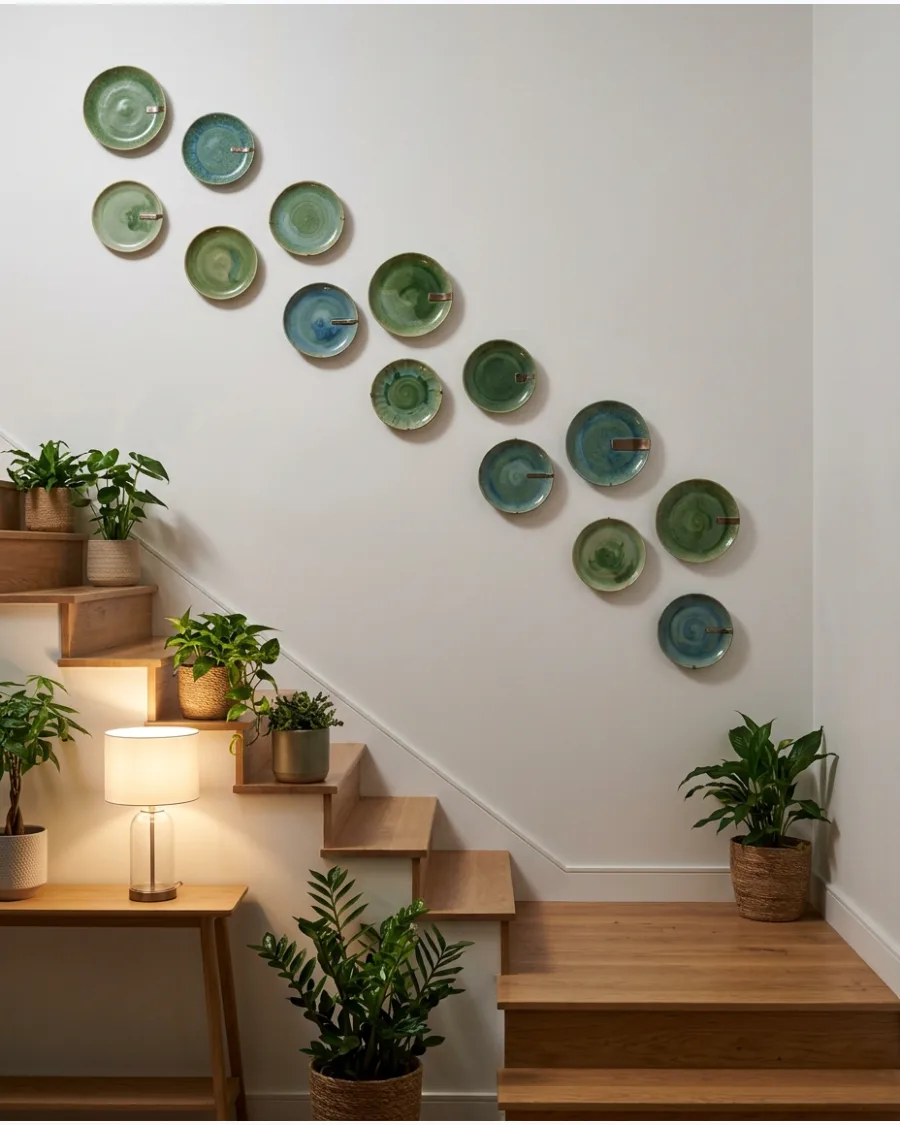
Arrange plates in a curved line that appears to travel across the wall. Follow the natural lines of the room, such as the slant of a staircase or the curve of an archway, to create flow. This layout breaks up the rigid straight lines of furniture and feels more like a custom mural than a standard display.
It works beautifully to connect two different zones in an open-concept room.
- $80-$150 for a large set of varied small plates.
- Lay the plates out on a large sheet of butcher paper and trace the curve first to guide your nails.
- Start the curve from the bottom and work your way up to control the visual flow.
Best shortcut: Use smaller plates for the tighter parts of the curve and larger ones for the wide sections.
40. Small Plates With Generous Spacing
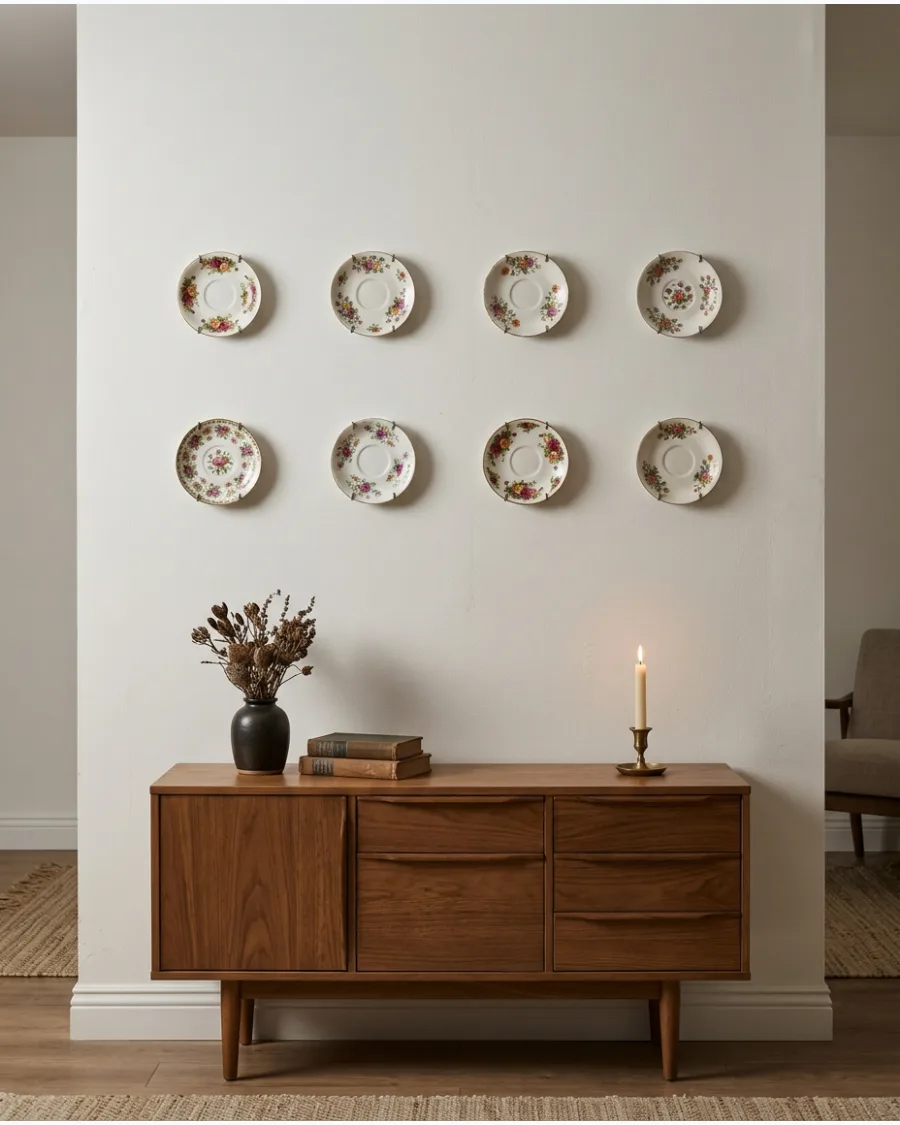
Hang a collection of small plates with plenty of empty wall visible between them. Leave at least eight to twelve inches of wall space between each plate to emphasize the open, modern layout. The open spacing makes the display feel airy and prevents delicate pieces from becoming visually lost.
This technique is particularly effective for showcasing hand-painted saucers on a large, blank wall.
- $20-$60 for a collection of vintage or new decorative saucers.
- Use a measuring tape to ensure the distance between every plate is identical for a clean look.
- Tiny adhesive discs are better than wire hangers for small, light plates to keep the look seamless.
Quick win: Use a laser level to keep the rows and columns perfectly aligned across the wide gaps.
PLATE WALL IDEAS FOR DIFFERENT ROOMS
41. Dining Room Plate Wall
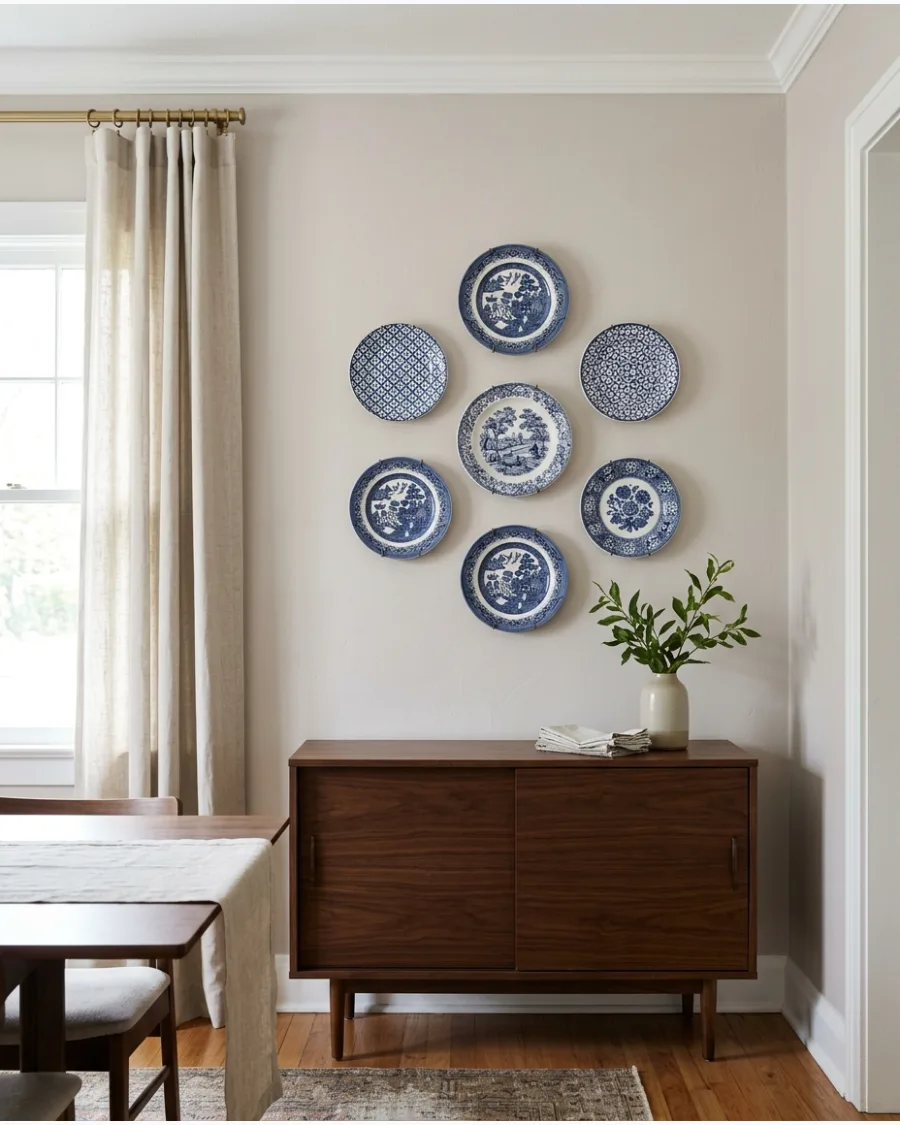
Use the space over a buffet to anchor the room and make it feel finished. Coordinating colors with your table runner or curtains makes the display feel like a part of the architecture.
Center the largest plate at eye level to create a focal point before adding smaller pieces around it. A cohesive color story prevents the wall from feeling like a random collection of dishes.
- Budget $50 to $200 for a set of high-quality decorative plates.
- Mount using wire hangers for heavy pieces to ensure they stay secure.
- Use monochromatic white plates for a modern look on a dark-colored wall.
Best shortcut: Trace your plates on paper first and tape the cutouts to the wall to test the layout.
42. Kitchen Breakfast Nook Display
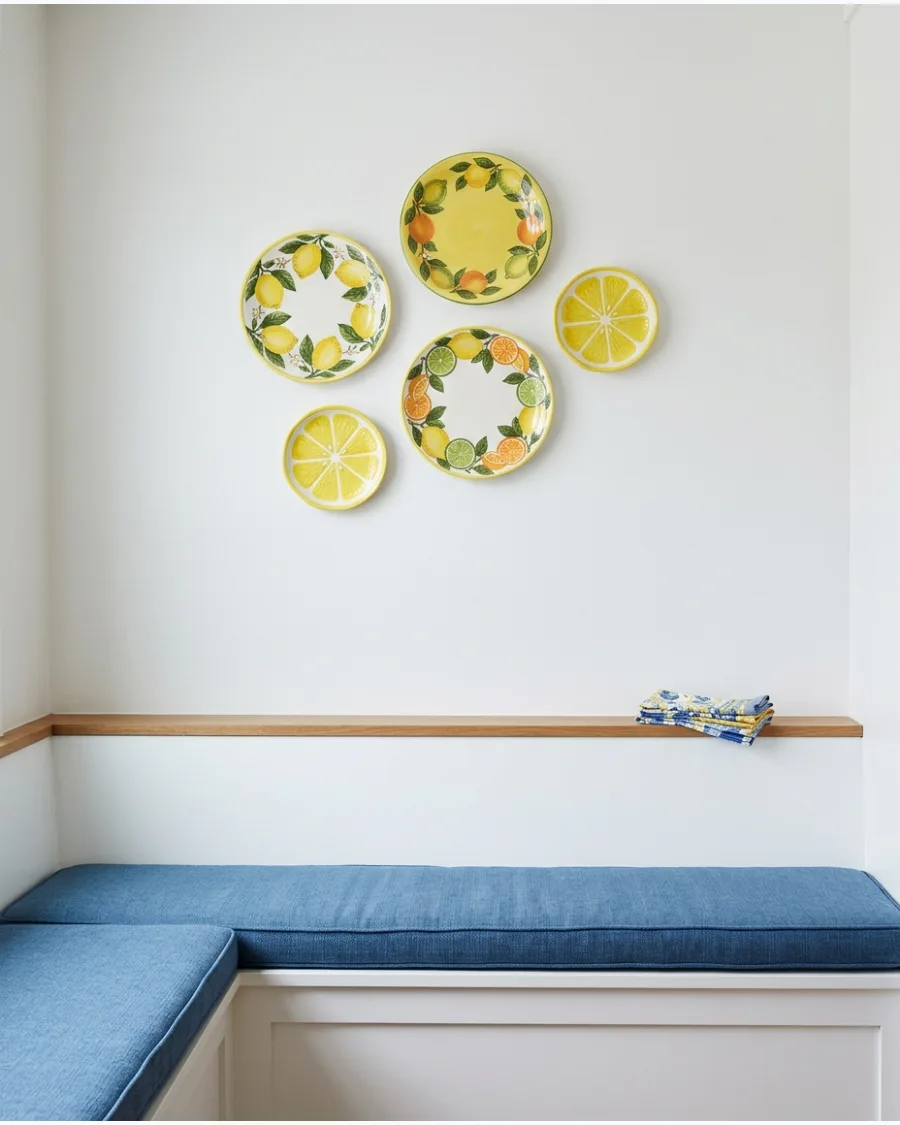
Brighten up a morning corner with casual, hand-painted designs that feel energetic. Fruit motifs or simple stripes work well to keep the vibe light and unpretentious.
Mount the plates at a lower height than usual so they sit just above the bench back for a cozy feel. This creates a decorative backsplash effect without the permanence of tile.
- Budget $20 to $60 using unique thrifted finds.
- Space plates 2 inches apart for a tight and intentional grouping.
- Swap for holiday-themed plates to easily refresh the kitchen seasonally.
Quick win: Use adhesive disc hangers for a floating look that does not show any metal wires.
43. Plates Above the Kitchen Counter
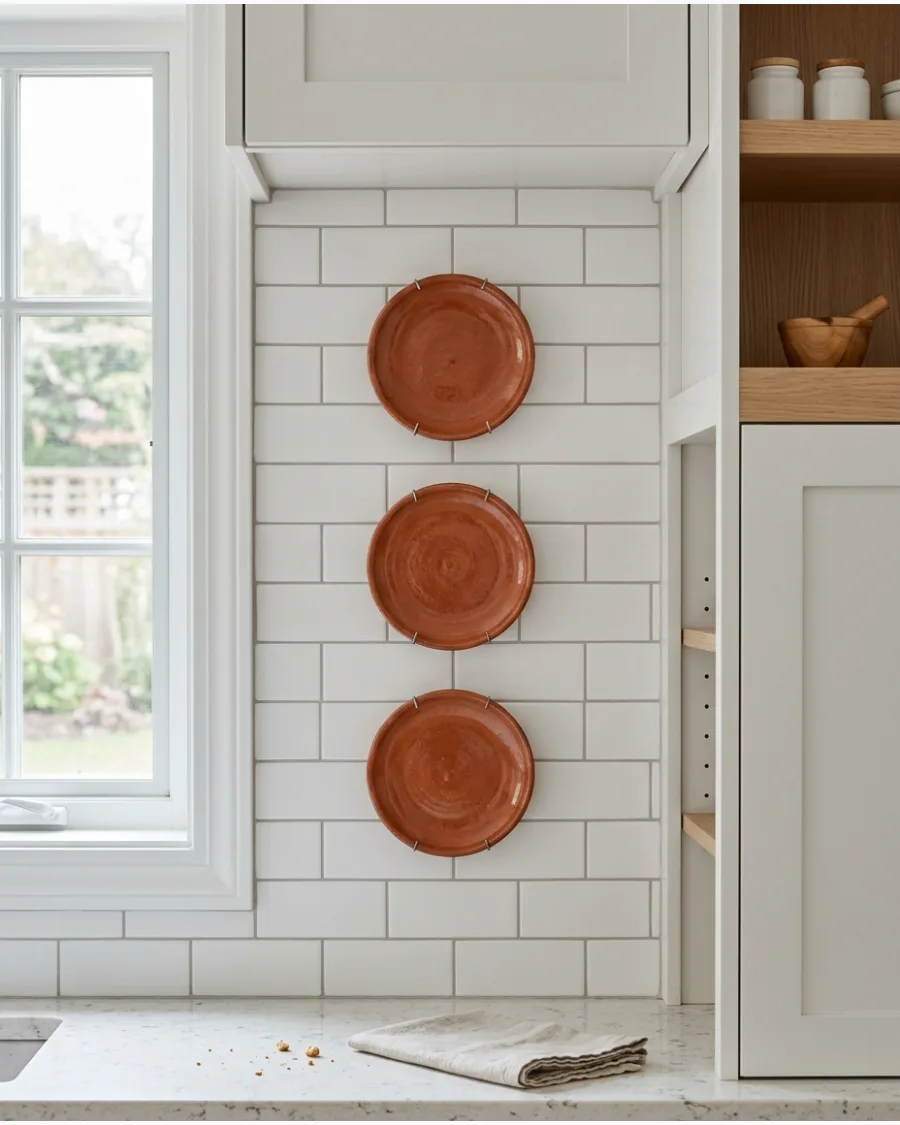
Transform a small strip of wall between cabinets or above a backsplash into a focal point. Compact arrangements of three or four plates add texture to hard kitchen surfaces.
Choose glazed ceramics that are easy to wipe down since kitchen walls often collect dust and steam. Keep them away from the stove to avoid grease buildup on the rims.
- Budget $15 to $40 for small artisan saucers.
- Ensure wall anchors are used if drilling into tile or hard backsplashes.
- Use mismatched saucers to fill awkward or thin wall gaps.
Most people skip this: Check the clearance of cabinet doors to make sure they will not hit the plates when opened.
44. Living Room Plate Gallery
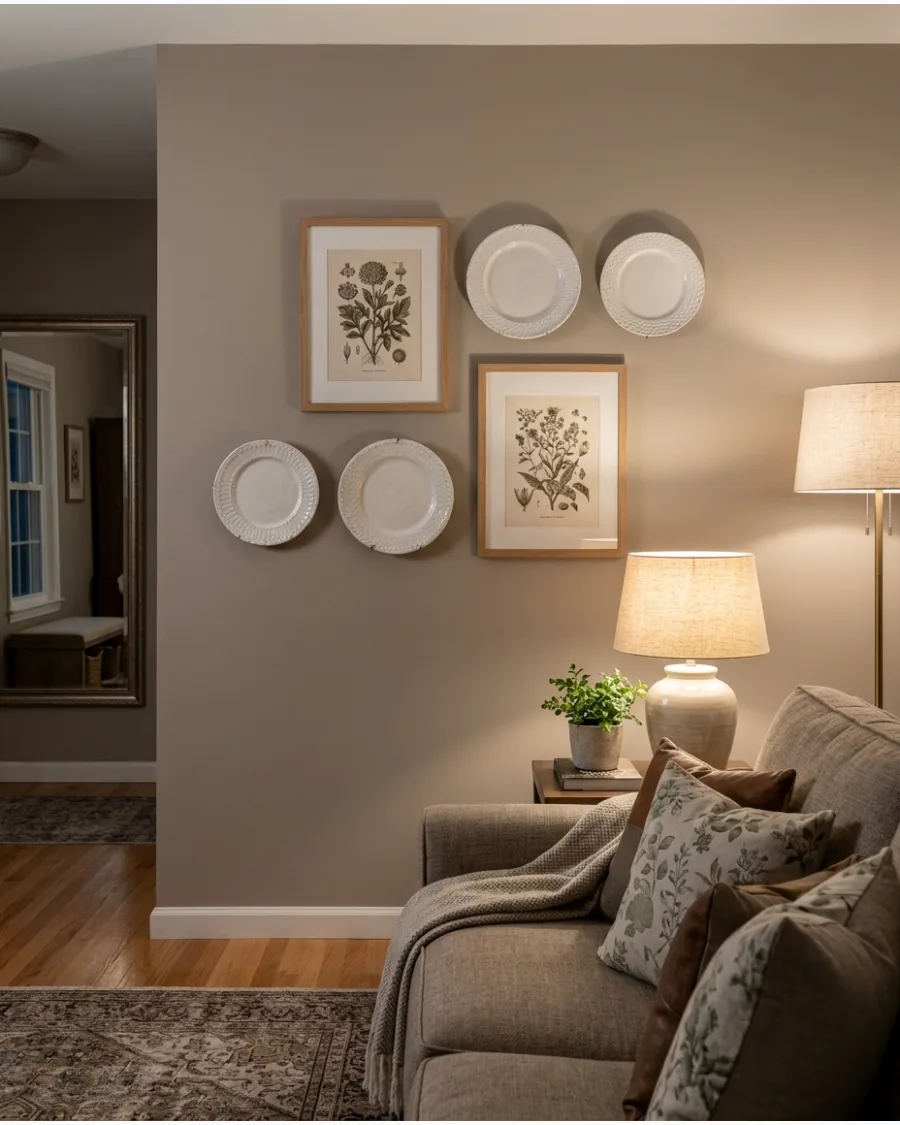
Mix ceramic textures with traditional framed art to add depth to your gallery wall. The round shape of a plate breaks up the sharp corners of picture frames and mirrors.
Position a large ceramic platter slightly off-center within a group of square frames to create visual movement. This approach makes a formal room feel more curated and less stiff.
- Budget $100 or more depending on the art pieces chosen.
- Maintain consistent 3-inch spacing between frames and plates.
- Use plates with high-relief textures to catch the light from lamps.
Quick win: Pick one color from your largest painting and choose plates that match that specific hue.
45. Entryway Plate Display
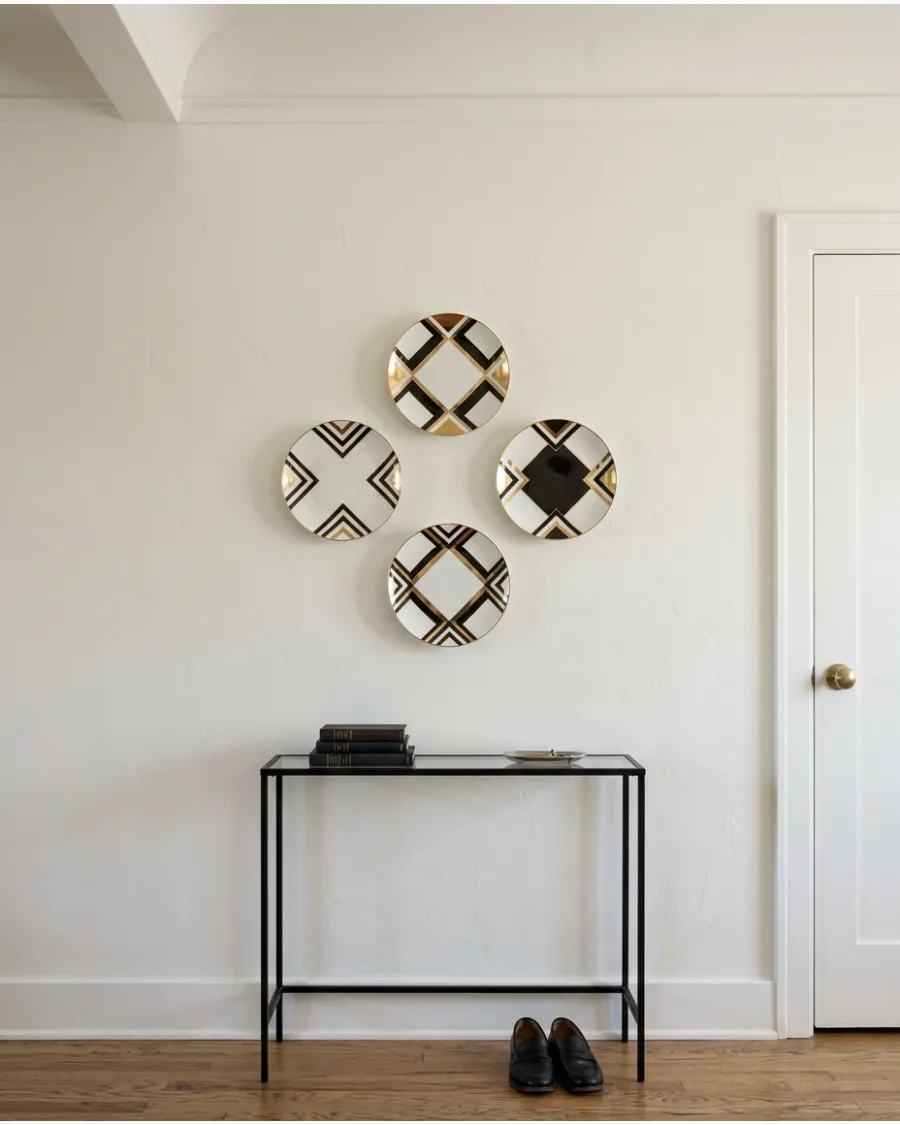
Welcome guests with a small, punchy collection that sets the tone for your home. A grouping of three to five plates above a console table acts as a great conversation starter.
Select plates with bold patterns or high-contrast colors to make a statement in a small entryway. It provides the look of expensive wallpaper without the commitment or cost.
- Budget $40 to $100 for a small, curated set.
- Center the arrangement 6 to 8 inches above the tabletop.
- Use sticky tack on the bottom edge of plates to keep them perfectly level.
Most people skip this: Use a level to ensure the center points of the plates align with the center of the console table.
46. Staircase Plate Wall
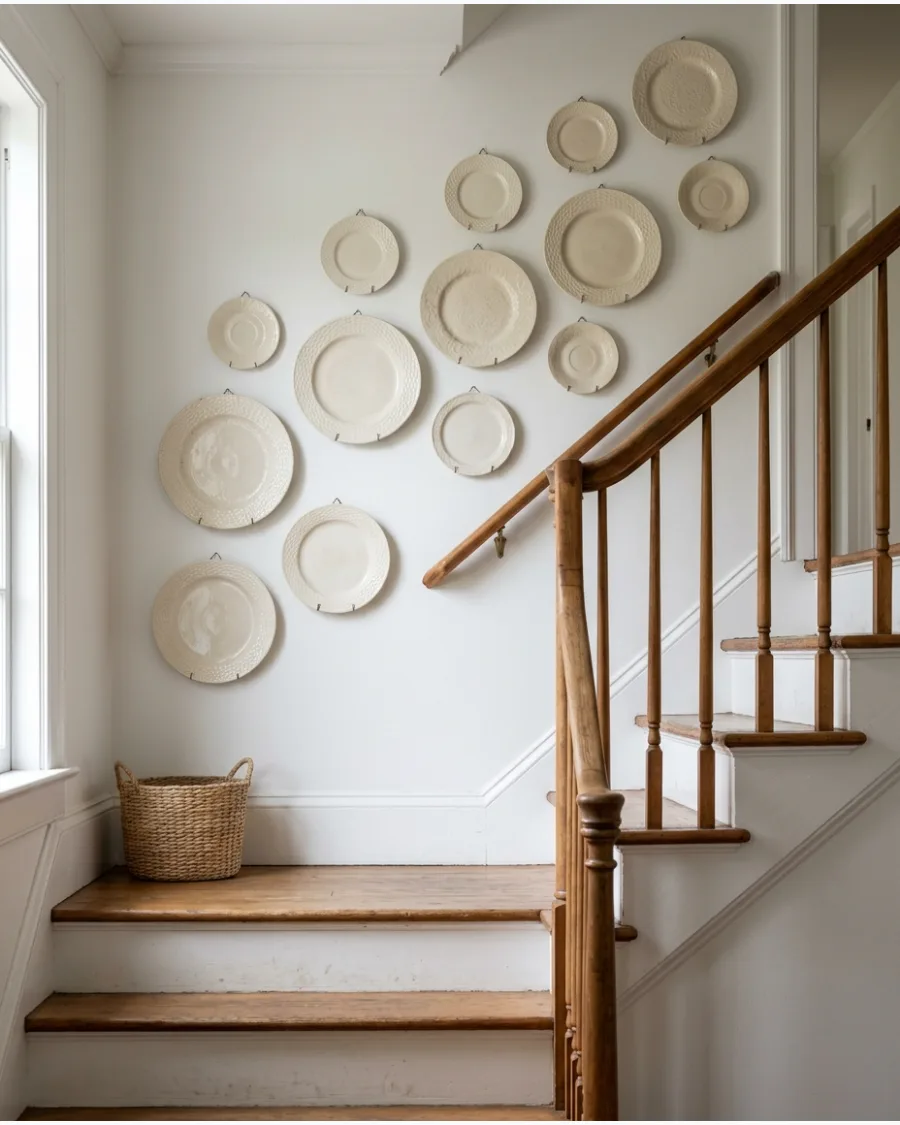
Follow the natural diagonal line of your stairs to draw the eye upward. Mixing different sizes keeps the arrangement from looking like a rigid line of dots.
Place the largest plates at the bottom of the stairs and gradually use smaller pieces as you reach the top. This creates a sense of lightness and height as people move through the house.
- Budget $100 to $300 for a large collection of pieces.
- Mount each plate securely to withstand the vibration of constant footsteps.
- Use a mix of matte and glossy finishes for subtle variety.
Best shortcut: Lay the plates out on the floor at an angle first to get the spacing right before hammering.
47. Bedroom Plate Wall
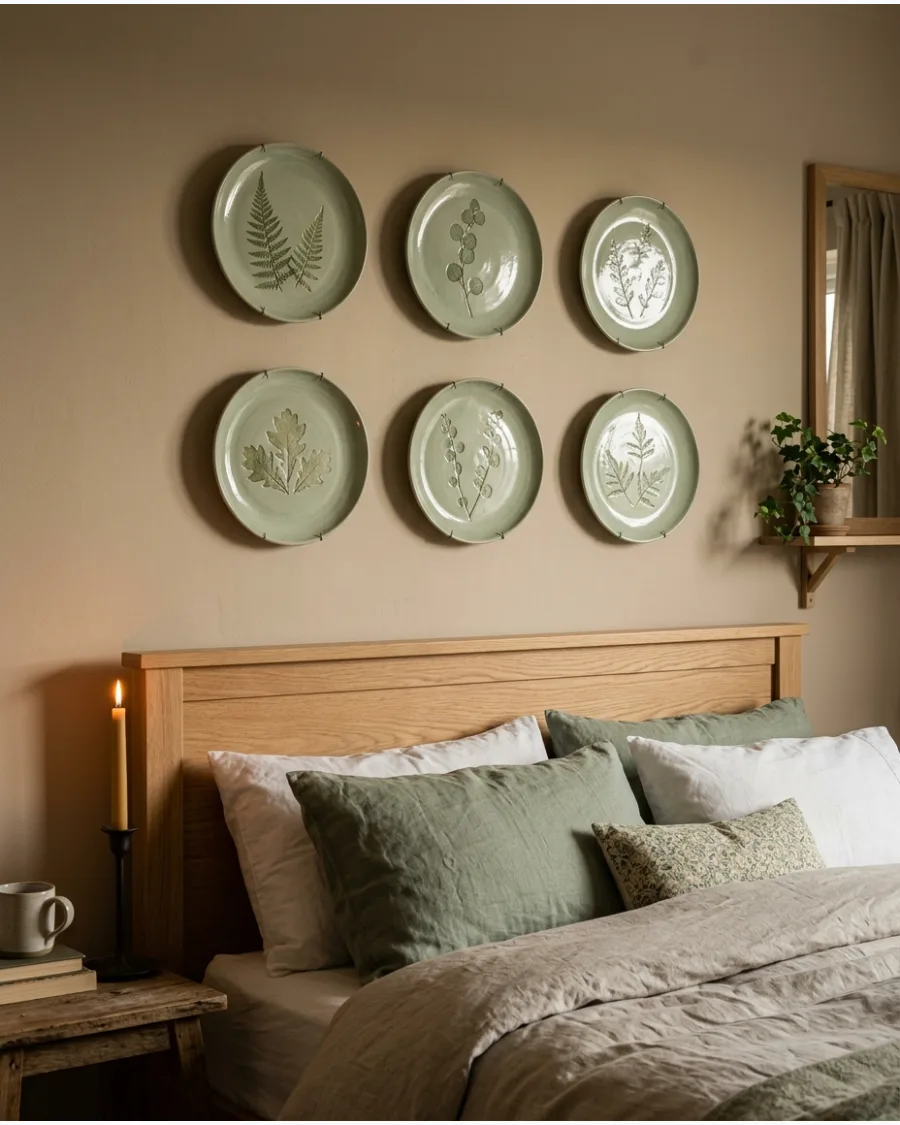
Soften a bedroom wall with a gentle arrangement of floral or botanical plates. The round shapes provide a calming contrast to the rectangular lines of a headboard or dresser.
Stick to a muted color palette like sage green or dusty rose to keep the space feeling restful. Secure mounting is vital here to ensure the pieces stay put over the bed.
- Budget $60 to $120 for a peaceful, matching set.
- Use heavy-duty spring-style hangers for maximum security.
- Choose plates with a matte finish to prevent harsh glare from bedside lamps.
Quick win: Group plates in even numbers for a more formal, symmetrical look that promotes a sense of order.
48. Hallway Plate Collection
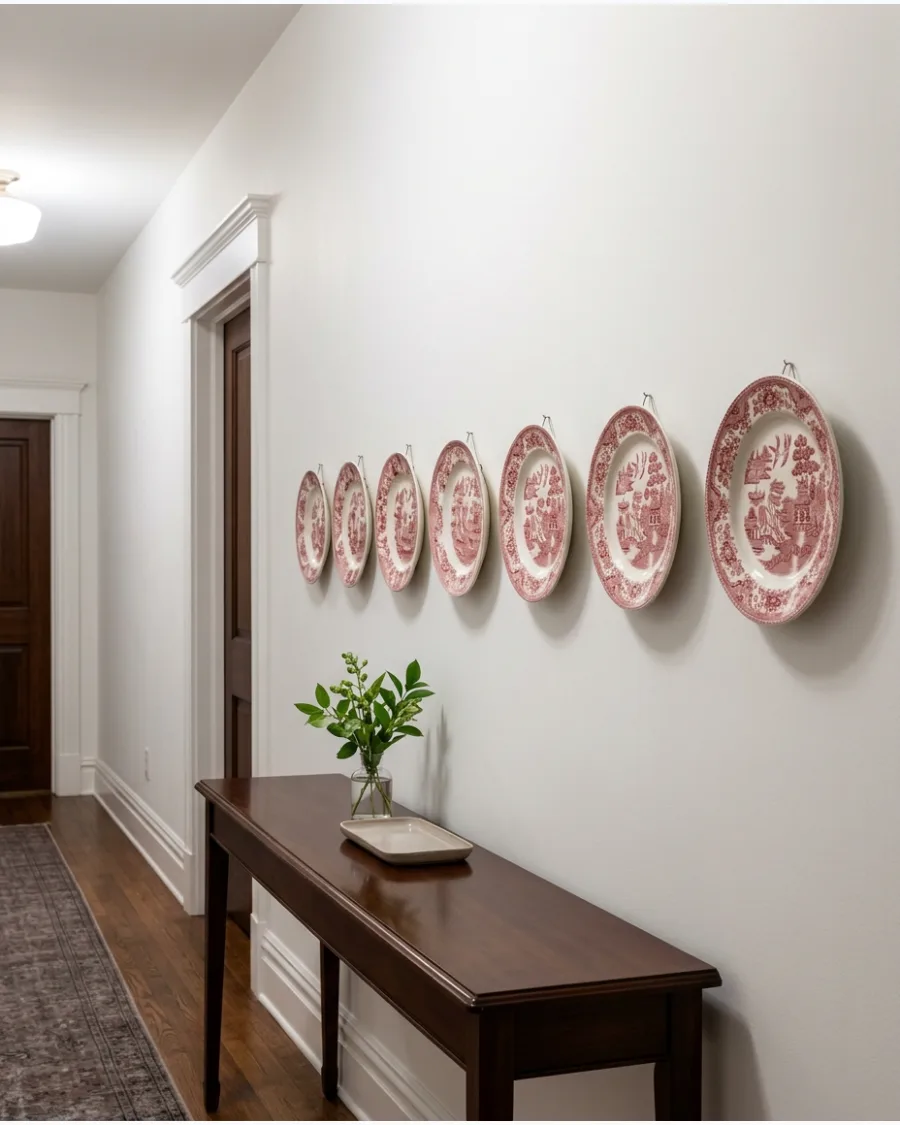
Turn a boring hallway into an art walk with a long, horizontal row of plates. Using plates with a shared theme, like a specific color or vintage style, makes the narrow space feel cohesive.
Hang the plates at exactly the same height to create a clean, architectural line down the hall. This draws the eye forward and makes the hallway feel more intentional.
- Budget $80 to $200 for a vintage set or reproductions.
- Use a laser level to ensure a perfectly straight line over long distances.
- Space plates at least 10 inches apart to prevent a cluttered feel in a narrow space.
Most people skip this: Measure the distance between plates from the center of each plate, not the edges, for perfect spacing.
CREATIVE PLATE DISPLAY IDEAS
49. Plates Arranged Around a Mirror
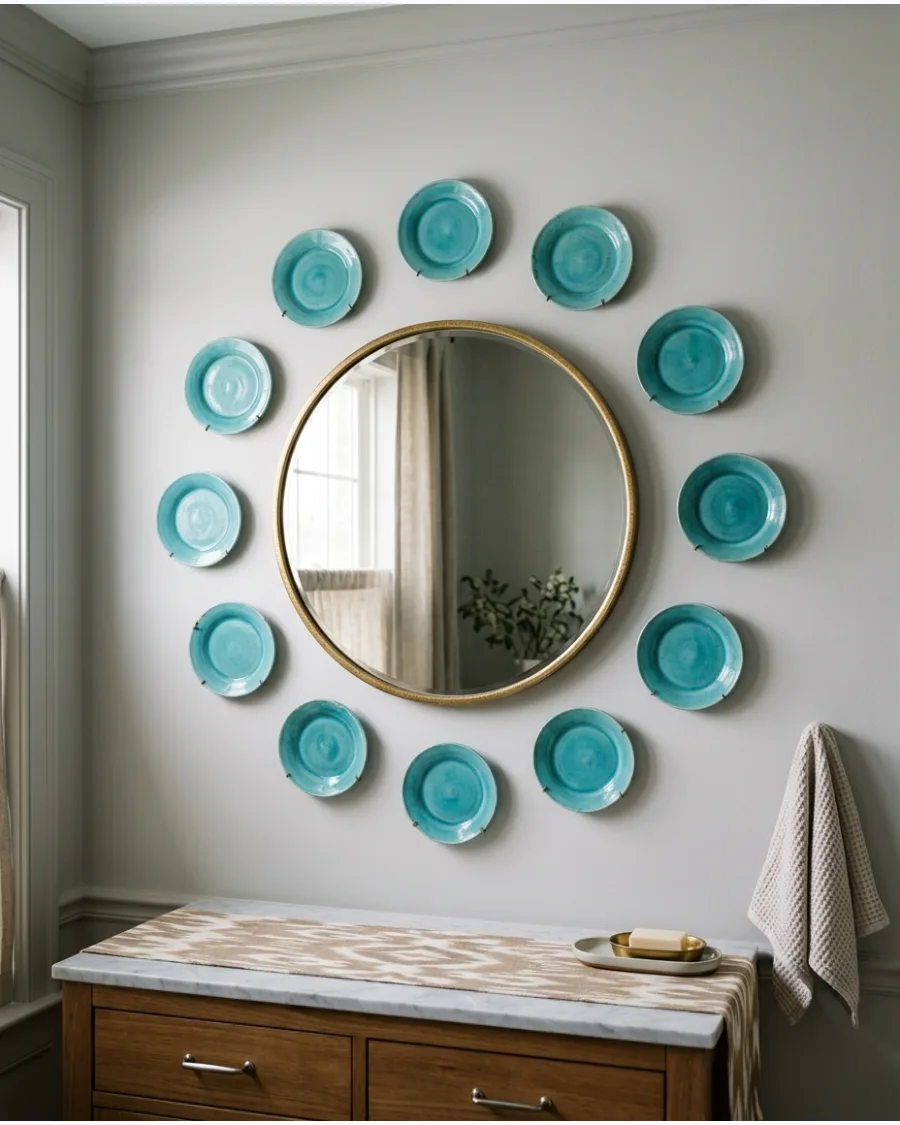
Frame a central mirror with decorative plates to create a large-scale wall feature. The mirror reflects light while the plates add color and texture to the surrounding wall.
Leave at least two inches of breathing room between the edge of the mirror and the plates so the display doesn't feel cramped. This trick makes a standard mirror look like a custom, high-end piece of art.
- Budget $150 or more including the mirror and the plates.
- Ensure the mirror is hung on a wall stud before adding the plates.
- Mix plate sizes to create a more organic, wreath-like shape around the glass.
Best shortcut: Start by hanging the mirror first, then work outward from the top and bottom to balance the sides.
50. Floor-to-Ceiling Plate Wall
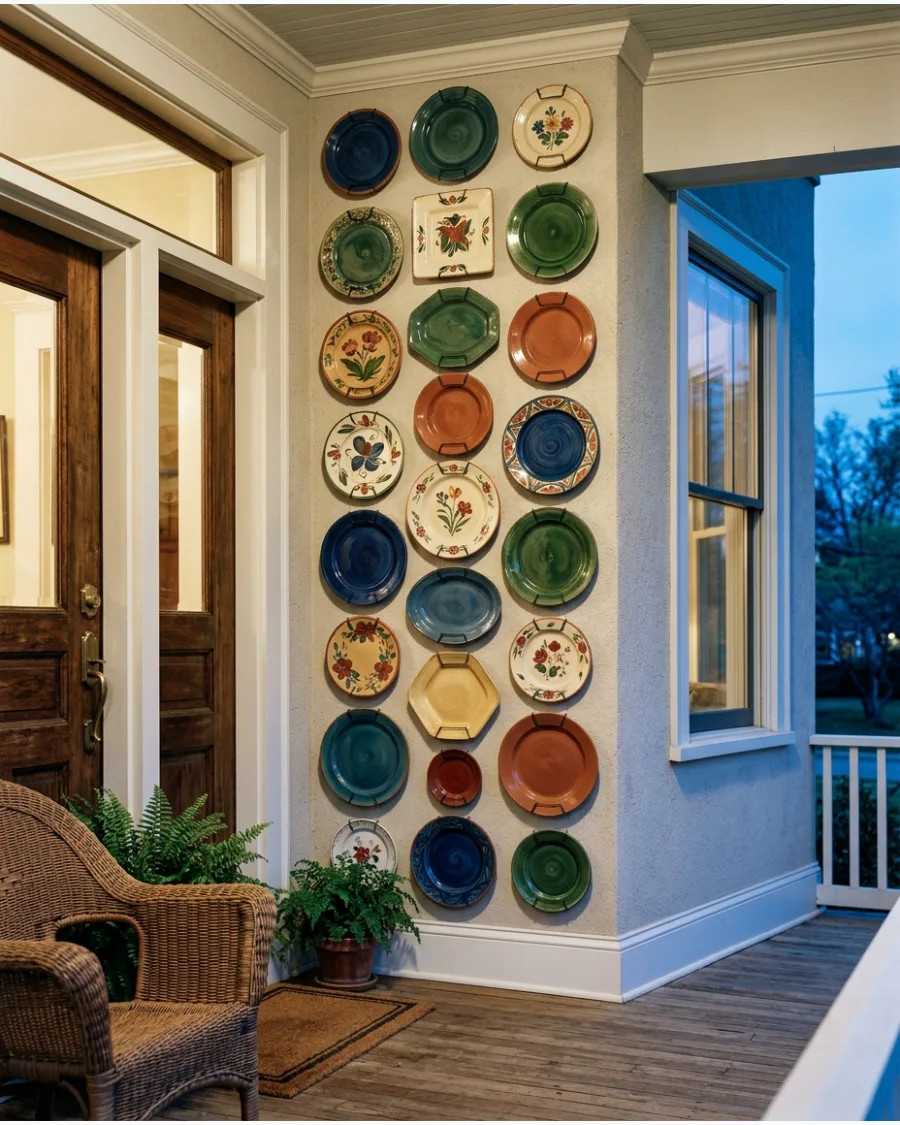
Go big with a dramatic display that covers a vertical section of the wall from top to bottom. This works best in a narrow nook or a corner that needs a bold decorative element.
Mix different shapes like ovals and squares with standard round plates to fill in the gaps for a full, tapestry look. It creates a high-impact focal point that feels like a permanent part of the room.
- Budget $200 to $500 for a large volume of plates.
- Use a variety of hanger sizes to accommodate different plate weights.
- Stick to a single color family to keep the massive display from feeling chaotic.
Quick win: Place the most durable or least expensive plates near the bottom where they are more likely to be bumped.
Frequently Asked Questions
What is the best way to hang plates without showing the hangers?
Adhesive disc hangers are the perfect solution for a clean, professional look because they stick to the back of the plate and remain completely hidden. These discs are incredibly strong and eliminate the need for visible wire clips that can distract from your beautiful dishware.
How do I plan a plate wall layout before putting holes in the wall?
The easiest method is to trace each plate onto paper, cut out the templates, and tape them to the wall using painter's tape. This allows you to experiment with different arrangements and spacing until you find the perfect layout without making any unnecessary marks on your drywall.
How much space should be between plates in a gallery wall?
For a cohesive and balanced look, aim to leave about 2 to 3 inches of space between each plate. This standard measurement provides enough separation to highlight individual pieces while ensuring the entire collection feels like a single, unified work of art.
Can I hang heavy platters on the wall safely?
Absolutely, but you must ensure you use the correct hardware rated for the platter's specific weight. For maximum security, try to mount heavy pieces directly into a wall stud or use high-quality toggle bolts and heavy-duty anchors.
How do I mix different plate patterns without it looking messy?
The key is to choose one unifying element, such as a consistent color scheme, a specific theme, or a similar shape, to tie the collection together. By keeping one factor constant, you can safely mix various patterns and textures while maintaining a curated and sophisticated aesthetic.