50 Christmas Tree Topper Ideas

This post may contain affiliate links: full affiliate disclosure.
The right topper serves as the crowning piece of your holiday tree, pulling together your ornaments and ribbon into one cohesive display. From traditional stars and angels to organic botanical sprays and playful character hats, there are countless ways to finish the tree's peak.
These ideas provide a variety of styles and materials to help you find a secure and attractive focal point for your home.
SECTION 1: CHRISTMAS TREE BOW TOPPERS
1. Oversized Red Velvet Bow Tree Topper
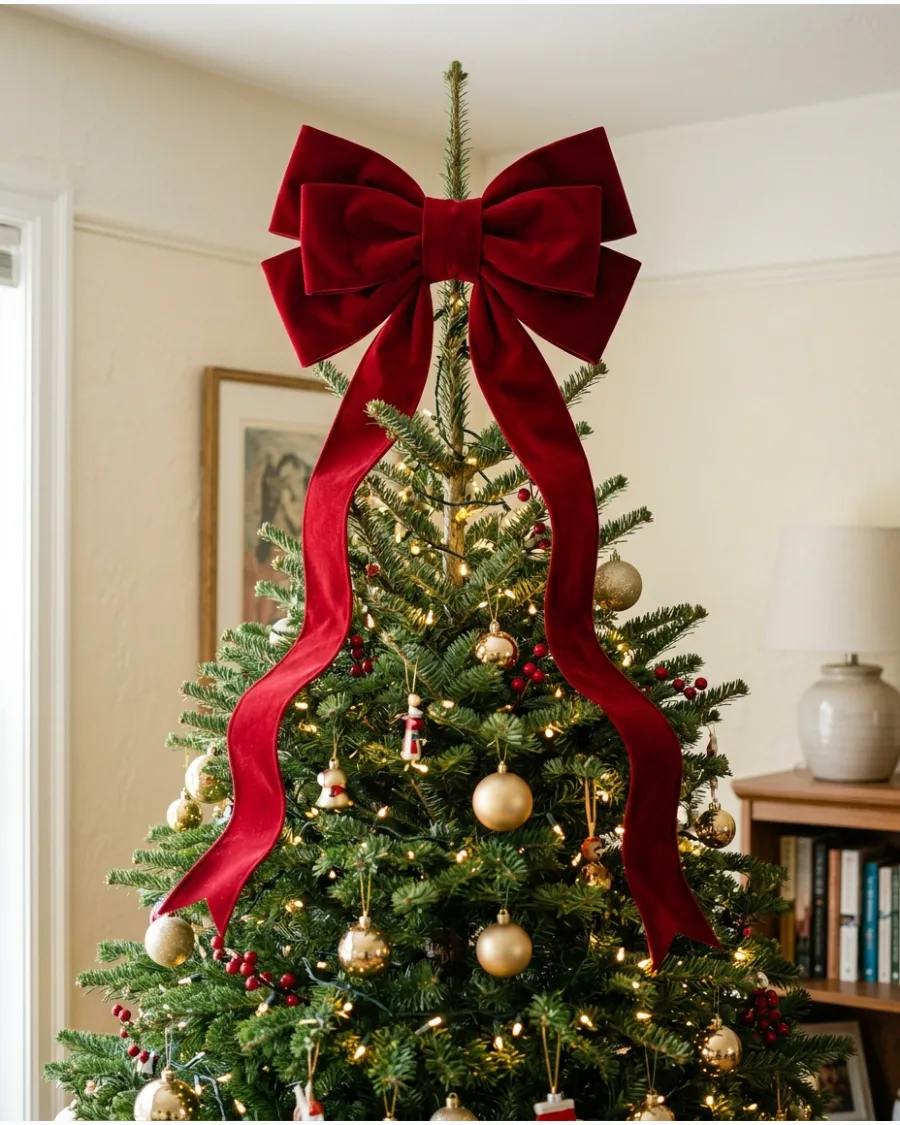
Use a large, plush velvet bow to create a soft and traditional focal point at the peak of your tree. The fabric texture contrasts well against the needles of a fir or spruce, especially when paired with warm white lights and gold ornaments.
Secure the center of the bow to the topmost vertical branch using a heavy-gauge florist wire to prevent it from tilting forward or slipping off. Ensure the tails are long enough to weave naturally through the upper third of the tree for a cascading effect.
- Select a bow with wired edges to ensure the loops maintain a full, rounded shape instead of drooping under the weight of the velvet fabric.
- Drape the tails downward in a loose zig-zag pattern, gently tucking sections into the branches to create a sense of depth and hide the cut ends.
- Match the velvet material to smaller bows or ribbon garlands used lower on the tree to establish a consistent color palette and texture.
If the top branch is too thin to support the bow, zip-tie a sturdy green garden stake or a wooden dowel to the main trunk to provide a stable mounting point.
2. Burgundy Velvet Bow Tree Topper
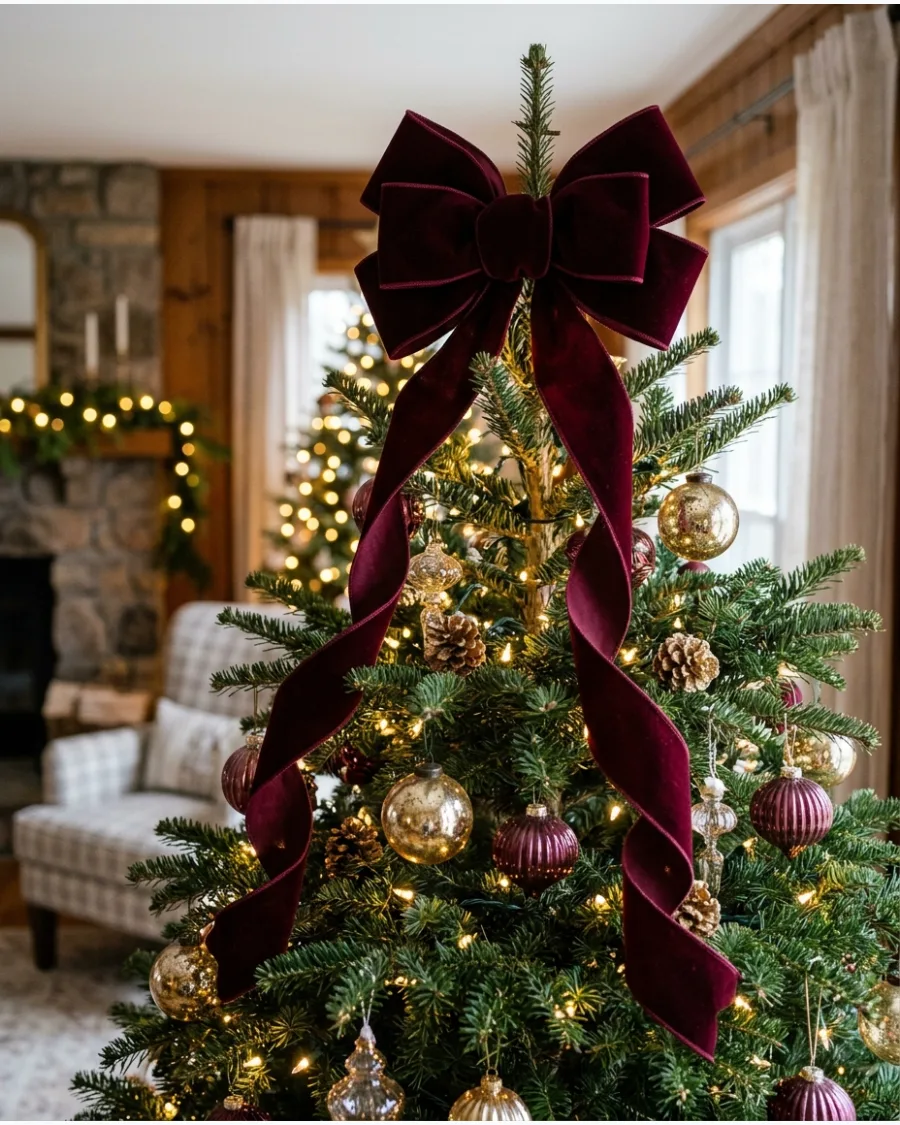
A deep burgundy velvet bow provides a more sophisticated alternative to traditional bright red ribbon. Choose a bow with long, trailing streamers that cascade down the top third of the tree to integrate the topper with the rest of the decor. For a coordinated look, match the velvet texture with wine-colored ornaments and antique gold baubles nestled into the dark green needles.
- Verify the bow has a wired edge to allow for custom shaping and to prevent the loops from sagging over time.
- Secure the bow to the topmost branch using a floral wire or a chenille stem hidden behind the knot for a stable, upright position.
- Layer the velvet with thinner gold ribbons or sprigs of faux berries to create more depth and dimension at the crown of the tree.
Twist the ends of the streamers around several branches as they fall to create a natural, nestled appearance instead of letting them hang flat.
3. Classic Red Satin Bow Tree Topper
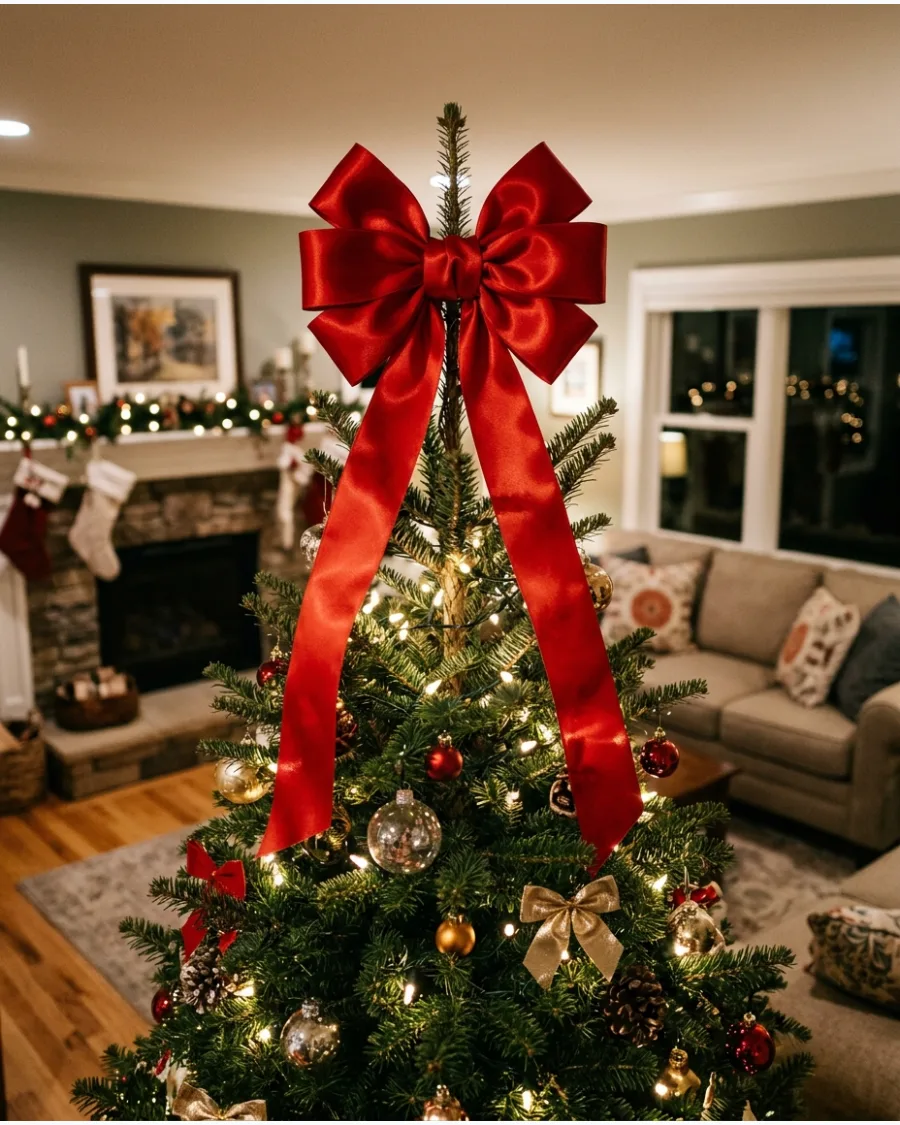
This classic choice provides a soft, traditional finish to the tree peak without the weight of heavy metal or glass ornaments. Secure a large red satin bow to the top vertical branch and allow the tails to cascade down the upper third of the tree. The flowing fabric bridges the gap between the topper and the rest of the decorations, making the transition feel seamless.
Satin reflects the tree lights, adding a subtle glow to the very top.
- Choose a wire-edged satin ribbon to ensure the loops of the bow hold their shape and the tails can be sculpted into graceful waves.
- Fold the top leader branch of the tree in half to create a sturdy anchor point before tying the bow or using a floral wire to attach it.
- Layer a second, narrower ribbon in a contrasting texture, such as a gold metallic or white velvet, behind the red satin to create depth.
Cut the ends of the ribbon tails into an inverted V-shape to prevent fraying and provide a crisp, professional finish.
4. Tartan Plaid Bow Tree Topper
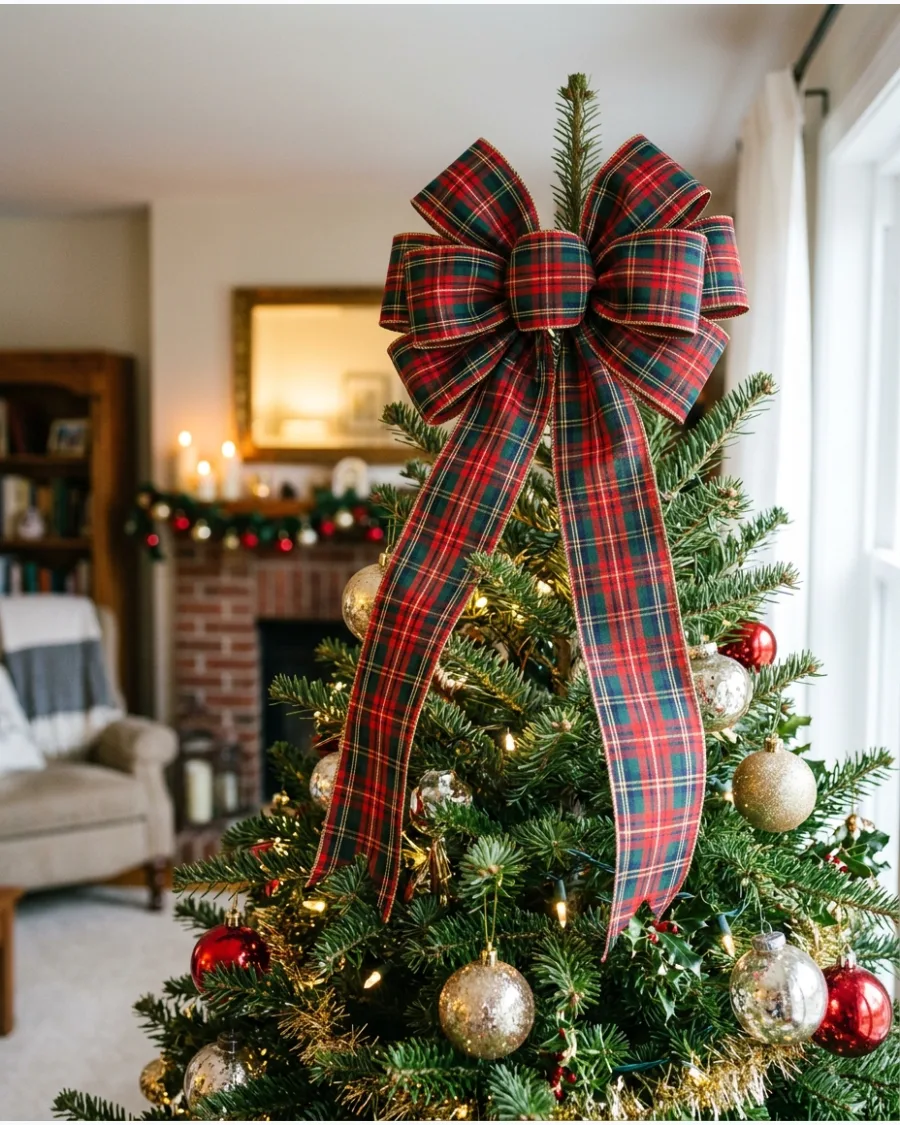
A large tartan bow creates a classic focal point that anchors a traditional or English country holiday theme. Use a multi-tonal ribbon featuring red, green, navy, and gold to coordinate with a wide variety of standard ornament colors.
Construct the bow with several loops of varying sizes to provide full coverage around the top of the tree frame. This style works best on dense evergreen branches where the fabric can rest securely without slipping.
- Choose a high-quality fabric ribbon with wired edges to ensure the loops maintain their volume and shape throughout the season.
- Secure the center of the bow to the topmost vertical branch using floral wire or a chenille stem, hiding the attachment point behind the center knot.
- Allow the ribbon tails to drape down the upper third of the tree, weaving them slightly into the branches to create a sense of movement.
If the top branch is too weak to support the bow's weight, zip-tie a sturdy wooden dowel to the trunk to create a hidden support extension.
5. Red and Gold Layered Bow Topper
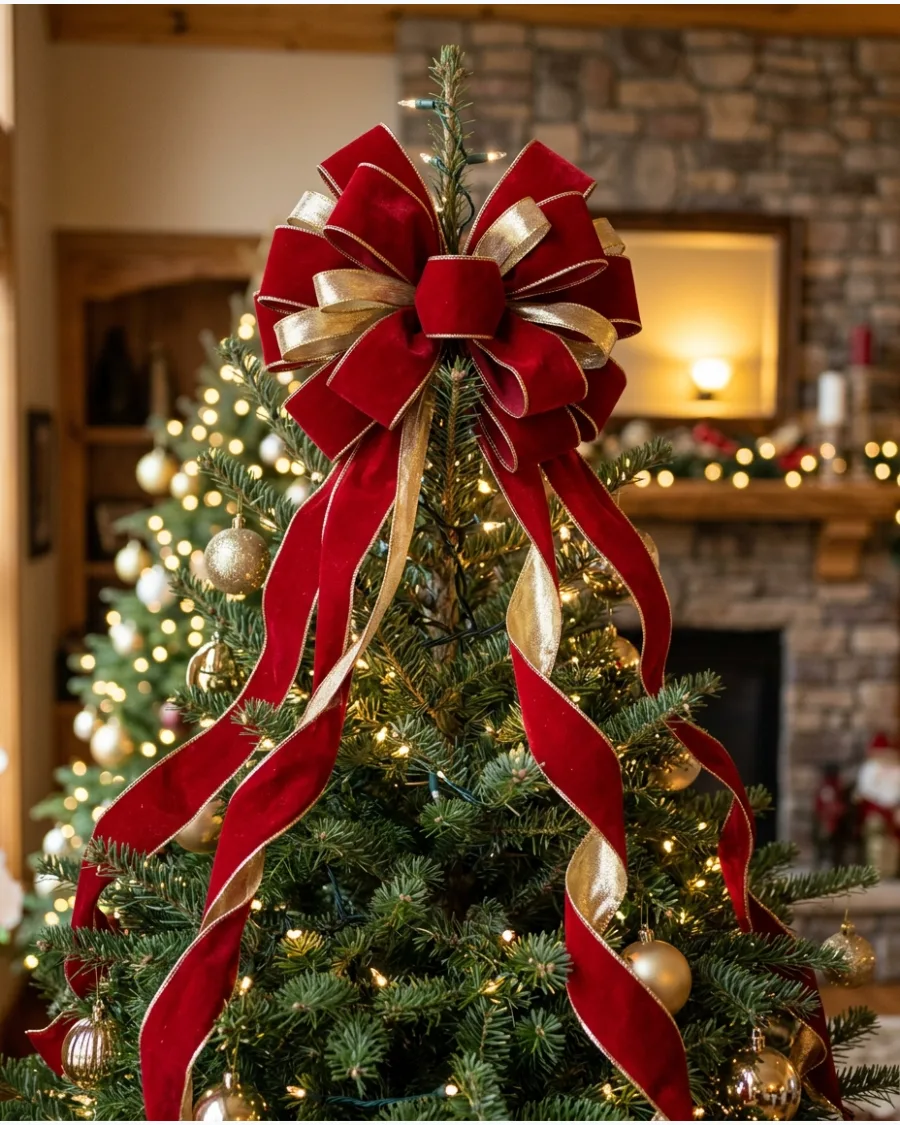
A layered bow provides a soft finish that integrates perfectly with the texture of evergreen needles. You can build high-contrast volume by stacking wide red velvet loops with a narrower gold metallic ribbon positioned directly on top.
Fasten the finished bow to the highest sturdy branch using a length of florist wire to ensure it stays upright and centered. This method allows you to customize the bow size to match the specific height and diameter of your tree.
- Select a proportionally sized wide red velvet ribbon for the base layer and a proportionally sized gold ribbon for the top accent to create distinct visual depth.
- Leave the ribbon tails long enough to cascade down the top third of the tree, weaving them into the branches for a professional look.
- Repeat the same red and gold ribbon combination in smaller loops or streamers on lower branches to unify the entire tree design.
Use wire-edged ribbon for both layers so you can easily reshape the loops and prevent the bow from sagging throughout the season.
6. Champagne Velvet Bow Tree Topper
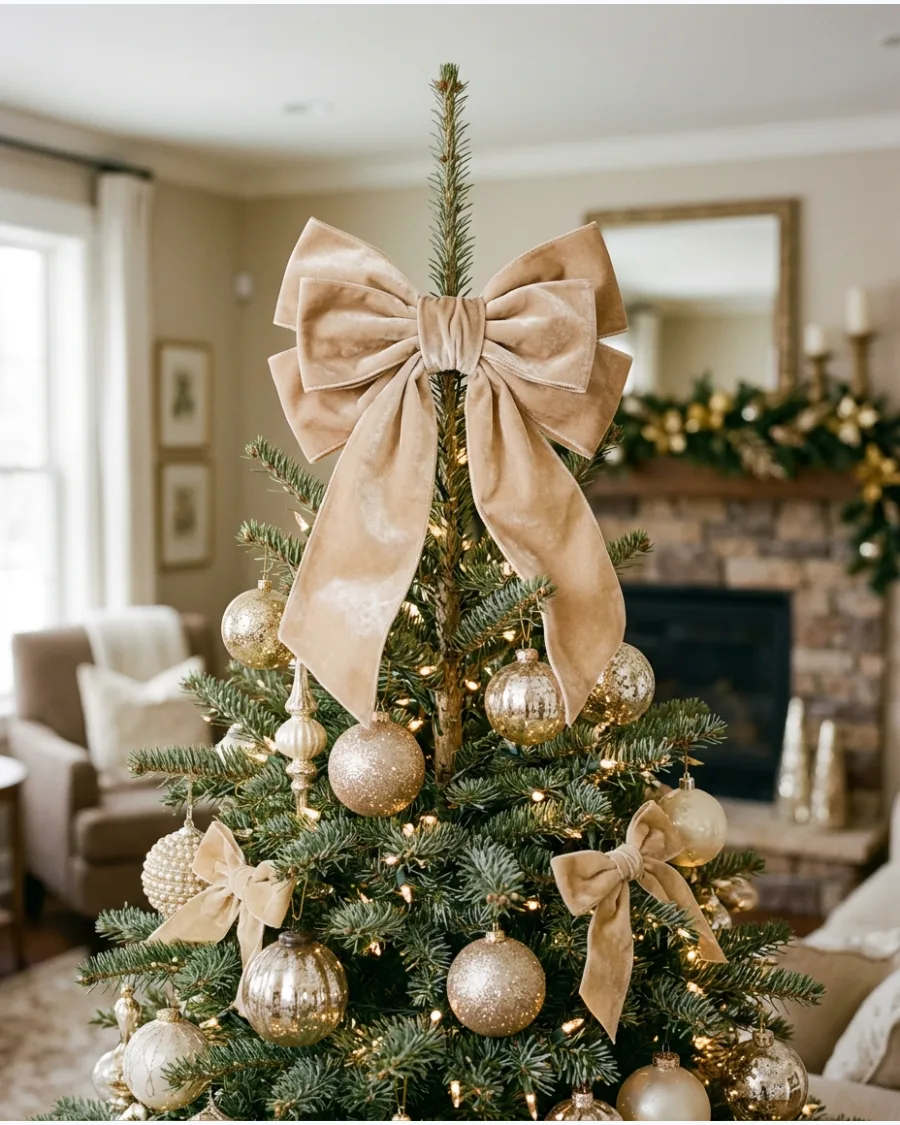
Create a soft, high-end look by using champagne or warm beige velvet ribbon as the focal point of your tree. This neutral palette works best when paired with ivory ornaments and warm gold metallic accents.
Secure the bow by wrapping a length of floral wire around the center knot and twisting it tightly to the tree's vertical leader branch.
- Select a wide, double-faced velvet ribbon with wired edges to ensure the loops remain full and do not sag over time.
- Check that the beige or champagne tone matches your existing warm-toned LED lights to prevent the fabric from looking grey or washed out.
- Tuck the ends of the ribbon loops slightly into the top layer of branches to hide the wire and create a seamless transition.
Layer two different widths of the same champagne ribbon to add depth and make the bow appear more professional.
7. Emerald Green Bow Tree Topper
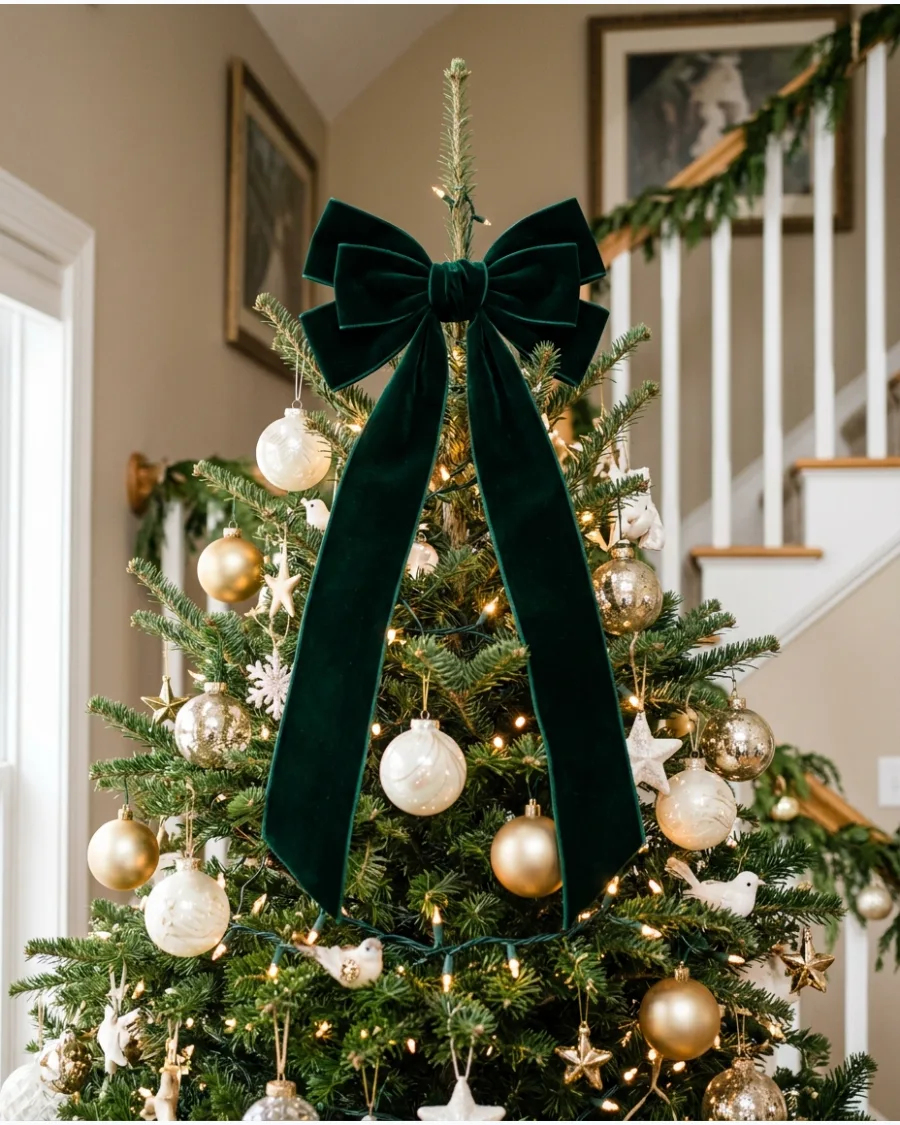
An emerald green velvet bow provides a rich contrast that feels organic against evergreen branches. This deep jewel tone anchors trees decorated with gold or cream elements for a classic, sophisticated finish.
Position the bow so the top loops extend just above the highest needle cluster to give the tree a bit of extra height.
- Choose a deep emerald fabric that mimics the natural shadow colors found deep within the tree's foliage.
- Use green pipe cleaners or floral wire to attach the bow so the mounting hardware remains invisible against the needles.
- Steam the ribbon loops after installation to remove any creases from storage and ensure the velvet looks smooth.
If the tree's top branch is too weak to support a heavy velvet bow, zip-tie a green garden stake to the trunk to provide a hidden, rigid support.
8. Black Velvet Bow Tree Topper
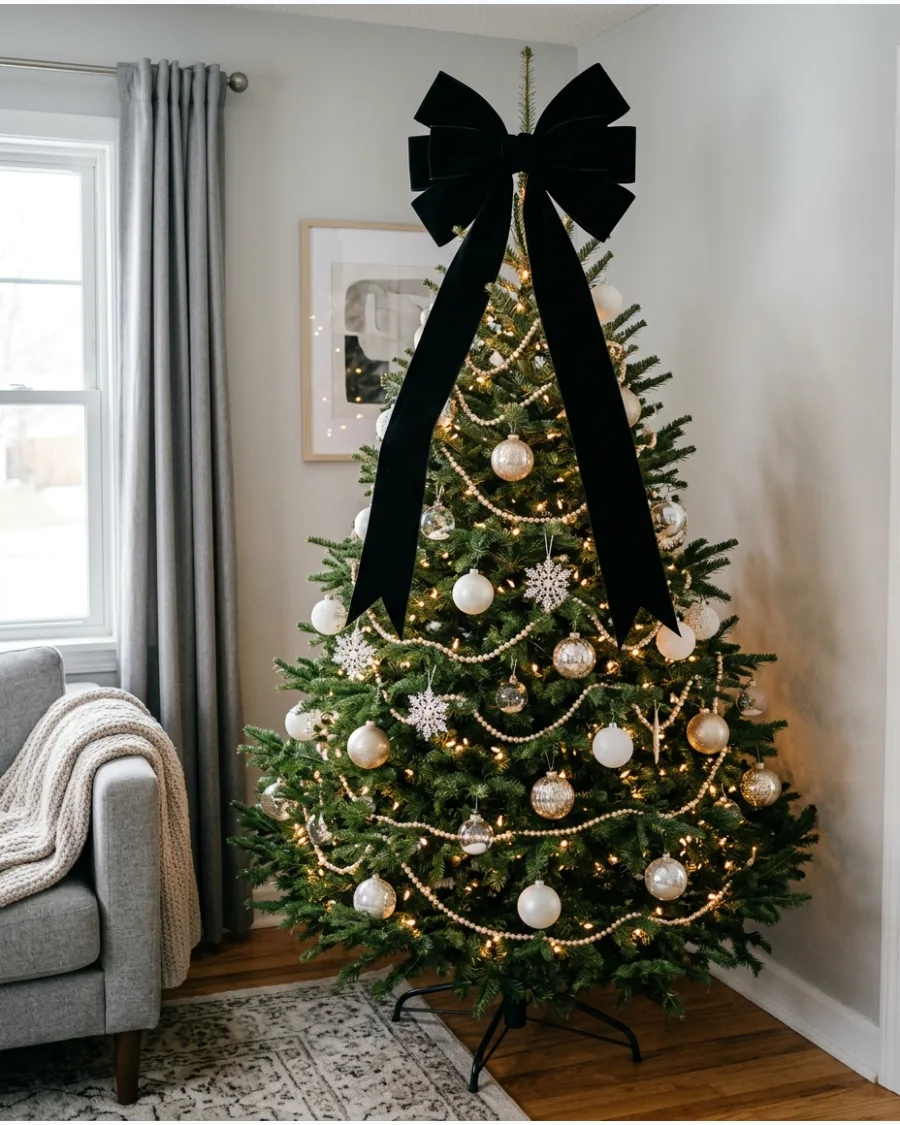
For a bold, modern statement, use an oversized black velvet bow as your primary topper. To prevent the black from looking too heavy, surround it with champagne, white, or deep burgundy ornaments that offer a high-contrast glow.
Fold the ribbon tails into soft 'V' shapes at the ends for a tailored, crisp appearance that complements modern decor.
- Opt for a proportionally sized or wider ribbon to ensure the black fabric has enough surface area to stand out against the dark tree.
- Ensure the bow is double-sided so no matte or dull underside is visible from any angle in the room.
- Brush the velvet with a soft lint brush after handling to remove any stray white needles or dust.
Incorporate a few matte black ornaments lower in the tree to create a cohesive color story that balances the heavy topper.
9. Red and White Candy Cane Bow Topper
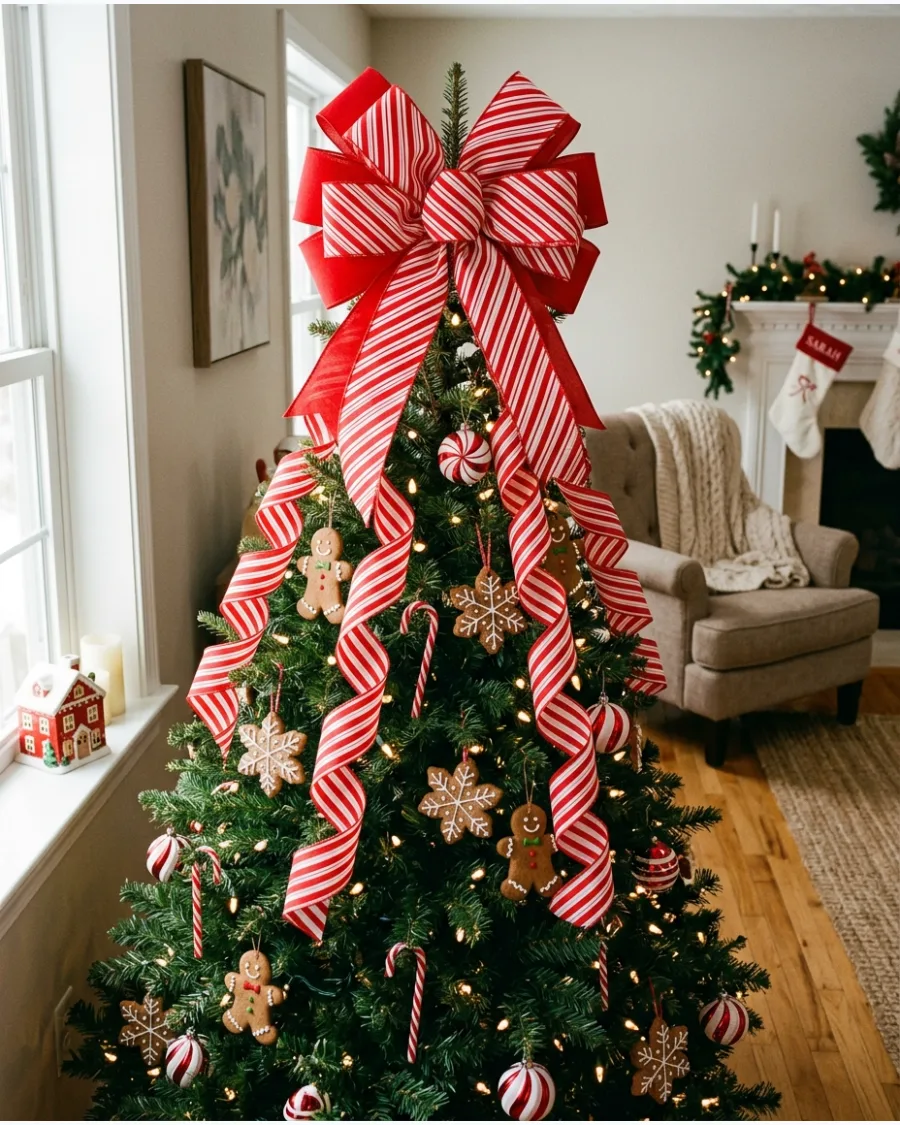
Bring a playful, whimsical energy to your tree by layering striped red-and-white ribbon with solid red accents. This style is the perfect finishing touch for trees featuring gingerbread or peppermint-themed ornaments.
Wrap the ribbon tails around a cardboard tube or your hand to create tight corkscrew curls that bounce down the top of the tree.
- Verify that the white in your ribbon matches the white in your peppermint ornaments to maintain a clean color palette.
- Use wired ribbon for the curls so they hold their shape throughout the season without drooping or flattening.
- Space the curls evenly around the top third of the tree to distribute the pattern and color.
Mix a glittered red ribbon with a matte striped ribbon to add texture and catch the tree lights.
10. Cascading Ribbon Bow Tree Topper
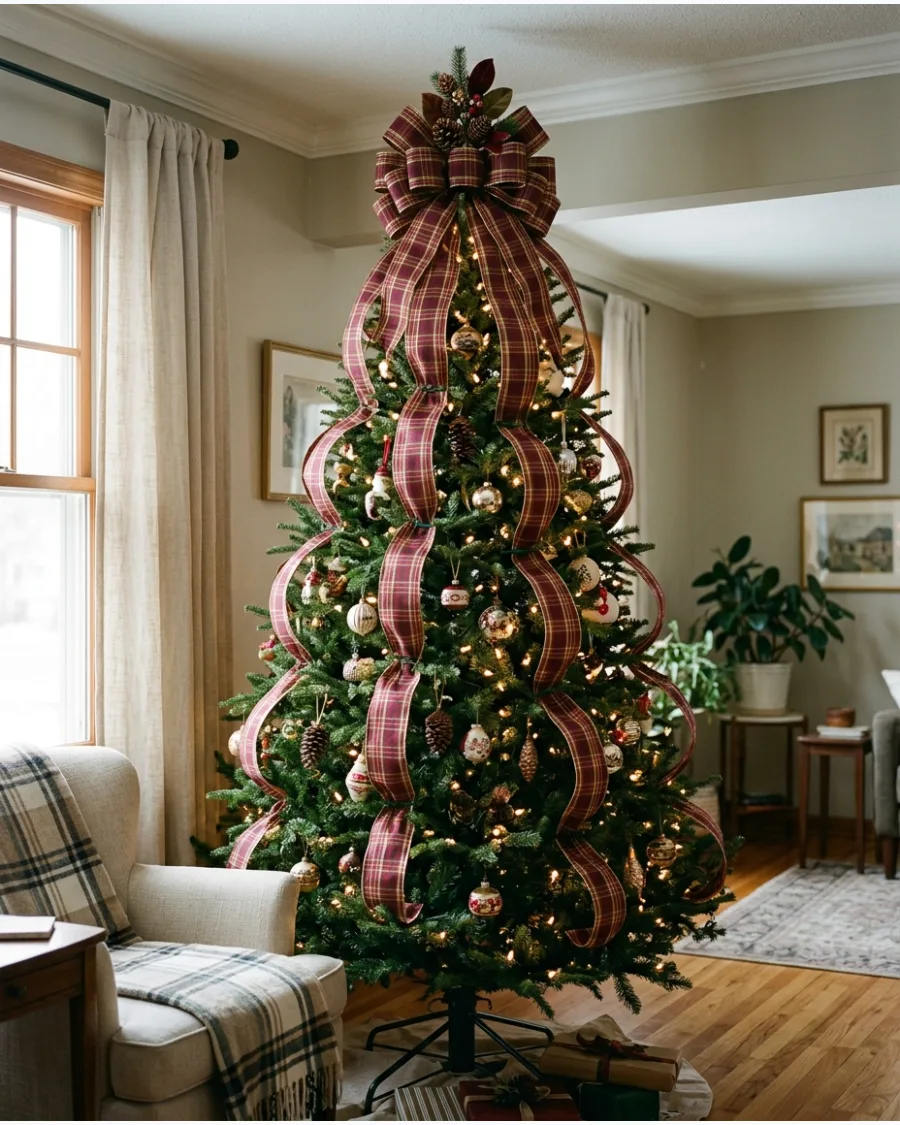
A cascading topper uses long ribbon tails to create a professional, woven look that spans the entire height of the tree. By tucking the ribbon into the branches at different depths, you create a sense of movement and flow.
Secure the central bow at the very peak, then use green floral pins to anchor the vertical tails into the branches every twelve inches.
- Measure your tree's height and multiply by the number of tails you want to ensure you buy enough ribbon for a full cascade.
- Allow the ribbon to billow out slightly between pin points rather than pulling it tight for a more natural appearance.
- Stagger the tails around the circumference of the tree so the ribbon is visible from every side of the room.
Pinch the ribbon slightly where it enters the branch to create a 'tucked' look that mimics professional florist styling.
SECTION 2: STAR CHRISTMAS TREE TOPPERS
11. Classic Gold Star Tree Topper
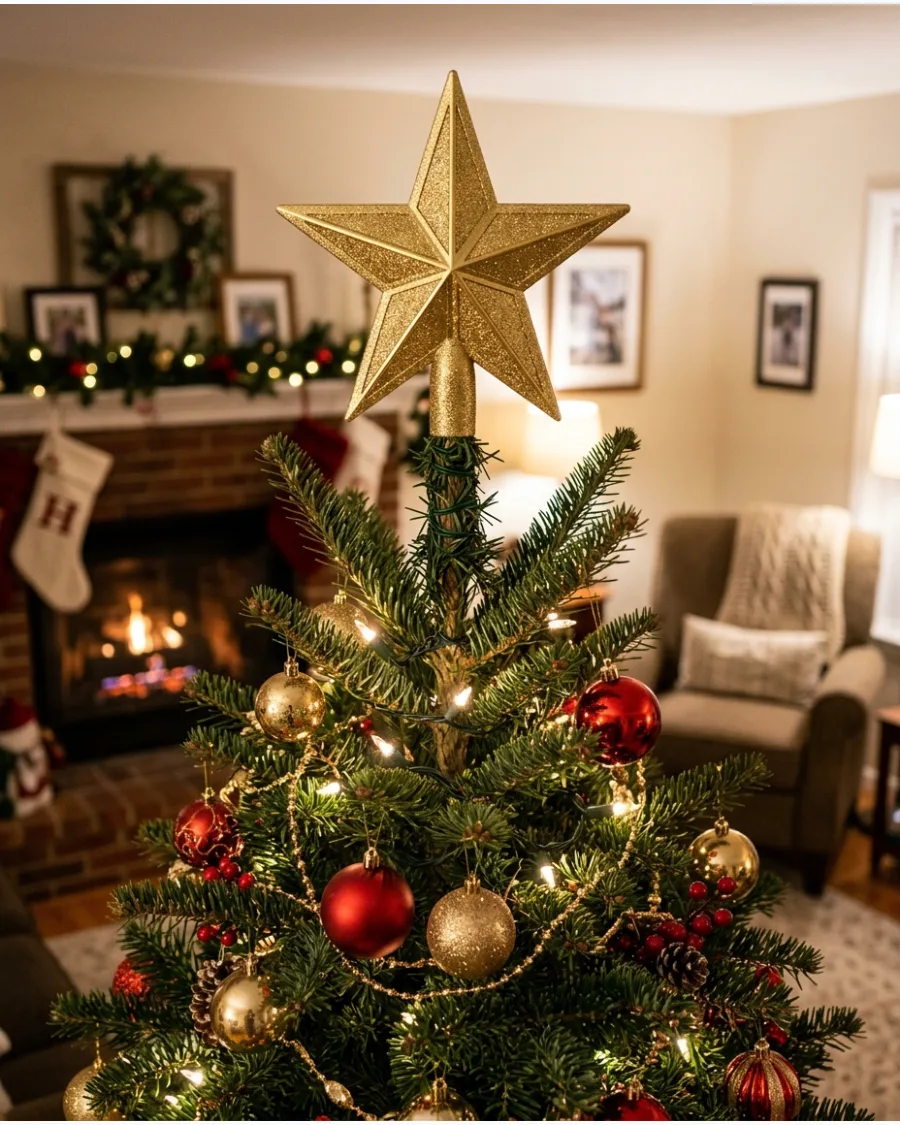
A bright gold star provides a traditional finish that coordinates with almost any color scheme. Select a star that is large enough to remain visible above your top layer of ribbon and ornaments without looking dwarfed by the tree's height. For a standard seven-foot tree, aim for a star that is roughly eight to ten inches wide to maintain balance.
- Look for a lightweight metal or glittered plastic to prevent the top branch from bending under the weight.
- Secure the base to the vertical lead branch using green floral wire or a zip tie for extra stability.
- Store the star in its original box or a padded container to prevent the points from bending or losing glitter over time.
If the top branch is too flimsy, fold it in half or zip-tie a sturdy wooden dowel to the trunk to create a stronger mount.
12. Antique Brass Star Tree Topper
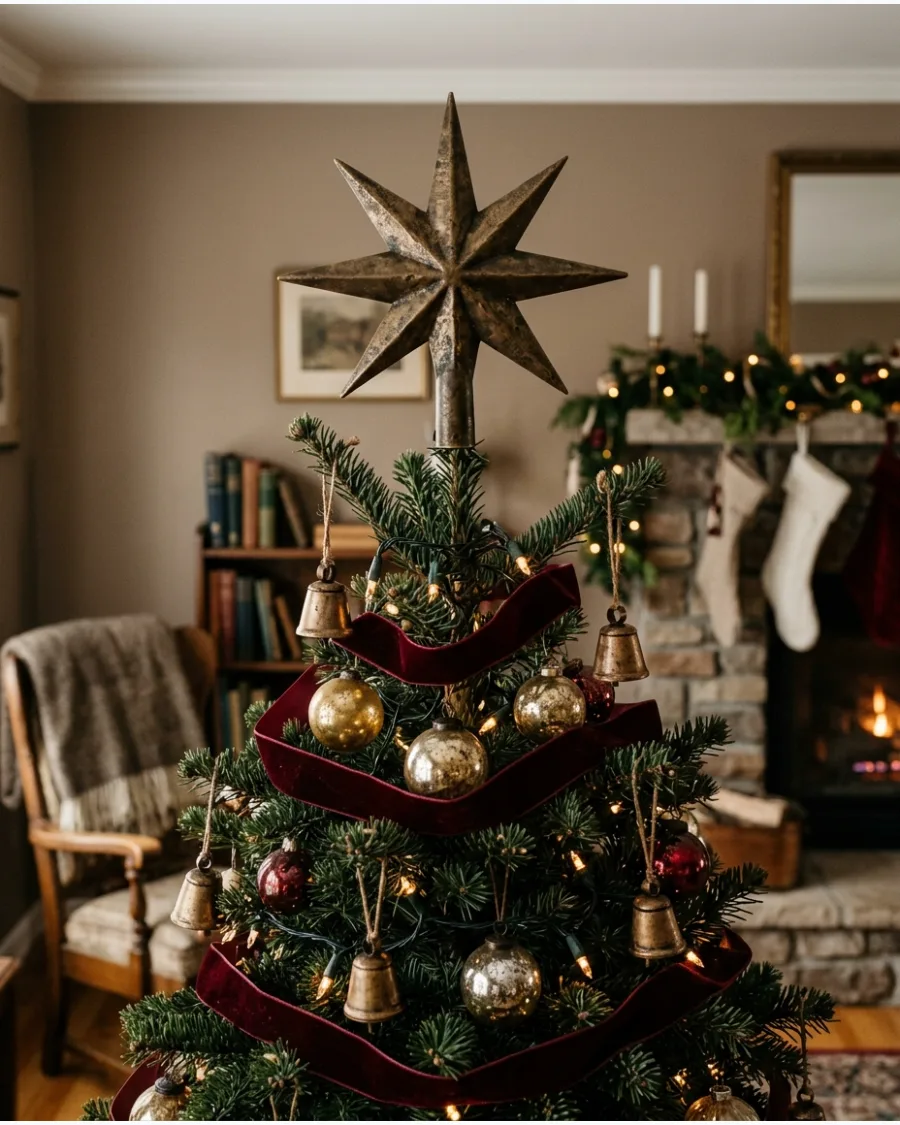
Use an aged brass or antique gold star to create a sophisticated, vintage-inspired look for your holiday tree. Pair this muted metallic finish with rich burgundy ribbons, dark green ornaments, and brass bells for a cohesive heritage theme. The matte texture of antique brass avoids the harsh glare often found with high-shine gold finishes.
- Choose a star with a patina finish to add depth and a sense of history to your holiday decor.
- Slide the topper onto the highest center branch and adjust the surrounding needles to hide the mounting cone or spiral.
- Wipe the brass with a soft, dry cloth before storing to remove fingerprints and oils that can tarnish the metal.
Layer in some velvet ribbon in a deep jewel tone to complement the heavy, classic feel of the brass star.
13. Lighted Star Christmas Tree Topper
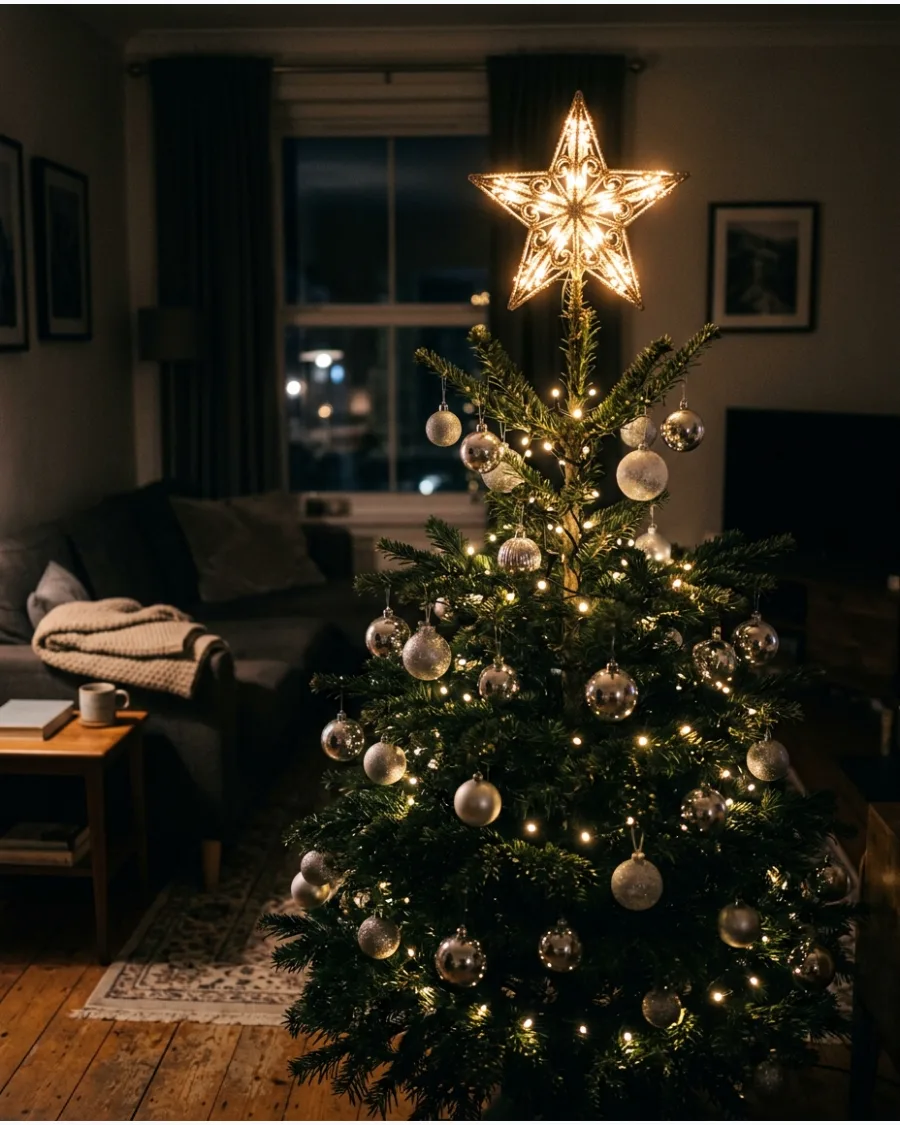
An illuminated star creates a warm focal point that draws the eye upward in a dimly lit room. Choose a star with built-in warm white lights and keep the surrounding ornaments simple to let the glow stand out as the main feature. This ensures the top of the tree looks organized rather than cluttered or visually overwhelming.
- Check that the topper's plug can reach your tree's light string or an extension cord hidden along the trunk.
- Tuck the power cord behind the main trunk and secure it with green wire to keep it invisible from the front view.
- Verify that all bulbs are functioning before mounting the star to avoid having to remove it once the tree is fully decorated.
Use a tree with a dedicated 'topper' outlet near the top to eliminate long, messy cord runs down the back of the tree.
14. Rustic Wooden Star Tree Topper
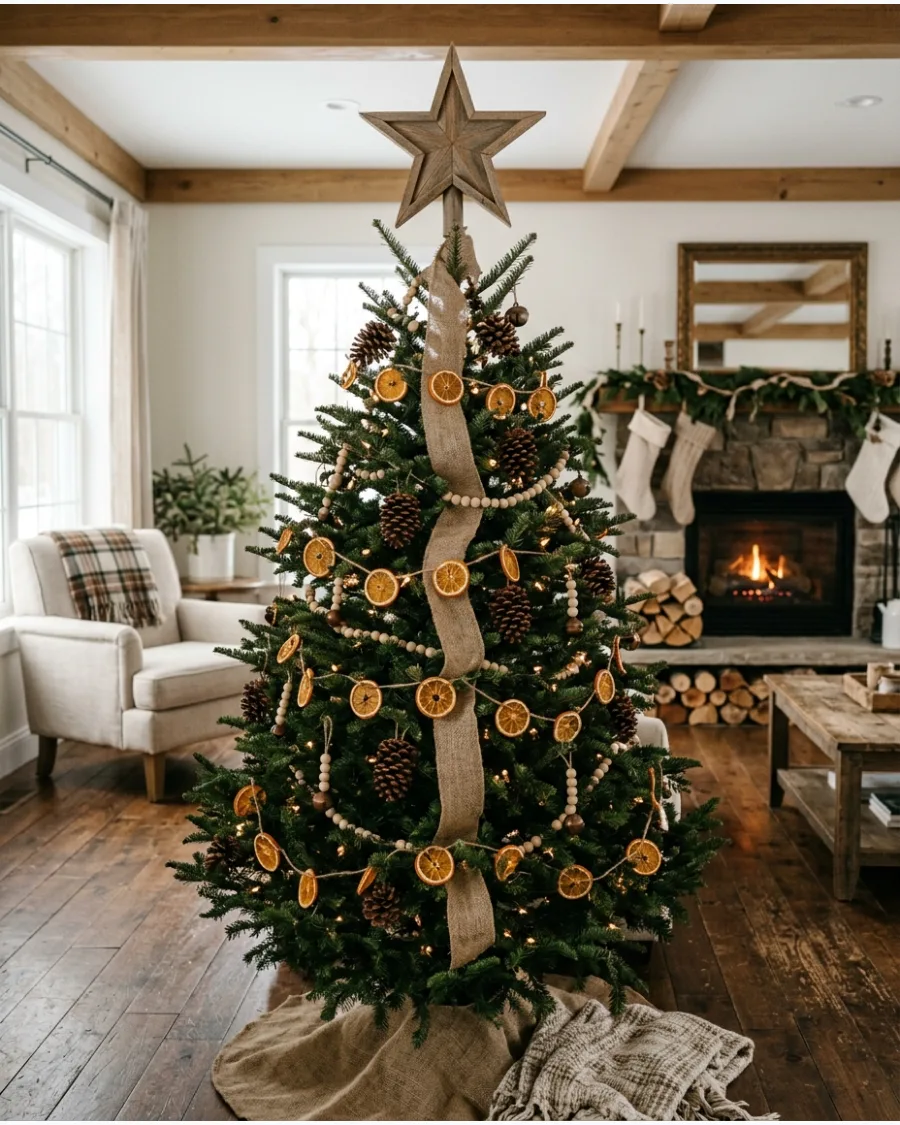
A natural wooden star is a great finishing touch for a farmhouse or woodland-style holiday display. Incorporate organic elements like pinecones, burlap ribbon, and dried orange slices to enhance the rustic aesthetic of the wood. The thick, flat profile of a wood star offers a sturdy alternative to more delicate glass or plastic options.
- Select a wood species or stain that matches your existing living room furniture for a more integrated look.
- Center the star's base over the trunk and use a brown pipe cleaner to blend the attachment with the wood material.
- Dust the star with a soft brush at the end of the season to keep the grain looking clean and free of debris.
If the wood topper is heavy, use two zip ties in a cross-pattern to lock the base to the tree's center pole.
15. Woven Rattan Star Tree Topper
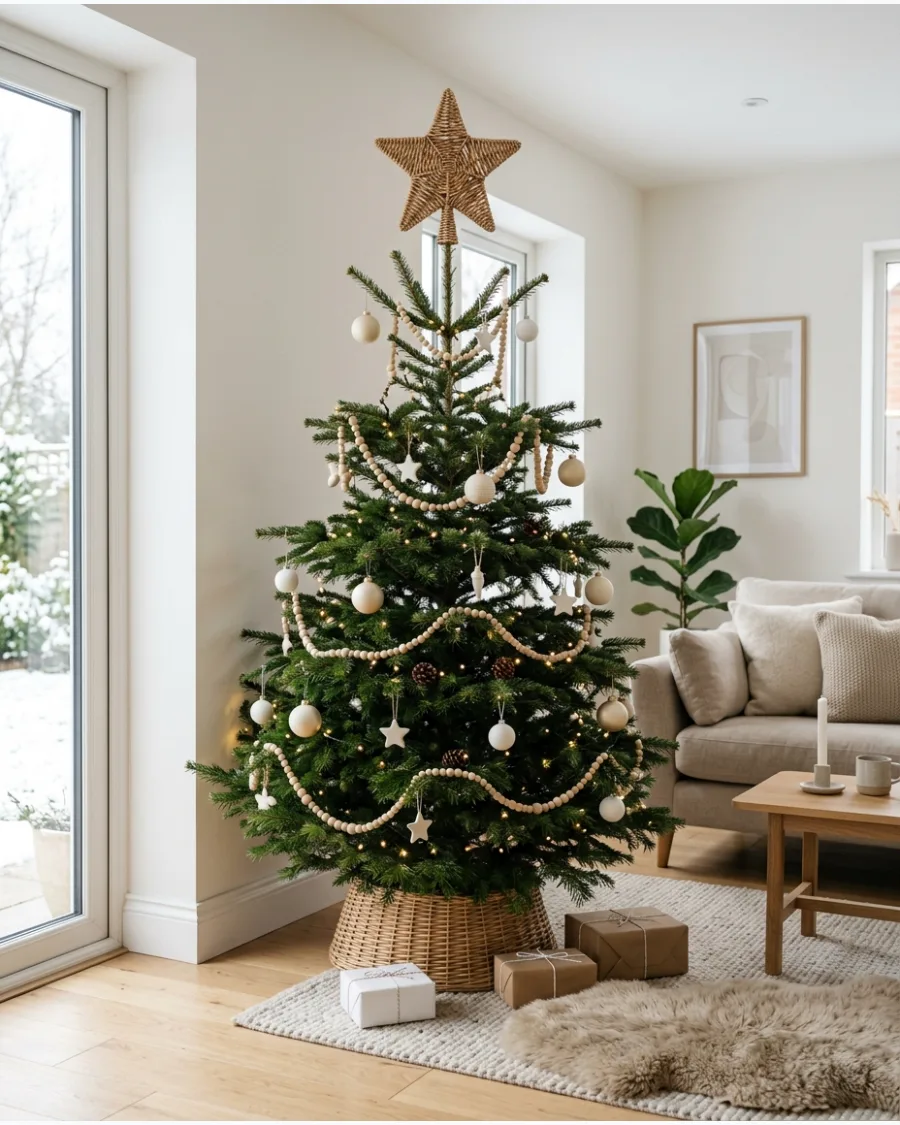
Bring a touch of natural texture to a Scandinavian or neutral-themed tree with a woven rattan or wicker star. Style this topper with white, cream, and light wood ornaments to maintain a clean and airy color palette throughout. The warm brown tones of the rattan provide a soft contrast against deep green pine needles without being distracting.
- Ensure the weave is tight enough to hold its shape while remaining light enough for the top branch to support.
- Gently push the tree's top branches into the hollow base of the star for a seamless, floating appearance.
- Store the star in a hard-sided plastic bin to protect the delicate woven fibers from being crushed or frayed.
Wrap a strand of thin copper fairy lights around the rattan for a subtle, integrated glow that doesn't hide the texture.
16. White Snowy Star Tree Topper
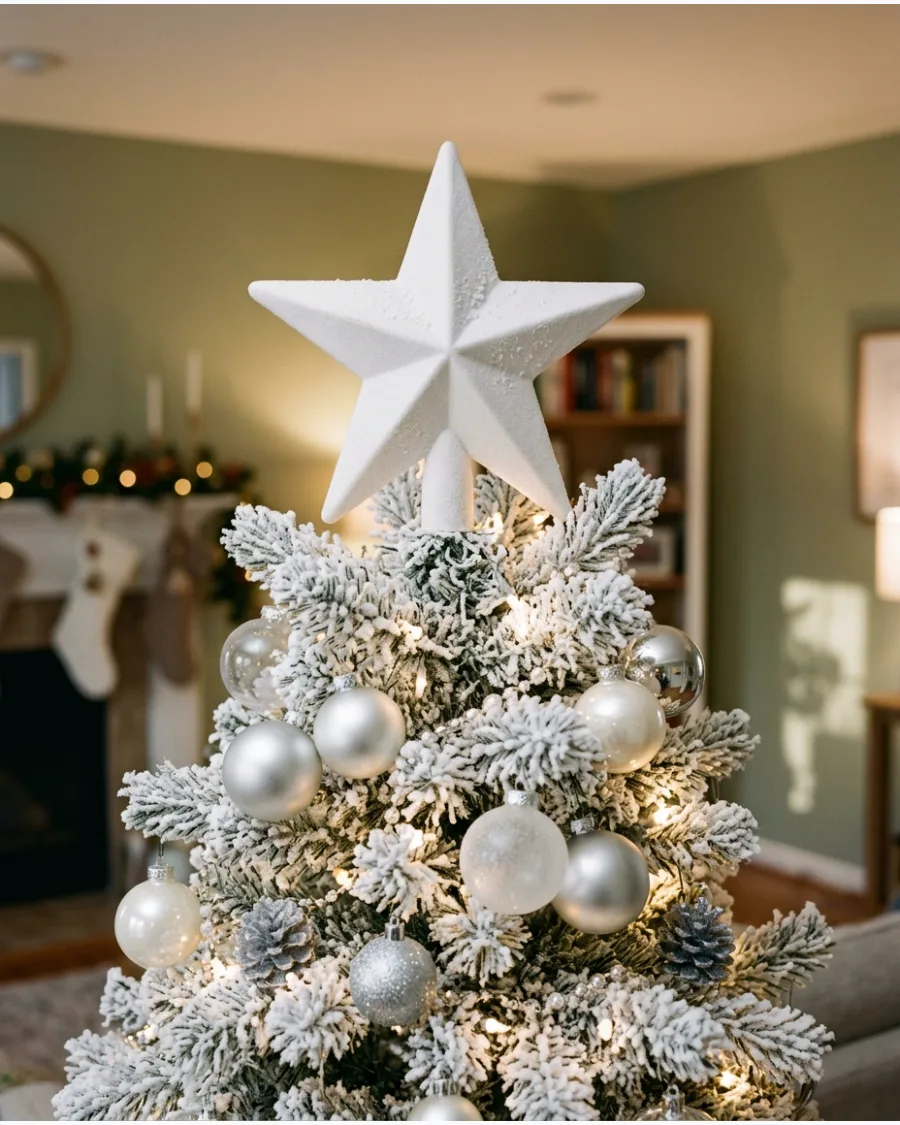
A white or flocked star provides a soft, frosted finish that mimics the look of a snow-covered forest. This style works best on trees with artificial flocking or white branches to maintain a seamless transition between the greenery and the topper.
Choose a flocked or matte white star that is slightly larger than the diameter of your tree’s top branch to ensure it stands out against the needles.
- Select a star with a matte or velvet finish to avoid harsh light reflections that can wash out the white color.
- Secure the star by sliding the vertical top branch of the tree into the star's base and reinforcing it with a short piece of green floral wire.
- Echo the white color by clustering pearl and silver ornaments directly beneath the topper for an icy winter palette.
If the star is too heavy for the single top branch, fold a second branch upward and zip-tie them together to create a sturdier support.
17. Crystal Star Christmas Tree Topper
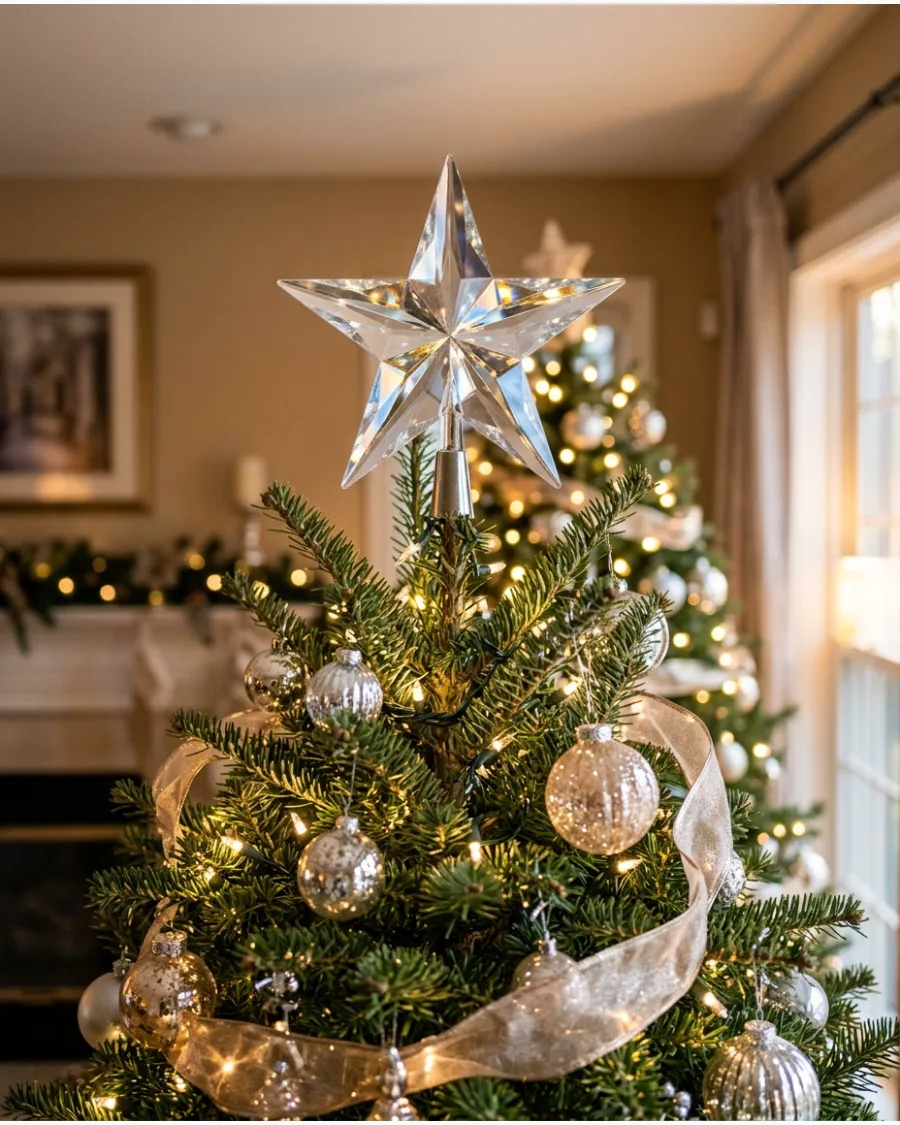
Clear faceted or crystal-style stars act like prisms, catching the glow from your tree lights to create a shimmering focal point. This topper is a versatile choice for elegant themes, complementing metallic accents like silver or champagne gold.
Position the crystal star so it sits directly above a light bulb on the top strand to maximize the light passing through its facets.
- Look for a faceted acrylic or glass star that has a clear clip-on base for a floating look.
- Tuck any visible power cords or battery packs into the dense needles at the top of the tree, hiding them behind a large silver ornament.
- Pair the star with champagne and icy blue ribbons to create a cool, elegant color palette throughout the room.
Use a small piece of clear fishing line to tether the star to a branch below if the base feels loose on the tree's leader.
18. Minimalist Metal Star Tree Topper
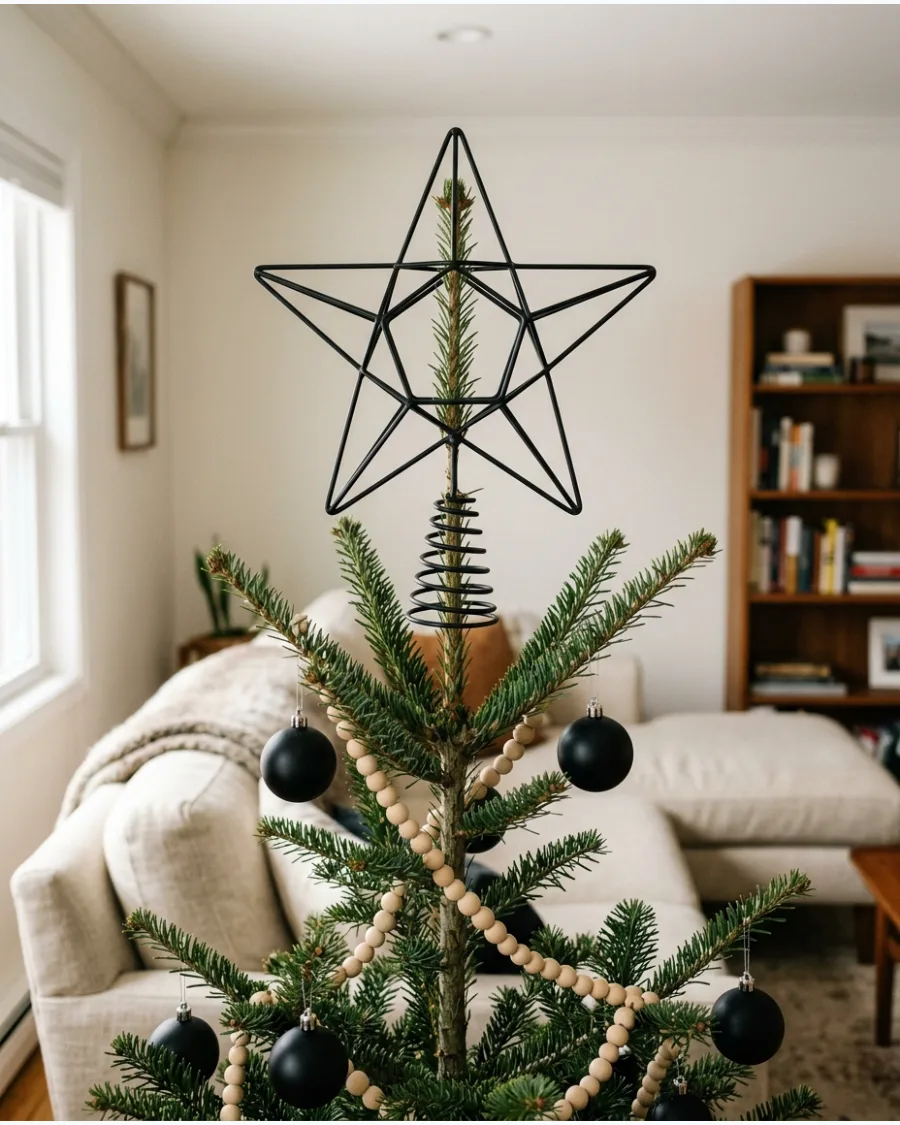
For a modern or industrial aesthetic, an open-frame metal star provides a clean, architectural silhouette. These toppers are typically lightweight and lack the bulk of traditional stars, making them ideal for slim or sparse trees.
Select an open-frame metal star in a finish that matches your home's hardware, such as matte black or brushed gold, for a consistent look.
- Check that the metal frame is lightweight enough to sit straight without leaning to one side.
- Slide the thin metal base over the tree’s center spike, ensuring the star faces the main seating area of the room.
- Maintain the modern look by leaving the top few inches of the tree branch visible through the star's open center.
If the metal finish is too shiny for your theme, use a light scuffing with fine sandpaper to create a more muted, aged look.
SECTION 3: ANGEL AND TRADITIONAL TREE TOPPERS
19. Classic Christmas Angel Tree Topper
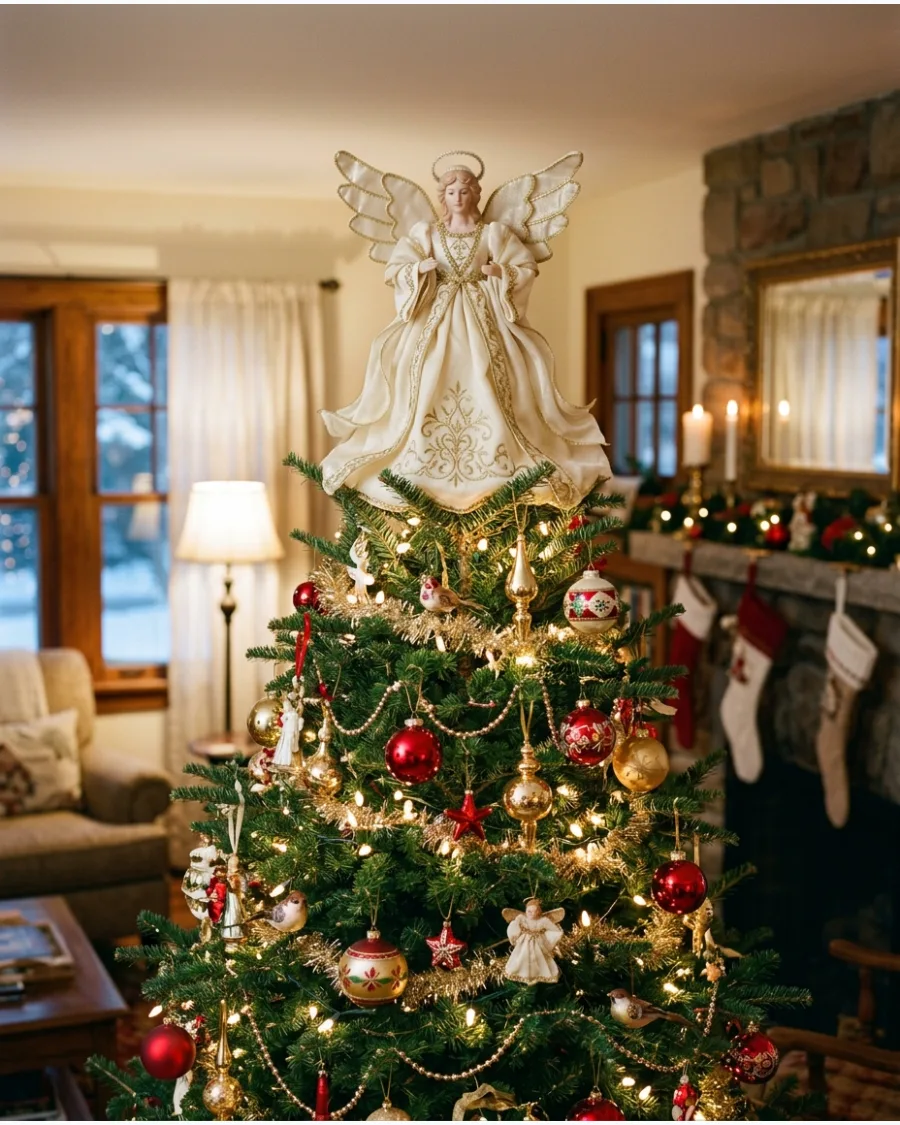
A traditional angel topper adds a sense of heritage and grace to a family Christmas tree. These figures often feature detailed fabric robes and delicate wings that soften the overall look of the tree's peak.
Select an angel whose fabric robes match the scale and color of your tree's ribbon to create a cohesive flow from top to bottom.
- Choose a figure with a cone-shaped base that can be pushed firmly onto the tree's central trunk for stability.
- Settle the angel deep into the top branches so its dress skims the greenery rather than hovering high above it.
- Gently steam or fluff the angel's fabric wings and robes before placing it to remove any creases from storage.
Tuck a few sprigs of gold-tipped faux greenery behind the angel to blend the figure's base into the tree's natural shape.
20. White and Gold Angel Tree Topper
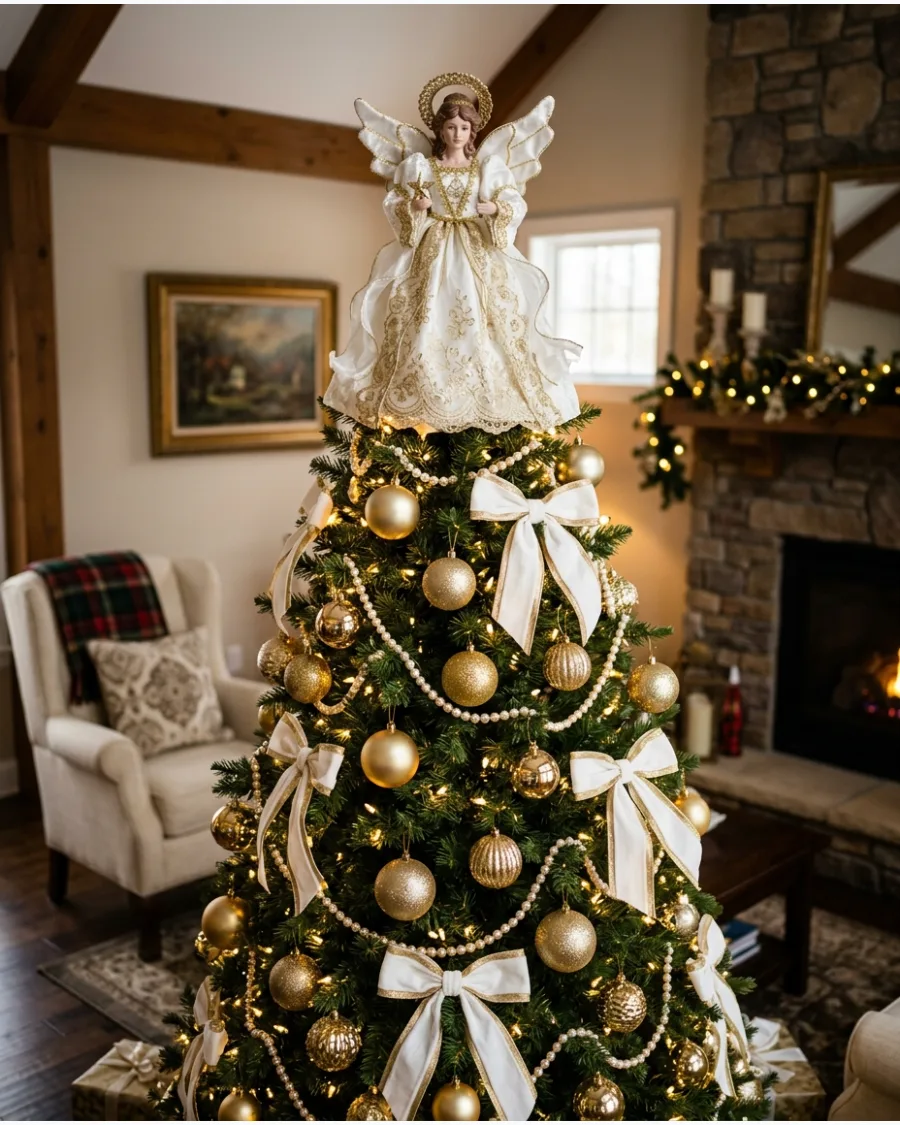
The combination of white and gold creates a bright, regal finish that suits trees decorated with warm lights and pearl accents. This topper style stands out beautifully against deep green needles and helps bounce light around the room.
Pair a white and gold angel topper with warm-toned LED lights to highlight the metallic threads in its gown and wings.
- Look for an angel featuring gold embroidery or lace that complements your existing collection of gold ornaments.
- Secure the figure by wrapping the top vertical branch with a rubber band before sliding the angel's cone base over it to increase friction.
- Drape white velvet or satin ribbon starting just below the angel's feet to pull the white color through the branches.
For a taller tree, choose a larger angel figure to prevent it from looking undersized against the tree's wide bottom diameter.
21. Vintage Angel Tree Topper
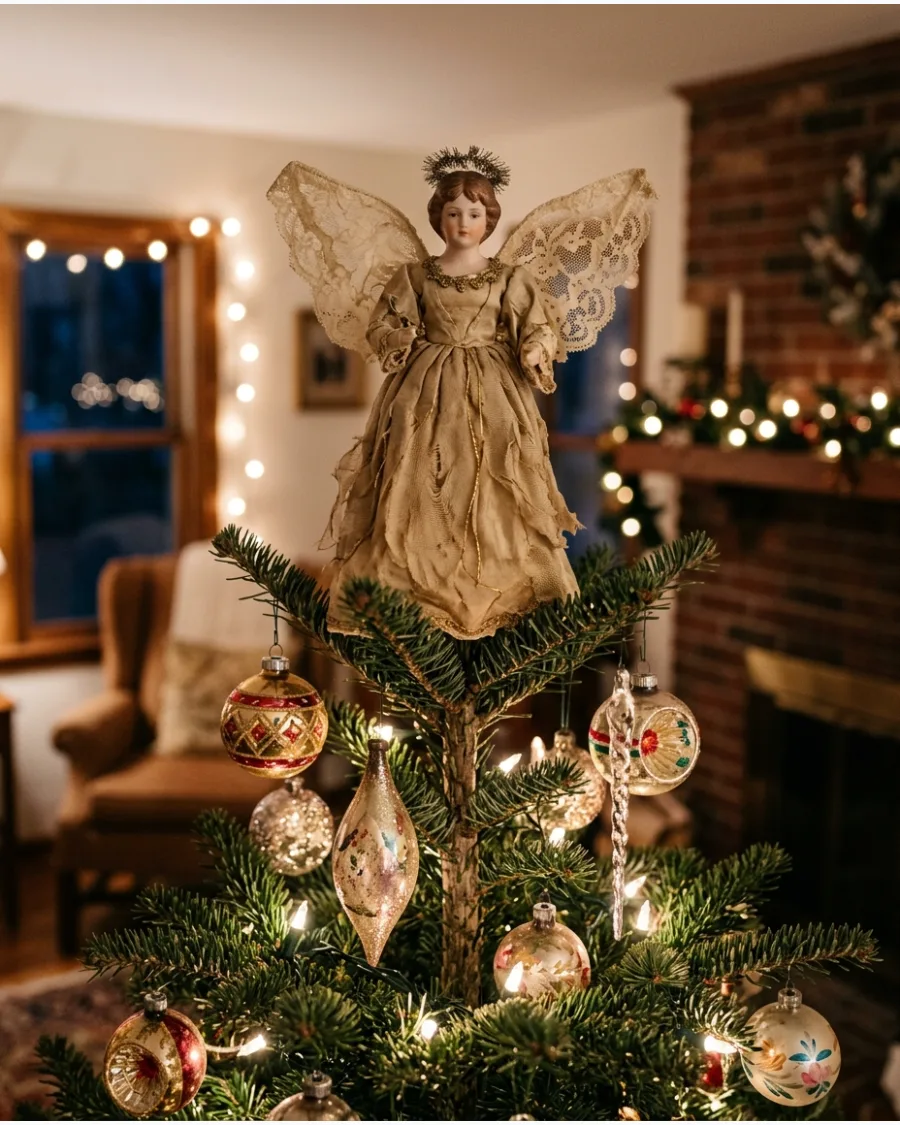
Select an angel featuring antiqued fabrics like aged lace or velvet to maintain a cohesive look with inherited ornaments. These figures often use muted tones such as cream, dusty rose, or tarnished gold rather than bright primary colors.
Secure the angel by sliding the conical base over the tree’s vertical leader branch to ensure it stays upright. This style bridges the gap between different eras of holiday decor.
- Look for hand-painted facial features or porcelain details that match the craftsmanship of heirloom glass baubles.
- Tuck any loose fabric or lace into the top branches of the tree to prevent the topper from looking disconnected.
- Wrap the delicate figure in acid-free tissue paper before storing it in a sturdy, crush-proof box to preserve the vintage fabrics.
If the leader branch is too weak, zip-tie a green bamboo stake to the trunk to provide a rigid support for the angel.
22. Natural Linen Angel Tree Topper
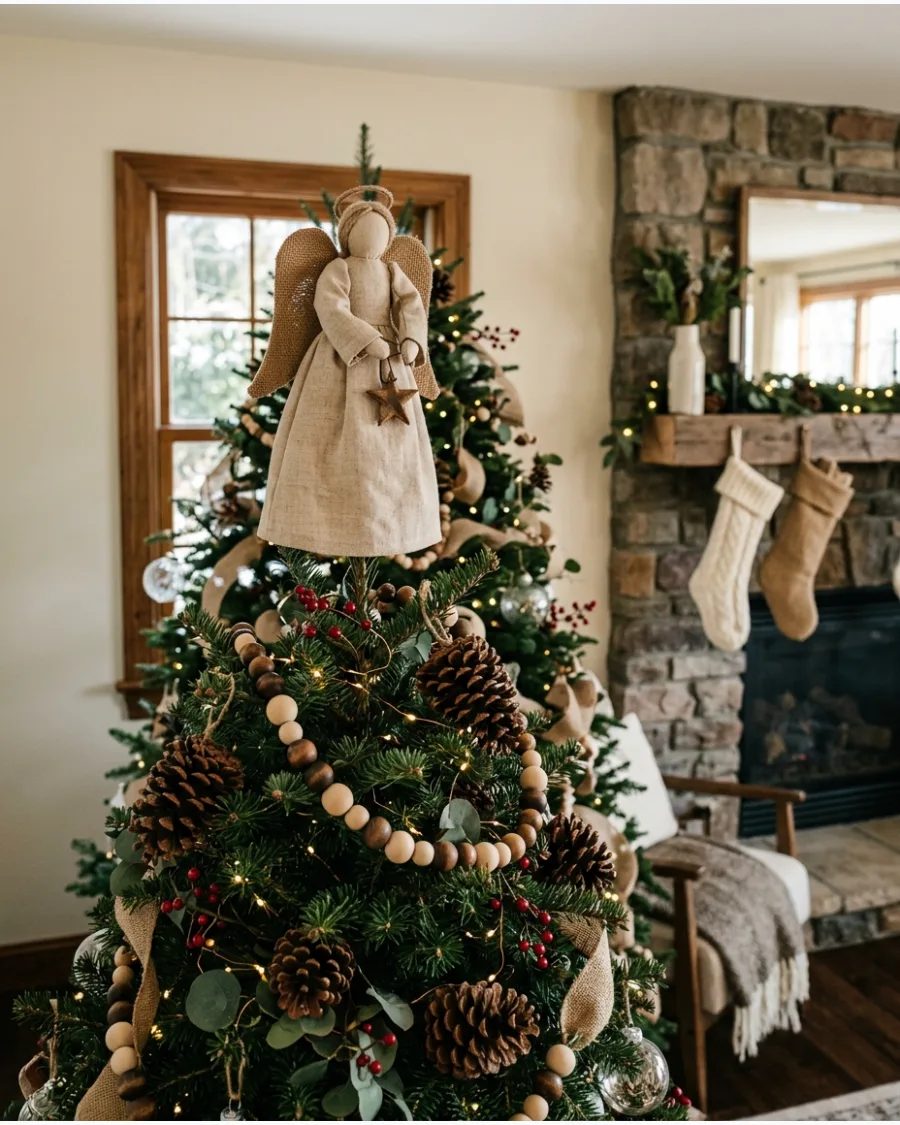
A linen or burlap angel provides a soft, organic texture that fits well with a modern farmhouse or rustic theme. Coordinate this topper with unbleached cotton ribbons, dried pinecones, and matte wooden ornaments distributed throughout the branches. The matte finish of these materials prevents the top of the tree from appearing overly shiny or artificial.
- Select a topper with a wooden head or limbs to add a sturdy, earthy element to the greenery.
- Position the angel so it sits flush against the top needles, hiding the plastic or wire support cone.
- Swap bright metallic tinsel for a strand of wooden beads or jute twine to maintain the natural aesthetic.
Mist the linen lightly with water and use your fingers to smooth out any creases from storage before placing it on the tree.
23. Lighted Angel Christmas Tree Topper
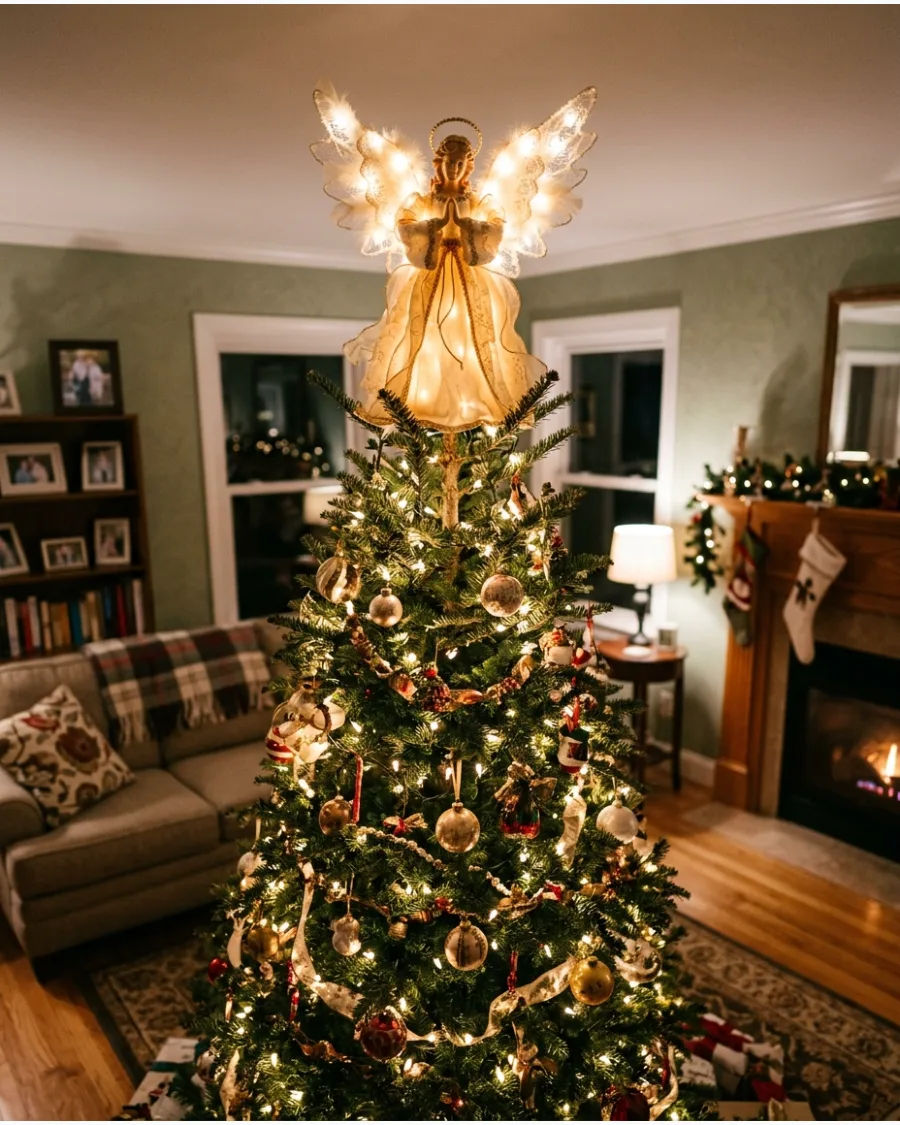
Choose an angel with internal warm white LEDs to create a soft, welcoming glow at the highest point of the room. This lighting style avoids the harsh blue tint often found in cool-toned electronics, ensuring the topper matches standard incandescent or warm LED string lights.
Route the power cord straight down the back of the trunk, securing it with green floral wire to keep the wire invisible.
- Check that the bulb type matches the color temperature of your existing tree lights to prevent a visual mismatch.
- Plug the topper into the same multi-plug or timer as the tree lights so they illuminate and shut off together.
- Verify the weight of the lighted unit, as internal electronics often require a thicker, reinforced top branch for stability.
Use a remote-controlled outlet plug to easily toggle the lights without reaching behind the tree every evening.
24. Christmas Cross Tree Topper
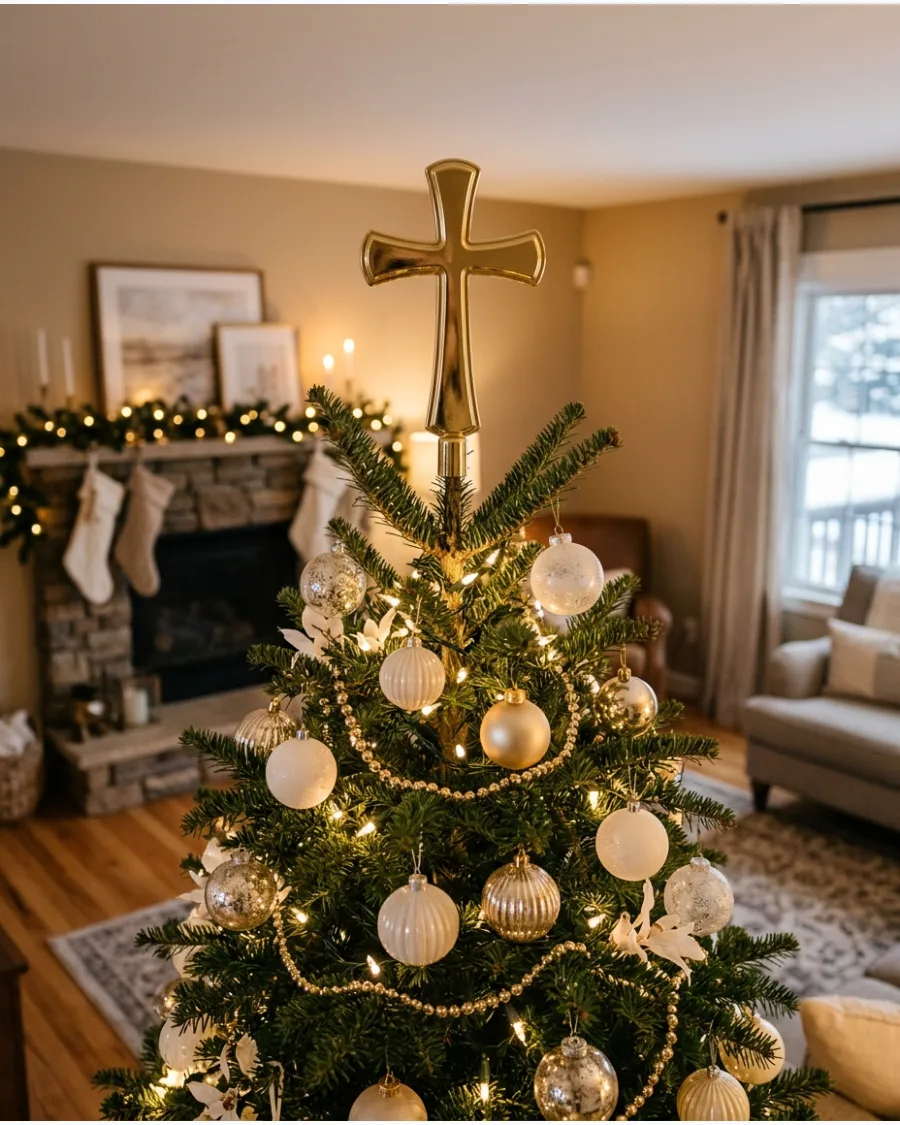
Use a decorative cross as a meaningful focal point that stands out from more common star or angel designs. A solid wood cross pairs well with rustic burlap and felt, while a polished metallic gold version suits a formal, traditional setting.
Center the cross perfectly on the top vertical branch to maintain symmetry and prevent it from leaning to one side.
- Choose a lightweight hollow-back metal or carved wood version to ensure it does not weigh down the top of the tree.
- Check the mounting bracket on the back of the cross to see if it requires additional wire or a specialized clip for a secure fit.
- Pair a gold cross with ivory and champagne ornaments for a sophisticated, monochromatic color palette.
If the cross lacks a built-in mount, use two heavy-duty green pipe cleaners to create a figure-eight wrap around the cross and the tree trunk.
SECTION 4: NATURAL AND BOTANICAL CHRISTMAS TREE TOPPERS
25. Pine and Berry Spray Tree Topper
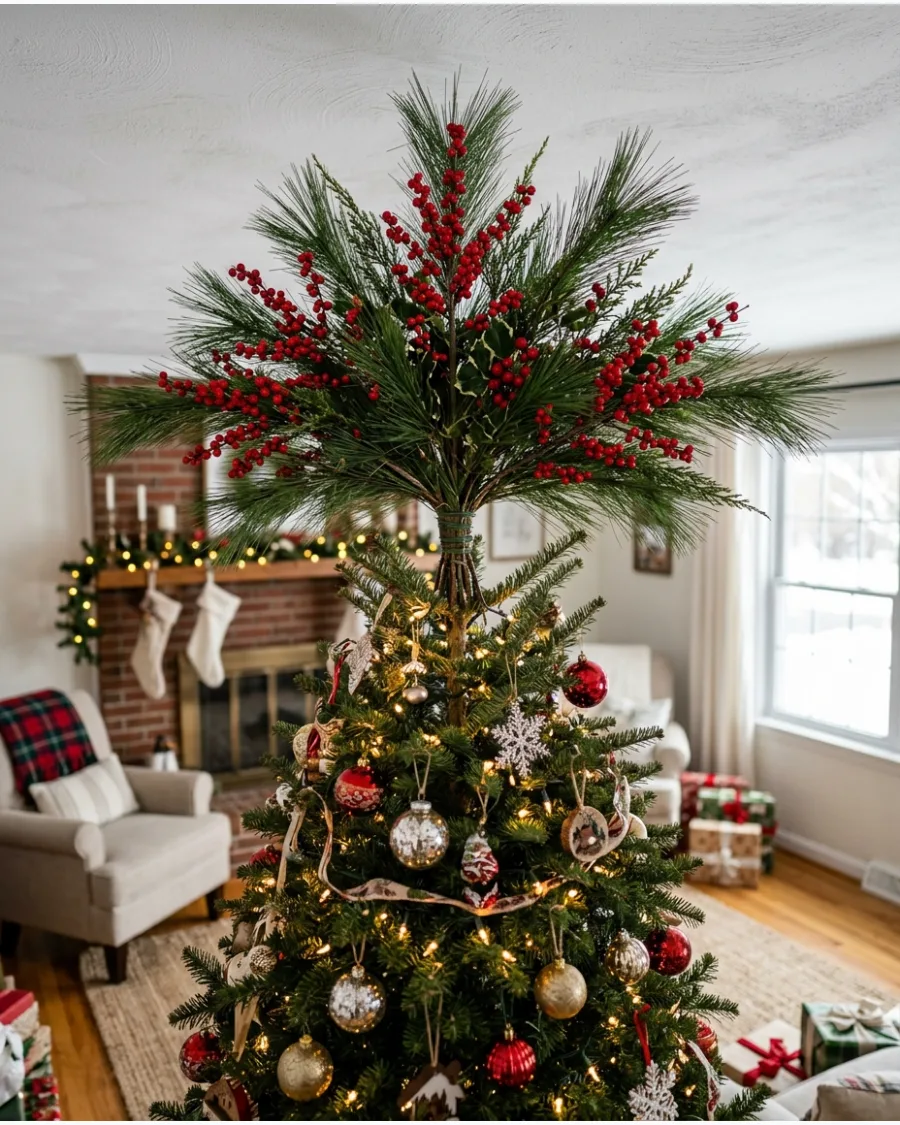
Create a custom botanical topper by gathering several tall pine picks and vibrant red berry sprays into a cohesive bundle. Instead of a single vertical clump, fan the stems outward at various angles to give the top of the tree a fuller, more natural silhouette. This approach allows you to customize the height and width of the topper to match the scale of your specific tree.
- Select stems with wired cores so you can bend the individual berry branches into organic, arching shapes.
- Insert the stems directly into the top of the tree, overlapping them with the existing needles to hide the artificial brown picks.
- Secure the entire bundle to the main trunk using a zip tie or green garden wire hidden beneath the branches.
Add a few sprigs of eucalyptus or frosted cedar to the mix to introduce different textures and shades of green.
26. Cedar Branch Christmas Tree Topper
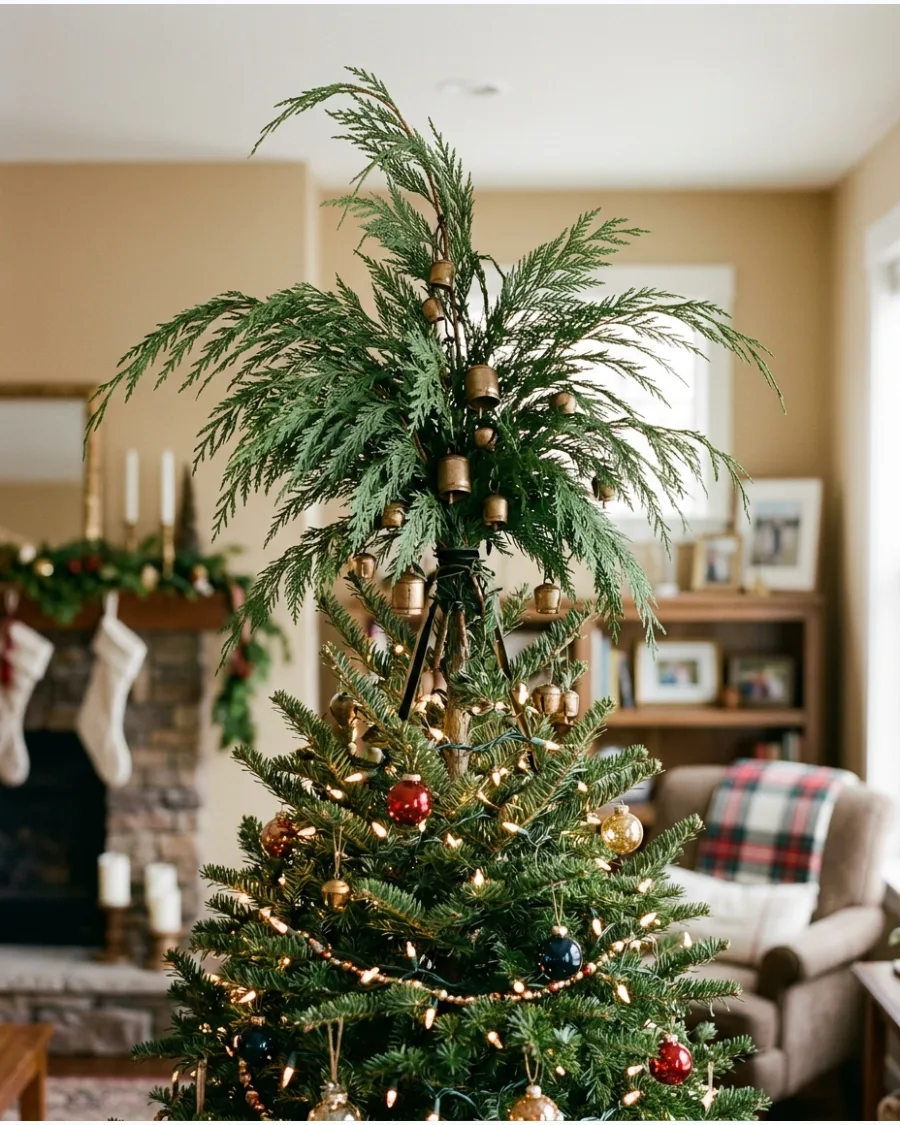
Use long, realistic cedar stems to create a soft, weeping effect at the top of the tree. These branches should extend both upward and outward to soften the sharp point of the tree's crown and create a more natural silhouette.
Tuck the stems deep into the center of the tree to ensure they stay secure without visible wire or mounting hardware. Keep the look focused on the flowing greenery by adding only a few small bells or subtle ribbon accents.
- Choose stems with varying lengths to mimic the asymmetrical growth pattern of a real cedar tree.
- Bend the internal wire cores of the artificial stems slightly downward to create a graceful, drooping fountain shape.
- Space decorative accents like berries or small bells evenly throughout the cedar spray rather than clustering them in one spot.
Use green floral wire to lash the main stems to the tree’s central trunk if the branches feel top-heavy or start to lean.
27. Pinecone and Evergreen Tree Topper
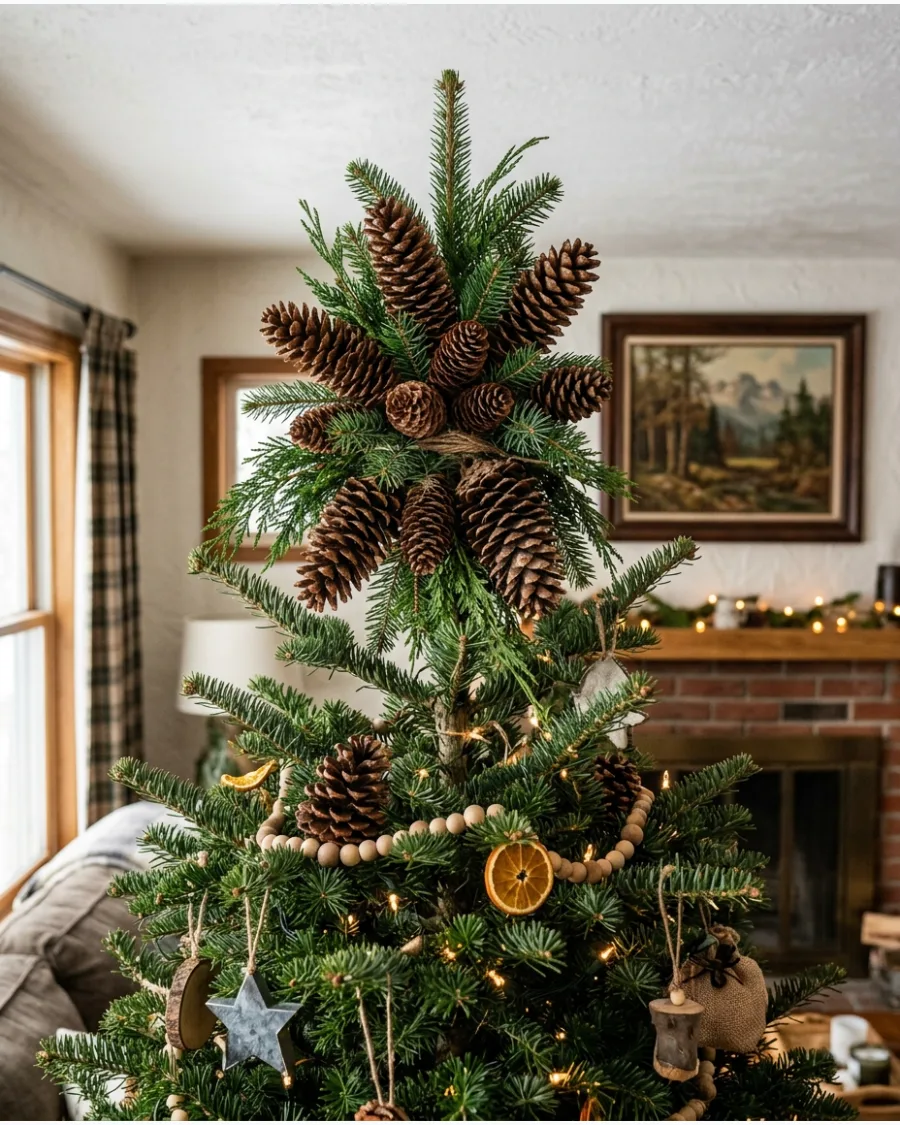
A mix of large pinecones and varied evergreen branches creates a woodland-inspired focal point for a rustic tree. Instead of placing a single pinecone at the very tip, arrange several at different angles to build a three-dimensional cluster that looks good from every side.
Nestle the largest pinecones into the base of the topper arrangement to provide a sturdy visual foundation and hide the tree's top leader branch. This style works best on trees with traditional green needles and natural wood ornaments.
- Select pinecones in different sizes and shades of brown to add depth and realism to the cluster.
- Intermix spruce and pine branches with the pinecones to hide the attachment points of the stems or wires.
- Walk around the tree to ensure there are no flat spots or visible gaps in the greenery where the pinecones meet the tree.
Lightly mist the pinecones with a matte sealer before use to prevent them from shedding dust or sap onto the lower ornaments.
28. Dried Orange Christmas Tree Topper
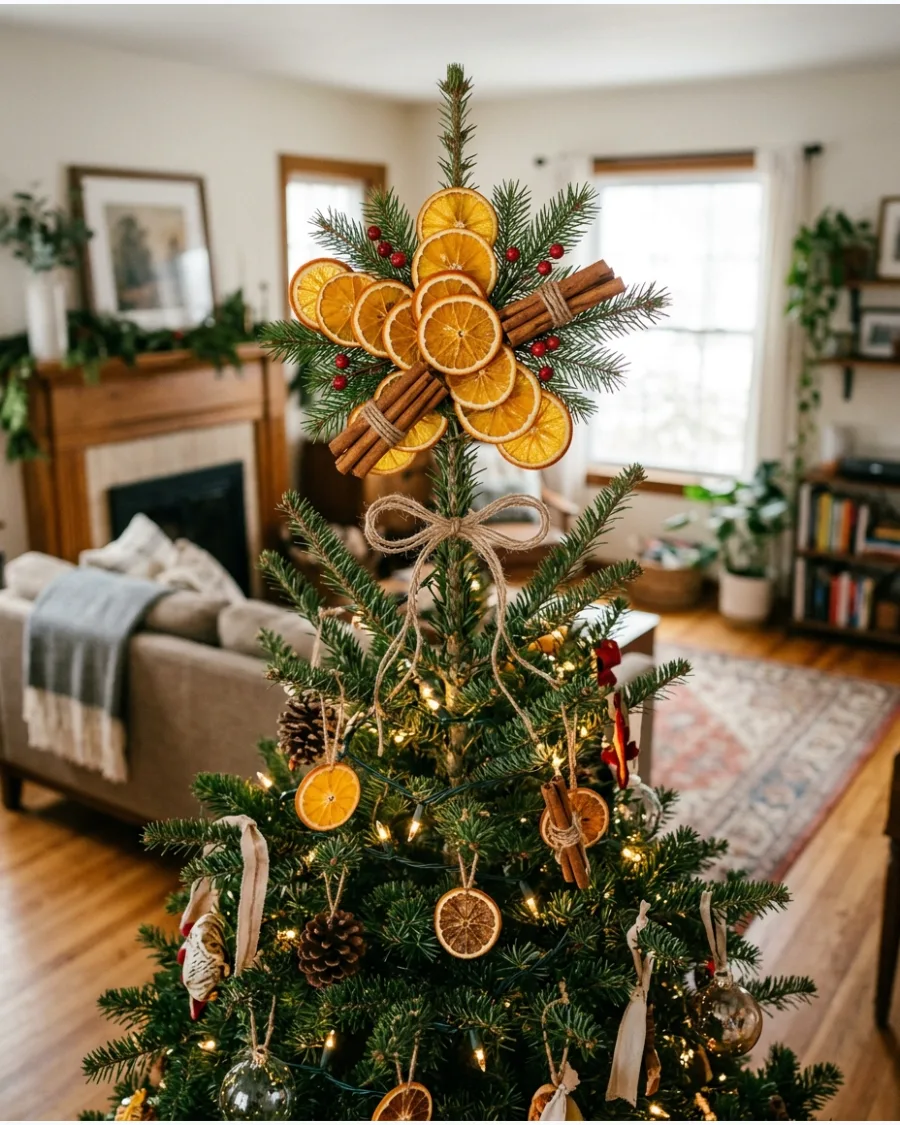
Create a botanical topper by combining dried orange slices with cinnamon sticks and fresh pine sprigs. This topper relies on repetition, so the citrus elements should appear throughout the rest of the tree ornaments to maintain a cohesive theme.
Bind the orange slices and cinnamon sticks together with a natural jute ribbon before securing the bundle to the tree's leader branch with green wire. The warm tones of the dried fruit stand out beautifully against dark evergreen needles.
- Use varying thicknesses of orange slices to catch the light differently and show the inner fruit patterns.
- Layer the pine sprigs behind the fruit to provide a dark, contrasting background that makes the orange pop.
- Store the dried elements in a cool, dry, airtight container after the holidays to prevent fading or moisture damage.
Thread a thin wire through the center of the orange slices to keep them from sliding or drooping over time in the arrangement.
29. Red Berry Branch Tree Topper
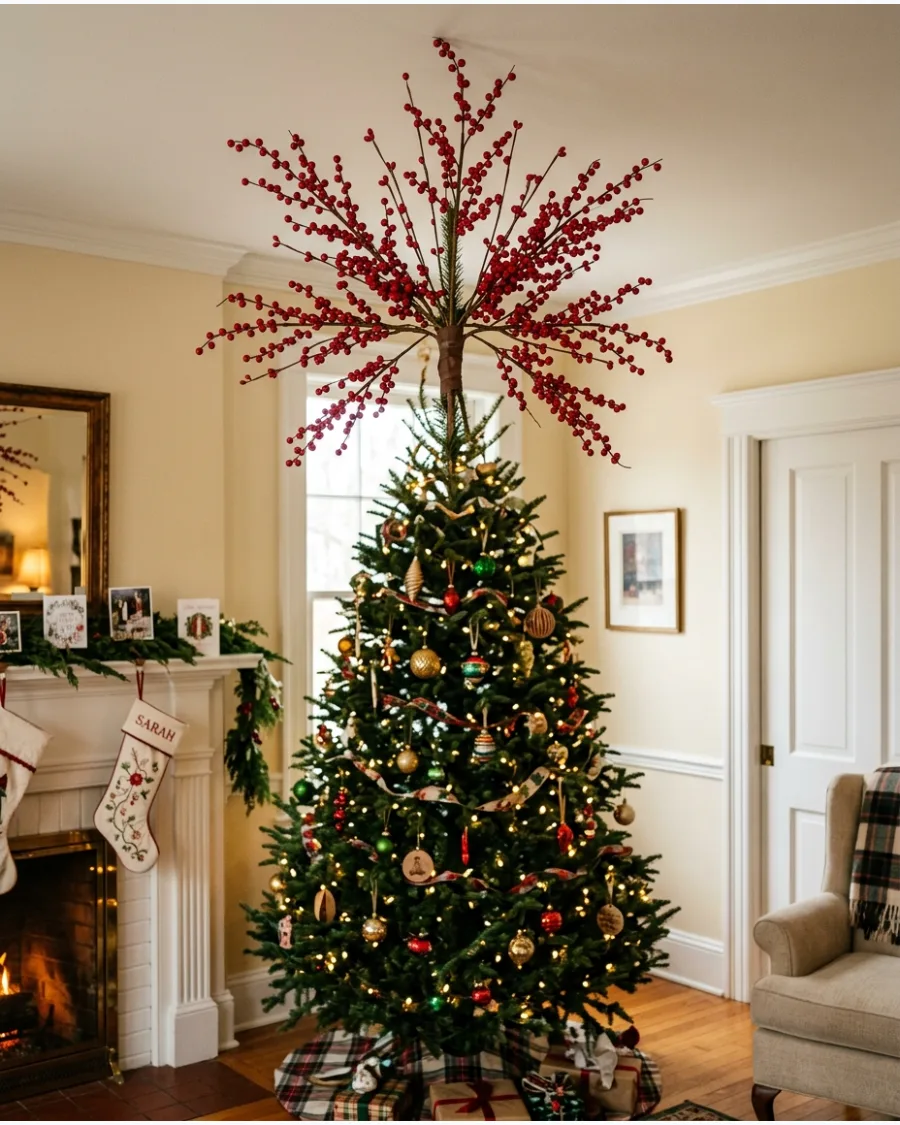
Using tall red berry picks is an effective way to add height and a burst of color to a tree without using a traditional star. Arrange the picks so they emerge vertically and diagonally from the crown, creating a dramatic starburst effect.
Vary the height of each pick by sliding some deeper into the tree while leaving others extended at their full length to create a layered look. This method provides a professional finish that draws the eye upward to the ceiling.
- Choose berry picks with a matte or glossy finish that matches the red ornaments used elsewhere on the tree.
- Twist the wire stems of the picks around the tree's top branches to prevent the arrangement from leaning.
- Fill the base of the berry burst with shorter evergreen stems to bridge the gap between the topper and the tree body.
Use berry picks with flexible wire stems so you can curve the ends slightly for a more organic, less rigid starburst shape.
30. Eucalyptus and Pine Tree Topper
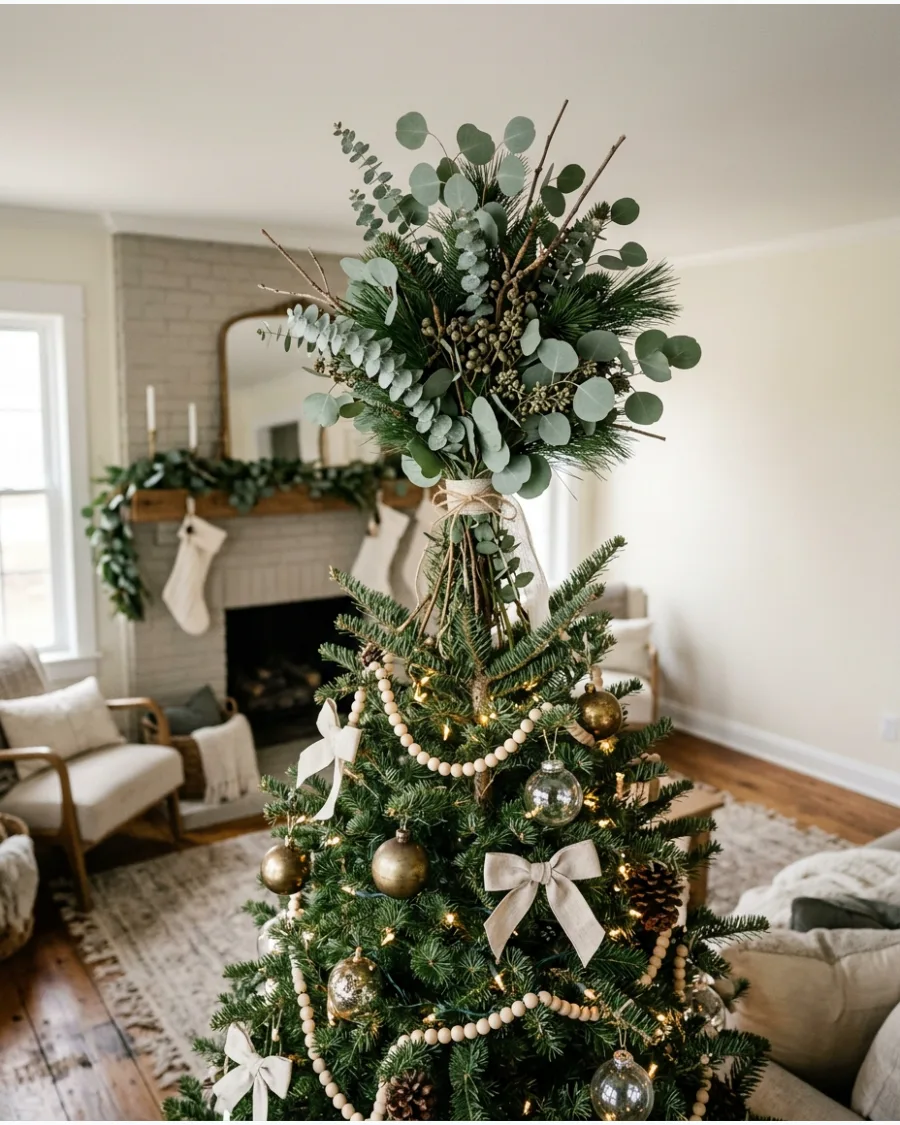
Mixing soft-textured eucalyptus leaves with stiff pine stems results in a modern, organic tree topper suitable for neutral decor styles. The silvery-green of the eucalyptus offers a sophisticated contrast to the darker green of a traditional Christmas tree.
Layer the eucalyptus leaves over the pine branches so the rounded leaves are the most visible element of the topper while the pine provides structure. This organic look complements farmhouse or Scandinavian interiors perfectly.
- Select silver dollar eucalyptus for larger, rounder leaves or seeded eucalyptus for added fine texture.
- Incorporate different shades of green greenery to make the topper look more realistic and full from a distance.
- Check that the weight of the eucalyptus stems is evenly distributed so the tree's top branch does not bend under the load.
If using fresh eucalyptus, place the stems in small water tubes hidden within the tree branches to keep the leaves from wilting.
31. Magnolia Leaf Christmas Tree Topper
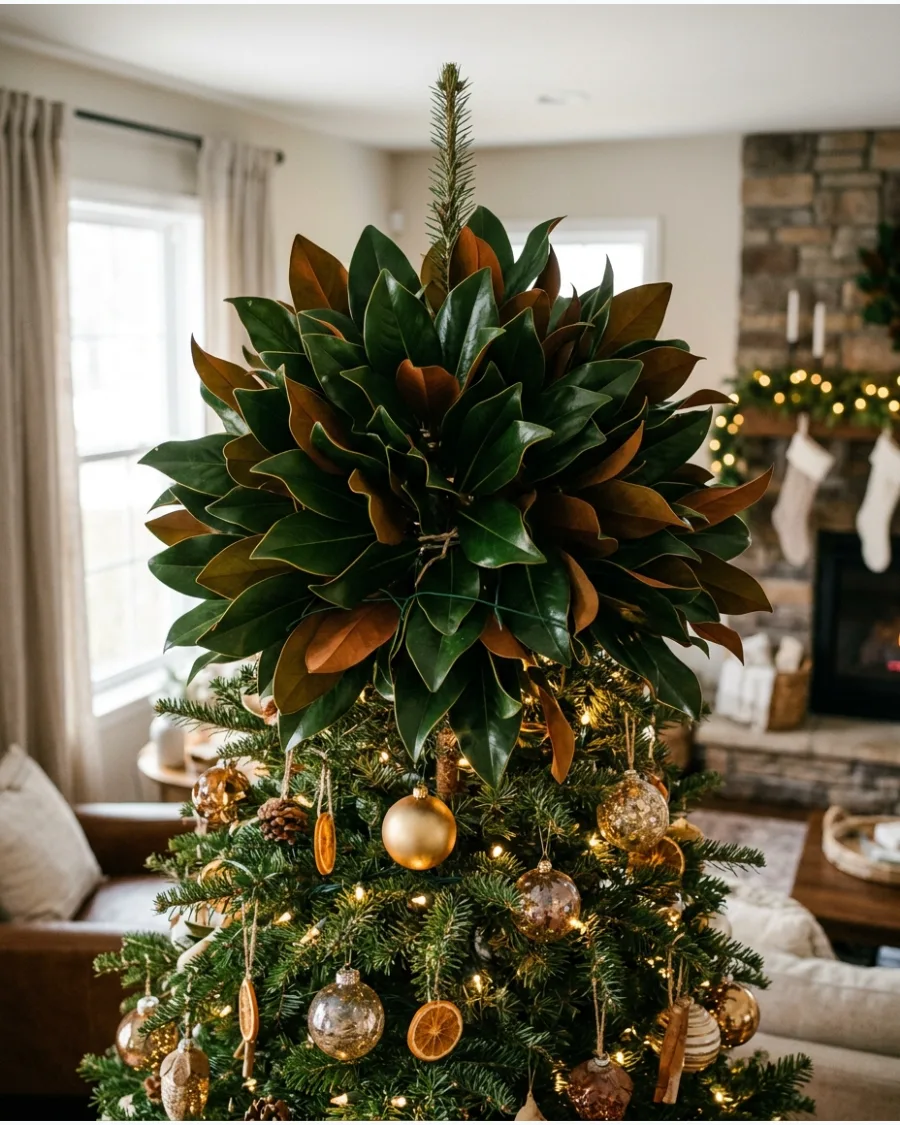
Large magnolia leaves provide a textured, organic crown that suits a variety of holiday color palettes. Tuck the individual leaf stems directly into the upper branches, overlapping them to hide the central trunk and create a full, radiating shape. This Southern-inspired look can be achieved with natural green leaves for a classic feel or metallic-painted versions for a more formal setting.
- Select leaves with a natural brown underside to introduce a rustic, two-toned contrast to the greenery.
- Secure the stems to the center pole of the tree using green floral wire to prevent the arrangement from shifting over time.
- Vary the heights and angles of the leaves as you place them to ensure the topper transitions smoothly into the rest of the tree.
Wipe real magnolia leaves with a tiny bit of vegetable oil on a soft cloth to maintain their natural sheen throughout the holiday season.
32. Pheasant Feather Christmas Tree Topper
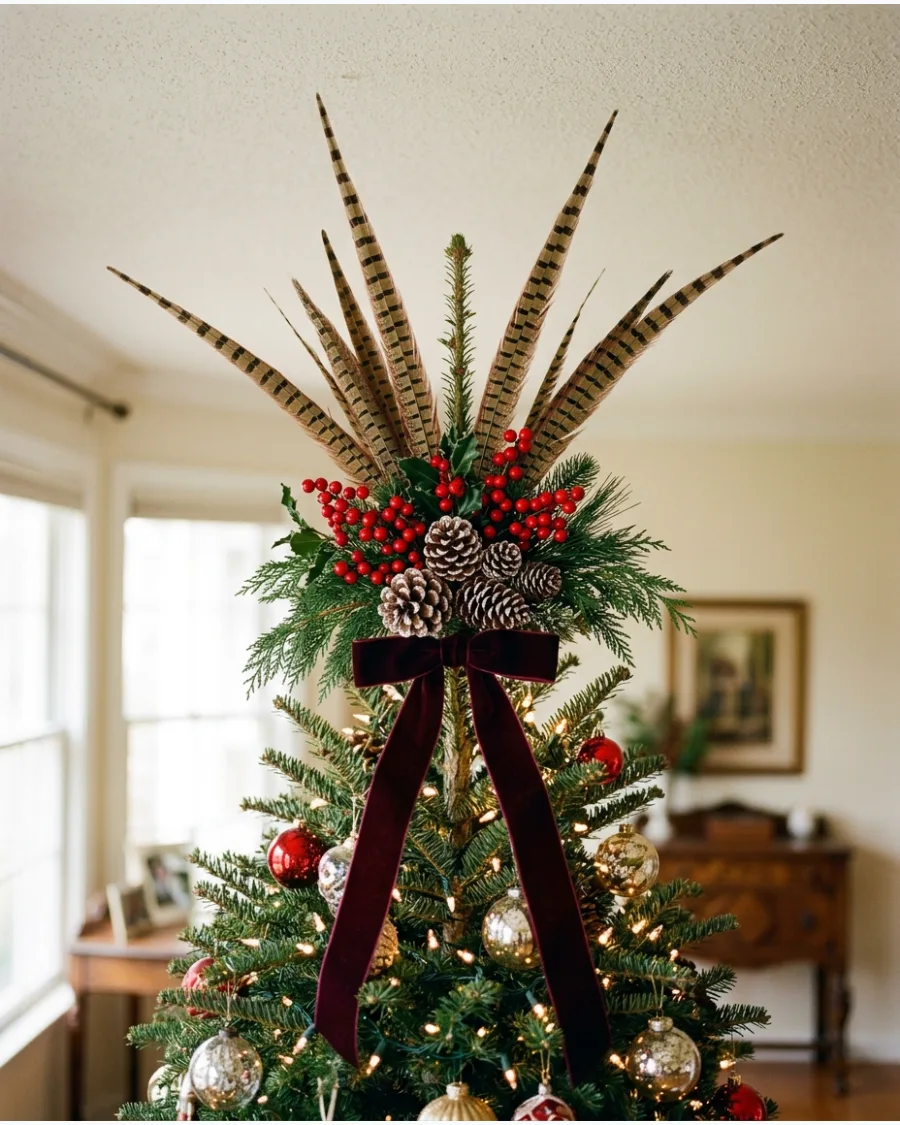
Long pheasant feathers provide a sophisticated vertical element that adds height to your tree without the bulk of a heavy metal topper. Insert several long feathers into the dense greenery at the crown alongside clusters of berries and pinecones to create a finished woodland arrangement. This combination ensures the delicate feathers look like a deliberate, stable part of the design.
- Choose feathers of varying lengths, placing the longest ones at the center for a traditional tapered silhouette.
- Bundle three or four feathers together with floral tape before inserting them to make them easier to anchor as a single unit.
- Add a velvet ribbon bow at the base of the feathers to conceal where the quills meet the tree branches.
If feathers become bent during storage, lightly steam them over a kettle to restore their natural volume and shape.
33. White Feather Christmas Tree Topper
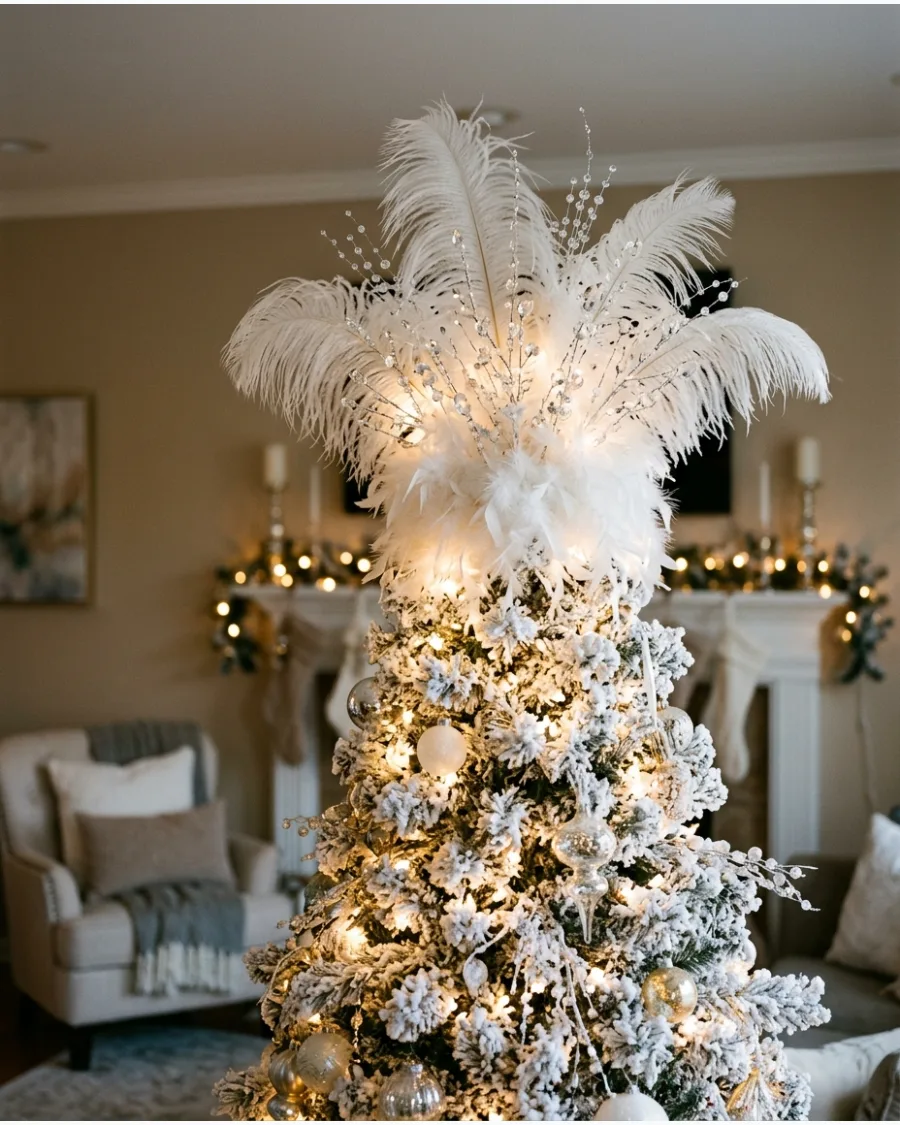
Soft white feathers create an airy, winter-inspired effect that beautifully complements flocked or metallic-toned trees. Layer the feathers alongside crystal-encrusted branches to catch the glow of the tree lights and add a subtle sense of movement to the top of the tree. This monochromatic approach provides a light, cloud-like finish that fits modern or glamorous holiday themes.
- Choose ostrich or marabou feather picks with built-in wire stems for better control over the final arrangement shape.
- Position the feathers so they curve slightly outward and upward to mimic the natural growth of the tree branches.
- Check that the feathers are not placed directly against large light bulbs to avoid any heat damage to the delicate material.
Use a hairdryer on a cool, low setting to gently fluff the feathers once they are securely placed on the tree top.
34. Frosted Branch Christmas Tree Topper
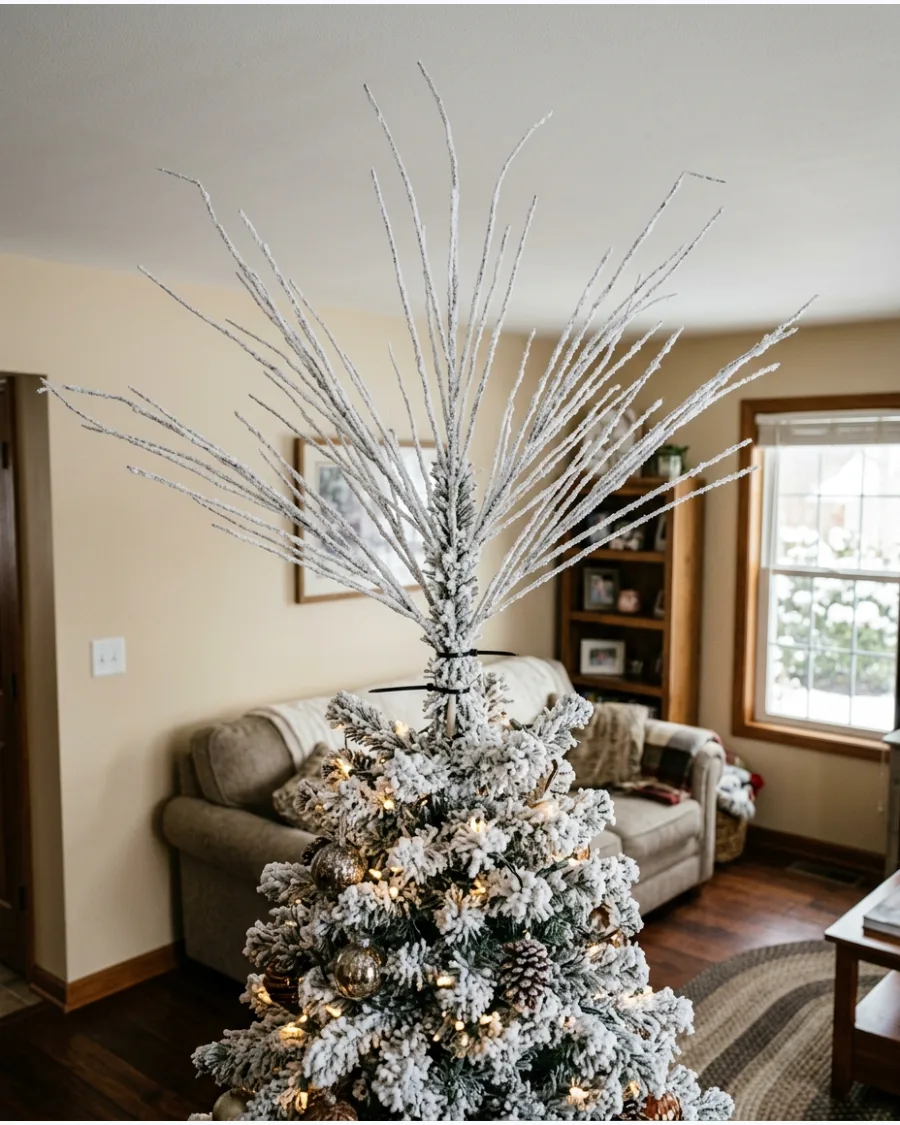
Frosted branches are a simple way to visually extend the height of a tree while maintaining a wintery, natural aesthetic. Fan the branches outward from the central leader branch to create a wide crown that blends seamlessly with the look of a flocked tree. This structural approach provides more volume than feathers while remaining lightweight and easy to install with basic ties.
- Match the level of snow or frost on the topper branches to the existing flocking on your tree for a consistent appearance.
- Anchor the heaviest branches to the tree's main trunk using zip ties concealed under the surrounding greenery.
- Mix in a few glittered or iced picks to add a reflective quality that mimics real frost under your indoor lighting.
Bend the wire stems of the branches into slight 'S' curves before inserting them to give the topper a more organic, wind-swept look.
SECTION 5: FLORAL CHRISTMAS TREE TOPPERS
35. Red Poinsettia Tree Topper
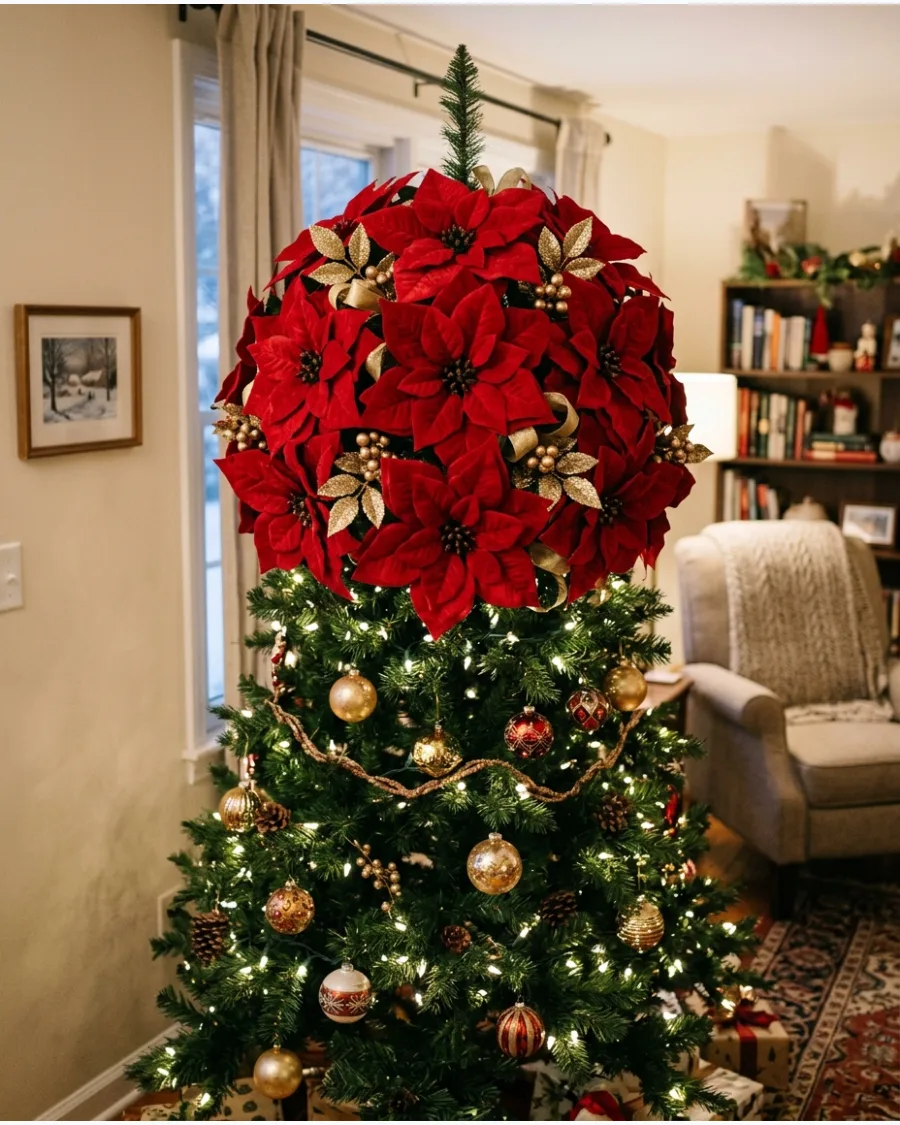
A cluster of large red poinsettias offers a bold, floral alternative to traditional stars or angel toppers. Arrange several oversized silk blooms around the very top of the tree, then tuck smaller matching flowers into the lower branches to unify the entire design. This repetition ensures the topper feels like an integrated part of the tree's theme rather than a separate piece.
- Select high-quality silk or velvet poinsettias with wired petals so you can shape them to hide any visible hardware at the tree's tip.
- Vary the direction the blooms are facing to ensure the topper looks full and attractive from every angle in the room.
- Incorporate gold or silver decorative picks within the cluster to add a bit of metallic contrast to the deep red petals.
Use a few extra-large blooms at the very top to create a stable visual base, then layer smaller ones on top to build height.
36. White Poinsettia Tree Topper
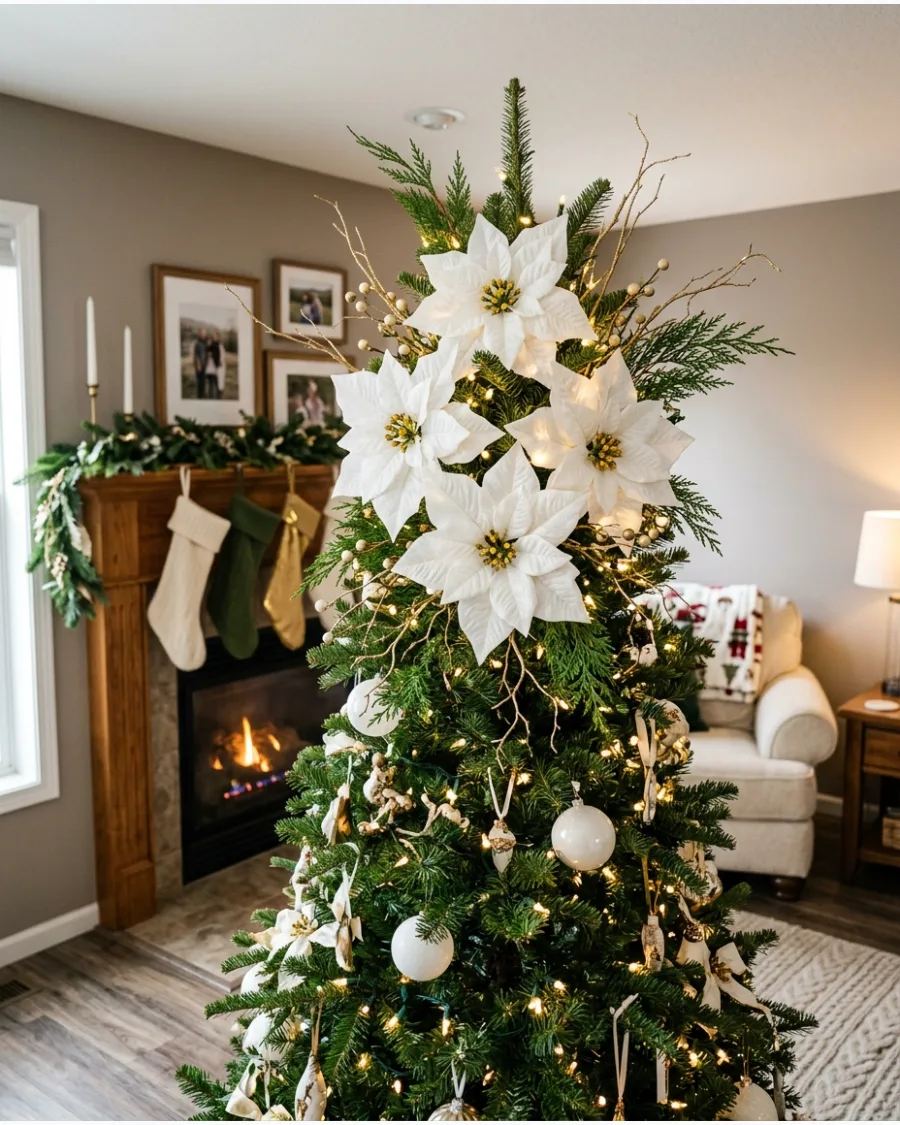
Use oversized white silk poinsettias to create a soft, wintry peak for a classic tree. Nestle the large flower heads into the top branches alongside sprigs of cedar or pine for a natural texture. Adding gold centers or subtle metallic branches prevents the white petals from looking flat against the greenery.
- Choose poinsettias with wired petals so you can shape them to look like they are in full bloom.
- Secure the floral stems to the central trunk using green floral wire or pipe cleaners to prevent drooping.
- Integrate a few smaller white ornaments nearby to draw the color down from the topper for a unified look.
Use a matte white finish for a modern look or a shimmer finish for a traditional frosty effect.
37. Burgundy Floral Tree Topper
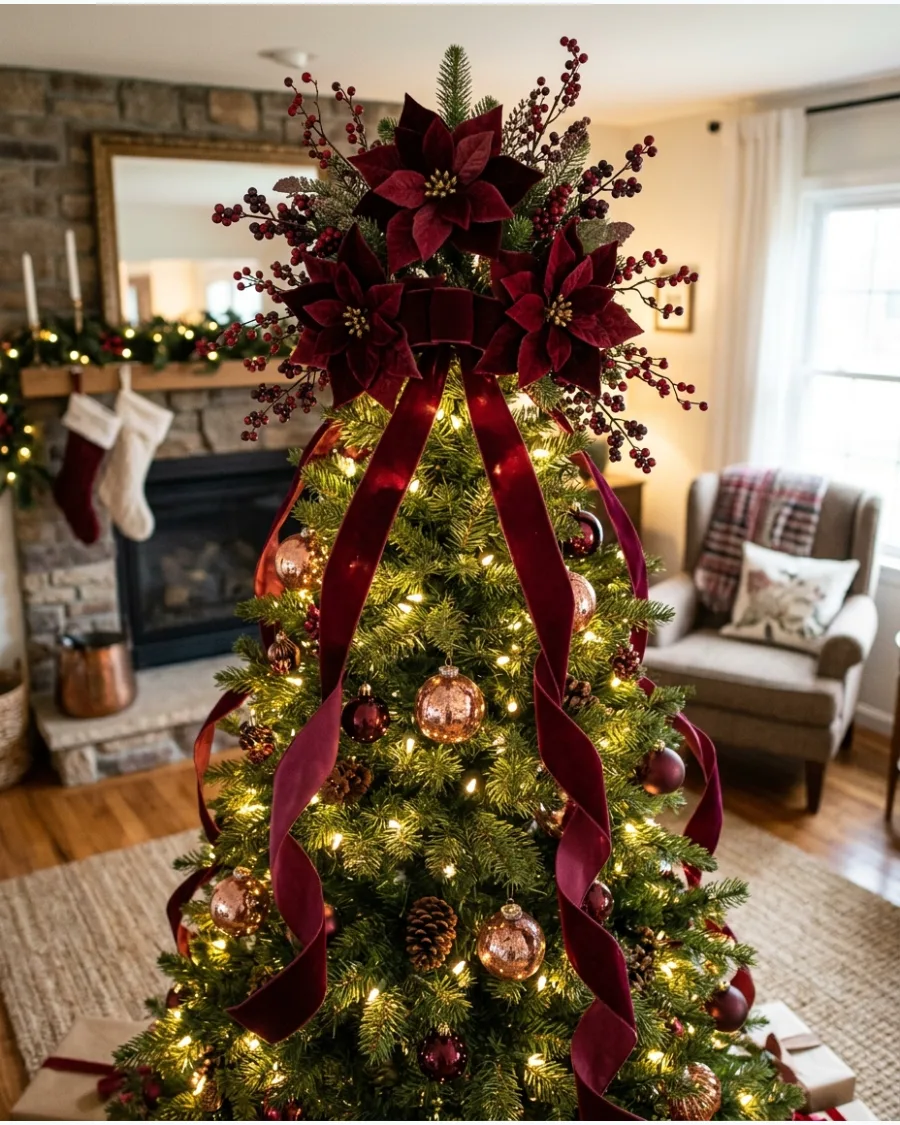
Create a moody focal point by combining deep burgundy poinsettias with dark berry sprays. Arrange the velvet-textured flowers at the very top and trail wine-colored velvet ribbon tails through the lower branches. This dark color palette works best on trees with warm white lights and copper or gold accents.
- Select velvet poinsettias with deep, saturated hues to ensure they stand out against the dark green needles.
- Push the berry sprays into the tree at varying heights around the topper to create a tiered effect.
- Match the ribbon fabric to the poinsettia petals to maintain a consistent texture throughout the design.
Loop the ribbon loosely over branches rather than pulling it tight to maintain a high-end, layered look.
38. Gold Poinsettia Tree Topper
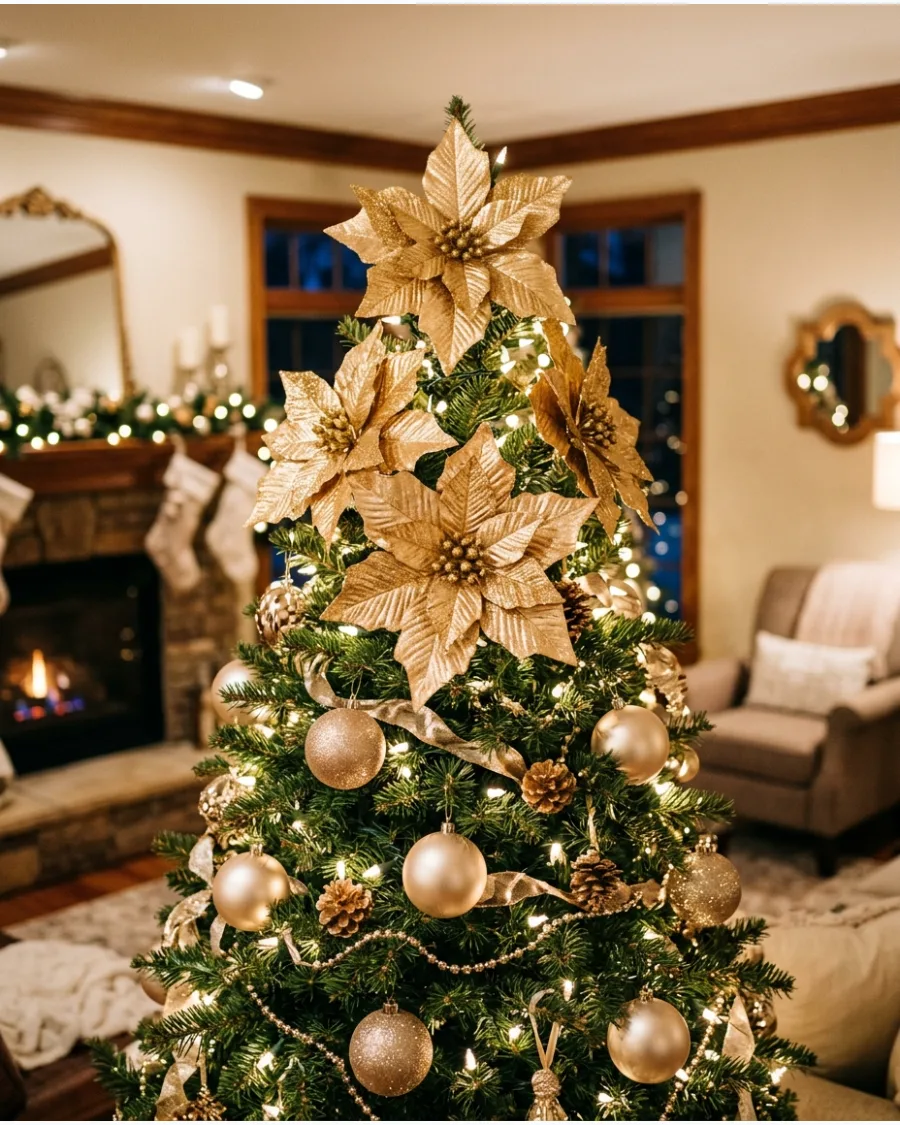
Form a sparkling floral crown by layering large metallic gold poinsettias across the upper third of the tree. Tuck the stems deep into the foliage to ensure the flower heads sit flush against the branches. This style pairs perfectly with champagne-colored ornaments and a warm lighting scheme for a cohesive metallic finish.
- Opt for glitter-dusted or metallic fabric poinsettias to maximize the reflection of the tree lights.
- Distribute the flowers in a circular pattern around the top leader branch for an angle that suits the placement visibility.
- Use wire-edged gold ribbon to fill any gaps between the flowers for a fuller, rounded appearance.
If the tree has a thin top branch, fold it over and zip-tie it to provide a sturdier base for heavy floral heads.
39. Winter White Floral Bouquet Topper
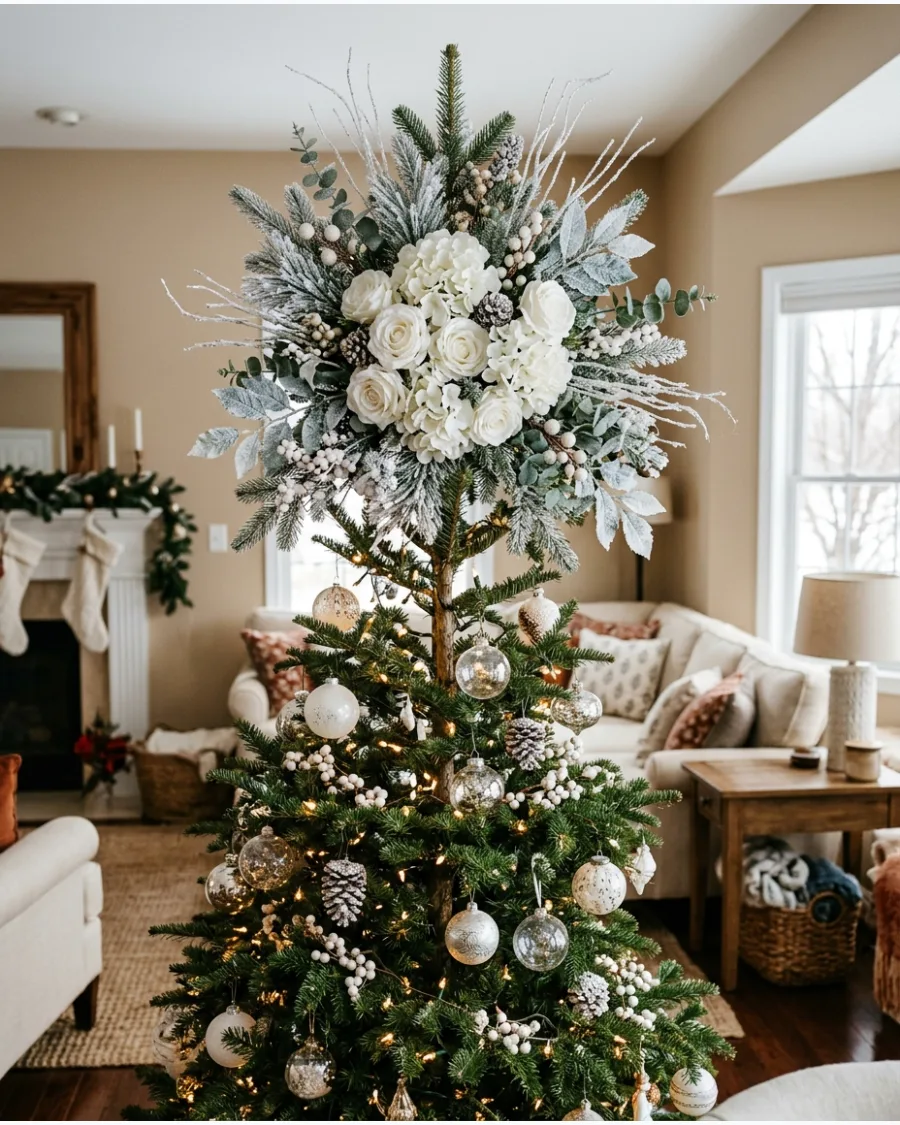
Assemble a custom bouquet-style topper by mixing white flowers with frosted leaves and snowy branches. Arrange the various stems both vertically and diagonally to mimic a hand-tied designer arrangement. The combination of textures from the greenery and the snowy accents provides a sophisticated finish that feels custom-made.
- Bundle the stems together with floral tape before placing them on the tree to keep the arrangement unified.
- Use frosted or flocked branch picks to add height and a sense of movement to the very top of the tree.
- Verify that the weight of the bouquet is balanced so the tree's top leader branch does not lean to one side.
Incorporate a few sprigs of eucalyptus or silver-dollar leaves for a contemporary, organic touch.
SECTION 6: WHIMSICAL AND THEMED CHRISTMAS TREE TOPPERS
40. Giant Candy Cane Tree Topper
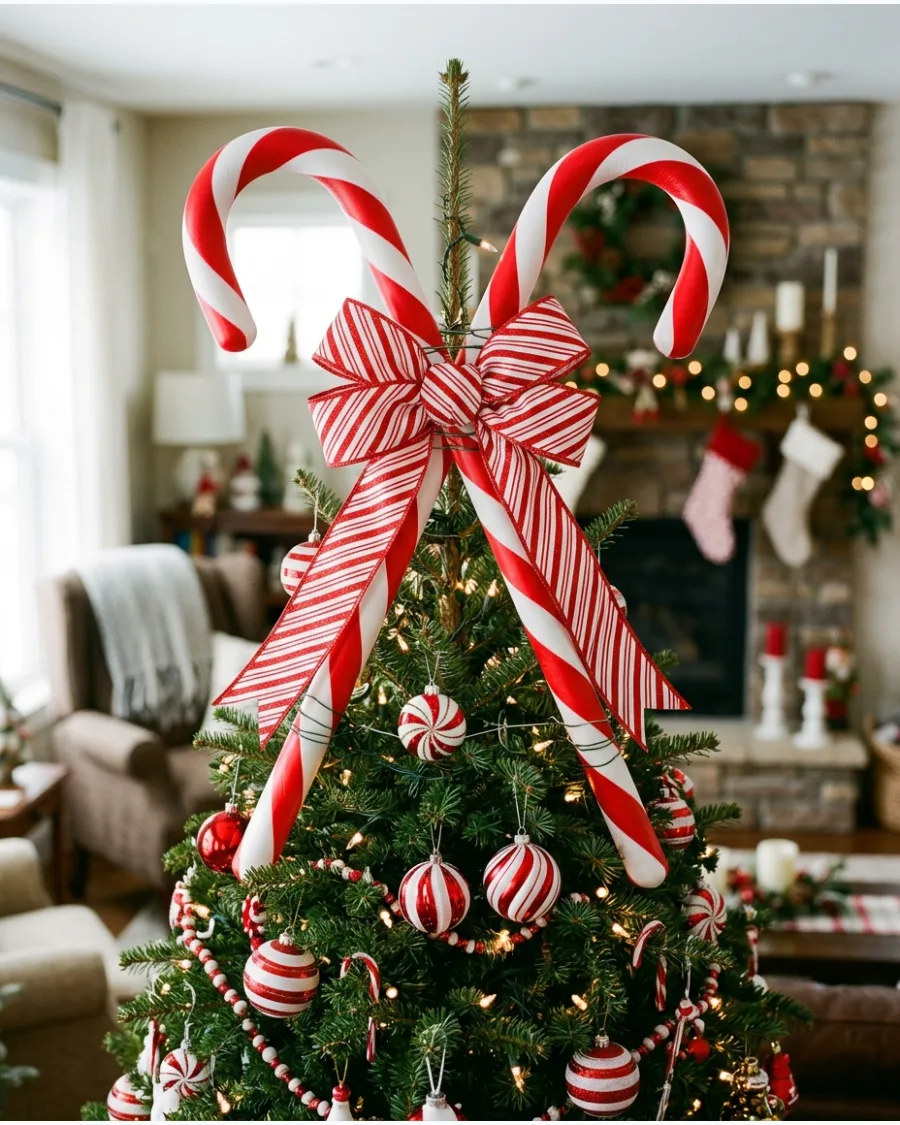
Create a whimsical focal point by crossing two oversized decorative candy canes at the tree's peak. Surround the base of the canes with a large striped ribbon bow to hide the attachment points and add volume. This playful topper is the ideal finishing touch for a peppermint-themed tree or a colorful family holiday setup.
- Choose lightweight plastic or foam candy canes to avoid putting too much stress on the top branch.
- Use clear zip ties to secure the candy canes to the main trunk so they remain upright throughout the season.
- Drape matching red-and-white ribbon spirals downward from the topper to tie the theme together.
Angle the candy canes slightly outward in a 'V' shape to create a more balanced and wide profile.
41. Gingerbread Tree Topper
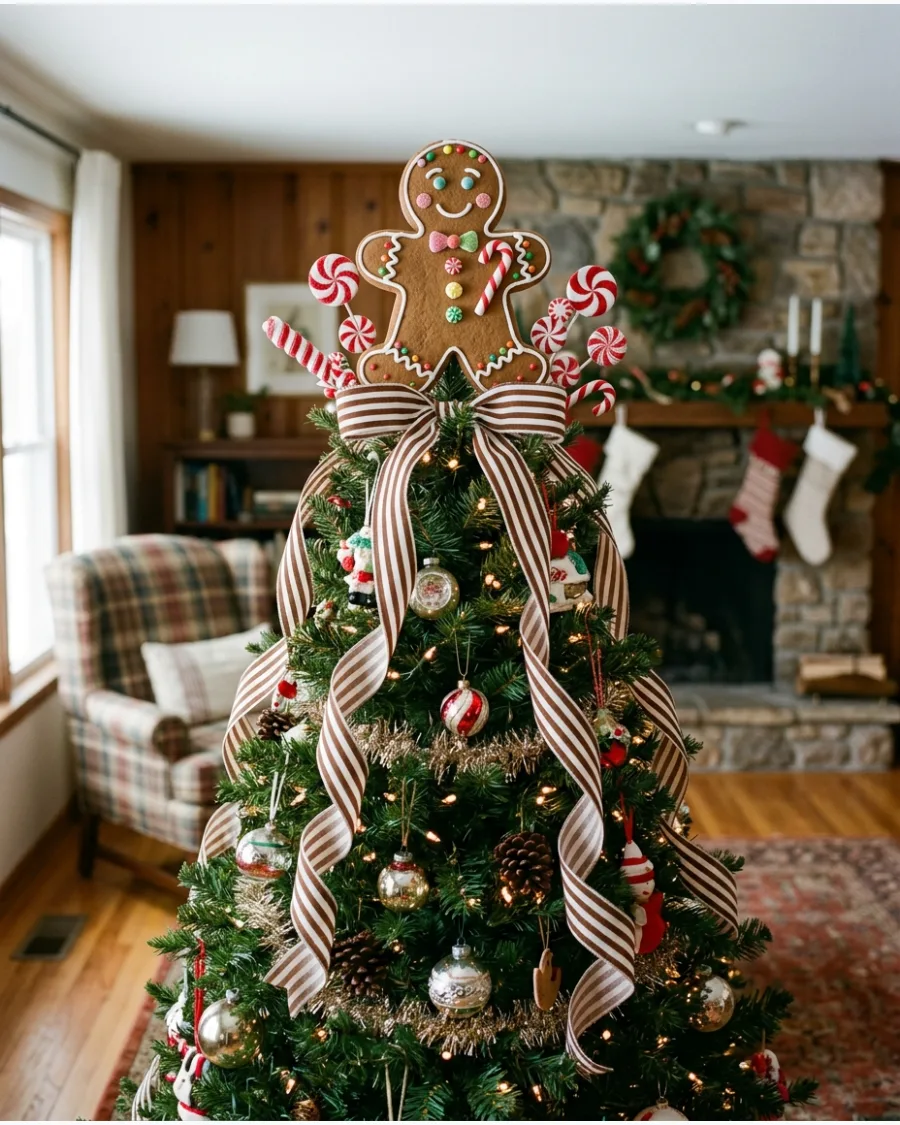
Create a playful confectionery theme by placing an oversized gingerbread man or house at the tree's peak. Secure the gingerbread figure to the central leader branch with clear floral wire to prevent it from leaning forward or sliding. Use brown-and-white ribbons and peppermint-striped ornaments to reinforce the bakery look throughout the evergreen branches.
- Choose a lightweight foam or resin figure to avoid bending the top of the tree.
- Tuck candy-themed floral picks and faux gingerbread cookies around the base of the topper to hide the attachment point.
- Use a thick brown-and-white striped ribbon to bridge the gap between the topper and the rest of the tree.
If using a gingerbread sign instead of a figure, attach it at two points to prevent it from spinning or tilting.
42. Grinch Christmas Tree Topper

Capture a whimsical storybook feel by making it look as though a character is climbing out of the tree. Insert a character head and matching green furry arms into the top third of the tree to create a sense of movement and mischief. Carry the lime green and red palette down through the branches with striped ribbons and oversized bulb ornaments.
- Look for lightweight plush or wired-limbs versions of the character to ensure they stay in place without heavy mounting.
- Position the arms so they appear to be reaching for specific ornaments to reinforce the theme.
- Use lime green mesh or ribbon to fill any gaps between the character head and the tree's greenery.
Place a bendable lime green elf leg ornament near the middle of the tree to imply the character is threading through the branches.
43. Santa Hat Christmas Tree Topper
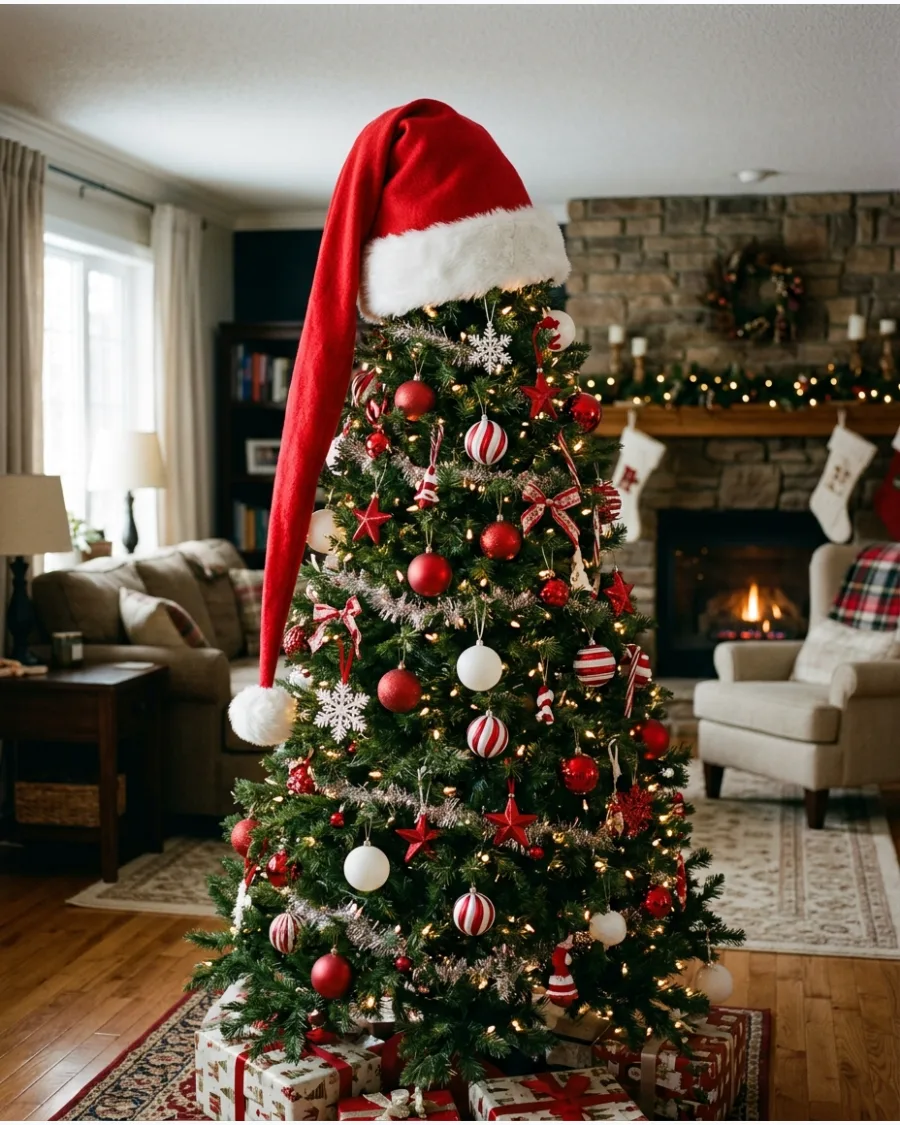
Create a simple and cozy focal point by sliding an oversized Santa hat over the top point of the tree. Fold the top of the hat to one side and pin it to a branch so it drapes naturally rather than standing straight up. This method works well for family rooms and provides a soft, safe option for households with children.
- Check that the hat opening is wide enough to cover the top few inches of the tree without compressing the branches too tightly.
- Stuff the interior of the hat with a small amount of tissue paper or poly-fill to help it maintain a rounded shape.
- Coordinate with red and white ornaments and a matching tree skirt to tie the look together.
Use a hat with a wired brim to easily adjust the tilt for a more animated look.
44. Snowman Hat Tree Topper
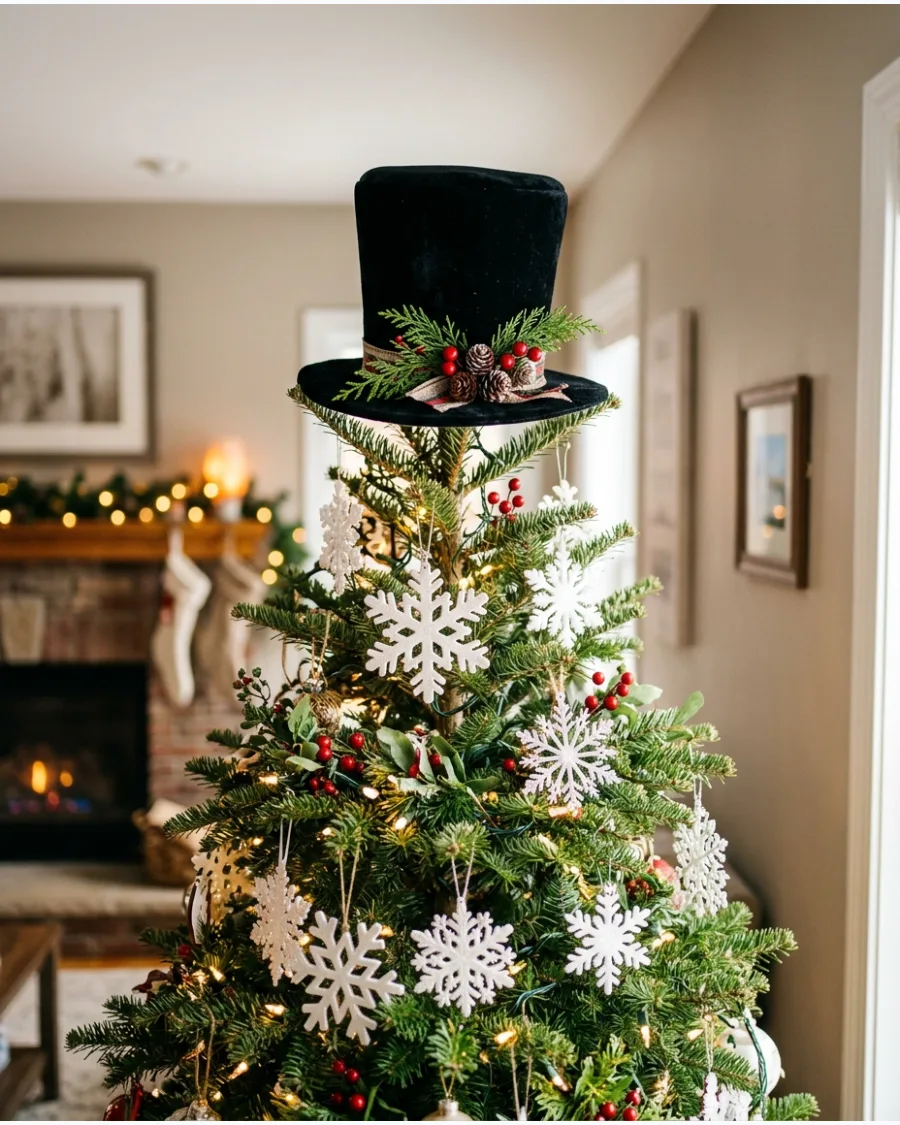
Add a classic winter touch by using a black felt or velvet top hat as the finishing piece. Wedge the hat onto the top branch and surround the brim with white flocked picks or red berries to anchor it visually. This topper provides a structured contrast against the soft needles of the tree.
- Select a hat with a built-in wire or clip to ensure it stays level throughout the season.
- Layer white snowflake ornaments and white mesh ribbon throughout the tree to mimic a snowman's body.
- Use a red plaid or solid red ribbon around the base of the hat to transition the black color into the tree's palette.
If the hat feels unstable, run a dark-colored pipe cleaner through the inside of the hat and twist it around the tree's trunk.
45. Nutcracker Christmas Tree Topper
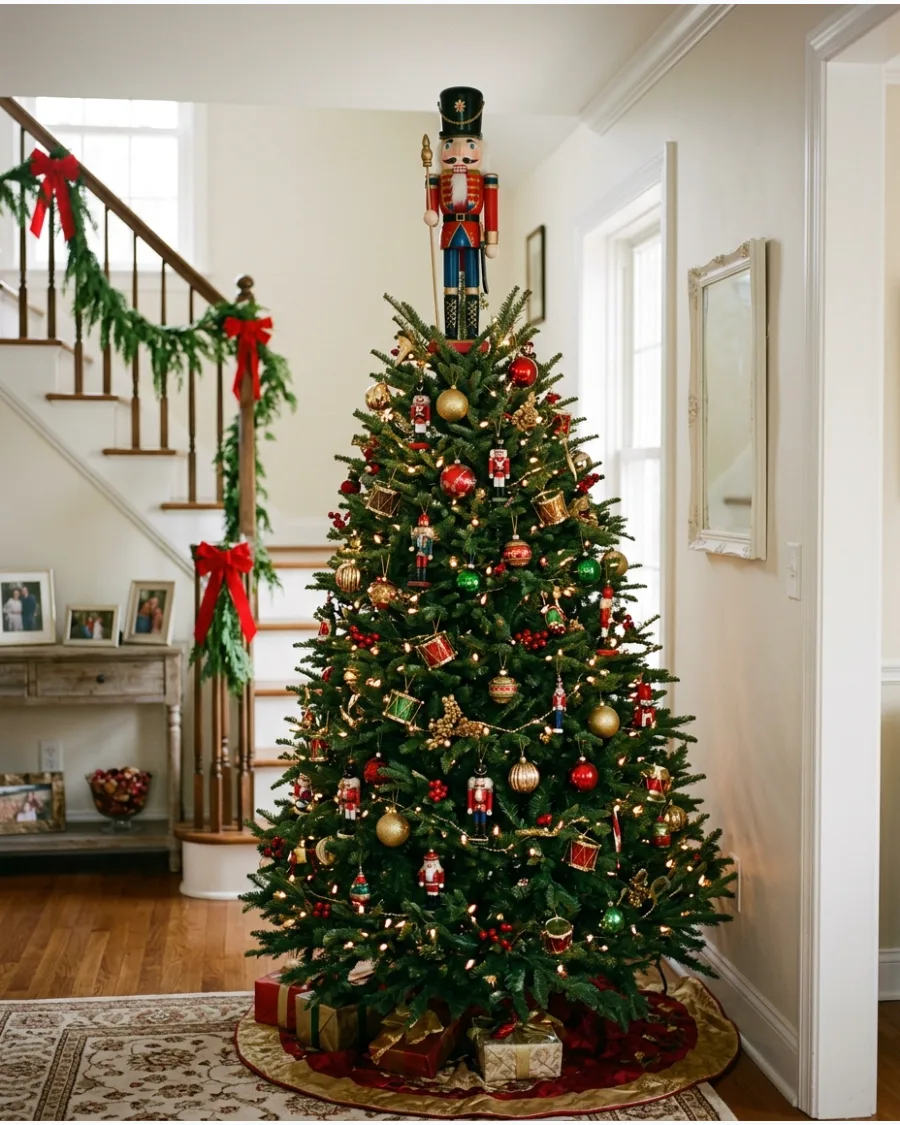
For a traditional and regal look, position a large, lightweight nutcracker figure at the very top. Tie the nutcracker securely to the main vertical branch using zip ties or heavy-duty wire hidden behind its back and boots. Echo the theme by placing smaller nutcracker ornaments, drums, and toy soldiers in the branches below.
- Verify that the figure is made of plastic or wood-look resin rather than heavy solid wood to prevent the tree from leaning.
- Use jewel-toned ribbons like navy, gold, or deep red to complement the classic nutcracker uniform.
- Place the figure slightly back from the center of the branch if the tree is against a wall to provide better balance.
Wrap the base of the nutcracker in a thick velvet ribbon to hide the feet and create a seamless transition to the tree.
46. Christmas Elf Hat Tree Topper
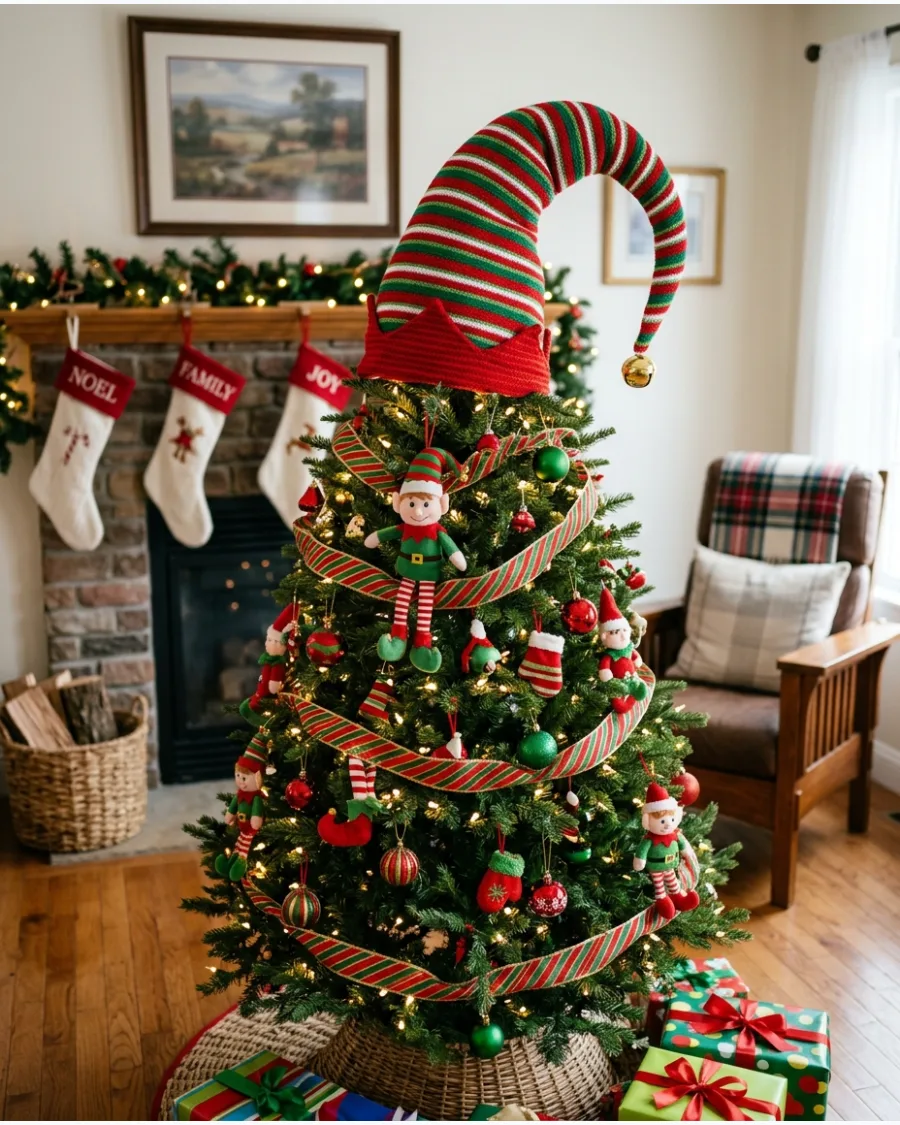
A striped elf hat adds a playful touch to a whimsical tree theme by bringing height and soft texture to the crown. Slide the hollow base of the hat over the top vertical branch of the tree, ensuring the wire interior holds the pointed tip in a jaunty curve. Carry the theme down the branches by tucking in matching elf-leg picks or curly ribbon streamers that coordinate with the hat's fabric.
- Choose a hat with an internal wire frame to customize the bend of the peak and prevent it from drooping.
- Secure the hat base to the main tree trunk using green floral wire or a zip tie to prevent it from sliding or tilting.
- Select a hat size that is approximately one-tenth the height of the tree to maintain proper visual proportions.
If the hat is too heavy for the top branch, zip-tie a sturdy bamboo stake to the tree trunk to act as a hidden support pole.
SECTION 7: UNIQUE AND DIY CHRISTMAS TREE TOPPERS
47. Oversized Christmas Bells Tree Topper
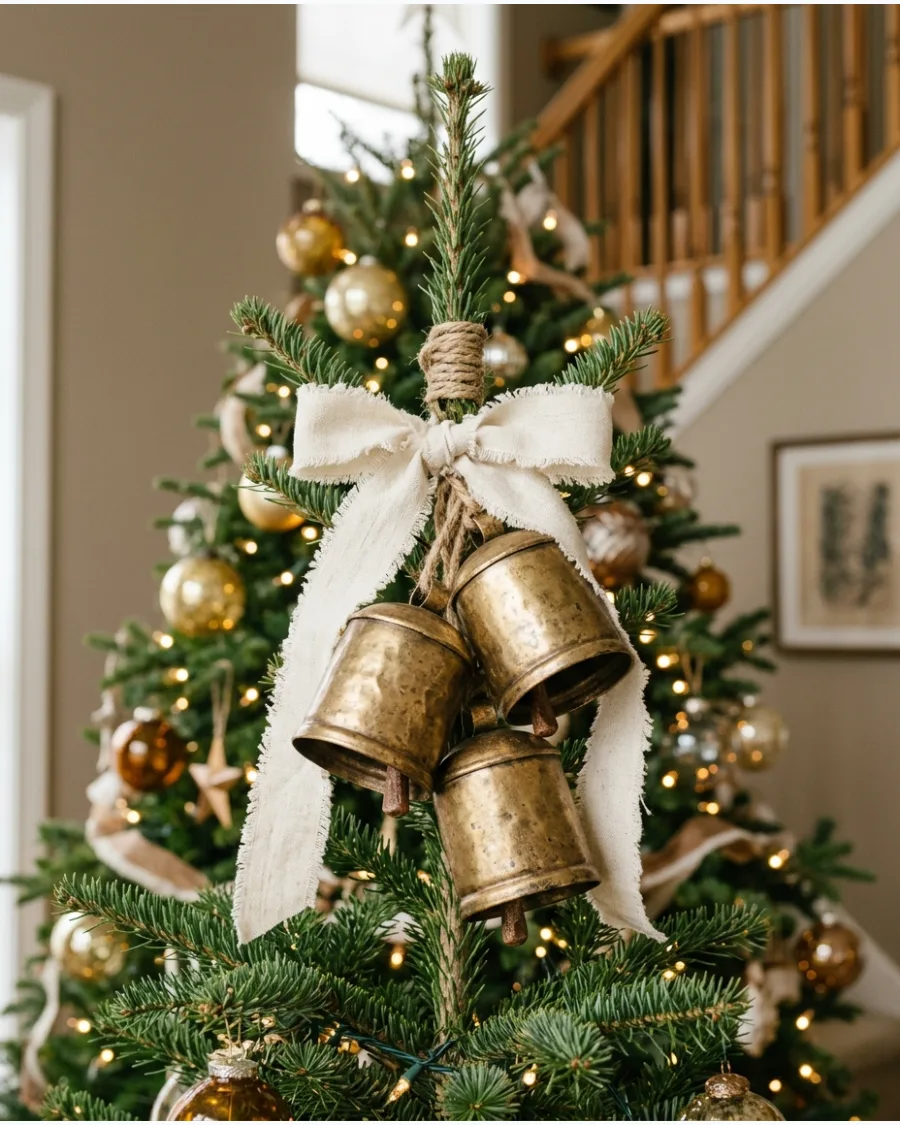
Cluster several large bells at the top of the tree for a classic, metallic finish that catches the holiday lights. Tie three or four bells of varying sizes together with twine and nestle them into a bed of evergreen sprigs at the tree's peak. Position them so they face slightly forward and downward for better visibility from across the room rather than pointing straight up.
- Select bells with a matte brass or shiny gold finish to complement your existing metallic ornaments.
- Use a sturdy ribbon loop to hang the bell cluster directly from the strongest part of the upper trunk rather than a flimsy branch tip.
- Surround the base of the bells with extra sprigs of pine or cedar to hide the attachment points and any mounting wires.
Check that the bells are securely fastened so they do not shift or ring loudly when people walk past the tree.
48. DIY Paper Star Tree Topper
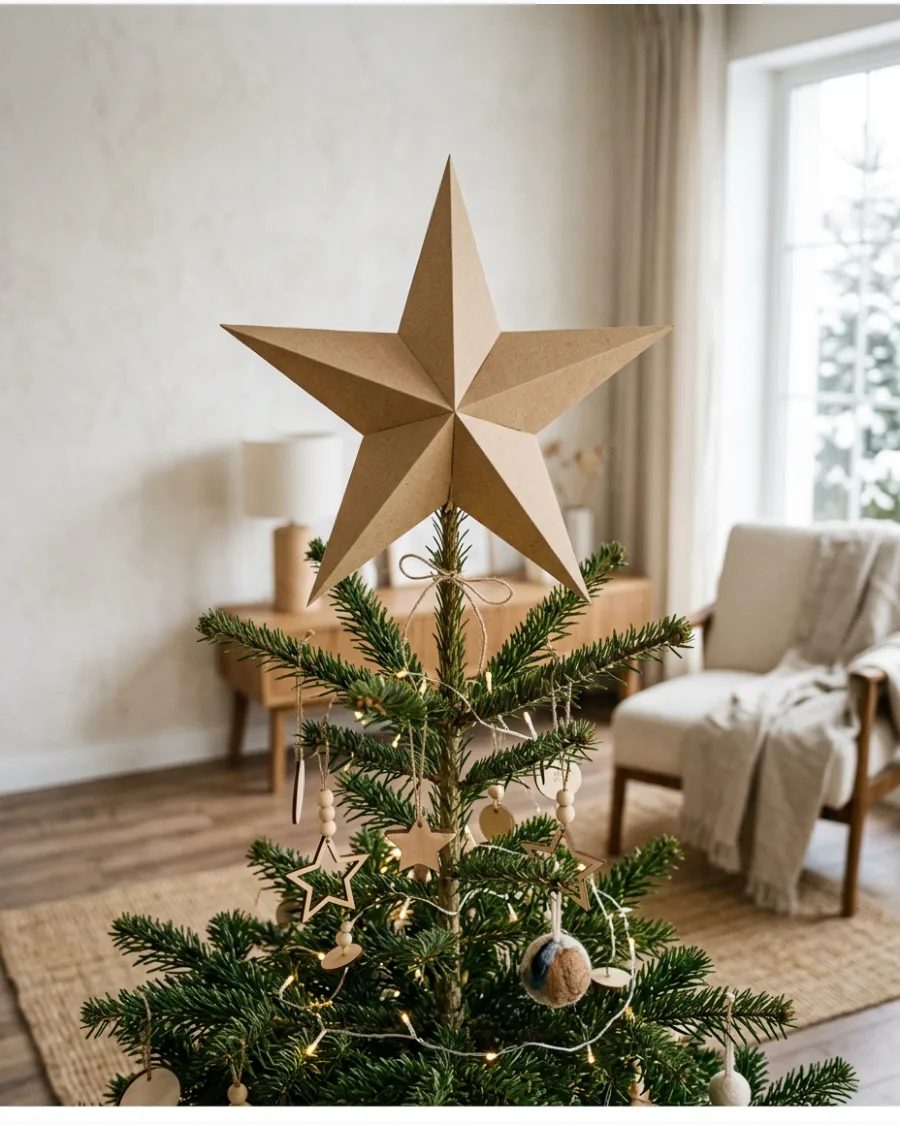
Handcrafted paper stars offer a lightweight and customizable alternative to heavy glass or metal toppers. Fold a large dimensional star from heavy cardstock or kraft paper and attach a small wooden dowel or floral clip to the back for mounting. This style works exceptionally well for Scandinavian or minimalist themes where natural textures and clean lines are preferred.
- Use the verified weight limit cardstock or heavier to ensure the star points remain crisp and do not wilt in a humid room.
- Apply a coat of clear spray sealant to the paper if you plan to store the star for reuse in future seasons.
- Choose a color like cream, white, or metallic gold that contrasts with your wall color so the star's silhouette is clearly defined.
If using kraft paper, add a thin line of white glue and fine glitter along the edges to help the star catch the glow of the tree lights.
49. Snowflake Christmas Tree Topper
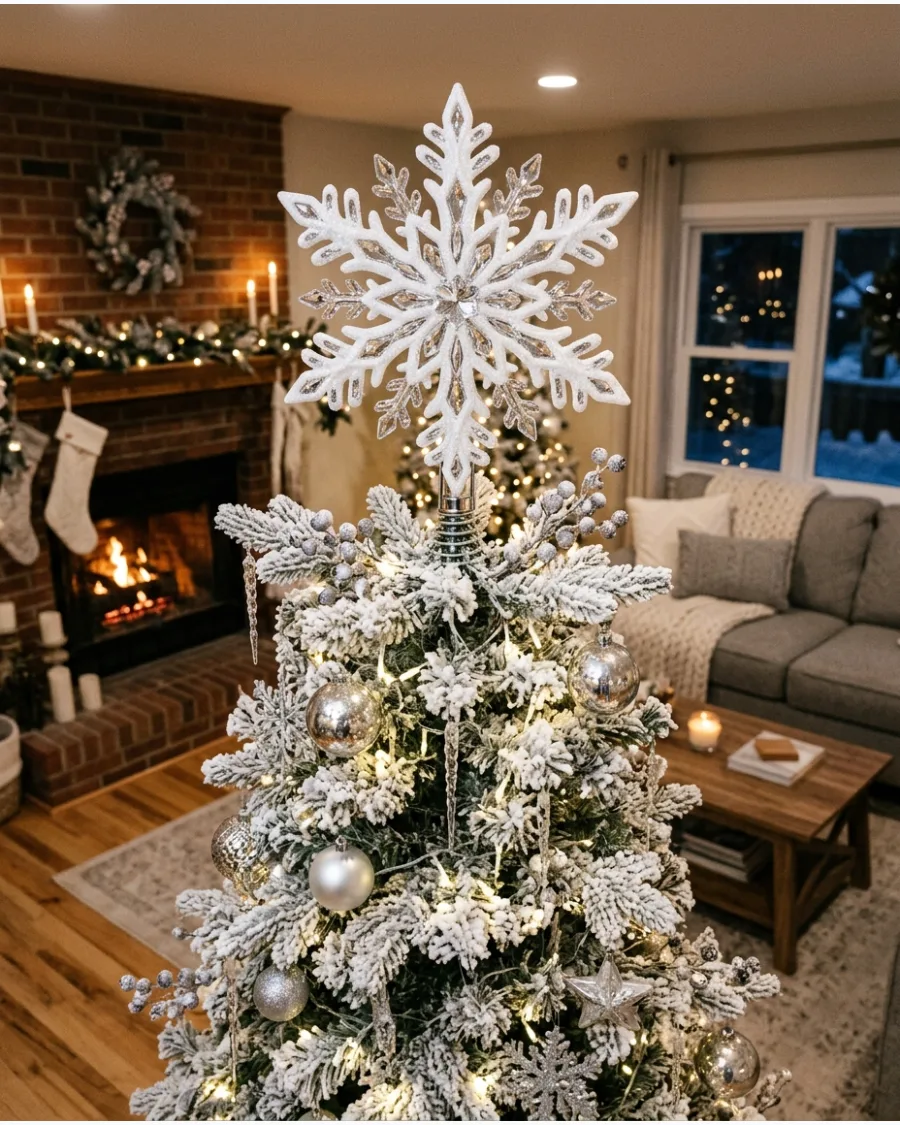
A large snowflake topper creates a crisp, wintery effect at the crown of the tree, especially for 'Winter Wonderland' themes. Mount a single oversized dimensional snowflake or zip-tie a cluster of smaller ones together to create a custom, multi-layered focal point. The icy textures of crystal, silver, or glittered finishes pair well with cool-toned LED lights and white garland.
- Look for a snowflake with a universal clip or a sturdy spiral base that fits standard artificial tree top branches.
- Layer several different snowflake sizes and materials, such as acrylic and wood, to create depth and visual texture.
- Ensure the snowflake is perfectly centered over the trunk to maintain the tree's vertical symmetry and balance.
For a 'floating' effect on a flimsy tree, use clear fishing line to tether the snowflake to a nearby ceiling hook for extra support.
50. Designer Mixed-Pick Christmas Tree Topper
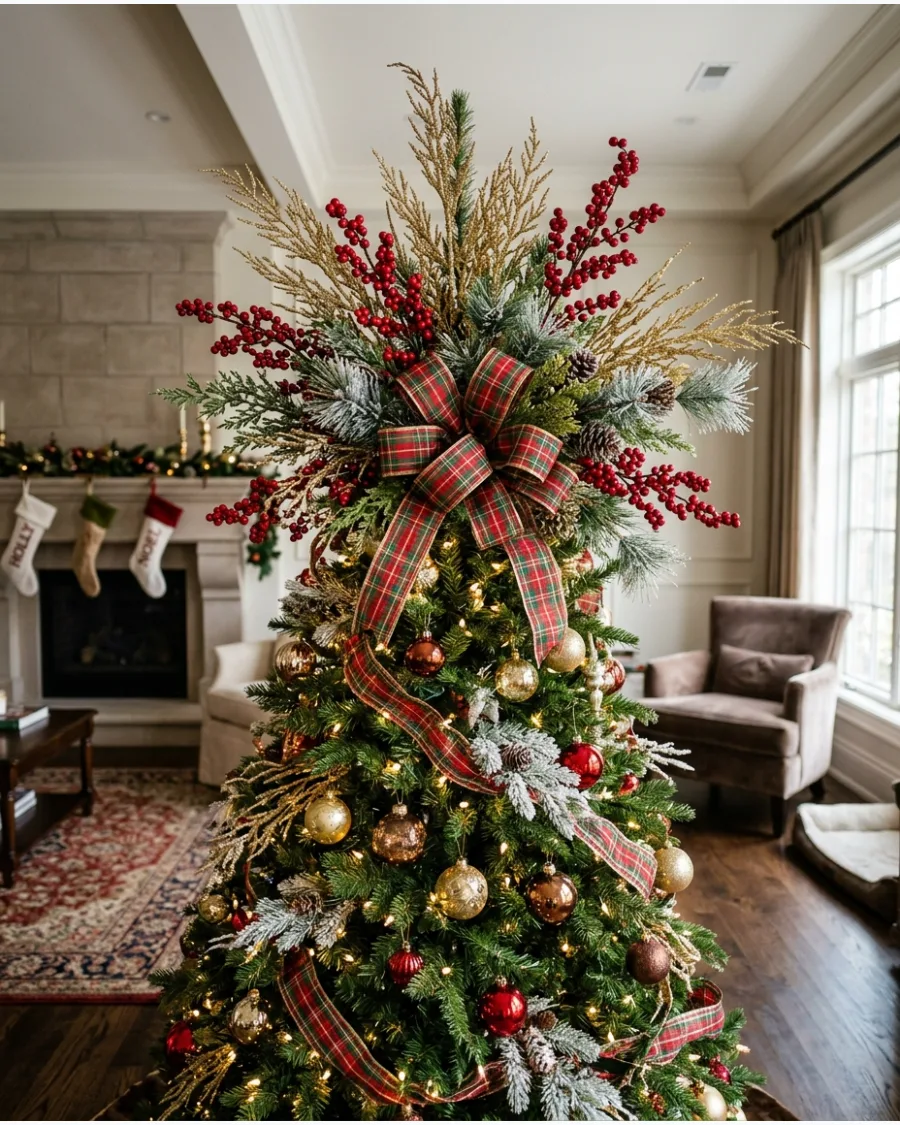
Create a professional-looking topper by layering various decorative picks into a full, rounded arrangement. Insert glittered branches and berry stems vertically into the top of the tree, fanning them out to create a dramatic spray effect. Tuck in large ribbon loops and faux florals to fill any gaps and hide the stems of the picks for a seamless finish.
- Select three to five different types of picks, such as pinecones, eucalyptus, and metallic leaves, for a rich, textured look.
- Secure the base of the pick bundle to the tree's center pole with floral tape or green zip ties for long-term stability.
- Distribute smaller versions of the same picks throughout the rest of the tree to tie the design together from top to bottom.
Vary the height of the picks, placing the tallest pieces in the center and shorter ones around the perimeter for a balanced, radial shape.
Frequently Asked Questions
How do I prevent a heavy tree topper from leaning or falling over?
To stabilize a heavy topper, check the strength of the top vertical branch. You can fold the branch in half to create a thicker, sturdier base, or use a green garden stake or wooden dowel zip-tied to the main trunk to provide extra vertical support for the weight of the item.
What is the best way to hide the wires or mounting hardware?
Use green floral wire, pipe cleaners, or zip ties that match the color of the tree's needles to blend in with the foliage. You can also nestle extra sprigs of faux greenery, berry picks, or small ribbon loops around the base of the topper to cover any visible clips or cords.
How do I choose the right size topper for my tree?
Balance is the most important factor when selecting a topper. For a standard seven-foot tree, a topper that is roughly eight to ten inches wide or tall usually maintains a good scale without looking too small or making the tree appear top-heavy.
How can I safely install a topper on a tall tree?
Always use a stable stepladder rather than standing on chairs or sofas. It is often easier to have a second person stand on the floor to hand you the topper and verify that it is centered and straight while you are at the top of the ladder.
Can I use non-traditional items like hats or floral bouquets as toppers?
Yes, many homeowners use lightweight items like Santa hats, silk poinsettias, or decorative picks to create a custom look. Just ensure the items are securely fastened with floral wire so they do not shift when the tree is moved or bumped.