60 Christmas Window Decorating Ideas

This post may contain affiliate links: full affiliate disclosure.
Decorating windows creates a festive look that can be enjoyed from both the inside and the outside of the home. Focusing on scale and secure hanging methods ensures the decor stays in place through the winter weather.
Simple additions like greenery and ribbon can transform a standard window into a holiday focal point without much effort.
CLASSIC CHRISTMAS WINDOW DECORATING IDEAS
1. Centered Evergreen Wreath With Velvet Ribbon
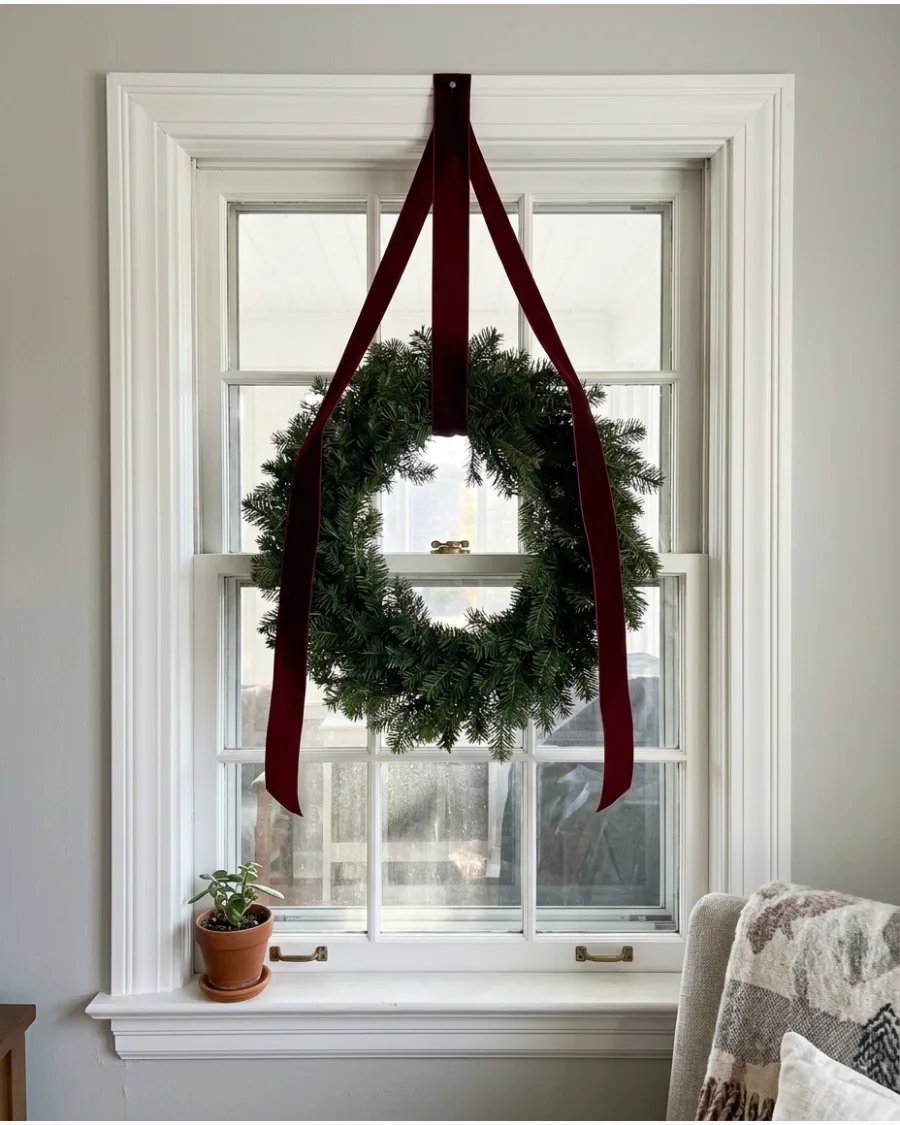
Hanging a single wreath in the center of the glass creates a clear focal point that looks great from the sidewalk. Use a long velvet ribbon in red or burgundy to add a soft texture against the hard glass surface.
Secure the ribbon to the top of the window frame with a small tack or a removable hook to keep it perfectly centered. A thick, high-quality ribbon makes even a basic wreath look expensive.
- $15-$40 per window depending on wreath size.
- Use suction cups or loop ribbon over the top sash for support.
- Choose weather-resistant velvet for exterior-facing windows.
Quick win: Loop the ribbon over the top of the window sash and close the window on it to lock it in place without using nails.
2. Matching Wreaths Across Multiple Windows
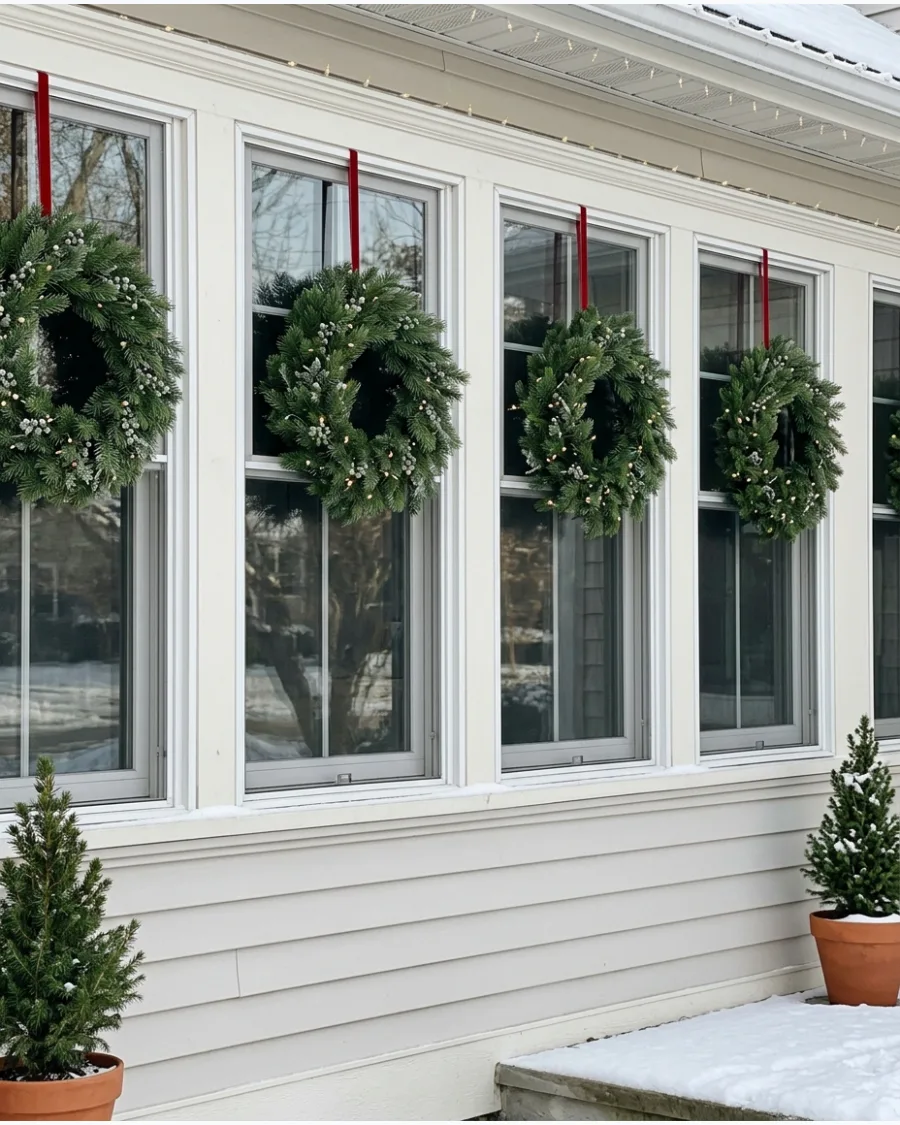
Using the same wreath design across a row of windows creates a clean and intentional look for the front of the home. Keeping the height consistent is the secret to making the display look professional rather than cluttered.
Measure from the top of the window frame to the center of the wreath on every window to ensure they all line up perfectly. This repetition works best when the wreaths are simple and not overly decorated.
- $50-$150 for a set of three wreaths.
- Measure twice to ensure uniform hanging height across the facade.
- Swap ribbons annually to change the color scheme easily.
Best shortcut: Use a laser level from the ground to check that all wreaths are sitting at the exact same horizontal line.
3. Christmas Garland Framing the Entire Window
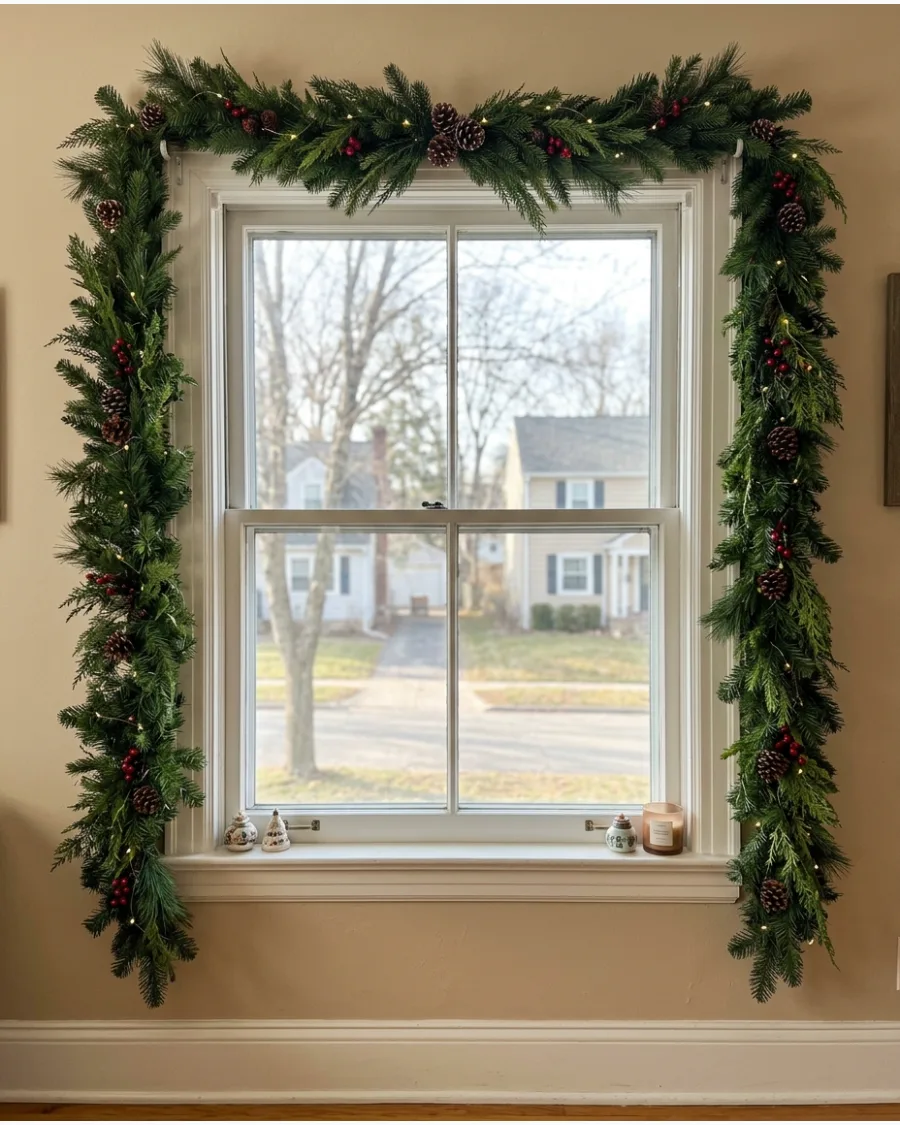
Outline the top and sides of the window with thick evergreen garland to create a lush, built-in look. Adding small pinecones or berries gives the greenery depth and helps it stand out against the house trim.
Use command hooks or small finishing nails on the outer edge of the casing to support the weight of heavy garland. This method works well for large windows that need a substantial amount of decor to look finished.
- $30-$80 depending on garland thickness and length.
- Use heavy-duty outdoor hooks for weight support on exterior trim.
- Add battery-operated fairy lights for nighttime visibility.
Most people skip this: Fluff the garland branches outward and toward the center of the window to hide the wire spine and any hanging hooks.
4. Draped Garland Across the Top of the Window
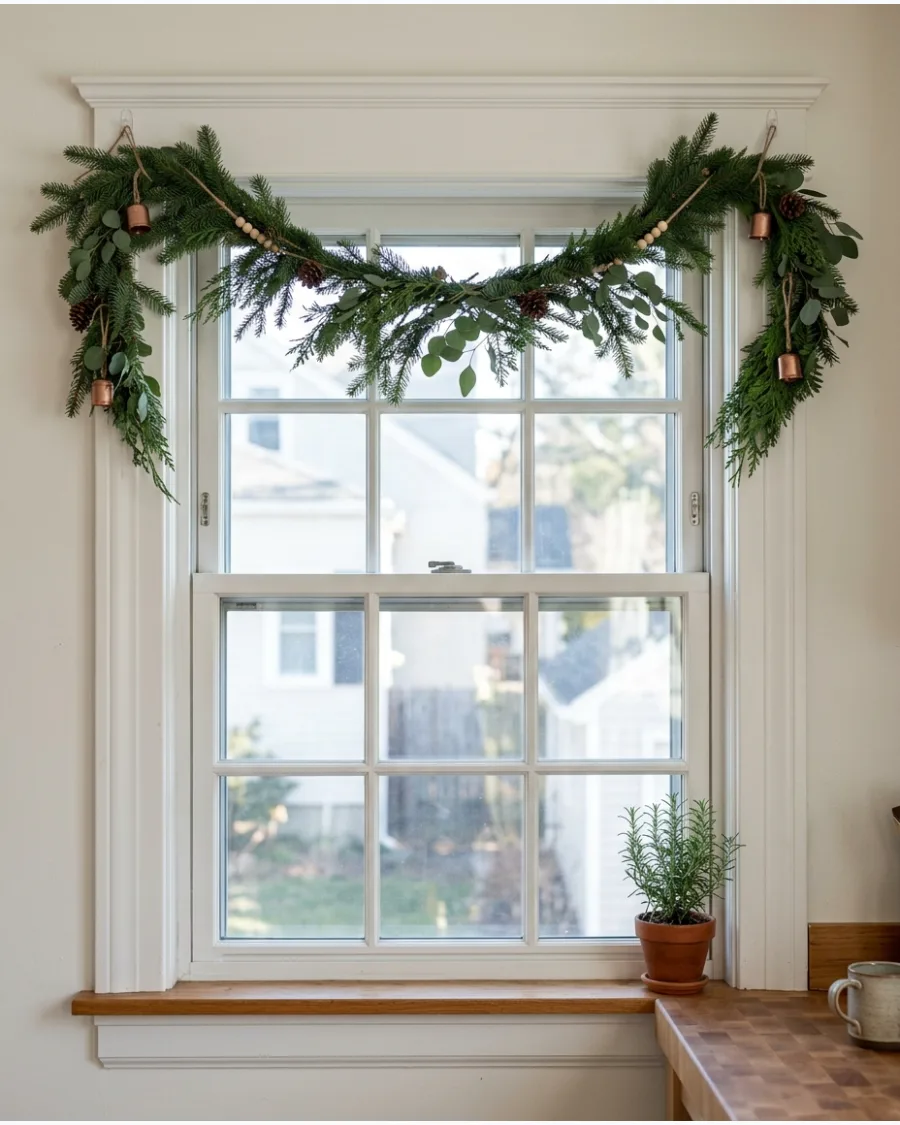
Swagging a garland across the upper frame creates a soft, elegant look that does not block the view. Let the ends of the greenery hang down about a foot on each side to frame the top of the glass.
Drape the garland loosely in the center so it dips slightly below the top of the window frame for a relaxed feel. This is an excellent option for kitchens or dining rooms where natural light is a priority.
- $20-$50 for a single window treatment.
- Requires three hooks: one at each top corner and one in the center.
- Works best with flexible greenery like cedar or cypress.
Quick win: Use thin floral wire to attach the garland to the hooks so it stays in the dip shape even if a breeze catches it.
5. Evergreen Window Garland With Red Bows
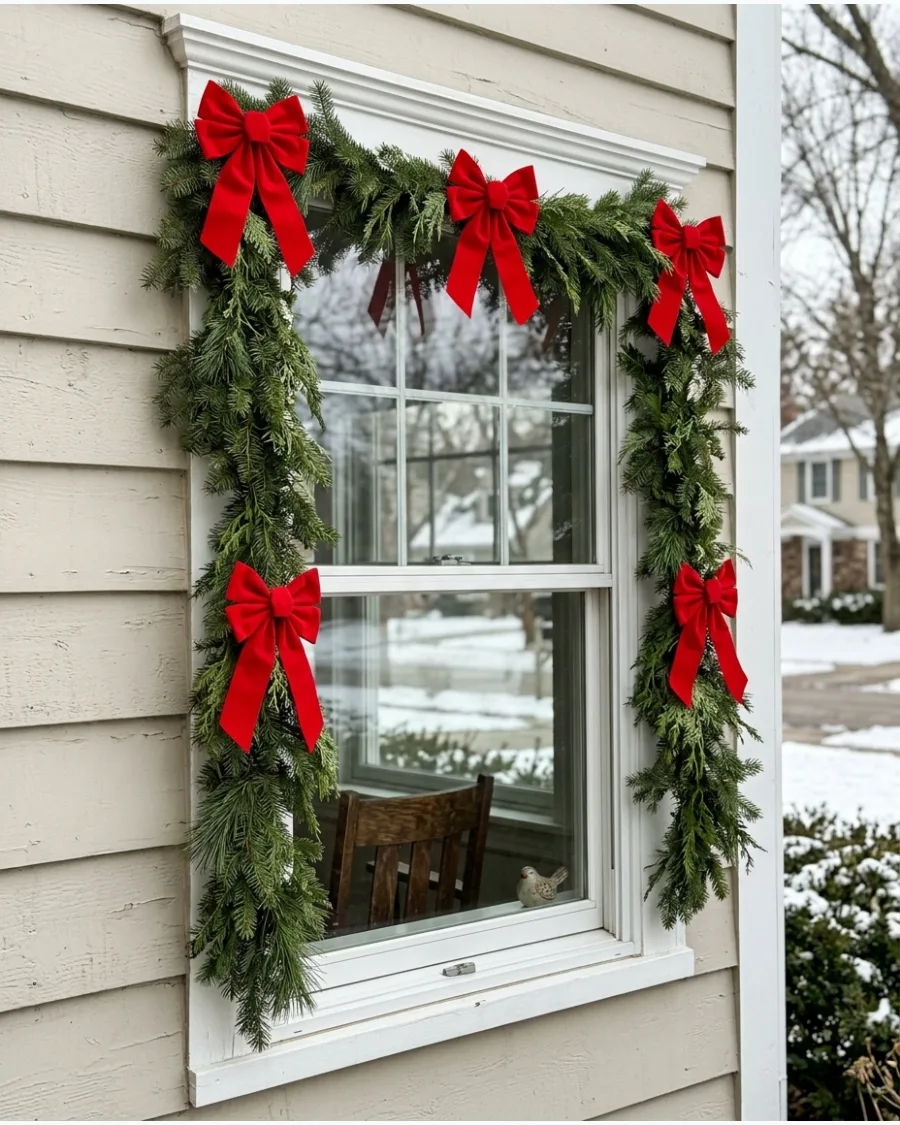
Framing a window with pine or cedar garland and adding structured red bows provides a very traditional holiday aesthetic. Place the bows at the corners or spaced evenly along the top to break up the solid green color.
Choose bows with wire-edged ribbon so you can shape the loops and keep them from drooping over time. The contrast of the bright red against the dark green is the most classic Christmas color combination.
- $25-$60 for garland and bows.
- Use pre-made bows to save time on assembly.
- Space bows evenly using a ruler for a balanced, symmetrical look.
Best shortcut: Use pipe cleaners in a matching green color to twist the bows onto the garland quickly and securely.
6. Oversized Gingham Bow Above the Window
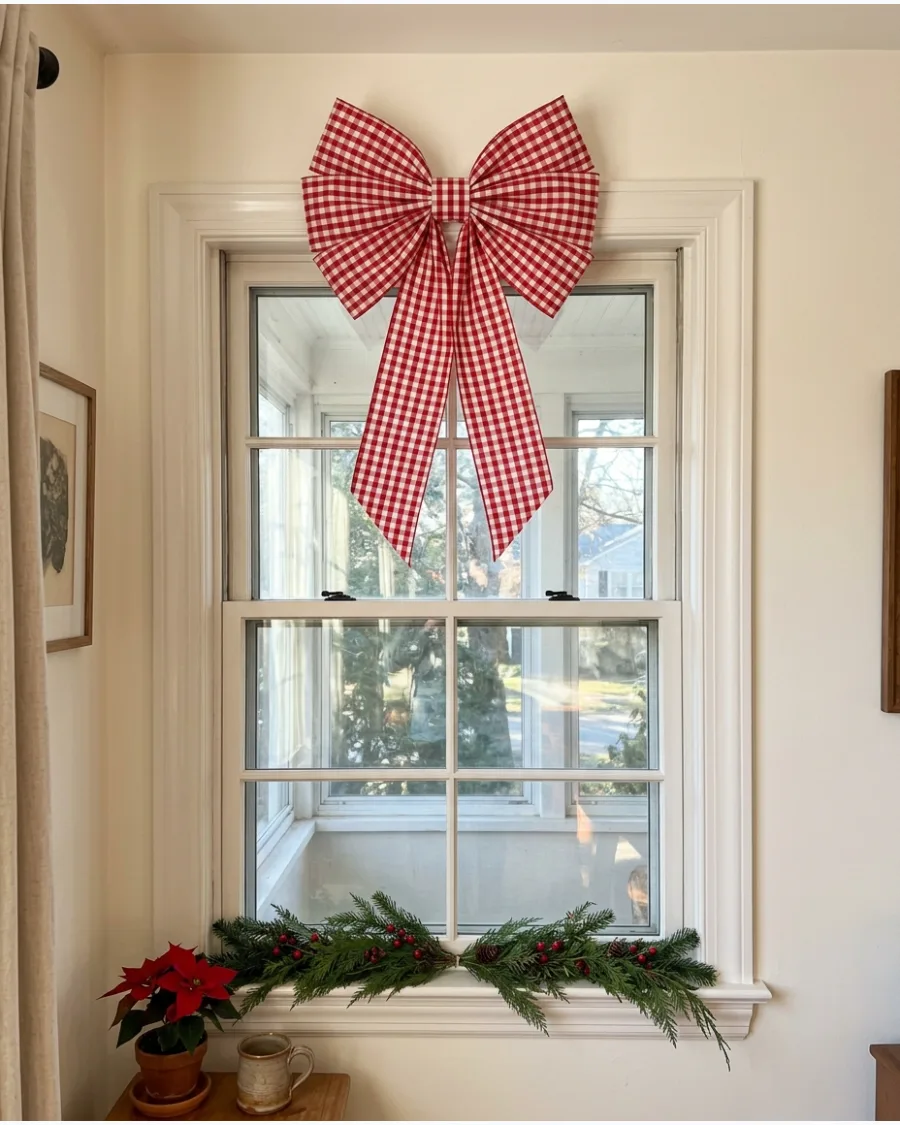
A single large gingham bow at the top center of a window makes a bold statement without needing any other greenery. This clean look works perfectly for modern or transitional homes that prefer a simple approach.
Select a ribbon width of at least four inches to ensure the bow has enough scale to be seen from the street. Gingham patterns in burgundy or forest green offer a fresh twist on standard solid colors.
- $10-$20 for high-quality ribbon.
- Use fabric ribbon for a better drape than plastic options.
- Secure with a single heavy-duty hook directly above the window trim.
Most people skip this: Cut the tails of the ribbon at a sharp angle or into a V shape to give the bow a finished, professional look.
7. Simple Boxwood Wreath Christmas Windows
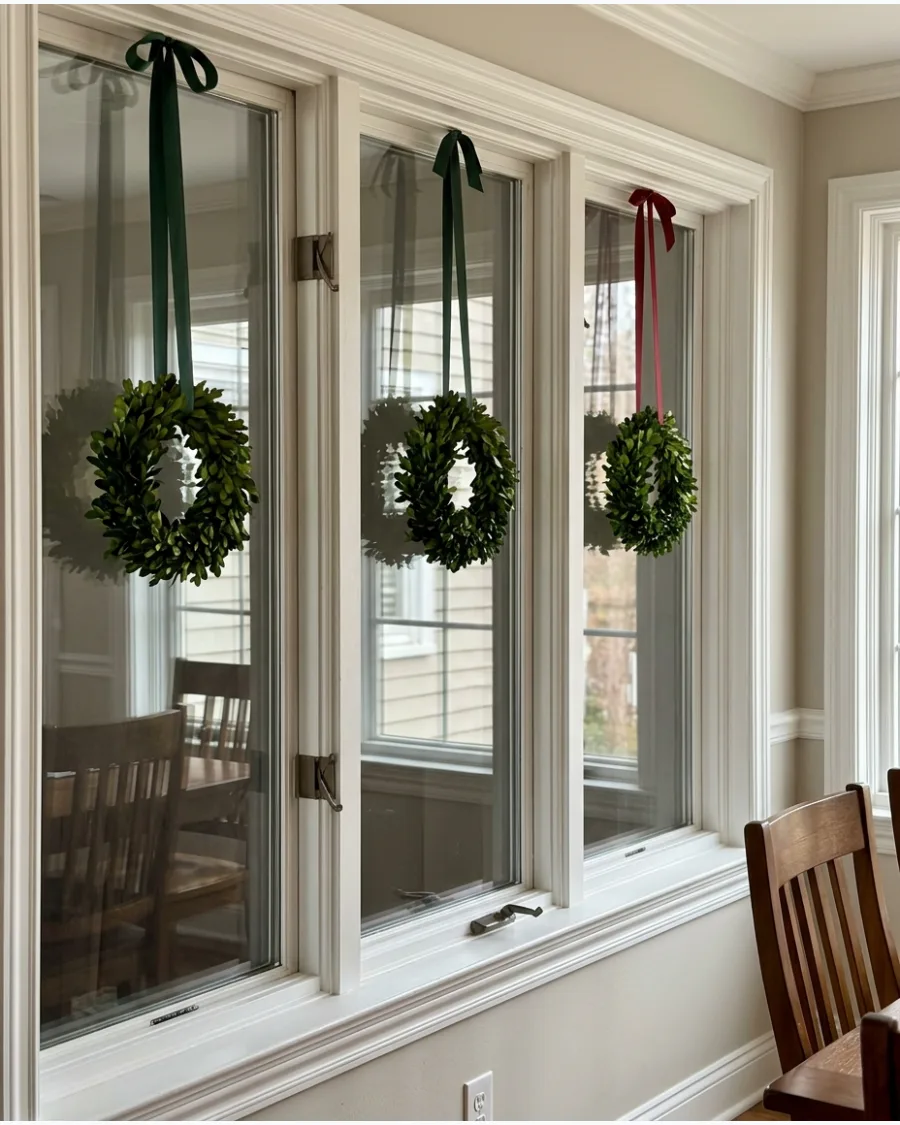
Small boxwood wreaths offer a manicured and tidy look that fits well in formal or transitional rooms. Hanging them from long, thin ribbons inside the window keeps the decor protected from the elements while looking beautiful from both sides.
Match the ribbon color to your interior accent colors for a cohesive design that feels like part of the room. These wreaths are often lighter than pine, making them easier to hang with simple adhesive hooks.
- $15-$30 per wreath.
- Use preserved boxwood for a realistic look that lasts multiple seasons.
- Hang inside the glass to keep the leaves clean and dust-free.
Quick win: Spritz preserved boxwood with water once every two weeks to keep the leaves from becoming brittle or turning brown.
8. Frosted Evergreen Wreath in the Window
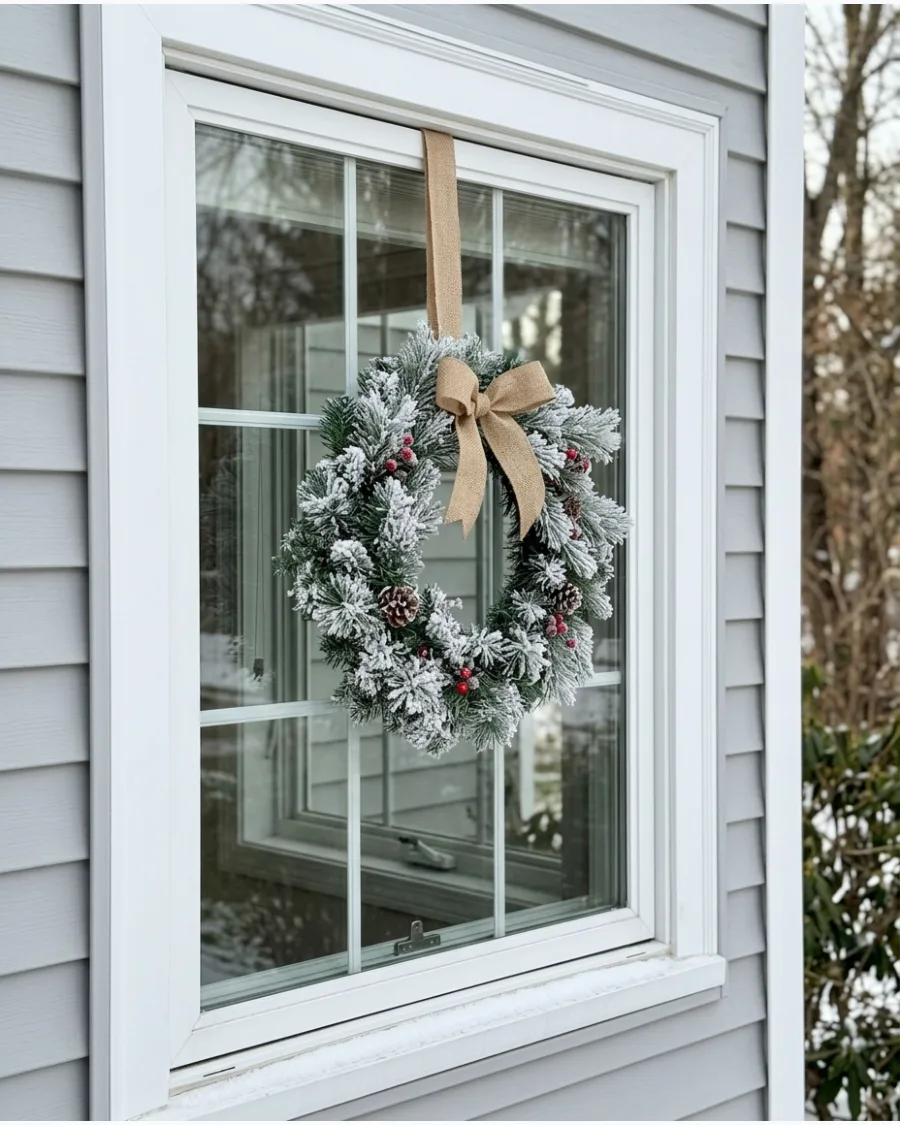
A lightly flocked or frosted wreath brings a wintery, snowy feel to the window even if there is no snow outside. The white tips on the greenery help the wreath stand out against dark window panes during the evening.
Pair a frosted wreath with a neutral ribbon like silver or white to keep the color palette calm and sophisticated. This style is ideal for those who prefer a winter theme over a traditional red-and-green palette.
- $20-$45 per wreath.
- Choose lightly flocked options to avoid excessive shedding inside the house.
- Use a clear suction cup for an invisible hanging method on the glass.
Best shortcut: If the flocking is shedding, spray the wreath with a light coat of hairspray to help the snow stay in place.
9. Cedar Garland With Brass Bells
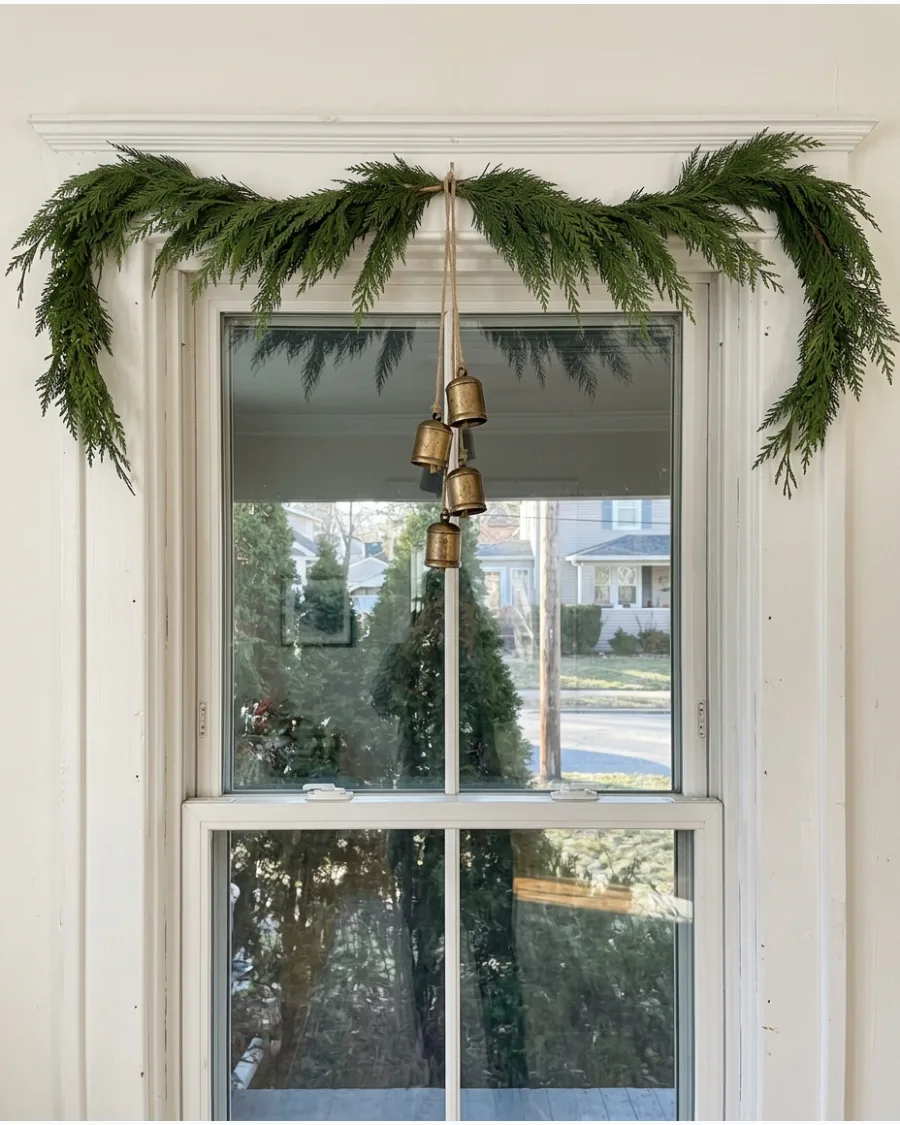
Drape a soft cedar garland across the top of the window and hang a cluster of vintage-style brass bells in the center. The bells add a metallic shine and a subtle sound when the window is opened or closed.
Tie the bells at varying lengths with twine or thin ribbon to create a more natural, gathered appearance. This look is refined and works well in rooms with existing gold or brass hardware.
- $35-$70 for garland and a set of bells.
- Use high-quality faux cedar for the best drape and realistic texture.
- Cluster 3 to 5 bells together for maximum visual impact.
Most people skip this: Scuff the bells slightly with fine sandpaper if they are too shiny to give them a more authentic, aged brass look.
10. Pine Garland With Pinecones and Berries
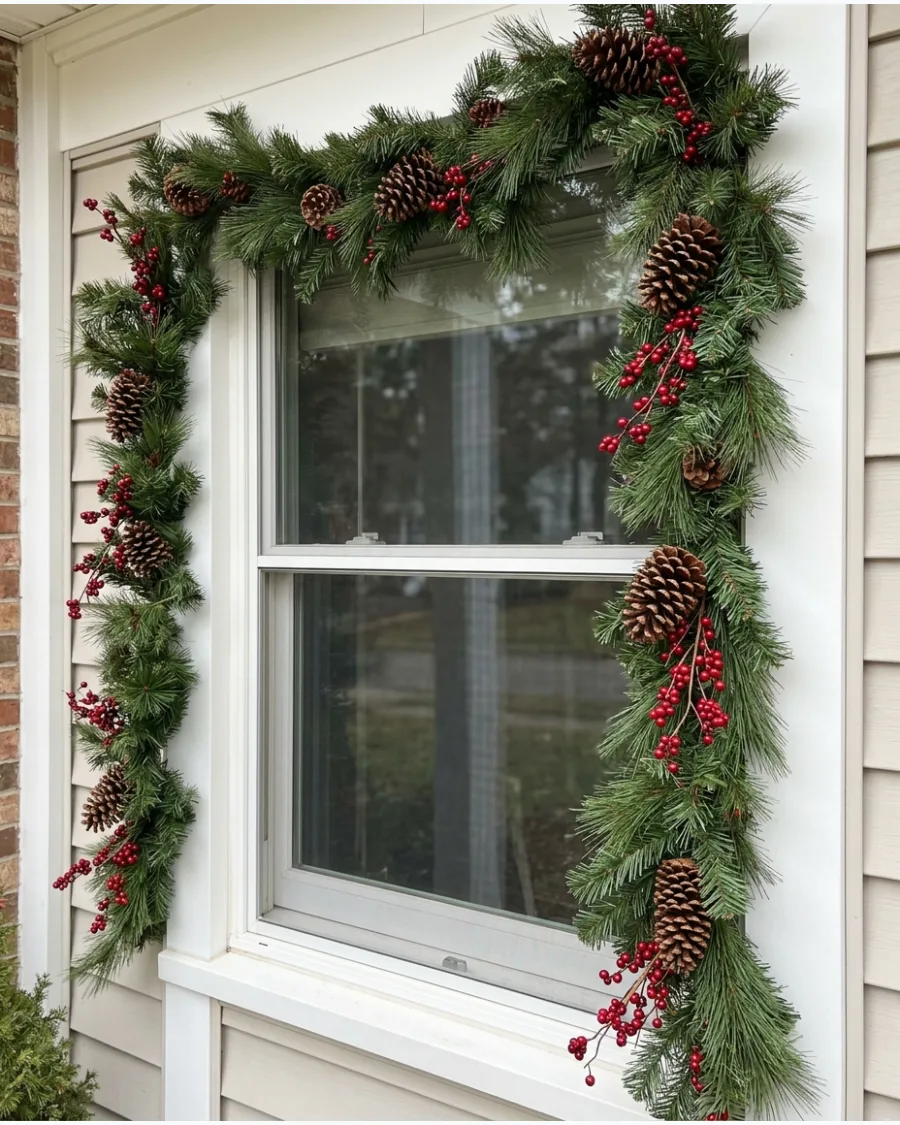
Combining pinecones and red berries with standard pine garland creates a full, woodland-inspired frame for your windows. The different textures and colors make the window look decorated without needing any extra ornaments.
Intertwine the berry stems deeply into the pine branches so they look like they are growing naturally from the garland. This is a durable option that holds up well against wind and cold on the exterior of the house.
- $30-$60 per window.
- Buy garland with pinecones already attached to save time on styling.
- Use floral wire to add extra berry picks if the garland looks thin.
Quick win: Use varying sizes of pinecones to make the garland look more realistic and less like a repeating factory pattern.
CHRISTMAS WINDOW LIGHTING IDEAS
11. Warm White Fairy Lights Around the Window Frame
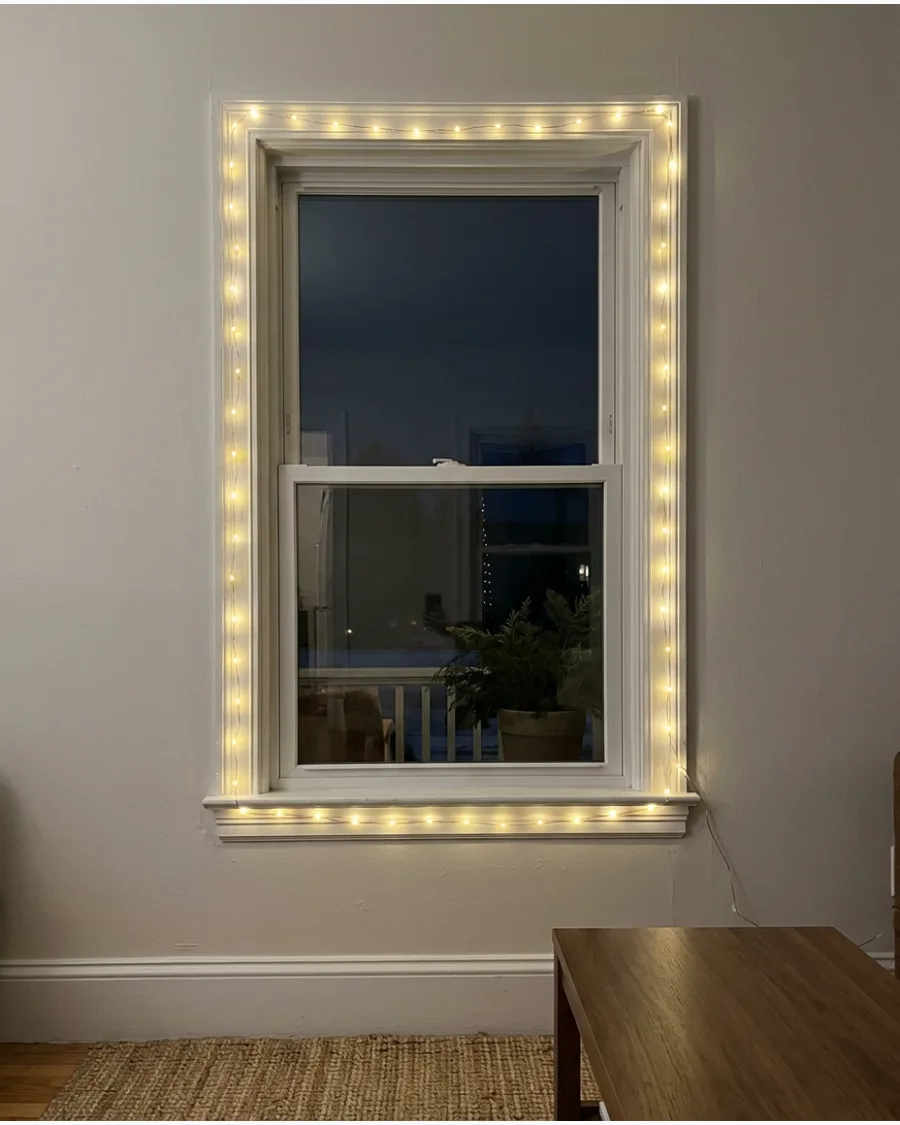
Outline the inside of the window with warm white micro lights to define the architecture. Keep the wire discreet so the glowing border becomes the main feature after dark.
Use clear adhesive clips to secure the wire tightly against the casing for a professional finish. Expert opinion: Stringing lights around the frame is the best way to highlight the window without blocking your view of the outdoors.
- $10 to $20 at local hardware stores.
- Place a clip every 6 inches to prevent the wire from sagging.
- Works for renters since adhesive clips remove without damaging the paint.
Quick win: Match the wire color to your window trim—white wire for white trim, copper or green for wood.
Home Decor
12. Glowing Graduated Window Tapers
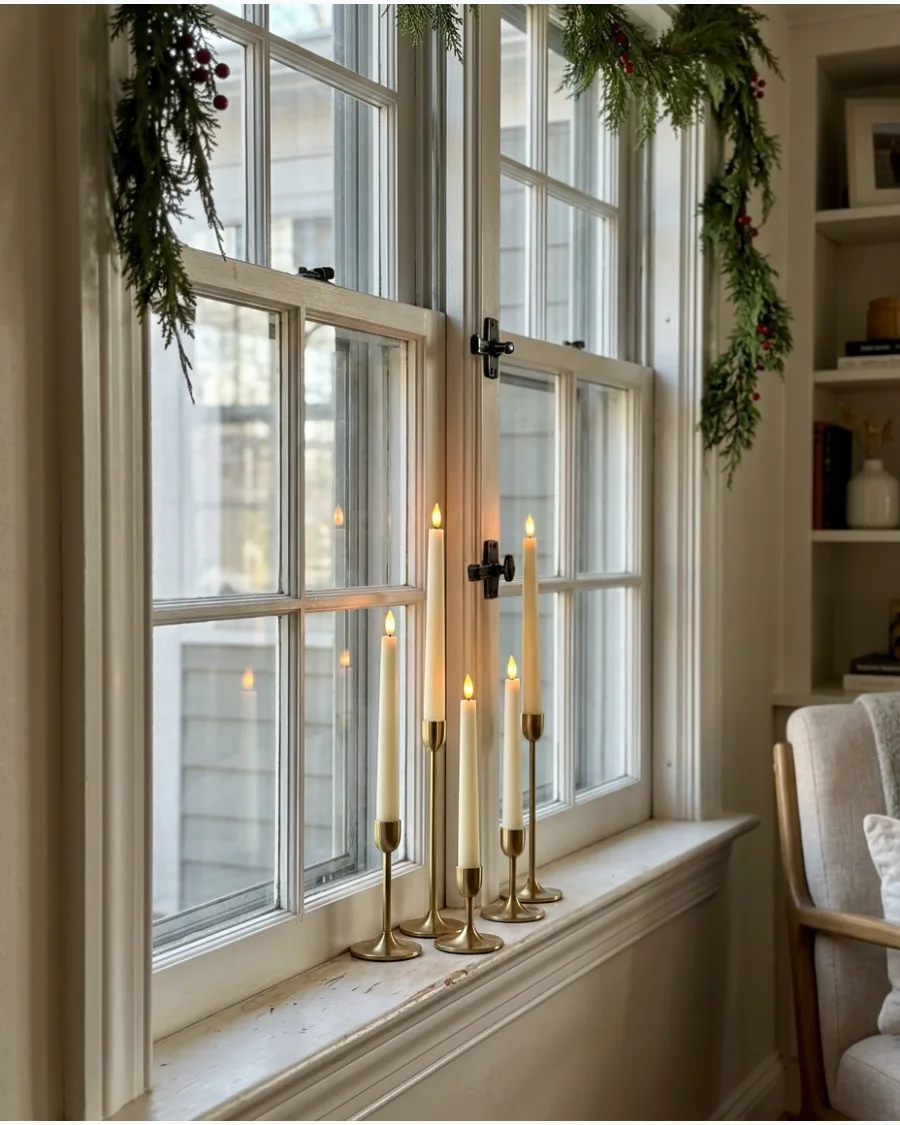
Arranging flameless tapers of varying heights creates a dynamic, architectural silhouette that captures attention from both the street and the living room. This layering technique adds depth to a flat window pane while maintaining a clean, modern aesthetic.
Stagger three to five candles in a cluster on each sill to mimic the natural movement of a real flame. While single candles are traditional, grouping them in odd numbers provides a high-end, intentional finish that feels significantly warmer.
- Purchase battery-operated tapers with built-in timers in late November to ensure the full season of evening light.
- Measure the depth of the windowsill to ensure the candle bases sit securely with at least an inch of clearance from the glass.
- Swap black holders for brass or natural wood to coordinate with the existing hardware in the room.
Quick win: Set the automatic timers at dusk so the windows illuminate simultaneously every evening without requiring manual adjustment.
Holiday Decor
13. Uniform Candlelit Window Display
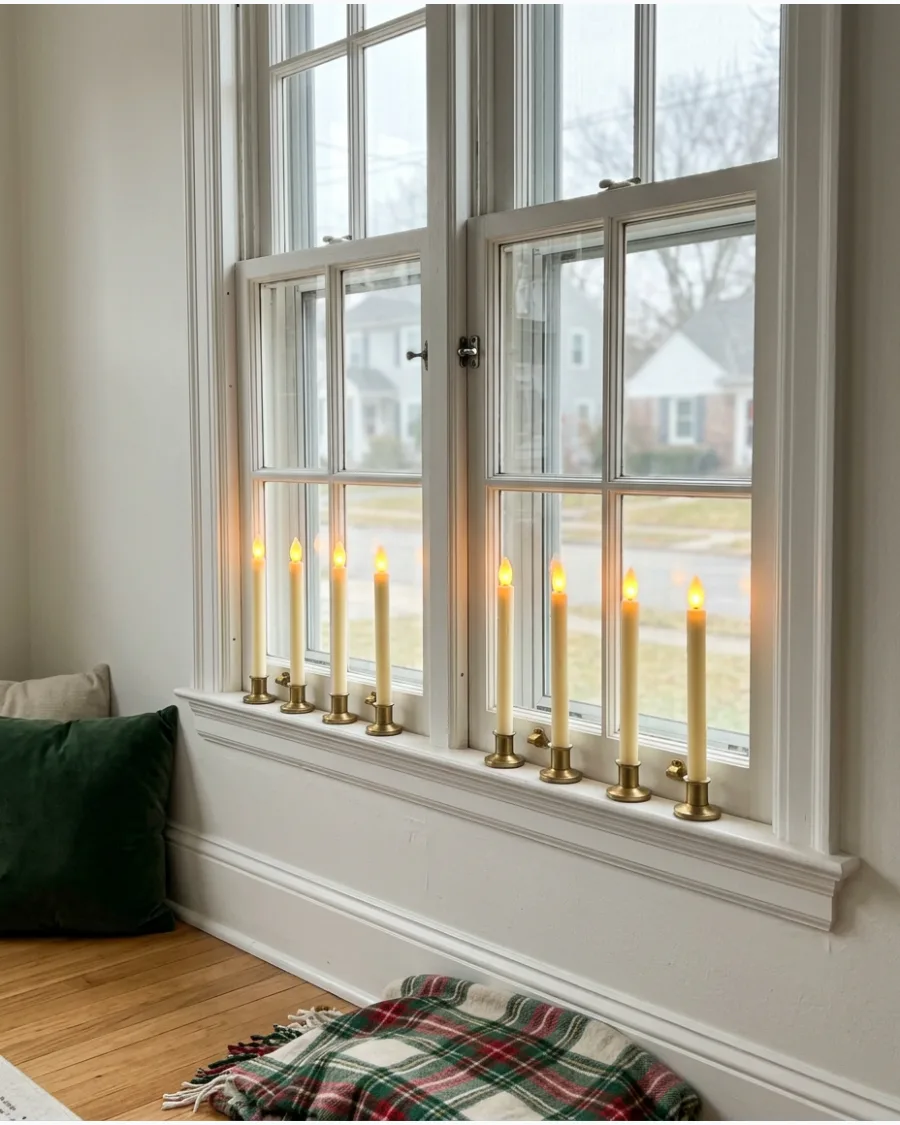
A uniform candlelit display creates a rhythmic, nostalgic glow that defines the home's exterior silhouette during winter nights. Using identical cordless LED tapers across every street-facing window provides a cohesive look without the clutter of mismatched decorations.
Measure the window sill depth before purchasing to ensure the candle bases sit securely without overhang. While many choose flickering bulbs, a steady, warm white light often looks more sophisticated and high-end from a distance. This approach works best when candles are set to a synchronized timer for a seamless evening ritual.
- Purchase bulk packs of battery-operated LED tapers in early November to ensure matching sets for every floor.
- Clean the window glass thoroughly and place candles exactly in the center of each pane for visual symmetry.
- Swap gold bases for matte black or silver to better match the existing hardware found in each room.
Quick win: Use a small piece of clear museum wax under the candle base to prevent tipping if curtains are accidentally moved.
CHRISTMAS WINDOW LIGHTING IDEAS
14. Hanging Light-Up Paper Stars
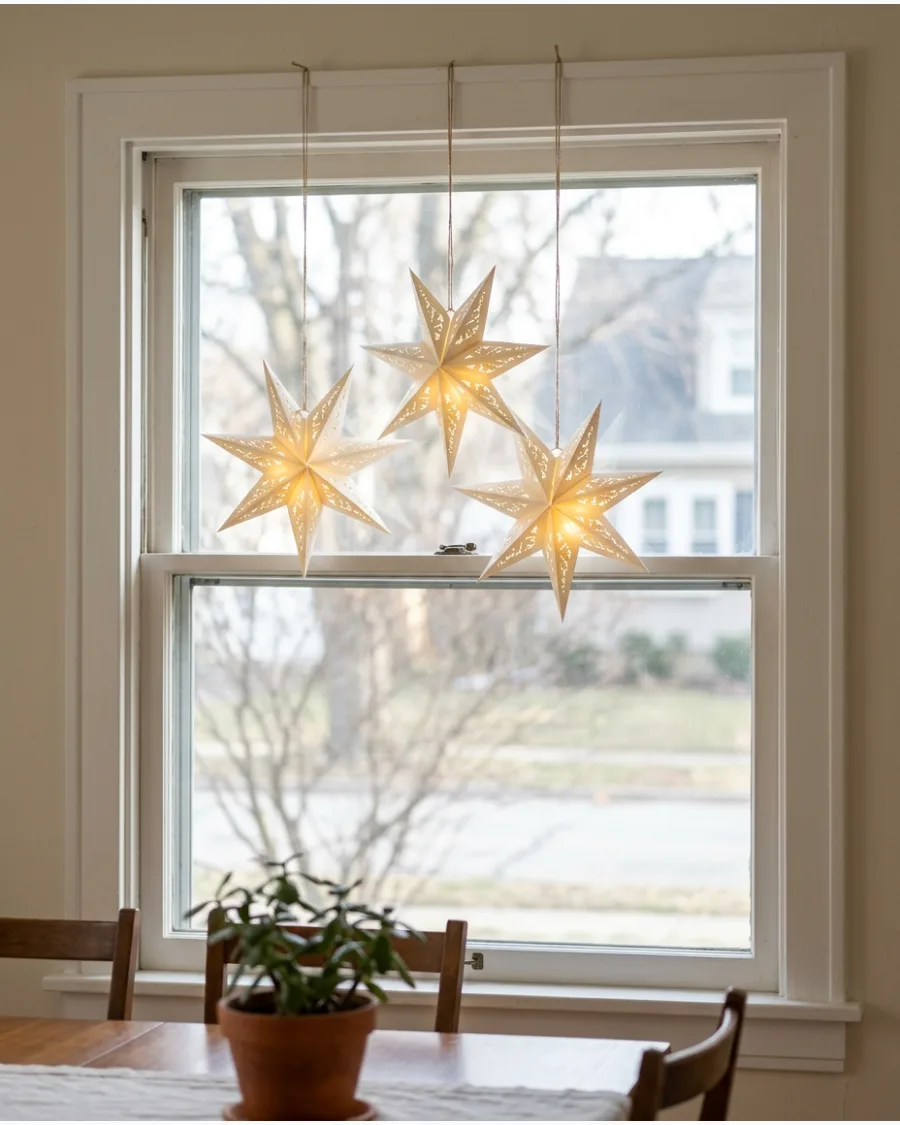
Suspend one or several illuminated paper stars in front of the glass at different heights for a Scandinavian feel. Choose warm white light to keep the atmosphere cozy rather than harsh.
Hang the stars using clear fishing line and a small hook in the upper window casing. Expert opinion: Large paper stars look best when they are the only decoration in the window to maintain a clean aesthetic.
- Budget around $25 per star including the light kit.
- Requires a nearby outlet; use a thin white extension cord to blend into the wall.
- Fold the stars flat for easy, damage-free storage after the holidays.
Quick win: Use a battery-powered LED puck light inside the star if you don't want to deal with hanging cords.
15. Cascading Fairy Light Curtain
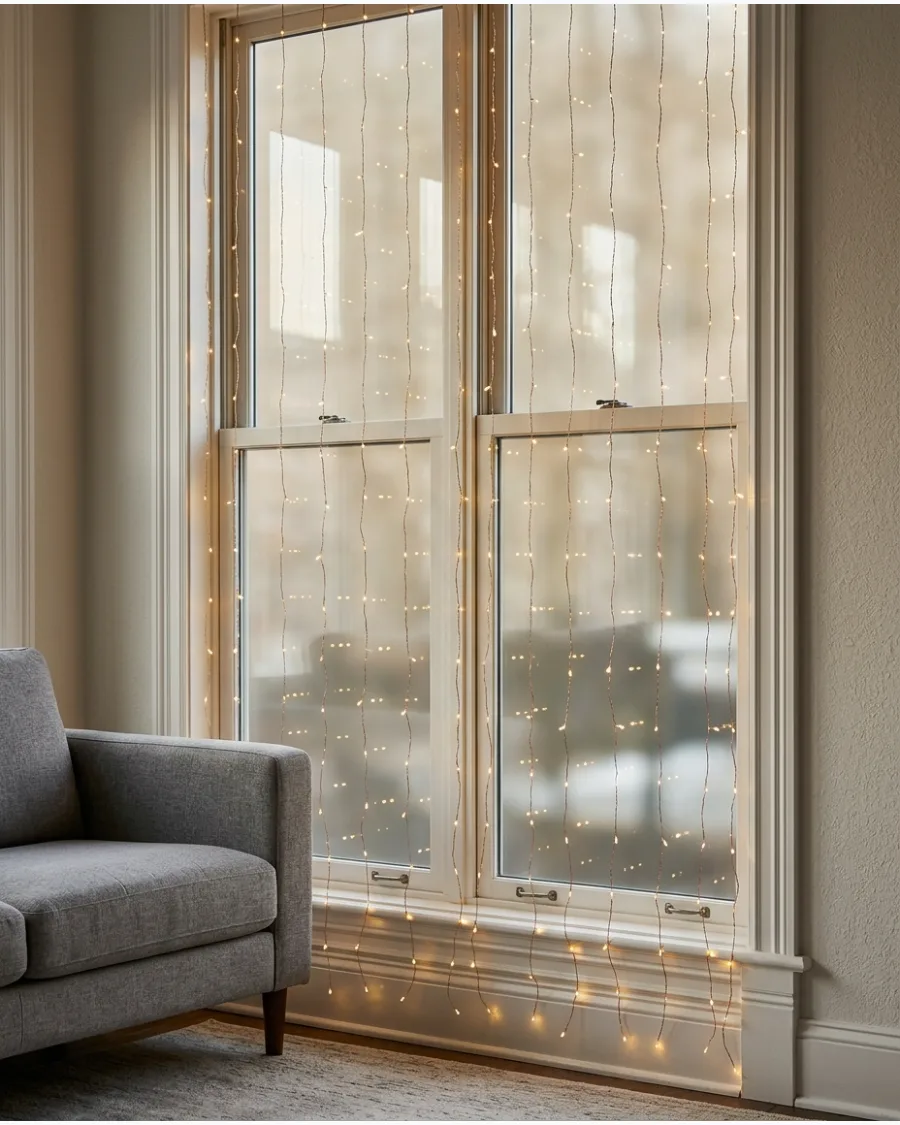
Hang delicate vertical strands of warm lights from the top of a large window to create a glowing curtain effect. This allows the glass and outdoor view to remain visible while adding a soft, magical layer to the room.
Drape the main horizontal wire behind the curtain rod to hide the bulk of the strand. Expert opinion: Fairy light curtains work best on large picture windows where they won't interfere with daily blind or shutter use.
- Costs between $20 and $35 depending on the width of the curtain.
- Plug the lights into a smart outlet for easy voice or phone control.
- Avoid tangles by hanging the top wire before unraveling the vertical strands.
Best shortcut: Use a few small pieces of clear tape at the bottom of each strand to keep them from blowing around when the HVAC kicks on.
16. Lighted Christmas Wreath Window Centerpiece
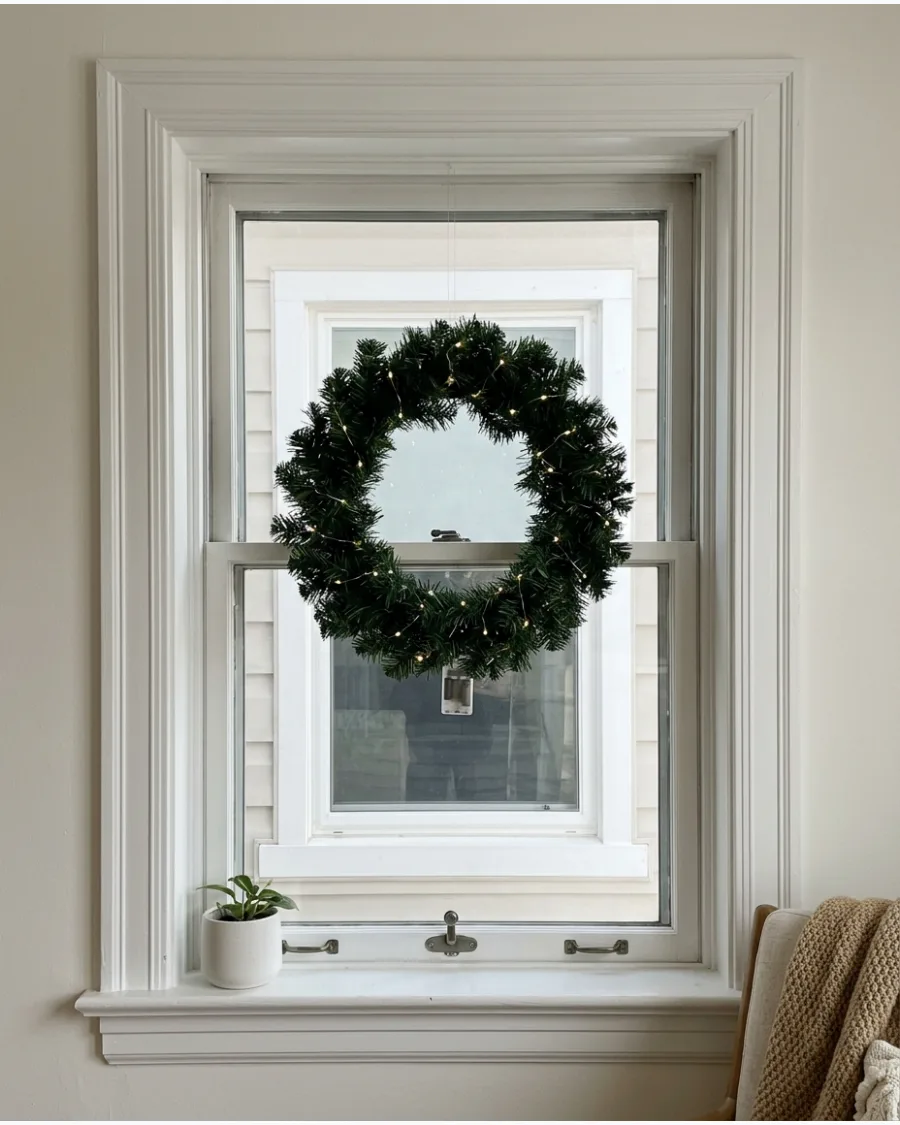
Wrap a simple wreath with tiny battery-powered lights and hang it against the center of the glass to ensure it is visible after sunset. The lights draw the eye to the greenery and provide a focal point for the entire window.
Tuck the battery pack into the foliage at the bottom of the wreath so it stays hidden from view. Expert opinion: Adding your own lights allows you to control the brightness and spacing better than pre-lit versions.
- Allow $40 for a high-quality wreath and a set of outdoor-rated micro lights.
- Use a heavy-duty clear suction hook to avoid obscuring the view with bulky hangers.
- Check batteries every two weeks if you don't use a timer function.
Most people skip this: Face the lights toward the glass to make the wreath pop from the street, or toward the room to enjoy the glow inside.
17. Glowing Christmas Village on the Windowsill
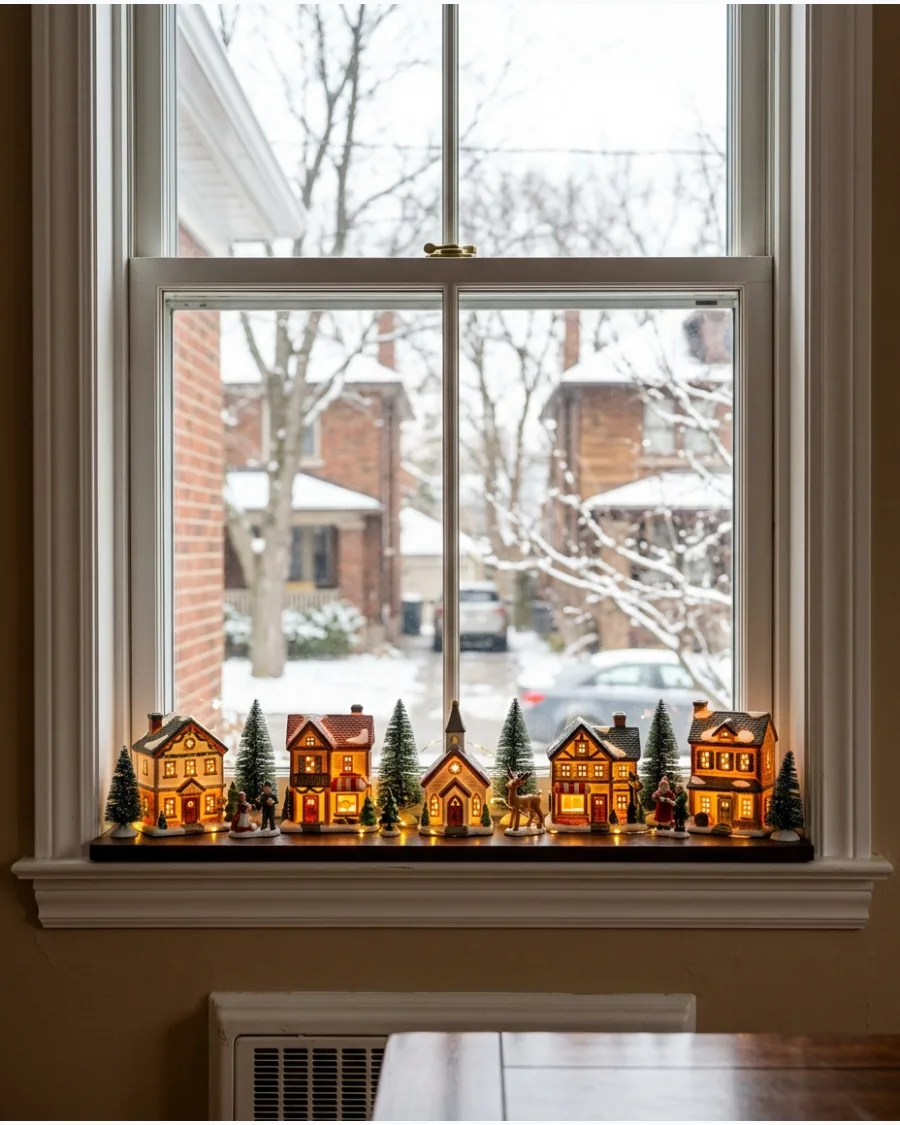
Arrange illuminated ceramic or wooden houses across the sill to create a miniature scene that can be enjoyed from both sides of the glass. The glowing windows of the houses provide a charming, nostalgic feel.
Place a thin layer of batting or faux snow underneath the houses to hide the power cords. Expert opinion: Keeping the scale of the houses consistent makes the scene look like a deliberate neighborhood rather than a random collection.
- Individual houses typically range from $15 to $50 each.
- Use battery-operated tea lights inside the houses for a cordless, clutter-free look.
- This setup is ideal for deep kitchen windows or bay windows with extra surface area.
Quick win: Add a few miniature evergreen trees between the houses to add height and texture to the display.
18. Star-Shaped Christmas Window Lights
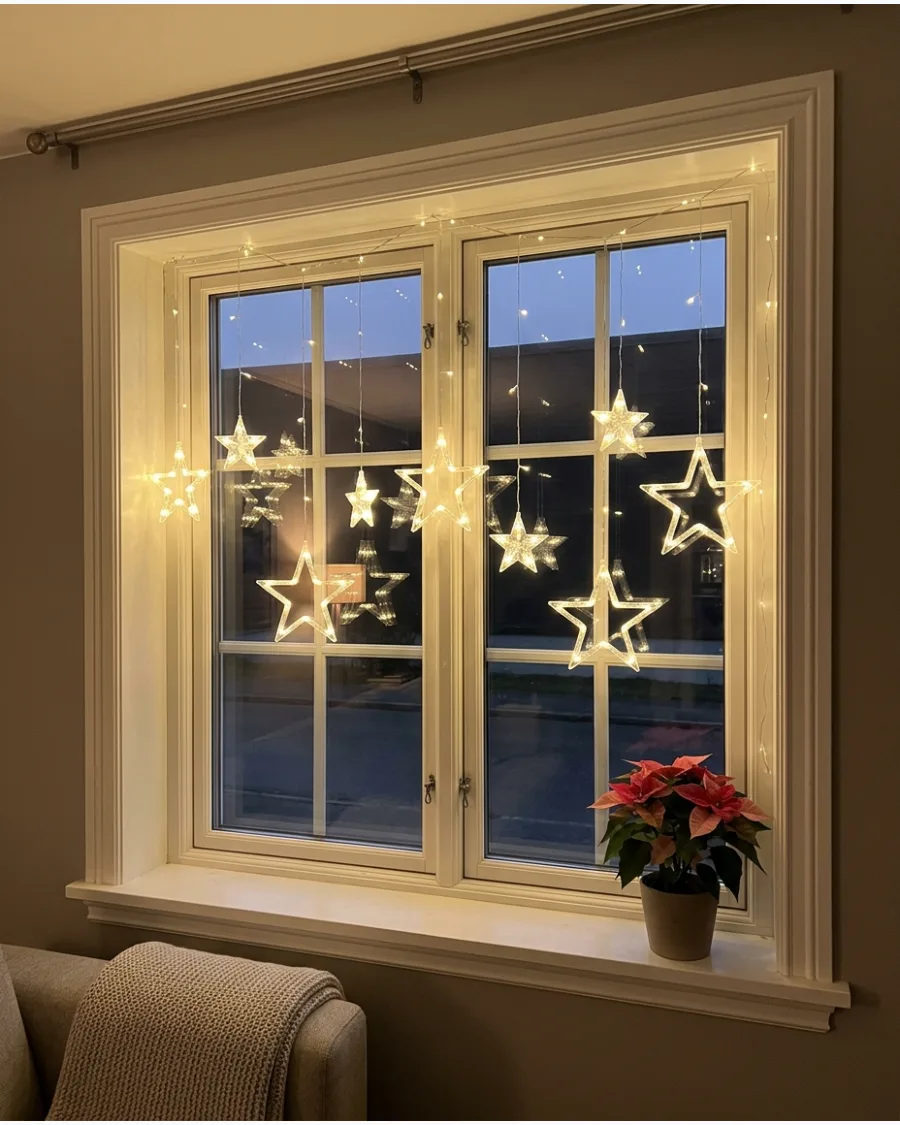
Hang illuminated star outlines across a wide window using different sizes to create a simple, high-impact nighttime display. The geometric shapes provide a modern alternative to traditional greenery.
Use small suction cups with hooks to attach the stars directly to the glass panes. Expert opinion: Geometric shapes like stars look modern and crisp, making them perfect for homes with a minimalist style.
- A multi-pack of stars usually costs around $30.
- Space the stars at uneven heights for a more natural, celestial look.
- Choose battery packs with 6-hour timers to save energy and effort.
Best shortcut: Clean the window glass with rubbing alcohol before applying suction cups to ensure they stay stuck all season.
19. Lanterns and Fairy Lights on the Windowsill
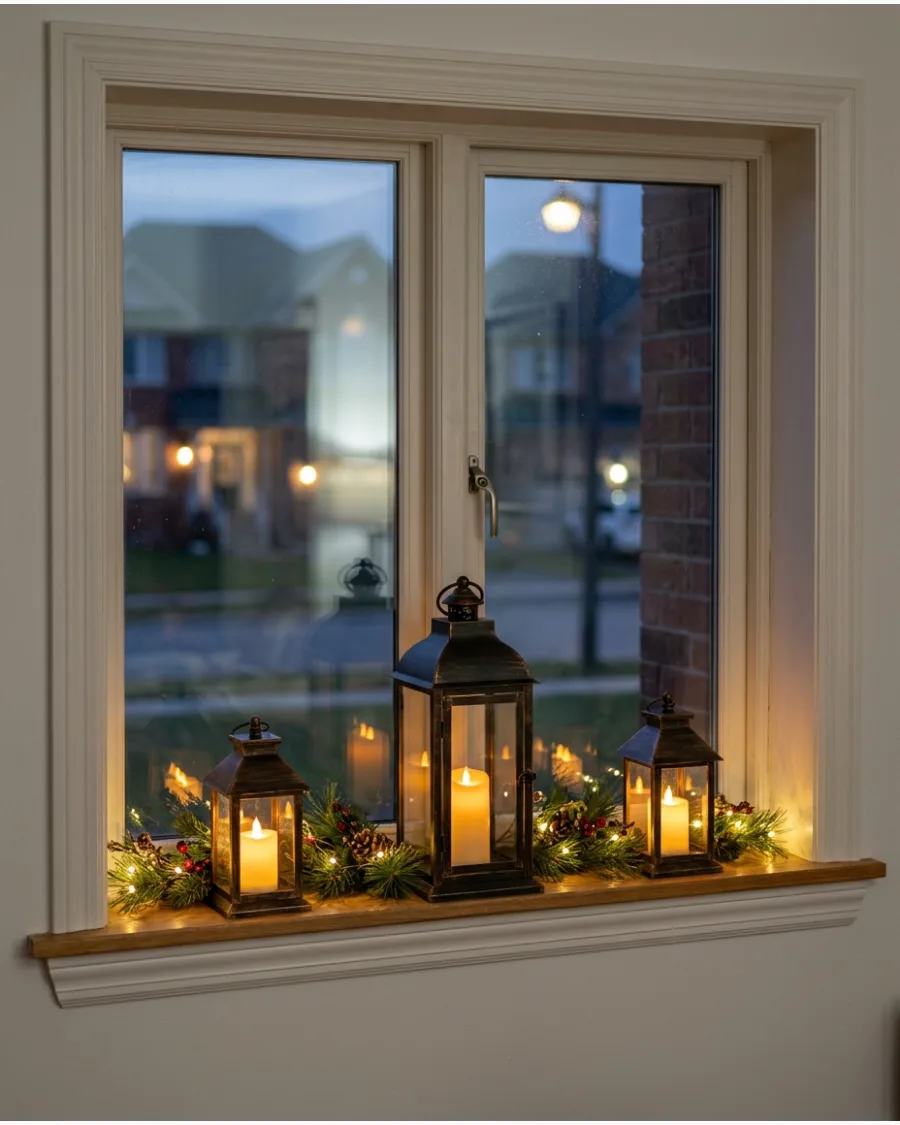
Place two or three lanterns along the sill and surround them with micro lights for a cozy evening glow. The lanterns provide a sturdy visual base that balances out the airy, sparkling look of the fairy lights.
Fill the lanterns with fairy lights instead of candles for a more whimsical effect. Expert opinion: Lanterns are a great way to add height and structure to a windowsill display without blocking too much light.
- Budget $25 per lantern plus $10 for fairy light strands.
- Use lanterns of varying sizes to create a balanced, asymmetrical grouping.
- Works well on wider windowsills or in deep window nooks.
Quick win: Use lanterns with glass panes to double the reflection and sparkle of the internal lights.
20. Warm Lights Hidden Inside Window Garland
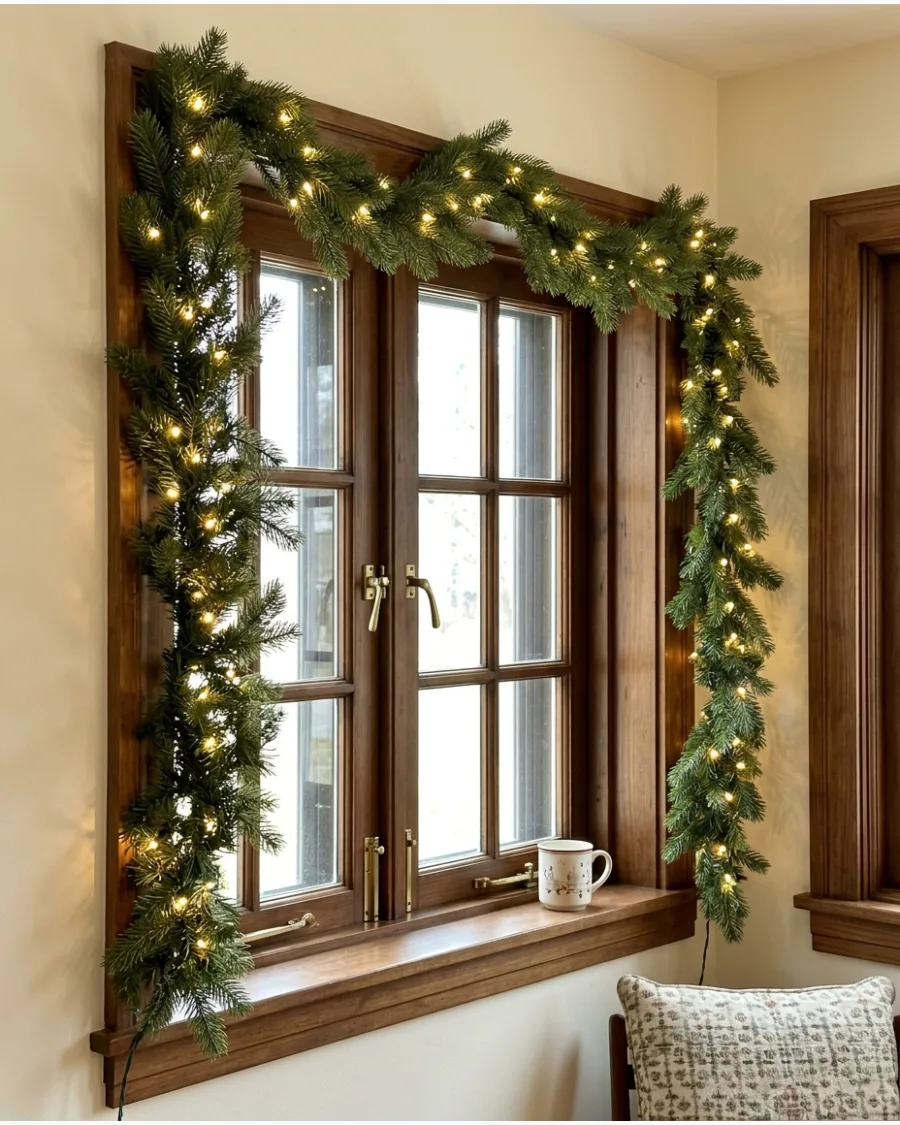
Weave miniature lights deep inside evergreen garland around the window frame for a sophisticated 'inner glow.' Keeping the bulbs partially hidden makes the greenery appear to glow naturally rather than looking covered in wires. Bury the green wire of the lights right against the center spine of the garland. Expert opinion: This technique makes inexpensive faux greenery look much more high-end and realistic after dark.
- Standard 50-count light strands cost about $15.
- Weave the lights through the garland on the floor before hanging it up.
- Use green florist wire to secure the light strand so it doesn't shift over time.
Most people skip this: Use 'warm white' LEDs rather than 'cool white' to mimic the traditional look of incandescent bulbs without the heat.
HANGING CHRISTMAS WINDOW DECORATIONS
21. Christmas Ornaments Hanging at Different Heights
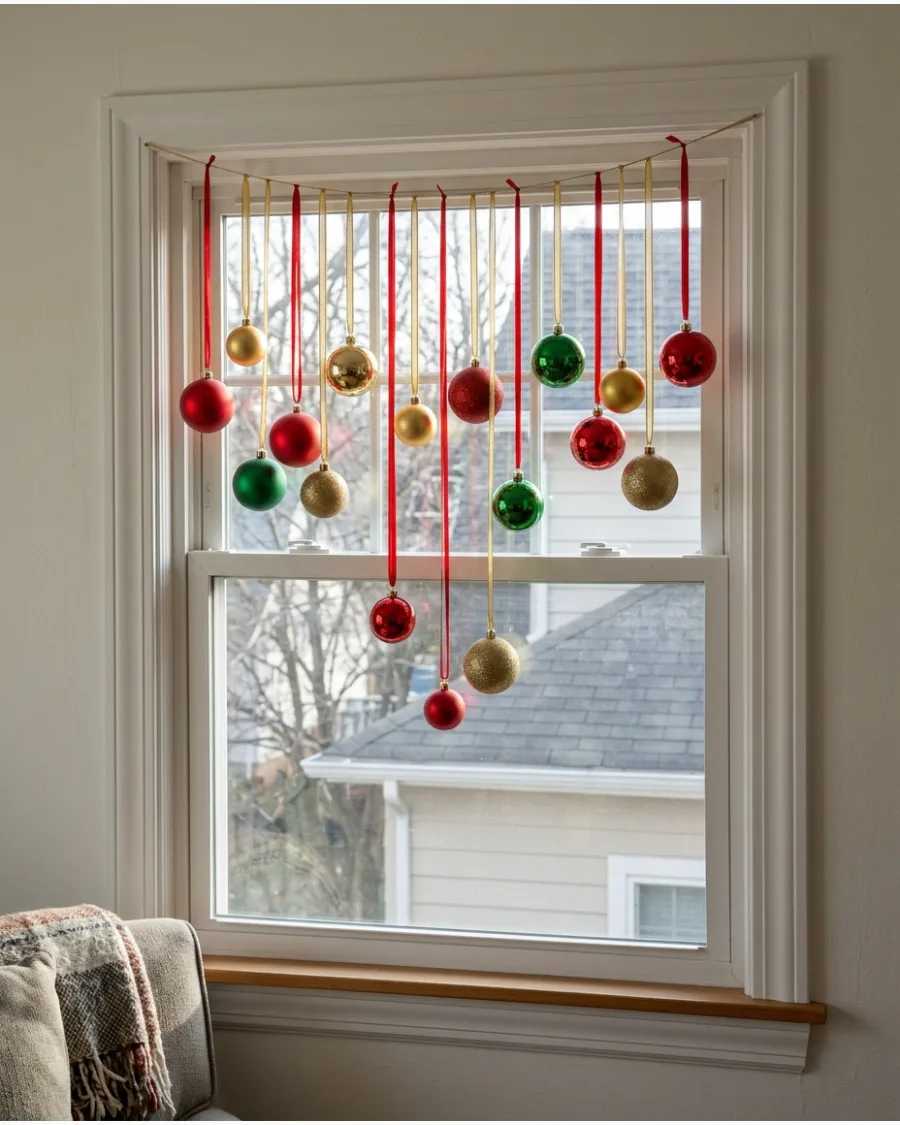
Layering ornaments at various levels creates a professional, tiered look that fills the entire glass pane. Use thin satin ribbons in a single color to keep the focus on the baubles themselves.
Attach the ribbons to the top of the window casing with small tacks or a tension rod to create a staggered, waterfall effect. This method works best when the colors of the ornaments match the existing room decor for a seamless transition.
- Buy shatterproof ornaments in bulk for around $20 to cover a standard double window.
- Use a ruler to measure ribbon lengths before cutting to ensure the staggering is even and intentional.
- Swap ornaments for dried orange slices or pinecones for a more organic, earthy aesthetic.
Quick win: Use a tension rod inside the window frame to hang ribbons so you don't have to put holes in your wood trim.
22. Red Velvet Bows Hanging in the Window
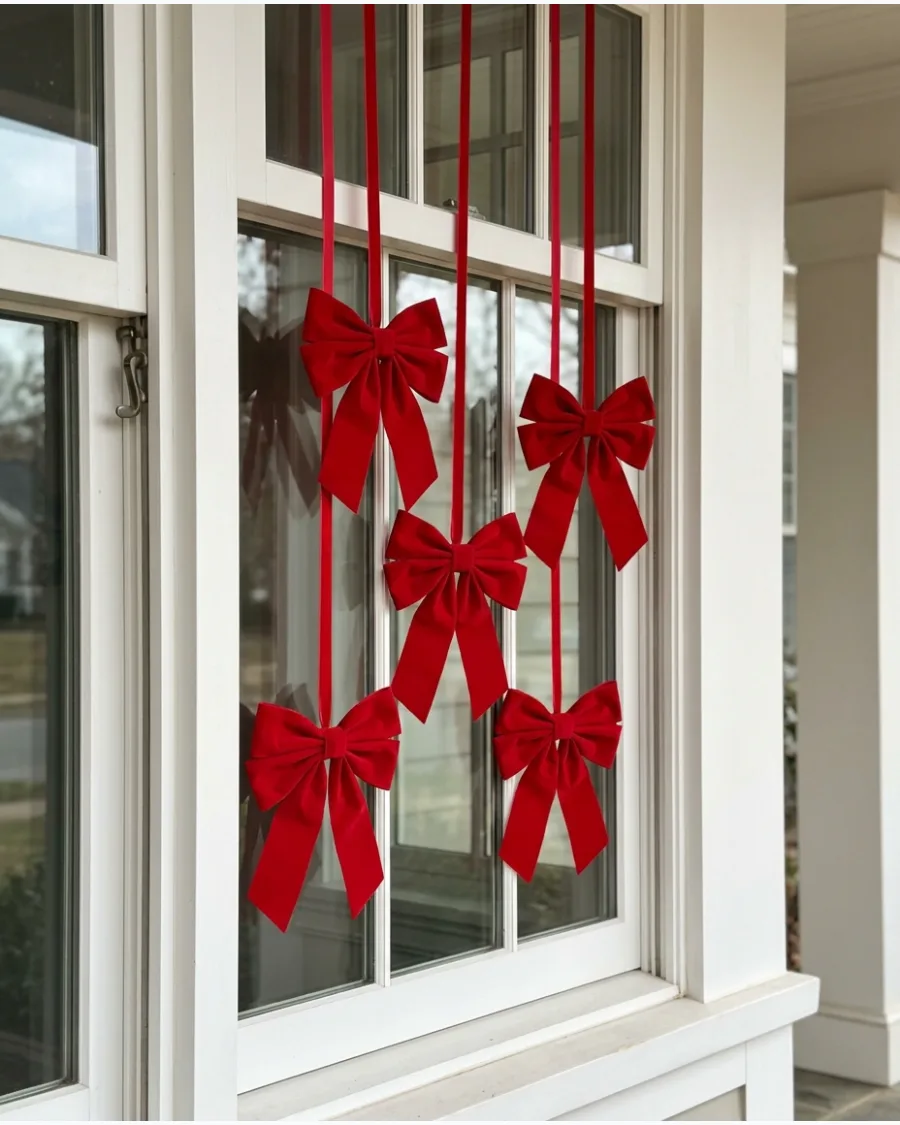
Bold red bows offer a classic, high-contrast look that stands out beautifully against white trim or snowy outdoor views. Choosing structured bows ensures they maintain their shape even if the window is opened or closed frequently.
Use a stiff velvet ribbon to ensure the loops maintain their shape and do not flop against the glass throughout the season. Repeating the same bow size creates a sense of rhythm and order across multiple windows.
- Pre-made velvet bows are available at most craft stores during early November for the best selection.
- Secure the top of the hanging ribbon to the top edge of the window sash so the bow moves with the window.
- Scale the bow size to the window width; a 6-inch bow usually looks best on standard residential windows.
Most people skip this: Lightly steam the ribbon tails after hanging to remove any creases from storage for a high-end finish.
23. Oversized Christmas Baubles in the Window
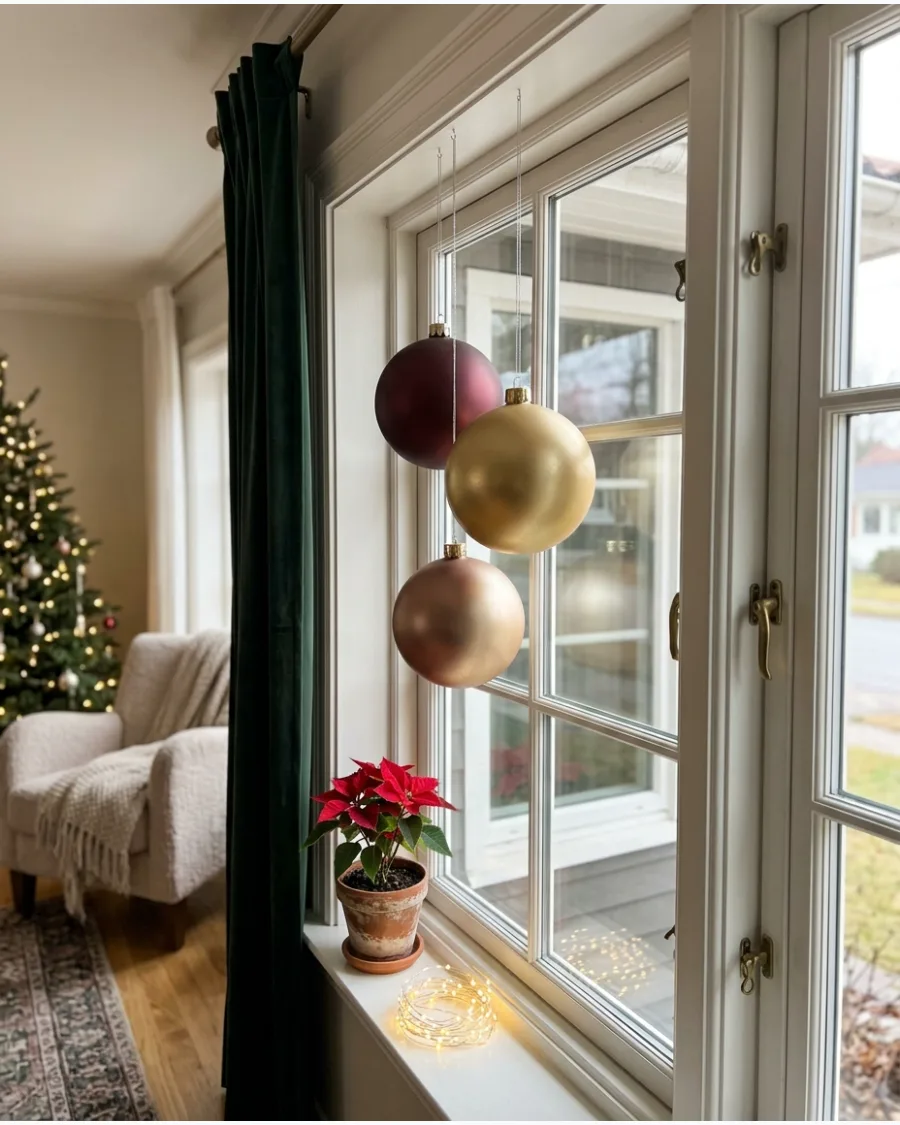
Large-scale decor makes a massive impact from the street while keeping the interior view clean and uncluttered. Using only a few high-quality pieces prevents the window from looking messy or chaotic.
Stick to just two or three colors to keep the oversized scale from feeling cluttered or overwhelming in a small space. Lightweight plastic versions are safer than glass for these larger sizes, especially in high-traffic areas like kitchens.
- Look for 'jumbo' or 'commercial grade' ornaments which typically measure 6 to 10 inches in diameter.
- Use heavy-duty suction hooks rated for at least 5 pounds if you are hanging these directly on the glass.
- Group ornaments in odd numbers like three or five to create a more pleasing visual balance.
Best shortcut: Use clear fishing line instead of heavy cord to make the large ornaments look like they are floating in mid-air.
24. Paper Snowflakes Suspended From the Window
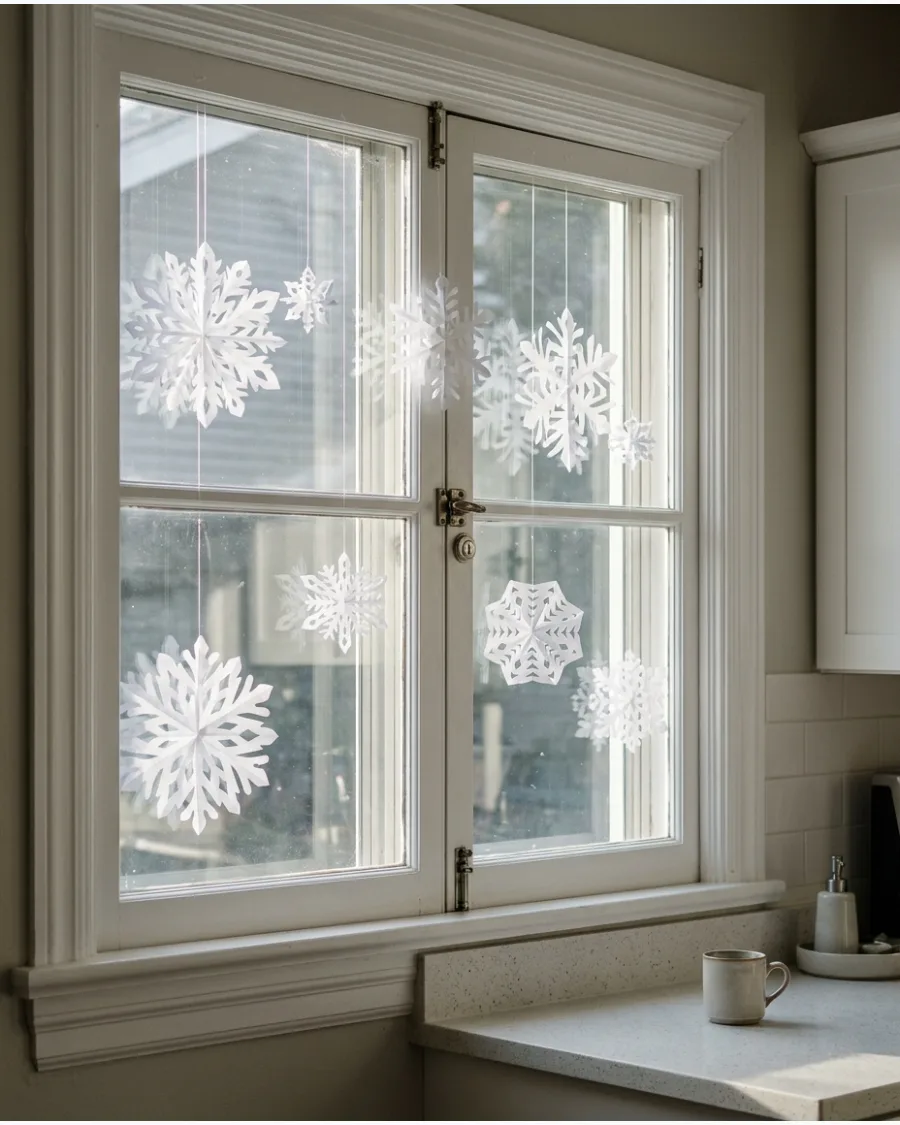
Paper decorations are a budget-friendly way to add intricate detail without adding physical weight to the window frame. They catch the light beautifully during the day and cast soft shadows at night.
Mix different intricate patterns and sizes to mimic the look of a natural snowfall without blocking the view or the light. This is an excellent choice for renters because the materials are lightweight and easy to remove without damage.
- White cardstock holds its shape better than standard printer paper for long-term holiday displays.
- Space the snowflakes at least 4 inches apart to prevent them from tangling when the heater or AC kicks on.
- Vary the sizes from 2 inches to 8 inches to create a sense of depth and perspective.
Quick win: Use a tiny dab of clear museum wax to keep snowflakes from spinning if you want them to face a specific direction.
25. Scandinavian Paper Stars Across the Window
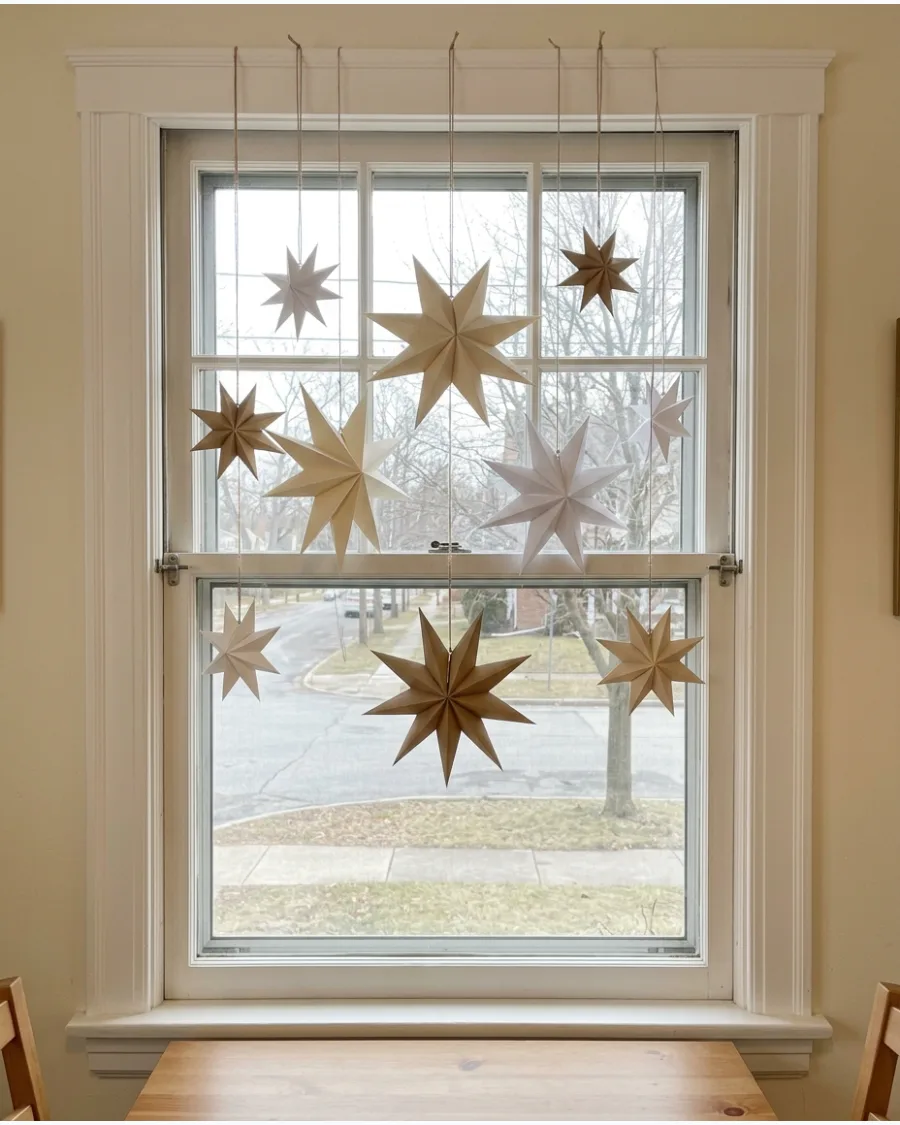
Folded paper stars bring a modern, minimalist vibe that feels festive but sophisticated.
The geometric shapes provide a nice contrast to the soft textures of greenery or fabric curtains. Opt for heavy cardstock or pre-folded stars to ensure the points stay crisp and professional-looking from both the inside and outside. Keeping the color palette neutral like cream, white, or kraft paper allows the architectural shapes to be the star of the show.
- Kraft paper stars are very affordable and pair perfectly with modern or minimalist home styles.
- Hang stars in the center of each window pane to emphasize the window's symmetry.
- Try mixing one large star with two smaller ones for a classic asymmetrical grouping.
Most people skip this: Check the view from the street at night; these stars look best when they are backlit by a warm lamp inside the room.
26. Gold Stars Hanging From Clear Thread
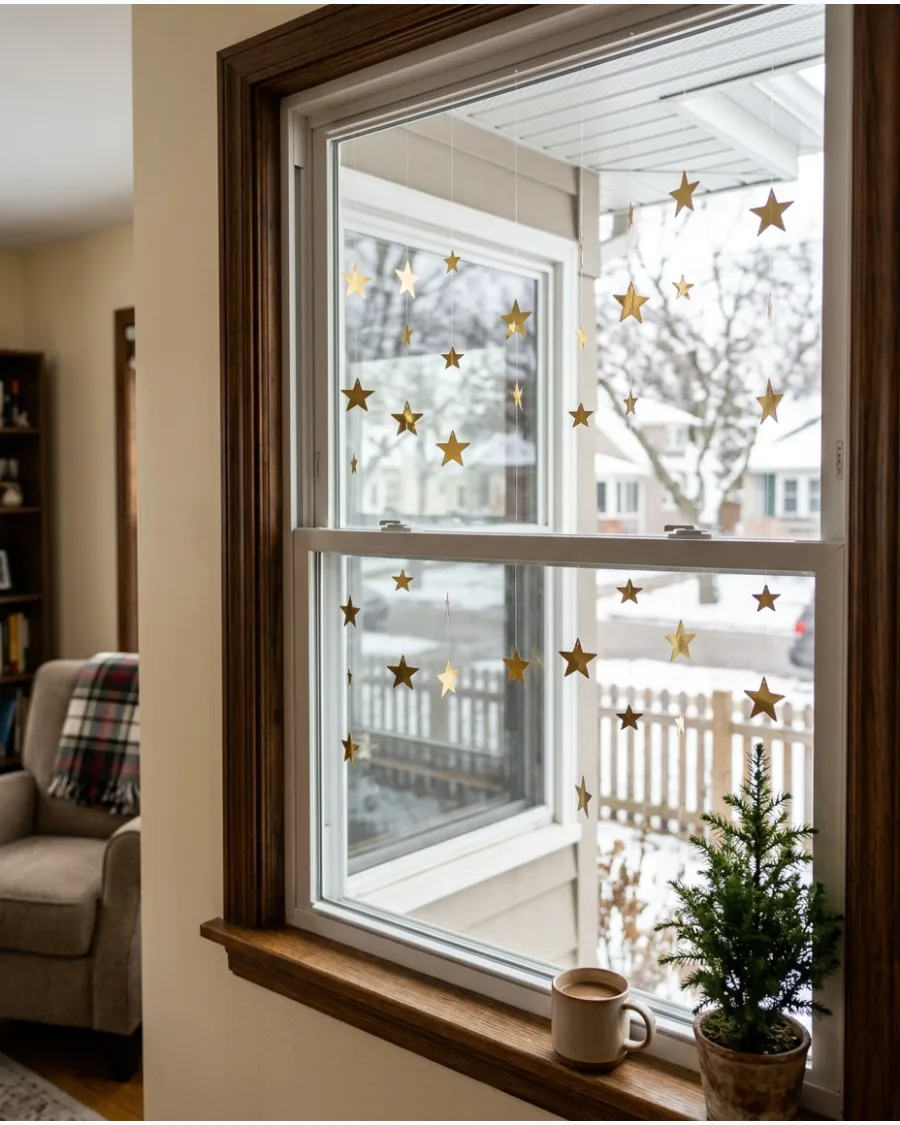
Thin metallic stars offer a subtle shimmer that catches the sun during the day and reflects indoor lights at night. Using a nearly invisible hanging method keeps the look clean and magical.
Use clear fishing line instead of ribbon to make the stars appear as if they are magically floating in the air. This style is perfect for those who prefer a more understated, elegant holiday aesthetic rather than traditional heavy decor.
- Thin metal or foil stars are lightweight enough to be held up with simple clear tape on the upper frame.
- Space the stars randomly across the window to avoid a stiff, grid-like appearance.
- Choose double-sided gold stars so they look finished from both the interior and the exterior.
Best shortcut: Use 4lb test monofilament fishing line; it is thin enough to be invisible but strong enough to hold multiple stars.
27. Red and Gold Ornament Window Curtain
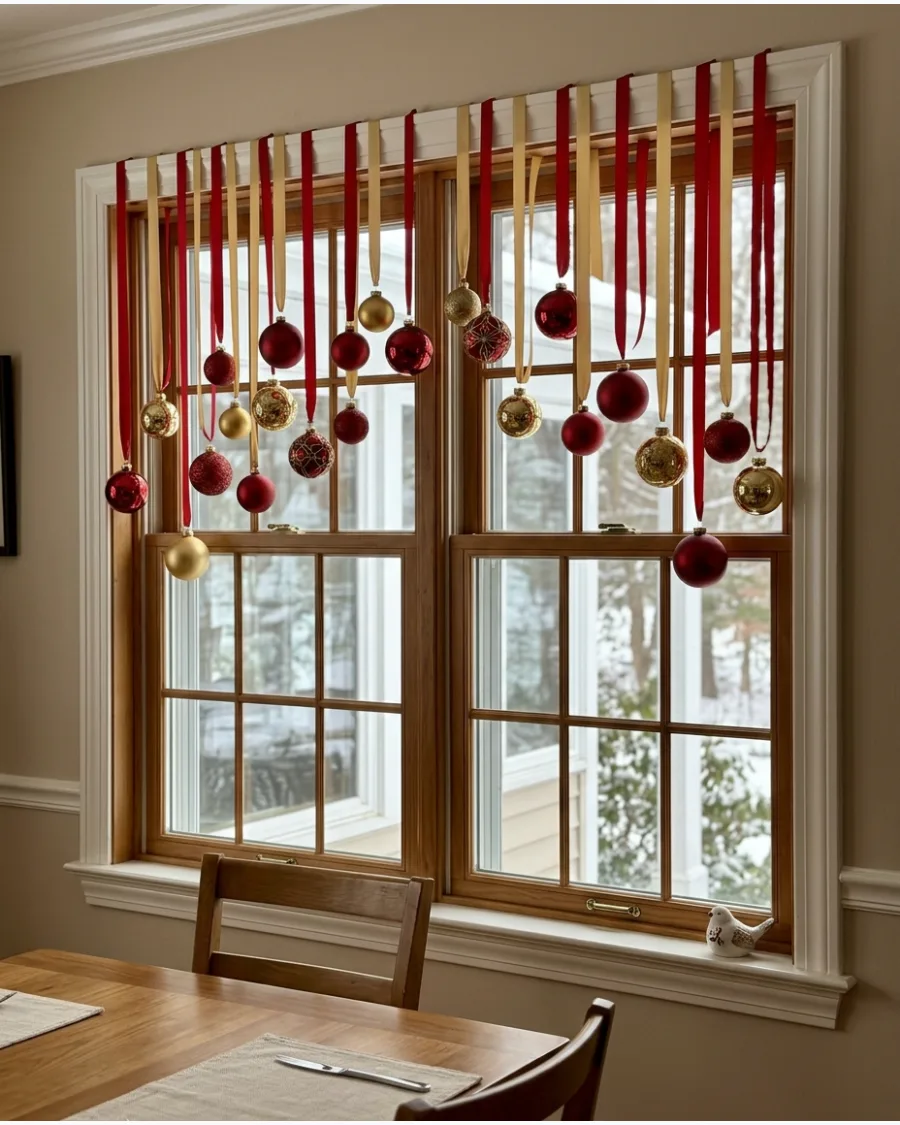
A classic red and gold combination feels instantly traditional and warm. Using ribbon instead of wire adds a soft, finished look to the display.
Vary the lengths by exactly four inches between each ornament to create a clean, intentional tiered look across the glass. This approach works particularly well in formal dining rooms or entryways where a more structured look is desired.
- Satin ribbon in a 1/4 inch width provides enough strength without looking bulky in the window.
- Anchor the ribbons to a single wooden dowel painted to match your trim for a quick one-piece installation.
- Mix matte and shiny finishes in the same color to add visual depth to the arrangement.
Quick win: Tie a small knot just above the ornament loop to prevent the bauble from sliding or tilting on the ribbon.
28. Snowflake and Icicle Window Display
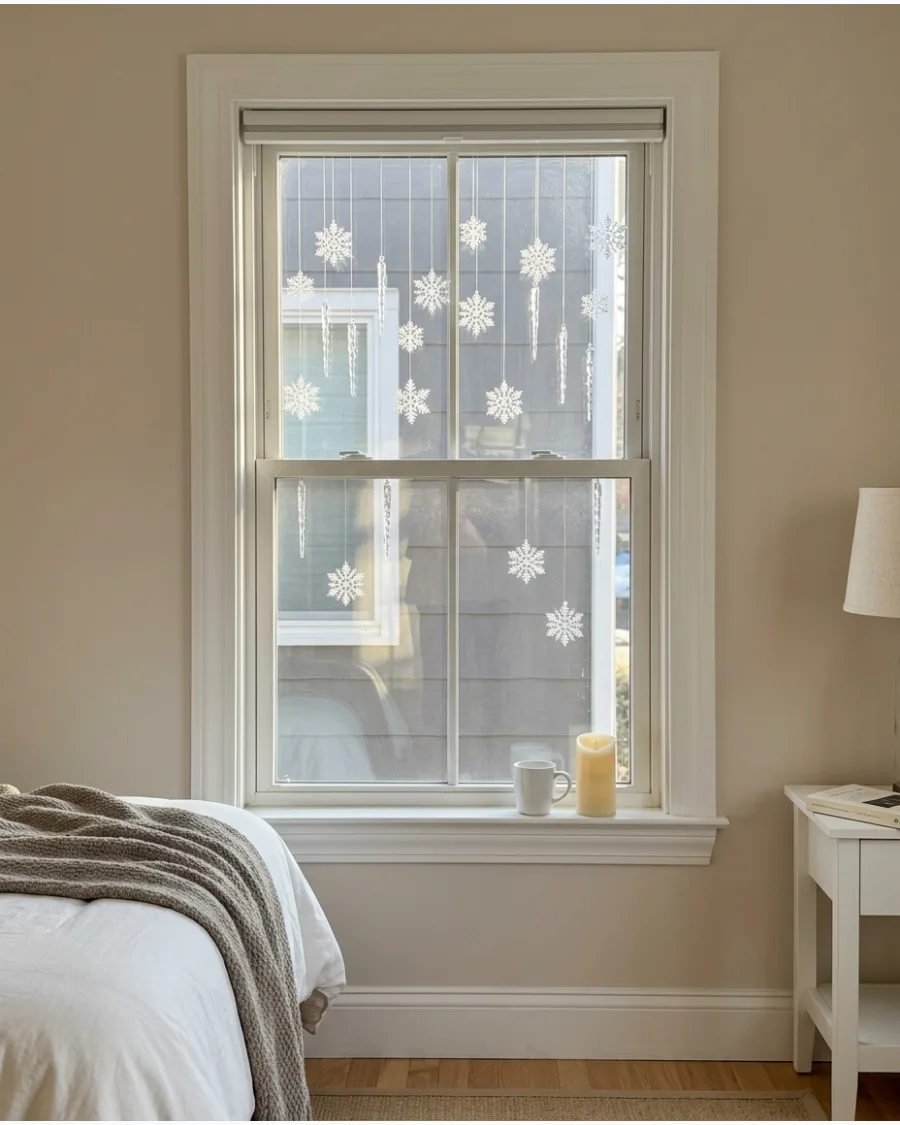
Combining different winter shapes creates a dynamic scene that looks like a frozen winter wonderland. The mix of opaque white and clear materials adds a realistic crystalline effect.
Place the icicles closer to the top of the frame and the snowflakes lower down to create a realistic wintry transition. This display is particularly effective in northern climates where it complements the actual weather outside.
- Acrylic icicles are much more durable and realistic-looking than tinsel or plastic versions.
- Use white thread for the snowflakes and clear line for the icicles to vary the visual weight.
- Concentrate more items at the top of the window and thin them out as you go down for a 'falling' effect.
Most people skip this: Group three icicles of different lengths together in small clusters for a more natural, icy look.
29. Wooden Christmas Ornaments Hanging in the Window
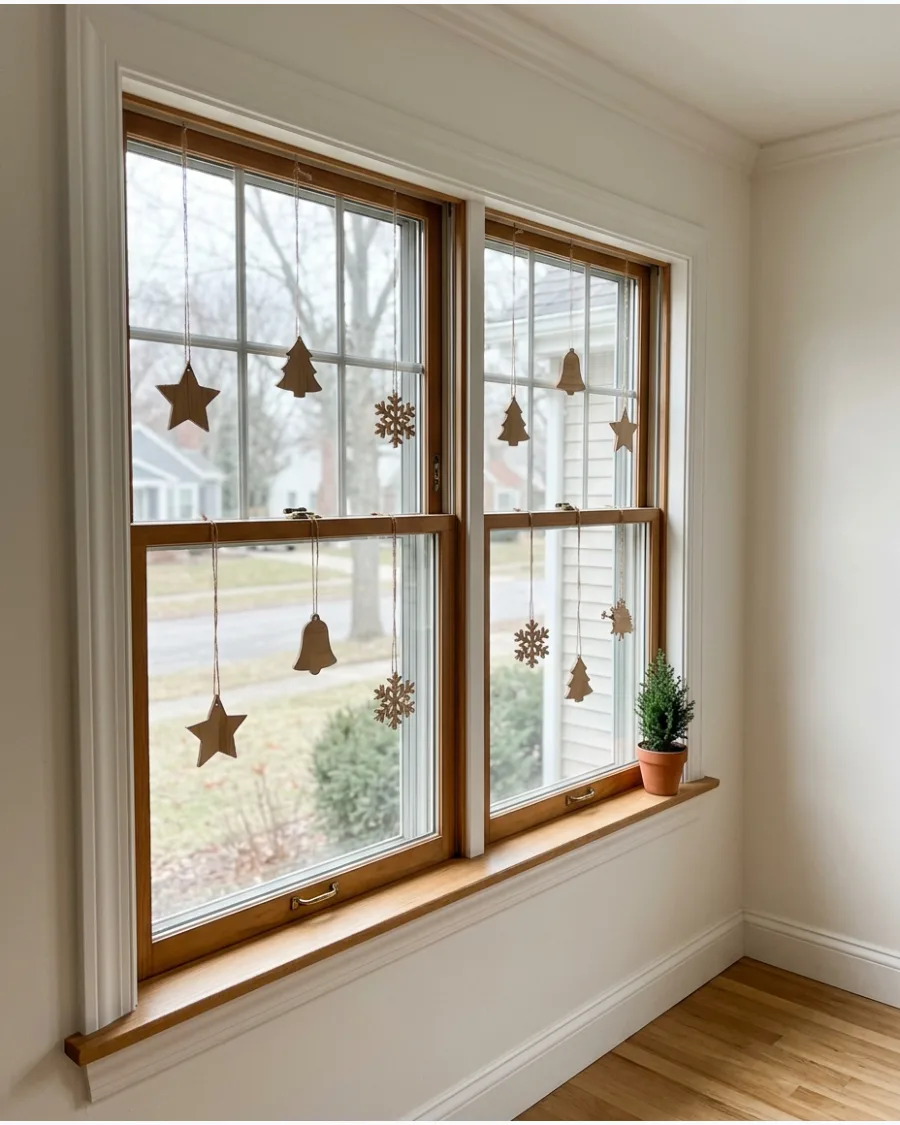
Natural wood tones bring a warm, organic feel to the holiday window that pairs well with greenery. These ornaments are durable and offer a break from the usual glitter and shine.
Pair these raw wood elements with simple twine to achieve a high-end look that avoids the plastic feel of traditional decor. This is the best option for homes with a modern farmhouse or Scandinavian-inspired interior.
- Unfinished wood ornaments are very budget-friendly and can be found in large packs for under $15.
- Keep the twine lengths varied to prevent the display from looking too flat or two-dimensional.
- Add a single wooden bead above each ornament to give the hanging a more crafted, custom feel.
Best shortcut: If the wood is too light, a quick wipe with a damp tea bag can give it a subtle, aged look without using smelly stains.
30. Christmas Bell Garland Hanging Across the Window
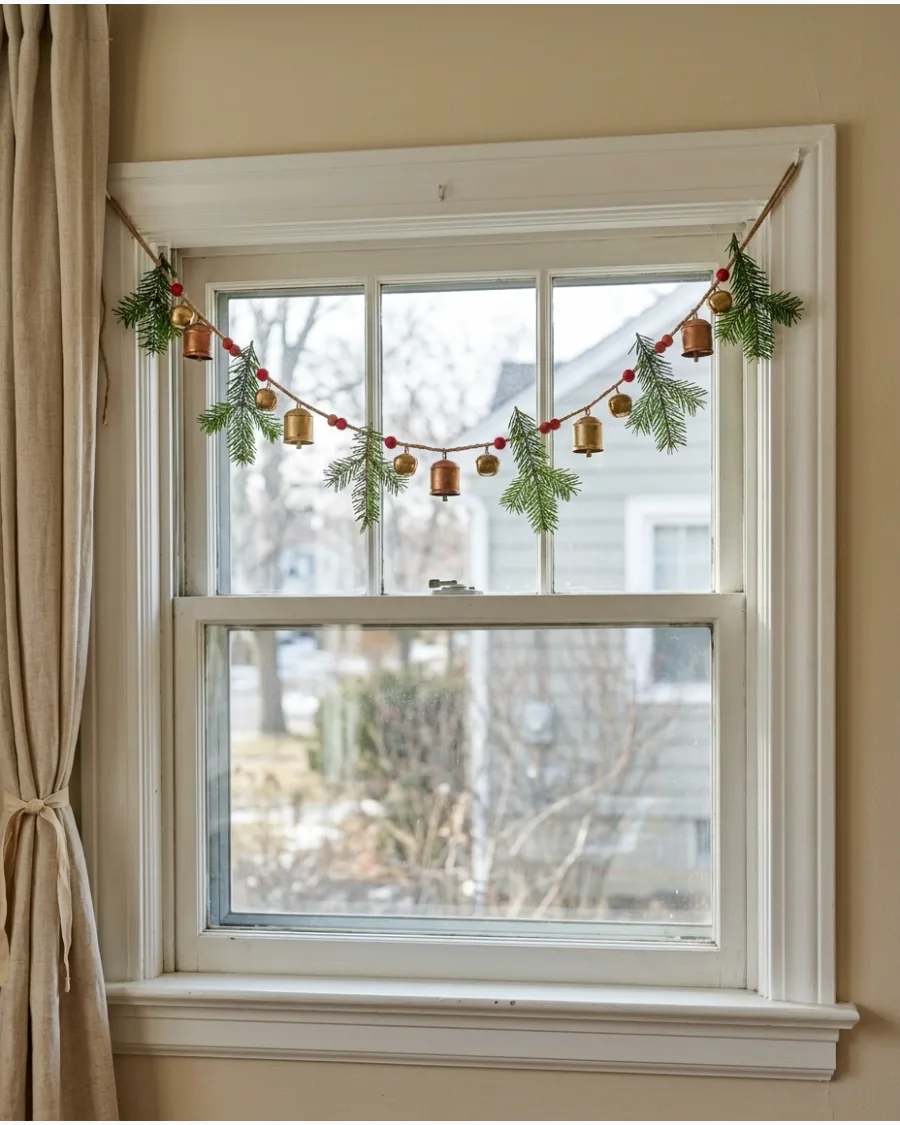
Bells add a nostalgic sound and a vintage aesthetic to the window area. They work best when hung horizontally across the top, acting as a decorative valance.
Space the bells every six inches along the ribbon and add a tiny sprig of fresh greenery at each knot for extra texture. The metallic finish of the bells reflects any nearby holiday lights, making the window glow at night.
- Small craft bells come in silver, gold, and rusted finishes to match any color scheme.
- Use a high-quality grosgrain ribbon to support the weight of the bells without sagging over time.
- Fasten the ends of the ribbon to the outer corners of the window trim with small command hooks.
Quick win: Use real cedar or pine sprigs; they will dry out slowly in the window and provide a faint, fresh scent every time the curtain moves.
CHRISTMAS WINDOW GLASS AND DIY IDEAS
31. White Window-Paint Christmas Village
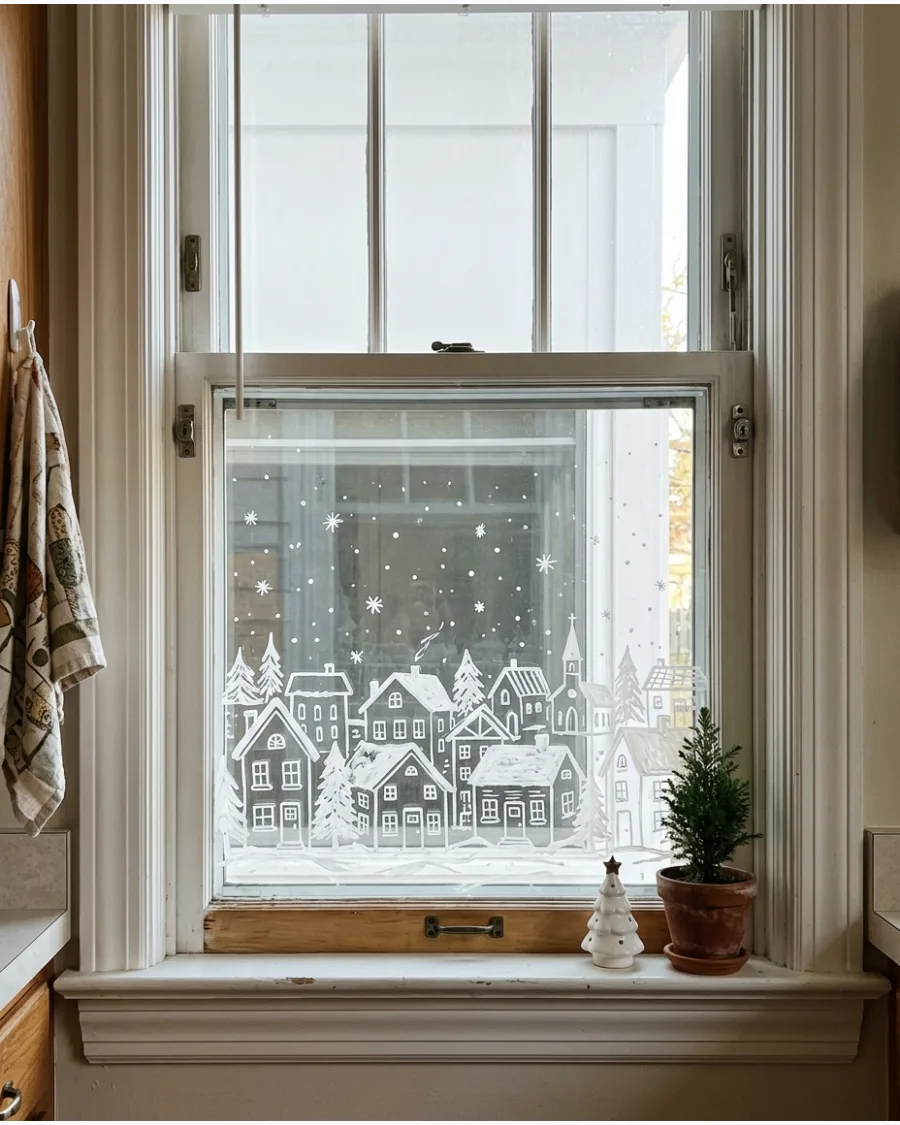
Use removable white window markers to draw a row of snowy houses and trees along the bottom of the glass. This technique creates a custom look that does not block the view of the yard.
Keep the drawings concentrated at the base to prevent the window from feeling cluttered. Simple outlines look much more professional than filled-in shapes.
- Marker set usually costs under $15
- 20-minute setup for a standard window
- Wipe with a damp cloth to remove after the holidays
Quick win: Use a ruler for straight rooflines to make the village look intentional rather than messy.
32. Hand-Drawn Snowflake Christmas Windows
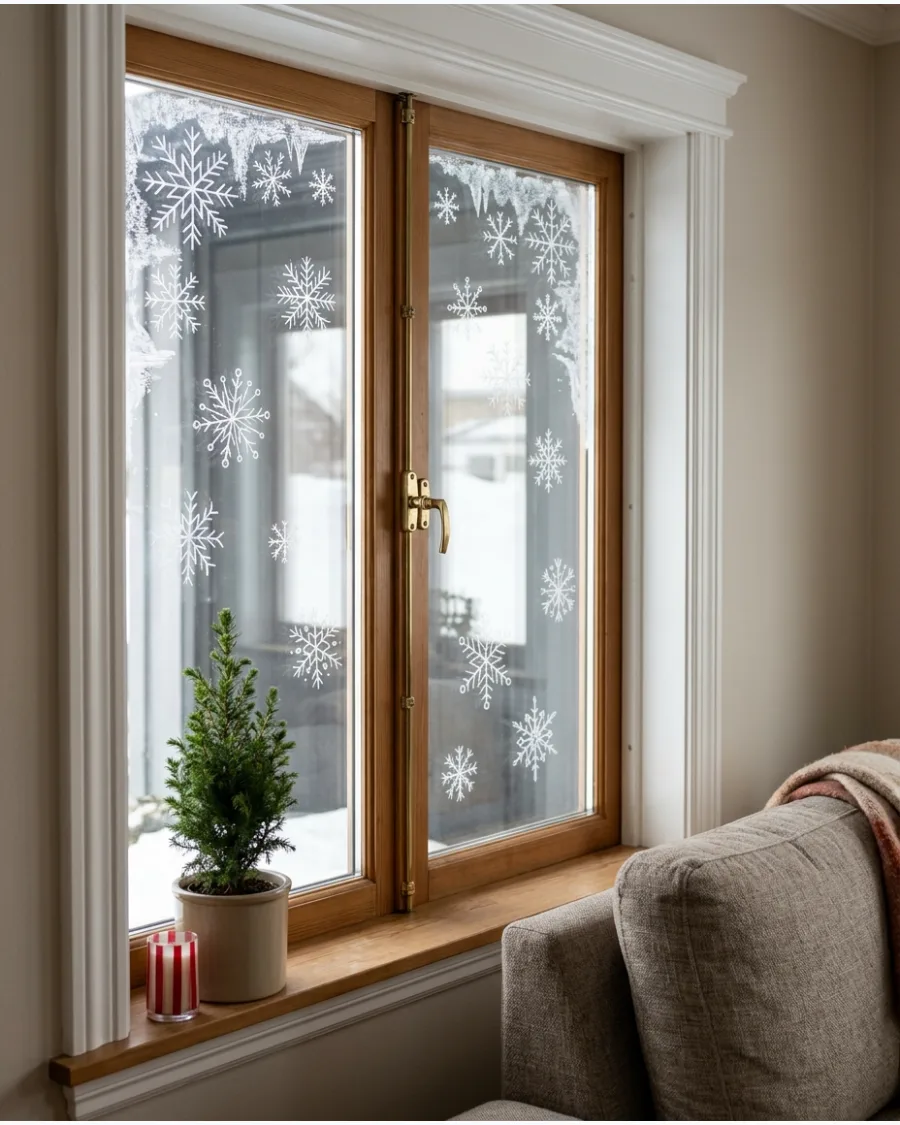
Removable chalk markers allow for intricate snowflake designs directly on the glass. Focusing these drawings around the corners of the pane mimics the look of natural frost patterns.
Vary the sizes and patterns of the snowflakes to give the display a more organic feel. This method is perfect for adding holiday cheer without hanging heavy decorations.
- Chalk markers available at most craft stores
- Best for non-porous glass surfaces
- Easy cleanup with standard window cleaner
Most people skip this: Print out snowflake templates and tape them to the outside of the glass to trace them perfectly from the inside.
33. Frosted Christmas Window Corners
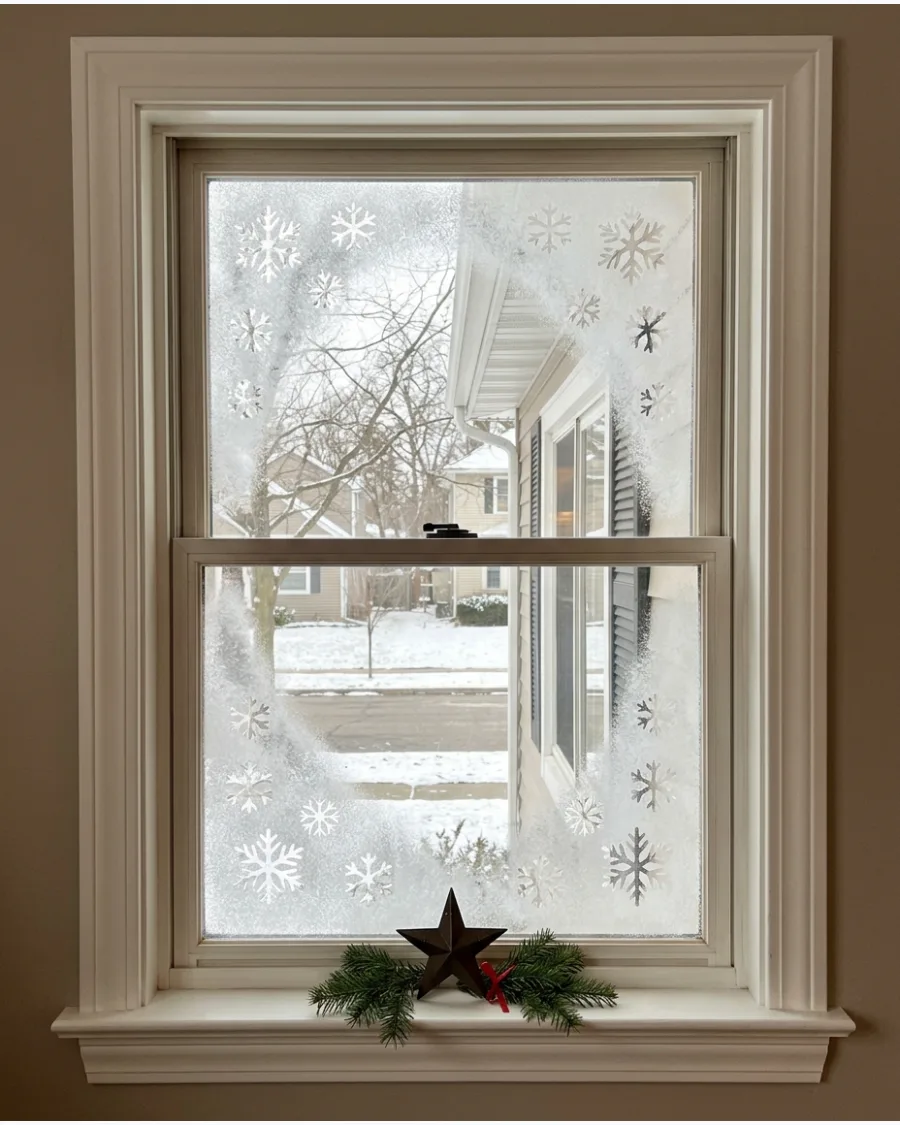
Applying frosted window film or snow spray to the corners of the window creates a classic winter atmosphere. This technique leaves the center of the glass clear so light can still fill the room during the day.
Use a stencil for the edges of the frost to ensure the shapes look sharp and clean. It is a sophisticated way to add texture to a plain window pane.
- Requires snow spray or static-cling film
- 10-minute application per window
- Use soapy water for easy film removal
Best shortcut: Static-cling frosted film is much easier to remove than aerosol snow spray at the end of the season.
34. Removable Christmas Window Clings
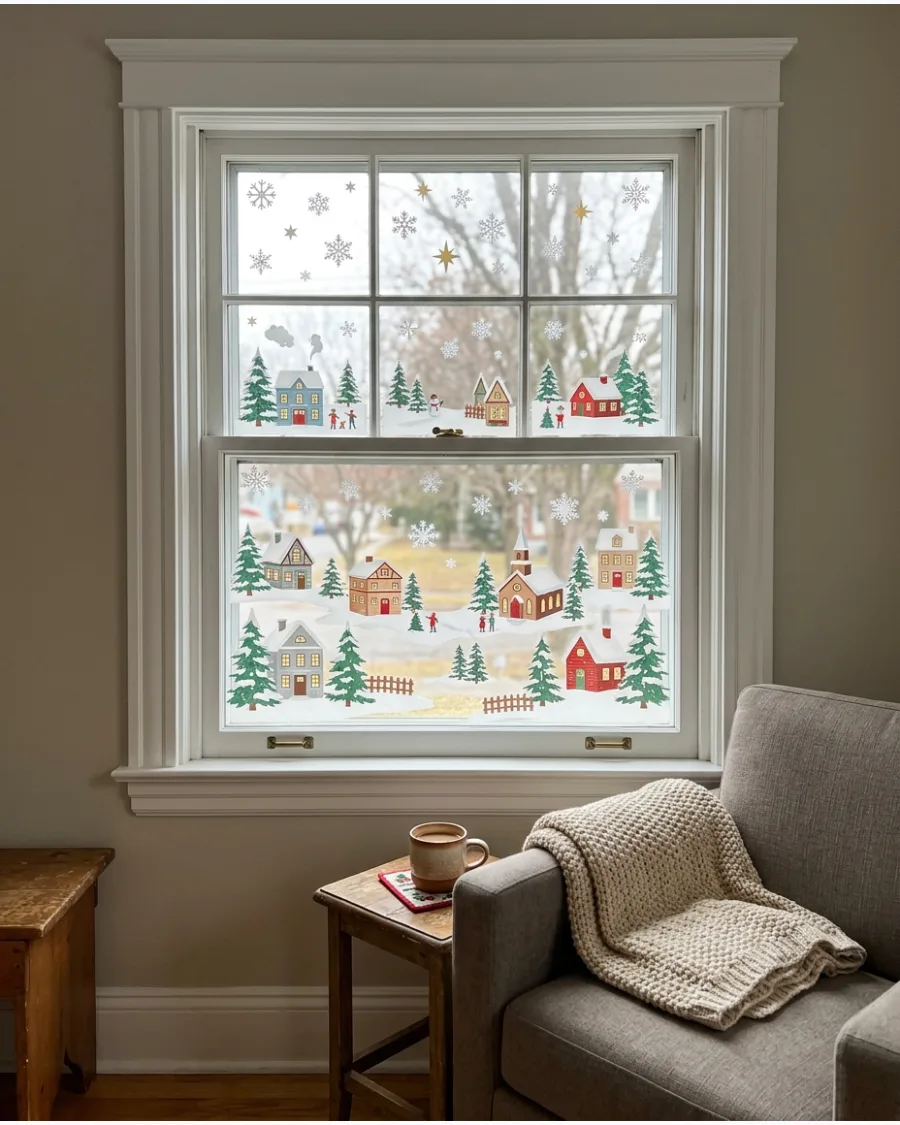
Modern window clings offer a damage-free way to add festive shapes to any glass surface. Arranging them in a deliberate scene, such as a gathering of stars, looks much better than random placement.
Overlap a few clings slightly to create a sense of depth and perspective. These are especially useful for renters who cannot use nails or tape on the window trim.
- Vinyl clings available for under $20
- Instant peel-and-stick application
- Reusable if stored on the original backing
Quick win: Clean the glass with rubbing alcohol first to ensure the clings stay stuck all through December.
35. White Paper Christmas Village Silhouette
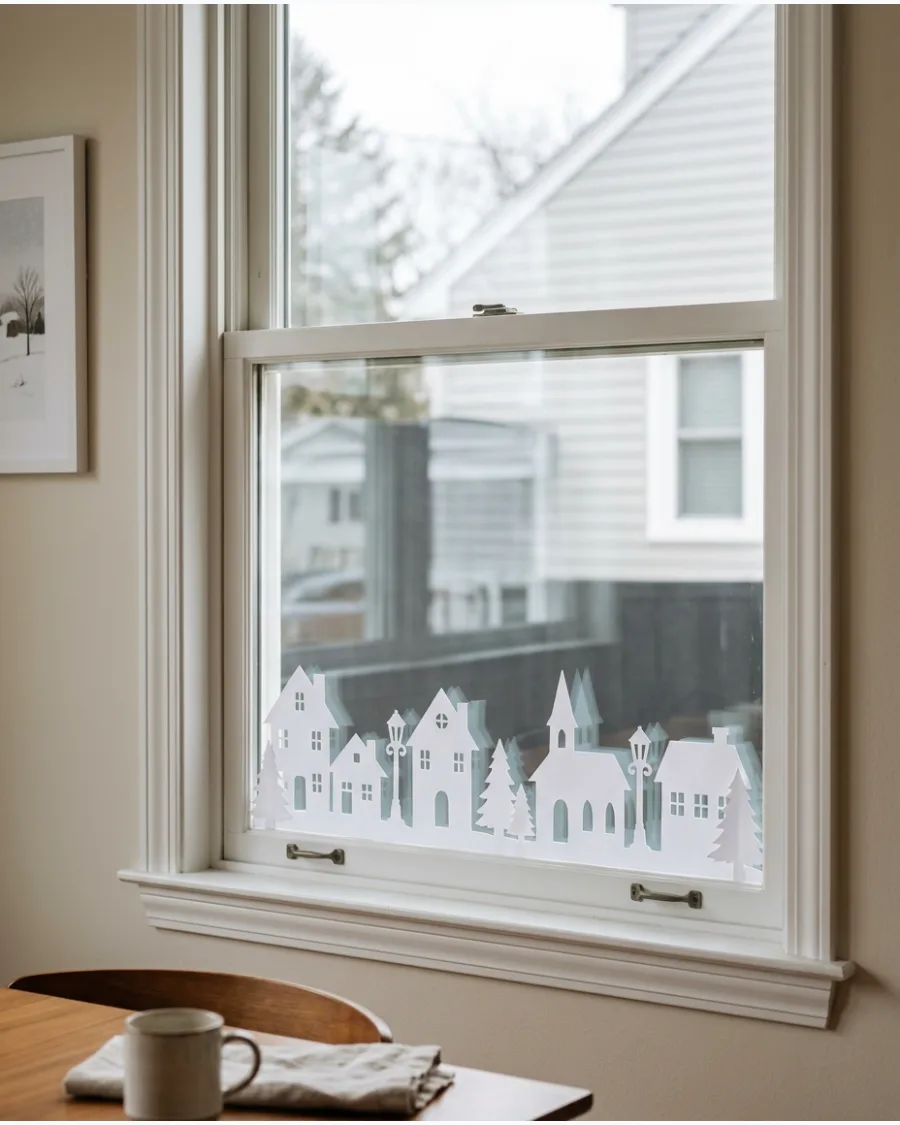
Cutting silhouettes of houses and lamp posts from white cardstock creates a crisp, architectural look. Line these shapes along the bottom of the window to form a continuous snowy scene.
Secure the paper to the glass with small pieces of clear double-sided tape for an invisible hold. This DIY project adds a high-end feel for the cost of a few sheets of paper.
- Requires white cardstock and scissors
- 45-minute DIY project
- Store flat in a folder to use again next year
Most people skip this: Place a battery-operated tea light behind each paper house on the sill to make the windows glow at night.
36. Paper Christmas Tree Forest on the Glass
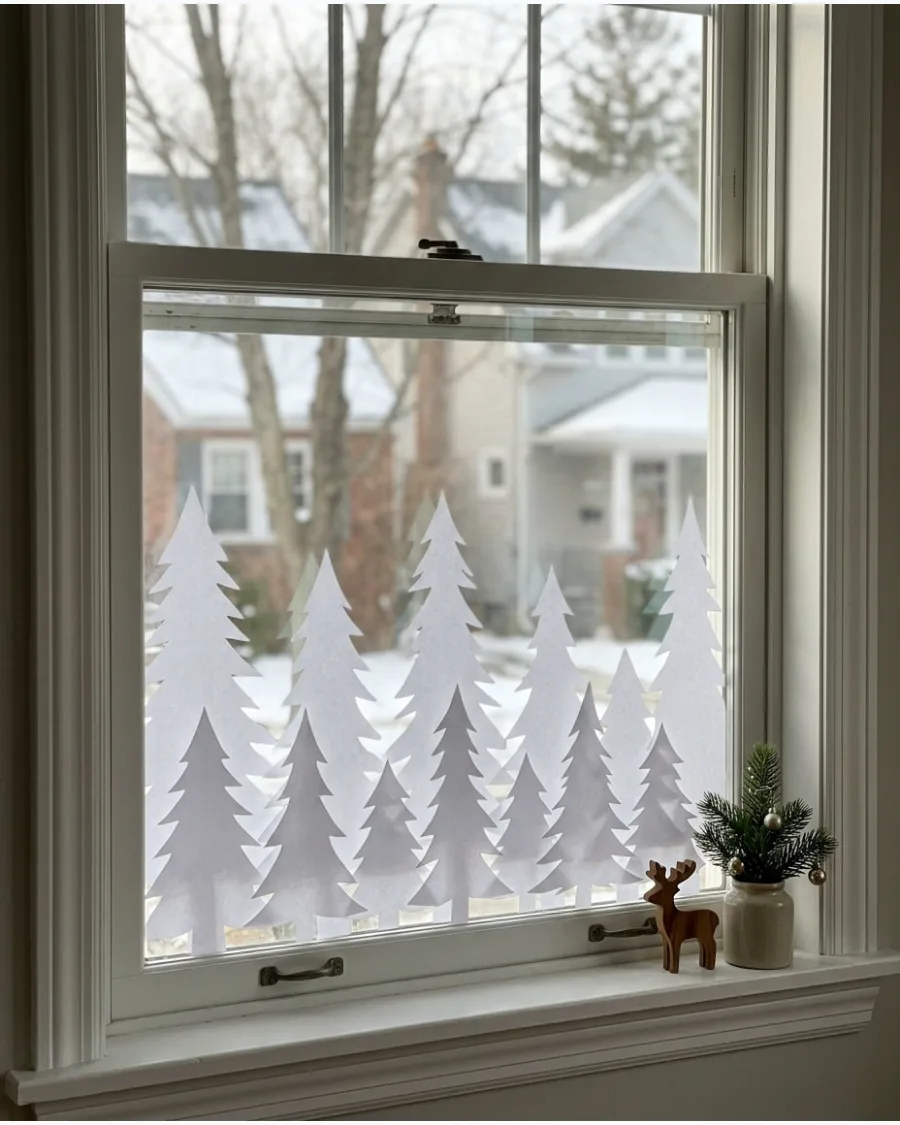
Layering different heights of paper evergreen silhouettes creates a mini forest across the lower pane. Using different shades of green or plain white adds visual interest without overwhelming the room.
Stagger the trees so some appear closer than others to give the scene more life. It is a great way to decorate large windows that feel too empty during the holidays.
- Uses construction paper or cardstock
- Low-cost DIY decoration
- Use painters tape for damage-free removal
Best shortcut: Use a decorative edge punch on the bottom of the trees to simulate a snowy ground line.
37. Faux Snow Window With Christmas Trees
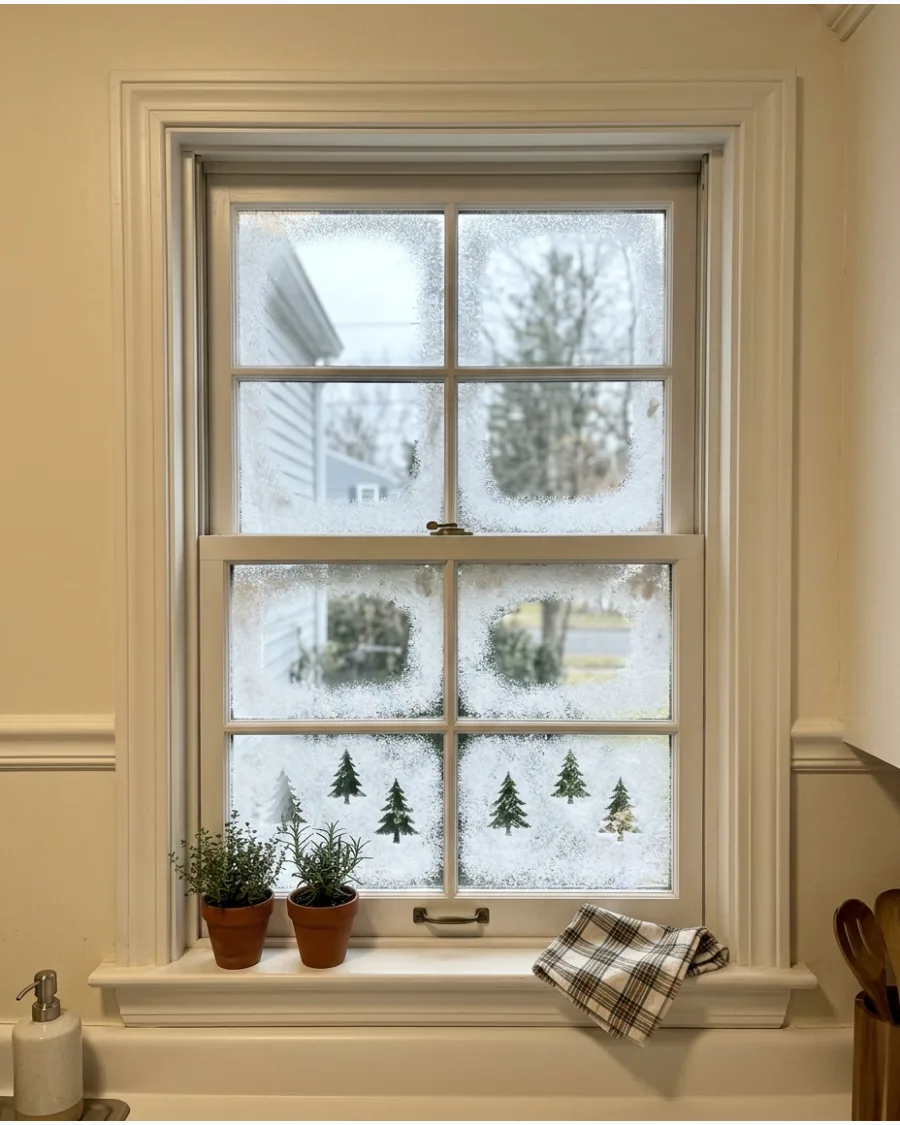
Spraying removable faux snow around the edges of the window frame gives the glass a cozy, aged appearance. For extra detail, use a stencil to create the shape of small fir trees within the snowy layer.
Keep the spray light and misty rather than thick and gloopy for the most realistic look. This style works well in kitchens where a bit of holiday whimsy is welcome.
- Requires aerosol snow spray
- 15-minute setup time
- Clean glass thoroughly before applying for best adhesion
Quick win: Hold the spray can at least 12 inches away to avoid drips and achieve a soft, feathered edge.
38. Tissue-Paper Stained Glass Christmas Stars
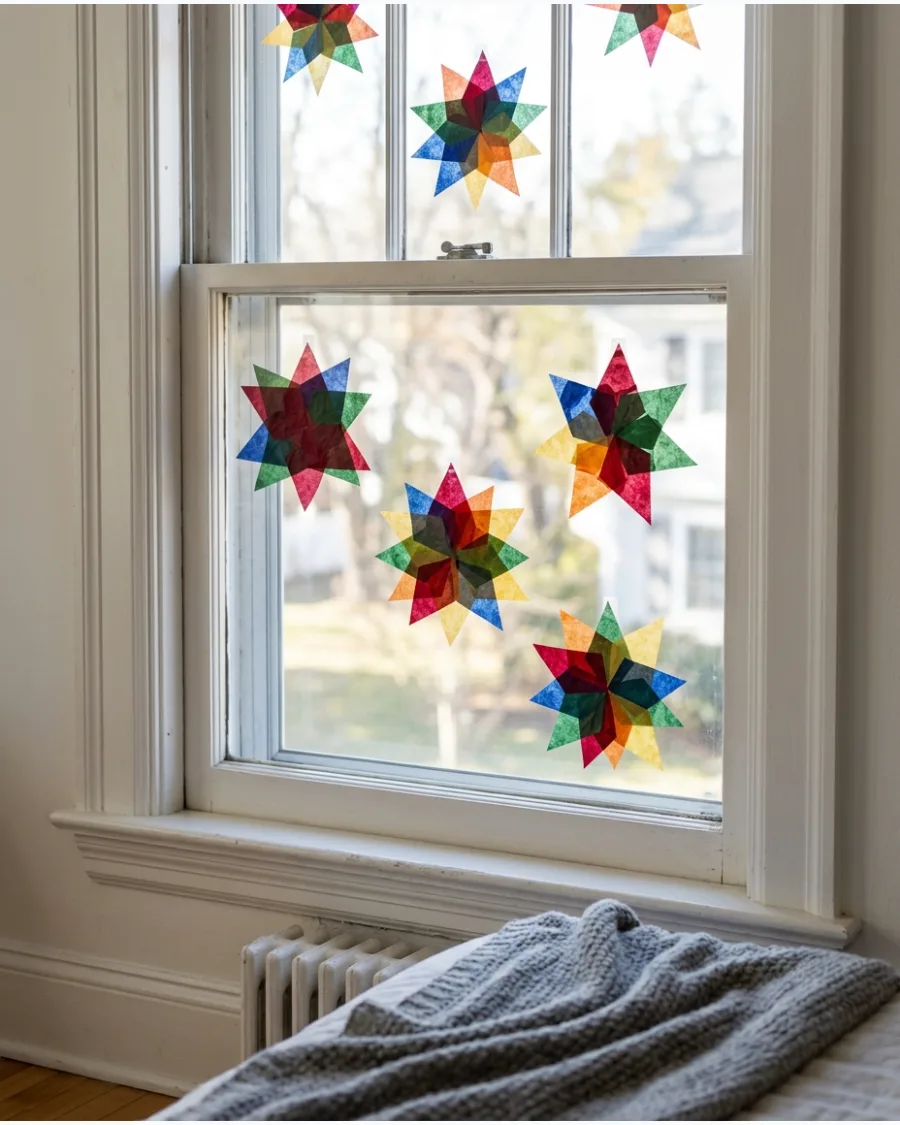
Creating stars from translucent tissue paper allows light to filter through in a beautiful, glowing way. When the sun hits these shapes, they take on the appearance of colorful stained glass.
Apply a thin layer of a glue stick to the edges of the paper to secure them flat against the pane. This is an affordable way to add a pop of seasonal color to a neutral room.
- Requires tissue paper and a glue stick
- 30-minute DIY project
- Best for south-facing windows to catch the light
Most people skip this: Layer different colors of tissue paper to create new shades and more complex patterns when backlit.
39. Minimal White Christmas Window Drawings
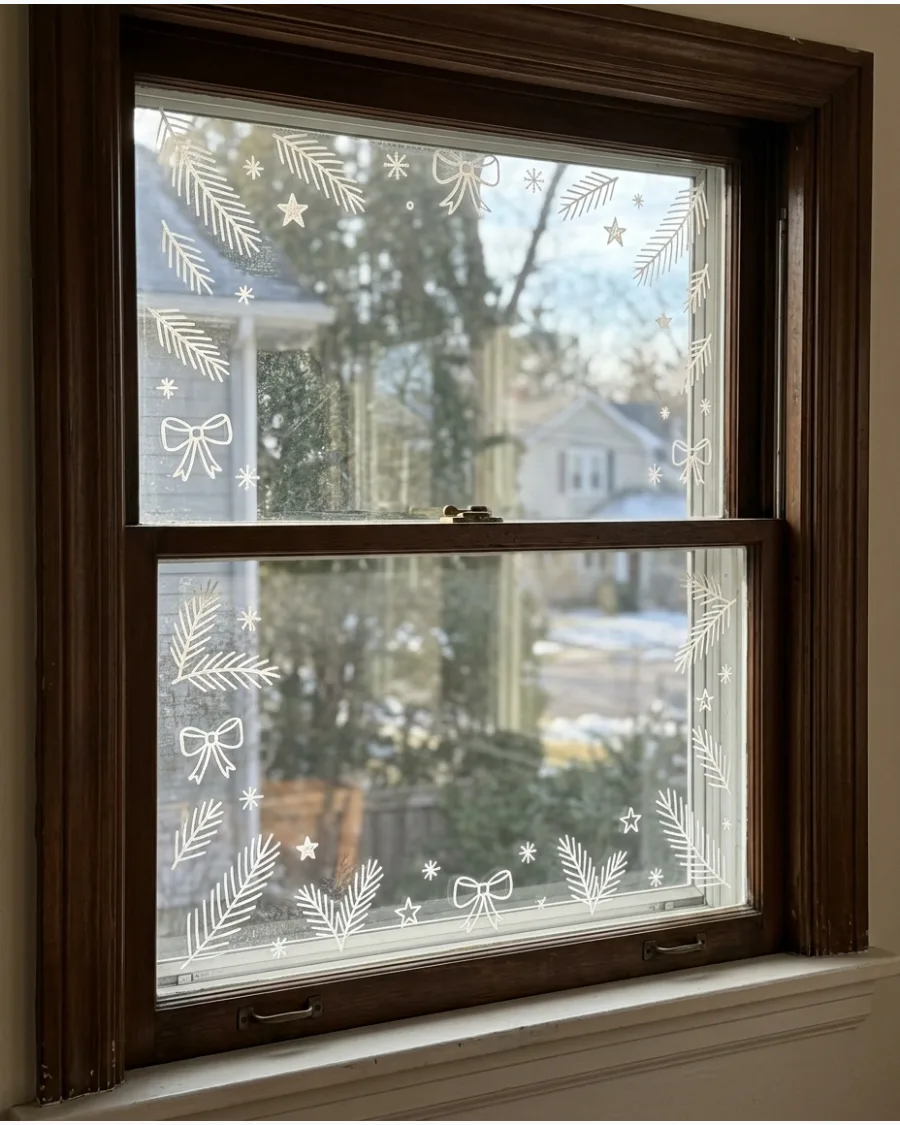
Simple line drawings of stars, bows, and evergreen branches around the perimeter of the glass offer a modern holiday touch. This minimalist approach keeps the window looking tidy and intentional.
Focus on clean, continuous lines rather than shading or filling in the drawings. It is the perfect solution for homes with a contemporary or Scandinavian aesthetic.
- Requires a fine-tip window marker
- 10-minute setup per window
- Erase mistakes easily with a dry microfiber cloth
Best shortcut: Use a coffee cup or a plate as a guide to draw perfectly round ornaments or wreaths on the glass.
40. Gingerbread Christmas Window Art
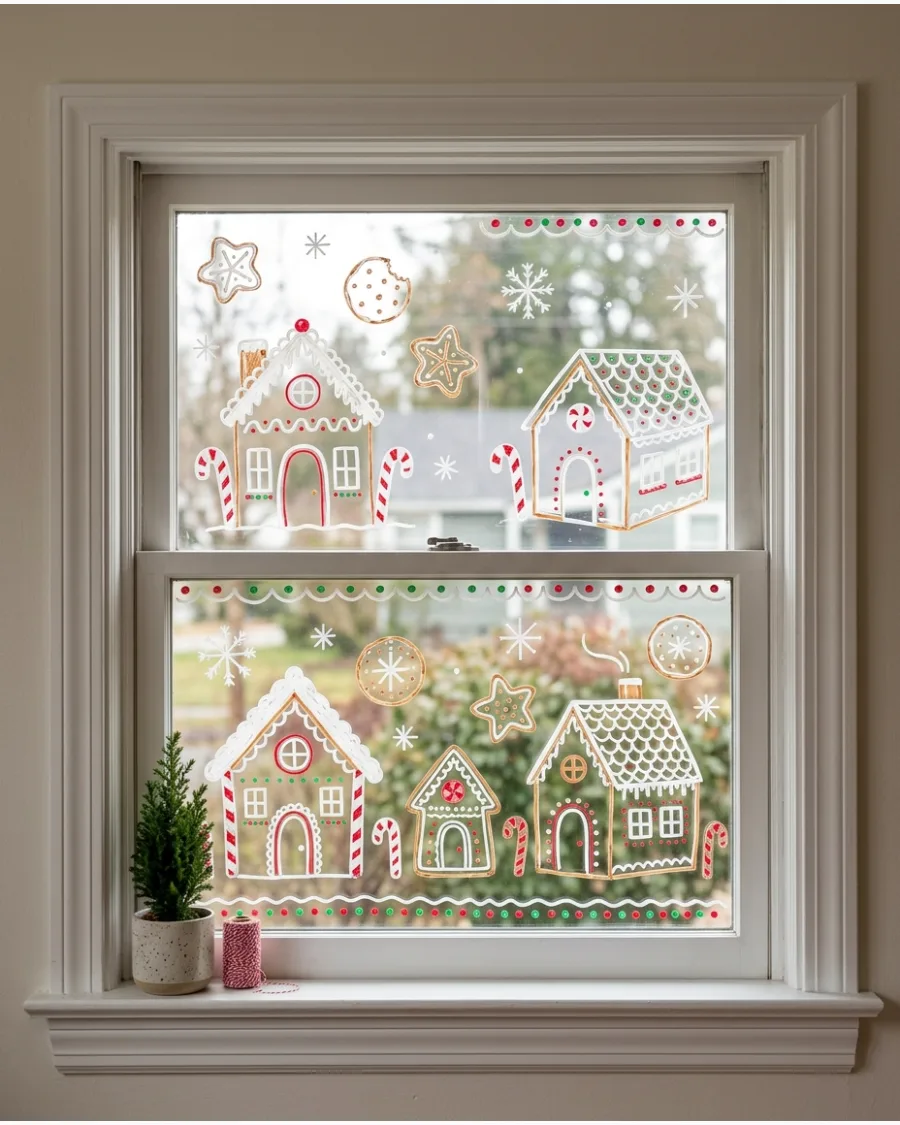
Using white and brown markers to draw gingerbread houses and candy canes creates a playful, candy-themed window. Adding white icing-style borders around the edges of the pane ties the whole look together.
Include small details like gumdrops and swirls to make the drawings look authentic. This theme is particularly effective in a kitchen or a child's bedroom.
- Requires multi-color window markers
- 40-minute DIY project
- Safe for all glass and mirrored surfaces
Quick win: Use a white marker for the icing and a light brown marker for the cookie base to make the art pop against the outdoor view.
CHRISTMAS WINDOWSILL DECORATING IDEAS
41. Mini Christmas Tree Windowsill Display
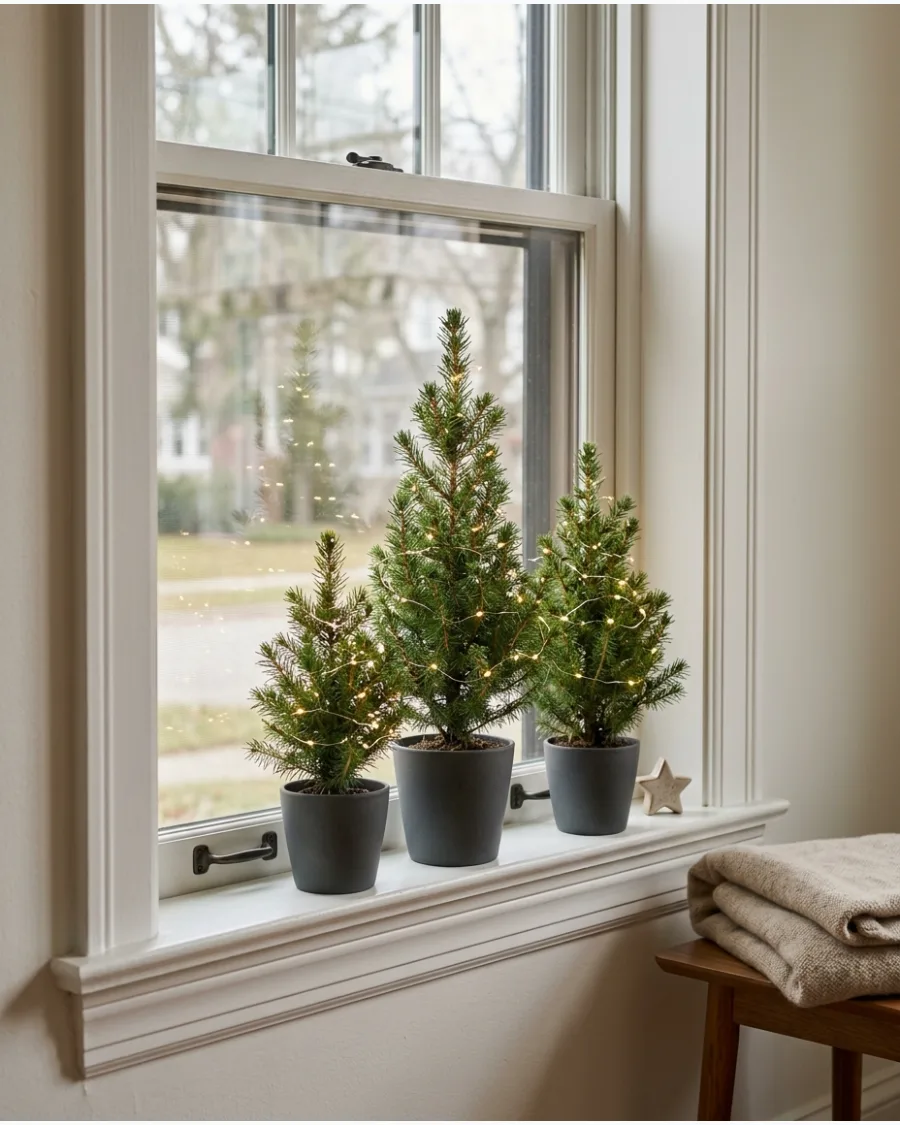
Placing a small cluster of trees on a ledge creates an instant focal point without blocking the view. Vary the heights of the trees to create visual depth along the window sill. This arrangement feels more intentional than a single tree centered alone.
Staggered heights look more professional and keep the eye moving across the glass.
- Sourcing: Find sets of three trees for under $30 at most big-box retailers.
- Setup: Place the tallest tree in the center and shorter ones on the sides for balance.
- Adaptation: Use battery-powered lights to avoid cords trailing down the wall.
Quick win: Use a bit of museum wax on the bottom of the tree bases to keep them from tipping if the curtains are moved.
42. Ceramic Christmas House Village
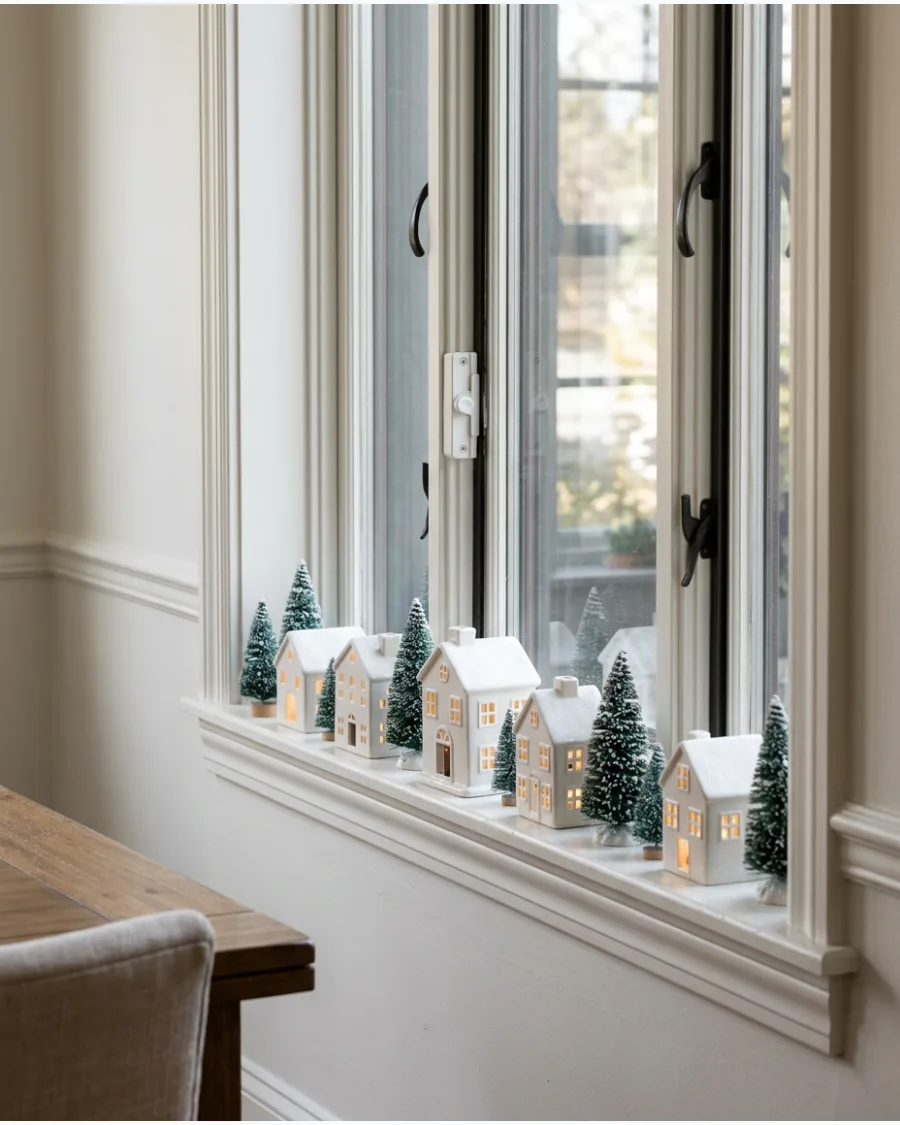
A row of simple white houses looks clean and sophisticated against a dark window at night. Tuck battery-operated tealights inside each house to make the windows glow from the street. This creates a warm, inviting look that is visible from both sides of the glass.
Ceramic houses provide a clean, modern look that doesn't feel cluttered or dated.
- Sourcing: Unpainted ceramic houses are budget-friendly and allow for a customized look.
- Setup: Space the houses evenly but group them in odd numbers for the best visual appeal.
- Adaptation: Renters can use removable mounting tape to secure houses on narrow sills.
Most people skip this: Use tealights with a remote control so you don't have to pick up every house to turn them on.
43. Bottle-Brush Christmas Tree Forest
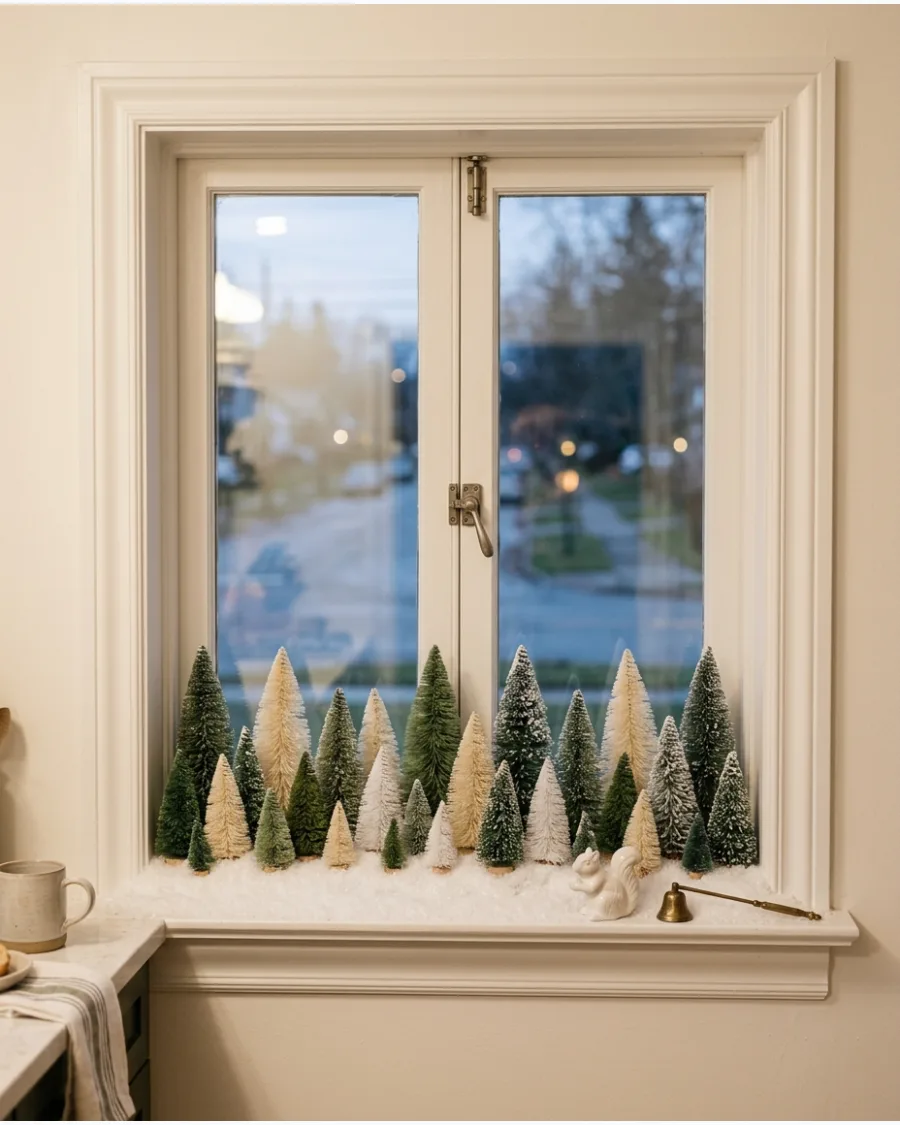
Bottle-brush trees offer a nostalgic feel with a modern, slim profile that fits perfectly on narrow ledges. Spread a thin layer of loose faux snow or white felt across the sill before placing the trees. This hides any dust on the sill and completes the winter scene.
Mixing muted tones like sage and cream keeps the display from looking like a toy store.
- Sourcing: Buy trees in bulk packs to get a variety of sizes and shades cheaply.
- Setup: Place larger trees in the back and smaller ones in front for a layered forest effect.
- Adaptation: For a colorful look, use trees in bright jewel tones like teal and magenta.
Best shortcut: Use a lint roller to quickly clean up any fallen bristles or faux snow at the end of the season.
44. Evergreen Branches in Simple Vases
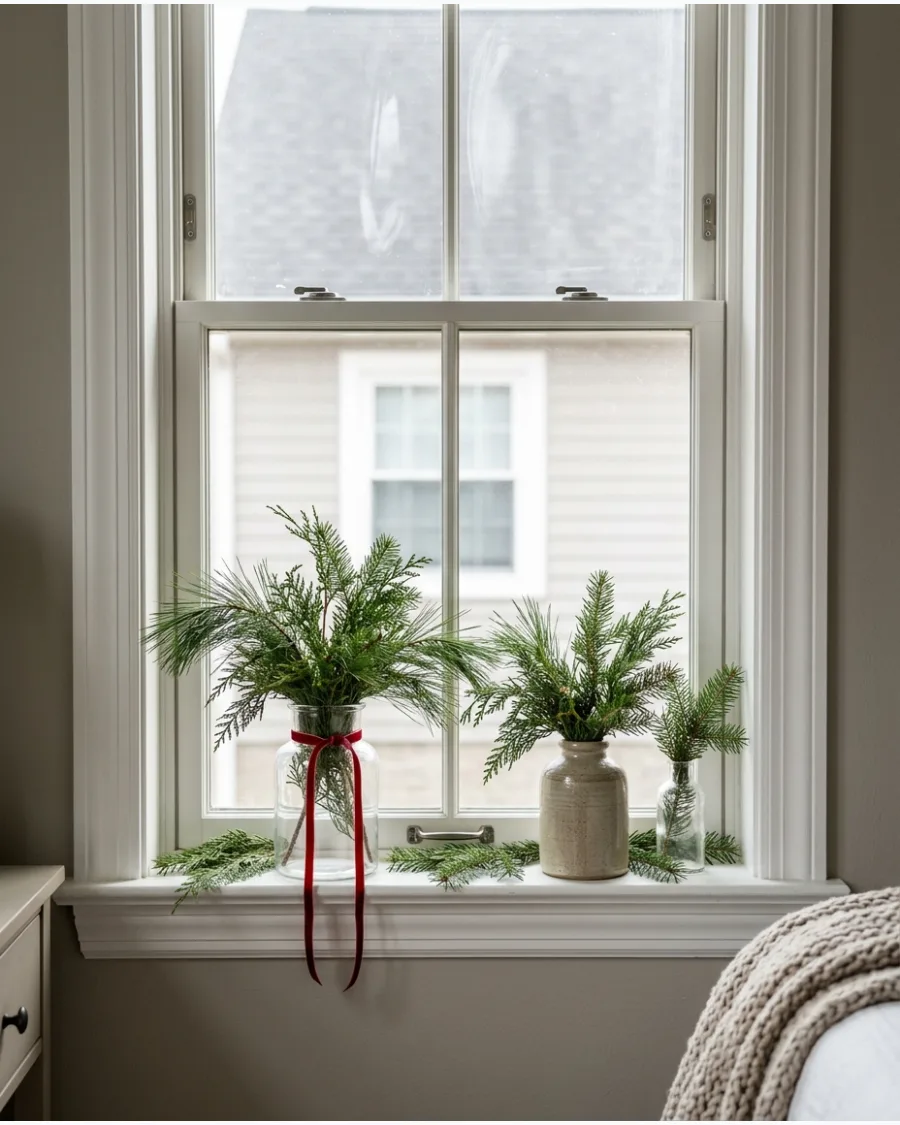
Fresh clippings from the yard are the most affordable way to bring life to a window. Use heavy-bottomed glass vases to prevent the weight of fresh branches from tipping them over. This minimalist approach lets the natural texture of the needles take center stage.
Real greenery adds a fresh scent that artificial decor just cannot match.
- Sourcing: Clip branches from your own backyard or ask for free scraps at a local tree lot.
- Setup: Strip the needles off the bottom two inches of each branch to keep the water clear.
- Adaptation: Use faux stems if you want the look to last from November through January.
Quick win: Add a drop of bleach to the water to keep the branches fresh and prevent bacteria growth.
45. Christmas Windowsill With Candles and Pinecones
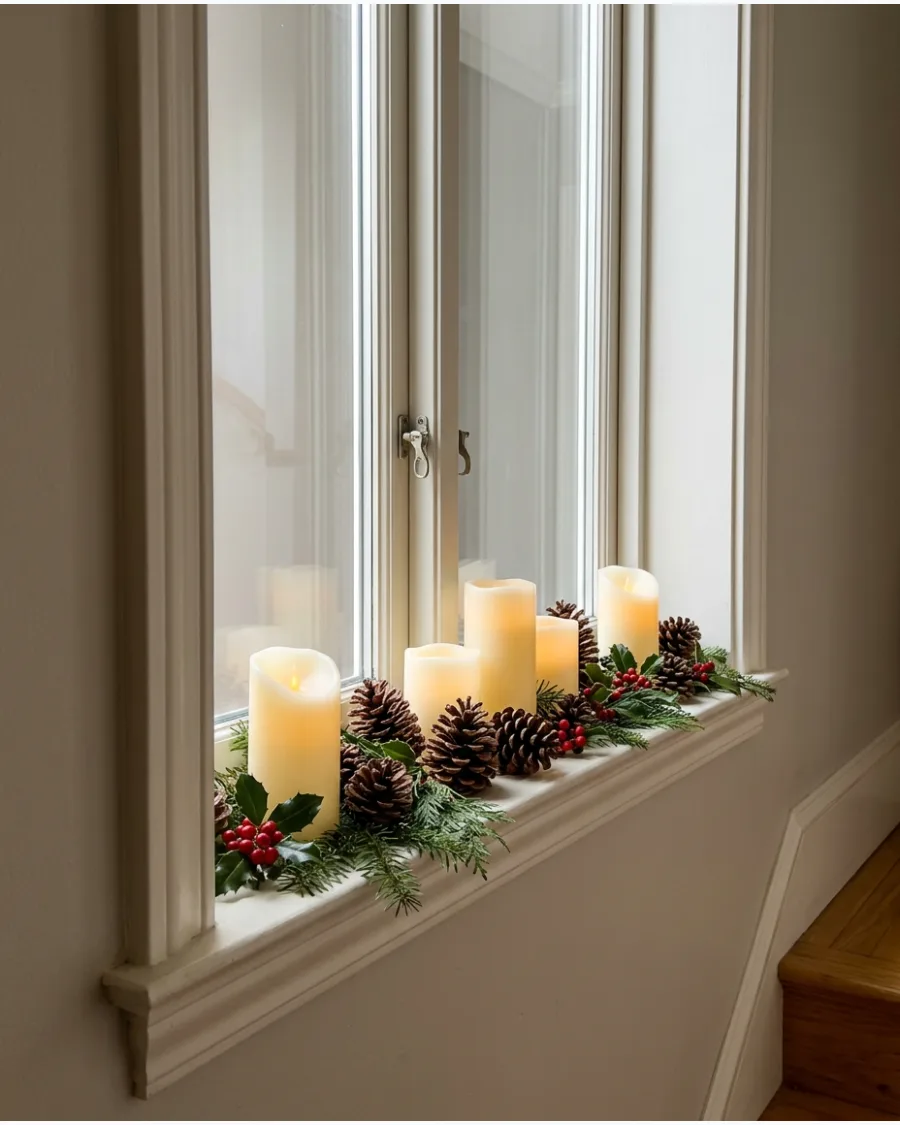
Layering natural elements with soft lighting creates a cozy, classic holiday atmosphere. Use flameless candles with built-in timers so the window lights up automatically every evening. This ensures the display is visible to neighbors without you having to remember to flip a switch.
Natural textures like pinecones bring much-needed warmth to cold glass panes.
- Sourcing: Collect pinecones from a park or buy scented versions for extra fragrance.
- Setup: Place the candles first, then tuck the pinecones around the bases to hide the plastic edges.
- Adaptation: Use LED taper candles in brass holders for a more formal dining room look.
Most people skip this: Mix different types of pinecones, like long spruce cones and round pine cones, for a more organic look.
46. Dried Orange and Evergreen Windowsill
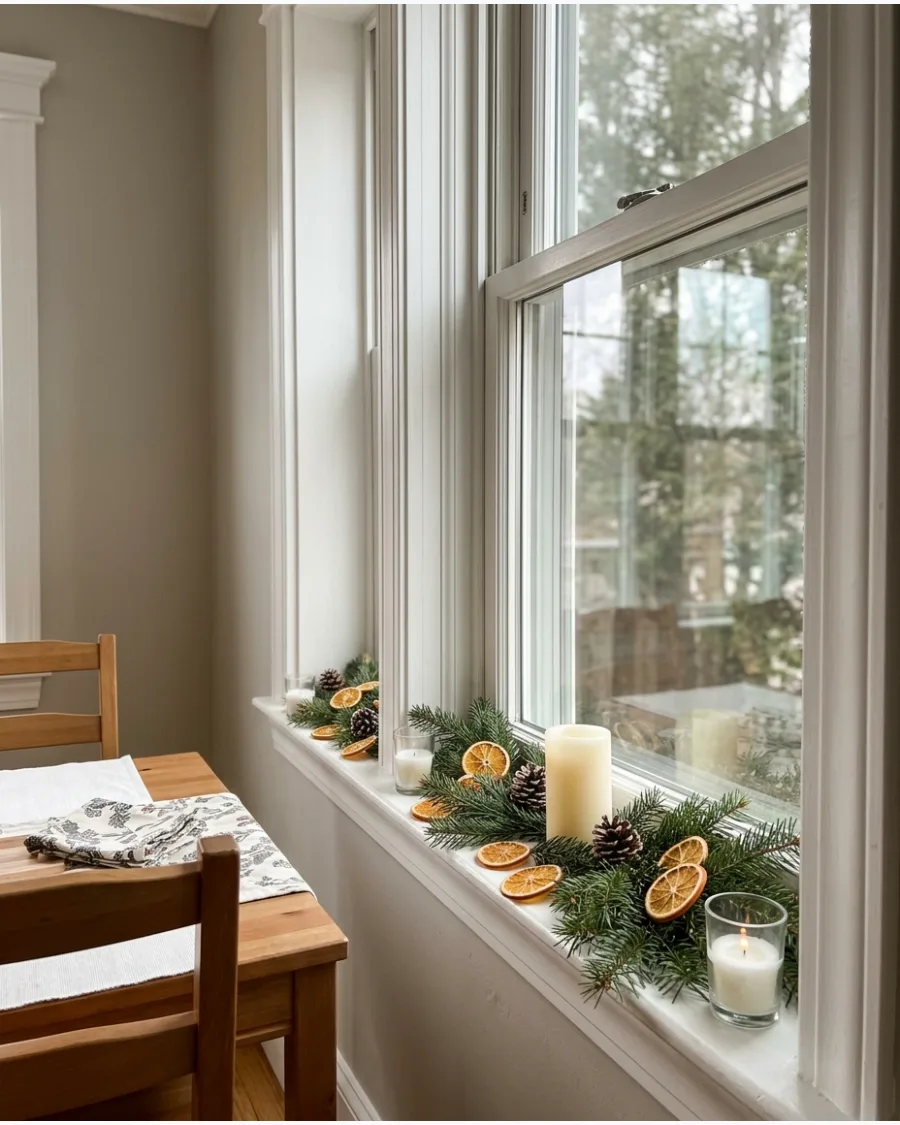
This look brings a vintage, handmade feel to the home using simple pantry items. Layer the dried orange slices over the evergreen branches to catch the sunlight during the day. The translucency of the fruit looks like stained glass when backlit by the sun.
Citrus adds a bright pop of color that stands out beautifully against dark green needles.
- Sourcing: Dry your own oranges in a low-temperature oven for a few hours for pennies.
- Setup: Lay the branches down first and nestle the orange slices in the gaps.
- Adaptation: Add cinnamon sticks tied with twine to introduce more brown tones and extra scent.
Best shortcut: Use a thin floral wire to secure the orange slices to the branches so they don't slide off.
47. Gingerbread Houses Along the Windowsill
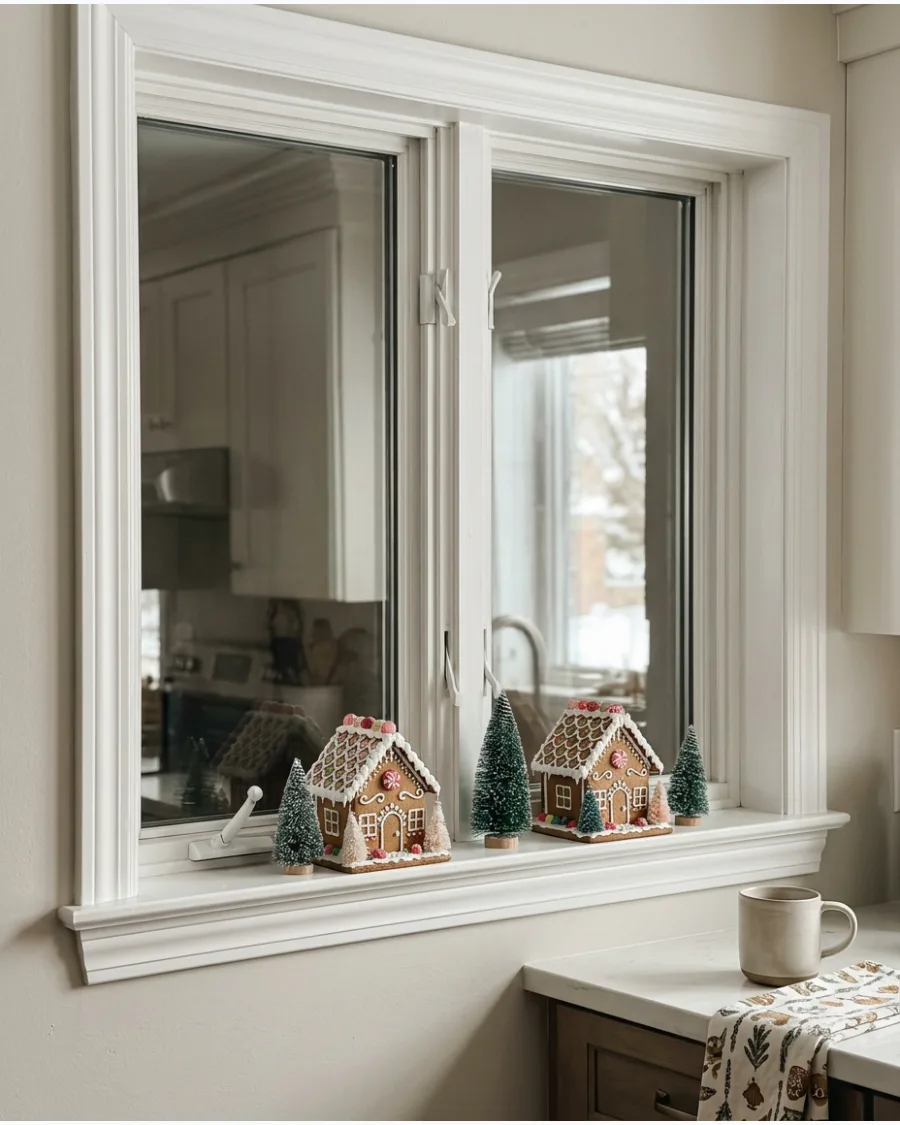
Gingerbread houses aren't just for the table; they make a whimsical addition to a kitchen window. Place these in a kitchen window where the theme matches the heart of the home. The sugary details add a playful touch that children and guests will love.
Faux gingerbread houses are a smart choice because they last forever and avoid the mess of real royal icing.
- Sourcing: Look for resin or clay gingerbread houses that can be reused every year.
- Setup: Elevate one house on a small wooden block to create different levels.
- Adaptation: If using real gingerbread, place a piece of parchment paper underneath to protect the sill.
Quick win: Surround the houses with white cotton batting to simulate soft, fluffy snow banks.
48. Neutral Christmas Village With Snowy Trees
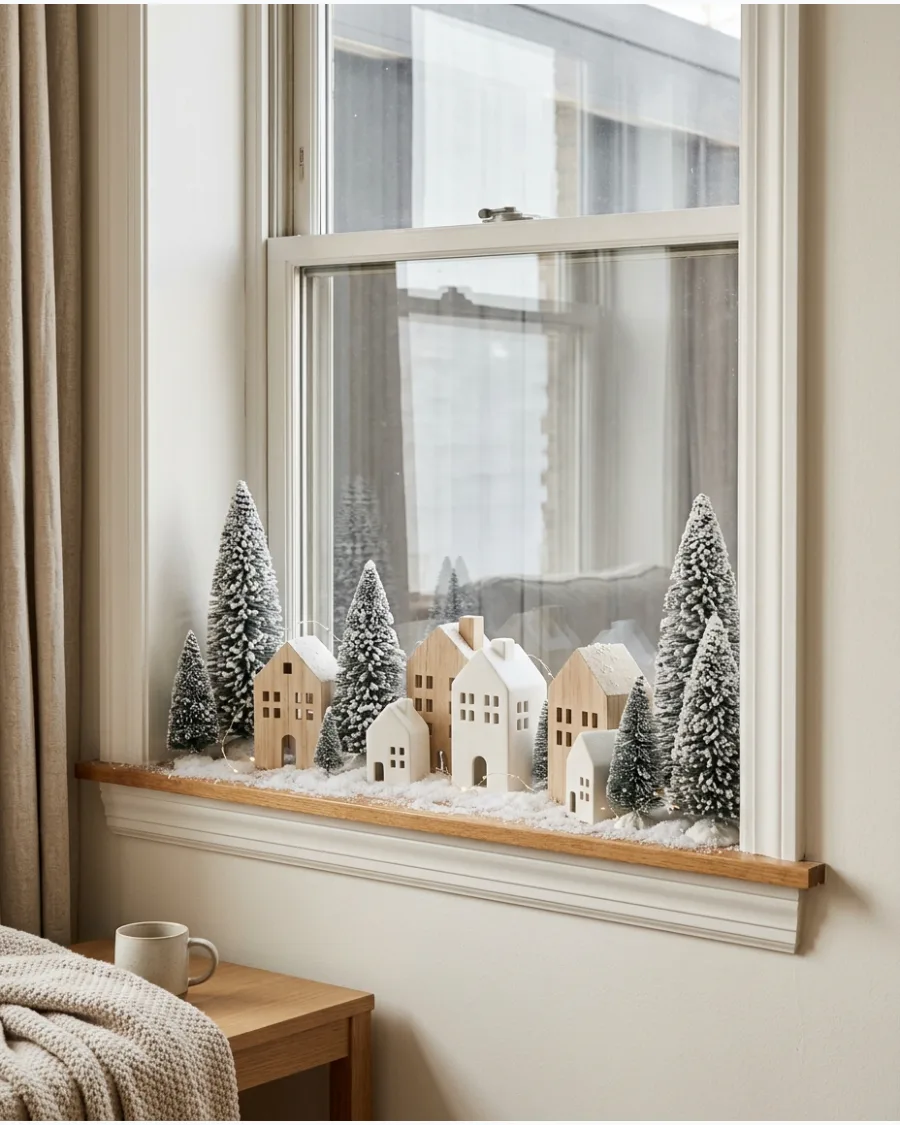
A monochromatic palette creates a calm, winter-wonderland feel that works in any room. Stick to a palette of white and cream for a sophisticated, calming effect. This prevents the decor from clashing with existing furniture or wall colors.
Flocking adds a soft texture that makes even inexpensive plastic trees look high-end.
- Sourcing: Flocked trees are available at most craft stores during the holiday season.
- Setup: Use a faux fur runner to ground the display and add a cozy texture to the sill.
- Adaptation: Add silver or gold accents if you want a bit of holiday sparkle without adding color.
Most people skip this: Use warm white LEDs rather than cool white to keep the neutral tones looking cozy instead of sterile.
49. Red Poinsettias on the Windowsill
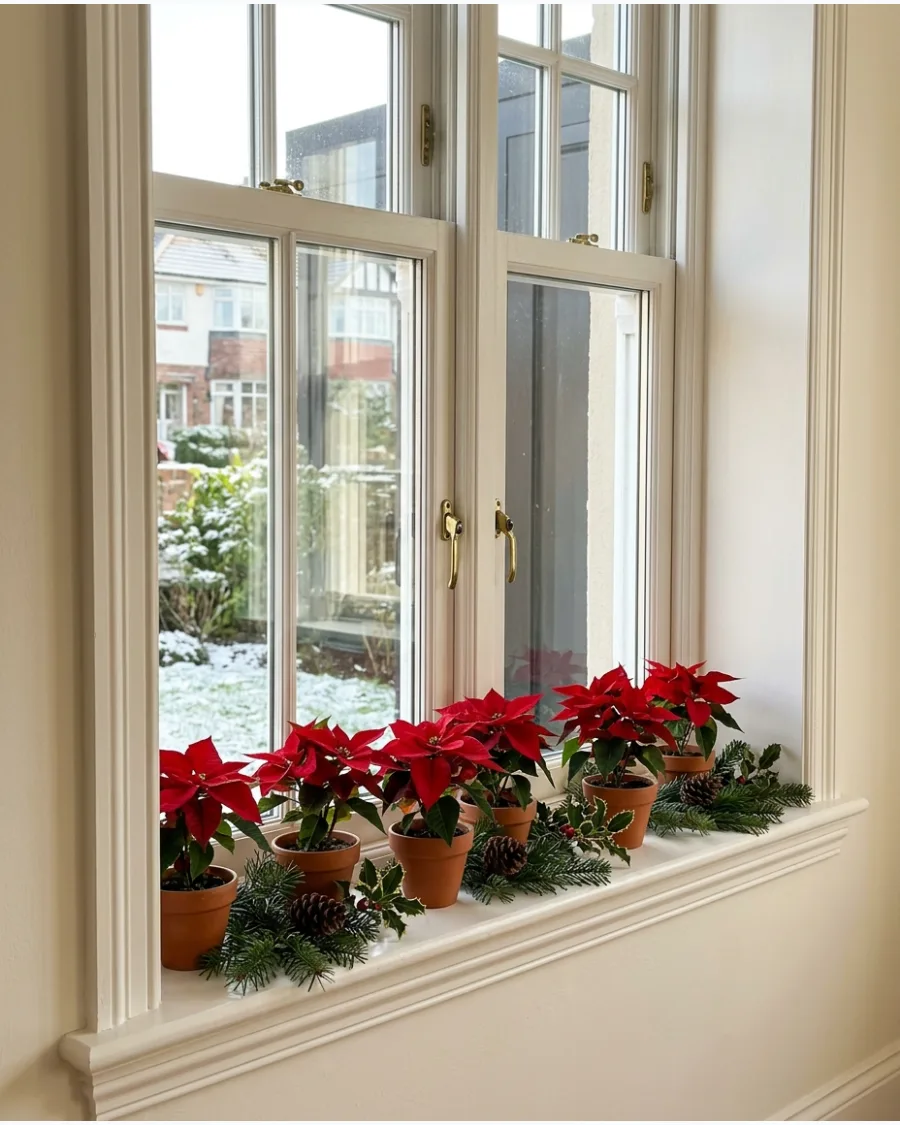
Nothing says traditional Christmas like the vibrant red of a poinsettia. Group three to five small pots together for a high-impact color block. This fills the space more effectively than spacing them out too thinly.
Poinsettias are the easiest way to get traditional Christmas red without buying plastic ornaments.
- Sourcing: Small poinsettias are widely available at grocery stores for a low price in December.
- Setup: Keep them in their plastic nursery pots and drop them into decorative ceramic planters.
- Adaptation: Use white poinsettias for a softer, more modern look in a neutral room.
Best shortcut: Water them only when the soil feels dry to the touch to keep the leaves from dropping early.
50. Vintage Christmas Figurines on the Windowsill
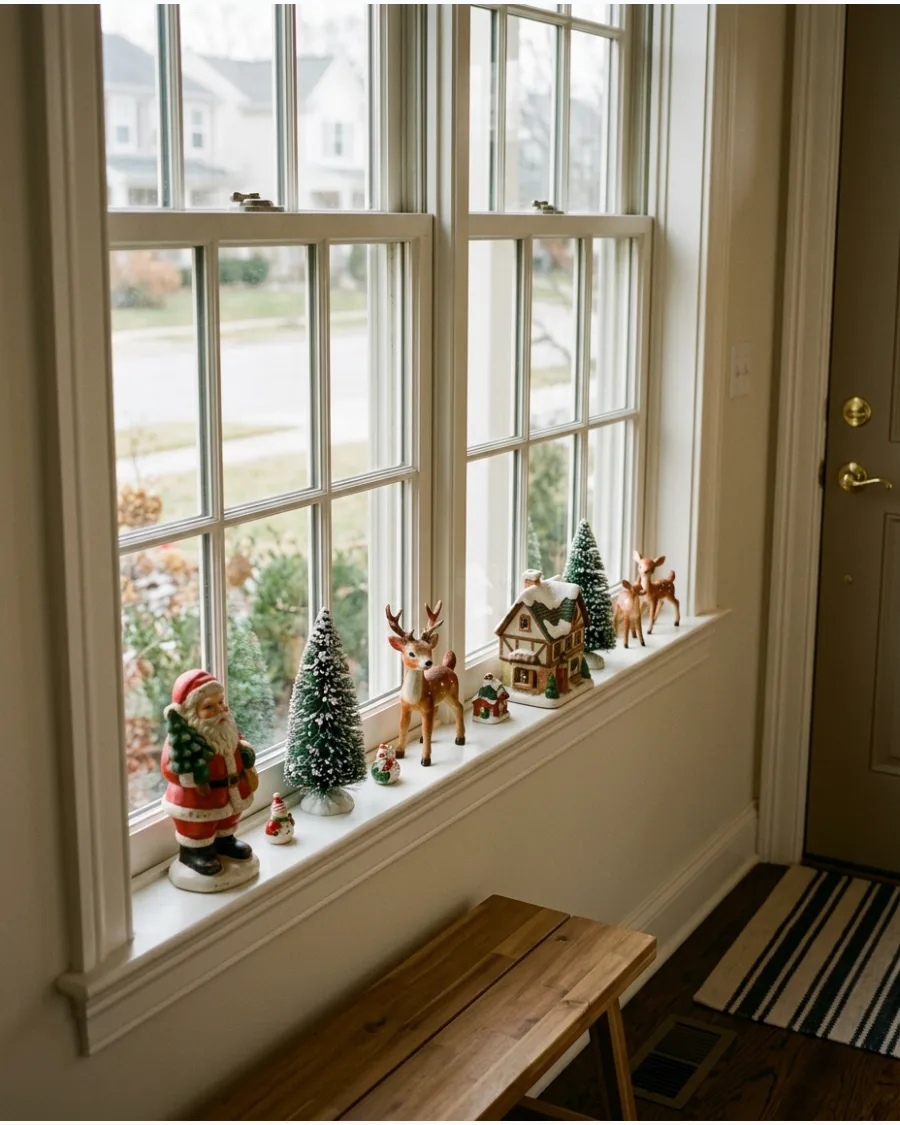
Using storied pieces adds character and a sense of history to your holiday windows. Space the figurines at least four inches apart to let each unique piece stand out. This avoids a cluttered look and lets the detail of each figure be seen.
Using heirlooms or vintage finds gives the window a story that store-bought kits often lack.
- Sourcing: Shop antique malls, thrift stores, or online marketplaces for authentic mid-century pieces.
- Setup: Place the tallest figure near the frame to frame the view properly.
- Adaptation: If you don't have antiques, look for 'reproduction' figurines that have a distressed finish.
Quick win: Place a small mirror behind the figurines to reflect the light and make the display look twice as deep.
NATURAL, TRENDING AND STYLED CHRISTMAS WINDOWS
51. Dried Orange Garland Across the Window
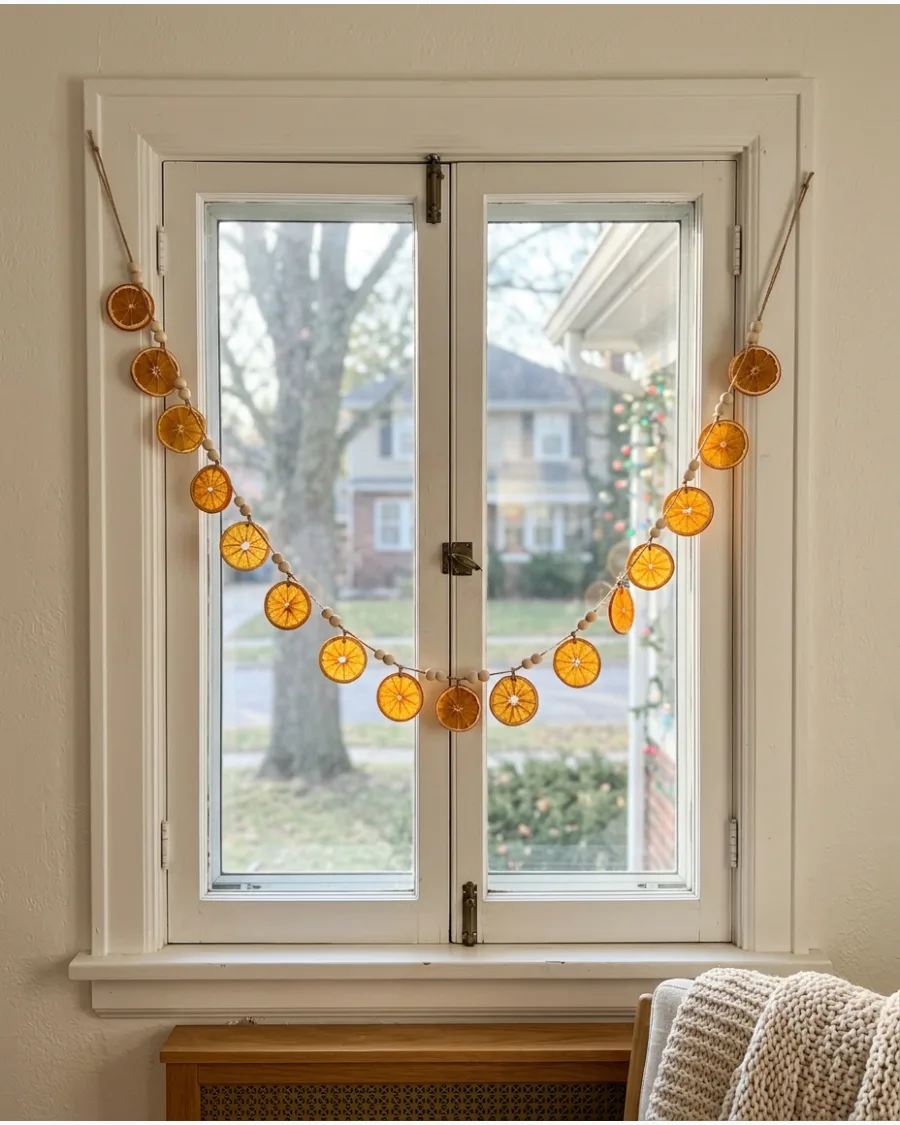
Stringing dried orange slices with wooden beads or cinnamon sticks creates a warm and natural holiday look. Loop the garland over small suction cup hooks on the glass to avoid using nails in the window frame. The natural sunlight coming through the window makes the citrus slices glow like stained glass.
This organic style feels much more high-end than plastic tinsel.
- Dry orange slices in a low-temperature oven for three hours until they are firm.
- Use clear fishing line instead of twine if you want the fruit to look like it is floating.
- Add dried bay leaves or eucalyptus between the oranges for an extra scent boost.
Quick win: Slice the oranges very thin to ensure they are translucent when the sun hits the window.
52. Vintage Christmas Window With Velvet Bows
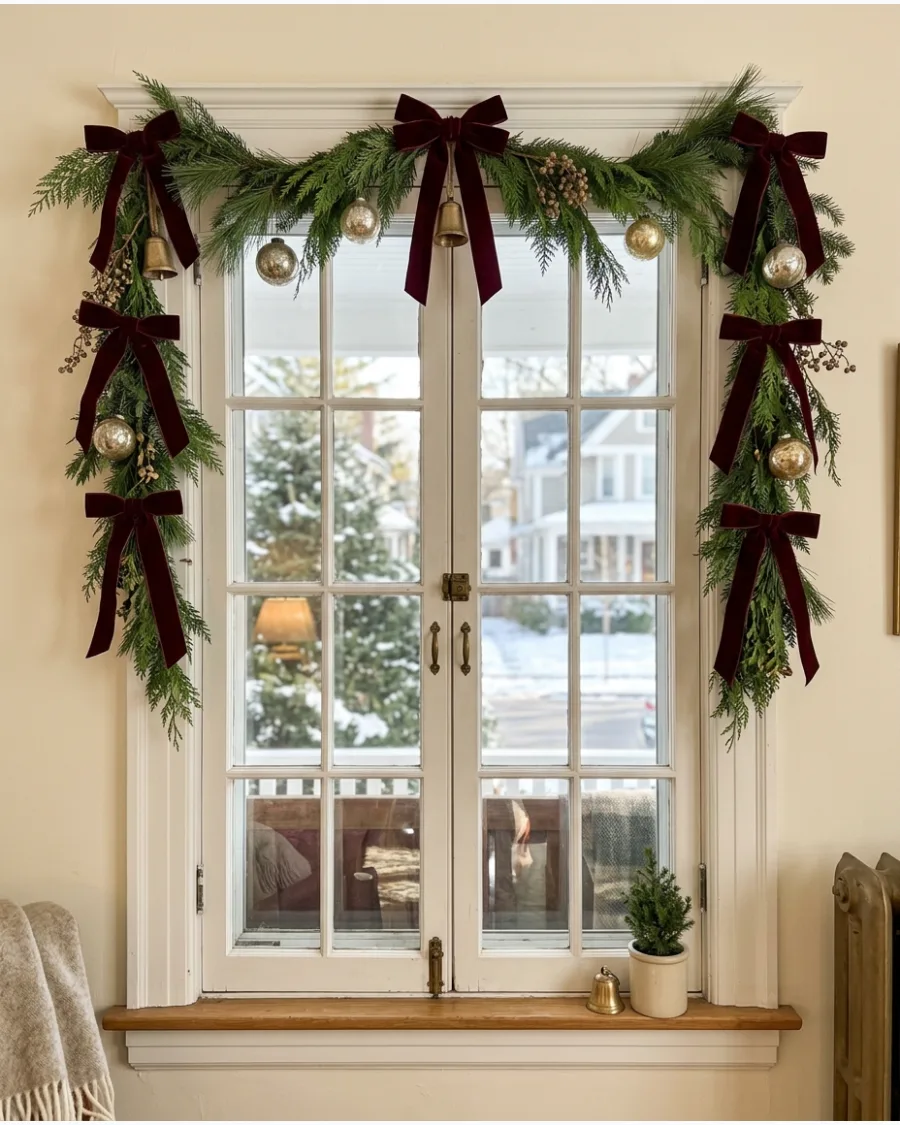
Combine evergreen branches with antique-style brass bells and deep burgundy velvet bows for a nostalgic feel. Secure thick velvet ribbons to the top of the window casing with small upholstery tacks for a secure hold that won't slip. Mixing the heavy fabric with fresh greenery makes the window look collected over time.
This traditional look works perfectly in older homes with thick wood trim.
- Buy velvet ribbon by the roll at craft stores to save money on large windows.
- Space the bows evenly or place one large one at the very top center for symmetry.
- Use floral wire to attach the bells to the ribbon so they hang at different lengths.
Most people skip this: Steam your velvet ribbon before hanging it to remove any creases from the spool.
53. Scandinavian Christmas Window in White and Natural Wood
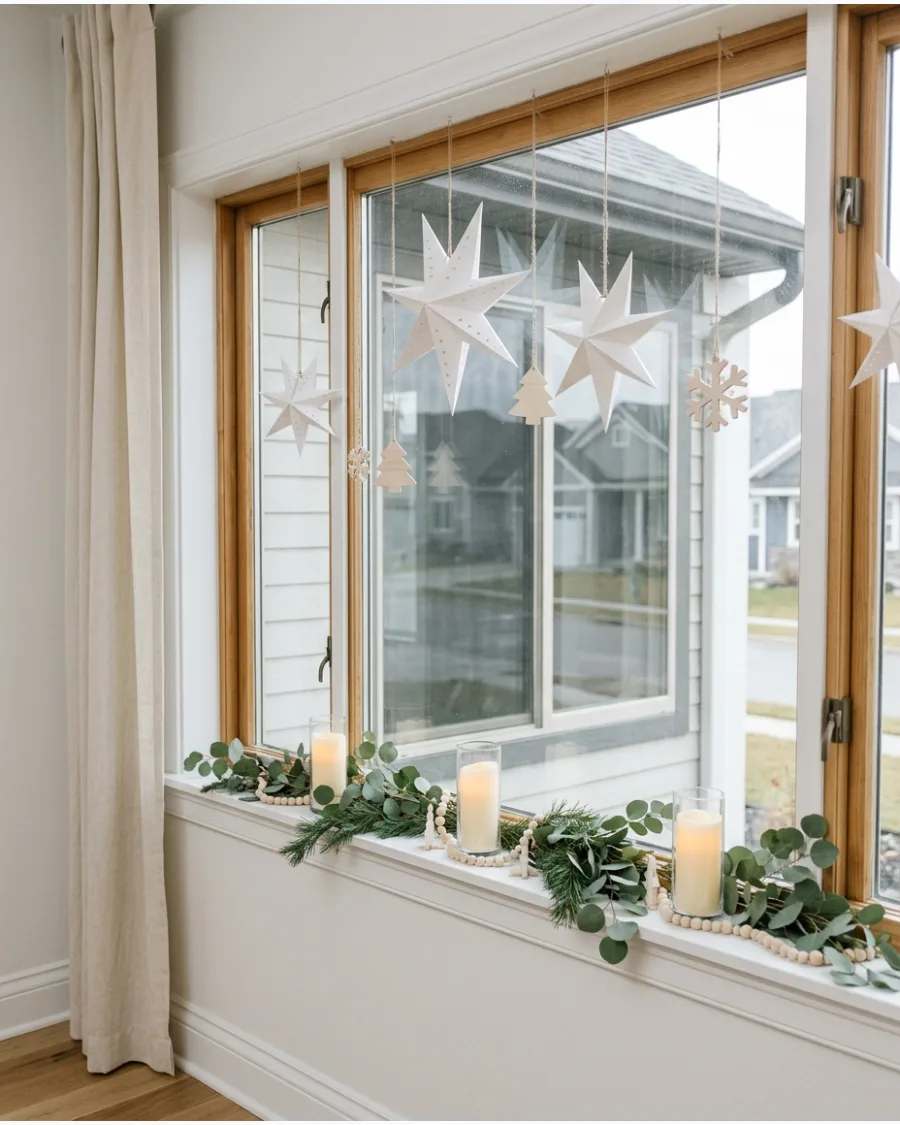
Decorate with white paper stars and pale wood ornaments to achieve a clean Nordic aesthetic. Hang different sizes of white paper stars at staggered heights to create a layered look that fills the window without feeling cluttered. Keeping plenty of empty space around the decorations is the secret to this style.
It creates a peaceful atmosphere that looks great during the day and night.
- Look for foldable 3D stars that can be easily stored flat after the holidays.
- Use battery-operated LED tea lights inside the stars for a soft evening glow.
- Stick to a monochrome palette of white and light wood to keep the look cohesive.
Best shortcut: Use clear adhesive cord clips on the top of the window frame to hang stars without tangling the strings.
54. Blue and White Christmas Window
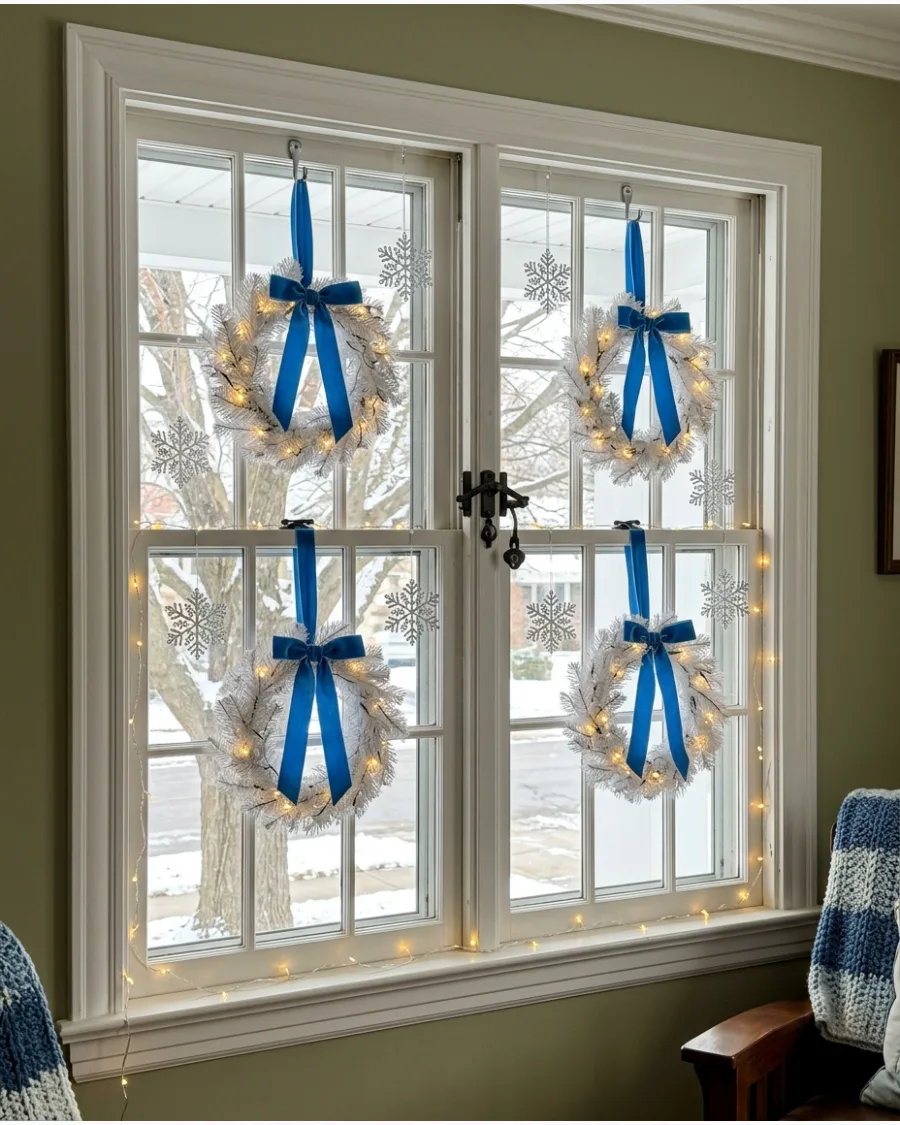
Use blue velvet ribbons and silver snowflakes to create a cool, icy window display. Mix silver snowflake ornaments with white-painted wreaths to brighten up a dark window frame and add depth. This color palette is a sophisticated alternative to traditional red and green.
It feels crisp and clean, especially when paired with cool-white fairy lights.
- Sourcing navy or dusty blue ribbon online is usually easier than finding it in local stores.
- Use white floral wire to blend into the wreath for a seamless look.
- Add a strand of cool-white LED lights to mimic the look of ice and snow.
Quick win: Use various shades of blue ribbon to add more visual interest to a single window.
55. Burgundy and Gold Christmas Window
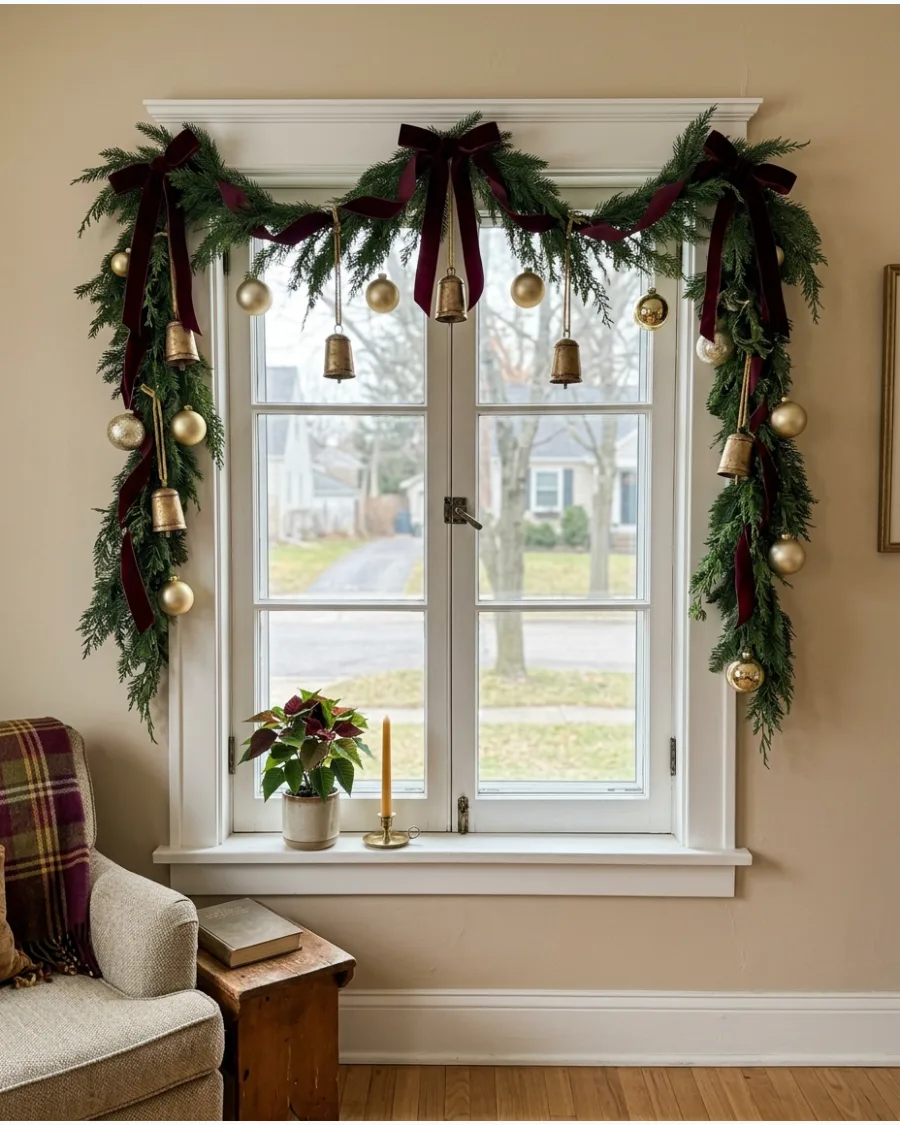
Deep burgundy and gold create a rich, high-end holiday look that feels more mature than bright red. Wind a gold-beaded strand through a thick evergreen garland to catch the light from indoor lamps and create a shimmering effect. This combination looks best when you use high-quality faux greenery that has a realistic texture.
The gold accents provide a warm contrast to the dark jewel tones.
- Use heavy-duty command hooks rated for five pounds to support the weight of a thick garland.
- Tuck in gold-painted pinecones to fill any gaps in the greenery.
- Choose matte gold finishes for a more modern and subtle look.
Most people skip this: Fluff the garland needles outward and upward before hanging to double the perceived volume.
56. Modern Minimalist Evergreen Window
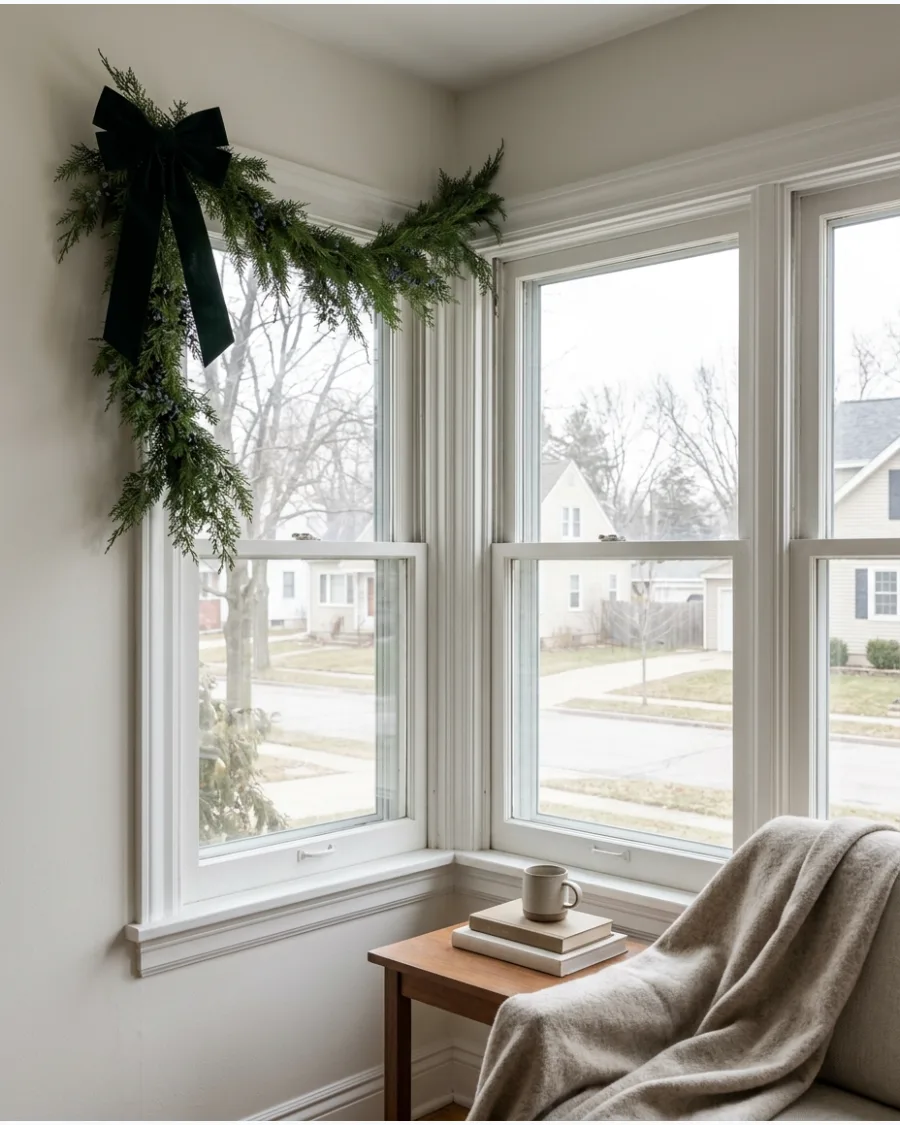
For a contemporary look, focus the decor on just one part of the window rather than the whole frame. Drape a single long branch of eucalyptus or pine over one top corner of the window for a sleek and intentional touch. Leaving most of the glass uncovered allows for maximum natural light.
This approach is perfect for smaller windows or modern apartments where space is limited.
- Choose long-lasting greenery like eucalyptus or cedar that looks good even when it dries.
- Use one focal point, like an oversized bell or a single bow, to anchor the branch.
- Secure the branch with a single clear adhesive hook hidden behind the leaves.
Best shortcut: Use a small piece of green floral wire to shape the branch so it follows the curve of the window frame.
OUTDOOR CHRISTMAS WINDOW DECORATING IDEAS
57. Evergreen Christmas Window Box With Red Berries
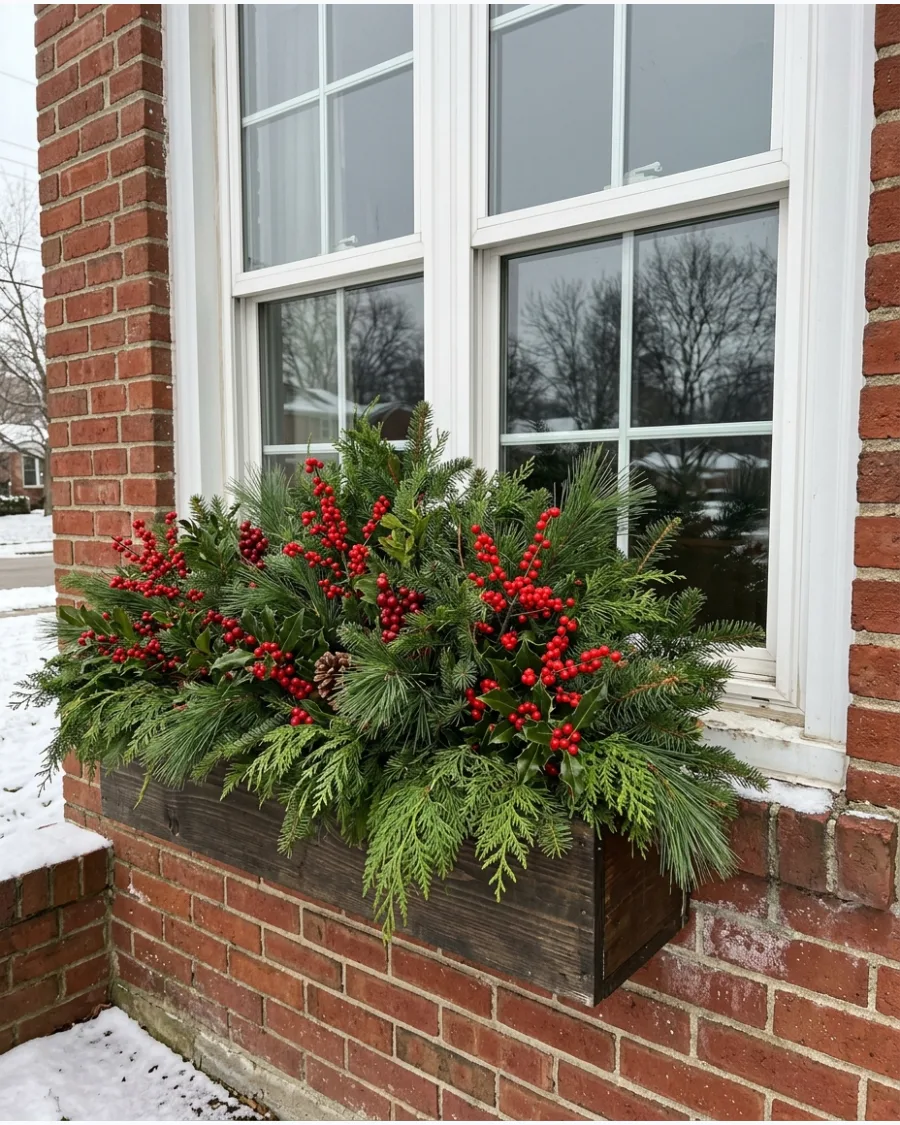
Transform your outdoor window boxes with a mix of cedar, pine, and fir branches for a lush winter look. Push the evergreen stems deep into the soil or floral foam to ensure the greenery stays upright during winter wind and snow. Adding bright red berry branches provides a pop of color that is visible from the street.
This is the fastest way to boost your home's curb appeal for the holidays.
- Buy faux berries for the outdoors so they don't shrivel or get eaten by birds.
- Mix at least three different types of greenery to create a professional, textured look.
- Water the soil once after planting real greens to help them freeze in place and stay hydrated.
Quick win: Angle some branches to spill over the front of the box to hide the container and create a cascading effect.
58. Lighted Christmas Window Box With Ornaments
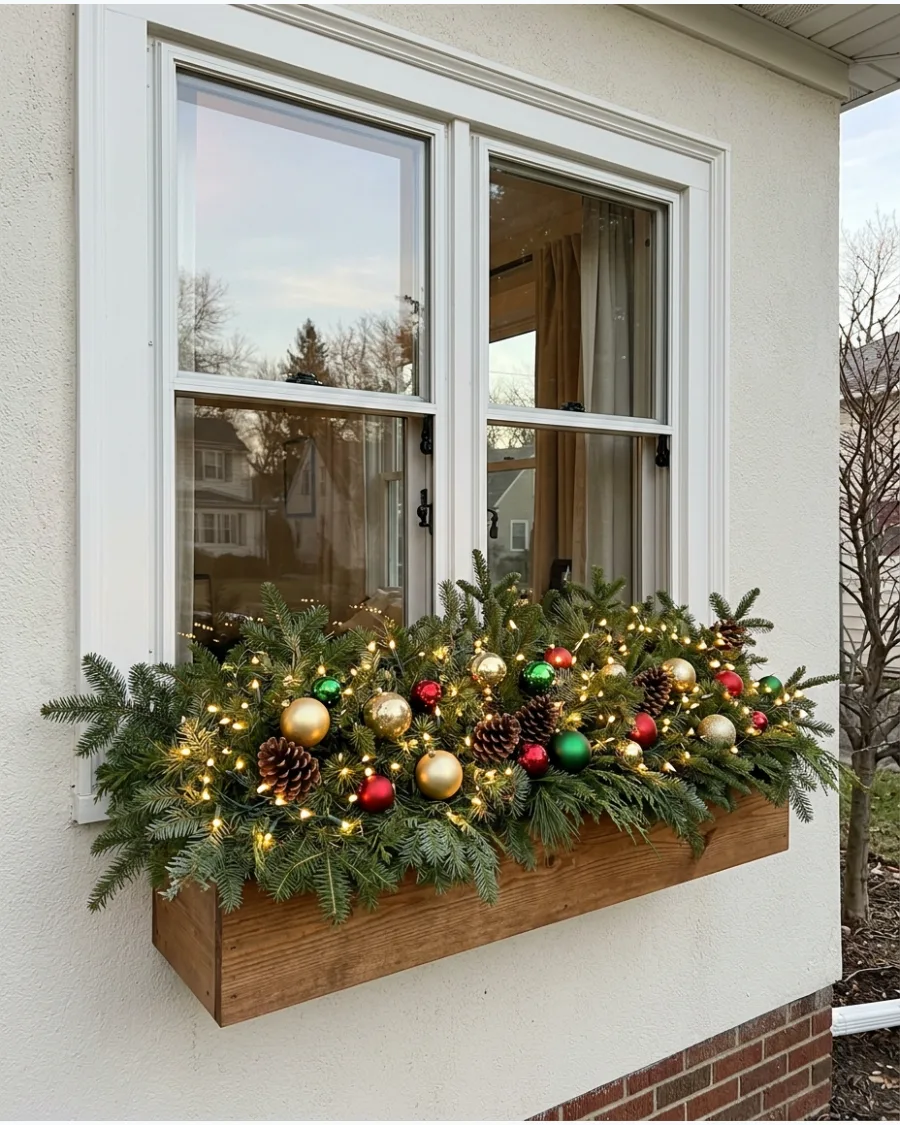
Make your window boxes glow after dark by adding lights and shatterproof ornaments. Tuck battery-operated outdoor lights under the greenery to make the ornaments sparkle and illuminate the house exterior. Using different sizes of ornaments adds variety and catches the light from different angles.
It creates a festive and welcoming look for anyone driving by your home.
- Only use shatterproof plastic ornaments to prevent breakage from freezing temperatures.
- Look for waterproof battery boxes with built-in timers to save energy.
- Intersperse large pinecones to fill space and add a natural element to the display.
Most people skip this: Use a timer set to six hours so the lights turn on at dusk and off before you go to bed.
59. Outdoor Window Wreath and Garland Combination
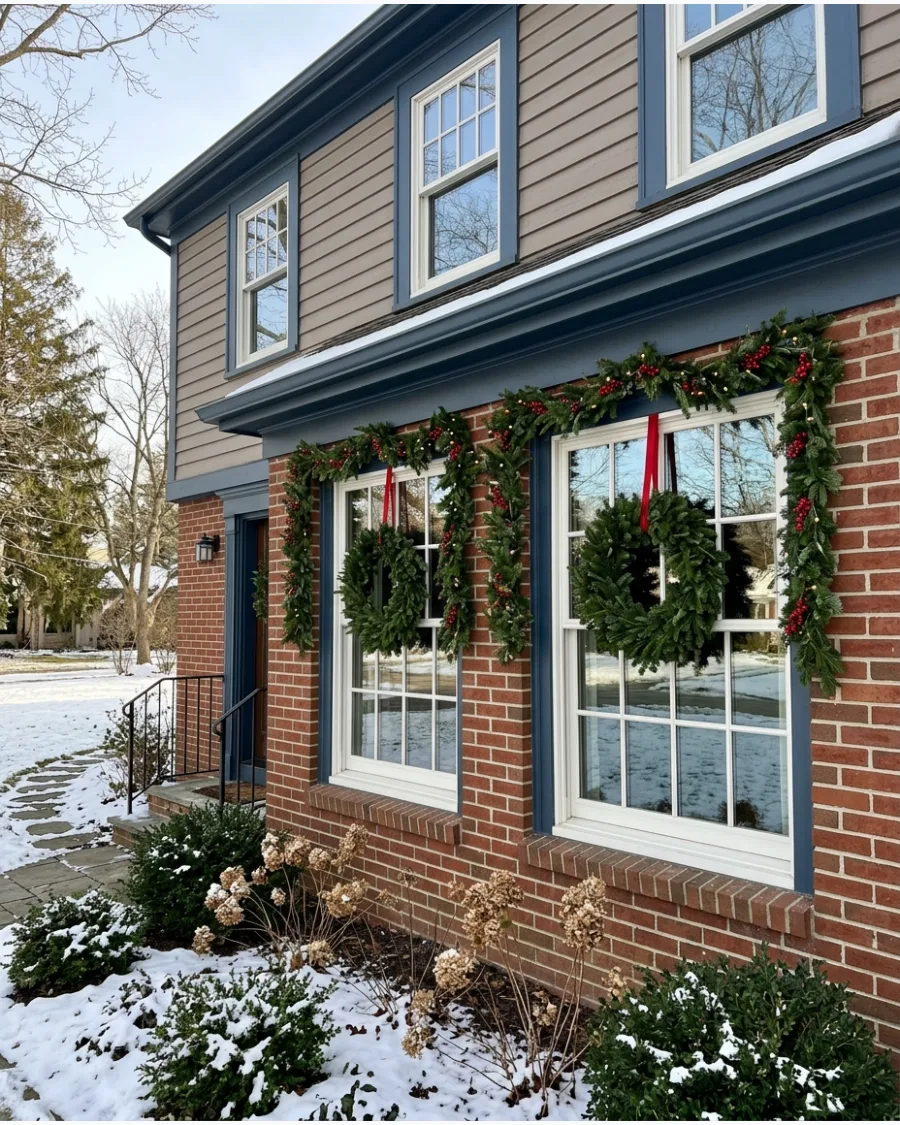
Hanging a wreath on the glass and framing it with garland creates a high-impact look for the front of your house. Use a heavy-duty suction hook rated for outdoor weight to keep the wreath centered on the glass without using wires. This double-layered approach looks very professional and polished.
Repeating this design on every front-facing window makes the whole house look cohesive.
- Measure the width of your window before buying garland to ensure it reaches the bottom of the frame.
- Use green zip-ties to secure the garland to window railings or shutter hinges.
- Match the greenery of the wreath to the garland for a unified appearance.
Best shortcut: If you have double-hung windows, you can sometimes loop a thin wire over the top sash to hang the wreath securely.
60. Christmas Window Box With Mini Trees and Oversized Bow
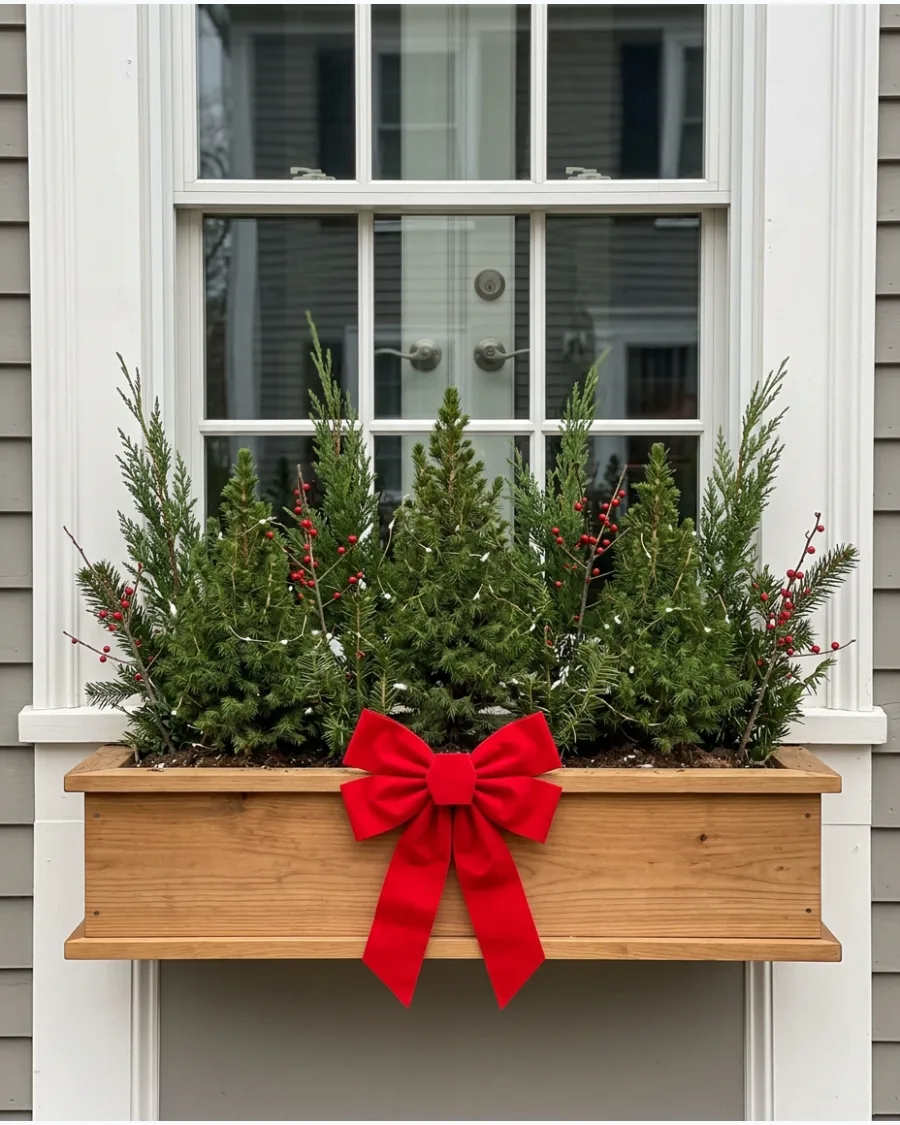
Placing small evergreen trees in a window box creates a miniature forest look that is very structured and tidy. Place three small potted evergreens in the window box and tie one large red bow in the center to anchor the design. This height adds drama to the window without blocking the view from inside.
It is an organized way to decorate that looks great all winter long.
- Use weather-resistant velvet or plastic ribbon for the bow so it doesn't limp in the rain.
- Secure the pots inside the box with bricks or heavy stones to prevent them from tipping over.
- Add a few subtle white lights to the mini trees to make them stand out at night.
Quick win: Use different heights of mini trees, with the tallest in the center, for a more balanced and professional look.
Frequently Asked Questions
How do I hang wreaths on windows without using nails?
You can easily secure wreaths using heavy-duty suction cups or clear adhesive hooks designed for glass surfaces. Another elegant option is to loop a festive ribbon over the top of the window sash and secure it on the interior side for a classic look.
How can I make my window decor look good from the outside?
Focus on using larger items and bright lights so the display is visible from the street, and ensure any wires are neatly tucked away. Choosing double-sided decorations or wrapping the 'back' of items in greenery ensures your home looks polished from both the sidewalk and your living room.
What are the best ways to decorate a window sill for Christmas?
Layer items of varying heights, such as flameless candles and miniature trees, to create depth and visual interest. Be sure to keep the arrangement slim enough so that the window remains functional and the decor doesn't interfere with your curtains or blinds.
How do I decorate windows that have blinds or shutters?
Utilize the top of the window frame or the blind header to hang lightweight garlands and ornaments without obstructing the hardware. You can also weave thin ribbons or small sprigs of greenery through the slats to add festive cheer while keeping your window treatments fully operational.
Are window candles safe to leave on all night?
LED window candles are perfectly safe to leave on overnight because they produce no heat and eliminate the risk of fire. Choosing models with built-in timers is a practical way to ensure your home stays glowing for curb appeal without needing to manually toggle them every evening.