60 Christmas Decorating Ideas Above Kitchen Cabinets

This post may contain affiliate links: full affiliate disclosure.
Decorating the space above kitchen cabinets turns a forgotten dust-trap into a festive focal point. This high-up area is perfect for adding seasonal cheer without sacrificing valuable counter space for cooking and prep.
GREENERY AND GARLAND ABOVE KITCHEN CABINETS
1. Simple Evergreen Garland Above the Cabinets
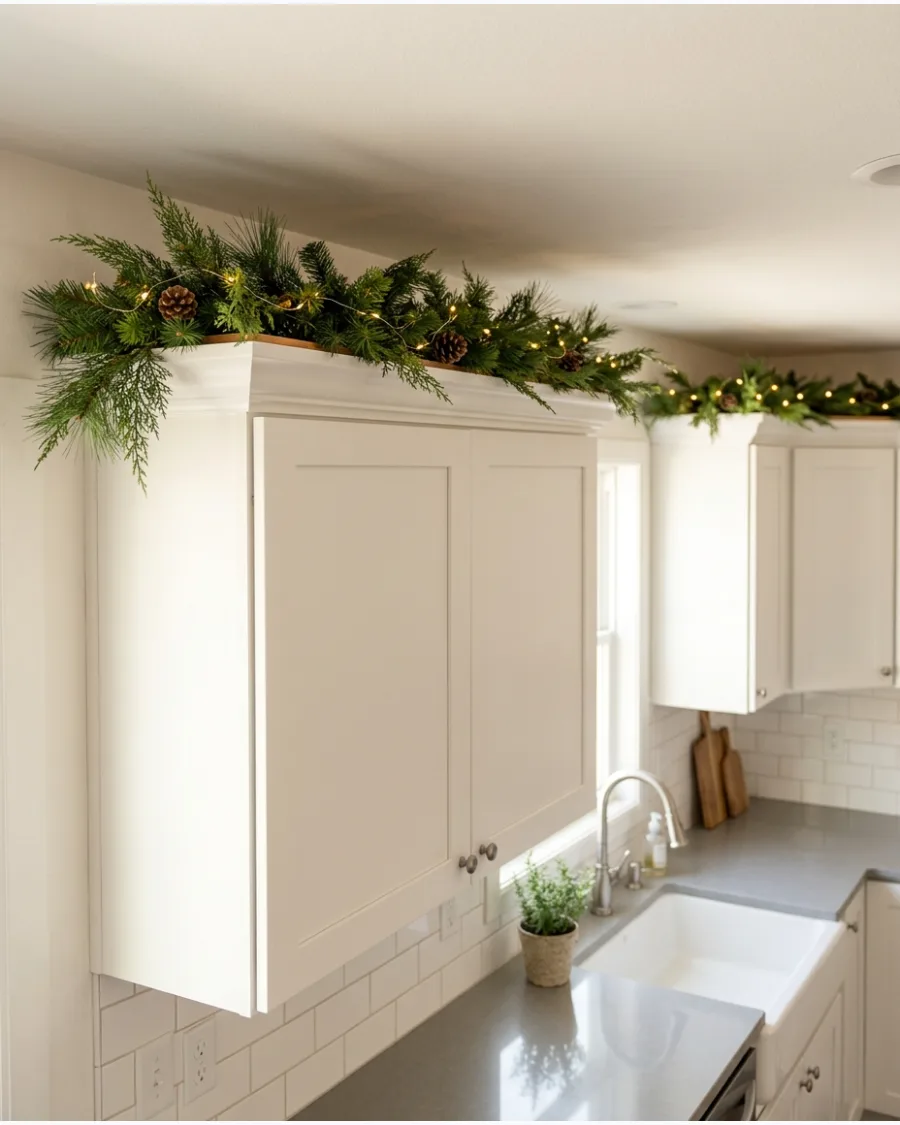
Laying a realistic pine or cedar garland across the top of the cabinets fills the vertical gap with a classic holiday feel. This approach keeps the kitchen functional because nothing touches the workspace below.
Measure the length of the cabinet run before buying to ensure the greenery spans the entire surface without gaps. Use a garland with a wire core so it stays exactly where it is placed.
- Buy 6-foot or 9-foot artificial pine garland.
- Lay the garland flat and fluff the branches toward the front.
- Works for any kitchen size or ceiling height.
Quick win: Use Command clips on the cabinet tops to keep the garland from sliding forward over time.
2. Layered Pine and Cedar Greenery
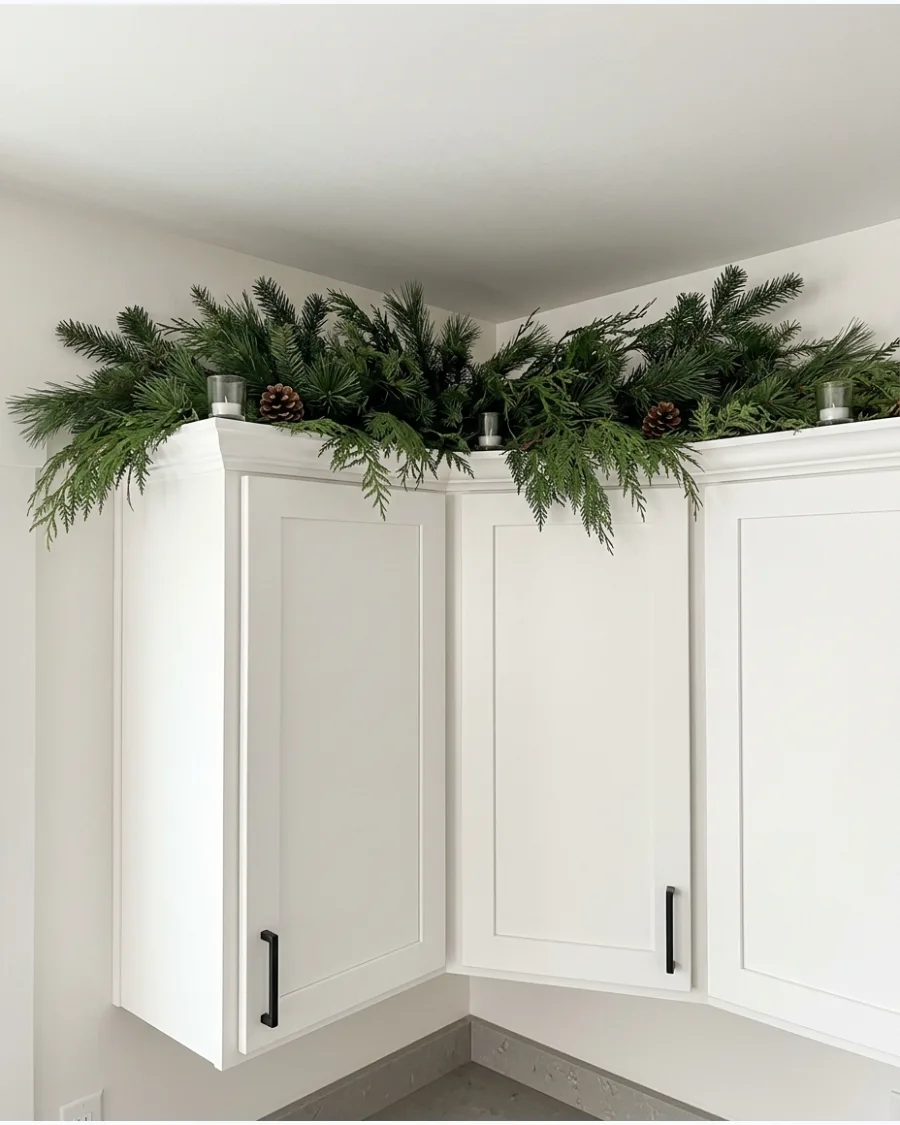
Mixing different evergreen textures creates a high-end look that feels more authentic than using a single material. Combining the stiff needles of pine with the soft, draping fronds of cedar adds immediate depth.
Weave the two different garlands together on the floor before lifting them into place above the cabinets. This method prevents the decor from looking thin or sparse against a tall ceiling.
- Combine two different 6-foot garlands.
- Intertwine the stems every 12 inches for a secure bond.
- Great for kitchens with high ceilings that need more visual weight.
Most people skip this: Fluff the branches in different directions to hide the plastic stems and create a 3D effect.
3. Cascading Cedar at the Cabinet Ends
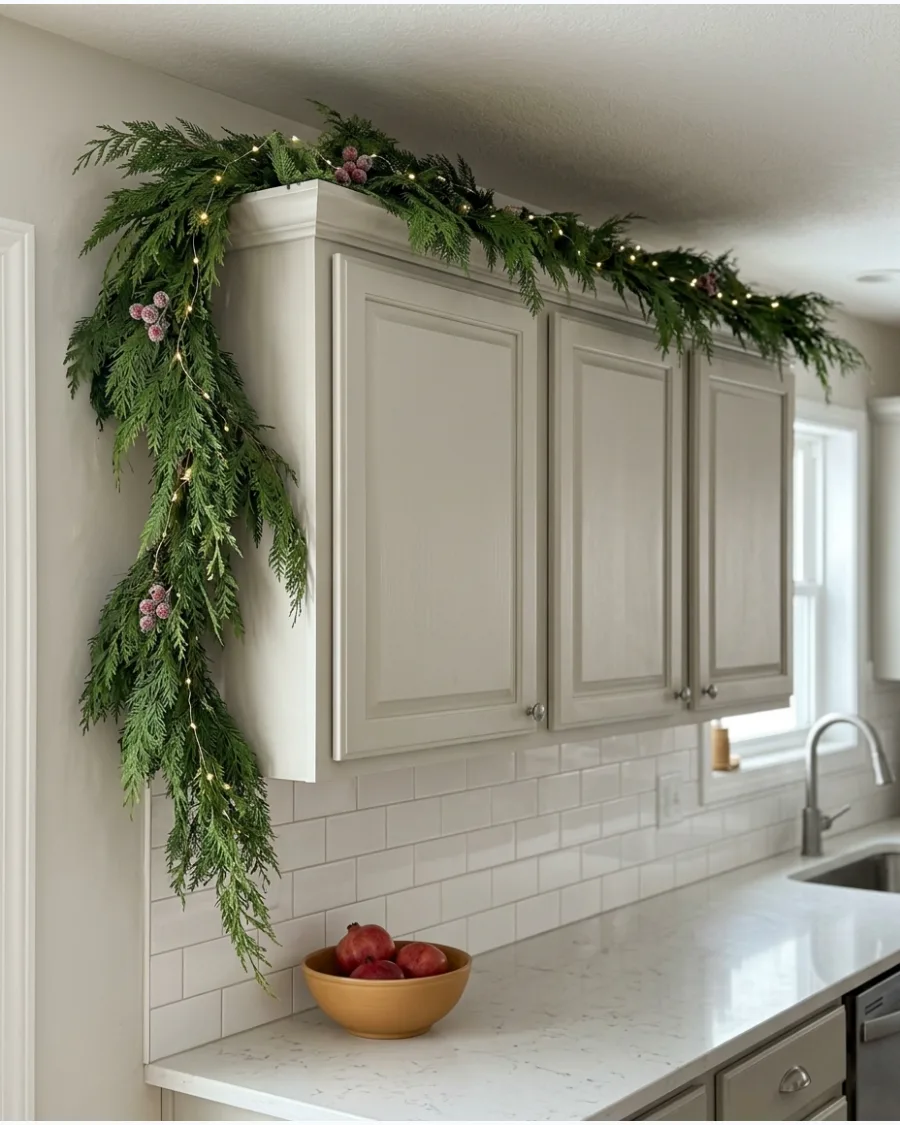
Allowing the ends of a cedar garland to spill over the sides of the cabinetry adds a soft, organic movement to the room. This technique draws the eye upward and makes the kitchen feel taller and more elegant.
Secure the garland at the very edge of the cabinet with a small weight or clip to prevent it from slipping. It creates a finished look that feels intentional rather than just tucked away.
- Select a draping cedar or cypress garland.
- Let 6 to 10 inches hang over the edge for the best scale.
- Ideal for open-end cabinets that do not meet a wall.
Best shortcut: Use a small piece of floral wire to shape the drip of the greenery so it looks naturally heavy.
4. Garland With Pinecones and Berries
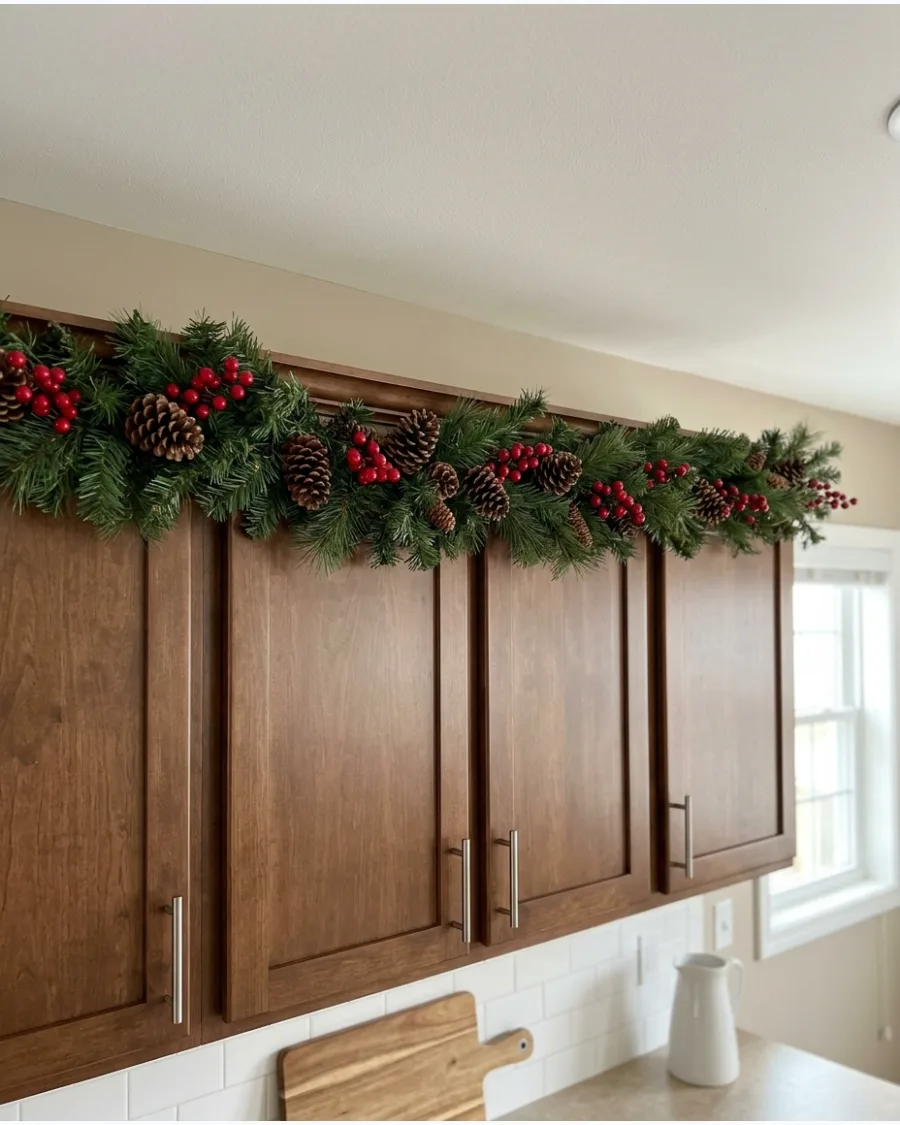
Adding pinecones and red berries to a standard garland provides pops of color and texture without needing extra ornaments. These natural elements break up the solid green line and add a traditional holiday warmth to the space.
Space the berry clusters evenly every two feet to maintain a balanced look across the entire cabinet run. It is an easy way to get a decorated look with very little effort.
- Use pre-decorated garland or separate floral picks.
- Tuck the berry stems deep into the greenery to hide wires.
- Classic look for traditional or transitional kitchens.
Quick win: If the berries are too shiny, a quick spray of matte sealer makes them look much more realistic.
5. Flocked Greenery Above White Cabinets
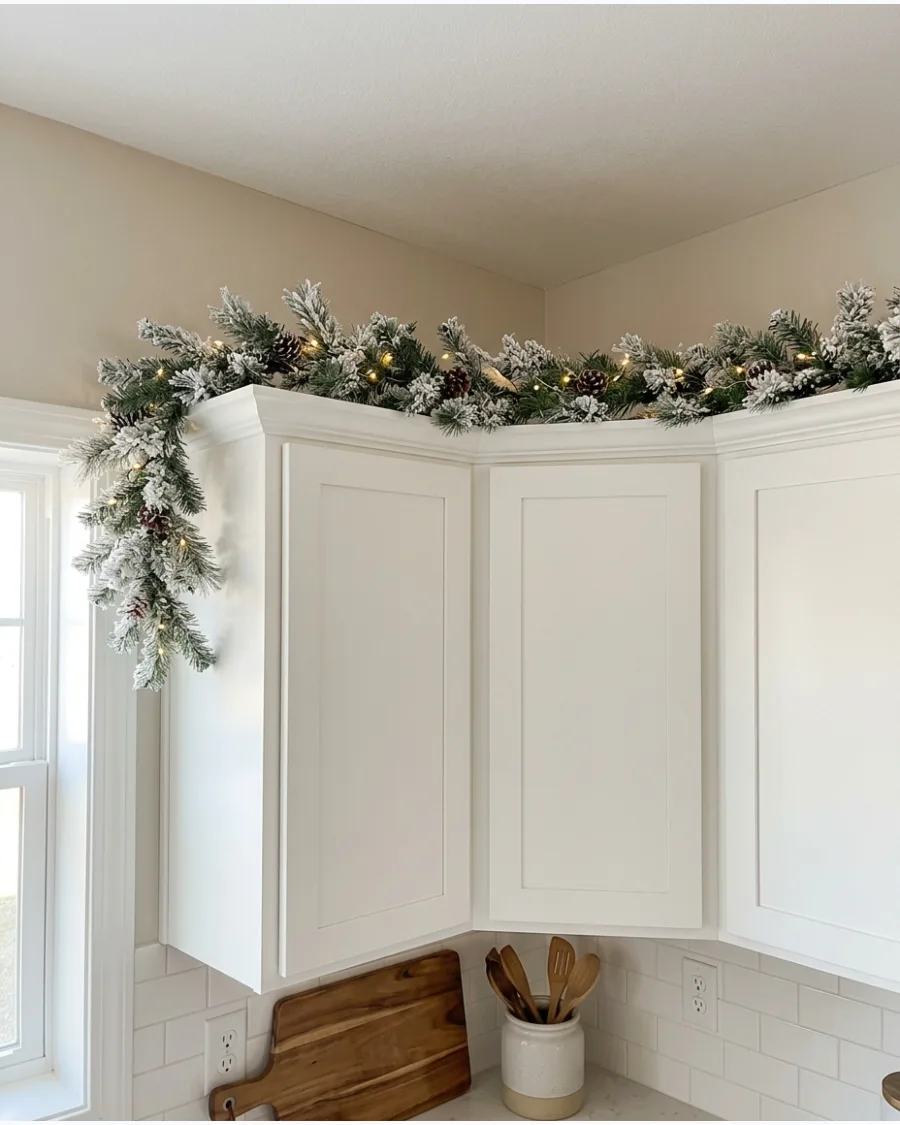
Lightly snow-dusted greenery looks stunning against white or cream cabinets for a cohesive, wintry aesthetic. The white flocking mimics a fresh snowfall and prevents the dark green needles from creating a harsh contrast in a light kitchen.
Choose a garland with light flocking so the green color still shows through and provides some depth. This keeps the kitchen feeling bright and airy during the darker winter months.
- Purchase a lightly flocked artificial garland.
- Shake the garland outside before installing to remove loose snow.
- Perfect for all-white kitchens or coastal styles.
Most people skip this: Place a strip of wax paper under flocked items to make post-holiday cleanup much faster.
6. Eucalyptus and Pine Christmas Greenery
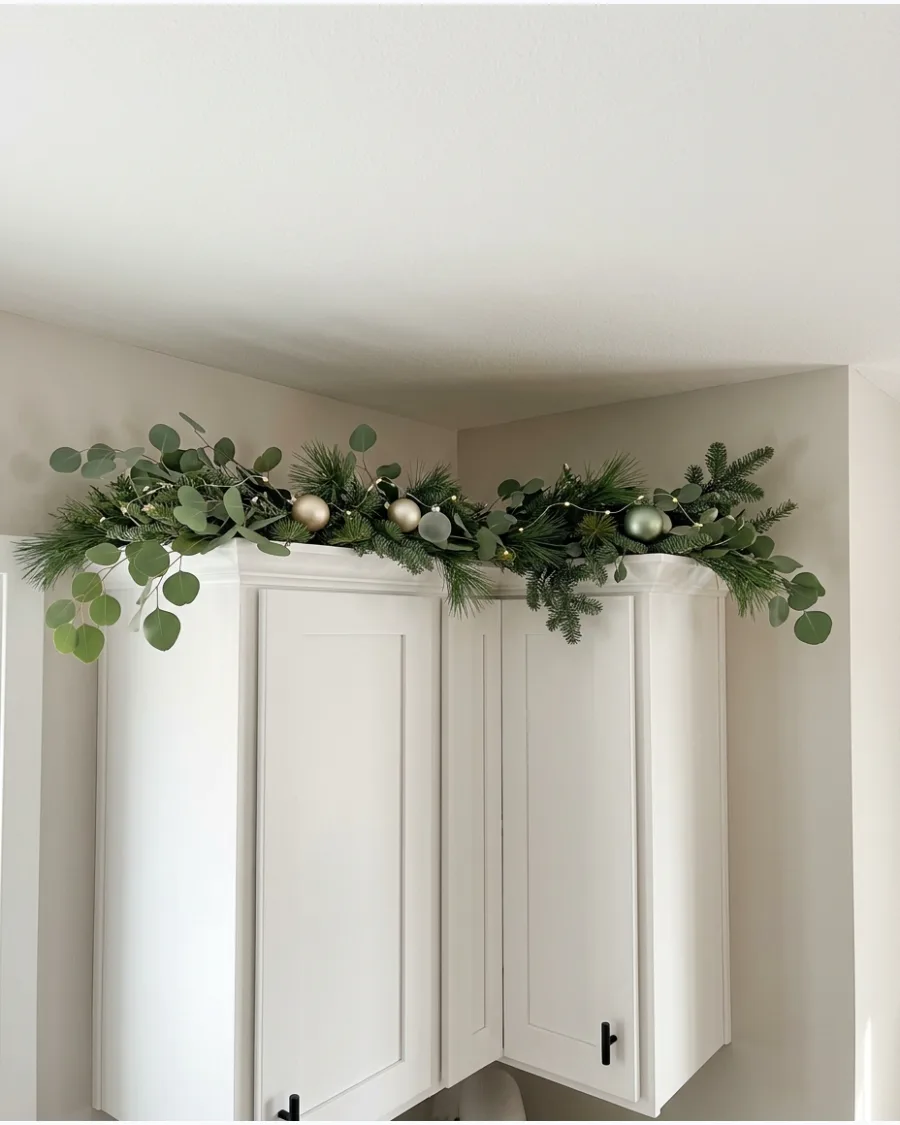
Mixing silvery-green eucalyptus leaves with traditional pine branches creates a modern, organic look. The different leaf shapes add sophisticated variety that works well in neutral or contemporary kitchens.
Layer the eucalyptus stems on top of the pine base so the round leaves are the most visible element. This combination feels fresh and updated compared to standard holiday decor.
- Use artificial eucalyptus stems and a pine garland.
- Use floral tape to attach eucalyptus branches to the main garland.
- Best for modern or minimalist kitchen designs.
Best shortcut: Use preserved eucalyptus for a real scent that lasts the entire holiday season.
7. Magnolia and Evergreen Cabinet Display
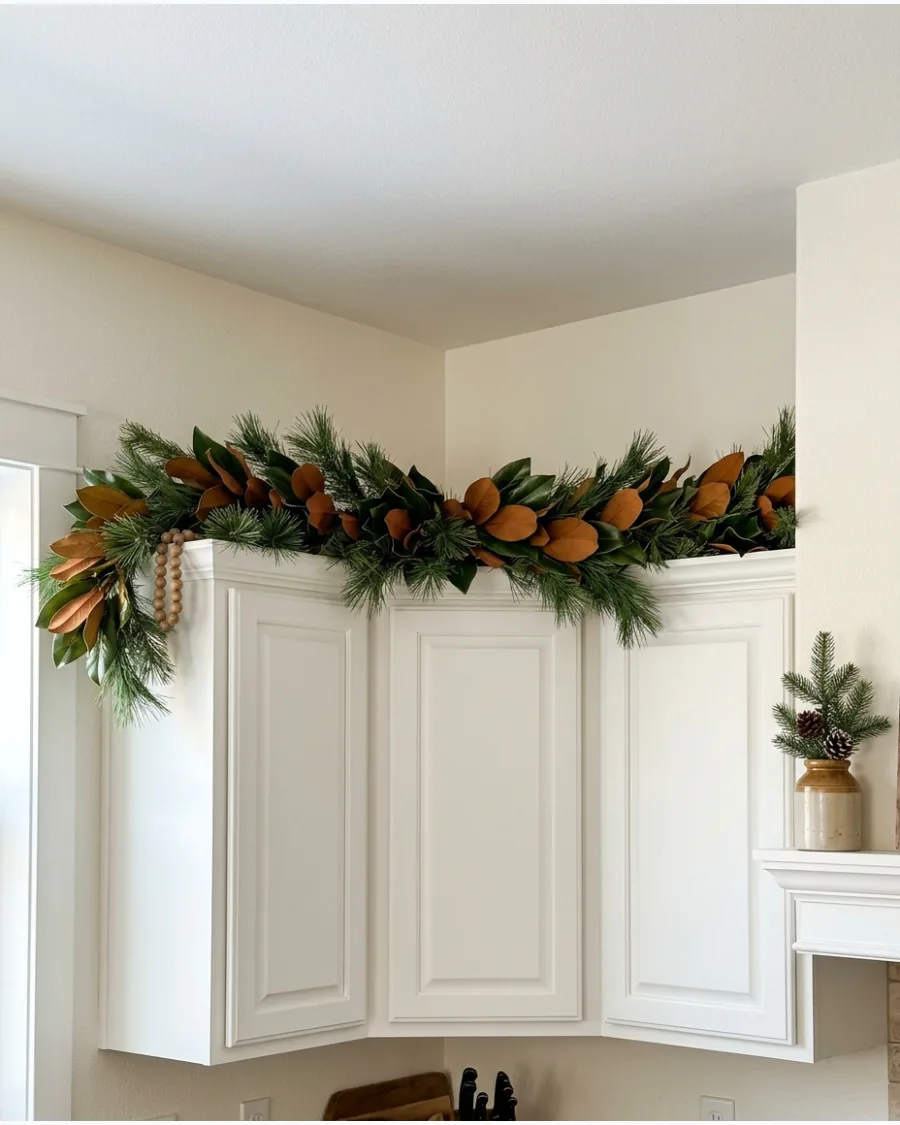
Magnolia leaves bring a rich, leathery texture and a warm brown underside that complements evergreen branches perfectly. This pairing looks substantial and expensive, filling large gaps between the cabinets and the ceiling effectively.
Position some magnolia leaves face-down to show off the velvety brown side for better color contrast. It is a great way to add a Southern or traditional touch to the kitchen.
- Use faux magnolia leaf picks or stems.
- Group leaves in sets of three for the most natural appearance.
- Works well in large kitchens with ample overhead space.
Quick win: Wipe faux magnolia leaves with a tiny bit of vegetable oil on a cloth to give them a realistic live sheen.
8. Greenery Bundles Between Cabinet Sections
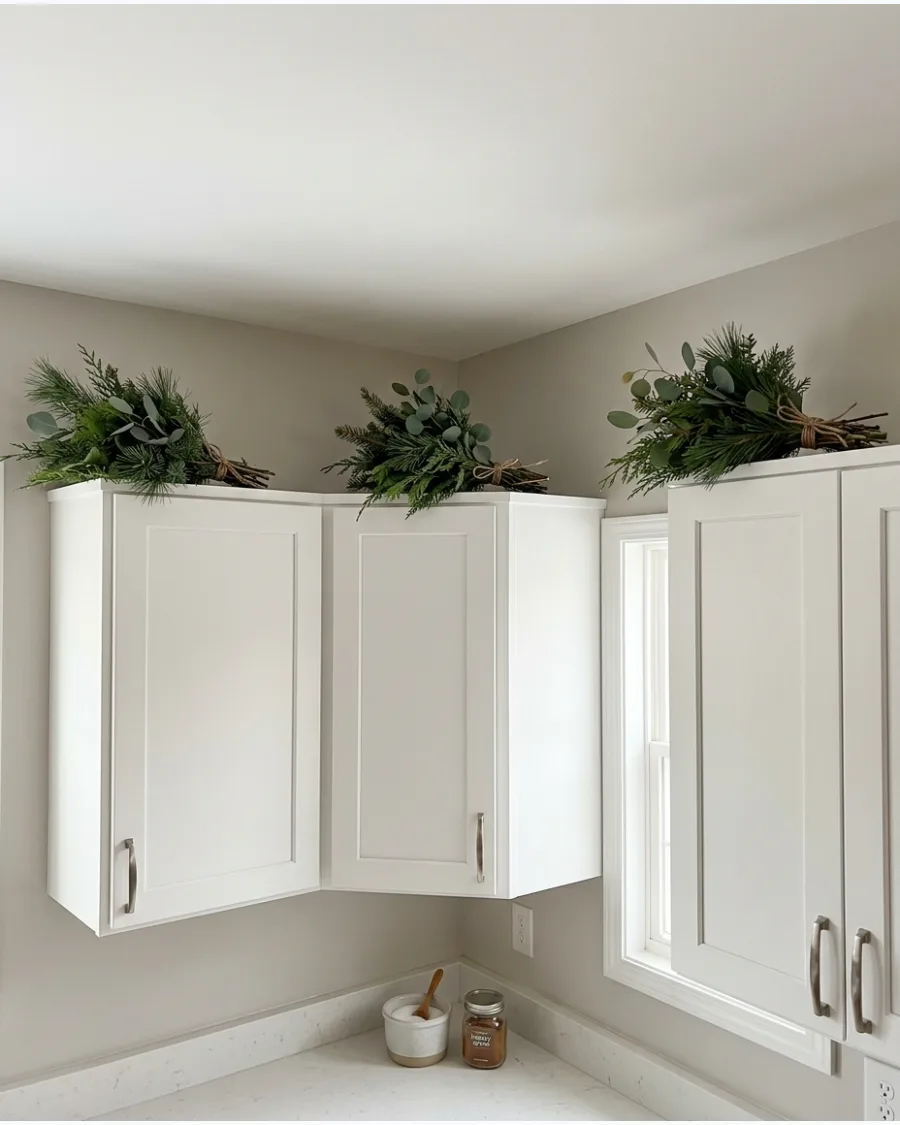
Instead of one long garland, placing small tied bundles of mixed greens above separate cabinet sections creates a lighter, more tailored look.
This is especially useful for kitchens with staggered cabinet heights or broken-up layouts. Tie the bundles with a simple twine or a velvet ribbon to keep the stems tidy and organized. It provides the festive green color without the visual weight of a heavy continuous strand.
- Use scraps of various faux greenery.
- Use zip ties or twine to create 12-inch bundles.
- Great for small kitchens or renters with limited space.
Most people skip this: Angle the bundles slightly toward the center of the room so they are more visible from a standing position.
MINI CHRISTMAS TREES ABOVE KITCHEN CABINETS
9. Mini Christmas Tree Forest
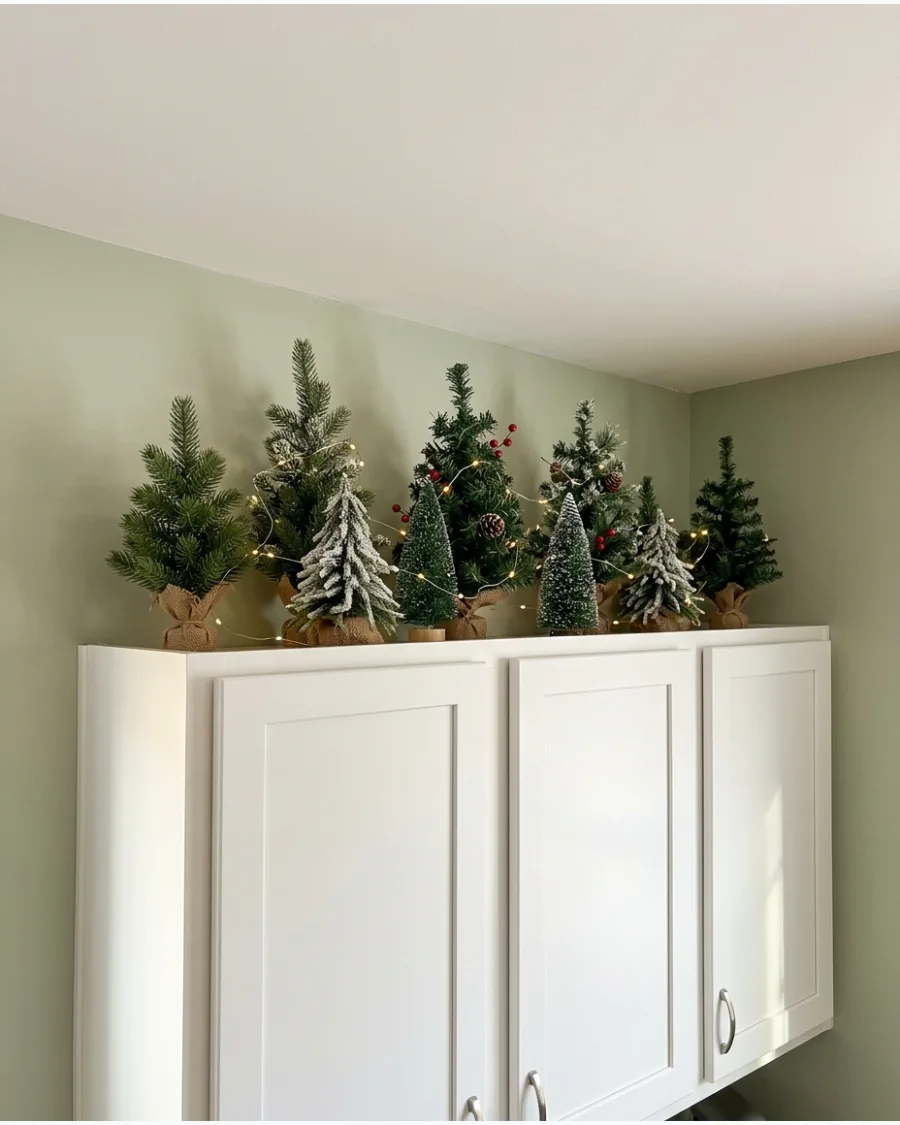
Grouping miniature evergreen trees in varying heights creates a playful forest scene that adds height to the kitchen. Using different shades of green and different needle types makes the collection look curated rather than a matched set.
Stagger the trees in a zigzag pattern rather than a straight line to create a sense of depth. This is an easy way to fill a large empty space with a single theme.
- Buy a set of 3 to 5 mini artificial trees.
- Ensure the tallest tree has at least two inches of ceiling clearance.
- Perfect for high-clearance spaces above cabinets.
Best shortcut: Use battery-operated fairy lights on just one or two trees to create a focal point without needing an outlet.
10. Bottle-Brush Tree Collection
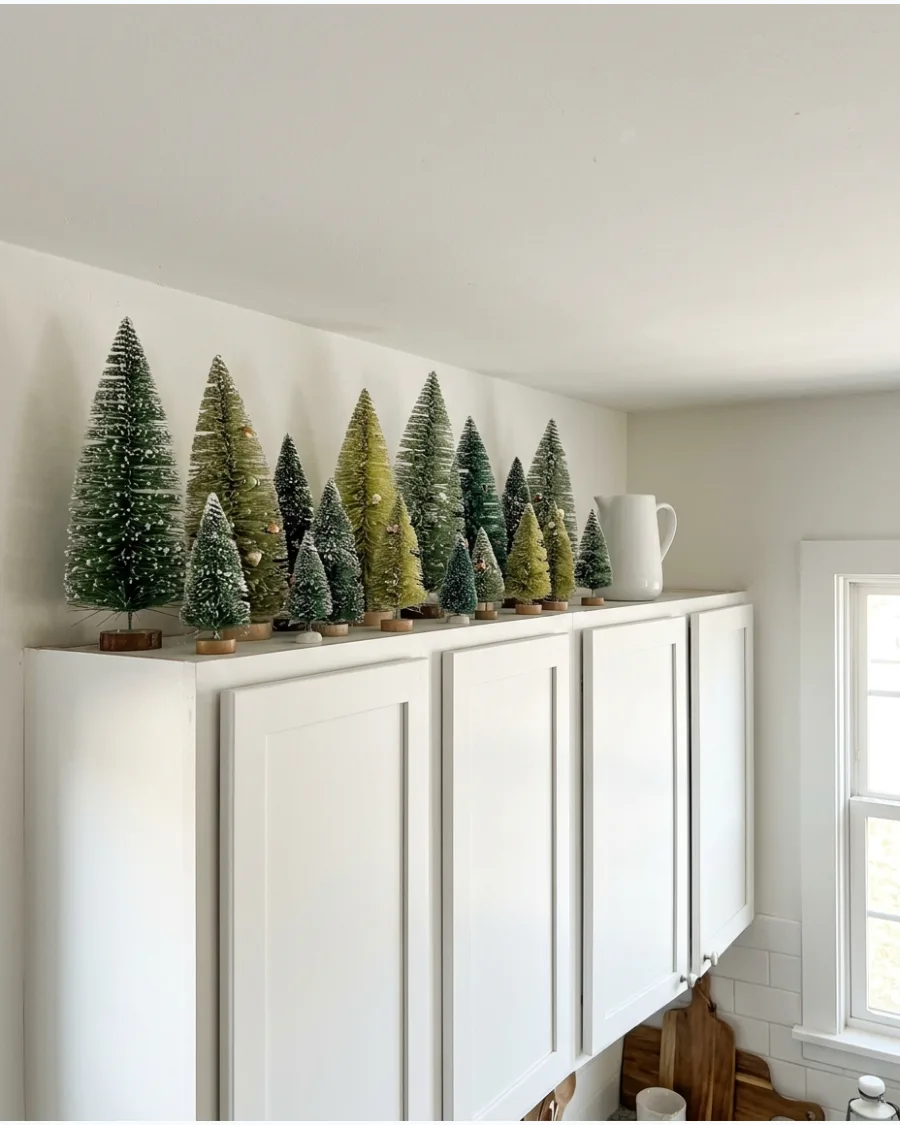
Bottle-brush trees offer a nostalgic, mid-century vibe and come in a huge variety of colors and sizes. Because they are lightweight and slim, they fit perfectly on narrow cabinet ledges where a traditional garland might be too bulky.
Mix different shades of green, cream, and metallic tones to keep the display looking sophisticated and intentional. They are easy to store and quick to set up every year.
- Buy a multi-pack of bottle-brush trees in varying sizes.
- Use a tiny bit of museum putty on the bases to keep them upright.
- Best for narrow cabinet tops or modern apartments.
Quick win: If the bases are wobbly, glue them to a small wooden craft stick for a more stable foundation.
11. Flocked Mini Trees Above Cabinets
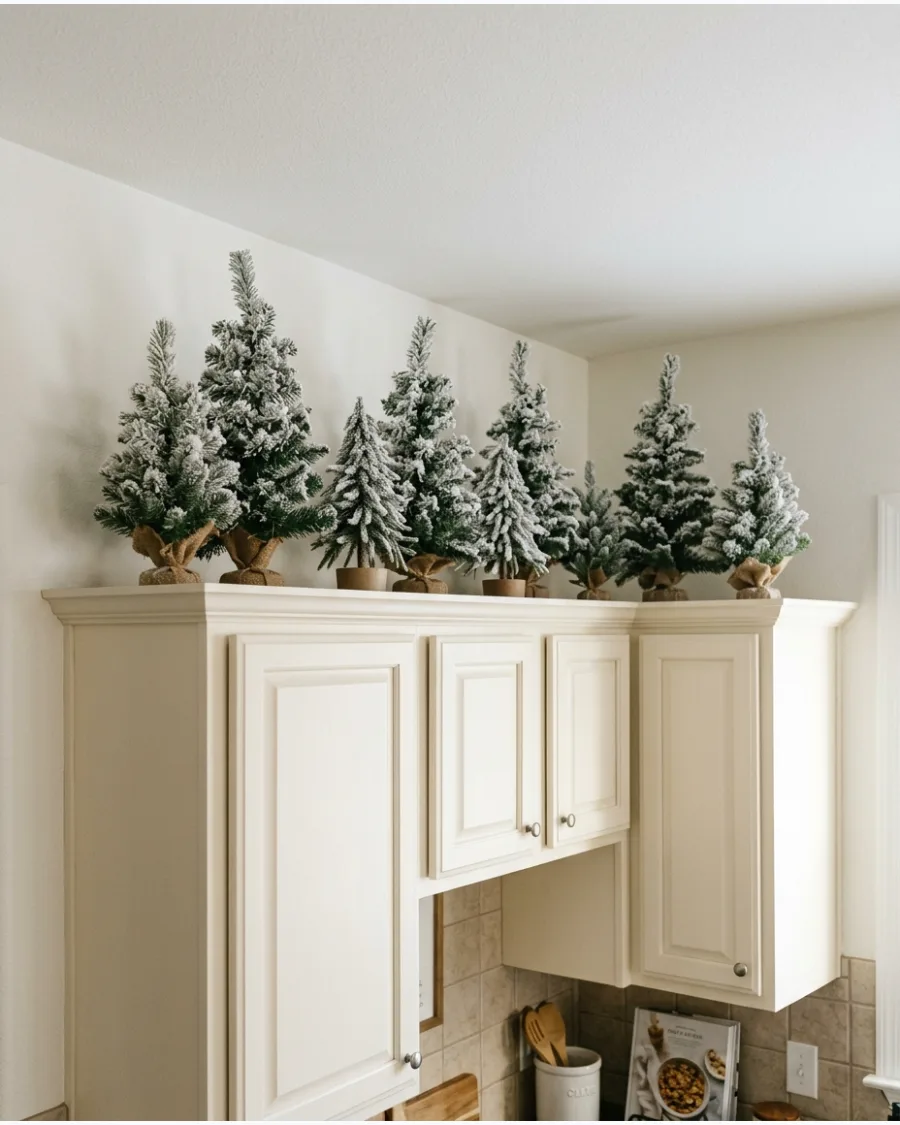
Flocked trees bring a soft, wintery texture to the high points of the kitchen. They provide height and visual interest without the mess of loose faux snow across your surfaces.
Place trees of three different heights in small clusters to create depth and a natural forest look. This setup works best when the trees have a sturdy base to prevent tipping during daily cabinet use.
- Purchase a set of pre-flocked tabletop trees from a craft store or online for under forty dollars.
- Stagger the trees so the tallest is in the back and the shortest is in the front to maximize the 3D effect.
- Add a small strand of battery-operated fairy lights to the trees if your kitchen feels dark during the winter months.
Quick win: Use museum putty on the bottom of tree bases to keep them from shifting when you open and close cabinet doors.
12. Ceramic Christmas Tree Collection
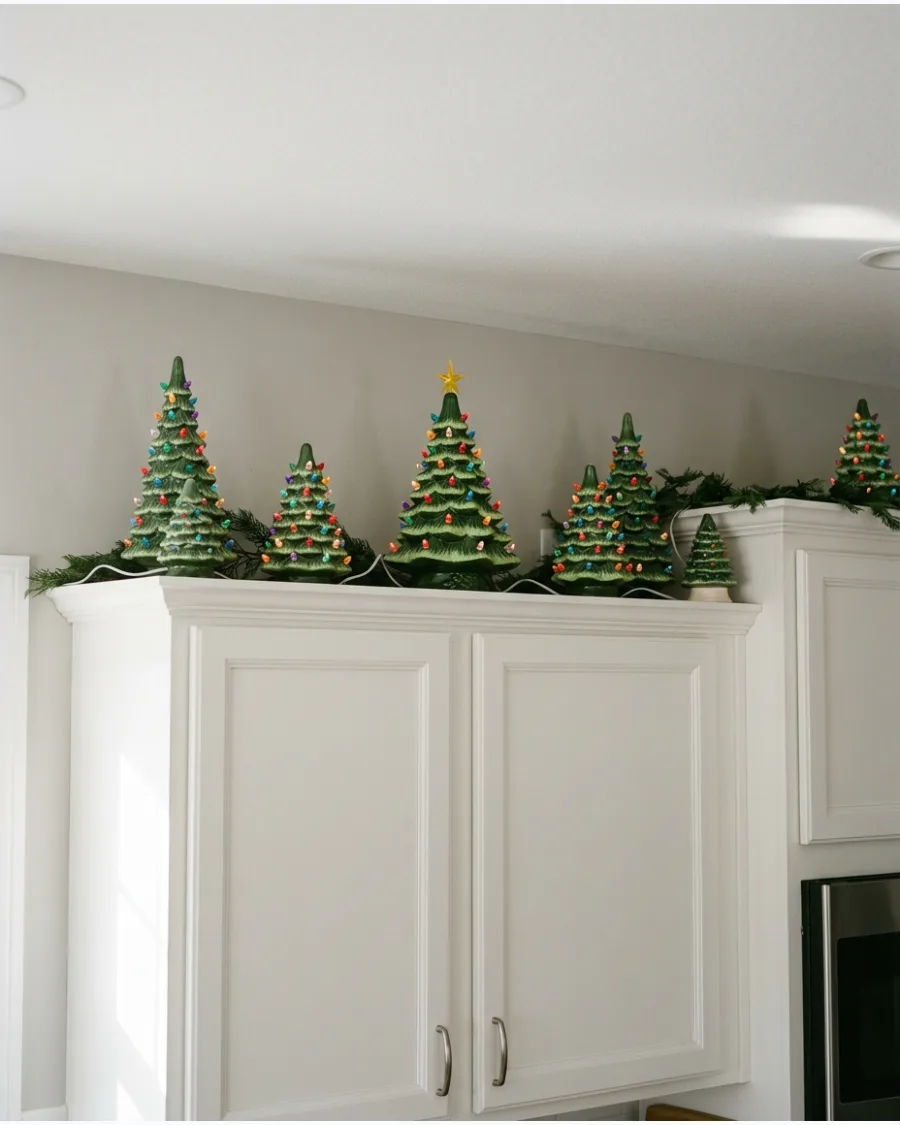
Ceramic trees offer a nostalgic glow and a smooth surface that is much easier to dust than traditional greenery. Keeping the colors coordinated creates a sophisticated look rather than a cluttered shelf of random objects.
Space the trees evenly across the cabinet run to draw the eye across the entire length of the room. Mixing gloss and matte finishes adds subtle variety without breaking the color theme.
- Look for ceramic sets in varying heights at home goods stores or vintage shops during the late fall.
- Wipe each tree with a damp cloth before placing it to ensure the kitchen grease doesn't bake onto the finish.
- Stick to a single color like all white or all green to keep the high-up display from looking too busy.
Best shortcut: Use battery-operated ceramic trees with built-in timers so you do not have to climb a ladder every night to turn them on.
13. Wooden Christmas Tree Display
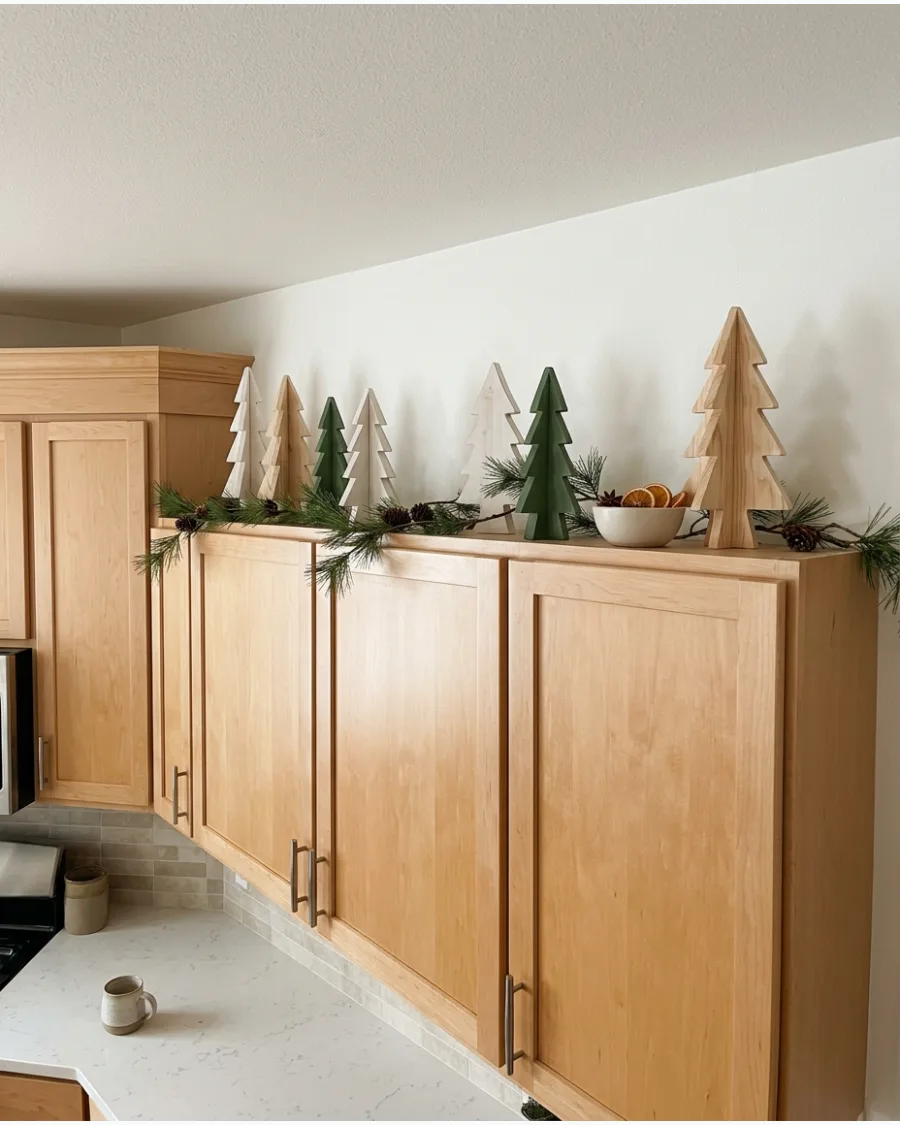
Carved wooden trees provide a warm, organic element that balances out the hard surfaces of a kitchen. These pieces are durable and store easily without losing their shape or shedding needles over time.
Mix different wood stains like oak and walnut to add warmth to a monochromatic kitchen. Simple geometric shapes keep the display feeling modern rather than traditional.
- Find unfinished wooden trees at craft stores and stain them yourself to match your kitchen island or flooring.
- Arrange the trees in groups of three to follow the design rule of odds for a more natural look.
- Paint the tips of the wooden trees white for a subtle snow-dusted effect that pops against dark walls.
Most people skip this: Check the clearance between the cabinet top and the ceiling before buying tall wooden trees to ensure they do not look cramped.
14. Mini Trees in Vintage Crocks
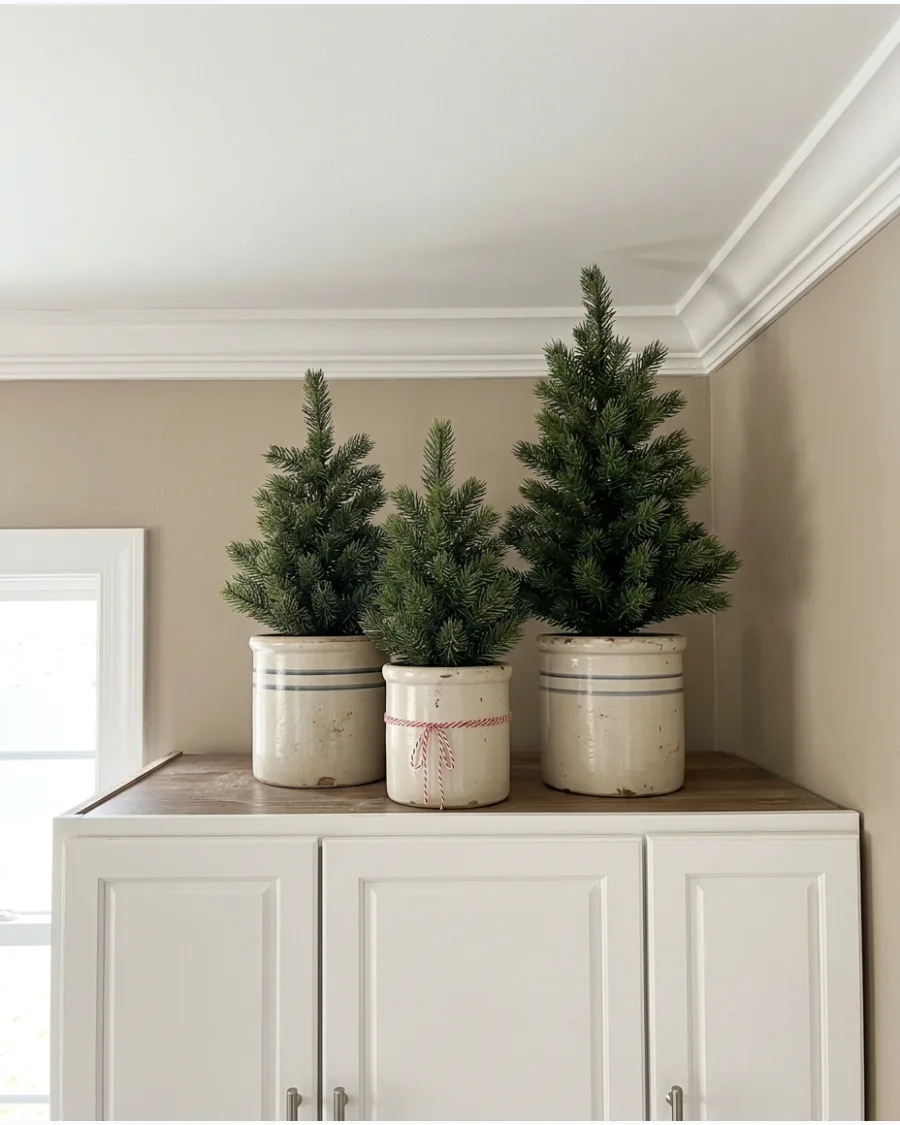
Tucking small evergreens into stoneware crocks adds a heavy, high-quality feel to the space above the cabinets. This look anchors the greenery and prevents it from looking like it is floating in mid-air.
Choose crocks with various heights and widths to give the display a curated and collected feel. The neutral tones of the pottery blend well with almost any kitchen color palette.
- Source authentic vintage crocks at antique malls or use high-quality reproductions for a similar look.
- Ensure the crocks are heavy enough to stay put but not so heavy that they exceed the weight limit of your uppers.
- Use faux cedar or pine inserts so you do not have to worry about watering plants in hard-to-reach areas.
Quick win: Stuff the bottom of deep crocks with newspaper or bubble wrap so the mini trees sit at the perfect height near the rim.
15. Mini Trees in Galvanized Buckets
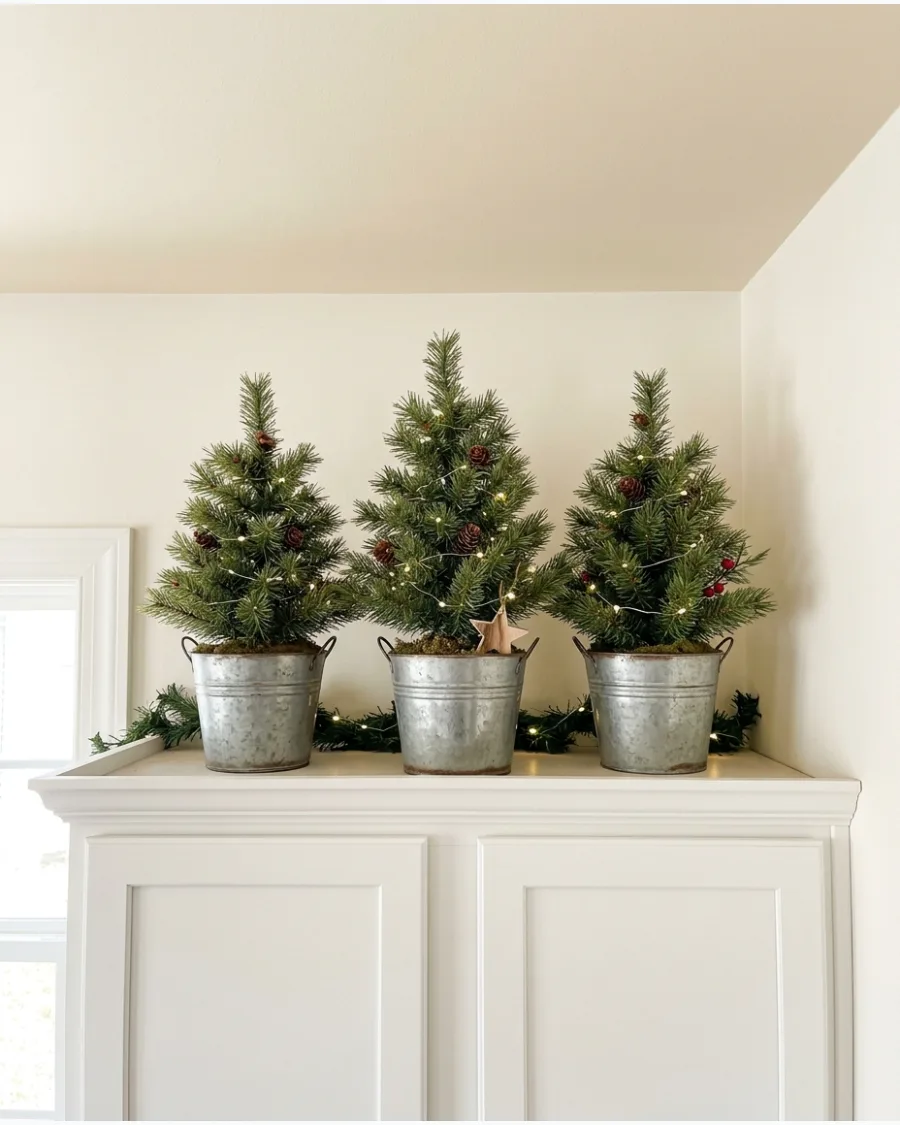
Metal buckets add a crisp, industrial edge that looks great against modern painted cabinetry. These containers are lightweight, making them easy to lift and position in high spaces without extra effort.
Group three buckets together at one end of the cabinet run for a focused visual impact. The reflective surface of the metal helps bounce light into the shadowy area near the ceiling.
- Pick up inexpensive galvanized pails from the dollar section or a hardware store.
- Tie a simple piece of twine around each bucket handle to add a touch of texture to the metal.
- Fill the buckets with pinecones around the base of the trees to hide the plastic pots.
Best shortcut: Buy pre-potted mini trees in plastic liners so they slide directly into the buckets without needing extra filler.
16. Burgundy Bow Mini Trees
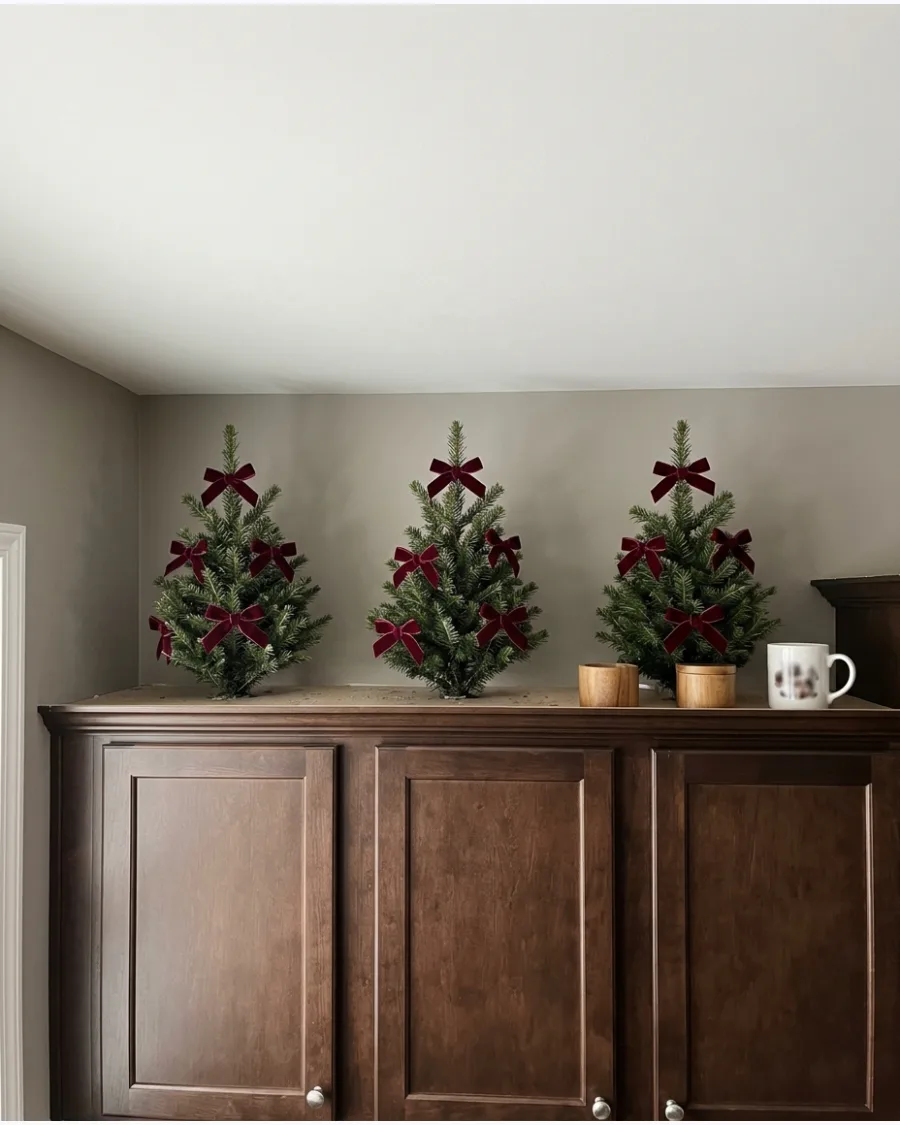
Adding velvet bows is the fastest way to update standard greenery with a high-end, trendy look. Burgundy offers a deep, rich alternative to bright red that feels more sophisticated in a modern kitchen.
Tie the bows with long tails to let the fabric drape naturally down the branches of the mini trees. This approach adds color and texture without the weight of traditional ornaments.
- Buy a roll of two-inch velvet ribbon and cut lengths to create uniform bows for all your trees.
- Secure the bows with thin floral wire so they do not slip off the branches when the cabinet doors are used.
- Match the ribbon color to your kitchen towels or a rug for a cohesive seasonal color story.
Most people skip this: Use wire-edged ribbon for the bows so you can fluff the loops and they will hold their shape all season.
CHRISTMAS VILLAGE ABOVE KITCHEN CABINETS
17. White Ceramic Christmas Village
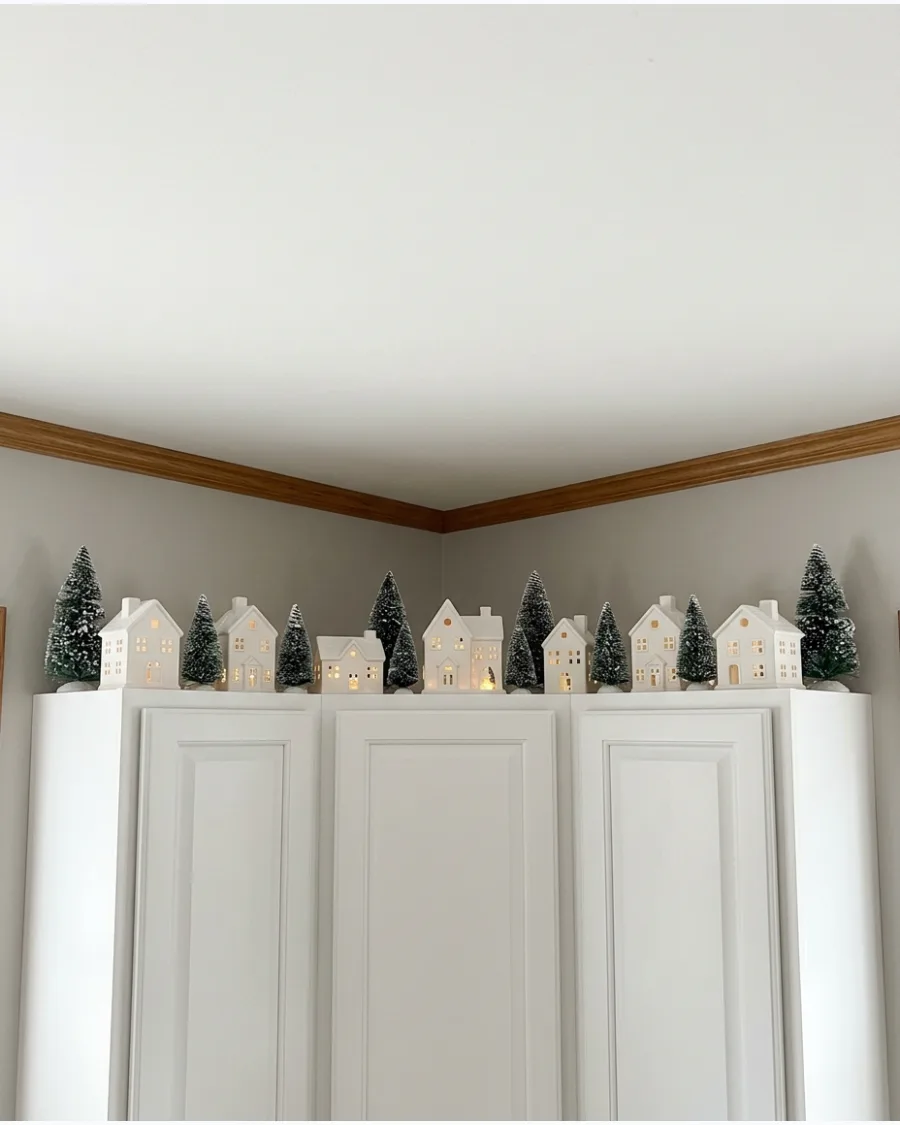
A monochrome village creates a clean and elegant miniature world that does not feel like a toy set. Placing houses at different depths creates a sense of a real streetscape along the cabinet tops.
Intersperse small bottle-brush trees between the houses to break up the hard lines of the ceramic. The white-on-white look keeps the kitchen feeling bright and airy even with extra decor.
- Collect houses over time or buy a complete set to ensure the white glazes match perfectly.
- Place taller houses toward the back and smaller cottages toward the front to create a sense of scale.
- Keep the display away from the stove area to prevent grease from dulling the white finish.
Quick win: Use a white felt runner underneath the houses to hide any unsightly wires and give the appearance of a snowy ground.
18. Snowy Christmas Village Above Cabinets
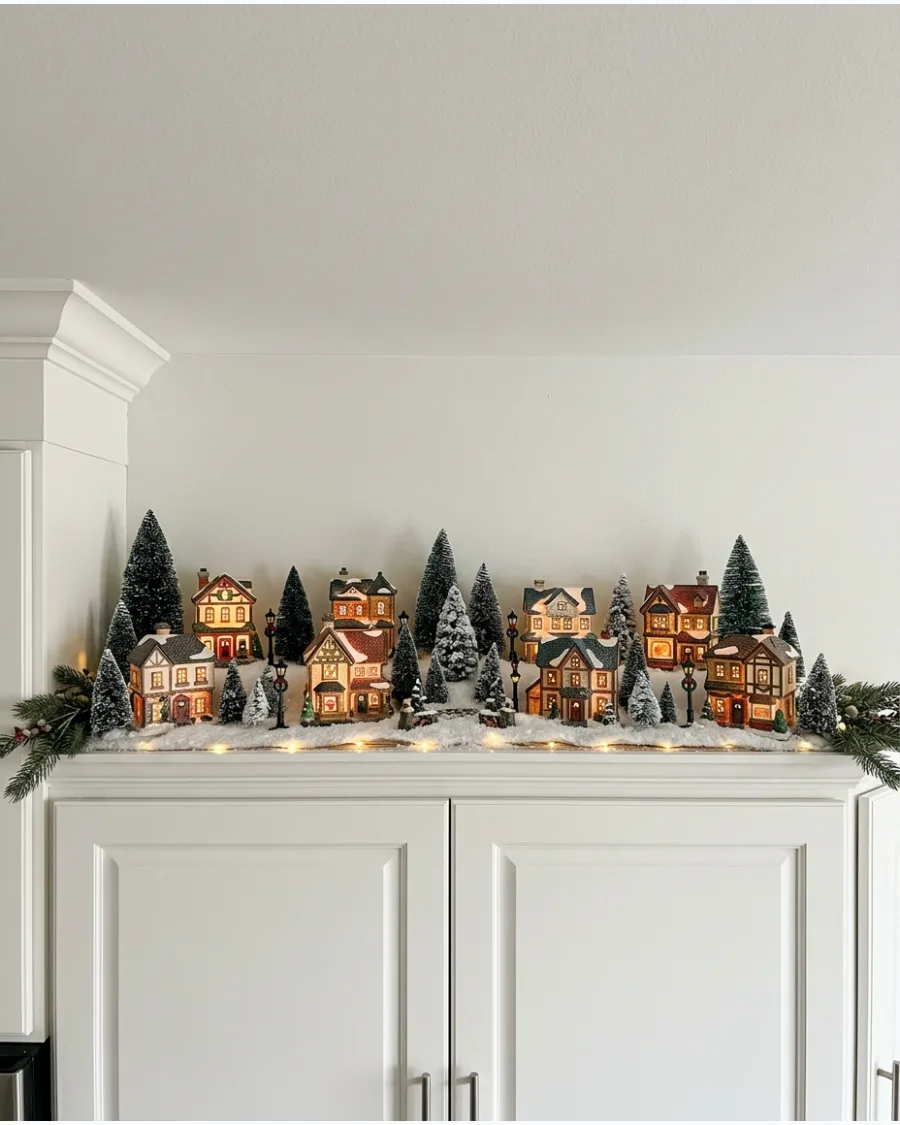
This classic winter scene uses faux snow to create a soft, cohesive base for a village display. Small illuminated houses provide a cozy glow that acts as secondary lighting for the kitchen in the evening.
Use a light dusting of faux snow or a white batting material to cover the entire top surface of the cabinet. This hides the gap between the cabinet and the wall for a more finished look.
- Use rolls of cotton batting for the snow to avoid the mess of loose plastic flakes in your food prep area.
- Hide battery packs behind the houses or under the batting to keep the display looking professional.
- Add a few small deer figurines or miniature park benches to bring the snowy scene to life.
Best shortcut: Place the houses on a thin piece of foam board first so you can easily lift the entire village down at the end of the season.
19. Vintage Christmas Village Collection
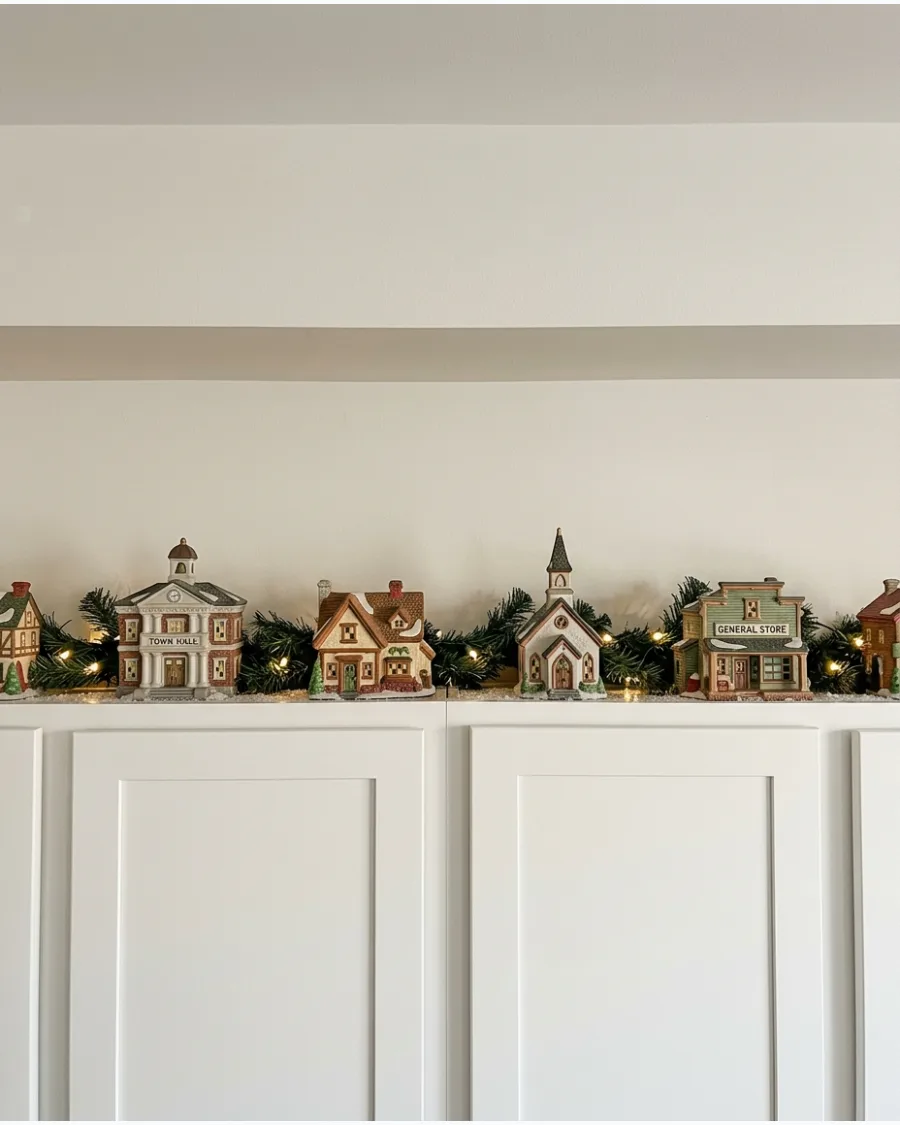
Displaying a collection of mismatched village houses adds character and a sense of history to the kitchen. Mixing different eras and styles works well when you use consistent greenery to tie them together.
Place the largest buildings in the center and taper down to smaller pieces at the ends of the cabinet run. This creates a balanced silhouette that fills the vertical space perfectly.
- Mix family heirloom pieces with new finds to create a display that tells a story.
- Use small wooden blocks to elevate certain houses so they can be seen over the cabinet trim.
- Tuck fresh or faux pine sprigs around the base of the houses to unify the different colors.
Most people skip this: Use a remote-controlled power strip for the village lights so you can turn the entire display on with one button from the floor.
20. Scandinavian Wooden Village
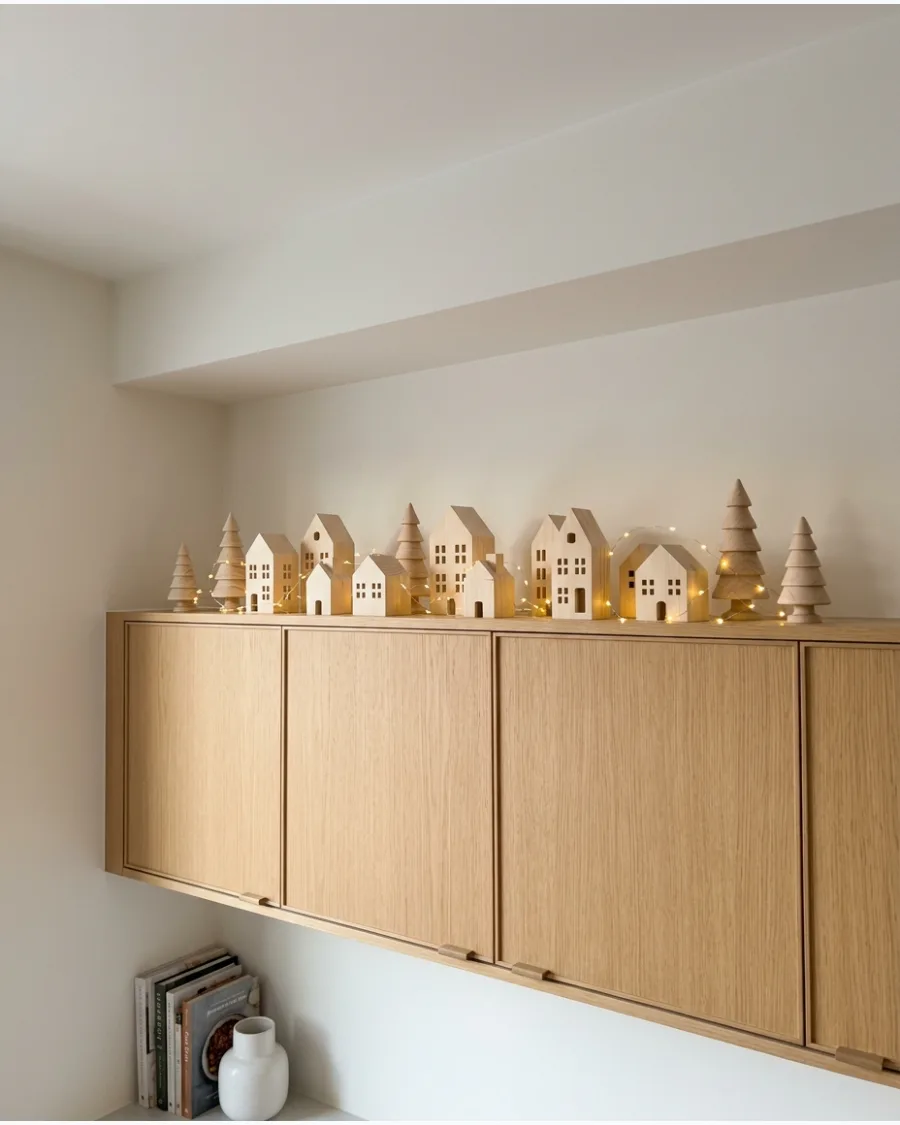
A wooden village offers a minimalist take on holiday decor that suits modern or Nordic-inspired kitchens. The natural wood tones bring warmth to the space without the visual clutter of bright colors.
Thread a string of warm micro lights through the houses to create a soft twinkling effect. This style is particularly effective in kitchens with clean lines and simple hardware.
- Look for balsa wood or pine house silhouettes for a lightweight and affordable display option.
- Keep the arrangement sparse with plenty of breathing room between houses for a true Scandi feel.
- Pair the wood houses with simple white or silver accents to maintain a cool and modern palette.
Quick win: Stick to a limited palette of two wood tones to keep the display looking intentional and high-end.
21. Gingerbread Village Above the Cabinets
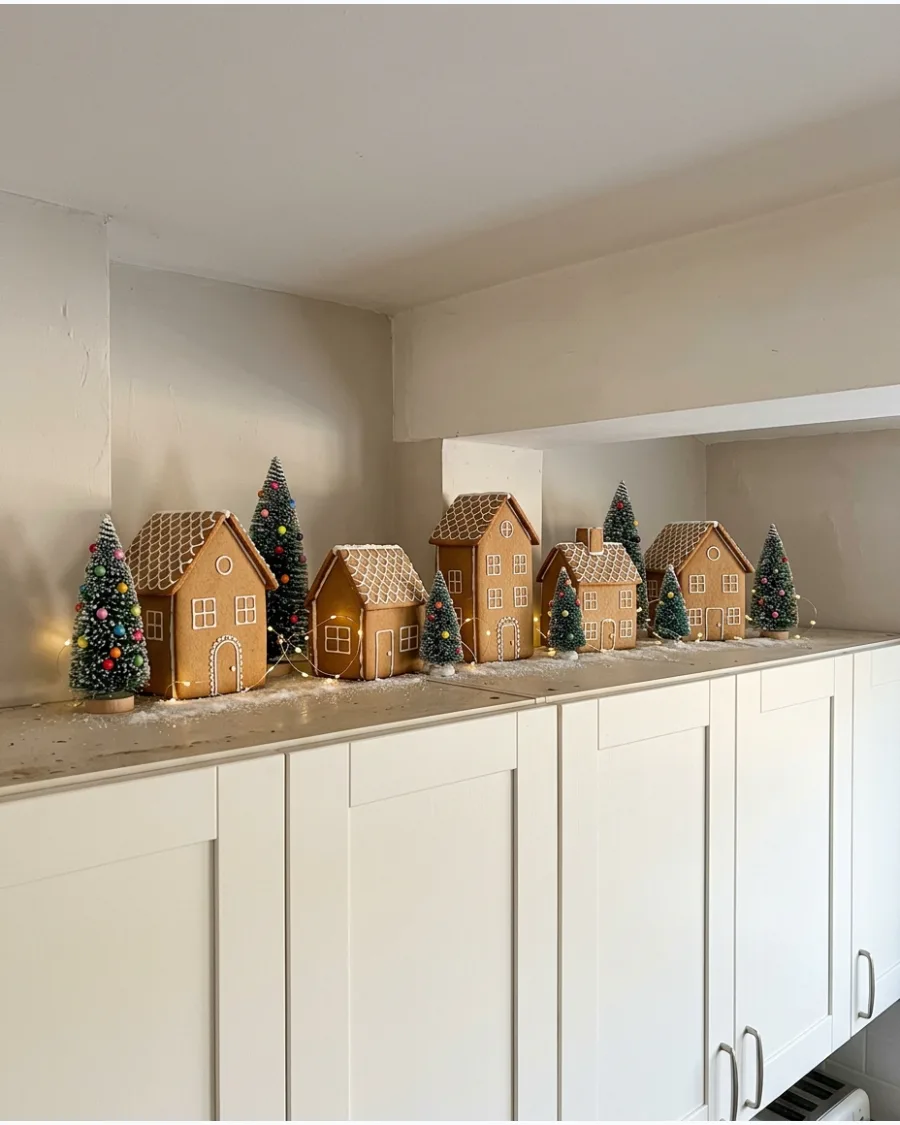
Use lightweight gingerbread-style houses paired with candy-colored trees and warm lights to create a playful scene. This setup adds a whimsical touch to the kitchen without needing heavy or fragile ceramics.
Arrange the houses at different angles to make the tiny street feel more realistic and lived-in.
- Lightweight resin or cardboard houses are safest for high surfaces.
- Use double-sided tape to secure small trees so they do not tip.
- Works well in modern white kitchens to add a pop of color.
Quick win: Use battery-operated tea lights inside the houses to avoid messy cords trailing down the cabinet sides.
22. Mini Christmas Main Street
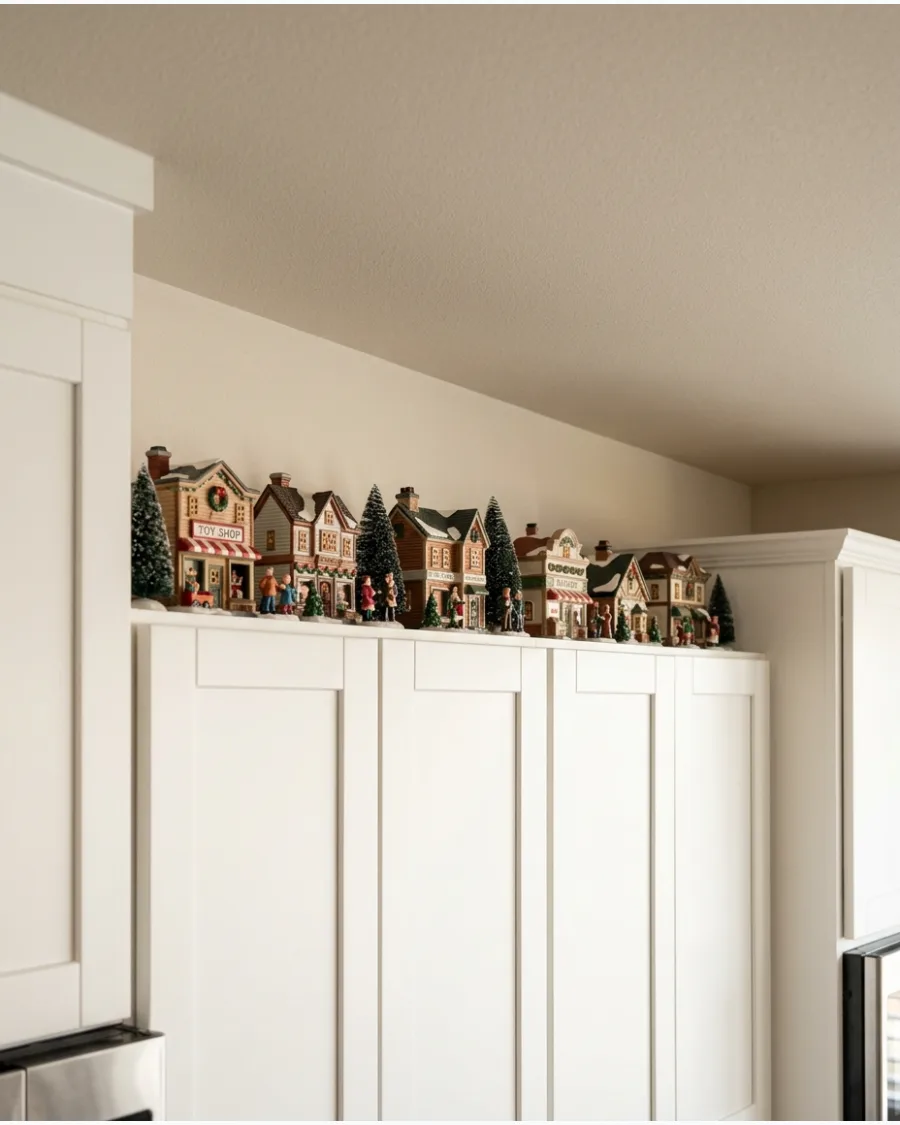
Line up miniature shops and storefronts to mimic a bustling holiday shopping district. Adding tiny figurines of people and streetlamps brings the scene to life in the unused vertical space.
Keep the tallest buildings in the back to ensure every shop remains visible from the floor.
- Look for village sets at craft stores during post-holiday sales.
- Space the buildings about two inches apart to prevent a cluttered look.
- Use museum wax on the bottom of figurines to keep them upright.
Most people skip this: Level the buildings with small cardboard shims if your cabinet tops have a recessed lip.
23. Village With a Church Focal Point
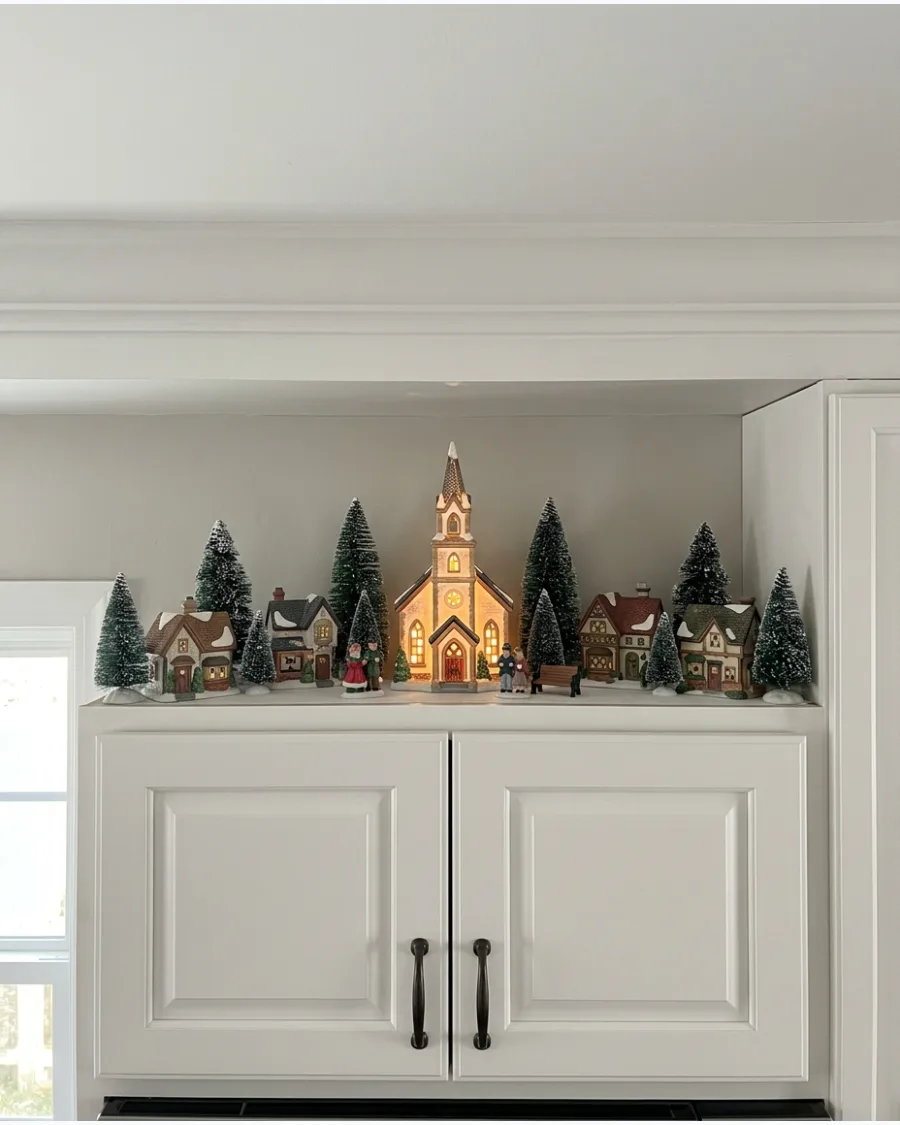
Anchor the display by placing a tall, illuminated church in the center of the cabinet run. Surround it with smaller homes and trees to draw the eye toward the middle of the kitchen.
Choose a church with a high steeple to maximize the vertical clearance between the cabinets and the ceiling.
- Measure the height of the steeple before buying to ensure it fits the ceiling gap.
- Use a central power strip hidden behind the church if using plug-in models.
- Balance the look by placing an equal number of small trees on both sides.
Best shortcut: Use a remote-controlled outlet so you can turn the entire village on with one click.
24. Village Hidden Among Evergreen Branches
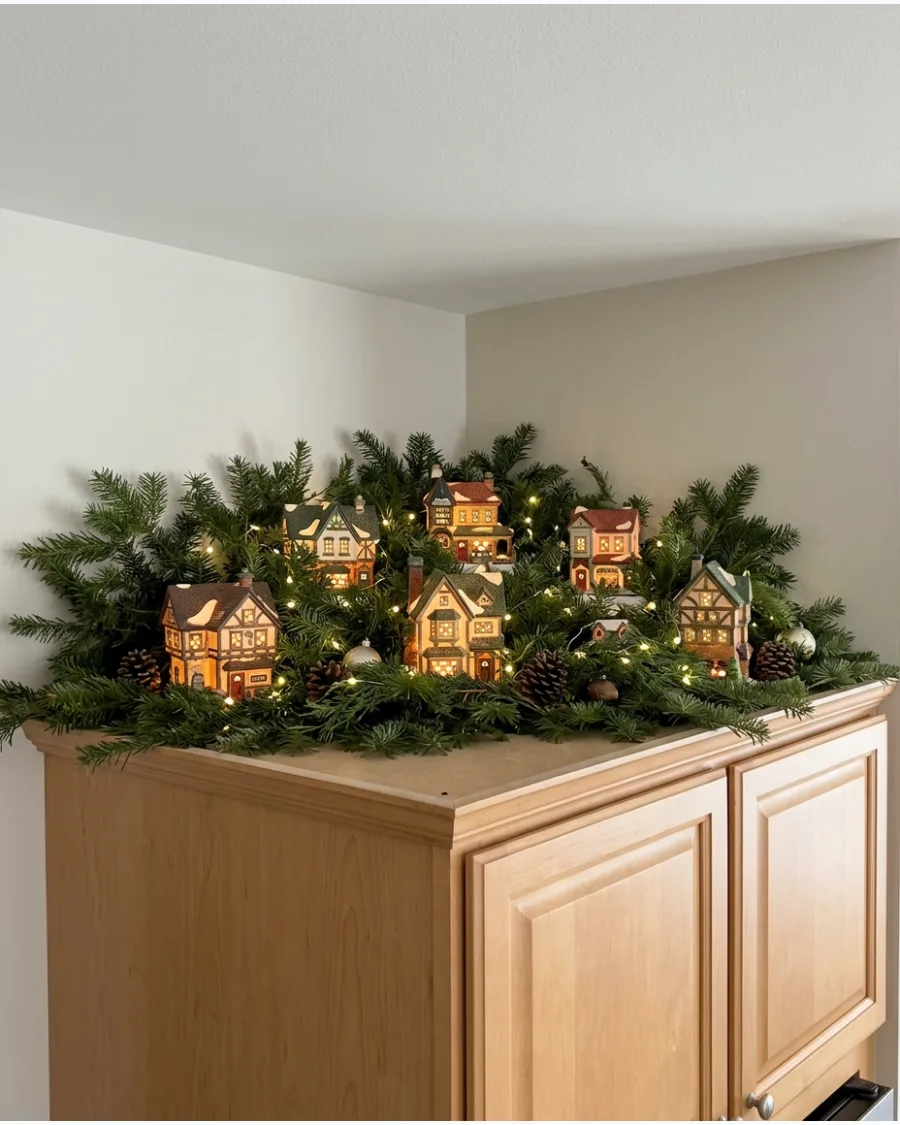
Nestle small glowing houses deep into loose evergreen branches for a cozy, tucked-away appearance. This method softens the look of the buildings and makes the village feel like a part of a forest.
Pull a few branches forward to partially obscure the base of the houses for a more natural effect.
- Use faux pine picks instead of a full garland for easier placement around houses.
- Opt for battery-powered houses to avoid weaving wires through thick needles.
- Dust the branches with a hairdryer on a cool setting after the season ends.
Quick win: Use white felt underneath the houses to mimic snow and hide the green plastic of the branches.
LIGHTED CHRISTMAS DECOR ABOVE CABINETS
25. Warm Fairy Lights Above the Cabinets
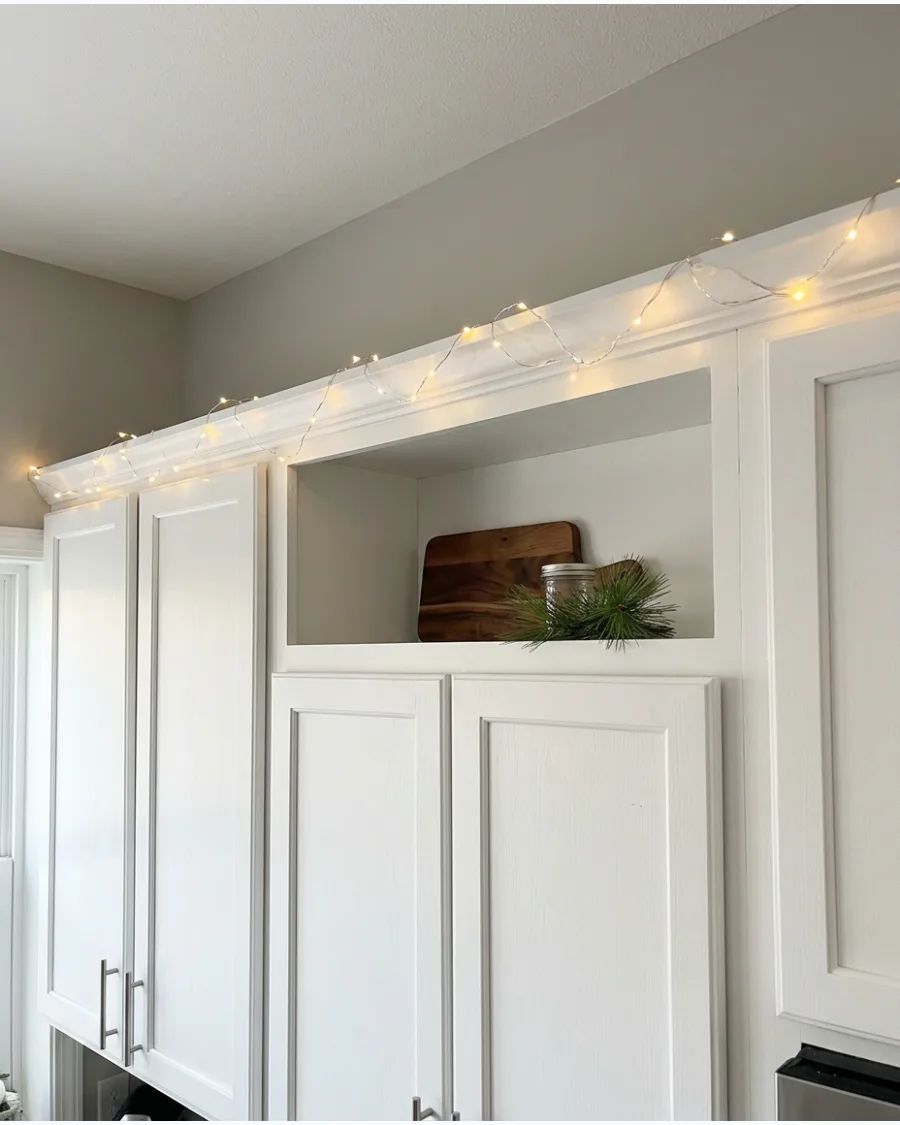
String delicate copper-wire fairy lights along the top of the cabinetry for a subtle, sophisticated glow. This minimalist approach fills the dark void near the ceiling without adding physical bulk.
Weave the lights in a loose zig-zag pattern to ensure the glow is distributed evenly across the entire surface.
- Choose warm white LEDs rather than cool white to keep the kitchen feeling cozy.
- Use clear adhesive clips to keep the wire from slipping off the edge.
- Battery packs can be hidden in small bowls or behind the cabinet trim.
Most people skip this: Set the timer function on the battery pack so the lights turn on automatically at sunset.
26. Pre-Lit Garland Cabinet Display
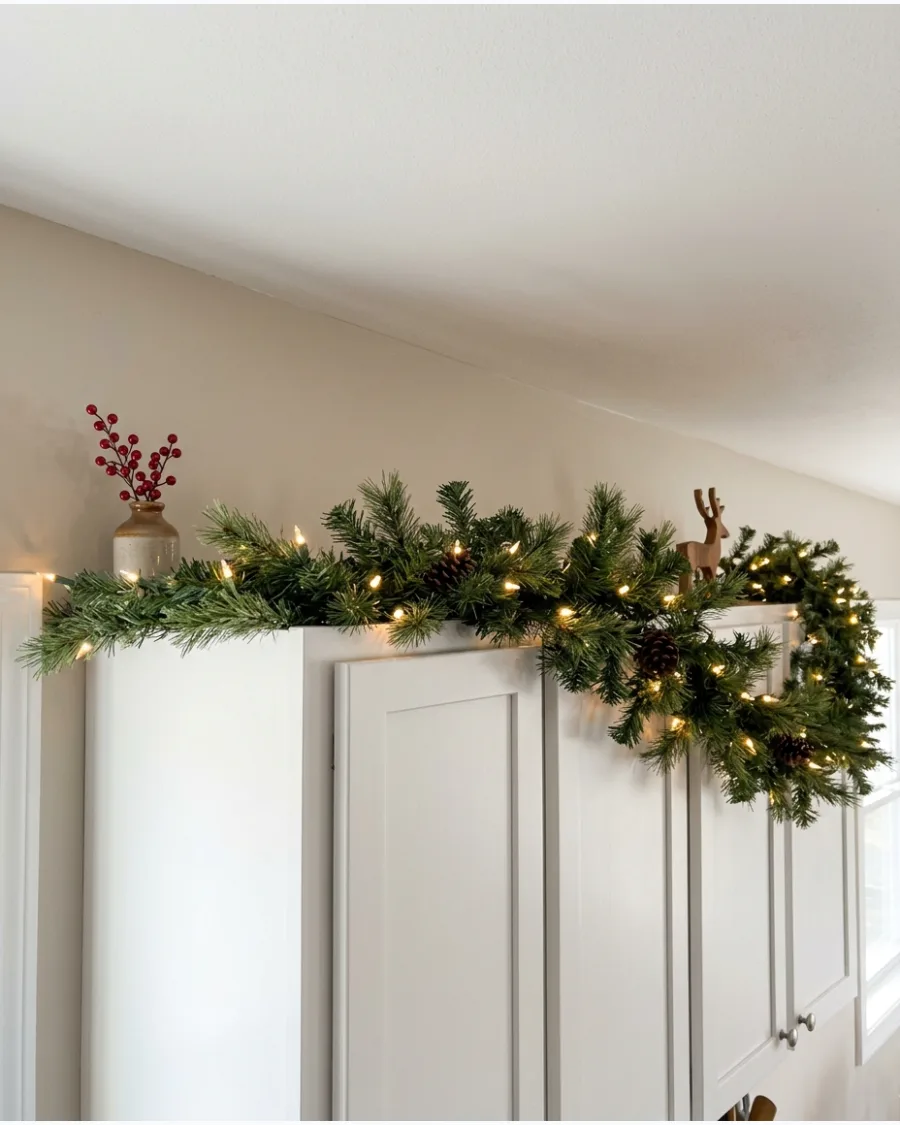
Drape a pre-lit evergreen garland across the length of the cabinets for an instant holiday transformation. The built-in lights save time and eliminate the struggle of wrapping wires around thick needles.
Fluff the branches outward toward the kitchen to make the garland look full and expensive.
- Measure the total length of the cabinet run and buy a garland at least one foot longer.
- Use zip ties to connect multiple garlands for a seamless look.
- Look for feel-real needle technology for a more authentic appearance.
Best shortcut: Drape the garland slightly over the front edge of the cabinet to hide the gap between the wood and the wall.
27. Illuminated Paper Stars Above Cabinets
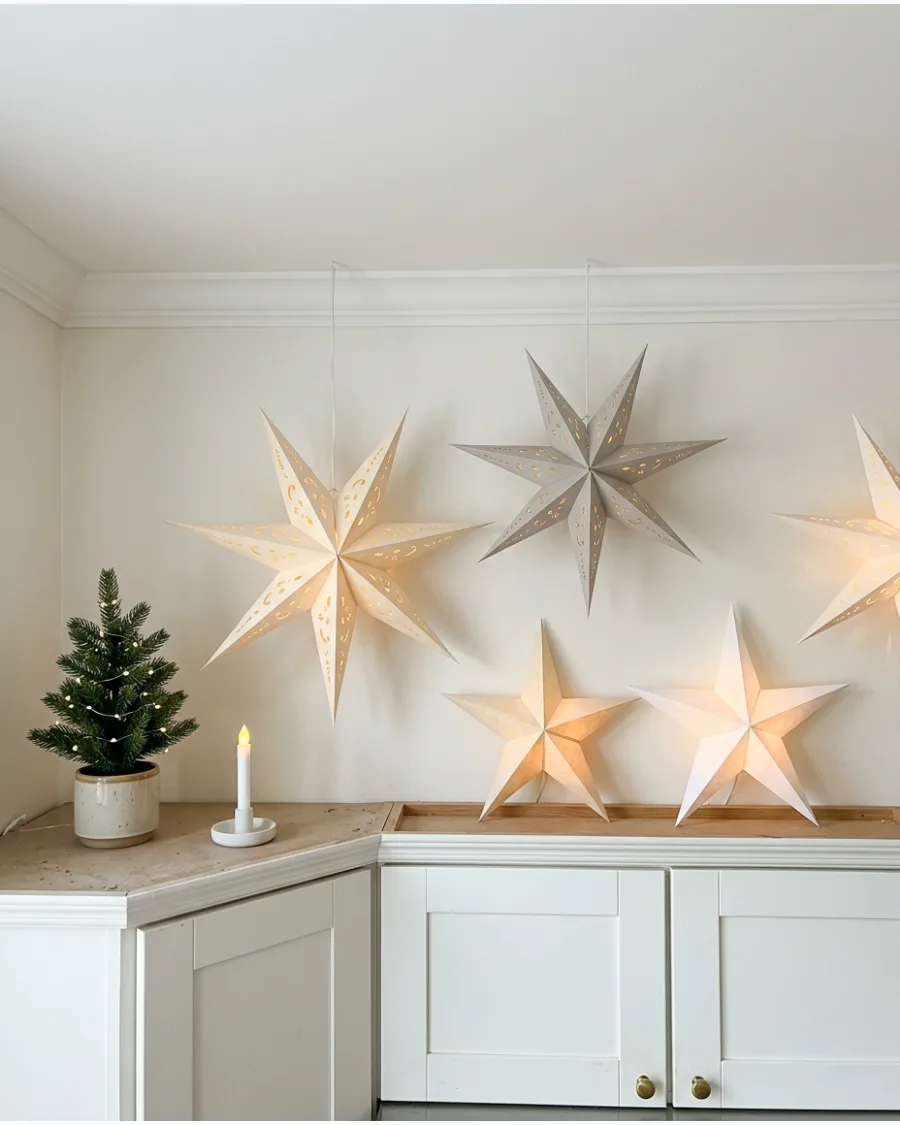
Lean or hang various sizes of white paper stars above the cabinets for a clean, Scandinavian look. These stars provide a large visual impact while remaining light enough to sit safely on top of the cabinetry.
Vary the sizes and overlap the points of the stars to create depth in the display.
- Use battery-operated puck lights inside the stars to make them glow without cords.
- Secure the base of the stars with a bit of mounting putty to prevent sliding.
- Fold them flat for easy storage in a small box after the holidays.
Quick win: Mix star patterns like solid paper and perforated designs to create interesting light shadows on the ceiling.
28. Mini Lanterns With Flameless Candles
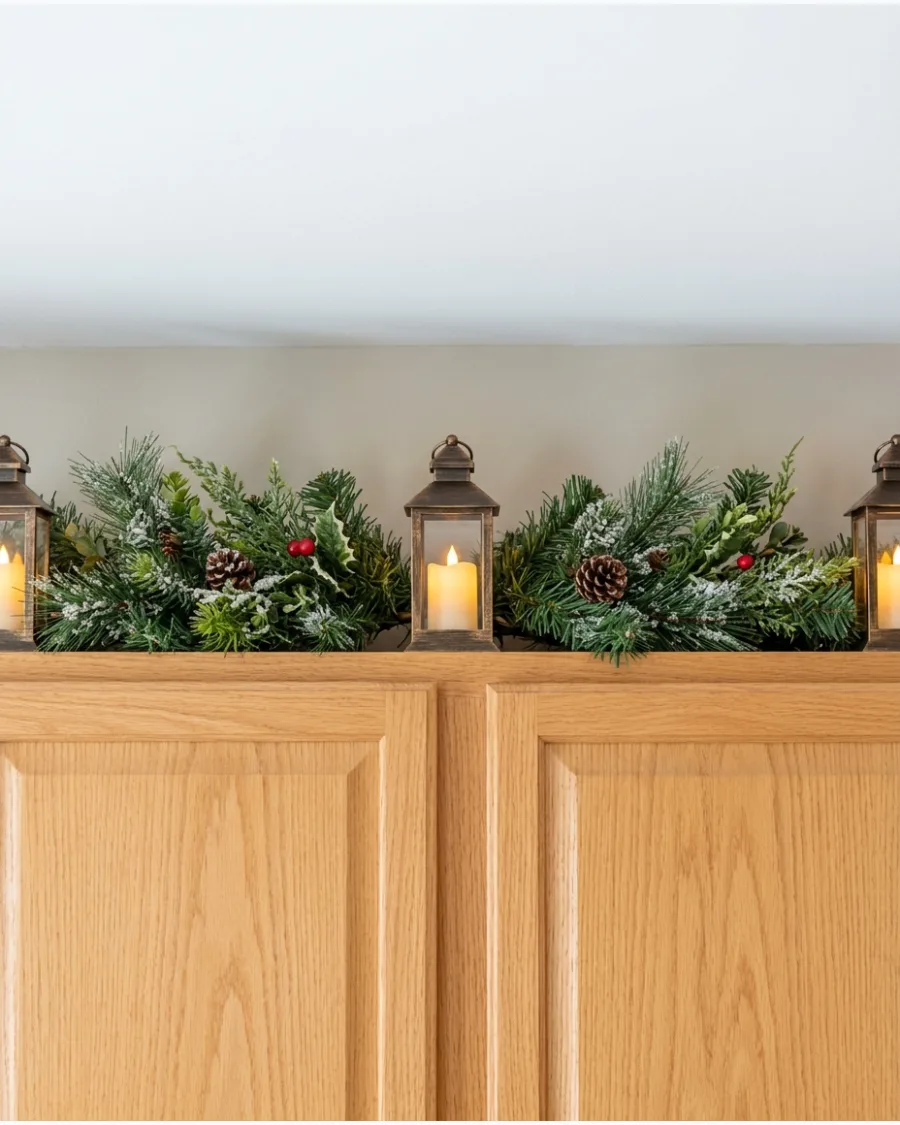
Arrange small metal or wooden lanterns equipped with flickering flameless candles along the cabinet tops. This adds a traditional, flickering warmth that is completely safe to leave unattended.
Group three lanterns of different heights together in the corner for a more professional-looking arrangement.
- Ensure the lanterns have a flat base so they do not wobble on the cabinet surface.
- Use candles with a moving flame effect for the most realistic look.
- Surround the base with a few loose pinecones to ground the display.
Most people skip this: Check the clearance of the cabinet doors to make sure the lanterns do not block them from opening.
29. Glowing Ceramic Houses and Greenery
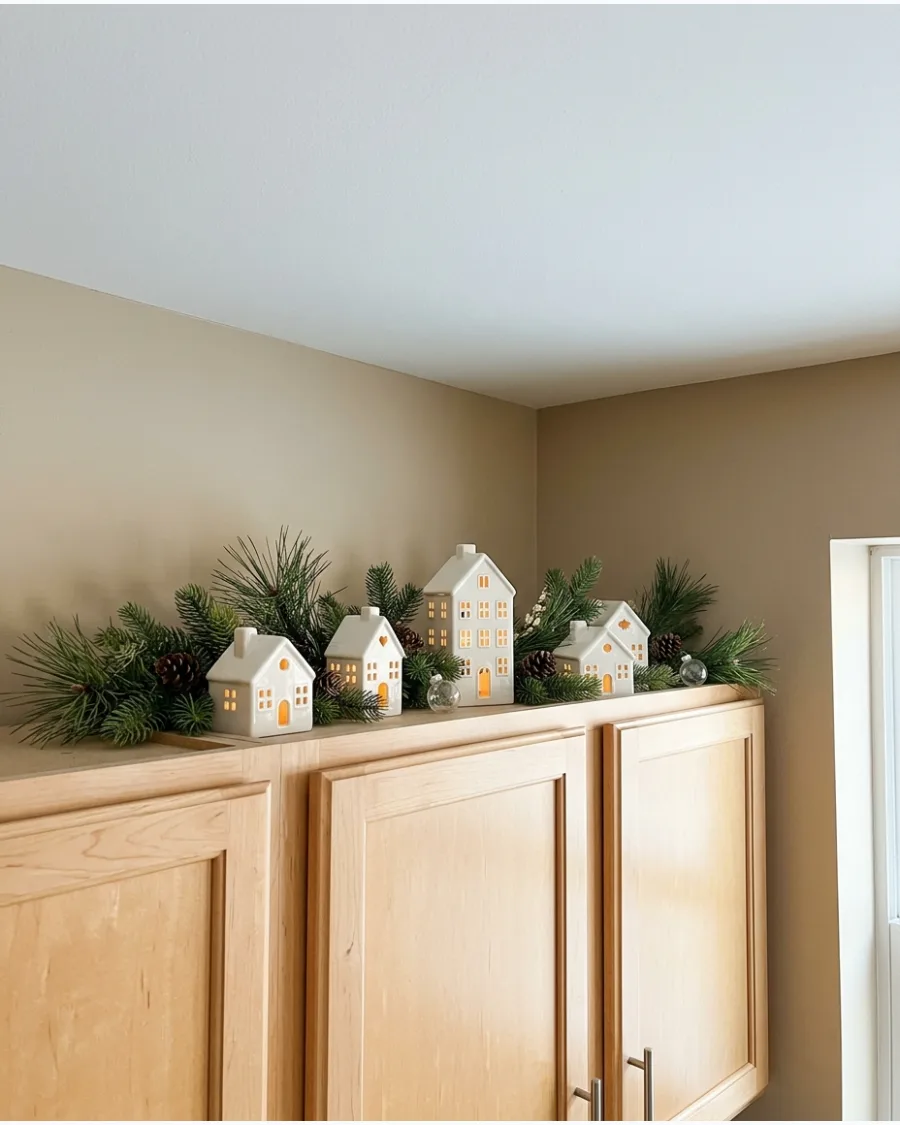
Combine simple white ceramic houses with sprigs of fresh or faux pine for a classic holiday look. The greenery provides a vibrant backdrop that makes the white ceramic pop during the day and glow at night.
Space the houses evenly across the greenery to create a balanced rhythm across the cabinets.
- Use LED tea lights that flicker to give the houses a lived-in appearance.
- Mix different house shapes like tall gables and wide cottages for variety.
- Wipe the cabinet tops clean before placing the greenery to prevent dust buildup.
Best shortcut: Use faux pine picks instead of a long garland so you can easily adjust the greenery around each house.
30. Twinkle Lights Behind Evergreen Branches
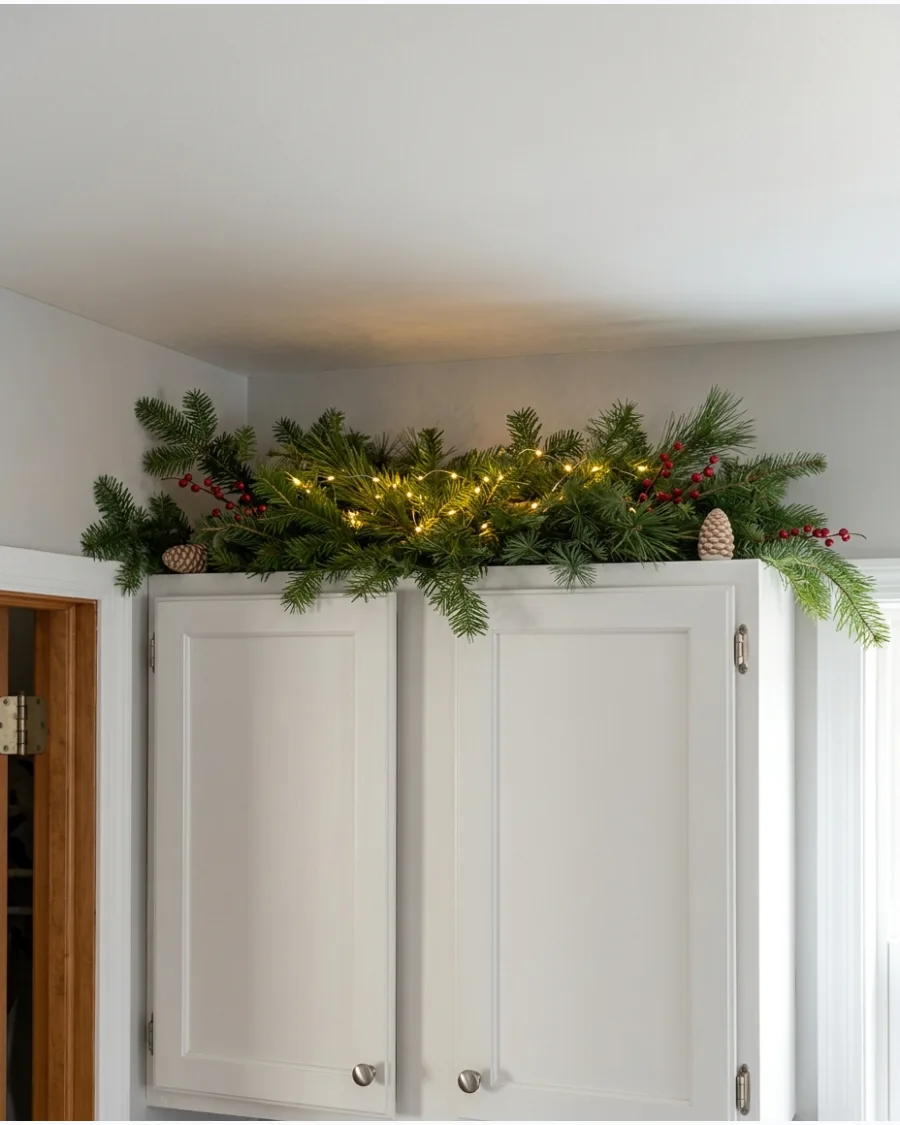
Place a strand of twinkle lights at the very back of the cabinet top, then lay evergreen branches in front of them. This creates a soft, diffused glow that shines through the needles without the wires being visible.
Push the lights as close to the wall as possible to bounce the light upward toward the ceiling.
- Use green-wired lights to blend in with the branches if any part of the strand shows.
- Opt for micro lights for a delicate shimmer rather than large bulbs.
- This technique works best on cabinets with a high ceiling clearance to let the light spread.
Quick win: Use a strand with multiple settings like twinkle or slow fade to add subtle movement to the kitchen.
31. Lighted Christmas Star Focal Point
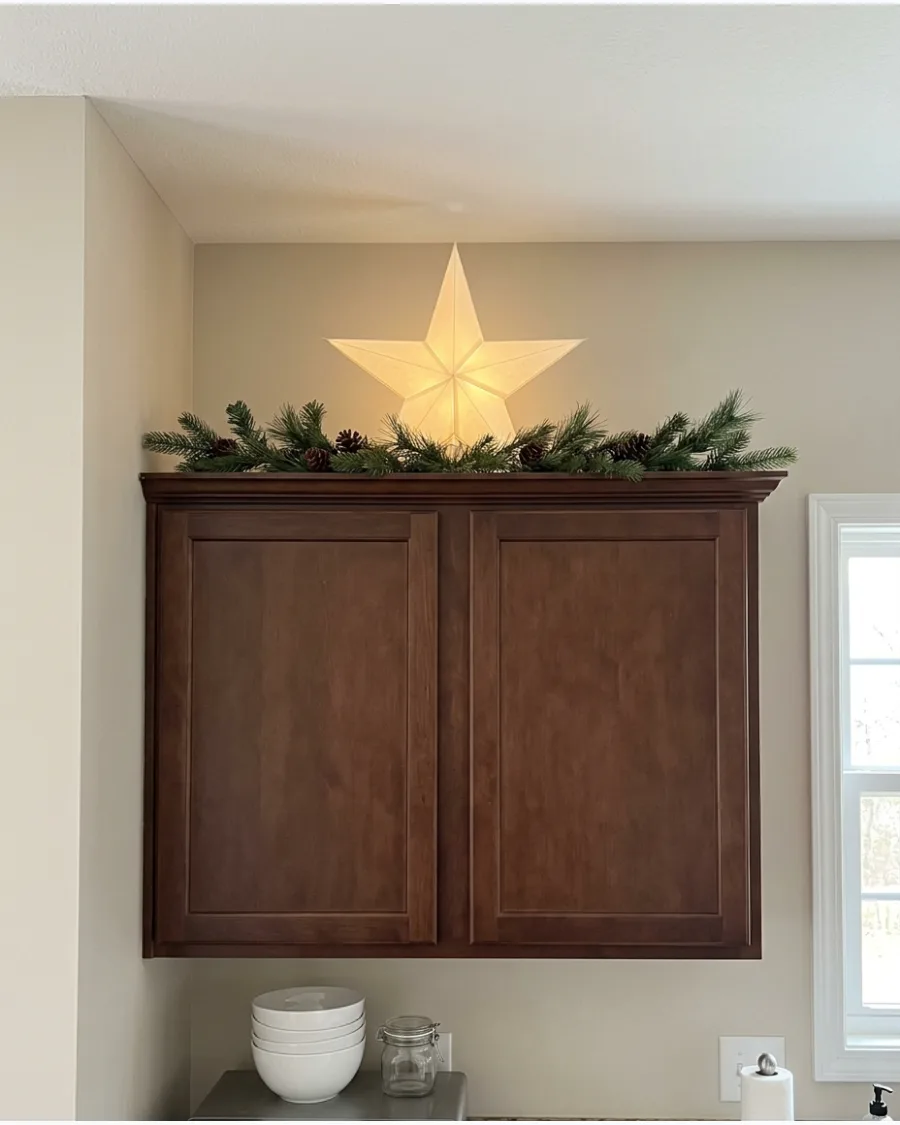
A single large star creates a strong visual anchor in the kitchen. Place the star in the center of the longest cabinet run to balance the room.
Surround the base with flat cedar or pine branches to hide any battery packs or wires. Measure the height between the cabinet and ceiling to ensure the star fits without touching the top.
- Buy a battery-operated star with a timer to avoid climbing a ladder daily.
- Use a small plate or stand to keep the star upright behind the cabinet trim.
- This works well in modern kitchens where a single bold piece feels cleaner than multiple small items.
Quick win: Use a piece of museum wax on the bottom of the star stand to prevent it from tipping when you open cabinet doors.
32. Candlelight-Style Cabinet Top Display
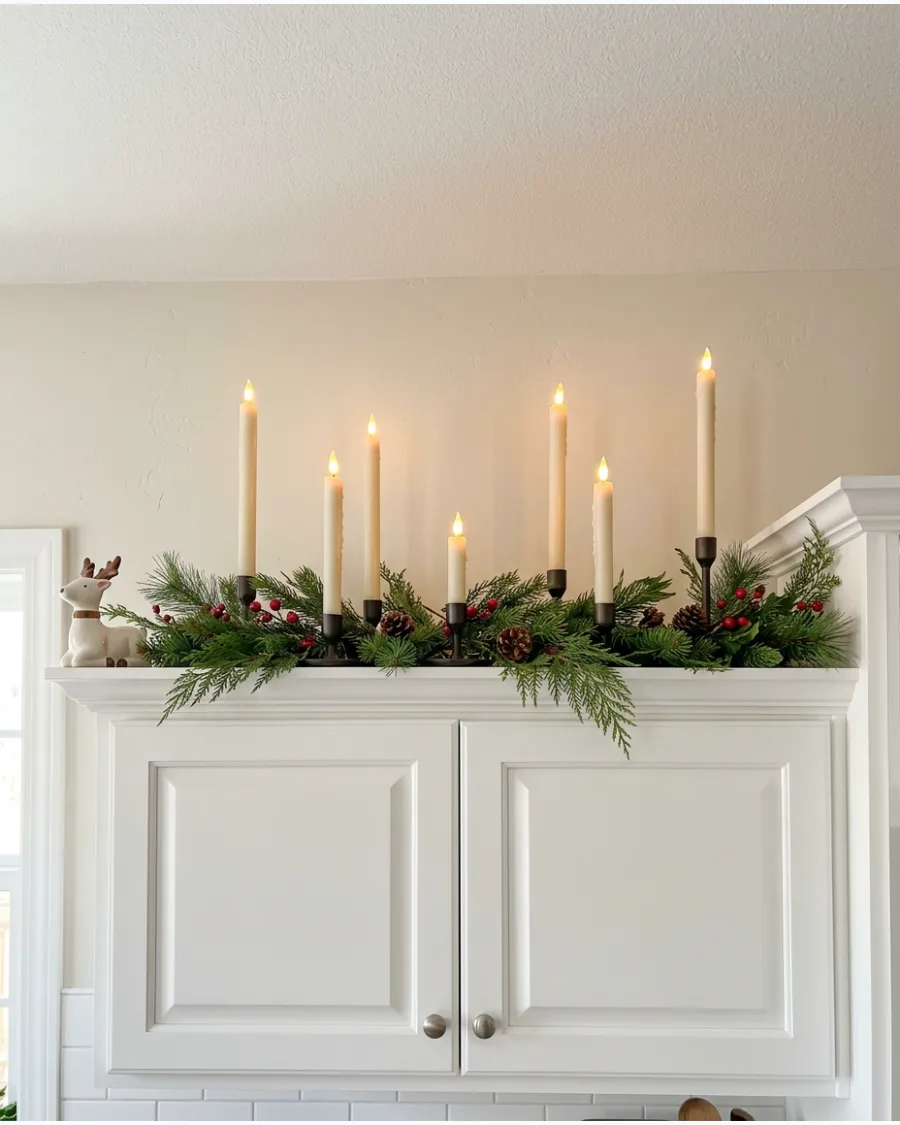
Grouping flameless candles provides the look of a cozy hearth without the fire hazard of real wax near the ceiling. Mix different heights to create a natural, staggered look across the cabinet tops.
Tuck small sprigs of greenery around the bases to ground the display. Set the candles to a remote-control timer so they all turn on at dusk simultaneously.
- Choose candles with a moving flame effect for the most realistic look from the floor.
- Space clusters about two feet apart to avoid a crowded look.
- This setup is perfect for dark kitchens that need extra ambient light during winter evenings.
Most people skip this: Check the battery life of your candles before placing them, as cold air near the ceiling can drain batteries faster.
RIBBONS, BOWS AND ORNAMENTS
33. Burgundy Velvet Bow Display
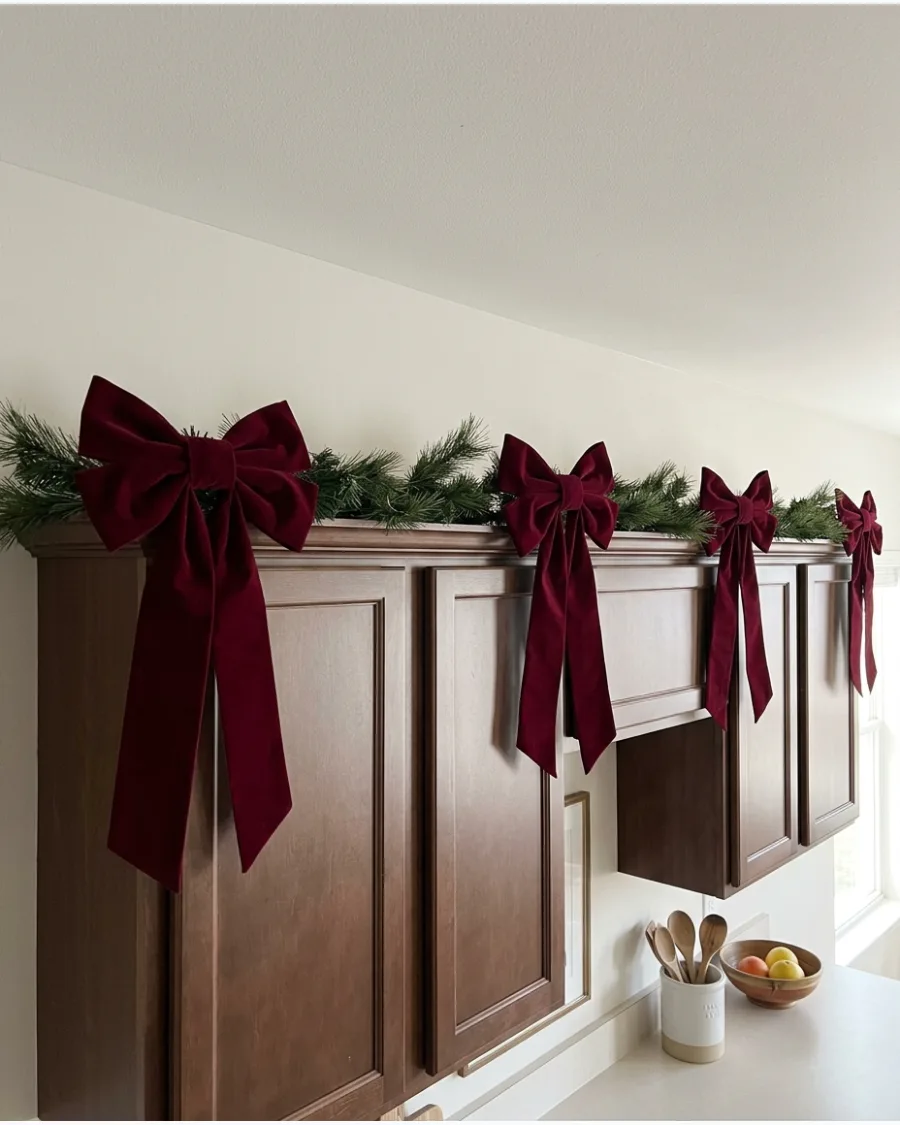
Deep burgundy tones add a sophisticated and moody feel to traditional greenery. Attach these bows to the highest points of your garland to draw the eye upward and emphasize ceiling height.
The velvet texture absorbs light, making the color look rich and expensive even from a distance. Secure the bows with floral wire instead of tape to ensure they stay upright all season.
- Look for wired velvet ribbon so you can fluff the loops and keep them from drooping.
- Use bows that are at least six inches wide so they don't get lost in the greenery.
- Deep red works best in kitchens with brass or gold hardware.
Quick win: Steam the ribbon tails before hanging them to remove any creases from storage.
34. Classic Red Bow Cabinet Decor
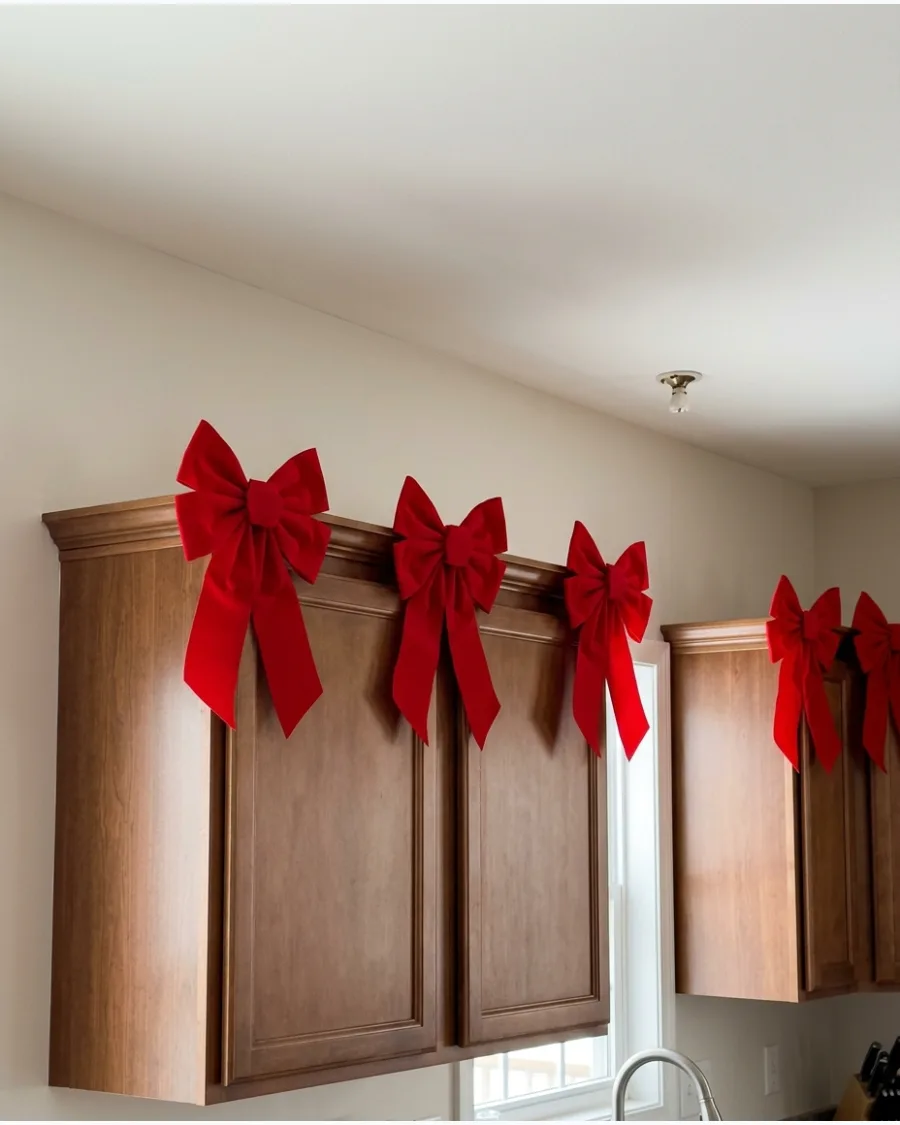
Bright red bows offer the most traditional holiday look and pop beautifully against white or light wood cabinets. Space them evenly to create a rhythmic pattern that feels organized and intentional.
This approach is one of the fastest ways to decorate a large area with minimal effort. Loop the ribbon around the garland and tie a simple shoelace knot for a classic, floppy look.
- Buy pre-made bows if you want a uniform look without the hassle of tying them yourself.
- Choose a weather-resistant ribbon if your kitchen gets a lot of steam from cooking.
- This style is a great budget-friendly option for high-impact decor.
Best shortcut: Use plastic zip ties to attach bows to your garland so they won't slip or fall if the cabinets are bumped.
35. Plaid Ribbon and Evergreen Decor
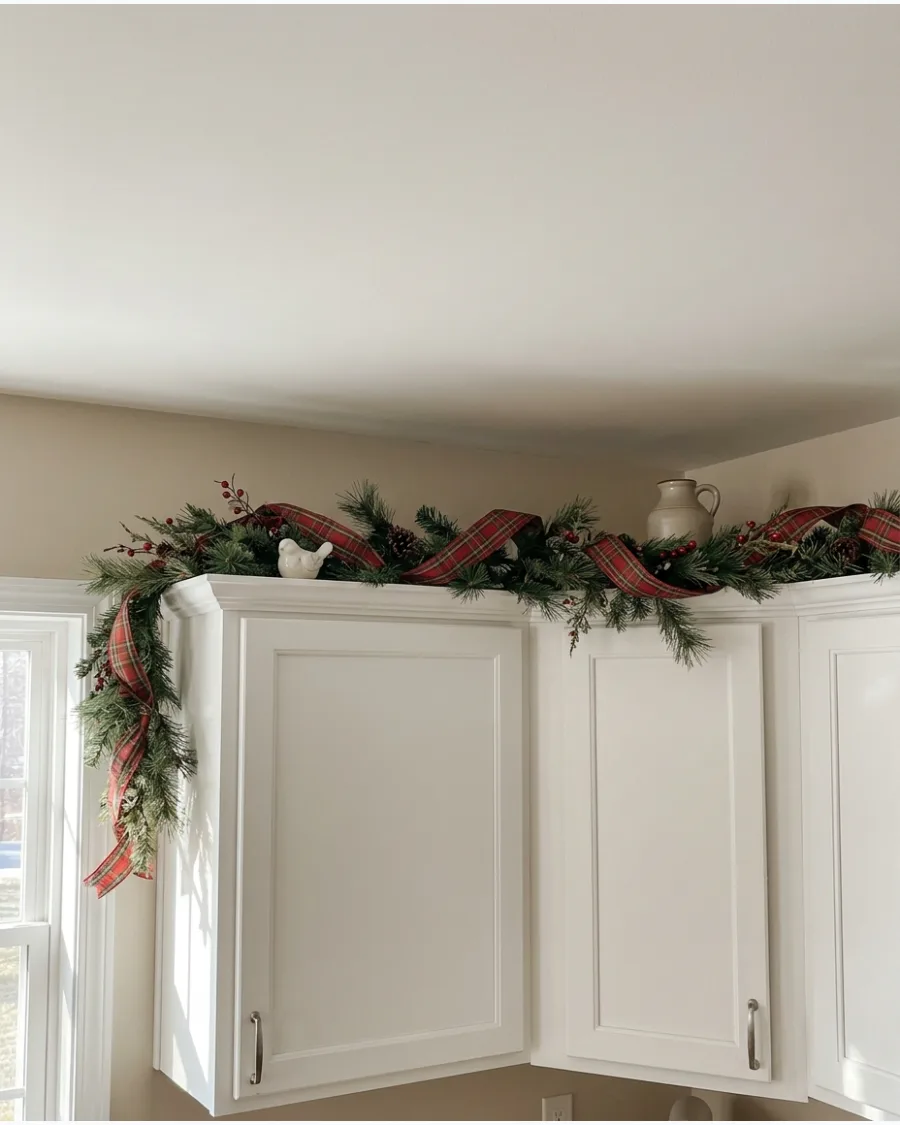
Plaid patterns bring a cozy, tactile feel to the kitchen that reminds people of warm blankets and winter cabins. Weave the ribbon loosely through the greenery rather than wrapping it tightly to keep the look airy.
This method works well to bridge the gap between different types of greenery, like pine and cedar. Tuck the ends of the ribbon deep into the branches to make it look like one continuous piece.
- Use a 2.5-inch wide ribbon for the best visibility from the floor.
- Choose a pattern with metallic gold threads to add a subtle sparkle when the kitchen lights are on.
- This works best in homes with a traditional or transitional style.
Most people skip this: Create poufs with the ribbon every 12 inches to add volume to thin, inexpensive garlands.
36. Forest Green Velvet Ribbon
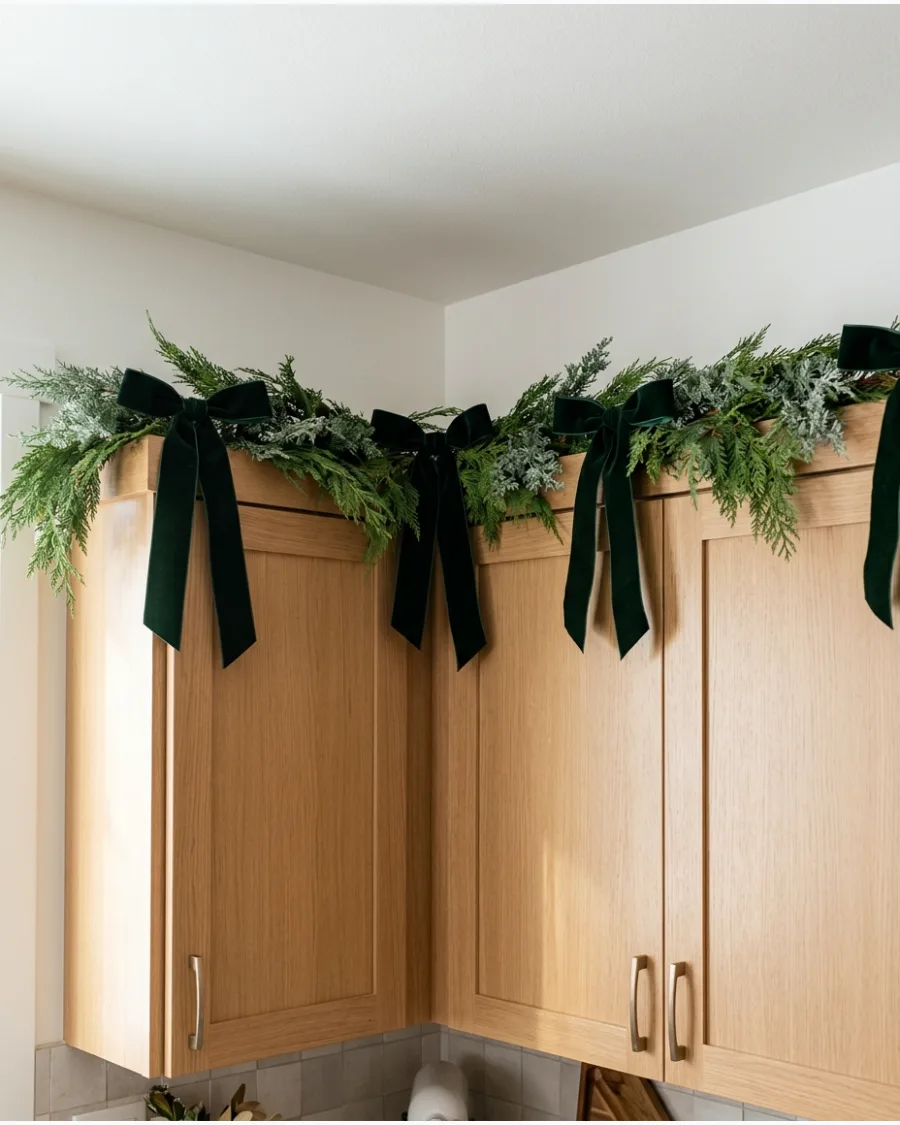
Using green ribbon on green branches creates a sophisticated tone-on-tone effect that feels very high-end. The subtle difference in texture between the velvet and the needles adds depth without adding visual noise.
This is the best choice for a minimalist kitchen where bright colors might feel too distracting. Choose a ribbon that is two shades darker than your greenery to ensure it stands out.
- Opt for double-sided velvet so the ribbon looks good from every angle in the kitchen.
- Keep the tails long—about 12 inches—to add vertical movement to the display.
- This style pairs beautifully with silver or chrome kitchen fixtures.
Quick win: Use a small dot of hot glue to secure the center of the bow loops so they don't flatten over time.
37. Antique Gold Ornament Garland
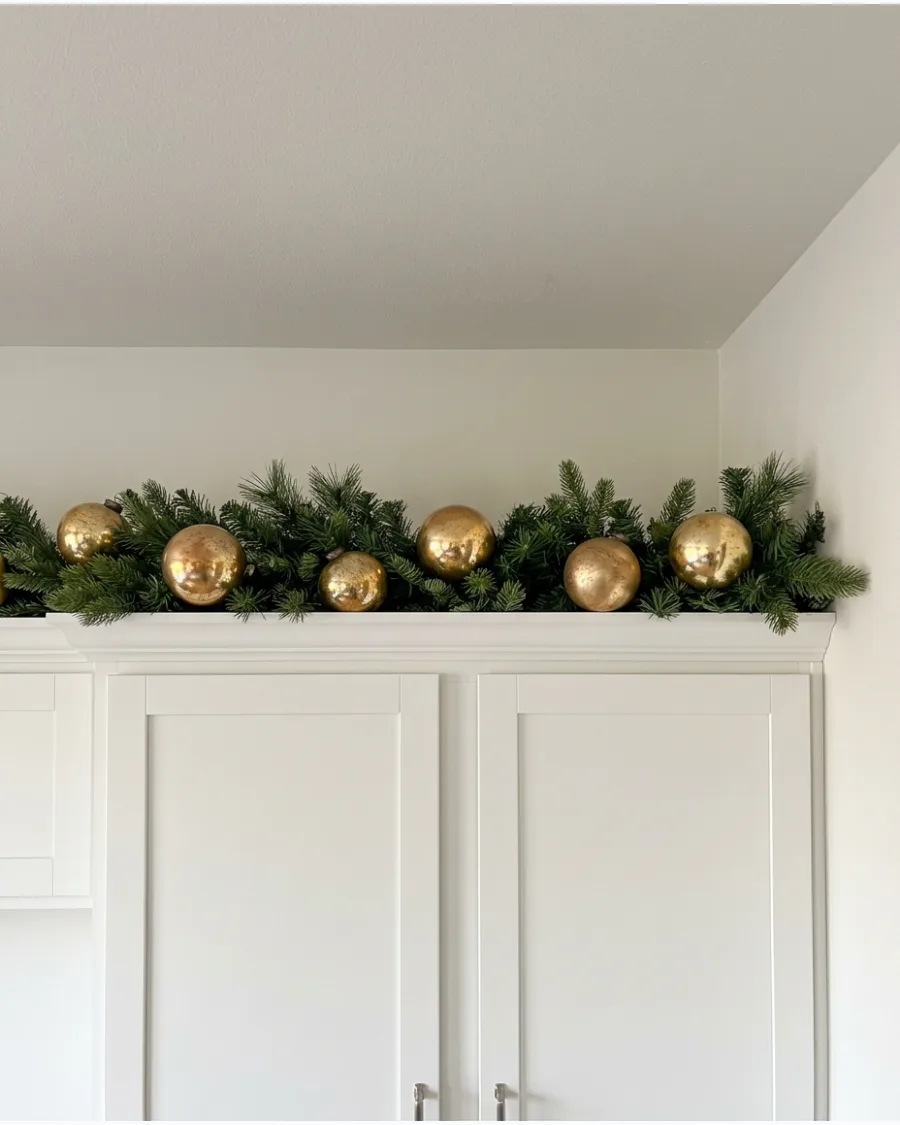
Gold accents reflect light and make a kitchen feel much brighter during the dark winter months. Nestle large ornaments into the greenery rather than hanging them to keep the display stable.
Using an antique or matte finish prevents the glare that often comes with shiny plastic ornaments. Cluster three ornaments of different sizes together every few feet for a professional, layered look.
- Use shatterproof ornaments for this high-up location to avoid accidents during setup or cleaning.
- Mix mercury glass textures with smooth matte finishes for more visual interest.
- This is an excellent way to use extra ornaments that didn't fit on the main tree.
Best shortcut: Thread a pipe cleaner through the ornament loops to easily twist them onto the garland branches.
38. Vintage Glass Ornament Collection
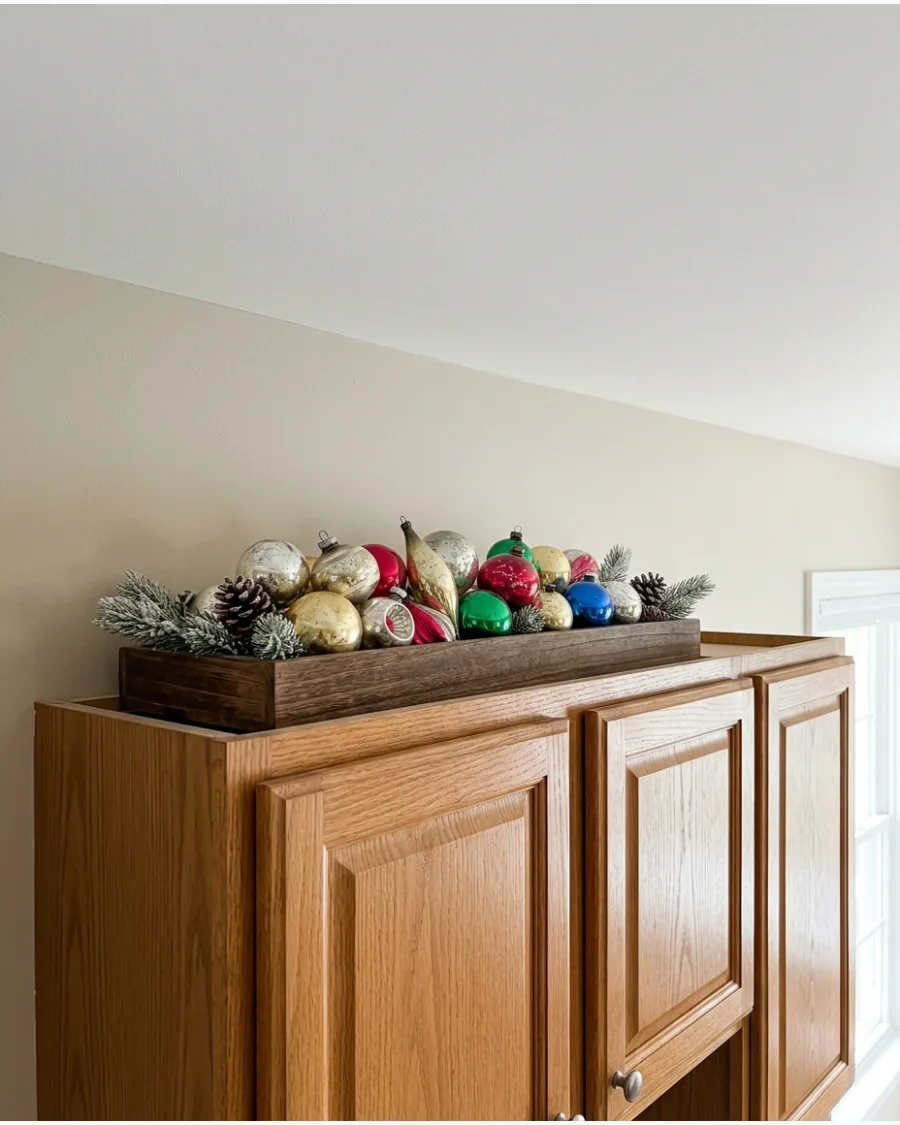
Colorful glass ornaments bring a sense of history and personality to the space above your cabinets. Instead of scattering them, place them in clear glass bowls or on silver trays to keep them grouped and safe.
This keeps the look curated rather than cluttered. Place the heaviest containers directly over the cabinet dividers where the structure is strongest.
- Use museum putty on the bottom of trays to keep them from sliding on smooth cabinet tops.
- Stick to a specific color palette, like all cool tones or all warm tones, to keep the collection looking cohesive.
- This is a great way to display family heirlooms that are too fragile for a high-traffic tree.
Most people skip this: Line the bottom of your display trays with white felt to prevent scratches on the cabinet finish.
39. Oversized Baubles Above Cabinets
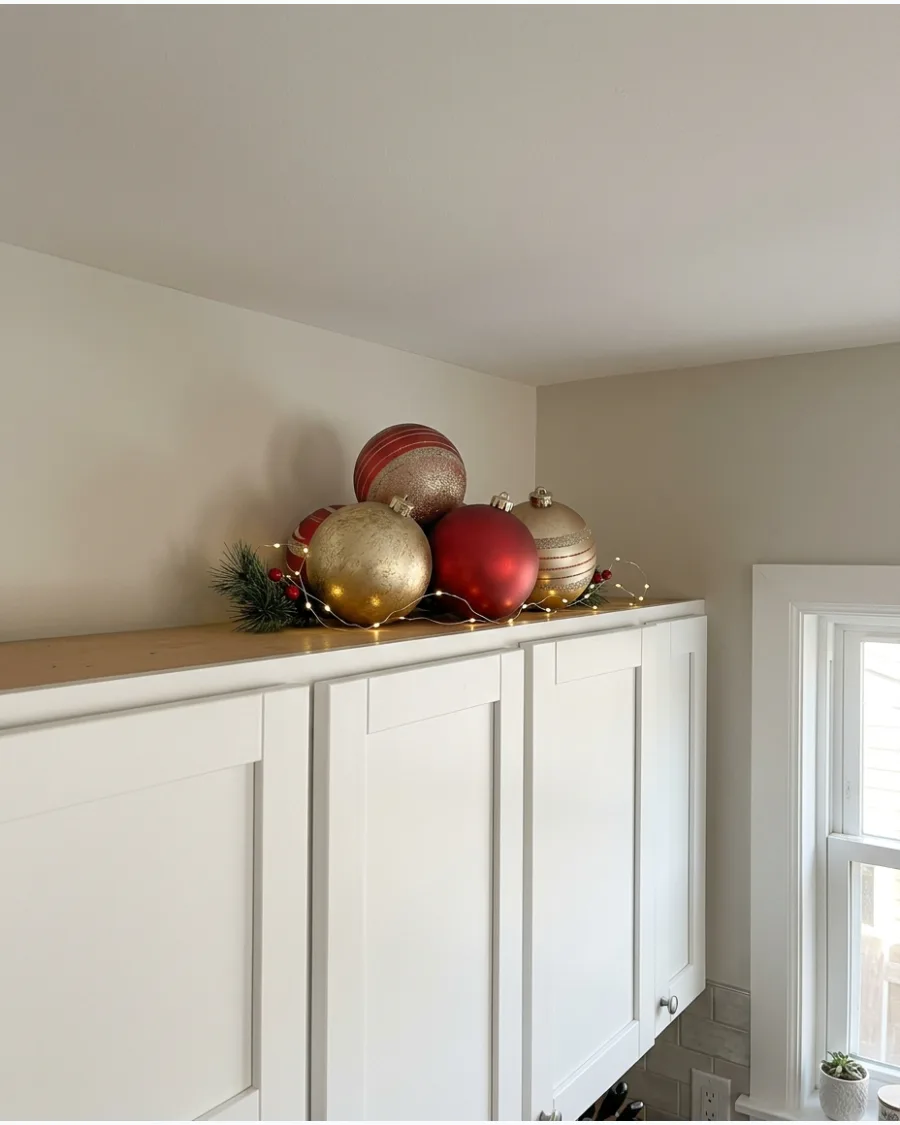
Small decorations often disappear when placed high up, so scaling up is the best way to make an impact. Use ornaments that are at least 6 to 8 inches in diameter to ensure they are visible from across the room.
A few large pieces look much cleaner and more intentional than a dozen small ones. Space the baubles evenly to act as focal points along the entire cabinet run.
- Look for lightweight plastic or foam-core ornaments to prevent adding too much weight to the cabinet tops.
- Choose a single color for all the baubles to create a modern, high-contrast look.
- These are easy to wipe clean of dust at the end of the season.
Quick win: Use a small roll of painters tape (sticky side out) under the baubles to stop them from rolling around.
40. Brass Bells and Greenery
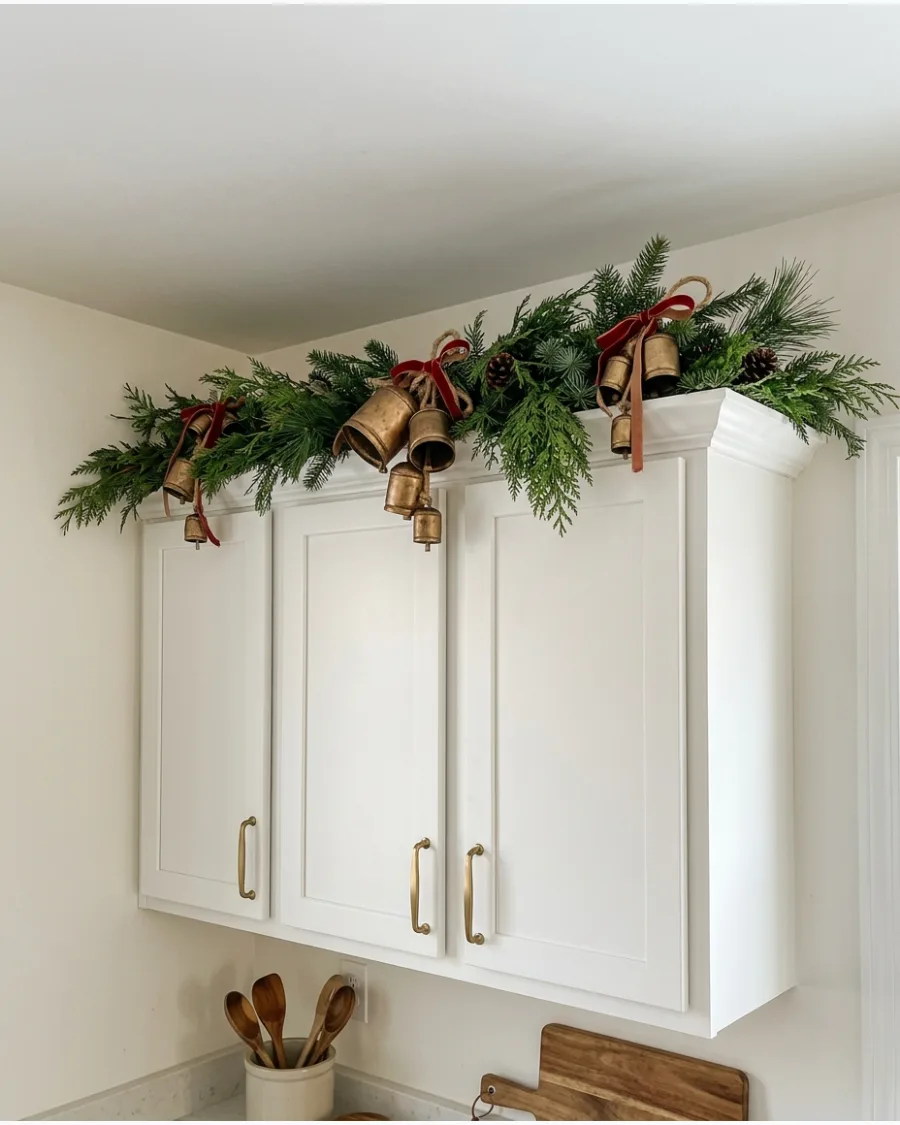
Brass bells add a vintage charm that feels timeless and warm. Drape them over the corners of the cabinets or nestle them into thick pine branches for a classic touch.
The metallic finish coordinates perfectly with modern brass cabinet pulls and faucets. Tie the bells together with twine or leather cord to give them a handcrafted appearance.
- Choose bells with a clapper inside so they make a soft sound if the cabinets are moved.
- Use different sizes of bells in each cluster to create more depth.
- This look is particularly effective in kitchens with warm wood tones or cream-colored walls.
Best shortcut: Hang the bells slightly over the edge of the cabinet crown molding so they are more visible from below.
SIGNS, ART AND CHRISTMAS LETTERING
41. Large Merry Christmas Sign
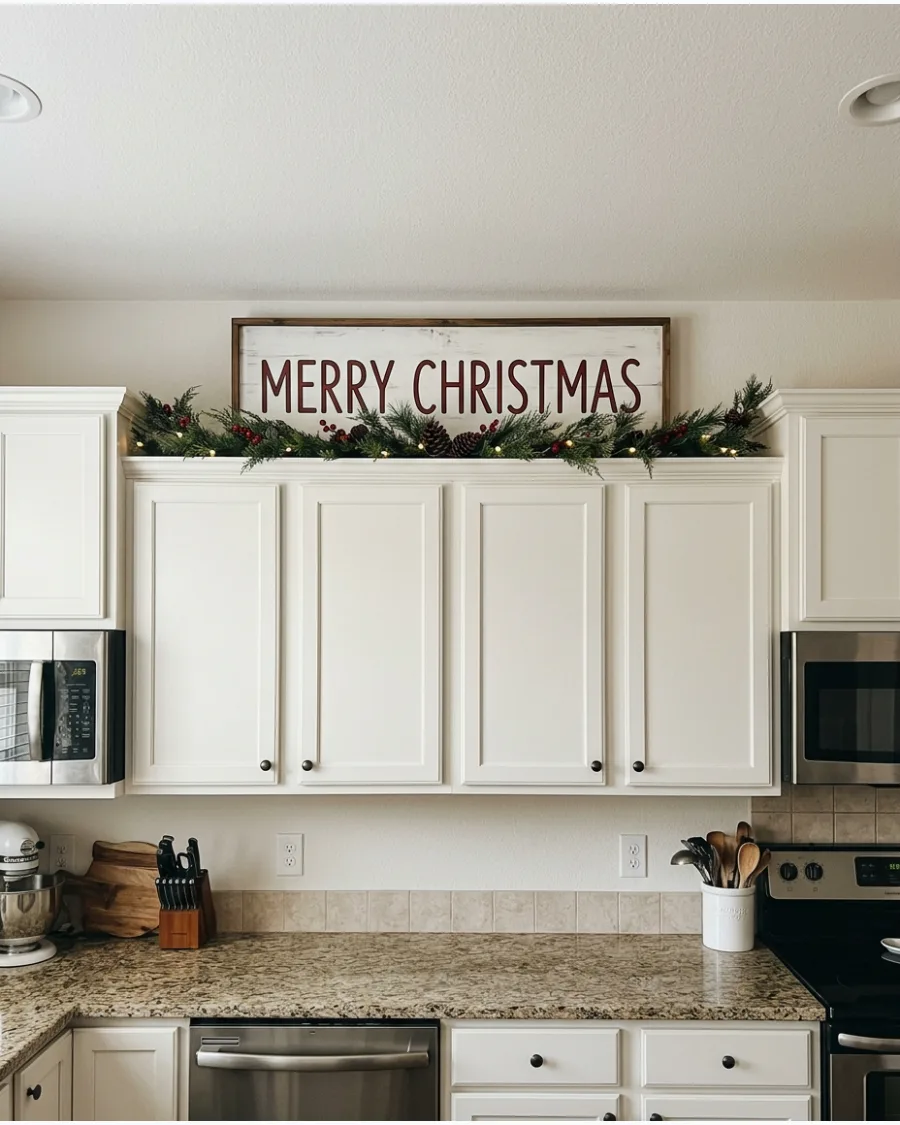
A single large sign creates an instant focal point without needing a lot of small trinkets. Surround the base with flat cedar branches to ground the sign while keeping the message readable.
Measure the height between your cabinet tops and the ceiling before buying a sign to ensure it fits with at least two inches of breathing room. This approach works best on a long, uninterrupted stretch of cabinetry.
- Wooden signs typically cost between thirty and sixty dollars at most home decor retailers.
- Center the sign on the largest section of cabinetry to create a balanced visual anchor for the room.
- Renter-friendly command strips can be used on the wall behind the sign to keep it from shifting.
Most people skip this: Use command strips on the back of the sign to prevent it from tipping forward when you open and close cabinet doors.
42. Vintage Christmas Sign Collection
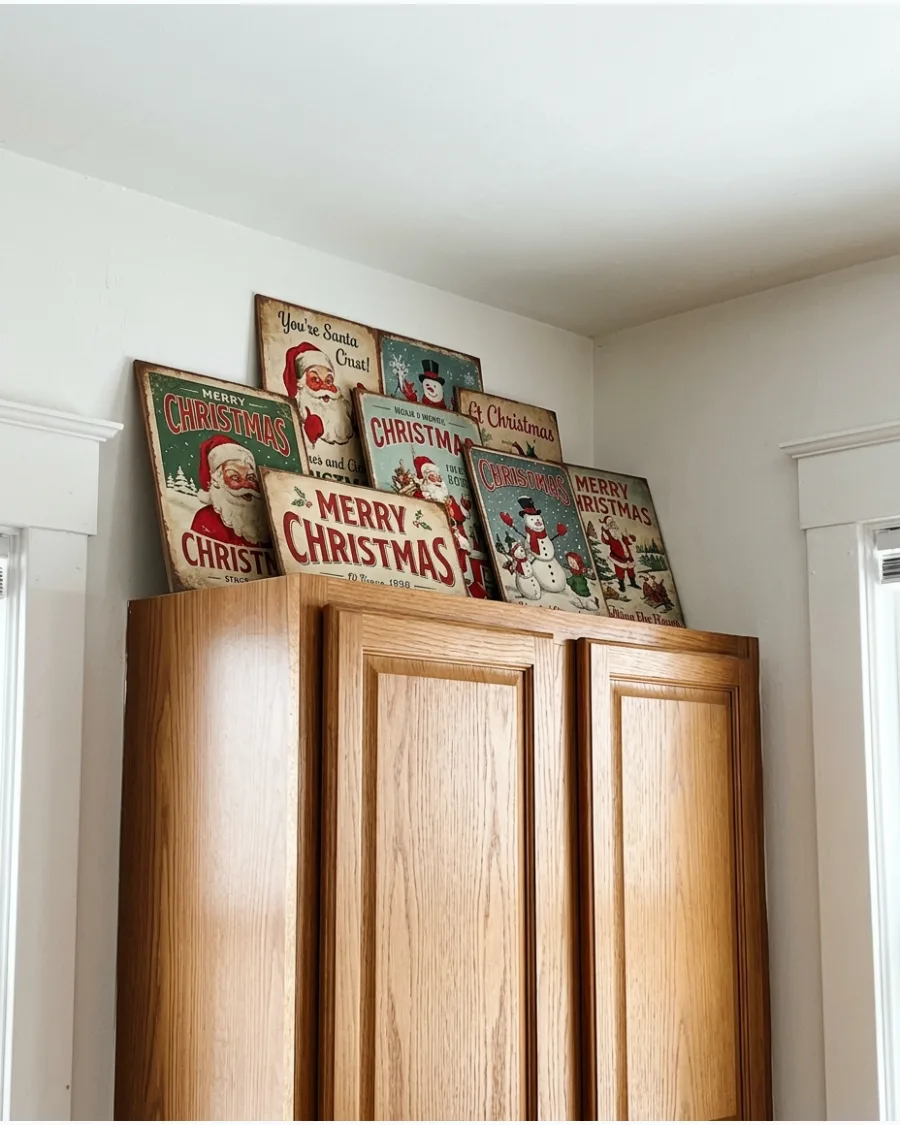
Layering smaller signs of different heights creates a curated look that feels more personal than a single mass-produced item. Lean them at slight angles against the wall and overlap the edges to build depth.
Stick to a consistent color palette, like red and cream, to keep the collection from looking cluttered or messy. This is a great way to fill shorter gaps where one large sign would not fit.
- Thrift stores and antique malls are the best places to find unique metal signs for under ten dollars.
- Stagger the signs by placing the tallest one in the back and the smallest in the front.
- Switch to smaller signs if you have less than twelve inches of clearance above your cabinets.
Quick win: Place a small piece of non-slip shelf liner under the signs to keep them from sliding on smooth cabinet surfaces.
43. Framed Winter Landscape Above Cabinets
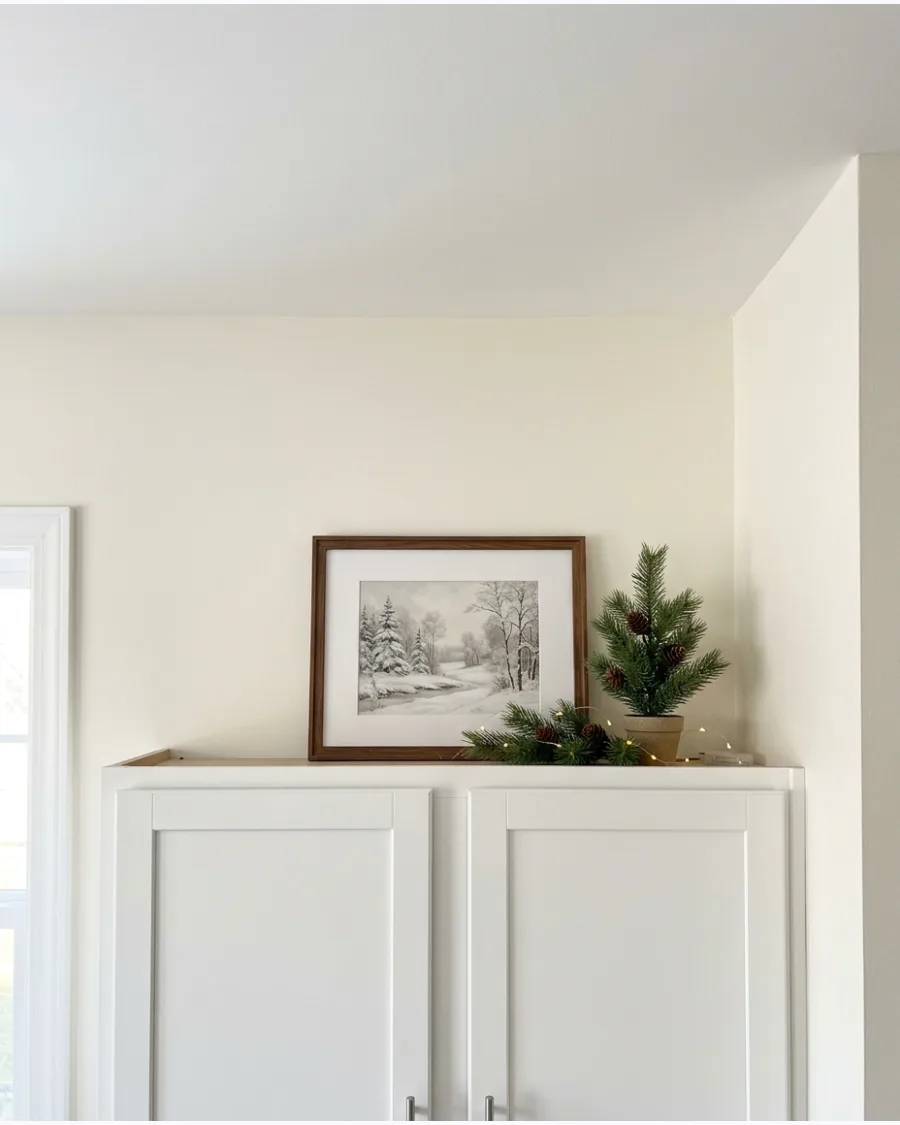
Art is not just for eye-level walls; placing framed landscapes above cabinets adds an unexpected touch of sophistication. Choose scenes with snowy forests or frozen lakes to bridge the gap between Christmas and the rest of winter.
Use thick, chunky frames to give the artwork enough visual weight to compete with the large scale of kitchen cabinets. This keeps the kitchen feeling like an extension of your living room.
- Printable winter art is a budget-friendly way to fill frames you already own for just a few dollars.
- Position frames at a slight forward tilt if your cabinets are high to make the art more visible from the floor.
- Use frames with glass fronts to make cleaning grease and dust much easier after the holidays.
Best shortcut: Swap out your existing above-cabinet art for seasonal prints using the same frames to save on storage space.
44. Christmas Chalkboard Sign
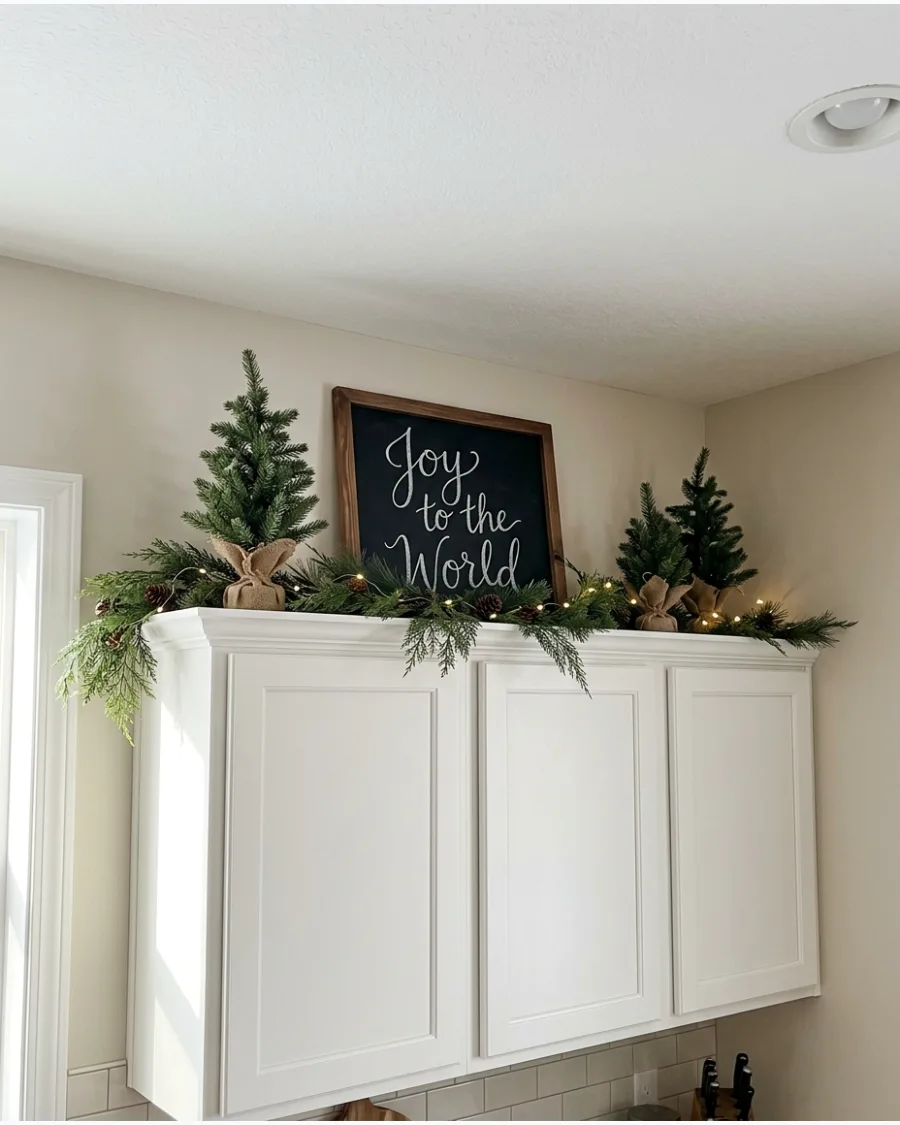
A chalkboard allows you to customize your holiday message every year without buying new decor. Surround the frame with mini bottlebrush trees of varying heights to create a miniature forest scene.
Use a chalk marker instead of traditional chalk for crisp lines that won't smudge or create dust in your cooking area. It adds a handmade, cozy feel that balances out cold stainless steel appliances.
- Standard tabletops chalkboards are available for fifteen to twenty-five dollars.
- Place the chalkboard in a corner where the two cabinet runs meet to fill that deep dead space.
- Change the message for Christmas morning to keep the decor feeling fresh and interactive.
Most people skip this: Season your chalkboard first by rubbing the side of a piece of chalk over the whole surface and wiping it off to prevent 'ghosting' of your letters.
45. Framed Vintage Santa Artwork
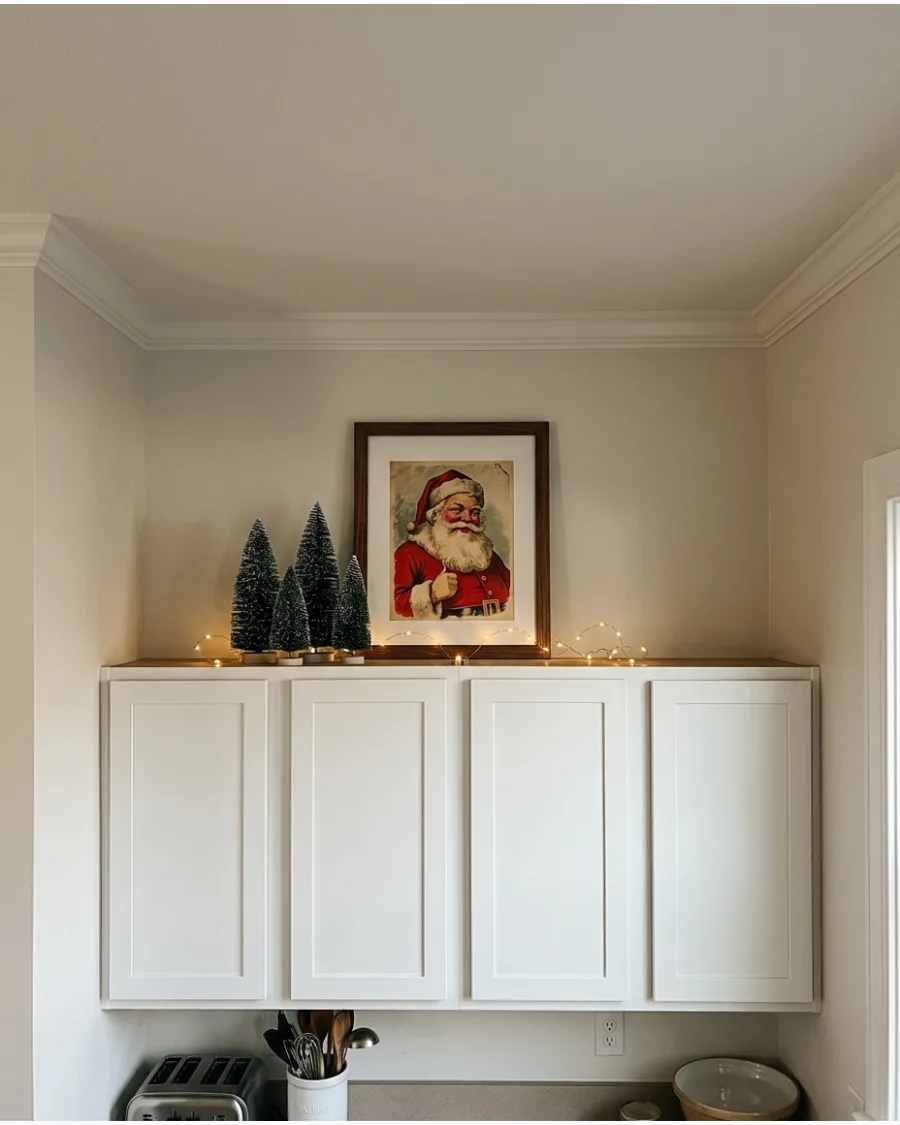
Old-fashioned Santa prints bring a sense of nostalgia and warmth to a modern kitchen. Pair the artwork with a few warm fairy lights to make the colors pop during the evening.
Place the frame slightly off-center to allow room for a small cluster of greenery on the opposite side. This prevents the display from looking too stiff or symmetrical.
- Search for 'public domain' vintage Christmas images to print at home for a free decor option.
- Secure the frame to the wall with adhesive strips to ensure it stays upright during heavy cabinet use.
- Pair red-toned Santa art with dark green cabinets for a classic, high-contrast look.
Quick win: If you have a deep cabinet, place a small box behind the frame to prop it up higher so the bottom of the art is not hidden by the cabinet trim.
46. Wooden Christmas Village Sign
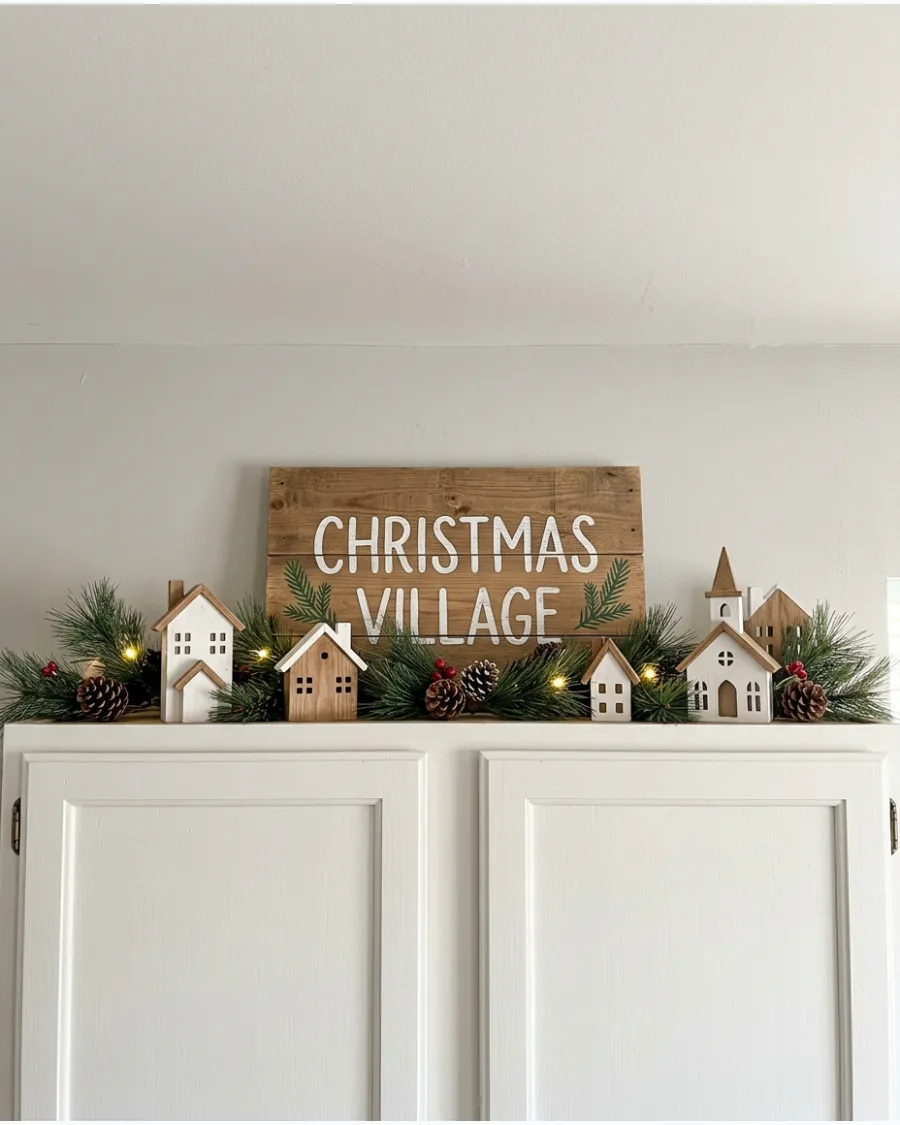
A long, narrow wooden sign with a village silhouette provides a clean backdrop for other holiday elements. Tuck a few real or artificial pine branches behind the sign to add height and texture.
Choose a sign with a dark wood finish to provide contrast against light-colored walls or white cabinetry. This setup creates a cohesive scene that feels intentional and grounded.
- Look for 'shelf sitters' or 'mantel signs' which are designed with a thick base to stand up on their own.
- Run the sign across the top of a microwave cabinet or a short cabinet section to add visual interest.
- Dust the top of the sign once a week with a microfiber cloth to keep the silhouette looking sharp.
Best shortcut: Use a battery-operated light strip behind the wooden sign to create a silhouette effect that highlights the village shape at night.
NATURAL AND HANDMADE CHRISTMAS DECOR
47. Dried Orange and Pine Display
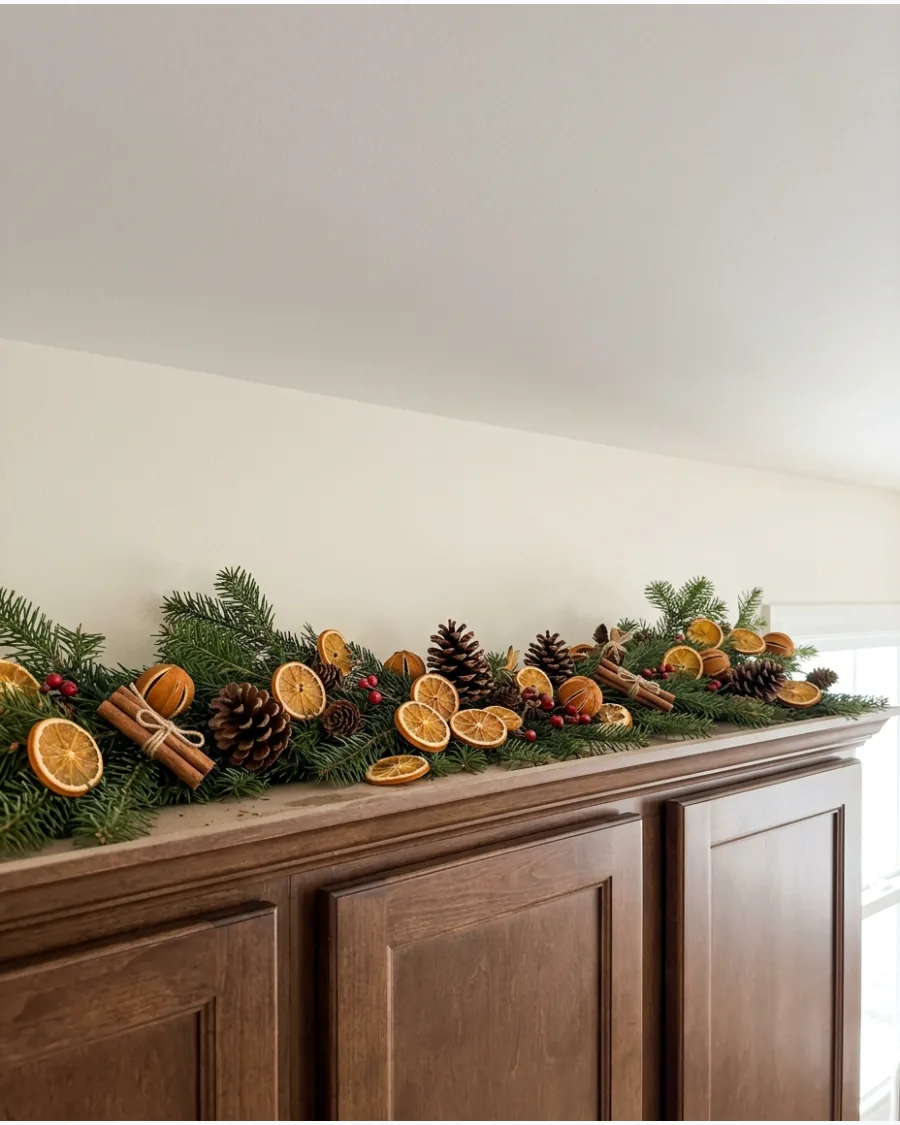
Combining natural elements like dried citrus and pine creates a look that is both traditional and fragrant. String the orange slices onto a thin wire or twine and drape them over loose evergreen branches.
Keep the orange slices away from direct contact with the cabinet surface by resting them on top of the greenery to avoid any potential oil stains. It is an affordable way to add a pop of color without using plastic ornaments.
- A bag of oranges and some fresh pine clippings can decorate a whole kitchen for under ten dollars.
- Space the orange slices about four inches apart to ensure the green branches still show through.
- Replace fresh pine branches every two weeks to keep the display looking vibrant and smelling great.
Quick win: Dry your own orange slices in a low-temperature oven for a few hours to ensure they are completely moisture-free before placing them on your cabinets.
48. Pinecone Collection Above Cabinets
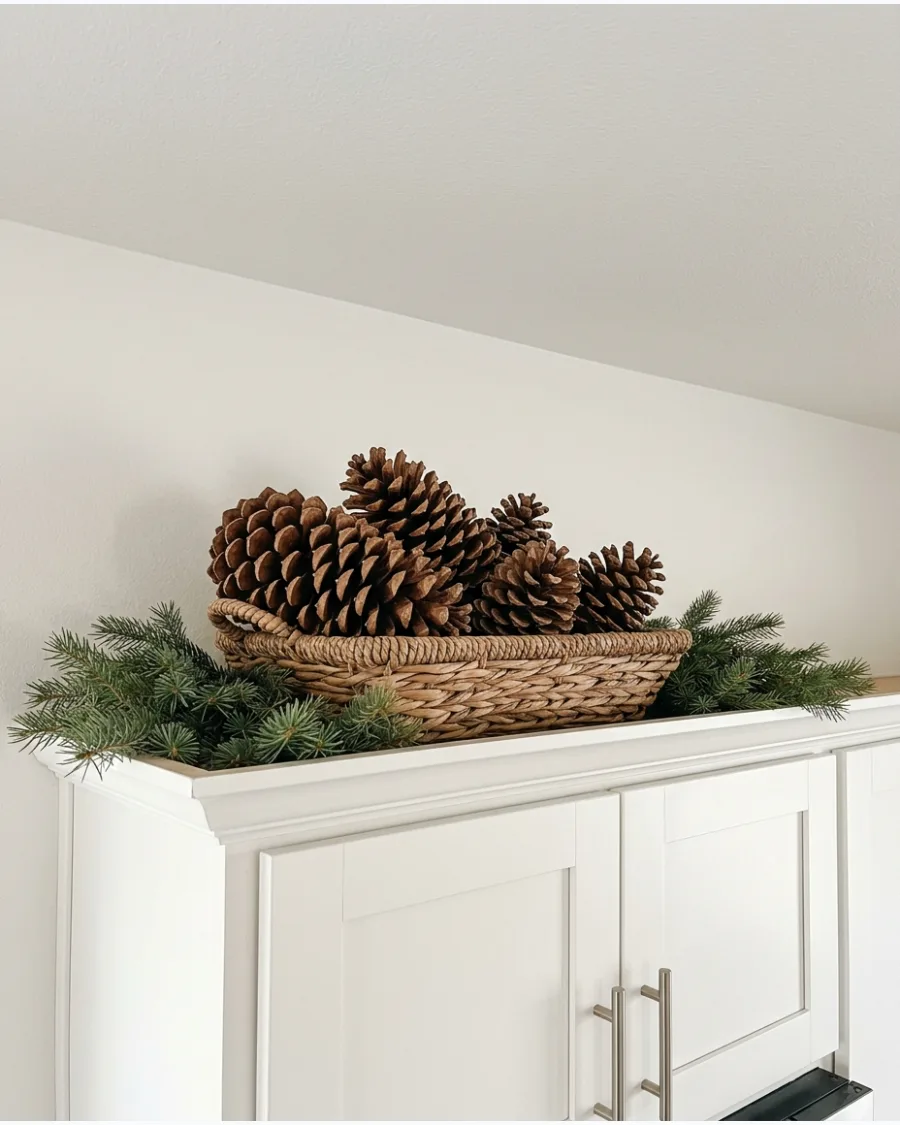
Large pinecones offer a lot of visual texture and fill empty spaces quickly. Arrange them in low wooden bowls or simple baskets to keep them from rolling around.
Mix different sizes and species of pinecones to make the display look more natural and less like a uniform store-bought set. This is one of the most budget-friendly ways to decorate since you can often find them for free outdoors.
- Buy bulk bags of scented pinecones to add a cinnamon aroma to your kitchen without candles.
- Cluster pinecones in groups of three or five to create a more professional, balanced look.
- Use a hair dryer on a cool setting once a week to blow dust off the pinecones without moving them.
Most people skip this: If you forage your pinecones, bake them at 200 degrees for 30 minutes to kill any bugs and melt away sticky sap before bringing them inside.
49. Rustic Birch Log Display
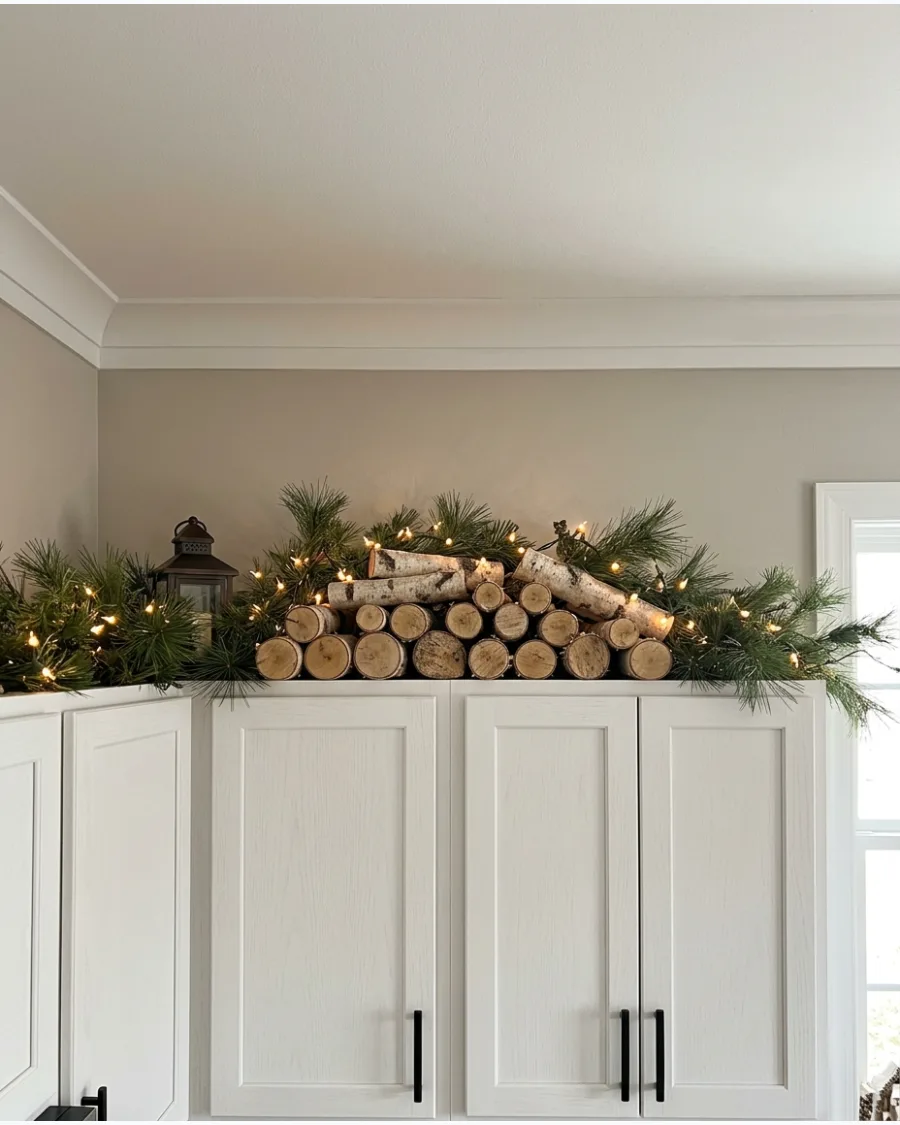
Birch logs add a bright, white natural element that works perfectly for a winter theme. Stack three or four small logs horizontally and secure them with a bit of twine or a hidden glue dot.
Position the logs so the ends face outward to showcase the beautiful circular grain and texture of the bark. Surround the base with dark green pine to make the white bark stand out.
- Decorative birch log bundles are usually available for fifteen to twenty dollars.
- Stack the logs in a pyramid shape to ensure they stay stable and do not roll off the cabinet edge.
- Leave this display up through February as it works well for general winter decor beyond Christmas.
Best shortcut: Use faux birch logs made of resin if you are worried about weight or finding clean, dry wood.
50. Woven Baskets Filled With Greenery
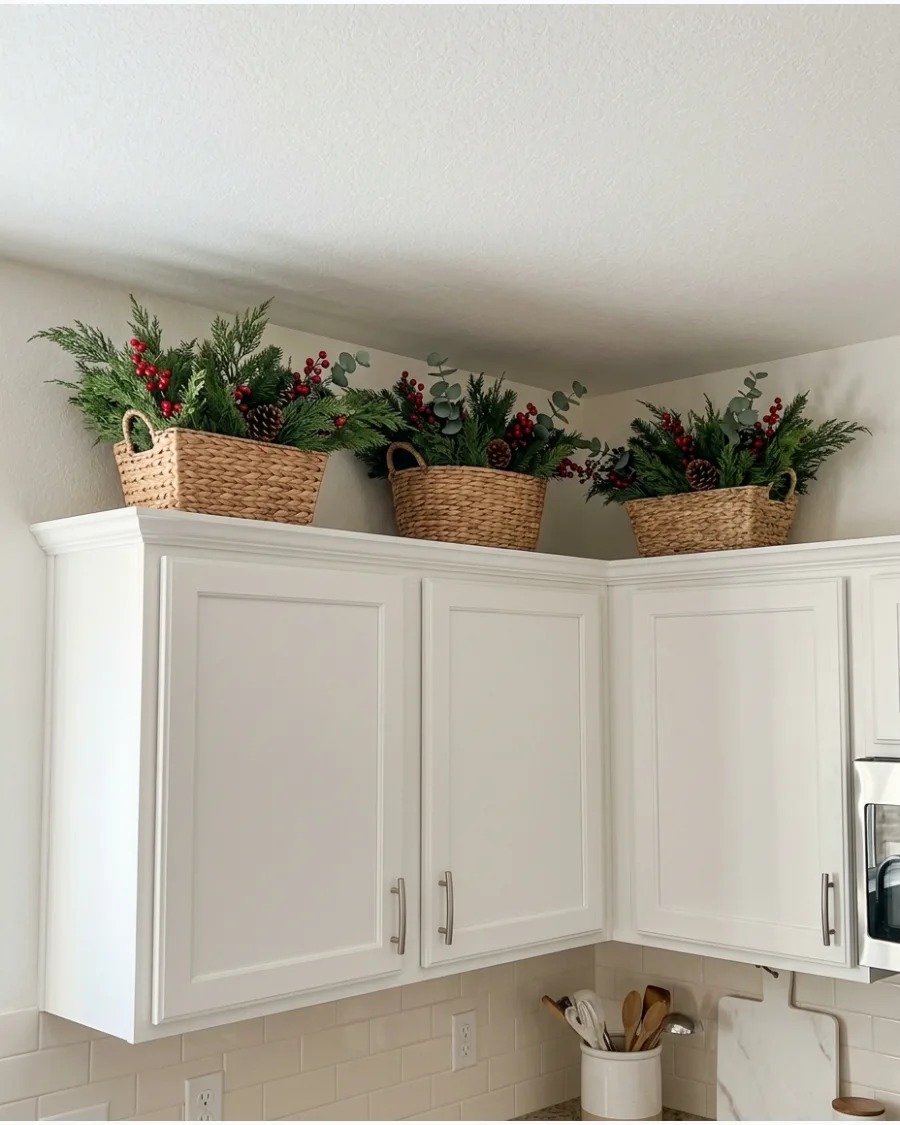
Baskets are great for adding height and hiding the messy ends of artificial greenery stems. Fill them with overflowing cedar or pine branches and a few red berry picks for a classic holiday look.
Choose baskets with a tight weave to prevent needles or dust from falling through onto your countertops below. This creates a cozy, farmhouse-inspired vibe that feels very approachable.
- Use baskets you already have around the house to save money on new seasonal containers.
- Place one basket at each end of a cabinet run to frame the space symmetrically.
- Add a small weight like a clean rock inside the basket to keep it from moving when doors are opened.
Quick win: Stuff the bottom of the basket with crumpled brown paper or floral foam to prop the greenery up so it spills over the edges perfectly.
51. Wooden Houses and Natural Greenery
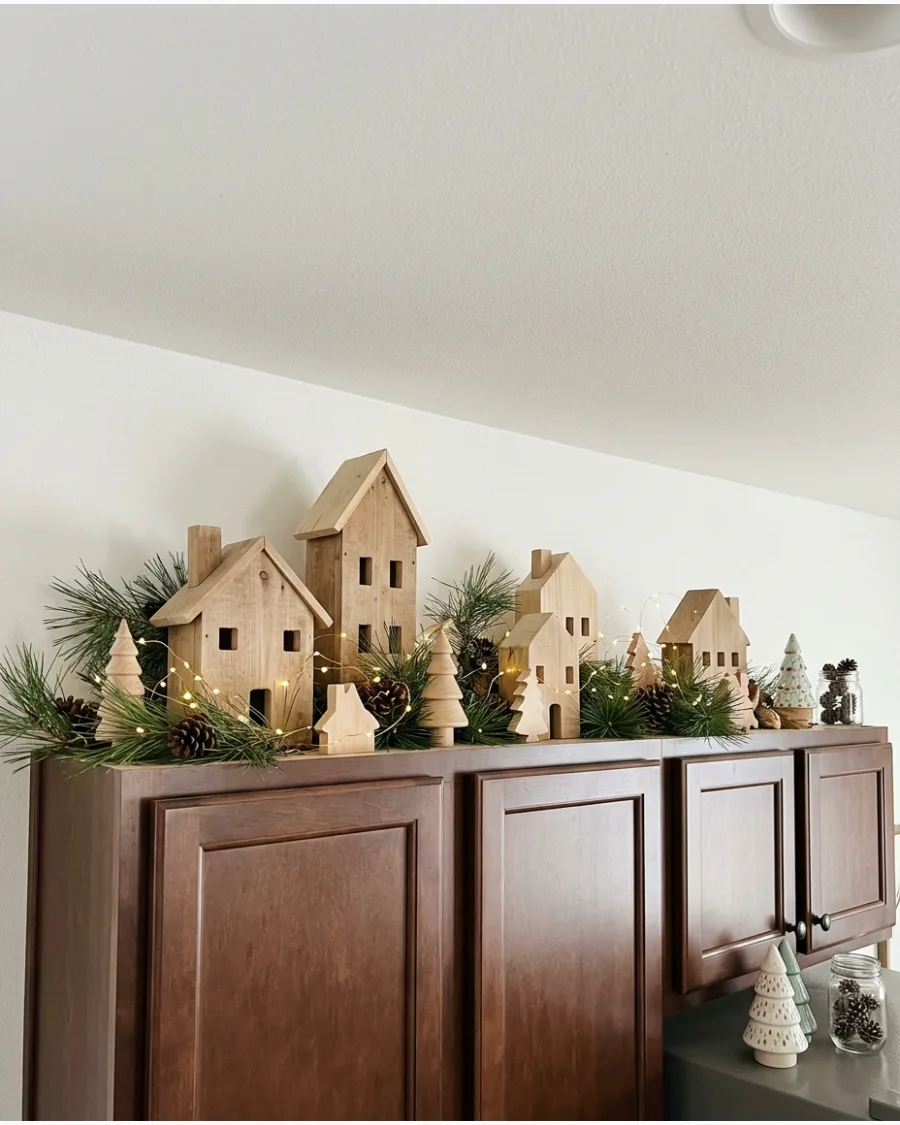
Small wooden house silhouettes create a charming village look without the fragility of ceramic. Place them at varying depths among real pine branches to add dimension to the display.
Arrange the tallest houses toward the back and smaller ones in front to give the display a sense of perspective. This setup works well because the wood tones warm up a white or gray kitchen instantly.
- Materials cost between $10 and $20 at most craft stores.
- Set these up in under 15 minutes by layering the greenery first and then nesting the houses.
- Paint the roofs of the wooden houses white to mimic a snowy look if the kitchen has dark walls.
Quick win: Use Command strips on the bottom of the houses to prevent them from sliding if the cabinet doors are slammed.
52. Dried Fruit and Cinnamon Garland
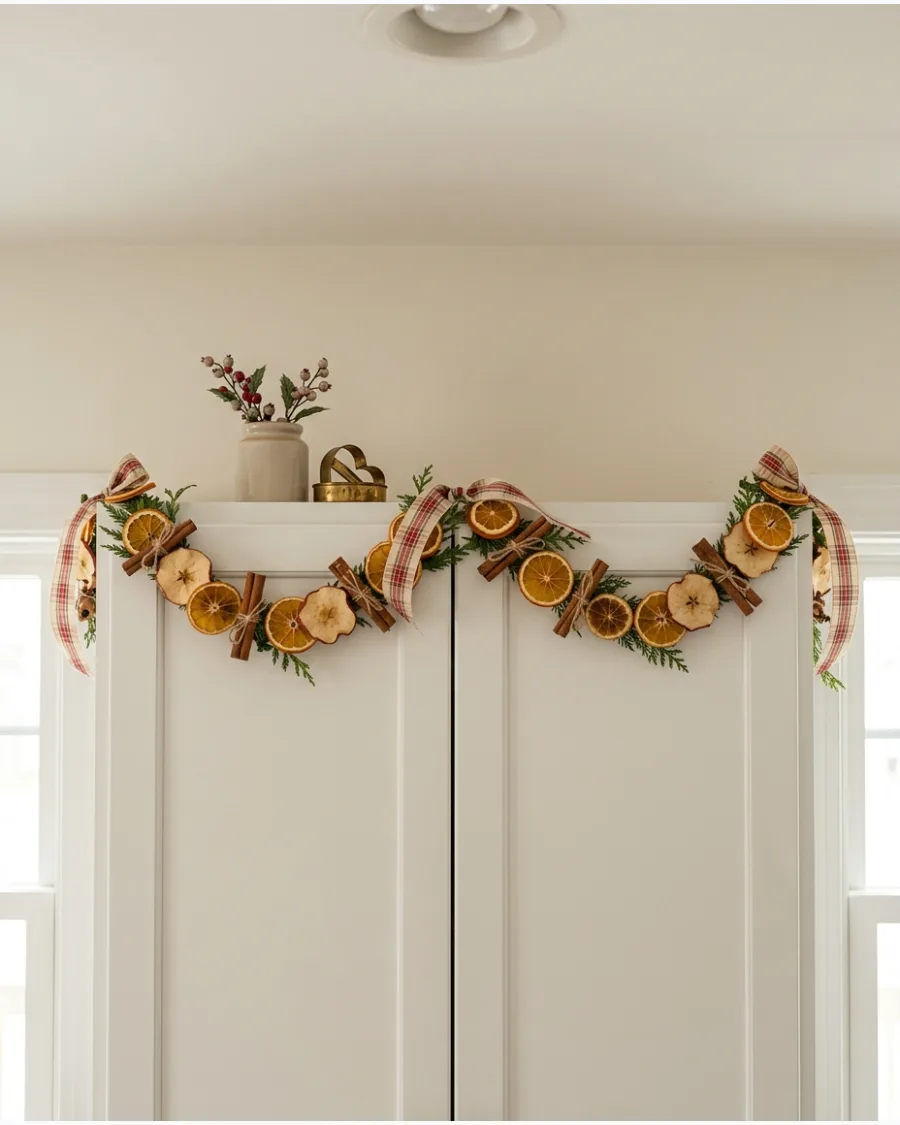
Bringing kitchen elements like oranges and cinnamon into the decor makes the space feel cohesive and intentional. String dried orange slices and cinnamon sticks onto a twine garland and drape it over a cedar base.
Use floral wire to secure the heavier fruit bundles so they do not slide off the edge of the cabinets. This adds a subtle scent and a pop of natural color that feels appropriate for a cooking space.
- Budget-friendly project that uses items found in most grocery stores.
- Assemble the garland on a table before climbing the ladder to drape it over the cabinets.
- Swap orange slices for dried lemon or lime for a brighter, more citrusy color palette.
Most people skip this: Spritz the greenery with a little water once a week to keep the needles from drying out and dropping into your food prep area.
CHRISTMAS DECOR STYLES ABOVE KITCHEN CABINETS
53. Cozy Vintage Christmas Cabinet Tops
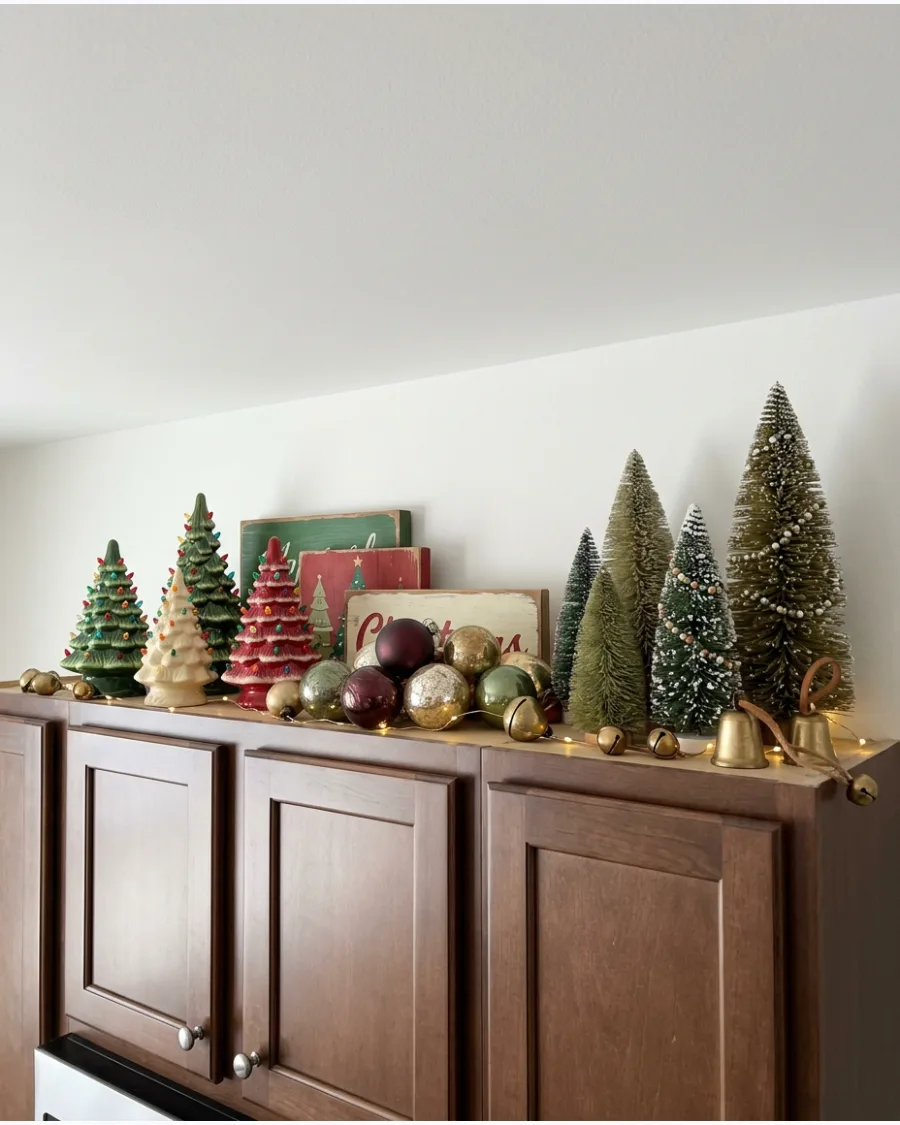
A nostalgic display relies on a mix of textures like ceramic, brass, and glass to create a layered look. Combine a classic ceramic tree with a few brass bells and a small retro-inspired sign for a collected feel.
Tuck warm fairy lights deep into the greenery to make the metallic surfaces of the bells glow at night. This approach makes the high space feel lived-in and cozy rather than empty.
- Source vintage pieces from thrift stores or family collections for a unique look.
- Place the largest item in the center and work outward to create a balanced focal point.
- Incorporate silver bells or mercury glass ornaments if the kitchen hardware is chrome or nickel.
Best shortcut: Use battery-operated lights with a built-in timer so you do not have to climb a ladder every night to turn them on.
54. Scandinavian Christmas Cabinet Decor
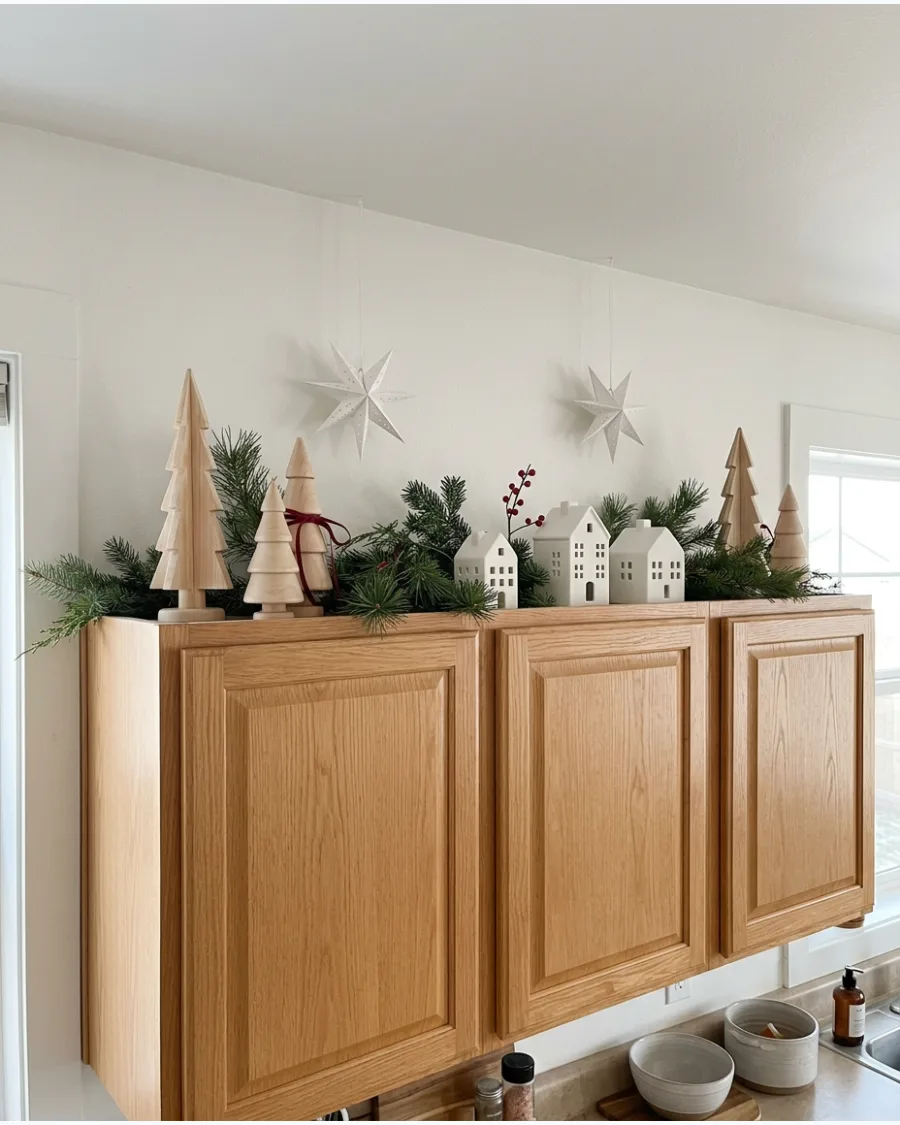
Nordic style focuses on light woods, white ceramics, and minimal greenery to keep the space feeling open. Use pale wooden tree cutouts and a few simple paper stars to keep the look airy and bright.
Keep the color palette strictly to white, light wood, and green to maintain that clean, modern aesthetic. This is a perfect solution for kitchens with low ceilings where heavy decor would feel too crowded.
- High-impact look for under $25 using simple paper and wood elements.
- Space items at least 12 inches apart to prevent the display from looking cluttered.
- Add a single pop of red with a small wooden bead garland for a traditional Nordic touch.
Quick win: Use white museum putty to keep lightweight paper stars upright and stable on the cabinet surface.
55. Farmhouse Christmas Above Cabinets
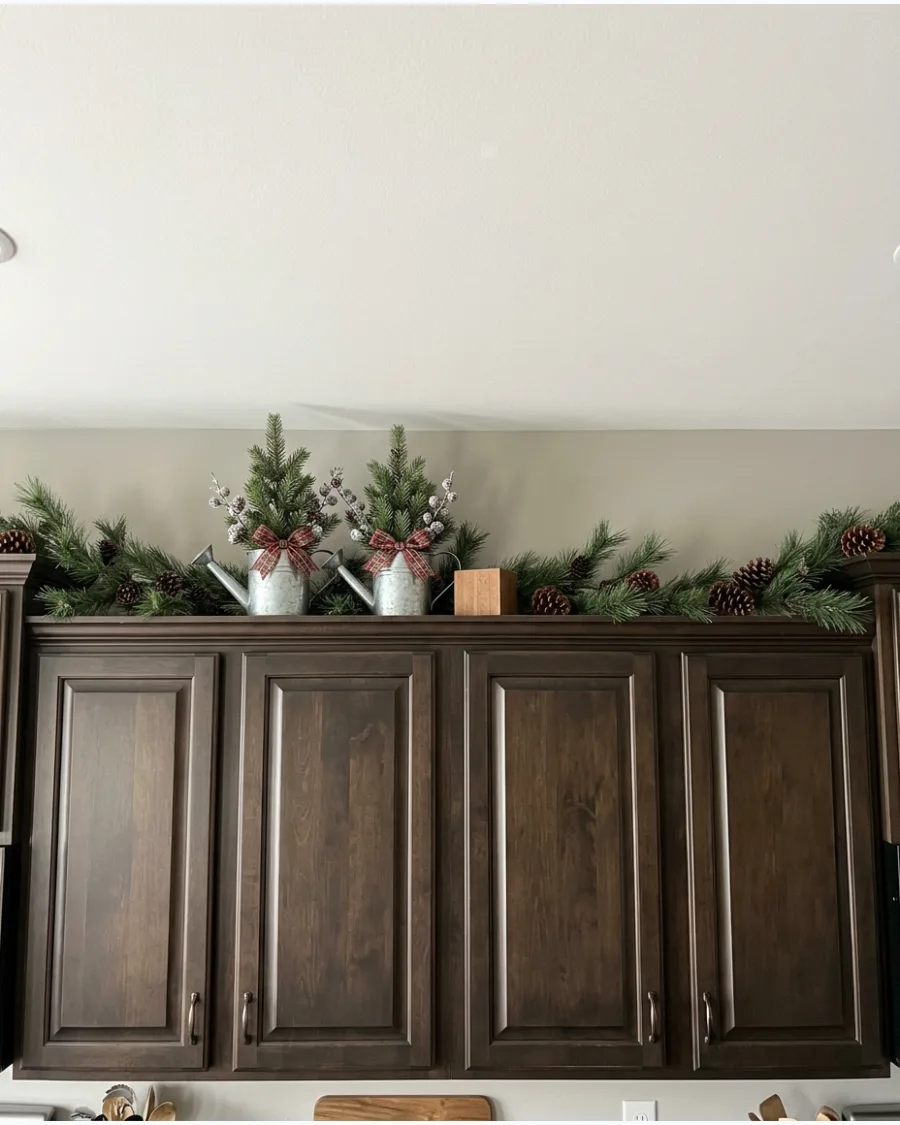
Farmhouse style thrives on the contrast between industrial metals and soft, natural greenery. Place a small evergreen tree in a galvanized bucket and pair it with a classic plaid ribbon.
Layer in a few large pinecones and a wooden sign to fill the vertical gap between the cabinet and the ceiling. This style is forgiving because it looks better when it is slightly asymmetrical and rustic.
- Utilize existing kitchen storage like buckets or crates to keep costs low.
- Center the bucket over the widest cabinet section to create a strong visual anchor.
- Swap plaid ribbon for plain burlap for a more neutral and earthy farmhouse look.
Most people skip this: Stuff the bottom of the galvanized bucket with paper towels to raise the mini tree so the branches start above the rim.
56. French Country Christmas Cabinet Display
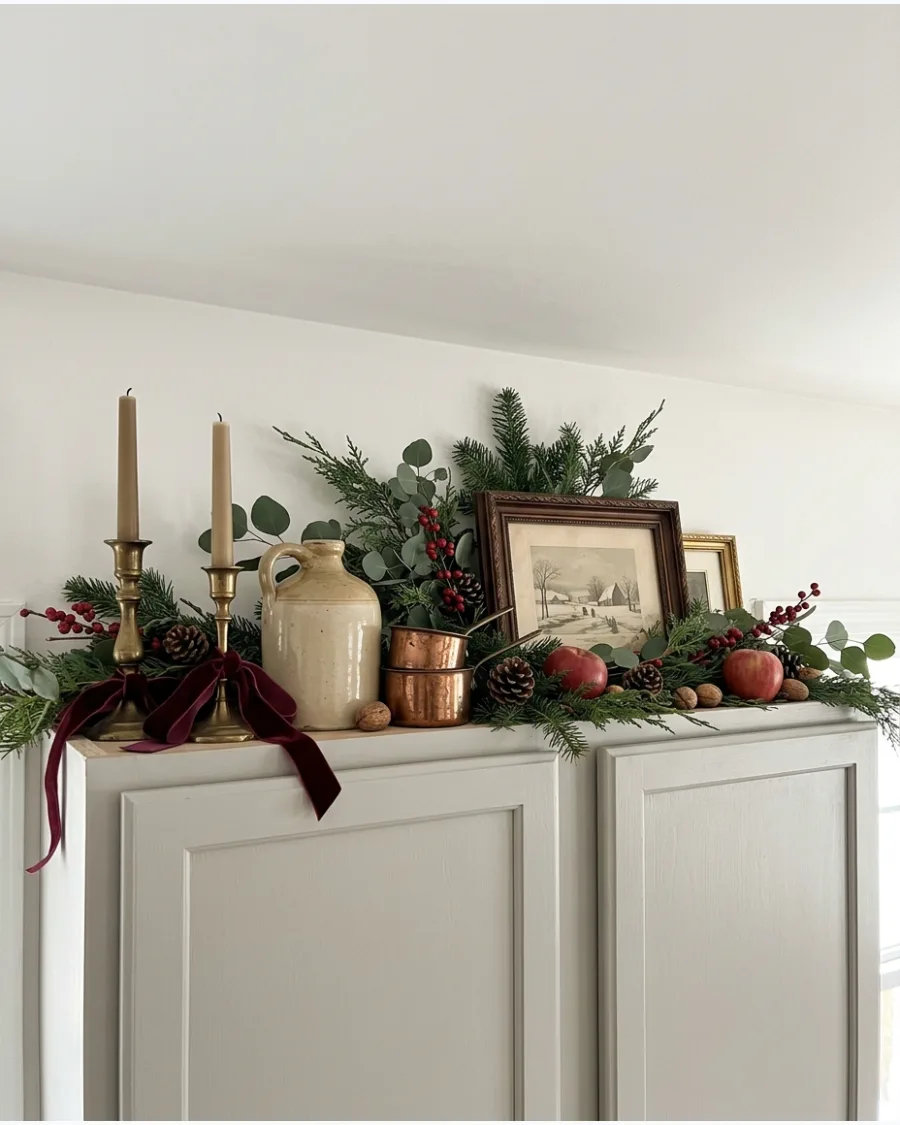
For a European feel, focus on elegant materials like velvet and brass mixed with simple greenery. Drape loose greenery over the edge and add a few pieces of white pottery or a small framed winter sketch.
Tie a long-tailed burgundy velvet ribbon around a piece of pottery to add a sophisticated touch of color. This style works because it feels high-end without requiring a massive amount of decor.
- Elevate the look by using real velvet ribbon instead of plastic-backed versions.
- Position the pitcher at a slight angle to make the display feel more casual and lived-in.
- Use navy blue velvet ribbon for a cooler color palette that still feels traditional.
Best shortcut: Use high-quality faux boxwood so you do not have to worry about the leaves drying out and turning brown mid-season.
57. Neutral Christmas Decor Above Cabinets
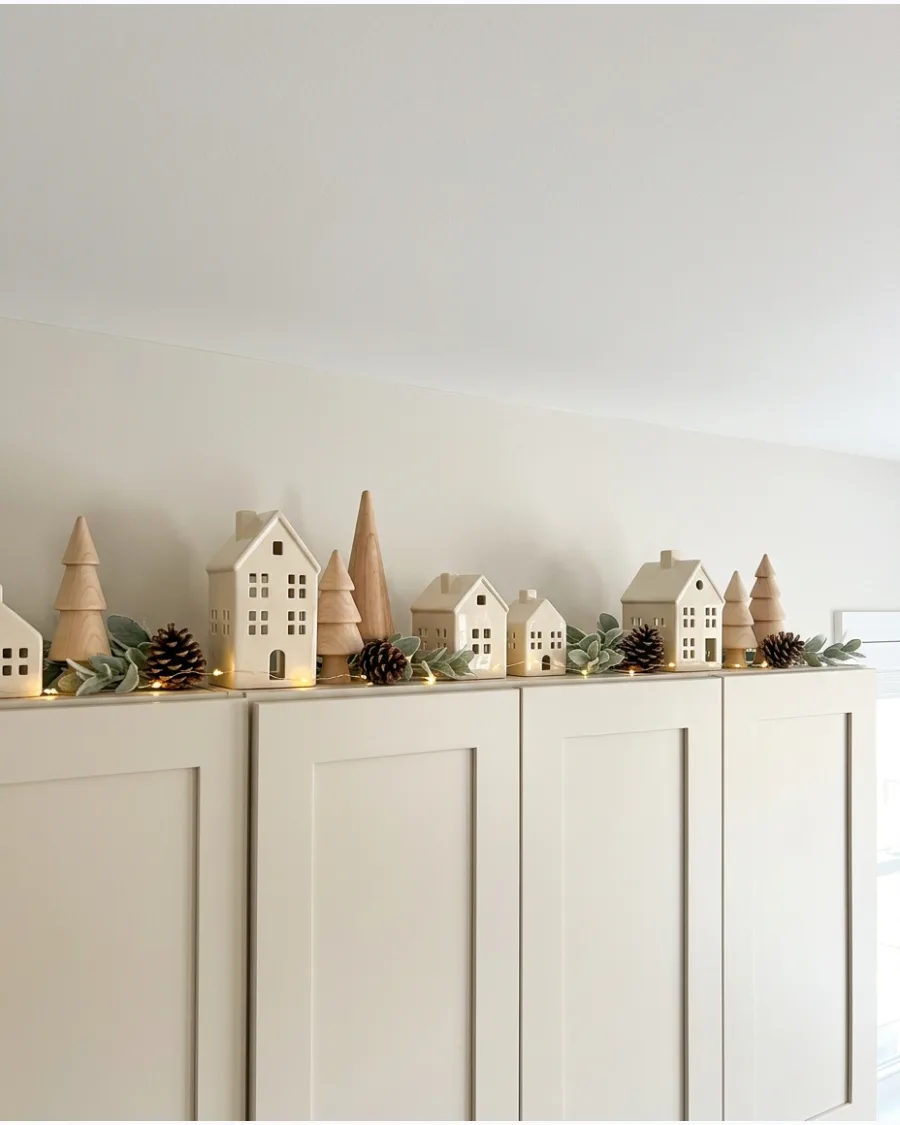
Neutral decor relies on different shades of white, cream, and tan to create visual interest. Use cream-colored ceramic houses and natural pinecones to create a soft, wintry scene above the cabinets.
Choose warm-toned LED lights instead of cool white to keep the neutral colors from looking blue or sterile. This approach is ideal for modern kitchens where you want festive cheer without breaking the existing color scheme.
- Focus on textures like matte ceramic and rough wood to add depth without using color.
- Group the ceramic houses in a tight cluster to create a small, concentrated village.
- Incorporate black metal accents like small lanterns for a high-contrast neutral look.
Quick win: Place the houses on small acrylic risers of different heights to make the display more visible from the floor.
58. Burgundy and Brass Christmas Cabinet Decor
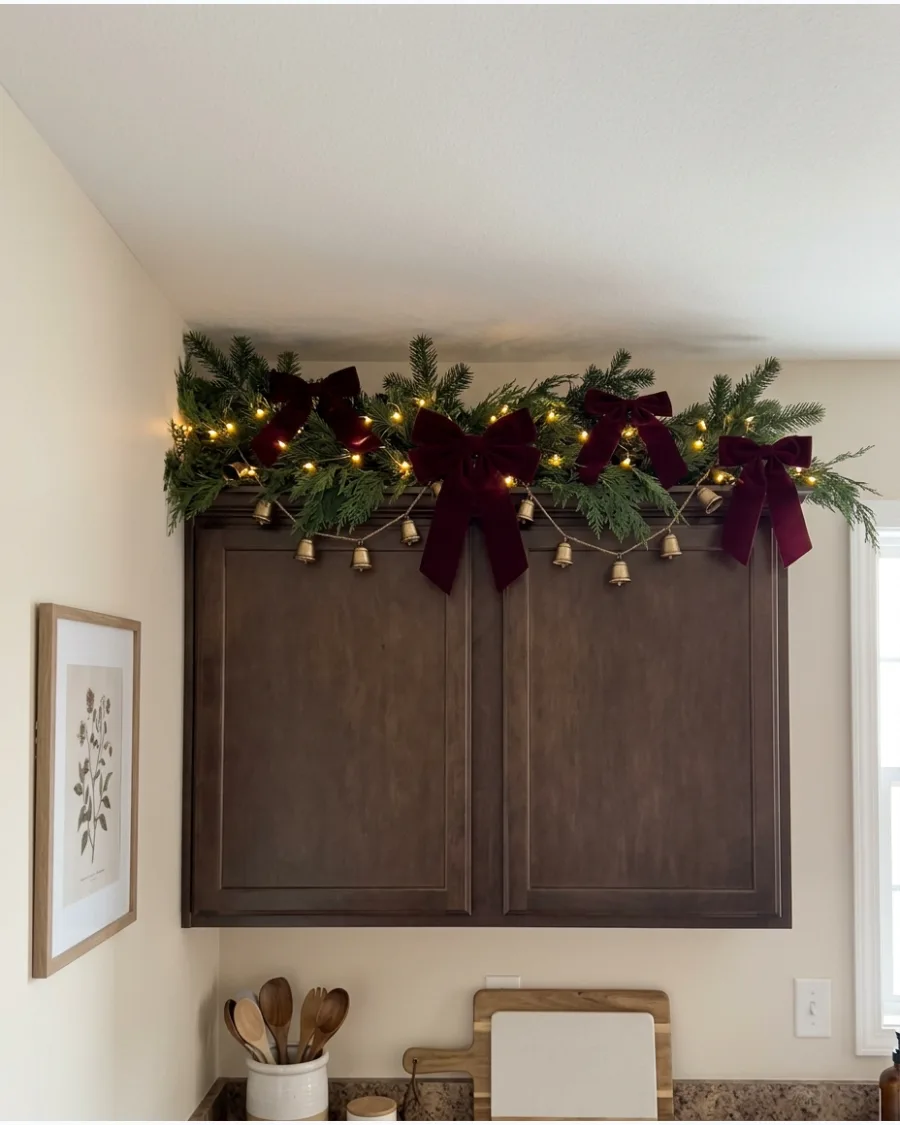
Dark greenery paired with deep red and gold creates a luxurious and traditional atmosphere. Hang brass bells from a thick pine garland and secure everything with velvet bows.
Use floral wire to attach the bells directly to the garland branches so they hang at the exact height you want. This color palette is a sophisticated update to the standard bright red and green decor.
- A slightly higher budget for quality garland and brass bells creates a long-lasting look.
- Overlap the garland sections to hide any gaps or thin spots in the greenery.
- Add gold-painted eucalyptus leaves to the garland for extra shine and texture.
Most people skip this: Buff the brass bells with a soft cloth before putting them up to remove fingerprints that will show under the kitchen lights.
59. Colorful Nostalgic Christmas Cabinet Display
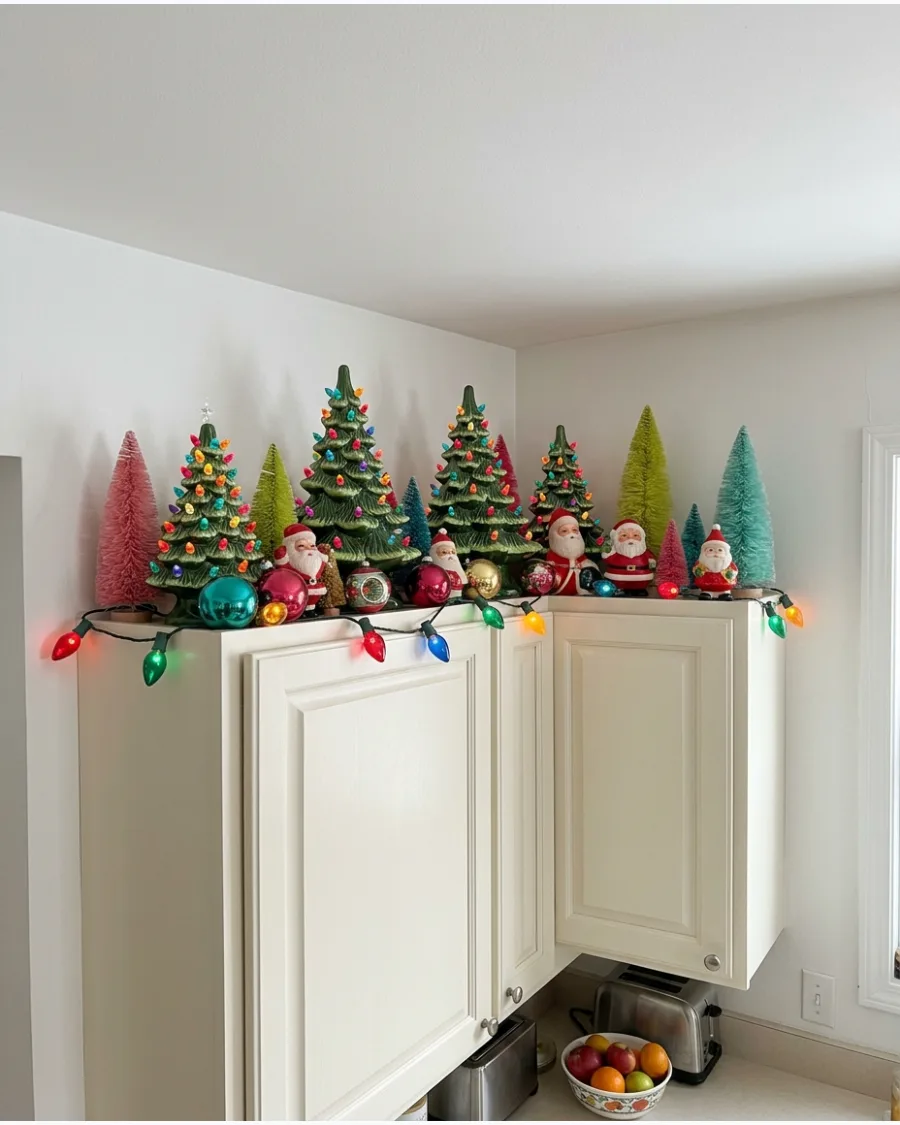
Bright colors and retro shapes bring a fun, high-energy feel to the kitchen during the holidays. Mix multicolored glass ornaments with bright bottle-brush trees in shades of pink, teal, and lime.
Scatter the colorful trees at different intervals across the entire length of the cabinets to lead the eye across the room. This is a great way to use inherited pieces that might not fit a more formal living room theme.
- Affordable way to decorate using multi-packs of trees and ornaments.
- Keep the background simple so the bright colors do not overwhelm the kitchen.
- Focus on one or two dominant colors if a full rainbow feels too busy for the space.
Best shortcut: Use a small piece of double-sided tape or museum wax on the bottom of round ornaments to keep them from rolling off the cabinet edge.
Home Decor
60. Illuminated Winter Cabinet Greenery
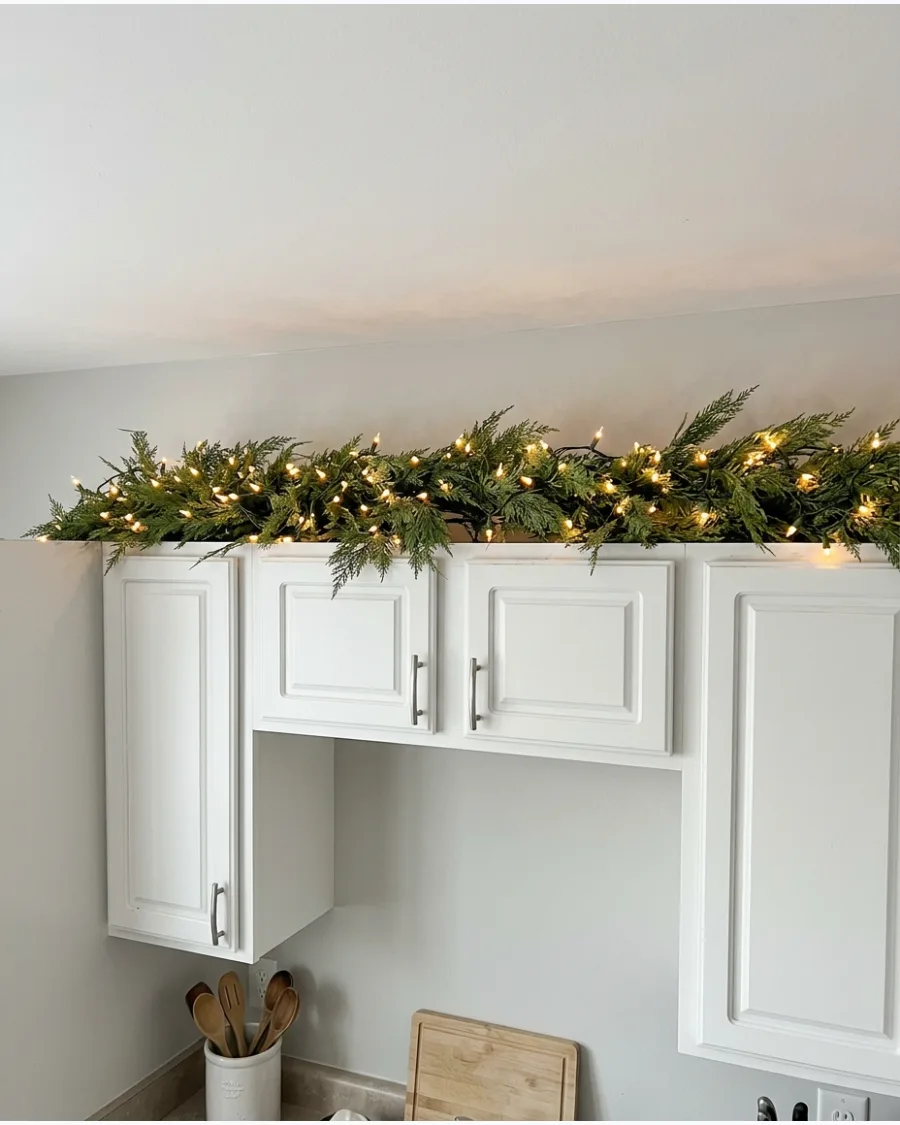
High kitchen cabinets often feel like wasted space during the holidays, but filling them with thick faux cedar and warm lights creates a cozy glow that reflects off the ceiling.
Secure lightweight battery-operated LED strands into the branches before lifting the greenery into place to avoid struggling with cords at a height. This method draws the eye upward, making small kitchens feel taller and more festive without sacrificing precious counter space. Using varied shades of green prevents the display from looking flat or artificial.
- Source realistic faux greenery in November to ensure the best selection before stock runs low.
- Place clear command hooks every two feet along the cabinet top to anchor the weight of the garland.
- Swap the ribbon colors annually to refresh the look without buying entirely new greenery.
Most people skip this: Dust the cabinet tops thoroughly and lay down a strip of parchment paper before decorating to make post-holiday cleanup effortless.
Frequently Asked Questions
How do I keep Christmas decor above cabinets from getting greasy?
To protect your decorations from airborne kitchen grease, place a layer of parchment paper along the top of the cabinets before styling. You can also opt for washable ceramic or plastic items that are easy to wipe down at the end of the season.
How do I power Christmas lights if there are no outlets above my cabinets?
Battery-operated LED light strings are the perfect solution for areas without built-in outlets. Look for strands with integrated timers so your lights automatically turn on and off, saving you from using a ladder every day.
What is the best height for decor in the cabinet-to-ceiling gap?
For a balanced look, aim for your decor to fill about 1/2 to 2/3 of the vertical space between the cabinet top and the ceiling. This prevents the display from looking either too small for the space or uncomfortably cramped against the ceiling.
Should I use real or faux greenery for above-cabinet garlands?
High-quality faux greenery is highly recommended because heat rises in the kitchen and will dry out live branches in just a few days. Faux options stay looking fresh all season long and won't drop messy needles into your food prep area.
How do I prevent decor from falling when I open and close cabinet doors?
Use a small amount of museum wax or Command strips to secure lightweight items directly to the cabinet tops. This provides enough grip to withstand the daily vibration of opening and closing doors without damaging your cabinetry.