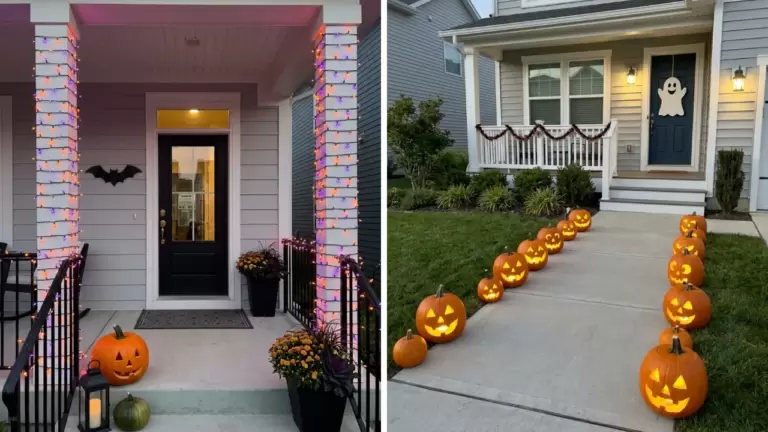
99 Creative Pumpkin Decorating Ideas for a Contest

This post may contain affiliate links: full affiliate disclosure.
Winning a pumpkin contest requires a design that catches the eye from across the room. These no-carve projects focus on bold colors and unique textures to ensure the entry stands out on the judging table.
Easy No-Carve Pumpkin Decorating Ideas
1. Melted Crayon Pumpkin
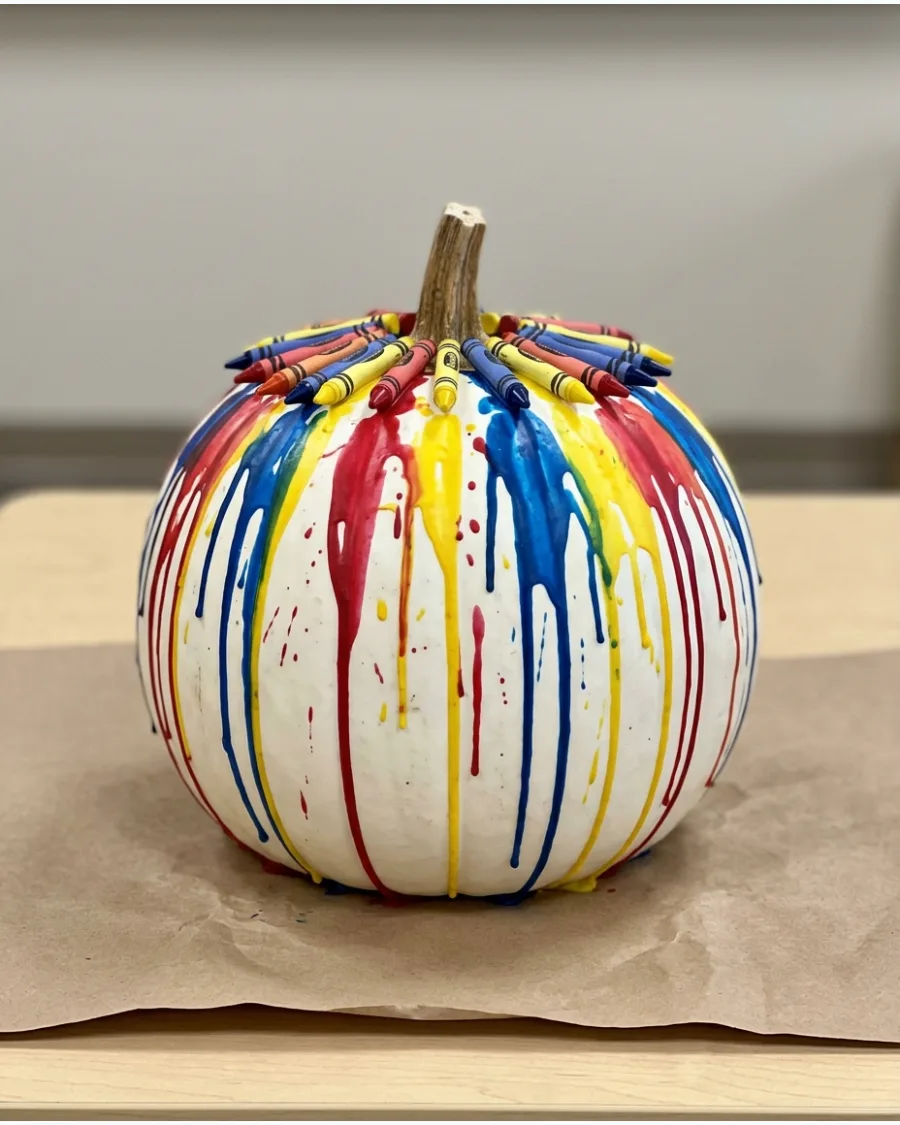
Glue colorful crayons around the pumpkin stem and carefully melt them so the wax drips down the sides. Use a white pumpkin to make the rainbow colors appear especially bright.
A hair dryer on the low heat setting prevents the wax from splattering too far.
- Source crayons from old school supplies to save money.
- Work in a cardboard box to catch stray drips during the melting process.
- Use a matte white spray paint base for the best wax adhesion.
Quick win: Angle the hair dryer downward to control exactly where the wax "river" flows.
2. Confetti Sprinkle Pumpkin
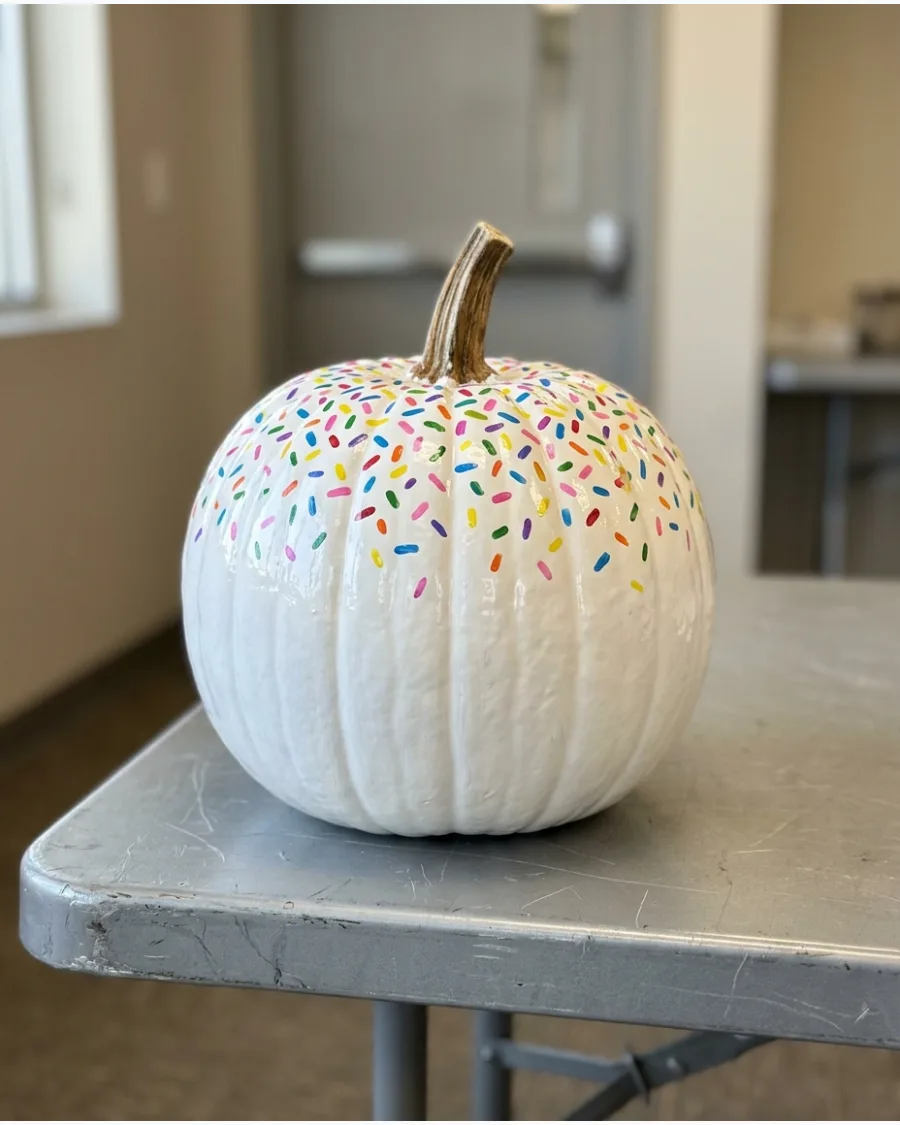
Paint the pumpkin white before covering the top with colorful painted sprinkles. Finish the design with a glossy coating to create the appearance of a decorated party cake.
Short, vertical brush strokes in varied colors create the most realistic sprinkle effect.
- Pick a round, squat pumpkin to mimic the shape of a layer cake.
- Use acrylic paint for the sprinkles to get vibrant, opaque colors.
- Apply a clear high-gloss sealer once the paint is completely dry.
Best shortcut: Use actual colorful polymer clay sprinkles glued on for a 3D textured look.
3. Button-Covered Pumpkin
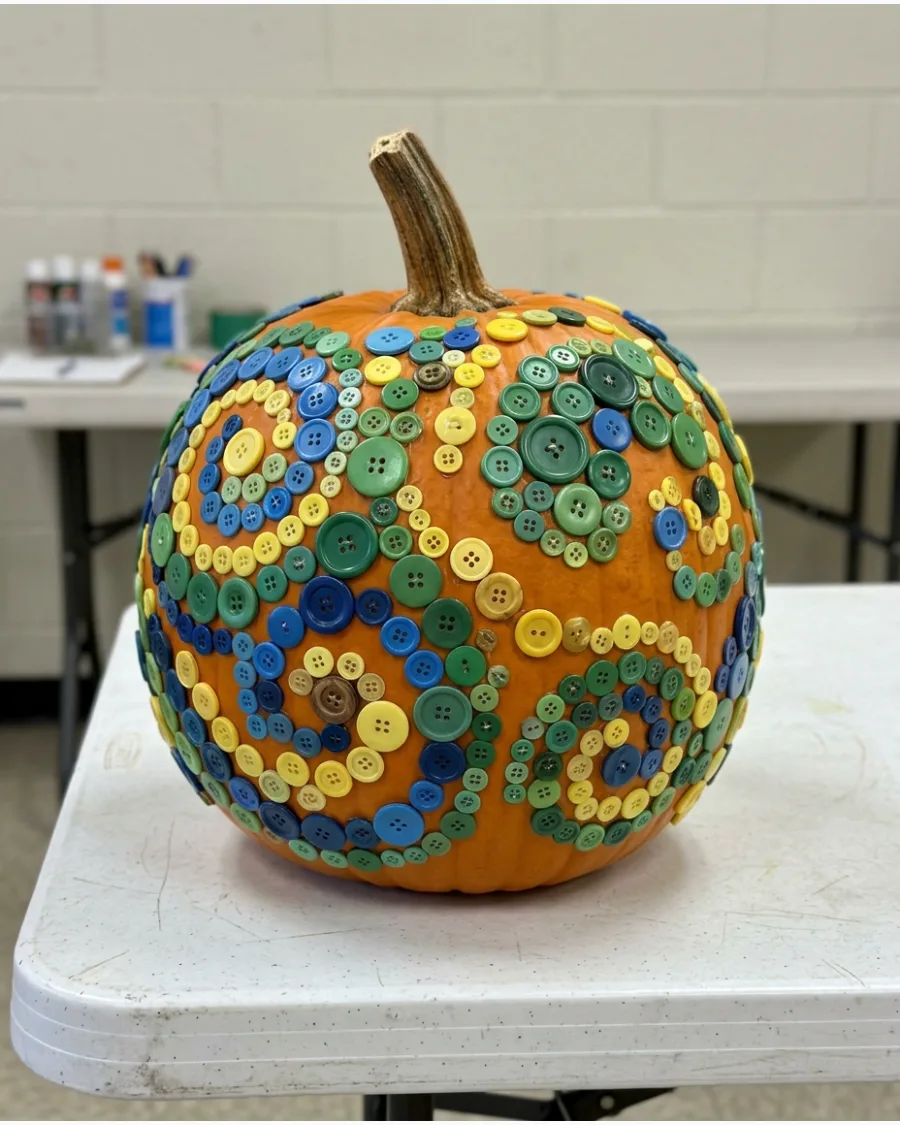
Attach colorful buttons in swirls, stripes or floral patterns across the pumpkin. Mixing several button sizes gives the design more texture and visual interest.
A low-temp glue gun is the best tool for securing buttons without melting the pumpkin skin.
- Buy bulk bags of assorted buttons for a wide variety of colors.
- Sketch the pattern lightly with a pencil before gluing anything down.
- Leave the natural stem unpainted to contrast with the plastic buttons.
Most people skip this: Overlap the edges of the buttons slightly to hide the pumpkin surface underneath.
4. Rainbow Drip Pumpkin
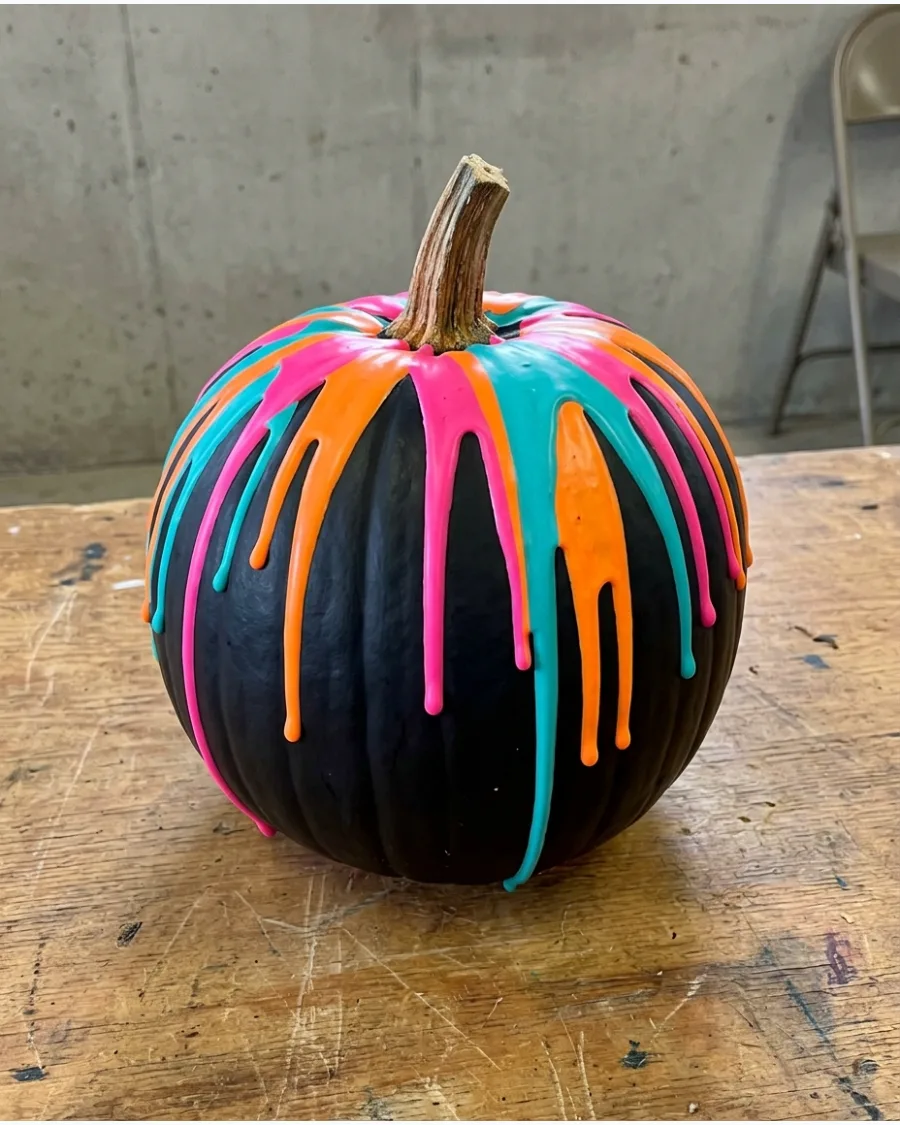
Paint thick streams of rainbow colors dripping from the pumpkin’s stem. Keep the bottom white or black so the dripping colors remain the main feature.
Tilt the pumpkin slowly as you pour the paint to guide the drips evenly.
- Use heavy-body acrylic paint so the drips stay thick and don't run too thin.
- Allow each color to dry slightly before adding the next to prevent muddy mixing.
- Set the pumpkin on a small riser so the paint can drip past the base.
Quick win: Use a squeeze bottle to apply the paint precisely around the stem area.
5. Tissue-Paper Mosaic Pumpkin
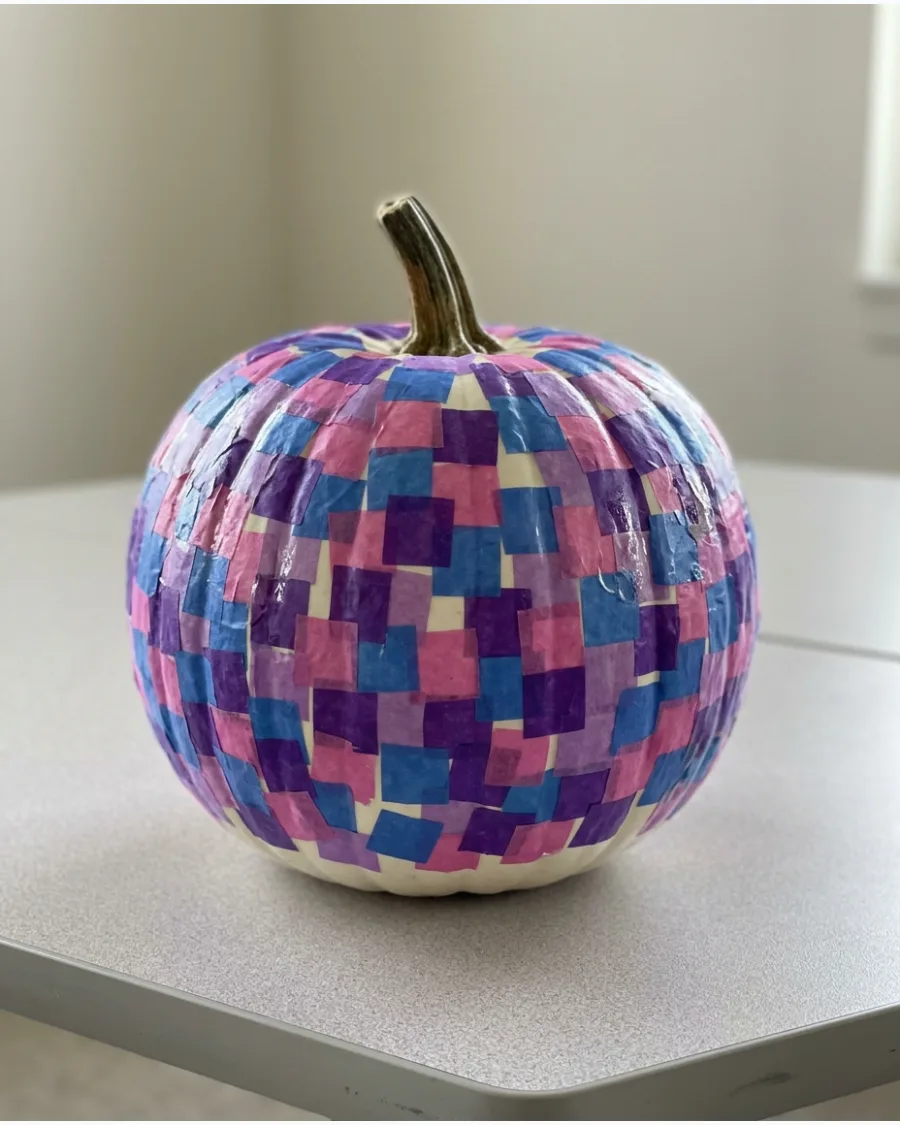
Cut colorful tissue paper into small shapes and attach them using decoupage glue. Overlap the pieces to create a bright stained-glass effect.
Apply a final layer of decoupage glue over the top to keep the paper from peeling.
- Pre-cut the tissue paper into squares or triangles to speed up the process.
- Use a white pumpkin or white primer so the colors stay translucent and bright.
- Keep a damp cloth nearby to wipe away excess glue drips.
Best shortcut: Use a decorative edge punch on the tissue paper for a more intricate mosaic look.
6. Googly-Eye Monster Pumpkin
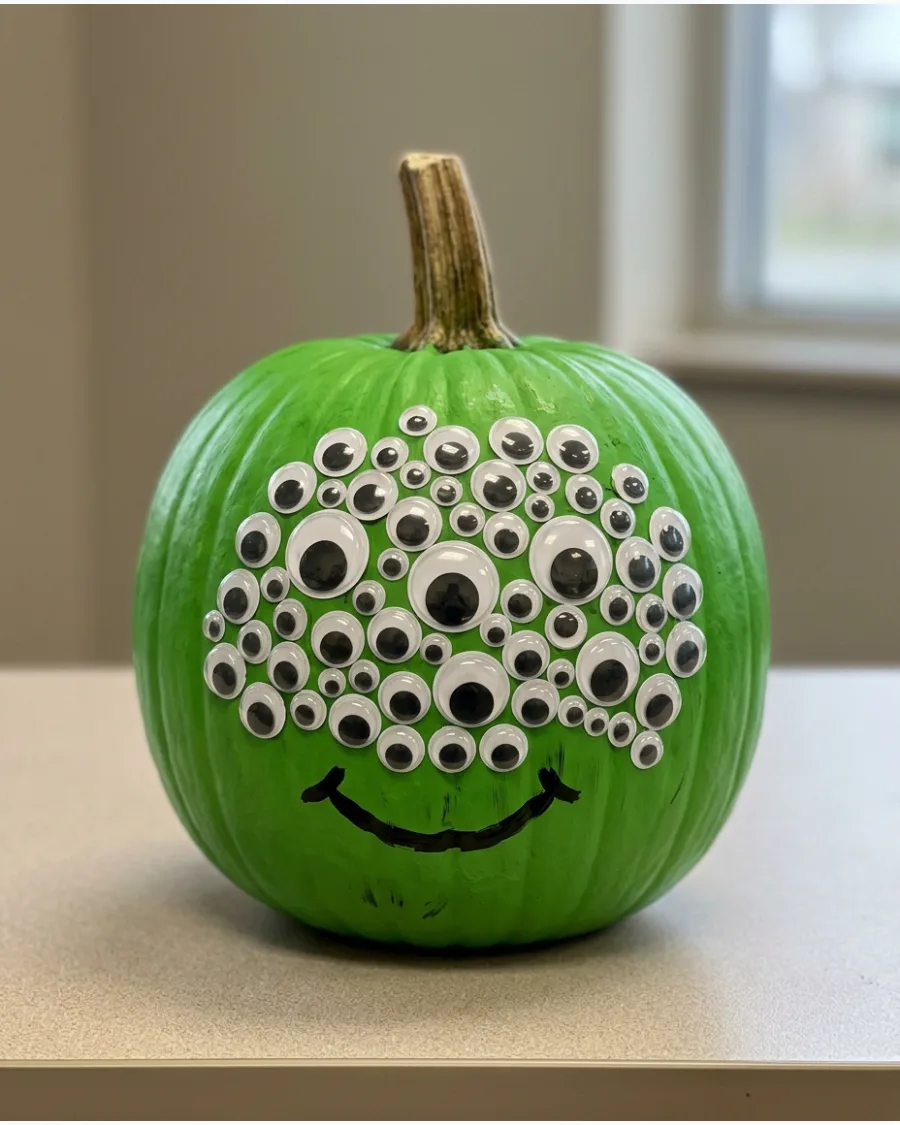
Cover the pumpkin with googly eyes in several different sizes. Add a large painted mouth to transform it into a silly Halloween monster.
Clustering the eyes in groups makes the monster look more expressive and chaotic.
- Use self-adhesive googly eyes for a faster, mess-free application.
- Paint the pumpkin a bright neon color like lime green before adding eyes.
- Add cardstock horns or ears to give the monster more personality.
Most people skip this: Use a mix of "eyelash" googly eyes and standard ones for more character.
7. Pom-Pom Pumpkin
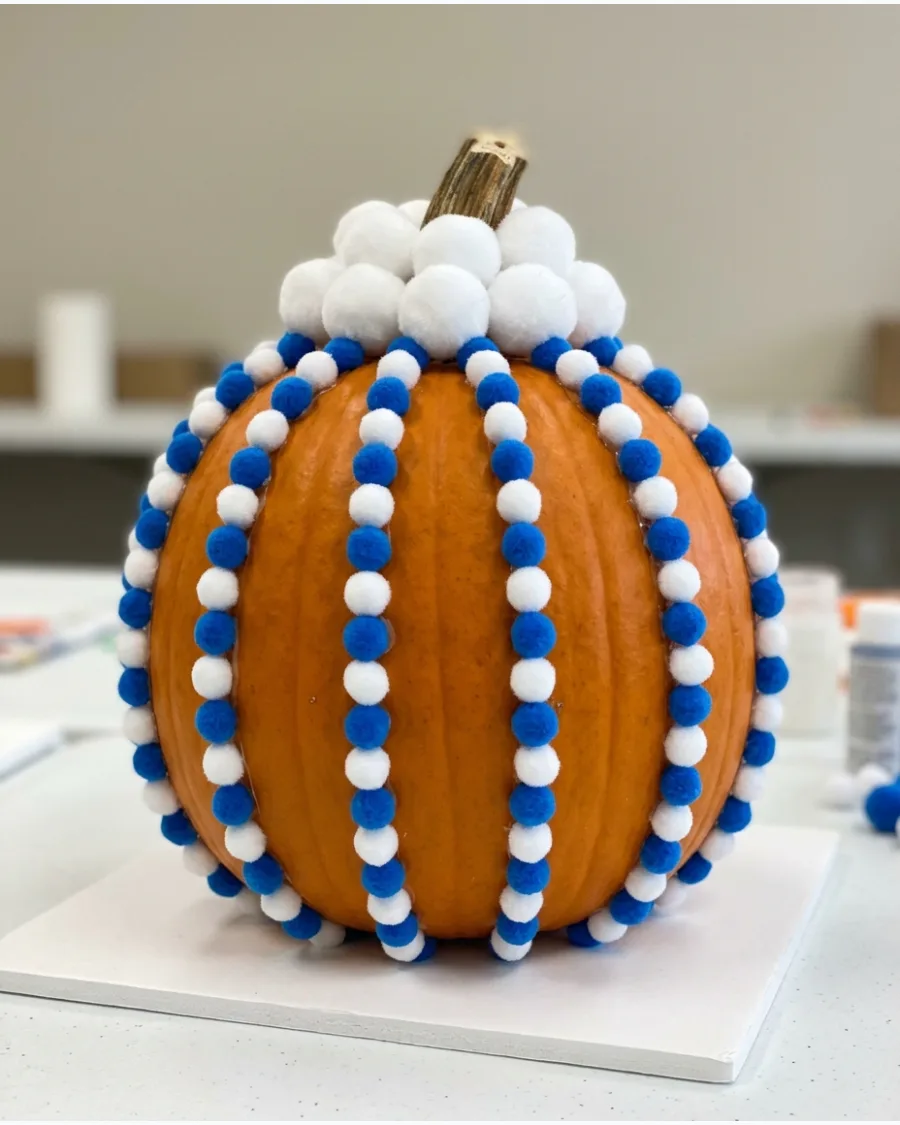
Glue small pom-poms across the pumpkin in a rainbow, polka-dot or patterned arrangement. Use oversized pom-poms around the stem for an extra playful finish.
Space the pom-poms evenly to ensure the base color of the pumpkin still shows through.
- Pick a color palette of three or four colors for a coordinated look.
- Use a high-tack craft glue if you are working with children to avoid hot glue burns.
- Choose a pumpkin with deep ribs to help align the rows of pom-poms.
Quick win: Use glitter pom-poms to add a bit of sparkle for the contest judges.
8. Chalkboard Pumpkin
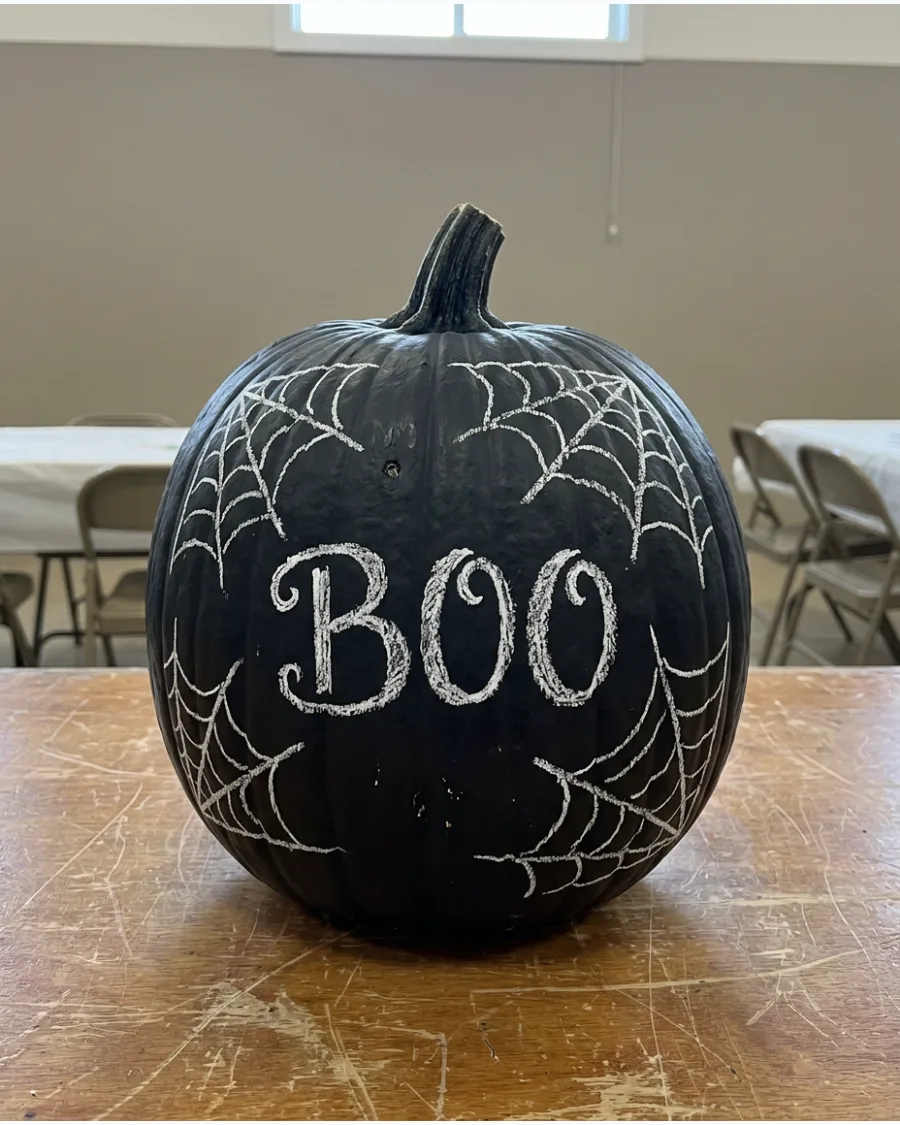
Coat the pumpkin with black chalkboard paint and decorate it using white or colorful chalk markers. Add stars, spiderwebs, words or Halloween doodles.
Two thin coats of chalkboard paint provide a smoother surface for drawing than one thick coat.
- Wait at least 24 hours for the paint to cure before writing on it.
- Use liquid chalk markers for crisp lines that won't smudge easily during transport.
- Wipe mistakes away with a damp cotton swab for precise corrections.
Best shortcut: Rub the side of a piece of regular chalk over the whole surface and wipe it off to "prime" the paint.
9. Washi-Tape Pattern Pumpkin
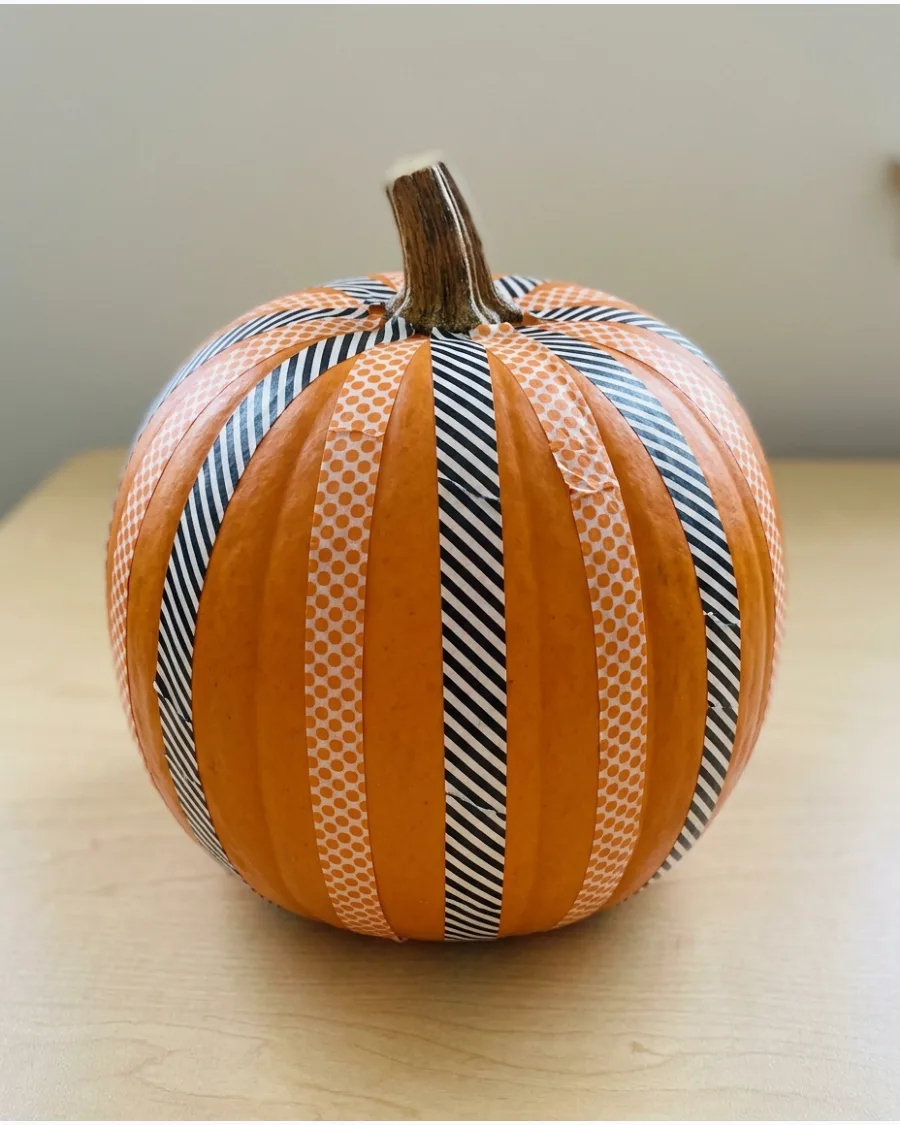
Apply strips of patterned washi tape vertically from the stem to the bottom. Alternate colors and prints to create an easy but polished contest entry.
Smooth the tape down firmly with a fingernail to prevent the edges from lifting in the cold.
- Select tapes with contrasting patterns like stripes, dots, and solids.
- Start at the stem and pull the tape tight to the bottom for a clean line.
- Trim the tape at the very bottom so it stays hidden when the pumpkin is sitting flat.
Most people skip this: Apply a thin layer of clear glue to the ends of the tape to make sure they stay stuck.
10. Glow-in-the-Dark Pumpkin
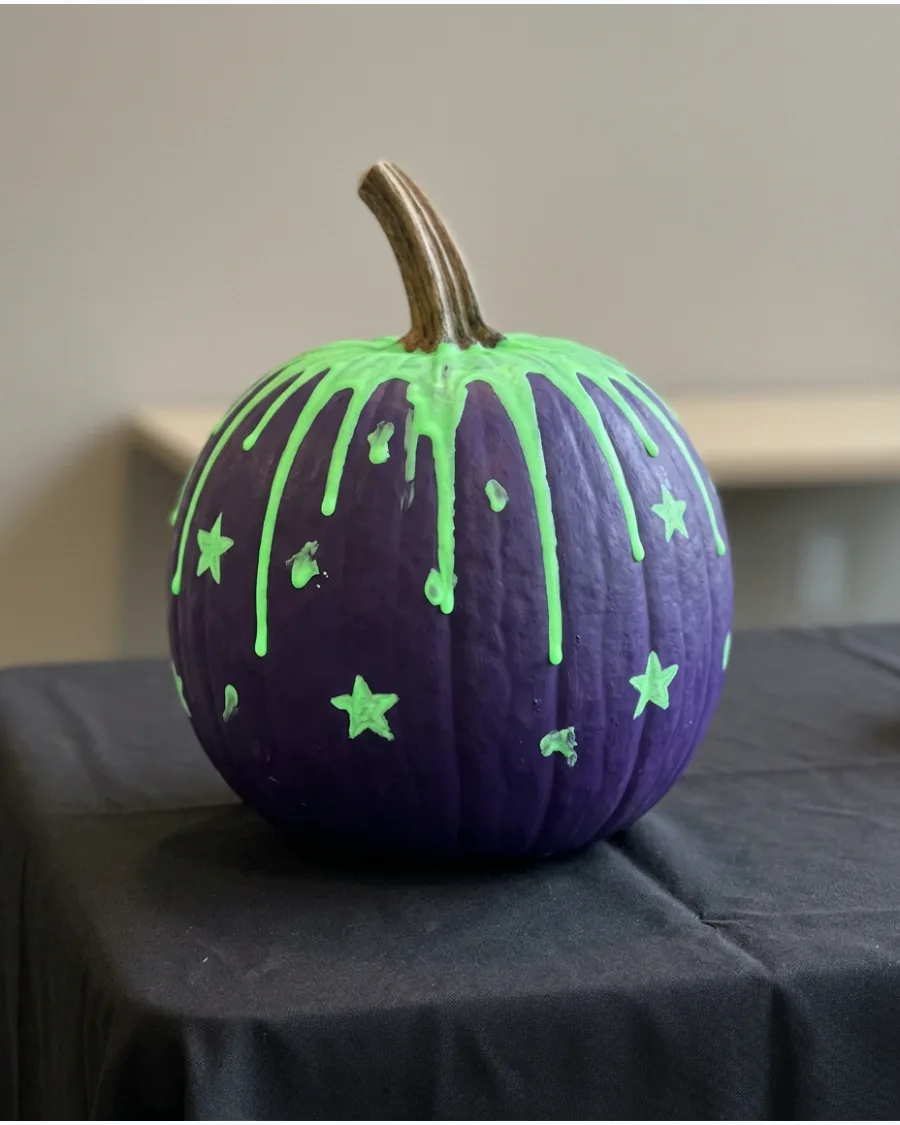
Paint ghosts, stars, skeletons or dripping slime with glow-in-the-dark paint. Present the pumpkin inside a dark display box so judges can see the glowing effect.
Charge the paint under a bright light for at least an hour right before the contest starts.
- Use a dark blue or black base paint to make the glowing elements pop.
- Apply multiple layers of glow paint since it often goes on thin.
- Test the glow in a windowless room to check for any missed spots.
Quick win: Use a blacklight flashlight nearby to keep the pumpkin glowing throughout the entire judging period.
11. Pipe-Cleaner Spider Pumpkin
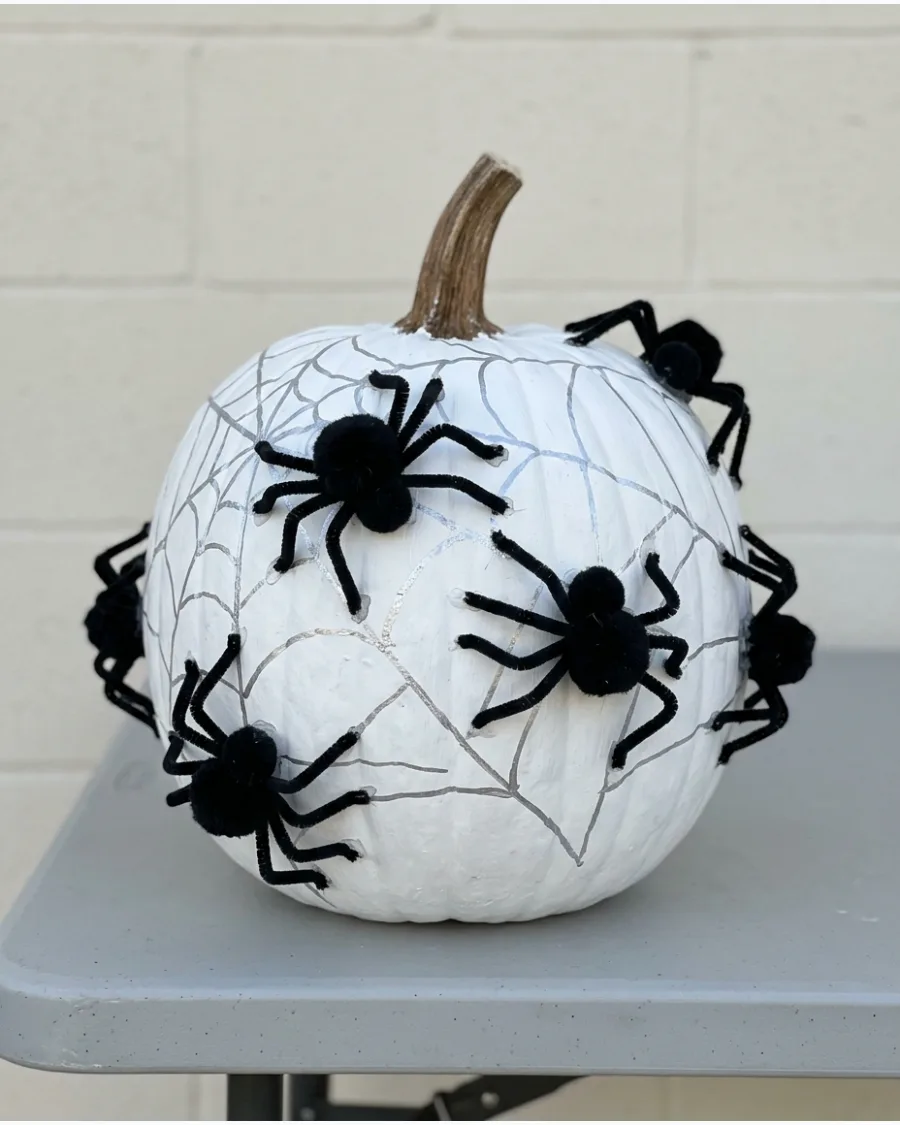
Spiders made from black pom-poms and pipe cleaners crawl across a white-painted surface. Hot glue provides the strongest bond for the fuzzy legs against the smooth pumpkin skin. A silver painted web connects the arachnids for a spooky, 3D effect.
- Buy bulk pipe cleaners and pom-poms online for a full colony of spiders.
- Glue the pipe-cleaner legs to the pom-pom body before attaching the spider to the pumpkin.
- Use a white pumpkin or white acrylic paint to make the black spiders pop.
Best shortcut: Use a silver paint pen instead of a brush for a cleaner, more controlled web design.
Storybook and School Pumpkin Ideas
12. Storybook Character Pumpkin
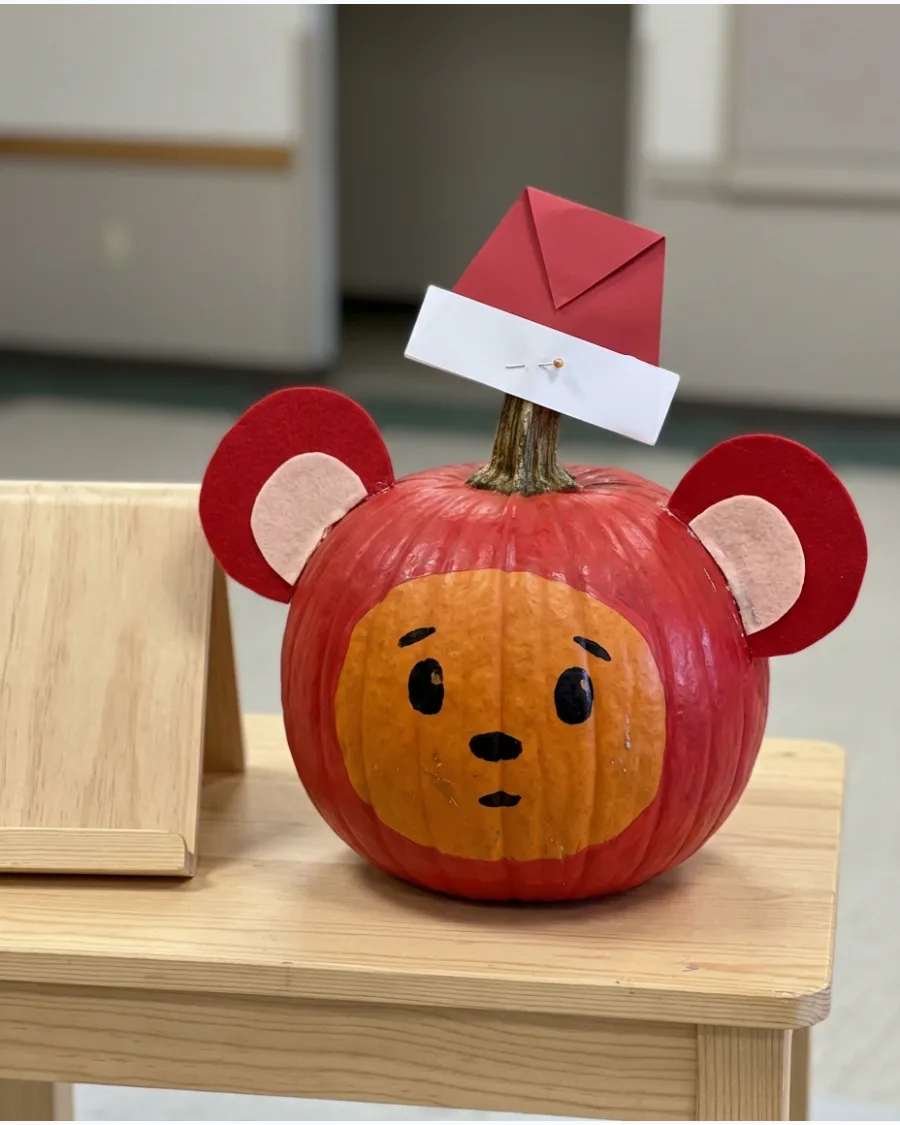
Recreate a favorite character using felt ears, cardstock accessories, and acrylic paint. Choosing a character with a round face makes the pumpkin's natural shape work for the design rather than against it. It stands out in school contests when the book is placed nearby.
- Visit a library or scroll through digital books for character inspiration.
- Use heavy cardstock for sturdy accessories like hats or glasses that won't flop.
- Stick to acrylic paint for fast drying and vibrant colors that don't streak.
Quick win: Seal the paint with a matte spray so the cardstock accessories don't peel off the surface.
13. Bookworm Pumpkin
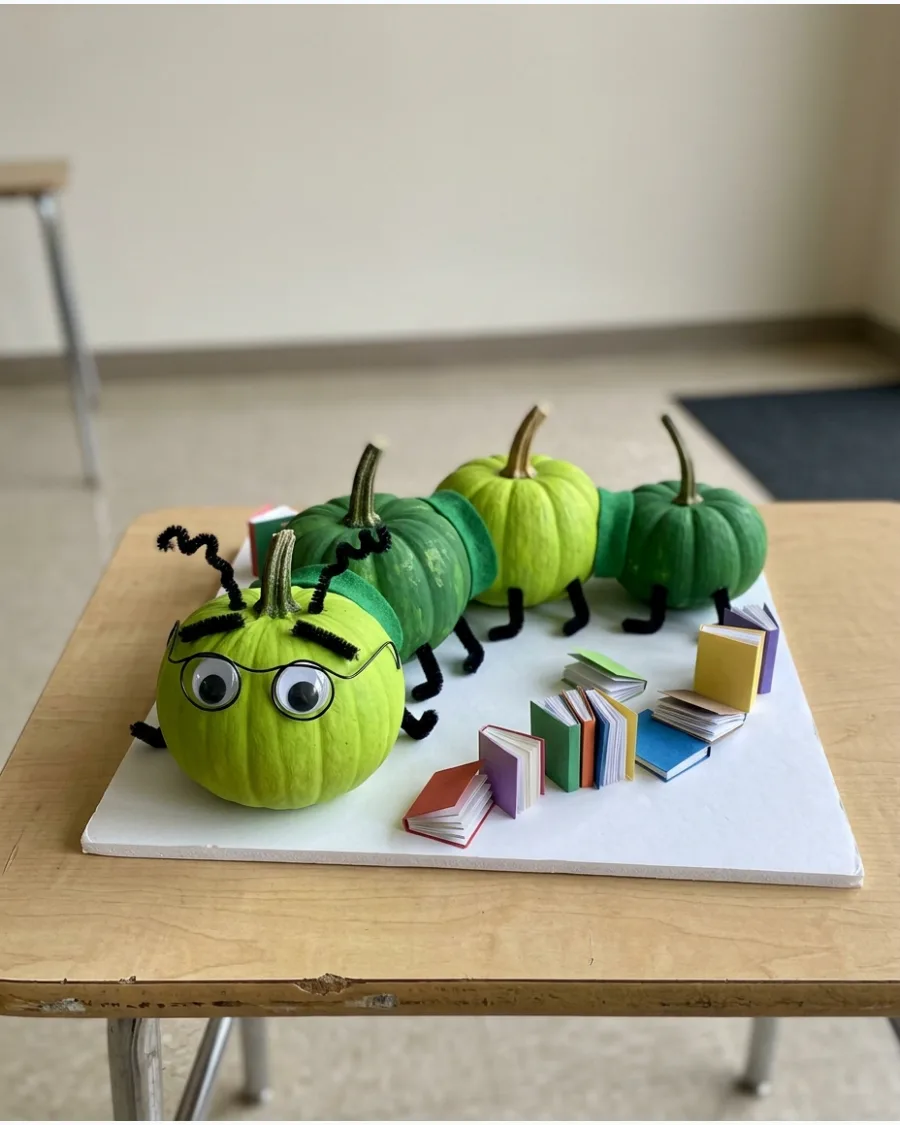
Multiple small pumpkins lined up create a long, segmented body. Painting each segment a slightly different shade of green adds depth and keeps the worm from looking flat. Wire-rimmed glasses and a pile of mini books complete the academic theme.
- Buy a bag of small pie pumpkins to ensure the segments are a uniform size.
- Use floral wire or sturdy toothpicks to connect the pumpkin segments together.
- Place the display on a long tray or board for easy transport to the contest.
Most people skip this: Use a small amount of museum putty under each pumpkin segment to keep the worm from rolling or shifting.
14. Library Pumpkin
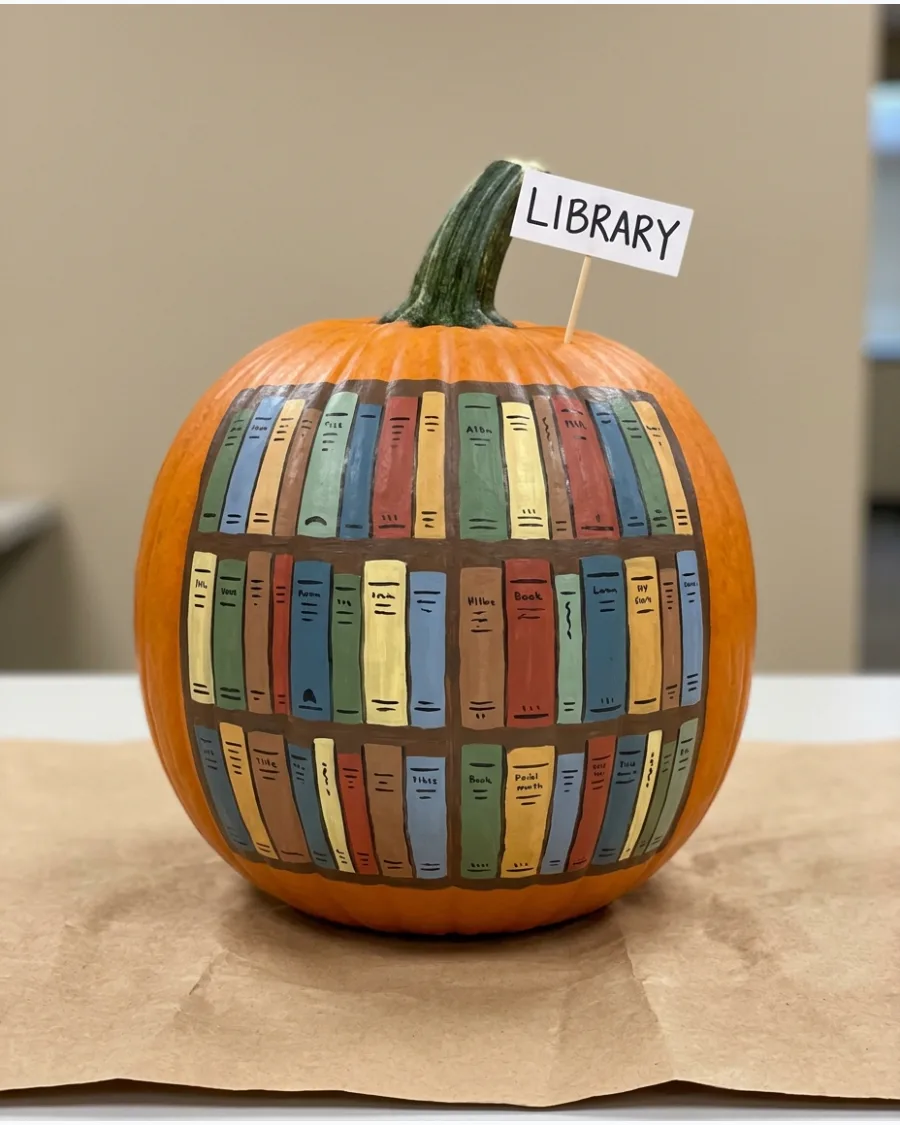
This diorama uses the pumpkin surface to show rows of tiny, colorful books. Using rectangular sponges dipped in paint is the fastest way to stamp book shapes onto the pumpkin surface. A small handmade sign adds a professional touch to the display.
- Use a paint marker to add tiny titles or gold lines to the book spines.
- Keep the color palette varied to represent different genres of books.
- Choose a flat-fronted pumpkin to make the stamping and painting process easier.
Quick win: Use gold metallic markers for the lettering on the book spines to make them catch the light.
15. Reading Owl Pumpkin
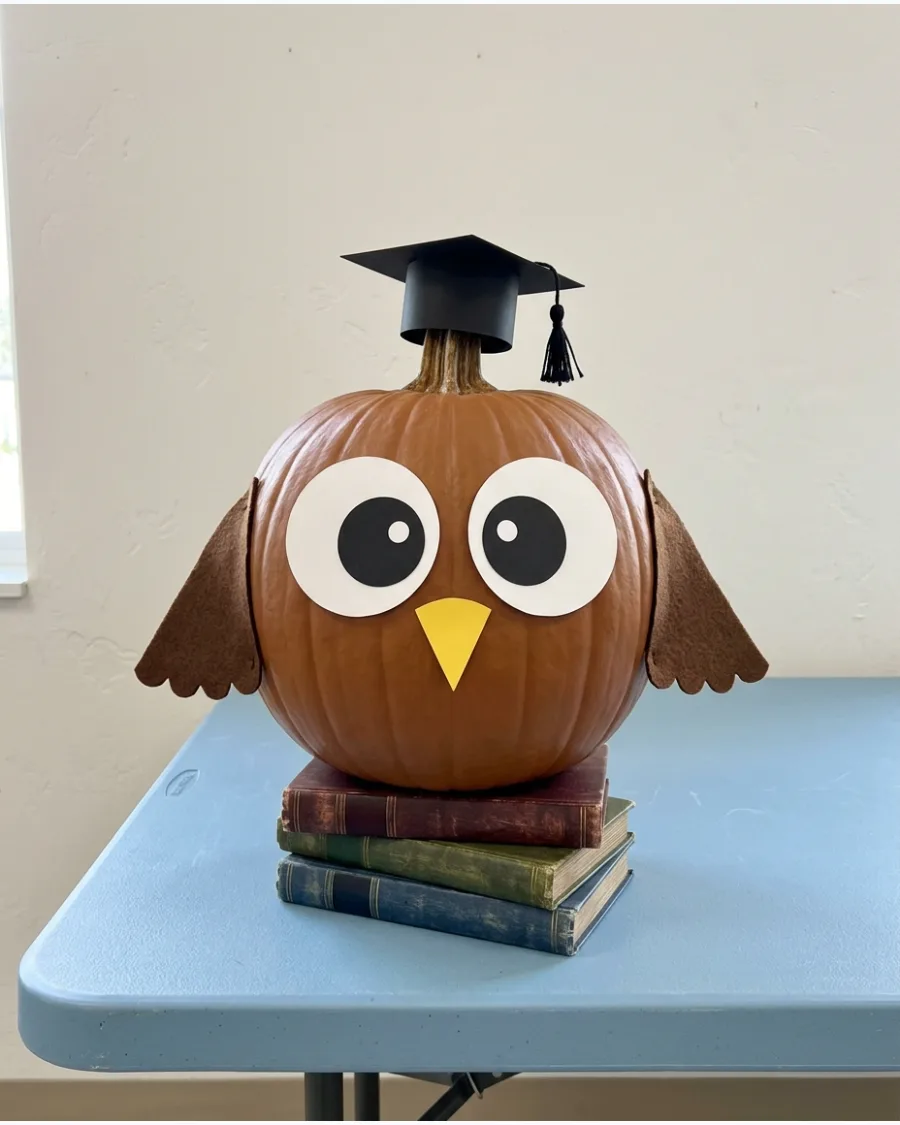
Large painted circles create the eyes, while cardstock triangles form the beak and wings. Layering felt feathers over the paint gives the owl a realistic texture that judges appreciate. A miniature graduation cap makes it perfect for a school-themed entry.
- Use stiff felt for the wings so they stand out from the pumpkin body.
- Choose a squat, wide pumpkin shape to mimic the naturally round look of an owl.
- Glue a small open book at the base to reinforce the reading theme.
Best shortcut: Use large white cupcake liners for the eye bases to get perfect circles without using a compass.
16. Pencil Pumpkin
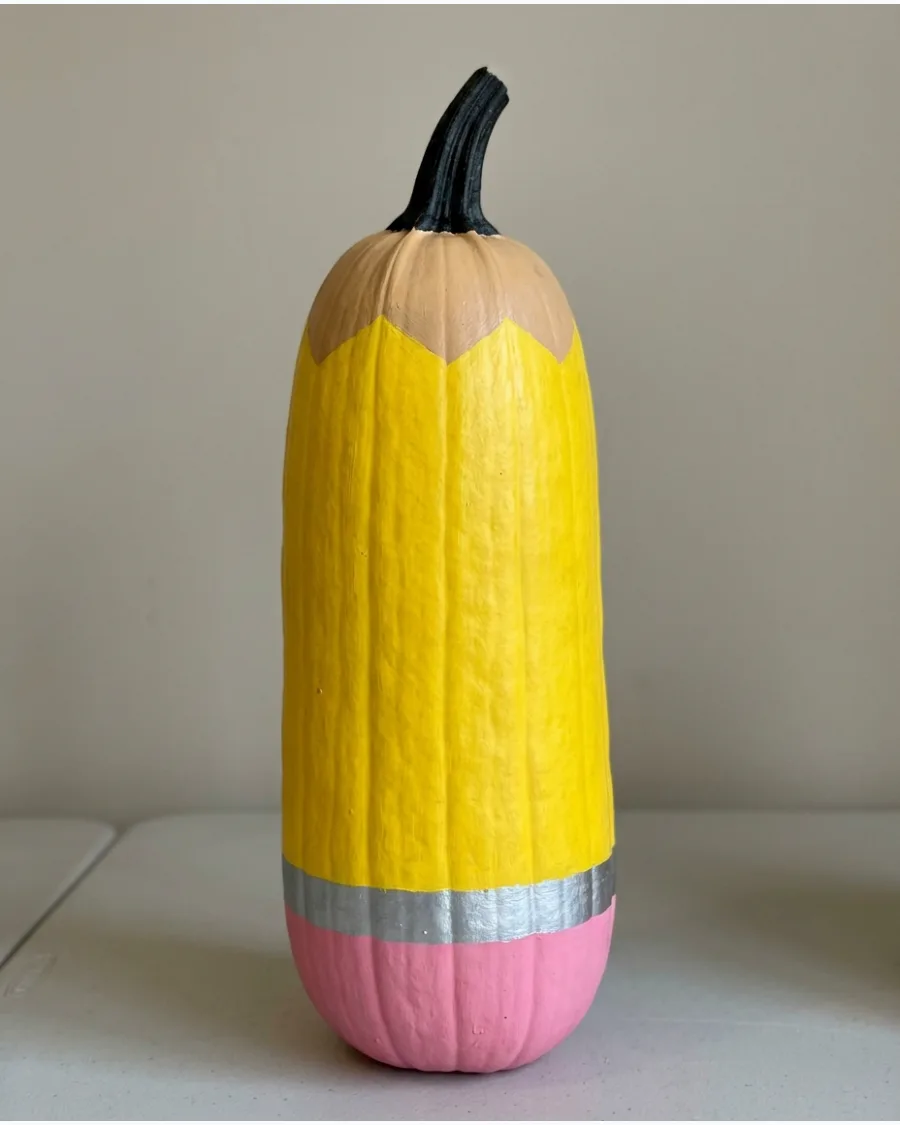
A tall, narrow pumpkin is transformed into a classic yellow pencil. Painting the area around the stem a light wood color mimics a freshly sharpened tip. Adding a pink eraser at the bottom makes the transformation instantly recognizable.
- Find a tall heirloom variety or a large butternut squash for the right shape.
- Use painter's tape to create crisp, straight lines between the yellow body and the eraser.
- Add a No. 2 label with a black permanent marker for a realistic detail.
Most people skip this: Use metallic silver duct tape for the metal band near the eraser for a realistic 3D texture.
17. School Bus Pumpkin
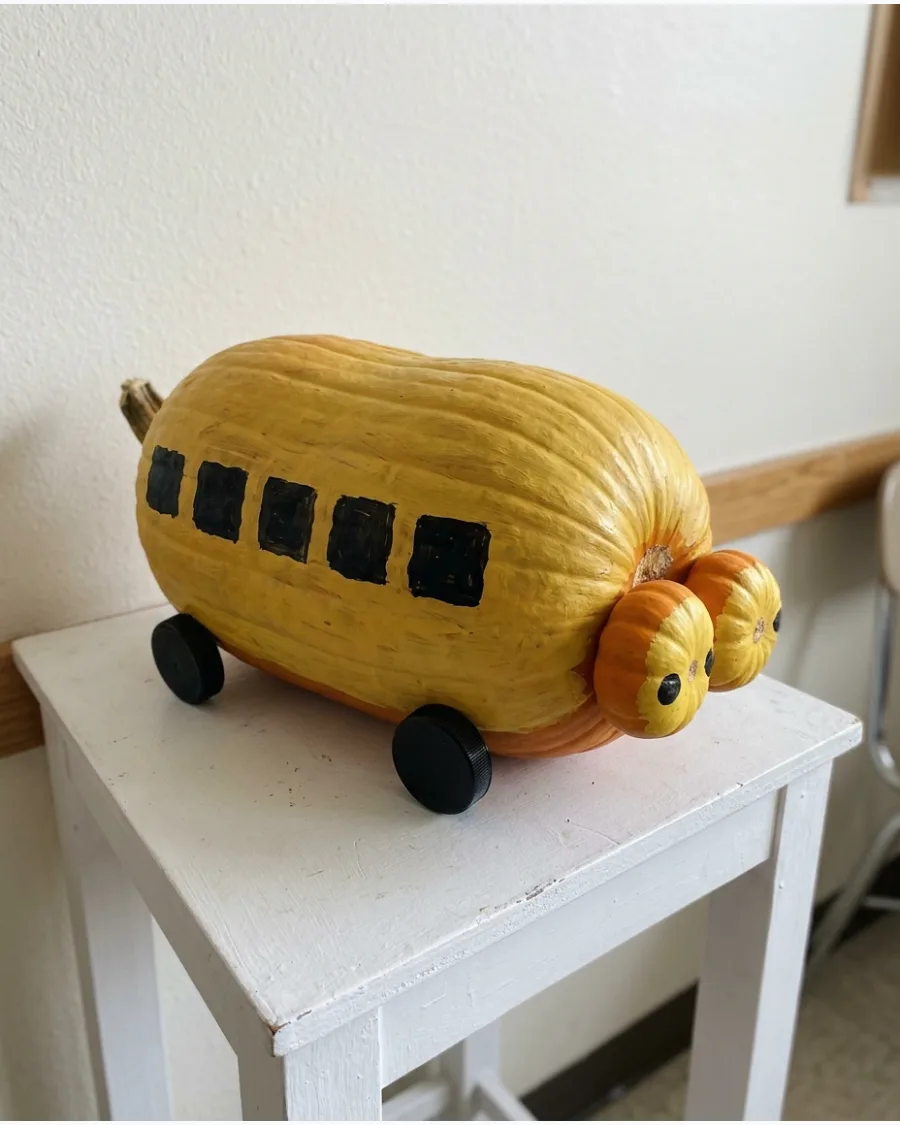
An oblong pumpkin works best for this yellow vehicle design. Black painted squares represent windows where you can glue small photos or drawings of students. Bottle caps painted black make excellent 3D wheels for the base of the bus.
- Look for a peanut squash or long pumpkin shape at the patch.
- Use a square sponge or stencil to keep all the windows the same size.
- Glue a small cardboard STOP sign to the side for an extra 3D element.
Quick win: Use a black permanent marker for the fine lines of the bus grille and the door outline.
18. Globe Pumpkin
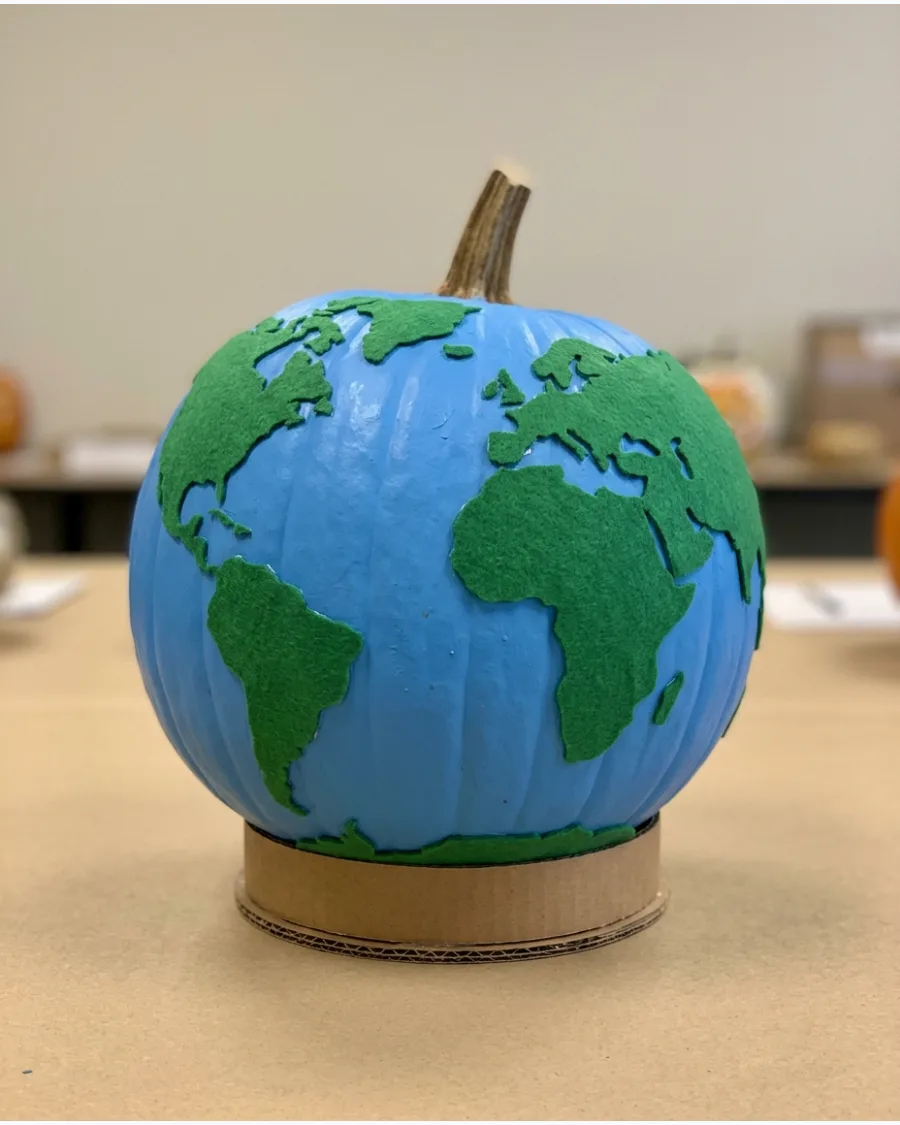
A round pumpkin painted blue serves as the ocean for green felt continents. Printing a map and using it as a template ensures the landmasses look accurate and professional. A sturdy cardboard ring base allows the globe to sit at a realistic angle.
- Use a matte blue paint to prevent glare during the contest judging.
- Trace map shapes onto felt or craft foam before cutting them out.
- Use a white paint pen to draw latitude and longitude lines across the blue areas.
Best shortcut: Use green sponge pieces to dab on the continents for a textured, topographical look instead of flat felt.
19. Crayon Box Pumpkin
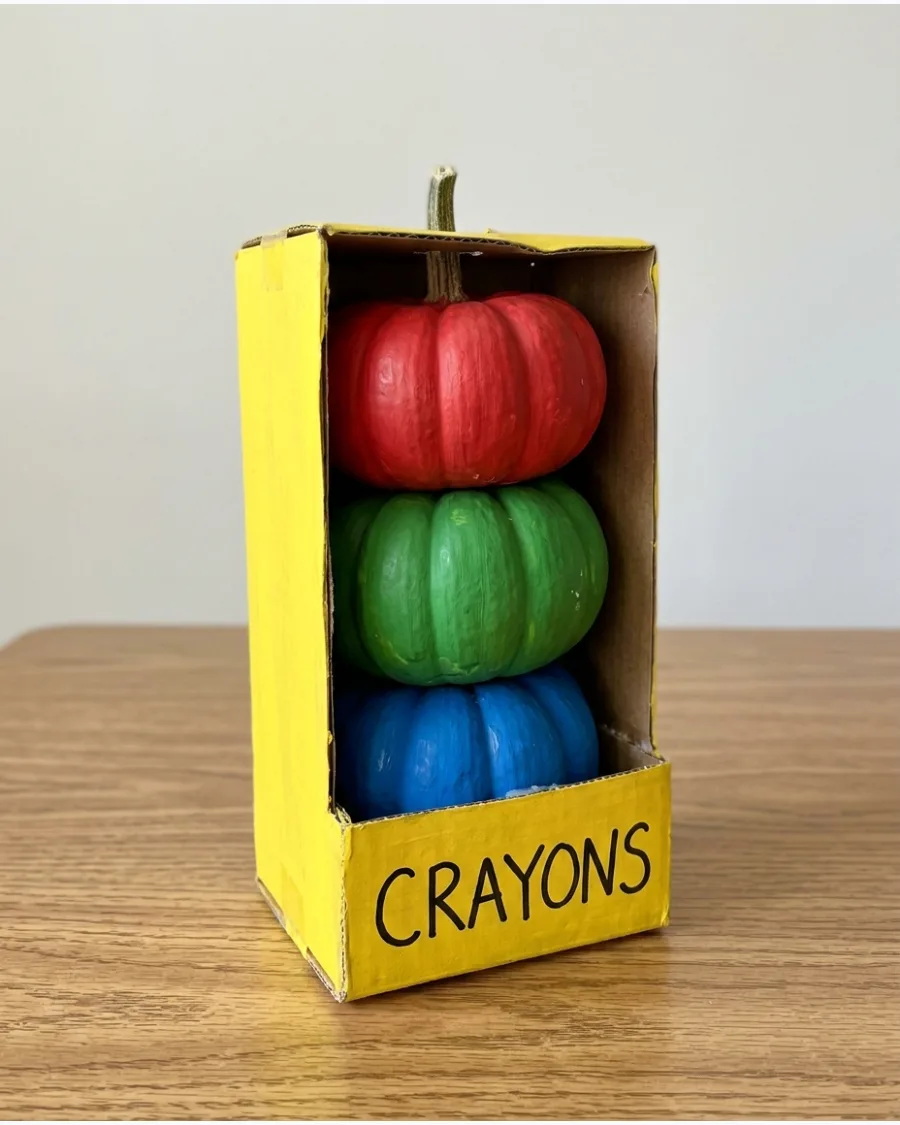
This group entry uses several small, narrow pumpkins painted in various bright hues. Tucking the pumpkins into a yellow-painted cardboard box creates the illusion of a giant crayon pack. It is a high-impact way to use multiple pumpkins in a single entry.
- Use a recycled shipping box and cut it to fit the height of your pumpkins.
- Match the paint colors to classic crayon shades like scarlet, indigo, and forest green.
- Secure the box to the display table with tape to prevent it from tipping over.
Quick win: Cut the box so the pumpkins sit at slightly different heights for a more dynamic and realistic look.
20. Science Experiment Pumpkin
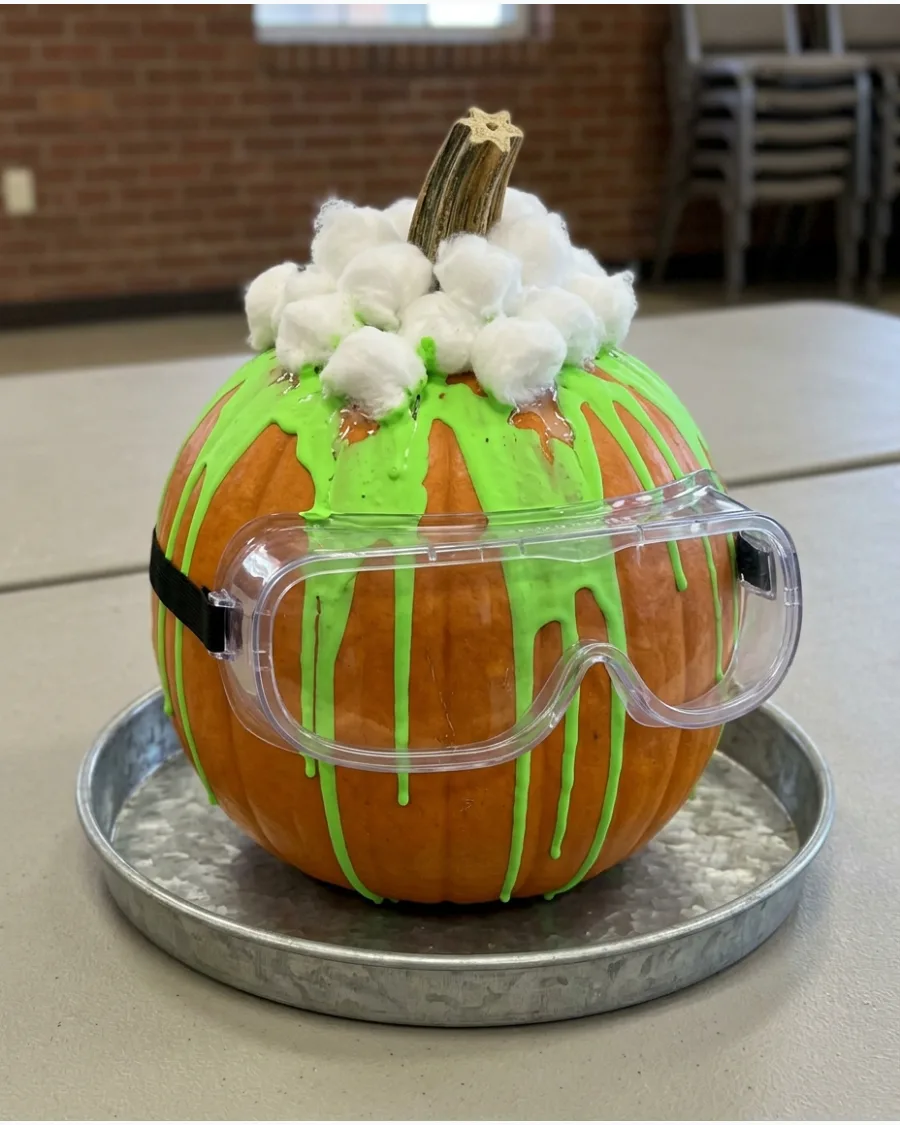
Neon green paint creates a bubbling effect over the top of the pumpkin. Gluing cotton balls around the stem mimics a chemical reaction mid-explosion. Plastic test tubes and safety goggles add to the mad-scientist theme of the display.
- Use neon or glow-in-the-dark paint for a high-impact visual effect.
- Glue empty plastic test tubes to the sides of the pumpkin using a low-temp glue gun.
- Place the entire project on a silver metal tray to look like a laboratory bench.
Most people skip this: Mix a little dish soap into the paint to give the bubbles a realistic, iridescent sheen.
21. Math Genius Pumpkin
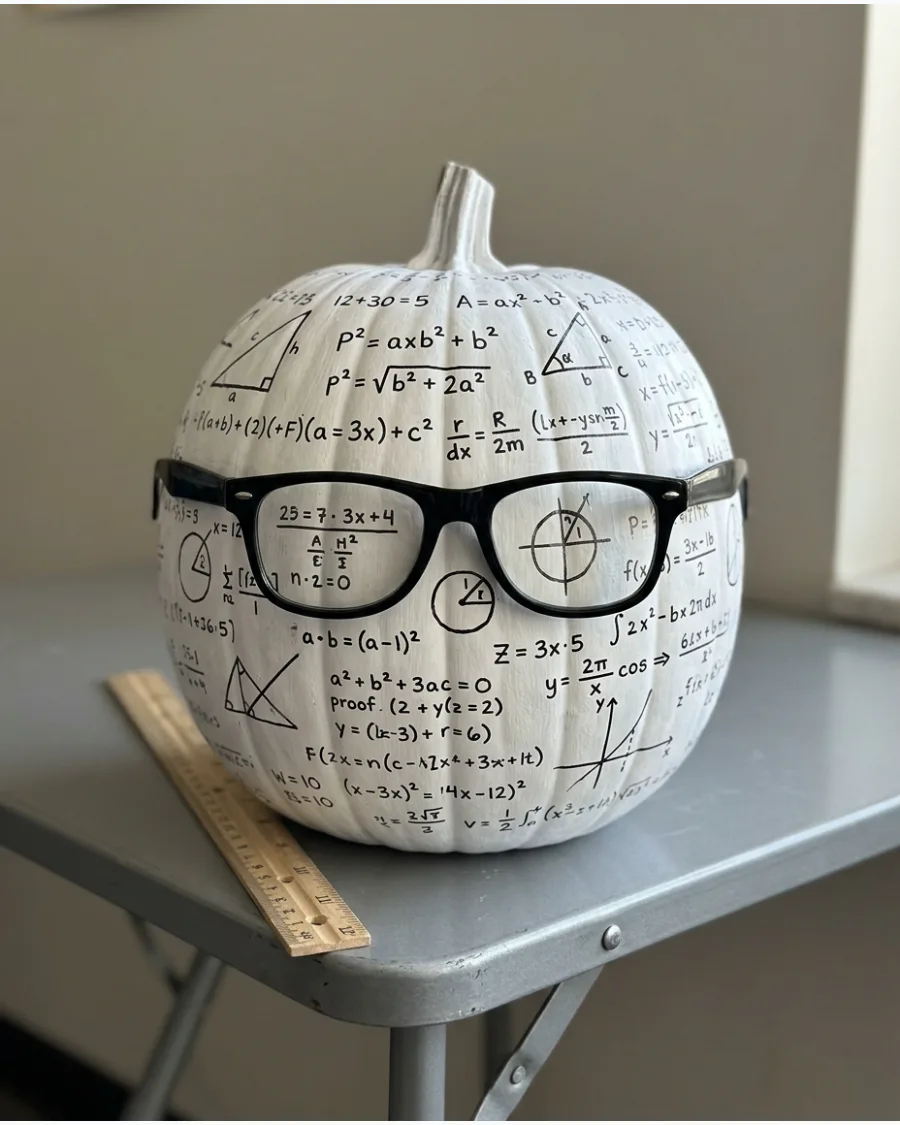
This design turns a standard pumpkin into a classroom-ready character using simple white paint and a black marker. Drawing complex formulas and geometric shapes across the surface gives the project an intellectual look that judges find impressive.
Stretch a pair of thick plastic glasses across the middle to give the character instant personality. Small accessories like a wooden ruler or a basic calculator glued to the base add to the theme without much effort.
- Use a white pumpkin or white acrylic paint to make the black ink pop.
- Secure the glasses with a small dab of hot glue behind the frames.
- Swap out the math symbols for chemical elements to create a science version.
Most people skip this: Use a permanent marker instead of a paint pen for finer, more legible numbers.
22. Stack of Books Pumpkin
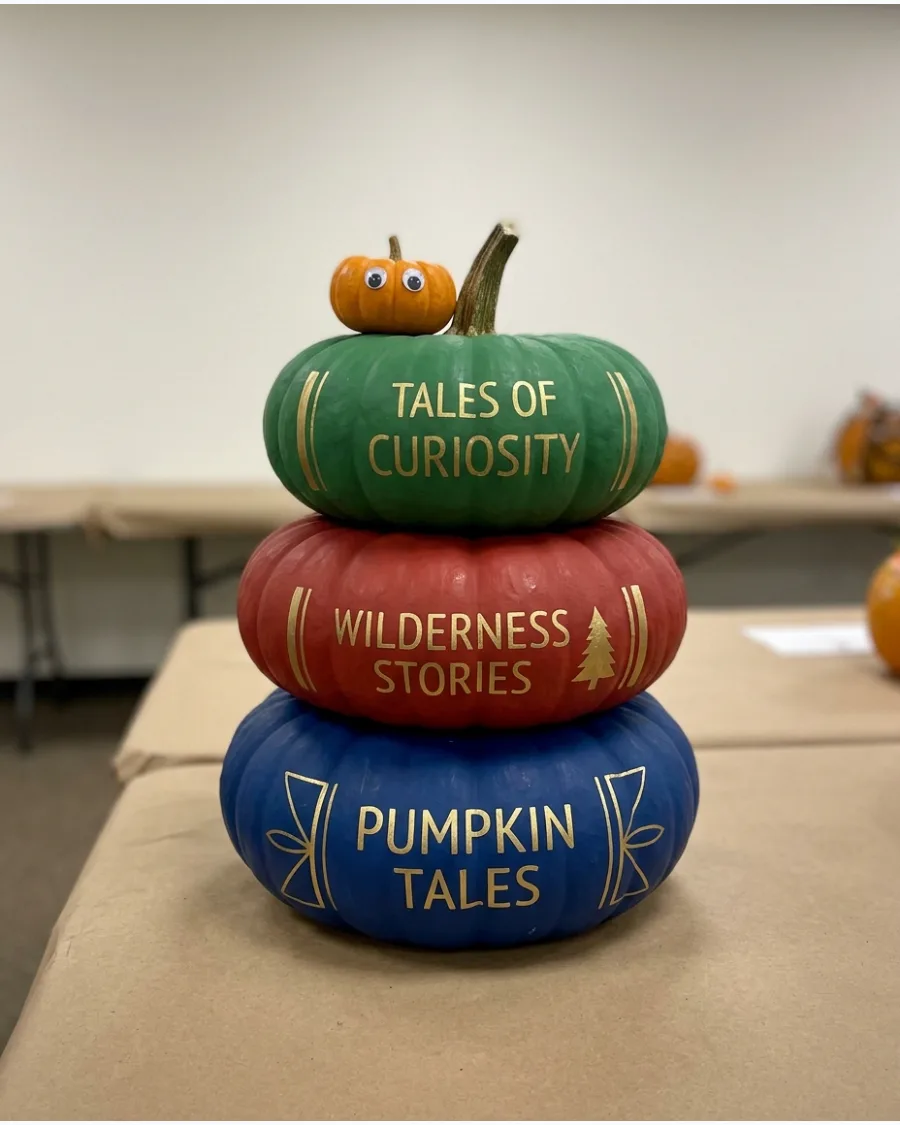
Flat, wide pumpkins are the secret to creating a stable stack that looks like a pile of library books. Paint each pumpkin a different solid color and use a paint pen to write classic titles along the flattest side.
Place the largest pumpkin on the bottom and secure each layer with a hidden dowel for stability. A tiny miniature pumpkin painted to look like a bookworm makes a perfect topper for this academic display.
- Look for 'Cinderella' or 'Fairytale' pumpkin varieties for the flattest stacking surfaces.
- Sand the contact points between pumpkins to prevent the stack from sliding.
- Customize the titles to match a specific school reading list or favorite genre.
Best shortcut: Use vinyl lettering for the book titles if your handwriting is shaky.
Cute Animal Pumpkin Decorating Ideas
23. Fluffy Highland Cow Pumpkin
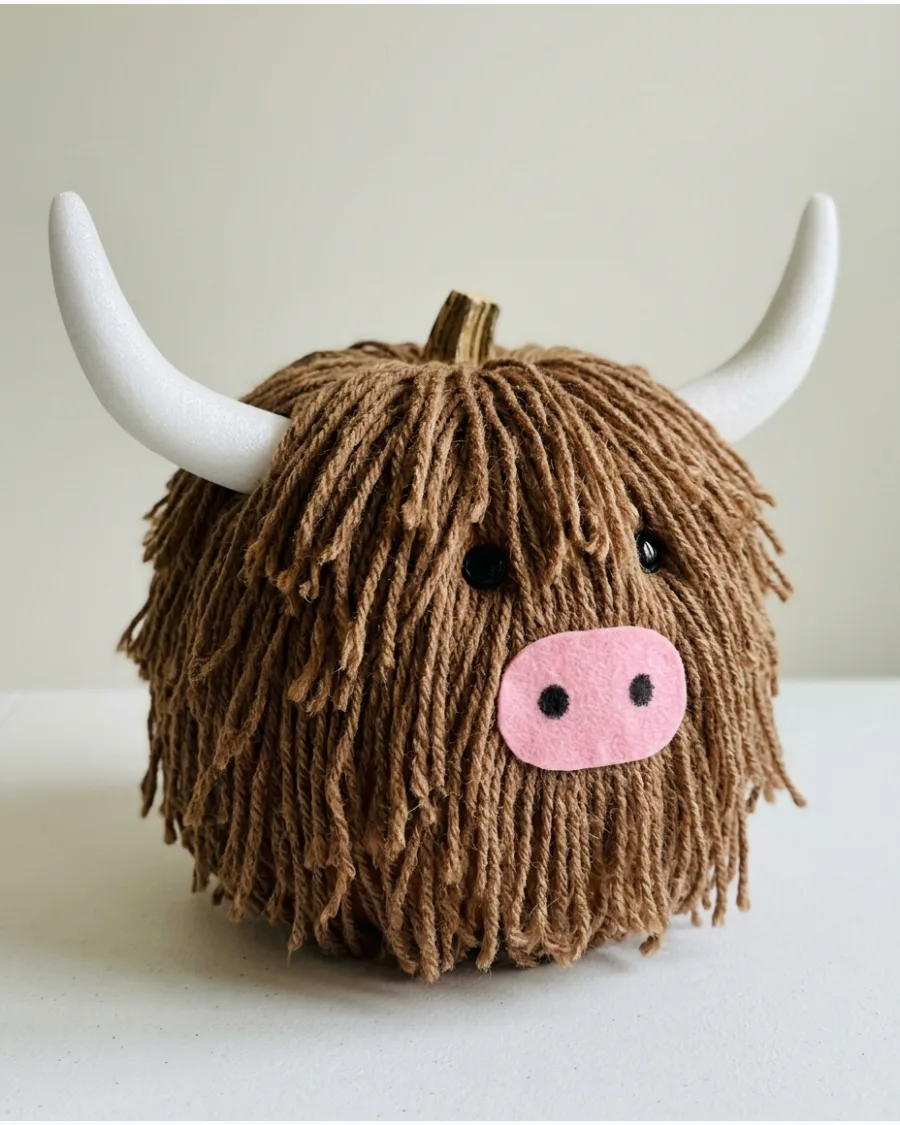
Highland cows are a crowd favorite in contests because of their unique texture and friendly faces. Use thick, shaggy brown yarn to create the signature 'hair' by gluing long strands from the stem downward.
Cut curved horns from white foam board and insert them into the sides of the pumpkin for a realistic 3D effect. A large oval of pink felt creates the snout, while small black beads serve as eyes peeking through the yarn.
- Buy chunky or 'eyelash' style yarn to get the most volume with the least amount of glue.
- Attach the horns by cutting small slits in the pumpkin skin and sliding the foam inside.
- Use a light gray yarn to create a 'silver' highland cow for a different look.
Quick win: Brush the yarn with a wide-tooth comb after gluing to make it look extra messy and authentic.
24. Hedgehog Pumpkin
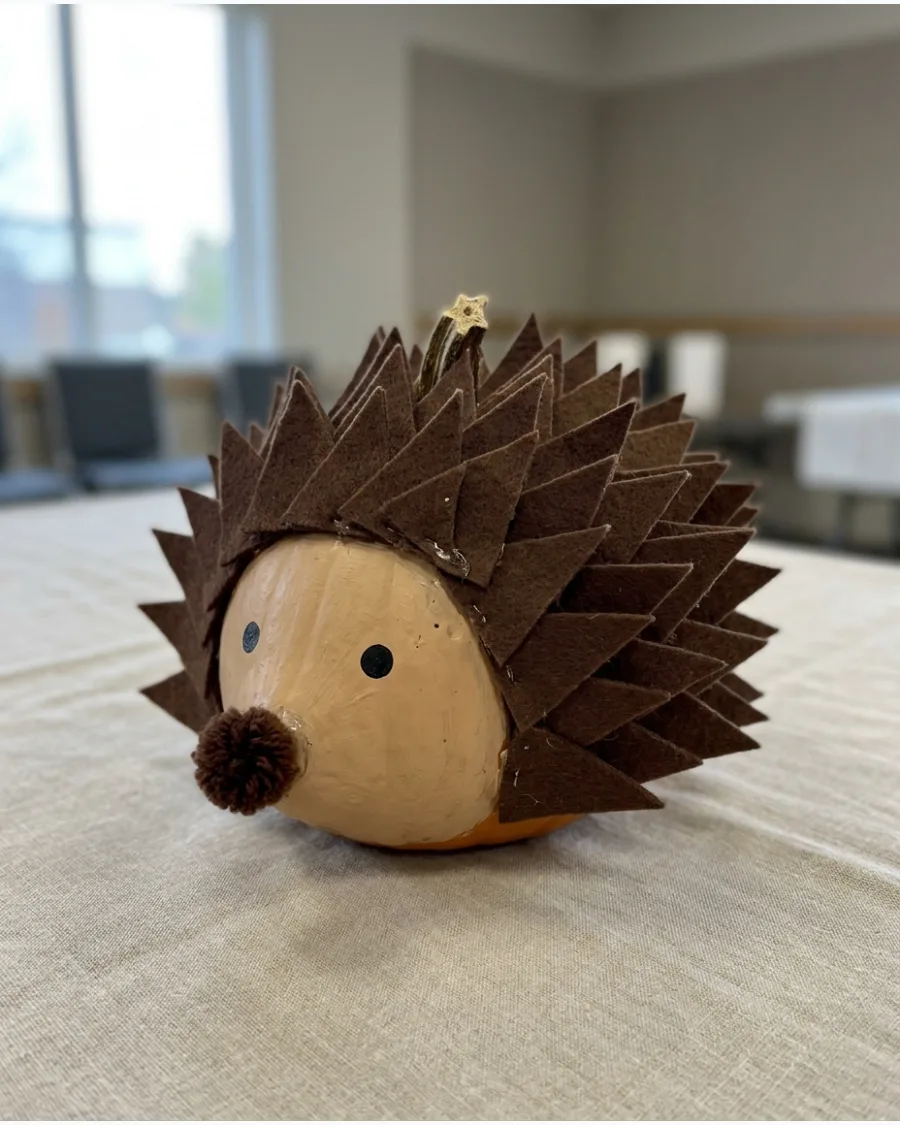
Transforming a small pumpkin into a hedgehog relies on creating a convincing coat of spikes. Paint the front third of the pumpkin a light tan for the face and the rest a deep chocolate brown.
Glue dozens of brown felt triangles or stiffened silk leaves in overlapping rows to mimic the animal's quills. A small black pom-pom glued to the very tip of the pumpkin makes a perfect nose for this woodland creature.
- Select an oblong or teardrop-shaped pumpkin to better represent the hedgehog's body.
- Use stiff felt rather than soft felt so the 'spikes' don't flop over.
- Try using painted toothpicks for spikes if the pumpkin won't be handled by children.
Most people skip this: Paint the 'skin' of the pumpkin under the spikes a dark color so no orange shows through.
25. Woodland Fox Pumpkin
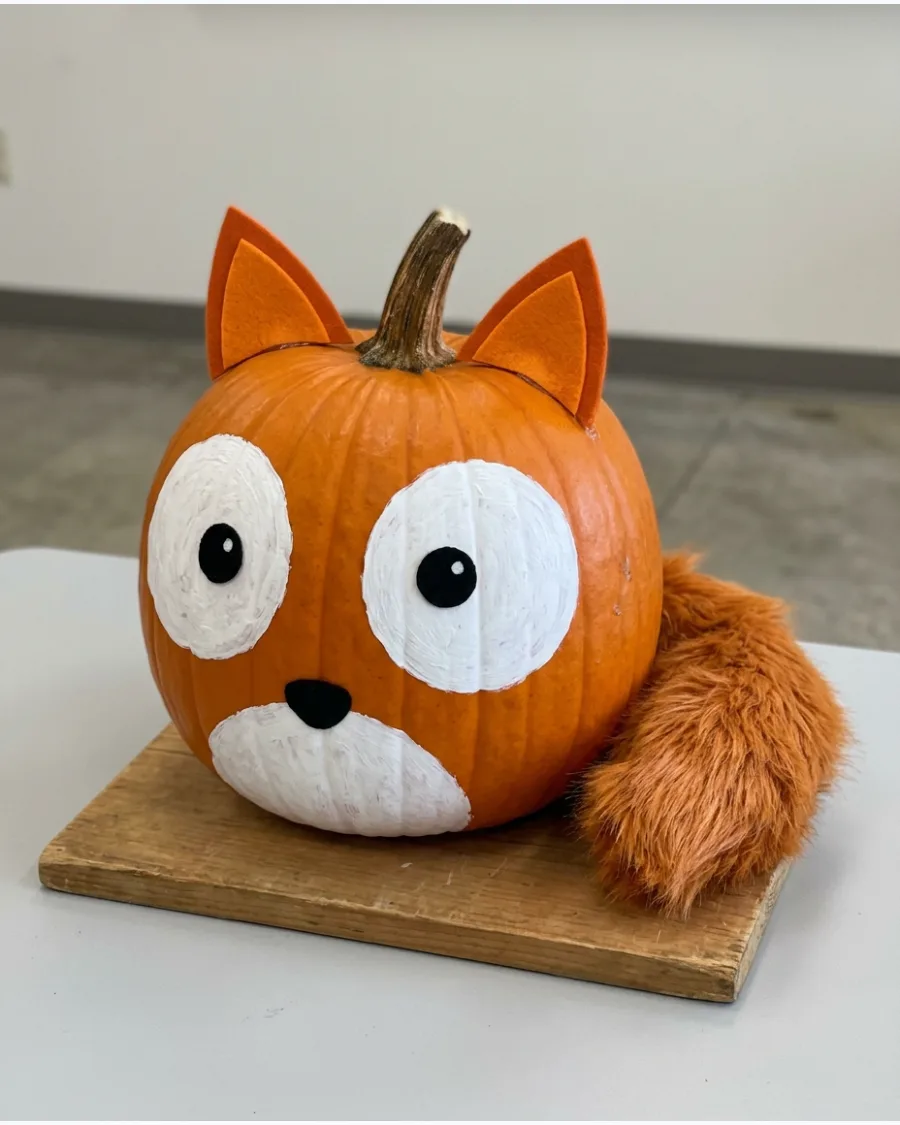
A fox design works best when you use the natural orange of the pumpkin as the primary color.
Use white acrylic paint to create two large teardrop shapes for the cheeks and a white patch on the chest. Attach a large, fluffy tail made of orange faux fur to the back so it wraps around the side of the display. Pointed felt ears glued near the stem give the fox its alert, clever expression.
- Leave the pumpkin's natural orange visible to save time and paint.
- Use a hot glue gun on a low-heat setting to avoid melting the faux fur backing.
- Add a small black button or felt circle for the nose to create a 3D profile.
Best shortcut: Use a white paint pen for the fine details around the fox's eyes for a cleaner look.
26. Raccoon Pumpkin
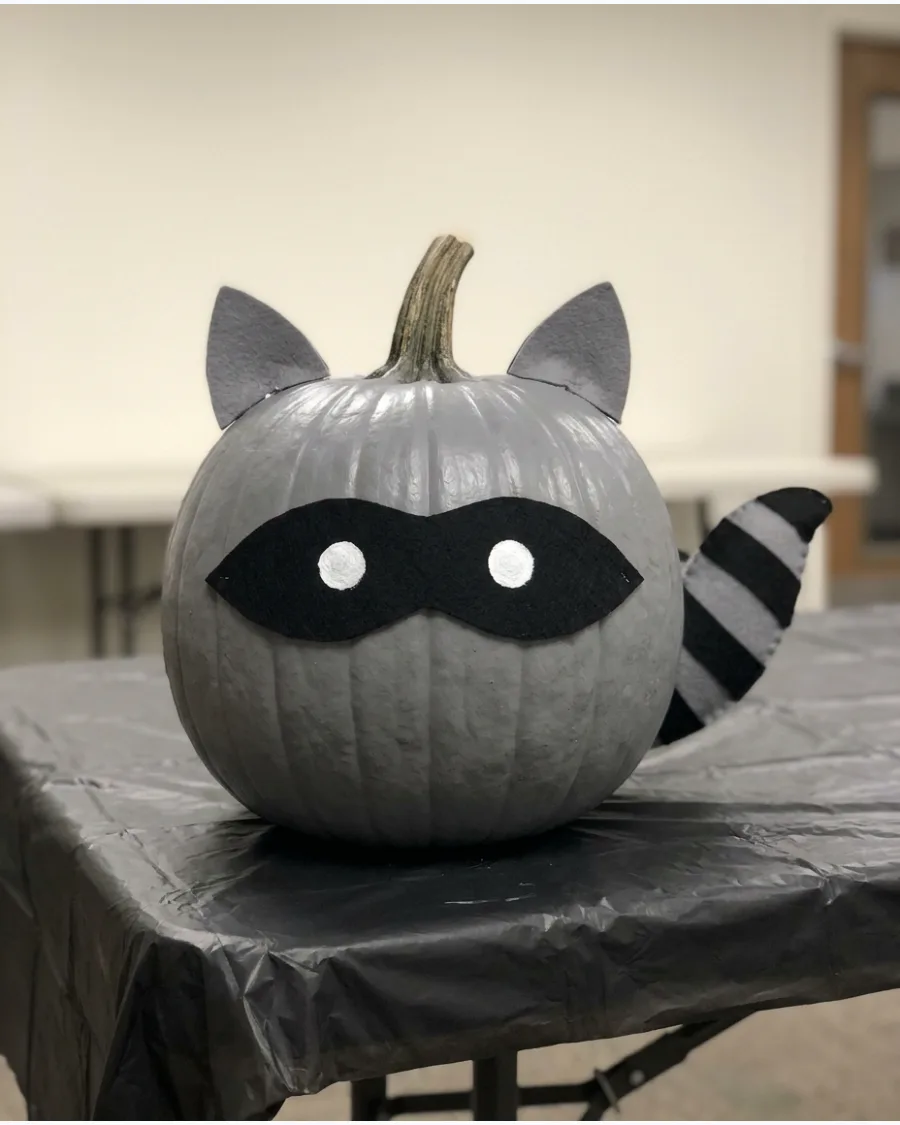
The key to a recognizable raccoon is the iconic black 'mask' around the eyes. Start by painting the entire pumpkin a medium gray and let it dry completely before adding details.
Cut a mask shape out of black felt and glue it across the center, then add small white dots for the eyes to make them pop. A striped tail made from gray and black felt strips can be attached to the back to finish the look.
- Apply two thin coats of gray paint for an even finish without streaks.
- Use a stiff cardboard backing behind the felt ears to keep them standing upright.
- Add 'paws' by gluing small gray painted stones to the base of the pumpkin.
Quick win: Use a sponge to dab on a little white paint for a 'furry' texture on the gray areas.
27. Black Cat Pumpkin
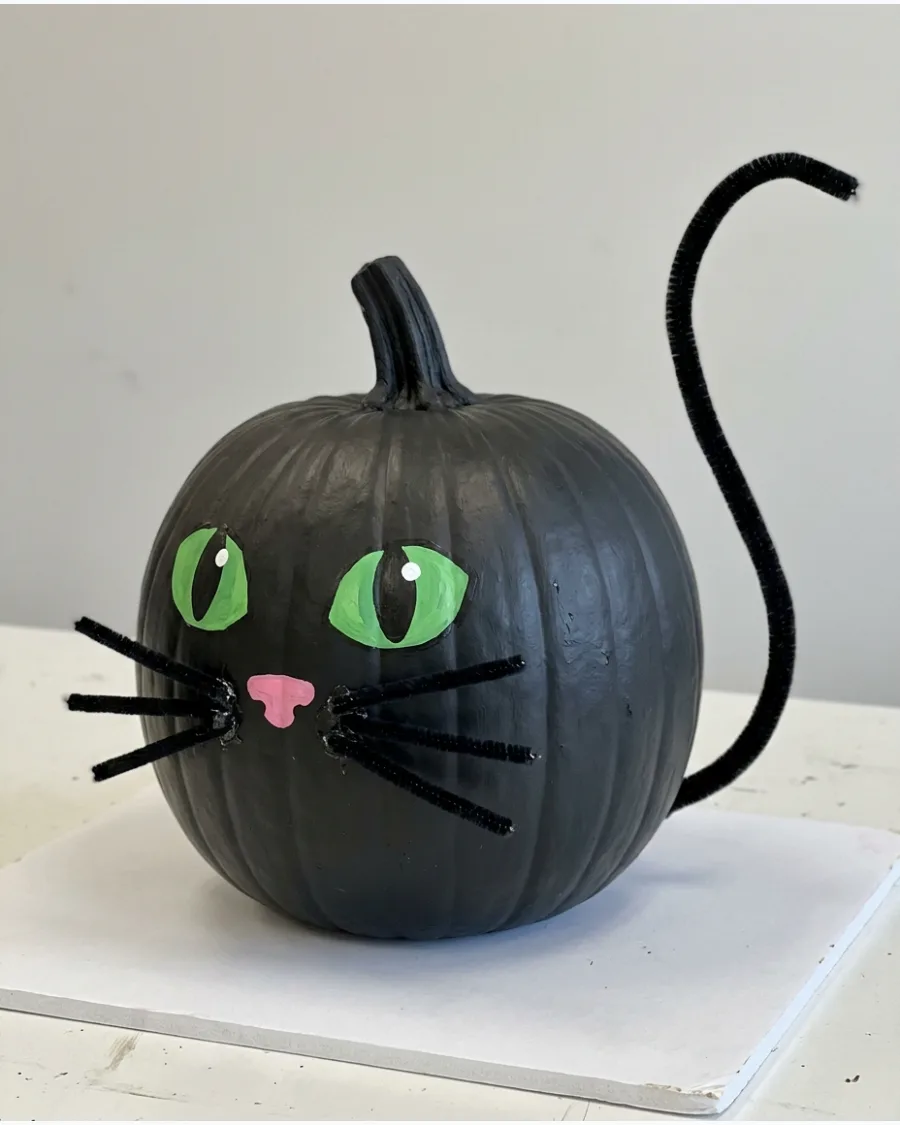
A black cat is a classic choice, but using different textures makes it a contest winner.
Coat the pumpkin in matte black paint to create a deep, solid base that hides the orange skin. Paint two large almond-shaped eyes in bright neon green to create a striking contrast against the dark body. Use black pipe cleaners for whiskers and a long, curved wire covered in black felt for a tail that can be positioned.
- Use matte paint rather than glossy to give the 'fur' a more realistic look.
- Position the whiskers by poking the pipe cleaners directly into the pumpkin skin.
- Add a glittery collar or a small bell around the stem for extra detail.
Most people skip this: Paint the stem black as well so it blends into the cat's head.
28. Pink Pig Pumpkin
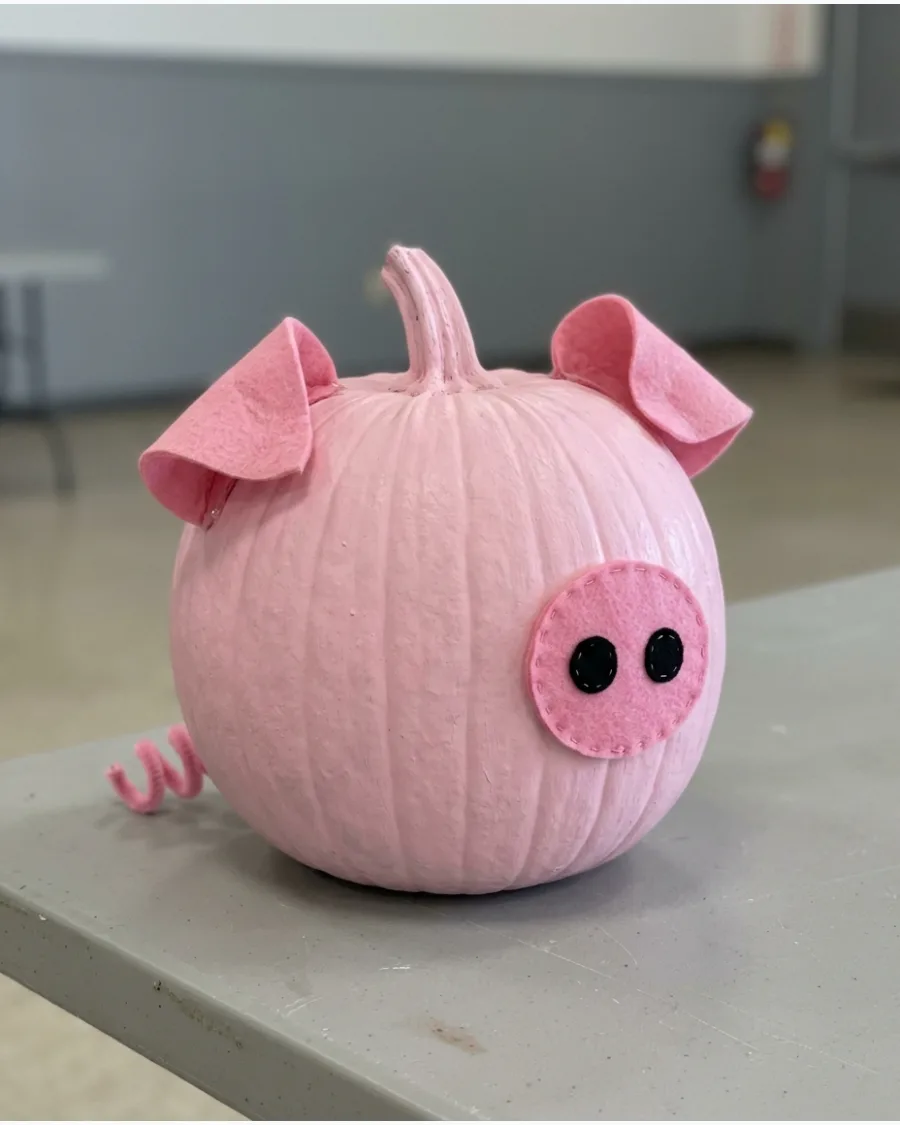
For a pig design, a round and plump pumpkin is the best starting point. Cover the entire surface in a soft candy-pink paint and add a large round snout made from a painted wooden disc or a large marshmallow.
Twist a pink pipe cleaner into a tight spiral and glue it to the back for a classic curly tail. Floppy triangular ears made from pink felt should be glued just below the stem to complete the look.
- Select the roundest pumpkin possible to mimic a pig's body shape.
- Use a slightly darker shade of pink for the inside of the ears to add depth.
- Glue four small pink-painted bottle caps to the bottom to act as hooves.
Best shortcut: Use a pink pool noodle slice for a lightweight, perfectly round snout.
29. Dalmatian Puppy Pumpkin
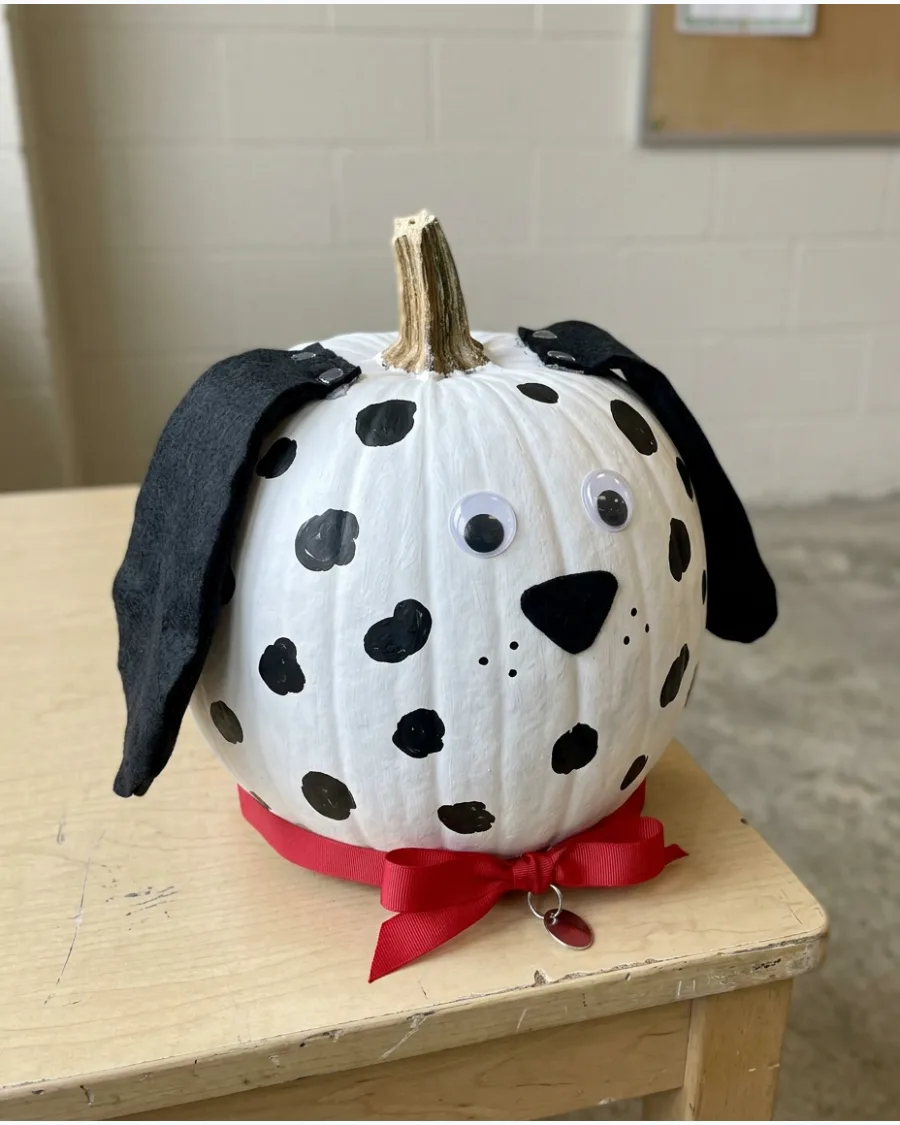
This puppy design is simple but very effective for school or office contests.
Paint the pumpkin a bright, clean white and allow it to dry before adding the spots. Use a round sponge brush to 'stamp' irregular black spots all over the surface for a realistic Dalmatian pattern. Long, floppy ears made from black felt and a red ribbon 'collar' around the base provide the finishing touches.
- Wipe the pumpkin with rubbing alcohol before painting white to help the paint stick.
- Vary the size and spacing of the spots so the pattern looks natural.
- Add a small pink felt tongue hanging out of the 'mouth' for a playful touch.
Quick win: Use a real dog collar from a dollar store for an authentic look that adds weight to the base.
30. Bumblebee Pumpkin
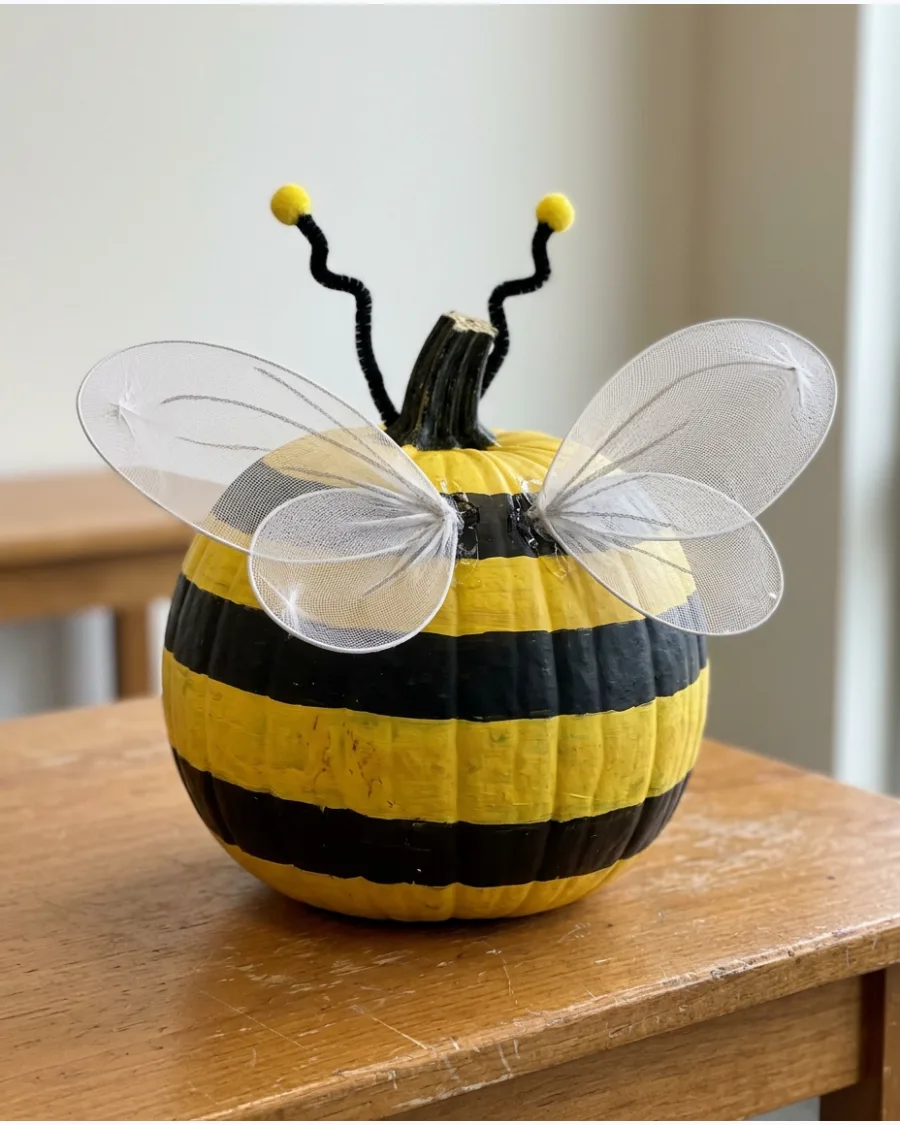
A bumblebee pumpkin stands out because of its high-contrast yellow and black stripes. Paint horizontal bands around the pumpkin, ensuring the lines are as straight as possible for a clean finish.
Attach wings made from translucent white mesh or vellum paper to the top sides using wire supports. Use black pipe cleaners with small yellow pom-poms on the ends for antennae that bounce when the pumpkin is moved.
- Use painter's tape to get perfectly crisp lines between the yellow and black stripes.
- Apply the yellow paint first, as it is harder to cover black if you make a mistake.
- Use a light coating of glitter on the wings to make them look like they are vibrating.
Most people skip this: Paint the stem black so it looks like part of the bee's head or a stinger.
31. Colorful Peacock Pumpkin
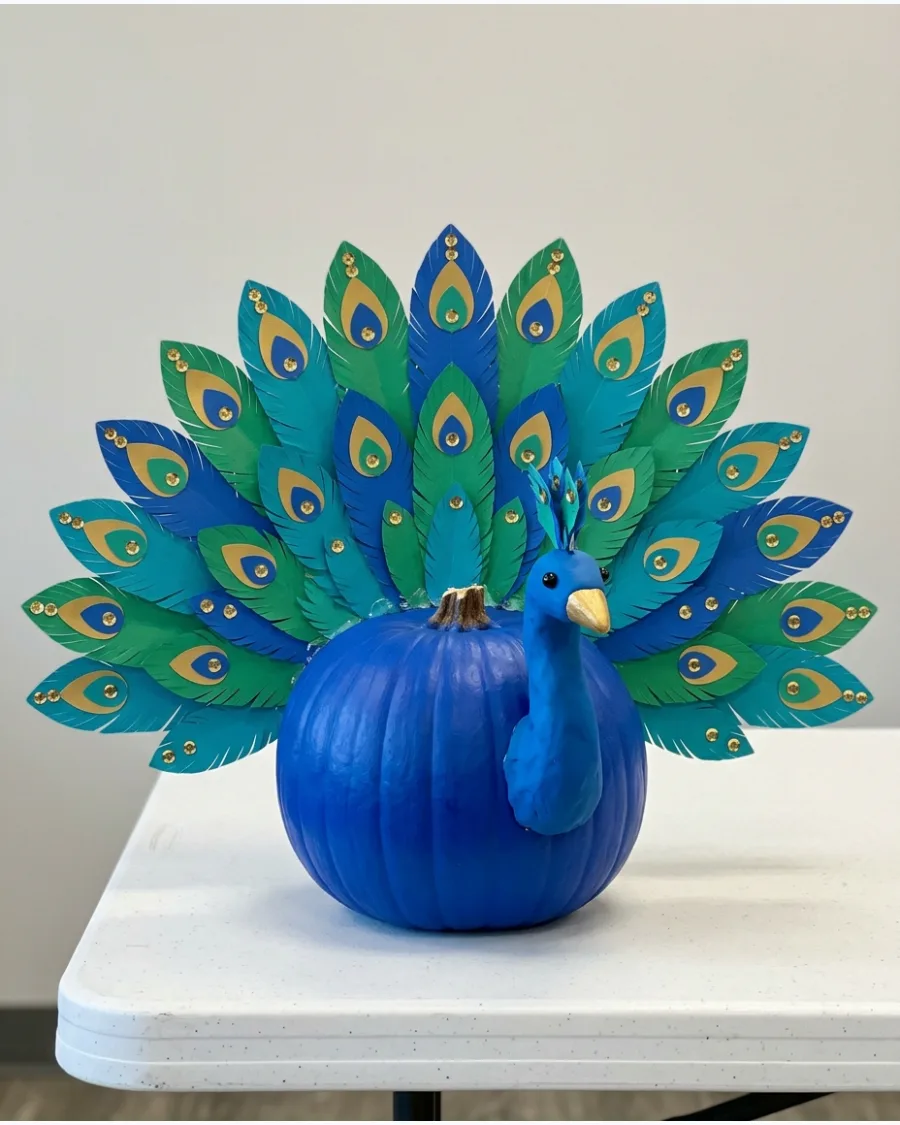
Paint the main pumpkin body a deep teal or royal blue to mimic a bird's torso. Glue a fan of stiff paper feathers to the back of the pumpkin to create a massive, upright tail. Adding sequins or glitter to the eye patterns on the feathers helps the design catch the light during judging.
Most people skip this: Reinforce the paper feathers with thin wire on the back so they do not flop over during the contest.
- Purchase royal blue acrylic paint and heavy cardstock.
- Cut feathers in a uniform teardrop shape and glue them in a wide semi-circle.
- Use a smaller pumpkin for the head if the main pumpkin is very large.
Most people skip this: Reinforce the paper feathers with thin wire on the back so they do not flop over during the contest.
32. Flamingo Pumpkin
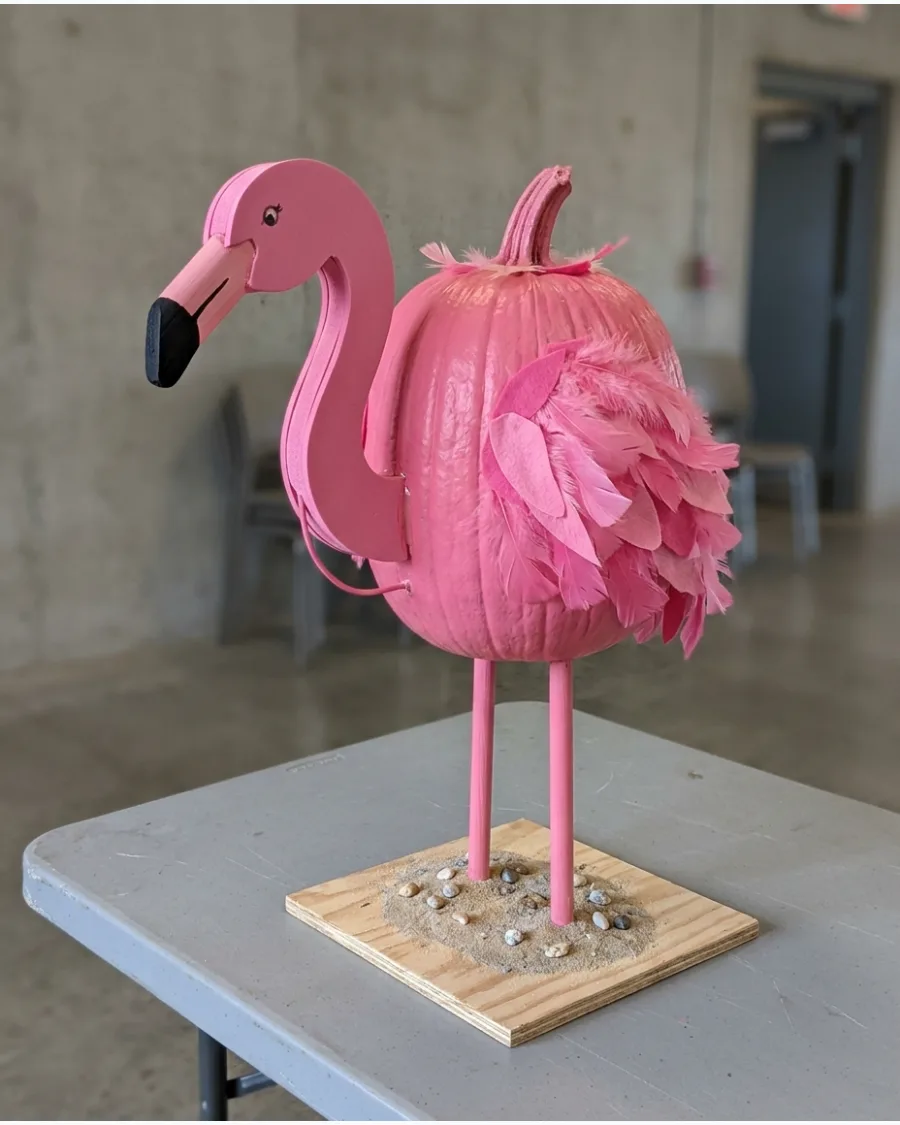
Choose a tall, oblong pumpkin to act as the bird's body and coat it in bright pink paint. Craft a long, curved neck from a thick piece of foam core or a sturdy wire wrapped in pink tinsel. Use two wooden dowels painted pink for legs to give the entry some height on the display table.
Quick win: Adding a few real pink feathers to the sides adds texture and movement that judges often appreciate.
- Pick a pumpkin with a vertical shape rather than a round one.
- Use a hot glue gun to secure the neck into a small hole carved in the pumpkin top.
- Secure the leg dowels into a heavy wooden base for stability.
Quick win: Adding a few real pink feathers to the sides adds texture and movement that judges often appreciate.
33. Sea Turtle Pumpkin
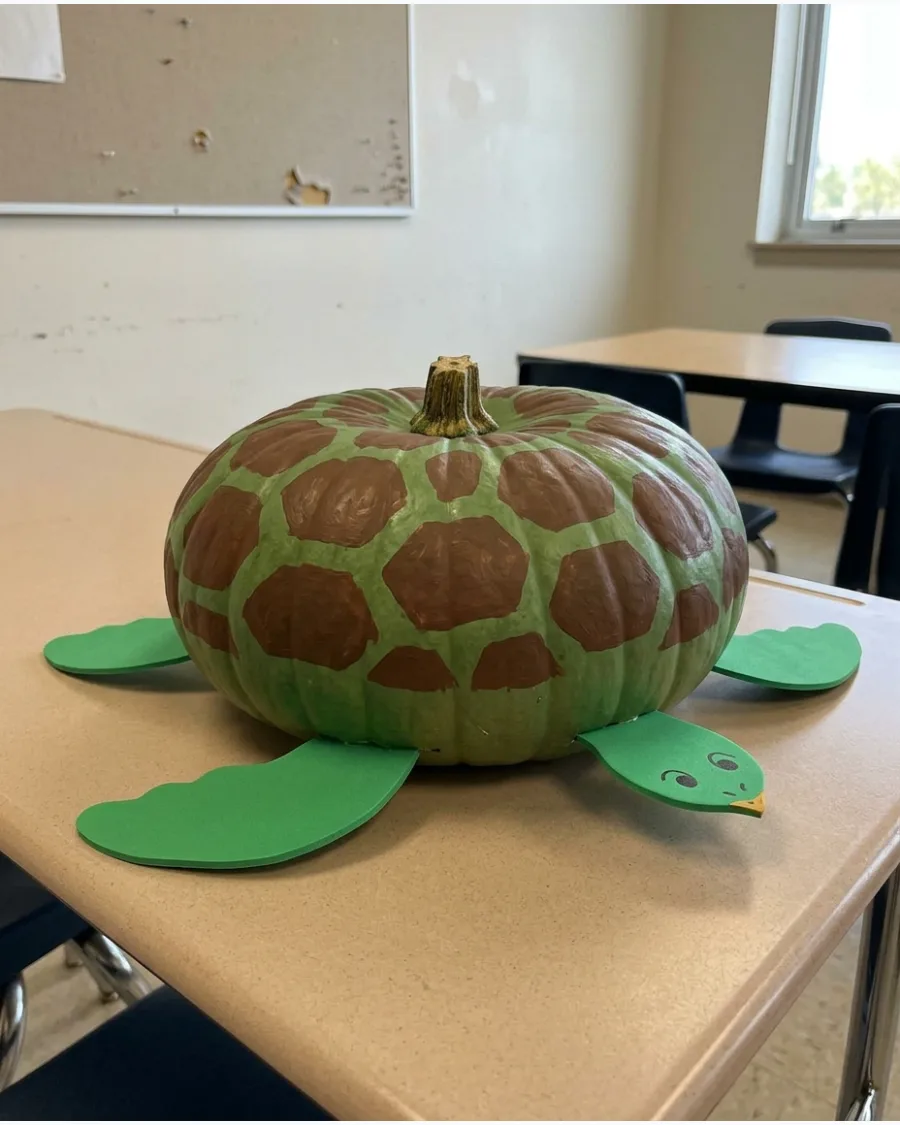
A flat, wide pumpkin known as a Cinderella style works best for the turtle's shell.
Paint a geometric hexagon pattern across the top using different shades of green and brown. Cut flippers and a head from green craft foam and pin them into the base of the pumpkin so they lay flat against the table. Best shortcut: Use a paint marker for the shell patterns to get much cleaner lines than a standard brush.
- Look for a pumpkin that is wider than it is tall.
- Sketch the hexagon pattern with a pencil before applying paint.
- Use upholstery pins to attach the foam limbs securely to the pumpkin skin.
Best shortcut: Use a paint marker for the shell patterns to get much cleaner lines than a standard brush.
Food-Inspired Pumpkin Contest Ideas
34. Ice-Cream Sundae Pumpkin
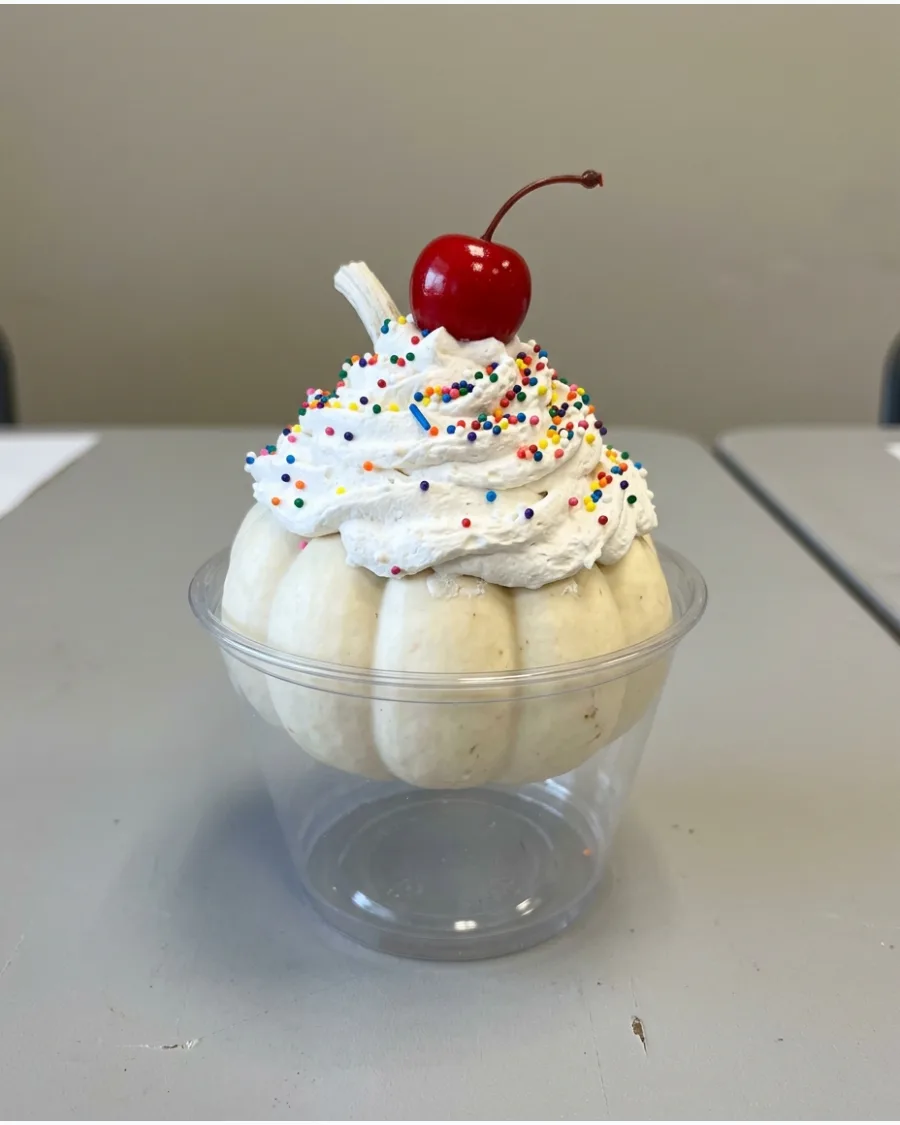
Set a small white pumpkin inside a large plastic bowl or an oversized sundae glass. Apply a thick layer of white lightweight spackle over the top of the pumpkin to mimic melting whipped cream. Top the spackle with real sprinkles and a red painted ping-pong ball to serve as the cherry.
Most people skip this: Use a clear spray sealant over the sprinkles so they do not fall off during transport.
- Buy lightweight wall spackle from a hardware store for the frosting.
- Ensure the pumpkin fits snugly inside the cup or bowl used as the base.
- Apply the sprinkles while the spackle is still wet so they stick naturally.
Most people skip this: Use a clear spray sealant over the sprinkles so they do not fall off during transport.
35. Doughnut Pumpkin
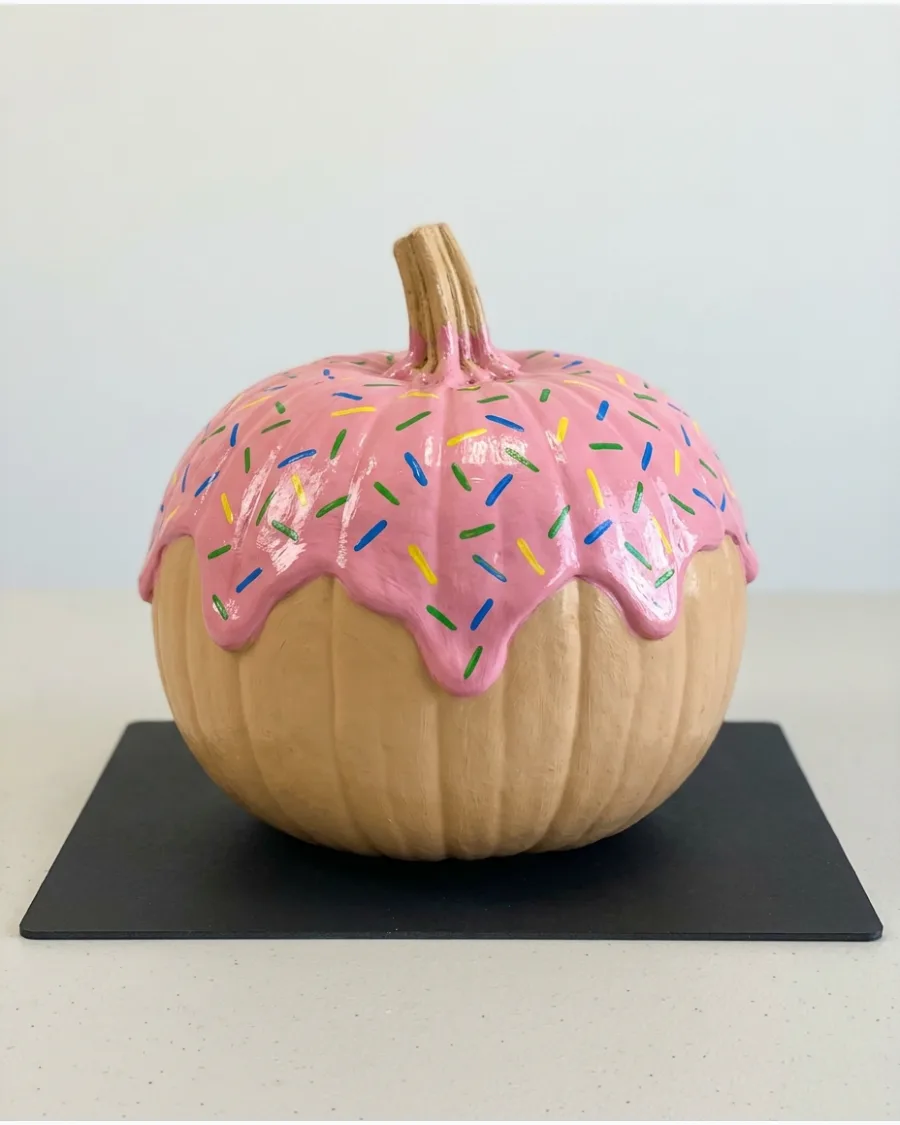
Select a very flat, squat pumpkin and paint the entire surface a light tan color to represent dough. Paint a thick circle of glossy pink or chocolate brown paint around the stem to look like frosting. Finish the look by painting small, colorful rectangles to look like sprinkles.
Quick win: Using a matte finish on the tan part and a high-gloss finish on the frosting makes the doughnut look much more realistic.
- Choose a pumpkin with a deep indentation around the stem for the doughnut hole.
- Use acrylic paint for the base and a glossy enamel for the frosting.
- Wait for the frosting layer to dry completely before adding sprinkle details.
Quick win: Using a matte finish on the tan part and a high-gloss finish on the frosting makes the doughnut look much more realistic.
36. Popcorn Bucket Pumpkin
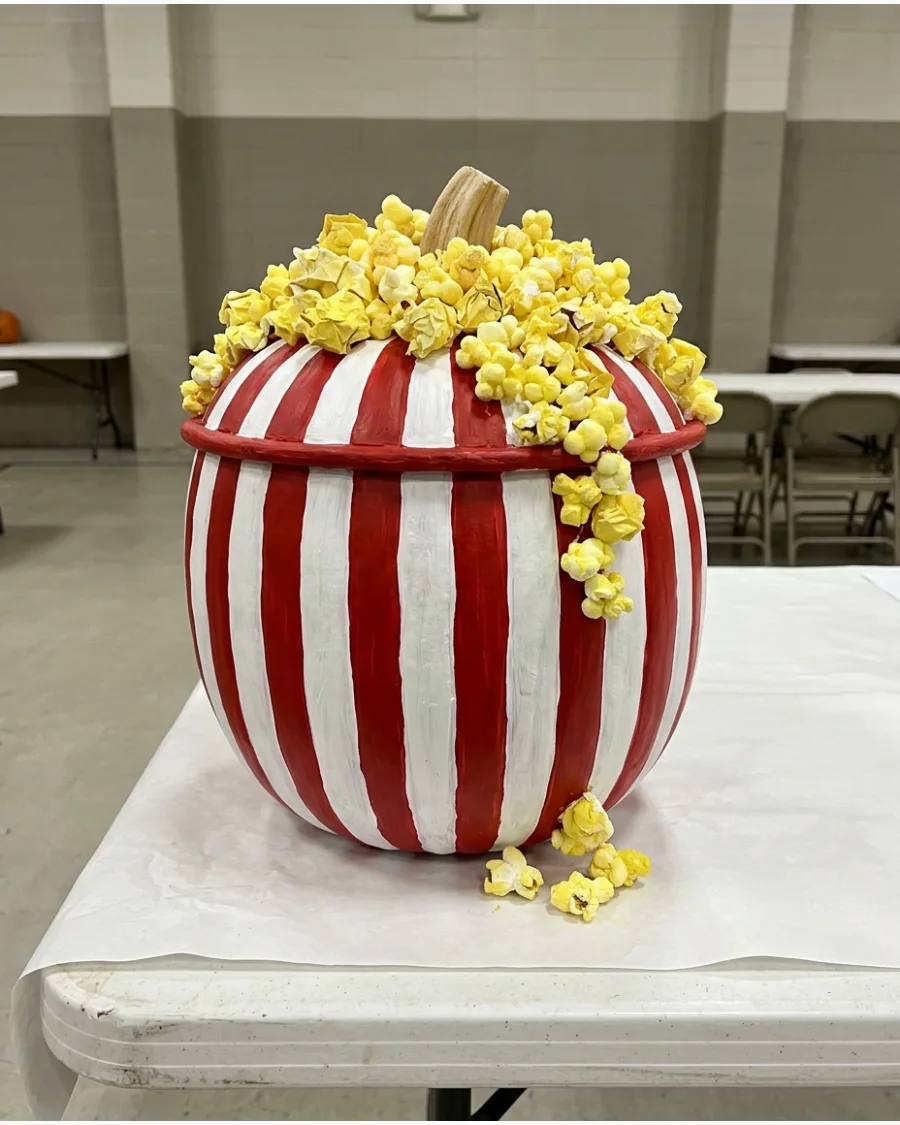
Paint the bottom two-thirds of the pumpkin with crisp vertical red and white stripes. Glue real popcorn or yellow-tinted cotton balls around the stem to make the bucket look like it is overflowing. Add a printed Popcorn label to the front for a professional finish.
Best shortcut: Spray the real popcorn with a clear acrylic sealer to prevent it from attracting pests or wilting before the contest ends.
- Use painter's tape to get perfectly straight red and white stripes.
- Apply yellow spray paint lightly to cotton balls if not using real popcorn.
- Print a vintage-style popcorn logo on cardstock and glue it to the center.
Best shortcut: Spray the real popcorn with a clear acrylic sealer to prevent it from attracting pests or wilting before the contest ends.
37. Gumball Machine Pumpkin
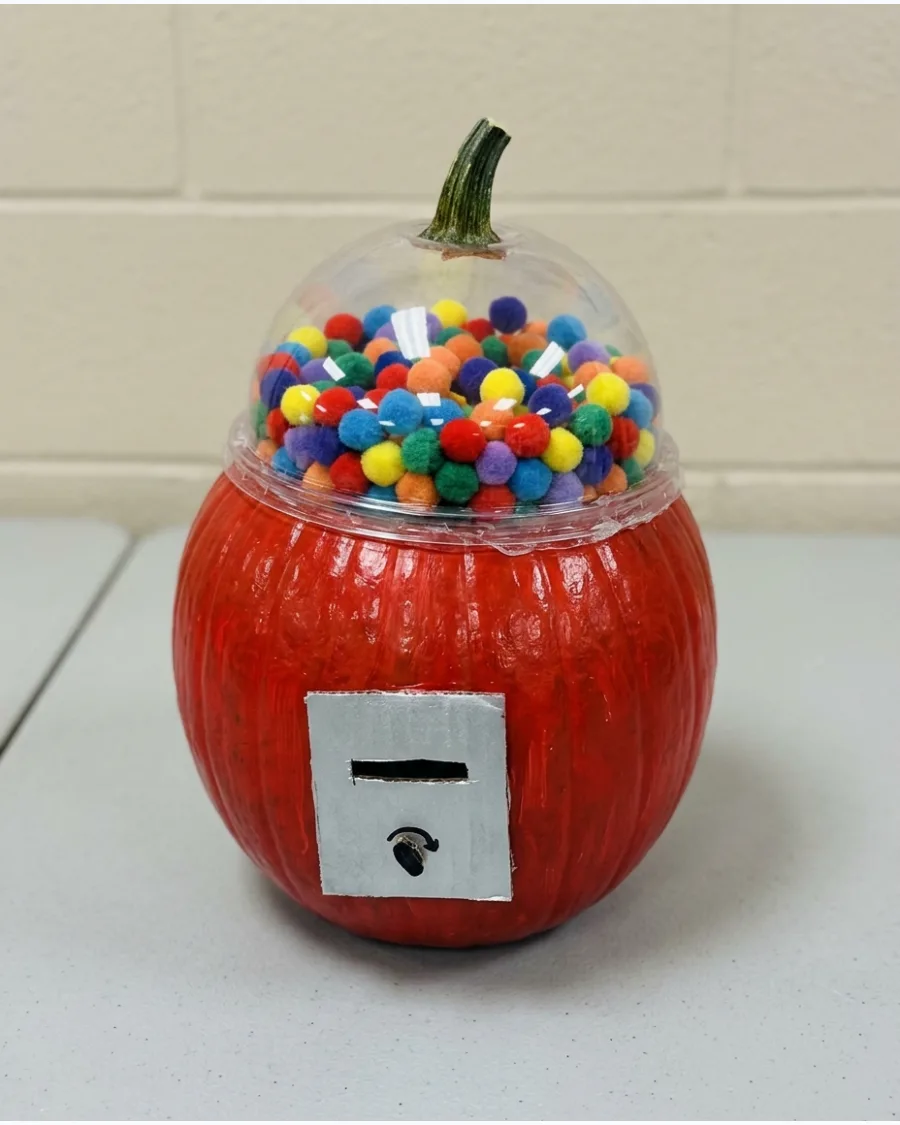
Paint the pumpkin base a bright, classic red and attach a small silver-painted cardboard rectangle to look like the coin slot. Invert a clear plastic fishbowl over the top of the pumpkin and fill it with multicolored craft pom-poms. Secure the bowl with a strong adhesive so it does not shift when the display is moved.
Quick win: Use a silver bottle cap as the turning knob for an authentic 3D effect.
- Match the size of the plastic bowl to the diameter of the pumpkin top.
- Use a mix of different sized pom-poms to represent various gumballs.
- Hot glue the bowl to the pumpkin for a permanent, sturdy bond.
Quick win: Use a silver bottle cap as the turning knob for an authentic 3D effect.
38. Cupcake Pumpkin
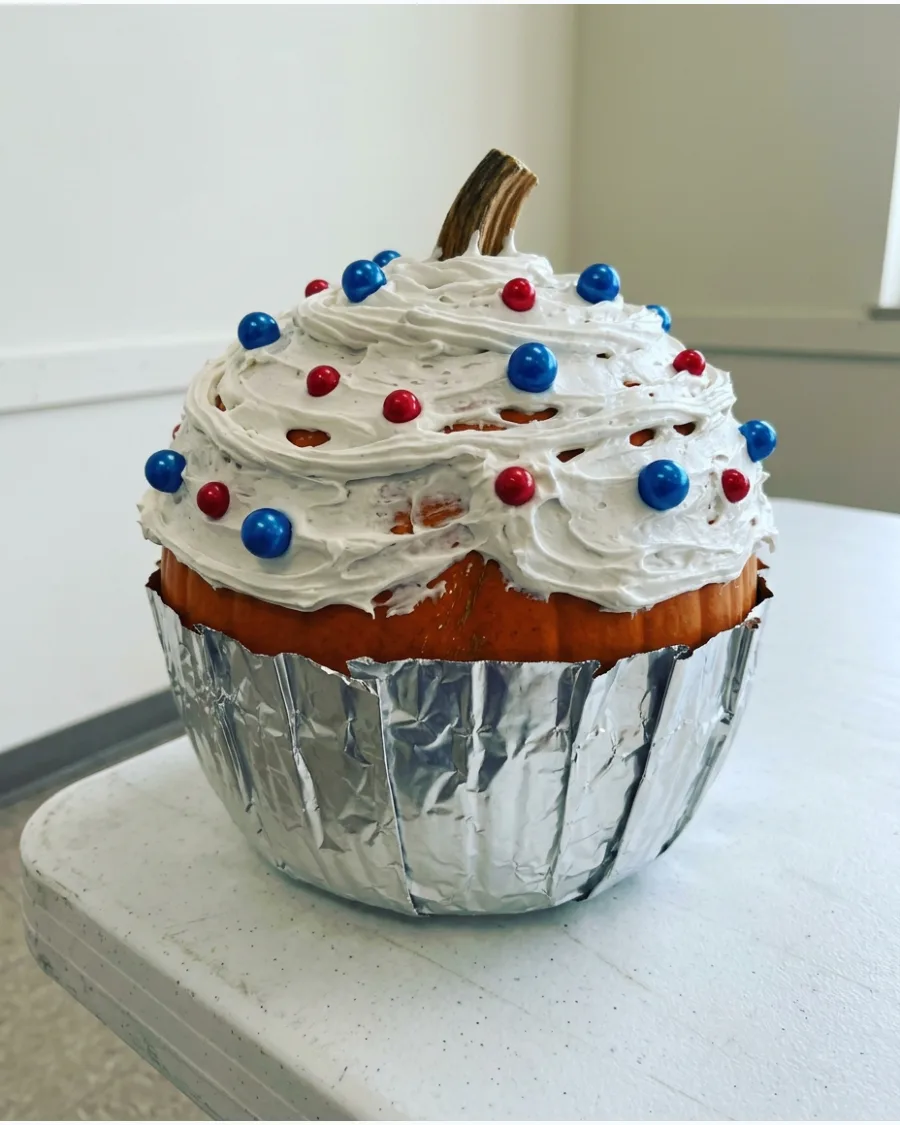
Wrap the bottom half of a medium pumpkin in pleated brown paper or a giant foil liner to create the cupcake base. Swirl pink or white expanding foam or thick caulk onto the top half to create the look of high-piled frosting. Drop a few large beads into the wet foam to act as sprinkles before it dries.
Most people skip this: Make sure the paper liner is taped securely to the pumpkin so it does not slide down during judging.
- Use a hot glue gun to attach the pleated paper base to the pumpkin skin.
- Apply expanding insulation foam slowly to avoid making a mess.
- Add a red glittery ornament on top to serve as a cherry.
Most people skip this: Make sure the paper liner is taped securely to the pumpkin so it does not slide down during judging.
39. Pizza Pumpkin
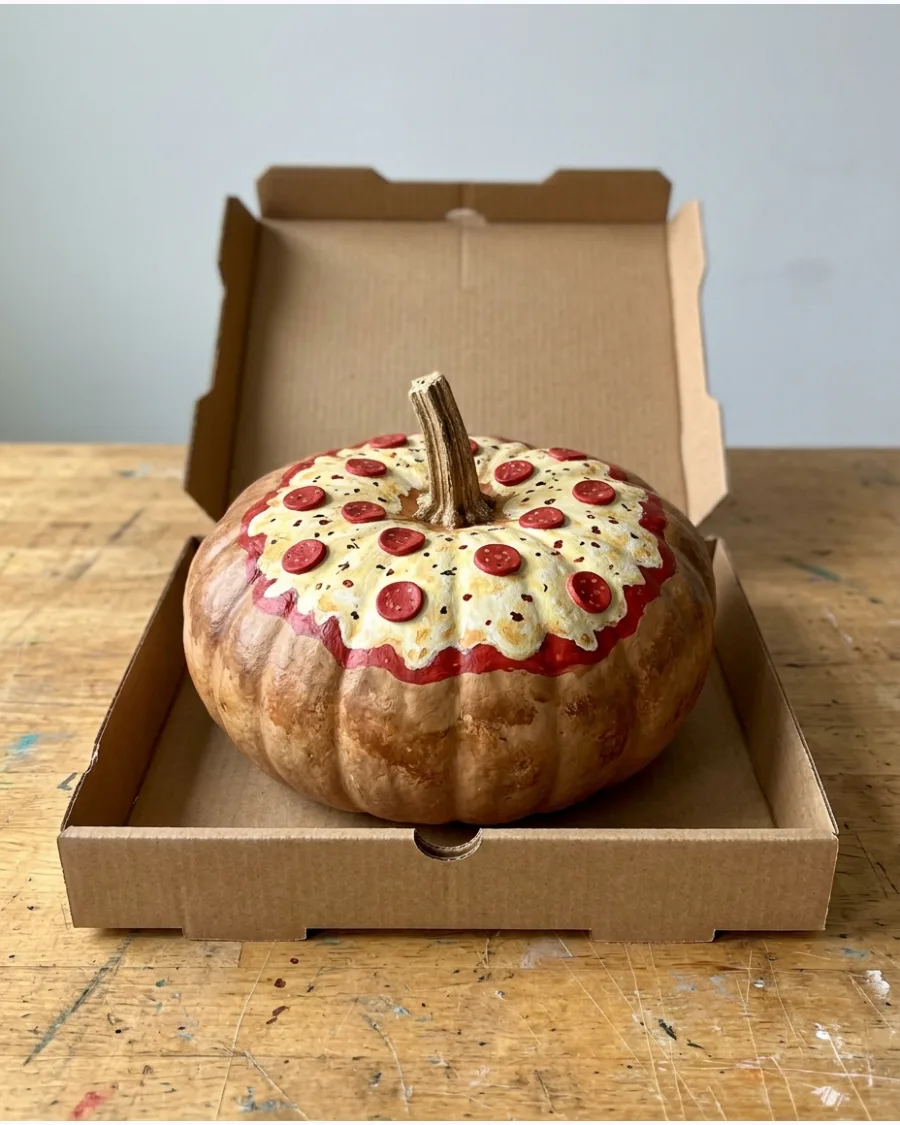
Choose a very flat pumpkin and paint the outer rim a crusty light brown. Fill the center with yellow paint for cheese and add red circles for pepperoni or green squares for peppers. Presentation is key for this entry, so place the finished pumpkin inside a clean, unused cardboard pizza box.
Quick win: Use puffy paint for the toppings to give the pizza a realistic 3D texture.
- Look for a white pumpkin to make the yellow cheese paint pop more.
- Ask a local pizza shop for a clean, unused medium-sized box.
- Use a sponge to apply the tan paint for a textured crust look.
Quick win: Use puffy paint for the toppings to give the pizza a realistic 3D texture.
40. Cheeseburger Pumpkin Stack
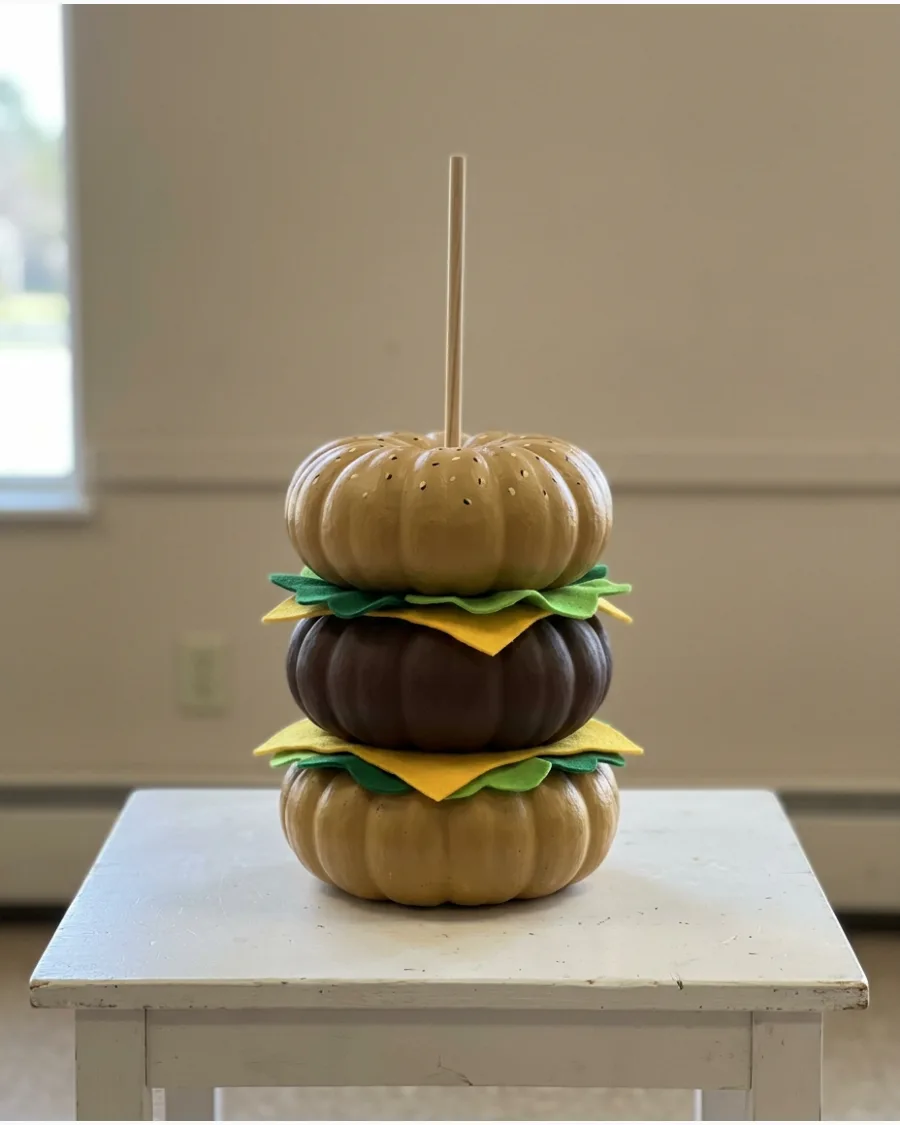
Use three or four flat pumpkins of varying sizes to build the layers of a burger. Paint the bottom and top pumpkins tan for the bun, a middle one brown for the patty, and use felt scraps for the lettuce and cheese. Drive a sturdy wooden dowel through the center of all the pumpkins to keep the stack from toppling over.
Best shortcut: Glue real sesame seeds to the top bun pumpkin for an instant boost in realism.
- Select flat pumpkins like the Long Island Cheese variety for easier stacking.
- Cut wavy edges into green felt to mimic the look of lettuce leaves.
- Use a drill to create the center hole for the dowel to avoid cracking the pumpkins.
Best shortcut: Glue real sesame seeds to the top bun pumpkin for an instant boost in realism.
41. Candy Corn Pumpkin
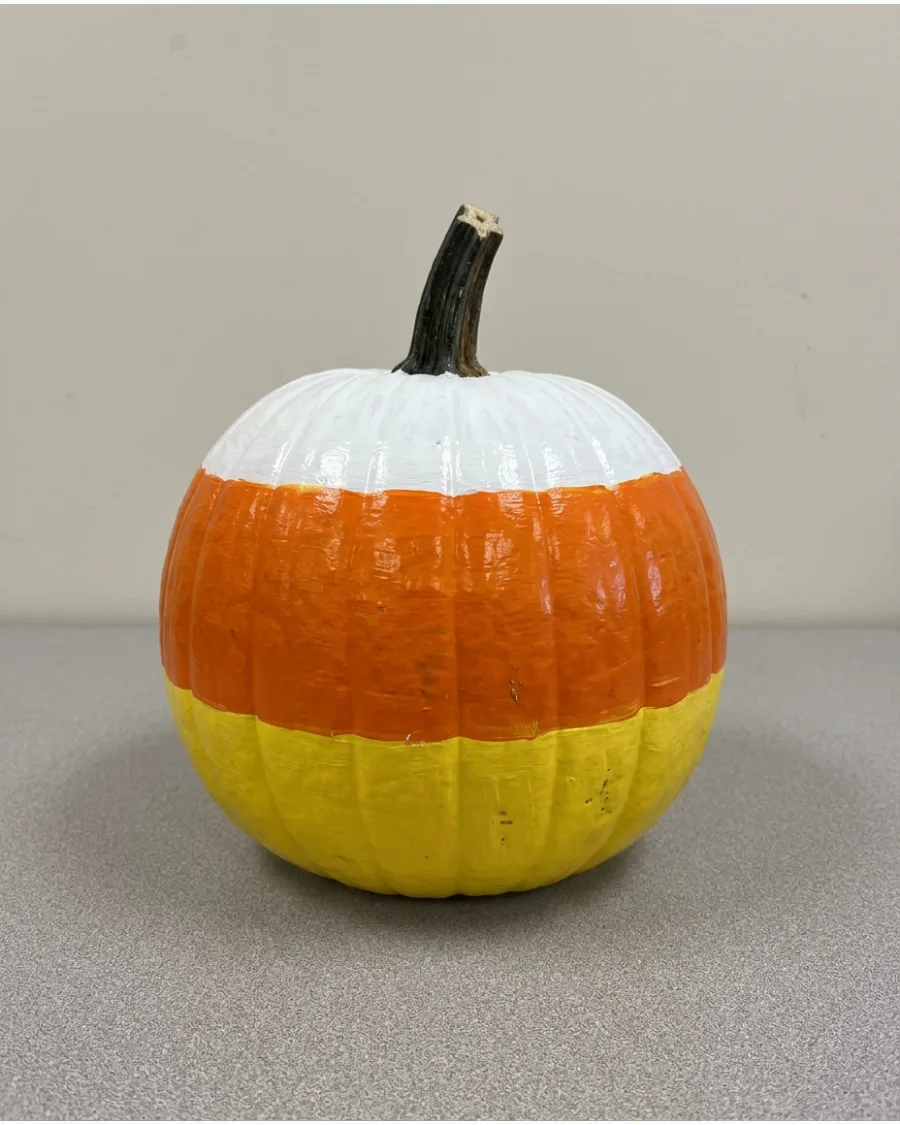
Three horizontal bands of white, orange, and yellow paint transform a standard pumpkin into a giant piece of candy. This design works because the bold colors are visible from across a room, making it a strong contender for a crowd-favorite award.
Use painter's tape to get crisp, straight lines between the color sections. A smooth, glossy finish helps the colors pop under fluorescent contest lighting.
- Buy white, orange, and yellow acrylic paint and a roll of painter's tape.
- Let each color section dry completely before taping off the next layer.
- Scale this up by using three different sized pumpkins stacked from largest to smallest.
Quick win: Start with a white pumpkin to skip the top layer of paint and save time.
42. Hot Cocoa Pumpkin
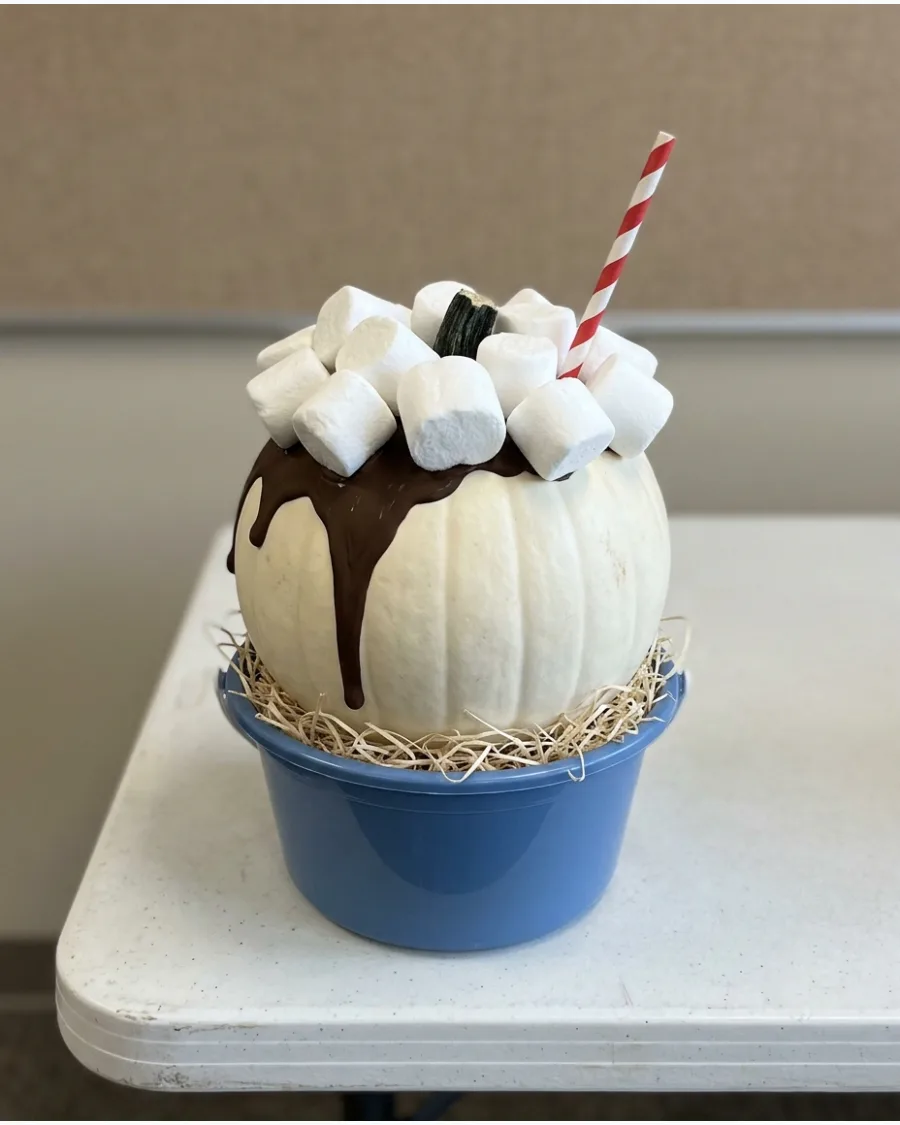
A white pumpkin serves as the froth inside a large bucket or basket decorated to look like a coffee mug. This 3D approach stands out because it moves beyond just paint and adds height to the display.
Glue large white cotton balls or foam cubes to the top to mimic oversized marshmallows. A cardboard handle attached to the side of the container completes the illusion.
- Find a large bucket or a round basket that fits the pumpkin's diameter.
- Use hot glue to secure the handle and the marshmallow decorations.
- Swap the blue mug for a red one to make it look like a classic holiday cocoa.
Best shortcut: Use a pool noodle painted brown for a sturdy, oversized mug handle.
43. Watermelon Pumpkin
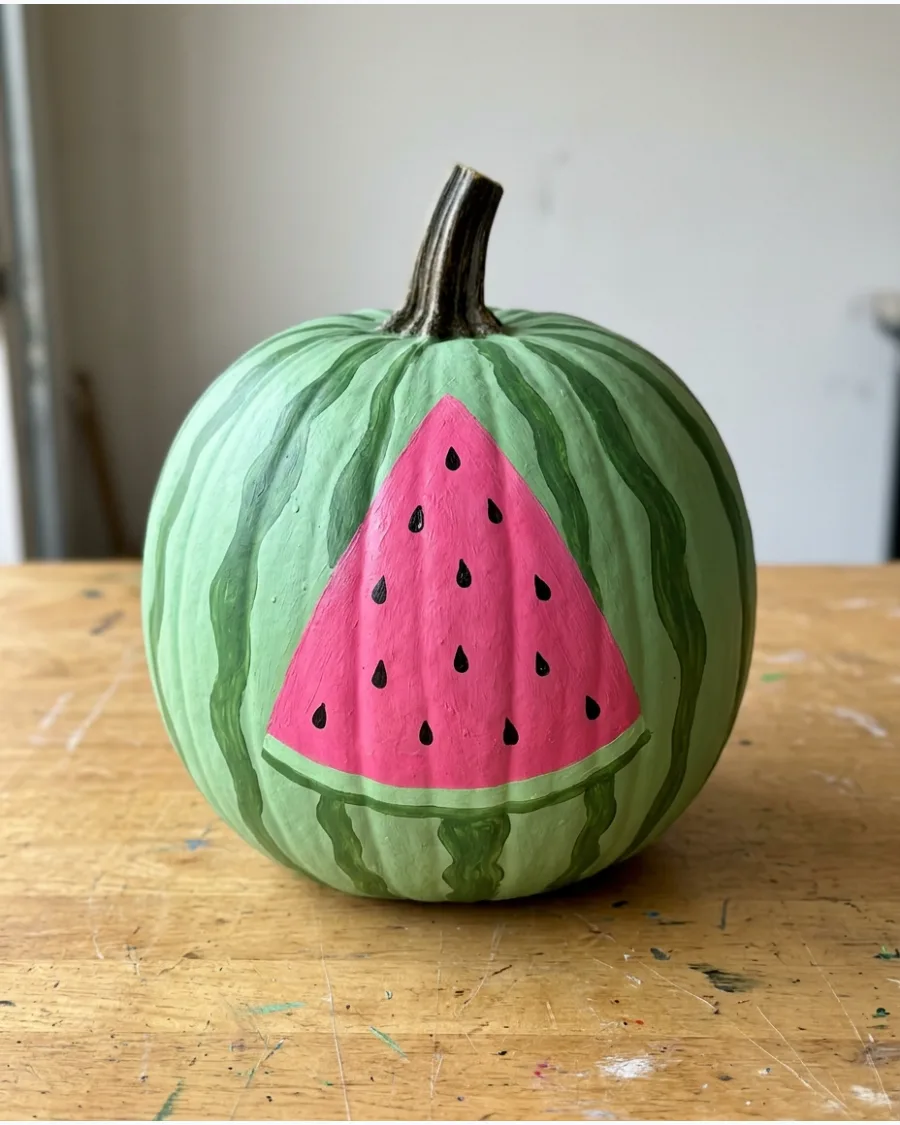
Painting a round pumpkin to look like a watermelon is an easy way to create a high-contrast entry. The dark green stripes against a lighter green base create a realistic texture that draws the eye.
Paint a small triangle on the front pink with black dots to show a slice of the fruit. This detail makes the design more interesting than a solid green fruit.
- Pick a very round, smooth pumpkin for the most realistic fruit shape.
- Use a sponge to dab on the light green paint for a mottled, natural look.
- Use outdoor-rated acrylics if the contest is held in a drafty or outdoor area.
Most people skip this: Add a coat of high-gloss sealer to give the watermelon a fresh, juicy appearance.
44. Taco Pumpkin
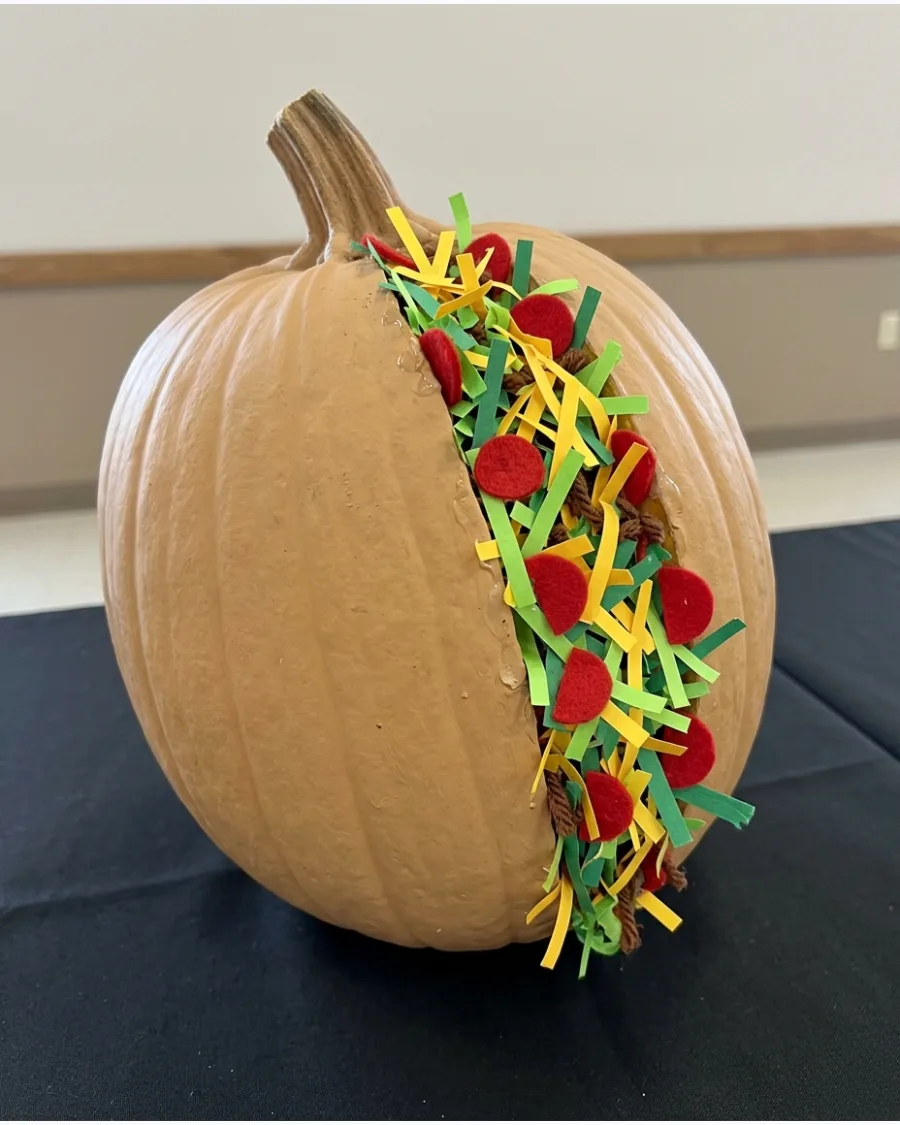
Turning a pumpkin on its side creates the perfect base for a giant taco shell. This transformation is a winner because it uses the natural shape of the pumpkin in an unexpected way.
Stuff the opening with shredded green paper and red pom-poms to represent lettuce and tomatoes. A cardboard base or a small stand is necessary to keep the pumpkin from rolling over.
- Use a flat or oblong pumpkin to make the taco shell look more authentic.
- Secure the toppings with plenty of tacky glue so they do not fall off during transport.
- Paint small brown spots on the shell to mimic toasted tortilla marks.
Quick win: Use yellow yarn to create realistic-looking shredded cheese that won't wilt.
Spooky Pumpkin Decorating Ideas
45. Mummy Pumpkin
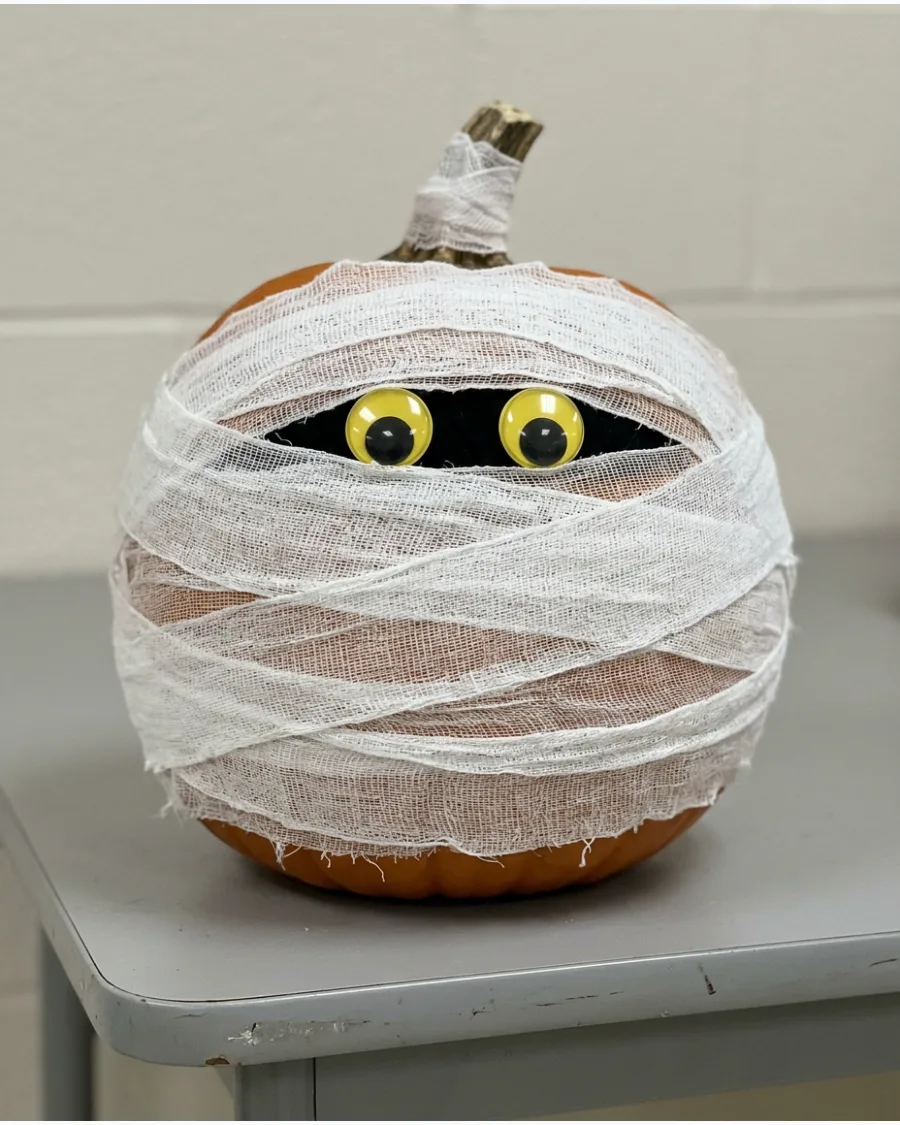
Wrapping a pumpkin in gauze is a fast, no-mess project that still looks impressive on a contest table. The texture of the fabric creates a 3D effect that paint alone cannot match.
Leave a narrow gap in the center of the wraps and glue two large yellow eyes inside. This creates a peeking effect that adds personality to the character.
- Buy several rolls of standard medical gauze or cheesecloth for a realistic texture.
- Use a few dots of hot glue to keep the ends of the gauze from unraveling.
- Dip the gauze in tea or coffee before wrapping to give the mummy an aged look.
Best shortcut: Use self-adhesive athletic wrap to make the bandaging process even faster.
46. Giant Eyeball Pumpkin
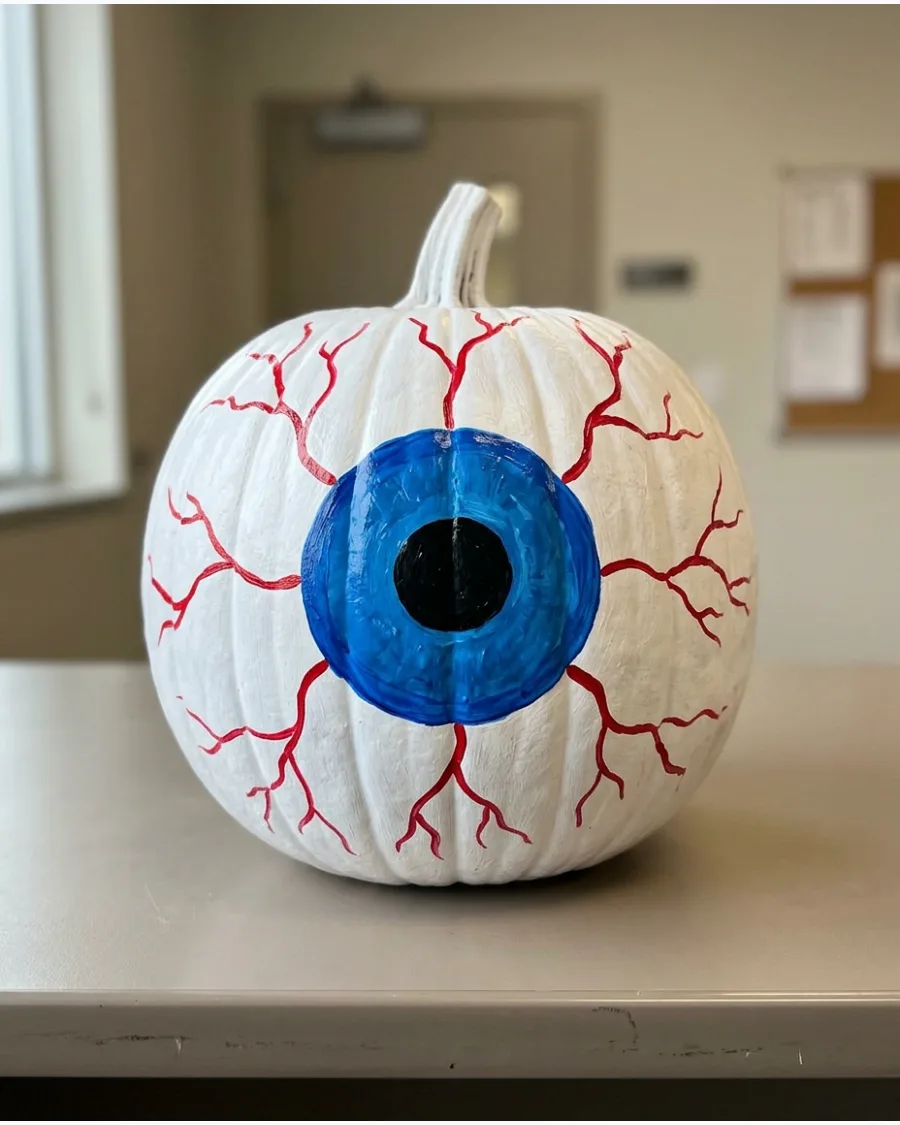
A white-painted pumpkin makes a perfect canvas for a giant, bloodshot eyeball. This design is high-impact because it is simple but very creepy when executed with detail.
Use a fine-tip brush or a red paint pen to draw thin, squiggly veins branching out from the iris. Focusing the detail on the center iris makes the eye look like it is following the judges.
- Start with a white Lumina pumpkin to save time on the base coat.
- Use a bowl or a compass to trace a perfect circle for the iris.
- Layer different shades of blue or green in the iris to give the eye more depth.
Most people skip this: Add a thick layer of clear gloss over the iris only to make it look wet and realistic.
47. Spiderweb Pumpkin
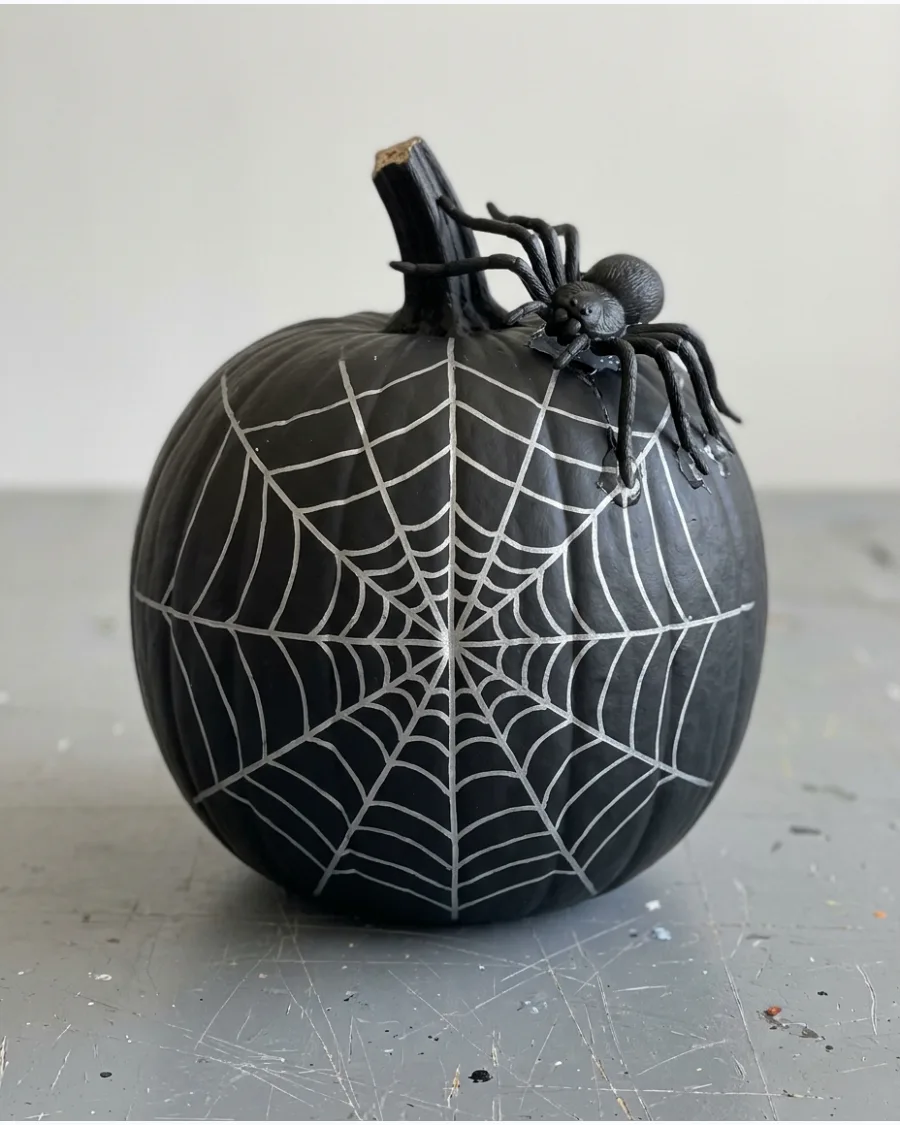
A matte black background makes a silver or white spiderweb design stand out brilliantly. This is a sophisticated look that works well for office or adult-level contests.
Glue a single, oversized plastic spider near the stem to act as the focal point of the web. The contrast between the dark pumpkin and the metallic web creates a sharp, clean aesthetic.
- Use matte spray paint for the base to ensure the silver pen does not smear.
- Follow the natural ribs of the pumpkin to guide your vertical web lines.
- Choose a spider that is proportional to the pumpkin size.
Quick win: Use a silver metallic Sharpie for the most control when drawing the intricate web lines.
48. Ghost Pumpkin Family
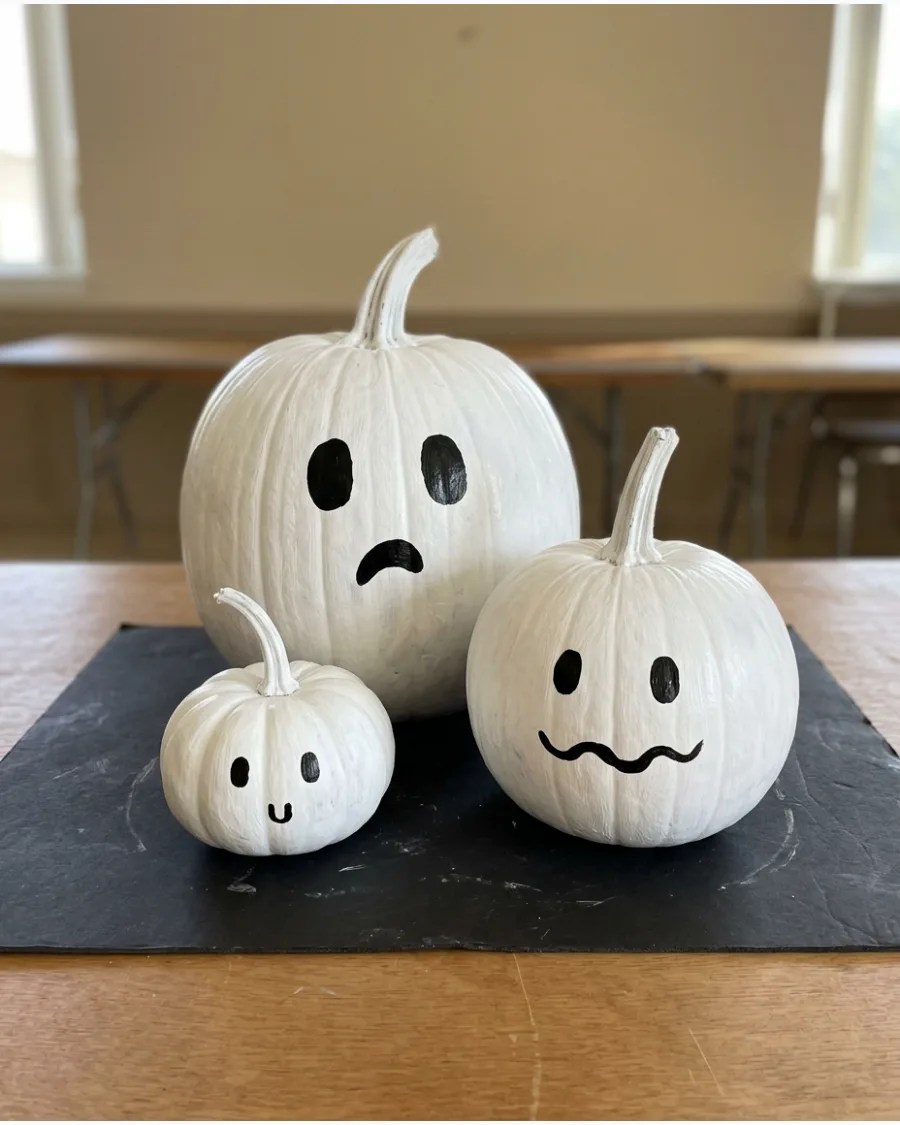
Using a group of pumpkins instead of just one creates a scene that often scores higher in contests.
Painting them all solid white with black faces gives the display a unified, spooky look. Give each ghost a different mouth shape—like an O for surprised or a wavy line for moaning. Varying the sizes of the pumpkins makes the family look more natural.
- Look for pumpkins with irregular shapes to give the ghosts more character.
- Use a matte white paint to avoid a plastic look and make them appear more ethereal.
- Arrange them on a piece of black fabric to make the white pumpkins pop.
Best shortcut: Use black felt cutouts for the faces instead of paint to avoid drips and keep edges sharp.
49. Witch Pumpkin
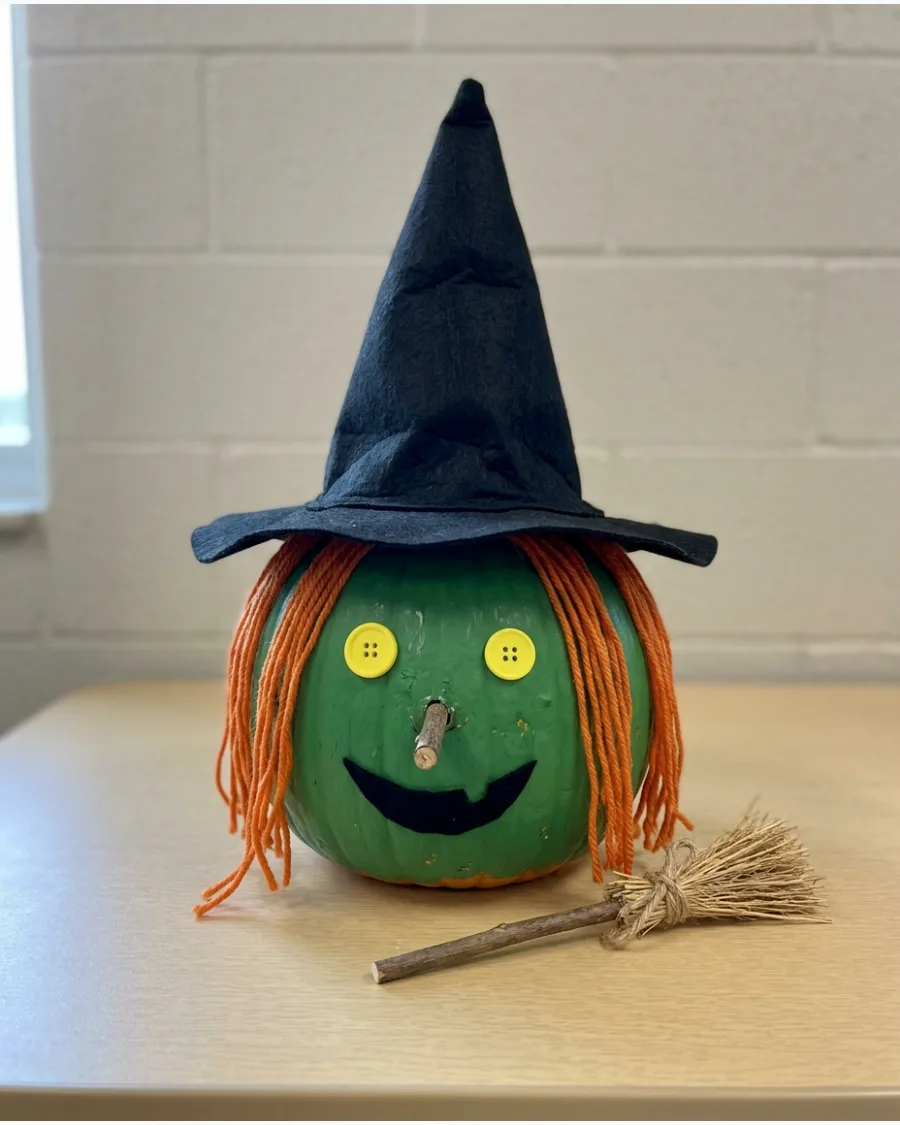
A green-painted pumpkin with a pointed hat is a classic contest entry that never goes out of style. Adding 3D elements like yarn hair and a prosthetic nose makes the design more memorable.
Position a miniature broom leaning against the side of the pumpkin to ground the character in a scene. The more accessories you add, the more complete the entry feels to judges.
- Use a bright lime green for a wicked look or a muted moss green for a traditional witch.
- Secure the hat with pins or hot glue so it does not fall off during the contest.
- Add warts using drops of hot glue painted green before applying the base coat.
Most people skip this: Use a purple or orange ribbon on the hat to add a splash of coordinating color.
50. Vampire Pumpkin
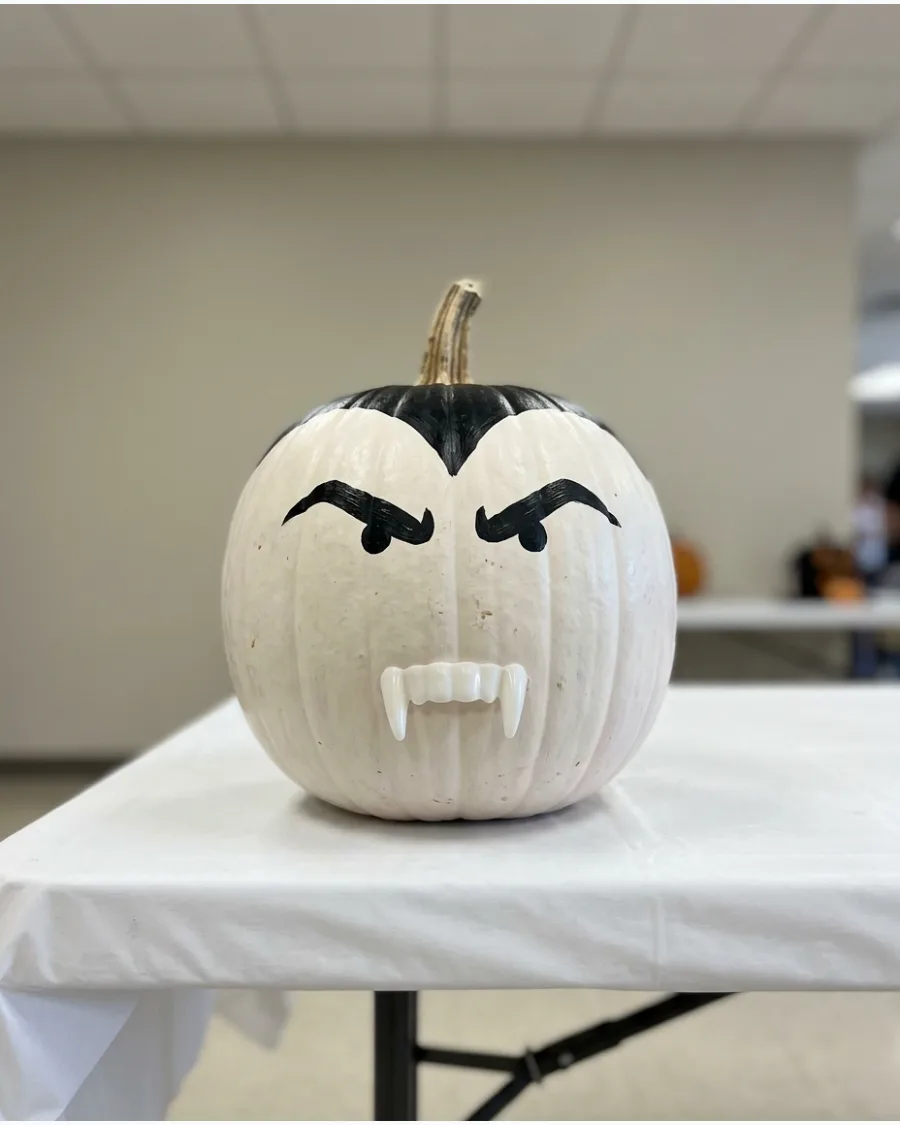
A vampire pumpkin uses sharp lines and a high-contrast color palette of black, white, and red. The key to this look is the widow's peak hairline painted at the top.
Insert two white plastic vampire fangs into a carved mouth or glue them to the front for a 3D effect. A simple red fabric cape tied around the base adds a dramatic finishing touch.
- Use a very pale gray or off-white paint for the skin to make the vampire look undead.
- Draw the eyes with a slight upward slant for a more menacing expression.
- If using plastic fangs, cut a small slit in the pumpkin skin to tuck them in securely.
Quick win: Use a red paint pen to add a single drop of blood coming from one of the fangs.
51. Zombie Pumpkin
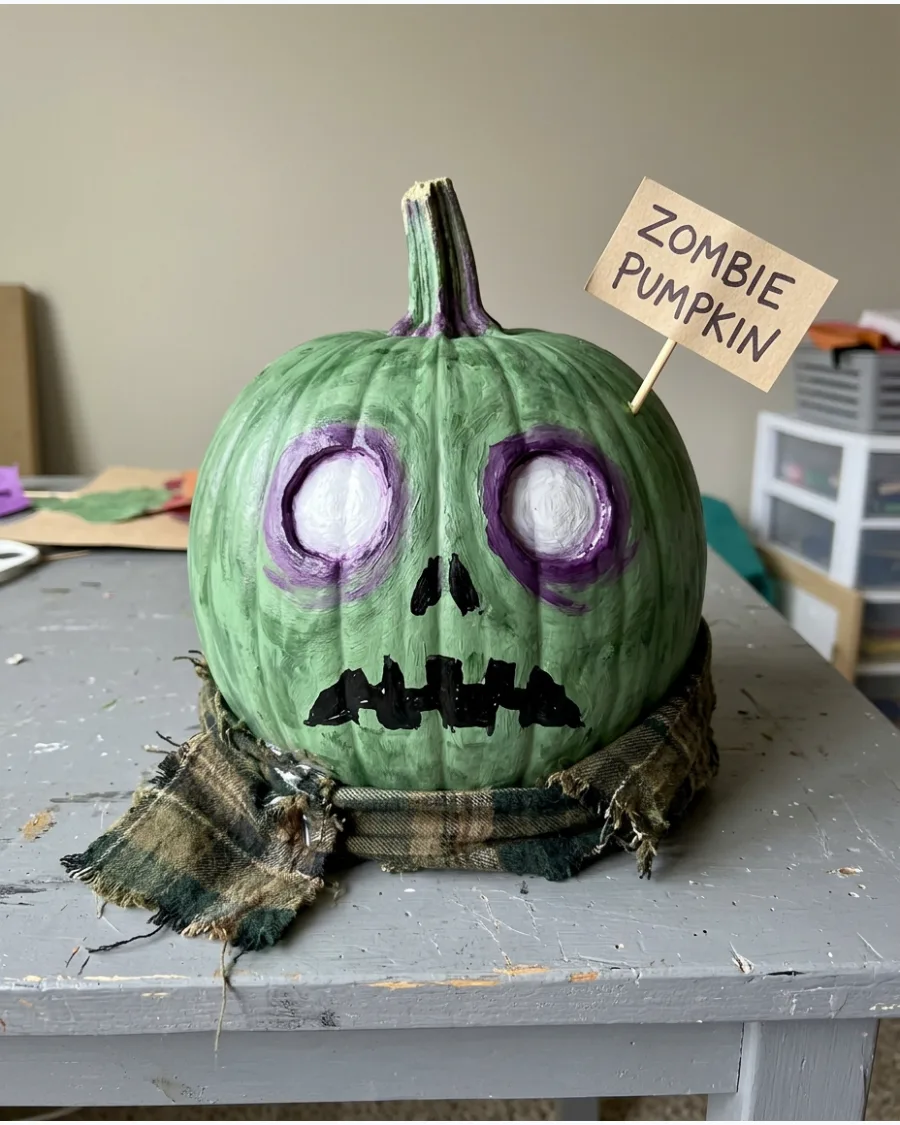
Use green, gray, and purple paint to create a cartoon zombie face on a medium-sized pumpkin. Add torn fabric clothing around the base and a handmade sign for a humorous touch.
Adding a small cardboard sign with a funny phrase like Brain Food makes the entry more memorable for judges.
- Buy affordable acrylic paints and scrap fabric at a local craft store.
- Layer the colors while the paint is wet to create a bruised, decaying skin effect.
- Store the finished project in a cool, dry spot to prevent the fabric from getting damp.
Quick win: Use a sponge instead of a brush to dab on the green and gray paint for a realistic, mottled skin texture.
52. Skeleton Pumpkin
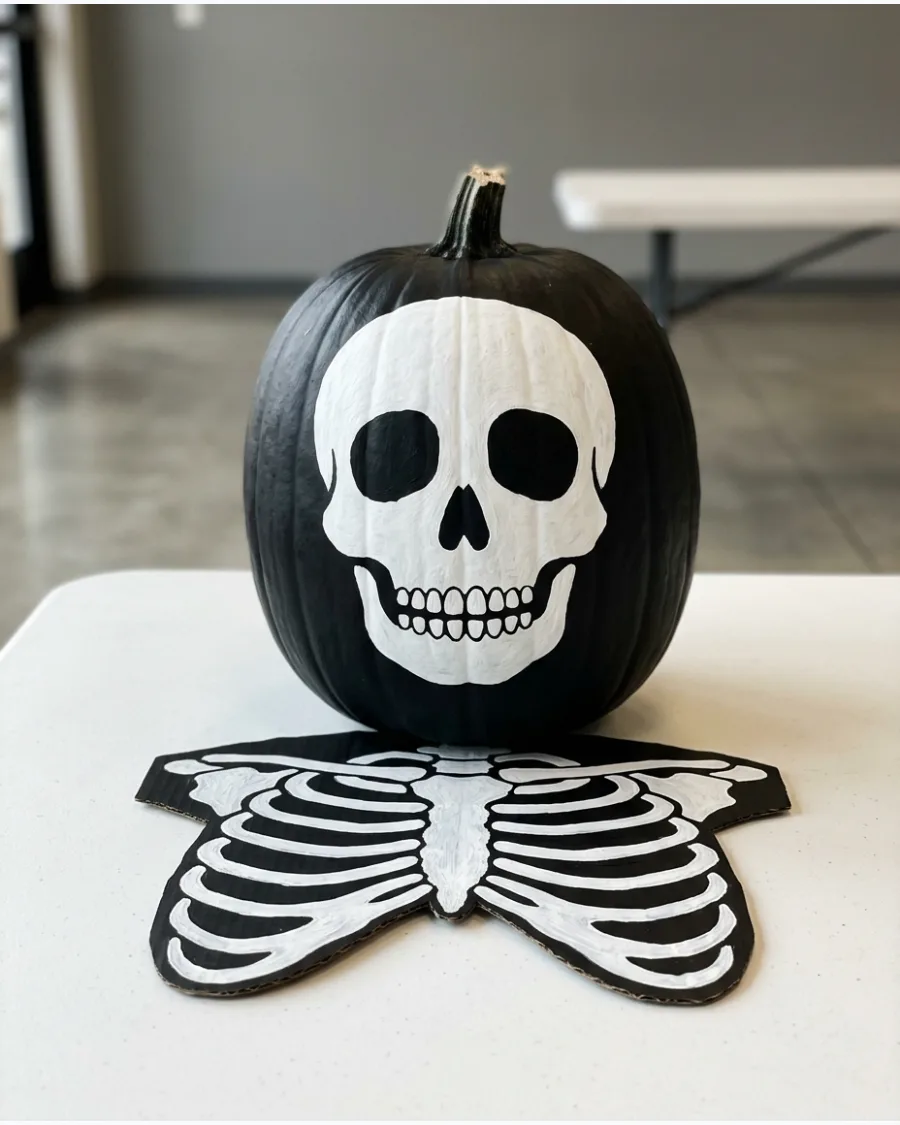
Paint a detailed white skull face onto a black pumpkin to create a high-contrast look. Extend the design onto a cardboard body so it appears to be a complete skeleton standing on the table.
Using a matte black spray paint base helps the white skull features pop from across the room.
- Pick up matte black spray paint and a white paint pen for sharp lines.
- Sketch the skull outline with a pencil before filling it in with white paint.
- Use heavy-duty tape to secure the pumpkin to the cardboard base for safe transport.
Best shortcut: A white paint marker provides much better control for the fine lines of the teeth than a traditional paintbrush.
53. Haunted House Pumpkin
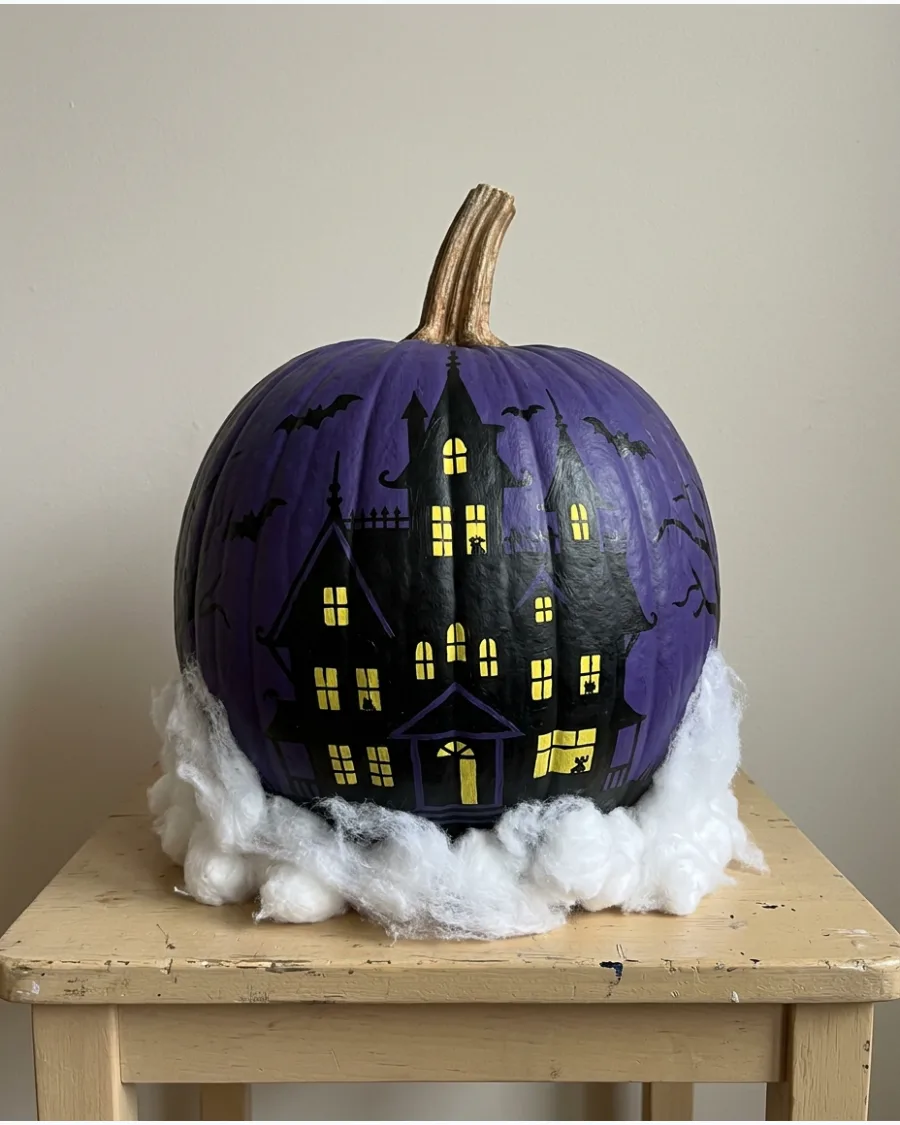
Paint a spooky mansion silhouette around the entire pumpkin and add glowing yellow windows for depth. Surround the base with miniature trees, tombstones, and cotton fog to create a full scene.
The secret to winning is creating a 360-degree scene that looks good from every angle.
- Look for miniature dollhouse trees or graveyard accessories at a hobby shop.
- Use a hot glue gun to attach the cotton fog so it stays in place during judging.
- This design works best on a tall, narrow pumpkin that mimics a house shape.
Most people skip this: Paint the pumpkin stem black or dark brown so it blends into the roofline of the haunted house.
54. Monster With Tentacles Pumpkin
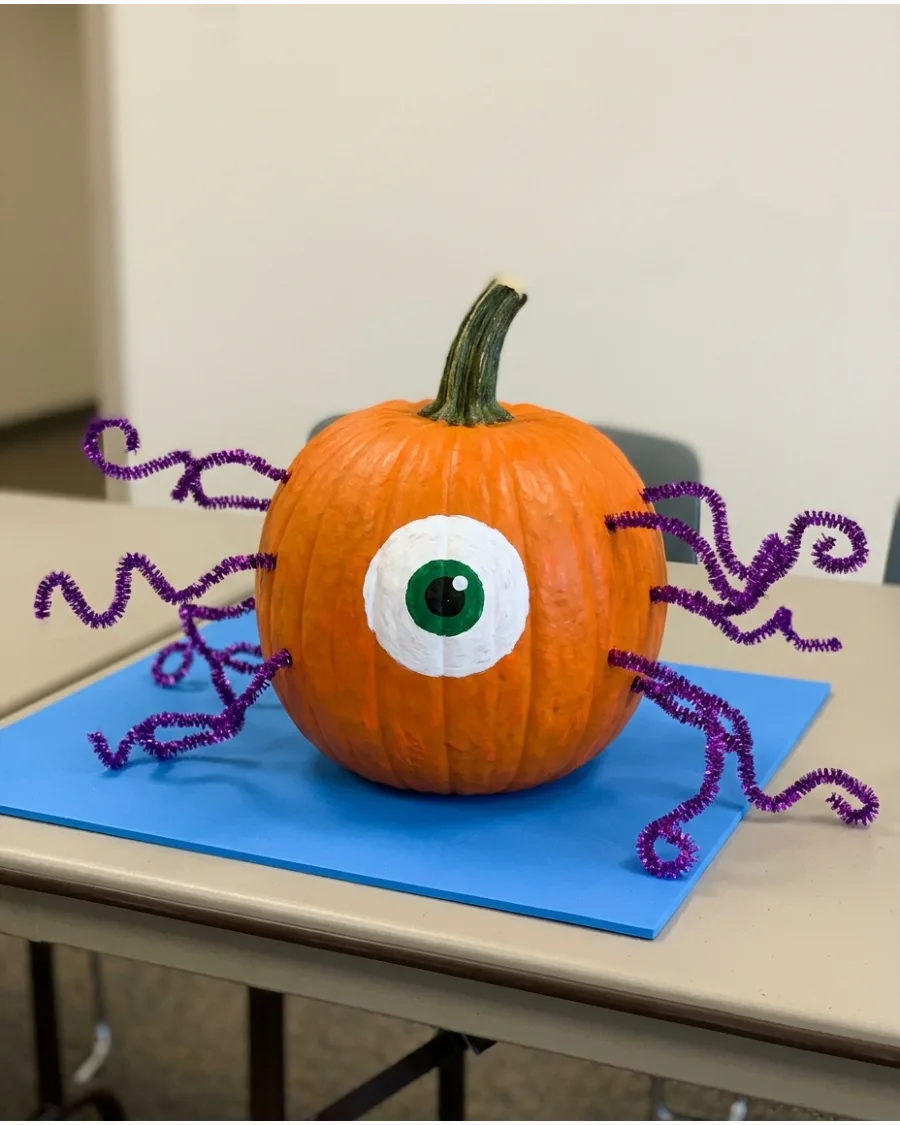
Give the pumpkin one giant eye, sharp painted teeth, and several flexible tentacles made from craft materials. Position the tentacles so they appear to crawl across the display table for a 3D effect.
Pool noodles or wired tinsel garlands make excellent, lightweight tentacles that are easy to shape.
- Use thick wire or pipe cleaners inside foam tubes to make the tentacles poseable.
- A glossy finish on the eye makes the monster look more lifelike and creepy.
- Ensure the tentacles are balanced on both sides so the pumpkin does not tip over.
Quick win: Use a clear coat of glossy Mod Podge just on the eyeball to give it a wet, realistic look.
55. Pumpkin Cemetery Scene
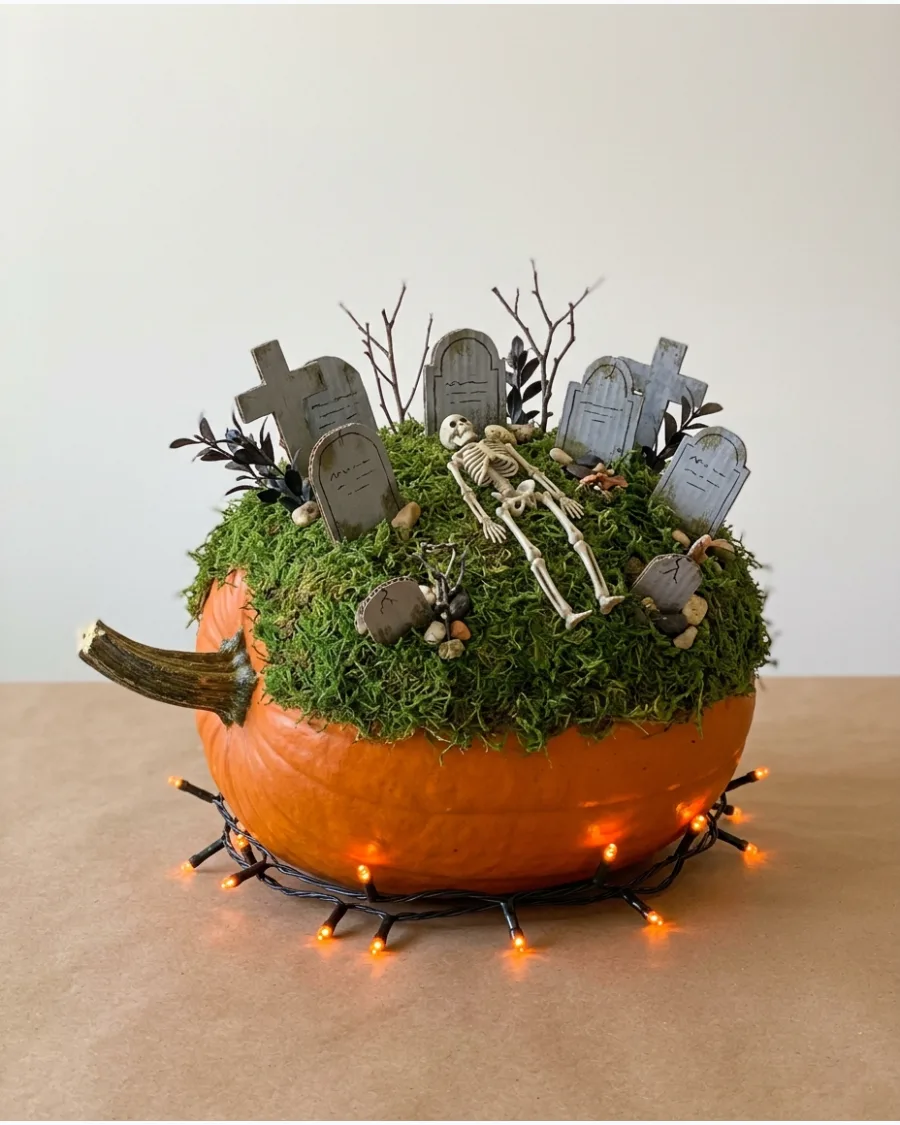
Use the pumpkin as a hill and decorate the surface with miniature tombstones, bare trees, and tiny ghosts. Add moss and battery-operated lights around the base to create an eerie glow.
Turning the pumpkin on its side creates a wider landscape for a more detailed graveyard display.
- Sourcing craft moss and miniature figurines from a hobby shop is the easiest way to start.
- Use a low-temp glue gun to avoid melting plastic figurines or damaging the pumpkin skin.
- Hide the battery pack for the lights behind the back of the pumpkin for a clean look.
Best shortcut: Use gray foam sheets to cut out tombstones; they are lightweight and easy to stick into the pumpkin skin.
Funny Pumpkin Decorating Ideas
56. Spa Day Pumpkin
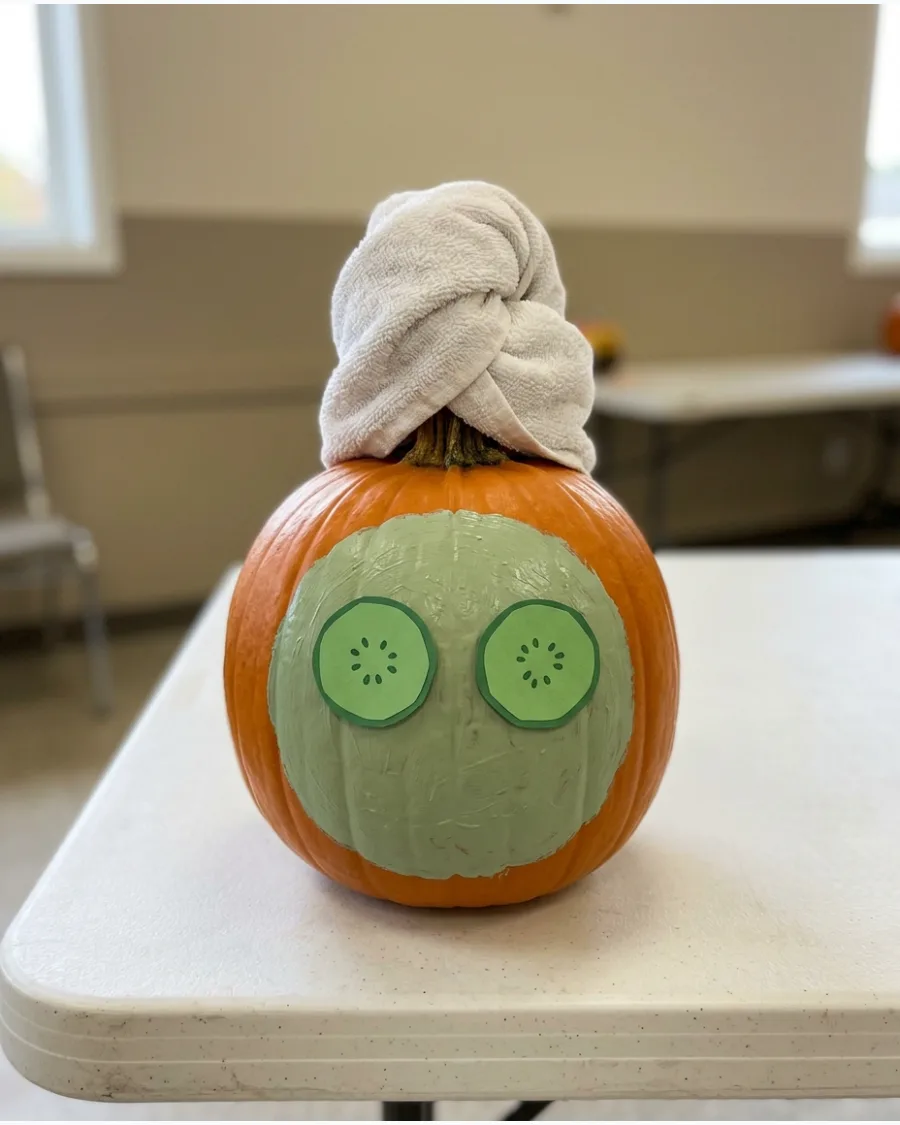
Paint a green face mask on the pumpkin and add faux cucumber slices over its eyes for a relaxed look. Wrap a small towel around the stem and include miniature beauty accessories on the table.
Using a real hand towel for the hair wrap adds a 3D element that judges love to see.
- Use a small white washcloth and a rubber band to secure the turban to the stem.
- Paint the mask with a matte finish to look like real drying facial clay.
- Place a small nail polish bottle or a makeup brush next to the pumpkin on the table.
Quick win: Use actual dried cucumber slices for a more realistic look, but replace them the morning of the contest.
57. Pumpkin Taking a Selfie
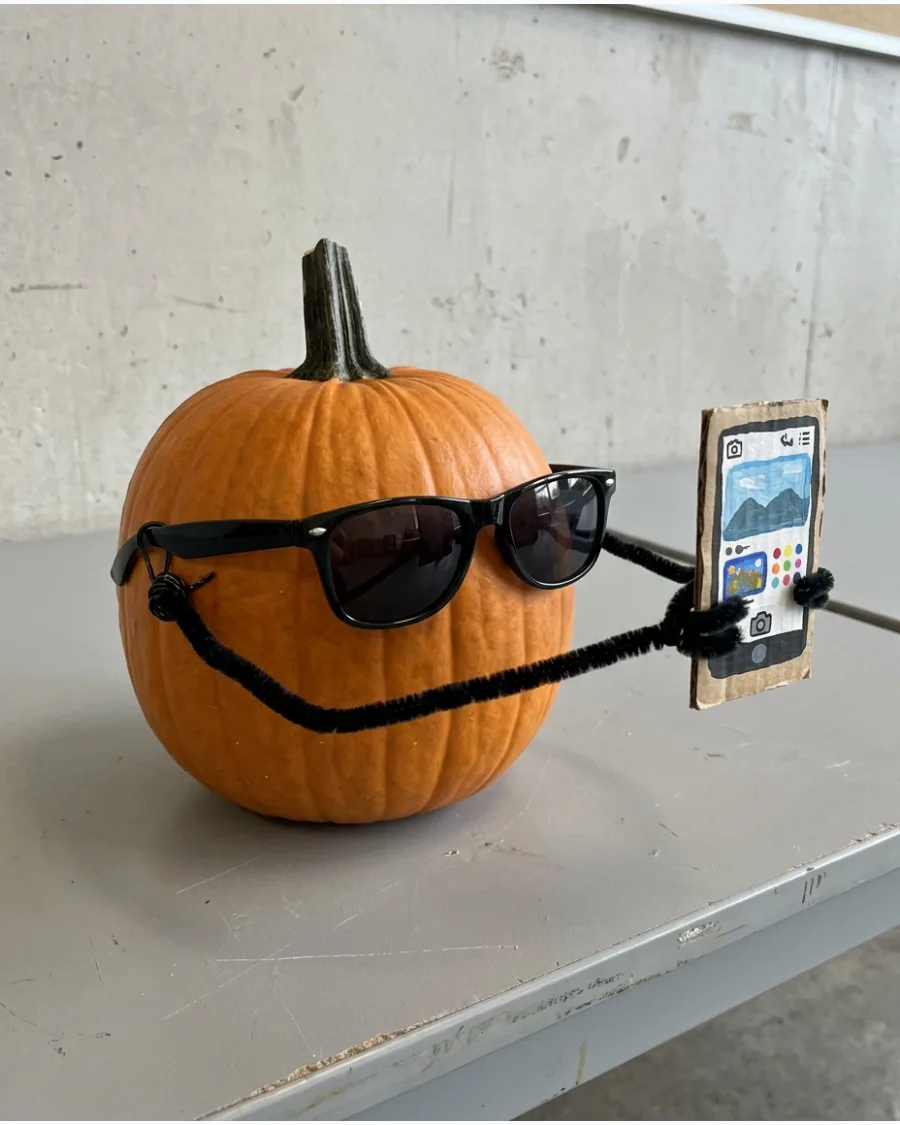
Give the pumpkin arms, sunglasses, and a small cardboard phone to create a modern character. Pose it in front of a miniature photo backdrop for a funny, relatable contest entry.
Bent coat hangers covered in fabric or felt make sturdy arms that can hold a lightweight cardboard phone.
- Print out a tiny screen image from a computer to glue onto the cardboard phone.
- Use a standard pair of adult sunglasses as they usually fit a medium pumpkin perfectly.
- Secure the arms by poking the wire ends directly into the pumpkin flesh for stability.
Most people skip this: Angle the pumpkin slightly so it looks like it is actually looking into the phone camera.
58. Grumpy Morning Pumpkin
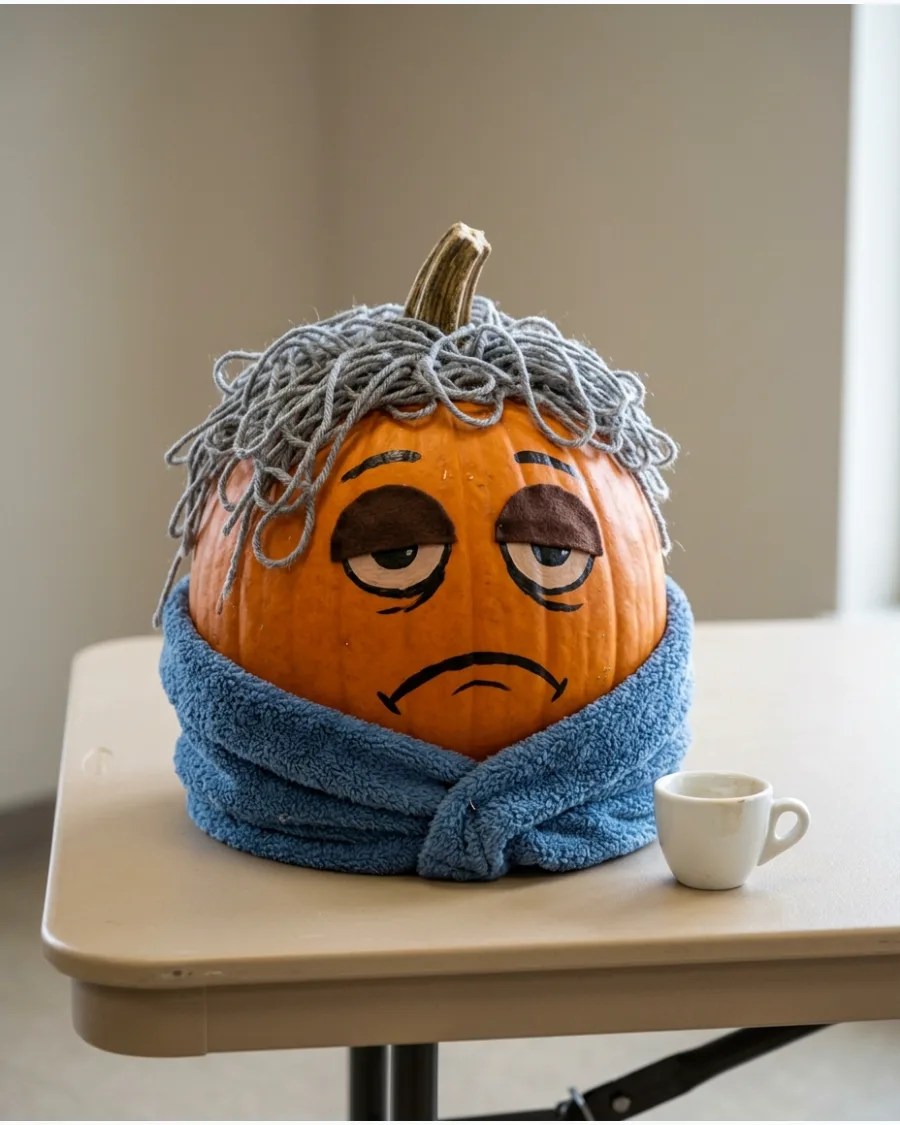
Add messy yarn hair, sleepy eyes, and a fabric robe around the pumpkin to capture a morning mood. Place a miniature coffee mug beside it with a humorous sign about needing caffeine.
Messy, tangled yarn creates the perfect bedhead look for this grumpy character.
- Use hot glue to attach the yarn hair in random directions for a chaotic look.
- A small piece of fleece or flannel fabric works best for the robe material.
- Write a phrase like Needs Coffee on a small scrap of paper and prop it against the mug.
Best shortcut: Use an old, clean sock with the toe cut off as a quick and easy robe for a smaller pumpkin.
59. Pumpkin in Disguise
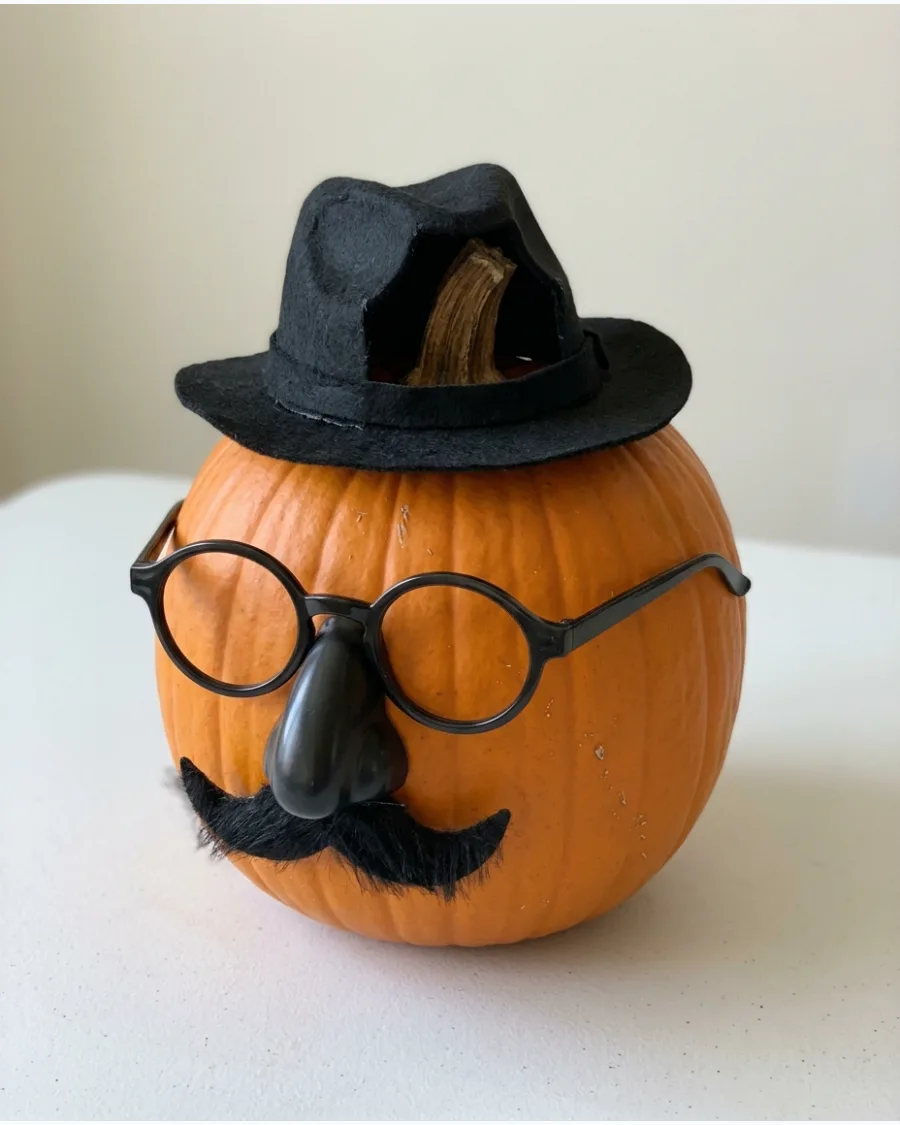
Give the pumpkin oversized glasses, a fake nose, eyebrows, and a mustache for a classic look. Add a tiny hat to the stem to complete the funny disguise.
The classic Groucho Marx glasses set is an instant crowd-pleaser and requires almost no extra work.
- Buy a nose and glasses disguise kit at a party supply or craft store.
- If the glasses will not stay on, use a clear rubber band around the back of the pumpkin.
- This idea works best on a tall, oval pumpkin that mimics a human face shape.
Quick win: Use a bit of double-sided tape on the bridge of the plastic nose to keep the disguise from sliding down.
60. Crazy Hair Day Pumpkin
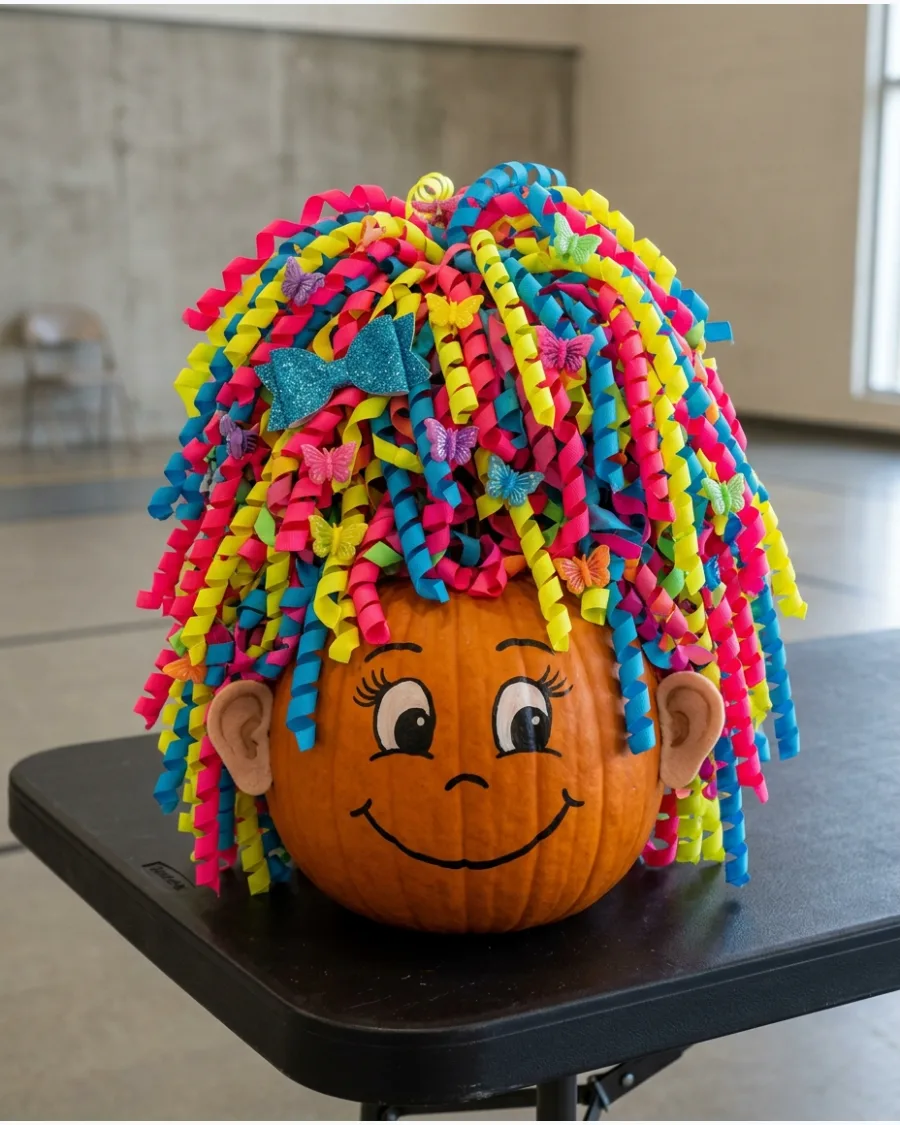
Create an enormous hairstyle using colorful yarn, pipe cleaners, ribbons, or curled paper. Add clips, bows, and miniature accessories throughout the hair for extra detail.
Using bright, neon colors for the hair ensures the entry will stand out in a crowded contest room.
- Use a mix of different textures like stiff pipe cleaners and soft yarn for visual interest.
- Secure the hair to a cardboard circle first, then glue the circle to the top of the pumpkin.
- Add a few stray ribbons trailing down the sides to give the hair more volume and movement.
Most people skip this: Use a curling ribbon and a pair of scissors to create bouncy spirals that give the hair more height.
61. Pumpkin Eating Candy
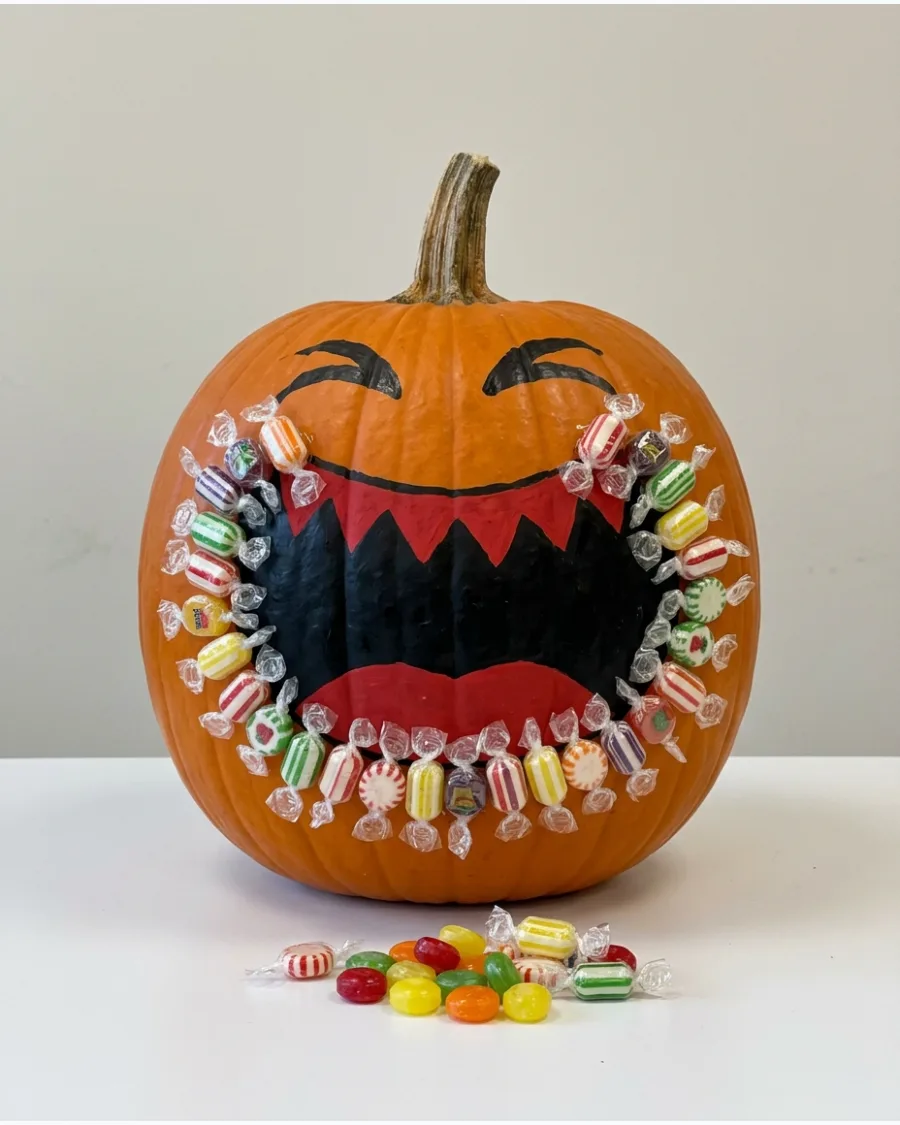
Paint a wide, gaping mouth on a large pumpkin and fill the opening with real wrapped candies. Glue a few pieces to the chin and scatter a handful across the table to create a messy, greedy look.
Hot glue the candy wrappers directly to the painted surface to ensure they do not slide off during transport. Use contrasting paint colors like bright red for the mouth to make it pop against the orange skin.
- Use leftover trick-or-treat candy or bulk bags from a craft store.
- Wipe the pumpkin with rubbing alcohol first so the paint and glue stick better.
- Swap the candy for plastic bugs or fake gold coins for a different theme.
Quick win: Use a mix of shiny foil wrappers to catch the judges' eyes under bright room lights.
62. Construction Worker Pumpkin
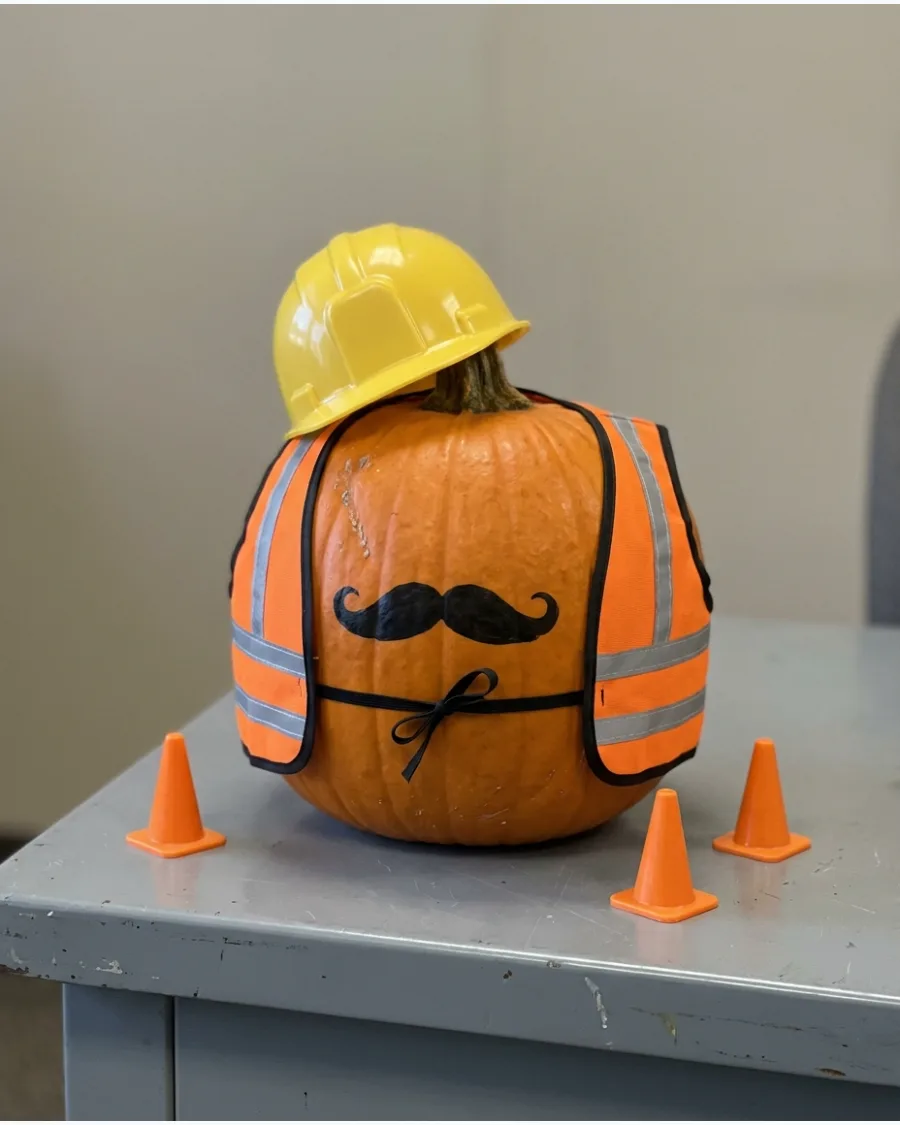
Transform a pumpkin into a site foreman by adding a classic yellow hard hat and a bright orange safety vest. Paint a thick, bushy mustache and place two small black circles for eyes to give it personality.
Arrange a set of miniature orange traffic cones and a toy bulldozer around the base to build a complete scene. This setup works best with a medium-sized pumpkin that fits the scale of the accessories.
- Buy a toy construction set for the most realistic-looking mini tools.
- Secure the hard hat with a few dots of clear adhesive or double-sided tape.
- Use a neon orange pumpkin if you want to match the safety theme perfectly.
Most people skip this: Tape a small "Under Construction" sign to the pumpkin's side for extra storytelling.
63. Pumpkin Tourist
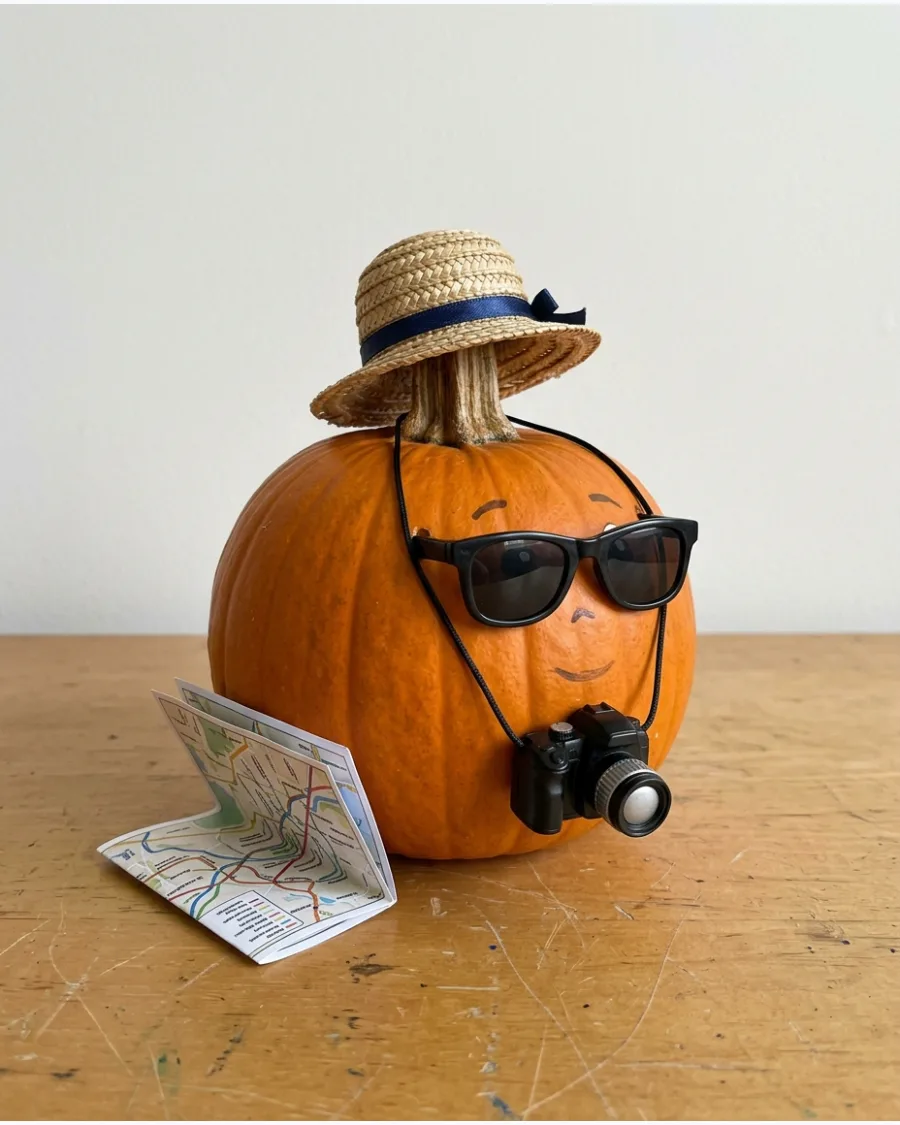
Give a pumpkin the ultimate vacation look with a straw sun hat, dark sunglasses, and a miniature camera strap around its neck. Scatter small postcards or a folded paper map at the base to suggest it is traveling through the contest.
Use a dab of blue painter's tape on the back of the sunglasses to hold them steady on the pumpkin's slippery surface. This design is great for people who want a high-impact look without using any paint.
- Look for doll-sized accessories or pet-sized hats for the perfect fit.
- Prop the pumpkin up on a small box if it needs help showing off the camera.
- Add a miniature passport made of folded blue cardstock to the display.
Best shortcut: Use a real Hawaiian shirt draped around the base to act as a colorful tablecloth for the entry.
64. Pumpkin Weather Reporter
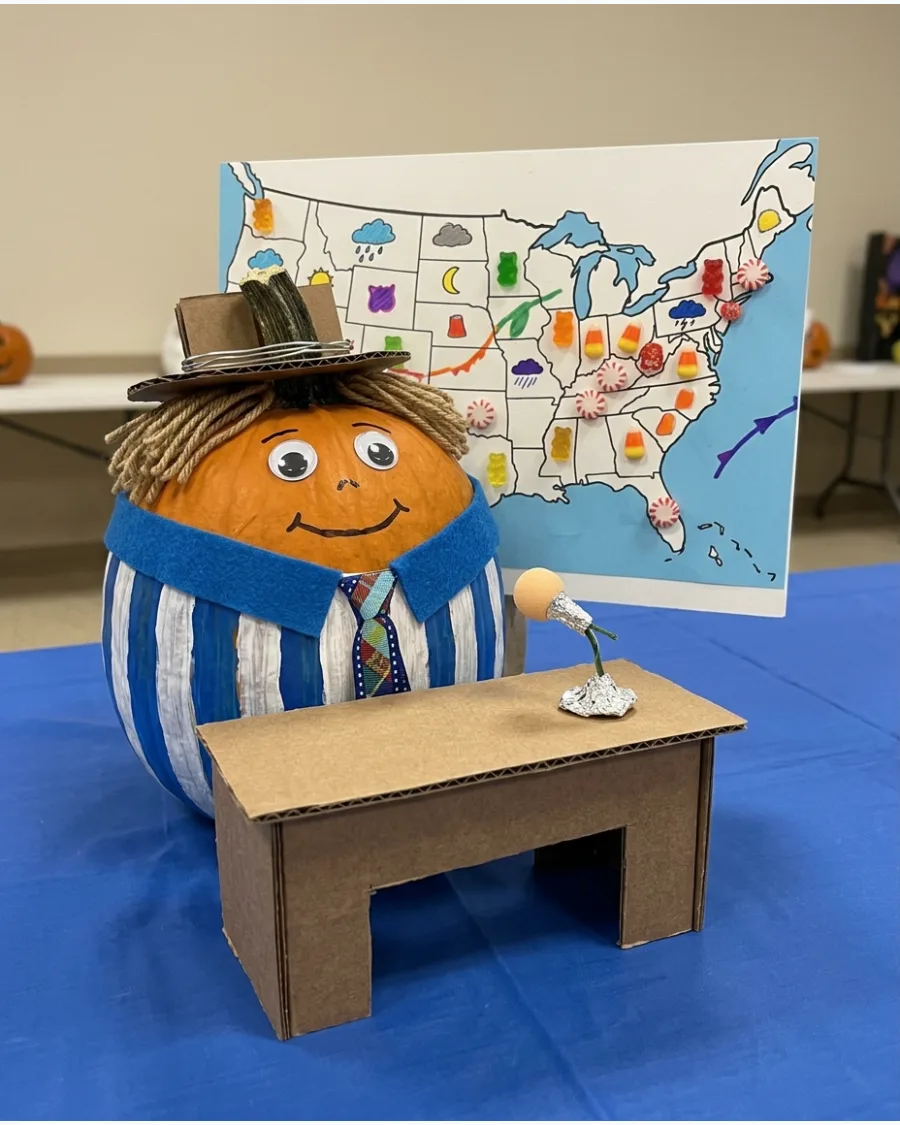
Set up a pumpkin behind a small cardboard rectangle painted to look like a news desk. Attach a small black bead or a rolled piece of felt to a toothpick to serve as a microphone.
Draw a candy forecast map on a piece of cardstock behind the pumpkin featuring clouds and falling lollipops. This interactive scene draws people in to read the funny weather details.
- Use thick cardboard for the desk so it does not tip over.
- Paint a small news logo on the front of the desk for a professional touch.
- Use a white pumpkin to represent a snow reporter if the contest is late in the season.
Quick win: Print a real weather map and glue small candy cutouts over it for a faster setup.
65. Pumpkin Chef
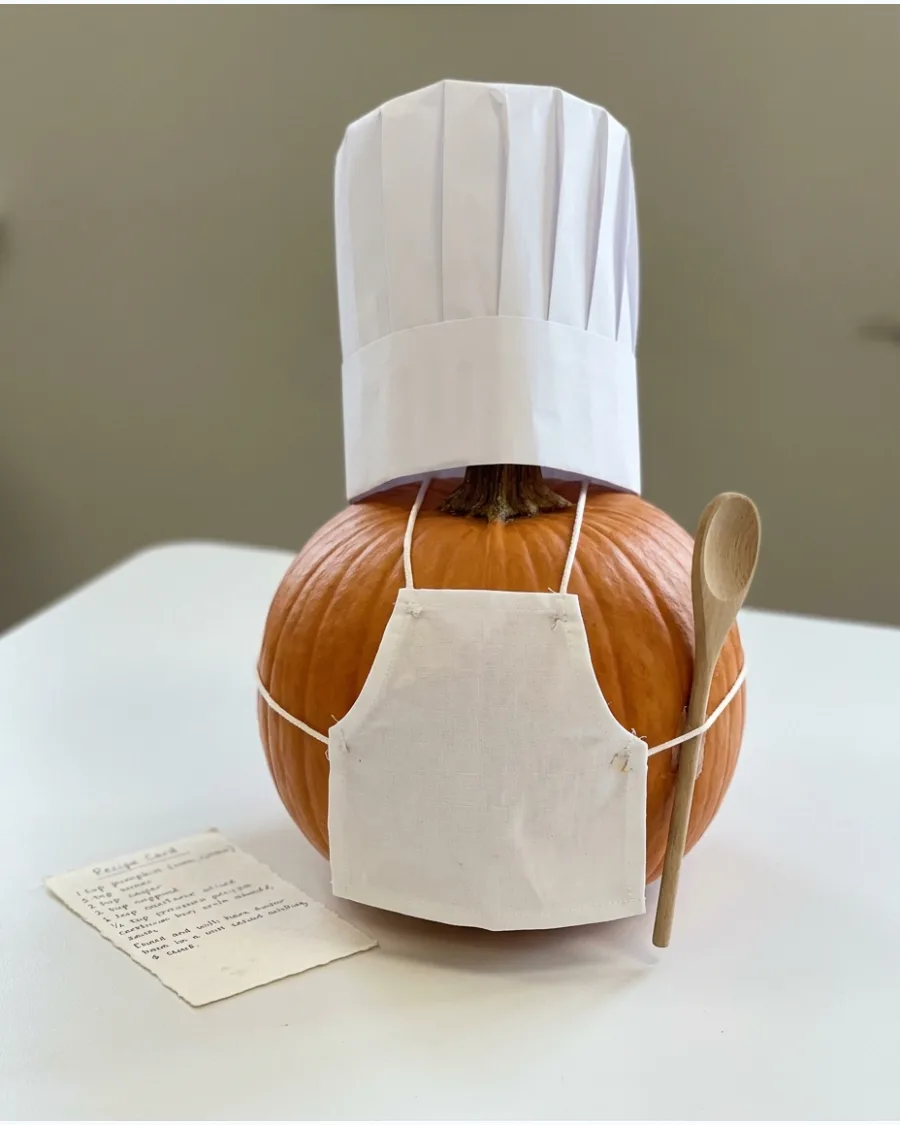
Top a pumpkin with a tall white chef's hat and add a thin, curled mustache using black pipe cleaners. Place a miniature apron around the middle and set a small wooden spoon or whisk next to it.
Write a spooky soup recipe on a tiny index card and prop it up against the pumpkin. The contrast of the white hat against the orange pumpkin makes it stand out from across the room.
- Paper chef hats are easy to find at party supply stores or can be made from cardstock.
- Use a white pumpkin for a pastry chef look.
- Glue a few dried pasta shapes to the apron for a messy kitchen effect.
Most people skip this: Dust a little real flour on the table around the pumpkin to finish the scene.
66. Pumpkin Office Worker
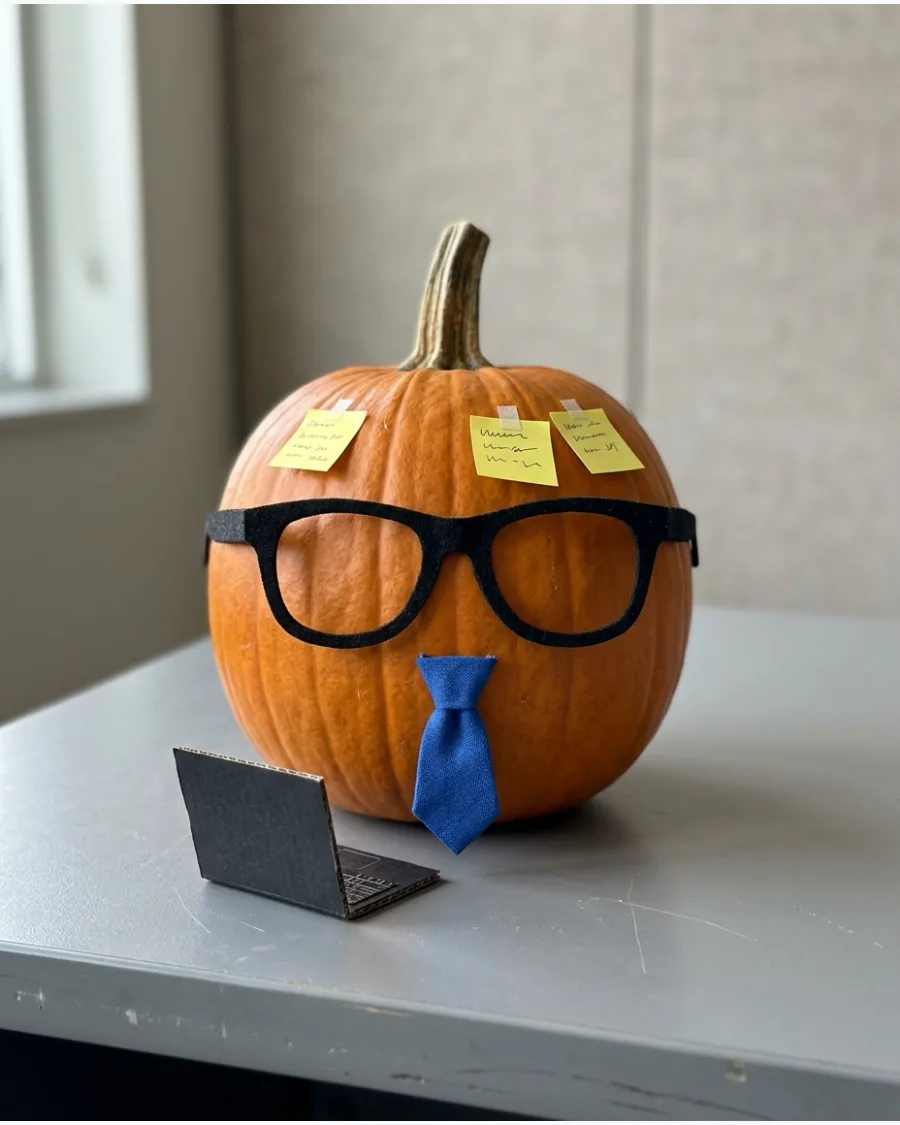
Give a pumpkin a professional makeover with a pair of reading glasses and a small clip-on tie. Place a miniature laptop made of folded black cardstock in front of it to complete the workspace.
Stick several tiny colorful sticky notes all over the pumpkin with funny to-do items like buy more seeds. This relatable design usually gets a lot of laughs in office-themed contests.
- Use old glasses or cheap frames from a dollar store.
- Secure the tie with a small safety pin or a bit of hot glue under the collar.
- Add a miniature coffee cup made from a white bottle cap.
Best shortcut: Use a real computer keyboard as the base for the pumpkin to sit on.
Fantasy and Magical Pumpkin Ideas
67. Unicorn Pumpkin
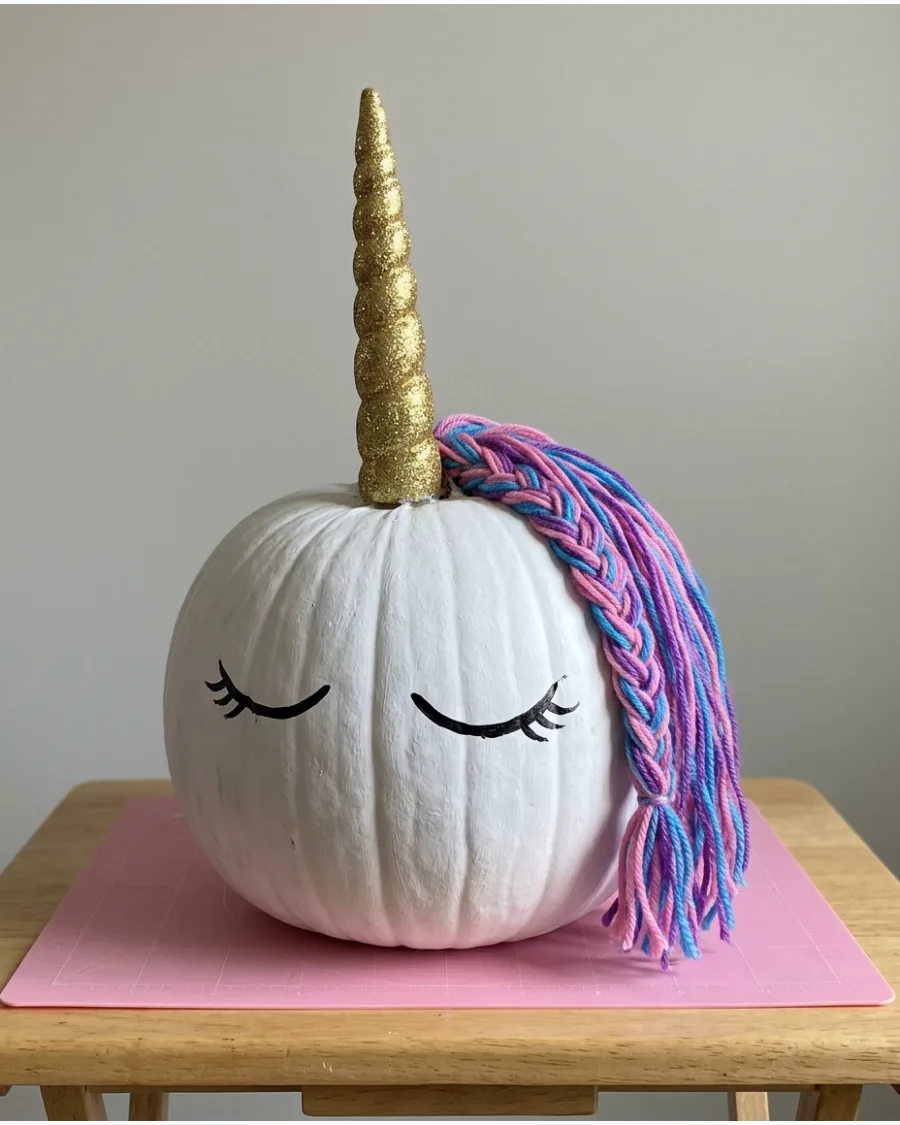
Paint a pumpkin solid white and attach a gold glittery horn to the top near the stem. Use pastel-colored yarn or ribbon to create a flowing mane that drapes down one side.
Draw two simple closed eyelashes with a black marker to give the unicorn a sleepy, magical expression. This design is a favorite for school contests because of its bright colors and clean look.
- Use a foam cone covered in glitter for a sturdy, lightweight horn.
- Acrylic paint works best for a smooth, matte white finish.
- Add a few stick-on rhinestones for extra sparkle along the mane.
Quick win: Use a white Ghost variety pumpkin to skip the painting step entirely.
68. Dragon Pumpkin
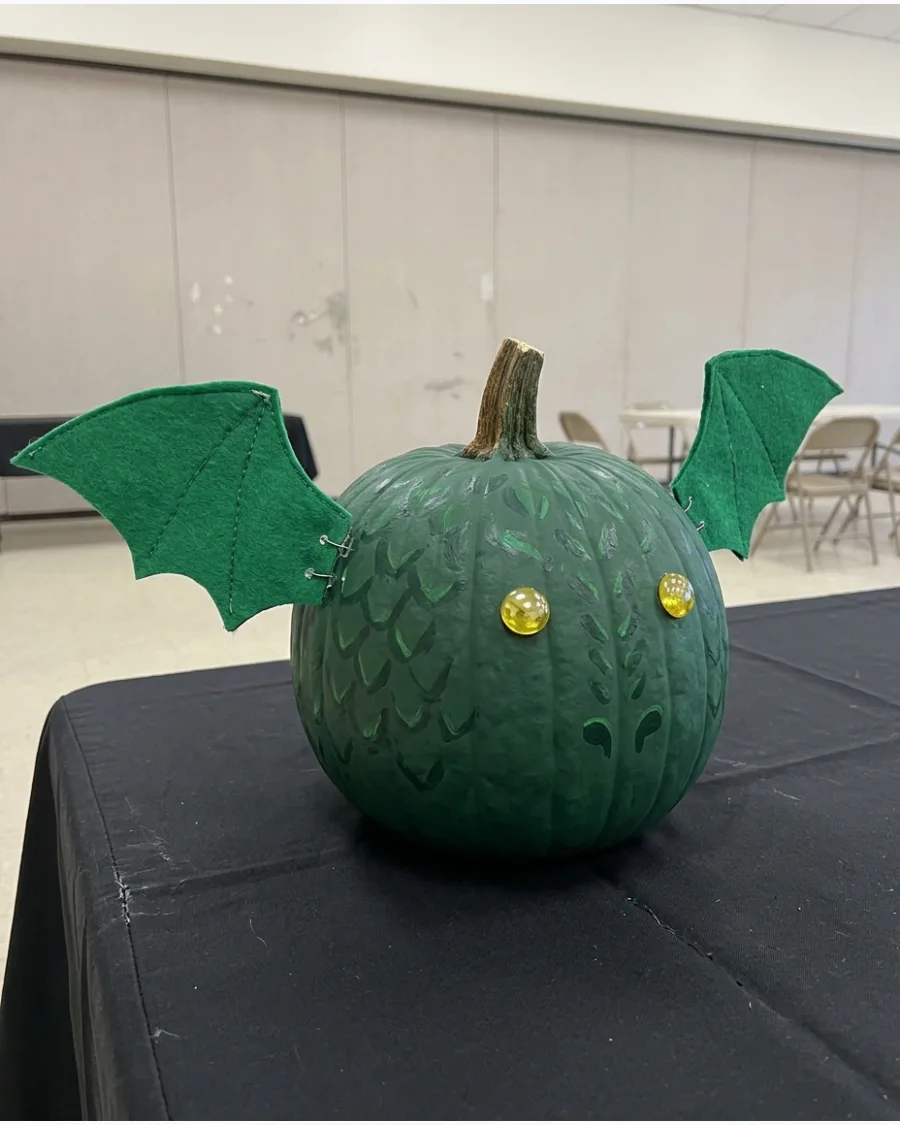
Cover a pumpkin in dark green or deep red scales by painting small overlapping U-shapes. Attach wings made of stiff felt to the sides and a long fabric tail that curls around the base.
Glue two large glass gems to the front for reflective, reptilian eyes that catch the light. Small tufts of gray cotton balls placed near the nose area look like puffs of smoke.
- Use a bumpy pumpkin variety for a naturally scaly texture.
- Wire the wings so they can be bent into a dramatic flying position.
- Add a few plastic gold coins around the base to show the dragon's hoard.
Most people skip this: Paint the stem gold to make it look like a magical horn or part of the dragon's head.
69. Mermaid Pumpkin
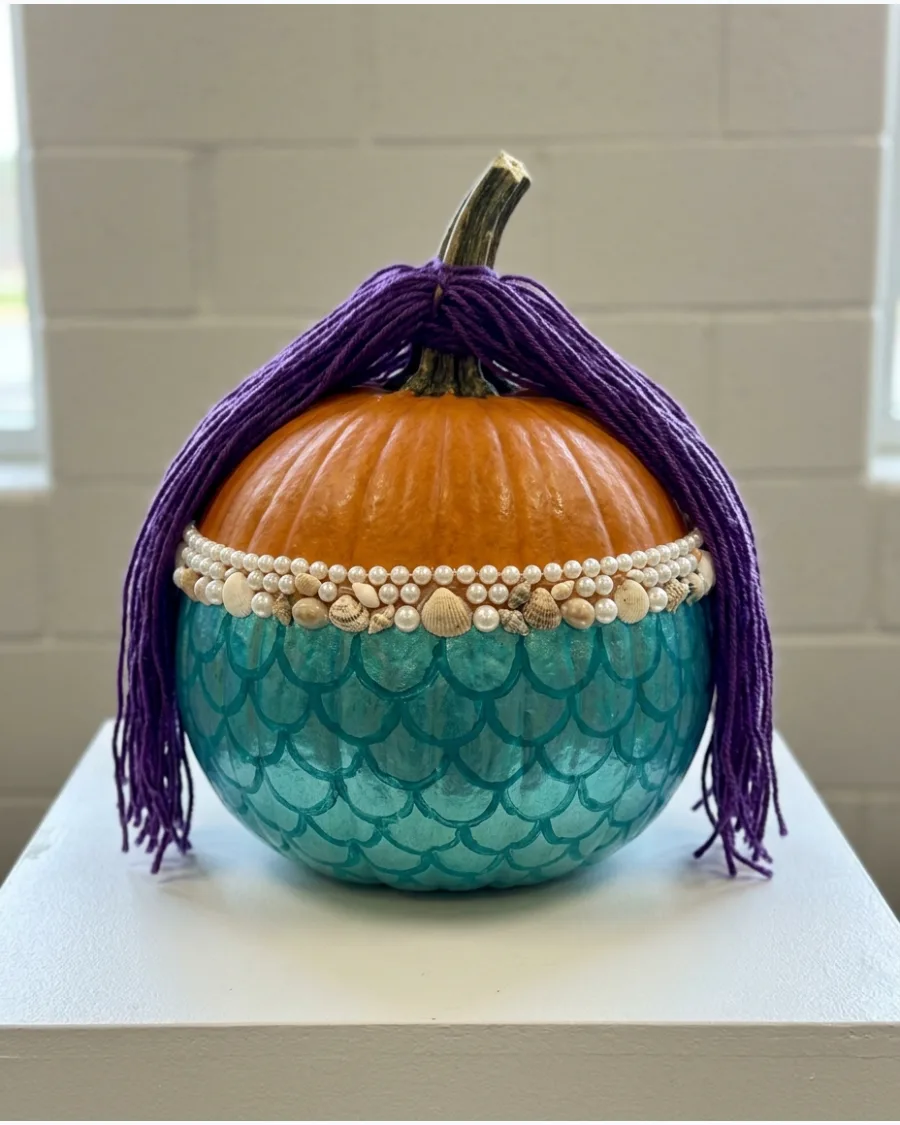
Paint the bottom half of a pumpkin with metallic teal scales and leave the top half a soft peach or tan. Glue small seashells and faux pearls around the waistline to hide the paint transition.
Braid long strands of teal and lavender yarn to create hair that flows from the stem down to the table. A flat cardboard tail painted with glitter can be tucked under the back.
- Use metallic acrylic paint to get the best underwater shine.
- Real shells from the beach or craft store add great 3D texture.
- A tall, narrow pumpkin works best to mimic a human-like torso.
Best shortcut: Use a fishnet stocking stretched over the painted bottom to create a perfect scale pattern instantly.
70. Fairy House Pumpkin
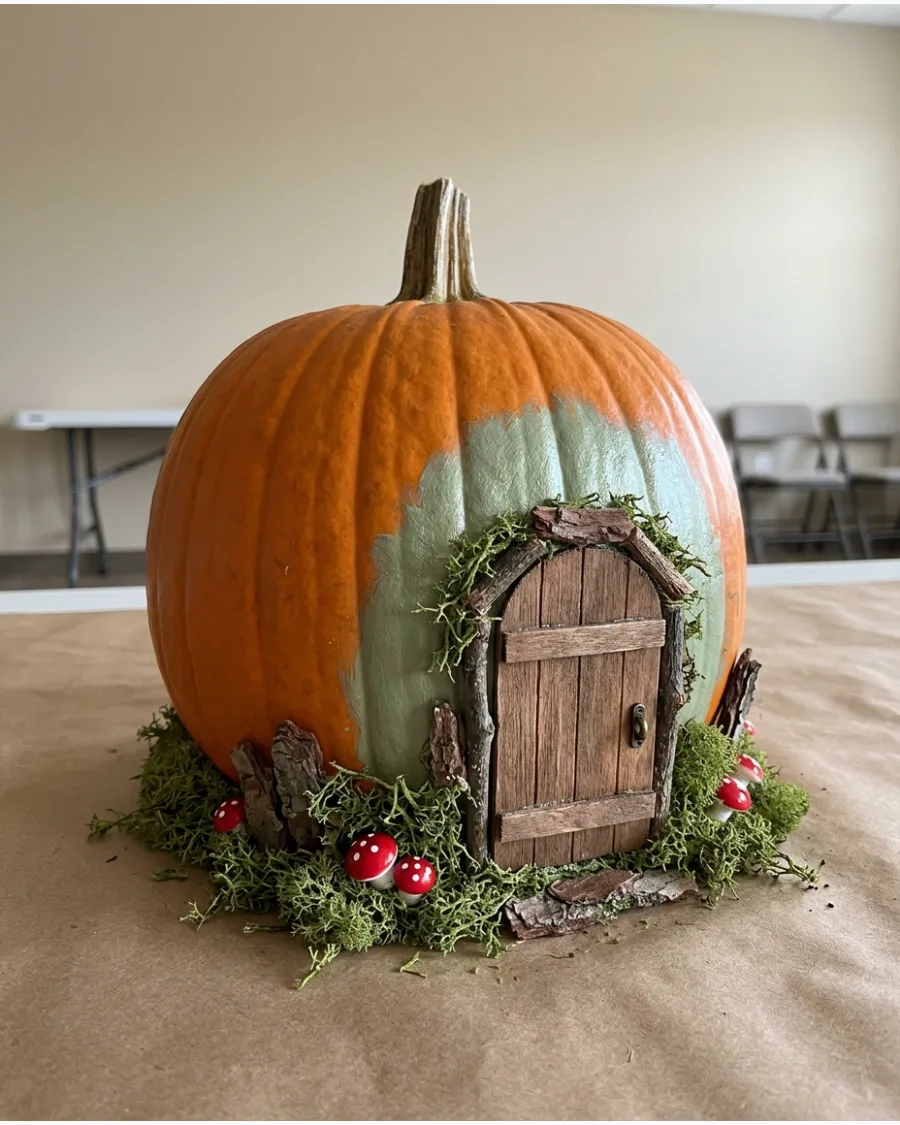
Transform a pumpkin into a woodland cottage by painting a small round door and several windows. Glue dried moss around the base and up the sides to make it look like it is part of the forest floor.
Place a few battery-operated tea lights behind the display to give the windows a warm, inviting glow. Adding tiny details like a pebble walkway or a twig ladder makes the scene feel complete.
- Use real twigs and flat stones from the yard for free, authentic decorations.
- If you do not want to carve, paint the windows with bright yellow glow paint.
- Seal the moss with a clear spray to prevent it from shedding during the contest.
Quick win: Use a hot glue gun to attach shingles made from pieces of pinecone for a rustic roof look.
71. Enchanted Mushroom Pumpkin
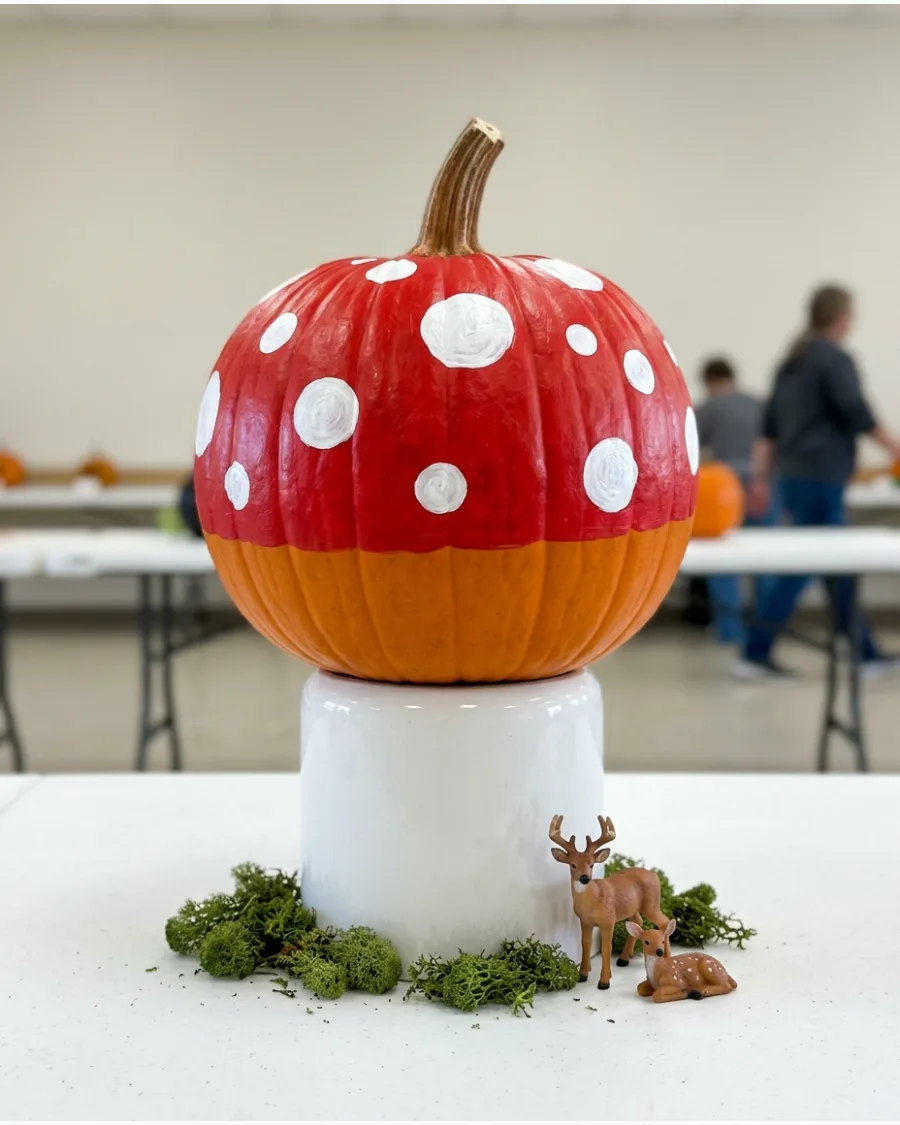
Turning a pumpkin into a toadstool creates a whimsical scene that catches the eye of every judge. Paint the top half a vibrant red and add large white dots for a classic forest look.
Elevate the pumpkin on a white-painted bucket or wide pedestal to mimic a thick mushroom stem. Small plastic woodland creatures placed at the base help sell the miniature world theme.
- Buy a large, flat-bottomed pumpkin for better stability.
- Use a hot glue gun to secure the pumpkin to its pedestal.
- Scale the mushroom to fit the specific height requirements of the contest table.
Quick win: Use a white paint pen for the spots to get perfectly crisp edges without messy brushes.
72. Celestial Moon Pumpkin
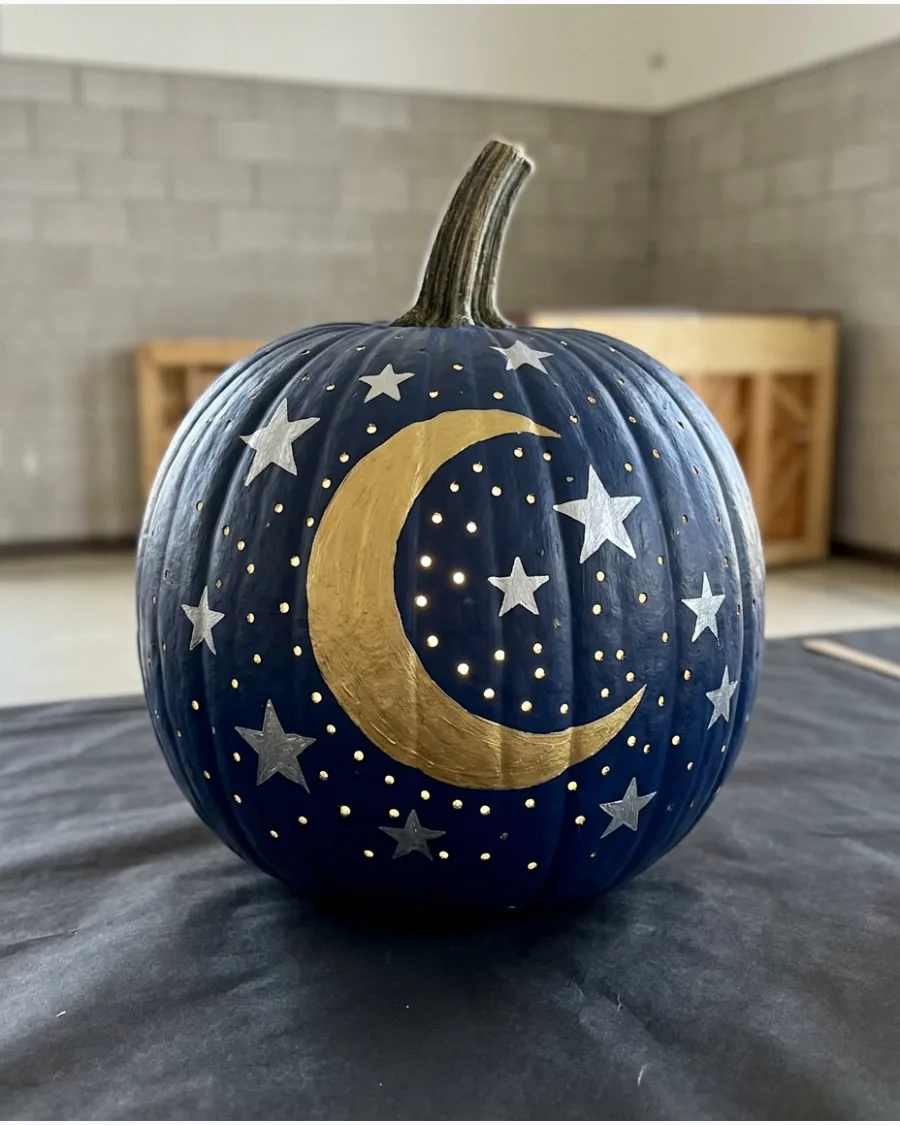
Deep navy paint and metallic accents turn a standard pumpkin into a miniature night sky. Use silver or gold paint pens to draw detailed constellations and crescent moons across the dark surface.
Poke tiny holes through the pumpkin walls and insert battery-operated fairy lights to create a glowing star effect. This design works best when the display area has slightly dimmed lighting.
- Choose a hollow pumpkin or a foam version to make wiring the lights easier.
- Use a drill with a small bit for uniform star holes.
- Select a high-pigment matte paint to prevent glare from the metallic markers.
Best shortcut: Use star-shaped stickers as a stencil if hand-drawing constellations feels too difficult.
73. Rainbow Cloud Pumpkin
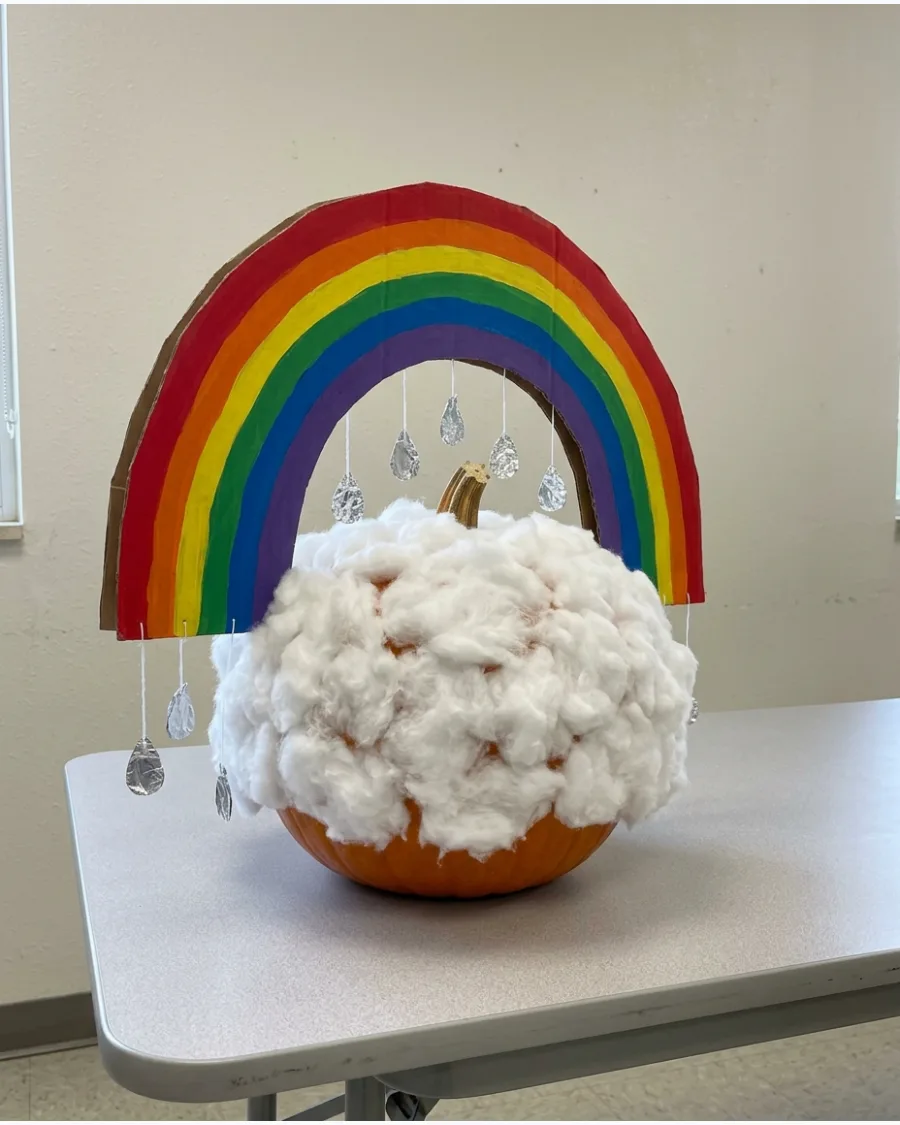
A cloud-themed pumpkin brings a bright pop of color to a contest lineup. Paint the entire pumpkin a soft white and add layers of cotton batting for a fluffy, 3D texture.
Cut a large rainbow shape from stiff cardboard and attach it securely to the back of the pumpkin with heavy-duty skewers. Shiny silver paper raindrops hanging from clear fishing line add movement to the display.
- Pick up a multi-pack of colored cardstock for the rainbow layers.
- Use spray adhesive to attach the cotton batting for a smooth, cloud-like finish.
- Ensure the rainbow is tall enough to be seen from across the room.
Most people skip this: Reinforce the back of the rainbow with a wooden dowel so it doesn't flop over during the contest.
74. Friendly Alien Pumpkin
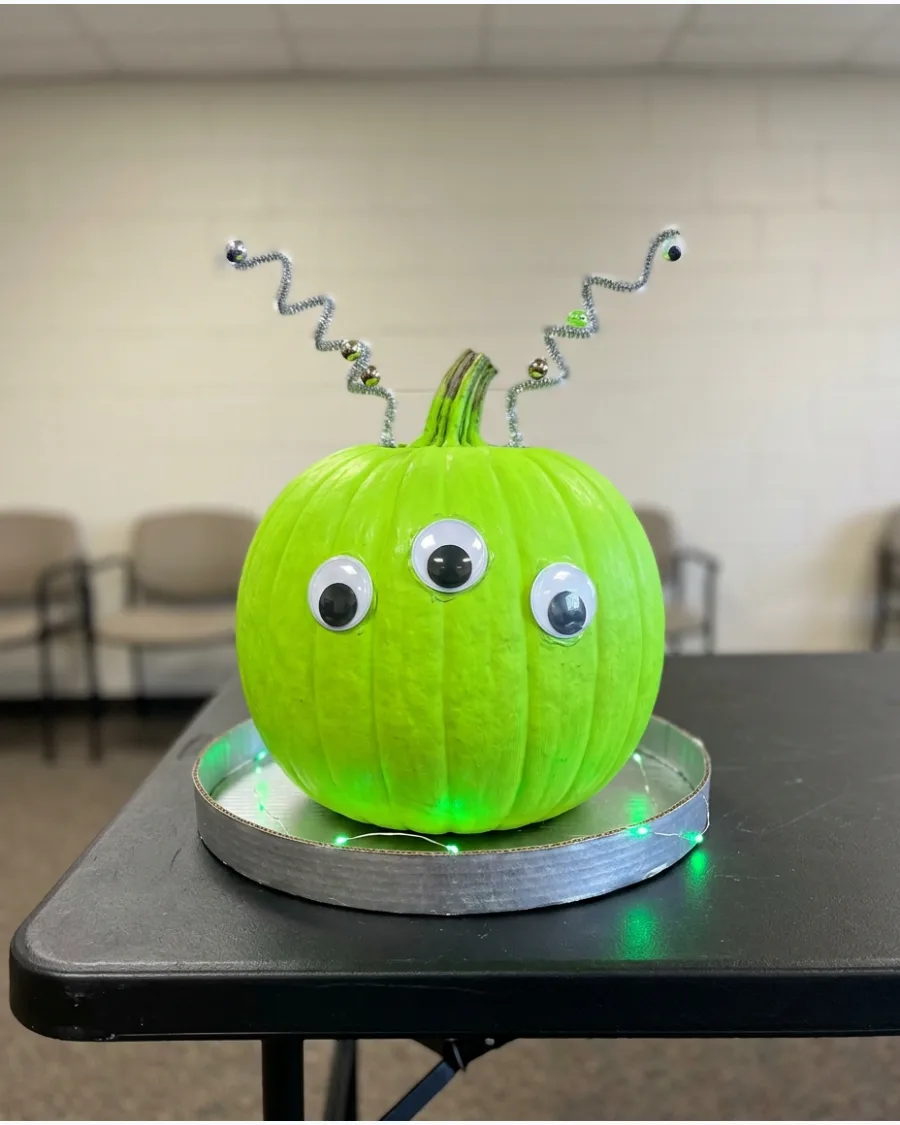
Neon green paint makes this extraterrestrial design stand out in a crowded room. Give the alien three large eyes and antennae made from silver pipe cleaners topped with glowing beads.
Build a simple flying saucer base out of two silver-painted cardboard circles and place the pumpkin right in the center. Adding a few small LED puck lights around the saucer rim creates a fun sci-fi vibe.
- Grab neon acrylic paint for the brightest possible green.
- Secure the eyes with strong craft glue so they don't fall off during transport.
- Use a foam pumpkin if the contest lasts more than a few days to avoid wilting.
Quick win: Use ping-pong balls for the eyes to give the alien a more bug-eyed, 3D appearance.
75. Magical Crystal Pumpkin
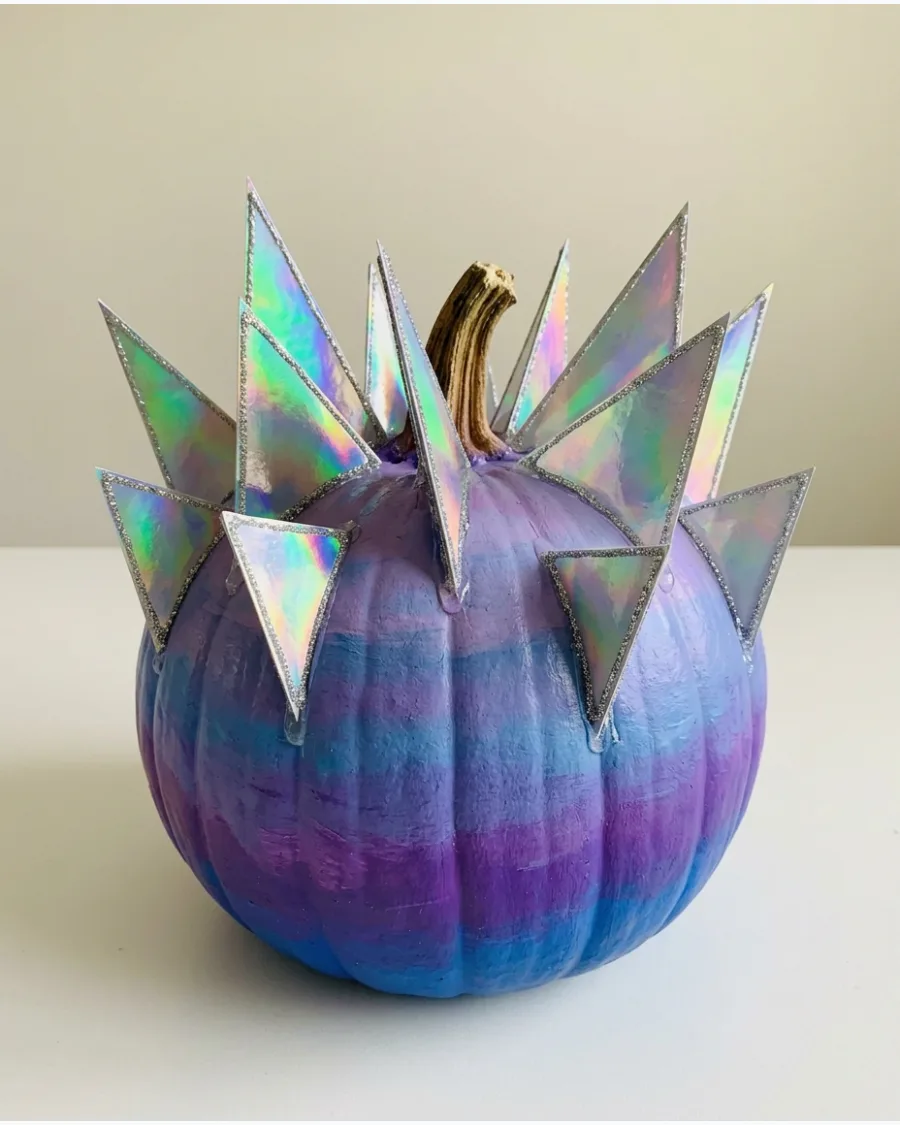
Geometric shapes and iridescent finishes give this pumpkin a high-end, mystical look. Fold iridescent paper into sharp, crystal-like pyramids and glue them in clusters around the pumpkin's stem.
Paint the pumpkin in a gradient of purple and blue to mimic the depth of a geode. Small dabs of silver glitter glue along the edges of the paper crystals add an extra layer of magic.
- Source iridescent cardstock from a local craft store for the best shine.
- Use a quick-dry tacky glue to keep the paper crystals in place.
- Aim for a mix of large and small paper shapes for a natural crystal cluster look.
Best shortcut: Use a sponge to blend the paint colors for a smooth, professional-looking gradient.
76. Royal Carriage Pumpkin
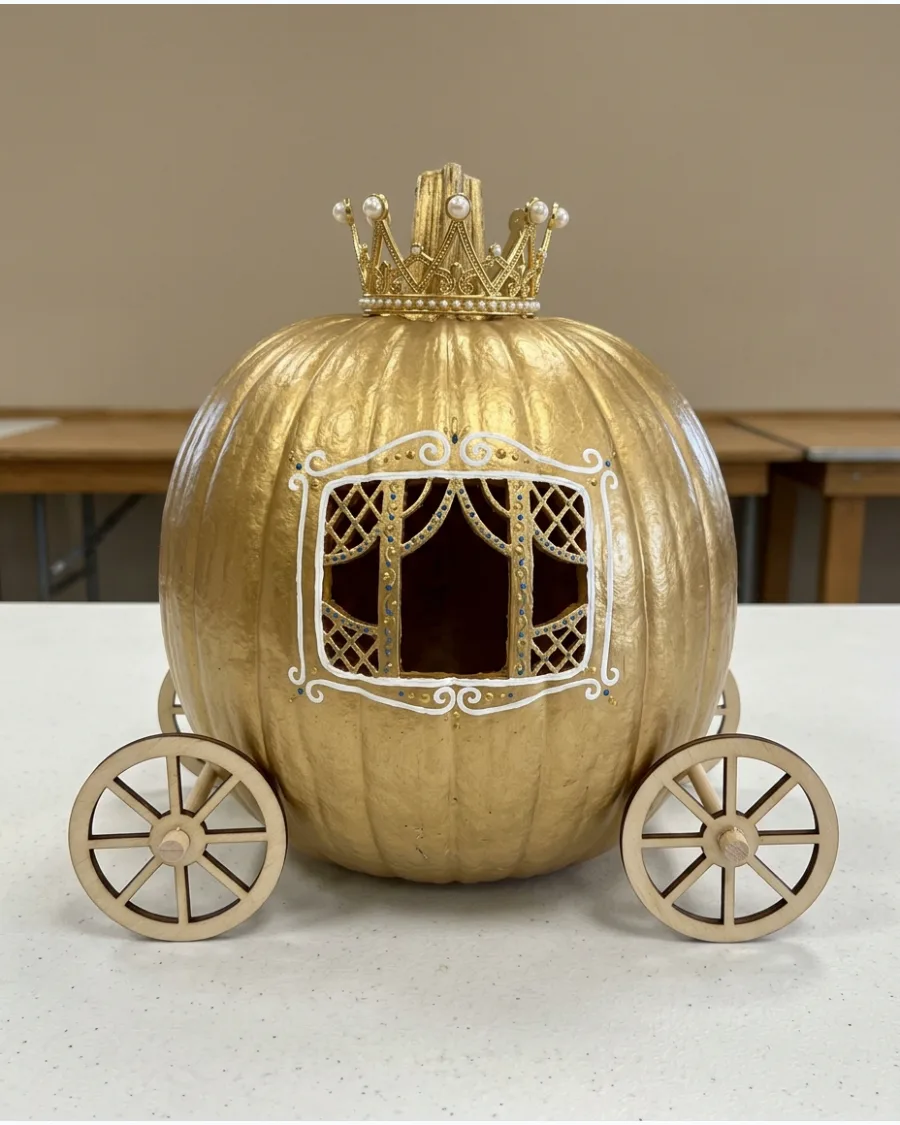
Transforming a pumpkin into a carriage is a classic move that never fails to impress judges. Paint the pumpkin a shimmering gold or soft pastel blue and use gold puff paint to outline ornate windows.
Attach four small gold-painted wooden craft wheels to the bottom edges using sturdy wooden dowels. A miniature plastic crown placed on top of the stem completes the regal transformation.
- Look for pre-cut wooden wheels in the toy section of a craft store.
- Use a thick gold metallic paint for a solid, non-transparent finish.
- Balance the wheels carefully so the pumpkin doesn't tip over.
Most people skip this: Paint the stem gold too so it blends in with the rest of the carriage design.
77. Friendly Garden Gnome Pumpkin
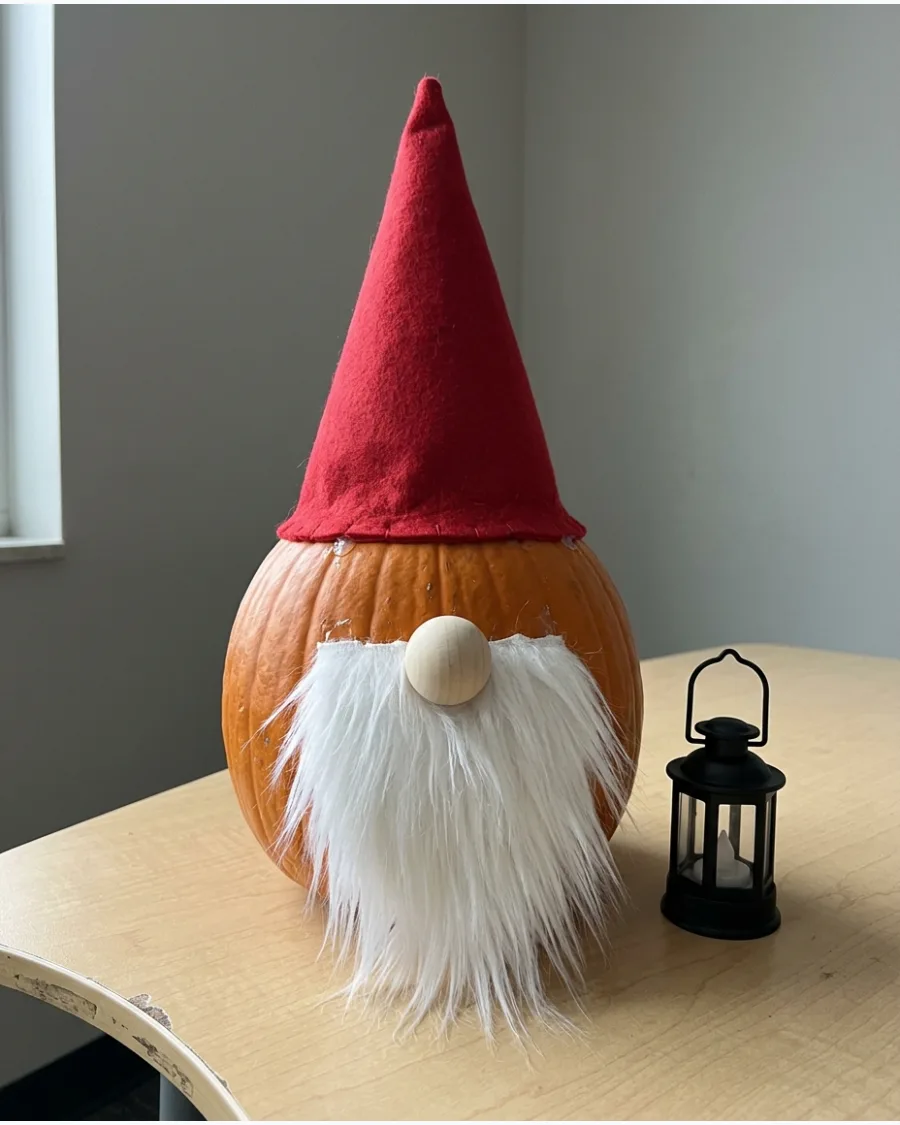
This no-carve idea uses texture and simple shapes to create a charming character. Glue a long beard made of white faux fur just below the stem and add a large wooden bead for a nose.
Craft a tall, pointed hat from stiff red felt and pull it down so it sits just above the gnome's nose. A small toy lantern placed on the table next to the pumpkin adds a nice storytelling element.
- Buy a small piece of faux fur from the fabric remnants bin to save money.
- Use hot glue to secure the felt hat so it doesn't slide off.
- Pick a pumpkin with a short stem so the hat fits snugly.
Quick win: Brush the faux-fur beard with a comb to make it look fluffy and well-groomed for judging.
Trendy and Aesthetic Pumpkin Ideas
78. Disco Ball Pumpkin
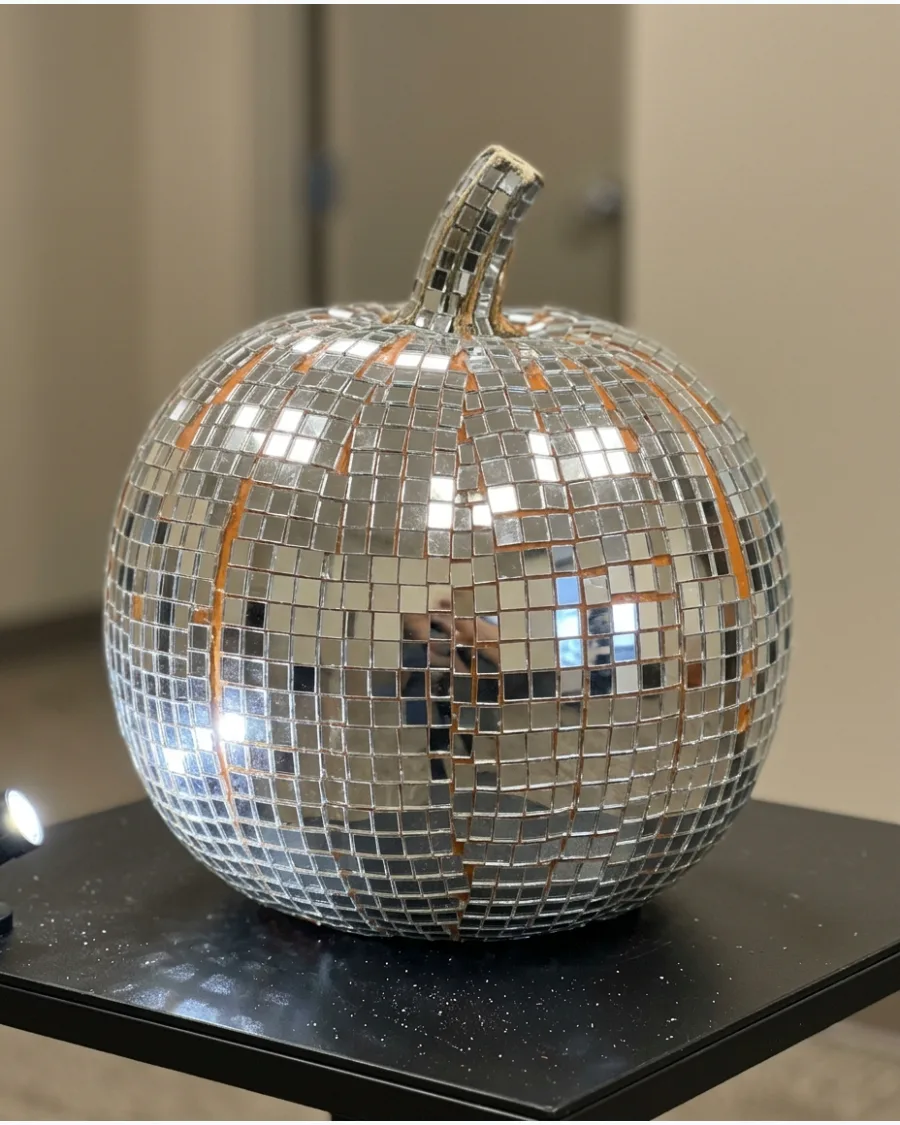
A disco ball pumpkin is the ultimate high-impact design for a brightly lit contest. Cover every inch of the pumpkin with small mirrored tiles or squares of reflective silver paper.
Position the pumpkin under a small battery-operated spotlight to maximize the sparkle effect on the display table. The clean, modern look stands out without needing complex carving or messy paint.
- Purchase self-adhesive mirror tiles to make the application process much faster.
- Start at the middle and work your way up and down for the straightest lines.
- Use a rounder pumpkin to better mimic the shape of a real disco ball.
Best shortcut: If you can't find mirror tiles, use high-gloss silver foil tape and cut it into small squares.
79. Pink Bow Pumpkin
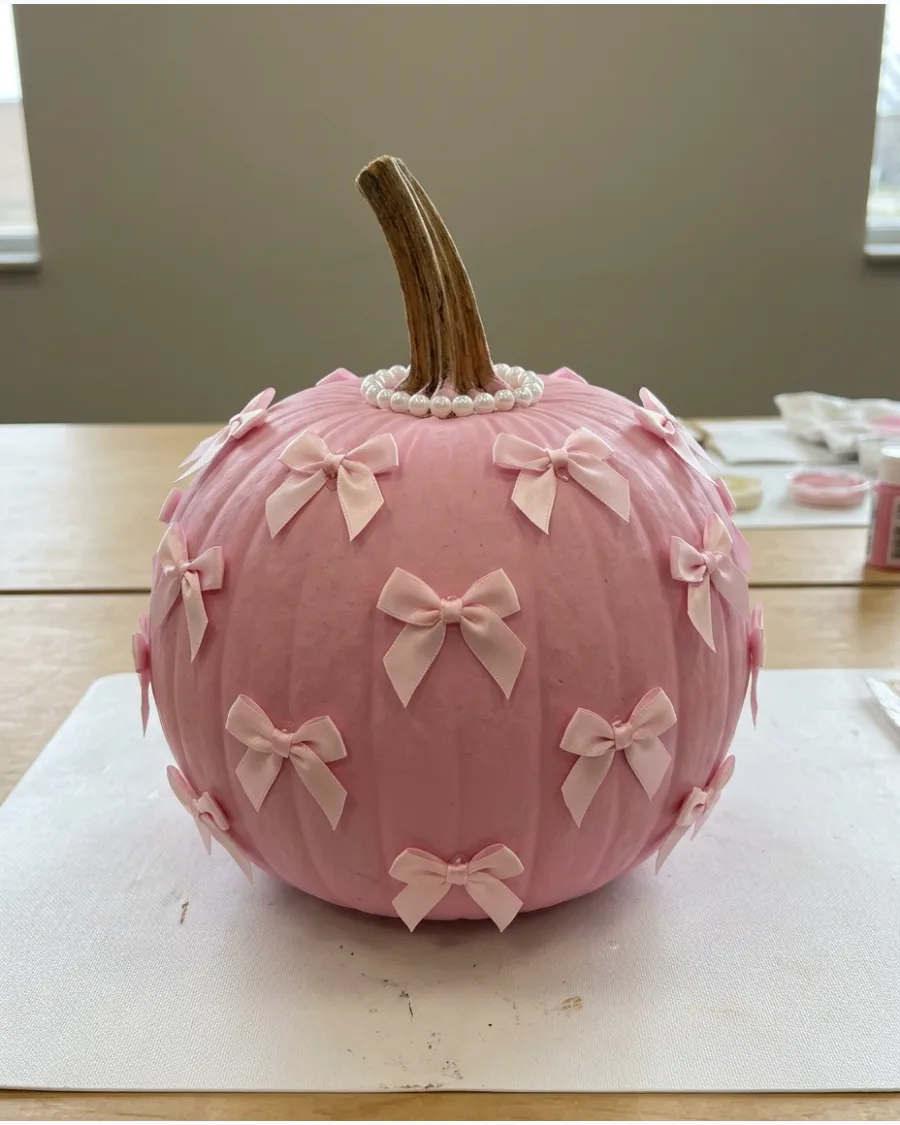
Soft colors and delicate details create a trendy, aesthetic entry that appeals to modern styles. Paint the pumpkin a smooth pastel pink and let it dry completely before adding decorations.
Tie several small satin bows out of thin ribbon and glue them in a random pattern across the entire pumpkin. Adding flat-back pearl accents around the base of the stem gives the design a polished, high-end finish.
- Use a matte spray paint for an even, non-streaky pink base.
- Opt for pre-made bows if you want a uniform look across the pumpkin.
- Keep the bows small so they don't overwhelm the shape of the pumpkin.
Most people skip this: Use a pair of tweezers to place the tiny pearls so you don't get glue on the pink paint.
80. Chrome Pumpkin
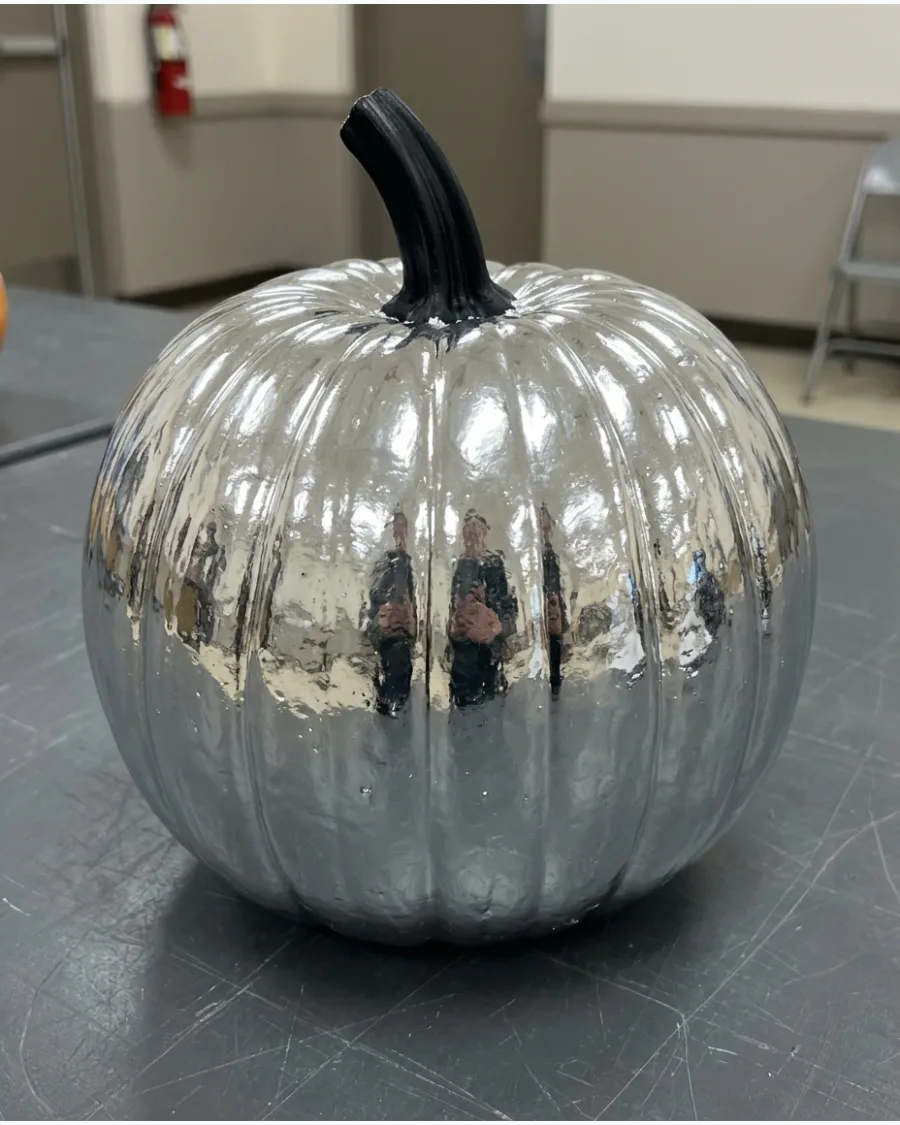
A chrome finish gives a pumpkin a futuristic, industrial look that is incredibly striking. Use a high-quality reflective silver spray paint to achieve a mirror-like surface.
Keep the design simple by leaving the stem natural or painting it a contrasting matte black for a sharp look. This minimalist approach works well because it emphasizes the smooth texture and light reflection of the finish.
- Look for mirror finish or chrome spray paint for the best results.
- Apply several thin coats rather than one thick one to avoid drips and runs.
- Ensure the pumpkin is completely clean and dry before you start painting.
Quick win: Buff the pumpkin with a soft microfiber cloth after the paint is fully cured to remove any fingerprints.
81. Cottagecore Floral Pumpkin
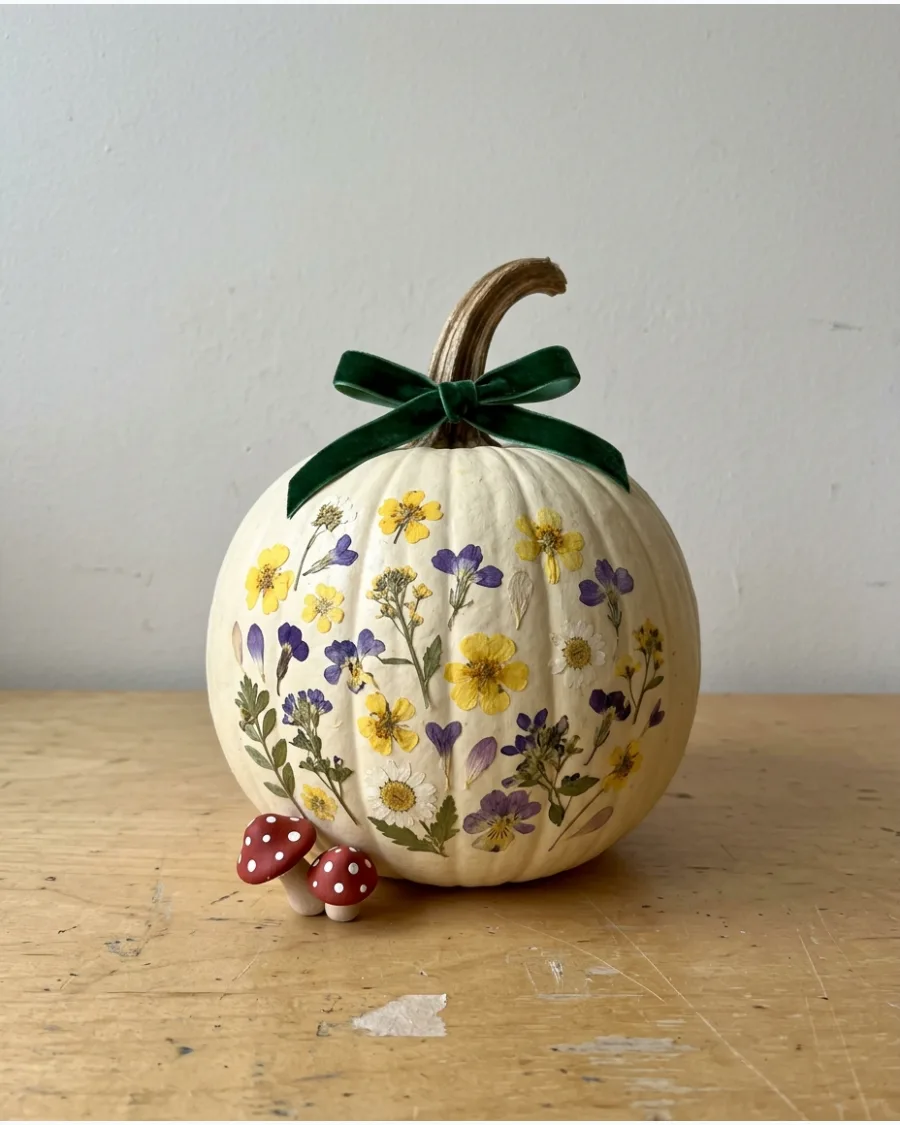
Use a neutral-colored pumpkin as the base for delicate pressed flowers and small faux mushrooms. This design relies on fine details rather than bold colors to catch the judge's eye.
Apply a thin layer of decoupage glue to the pumpkin surface before pressing the dried flowers firmly into place. A velvet ribbon tied around the stem adds a final touch of texture that looks professional.
- Buy a pack of pre-pressed dried flowers online for under ten dollars to save time.
- Use tweezers to place the small petals onto a thin layer of clear glue without smudging the design.
- Swap the flowers for colorful autumn leaves if you want a more seasonal look that costs nothing.
Most people skip this: Seal the entire pumpkin with a matte spray once the glue is dry to prevent the flowers from curling or falling off.
82. Pastel Checkerboard Pumpkin
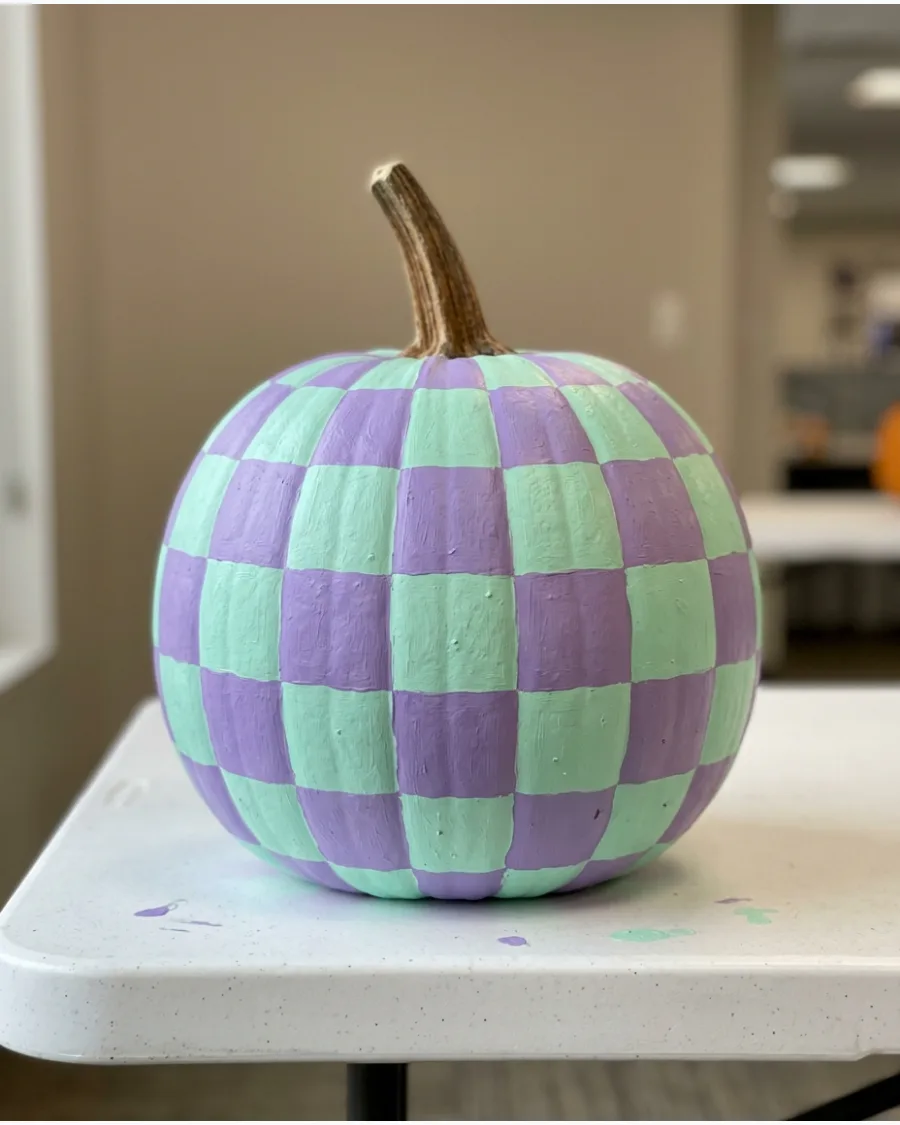
A checkerboard pattern creates a high-contrast look that stands out on a busy contest table. Use a soft palette like lavender and mint to give the traditional pattern a modern update.
Mark out a grid with a pencil and a flexible measuring tape to ensure the squares remain even around the curves. Keep the paint thick enough to cover the pumpkin skin in one coat for a clean finish.
- Spend about an hour painting the first color to ensure the grid is perfectly straight.
- Mark the grid with a pencil first to avoid making mistakes with the permanent paint.
- Use bright neon colors instead of pastels if the contest is held in a dimly lit room.
Quick win: Use low-tack painter's tape to mask off the squares if you do not have a steady hand for freehand painting.
83. Painted Patchwork Pumpkin
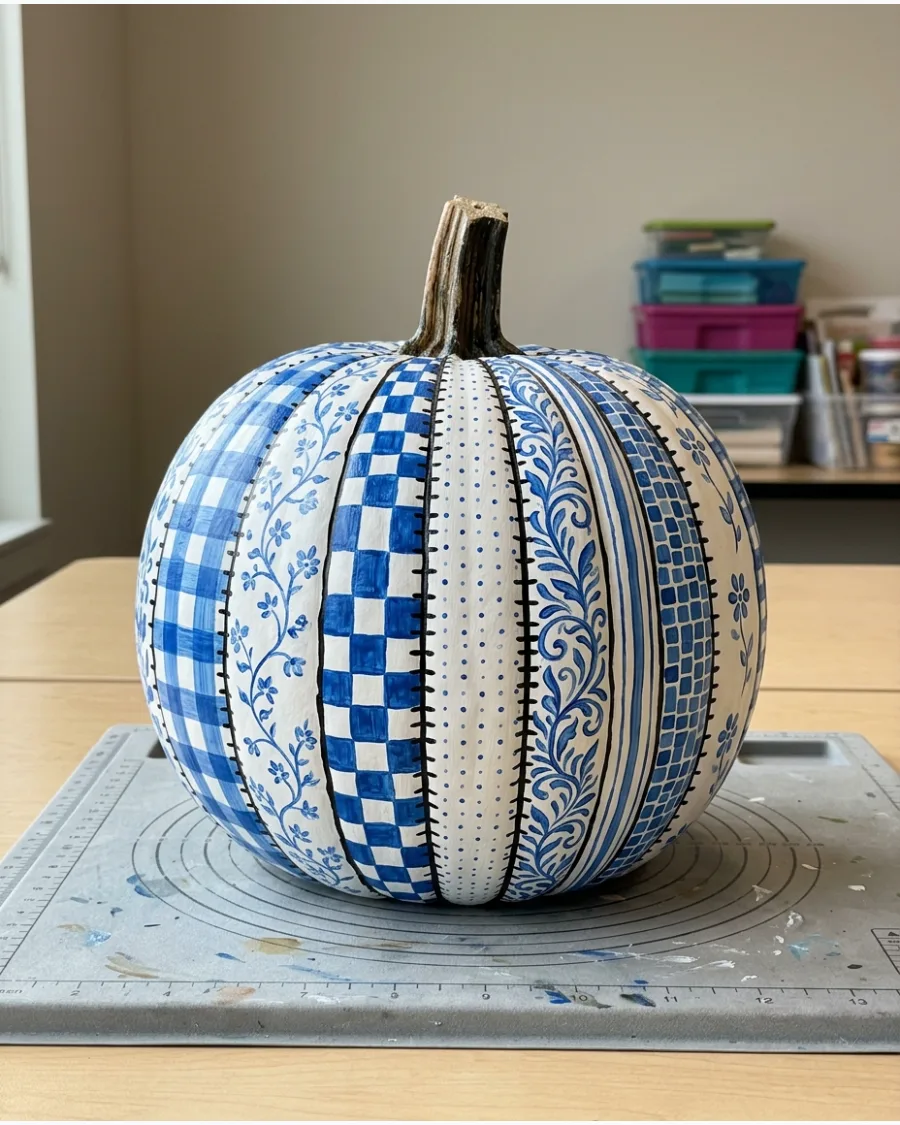
This design turns a single pumpkin into a collection of patterns like plaid, stripes, and florals. Dividing the pumpkin into vertical sections following its natural ribs makes the layout easier to manage.
Use a fine-liner brush to add small details like faux stitching lines between each patterned section. A consistent color scheme like blues and whites keeps the busy patterns from looking messy and disjointed.
- Use leftover acrylic paint from other projects to keep the cost of this multi-color design low.
- Place the pumpkin on a rotating stand to reach all sides without touching the wet paint.
- Choose only two patterns like stripes and dots for a simpler version that takes less time.
Best shortcut: Use paint pens for the intricate patterns like tiny flowers or thin plaid lines instead of a traditional brush.
84. Pearl and Rhinestone Pumpkin
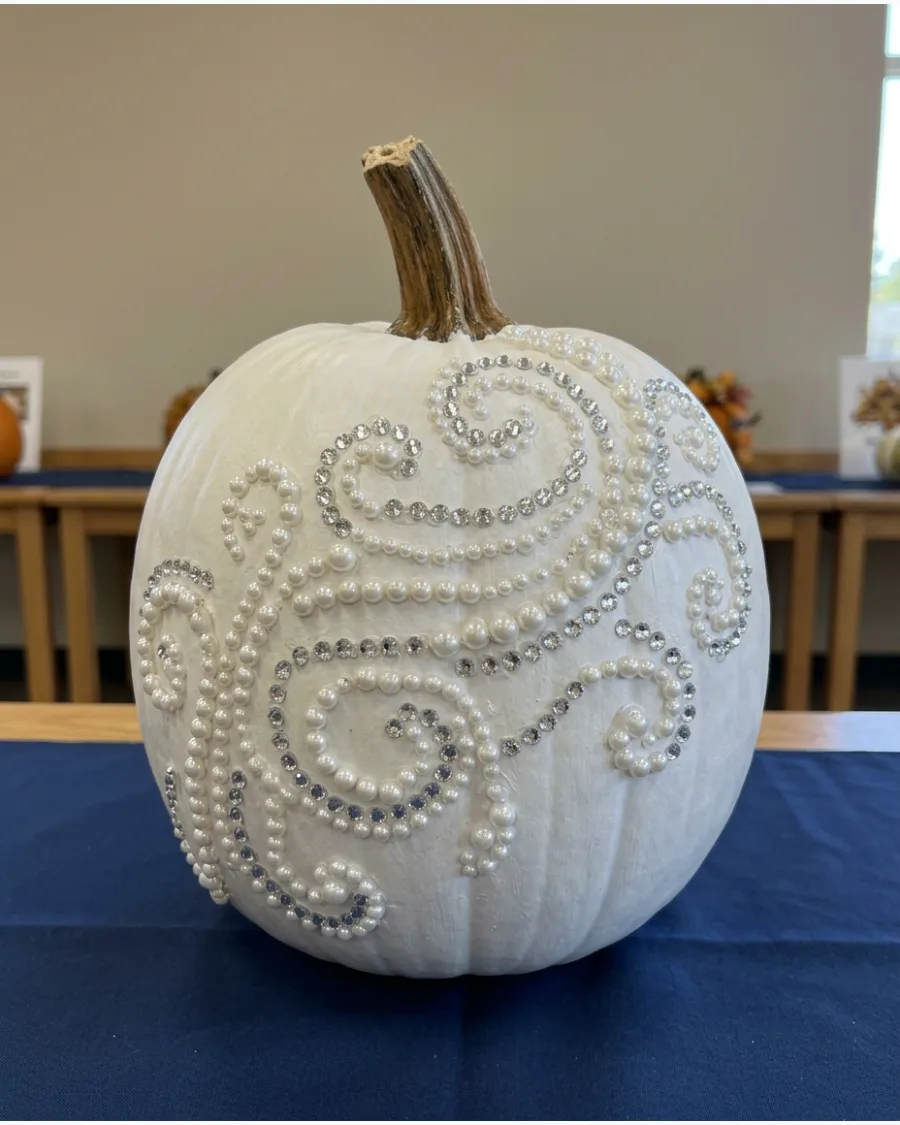
Texture and shine are major advantages in a contest judged under bright indoor lights. Cover a neutral-painted pumpkin with swirling lines of flat-back pearls and clear rhinestones.
Map out the swirls with a white charcoal pencil so the lines are easy to follow but will not show through the gems. This approach looks much more intentional and professional than a random scattering of beads.
- Purchase bulk bags of flat-back pearls and rhinestones to ensure you have enough to cover the surface.
- Use a wax-tipped jewelry tool to pick up and place the smallest gems accurately.
- Substitute the pearls for colorful buttons if you want a more whimsical and budget-friendly entry.
Most people skip this: Wipe the pumpkin with rubbing alcohol before painting to remove any wax that might prevent the glue from sticking.
85. Blue Porcelain Pumpkin
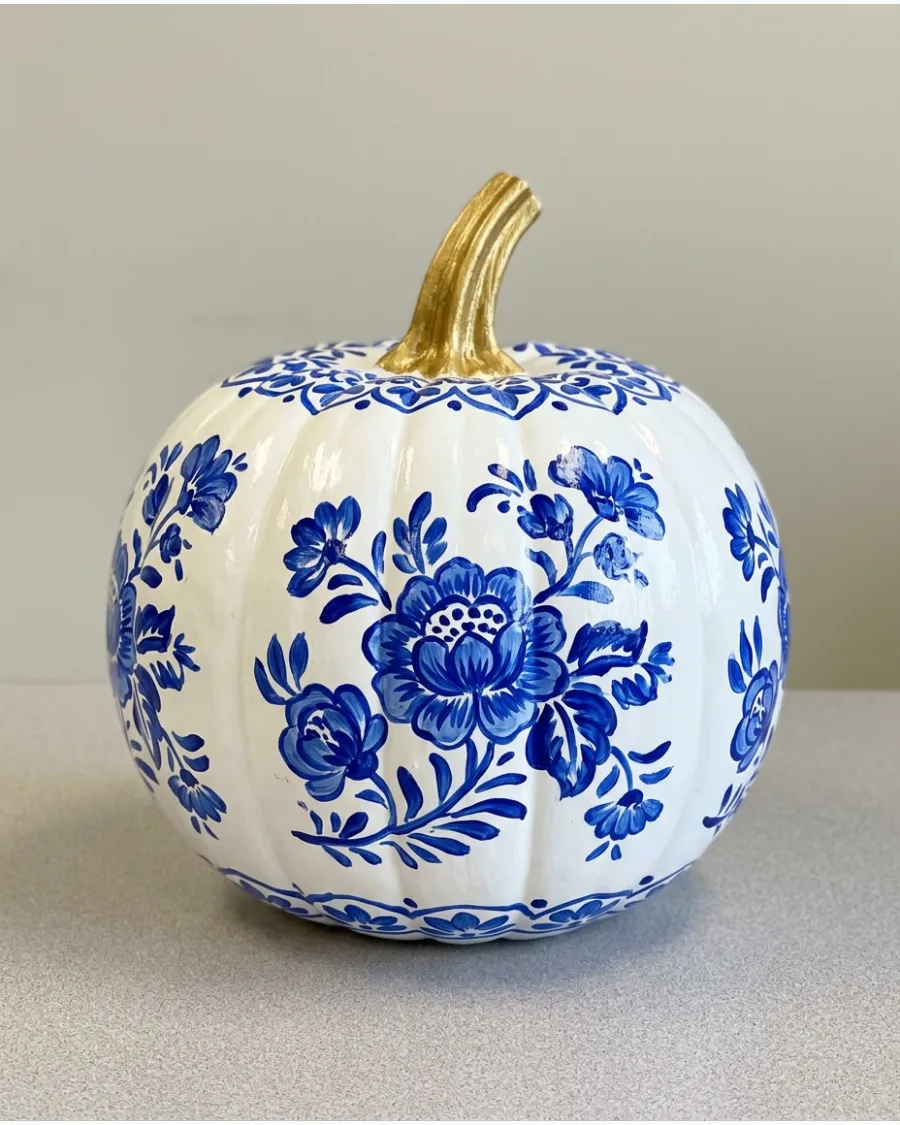
This elegant design mimics the look of expensive Chinoiserie pottery using simple blue and white paint. Paint the entire pumpkin a crisp, glossy white before adding intricate vine and flower motifs in cobalt blue.
Paint the stem with a brilliant metallic gold to contrast with the cool blue tones. It works best on smooth-skinned pumpkins with very shallow ribs for the most realistic look.
- Find a smooth-skinned pumpkin at a local farm to make the fine blue details easier to paint.
- Apply a high-gloss spray sealer once the paint is dry to give it a ceramic look.
- Use blue permanent markers instead of paint if you are worried about shaky brush strokes.
Quick win: If the hand-painting feels too difficult, use blue floral temporary tattoos or water-slide decals on the white base.
86. Stained-Glass Pumpkin
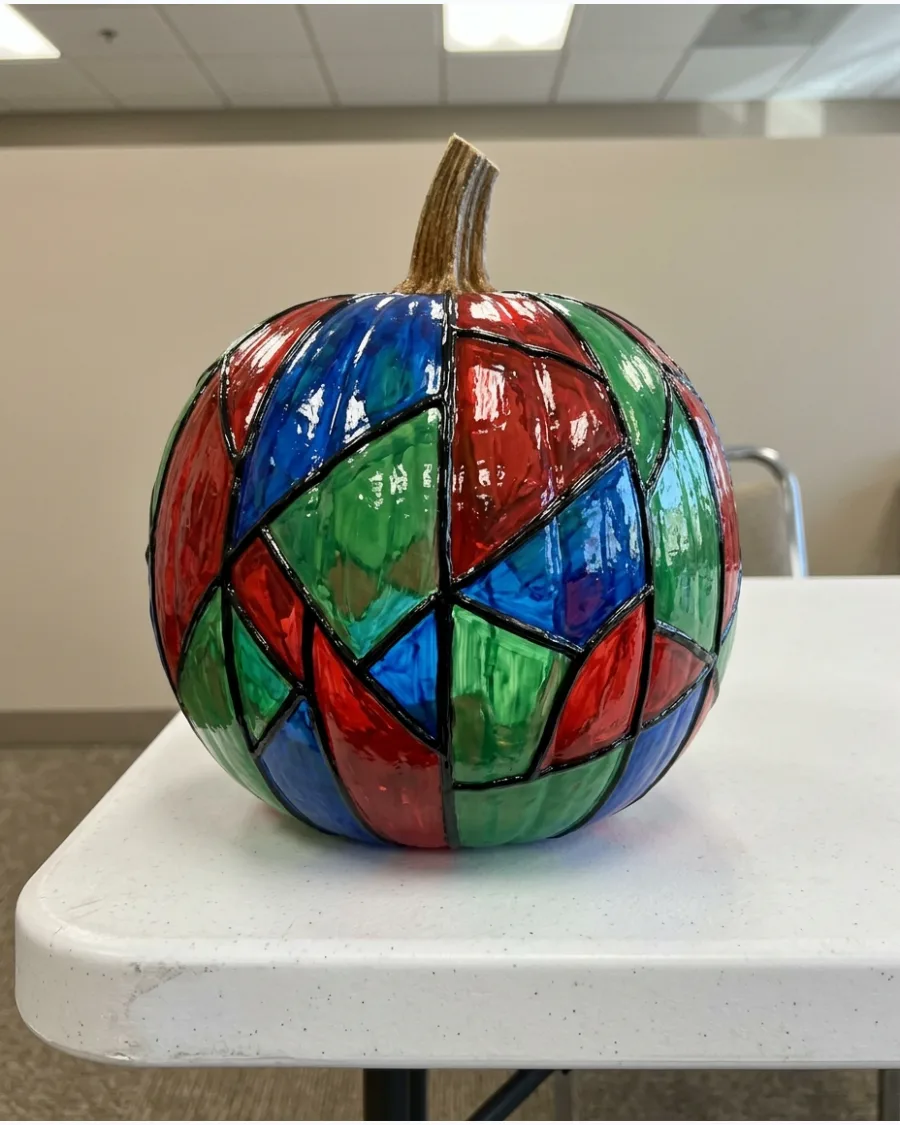
Create the illusion of leaded glass by using thick black paint to outline large geometric shapes. Fill the centers with vibrant, translucent colors that catch the light.
Apply a thick layer of glossy decoupage medium over the colored sections to give them a glass-like depth. This design is especially effective if the pumpkin is placed near a window or under a direct spotlight.
- Budget for at least two tubes of black dimensional paint to create the thick lead outlines.
- Lay the pumpkin on its side and work in small sections so the paint does not run.
- Use silver outlines instead of black to create a modern etched glass effect.
Best shortcut: Mix a drop of food coloring into clear glue to create your own translucent glass paint if you do not have stained-glass paint.
87. Newspaper Collage Pumpkin
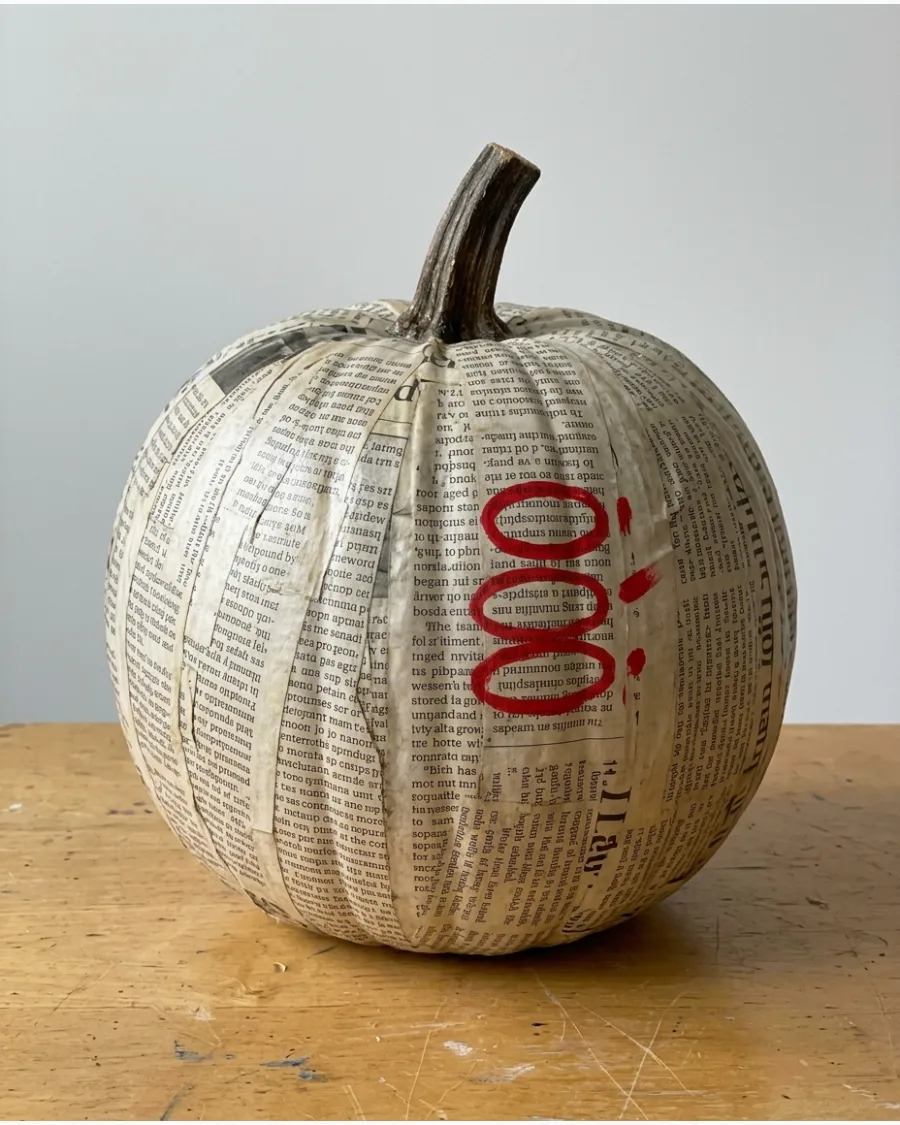
Decoupage is a great way to add complex text and imagery without needing advanced drawing skills. Cover a medium-sized pumpkin with torn pieces of newspaper, old book pages, or sheet music.
Tear the paper into small strips rather than large squares so they lay flat against the pumpkin curves. Highlighting a few specific words with a bright pop of paint can create a hidden message for the judges.
- Use a free local newspaper or old magazines to keep the material costs near zero.
- Smooth out air bubbles with the edge of a credit card while the glue is still wet.
- Use color-coded pages from a comic book for a more vibrant and playful contest entry.
Most people skip this: Dip the paper strips in a bowl of water for a second before gluing to make them more pliable and easier to smooth out.
88. Monochrome Floral Pumpkin
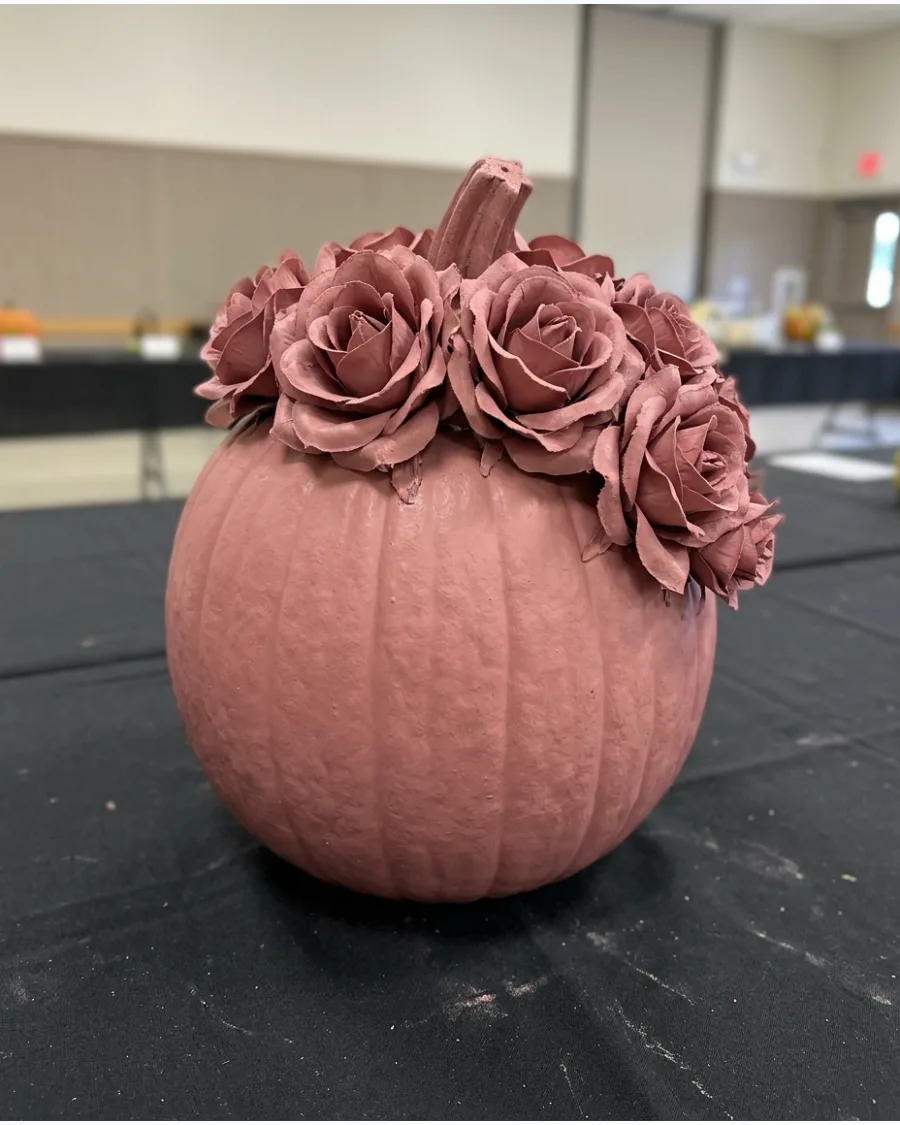
A monochrome look is sophisticated and stands out among the usual orange and black decorations. Paint a pumpkin and several artificial silk flowers in the exact same shade, such as a deep forest green or a dusty rose.
Glue the painted flowers around the top of the pumpkin so they appear to grow out from the stem. The variation in texture between the smooth pumpkin and the fabric petals creates visual interest.
- Buy one can of 2-in-1 paint and primer to cover both the pumpkin and the silk flowers quickly.
- Use a hot glue gun to attach the flowers firmly so they do not fall off during the car ride.
- Try an all-black monochrome look with matte paint for a more gothic and dramatic entry.
Quick win: Use different shades of the same color family, like navy, royal, and sky blue, to add depth while staying monochrome.
Elaborate Contest-Winning Pumpkin Displays
89. Under-the-Sea Pumpkin
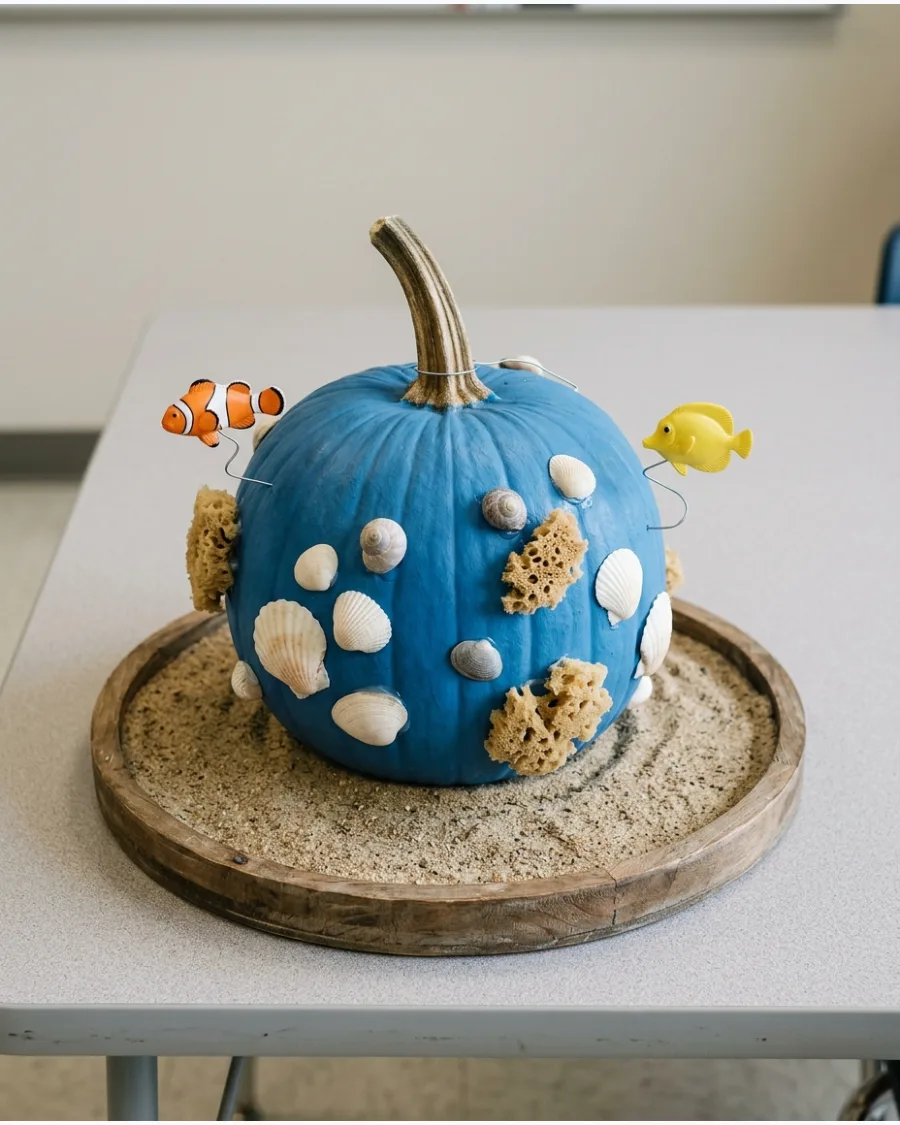
Transform a pumpkin into a vibrant reef scene by attaching 3D elements like coral and seashells. Paint the pumpkin a deep ocean blue and use sponges to add lighter blue and green highlights.
Stack the pumpkin on a base of sand or gravel to ground the display and make it look like a complete scene. Add small plastic fish on thin wires to give the illusion that they are swimming around the reef.
- Collect seashells from a previous trip or buy a small bag at a craft store for a few dollars.
- Use stiff floral wire to make the plastic fish look like they are floating in mid-air.
- Replace the sand with blue shredded paper if you need a lighter display that is easier to carry.
Best shortcut: Use clear glass marbles or flat gems glued in vertical lines to mimic rising air bubbles.
Home Decor
90. Underwater Pumpkin Aquarium Display
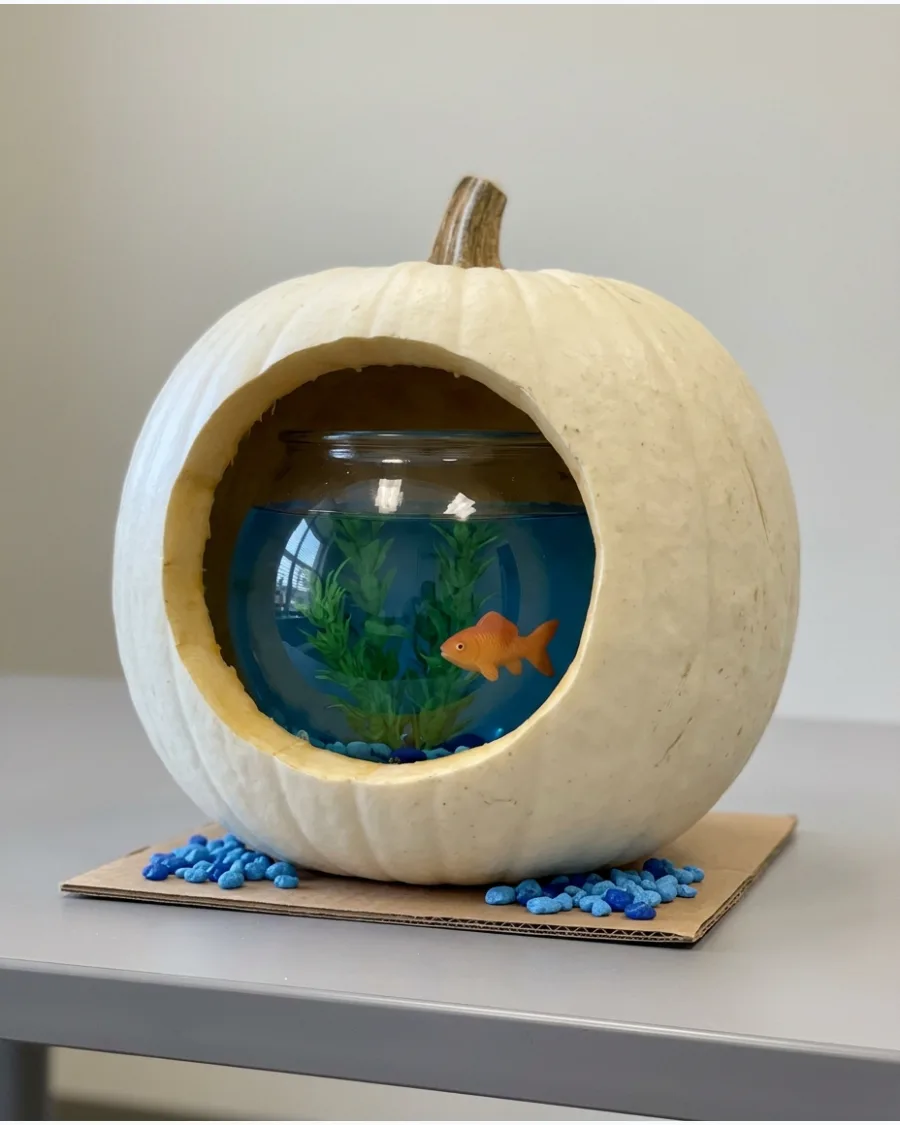
This design replaces a traditional candle with a miniature aquatic world housed inside a hollowed-out gourd. By carving a wide circular window and inserting a small glass bowl, the pumpkin becomes a sturdy frame for a creative landscape.
Fill the interior with blue-tinted water, plastic greenery, and floating toy fish to create a convincing underwater effect. Using a white pumpkin provides a clean, modern look that contrasts beautifully with bright blue decor. A small submersible LED light placed at the bottom of the bowl makes the entire scene glow from within.
- Select a large, wide pumpkin and a glass bowl that fits comfortably inside the hollowed center.
- Carve the opening slightly smaller than the bowl's diameter to keep the glass securely tucked behind the pumpkin shell.
- Swap the water for blue gelatin if the display needs to remain stable during transport to a contest.
Quick win: Add a layer of aquarium gravel to the bottom of the glass bowl to hide the battery pack of a submersible light.
Elaborate Contest-Winning Pumpkin Displays
91. Hot-Air Balloon Pumpkin
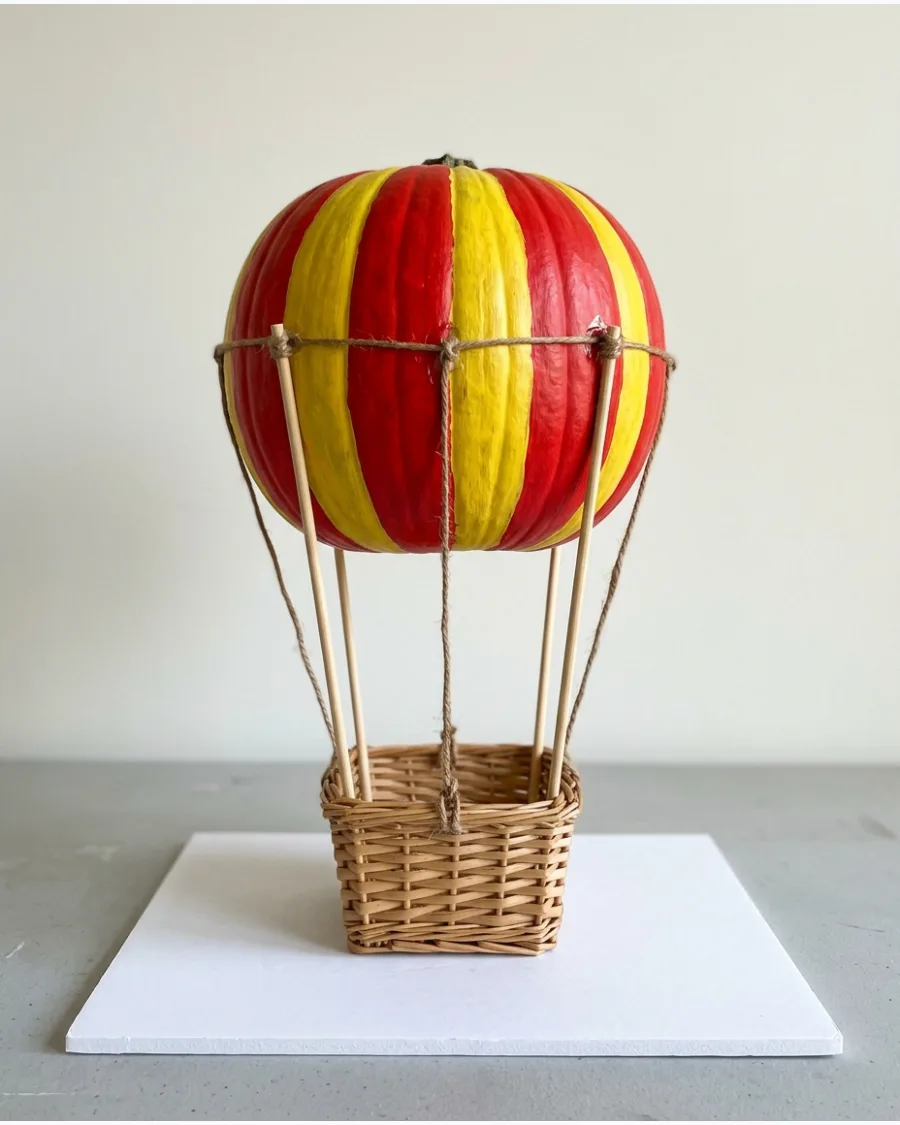
Use a medium-sized pumpkin as the balloon and attach a small wicker basket underneath using sturdy dowels or thick wire. Paint the pumpkin in bright, alternating vertical stripes to mimic traditional balloon fabric.
Secure the basket to a heavy wooden base to prevent the top-heavy pumpkin from tipping over during judging. This height makes the entry stand out in a sea of flat displays.
- Source a lightweight basket from a craft store to reduce strain on the supports.
- Use hot glue to reinforce where the dowels enter the pumpkin skin.
- Add cotton ball clouds around the base of the basket for a finished look.
Best shortcut: Use spray paint and painter's tape for the stripes to get perfectly clean lines without brush marks.
92. Pumpkin Ferris Wheel
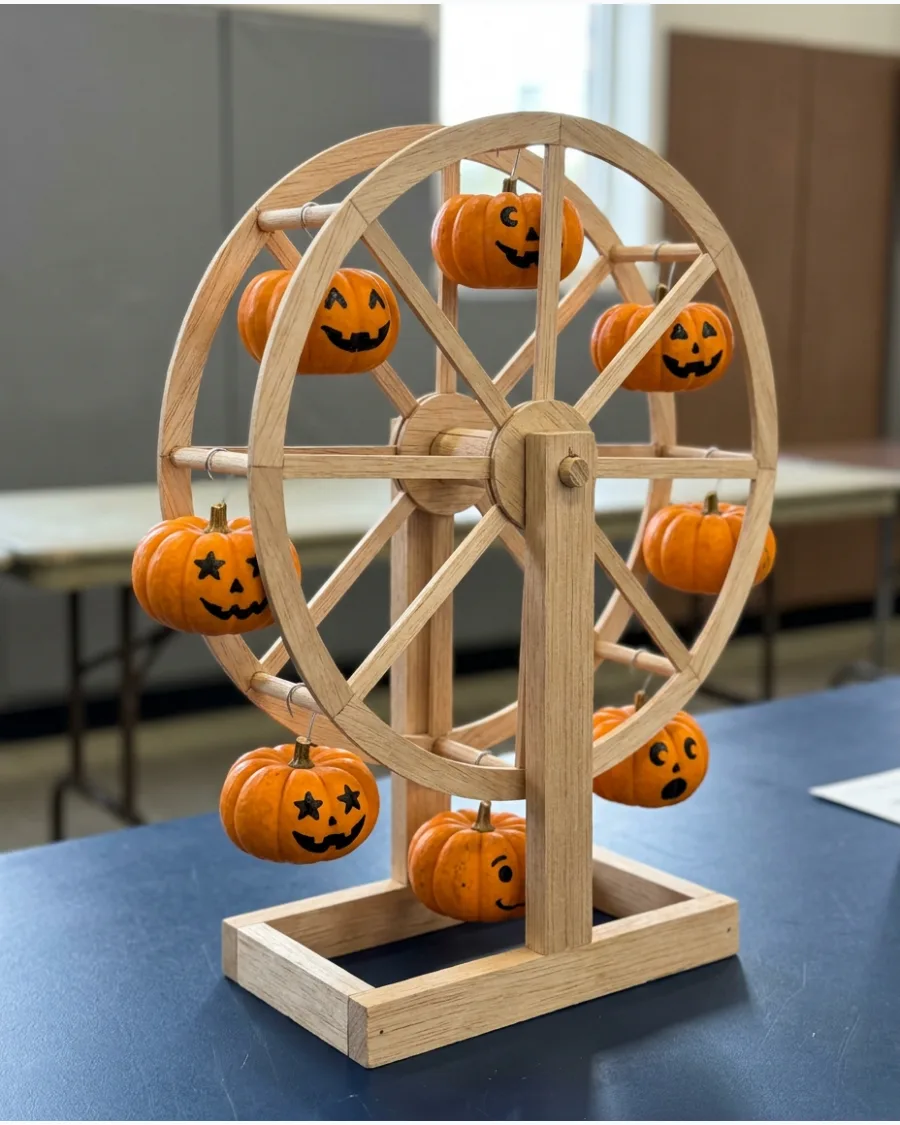
Build a large circular frame from foam core or balsa wood and attach tiny mini-pumpkins as the passenger cars. Paint each mini-pumpkin with a different expressive face to add personality and detail.
Balance the weight of the mini-pumpkins carefully around the wheel so the structure stays upright without leaning. This mechanical look captures attention because it suggests motion and engineering.
- Pick mini-pumpkins of nearly identical size to keep the wheel's weight distribution even.
- Use a thick wooden dowel as the center axle for maximum stability.
- Paint the frame a metallic silver or gold to make it look like a real carnival ride.
Quick win: Use a Lazy Susan base under the display so judges can spin the wheel to see every pumpkin character.
93. Pumpkin Campfire Scene
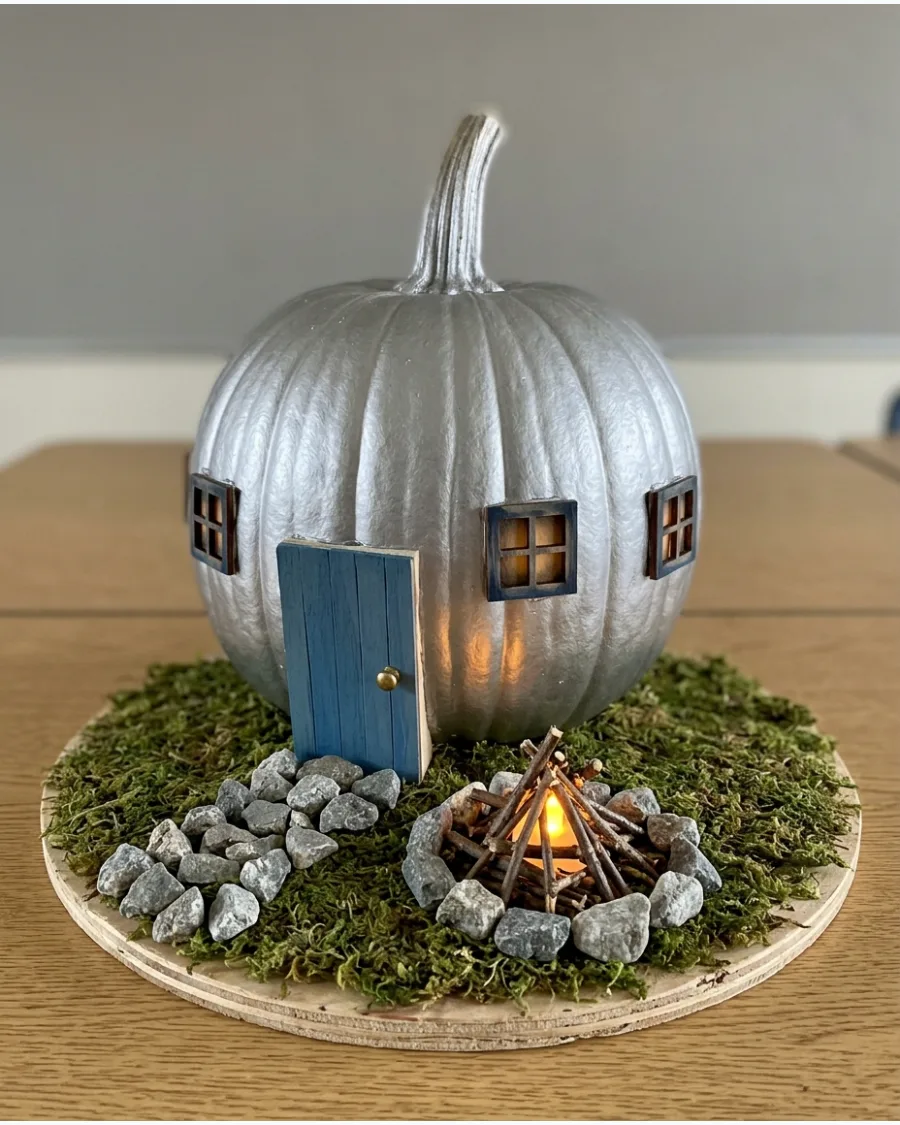
Transform a pumpkin into a retro-style camper by painting it silver with a small door and windows. Surround the base with a ground of moss or pebbles and place a small pile of twigs to act as a campfire.
Insert a flickering battery-operated tea light inside the twig pile to create a realistic glowing flame effect. Small details like these make the scene feel like a complete miniature world.
- Use a silver paint pen for the camper's window frames to get a sharp metallic finish.
- Buy a bag of preserved sheet moss for a mess-free and realistic forest floor.
- Glue small red and yellow cellophane bits to the twigs to enhance the fire look.
Most people skip this: Paint the pumpkin stem brown and wrap it in a tiny piece of flannel to look like a rolled-up sleeping bag on top of the camper.
94. Pumpkin Candy Shop
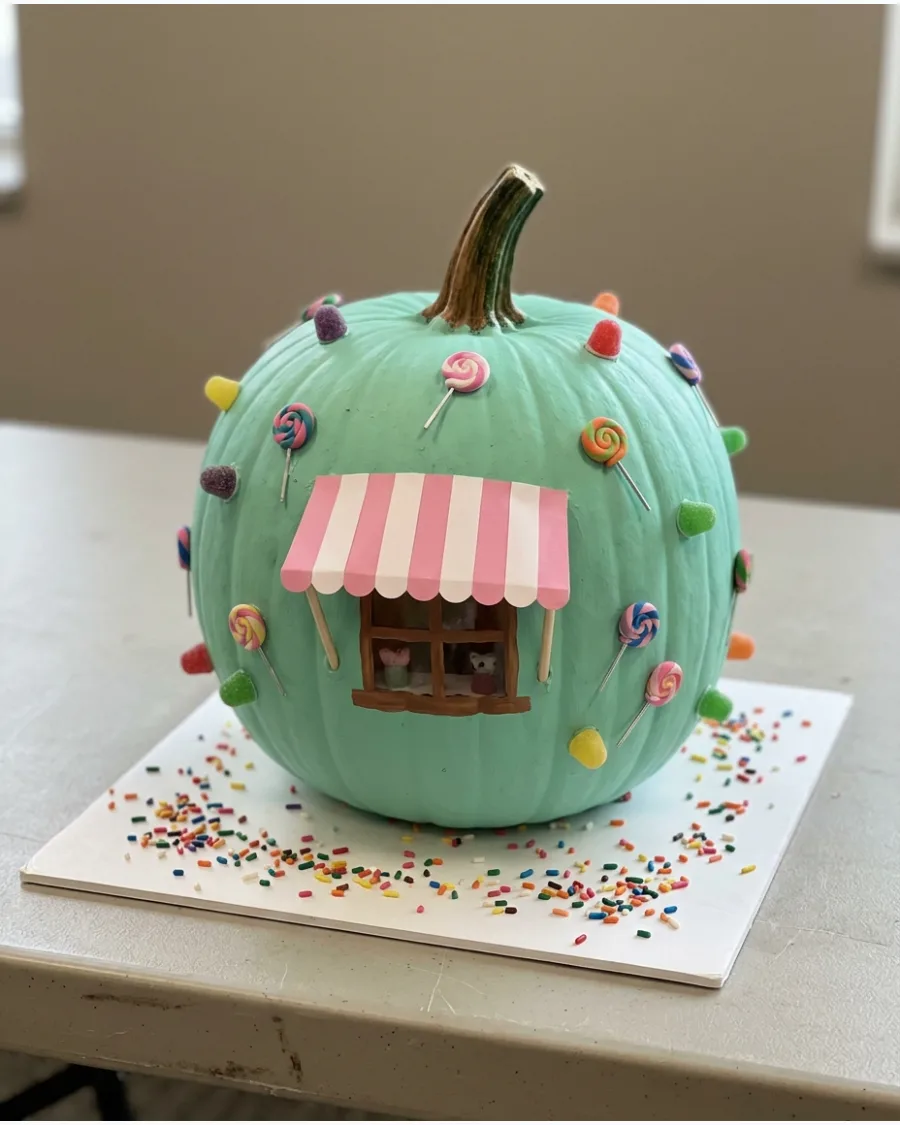
Paint a pumpkin a soft pastel color and add a striped paper awning over a hand-painted window filled with candy. Glue real colorful candies or clay sweets around the base to create a sidewalk display.
Apply a clear glossy sealer over any real candy used to prevent it from getting sticky or attracting insects. This theme is a crowd-pleaser because of its bright colors and playful energy.
- Print a tiny Candy Shop sign on cardstock and glue it to a toothpick for the entrance.
- Use a hot glue gun for the awning to ensure it stays angled correctly.
- Choose a pumpkin with a flat front surface to make painting the shop window easier.
Quick win: Use a white paint marker to draw glass reflections on the painted windows for a 3D effect.
95. Pumpkin Farm Scene
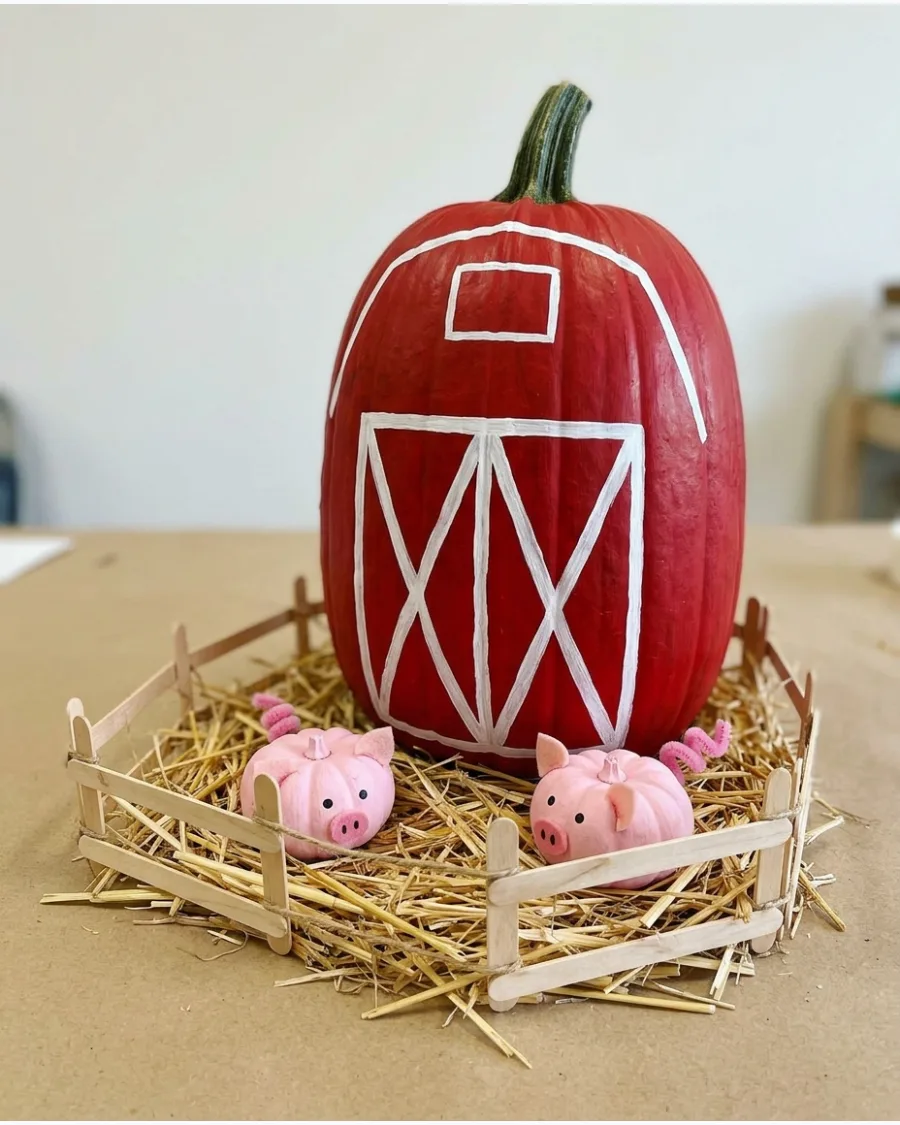
Paint a large, tall pumpkin bright red with white X patterns to resemble a classic barn. Create a small farmyard around it using popsicle stick fences and a few handfuls of real hay or straw.
Make tiny animals like pigs or cows out of the smallest pumpkins you can find to keep the scale consistent. This classic Americana look is easy for judges to recognize and appreciate.
- Secure the straw to the base board with spray adhesive so it doesn't blow away.
- Use a black permanent marker for the wood grain details on the barn doors.
- Look for Jack-Be-Little pumpkins for the most realistic miniature animal shapes.
Best shortcut: Use a pre-made miniature picket fence from a fairy garden kit to save time on construction.
96. Space Adventure Pumpkin
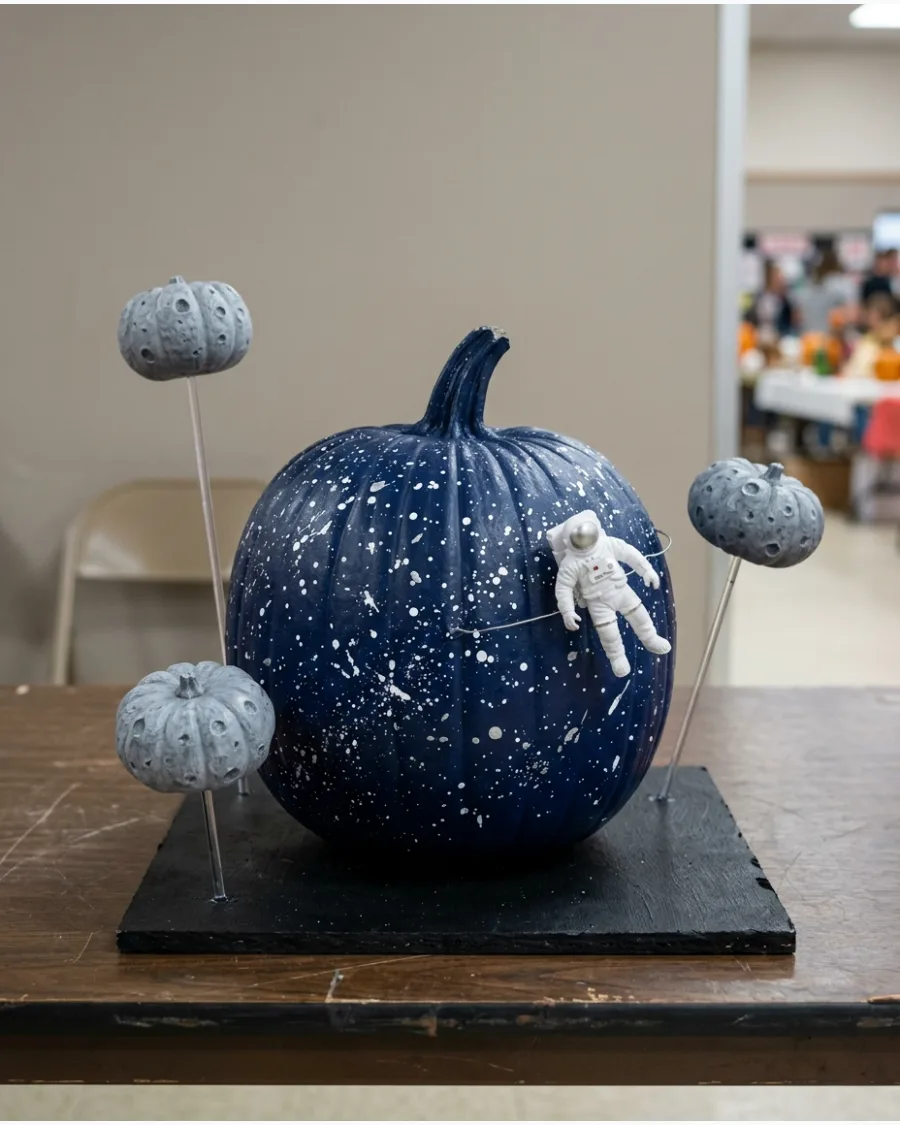
Paint a large pumpkin matte black or deep navy and splatter it with white paint to create a starry galaxy. Attach a small toy rocket or astronaut to the side using a stiff wire to make it look like it is floating.
Use clear acrylic rods to hold up smaller painted pumpkins as moons to give the display a sense of depth and orbit. This design works well because it uses the entire space around the pumpkin, not just the surface.
- Use a toothbrush to flick white acrylic paint for the most realistic star clusters.
- Apply a coat of glitter spray for a nebula effect that catches the light.
- Anchor the clear rods into a heavy foam base hidden under the black display board.
Most people skip this: Paint one side of the moons a lighter gray than the other to simulate a single light source like a sun.
97. Weather Through the Seasons Pumpkin
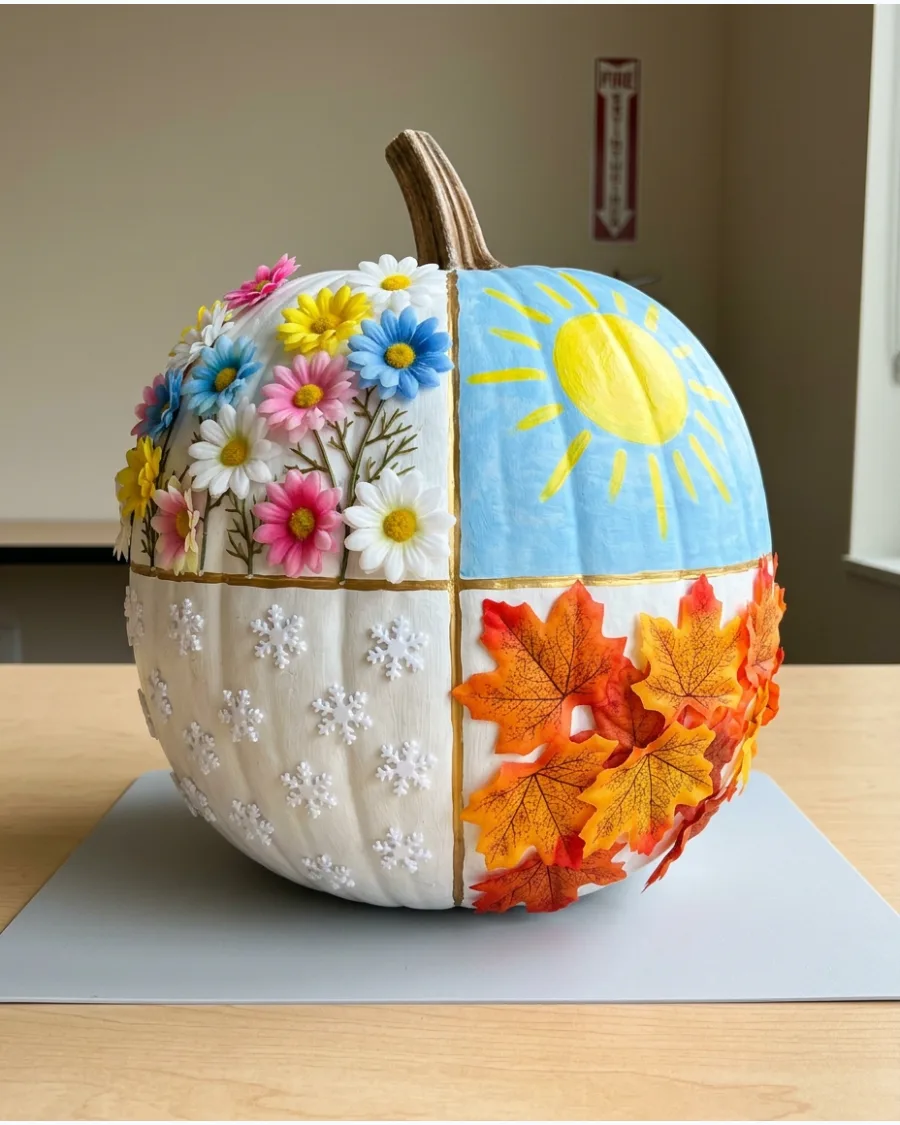
Divide the pumpkin into four equal vertical segments using thin tape or paint lines. Decorate each section with icons like a sun for summer, a snowflake for winter, a flower for spring, and a leaf for fall.
Use 3D elements like silk flowers and plastic snowflakes to make each season pop off the surface. This educational and artistic approach shows off a high level of planning and detail.
- Use a flexible measuring tape to ensure the four sections are perfectly even before painting.
- Match the colors of the base paint in each section to the season, like light blue for winter and tan for fall.
- Glue the 3D items starting from the center of each section and working outward.
Quick win: Use a hair dryer on a cool setting to quickly set the glue on the 3D elements so they don't slide down the pumpkin.
98. Pumpkin City
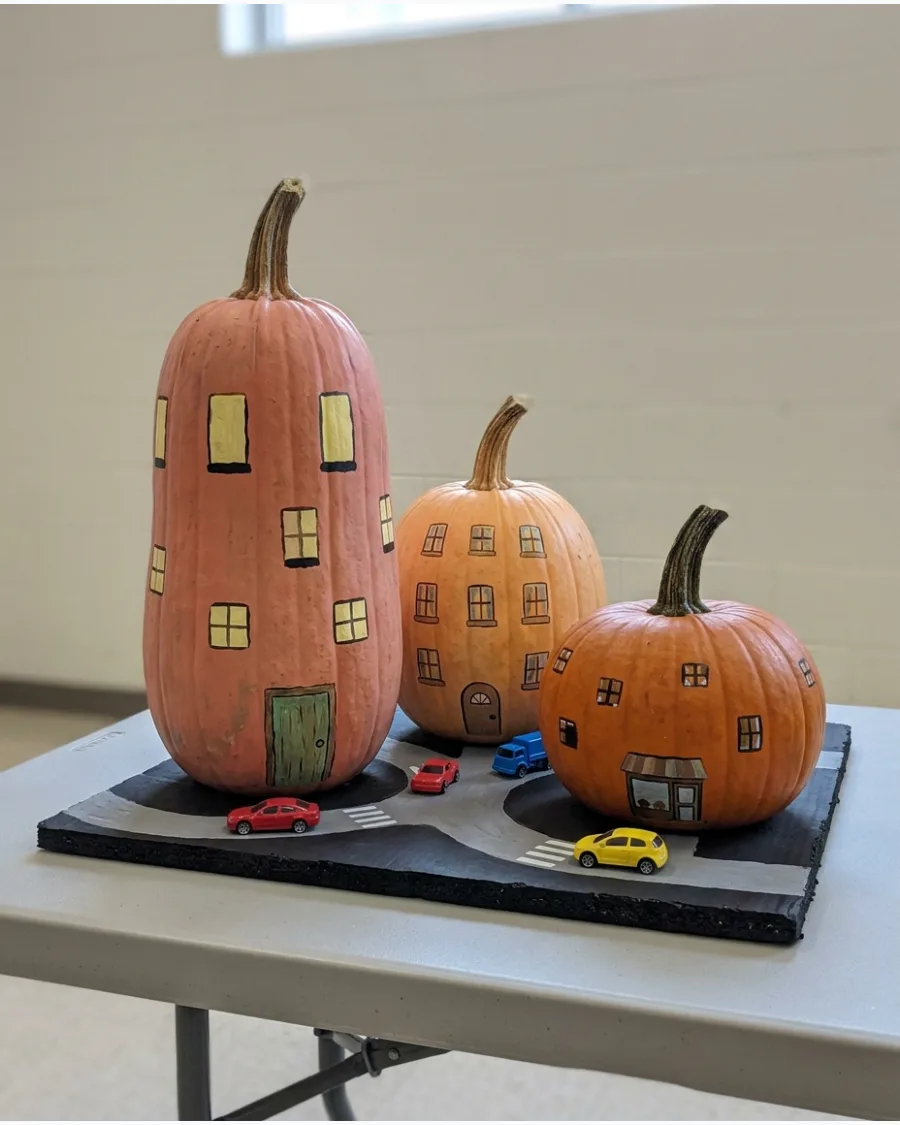
Arrange a group of pumpkins of different heights and paint them to look like skyscrapers, houses, and shops. Use black markers to draw rows of windows and colorful paint for the doors and roofs.
Set the pumpkins on a black board with gray roads painted between them to tie the whole city scene together. This village style entry is impressive because it uses multiple pumpkins to tell a story.
- Use tall, narrow pumpkins for skyscrapers and rounder ones for cottages to vary the skyline.
- Add tiny streetlights made from black pipe cleaners and yellow beads for extra detail.
- Group the pumpkins closely together to make the city look dense and bustling.
Best shortcut: Use square sponge stamps to quickly print perfectly uniform rows of windows on the taller pumpkins.
99. Pumpkin Decorating Contest Trophy
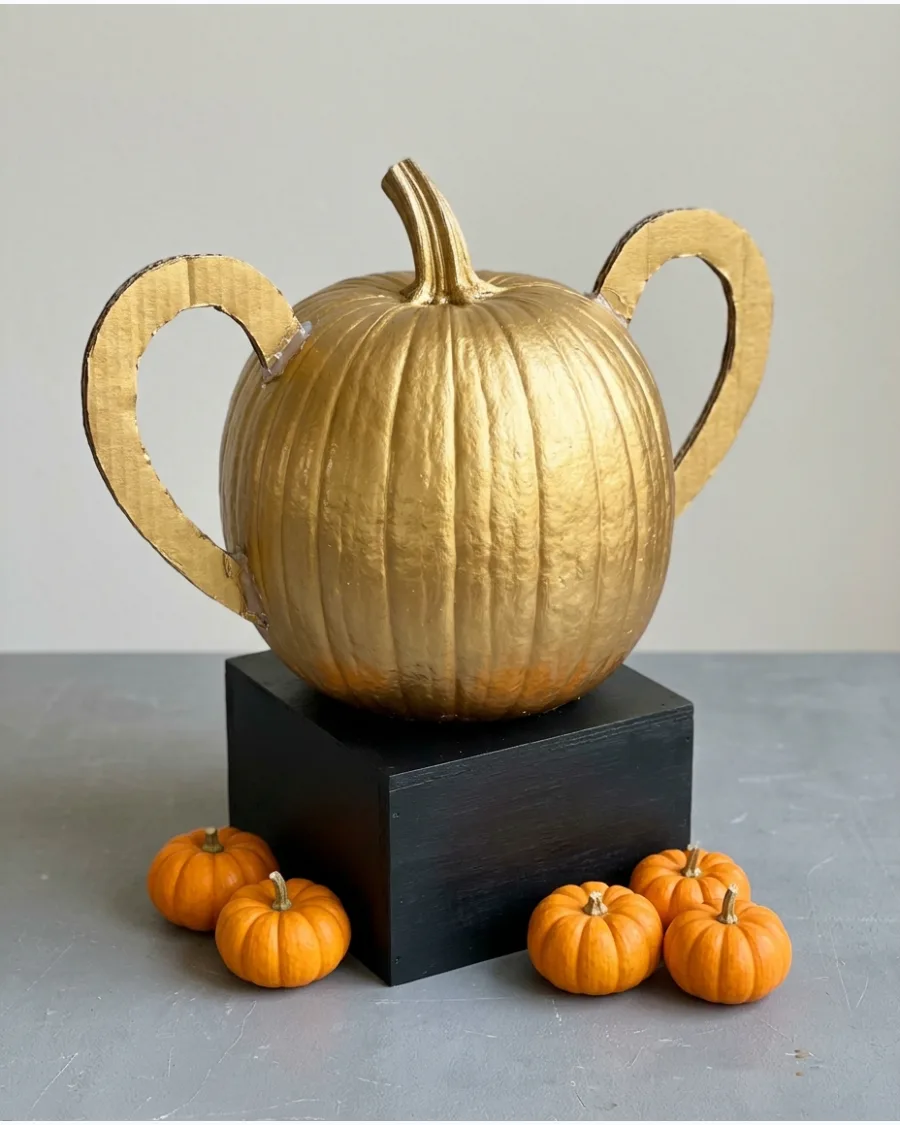
Paint a large, perfectly shaped pumpkin with metallic gold spray paint and attach two large cardboard handles to the sides. Place it on a tall, sturdy black pedestal or box to give it the height of a real trophy.
Surround the base of the trophy with several tiny unpainted pumpkins to make it look like it just won the competition. This meta-concept is clever and usually gets a laugh from the judges.
- Apply a primer before the gold spray paint to get the smoothest, most reflective finish.
- Use heavy-duty construction adhesive or E6000 to keep the handles securely attached.
- Write 1st Place or Grand Champion on the pedestal using a gold paint pen.
Most people skip this: Weight the pedestal box with a few stones so the display doesn't tip over if the table is bumped.
Frequently Asked Questions
How do I make my contest pumpkin last longer without rotting?
To keep your pumpkin fresh, soak it in a diluted bleach solution after carving and seal any exposed edges with petroleum jelly. Opting for no-carve designs like painting or decoupaging is also a great way to ensure your entry stays perfect until judging day.
What are the best themes for winning a pumpkin decorating contest?
Winning entries often feature clever puns, current pop culture icons, or elaborate diorama scenes built inside the pumpkin. Focus on high-impact visuals and creative storytelling to really capture the judges' attention and stand out from the crowd.
What tools do I need for intricate pumpkin carving?
Upgrade from basic kits to professional tools like linoleum cutters and clay loops for precise surface etching and shading. These specialized implements allow you to create fine details and varying depths that give your design a professional, three-dimensional look.
How can I transport a decorated pumpkin to a contest safely?
Place your pumpkin in a sturdy box lined with rolled towels to prevent it from rolling or shifting during the drive. Be extra careful with top-heavy decorations and consider attaching fragile elements only once you have arrived at the contest site.
Can I use a fake pumpkin for a contest?
Many contests allow foam "funkins," which are perfect for permanent keepsakes and detailed paint jobs. To make a fake pumpkin look realistic, add realistic textures or a bit of weight to the bottom so it sits naturally among the real ones.