50 Halloween Bat Wall Ideas

This post may contain affiliate links: full affiliate disclosure.
Transforming an empty wall into a spooky focal point is easy with the right bat arrangement. These ideas focus on creating movement and depth using simple black silhouettes and smart placement techniques.
Classic Halloween Bat Wall Ideas
1. Classic Black Paper Bat Swarm
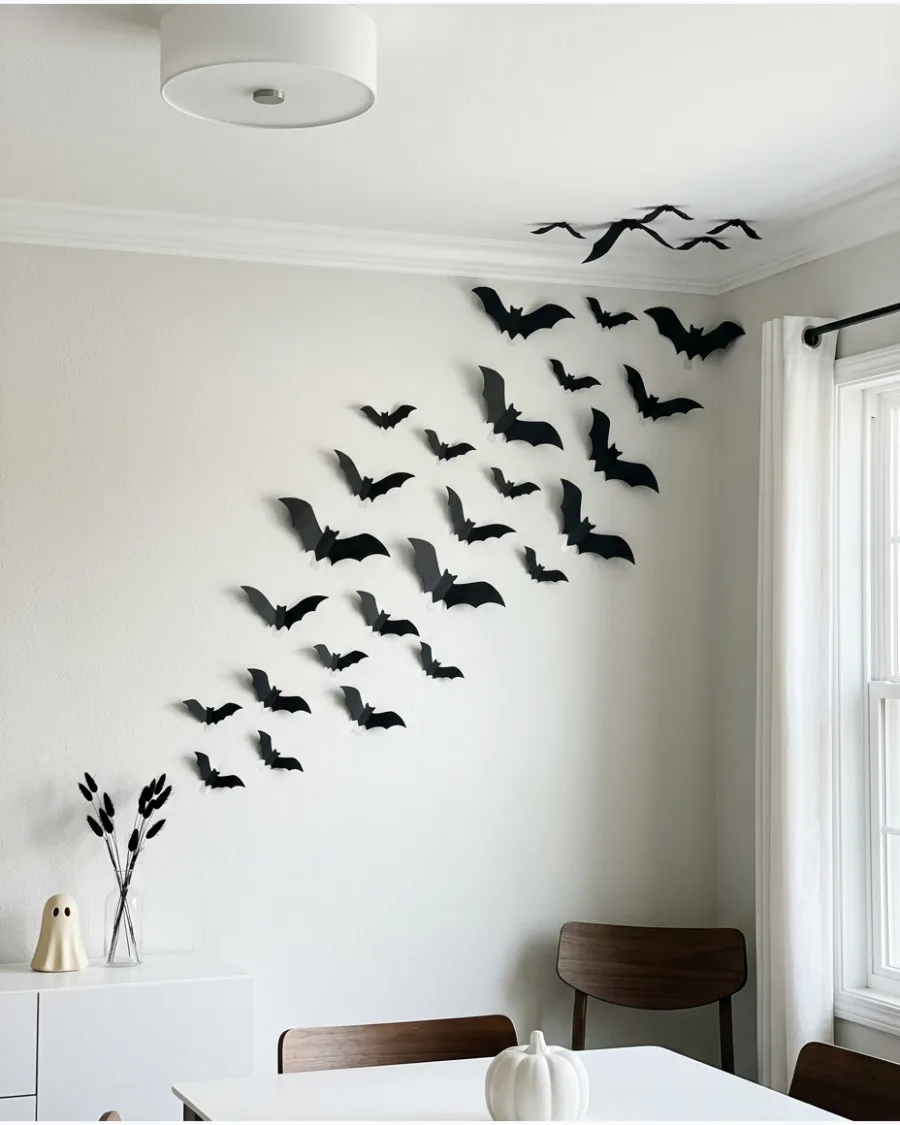
Cut black bats in several sizes and arrange them as though they are flying diagonally across the wall. Fold each bat’s wings slightly forward to give the display a simple 3D effect. This method works best on light-colored walls to provide high contrast.
- Budget: Under $10 for a pack of cardstock.
- Use removable adhesive putty to prevent paint damage on drywall.
- Mix at least three distinct sizes for a natural look.
Quick win: Use a ruler to map out a light pencil line for the flight path before sticking anything down.
2. Small-to-Large Flying Bat Arrangement
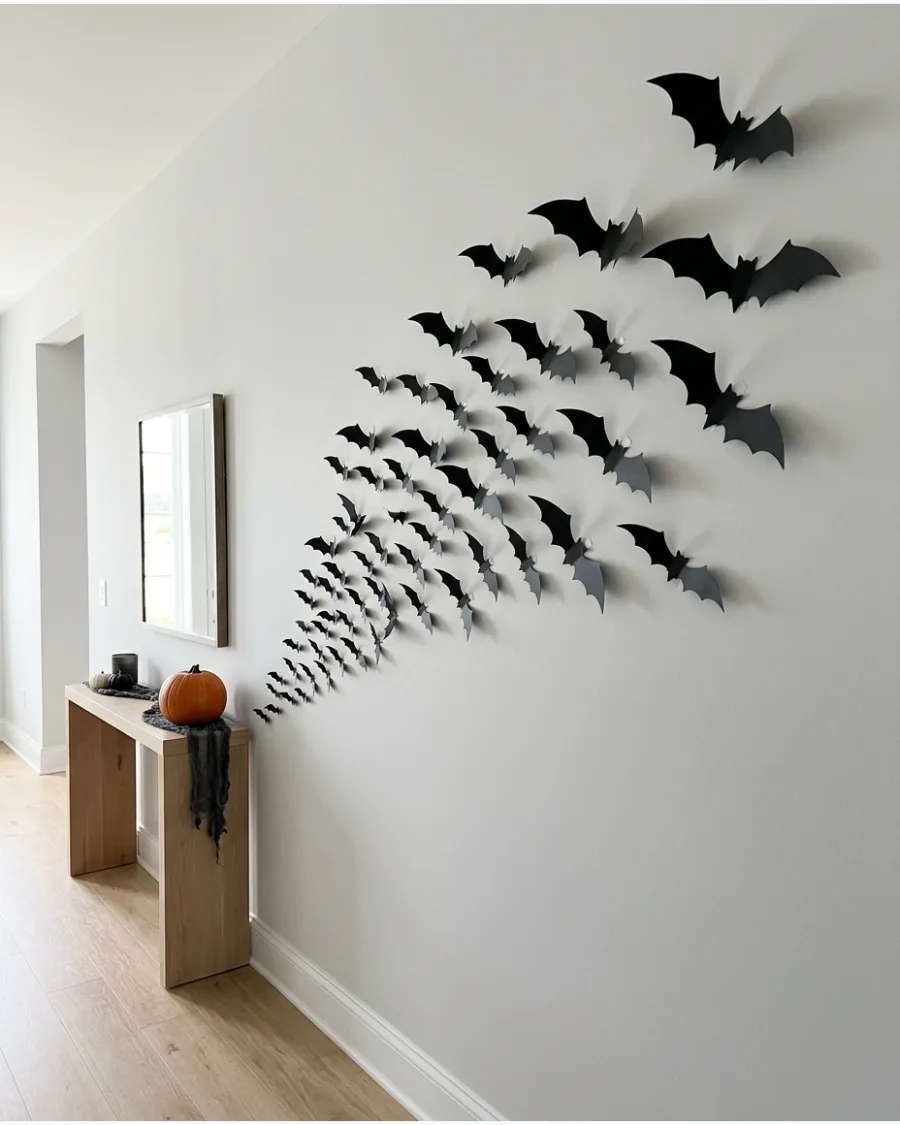
Begin with tiny bats clustered closely together and gradually increase their size as the swarm spreads across the wall. This creates movement and makes the display look as though the bats are flying toward the room. It is a great way to lead the eye toward a specific piece of furniture.
- Setup time: 20 minutes.
- Place the smallest bats at the starting point of the swarm.
- Works well in long hallways or narrow entryways.
Best shortcut: Group the smallest bats tightly to create a dense launch point.
3. Corner-to-Ceiling Bat Swarm
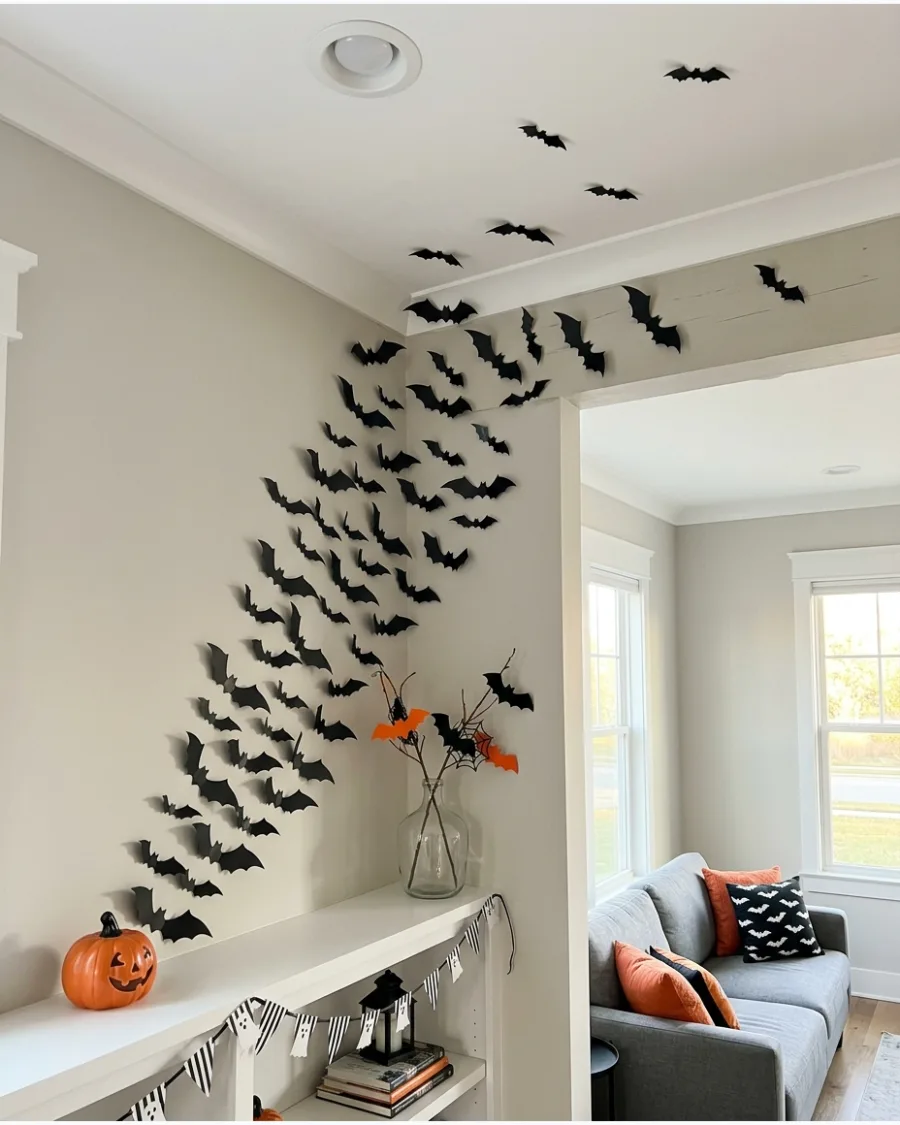
Start the bats near the bottom corner of the wall and continue the arrangement toward the ceiling. Space them farther apart near the top to make the swarm appear to disperse. This technique adds height to a room and uses often-ignored vertical space.
- Cost: Minimal for paper and tape.
- Focus on the corner seam to ground the arrangement.
- Use more bats at eye level for the most visual impact.
Most people skip this: Angle some bats slightly toward the ceiling to emphasize the upward flight direction.
4. Floor-to-Ceiling Bat Wall
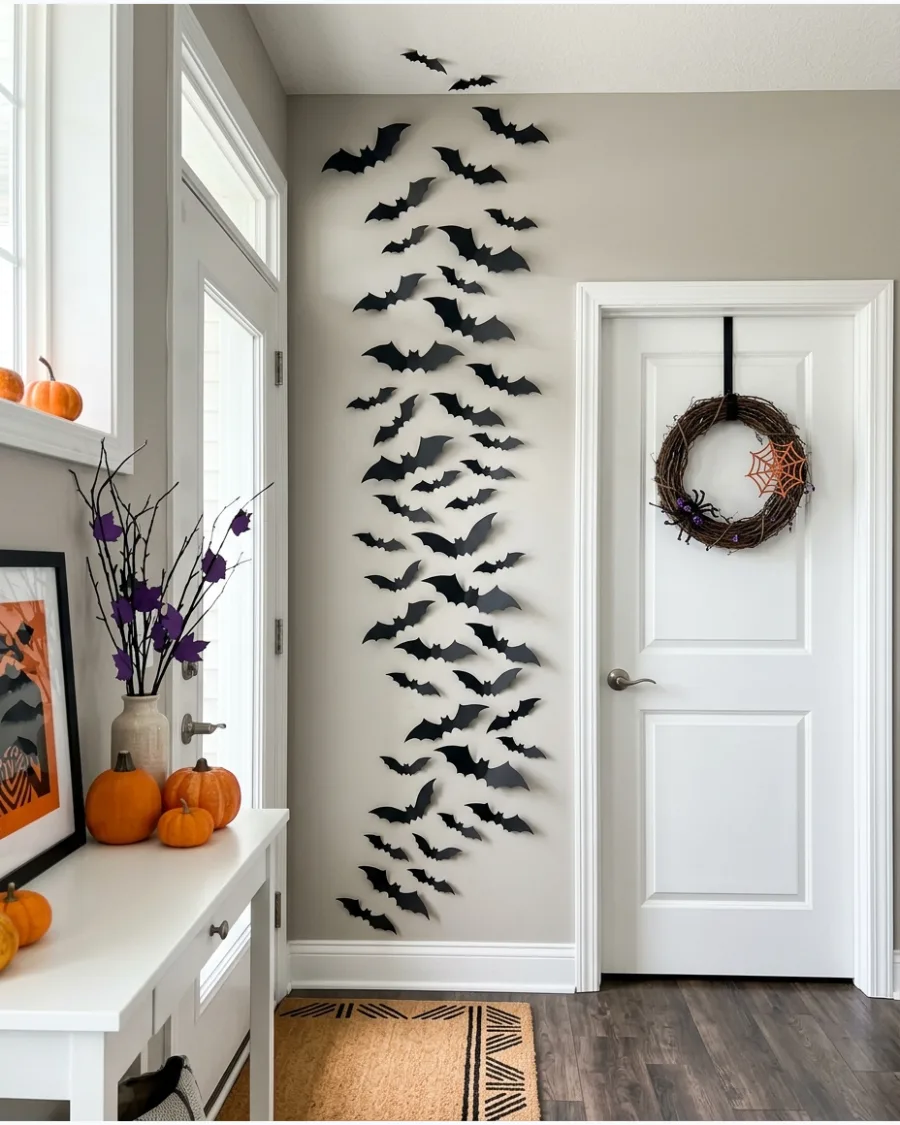
Cover one narrow section of the wall with bats flying from the baseboard to the ceiling. This vertical arrangement works especially well in small entryways and empty corners. It creates a dramatic pillar of bats without overwhelming a large wall.
- Ideal for renters with limited wall space.
- Use extra-strong adhesive on the bottom bats where they might be bumped.
- Keep the width of the swarm consistent for a clean look.
Quick win: Line up the center of the swarm with a light switch or door frame for a balanced feel.
5. Oversized Bat Feature Wall
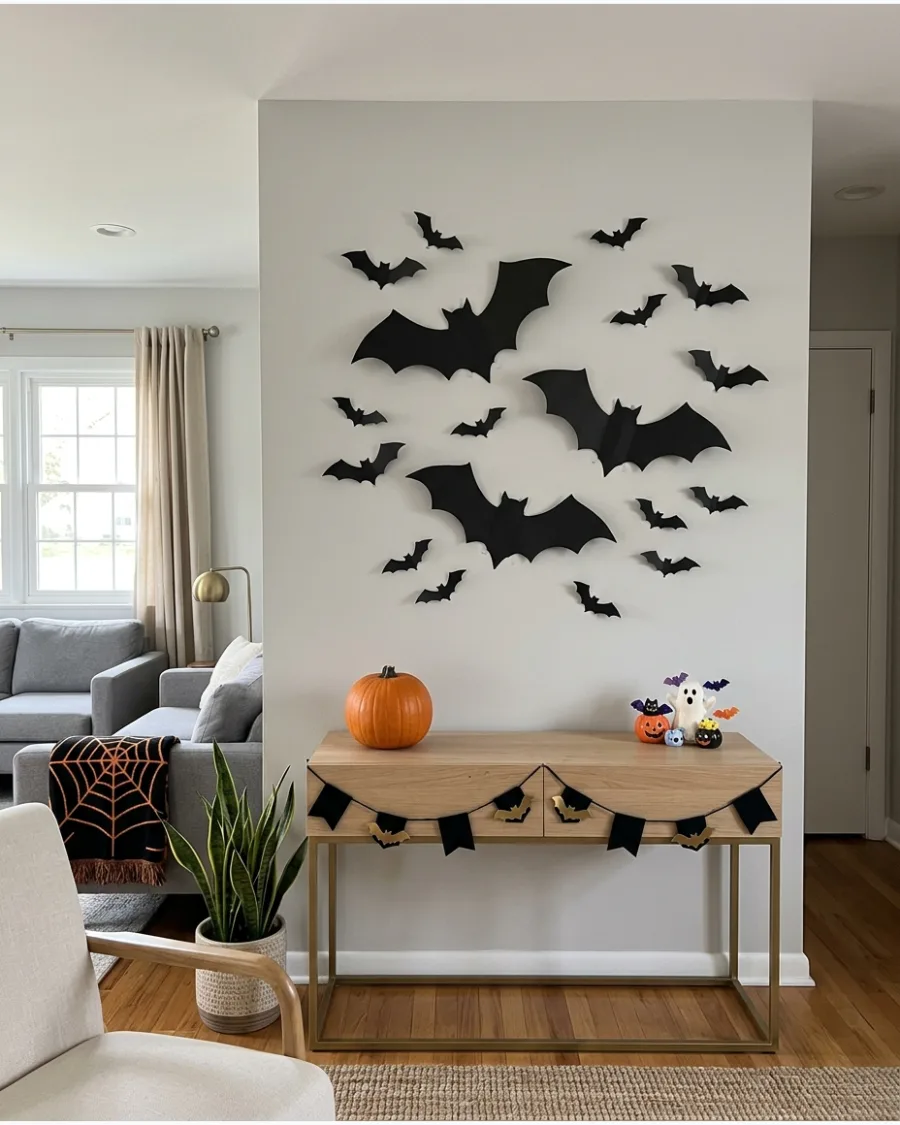
Use several extra-large bat silhouettes as the main focal point. Surround them with smaller bats to create a bold display without covering the entire wall. Large bats act as anchors for the rest of the design.
- Budget: $15 to $20 for large vinyl decals.
- Place the largest bats first to establish the center of the display.
- Mix matte and glossy finishes for subtle texture.
Best shortcut: Use heavy cardstock for the large bats so they do not curl or sag over time.
6. Minimalist Five-Bat Wall Display
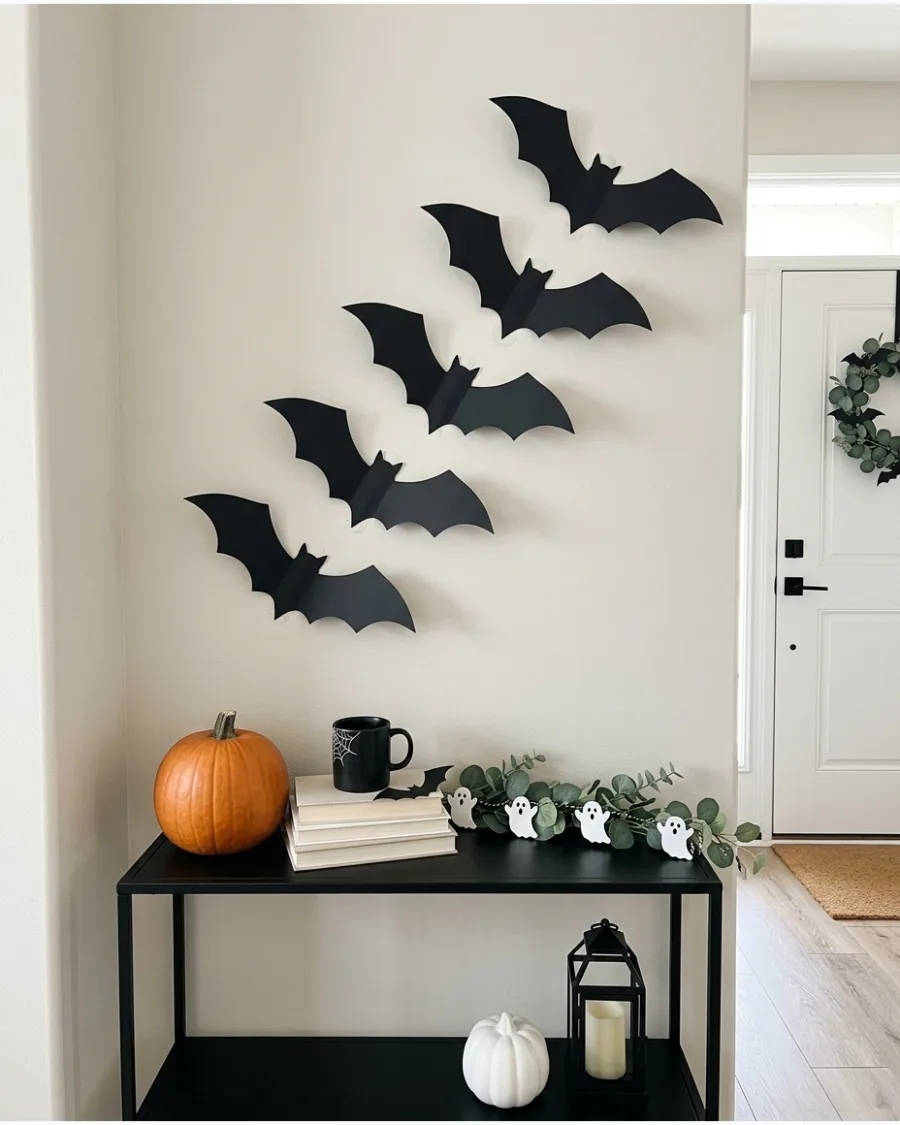
Arrange five large black bats in a clean diagonal line. This simple design adds Halloween character without making the room feel overly decorated. This is the perfect choice for modern or minimalist homes.
- Setup time: 5 minutes.
- Ensure the bats are all the same size for a uniform look.
- Use double-sided tape for a flat, clean profile.
Quick win: Use odd numbers like five or seven to create a more pleasing visual balance.
7. Dense Bat Cloud
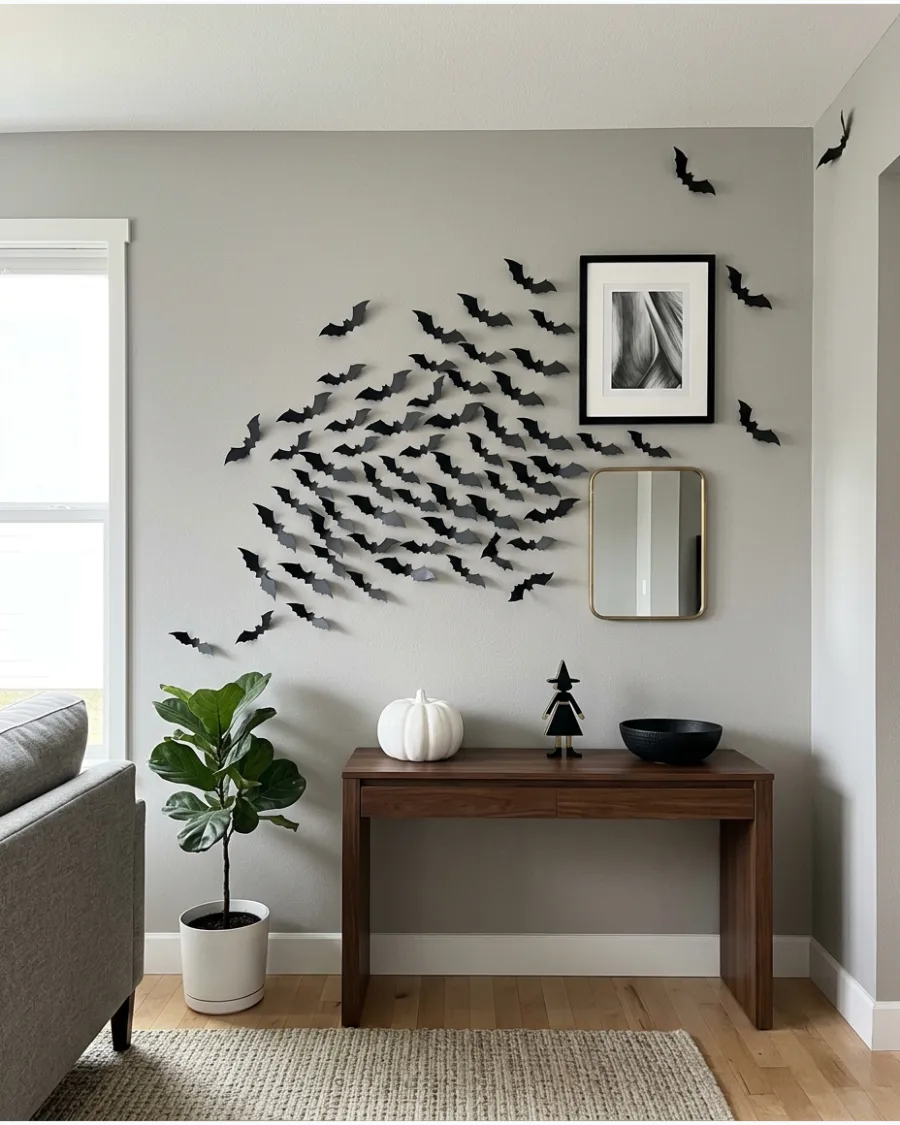
Cluster dozens of small bats closely together in the center of the wall. Allow a few bats to escape around the edges so the arrangement resembles a moving cloud. This creates a high-impact focal point that feels energetic.
- Time: 30 to 45 minutes for assembly.
- Overlap some bat wings slightly to create depth.
- Best for large, open wall spaces above a sofa.
Most people skip this: Vary the wing-fold angles within the cluster to make the cloud look thicker.
8. Scattered Flying Bats
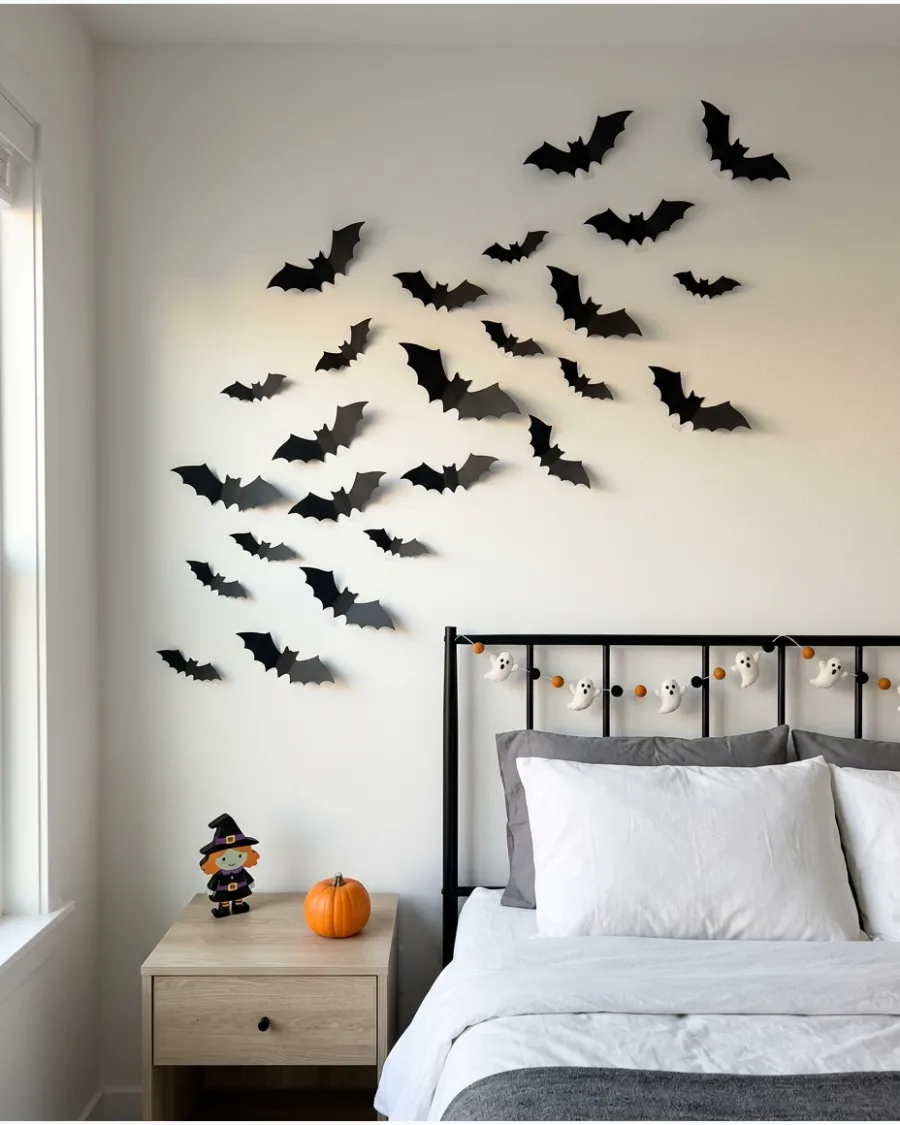
Place bats at varied angles and distances rather than following one perfect line. The irregular spacing gives the wall a more natural flying-swarm appearance. Avoid straight lines to make the display feel more organic and less staged.
- Cost: $10 for a variety pack.
- Rotate each bat as you stick it to avoid repetitive patterns.
- Use a mix of sizes to enhance the random effect.
Best shortcut: Drop the bats on the floor first to see a random layout before putting them on the wall.
9. Symmetrical Bat Wall
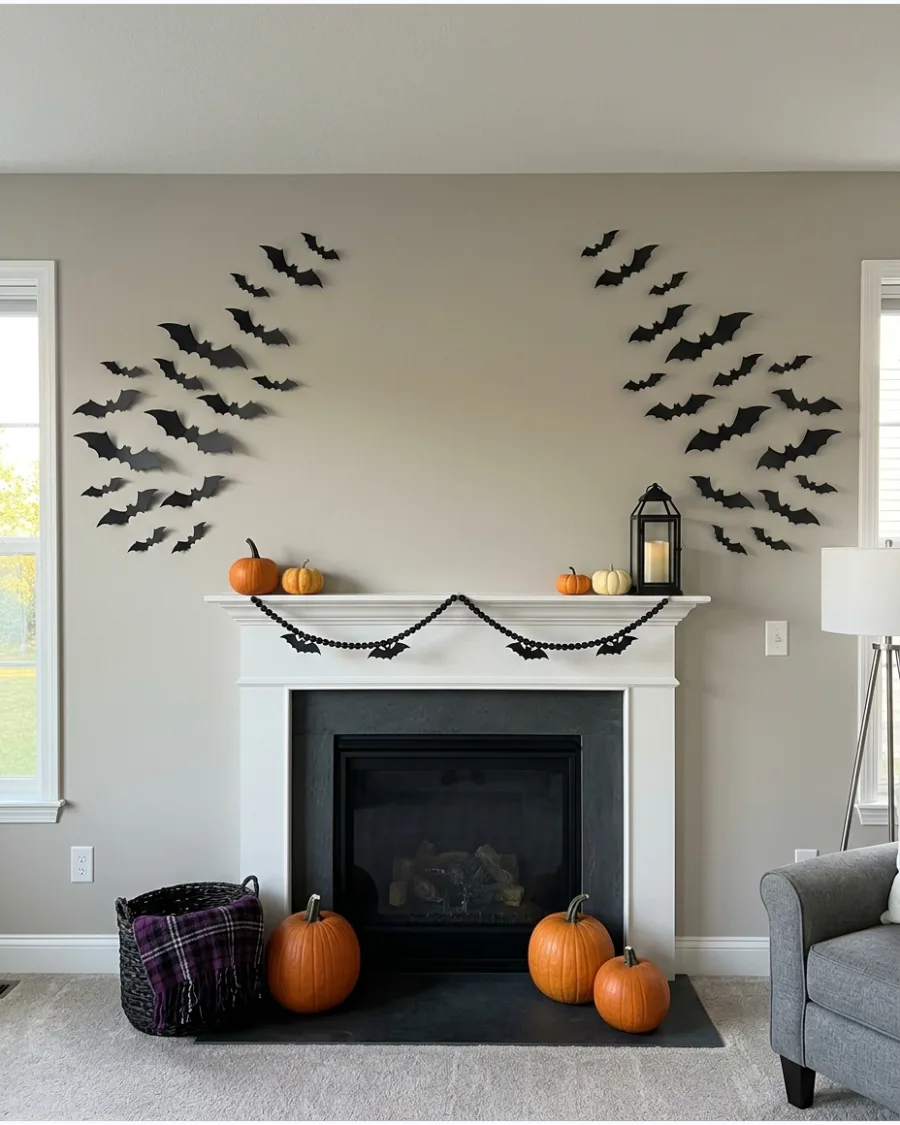
Create matching bat arrangements on both sides of a fireplace, doorway or piece of furniture. Keep the sizes and spacing balanced for a polished Halloween display. This works best in formal living rooms or dining areas.
- Setup: Requires measuring for exact symmetry.
- Use the same number of bats on each side.
- Great for flanking a large mirror or piece of art.
Quick win: Use a piece of painter's tape to mark the center point of each side before starting.
10. Curved Bat Flight Path
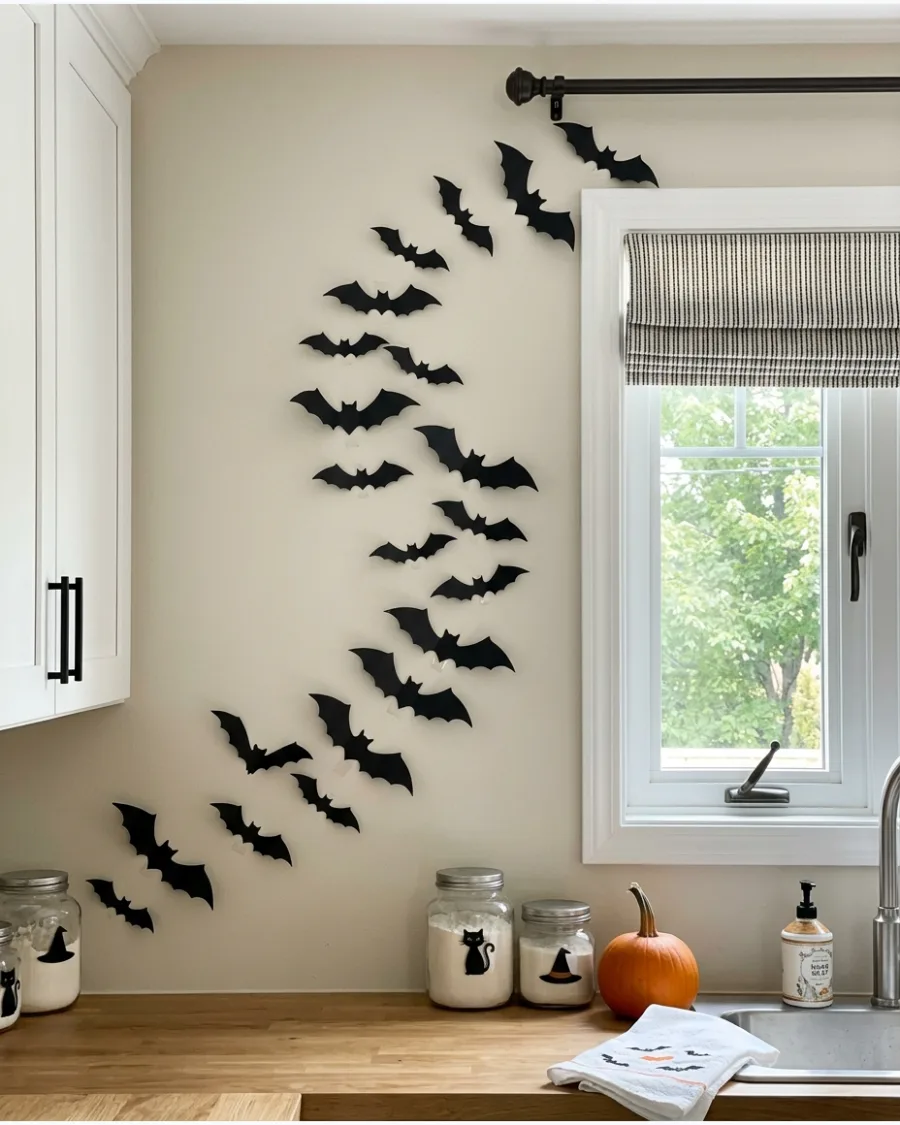
Arrange the bats in a soft curved line that sweeps across the wall. Change the direction of their wings slightly to strengthen the illusion of movement. An S-curve or a C-curve guides the eye across the room beautifully.
- Time: 25 minutes.
- Use light pencil marks to trace the curve first.
- Place larger bats in the middle of the curve for visual weight.
Most people skip this: Point the noses of the bats along the line of the curve to maintain the flow.
Halloween Bats Around a Fireplace
11. Bats Flying Out of the Fireplace
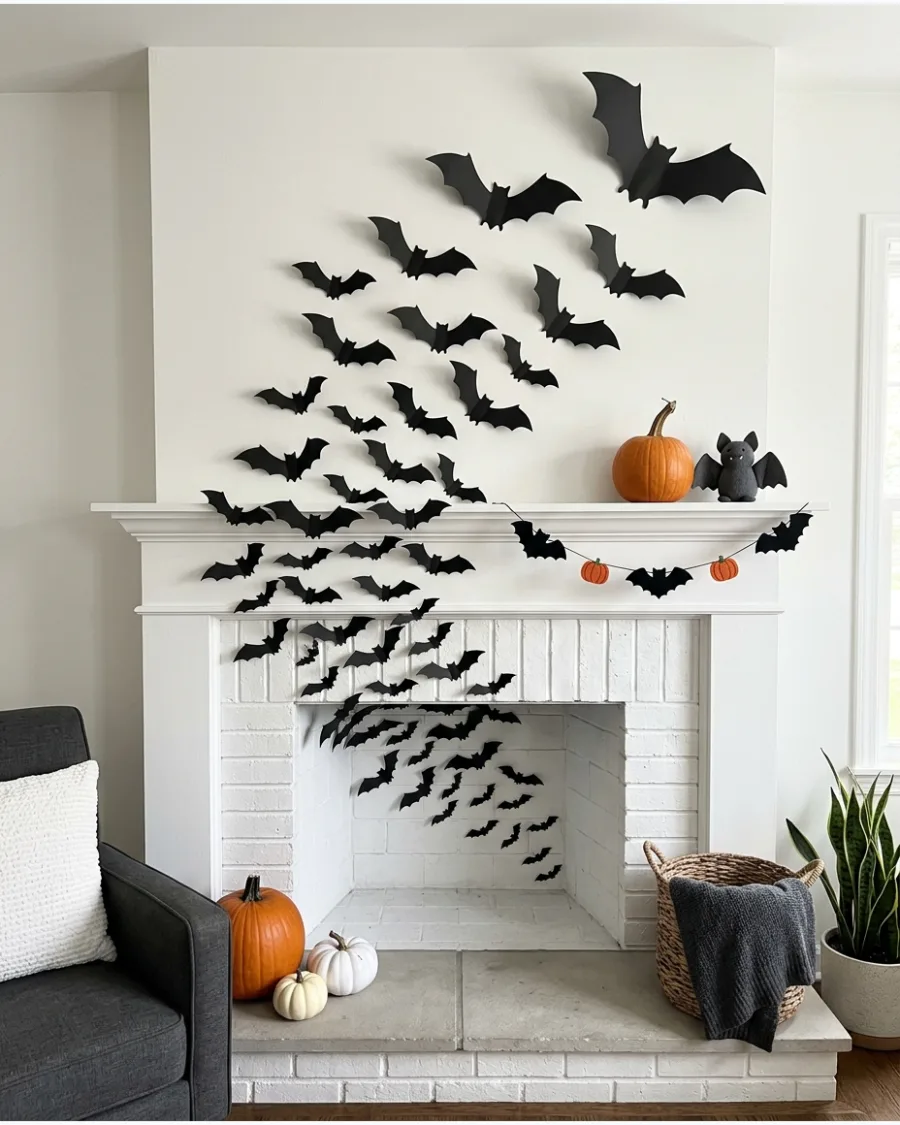
Begin with a dense group of small bats inside the fireplace opening and continue them upward across the wall. Make the bats larger as they move toward the ceiling.
Start with the smallest bats at the hearth level to create the illusion of depth and movement. This creates a high-impact focal point that draws the eye upward.
- $10 budget for basic paper bats.
- 20 minutes setup time for a standard fireplace.
- Works best with non-functional or decorative fireplaces.
Quick win: Use extra-strong adhesive putty for the bats inside the firebox where surfaces might be rougher.
12. Bats Above the Mantel
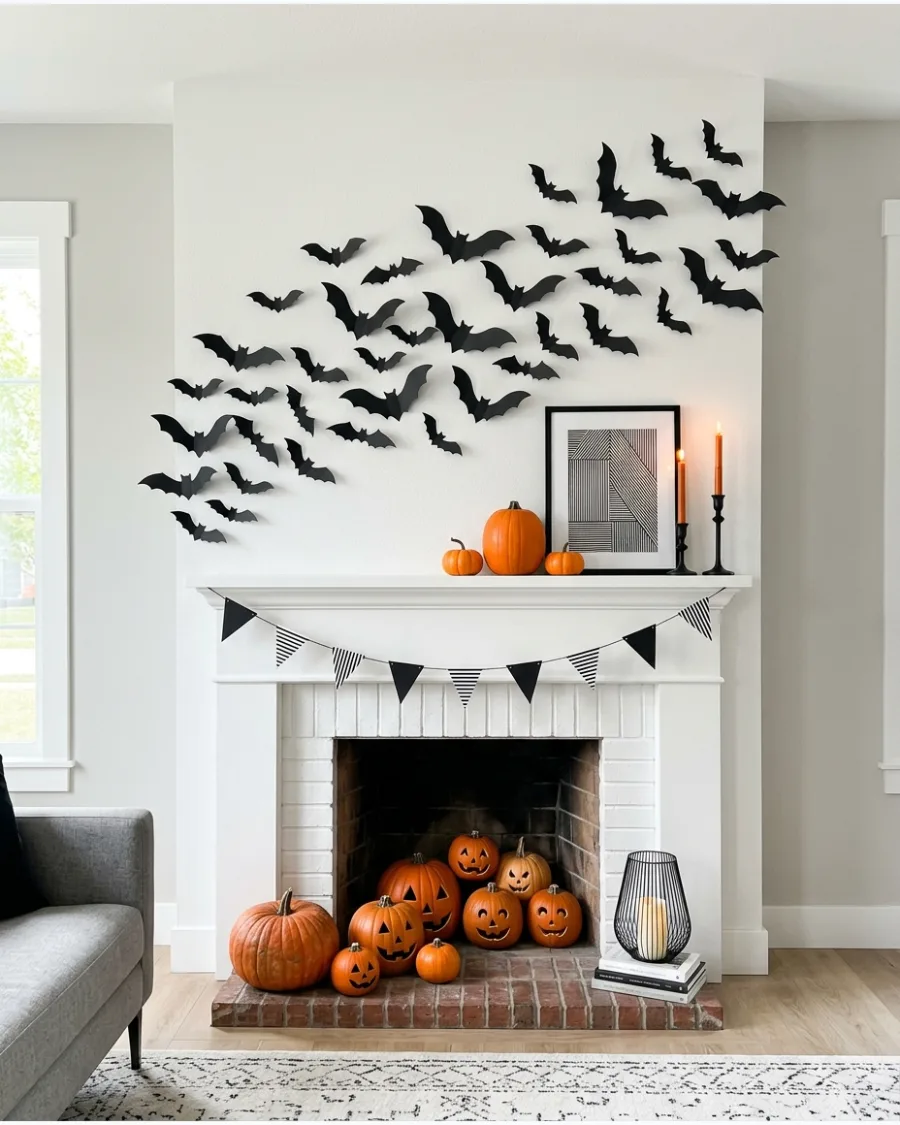
Arrange a wide swarm above the fireplace mantel while leaving space for candles, pumpkins and framed artwork. Let a few bats extend beyond the mantel’s width for a less formal look.
Vary the wing folds on each bat to ensure the shadows look natural against the wall. This layout feels intentional without being stiff.
- Under $15 for a pack of 60 bats.
- 15 minutes to arrange and stick.
- Great for layered mantel displays with existing decor.
Most people skip this: Leave at least three inches of breathing room between the top of your mantel decor and the first bat.
13. Bats Around a Round Mirror
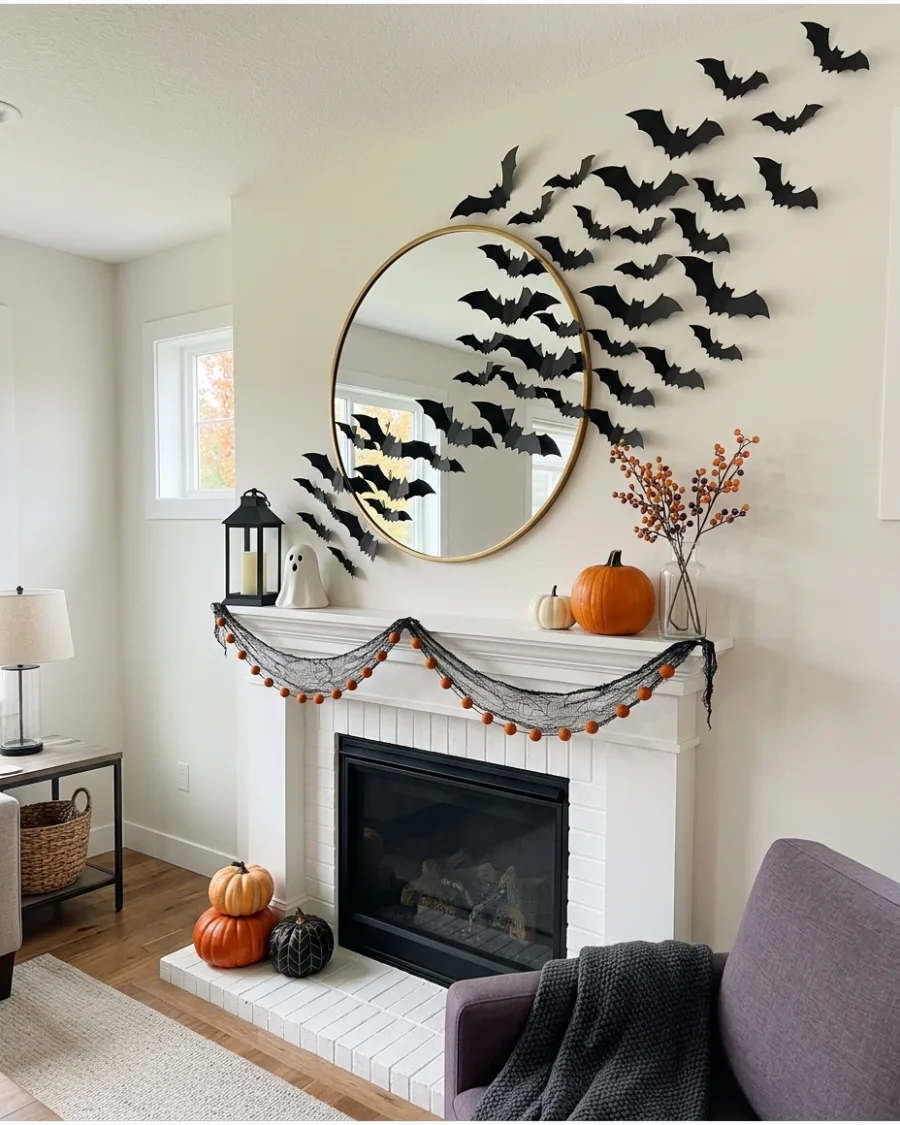
Surround a round mantel mirror with black bats in several sizes. Concentrate the bats near one side so they appear to fly around the mirror rather than form a perfect border.
Overlap a few bat wings slightly onto the glass to break up the hard edge of the mirror. It creates a sense of frantic energy that works well for a spooky theme.
- $12 for a multi-size bat pack.
- 10 minutes to complete the framing effect.
- Works on any circular wall art or clock.
Best shortcut: Use a microfiber cloth to clean the mirror edge before sticking bats down to ensure the adhesive holds.
14. Bats With Black Taper Candles
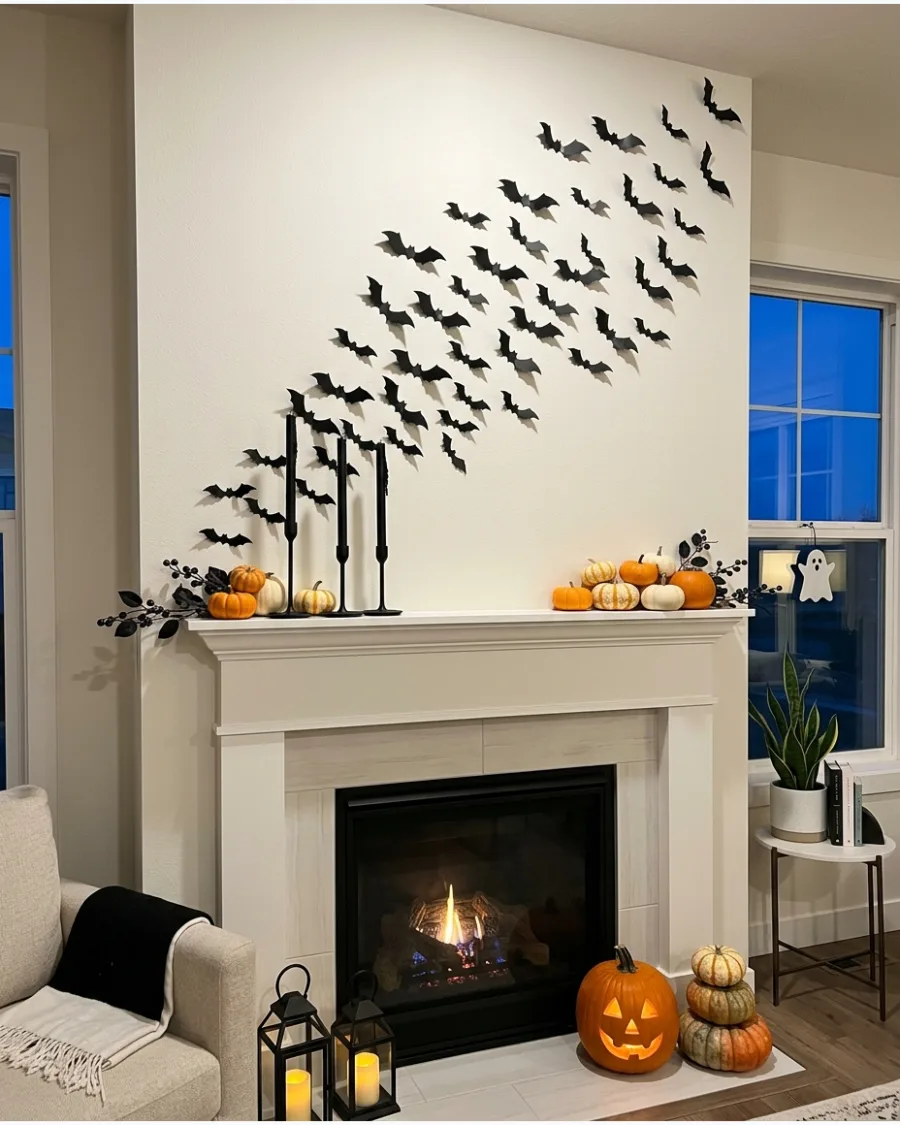
Pair a paper bat wall with black taper candles displayed across the mantel. Add dark candleholders and a few miniature pumpkins for a dramatic but uncomplicated arrangement.
Stick the bats in a diagonal line that mimics the rising smoke from the candles. This simple color palette keeps the room looking sophisticated.
- $25 for bats and a set of taper candles.
- 15 minutes to set up the display.
- High-contrast look that pops against light-colored walls.
Quick win: Use LED taper candles if you are placing bats directly above the flame height for safety.
15. Bats With White Pumpkins
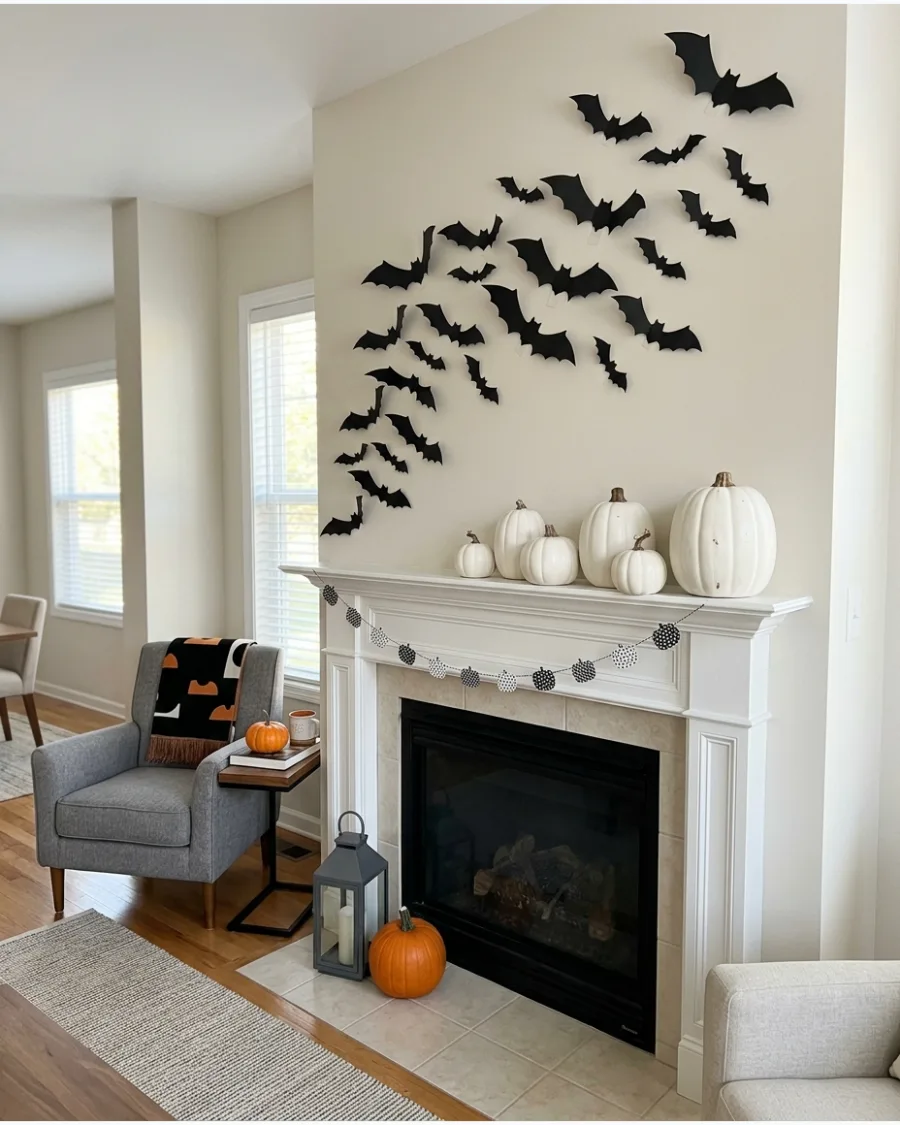
Decorate the mantel with neutral white pumpkins and place a black bat swarm above them. The strong contrast creates a modern Halloween look that suits light-colored rooms.
Group the pumpkins in odd numbers like three or five to ground the airy bat display above them. This setup avoids the traditional orange and black for a cleaner aesthetic.
- $30 for a set of reusable craft pumpkins.
- 20 minutes to arrange the grouping.
- Perfect for minimalist or modern interiors.
Most people skip this: Use different textures of white pumpkins, like matte and glossy, to add visual interest.
16. Bats With Draped Black Fabric
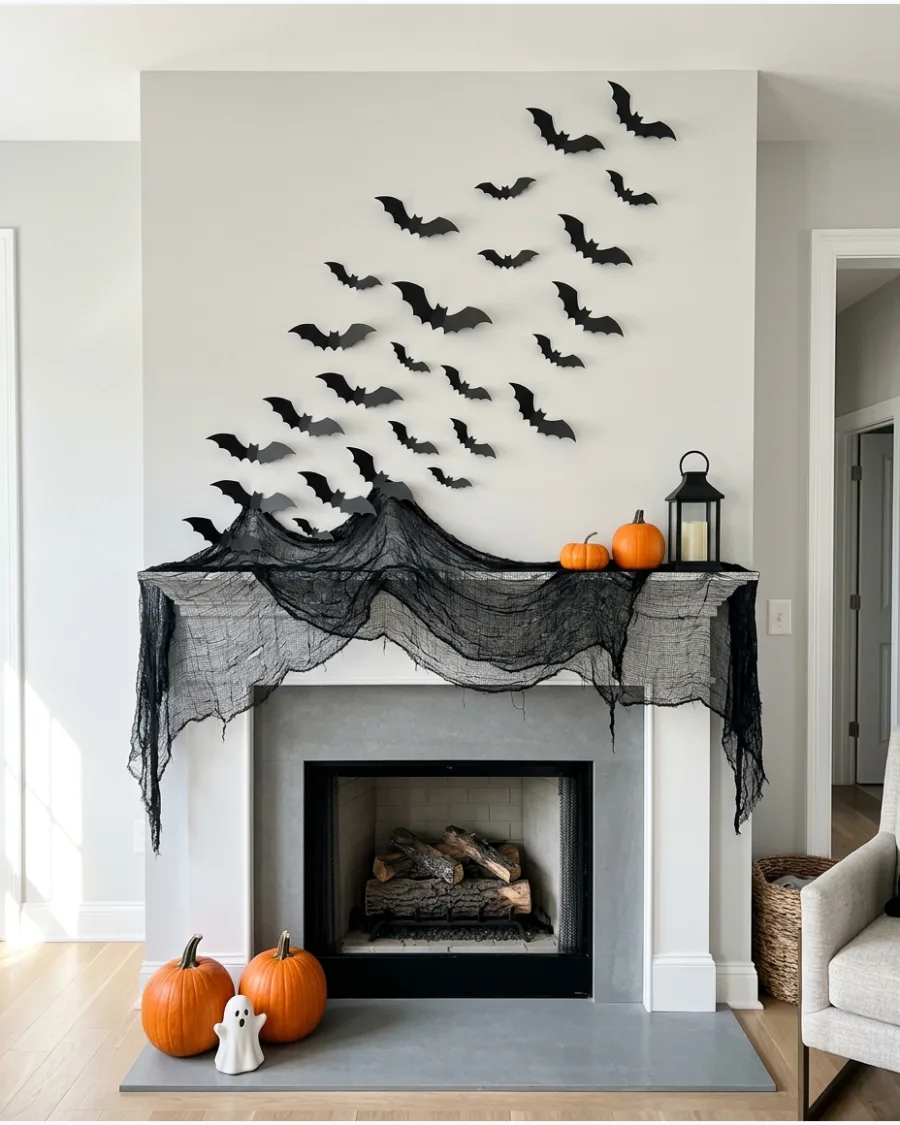
Drape lightweight black fabric across the mantel and arrange the bats climbing the wall above it. Allow the fabric to hang unevenly for a soft haunted-house effect.
Tuck the bottom row of bats slightly into the folds of the fabric to connect the two elements. The fabric adds a tactile layer that makes the flat paper bats pop.
- $15 for fabric and bats.
- 25 minutes to drape and stick.
- Covers up dusty or old mantel surfaces easily.
Best shortcut: Use clear push pins to secure the fabric to the top of the mantel so it doesn't slide off from the weight of the bats.
17. Bats Surrounding Mantel Artwork
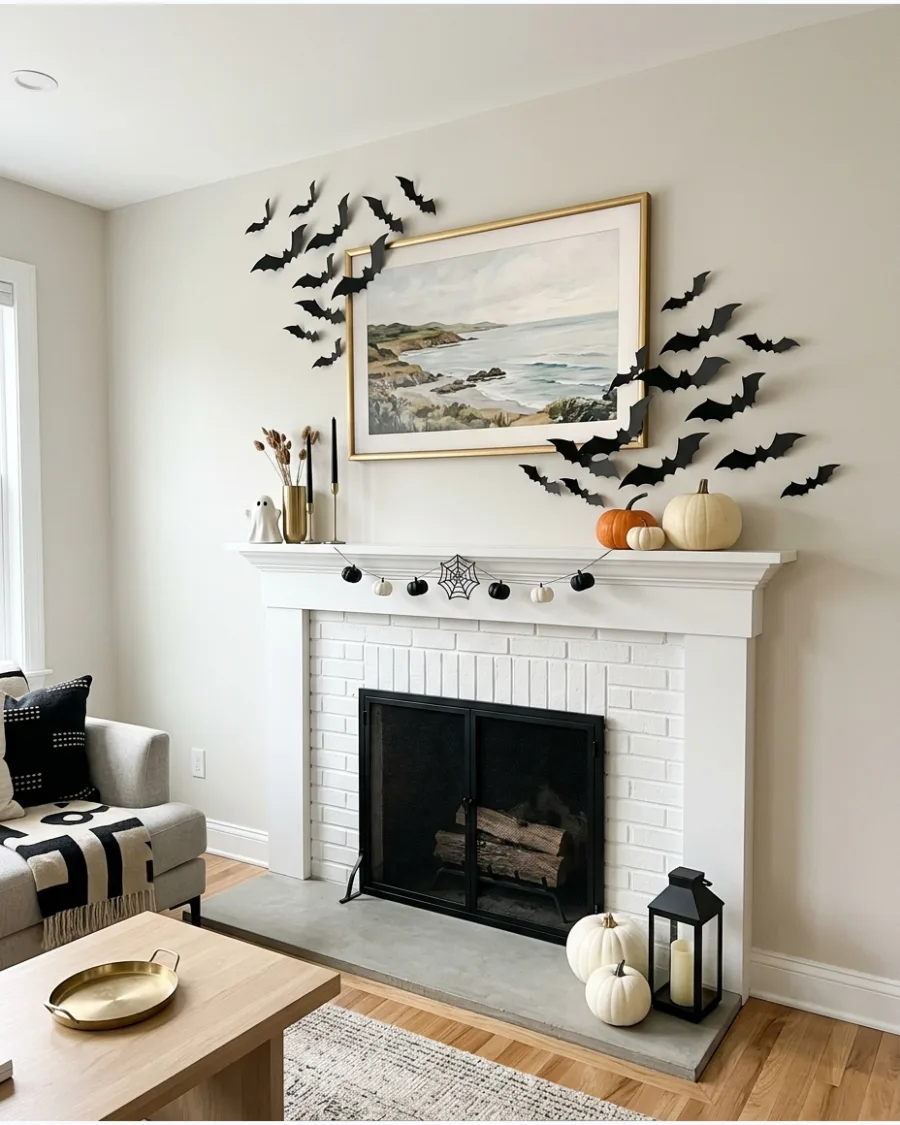
Keep an existing framed picture above the fireplace and arrange bats around its corners. Position some bats partly behind the frame to make the swarm feel integrated into the room.
Angle the bats so they appear to be flying out from behind the frame at different heights. This is an easy way to decorate without taking down your year-round art.
- $10 for a small pack of bats.
- 15 minutes to tuck and stick.
- Uses existing home decor to save on storage space.
Quick win: Use painter's tape on the back of the bats if you are sticking them directly to an expensive picture frame.
18. Bats and Bare Branch Mantel
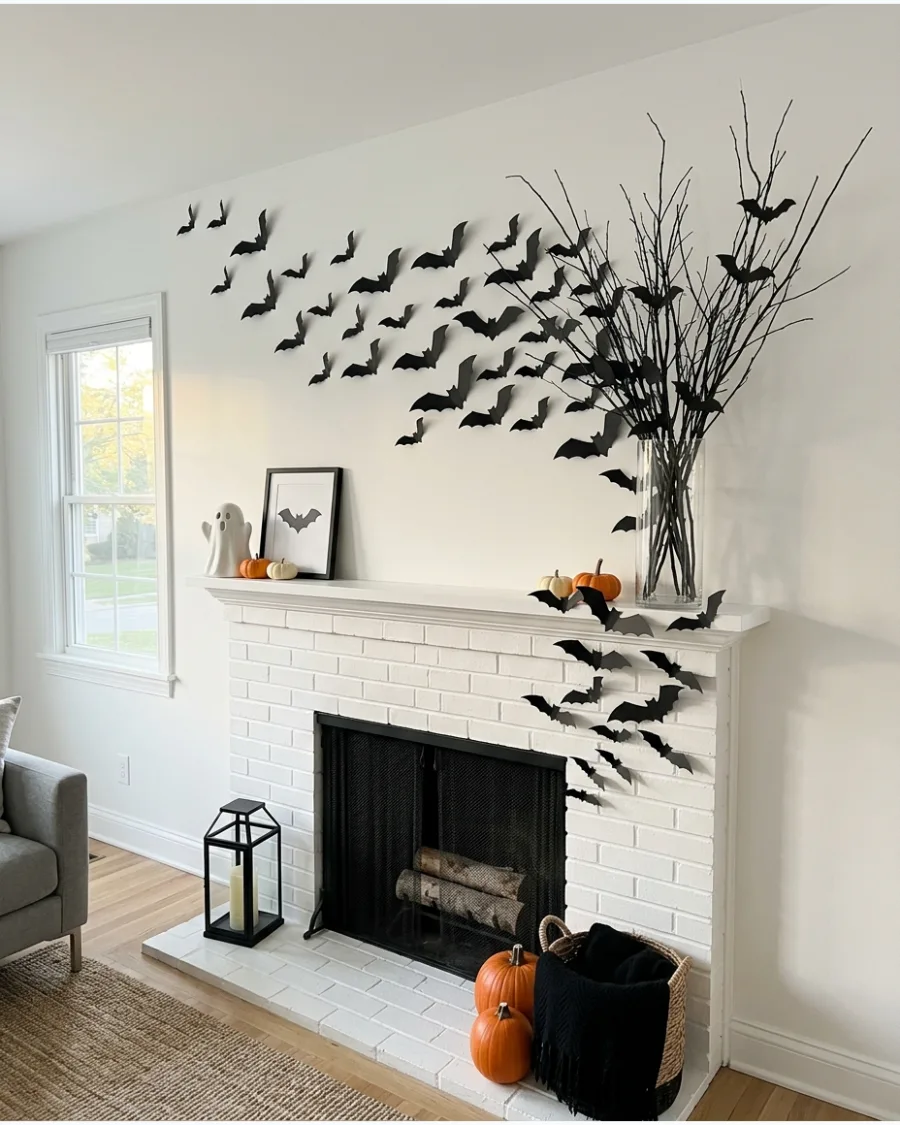
Display tall bare branches in a vase on one side of the mantel and extend the bat arrangement from the branches onto the wall. This creates the impression that the bats are leaving their roost.
Attach the smallest bats to the very tips of the branches using thin floral wire. It adds a 3D element that a flat wall display lacks.
- $5 for spray paint if using found branches.
- 30 minutes for assembly and placement.
- Adds height to rooms with low ceilings.
Most people skip this: Spray paint found branches matte black for a more cohesive and intentional look.
Bats Around Mirrors, Doors and Windows
19. Halloween Bats Around an Entryway Mirror
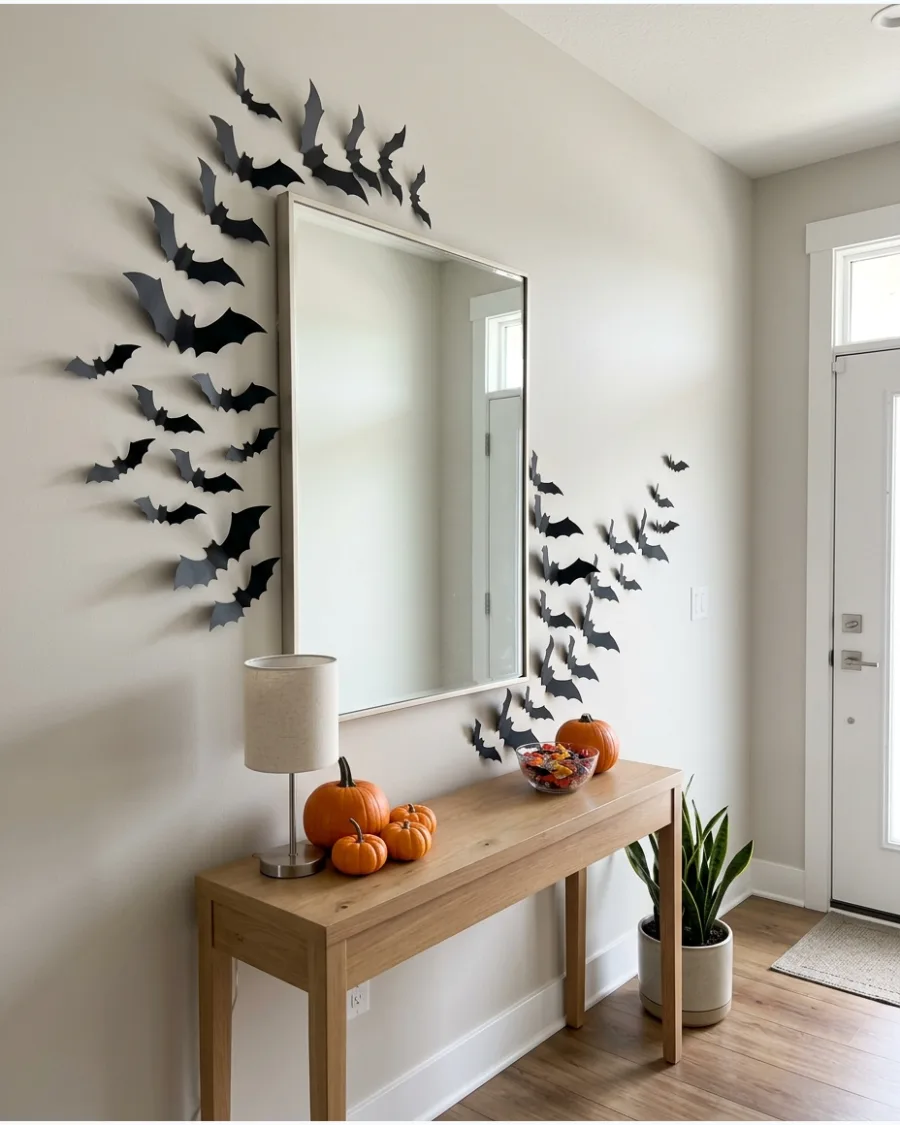
Arrange bats around an entryway mirror and continue a few across the nearby wall. Add a small lamp, pumpkins and a bowl for Halloween candy beneath the display.
Place the bats in a C-shape around the mirror to guide guests toward the candy bowl. This makes the entryway feel festive the moment someone walks through the door.
- $15 for basic bats and candy bowl.
- 20 minutes to set up the entry zone.
- Great for greeting trick-or-treaters at the door.
Best shortcut: Use a command hook to hang the candy bowl if your console table is too small for all the decor.
20. Bats Flying Across a Full-Length Mirror
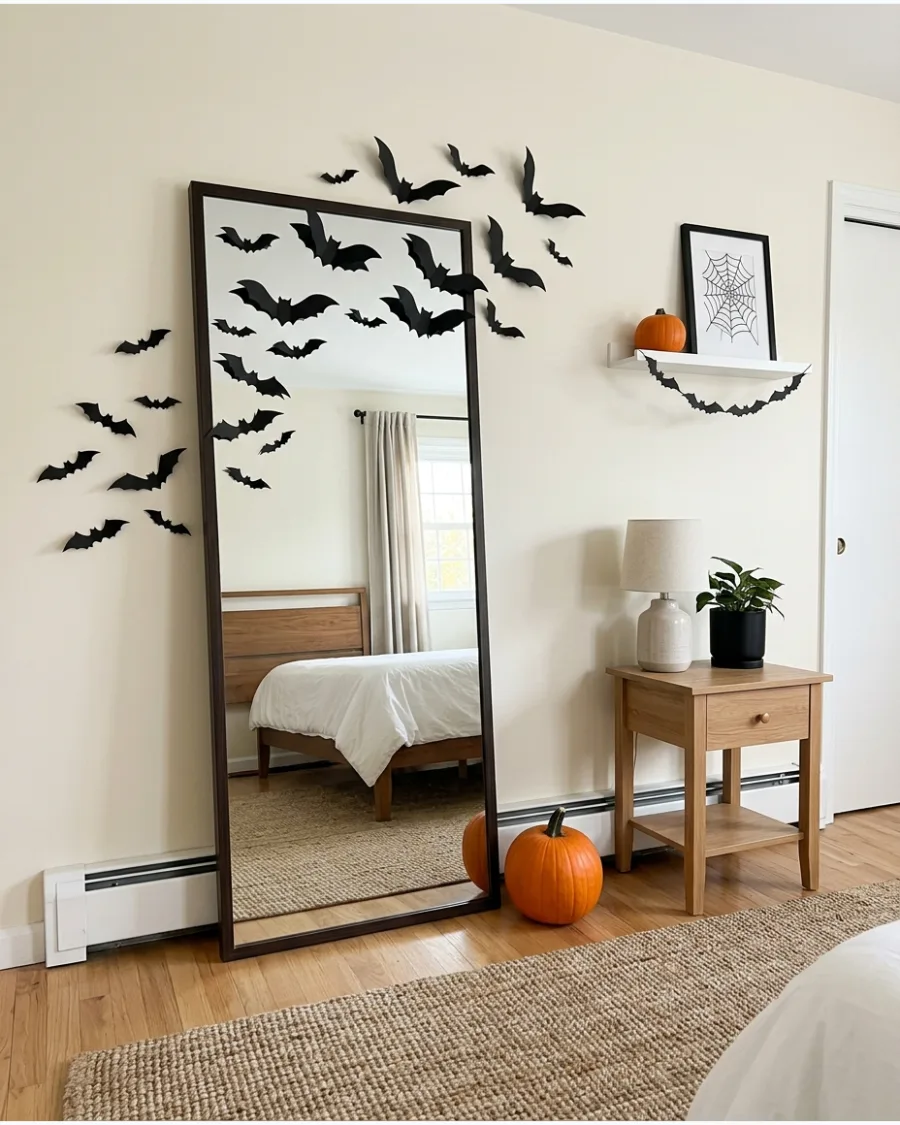
Place black bats across one corner of a full-length mirror and continue them onto the surrounding wall. Keep the center of the mirror clear so it remains practical to use.
Stick bats to the mirror surface using double-sided tape that is safe for glass. This trick doubles the number of bats you see because of the reflection.
- $10 for a standard pack of bats.
- 10 minutes for a quick visual update.
- Works well in small apartments to add depth.
Quick win: Use a glass cleaner after removing the bats to get rid of any adhesive residue instantly.
21. Bats Escaping Through a Doorway
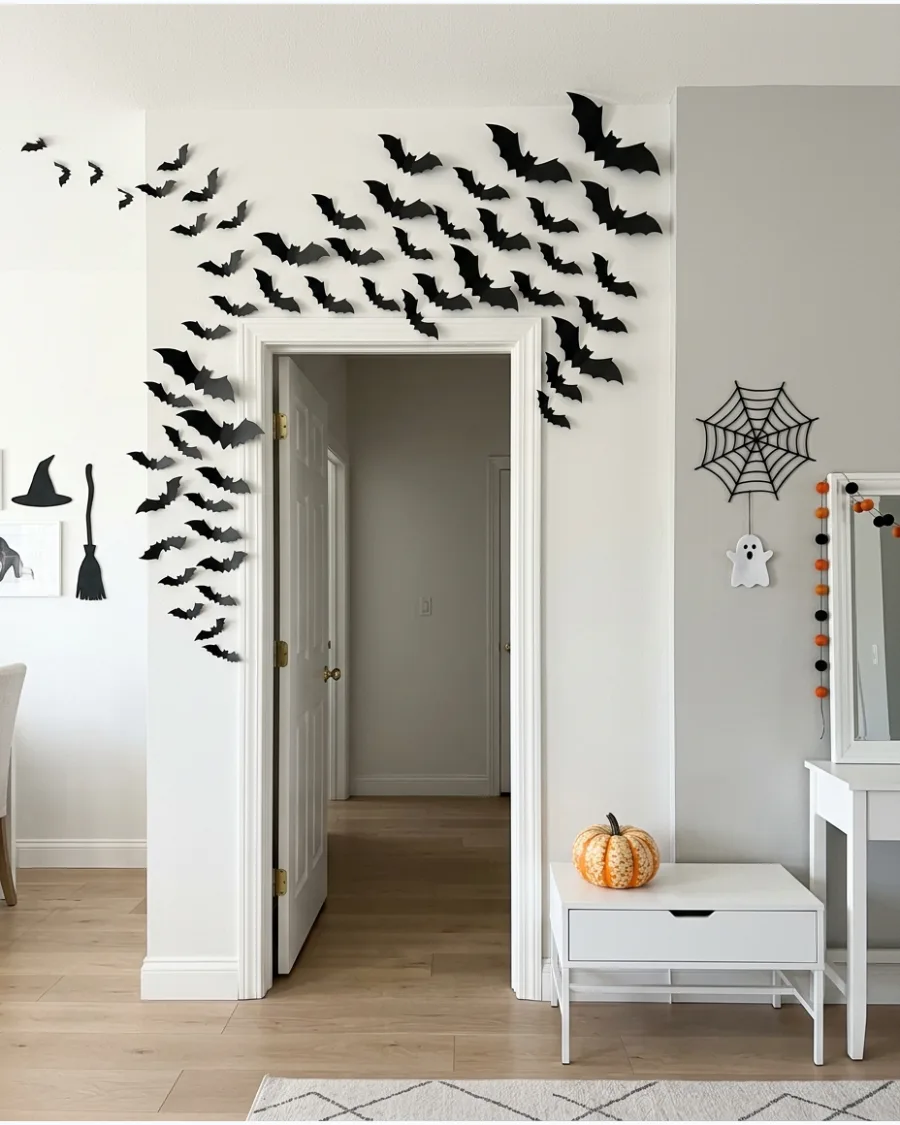
Cluster the bats above one side of a doorway and spread them across the adjoining wall to create a sense of motion. The arrangement should look as though the bats are flying from one room into another in a continuous stream.
Place the smallest bats furthest from the door to mimic a disappearing tail of the swarm. This technique adds architectural interest without needing extra furniture or floor space. It works best on light-colored walls where the black silhouettes can pop.
- Cost: Under $15 for a large pack of precut plastic or cardstock bats.
- Placement: Group bats tightly at the door frame edge and increase spacing as they move away.
- Adaptation: Use smaller bats for narrow hallways to prevent the space from feeling claustrophobic.
Most people skip this: Angle the bats so they follow the natural sightline of someone walking through the door.
22. Bats Flying Through a Window
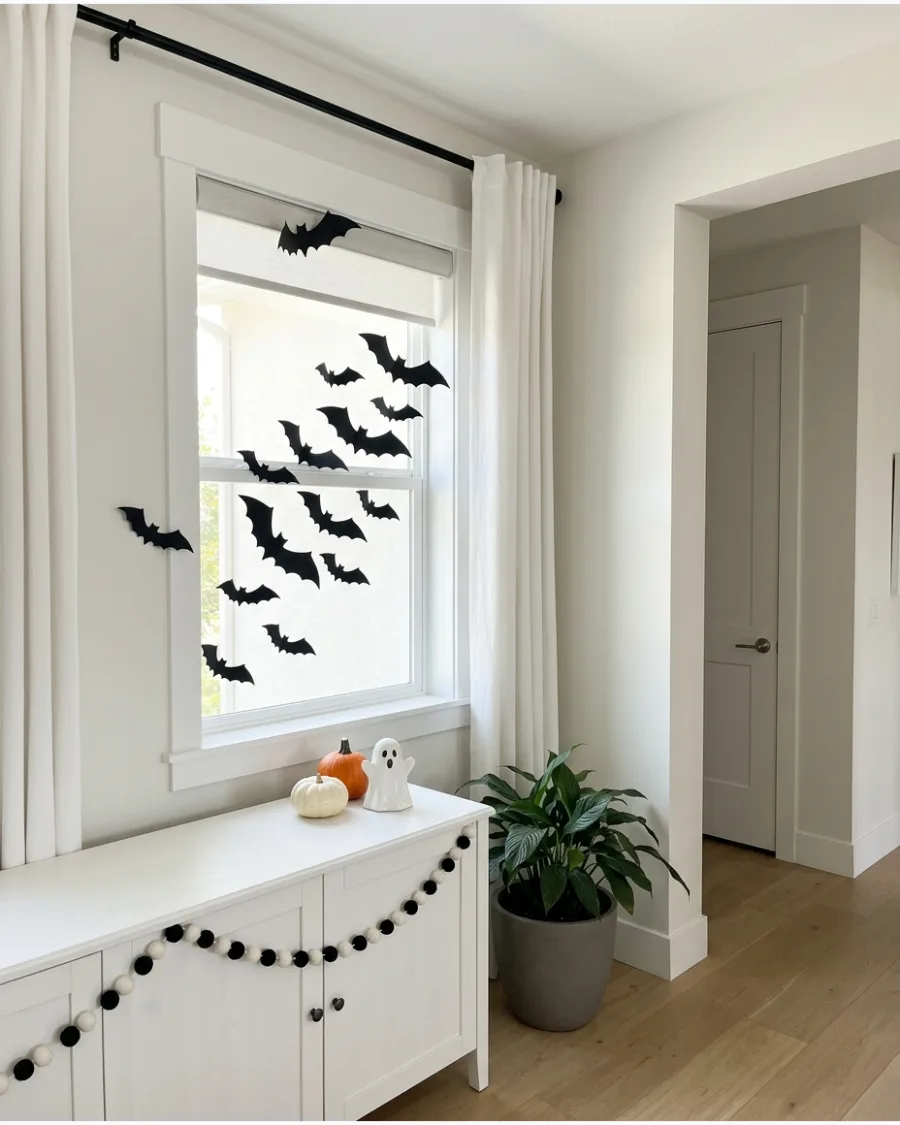
Place bats around the upper corner of a window and continue them across the wall for a dramatic entry effect. Position the bats facing inward so they appear to be entering the room from the outdoors.
Angle the bat bodies toward the center of the room to create a clear sense of direction. Windows are natural focal points that don't require clearing wall space to decorate. This setup looks especially striking when back-lit by natural daylight.
- Sourcing: Look for waterproof PVC bats if you plan to stick any directly to the glass.
- Setup: Clean the window glass with rubbing alcohol first to ensure the adhesive stays put.
- Adaptation: For renters, use low-tack painter's tape rolled behind the bats to protect window trim.
Quick win: Mix two different wing shapes to make the 'swarm' look more realistic and less like a repeating pattern.
23. Bat-Covered Interior Door
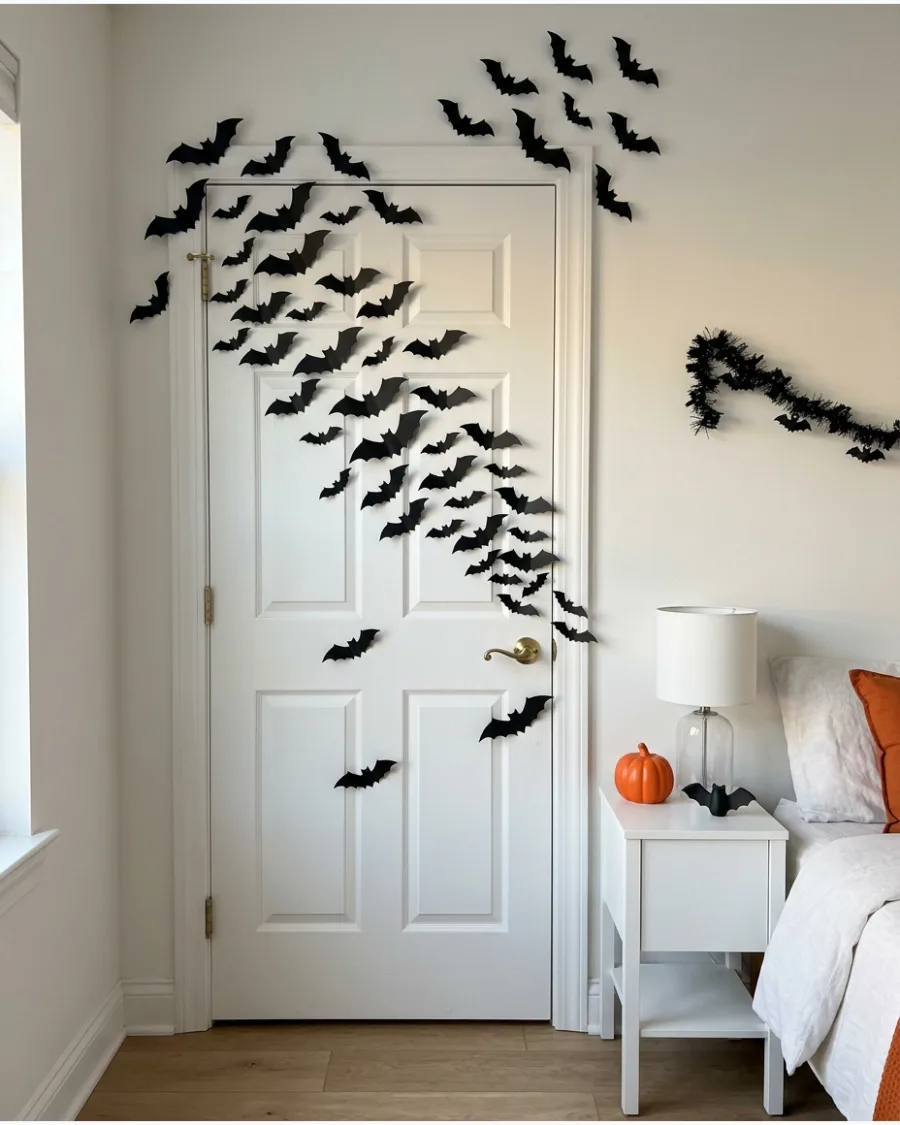
Arrange a small swarm across a plain white or wooden interior door to turn a functional element into decor. Continue several bats above the doorframe to extend the display beyond the door and onto the wall.
Use removable putty on the door surface to avoid pulling off paint when the season ends. Using the door itself makes the decor feel immersive rather than just an afterthought. It is a great way to decorate a bedroom or bathroom door for a party.
- Timing: Takes about 20 minutes to map out a path and stick the bats down.
- Logistics: Keep bats away from the door handle and the side with the hinges to avoid crushing them.
- Adaptation: If the door is dark, use white or silver bats for better visibility.
Best shortcut: Crease the wings sharply before sticking them down to give the bats a 3D look that casts shadows.
24. Bats Around the Front Door Interior
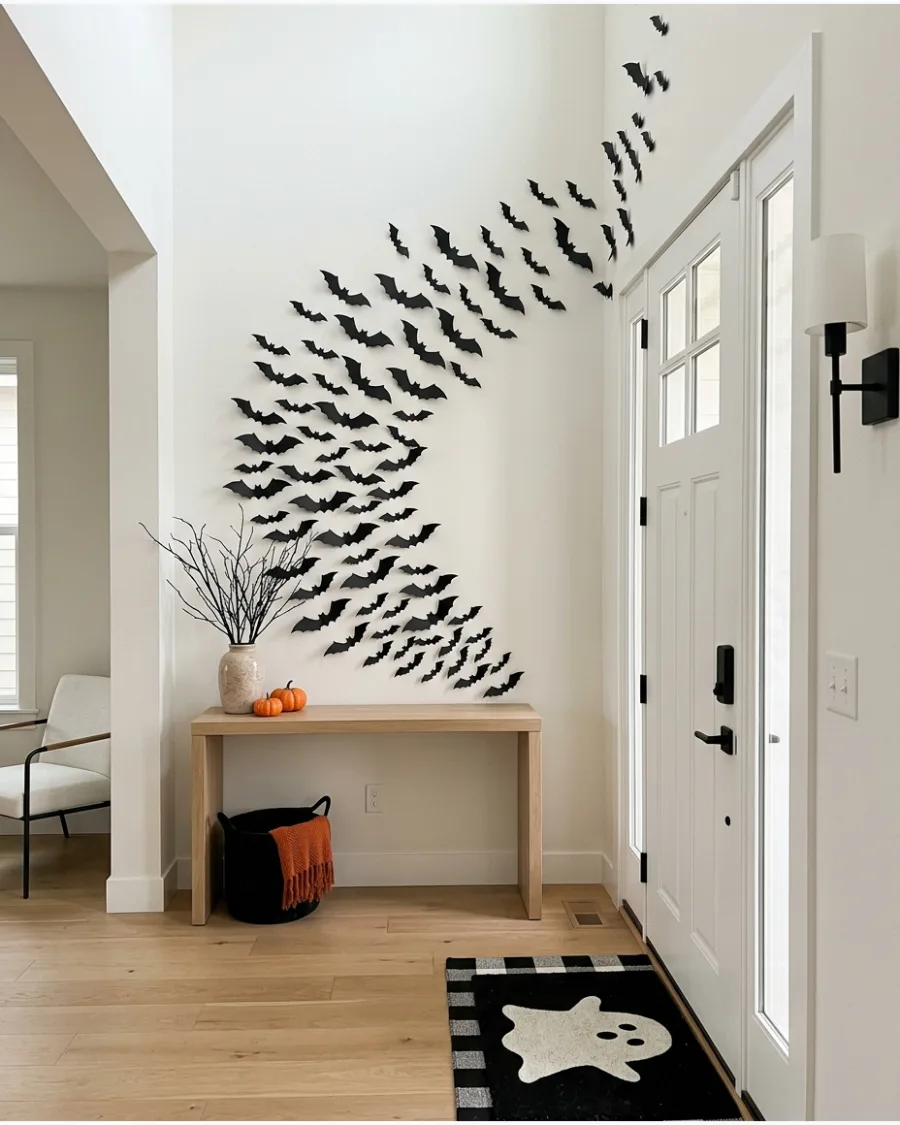
Decorate the wall beside the front door with bats flying upward from an entry table for an instant greeting. This creates a noticeable Halloween moment as soon as guests enter the house.
Start the densest part of the swarm at the height of the console table and thin them out as they reach the ceiling. This vertical movement draws the eye upward and makes small entryways feel taller. It is a practical way to decorate without blocking the walkway.
- Budget: A single pack of 60 bats is usually enough to cover an entry wall.
- Setup: Place a few pumpkins or a tray on the table to 'anchor' the bottom of the swarm.
- Adaptation: For small foyers, keep the swarm narrow to avoid overwhelming the space.
Most people skip this: Place one or two bats on the ceiling to make the swarm feel like it is truly filling the room.
25. Bats Around an Arched Doorway
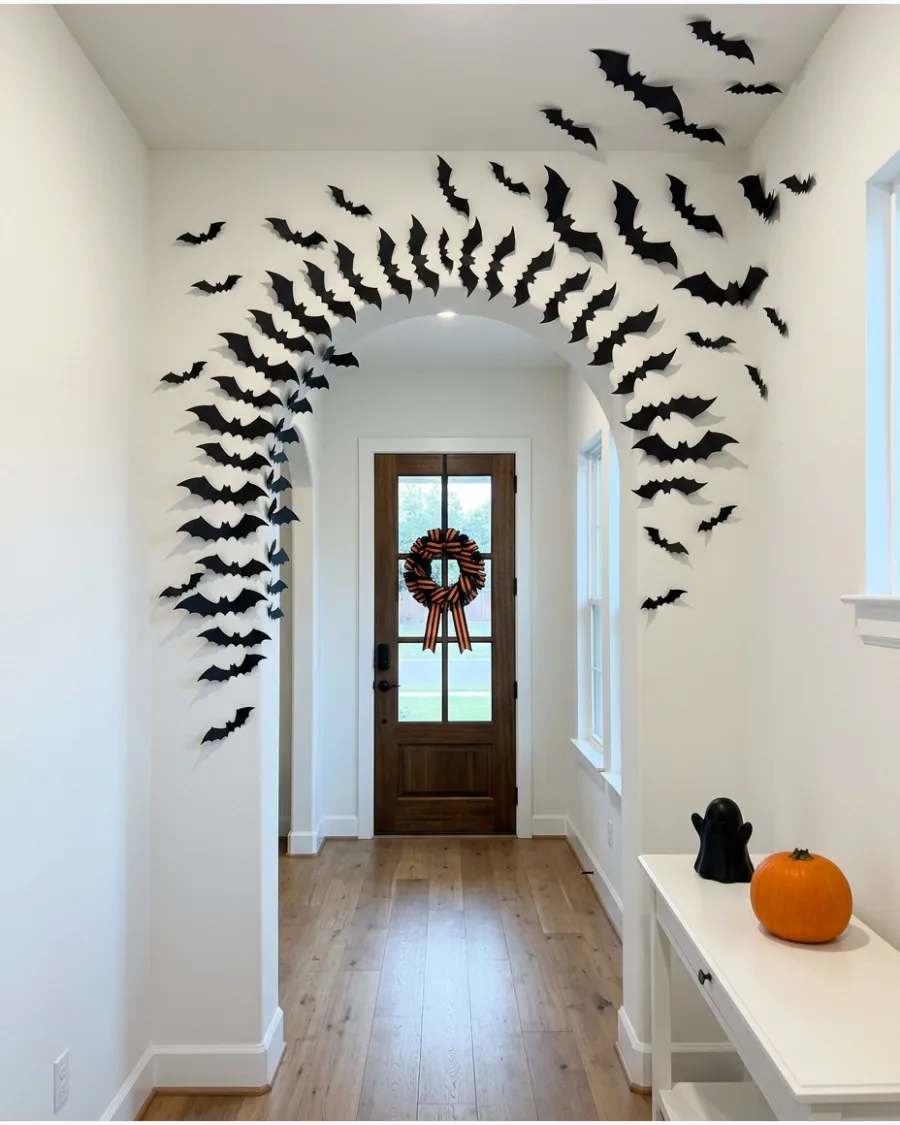
Follow the curved shape of an arched doorway with bats in graduated sizes to highlight the architecture. Allow the swarm to continue beyond the arch and onto the ceiling for a more dramatic effect.
Trace the curve of the arch with medium-sized bats before filling in the surrounding wall space. Arches are beautiful features that look even better when highlighted by seasonal movement. This arrangement feels more custom and high-end than a random cluster.
- Sourcing: Use bats with varying wing spans to emphasize the curve of the arch.
- Placement: Space bats about 4 inches apart along the arch to keep the line clean.
- Adaptation: If you have a square doorway, mimic the arch shape with the bats to soften the corners.
Quick win: Use a piece of string and a pencil to lightly mark a guide curve on the wall before sticking.
26. Bats Across a Window Frame
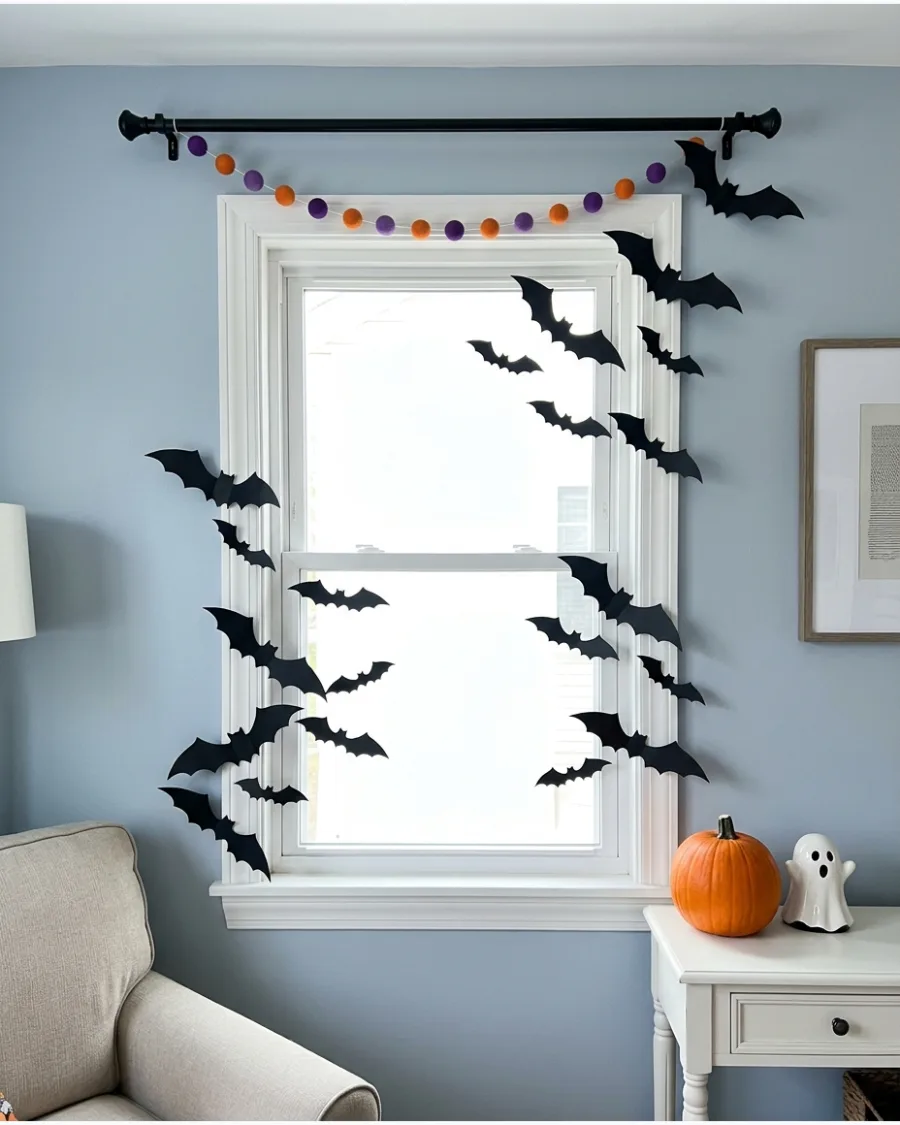
Attach bats to both the wall and the window trim so the display crosses different surfaces seamlessly. Keep the center of the glass mostly uncovered to preserve natural light while still feeling festive.
Bend the wings of the bats at different angles to make them look like they are banking around the trim. Crossing surfaces like trim and glass adds depth that flat wall displays often lack. It makes the bats look like they are actually navigating the room's obstacles.
- Budget: Cardstock bats are cheaper than plastic and hold a wing-crease better for 3D effects.
- Setup: Use double-sided foam tape for a stronger hold on painted wood trim.
- Adaptation: Use only 3 or 4 large bats for a minimalist look that still highlights the window.
Best shortcut: Stick the bats to the trim first, then fill in the wall gaps to ensure the transition looks natural.
Living Room and Bedroom Bat Walls
27. Bats Flying Behind the Television
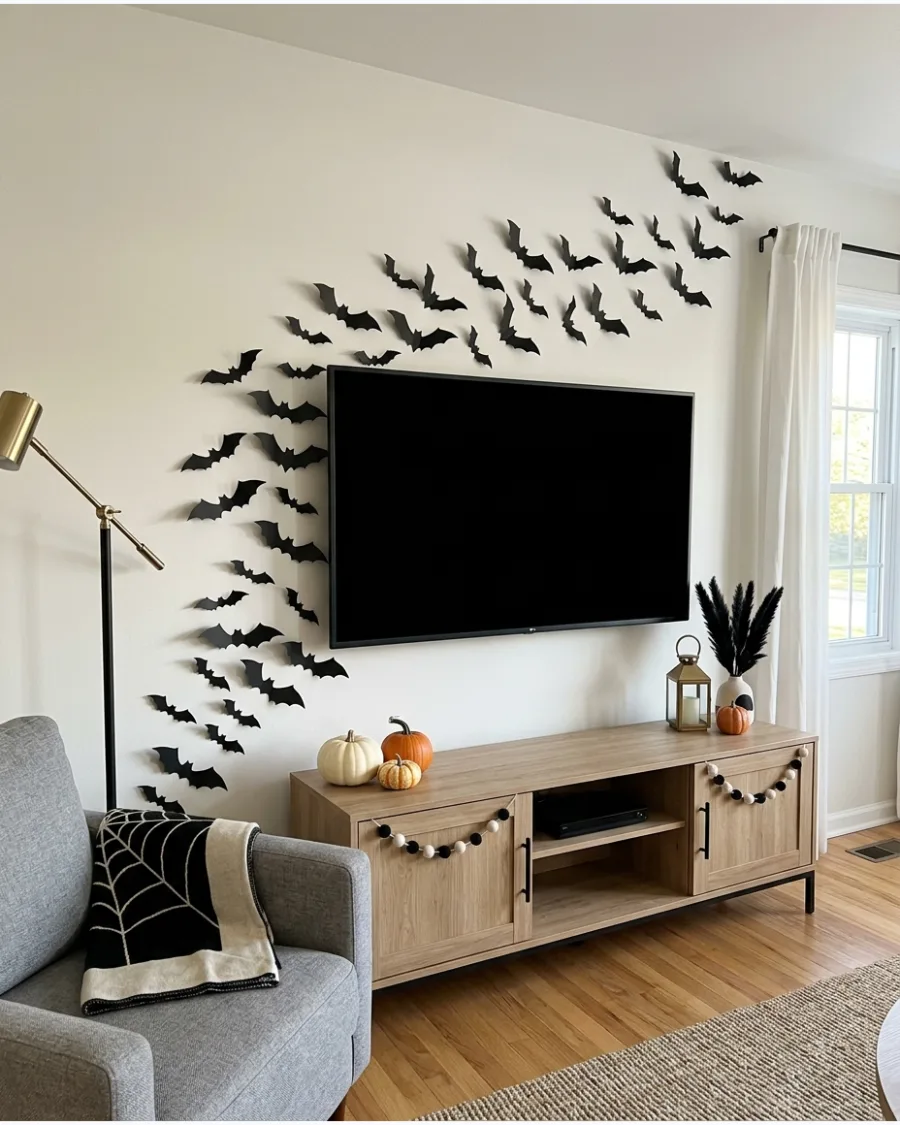
Arrange bats from one lower corner of the television toward the upper wall to create a dynamic background. Keep the center of the screen clear and use smaller bats near the edges to avoid visual clutter.
Ensure no bats overlap the actual screen to prevent distractions while watching your favorite shows. The black screen of a TV acts as a natural cave for bats to emerge from when it is turned off. This is an easy way to decorate the main entertainment hub of the home.
- Timing: 15 minutes to install once the TV is off and the wall is cool.
- Placement: Focus the density at the bottom corner and fan them out as they go up.
- Adaptation: If the TV is on a stand, start the bats from behind the stand instead of the screen.
Most people skip this: Use matte-finish bats to prevent the TV light from reflecting off the plastic and causing glare.
28. Bats Above a TV Console
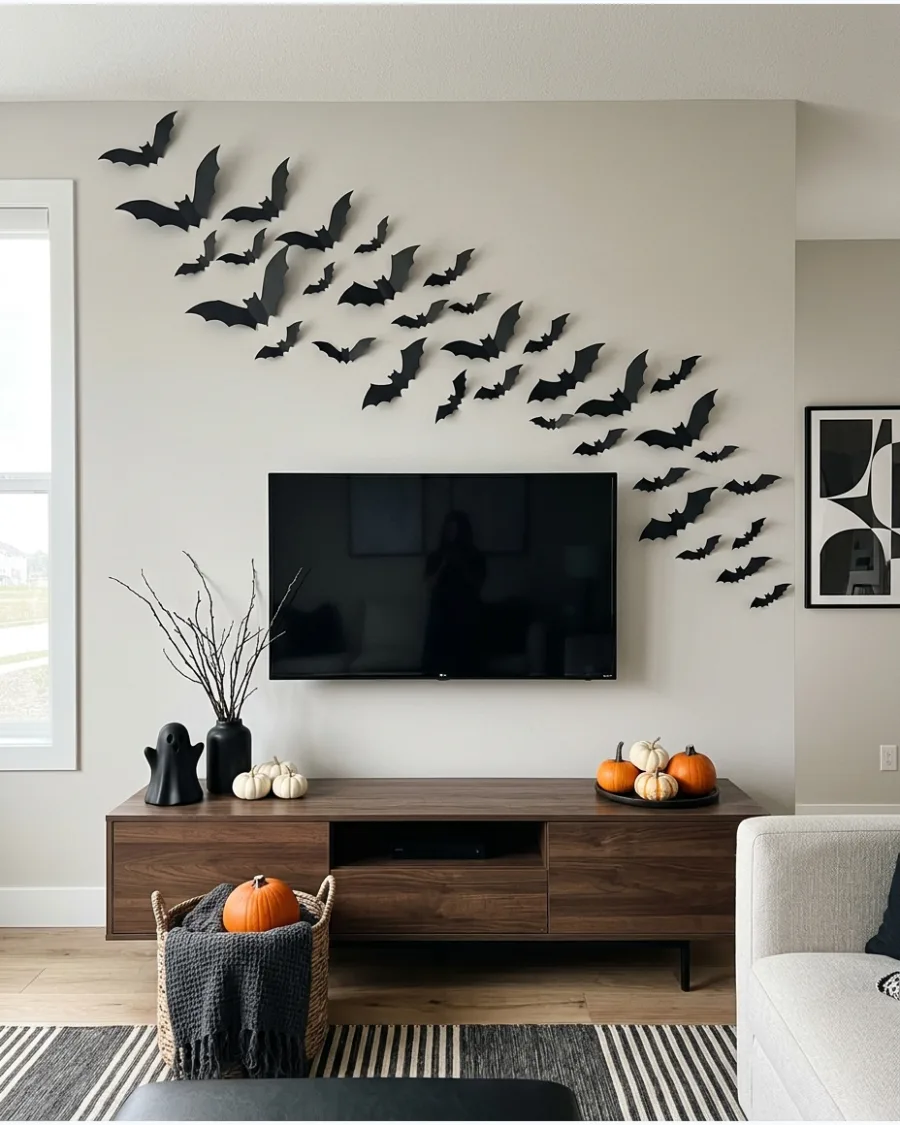
Create a wide bat arrangement above the television and decorate the console with pumpkins and dark branches. Use a limited color palette of black, white, and wood tones to keep the setup cohesive and modern.
Keep the console decor low and wide so it doesn't block the bottom of the television. A cohesive color palette keeps the look sophisticated instead of cluttered.
This turns the most-used wall in the living room into a festive focal point.
- Sourcing: Buy a bulk pack of at least 100 bats to cover a large living room wall.
- Setup: Wipe the wall with a dry cloth to remove dust before applying adhesive.
- Adaptation: Add a few battery-operated tea lights on the console to cast bat shadows on the wall at night.
Quick win: Use varying sizes of bats to create a sense of perspective and depth across the wide wall.
29. Bats Around a Gallery Wall
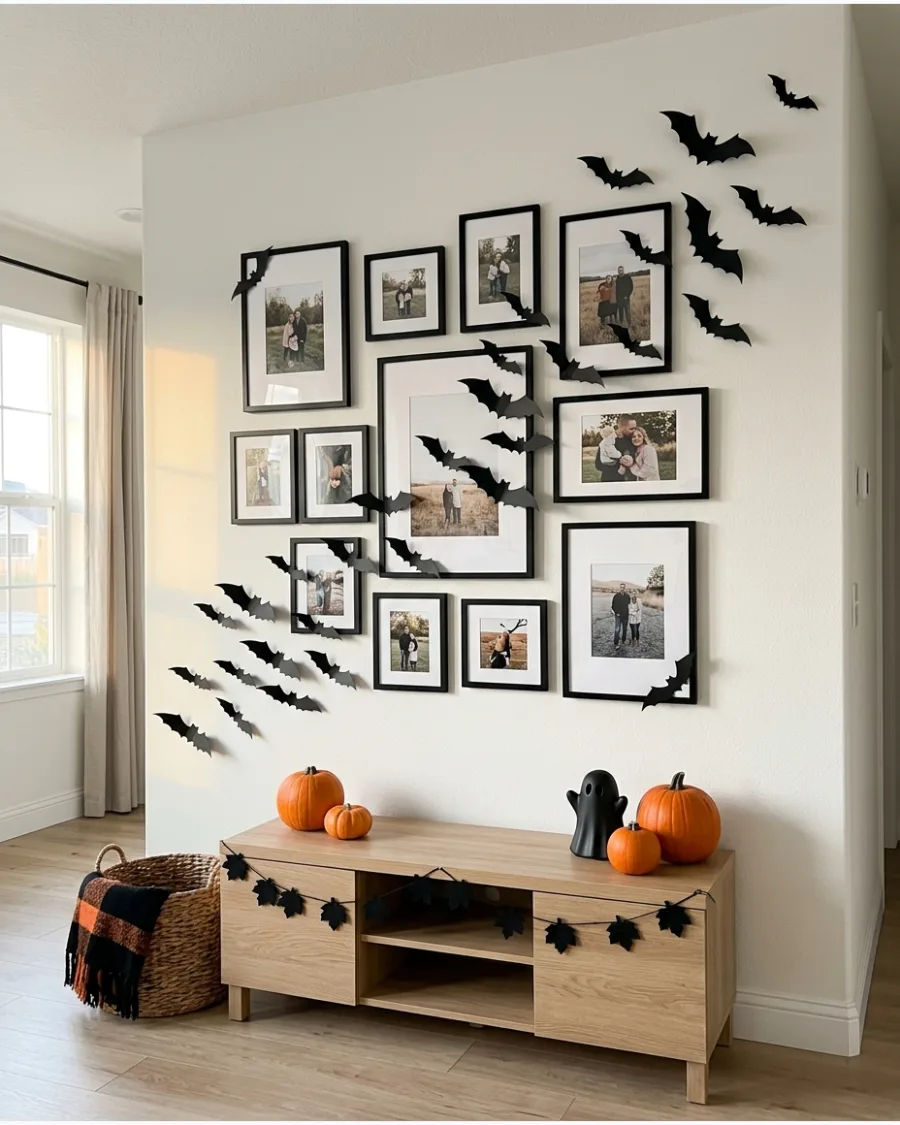
Place bats between frames and around the outer edges of a gallery wall to integrate the holiday theme. Allow a few bats to overlap the frames slightly so the seasonal decorations feel connected to the existing artwork.
Tuck a few bat wings under the edges of the frames to make the swarm look like it is weaving through the art. Integrating bats into existing art makes the holiday decor feel like a planned part of the room's design. It is much easier than taking down your pictures to make room for decorations.
- Budget: This uses fewer bats than a full wall swarm, making it a budget-friendly option.
- Logistics: Be careful not to stick adhesive directly onto delicate photo paper or expensive frames.
- Adaptation: If your frames are colorful, use only black bats to provide a sharp, spooky contrast.
Best shortcut: Focus bats in the 'negative space' between frames to keep the arrangement looking tidy.
30. Bats Above the Sofa
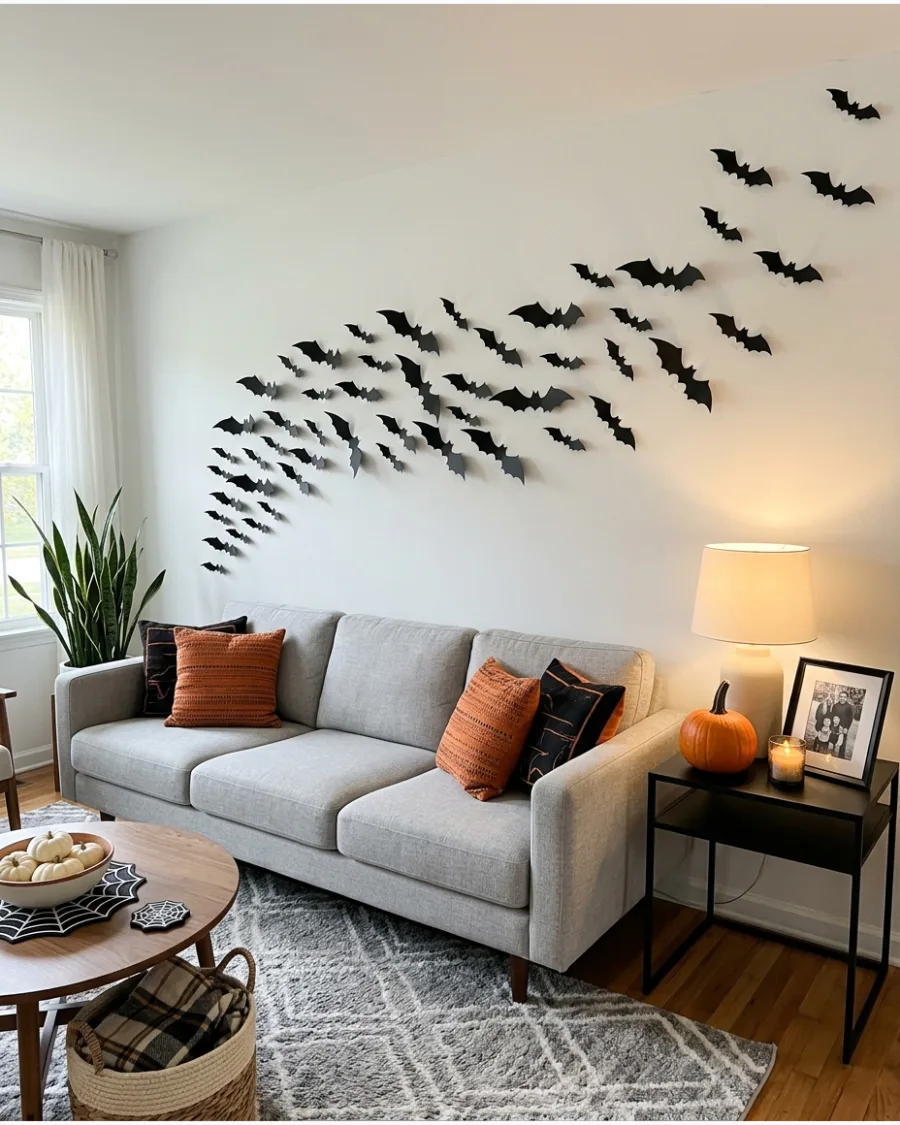
Arrange a horizontal swarm across the empty wall above a sofa for a high-impact living room update. Begin with a dense cluster on one side and gradually spread the bats toward the opposite corner.
Anchor the swarm above one end of the sofa and let it trail off toward the opposite lamp or side table. This fills the large empty space above a couch without needing heavy or expensive art pieces. It creates a great backdrop for family photos during the Halloween season.
- Sourcing: Choose bats with a slight sheen to make them stand out against flat wall paint.
- Placement: Start the swarm about 12 inches above the top of the sofa back.
- Adaptation: Use a mix of large and medium bats to fill the large horizontal span effectively.
Most people skip this: Step back frequently while applying to ensure the 'flight path' looks natural from across the room.
31. Bats Above the Bed
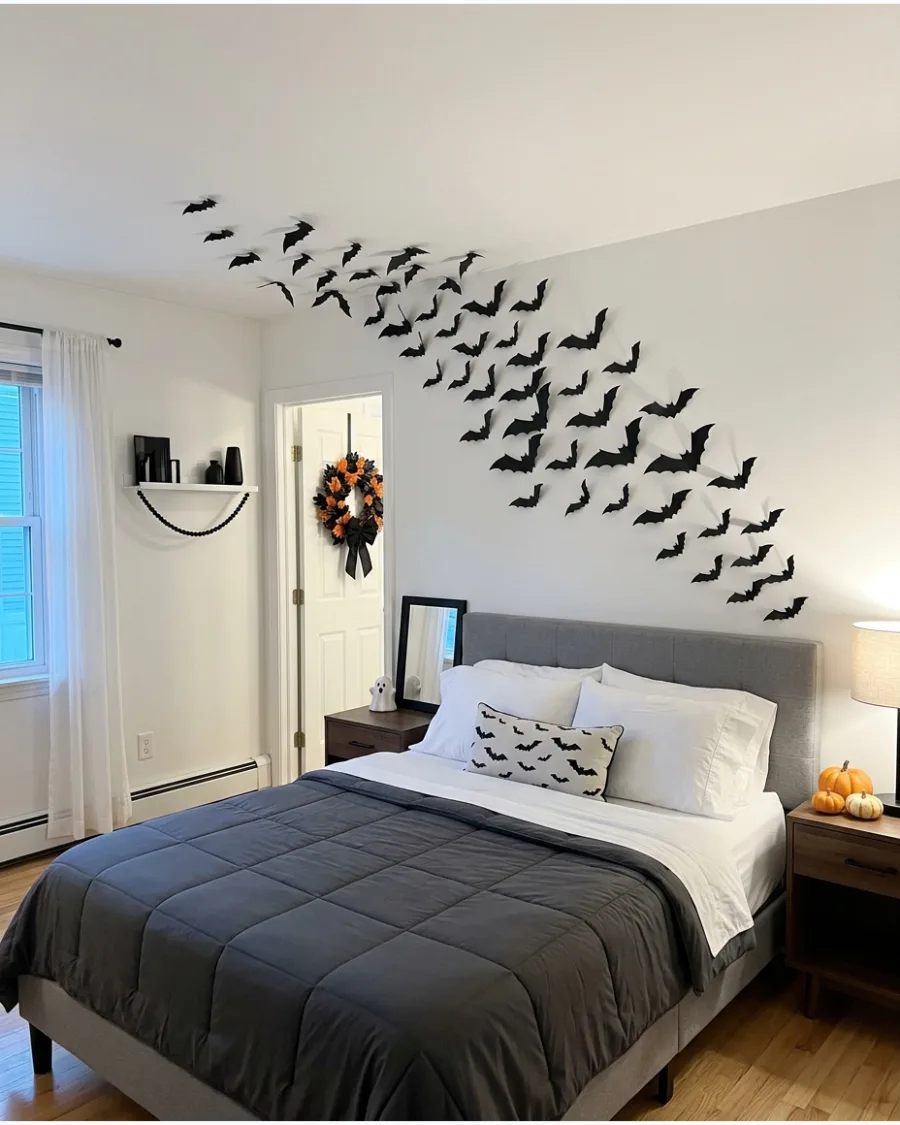
Use lightweight paper or felt bats to create a seasonal focal point in the bedroom. Start the cluster at the headboard and trail them toward one upper corner of the ceiling.
Fold the wings at different angles to create a shadow effect that makes the swarm look like it is actually lifting off the wall. This adds a festive touch to the room without requiring bulky furniture changes.
- Pack of 50-100 paper bats for under fifteen dollars.
- Secure with painter's tape or removable adhesive dots to protect wall paint.
- Works in any size bedroom by scaling the number of bats used.
Quick win: Use felt bats instead of paper for a matte, high-end look that doesn't reflect light from bedside lamps.
32. Gothic Bedroom Bat Wall
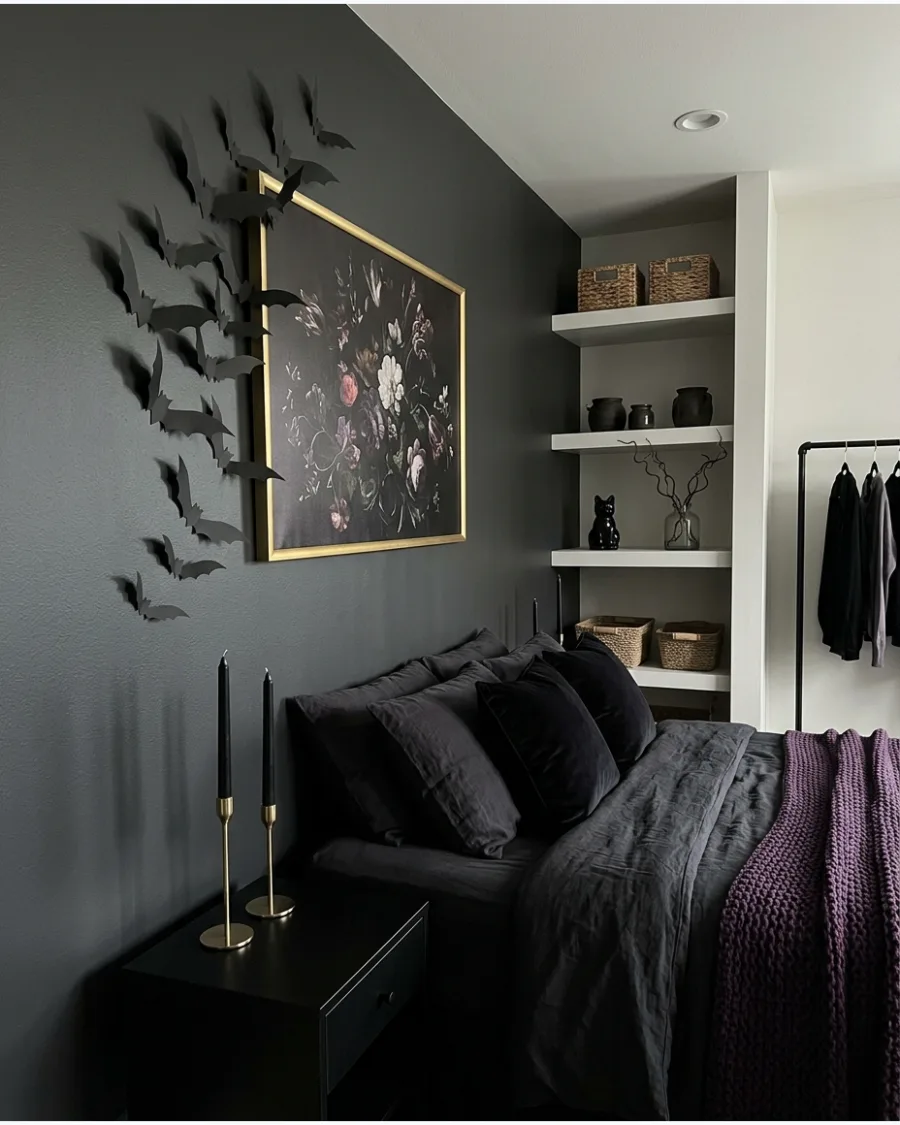
Combine black bats with dark floral artwork and antique-style frames for a moody aesthetic. Concentrate the bats in a tight cluster near the focal art piece to anchor the design without making the room feel cluttered. This setup works best on a dark accent wall where the black-on-black textures provide subtle depth.
- Choose bats with a slight sheen to stand out against matte dark paint.
- Place the largest bats closest to the artwork to create a visual anchor.
- Add black taper candles nearby to enhance the gothic atmosphere.
Most people skip this: Use a small piece of black poster putty for a stronger hold on textured or dark-painted walls.
33. Cute Pastel Bedroom Bats
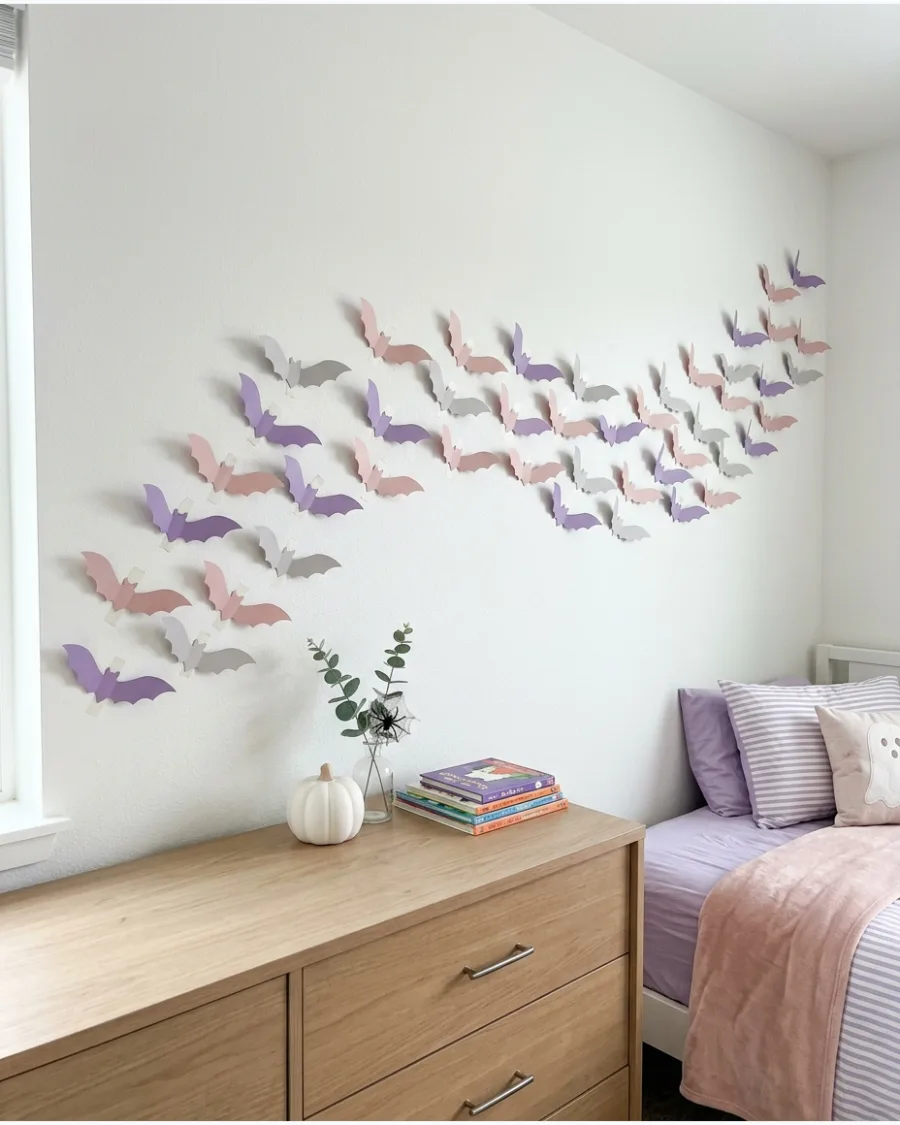
Create bats from lavender, blush, gray, and black cardstock for a softer take on Halloween. Arrange these lighter colors in a gentle wave pattern to keep the vibe playful and seasonally appropriate for a child's room or a softer aesthetic. It provides a festive look that coordinates with light-colored bedding and furniture.
- Standard cardstock and a bat-shaped punch or template.
- Space the bats further apart than usual to maintain an airy, light feel.
- Swap out traditional black bats for these pastels to match a nursery theme.
Best shortcut: Use a craft punch to quickly create dozens of uniform bats from colored cardstock.
34. Bat Wall Above a Reading Nook
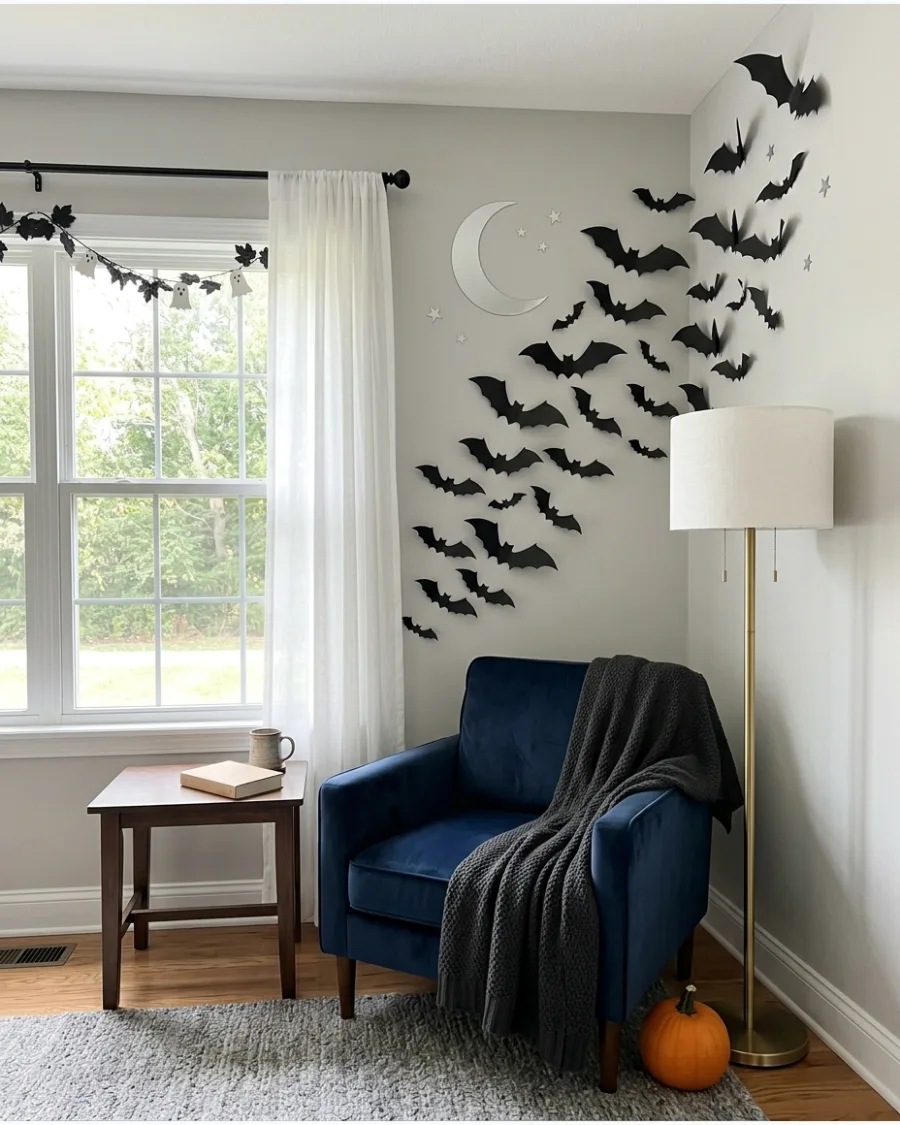
Decorate the wall above a reading chair with bats, a crescent moon, and small stars. Position the bats so they appear to be flying away from the light of the lamp to create a natural sense of motion. A dark throw blanket on the chair helps tie the spooky theme into the seating area for a cozy corner.
- Include a large crescent moon decal to serve as the starting point for the bats.
- Keep the arrangement within the width of the armchair for a balanced look.
- Add a few bats to the base of the lamp for a cohesive display.
Quick win: Mix in a few small star decals to give the bat swarm a night-sky backdrop.
35. Bats Around Floating Shelves
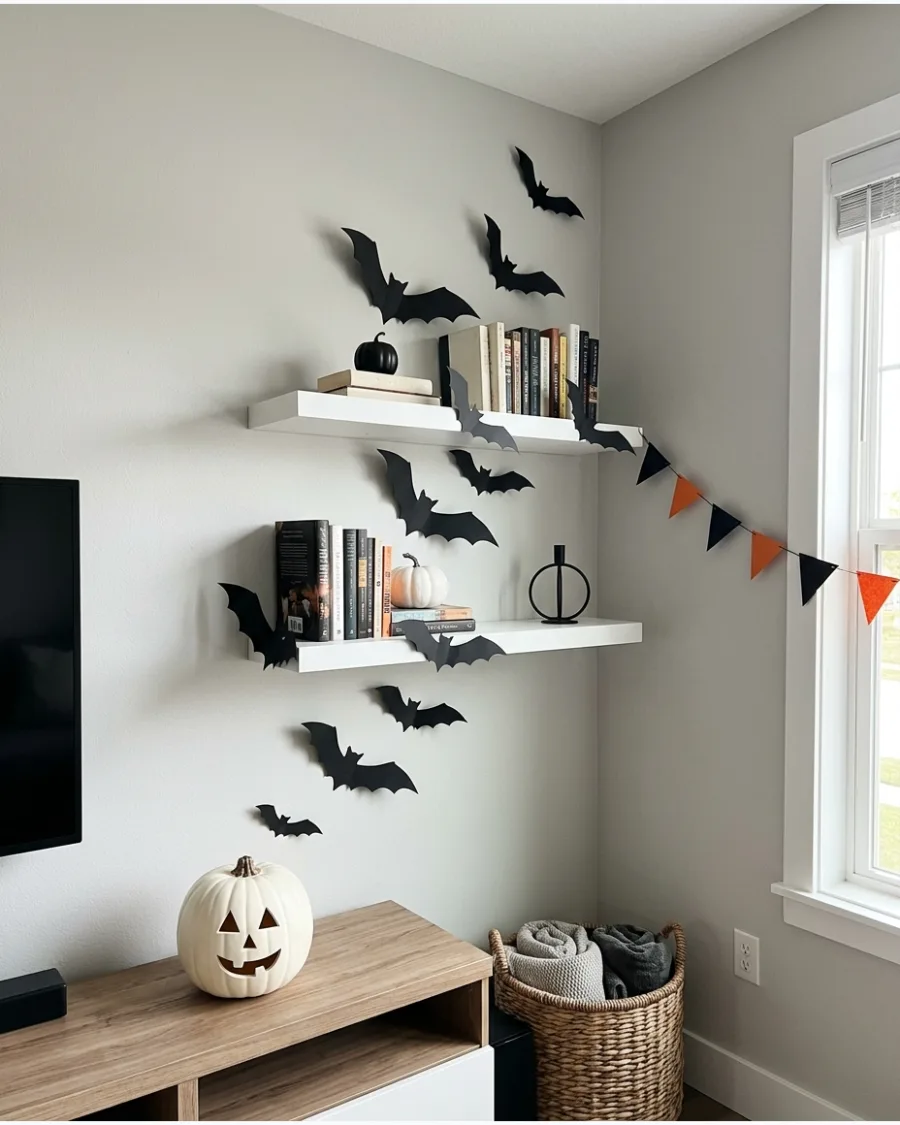
Arrange small bats between and around floating shelves to integrate them into your existing decor. Place some bats on the shelf edges and others on the wall behind them to give the arrangement depth and layers. This makes it look like the swarm is weaving through your books and candles.
- Use various sizes of bats to mimic a realistic swarm.
- Avoid placing bats directly in front of book titles so you can still find your favorites.
- Remove some everyday decor items to give the bats more space to 'breathe'.
Most people skip this: Bend one wing more than the other on shelf-mounted bats to make them look like they are turning.
Kitchen, Hallway and Staircase Bat Ideas
36. Bats Across Kitchen Cabinets
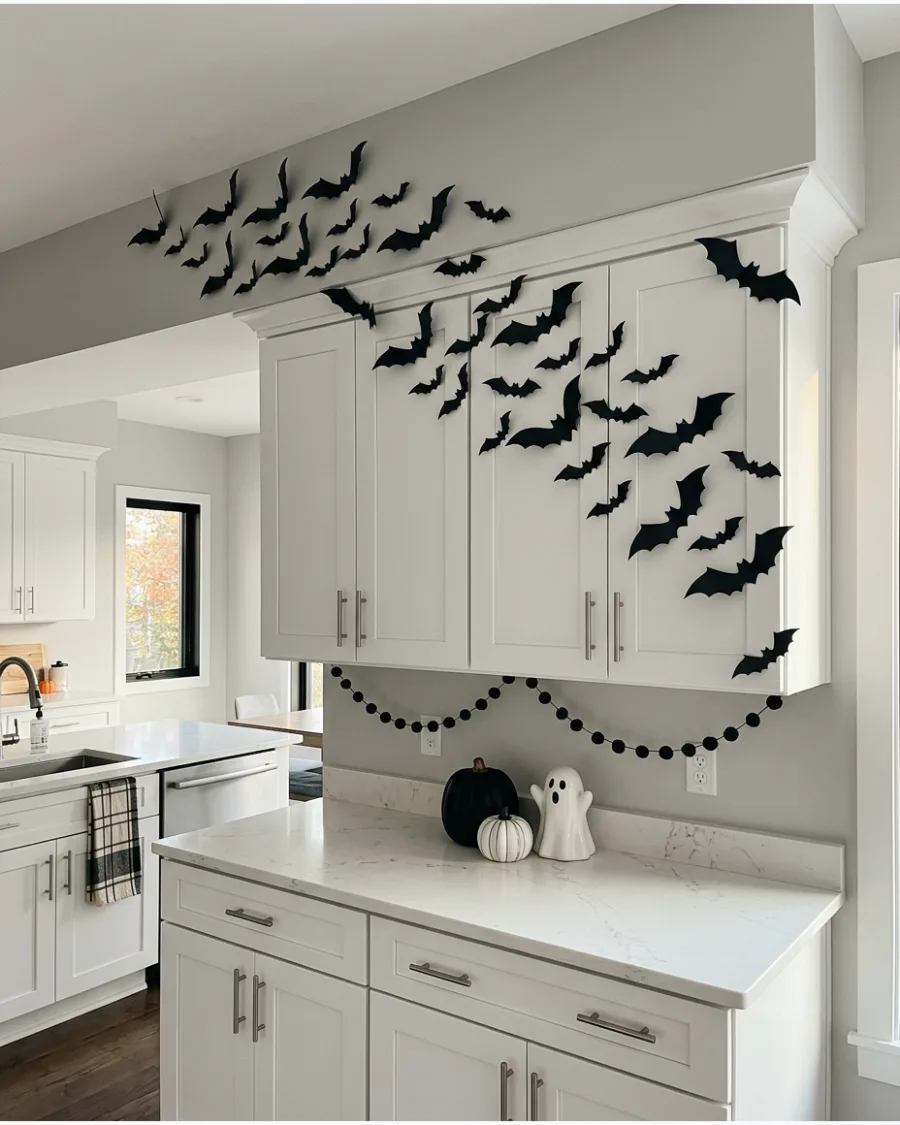
Place bats on the wall above the cabinets and allow a few to continue onto the cabinet doors. Apply the bats with removable adhesive dots so they stay secure on smooth cabinet surfaces without leaving any sticky residue behind. Use smaller bats in the kitchen so the arrangement doesn't feel crowded in a high-traffic area.
- Clean cabinet surfaces with a dry cloth before applying bats to ensure a good bond.
- Keep bats away from stove heat or steam-heavy areas like the dishwasher.
- Use plastic bats rather than paper for easier cleaning in the kitchen.
Best shortcut: Stick to the upper cabinets only to keep the decor out of the way of daily meal prep.
37. Bats Around a Kitchen Window
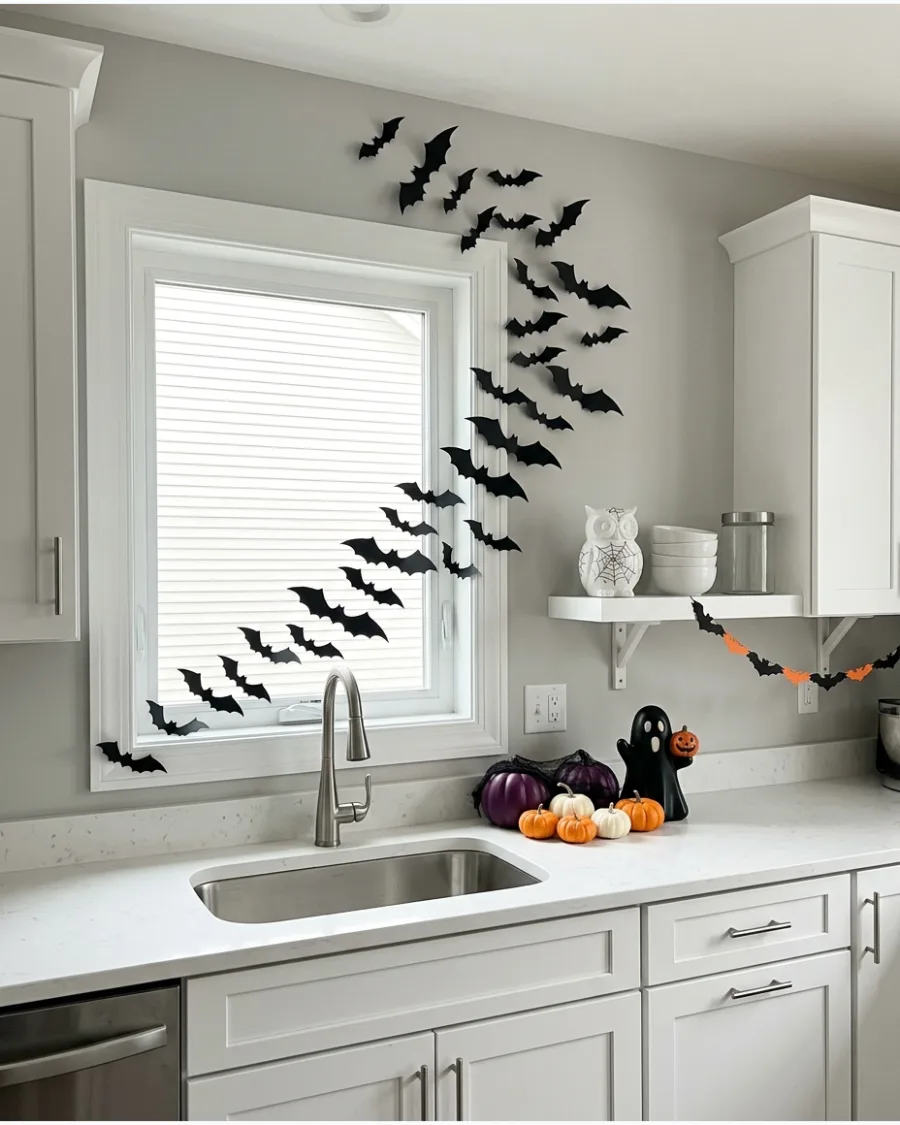
Create a narrow swarm flying from the countertop toward the upper corner of the window. Keep the bats away from the actual window handle or latch so the window remains fully functional throughout the season. Pairing this with a bowl of miniature pumpkins creates a simple and practical kitchen display.
- Use waterproof plastic bats if you are placing them near the sink.
- Start the trail near a fruit bowl or canisters for a grounded starting point.
- Angle the bats upward to lead the eye toward natural light.
Quick win: Place one or two bats directly on the glass to create interesting shadows when the sun shines through.
38. Bats Along the Staircase Wall
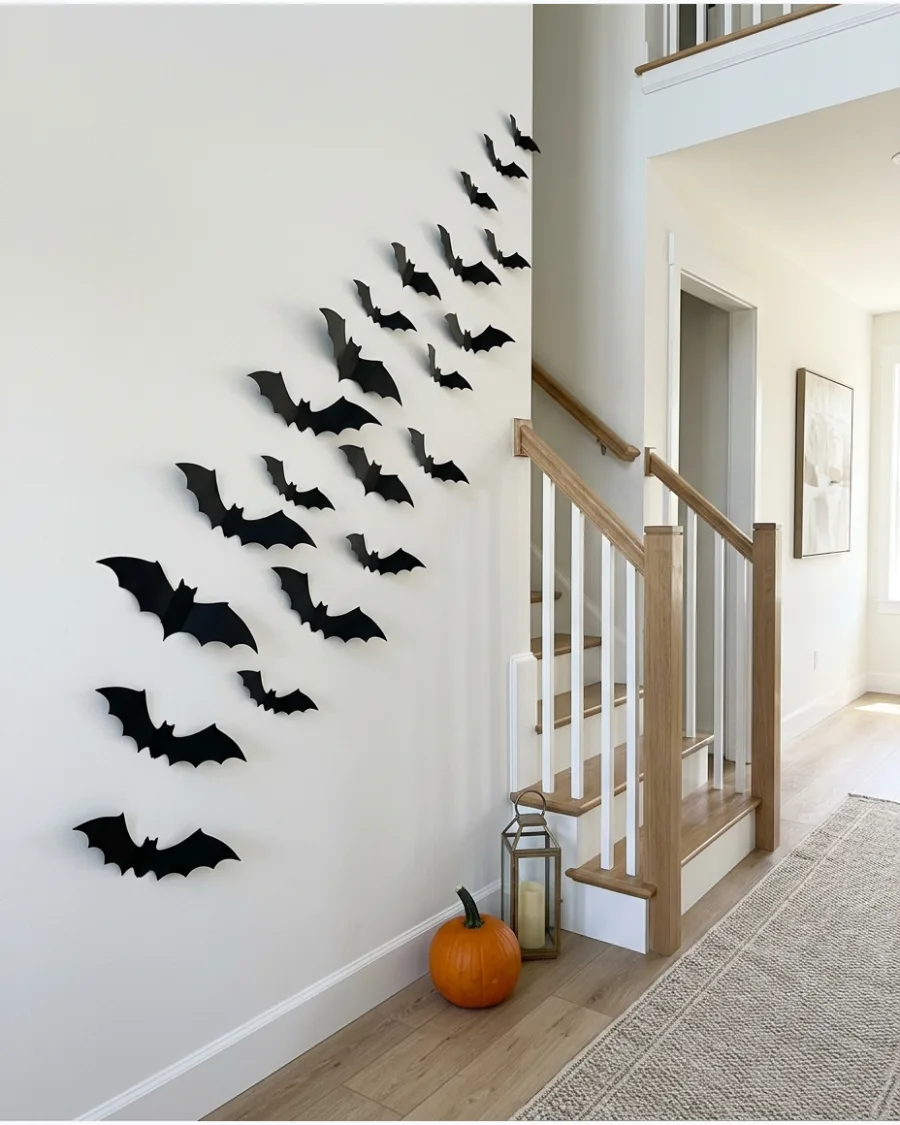
Follow the upward angle of the stairs with bats in several different sizes. Use larger bats at the bottom and smaller ones as they fly higher to create a perspective trick that makes the staircase feel taller. This draws the eye upward and makes use of the often-ignored wall space in a transition area.
- Place bats at least 12 inches above the handrail to prevent them from being knocked off.
- Vary the spacing so the 'swarm' looks natural rather than a straight line.
- Use a mix of 12-inch and 3-inch bats for the best visual impact.
Most people skip this: Angle the bats so they are flying parallel to the stairs for a sense of speed and direction.
39. Bats Above Staircase Picture Frames
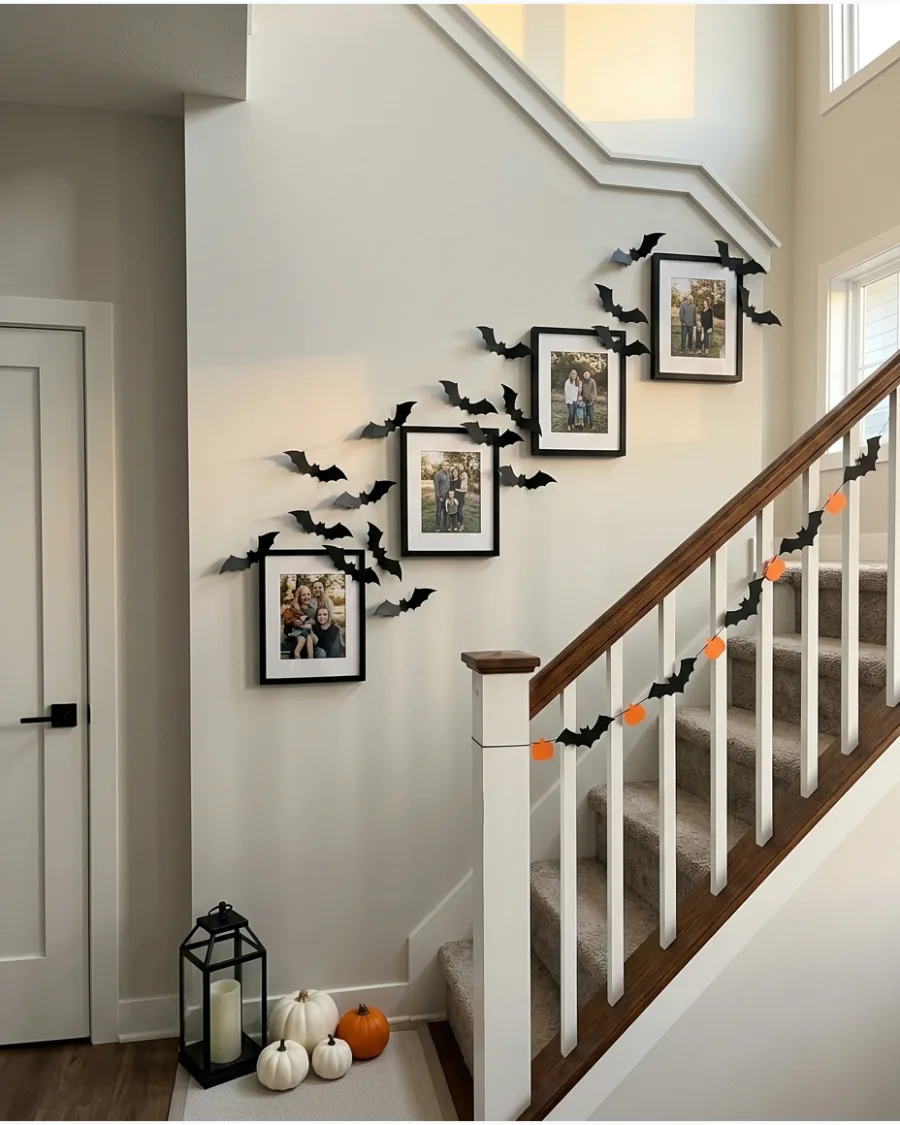
Add bats between family photographs or artwork displayed along the stairs. Focus the bats on the top corners of the frames to avoid blocking the glass or the people in the pictures. This integrates the holiday theme into your existing gallery wall without having to take anything down.
- Match the bat material to the frame finish for a coordinated look.
- Use a few bats to 'connect' separate frames into one cohesive holiday display.
- Keep the bats concentrated in 2-3 spots rather than around every single frame.
Best shortcut: Use pre-bent plastic bats to save time during the setup process.
40. Long Hallway Bat Swarm
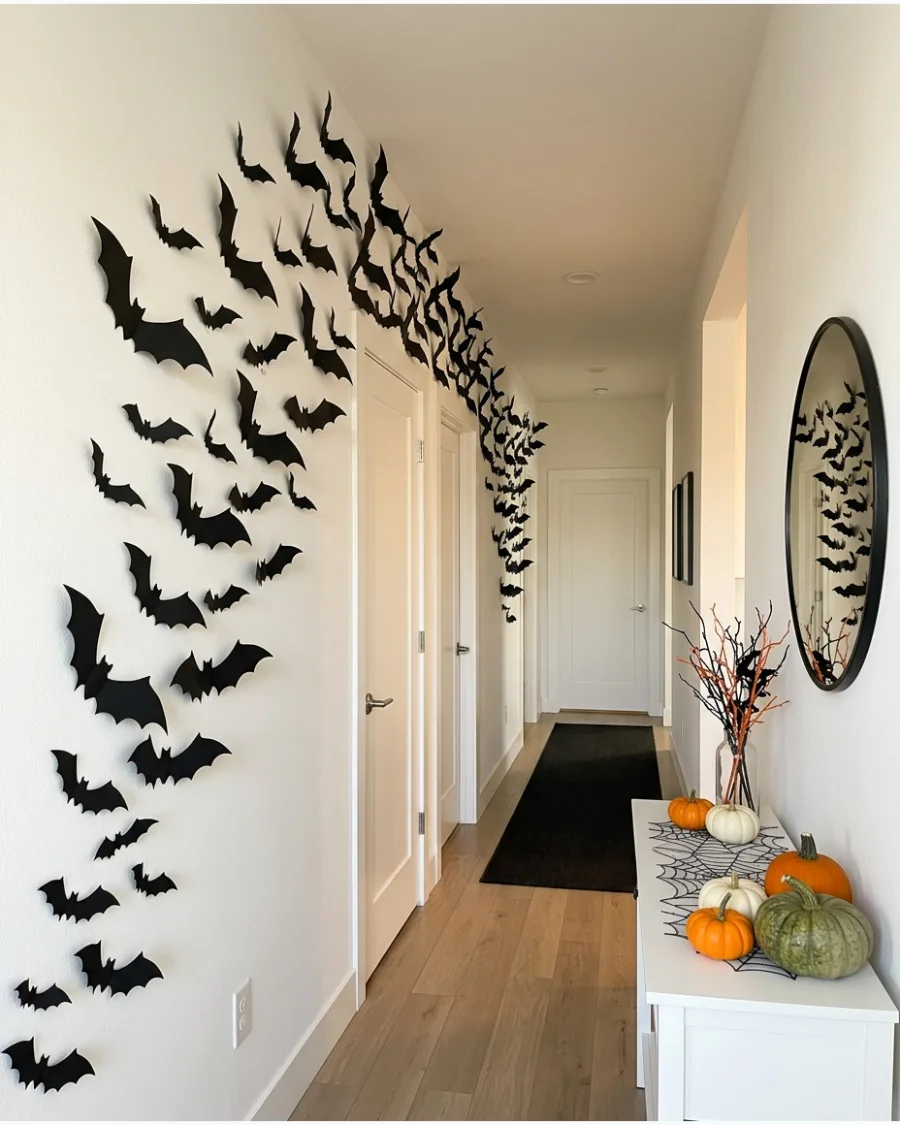
Create a continuous trail of bats moving down a narrow hallway to turn a plain space into a festive experience. Vary the height and wing direction of each bat to ensure the swarm looks like an active, moving group rather than a static border. This adds visual interest to a part of the home that usually lacks decor.
- Space the bats about 6 to 10 inches apart for a long hallway trail.
- Keep the trail above shoulder height to prevent people from bumping into them.
- Use a single color for the bats to keep the narrow space from feeling too busy.
Quick win: Point some bats toward open doorways to suggest they are flying into different rooms.
41. Bats Around a Hallway Light
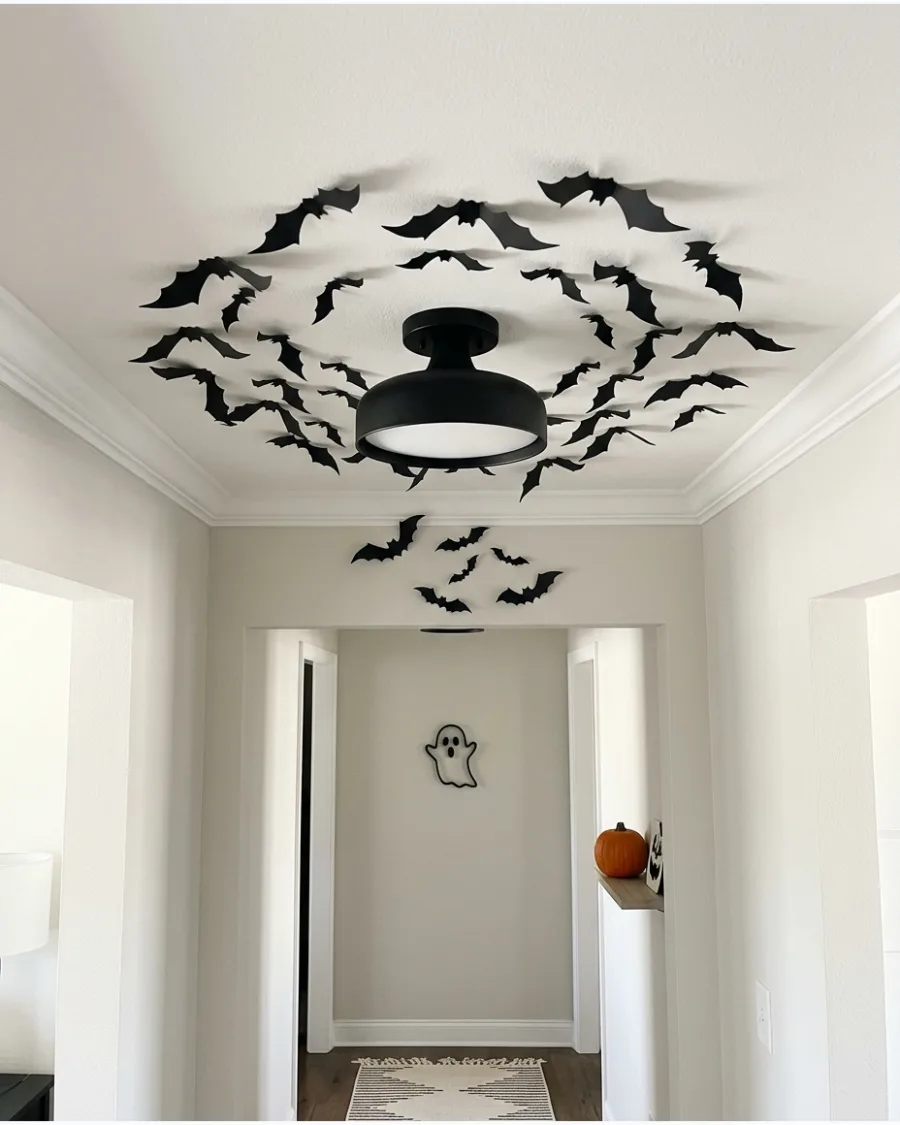
Arrange bats around a wall sconce or beneath a ceiling light. The lighting will cast shadows from folded 3D wings and make the display more noticeable at night.
Position the bats so they appear to be circling the light source for the most realistic movement. This technique highlights the texture of the bats without needing extra spotlighting.
- Budget-friendly paper bats
- Clear adhesive dots for wall mounting
- Works in any narrow hallway or entryway
Quick win: Use a warm-toned bulb to create softer, more dramatic shadows on the wall behind the bat wings.
42. Small Bathroom Bat Wall
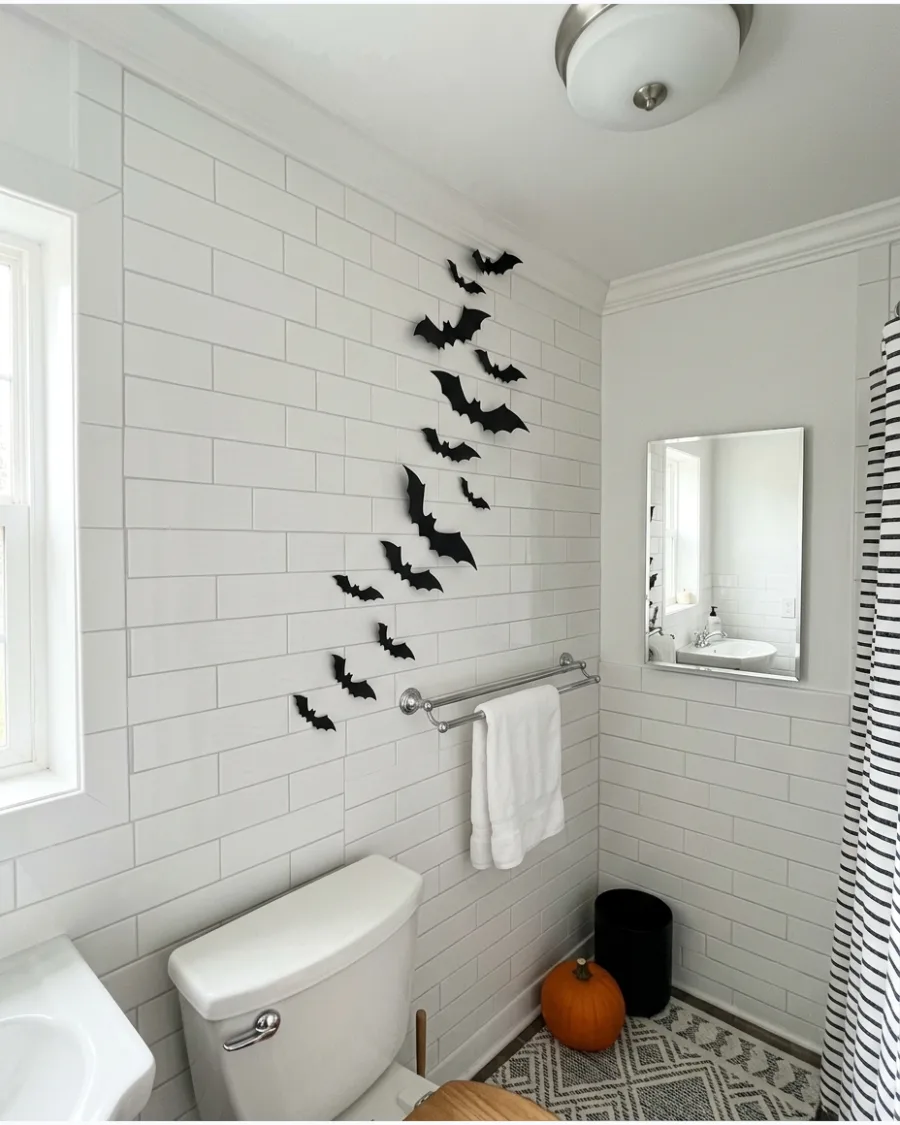
Place a compact group of bats above the toilet, towel rack, or mirror. A small arrangement adds Halloween style without making the bathroom feel crowded.
Stick to a vertical trail to guide the eye upward and make the small room feel taller. This is a great way to bring the holiday into every corner of the home.
- Removable mounting putty
- Moisture-resistant plastic bats
- Best for guest bathrooms or powder rooms
Most people skip this: Use plastic bats instead of cardstock in bathrooms to prevent the wings from drooping due to shower steam.
Creative DIY Bat Wall Designs
43. Cricut Halloween Bat Wall
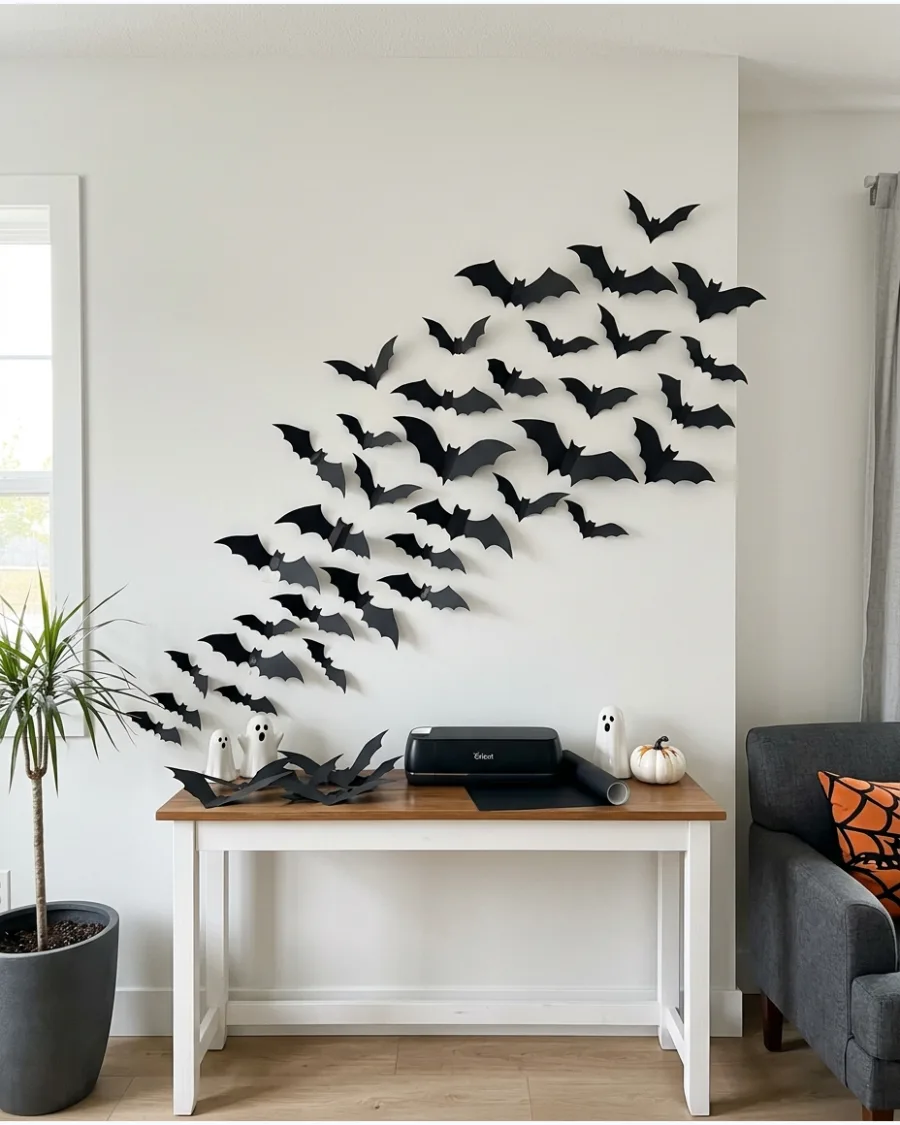
Cut several bat shapes and sizes with a Cricut or similar cutting machine. Use thicker black cardstock and fold the wings to create consistent 3D decorations.
Mix three or four different wing shapes to give the swarm a more natural and varied look. Custom cutting allows for perfectly sized bats that fit your specific wall space.
- Heavyweight black cardstock
- Cutting machine software
- Reusable adhesive strips
Best shortcut: Use the offset feature in your design software to create slightly larger backing pieces for a layered effect.
44. Reusable Felt Bat Wall
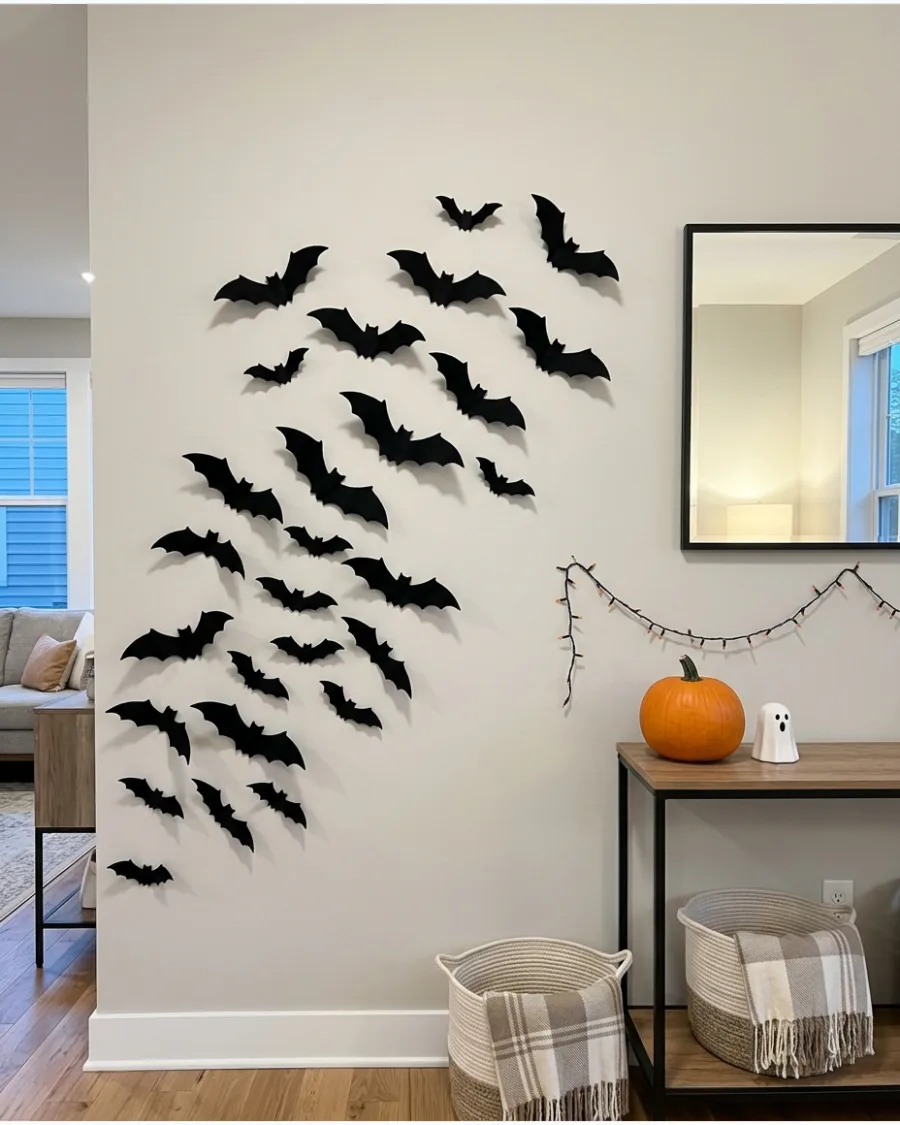
Cut bats from stiff black felt instead of paper.
Store them flat after Halloween so the same wall display can be reused in future years. Felt bats provide a matte finish that absorbs light and looks high-end against a light-colored wall. They are more durable than paper and won't tear during removal.
- Stiffened black felt sheets
- Fabric scissors or rotary cutter
- Command strips for felt
Quick win: Use stiffened felt specifically so the wings hold their shape without flopping over time.
45. Velvet Bat Wall
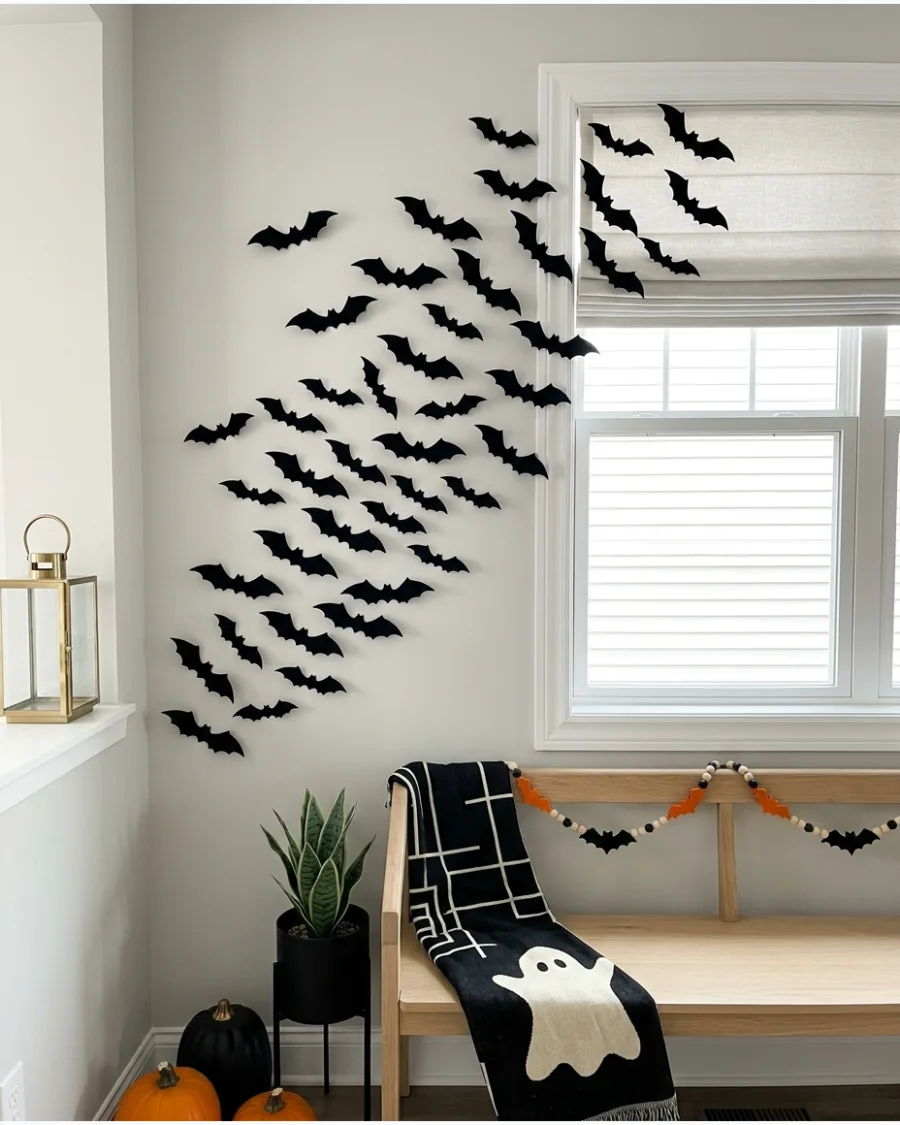
Cover cardstock bat shapes with black velvet or flocked paper. The soft texture creates a deeper black finish that works well with elegant Halloween decorations.
Place these bats in a well-lit area where the light can catch the texture of the fabric. This adds a sophisticated touch to a standard holiday theme.
- Black velvet contact paper
- Cardstock base
- Sharp detail scissors
Best shortcut: Buy velvet-textured contact paper to skip the messy glue and fabric-cutting steps.
46. Metallic Bat Wall
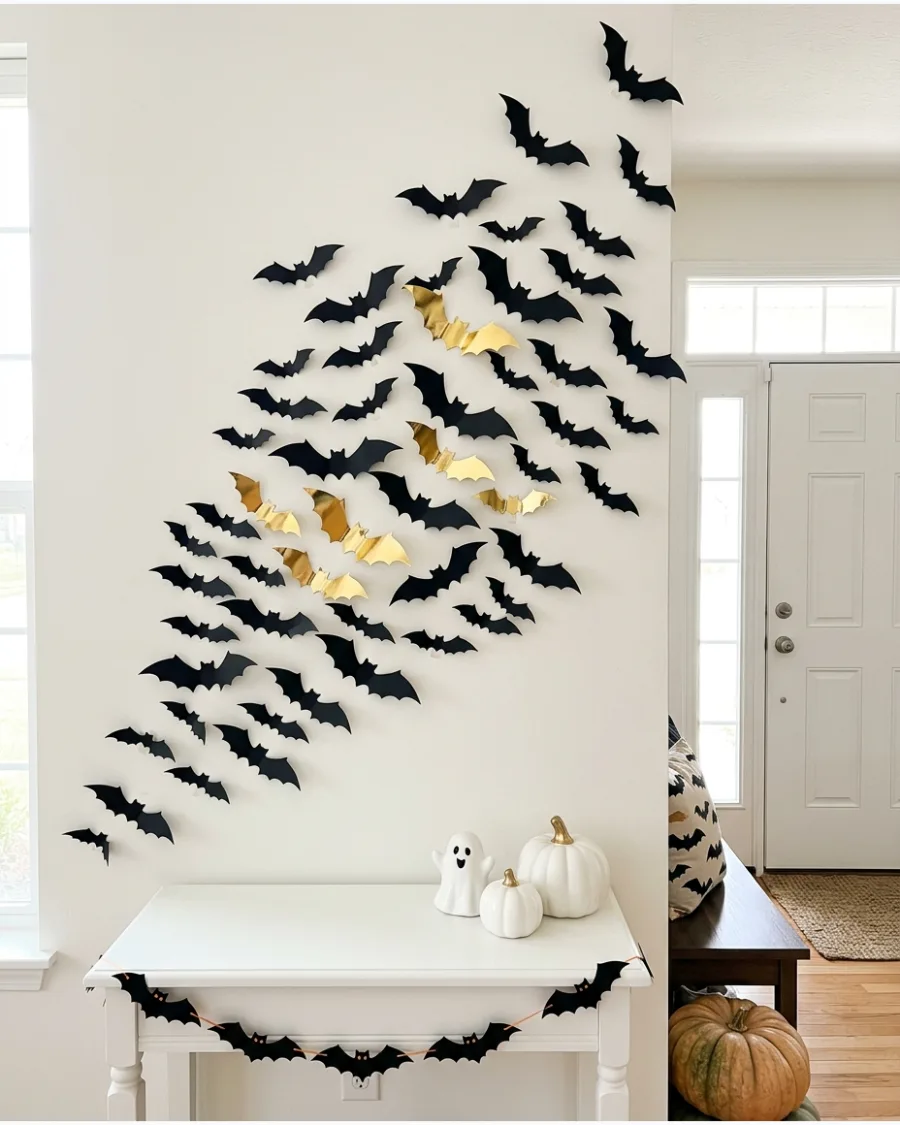
Mix black bats with a few metallic gold, silver, or copper bats. Keep the metallic pieces limited so they look like highlights within the swarm.
Scatter the metallic bats toward the center of the swarm to act as focal points. The shimmer adds a festive, party-ready vibe to the display.
- Metallic gold cardstock
- Black cardstock
- Removable double-sided tape
Most people skip this: Match the metallic bat color to your existing room hardware, like brass lamps or silver picture frames.
47. White Bats on a Black Wall
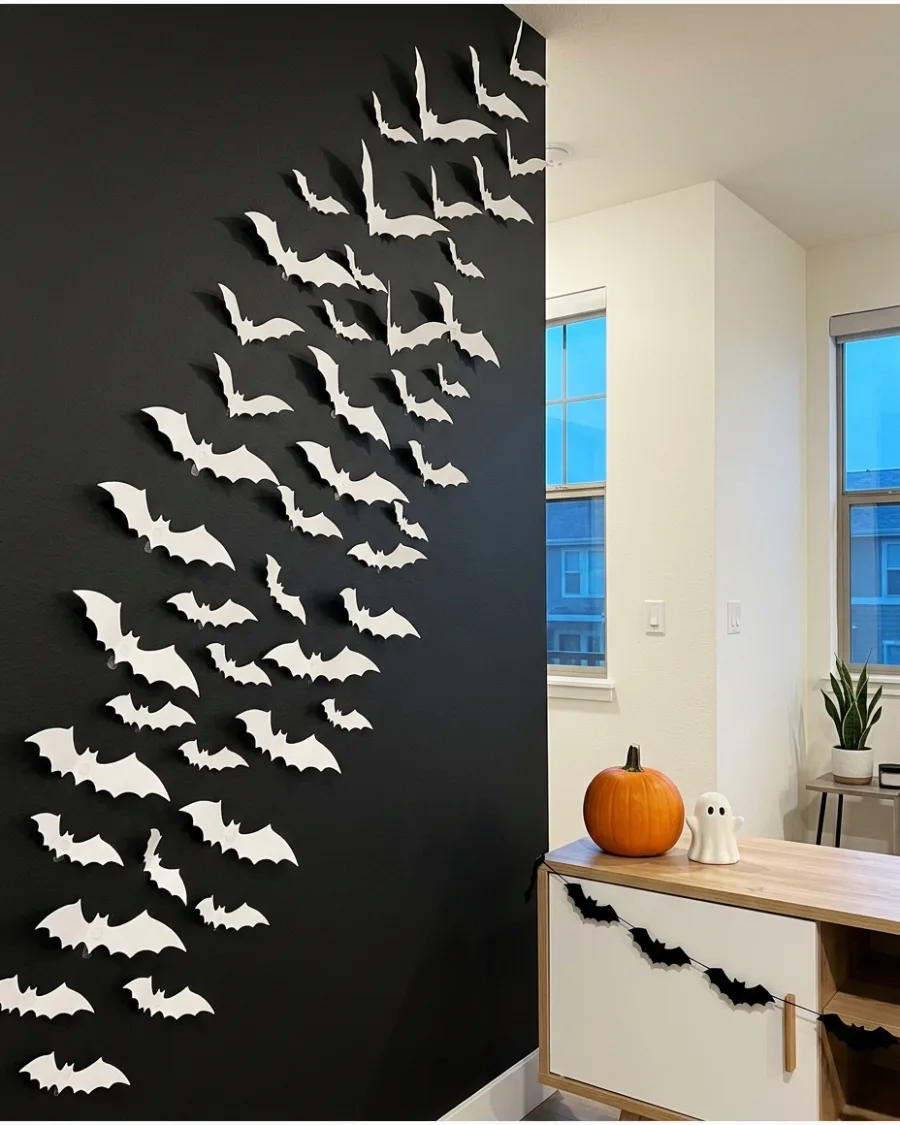
Use white, cream, or pale-gray bat silhouettes against a dark accent wall. The reversed color palette creates a dramatic alternative to traditional black paper bats.
Use bright white bats for a high-contrast look that pops against charcoal or black paint. It is a modern twist that feels clean and intentional.
- Bright white cardstock
- Dark gray or black wall
- Blue painter's tape
Quick win: Use off-white or cream bats if your black wall has warm undertones to keep the palette cohesive.
48. Glow-in-the-Dark Bat Wall
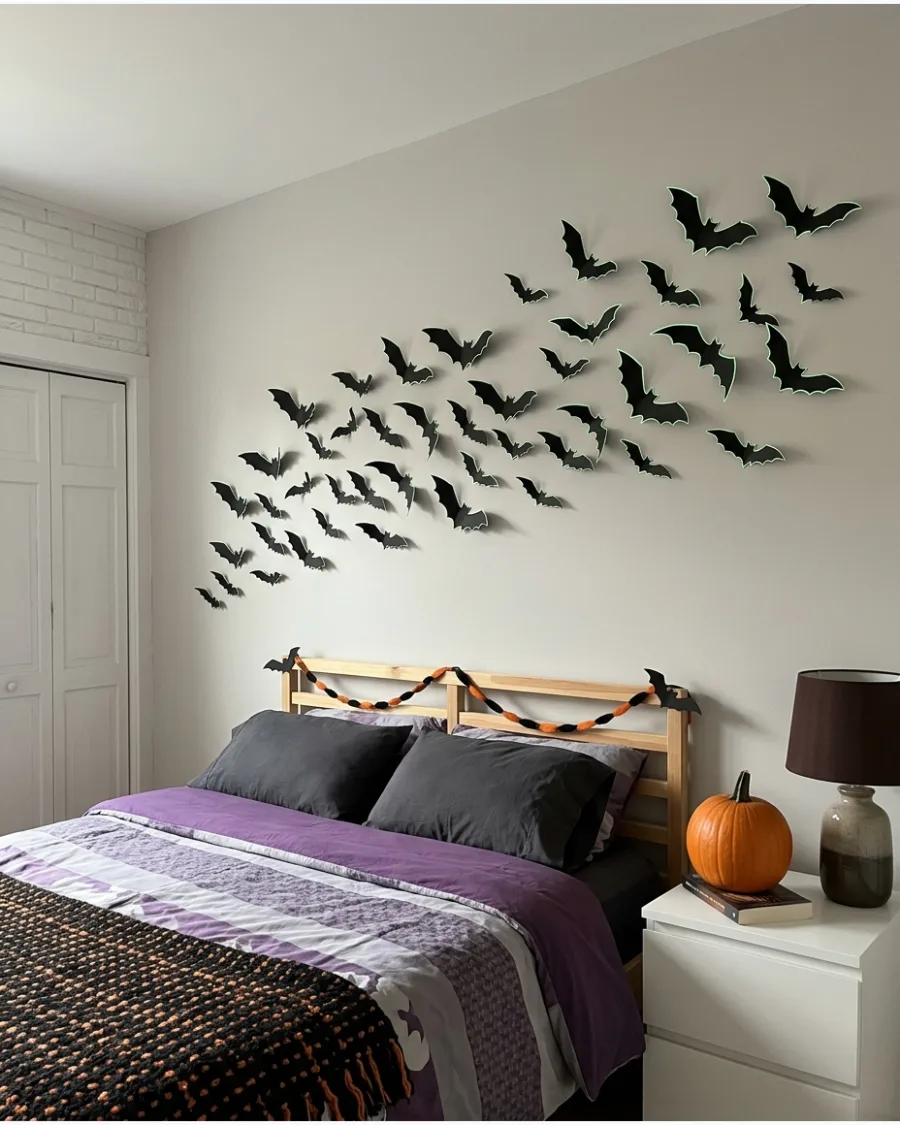
Add glow-in-the-dark details to black bats or cut the shapes from luminous paper. Arrange them around a bedroom, party room, or dark hallway where the glow will be visible.
Focus the glowing bats near the edges of the swarm to define the shape when the lights go out. This is a fun, interactive element for kids' rooms or evening parties.
- Glow-in-the-dark paint or tape
- Black cardstock
- UV flashlight for charging
Best shortcut: Use glow-in-the-dark puff paint to create raised, luminous veins on the bat wings.
49. Bats Flying Around a Crescent Moon
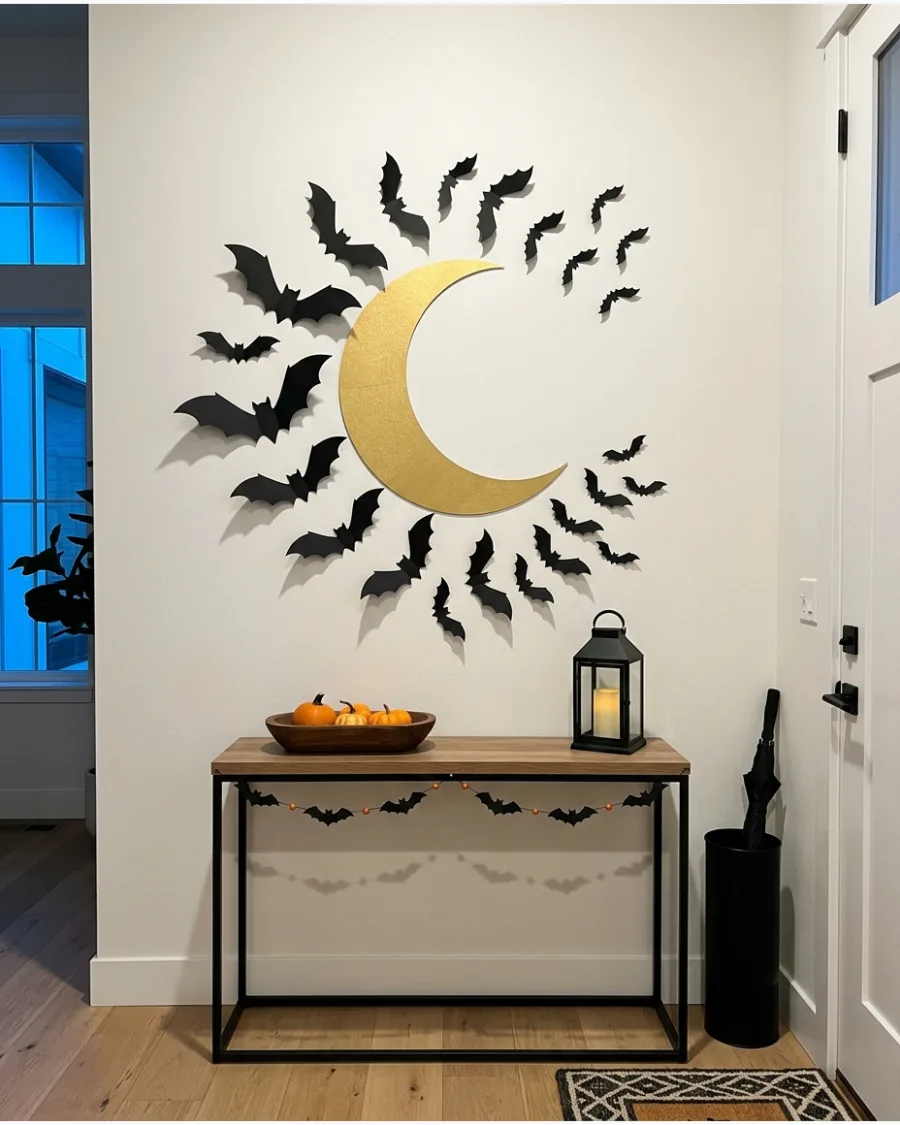
Create a large crescent moon from gold, white, or silver cardstock and surround it with black bats. Place the largest bats near the moon and smaller ones farther away.
Curve the bat flight path to follow the outer edge of the moon for a balanced composition. This creates a clear central focal point for a large, empty wall.
- Large gold poster board
- Black cardstock bats
- Precision craft knife
Most people skip this: Tape the moon first to anchor the design, then build the bat swarm around it to ensure proper spacing.
50. Bats Emerging From a Picture Frame
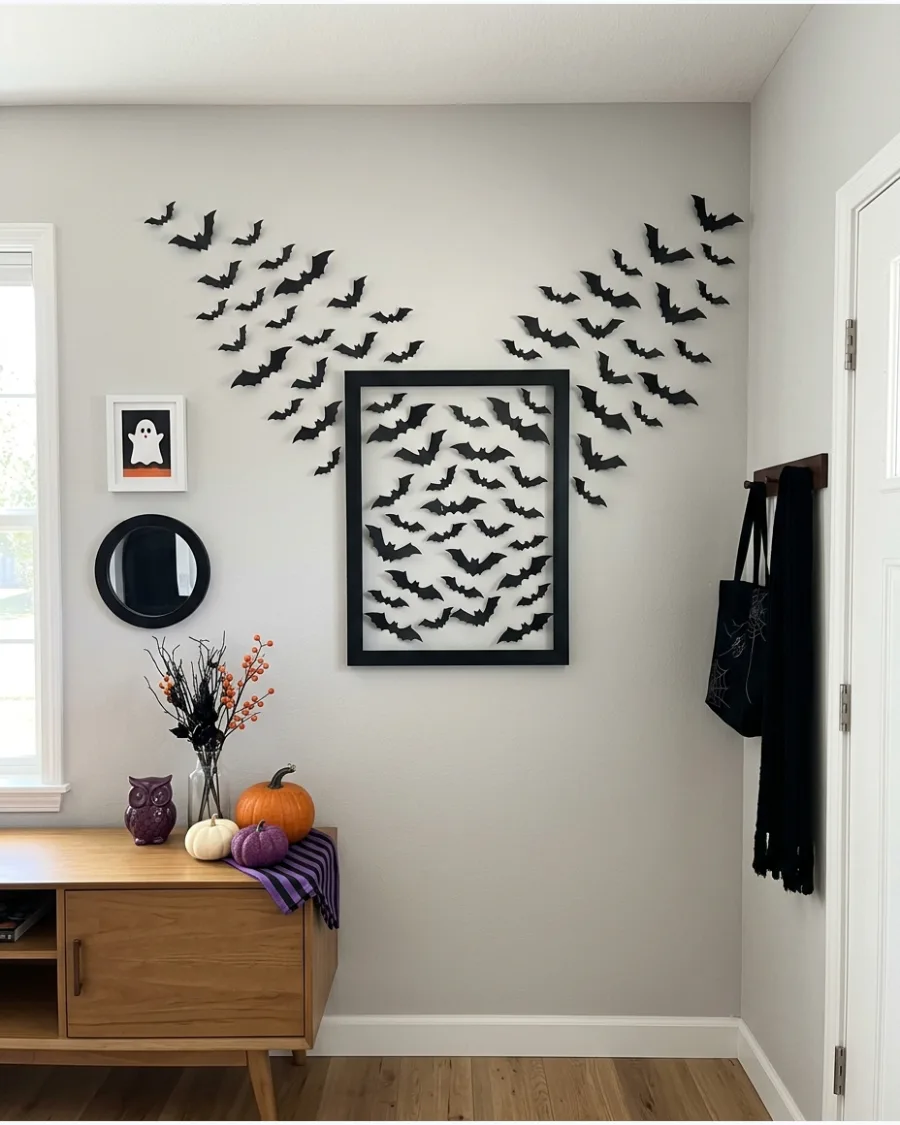
Use an empty antique-style frame as the starting point for the display. Cluster bats inside the frame and continue them across the wall so they appear to fly out of the artwork.
Angle the bats away from the frame in a widening V-shape to mimic a sudden burst of movement. This turns a simple wall decoration into a storytelling piece.
- Empty picture frame
- Black paper bats
- Removable adhesive dots
Quick win: Use a frame that matches your wall color for a subtle look, or a contrasting color to make the exit point stand out.
Frequently Asked Questions
What is the best way to stick bats to the wall without damaging paint?
The safest method is using painter's tape loops or mounting putty, which provide a firm hold without pulling off the finish. You can also use specialized poster tabs designed for easy, residue-free removal once the Halloween season is over.
How do I make the bat swarm look realistic?
To mimic natural flight, arrange your bats in a flowing 'S-curve' pattern rather than a straight line. Incorporating at least three different sizes of bats is also essential for creating depth and a sense of movement across your wall.
Should I use paper or plastic bats?
Cardstock paper bats offer a classic matte look that absorbs light beautifully indoors, while PVC plastic bats are more durable and feature a slight sheen. Choose plastic if you need a weather-resistant option for a porch or want a decoration that lasts for years.
Where is the best place to start a bat swarm?
Begin your arrangement at a natural 'exit' or 'entry' point, such as the corner of a window, a fireplace, or from behind a piece of furniture. This makes it look like the bats are emerging from a specific spot and moving into the room.
How do I get the wings to stay bent?
For the best results, pre-fold the wings sharply along the body lines before applying any adhesive to the center. This ensures the bats maintain their 3D shape and keep their wings popped out from the wall throughout the holiday.