50 No Carve Pumpkin Ideas for a Decorating Contest

This post may contain affiliate links: full affiliate disclosure.
Winning a pumpkin contest requires a design that stays fresh for days and looks intentional from every angle. No-carve methods prevent the pumpkin from rotting and allow for intricate details that carving tools simply cannot achieve.
Easy No-Carve Pumpkin Decorating Contest Ideas
1. Melted Crayon Pumpkin
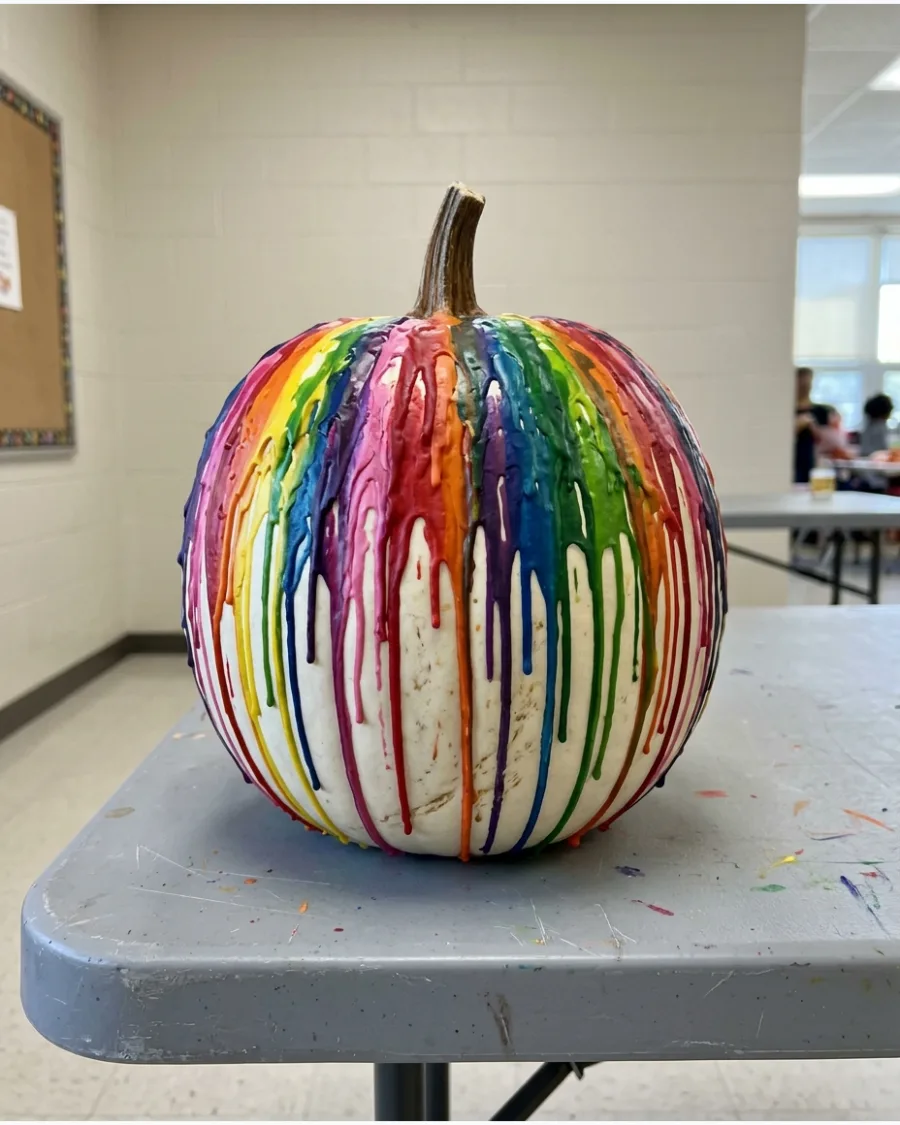
Attach unwrapped crayons around the stem and melt them with a hairdryer so the colors flow down the sides. A white pumpkin provides the best high-contrast canvas for these rainbow drips to stand out.
Heat the crayons slowly on a low setting to prevent splattering and maintain control over the drip pattern. This design is a crowd-pleaser because of its vibrant, vertical texture.
- Budget under $15 for a full pack of crayons and a pumpkin.
- Secure crayons with a small dab of glue before heating.
- Swap rainbow colors for ombre blues or metallics for a sophisticated look.
Quick win: Remove the crayon wrappers completely to ensure the wax flows smoothly without getting caught on paper scraps.
2. Confetti Pumpkin
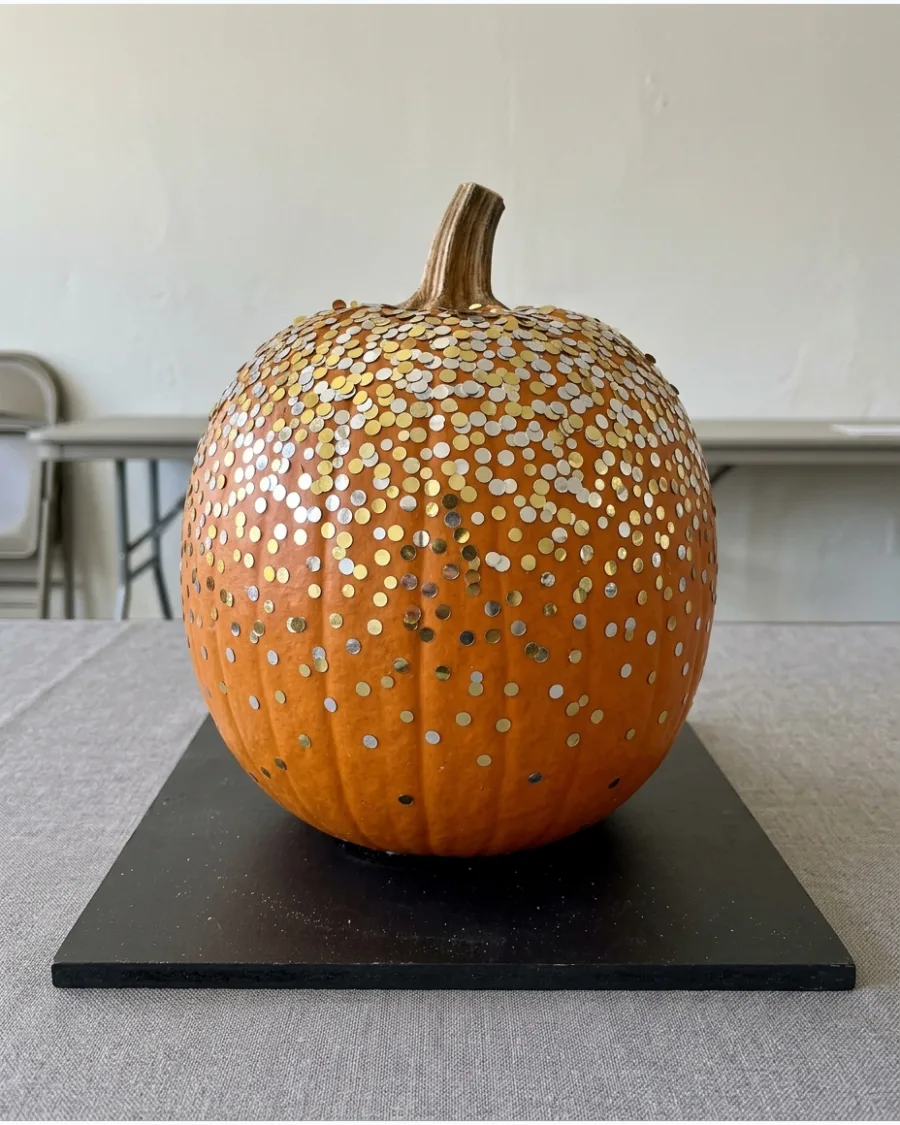
Cover the pumpkin with colorful paper circles or metallic confetti using a clear-drying adhesive. Concentration of the pieces near the top creates a festive, exploding effect as they space out toward the bottom.
Use a foam brush to apply a thin layer of decoupage glue to ensure the confetti lays flat against the curves. The shimmer from metallic confetti catches the light better than standard paint.
- Takes about 30 minutes to apply and dry.
- Work in small sections to prevent the glue from drying too fast.
- Use oversized sequins for extra sparkle and a 3D effect.
Best shortcut: Use a hole punch on colorful cardstock to create custom confetti that matches a specific theme.
3. Rainbow Drip-Paint Pumpkin
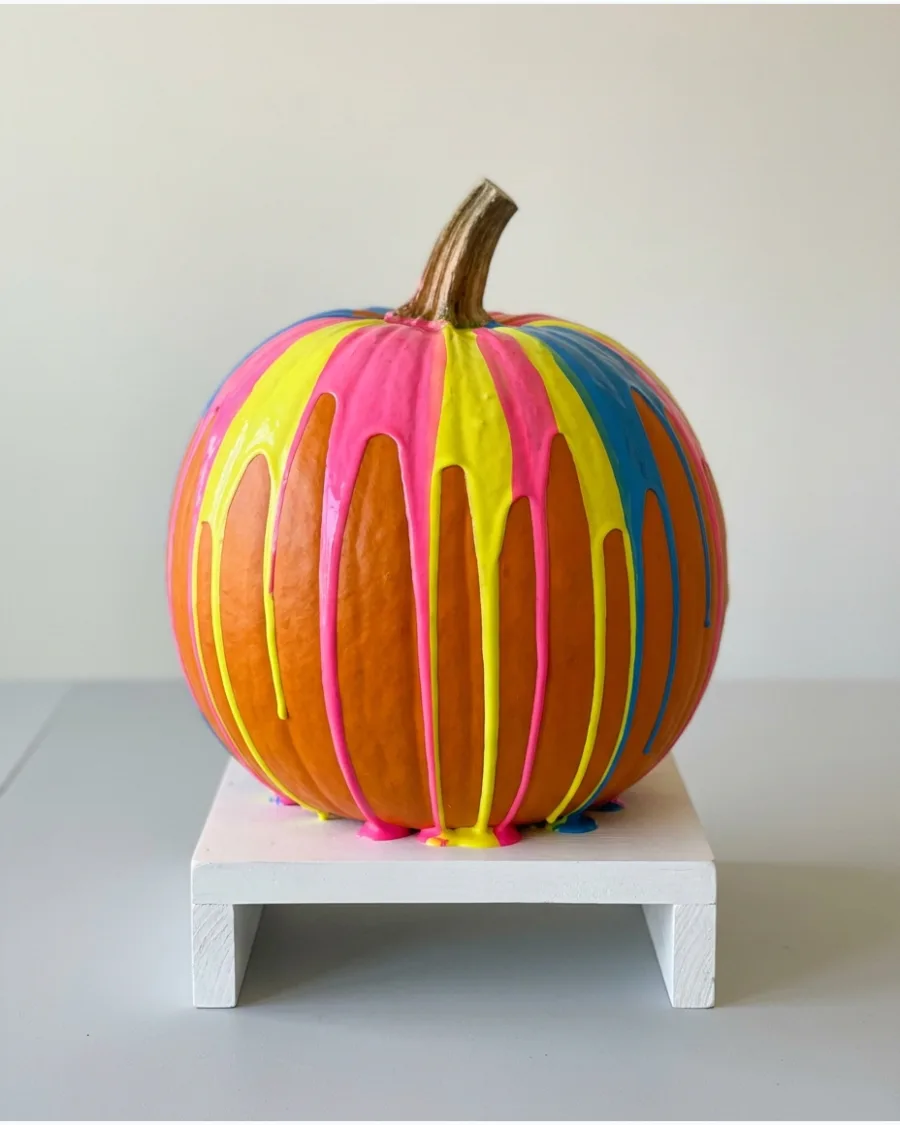
Pour several bright acrylic paint colors around the stem and let them drip naturally toward the base. Placing the pumpkin on a simple painted base or a small riser makes the finished entry look professional and complete.
Layer the paint colors one by one while they are still wet to create beautiful marbling effects. This method covers imperfections in the pumpkin skin perfectly.
- Acrylic craft paint is the most affordable and vibrant choice.
- Set the pumpkin on an upside-down plastic cup while painting to catch drips.
- Choose a pumpkin with deep vertical ridges to guide the paint flow.
Most people skip this: Thin the paint slightly with water so it flows consistently without leaving large, gloppy clumps at the top.
4. Polka-Dot Pumpkin
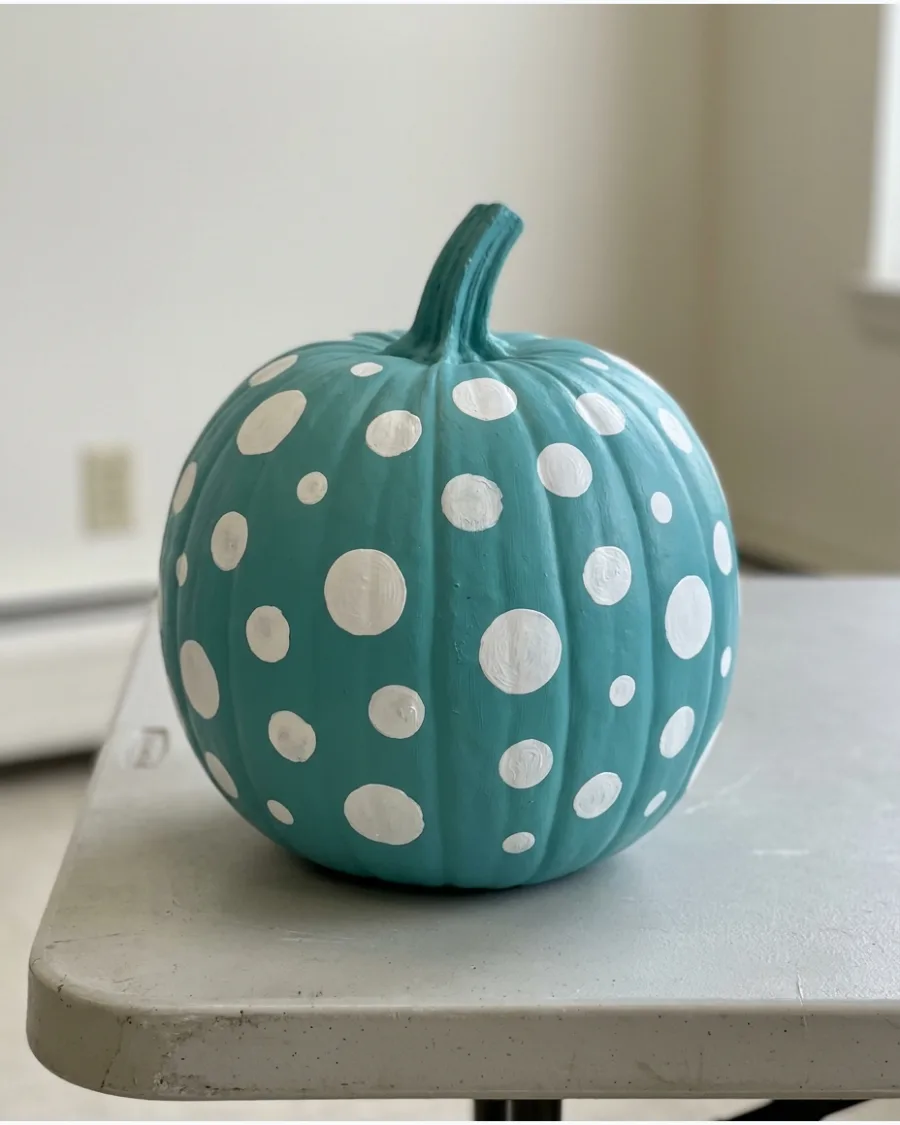
Paint the pumpkin a solid base color and add evenly spaced dots in contrasting shades for a clean, graphic look. Using different dot sizes gives the pattern more visual interest and depth.
Dip a round sponge pouncer into the paint to get perfectly circular dots without any brush strokes. A matte base with glossy dots creates a high-end look that stands out.
- Requires two coats of base paint for full coverage.
- Plan the spacing with a pencil before applying the dots.
- Try neon dots on a black pumpkin for a glow-in-the-dark effect.
Quick win: Use the eraser end of a pencil to create tiny, uniform dots between the larger circles.
5. Checkerboard Pumpkin
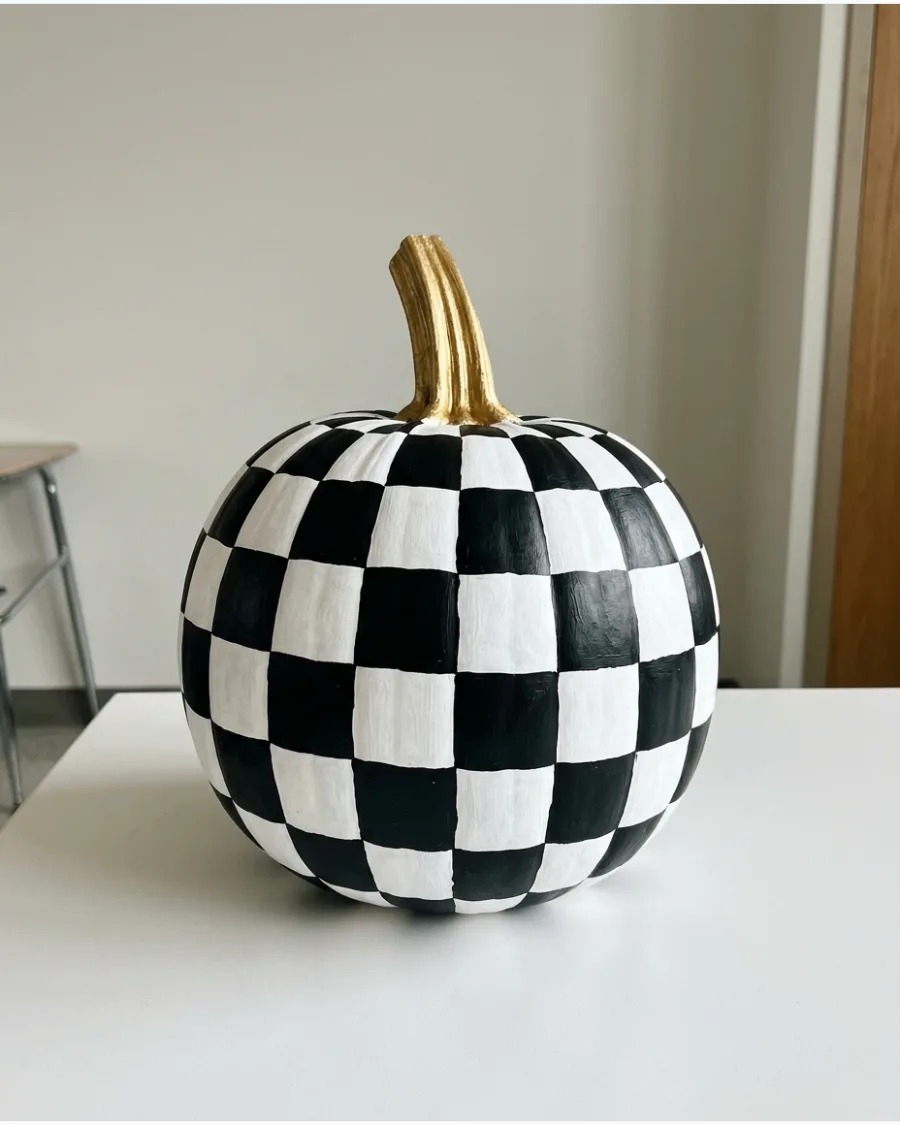
Create a bold black-and-white checkerboard pattern across the entire pumpkin surface for a high-impact entry. This geometric design shows extreme patience and precision to contest judges.
Use thin painter's tape to mark off the grid lines before filling in the squares with a steady hand. A bright gold or neon green stem adds a necessary pop of color to the monochromatic base.
- Allow at least 2 hours for drying between colors.
- Use a square-tipped brush to keep the corners of the checkers sharp.
- Scale the size of the squares to the size of the pumpkin for the best balance.
Most people skip this: Seal the finished design with a clear gloss spray to prevent the black paint from scuffing during the contest.
6. Googly-Eye Monster Pumpkin
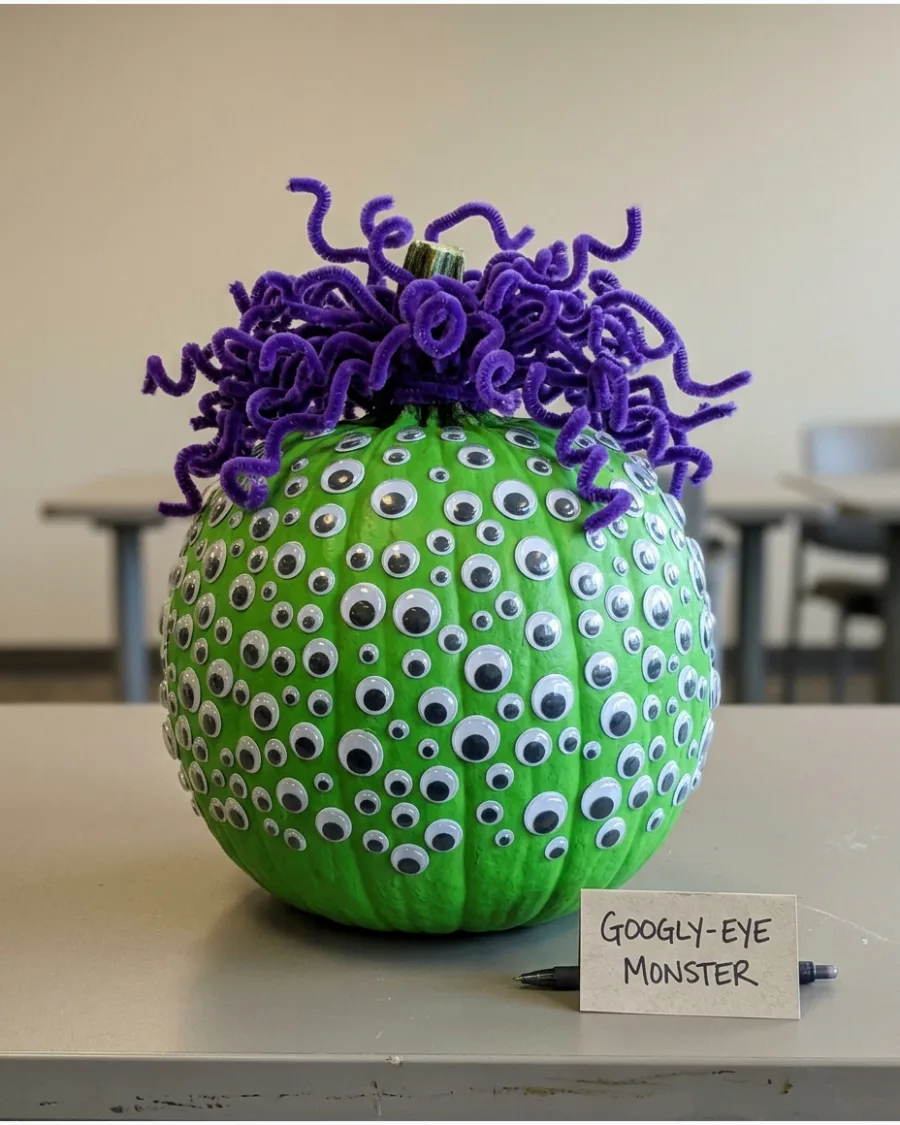
Cover the entire surface of the pumpkin with googly eyes in various sizes to create a quirky monster. Adding a small felt mouth and fuzzy pipe-cleaner hair gives the character a distinct personality.
Use a hot glue gun to secure the eyes so they don't slide off the waxy pumpkin skin. This design is especially effective for school contests because it is tactile and funny.
- Buy a bulk pack of multi-size googly eyes for the best variety.
- Paint the pumpkin a bright color first so no orange shows through the gaps.
- Add a few 'giant' eyes on the front to create a focal point for the face.
Best shortcut: Use self-adhesive googly eyes if you are working with children to avoid the mess of liquid glue.
7. Button-Covered Pumpkin
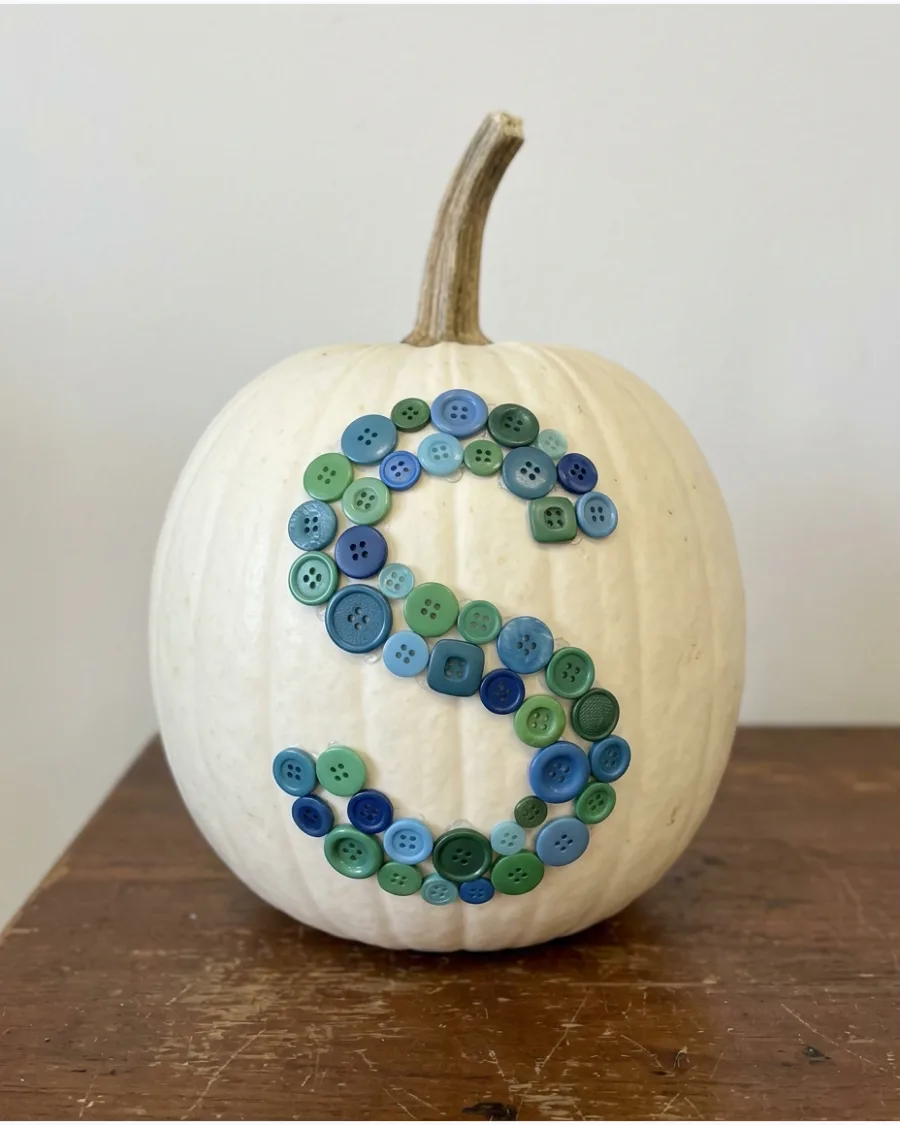
Attach assorted buttons across the pumpkin in a planned pattern or a colorful mosaic. You can arrange them into stripes, flowers, or even a large initial for a personalized touch.
Mix different textures like wooden, plastic, and metallic buttons to add more visual depth to the design. A white or light-colored pumpkin makes the colors of the buttons pop significantly more.
- Use a strong tacky glue or hot glue for a permanent bond.
- Layer smaller buttons on top of larger ones for a 3D effect.
- Choose a flat-surfaced pumpkin to make it easier to glue the buttons down.
Quick win: Sort your buttons by color before starting to ensure your pattern stays consistent and organized.
8. Yarn-Wrapped Pumpkin
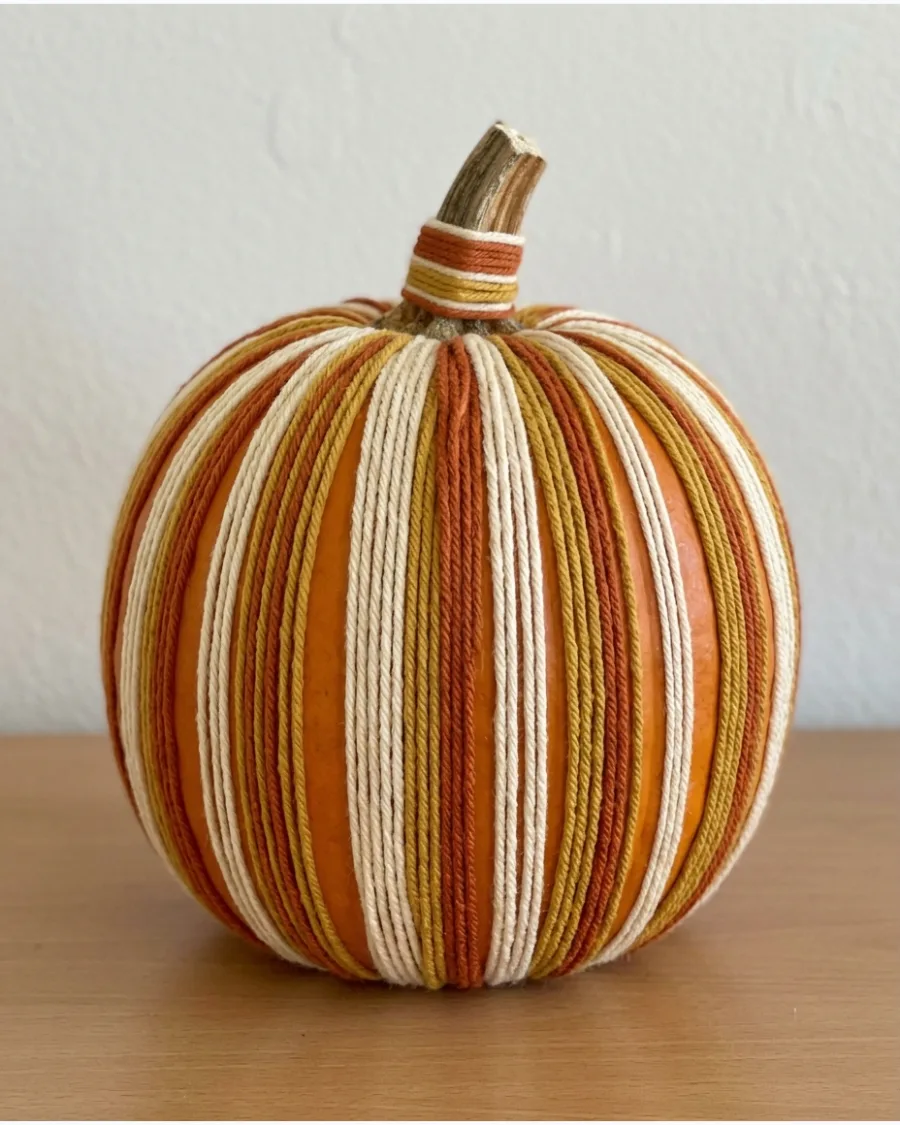
Wrap thick, textured yarn vertically around the pumpkin using the natural ridges as a guide. Alternating several colors creates a cozy, sweater-like appearance that is perfect for a fall theme.
Apply a small bead of glue at the top and bottom of each ridge to keep the yarn from slipping out of place. This design is great because it requires no paint and has zero drying time.
- Chunky or 'blanket' yarn provides the best coverage with fewer wraps.
- Tuck the yarn ends under the stem for a clean, finished look.
- Add a small felt leaf near the stem to complete the cozy aesthetic.
Most people skip this: Use a variegated yarn that changes color on its own to get a complex look with half the effort.
Cute No-Carve Pumpkin Contest Ideas
9. Friendly Ghost Pumpkin
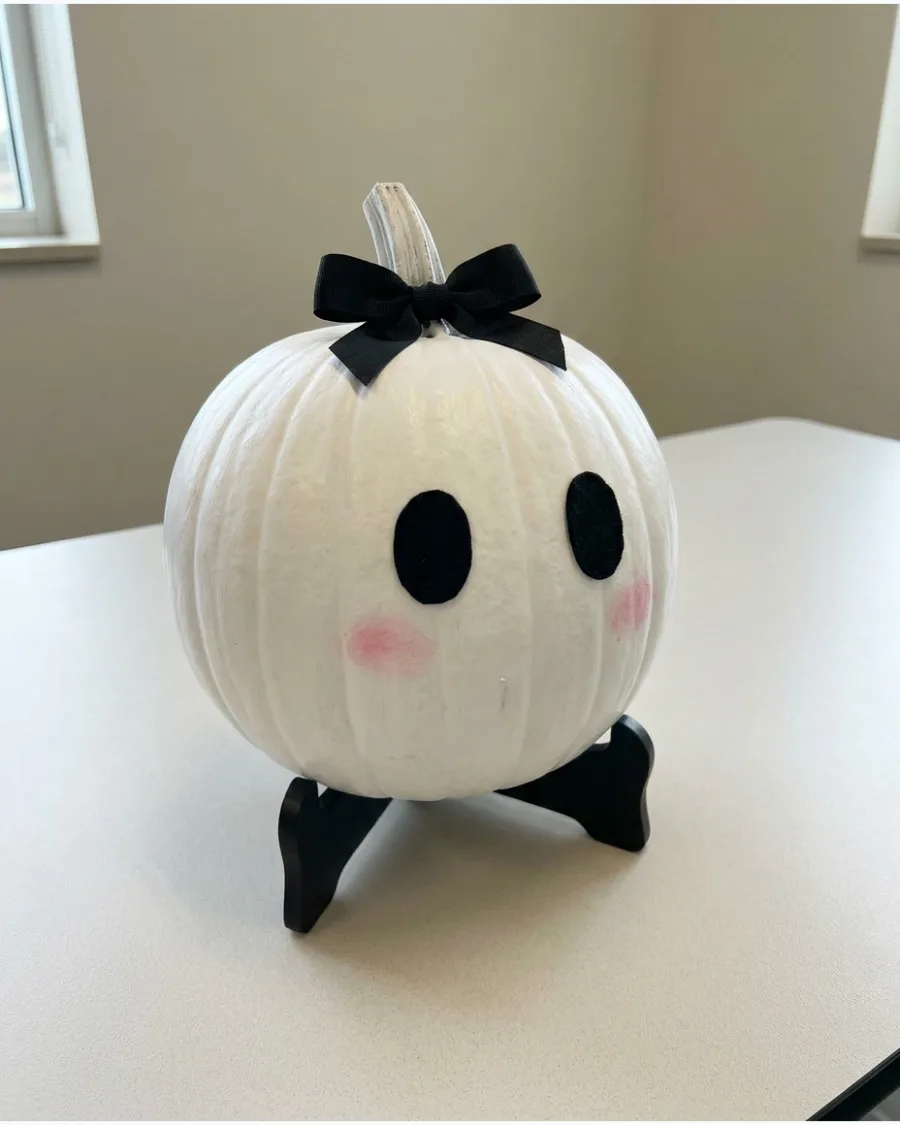
Paint the pumpkin a solid, crisp white and add simple black oval eyes and a tiny mouth for a classic ghost face. Finish the look with soft pink cheeks and a small fabric bow on the stem.
Apply two coats of white primer first to ensure the orange pumpkin skin doesn't bleed through the white paint. This minimalist design is charming and stands out against more cluttered entries.
- Use a permanent marker for the black eyes to get the cleanest edges.
- A satin-finish paint gives the ghost a soft, ethereal glow.
- Add a small piece of cheesecloth draped over the top for extra texture.
Quick win: Use a pink makeup sponge and a tiny bit of real blush to create perfectly soft, blended rosy cheeks.
10. Sleeping Pumpkin
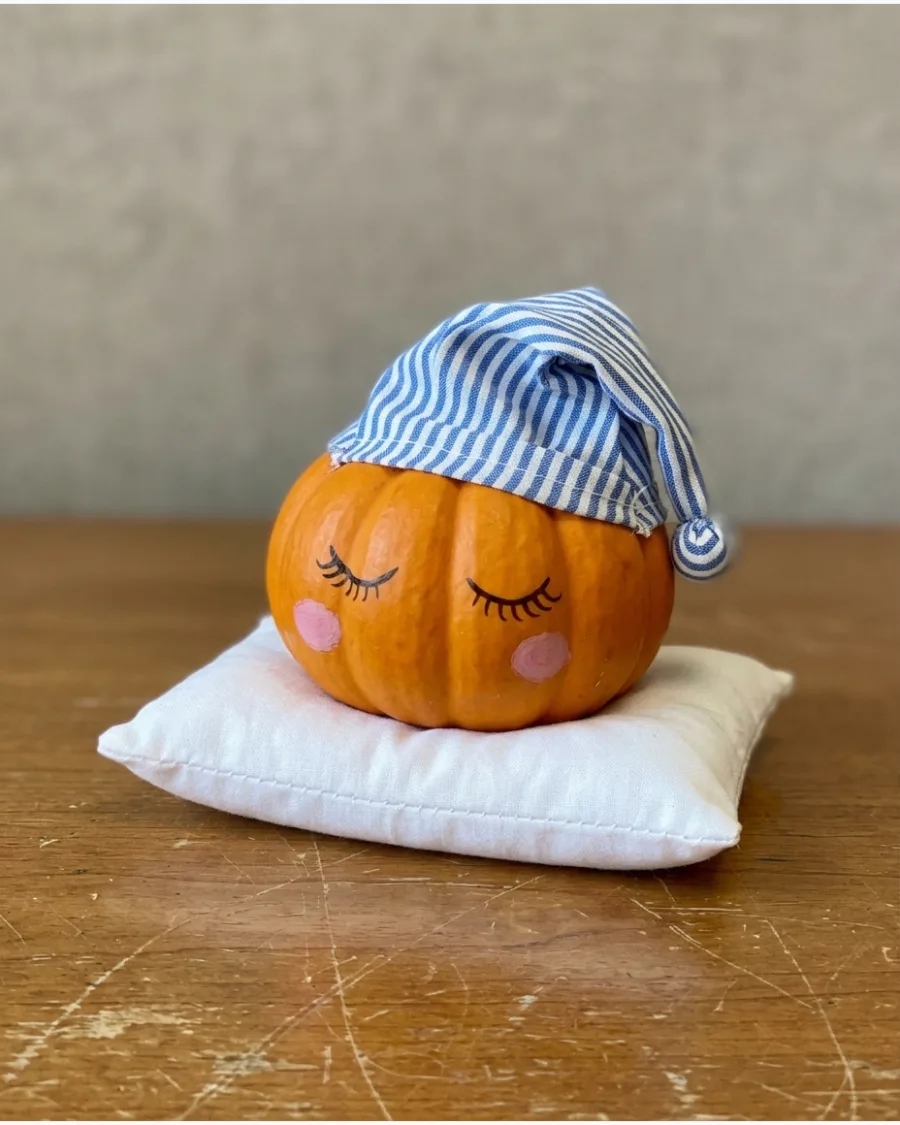
Paint closed eyelashes and rosy cheeks on the front of the pumpkin to create a peaceful, sleeping face. Add a soft fabric sleeping cap and place the pumpkin on a miniature pillow to complete the character.
Prop the pumpkin slightly forward on its pillow so the face remains fully visible to the contest judges. This design wins by creating a scene rather than just a decorated object.
- Use a fine-tip paint pen for the delicate eyelash details.
- Secure the sleeping cap with a single pin or a dot of glue.
- A small pumpkin works best for this idea to keep the scale of the pillow realistic.
Best shortcut: Use an old infant-sized winter hat or a large sock as a ready-made sleeping cap.
11. Pumpkin Fairy
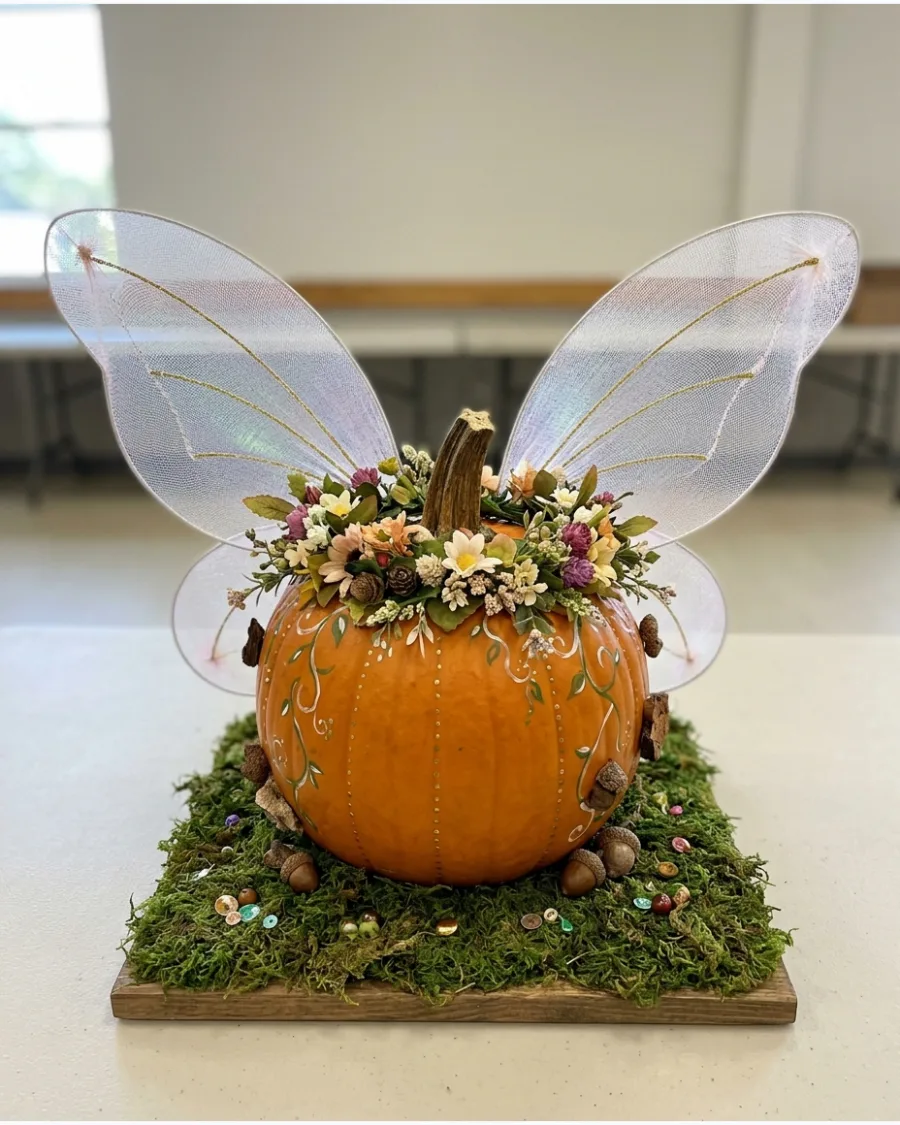
Transform a pumpkin into a woodland sprite using craft wings and a floral crown. Attach the wings to the back with strong adhesive strips to ensure they stay upright during the entire judging process. Moss and tiny mushrooms around the base create a complete miniature world that draws people in.
- Sourcing: Craft wings and silk flowers usually cost between $10 and $15.
- Setup: Apply the wings last to avoid crushing the mesh during transport.
- Adaptation: Use a white pumpkin for a more ethereal winter-fairy look.
Quick win: Use a hot glue gun on a low setting to attach the flower crown so you do not melt the pumpkin skin.
12. Pumpkin Ballerina
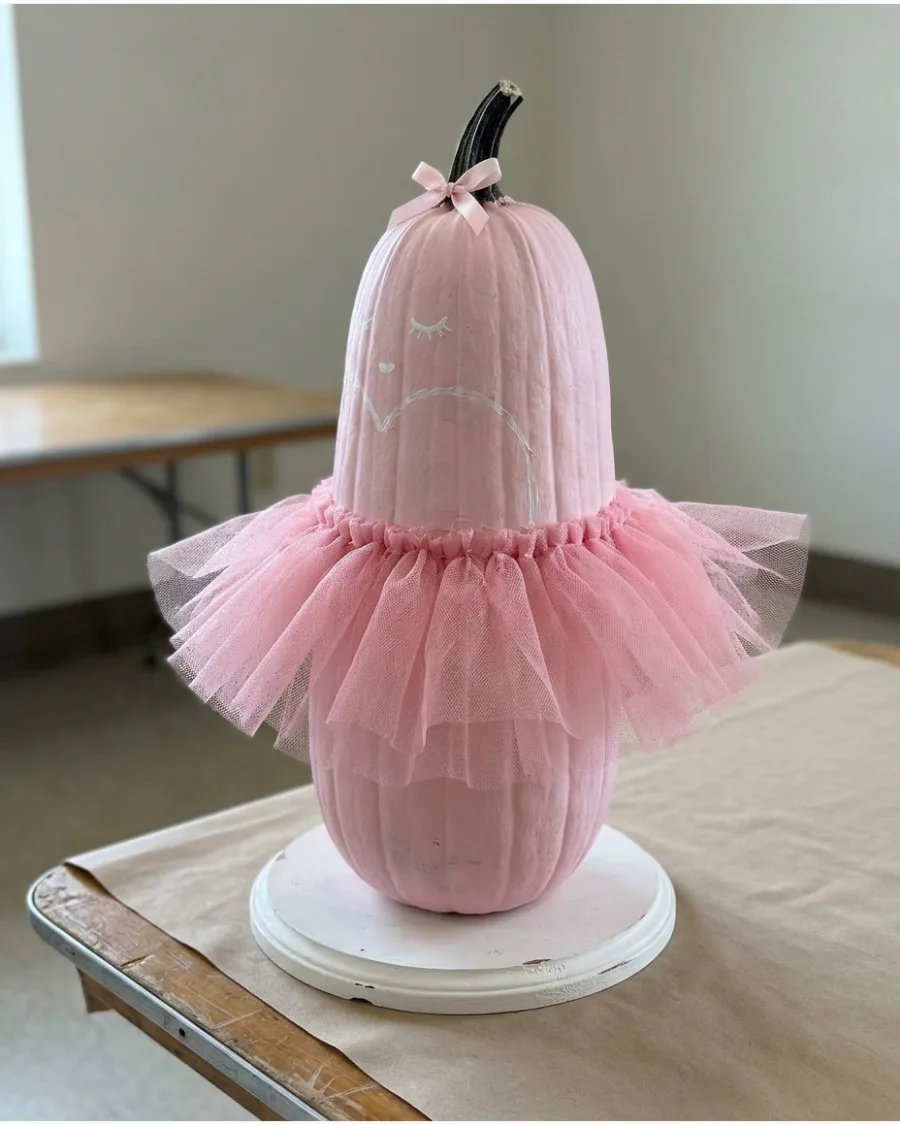
A simple tutu and a hair bun make this design a standout for performance-themed contests. Wrap a strip of pink tulle tightly around the middle of the pumpkin and secure it with a matching ribbon to create the skirt. The stem acts as the perfect anchor for a yarn or painted hair bun.
- Sourcing: Tulle rolls are significantly cheaper than pre-made tutus.
- Setup: Anchor the tutu with double-sided tape to prevent it from slipping down the smooth pumpkin skin.
- Adaptation: Add silver glitter glue to the tutu for extra stage presence.
Best shortcut: Use a large donut-style hair scrunchie around the stem to create an instant, perfect bun.
13. Pumpkin Princess
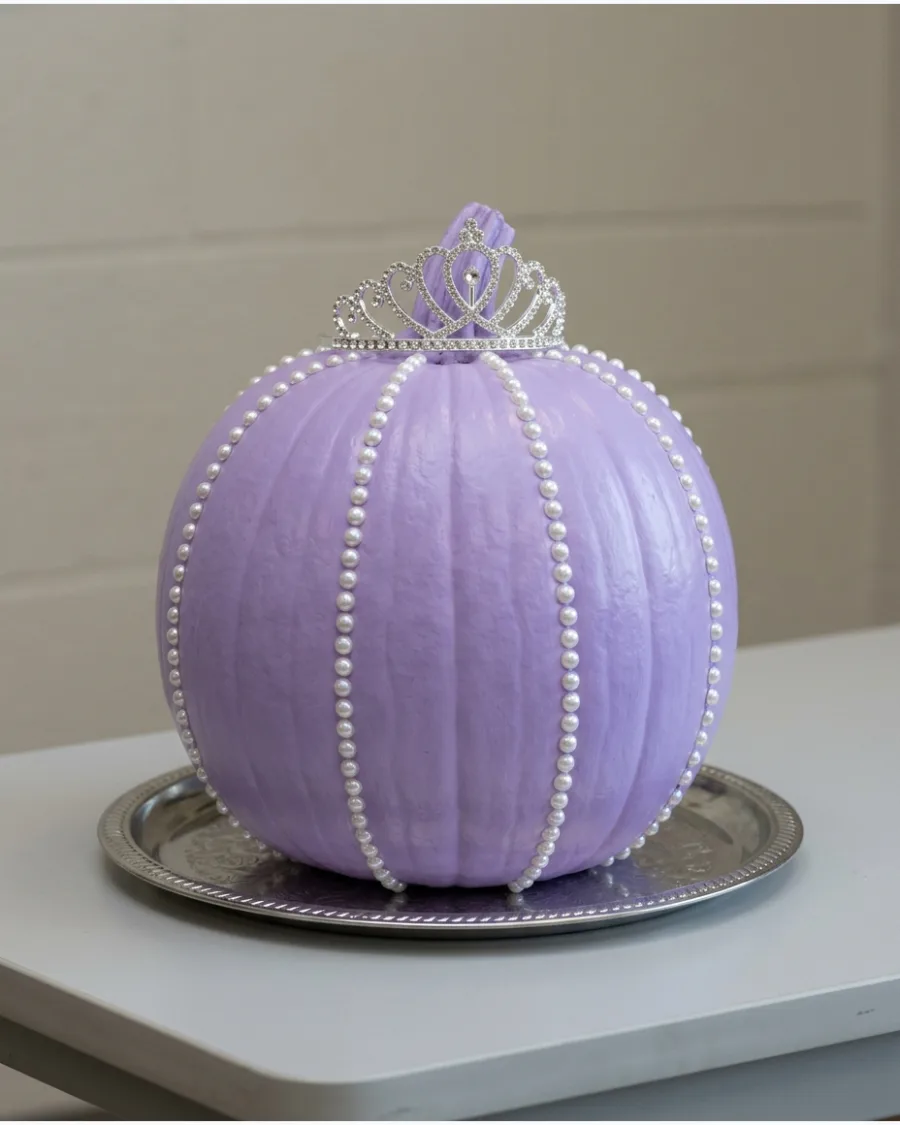
Use pastel paint and sparkling accents to create a royal entry for a school or office contest. Glue individual rhinestones in a pattern around the top of the pumpkin to mimic a necklace or gown detail. A lightweight plastic tiara pinned to the top adds height and instant recognition.
- Sourcing: Plastic tiaras and stick-on gems are available at most dollar stores.
- Setup: Paint the pumpkin at least 24 hours before adding gems to ensure the surface is dry.
- Adaptation: Use gold spray paint for a Midas-touch royal look.
Most people skip this: Seal the pastel paint with a matte spray first so the adhesive gems stick better to the surface.
14. Cloud and Rainbow Pumpkin
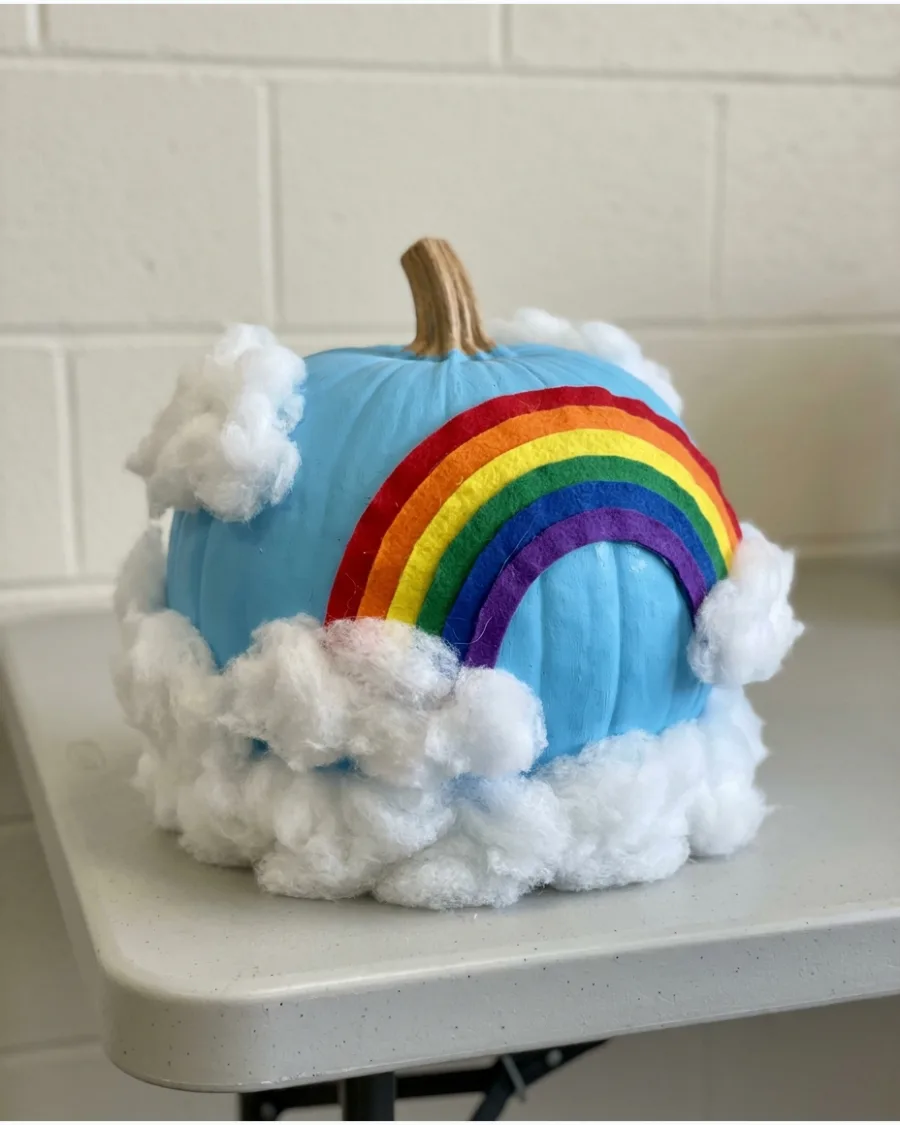
This design uses varied textures to grab the attention of the judges. Pull apart cotton batting or polyester stuffing to create airy clouds that wrap around the base of a blue-painted pumpkin. A stiff felt rainbow arching across the front adds a pop of bright, contrasting color.
- Sourcing: Polyester fiberfill and multi-color felt sheets cost around $10.
- Setup: Use stiffened felt for the rainbow so it does not flop over during display.
- Adaptation: Add silver glitter to the clouds to look like a rain shower.
Quick win: Use pipe cleaners inside the felt rainbow to give it a sturdy, bendable structure.
15. Sunshine Pumpkin
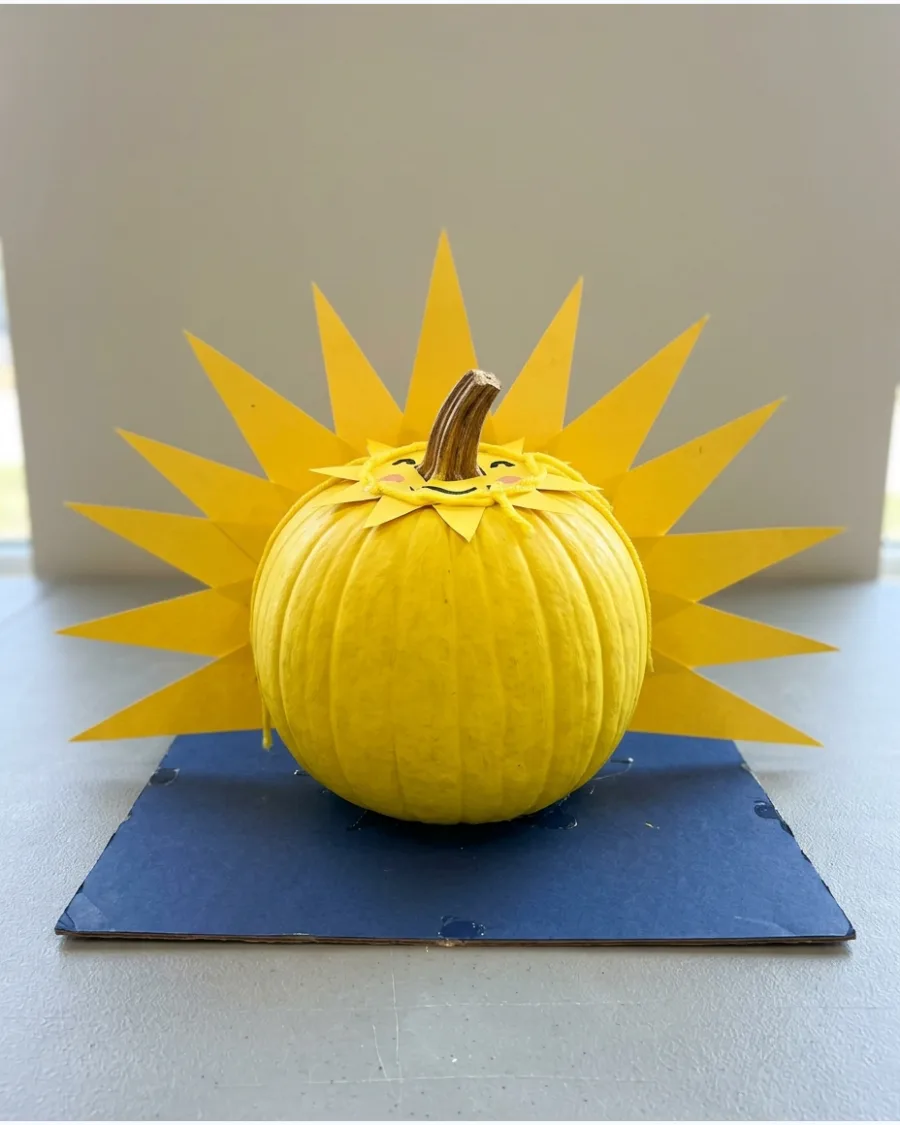
Bright yellow paint and paper rays turn a standard gourd into a cheerful sun. Cut long triangles from yellow cardstock and glue them to the back of the pumpkin in a radiating circle. A simple black-painted smiley face keeps the design clean and high-impact from a distance.
- Sourcing: Yellow acrylic paint and heavy cardstock are the primary materials needed.
- Setup: Attach rays to a cardboard backing first, then glue the backing to the pumpkin for stability.
- Adaptation: Use orange and red rays for a sunset effect.
Best shortcut: Use a compass or a large bowl to trace the face circles so the proportions look professional.
16. Sweet Dreams Moon Pumpkin
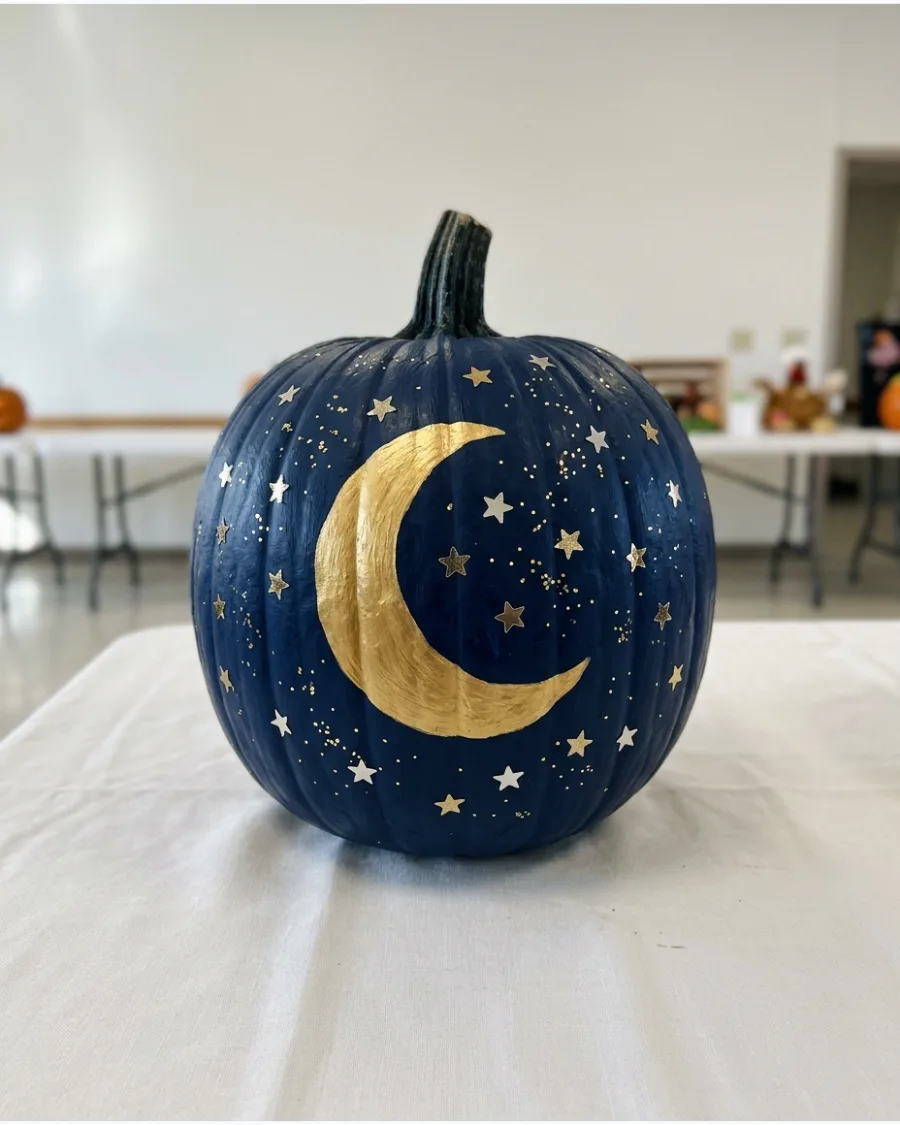
Dark colors make gold accents stand out in a crowded contest field. Paint the pumpkin a deep midnight blue and use a gold paint pen to draw crisp stars and a crescent moon. Resting the pumpkin on a bed of white batting makes it look like it is floating in the night sky.
- Sourcing: Navy paint and gold metallic markers are available at any craft store.
- Setup: Use a stencil for the moon to get a perfect, clean curve.
- Adaptation: Add a tiny nightcap made from a scrap of striped fabric for extra character.
Most people skip this: Use a metallic paint pen instead of a brush for the stars to get much finer, sharper detail.
Animal Pumpkin Decorating Contest Ideas
17. Highland Cow Pumpkin
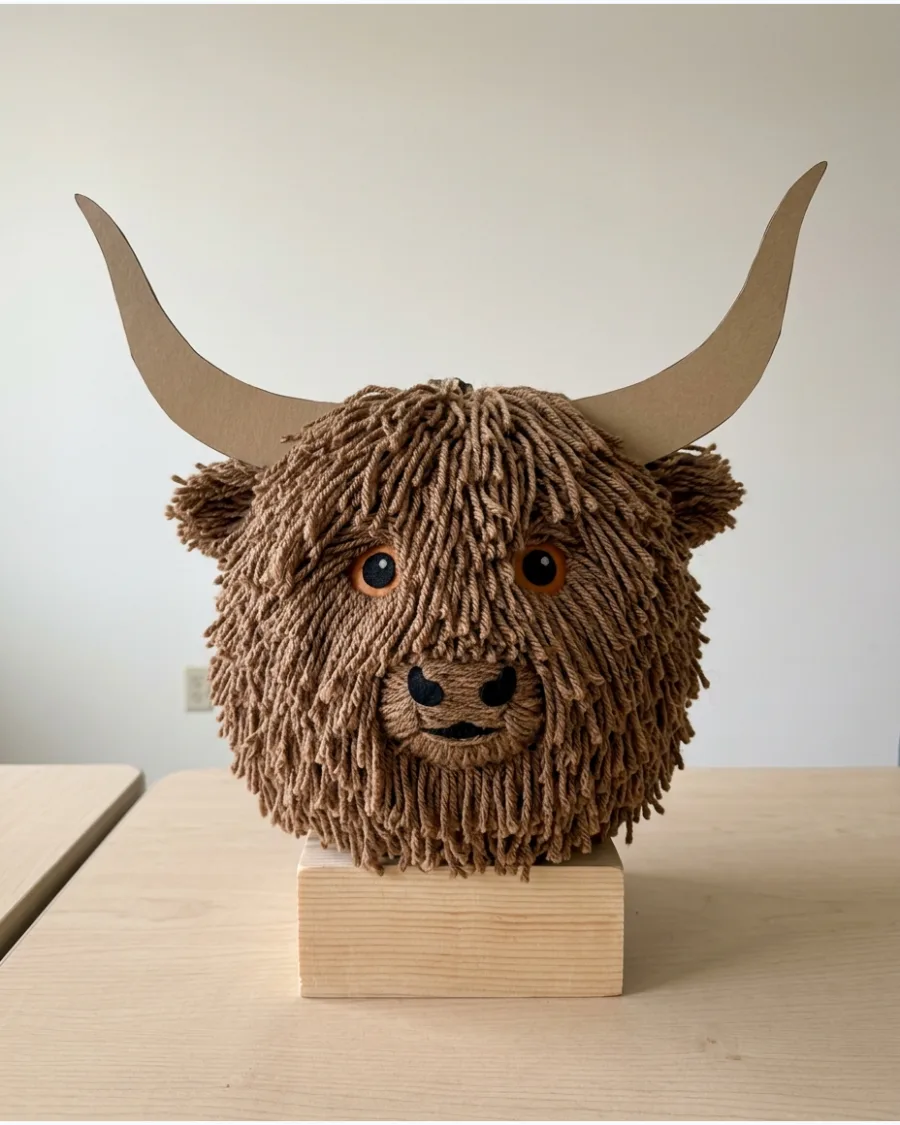
Texture is the key to winning animal-themed categories. Drape long strands of thick brown yarn over the top of the pumpkin to create the signature shaggy look of a highland cow. Add cardboard horns and a large painted snout to finish the character and make it recognizable.
- Sourcing: Look for bulky or chunky brown yarn to get the best hair texture.
- Setup: Glue the yarn in layers starting from the bottom and working toward the stem.
- Adaptation: Use white yarn for a rare white highland cow version.
Quick win: Brush out the yarn ends with a wide-tooth comb to make the hair look even fluffier and more realistic.
18. Fluffy Sheep Pumpkin
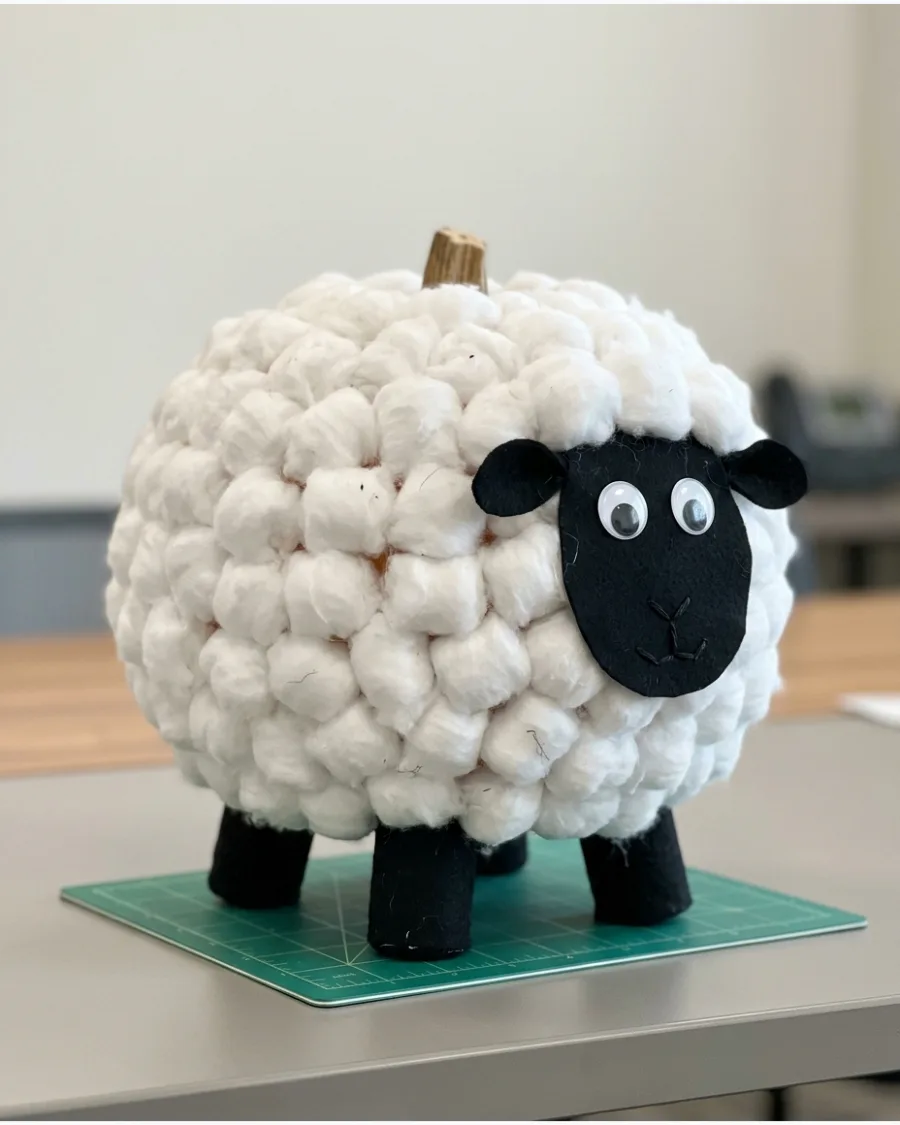
This high-texture project is easy for all ages but looks very impressive to judges. Cover every inch of the pumpkin surface with white cotton balls or large pom-poms using a low-temp glue gun. A black felt oval for the face and four small wooden dowels for legs complete the sheep's body.
- Sourcing: A single bag of 200 cotton balls is usually enough for a medium pumpkin.
- Setup: Leave a small gap at the front for the face attachment so it sits flush.
- Adaptation: Use gray pom-poms or wool roving for a different breed of sheep.
Best shortcut: Use a black-painted mini pumpkin for the head to give the sheep a 3D, lifelike appearance.
19. Hedgehog Pumpkin
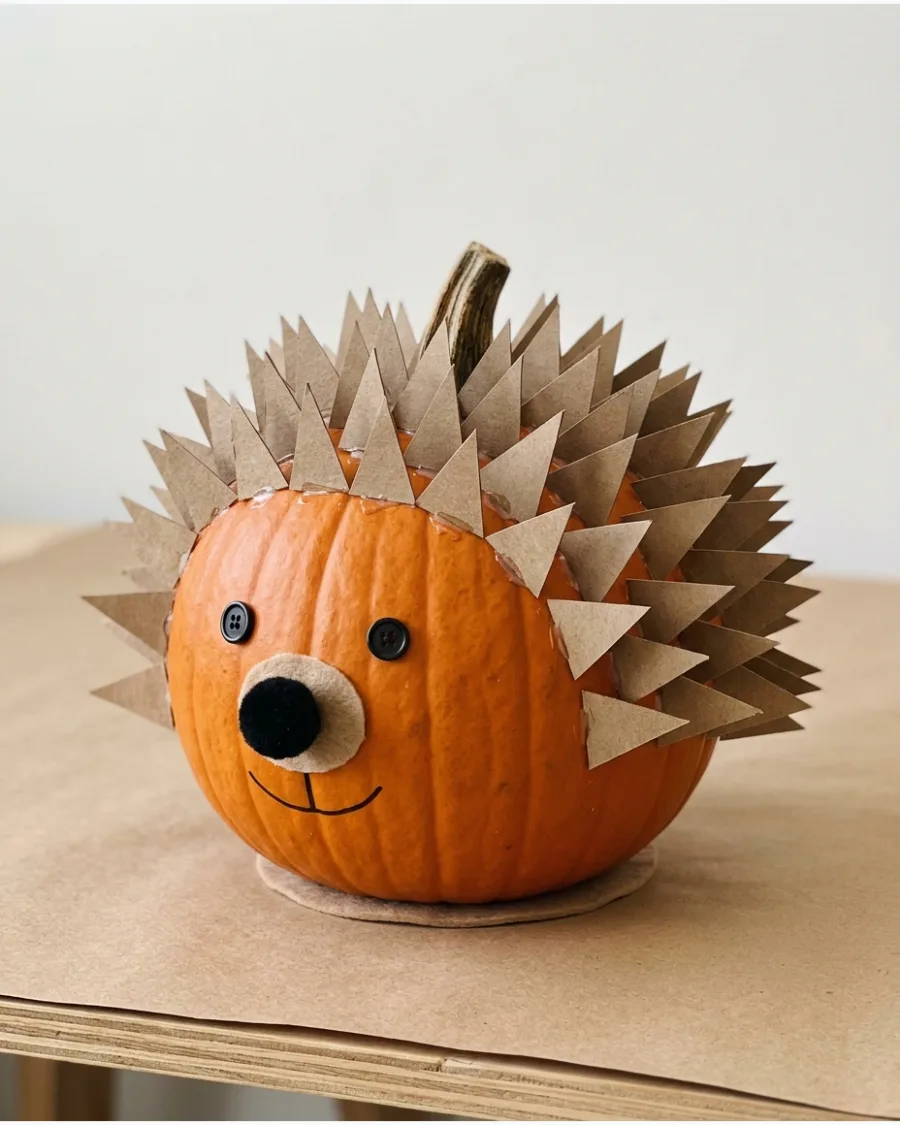
Creating three-dimensional spikes gives this pumpkin a unique and interesting silhouette. Fold brown cardstock into small accordion shapes or use brown paper leaves to cover the back two-thirds of the pumpkin. A pointed felt cone attached to the front serves as the hedgehog's snout.
- Sourcing: Brown construction paper or artificial fall leaves work perfectly for spikes.
- Setup: Angle the spikes backward toward the stem to create a sense of movement.
- Adaptation: Use painted toothpicks for a more realistic, though sharper, spike texture.
Most people skip this: Paint the pumpkin brown before adding spikes so no orange skin peeks through the gaps in the quills.
20. Owl Pumpkin
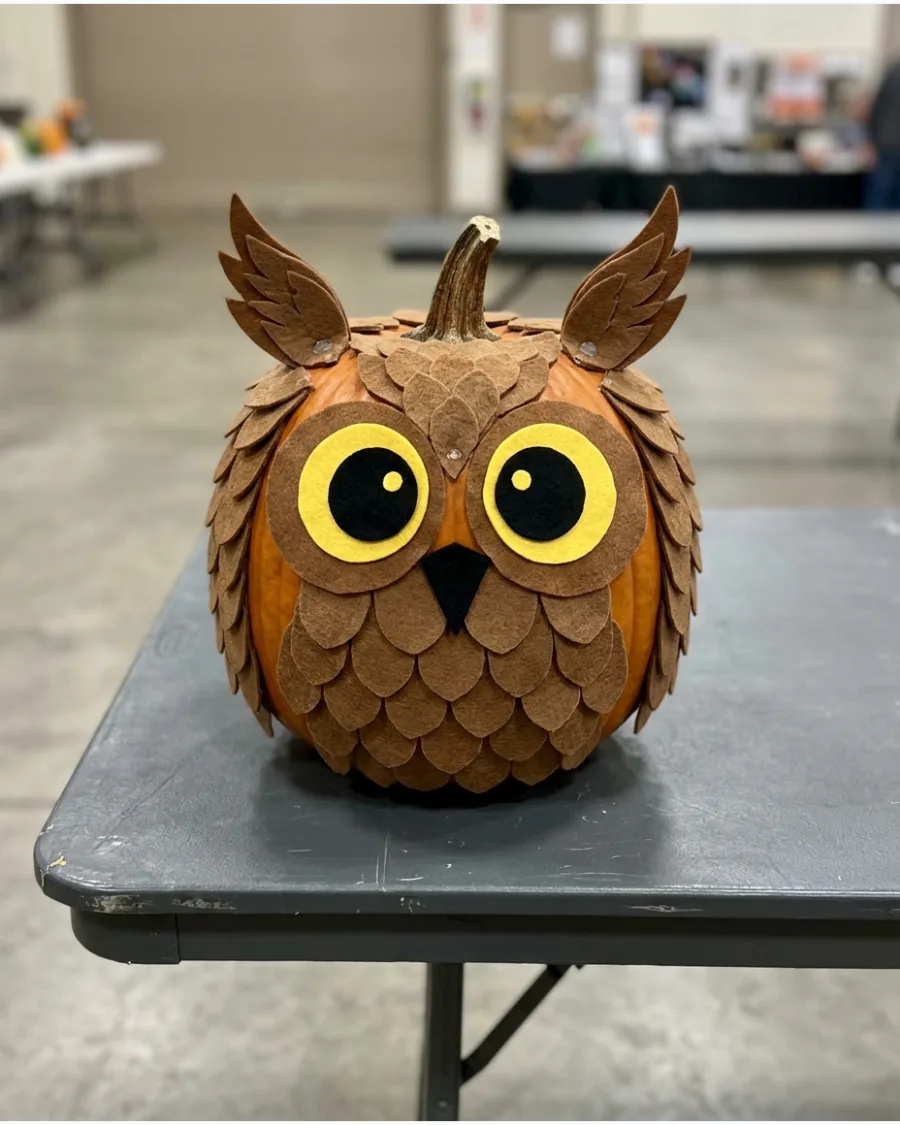
Layered materials create depth and visual interest in this bird design. Cut large circles from felt or cardstock and layer them to create oversized, expressive owl eyes on the front of the pumpkin. Overlapping feathers made from cupcake liners or felt scraps give the body a soft look.
- Sourcing: Felt sheets or patterned cupcake liners are inexpensive options for feathers.
- Setup: Use a hot glue gun to secure the heavy felt layers so they do not peel off.
- Adaptation: Use white and silver materials for a snowy owl theme.
Quick win: Use large buttons for the pupils of the eyes to give the owl a shiny, focused gaze that catches the light.
21. Fox Pumpkin
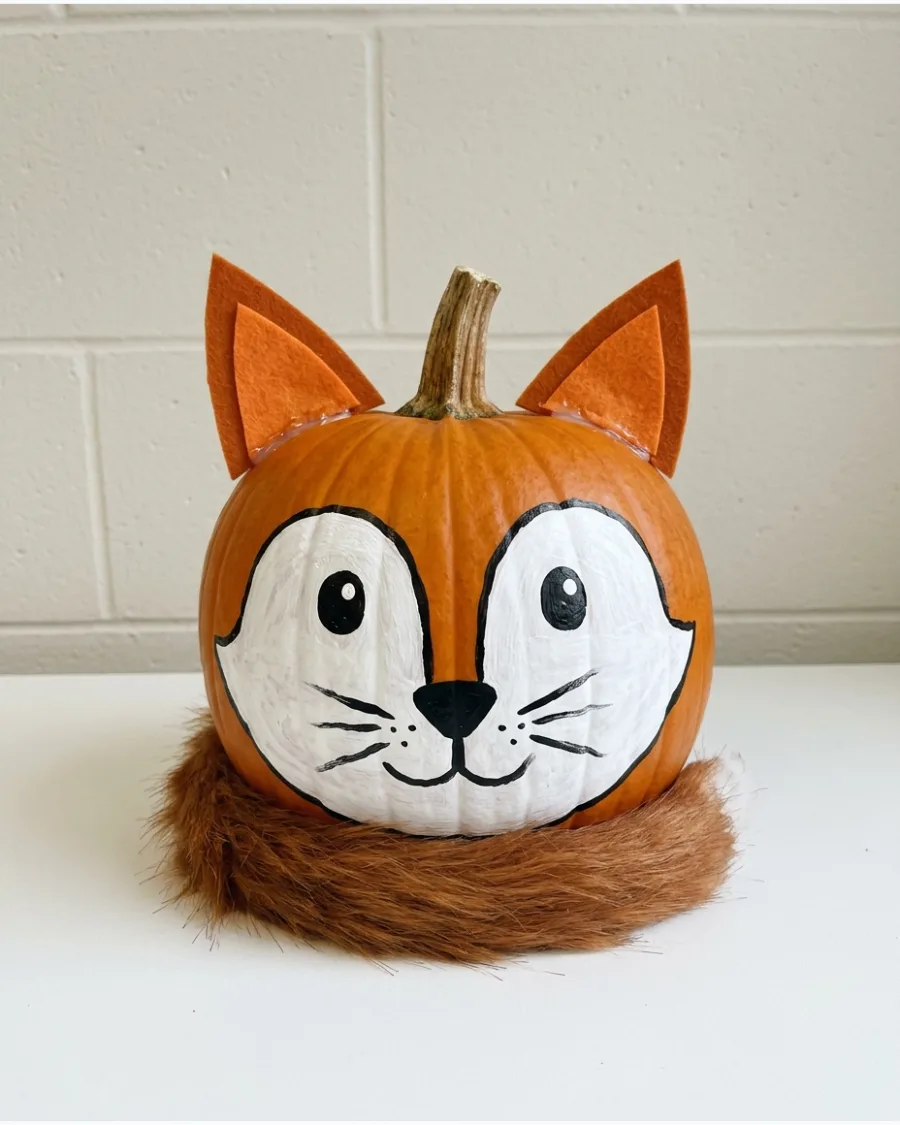
Paint the pumpkin a vibrant orange and add white teardrop shapes on the front for the face and chest. Use orange felt for pointed ears and a piece of faux fur for a fluffy tail attached to the back.
Use stiff felt for the ears to prevent them from drooping during the judging.
- Materials like felt and faux fur are available at most craft stores for under five dollars.
- Secure the tail with a heavy-duty adhesive or hot glue to ensure it stays attached when the pumpkin is moved.
- Substitute the faux fur with a thick orange yarn braid if fur is not available.
Quick win: Outline the white paint sections with a thin black marker to make the facial features pop from a distance.
22. Black Cat Pumpkin
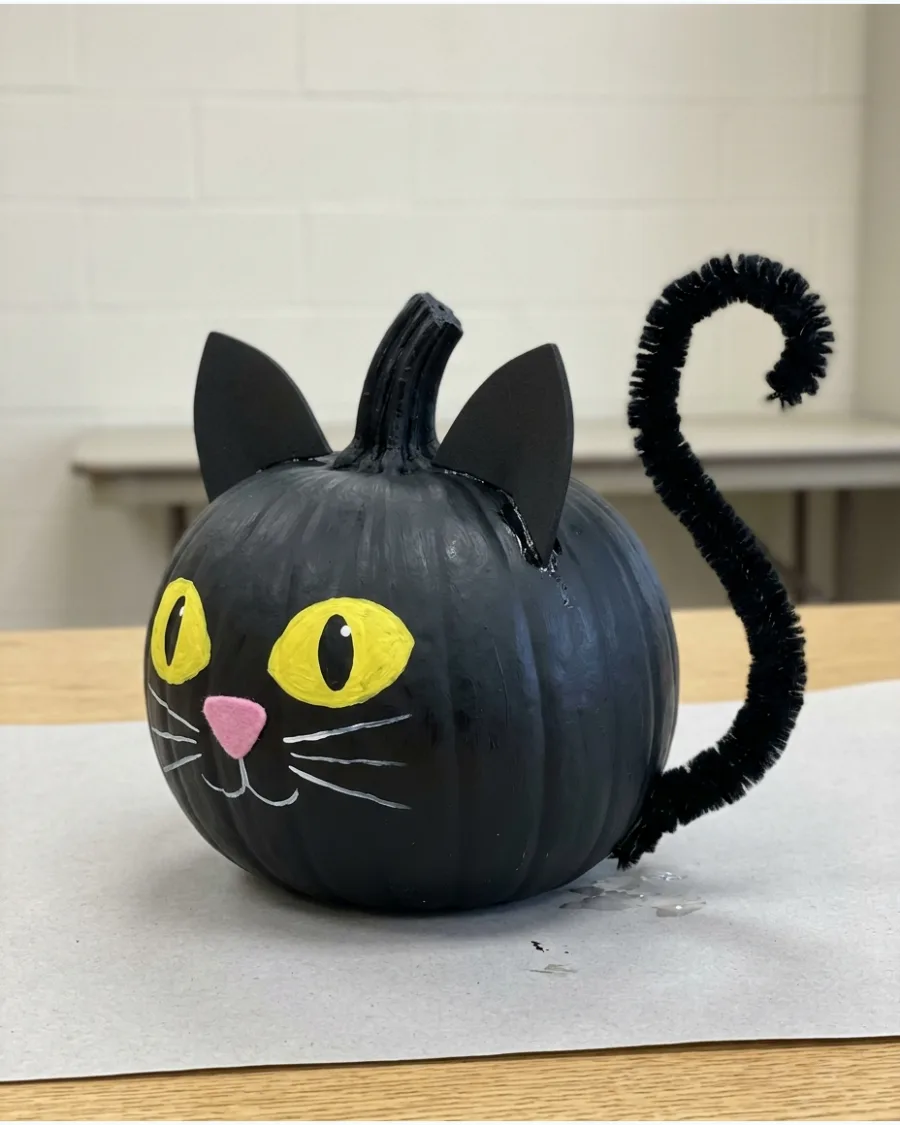
Paint the pumpkin matte black and attach two triangular ears made from black craft foam. Add painted whiskers, bright yellow or green eyes, and a curled tail made from a thick black pipe cleaner.
Apply a second coat of matte black paint to ensure the pumpkin's natural orange color doesn't peek through under bright contest lights.
- A standard craft pumpkin can be painted in about twenty minutes excluding drying time.
- Position the ears slightly forward on the pumpkin to give the cat an alert and curious expression.
- Use glittery green paint for the eyes to help the cat stand out in a crowded contest lineup.
Best shortcut: Use a black paint pen for the whiskers to get cleaner lines than a traditional brush can provide.
23. Frog Pumpkin
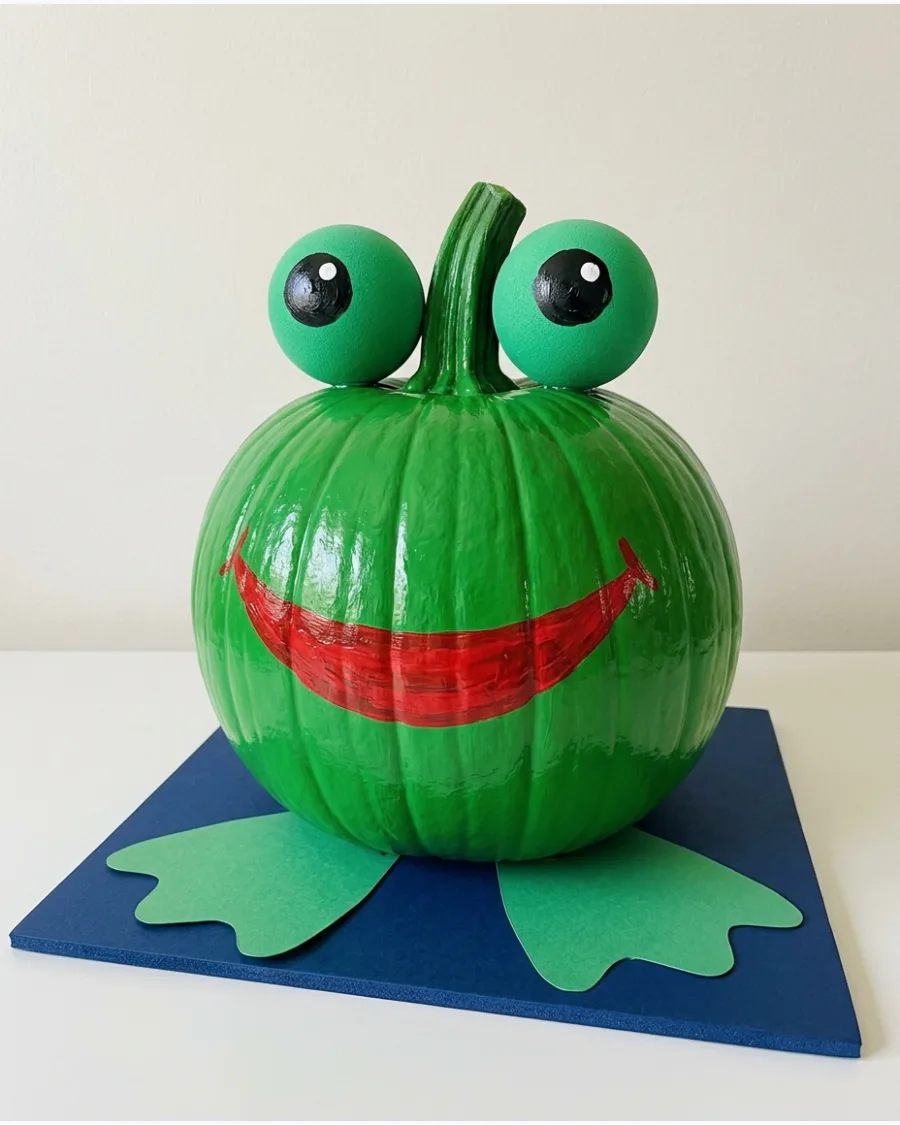
Paint the pumpkin a bright green and attach two large raised eyes near the stem using painted foam balls. Add a wide red smile, webbed feet cut from cardstock, and a small paper fly glued near the mouth.
Glue two small green-painted foam balls near the stem to create the signature protruding eyes of a bullfrog.
- Foam balls and acrylic paint are budget-friendly items found at any discount store.
- Place the feet so they extend outward from the bottom to create a stable look for the character.
- Add a long, thin strip of red paper curled around a pencil to represent a tongue catching the fly.
Most people skip this: Paint a small white dot in the center of the black pupils to give the frog's eyes a realistic reflection.
24. Turtle Pumpkin
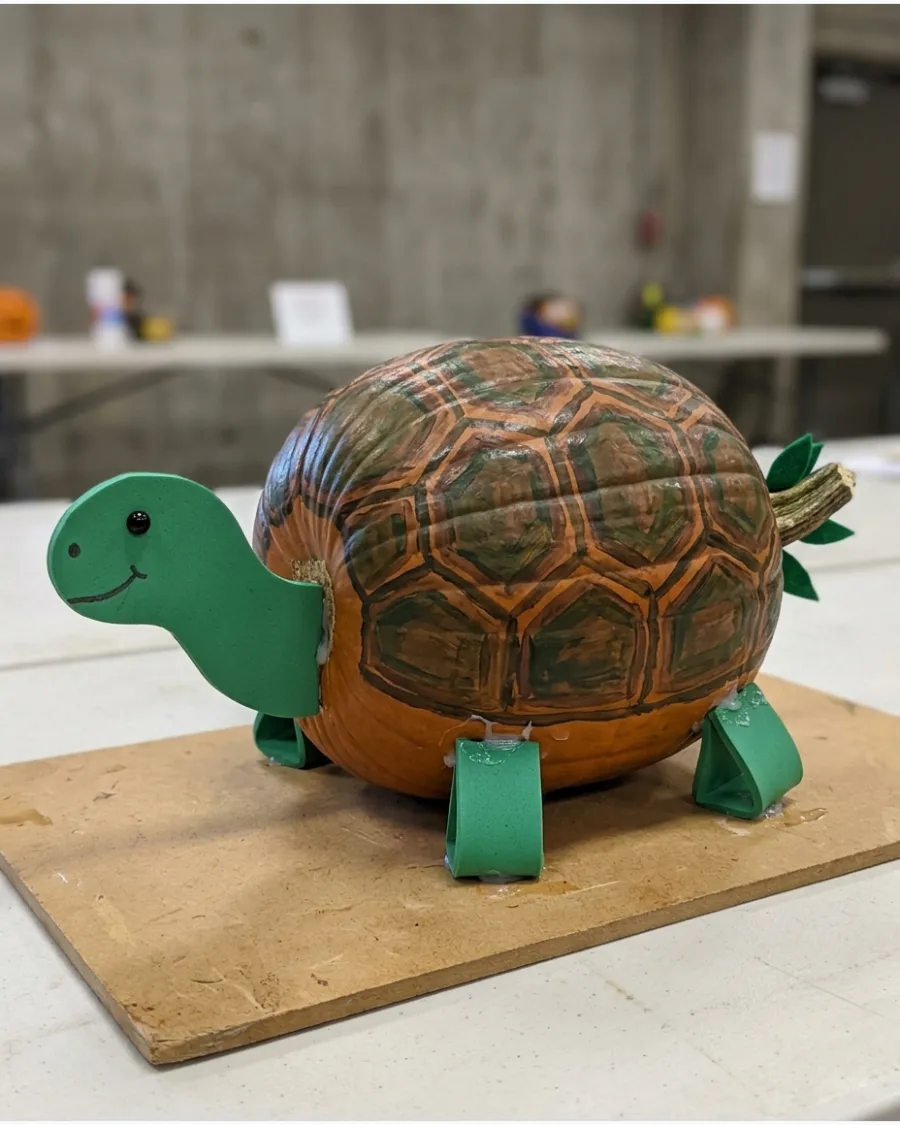
Turn a wide pumpkin on its side and paint the surface with green and brown hexagons to resemble a turtle shell. Add a lightweight foam head, four short legs, and a small tail made from green cardstock.
Select a flat, wide pumpkin that naturally rests on its side to give the turtle a realistic low-profile shell.
- Finding the right shaped pumpkin at a patch is the most time-consuming part of this project.
- Use hot glue to attach the head and legs to the bottom edge of the pumpkin shell for a seamless look.
- Paint the shell with metallic gold accents to create a more decorative or 'jeweled' turtle entry.
Quick win: Use a hexagonal stencil to keep the shell pattern consistent and professional across the entire surface.
25. Peacock Pumpkin
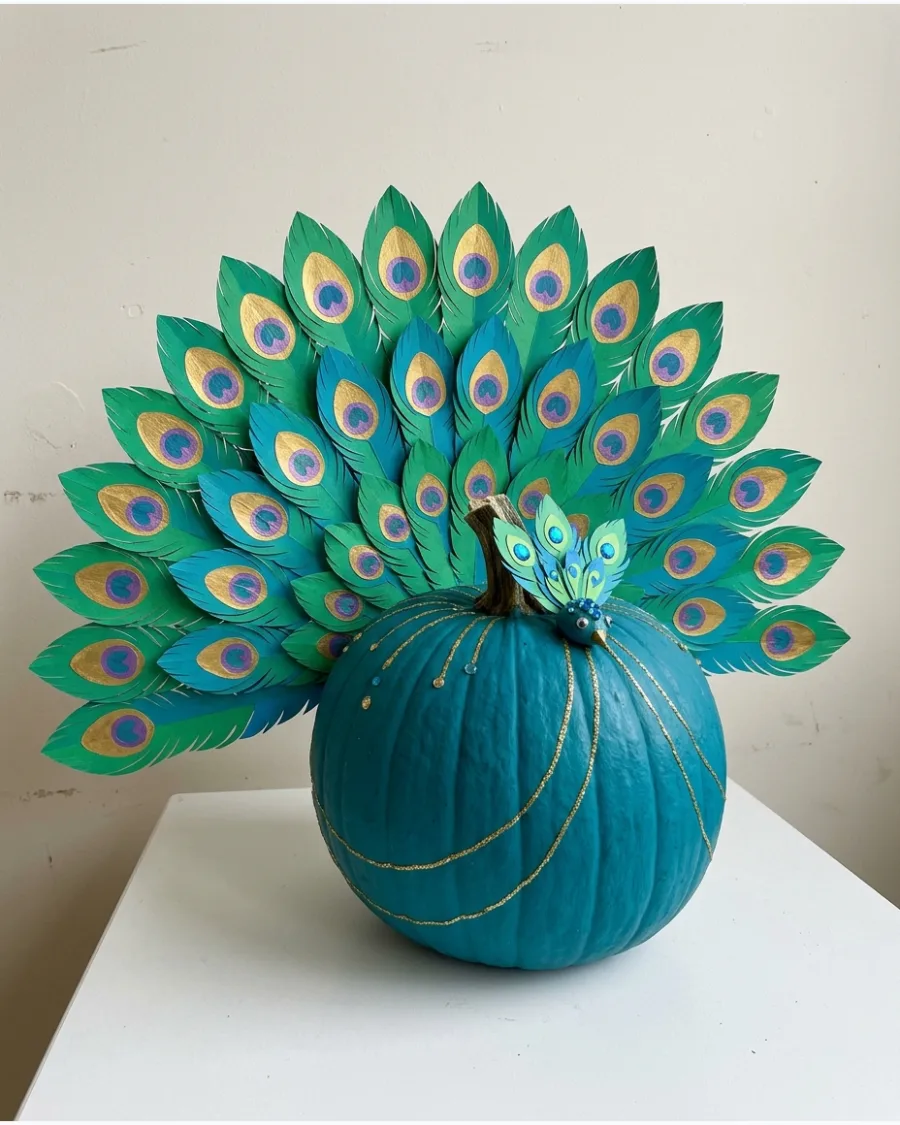
Paint the pumpkin a deep blue and create a large fan-shaped tail using layered cardstock feathers. Decorate each feather with colorful eye-shaped patterns using gold, teal, and purple paint.
Reinforce the paper feather fan with a piece of stiff cardboard on the back so the tail stays upright throughout the contest.
- Budget about one hour to cut and paint the individual feathers for the tail fan.
- Attach the tail fan to the back of the pumpkin using a sturdy adhesive or small wooden dowels for support.
- Mix in a few real peacock feathers with the paper ones to add authentic texture and height.
Best shortcut: Buy pre-cut feather shapes from a craft store to save time on the most tedious part of the build.
26. Bee Pumpkin
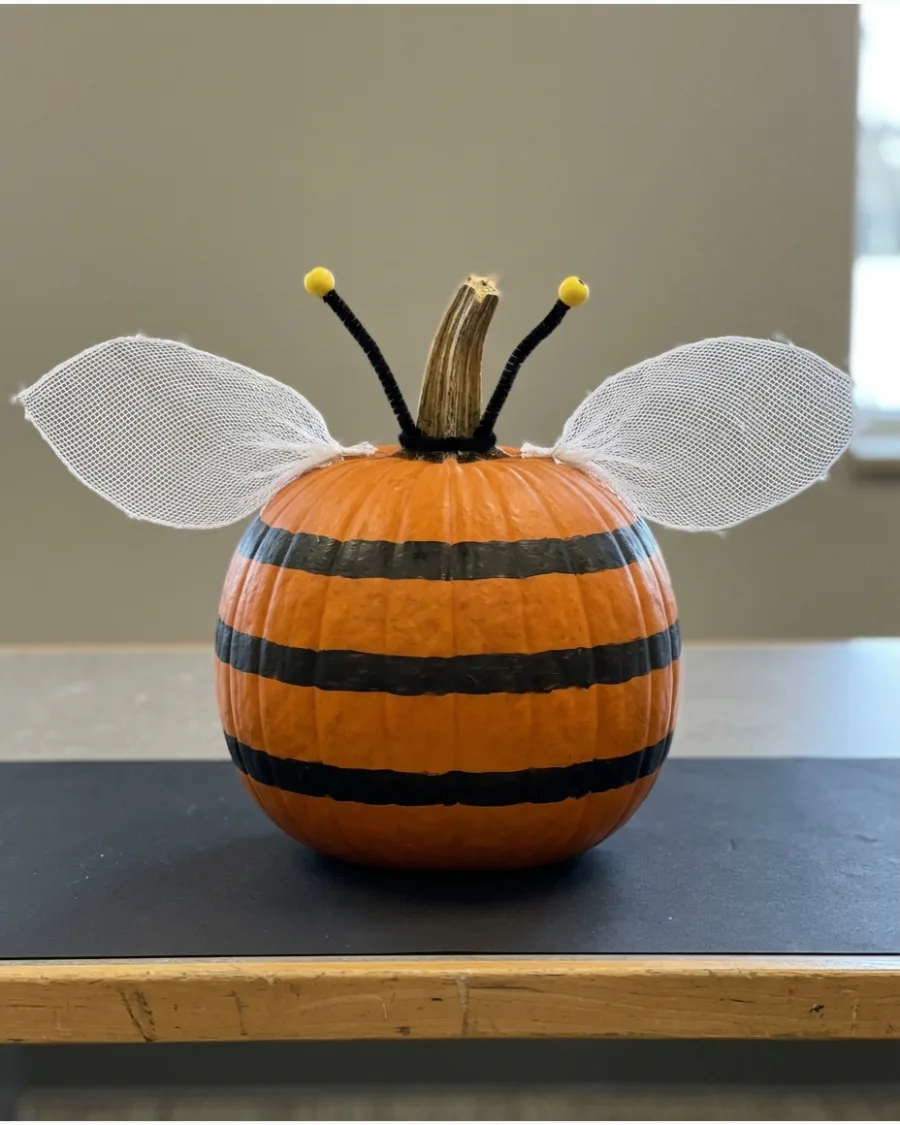
Paint the pumpkin with horizontal yellow and black stripes to look like a honeybee. Add translucent mesh wings, pipe cleaner antennae, and a friendly painted face with large black eyes.
Use black electrical tape instead of paint for the stripes to get perfectly straight lines without any messy edges.
- Electrical tape and pipe cleaners are very inexpensive materials that provide a high-quality finish.
- Twist the pipe cleaners around a pencil to create a bouncy, spring-like effect for the antennae.
- Add a small wooden sign that says 'Bee Mine' or 'Honey' to give the entry more character.
Most people skip this: Use white tulle or fine mesh for the wings instead of paper to make them look light and airy.
Food-Inspired No-Carve Pumpkin Ideas
27. Ice Cream Sundae Pumpkin
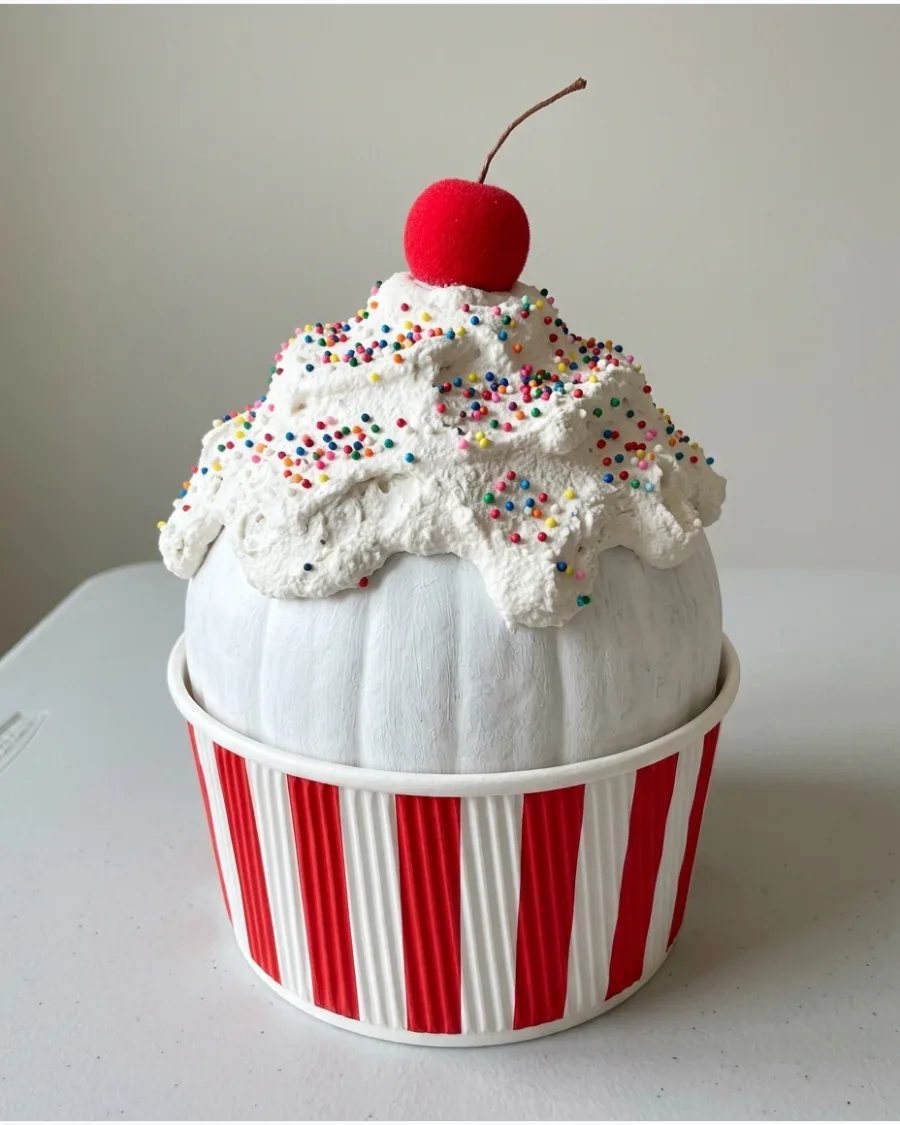
Paint the pumpkin a solid color like vanilla white or strawberry pink and place it inside a large decorative tub. Add faux whipped cream made from spackle, colorful bead sprinkles, and a lightweight red cherry on top.
Pipe white lightweight spackle onto the top of the pumpkin to mimic the thick, fluffy texture of real whipped cream.
- A container of lightweight spackle is available at hardware stores for under ten dollars.
- Allow the spackle to dry for at least 24 hours before moving the pumpkin to prevent smudging.
- Drizzle brown paint over the top to look like chocolate syrup before adding the sprinkles.
Quick win: Use real colorful plastic beads as sprinkles because they look more vibrant than painted dots.
28. Caramel Apple Pumpkin
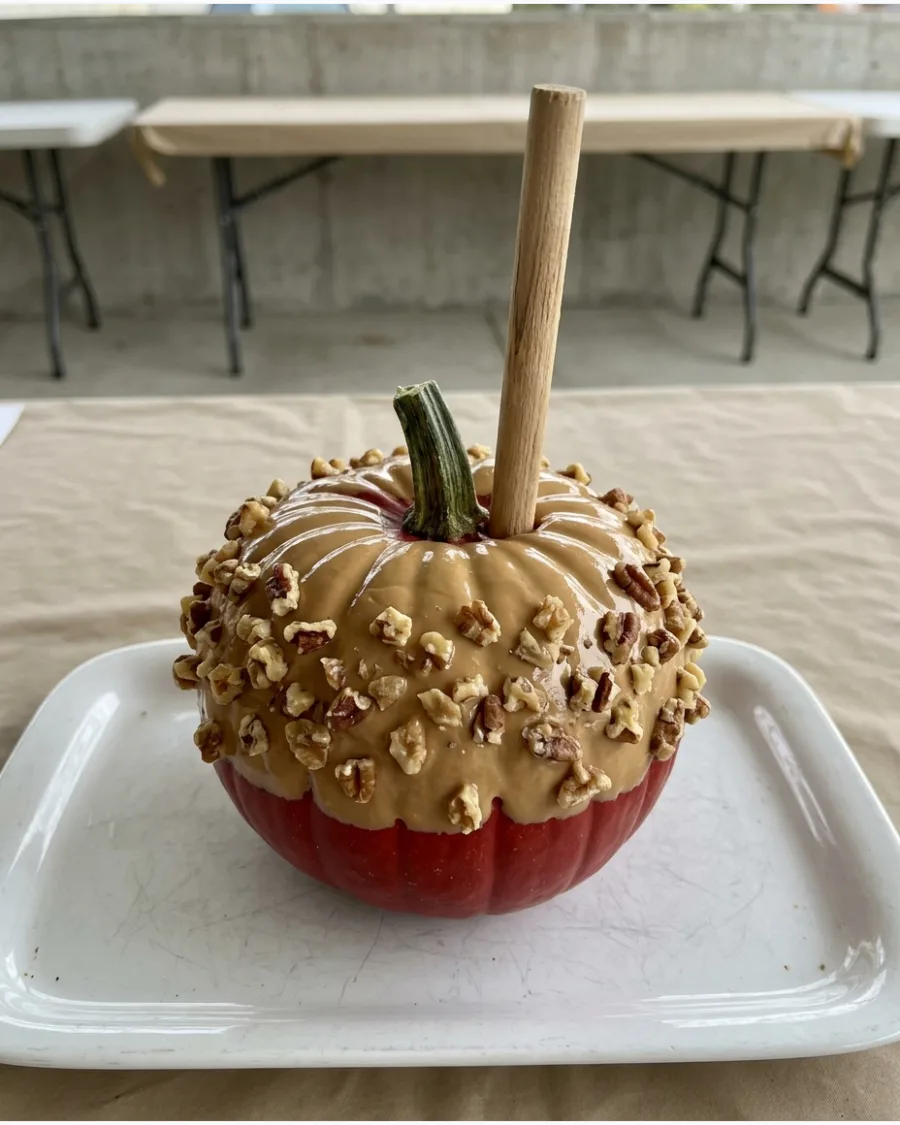
Paint a small, round pumpkin bright red or green and cover the top half with a thick layer of faux caramel-colored paint. Add lightweight faux sprinkles or crushed nuts and a thick craft stick near the stem.
Mix brown acrylic paint with a bit of glossy gel medium to create a 'caramel' that looks sticky and authentic.
- Small pumpkins are usually very affordable and easier to display in a food-themed setup.
- Glue the nuts or sprinkles onto the caramel paint while it is still wet so they set firmly in place.
- Wrap the bottom of the pumpkin in clear cellophane to make it look like a wrapped treat from a candy shop.
Best shortcut: Use a thick wooden dowel or a real sturdy branch instead of a flimsy craft stick for a more realistic look.
29. Donut Pumpkin
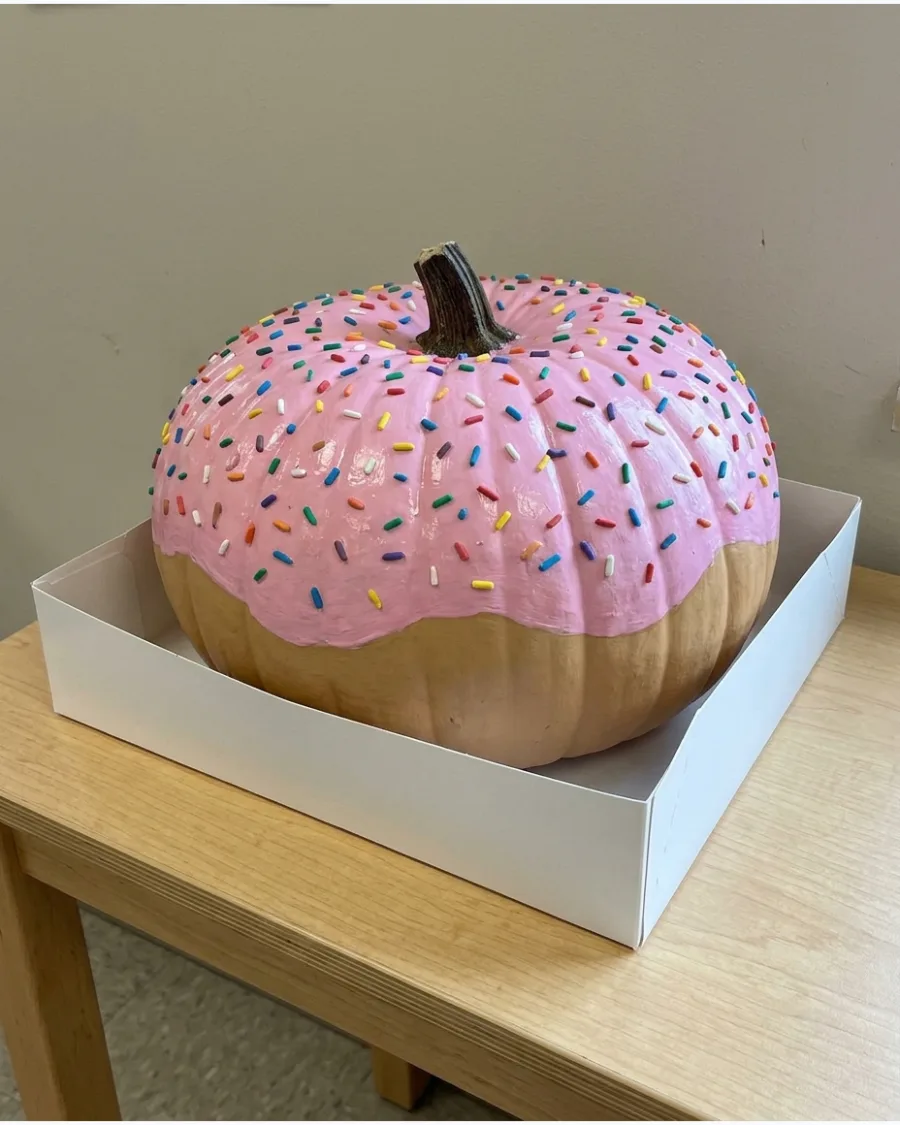
Paint the top half of a wide, flat pumpkin to resemble colorful frosting and add small painted or clay sprinkles. Display the finished pumpkin inside a real bakery-style box for a complete presentation.
Place the pumpkin inside an open cardboard bakery box to instantly sell the donut theme to the judges.
- Bakery boxes can often be purchased individually at craft stores or requested at local donut shops.
- Select a 'Cinderella' style pumpkin because its squat shape most closely resembles a real donut.
- Paint a small circle of dark brown in the center around the stem to mimic the donut hole.
Most people skip this: Use puffy paint for the sprinkles to give them a three-dimensional look that mimics real sugar toppings.
30. Cupcake Pumpkin
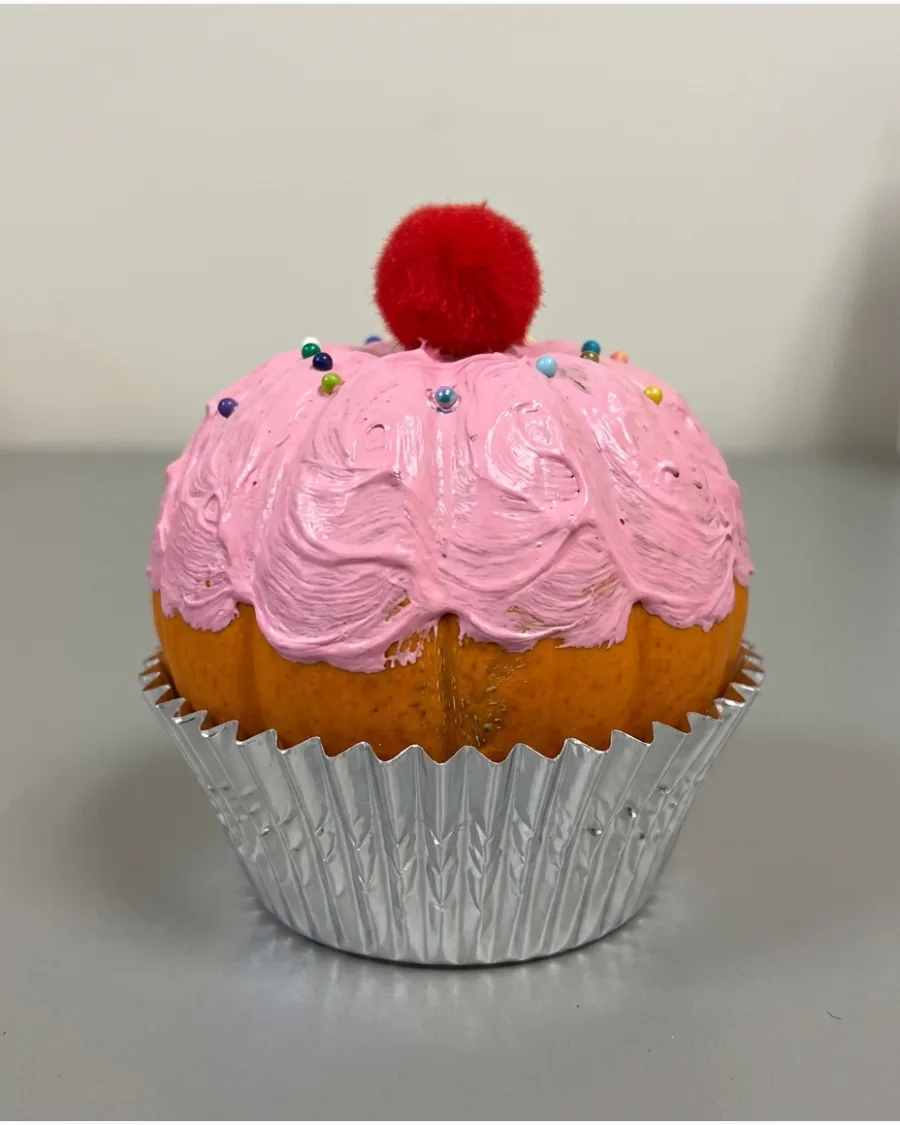
Place a small round pumpkin inside an oversized paper cupcake wrapper or a pleated foil liner. Decorate the top with faux frosting using paint or spackle, add sprinkles, and finish with a red pom-pom cherry.
Accordion-fold a large sheet of heavy cardstock to create a custom oversized cupcake liner that fits the pumpkin's base perfectly.
- Heavy cardstock or silver foil paper works best for creating a sturdy liner that won't collapse.
- Apply the paint in a swirling motion starting from the stem to mimic the look of piped buttercream frosting.
- Use a small pumpkin so it doesn't become too heavy for the paper base to support.
Quick win: Use a large silver tinfoil pie pan as the base if you cannot find large enough cardstock for the liner.
31. Popcorn Pumpkin
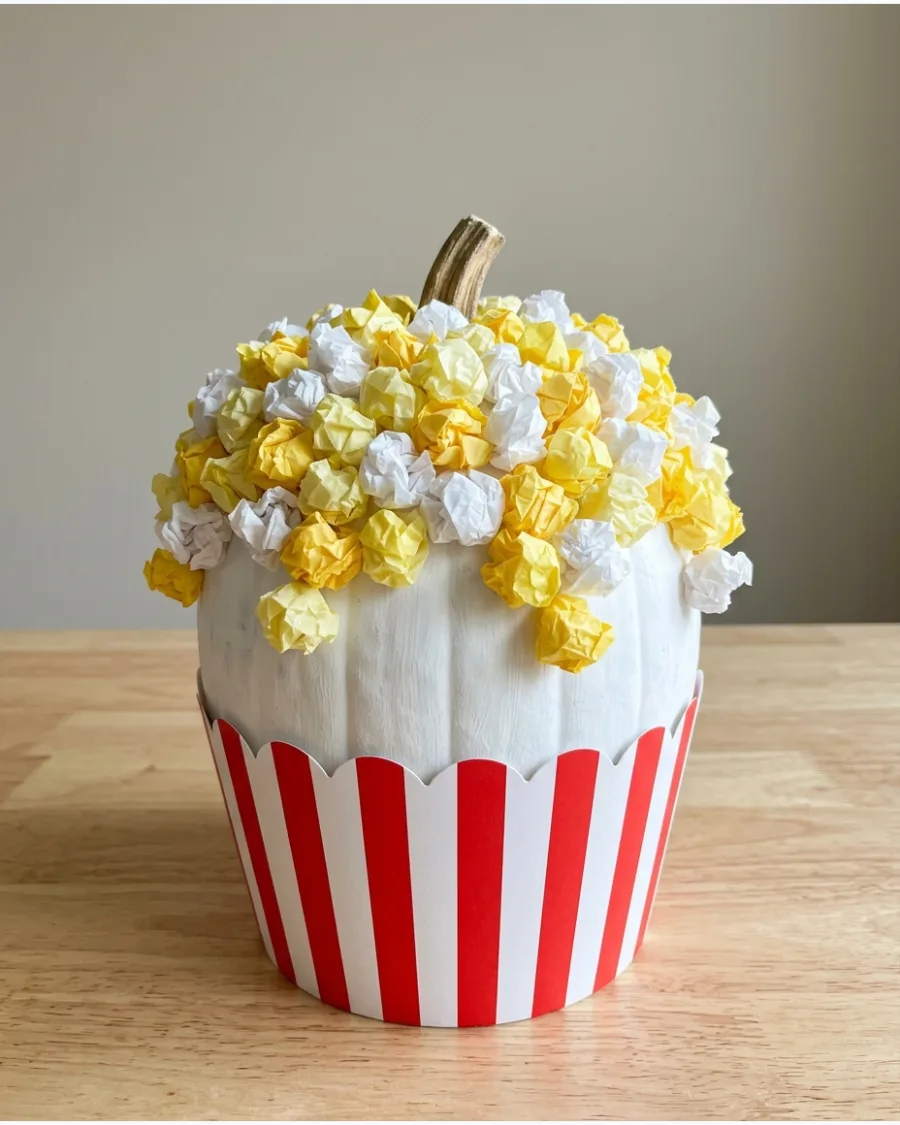
This design turns a standard white pumpkin into a classic movie theater snack. Placing the pumpkin inside a striped tub gives the project height and extra stability for a contest table.
Glue crumpled bits of yellow and white tissue paper to the top surface to mimic buttery kernels. It stands out because of the unexpected 3D texture and height.
- Materials: Red and white striped popcorn tub, white pumpkin, and yellow tissue paper.
- Secure the pumpkin inside the tub with crumpled newspaper to keep it level during transport.
- Swap tissue paper for real spray-lacquered popcorn for a more realistic texture.
Best shortcut: Use a hot glue gun on the low-heat setting to avoid melting the thin tissue paper or damaging the pumpkin skin.
32. Gumball Machine Pumpkin
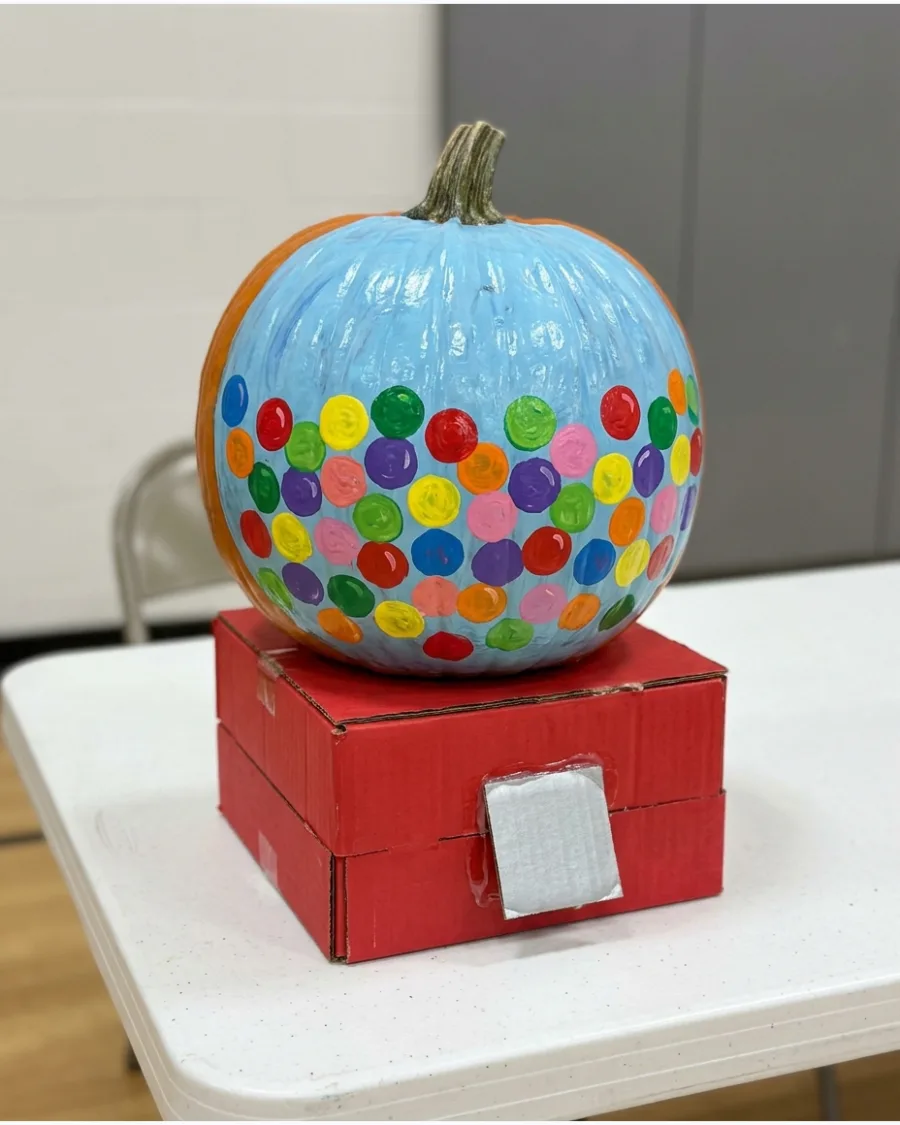
A round pumpkin is the perfect shape for a retro candy dispenser. Paint the main body a clear blue-grey to look like glass and add bright multi-colored dots for the gumballs.
Construct a red cardboard base and a silver dispenser flap to complete the 3D illusion. The bright colors make it a high-contrast entry that catches the eye.
- Materials: Acrylic paint set, red cardstock, and silver metallic paint.
- Paint the glass area first and let it dry completely before adding the colorful gumball dots.
- Use a small terracotta pot painted red as a sturdy base instead of cardboard for extra weight.
Quick win: Use a circular sponge dauber to make perfectly uniform gumballs in seconds.
33. Candy Jar Pumpkin
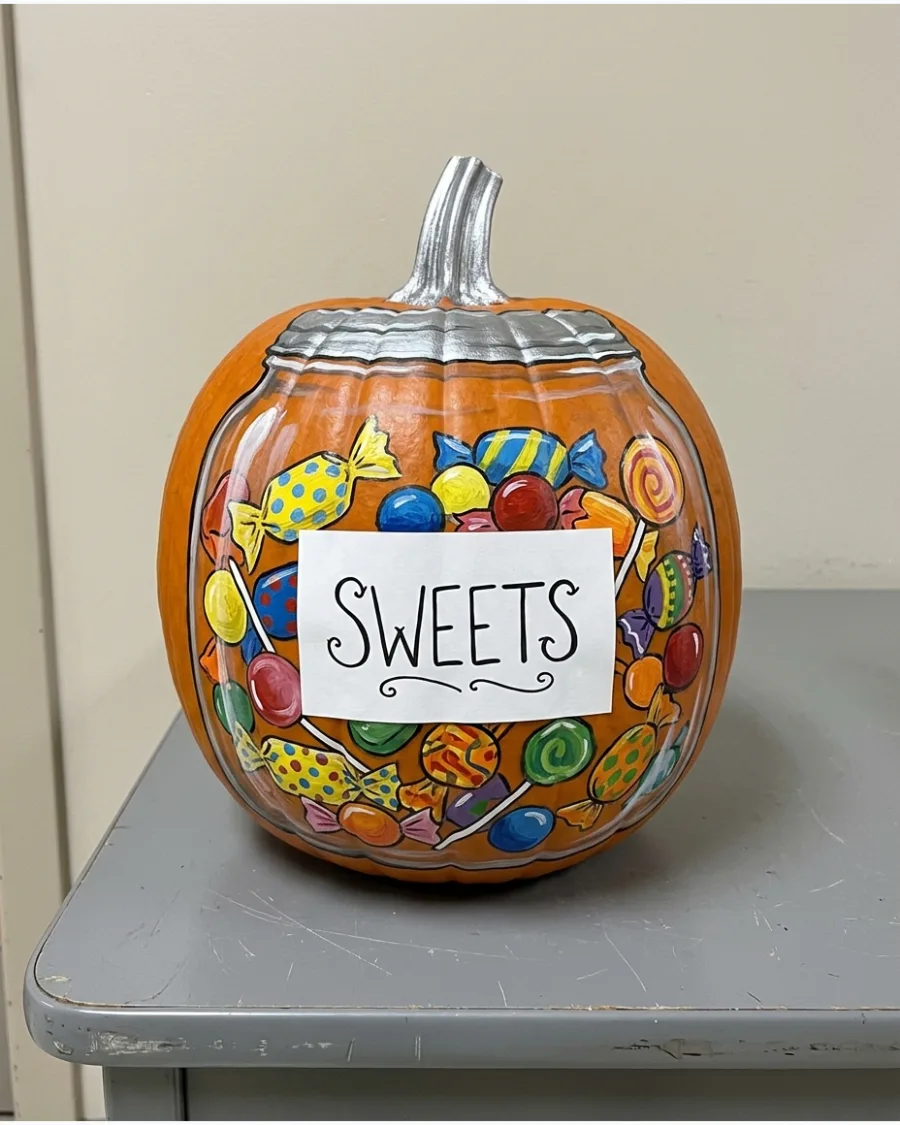
This design mimics a vintage apothecary jar overflowing with treats. Paint the pumpkin a soft transparent white and add colorful shapes to represent wrapped candies.
Finish the look by painting the stem silver and adding a large cardstock label to the front. It looks much more complex than a simple painted pumpkin and tells a clear visual story.
- Materials: Metallic silver paint, white cardstock, and multi-colored markers.
- Center the label carefully to hide any uneven paint lines where the candy meets the jar edge.
- Tie a real ribbon around the stem for an extra touch of realistic texture.
Most people skip this: Use a gloss sealer over the glass area to give it a realistic shine that reflects the light.
34. Taco Pumpkin
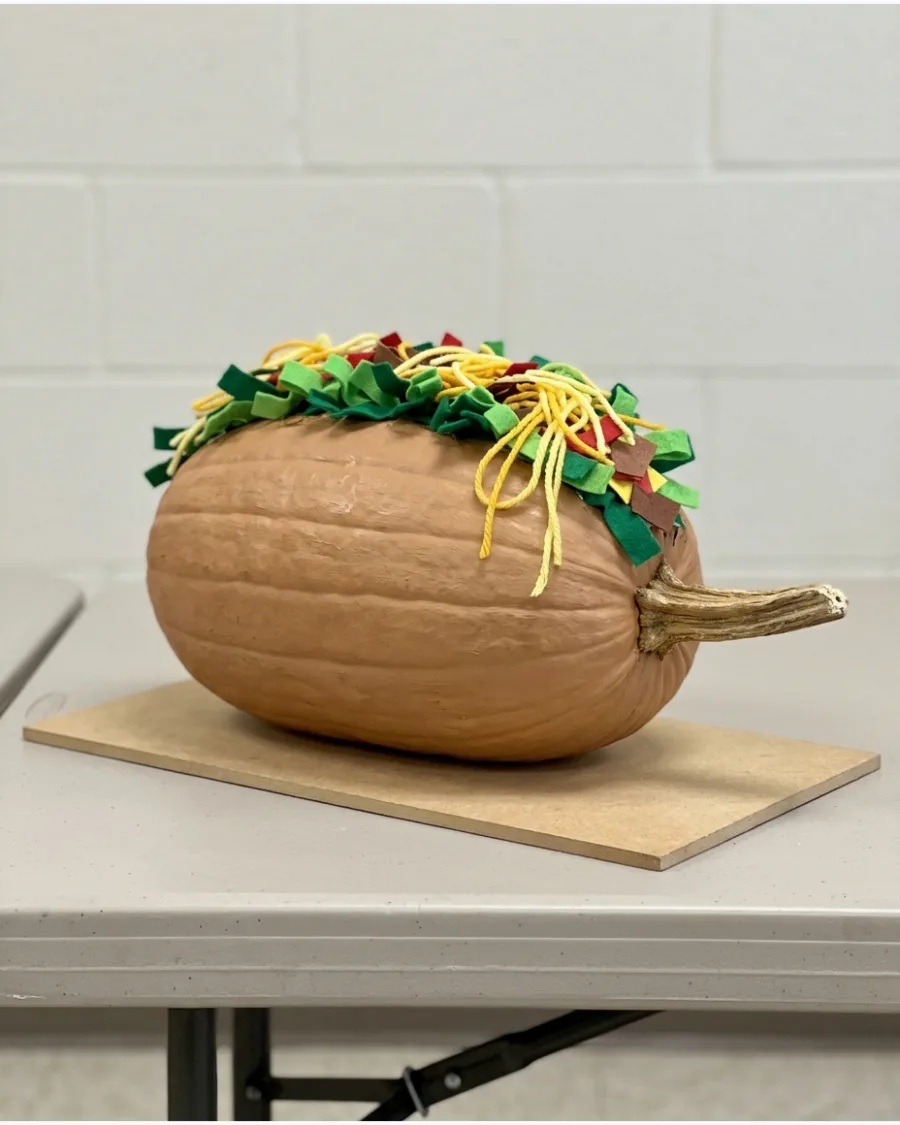
An oblong pumpkin becomes a festive taco shell when placed on its side. Use tan paint for the shell and layers of colorful felt for the toppings.
Tuck ruffled green felt and yellow yarn into a slit along the top to represent lettuce and cheese. This 3D approach adds great visual interest from every angle of the display.
- Materials: Oblong pumpkin, green felt, and yellow yarn.
- Use a small amount of clay or a hidden ring of cardboard to keep the pumpkin from rolling on the table.
- Add brown pom-poms to represent ground beef for more 3D texture.
Quick win: Crinkle the green felt by hand before gluing it to give the lettuce a more natural, messy look.
35. Hamburger Pumpkin
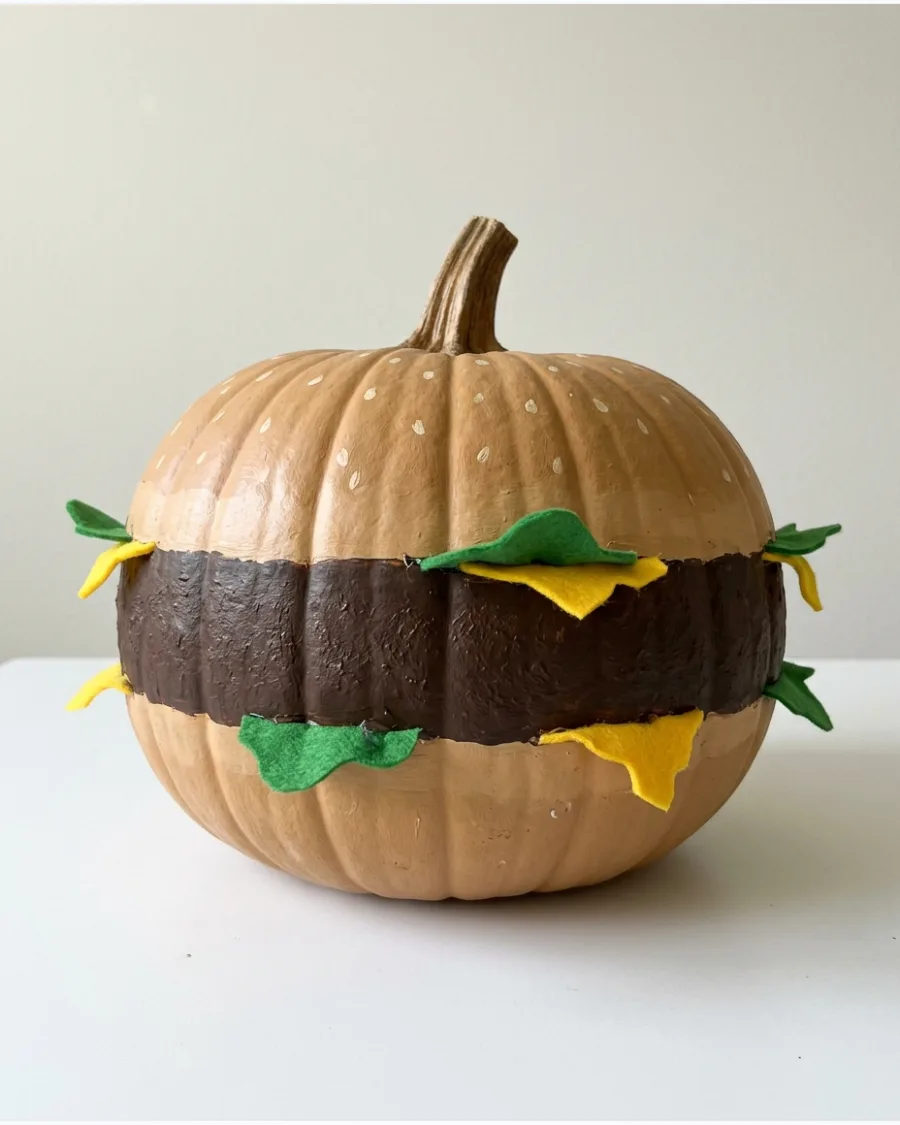
A wide, flat pumpkin works best for this stacked sandwich design.
Paint the top and bottom sections light brown for the bun and add a dark brown stripe in the middle for the patty. Glue felt triangles and circles around the center to look like melting cheese and tomato slices. It is a fun, recognizable project that stays upright easily on a contest surface.
- Materials: Tan and dark brown acrylic paint, felt scraps, and white paint for seeds.
- Add small white paint flecks to the top of the bun to look like sesame seeds.
- Use two smaller pumpkins stacked on top of each other for a double cheeseburger look.
Best shortcut: Use a sponge to tap on the brown paint for the meat to give it a realistic, bumpy texture.
36. Hot-Air Popcorn Cart Pumpkin
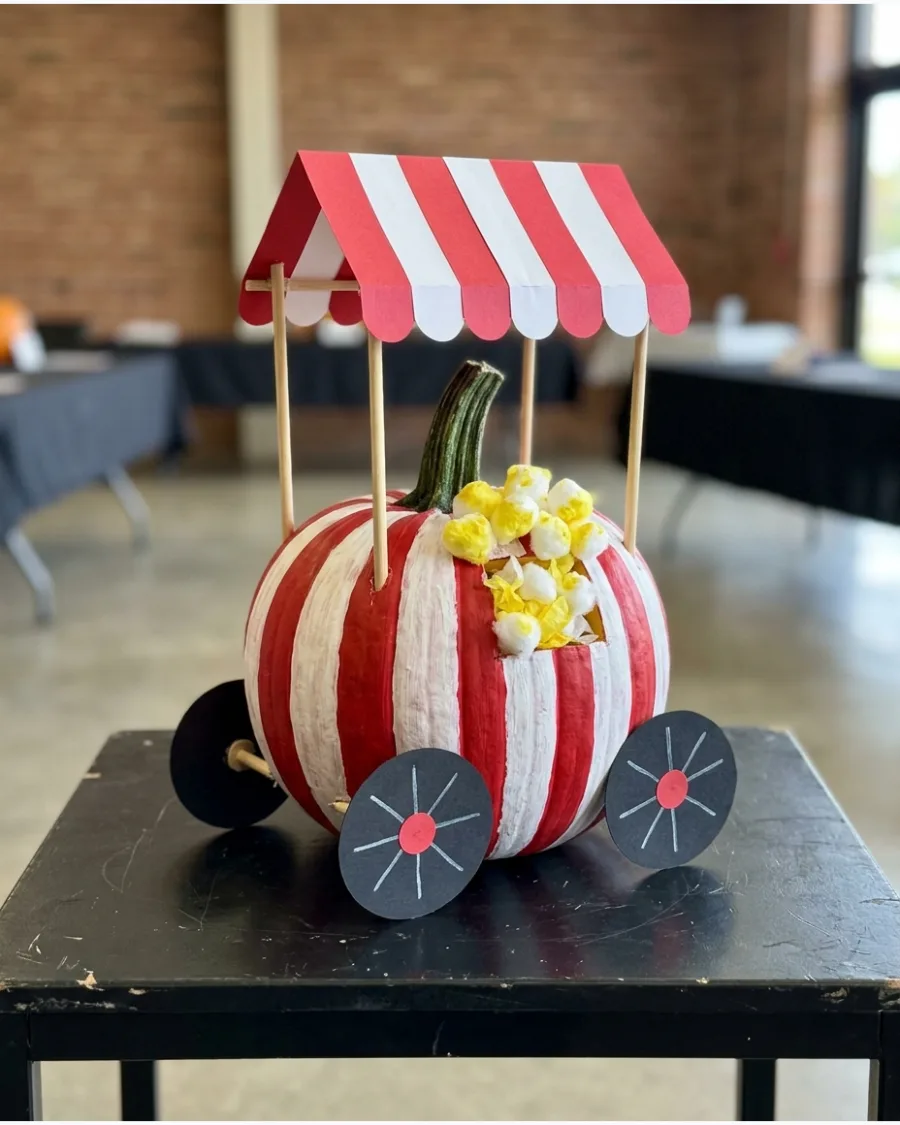
Transform a pumpkin into a vintage carnival cart with a few simple attachments. Use red and white stripes for the body and add paper wheels to the sides.
Attach a small striped paper canopy over the top using wooden skewers for support. The architectural elements make it look like a professional model rather than just a vegetable.
- Materials: Red and white paint, wooden skewers, and black cardstock.
- Ensure the skewers are pushed deep enough into the pumpkin to stay stable during the contest.
- Add a tiny Fresh Popcorn sign to the front to make the concept immediately recognizable.
Most people skip this: Paint the skewers white or red so they blend in with the cart supports.
Storybook and School Pumpkin Contest Ideas
37. Original Storybook Character Pumpkin
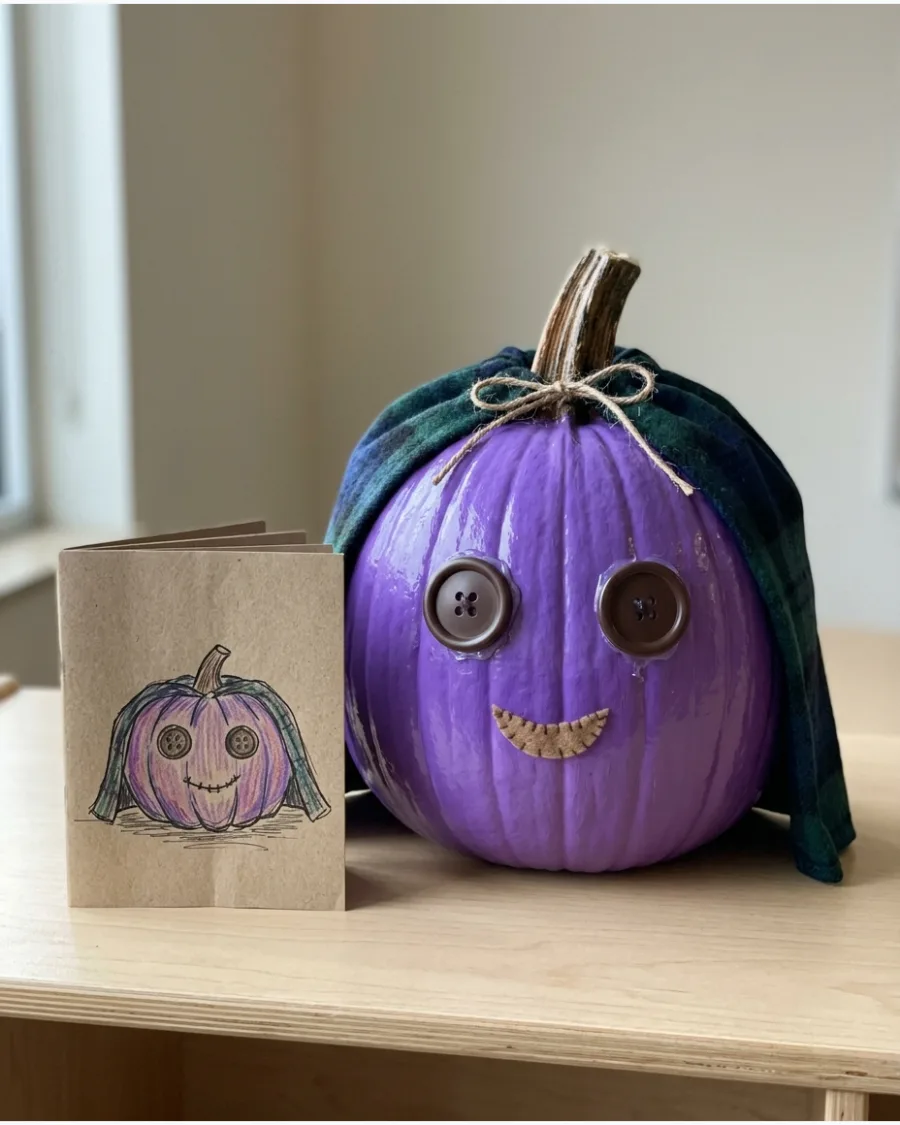
Creating a brand-new character allows for total creative freedom in a contest. Use fabric scraps, buttons, or wire to give the pumpkin a unique personality and outfit.
Display the finished pumpkin next to a handmade book cover that tells the character's name and story. This idea wins points for both craft skills and original imagination.
- Materials: Assorted buttons, fabric scraps, and cardstock.
- Keep the backstory short so judges can read it quickly during the contest walk-through.
- Use hot glue for heavy accessories like capes or hats to keep them from sliding off the smooth skin.
Quick win: Give the character a signature prop, like a tiny wand or a hat, to make them more memorable.
38. Bookworm Pumpkin
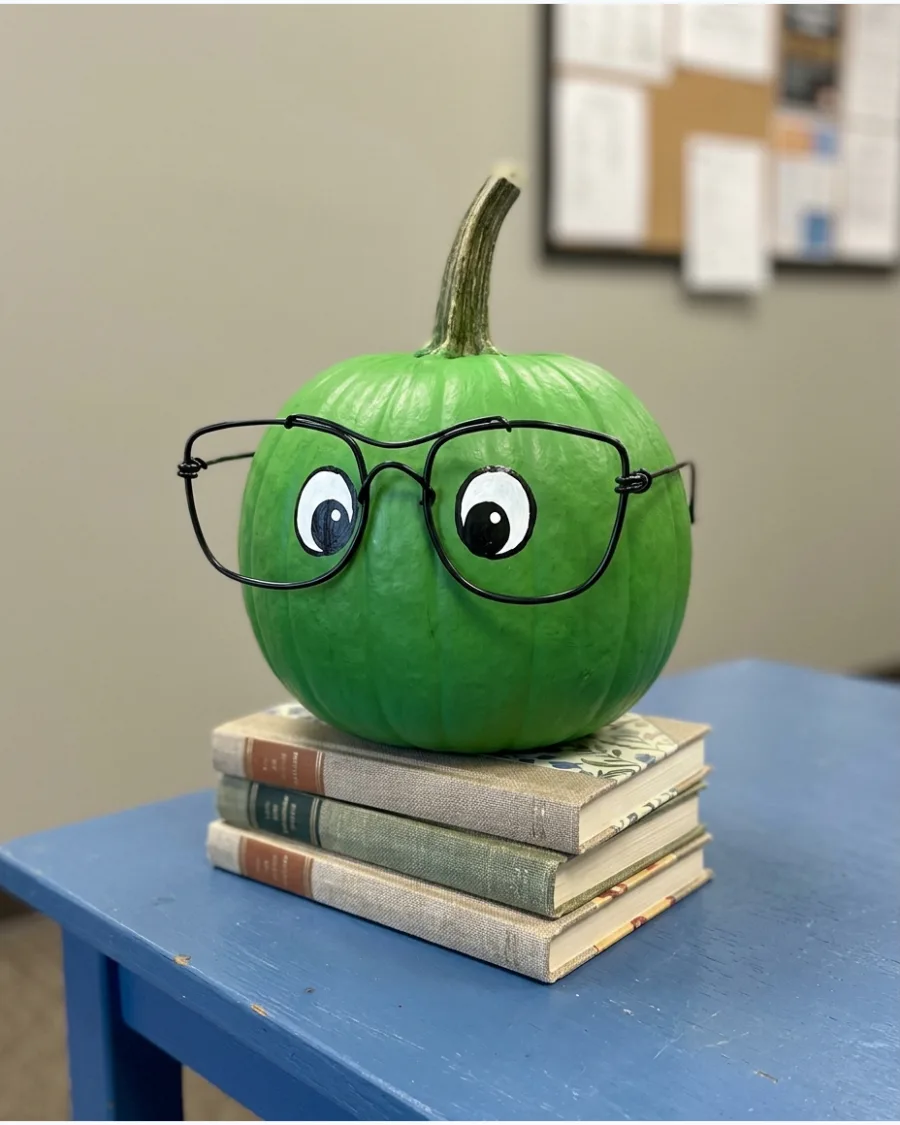
A friendly green bookworm is a classic choice for school-themed contests. Paint the pumpkin a bright lime green and add a pair of oversized wire or plastic glasses.
Place the pumpkin on top of a stack of old books to reinforce the literary theme. The glasses add a charming, intellectual character that appeals to all ages.
- Materials: Green paint, thick black wire or pipe cleaners, and old books.
- Twist the wire into circles and secure them behind the pumpkin stem for extra stability.
- Add a small paper bookmark tongue sticking out of the worm's mouth for a playful detail.
Best shortcut: Use a pair of real, cheap reading glasses from a dollar store for a more realistic and sturdy look.
39. Pumpkin School Bus
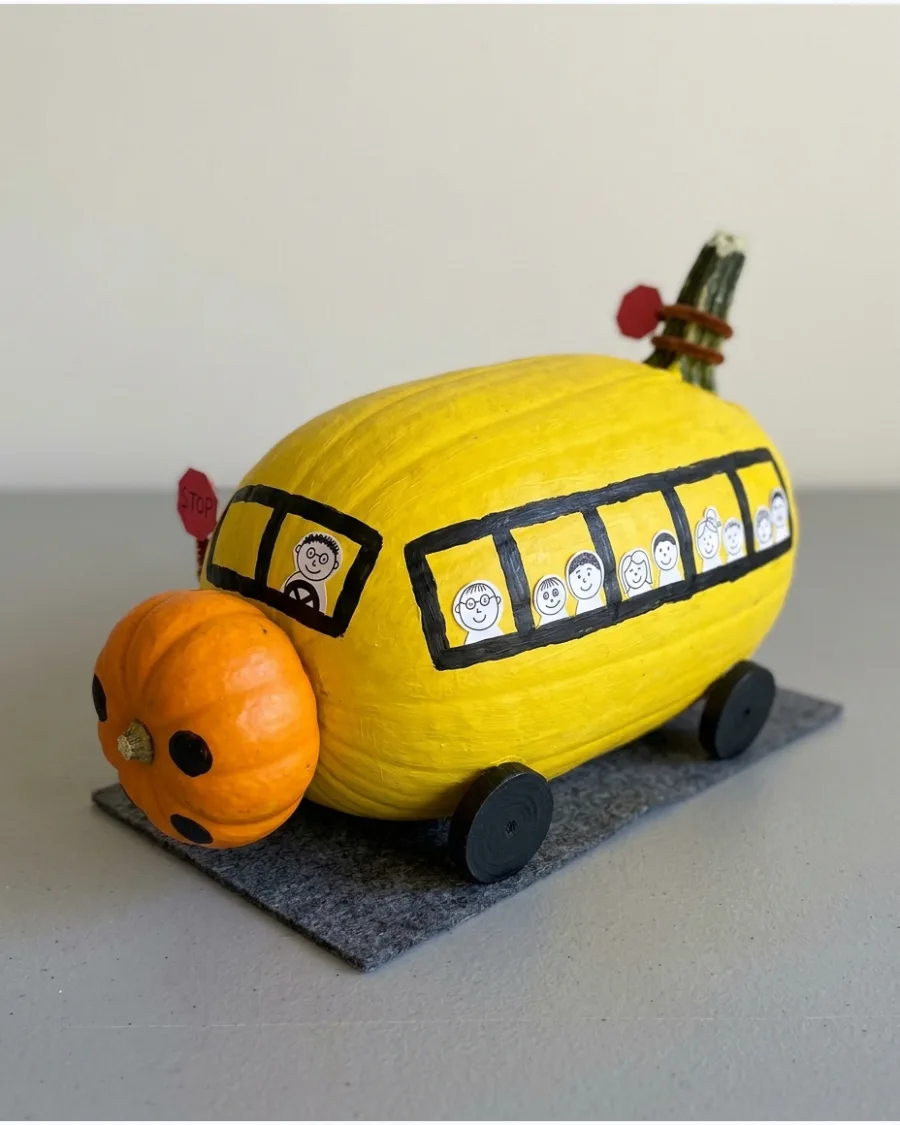
Long, oblong pumpkins are the ideal shape for a classic yellow school bus. Paint the entire surface bright yellow and use black markers or paint for the windows and trim.
Glue small photos or drawings of students into the windows to add a personal touch to the entry. It is a great way to represent a specific classroom or school spirit.
- Materials: Yellow and black acrylic paint, cardstock, and markers.
- Draw the window outlines with a pencil before filling them in with black paint to ensure they are even.
- Attach black bottle caps to the bottom for 3D wheels that lift the pumpkin slightly.
Most people skip this: Paint a STOP sign on a small piece of red cardstock and glue it to the side for extra authentic detail.
40. Globe Pumpkin
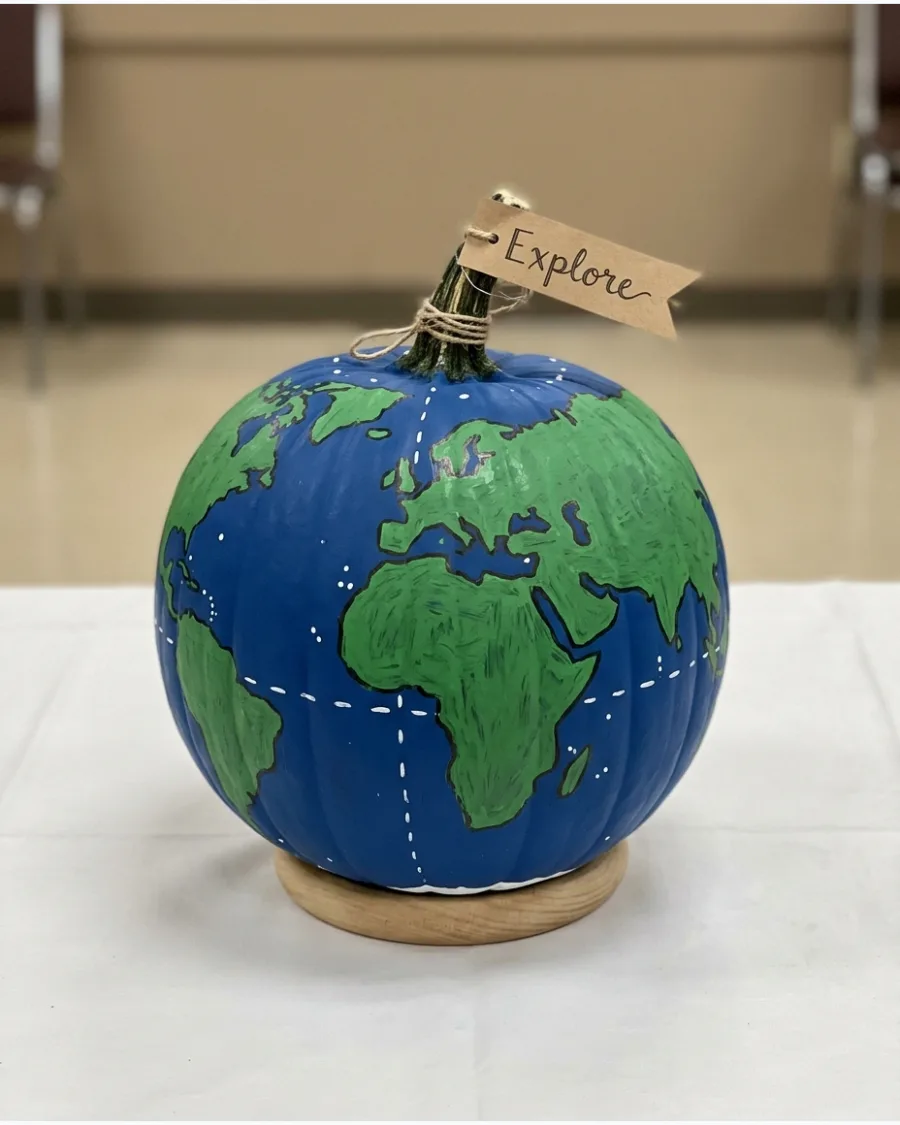
A round pumpkin naturally mimics the shape of the Earth. Paint the oceans a deep blue and use green felt or paint for the continents.
Mount the pumpkin on a simple wooden or cardboard stand to make it look like a real classroom globe. It is an educational and visually striking entry that fits perfectly in a library or school setting.
- Materials: Blue and green paint, wooden ring or bowl, and cardstock.
- Look at a map while painting to get the general shapes of the continents correct for accuracy.
- Use a gold metallic marker to outline the continents for a more polished and professional look.
Quick win: Use a sponge to dab the green paint over the blue to create a more natural, textured coastline.
41. Scientist Pumpkin
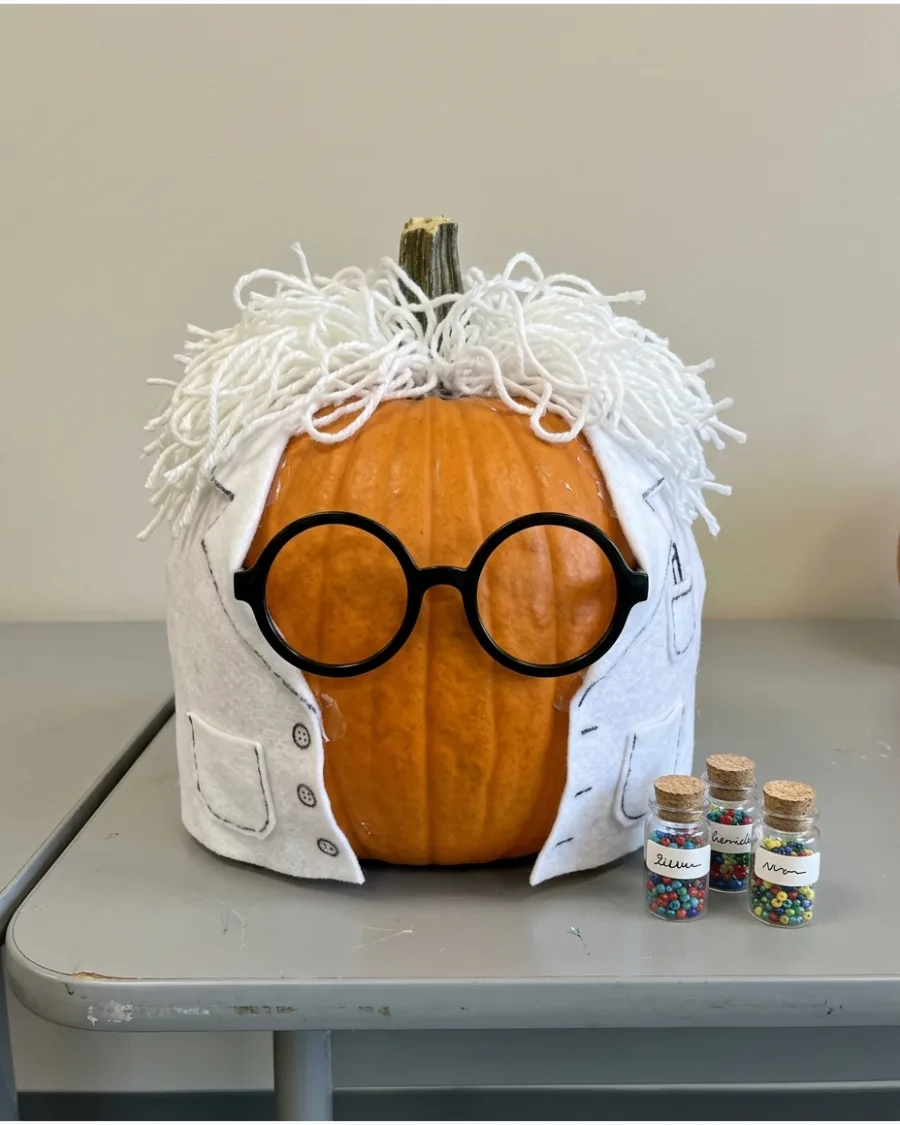
Use white felt to create a miniature lab coat that wraps around the pumpkin’s middle. Glue on thick black plastic frames and a wild wig of white yarn to give the pumpkin a frantic genius look. This entry stands out because it uses height and texture to create a character rather than just a face.
The messy hair and oversized glasses make it instantly recognizable on a crowded contest table.
- Sourcing: Approximately $10-15 for yarn, felt, and toy glasses.
- Setup: Attach the lab coat and hair using a low-temperature hot glue gun for a secure bond.
- Adaptation: Add a tiny clipboard made from cardboard with a "winning formula" written on it.
Quick win: Use a stiff white poster board for the lab coat collar so it stands up straight and holds its shape.
42. Astronaut Pumpkin
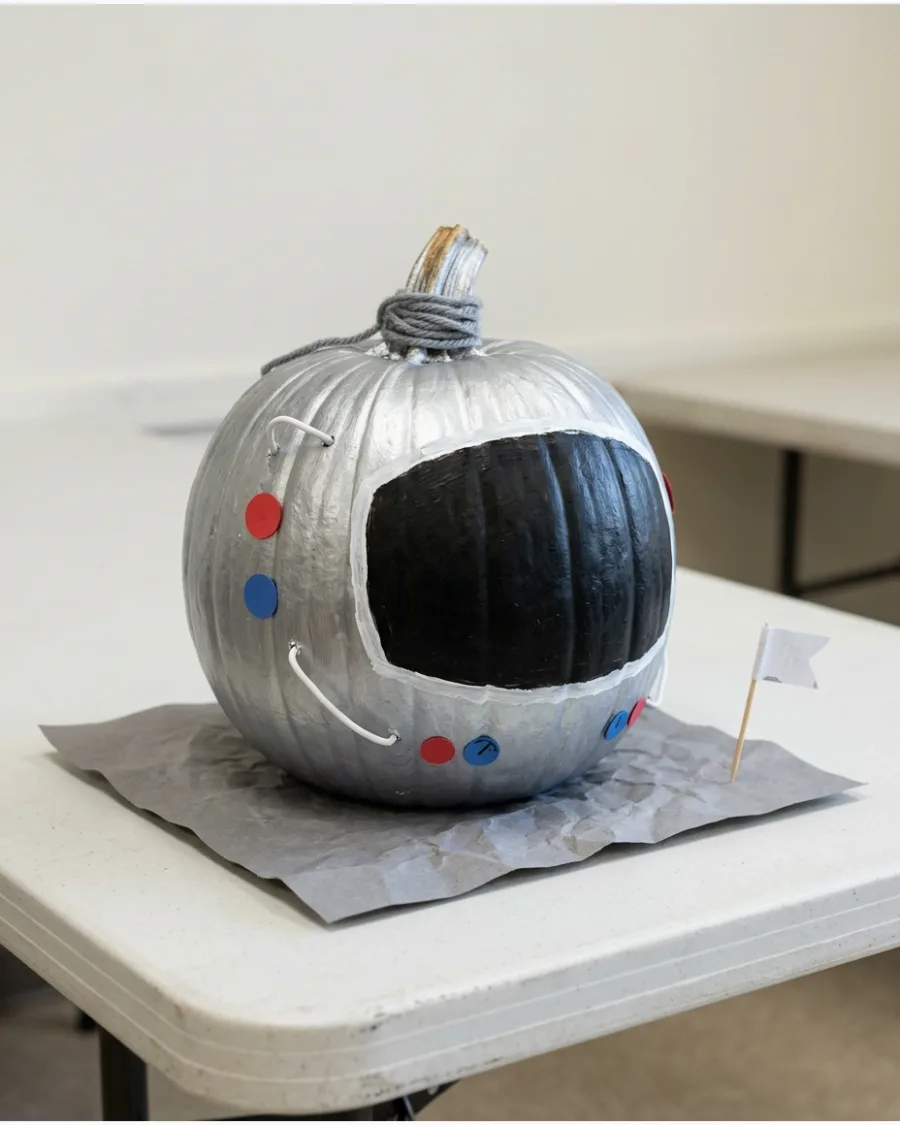
Paint the entire pumpkin metallic silver or white to mimic a space suit. Create a large black oval on the front for the visor and use silver duct tape to add mechanical details around the edges. Placing the pumpkin on a base of crumpled gray paper creates a realistic moon surface for the display.
This design is high-impact because the metallic finish catches the light better than standard matte paint.
- Sourcing: Silver spray paint and industrial-style silver tape from a hardware store.
- Setup: Let the base paint dry for at least four hours before applying any tape or visor details.
- Adaptation: Glue on a small flag or a printed mission patch to the side of the "helmet."
Most people skip this: Use a matte black paint for the visor to make the silver helmet look more reflective and metallic by comparison.
43. Artist Pumpkin
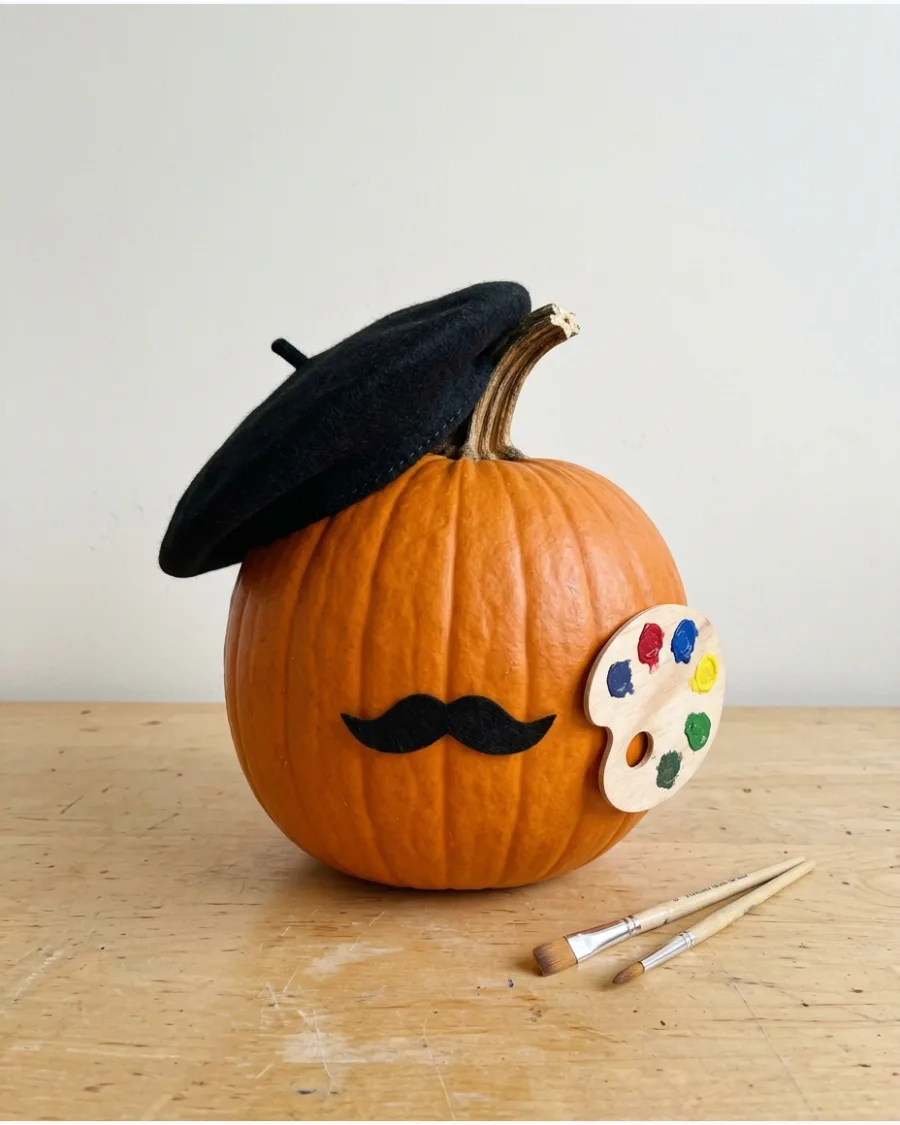
Perch a small black felt beret at an angle on top of the pumpkin’s stem. Paint a thin, curled mustache across the front and glue a small wooden palette to the side of the pumpkin. This design works well because it uses props to tell a story without needing complex carving skills.
It is an excellent choice for an art classroom or community center contest.
- Sourcing: Around $5 for a small piece of felt and a mini wooden palette.
- Setup: Use a small dot of hot glue to secure the beret so it does not slide off the stem.
- Adaptation: Drip bright acrylic paint down the sides of the pumpkin for a "messy studio" effect.
Best shortcut: Buy a pre-made doll-sized beret to save time on sewing or cutting felt shapes manually.
44. Librarian Pumpkin
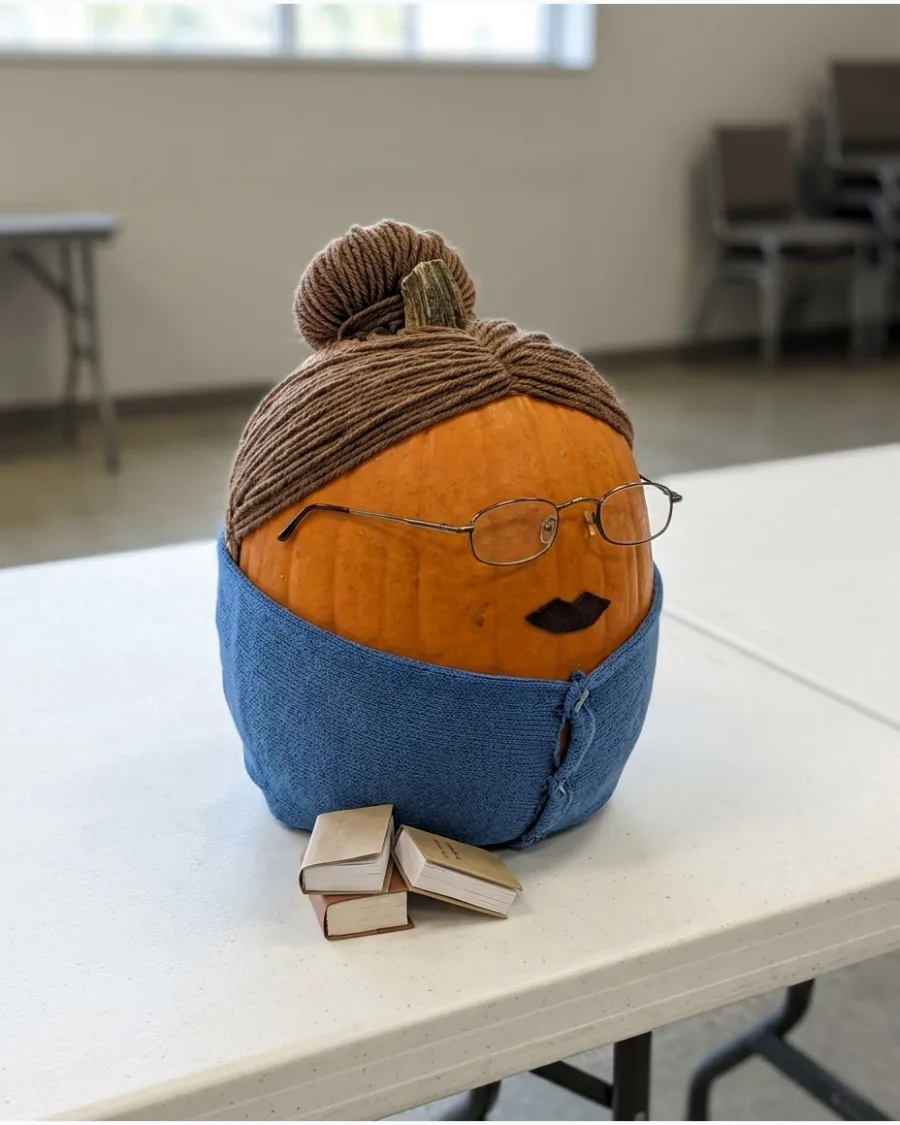
Wrap a piece of knit fabric around the pumpkin like a cozy cardigan and secure it with a small button. Give the pumpkin a pair of reading glasses and a bun made from coiled brown yarn on top. This character-driven design is perfect for school or library contests where a studious theme is appreciated.
Using real accessories like glasses adds a level of polish that painted-on features cannot match.
- Sourcing: Use scrap fabric from an old sweater or a thrifted scarf.
- Setup: Secure the glasses by looping a thin wire around the pumpkin stem behind the bun.
- Adaptation: Add a small "Silence Please" sign held by a pipe cleaner arm to reinforce the theme.
Quick win: Use real wire-rimmed glasses from a thrift store for a more authentic and sturdy look.
Spooky No-Carve Pumpkin Decorating Ideas
45. Witch Pumpkin
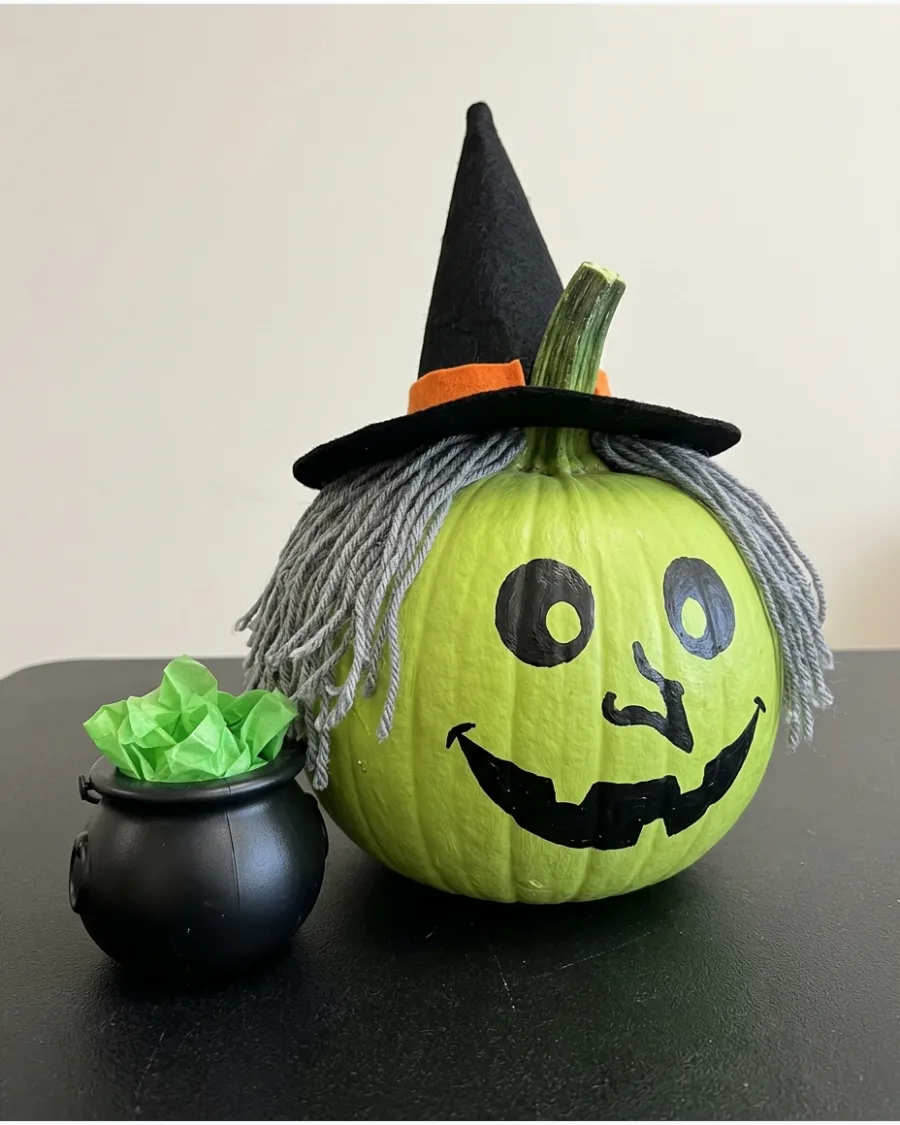
Paint the pumpkin a vibrant lime green and add a large, warty nose made from a small piece of painted air-dry clay. Top the pumpkin with a tall black felt hat and long strands of scraggly gray yarn for hair. Placing a small plastic cauldron nearby adds to the spooky silhouette.
The contrast between the bright green skin and the dark accessories makes this entry pop from a distance.
- Sourcing: Green acrylic paint and a standard costume witch hat.
- Setup: Attach the hat with long upholstery pins to ensure it stays upright during the contest.
- Adaptation: Glue on purple sequins or beads to act as "magic warts" for a more whimsical style.
Best shortcut: Use a battery-operated tea light inside the nearby cauldron to make the green tissue paper look like glowing brew.
46. Mummy Pumpkin
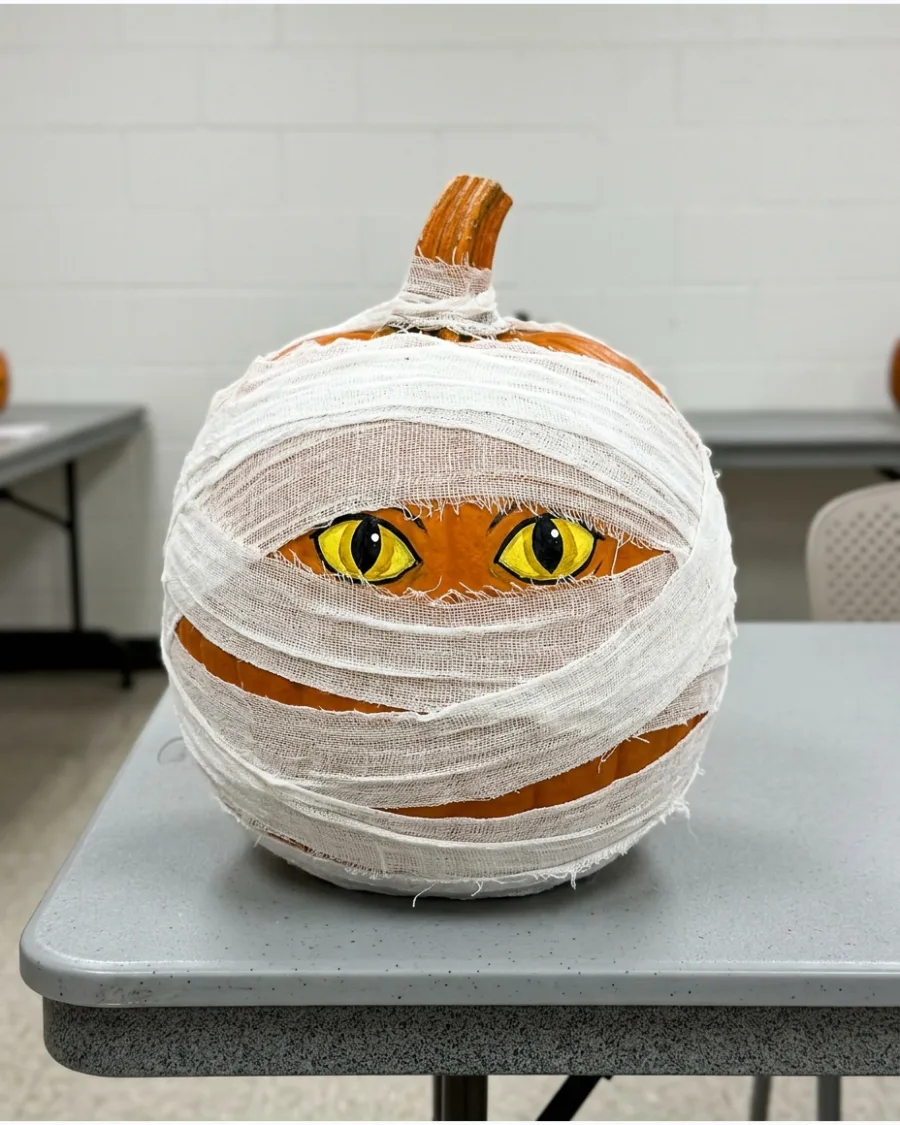
Wrap the pumpkin in overlapping layers of white gauze, leaving a narrow horizontal gap for the eyes. Glue two large yellow circles in the gap to create a "peeking" effect from within the bandages. This is one of the easiest winning designs because the texture of the gauze provides instant visual interest.
It is a great choice for a last-minute entry that still looks intentional and professional.
- Sourcing: $3-5 for a roll of medical gauze from a local pharmacy.
- Setup: Secure the end of the gauze with a clear adhesive or a small pin hidden at the back.
- Adaptation: Dip the gauze in weak tea and let it dry for an "aged" ancient mummy appearance.
Most people skip this: Spray the pumpkin with a light coat of spray adhesive before wrapping to keep the gauze from slipping down the sides.
47. Spider Pumpkin
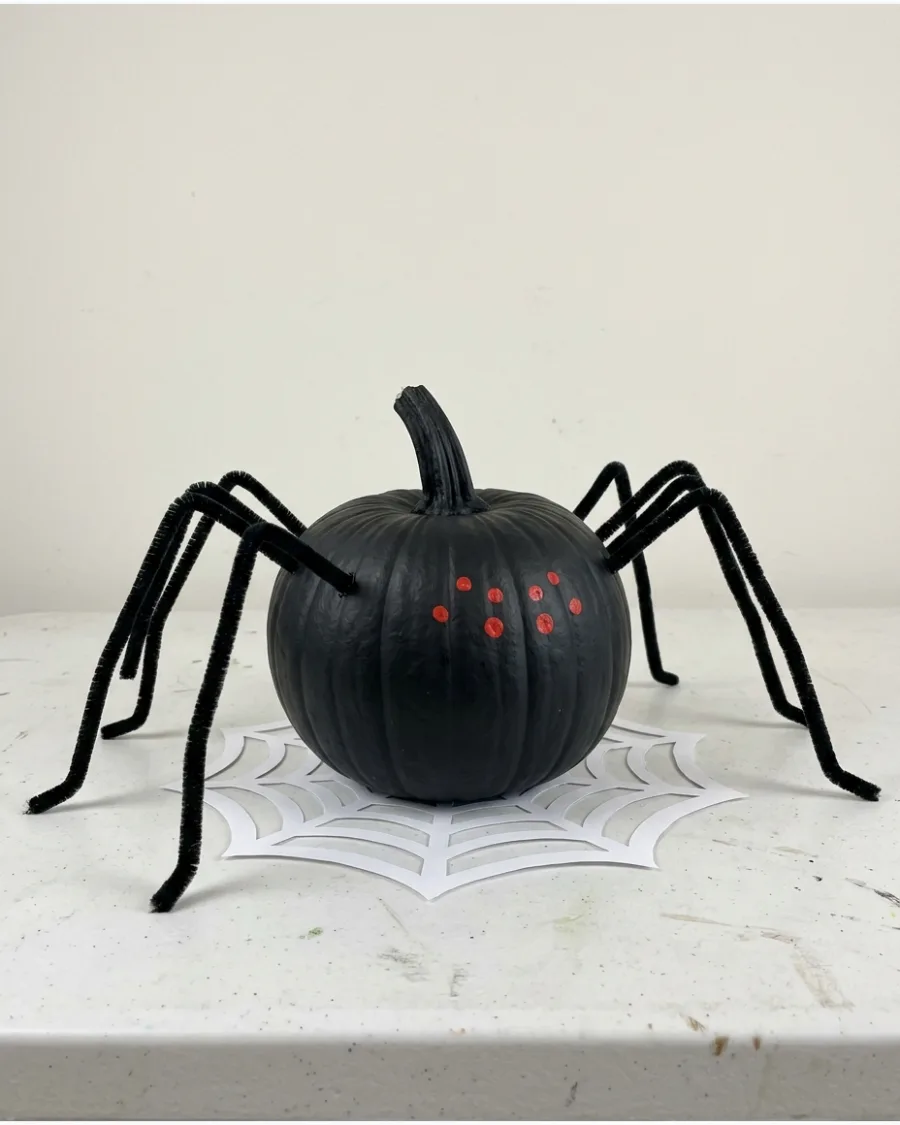
Paint the pumpkin matte black and attach eight long legs made from thick black pipe cleaners or foam tubing. Glue multiple pairs of small red eyes across the front to create a creepy, multi-eyed spider face. The wide stance of the legs makes the pumpkin appear much larger and more imposing on a contest table.
This design works best on smaller, rounder pumpkins that can sit low to the surface.
- Sourcing: Black acrylic paint and extra-long jumbo pipe cleaners.
- Setup: Poke small holes into the pumpkin surface with a skewer to anchor the legs firmly.
- Adaptation: Use white yarn to create a large web on the display table for the spider to sit on.
Quick win: Use foam pipe insulation from the hardware store for the legs if you are decorating a very large pumpkin.
48. Eyeball Pumpkin
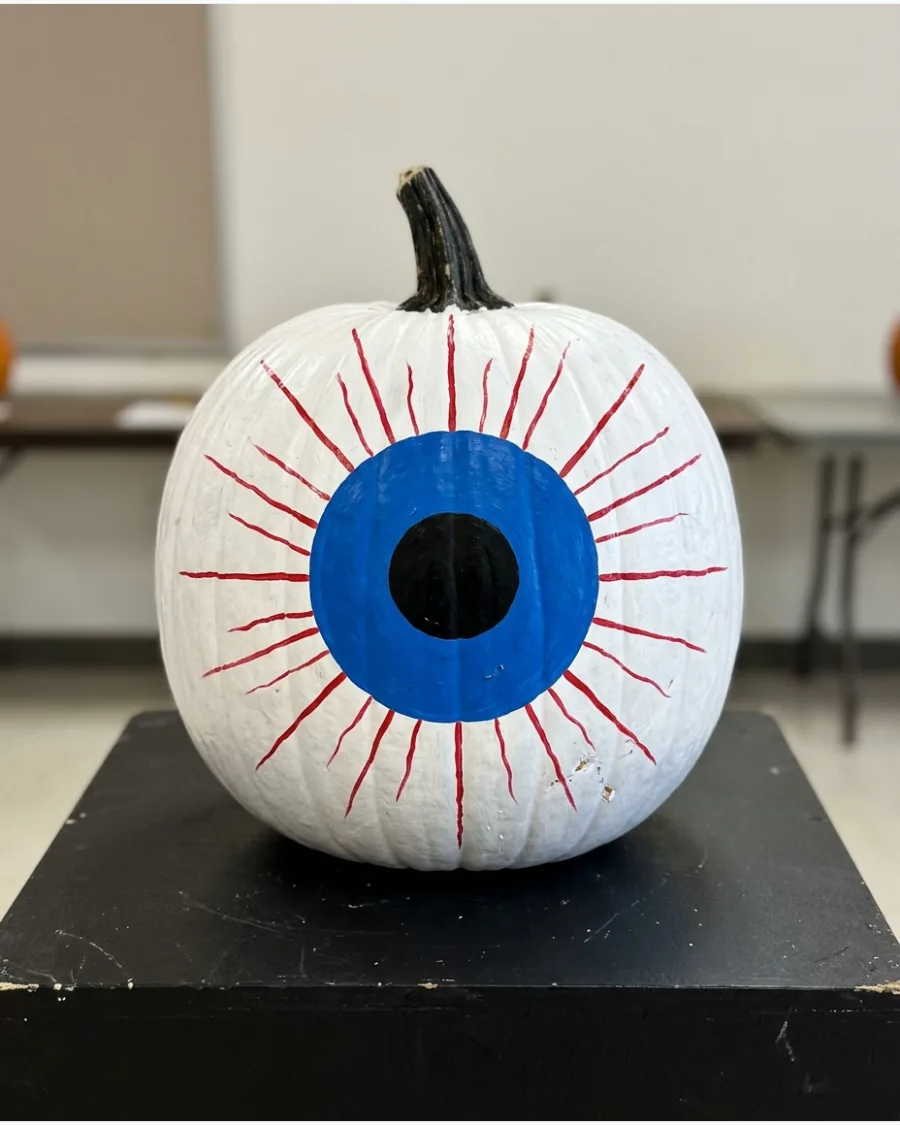
Paint a white pumpkin with a large blue or green circle in the center to represent the iris. Add a smaller black circle for the pupil and use a fine-tip brush to paint red squiggly veins branching out from the center. This graphic, high-contrast design is highly visible from across a room, making it a strong competitor in large halls.
The simplicity of the shape makes the precision of the painting the star of the show.
- Sourcing: White, blue, and red acrylic paints and a fine-detail brush.
- Setup: Use a compass or a bowl to trace perfect circles before you start painting.
- Adaptation: Use glow-in-the-dark paint for the iris to make it stand out during low-light events.
Best shortcut: Use a large blue plastic plate glued to the front as the iris to save time and ensure a perfect circle.
Creative Contest-Winning Pumpkin Ideas
49. Pumpkin Hot-Air Balloon
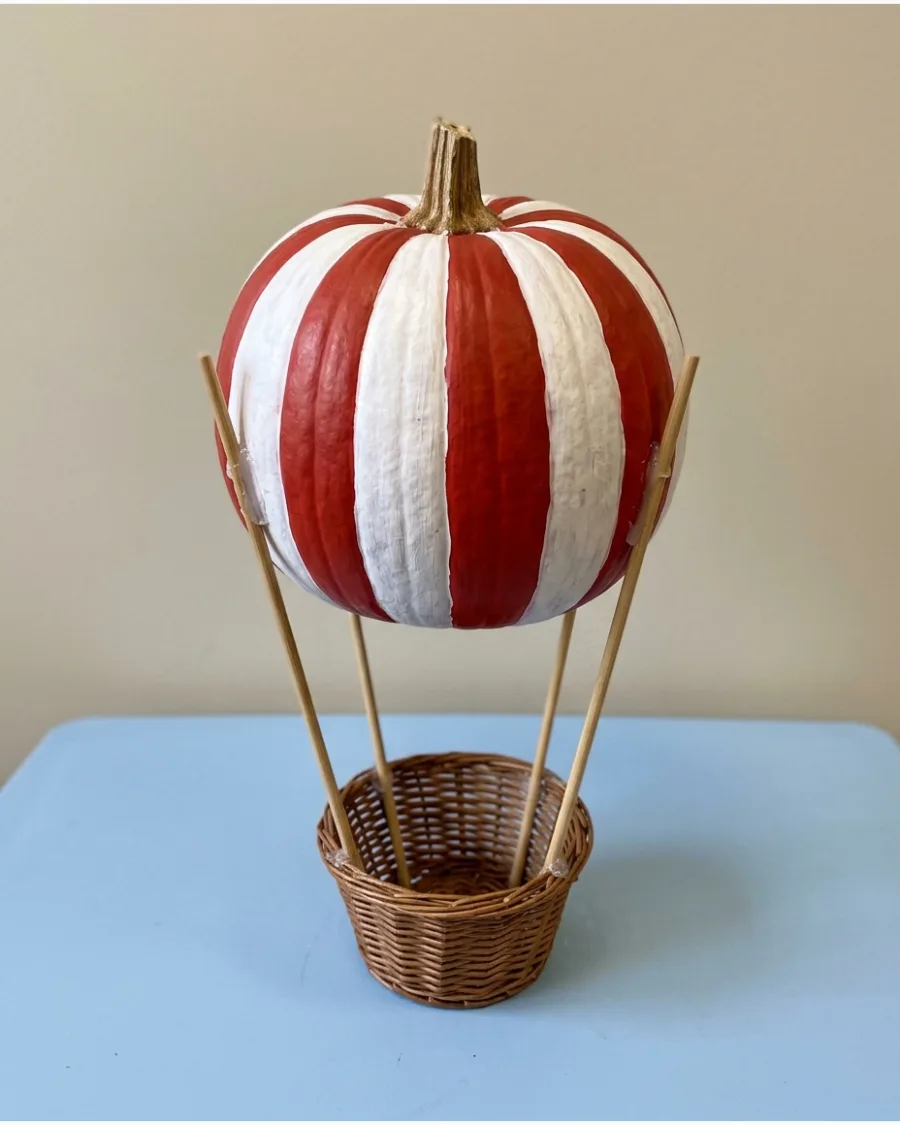
Suspend the pumpkin above a small wicker basket using four wooden dowels painted to look like ropes. Decorate the pumpkin with bright vertical stripes and attach small paper flags around its widest part. This idea wins points for engineering and creativity by turning the pumpkin into a structural element rather than just a character.
It creates a vertical display that stands out among flatter entries.
- Sourcing: Small wicker basket and 1/4-inch wooden dowels.
- Setup: Secure the dowels into the basket with floral foam or heavy-duty tape at the bottom.
- Adaptation: Add a small toy figure or a mini animal inside the basket as the pilot.
Most people skip this: Balance the weight carefully by centering the pumpkin exactly over the basket base to prevent tipping.
50. Pumpkin Under-the-Sea Diorama
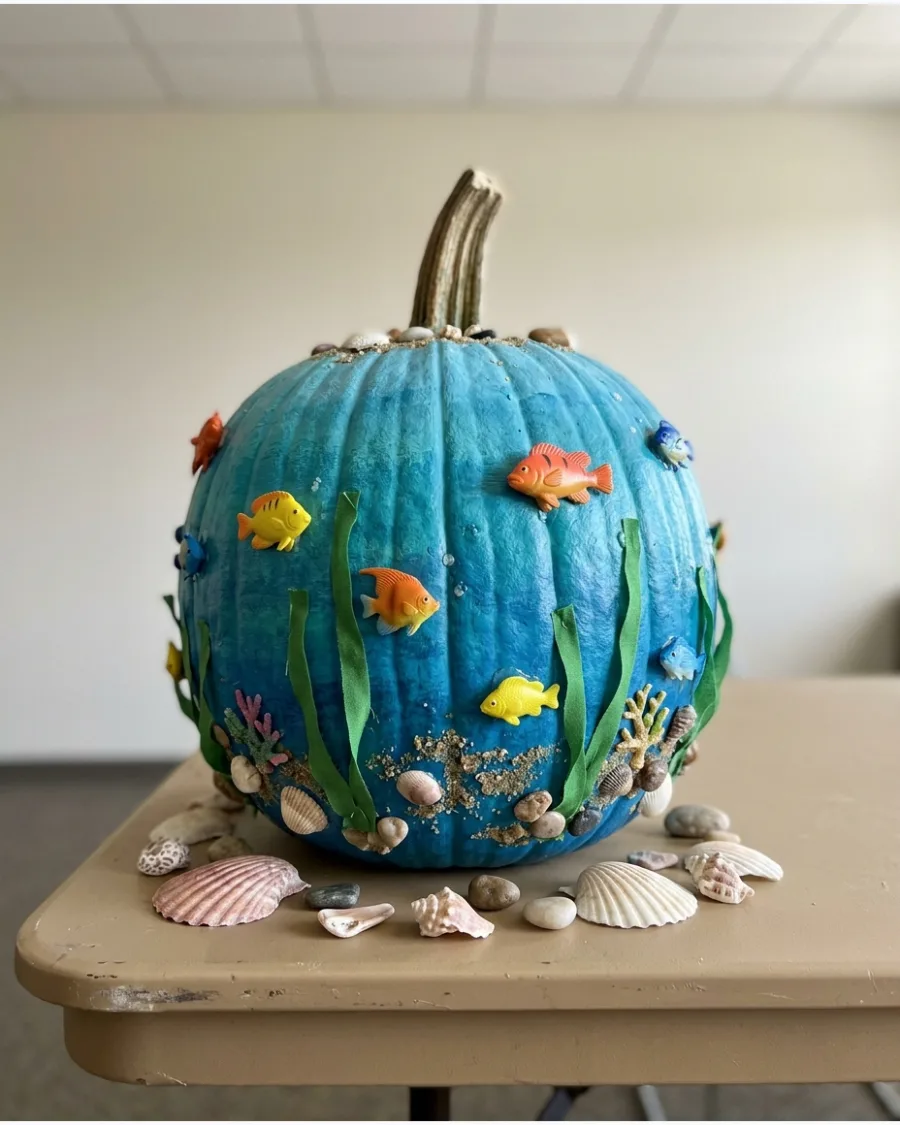
Paint the pumpkin in a blue-to-green gradient and glue on small plastic fish and faux seaweed. Scatter real seashells around the base and add a layer of sand or tan felt to ground the scene. This multi-layered approach creates an immersive display that encourages judges to look closer at the details.
Using 3D attachments like fish makes the scene feel more alive than a flat painting.
- Sourcing: Blue paint, plastic toy fish, and real seashells.
- Setup: Use hot glue for the fish and seaweed to ensure they stay in place during transport.
- Adaptation: Add a "treasure chest" made from a small painted jewelry box at the base.
Quick win: Use bubble wrap painted light blue at the base of the pumpkin to look like rising ocean bubbles.
Frequently Asked Questions
How do I make decorations stick to a pumpkin without carving?
For a secure bond, use a low-temperature hot glue gun or heavy-duty glue dots which adhere well to the pumpkin's waxy skin. If you are attaching heavier accessories, industrial-strength double-sided tape is a reliable choice to ensure everything stays in place for the judges.
What are the best pumpkin types for no-carve decorating?
Choose smooth-skinned varieties like 'Pie Pumpkins' or 'White Lumina' because their flat surfaces are ideal for paint, markers, and stickers. Avoid bumpy 'Knucklehead' types, as their deep ridges make it difficult for adhesives and intricate designs to lay flat.
How long will a no-carve pumpkin last for a contest?
While carved pumpkins rot in just a few days, an uncarved pumpkin can stay fresh for several months if kept in a cool, dry place. To maximize its lifespan, wipe the exterior with a mild bleach and water solution to kill bacteria before you begin decorating.
What are some winning 'theme' ideas for a pumpkin contest?
Catch the judges' eyes with recognizable pop culture characters or clever pun-based designs that make people laugh. For a more sophisticated look, try using high-fashion textures like lace overlays, metallic paints, or sequin patterns to create a high-end aesthetic.
How do I transport a decorated pumpkin to a contest safely?
Place your pumpkin in a sturdy box that is just slightly larger than the fruit, using crumpled paper or towels to pad the sides. Secure any loose 3D elements with extra adhesive before leaving, and keep a small touch-up kit handy for quick repairs once you arrive.