60 Christmas Garland Ideas Above Kitchen Cabinets

This post may contain affiliate links: full affiliate disclosure.
The gap between kitchen cabinets and the ceiling often feels like a missed opportunity for seasonal styling. Adding a garland fills this awkward void while keeping countertops clear for meal prep.
Choosing the right greenery and lighting transforms the entire room without requiring a full renovation.
CLASSIC GARLAND ABOVE KITCHEN CABINETS
1. Simple Pine Garland Above Kitchen Cabinets
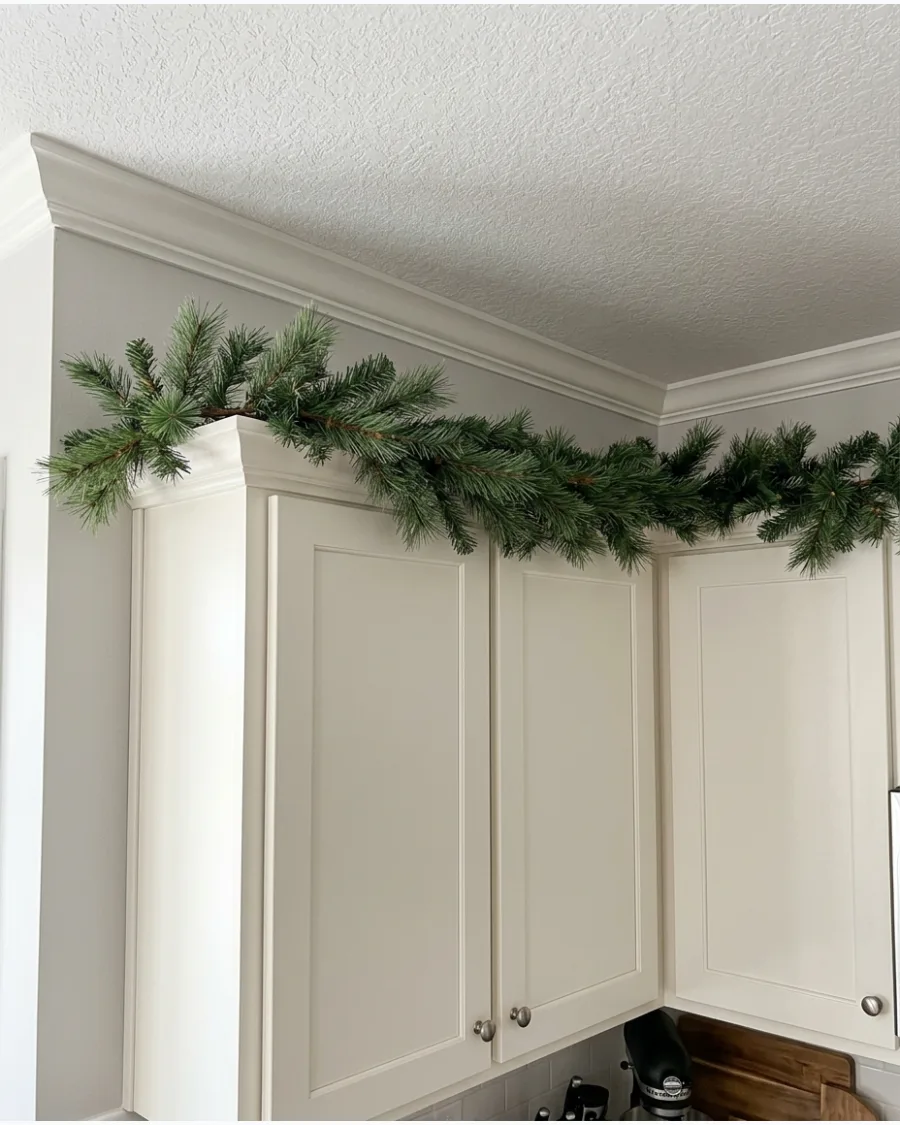
Faux pine provides a sturdy base that holds its shape along the straight lines of modern or traditional cabinetry. This classic choice adds immediate texture and warmth to the highest point of the kitchen.
Secure the garland with small adhesive hooks hidden behind the cabinet crown molding to prevent it from sliding forward. Real pine dries out quickly in warm kitchens, so high-quality faux branches are a much better long-term investment.
- Look for 6-foot or 9-foot lengths to minimize unsightly seams.
- Bend the wire branches outward to create volume and hide the central plastic spine.
- Use command hooks on the top surface of the cabinets so they remain invisible from the floor.
Quick win: Dust the top of the cabinets thoroughly before laying down the greenery to keep the garland clean all season.
2. Cedar Garland Across the Cabinet Tops
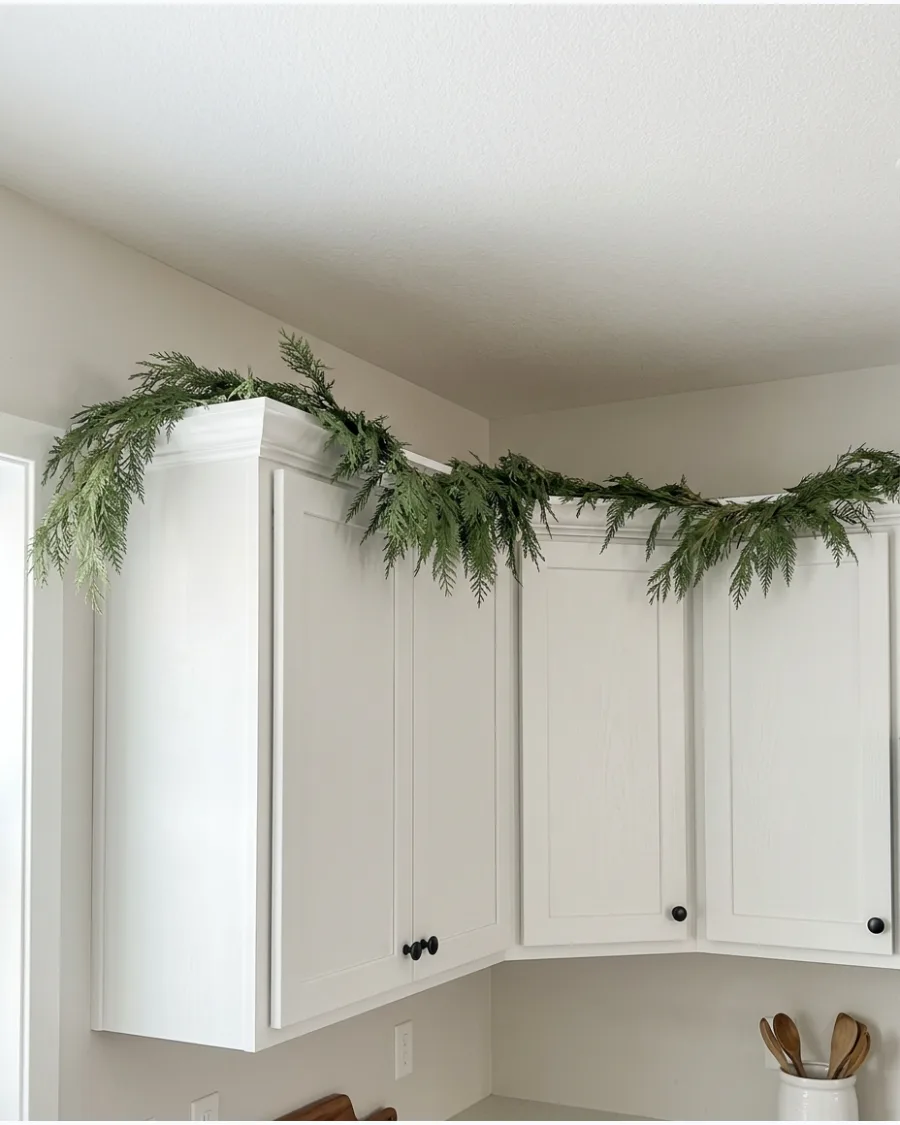
Cedar garland offers a softer, more draped look that flows naturally over the edges of cabinet tops. Its delicate, flat needles provide a more realistic and organic feel compared to stiff pine needles.
Drape the ends of the cedar slightly over the cabinet corners to soften the harsh architectural lines of the kitchen. This style works best for those who want a minimalist or "undone" aesthetic that doesn't feel over-styled.
- Real-touch cedar is the gold standard for a realistic look without the mess of shedding needles.
- Lay the garland flat and let the side branches hang naturally over the front edge.
- Double up the garland in the center of a long run of cabinets to create a focal point.
Most people skip this: Use floral wire to connect multiple strands so they don't shift or create gaps.
3. Mixed Pine and Cedar Cabinet Garland
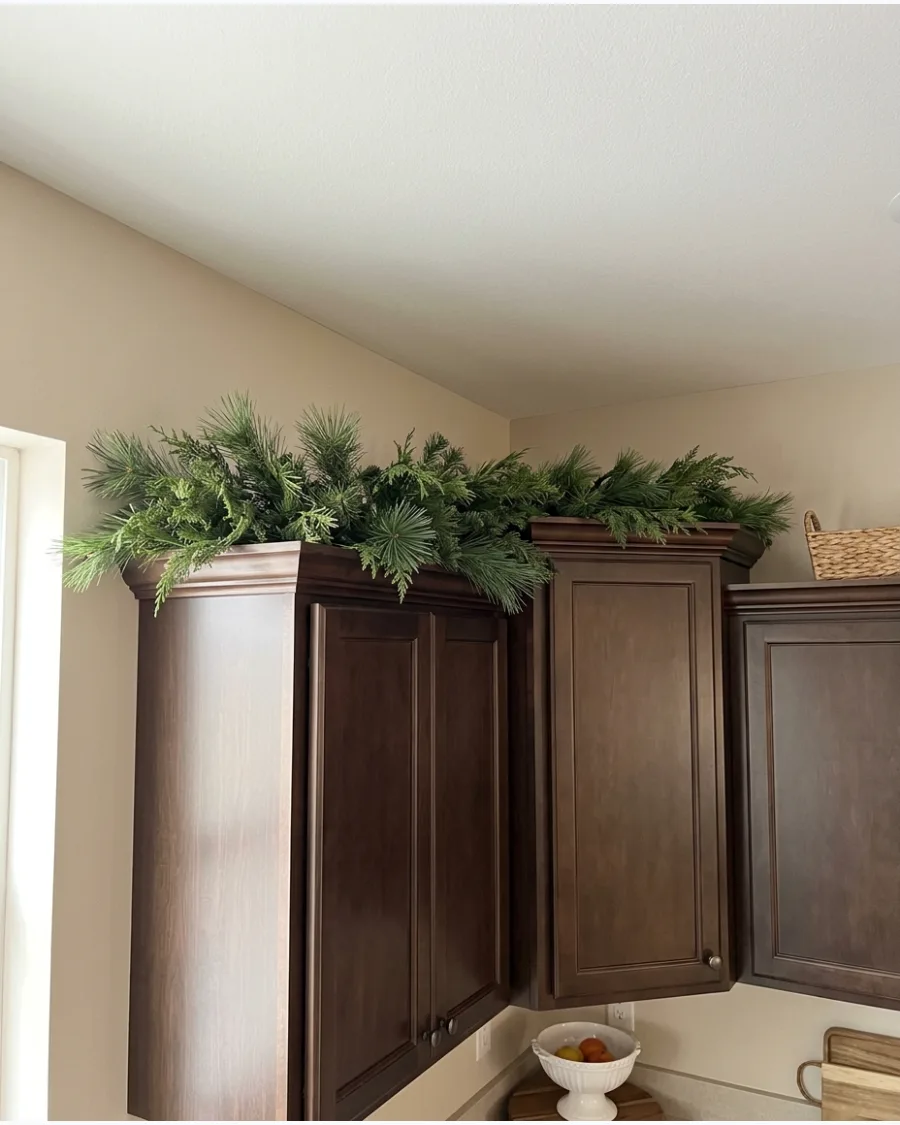
Mixing different types of greenery creates a high-end, custom look that a single-material garland can't achieve. The stiffness of pine provides structure, while the softness of cedar adds movement and depth.
Twist a strand of pine and a strand of cedar together before lifting them onto the cabinets for a seamless blend. This layered approach makes the decor look intentional and professionally styled.
- Buy one thick pine garland and one thin cedar garland to balance the weight.
- Fluff the pine branches first then weave the cedar through the center.
- This works exceptionally well in large kitchens with high ceilings where a single garland might look too thin.
Best shortcut: Use zip ties to secure the two different garlands together on the ground before installing them.
4. Garland With Natural Pinecones
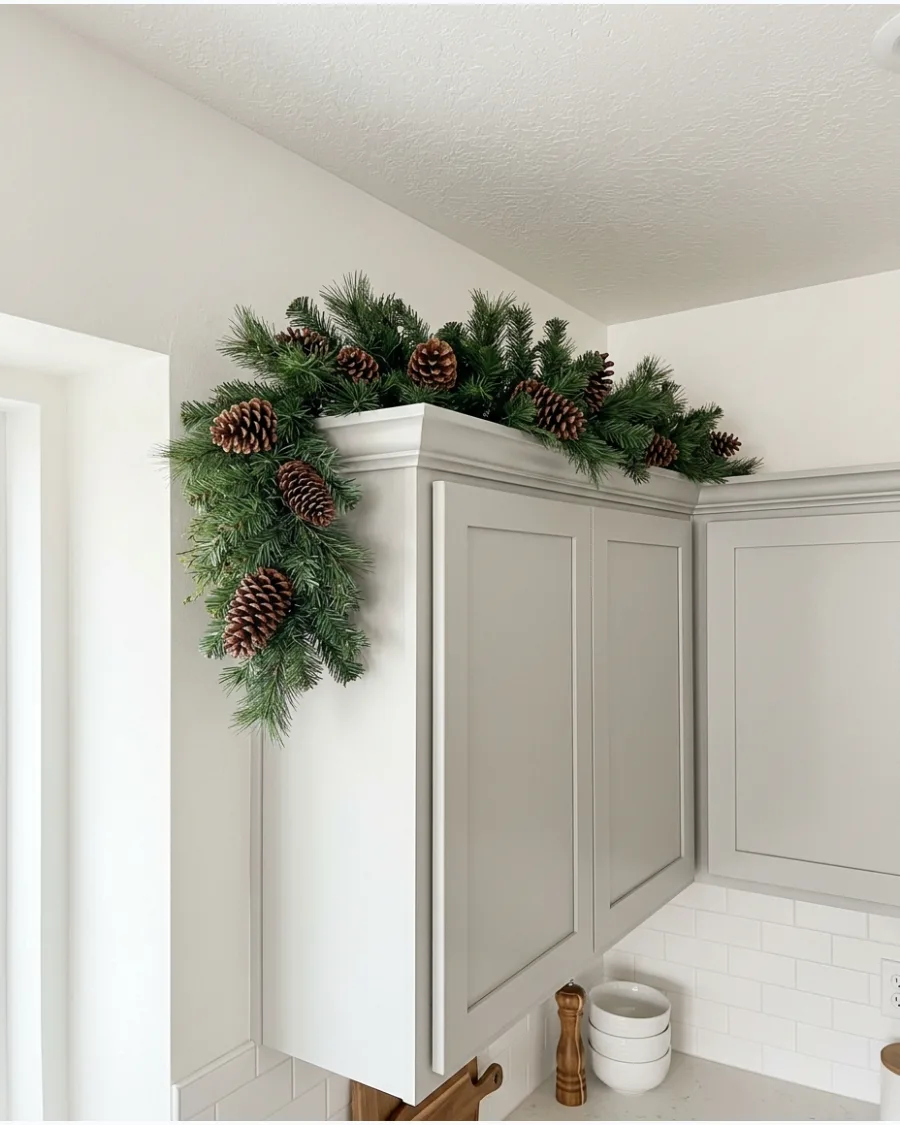
Pinecones add a natural, woody element that breaks up the solid green of a standard garland. They provide a rustic touch that feels appropriate for the entire winter season, not just the holidays.
Wire the pinecones directly to the garland frame to ensure they stay visible and don't fall behind the cabinets. Using various sizes of pinecones creates a more authentic, forest-inspired appearance.
- Collect pinecones from the yard or buy unscented ones to avoid overwhelming the kitchen with artificial smells.
- Space the pinecones in small clusters of three for a balanced visual rhythm.
- Spray the pinecones with a light coat of clear sealer to prevent dust from sticking to them.
Quick win: Use different shades of brown pinecones to add more visual depth to the greenery.
5. Garland With Red Berry Sprigs
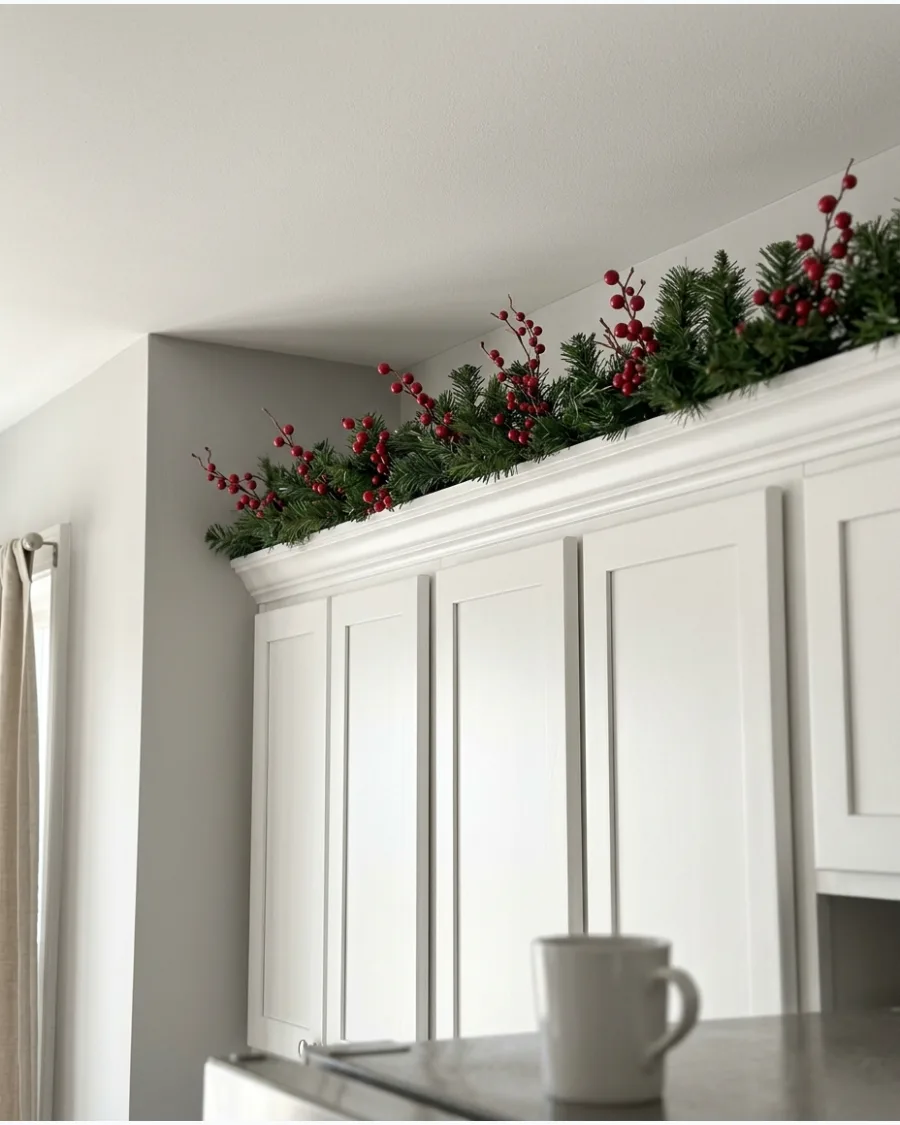
Red berries provide a classic pop of color that instantly makes the kitchen feel festive and bright. They contrast beautifully against green needles and draw the eye upward to the architectural details of the room.
Insert individual berry picks at an angle so they appear to be growing out of the garland naturally. This is the easiest way to add a traditional holiday theme without using ornaments.
- Choose waterproof or plastic-coated berries to prevent the color from bleeding if they get damp.
- Distribute the berries evenly but avoid perfect symmetry to keep the look organic.
- Use burgundy berries for a more sophisticated, moody look in a dark-toned kitchen.
Best shortcut: Buy garlands with berries already attached to save time during the busy holiday setup.
6. Garland With White Berry Accents
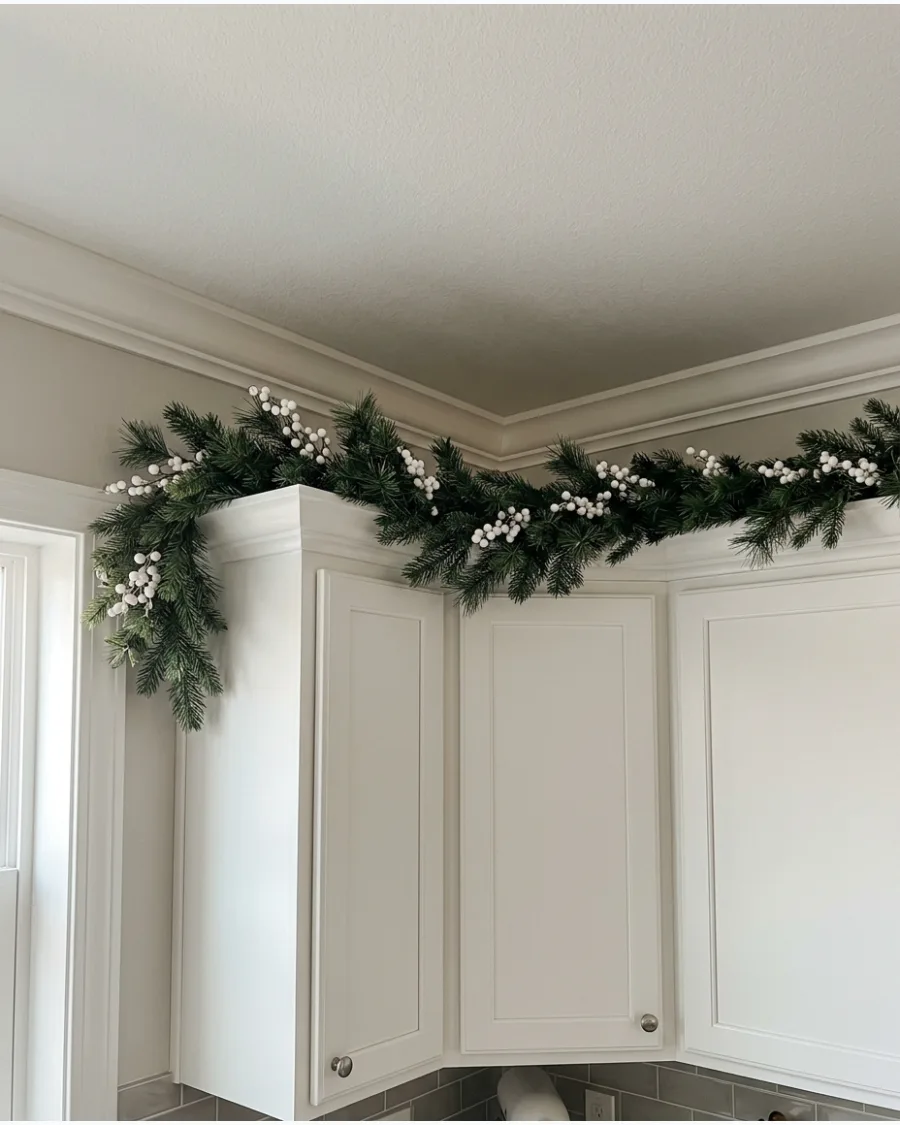
White berries offer a clean, modern alternative to traditional red accents and look stunning in contemporary kitchens. They mimic the look of snow-covered mistletoe or snowberries, providing a wintery feel that lasts through January.
Pair white berries with silver or frosted greenery to enhance the winter wonderland aesthetic. This neutral palette keeps the kitchen feeling airy and bright rather than cluttered.
- Look for tallow berries or snowberries for the most realistic white accent.
- Place white berries near the front of the garland where they will catch the most light.
- This look is perfect for kitchens with marble or quartz backsplashes that have cool gray veining.
Most people skip this: Wipe down the berry clusters with a microfiber cloth before installing to remove any factory film.
7. Lightly Flocked Garland Above Cabinets
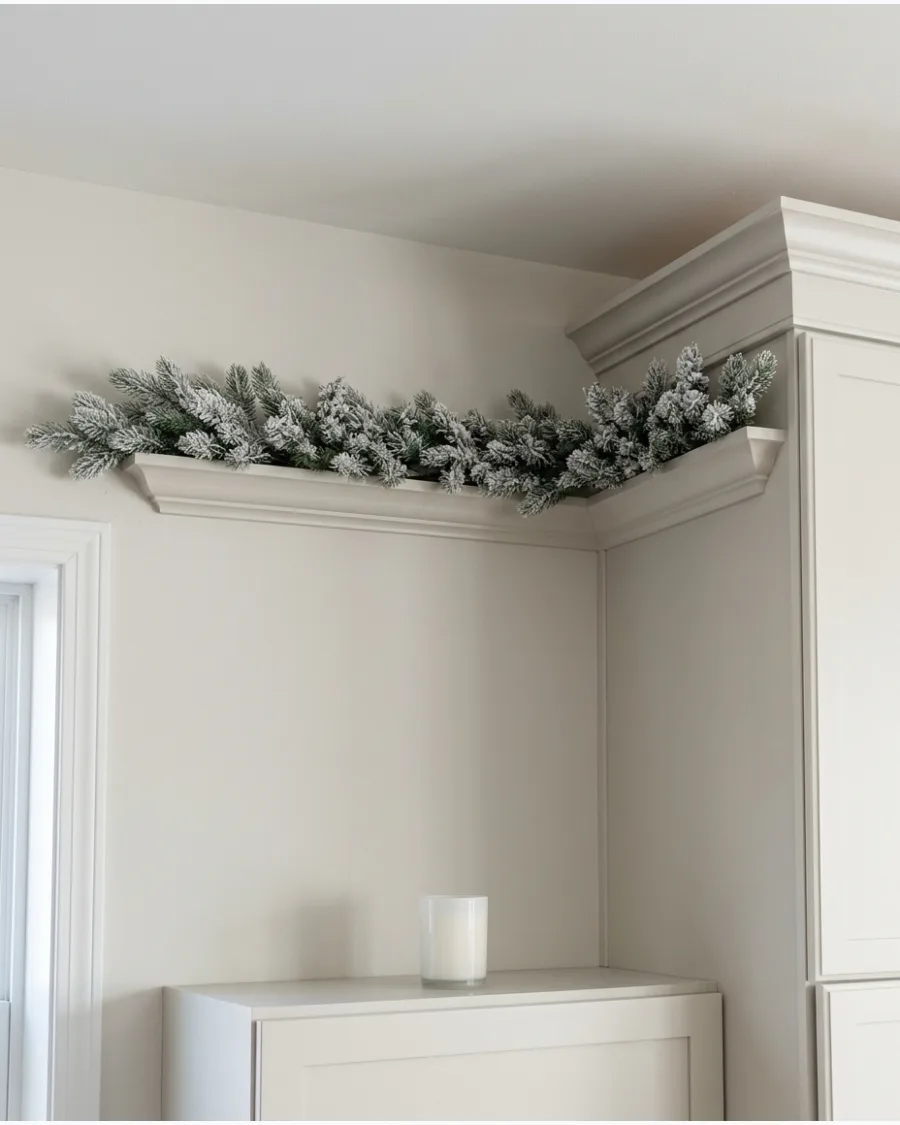
A lightly flocked garland adds a hint of winter frost without the heavy, messy buildup of traditional flocking. It creates a soft, bright edge that helps the greenery stand out against darker cabinet finishes.
Shake the garland outdoors before bringing it inside to remove any loose flocking particles. This subtle snow effect adds a layer of texture that makes the kitchen feel cozy and seasonal.
- Search for frosted or iced garlands if you want something even more subtle than flocking.
- Avoid placing flocked items directly above the stove where grease and steam can yellow the white particles.
- Mix in a few silver sprigs to catch the light and mimic the sparkle of real ice.
Quick win: Use a spray-on flocking if you want to customize the amount of snow on a plain green garland.
8. Extra-Full Evergreen Cabinet Garland
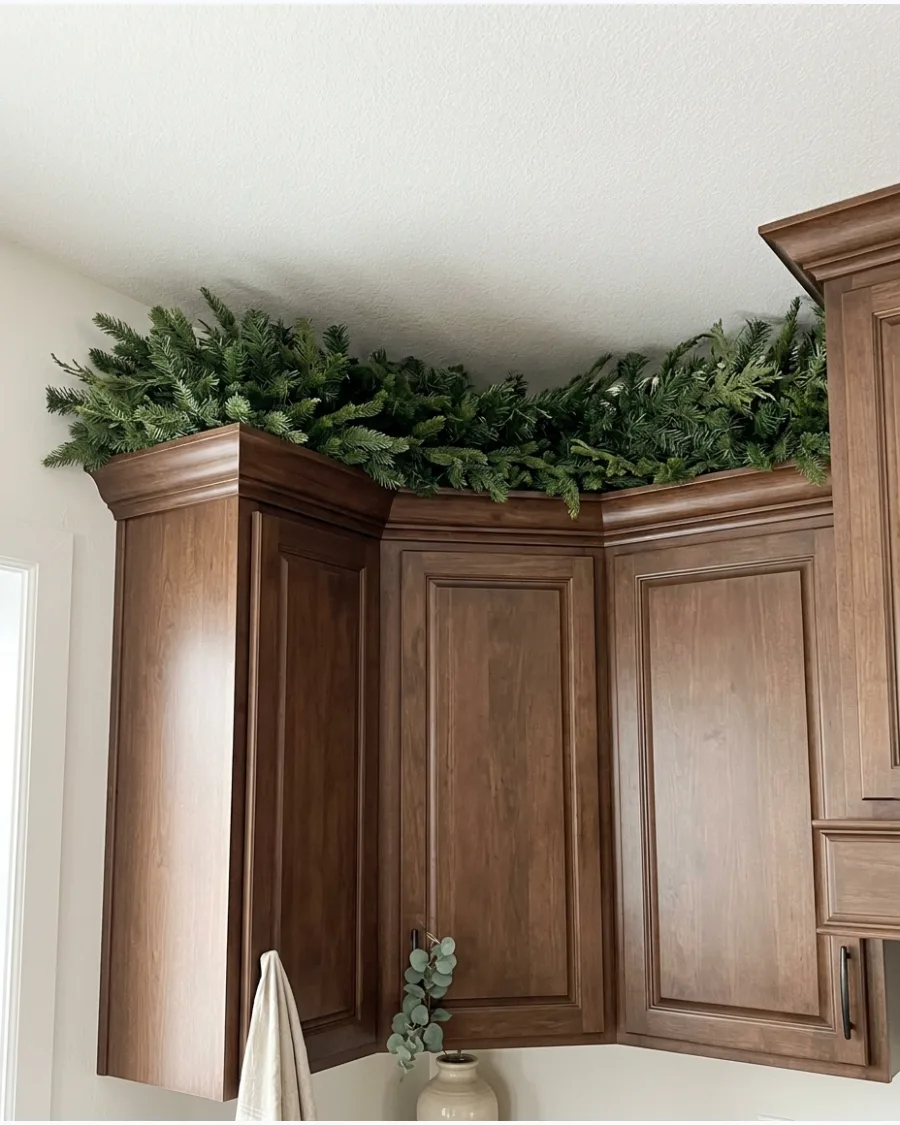
In kitchens with significant space between the cabinets and the ceiling, a standard garland can look thin and underwhelming. Layering two garlands or choosing an extra-full variety ensures the decor has enough visual weight to fill the gap.
Stagger the two garlands so one sits slightly higher than the other to maximize the vertical coverage. This creates a lush, high-end look that mimics professional holiday installations.
- Look for garlands with a high tip count to ensure the fullest possible appearance.
- Use heavy-duty floral wire to bind two garlands together every 12 inches.
- For very deep cabinets, push the garland slightly back from the edge to allow for more layering in front.
Most people skip this: Fluff the back branches upward toward the ceiling to make the garland appear even taller.
LIGHTED GARLAND ABOVE KITCHEN CABINETS
9. Warm White Lighted Cabinet Garland
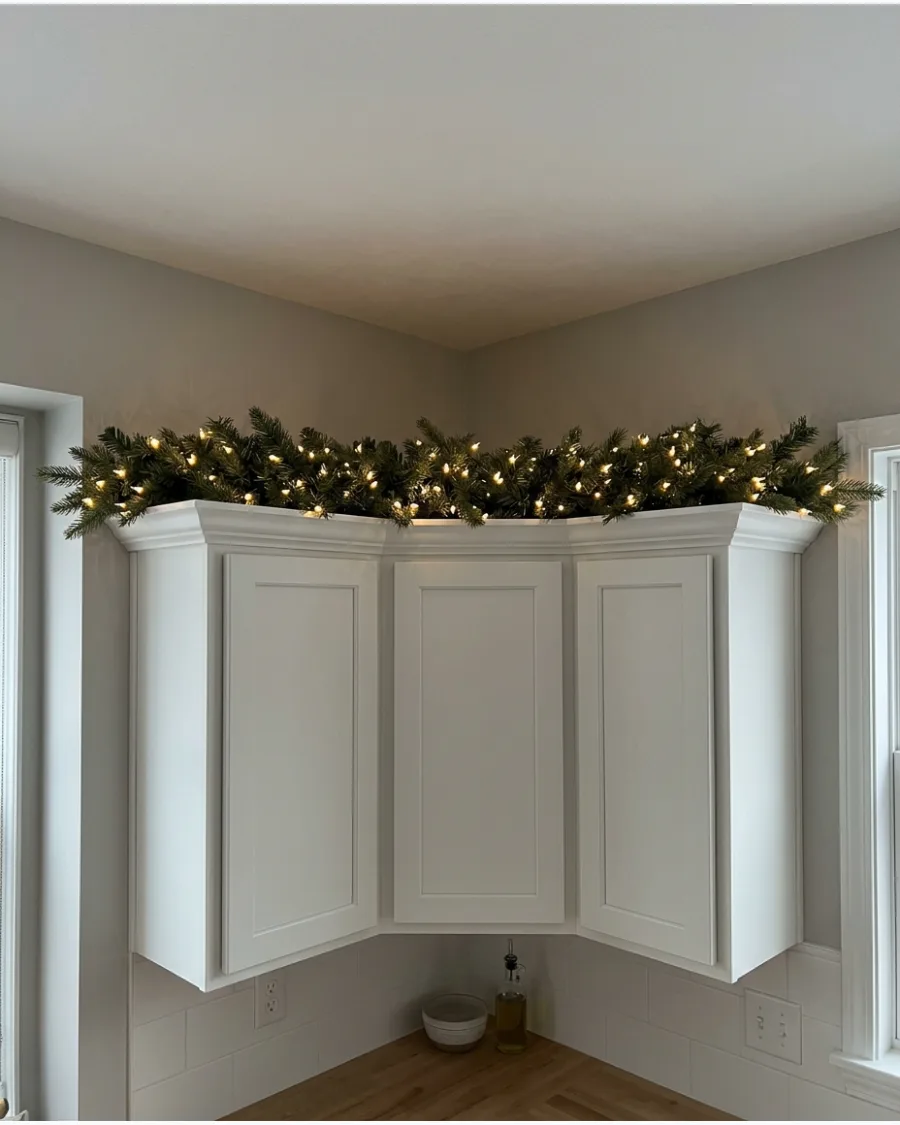
Adding lights to the top of the cabinets provides beautiful ambient lighting that highlights the ceiling and adds a cozy glow. Warm white micro-lights or fairy lights are best because the thin wires disappear into the greenery.
Choose battery-operated lights with a built-in timer so the garland illuminates automatically every evening. This setup eliminates the need for visible cords running down the side of the cabinets.
- Look for warm white LEDs rather than cool white to keep the kitchen feeling inviting.
- Weave the lights deep into the branches to create a diffused glow rather than harsh points of light.
- If an outlet is available above the cabinets, use plug-in lights for consistent brightness all season.
Best shortcut: Hide the battery pack in a small decorative box or behind a cluster of branches at the end of the garland.
10. Pre-Lit Garland Above Kitchen Cabinets
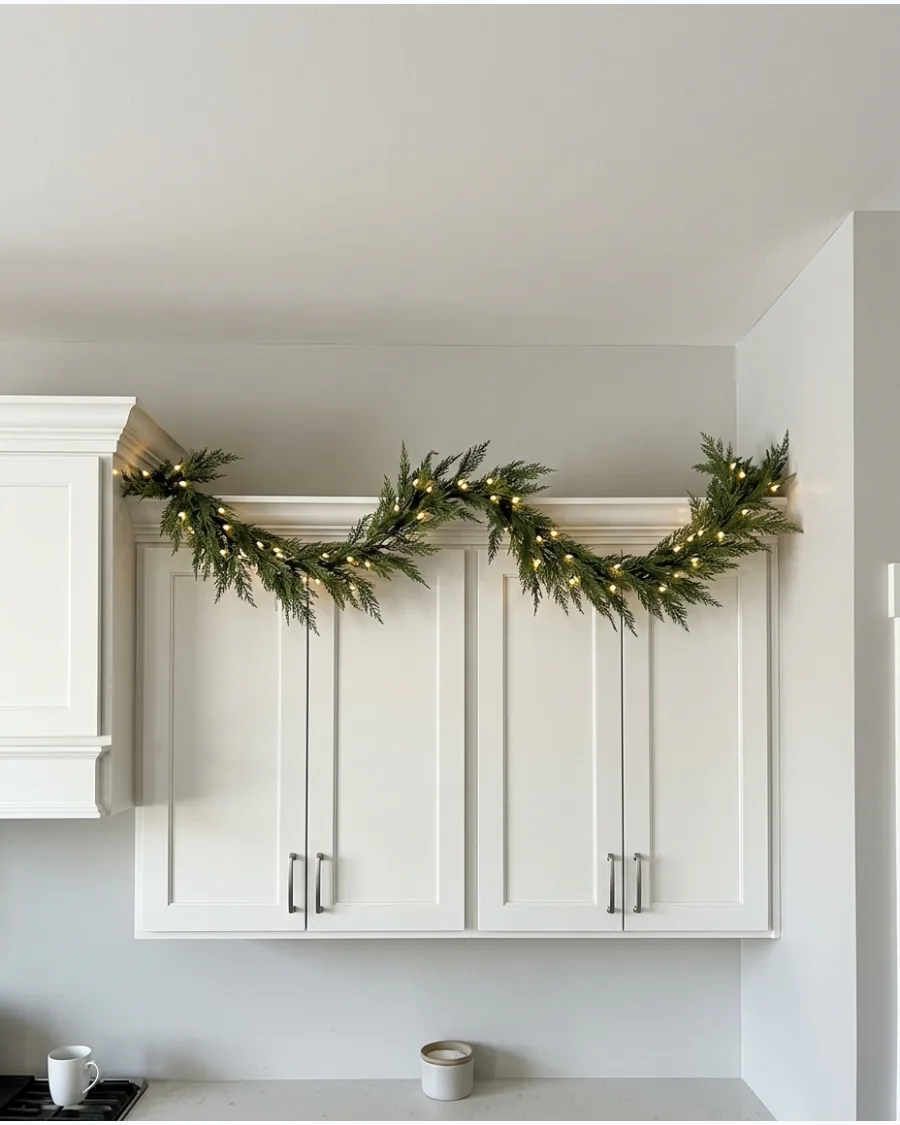
Pre-lit garlands are the ultimate convenience for high-reach areas like the top of kitchen cabinets. They come with the lights already perfectly spaced, ensuring a balanced glow across the entire length of the cabinetry.
Test the lights on the floor before climbing the ladder to install the garland. This all-in-one solution saves time and reduces the frustration of tangled wires in a cramped space.
- Choose a commercial grade pre-lit garland for better bulb longevity and brighter output.
- Ensure the cord length is sufficient to reach your power source without tension.
- If the lights are too bright, use a plug-in dimmer switch to adjust the ambiance.
Quick win: Look for garlands with stay-lit technology so one bad bulb doesn't darken the whole strand.
11. Twinkle Light Garland
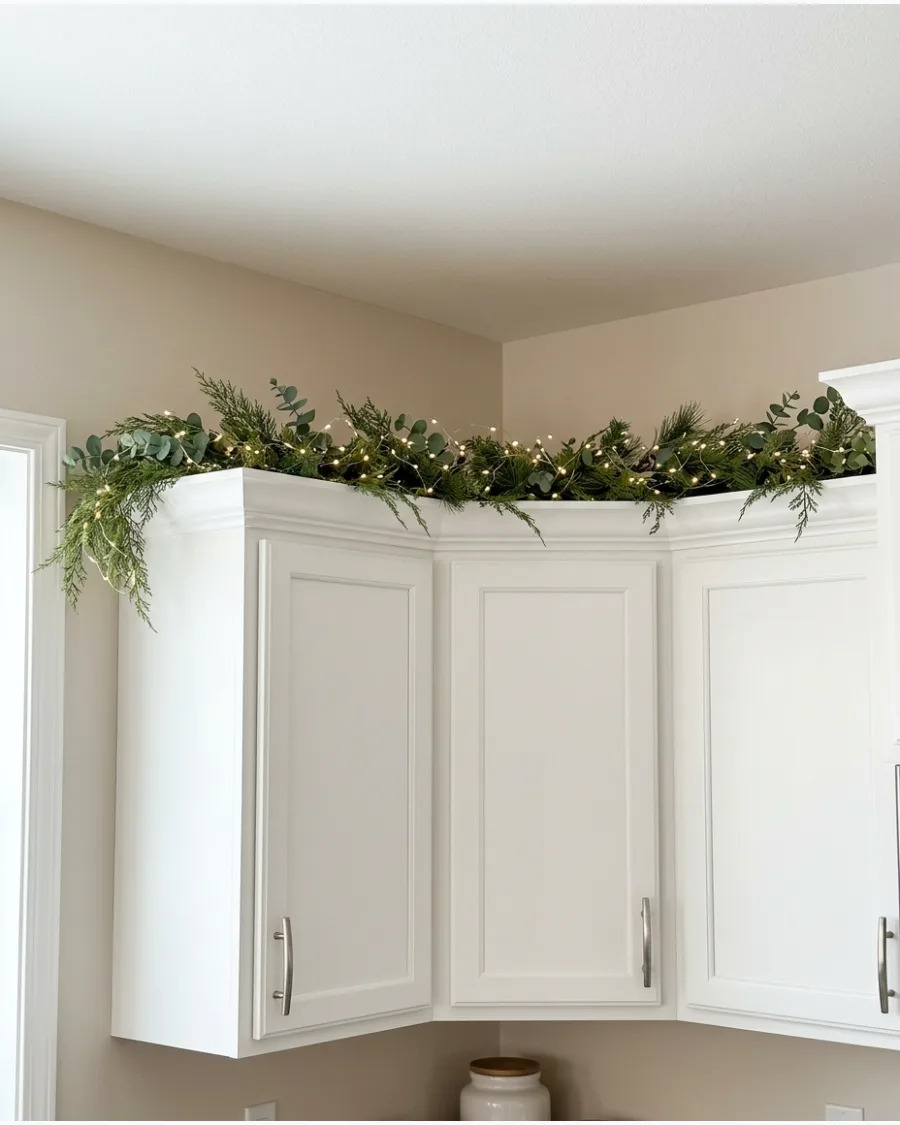
Twinkle lights add a layer of animation to the kitchen ceiling line. The subtle flashing mimics a starry sky rather than a loud holiday display.
Drape the lights loosely over the greenery so the bulbs peek out from different depths. Using a twinkle setting on a low speed keeps the effect elegant and high-end.
- Buy micro-LED twinkle strings with at least 50 lights per 6 feet of garland.
- Weave the lights into the garland before lifting it onto the cabinet tops.
- Choose a warm white bulb color to maintain a cozy kitchen atmosphere.
Most people skip this: Use a remote-controlled plug so you can adjust the twinkle speed without a ladder.
12. Battery-Powered Garland Above Cabinets
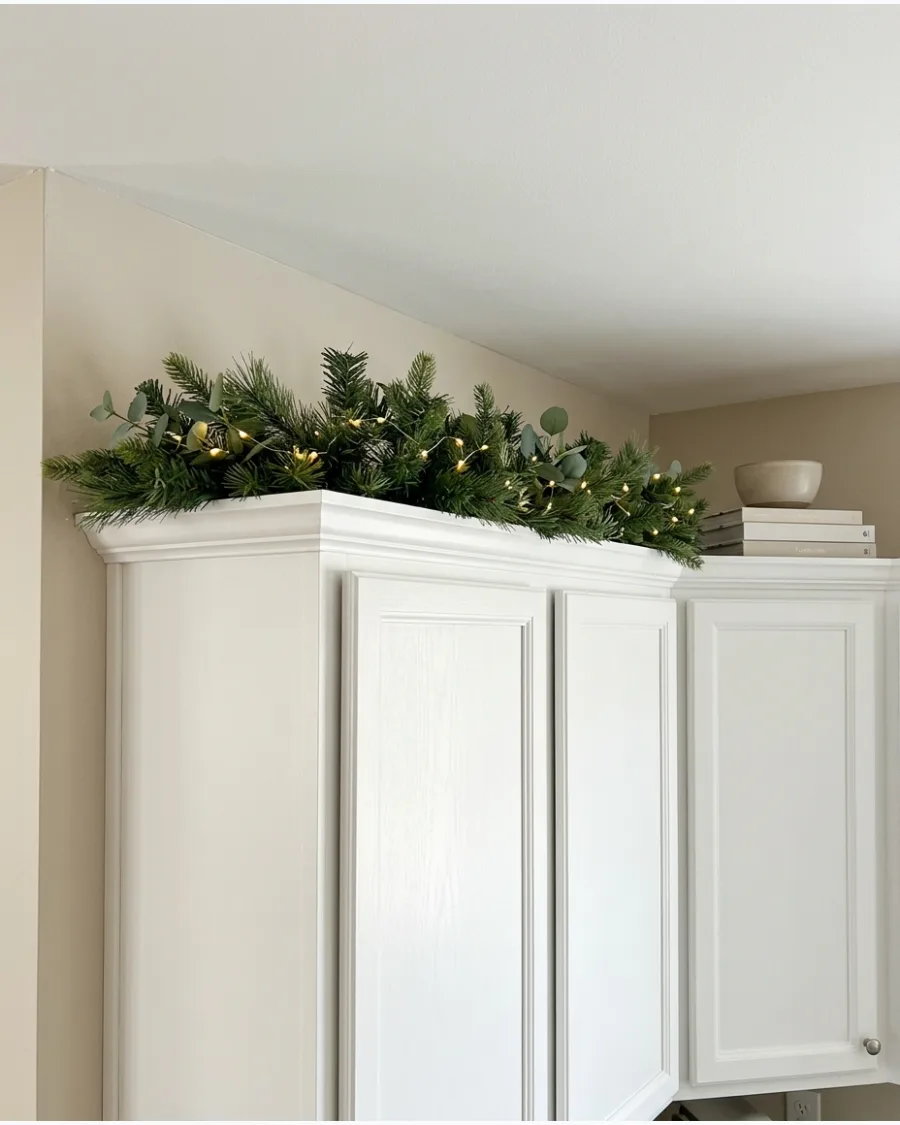
Battery packs eliminate the need for messy extension cords trailing down the backsplash. Modern LED sets often include timers, so the garland turns on automatically every evening.
Tuck the battery box behind a thick section of needles at the very end of the cabinet run. This setup allows for a clean, cordless look in any kitchen layout.
- Look for battery packs with a 6-hour timer function to save energy.
- Use rechargeable batteries to avoid waste throughout the holiday season.
- Secure the battery box with a small piece of painter's tape to prevent it from sliding.
Quick win: Place the battery pack on the side furthest from the main entrance to keep it completely out of sight.
13. Soft Fairy Light Cedar Garland
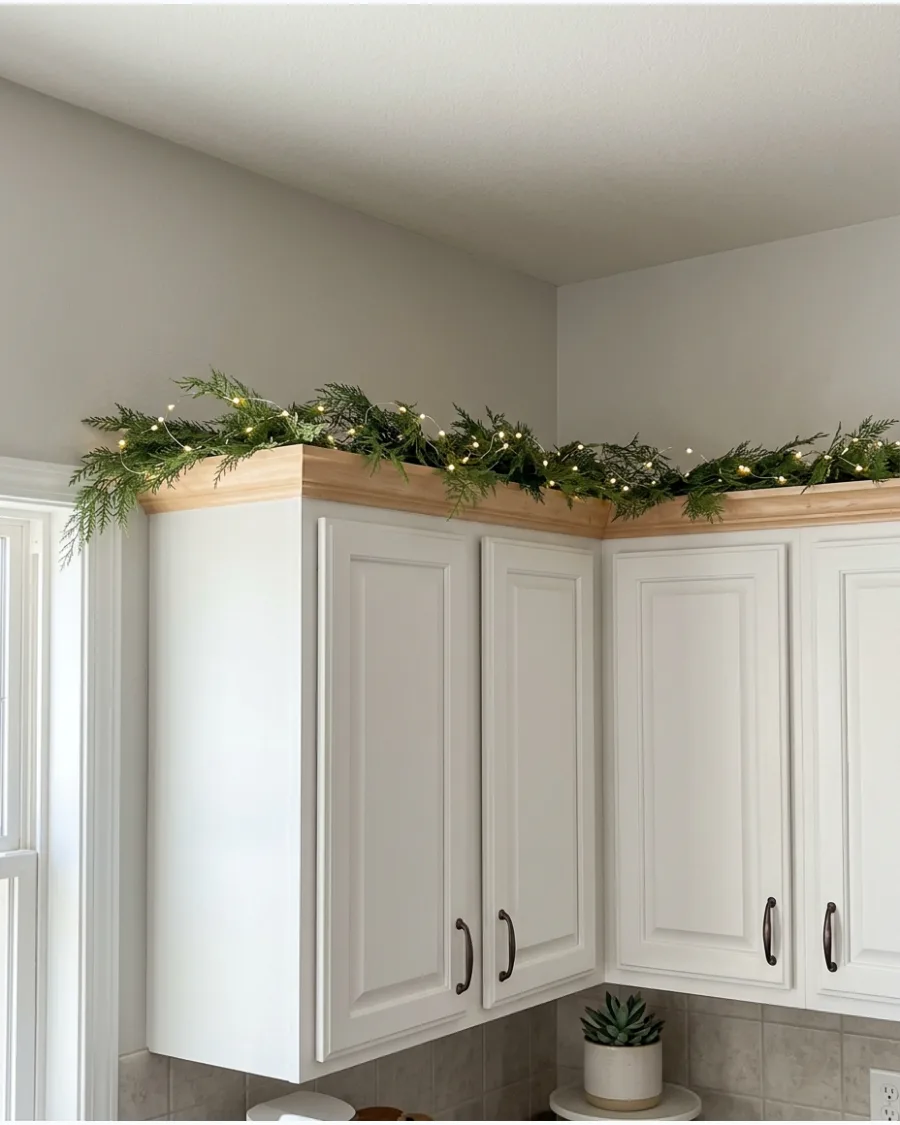
Cedar has a naturally delicate, drooping texture that pairs beautifully with thin copper wire lights. These lights are nearly invisible during the day but provide a soft glow at night.
Wrap the wire around the main stem of the cedar to keep the lights secure and evenly spaced. It is a perfect choice for minimalist kitchens that need just a touch of warmth.
- Select real or high-quality faux cedar for the most realistic drape.
- Use copper wire lights because the metal color blends into the brown cedar stems.
- Layer two strands of lights for a brighter glow if the kitchen has no other accent lighting.
Best shortcut: Use a command hook on the cabinet top to keep the cedar from sliding forward under the weight of the lights.
14. Lighted Garland With Glowing Ceramic Houses
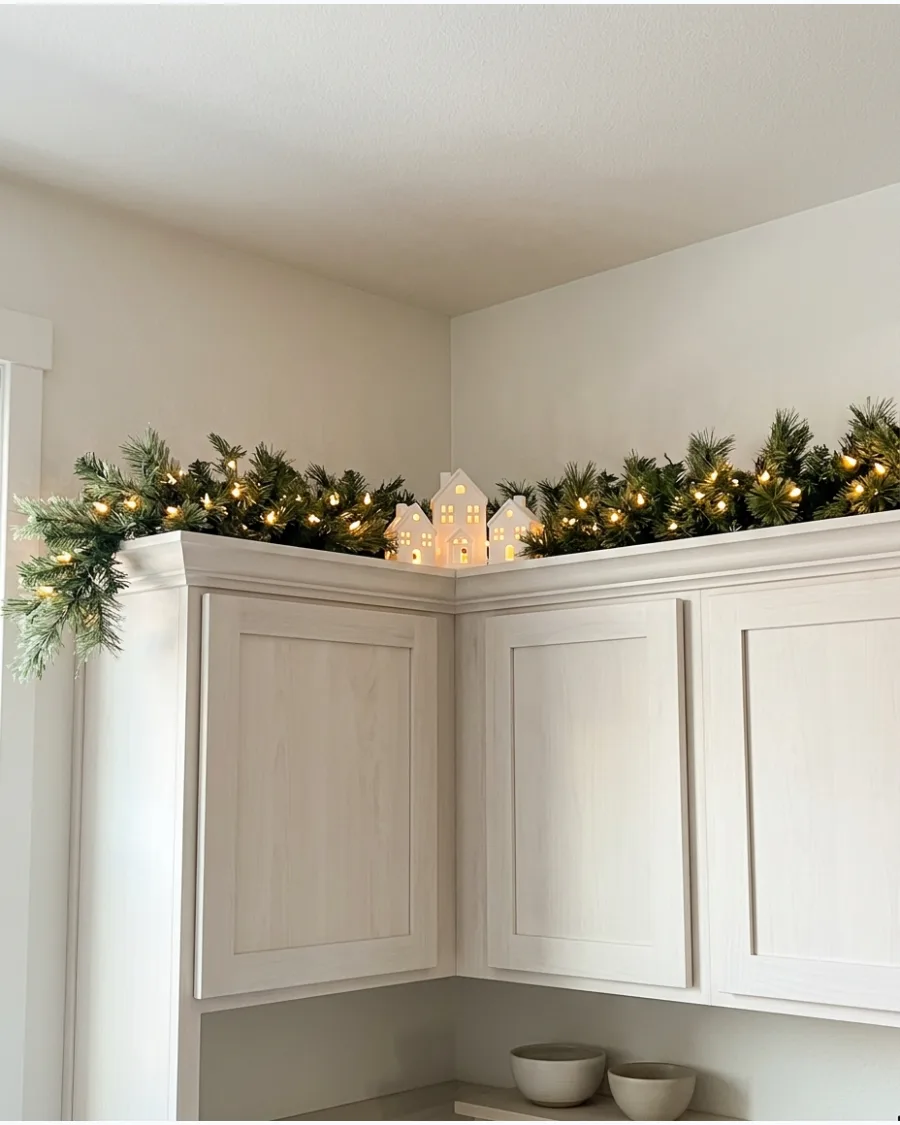
Creating a village scene above the cabinets turns a dead space into a major focal point. Use small, unglazed white ceramic houses nestled into a pre-lit pine garland.
Place the houses near the front edge of the cabinet top so they remain visible from the kitchen island. The glow from within the houses adds a cozy, architectural element to the decor.
- Use battery-operated tea lights inside the houses to avoid extra wires.
- Mix different house heights to create a more interesting skyline effect.
- Choose houses with a matte finish to prevent harsh reflections from the overhead lights.
Most people skip this: Put a small piece of non-slip shelf liner under each house to keep them level on the garland.
15. Garland With Mini Lantern Lights
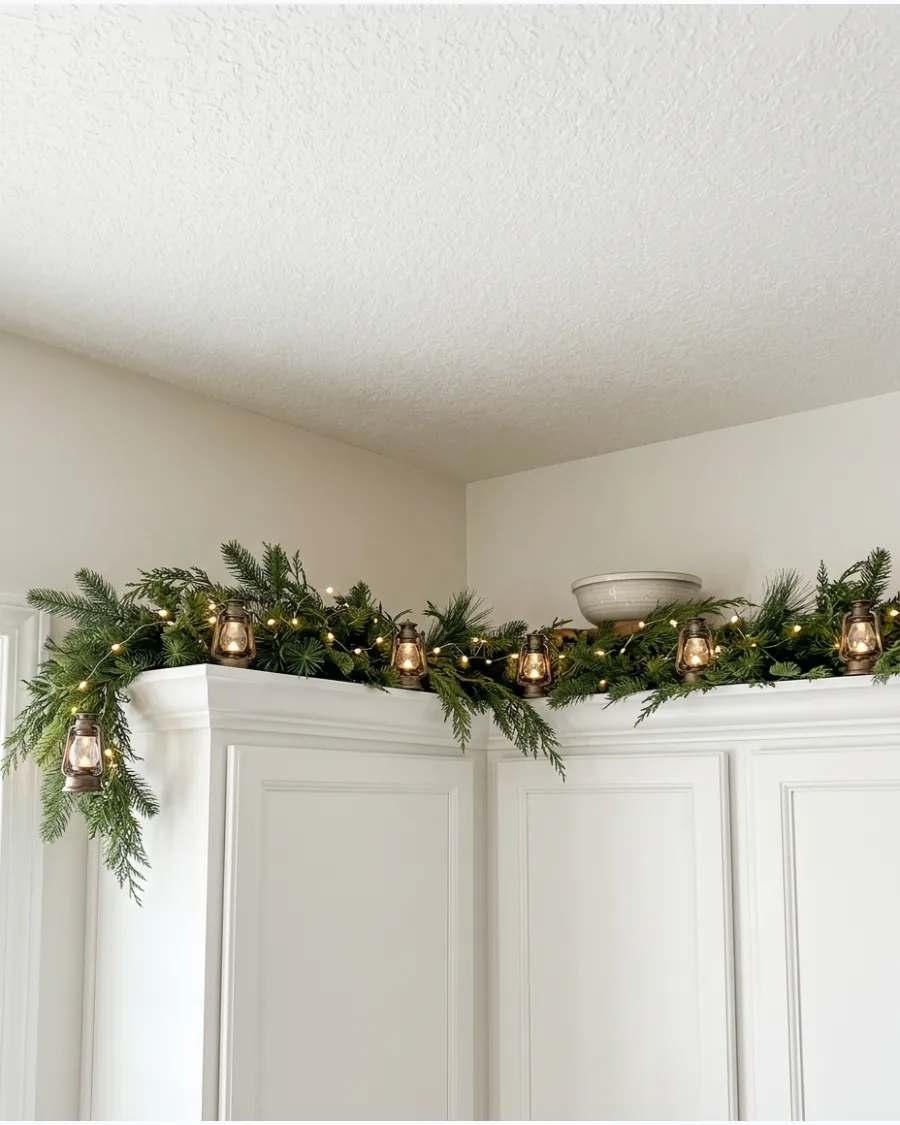
Mini lantern lights provide a vintage feel that grounds the airiness of the ceiling gap. These larger bulbs create distinct pools of light rather than a general shimmer.
Space the lanterns about twelve inches apart to prevent the display from looking crowded. This style works best on taller cabinets where the lanterns have room to hang slightly.
- Pick lanterns with a black or bronze finish to contrast against light cabinets.
- Ensure the lanterns are LED-based so they do not generate heat near the ceiling.
- Use a thick pine garland to support the weight of the larger lantern bulbs.
Quick win: Use clear fishing line to hang a few lanterns at slightly different heights for a custom look.
16. Garland With Star-Shaped Lights
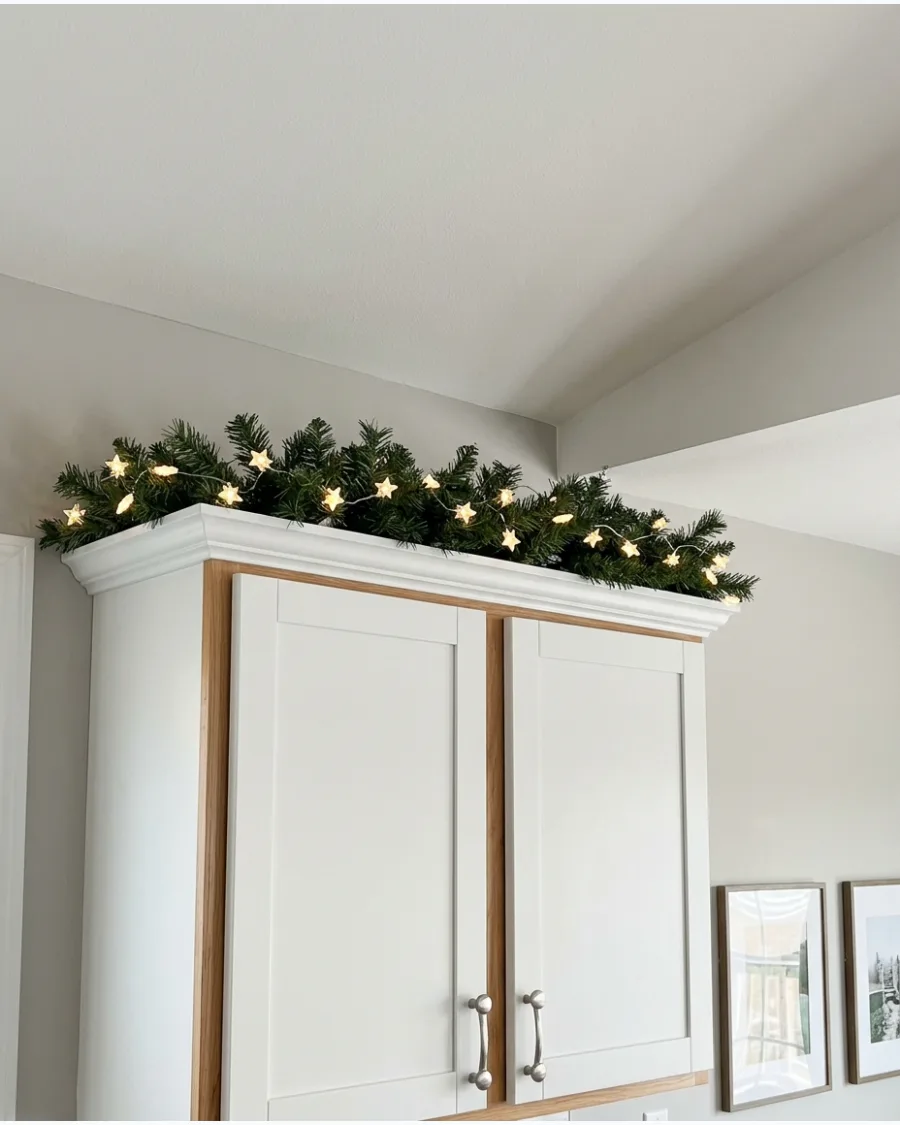
Star-shaped lights offer a whimsical geometric contrast to the organic shapes of evergreen branches. They stand out more than standard bulbs, making them a great choice for high ceilings.
Angle the stars so they face outward toward the room for maximum visibility. Using warm-toned stars keeps the kitchen feeling inviting rather than icy.
- Look for stars made of frosted plastic to diffuse the light evenly.
- Space the stars evenly along the entire length of the cabinetry.
- Pair star lights with a simple, non-decorated garland to let the shapes shine.
Best shortcut: If the stars keep flipping over, use a small green twist-tie to anchor the star base to a garland branch.
RIBBON AND BOW GARLAND IDEAS
17. Red Velvet Bow Cabinet Garland
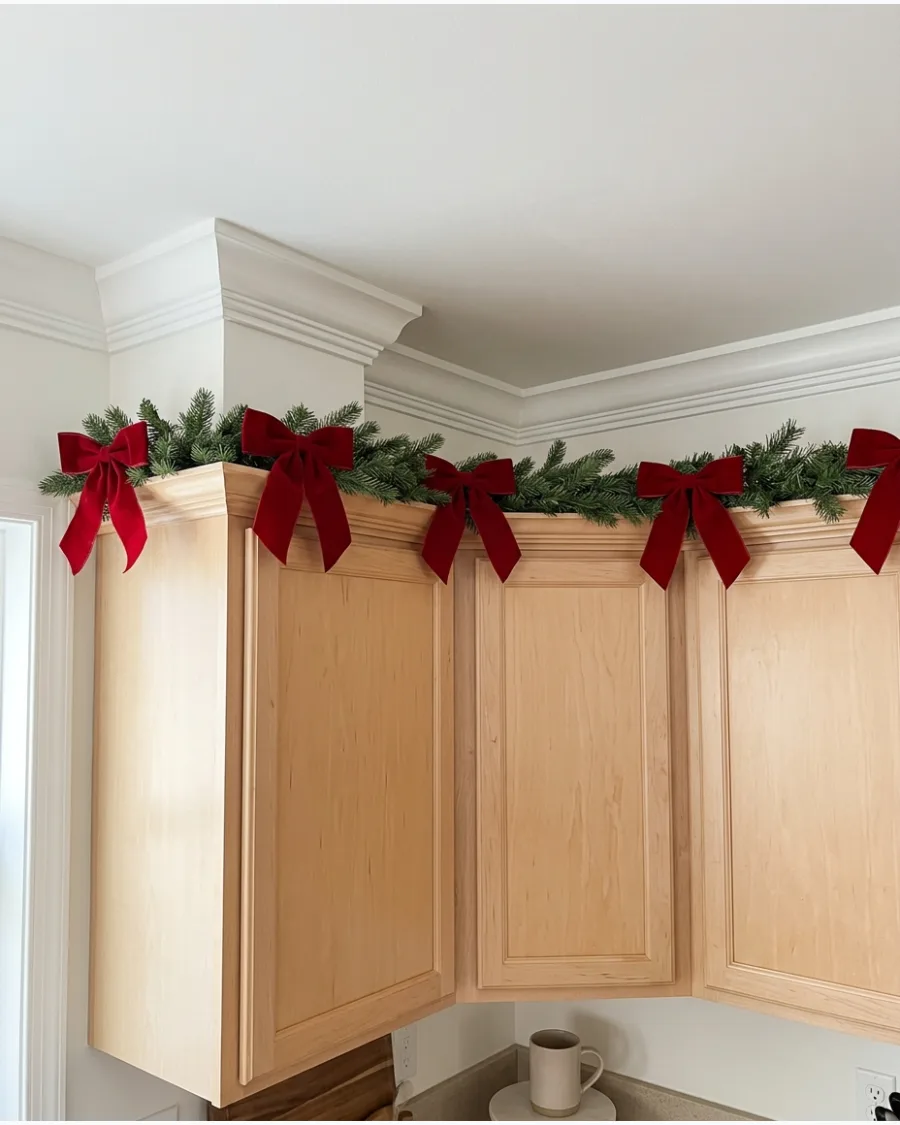
Red velvet is a classic choice that provides an instant pop of color against green needles. The heavy fabric adds a high-end feel that plastic or paper ribbons cannot match.
Use floral wire to attach the bows directly to the garland frame for a secure hold. Placing bows at the corners of the cabinet run defines the shape of the room.
- Choose wired-edge velvet ribbon so you can fluff the bows back into shape.
- Space bows roughly 2 to 3 feet apart for a balanced look.
- Opt for a deep crimson shade for a more traditional and expensive appearance.
Quick win: Cut the ribbon tails at an angle or in a 'V' shape to give the bows a professional, finished look.
18. Burgundy Velvet Garland
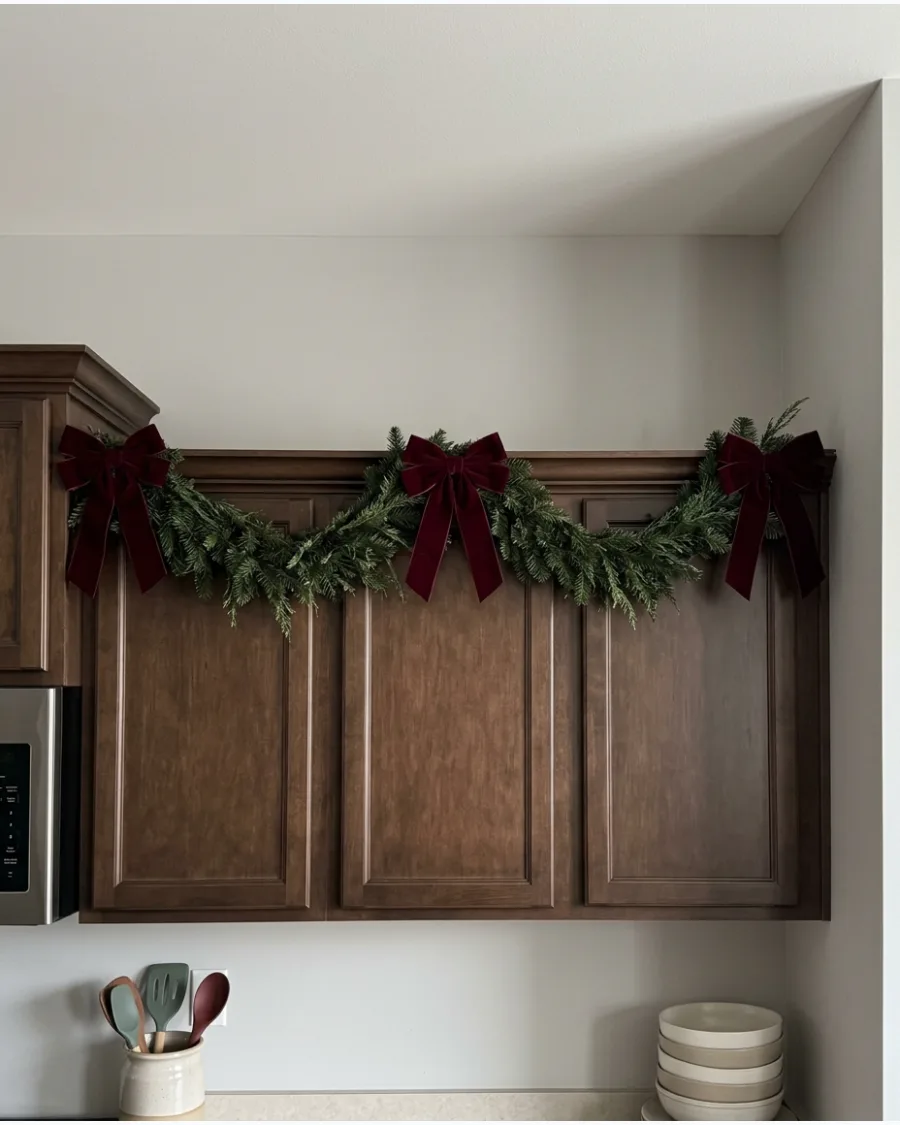
Burgundy is a sophisticated alternative to traditional bright red, offering a more muted and moody vibe. This deep jewel tone pairs exceptionally well with dark wood or navy blue cabinets.
Select a ribbon width of at least two inches so the color is visible from across the room. The rich texture of velvet absorbs light, creating a soft, matte look.
- Pair burgundy with gold accents for a luxurious holiday color palette.
- Use extra-long tails on the bows to add vertical interest to the cabinet tops.
- Ensure the velvet is double-sided if the garland is visible from a loft or stairs.
Most people skip this: Steaming the ribbon tails before hanging removes fold lines from the packaging.
19. Forest Green Velvet Ribbon Garland
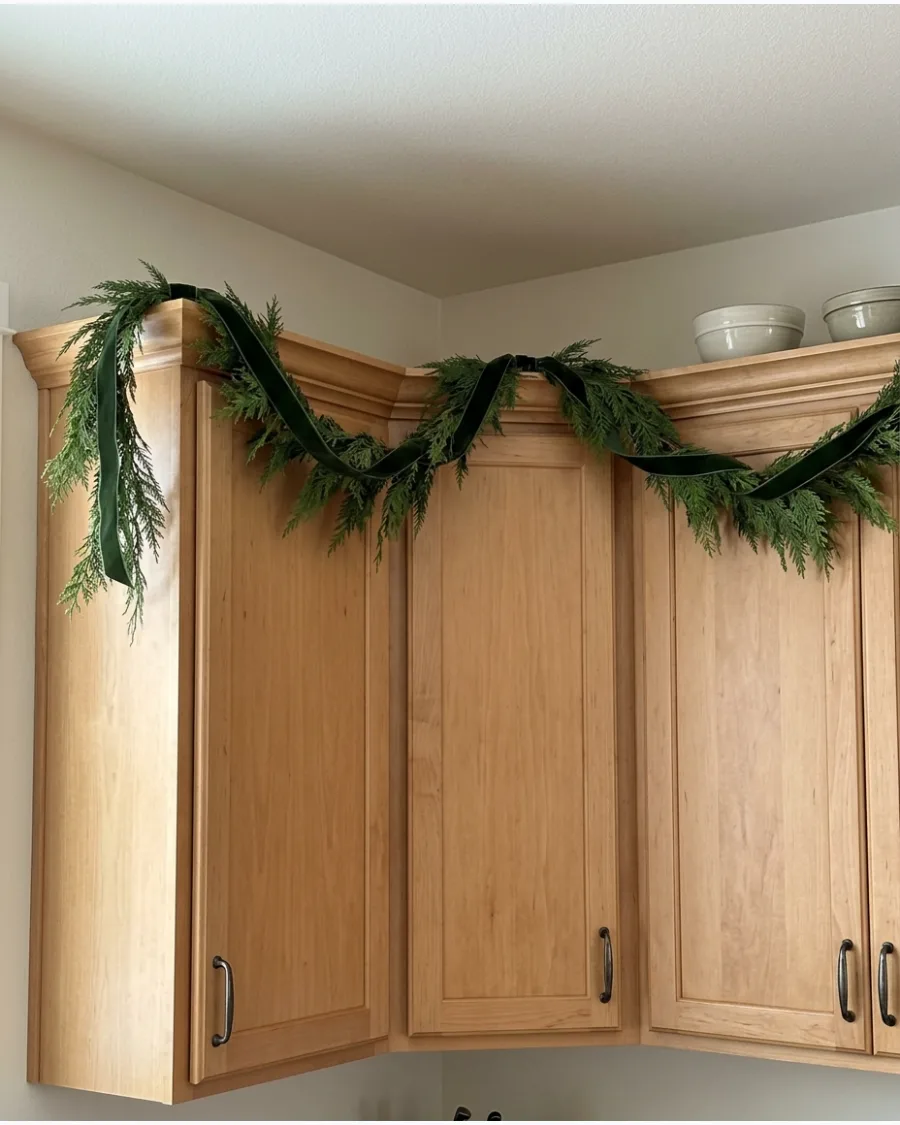
Using forest green ribbon on green garland creates a subtle, layered effect. This monochromatic approach adds depth and luxury without high contrast.
Let the ribbon tails drape slightly over the front edge of the cabinet molding. This technique makes the garland feel more integrated with the cabinetry.
- Mix different shades of green to prevent the decor from looking flat.
- Use a wider ribbon for a more dramatic, modern statement.
- Tie simple knots instead of bows for a more casual, organic feel.
Best shortcut: Use green floral wire to pinch the ribbon in the middle before tying it to the garland for easier shaping.
20. Plaid Ribbon Garland Above Cabinets
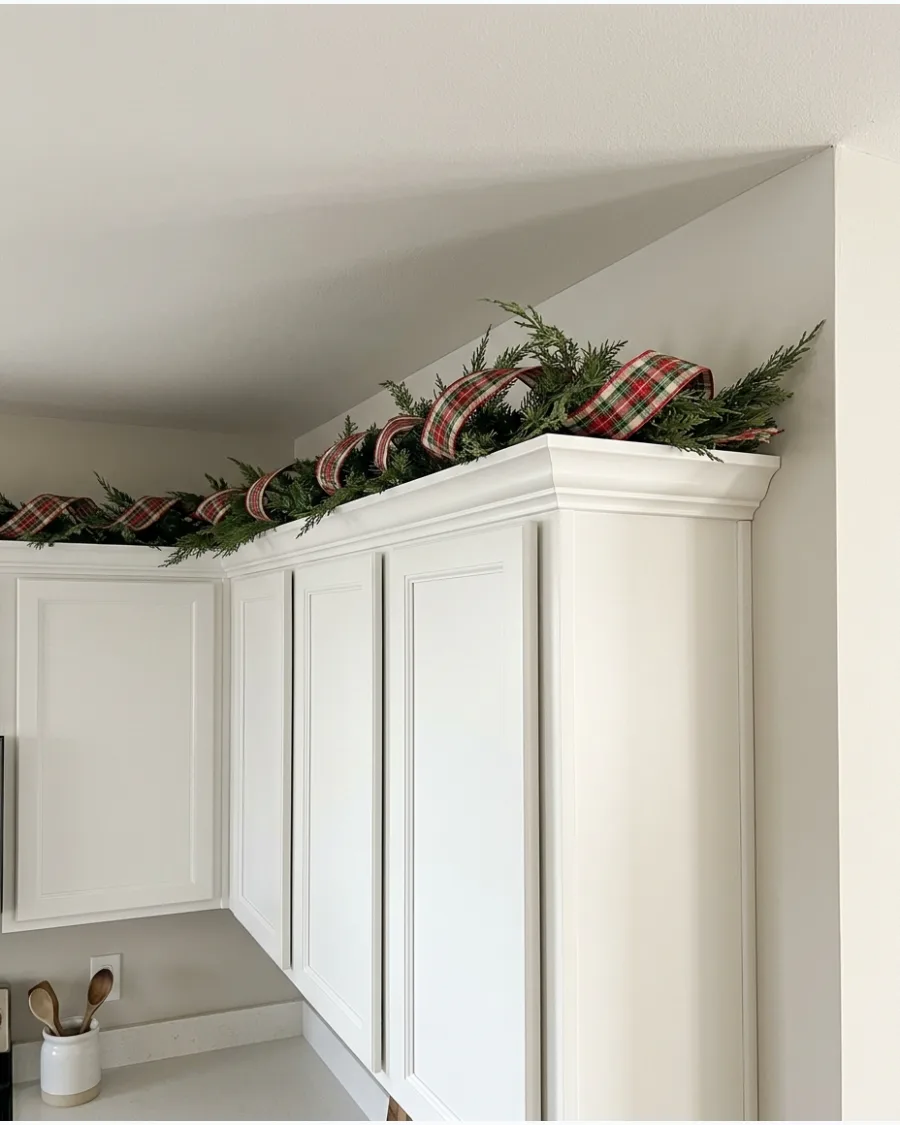
Plaid ribbon brings a sense of pattern and coziness to a hard-surfaced kitchen. It works well for tying together different colors used in the room's decor.
Loop the ribbon loosely through the branches rather than tying tight knots for a fuller appearance. A classic red and green plaid is a fail-safe choice for a traditional holiday look.
- Choose a plaid that includes the existing colors of your kitchen walls or backsplash.
- Use wired ribbon to create 'billows' or humps in the ribbon as it travels through the garland.
- Secure the ribbon at both ends with wire so it doesn't shift over time.
Quick win: Use two different widths of plaid ribbon together for a more custom, designer look.
21. Gingham Ribbon Cabinet Garland
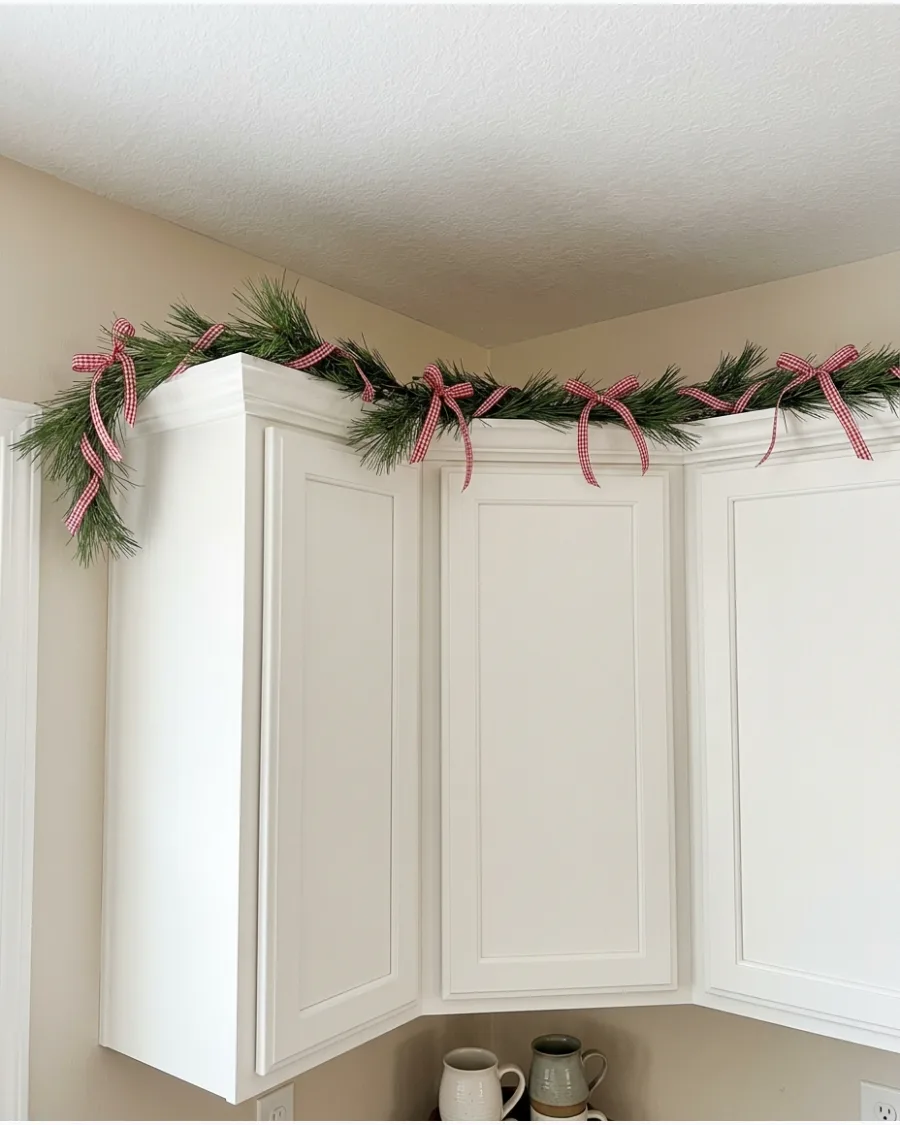
Gingham ribbon adds a classic, casual pattern that works perfectly for a relaxed kitchen vibe. The check pattern breaks up the solid green of a pine garland without feeling too formal.
Tie small gingham bows at even intervals to keep the look balanced and intentional. It is a great way to bring a pop of color to a neutral kitchen.
- Buy ribbon in bulk from a craft store for under $10.
- Space bows about twelve inches apart for a uniform look.
- Swap red for blue or black gingham to match specific kitchen accents.
Quick win: Use wired ribbon so you can fluff the loops and they stay upright all season.
22. Champagne Ribbon Garland
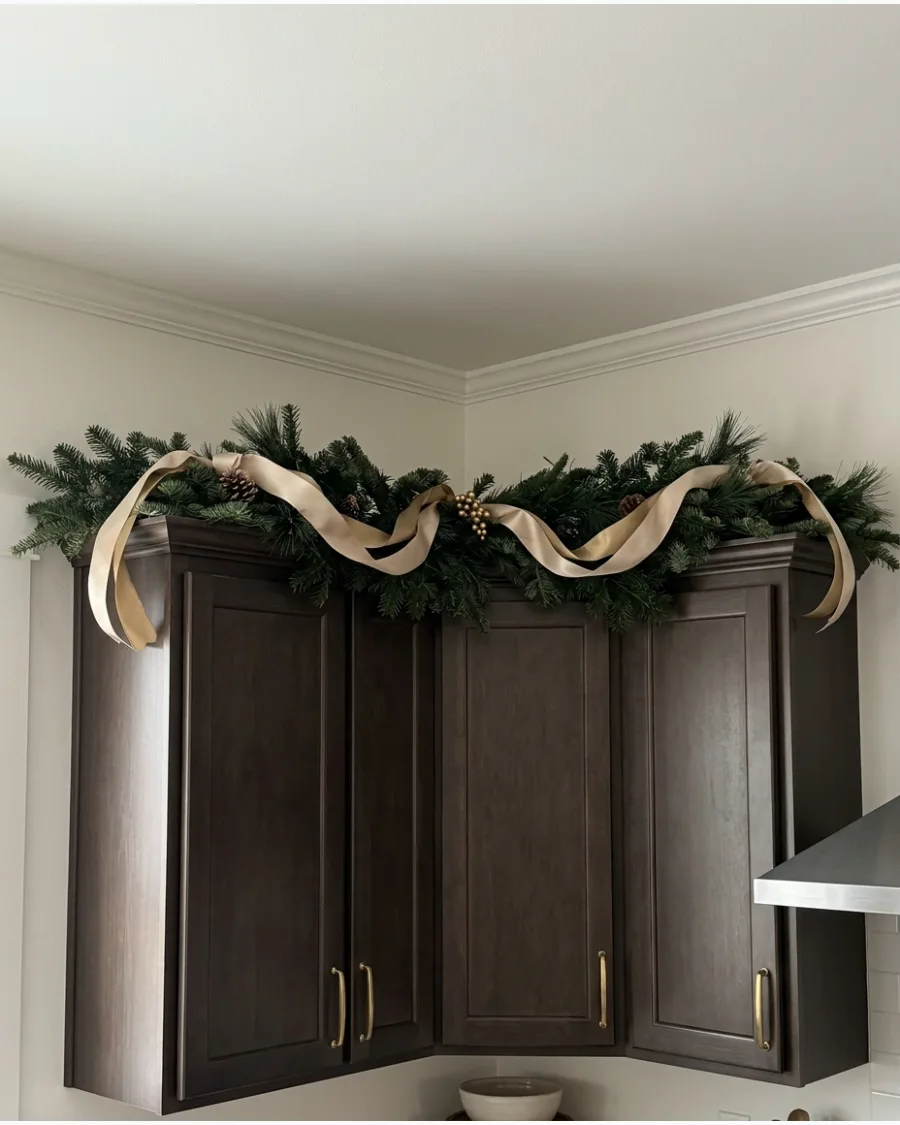
Champagne ribbon offers a sophisticated alternative to bright gold or silver. It creates a soft shimmer that feels upscale and pairs beautifully with brass or gold cabinet pulls.
Weave the ribbon loosely through the greenery to let the light catch the metallic threads. This subtle color keeps the kitchen feeling bright and airy.
- Look for champagne or oatmeal satin ribbon at holiday sales.
- Twist the ribbon as you weave it to create more dimension and shadow.
- Pair with warm white LED lights to enhance the gold tones.
Most people skip this: Iron your ribbon before hanging it to remove any creases from the spool.
23. Long Ribbon Tails Between Cabinets
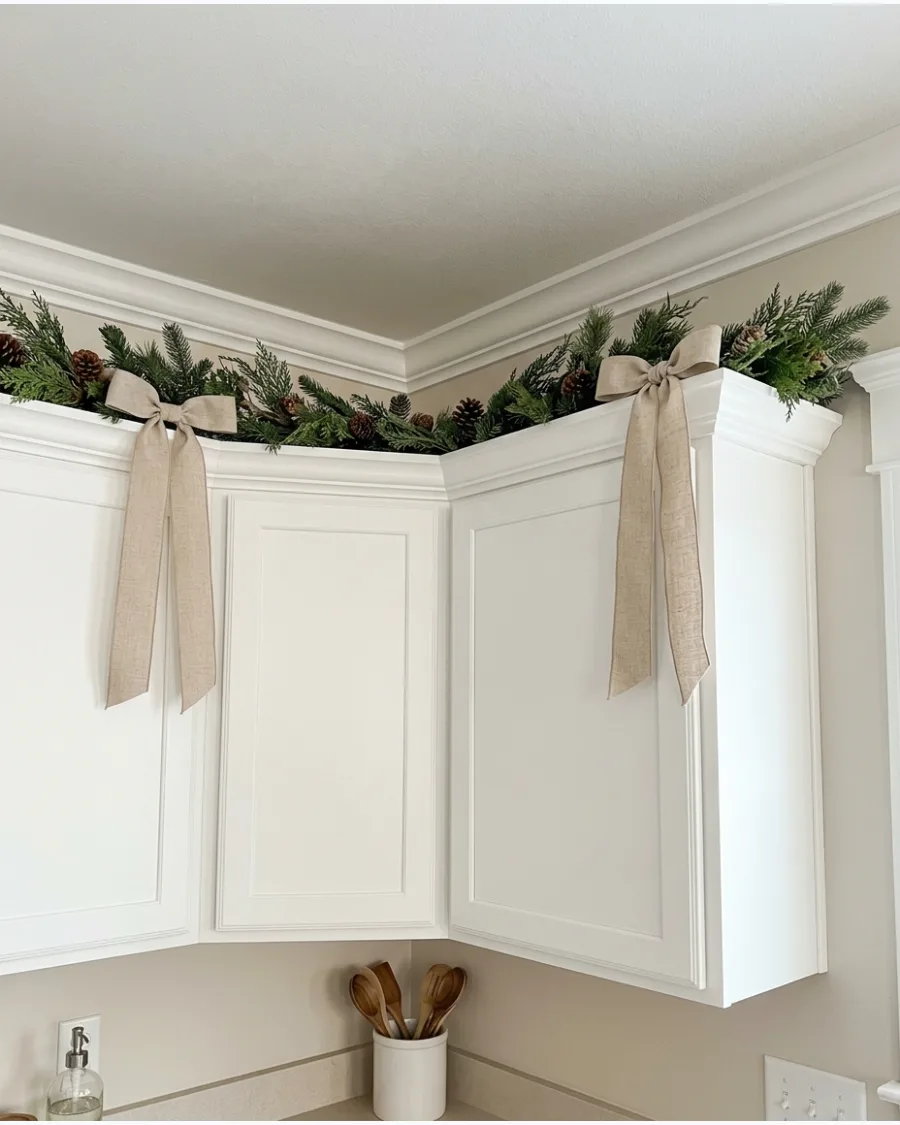
Using long ribbon tails creates a vertical element that draws the eye upward. This technique works best at the corners or where the cabinet height changes.
Let the tails hang down about six to eight inches to add movement without interfering with cabinet doors. It gives the kitchen an expensive, custom-styled look.
- Cut ribbon ends at an angle or into a V shape for a finished look.
- Secure bows with floral wire to the garland base for stability.
- Use this method on end-cap cabinets to frame the kitchen space.
Best shortcut: Use a dab of hot glue or a small safety pin on the back of the bow to keep the tails from twisting.
24. Mixed Velvet Bow Garland
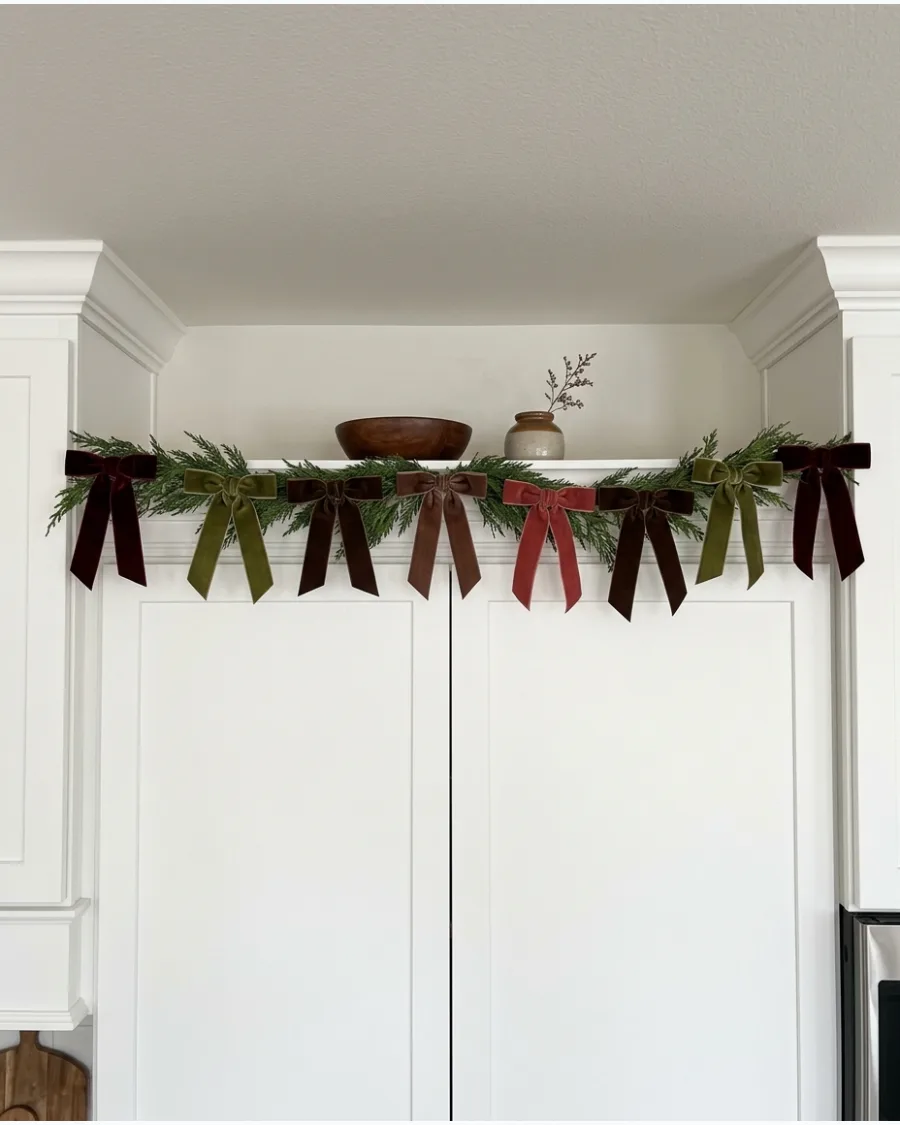
A mix of velvet colors creates a modern, curated palette that feels very current. Using earthy tones like olive, burgundy, and chocolate brown adds depth that a single color cannot provide.
Distribute the different colors randomly to make the garland look like a custom designer piece. It brings a soft, tactile texture to the hard surfaces of a kitchen.
- Purchase a multi-pack of velvet ribbon or use scraps from other projects.
- Stick to three or four colors within the same tonal family for a cohesive feel.
- Use thin half-inch ribbon for a delicate, modern look.
Quick win: Mix matte velvet with a few shiny ribbons to add more visual interest.
NATURAL CHRISTMAS GARLAND IDEAS
25. Dried Orange Garland Above Kitchen Cabinets
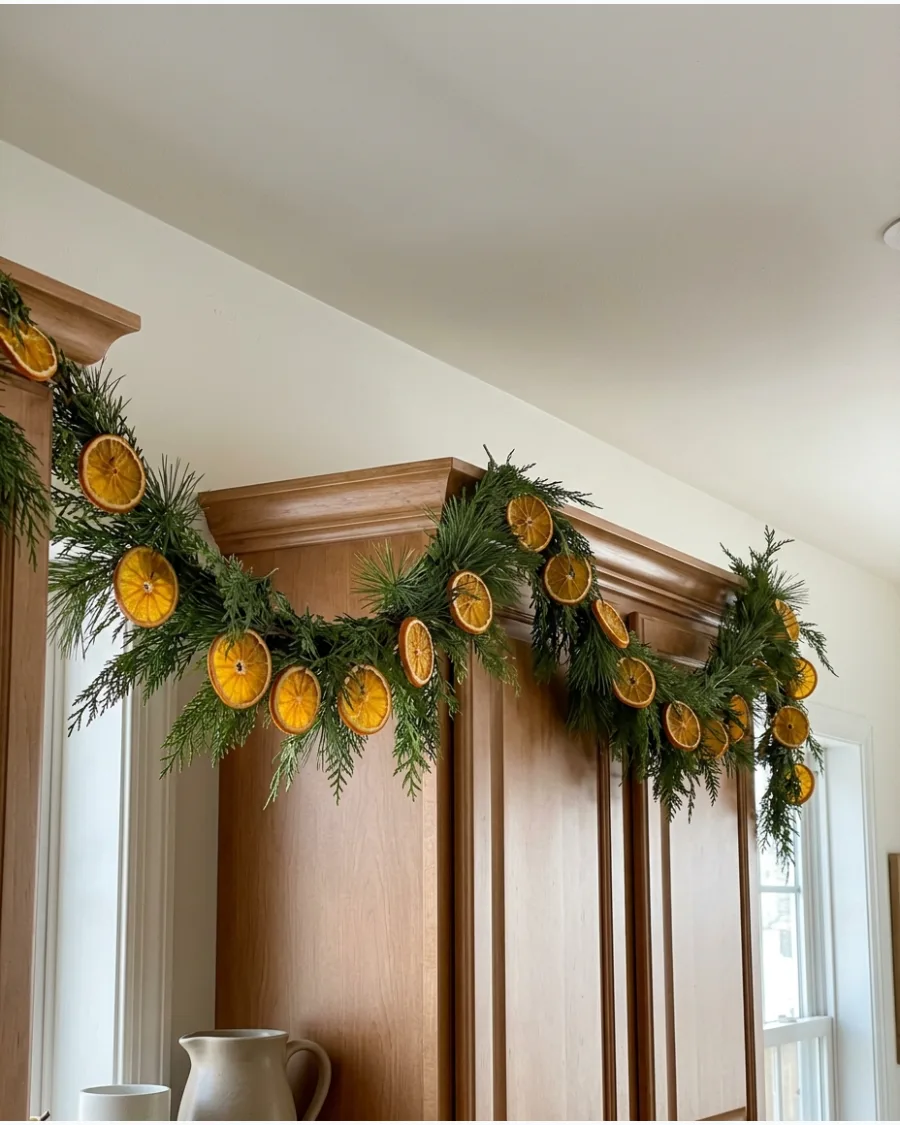
Dried orange slices are a classic kitchen decor element that adds a pop of natural color. The translucent orange slices catch the light and look beautiful against dark evergreen needles.
Thread the slices onto twine before nestling them into the garland for easy removal later. This look is timeless and fits almost any kitchen style.
- Dry your own slices in a low-temp oven or buy them pre-dried.
- Space slices every four inches to ensure the color is visible from the floor.
- Keep the slices away from direct heat sources to prevent them from darkening.
Most people skip this: Use thin wire to hang slices at different depths within the garland for a 3D effect.
26. Orange and Cinnamon Cabinet Garland
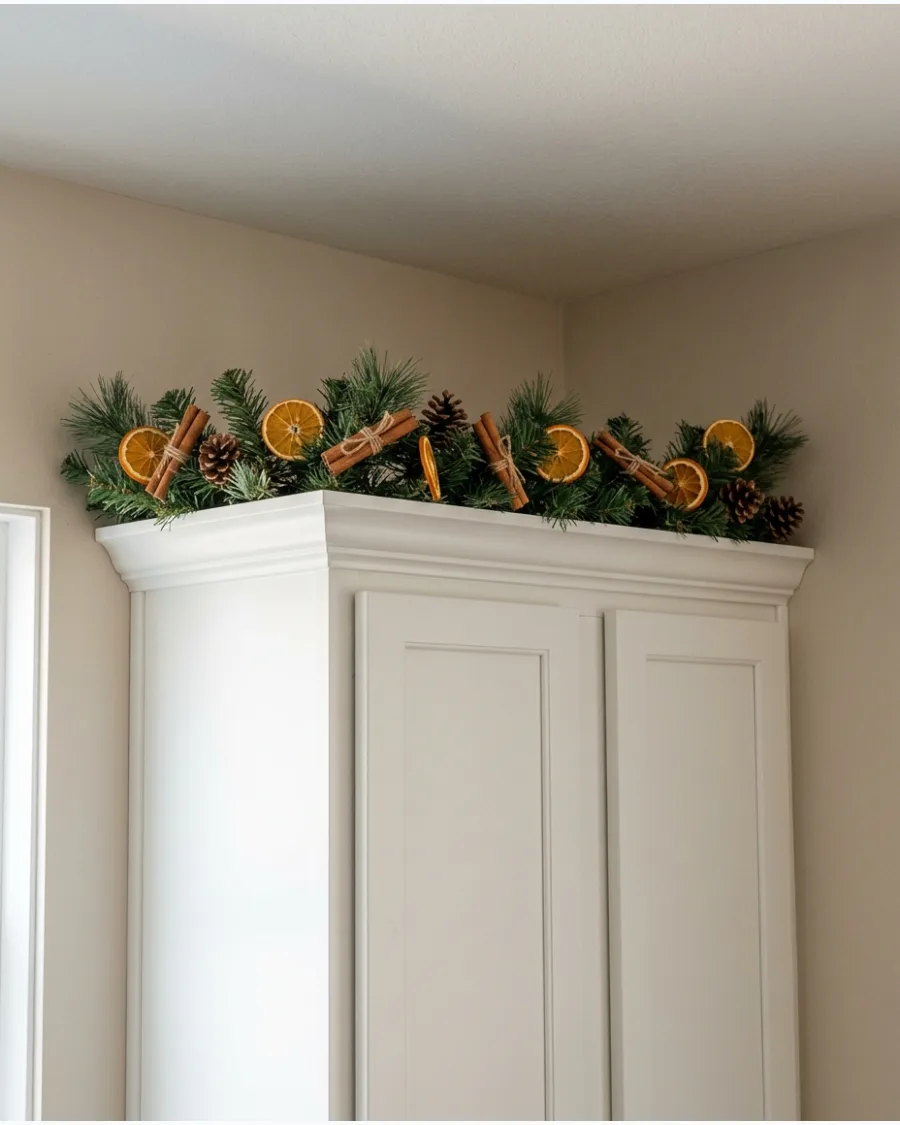
Combining citrus and cinnamon brings a warm, sensory feel to the kitchen. The brown cinnamon sticks provide a nice contrast to the bright oranges and green branches.
Bundle three cinnamon sticks together with twine before tucking them into the greenery. This combination feels cozy and specifically suited for a cooking space.
- Use six-inch cinnamon sticks for better visibility from a distance.
- Secure bundles with floral wire so they do not roll off the cabinet top.
- Add a few small pinecones to bridge the gap between the green and brown tones.
Best shortcut: Scent the cinnamon sticks with a drop of essential oil for an extra kitchen aroma.
27. Eucalyptus and Pine Garland
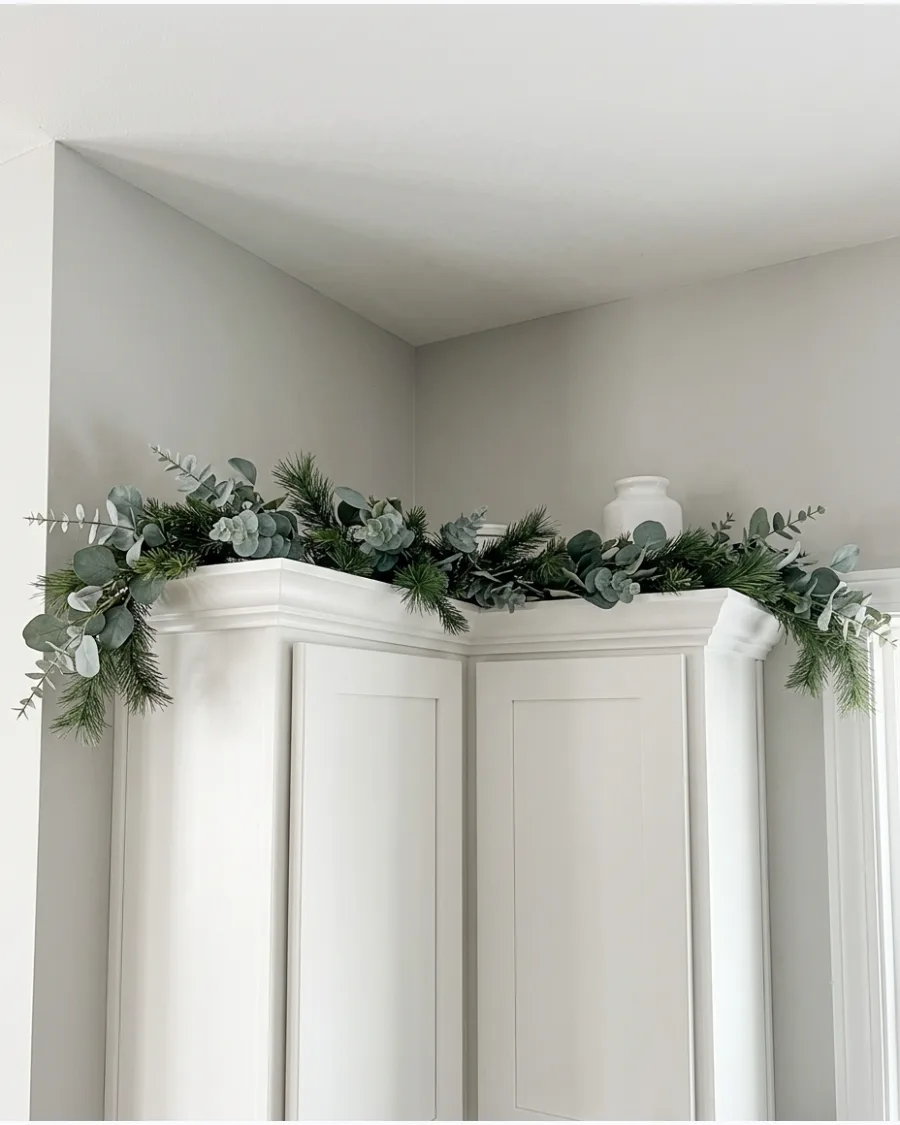
Mixing eucalyptus with pine creates a softer, more organic texture than evergreen alone. The silvery-green leaves of the eucalyptus brighten up the display and add a modern touch.
Tuck individual eucalyptus sprigs into a pine base to create a layered, custom look. This works exceptionally well in kitchens with marble or white stone.
- Use preserved eucalyptus for a real look that lasts all season.
- Mix silver dollar and seeded eucalyptus varieties for extra texture.
- Keep the ratio seventy percent pine and thirty percent eucalyptus for a balanced appearance.
Quick win: Use faux eucalyptus if your kitchen gets a lot of direct sun to avoid fading.
28. Magnolia Leaf Christmas Garland
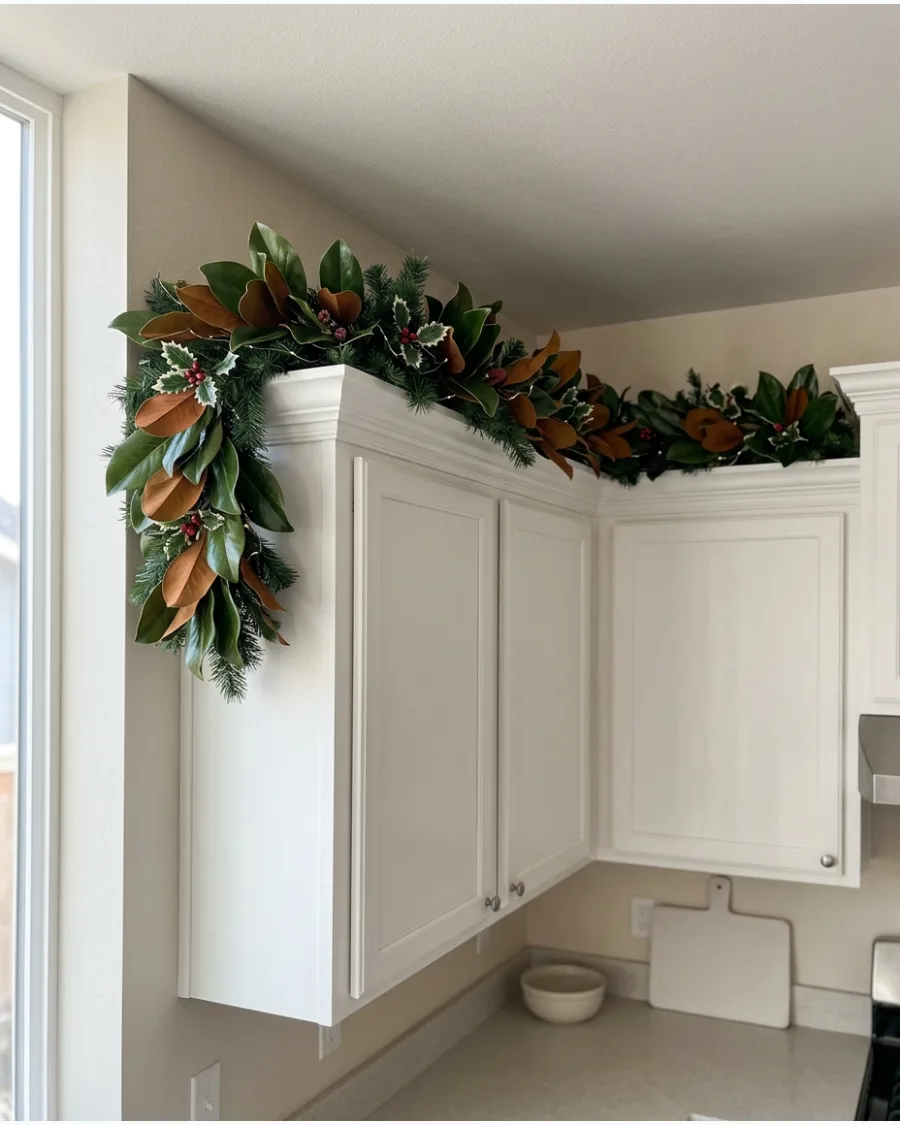
Magnolia leaves offer a bold, architectural look with their large size and dual-toned colors. The glossy green top and fuzzy brown underside provide a rich contrast that feels very high-end.
Insert the leaves at different angles to show off both the green and brown sides. This is an excellent choice for filling large gaps between the cabinet and ceiling.
- Look for fresh magnolia bunches at local florists in early December.
- Spray the leaves with a leaf shine product to keep them looking vibrant.
- Overlap the leaves slightly to hide the stems and any gaps in the garland.
Most people skip this: Use heavy-duty floral wire to secure magnolia stems, as they are heavier than pine sprigs.
29. Rosemary-Inspired Kitchen Garland
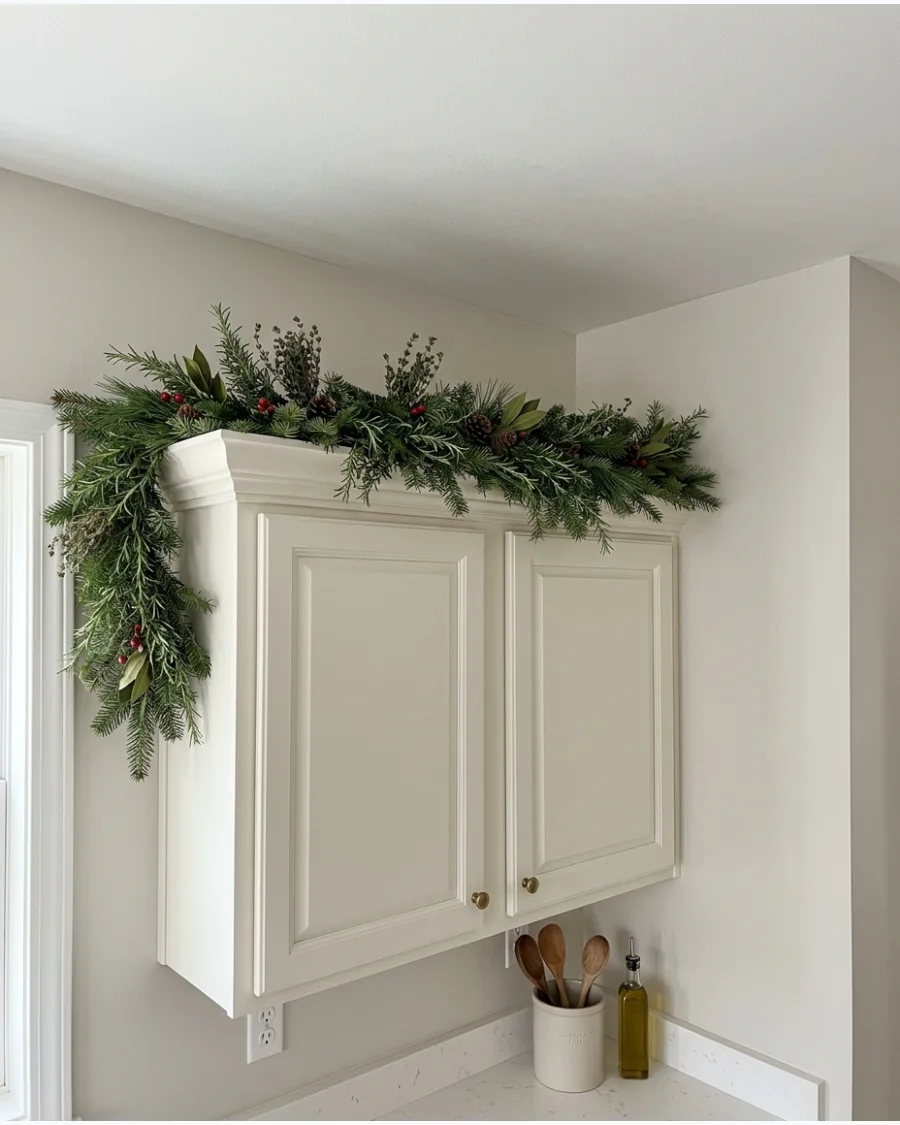
Using rosemary-like greenery connects the decor directly to the function of the kitchen. The fine, needle-like leaves of rosemary or thyme sprigs add a delicate texture that looks great up close.
Mix in faux herb sprigs to ensure the display stays green and fresh-looking for weeks. It is a subtle way to do holiday decor that feels culinary.
- Search for rosemary or herb garlands at craft stores.
- Stick to a monochromatic green palette for a clean, botanical look.
- Pair with simple white ceramic accents for a fresh kitchen aesthetic.
Best shortcut: Use rosemary-scented room spray on the garland to trick the senses.
30. Pinecone and Twig Garland
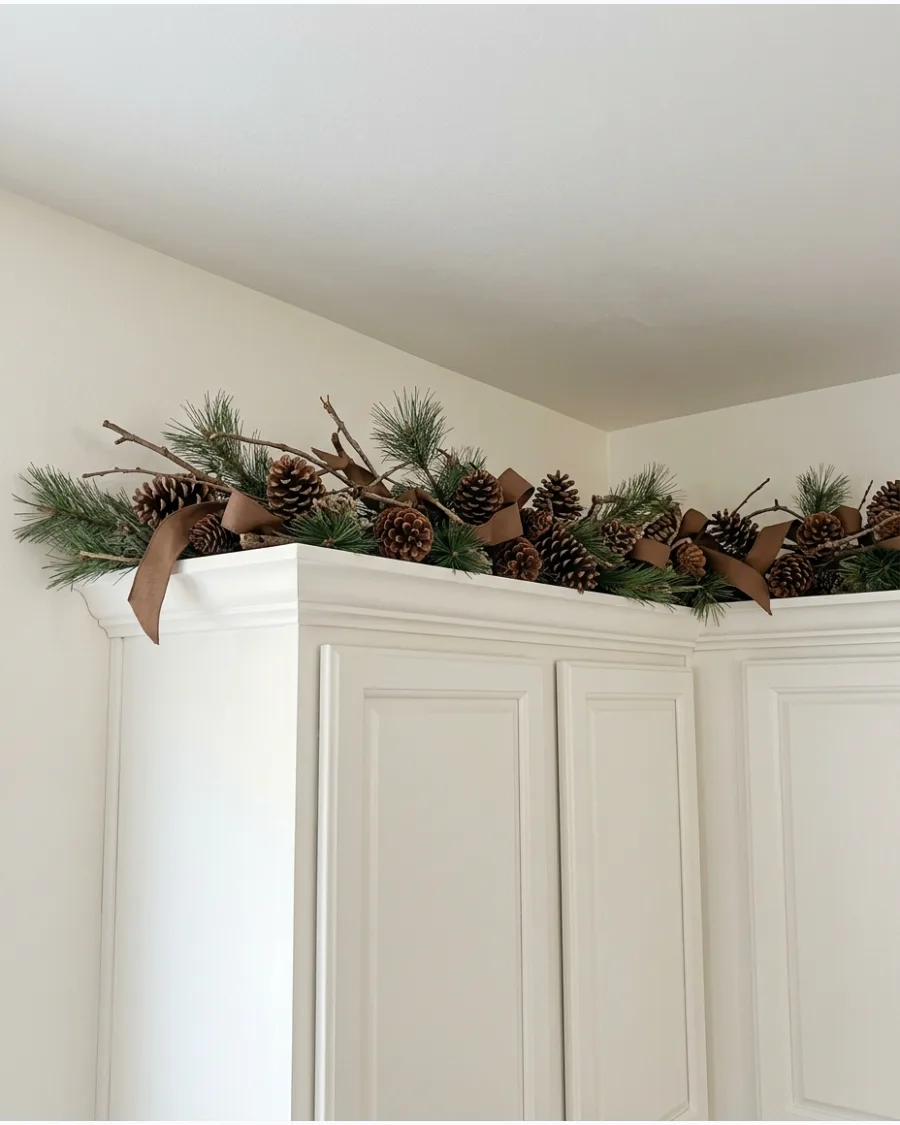
A combination of pinecones and twigs creates a grounded, earthy look that avoids the flash of typical holiday decor. The varying brown tones and rough textures make the kitchen feel warm and inviting.
Use twigs of different lengths to give the garland an airy, wild shape. This style is perfect for those who prefer a more natural, understated holiday.
- Collect twigs from the yard and clean them before bringing them inside.
- Vary the size of the pinecones from tiny hemlock cones to large sugar pinecones.
- Secure heavier pinecones with brown pipe cleaners to keep them in place.
Quick win: Spray the twigs with a light dusting of white paint for a subtle frosted look without using heavy glitter.
31. Dried Apple and Orange Garland
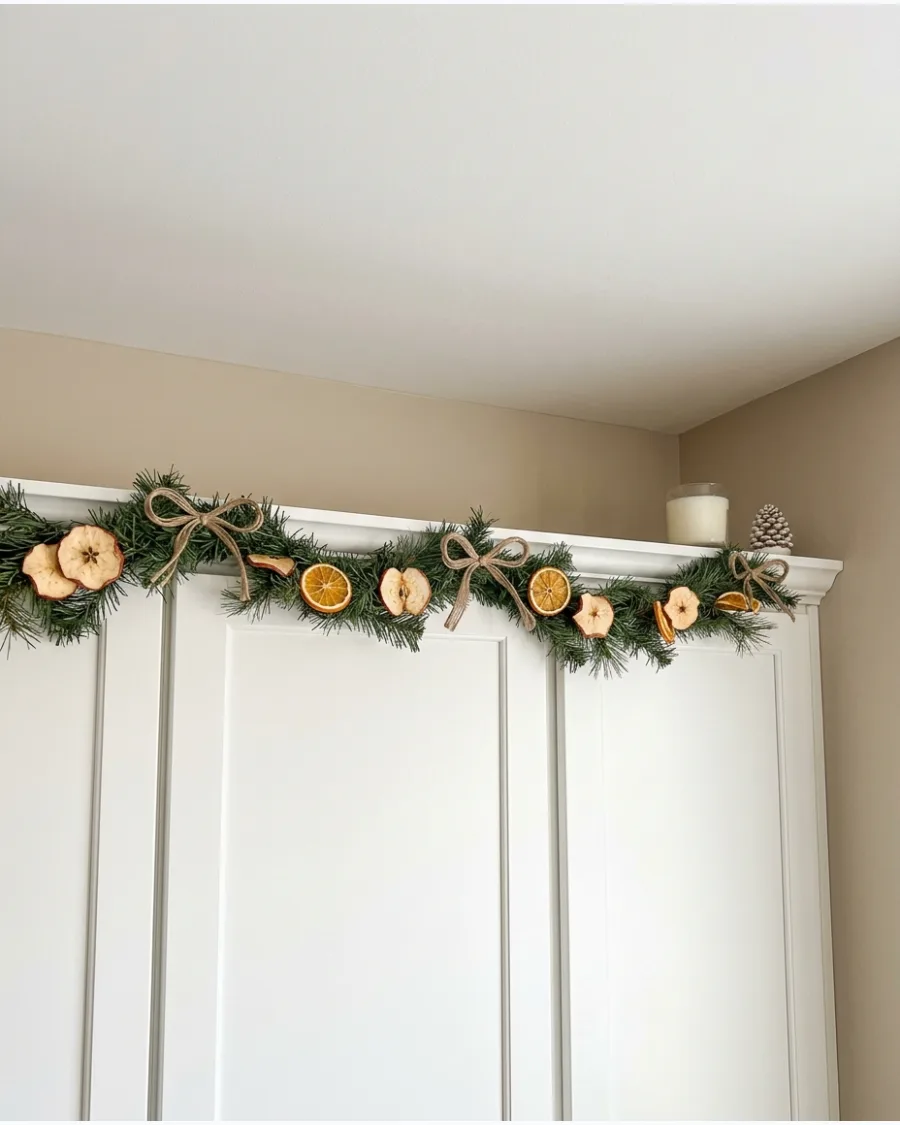
Layering dried fruit slices into greenery brings a warm, organic feel to the kitchen. The light catches the translucent citrus and crisp apple rings, making the cabinet tops look vibrant.
Tuck the slices deep into the branches so they appear to be part of the bough rather than just sitting on top. Faux fruit lasts longer, but real dried slices offer a subtle, natural scent.
- Buy pre-dried fruit slices or dehydrate your own in a low-heat oven.
- Use thin floral wire to secure each slice to the garland spine so they do not slide off.
- Swap apples for dried lemon or lime slices to match a cooler kitchen color palette.
Quick win: Use a needle and fishing line to string the fruit into mini-strands before draping them over the greenery for faster setup.
32. Woodland Garland Above Cabinets
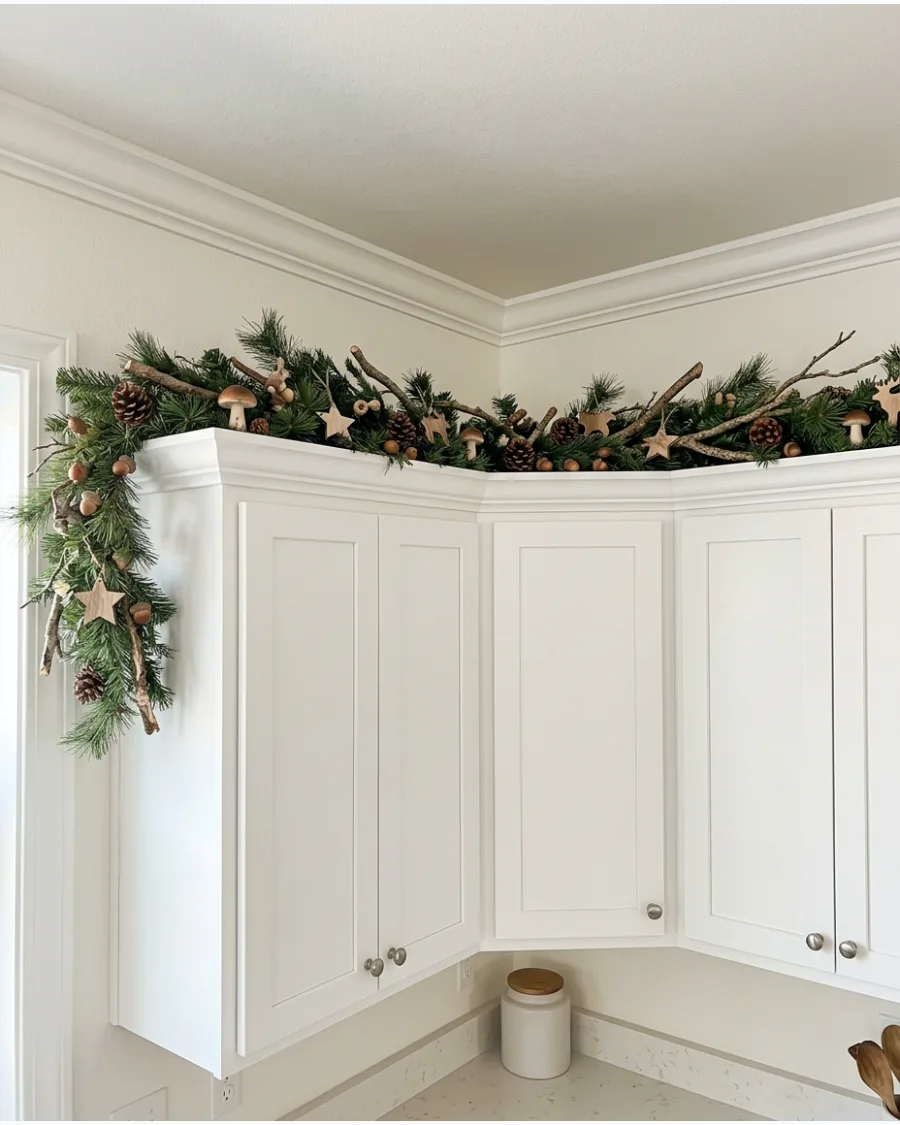
Create a forest-inspired look by mixing different textures like pinecones, acorns, and small wooden accents. This style fills the gap between the cabinet and ceiling with varied heights and shapes.
Incorporate a few bare, slender branches to break up the solid green line of the garland. It makes the display look more intentional and less like a store-bought strip of plastic.
- Scavenge pinecones and twigs from the yard or buy a woodland-themed decor kit.
- Place the heaviest pinecones first to anchor the garland shape on the cabinet top.
- Add faux moss or lichen-covered stones for an extra layer of forest floor realism.
Most people skip this: Use command hooks on the top surface of the cabinet to keep the branches from tipping forward over the edge.
ORNAMENT GARLAND ABOVE KITCHEN CABINETS
33. Red Ornament Cabinet Garland
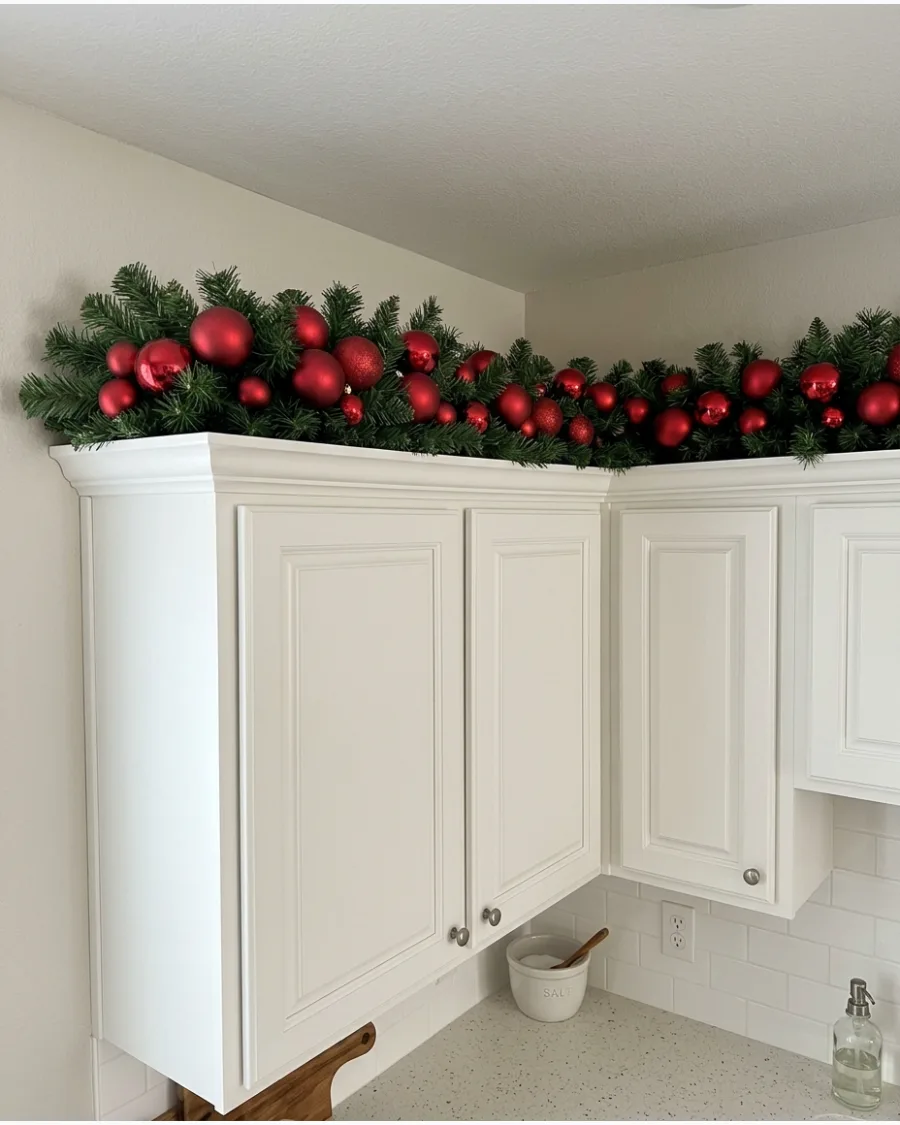
Red baubles provide a classic pop of color that stands out against neutral kitchen walls. Using a mix of matte, shiny, and glitter finishes adds depth and keeps the red from looking flat.
Nestle the ornaments into the center of the greenery rather than hanging them from the bottom edge. This keeps the cabinet doors clear and prevents the decor from looking cluttered.
- Purchase a bulk pack of shatterproof ornaments to ensure you have enough to fill the entire length.
- Use pipe cleaners to twist the ornament loops directly onto the garland branches.
- Group three ornaments together in small clusters for a more professional, high-end look.
Best shortcut: Use different shades of red, like burgundy and crimson, to make the display look more expensive and curated.
34. Gold Ornament Garland
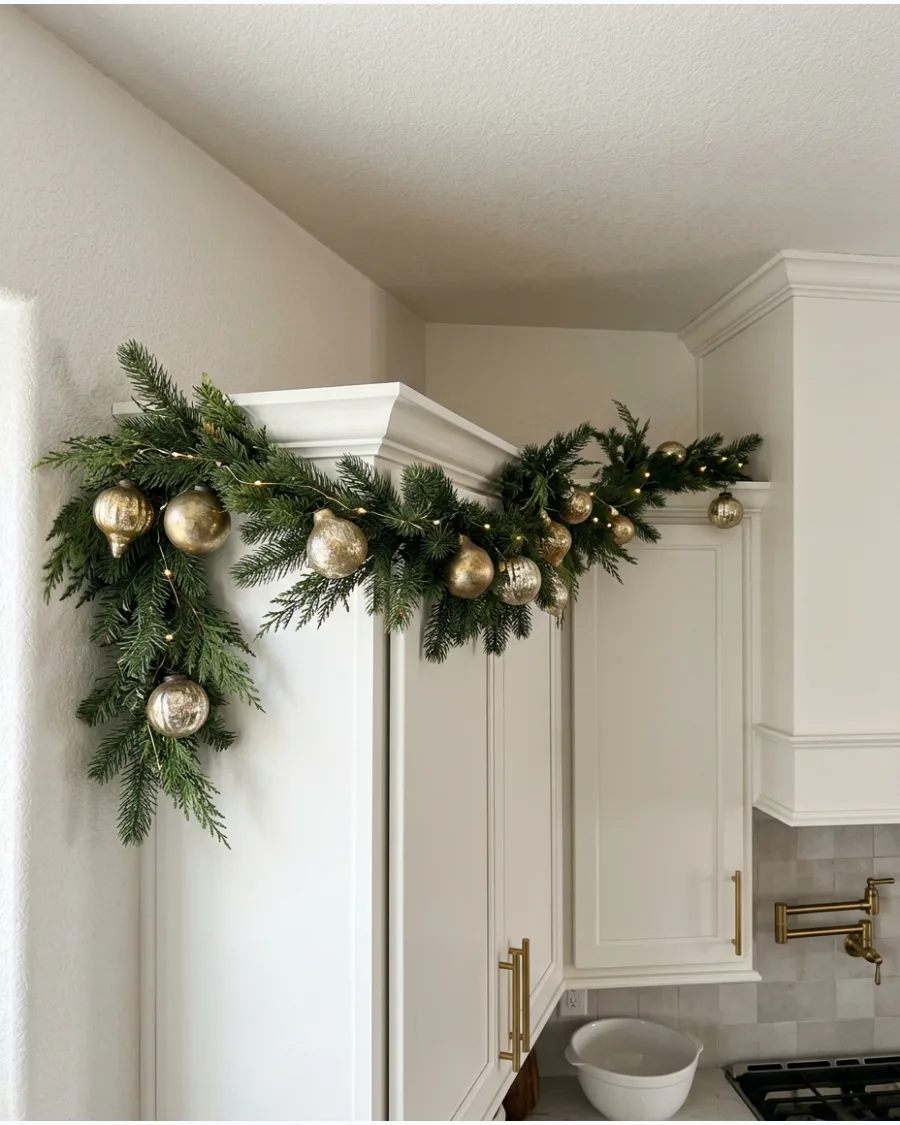
Gold accents bring a sophisticated glow to the kitchen, especially when paired with brass hardware. Using antique or brushed gold finishes feels more modern than bright, yellow gold.
Space the ornaments evenly across the top of the cabinets to create a balanced, rhythmic look. This style works well for year-round warmth or a festive holiday touch.
- Look for mercury glass style ornaments to get a vintage, high-end shimmer.
- Secure ornaments with gold wire so the attachments blend into the decor.
- Mix in a few gold-painted leaves or berries to extend the metallic theme.
Quick win: Dust the ornaments before placing them, as the high position makes any dullness or fingerprints visible under kitchen lights.
35. White Ornament Garland
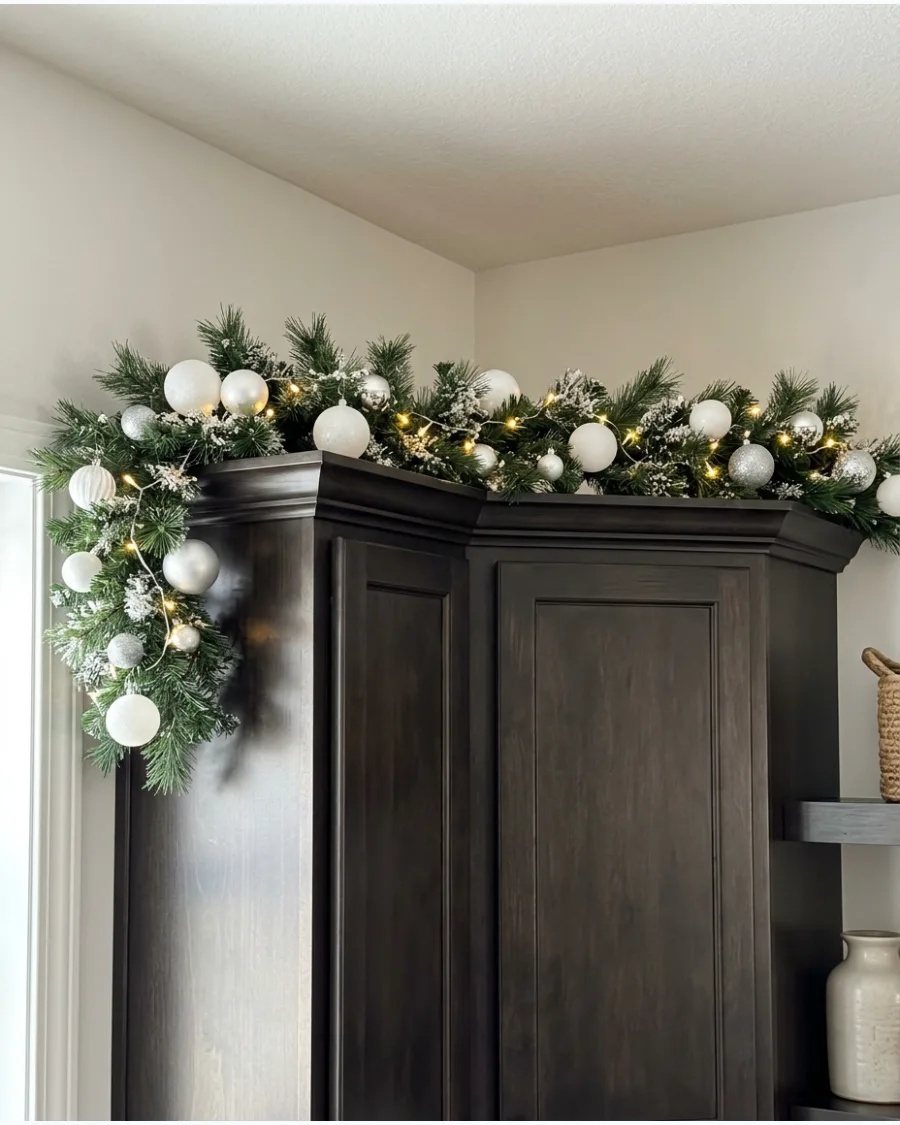
White ornaments create a crisp, snowy contrast against dark green branches and wood cabinets. This palette feels clean and bright, which is perfect for a space where food is prepared.
Choose ornaments with different textures, like flocked, pearlescent, and ribbed, to keep the white-on-green look interesting. It provides a high-end, winter wonderland vibe without needing a lot of extra color.
- Buy a set of mixed-texture white ornaments to save time on styling.
- Use white floral wire or pipe cleaners to attach the ornaments so they stay in place.
- Add a strand of cool-white fairy lights to enhance the icy look of the white baubles.
Most people skip this: Check the view from across the room to ensure the white ornaments do not look like random spots of light or gaps in the greenery.
36. Vintage Ornament Cabinet Garland
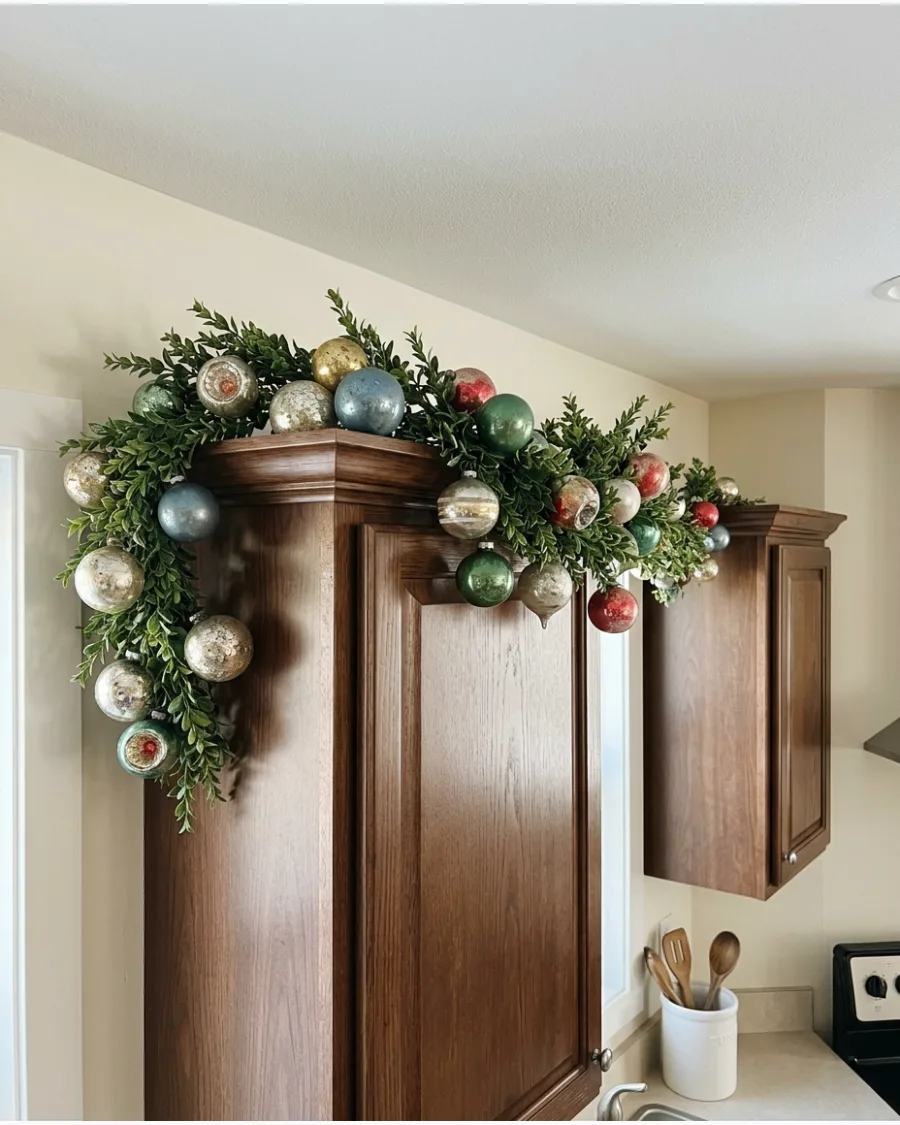
Mixing colorful, old-fashioned glass ornaments creates a nostalgic and cozy kitchen atmosphere. This style is about variety and character rather than perfect symmetry.
Use ornaments with unique shapes like indents, teardrops, and finials to give the garland an authentic antique feel. It is a great way to display delicate pieces safely away from high-traffic counter areas.
- Source vintage ornaments from thrift stores or buy modern retro reproductions for durability.
- Place larger, round ornaments toward the back and more detailed shapes toward the front.
- Use a thick, high-quality faux garland to support the weight of real glass pieces.
Quick win: If using real glass, wrap the ornament necks with a bit of floral tape before wiring them to prevent the metal caps from popping off.
37. Oversized Ornament Garland
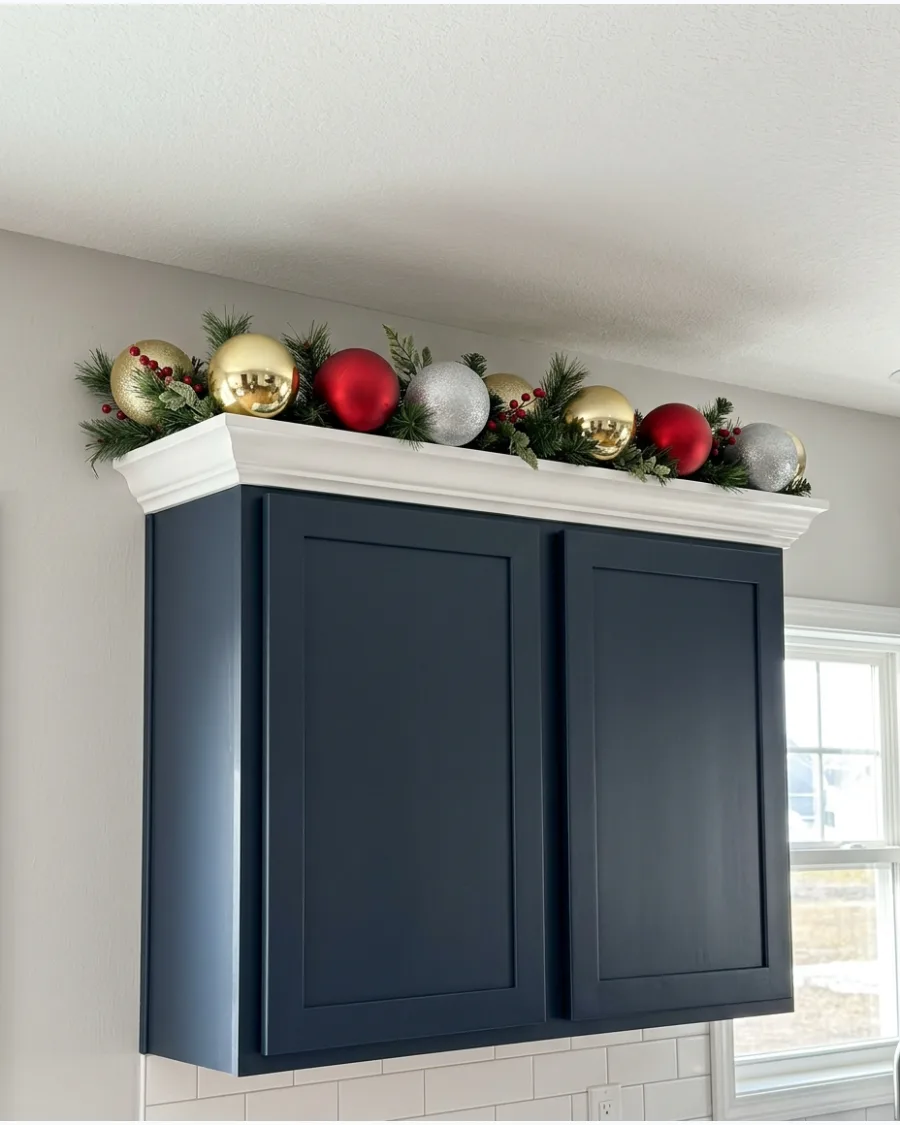
Small ornaments often disappear when placed high up on cabinets, but oversized baubles make a bold statement.
These larger pieces fill the gap more effectively and require fewer items to look finished. Limit the number of large ornaments to three or five per cabinet section to avoid a crowded appearance. This scale works best in kitchens with high ceilings or large gaps above the cabinetry.
- Look for lightweight plastic or foam-based oversized ornaments to avoid putting stress on the cabinet tops.
- Position the ornaments so they are slightly angled toward the room for maximum visibility.
- Balance the large ornaments with thick, fluffy greenery so the scale looks intentional.
Best shortcut: Use a few large ornaments as anchors and fill the remaining space with simple greenery for a minimalist but high-impact look.
38. Mini Bell Garland Above Cabinets
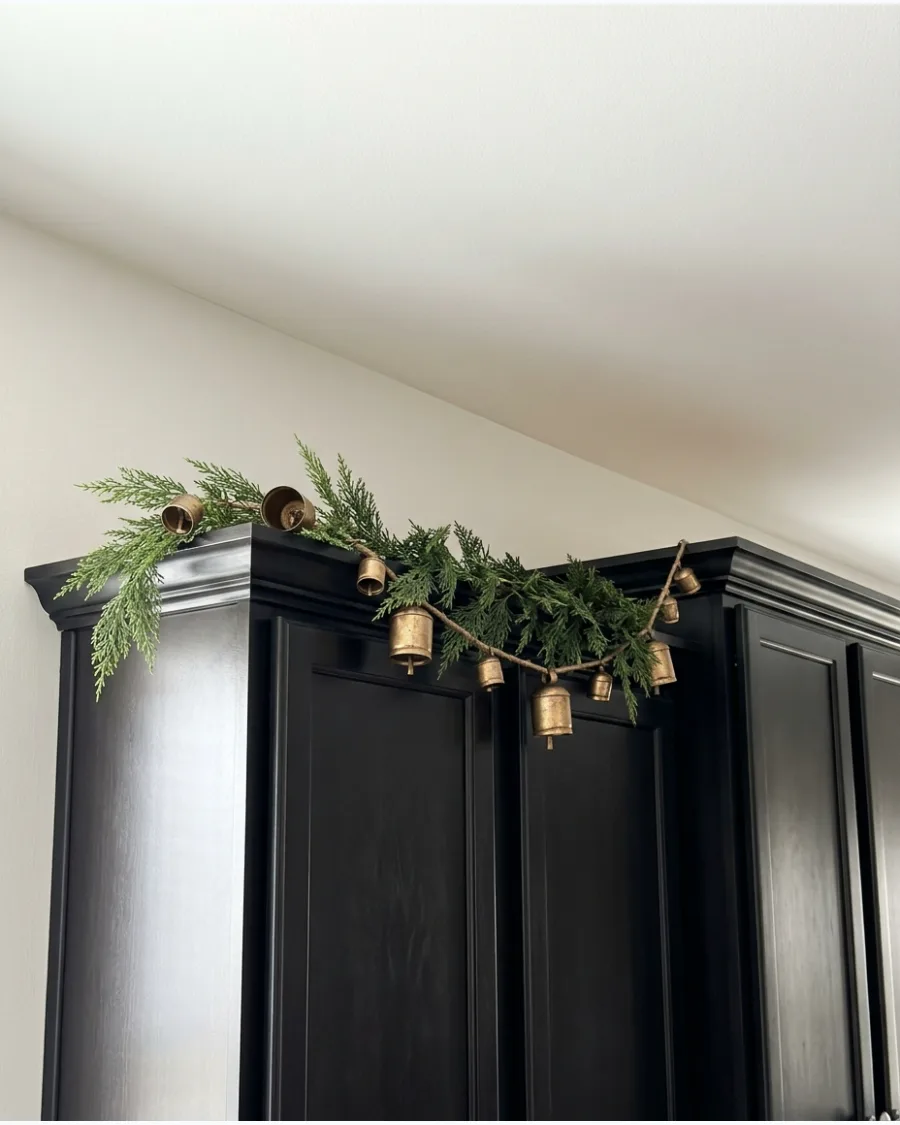
Brass or silver bells add a charming, old-world touch to a kitchen garland. They provide a different texture than round ornaments and offer a subtle, rustic shine.
Drape a secondary string of small bells over the greenery rather than tucking individual ones inside. This creates a layered effect that looks professional and well-styled.
- Buy pre-strung bell garlands or make your own using craft bells and twine.
- Choose bells with a matte or weathered finish to avoid a cheap, shiny plastic look.
- Use small pieces of wire to secure the bell string at the corners so it does not sag too low.
Quick win: Mix different sizes of bells on the same string to create a more organic, handcrafted appearance.
CHRISTMAS STYLE GARLAND IDEAS
39. Scandinavian Garland Above Kitchen Cabinets
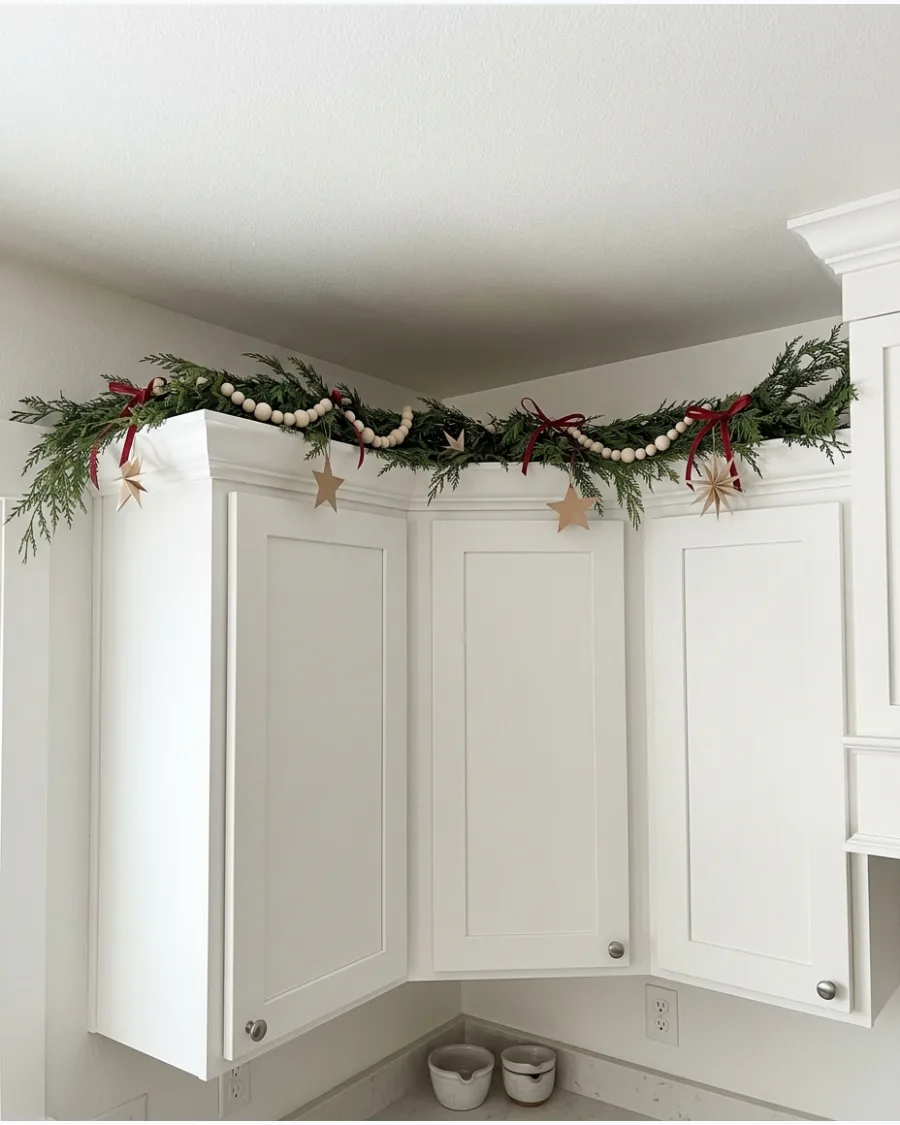
A Nordic-inspired look focuses on simplicity, natural materials, and a restrained color palette. Use light, airy greenery like cedar or eucalyptus and keep the decorations minimal.
Incorporate a few simple paper stars or unpainted wooden beads to maintain the clean, functional aesthetic. This style is perfect for modern kitchens that need a touch of holiday warmth without the clutter.
- Select a garland with a more leggy or sparse look rather than a thick, bushy one.
- Stick to a palette of green, white, and light wood tones for all accents.
- Use battery-operated fairy lights with a warm glow to add ambiance without visible wires.
Most people skip this: Leave some sections of the garland completely bare to emphasize the natural beauty of the branches.
40. Vintage Christmas Kitchen Garland
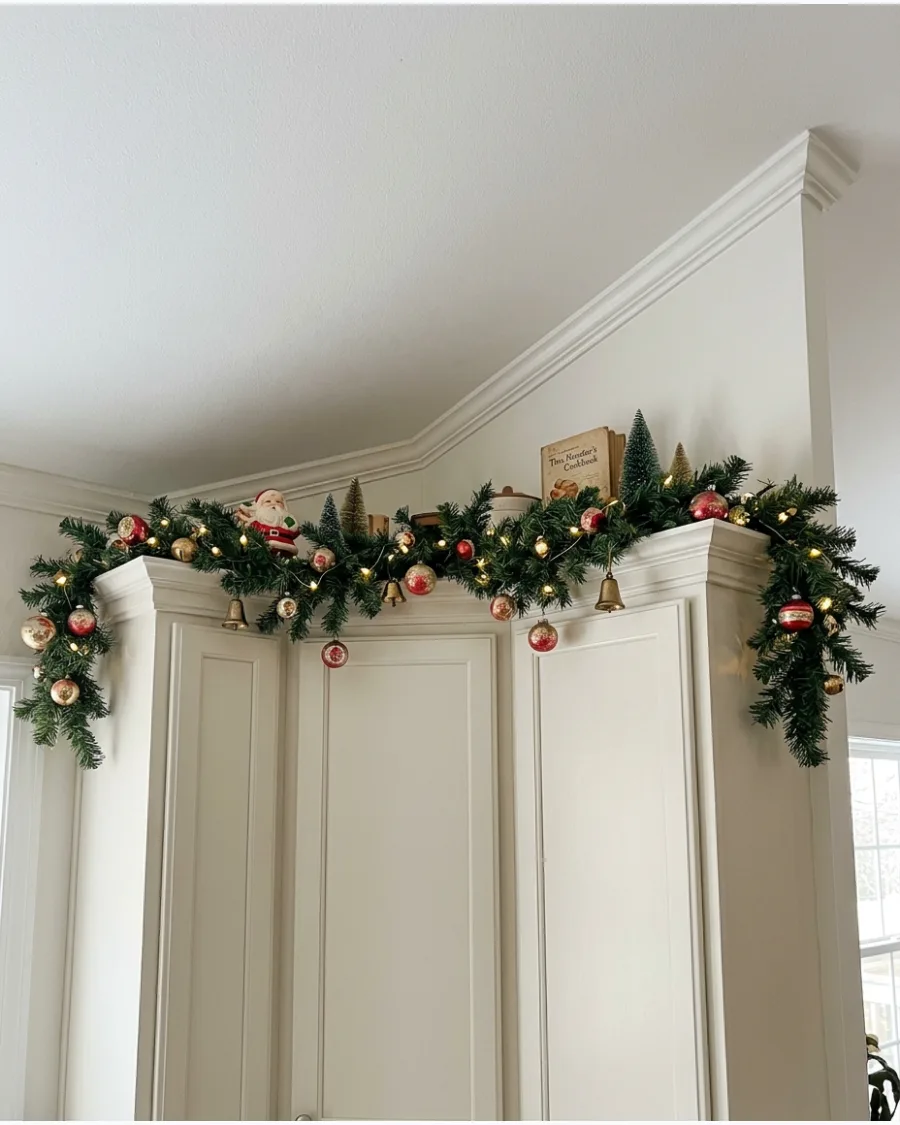
This style combines all the best elements of a classic, nostalgic holiday. Lush greenery is paired with warm lights, brass accents, and traditional holiday colors.
Add a few small bottle-brush trees in varying heights behind the garland to create a sense of depth and a village feel. It creates a focal point that feels like a cherished family tradition.
- Use warm white LED lights to mimic the soft glow of old-fashioned incandescent bulbs.
- Mix different types of greenery, like pine and spruce, to give the garland a more realistic look.
- Add a few small, traditional red bows at the corners for a classic finishing touch.
Best shortcut: Use a pre-lit garland as your base to save time on wiring lights, then just add your vintage accents.
41. Farmhouse Christmas Cabinet Garland
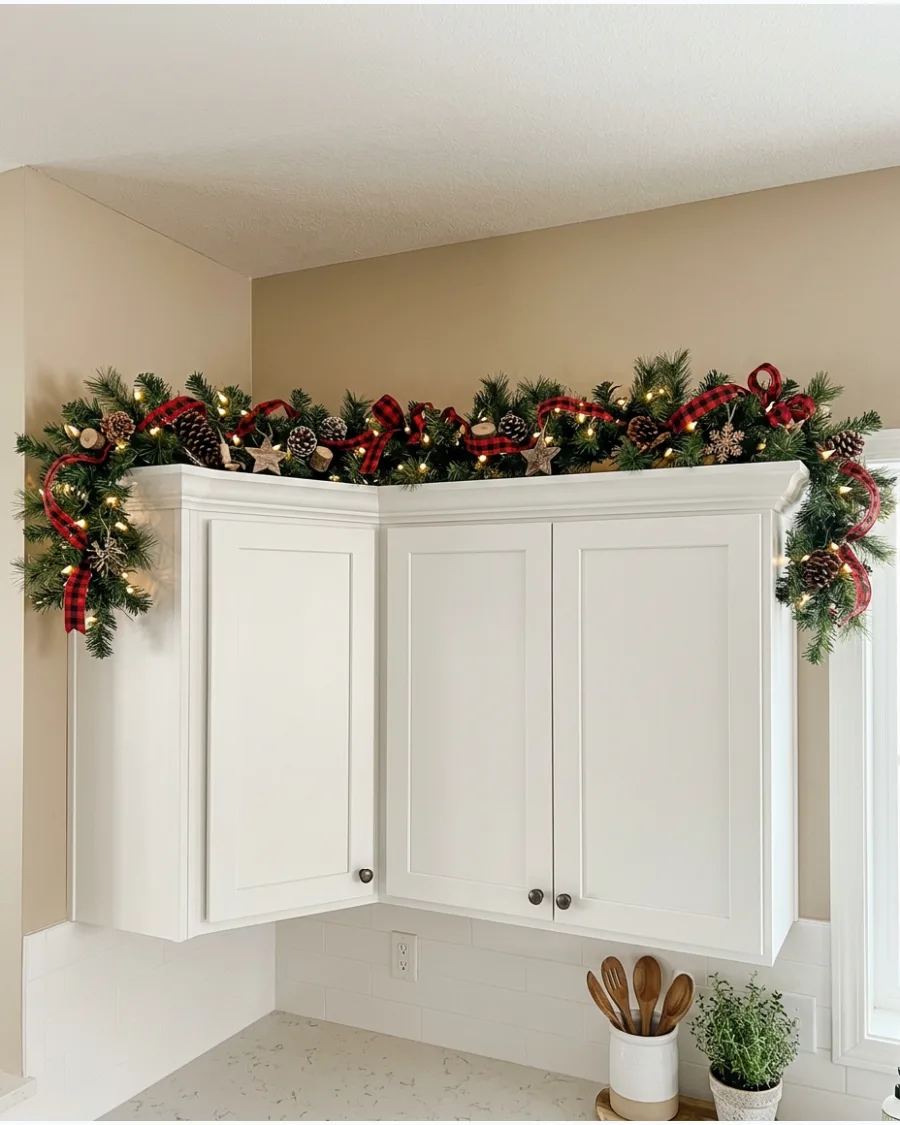
Combine traditional pine greenery with classic patterns to create a warm, lived-in feel above the cabinets. Buffalo check ribbon adds a high-contrast pop against white cabinetry while keeping the overall vibe casual and approachable. Tucking in small wooden stars or ornaments gives the display a handcrafted touch that balances the greenery.
Most people skip this: mixing different textures of wood prevents the farmhouse look from feeling too flat or manufactured.
- Use 9-foot pine garland strands and 2.5-inch wired plaid ribbon.
- Secure the ribbon with floral wire every two feet to keep it from sliding off the cabinet edge.
- Swap the red plaid for black and white gingham to work with a modern farmhouse color scheme.
Quick win: Use command hooks on the top surface of the cabinet to keep the garland from shifting when you open doors.
42. French Country Christmas Garland
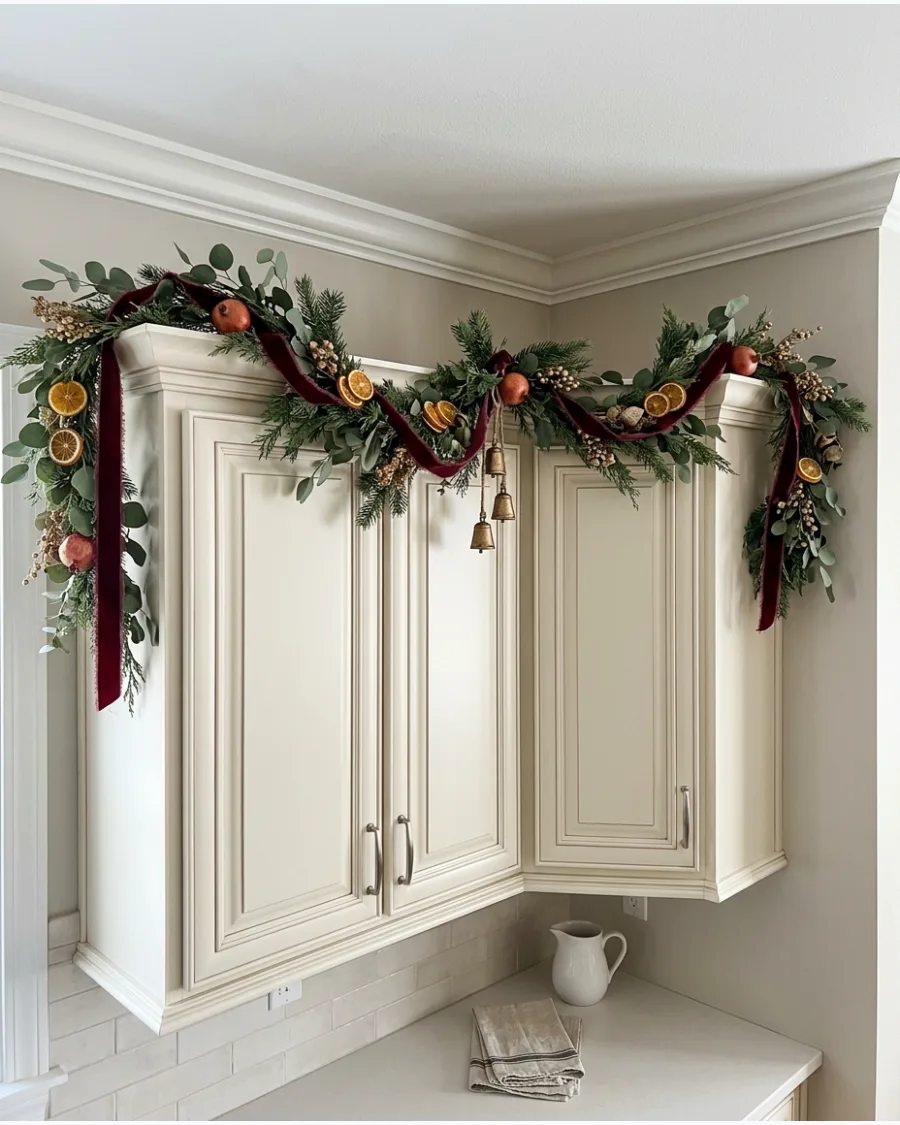
Create a sophisticated European look by mixing wispy greenery with deeper, moodier tones. Incorporate dried fruit like pears or oranges to bridge the gap between holiday decor and functional kitchen elements. Small antique-style bells and burgundy velvet ribbon provide a soft, historical feel that looks expensive without a high price tag.
Expert opinion: Loose, airy greenery looks far more authentic for this style than stiff, perfectly symmetrical branches.
- Look for 'real touch' cedar or eucalyptus at craft stores during late November sales.
- Wipe the cabinet tops thoroughly before placement to prevent dust from sticking to the velvet ribbon.
- Add gold-painted walnuts or small dried artichokes for a more rustic French garden aesthetic.
Best shortcut: Use a thin fishing line to hang the bells at different heights for a more natural, layered look.
43. Neutral Christmas Kitchen Garland
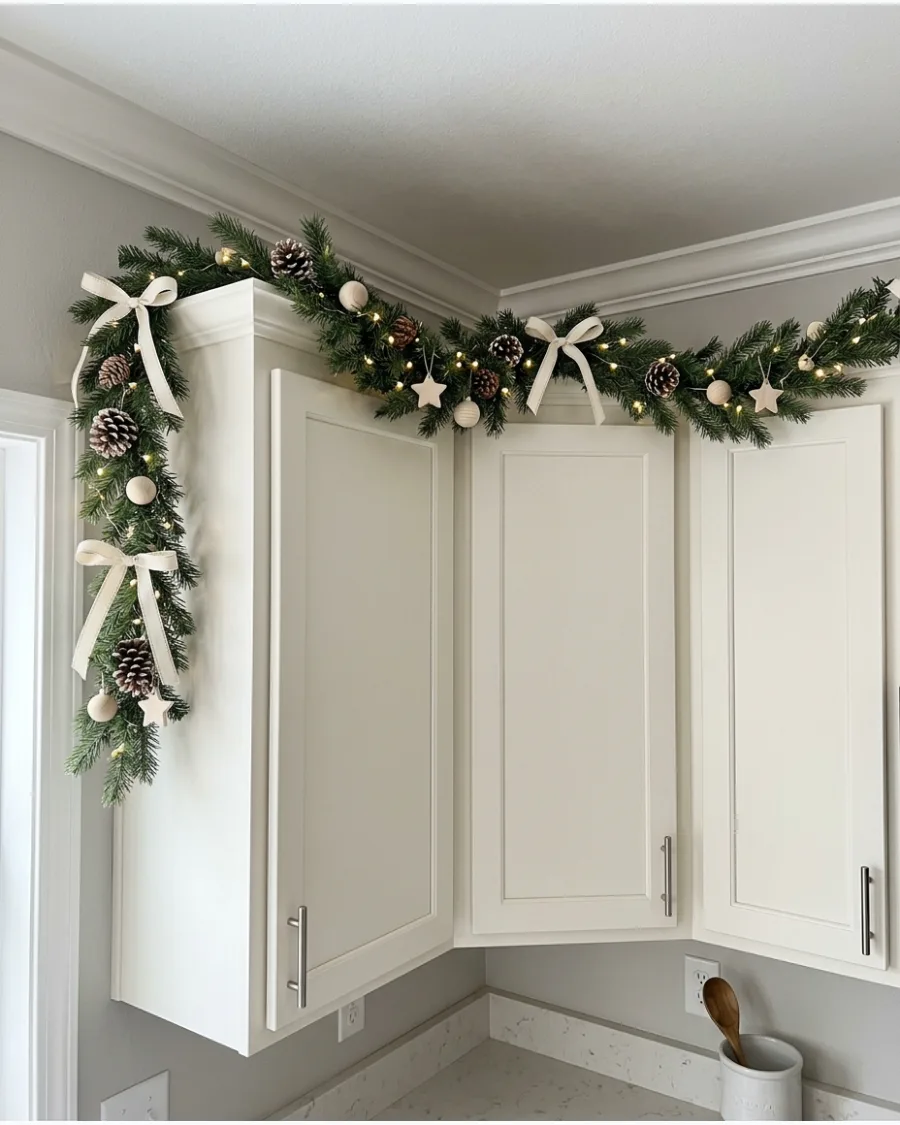
Stick to a monochrome palette of greens, creams, and light woods to keep the kitchen feeling airy and bright. Using a thick cream linen ribbon instead of a shiny metallic one keeps the focus on the texture of the greenery. Pale wood ornaments and natural pinecones add visual interest without introducing distracting colors.
Expert opinion: Neutral decor is the best choice for small kitchens because it doesn't visually shrink the space between the cabinets and the ceiling.
- Source bleached or 'frosted' pinecones for a softer look that blends with cream accents.
- Lay the garland flat on the cabinet crown molding and let the ribbon tails drape slightly into the corners.
- Change the linen ribbon to a sage green for a very subtle, earthy variation on the neutral theme.
Most people skip this: Use warm-toned copper wire fairy lights rather than silver wire to keep the neutral tones looking cozy.
44. Rustic Woodland Cabinet Garland
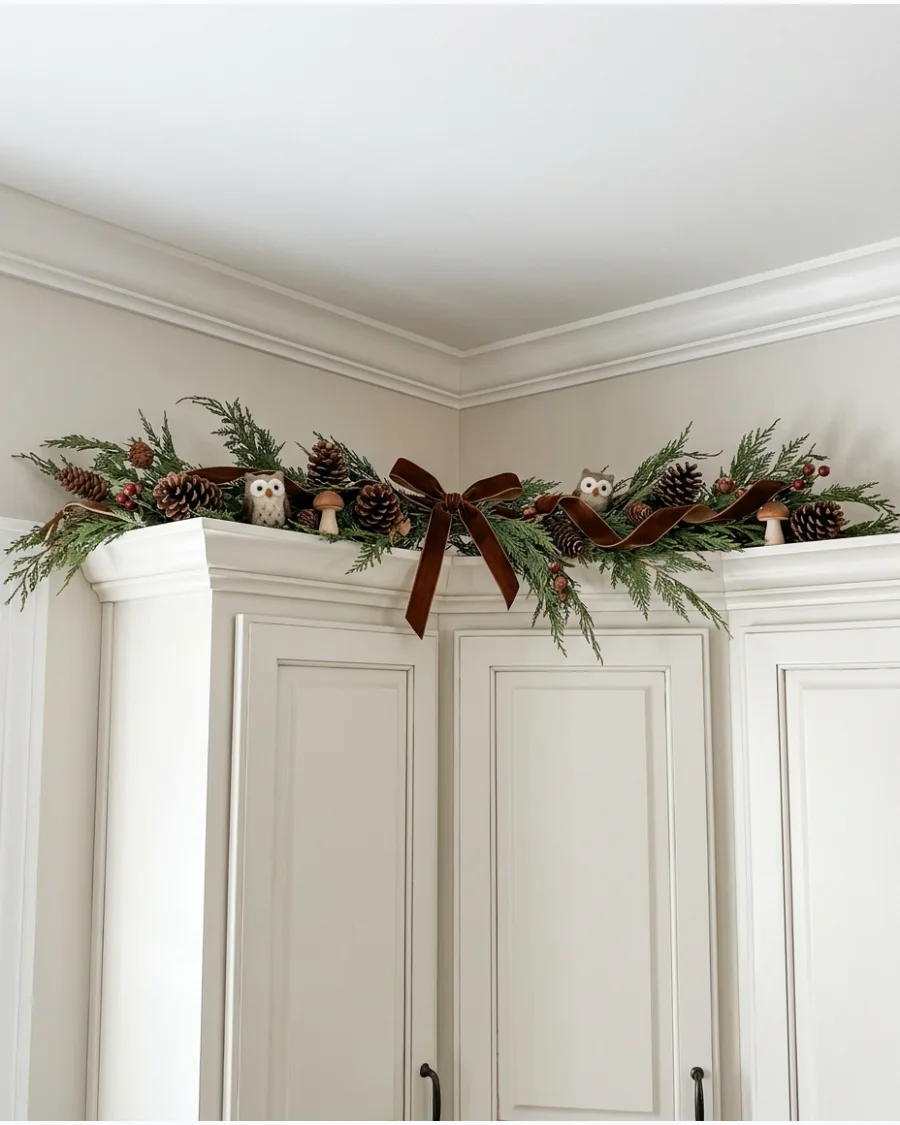
Bring the outdoors in by using asymmetrical cedar branches and earthy textures. Use irregular branches to mimic the look of a real forest floor for a more relaxed and nature-inspired aesthetic. Brown velvet ribbon offers a rich, organic texture that feels more modern and grounded than traditional bright holiday colors.
Expert opinion: Skipping the 'perfect' look makes the setup much faster and more forgiving for beginners.
- Gather large pinecones from the yard or buy bulk bags of unscented cones in early autumn.
- Nestle the greenery deep toward the wall to create shadows that add depth to the display.
- Incorporate sprigs of dried baby's breath to simulate a light dusting of snow without the mess of flocking.
Quick win: Place a few drops of cedar essential oil on the back of the garland to give the kitchen a fresh forest scent.
45. Classic Red and Green Cabinet Garland
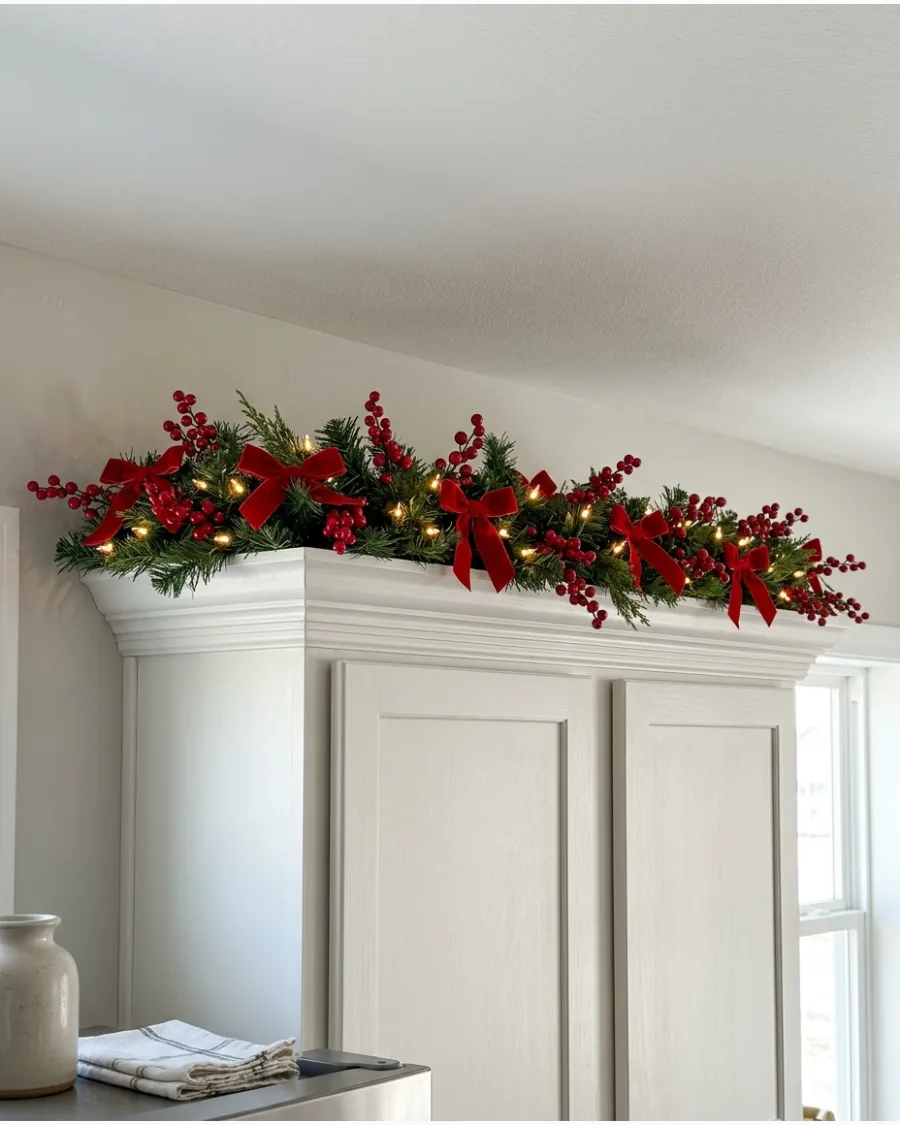
Go for a timeless look with dense spruce and vibrant pops of red. Layer red berry sprigs deep into the greenery to ensure the color is visible from every angle in the room. Large red velvet bows placed at the corners of the cabinet run create a structured, traditional finish that feels celebratory.
Expert opinion: This color combination is the safest bet for high-impact holiday cheer in a white or light gray kitchen.
- Buy pre-lit spruce garland to save time on winding lights through thick branches.
- Space bows exactly 3 feet apart for a rhythmic, professional appearance.
- Use matte red ornaments instead of berries for a slightly more modern take on this classic style.
Most people skip this: Fluff the branches upward toward the ceiling to fill the entire gap and hide any electrical cords.
46. Burgundy and Brass Cabinet Garland
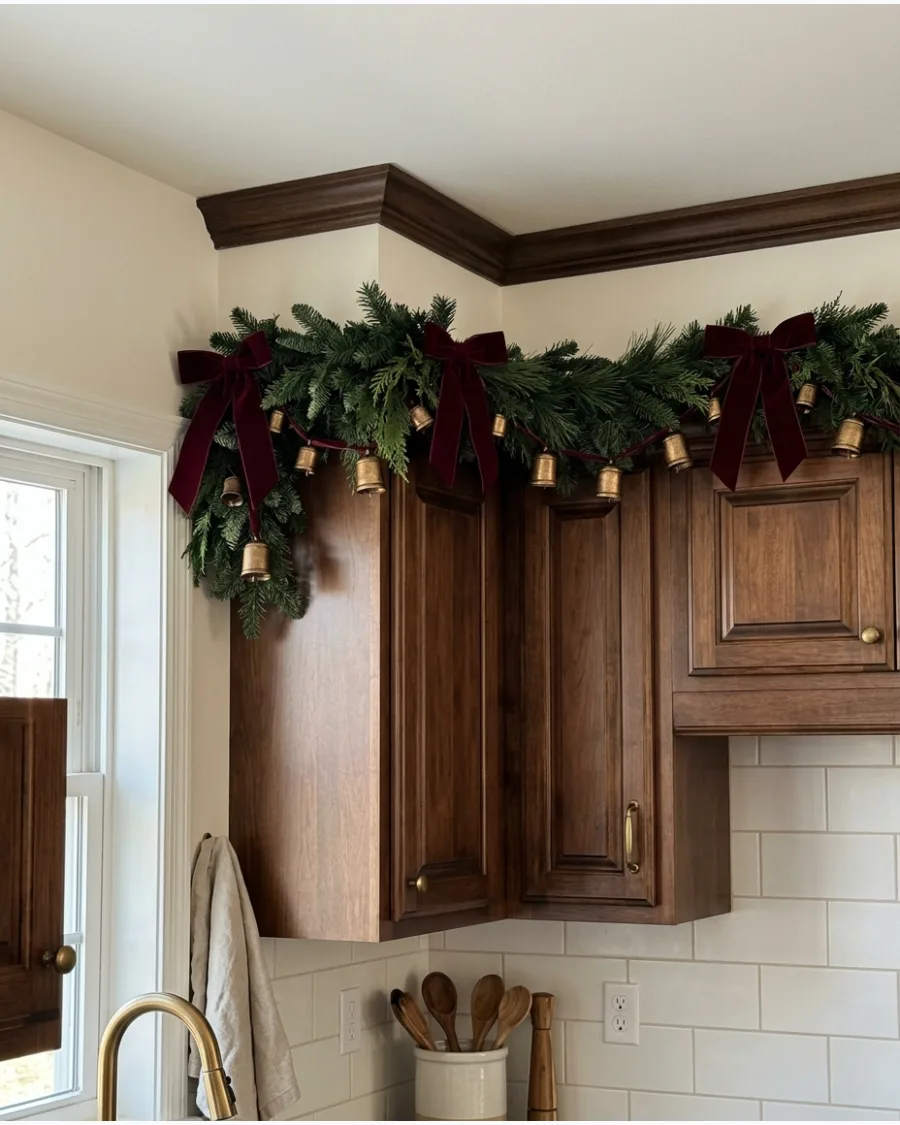
Pair dark greenery with sophisticated metallics for a high-end look. Hang a cluster of brass bells in a corner or above the sink to add a heavy, high-quality metallic element to the greenery. Deep burgundy silk or velvet ribbon looks more sophisticated and 'expensive' than standard bright red.
Expert opinion: Brass accents work best when they match the existing hardware or faucet finish in your kitchen.
- Look for 'antique brass' or 'raw brass' finishes to avoid a cheap, shiny plastic look.
- Wire the bells directly to the garland frame so they don't swing when the cabinet doors are used.
- Use navy blue ribbon instead of burgundy if you want a cooler, more contemporary color story.
Best shortcut: Use floral wire to bundle three bells together at different lengths before attaching them to the garland.
CREATIVE GARLAND LAYOUT IDEAS
47. Garland With a Center Cabinet Focal Point
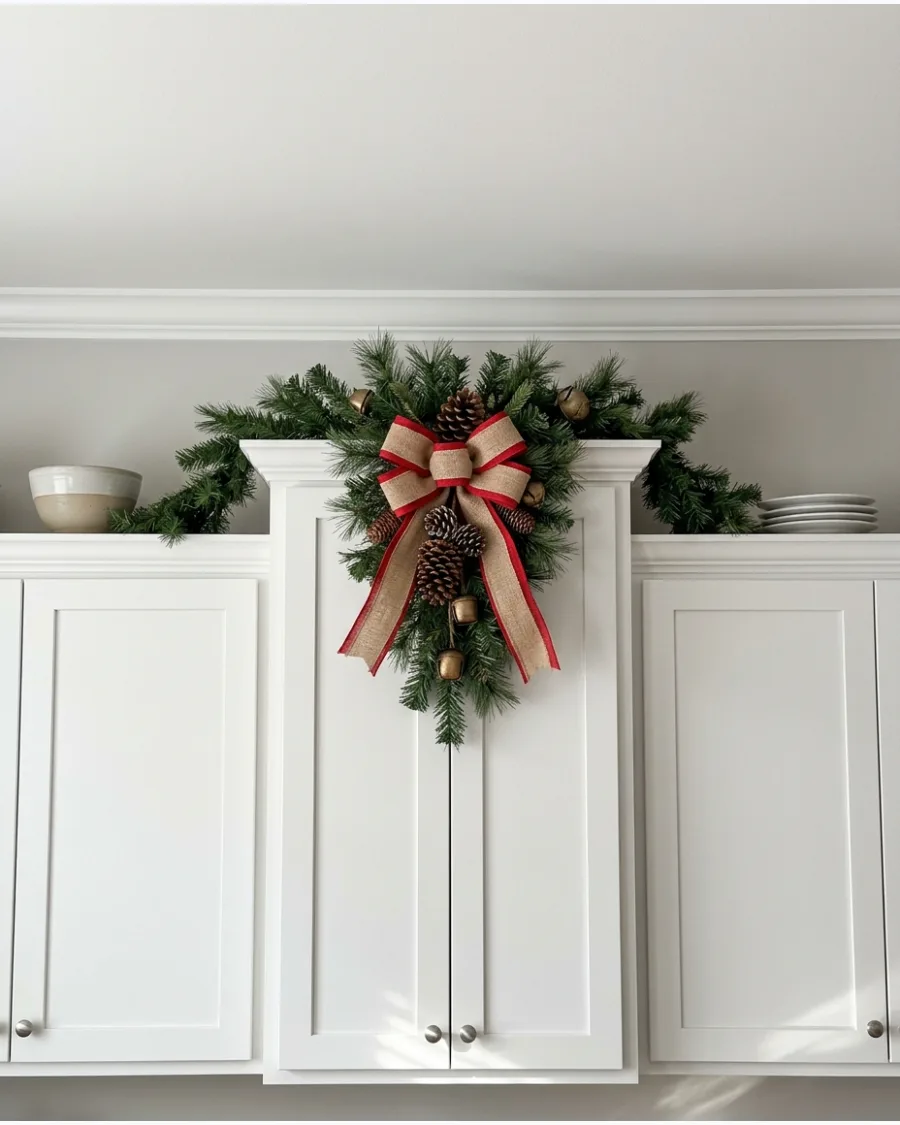
Break up a long run of cabinets by creating a visual anchor in the middle. Build up the volume on the tallest or most central cabinet to create a clear focal point for the whole kitchen. A single oversized bow or a grouping of extra-large pinecones prevents the garland from looking like one flat, boring line.
Expert opinion: Creating a focal point makes a standard cabinet run feel like a custom architectural feature.
- Use two 6-foot garlands and overlap them in the center to naturally create more bulk.
- Measure the center point of the cabinet run before you start to ensure the focal point is perfectly centered.
- Add a small wreath on top of the central garland section for extra height and drama.
Quick win: Use a slightly brighter set of lights in the center section to draw the eye toward the focal point.
48. Cascading Garland at the Cabinet Ends
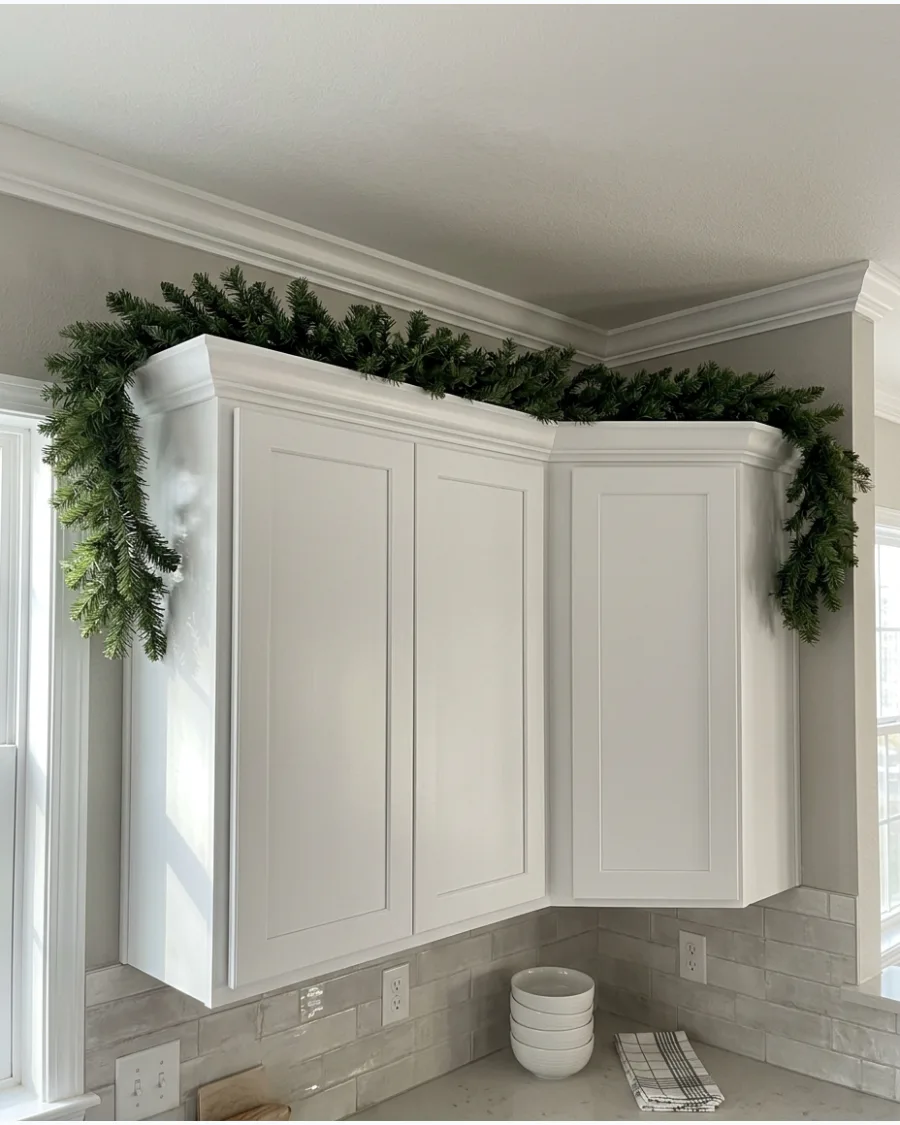
Add movement to your decor by letting the greenery spill over the edges. Allow the ends of the garland to hang six to twelve inches down the side of the cabinet to frame the kitchen layout. This technique works especially well on cabinets that don't sit flush against a wall, adding a soft finish to hard corners.
Expert opinion: Cascading ends help 'ground' the decor so it doesn't look like it is floating on top of the cabinets.
- Choose a garland with a flexible wire core so you can bend the 'drip' into a natural shape.
- Ensure the cascading end does not block any light switches or adjacent pantry doors.
- Attach a heavy ornament or bell to the very tip of the cascade to help it hang straight.
Most people skip this: Taper the thickness of the greenery as it goes down the side for a more realistic 'vining' effect.
49. Garland Between Cabinet Tops and the Ceiling
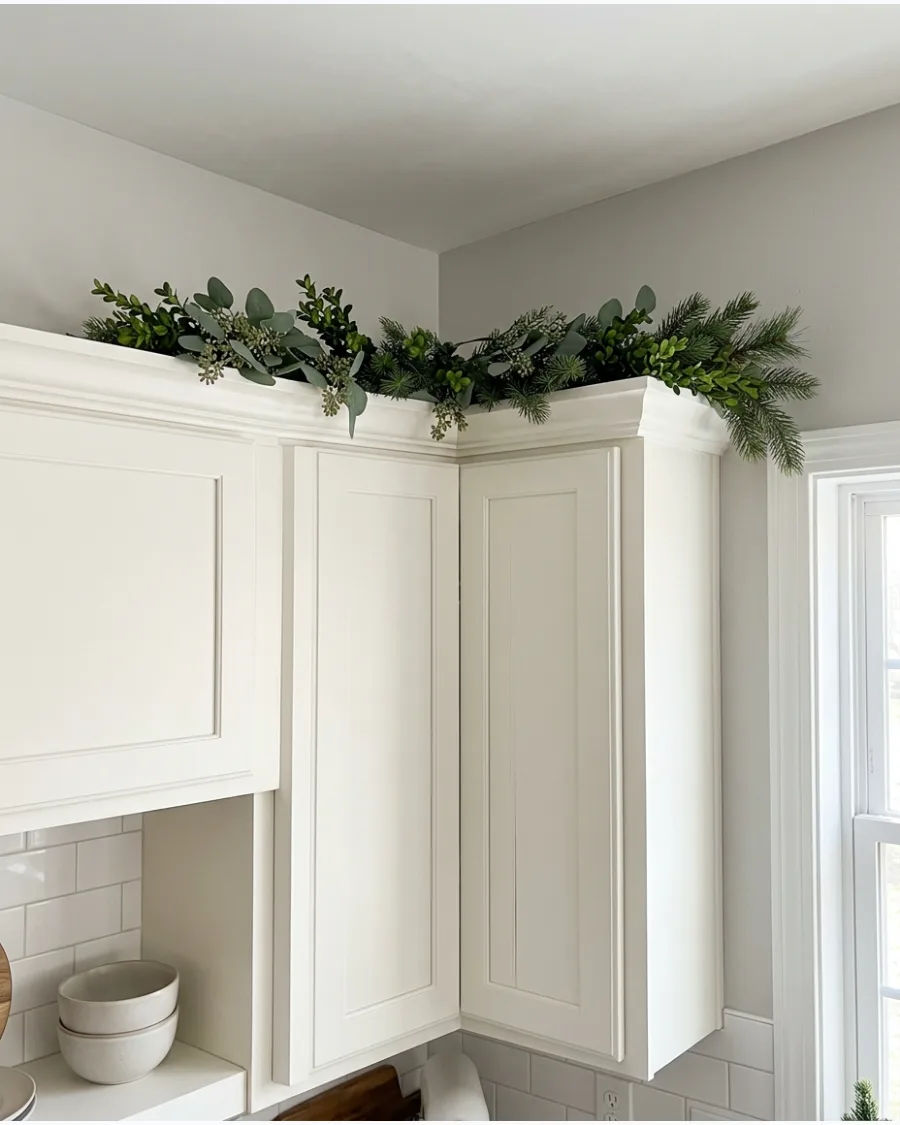
Turn a dust-catching gap into a lush design feature. Layer different types of greenery, like pine and eucalyptus, to fill the vertical space so the garland doesn't look like a thin, lonely line. This makes the cabinets look like they were custom-built to reach the ceiling while hiding any unsightly shadows.
Expert opinion: Filling the gap completely creates a high-end, 'built-in' look that is very popular in professional interior design.
- Measure the height of the gap and buy garland that is at least two inches taller to ensure a snug fit.
- Use 'filler' greenery like inexpensive silk ivy at the back to save money on the more expensive front layers.
- Place the garland slightly forward so the tips touch the ceiling, creating a seamless transition.
Best shortcut: Use tension rods between the top of the cabinet and the ceiling to hold heavy greenery in place without nails.
50. Continuous Garland Around the Kitchen Cabinet Line
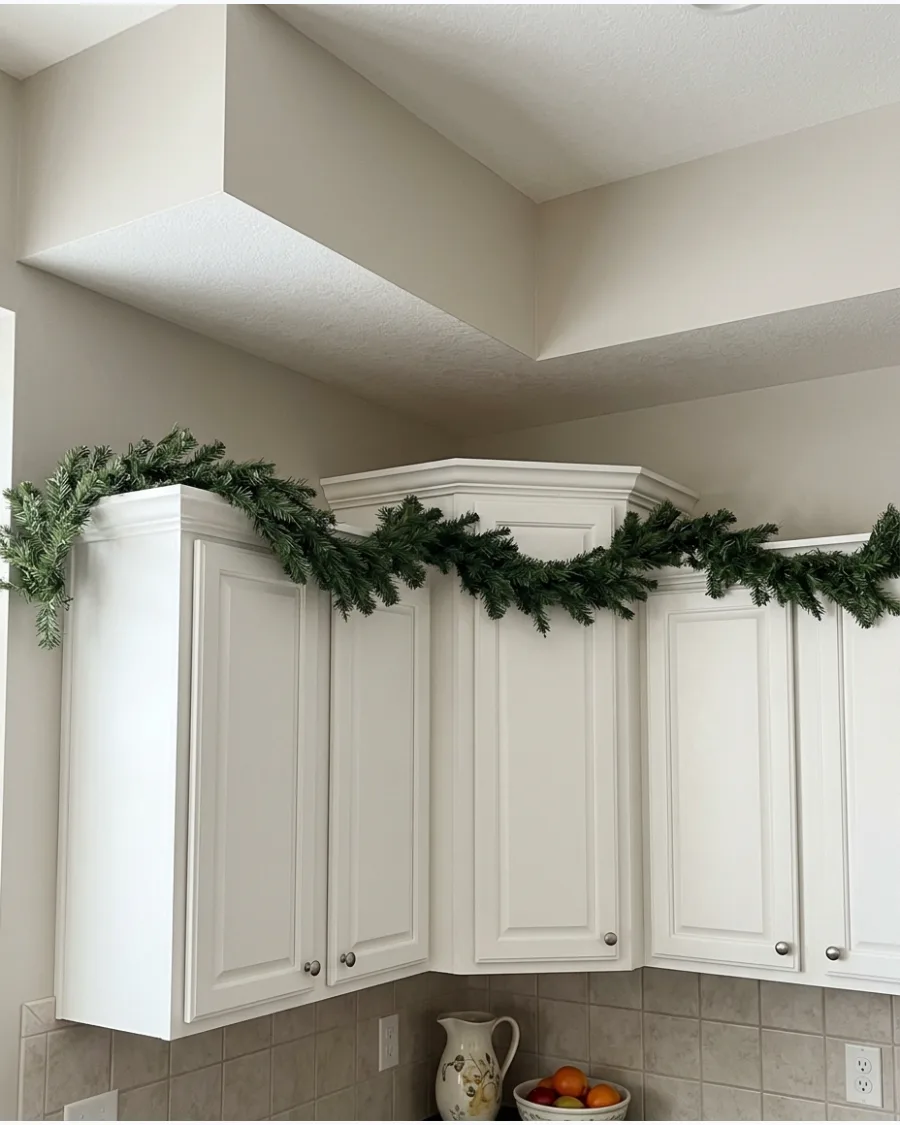
Unify the entire kitchen by running one unbroken line of greenery. Connect separate garland sections with floral wire to ensure the greenery looks like one seamless piece flowing around corners and over gaps. This creates a sense of rhythm and keeps the eye moving throughout the space for a cohesive feel.
Expert opinion: A continuous line is the best way to make a large or disjointed kitchen feel intentionally styled.
- Buy all your garland at once from the same brand to ensure the color and needle type match perfectly.
- Use an extension cord hidden behind the refrigerator or microwave to power the entire continuous run.
- Wrap the garland tightly around corners to maintain the shape of the cabinetry.
Quick win: If you have a gap above the stove or sink, use a thin piece of wood or a tension rod to 'bridge' the garland across the opening.
51. Frosted Boxwood Structured Look
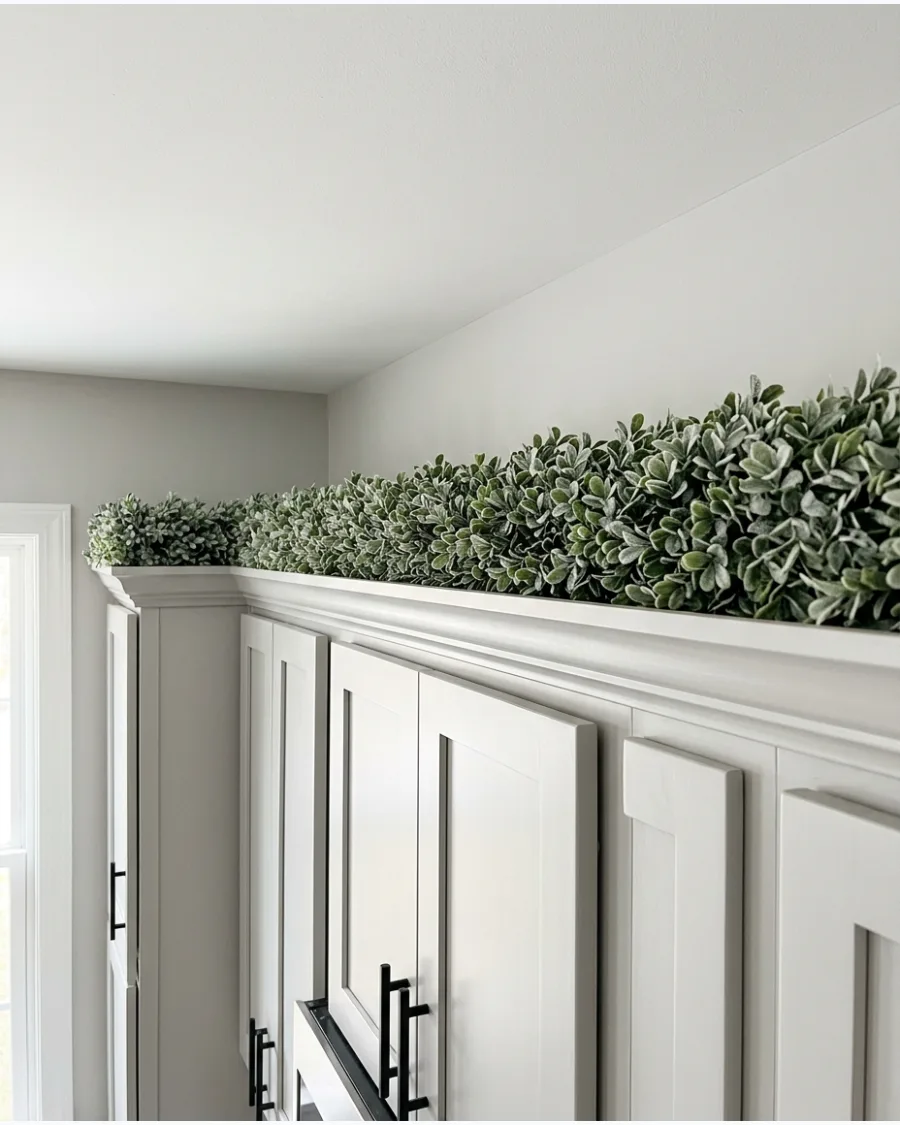
Boxwood offers a tighter and more structured look than messy evergreens. The frosted finish adds a subtle winter glow without shedding glitter everywhere in the cooking area.
Secure the garland with clear adhesive hooks to prevent it from sliding forward over the cabinet edge. Structured greenery looks cleaner in modern kitchens than wispy pine.
- Purchase 6-foot lengths for easy handling.
- Use clear command hooks every two feet.
- Swap for plain boxwood in spring months.
Most people skip this: Wipe the cabinet tops with rubbing alcohol before applying hooks so they stick to the greasy surface.
52. Lemon and Bay Leaf Freshness
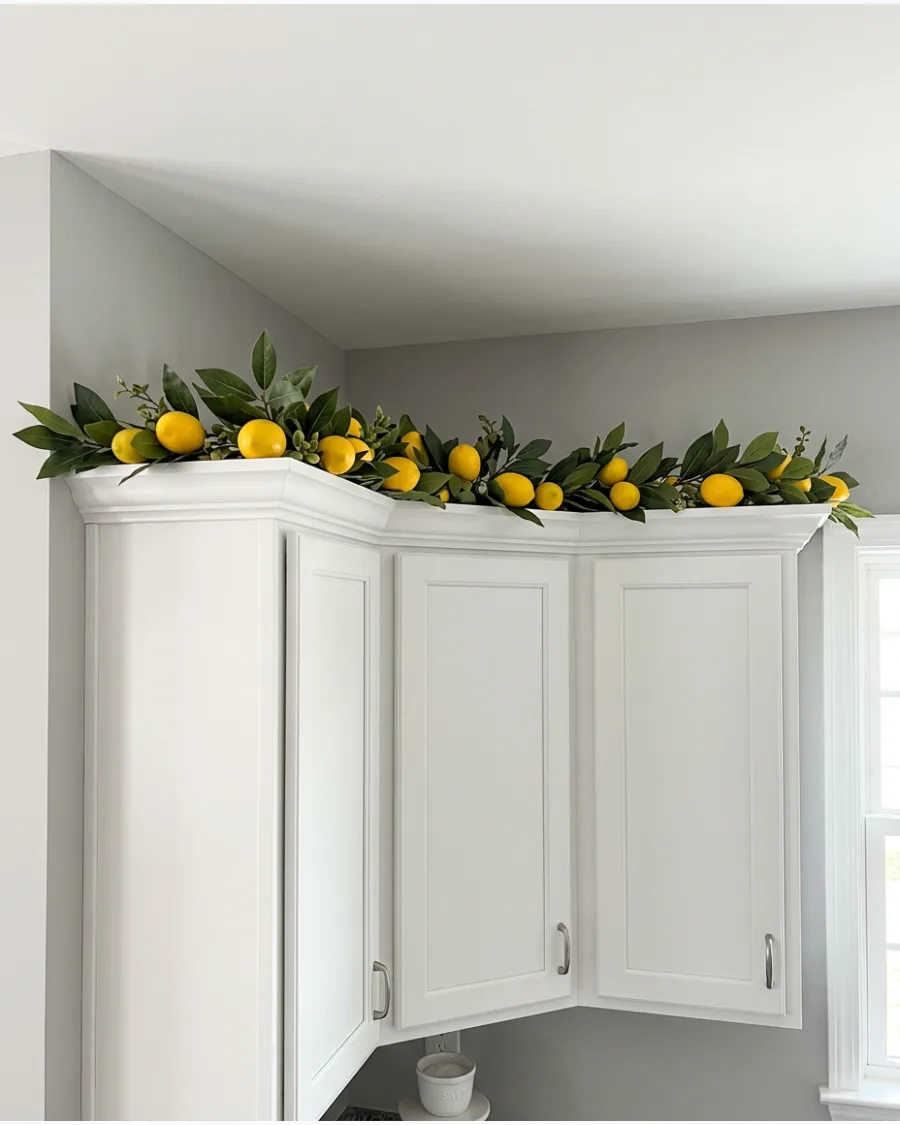
A kitchen-themed garland uses edible-looking elements like bright yellow lemons and dark green bay leaves. This style feels fresh and works well in spaces that need a pop of color against white walls.
Space the lemons evenly to keep the visual weight balanced across the entire cabinet run. Fruits add an organic, lived-in feel that feels more authentic to a kitchen space.
- Look for realistic UV-resistant silk leaves.
- Wire individual lemons into a standard leaf garland.
- Wipe leaves with a damp cloth monthly.
Quick win: Use floral wire to point the lemon stems downward so the fruit appears to be hanging naturally.
53. Silver Tinsel and Bead Layers
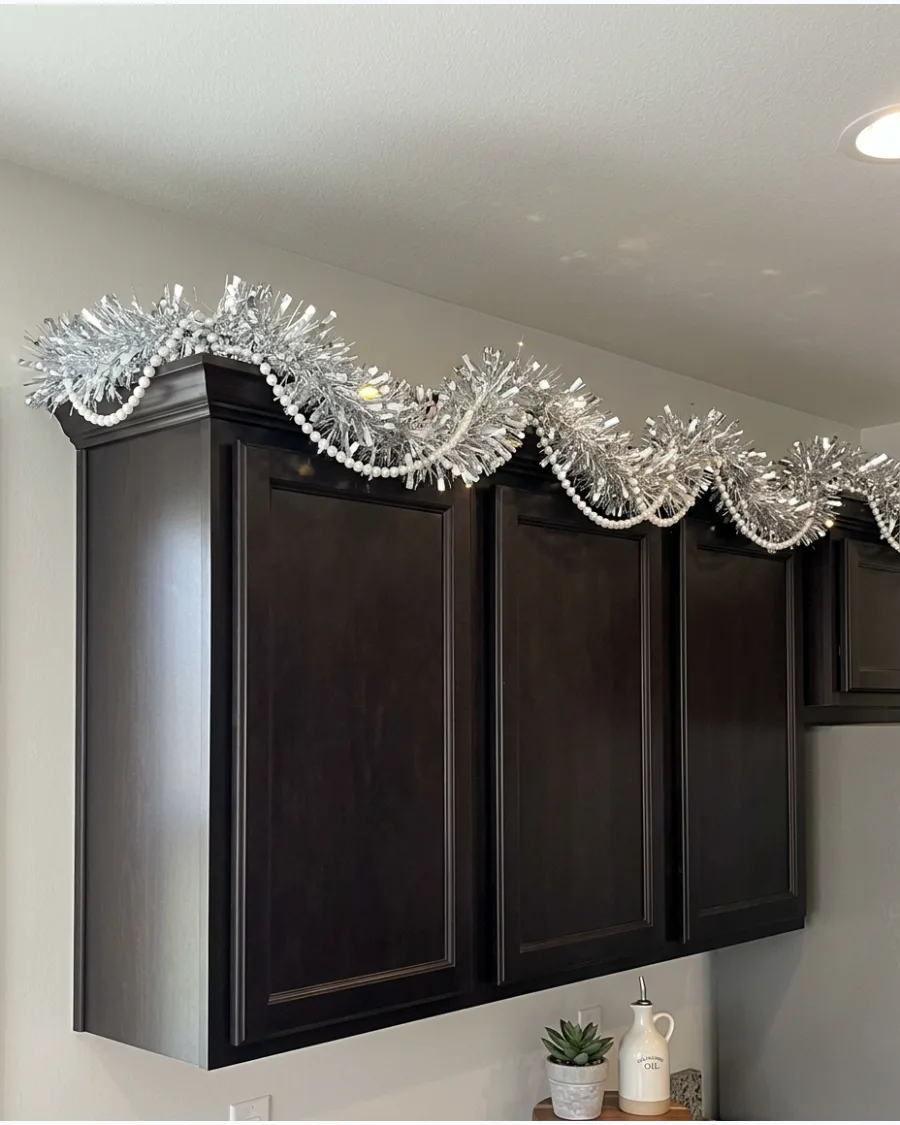
Metallic accents reflect light into the dark corners near the ceiling. Mixing thick silver tinsel with thin plastic beads creates depth and a classic holiday texture.
Drape the bead strand loosely so it hangs slightly lower than the tinsel for a layered effect. Reflective surfaces make high ceilings feel less cavernous in the evening.
- Layer two different thicknesses for variety.
- Use metallic silver to match stainless appliances.
- Avoid tinsel with large flakes that shed.
Best shortcut: Twist the beads around the tinsel before lifting it onto the cabinets to save time on a ladder.
54. Geometric Paper Leaf Modernity
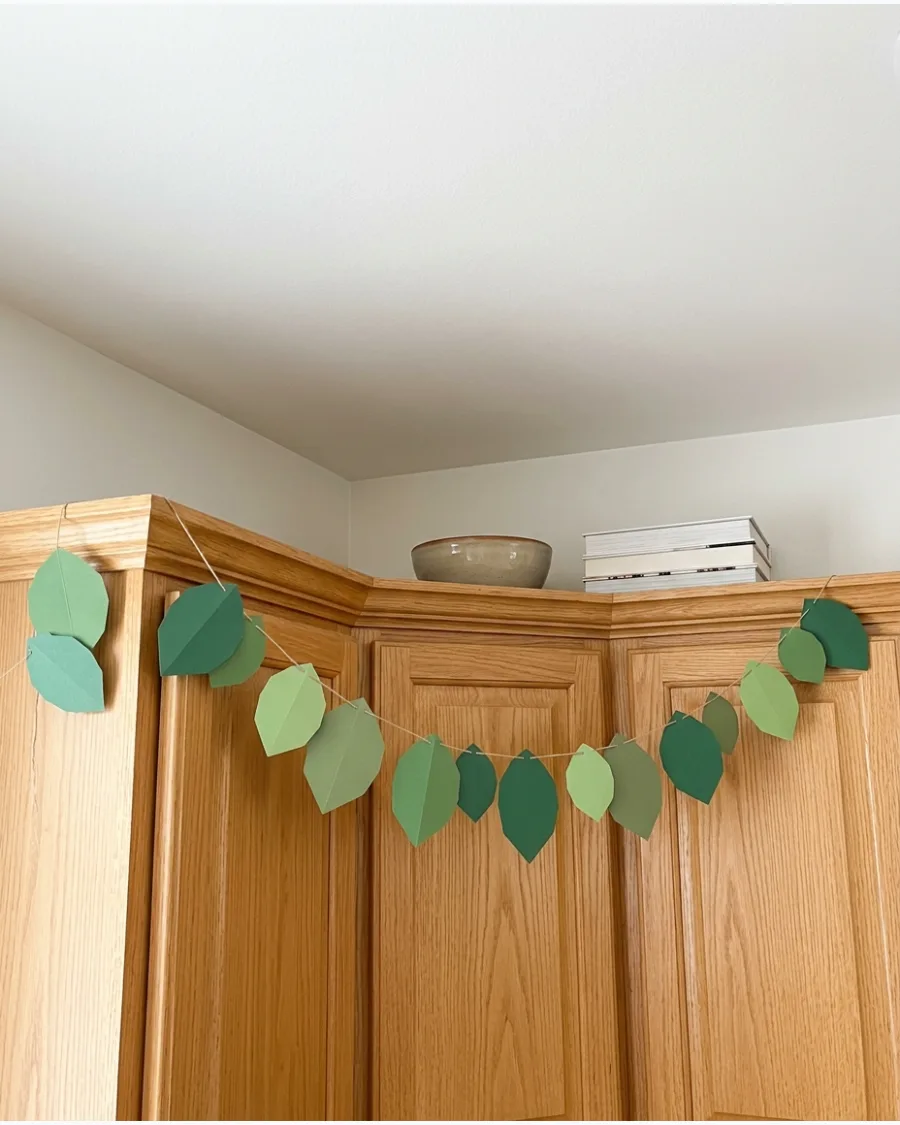
Cardstock garlands offer a crisp and modern alternative to faux greenery. These are lightweight and do not trap grease or dust like fabric or plastic needles often do.
Choose a mix of forest green and sage paper to give the flat leaves more visual dimension. Paper is the best low-maintenance option for kitchens because it is easy to replace if it gets dirty.
- Search for '3D paper leaf garland' for depth.
- Dust with a canned air spray.
- Recycle the garland at the end of the season.
Most people skip this: Fold the center of each paper leaf slightly to create a vein that catches the light.
55. Felt Pom Pom Soft Texture
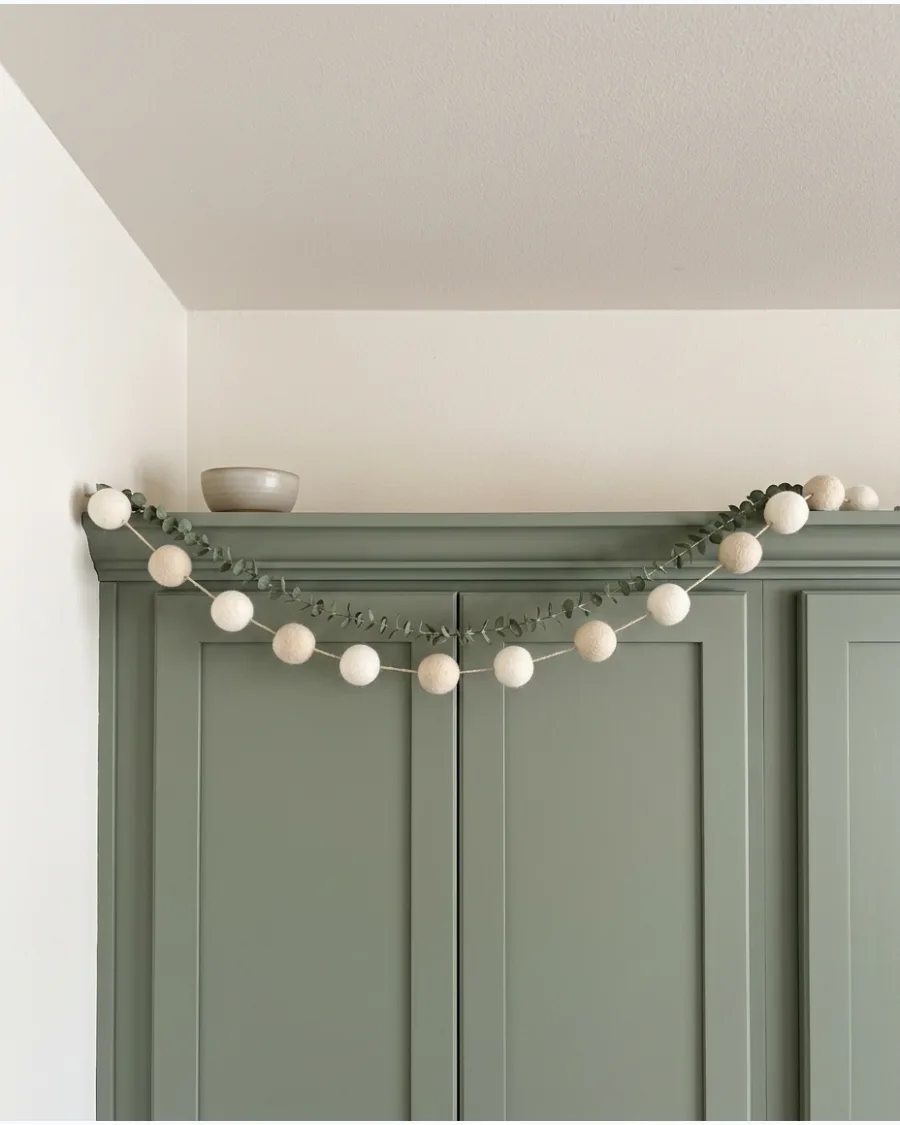
Soft felt poms add a cozy and tactile element to a high-up space. This look is perfect for homes that want a festive but approachable kitchen atmosphere.
Layer the pom pom string over a thin vine garland to keep the look grounded and intentional. The matte finish of felt prevents the decor from looking too plastic under bright kitchen lights.
- Choose 2cm poms for the best visibility.
- Mix cream, white, and gray for a neutral look.
- Keep poms away from the stove vent area.
Quick win: Space the poms about three inches apart so the greenery underneath stays visible.
56. Copper Wire and Ivy Mix
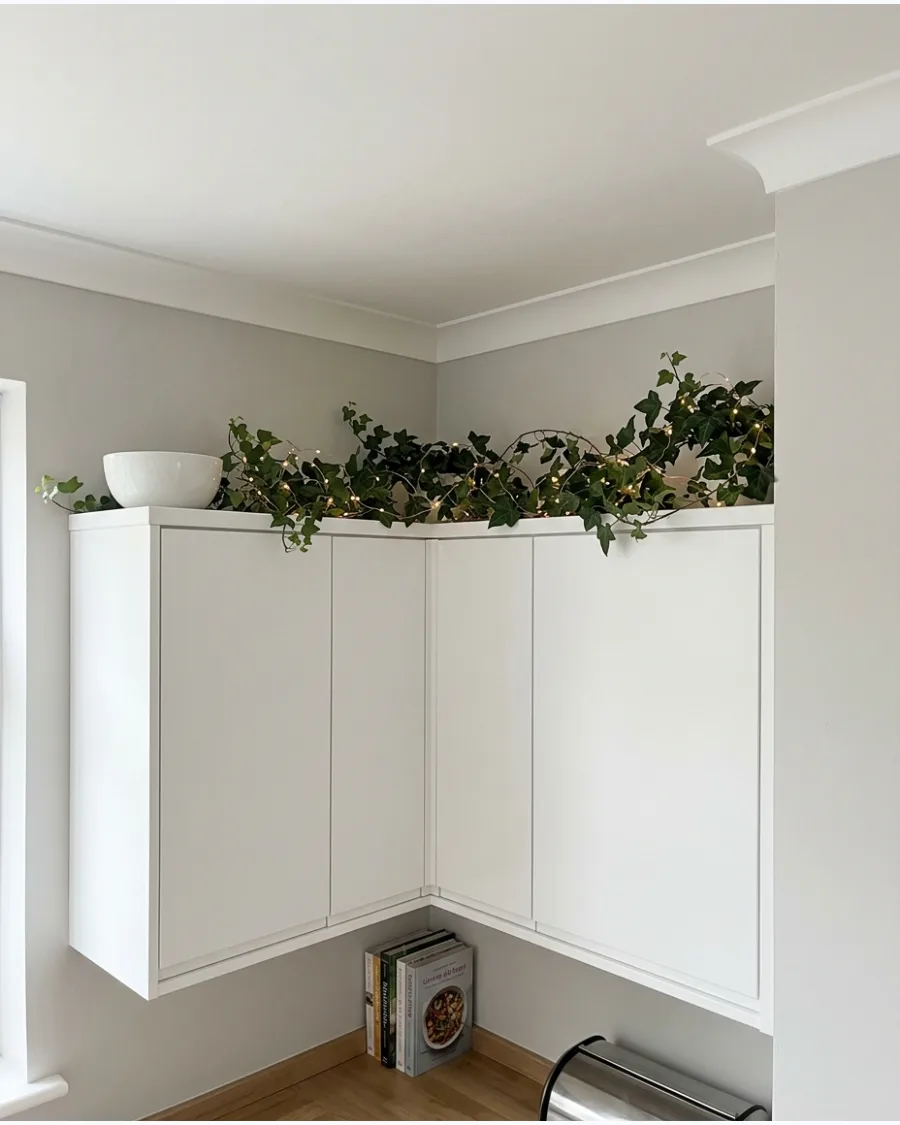
Thin copper wire lights wrapped around ivy vines create a modern industrial vibe. The dark green leaves hide the wiring while the copper adds a warm metallic glow to the ceiling line.
Run the battery pack behind a decorative pitcher or bowl to keep it out of sight. Thin vines are easier to manipulate around crown molding than thick and stiff evergreen garlands.
- Use battery-operated lights with a timer.
- Secure the ivy with small clear zip ties.
- Check battery life every three weeks.
Best shortcut: Tape the battery box to the top of the cabinet with painter's tape so it doesn't fall behind the unit.
57. Faux Black Taper Sophistication
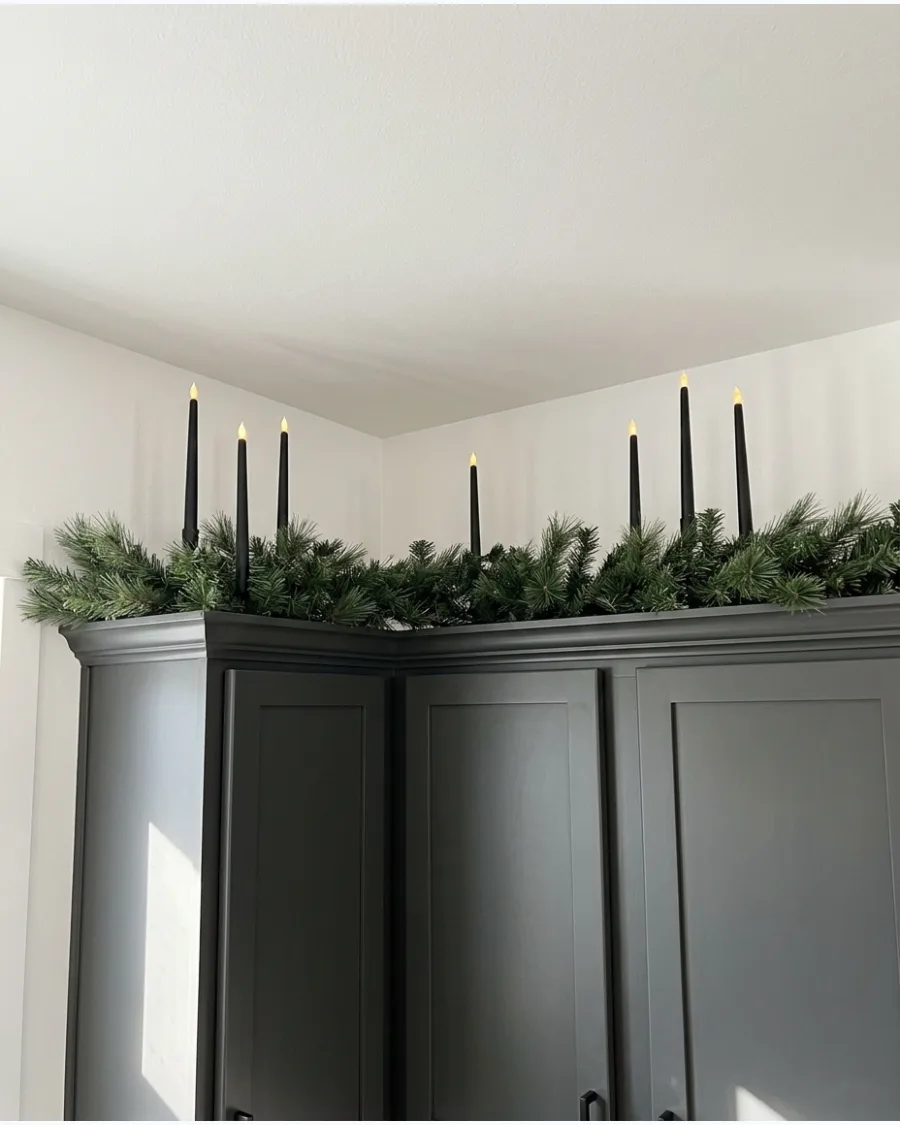
Battery-operated black candles nestled in greenery provide a sophisticated and moody aesthetic. This high-contrast look works beautifully in kitchens with dark hardware or black accents.
Use candles with a flicker effect to mimic a real flame without the fire hazard near the ceiling. Vertical elements like candles break up the long horizontal line of the cabinets.
- Use remote-controlled candles for easy access.
- Mount candles in small weighted holders.
- Space candles every 18 inches.
Most people skip this: Use a small piece of poster tack on the bottom of the candle holders to keep them perfectly upright.
58. Silk Peony and Vine Transition
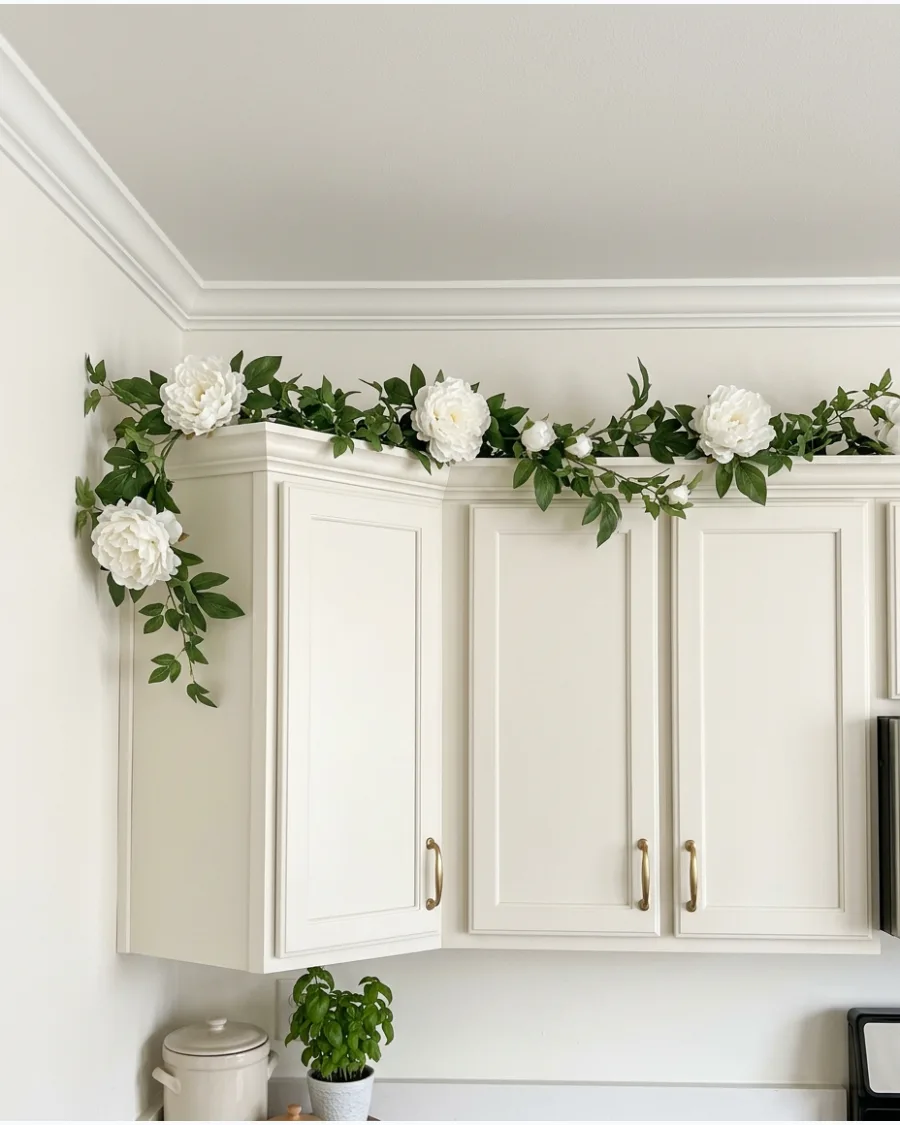
Seasonal flowers can transition a kitchen garland from winter into the spring months. White silk peonies tucked into green vines look high-end and fresh against any cabinet color.
Push the flower heads deep into the greenery so only the petals peek out for a natural look. Tucking flowers in rather than sitting them on top makes the garland look like a custom floral arrangement.
- Choose high-quality 'real touch' silk flowers.
- Use odd numbers of flowers for better balance.
- Vary the flower sizes for a realistic garden feel.
Quick win: Steam the silk flowers before putting them up to remove any flat spots from storage.
59. Dried Wheat and Grass Texture
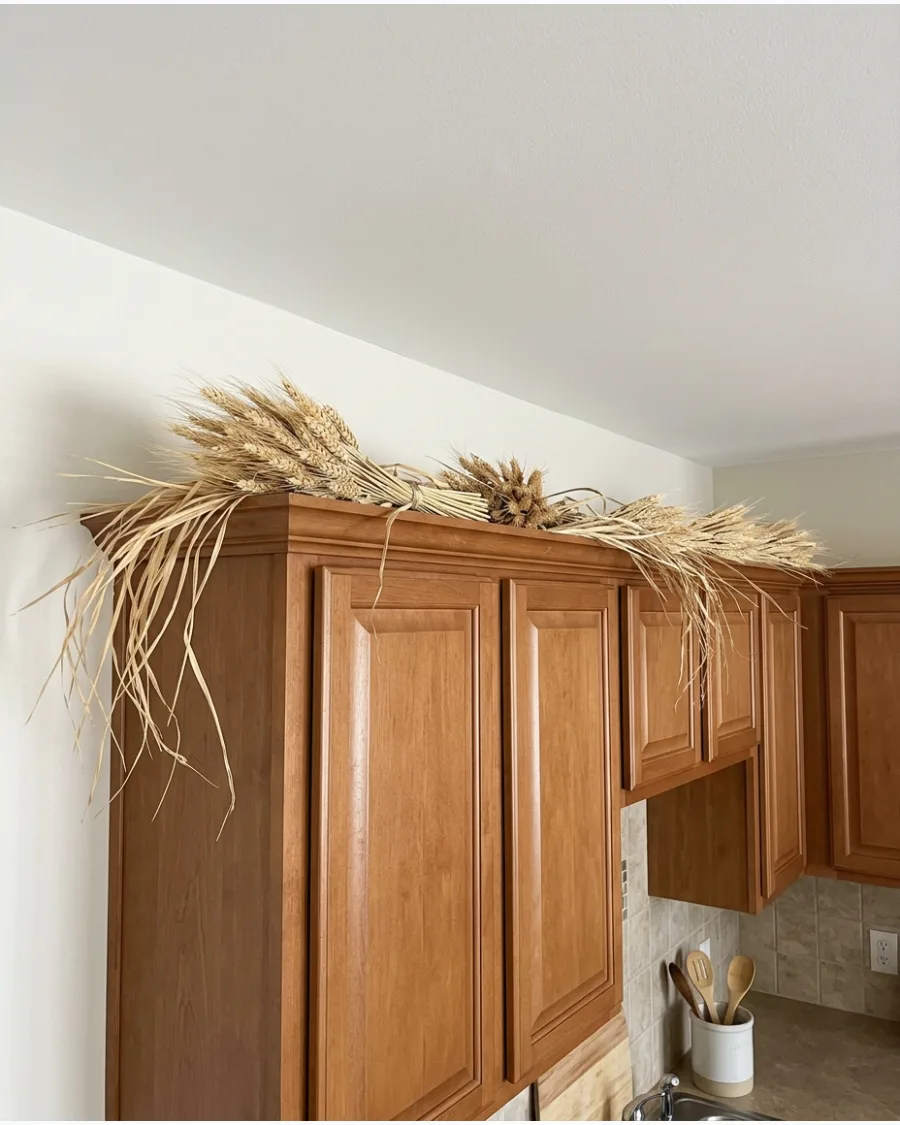
For a neutral and earthy look, use dried wheat stalks and long ornamental grasses. This texture is ideal for the months between summer and the winter holidays.
Bundle the wheat with twine before placing it in the garland to ensure the stalks stay upright. Natural tan tones soften the transition between dark cabinets and a white ceiling.
- Spray with unscented hairspray to prevent shedding.
- Keep away from direct heat or steam.
- Layer with a burlap ribbon for extra texture.
Most people skip this: Angle the wheat bundles slightly outward so they are visible from the floor level.
60. Navy and Silver Winter Tones
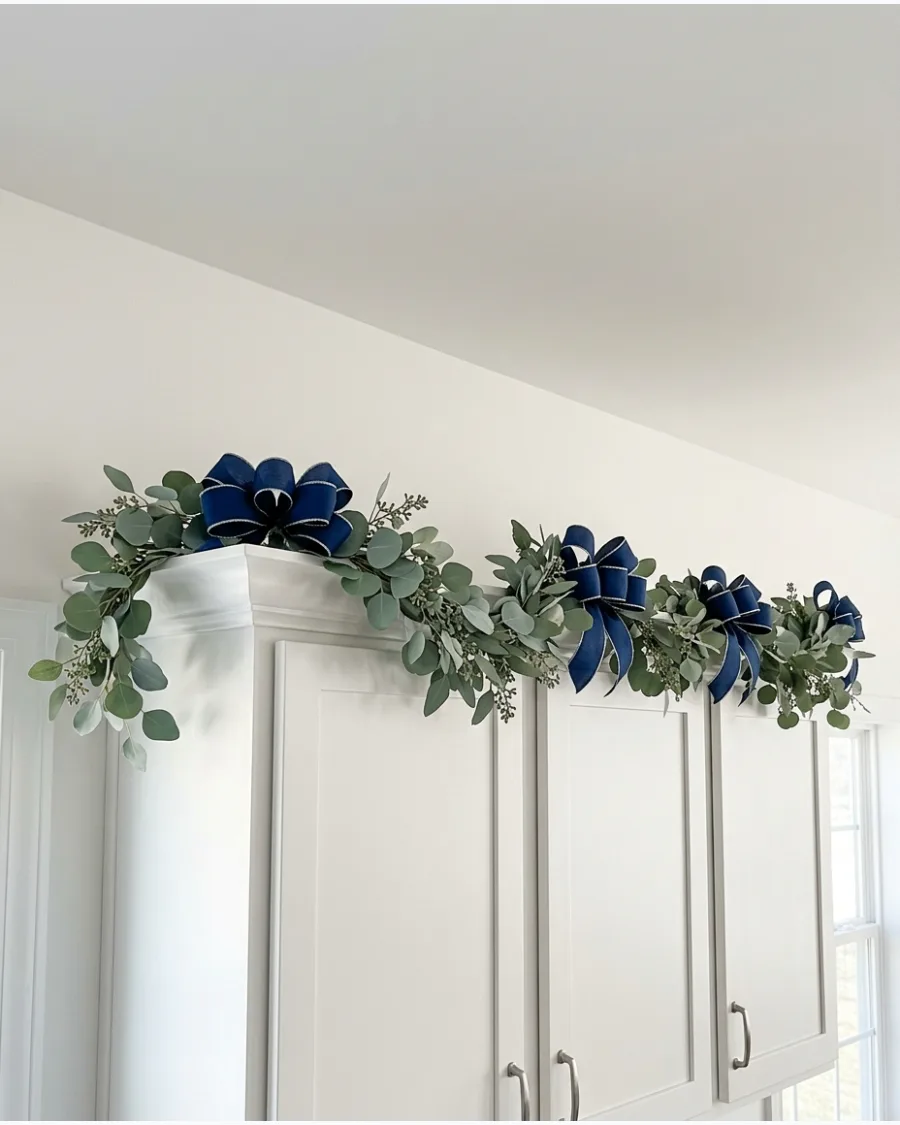
Move away from traditional red and green with a cool-toned navy and silver palette. Silver-dollar eucalyptus leaves paired with navy blue ribbons feel elegant and wintery.
Loop a wide navy ribbon through the silver leaves every twelve inches for a professional finish. Cool tones work best in kitchens with marble or stainless steel finishes.
- Use wired ribbon to hold the loop shapes.
- Mix in silver-painted pinecones for shine.
- Pair with cool white LED fairy lights.
Best shortcut: Cut the ribbon into 12-inch strips and tie them on rather than trying to weave one long continuous piece.
Frequently Asked Questions
How do I keep the garland from falling off the top of the cabinets?
Secure your garland by placing Command hooks horizontally along the cabinet tops or using small weighted bags at the ends to anchor the greenery. A non-slip shelf liner placed underneath also provides excellent grip and prevents the arrangement from sliding forward.
How do I prevent the garland from getting greasy and dusty in the kitchen?
Opt for high-quality faux greenery with smooth, plastic-coated leaves, as these are much easier to wipe down than porous silk or real branches. To maintain its appearance, give the garland a quick dusting or a light spray with a mild degreaser every few weeks to combat kitchen residue.
Should the garland hang over the edge or sit flat on top?
For a traditional, cozy feel, let the garland drape slightly over the front edge to add depth and visual interest. If you prefer a modern, minimalist aesthetic, keep the greenery tucked back so it sits flat and creates a clean line flush with the cabinet tops.
How do I hide the cords if I use a pre-lit garland?
Use battery-operated garlands to eliminate cords entirely, tucking the small battery packs behind the foliage where they remain hidden. If using plug-in lights, run thin extension cords along the back wall of the cabinet tops and secure them with clear adhesive clips.
What is the best type of greenery for year-round above-cabinet decor?
Eucalyptus, boxwood, and olive leaf are excellent choices for a timeless look that feels fresh in every season. These varieties offer a natural, neutral texture that complements most kitchen designs without the holiday-specific association of pine or cedar.