50 Fireplace Tile Surround Ideas

This post may contain affiliate links: full affiliate disclosure.
Start by deciding what you want to notice from the sofa. A narrow frame draws attention to the opening, while a tall tiled face changes the wall.
Save a few surrounds with proportions like yours. Compare the patterns, grout, and hearth edges, then see how each tile sample looks beside your flooring and mantel.
Before ordering, confirm your fireplace’s facing, clearance, and hearth requirements with the installer. That gives you the usable dimensions for comparing tile sizes and planning the cuts.
As an Amazon Associate I earn from qualifying purchases.
Classic tile layouts worth saving
A narrow surround can carry a surprising amount of pattern. Start with the width of the two tiled sides, then compare how many full pieces fit.
1. Warm white subway tile with a running bond
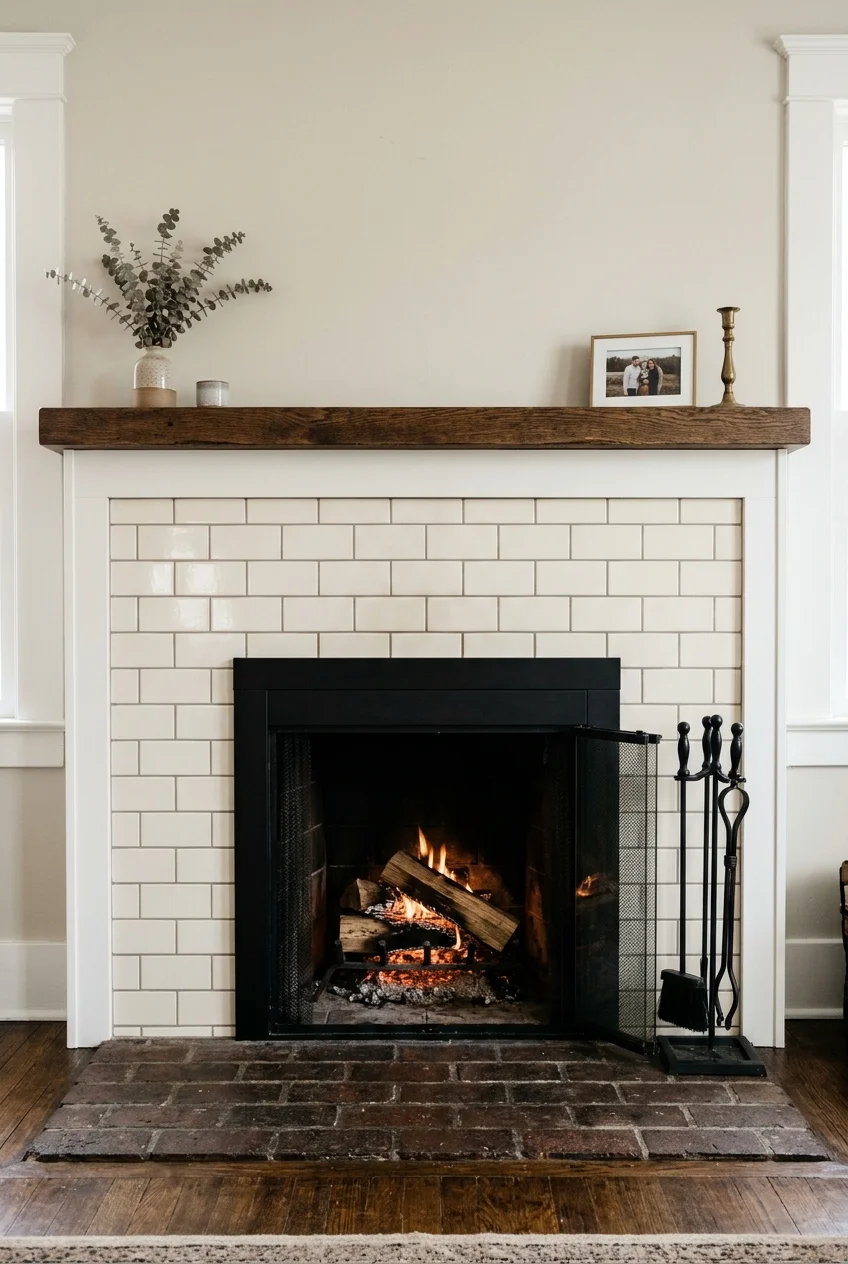
Creamy rectangles soften the hard line of a black firebox, especially when the surrounding trim is white. Try a warm gray grout to show the bricklike stagger.
Lay out the two sides together before setting tile. Matching the cut widths at both inner edges gives a small surround a calmer, better balanced frame.
2. Vertical stacked sage tile
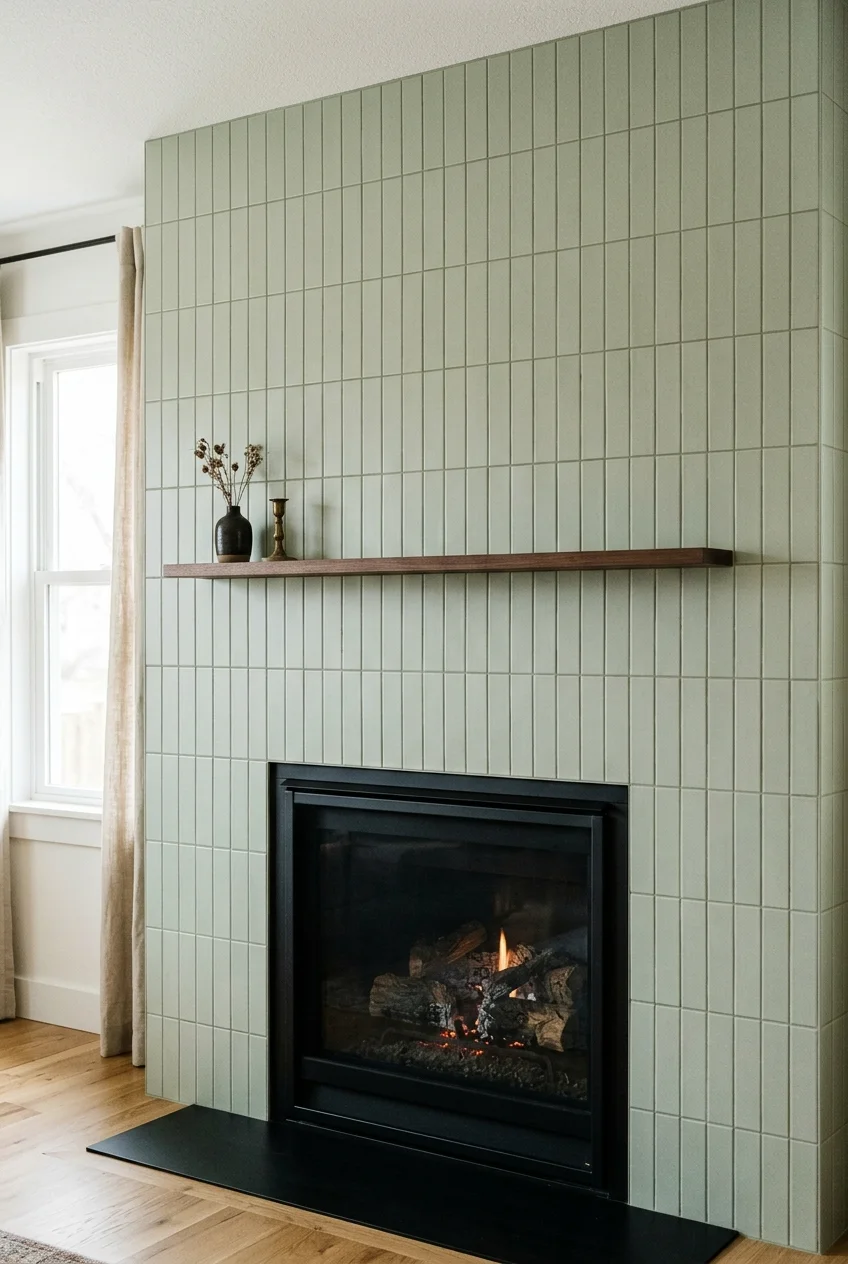
Stand slim sage rectangles upright and align their joints to draw the eye toward the mantel. A muted glaze lets the strong vertical lines lead.
If the band over the opening is shallow, compare two short courses with one taller course on paper. Favor the layout that avoids a thin top strip.
3. Marble herringbone inside a white mantel
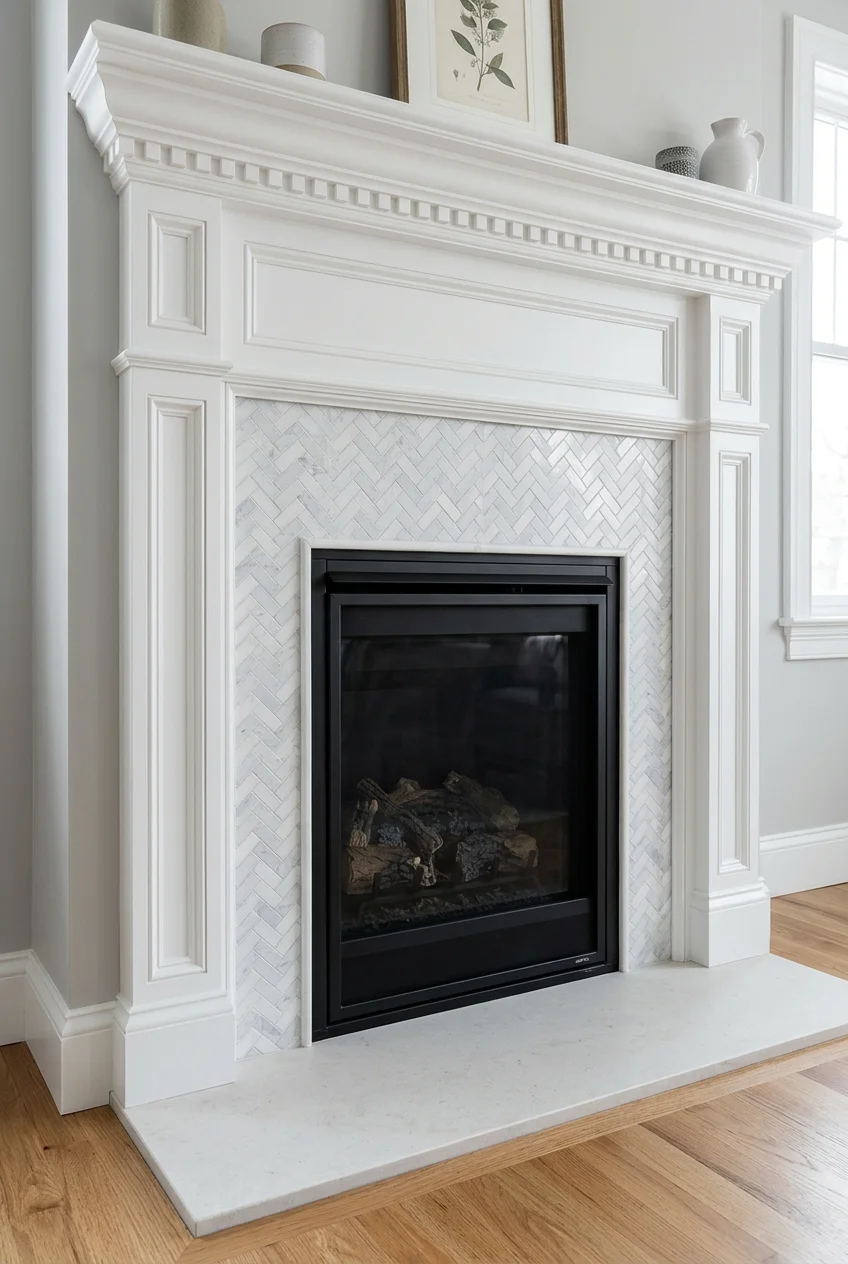
Small marble rectangles give a formal white mantel a quieter kind of pattern. Choose low-contrast grout so the veining stays visible between the angled joints.
Mark the center above the opening and move the layout sideways until the cuts on the two legs look even. Check the top corners, too.
For the hearth, compare a plain coordinating surface with the same pattern. A plain hearth makes it easier to appreciate the diagonal lines on the face.
4. Glossy handmade-look squares
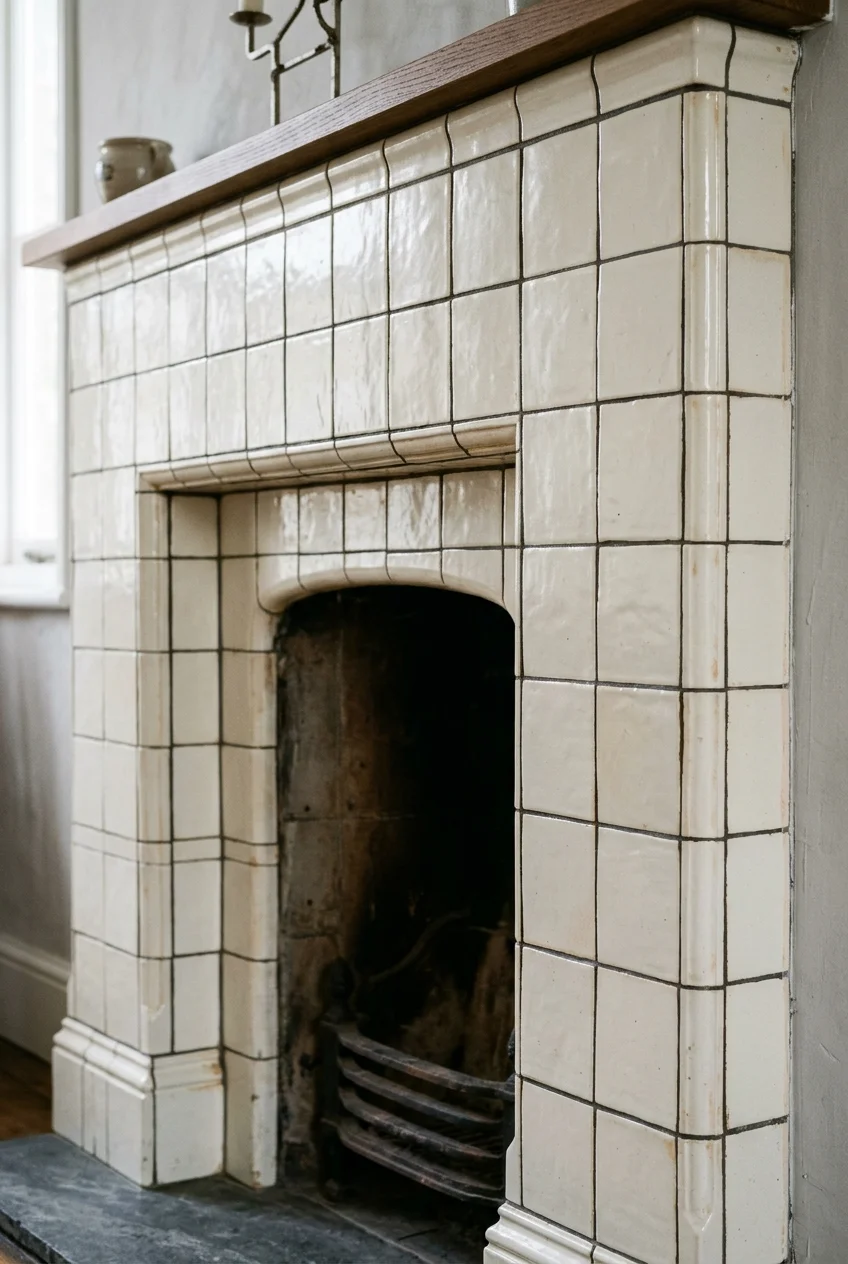
A glaze that pools slightly at the edges makes a simple square grid interesting even from across the room. Soft ivory keeps those shifts easy to see.
Put several sample tiles together on a vertical board. The value of this look comes from the difference between neighboring tiles, which one sample can hide.
5. Charcoal stacked tile with quiet grout
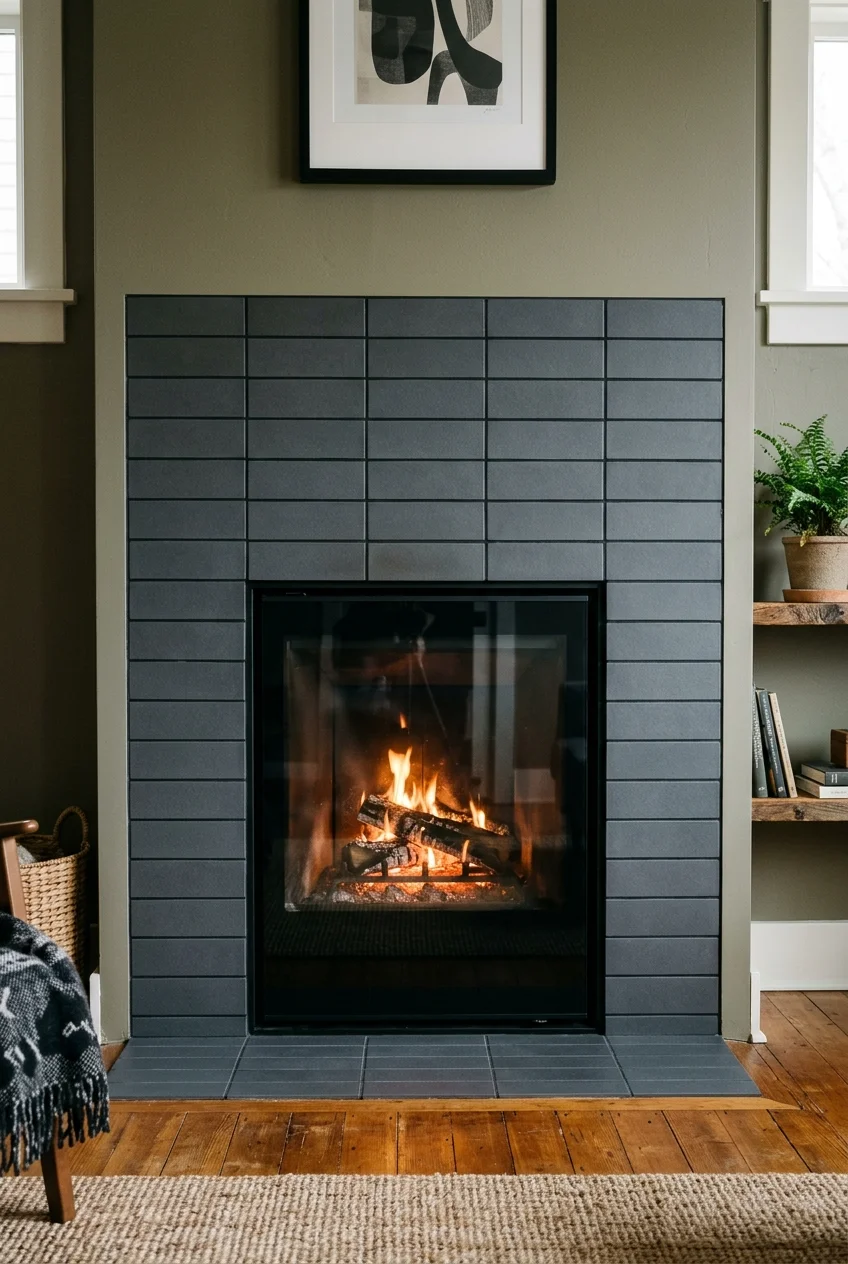
Keep the grout close to the charcoal tile color so the firebox and its surround read as one broad dark shape from the sofa at night.
A matte surface softens glare, while aligned horizontal joints keep the short sides orderly. Compare grout on a sample board before committing to a full batch.
6. Straight-set white squares with contrasting grout
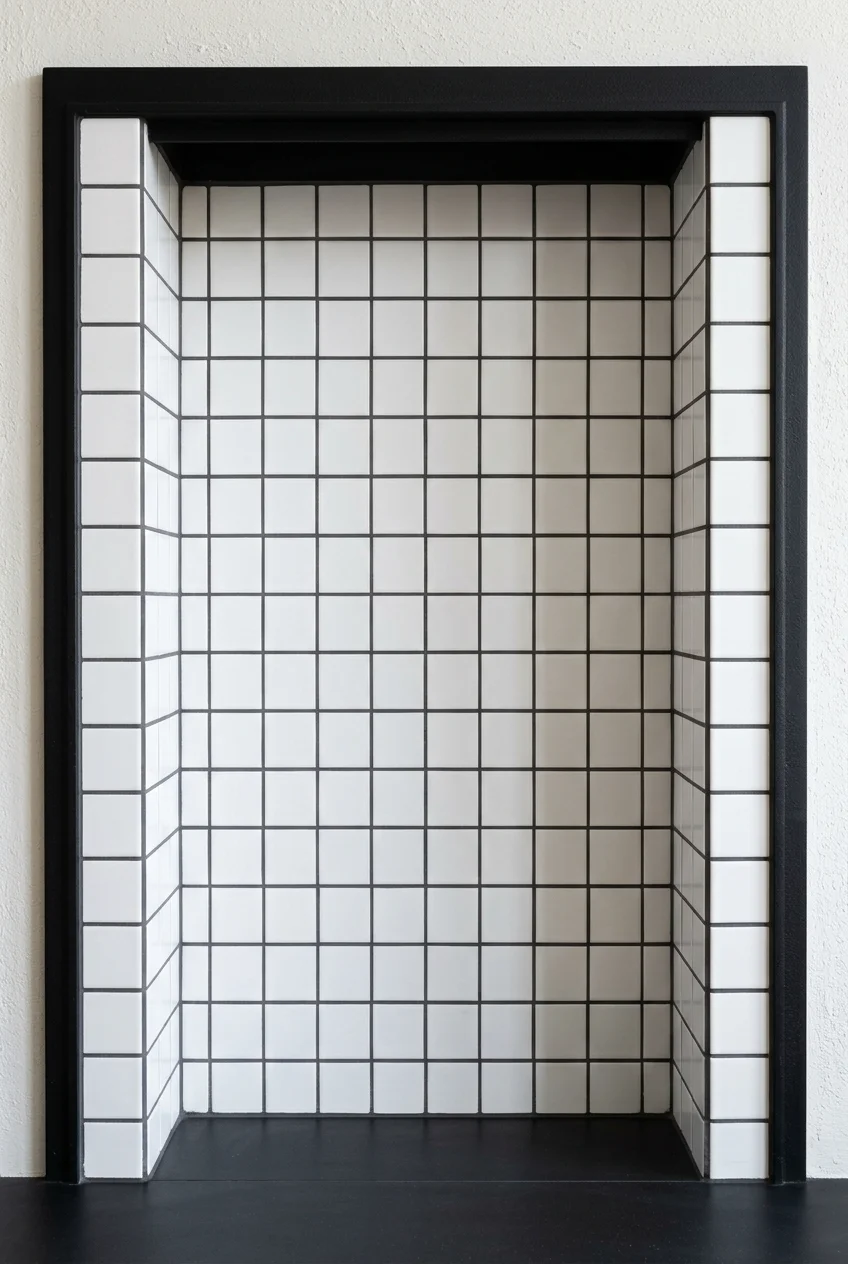
Dark grout turns white squares into graph paper, so the corner cuts get almost as much attention as the tiles. Start the drawing at the opening.
If you have only a narrow strip beside the firebox, test a smaller square first. Two balanced columns may look more intentional than a full tile and sliver.
Watch for Preview a cured grout sample on a spare tile, especially with a textured surface that might hold dark pigment. Follow the tile maker’s grout guidance.
7. Large porcelain tiles with sparse joints
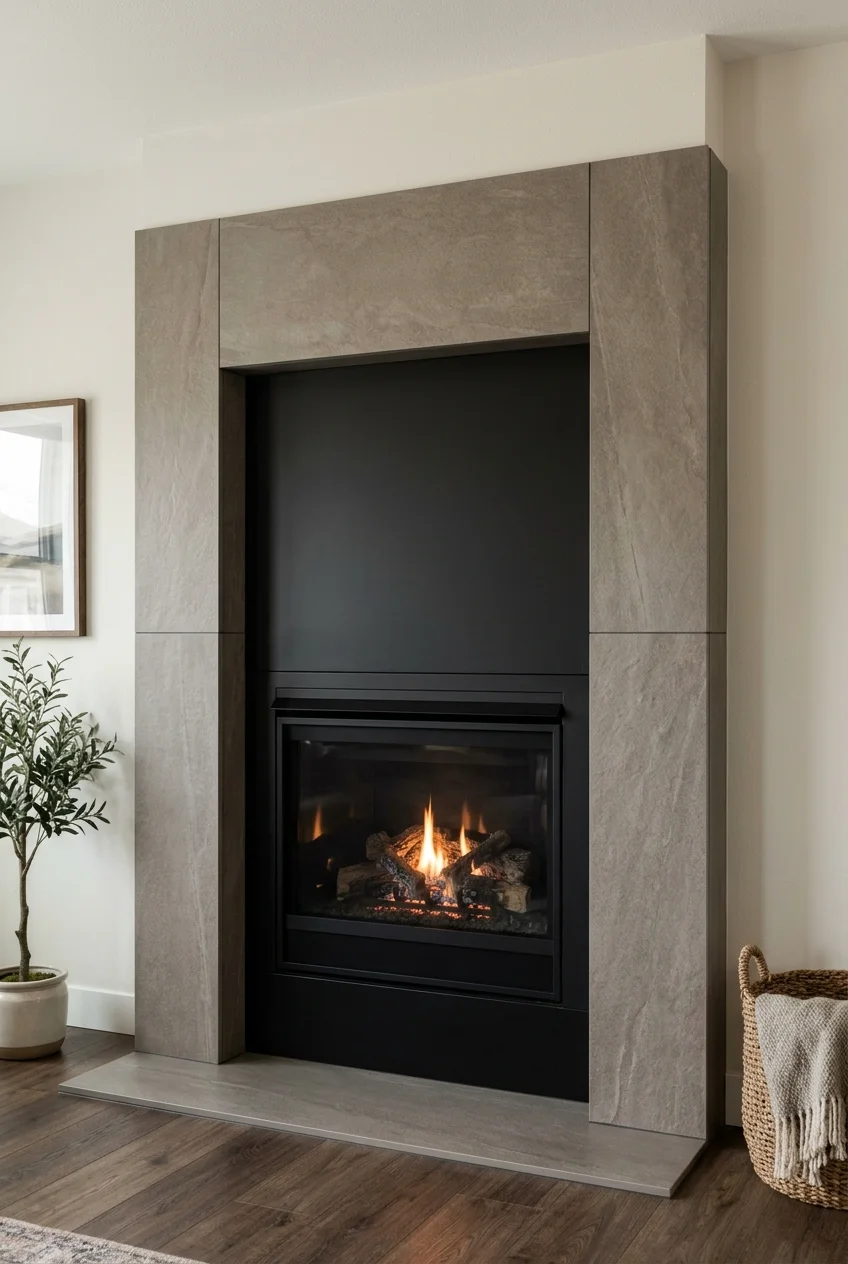
Large pieces suit a simple rectangular surround when you want the surface color to carry more weight than the grid. Start by drawing the exact tile breaks.
Position the larger uninterrupted pieces where they’ll be easiest to see from your main seat. Window light can make a badly placed seam more obvious.
Ask the installer how the proposed pieces will be cut around the opening. Separate legs and a lintel can place joints in deliberate locations and simplify handling.
Dry-fit the layout with the thickness of the tile and setting materials in mind. Check the appliance’s allowed finish depth and access to removable front parts.
8. A slate split-face strip surround
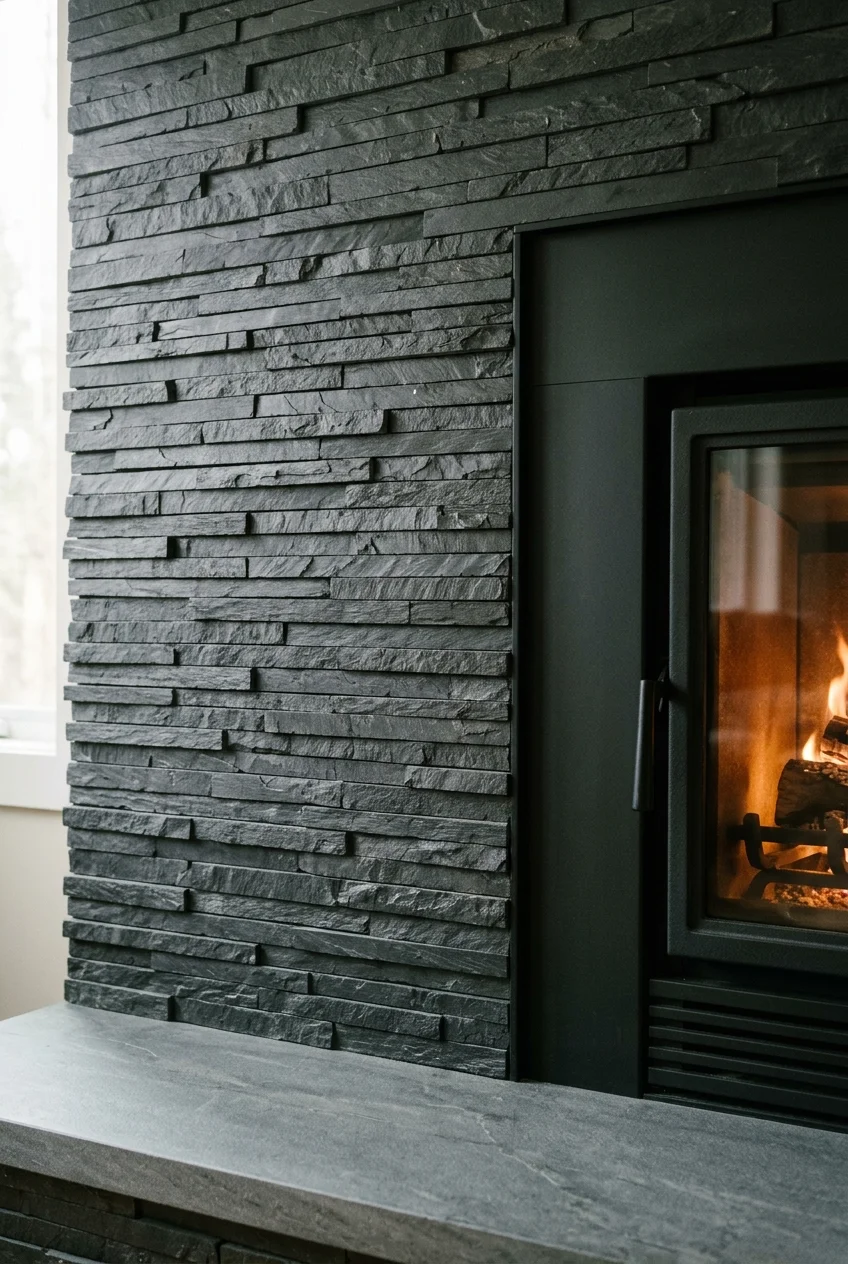
Thin slate strips cast small shadows across the surround, making texture visible without adding a strong grout grid. Use a simple mantel profile to frame them.
Plan how the textured ends will finish at the firebox and outer edge. An approved smooth border can give those irregular cuts a straighter stopping point.
Choose smooth hearth tile for an easier sweep after use. A sample of the slate beside that hearth finish helps you compare their undertones and texture.
Color and glaze that read across the room
9. Deep green tile against warm wood
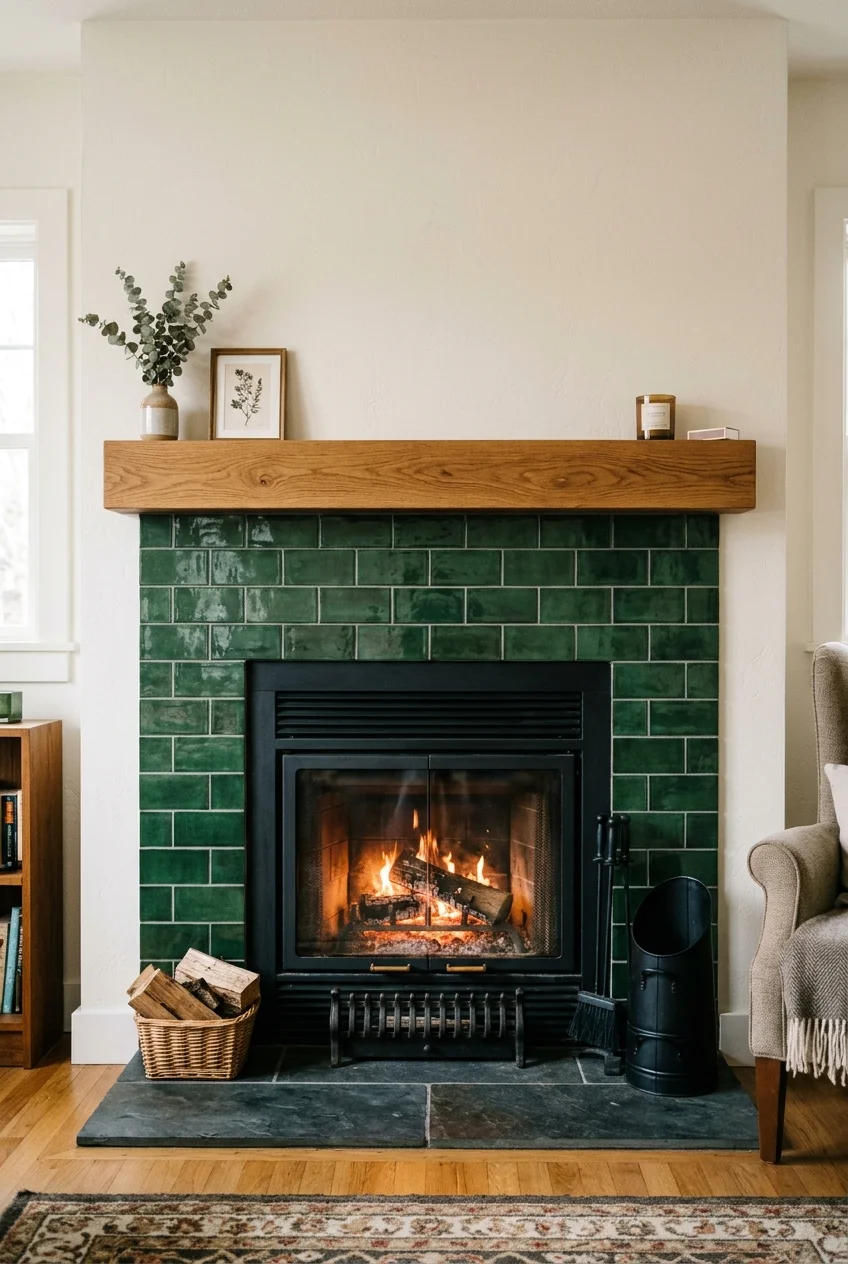
Dark green glaze has enough contrast to pull attention toward a narrow fireplace. Warm oak nearby brings out green undertones that can disappear beside cool gray finishes.
Compare the sample against the mantel at night as well as by day. Some deep greens read almost black when the fireplace wall faces away from a window.
10. Cobalt gloss for a shadowed wall
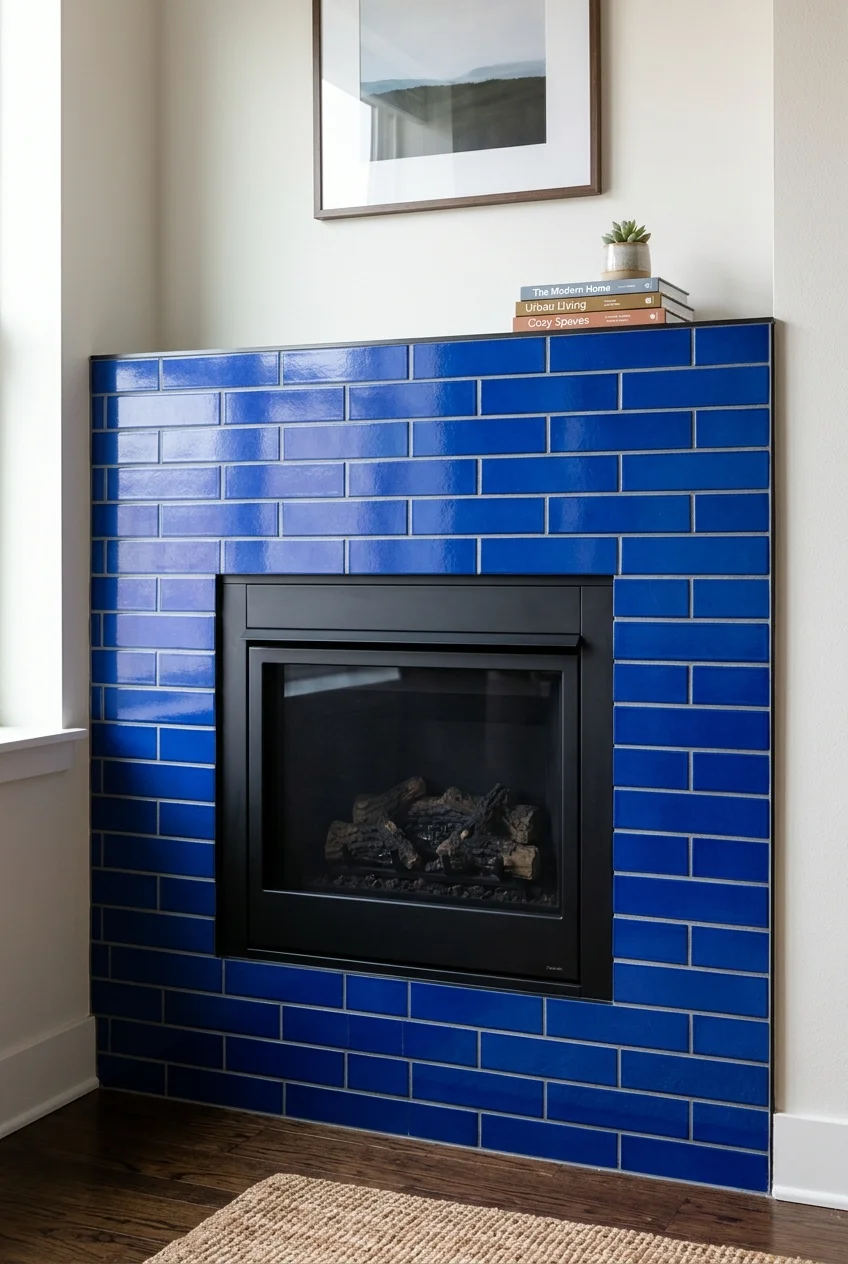
A saturated blue glaze catches reflected light in a room with little direct sun. Pick grout with a similar depth of blue so the field reads as one color.
Try the sample where the surround will sit, then look from the hallway. This is a strong color even when the fireplace is only partly visible.
11. Powder blue with a chalky matte surface
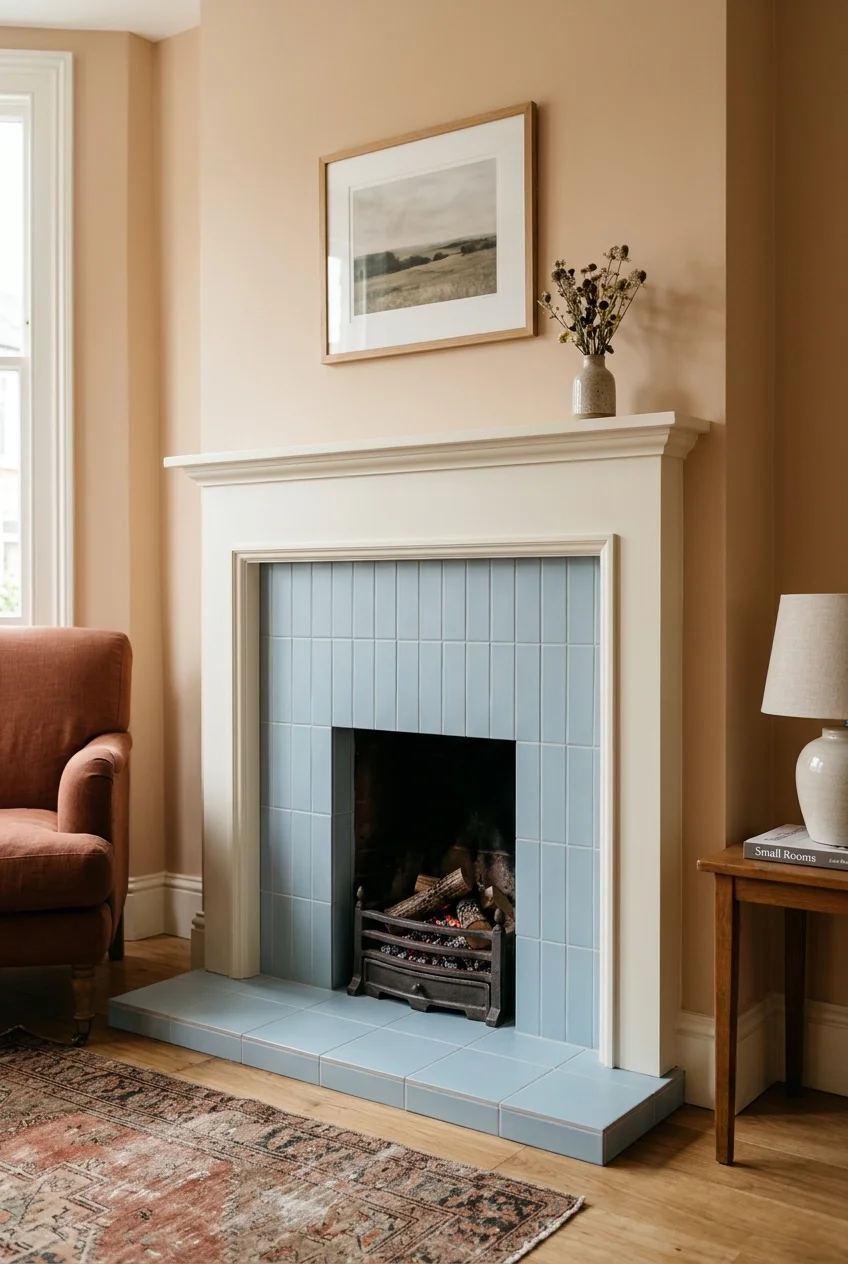
Soft matte blue looks distinctly different alongside cream trim than it does beside clean white. Sample both paint directions before settling on the surround palette.
Choose broad, simple tile shapes so the pale color stays legible at a distance. A quiet grout line keeps the frame soft without erasing the tile entirely.
12. Terracotta squares with a soft clay palette
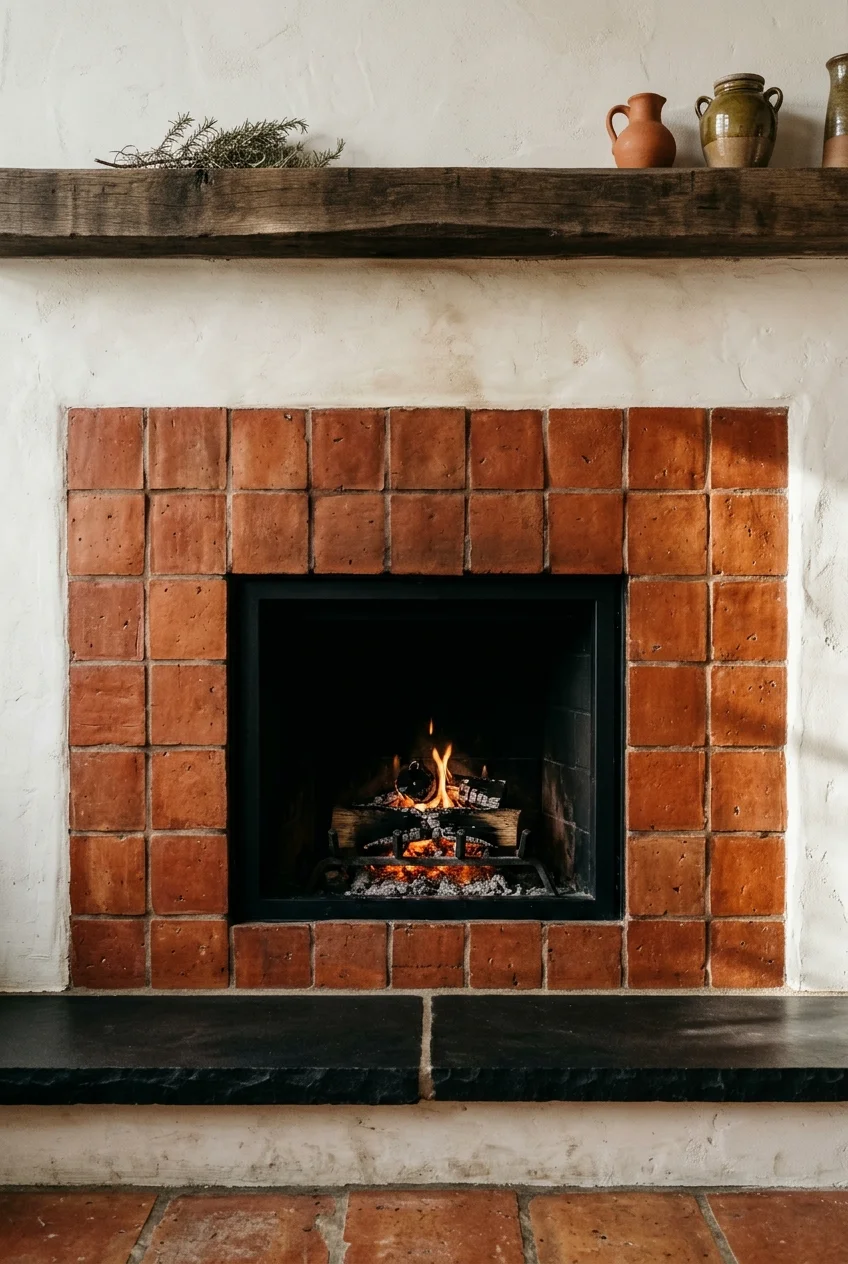
Clay tones work well with off-white plaster because the tile can carry color without demanding a sharply contrasting border. Look at a few fired shades together.
Confirm suitability for the intended location and ask about sealing and cleaning before choosing a particular tile. Porous terracotta deserves extra consideration on a working hearth.
Try a warm neutral grout rather than an orange match if you’d like the shape of each square to remain readable without introducing another strong color.
13. Wine-red glaze in a narrow band
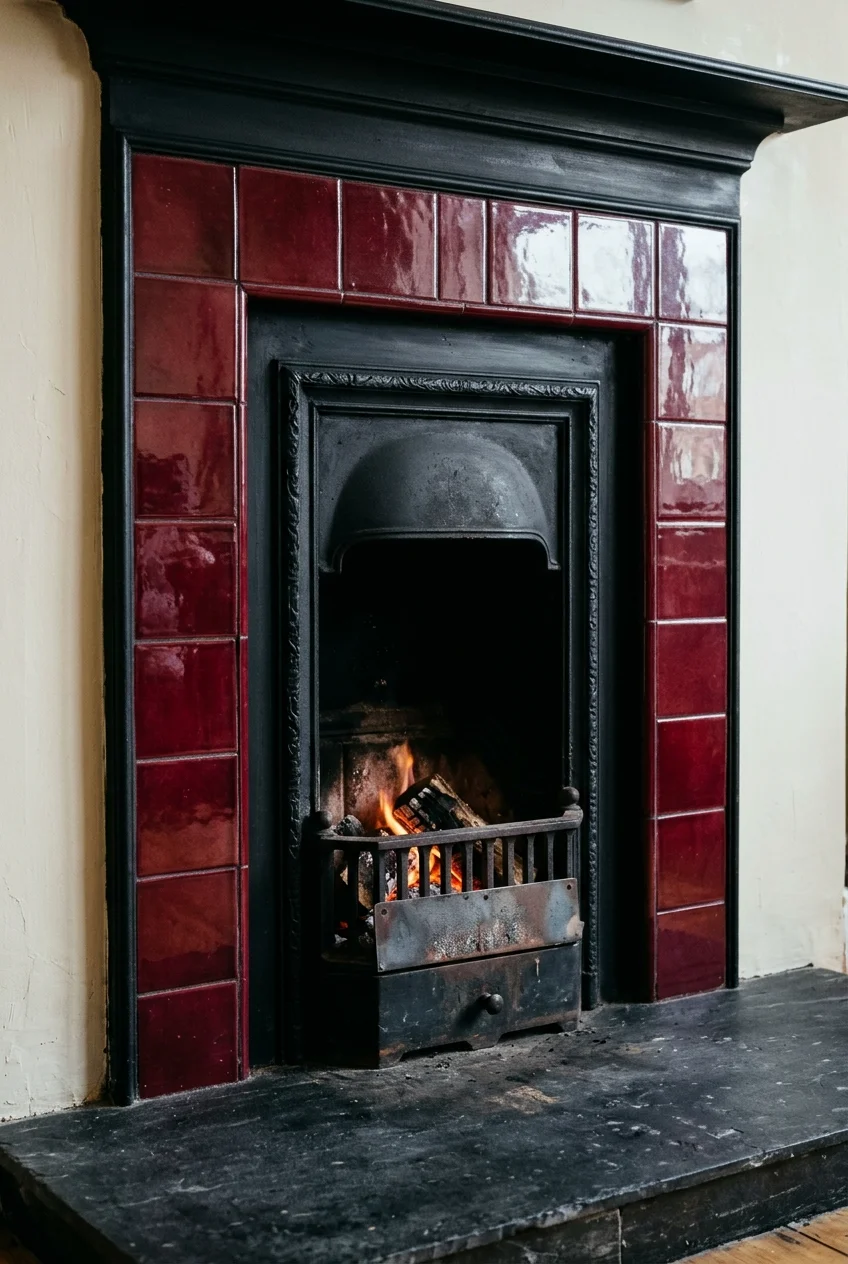
Concentrate burgundy glaze beside a dark firebox for color that looks rich without taking over the entire wall. A plain stone hearth gives the eye a rest.
Look at a sample beside your black insert frame before ordering. A wine red with a brown undertone can read warmer than a cooler berry glaze.
14. Honey and ocher in a tonal mix
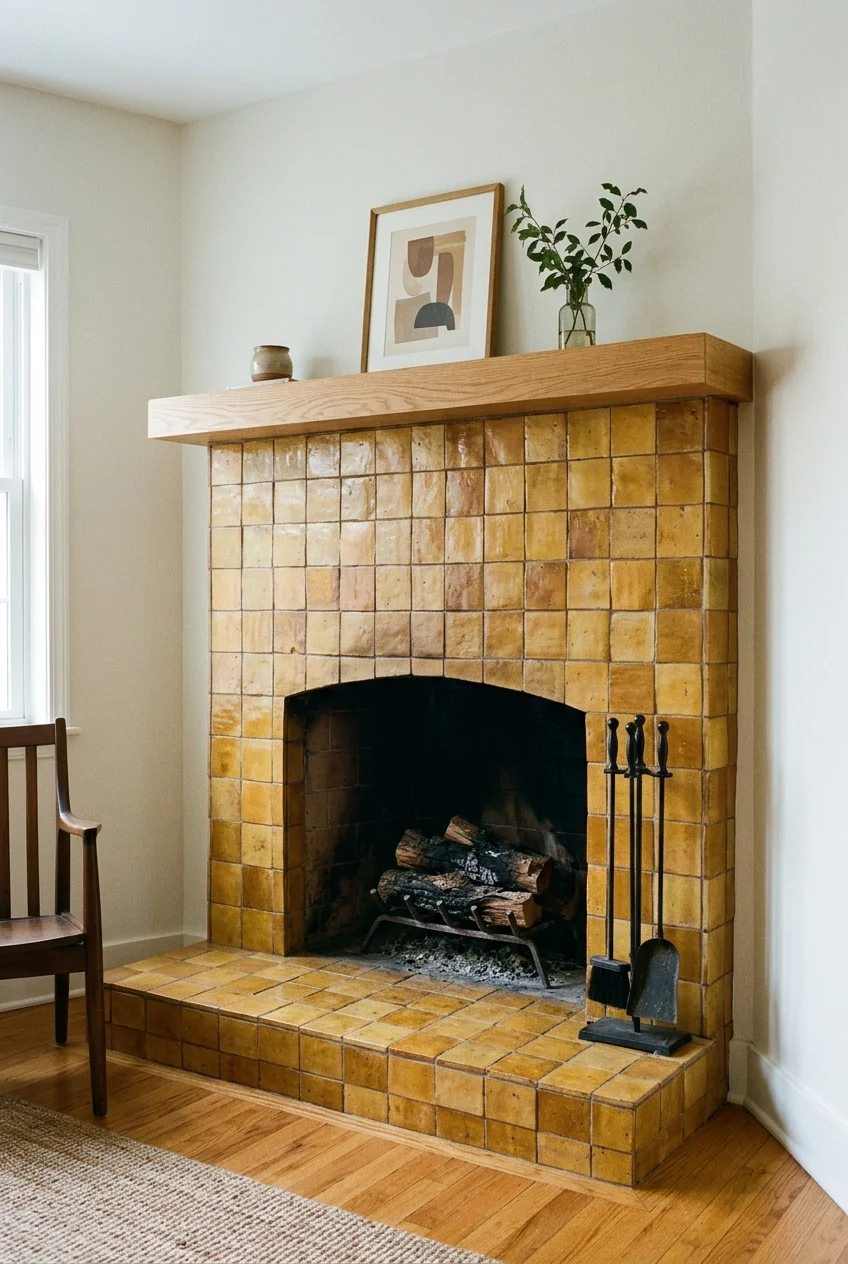
A mix of amber, honey, and ocher tiles gives a fireplace the depth of one color in several shades. Keep the pieces one size for continuity.
Before setting anything, spread out several cartons and shuffle the tones. Stand back to spot a dark patch or satisfyingly balanced cluster before you commit.
Practical tip Photograph the dry layout in black and white. The image makes big jumps in value clearer when it’s hard to compare similar warm colors by eye.
15. A blue-black to blue-gray gradient
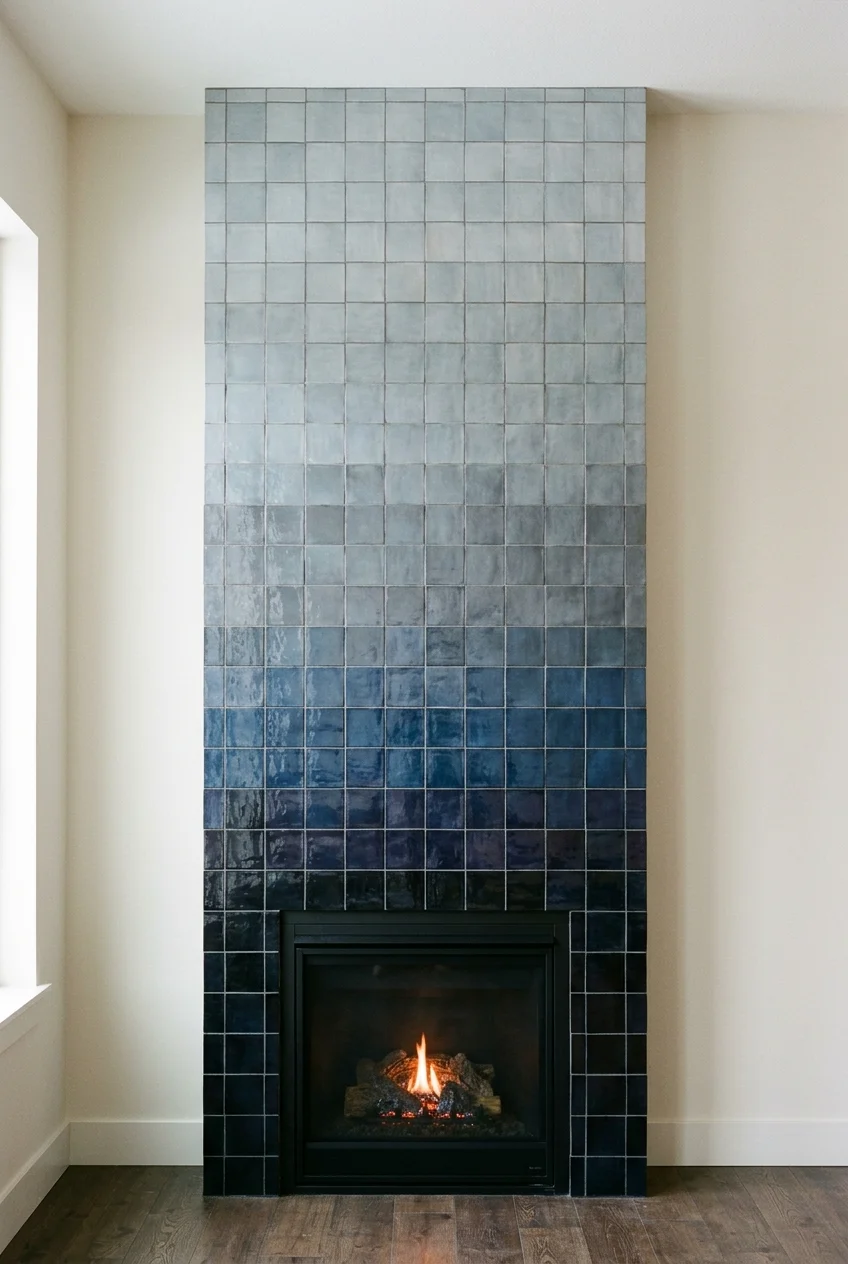
A planned gradient gives tall tilework direction. Concentrate the deep blue-black shades around the opening and let closely related blue-grays take over near the top.
Work from a drawing that assigns a shade to each course. Blend adjacent colors within their transition rows so the result looks gradual from the sofa.
Ask for physical samples of every shade and check their dimensions and thickness together. Matching color through a catalog alone makes this layout harder to predict.
- Arrange the entire gradient on the floor first.
- Group and mark courses by row for the installer.
- Compare all shades under the room’s evening light.
16. Gloss and matte in the same color
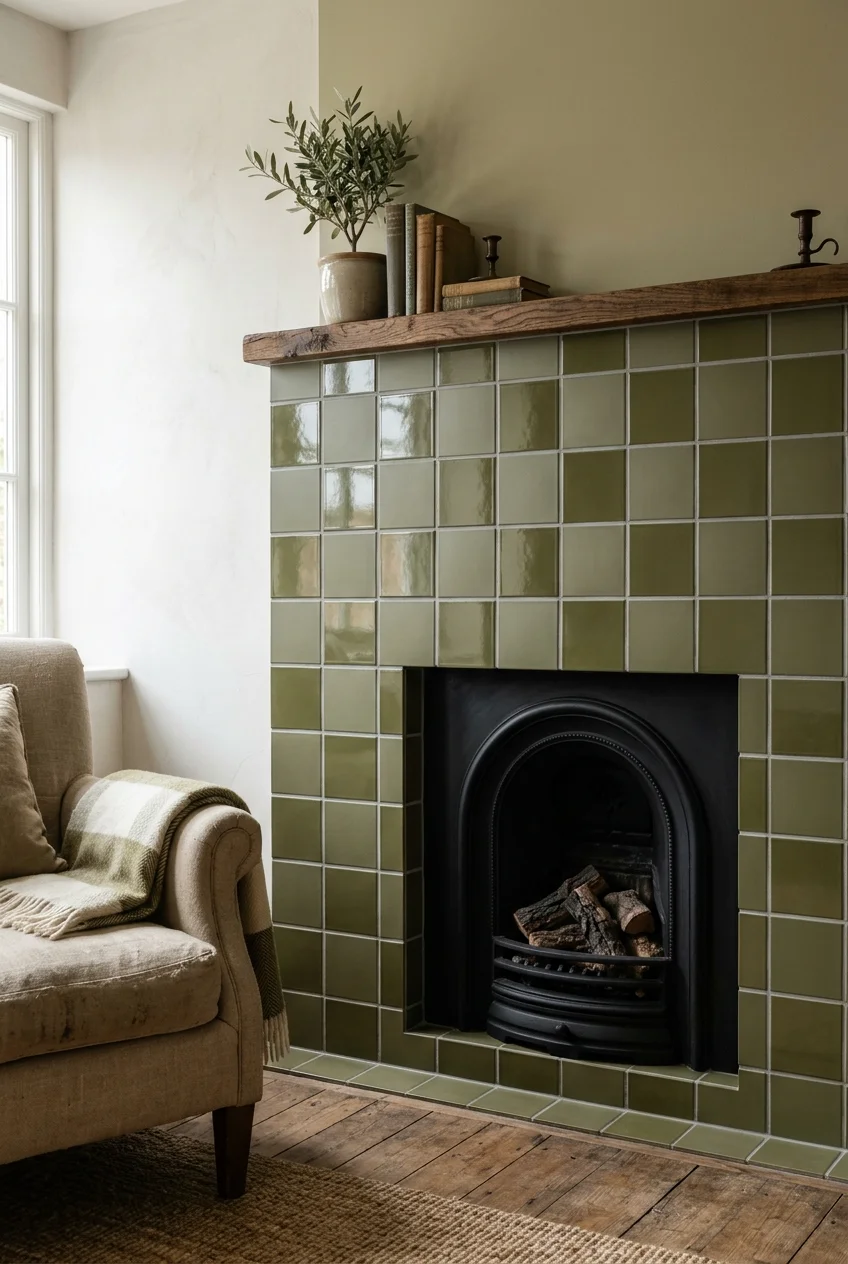
Alternate matte and gloss tiles in one hue for a pattern that appears as you move. This works where side light can catch the two surfaces.
Set out sample pairs and check their thickness and face size. A matching color name tells you little about how cleanly the two finishes will sit together.
Pattern, borders, and focal details
17. Patterned cement-look porcelain on the face
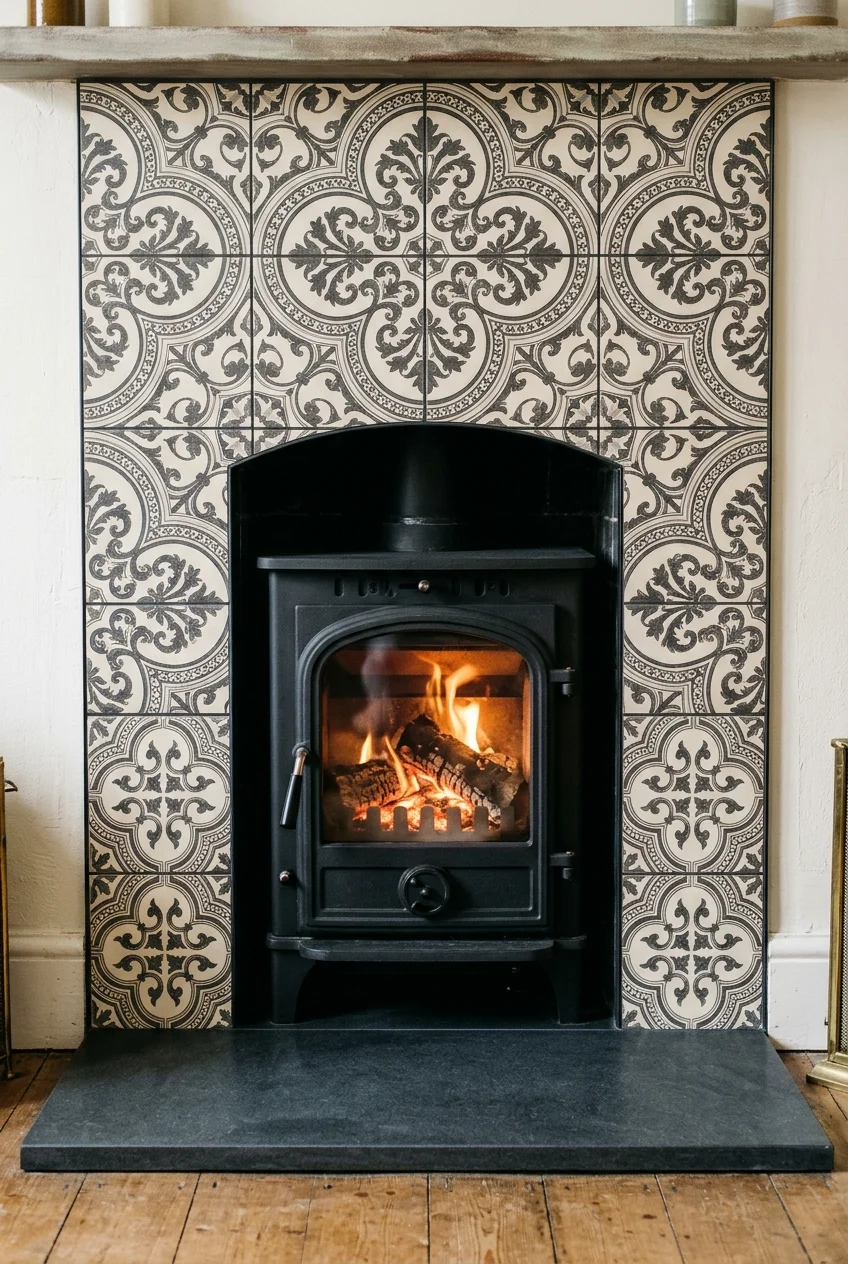
A repeating medallion is easiest to see where you have room for several complete motifs. Carry it over the lintel and keep the hearth a solid color.
Assemble several pieces before buying. Some designs form a larger pattern across four tiles, so one product photo won’t tell you what fits across your opening.
Draw the face to scale and move the repeat until the most recognizable motifs land on broad surfaces. Check how the pattern ends on both sides.
18. A checkerboard centered on a grout line
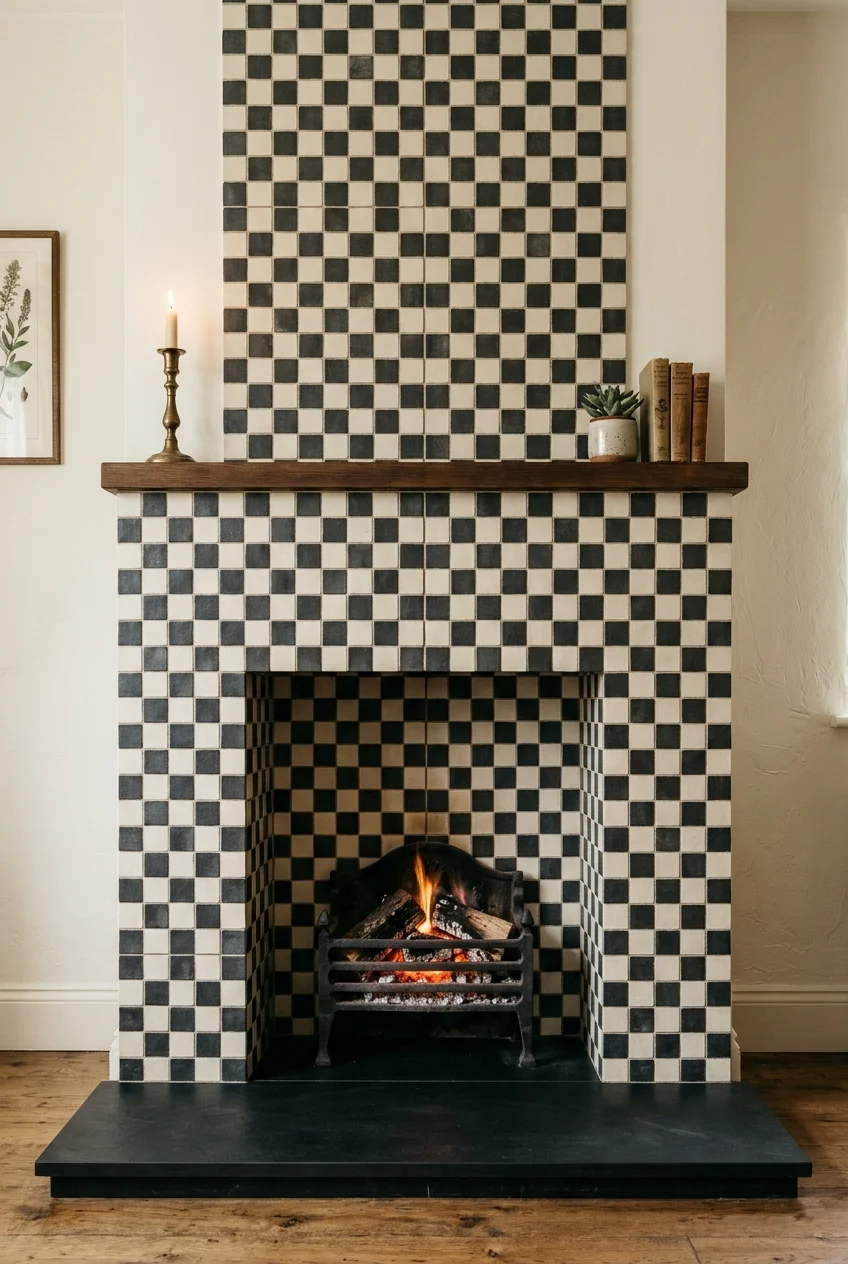
Use warm cream and muted black checks on the face for a bold fireplace in a room with simple walls. Keep the tile size modest beside the opening.
Try moving the grid half a tile in the layout drawing. The shift can put a clean seam at the center and leave matching cuts at the outer edges.
Pick a solid hearth color already in the pattern. A second checkerboard on the floor can make it harder to see where the fireplace itself ends.
19. True chevron with a vertical centerline
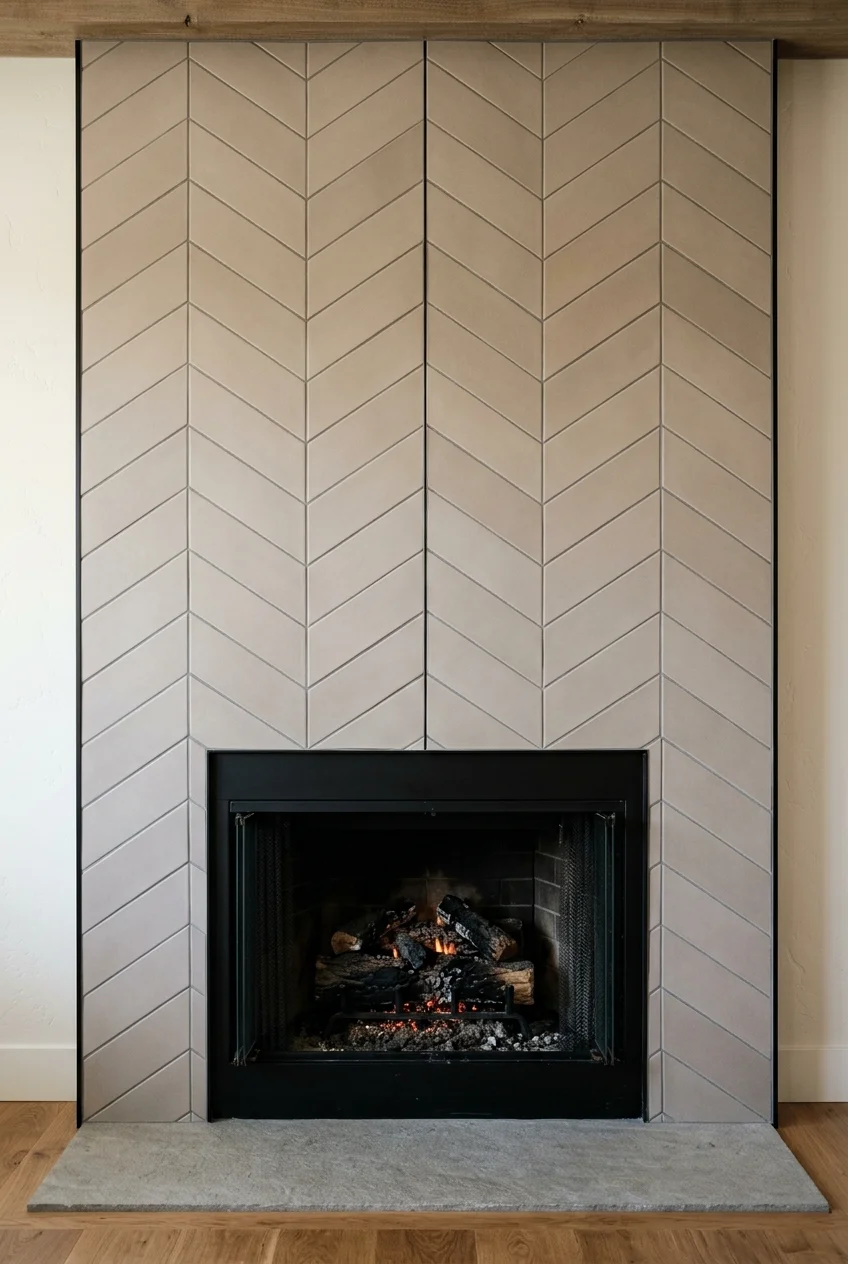
Chevron uses angled ends to meet at sharp points. Center one run of points above the opening so the pattern feels tied to the fireplace below.
Dry-lay matching left and right pieces before cutting. The outer edges will need a deliberate finish, especially where angled pieces meet a narrow painted surround.
20. Slim contrasting border around a plain field
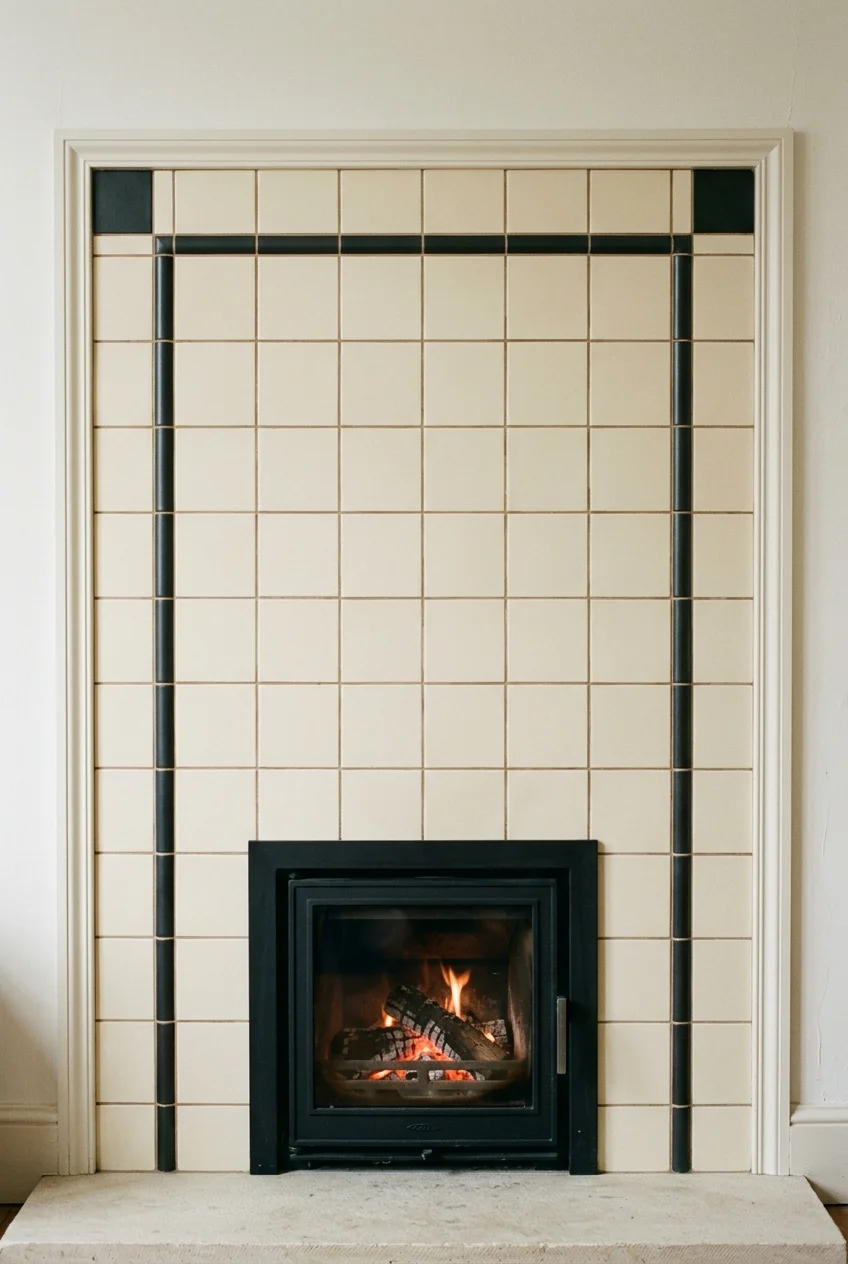
A single dark border gives plain cream tiles the definition of a picture frame. Set its width on paper first so it feels proportional to the opening.
Plan the corners as part of the design. Matching factory corners or a coordinated square corner piece can make the border look cleaner than a patched turn.
21. Arts and Crafts relief tile accents
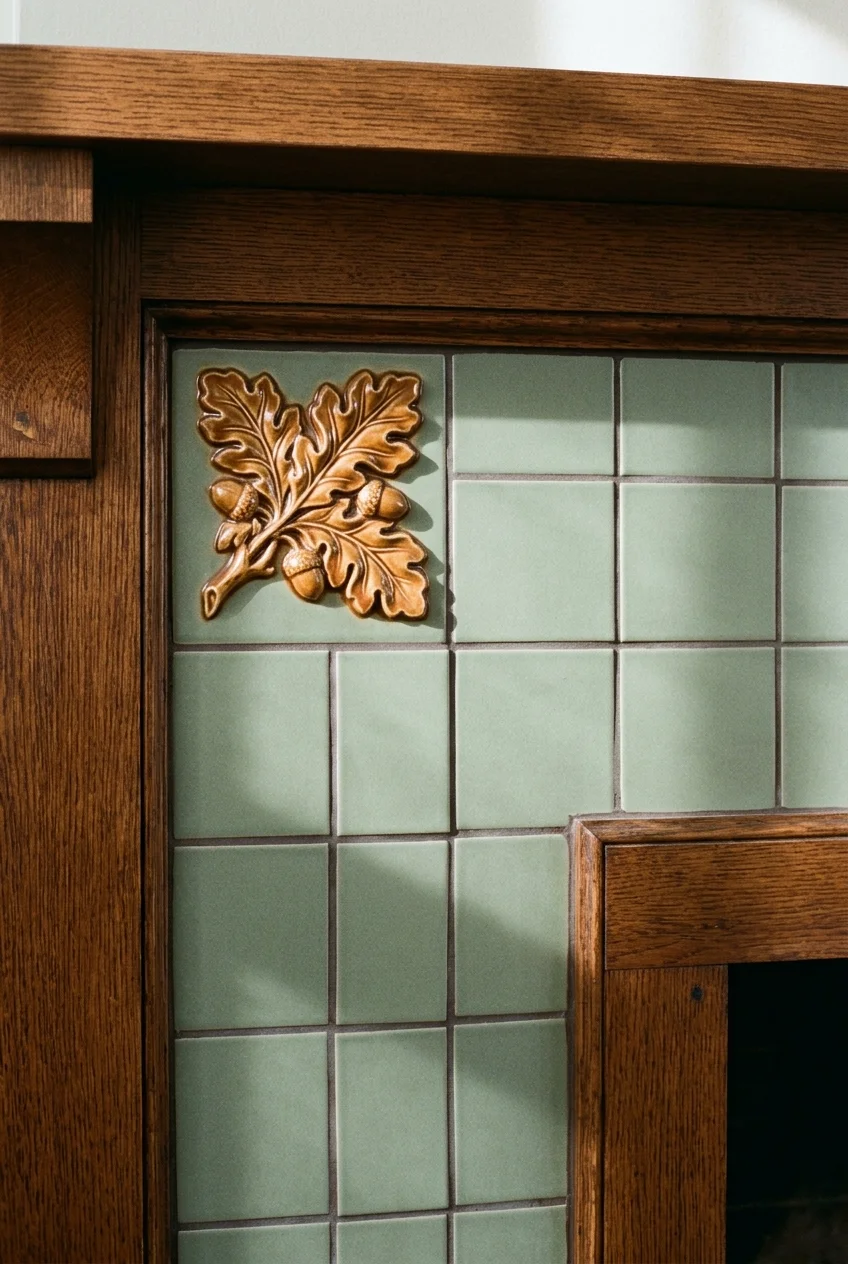
A handful of raised botanical tiles can give a broad surround a handcrafted rhythm. Put them near the upper corners, where a viewer can see the relief.
Compare their thickness to the field tile before drawing the layout. A planned change in plane reads like detail, while a mismatched edge can look accidental.
Repeat the field tile’s glaze family in the accents to keep the relief subtle, or choose a warmer contrast when you want the corner detail to stand out.
22. A tiled arch around an existing arched opening
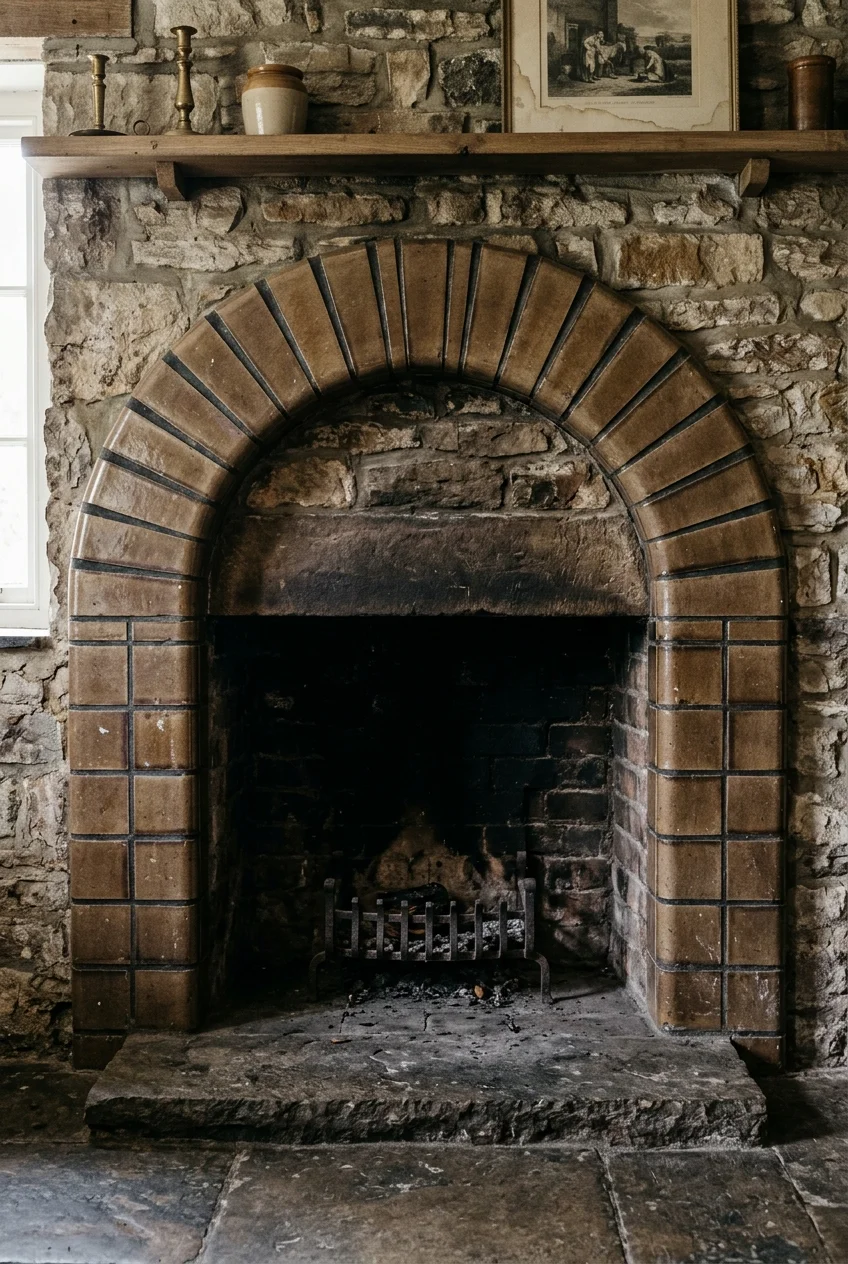
Small wedge-shaped or purpose-made arch pieces let the joints fan around the opening. An even outer curve does more for the look than an elaborate pattern.
Start with a full-size tracing of the arch and check whether the two sides actually mirror each other. Older openings can look symmetrical from a distance.
Plan the transition where the curve meets the straight legs. Ask the installer to show how the first radial joint sits beside the last straight course.
Preserve the existing opening geometry and any required clearances. For a listed unit, check how its front and finishing details meet the proposed tile before ordering.
23. A hand-painted frieze above plain legs
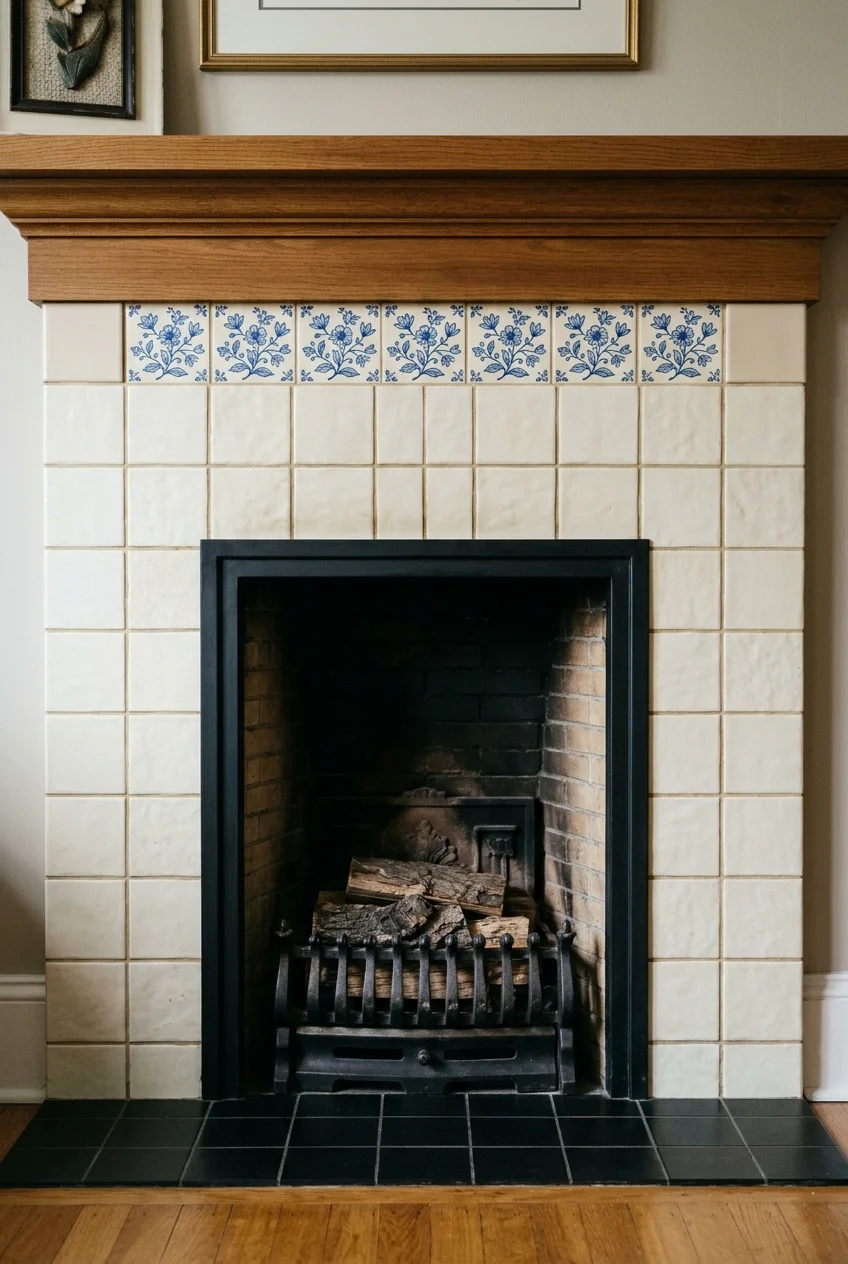
A single horizontal row of painted motifs can bring color to a fireplace while keeping the side legs quiet. Choose a repeat you can center above the opening.
Draw the full row before you order. If the last motif would be awkwardly cropped, finish with short lengths of plain field tile at each end.
24. Tiny mosaics on a recessed band
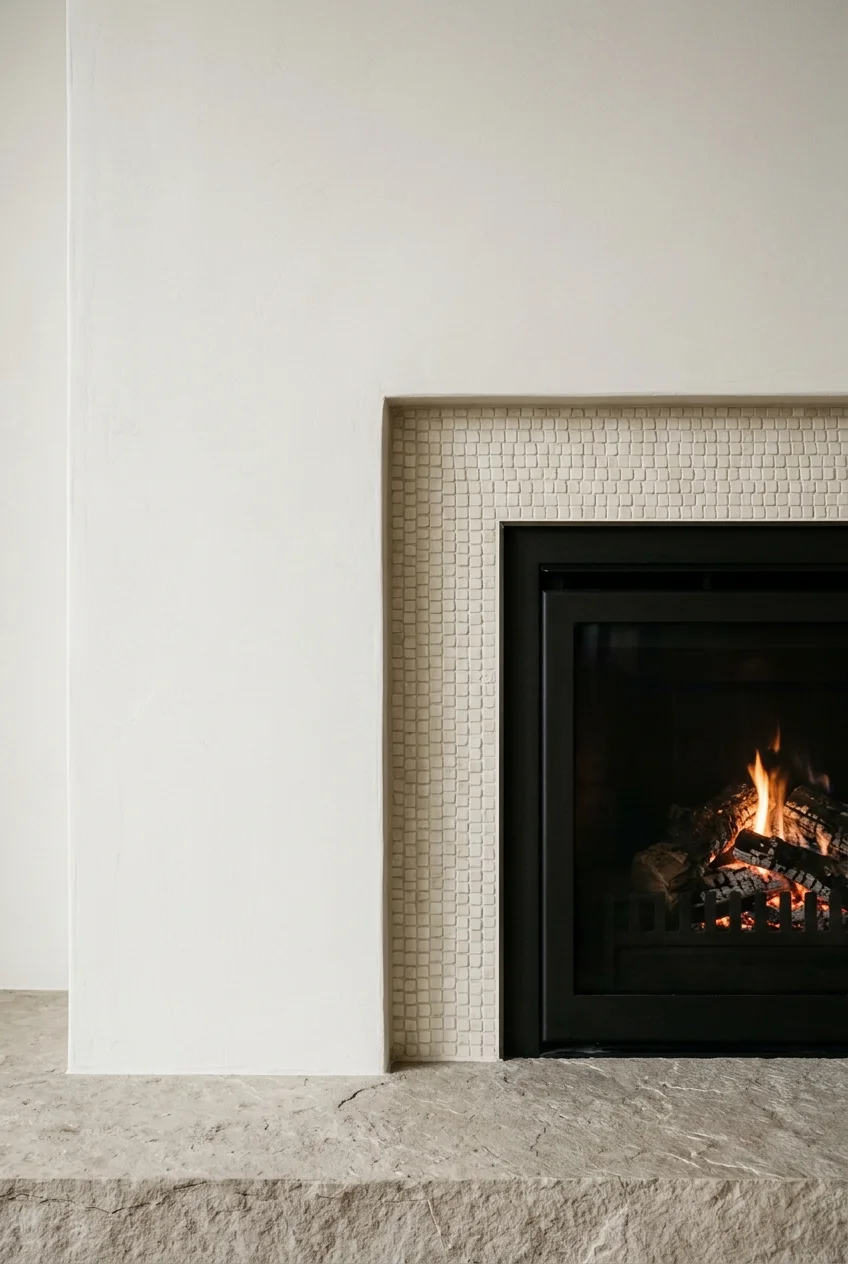
Small mosaics make sense in a shallow recessed band where large pieces would leave skinny cuts. A single understated color lets the shadow line show clearly.
Compare a pair of adjacent sheets before ordering. The spaces between sheets should blend into the smaller joints, especially where the tile turns near the face.
Ask the supplier whether the full mosaic, including its backing and mounting system, is approved for the intended fireplace location. Choose the setting materials accordingly.
Tile materials that change the character of the fireplace
25. Honed limestone tiles in long horizontal courses
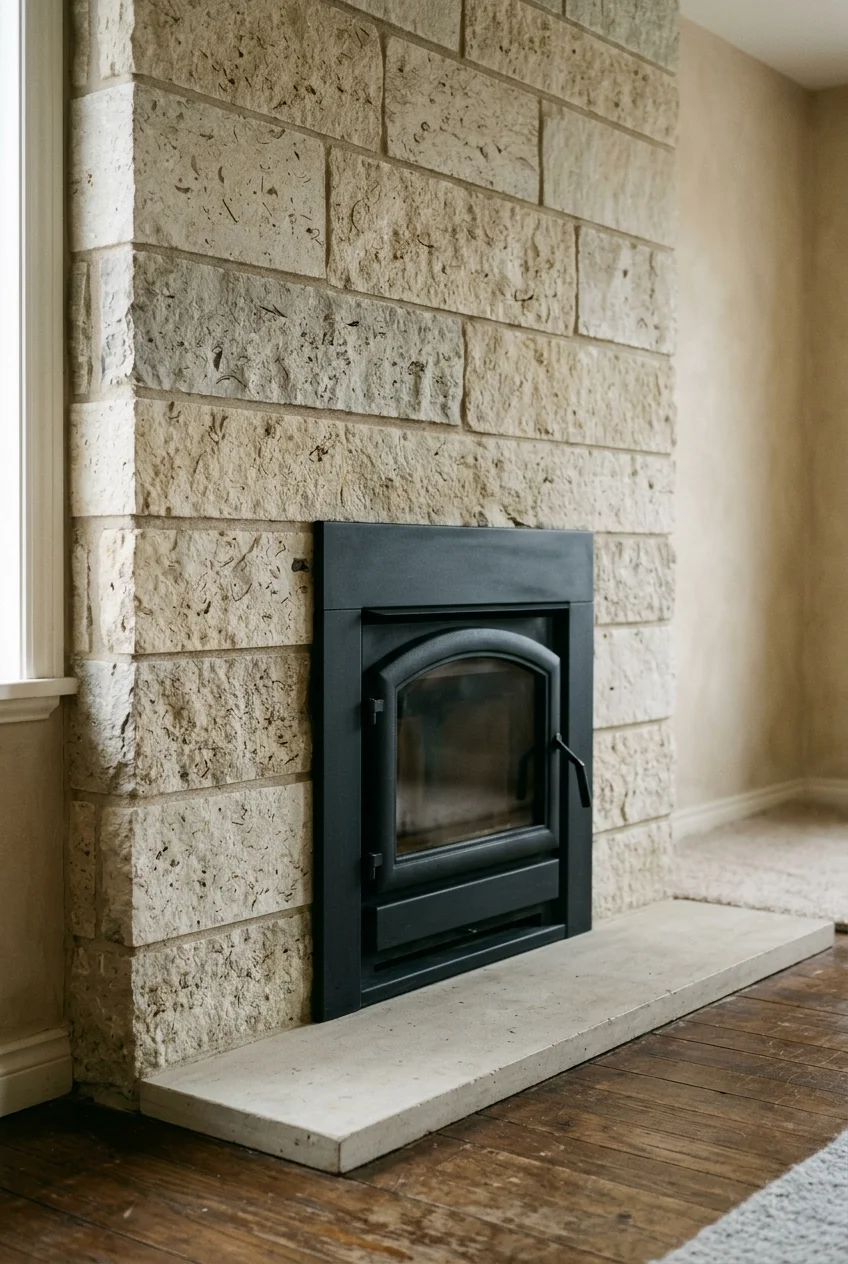
Long honed limestone pieces give the fireplace a soft, dry finish. Low-contrast joints keep attention on the subtle fossils and color shifts across the stone.
Ask the stone supplier about cleaning and sealing, then compare an untreated sample and any proposed sealed sample. Some treatments can change the look you chose.
26. Veined porcelain with a planned vein flow
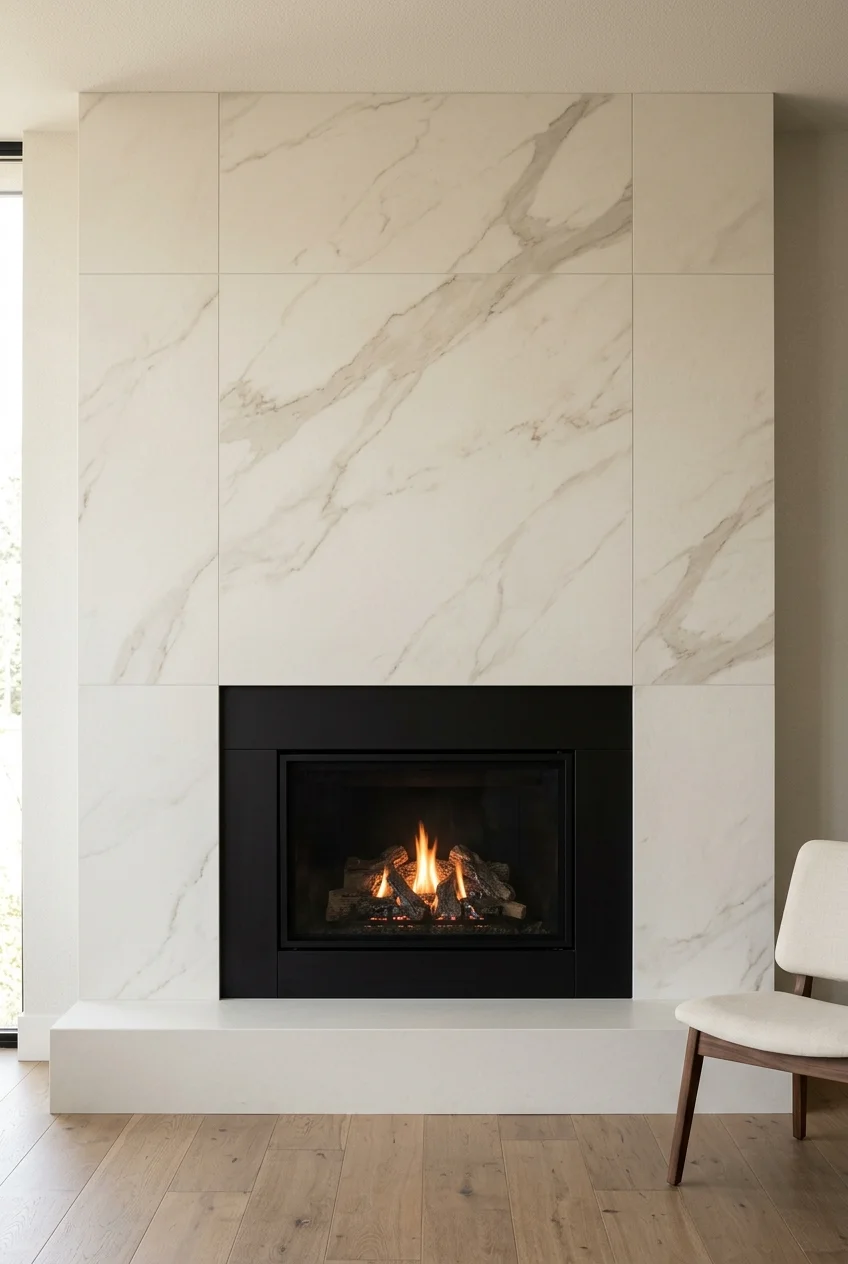
Large marble-look porcelain tiles can suggest a continuous slab if you plan where the veins cross the joints. Start by comparing full tiles across several boxes.
Photograph the best dry layout and number the pieces on your drawing. Aim for veins that flow across the surround with a believable change in direction.
Set aside tiles with a conspicuous repeat for less visible cuts. View the proposed face from the sofa, where matching loops or stripes often become clearer.
27. Slim brick tile with neatly struck joints
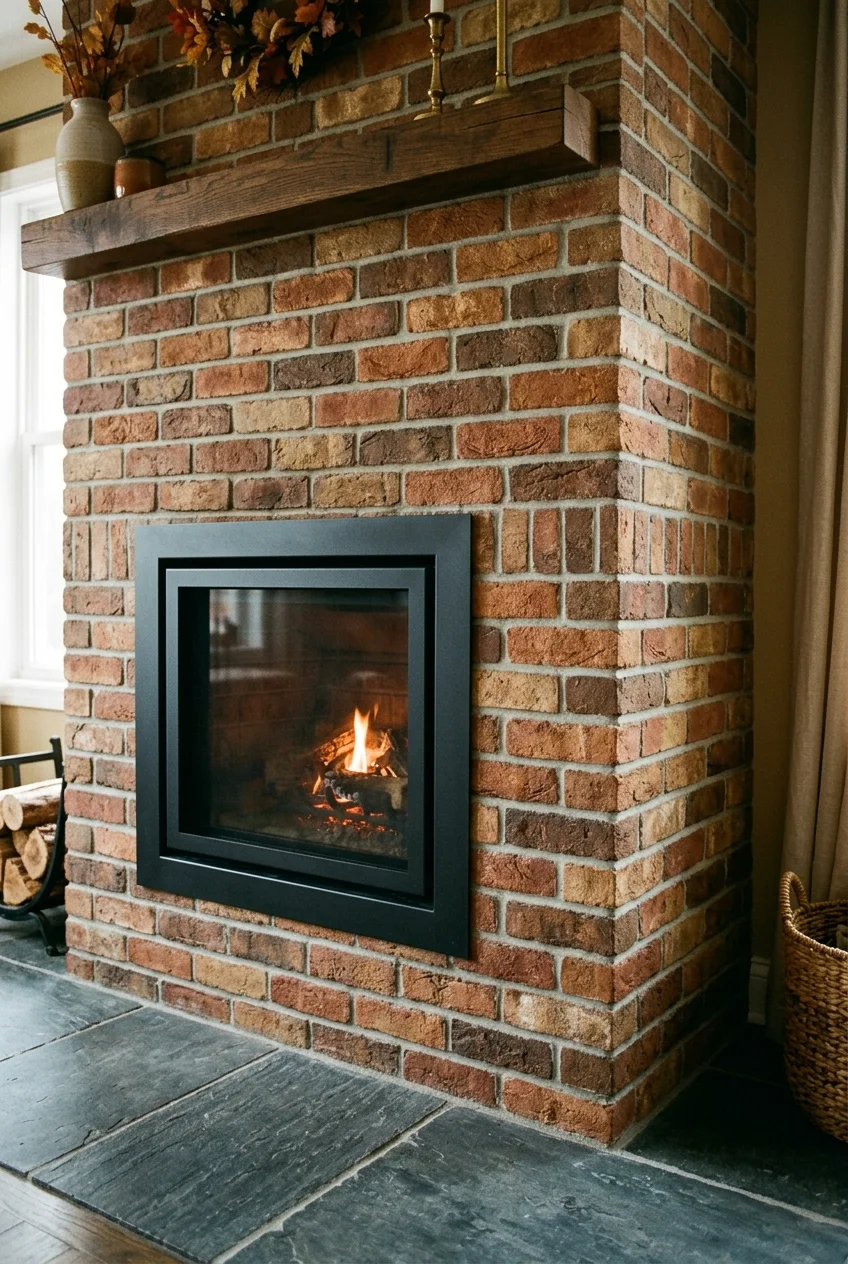
Thin brick gives you the look of a laid brick face in a compact profile. Choose rectangles with compatible corner pieces if the surround will wrap a projecting breast.
Look at grout joint samples at full size. A deep shadow line picks out every brick, while a flatter joint lets varied clay tones lead the design.
28. Reeded tile above a smooth lower band
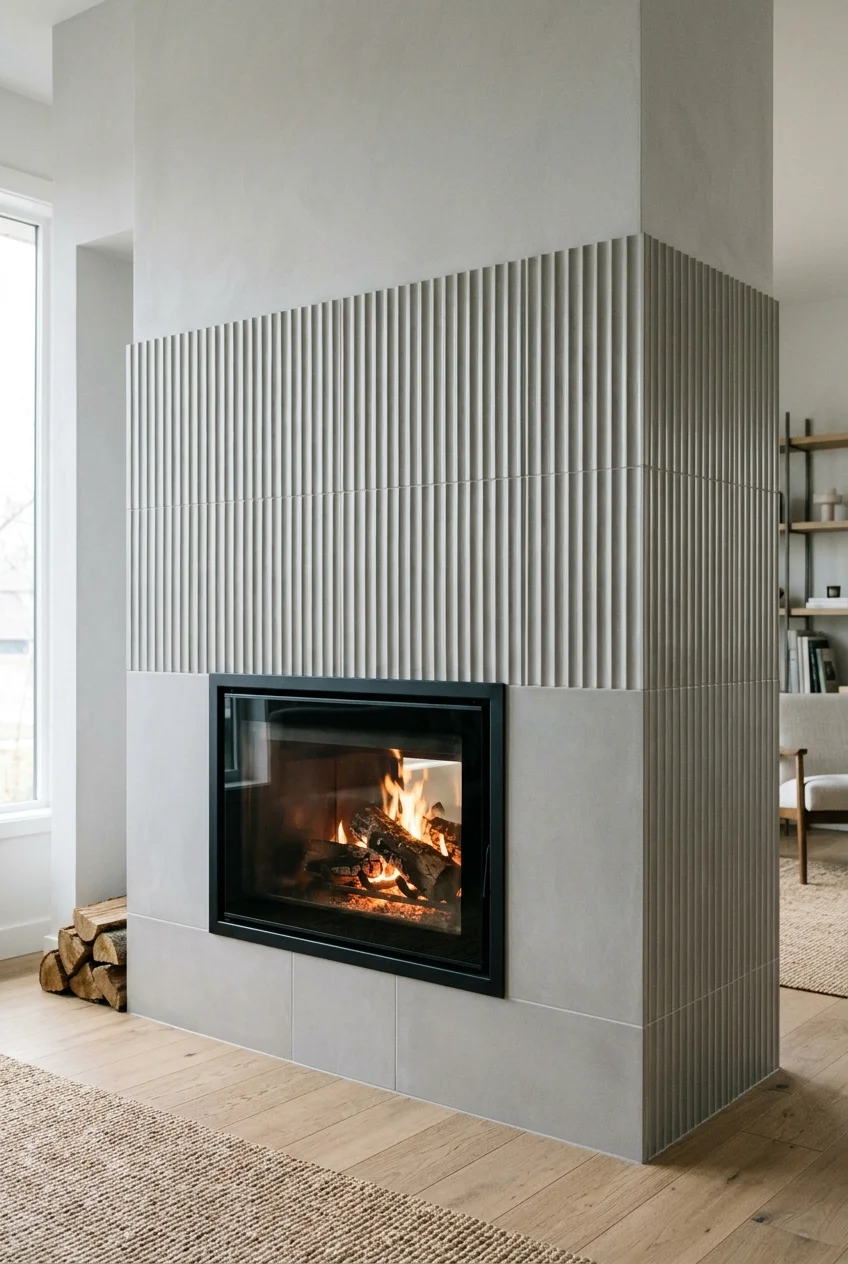
Keep vertical ribs on the upper part of the fireplace, where their shadows have space to show. Smooth field tile beneath makes the lower area easier to wipe.
Check the visual break between the two finishes from across the room. An upper edge aligned with a mantel or trim line can make the transition feel planned.
Choose compatible thicknesses or have the installer draw a finished transition. Projecting ribs are much more noticeable at a cut side edge than in the center.
29. Terrazzo-look porcelain with scattered chips
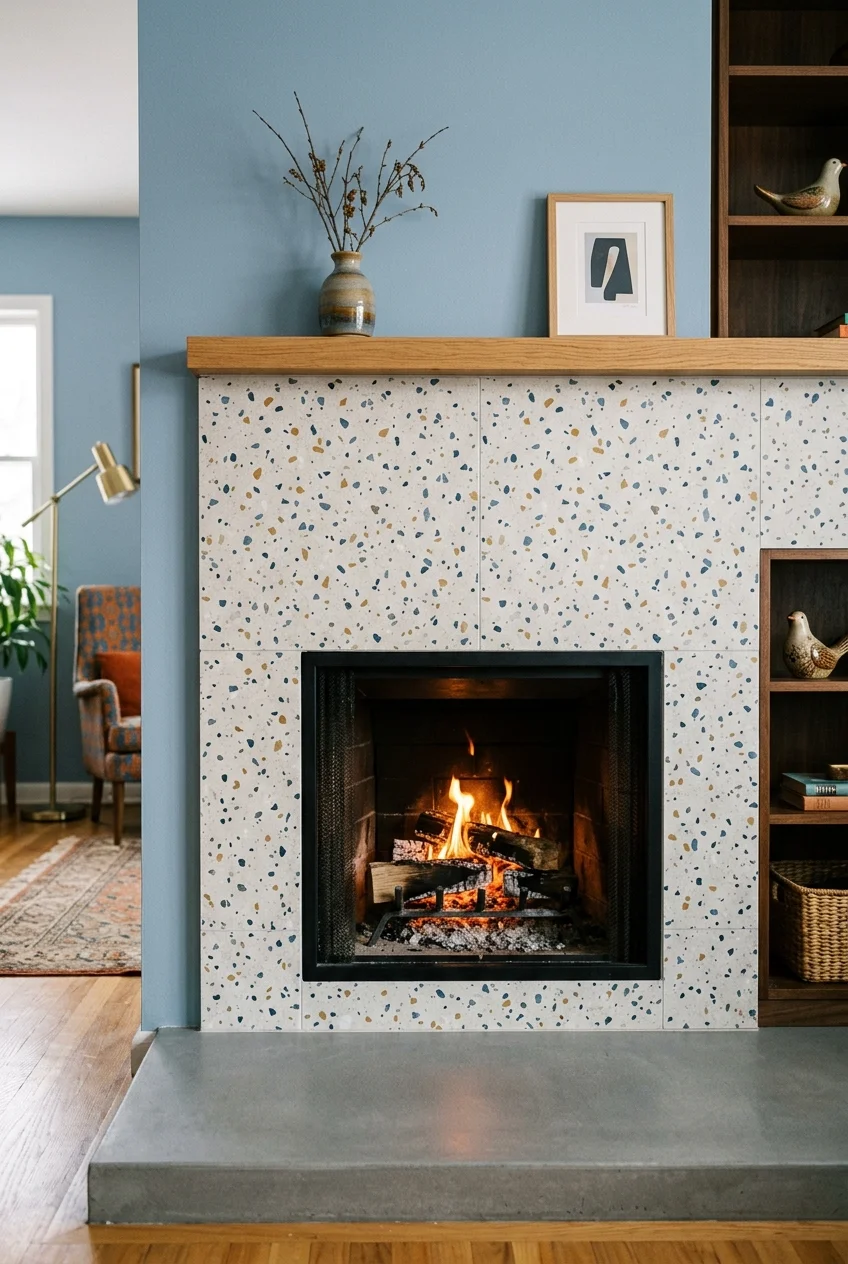
Choose a chip scale that fits the visible band around the firebox. A few large fragments can get lost if each leg is only one tile wide.
Look for a terrazzo print with several distinct faces, especially when laying larger pieces side by side. Pull one chip color into the adjacent wall paint.
30. Punched tin-look ceramic as an accent panel
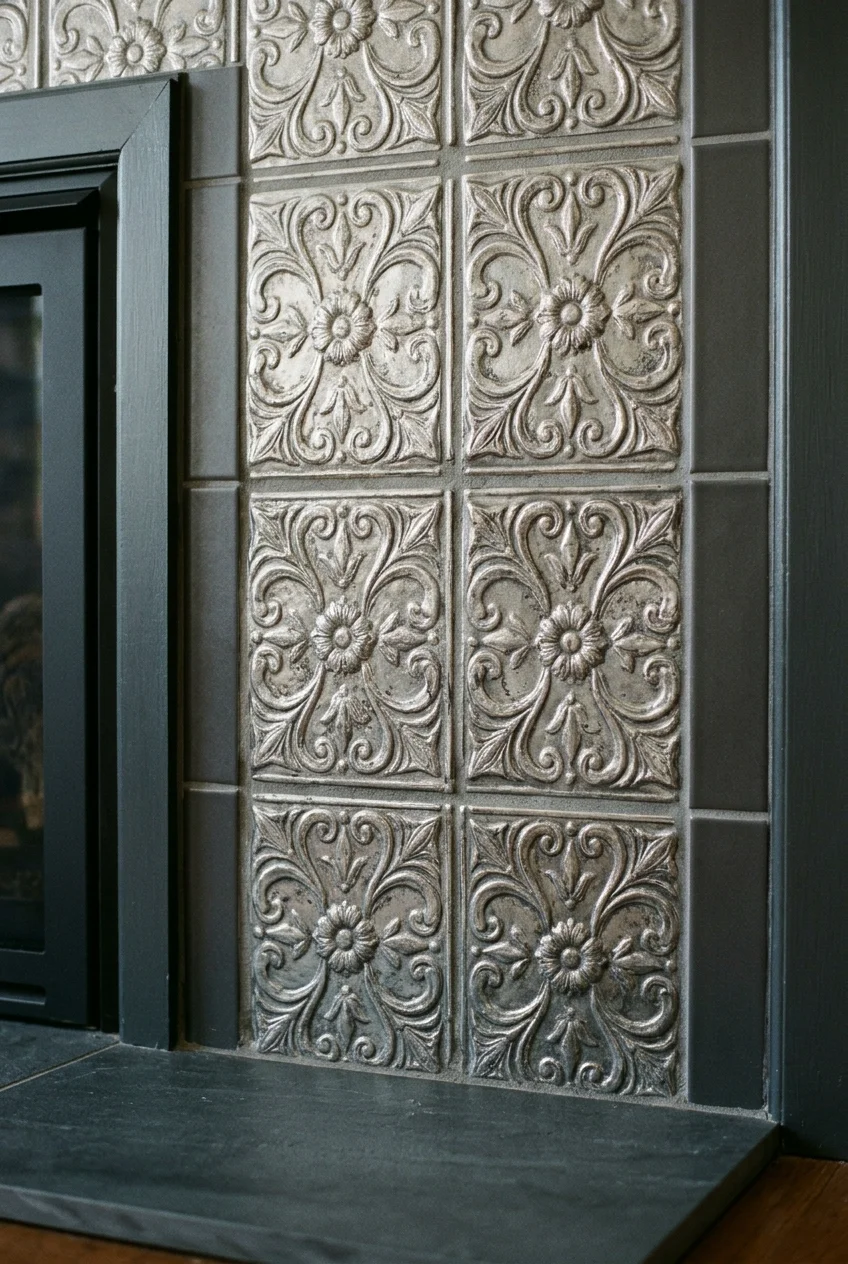
A pressed metal pattern in ceramic can add delicate ornament to a plain fireplace. Keep it on the face so the raised pattern is easy to see.
Look at the tile from an angle with a lamp on. Soft relief may be easier to live with than specular metallic highlights across the entire wall.
Ask about edge pieces or field tiles that match the finish. Leaving an awkward cut through the motif exposed can undermine the effect at the perimeter.
Where to start and stop the tile
31. A narrow tile band inside a traditional mantel
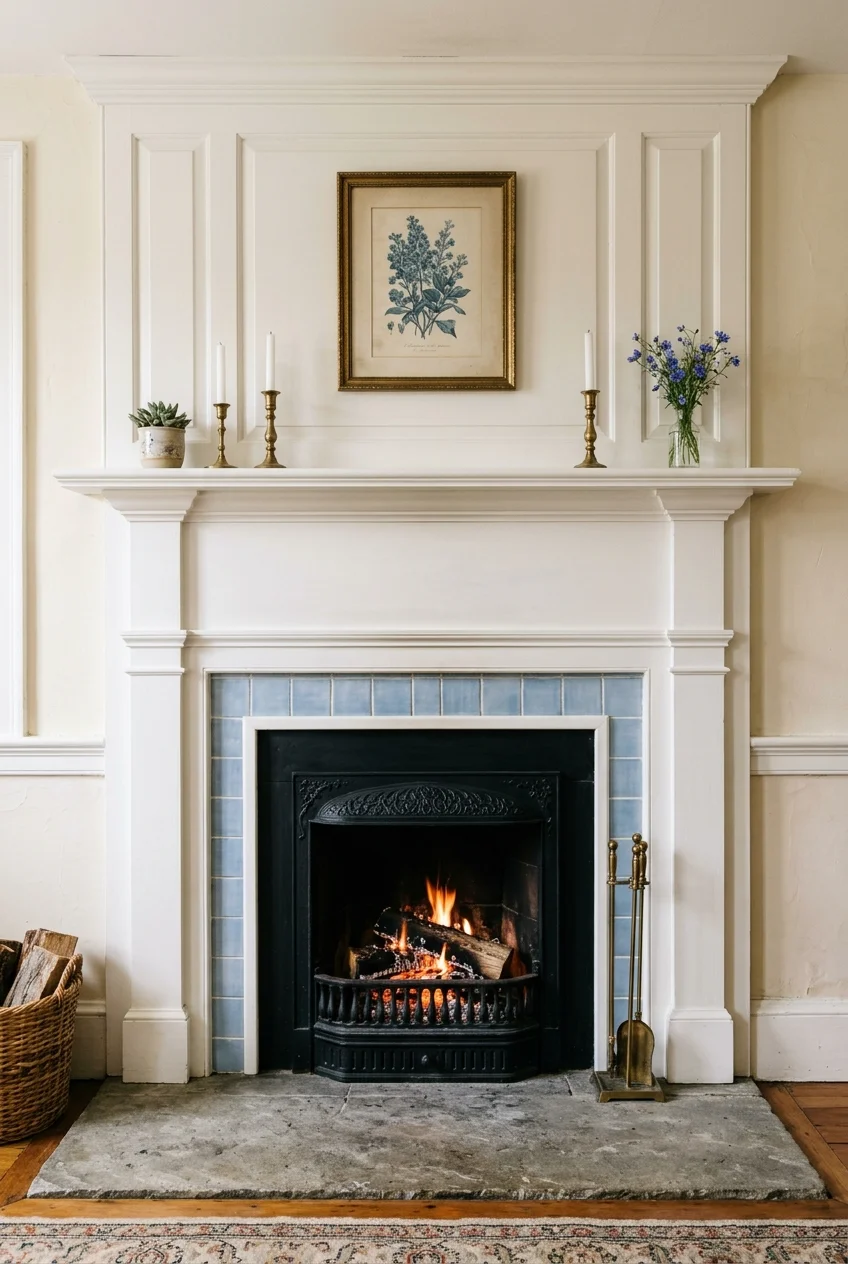
A slim surround keeps an original painted mantel in charge of the composition. Pick a tile small enough for its pattern to be legible on both legs.
Measure the two legs independently, especially in an older house. Ask the installer how they’ll balance the cuts if the mantel and opening aren’t perfectly centered.
Allow for existing trim clearances and verify them when changing the fireplace face. Any increase in finish thickness can alter how the front and trim meet.
32. A full-height tiled chimney breast
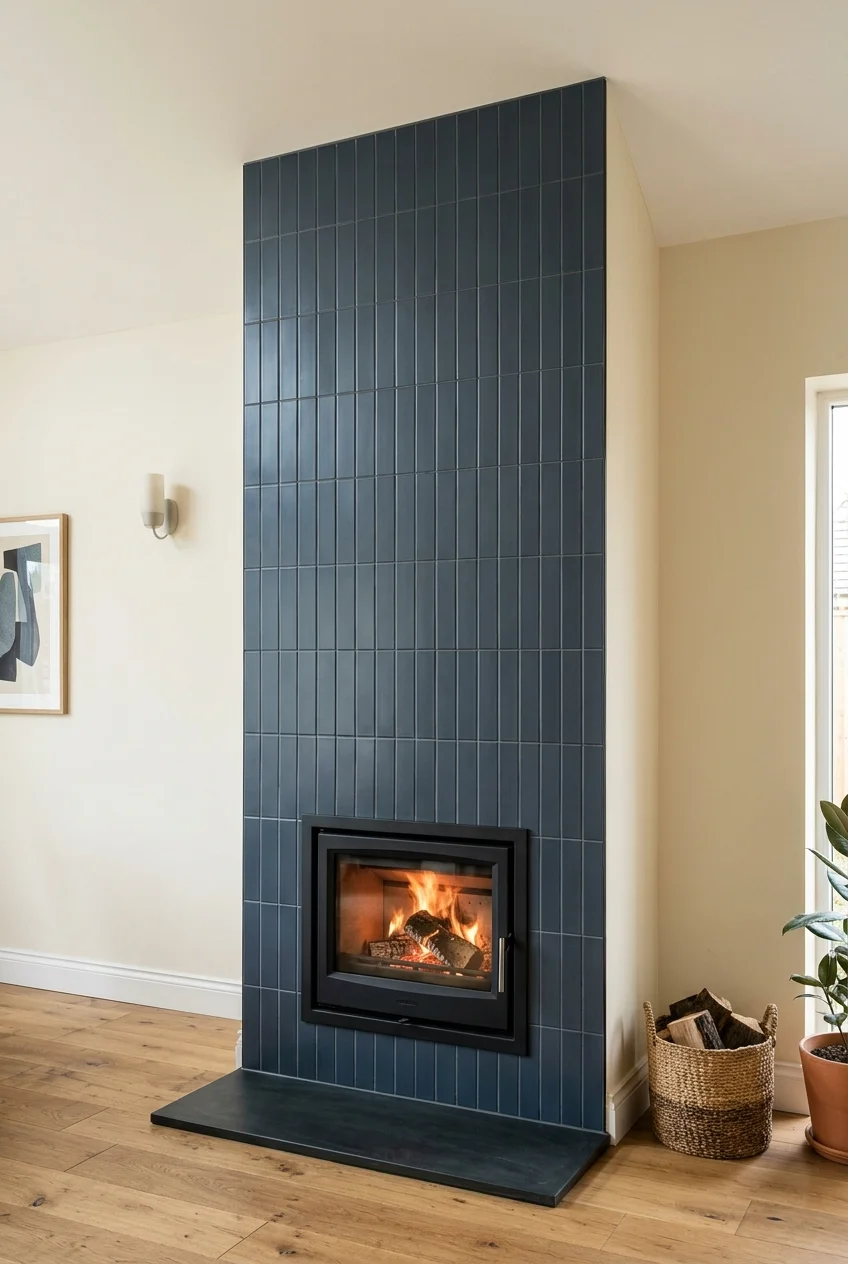
Tile the projecting fireplace breast to the ceiling for a stronger vertical outline. Let the return walls stay painted if you want to keep that outline crisp.
Mark which edges will be seen from the adjacent room. Plan whether the tile will finish flush or stop at a visible profile on the way around.
A tall face makes grout and repeat more conspicuous. Lay enough samples out at once to see how they behave together, preferably at real viewing distance.
Setup note Measure to the ceiling at several points before fixing the course heights. A slightly uneven ceiling is easier to disguise with a generous final course.
33. Cabinet-to-cabinet tile across a fireplace recess
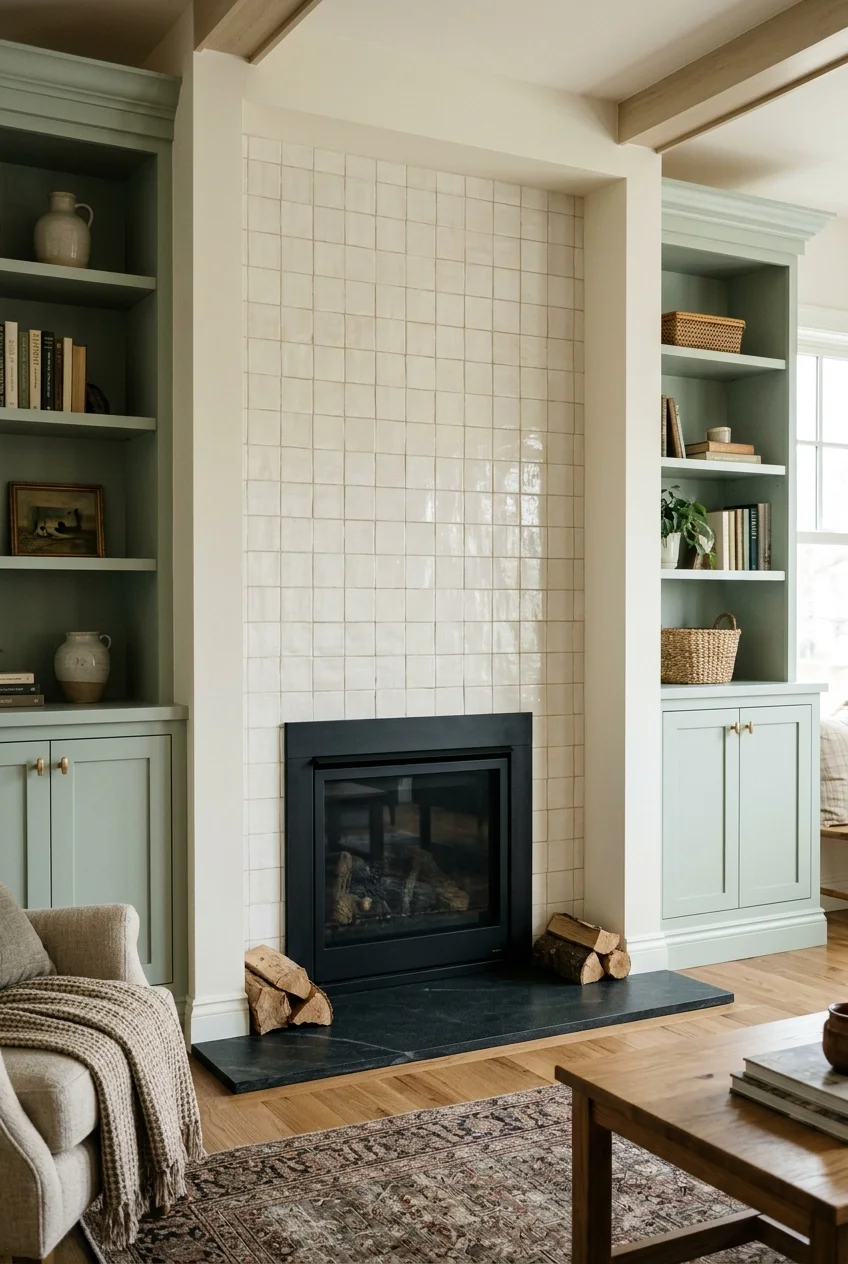
Use the space between built-ins to define the tile field. Hold the side cabinets outside required clearances and make the tiled back the continuous center feature.
Work out where doors and drawers need to swing before choosing the wall depth. A small return beside each cabinet can separate the finishes and protect the edge.
Check how the two colors look with the cabinet lights on. One shared undertone can connect the cabinetry and tile even when they differ in value.
For room-wide layout options, compare these living room fireplace ideas before fixing the width of the cabinets or deciding how much tile the recess should show.
34. A wraparound return on a projecting fireplace
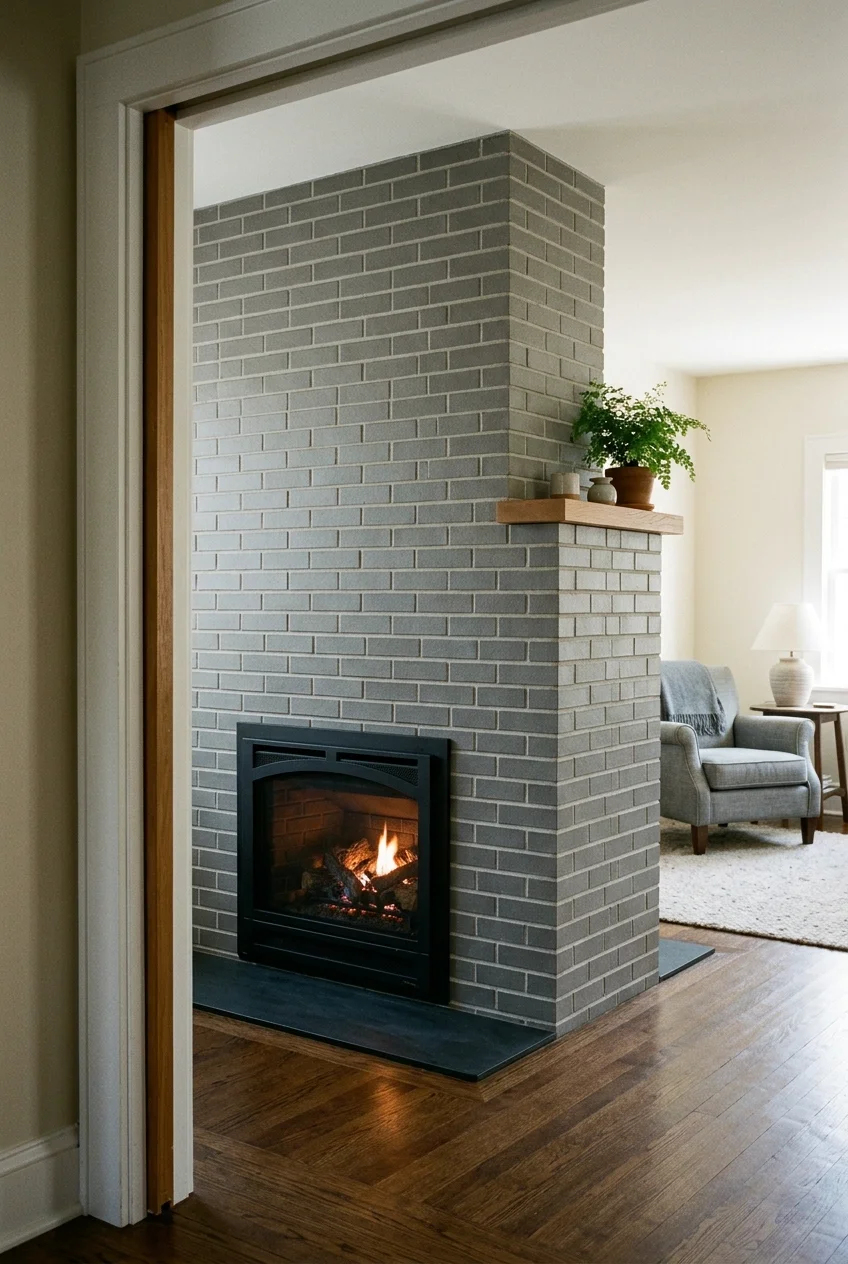
Carry tiles around one visible corner when the fireplace is seen from two directions. That return makes the face feel like part of the architecture from the doorway.
Draw the front and side together so the horizontal joints meet at the corner. Compare compatible corner tile, finished edges, or a suitable profile before ordering.
Decide where the tile ends on the return wall. An end aligned with a pilaster or another clear break is easier to understand from the side.
35. An end-of-wall tile field for a corner fireplace
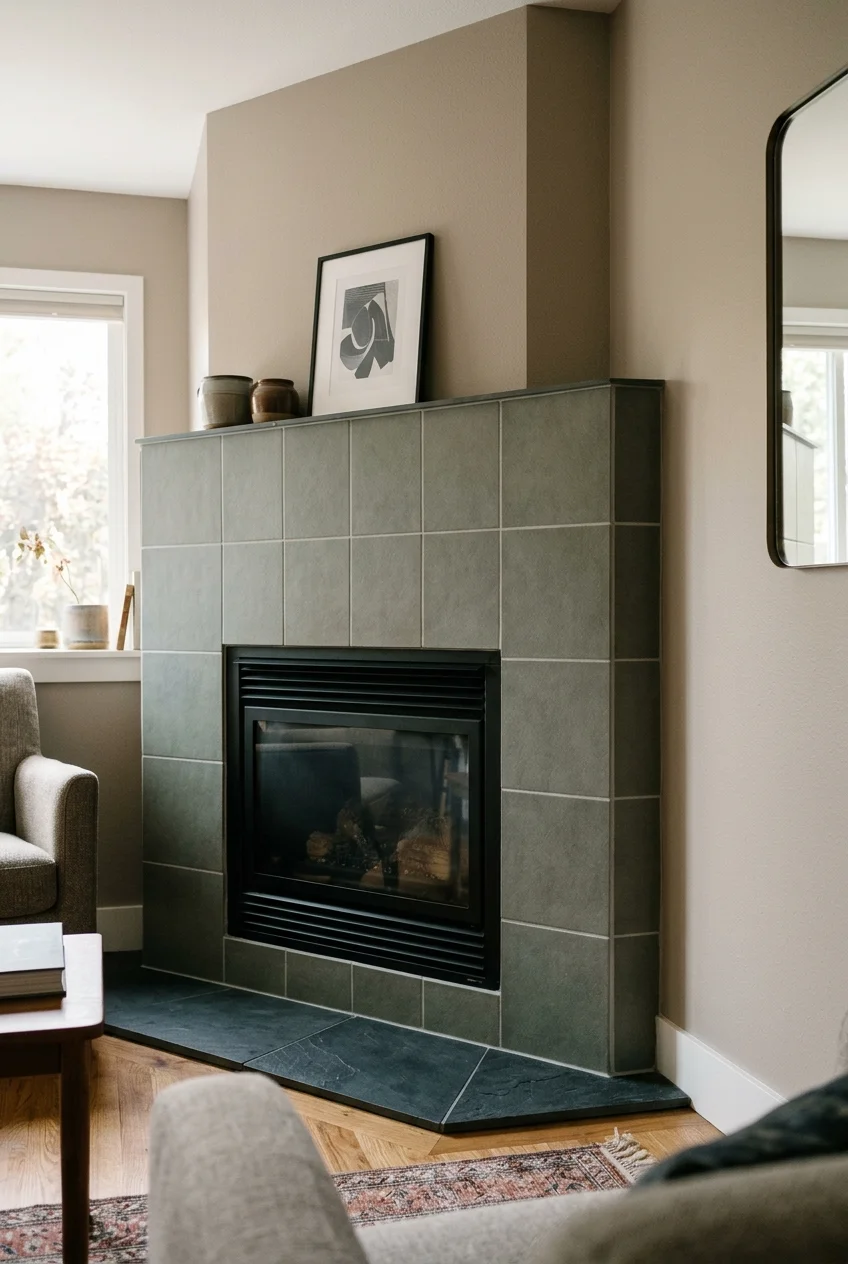
A corner fireplace shares sightlines with two walls. Give one wall the visual weight by extending the tile field across the face and ending it at the inside corner.
Check the view from each seat before marking that boundary. Carrying the tile onto the adjacent wall can make the corner feel heavier than a clean stop.
Keep the existing door, vent, and service areas accessible. If the fireplace is angled, trace its footprint and check where the front edge meets the hearth.
36. A tiled surround and plaster chimney above
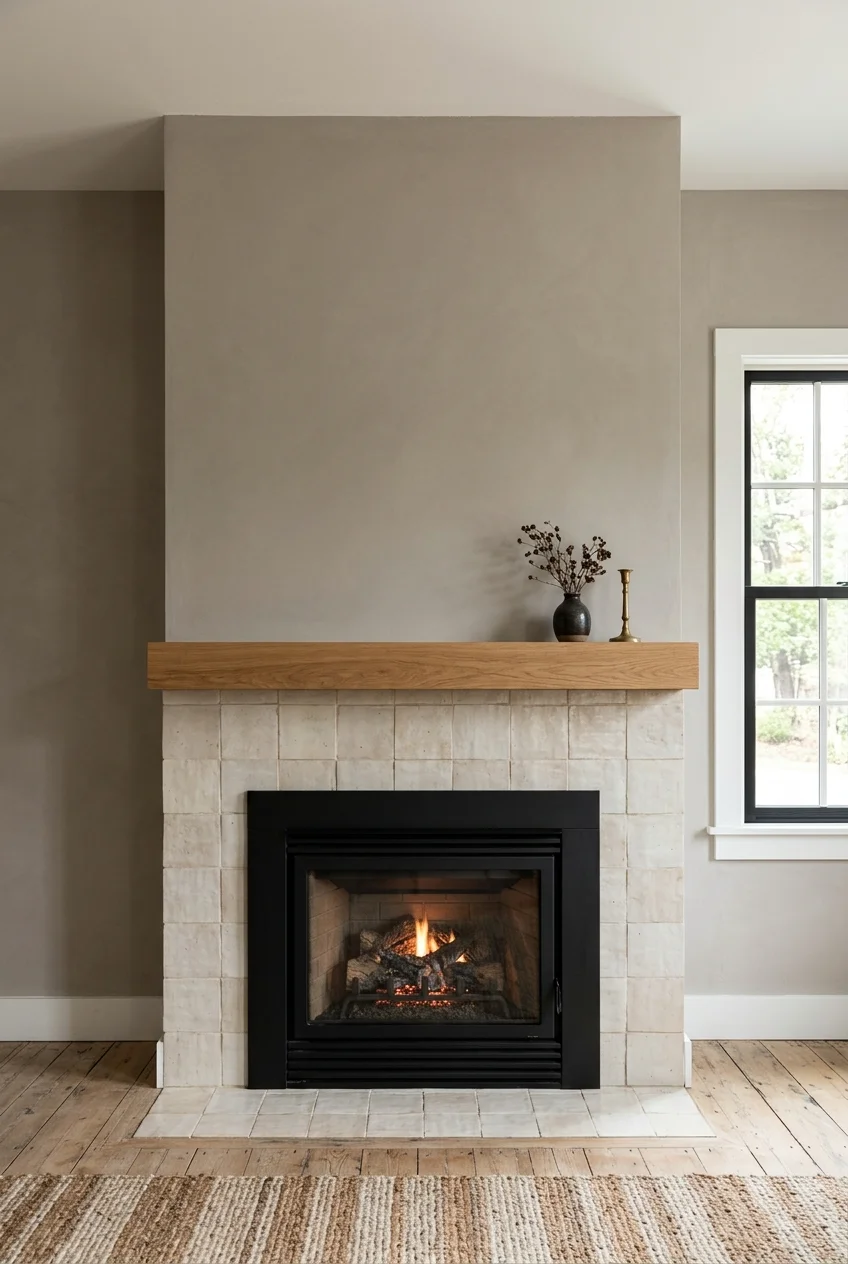
Take the tile up to a deliberate horizontal break, then use plaster above. A common undertone keeps the change in material from reading as a stripe.
Draw that stopping line while looking from the sofa. Aligning it with a nearby sill or architectural break can make a short tiled face feel intentional.
Leave room in the finish plan for a clean transition and any required noncombustible zone. Ask how the plaster edge will meet the selected tile thickness.
37. A wide electric insert framed by one tile plane
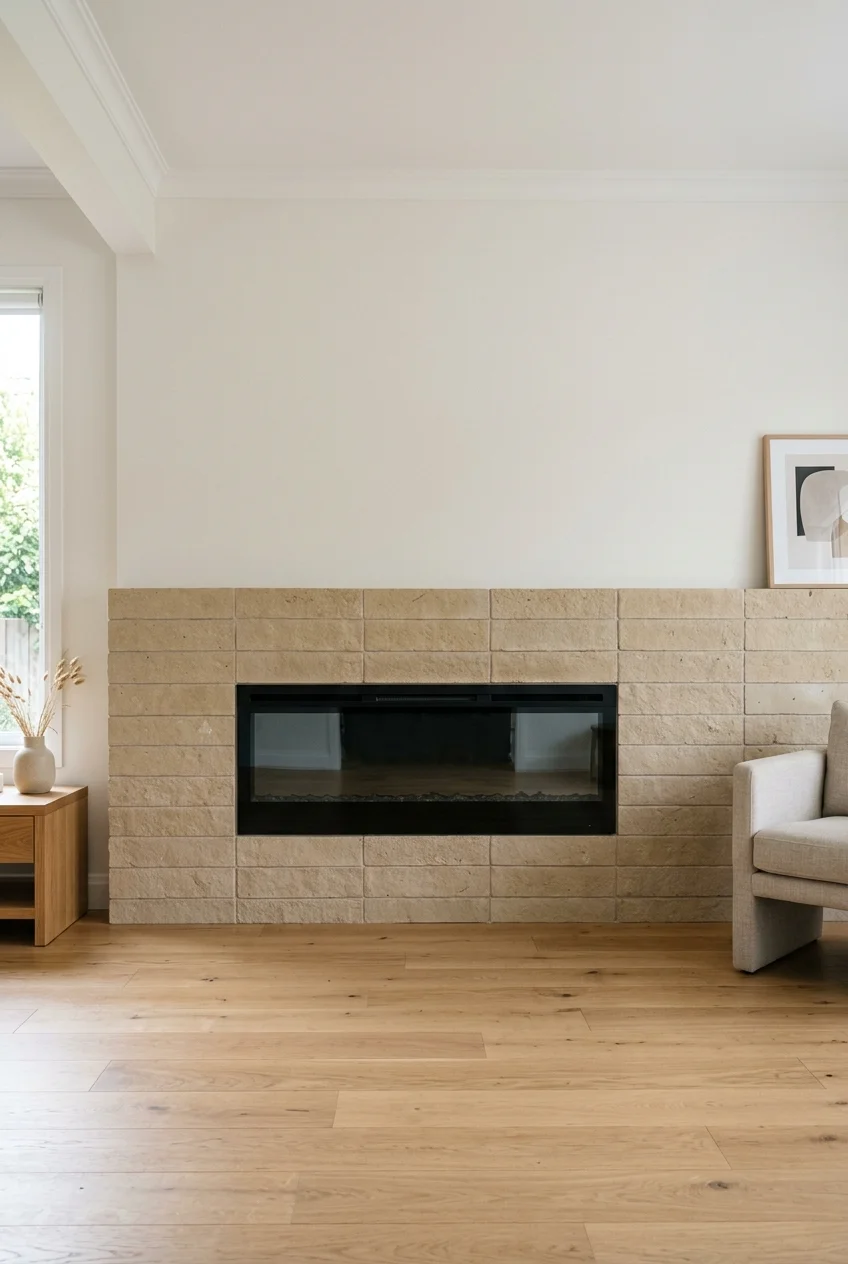
A long electric unit looks settled when the tile field gives both ends room. Try horizontal courses that continue past the opening so the eye follows the full wall.
Read the manual for your exact model before drawing the surround. Heat outlets, controls, and access needed for removing the front can affect where the finish stops.
Find out whether the specified front trim can accommodate the tile and setting bed. Set the opening and finish plane on the same drawing before ordering materials.
- Position the vent and controls on the elevation.
- Show how the removable front will be accessed.
- Draw the tile and setting-bed thickness in section.
Pair the tiled surround with the hearth
38. A matching tile with a different orientation underfoot
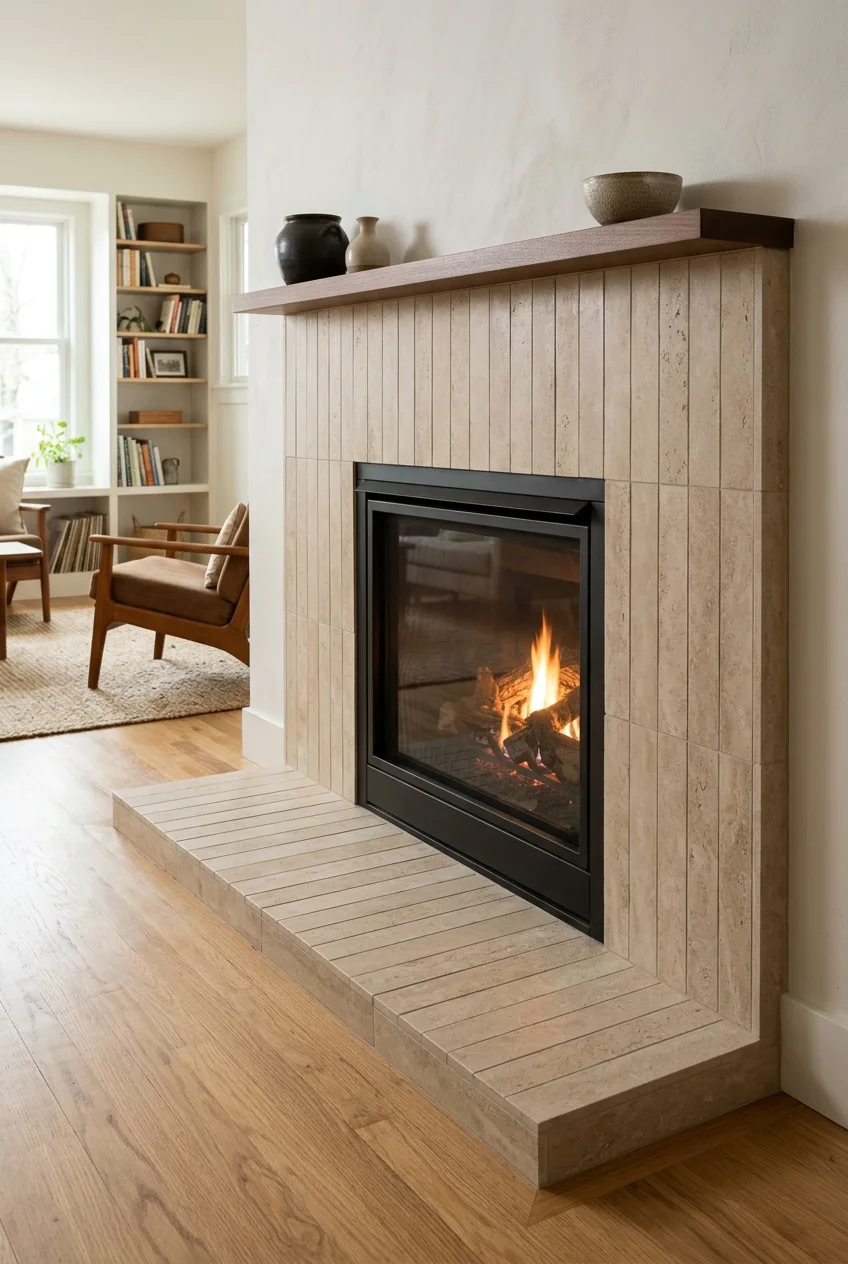
Keep a continuous color by choosing a tile approved for both locations. Turn the hearth layout so its joints give the horizontal surface a character of its own.
Check the junction from standing height. Where joints can align deliberately across the change in plane, the two orientations can look connected without repeating the same pattern.
Ask how the hearth will meet the floor and whether the assembly meets the applicable fireplace requirements. Surface tile alone may leave necessary hearth protection unaddressed.
39. A chunky stone hearth below small geometric tile
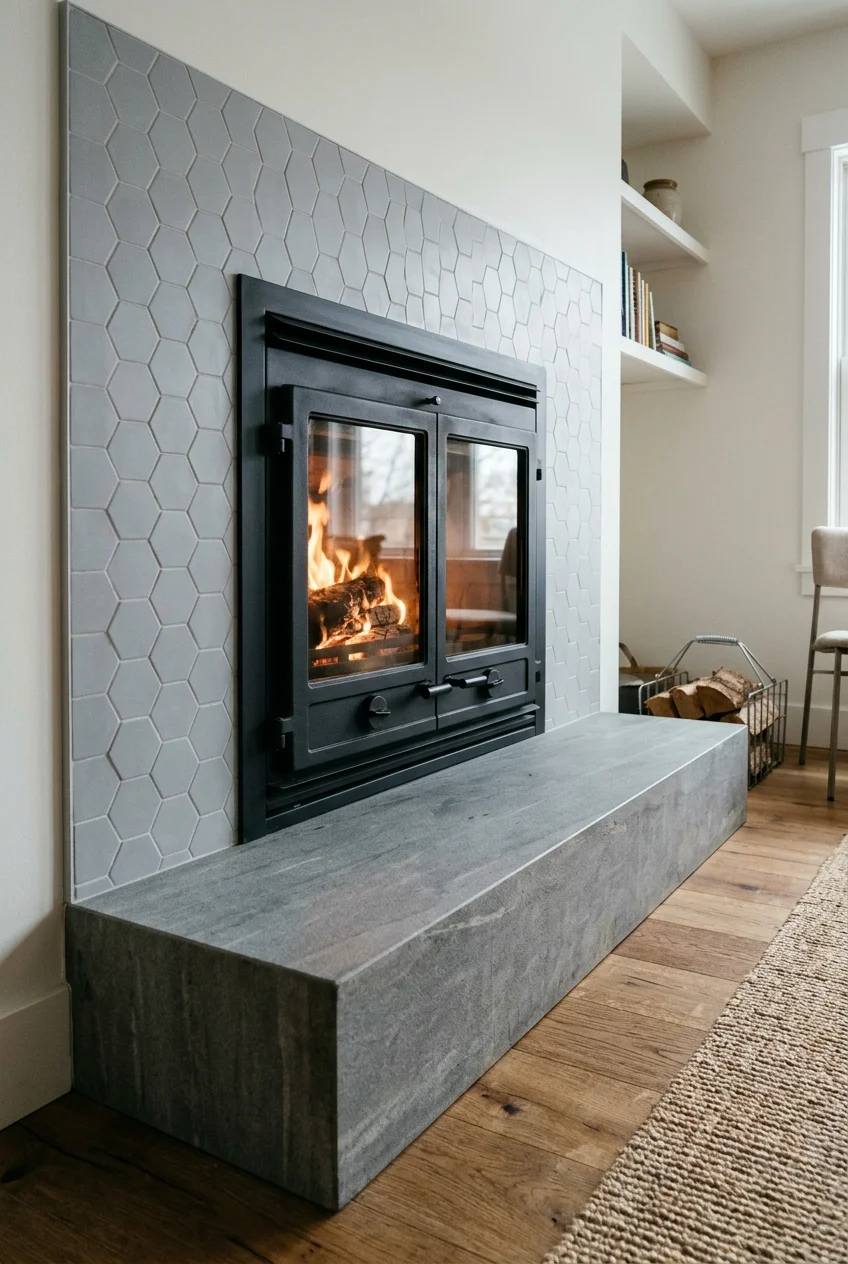
Small geometric tile gives a low fireplace its detail. A single-looking stone hearth under it offers a long calm line and a clear change of scale.
Choose a hearth color from the quieter parts of the pattern. Compare edge profiles in person since the thickness will show from the chairs beside the fireplace.
For a raised hearth, mark the projection on the floor to see how it affects the route through the room. Keep the required hearth dimensions in the plan.
40. A flush tile hearth framed by the floor
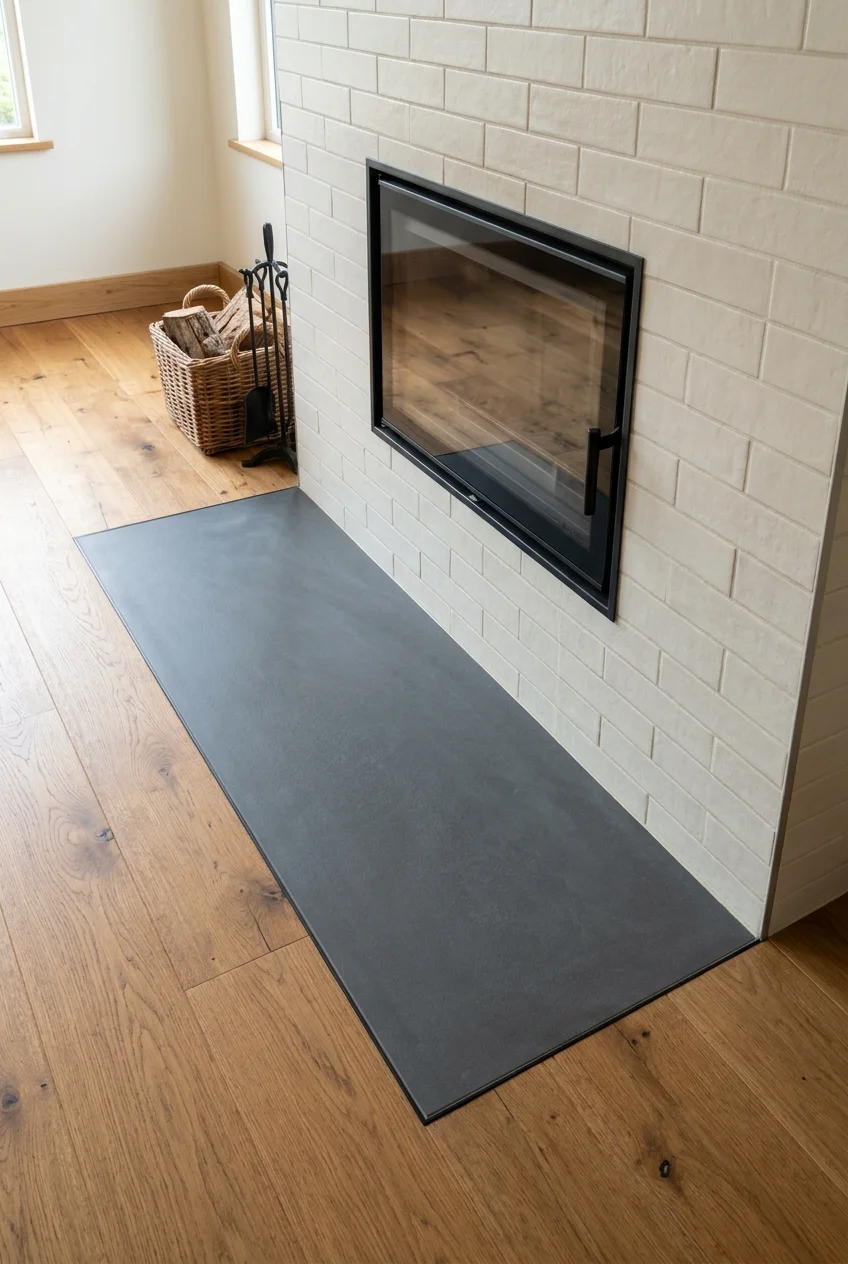
A flush transition looks especially clean on a shallow fireplace wall. Use a separate tile color if you want the hearth to show against the floor.
Have the installer verify the required hearth assembly and whether the floor structure can accommodate it. Draw the finished height, including the tile and setting bed.
Pick an appropriate transition between the different floor materials. Ask how the installer will handle movement while keeping the joint tidy and the adjacent flooring intact.
Setup note Only choose the flush look once you’ve confirmed the required hearth footprint. A smaller panel can look tidy on paper while providing inadequate protection in practice.
41. A diagonal hearth grid beneath straight wall tile
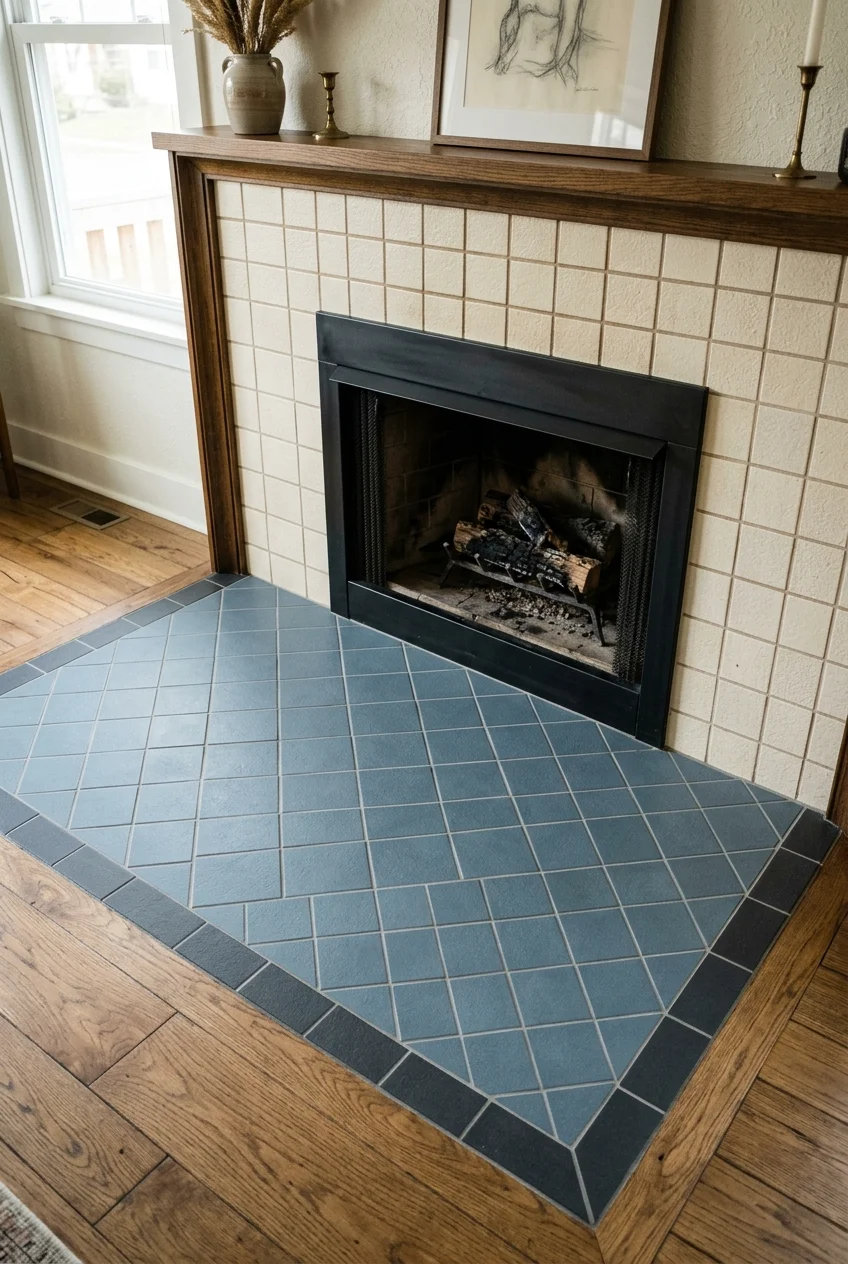
Diagonal floor joints can lead the view toward the fireplace without adding a second color. Use simple square field tiles and a straight perimeter for definition.
Draw the hearth centerline through the opening. Shift the diagonal repeat until the pair of tip cuts at the front edge looks deliberate and balanced.
Consider a plain perimeter course if the layout leaves many tiny triangular cuts. It can also give the hearth a distinct boundary against a similarly colored floor.
42. A hearth made wider than the tiled face
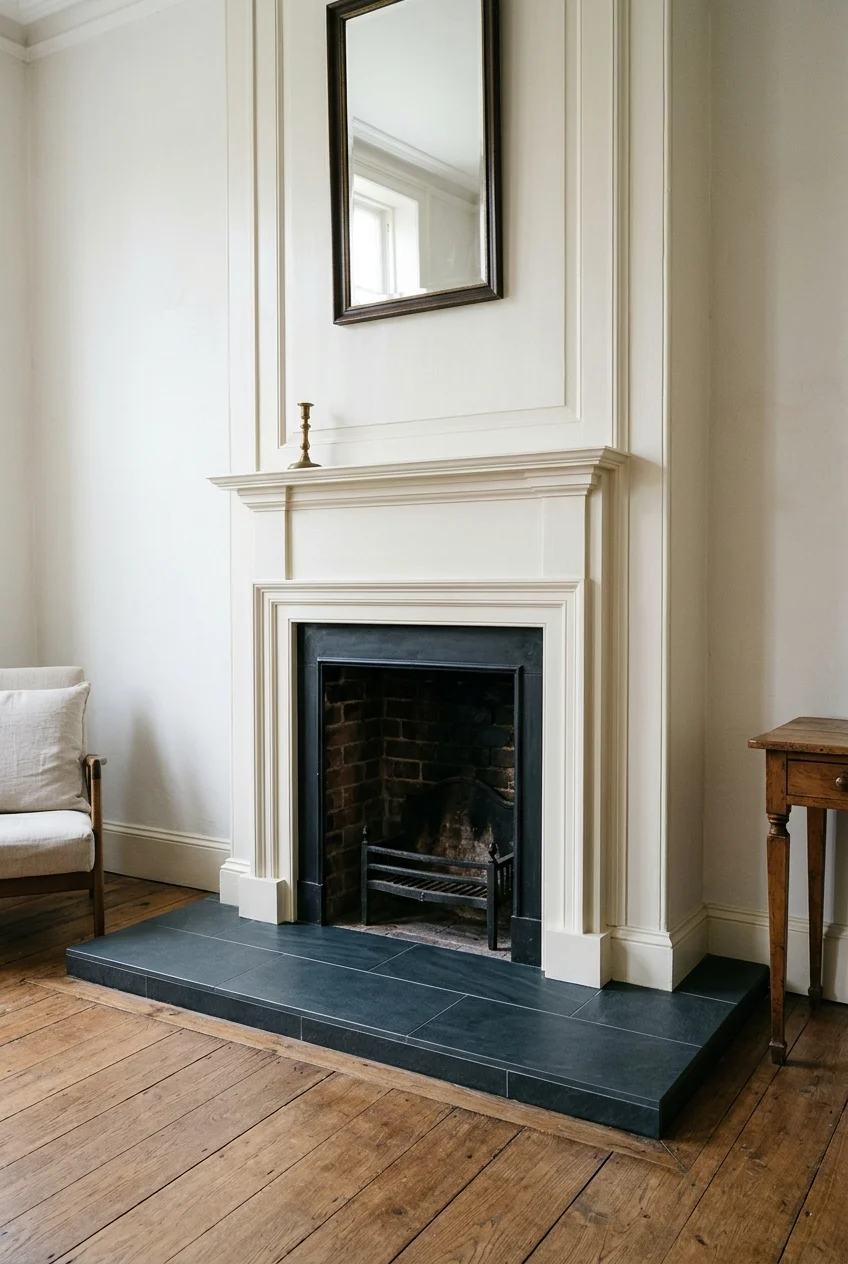
Extending the hearth past both legs can make a tall, narrow surround feel more settled. Show equal extensions when the fireplace sits squarely on the wall.
Use a floor mock-up to judge the footprint from the doorway and seated positions. Adjust the proportions within the fireplace requirements and leave the walking route open.
43. A two-tone tile border around the hearth
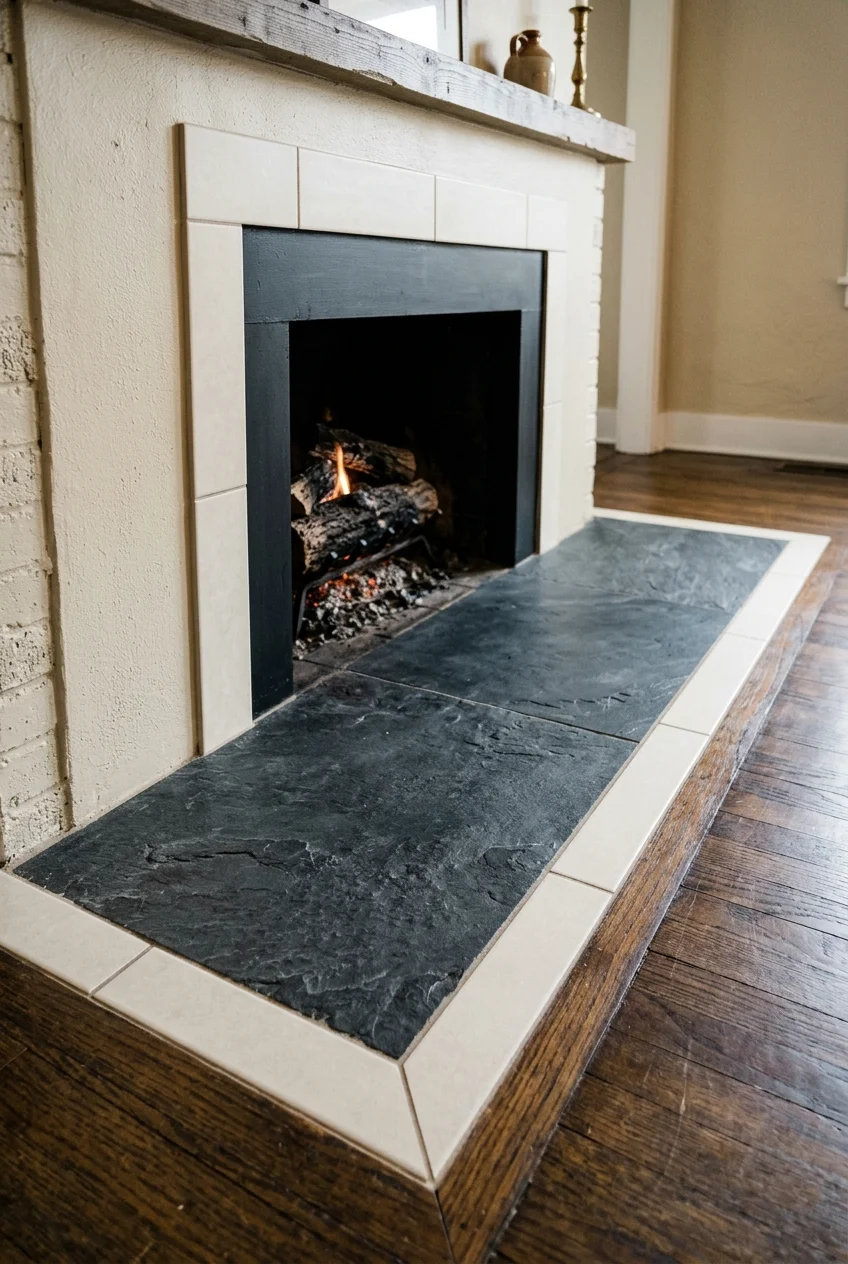
A narrow boundary tile can make a hearth easier to distinguish from dark flooring. Pull its color from the surround so the two surfaces still feel related.
Decide how the border turns at both front corners and how it meets the surround at the back. Plot these small cuts before choosing the field tile layout.
Give an existing fireplace a different look
44. Preserve vintage tile and change the mantel color
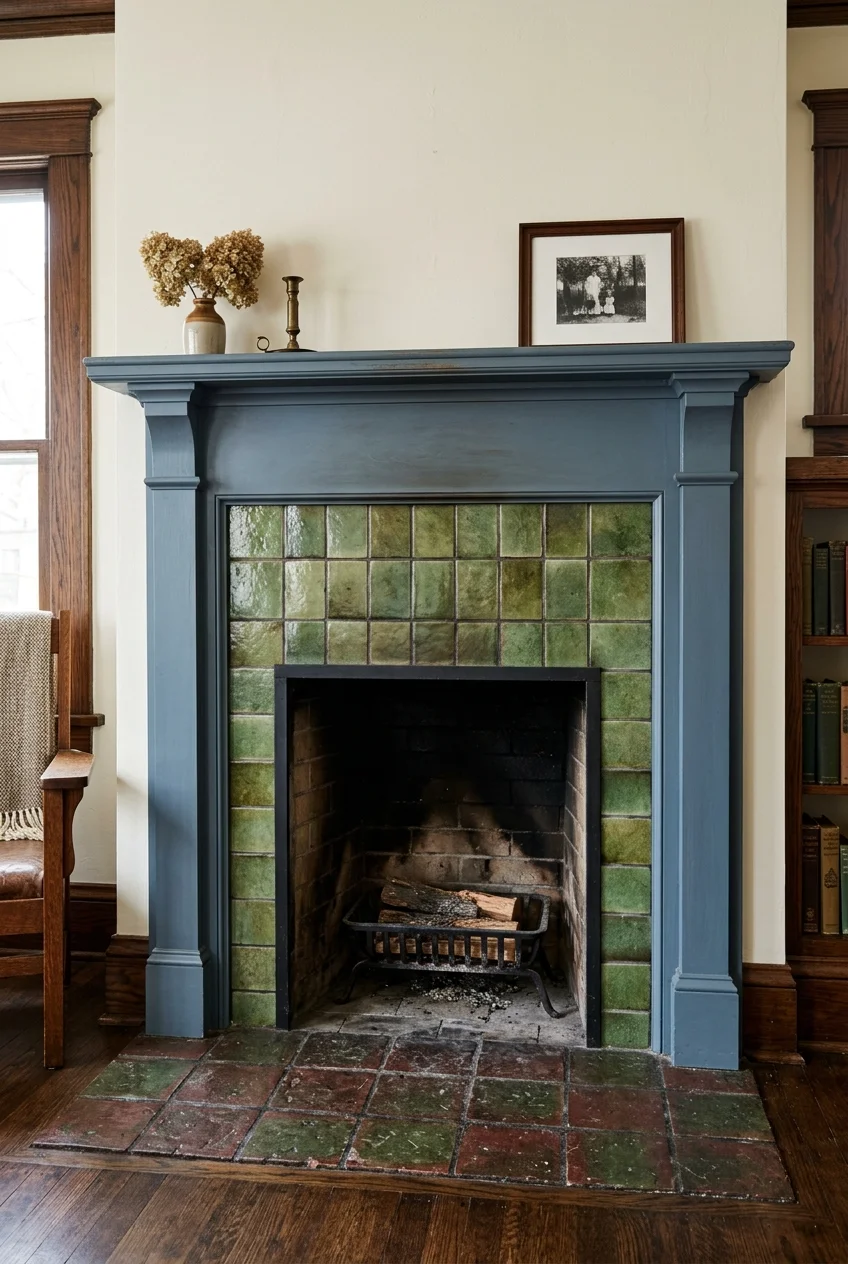
If the original tiles are in good condition, try a paint color pulled from their quietest detail. A smoky trim color can make old glaze look richer.
Check a large paint sample beside several tiles. If there’s crumbling grout or loose tile, consult someone experienced in historic tile before undertaking an extensive cosmetic update.
If you’re refreshing the rest of the room at the same time, these budget living room makeover ideas offer options that can work around your existing fireplace.
45. Replace the tired face while keeping the existing hearth
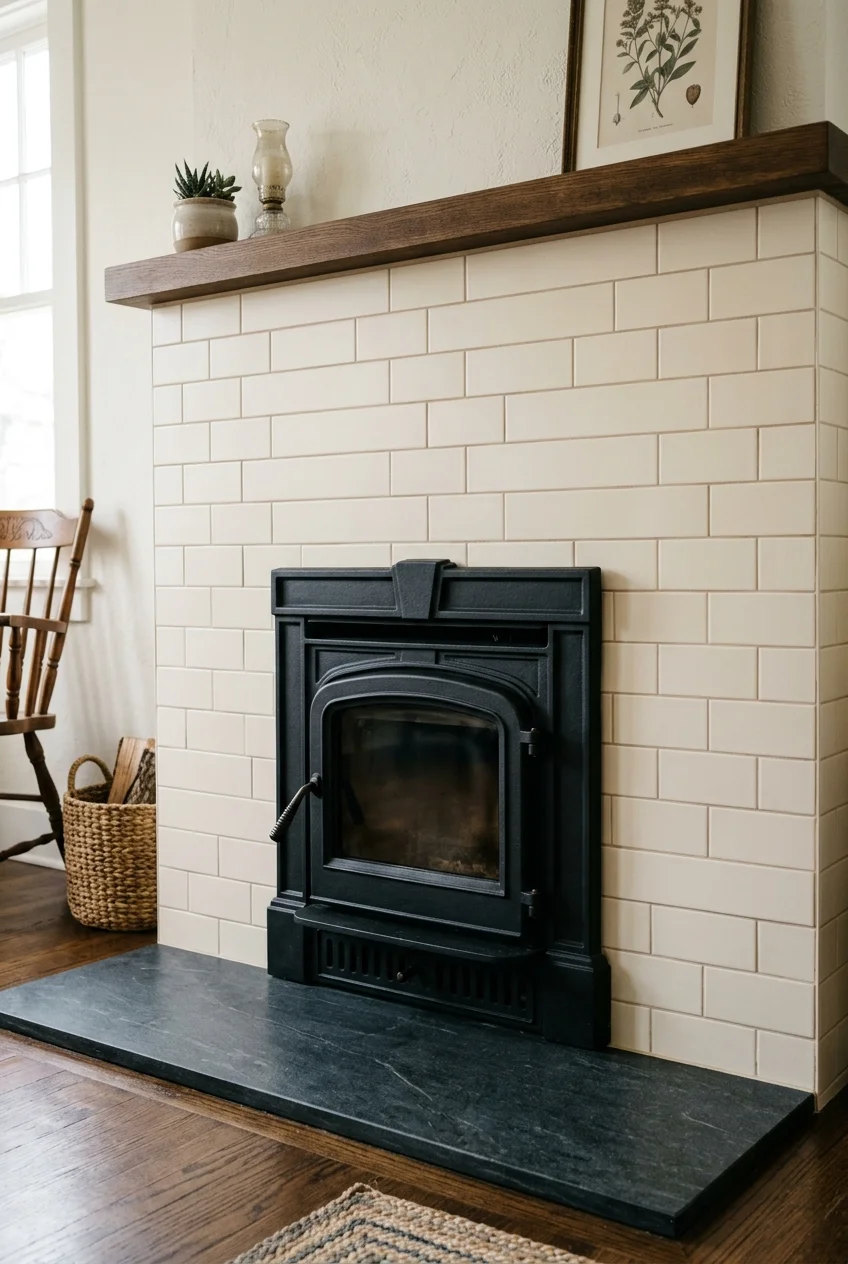
Use the hearth as the reference sample for the rest of the fireplace. Pull the new tile’s undertone from the existing surface even if you change the pattern.
Have the existing hearth checked for condition and suitability. Damaged construction or an appliance change can make a face-only update impractical, even when the hearth looks fine.
Match the proposed finish plane to the hearth’s rear edge on a drawing. A thicker new face can change that meeting line and crowd the existing front.
If the hearth has dark movement or mottling, try a calmer tile on the face. That keeps existing marks and joints from competing with the new surface.
46. A slim edge profile for an exposed tile perimeter
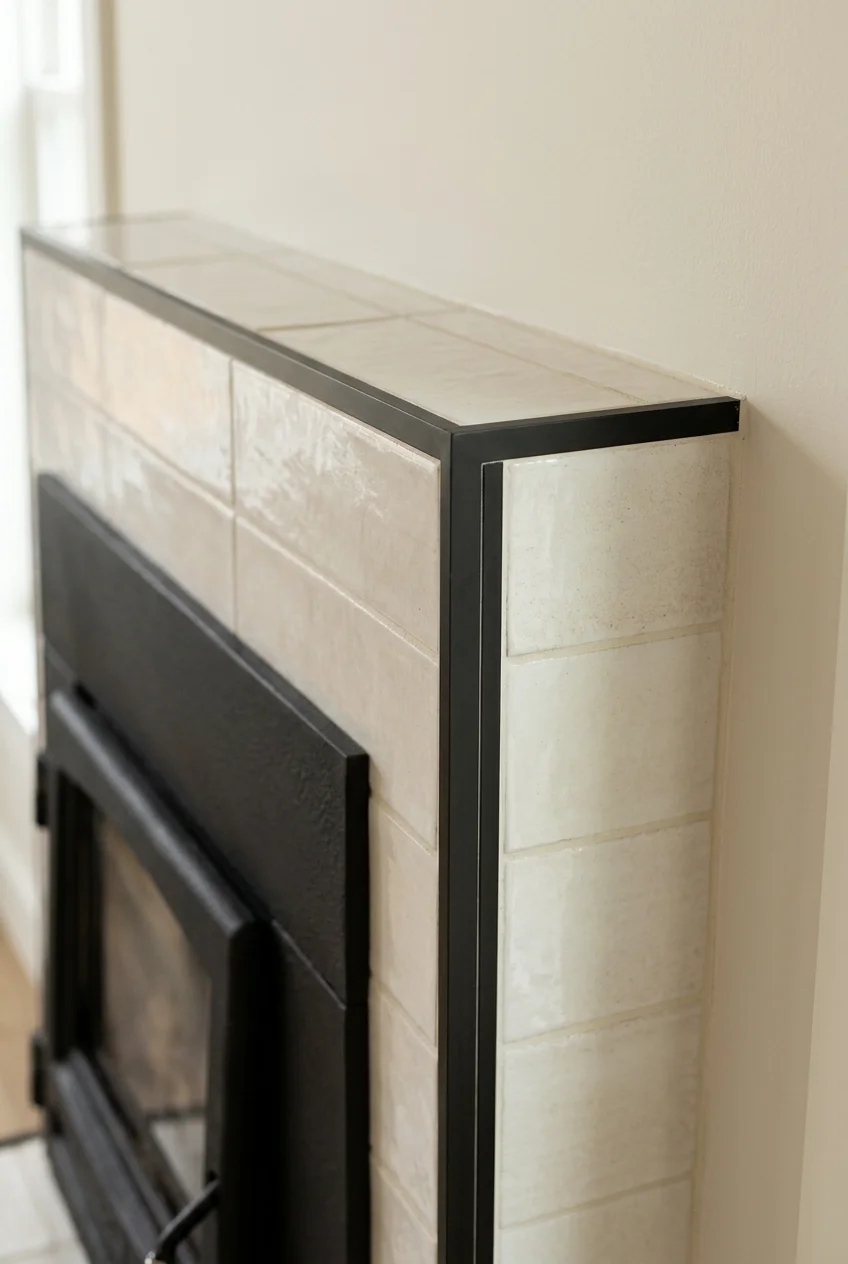
An exposed tile edge can make the outside of a surround look unfinished. Try a narrow profile coordinated with the fireplace frame or a nearby hardware finish.
Choose a profile made for the installed tile thickness and approved for the intended location. Decide how the corners join before the surround is set in place.
If you need several straight cuts in ceramic field tile, confirm the blade size, arbor, and speed rating against the wet saw manufacturer’s manual before buying.
For a compatible wet saw, consider the QEP 7-inch ceramic wet-cut blade (paid link). Choose a different blade for porcelain or stone if your saw manufacturer specifies one.
47. A porcelain overlay on sound existing tile
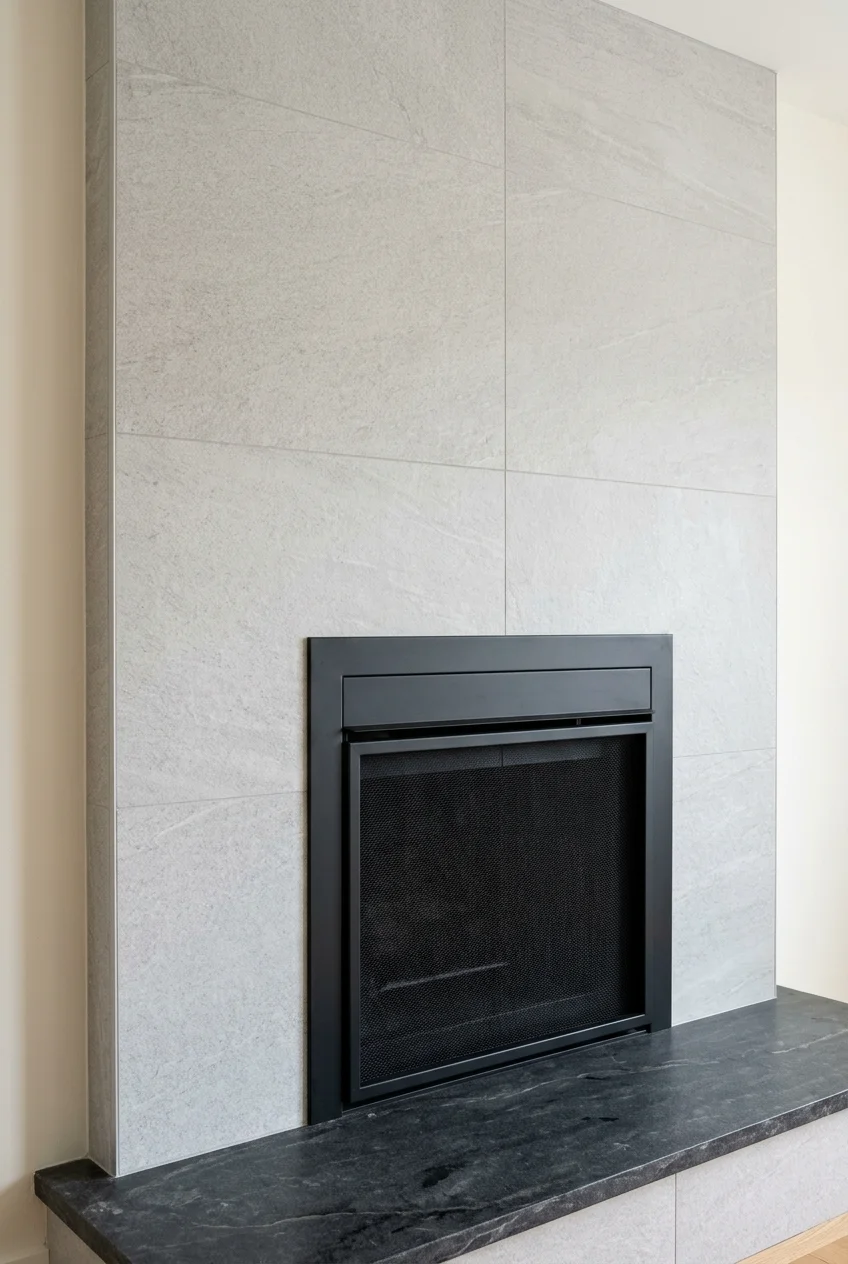
A thin porcelain overlay can change a dated pattern where the old tile is firmly bonded and the appliance’s finishing requirements allow a thicker built-up surface.
The Tile Council of North America’s overlay guidance calls for well-bonded existing tile and a suitable setting system. Have the installer confirm both along with flatness and condition.
Compare a section drawing of the new face with the existing hearth, mantel and any removable appliance parts. Include the thickness of both tile and mortar.
- Check where the extra layer meets the hearth.
- Identify the removable front, door swing, and vent locations.
- Confirm the system can bond to the existing tile and suit the fireplace zone.
Ask for a removal and replacement plan if the overlay fails any of those checks. Preserving old tile underneath has value only when the finished assembly works.
48. A new tile frame around a gas insert
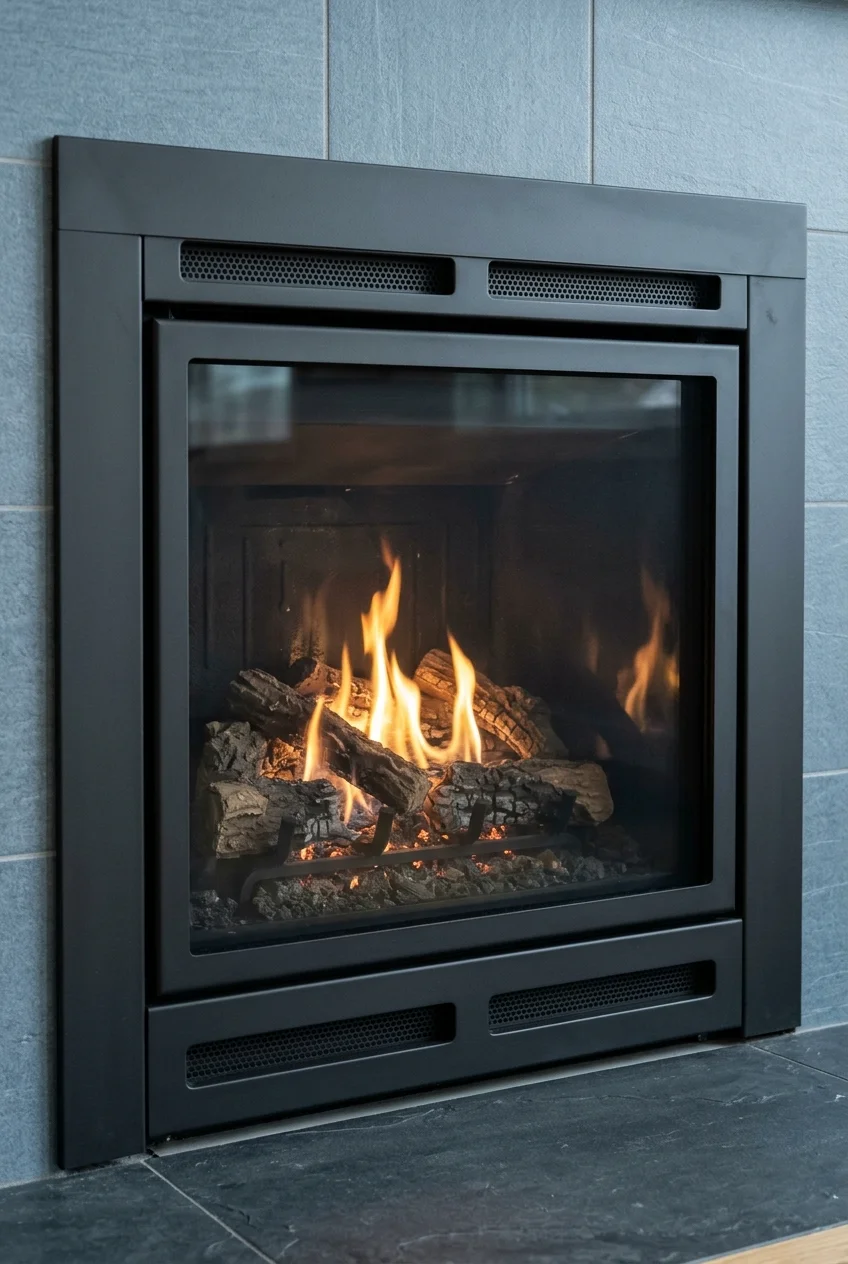
Let the insert’s factory front set the inner boundary, then use tile to bring the opening into proportion with the rest of the wall or mantel.
Get the exact insert and surround instructions before selecting tile. They explain where finishing can meet the front and what access the installer needs after tiling.
Ask how trim will come off for service once the tile is in place. Include a detail drawing showing the air openings and the maximum finish projection.
If the appliance is going into an existing masonry fireplace, have the installer verify that the opening, venting, and hearth are suitable for the specific model.
49. A clean grout refresh that leaves the original tile in place
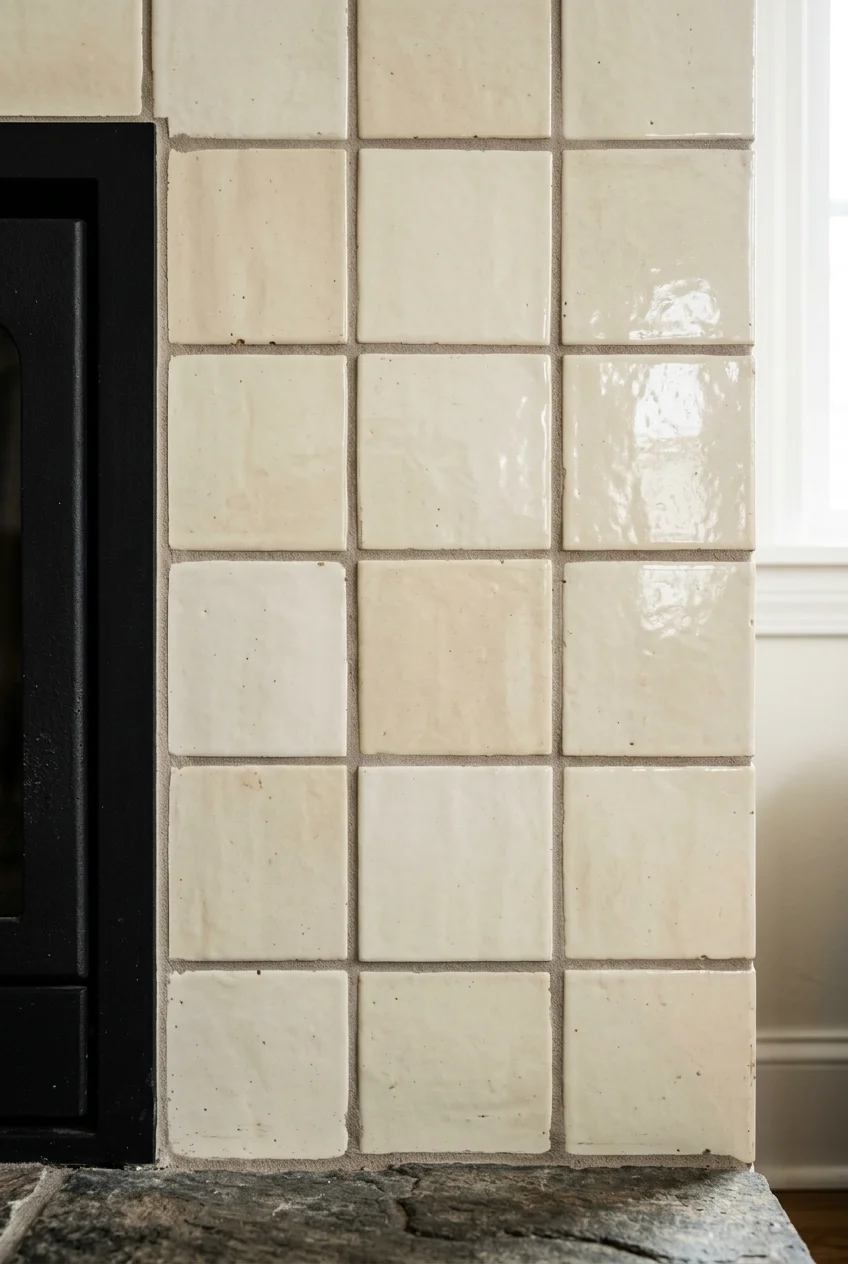
If the tiles still suit the room, a more compatible joint color can pull the design together. Compare a neutral sample with the cleaned existing surface.
Have deteriorated grout and recurring cracks assessed before renewing the joints. An underlying issue can produce the same cracks again even after a tidy cosmetic update.
Test the grout on an inconspicuous area or spare piece first. Soft, porous or textured surfaces can hold pigment, and some glazed faces can be scratched.
50. An accent tile frame for a permanently decommissioned fireplace
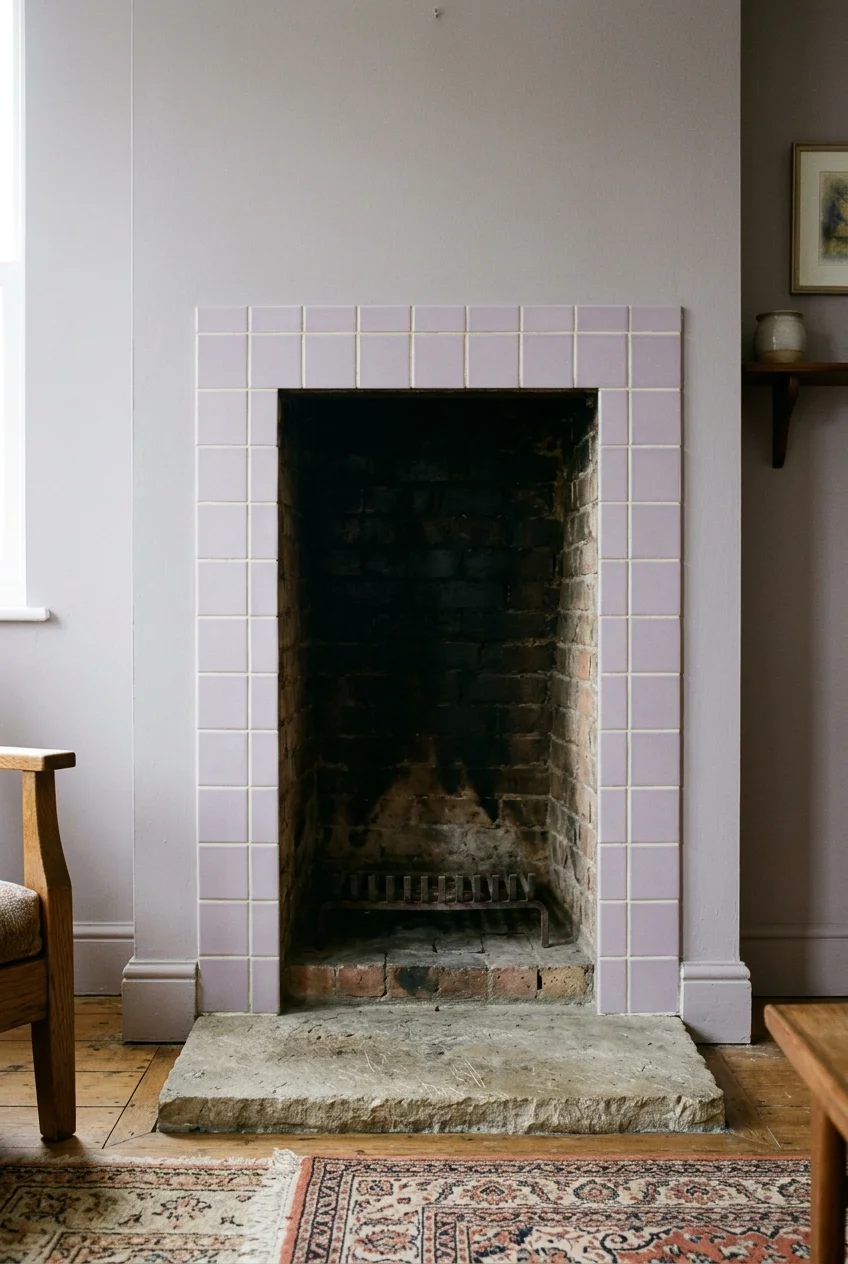
A simple tile frame can make an unused fireplace feel intentional. Use small squares around the opening and paint the surrounding room in a closely related shade.
Confirm the fireplace has been permanently decommissioned and have the condition of the opening checked before treating it as a decorative niche or covering any surfaces.
Leave the dark opening visually quiet so the tiled frame stands out. A plain hearth makes the original shape legible even in a small living room.
Frequently Asked Questions
Can the same tile go on the surround and the hearth?
Sometimes. Ask the tile maker about both intended uses and check whether the fireplace requires a specific hearth assembly, facing material or minimum hearth size.
If your chosen wall tile is textured, consider a compatible smooth finish for the hearth. It keeps the color relationship and gives you fewer grooves to clean.
How much extra fireplace tile should I order?
Count from a scaled layout so you can see where offcuts can be reused. Directional patterns, borders, and unusually narrow legs can affect how much you need.
Ask the supplier whether you can get the same production lot later. Keep a few full tiles from your order for repairs, especially with a variable glaze.
Can I change the look of a tile surround in a rental?
Ask the landlord before making permanent changes. For an update without altering the tile, repeat one of its colors in artwork on a nearby wall.
Keep decor outside the fireplace’s required clearances. If you want a new finish on the surround itself, have the owner confirm materials with the fireplace installer.