50 DIY Spooky Halloween Decor Ideas

This post may contain affiliate links: full affiliate disclosure.
Transforming a home for the season does not require expensive store-bought props. High-impact spooky decor often comes from simple materials like fabric, clay, and paper used in clever ways.
These projects focus on a clean, intentional aesthetic that brings a haunting atmosphere to any residential space.
1. Floating Cheesecloth Ghosts
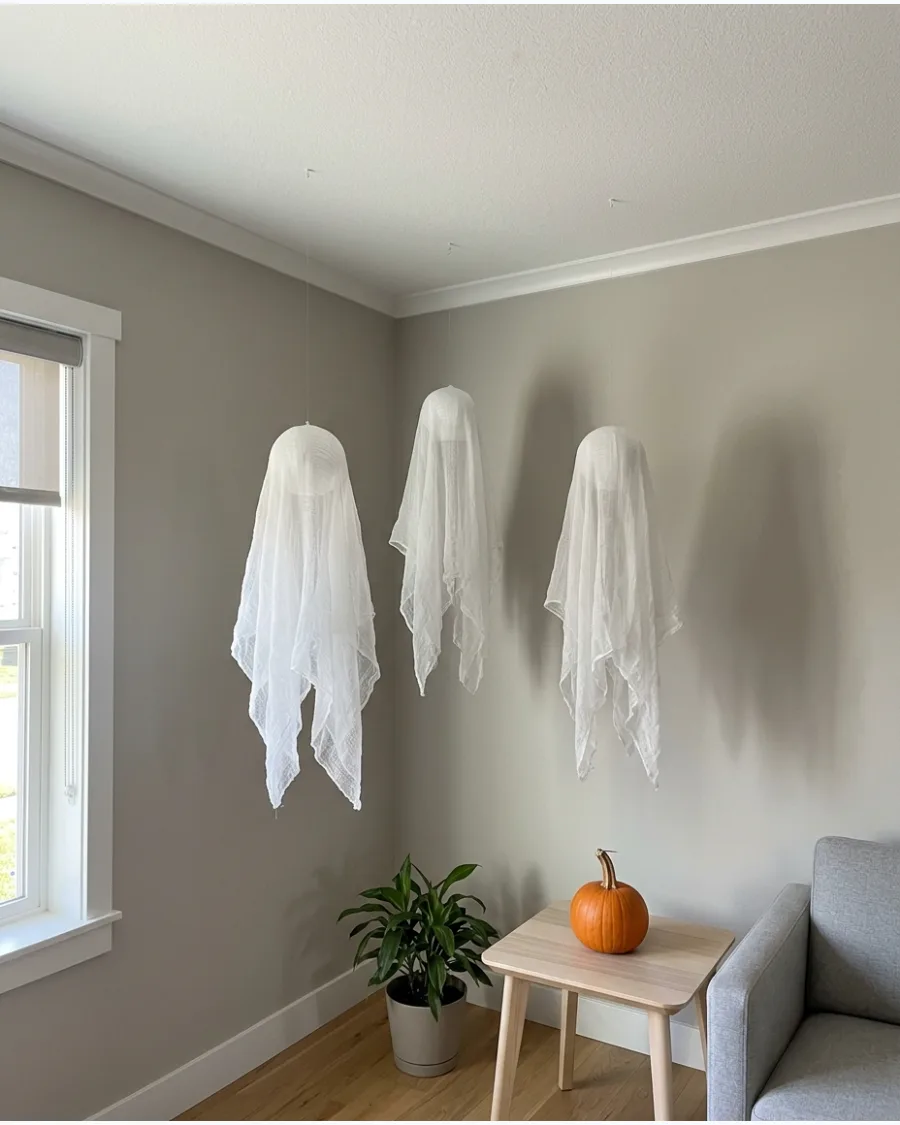
Shape cheesecloth over balloons or lightweight forms and brush it with fabric stiffener. Once dry, remove the forms and suspend the ghosts from clear thread for a floating effect.
Apply two layers of cloth to give the figures enough structure to hold their shape without drooping. Hanging these at different heights creates a more realistic sense of movement in the room.
- Low-cost project using cheesecloth and fabric stiffener.
- Use clear monofilament line to make the hanging hardware invisible.
- Hang these in a hallway where air currents provide natural motion.
Quick win: Use a black marker to add tiny dots for eyes only after the stiffener is completely dry.
2. Glowing Ghost Mason Jars
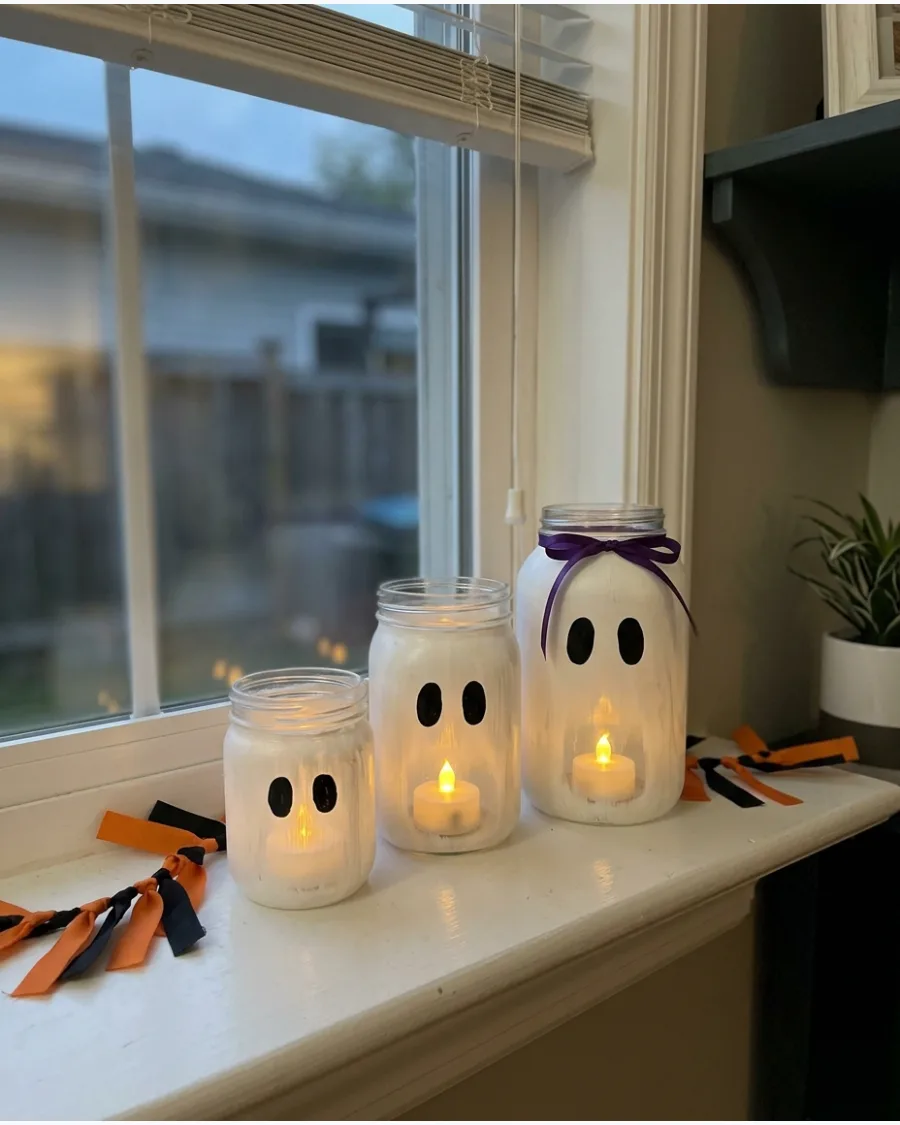
Paint recycled glass jars with translucent white paint and add simple ghost faces. Place battery-operated tea lights inside to create a soft glow for shelves, windows, or party tables.
Use a sponge brush to apply the paint for a streak-free finish that mimics frosted glass. These look best when grouped in odd numbers to create a balanced display.
- Uses repurposed glass jars and acrylic paint.
- Place on a mantel or shelf away from foot traffic.
- Swap tea lights for color-changing LEDs for a more eerie effect.
Most people skip this: Clean the jars with rubbing alcohol before painting to ensure the color bonds perfectly to the glass.
3. Scrap-Fabric Hanging Ghosts
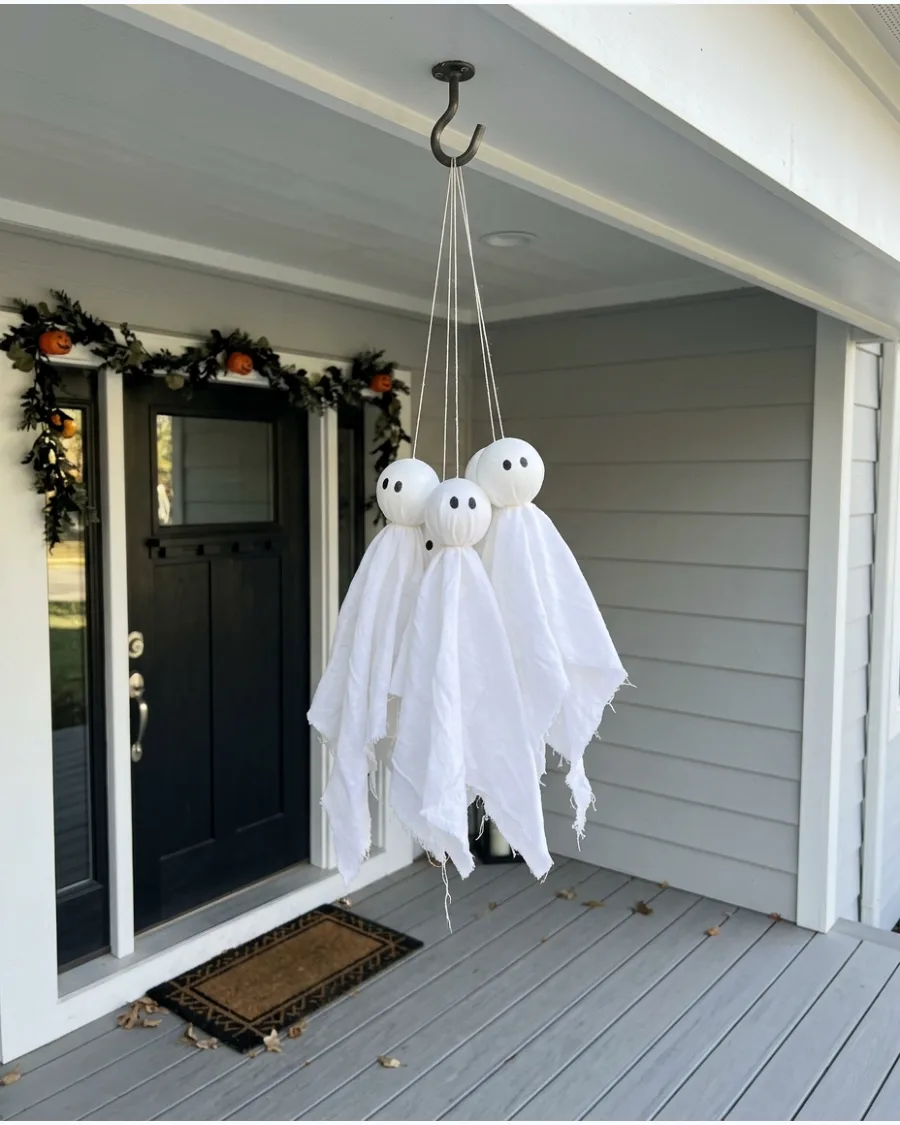
Drape old white fabric over foam balls and tie the material beneath each head. Hang several ghosts from a porch ceiling or tree branches at different heights.
Use fishing line to secure the ghosts so they appear to hover in mid-air. This project is a great way to repurpose old linens or scrap fabric from other crafts.
- Budget-friendly use for old sheets or fabric scraps.
- Secure the fabric with white rubber bands before tying the decorative string.
- Space them at least twelve inches apart to prevent tangling in the wind.
Best shortcut: Use a large needle to thread the hanging line directly through the foam ball for a secure anchor.
4. Oversized Sheet Ghosts
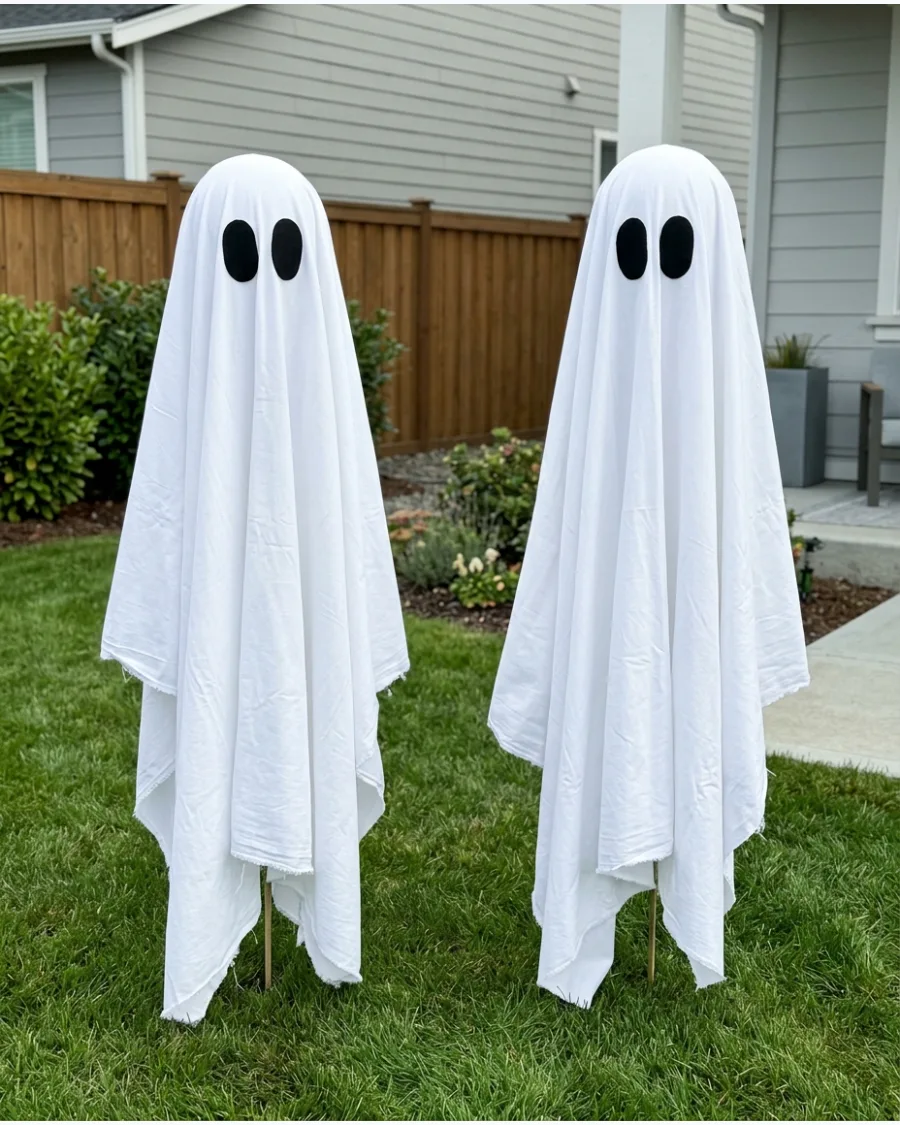
Cover tall garden stakes or lightweight frames with old white sheets. Add black felt eyes and arrange the ghosts across the yard as a simple, high-impact display.
Drive the stakes at least six inches into the ground to ensure the ghosts stay upright during autumn wind gusts. This method provides a large-scale spooky look without the weight of heavy plastic statues.
- Requires old white sheets and garden stakes.
- Position these in the center of the yard for maximum visibility from the street.
- Use safety pins to secure the sheets to the stakes so they don't blow away.
Quick win: Spray the bottom edge of the sheets with a bit of fabric protector to keep them from soaking up morning dew.
5. Ghost Portrait Gallery
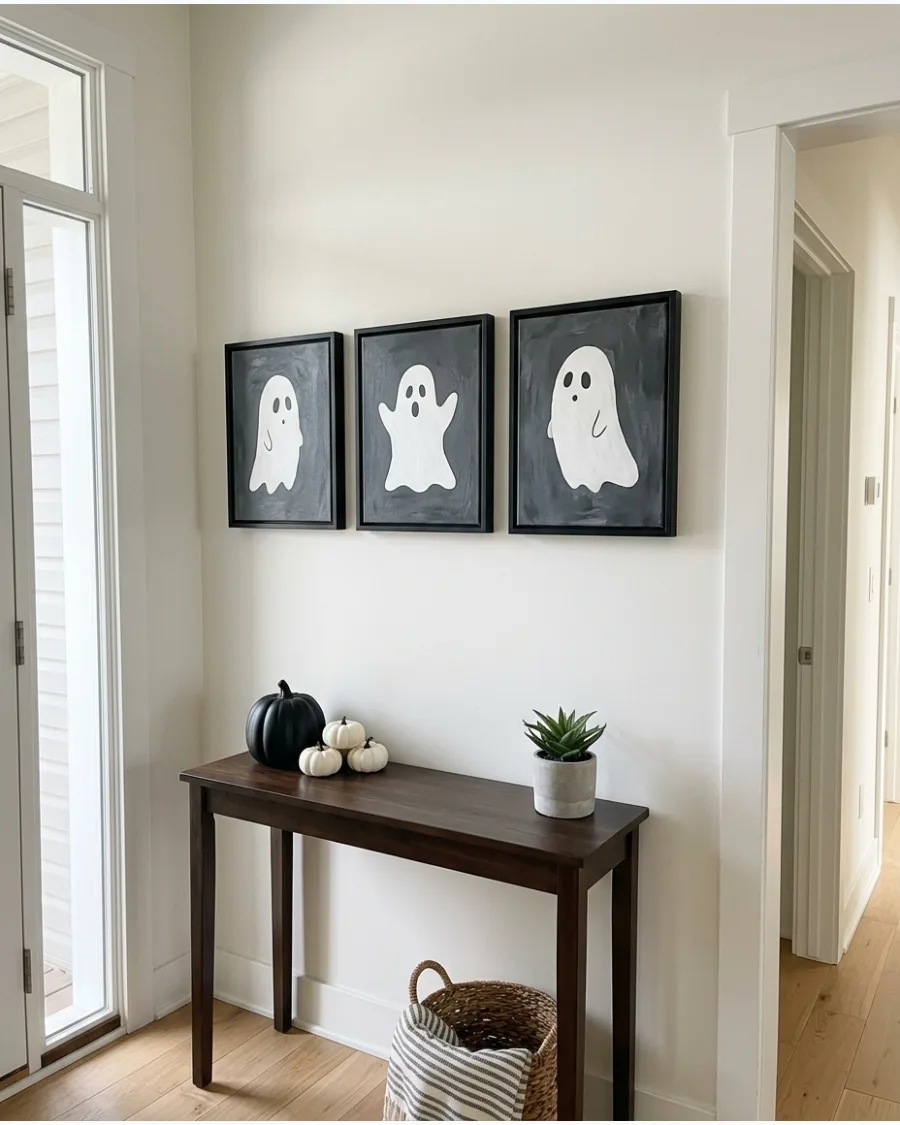
Paint simple ghost figures onto inexpensive canvases or thrifted framed art. Use muted cream, black, gray, and brown shades for an aged haunted-house appearance.
Layer thin washes of gray paint over the ghost shapes to make them look like they are fading into the background. This creates a sophisticated yet spooky focal point on a gallery wall or entryway table.
- Inexpensive art project using craft paint and small canvases.
- Hang with adhesive strips to avoid damaging walls in rental homes.
- Mix different frame styles to give the gallery a curated look.
Most people skip this: Paint the edges of the canvas black so the art looks finished even from a side angle.
6. Mini Clay Ghost Village
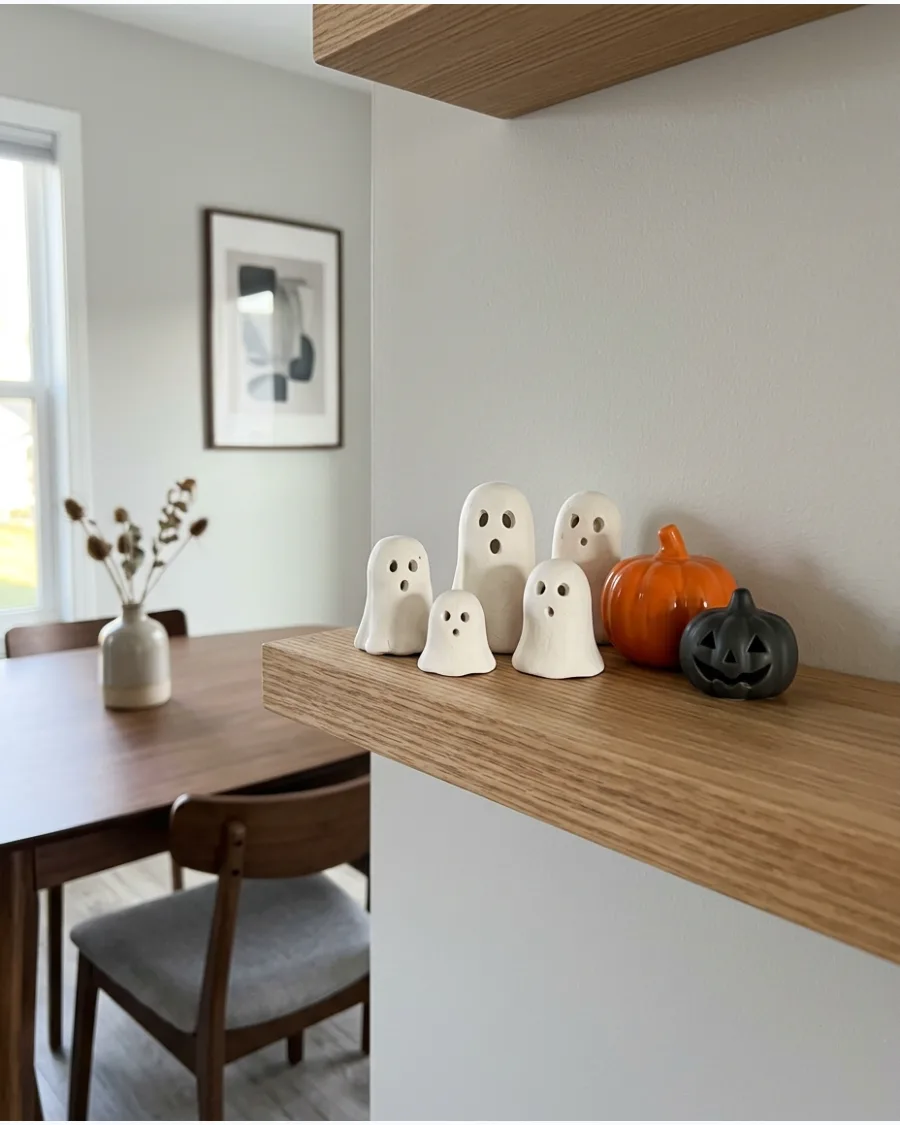
Shape air-dry clay into tiny ghosts with different expressions and poses. Display them around miniature pumpkins, moss, and battery-operated lights.
Roll the clay thin before shaping to ensure the ghosts dry evenly without cracking. These small figures work well as a centerpiece for a dining table or a subtle addition to a bookshelf.
- Requires air-dry clay and basic sculpting tools.
- Place on a tray to make the display easy to move for cleaning.
- Store in a padded box to prevent the clay from chipping after the season.
Best shortcut: Use the end of a paintbrush to poke perfectly round holes for the ghost eyes.
7. Light-Up Tomato Cage Ghosts
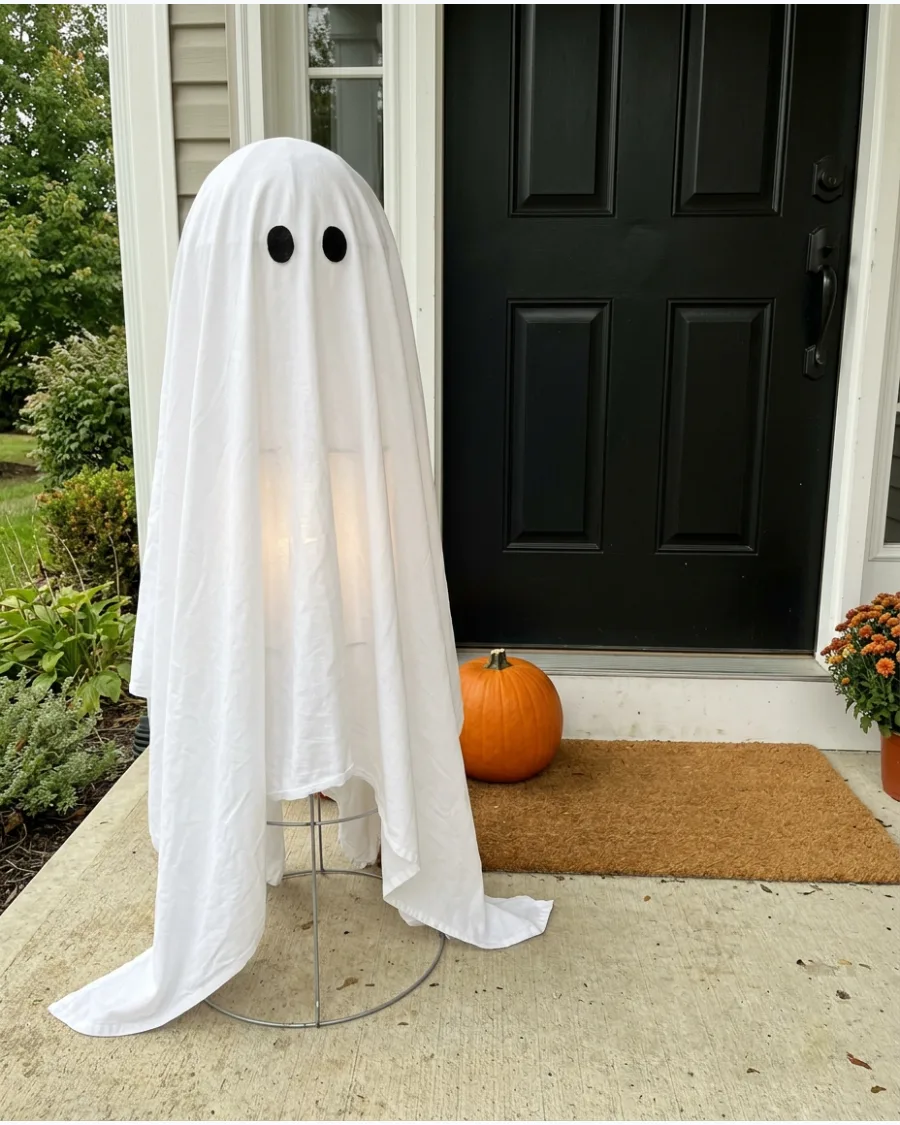
Turn upside-down tomato cages into tall ghost forms and wrap them with white fabric. Place battery-operated string lights underneath to illuminate them at night.
Secure the fabric at the top of the cage with a zip tie to create a rounded head shape. This is an effective way to fill large empty spaces on a porch or in a dark corner of a room.
- Utilizes standard wire tomato cages and white fabric.
- Use cool-to-the-touch LED lights to keep the fabric safe.
- Place a heavy rock on the bottom wire ring to prevent tipping.
Quick win: Use a white pillowcase for the head section to hide the wire structure more effectively.
8. Ghost Garland
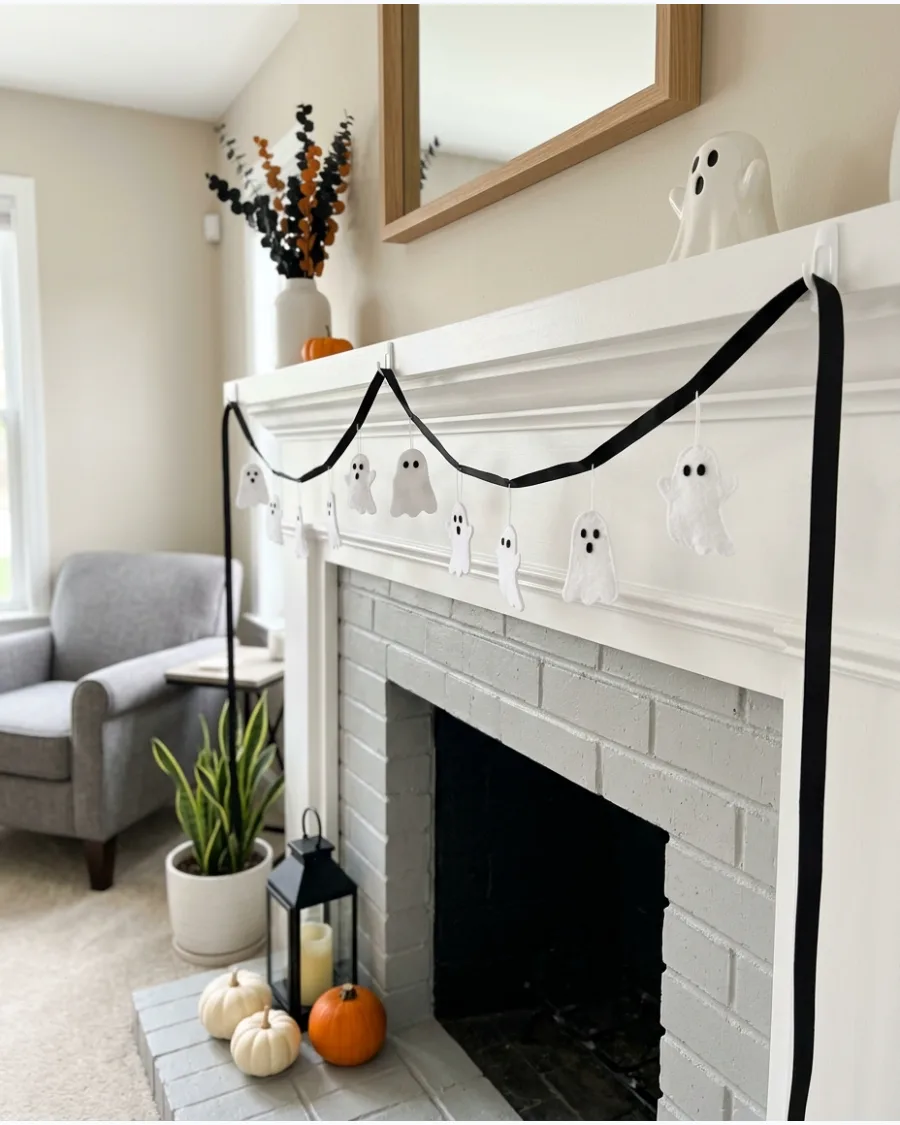
Cut small ghost shapes from white felt, fabric, or thick paper. String them together with black ribbon and hang the garland across a mantel, doorway, or staircase.
Space the ghosts about four inches apart to ensure the shapes remain distinct when the garland hangs. This adds a touch of seasonal character without overwhelming the existing room decor.
- Fast craft using felt scraps and ribbon.
- Use a hole punch to create consistent attachment points for the ribbon.
- Attach to the mantel with clear removable hooks for easy cleanup.
Most people skip this: Use stiffened felt so the ghosts don't curl or flip over while hanging.
9. Ghost Pillow Covers
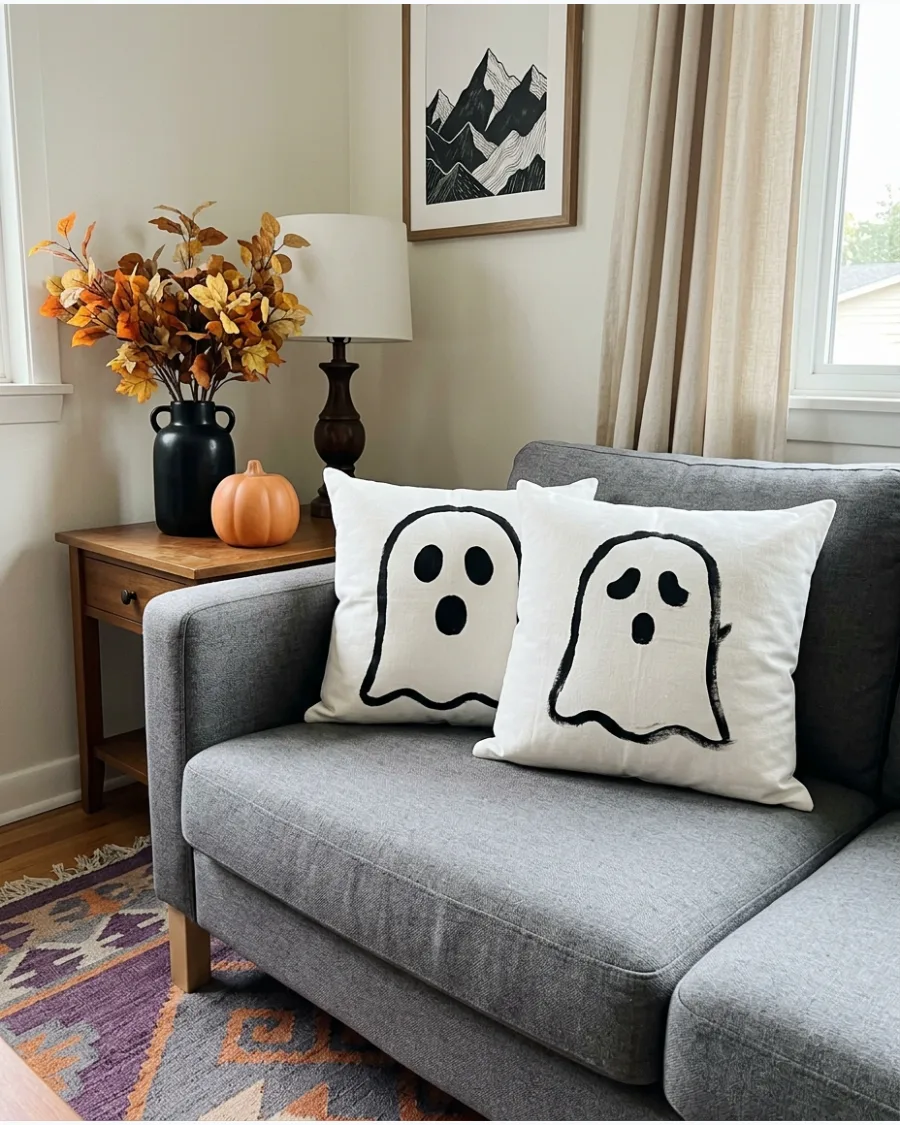
Make temporary Halloween pillow covers from white fabric and add ghost faces with black fabric paint. Mix cheerful and spooky expressions to create a playful sofa display.
Iron the fabric after the paint dries to set the design and prevent smearing. These covers can be slipped over existing throw pillows to save storage space during the rest of the year.
- Requires plain white pillow covers and fabric paint.
- Choose covers with zippers for easy removal and washing.
- Use a stencil for the eyes to keep the faces looking consistent.
Best shortcut: Use black felt stickers for the eyes if you want to avoid the mess of fabric paint.
10. Ghostly Window Curtains
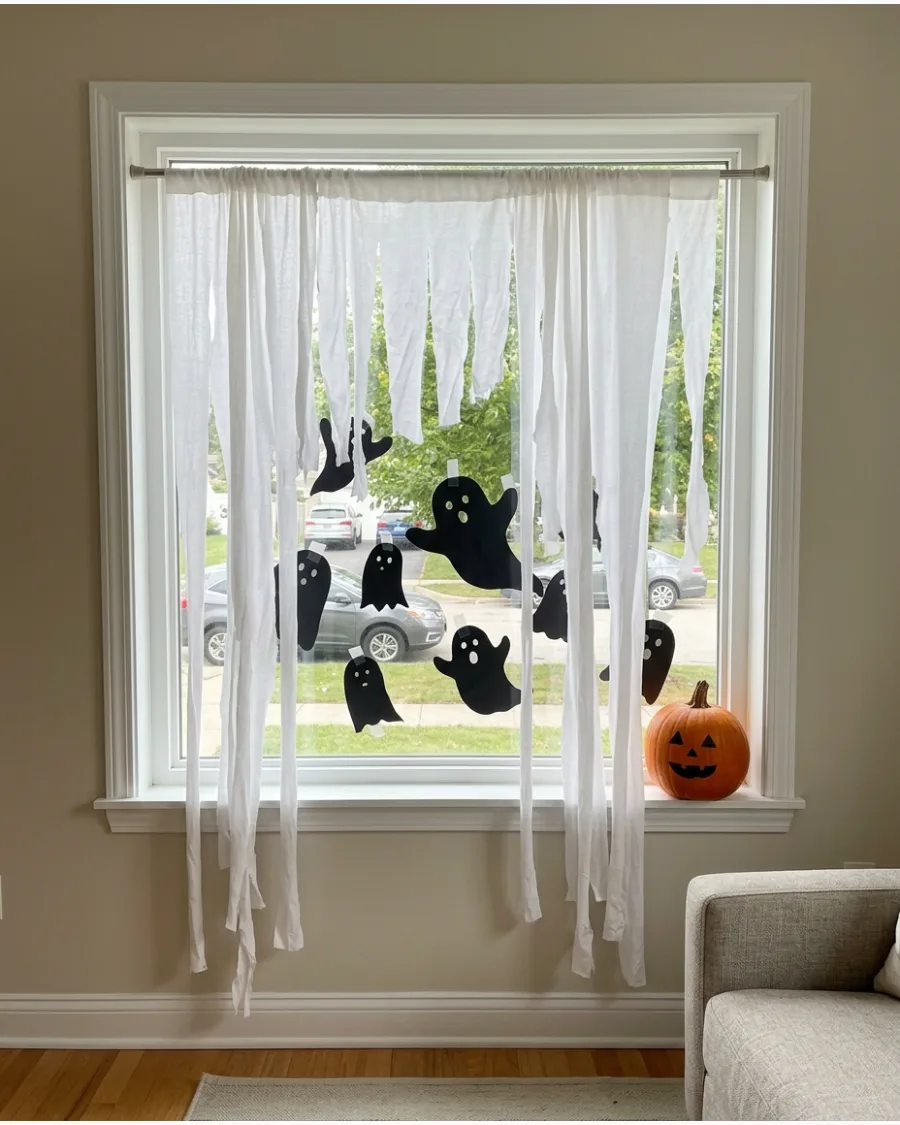
Cut uneven strips into inexpensive white fabric and hang them behind sheer curtains. Add paper ghost silhouettes to make the windows look haunted from outside.
Vary the lengths of the fabric strips to create a tattered, aged look that catches the light. This setup creates a spooky silhouette when the indoor lights are on at night.
- Uses low-cost white fabric or old sheer curtains.
- Secure silhouettes to the glass with clear double-sided tape.
- Layer the fabric for a fuller, more ghostly appearance.
Quick win: Light the window from below with a small floor lamp to make the ghosts pop against the dark glass.
DIY Bat and Spider Decor
11. Paper Bat Wall Swarm
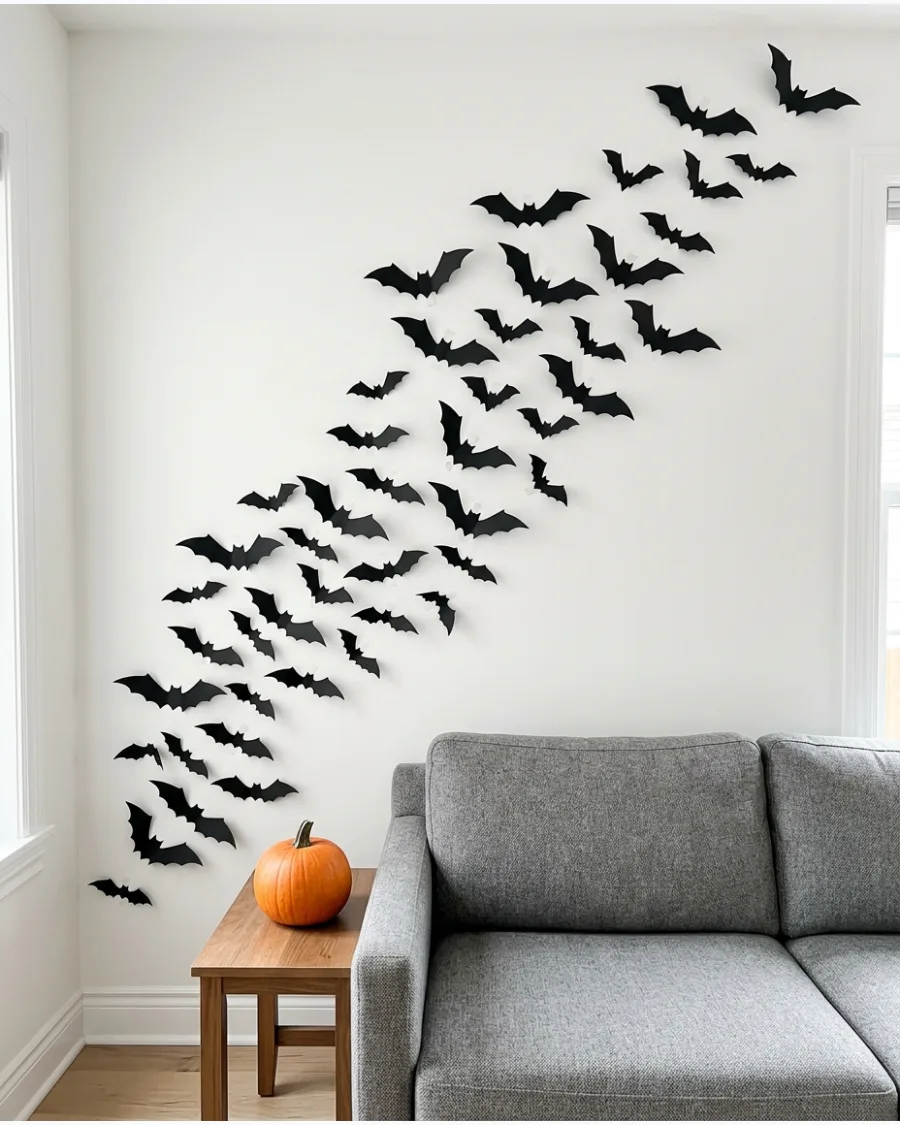
Cut bats in several sizes from black cardstock and gently fold the wings outward to create a 3D effect. Using double-stick foam tape allows these bats to pop off the wall and cast realistic shadows. Arrange them in a sweeping pattern above a mantel, bed, or staircase to imply movement.
- Black cardstock and removable adhesive strips
- Use a template to ensure uniform wing shapes
- Stick to a single color for a high-end graphic look
Quick win: Vary the wing fold angles on different bats to make the swarm look like it is actively in flight.
12. Hanging Bat Chandelier
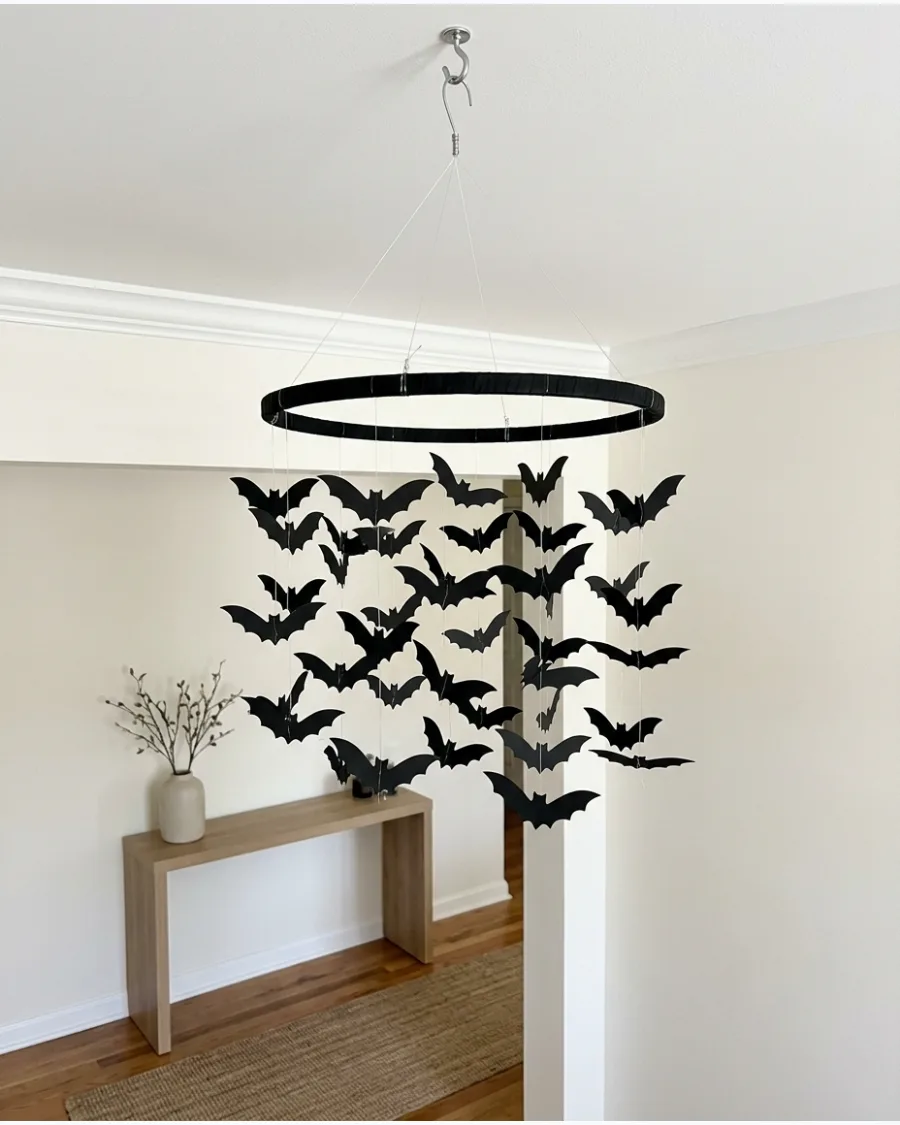
Attach paper or felt bats to clear thread and suspend them from a painted embroidery hoop for a floating display. Hanging this from a ceiling hook creates a moving shadow display when the evening lights are low. This adds vertical interest to an entryway without taking up floor space.
- Embroidery hoop and clear fishing line
- Balance the weight by spacing the bats evenly around the hoop
- Use black felt for a durable and soft texture
Best shortcut: Buy a pre-finished black hoop to skip the time-consuming painting and drying process.
13. Spooky Bat Branch Centerpiece
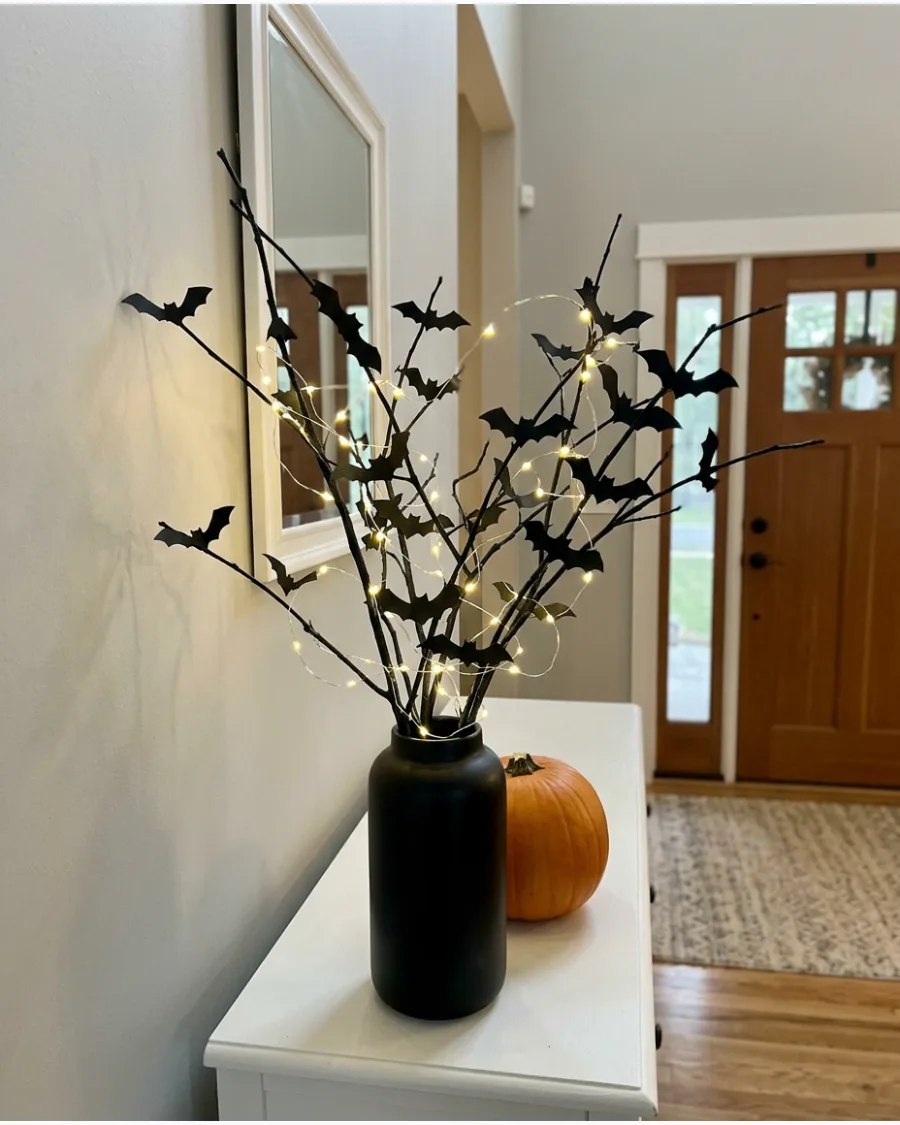
Paint gathered branches matte black and place them in a tall vase for an eerie, structural look. Placing this in a heavy ceramic vase prevents the tall branches from tipping over under the weight of decorations. Add small hanging bats, miniature moons, or tiny battery-operated lights for extra detail.
- Real tree branches and matte spray paint
- Secure the base with decorative stones inside the vase
- Add a few purple or orange lights for a subtle pop of color
Most people skip this: Sand the branches lightly before painting to ensure the black finish adheres without peeling.
14. Giant Cardboard Porch Bats
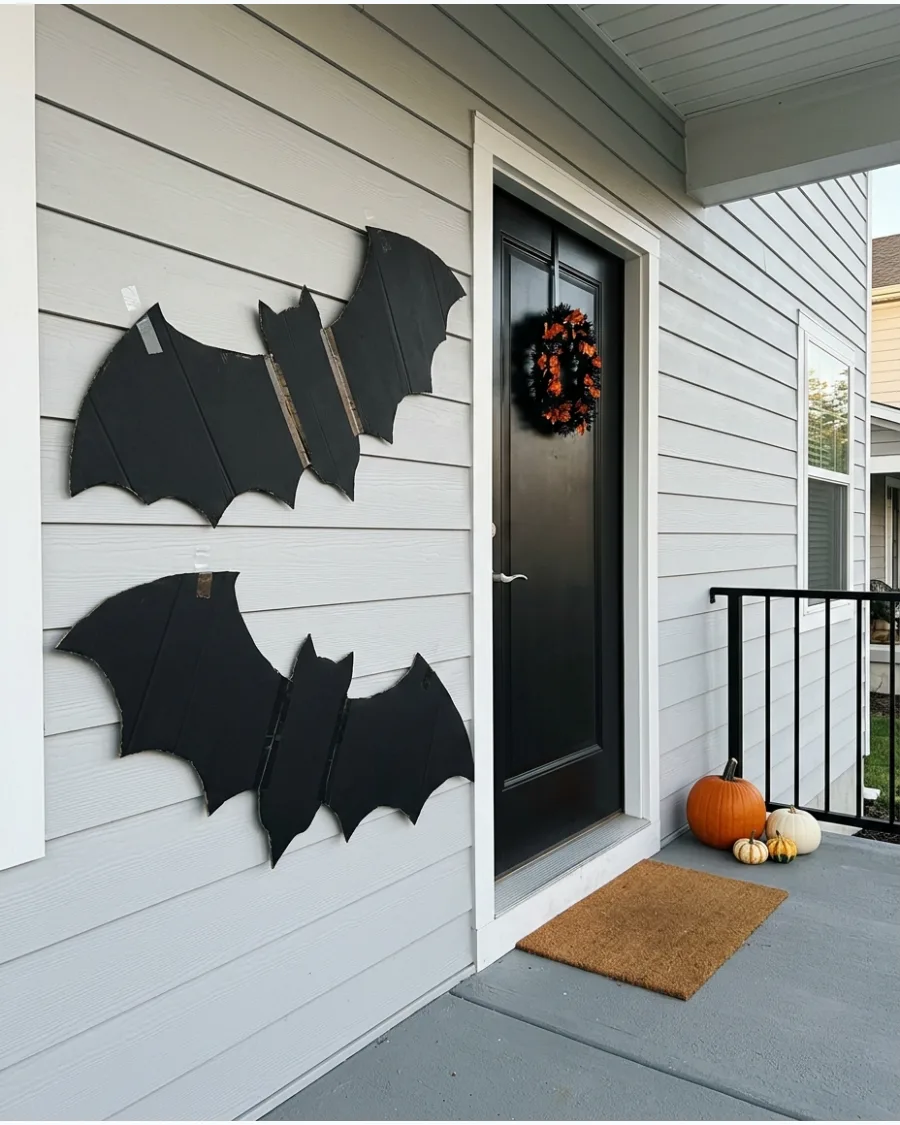
Cut oversized bats from sturdy cardboard and paint them black for a bold outdoor statement. Using exterior-grade mounting tape keeps these heavy cutouts secure against wind on porch walls or shutters. These giant shapes provide high visibility from the street for a low cost.
- Upcycled cardboard and black exterior acrylic paint
- Trace shapes using a large stencil for clean edges
- Seal the cardboard edges with tape to prevent moisture damage
Quick win: Paint both sides of the cardboard so the bats look finished from every angle if they are visible through windows.
15. Spiderweb Picture Frames
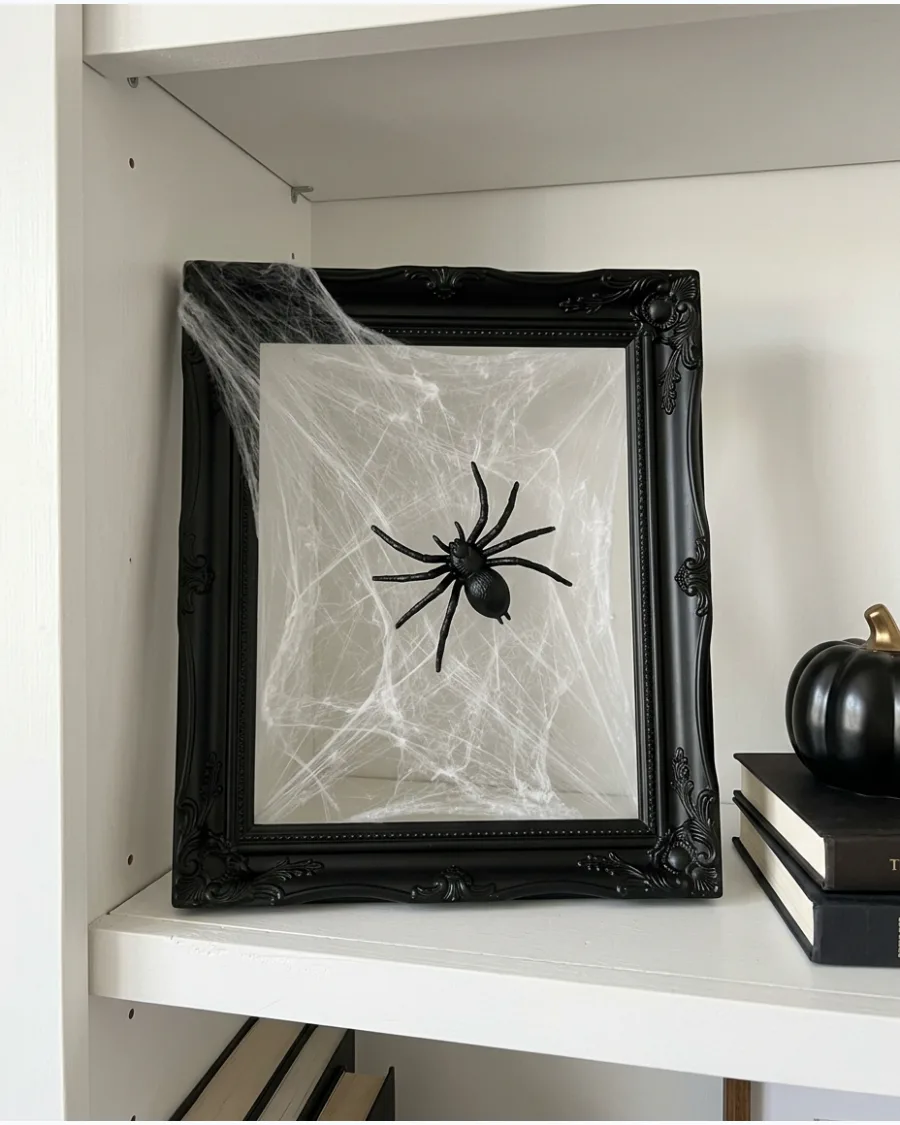
Stretch faux spiderweb material across empty thrift-store frames for a creepy gallery wall. Pulling the webbing extremely thin makes it look like a real, aged spider infestation rather than a store-bought prop. Add plastic spiders or antique-style labels inside each frame to complete the scene.
- Empty frames and stretchable faux webbing
- Hook the webbing on the frame's back tabs for a secure hold
- Group different frame sizes together for a curated look
Best shortcut: Use a tiny drop of hot glue on the back of the frame to keep the webbing from slipping over time.
16. Yarn Spiderweb Wall Hanging
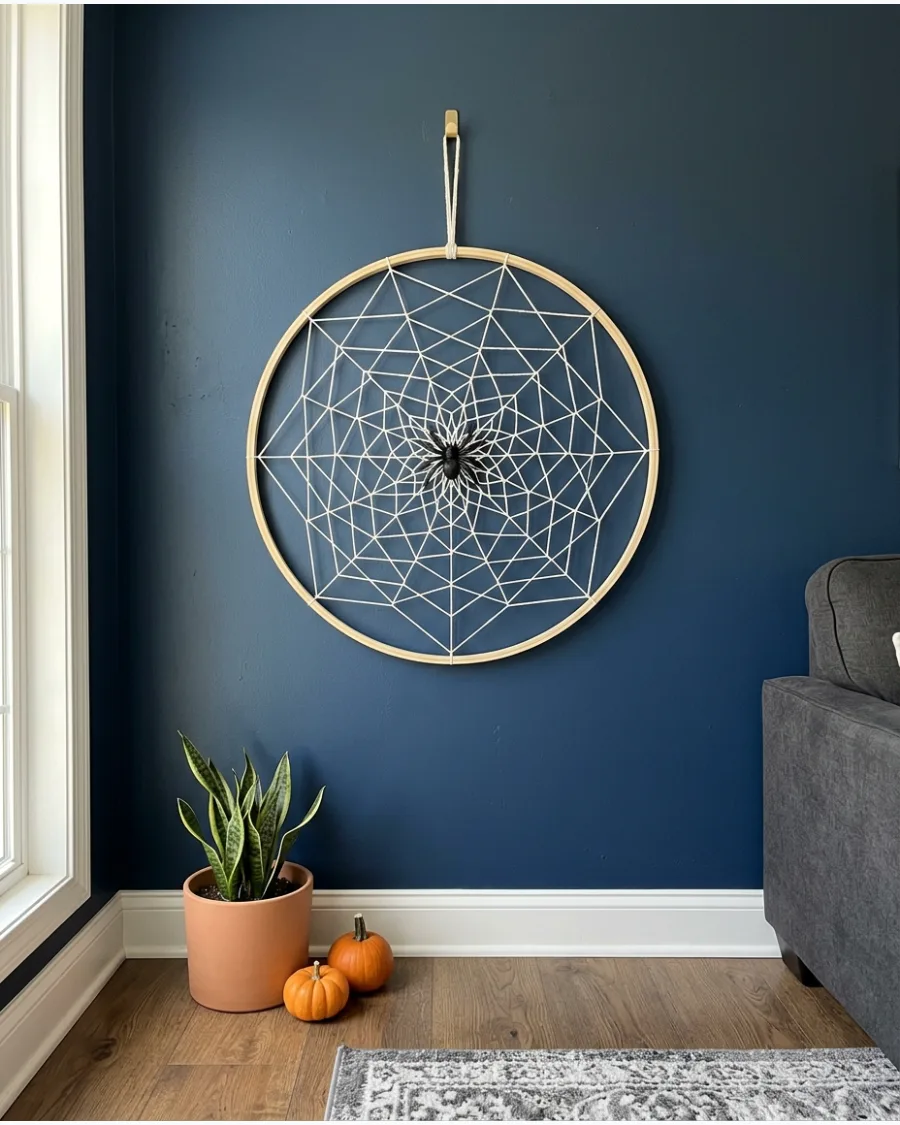
Wrap black, gray, or white yarn around a wooden hoop to create a geometric web pattern. A simple radial pattern creates a graphic, modern look that fits any room style while remaining mess-free. Add a handmade felt spider to the center for a tactile finish.
- Wood hoop and thick white or black yarn
- Start with the vertical spokes before weaving the concentric circles
- Use a command hook for damage-free hanging on apartment walls
Quick win: Use a contrasting yarn color like neon orange for a more playful and modern punch of color.
17. Giant Trash-Bag Spiderwebs
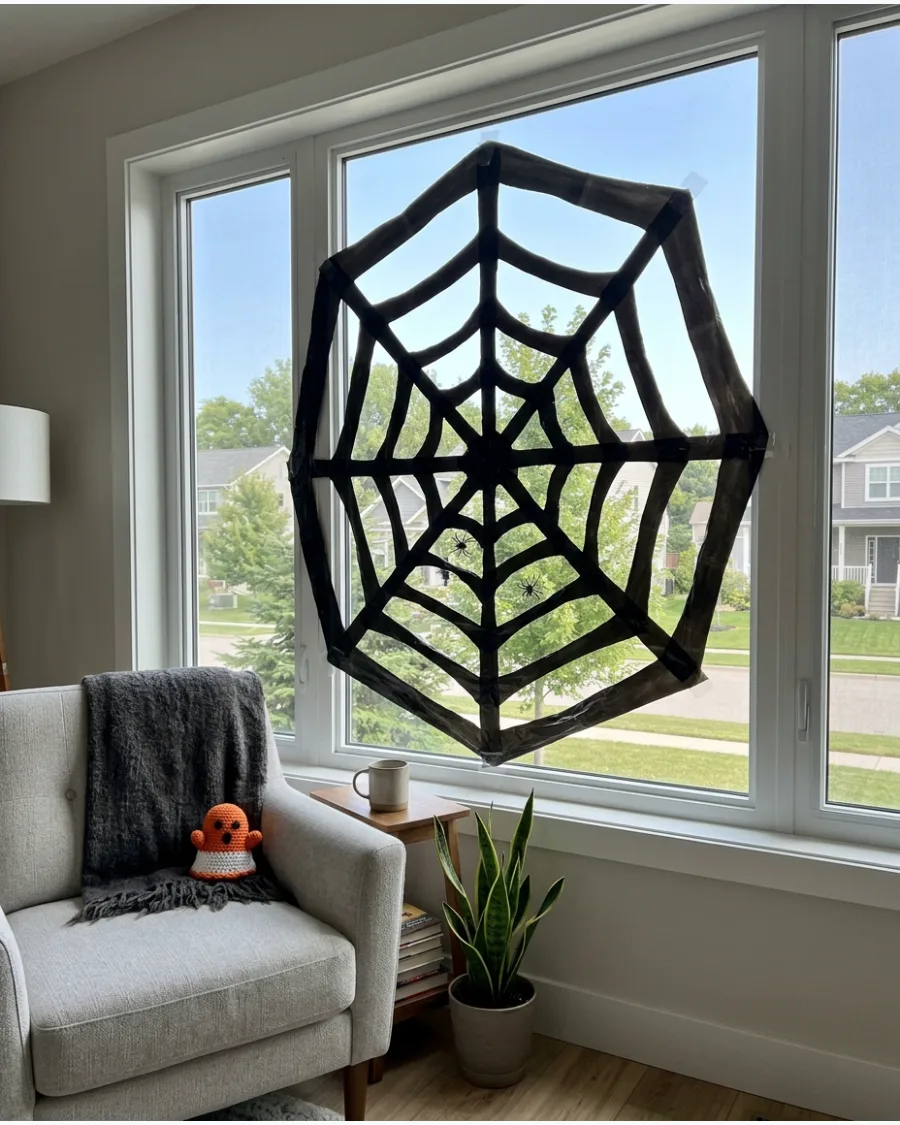
Cut folded black trash bags into large web designs, similar to making paper snowflakes. Folding the bag into a triangle before cutting ensures a perfectly symmetrical web every time. These are waterproof and hold up well when taped to exterior windows or garage doors.
- Black trash bags and sharp heavy-duty scissors
- Use clear packing tape for a nearly invisible hold on glass
- Layer two webs of different sizes for a more complex look
Most people skip this: Use heavy-duty contractor bags for a thicker, matte look that appears more like professional vinyl than thin plastic.
18. Pom-Pom Spider Garland
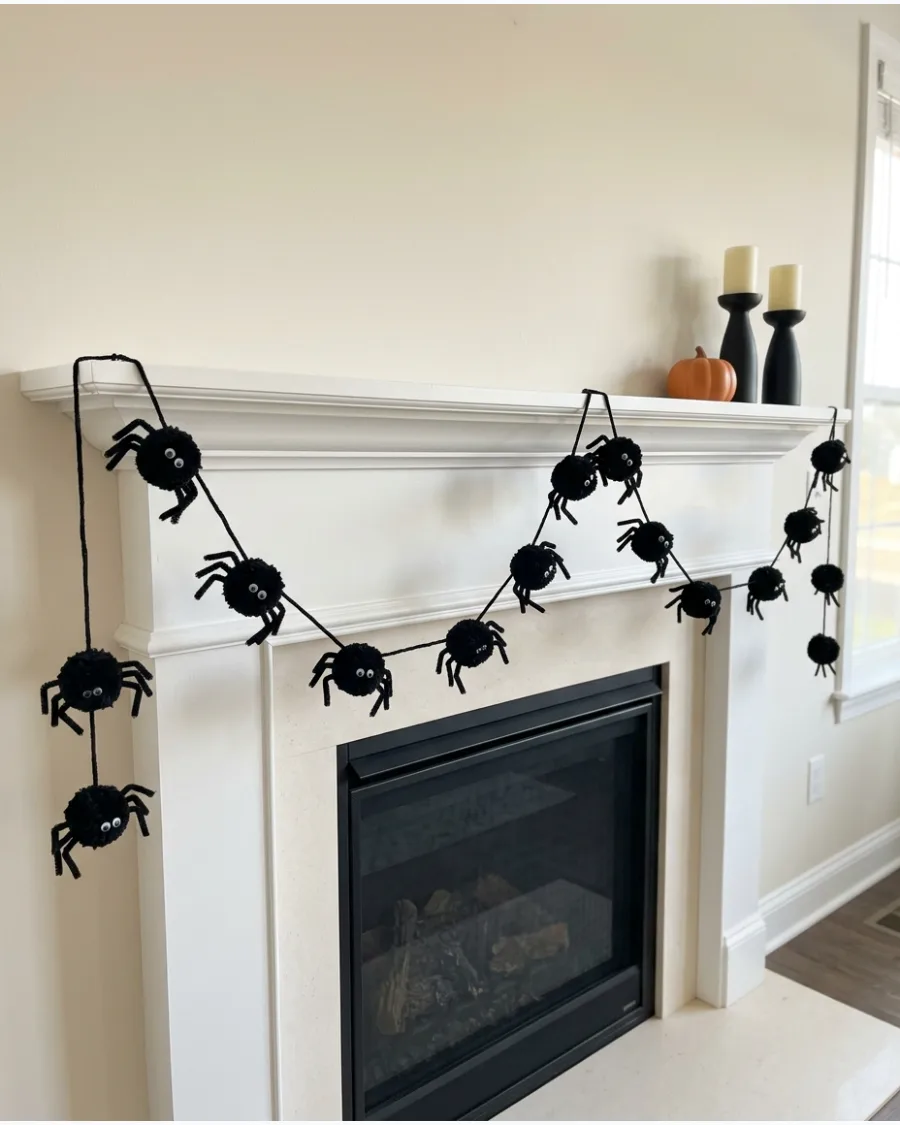
Create fuzzy spiders from black pom-poms and pipe cleaners for a soft, spooky garland. Bending the pipe cleaner legs at different angles gives each spider a unique, lifelike personality as they crawl along the string. Drape the finished garland along shelves, mirrors, or party tables.
- Black pom-poms and matching pipe cleaners
- Use hot glue to attach the legs firmly to the pom-pom body
- Space the spiders ten inches apart for the most natural drape
Best shortcut: Buy pre-made large pom-poms to save time on winding and trimming yarn by hand.
DIY Spooky Decor Ideas for Halloween
19. Infested Grapevine Egg Wreath
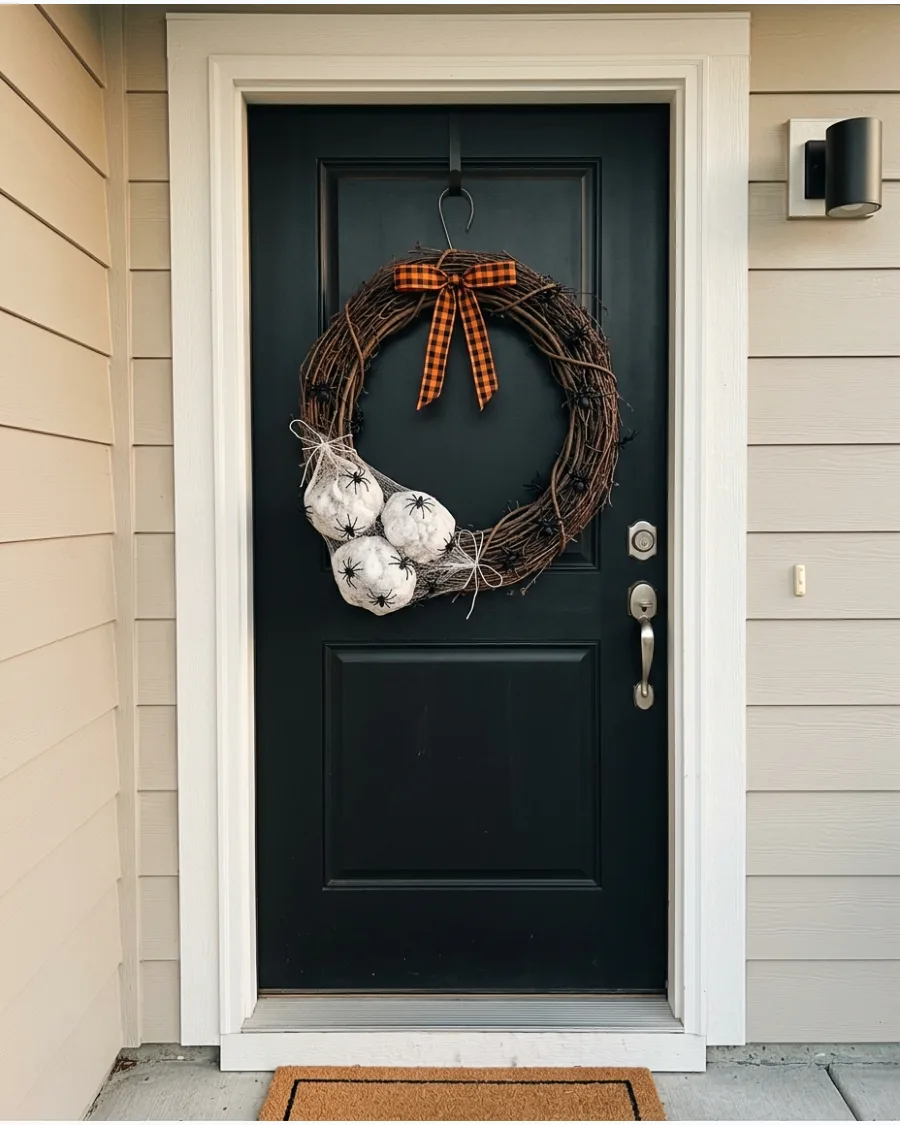
A grapevine wreath provides a natural, tangled foundation for a swarm of emerging spiders. Using white hosiery stuffed with poly-fill creates realistic, sagging egg sacs that contrast sharply against the dark wood.
Hot glue small plastic spiders crawling out of the mesh to simulate a mid-hatch infestation. This design works because it uses texture rather than gore to create a sense of unease. For the most unsettling effect, group the sacs in uneven clusters of three rather than spacing them evenly around the circle.
- Buy a standard 18-inch grapevine wreath and a pack of white nylon stockings for under twenty dollars.
- Stuff cut sections of the stockings with cotton balls or fiberfill, tying the ends with clear fishing line before gluing them into the wreath crevices.
- Swap the white hosiery for grey or cheesecloth to create an aged, dusty appearance for a Victorian-style haunt.
Most people skip this: Lightly spray the white sacs with a matte grey paint from a distance to add depth and shadow to the silk texture.
DIY Bat and Spider Decor
20. Crawling Spider Staircase
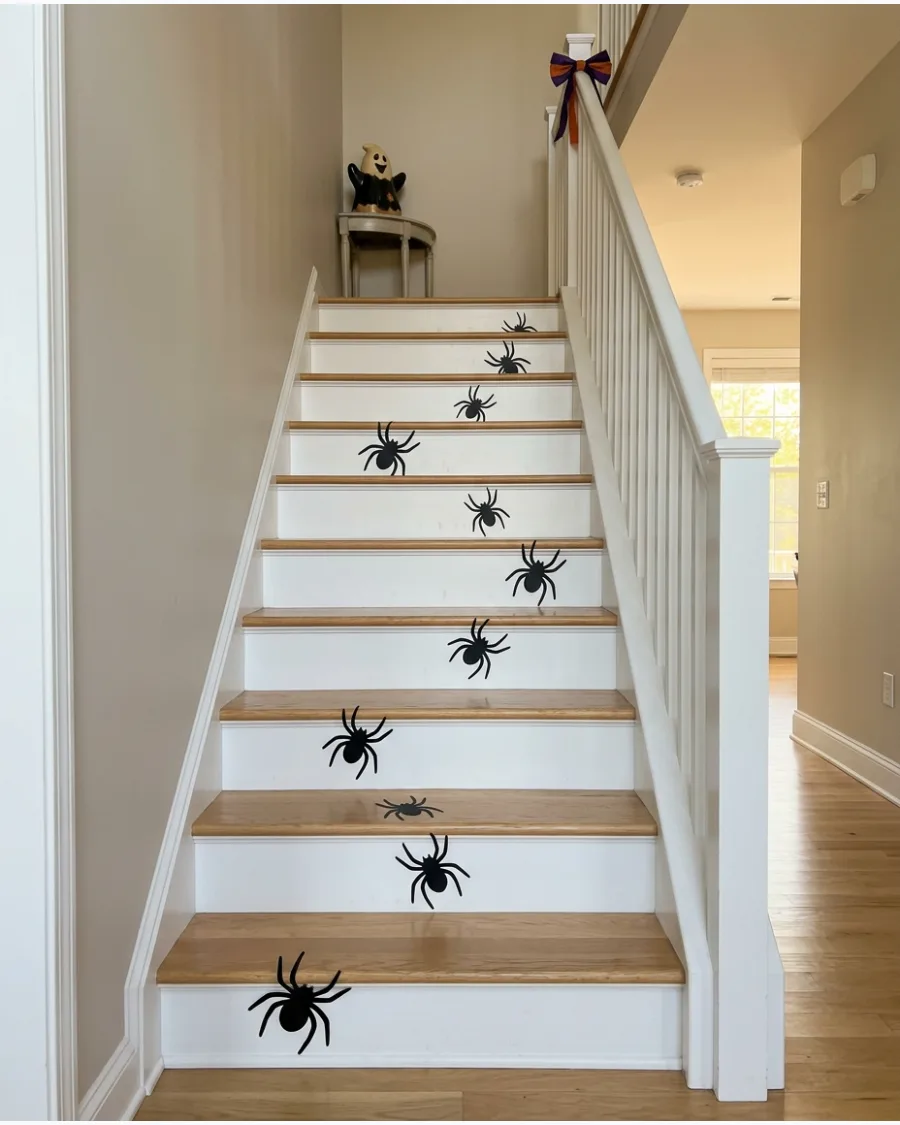
Cut spider silhouettes from removable black vinyl or cardstock and arrange them along your stairs. Placing the spiders on the vertical risers keeps them visible without becoming a tripping hazard for guests. This creates a surprising infestation effect in a high-traffic area of the home.
- Removable black vinyl or black cardstock
- Mix three different spider shapes and sizes for variety
- Ensure the surface is clean and dry before applying for a long hold
Most people skip this: Follow the natural lines of the staircase trim to make the crawl pattern look more realistic and intentional.
Gothic and Witchy DIY Decor
21. Gothic Dripping Candle Display
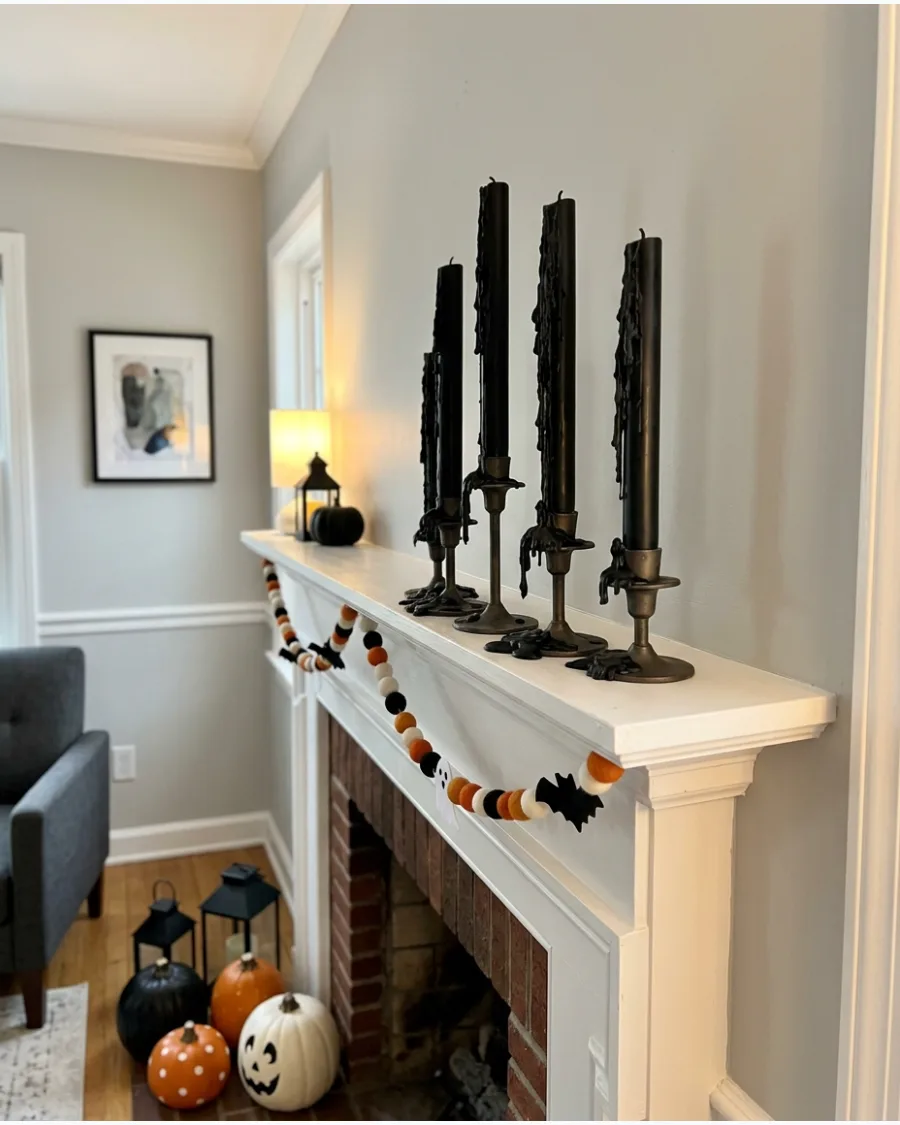
Transform plain battery-operated tapers into eerie artifacts using a hot glue gun. Layer the glue heavily at the top and let it run down the sides to mimic years of melting wax.
Paint the entire candle and the glue drips in a matte black finish for a cohesive look. This technique adds texture and height to any Halloween table without the fire hazard of real wax.
- Budget: $15 – $25; Time: 1 hour
- Group candles in varying heights on a non-flammable tray for stability
- Use metallic silver or gold paint for a luxury gothic look instead of black
Quick win: Use a low-temp glue gun to avoid melting the plastic casing of the battery candles.
22. DIY Haunted Mirror
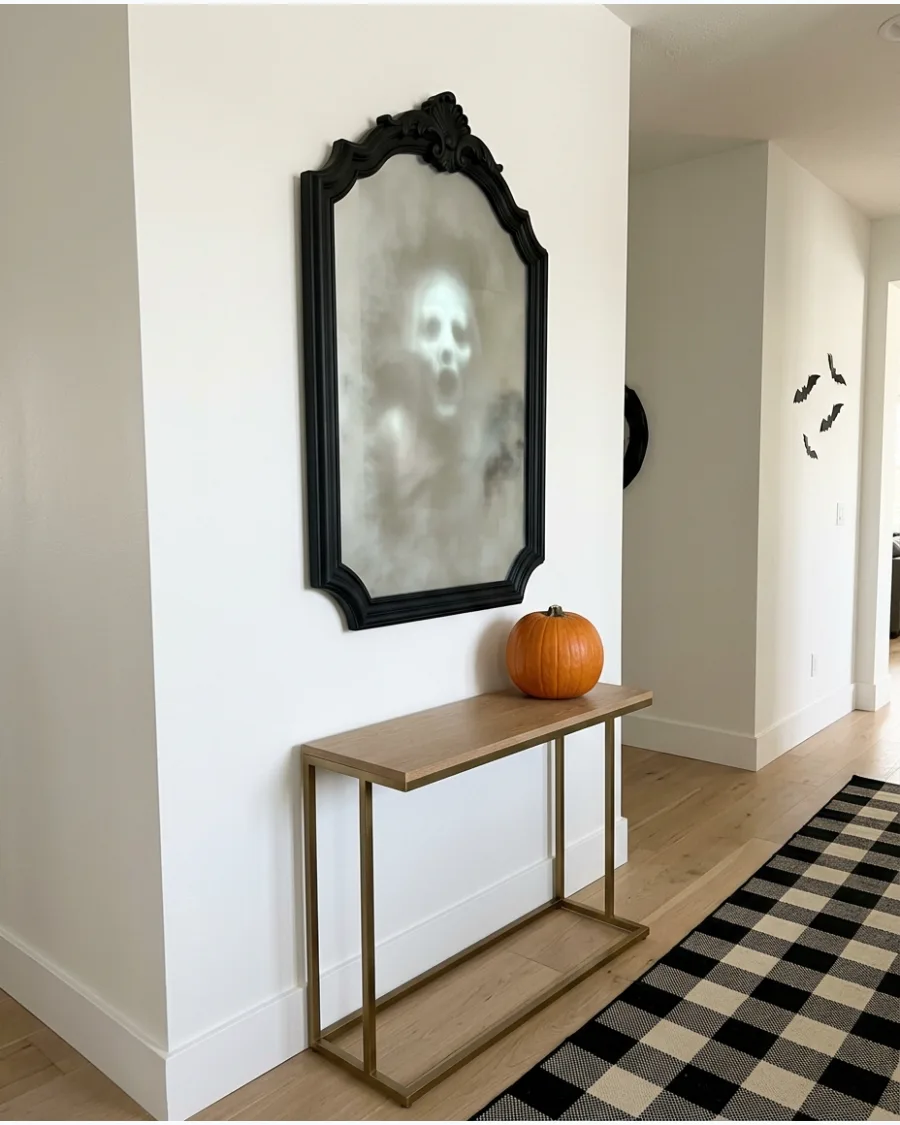
An ordinary mirror becomes a portal to the beyond with a few simple alterations. Use a matte black spray paint on the frame to ground the piece in a spooky aesthetic.
Apply a thin layer of frosted glass spray or a removable window film to create a foggy appearance. Placing a dark paper silhouette behind the film makes it look like a figure is trapped inside.
- Budget: $20 – $40; Time: 2 hours
- Secure the silhouette to the back of the glass before reassembling the frame
- Swap the silhouette for a vintage photograph for a Victorian ghost vibe
Most people skip this: Clean the glass thoroughly with alcohol before applying film to prevent air bubbles.
23. Vintage Potion Bottle Collection
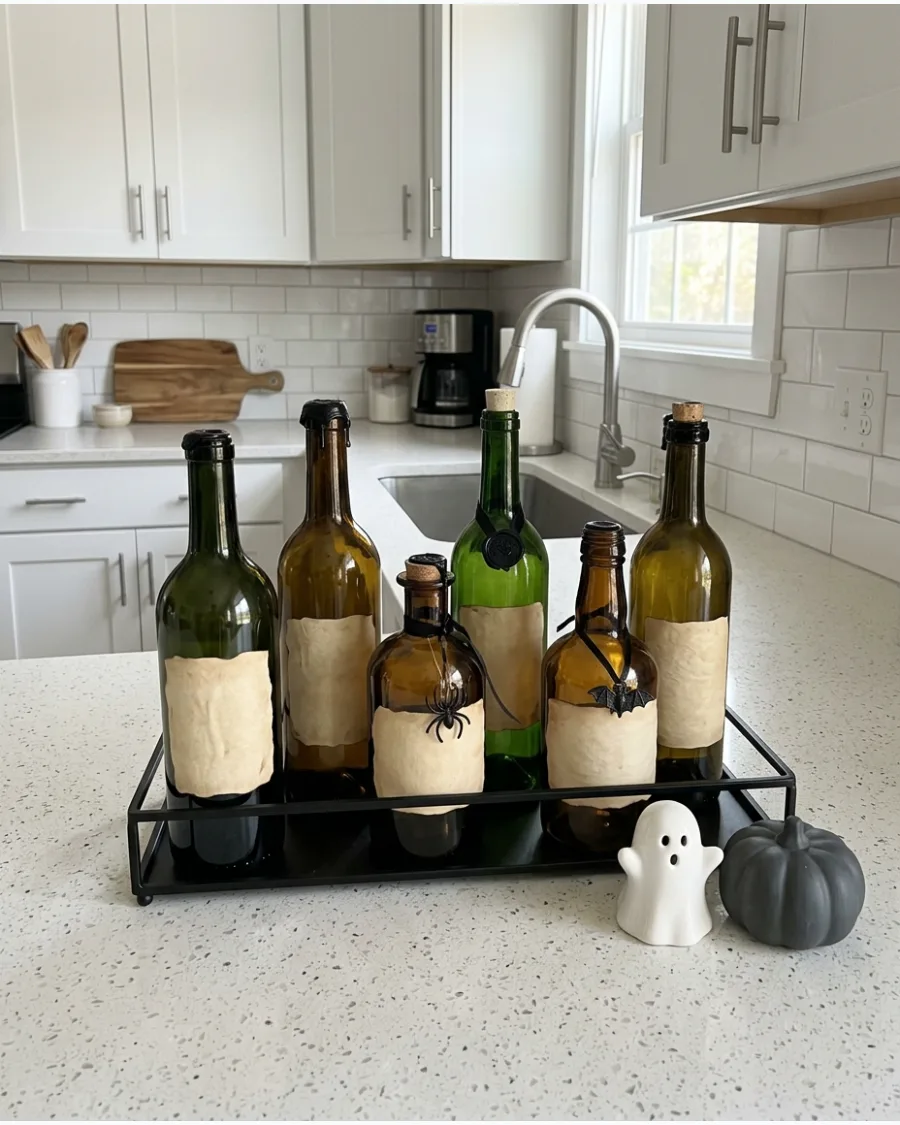
Turn kitchen glass waste into a high-end apothecary display with dark paint and custom labels. Use translucent glass paint to keep the bottles looking like real colored glass rather than plastic.
Arrange the finished bottles on a dark metal tray with dried eucalyptus and old leather-bound books. This creates a sophisticated focal point that feels curated rather than cluttered.
- Budget: $10 – $20; Time: 1 hour
- Group bottles in odd numbers to create a more natural visual balance
- Fill bottles with colored water and glitter for a magical swirling effect
Best shortcut: Print labels on sticker paper and tea-stain them before applying for an instant aged look.
24. Spellbook Storage Boxes
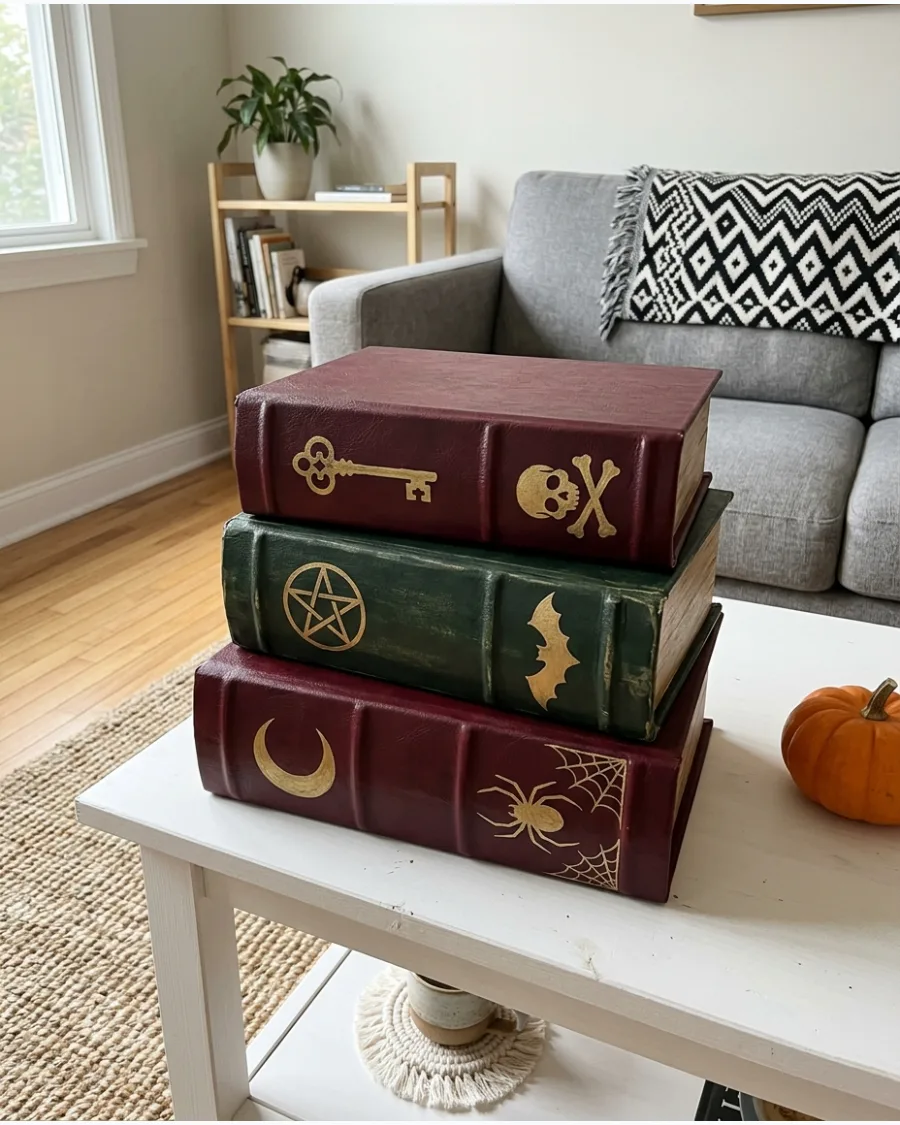
Ordinary cardboard book boxes can be disguised as ancient grimoires with a little paint and creativity. Use thick acrylic paint in jewel tones like burgundy or emerald to give the covers depth.
Apply gold paint to the edges of the boxes to mimic the look of gilded, aged pages. These work perfectly as hidden storage for remotes or small Halloween treats.
- Budget: $15 – $30; Time: 2 hours
- Stack them horizontally on a bookshelf or coffee table for a lived-in look
- Glue plastic gems or small metal charms to the covers for added texture
Most people skip this: Buff a small amount of black wax over the finished paint to create realistic shadows in the corners.
25. Witch Hat Door Hanger
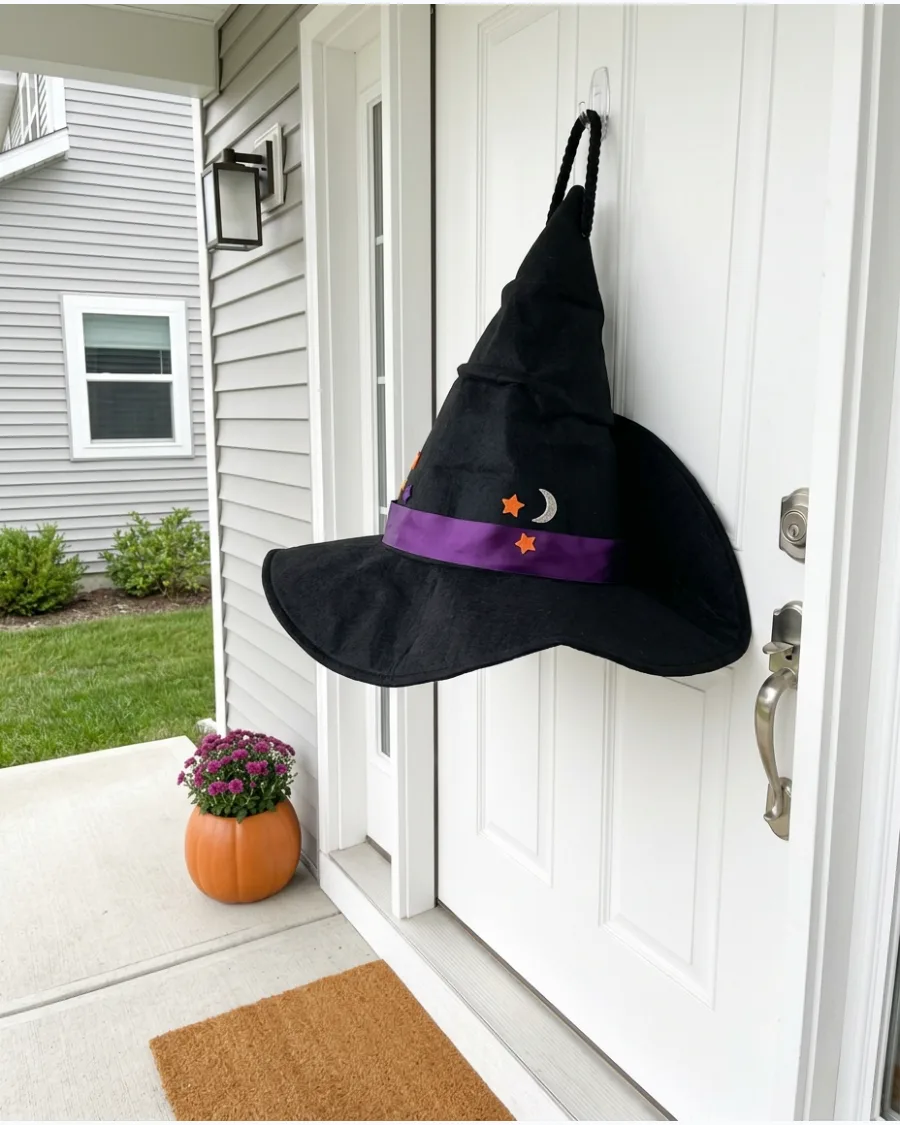
A sculptural witch hat offers a more interesting silhouette than a standard round wreath. Use stiff black felt or heavy poster board to ensure the hat keeps its pointed shape against the wind.
Add a wide satin ribbon and a few sprigs of dried lavender or feathers to give it a custom designer feel. This looks intentional and sharp against a brightly colored front door.
- Budget: $10 – $20; Time: 45 minutes
- Use a heavy-duty suction cup or a magnetic hook for a secure hold on the door
- Switch the ribbon to orange or lime green to match your existing porch decor
Quick win: Stuff the top of the hat with plastic grocery bags to keep the point from flopping over.
26. Hanging Witch Broom Display
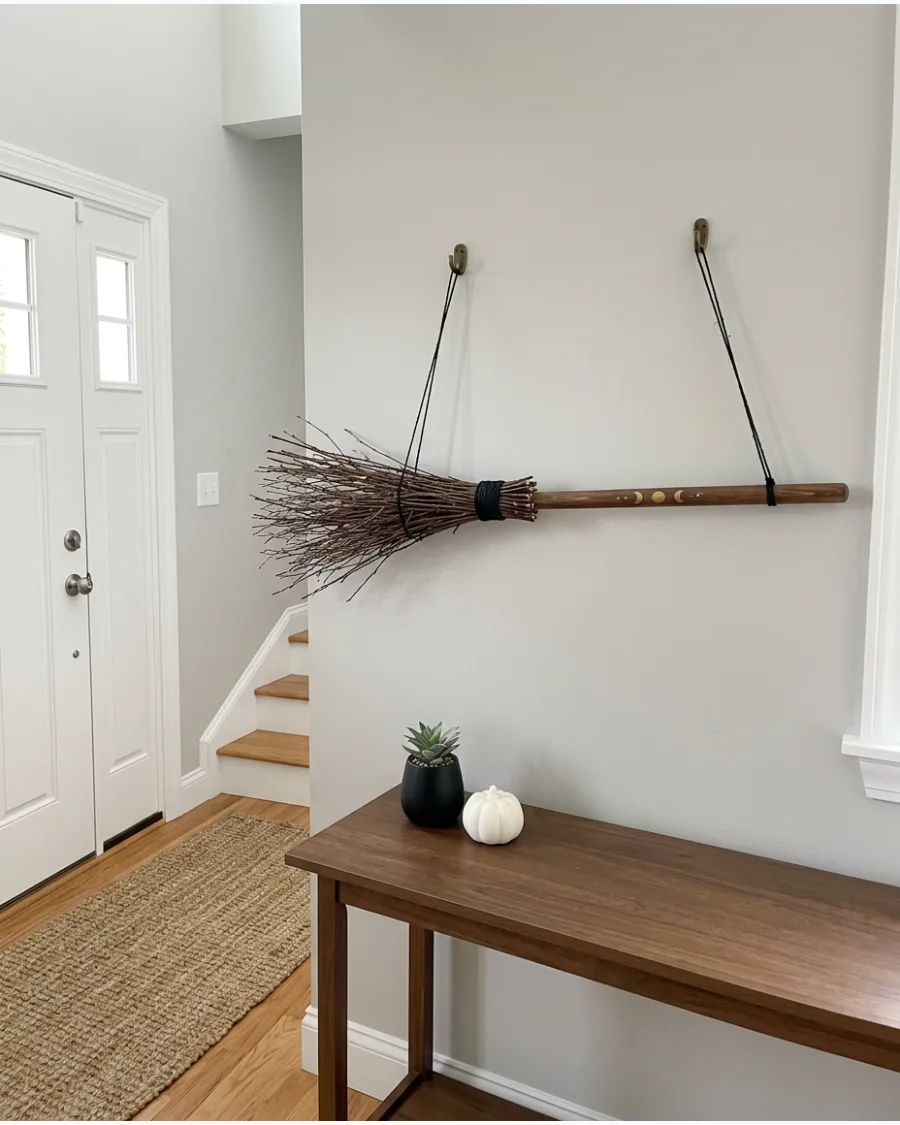
Bringing natural elements like twigs and branches indoors adds an organic, spooky texture to your walls. Secure a bundle of thin sticks to a sturdy wooden dowel using wire or heavy black thread.
Hang the broom horizontally on an entryway wall using two small hooks for a floating effect. It is a simple way to fill a large vertical space without spending much money.
- Budget: $5 – $10; Time: 30 minutes
- Position the broom at eye level or slightly above a console table
- Spray the twigs with black glitter spray for a more whimsical, magical look
Best shortcut: Use fallen branches from the yard to save money and get more realistic textures.
27. Crystal Ball Table Decoration
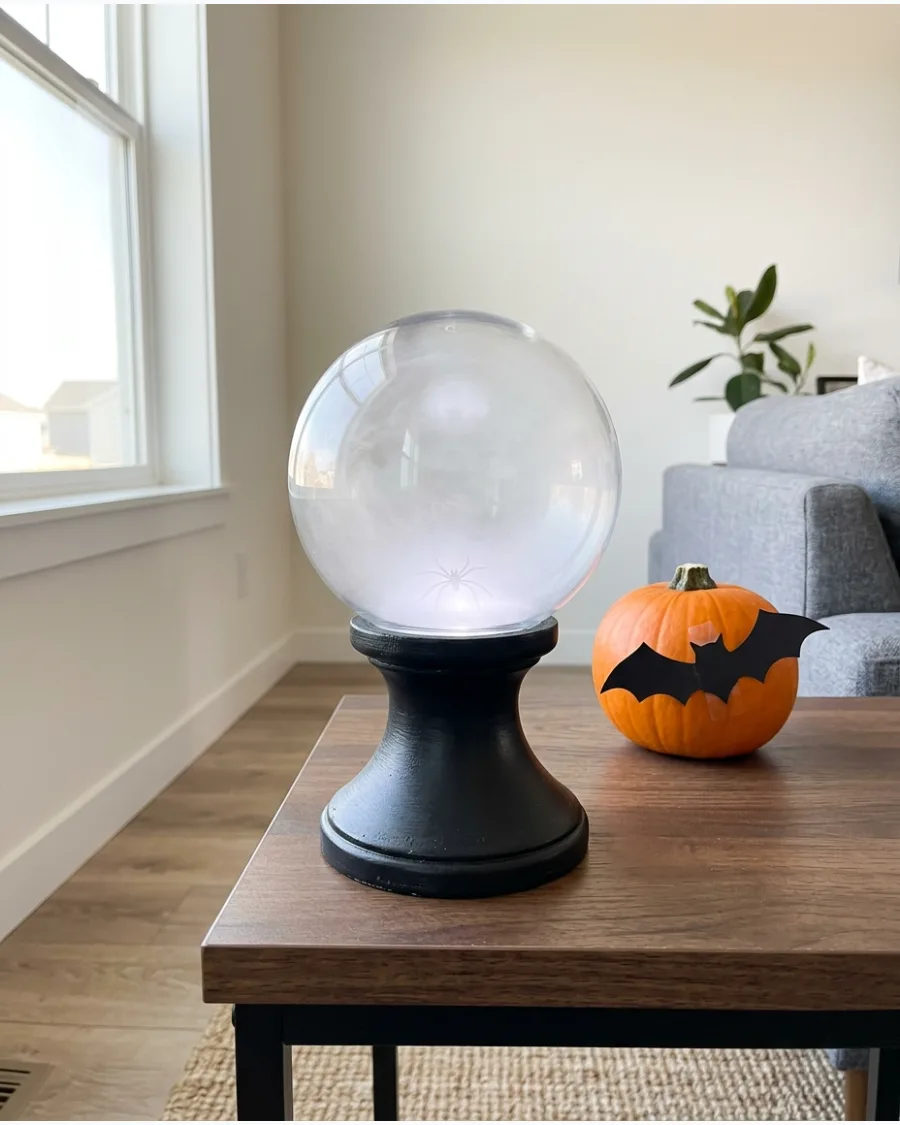
Create a mysterious centerpiece using a clear glass globe and a decorative pedestal. A simple candle holder works perfectly as a base when painted to match your room’s decor.
Stuff the inside of the globe with iridescent cellophane or sheer white fabric to catch the light from a hidden LED. It provides a soft, eerie glow that works well on a dining table or nightstand.
- Budget: $15 – $25; Time: 20 minutes
- Place the display away from high-traffic edges to prevent accidental tipping
- Use a color-changing LED puck light inside for a more dramatic effect
Quick win: A fishbowl turned upside down makes a great budget-friendly alternative to a glass globe.
28. Gothic Floral Arrangement
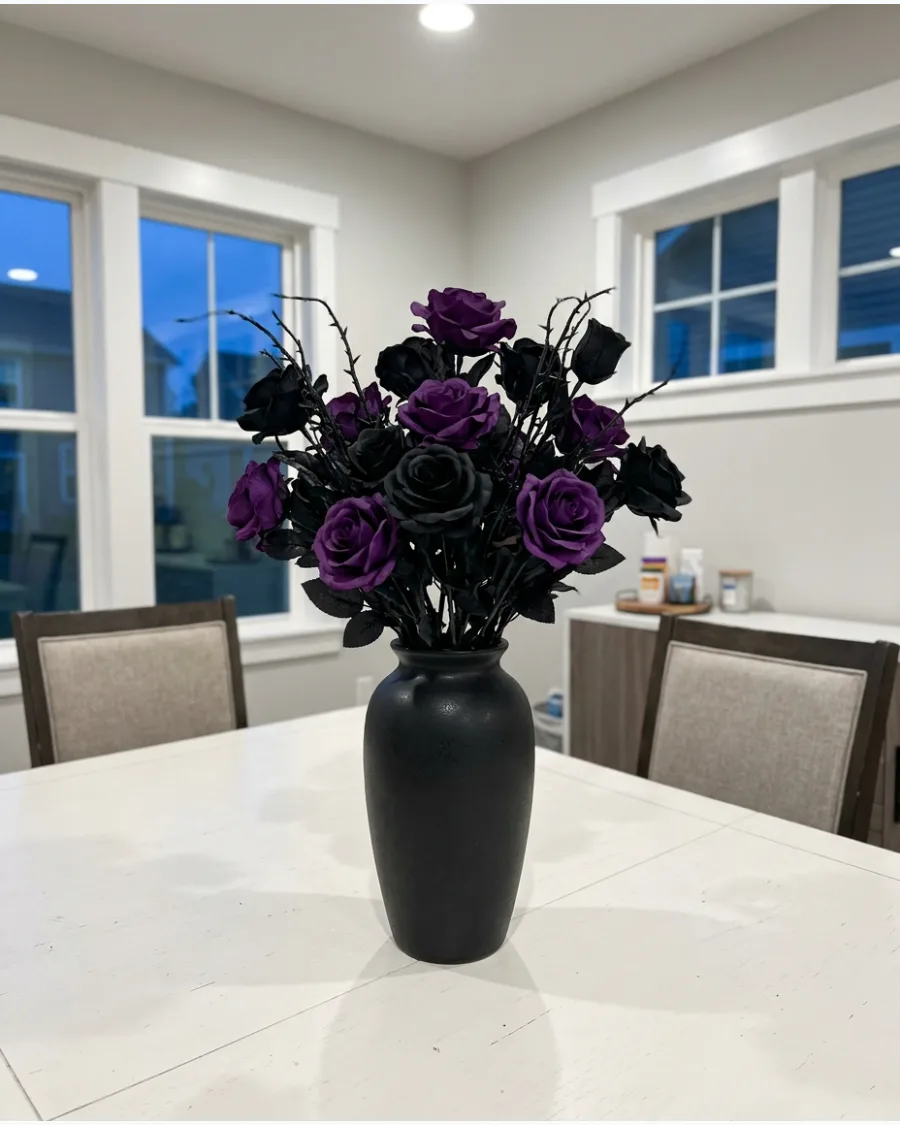
Standard silk flowers take on a dark, moody vibe when treated with a bit of spray paint. Choose deep purples and blacks to create a sophisticated palette that avoids the typical orange and black cliches.
Tuck a few black feathers or small plastic spiders into the arrangement for a subtle surprise. This looks best in a heavy ceramic or metal vase that can handle the visual weight of the dark colors.
- Budget: $20 – $40; Time: 30 minutes
- Vary the heights of the stems to create a more professional, layered look
- Mix in dried wheat or eucalyptus for a variety of natural textures
Most people skip this: Lightly mist the finished flowers with a matte sealer to prevent the paint from chipping.
29. Celestial Moon Garland
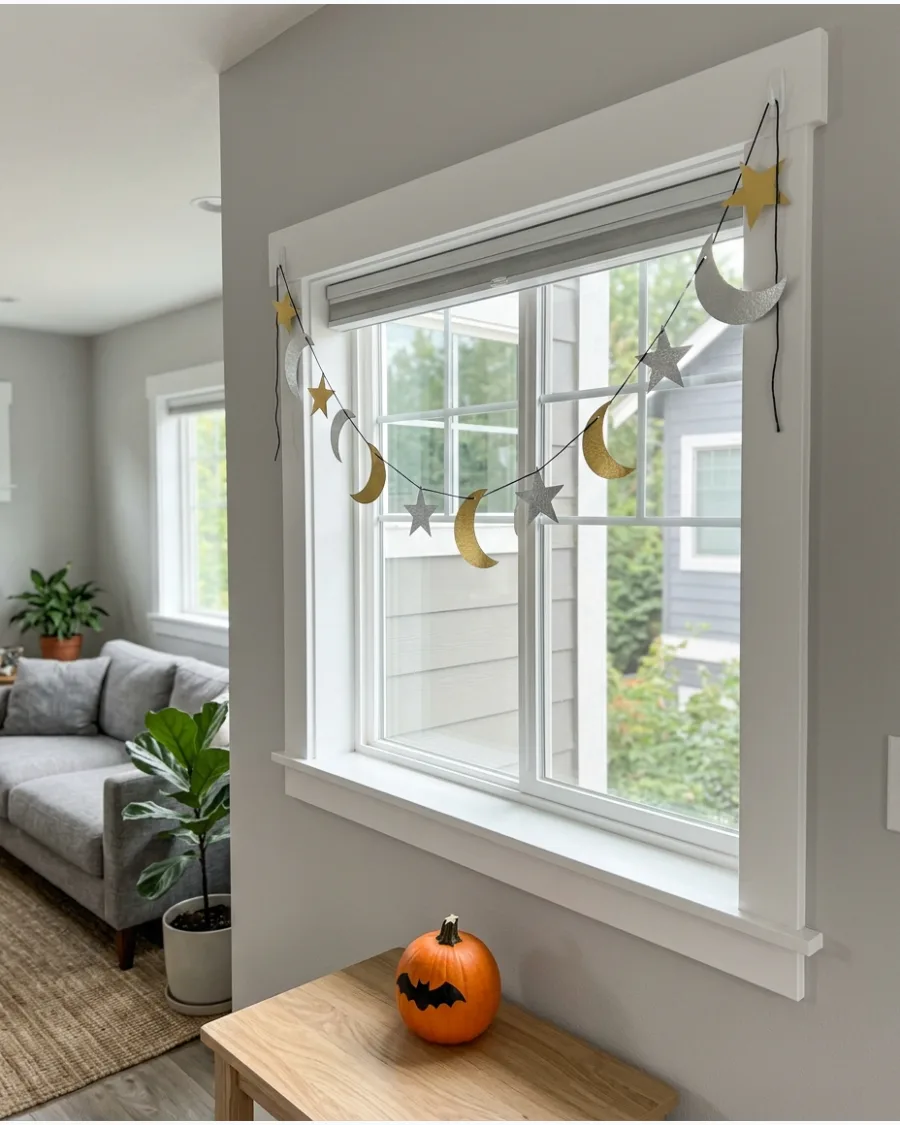
A celestial theme adds a touch of cosmic mystery to your Halloween setup.
Cut crescent moons and stars from heavy metallic cardstock to give the garland some structural integrity. String the shapes onto a thin black cord or ribbon and drape it across a window or mantel. The metallic finish reflects ambient light, making the room feel more dynamic at night.
- Budget: $5 – $15; Time: 1 hour
- Space the shapes evenly or group them in clusters for a more organic feel
- Use double-sided tape to keep the shapes from spinning if hanging against a wall
Quick win: Use a star-shaped craft punch to get perfectly uniform shapes in half the time.
30. DIY Black Cat Silhouettes
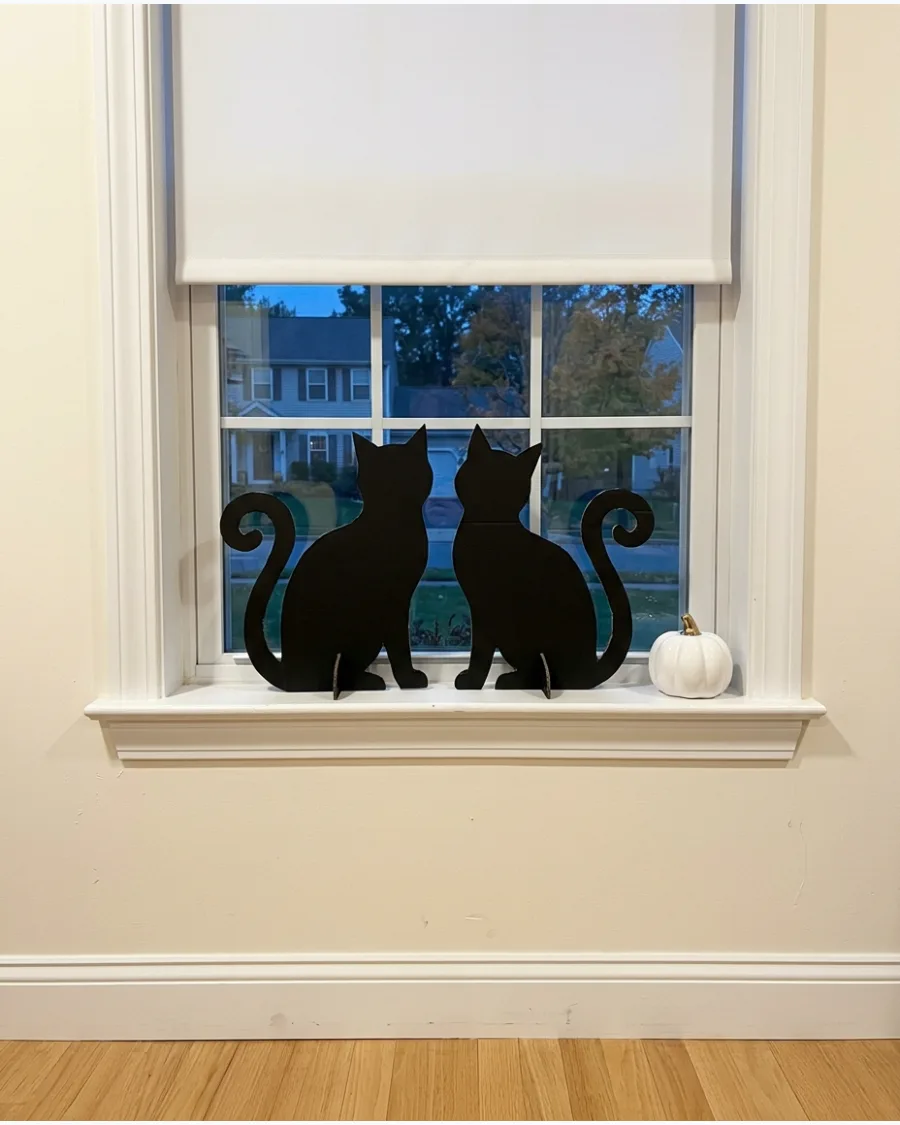
Classic black cats are a staple of Halloween and look great when used in unexpected places. Cut the silhouettes from foam board or thick cardboard and paint them with a flat black finish to eliminate glare.
Place them in windows or peeking out from behind furniture to create a sense of movement in the room. Their sharp outlines stand out beautifully against light-colored walls or bright window glass.
- Budget: $10 – $20; Time: 1.5 hours
- Secure the silhouettes with removable adhesive putty to avoid damaging paint
- Add small yellow or green glow-in-the-dark stickers for the eyes
Best shortcut: Trace a template from a coloring book or online clip art to get realistic cat poses.
Vintage and Pumpkin Decorations
31. Retro Paper-Mâché Pumpkins
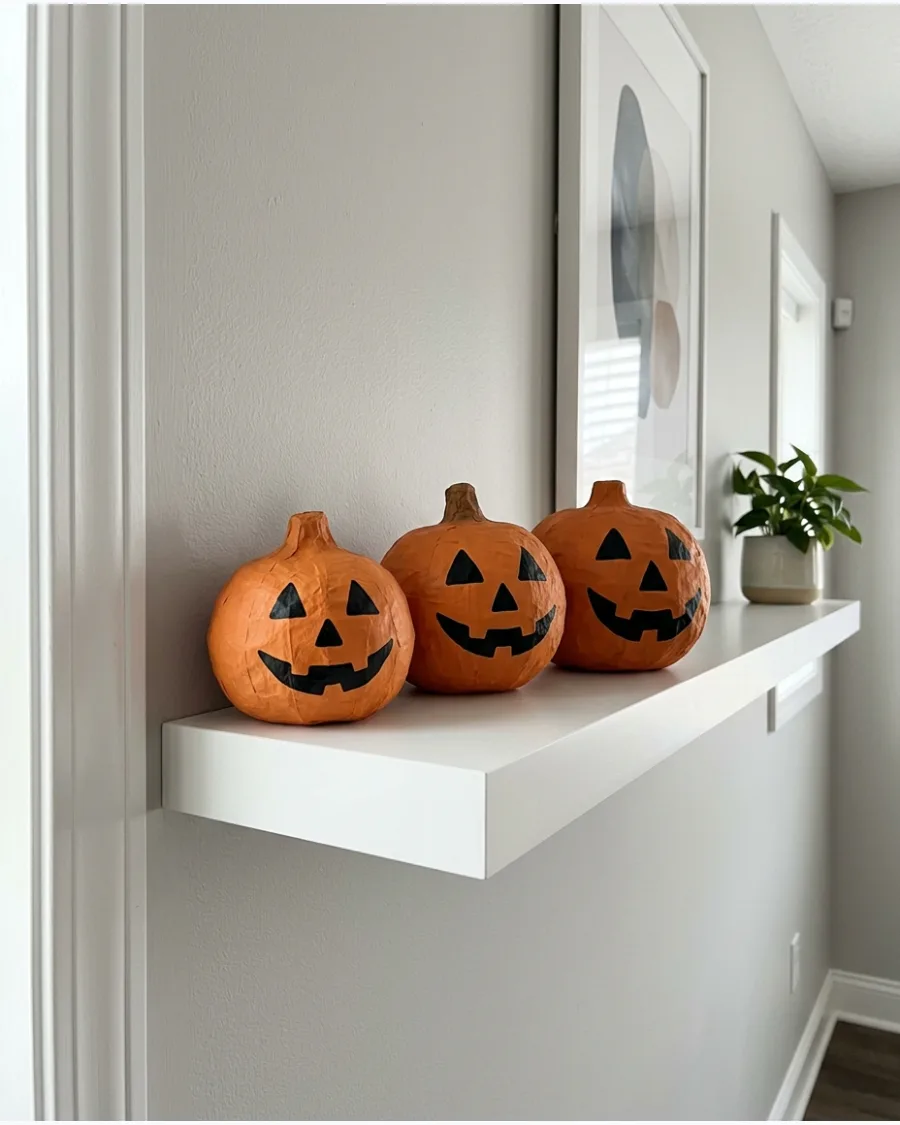
Layering newspaper strips over small balloons creates a lightweight base for custom holiday figures. Use a mix of flour and water for the paste to ensure it dries hard enough for painting.
Apply a matte finish over the faded orange and cream paint to give these a truly aged look. This method is perfect for getting that specific 1950s holiday aesthetic without hunting through antique shops.
- Buy newsprint or use recycled newspapers and balloons.
- Allow at least 24 hours for the paper-mâché to dry before popping the balloon.
- Store these in a dry plastic bin to prevent moisture damage between seasons.
Quick win: Use a damp sponge to lightly dab yellow paint onto the orange base for a more realistic, mottled vintage texture.
32. Distressed Jack-O’-Lantern Signs
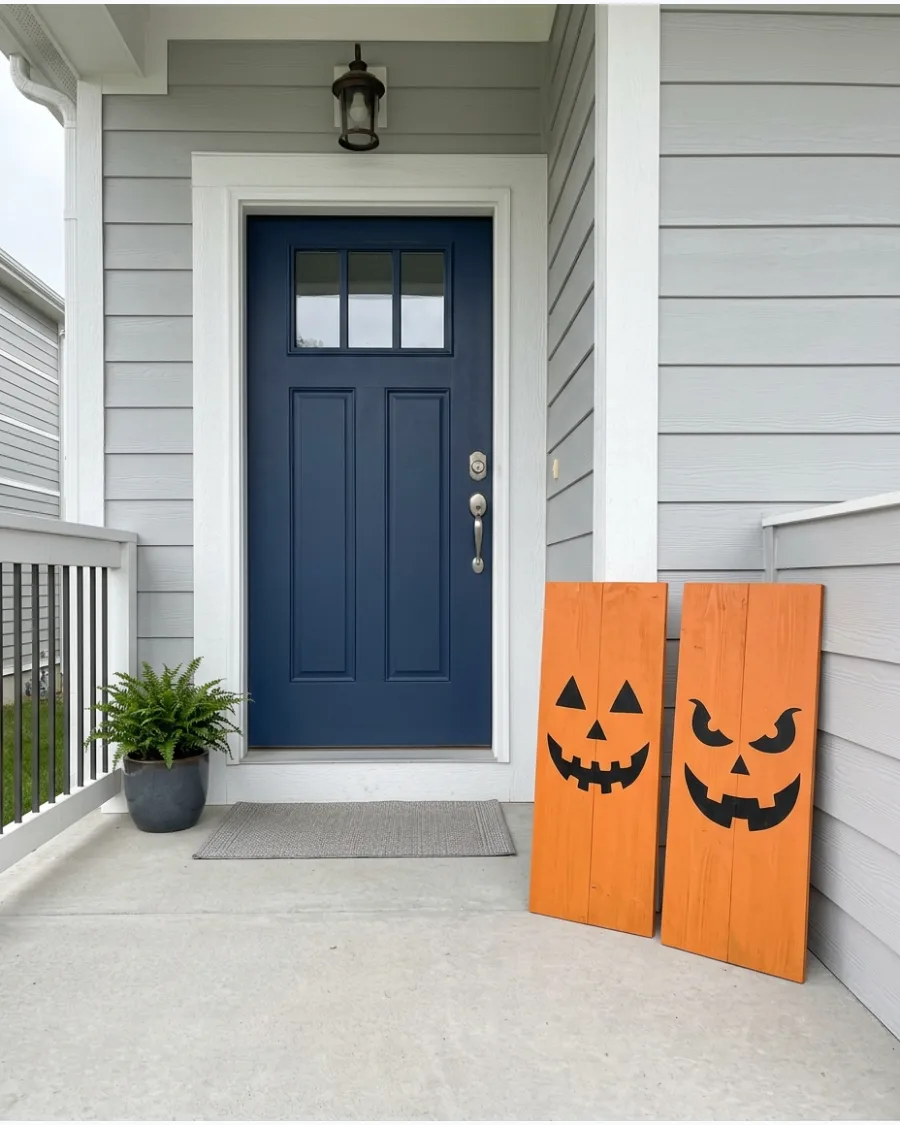
Turning spare wood scraps into holiday signage adds a sturdy, handmade element to a porch or entryway. Focus on simple, bold pumpkin faces using black acrylic paint.
Sand the corners of the wood after the paint dries to create a naturally worn appearance. Adding a dark wax finish helps the wood look like a found object from a historical cellar.
- Use scrap plywood or 1×4 pine boards from a local hardware store.
- Use a 120-grit sandpaper block for the most controlled distressing.
- Lean these against a wall or use command strips for a renter-friendly wall display.
Most people skip this: Apply the dark wax only to the edges and corners to mimic real wear-and-tear patterns.
33. Black Lace Pumpkins
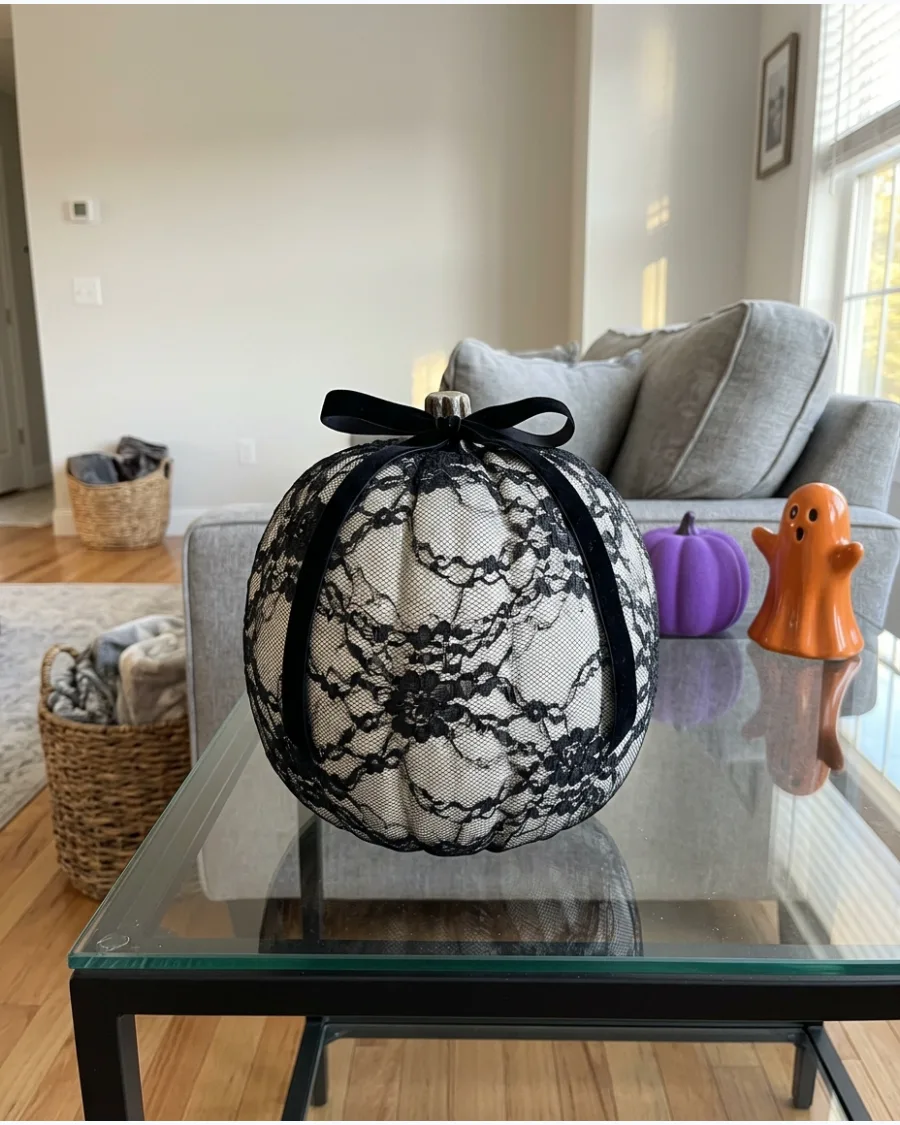
Covering faux pumpkins in black lace is a sophisticated way to lean into a gothic theme. Use a spray adhesive or decoupage glue to ensure the fabric follows the curves of the pumpkin.
Tie a thick velvet ribbon around the stem to hide the top edges of the lace. This look works best when grouped with dark, silk flowers for a moody centerpiece.
- Source black lace trim or fabric remnants from a craft store.
- Use matte white or orange faux pumpkins as a high-contrast base.
- These are best kept indoors to protect the delicate fabric from wind and rain.
Best shortcut: Use black lace stockings or tights to easily slip over the pumpkin for a perfectly tight fit without messy glue.
34. Moss-Covered Haunted Pumpkins
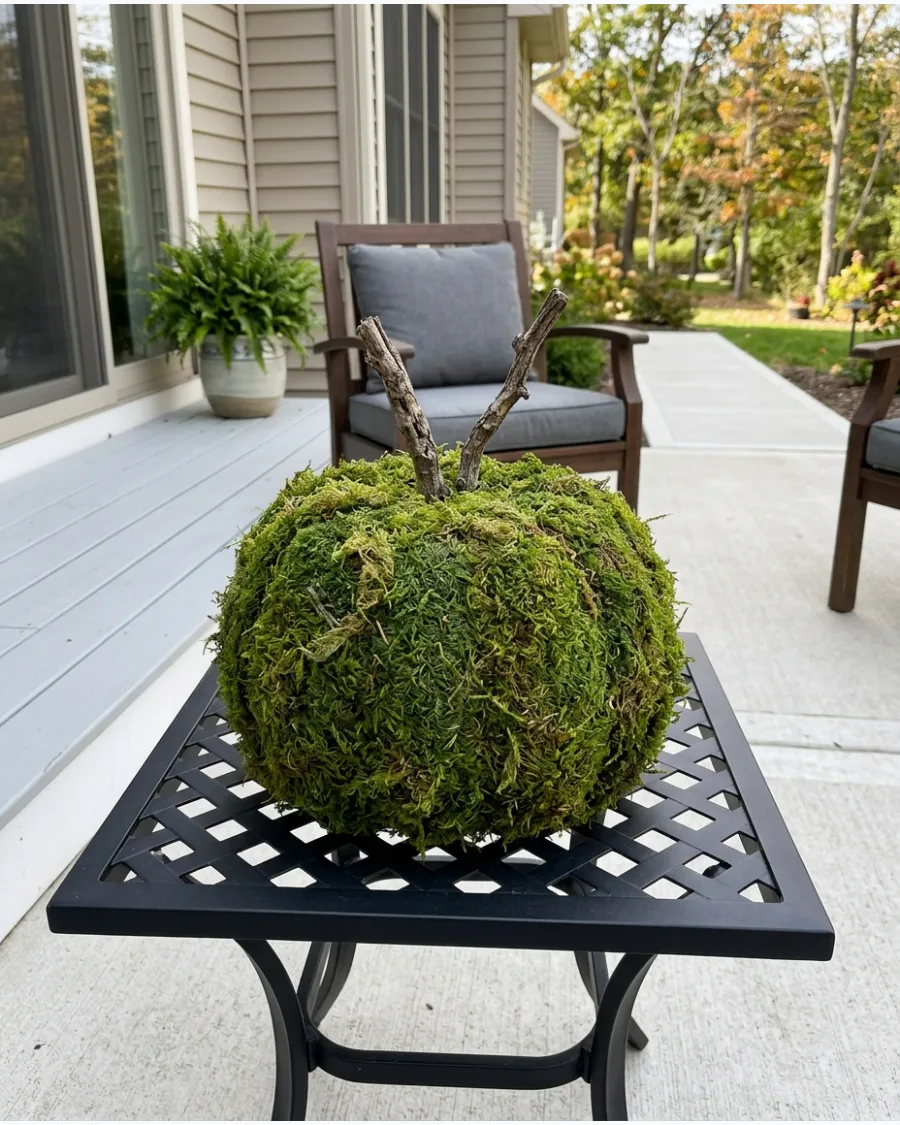
Preserved sheet moss gives standard foam pumpkins an earthy, overgrown feel that mimics a haunted forest. Secure the moss with hot glue, leaving small gaps to show the texture underneath.
Tuck in a few dried, dark twigs at the top to serve as a gnarled stem. This project brings a lot of texture to a display and looks great on a shaded porch.
- Buy bags of preserved sheet moss or reindeer moss.
- Use a low-temp glue gun to avoid melting the foam pumpkin base.
- Keep these in a covered area to prevent the moss from fading in direct sunlight.
Quick win: Mist the moss with a little bit of hairspray to help keep the small fibers from shedding on your furniture.
35. Painted Vintage Pumpkin Faces
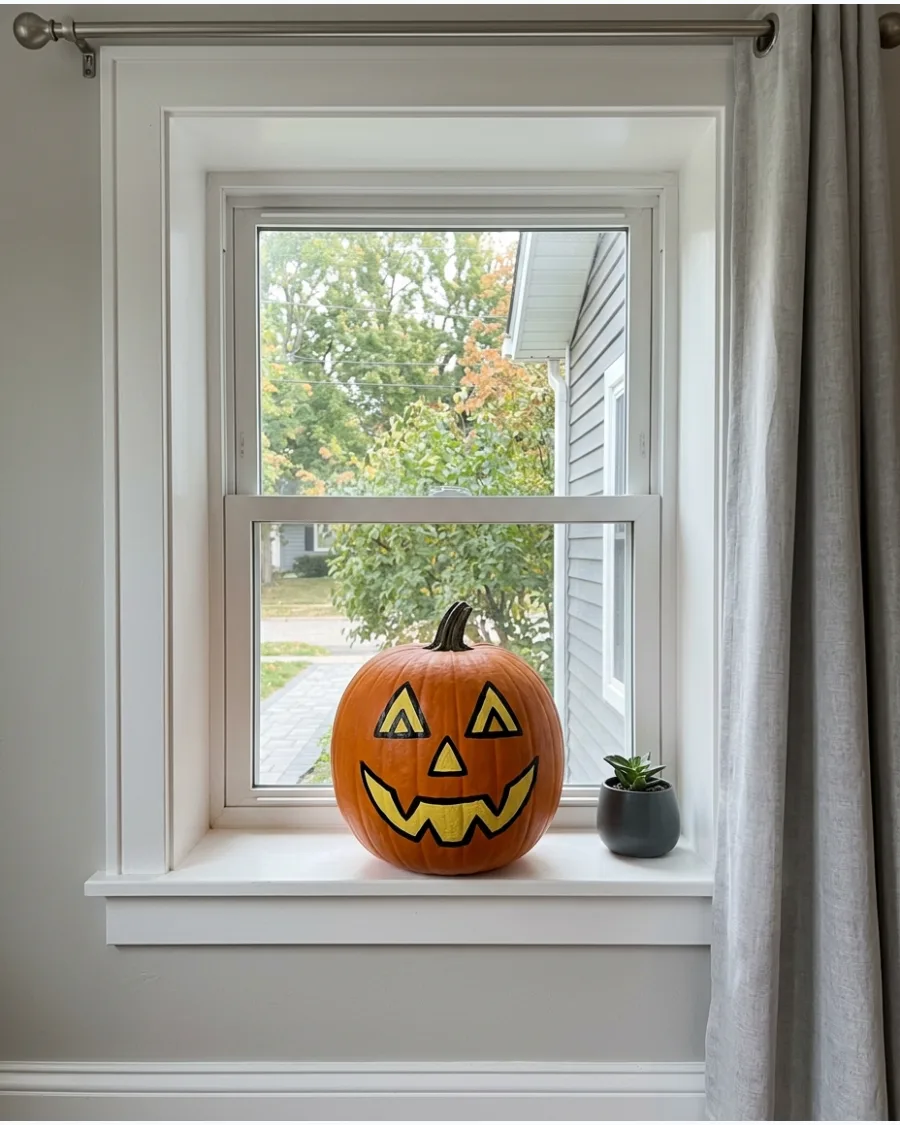
Recreating the hand-drawn look of early 20th-century decorations is all about embracing imperfections. Use a fine-tipped brush to outline large, expressive eyes and toothy grins in black and off-white.
Stick to a palette of muted oranges and yellows to avoid a modern neon look. These pumpkins look intentional and high-end when the paint is applied with a slightly dry brush.
- Use real pumpkins or high-quality resin pumpkins for a better painting surface.
- Sketch your design lightly with a pencil before committing with paint.
- These pumpkins look great as a focal point on a side table or window ledge.
Most people skip this: Mix a tiny drop of brown paint into your orange to kill the brightness and get that authentic faded look.
36. Pumpkin Candle Pedestals
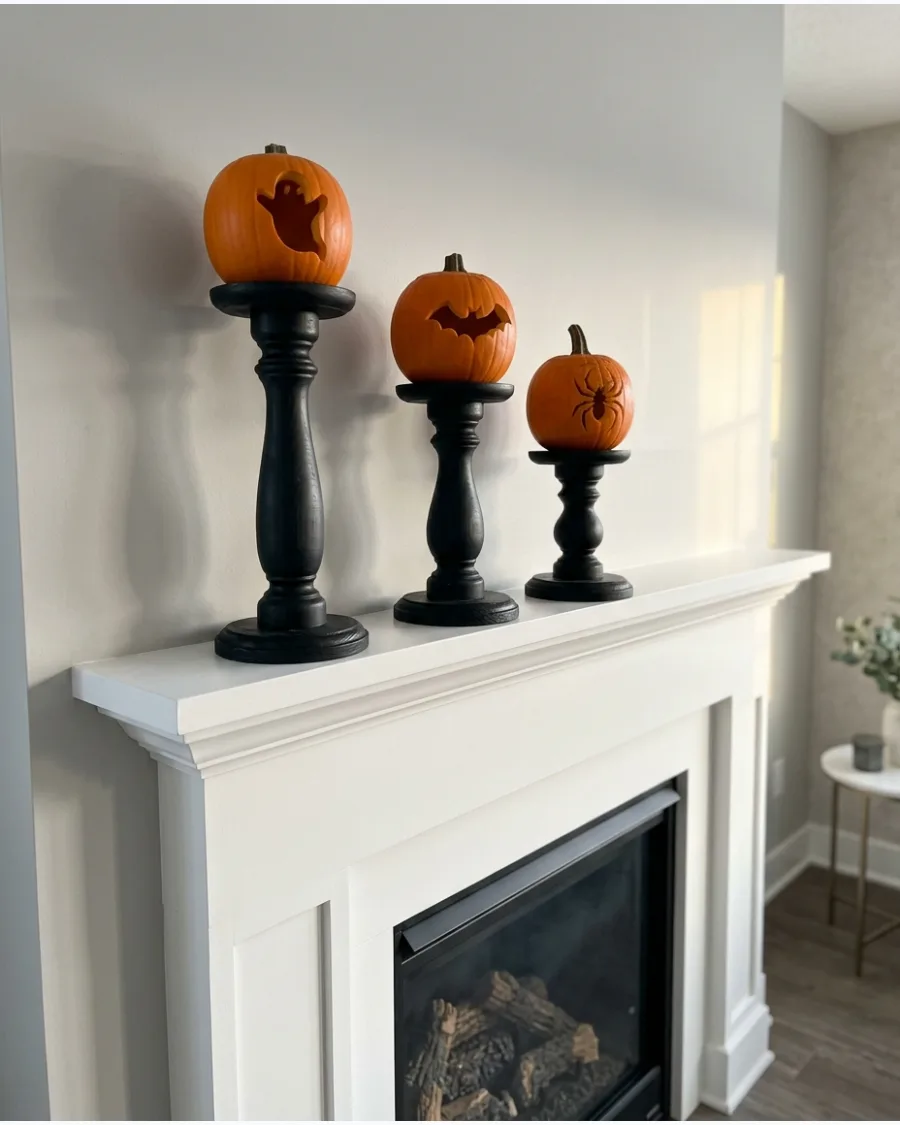
Elevating small pumpkins on black pedestals creates immediate visual interest through varying heights. Paint basic wooden candleholders or terracotta pots with a matte black spray paint for a uniform look.
Place a mini pumpkin directly where the candle would normally sit for a playful swap. This is an effective way to fill vertical space on a narrow mantel or shelf.
- Scour thrift stores for mismatched wooden candleholders or buy a set of unfinished ones.
- Use mini pumpkins that are roughly the same diameter as the pedestal top.
- Secure the pumpkin with a small piece of museum wax to prevent it from rolling off.
Best shortcut: Use black chalk paint for the pedestals because it dries in minutes and requires zero priming.
37. Moon-and-Stars Pumpkins
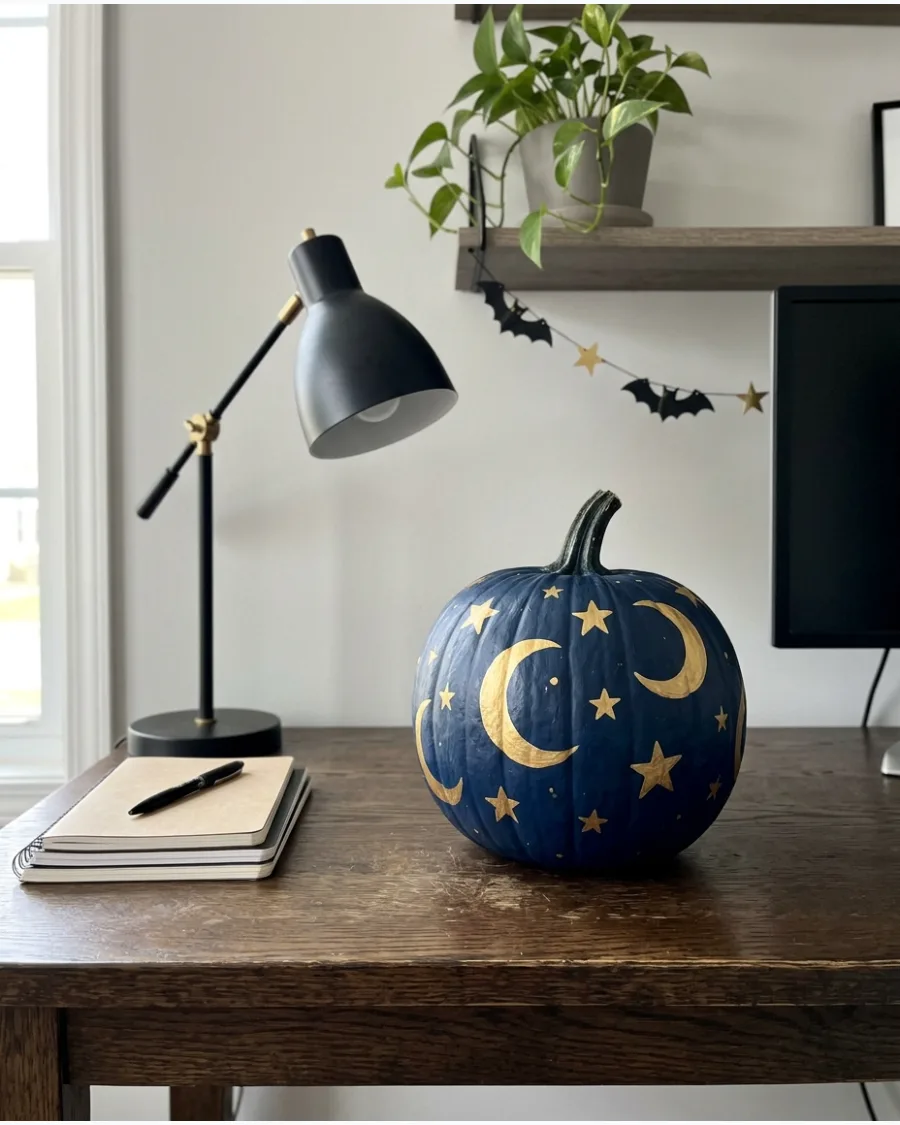
A celestial theme offers a mystical alternative to traditional spooky faces. Paint your pumpkins a deep midnight blue or charcoal gray to create a dark sky background.
Use a metallic gold paint pen to draw crisp crescents and tiny star clusters. This design feels modern and sophisticated while still fitting perfectly into a Halloween display.
- Use matte spray paint for the base coat to make the gold details pop.
- Draw constellations that actually exist for a clever, realistic touch.
- Arrange these with white pumpkins to create a high-contrast, starry night theme.
Quick win: Use a toothpick dipped in gold paint to create the tiniest, sharpest star points.
38. Pumpkin Topiary
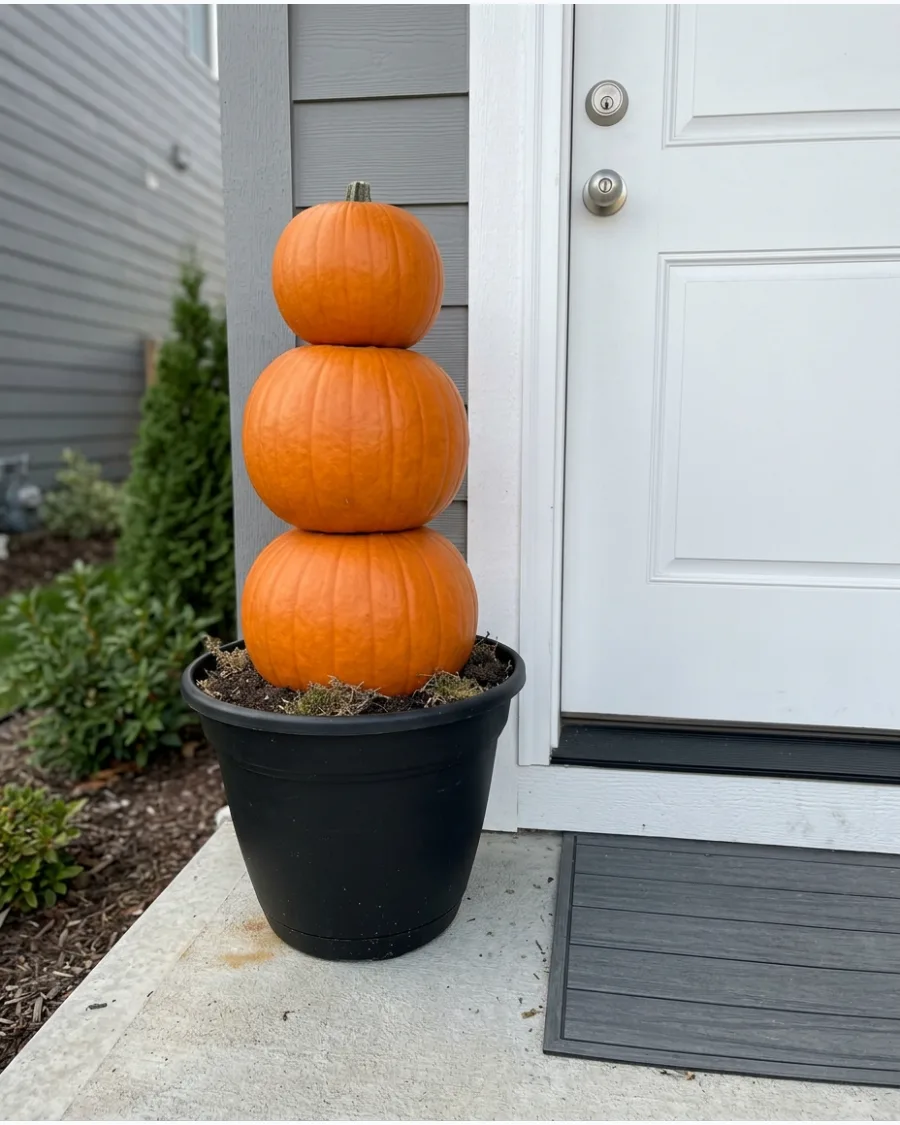
Stacking pumpkins creates a vertical statement piece that works well in tight corners or next to an entry door. Secure three different-sized faux pumpkins using a wooden dowel or heavy-duty adhesive.
Paint the bottom pumpkin with the largest face to anchor the design visually. This setup provides a lot of impact without taking up much floor space.
- Choose lightweight foam pumpkins to ensure the stack remains stable.
- Use a sturdy plastic or ceramic planter filled with sand as the base.
- Store the topiary in one piece or design it to disassemble for easier storage.
Most people skip this: Remove the stems from the bottom two pumpkins so the one above it can sit completely flush.
39. Skeleton Hand Pumpkin Stand
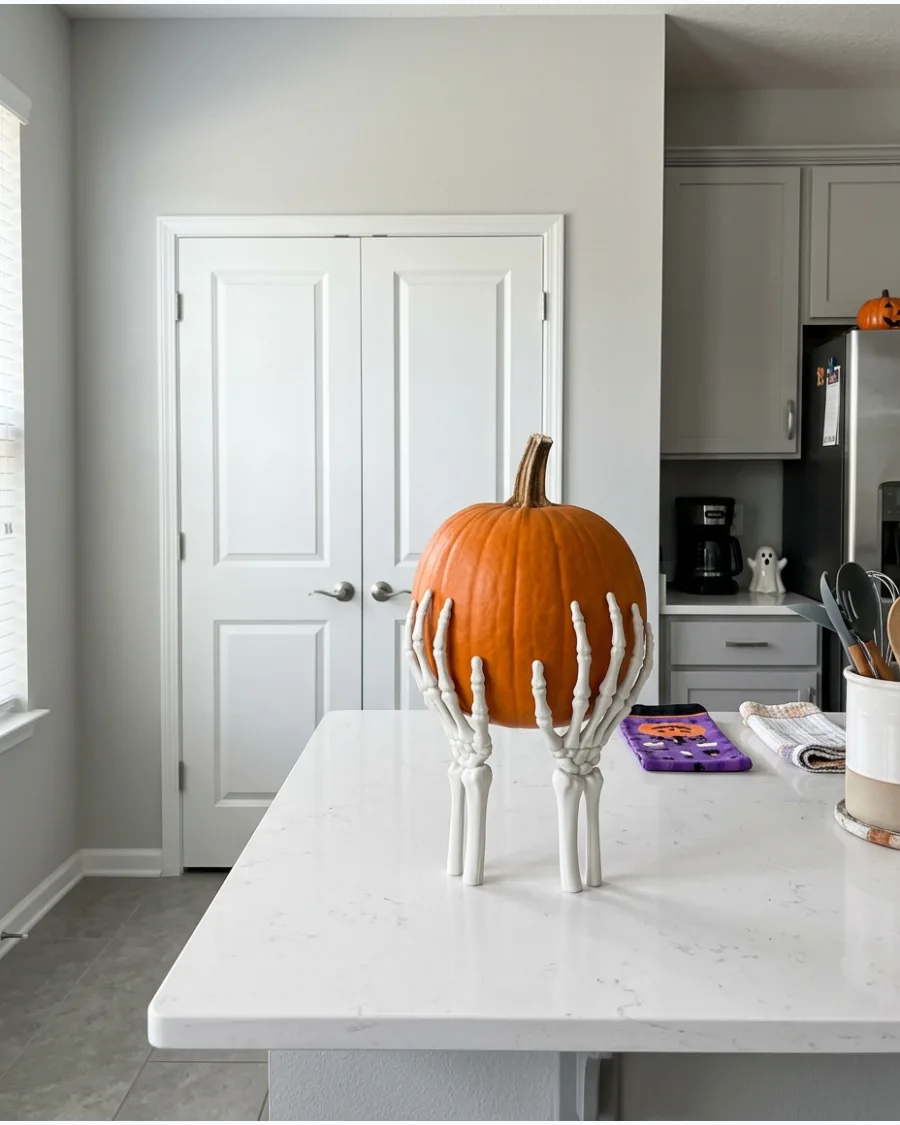
Using plastic skeleton hands as a base makes it look like the pumpkin is being offered up by the undead. Glue the palms of the hands to the bottom of the pumpkin with the fingers curling upward.
Position the hands evenly so the pumpkin stays balanced on the table surface. This is a creepy, low-cost way to add height and a spooky motif to a standard pumpkin.
- Buy a pack of life-sized plastic skeleton hands from a party supply store.
- Use a medium-sized foam pumpkin so the weight doesn't overwhelm the plastic hands.
- This project works best on flat, stable surfaces like a dining table or console.
Quick win: Paint the skeleton hands with a light brown wash to make them look buried and more realistic.
40. Mini Pumpkin Haunted Village
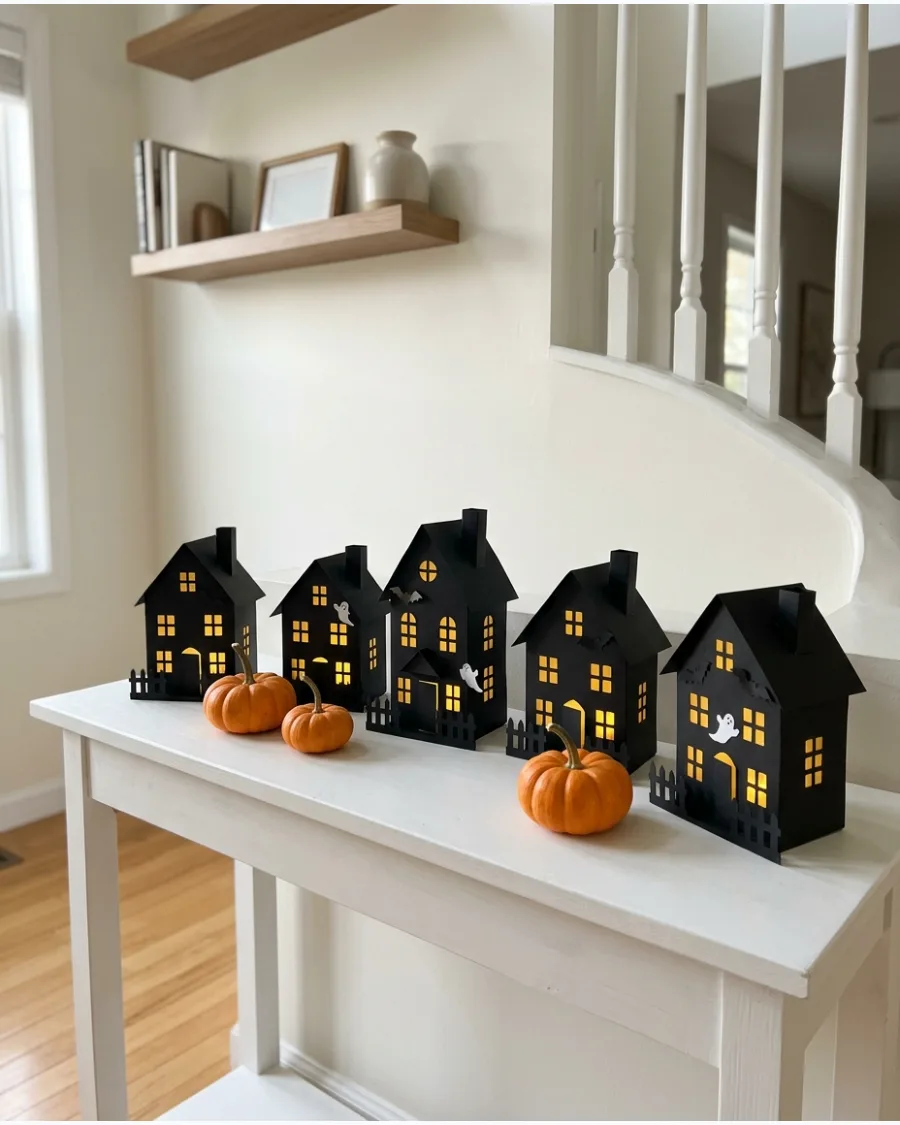
Creating a tiny neighborhood out of black cardboard houses and mini pumpkins is a great way to decorate a windowsill. Cut small square windows into the houses so light can peek through from behind.
Tuck battery-operated tea lights inside the houses to create a spooky glow at night. This miniature scene is a fun way to use leftover craft scraps and small seasonal produce.
- Use black cardstock or paint small birdhouses matte black.
- Space the pumpkins between the houses to act as yard decor.
- Place the village on a long runner or a tray to define the boundaries of the scene.
Best shortcut: Use black spooky fabric or cheesecloth as a base to hide the wires of any LED string lights you use.
Indoor Spooky Decor
41. Haunted Bookshelf Makeover
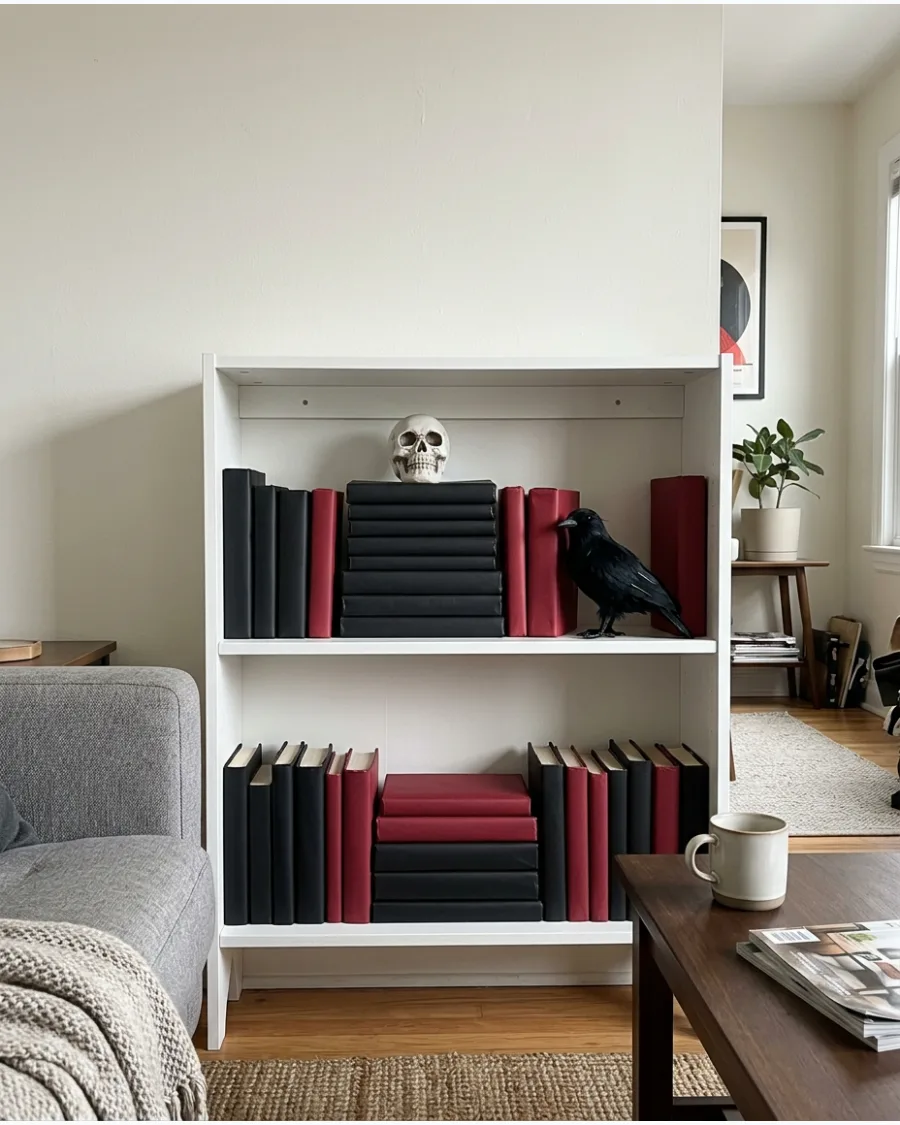
Transform a standard bookcase by wrapping existing books in matte black and burgundy paper. Create custom spine labels with a typewriter font to make the collection look like an ancient library. This approach keeps the room looking intentional rather than cluttered with cheap plastic props.
It is a simple way to change the entire mood of a living room without buying new furniture.
- Matte craft paper and a printer for labels.
- Remove the jackets and wrap the books like gifts to protect the originals.
- Mix in some vintage-style leather books for varied texture.
Most people skip this: Use double-sided tape on the inside of the book cover so the paper doesn't slide around when you move them.
42. Spooky Silhouette Lampshade
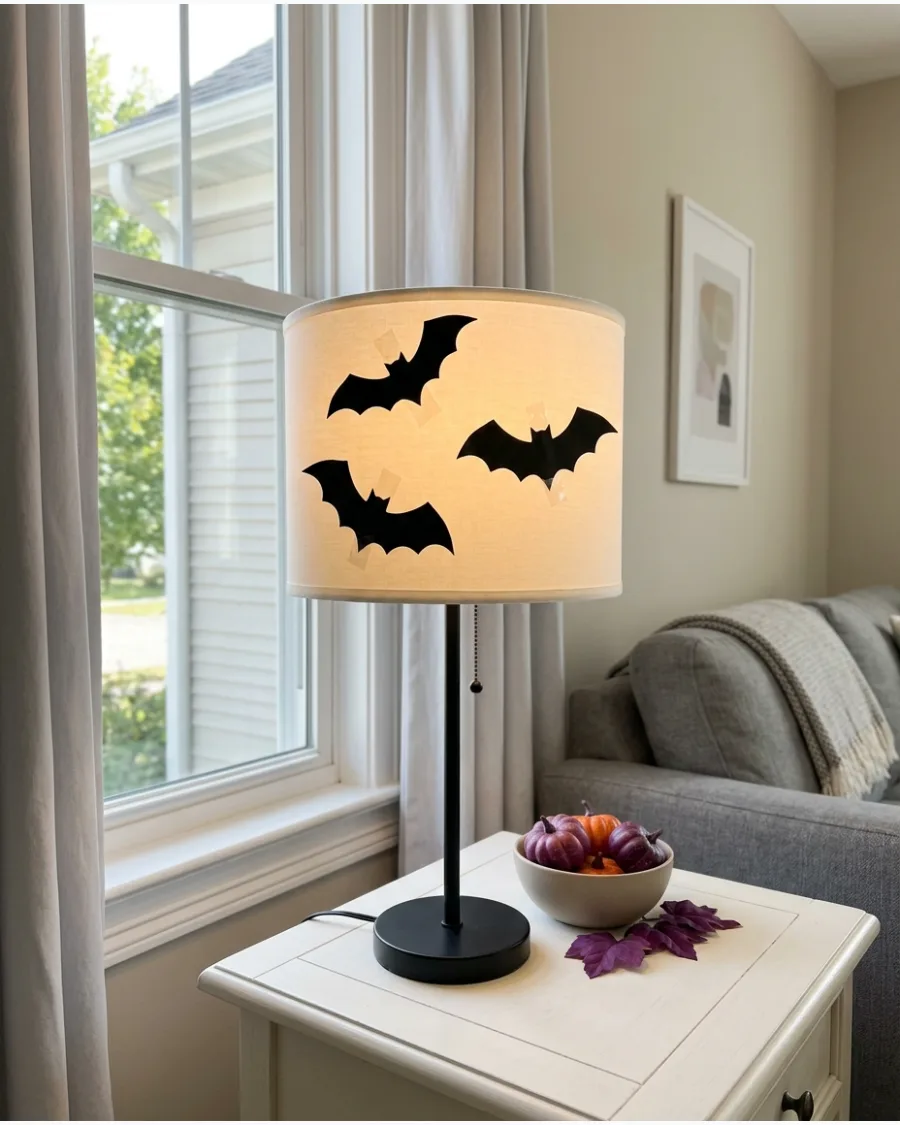
Turn a basic lamp into a hidden piece of art by taping black cardstock cutouts to the inner lining. When the light is off, the lamp looks normal, but switching it on reveals a swarm of bats or spindly branches. It is the perfect way to add a surprise element to a living room.
This works best on lamps with light-colored fabric shades that allow plenty of light to pass through.
- Black cardstock and clear tape.
- Stick the cutouts to the inside of the shade to hide the edges.
- Use LED bulbs to ensure the paper doesn't get too hot.
Quick win: Use a template for the cutouts to ensure the shapes look sharp and professional when the light shines through.
43. DIY Coffin Shelf
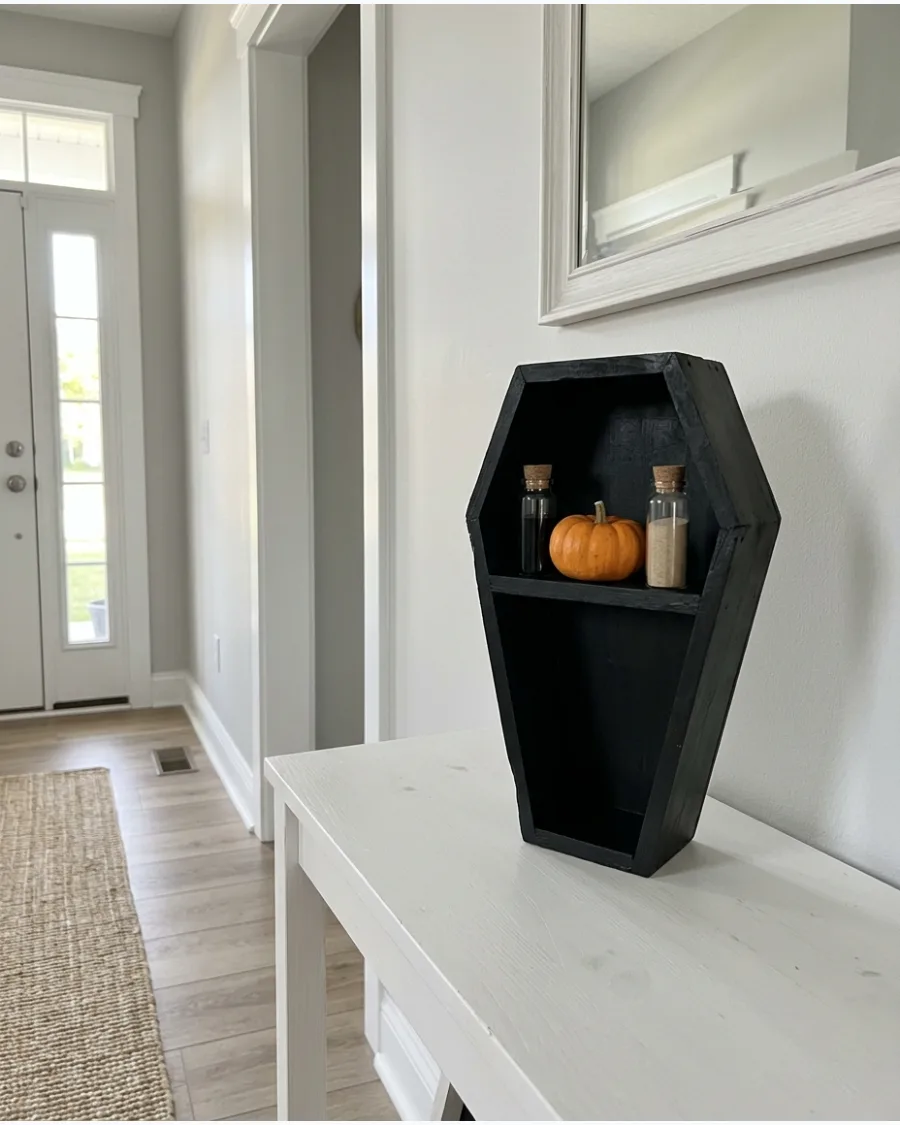
Build a small display case using thick foam board or craft wood in a classic hexagonal coffin shape. Paint the entire structure in a matte black finish to make small trinkets like mini pumpkins or potion bottles pop. This is a high-impact piece that works well on a side table or as part of a wall gallery.
It provides a dedicated spot for your smallest Halloween treasures.
- Black foam board and hot glue.
- Measure the angles carefully for a symmetrical shape.
- Use a matte spray paint for an even finish without brush marks.
Best shortcut: Use black foam board from the start so you only have to paint the cut edges instead of the whole surface.
44. Haunted Portrait Makeover
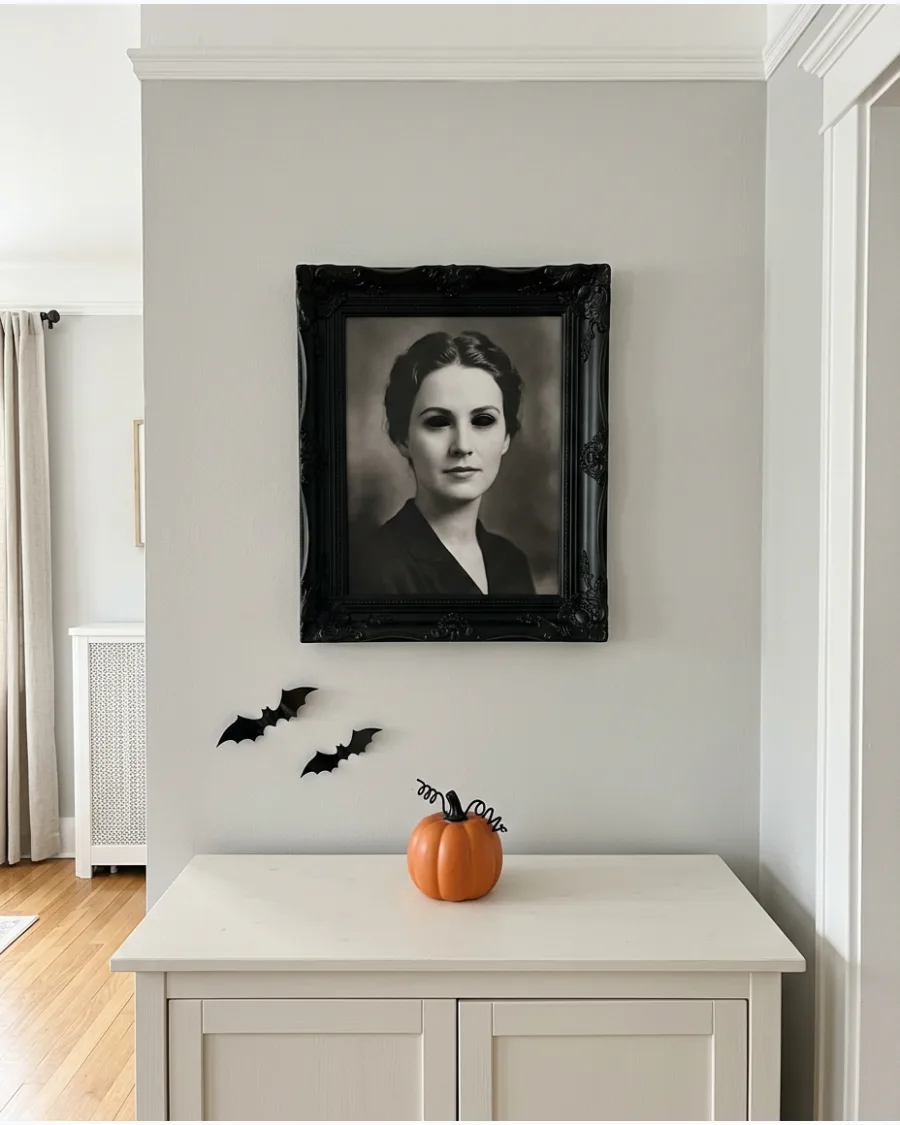
Take a printed vintage portrait and use black paint to add subtle, creepy details like glowing eyes or darkened shadows. Frame the altered art in a heavy, ornate frame to give it the weight of a real family heirloom. This adds a layer of history to your Halloween theme that looks much better than modern posters.
It is an easy way to repurpose old frames found at thrift stores.
- Thrifted frame and black acrylic paint.
- Print a public domain vintage photo on heavy cardstock.
- Lightly sand the frame edges for a slightly worn look.
Most people skip this: Use a matte sealer over the paint so the spooky additions match the texture of the original print.
45. Creepy Crawling Table Runner
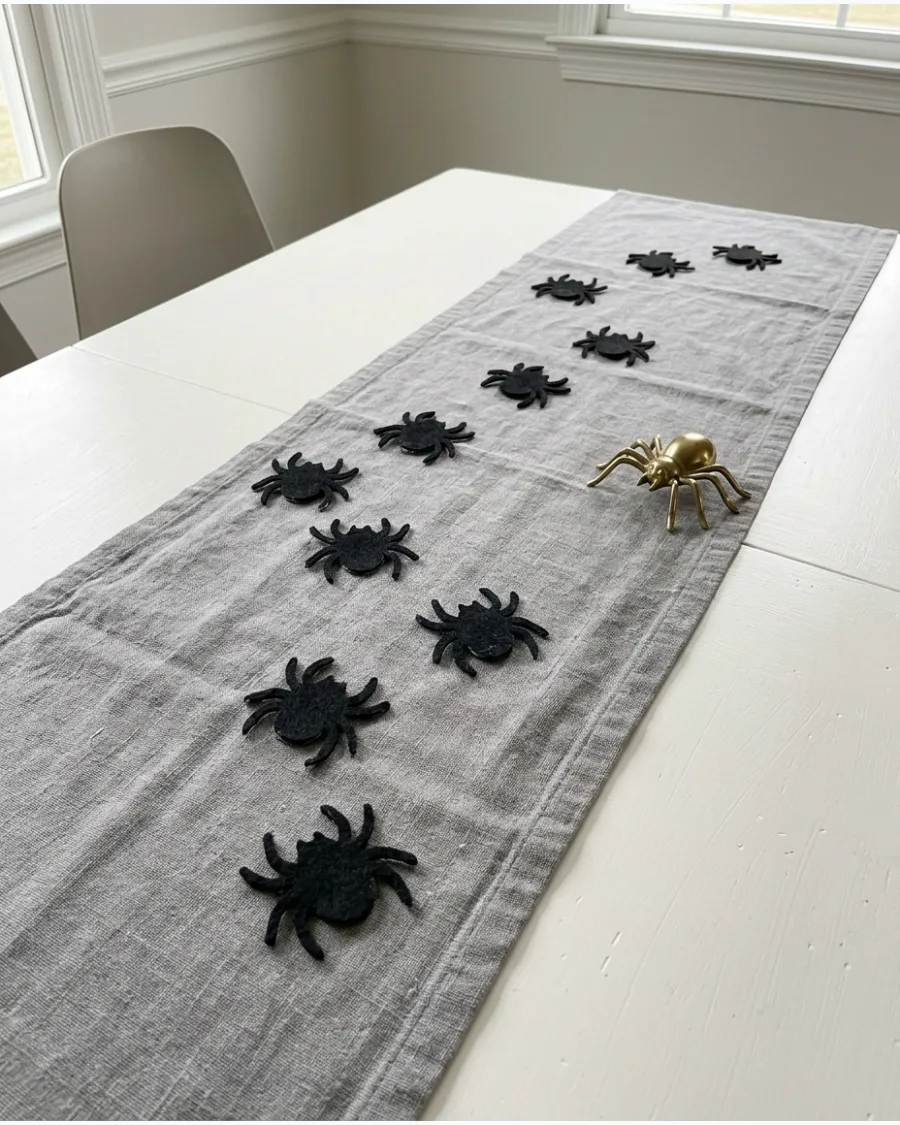
Give a simple linen table runner a makeover by attaching black felt silhouettes of spiders and beetles. Scatter the insects in a way that makes them look like they are migrating across the table toward the centerpiece. Felt is better than plastic because it stays flat and doesn't slide around when people are eating.
It creates a dimensional look that is much more sophisticated than a printed cloth.
- Black felt and fabric glue.
- Cut varying sizes of insects for a more realistic look.
- Space them unevenly to mimic natural movement.
Quick win: Use a stiff felt so the legs of the spiders don't flop over or lose their shape during the party.
46. Floating Candle Ceiling
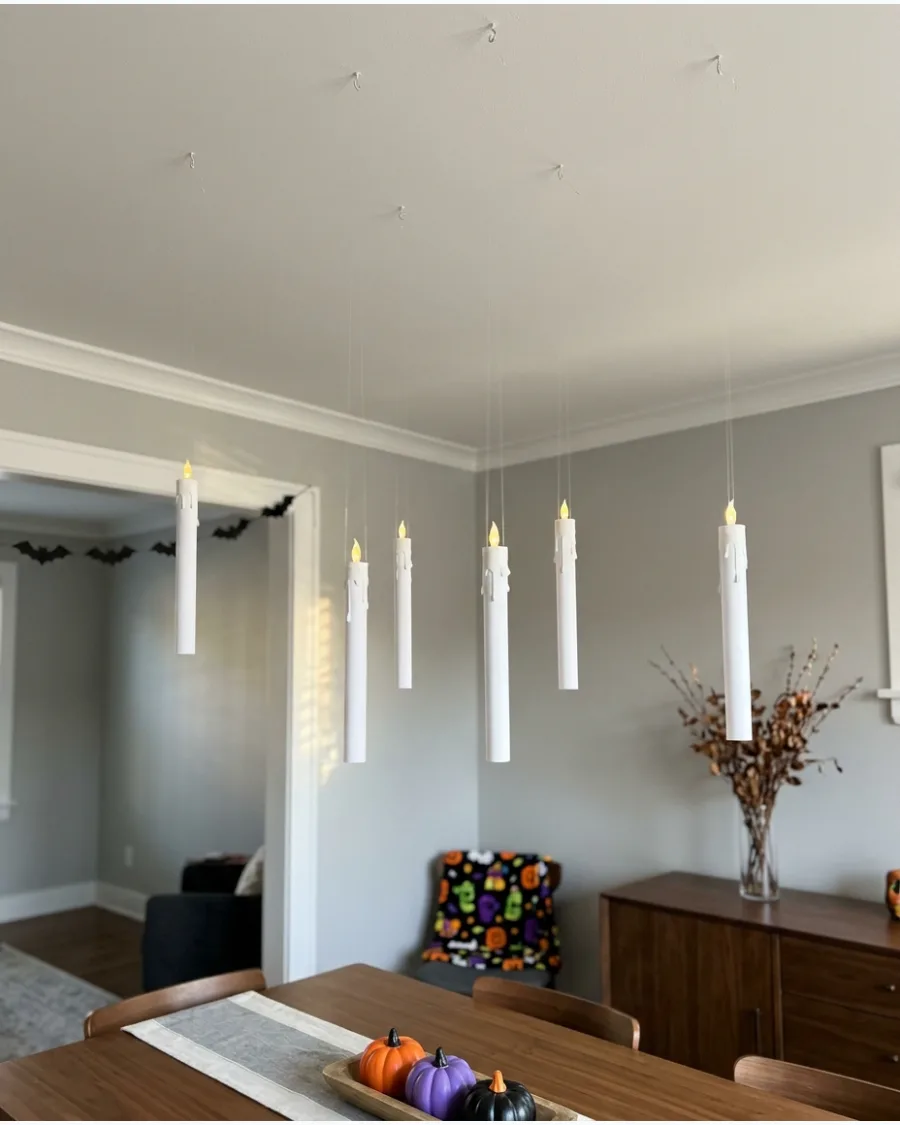
Create a magical atmosphere by hanging battery-operated candles from the ceiling using thin clear line. Drip hot glue down the sides of paper tubes before painting them white to mimic the look of old, melting wax. These look best when hung at varying heights to fill the vertical space of a hallway or dining room.
It is a classic look that adds movement whenever someone walks by.
- Cardboard tubes and clear fishing line.
- Use battery-operated tea lights for safety.
- Secure the line to the ceiling with small clear adhesive hooks.
Best shortcut: Use a remote-controlled tea light set so you don't have to climb a ladder to turn them on every night.
47. Spooky Apothecary Tray
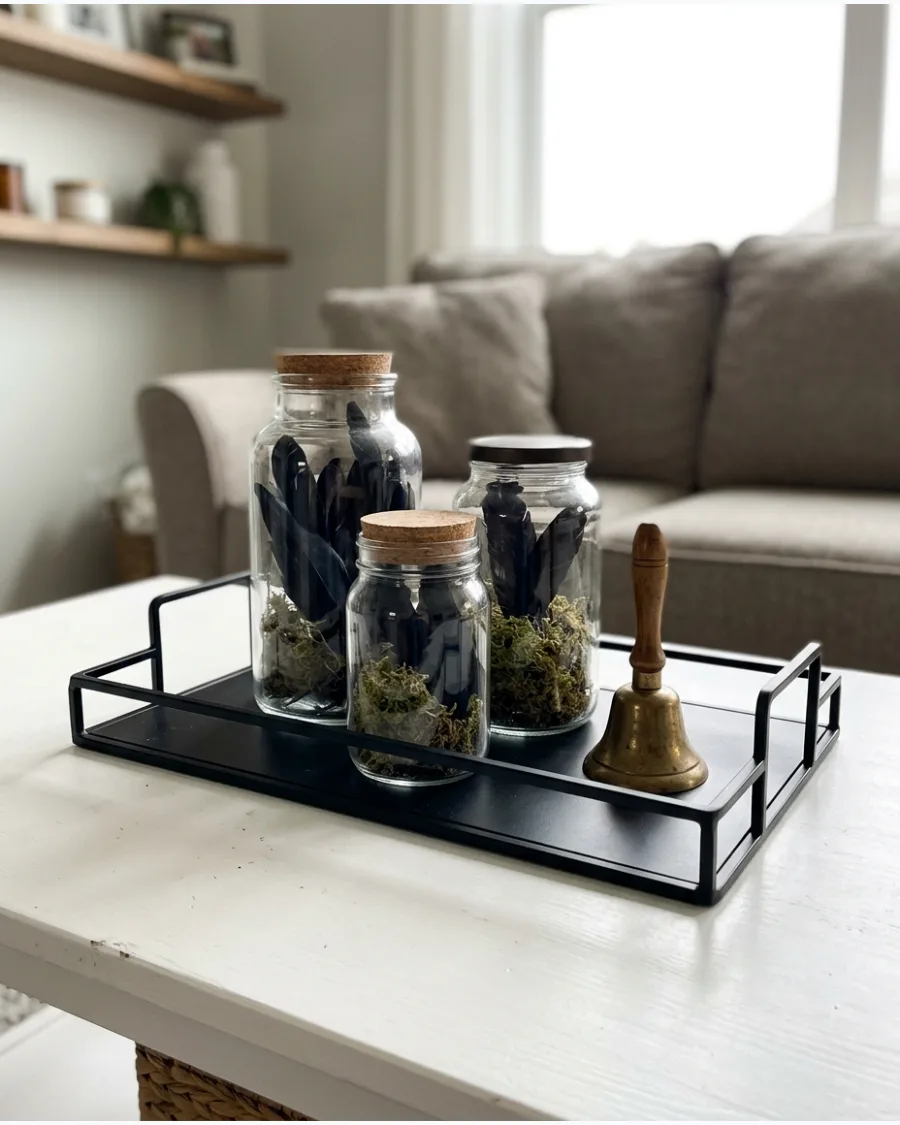
Group several glass jars and dark curiosities on a metal tray to create a focal point for a coffee table. Fill the jars with dried moss, black feathers, or small bones to give the impression of a Victorian collector's shelf. Keeping the colors muted ensures the display looks sophisticated rather than like a toy box.
It is an excellent way to style a small space with items you may already have.
- Black metal tray and assorted glass jars.
- Use printed poison labels for an extra detail.
- Add a few dried flowers for a softer texture.
Most people skip this: Vary the heights of the jars to create visual interest and prevent the tray from looking flat.
48. Skeleton Shadow Box

Mount a small plastic skeleton or individual bones inside a deep shadow box frame. Line the back with aged paper or black velvet to make the white bones stand out with high contrast. This is a great way to use broken skeleton props that are no longer sturdy enough to stand on their own.
It looks like a high-end scientific specimen display.
- Shadow box frame and plastic skeleton.
- Use hot glue to secure the pieces to the backing.
- Add small paper moths for a natural history vibe.
Quick win: Use tea-stained paper for the background to give the whole project an antique, found-in-the-attic look.
49. Haunted Fireplace Insert
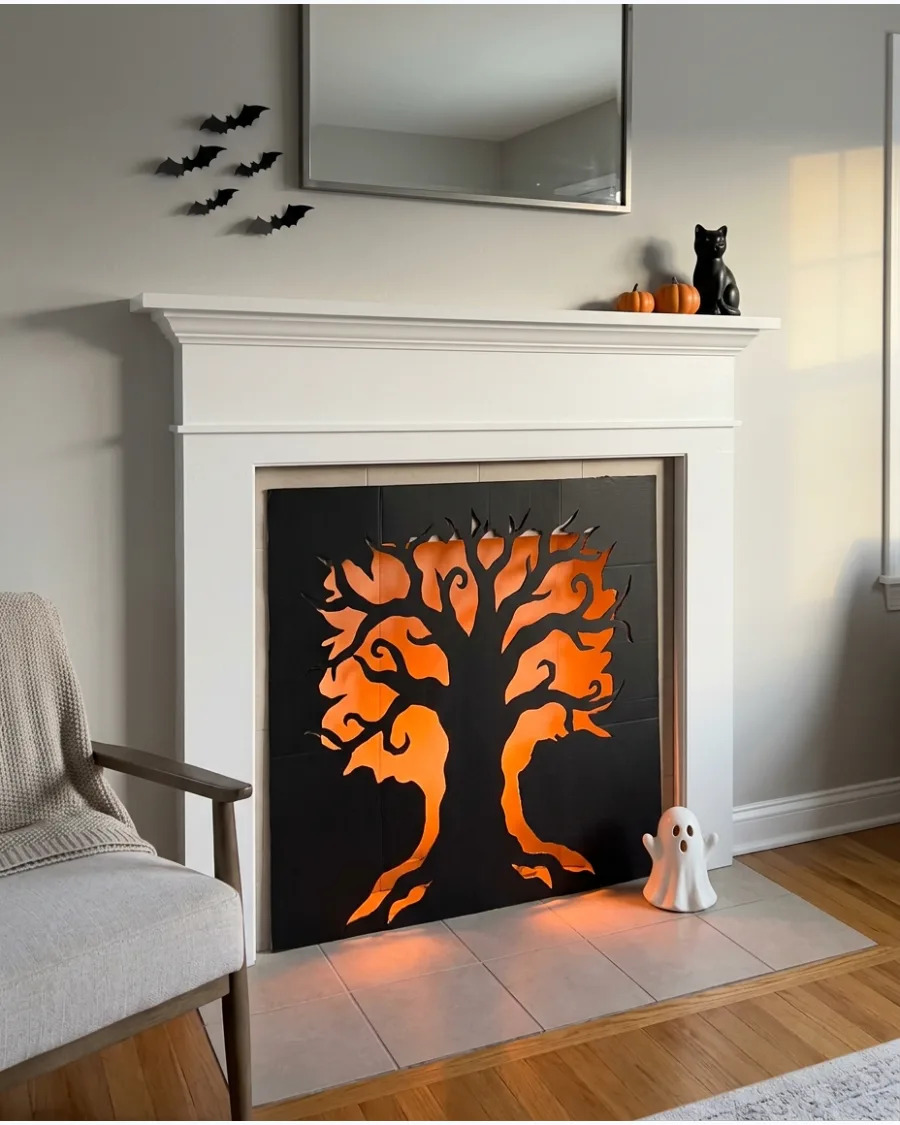
If you have an unused fireplace, fill the opening with a custom cardboard silhouette of a haunted house or a spooky forest. Back the silhouette with orange lights and crumpled tissue paper to create a flickering, fire-like glow without any actual heat. It fills a large, empty architectural feature that people often forget to decorate.
This creates a safe focal point that is perfect for homes with pets or small children.
- Large cardboard and black paint.
- Use battery-powered LED string lights.
- Secure the cardboard with removable mounting putty.
Best shortcut: Use a box cutter with a fresh blade to get clean, sharp edges on the intricate parts of the silhouette.
50. Spooky Cabinet of Curiosities
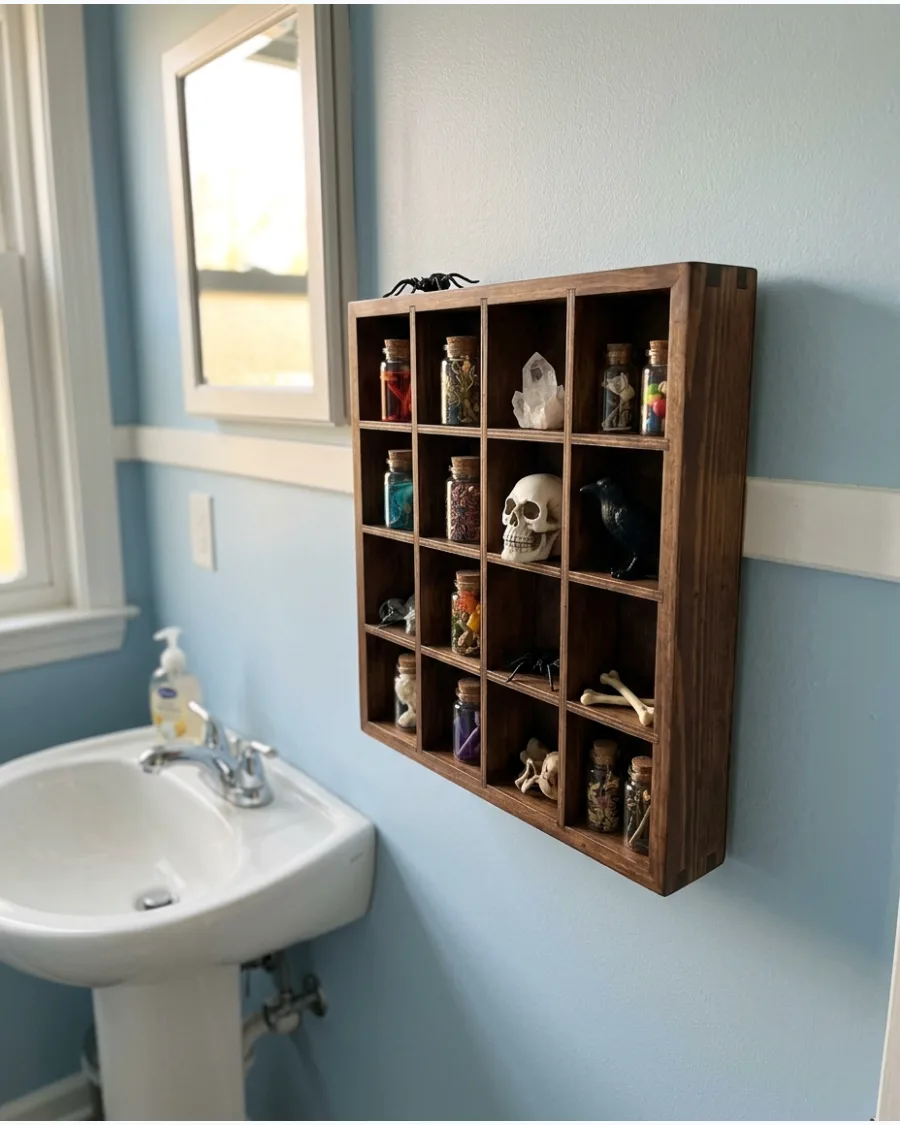
Turn a small wall cabinet or spice rack into a miniature museum of the macabre. Fill the small compartments with handmade potion bottles, crystals, and tiny skulls to create a dense, detailed display. It works best in a small space like a bathroom or a narrow hallway where guests can see the details up close.
The key is to pack the shelves tightly for a collected look.
- Small wall cabinet and miniature props.
- Paint the interior a dark color to highlight the items.
- Add tiny handwritten labels to the jars.
Most people skip this: Use museum wax or a tiny dab of hot glue to keep the small items from falling over if the cabinet is bumped.
Frequently Asked Questions
How can I make DIY decor look 'spooky' rather than just 'cute'?
To elevate the scare factor, focus on monochromatic color schemes and sharp silhouettes rather than bright, playful patterns. Use strategic backlighting to cast long, unsettling shadows that transform ordinary shapes into eerie figures.
What are the best budget-friendly materials for large-scale spooky decor?
Cheesecloth is an affordable way to create tattered, ghostly textures, while black cardstock is perfect for mass-producing silhouettes. For larger structural pieces, PVC pipe provides a sturdy and inexpensive frame for building life-sized ghouls.
How do I decorate for Halloween without ruining my walls or porch?
Use removable command hooks and clear fishing line to hang floating decorations without leaving permanent marks. Tension rods are also a great solution for securing heavy drapes or webs in doorways without the need for nails or screws.
Can I do 'spooky' decor if I have a modern/minimalist home style?
Yes, you can maintain a clean aesthetic by incorporating a single, high-impact element like a swarm of black bats on a white wall. Focus on minimalist shapes and a restricted color palette to ensure the decor feels intentional rather than cluttered.
How long do these DIY projects typically take to complete?
Most of these projects can be completed in a single evening or a few hours over a weekend. They are designed to provide maximum visual impact with a relatively low time commitment for busy crafters.