50 Christmas Village Table Display Ideas

This post may contain affiliate links: full affiliate disclosure.
A miniature Christmas village turns a flat table into a winter wonderland by adding height and texture. Using layers of snow and smart lighting creates a cohesive scene that draws the eye and hides messy power cords.
These practical arrangements highlight the charming details of every small building while keeping the display tidy and professional.
CLASSIC CHRISTMAS VILLAGE TABLE DISPLAY IDEAS
1. Classic Snowy Christmas Village Table
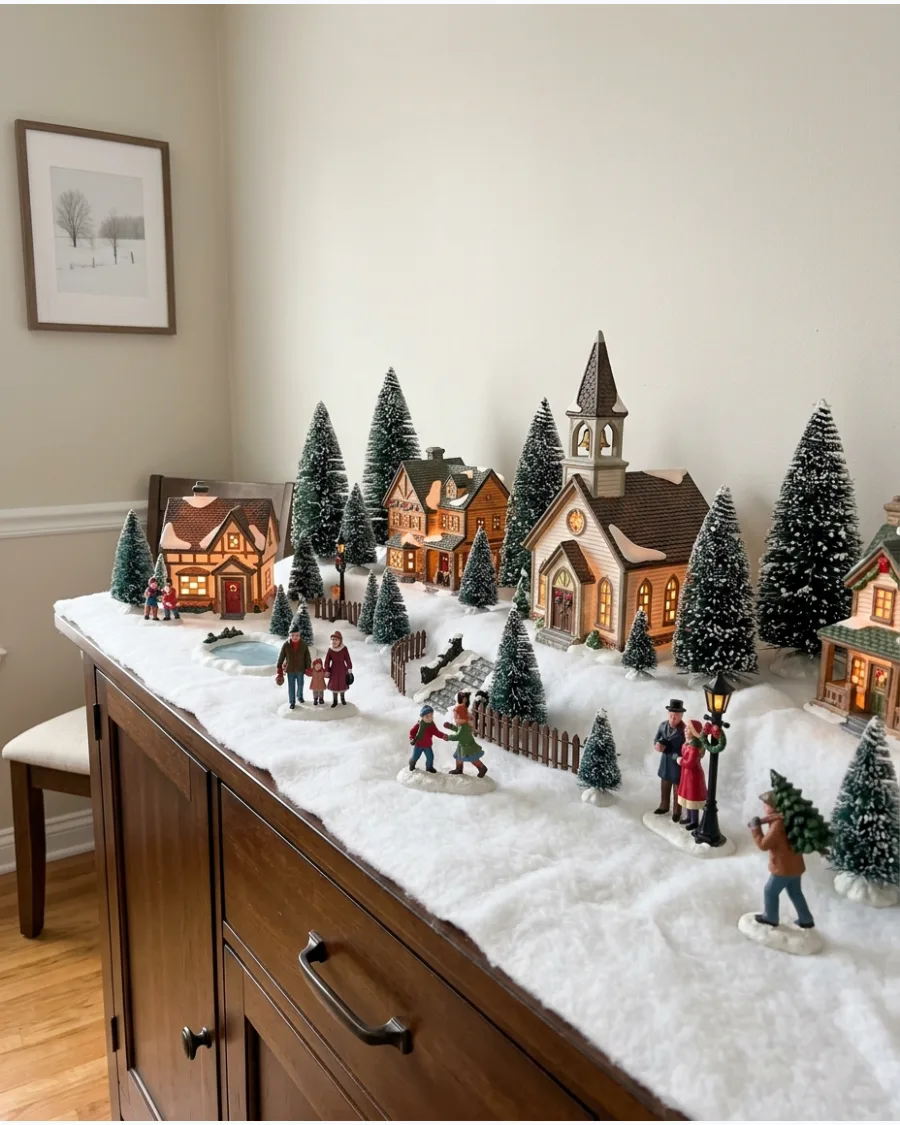
Cover the tabletop with a soft white snow blanket to provide a unified base for your miniature buildings and figurines. Tucking the battery packs or electrical cords under the batting keeps the surface clean and focuses attention on the display.
Layering cotton batting over a white tablecloth adds realistic depth and hides the hard edges of the ceramic house bases.
- Use budget-friendly cotton batting or polyester fiberfill from craft stores.
- Spread the snow layer first before firmly placing buildings to prevent tipping.
- Sprinkle loose faux snow on top of the batting for extra realistic texture.
Best shortcut: Use a white tablecloth underneath so any small gaps in the snow blanket look like part of the landscape.
2. Glowing Village With Warm Window Lights
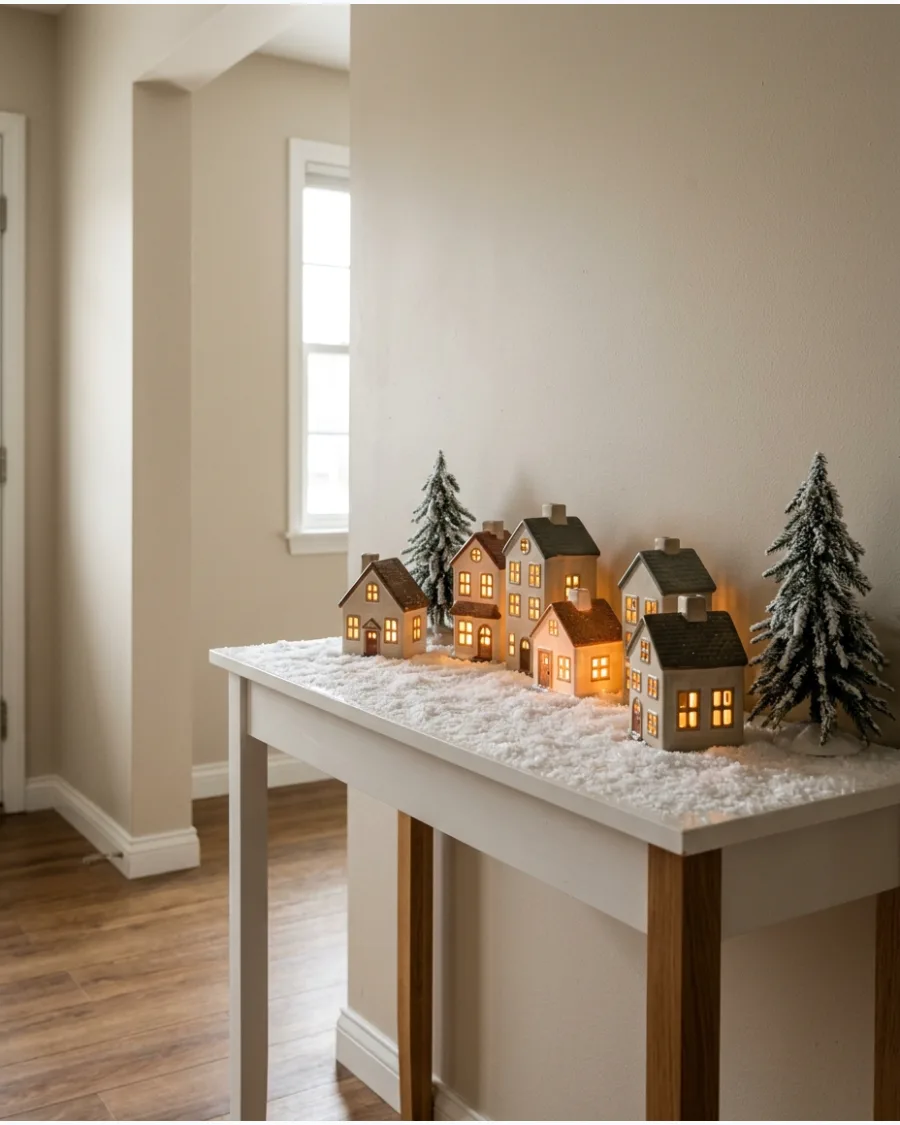
Focus on the internal illumination of the houses to create a warm and inviting nighttime atmosphere on your table. Dimming the overhead room lights allows the miniature windows to cast a soft glow across the faux snow.
Position houses with the most windows toward the front of the table to maximize the light spill onto the surrounding scenery.
- Choose battery-operated LED houses to avoid tangled wires on the tabletop.
- Group houses close together to concentrate the light in specific zones.
- Use warm white bulbs instead of cool blue LEDs for a traditional cozy feel.
Quick win: If a house does not have a built-in light, tuck a battery-operated tea light behind it to create a silhouette effect.
3. Christmas Village With a Central Church
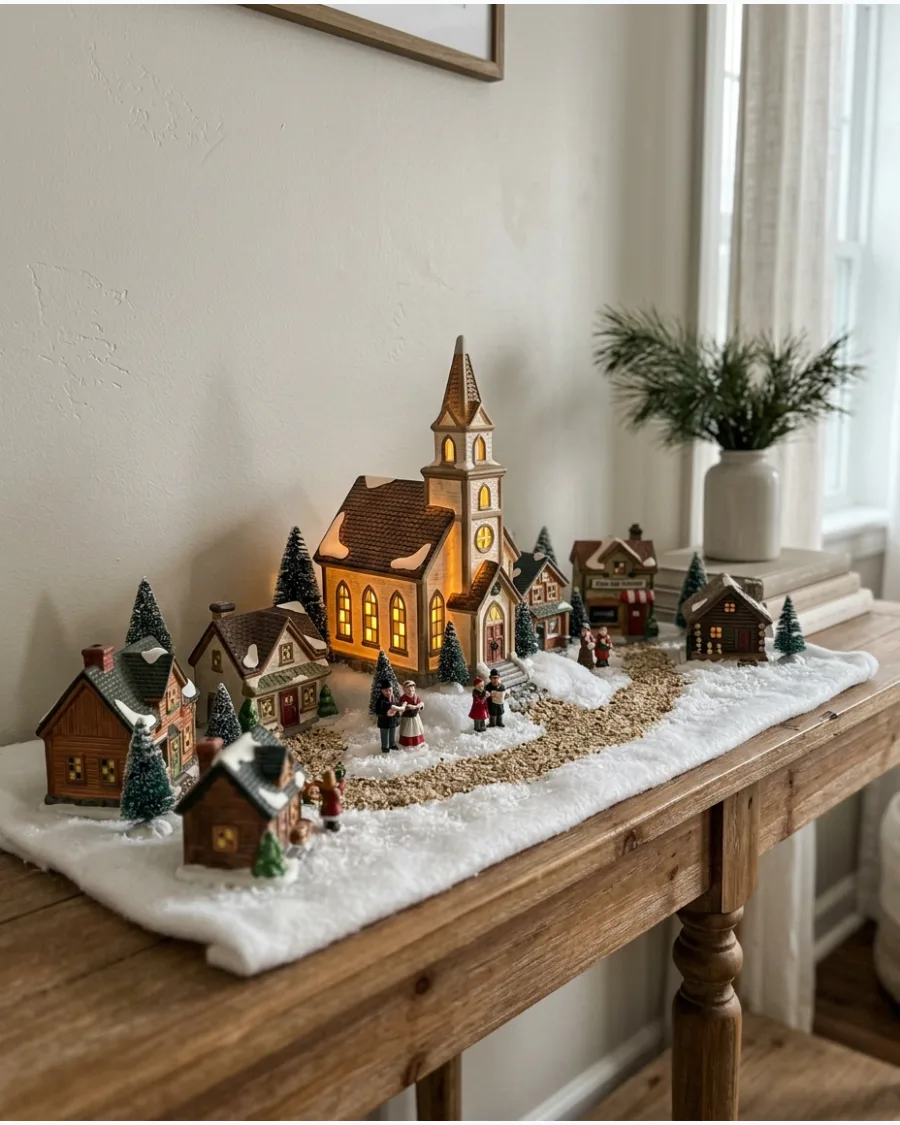
Establish a sense of scale by placing a taller illuminated church near the center or back of the table. Surround the church with smaller shops and cottages to create a natural hierarchy that mimics a real town layout.
Elevate the central church on a small box hidden under the snow blanket to give it more height than the surrounding pieces.
- Sourcing a taller church model creates an instant focal point for the eye.
- Place the church on a sturdy riser like a book or a small wooden block.
- Add tiny bottle-brush trees around the church perimeter to frame the building.
Most people skip this: Place the tallest building slightly off-center for a more natural and less formal look.
4. Traditional Red and Green Christmas Village
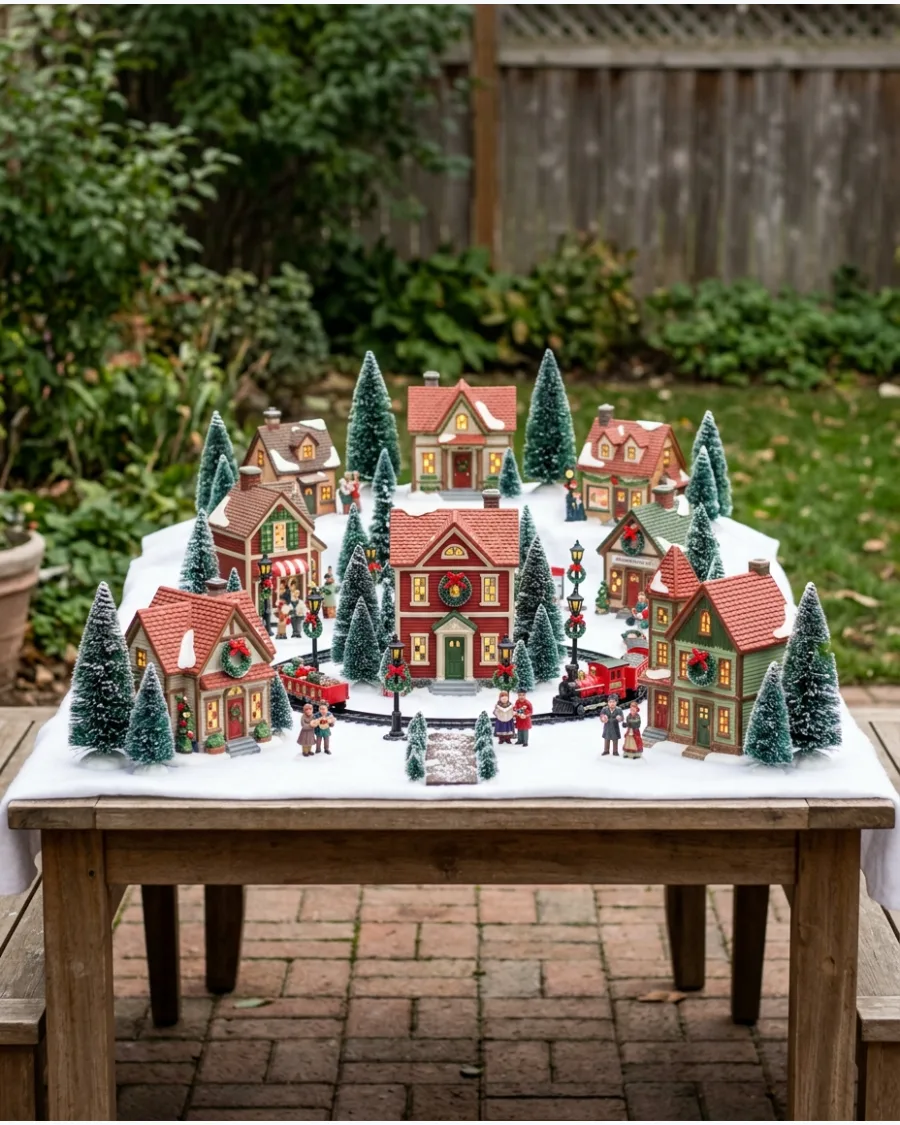
Stick to a strict color scheme of red-roofed buildings and deep green trees for a classic holiday tabletop look. This coordinated approach prevents the display from looking cluttered or mismatched.
Tying tiny red bows onto the green bottle-brush trees carries the color theme throughout the entire snowy landscape.
- Search for red and green themed village sets to ensure color consistency.
- Use thin green velvet ribbon for the tiny bows to add a high-end texture.
- Space the red elements evenly across the table to balance the visual weight.
Quick win: Use red berries from a floral pick to add pops of color without buying expensive village accessories.
5. Snow-Covered Village Main Street
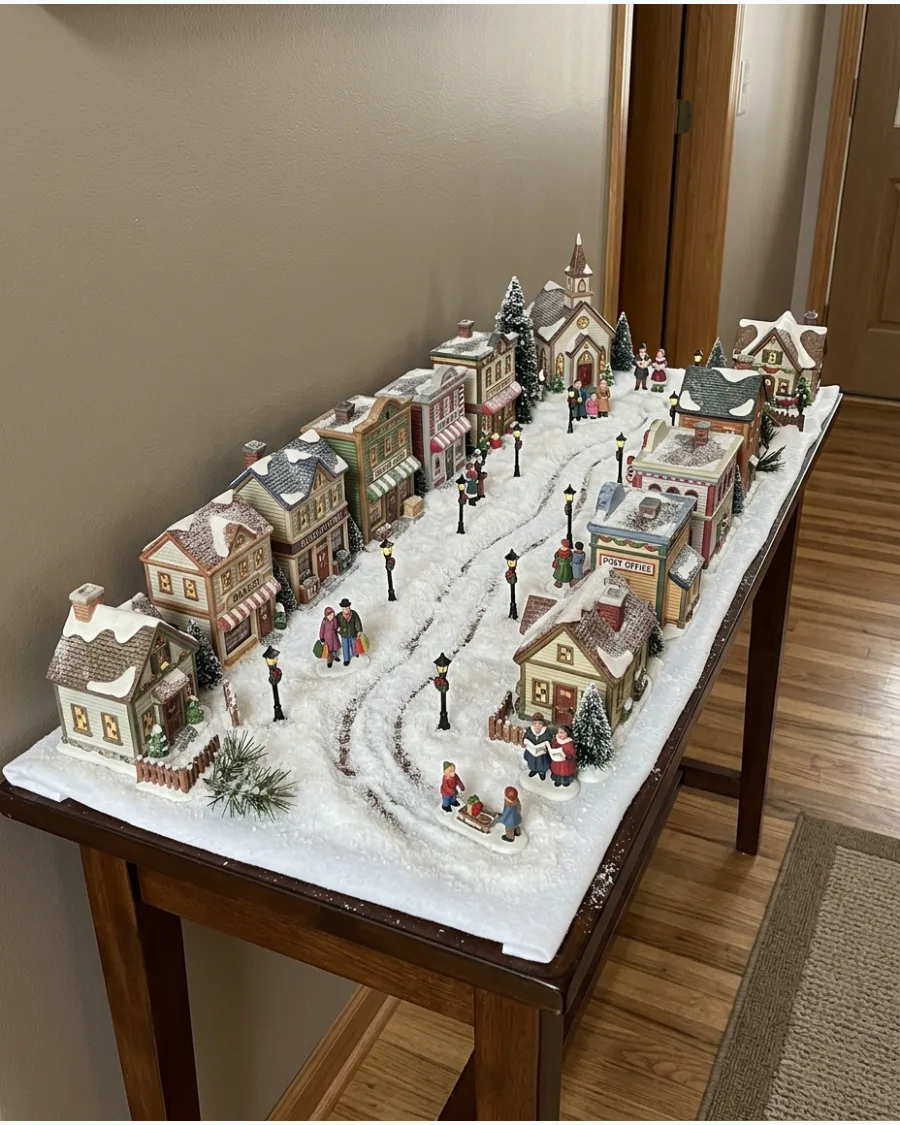
Arrange your buildings in two parallel lines to mimic a classic town main street running down the center of the table. Leave a clear road of snow in the middle where you can place tiny streetlights and miniature people.
Angling the houses slightly toward the center of the table makes the street feel more inviting and realistic.
- Standard ceramic shop buildings work best for this linear street layout.
- Measure the table width to ensure the central path is wide enough for figurines.
- Add a tiny toy car or sled in the middle of the road for extra detail.
Best shortcut: Use a strip of grey felt under the snow to represent a paved road peeking through the winter drifts.
6. Cozy Village Town Square
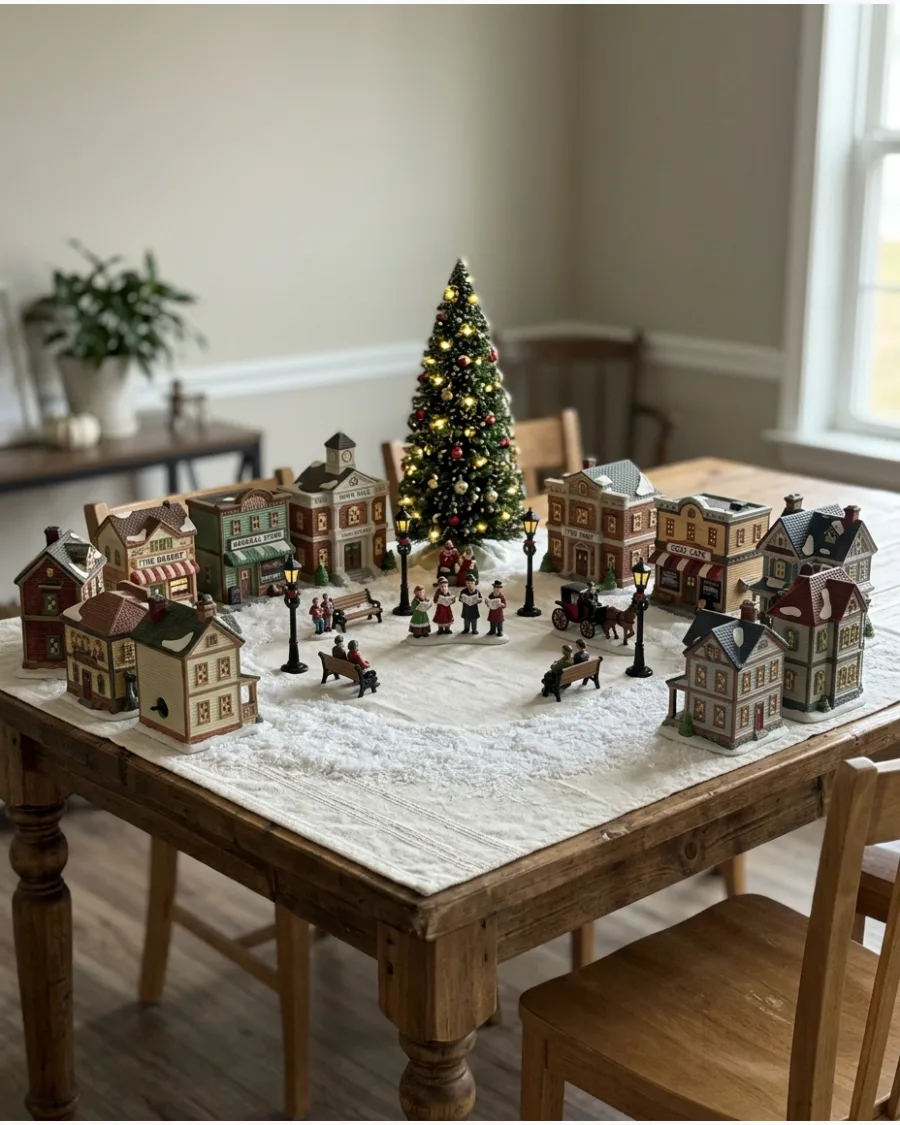
Create a circular focal point in the middle of the table by grouping your shops and houses in a ring. Place a large decorated tree or a miniature fountain in this open space to act as the heart of the village.
Positioning carolers and benches in the central square brings the scene to life and tells a story.
- Include miniature park benches and town trees to fill the square.
- Leave at least four inches of open space in the center for the main feature.
- Use a small craft mirror to mimic an ice rink or fountain in the square.
Most people skip this: Use different heights of snow to create a raised square for more visual interest.
7. Christmas Village With Snowy Pine Forest
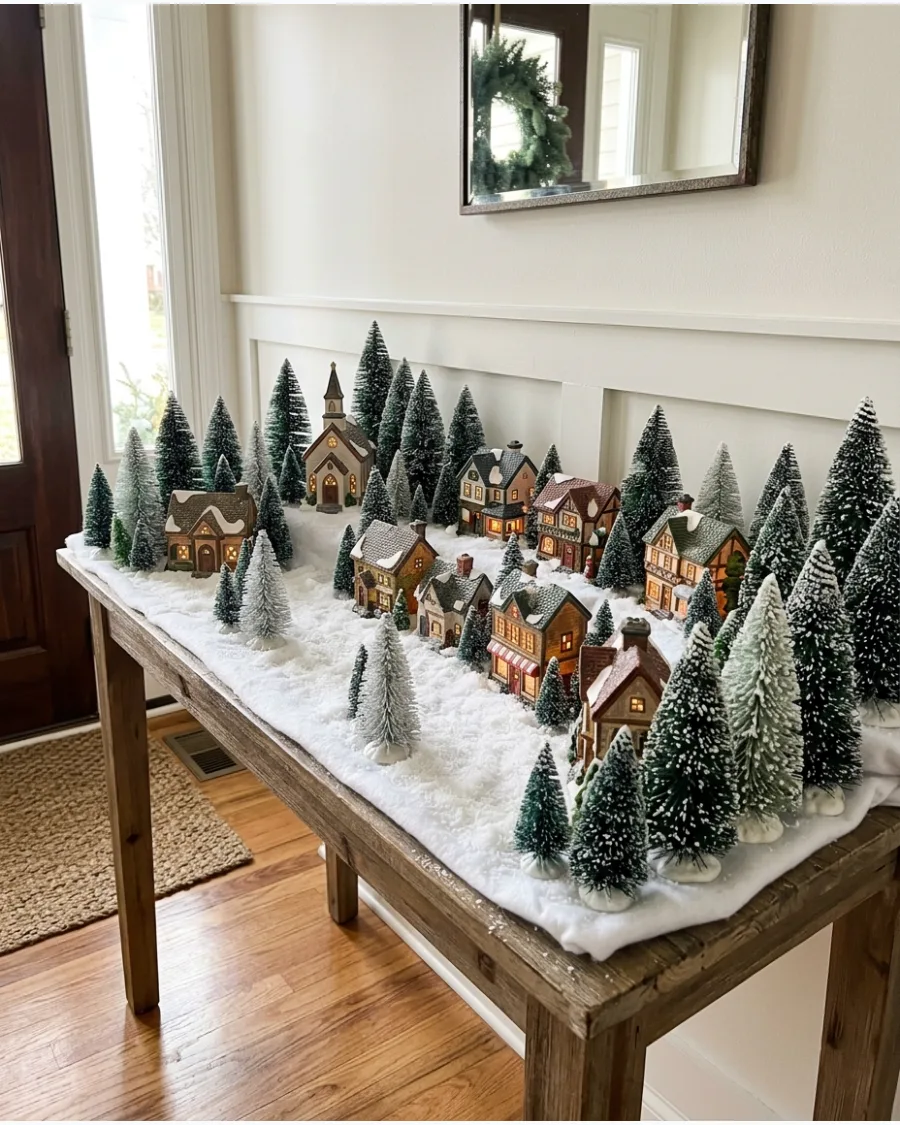
Use a high density of miniature evergreen trees to make the buildings look like they are nestled deep in the woods. Varying the sizes and shades of green trees adds depth and realism to the tabletop forest.
Tucking the houses into clusters of trees hides the power cords and makes the buildings feel integrated into the land.
- Buy an assorted pack of bottle-brush trees to get various heights.
- Place the largest trees at the back of the table to create a forest backdrop.
- Use frosted trees with white tips for a more realistic snow-covered effect.
Quick win: Sprinkle a little extra loose faux snow over the tree branches for a freshly-fallen look.
Home Decor
8. Tiered Twilight Village Table
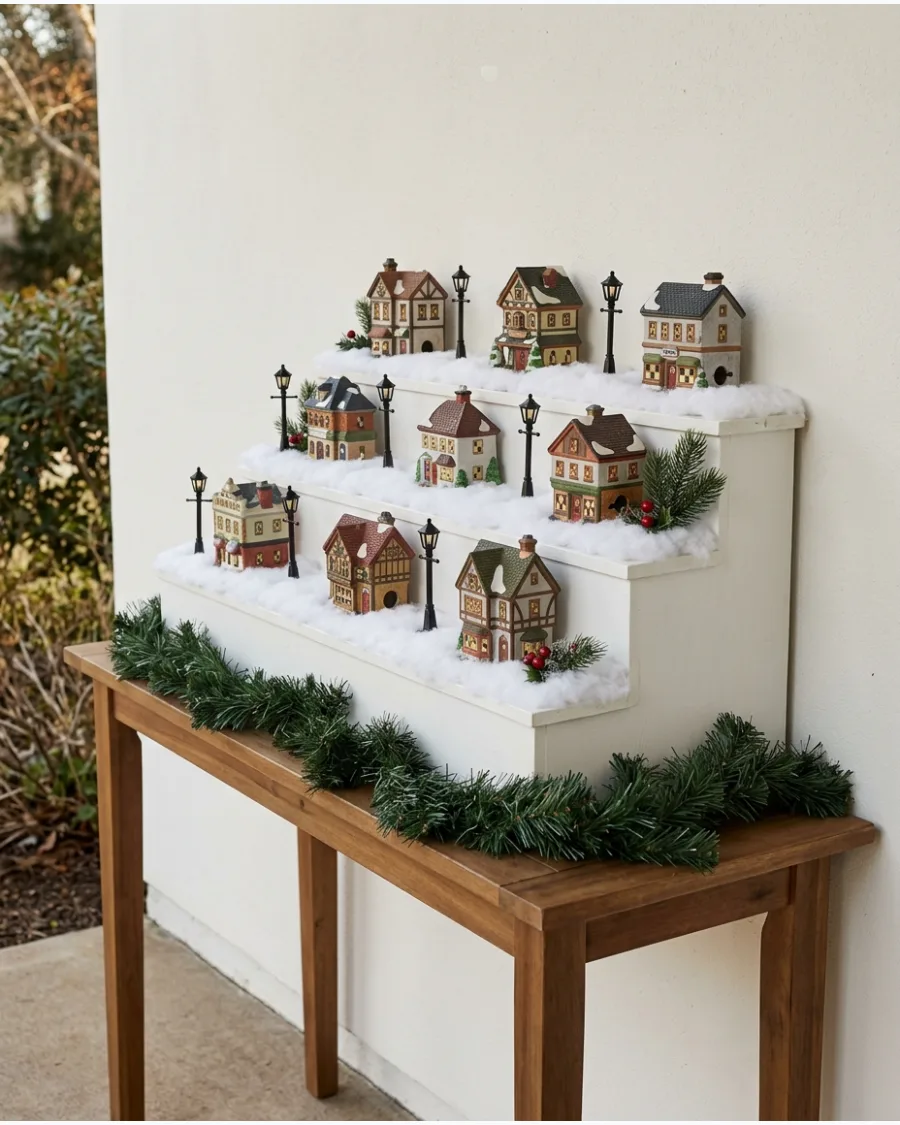
Tiered displays allow for depth and clear sightlines for every miniature building. Use battery-operated streetlights to define the pathways between houses and create a sense of scale. This setup works best on a narrow console table against a wall where wires can be hidden behind the tiers.
Warm white LEDs provide a more nostalgic and cozy glow than cool-toned bulbs, which can sometimes feel clinical in a home setting.
- Purchase LED streetlights in bulk sets during pre-season sales to ensure matching light temperatures.
- Secure wires along the back of the risers using clear adhesive clips or masking tape.
- Adjust the spacing of streetlights to mirror actual city planning for a more realistic landscape.
Most people skip this: Place streetlights at varying heights to draw the eye upward and make the display feel larger than its footprint.
CLASSIC CHRISTMAS VILLAGE TABLE DISPLAY IDEAS
9. Village With Snow-Covered Footpaths
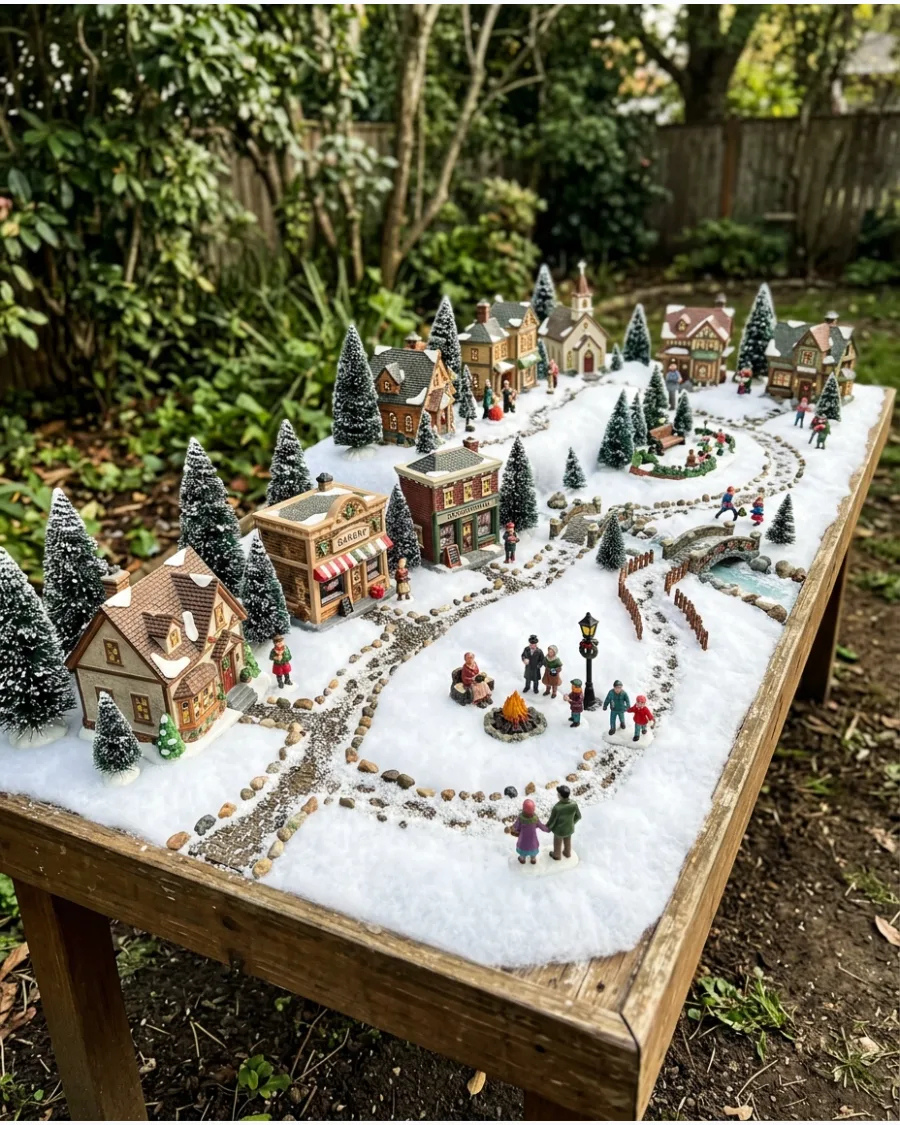
Carve out winding paths in the faux snow to connect the different buildings and gathering areas on the table. Using a finger or a small brush to press down the snow creates the appearance of well-traveled trails.
Filling the indentations with fine iridescent glitter makes the paths stand out against the white landscape.
- Use loose faux snow or glitter to define the walking paths.
- Plan the path layout before setting all the buildings in their final spots.
- Use a small paintbrush to tidy up the edges of the paths for a clean look.
Most people skip this: Add tiny footprints in the snow using the end of a toothpick to make the scene look lived-in.
Holiday Decor
10. Forested Village Centerpiece
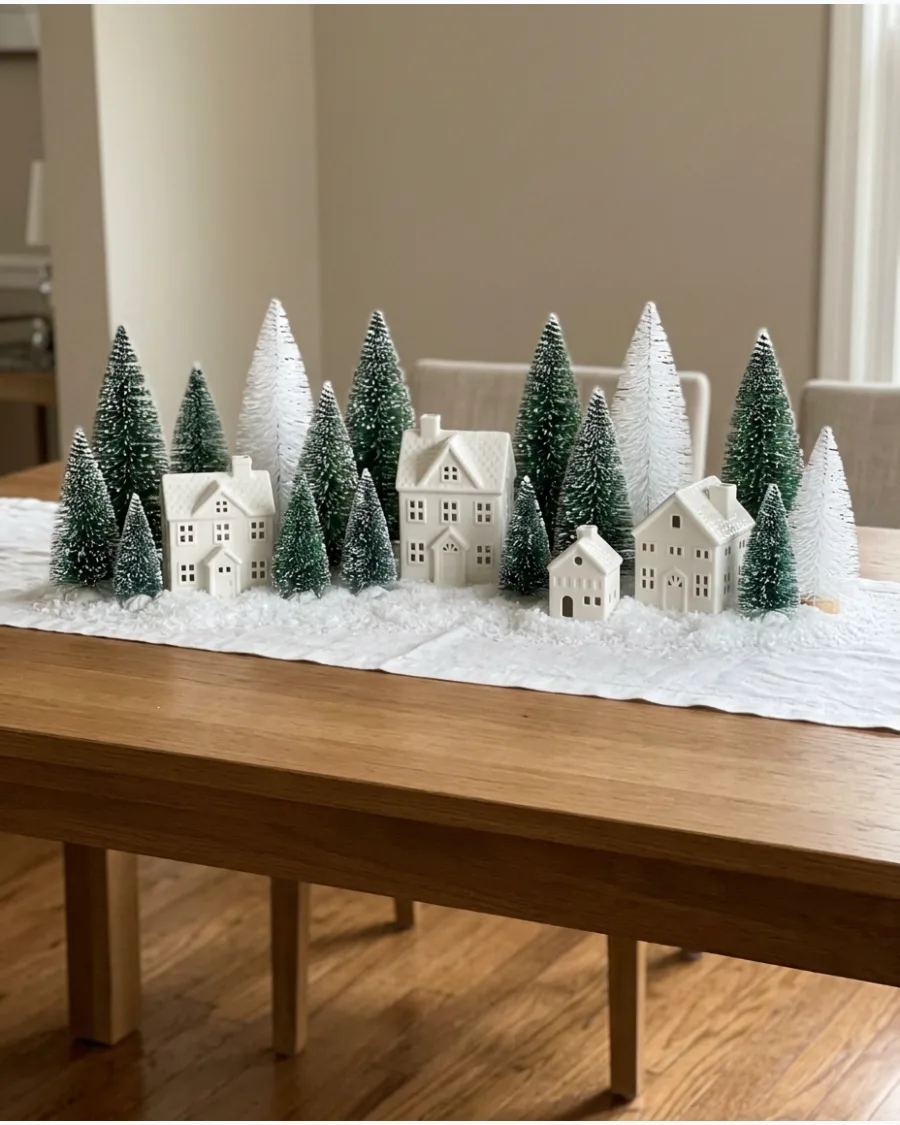
This design uses varying heights of bottle brush and flocked trees to create a dense forest around a few select ceramic houses. Placing buildings at different elevations using hidden risers creates a sense of depth and realism on a flat tabletop.
Layer white felt or faux snow over the base to hide the tree stands and wiring. It is more effective to group trees in clusters of three rather than spacing them out evenly across the table.
- Source multi-packs of bottle brush trees in various shades of green and cream for a natural look.
- Use small wooden blocks or inverted ramekins under the snow layer to give houses and trees different heights.
- Swap ceramic houses for simple glass hurricanes with fairy lights for a more modern, minimalist aesthetic.
Quick win: Use a stiff paintbrush to dust extra glitter or faux snow onto the rooflines of the houses to blend them into the forest.
TIERED CHRISTMAS VILLAGE TABLE DISPLAYS
11. Three-Level Snowy Christmas Village
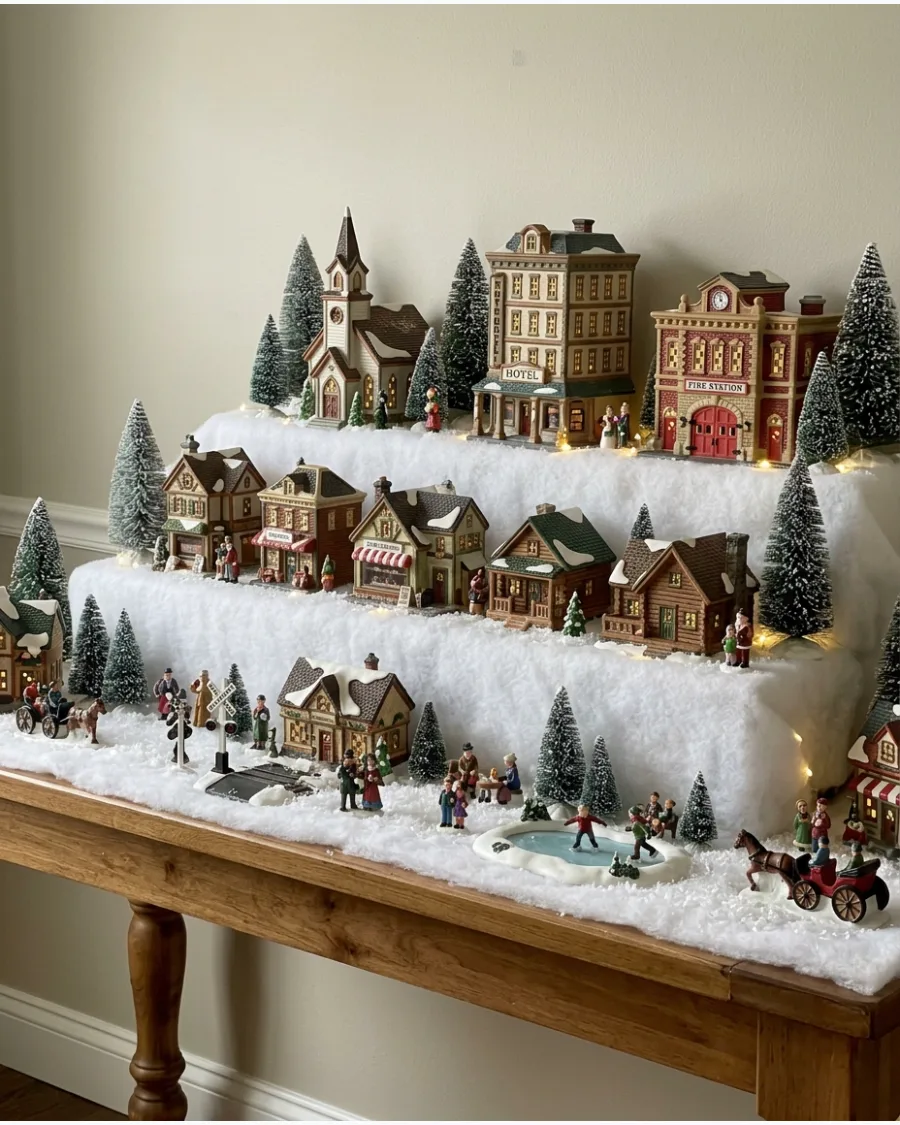
Using multiple levels adds immediate depth to a flat tabletop and ensures every building is visible. Arrange tall buildings on the highest tier at the back and place smaller cottages and figurines on the lower steps.
Place the largest buildings on the highest tier to prevent them from blocking the view of smaller cottages. This layout creates a dense, bustling look that feels more like a real town than a single row of houses.
- Use acrylic or cardboard display risers to create the steps.
- Drape white felt or cotton batting over the entire structure to hide the steps.
- Organize by scale with the largest items in the rear and the smallest in front.
Quick win: Hide all the power cords and battery packs behind the risers for a cleaner look.
12. Mountain Hill Christmas Village Table
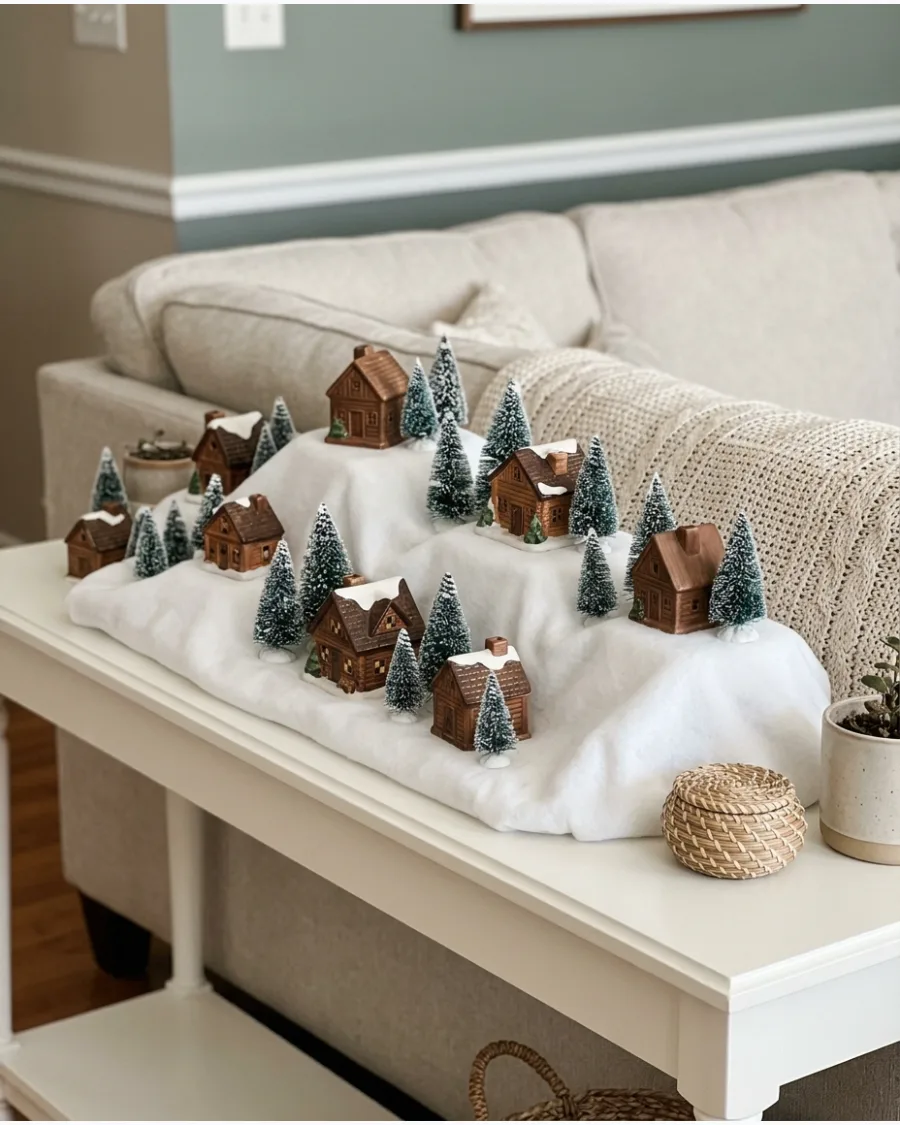
Flat tables can make a village look one-dimensional, so building hills at the back adds a landscape feel. Use bunched-up fabric or batting to create various elevations for cabins and lodges.
Tuck thick batting under the back edge of the display to create a sloped mountain look without buying expensive plastic bases. This verticality makes the scene feel like a mountain resort.
- Roll up towels or bubble wrap to form the base of the hills.
- Position cabins at different angles to mimic natural mountain terrain.
- Cluster frosted trees around the buildings to enhance the forest vibe.
Best shortcut: Use double-sided tape on the bottom of houses to keep them from sliding off the slopes.
13. Cascading Village From High to Low
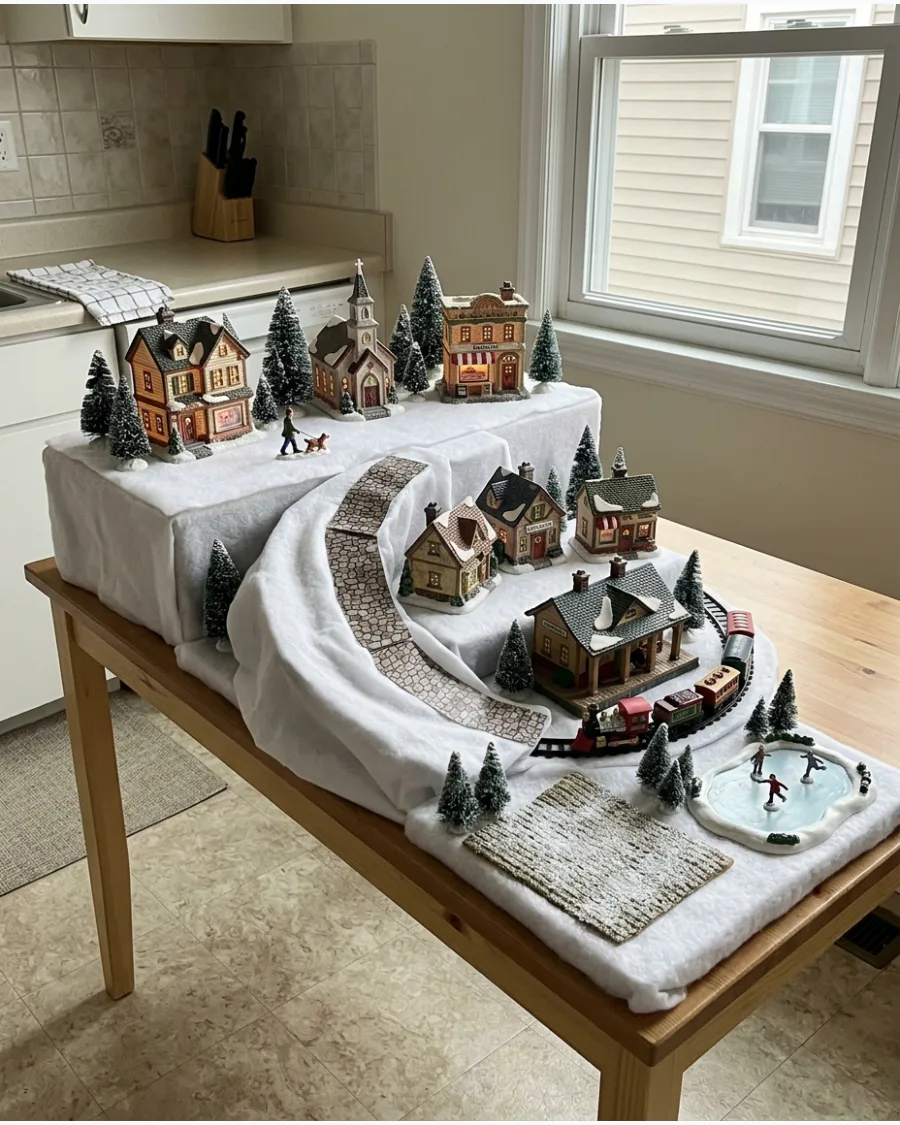
A cascading layout uses a high point at one end of the table and gradually lowers the terrain toward the other. This asymmetrical look is more visually interesting than a perfectly centered display.
Start the highest point near a wall or corner to anchor the display and let it taper off toward the open end of the table. It naturally guides the eye across the entire scene.
- Build the highest point using a stack of sturdy books under the snow.
- Place a focal point building, like a manor, at the peak.
- Use a table runner to define the footprint of the village path.
Most people skip this: Use a dusting of artificial glitter snow on the slopes to catch the light.
14. Tiered Wooden Riser Christmas Village
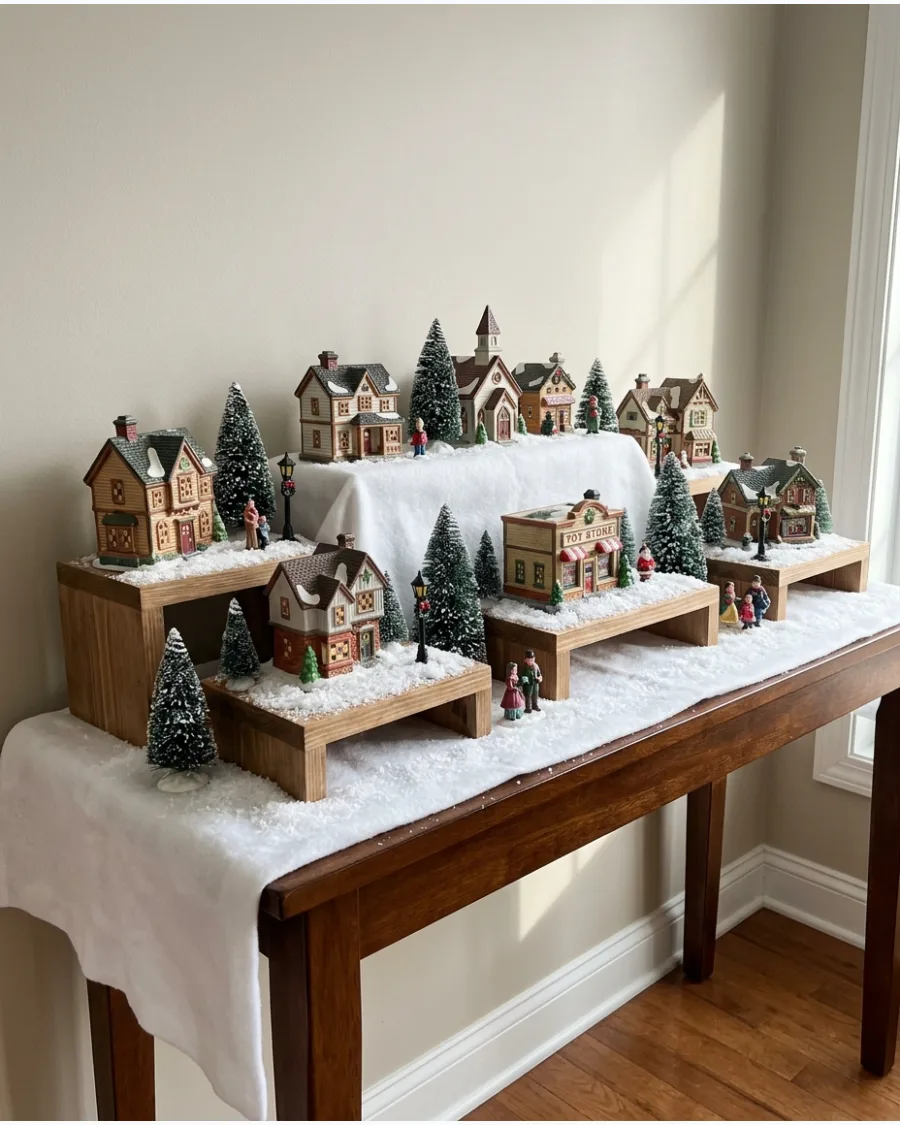
Wooden risers provide a sturdy and clean way to add height without needing a complex permanent platform. These blocks can be staggered to create a modern, structured look for the village.
Stagger the wooden blocks at varying angles to avoid a stiff, bleacher-like appearance in the village layout. The natural wood adds a warm, organic touch under the faux snow.
- Buy unfinished wood craft blocks in various sizes.
- Space the blocks out so the buildings don't look crowded.
- Scatter loose faux snow around the base of the blocks for a blended look.
Quick win: Paint the wood blocks white if the snow layer is thin to prevent the wood grain from showing through.
15. Hidden Box Christmas Village Hills
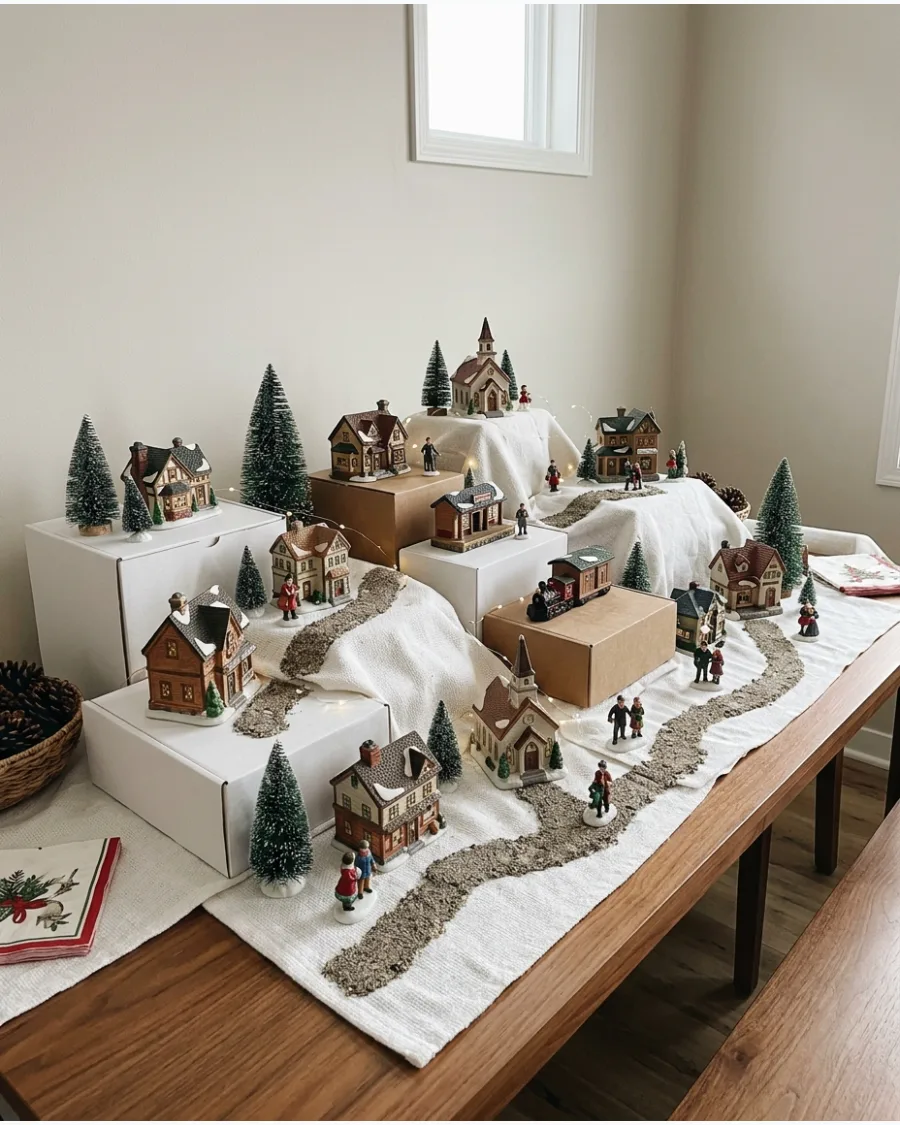
Repurposing household items like shipping boxes is the fastest way to create a multi-level landscape. Simply cover the boxes with a thick white blanket or snow fabric to create rolling hills.
Select sturdy cardboard boxes or plastic bins that won't collapse under the weight of heavy ceramic buildings. This method is completely customizable and costs nothing.
- Use different box sizes to create a varied skyline.
- Smooth the fabric over the boxes to avoid sharp, unnatural corners.
- Place heavier buildings on the flattest parts of the boxes for stability.
Best shortcut: Use small books to make micro-adjustments in height for smaller figurines.
16. Village With a Raised Church Hill
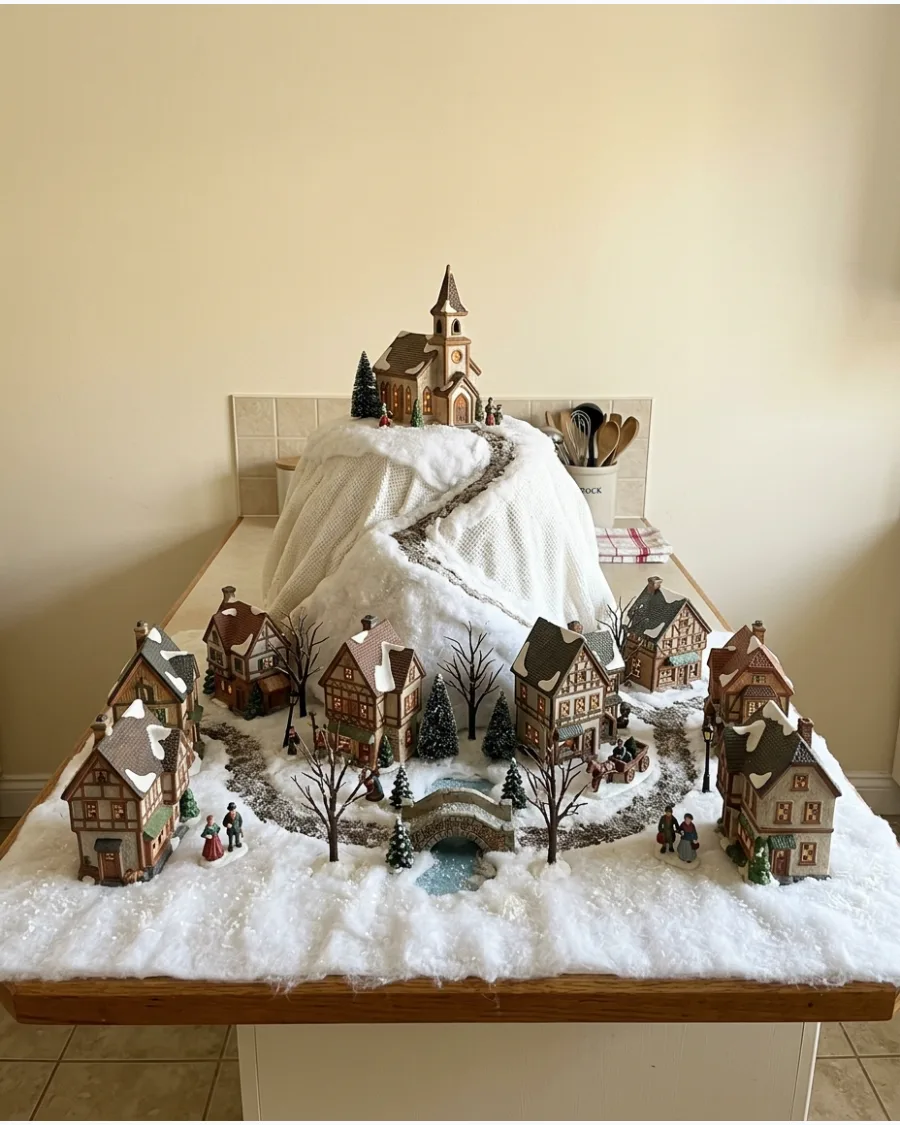
In many old-world villages, the church sits at the highest point as a community anchor. Elevating your church on a central hill creates a traditional European town aesthetic.
Position the church as the highest focal point to mimic the layout of a historic European town square. The rest of the shops and homes can then be arranged in a semi-circle on the table below.
- Use a decorative cake stand or a sturdy pedestal to raise the church.
- Line the path leading up to the church with miniature streetlamps.
- Place caroler figurines on the steps of the church for a festive touch.
Most people skip this: Place a small battery-operated spotlight behind a tree to highlight the church steeple.
17. Elevated Village Shopping Street
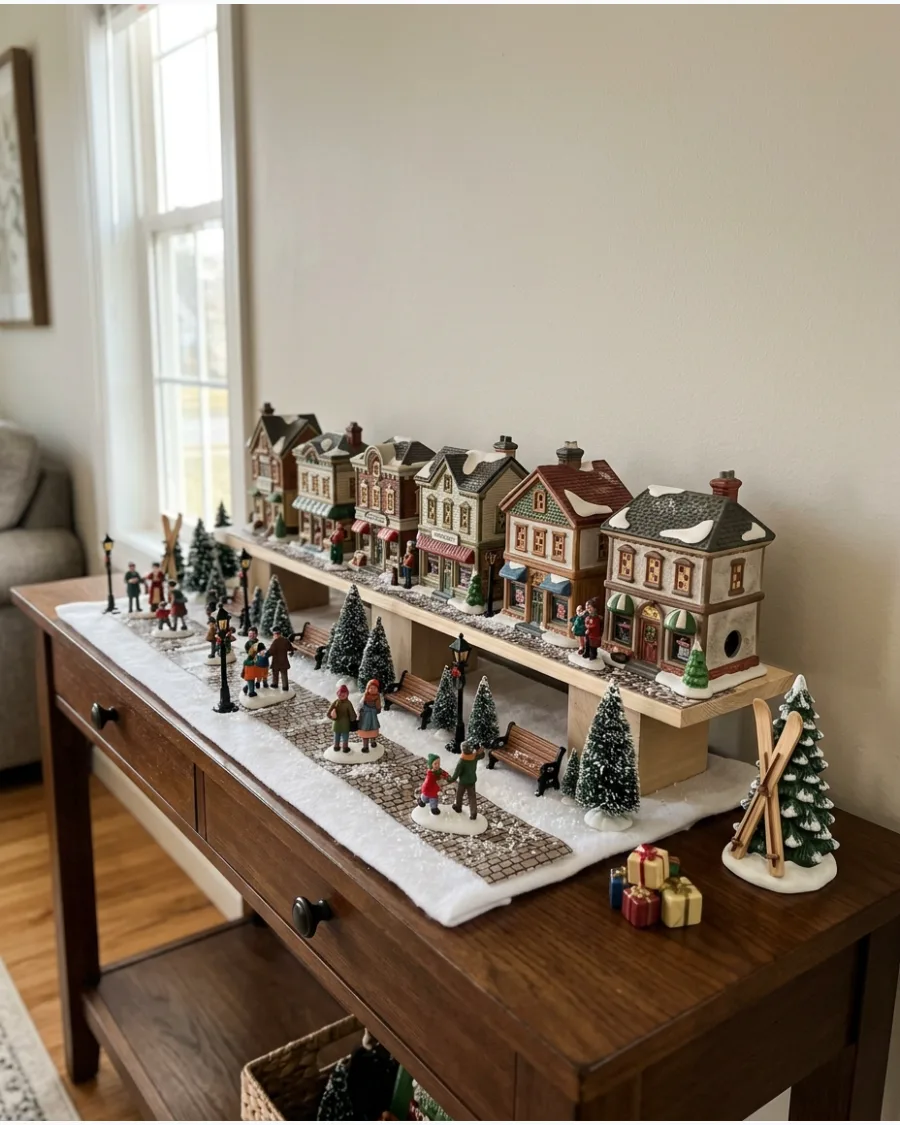
Creating two distinct levels allows you to separate the storefronts from the pedestrian areas. Raise the buildings slightly and keep the front of the table open for a 'sidewalk' feel.
Line the lower level with benches and streetlights to make the shopping district feel bustling and lived-in. This layout makes the scene feel like a real destination.
- Use a long, narrow riser to lift an entire row of shops at once.
- Keep figurines on the lower level to ensure they don't get lost behind buildings.
- Add miniature wreaths to the shop doors for extra detail.
Quick win: Use a strip of grey felt on the lower level to create a realistic paved sidewalk.
18. Tiered Village With a Train Below
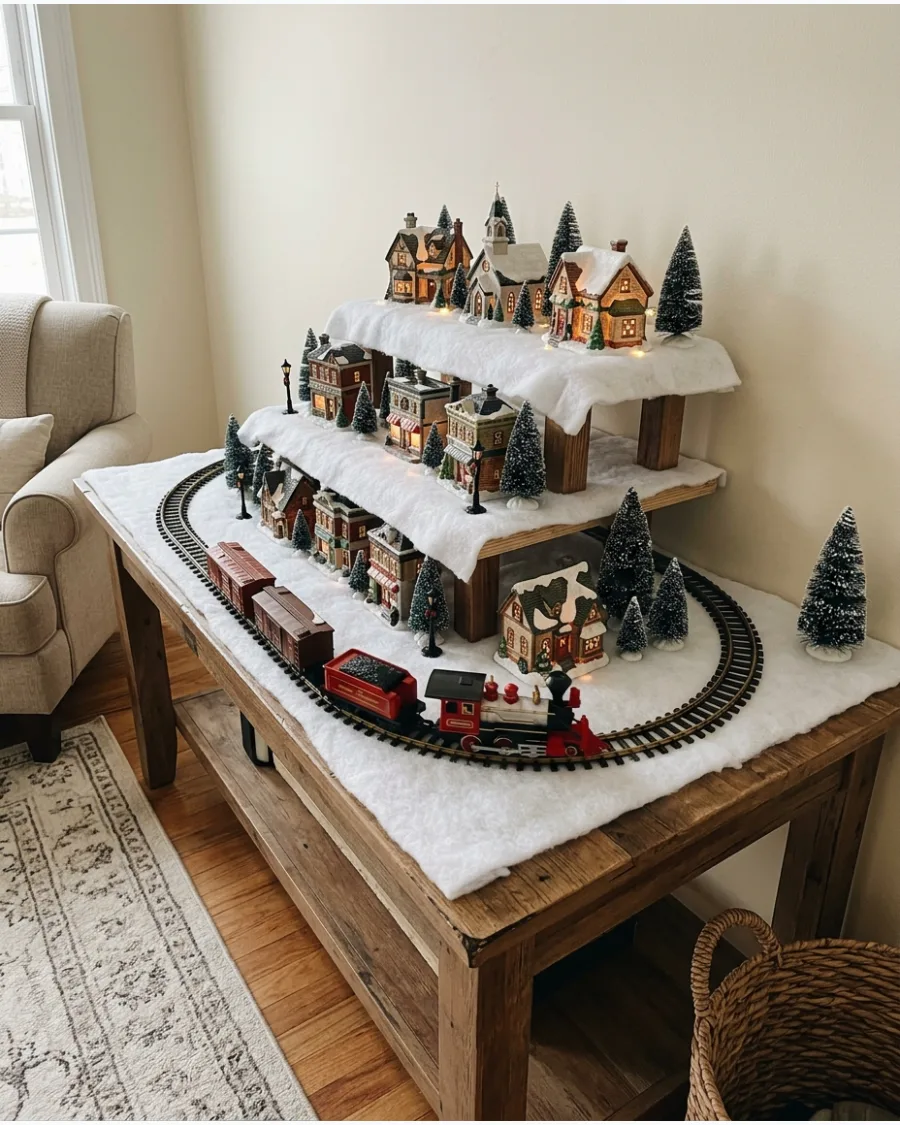
Adding a train provides movement, but tracks often get hidden behind buildings on a flat surface.
By raising the houses on platforms, the train can circle the village at the lowest level where it is clearly visible. Ensure the raised platforms are high enough that the train tracks don't get buried under falling faux snow from the upper levels. This keeps the tracks clear and the train running smoothly.
- Check that the train has enough clearance to pass under any overhanging platforms.
- Keep the track on the hard table surface for the most stability.
- Place the train transformer behind a raised hill to hide the wires.
Best shortcut: Use a battery-operated train to avoid running extra power cords across the table.
19. Snowy Village With Raised Forest Hills
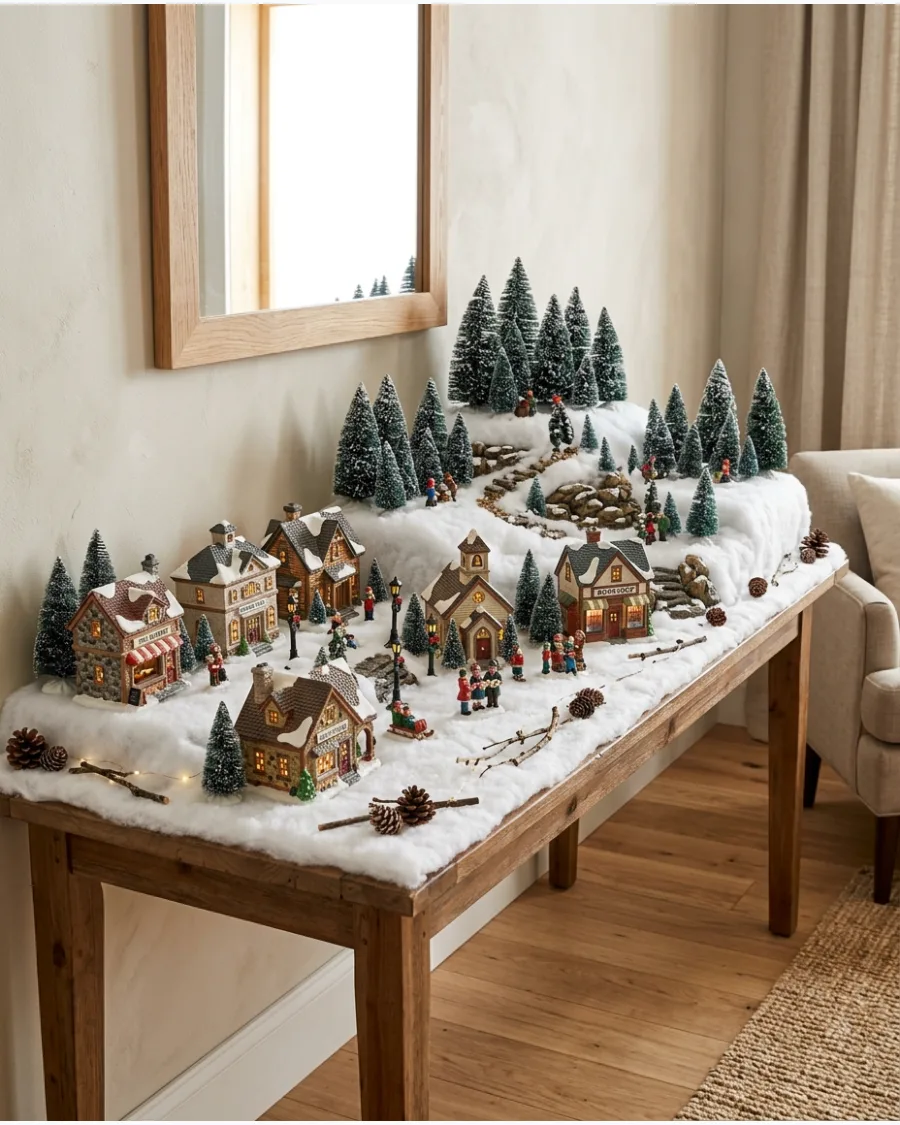
Elevation isn't just for houses; it works perfectly for creating a background forest. Placing groups of trees on raised mounds behind the village adds scale and frames the buildings.
Mix different shades of green and heights of bottle brush trees on the hills to add realistic texture to the horizon. It makes the village feel like it is nestled in a valley.
- Use small bowls or cups upside down under the snow to create tree mounds.
- Group trees in odd numbers for a more natural forest look.
- Place the tallest trees on the highest points for maximum impact.
Quick win: Lightly spray the trees with adhesive and sprinkle on iridescent glitter for a frozen effect.
20. Multi-Level Village With Winding Roads
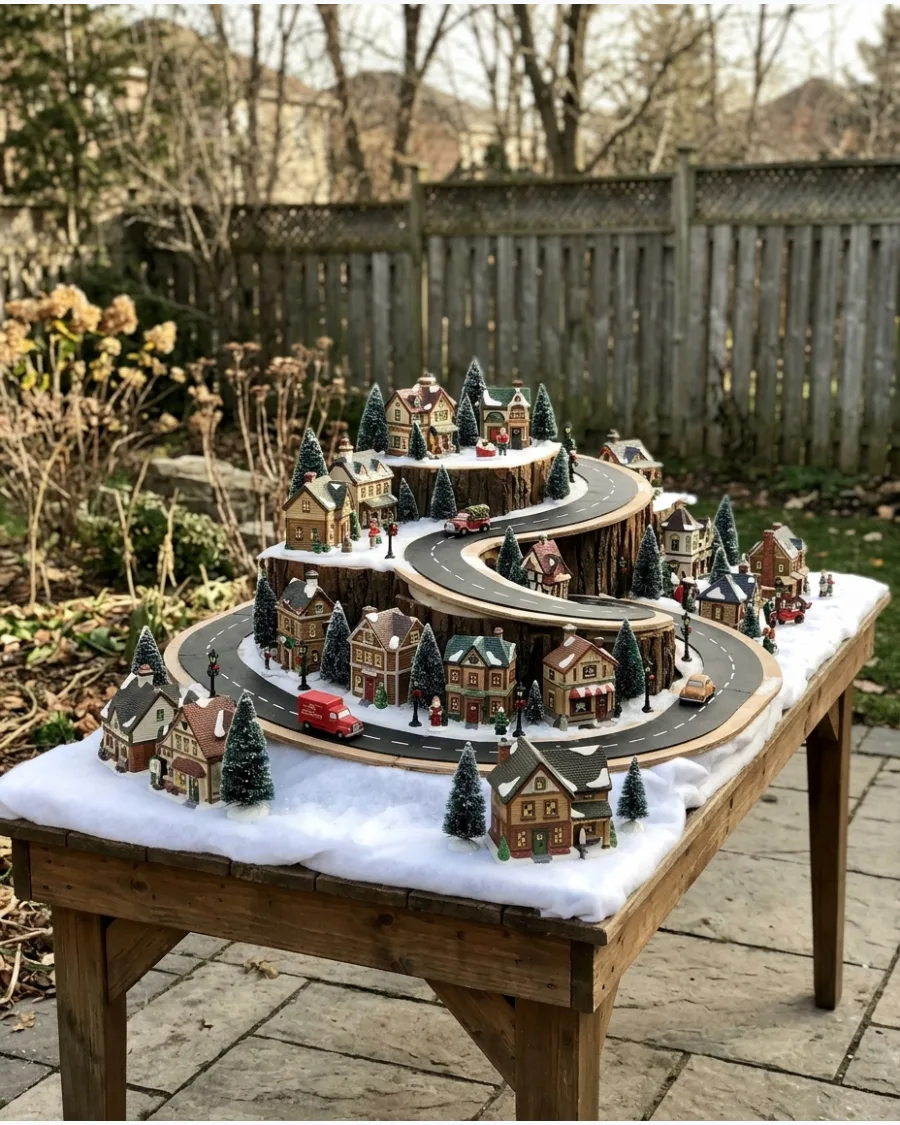
A winding road that travels between different elevations makes a small table display feel much larger. Use grey felt or sandpaper to create a path that curves around the hills and connects the buildings.
Curve the road around the hills rather than running it in a straight line to make the small table space feel like a sprawling landscape. Adding miniature vehicles brings the road to life.
- Cut road shapes from thin grey felt so they lay flat on the slopes.
- Place a miniature car or truck on the road to suggest movement.
- Line the curves of the road with small stones or tiny fences.
Most people skip this: Use a narrow strip of white paint or a chalk marker to add a center line to your felt road.
CHRISTMAS VILLAGE TABLE THEME IDEAS
21. Victorian Christmas Village Table
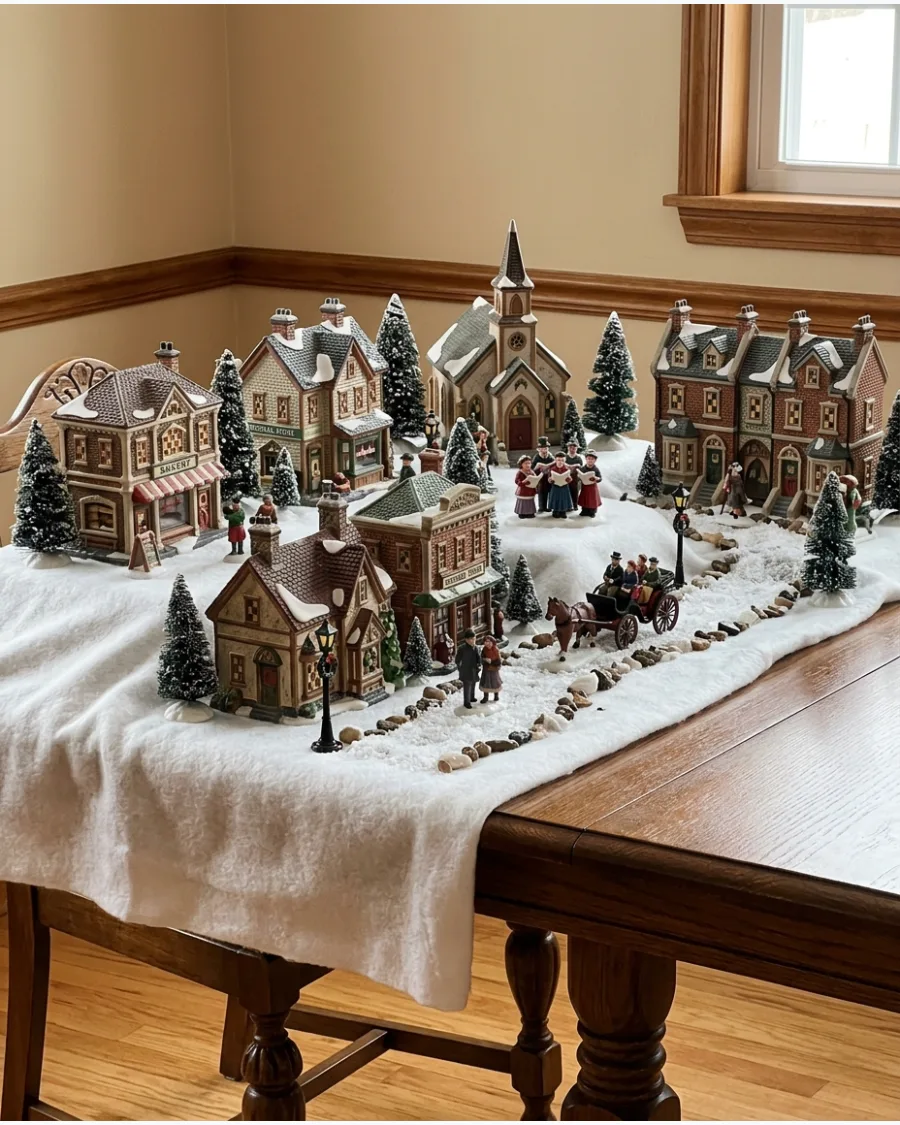
Intricate Victorian houses and horse-drawn carriages bring a sense of nostalgia to a holiday table. This style relies on detailed architectural elements like gables and porches to look high-end.
Line up gas-style streetlights along a main thoroughfare to guide the eye through the display. Authentic Victorian scenes look best when warm, yellow-toned bulbs are used instead of bright white LEDs.
- Sourcing high-quality porcelain Victorian buildings from estate sales or specialty retailers is often more affordable than buying new sets.
- Run all power cords through a single slit in the table runner to keep the main street looking tidy and professional.
- Swap the white snow for a dark green velvet cloth to create a city-square look that works well in smaller apartments or library spaces.
Quick win: Use a small mirror as a frozen pond in the center of the village to reflect the glowing window lights.
22. European Christmas Market Village
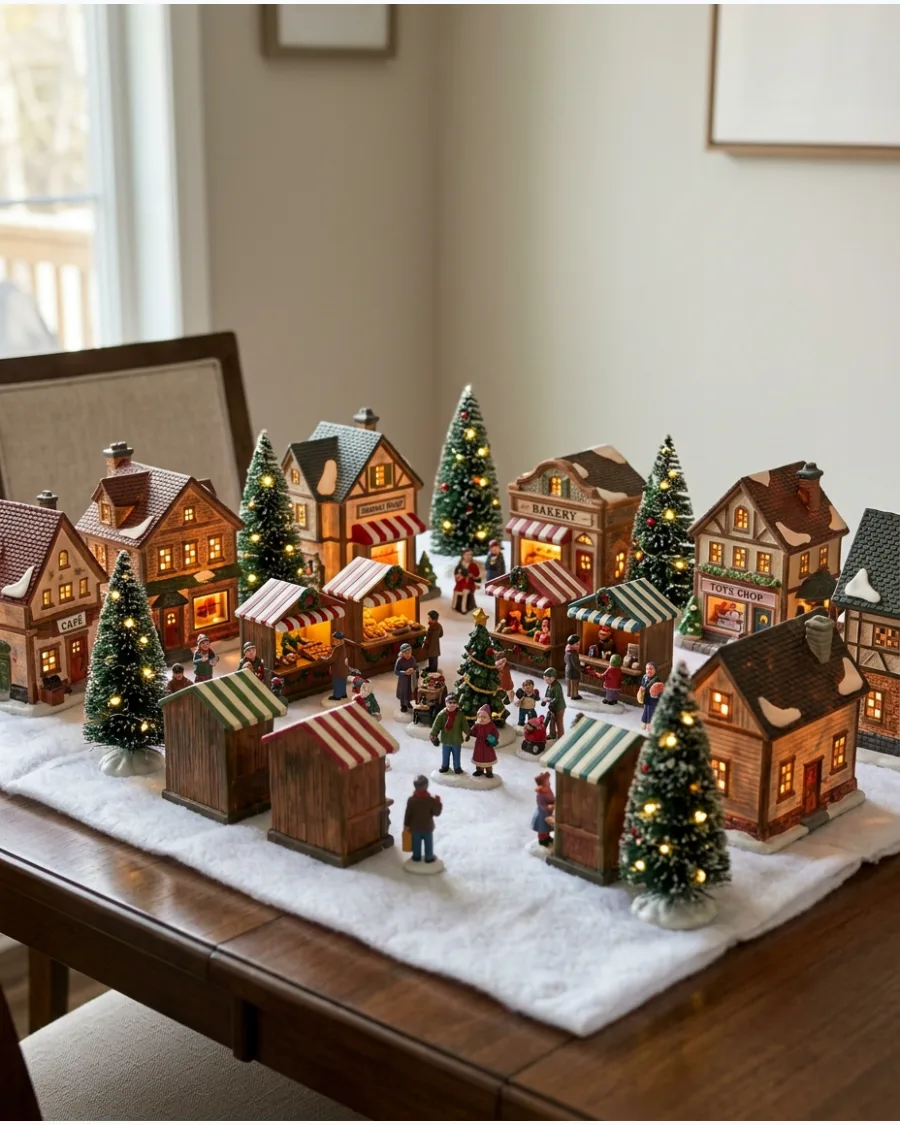
A miniature Christmas market uses small vendor stalls and a central square to mimic the energy of a real holiday festival. Arrange tiny shoppers and bakery stalls around a central decorated tree to create a clear focal point.
Keep the central market square flat and clear of heavy snow drifts to allow the figurines to stand upright. Using varied stall types like toy shops and cider stands adds realistic depth to the scene.
- Budget for multiple small accessory sets like benches and market stalls rather than one large building to fill more table space.
- Secure lightweight figurines to the table surface with a tiny dab of museum wax to prevent them from tipping over.
- Adapt the market for a modern kitchen island by using only food-themed stalls and minimalist white lighting.
Best shortcut: Use real cinnamon sticks or star anise near the bakery stalls to add a subtle holiday scent to the display.
23. Alpine Ski Village Table
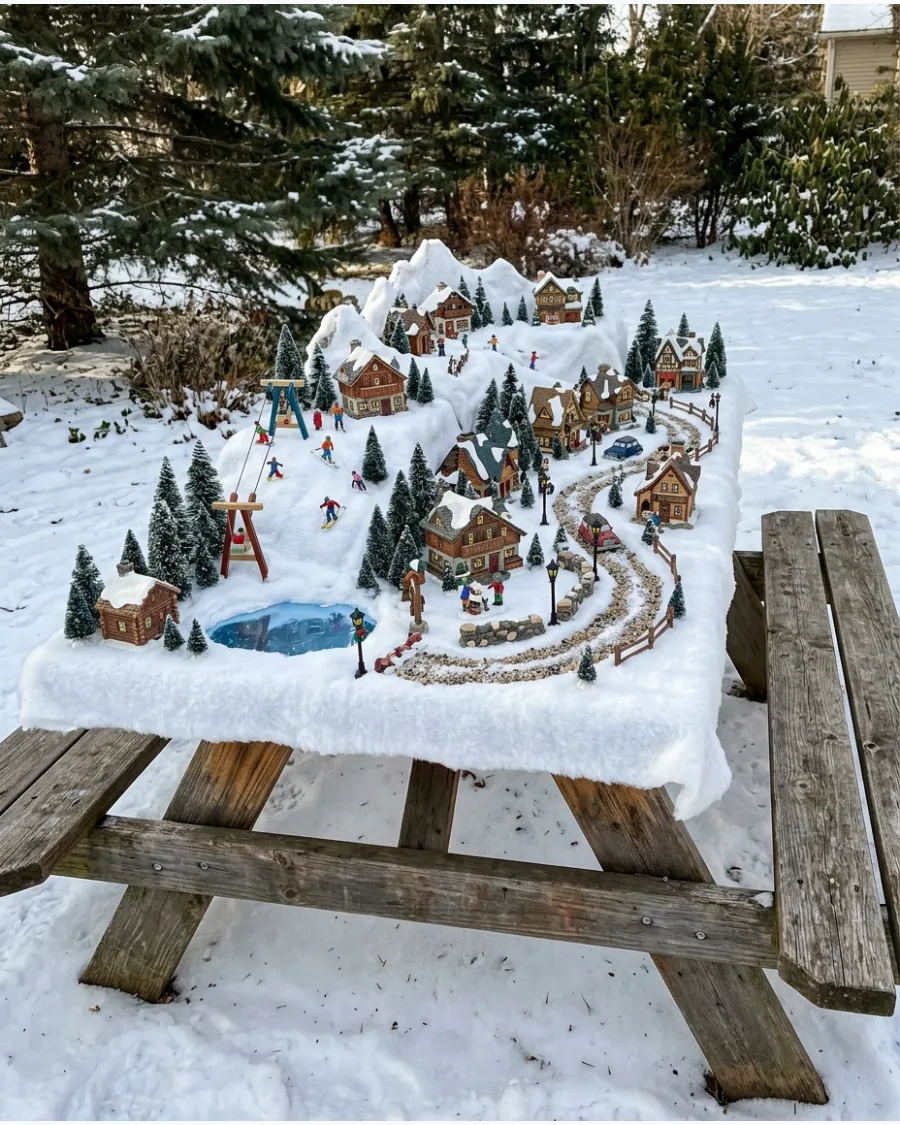
Elevated terrain and tiny skiers turn a flat table into a dramatic winter resort. Use foam blocks under batting to create the height needed for a convincing ski run or mountain peak.
Tuck miniature skiers and dense pine trees into the vertical gaps between buildings to fill the landscape. A mountain scene looks most realistic when the ground cover is crisp, bright white to simulate fresh powder.
- Purchase various sizes of bottle brush trees in bulk to create a dense forest look without overspending on individual buildings.
- Hide the edges of the foam elevation blocks by draping extra-thick polyester batting over the sides and pinning it in place.
- Scale the mountain down for a small side table by using only one large peak and two small cabins at the base.
Most people skip this: Angle the buildings slightly away from the viewer to make the mountain paths look longer and steeper.
24. Cozy Mountain Cabin Village
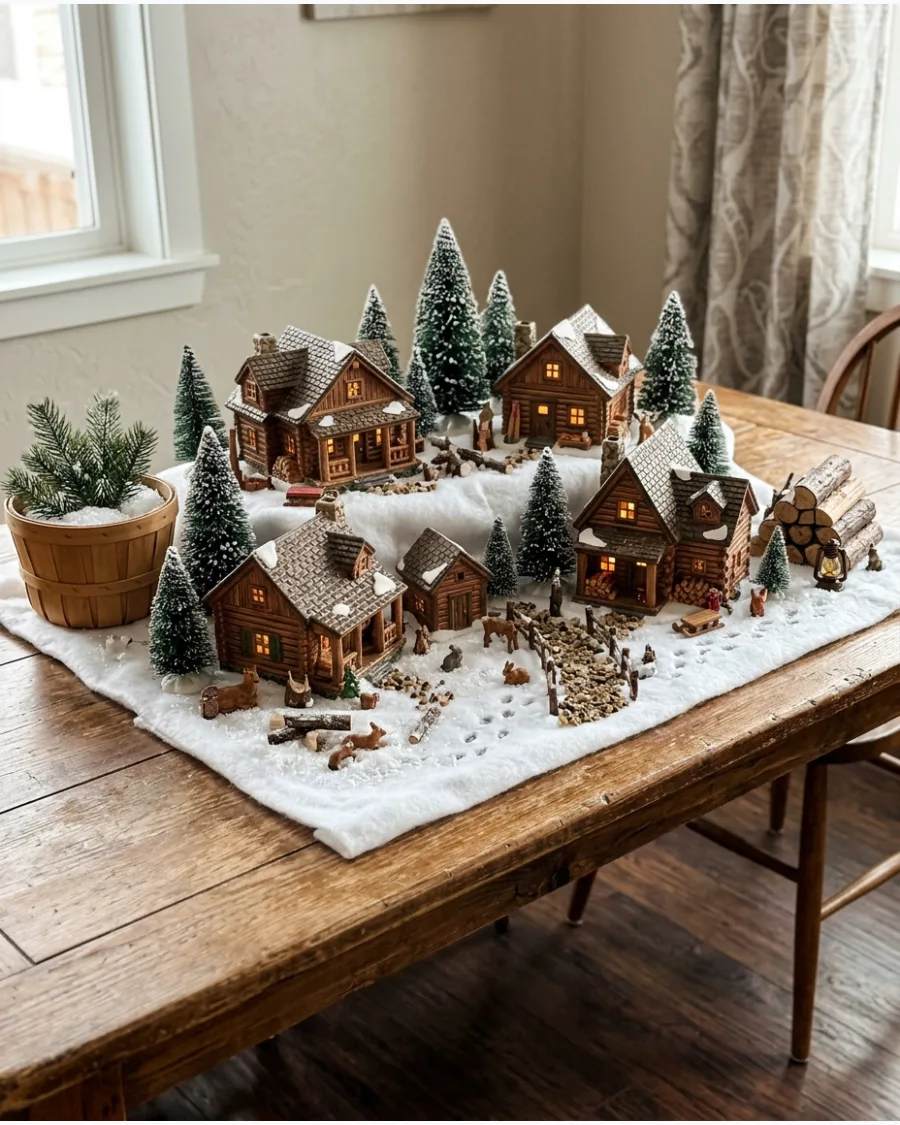
Focus on rustic cabins and woodland elements to create a quiet, secluded atmosphere. This layout works best when buildings are spaced further apart to imply a forest setting.
Scatter small twigs and real pinecones around the cabin bases to blend the structures into the natural terrain. Using warm, flickering window lights makes these small wood-look structures feel lived-in and inviting.
- Source natural elements like bark and stones from a backyard or local park to save on landscaping costs.
- Group buildings in odd numbers like threes or fives to create a more natural and balanced visual flow.
- Use a brown or tan table runner instead of white to emphasize the earthy, woodland feel of a mountain retreat.
Quick win: Place a small battery-operated tea light behind a pile of twigs to simulate a tiny outdoor campfire.
25. North Pole Christmas Village
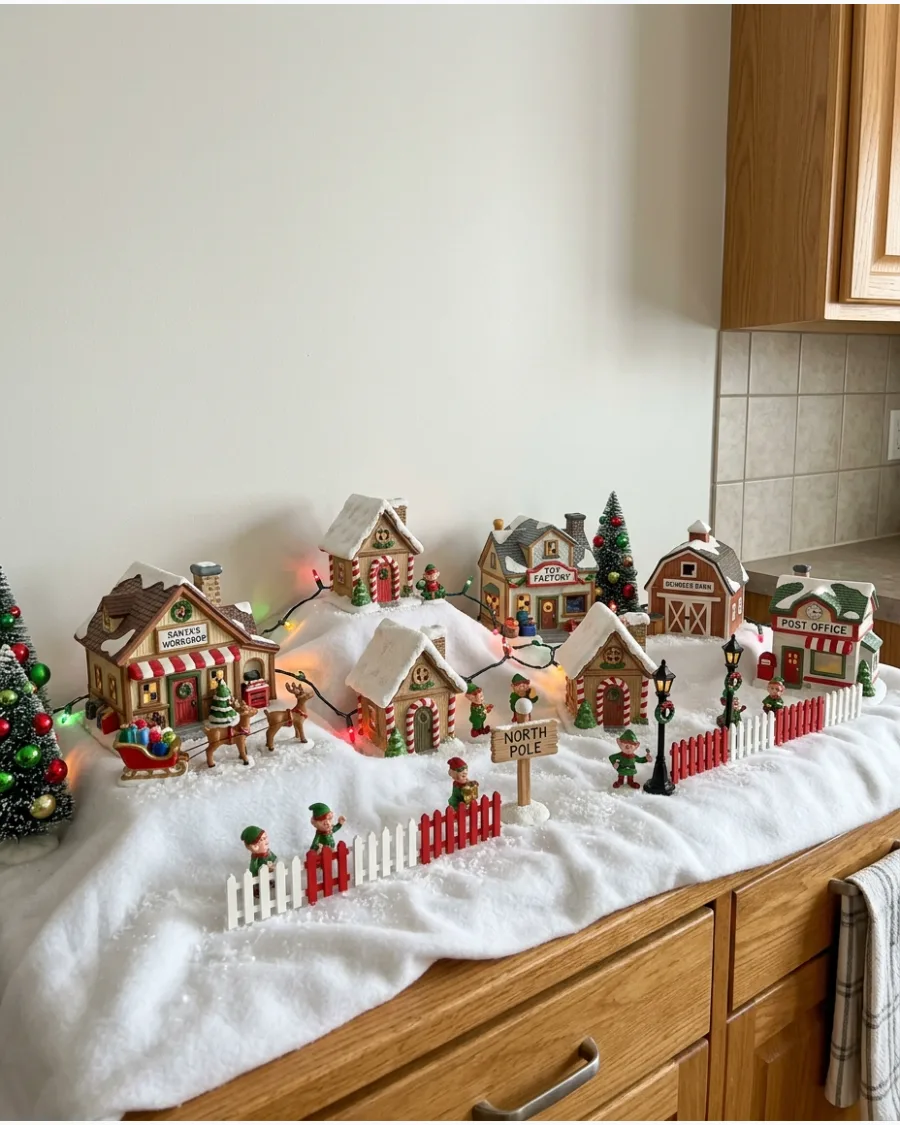
Bright colors and candy-striped accents define this playful version of Santa's workshop. This theme is the perfect place to use colorful multi-colored lights rather than standard white ones.
Wrap the edge of the table in a thick red and white ribbon to frame the North Pole scene. Vibrant primary colors separate this whimsical display from more traditional or realistic villages.
- Look for colorful resin buildings at big-box retailers during early November for the best selection of playful North Pole themes.
- Use a layer of iridescent glitter over the faux snow to give the North Pole a magical, shimmering finish.
- Adapt the look for a child's bedroom by using unbreakable plastic buildings and battery-powered LED strands.
Best shortcut: Use striped peppermint candies as stepping stones to create a path between Santa's house and the workshop.
26. Gingerbread Christmas Village Table
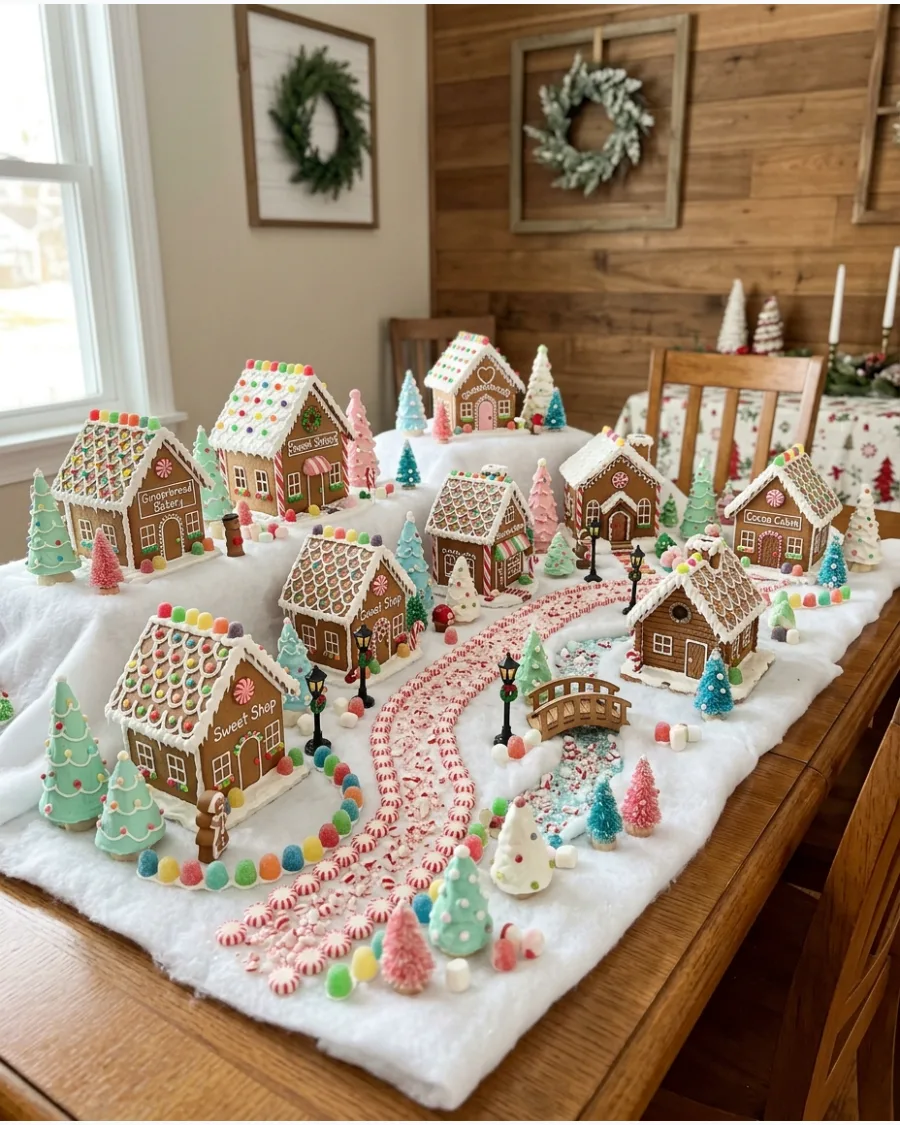
Gingerbread-style houses with faux icing details offer a lighthearted and sweet aesthetic. The pastel colors and candy accents create a whimsical look that stands out from typical ceramic villages.
Place gumdrop-shaped figurines and peppermint-patterned paths between the houses for a cohesive theme. This style looks most effective when paired with soft, fluffy snow that resembles powdered sugar.
- Invest in resin gingerbread houses rather than real cookies to ensure the display lasts for many years without attracting pests.
- Arrange the houses on a cake stand or tiered server to emphasize the food-inspired theme of the village.
- Mix in pastel-colored bottle brush trees in shades of mint and pink to complement the candy-colored icing details.
Most people skip this: Use white caulk in a piping bag to add extra 'icing' details or snow drifts to the base of the buildings.
27. White Ceramic Christmas Village
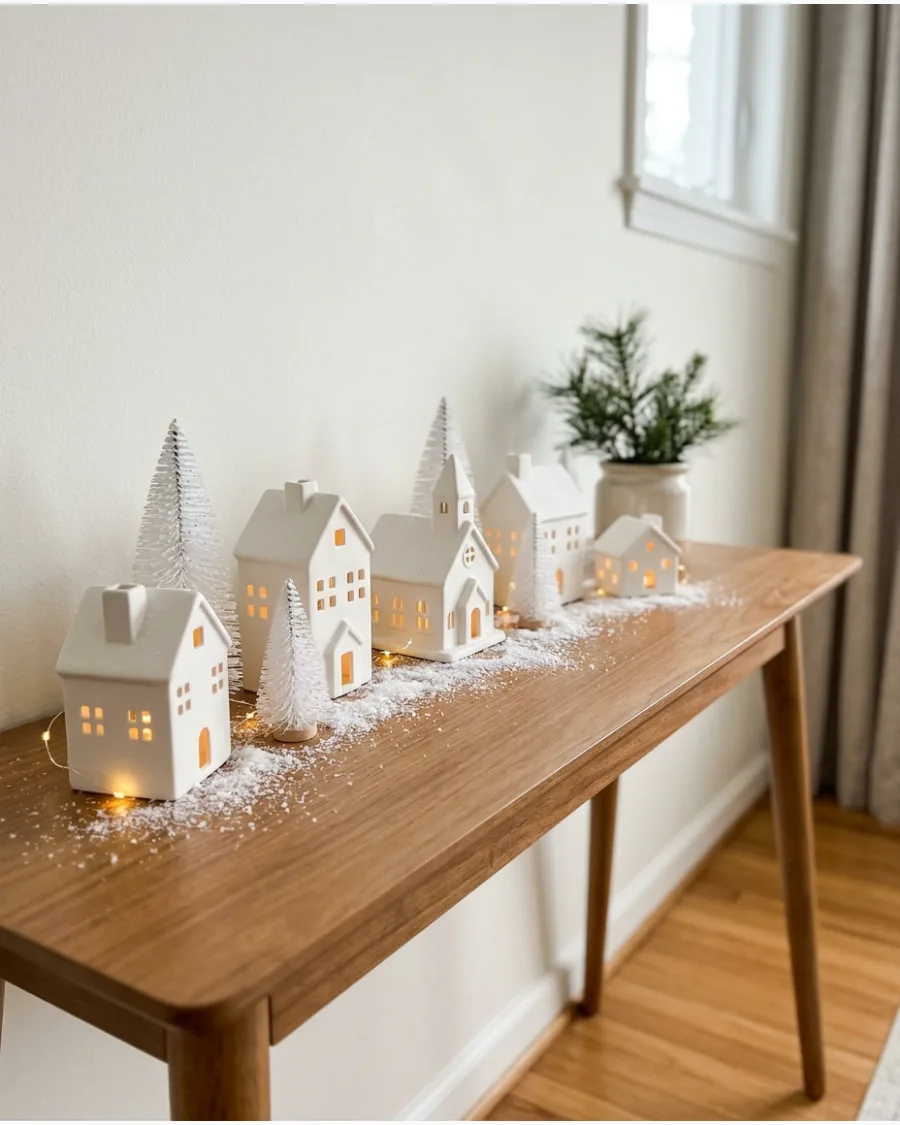
Simple white houses create a clean, modern aesthetic that fits perfectly in minimalist homes. This monochrome approach is sophisticated and focuses on the shapes of the buildings rather than busy details.
Use a single strand of warm white fairy lights to illuminate the entire row of houses from the inside. Keeping the accessories all-white is much more striking than introducing bright colors into this specific theme.
- Shop for white ceramic houses at craft stores or home decor outlets where they are often sold as individual budget-friendly pieces.
- Space the houses evenly along a narrow runner to create a clean, architectural line that doesn't feel cluttered.
- Add texture by using a white faux-fur runner as the base to contrast with the smooth ceramic surfaces of the houses.
Quick win: Place a few sprigs of fresh eucalyptus behind the houses for a pop of natural green that won't overwhelm the white palette.
28. Scandinavian Christmas Village Table
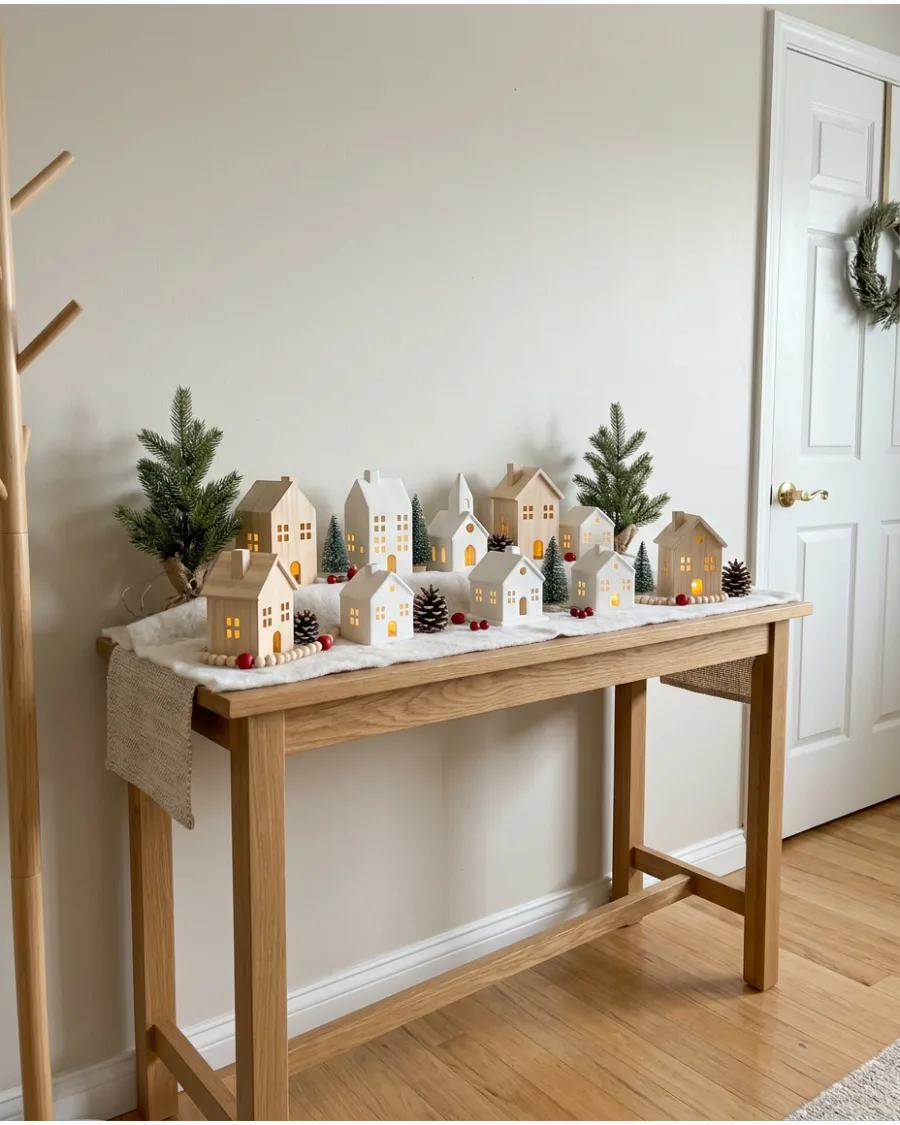
Natural wood, simple white ceramics, and restrained red accents define the Nordic village look. This theme relies on a mix of materials to feel warm despite its minimalist roots.
Mix pale wooden house silhouettes with a few solid white buildings for a textured, layered look. Red accents should be small and intentional, such as a single red bird or one wooden reindeer.
- Sourcing unfinished wood houses from craft stores allows for custom staining to match existing furniture in the room.
- Keep the lighting subtle by using small battery-operated tea lights instead of bright, plug-in bulbs.
- Incorporate natural evergreen sprigs in a simple glass vase next to the village to bring in a fresh outdoor element.
Best shortcut: Use a grey felt runner as the base to give the display a cozy, modern Scandinavian feel instantly.
29. Vintage Christmas Village Table
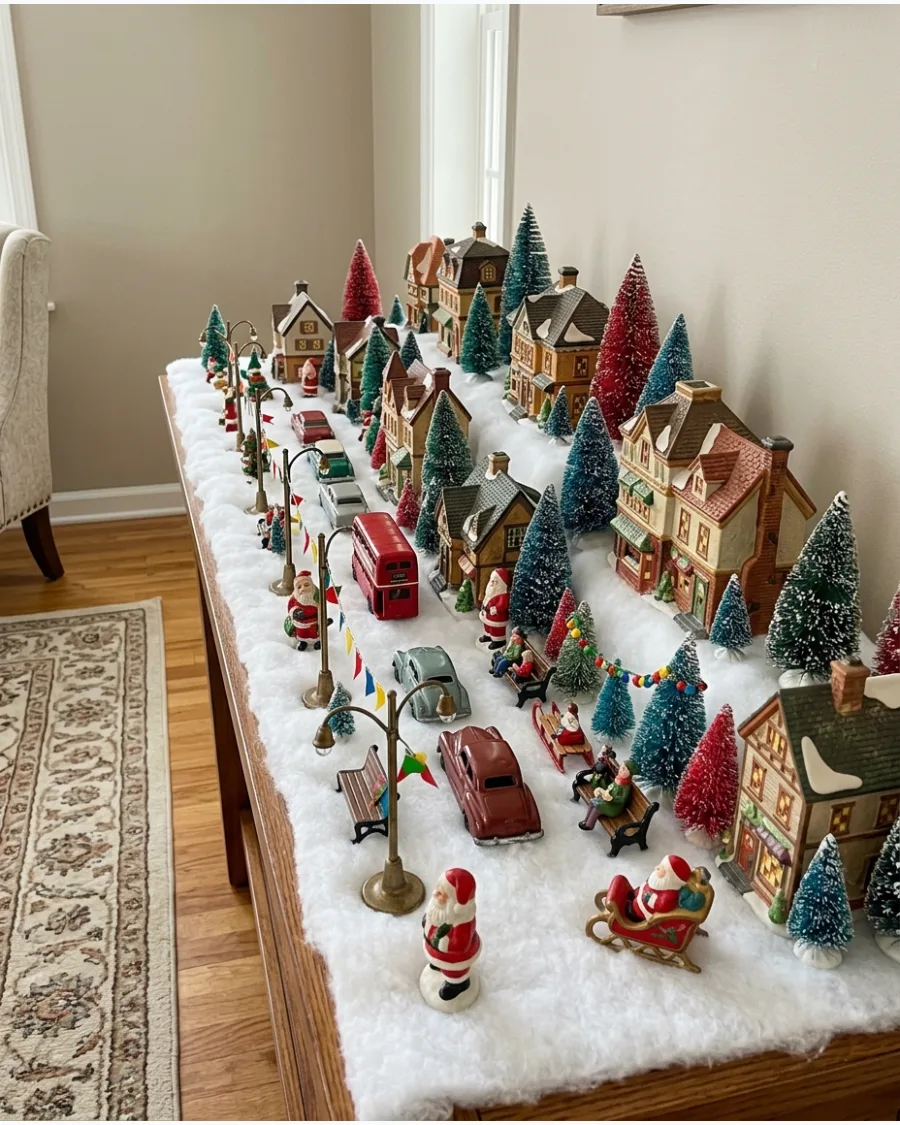
Mid-century cardboard 'putz' houses and bright bottle-brush trees create a charming retro vibe. This nostalgic approach is excellent for displaying collected pieces or family heirlooms with a lot of character.
Park tiny vintage-style cars on the snowy streets to add a sense of movement and era-specific detail. Saturated, colorful bottle-brush trees are the key to nailing this specific vintage look.
- Search for vintage 'putz' houses at antique malls or online auction sites to find authentic pieces from the 1950s.
- Use a generous amount of chunky 'mica' style glitter on the snow to replicate the sparkle found in mid-century displays.
- Adapt the vintage theme for a small shelf by using just two houses and a cluster of colorful trees in the corner.
Most people skip this: Check the wiring on old buildings carefully and replace any frayed cords with new LED clip-in lights for safety.
30. Woodland Christmas Village
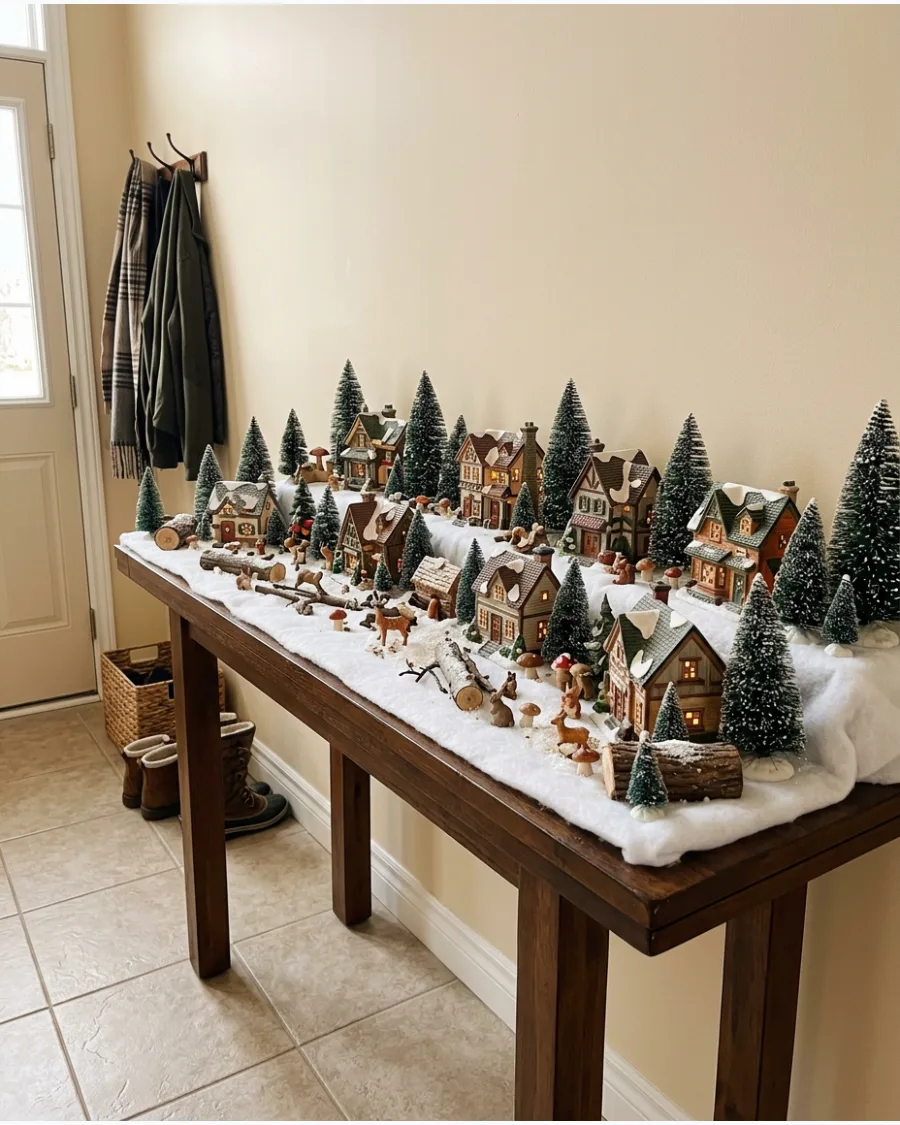
Small cottages surrounded by forest animals and greenery bring the outdoors onto the table. This theme focuses on wildlife and natural textures rather than a busy town square.
Nestle the buildings into a bed of dried moss or deep green fabric to simulate a lush forest floor. Adding miniature mushrooms and fallen logs creates a layer of realism that standard snow-only displays lack.
- Buy bags of preserved moss from a garden center to create a realistic and mess-free forest floor for the village.
- Space the animals in small groups—like a pair of deer near a tree—to tell a silent story within the landscape.
- Use stone-textured spray paint on plain plastic houses to give them an earthy, cottage-like appearance for very little cost.
Quick win: Use a piece of rough tree bark as a natural bridge over a small 'stream' made of blue pebbles or glass beads.
SMALL AND SIMPLE CHRISTMAS VILLAGE TABLE IDEAS
31. Mini Village on a Small Side Table
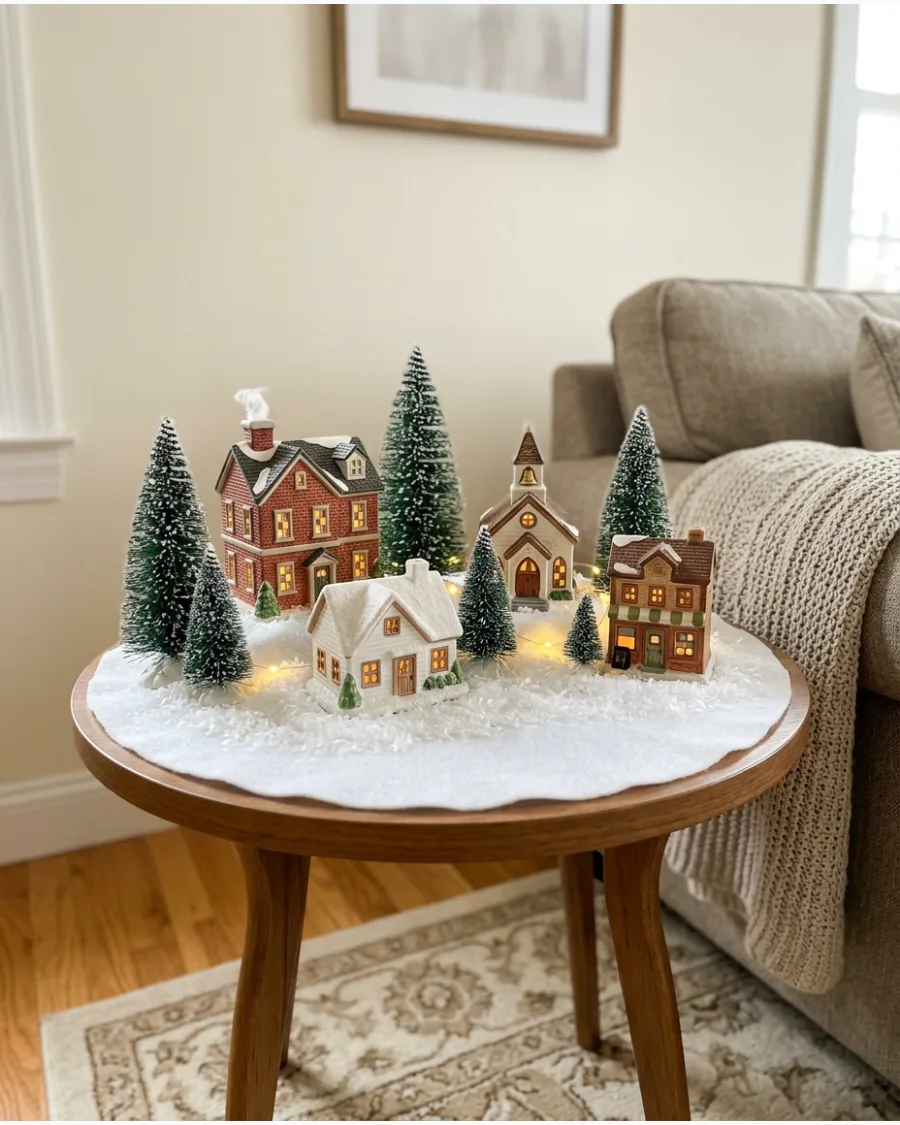
A compact side table is the perfect spot for a curated set of three to five miniature houses. This setup keeps the holiday spirit contained to a small footprint without overwhelming a room.
Tuck the power strip behind a table leg to keep the focus on the tiny town instead of messy cords. Using a few bottle brush trees adds a sense of scale to the small surface. This works best in a living room corner where the glow can provide ambient light in the evening.
- Setup takes about 20 minutes and costs very little if using existing pieces.
- Position the table in a corner to protect the delicate houses from being bumped.
- Use a small white fabric scrap as a base to hide the tabletop and mimic snow.
Quick win: Use a battery-powered puck light inside houses that don't have built-in wiring.
32. Christmas Village on a Console Table
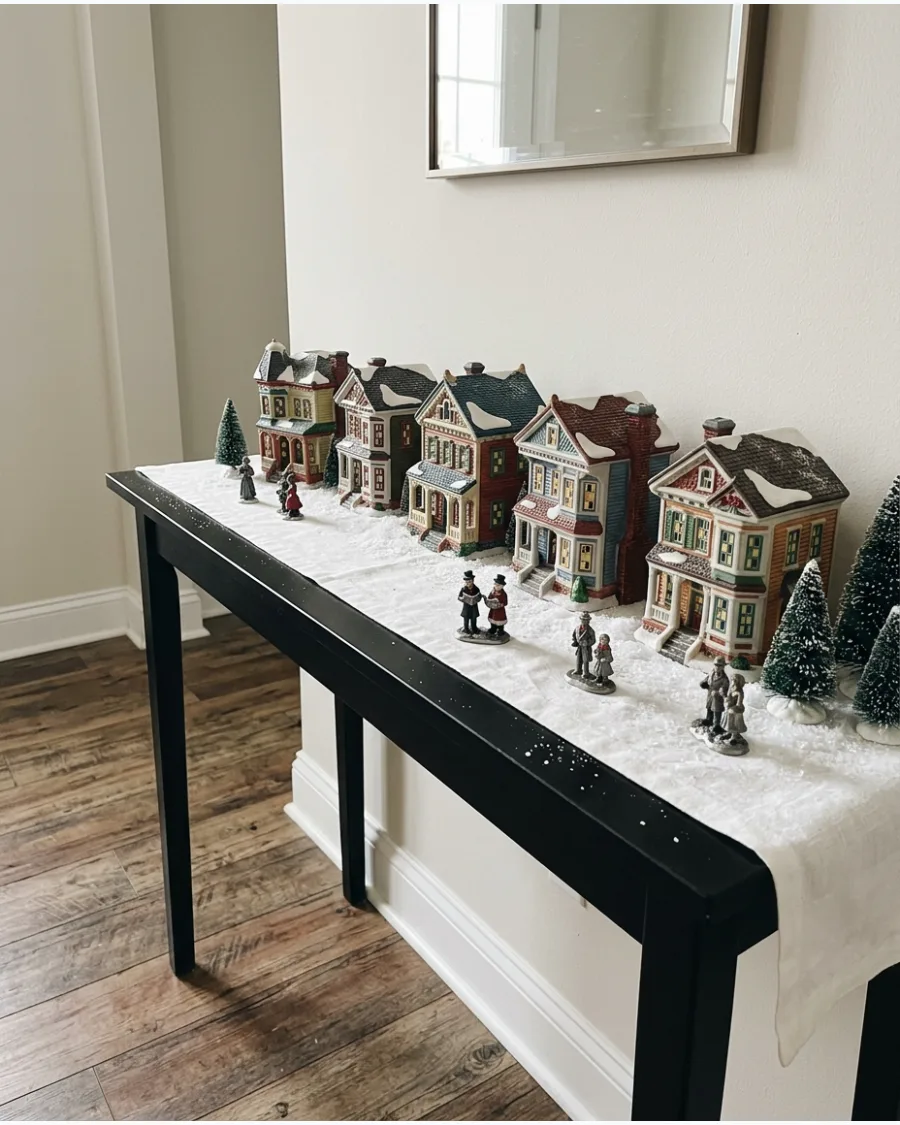
Entryway console tables offer a long, narrow stage that is ideal for a linear town layout. This arrangement allows guests to see every detail as they walk down a hallway or enter the home.
Place the tallest buildings against the wall and the smaller figures toward the edge for better depth. Keeping the display narrow ensures the table remains functional for keys or mail. A simple white runner provides a clean foundation for the buildings.
- Budget-friendly using a simple white fabric runner and standard village pieces.
- Arrange buildings in a single or double row to maintain a slim profile on the table.
- Secure the runner with museum wax to prevent it from sliding off the narrow surface.
Most people skip this: Use a thin power strip mounted to the back of the table to hide all the plugs.
33. Christmas Village on a Buffet Table
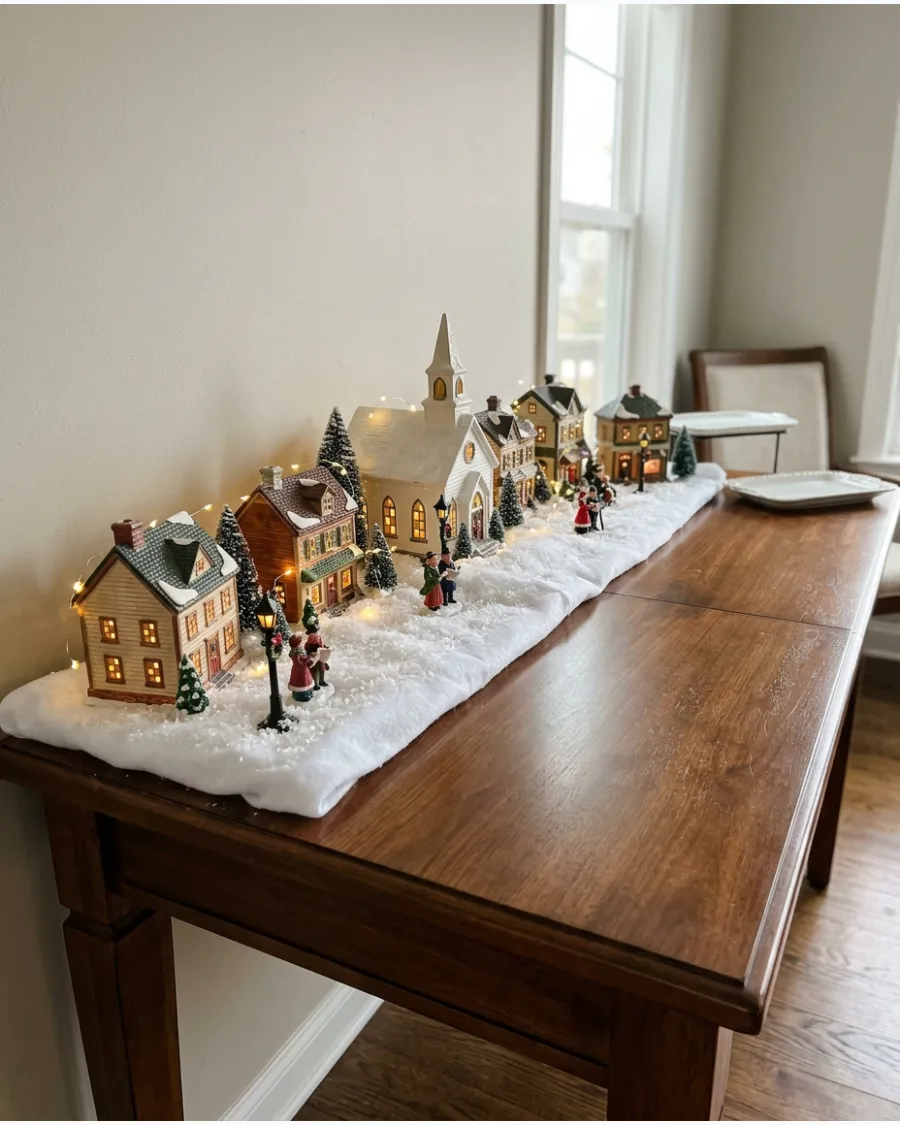
A dining room buffet provides ample space for a sprawling village with a central church and surrounding shops. This display adds a festive backdrop for holiday meals and family gatherings.
Leave at least one-third of the buffet surface open so the village doesn't interfere with serving food. Integrating warm white lights inside the buildings creates a cozy atmosphere during dinner. Small pine trees tucked between houses add a natural forest element.
- Ideal for a weekend setup before hosting a holiday dinner party.
- Center the tallest building and work outward to create a balanced, symmetrical look.
- Use a heavy snow blanket material to protect the wood finish of the buffet.
Best shortcut: Use a remote-controlled outlet so you can turn the whole village on with one click.
34. Mini Village on a Round Table
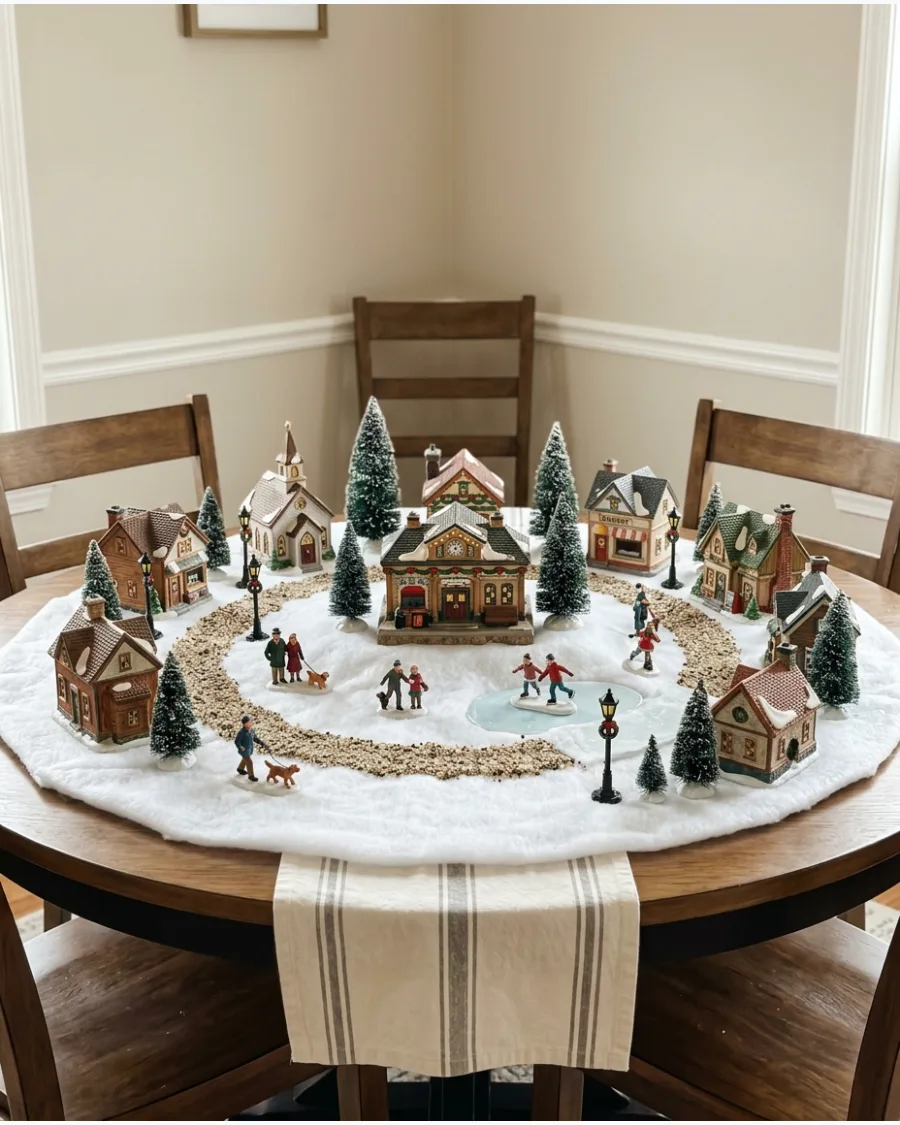
Creating a village on a round table allows for a 360-degree view that works well in the center of a room or a foyer. This layout encourages people to walk around the table to discover different miniature scenes.
Position the largest building in the very center to act as a focal point for the entire circular scene. Surround the center house with smaller shops, trees, and winding paths made of pebbles or glitter. This arrangement feels more like a complete town square than a flat display.
- Sourcing a round snow blanket or cutting a square one into a circle is essential.
- Distribute weight evenly around the table to keep the display stable.
- Add a few miniature people facing different directions to make the scene look lived-in from every angle.
Quick win: Use a lazy Susan under the center snow to easily rotate the buildings while decorating.
35. Five-House Christmas Village
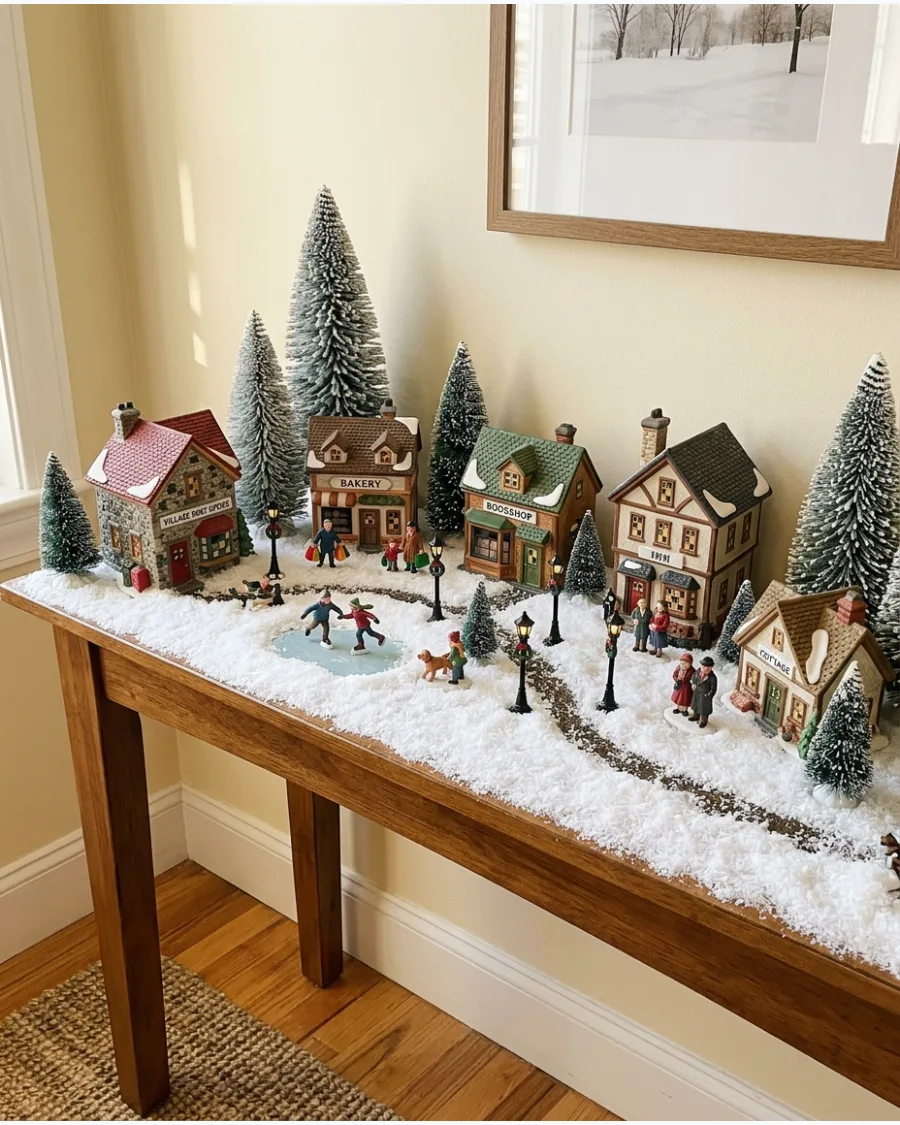
Limiting the display to exactly five coordinated houses creates a clean and intentional look that avoids clutter. Highlighting a small number of buildings allows you to focus more on the accessories like streetlights and miniature people.
Use small cardboard boxes hidden under the snow blanket to create different elevations for each of the five houses. This variety in height makes a small collection feel much larger and more professional. Coordinated colors, like all-white or all-red, provide a sophisticated finish.
- Low budget since it only requires five main buildings and basic accessories.
- Group the houses in a 2-3 split or a slight arc to create visual interest.
- Match the building style to your home decor for a seamless seasonal transition.
Most people skip this: Use a small amount of adhesive putty under the figurines to keep them from falling over.
36. Minimal Three-House Christmas Village
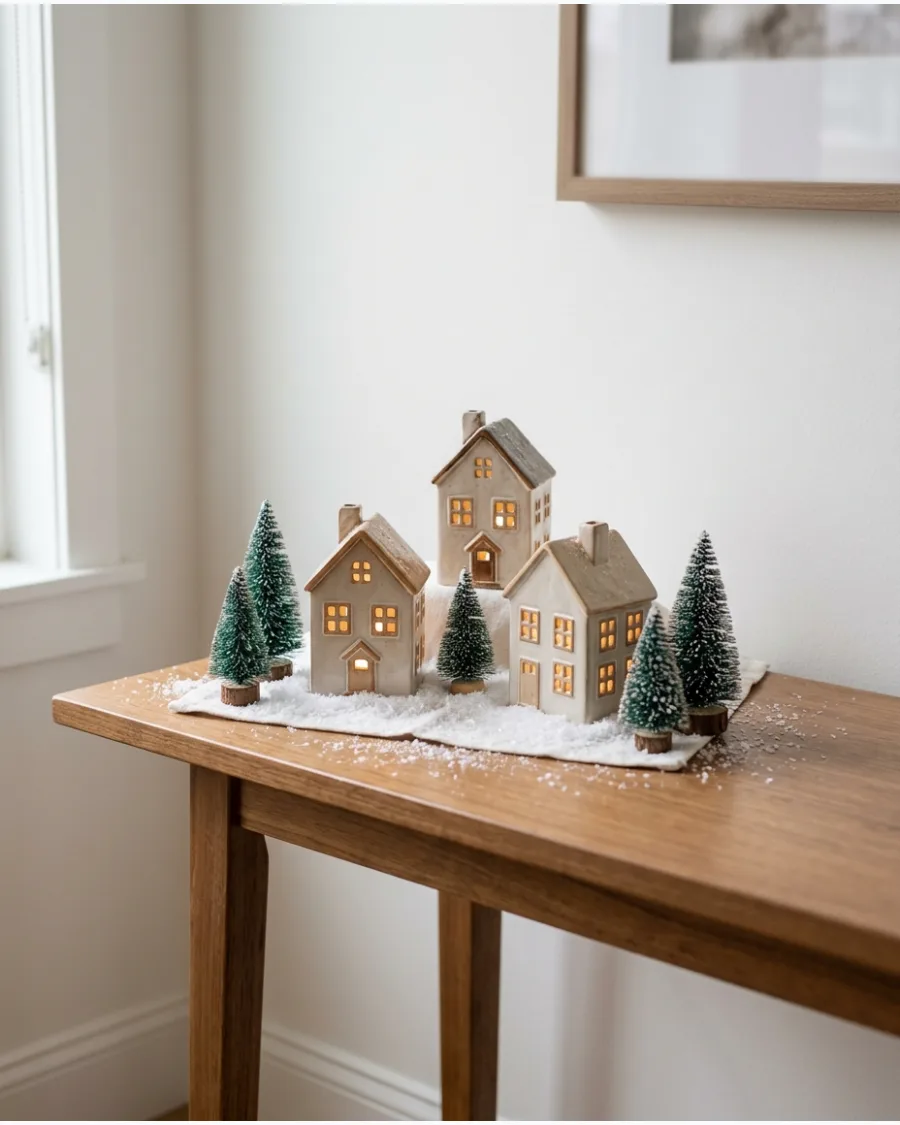
A three-house cluster is the ultimate solution for small apartments or minimalist decor styles. By grouping just three buildings, you create a powerful focal point without needing much space.
Group the three buildings in an odd-numbered cluster to create a more natural and balanced visual weight. Surround them with a generous dusting of loose faux snow to ground the scene. A few bottle brush trees in varying heights complete the look without adding bulk.
- Fastest setup time for a holiday display, taking less than ten minutes.
- Place this cluster on a tray or a large plate to make it easy to move for cleaning.
- Choose buildings with different roofline shapes to add variety to the small group.
Best shortcut: Use battery-operated tea lights inside the houses to avoid any visible wires.
37. Village on a Tiered Tabletop Tray
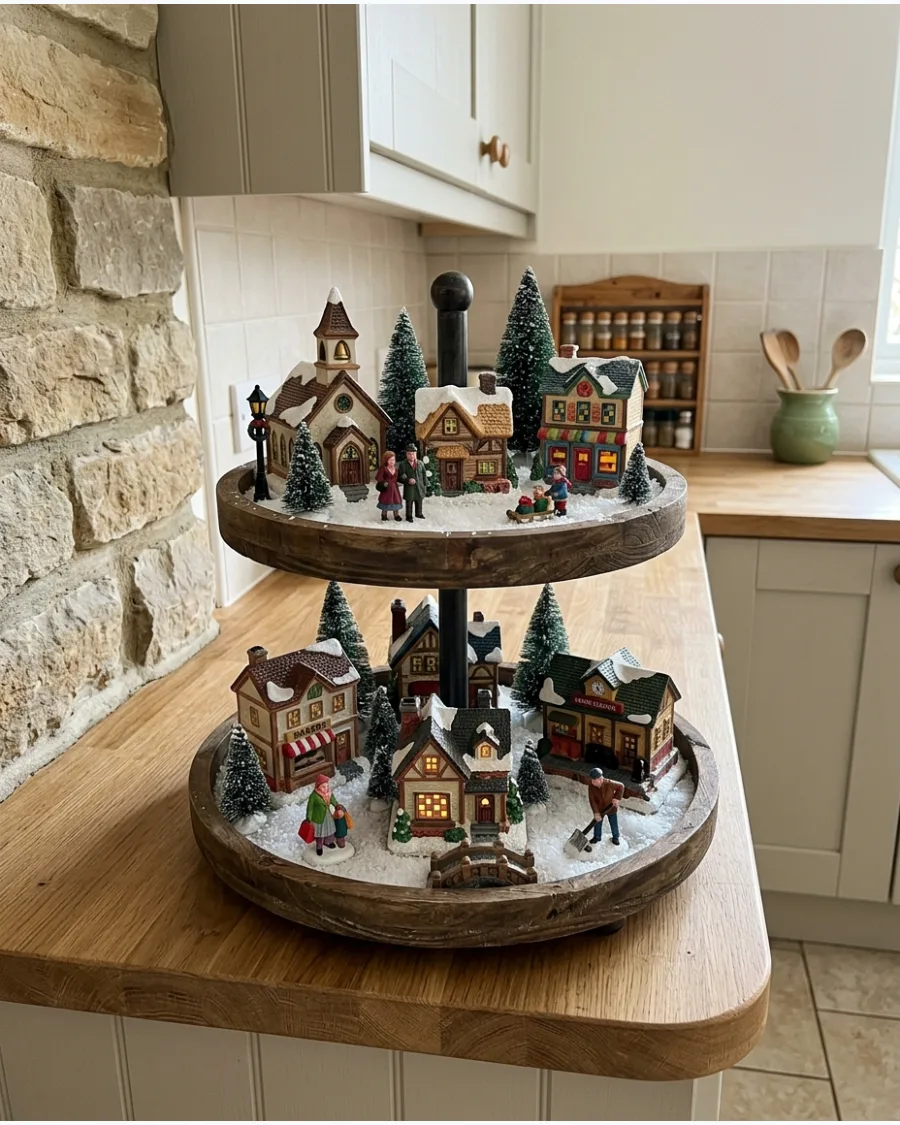
A tiered tray turns a flat village into a vertical landscape, making it perfect for kitchen islands or small consoles. This method uses vertical space to show off several tiny buildings and figures.
Add a dusting of loose faux snow to every level of the tray to tie the vertical layers together. Place larger houses on the bottom tier and the smallest accessories or a single tiny chapel on the top. This keeps the display feeling stable and visually grounded.
- Great for small spaces or renters who don't have large tables for decorating.
- Use mini-scale buildings specifically designed for ornaments or tiered trays.
- Add a small battery-powered light string woven through the tiers for a nighttime glow.
Quick win: Use real evergreen sprigs on the tiers to add a fresh scent to the display.
38. Christmas Village Under a Glass Cloche
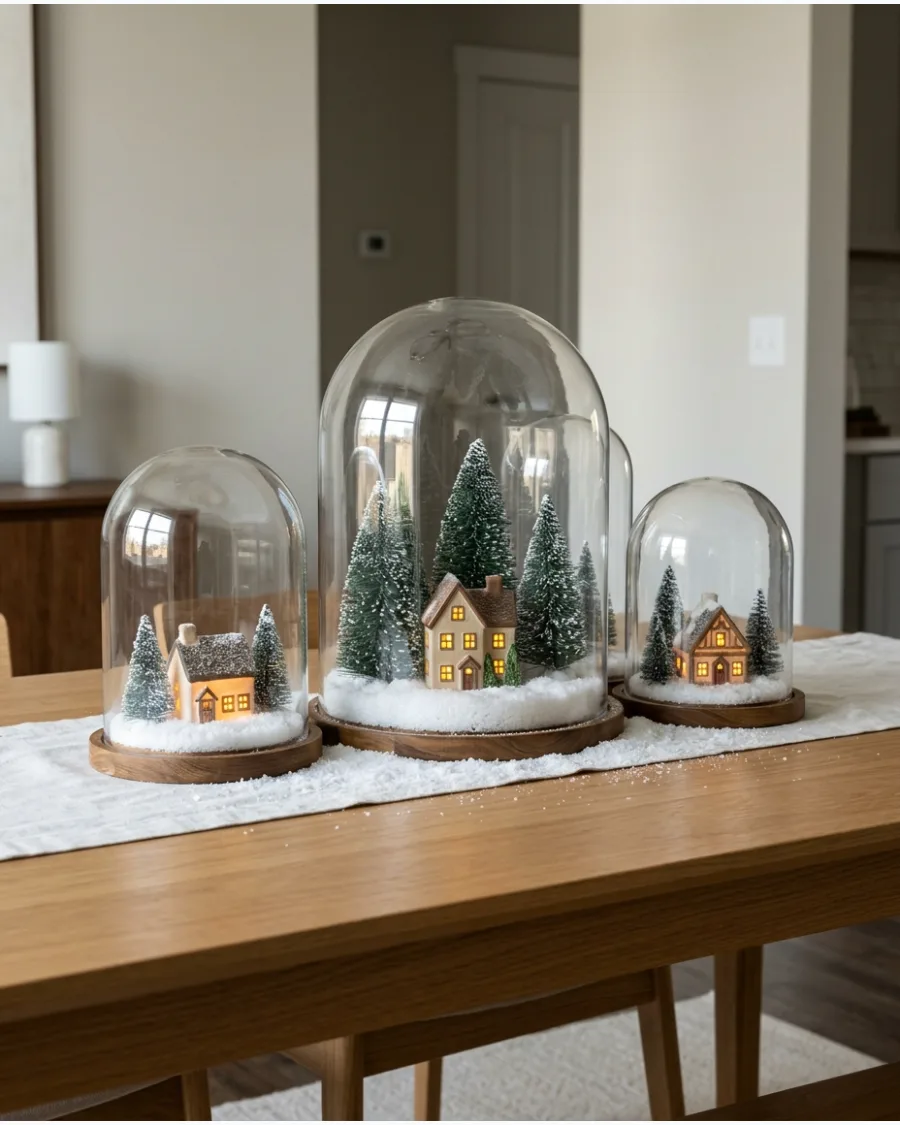
Placing a miniature house inside a glass cloche turns a simple decoration into a museum-quality display. Using multiple cloches of different sizes creates a sophisticated 'neighborhood' across a table.
Choose battery-operated LED houses for cloches to avoid drilling holes for power cords in the display surface. The glass reflects the interior lights, doubling the glow of the village. This setup also protects delicate pieces from dust and curious pets.
- Moderate budget depending on the number and size of glass cloches used.
- Place the largest cloche in the middle and smaller ones on the sides for a classic mantle look.
- Wipe the inside of the glass with an anti-static cloth to keep faux snow from sticking to the sides.
Most people skip this: Place a small mirror under the snow inside the cloche to mimic a frozen pond.
CREATIVE SNOW AND LANDSCAPE IDEAS
39. Deep Snowdrift Christmas Village
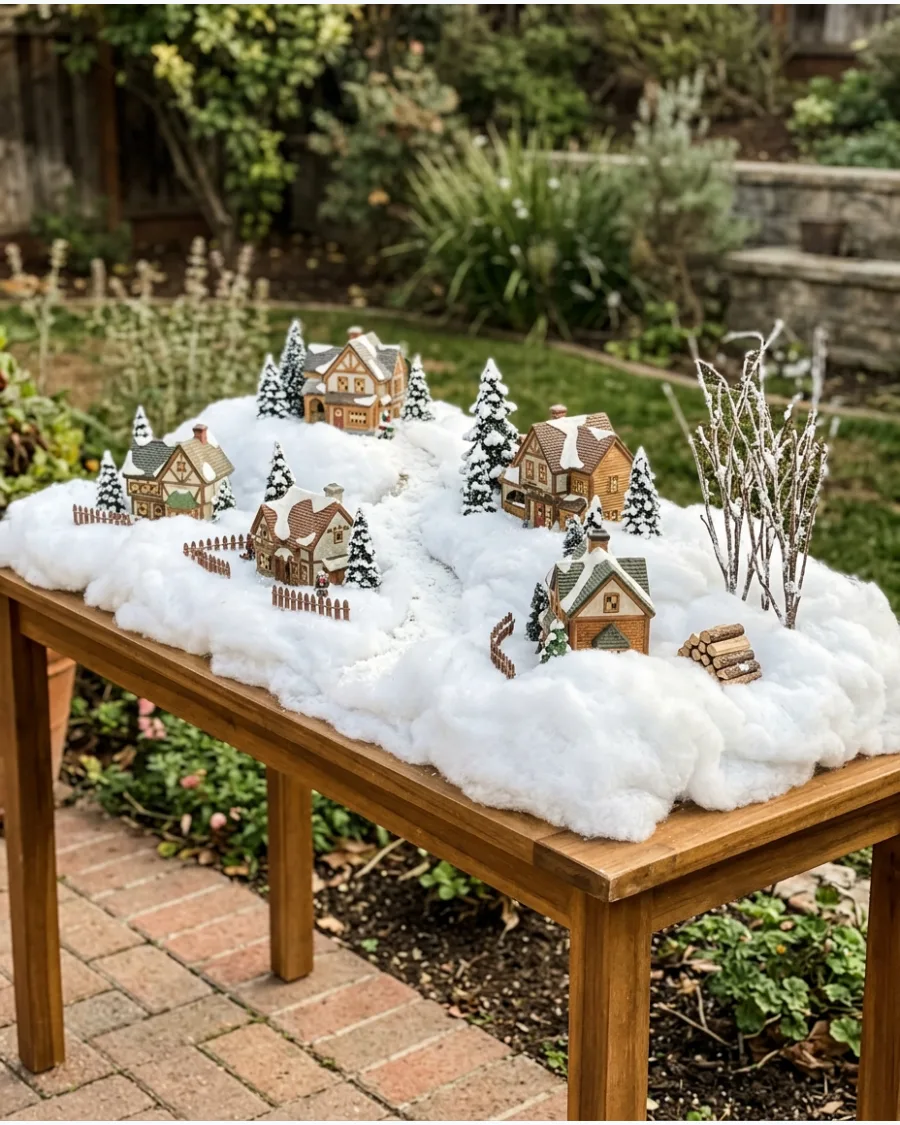
Creating deep snowdrifts makes a village feel like it is part of a real winter landscape rather than just sitting on a table. This look is achieved by layering thick batting and loose artificial snow.
Mound extra batting or loose snow against the sides of the buildings to make them look nestled into the landscape. Burying the bases of fences and trees adds to the realism of a heavy snowfall. It creates a soft, pillowy texture that makes the whole display feel more cozy.
- Low cost using inexpensive polyester batting and loose faux snow flakes.
- Use a spray adhesive on tree branches before sprinkling snow for a 'freshly fallen' look.
- Avoid placing lights directly against flammable batting; use cool-to-the-touch LEDs.
Best shortcut: Use a hairdryer on the cool setting to gently blow loose snow into natural-looking drifts.
40. Snowy Mountain Backdrop Village
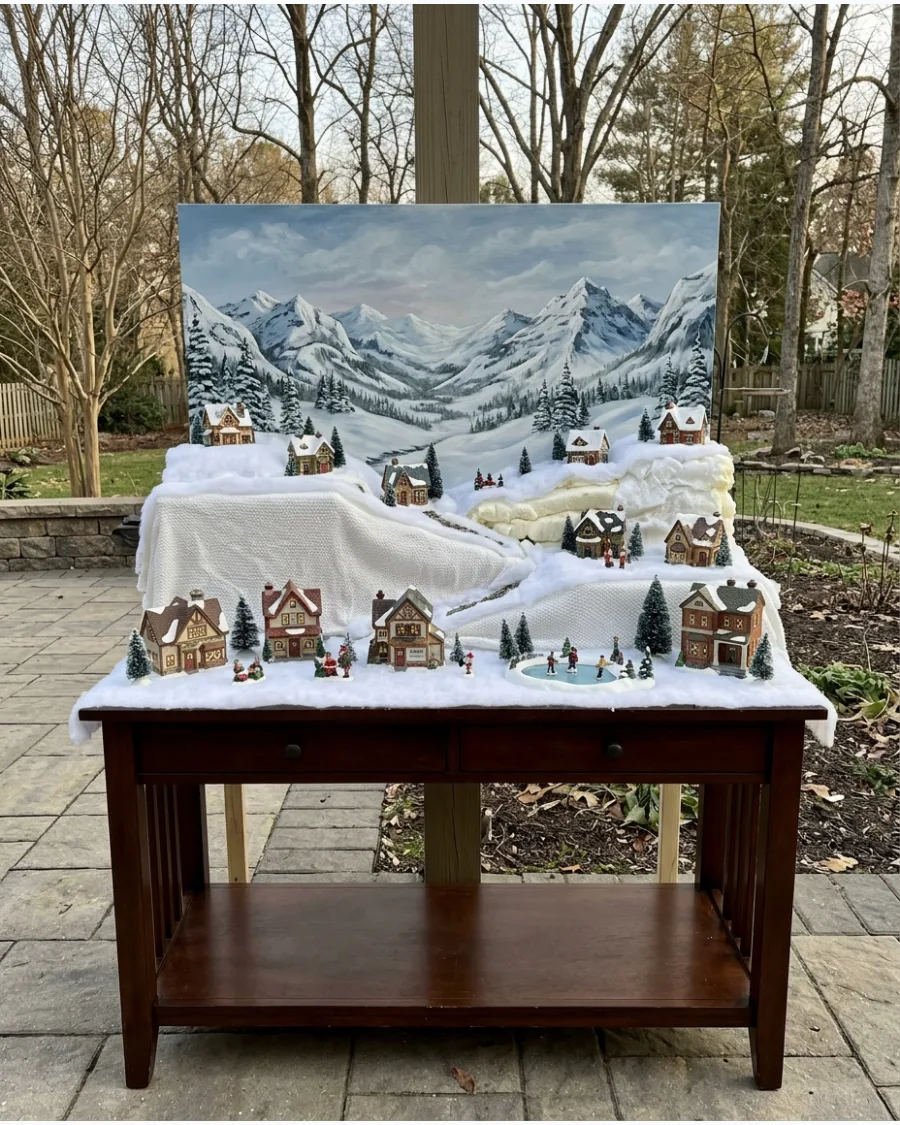
A mountain backdrop adds immediate depth and scale to a tabletop village, making it look like a vast landscape. You can create this by propping up a painted board or using tiered foam layers.
Prop a white foam board mountain cutout against the wall to give the table display a sense of endless scale. Building up the terrain in the back with foam blocks hidden under snow creates a high-altitude look for the furthest houses. This technique draws the eye upward and makes the display a true room feature.
- Requires some DIY time to cut and paint the foam board mountains.
- Secure the backdrop to the wall or the back of the table with heavy-duty tape.
- Use blue or purple tinted lights in the 'mountain' area to simulate a cold winter dusk.
Quick win: Paint the tips of your foam mountains with silver glitter paint to catch the light.
41. Frozen River Christmas Village
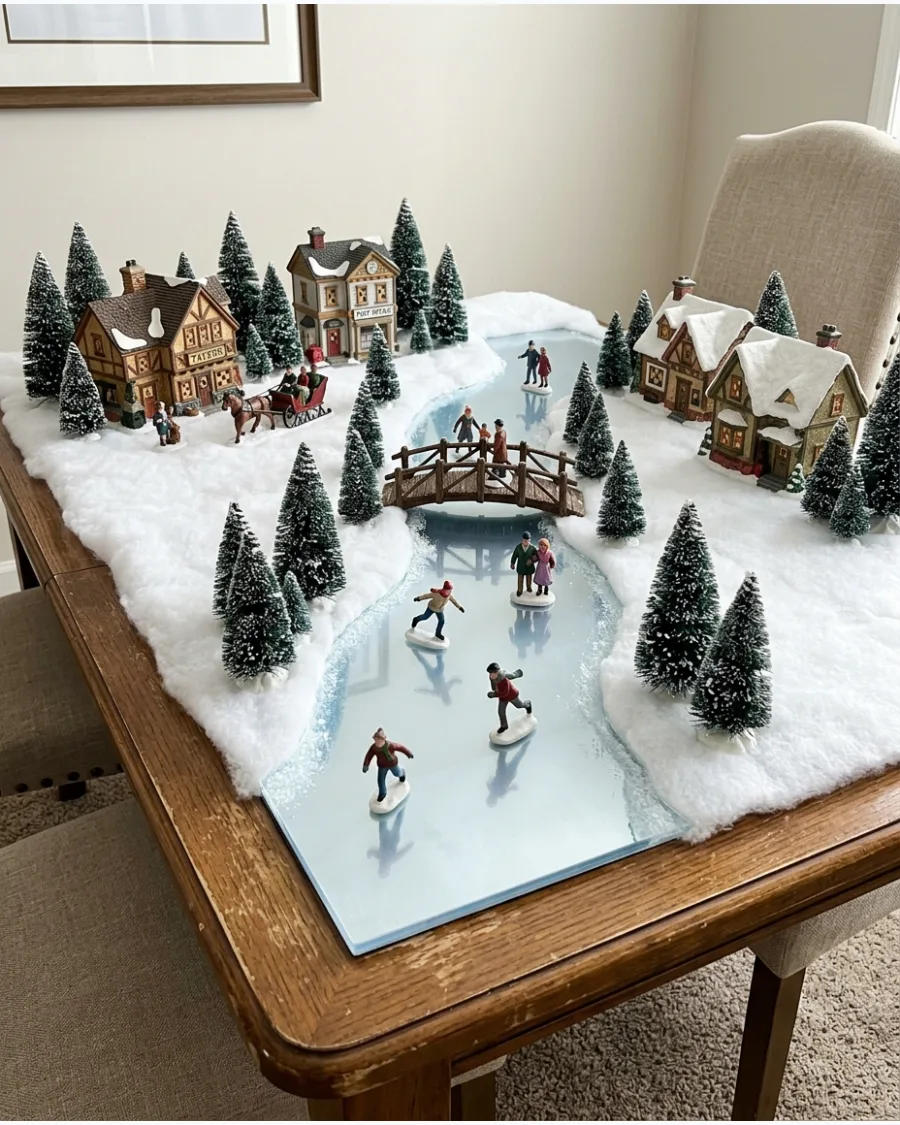
A reflective river winding across the table adds a sense of movement to a static display. Use a strip of blue acrylic or a narrow mirror to mimic a frozen waterway and place miniature stone bridges over the ice to connect different parts of the town.
Anchor the edges of the river with loose faux snow to hide the sharp borders of the reflective material. This technique creates a professional landscape feel on a standard flat surface.
- Source acrylic strips from craft stores or use reflective mirror tape for a budget-friendly alternative.
- Lay the river path first before adding heavy buildings to ensure the water flow looks natural.
- Swap the blue acrylic for silver tinsel ribbon if you prefer a more whimsical or sparkly ice effect.
Best shortcut: Use a roll of shiny blue gift wrap under a layer of sheer white organza for a soft, shimmering ice look.
42. Ice-Skating Pond Village
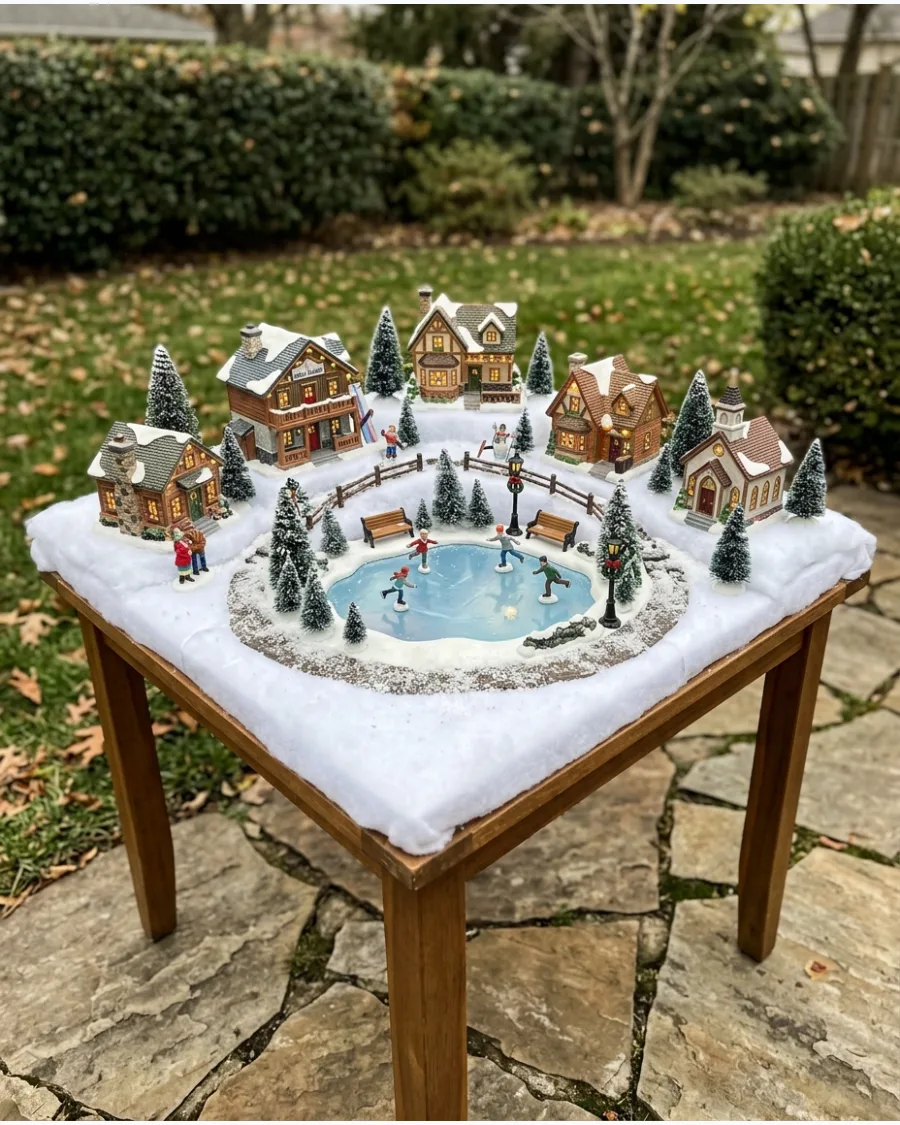
A central pond creates a natural gathering spot for miniature figures and draws the eye to the middle of the table. Surround the pond with small park benches and streetlights to make the scene feel populated and busy.
Position skating figurines at various angles on the reflective surface to suggest they are actually moving. This works best when the pond is placed at the lowest point in your landscape layout.
- Find small round mirrors at craft stores or repurpose an old vanity mirror for the pond base.
- Use clear museum gel to keep the skaters upright on the slippery surface without leaving a residue.
- Scale the pond size to your largest building so the proportions look realistic within the town square.
Quick win: Dust a tiny bit of baking soda over the very edges of the mirror to look like frost creeping onto the ice.
43. Village With a Stone Bridge and River
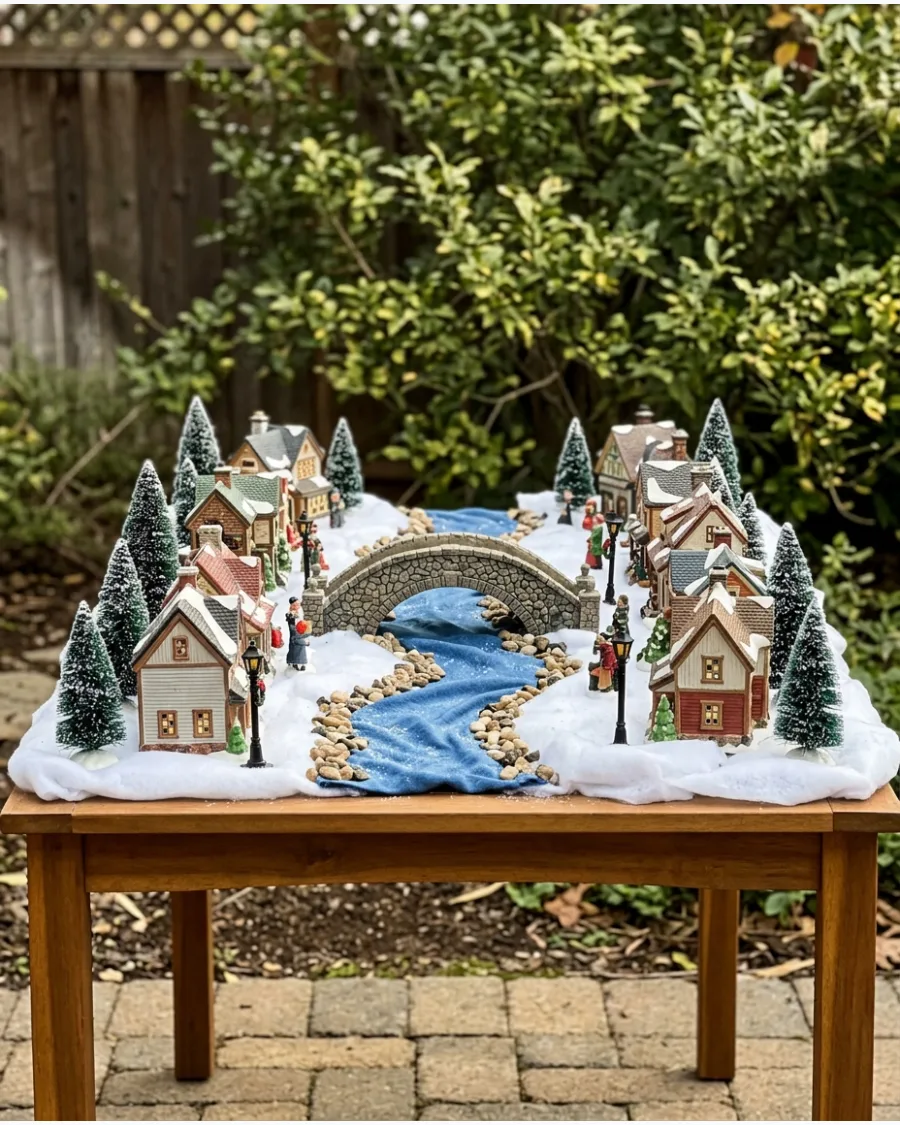
Adding a bridge provides a vertical element that breaks up a flat tabletop and adds architectural interest. Use a textured riverbed made of blue fabric or small pebbles to contrast with the smooth snow elsewhere.
Line the riverbanks with tiny evergreen trees to frame the bridge and create a focal point. This setup makes the village feel like a real town designed around a natural landscape.
- Look for resin aquarium bridges for a sturdy and realistic stone look that matches the scale of most houses.
- Place the bridge at a slight angle rather than perfectly straight to create a more natural and organic appearance.
- Use blue felt for the water if you want a matte look that doesn't reflect overhead ceiling lights.
Most people skip this: Add a few tiny real pebbles at the base of the bridge to hide the seam where it meets the table.
44. Christmas Village With Winding Mountain Road
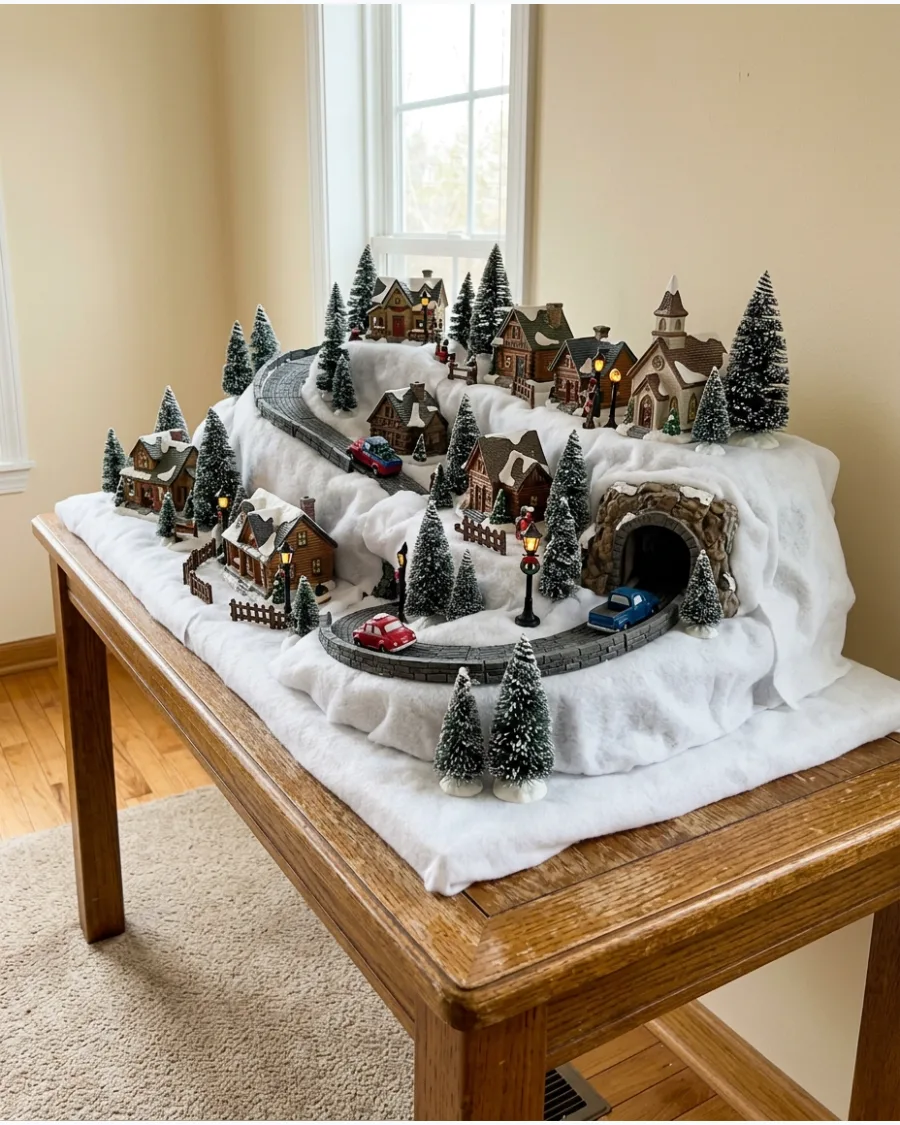
Elevation is key for making a tabletop display look professional and three-dimensional. Use stacked books or foam blocks under a white cloth to create a sloped mountain for a road to climb.
Curve the road around the hills to create depth and lead the viewer's eye through the entire display. Small cars or a miniature bus add a sense of life to the mountain pass as they travel between levels.
- Use grey felt or fine sandpaper to create a realistic road texture that stays in place on slopes.
- Secure the road material with pins or double-sided tape so it doesn't slide down the hidden hills.
- Create a tunnel entrance using a large piece of tree bark or a hollowed-out foam block for added realism.
Quick win: Use black masking tape for a quick road that sticks directly to your snow base and stays put.
ELEGANT AND TREND-FOCUSED CHRISTMAS VILLAGE TABLES
45. Burgundy and Gold Christmas Village
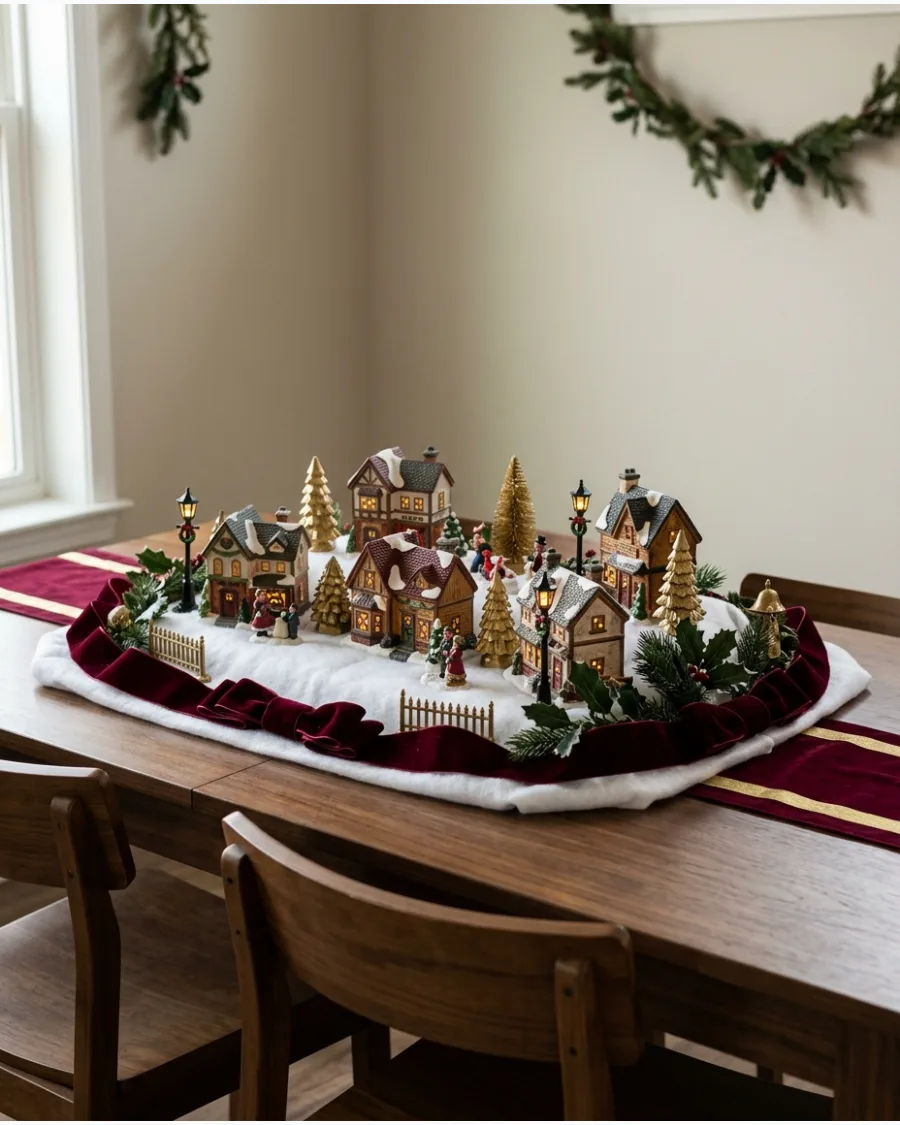
Move away from bright colors by using a palette of deep wine reds and metallic golds for a sophisticated look. Wrap the base of the village in burgundy velvet ribbon or use gold-painted bottle brush trees to elevate the scene.
Incorporate gold-toned streetlights and warm yellow LED bulbs inside the houses to maintain a cohesive glow. This style works perfectly in a formal dining room with traditional decor.
- Buy plain green bottle brush trees and spray paint them with metallic gold for a custom, high-end look.
- Use burgundy cloth napkins as hills or mounds under the snow to add rich texture to the landscape.
- Mix in some dried eucalyptus or dark greenery for an earthy and upscale touch to the village perimeter.
Best shortcut: Use gold leaf pens to highlight the window frames or doors of standard village houses for instant elegance.
46. Candlelit Christmas Village Table
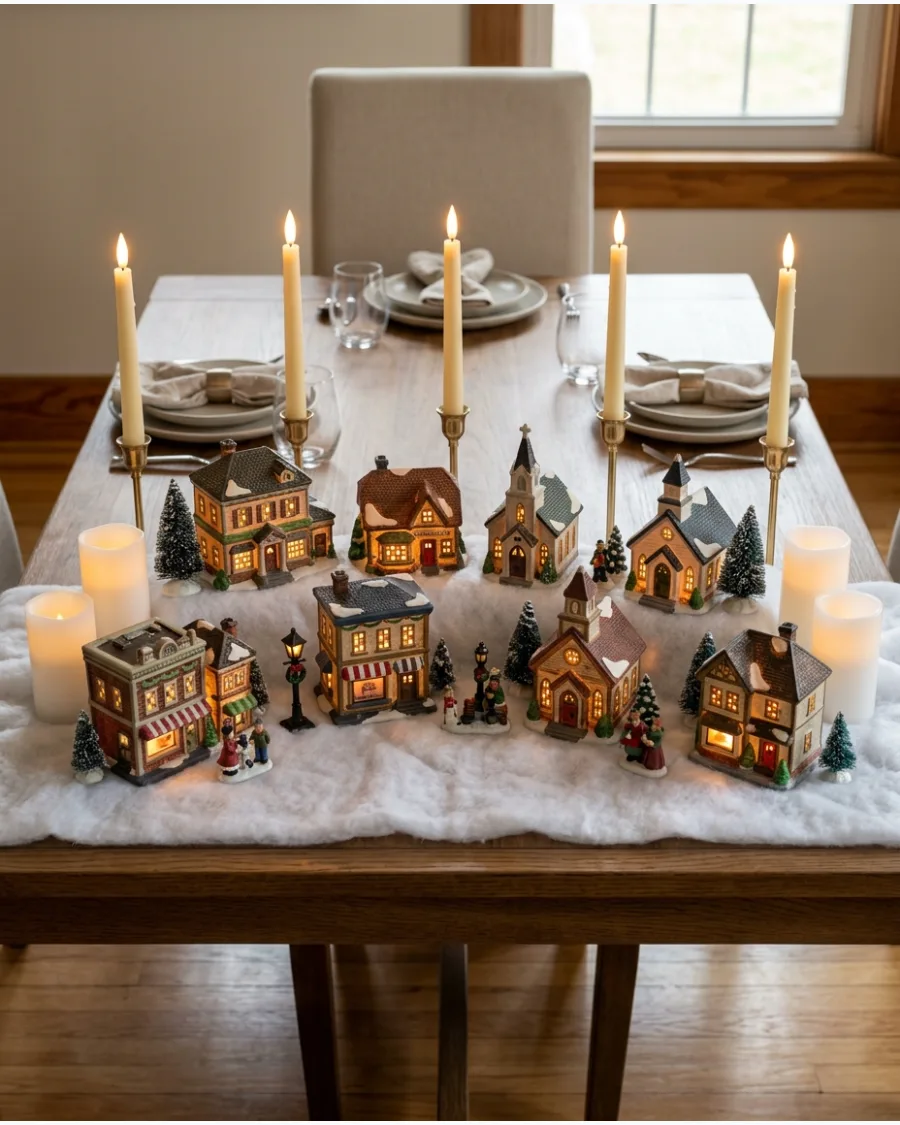
Lighting is the most important part of any village, but adding external candles takes the atmosphere to a new level.
Place flameless pillar candles behind the houses to create a beautiful backlit silhouette effect. Scatter flicker-flame tea lights among the trees to mimic the look of small campfires or street lanterns. Always stick to battery-operated candles to avoid heat damage to the miniature buildings or snow.
- Use candles with built-in timers so the village glows automatically at the same time every evening.
- Group candles in odd numbers like three or five for a more balanced and visually appealing arrangement.
- Choose candles with a warm white or yellow flame to match the light coming from the house windows.
Most people skip this: Place a small mirror behind the candles to double the light and make the village look twice as deep.
47. Monochromatic Winter White Village
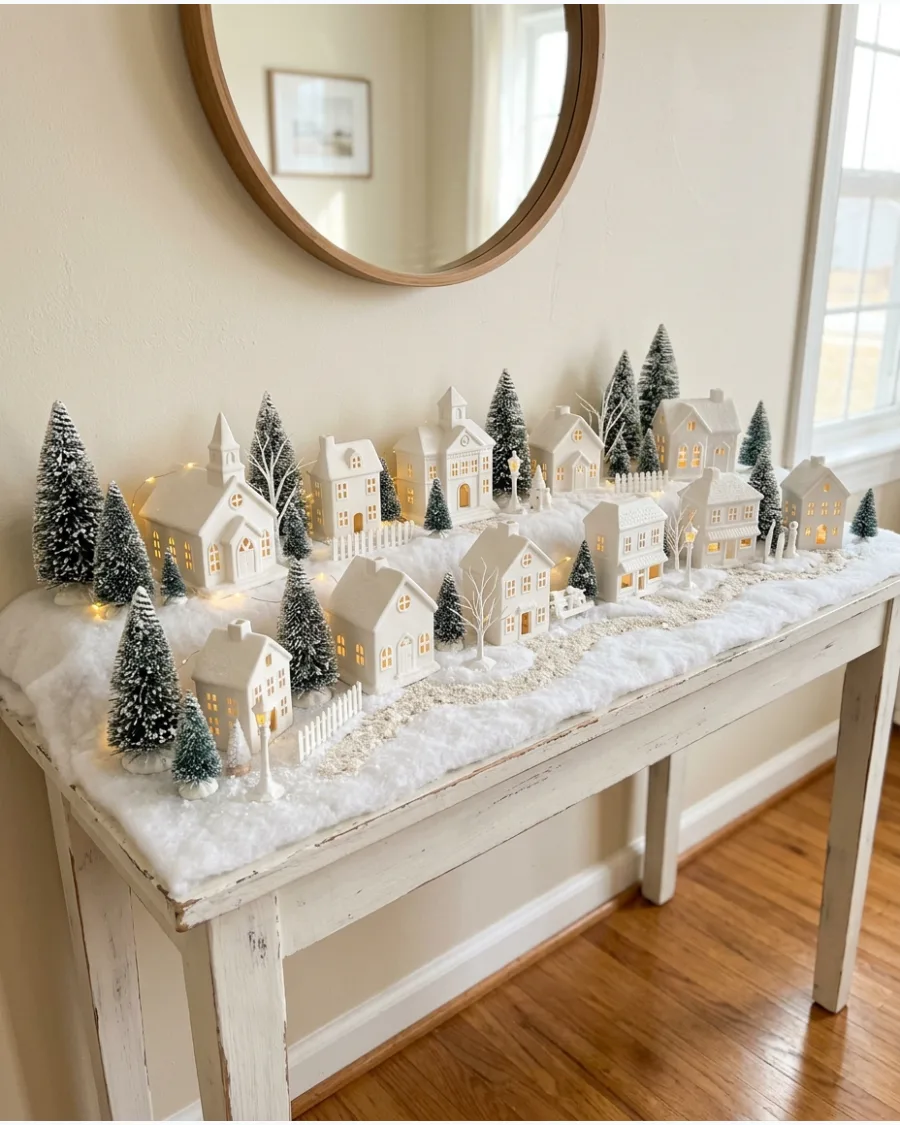
A single-color theme creates a calm and sophisticated look that doesn't feel cluttered on a table. Use only white ceramic houses, white glittery trees, and a thick white faux-fur or cotton base for the terrain.
Vary the textures of the white materials to keep the display from looking flat or boring. This minimalist approach lets the architectural details of the houses stand out as the main focus.
- Look for unfinished ceramic houses that you can paint a matte white for a uniform and designer appearance.
- Use white iridescent glitter sparingly to mimic the sparkle of fresh snow without adding color.
- Mix in clear glass trees or crystal accessories to add a frozen element that maintains the white theme.
Best shortcut: Use white spray primer on mismatched houses to instantly turn them into a cohesive, modern set.
48. Collected Heirloom Christmas Village
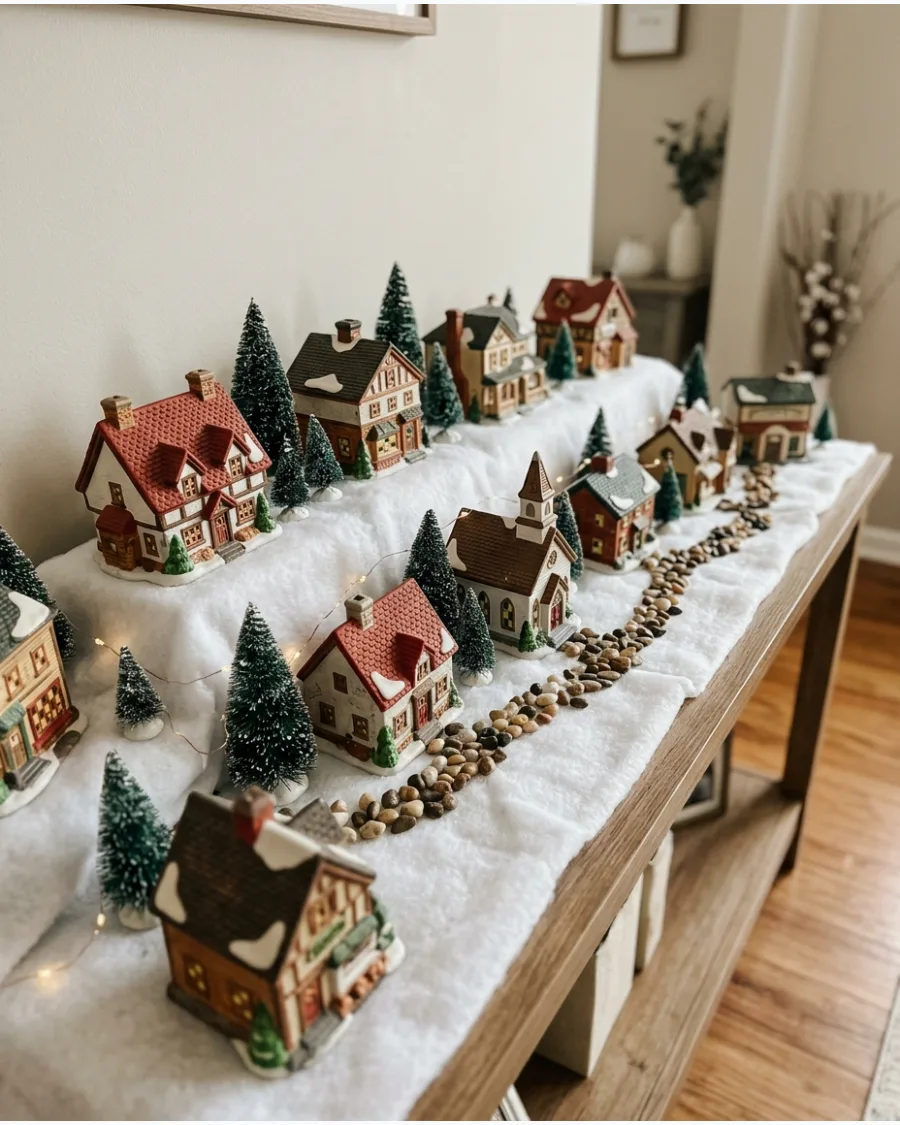
Mixing different styles and eras of village pieces gives the display a cozy, lived-in feel with a personal story. Tie the mismatched pieces together by using a consistent style of tree and the same color of snow throughout the table.
Group buildings by scale rather than brand to ensure the taller pieces don't overshadow the smaller ones. This is a great way to showcase pieces passed down through generations.
- Use uniform warm-white lighting in every house to bridge the gap between different brands and eras.
- Place older or more fragile pieces toward the back of the table where they are less likely to be bumped.
- Add a few modern figures like a mail truck or updated cars to blend the different time periods together.
Quick win: Use a single long power strip hidden behind the table to unify the cords from different types of lit houses.
STORYTELLING CHRISTMAS VILLAGE TABLE DISPLAYS
49. Christmas Eve Village Scene
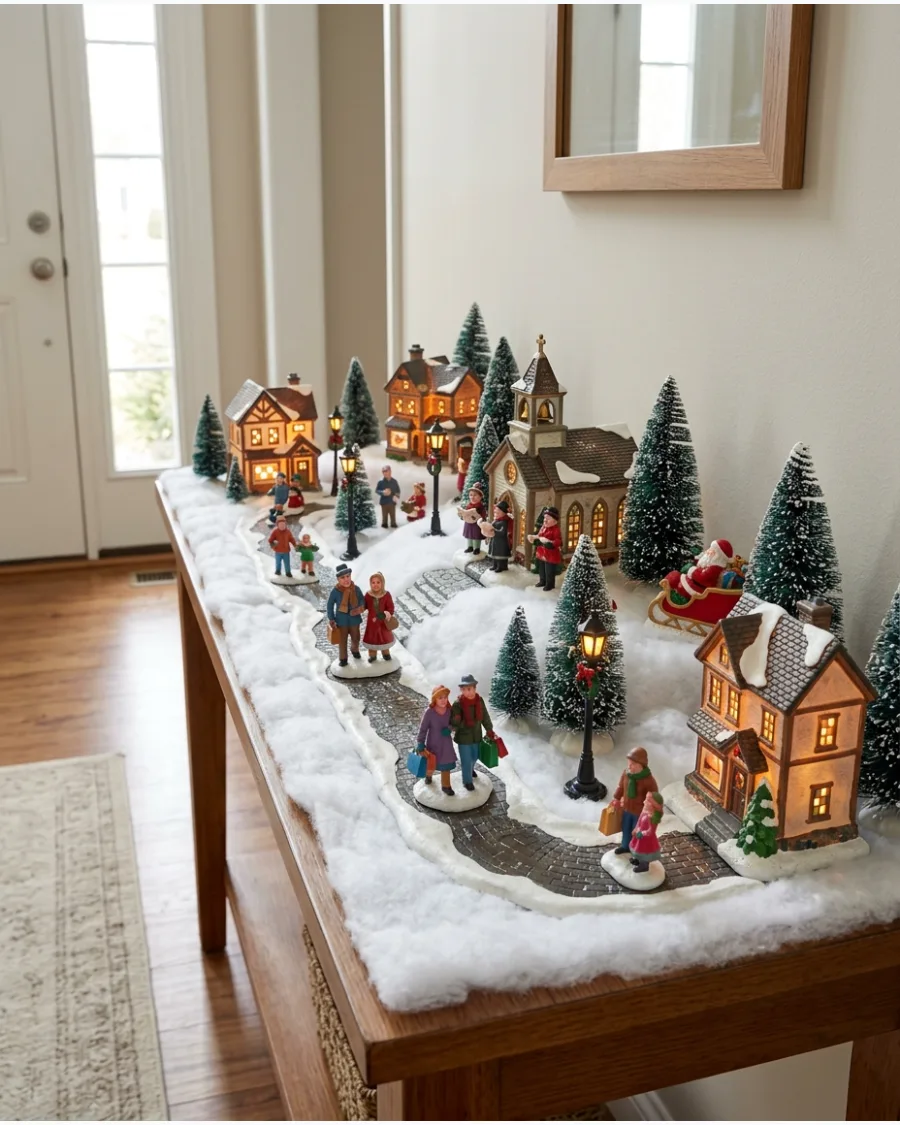
Focus on the quiet anticipation of the night before Christmas by arranging figures in specific activities. Place carolers near a lit church and shoppers carrying tiny gift bags to suggest a town preparing for the holiday.
Tuck a tiny Santa sleigh and reindeer on a rooftop or a high hill to add a playful hidden detail. The goal is to make the table look like a snapshot of a specific moment in time.
- Use snow blankets that have a slight blue tint to mimic the look of moonlight on the ground.
- Position the figures so they are facing each other or looking toward the church to create a sense of community.
- Use snow spray on the windows of the houses to make them look frosted from the cold night air.
Most people skip this: Put a tiny yellow LED inside the church to make it the brightest building in the Eve scene.
50. Christmas Morning Village Scene
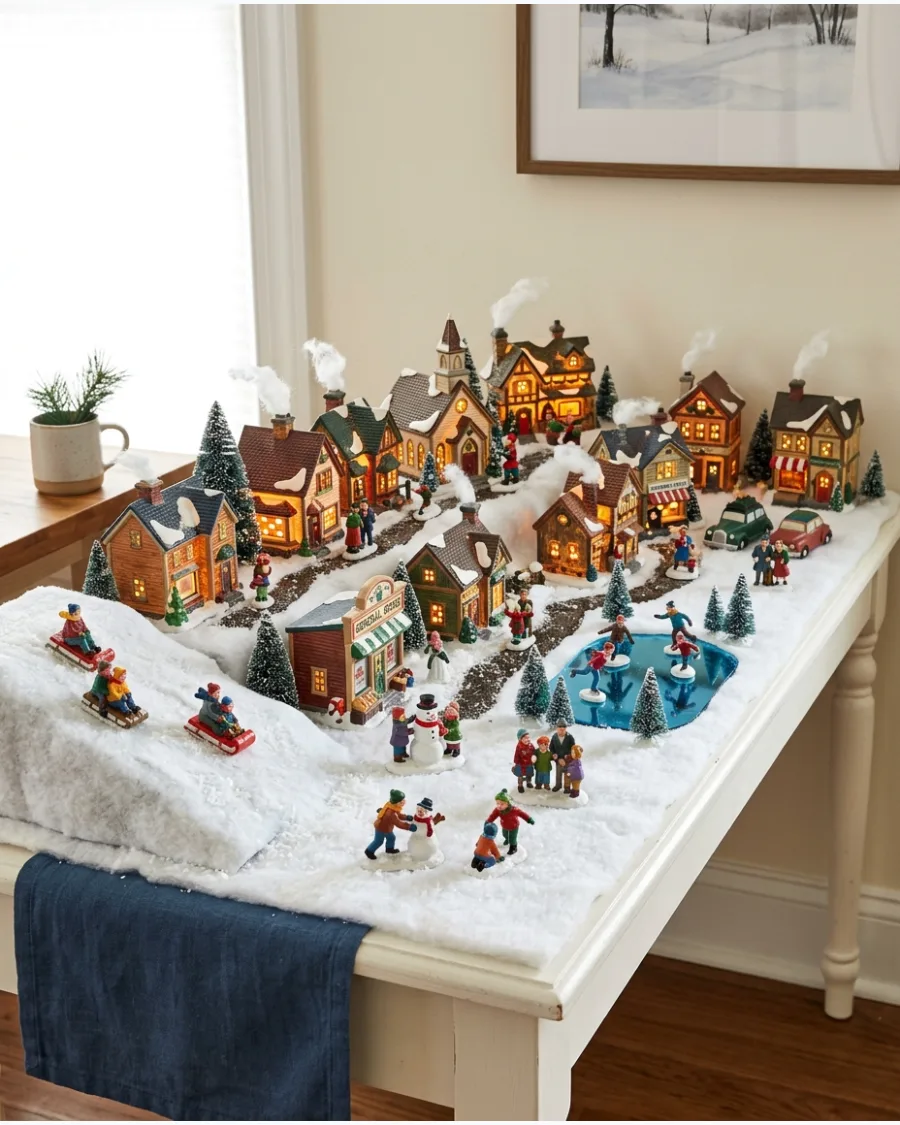
This display should feel bright, energetic, and full of life to represent the excitement of Christmas morning. Use figures of children sledding, people walking dogs, and families visiting their neighbors' houses across the tabletop.
Place smoke made of cotton balls coming out of the chimneys to show that the houses are warm and active. Bright morning light or cool-toned LEDs help simulate the start of a crisp winter day.
- Choose figures in bright winter coats to add pops of color against the white snow base.
- Use a snow glitter that is very fine and sparkly to represent the look of morning frost.
- Position sledders on a steep slope made from a hidden box to create a sense of speed and action.
Quick win: Gently pull a cotton ball apart until it is wispy and use a tiny dab of glue to stick it to the chimney top.
Frequently Asked Questions
How do I hide the messy power cords on a table display?
You can easily tuck wires beneath a thick snow blanket or a layer of green moss for a seamless look. Strategically placing bottle brush trees or small figurines over cord connections also helps camouflage the clutter.
What can I use to create different heights for my village houses?
Elevate your display by stacking books, small boxes, or acrylic risers underneath your snow blanket to create natural-looking hills. This adds visual interest and ensures that houses in the back remain visible from across the room.
Is it better to use a snow blanket or loose artificial snow on a dining table?
A snow blanket is usually the better choice for dining tables because it stays in place and won't end up in your food. For a touch of sparkle without the mess, you can sprinkle a tiny bit of loose snow just in the center of the blanket.
How do I style a Christmas village on a narrow console table?
Focus on a linear street layout by placing your largest houses in the center and smaller accessories toward the ends. Use varying heights to prevent the display from looking flat and keep the front edge clear to avoid accidental bumps.
Can I mix different brands and styles of village houses?
Absolutely, mixing brands is a great way to add character as long as you use a consistent base like white snow to tie them together. You can also unify mismatched styles by sticking to a specific color palette for your trees and accessories.