60 DIY Christmas Centerpiece Ideas

This post may contain affiliate links: full affiliate disclosure.
Elevate your holiday table with handmade arrangements that look professional without the high florist price tag. These greenery-based designs use natural textures and simple layers to create a warm, festive atmosphere for any dining space.
NATURAL GREENERY CHRISTMAS CENTERPIECES
1. Evergreen Garland and Taper Candle Centerpiece
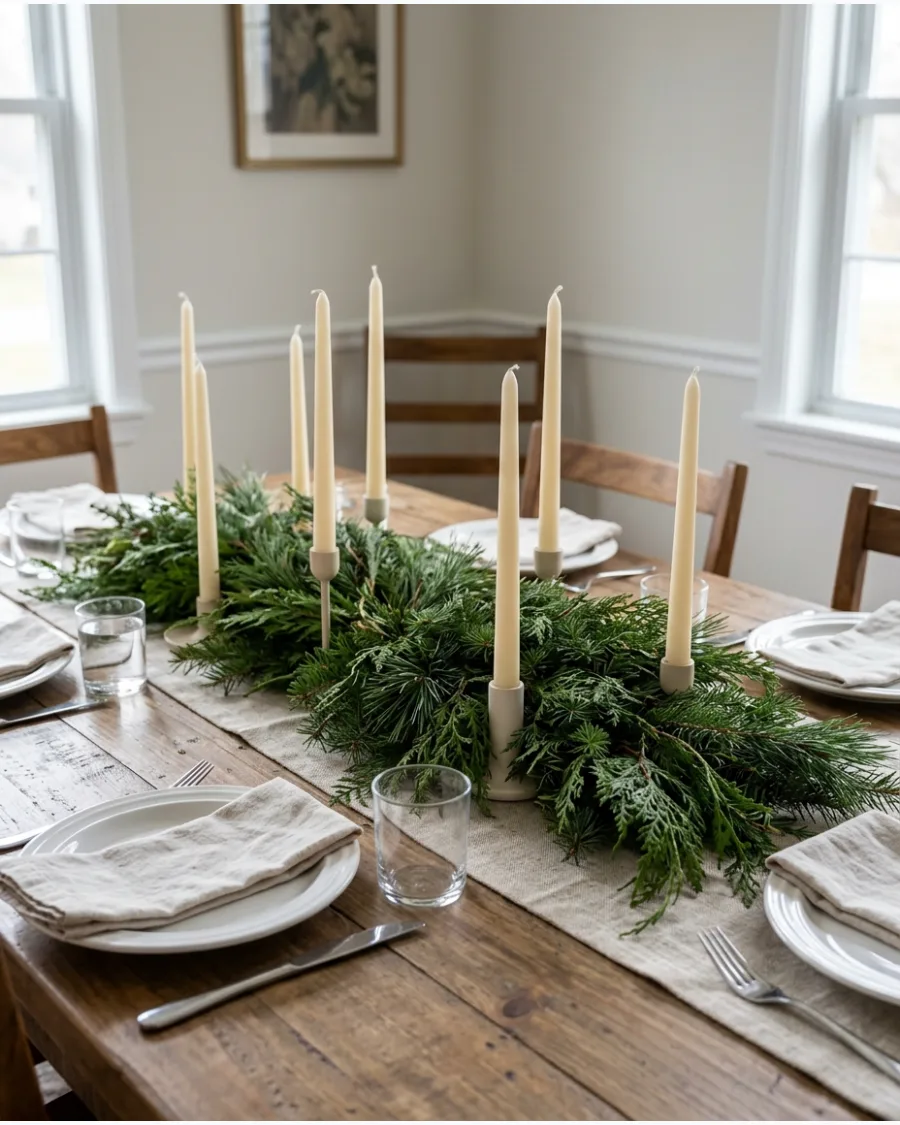
Laying a loose garland of cedar and pine branches directly on the table creates an instant high-end look without needing a container. Space your taper candles at uneven intervals to keep the arrangement feeling organic and relaxed rather than stiff. This style works perfectly for long rectangular tables because it draws the eye across the entire surface.
- Fresh cedar and pine clippings (15 mins).
- Arrange greenery first then tuck in candle holders.
- Mist the greenery daily to prevent needles from drying out.
Quick win: Use a mix of at least three different types of greenery to add depth and texture to the garland.
2. Cedar, Pinecone, and Berry Centerpiece
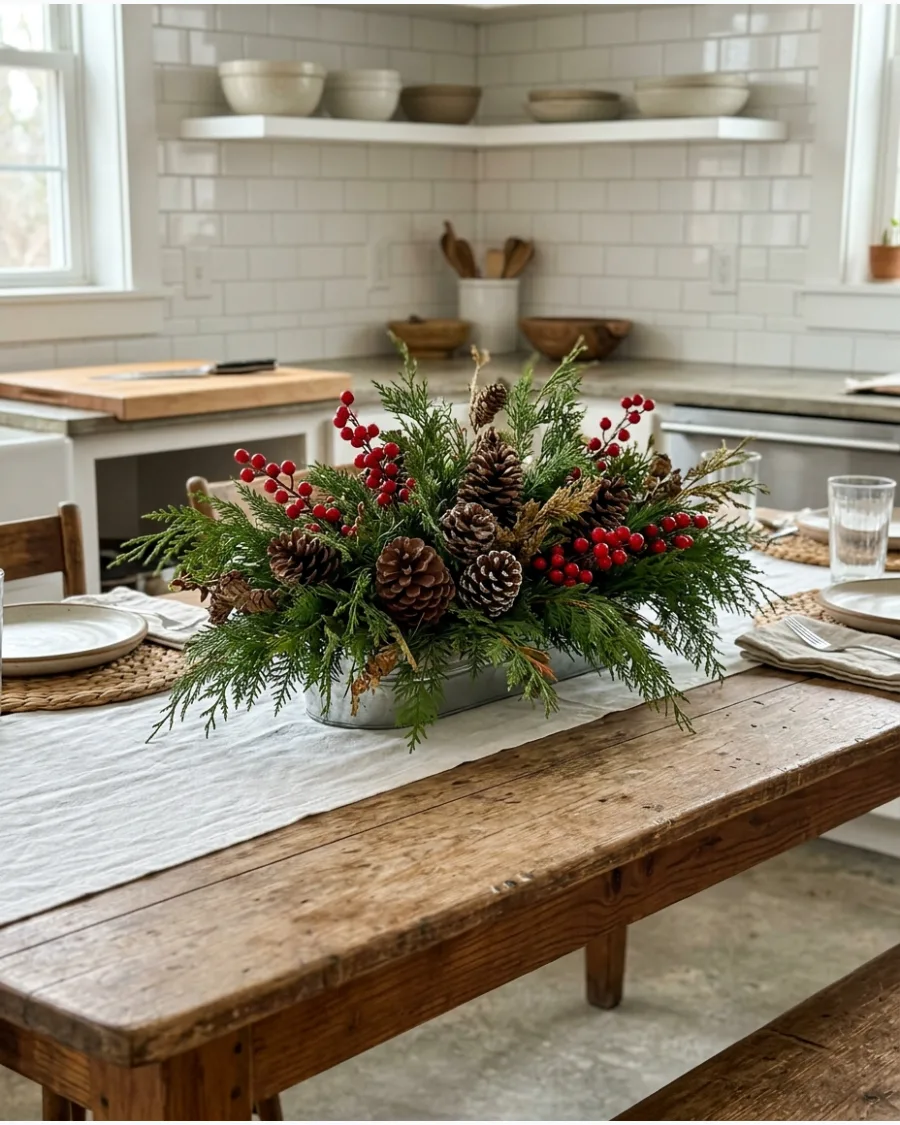
This classic combination relies on the contrast between soft cedar needles and the structure of natural pinecones. Place the largest pinecones first to anchor the design before tucking in smaller berry clusters for pops of red. Keeping the height under six inches ensures your guests can chat comfortably without looking through branches.
- Store-bought or foraged pinecones (10 mins).
- Group berries in threes for a more natural look.
- Use a low tray to keep the table tidy.
Best shortcut: Use floral wire to attach berries to the pinecones so they do not roll around when the table is moved.
3. Dried Orange and Evergreen Centerpiece
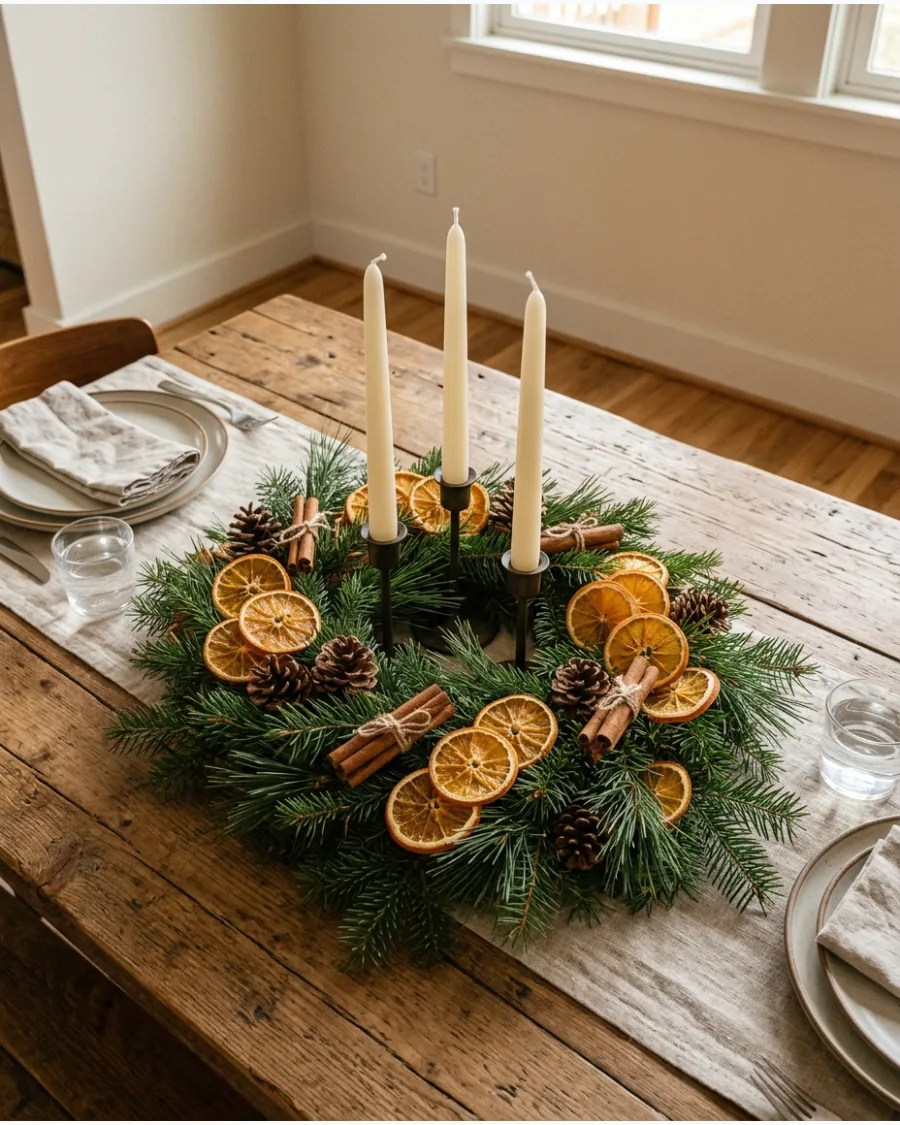
Dried citrus adds a bright, translucent quality that glows when placed near candlelight. Thread twine through the orange slices or simply nestle them into the greenery for a Scandinavian-inspired aesthetic. The scent of the citrus combined with fresh pine creates a subtle holiday fragrance that is not overwhelming.
- Oven-dried orange slices (2 hours drying time).
- Layer oranges near the candles to catch the light.
- Store dried oranges in an airtight container for next year.
Most people skip this: Blot the orange slices thoroughly before drying them in the oven to get a clearer, more vibrant color.
4. Eucalyptus and Pine Christmas Centerpiece
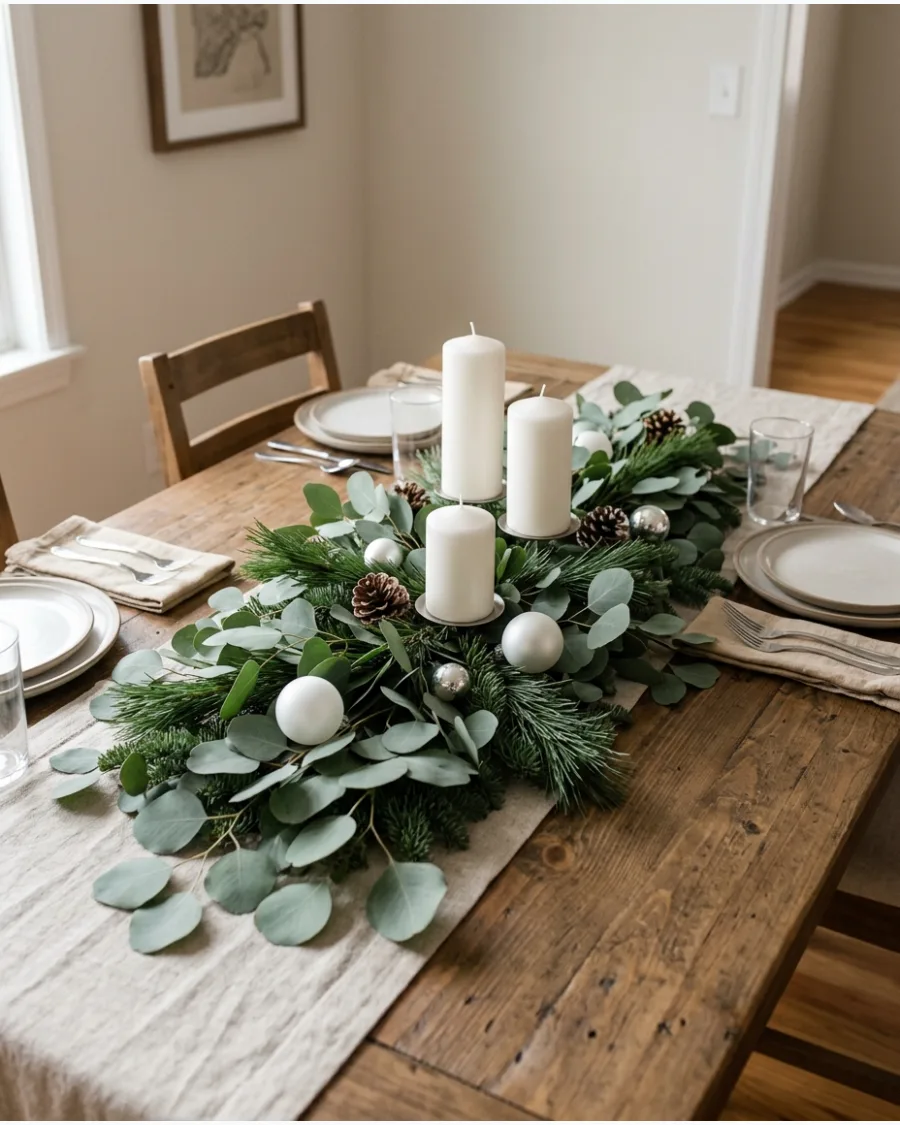
Mixing the silvery-blue tones of eucalyptus with deep green pine creates a sophisticated, modern color palette. Tuck small white ornaments into the leaves to brighten the arrangement and provide a clean contrast to the dark branches. This pairing feels lighter and more airy than traditional all-evergreen displays.
- Fresh seeded eucalyptus and pine (20 mins).
- Criss-cross the stems to build volume without using floral foam.
- Use white candles to match the modern feel.
Quick win: Strip the bottom two inches of leaves off the eucalyptus stems to make them easier to tuck into the pine base.
5. Magnolia Leaf Christmas Centerpiece
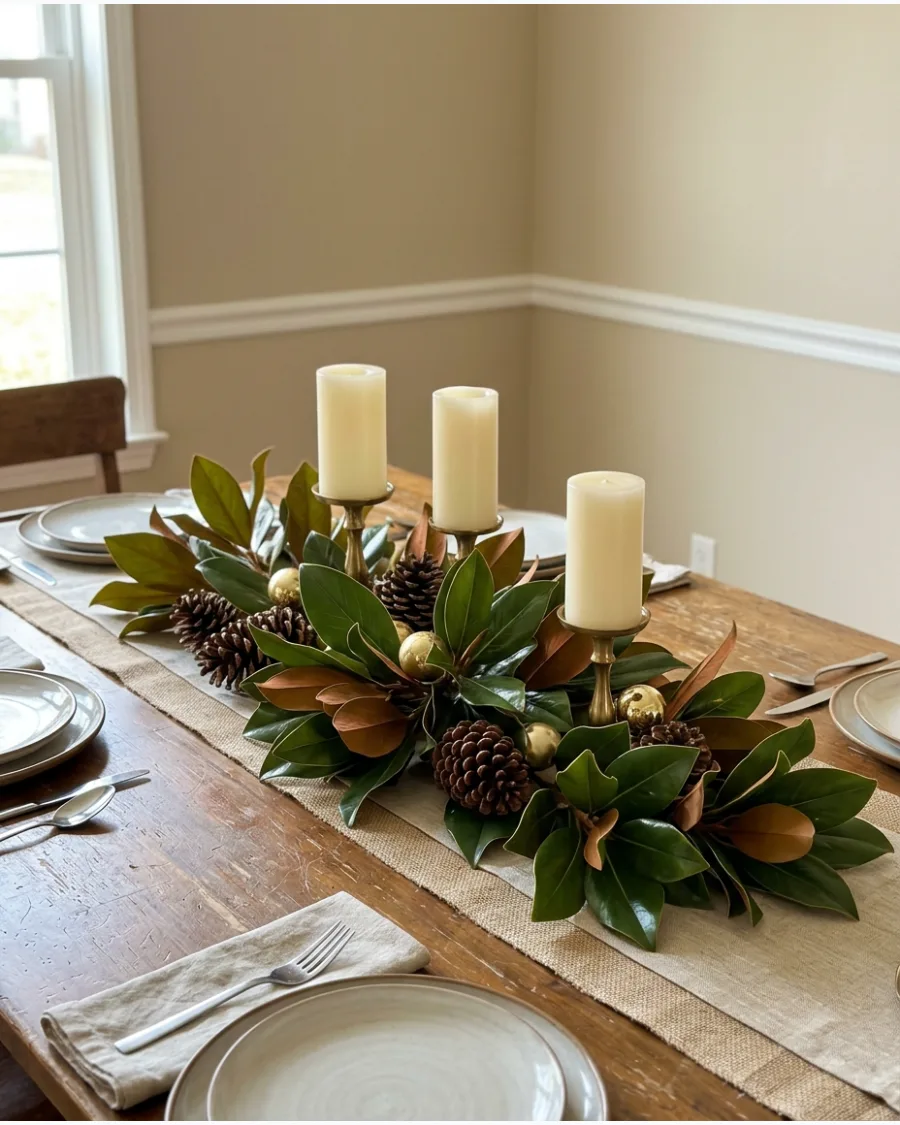
Magnolia leaves offer a beautiful two-toned look with glossy green tops and velvety brown undersides. Incorporate gold ornaments to highlight the warm tones of the leaves and add a touch of formal elegance. These sturdy leaves hold up much longer than traditional needles, making this a great choice for early decorators.
- Fresh magnolia branches (15 mins).
- Overlap the leaves like shingles to hide the stems.
- Wipe leaves with a damp cloth to make them shine.
Best shortcut: Spray a little leaf shine or hairspray on the magnolia leaves to keep them looking fresh for weeks.
6. Rosemary and Evergreen Candle Centerpiece
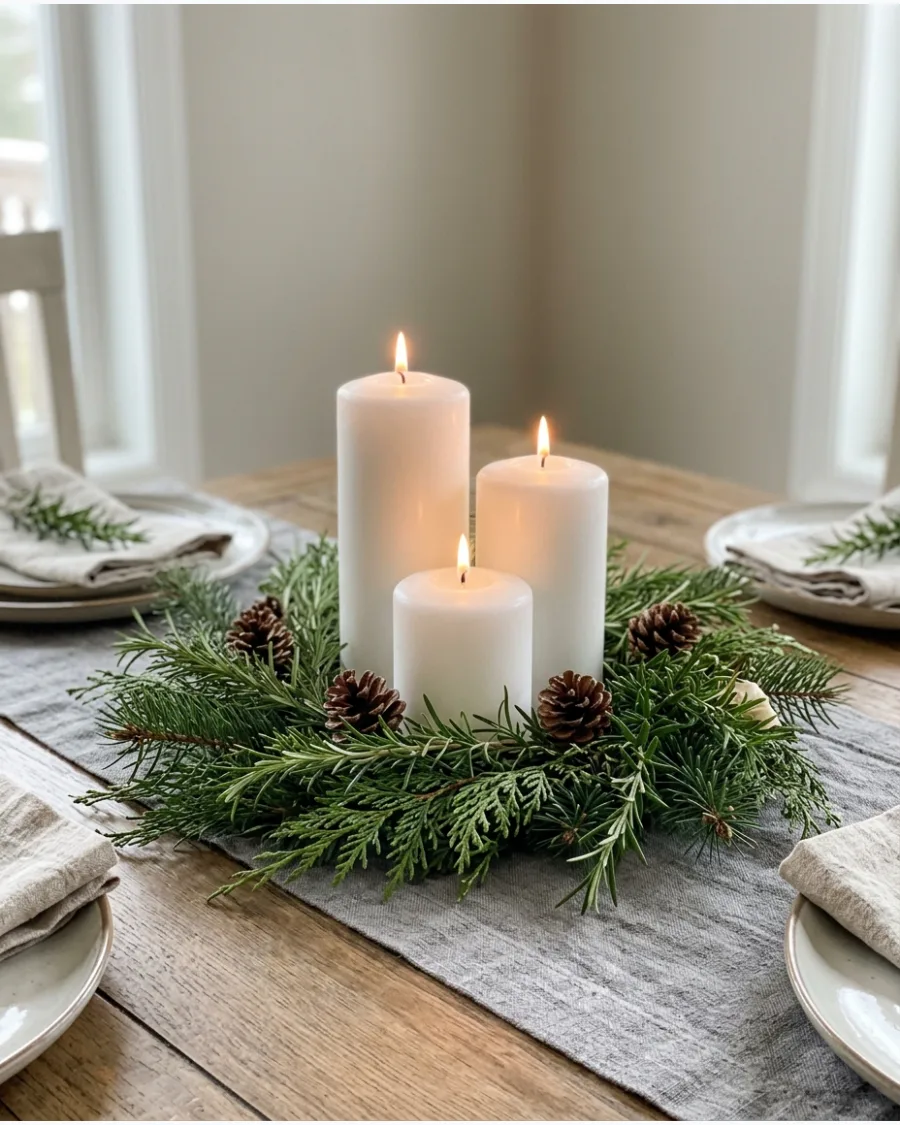
Grouping white pillar candles in the center of the table provides a strong focal point for the surrounding greenery. Surround the base of the candles with fragrant rosemary sprigs and cedar to create a lush, textured ring. The heat from the candles gently warms the rosemary, releasing a pleasant herbal scent throughout the room.
- Grocery store rosemary and cedar (15 mins).
- Use candles with different diameters for visual interest.
- Place greenery at least two inches away from the flame.
Most people skip this: Use battery-operated pillar candles if you want the greenery to sit right against the wax for a fuller look.
7. Pine Branch Centerpiece With Red Velvet Bows
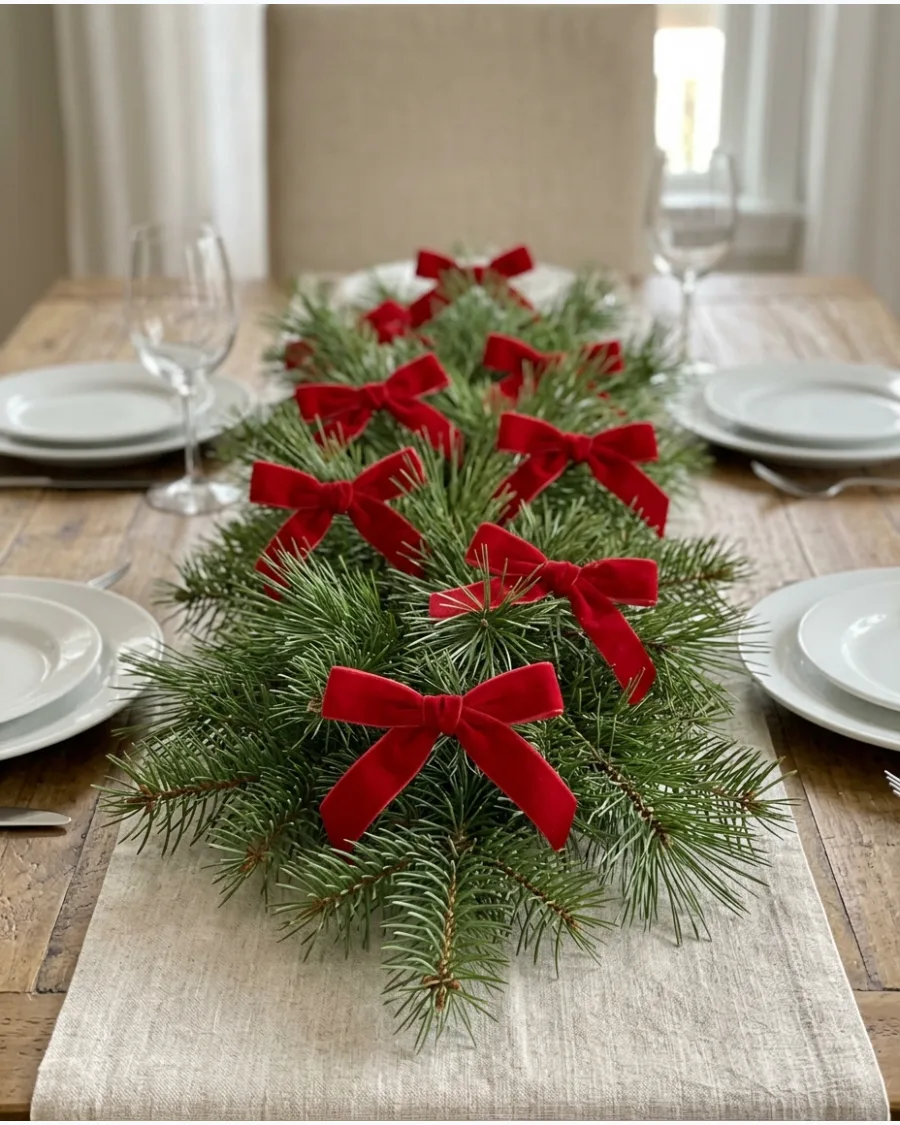
Velvet bows are a simple way to add high-end texture and color without the bulk of traditional ornaments. Space the bows evenly along a pine branch base to create a rhythmic, classic look that feels intentional. Burgundy or deep red velvet works best to provide a rich contrast against the dark green needles.
- Velvet ribbon or pre-made bows (10 mins).
- Use thin wire to secure the bows so they do not slip.
- Choose a 1-inch wide ribbon for the best scale.
Quick win: Slightly singe the ends of the velvet ribbon with a lighter to prevent fraying throughout the season.
8. Evergreen Centerpiece With Brass Candlesticks
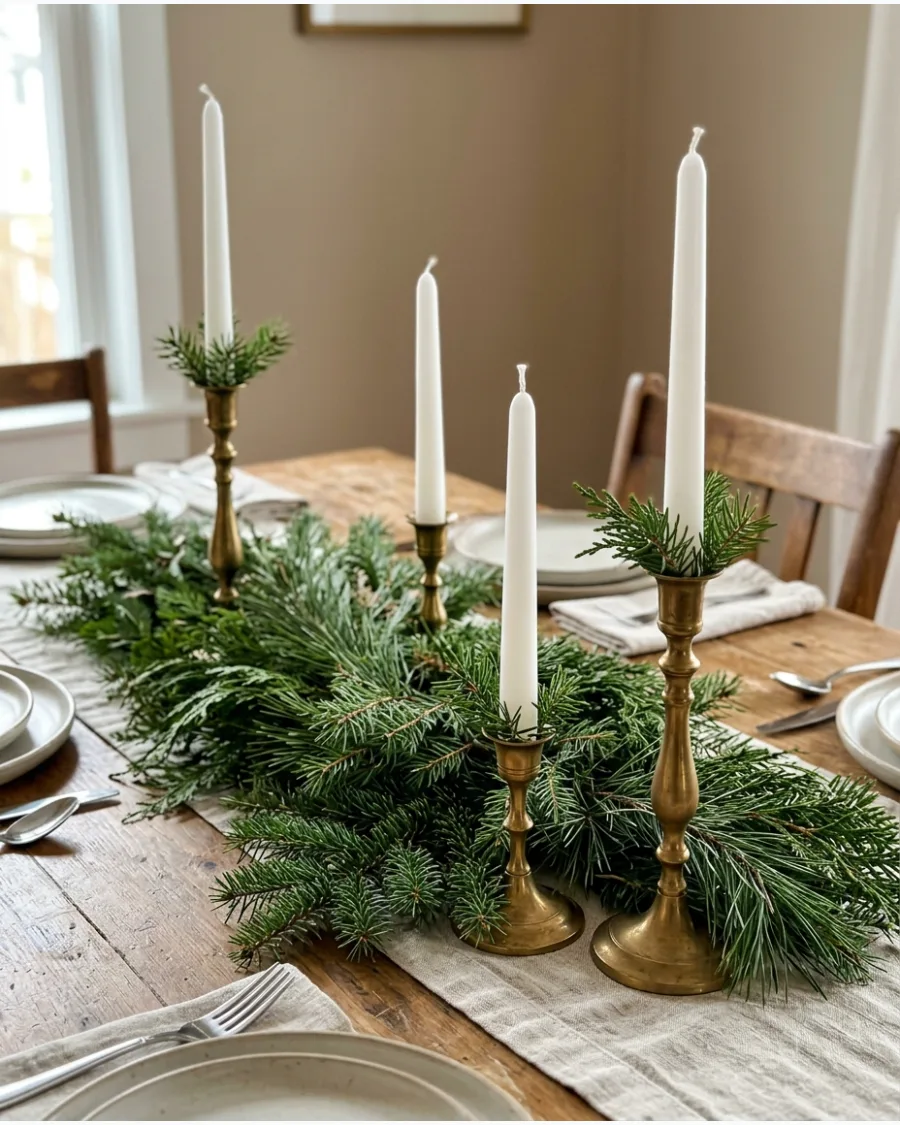
Brass candlesticks bring a vintage, warm glow to the table that pairs perfectly with traditional Christmas greenery. Stagger the heights of the candlesticks along the greenery to create movement and keep the eye moving across the table. The metallic finish reflects the candlelight, making the whole arrangement feel more expensive.
- Thrifted or new brass holders (10 mins).
- Use sticky wax in the holders to keep candles perfectly straight.
- Mix different styles of brass for a curated look.
Best shortcut: Use a micro-fiber cloth to quickly buff your brass before guests arrive to ensure they catch the light.
9. Woodland Moss and Evergreen Centerpiece
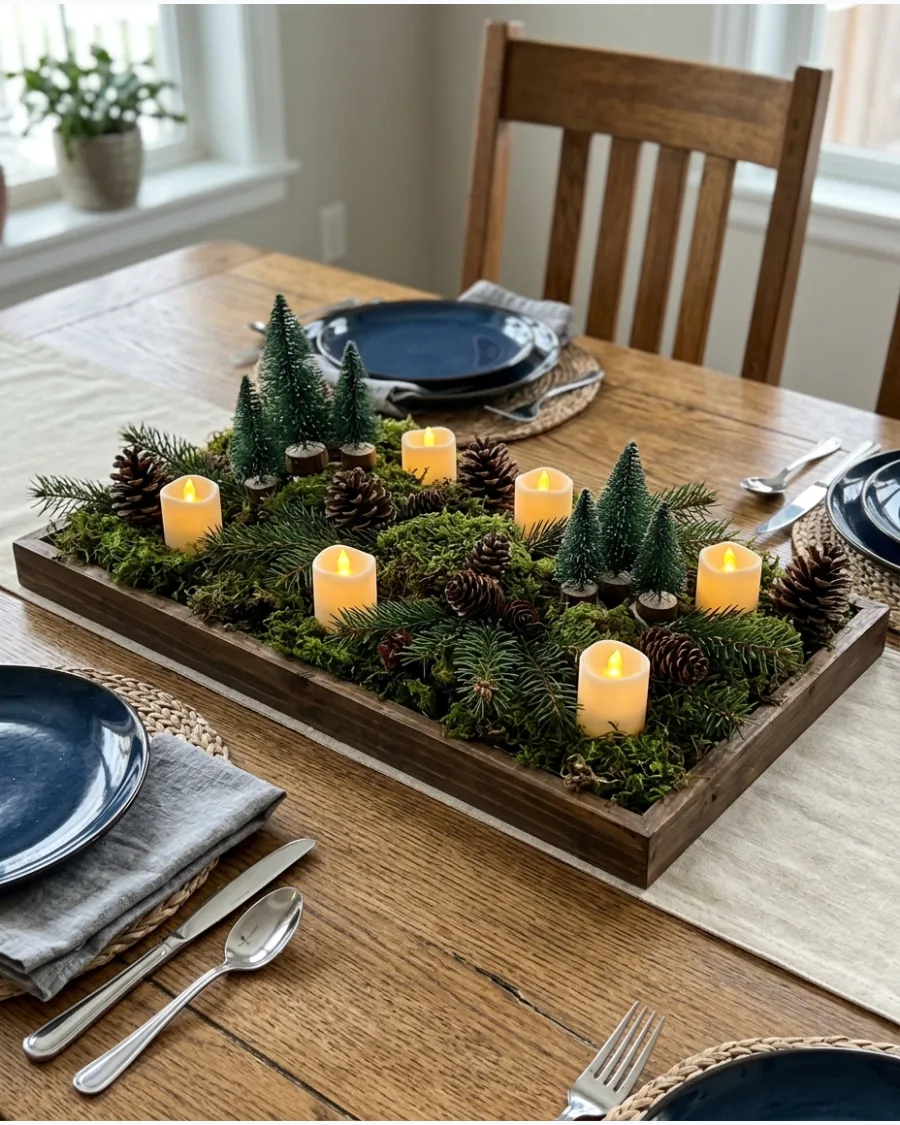
Using a tray as a base allows you to build a detailed forest scene that remains easy to move for mealtime. Layer preserved moss over the bottom of the tray before adding small pine sprigs and miniature trees to create height. Battery-operated candles are the safest choice here, as they can be nestled directly into the moss.
- Preserved sheet moss and tray (20 mins).
- Use different shades of green moss for a realistic forest floor.
- Add a few small stones for extra texture.
Most people skip this: Use a tray with a small lip to keep the moss and needles from shedding onto the dining table.
10. Simple Foraged Greenery Christmas Centerpiece
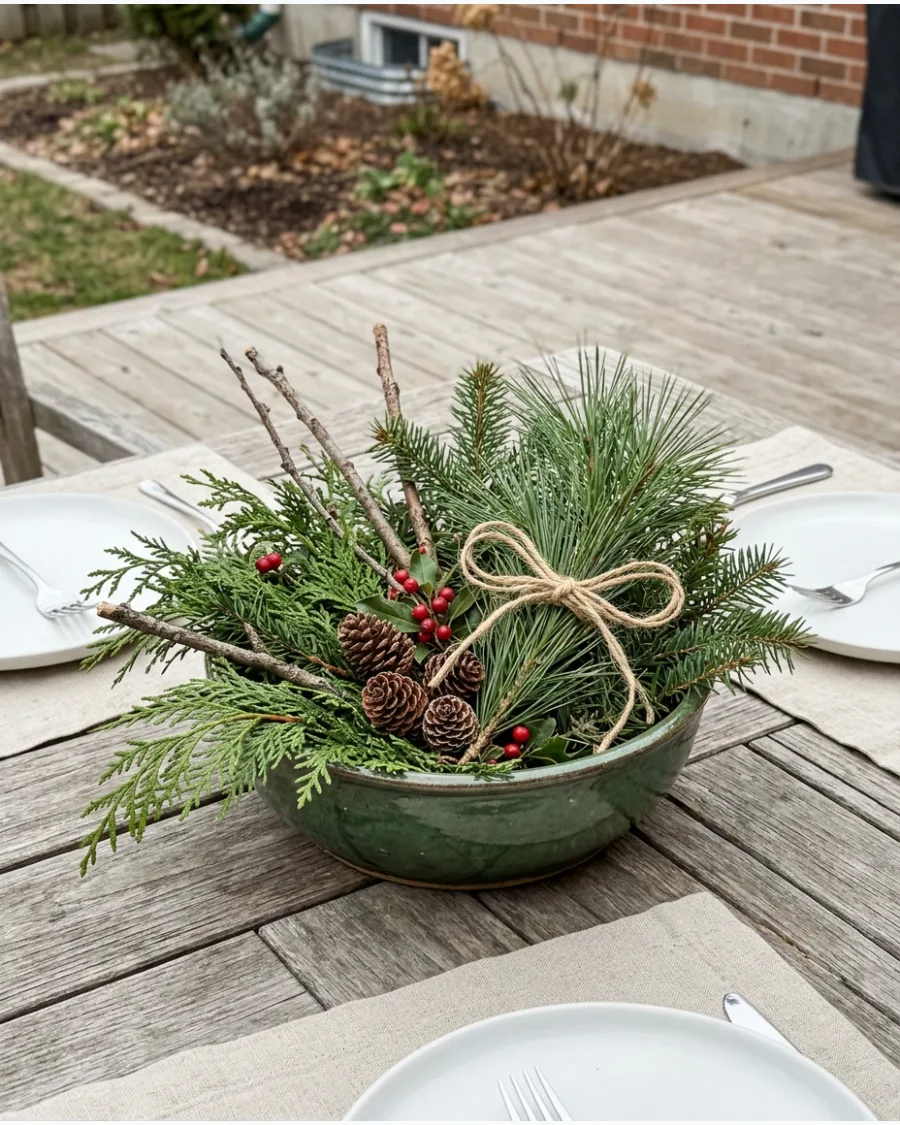
A low bowl or wide-mouth vase makes it easy to create a professional-looking arrangement with whatever is growing in the yard. Focus on using bare twigs and berry branches to add height and architectural interest to the softer evergreen base. This organic style looks best when it is slightly asymmetrical and imperfect.
- Foraged branches and twigs (15 mins).
- Use a heavy bowl to prevent the weight of the branches from tipping it.
- Change the water every three days.
Quick win: Use a piece of chicken wire or a flower frog inside the bowl to hold the heavy evergreen stems exactly where you want them.
CHRISTMAS CANDLE CENTERPIECES
11. Cranberry Floating Candle Centerpiece
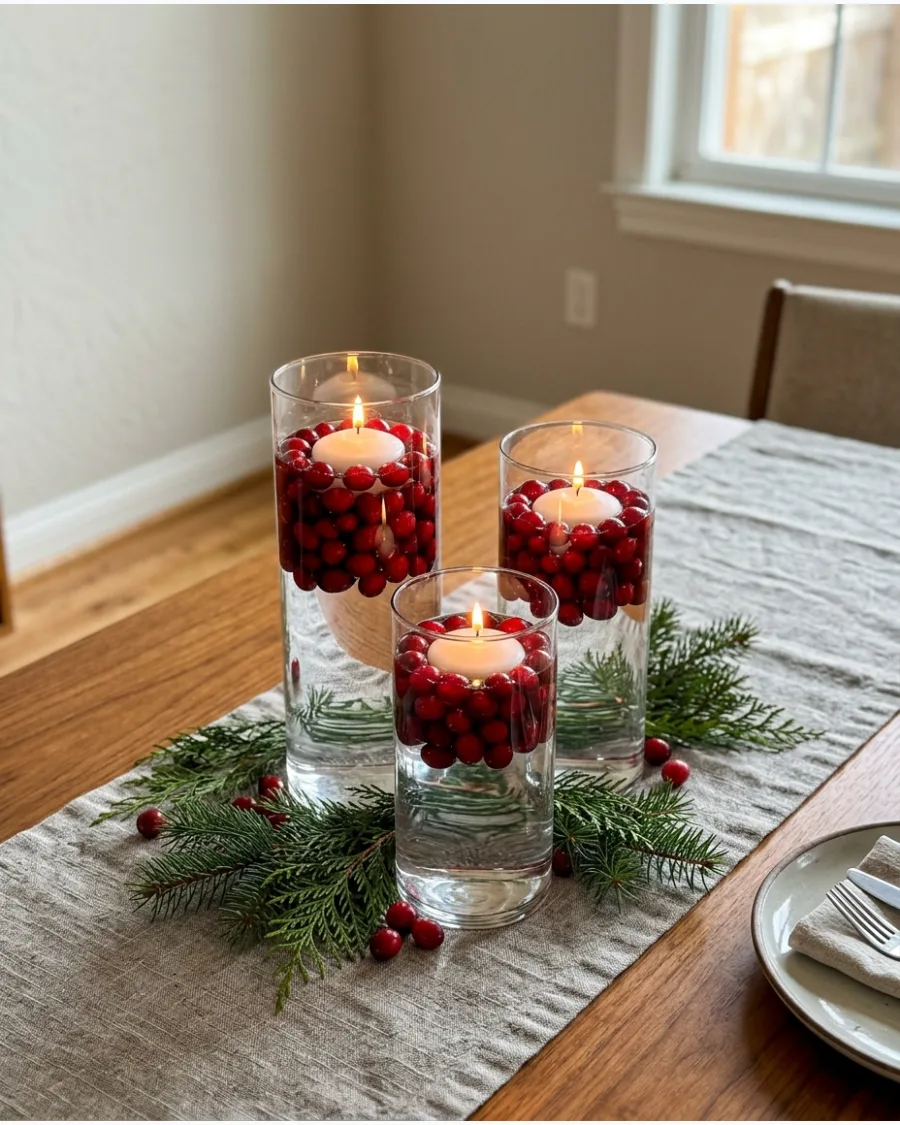
Clear glass cylinders filled with water and fresh cranberries create a vibrant red base for white floating candles. Group three cylinders of different heights together to add visual interest and height to the center of the dining table. This setup works because the red berries pop against the white candlelight and green foliage.
Most people find that adding a few cedar sprigs around the base grounds the glass containers perfectly.
- Materials cost under twenty dollars and take ten minutes to assemble.
- Place the cylinders on a waterproof tray to protect the table surface from spills.
- Swap cranberries for sliced lemons or oranges for a fresh post-holiday look.
Quick win: Use distilled water in the jars to prevent air bubbles from forming on the cranberries and glass.
12. Mason Jar Christmas Candle Centerpiece
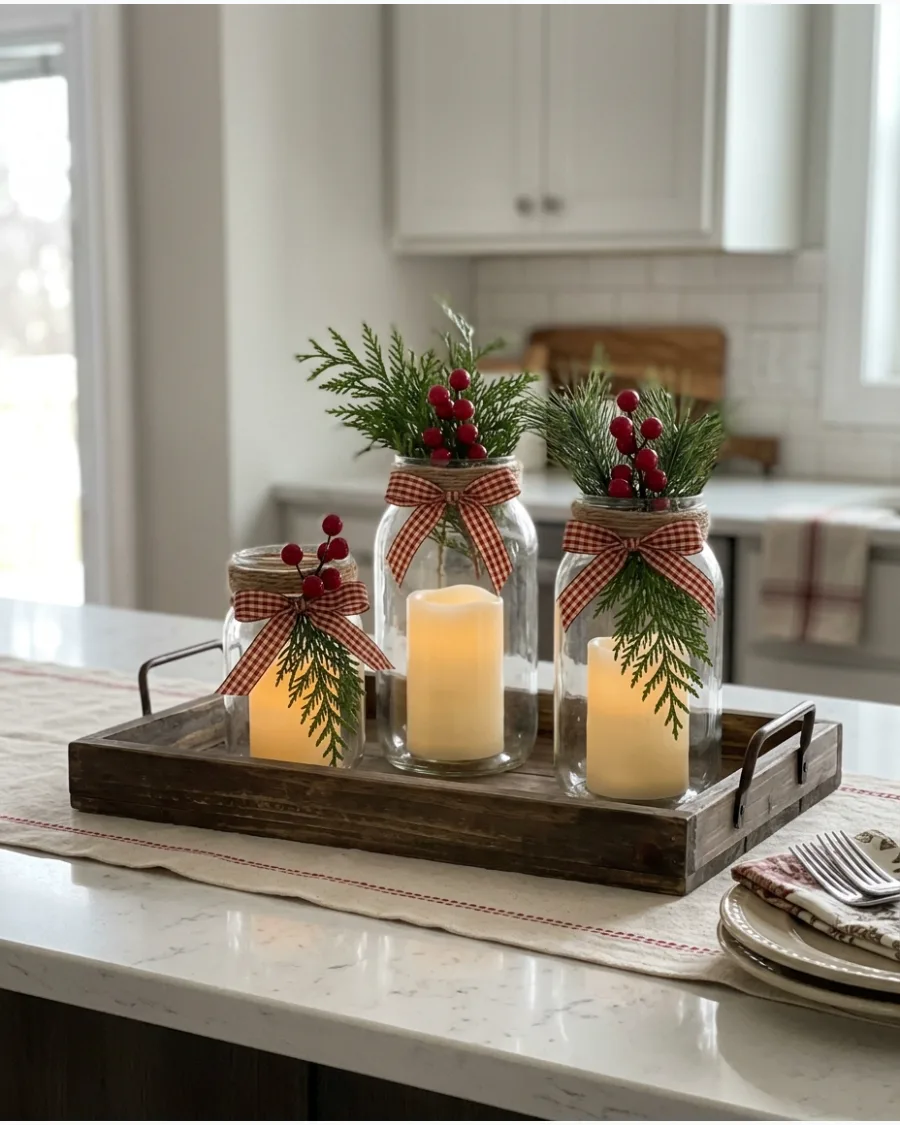
Battery-operated candles inside mason jars provide a safe and warm glow for a kitchen eating area. Wrap the neck of each jar with twine and a small sprig of boxwood to soften the look of the glass. Grouping these jars on a wooden tray makes the arrangement easy to move when dinner is served.
Using jars of different sizes creates a more relaxed and layered feel.
- Use jars from the pantry to keep this project nearly free.
- Line the bottom of the jars with Epsom salt to mimic the look of fresh snow.
- Choose jars with quilted or diamond patterns to create interesting light reflections.
Most people skip this: Use LED candles with a timer function so the jars light up automatically every evening.
13. Pillar Candle and Pinecone Centerpiece
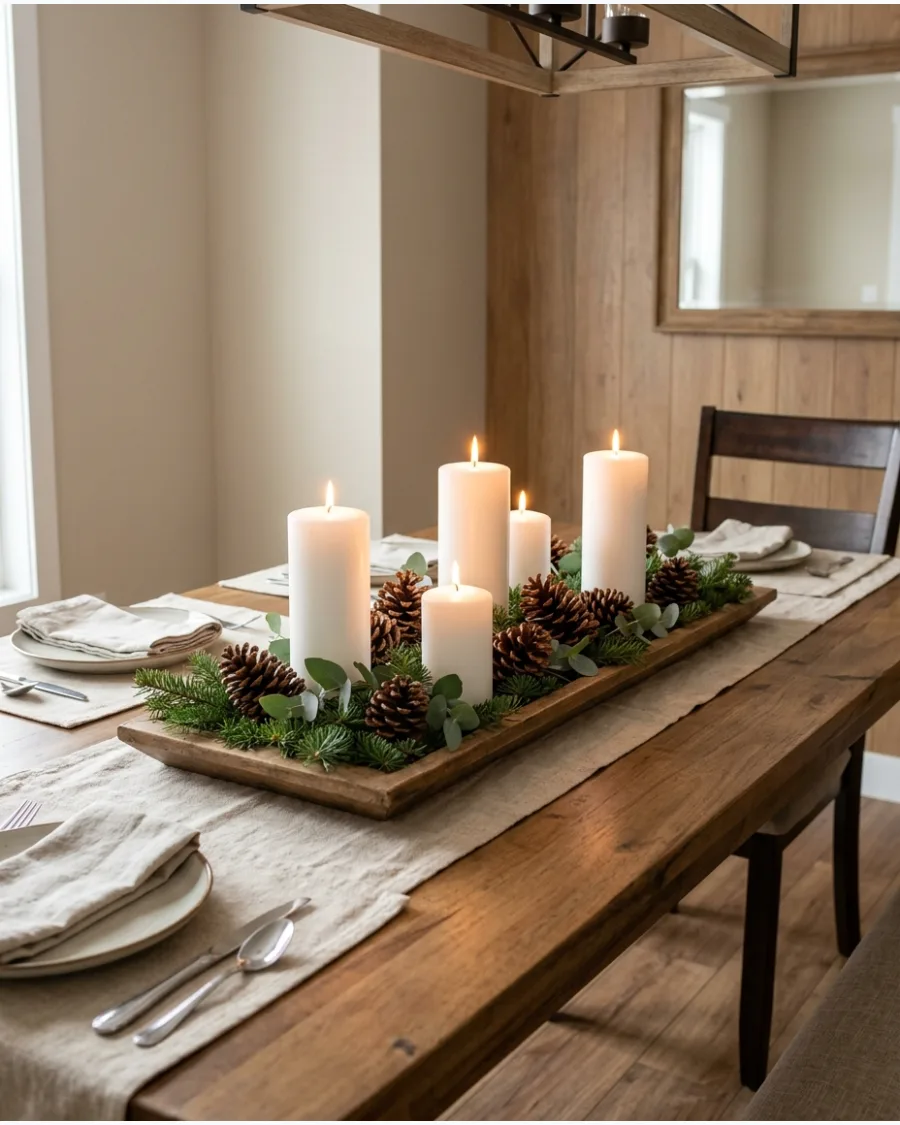
White pillar candles offer a clean look that emphasizes natural textures over bright colors. Arrange five candles of varying heights in a straight line down a long tray and pack the gaps tightly with large pinecones. This neutral palette allows the natural shadows and light to take center stage.
It is a smart way to use foraged items without making the table feel cluttered.
- Gather pinecones from the yard and bake them at a low temp to remove pests.
- Space the candles at least two inches apart to prevent the wax from melting unevenly.
- Lightly dust the pinecones with white spray paint for a frosted winter appearance.
Best shortcut: Use a bit of museum wax on the bottom of each candle to keep them perfectly upright on the tray.
14. Burgundy Taper Candle Christmas Centerpiece
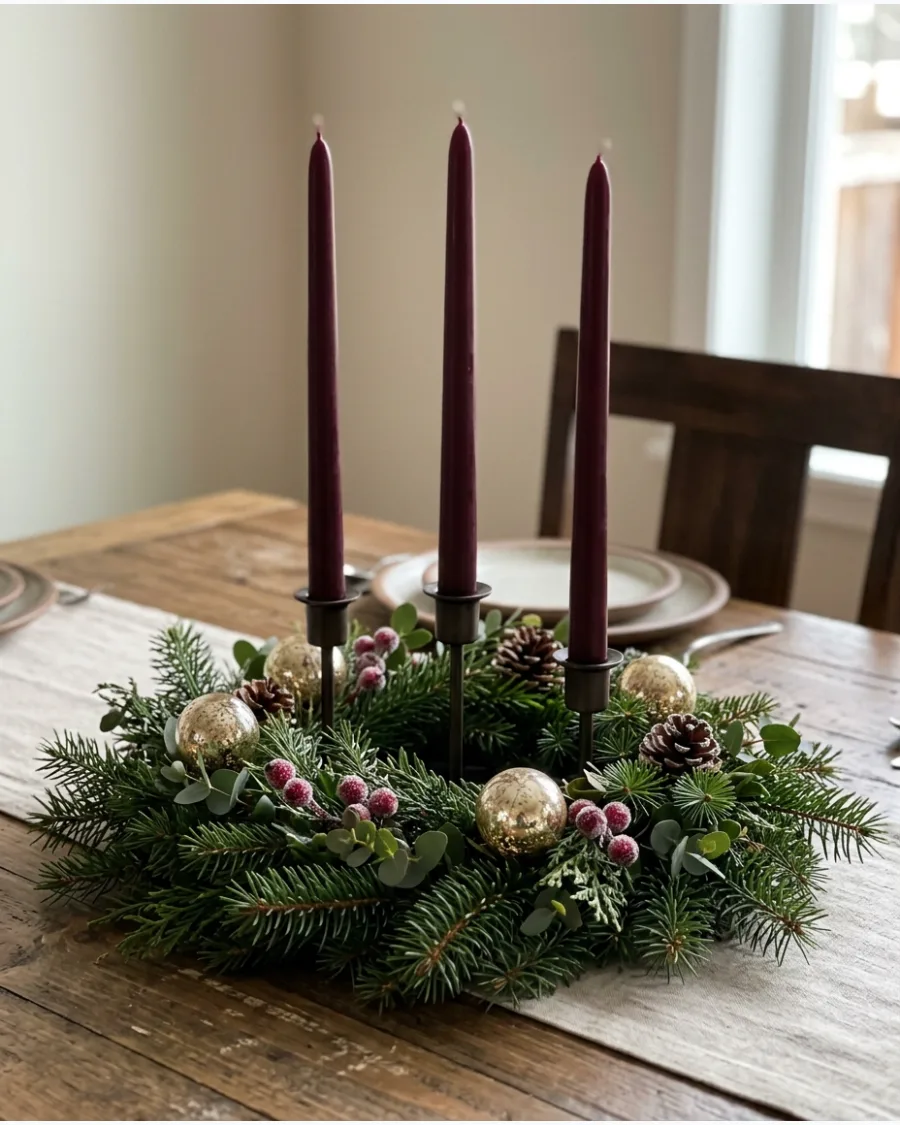
Deep burgundy taper candles add a sophisticated and moody vibe to a traditional holiday table. Tuck small antique-gold ornaments into the base of dark evergreen branches to reflect the flickering candlelight. The contrast between the rich red wax and the dark green needles creates a high-end look.
This style works best with simple brass or black candle holders that do not compete with the colors.
- Buy dripless taper candles to prevent wax from ruining the table linens.
- Set the heights of the candles unevenly to create a more organic and modern flow.
- Swap the burgundy for navy or forest green to match different room color schemes.
Quick win: Slightly melt the bottom of the taper candle before placing it in the holder for a rock-solid fit.
15. Christmas Candle Wreath Centerpiece
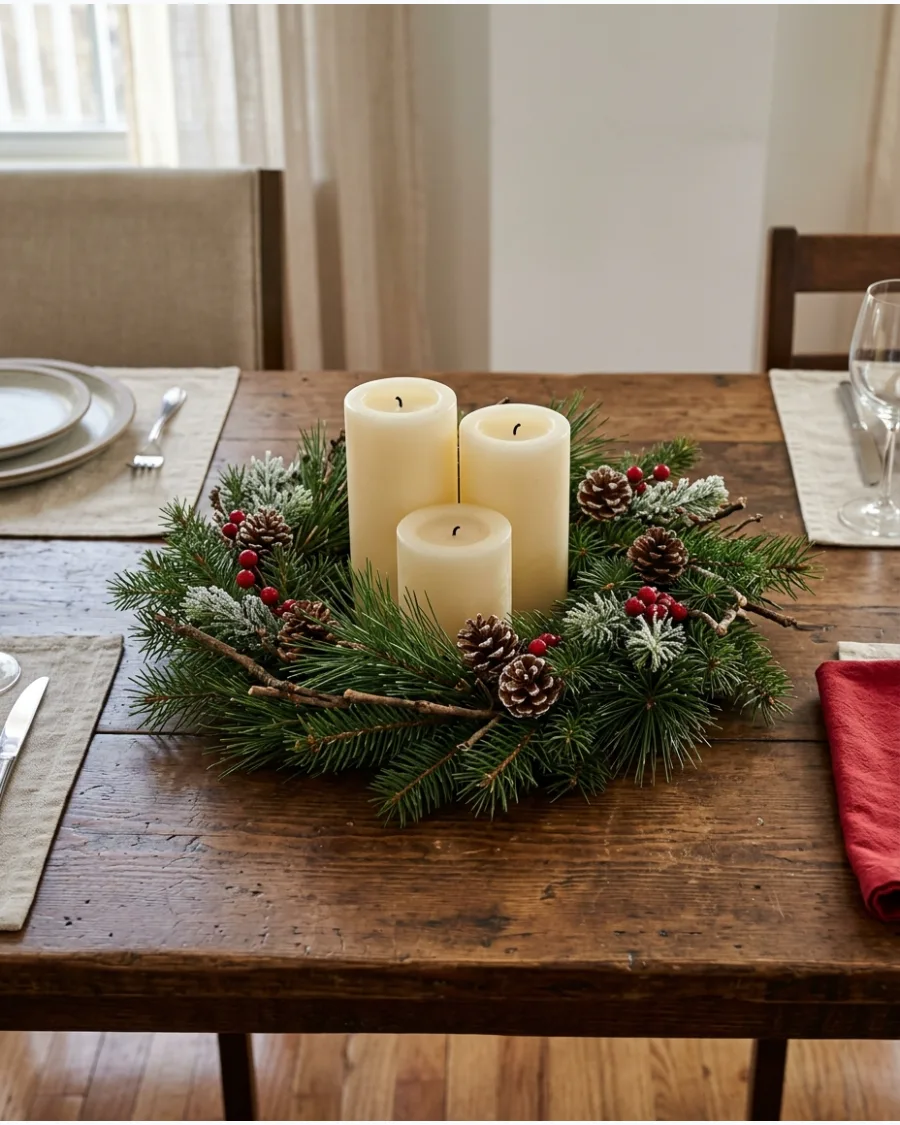
A small tabletop wreath acts as a natural frame for a central candle display. Place one large, thick pillar candle in the middle of a pre-made evergreen wreath for an instant focal point. Adding a few red berries or small pinecones provides just enough detail without overwhelming the space.
This design keeps the centerpiece compact, leaving plenty of room for food platters.
- Use a 10-inch wreath for standard dining tables to maintain proper scale.
- Place a glass candle plate under the pillar to catch any stray wax drips.
- Mist the wreath with water every few days to keep the greens looking fresh.
Most people skip this: Use a candle with three wicks to ensure the flame is large enough to be seen over the greenery.
16. Wood Bead and Candle Centerpiece
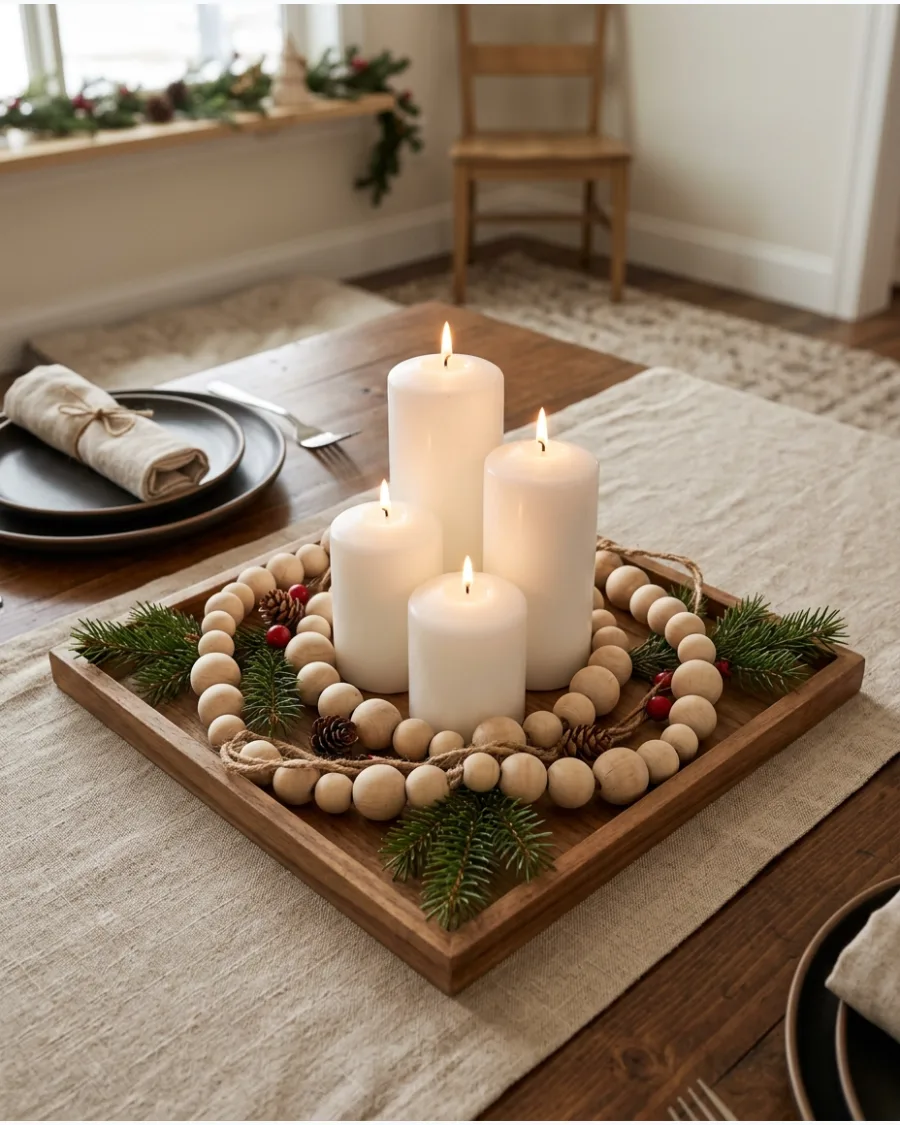
Natural wood beads bring a modern and tactile element to a holiday arrangement. Coil a long strand of large wooden beads around the base of three white candles on a low tray. This minimalist approach feels fresh and pairs well with a few scattered eucalyptus leaves.
It is a great way to add a soft, organic touch to a room with lots of hard surfaces.
- Look for 20mm or larger beads to ensure the strand has enough visual weight.
- Paint a few beads in gold or red to tie the piece into your specific holiday theme.
- Keep the beads at least three inches away from the candle flames for safety.
Best shortcut: Buy a pre-strung wood bead garland to save time on threading individual beads.
17. Birch Log Candle Holder Centerpiece
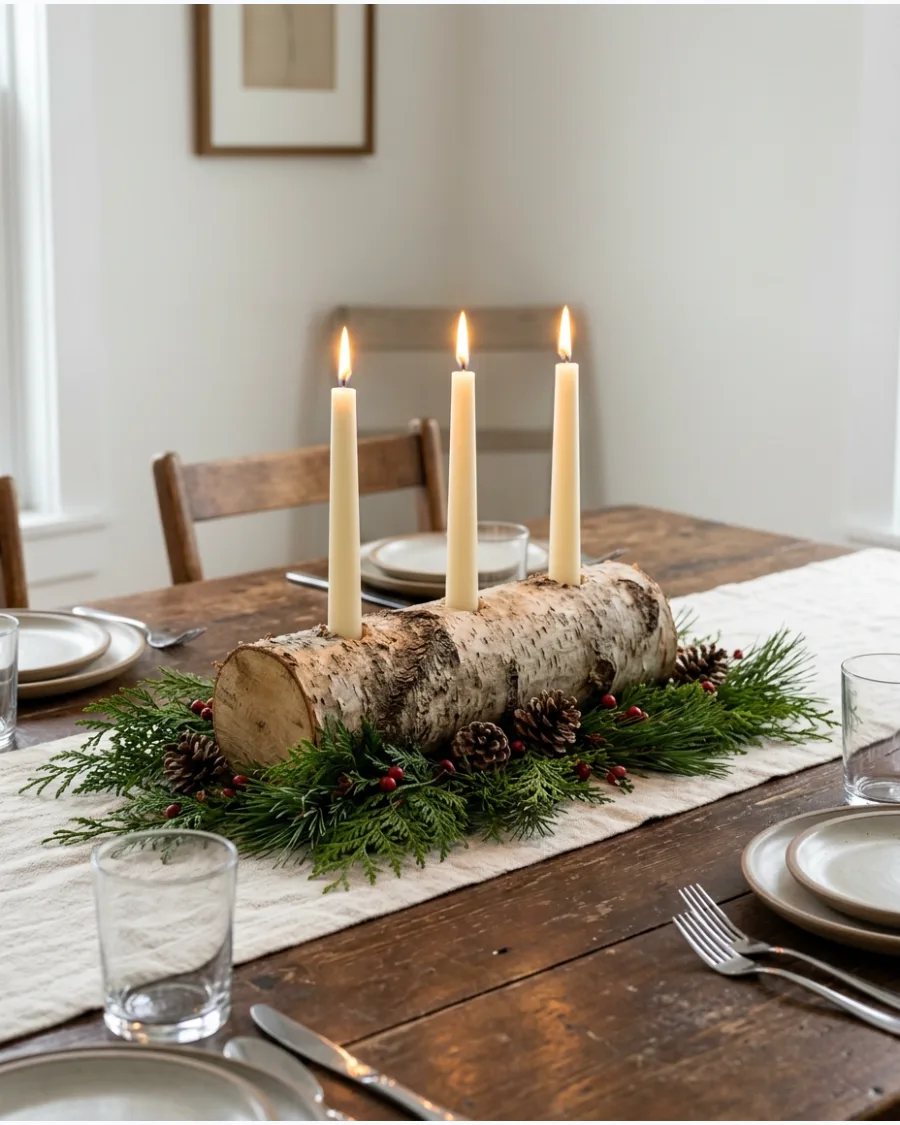
A birch log adds an organic and woodland feel to the center of the table. Use a log with pre-drilled holes for LED tea lights to ensure the display is safe for all-night use. Surrounding the white bark with flat cedar branches helps the log blend into the holiday decor.
This piece works well on a buffet or a long rectangular dining table.
- Search for kiln-dried birch logs to ensure they are clean and dry for indoor use.
- Line the bottom of the log with felt pads to prevent it from scratching the table.
- Add small clusters of red berries at the ends of the log for a pop of color.
Quick win: If using real tea lights, place them in metal or glass inserts before putting them in the wood.
18. Lantern Christmas Table Centerpiece
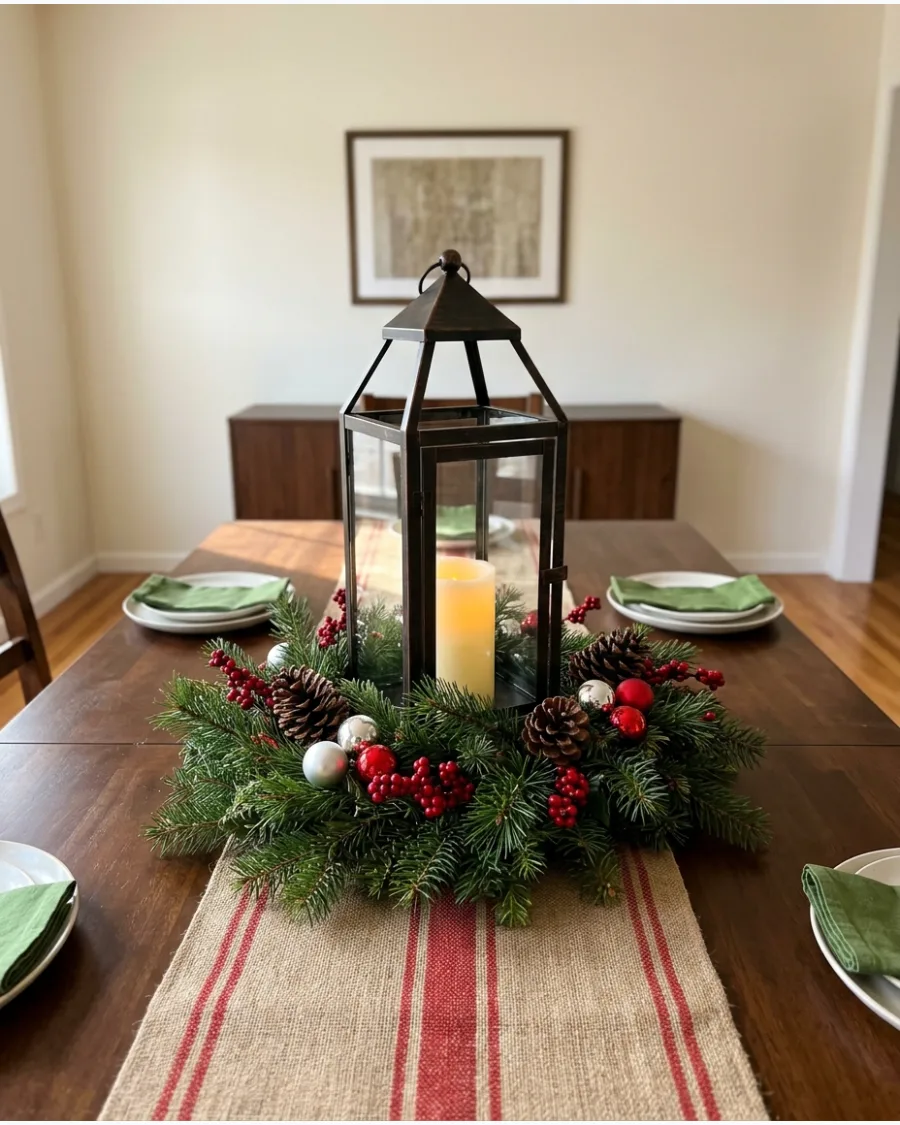
Lanterns provide a structured look that keeps candles contained and protected. Surround the base of a black metal lantern with a lush mix of evergreen sprigs and small red ornaments. A battery-operated candle inside the lantern ensures a worry-free glow throughout the holiday meal.
This is a practical choice for homes with pets or small children who might bump the table.
- Choose a lantern with glass panes to amplify the light across the table.
- Fill the bottom of the lantern with small ornaments or faux snow for extra detail.
- Use an outdoor-rated lantern if the centerpiece will be used on a patio or porch.
Most people skip this: Tie a velvet ribbon to the top handle of the lantern to add a soft texture to the metal.
19. Clustered Glass Candle Centerpiece
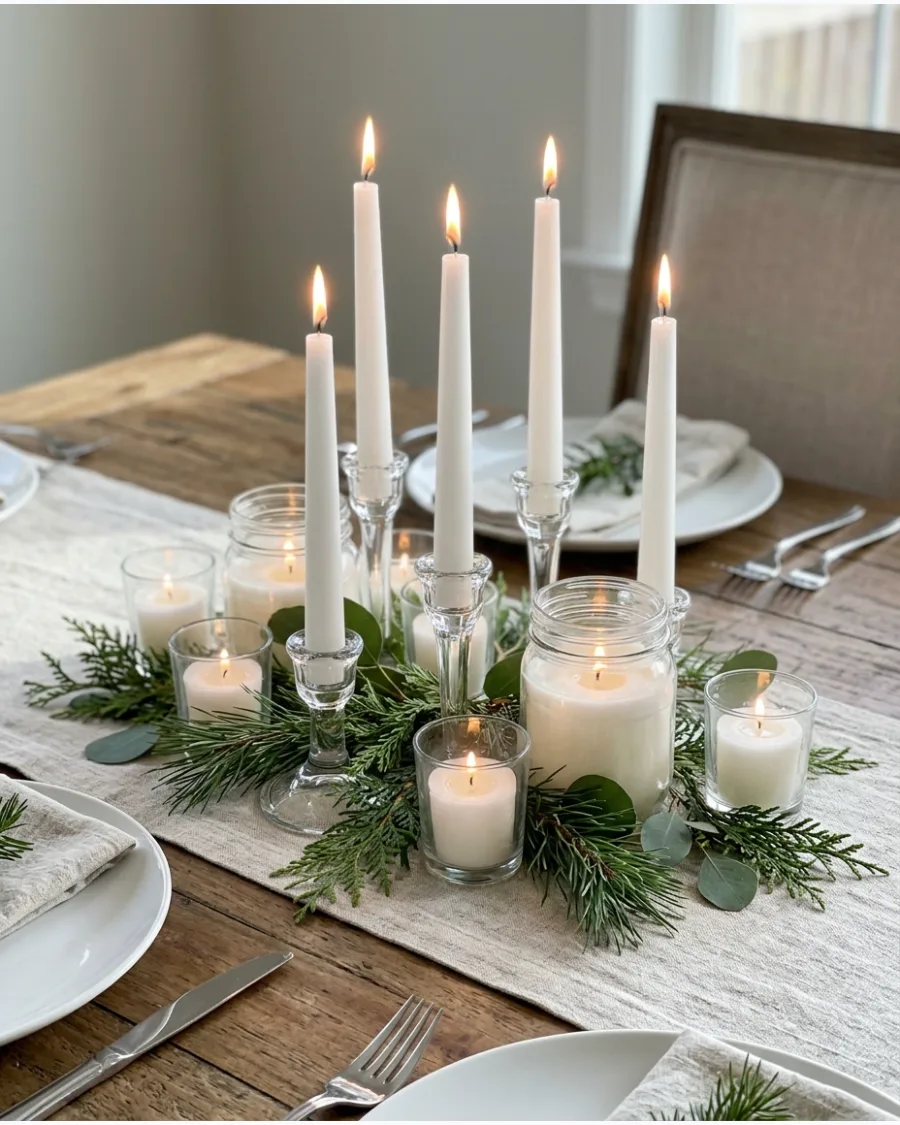
Using multiple clear glass holders creates a shimmering effect that brightens the entire room. Weave thin sprigs of rosemary or spruce between various glass cylinders to connect the individual pieces. The transparency of the glass keeps the table feeling open and airy even with a large number of candles.
It is a simple way to achieve a professional-looking sparkle with very little effort.
- Mix different styles of glass, like ribbed and smooth, to add subtle texture.
- Use white candles to keep the look monochromatic and modern.
- Cluster the glass in the center for a round table or spread it out for a long one.
Best shortcut: Buy glass cylinders in bulk sets to get a variety of heights at a lower price point.
20. Candle and Christmas Ornament Centerpiece
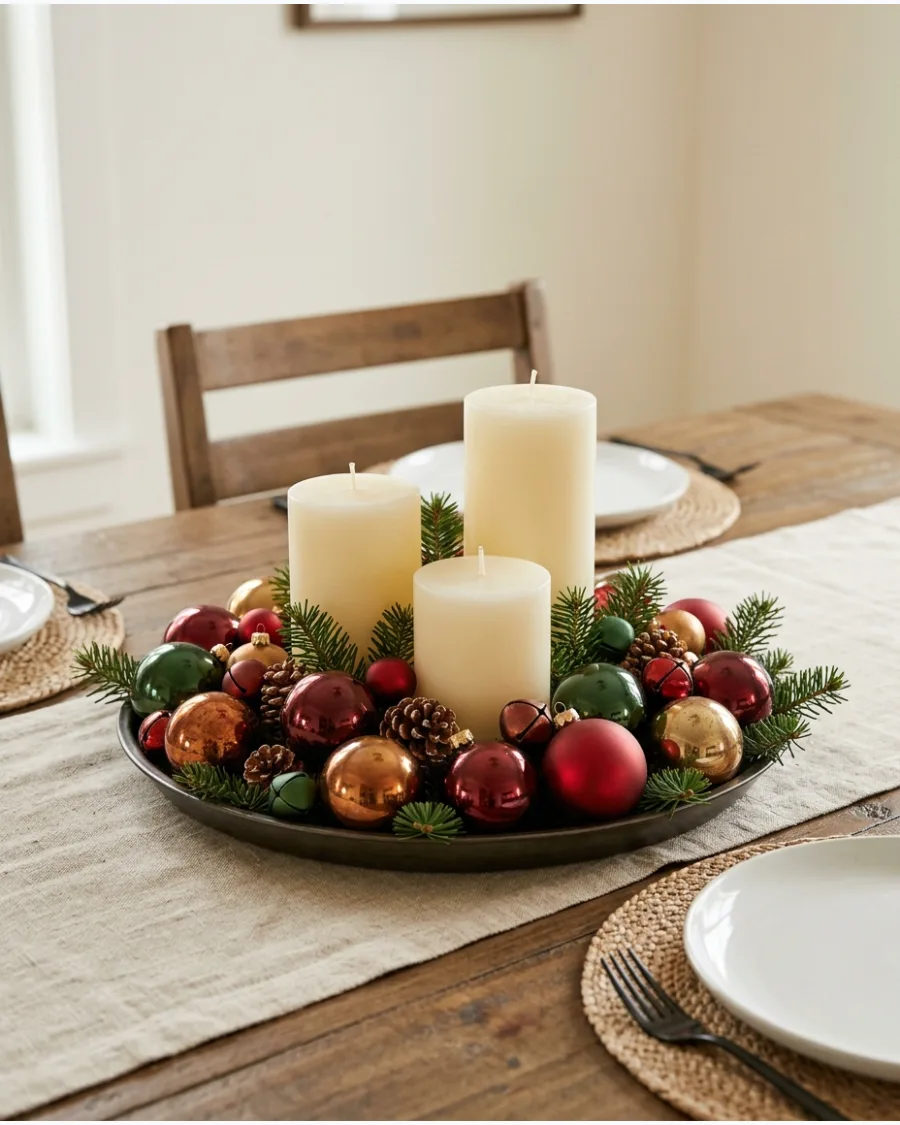
Mixing candles with ornaments is an easy way to carry your tree’s color theme to the dining table. Fill a shallow tray with white pillar candles and nestle ornaments of different sizes and textures around them. Using a single color like silver or gold keeps the look cohesive and upscale.
A few evergreen needles tucked into the edges will soften the transition between the tray and the table.
- Use shatterproof ornaments if the centerpiece will be handled frequently.
- Mix matte, shiny, and glitter finishes to create depth within the same color.
- Ensure the ornaments are heavy enough to stay in place without rolling.
Quick win: Use a small dab of hot glue or clear tape to secure ornaments together if they keep shifting.
FRUIT AND BOTANICAL CHRISTMAS CENTERPIECES
21. Pomegranate and Evergreen Centerpiece
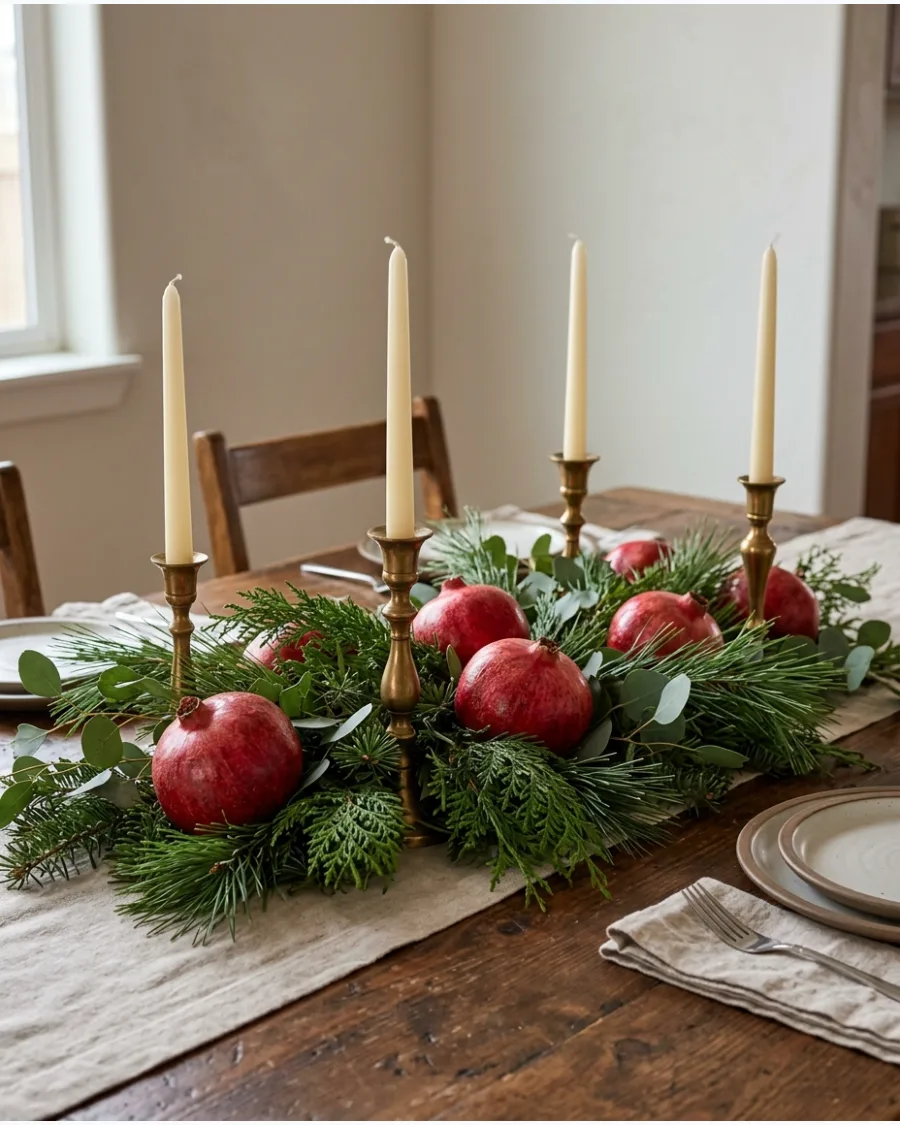
Layering fresh pomegranates into a base of pine and eucalyptus provides a deep, natural red that plastic ornaments cannot mimic. The weight of the fruit helps hold the greenery in place without needing floral foam.
Place the pomegranates in small clusters of three to create visual weight and a more professional look. Real fruit adds a subtle scent and a sophisticated texture to the table.
- Sourcing: Pick up fresh pomegranates and mixed greens from a local grocery store or florist.
- Setup: Lay a greenery base first, then nestle fruit into the gaps to secure the branches.
- Adaptation: Use faux pomegranates for a version that lasts the entire month without spoiling.
Quick win: Rub a tiny bit of vegetable oil on the pomegranate skins to give them a soft, natural glow.
22. Red Apple Christmas Centerpiece
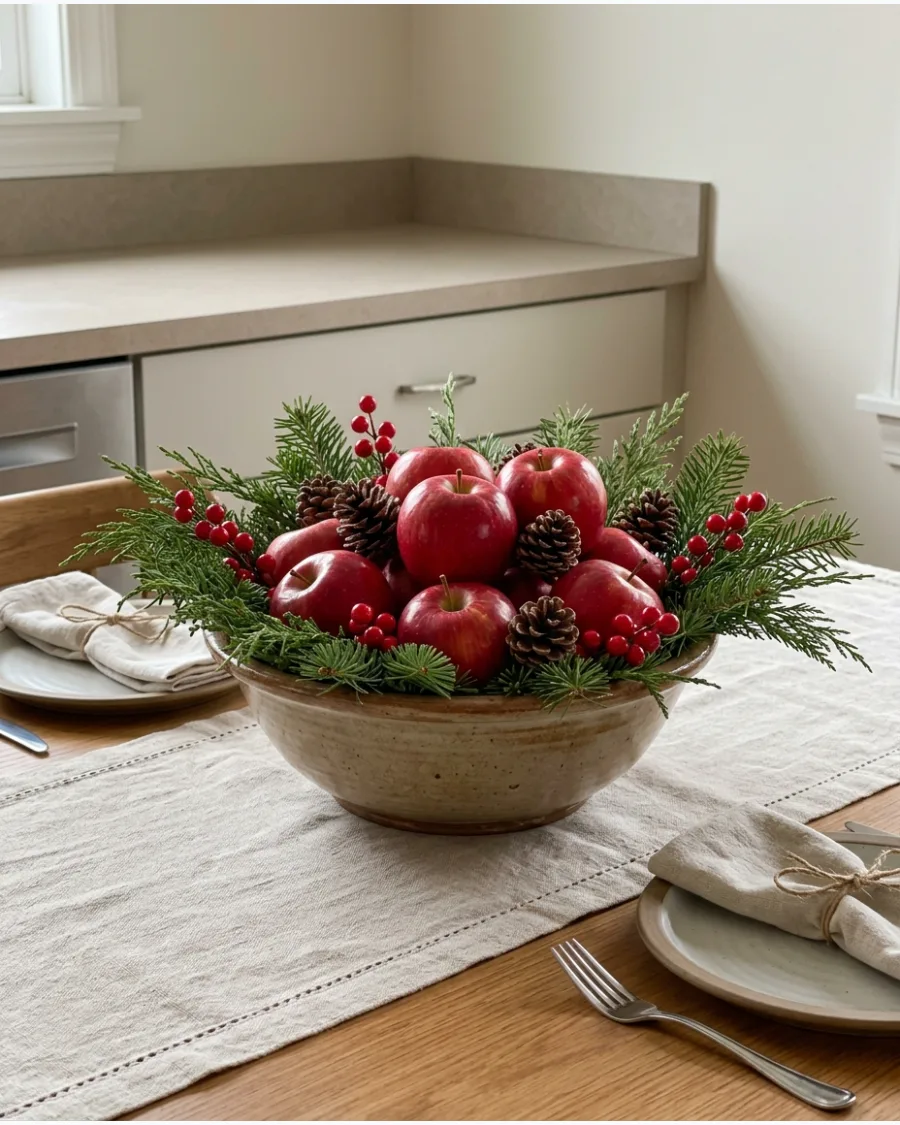
A simple ceramic bowl filled with bright red apples offers a classic look that fits almost any kitchen or dining space. Tucking small sprigs of cedar and a few pinecones between the fruit fills the gaps and adds height.
Polishing the apples with a soft cloth before arranging them ensures they catch the light from nearby candles. This approach is much more practical than complex floral arrangements.
- Sourcing: Use standard Red Delicious or Gala apples from the produce aisle for a budget-friendly option.
- Setup: Use a heavy ceramic or stone bowl to prevent the arrangement from tipping as it fills up.
- Adaptation: Switch to a wooden dough bowl for a more textured, earthy feel in a casual dining room.
Best shortcut: Use apples of slightly different sizes to make the bowl look naturally abundant rather than uniform.
23. Green Apple and Cedar Centerpiece
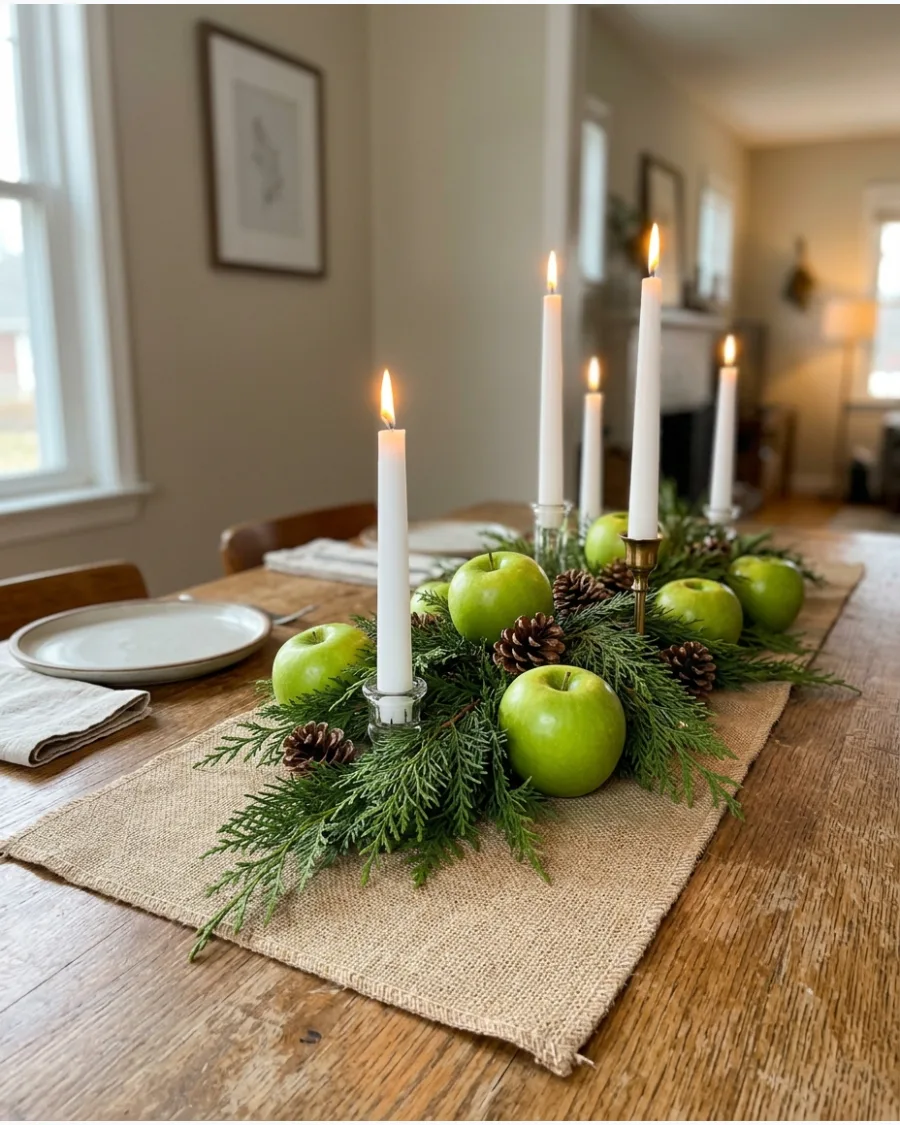
Green apples provide a crisp, modern alternative to traditional red decor and look stunning against dark cedar branches. Adding white pillar candles into the mix breaks up the green tones and provides a warm glow.
Group the apples in the center of the table and let the cedar branches trail out toward the ends of the runner. It is a refreshing color palette that feels clean and sophisticated.
- Sourcing: Granny Smith apples provide the most vibrant green color for this monochromatic look.
- Setup: Place candles in glass holders first to keep wax off the fruit and greenery.
- Adaptation: Add silver glass ornaments to lean into a cool-toned winter theme for a formal dinner.
Most people skip this: Anchor the trailing cedar branches with small clear adhesive hooks if the table is in a high-traffic area.
24. Pear and Evergreen Christmas Centerpiece
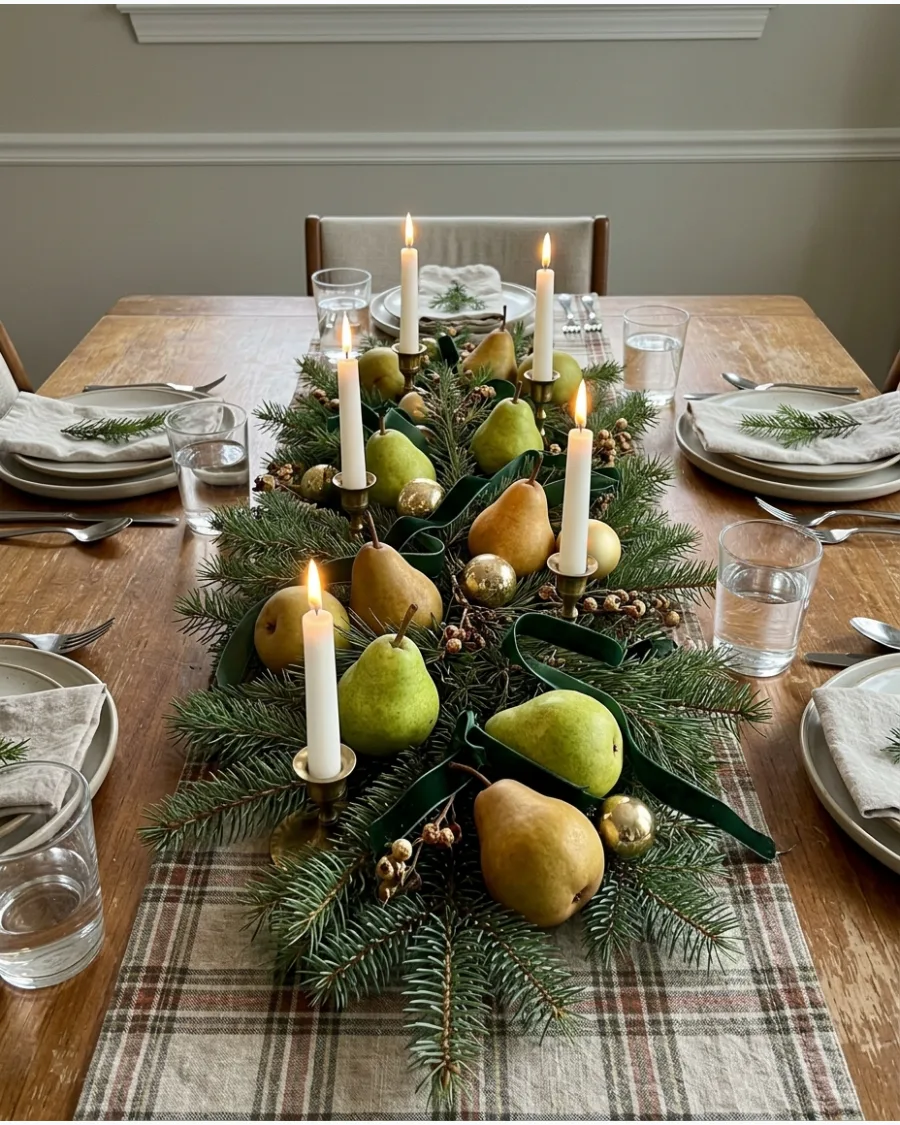
Golden or green pears have an elegant shape that elevates a simple greenery runner. Placing them sporadically between evergreen branches creates a sense of movement across the dining surface.
Tie a thin velvet ribbon around the stem of each pear to add a high-end designer touch. The matte finish of the pear skin contrasts beautifully with the glossy needles of fresh pine.
- Sourcing: Look for Bosc or Anjou pears for their unique shapes and muted, elegant colors.
- Setup: Space pears about 6 to 8 inches apart along the center of the table for a balanced look.
- Adaptation: Use gold-painted faux pears for a more formal, metallic aesthetic that doesn't bruise.
Quick win: Choose pears that are still slightly firm so they hold their shape and color for the duration of the holiday week.
25. Orange Pomander Christmas Centerpiece
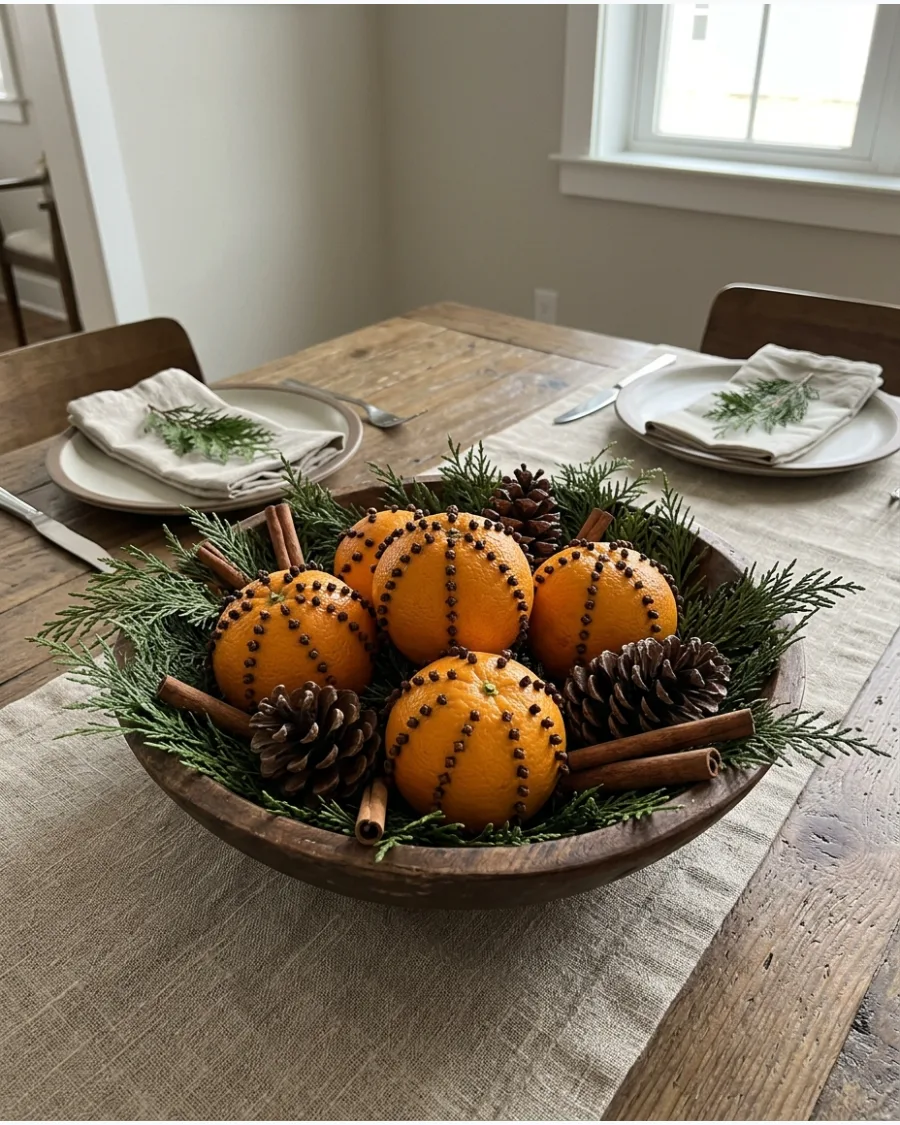
Studding oranges with whole cloves creates a centerpiece that doubles as a natural room deodorizer. These pomanders look best when piled in a simple bowl or glass hurricane with cinnamon sticks and cedar.
Poke holes in the orange skin with a toothpick before inserting the cloves to protect your fingers and keep the patterns neat. This is a time-tested tradition that feels much more personal than store-bought decor.
- Sourcing: Buy whole cloves in bulk online or at a warehouse store to save on costs.
- Setup: Create various patterns like stripes, swirls, or stars with the cloves for visual interest.
- Adaptation: Place individual pomanders at each place setting as a fragrant and edible party favor.
Best shortcut: Use a rubber band around the orange as a guide to keep your clove lines perfectly straight.
26. Cranberry and Evergreen Glass Vase Centerpiece
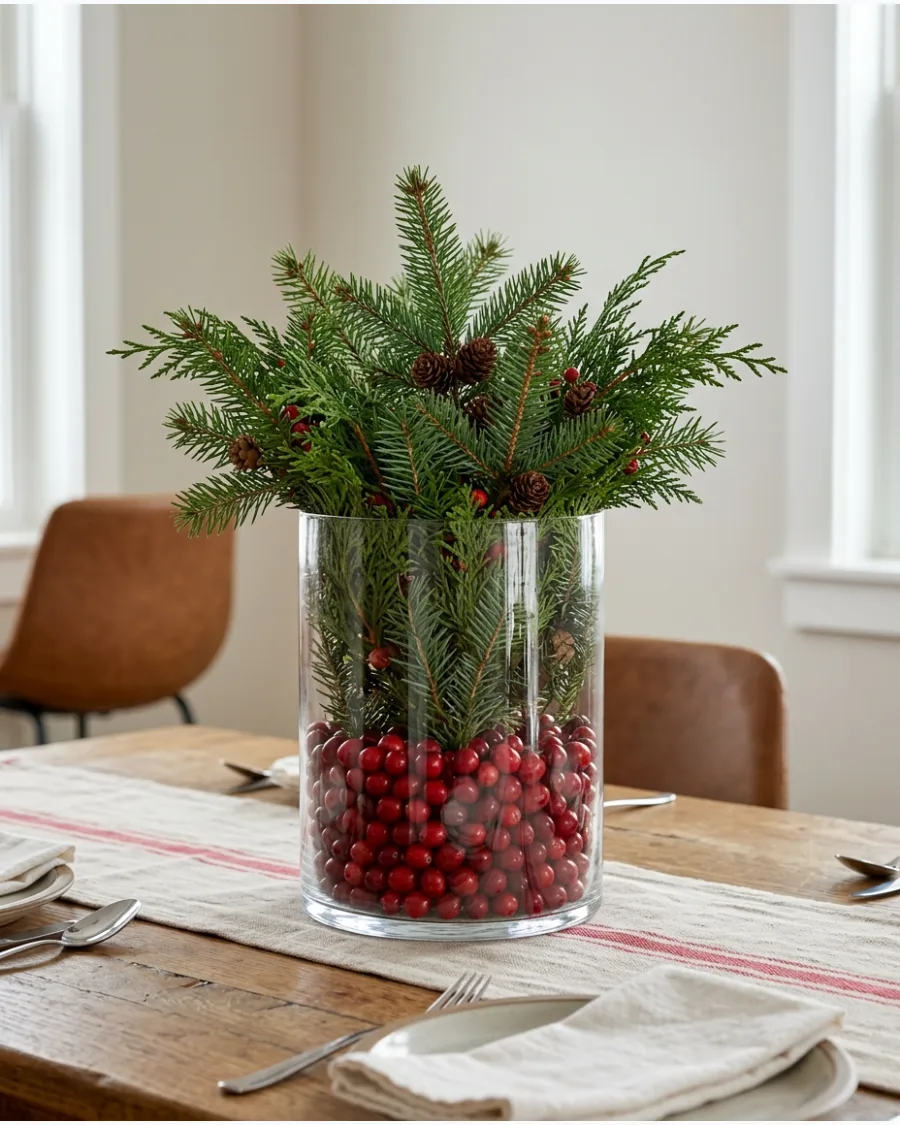
Filling the base of a clear glass vase with fresh cranberries provides a sturdy and colorful anchor for evergreen stems. The berries hide the messy ends of the branches and add a pop of saturated red to the water.
Cut your evergreen branches at different heights to create a full, layered look within the vase. This project takes less than five minutes but looks like it came from a high-end florist.
- Sourcing: One or two bags of fresh cranberries from the grocery store is enough for several small vases.
- Setup: Add water to the vase to keep the greenery fresh and help the berries float or settle naturally.
- Adaptation: Use faux berries and no water if you want the arrangement to stay out for the entire season.
Most people skip this: Rinse the cranberries in cold water before adding them to the vase to remove any dust or debris that might cloud the water.
27. Mixed Christmas Fruit Bowl Centerpiece
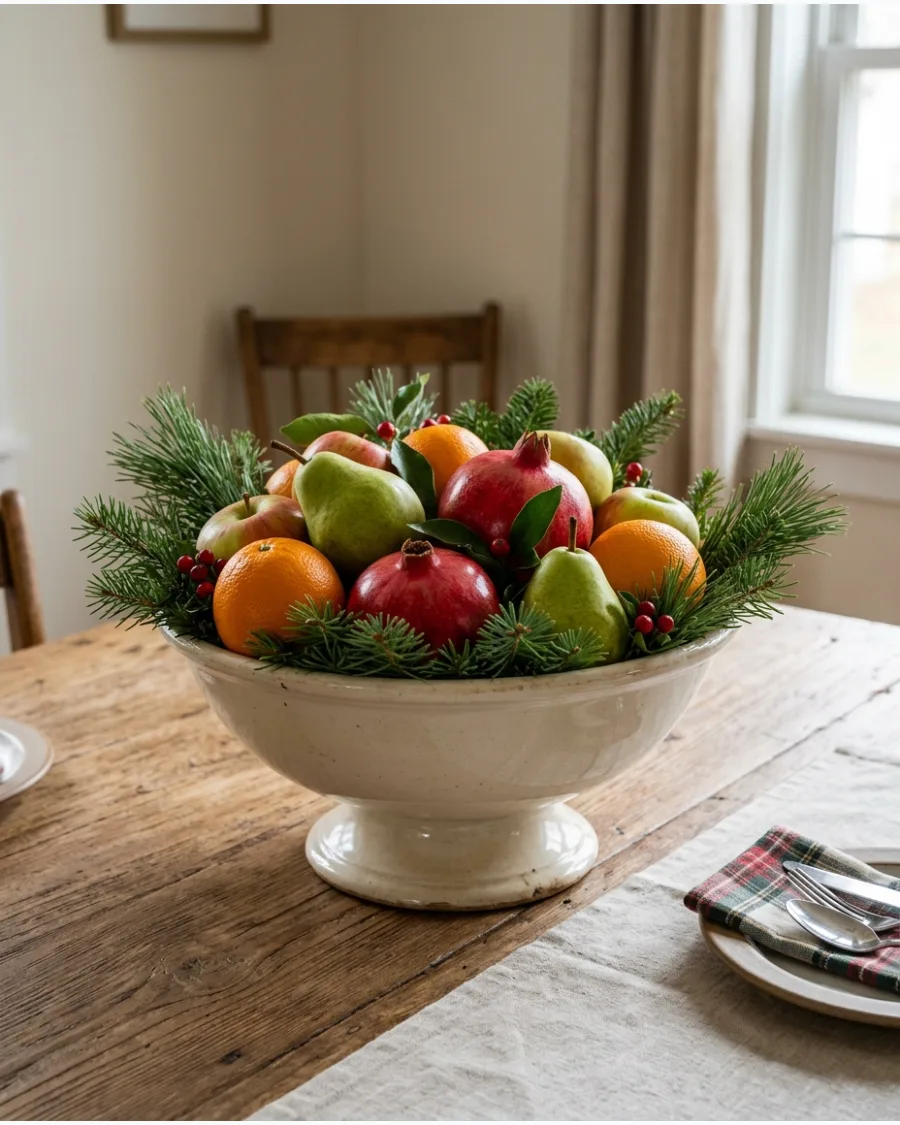
An abundant bowl of mixed fruits like apples, pears, and oranges creates a lush, old-fashioned holiday feel. Layering the largest fruits at the bottom and tucking smaller berries and greens into the top ensures the arrangement looks full.
Use a footed bowl or a pedestal stand to give the centerpiece height and make it the focal point of the table. It is a practical way to display holiday snacks while decorating at the same time.
- Sourcing: Choose a mix of 3-4 different fruit types to create variety in color and texture.
- Setup: Start with the largest fruit at the bottom and fill gaps with smaller items like nuts or berries.
- Adaptation: Add a few sprigs of dried baby's breath for a snowy, delicate effect among the fruit.
Quick win: Use a few crumpled paper towels at the bottom of the bowl to add volume so you don't need as much fruit to make it look full.
28. Dried Citrus and Cinnamon Bowl Centerpiece
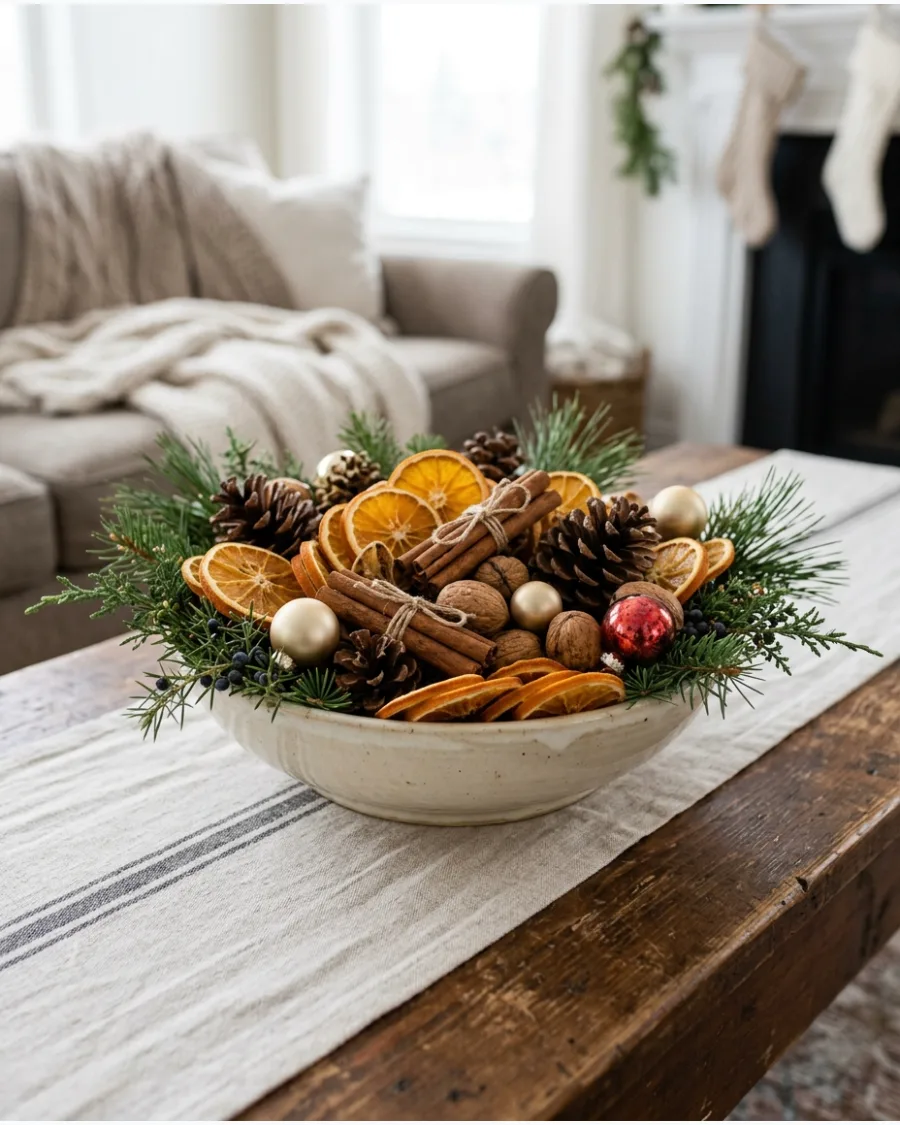
Dried orange slices and cinnamon sticks offer a rustic, textured look that lasts much longer than fresh fruit. Mixing these elements with walnuts and small ornaments in a decorative bowl creates a centerpiece that feels warm and inviting.
Scatter a few of the dried slices onto the tablecloth around the bowl to make the arrangement feel more expansive. This is an excellent choice for a coffee table where a tall arrangement might block the view.
- Sourcing: Dry your own citrus in the oven or buy pre-dried slices from a craft store.
- Setup: Arrange the cinnamon sticks in small bundles of three tied with twine for better visual impact.
- Adaptation: Add a string of battery-operated fairy lights to the bowl for a soft evening glow.
Best shortcut: Dry your citrus slices in a low-temperature oven (200°F) for 3 hours to get a consistent, translucent look.
29. Red Roses and Evergreen Christmas Centerpiece
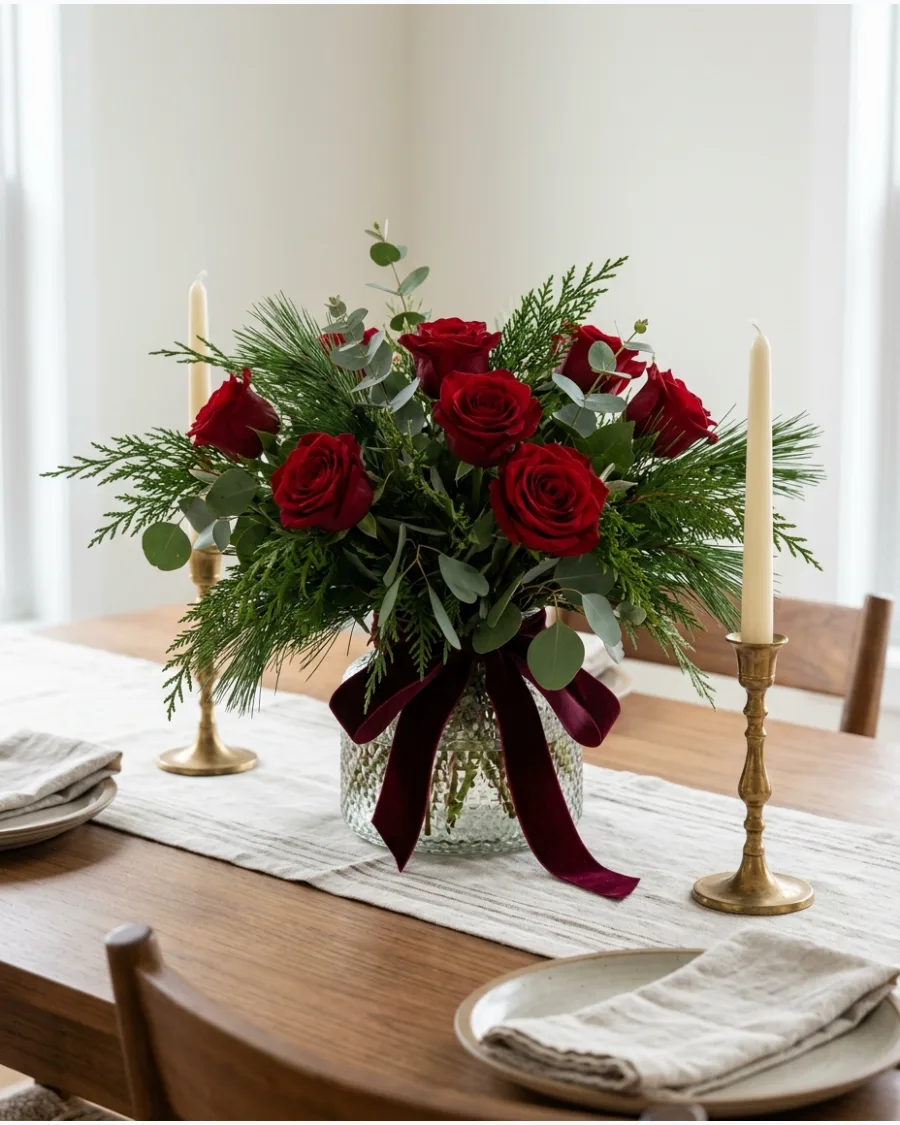
Combining the softness of red roses with the sharp texture of pine and cedar creates a sophisticated and romantic holiday table. A low vase keeps the flowers at eye level so guests can easily talk across the table.
Strip the leaves off the rose stems below the water line to prevent bacteria growth and keep the flowers fresh longer. The deep red against dark green is a timeless color combination that always works.
- Sourcing: Purchase roses from a local florist or grocery store a day or two before your event.
- Setup: Use a floral frog or a grid of clear tape across the vase opening to keep the heavy rose heads in place.
- Adaptation: Use high-quality silk roses for a permanent arrangement you can reuse every year.
Most people skip this: Recut the rose stems at a 45-degree angle under water to ensure they can hydrate properly in the dense greenery.
30. White Flowers and Winter Greenery Centerpiece
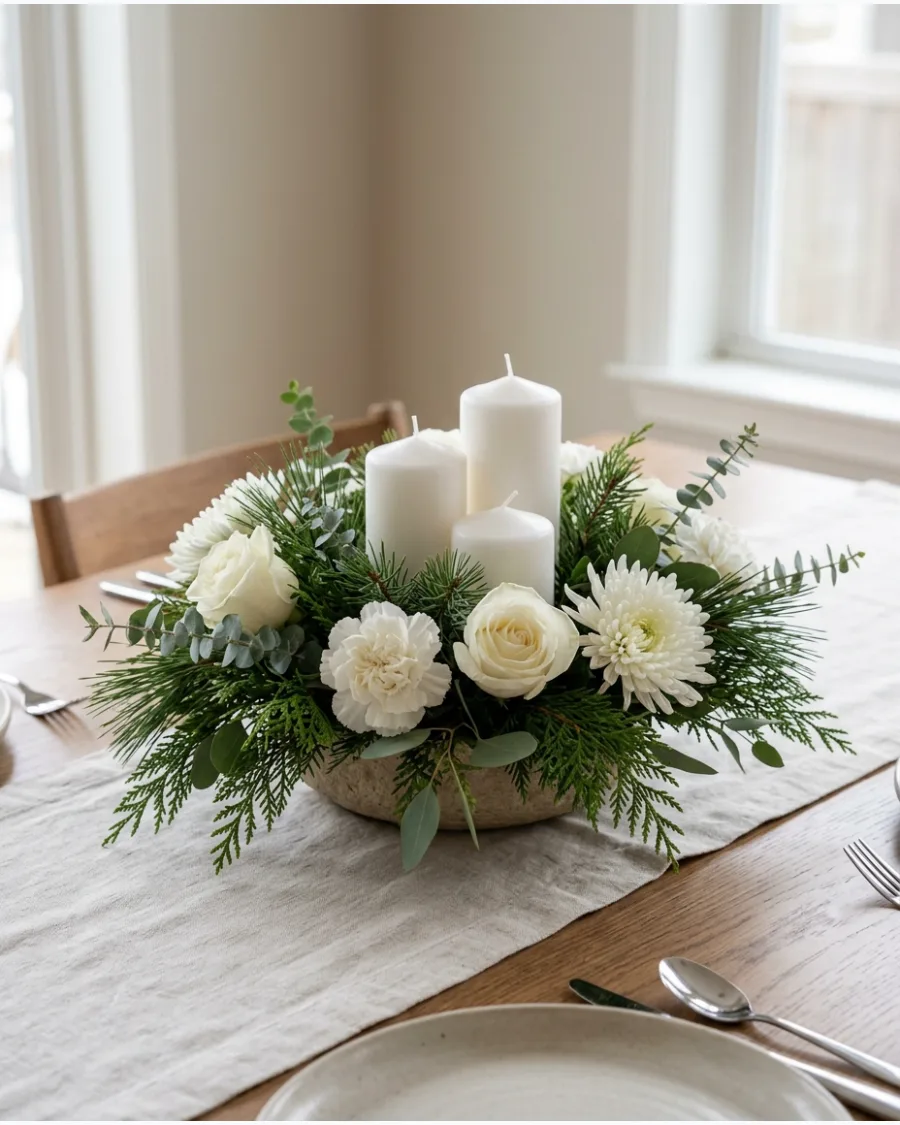
White flowers like carnations or roses paired with winter greens create a clean, snowy aesthetic. This neutral palette works perfectly in modern homes or for those who prefer a more subtle holiday look.
Incorporate different textures of greenery, like feathery cedar and broad eucalyptus leaves, to give the white flowers more depth. Adding a few white taper candles nearby completes the elegant winter scene.
- Sourcing: White carnations are very affordable and can last up to two weeks with regular water changes.
- Setup: Place the tallest greenery in the center of the pitcher and work the flowers in around the base.
- Adaptation: Add silver-sprayed pinecones or ornaments for a more icy winter feel.
Quick win: If your white flowers start to droop, trim the stems and place them in warm water to help them revive quickly.
RUSTIC AND FARMHOUSE DIY CHRISTMAS CENTERPIECES
31. Wooden Dough Bowl Christmas Centerpiece
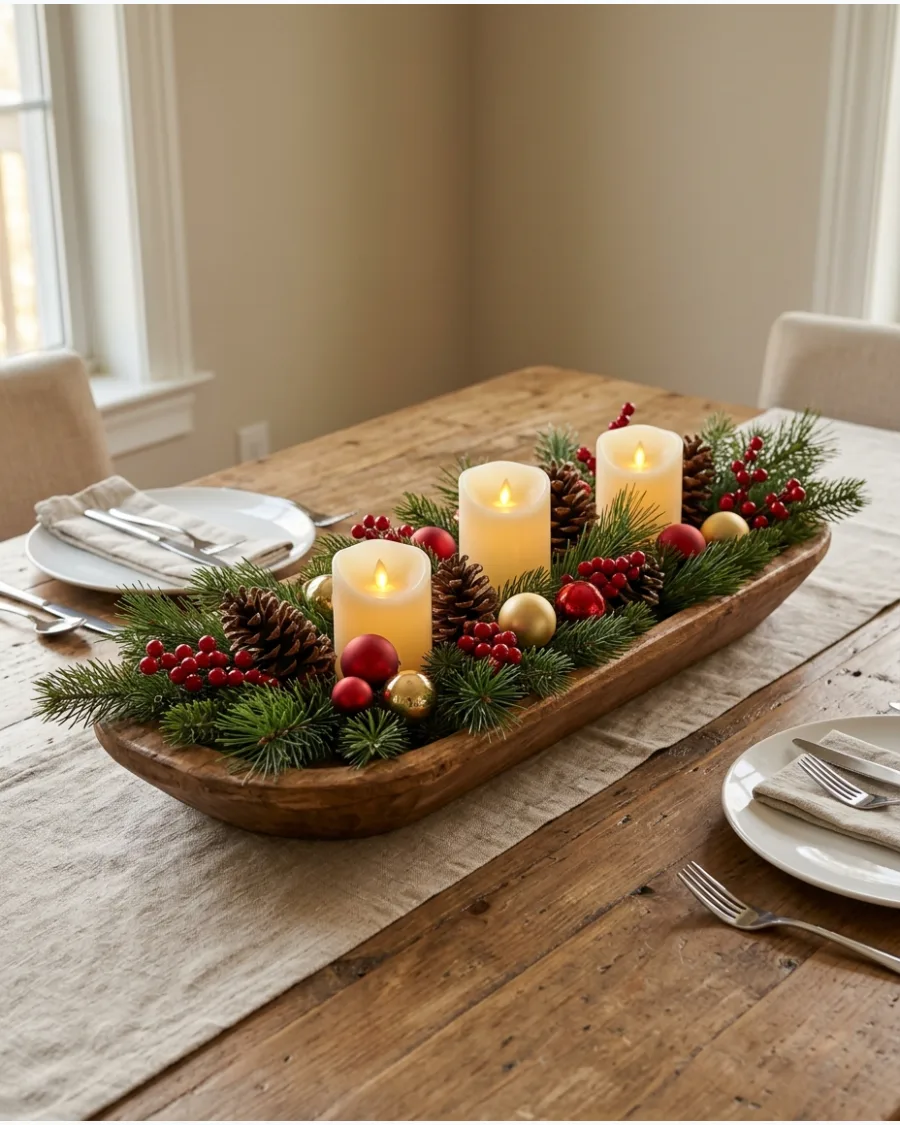
A long dough bowl provides a sturdy, low-profile base that will not block conversation across the table. Fill the bottom with floral foam or newspaper to give the greenery some height and stability.
Tuck battery-operated fairy lights deep into the pine branches to create a soft glow that highlights the wood grain. This setup works best on long rectangular surfaces where the bowl can span the middle third of the table.
- Expect to spend about 30 minutes on assembly with a budget of 20 to 40 dollars depending on the bowl size.
- Place the bowl in the center of the table first and build the arrangement inside it to avoid moving a heavy finished piece.
- Swap the ornaments for white pumpkins or dried leaves to transition this base into a fall centerpiece next year.
Quick win: Use floral wire to secure heavy pinecones to the bowl's edge so they do not roll out when the table is bumped.
32. Galvanized Metal Tray Christmas Centerpiece
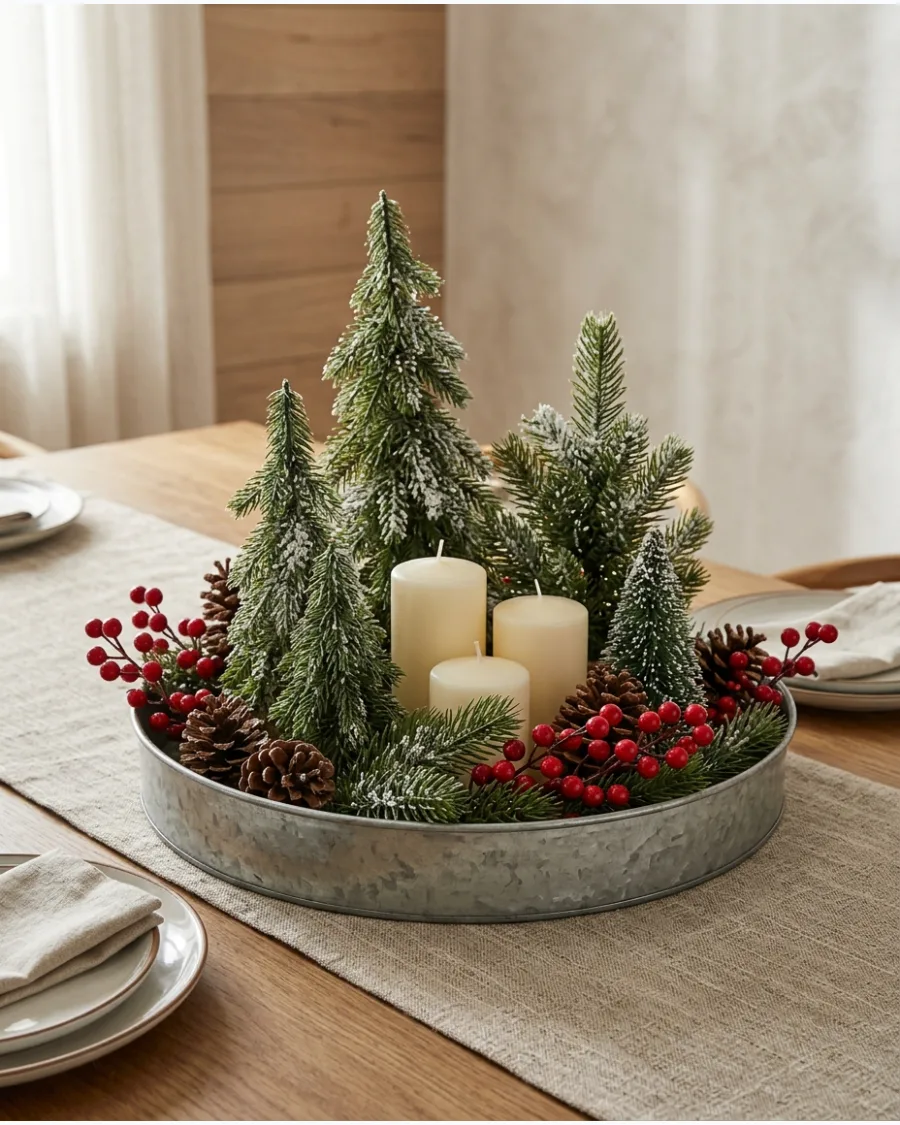
Galvanized metal adds a cool, industrial texture that balances the warmth of holiday greens. Use a round or rectangular tray to group mismatched items like bottle brush trees and white candles into one cohesive unit.
Layer a handful of faux snow or white salt at the bottom of the tray to hide the bases of your miniature trees. The high sides of the tray make it easy to move the entire display when you need to clear the table for dinner.
- Trays can be found at most craft stores for under 15 dollars and take 10 minutes to style.
- Center the tallest candle or tree in the middle and work outward with smaller items for a balanced look.
- Use a tray with handles to make this a portable centerpiece for outdoor patio tables or coffee tables.
Best shortcut: Spray the metal tray with a matte clear coat if you plan to use real berries to prevent juice stains on the metal.
33. Wooden Crate Christmas Centerpiece
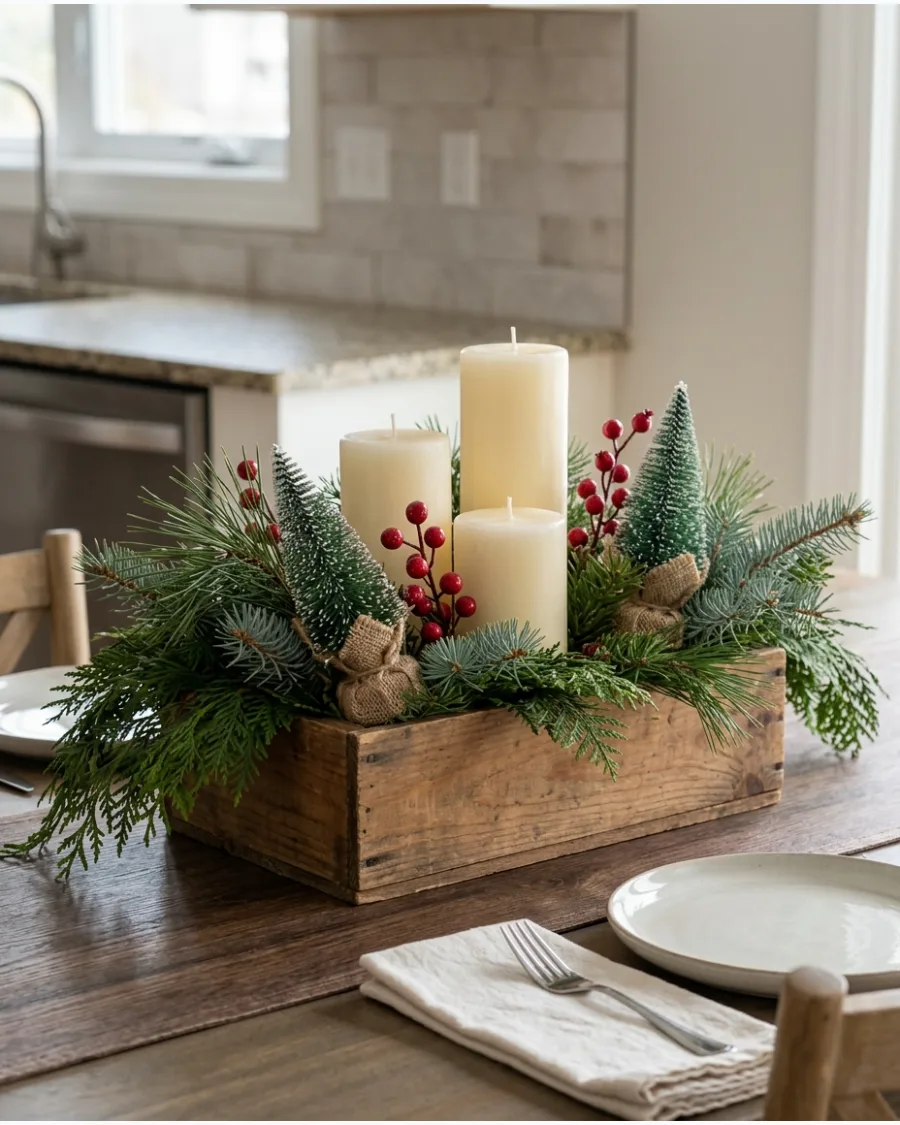
Small wooden crates offer a boxed-in look that feels organized and intentional. Line the crate with plastic wrap before adding damp floral foam if you want to keep real cedar or pine fresh for weeks.
Let the longest branches drape over the sides of the wood to soften the hard rectangular lines of the crate. This arrangement looks particularly good on kitchen islands or breakfast nooks where a casual vibe is preferred.
- Small crates are inexpensive and can be painted or stained in about an hour to match your room decor.
- Keep the height of the crate and greenery under 12 inches to ensure everyone can see each other across the island.
- Remove the holiday berries and add white flowers to keep the crate looking fresh through the rest of winter.
Most people skip this: Sand the bottom of the crate or add felt pads to prevent the rough wood from scratching your table surface.
34. Rustic Lantern and Pinecone Centerpiece
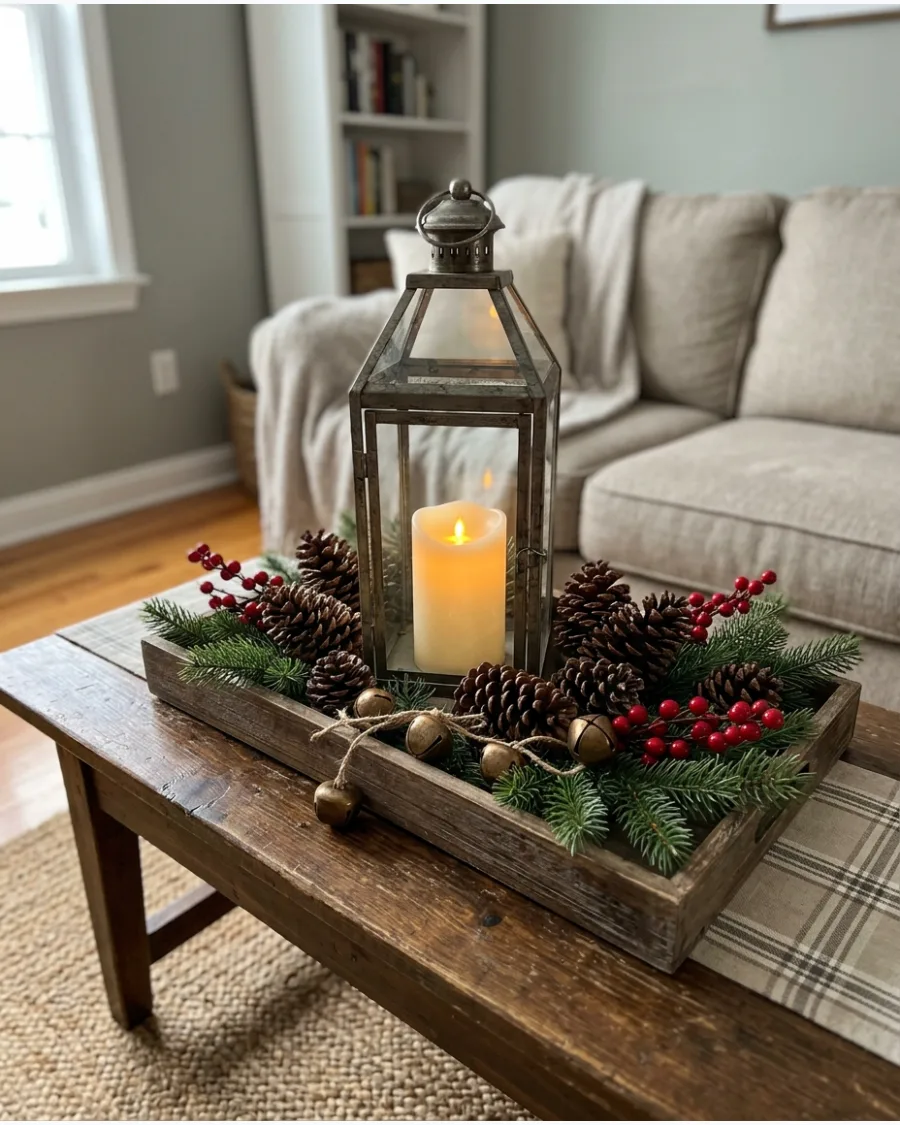
A central lantern acts as a strong anchor for a sprawling arrangement of natural elements. Surround the base with oversized pinecones and sprigs of holly to create a lush, nested effect.
Place a battery-operated candle inside the glass to avoid soot buildup and heat damage to the surrounding greenery. This classic look fits perfectly on a coffee table or a large entry console where it can be seen from all sides.
- Lanterns are a versatile investment that can be reused for every season with different filler.
- Secure the lantern to the tray with a small piece of poster putty to keep it from sliding during transport.
- Add a few silver ornaments among the pinecones to reflect the light from the candle for extra sparkle.
Quick win: Use a lantern with a timer function so the centerpiece lights up automatically every evening at the same time.
35. Mini Christmas Tree Farm Centerpiece
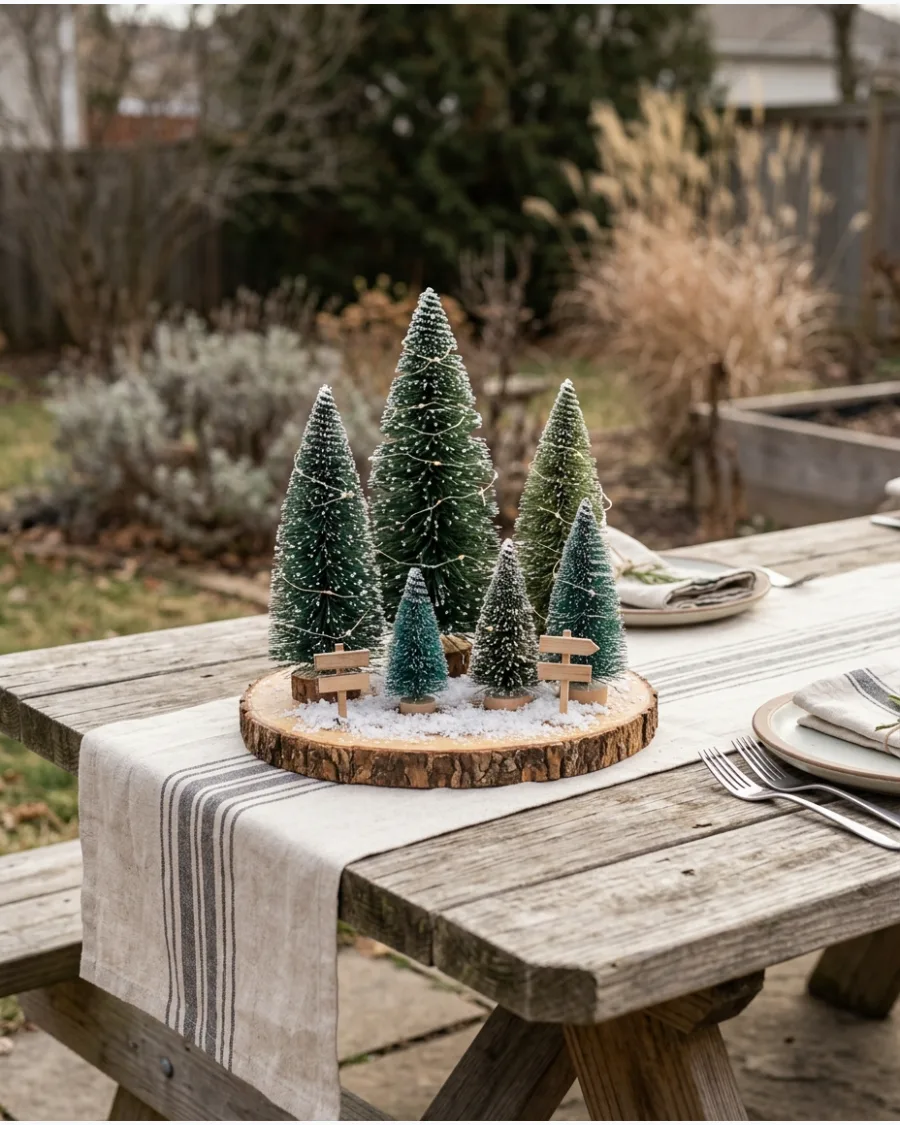
Creating a miniature landscape brings a playful, whimsical energy to the dining room. Use a narrow board or a long wood slice to line up trees of varying textures, such as wood, felt, and bristle.
Scatter a light dusting of faux snow across the base to tie the different tree styles together into one scene. This linear design is excellent for narrow tables where space for large round arrangements is limited.
- Bottle brush trees are very affordable and can be collected over time in various colors.
- Space the trees unevenly and in small clusters of three to make the forest look more natural.
- Use a runner underneath the board to catch any loose faux snow or glitter from the trees.
Best shortcut: Use a glue dot on the bottom of each tree to keep the farm from tipping over if the table is moved.
36. Farmhouse Red Truck Christmas Centerpiece
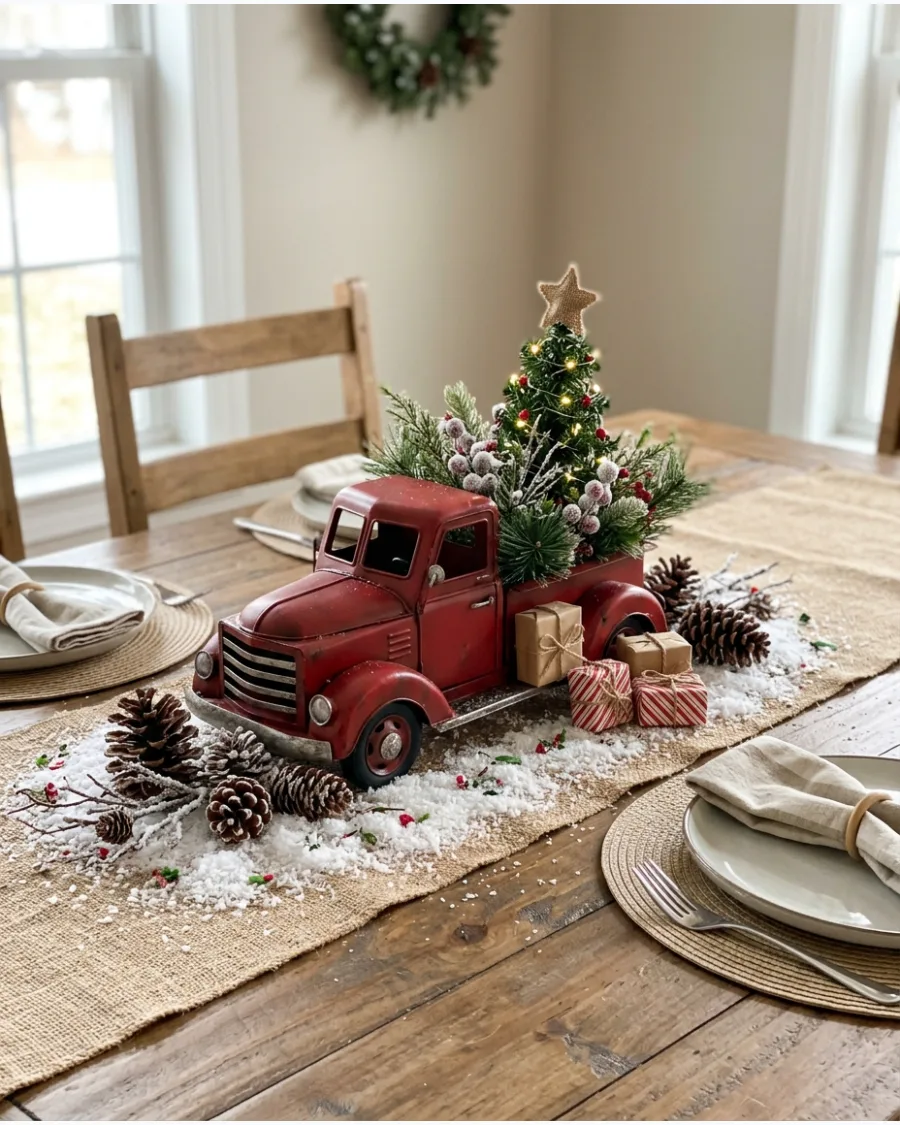
A vintage-style red truck is a staple of farmhouse holiday decor that works as a great conversation starter. Fill the truck bed with small sprigs of real boxwood or tiny wrapped boxes to add realistic detail.
Set the truck on a bed of cotton batting or faux snow to make it look like a winter scene rather than just a toy on a table. This centerpiece is a hit in homes with children or for casual holiday brunches.
- Decorative trucks are widely available during the holidays for 15 to 25 dollars.
- Position the truck in the center of the table and surround it with a few larger pinecones to ground the display.
- Switch the truck bed contents to small hearts or shamrocks to reuse the truck for other holidays.
Most people skip this: Point the truck at a slight angle rather than straight ahead to create a more natural, dynamic look for the display.
37. Plaid and Evergreen Christmas Centerpiece
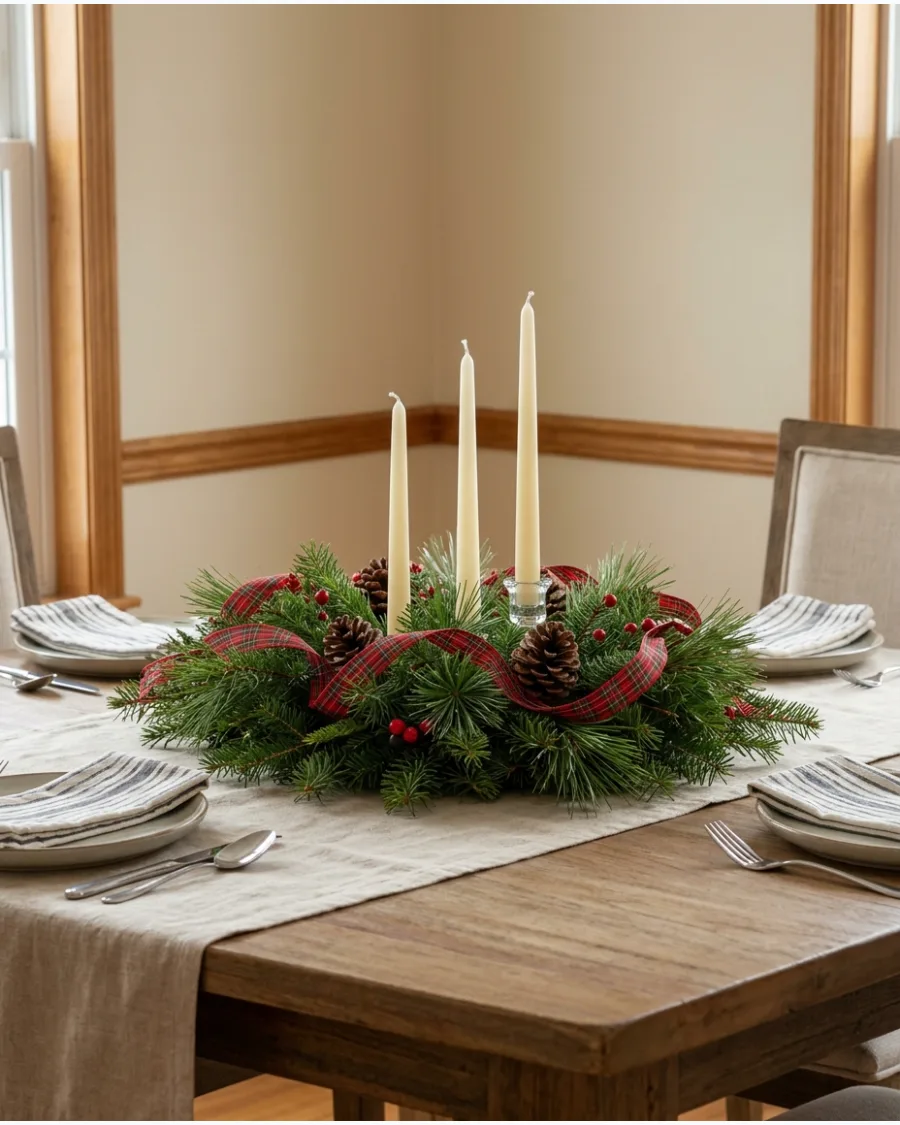
Tartan plaid ribbon adds an instant traditional feel to simple greenery. Weave the ribbon through a low mound of cedar and pine, letting the loops peek out at different heights.
Use wired ribbon so you can shape the bows and folds to stay exactly where you want them among the branches. This style provides a pop of color that coordinates well with red or green place settings.
- One roll of wired ribbon is enough for a large centerpiece and usually costs under 10 dollars.
- Cut the ends of the ribbon into a V-shape or dovetail for a clean, professional finish.
- Mix two different plaid patterns if they share the same color palette to add more visual interest.
Quick win: Match the plaid pattern to your napkins or table runner for a high-end, professionally designed look.
38. Wood Slice Candle Christmas Centerpiece
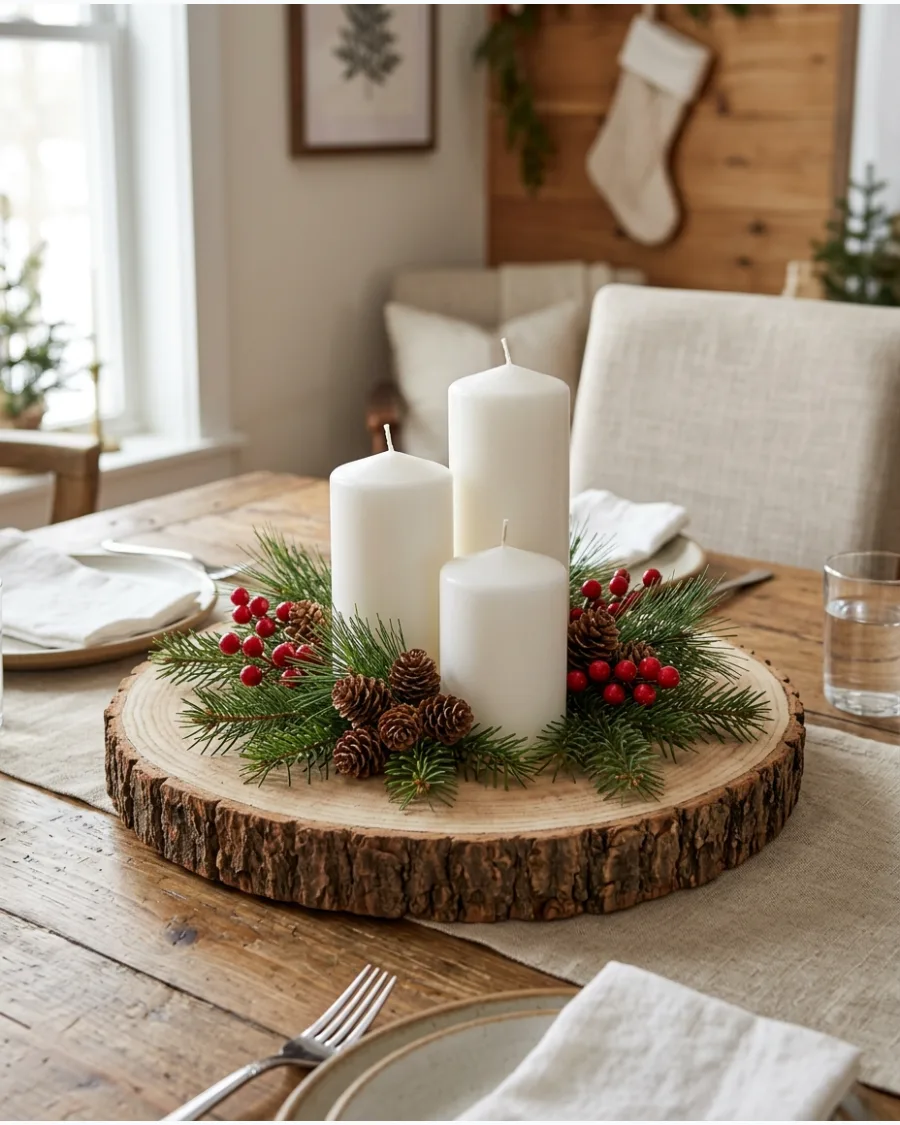
A large wood slice provides a natural, organic platform for a cluster of candles. Group three pillar candles of different heights in the center to create a tiered focal point.
Incorporate small sprigs of rosemary or pine around the base of the candles to bring a fresh scent to the table. The exposed bark edge adds a rugged texture that works well in modern or traditional homes.
- Natural wood slices can be purchased pre-sanded and leveled, saving you significant DIY effort.
- Keep the greenery away from the candle wicks to ensure the arrangement is safe to light.
- Use unscented candles if you are placing this on a dining table so the wax smell does not interfere with the meal.
Best shortcut: If the wood slice is wobbly, stick a few adhesive felt bumpers on the bottom to level it out and protect your furniture.
39. Vintage Sled Miniature Christmas Centerpiece
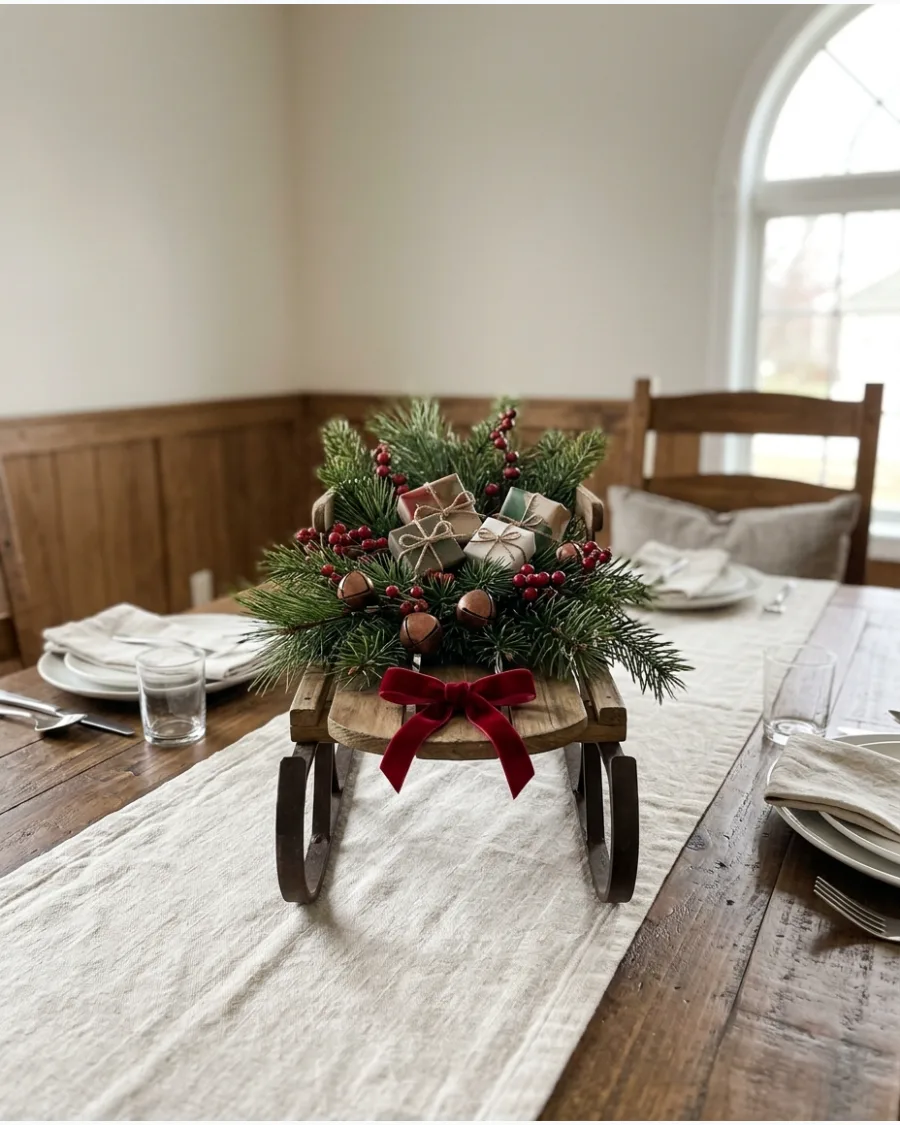
A decorative miniature sled creates a unique, elevated base for a holiday arrangement. Pile pine branches and small berries on top of the sled, securing them with a bit of twine or wire.
Tie a small velvet bow to the front of the sled to add a touch of softness to the wooden structure. This long, narrow piece is ideal for filling the center of a rectangular dining table without taking up too much width.
- Miniature sleds are common in holiday craft sections and are easy to store flat after the season.
- Face the front of the sled toward the main entrance of the room for the best visual impact.
- Spray the greenery with a light coat of glitter spray to give the sled a freshly-snowed-on appearance.
Most people skip this: Use the space underneath the sled runners to tuck in a few extra sprigs of greenery for a fuller, more integrated look.
40. Rustic Bell and Greenery Centerpiece
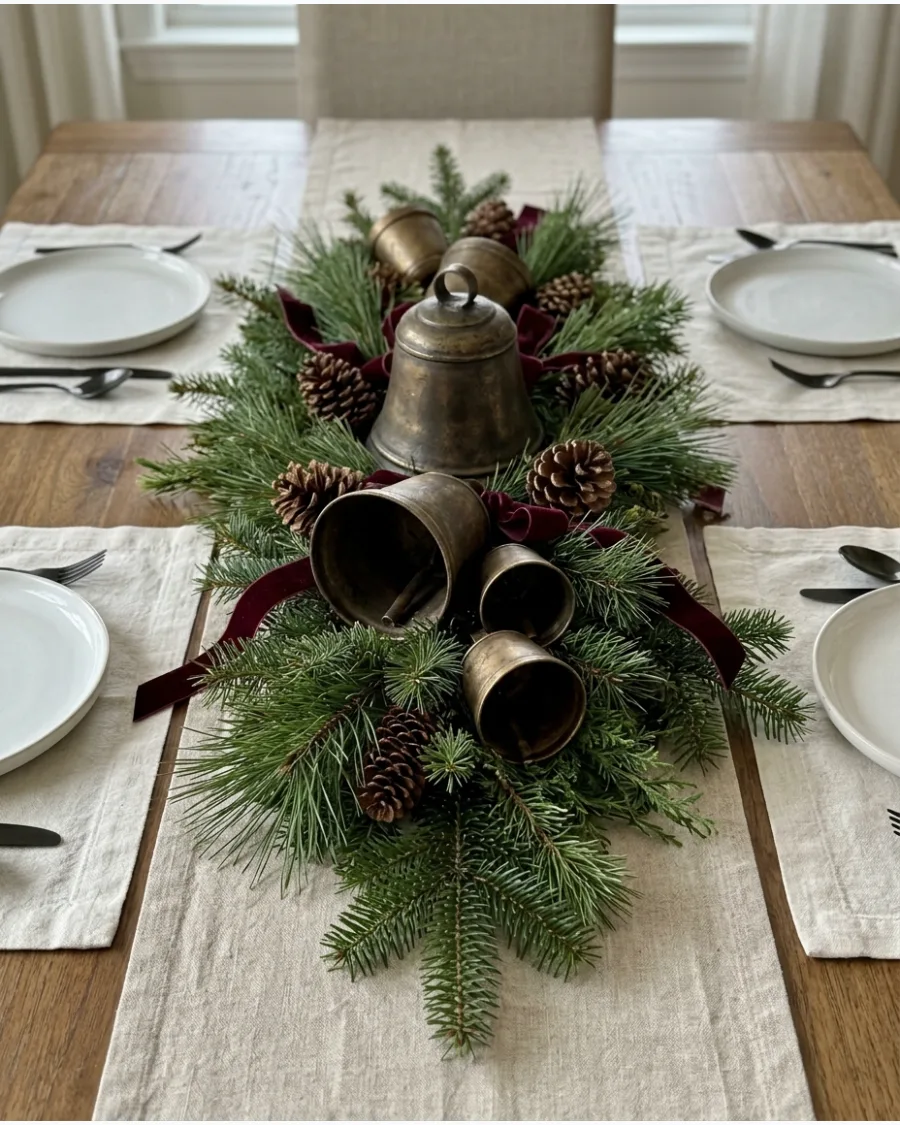
Oversized brass or bronze bells bring a metallic shine and a nostalgic sound to your holiday table. Nest the bells into a thick bed of mixed evergreens like pine and spruce.
Choose bells with a matte or antiqued finish to keep the look sophisticated rather than overly shiny or plastic. This arrangement feels grand and festive, making it perfect for a formal Christmas dinner.
- Antiqued bells can be found in sets and are durable enough to last for many years of use.
- Vary the sizes of the bells to create a more dynamic and less symmetrical arrangement.
- Use a heavy-duty wire cutter if you need to trim the loops off the bells to make them sit flat in the greenery.
Quick win: Tie a small piece of twine to each bell clapper to keep them from ringing loudly every time someone bumps the table.
EASY AND BUDGET DIY CHRISTMAS CENTERPIECES
41. Dollar Store Ornament Bowl Centerpiece
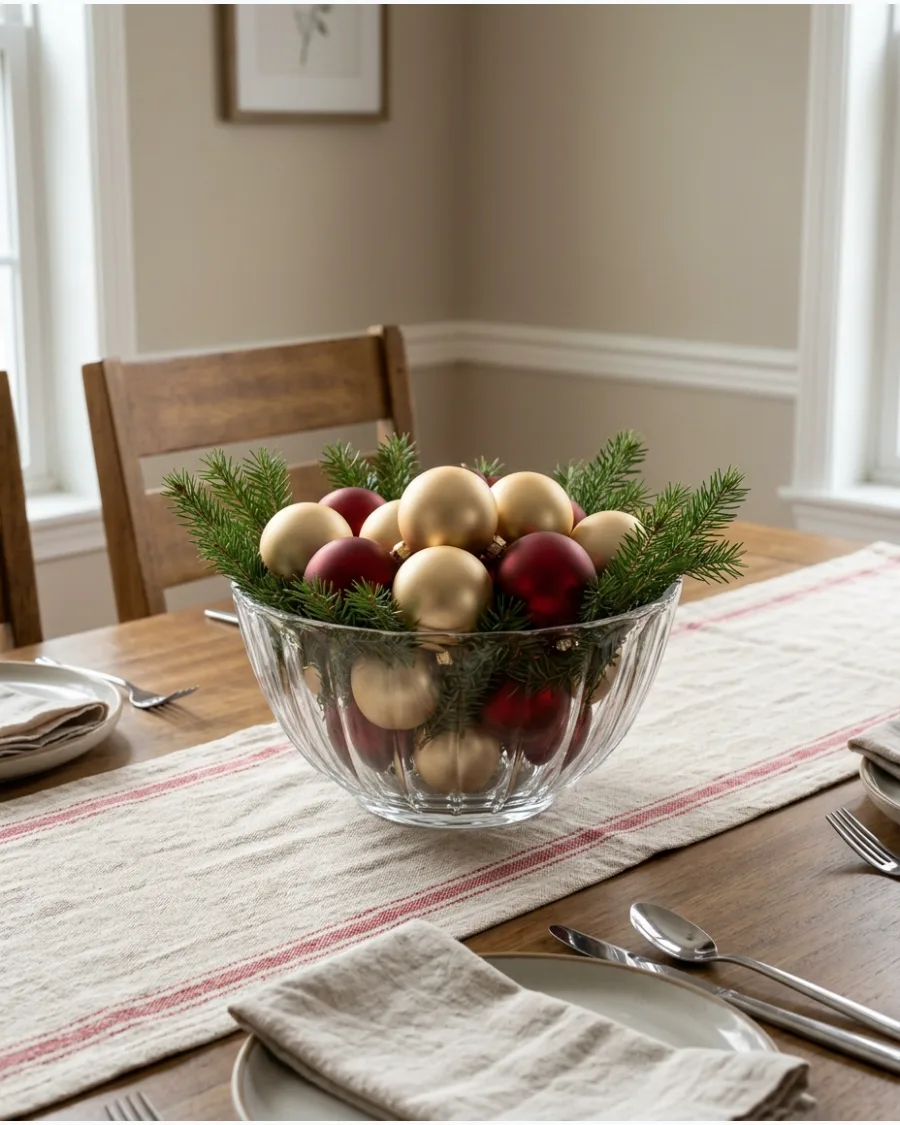
Fill a clear glass bowl with ornaments in a tight color palette like silver and navy. Tuck in small pieces of fresh cedar to hide the gaps between the spheres and add a natural scent.
Keep the color palette limited to three shades to prevent the arrangement from looking cluttered or cheap.
- Sourcing: Ornaments and bowls are readily available at discount retailers for under $15.
- Setup: Layer the largest ornaments at the bottom and use smaller ones to fill the top gaps.
- Adaptation: Swap the clear bowl for a white ceramic bowl to hide ornament hooks more easily.
Quick win: Use a bit of double-sided tape to keep ornaments from rolling out of place as you build the layers.
42. Dollar Store Christmas Tree Centerpiece
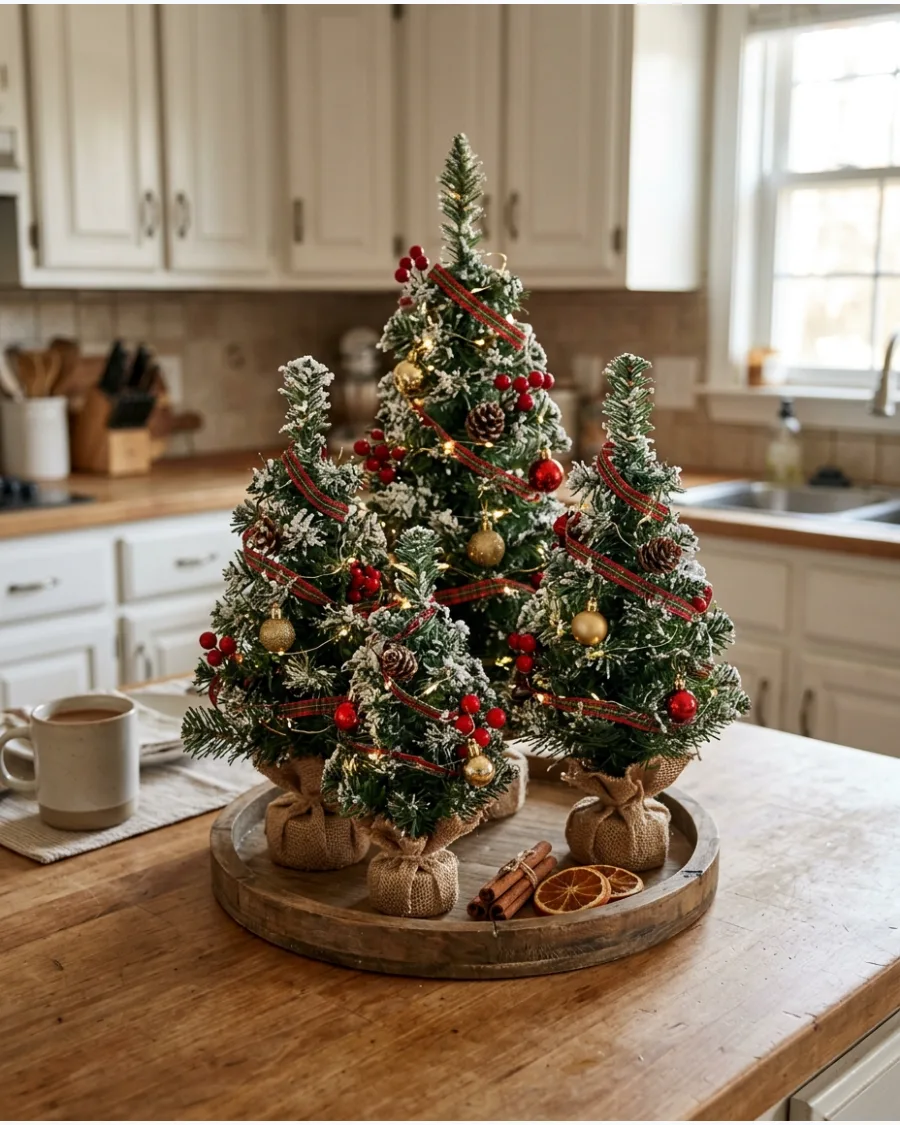
Cluster a variety of small faux trees on a neutral tray to create a miniature forest look. Vary the heights of the trees by placing some on small wood blocks or upside-down ramekins hidden under the tray's filler. This creates a much more expensive, tiered look than just lining them up in a row.
- Sourcing: Miniature trees are found in seasonal aisles for $1 to $5 each.
- Setup: Place the tallest tree in the center-back and work smaller ones toward the front edges.
- Adaptation: Add a string of battery-operated fairy lights to create a glow for evening dinners.
Best shortcut: Dust the tips of green trees with a little white spray paint to give them a high-end flocked look.
43. Glass Jar Evergreen Centerpiece
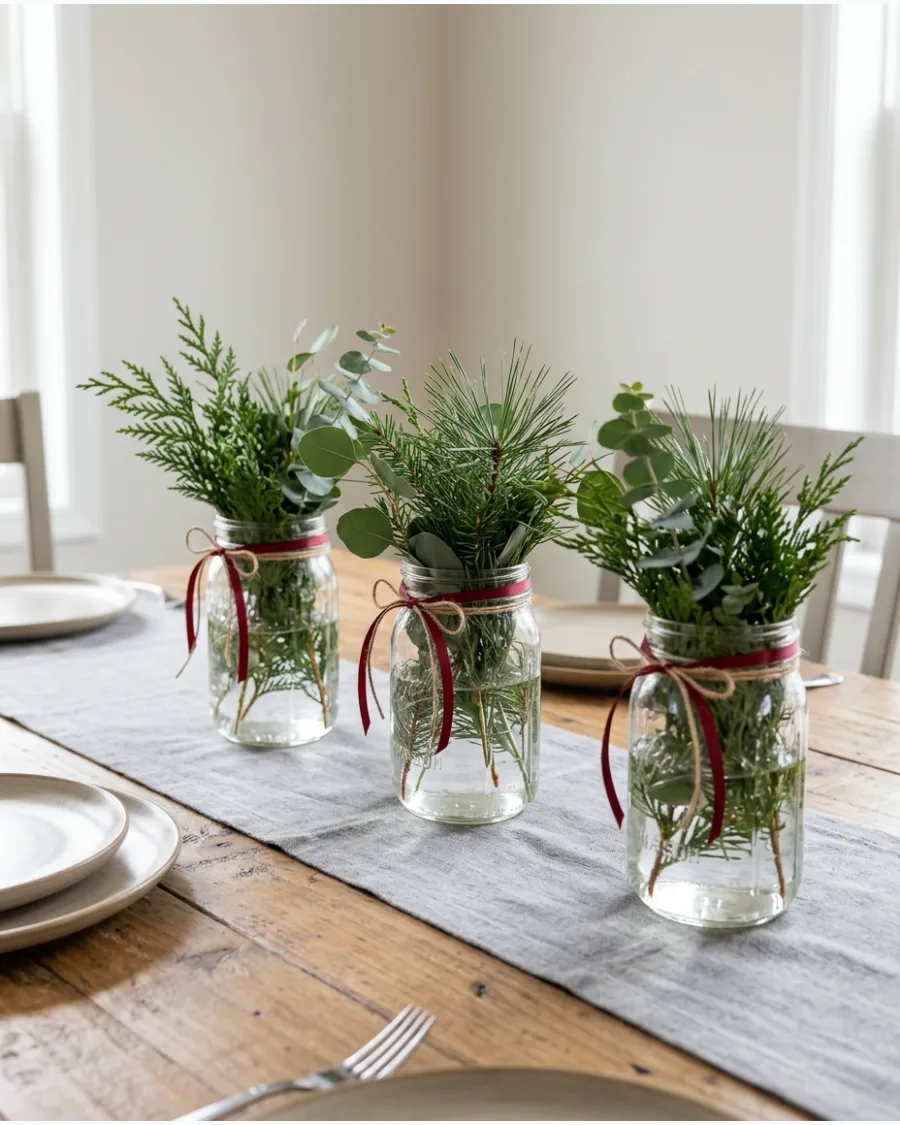
Line up mismatched clear jars filled with water and fresh evergreen clippings down the center of the table. Tie a single strand of velvet or twine around the neck of each jar to unify the different shapes. This creates a fresh, low-profile runner that does not block conversation across the table.
- Sourcing: Recycle glass jars from the pantry or find them at thrift stores for pennies.
- Setup: Space jars about four inches apart to cover the length of a standard dining table.
- Adaptation: Use eucalyptus or rosemary for a lighter fragrance that won't overwhelm the food.
Most people skip this: Change the water every two days to keep the greenery from looking murky and brown.
44. Wine Bottle Christmas Candle Centerpiece
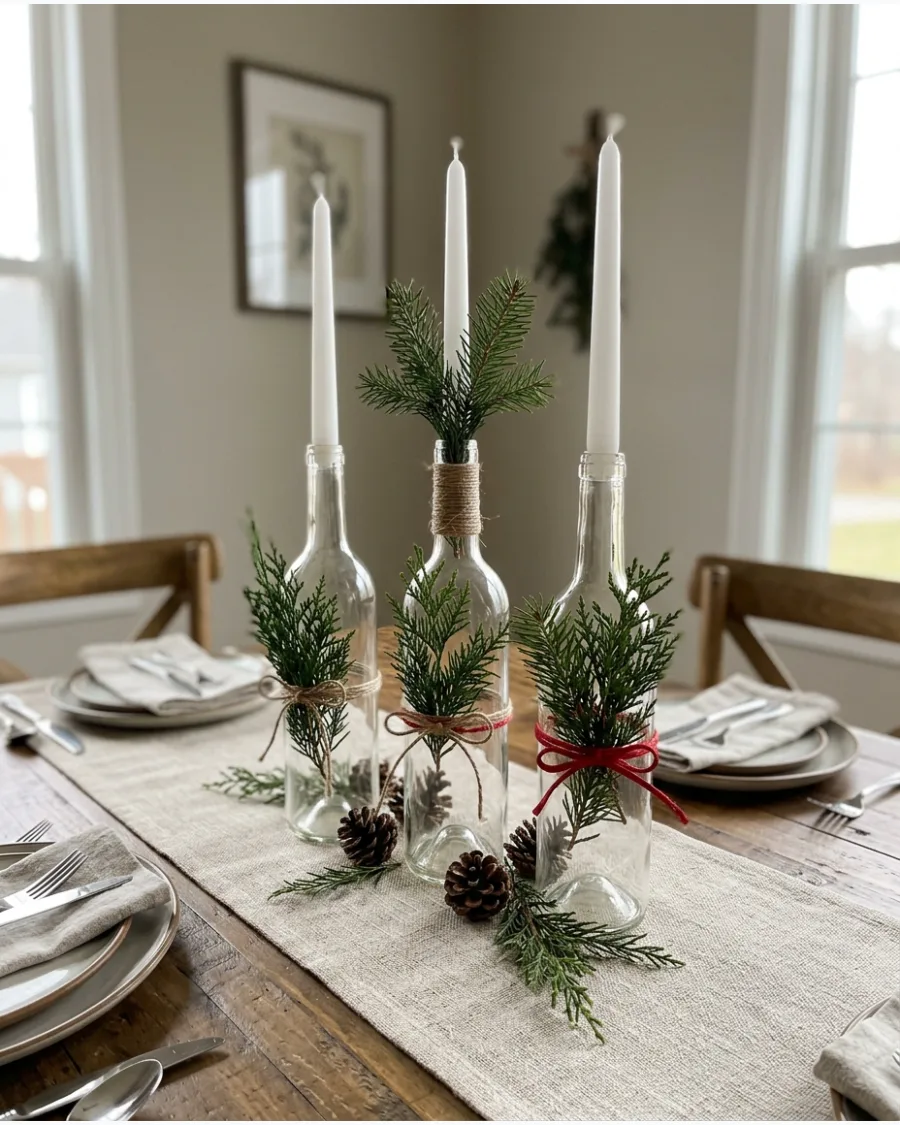
Repurpose empty wine bottles as elegant holders for long taper candles. Soak the bottles in warm soapy water to remove labels completely before adding a small sprig of greenery with clear tape. Mixing clear, green, and amber glass adds a sophisticated variety to the table display.
- Sourcing: Save bottles from holiday dinners or ask a local restaurant for their empties.
- Setup: Stagger the bottles in a zigzag pattern down the table for better stability.
- Adaptation: Paint the bottles matte black or gold for a modern, high-contrast look.
Quick win: If the taper candle is too thin for the bottle neck, wrap the base of the candle in a little floral tape for a snug fit.
45. Christmas Ornament Vase Centerpiece
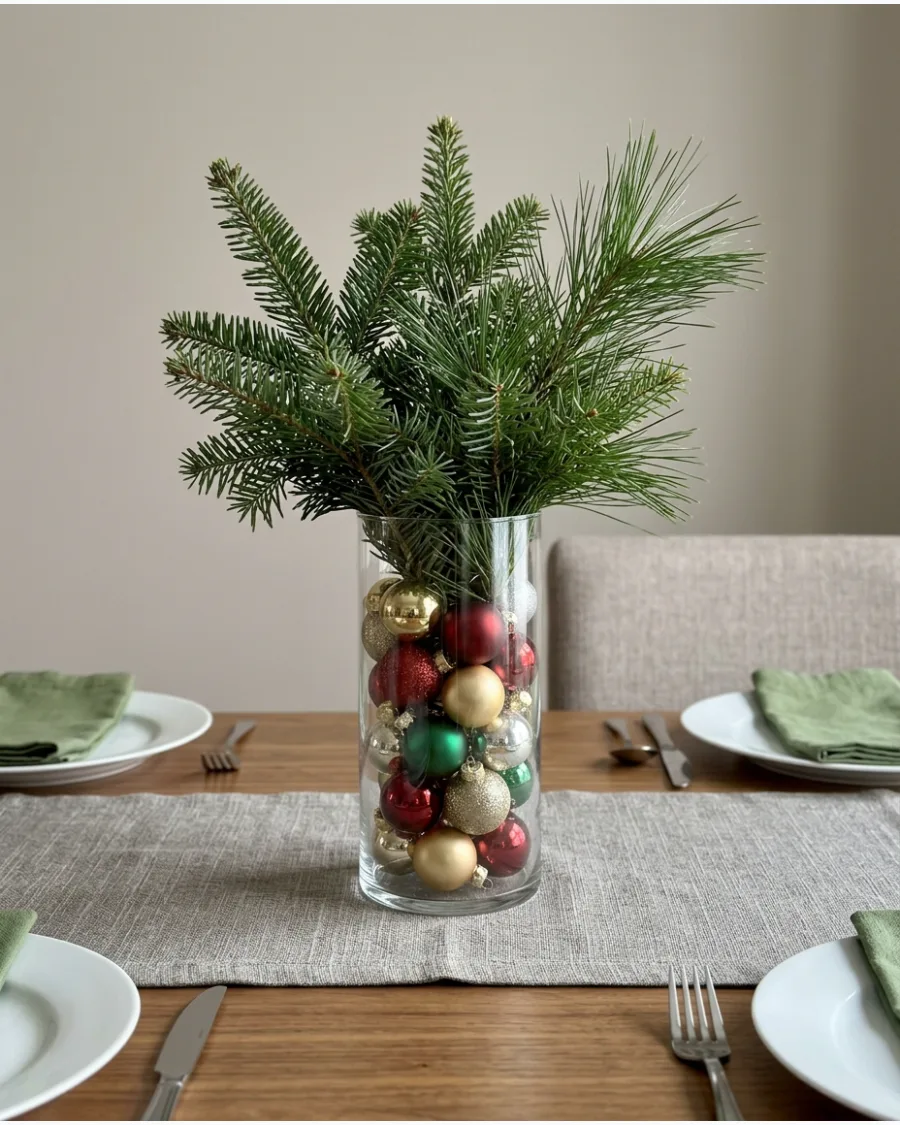
Fill a tall cylinder vase with small ornaments and top it with large evergreen branches. Choose ornaments in a single metallic tone like gold or copper to create a sophisticated base for the green needles. The weight of the ornaments helps stabilize the branches so they do not tip the vase over.
- Sourcing: Tall glass vases are common at craft stores or dollar shops.
- Setup: Fill the vase three-quarters full with ornaments before inserting the branches.
- Adaptation: Use frosted branches or red berries for a pop of color against the metallic ornaments.
Best shortcut: Use plastic ornaments instead of glass to avoid breakage if the vase is bumped during a meal.
46. Paper Christmas Tree Centerpiece
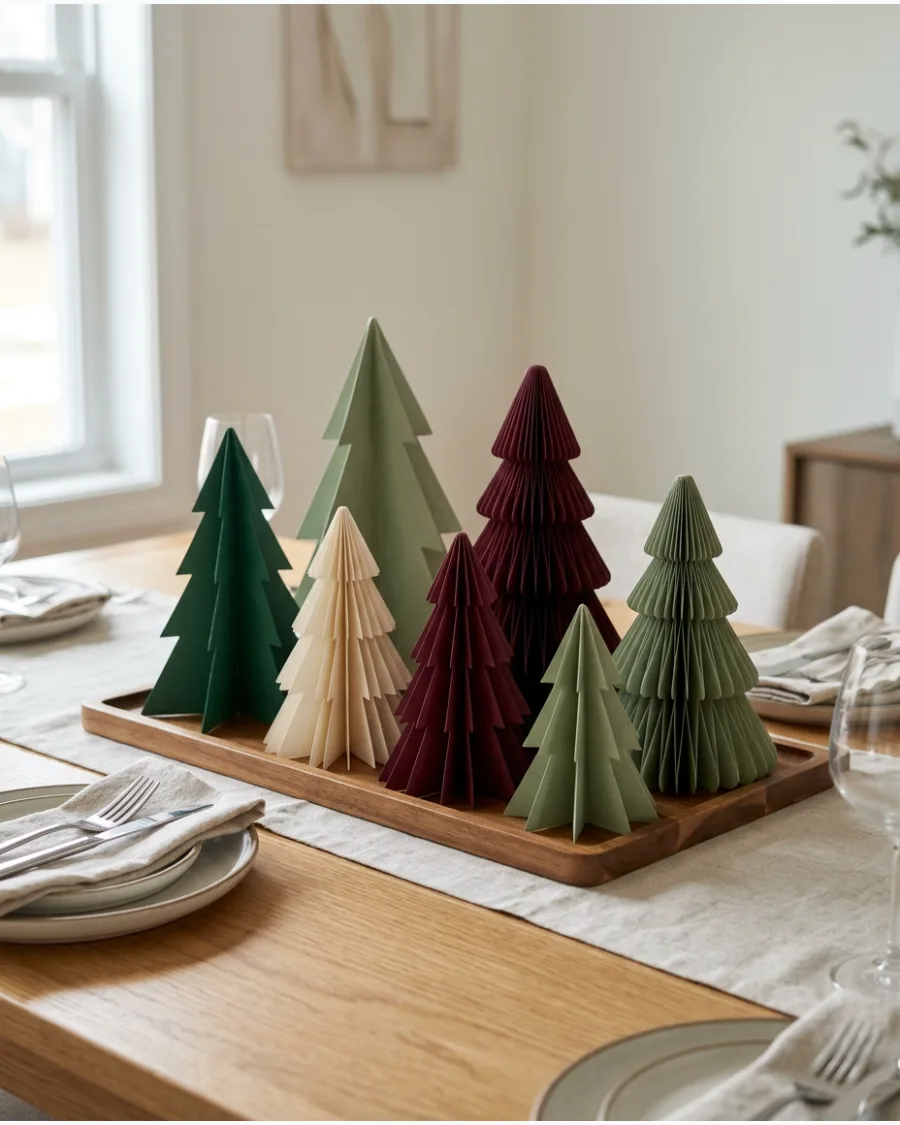
Fold cardstock into simple cone shapes or accordion pleats to make a modern paper forest. Use a mix of textured papers like glitter cardstock and matte vellum to give the flat material more visual interest. These are incredibly lightweight and easy to store flat in an envelope after the holidays.
- Sourcing: Cardstock and glue sticks are available at any office supply or craft store.
- Setup: Secure the paper cones with a small piece of clear tape on the inside.
- Adaptation: Scale the trees down to two inches tall to use as place card holders for guests.
Most people skip this: Use a bone folder or the edge of a credit card to get crisp, professional-looking creases on your folds.
47. Mason Jar Snowy Christmas Tree Centerpiece
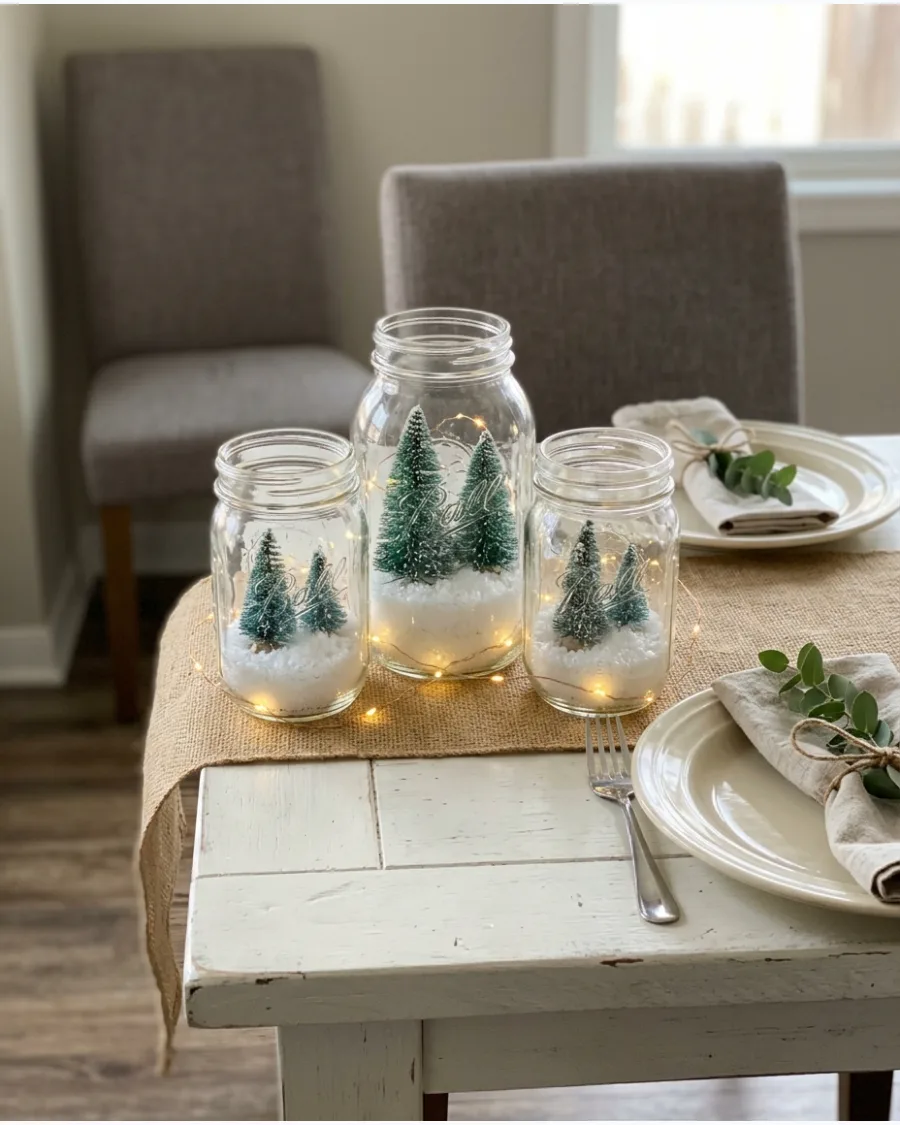
Create a snowy scene by placing a small bottle-brush tree inside a mason jar filled with an inch of Epsom salt. Group three jars of different sizes together on a silver tray to mimic a winter village. The salt looks exactly like real snow and provides a sturdy base for the trees to stand upright.
- Sourcing: Mason jars are found in the canning aisle of most grocery stores.
- Setup: Pour the salt into the jar first, then nestle the tree base into the center.
- Adaptation: Add a small plastic deer or a tiny house inside the jar to create a more detailed scene.
Quick win: Tie a red ribbon around the rim of the jar to hide the metal threads for a cleaner look.
48. Upside-Down Wine Glass Christmas Centerpiece
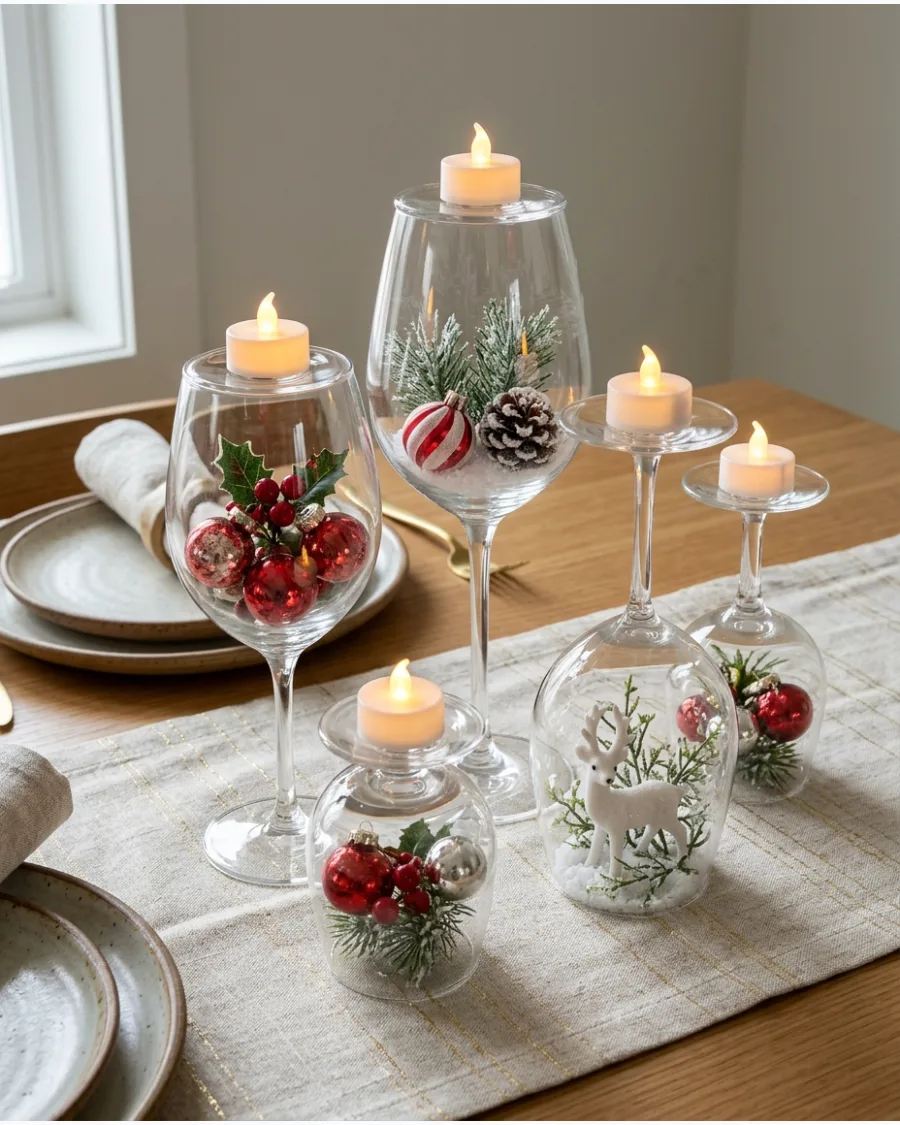
Place a small ornament or a sprig of holly on the table and cover it with an upside-down wine glass. Use the flat base of the glass as a pedestal for a small LED tea light to add height and glow. This is an excellent way to use extra glasses that do not match your dinner set.
- Sourcing: Use any stemmed glassware you already have in your kitchen cabinets.
- Setup: Ensure the table is level so the tea lights do not slide off the glass bases.
- Adaptation: Place a small photo or a name tag inside the glass for a personalized touch.
Best shortcut: Use LED tea lights instead of real candles to prevent heat from cracking the thin glass.
49. Christmas Gift Box Centerpiece
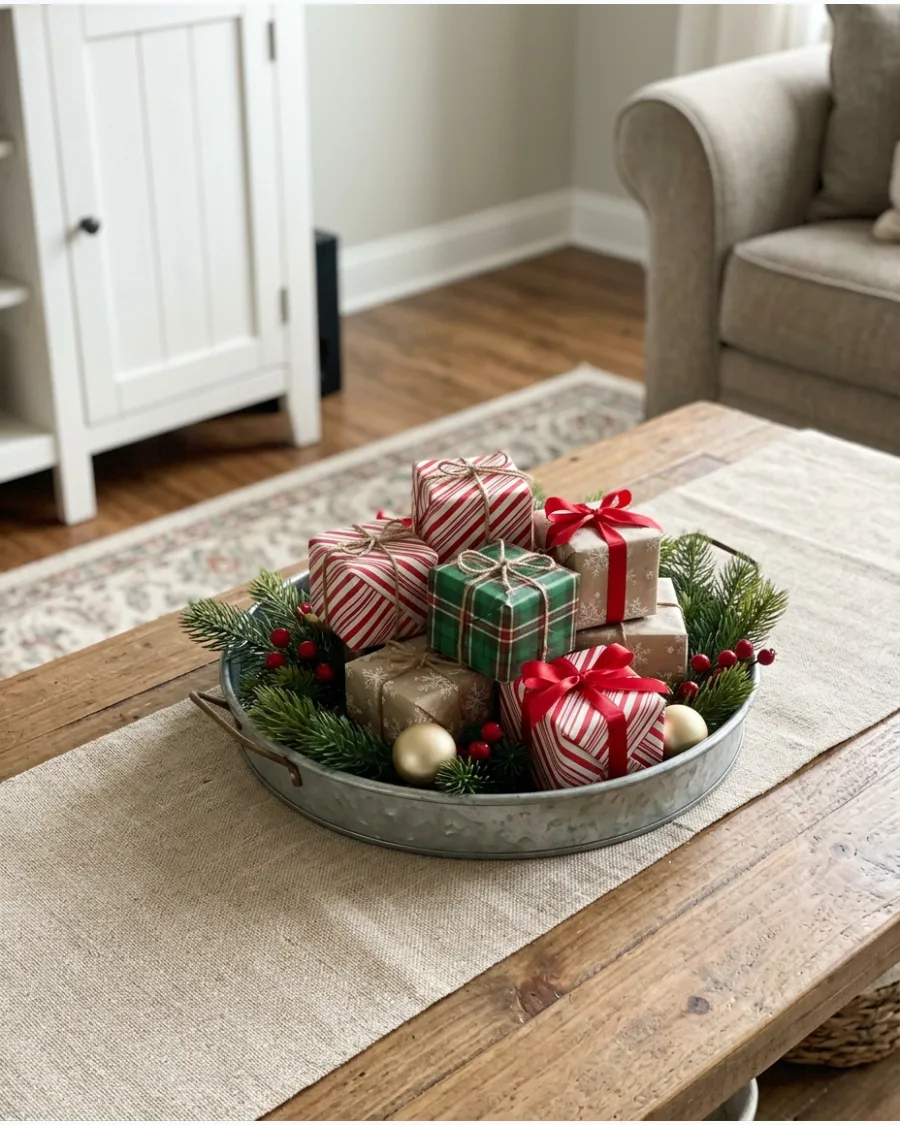
Wrap small jewelry boxes or empty tea boxes in festive paper to serve as decor. Stack the boxes in a pyramid shape on a flat plate and tuck in small pieces of greenery to fill the gaps. It creates a whimsical, celebratory feel that works well on a coffee table or sideboard.
- Sourcing: Reuse small shipping boxes or product packaging from around the house.
- Setup: Wrap the boxes tightly and use double-sided tape for a professional finish.
- Adaptation: Use brown kraft paper and twine for a more neutral, understated look.
Most people skip this: Weight the bottom boxes with a few pebbles so the stack doesn't tip over if the table is bumped.
50. Candy Cane Vase Christmas Centerpiece
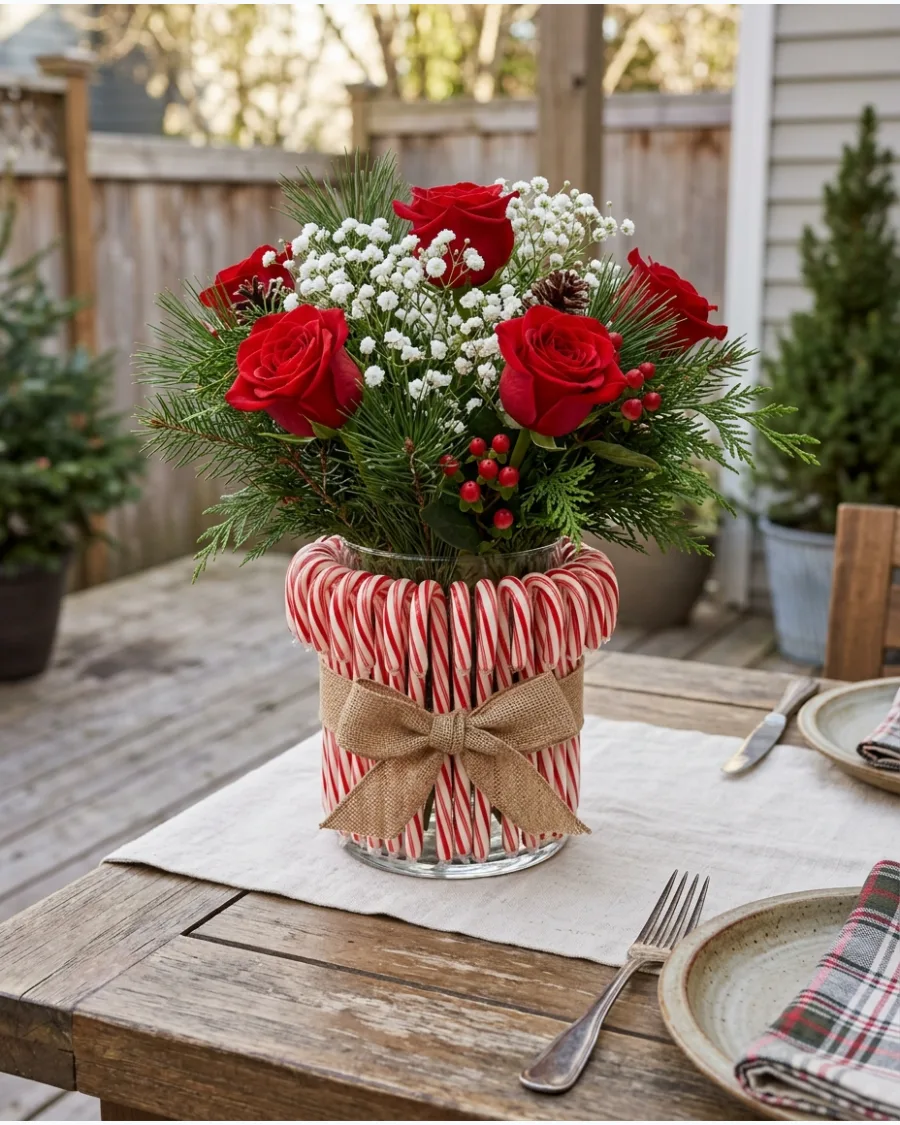
Glue candy canes vertically around the outside of a clean tin can or glass jar. Wrap a wide red ribbon around the middle of the candy canes to hide the adhesive and add a finished look. Fill the container with white carnations or baby's breath for a classic red-and-white theme.
- Sourcing: Buy bulk boxes of candy canes at the grocery store for the best price.
- Setup: Use a hot glue gun to secure the candy canes quickly to the container.
- Adaptation: Leave the wrappers on the candy canes if you want to give them away to kids after the party.
Quick win: Use a rubber band to hold the candy canes in place while the glue sets, then cover the band with your ribbon.
TRENDING, ELEGANT, AND WHIMSICAL CHRISTMAS CENTERPIECES
51. Burgundy Velvet Bow Christmas Centerpiece
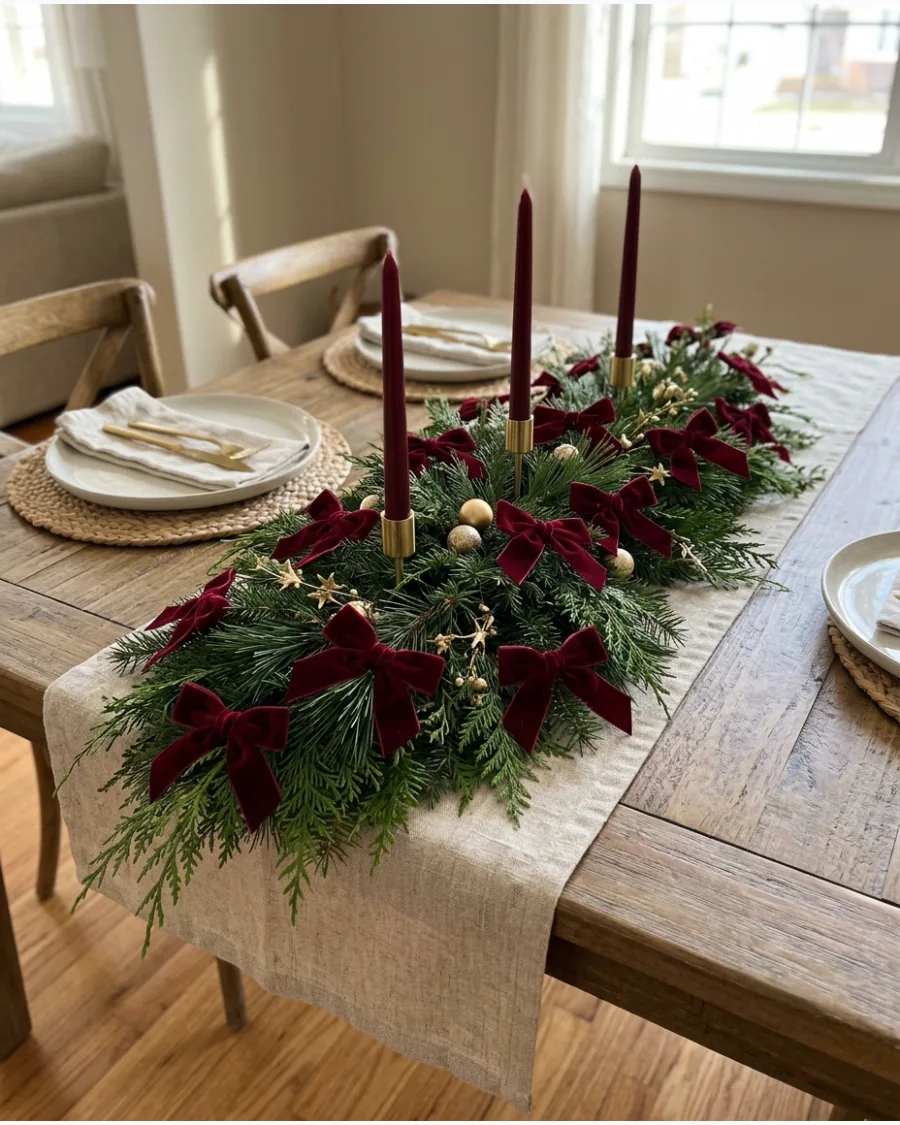
Velvet adds a rich, expensive texture that plain satin ribbon often lacks. Secure the bows to the branch tips using thin floral wire so they stay upright and visible throughout the dinner. This trend works best when the bows are small and repeated frequently across a long evergreen garland.
- Sourcing: Buy a spool of 1-inch velvet ribbon and pre-cut the pieces to 6 inches for uniform bow sizes.
- Setup: Lay a fresh or high-quality faux cedar garland down the center of the table before adding the bows.
- Adaptation: Use navy or forest green velvet for a different color story that still feels high-end.
Quick win: Use pre-tied bows with wire stems to save time during the busy holiday week.
52. Antique Gold Candelabra Christmas Centerpiece
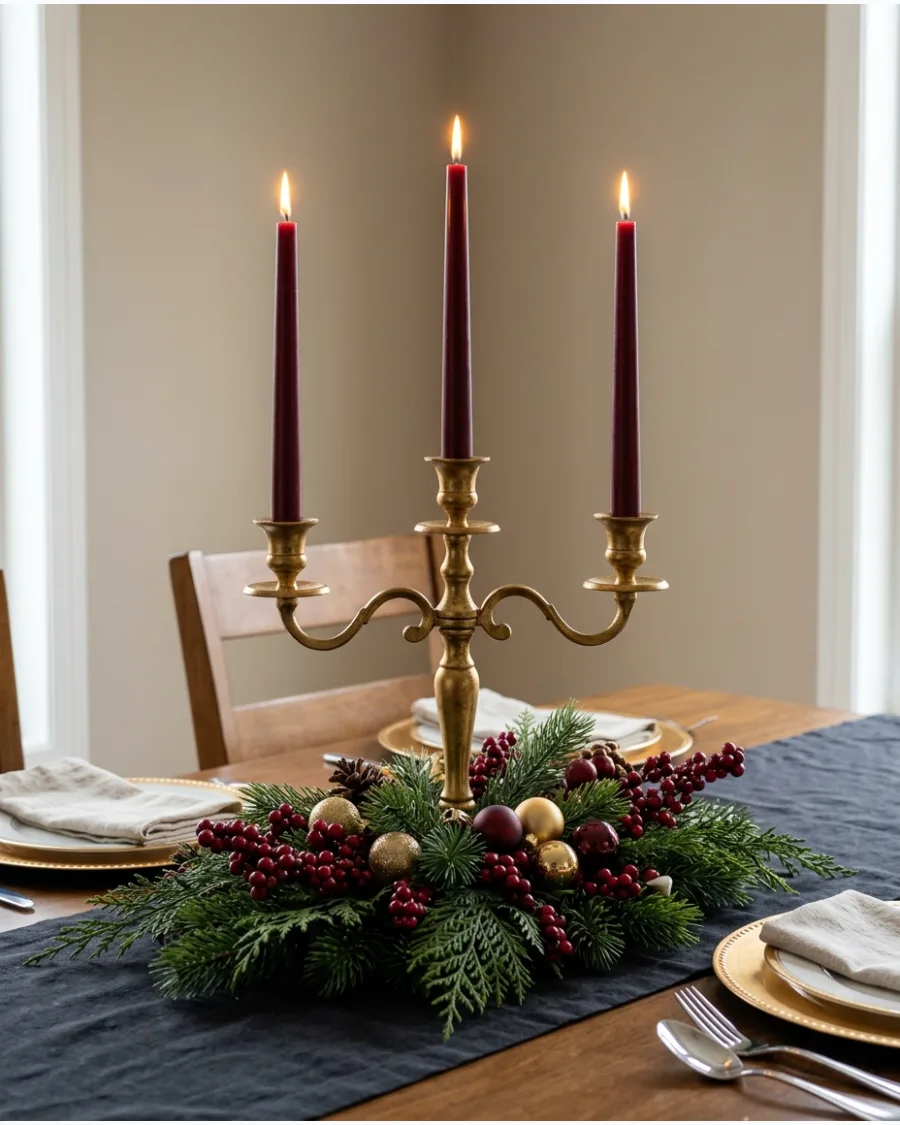
A heavy candelabra provides instant height without blocking the view of guests sitting across from each other. Tuck small sprigs of dark holly or red berries around the base of each candle cup to hide the metal hardware. Choosing cream or burgundy candles instead of white makes the display feel more intentional and dramatic.
- Sourcing: Look for heavy metal candelabras at thrift stores or home decor outlets for a vintage feel.
- Setup: Place the candelabra on a stable surface and use candle adhesive or wax dots to keep tapers perfectly straight.
- Adaptation: For long tables, use two matching candelabras spaced eighteen inches apart.
Best shortcut: If the candelabra is too shiny, a light dusting of matte gold spray paint gives it an aged look.
53. Jewel-Tone Christmas Ornament Centerpiece
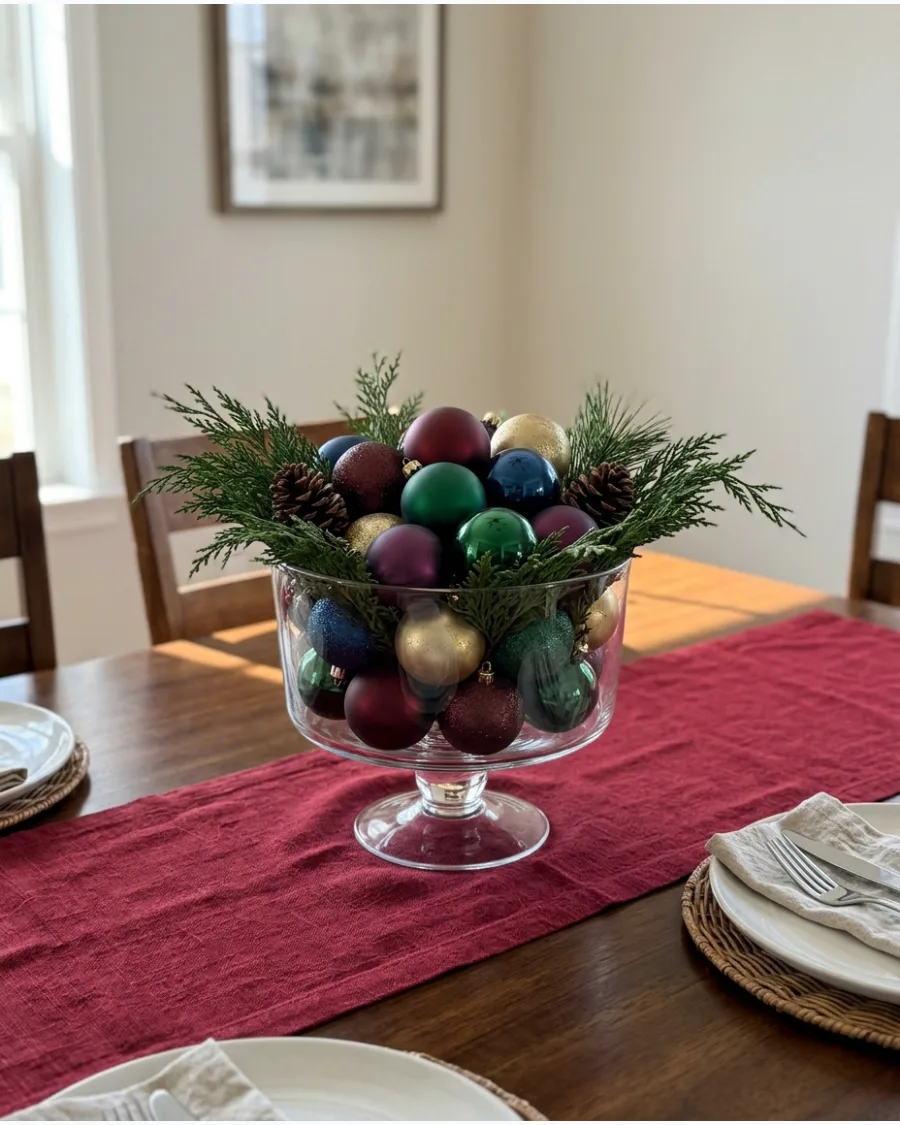
Mixing matte and glossy finishes prevents dark jewel tones from looking like a flat, heavy mass. Layer the largest ornaments at the bottom of the bowl and nestle the smaller, more delicate ones into the gaps on top. This approach creates a luxurious feel that mimics high-end boutique displays.
- Sourcing: Collect ornaments in sapphire, emerald, and plum from post-holiday sales to save on bulk sets.
- Setup: Use a footed bowl or pedestal dish to give the arrangement more presence on the table.
- Adaptation: Add a few sprigs of real eucalyptus to soften the edges of the metallic ornaments.
Most people skip this: Use a mix of large and very tiny ornaments to fill the small gaps and hide the bowl bottom.
54. Gingerbread House Christmas Centerpiece
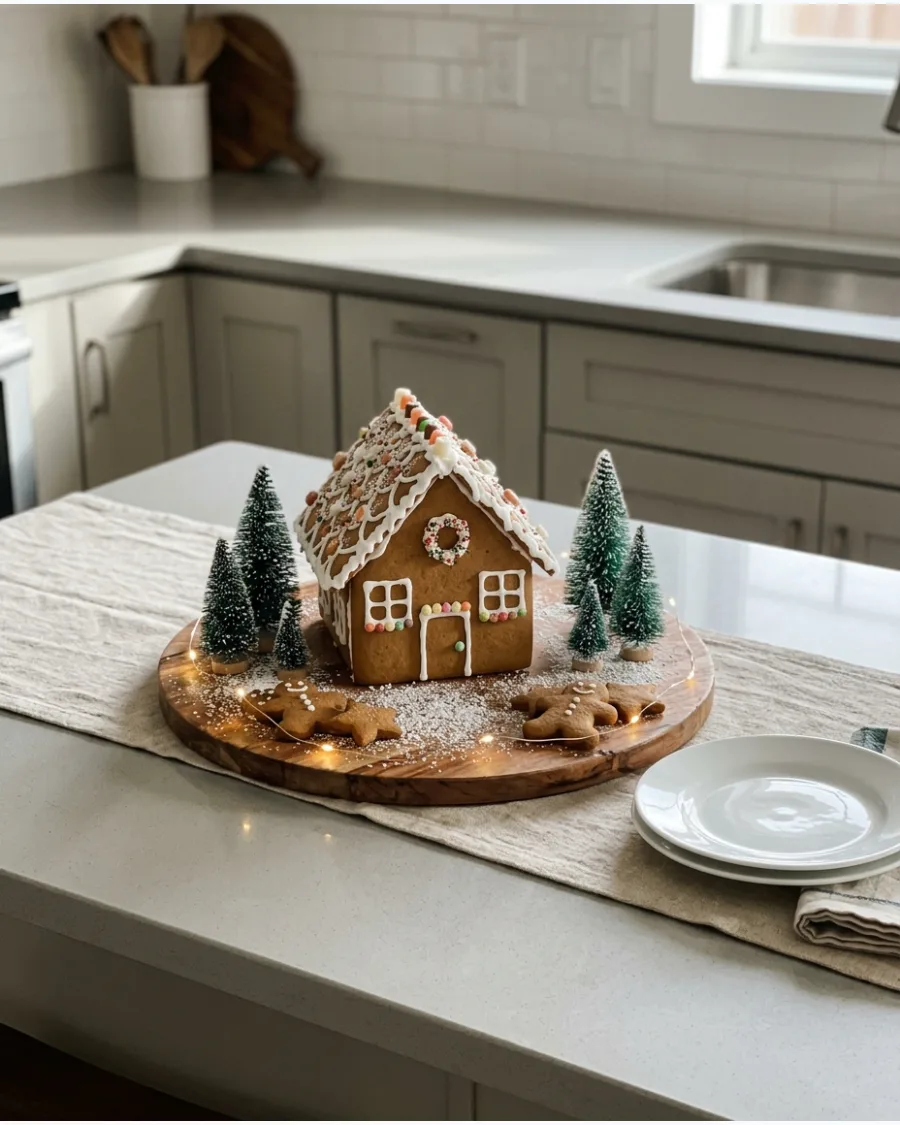
A single gingerbread house serves as a charming and edible-style focal point for a kitchen table. Place the house on a white ceramic cake stand to lift it above the plates and make it the primary subject. Surrounding the base with granulated sugar creates a realistic snow effect that won't ruin the house.
- Sourcing: Use a sturdy pre-baked kit if you want to focus on the decorating rather than the baking.
- Setup: Build the house on a cardboard base first, then move the entire base onto the cake stand.
- Adaptation: Use white icing and clear sprinkles for a sophisticated 'winter white' look.
Quick win: Assemble the house a day early so the icing is completely hard before you move it to the table.
55. Gingerbread Village Christmas Centerpiece
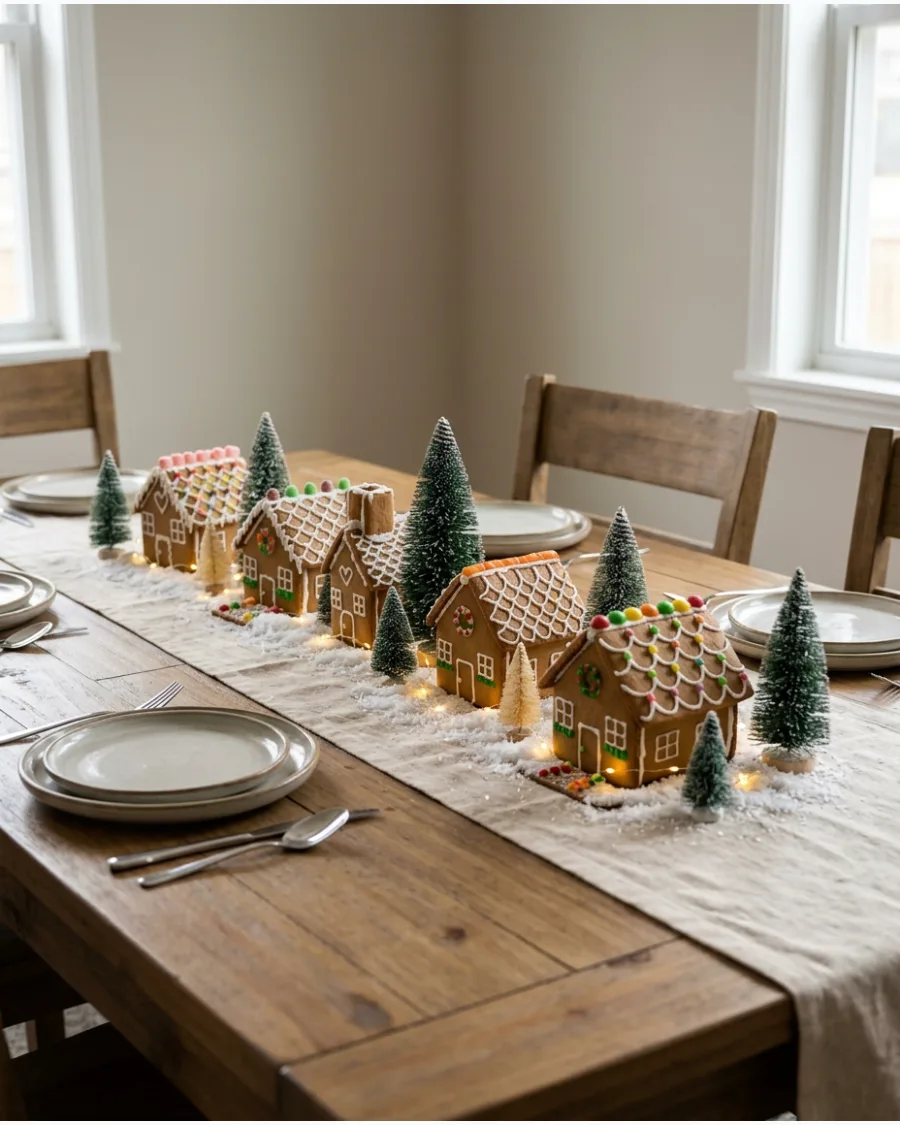
Varying the sizes and shapes of the houses keeps a miniature village from looking too uniform. Weave a string of battery-operated fairy lights behind the houses to create a warm glow that shines through the windows. This setup creates a whimsical atmosphere that works perfectly for a long dining table.
- Sourcing: Mini gingerbread molds or kits are available at most craft stores during the holidays.
- Setup: Arrange the houses in a slight zig-zag pattern rather than a perfectly straight line for a natural look.
- Adaptation: Use porcelain white houses instead of real gingerbread for a centerpiece that lasts all season.
Best shortcut: Use store-bought kits for the houses and focus your energy on the creative icing designs.
56. Nutcracker Christmas Centerpiece
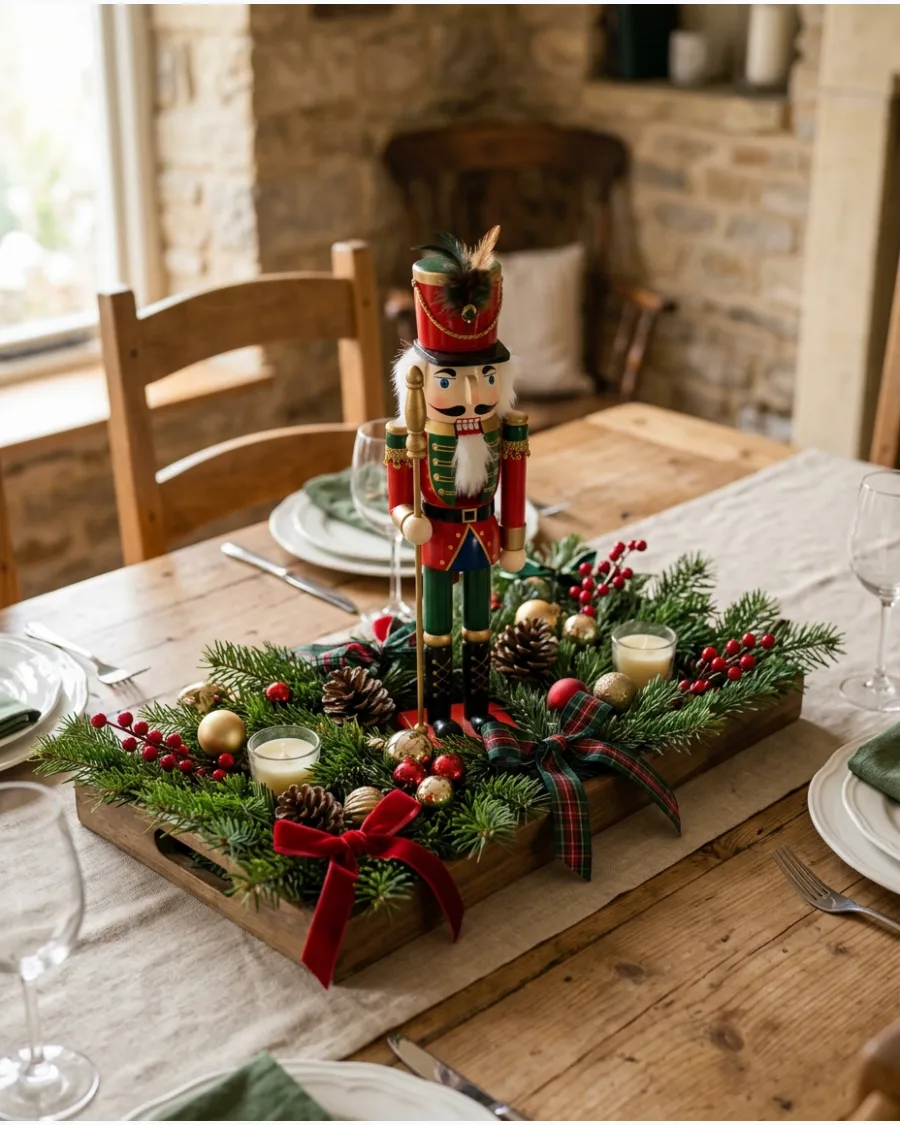
Choosing a nutcracker that matches your room's color palette makes the display feel like part of the decor rather than a toy. Set the nutcracker on a small riser inside the tray so he peeks out clearly over the evergreen branches. Surrounding him with traditional red and green accents reinforces the classic holiday theme.
- Sourcing: Look for nutcrackers with unique details like velvet capes or metallic trim to elevate the look.
- Setup: Use a tray with high sides to keep the greenery and ornaments contained in one area.
- Adaptation: Use an all-white or all-gold nutcracker for a more contemporary, monochromatic style.
Most people skip this: Place a small piece of museum putty under the nutcracker's base so it doesn't tip over.
57. Candy Cane Christmas Centerpiece
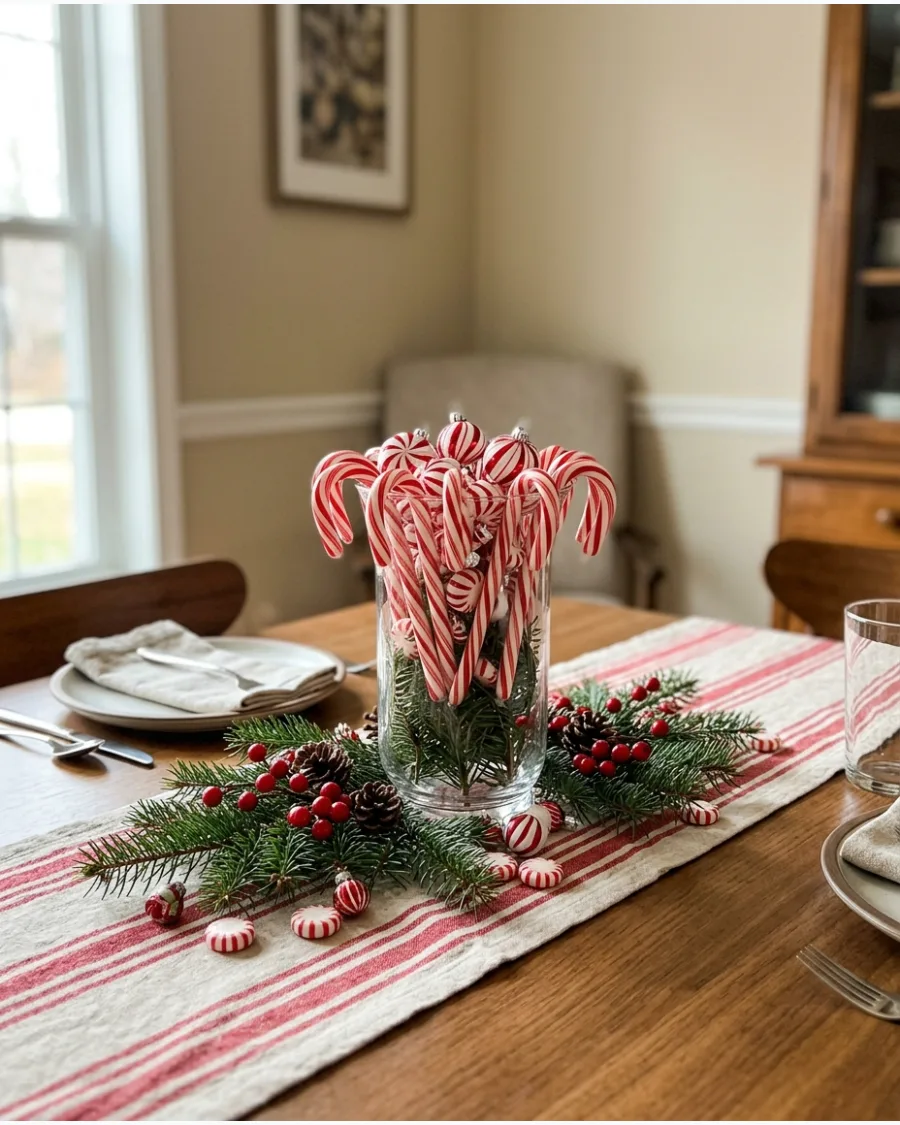
Sticking to a strict red and white color palette keeps this playful look from feeling cluttered. Stand the candy canes upright in the jar first, then drop in the greenery sprigs to hold them in place. This provides a fast, budget-friendly option that adds a bright pop of color to a casual dining area.
- Sourcing: Standard peppermint candy canes are the most classic choice, but cherry-flavored ones offer a deeper red.
- Setup: Use a tall, narrow vase to help the candy canes stand upright without leaning too much.
- Adaptation: Fill the bottom of the vase with red peppermint candies to act as a base for the canes.
Quick win: If using real candy canes, leave the wrappers on to prevent them from getting sticky in humid rooms.
58. Christmas Village Under Glass Centerpiece
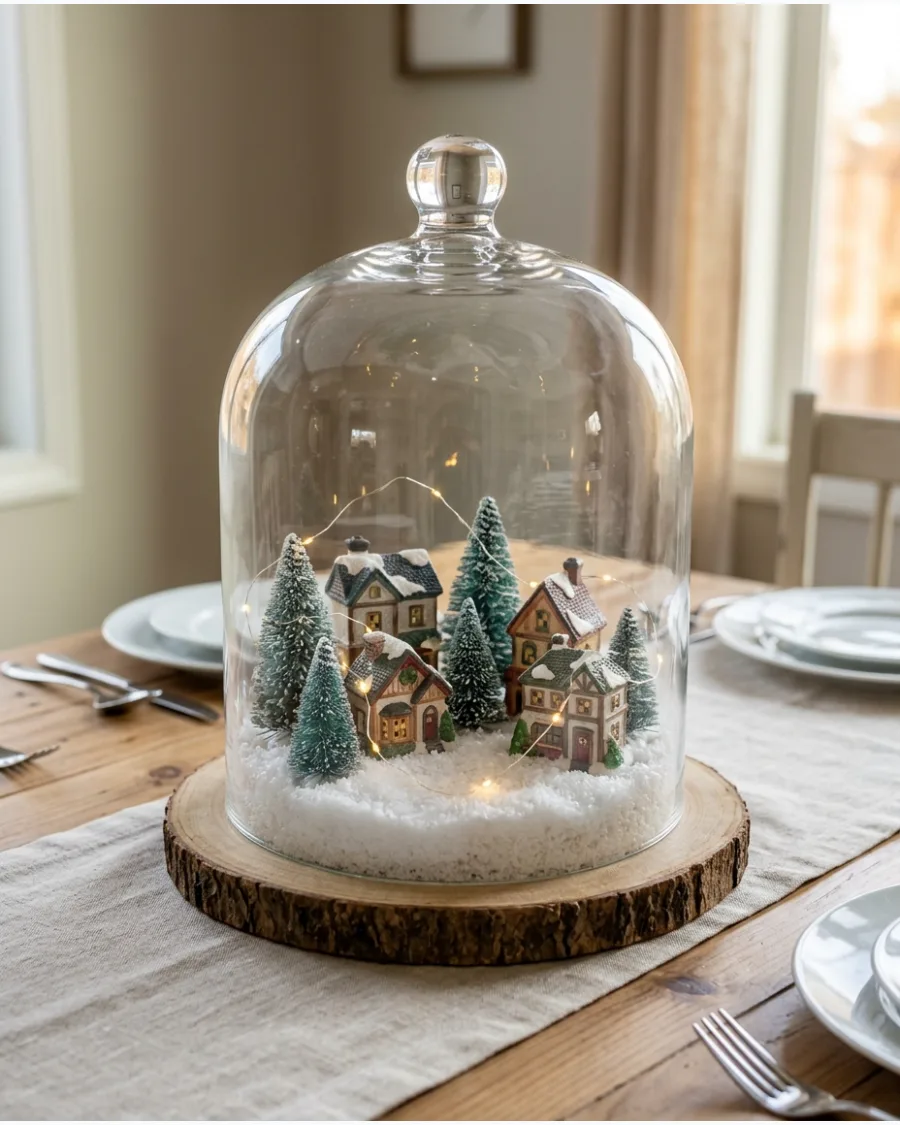
A glass dome keeps faux snow contained and protects delicate miniatures from accidental spills during dinner. Use a small piece of double-sided tape to keep the tiny houses from sliding when you move the cloche. This creates a self-contained winter world that works well on round tables or sideboards.
- Sourcing: Glass cloches can be found at garden centers or home goods stores in various sizes.
- Setup: Layer the snow last, using a small spoon to tuck it around the base of the houses and trees.
- Adaptation: Add a single battery-operated tea light inside one of the houses for a nighttime glow.
Best shortcut: A battery-operated puck light hidden in the snow can illuminate the village from below.
59. Champagne Gold Christmas Centerpiece
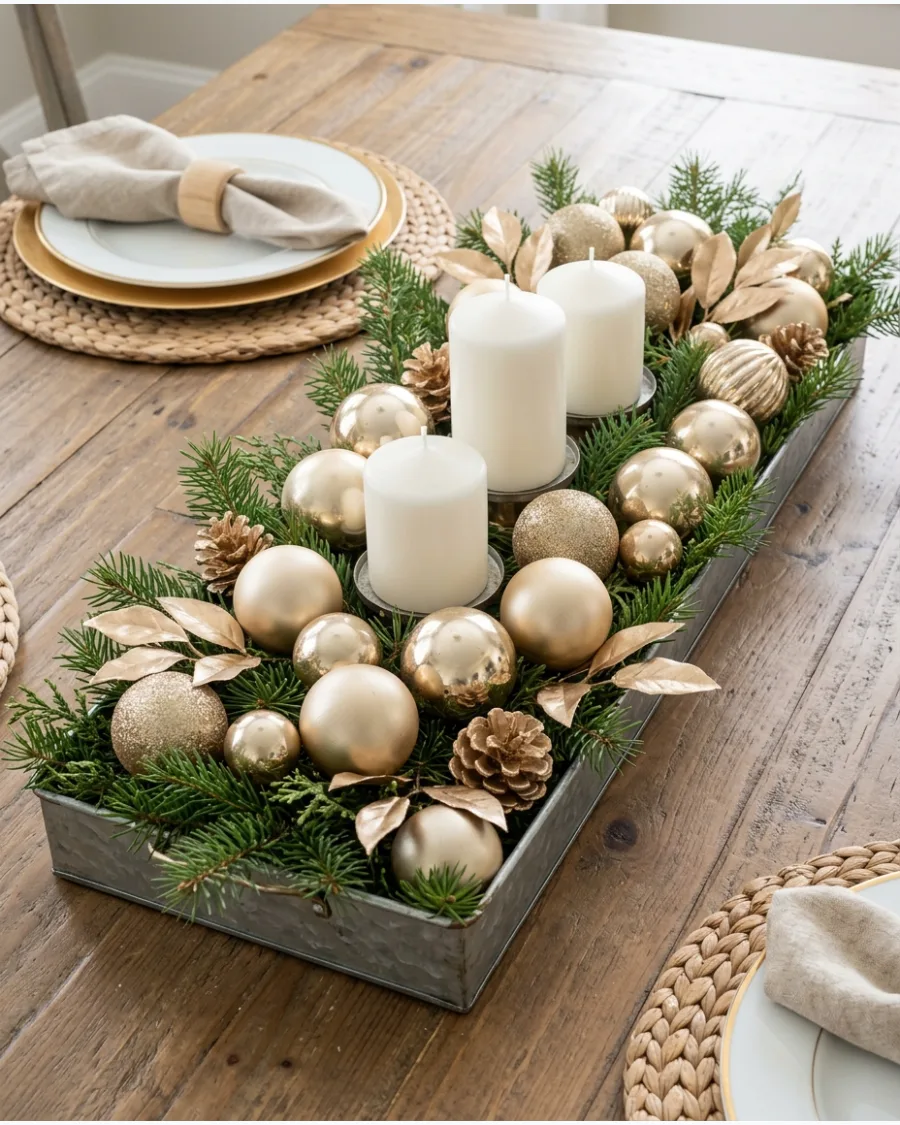
Champagne gold offers a softer, more modern alternative to traditional bright yellow gold. Layer ornaments of different sizes and textures on a long tray to ensure the metallic tones catch the light from every angle. This monochromatic palette creates a sophisticated look that feels lush without being loud.
- Sourcing: Search for 'champagne' or 'soft gold' specifically to avoid the brassy tones of standard gold.
- Setup: Use white pillar candles of varying heights to break up the horizontal line of the tray.
- Adaptation: Spray paint a few real dried leaves with metallic gold to add an organic texture.
Most people skip this: Mix in a few stems of dried eucalyptus for a muted green that complements champagne gold perfectly.
60. Moody Burgundy, Green, and Gold Christmas Centerpiece
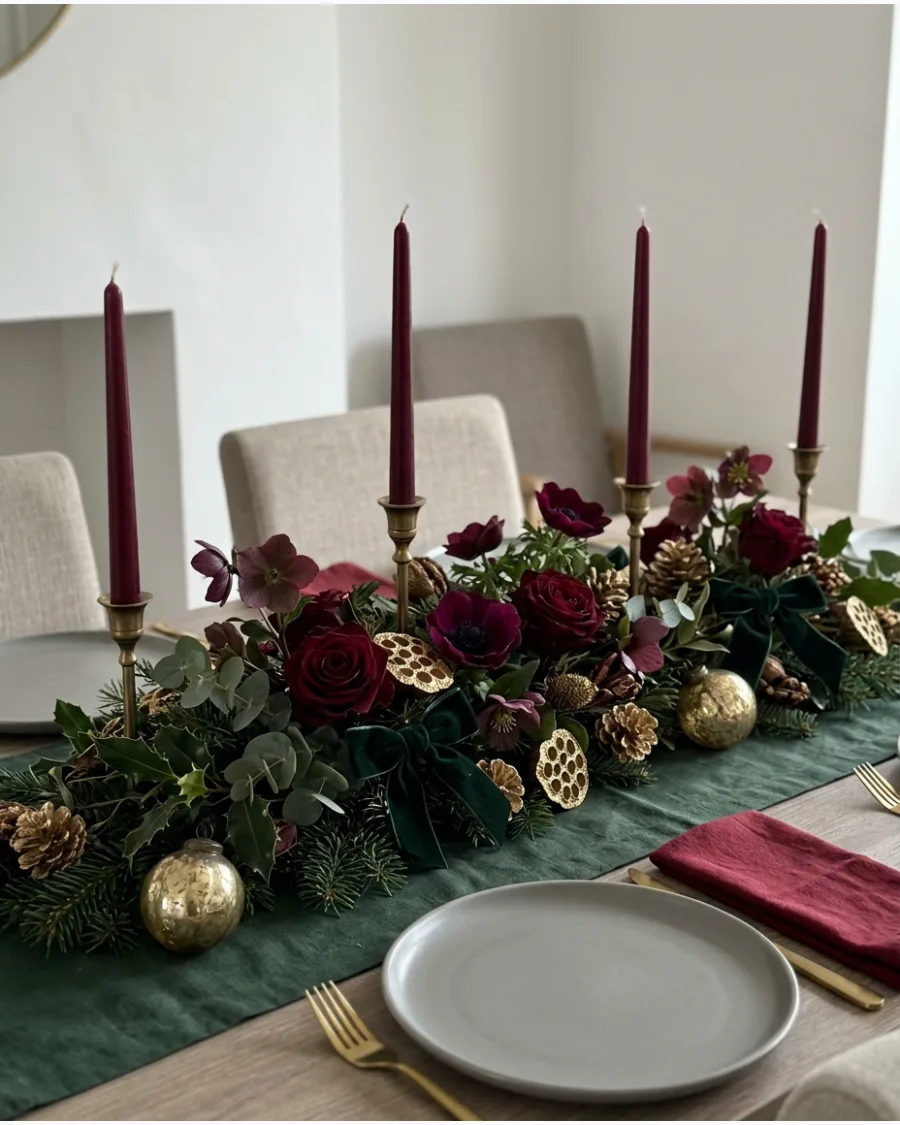
A low arrangement allows guests to see each other clearly while still making a bold style statement. Cluster deep burgundy silk flowers in the center of the greenery to create a dense focal point that looks professionally designed. This moody palette pairs beautifully with dark wood tables and candlelight.
- Sourcing: Look for silk ranunculus or peonies in deep wine or plum shades for the most realistic look.
- Setup: Use a floral foam block inside the bowl to secure the flower stems and greenery at the correct angles.
- Adaptation: Swap the gold accents for silver if you want a cooler, more wintry version of this look.
Quick win: Use black or dark charcoal taper candles for an even moodier, high-fashion holiday look.
Frequently Asked Questions
How do I keep real evergreen branches fresh in a centerpiece?
To keep evergreens vibrant, mist them daily with water and use floral foam soaked in water to provide constant hydration. You can also spray the needles with an anti-transpirant like Wilt Pruf to lock in moisture and prevent premature shedding.
What is the best height for a Christmas centerpiece to ensure guests can see each other?
Aim to keep your arrangement under 12 inches tall to maintain clear sightlines across the table for easy conversation. Alternatively, use very tall, slender pedestals that lift the decor well above eye level so guests can see each other underneath the display.
How can I make a high-end looking centerpiece on a budget under $20?
Focus on using free natural elements like pinecones and backyard clippings paired with thrifted glass jars or a simple wooden tray. A light dusting of faux snow or a few metallic ornaments can instantly elevate these affordable materials into a sophisticated, luxury display.
What are some modern Christmas color palettes beyond traditional red and green?
For a contemporary look, try a sophisticated palette of champagne gold and cream or a cool 'winter wonderland' theme featuring icy blues and silver. Minimalist designs using monochromatic whites with natural wood accents also offer a chic, modern aesthetic for the holidays.
How do I secure candles safely in a DIY greenery arrangement?
Always use sturdy candle stakes or floral clay to anchor candles firmly to your base or container to prevent tipping. Ensure there is at least a two-inch safety buffer between the flame and any flammable greenery, or opt for realistic LED flameless candles for a worry-free glow.