70 Christmas Wall Decor Ideas

This post may contain affiliate links: full affiliate disclosure.
Refreshing your walls for the holidays creates a festive atmosphere without cluttering floor space. This collection covers everything from oversized evergreen wreaths and elegant velvet bows to interactive advent calendars and budget-friendly DIY paper snowflakes.
Whether you prefer a traditional red and green palette or a minimalist Scandinavian aesthetic, these ideas help you personalize every room in your home.
WREATH AND GREENERY CHRISTMAS WALL DECOR
1. Oversized Christmas Wreath Above the Sofa
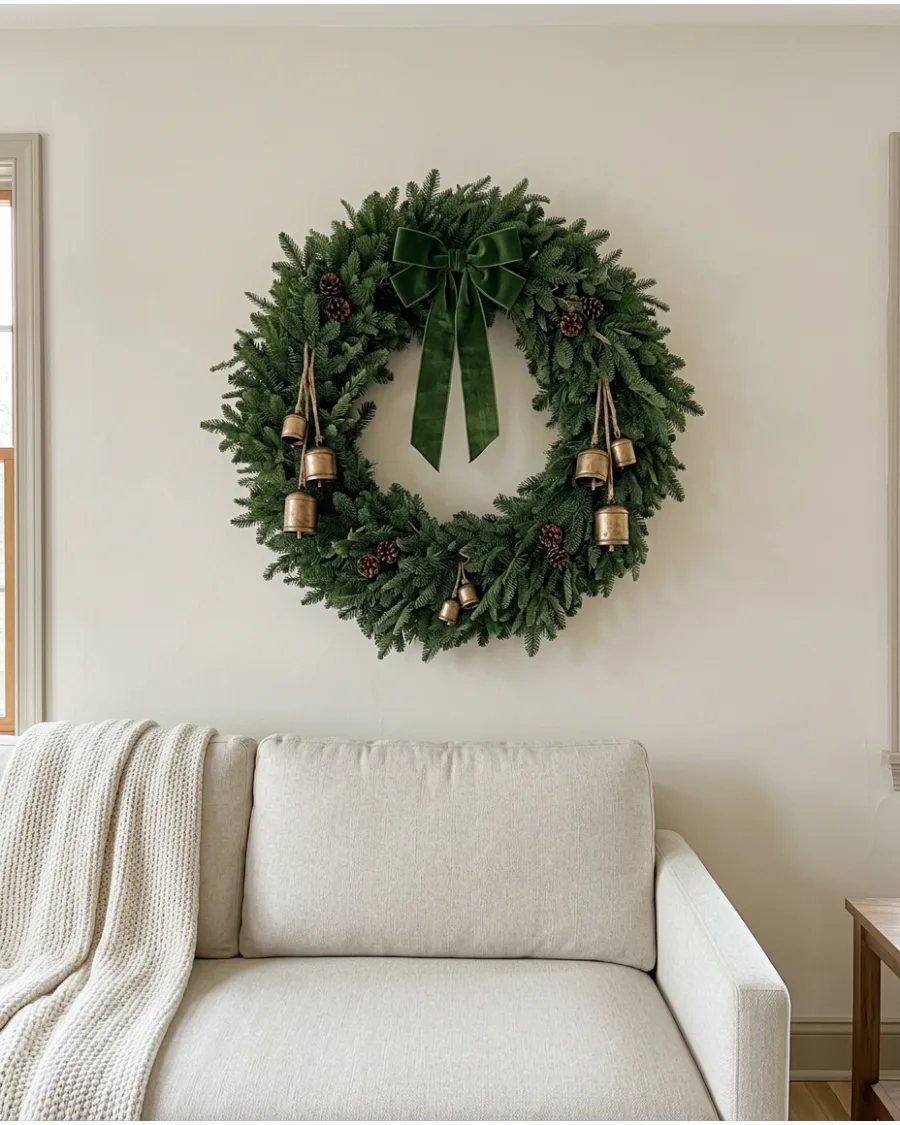
A large-scale wreath acts as a singular focal point that commands attention without cluttering the room. This approach works best on expansive, neutral walls where the contrast of deep greenery can truly stand out.
Center a single 30-inch or larger evergreen wreath approximately 6 to 10 inches above the back of your sofa for a balanced, high-impact display. Embellish the foliage with textured elements like brass bells or pinecones to add depth and a metallic pop.
- Select a sturdy wall hook or a specialized wreath hanger capable of supporting the weight of a larger, heavier frame.
- Add a long, trailing velvet bow to draw the eye downward and visually connect the wreath to the furniture below.
- Keep adjacent wall space clear of smaller art pieces to maintain the 'oversized' impact of the greenery.
If your wreath is heavy, use a toggle bolt or an adhesive hook rated for at least double the wreath's weight to prevent slips or wall damage.
2. Christmas Wreath Gallery Wall
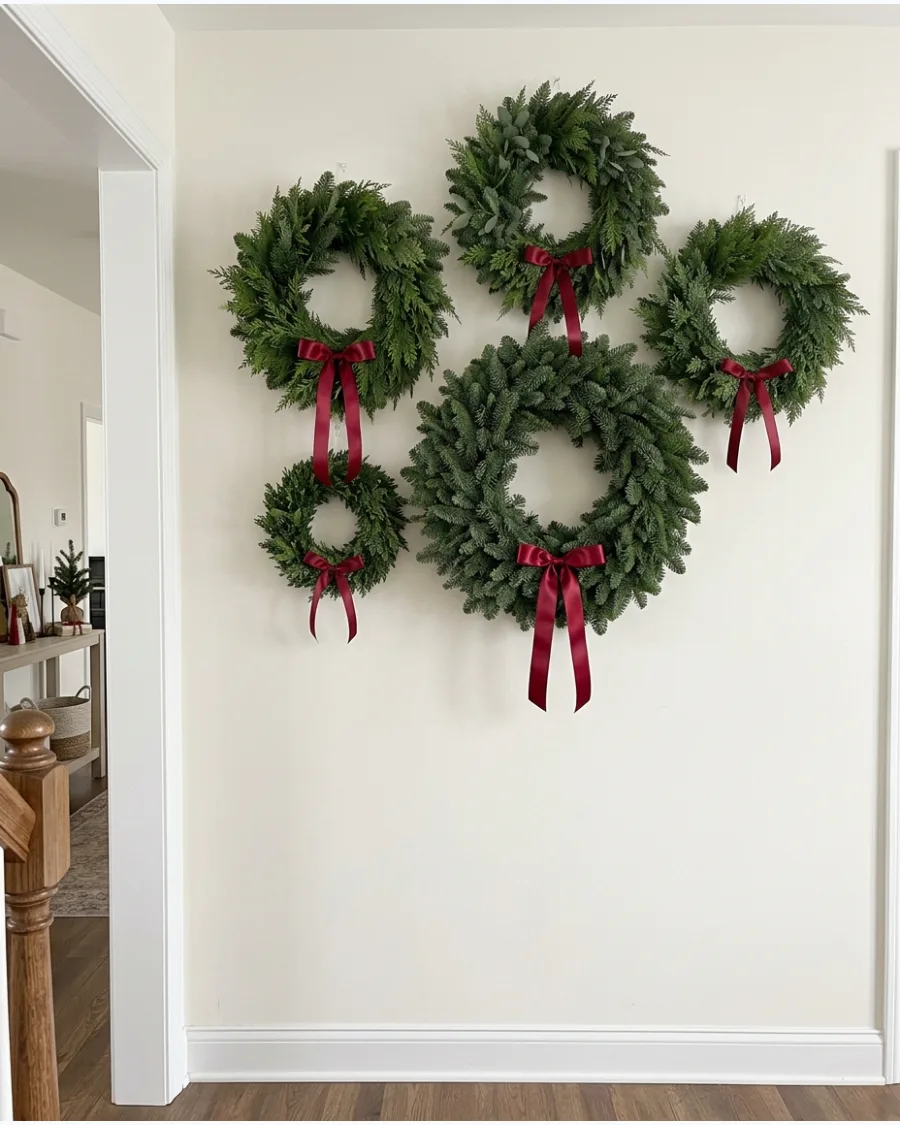
Replacing your standard gallery wall with a collection of wreaths creates a lush, organic texture that traditional framed holiday art often lacks. By varying sizes but keeping the foliage types consistent, you create a cohesive look that feels like a deliberate art installation.
Mount a cluster of five to seven wreaths of varying diameters across a large living room or hallway wall to mimic the rhythm of a traditional gallery wall. This setup allows you to fill a wide space without needing a single, massive item.
- Mix different greenery textures, such as spruce, cypress, and eucalyptus, while staying within the same green color family.
- Use identical ribbons at the top of each wreath to provide a visual anchor for the disparate sizes.
- Arrange the largest wreaths first in the center of the wall, then tuck the smaller ones into the surrounding gaps.
Trace your wreaths on kraft paper and tape the cutouts to the wall first to finalize the layout without making unnecessary holes.
3. Three Matching Christmas Wreaths in a Row
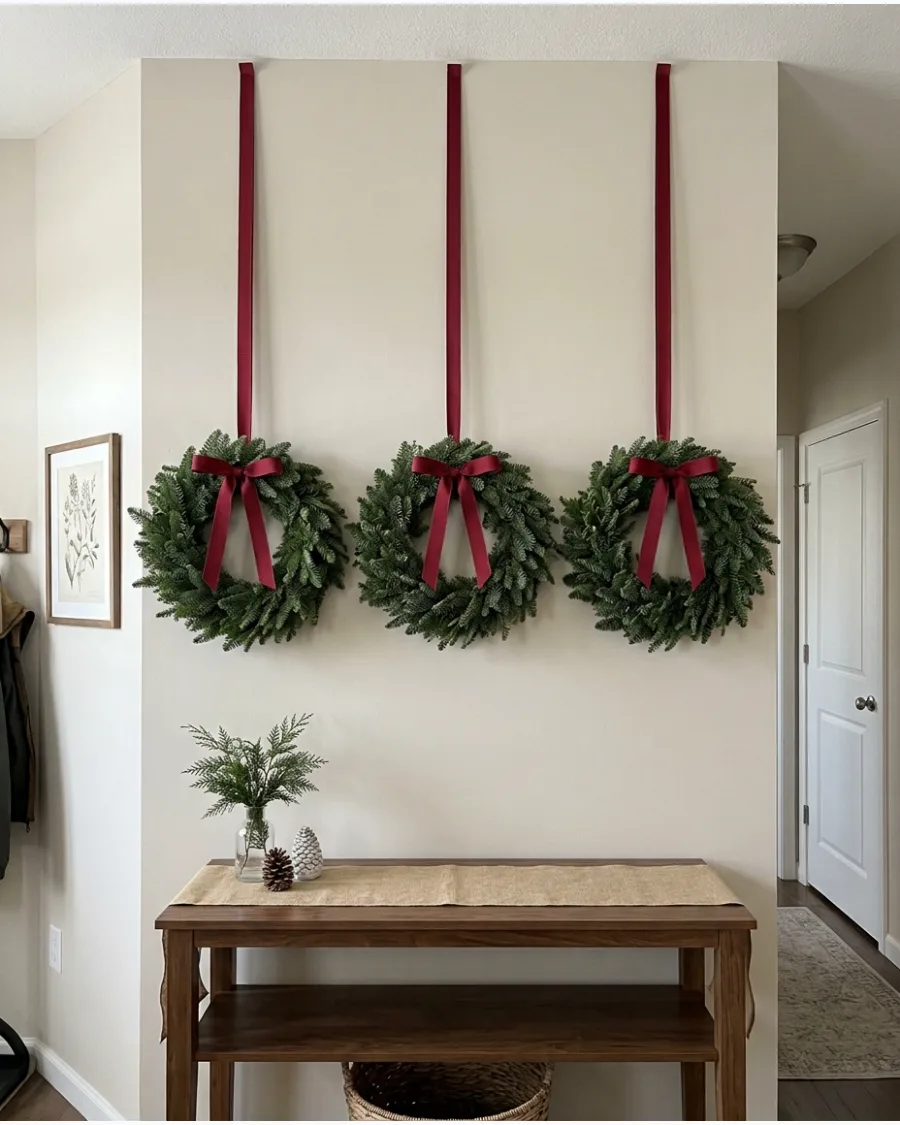
Symmetry brings a sense of order and formal elegance to holiday decorating that fits well in structured spaces. This trio arrangement works exceptionally well in transitional areas like long hallways or behind a dining table.
Hang three identical 20-inch wreaths in a perfectly level horizontal line with exactly 4 to 6 inches of space between each outer edge. The repetition creates a rhythmic pattern that feels more modern and architectural than a single large piece.
- Use a measuring tape and painter’s tape to mark the center points and ensure the heights are perfectly aligned.
- Suspend each wreath from matching lengths of satin or grosgrain ribbon for a tailored, high-end appearance.
- Ensure the embellishments, such as berry clusters or lights, are positioned identically on all three for total symmetry.
Use small pieces of double-sided mounting putty on the back of each wreath frame to keep them from tilting or shifting over time.
4. Mini Christmas Wreath Wall
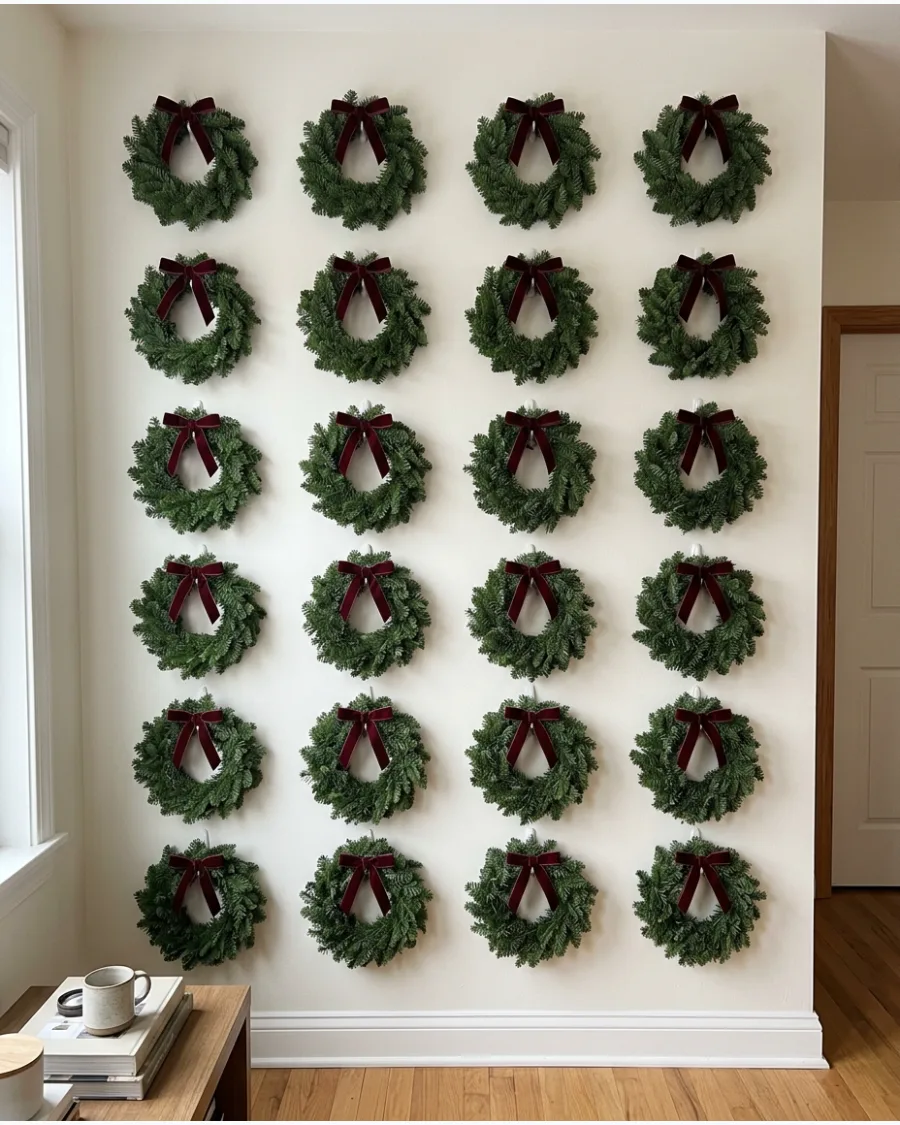
Grid layouts turn small decorative items into a significant wall statement through the power of repetition. This technique is particularly effective for small apartments or specific accent walls that need a pop of festive color without overwhelming the square footage.
Organize twelve to sixteen mini evergreen wreaths into a precise grid pattern on a blank wall to create a living 'wallpaper' effect. Choosing a consistent bow color, like deep burgundy or bright red, ties the entire grid together visually for a professional finish.
- Opt for wreaths between 6 and 10 inches in diameter to keep the grid manageable and visually neat.
- Use small, discreet adhesive hooks to avoid damaging drywall, as mini wreaths are typically very lightweight.
- Maintain consistent vertical and horizontal spacing—usually about 3 inches—between every wreath in the group.
If your wall is a dark color, use frosted or flocked mini wreaths to ensure the grid pops against the background.
5. Burgundy Bow Christmas Wreath Wall Decor
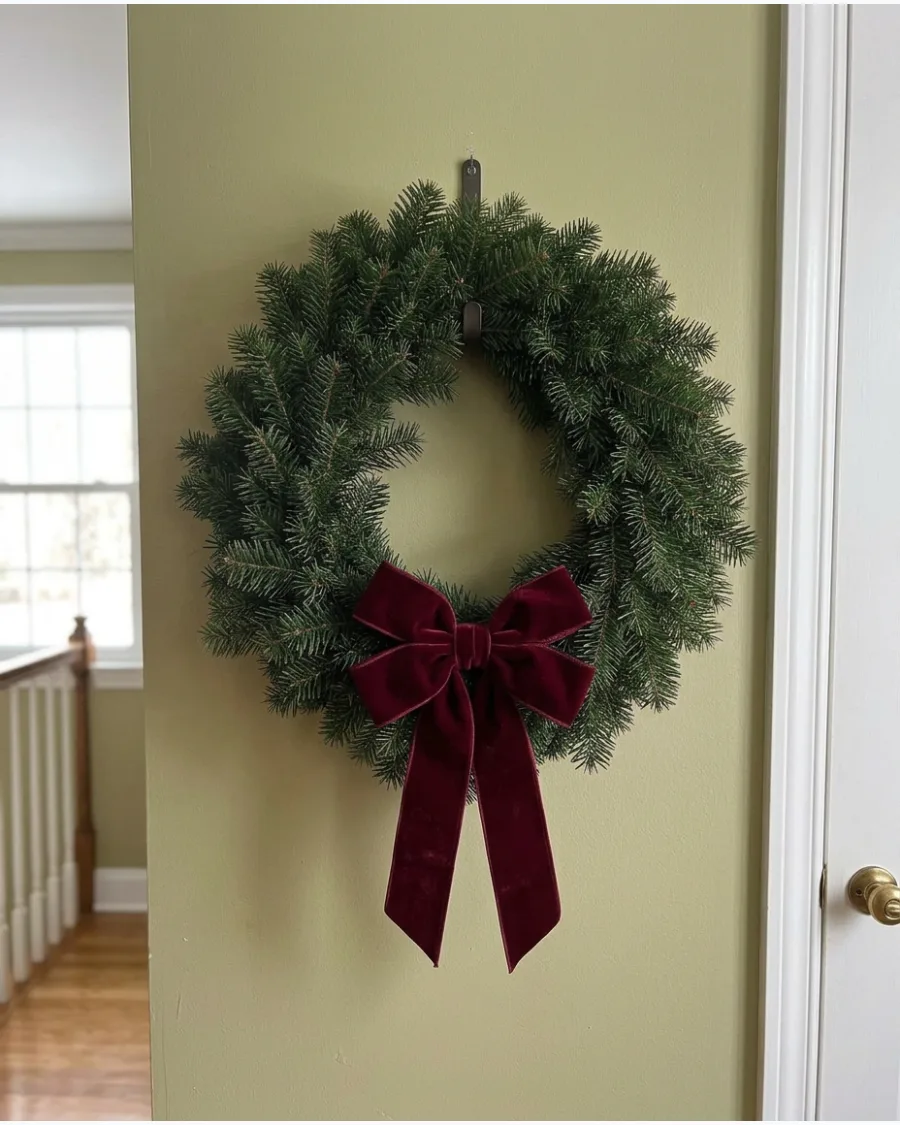
A classic evergreen wreath is transformed into a sophisticated piece of wall art by focusing on a single, high-quality accent. The contrast between deep, moody burgundy and dark forest green offers a refined alternative to bright primary reds for a more modern aesthetic.
Adorn a thick, unlit pine wreath with one oversized burgundy velvet bow placed at either the six o'clock or twelve o'clock position. This minimalist approach emphasizes the texture of the ribbon and the natural beauty of the needles.
- Choose a wired velvet ribbon to ensure the loops of the bow stay voluminous and do not flatten against the wall.
- Pair the wreath with dark wood furniture or charcoal-toned walls to enhance the 'moody traditional' aesthetic of 2026.
- Leave the rest of the wreath undecorated—no lights or ornaments—to keep the focus entirely on the scale of the bow.
Steam the ribbon tails once the wreath is hung to remove any fold lines and allow the velvet to drape naturally and smoothly.
6. Green Velvet Bow Christmas Wreath
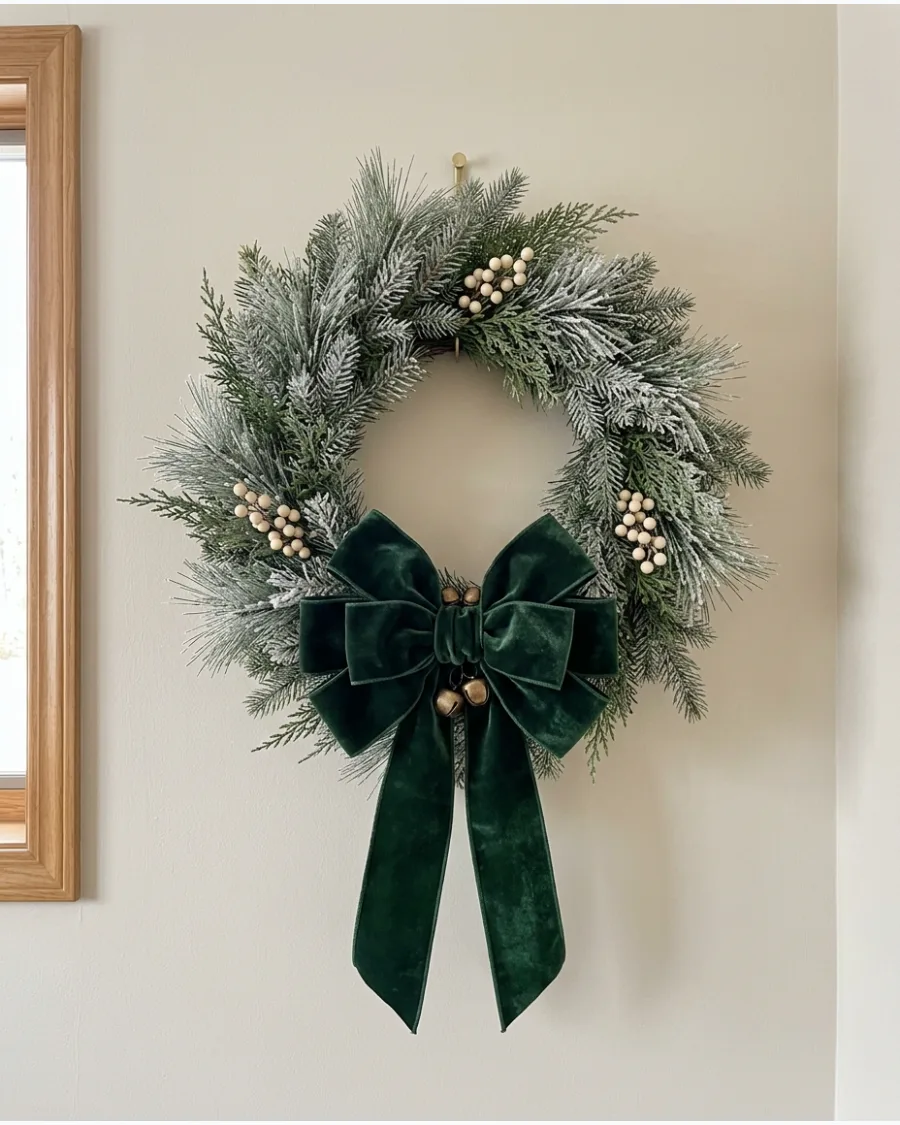
A dark green velvet bow provides a luxurious, heavy texture that anchors a light or frosted wreath against a neutral wall. Secure a large, multi-loop bow to the bottom center of a frosted pine wreath using thin florist wire to make the fabric the primary focal point. Complement the deep green tones with small accents like brass bells or cream berries nestled into the needles.
- Use wired velvet ribbon to ensure the bow loops maintain a full, rounded shape
- Cluster cream berries near the bow knot to add a bright point of contrast
- Choose a lightly frosted wreath to make the dark green fabric pop
Layer two different widths of velvet ribbon when making the bow to create a more custom, high-end designer look.
7. Christmas Wreath With Brass Bells
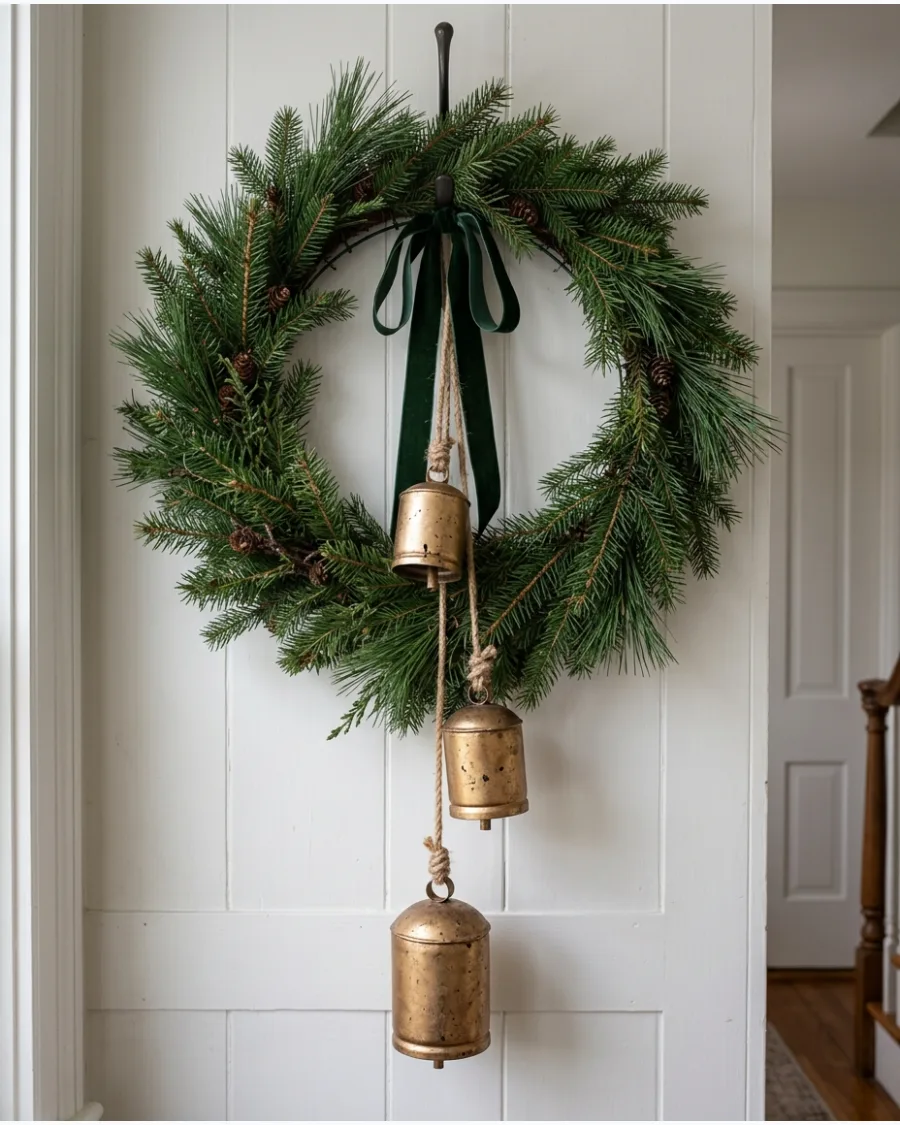
Antique-style bells add a nostalgic, melodic element to traditional wall greenery. Suspend three graduated brass bells from the center of a natural evergreen wreath using jute twine or a thin velvet ribbon so they hang at varying heights. This arrangement introduces a warm metallic finish that stands out against the dark, organic needles of the pine.
- Use bells with an 'antique' or distressed gold finish for a rustic, lived-in feel
- Knot the twine directly to the wreath frame to prevent the bells from sliding
- Wrap a long velvet ribbon around the top hook for a finished, traditional look
Place a small piece of clear tape inside the bell clappers if you want to prevent them from ringing every time a nearby door closes.
8. Christmas Wreath With Long Ribbon Tails
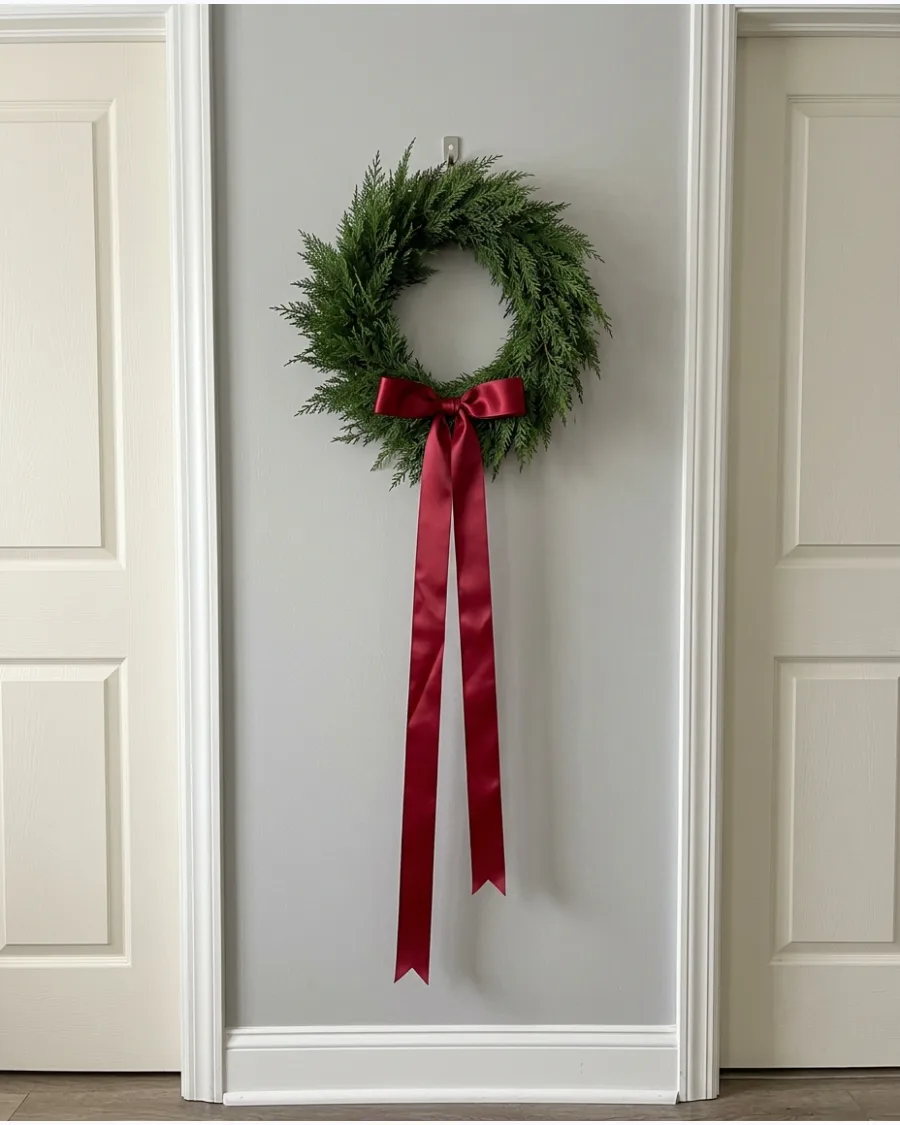
Extending the length of your wreath with ribbon tails creates a dramatic vertical line that is perfect for tall, narrow wall spaces. Attach a single large bow to the top or bottom of a minimalist wreath and allow the ribbon ends to cascade down at least two feet below the greenery. This simple addition provides movement and a sophisticated pop of color without cluttering the wall with small objects.
- Cut the ribbon ends into a 'V' or dovetail shape for a clean, tailored finish
- Use satin ribbon for a slight shimmer or velvet for a matte, heavy drape
- Iron or steam the ribbon tails before hanging to remove any creases from the roll
If the ribbon is too light to hang straight, hide a small fishing weight inside the bottom fold of the dovetail cut.
9. Natural Pine and Cedar Christmas Wreath
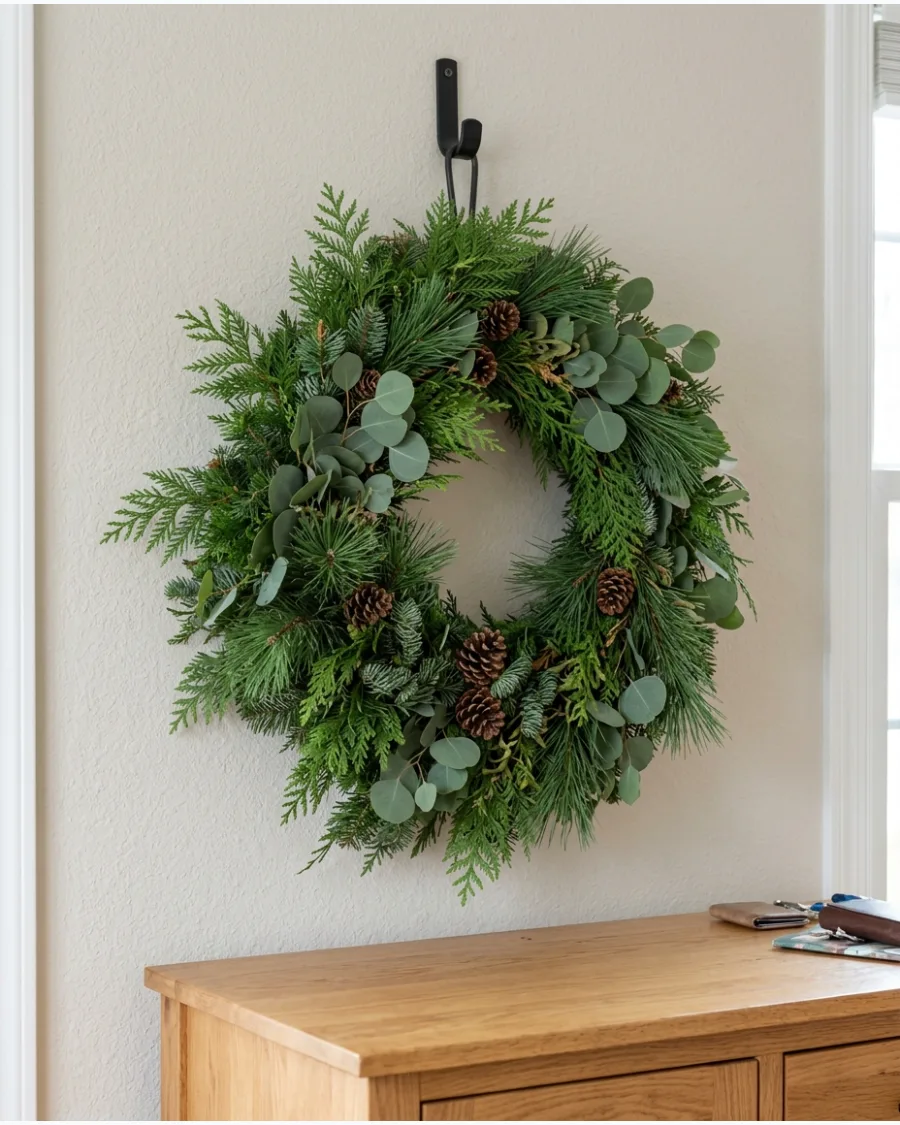
Mixing different types of evergreen foliage creates a rich, organic texture that looks more sophisticated than a single-species wreath. Combine flat-leaf cedar branches with needle-heavy pine and silver dollar eucalyptus to create a lush, multi-tonal wall display. By keeping additional decorations minimal, you allow the natural variations in the greenery's color and shape to be the main attraction.
- Tuck in a few real pinecones to add woody texture and depth
- Mix in eucalyptus for a dusty blue-green color contrast
- Use varying lengths of stems to create an asymmetrical, wilder silhouette
If using fresh greenery, mist the back of the wreath every few days to keep the branches hydrated and prevent needle drop on your walls.
10. Snowy Flocked Christmas Wreath Wall
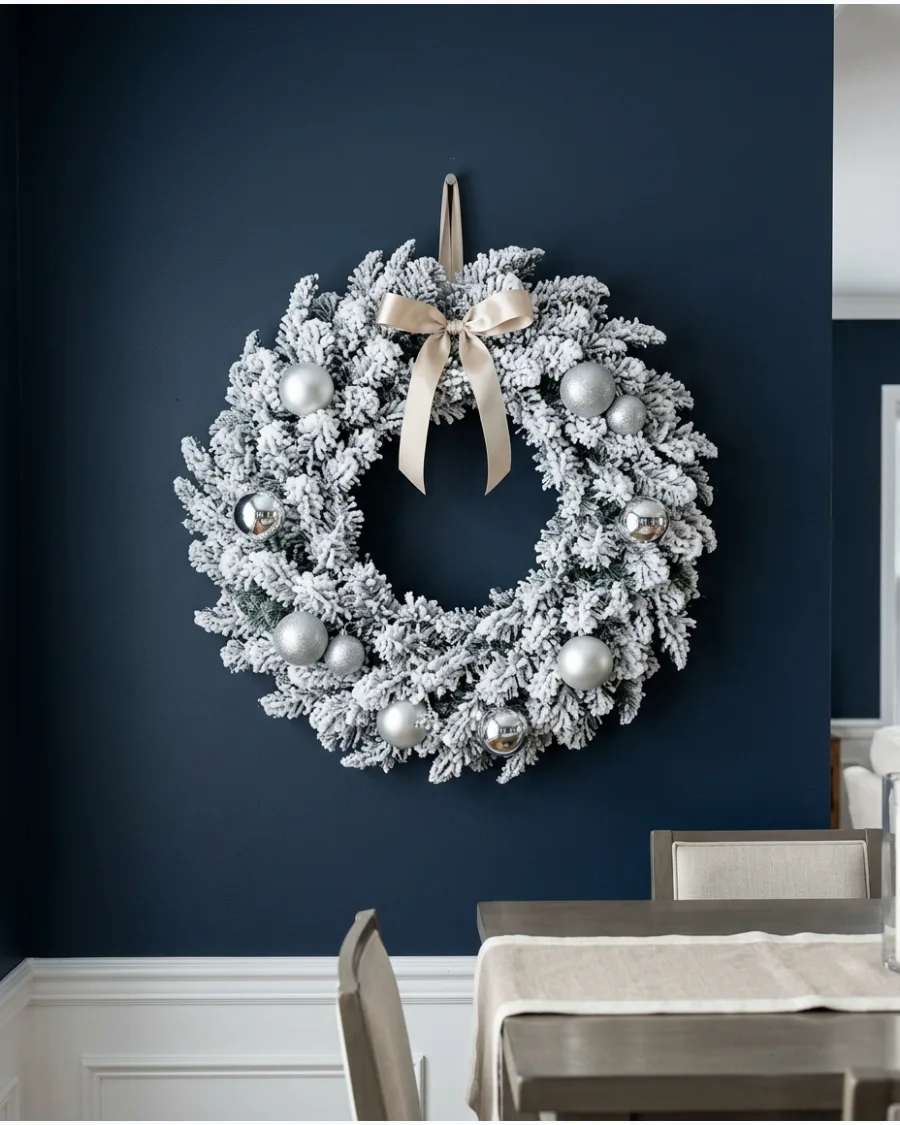
A flocked wreath mimics the look of a heavy snowfall and provides a bright, high-contrast element for dark-colored walls. Enhance the wintry theme by adding silver or champagne-colored ornaments that catch the light against the white 'snow' coating. This style works particularly well in modern or 'winter wonderland' themes where cool tones like pale blue or crisp white are preferred over traditional reds.
- Choose a wreath with 'heavy flocking' for a thick, snow-covered appearance
- Add frosted or clear glass ornaments to mimic the look of ice
- Pair with a navy, charcoal, or dark wood wall to make the white branches stand out
Work with the wreath on a drop cloth or outdoors initially, as the flocking material can shed slightly during the fluffing and decorating process.
11. Christmas Swag Wall Hanging
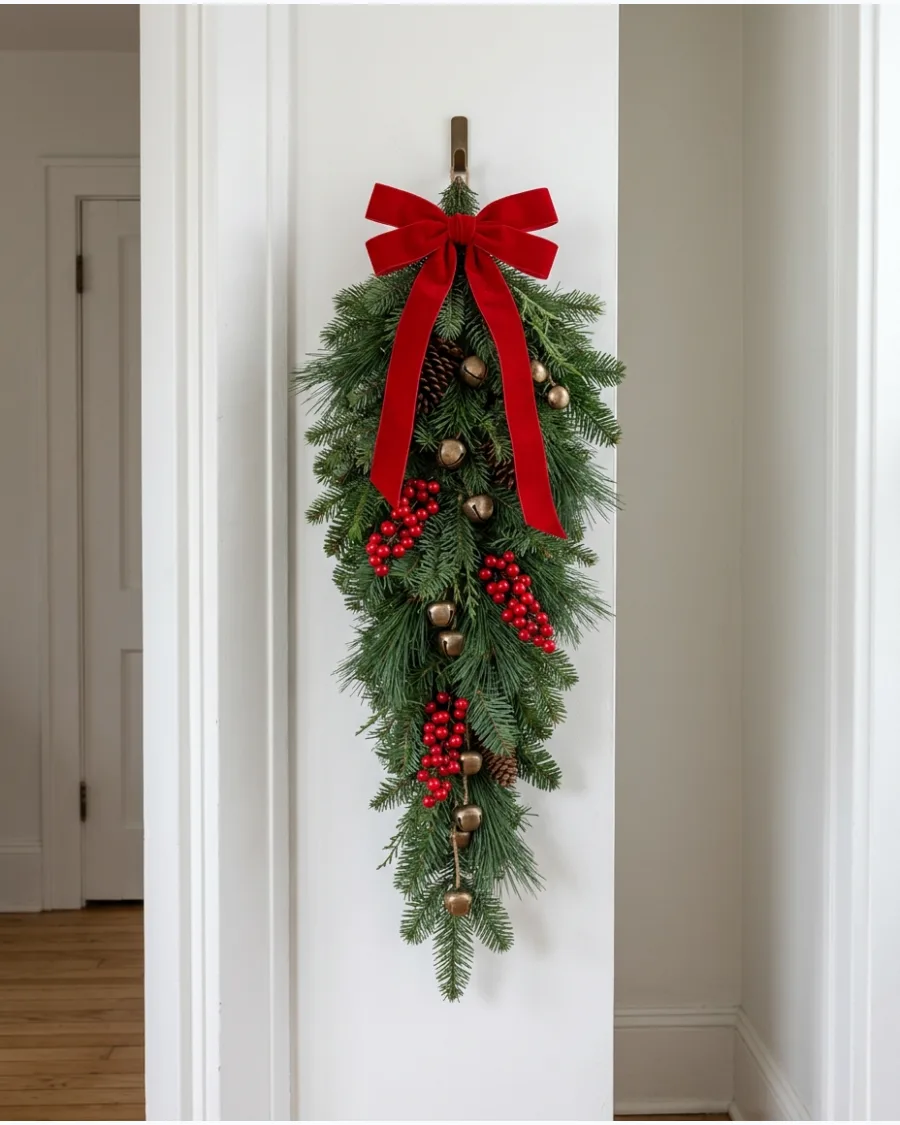
Swags offer a vertical alternative to traditional round wreaths, making them ideal for narrow wall sections or door sidelights. Secure a single teardrop-shaped evergreen assembly to a sturdy wall hook at eye level to draw the gaze upward and maximize small wall spaces. Intersperse the needles with clusters of red berries and small brass bells for a classic holiday texture.
- Use a large velvet bow at the top to conceal the hanging wire or hook.
- Stagger pinecones throughout the lower two-thirds to maintain visual weight and depth.
- Choose a mixture of pine and eucalyptus for a modern, multi-tonal greenery look.
Fluff the individual needle branches outward and forward before hanging to ensure the swag looks full and hides the central structural spine.
12. Double Christmas Swag Wall Display
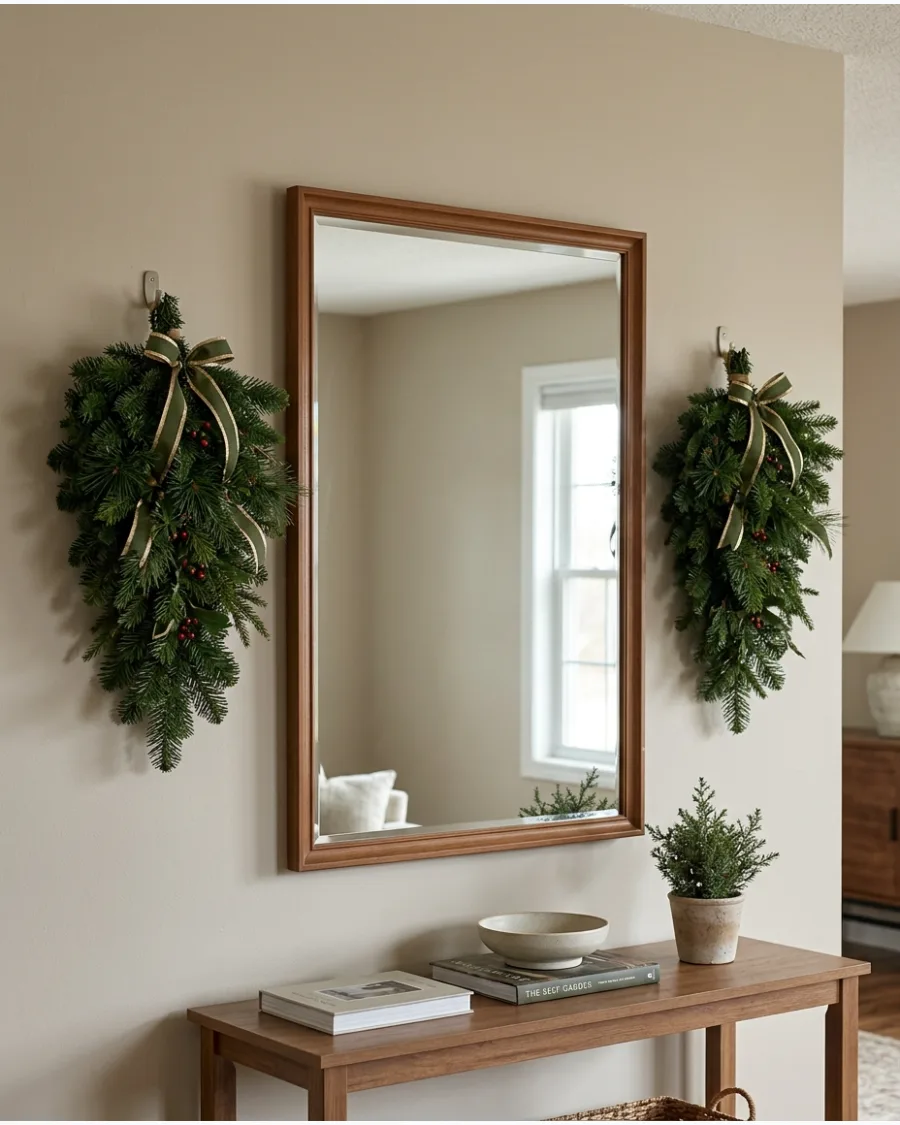
Symmetrical arrangements create a formal, balanced look that anchors a large focal point like a television or mirror. Mount two identical evergreen swags at the same height on either side of your central wall feature to frame the space elegantly without overwhelming it. This technique works well in dining rooms or living areas where you want to add seasonal flair while keeping existing artwork on display.
- Use a level to ensure the top of each swag aligns perfectly across the horizontal plane.
- Pick swags with identical branch density and length to maintain visual balance.
- Keep the embellishments, such as ribbon color and ornament size, consistent on both pieces.
If framing a TV, ensure the swags are hung at least six inches away from the edge to avoid blocking the screen or interfering with remote sensors.
13. Evergreen Garland Across a Living Room Wall
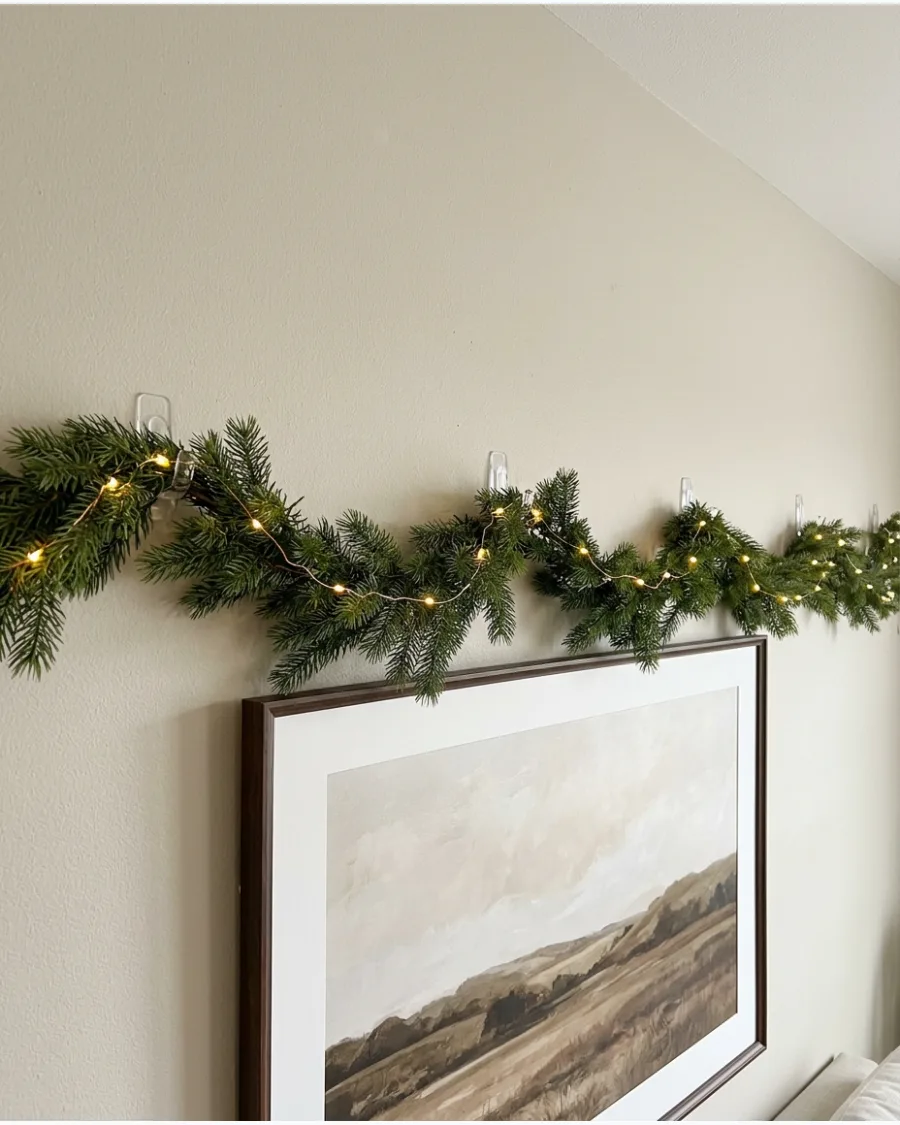
A horizontal garland acts as a living border that adds warmth and texture to an expansive wall surface. Install clear adhesive hooks every 18 inches along the top of a wall or art frame to support the weight of a heavy pine garland across the room. Allow the greenery to dip slightly between the support points for a relaxed, organic feel rather than a rigid straight line.
- Weave a string of warm white LED lights through the branches for a soft evening glow.
- Tuck in sprigs of cedar or juniper to add variety and texture to a standard pine base.
- Use thin floral wire to secure ribbons or small ornaments at each hanging point for extra color.
Measure the wall length first and buy a garland that is 20% longer than the space to account for the natural drapes and curves.
14. Cascading Christmas Garland Wall
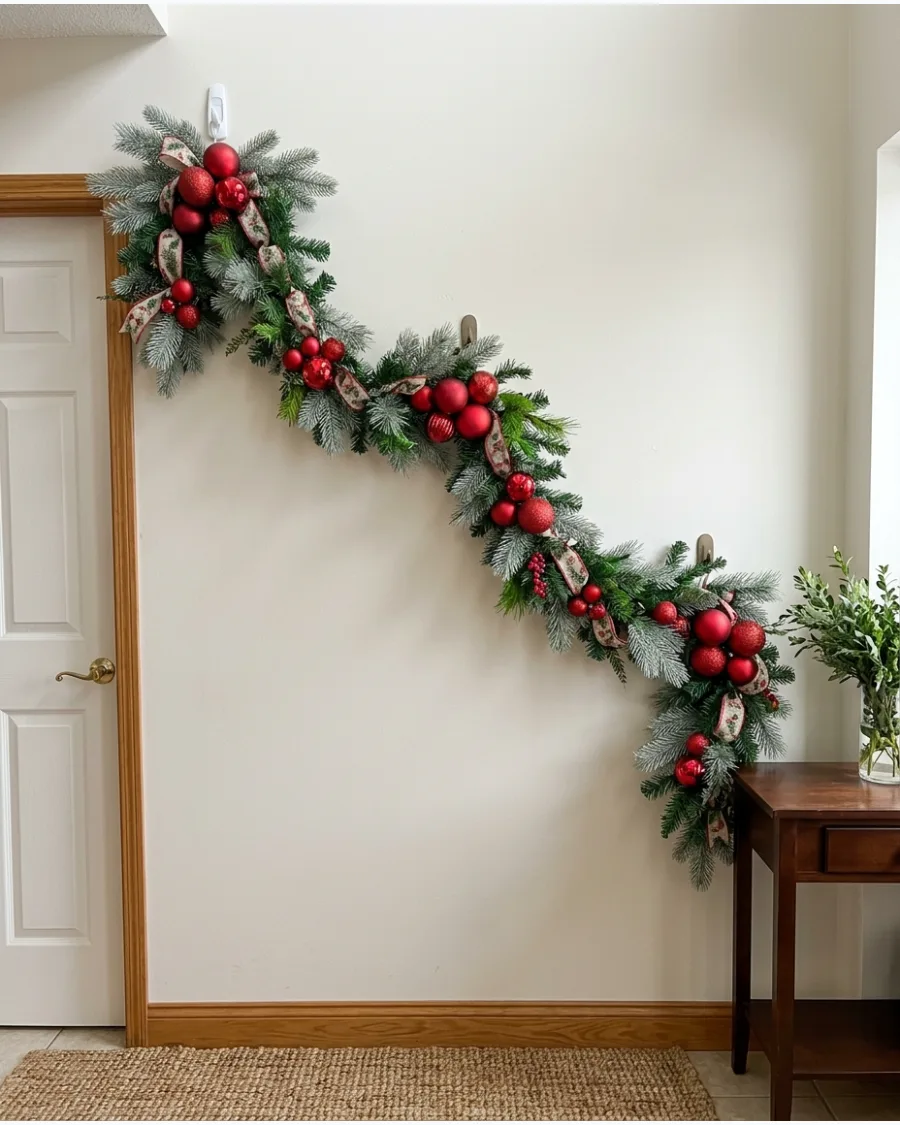
Diagonal placement creates a sense of movement and energy that a standard horizontal line cannot achieve. Anchor the start of your garland near the ceiling on one side and sweep it down toward a lower point on the opposite wall corner for a cascading effect. This asymmetrical approach is particularly effective in entryways or behind a buffet table to guide the eye through the room.
- Mix in large-scale ornaments at the lowest point of the curve to create a visual focal cluster.
- Use varying shades of greenery, such as silver fir and dark spruce, for added depth and realism.
- Ensure the diagonal path does not cut across doorways or active walking paths to maintain room functionality.
Use heavy-duty rated hooks for the highest anchor point, as it will bear the majority of the garland's downward tension and weight.
15. Christmas Garland Around Wall Art
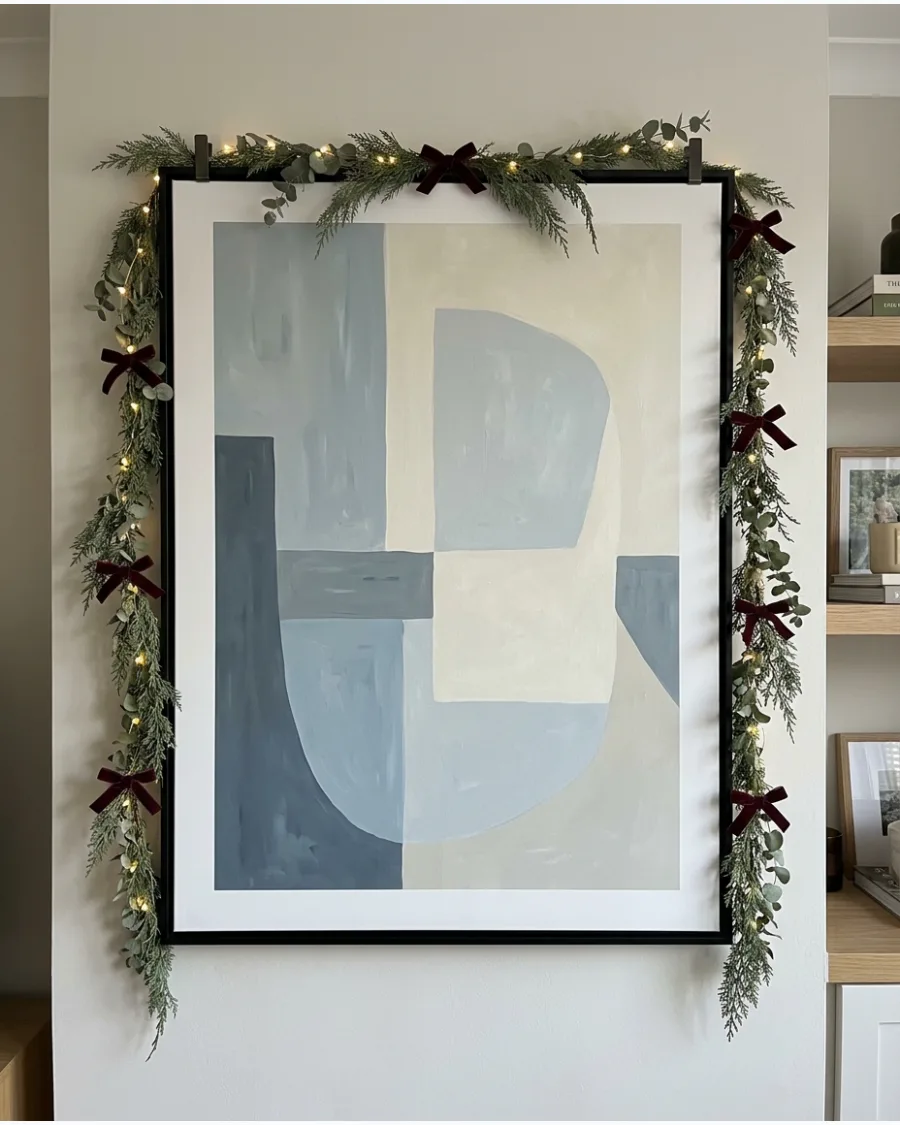
Transforming everyday art into holiday decor saves space and keeps your favorite pieces on display throughout the season. Drape a flexible, lightweight cypress or eucalyptus garland around the perimeter of a large picture frame, securing it with discreet clips or floral wire. This simple addition softens the hard edges of the frame and integrates the artwork into the broader festive theme of the room.
- Add battery-operated micro-fairy lights to illuminate the artwork without needing a nearby outlet.
- Place a small velvet bow at each top corner to define the shape of the frame and add a pop of color.
- Use a thin, airy garland to ensure the greenery does not obscure the actual subject of the artwork.
Check that the garland is not resting directly on the glass to prevent moisture buildup or potential scratches on the frame's finish.
16. Christmas Greenery Around a Wall Mirror
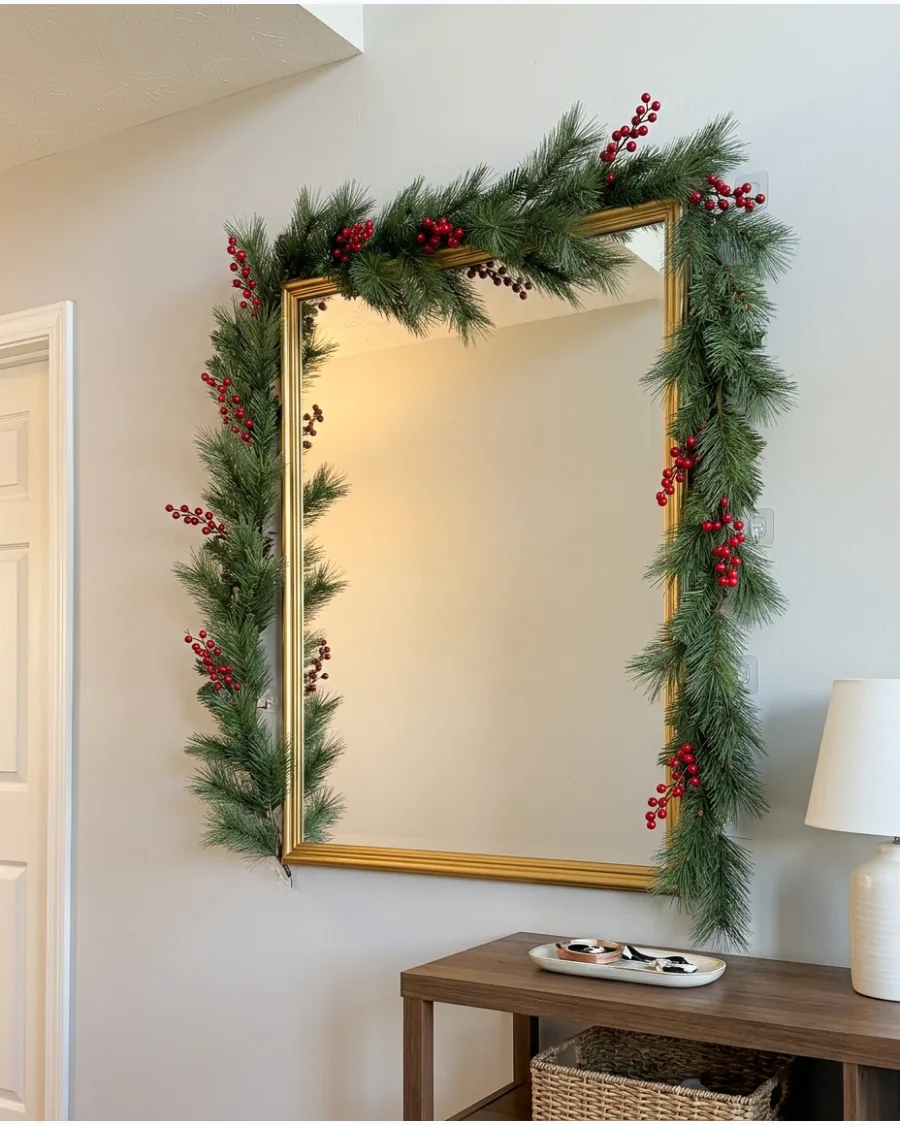
Transform a standard household mirror into a seasonal focal point by utilizing its frame as a sturdy mounting base. Drape a thick pine garland over the top and down the sides of the mirror, securing it with clear adhesive hooks or wire to keep the glass surface clear. The mirror naturally reflects the texture of the needles and the glow of nearby lights, making the greenery appear twice as lush.
- Incorporate clusters of red berries or small brass bells for classic holiday contrast
- Weave in a slim velvet ribbon to add a soft, luxurious texture to the pine
- Ensure the garland is positioned on the outer edge of the frame to avoid blocking the reflection
Check that the mirror's wall mounting hardware can support the added weight of the garland before you begin decorating.
SPACE-SAVING CHRISTMAS TREE WALL DECOR
17. Garland Christmas Tree on the Wall
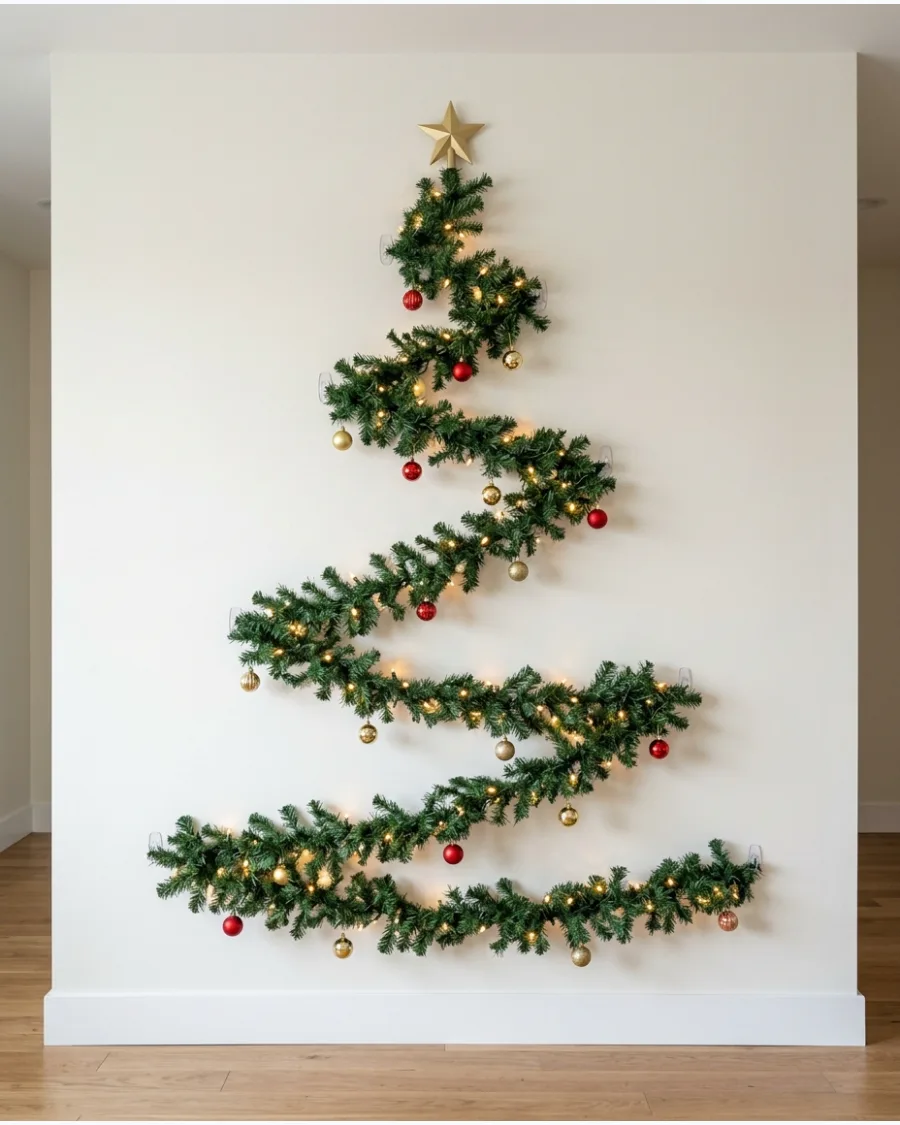
This wall-mounted tree design provides the visual impact of a traditional evergreen without consuming any floor space. Outline a large triangle on a blank wall using clear command hooks and wind a lush faux evergreen garland through them to form the tree's silhouette. This approach is ideal for small apartments or high-traffic hallways where a floor-standing tree would be impractical.
- Use battery-operated LED string lights to avoid visible cords running to floor outlets
- Stagger the hooks in a slight zig-zag pattern to create a fuller, more realistic tree shape
- Attach a lightweight star or bow at the top point to complete the tree aesthetic
Use floral wire to bundle two thinner garlands together if you want a thicker, more dimensional tree profile.
18. Fairy Light Christmas Tree Wall
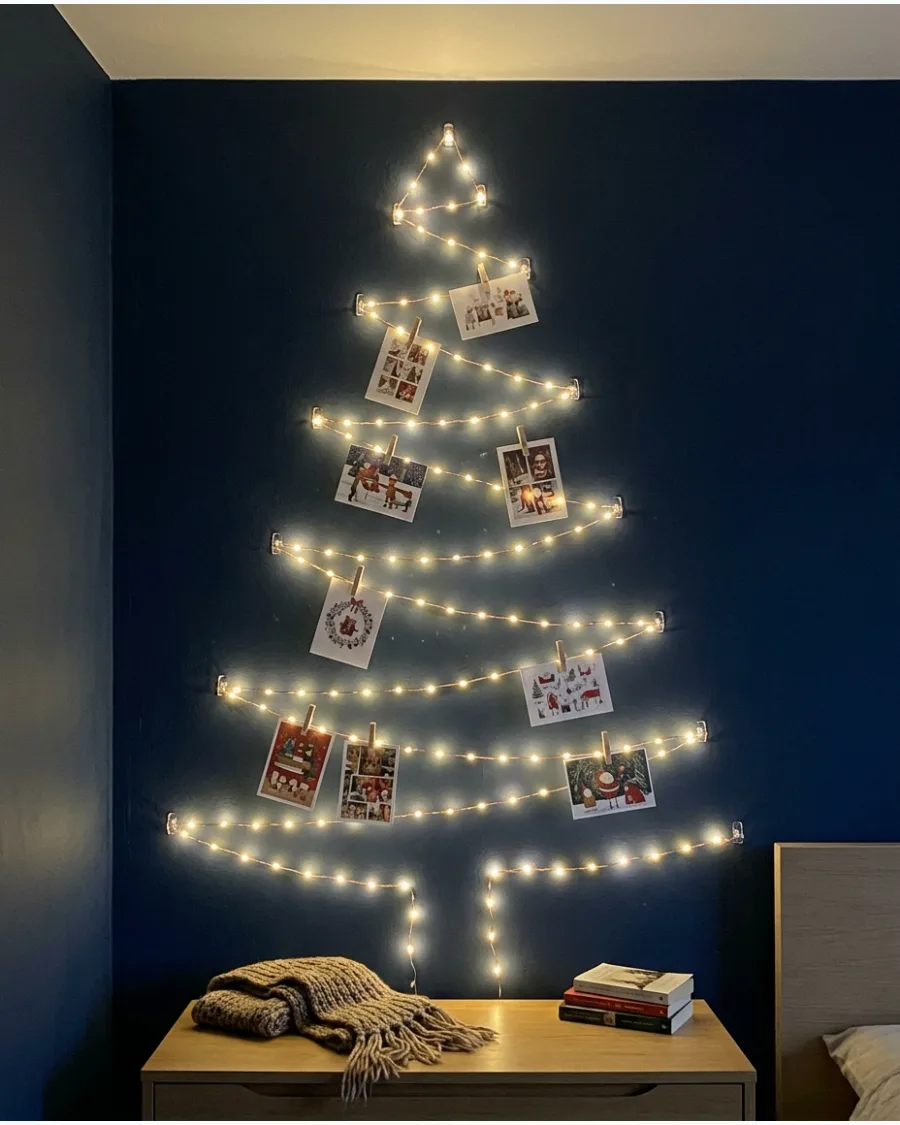
Create a luminous and minimalist focal point using only light and small decorative accents. Map out a tiered zig-zag pattern with clear wall clips and thread a long strand of warm white fairy lights to define the tree shape. This setup is exceptionally renter-friendly and can be customized by clipping Christmas cards or lightweight wooden stars directly onto the wire.
- Choose copper-wire fairy lights for a delicate, nearly invisible frame when the lights are off
- Ensure the horizontal tiers are leveled to maintain a professional, clean silhouette
- Conceal the battery pack at the bottom behind a small decorative box or piece of furniture
Use a pencil to lightly mark the clip positions before adhering them to ensure perfect symmetry.
19. Branch Christmas Tree Wall Hanging
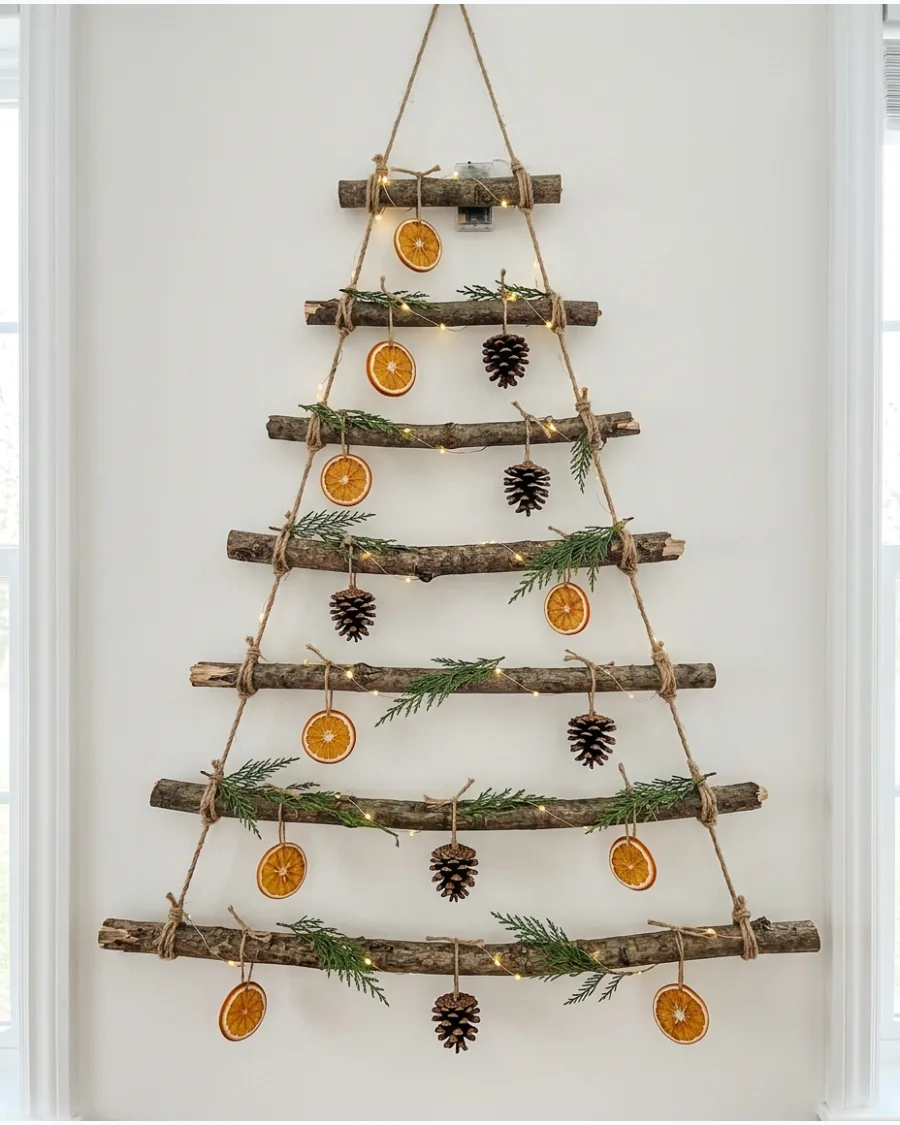
Introduce a rustic, organic element to your decor with a tree assembled from natural wood. Tie natural branches together with sturdy twine, starting with the shortest at the top and increasing in length toward the base to form a hanging ladder-style triangle. This structure serves as a series of horizontal shelves, making it a perfect display for vintage ornaments or dried citrus slices.
- Sand the ends of the branches to prevent them from scratching the wall surface
- Space the branches approximately 5 inches apart for a balanced, airy silhouette
- Secure the entire piece from a single heavy-duty hook at the very top for easy hanging
Match the twine color to your wall paint to create a 'floating' effect where only the wood and ornaments are prominent.
20. Wooden Christmas Tree Wall Decor
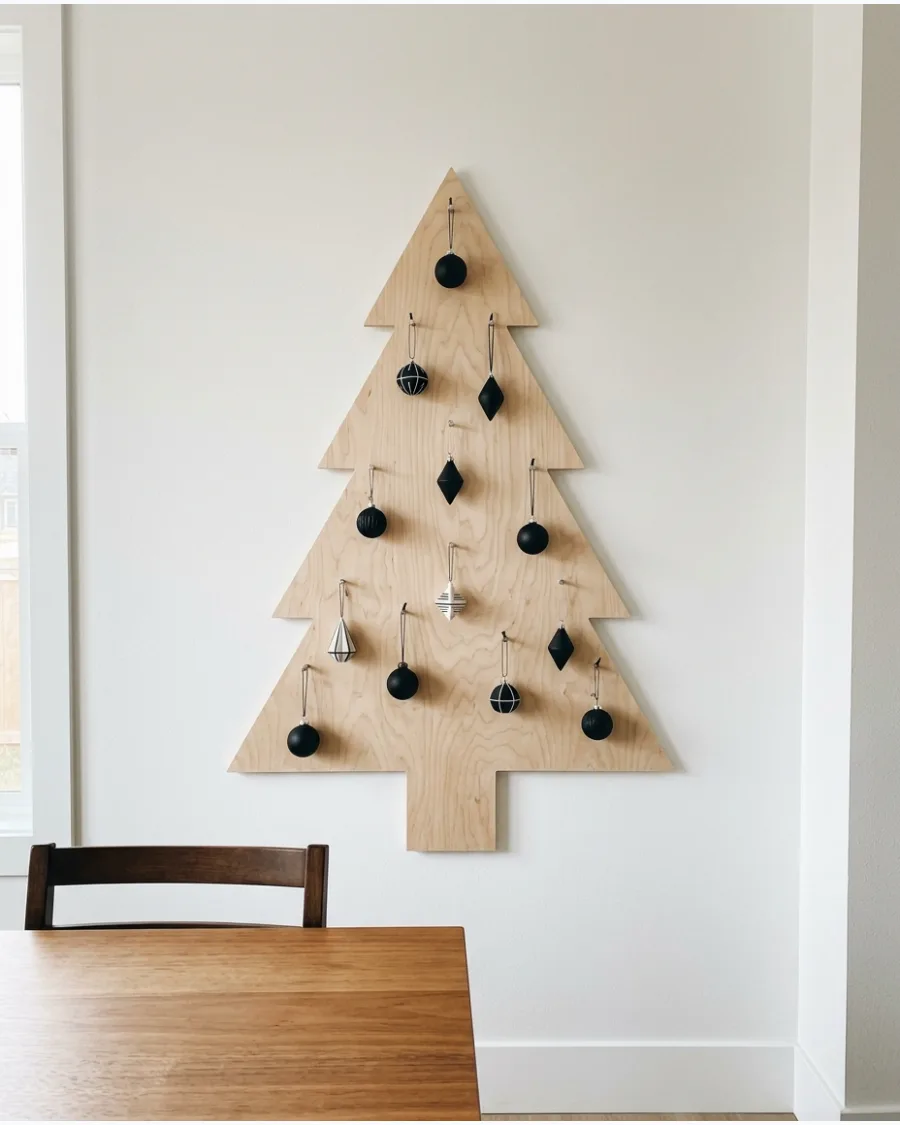
A flat wooden silhouette offers a clean, Scandinavian-inspired aesthetic that complements modern interiors. Mount a pre-cut plywood or slat-wood tree shape flush against the wall and use small tacks or adhesive hooks to hang a curated selection of ornaments. The natural wood grain provides a warm, textural background that contrasts beautifully against both light and dark wall colors.
- Leave the wood raw for a minimalist feel or apply a light stain to match your existing furniture
- Use double-sided heavy-duty mounting tape for a drill-free installation on smooth walls
- Incorporate small wooden shelves or pegs onto the silhouette to hold flameless tea lights
If using a slat-wood design, leave small gaps between the horizontal boards so you can slide ornament hooks through without drilling.
21. Ribbon Christmas Tree Wall
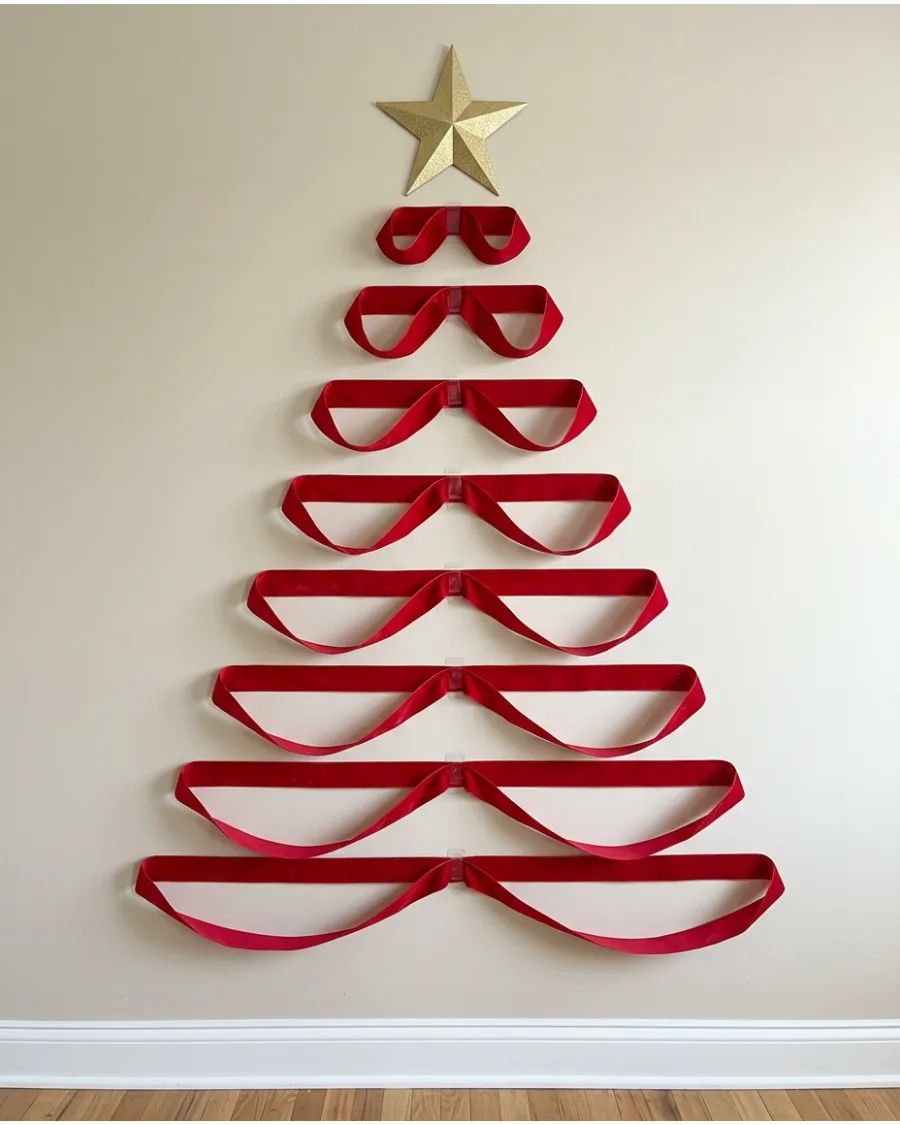
Transform a bare wall into a festive focal point by looping wide ribbon into a classic silhouette. Secure the center of each ribbon loop to the wall, increasing the width as you move toward the floor to mimic branches. Choose a texture like velvet or a classic pattern like red plaid to add depth to the flat surface.
- Use clear adhesive hooks or painter's tape hidden behind the loops to prevent wall damage.
- Ensure the spacing between rows is consistent to maintain the tree's geometric balance.
- Add a coordinating oversized bow at the peak to ground the design.
Iron the ribbon first to remove creases, as stiff, flat loops create a much cleaner architectural look.
22. Ornament Christmas Tree Wall
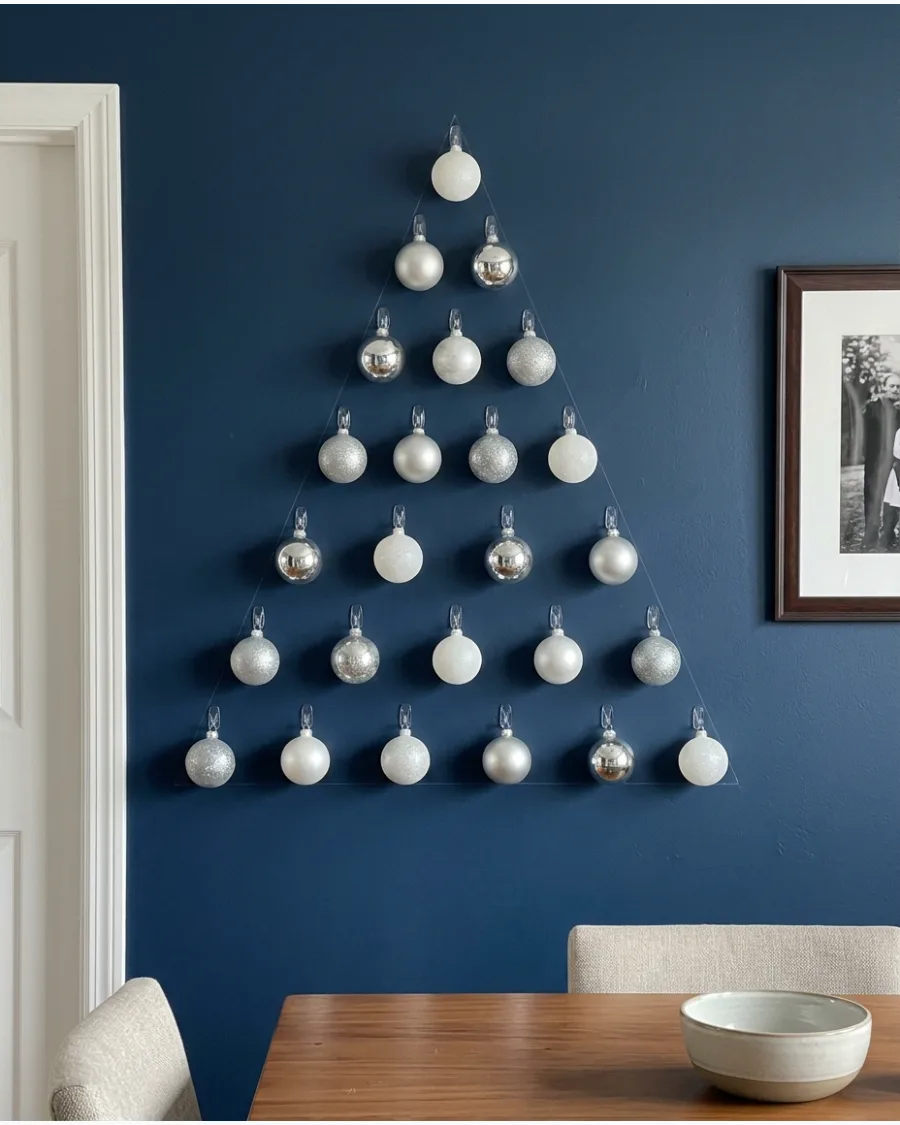
This approach uses traditional tree trimmings to create a modern, vertical art piece without the bulk of a real tree. Map out a precise equilateral triangle on the wall using light pencil marks or a laser level before hanging your removable hooks. Keep the ornament sizes varied but stay within a single color family to ensure the arrangement looks intentional rather than cluttered.
- Space the ornaments closely enough that the eye easily connects the dots into a solid triangular form.
- Use Command-style clear hooks that can support the weight of heavier glass baubles safely.
- Mix matte, shiny, and glitter finishes to add visual interest within your chosen palette.
Hang the largest ornaments at the bottom and the smallest at the top to give the wall-tree a natural sense of scale.
23. Christmas Card Tree Wall
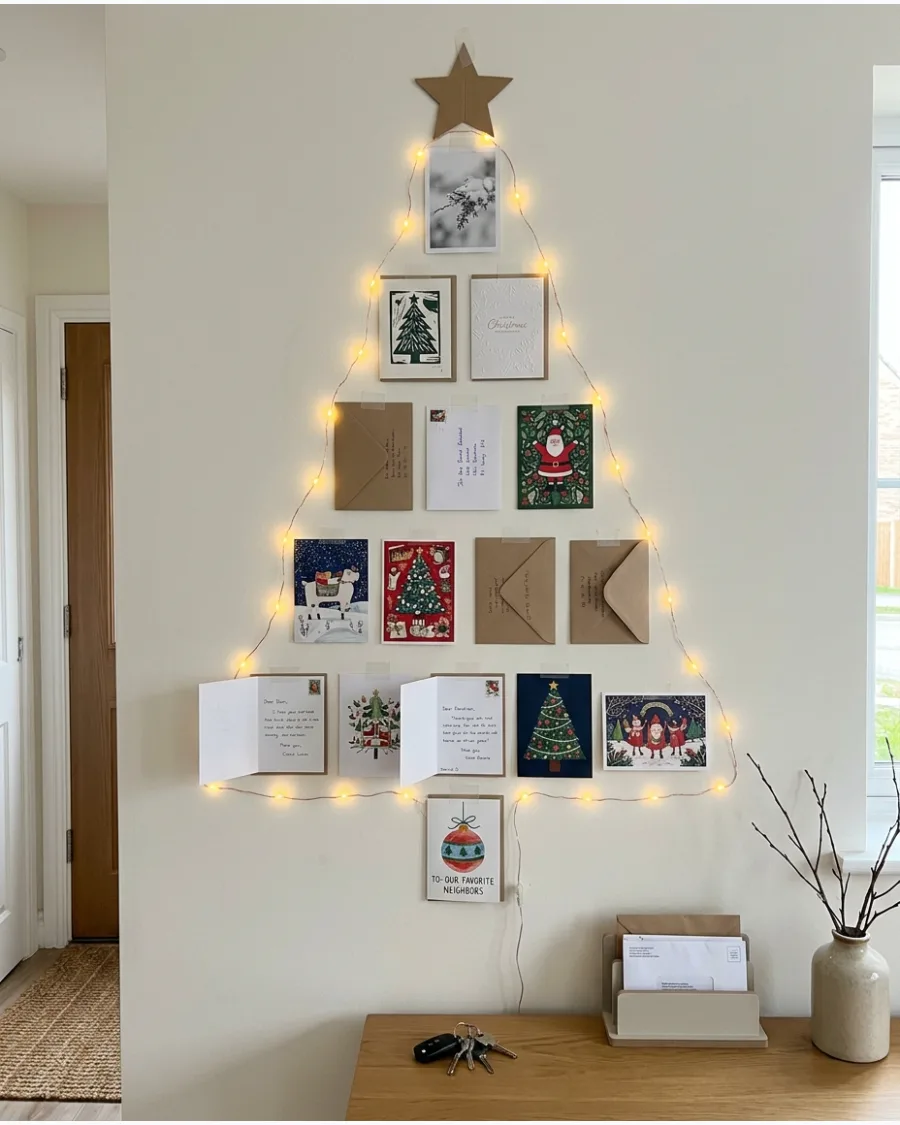
Celebrate the holiday season by turning your incoming mail into a meaningful decorative installation. Arrange your holiday cards in horizontal rows that expand in width from top to bottom, creating a tiered evergreen effect. This display allows you to enjoy the messages from loved ones while saving precious floor space.
- Frame the card arrangement with a thin strand of battery-operated fairy lights to define the silhouette at night.
- Use double-sided poster tape or specialized card clips to keep the cards perfectly flush against the wall.
- Place a lightweight cardboard or metal star at the apex to complete the festive look.
If you have fewer cards, fill the gaps with colorful envelopes or leftover scraps of wrapping paper to maintain the tree shape.
24. Family Photo Christmas Tree Wall
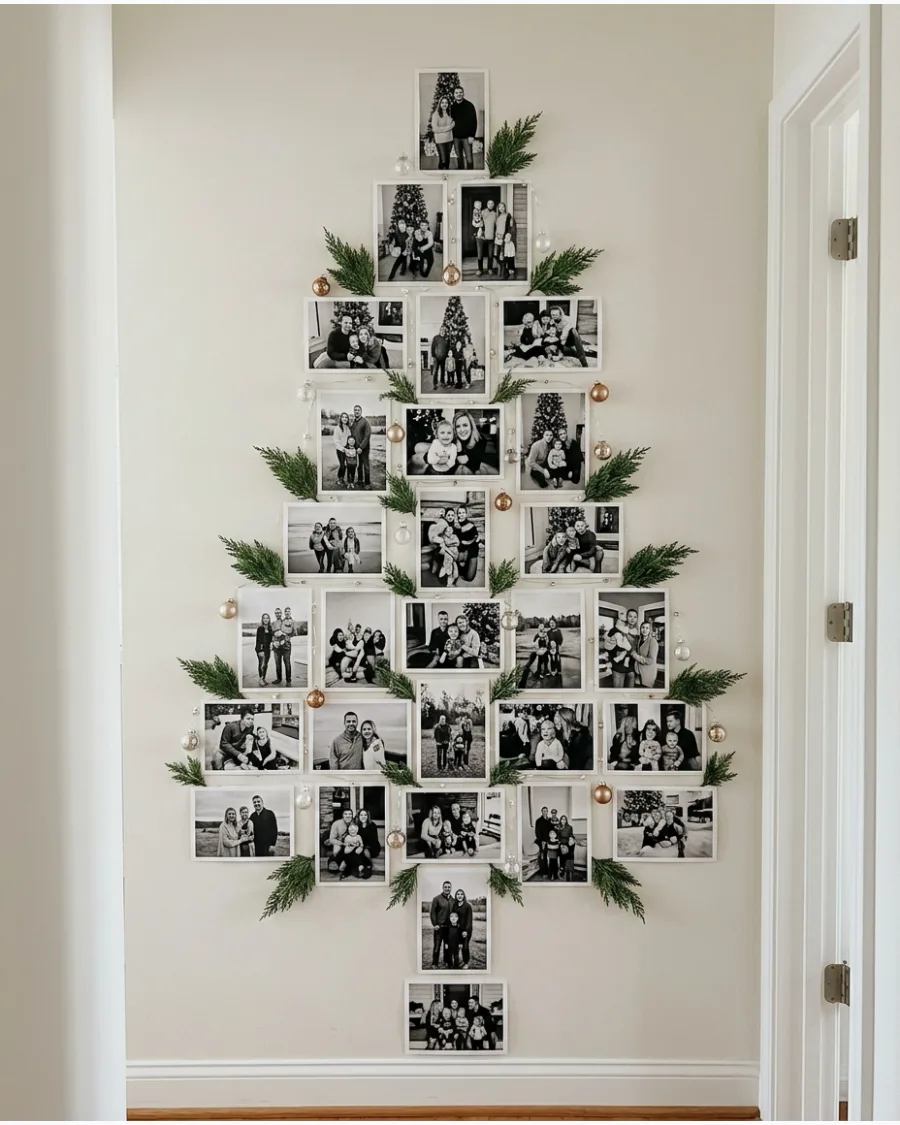
Create a nostalgic tribute to past holidays by mounting family photos in a structured tree formation. Place the photos edge-to-edge in a central vertical column, then branch out horizontally with more photos to build the base of the tree. This serves as both a seasonal decoration and a personalized conversation piece for visiting guests.
- Weave small sprigs of fresh or faux eucalyptus between the photo edges to soften the lines.
- Use black-and-white photos for a sophisticated look or colorful snapshots for a vibrant feel.
- Stick to a uniform photo size for a grid-like appearance or mix sizes for a more organic style.
Use a paper template on the floor to plan the photo layout before you start attaching anything to the wall.
25. Washi Tape Christmas Tree Wall
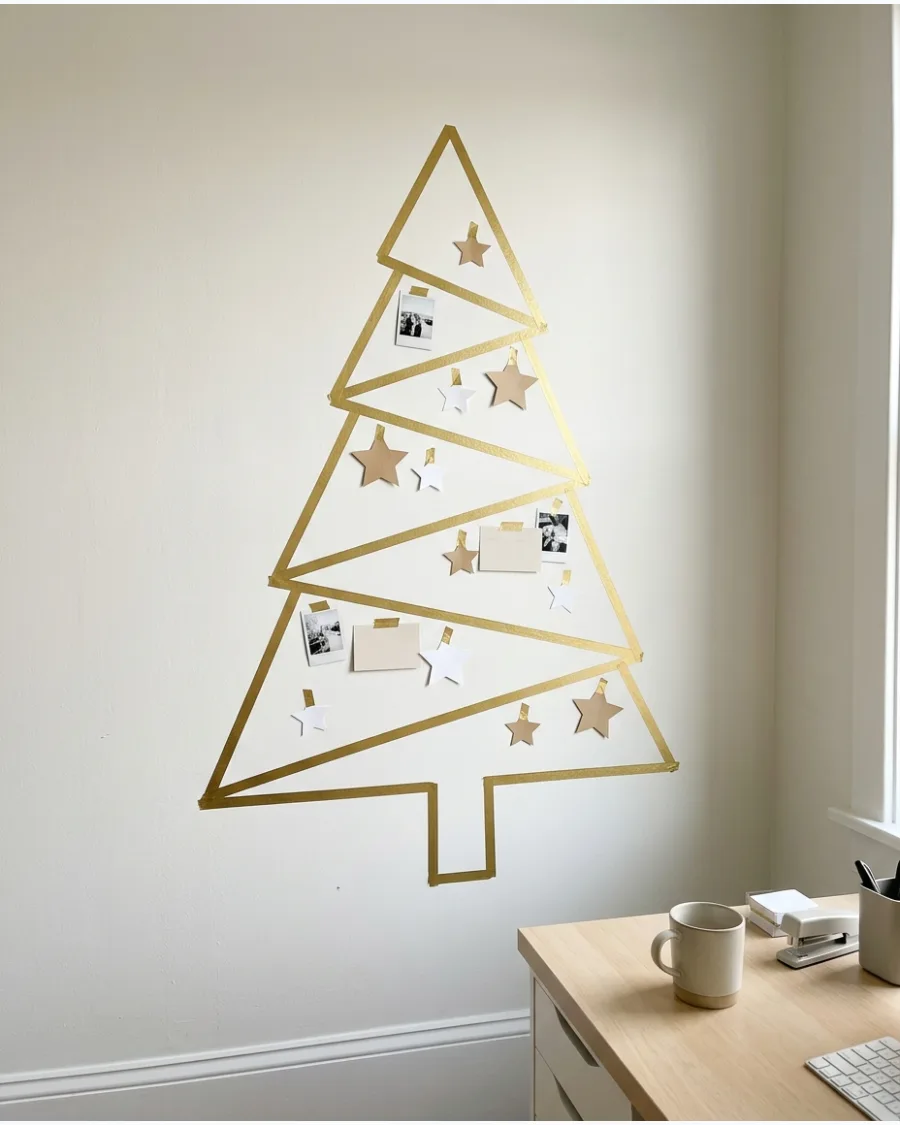
Washi tape offers a low-profile, renter-friendly way to add holiday spirit to a narrow hallway or kitchen wall. Apply strips of decorative tape in a simple geometric zigzag or a series of straight lines to define the outer edges of a tree. Because the tape is easily repositionable, you can experiment with different angles until the proportions look right.
- Adhere lightweight paper stars or cut-outs inside the tape border using the same tape.
- Choose a metallic gold or deep green tape to make the minimalist outline pop against neutral walls.
- Peel the tape away slowly after the holidays to avoid any adhesive residue or paint peeling.
Use a ruler to ensure your tape lines are straight and the symmetry is balanced across the vertical axis.
26. Felt Christmas Tree Wall for Kids
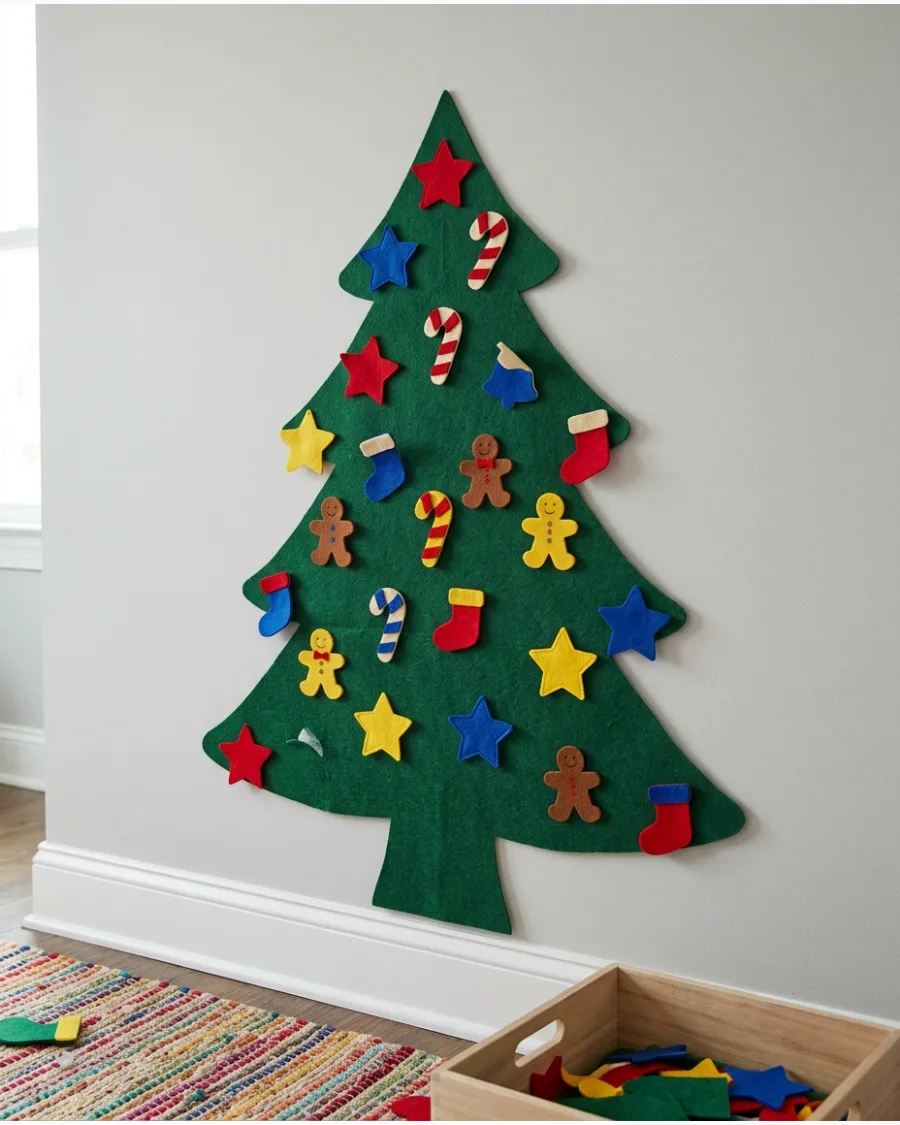
Create a tactile holiday experience that keeps little ones engaged away from the main family tree. Mount a large green felt tree cutout to the wall using hook-and-loop fasteners or non-damaging adhesive strips to create a dedicated interactive play zone. This renter-friendly solution allows children to customize their own decoration without the risk of breaking glass ornaments.
- Assorted soft felt ornaments with velcro backings
- Child-height placement for easy accessibility
- Vibrant contrasting colors to stimulate motor skills
Store the ornaments in a small decorative basket or a wall-mounted felt pocket next to the tree to keep the floor clear when playtime is over.
27. Christmas Village Wall Tree
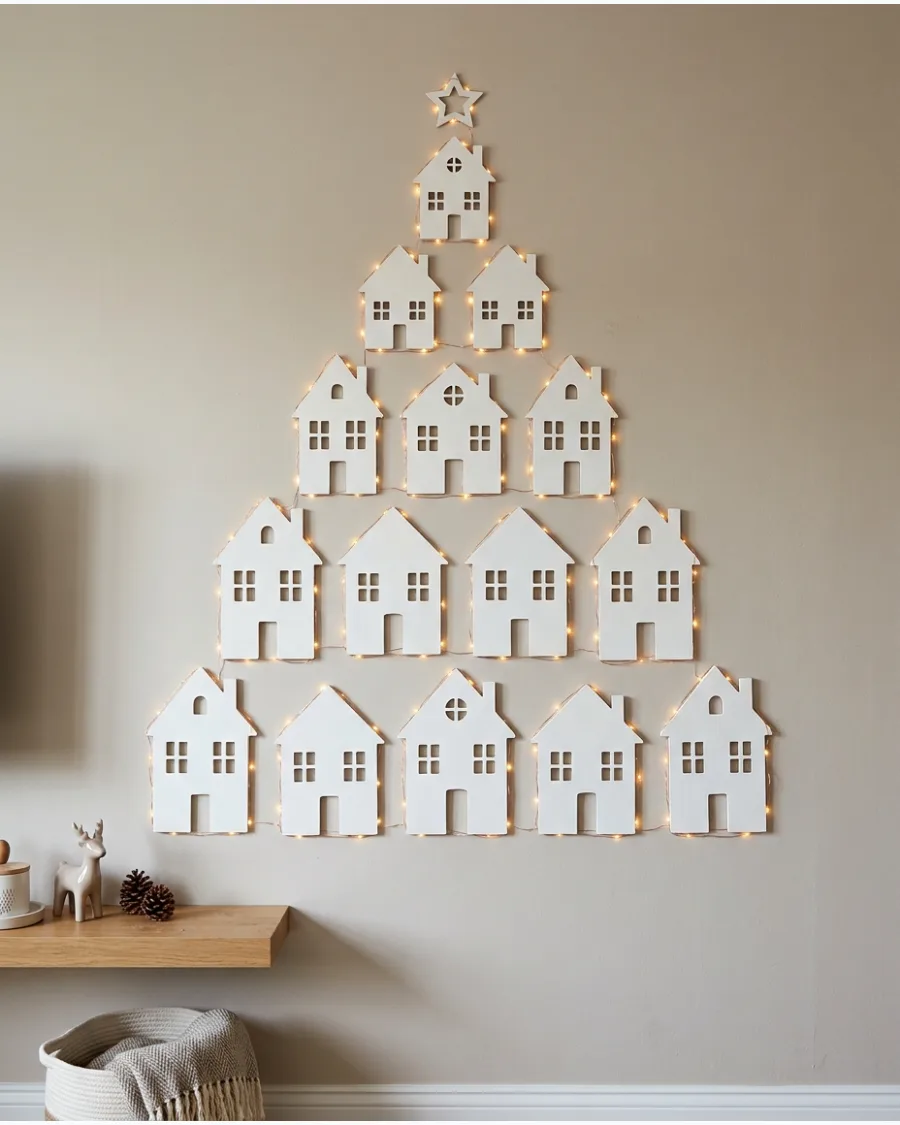
Transform a traditional village display into a vertical work of art to save floor and counter space. Arrange flat wooden or cardboard house cutouts in tiered horizontal rows to form a large triangular tree silhouette on an open wall. This method creates a whimsical, two-dimensional neighborhood that acts as a sophisticated alternative to a standard tree.
- Warm white micro-LED fairy lights woven between houses
- Varied house shapes and sizes for visual interest
- Matte white or natural wood finishes for a clean look
Use painters tape to lightly mark a large triangle on the wall before sticking the houses to ensure the final tree shape is perfectly symmetrical.
28. Minimalist Scandinavian Wall Tree
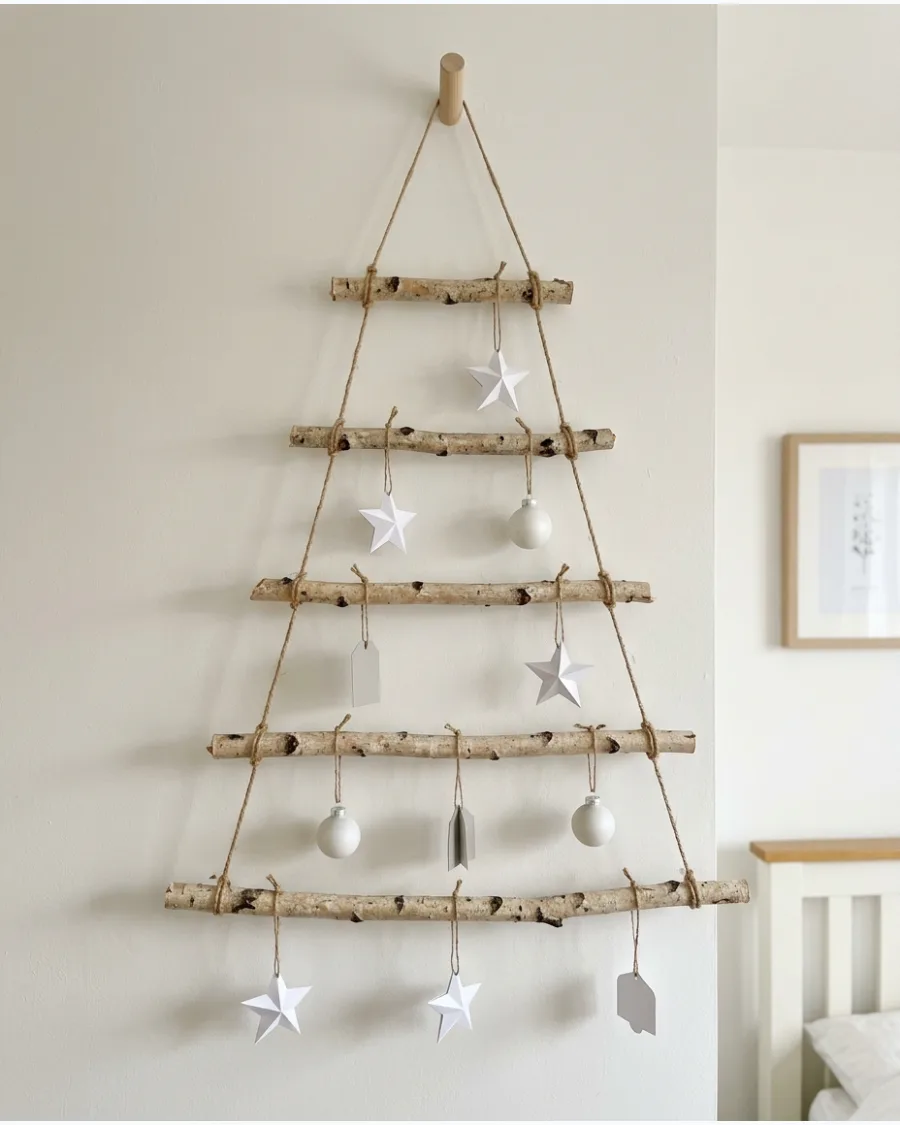
Embrace the simplicity of Nordic design with a lightweight, organic wall hanging. Connect five or six horizontal birch branches with natural twine, reducing the length of each branch as you go upward to build a ladder-style tree frame. This structure provides a rustic, airy backdrop for a few select ornaments without overwhelming a small room.
- Folded white paper stars and geometric ornaments
- Unfinished light wood for a natural texture
- Single-point hanging for easy installation
Balance the weight of your ornaments across the branches as you hang them to keep the branch levels perfectly horizontal.
BOW, RIBBON AND STOCKING CHRISTMAS WALL DECOR
29. Oversized Red Velvet Bow Wall Decor
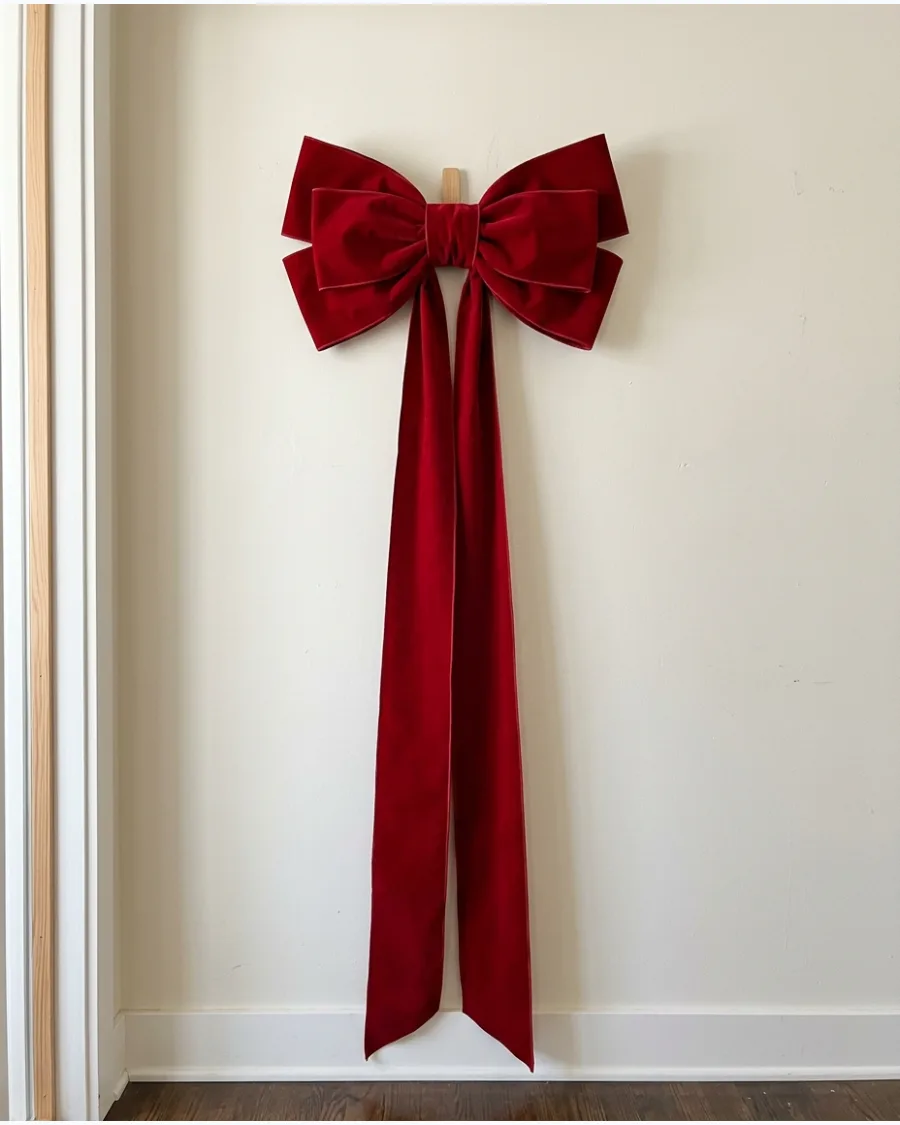
Make a bold, singular statement that requires almost no assembly time. Hang one extra-large red velvet bow in the center of an empty wall, allowing the long ribbon tails to drop vertically toward the floor for a dramatic effect. The rich fabric texture and deep color provide an instant festive focal point that works well in entryways or dining areas.
- Stiffened ribbon edges to maintain a crisp bow shape
- Extra-long tails (3 feet or more) for maximum impact
- Deep ruby or crimson red velvet for a classic look
Lightly steam the ribbon tails with a garment steamer or low-heat iron before hanging to ensure the velvet drapes smoothly without creases.
30. Oversized Green Velvet Bow Wall Decor
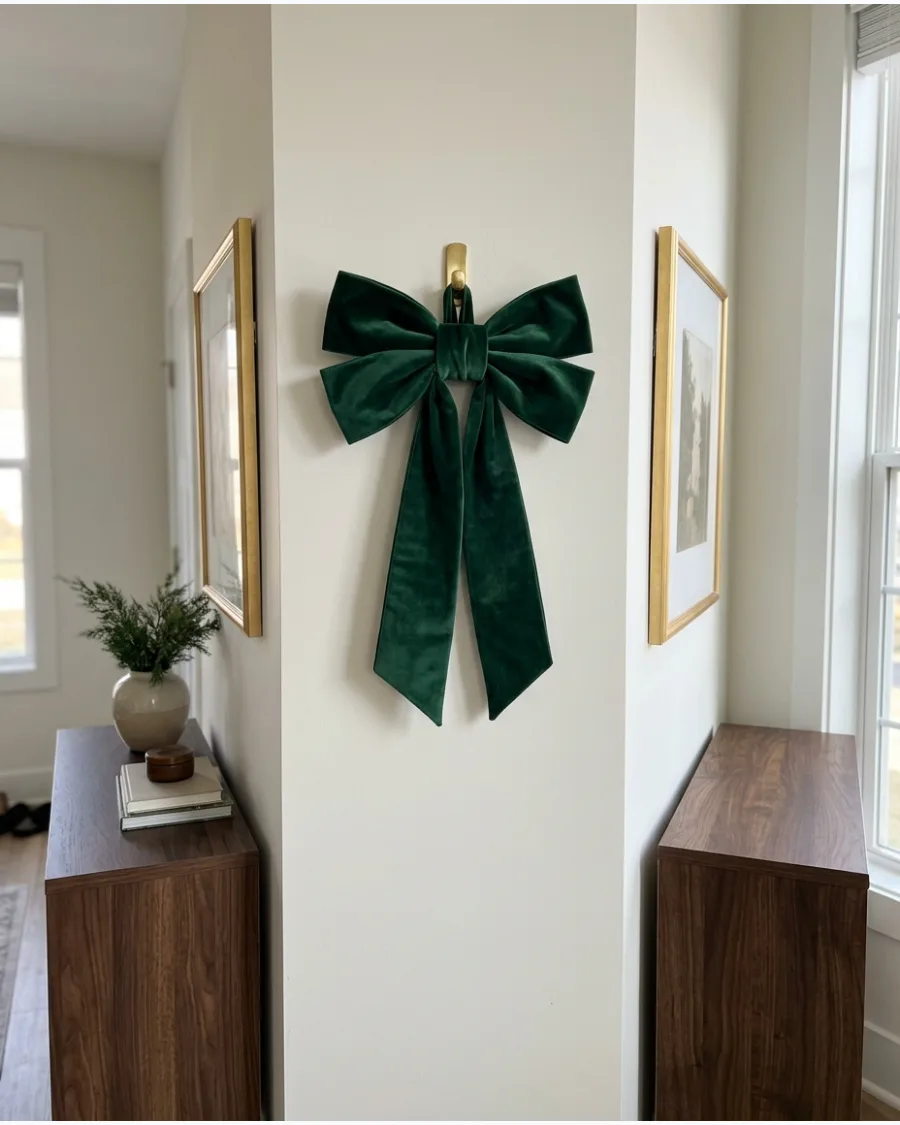
Choose a sophisticated and moody alternative to traditional red for a luxury holiday feel. Place a large-scale forest green velvet bow above a console table or between two pieces of framed art to anchor your seasonal wall display. This deep jewel tone adds a layer of elegance that pairs exceptionally well with gold frames and warm wood furniture.
- Plush emerald or forest green velvet fabric
- Wide ribbon width of 4 inches or more for a high-end feel
- Discreet wire loop for secure hanging
Incorporate brass or gold accents nearby to highlight the green velvet and create a vintage 'old world' holiday aesthetic.
31. Burgundy Velvet Bow Christmas Wall
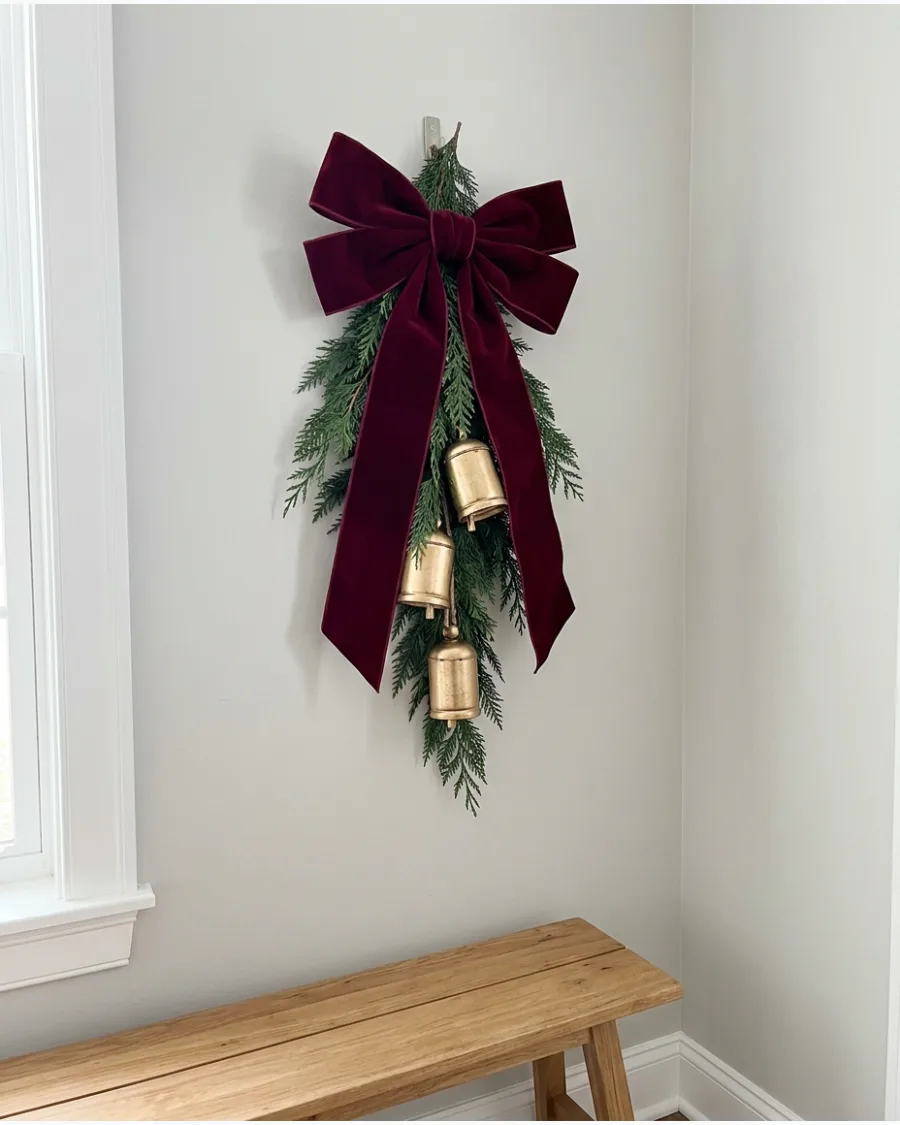
Velvet brings a rich, tactile element to holiday decorating that complements traditional interiors. Attach a large burgundy velvet bow to a cluster of dark evergreen branches and brass bells secured with a discreet wall hook. This arrangement creates a moody, elegant focal point that works well in a dining room or entryway.
- Select a wired velvet ribbon to ensure the bow loops maintain their shape throughout the season.
- Layer three to five small brass bells on varying lengths of twine tucked behind the bow's knot.
- Use a heavy-duty removable adhesive hook to support the weight of the bow and branches without damaging the wall.
Steam the velvet ribbon lightly before hanging to remove creases from storage for a professionally styled finish.
32. Gingham Christmas Bow Wall Decor
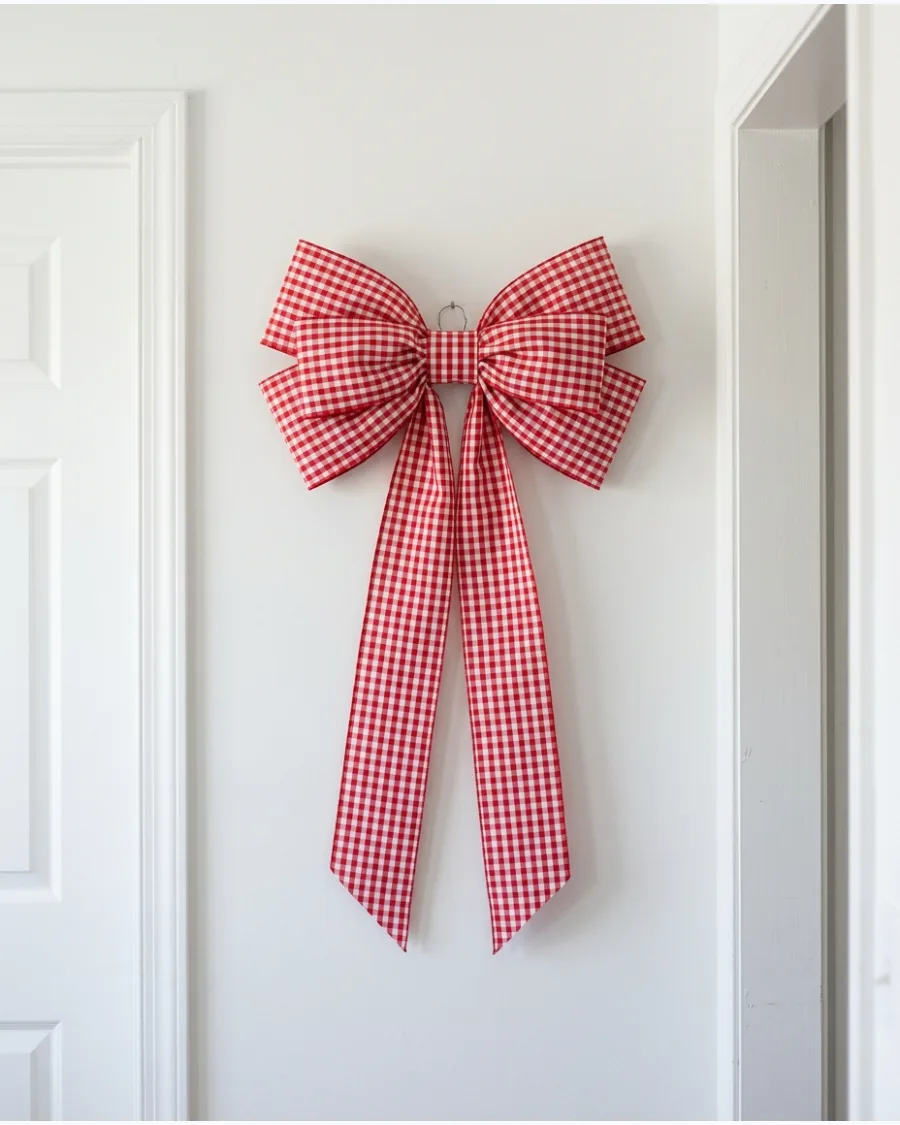
Gingham patterns offer a nostalgic, cottage-inspired feel that simplifies holiday decorating. Center an oversized red and white gingham bow on a blank wall to create a cheerful focal point that requires no additional ornaments. The bold pattern provides enough visual weight to stand alone in a breakfast nook or mudroom.
- Choose a ribbon with a large-scale check pattern for greater impact on an empty wall space.
- Ensure the bow is sized proportionately to the wall area, typically between 12 and 18 inches wide for a standard wall.
- Secure the center of the bow with a floral wire loop attached to a small finishing nail or a clear hook.
Tuck a small piece of tissue paper or cotton batting inside each bow loop to give the fabric a fuller, more rounded appearance.
33. Plaid Christmas Ribbon Wall Hanging
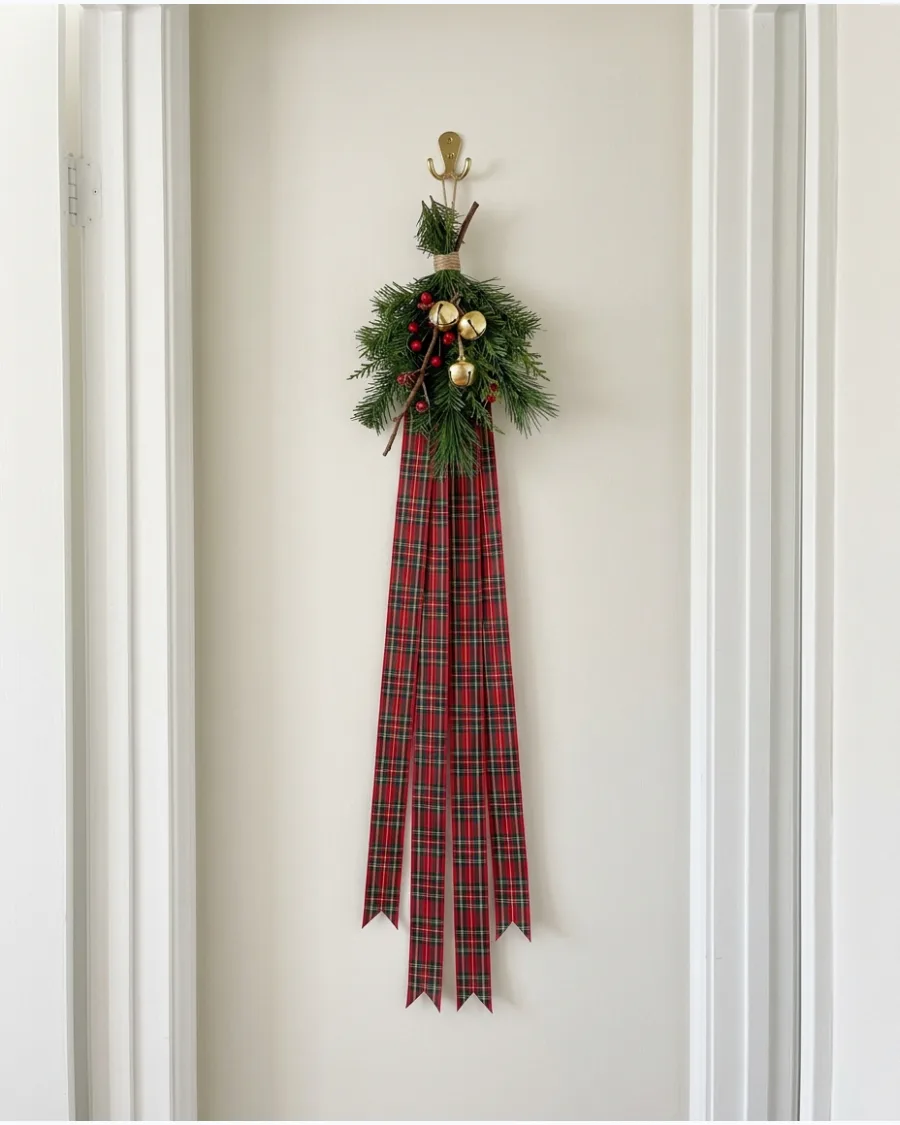
A vertical ribbon hanging is an excellent way to decorate narrow wall sections or corners. Suspend several long lengths of tartan plaid ribbon from a small bundle of evergreen sprigs and gold bells mounted at eye level. This design allows the traditional colors to flow vertically, adding height and interest to the room.
- Cut the ribbon ends into a swallowtail 'V' shape to prevent fraying and provide a finished look.
- Vary the lengths of the ribbons by two to three inches to create a more dynamic, tiered effect.
- Bind the top of the ribbon tails with green floral tape or twine before concealing the join with greenery.
Mix two different but coordinating plaid patterns, like a Royal Stewart and a Black Watch plaid, to add visual depth to the hanging.
34. Christmas Bow Gallery Wall
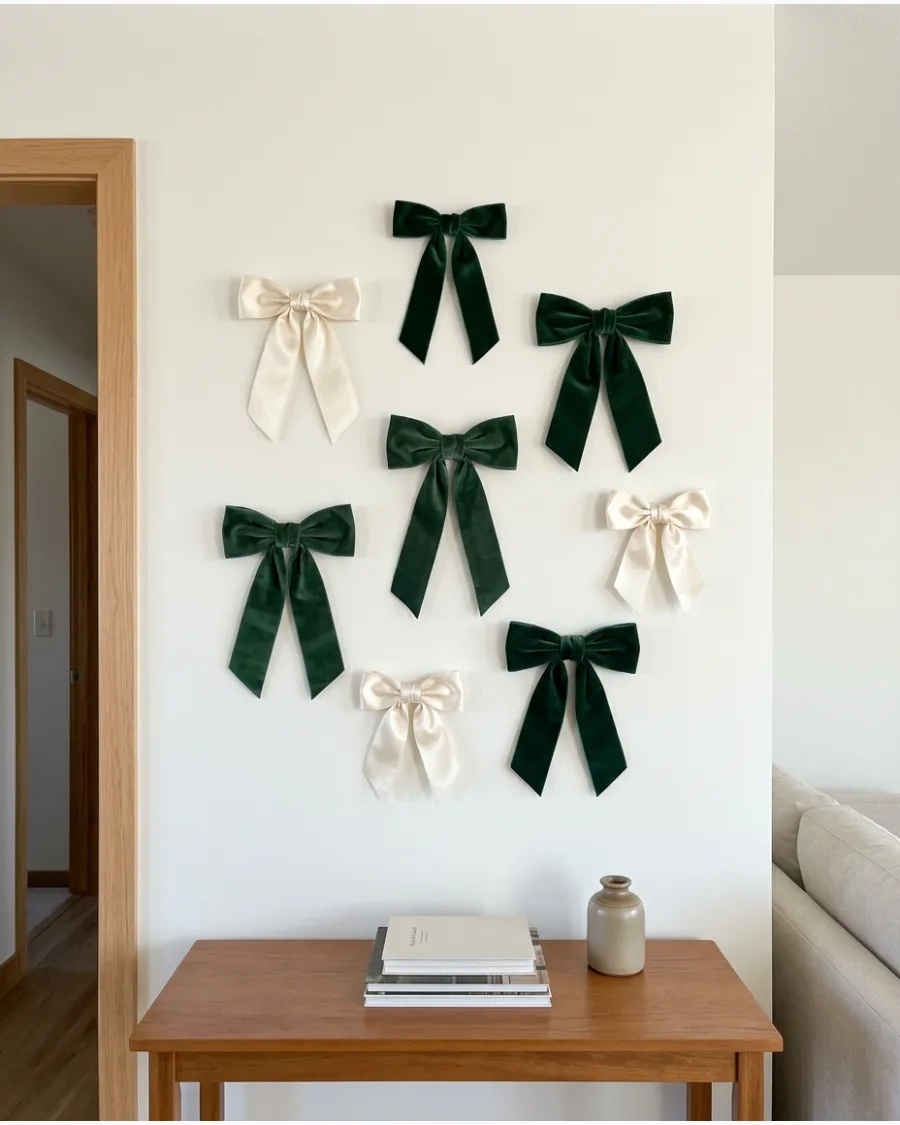
Creating a gallery wall of bows is a modern way to embrace one of the season's most popular trends. Arrange several fabric bows in different sizes across the wall in a loose grid or organic cluster using temporary adhesive strips. Limiting the palette to two coordinating colors, such as cream and forest green, keeps the display looking intentional and sophisticated.
- Use different ribbon textures like satin, grosgrain, and velvet to add variety within your color scheme.
- Place the largest bow slightly off-center to act as an anchor for the rest of the arrangement.
- Space the bows roughly six to eight inches apart to ensure each one is distinct and the wall doesn't look cluttered.
Create paper templates of each bow size and tape them to the wall first to finalize your layout before attaching the actual bows.
35. Velvet Ribbon Garland Across the Wall
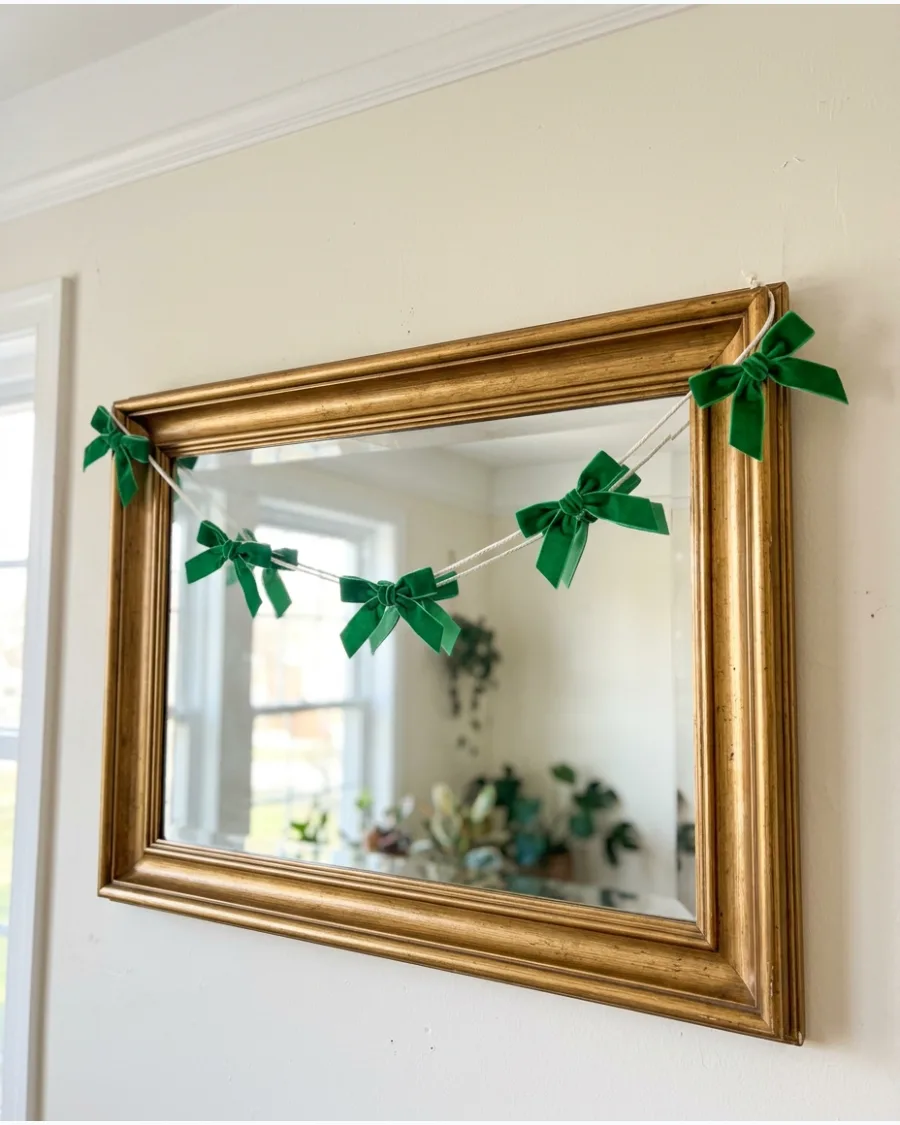
A ribbon garland provides a softer, lighter alternative to traditional heavy evergreen swags. Space small velvet bows evenly along a length of thin cord or ribbon and drape it in gentle curves across wall art or a large mirror. This approach adds a festive layer to existing decor without requiring additional heavy mounting hardware.
- Tie the bows directly onto the cord at 12-inch intervals to keep them from sliding during installation.
- Use a contrasting color for the bows, like emerald green on a white wall, to ensure the garland is visible.
- Fasten the garland at the corners of frames or shelf brackets to discreetly hide the mounting points.
Allow the ends of the cord to hang down vertically by at least six inches for a more traditional, 'draped' aesthetic.
36. Stocking Wall Display Without a Mantel
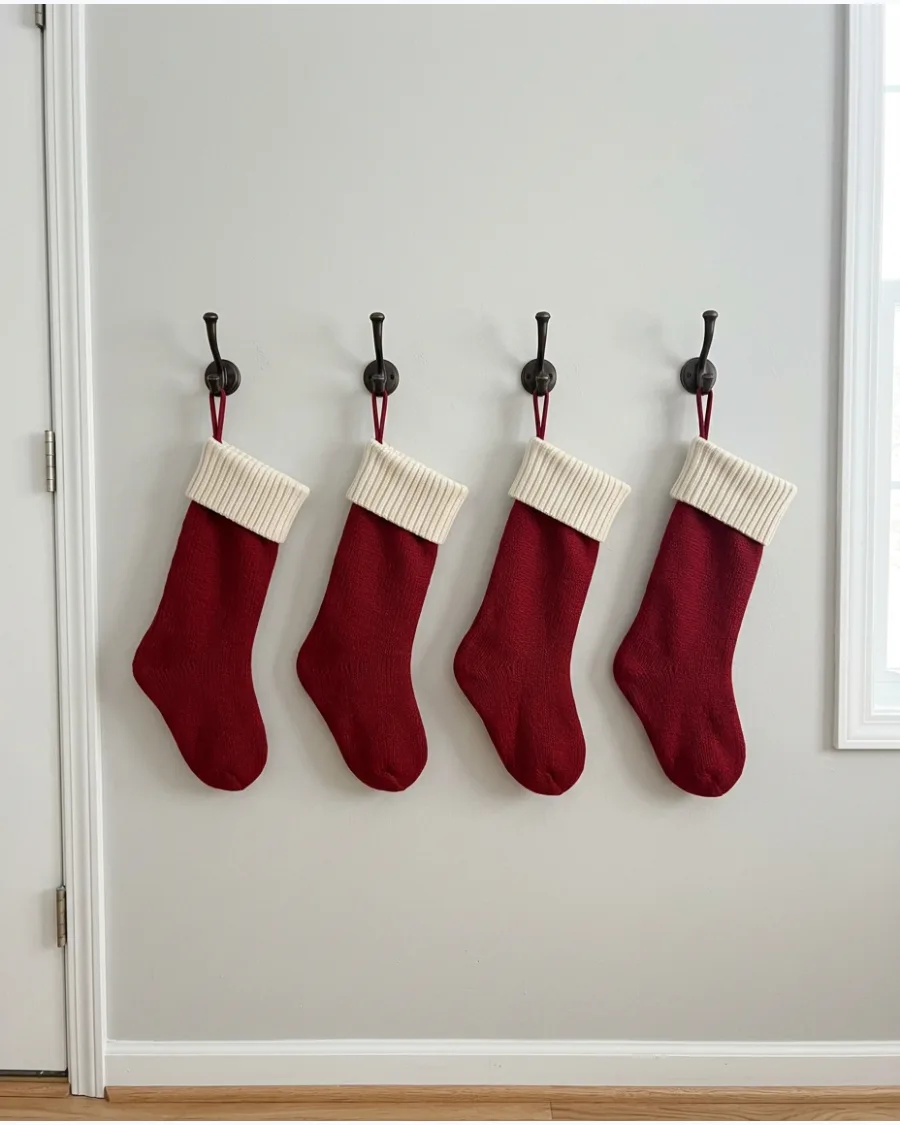
If your home lacks a fireplace, you can still enjoy the tradition of hanging stockings by utilizing a dedicated wall space. This setup works well in entryways or hallways where floor space is limited but vertical room is plentiful.
Install a row of decorative brass or wooden hooks along an empty wall at waist height to serve as a designated stocking station. Adding a simple sprig of greenery or a thin ribbon above the hooks helps define the area as a festive holiday feature rather than just utility storage.
- Spacing hooks 8 to 10 inches apart to allow stockings to hang without overlapping
- Using heavy-duty adhesive hooks to avoid permanent wall damage in rental properties
- Incorporating a small shelf above the hooks for holding holiday cards or lightweight figurines
Weight the toes of the stockings with a little tissue paper so they maintain their shape even when empty.
37. Stocking and Garland Christmas Wall
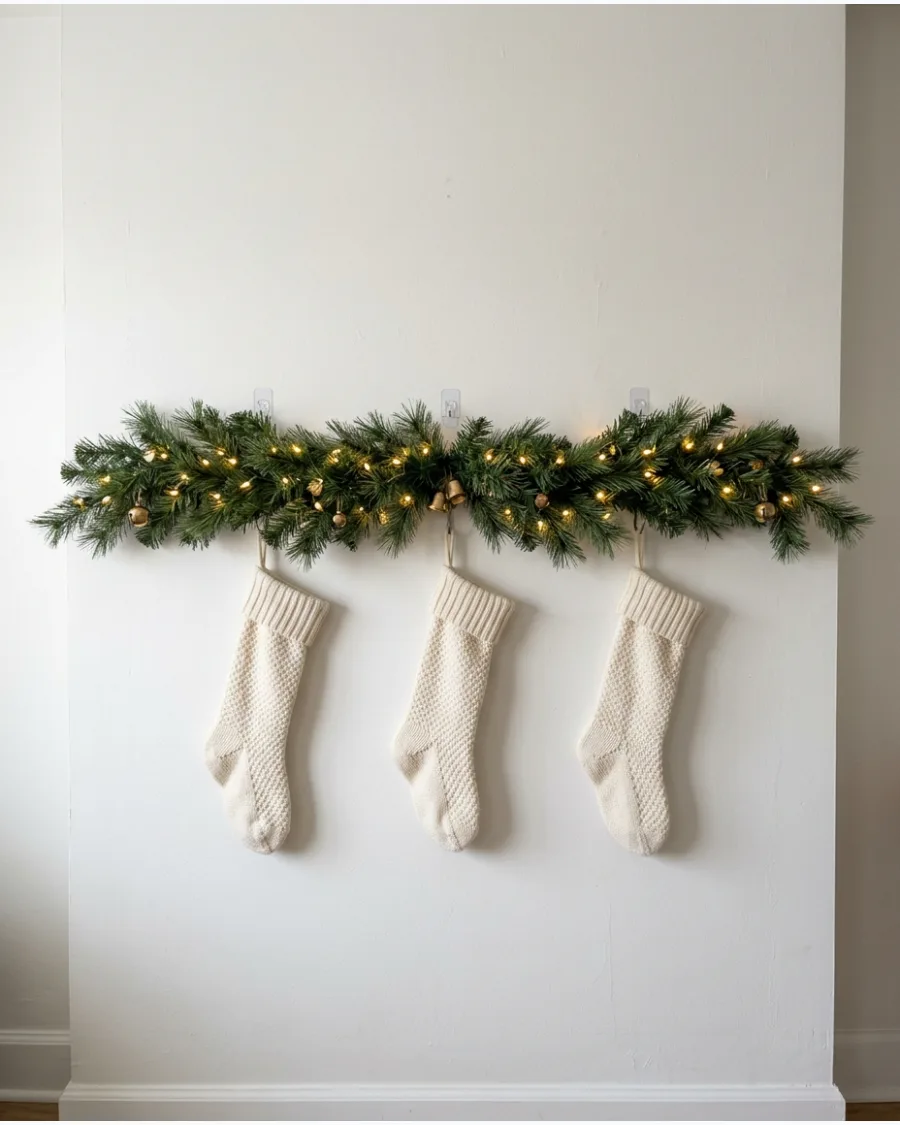
This arrangement mimics the structural look of a decorated mantel by layering greenery directly above your stocking line. It creates a lush, architectural element on a flat wall that feels substantial and intentional.
Secure a faux evergreen garland horizontally using adhesive hooks roughly six inches above your row of stockings to mimic the look of a traditional mantelpiece. You can tuck in small bells or battery-operated fairy lights to add depth and a warm glow to the greenery.
- Weaving a thin strand of LED fairy lights through the garland for evening ambiance
- Attaching small brass bells with floral wire to add a metallic texture to the greens
- Layering different types of greenery, like cedar and pine, for a fuller appearance
Use a garland with a wire core so you can easily shape it to hide the wall hooks and create a slight 'drape' at the ends.
38. Personalized Family Stocking Wall

Organizing your stockings with clear identifiers ensures the wall display feels like a curated family feature rather than a random collection. Using consistent materials for the tags helps unify stockings that may have different patterns or colors.
Attach small wooden alphabet letters or handwritten cardstock tags to the loop of each stocking using a short length of coordinating ribbon. This method allows you to easily update names as the family grows without needing to buy entirely new stockings.
- Using wooden letter cutouts for a modern, 3D effect on the stocking loops
- Choosing a single ribbon color, like burgundy or forest green, to tie the look together
- Alternating stocking patterns in a repeatable sequence to maintain visual balance
If using cardstock tags, use a hole punch and a metal reinforcement eyelet to prevent the ribbon from tearing the paper over time.
CHRISTMAS WALL ART AND GALLERY WALL IDEAS
39. Vintage Christmas Gallery Wall
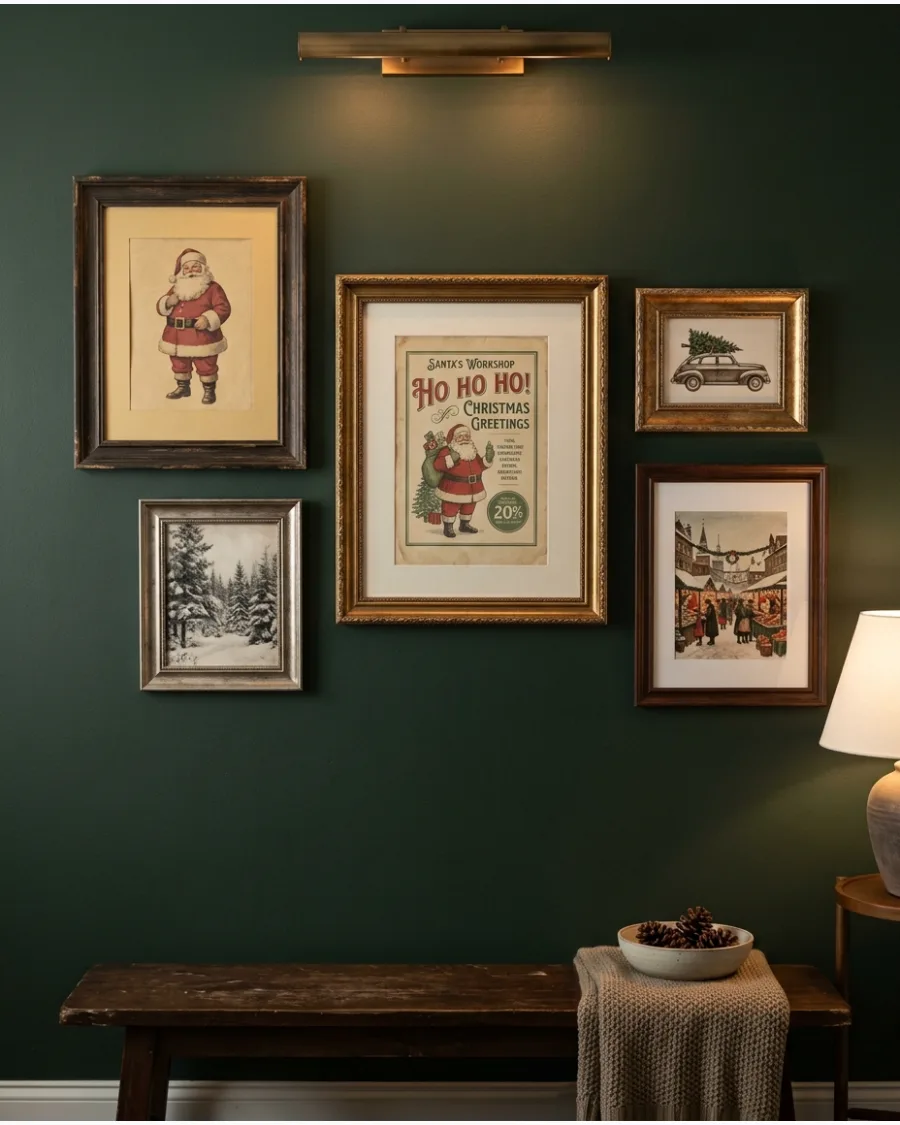
Transforming your usual art into a seasonal gallery wall brings a sense of history and nostalgia to your holiday home. By sourcing images from old magazines or public domain archives, you can create a high-impact look on a budget.
Arrange a collection of thrifted gold and wood frames containing nostalgic Santa illustrations and retro holiday advertisements in an asymmetrical cluster. Mixing frame sizes and finishes enhances the 'collected over time' aesthetic that defines vintage decor.
- Selecting prints with aged, tea-stained, or sepia-toned backgrounds for authenticity
- Varying frame depths to create a more dynamic, three-dimensional wall texture
- Using removable adhesive strips to easily swap frames back to everyday art after the season
Look for vintage postcards or old sheet music for 'Silent Night' to fill smaller frames within the gallery.
40. Traditional Christmas Gallery Wall
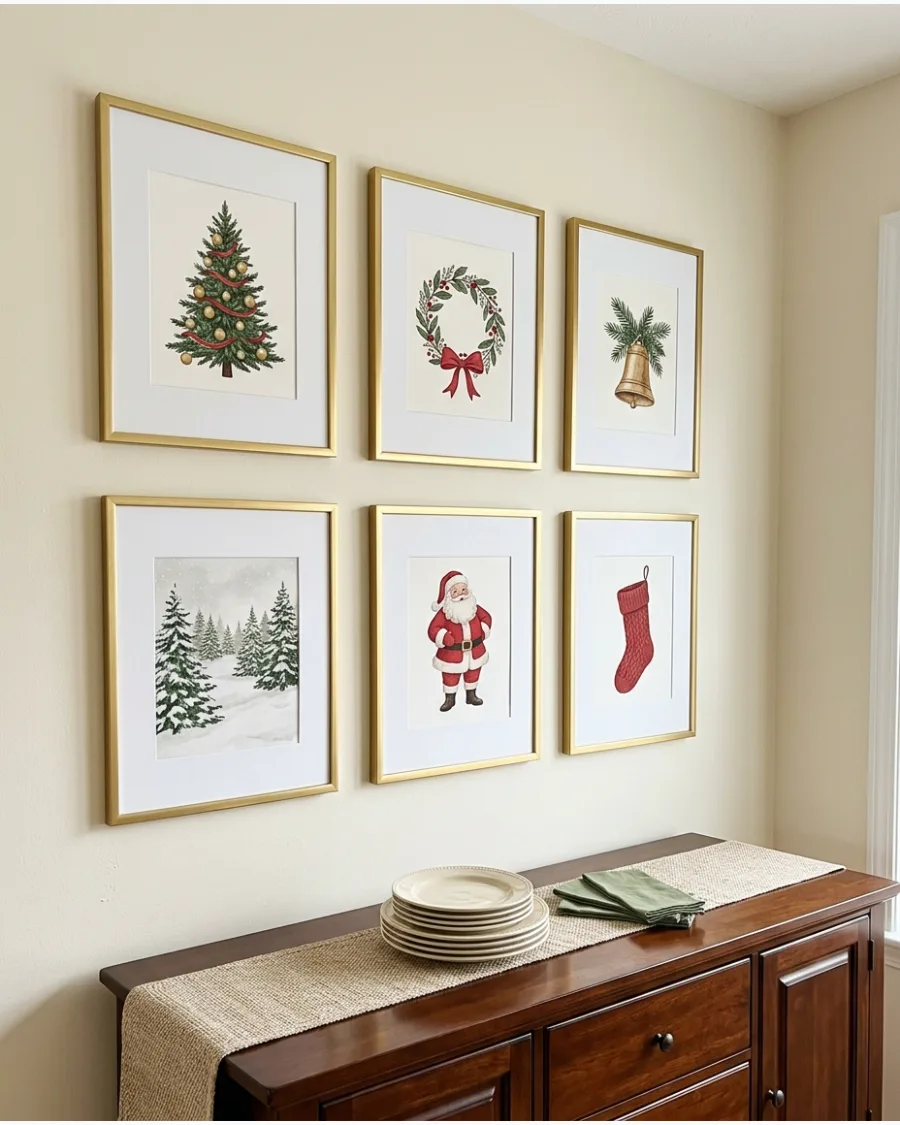
A traditional gallery wall focuses on a balanced, cohesive color palette to create a polished and formal holiday atmosphere. This approach works best when you stick to a specific set of classic motifs like evergreens, bells, and snowy landscapes.
Create a structured grid of framed prints featuring classic motifs like evergreen trees, gold bells, and winter landscapes to establish a formal holiday focal point. Using matching frames ensures the arrangement looks organized and professional, even with diverse subject matter.
- Keeping all mats and frames in the same color (such as white mats and gold frames) for consistency
- Choosing artwork that shares a common 'illustration style' to prevent visual clashing
- Centering the grid at eye level (about 57 to 60 inches from the floor) for the best viewing angle
Lay your frames out on the floor first to finalize the spacing before driving any nails into the wall.
41. Neutral Christmas Gallery Wall
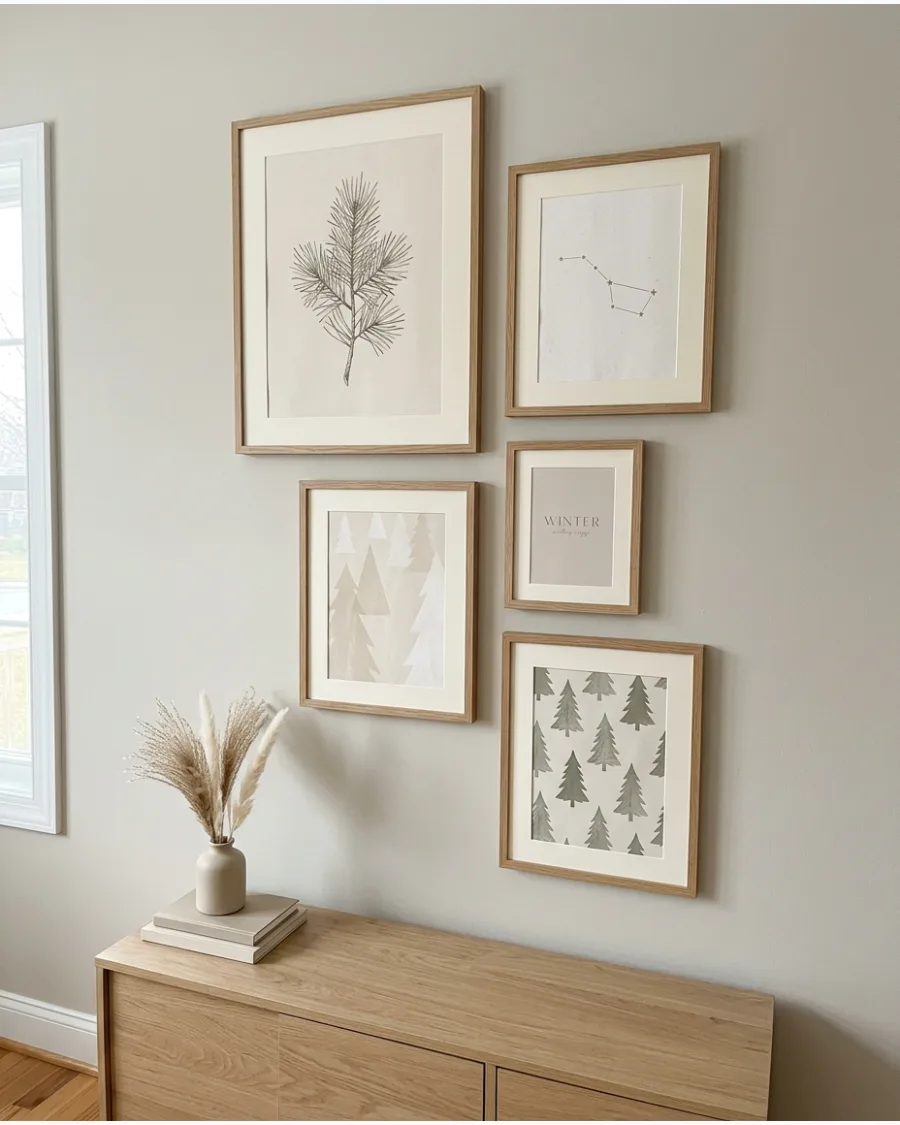
Create a serene holiday atmosphere by curating art in a soft, monochromatic palette of cream, beige, and muted green. Focus on understated winter motifs like pine branches, minimalist stars, and simple typography to maintain a sophisticated look that doesn't overwhelm the room.
Group these neutral prints in thin oak or matte white frames to ensure the display feels cohesive and integrated with your existing light-colored walls. This approach allows you to celebrate the season with a calm, modern aesthetic.
- Mix different frame sizes to create visual interest while keeping the color palette strictly restricted to neutrals.
- Use cream-colored mats to provide a soft transition between the white paper of the artwork and the frame.
- Incorporate one typography piece with a simple, thin font for a modern graphic element among the botanicals.
Swap out your everyday prints but keep your existing frames to save money and storage space during the holidays.
42. Red and Green Christmas Gallery Wall
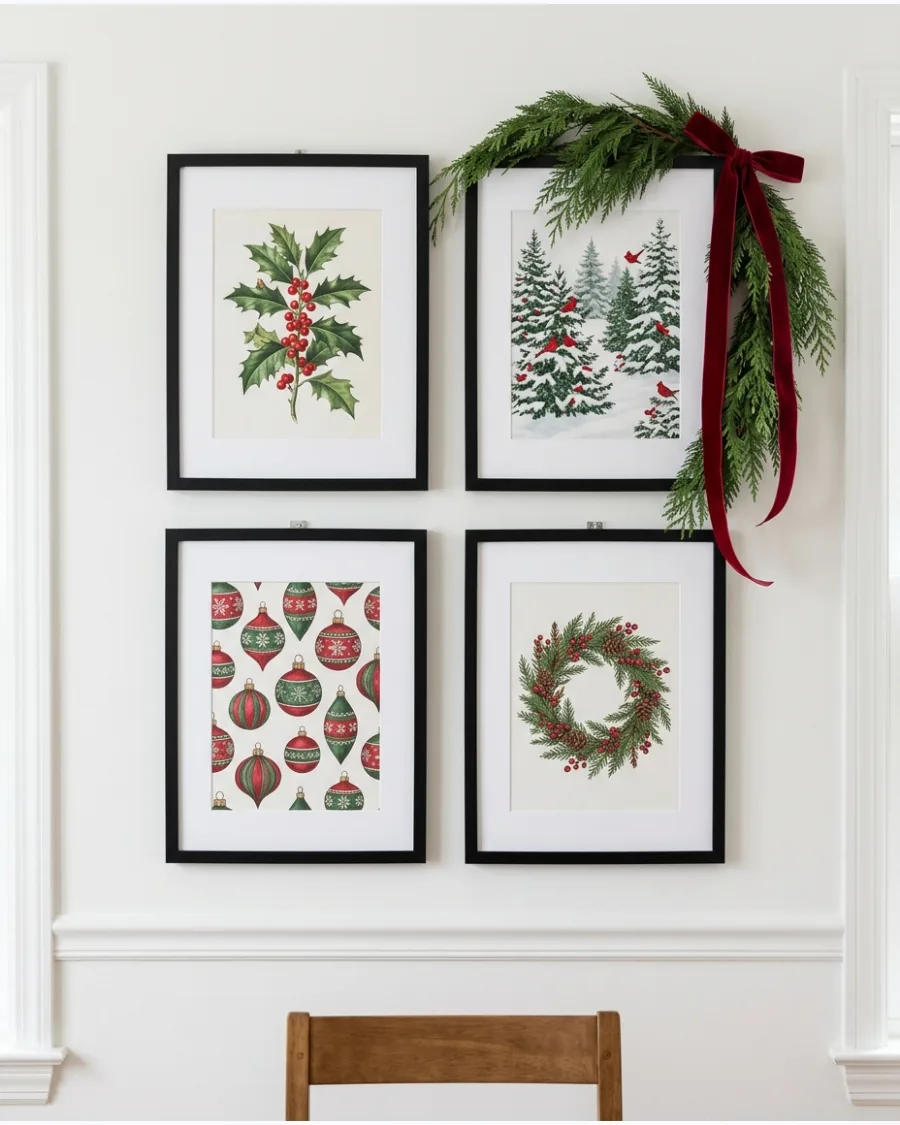
Embrace the classic colors of the season by building a high-energy gallery wall focused on vibrant reds and deep evergreens. Choose prints with traditional themes like holly berries or vintage winter scenes to establish a festive focal point.
Incorporate physical textures by hanging a velvet red ribbon or a sprig of fresh cedar over the corner of the largest frame to bridge the gap between two-dimensional art and three-dimensional decor. This repetition of color across different mediums creates a professionally styled, layered look.
- Anchor the arrangement with a central large print featuring a bold red element like a vintage sled or winter berries.
- Use dark green frames or traditional black to make the red tones pop against the wall surface.
- Drape a small piece of greenery from the top of one frame to add organic movement to the rigid grid layout.
Use removable adhesive strips designed for heavy frames to avoid damaging walls when hanging seasonal art.
43. Burgundy Christmas Gallery Wall
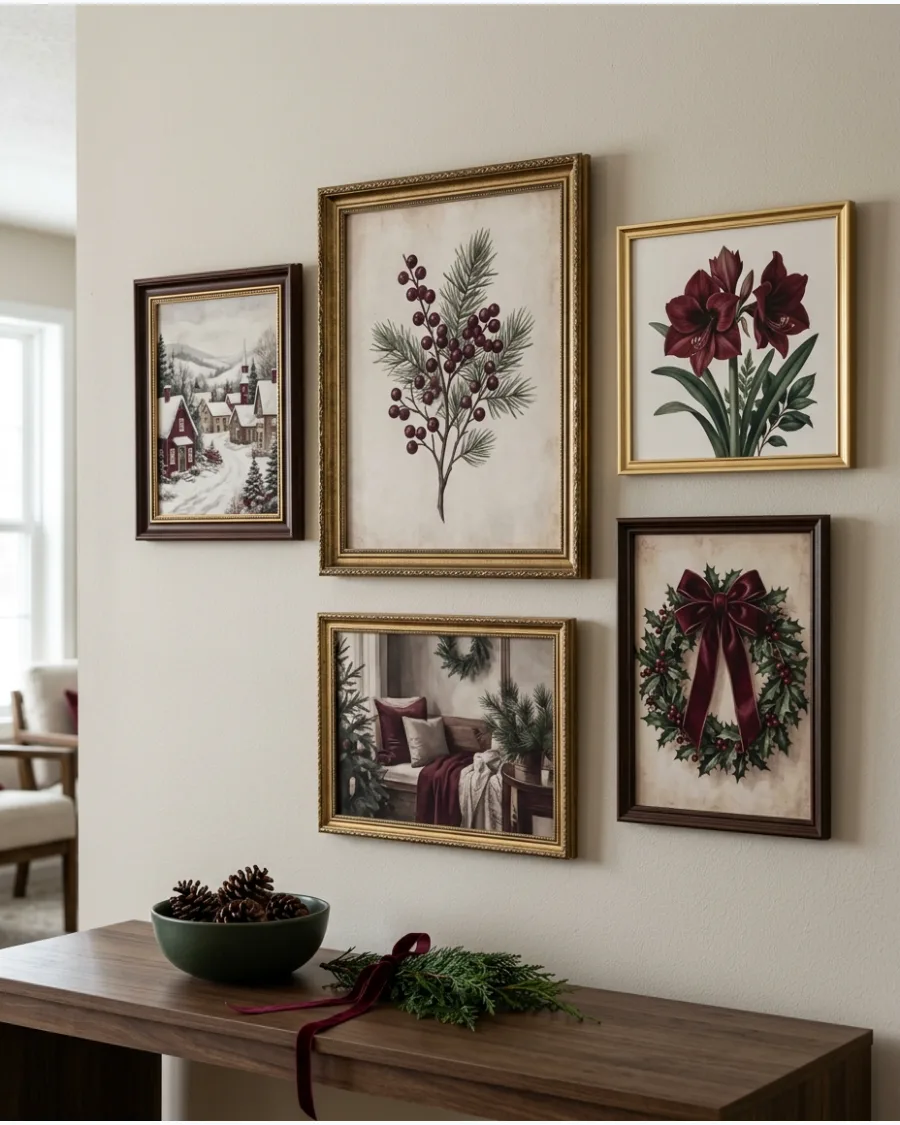
Create a sophisticated holiday focal point by layering deep, moody colors like burgundy and dark green with warm metallic accents. Mix botanical pine prints, winter landscapes, and traditional imagery to vary the visual interest across the display.
Hang your largest burgundy-themed piece at eye level first and build the rest of the gallery around it to maintain a balanced composition. This approach updates the standard red-and-green palette with more mature, muted tones that feel timeless rather than temporary.
- Incorporate antique gold or dark wood frames to add weight and age to the holiday display.
- Intersperse non-art elements like a small brass horn or a velvet-tied sprig of greenery for dimension.
- Select matte or textured paper prints to prevent harsh light reflections on the darker, moody colors.
Use adhesive hanging strips for temporary holiday galleries to avoid patching holes in your walls once the season ends.
44. Christmas Tree Art Gallery Wall
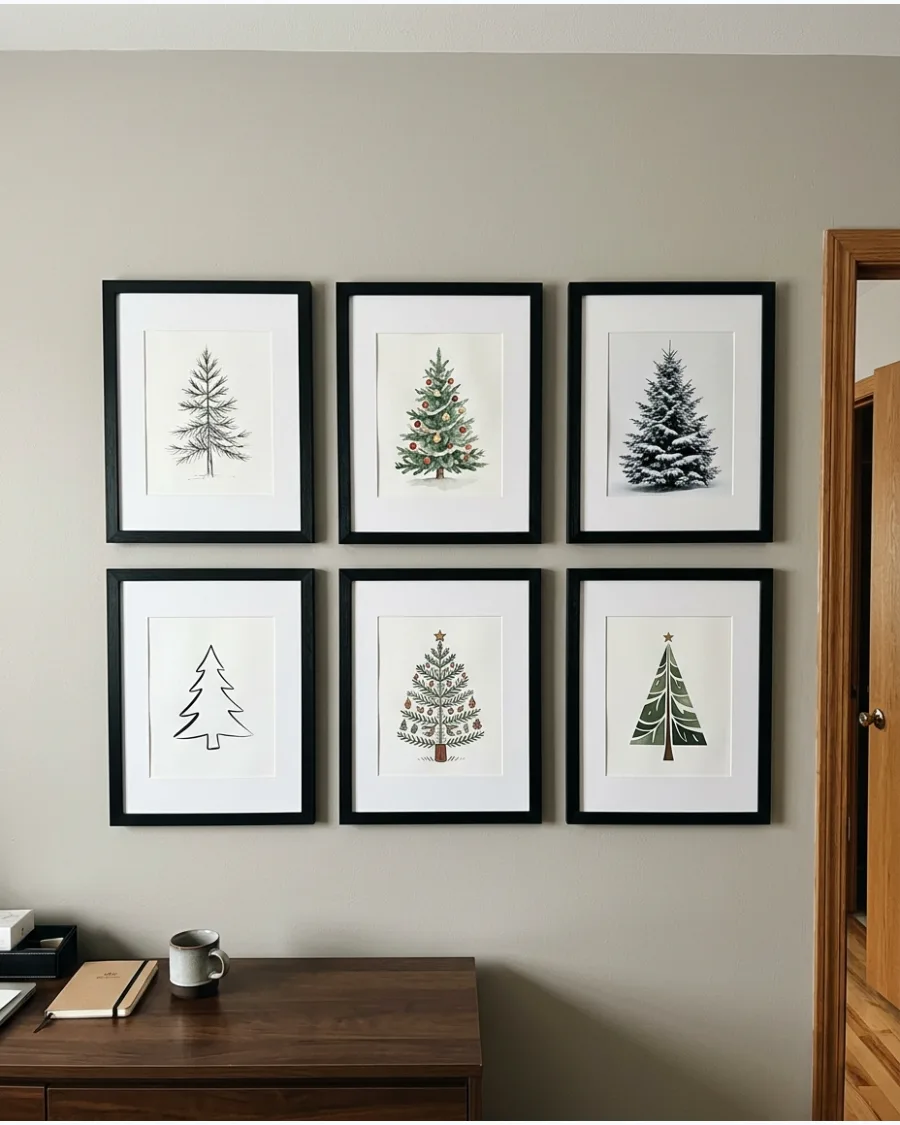
Celebrate the iconic symbol of the holiday by dedicating a whole wall section to various artistic interpretations of the Christmas tree. You can mix sketches of sparse pines, watercolor paintings of decorated spruces, and high-resolution photographs of snowy firs.
Maintain a sense of order in the diverse collection by using identical frame styles and colors for every piece of tree art. This consistency allows the unique style of each tree illustration to stand out without looking cluttered.
- Include different species of trees, from long-needle pines to dense cedars, to vary the shapes in the gallery.
- Use crisp white matting for all pieces to create a clean, museum-like presentation for the illustrations.
- Arrange the frames in a tight grid or a clustered organic shape depending on your available wall space.
If you have children, include one of their tree drawings in a matching frame for a sentimental and personal touch.
45. Winter Landscape Christmas Wall Art
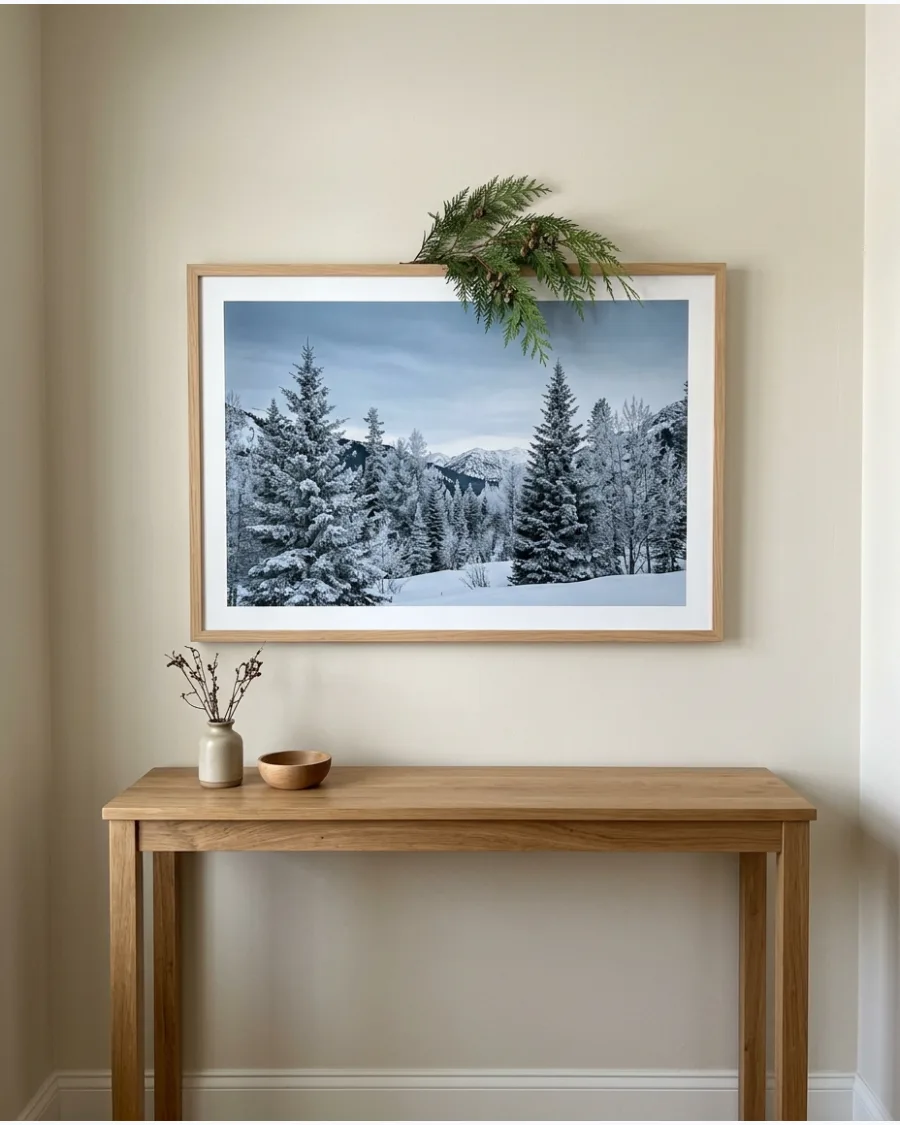
Invest in high-quality prints of snowy landscapes that provide a serene winter vibe well beyond the holiday season. Images of frosted mountain peaks, quiet cabins, or winding forest paths offer a sophisticated seasonal look that doesn't feel overtly commercial.
Temporarily embellish these frames with a small swag of cedar or a single festive bow during December to shift the look from 'winter' to 'Christmas.' This approach is both budget-friendly and efficient, as only the small accents need to be removed in January.
- Select oversized landscape prints to fill large wall spans above a sofa or sideboard for a high-impact seasonal look.
- Use natural wood frames to complement the outdoor themes of the mountains and forests depicted in the art.
- Focus on imagery with cool tones like blues and grays to reflect the actual winter light in your home.
Choose matte finish prints rather than glossy to prevent glare from indoor holiday lights and flickering candles.
46. Vintage Santa Christmas Wall Art
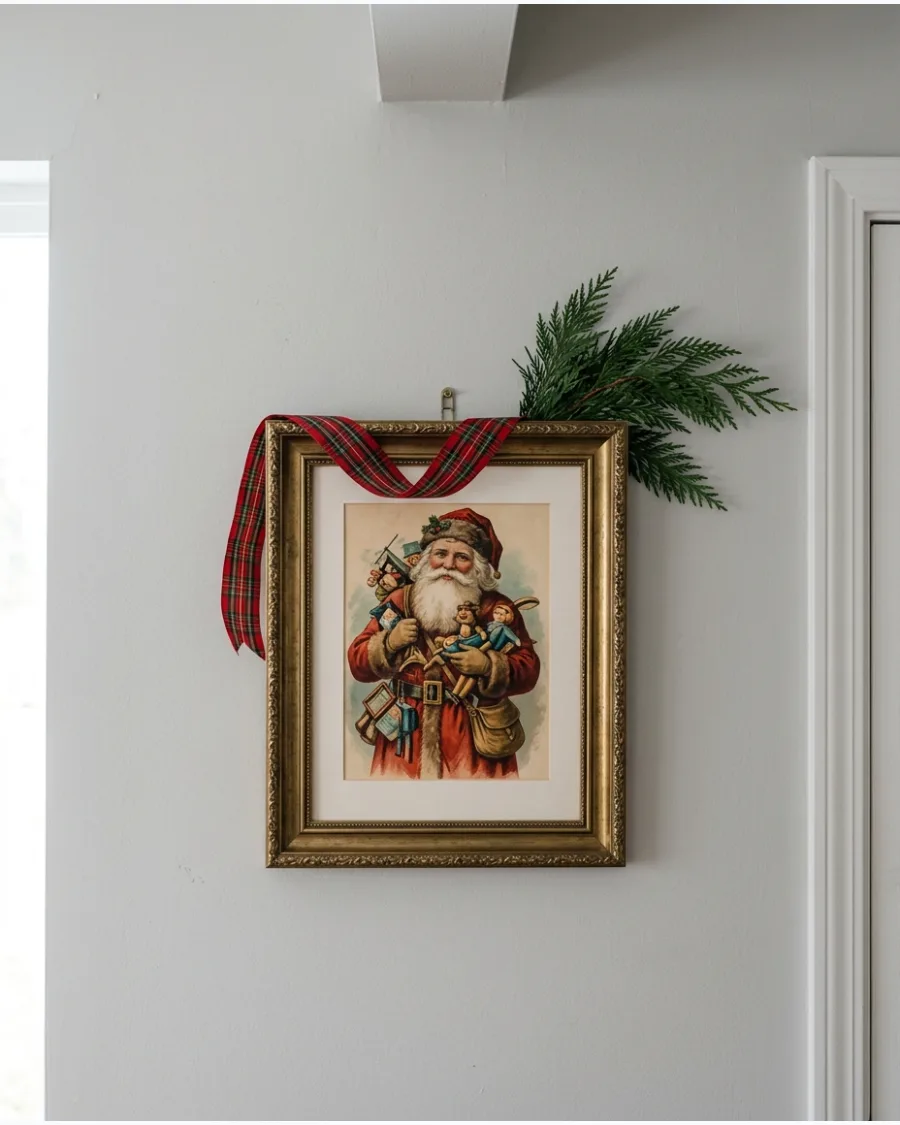
Nostalgic Santa illustrations provide a warm, traditional feel that anchors a holiday gallery wall. These vintage-style prints work best when paired with aged textures like brass and weathered wood.
Layer a length of red tartan ribbon over the top of the frame and tuck a sprig of fresh cedar behind the corner for a 3D effect. This approach transforms a flat print into a curated decorative display.
- Select illustrations with muted, antique color palettes to avoid a bright plastic look
- Use ornate brass or gold-leaf frames to complement the vintage aesthetic
- Secure the ribbon to the back of the frame or the wall hook to prevent it from slipping
Look for copyright-free digital archives of Victorian postcards to print high-quality vintage imagery at home for a budget-friendly custom size.
47. Christmas Botanical Wall Prints
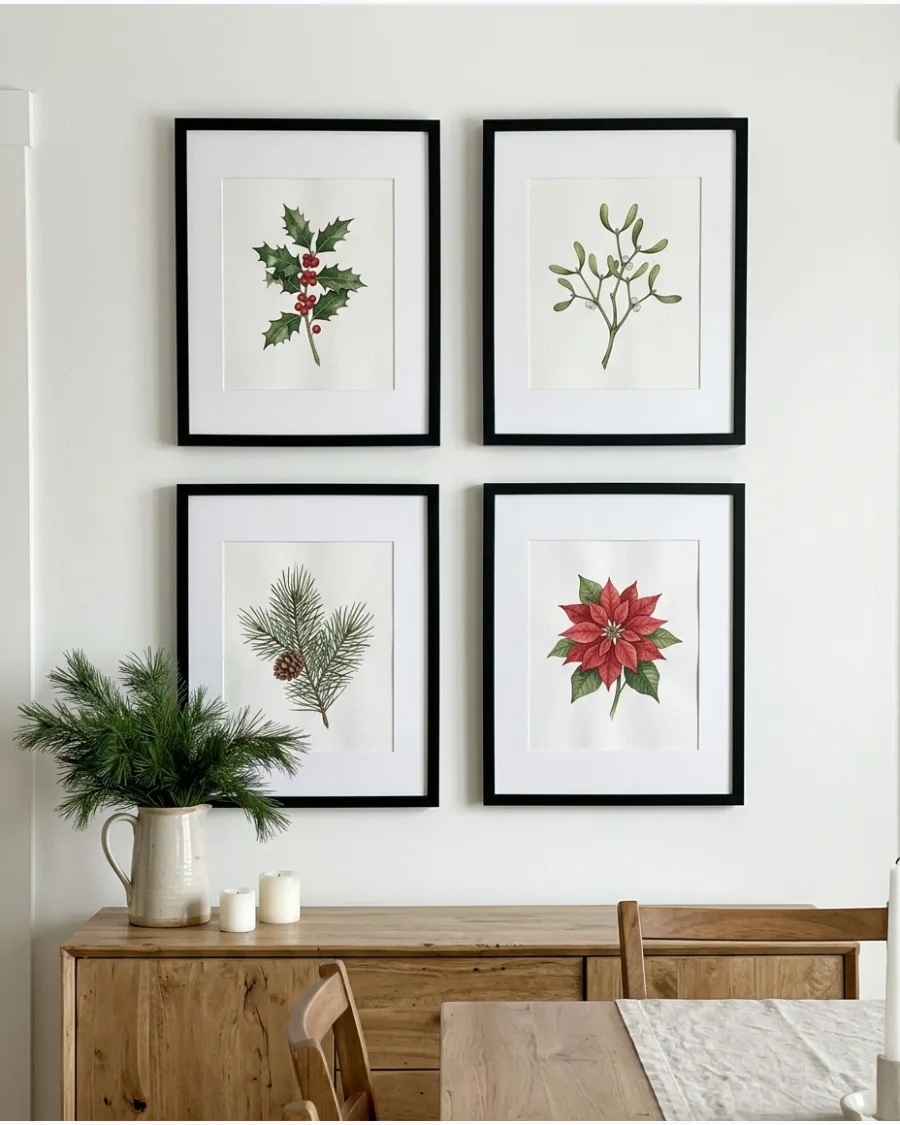
Botanical prints of holly, mistletoe, and pine offer a sophisticated way to decorate without relying on standard holiday characters. These illustrations bring the outdoors in and work exceptionally well in minimalist or farmhouse-style homes.
Arrange a grid of four or six matching frames to create a high-impact botanical display that feels cohesive and intentional. This method keeps the room looking seasonal but elegant.
- Choose prints with white or cream backgrounds for a clean, consistent look in a grid
- Mix different species like berries and evergreens to add visual variety within the set
- Opt for thin black or natural wood frames to keep the focus on the botanical details
Use matching frames and identical matting sizes to ensure the grid looks professional rather than cluttered.
48. Christmas Typography Wall Art

Typography art uses holiday sayings or simple words like 'Joy' and 'Noel' to set a festive mood. To prevent the room from feeling too busy, keep the text pieces to a minimum and surround them with non-textual elements.
Select one bold, well-designed typographic piece and center it within a larger arrangement of greenery or simple landscapes. Classic serif or script fonts often feel more timeless than trendy chalkboard styles.
- Stick to one or two colors for the text to maintain a clean, modern aesthetic
- Ensure the font is legible from across the room for maximum impact
- Use high-contrast combinations, such as black ink on cream paper or gold on navy
Balance a text-heavy piece by flanking it with textural items like a small wreath or a wooden bead garland.
49. Large Christmas Canvas Above the Sofa
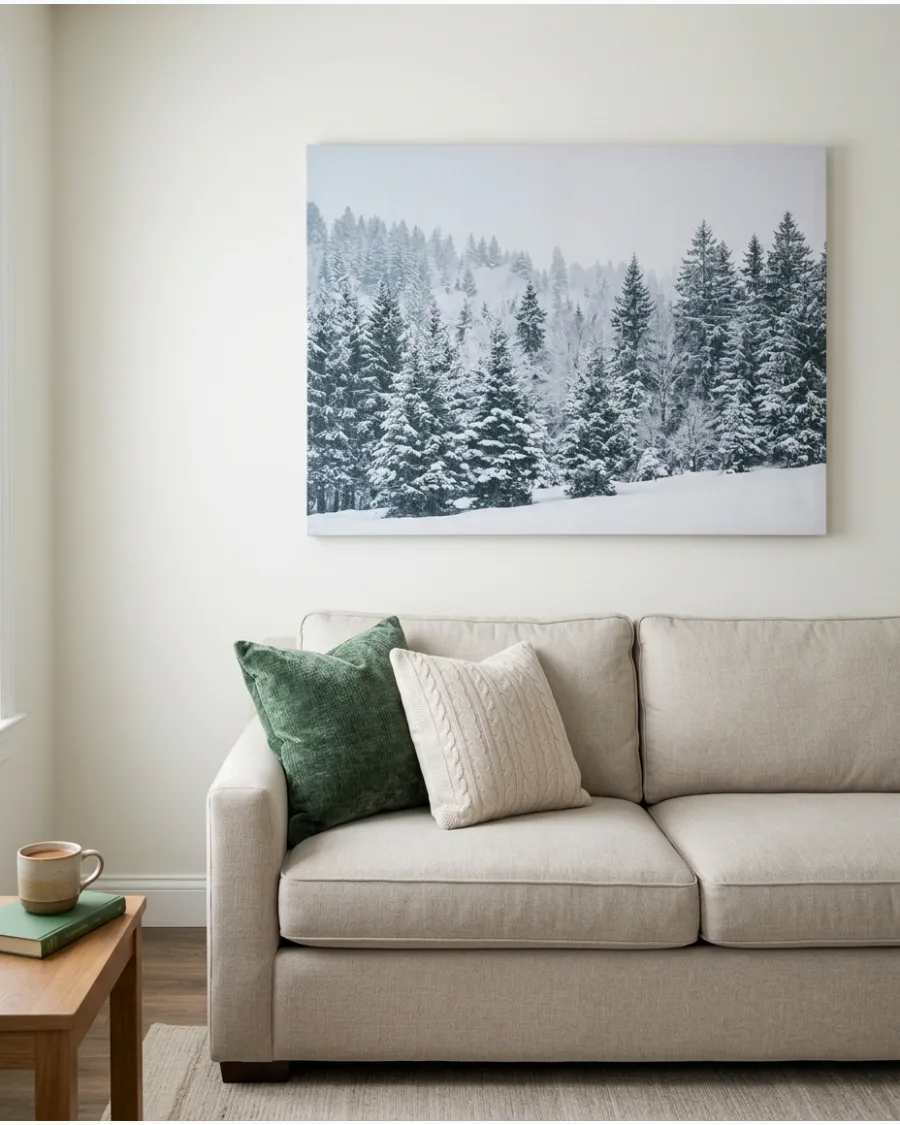
Swapping out your main living room artwork for a seasonal canvas is the fastest way to transform the entire space. A large-scale snowy landscape or a vintage winter scene acts as a seasonal window, grounding the room's holiday theme.
Measure your existing artwork and choose a holiday canvas of the same dimensions so you can reuse the same hanging hardware. This single change provides a high-impact makeover without needing dozens of smaller items.
- Select a scene that complements your existing living room color palette
- Choose a gallery-wrapped canvas for a modern, frameless look or a thin floater frame for elegance
- Ensure the canvas is at least two-thirds the width of the sofa for proper scale
If you don't want to store a large frame, look for holiday-themed fabric tapestries or canvas scrolls that can be rolled up compactly.
50. Framed Christmas Wrapping Paper Art
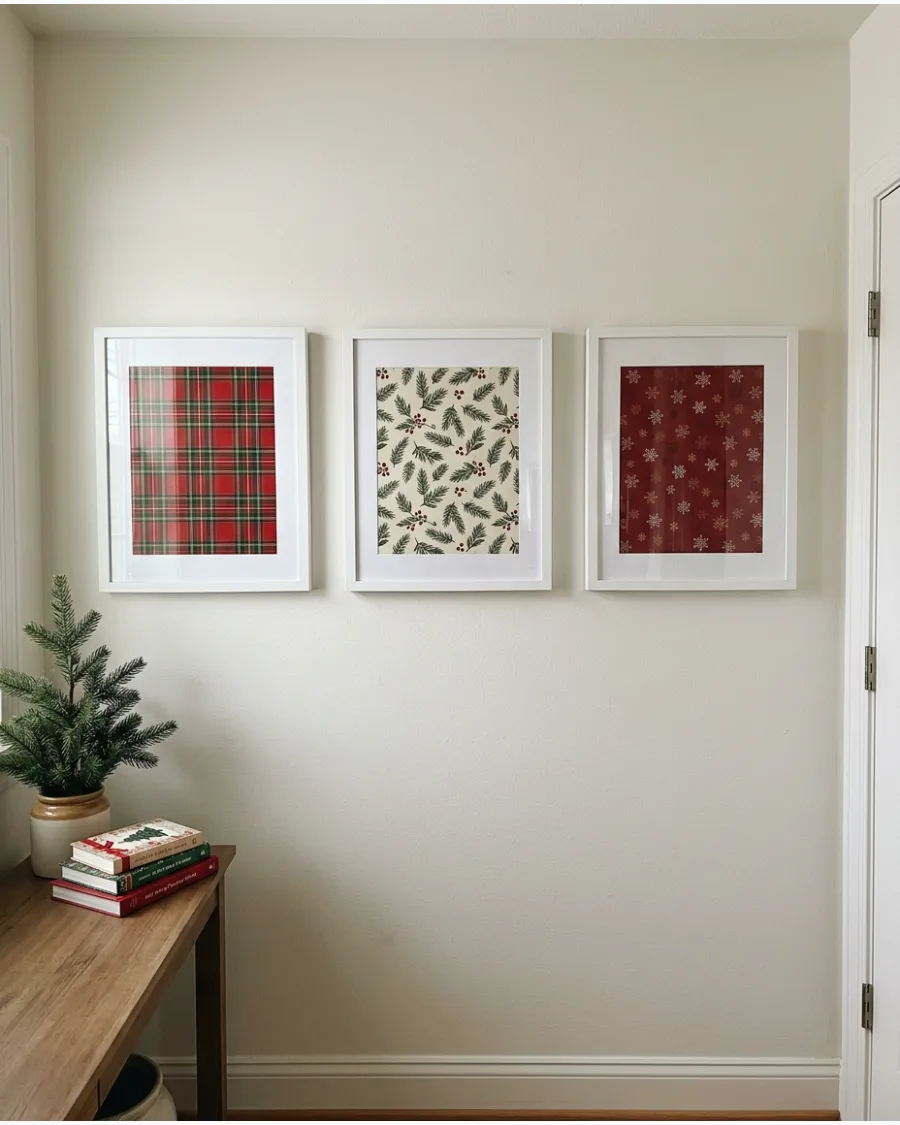
High-quality wrapping paper often features beautiful patterns that are perfect for temporary holiday art. This is a budget-friendly way to fill a wall with color and texture using items you likely already have.
Cut pieces of wrapping paper to fit several coordinating frames and arrange them together for a cohesive, patterned gallery wall. Mix patterns like classic tartan with simple stripes or botanical motifs for visual interest.
- Use heavy-weight, matte-finish paper to prevent wrinkling and glare inside the frame
- Iron the paper on a low, dry setting if there are stubborn creases from the roll
- Stick to a consistent frame color to unify different paper patterns
Use the cardboard insert that comes with the frame as a template to trace and cut the paper for a perfect fit every time.
51. Christmas Sheet Music Wall Art
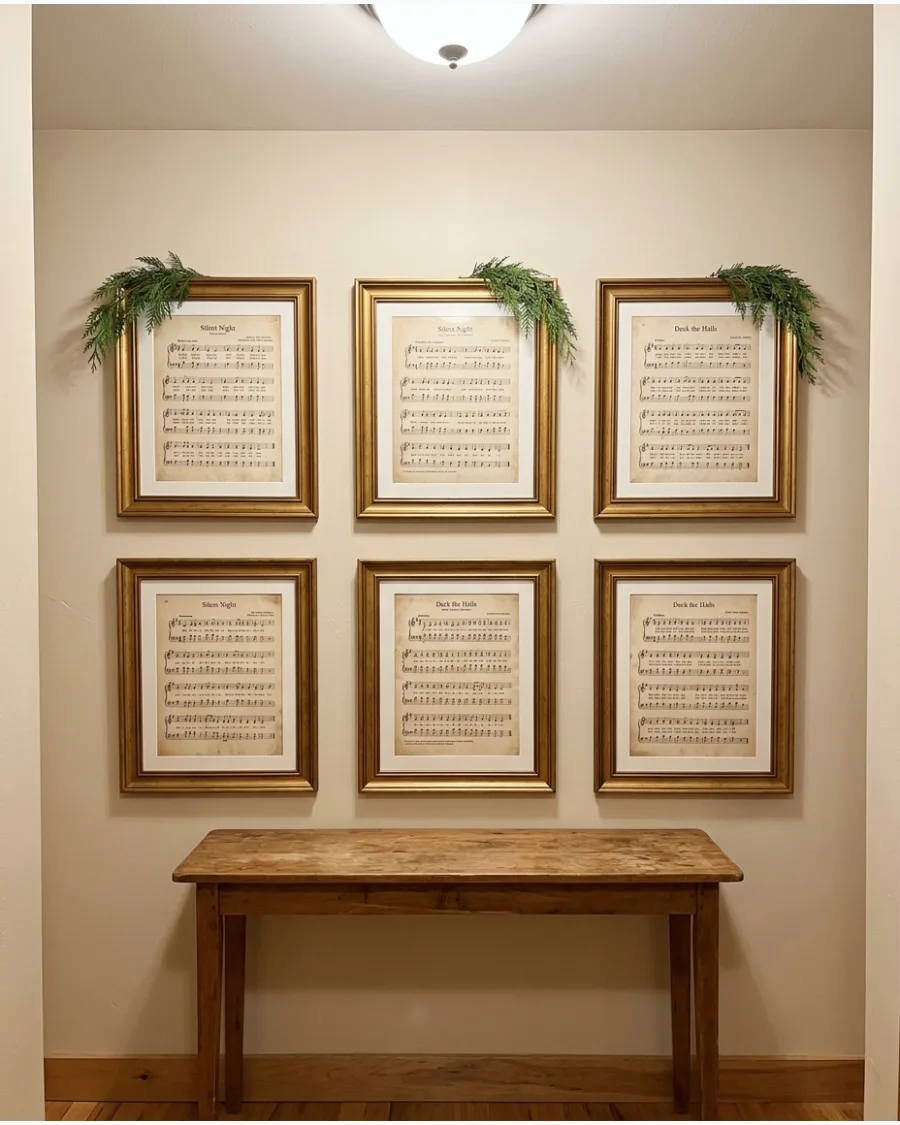
Create a nostalgic display by framing pages of classic carols like 'Silent Night' or 'Deck the Halls.' Frame several pages of vintage-style sheet music in varied gold or dark wood frames to establish a traditional gallery wall. This approach brings a sense of history and classic charm to any hallway or living room. You can enhance the arrangement by tucking small sprigs of fresh cedar behind the frame edges.
- Use acid-free mounting paper to prevent the sheet music from yellowing further over time.
- Choose frames with different thicknesses but similar finishes to maintain a cohesive look.
- Include a mix of portrait and landscape orientations to make the gallery feel collected rather than manufactured.
If you don't have vintage books, print high-resolution scans onto cream-colored cardstock for an instant antique effect.
52. Christmas Postcard Gallery Wall
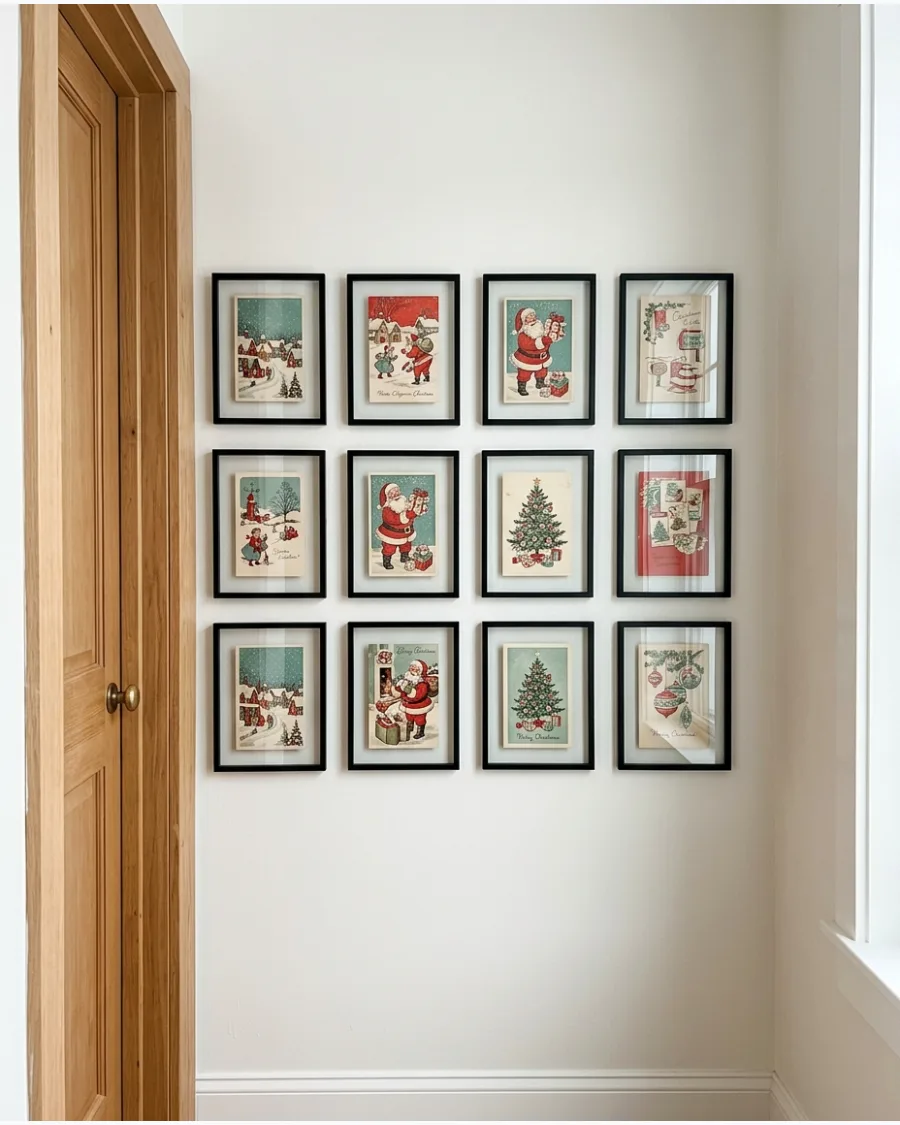
Vintage postcards offer a window into holiday celebrations of the past with their distinct illustrations of snowy villages and Santas. Arrange a collection of reproduction vintage Christmas postcards in a tight grid using decorative clips or thin frames. This grouped arrangement works particularly well in small spaces like entryways or kitchen nooks.
Mixing different artistic styles from various decades adds a curated, nostalgic feel to the room.
- Group postcards by color story, such as all-blue winter scenes or traditional red Santas.
- Use a large shadow box frame to house several postcards at once if you prefer a single wall hanging.
- Incorporate a few blank-backed cards to show off decorative vintage stamps or handwriting.
Mount smaller postcards onto larger cardstock mats before framing to ensure they don't look lost on a large wall.
DIY AND HANDMADE CHRISTMAS WALL DECOR
53. DIY Paper Snowflake Wall
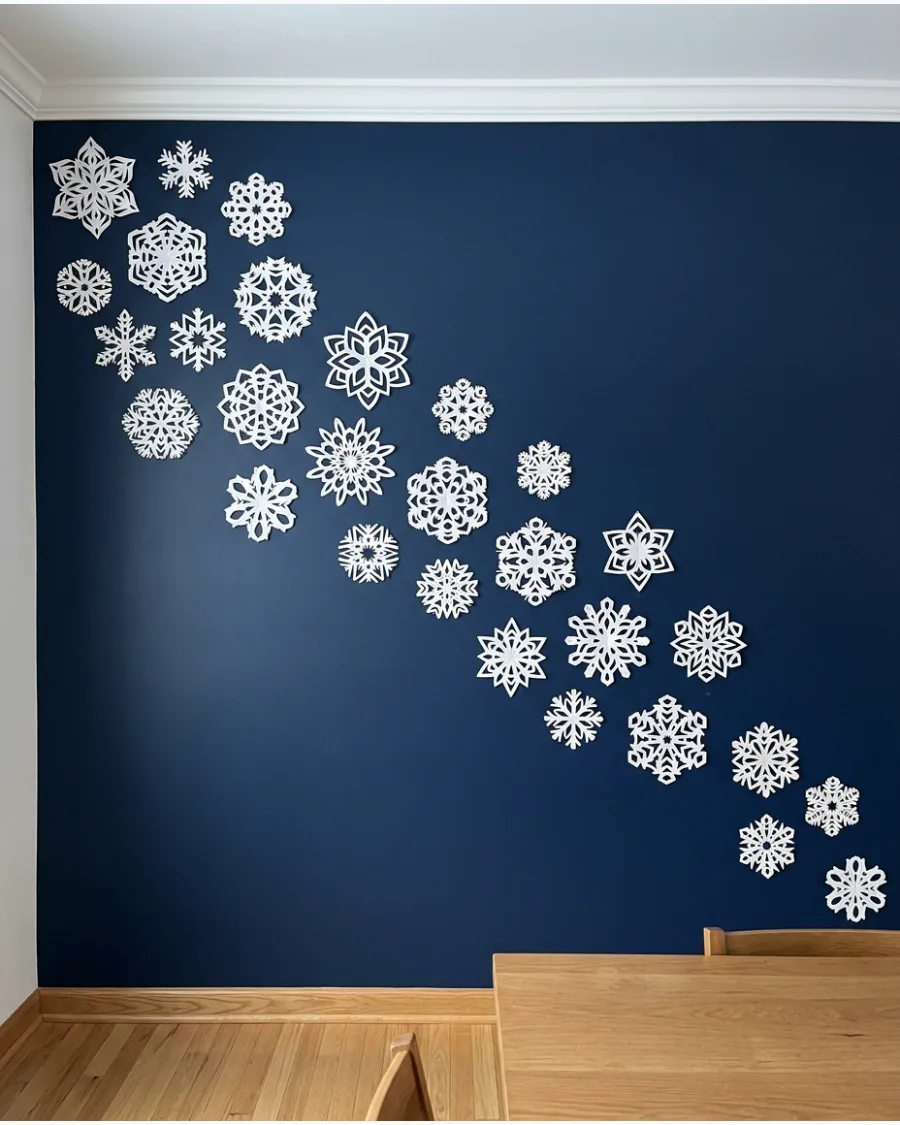
Handmade paper snowflakes are a budget-friendly way to create a whimsical winter atmosphere. Cut multiple sizes of intricate white paper snowflakes and adhere them to a dark-colored wall in a diagonal, drifting pattern. This arrangement mimics the look of a falling snowstorm and provides a high-contrast visual against navy or charcoal backgrounds.
Because they are lightweight, they can be easily attached with removable adhesive dots.
- Vary the number of folds (six or eight) to create diverse geometric patterns.
- Use heavy-weight cardstock for larger flakes to prevent them from curling away from the wall.
- Overlap several snowflakes of different sizes to add physical depth to the display.
Iron your folded snowflakes on a low, dry setting to ensure they lay perfectly flat against the wall surface.
54. Giant Paper Snowflake Wall Decor
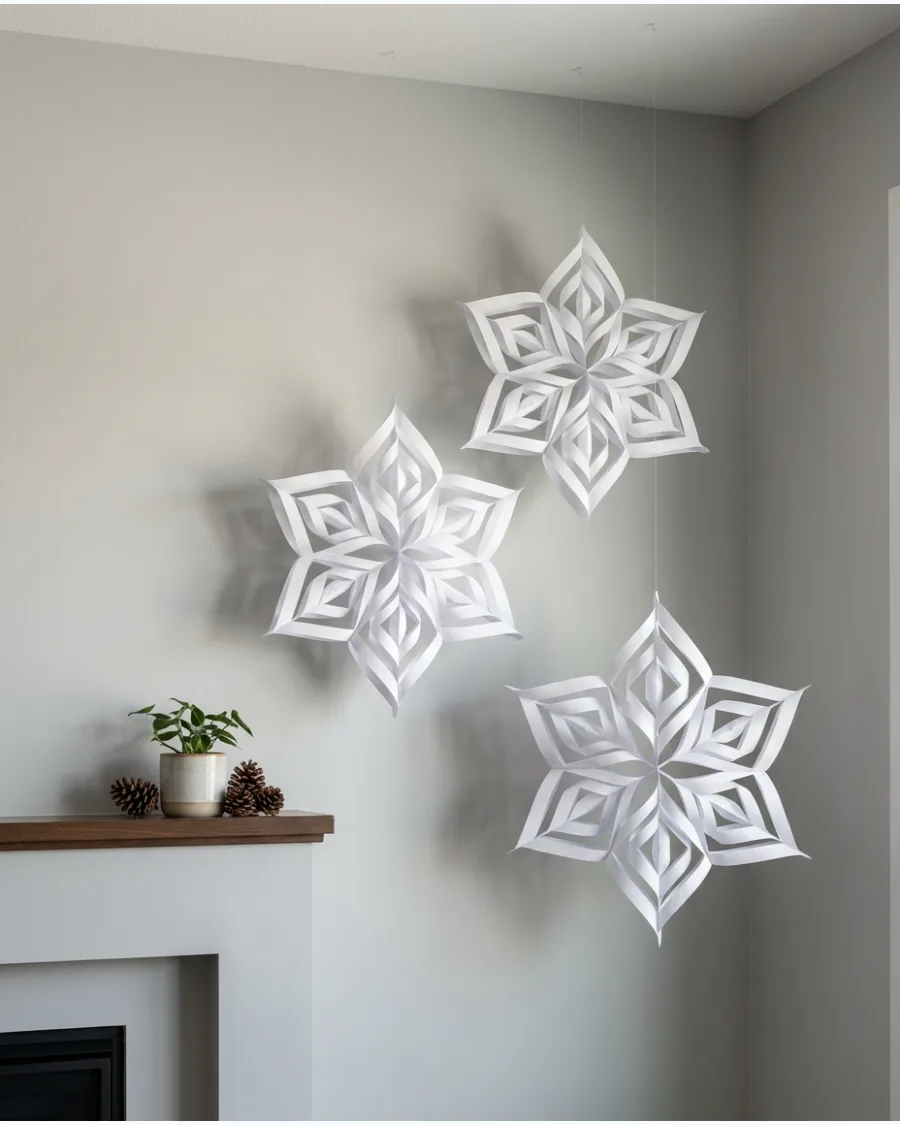
For a dramatic and modern look, opt for a few oversized paper snowflakes rather than many small ones. Hang three or four oversized three-dimensional paper snowflakes at staggered heights to create a bold, lightweight focal point on a large wall. These 3D versions add architectural interest and shadows that flat paper cannot provide.
They are ideal for high-ceiling rooms where small decorations would get lost.
- Choose 'honeycomb' or 'accordion-fold' snowflakes that arrive flat and pop open for easy assembly.
- Mix white and cream tones to add subtle visual depth to the arrangement.
- Use clear monofilament line to hang them from the top of the wall for a floating appearance.
Place a small piece of clear tape over the hanging hole on the snowflake to prevent the paper from tearing over time.
55. Hanging Paper Star Christmas Wall
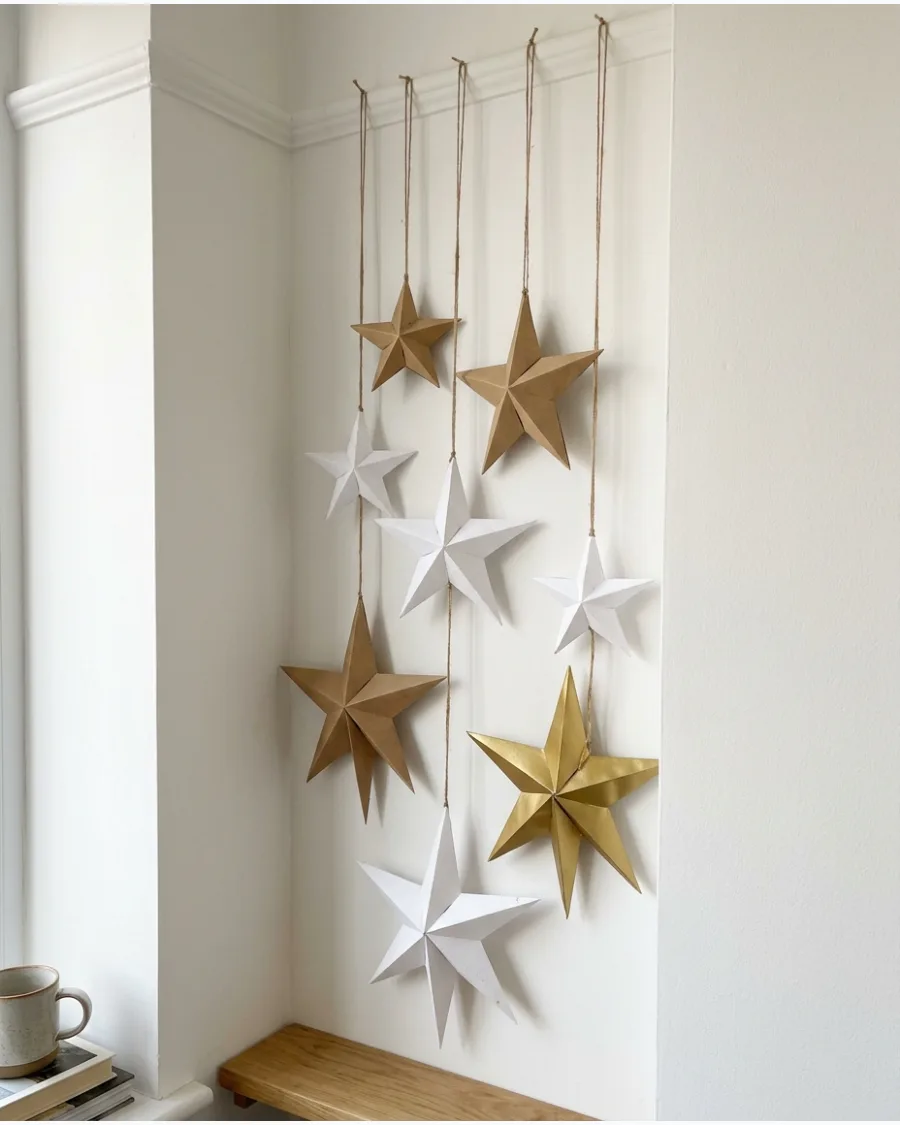
Folded paper stars bring a geometric, Scandinavian-inspired feel to holiday decorating. Suspend a variety of folded paper stars at staggered lengths using twine or thin ribbon to fill a narrow wall area with festive vertical lines. Using a mix of kraft paper, white, and gold stars creates a warm, organic palette.
This method is particularly effective for decorating the space between windows or on narrow structural columns.
- Use stars with five, seven, or nine points to vary the geometric complexity of the display.
- Anchor the strings to the wall using small, clear adhesive hooks hidden near the ceiling line.
- Add a single small wooden bead to the string above each star for an extra artisanal detail.
Thread a battery-operated fairy light strand through the center of larger stars to make them glow from within at night.
56. DIY Dried Orange Garland Wall
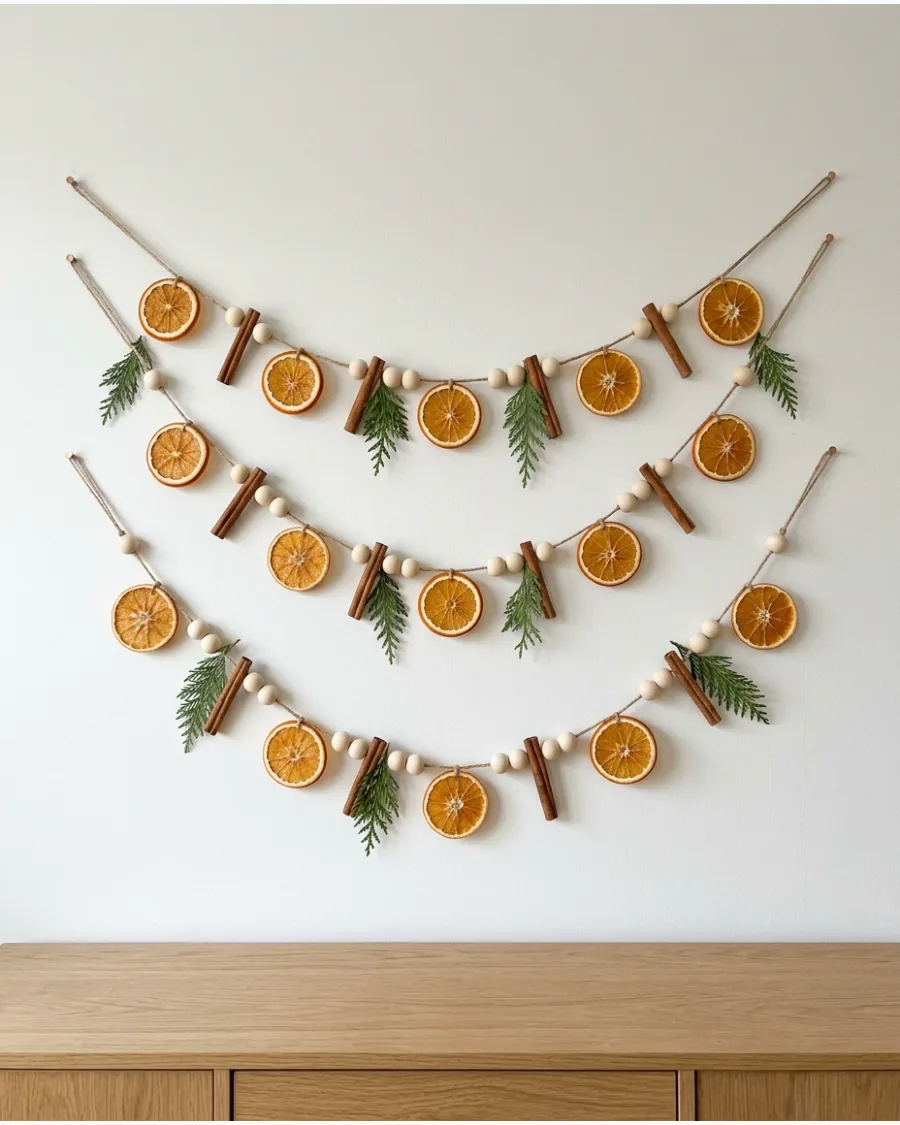
Combine the warm, translucent look of dried citrus with the earthy tones of natural wood and greenery for a fragrant holiday display. This handmade garland adds a rustic, aromatic element to your Christmas wall decor without requiring expensive materials.
Thread dried orange slices, small wooden beads, and cinnamon sticks onto jute twine to create a textured, multi-layered garland across an empty wall.
- Use a tapestry needle to pierce the centers of the orange slices easily without cracking the pulp.
- Space out cinnamon sticks every five or six slices to create a rhythmic visual pattern and consistent scent.
- Tuck in small sprigs of fresh cedar or faux rosemary between the oranges to provide pops of vibrant green.
Dry your orange slices in a low-temperature oven for several hours until fully brittle to prevent molding and ensure they stay translucent when backlit.
57. DIY Pinecone Christmas Wall Hanging
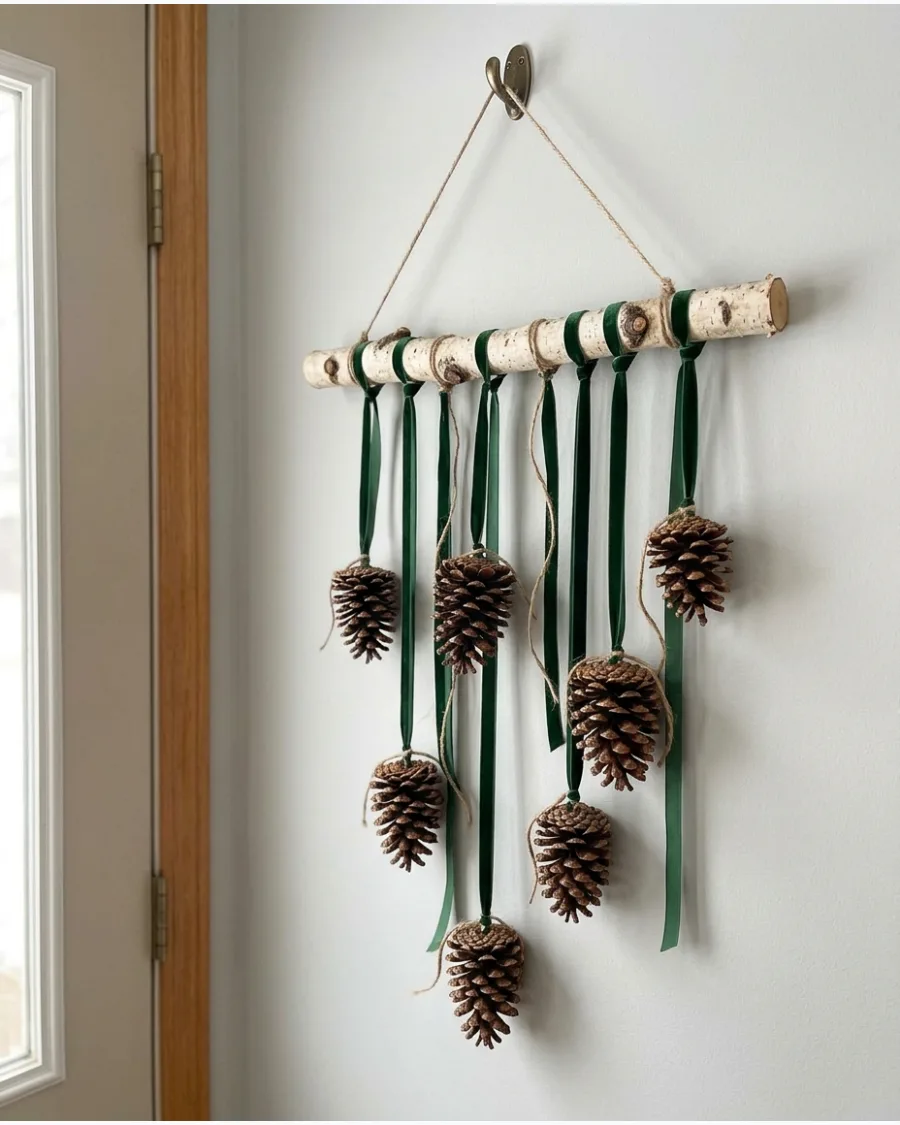
Transform simple nature-walk finds into a sophisticated vertical wall display that adds depth to flat surfaces. This arrangement uses varying lengths to create a sense of movement and organic texture.
Tie individual pinecones to pieces of thin velvet ribbon or twine and suspend them at staggered heights from a sturdy, natural wooden branch mounted on the wall.
- Select a branch with interesting texture or silver birch bark to serve as the primary horizontal anchor.
- Secure the ribbons to the branch using simple slip knots to allow for easy height adjustments during installation.
- Interspersed small brass bells or faux berry sprigs among the pinecones for subtle festive color and sound.
Lightly brush the tips of the pinecone scales with white acrylic paint to create a 'frosted' effect that makes them stand out against dark or neutral walls.
58. DIY Christmas Bell Wall Hanging
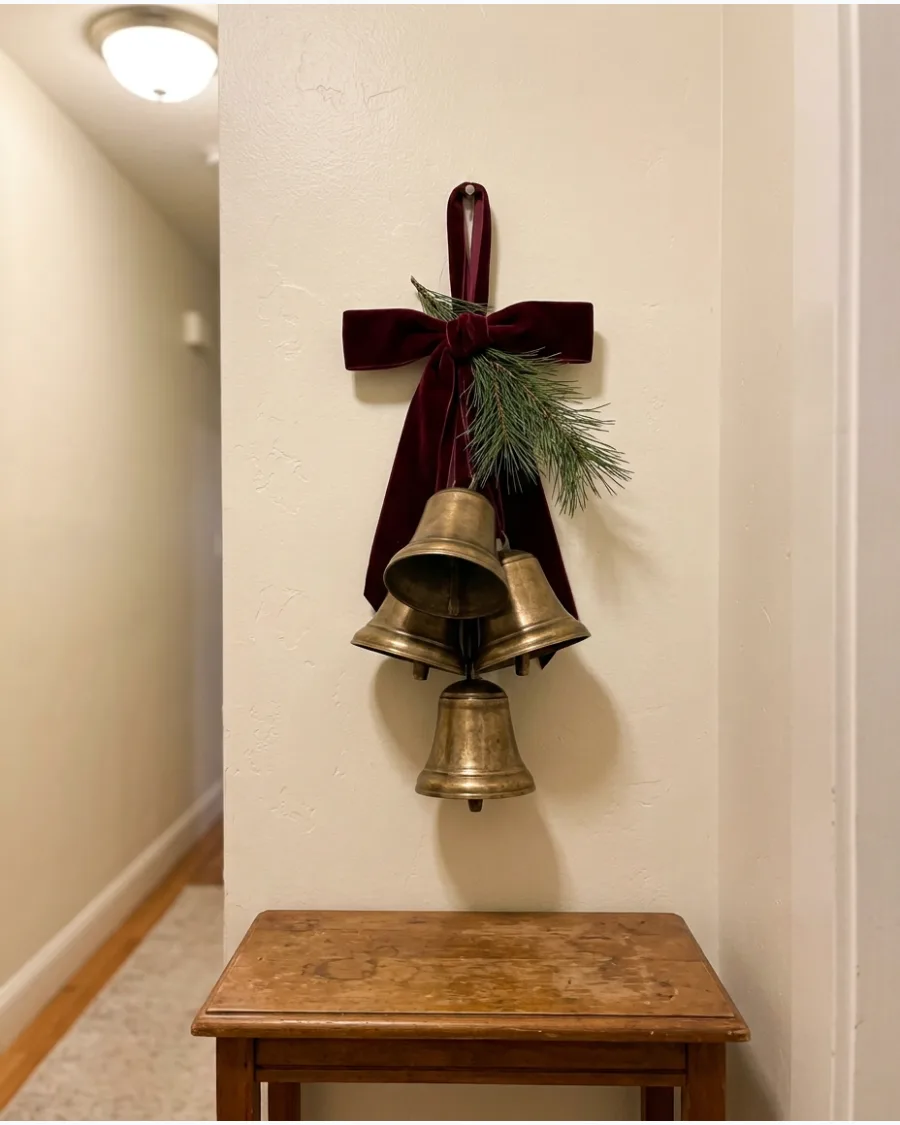
Bells offer a classic holiday sound and a vintage metallic finish that fits perfectly in traditional or neutral interiors. This small-scale wall ornament works effectively as a focal point in a hallway or above a small side table.
Cluster three to five antique brass bells together using a thick velvet ribbon and add a sprig of greenery to create a cohesive wall ornament.
- Vary the lengths of the ribbons so the bells hang at different levels, preventing them from clumping into a single mass.
- Use a deep holiday hue like burgundy or forest green for the ribbon to provide a rich contrast against the brass.
- Secure the greenery behind the main ribbon knot to provide a lush, organic backdrop for the metallic bells.
If using heavy metal bells, use a small clear adhesive hook hidden behind the greenery to support the weight rather than relying on the ribbon alone.
59. DIY Wooden Bead Christmas Wall Garland
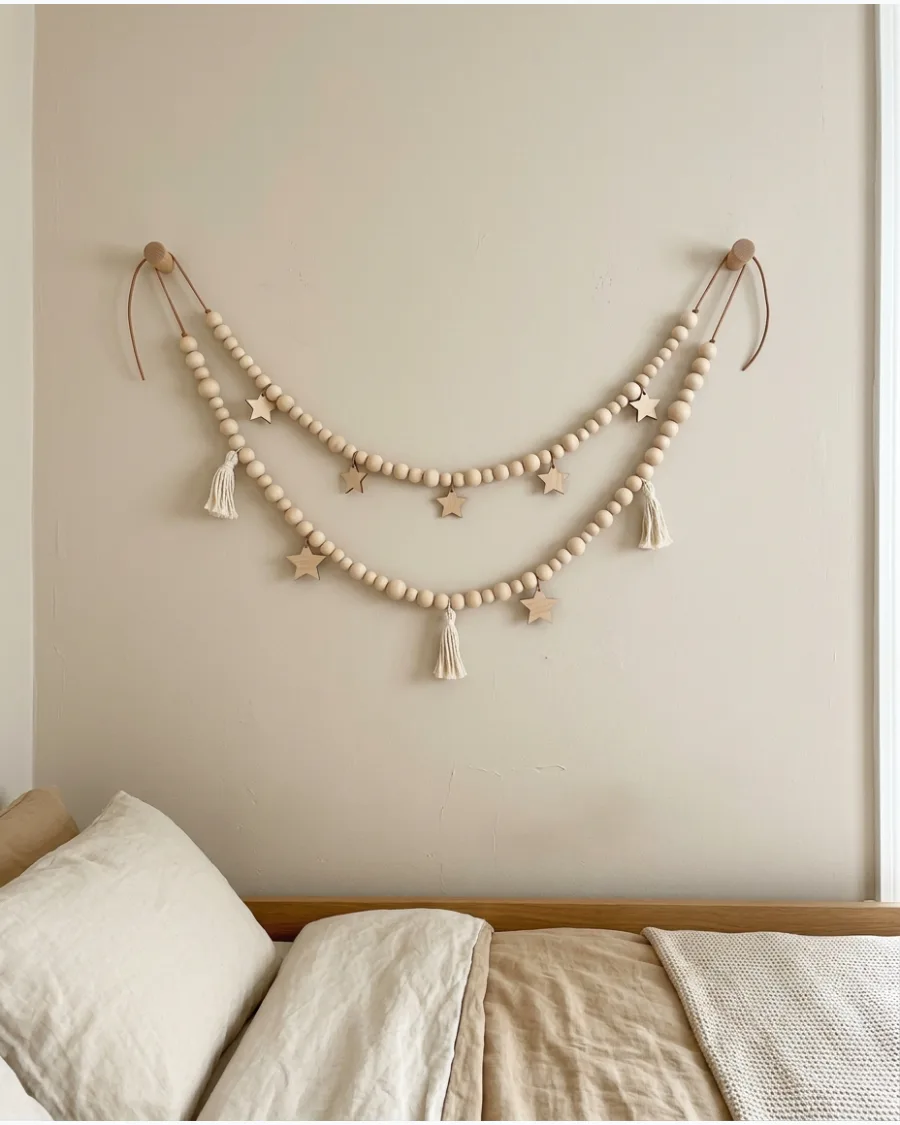
For a Scandinavian or minimalist aesthetic, focus on light woods and simple geometric shapes. This garland provides a subtle texture that feels festive without overwhelming a clean, modern room design.
String natural, unfinished wooden beads onto a leather cord or cotton twine and accent the strand with small wooden stars or tassels.
- Mix different bead diameters, such as 12mm and 20mm, to create a more dynamic, handcrafted appearance.
- Drape the finished garland in multiple overlapping swags to create a fuller visual impact on a large, empty wall.
- Keep the color palette strictly neutral with raw wood tones, cream cotton tassels, and light tan leather cord.
Sand any rough edges on the wooden stars before threading them to ensure the garland looks polished and doesn't snag on the wall surface.
60. DIY Christmas Ornament Wall Hanging
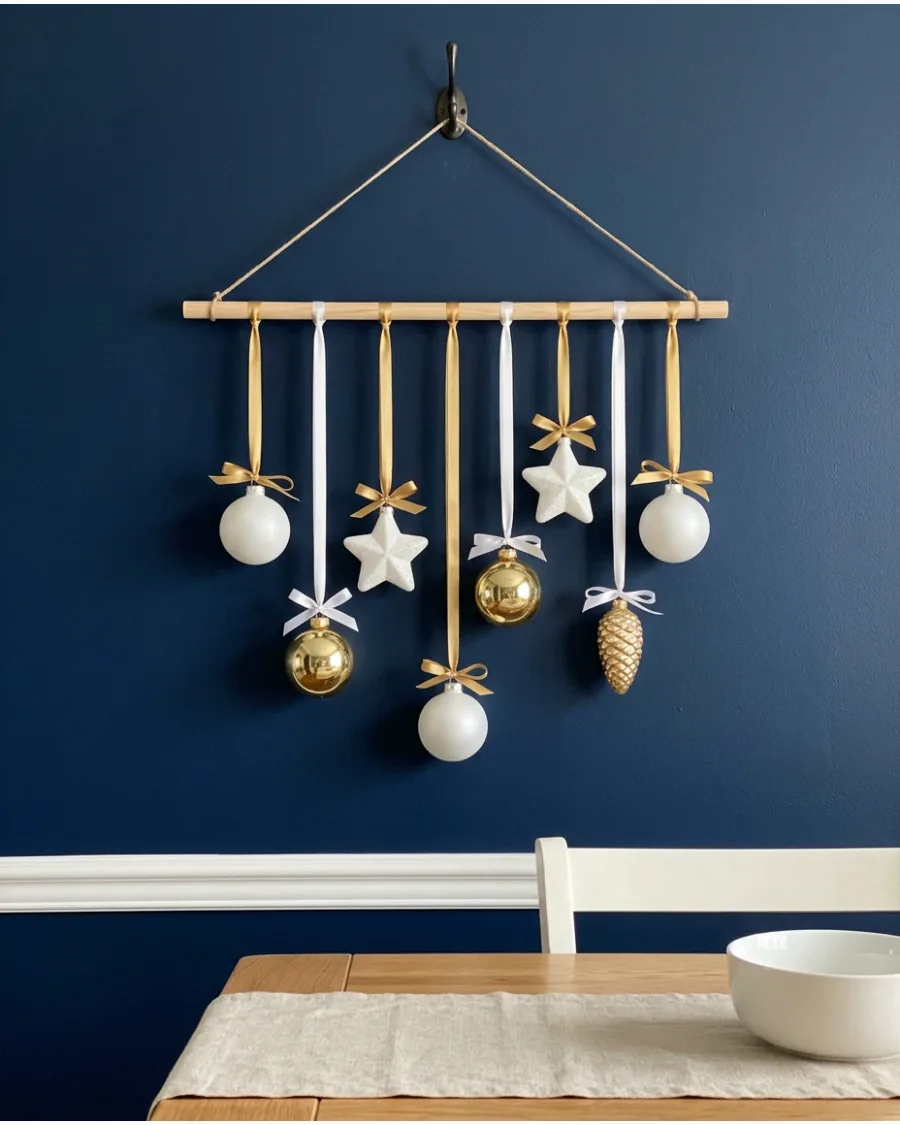
This vertical hanging is an excellent way to display favorite ornaments outside of the traditional tree setup.
It creates a structured, geometric alternative to a wreath that works well in modern or transitional homes. Suspend individual ornaments from a wooden dowel or branch using thin satin ribbons, ensuring each ornament sits at a different vertical level.
- Coordinate the ornament colors—such as gold, white, and silver—to keep the hanging looking organized and intentional.
- Space the ribbons evenly along the dowel, about two to three inches apart, to prevent the ornaments from tangling or overlapping.
- Choose a dowel that is roughly four inches wider than the total width of the ornament cluster for a balanced, framed silhouette.
Use a small level when mounting the dowel to the wall to ensure the vertical ribbons hang perfectly straight and parallel.
61. DIY Christmas Village Wall Display
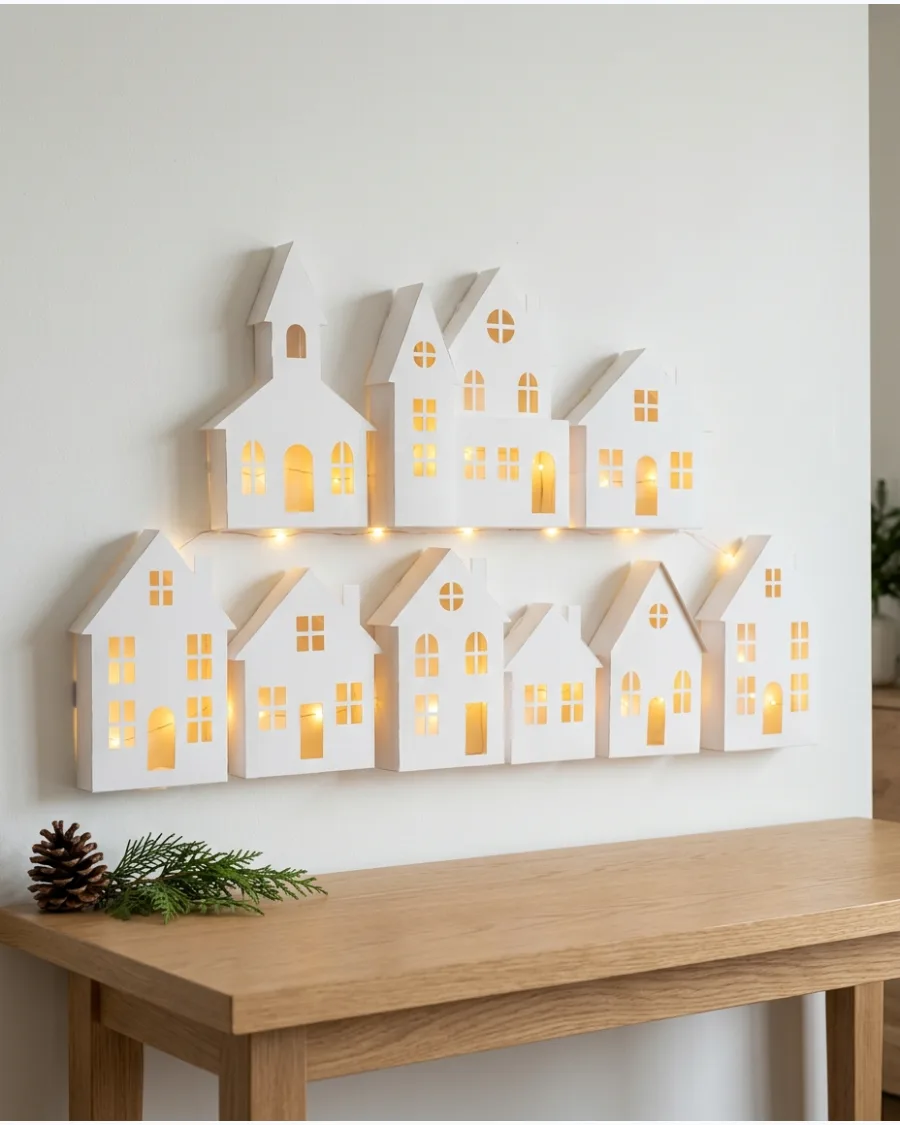
Create a whimsical holiday scene by cutting house silhouettes from thick cardstock or thin wood panels. Arrange these silhouettes at varying heights along a wall to form a multi-layered town skyline. Tuck small battery-operated LED fairy lights behind the cutouts to give the windows a warm, inviting glow without the bulk of ceramic houses.
This space-saving display works beautifully above a console table or along a hallway.
- Use white cardstock for a snowy village look or raw wood for a more rustic feel
- Secure the houses using damage-free adhesive strips to keep the setup renter-friendly
- Scatter small adhesive stars or dots above the houses to represent a winter night sky
Vary the size and roof styles of the houses to add visual depth and create a more dynamic village silhouette.
62. DIY Christmas Advent Calendar Wall
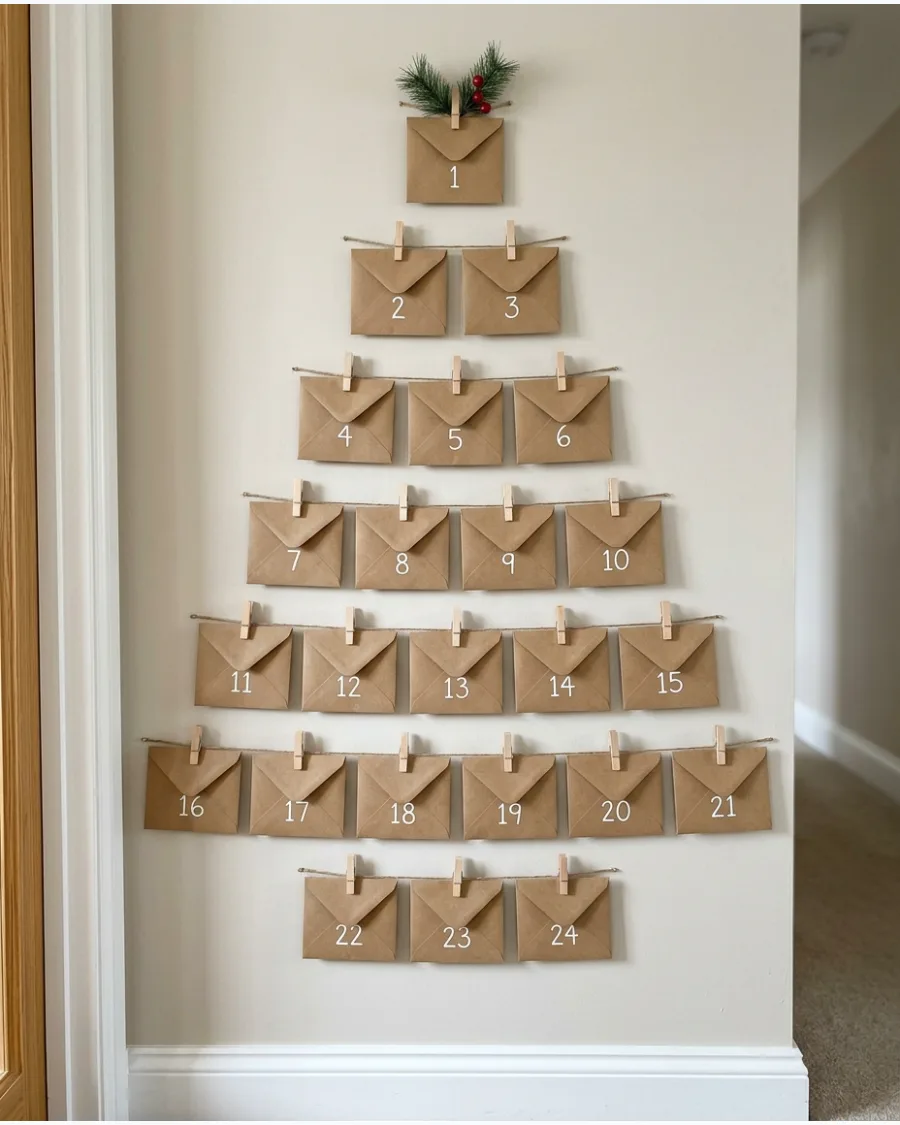
Transform a blank wall into an interactive holiday countdown by mounting 24 small vessels in a festive shape. Arrange numbered kraft paper envelopes or small burlap bags in a large triangle to mimic the shape of a Christmas tree. Fill each container with a small treat, activity prompt, or lightweight ornament to discover each morning.
This approach turns a functional advent calendar into a significant piece of seasonal wall art.
- Mix different textures like paper, fabric, and wood clips for a curated, handmade aesthetic
- Use a wooden branch at the top to anchor the display if you prefer a hanging garland style
- Apply numbered stickers or hand-stamped digits to ensure each day is clearly identified
If you have young children, place the containers at a reachable height while ensuring the 'tree' remains visually balanced on the wall.
CHRISTMAS WALL DECOR STYLES AND COLOR PALETTES
63. Ralph Lauren Inspired Christmas Wall Decor
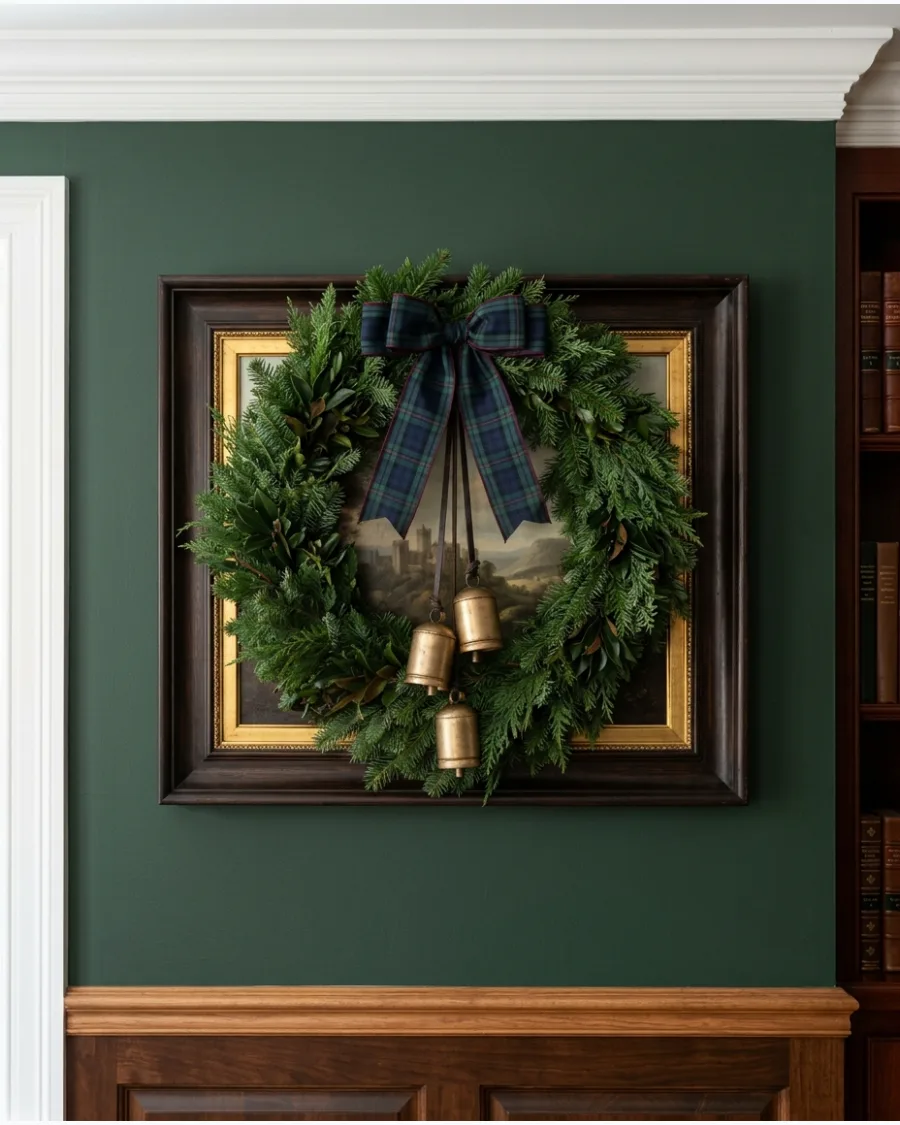
Achieve a sophisticated heritage look by layering classic patterns with rich, deep colors. Hang a lush evergreen wreath accented with a large navy and forest green tartan ribbon alongside dark wood-framed oil paintings. Incorporate elements like brass bells on leather cords and deep red velvet bows to evoke the feeling of a traditional English country estate.
This style relies on high-quality materials and a palette of jewel tones to feel timeless and luxurious.
- Incorporate vintage-style landscape or equestrian art into your wall arrangement
- Choose a wired tartan ribbon to create crisp, voluminous bows that hold their shape
- Cluster several heavy brass bells together for a tactile and acoustic decorative element
Layering a wreath directly over a framed piece of art adds immediate depth and a curated, high-end feel.
64. Vintage Christmas Wall Decor
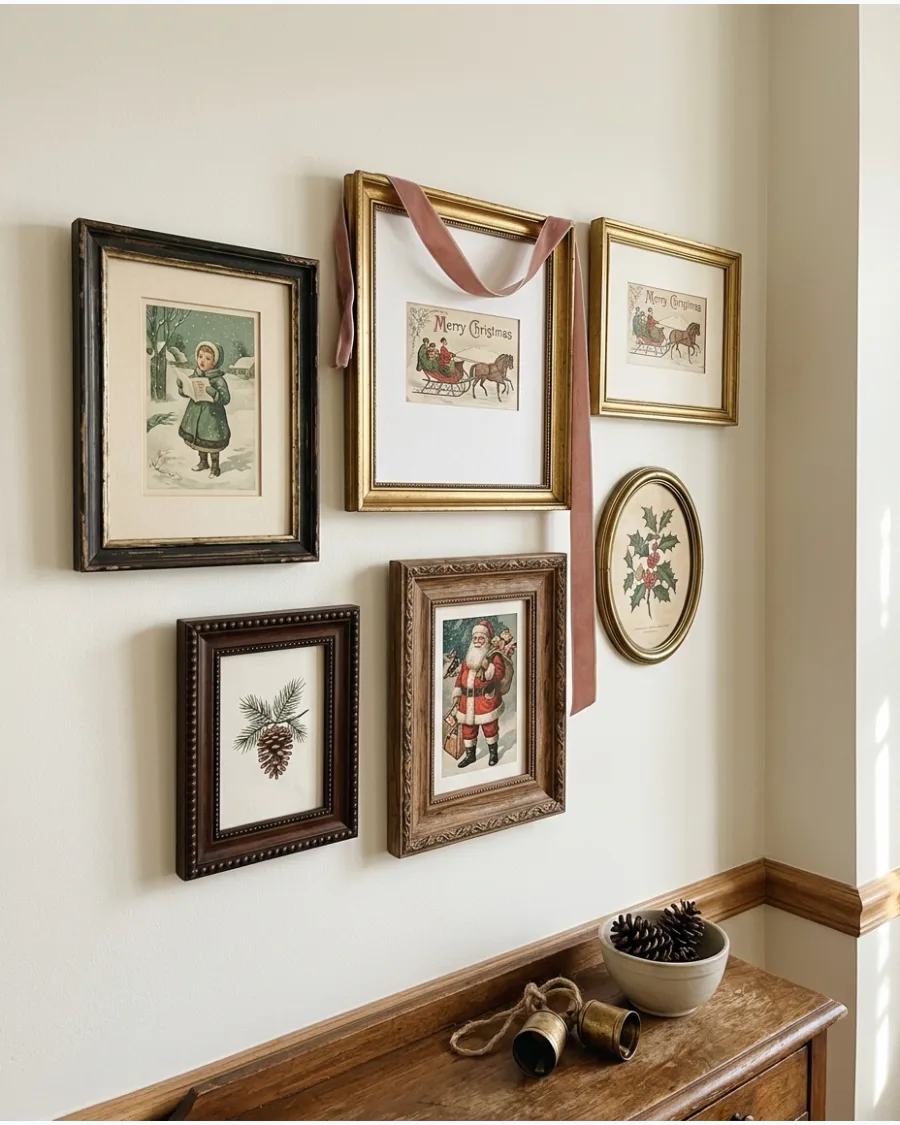
Create a nostalgic holiday atmosphere by assembling a gallery of treasures that look collected over many years. Frame vintage Christmas postcards or botanical holly prints in mismatched antique-style gold and wood frames for an authentic feel. Add soft textures by draping velvet ribbons in muted sage or dusty rose over the corners of the frames.
This approach avoids a 'store-bought' look and instead celebrates the charm of weathered materials and traditional imagery.
- Hunt for authentic vintage frames at thrift stores to get varied patinas and ornate details
- Tuck dried orange slices or small sprigs of real cedar into the frame edges for a sensory touch
- Hang a few glass ornaments from the wall using thin silk thread to add vertical interest
Use an asymmetrical layout rather than a rigid grid to reinforce the idea that the collection grew naturally over time.
65. Scandinavian Christmas Wall Decor
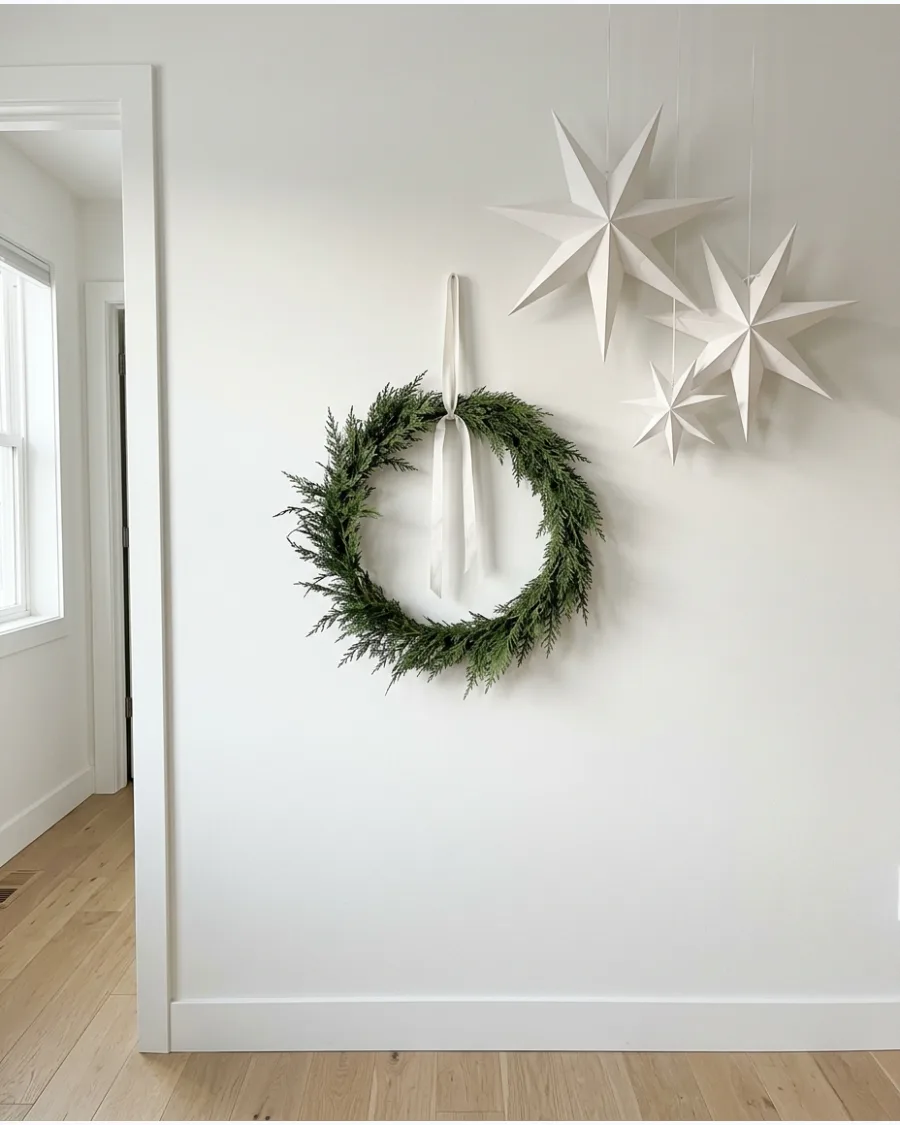
Embrace the 'hygge' philosophy with a wall display that is both minimalist and incredibly cozy. Mount a single, delicate evergreen wreath with a thin white linen ribbon as the primary focal point on a light-colored wall. Complement the greenery with 3D white paper stars of varying sizes and simple unfinished wood accents.
This style emphasizes clean shapes and organic materials, creating a serene holiday environment that doesn't feel cluttered.
- Choose thin-profile greenery like eucalyptus, olive branches, or minimal pine for the wreath
- Use warm white fairy lights with ultra-thin silver wires to add a subtle twinkle
- Include light-toned wood beads or simple geometric wooden ornaments to provide texture
Keep the surrounding wall space largely empty to allow the individual textures of the wood and greenery to stand out effectively.
66. Cottage Christmas Wall Decor
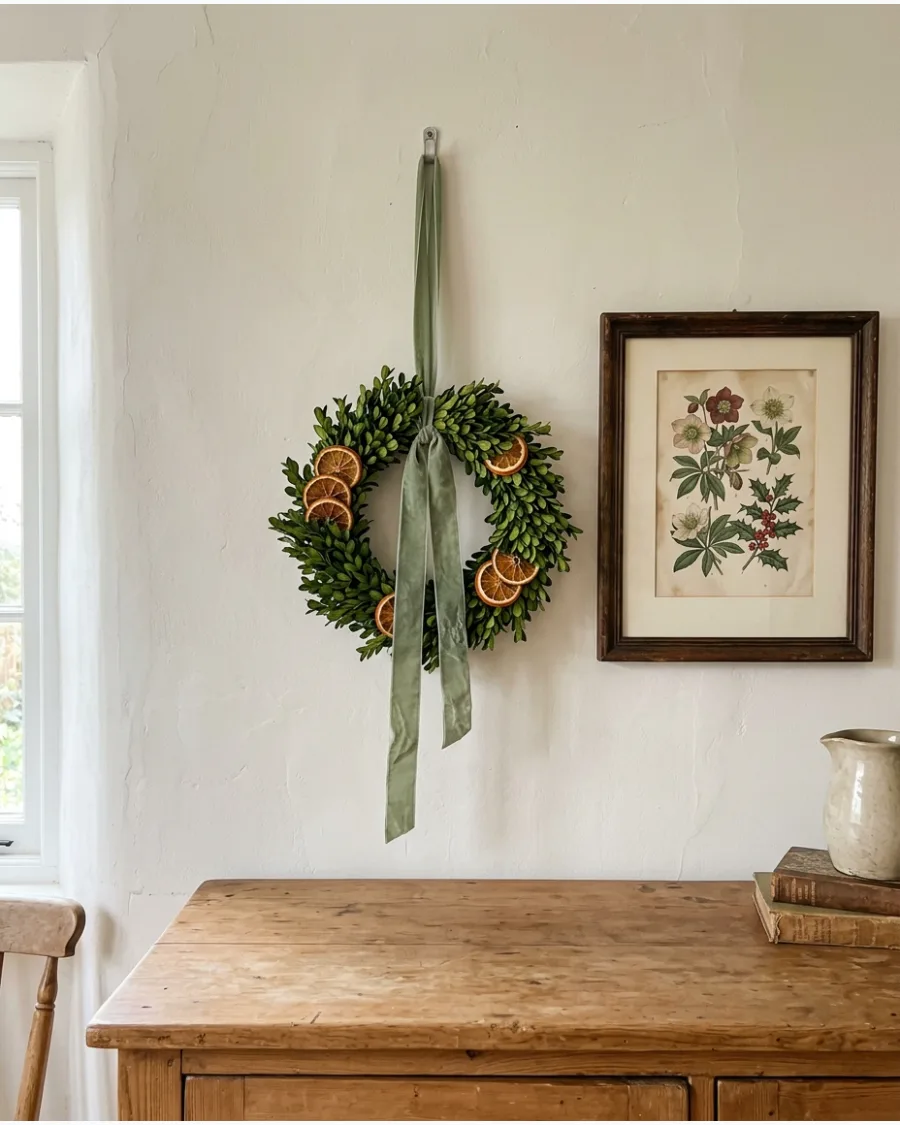
Capture a cozy, English-cottage feel by mixing small-scale greenery with vintage elements. Incorporate organic textures like dried orange slices and layered velvet ribbons to soften the look of the wall.
Group slightly mismatched items such as small wreaths and vintage floral prints to create an intentionally lived-in holiday display. This approach works best on smaller wall sections or in dining nooks where details are appreciated up close.
- Use sage or dusty blue velvet ribbons to complement the dried oranges and greenery.
- Hang vintage-style prints in dark wood or gold-leaf frames for an aged appearance.
- Integrate small sprigs of real eucalyptus or cedar to add a natural fragrance to the display.
Tie dried orange slices directly onto wreath frames using twine for a secure, rustic attachment.
67. Traditional Red and Green Christmas Wall Decor
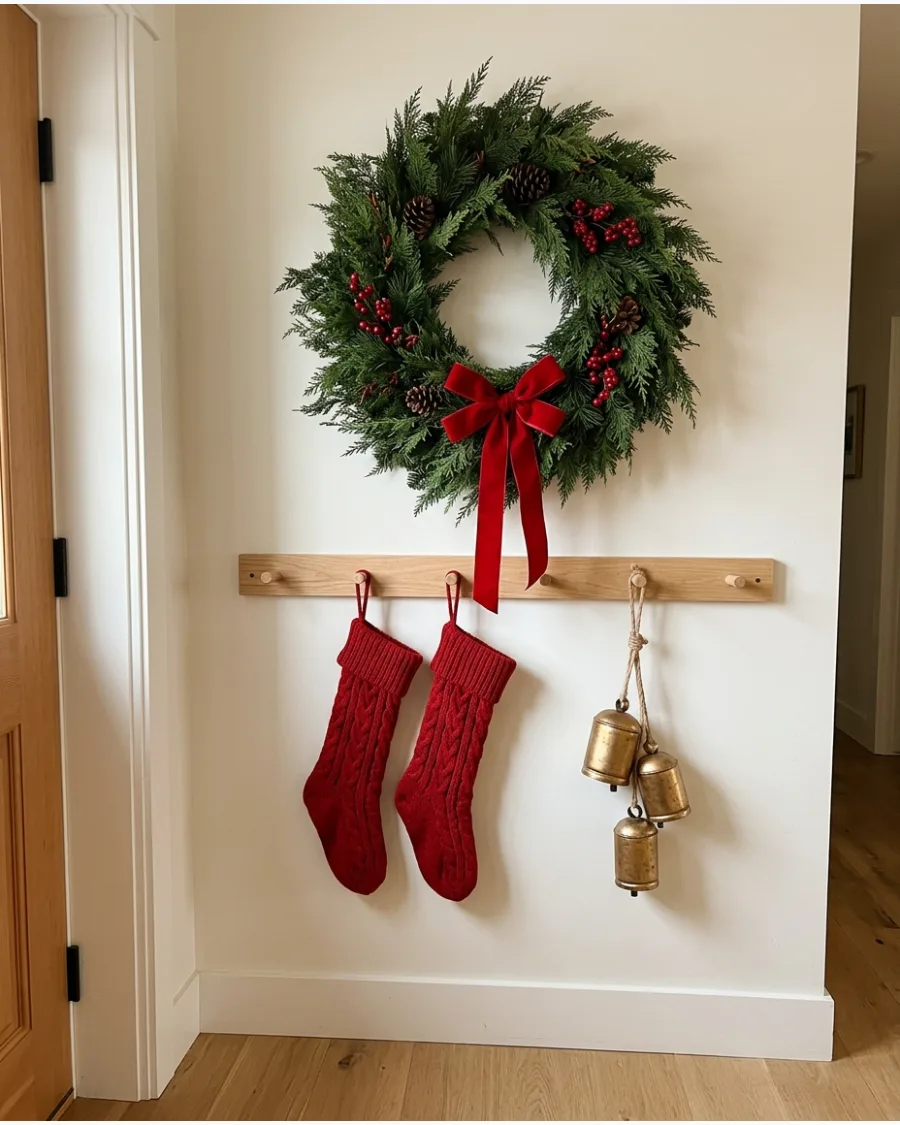
Create a timeless holiday atmosphere by leaning into the classic Christmas color palette. Layer deep green evergreen wreaths with thick red velvet ribbons and pops of plaid to establish a festive focal point.
Hang a row of stockings and brass bells alongside your greenery to add height and variety to the arrangement. This high-contrast look ensures the decor remains the main attraction in a family room or entryway.
- Intersperse bright red berry picks into the greenery to break up solid blocks of green.
- Use brass bells with a matte or weathered finish to ground the vibrant red and green tones.
- Incorporate plaid ribbon in a Stewart Tartan pattern for a classic heritage feel.
Use Command hooks hidden behind ribbon loops to hang stockings securely without damaging the wall surface.
68. Burgundy and Brass Christmas Wall Decor
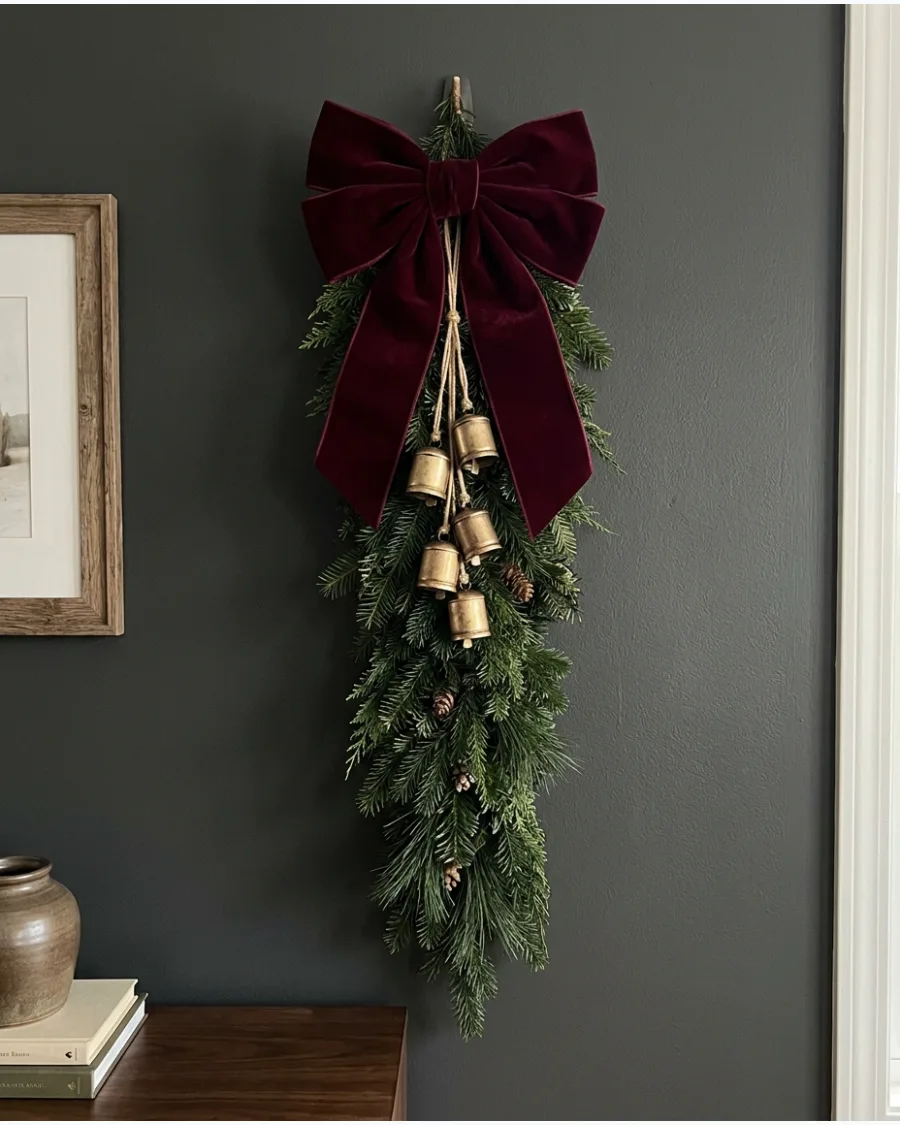
Elevate your holiday aesthetic with a sophisticated mix of deep burgundy and warm metallic accents. This palette offers a moodier, more elegant alternative to traditional bright red by using velvet textures and antique brass finishes.
Pair oversized burgundy velvet bows with dark evergreen swags and antique brass frames for a rich, layered effect. The combination of dark wine tones and gold-toned metal creates a luxurious look that feels both festive and refined.
- Choose 'antique brass' finishes for bells and frames to avoid a shiny, artificial appearance.
- Use heavy velvet ribbon that holds its shape well when tied into large, structural bows.
- Accent the dark greenery with gold-painted pinecones to catch the light.
Layer different shades of burgundy and plum to add depth and keep the monochrome palette from looking flat.
69. Neutral Christmas Wall Decor
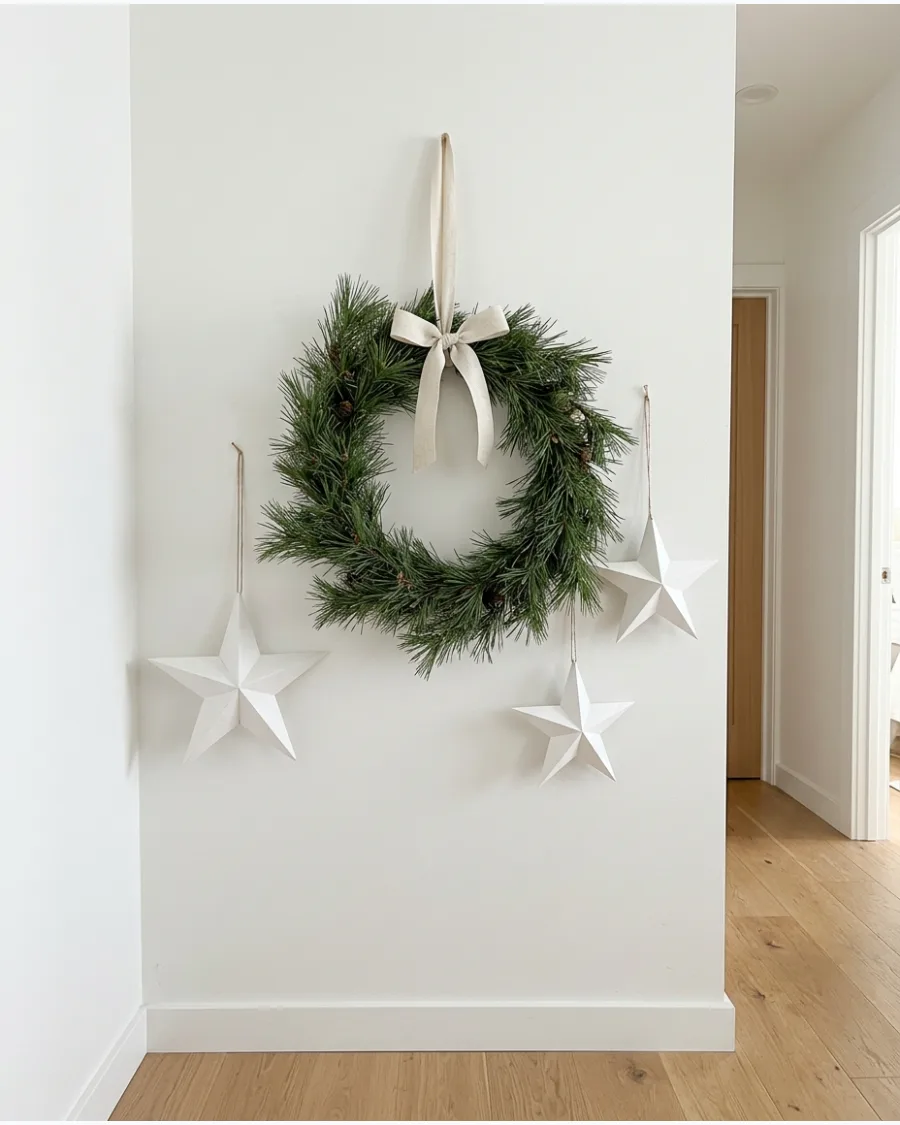
Focus on texture and natural materials to create a calm, festive environment without using bright colors. Combine cream-colored textiles, light wood elements, and fresh greenery to build a soft, winter-inspired wall.
Mix simple evergreen wreaths with white paper stars and natural wood ornaments to maintain a clean, monochromatic look. This style is ideal for minimalist homes or as a subtle backdrop in a high-traffic area like a kitchen.
- Use cream-colored linen or grosgrain ribbon instead of shiny satin for a more organic feel.
- Incorporate beige textiles, such as a fabric banner or small stockings, to add warmth.
- Arrange pine branches in a minimalist 'branch wall' style for a low-profile alternative to a full tree.
Use white or light-colored hanging hardware to ensure the attachment points blend into the wall surface.
70. Cozy Collected Christmas Wall Decor
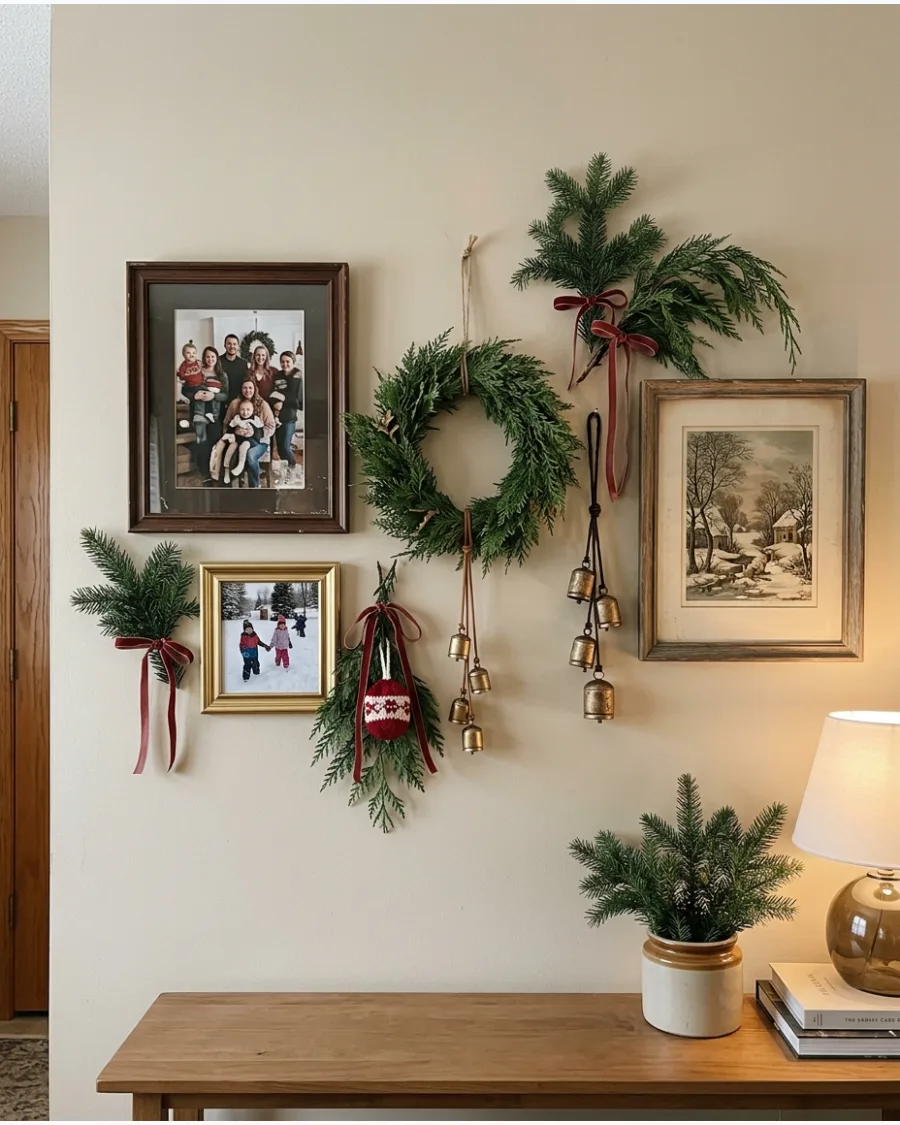
Build a personal feature wall by blending meaningful holiday items with standard seasonal decor. This 'collected' look relies on layering family photos, vintage artwork, and handmade pieces for a narrative-driven display.
Maintain a consistent color theme across your mismatched items to ensure the wall feels curated rather than cluttered. By mixing textures like paper, wood, and metal, you create a visual story that invites guests to look closer.
- Frame small family photographs from past Christmases to tuck between larger art pieces.
- Hang a small bell or ornament from the bottom of a picture frame for an unexpected decorative touch.
- Use small bundles of greenery or 'sprigs' to fill gaps between frames and wreaths.
Lay your items out on the floor first to test the arrangement and spacing before committing to wall placements.
Frequently Asked Questions
How can I hang heavy garlands or wreaths without damaging my walls?
Use damage-free adhesive hooks rated for the specific weight of your decor, or utilize existing architectural features like picture molding and curtain rods. For heavy wreaths on doors or window frames, over-the-door hangers or tension rods can provide extra support without the need for nails.
How do I keep fresh greenery from drying out too quickly indoors?
Mist fresh wreaths and swags with water every few days to maintain moisture, and keep them away from direct heat sources like radiators or fireplaces. Choosing a mix of hardy evergreens, such as cedar or pine, can also help the display last longer than more delicate varieties like spruce.
What are the best wall decor options for small apartments?
Flat displays like washi tape trees, paper snowflake clusters, or hanging branch ladders maximize vertical space without encroaching on the floor. Mirrors can also be used as a base for small greenery swags to reflect light and make the room feel larger while adding a festive touch.
How do I make my holiday wall decor look cohesive with my existing furniture?
Match the color palette of your ribbons and ornaments to the dominant tones in your room, such as using navy velvet bows in a room with blue accents. Repeating the same frame material or greenery type across different wall displays helps unify various decorative elements throughout the house.
What are some low-cost ways to fill a large blank wall for Christmas?
Create a high-impact display using inexpensive materials like oversized paper snowflakes, DIY dried orange garlands, or framed pieces of high-quality wrapping paper. These options provide significant visual scale and texture without the high price tag of large-scale commercial art or massive pre-lit wreaths.