60 DIY Christmas Ornament Ideas

This post may contain affiliate links: full affiliate disclosure.
Personalizing a holiday tree does not require a massive budget or professional crafting skills. Small, handmade touches create a cohesive look that store-bought sets simply cannot match.
EASY DIY CHRISTMAS ORNAMENTS
1. Air-Dry Clay Star Ornaments
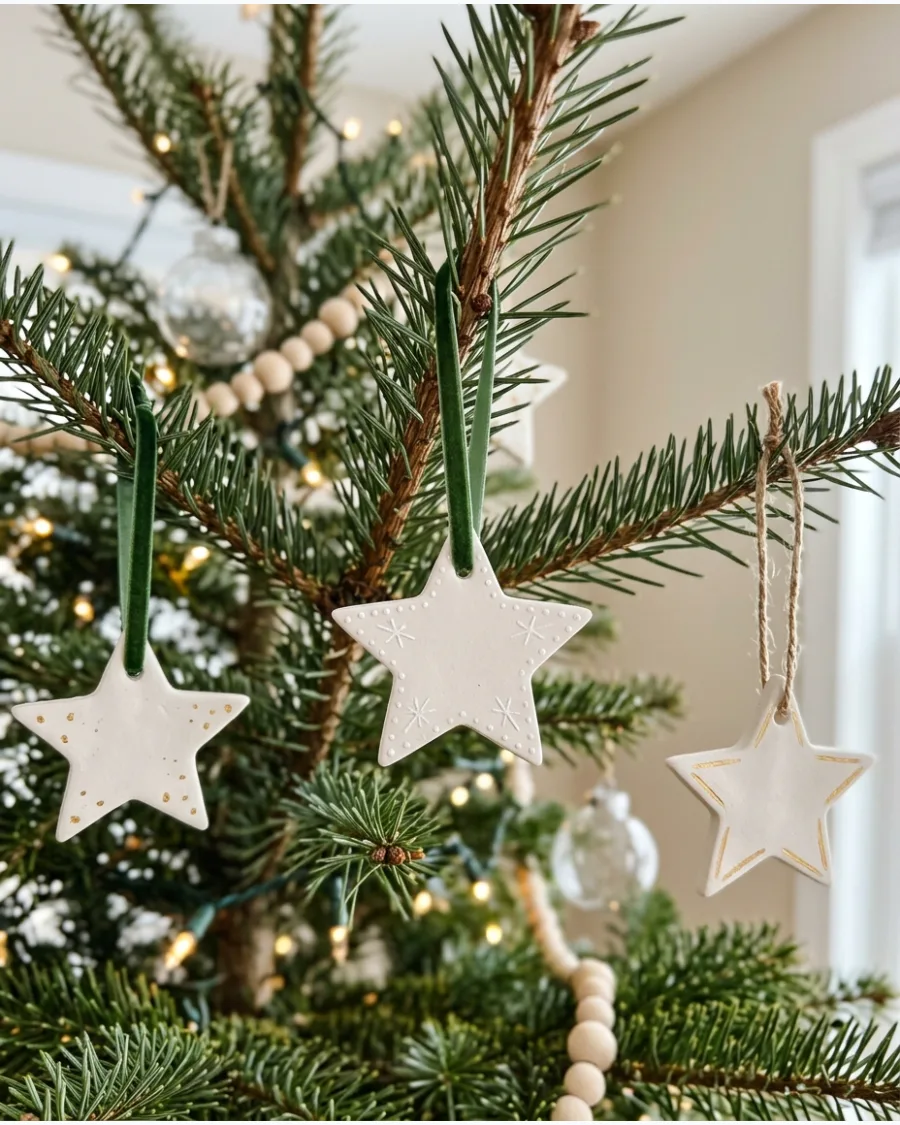
Roll out white air-dry clay to a consistent quarter-inch thickness before using a cookie cutter for crisp edges. Sand the edges lightly once dry to remove any rough spots from the cutting process.
Tie a thin velvet ribbon through the top hole to give these simple shapes an expensive, high-end finish. Most people skip sanding, but it makes the clay look like ceramic.
- $5-10 for a large tub of clay.
- Let shapes dry for 24-48 hours on a flat rack to prevent curling.
- Use a straw to punch perfectly round hanging holes before the clay sets.
Quick win: Use a damp finger to smooth out any cracks in the clay while it is still wet.
2. Salt Dough Christmas Ornaments
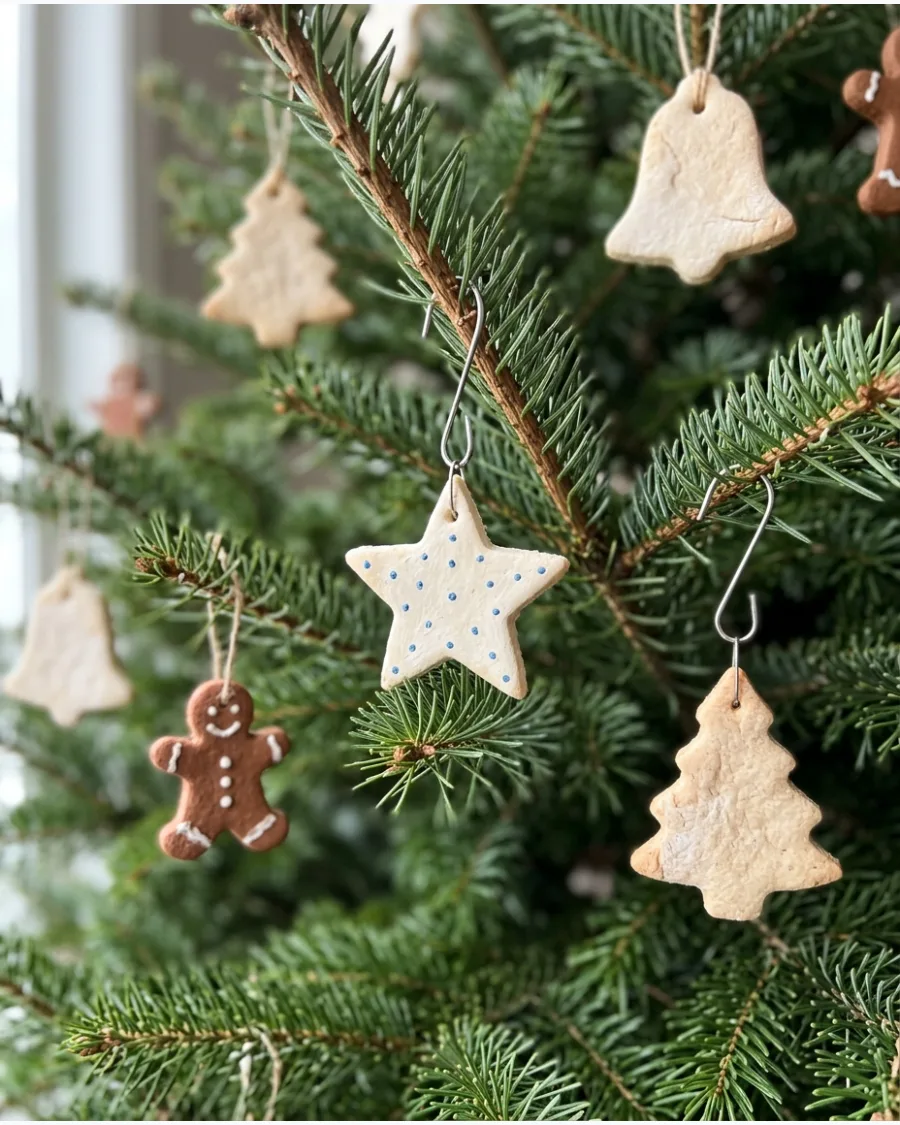
Mix flour, salt, and water to create a durable dough that holds fine detail from traditional cookie cutters. Bake the shapes at a low temperature to ensure they dry completely without bubbling or browning.
Seal the finished pieces with a clear matte spray to prevent moisture from softening the dough over time. Leaving them unpainted offers a warm, neutral look that fits any tree style.
- Pantry staples cost under $2 for a full batch.
- Bake at 200 degrees Fahrenheit for several hours until completely hard.
- Store in a dry, airtight container to reuse them for years.
Best shortcut: Add a teaspoon of cinnamon to the dough for a natural brown color and a subtle holiday scent.
3. Painted Wood Slice Ornaments
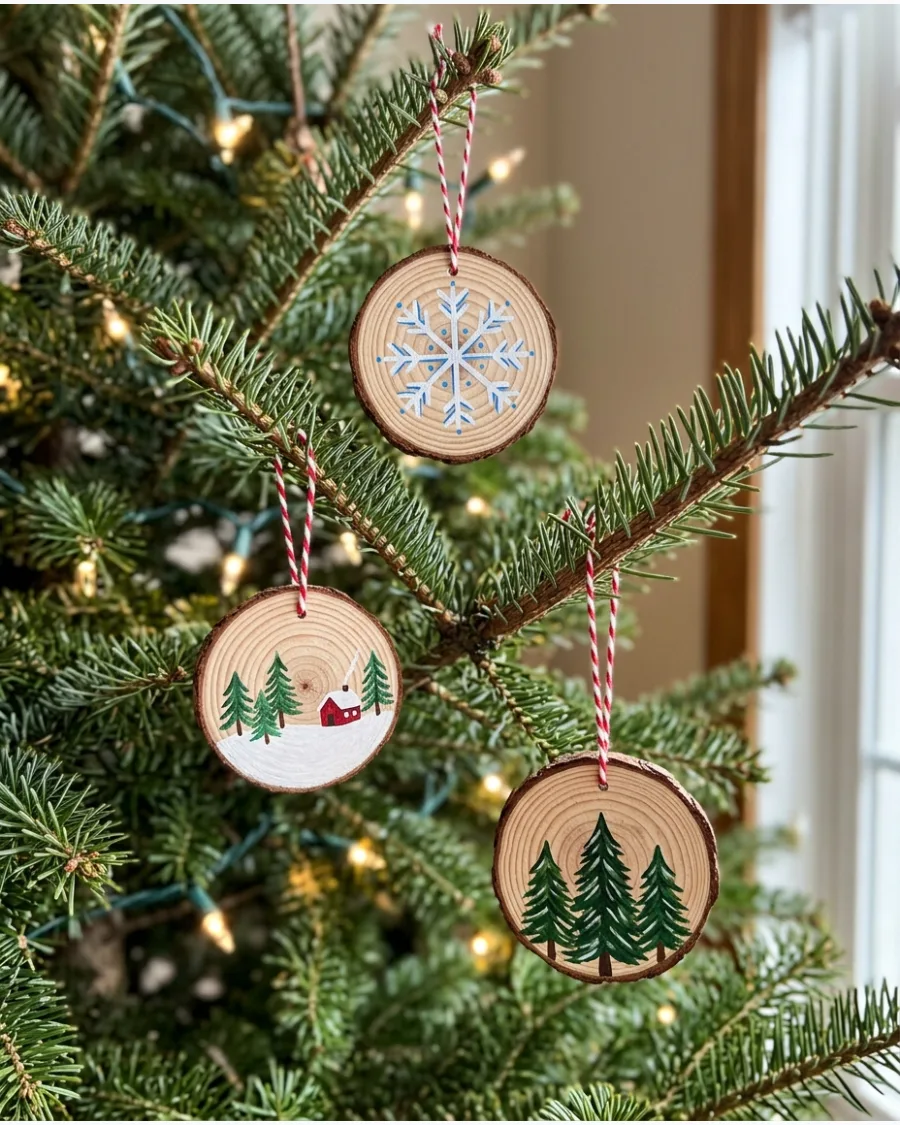
Select pre-drilled wood slices with intact bark to provide a natural frame for your artwork. Use acrylic paint pens instead of brushes to get better control when drawing fine snowflake lines or tiny winter houses.
Leave the outer ring of the wood exposed to highlight the natural texture and growth rings. This contrast between the raw wood and the paint makes the ornament feel modern rather than rustic.
- $12 for a pack of 20 pre-drilled slices.
- Use paint pens for better precision on the textured surface.
- Apply a thin coat of wood sealer if you plan to use these outdoors.
Most people skip this: Lightly sand the surface of the wood slice before painting to prevent the ink from bleeding into the grain.
4. Clear Baubles Filled With Ribbon
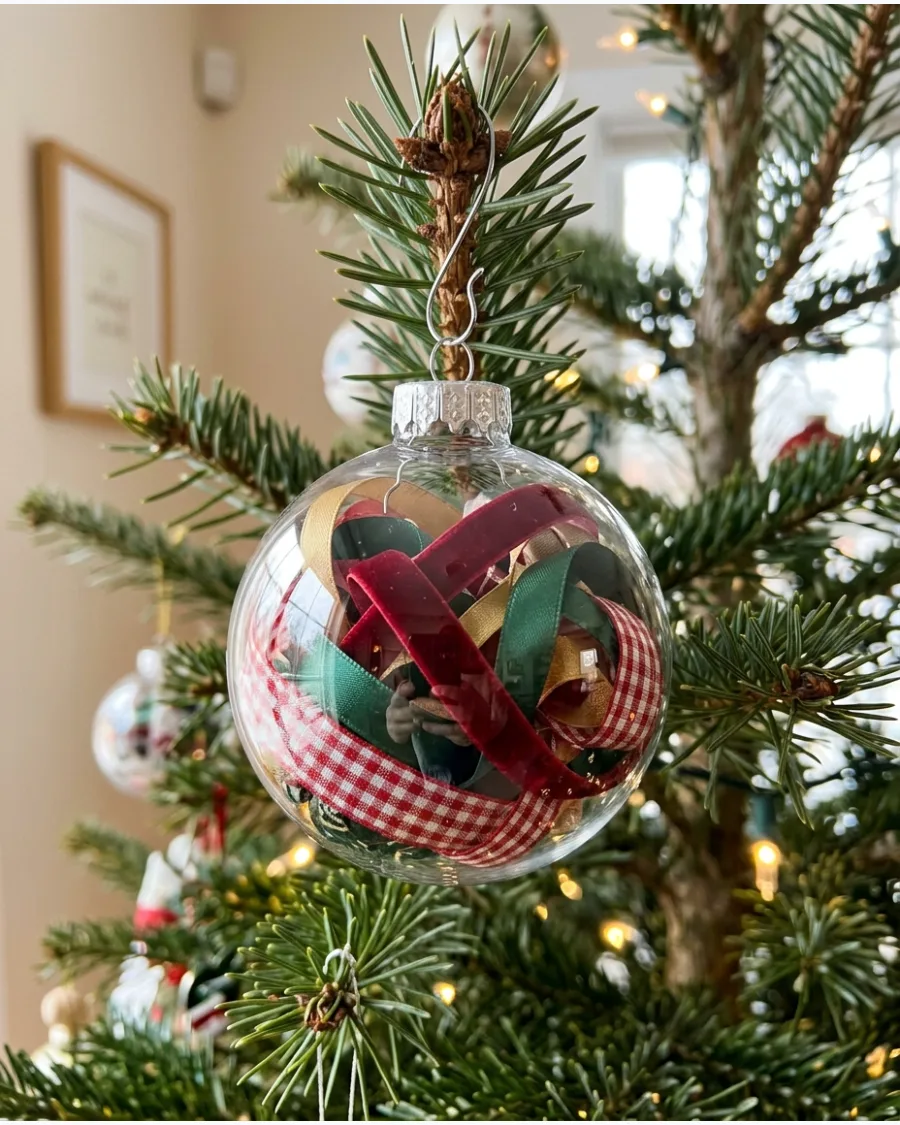
Remove the metal cap of a clear glass or plastic ornament and stuff it with lengths of high-quality ribbon. Use a chopstick to push the ribbon around until it fills the space evenly without looking cramped.
Choose a mix of textures like velvet and sheer organza to create visual depth inside the sphere. This is the fastest way to update old ornaments without using messy glue or paint.
- $1 per ornament plus ribbon scraps.
- Takes less than two minutes per ornament to assemble.
- Swap the ribbon colors every year to match a new holiday theme.
Quick win: Use extra-wide ribbon for a bold, solid block of color or thin twine for a more delicate, airy look.
5. Mini Ribbon Bow Ornaments
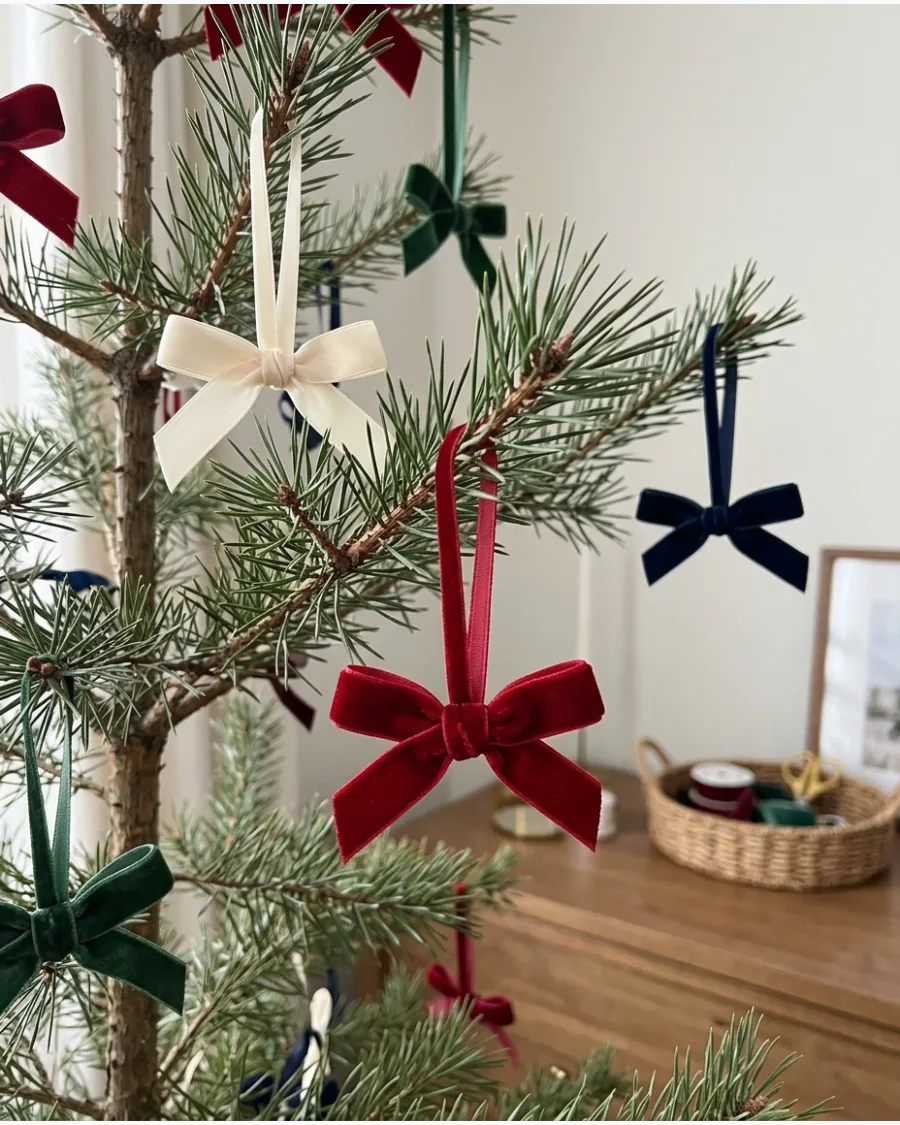
Cut velvet ribbon into six-inch strips and tie them into classic, floppy bows with long tails. Attach a small wire hook or a loop of thread to the back of the knot so the bow sits flush against the branch.
Steam the ribbon tails after tying to ensure they hang straight and look polished. These add a soft, feminine touch that fills large gaps between branches beautifully.
- $5 for a spool of ribbon.
- No tools required other than sharp fabric scissors.
- Use wired ribbon if you want the loops to stay perfectly puffed.
Best shortcut: Use a tiny drop of clear nail polish on the cut ends of the ribbon to prevent fraying.
6. Beaded Candy Cane Ornaments
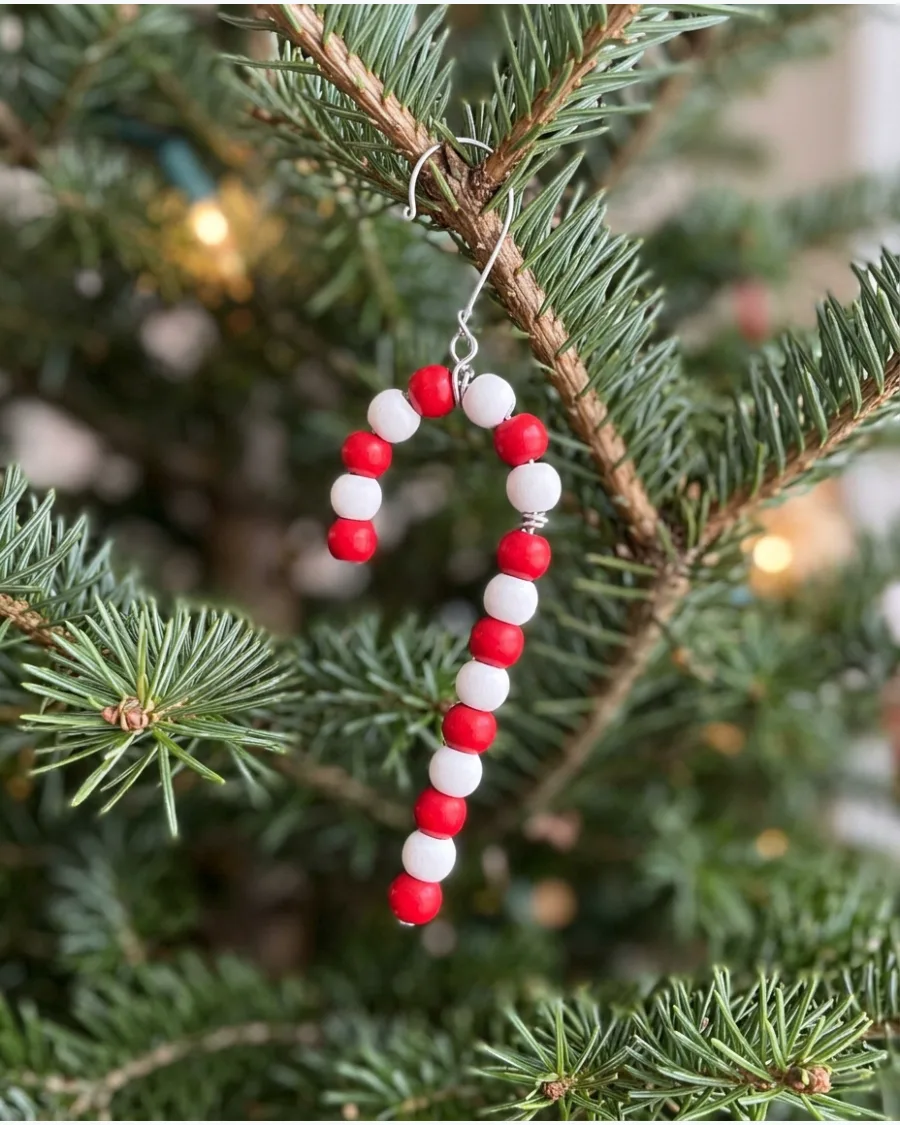
Slide alternating red and white wooden beads onto a piece of 20-gauge floral wire. Curve the top of the wire into a hook shape and secure the ends by looping the wire back through the last bead.
Use matte-finished beads rather than glossy plastic to give the candy canes a more sophisticated, craft-room feel. These are sturdy enough for kids to handle without breaking.
- $8 for a large bag of mixed beads.
- Takes 5 minutes to assemble.
- Adjust the size by using larger beads or longer wire sections.
Quick win: Tuck the sharp wire ends back into the bead holes using needle-nose pliers to keep them safe.
7. Mini Pom-Pom Wreath Ornaments
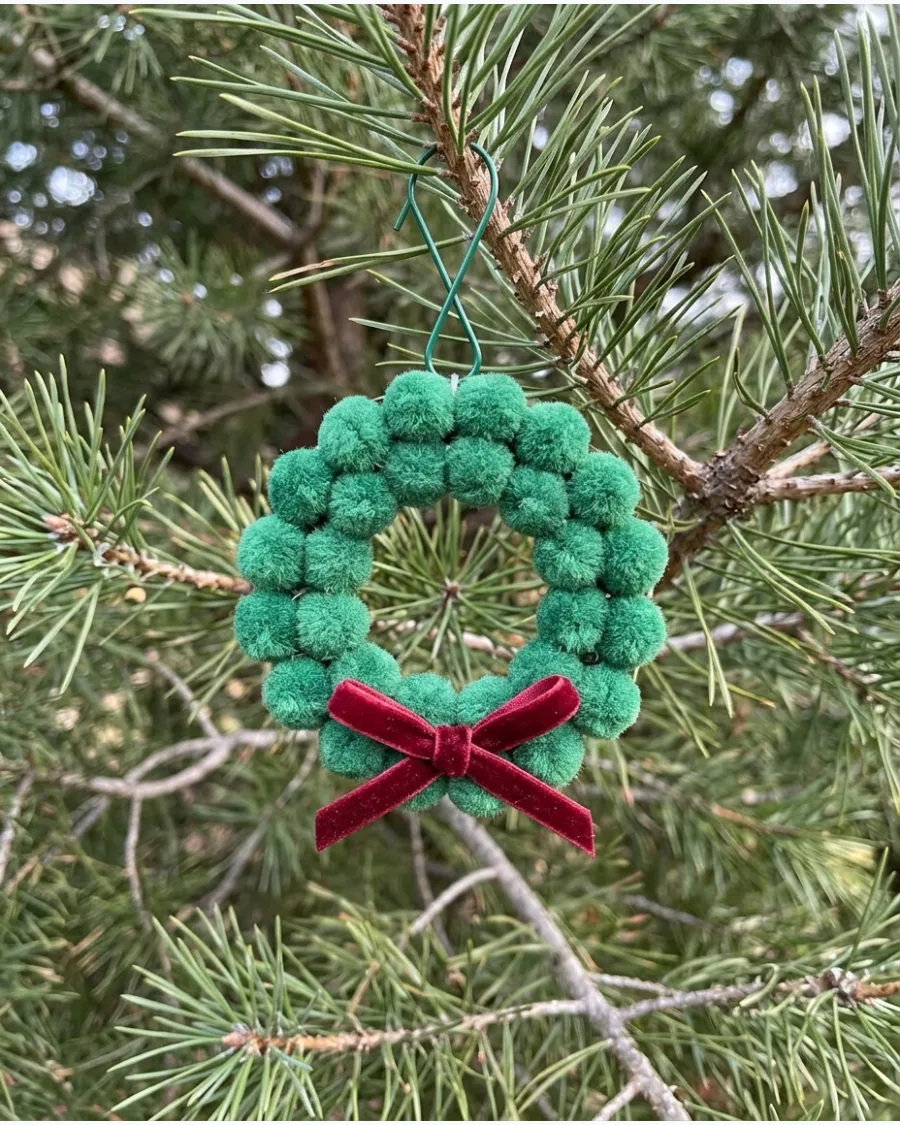
Use a small wooden ring or a circle cut from cardboard as a sturdy base for the wreath. Apply hot glue to small green pom-poms and pack them tightly together to hide the base completely.
Add a single tiny red bow at the bottom to provide a focal point and a pop of traditional color. The fuzzy texture of the pom-poms provides a nice contrast to the sharp needles of a real tree.
- $10 for a bulk pack of pom-poms and rings.
- Use low-temp hot glue to avoid melting the pom-pom fibers.
- Make a set of ten to use as consistent fillers across the whole tree.
Most people skip this: Use varying shades of green pom-poms in the same wreath to create a more realistic, dimensional look.
8. Wooden Bead Snowflake Ornaments
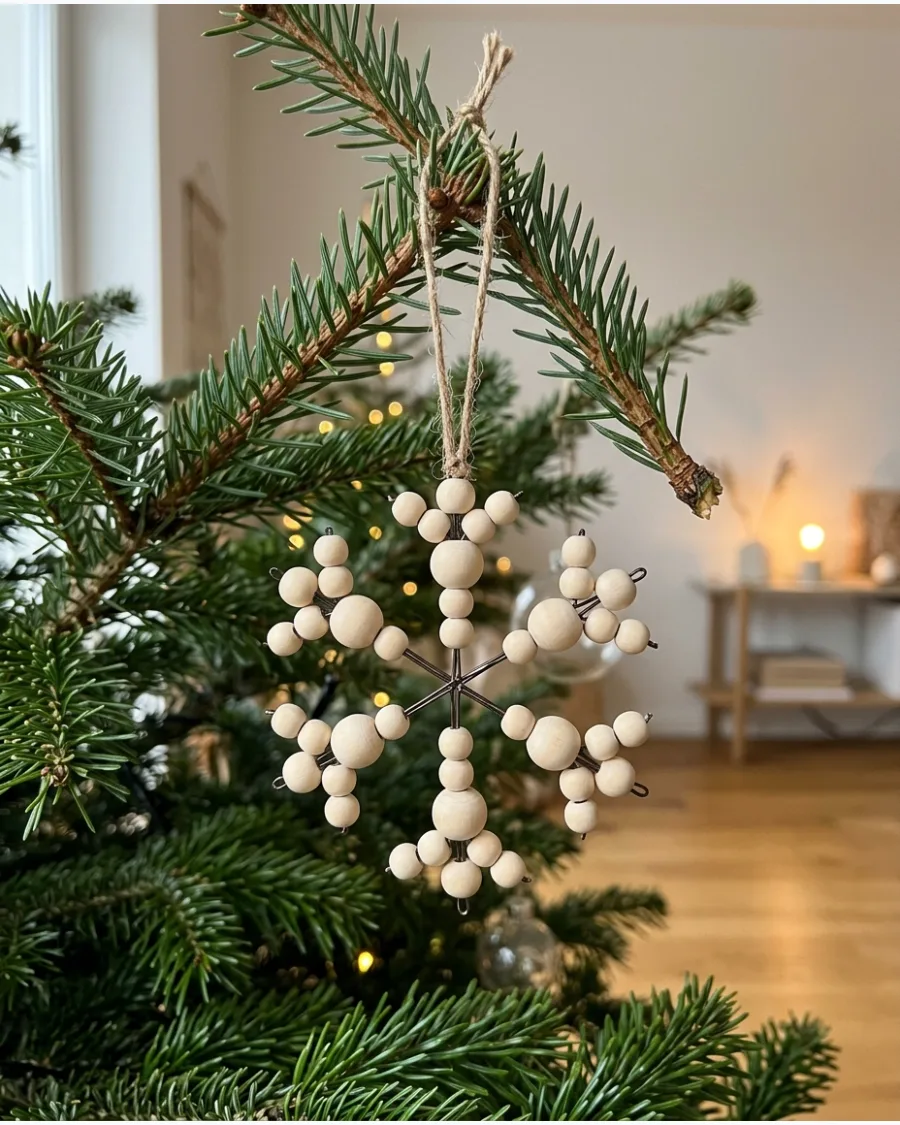
Thread natural wooden beads onto six pieces of wire and twist them together at the center to form a starburst. Vary the sizes of the beads, placing the largest ones toward the center and the smallest at the tips.
Keep the wood unpainted to maintain a clean, Scandinavian aesthetic that works with neutral decor. These look much more expensive than they are because of the intricate geometric pattern.
- $15 for a multi-size bead kit.
- Requires wire cutters and pliers.
- Store them flat between layers of tissue paper to prevent the wire from bending.
Best shortcut: Use white floral wire instead of silver so the structure blends in with the beads.
AIR-DRY CLAY AND DOUGH ORNAMENT IDEAS
9. Botanical Imprint Clay Ornaments
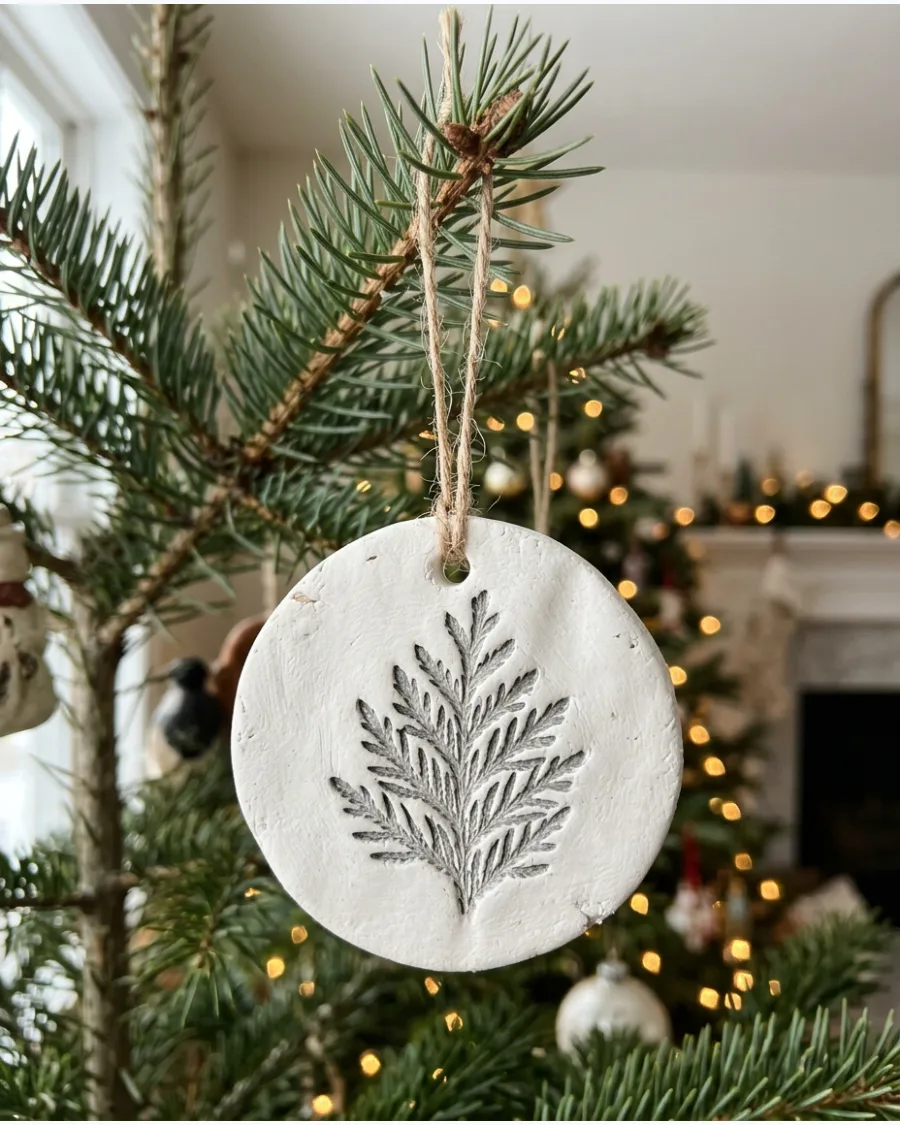
Press a fresh sprig of evergreen or a firm leaf into wet clay to leave a detailed fossil-like impression. Carefully lift the plant material out to reveal the veins and texture before the clay begins to skin over.
Rub a tiny amount of gold wax or watered-down paint into the indentations to make the botanical details pop. This method captures the beauty of the garden in a permanent form.
- Free greenery can be sourced from your own yard.
- Work quickly so the clay doesn't dry before you finish the imprinting.
- Use a rolling pin to ensure even pressure across the plant sprig.
Quick win: Use dried herbs like rosemary for a textured look that also smells great while you work.
10. Stamped Clay Word Ornaments

Use a small alphabet stamp set to press holiday greetings or names into the center of a clay disc. Ensure the stamps are clean and pressed with even pressure to avoid ghost lines from the edges of the stamp blocks.
Fill the letter grooves with black ink or paint to make the words legible from a distance. These personalized pieces make excellent gift toppers that double as ornaments.
- $10 for a basic alphabet stamp set.
- Wipe stamps with a damp cloth between uses to keep the clay white.
- Make a personalized ornament for every guest at a holiday dinner.
Most people skip this: Use a ruler as a guide to keep your stamped letters in a perfectly straight line.
11. Personalized Initial Clay Ornaments
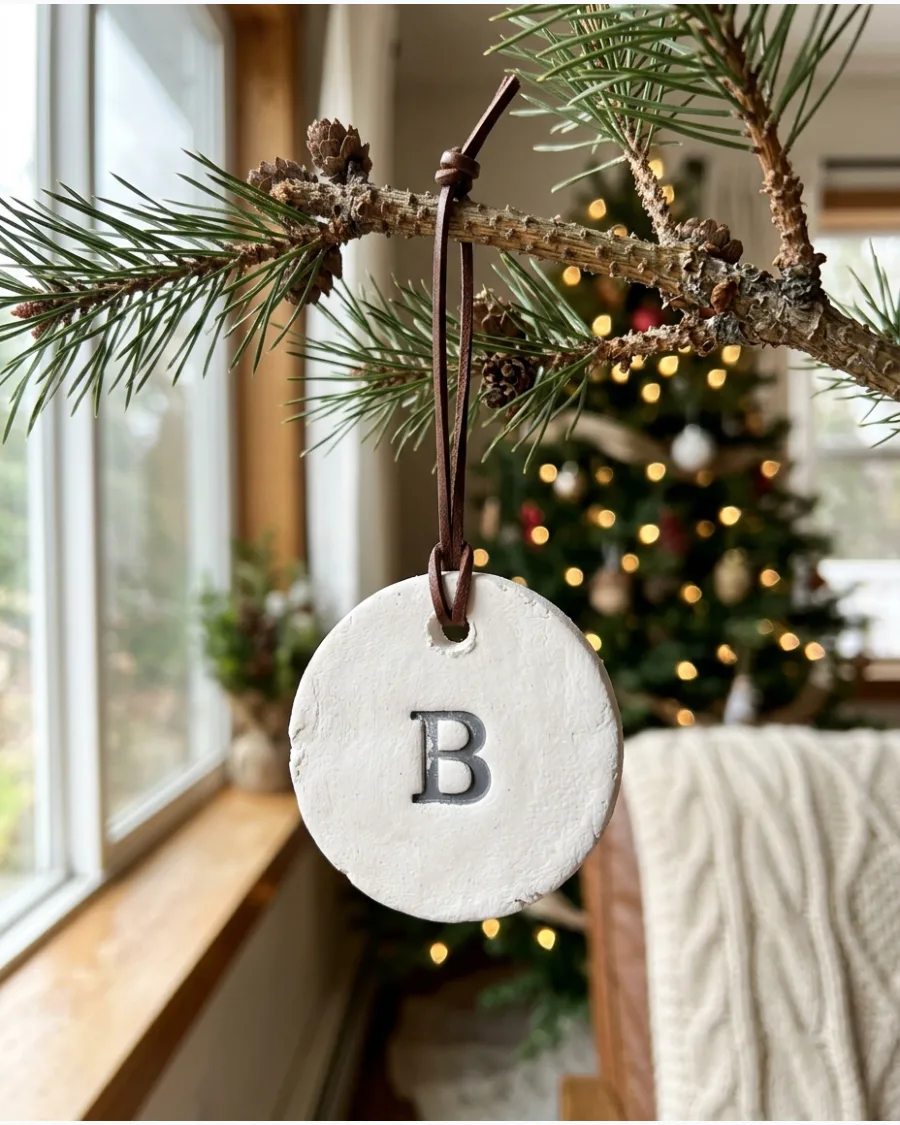
Use a small round cookie cutter to create uniform clay circles from white air-dry clay. Stamp a single uppercase letter into the center of each disc while the clay is still wet for a clean, professional look.
Thread a thin leather cord through a pre-drilled hole to give these simple medallions a high-end finish. A set of these works well as a personalized gift topper or a dedicated family tree section.
- Costs under ten dollars for a large pack of air-dry clay.
- Poke the hanging hole with a drinking straw before the clay dries.
- Use a set of metal alphabet stamps for perfectly straight letters.
Quick win: Lightly sand the edges with a fine-grit sponge once the clay is dry to remove any rough bits.
12. Gingerbread-Style Clay Ornaments
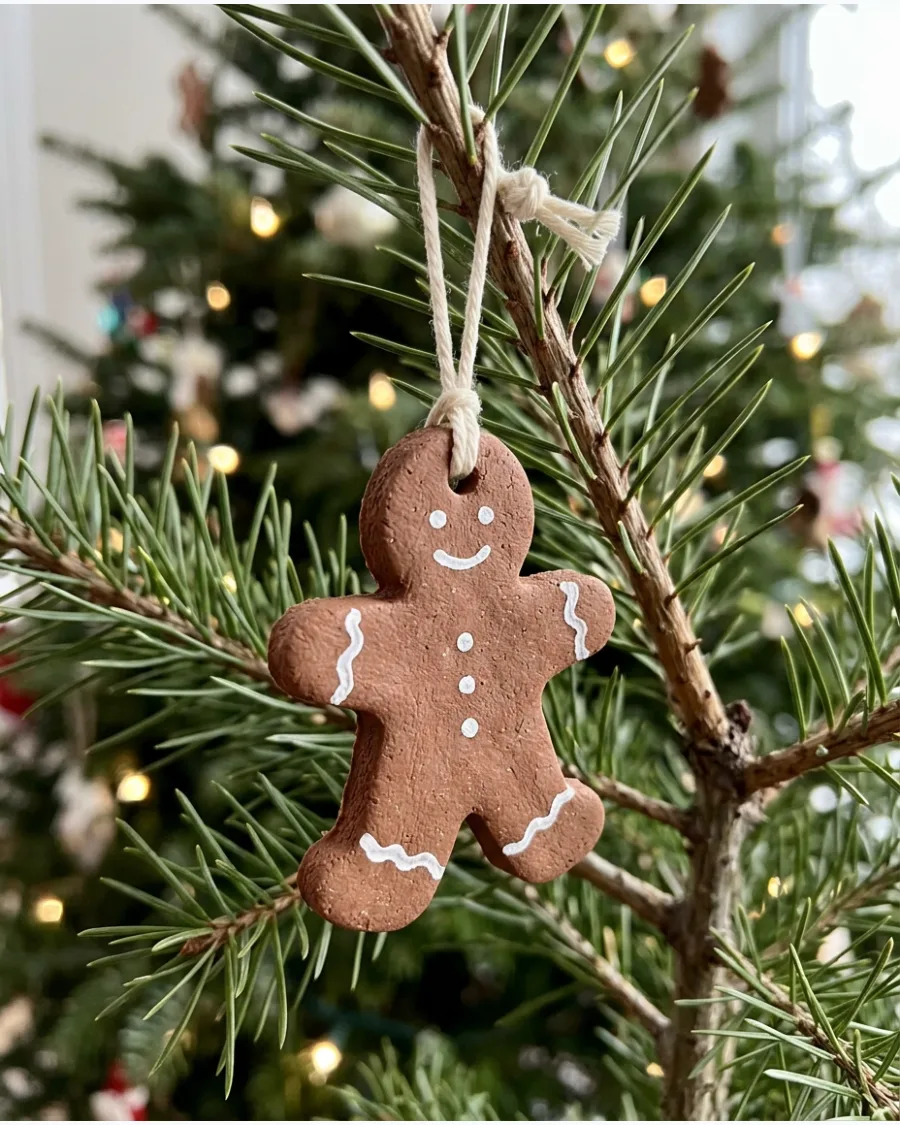
Brown air-dry clay offers the warm look of cookies without the risk of attracting pests or crumbling over time. Use a white paint pen to draw dots, squiggles, and outlines that mimic traditional royal icing.
Allow the clay to dry completely for at least 24 hours before adding the white paint details. These look best when you mix several shapes like stars, hearts, and little people.
- Requires a full day of drying time before decorating.
- Use a fine-tip acrylic paint pen for the best control over the design.
- Store in a rigid container to prevent the clay limbs from snapping during the off-season.
Best shortcut: If you can't find brown clay, mix a little burnt umber acrylic paint into white air-dry clay before molding.
13. Embossed Lace Clay Ornaments
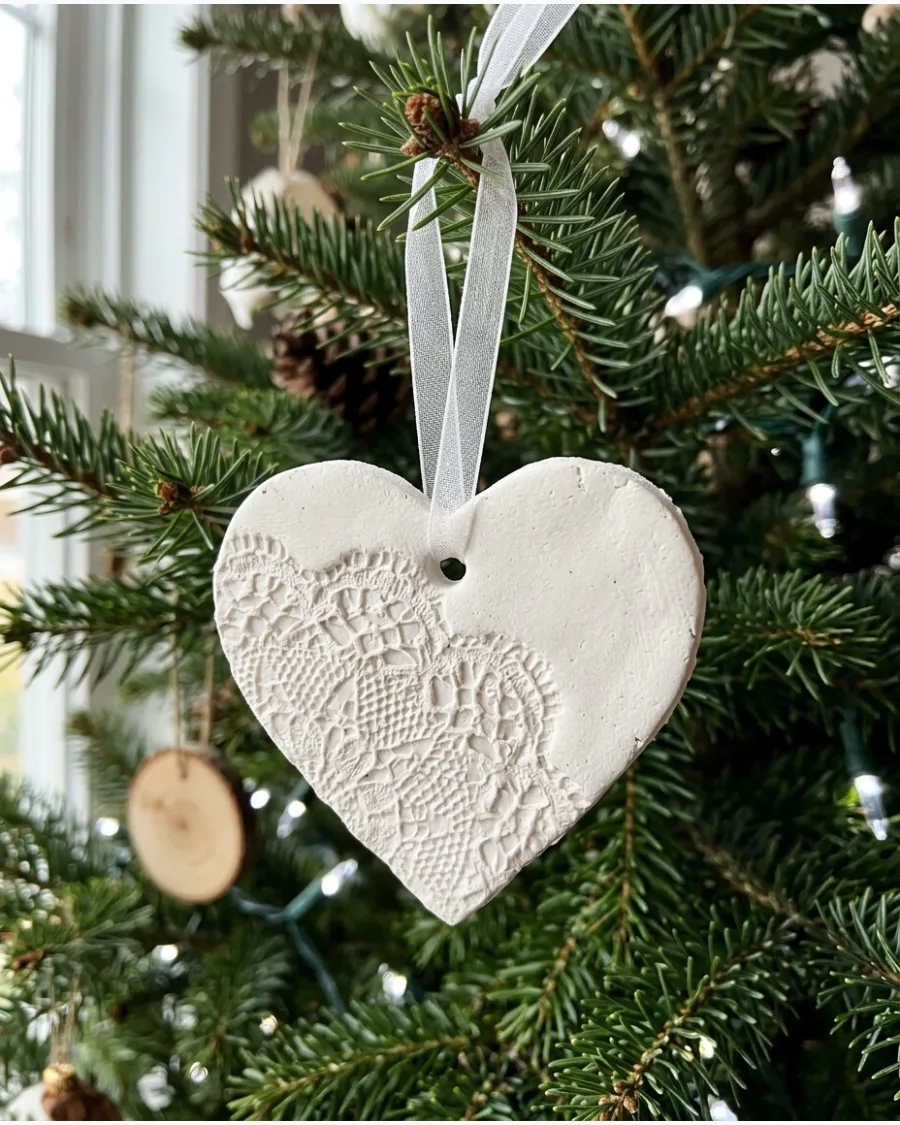
Pressing a piece of vintage lace or a textured doily into wet clay creates an intricate pattern that looks far more expensive than it is. Gently peel the fabric away to reveal the design, then use a cookie cutter to crop the best part of the pattern.
Choose lace with a thick, raised weave to ensure the impression is deep enough to catch the light. These ornaments add a soft, romantic texture to a tree filled with shiny glass bulbs.
- Works best with scrap lace or small crochet doilies.
- Use a rolling pin to apply even pressure over the fabric for a consistent depth.
- Leave the clay unpainted to highlight the delicate shadows created by the texture.
Most people skip this: Wipe the clay surface with a damp finger after cutting to smooth out the fuzz left by the cookie cutter.
14. Gold-Edged Clay Ornaments
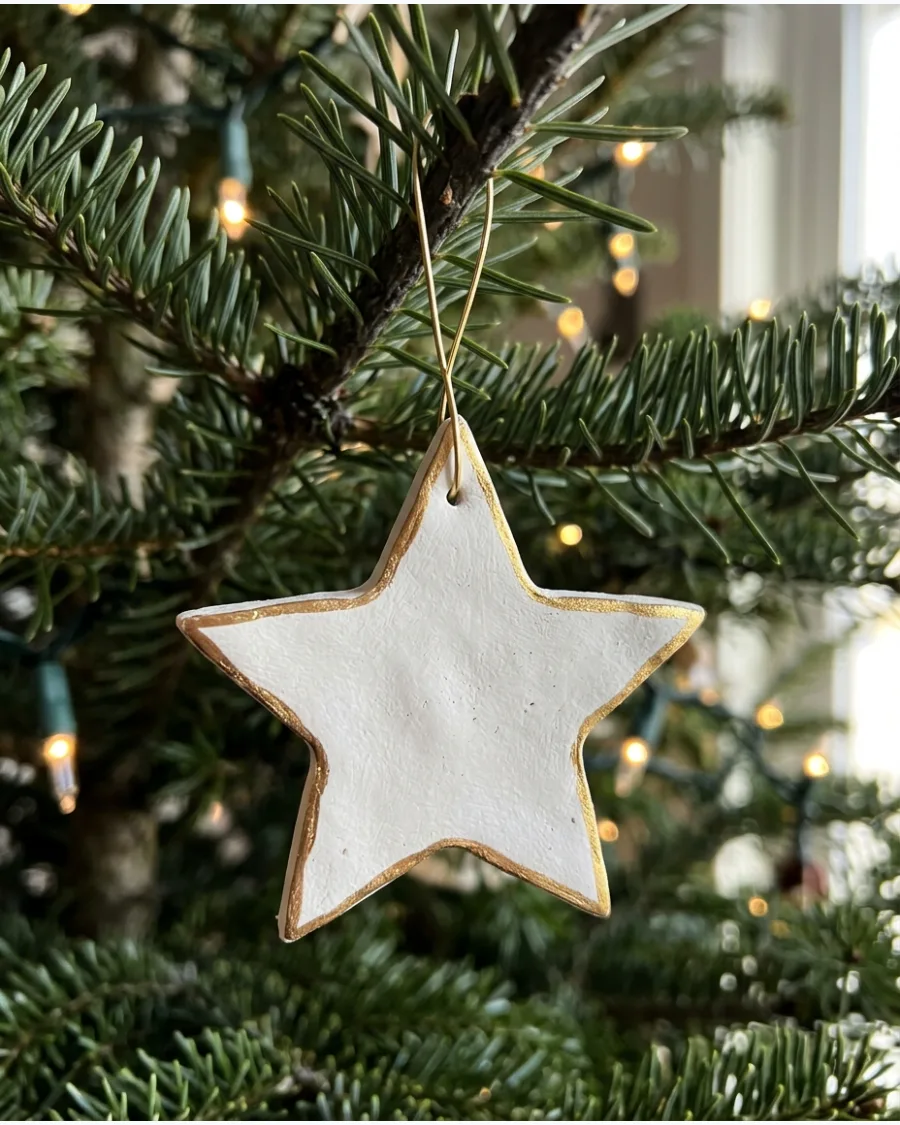
Minimalism works well for holiday decor when you add a touch of metallic shine. Cut simple geometric shapes from white clay and, once dry, use a small brush to apply liquid gold leaf or metallic paint only to the very edge.
Keep the paint on the thin side of the rim to maintain a clean, modern aesthetic. This small detail makes a basic handmade project look like a boutique find.
- Costs only pennies per ornament after the initial paint purchase.
- Use a steady hand or a flat-edged brush for the cleanest gold trim.
- Looks most effective on a tree decorated with warm white lights.
Quick win: Use a metallic gold permanent marker instead of a brush for a faster, mess-free application.
15. Mini Clay Christmas Houses
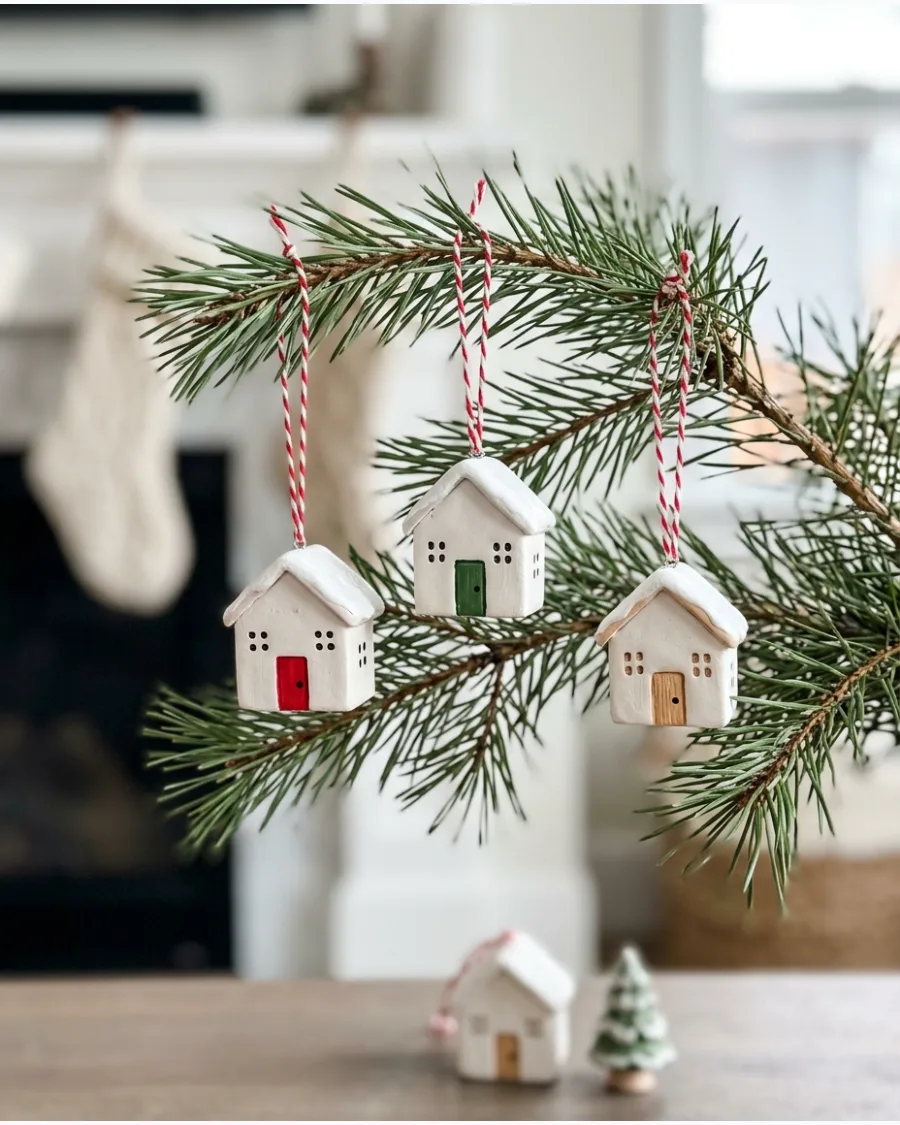
Cut simple house silhouettes with peaked roofs from a slab of rolled-out clay using a craft knife. You can keep them flat like cookies or join two pieces to make a 3D shape if you have extra time.
Poke two small holes near the roof peak to thread your hanging ribbon through so the house stays level. These look fantastic when grouped together on a single branch to create a floating village effect.
- Use a craft knife and a metal ruler for sharp, straight roof lines.
- Paint a small snowy roof line with white glitter glue for extra sparkle.
- Make various heights and widths to create a more interesting display.
Best shortcut: Use a small square of sandpaper to flatten the bottom edge so the houses can also stand on a mantel.
16. Terracotta Clay Star Ornaments
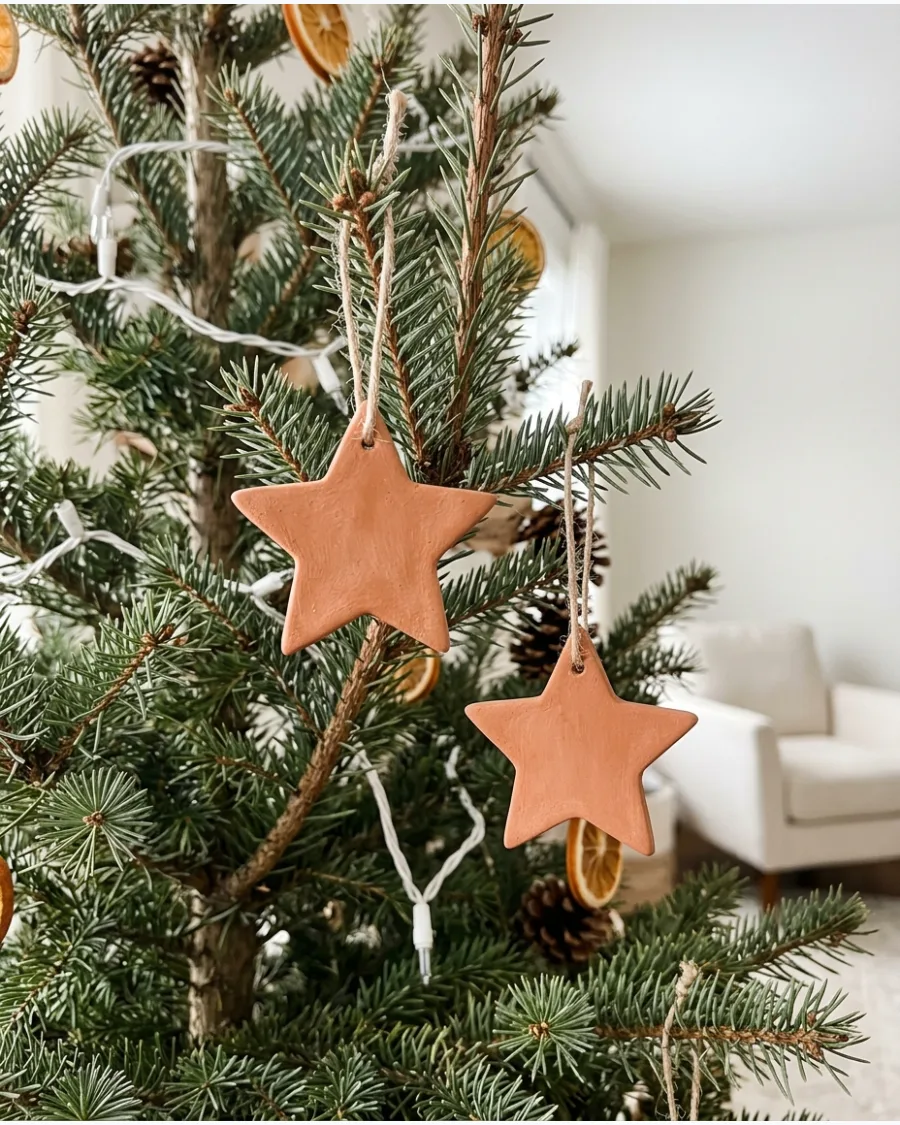
Terracotta clay provides a beautiful, earthy orange hue that contrasts perfectly with dark evergreen needles. Roll the clay out to a quarter-inch thickness and use a star-shaped cutter for a classic look.
Pair the warm clay tones with a simple jute twine hanger to lean into a natural, organic style. These are durable and offer a matte finish that does not compete with glossy ornaments.
- Air-dry terracotta clay is widely available and needs no kiln firing.
- Avoid painting these to let the natural clay color stand out.
- Great for a Scandinavian-style or neutral tree theme.
Most people skip this: Seal the terracotta with a matte spray if you live in a humid climate to prevent the clay from softening over time.
PAPER AND CARDBOARD CHRISTMAS ORNAMENTS
17. Folded Paper Christmas Tree Ornaments
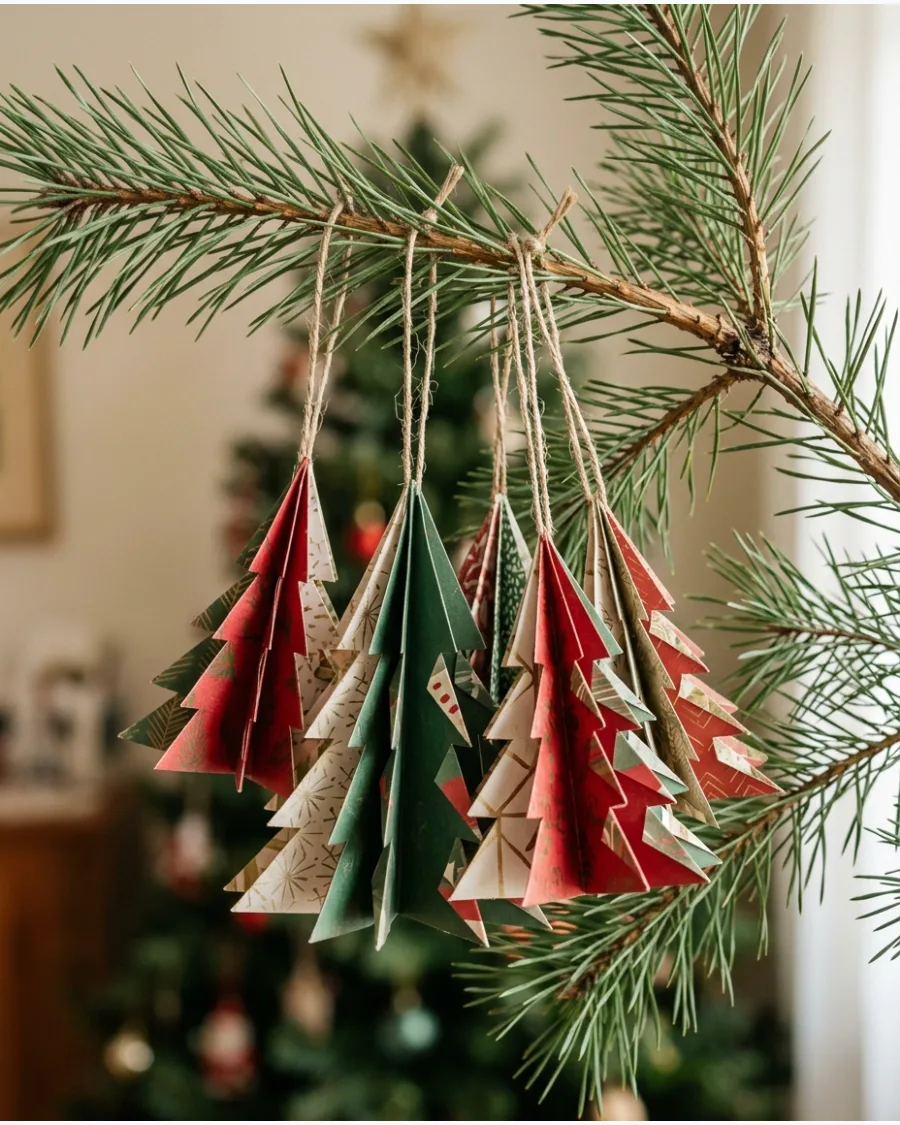
Use heavy cardstock or double-sided scrapbooking paper to create these three-dimensional trees. Fold multiple identical tree shapes in half and glue the backs together to create a dimensional fan effect.
Use a glue stick instead of liquid glue to prevent the paper from warping or wrinkling. These are so lightweight that they will not weigh down even the thinnest of branches.
- Use 65-pound cardstock for the best balance of flexibility and sturdiness.
- Takes about ten minutes per ornament once the shapes are cut.
- A great way to use up leftover holiday wrapping paper scraps.
Quick win: Use a bone folder or the edge of a credit card to get crisp, sharp creases on every fold.
18. Accordion Paper Star Ornaments
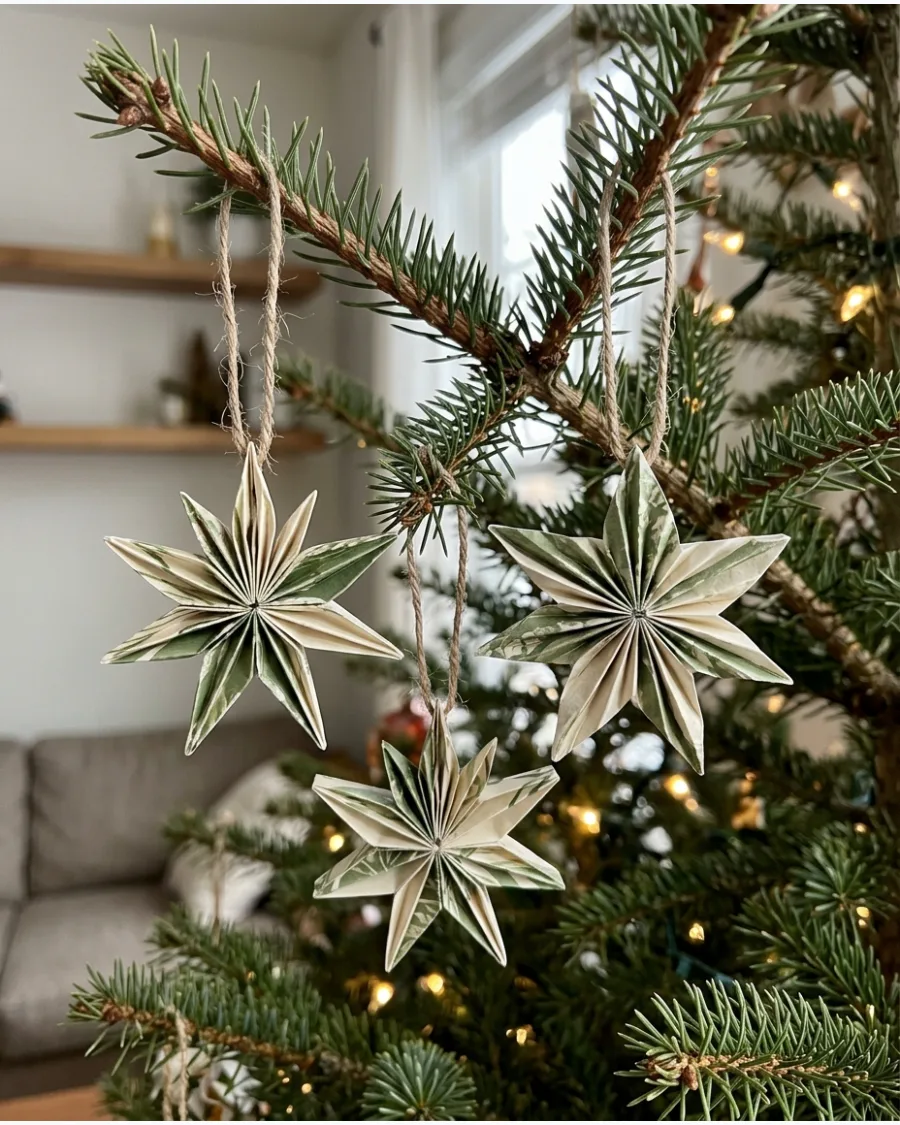
These stars are made by folding a long strip of paper back and forth like a fan and then joining the ends into a circle. Secure the center with a bit of wire or string before gluing the ends together to form the star shape.
Cut small notches into the folded edges before opening to create a snowflake look within the star. They provide a lot of visual impact for very little cost.
- Works best with lightweight paper or vellum rather than heavy cardstock.
- Use a hot glue gun to quickly and securely join the ends of the fan.
- Scale them up to six inches for a bold statement piece on a large tree.
Best shortcut: Use a paper trimmer with a scoring blade to pre-mark your fold lines for perfectly even pleats.
19. Honeycomb Paper Bauble Ornaments
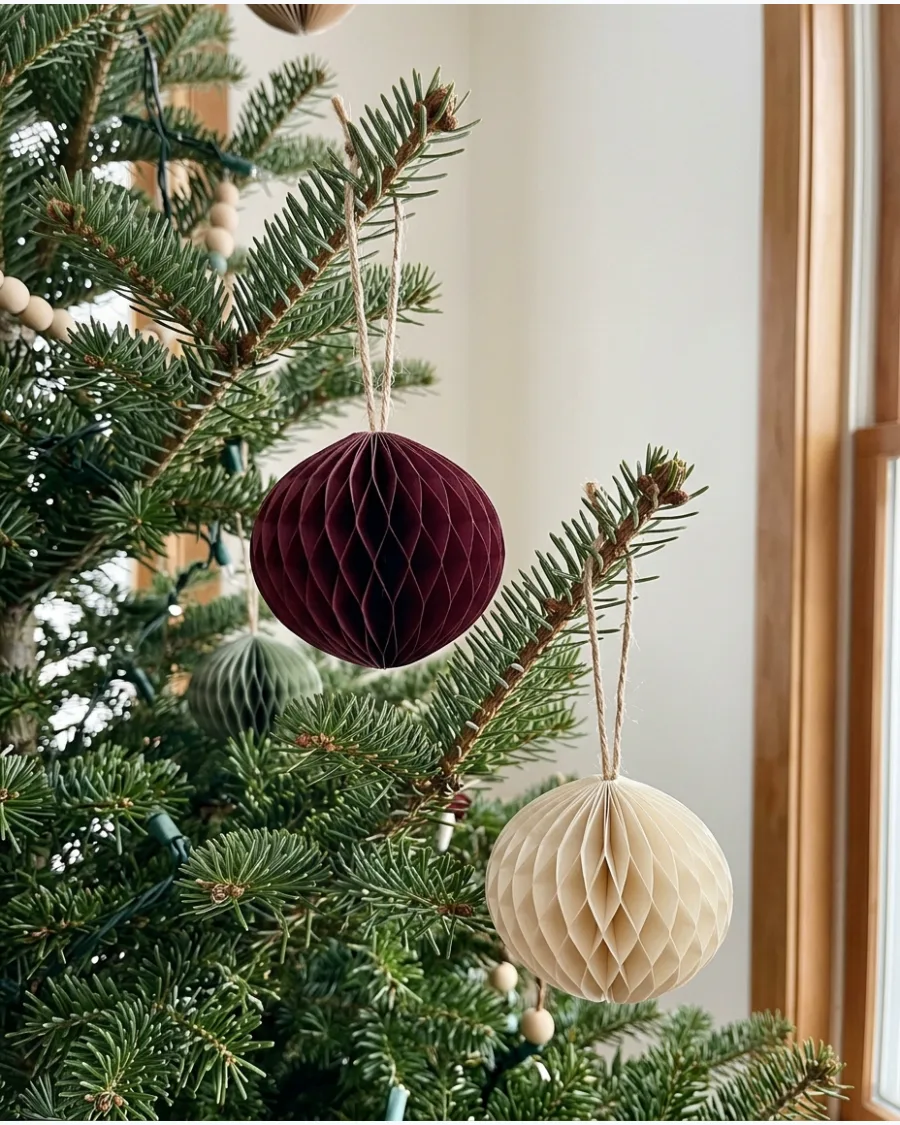
These ornaments look complex but are made by gluing together a stack of paper circles at specific alternating points.
When the stack is opened, it creates a delicate honeycomb lattice that looks store-bought. Use a rich, jewel-toned paper like navy or emerald to make these look sophisticated rather than craft-like. They fold flat for easy storage, which is a huge plus for small spaces.
- Requires 20 to 30 paper circles per bauble for a full look.
- Use a small dab of clear-drying craft glue for the lattice joints.
- Store them flat in an envelope after the holidays to save space.
Most people skip this: Use a circle punch to cut all your paper shapes at once to ensure they are perfectly identical.
20. Vintage Book Page Star Ornaments
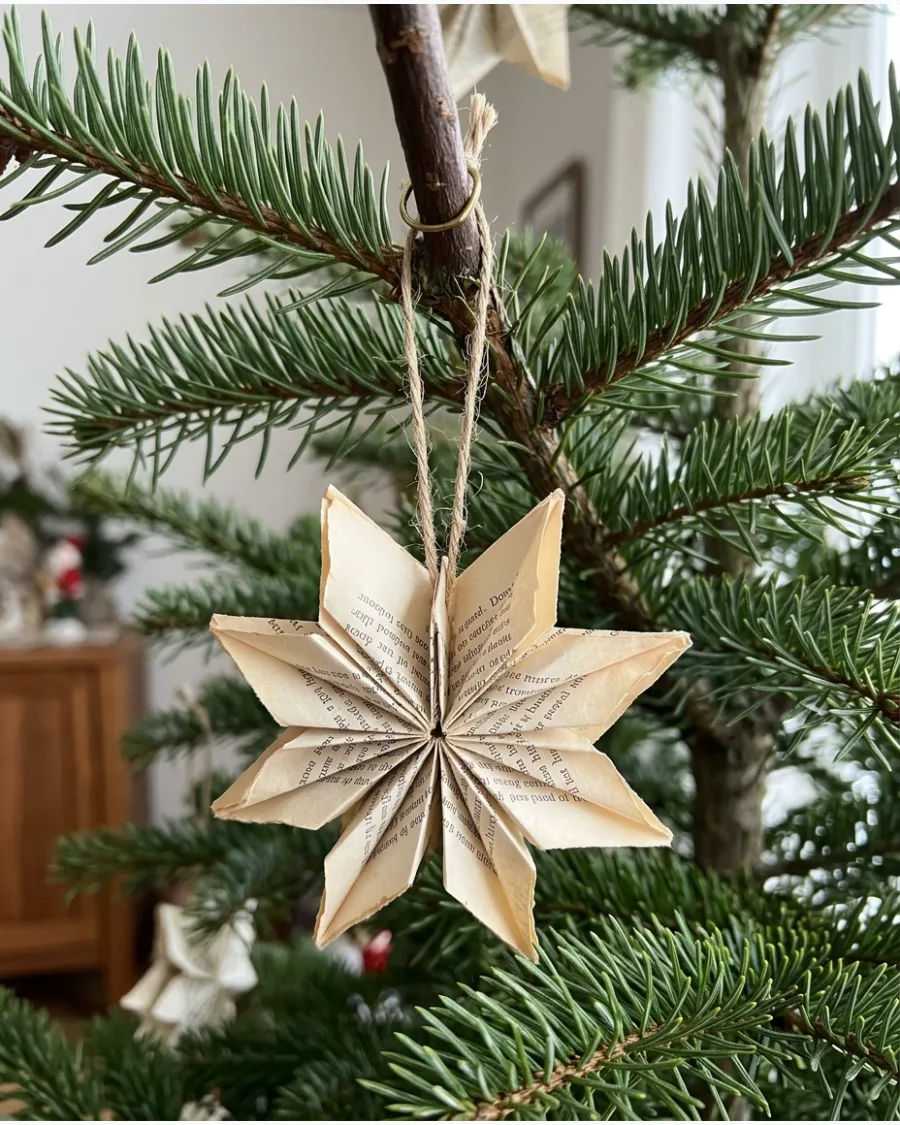
Old books that are falling apart find new life as nostalgic ornaments with a lot of character. Cut the pages into stars or roll them into small cones and glue them to a cardboard backing to create a burst effect.
The yellowed edges of old paper provide a built-in vintage color palette that looks great with gold accents. This is an eco-friendly project that adds a storytelling element to your decor.
- Source old books from thrift stores, library sales, or free bins.
- Lightly brush the edges with brown ink to emphasize the aged look.
- Mix with dried orange slices for a classic, old-world holiday feel.
Quick win: Look for pages with interesting headers or illustrations to make the center of the star a focal point.
21. Paper Snowflake Ornaments
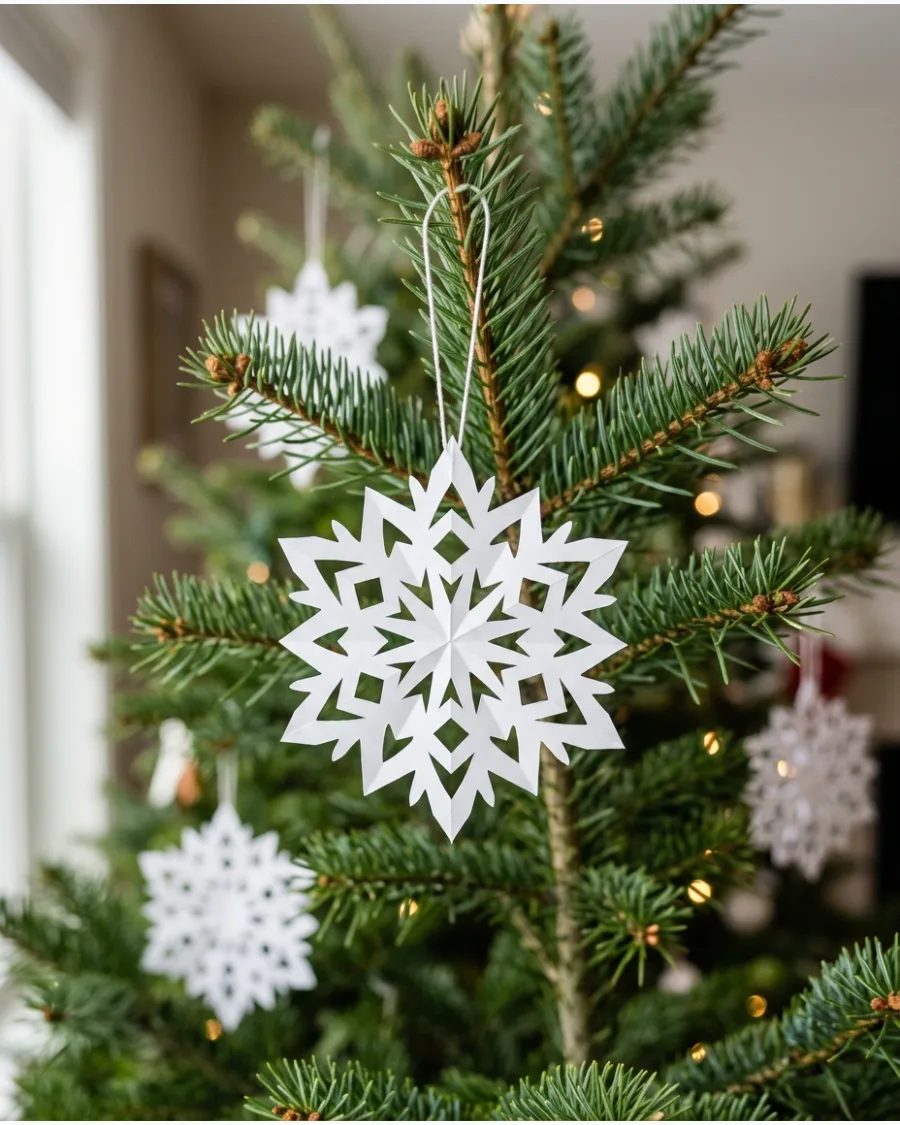
Use classic folding and cutting techniques to create unique patterns. Stiffer cardstock helps these keep their shape better than thin printer paper.
Hang several at different depths in the branches to create a sense of snowfall within the tree. These look best when you vary the size and pattern of every single one.
- White or cream cardstock, scissors, and thread.
- Fold paper into triangles and snip small geometric shapes along the edges.
- Use silver glitter glue on the edges to catch the light.
Quick win: Iron the snowflakes on a low setting after cutting to remove the fold creases for a flatter, more professional look.
22. Rolled Paper Cone Tree Ornaments
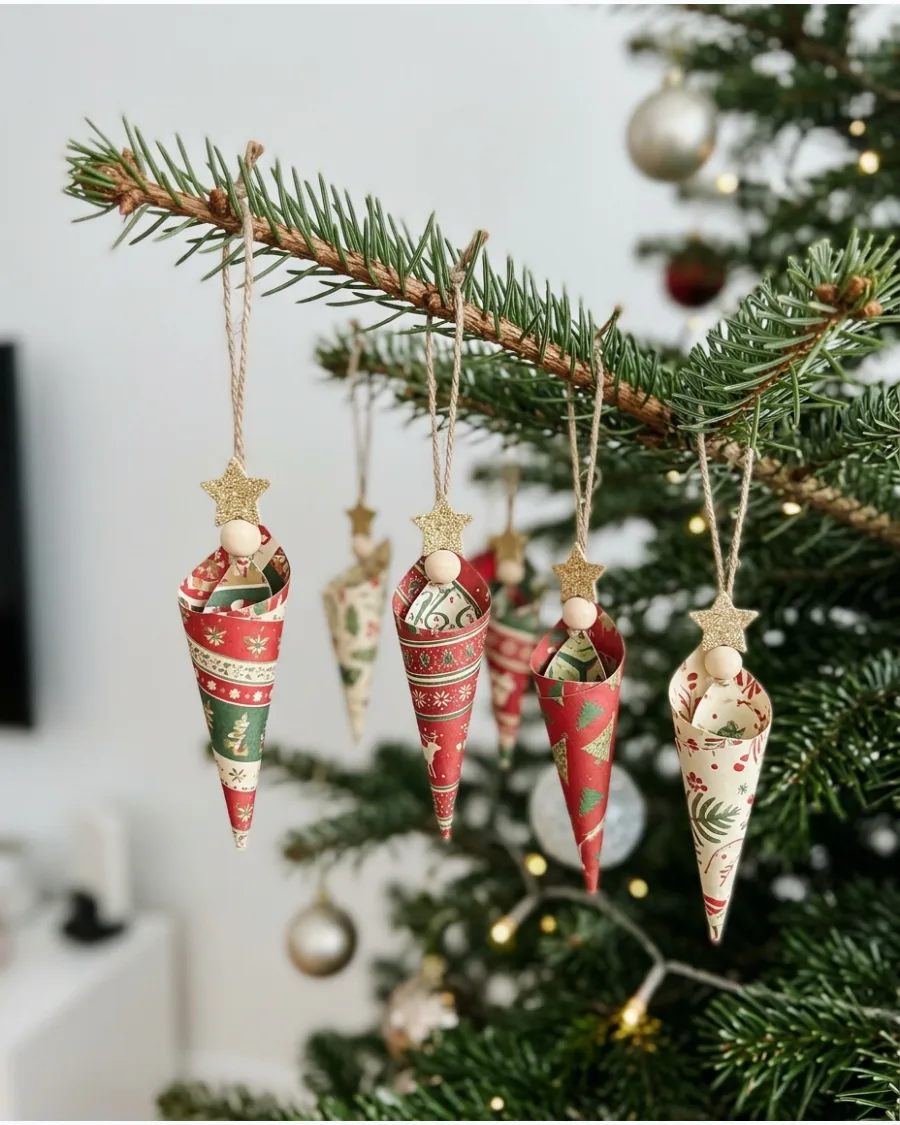
These simple cones mimic modern minimalist trees and take only minutes to assemble. Secure the seam with a thin line of hot glue to prevent the paper from unrolling over time.
Top each cone with a single natural wood bead to add a touch of organic texture. Patterned scrapbooking paper works well here because it usually has a nice weight.
- Patterned paper, hot glue, and wooden beads.
- Roll a paper semicircle into a cone and glue the overlap.
- Mix different heights and patterns for a curated forest look.
Best shortcut: Use a circular object like a bowl to trace your initial shapes so the cones have a perfectly flat base.
23. Quilled Paper Snowflake Ornaments
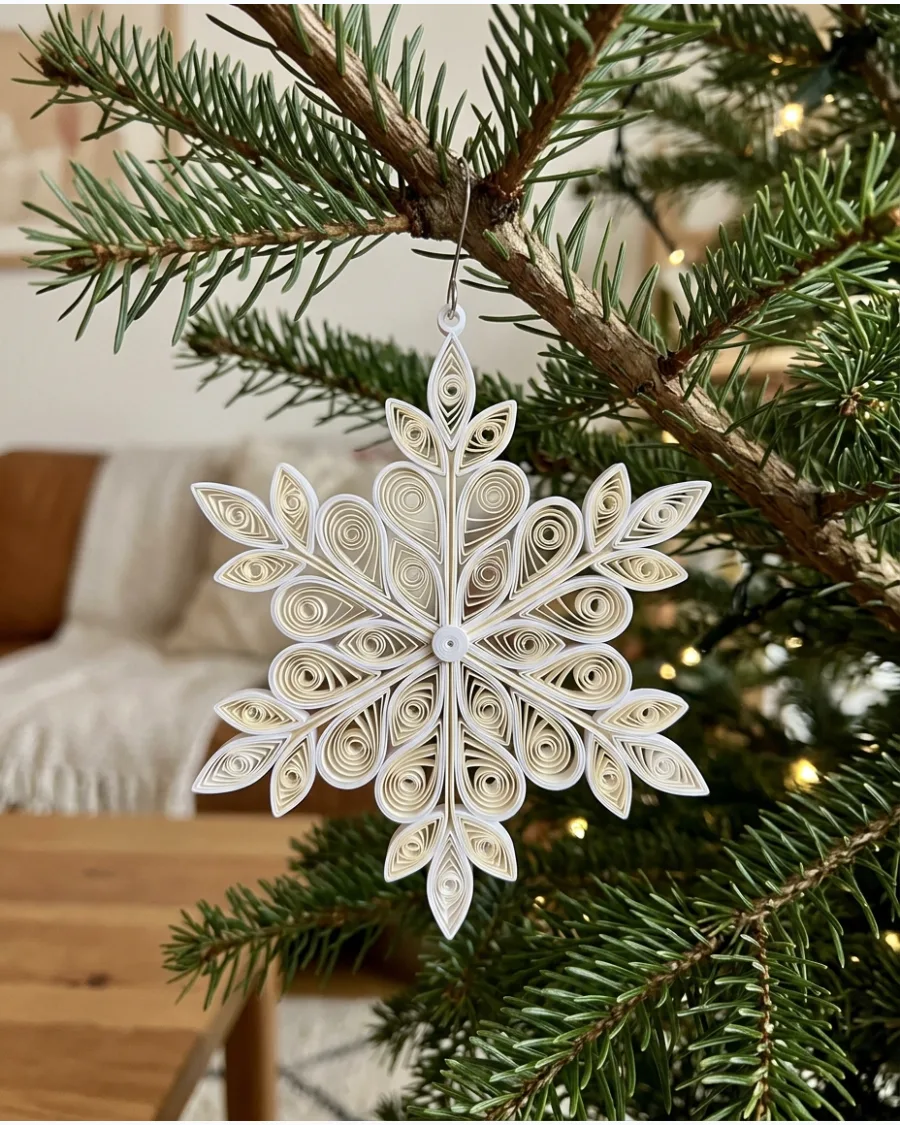
Quilling involves rolling thin strips of paper into coils that you then pinch into shapes like teardrops or diamonds. Glue these shapes together in a radial pattern to build a complex snowflake structure.
Apply a light coat of clear-drying spray sealant to make the delicate paper coils more durable for storage. The shadows created by the open paper loops add beautiful depth to the tree.
- 1/8-inch paper strips, quilling tool, and clear glue.
- Roll strips into tight circles, release slightly, and glue the end before pinching into shapes.
- Use metallic-edged paper strips for a subtle sparkle without the mess of loose glitter.
Most people skip this: Use a toothpick to apply tiny dots of glue between the paper coils so the adhesive doesn't overflow and ruin the texture.
24. Recycled Christmas Card Ornaments
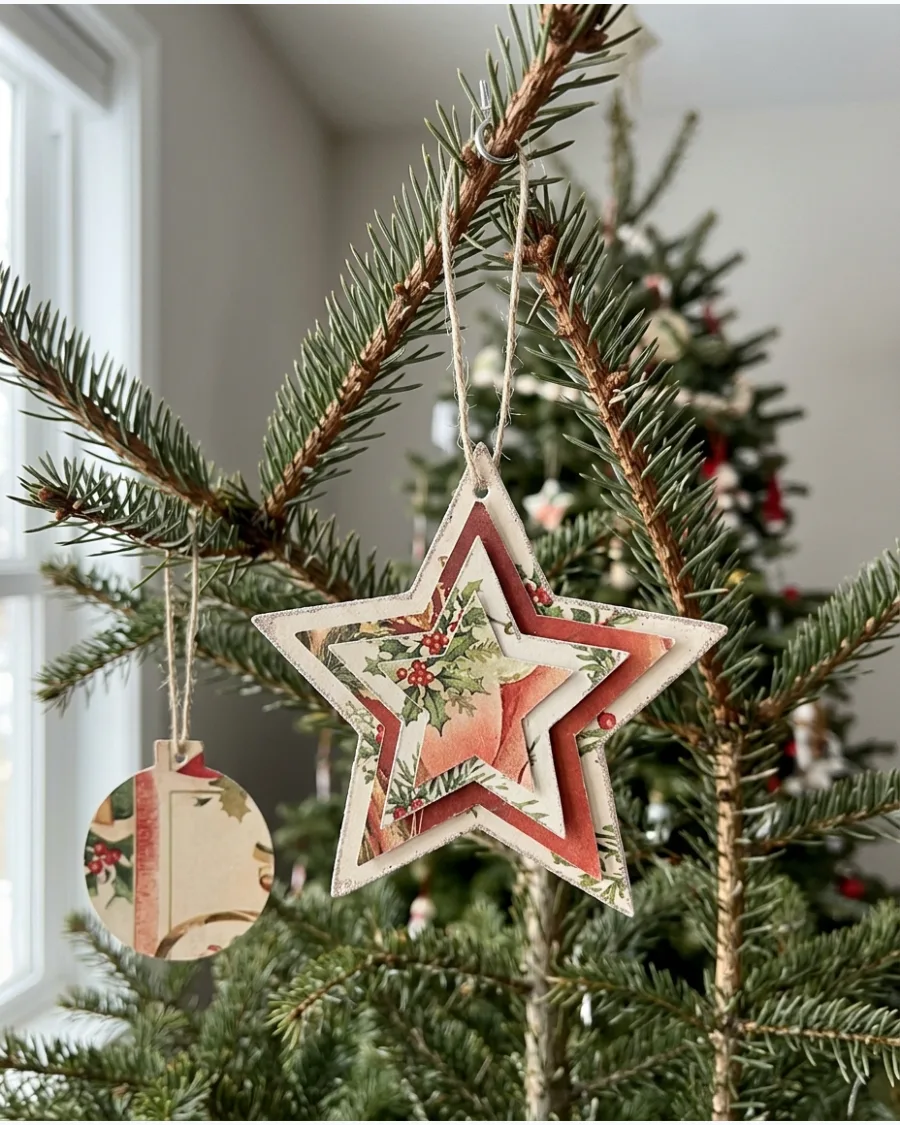
Give old holiday cards new life by cutting out the most beautiful illustrations or sentiments. Use a large craft punch to get perfect circles or stars every time without jagged edges.
Glue two identical shapes back-to-back so the ornament looks finished from every angle as it spins. This is a great way to preserve handwriting from loved ones who are no longer around.
- Old Christmas cards, craft punches, and baker's twine.
- Punch shapes from card fronts and punch a small hole at the top for hanging.
- Layer three or four identical shapes folded in half to create a 3D medallion.
Quick win: Sand the cut edges of the cardstock lightly with a fine-grit sandpaper to remove any paper burrs for a clean finish.
FELT AND FABRIC CHRISTMAS ORNAMENTS
25. Hand-Stitched Felt Heart Ornaments
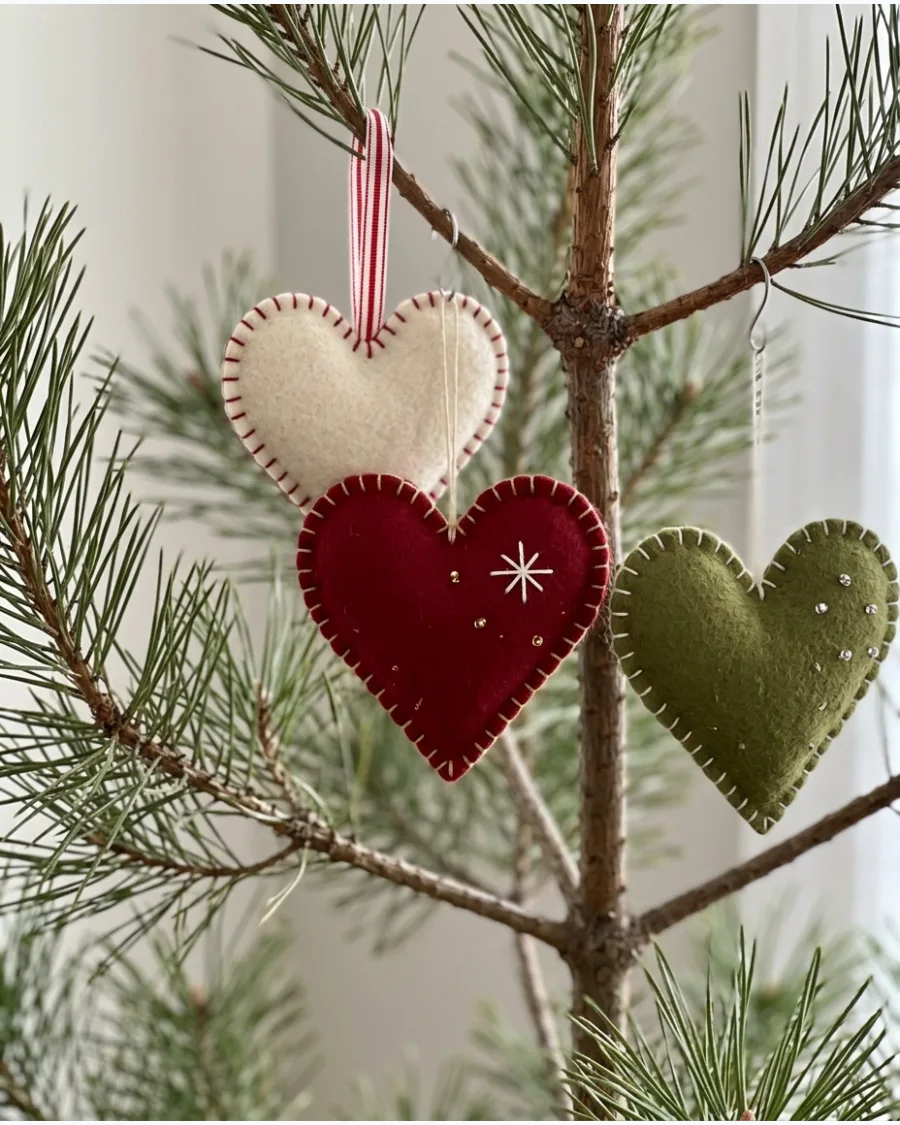
Soft felt hearts add a cozy, tactile element to the Christmas tree. Use a contrasting embroidery floss color to make the blanket stitch around the edge really pop.
Stuff them with just enough polyester fiberfill to create a soft curve without making the seams look strained. Adding a few tiny seed beads to the center gives them a high-end boutique look.
- Wool felt sheets, embroidery floss, and poly-fill stuffing.
- Cut two heart shapes and stitch them together, leaving a small gap to add stuffing before closing.
- Embroider a small snowflake or initial on the front piece before sewing the two sides together.
Best shortcut: Use a freezer paper template ironed onto the felt to get perfectly symmetrical hearts without leaving pen marks on the fabric.
26. Felt Christmas Tree Ornaments
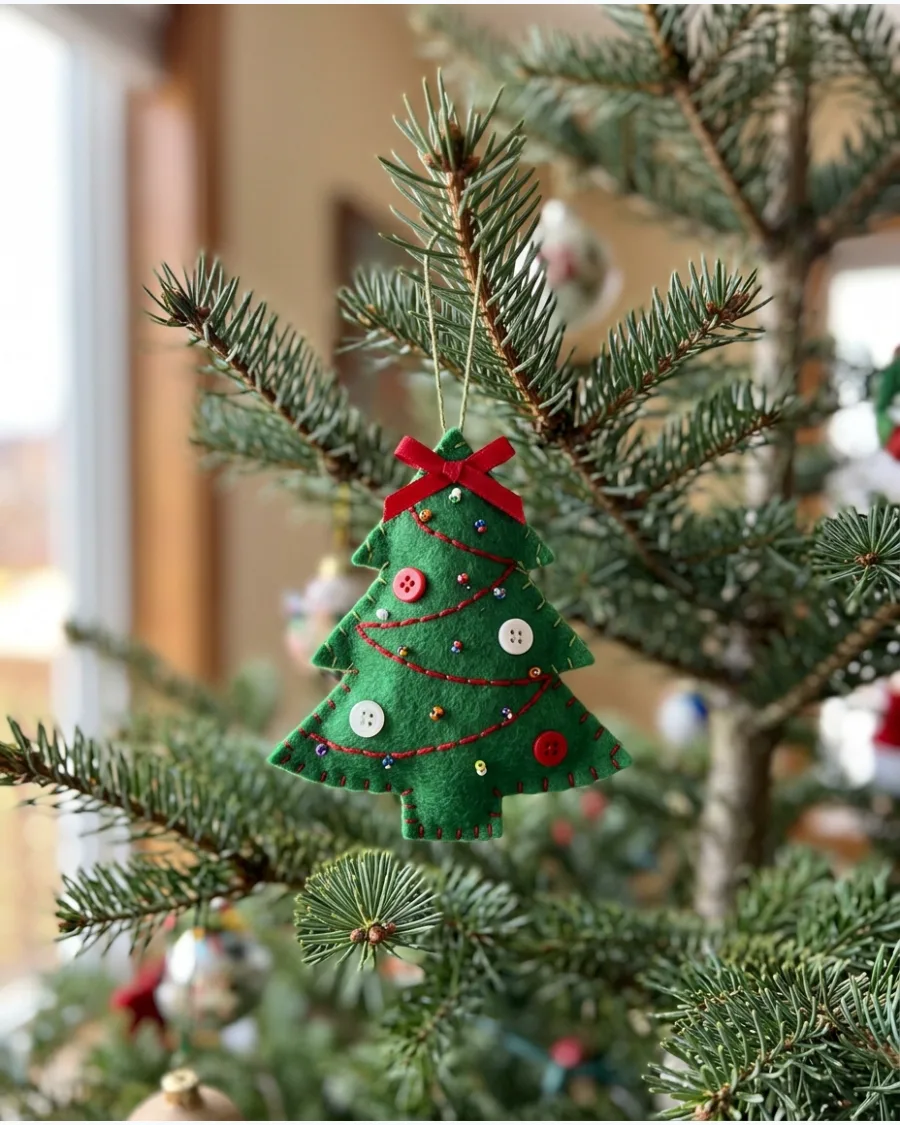
These layered trees are a great project for using up small felt scraps from other crafts. Stack two or three different shades of green felt to create a sense of depth and dimension.
Sew small colorful buttons onto the branches to act as miniature ornaments. The matte texture of the felt provides a nice contrast to shiny glass bulbs.
- Green felt, small buttons, and embroidery thread.
- Cut simple triangle shapes and stitch them together with a layer of stuffing in between.
- Use pinking shears on the bottom edge of the felt to mimic the look of pine needles.
Most people skip this: Place a small piece of cardboard inside the base of the tree before sewing it shut to help it keep a crisp, flat shape.
27. Felt Gingerbread House Ornaments
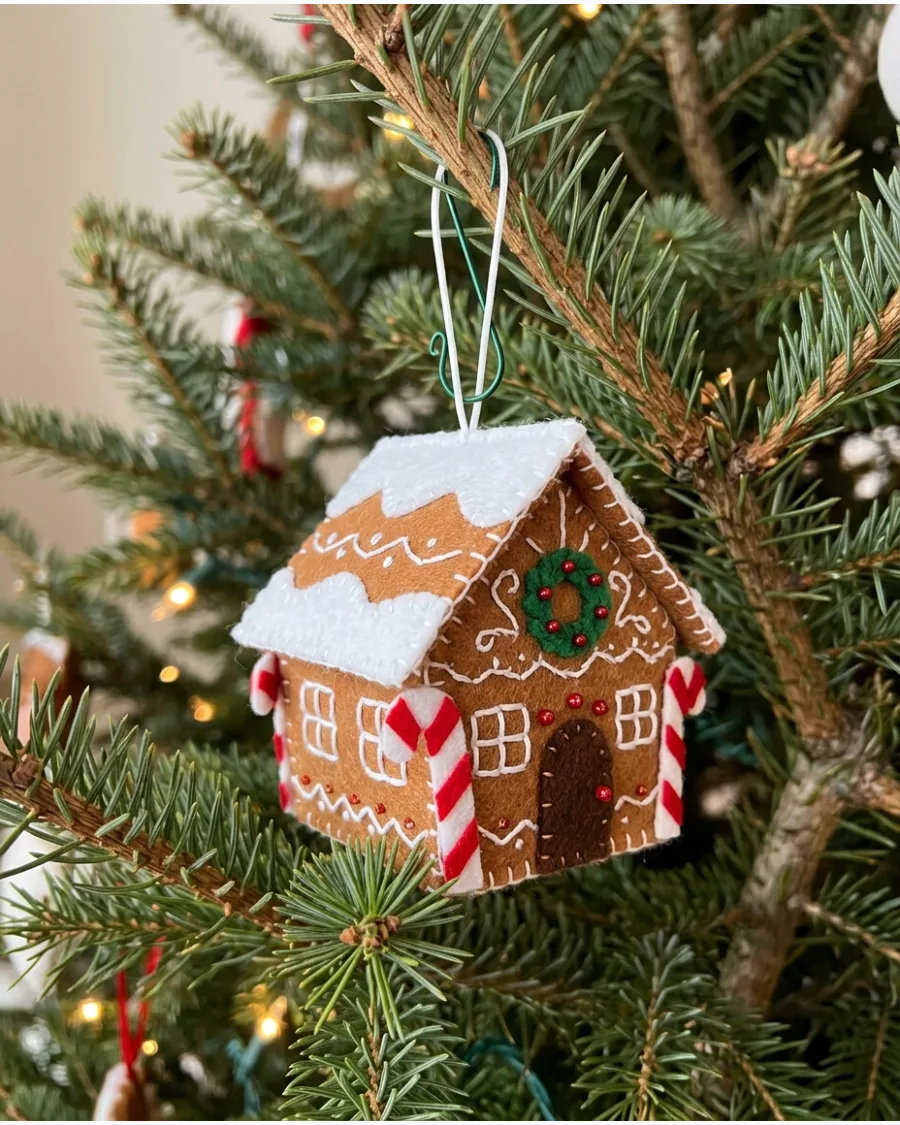
Brown felt serves as the perfect cookie base for these sweet little house decorations. Use white embroidery thread to mimic the look of piped royal icing around the doors and roofline.
Add a small loop of white ric-rac trim to the roof to look like a decorative snow border. These look best when you keep the details simple and graphic.
- Tan or brown felt, white embroidery floss, and ric-rac trim.
- Cut house silhouettes and stitch on white felt snow patches for the roof.
- Add tiny red felt circles for gumdrop accents or berry bushes near the door.
Quick win: Use a white fabric paint pen for the finest icing details if your embroidery skills are still developing.
28. Embroidered Felt Star Ornaments
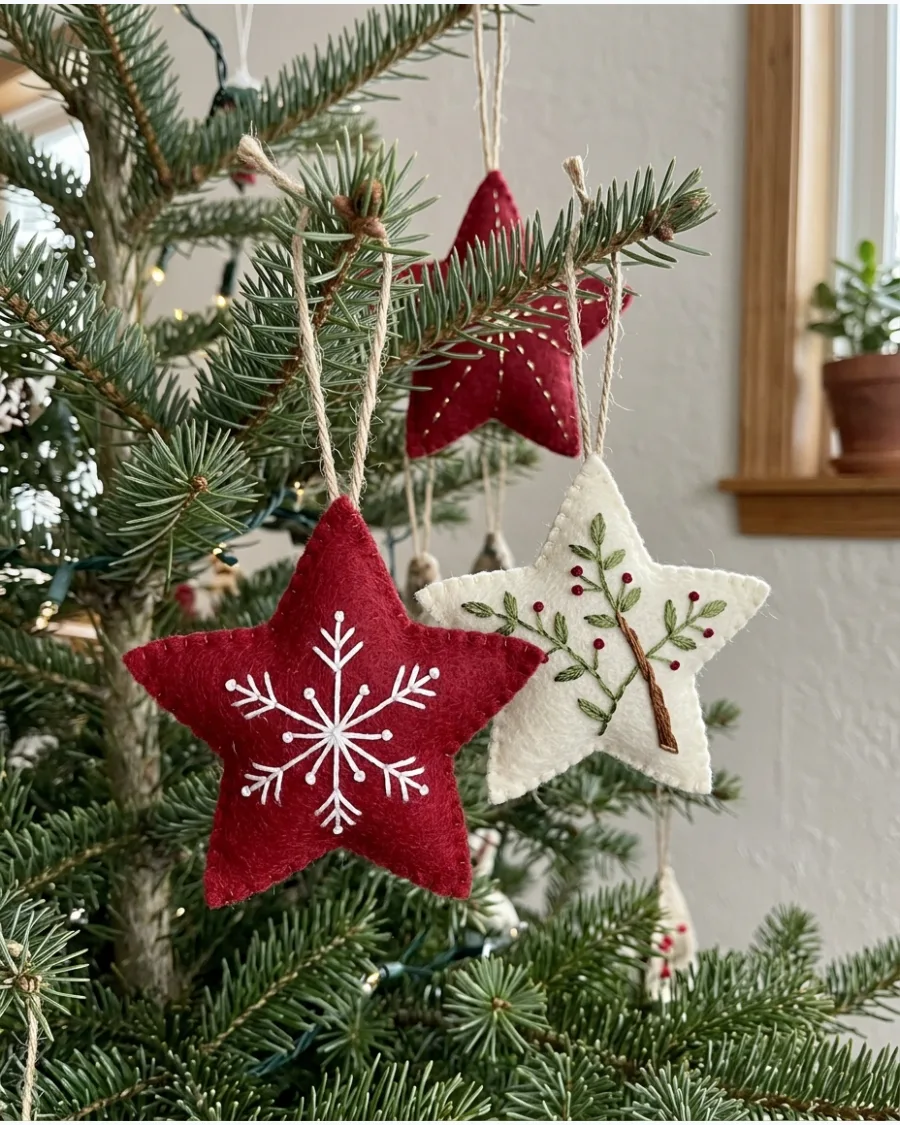
Simple stars become much more elegant when you add metallic thread or intricate floral patterns. Choose a high-quality wool blend felt because it holds stitches better than the thin acrylic versions.
Use a metallic silver or gold thread to stitch a single large snowflake in the center of the star. These flat ornaments are easy to store and won't break if the tree gets bumped.
- Wool blend felt, metallic embroidery thread, and sewing needles.
- Trace a star shape onto the felt and complete all embroidery before cutting the shape out.
- Back the embroidered star with a second piece of felt to hide the messy knots on the underside.
Best shortcut: Use a water-soluble stabilizer to print your embroidery pattern, then wash it away once the stitching is done.
29. Plaid Fabric Stuffed Ornaments
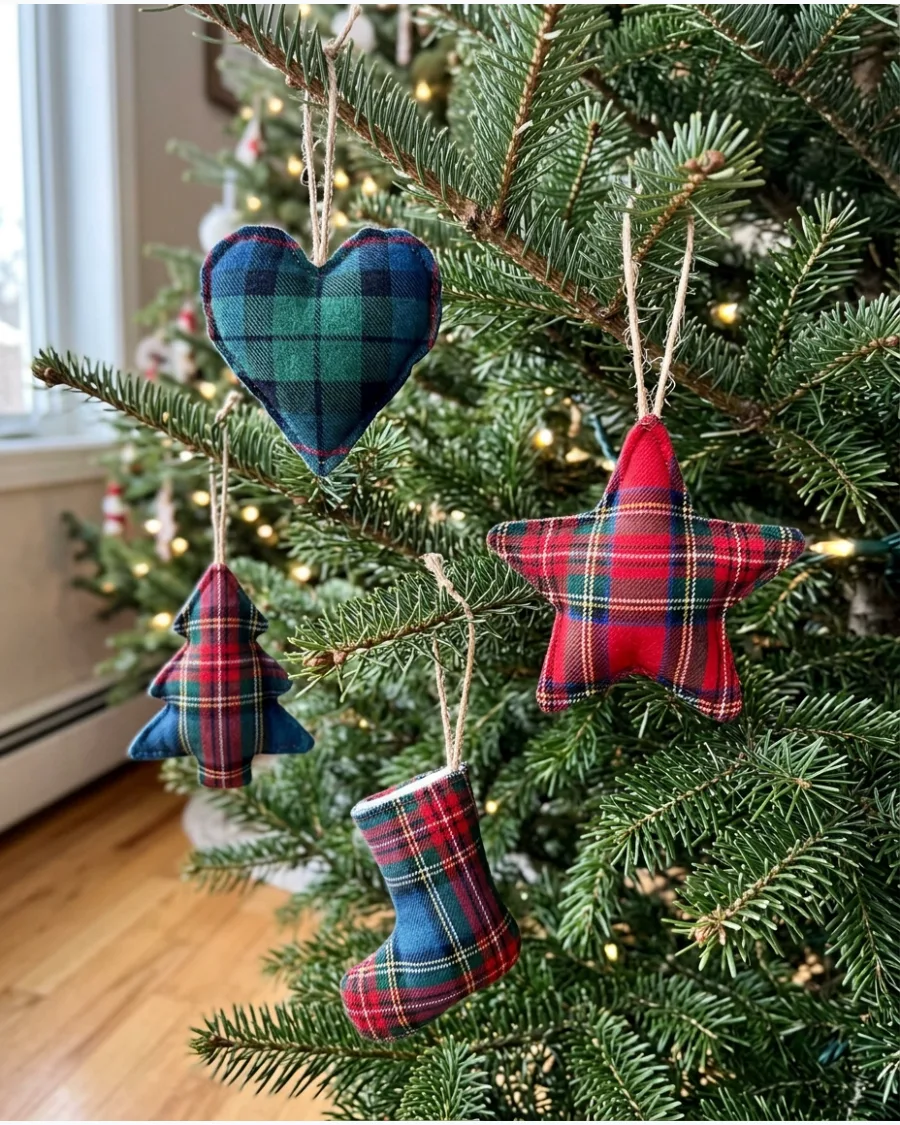
Plaid and tartan fabrics instantly bring a traditional, cabin-like feel to holiday decor. You can repurpose old flannel shirts or use fat quarters from the craft store for a variety of patterns.
Cut the fabric on the bias (diagonally) to give the plaid pattern a more interesting diamond look on the ornament. These are very lightweight and won't weigh down the tips of the branches.
- Plaid fabric, polyester stuffing, and pinking shears.
- Sew simple shapes right-sides together, flip inside out, and stuff.
- Tie a thick velvet ribbon at the top of the ornament for a luxurious finishing touch.
Most people skip this: Use pinking shears to cut your fabric edges if you want a no-sew rustic look where the edges are meant to show.
30. Quilted Fabric Scrap Ornaments
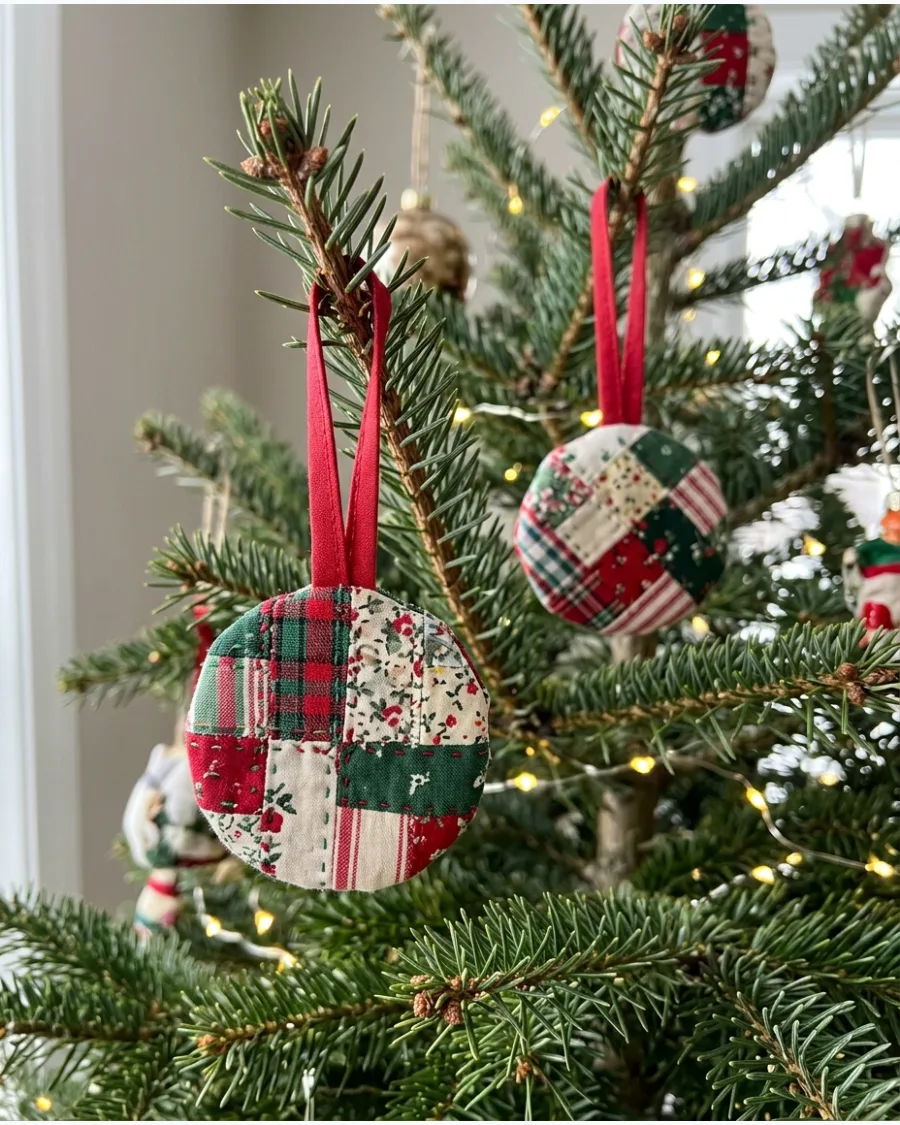
Small scraps of fabric can be sewn together to create a patchwork effect that feels nostalgic and personal. Use a simple crumb quilting technique where you join random shapes until you have a piece large enough to cut an ornament from.
Quilt through a layer of batting to give the ornament a slightly puffy, textured appearance. This project is the ultimate way to clear out your sewing scrap bin.
- Fabric scraps, cotton batting, and a sewing machine.
- Sew scraps into a larger sheet, layer with batting, and quilt simple lines across the surface.
- Finish the edges with a tight zigzag stitch or bias tape for a clean look.
Quick win: Use a decorative star or heart stitch on your sewing machine to join the fabric scraps for added detail.
31. Vintage Fabric Bow Ornaments
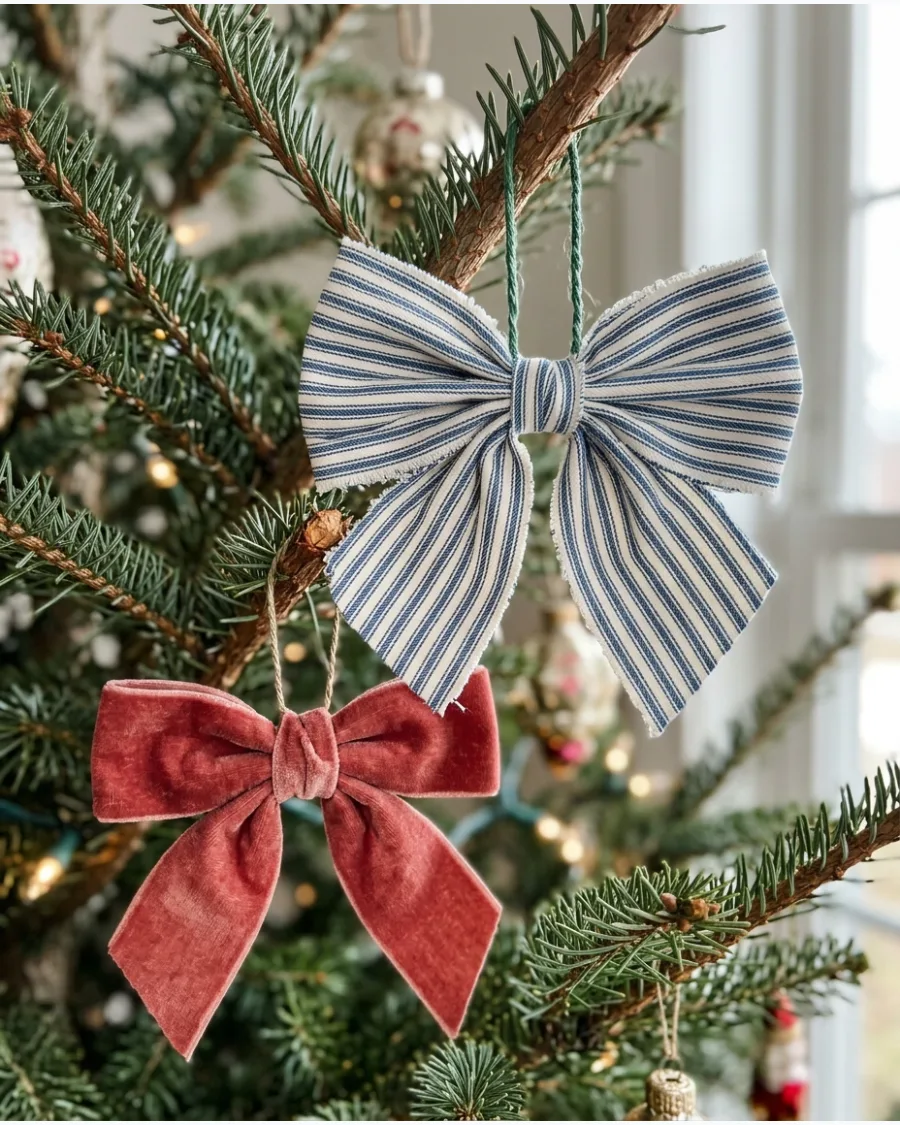
Create oversized bows using floral, ticking stripe, or velvet fabric remnants for a soft, classic look. Cut fabric into long strips with pinking shears to prevent fraying and add a decorative zig-zag edge. These bows look best when the tails are left long to trail down the tree branches like ribbon streamers.
Fabric bows are an excellent way to use up sewing scraps while adding significant visual volume to the tree.
- Use scraps from old linens or fat quarters for a low-cost material source.
- Tie the bows directly to the branch or use a thin florist wire for more control.
- Choose stiffened velvet or heavy cotton for bows that need to hold their shape.
Best shortcut: Use pinking shears to get a finished edge without needing a sewing machine.
32. Felt Woodland Animal Ornaments
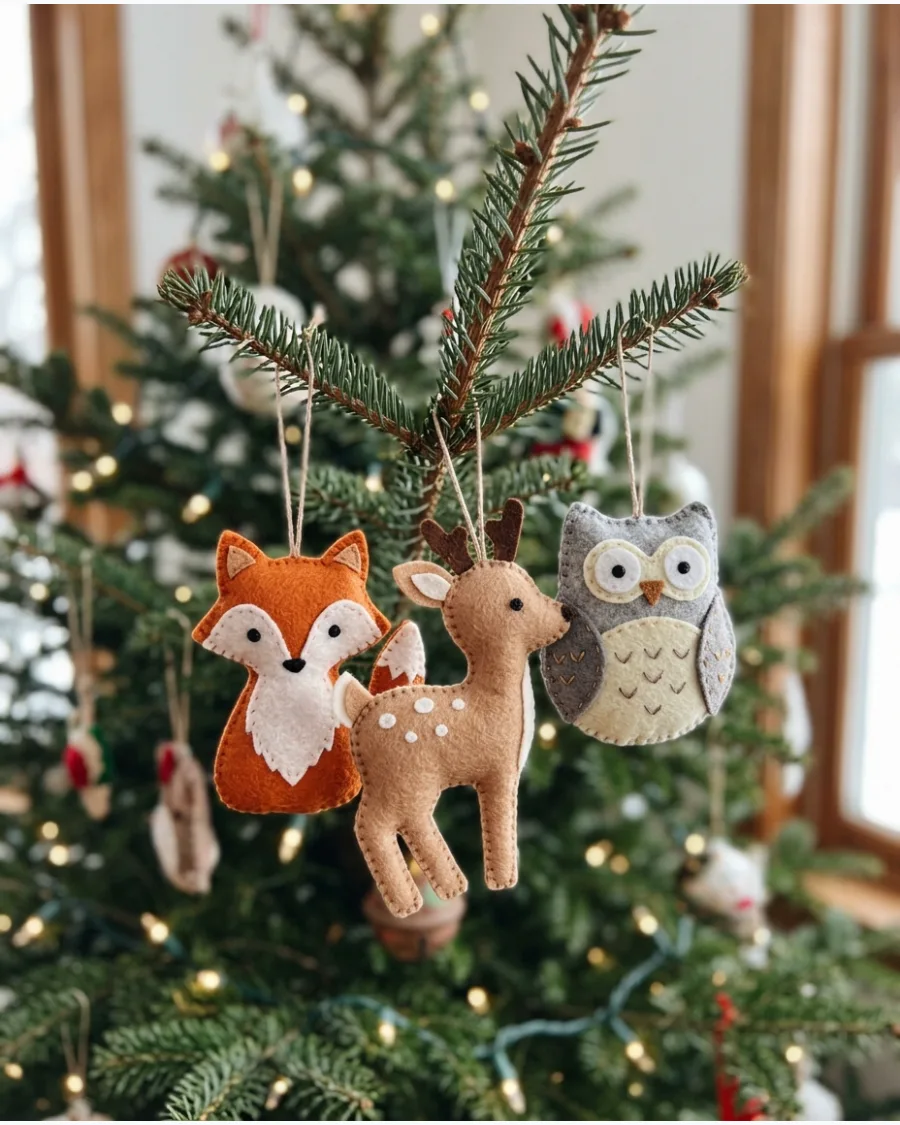
Handcraft simple foxes, deer, or owls from felt sheets for a playful handmade look. Use a simple whip stitch around the edges with contrasting embroidery floss to give the animal a clear, defined outline. These flat ornaments are lightweight and won't weigh down thinner branches on a real tree.
They provide a soft texture that contrasts well with shiny glass baubles.
- Standard craft felt sheets and embroidery floss are the only main supplies needed.
- Trace shapes using a cookie cutter to ensure consistent sizing for a set.
- Scale them down for mini trees or use larger versions as gift toppers.
Most people skip this: Iron your felt before cutting to remove creases that make the finished animal look messy.
NATURAL AND RUSTIC DIY ORNAMENTS
33. Dried Orange Slice Ornaments
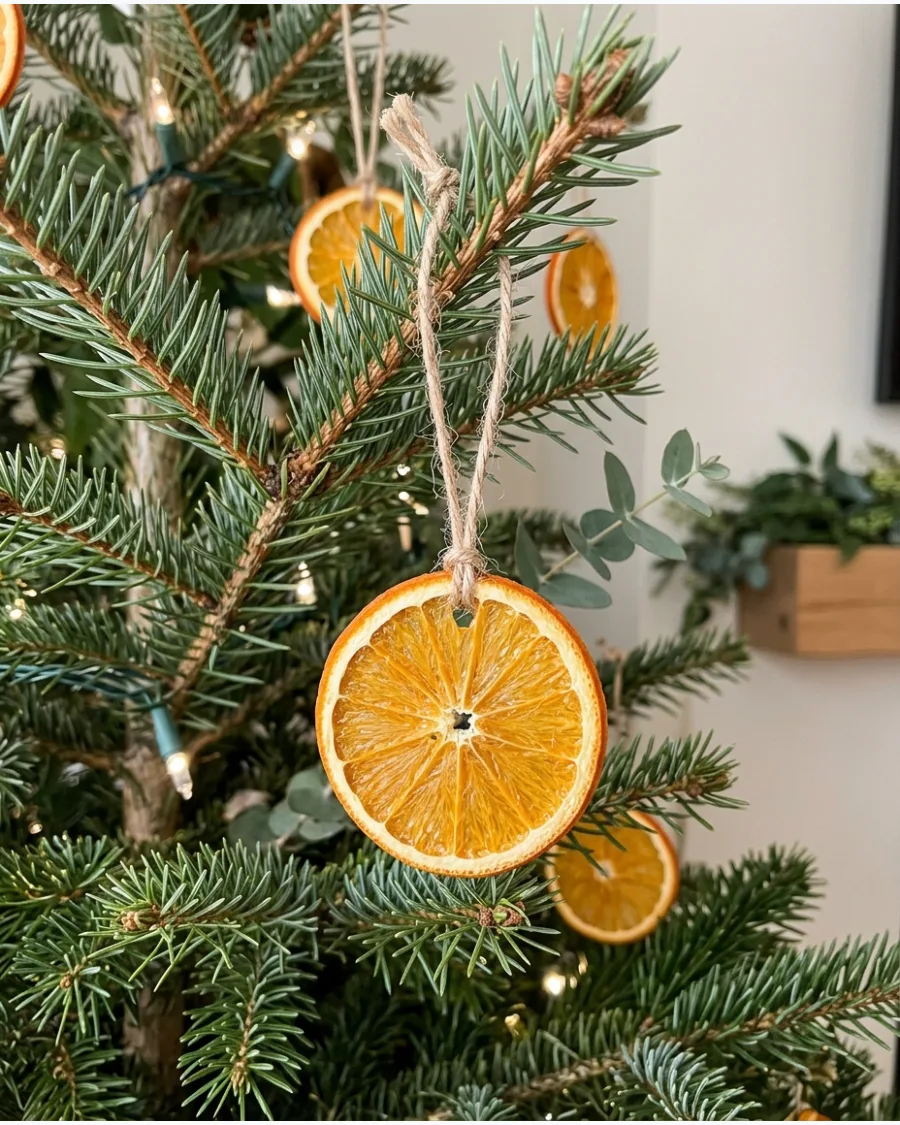
Dry thin orange slices in a low-temperature oven until they are translucent and firm to the touch. Thread a piece of velvet ribbon through the center of the slice rather than the edge to keep the fruit from tearing over time. These catch the light beautifully when placed near a warm white bulb on the tree.
They offer a traditional, natural aesthetic that works in any home style.
- Slice 2-3 large navel oranges into 1/4 inch rounds.
- Bake at 200 degrees for 3-4 hours on a parchment-lined tray.
- Use leftover slices to create a matching natural garland for the mantle.
Quick win: Blot the orange slices with a paper towel before baking to speed up the drying process.
34. Cinnamon Stick Bundle Ornaments
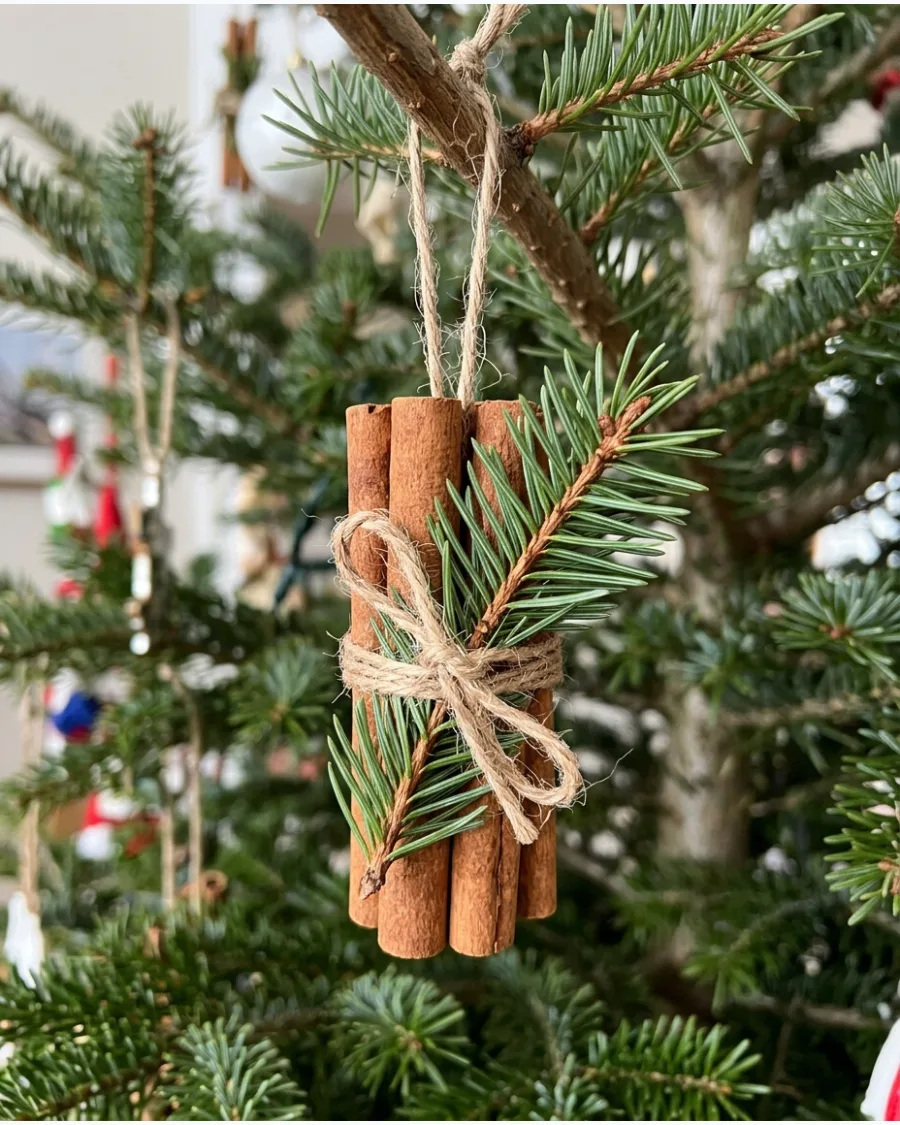
Tie several cinnamon sticks together with sturdy twine to create a fragrant, rustic bundle. Tuck a small sprig of fresh cedar or pine behind the twine knot to add a pop of green against the brown wood. These provide a subtle natural scent that artificial ornaments cannot replicate.
They are a great way to fill gaps in the tree with inexpensive materials.
- Purchase cinnamon sticks in bulk spice sections to save money.
- Use a dab of hot glue between the sticks to keep the bundle from slipping.
- Swap the jute twine for red and white baker's twine for a more festive look.
Best shortcut: Use a low-temp glue gun to secure the evergreen sprig so it doesn't fall out as the branch dries.
35. Pinecone Christmas Tree Ornaments
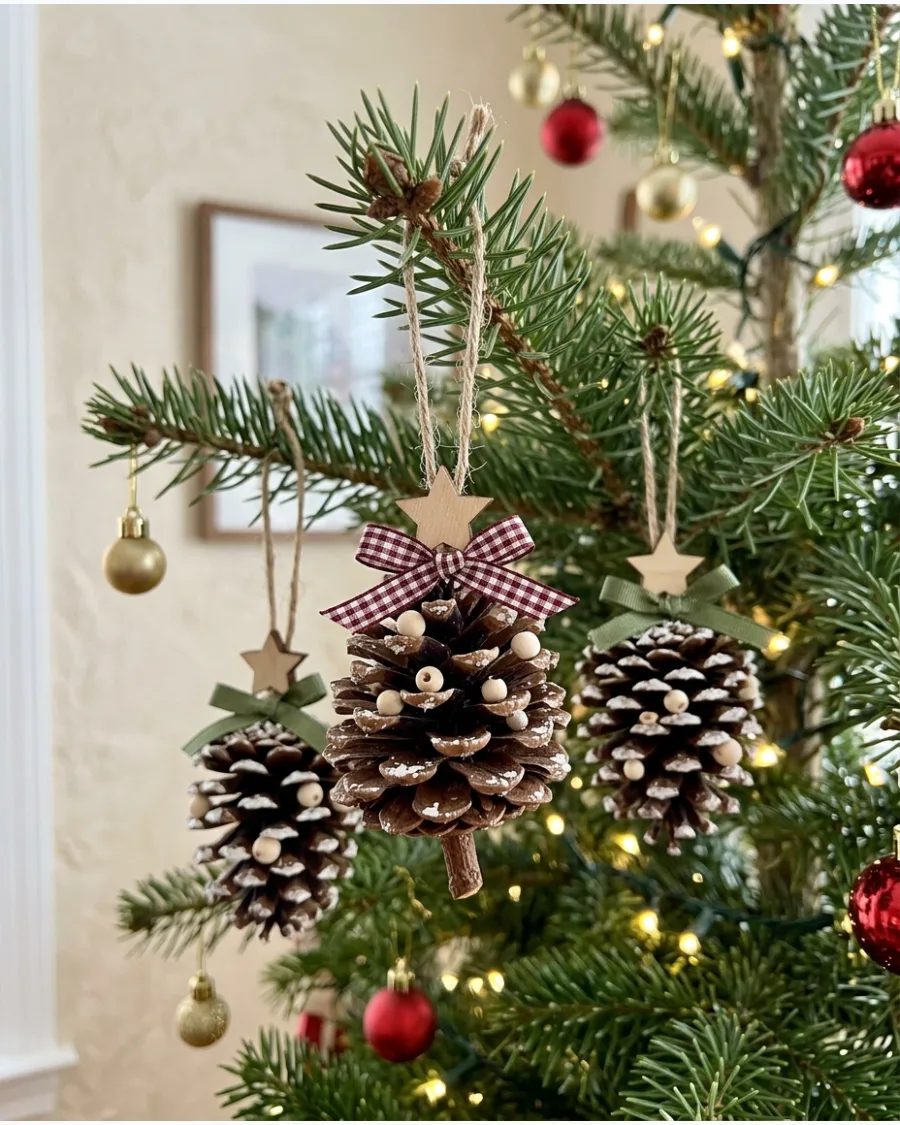
Decorate small pinecones with miniature stars or beads to transform them into tiny hanging trees. Apply a light dusting of white acrylic paint to the very tips of the pinecone scales to mimic a fresh snowfall. A small wooden star glued to the top completes the look without needing expensive tools.
These ornaments bring the outdoors inside for a cozy, winter-cabin feel.
- Collect foraged pinecones or buy a bag of pre-cleaned cones.
- Use a small, dry paintbrush for the snow detail to keep it looking realistic.
- Choose pinecones with flat bottoms so they hang straight on the branch.
Quick win: Bake foraged pinecones at 200 degrees for 30 minutes to kill any lingering bugs before bringing them inside.
36. Mini Pinecone Wreath Ornaments
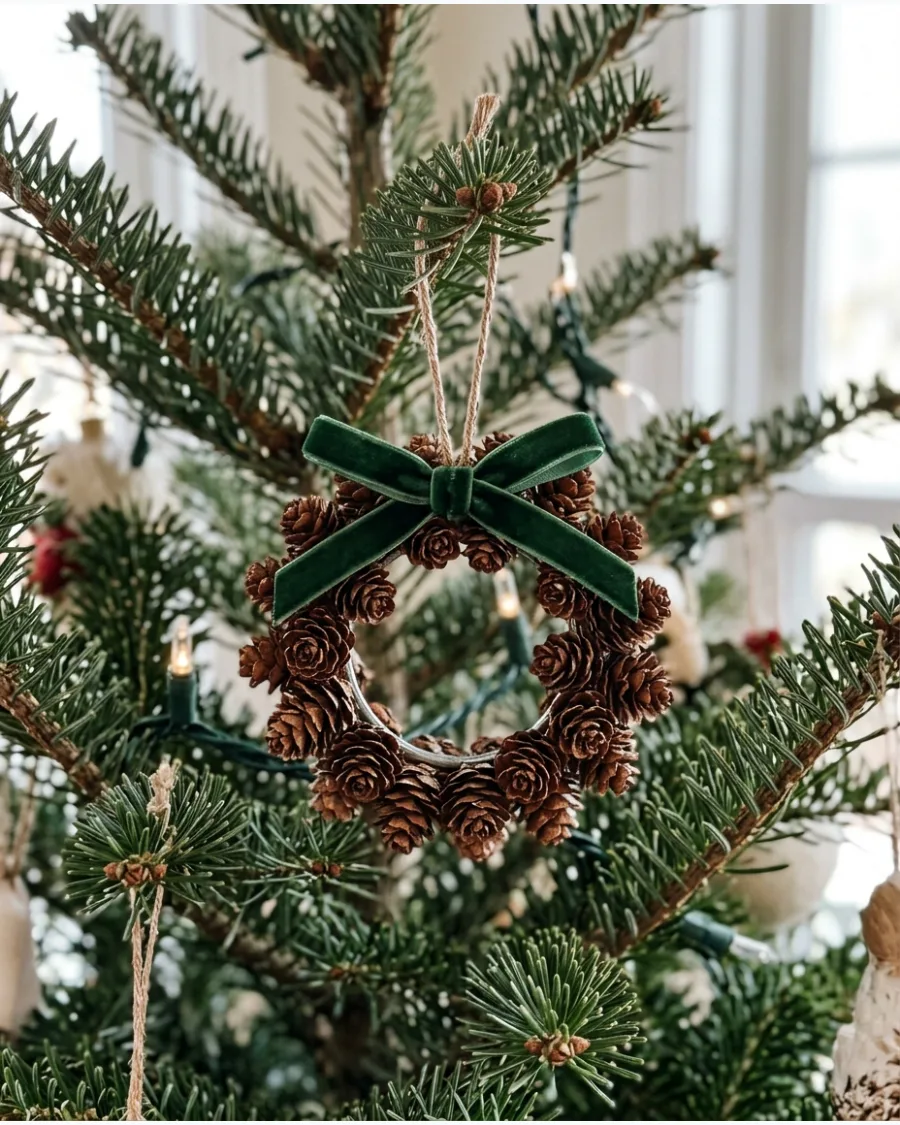
Attach tiny pinecones around a small ring to create a miniature version of a classic holiday wreath. Finish the wreath with a narrow gingham bow at the top to hide the hanging loop attachment point. These add a high-texture element that stands out against the soft needles of an evergreen tree.
They are sturdy enough to be used as decoration for many years.
- Use 1-inch mini pinecones and a strong hot glue gun.
- A mason jar lid ring or a small cardboard circle works as a sturdy base.
- Keep the wreath under 4 inches wide to prevent it from looking too bulky on the branch.
Most people skip this: Paint the base ring a dark brown color first so any gaps between pinecones aren't noticeable.
37. Rosemary Mini Wreath Ornaments
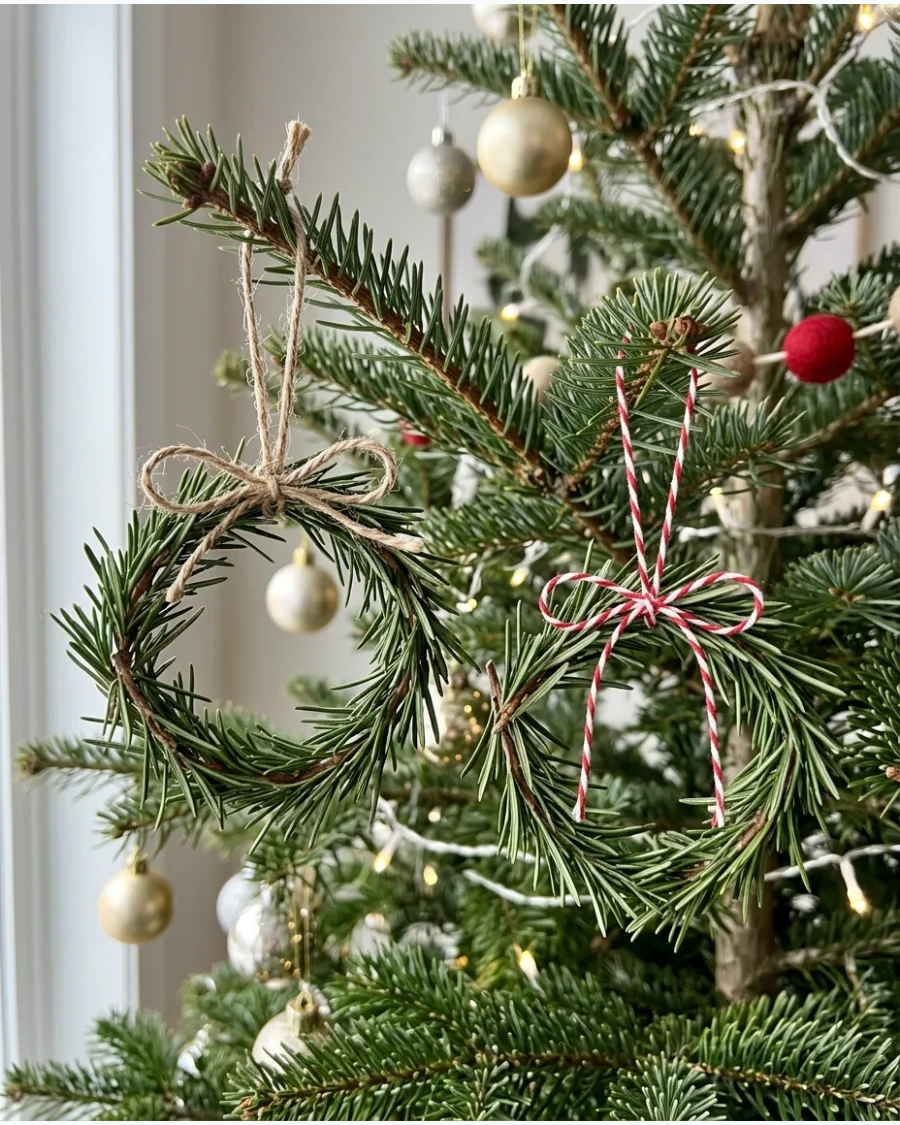
Shape flexible rosemary stems into small circles and secure the ends with thin floral wire. Tie a piece of natural twine over the wire to create a rustic hanging loop that covers the mechanics. These ornaments smell incredible and look like delicate, botanical versions of traditional wreaths.
They are best made a few days before Christmas for maximum freshness.
- Use fresh rosemary sprigs and 22-gauge green floral wire.
- Soak woody stems in warm water for 10 minutes to make them more pliable.
- Repurpose these as fragrant napkin rings for a holiday dinner party.
Best shortcut: Use "prostrate" rosemary varieties if possible, as they naturally grow in more curved, flexible shapes.
38. Twig Star Christmas Ornaments
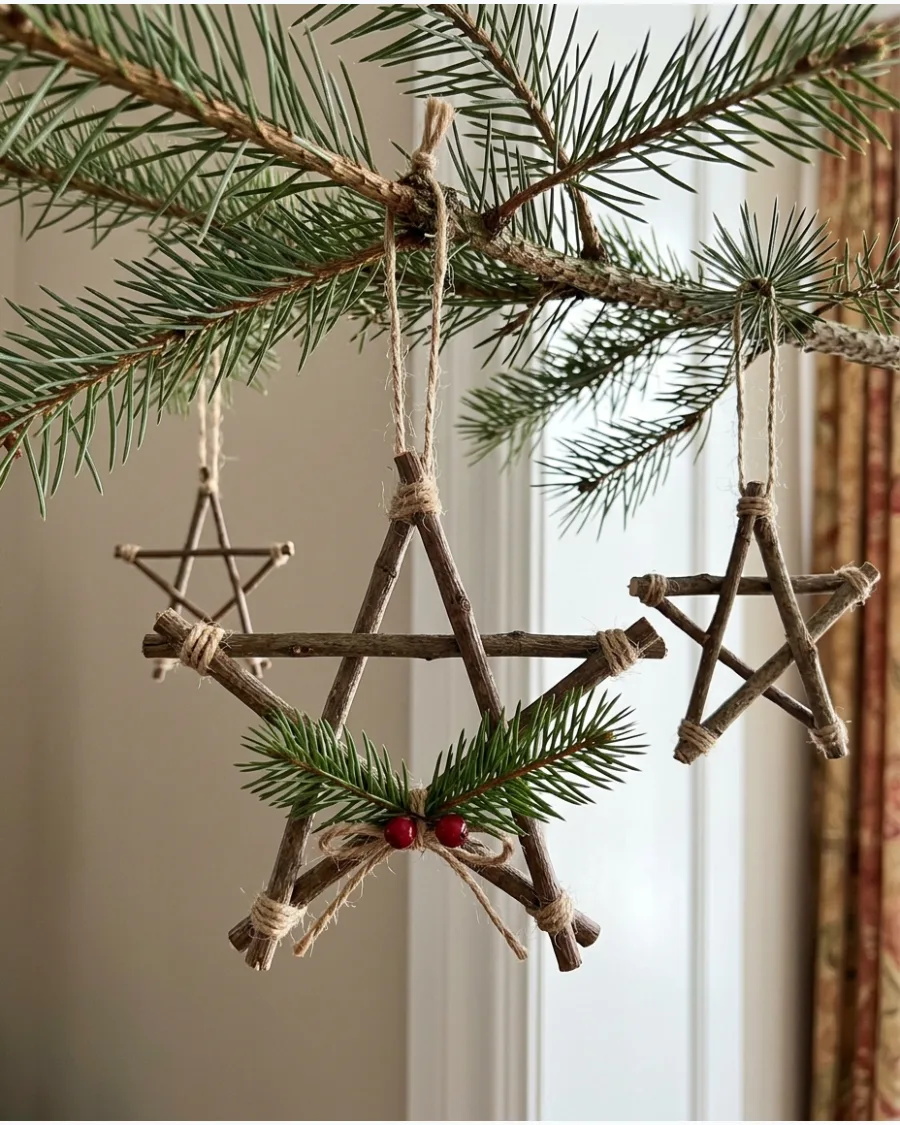
Join short, straight twigs into rustic five-point stars using hot glue at the intersections. Wrap jute twine around each joint several times to reinforce the structure and add a handmade, rustic detail. These are virtually free to make and bring a graphic, geometric look to your holiday decor.
They work especially well on trees with a minimalist or Scandinavian theme.
- Dry fallen twigs and hot glue are the only required materials.
- Try to find twigs of similar thickness for a balanced, symmetrical star.
- Paint the finished star gold or silver for a more sophisticated style.
Quick win: Use a template drawn on paper to align the twigs perfectly before you start gluing.
39. Dried Flower Christmas Ornaments
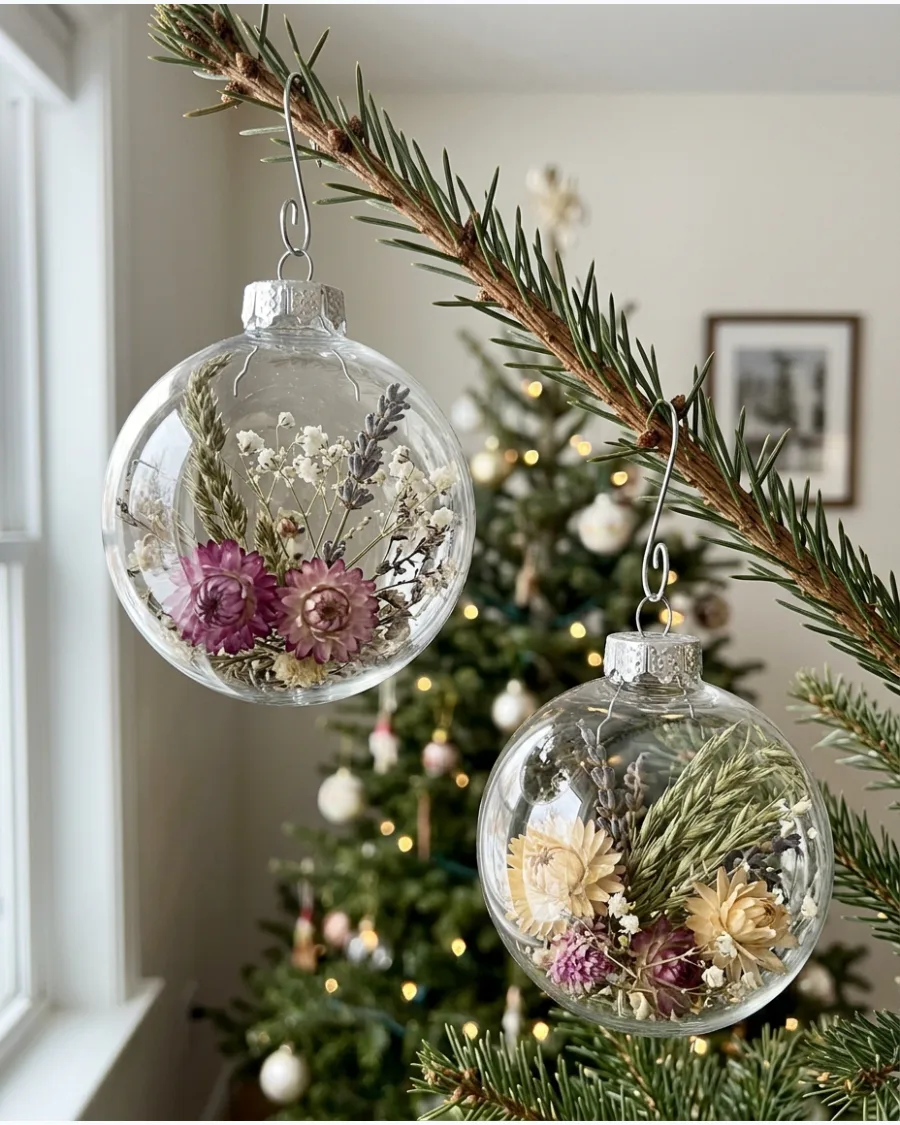
Place small dried flower heads or botanical stems inside clear glass or plastic ornaments for a delicate look. Use a pair of long tweezers to position the flowers so they face outward toward the glass rather than clumping in the center. This creates a meadow-inspired ornament that bridges the gap between seasons.
It is a sophisticated way to add color without using traditional glitter.
- Use clear fillable ornaments and various dried botanicals.
- Add a pinch of faux snow to the bottom to create a wintry scene.
- Choose flowers with strong stems that won't crumble when inserted through the top.
Most people skip this: Remove the metal cap and drop a tiny bit of clear glue inside to keep the flower stems from shifting.
40. Acorn and Wooden Bead Ornaments
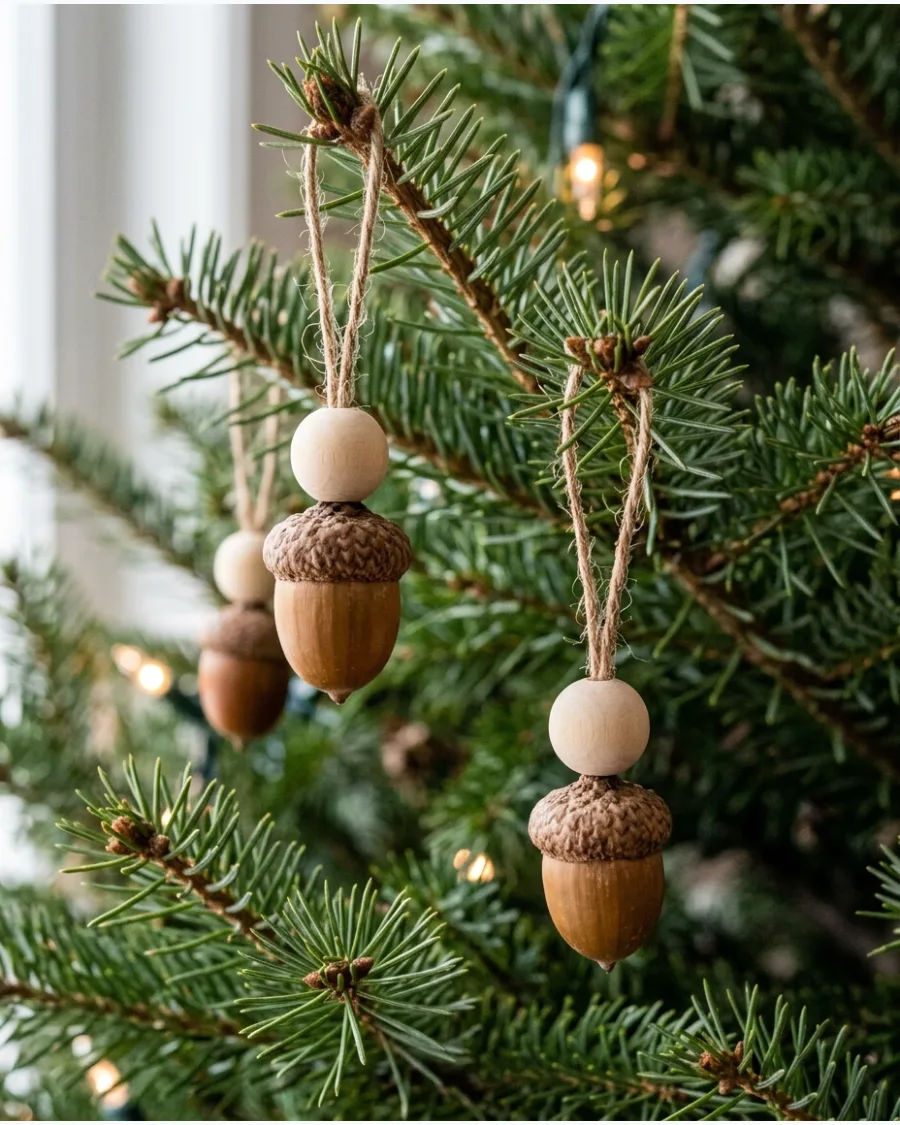
Combine natural acorn caps with unfinished wooden beads to create a simple, minimalist ornament. Glue a 20mm wooden bead into a real acorn cap to create a clean, modern interpretation of a woodland find. These look best when hung in small clusters at varying heights on the tree.
They offer a high-end look with very little assembly time required.
- Gather natural acorn caps and purchase 20mm unfinished wood beads.
- Use a strong clear-drying craft glue for a permanent, invisible bond.
- Paint the wooden beads in muted tones to match a specific color palette.
Best shortcut: If you can't find real acorns, use "unfinished wood acorns" which come in two pieces ready for assembly.
PERSONALIZED AND KEEPSAKE ORNAMENTS
41. Family Photo Frame Ornaments
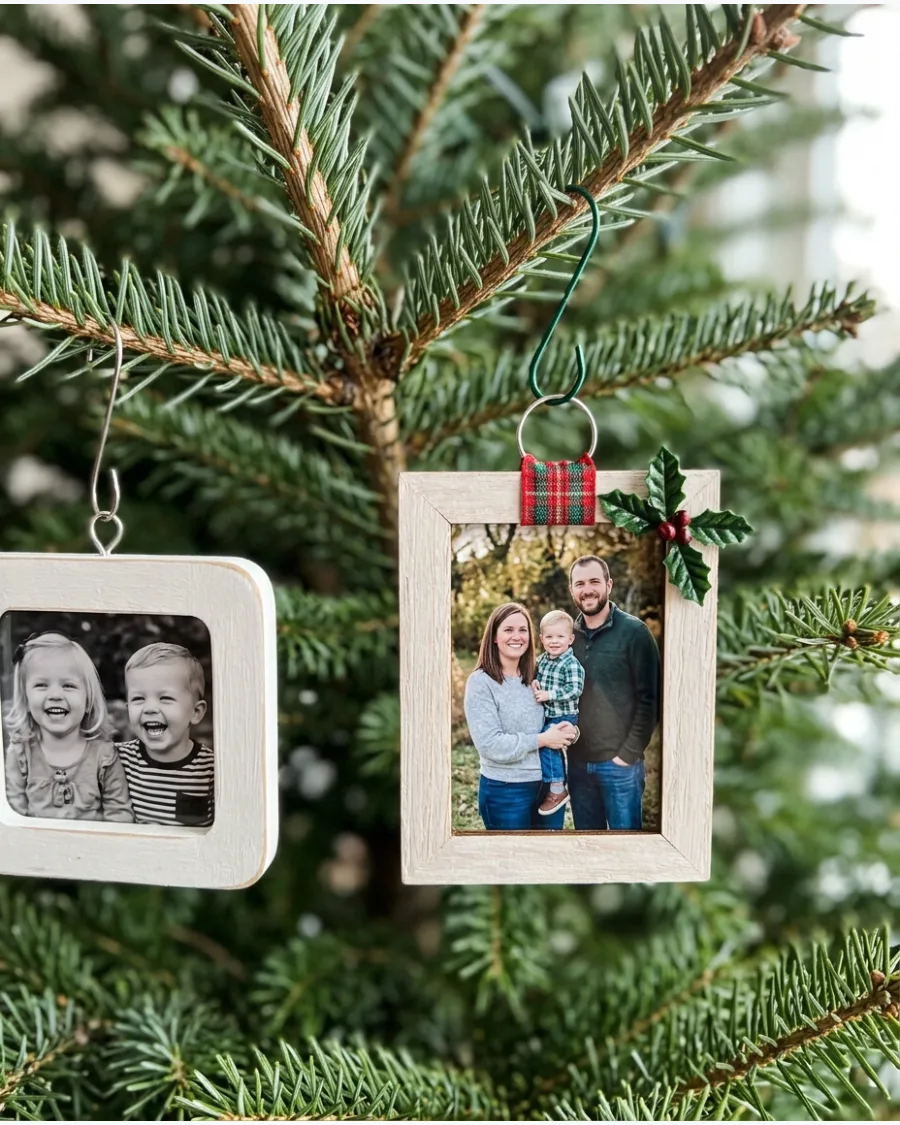
Use tiny wooden frames or heavy cardstock to showcase small family snapshots. Tie a thin velvet ribbon through a small screw eye at the top of the frame for a secure and stylish hang. This project turns the tree into a living history book that grows every season.
Wood frames provide more durability than paper ones over years of storage.
- Budget: $5 for a set of mini frames at most craft stores.
- Use acid-free tape to secure the photo inside the frame.
- Swap photos out each year or glue the frame shut for a permanent keepsake.
Quick win: Use black and white filters on all photos to make a mismatched collection of frames look like a coordinated set.
42. Polaroid-Style Photo Ornaments
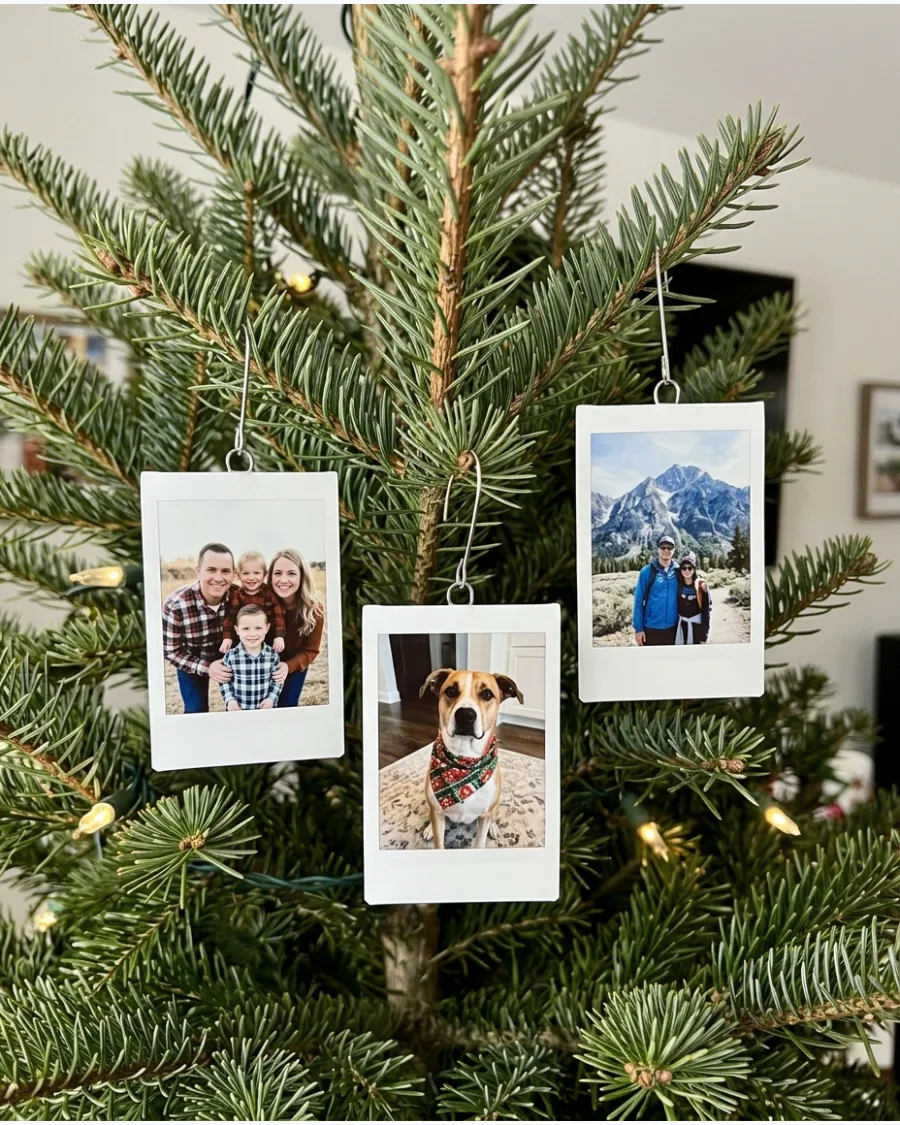
Print digital photos with a wide white bottom border to mimic the classic instant film look. Punch a single hole in the top center and thread a piece of striped baker’s twine through it. These are incredibly lightweight, making them perfect for the thin branches at the top of the tree.
Using cardstock instead of actual film keeps the ornaments from curling in humid storage bins.
- Timing: 15 minutes to print and punch holes for a dozen photos.
- Add the year in the bottom white margin using a fine-tip black marker.
- Laminate the photos if you want them to withstand messy hands or spills.
Most people skip this: Use a 1/8-inch hole punch instead of a standard size to keep the hole proportional to the small photo.
43. Handwritten Recipe Ornaments
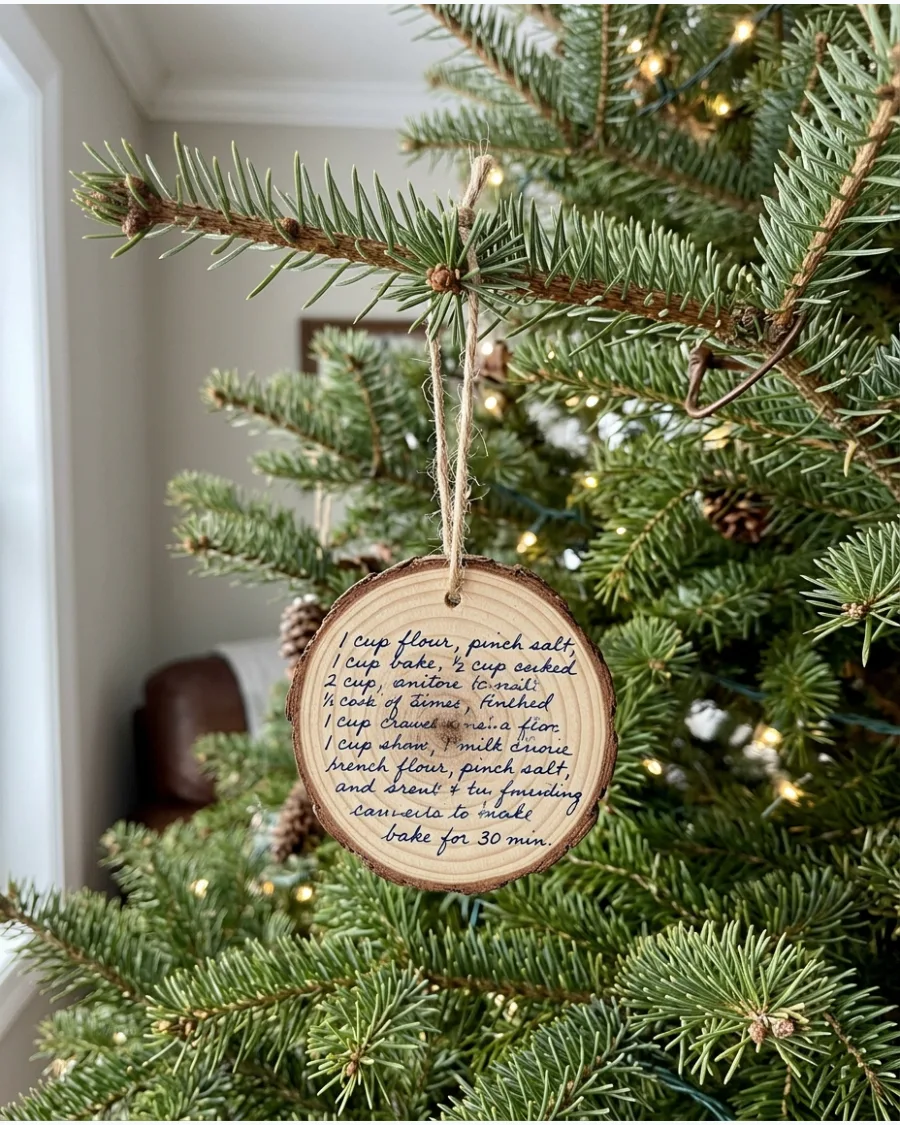
Print a scan of a family recipe onto transfer paper and apply it to a smooth wood disc. Seal the surface with a matte clear coat to prevent the ink from fading or peeling over time. It is a beautiful way to honor family traditions without risking damage to the original paper document.
This works best with recipes that have distinctive, recognizable handwriting.
- Budget: $8 for wood slices and transfer medium.
- Sand the wood surface with 220-grit sandpaper before applying the transfer.
- Focus on the recipe title or a specific instruction for better readability on small discs.
Best shortcut: If you do not have transfer paper, use a high-quality laser print and a gel medium to move the ink to the wood.
44. Child Handprint Clay Ornaments
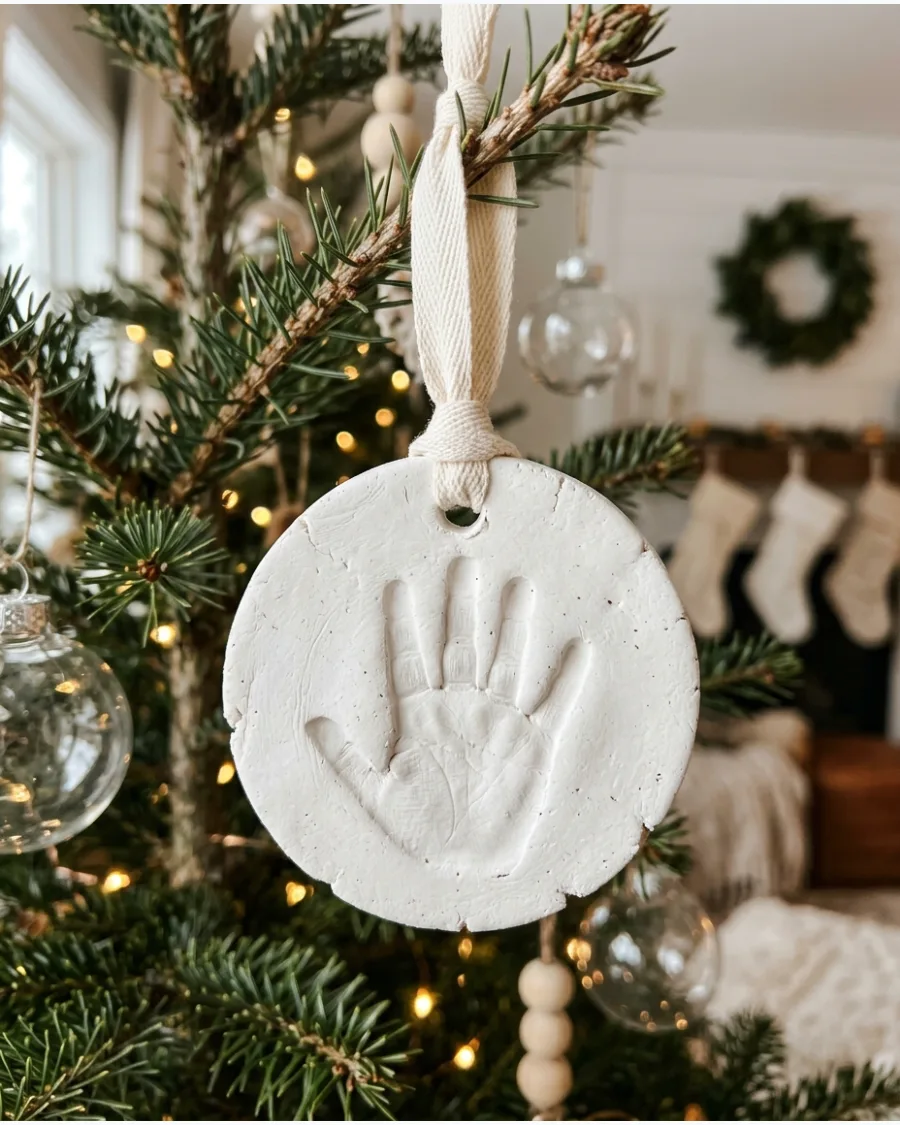
Press a hand into air-dry clay and use a straw to poke a hole for the ribbon before the material hardens. Write the child's name and the year on the back with a fine-tip permanent marker once the clay is completely dry. These ornaments capture a specific moment in time that parents will cherish as the kids grow up.
Avoid salt dough if the home is in a high-humidity area, as it can soften over time.
- Timing: 10 minutes to mold, plus 24 to 48 hours for drying.
- Knead the clay thoroughly before pressing to prevent surface cracking.
- Paint only the inside of the handprint for a clean, modern look.
Quick win: Use a rolling pin with guides to ensure every ornament in the set is exactly the same thickness.
45. Pet Paw Print Ornaments
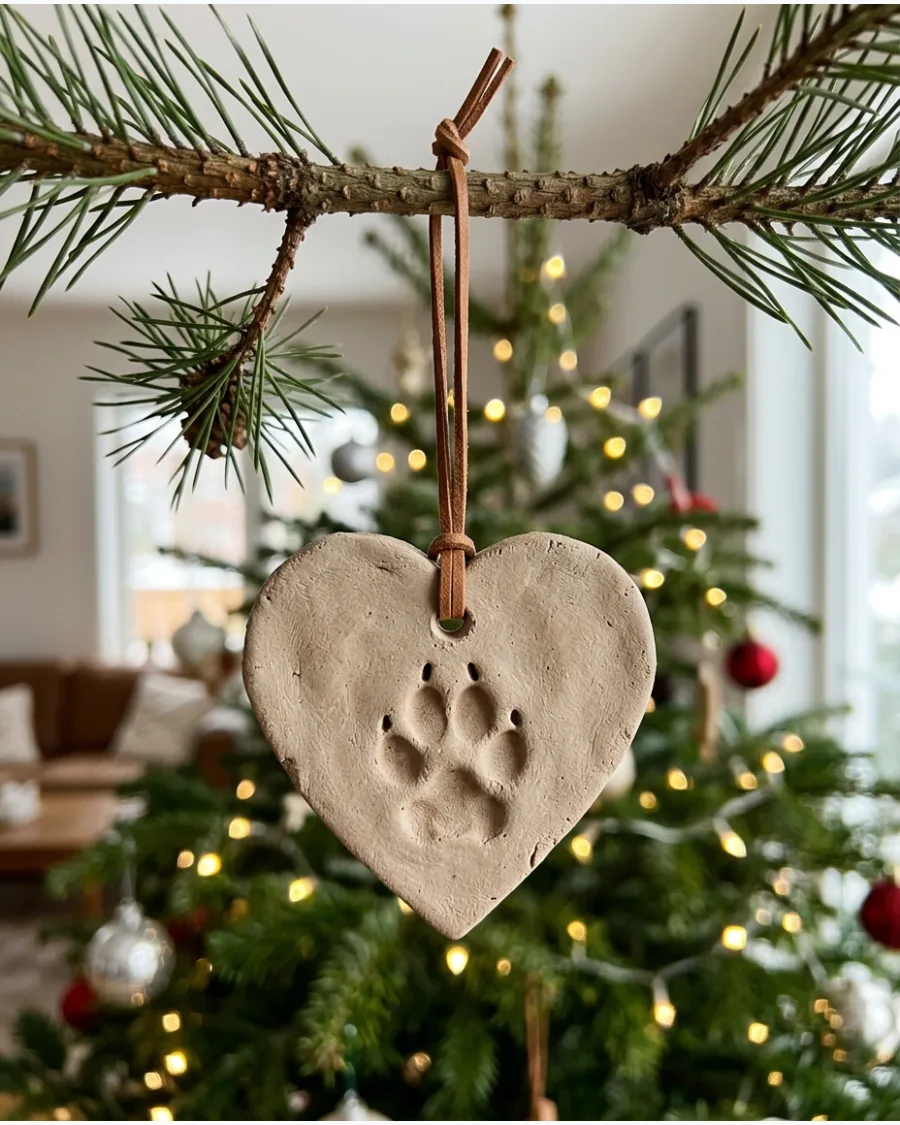
Use a pet-safe ink pad or soft clay to capture a dog or cat's paw print. Sand the edges of the dried clay to ensure a smooth, professional finish before hanging. It is a sweet way to include furry family members in the holiday celebrations.
Make sure to clean the pet's paw immediately after to avoid any messy tracks on the carpet.
- Budget: $10 for a pet-safe impression kit.
- Trim the fur between the pet's paw pads to get a clearer impression.
- Use a leather cord instead of ribbon for a more durable, pet-inspired look.
Most people skip this: Press firmly on the center of the paw and each toe individually to get a deep, lasting imprint.
46. Personalized Name Wood Ornaments
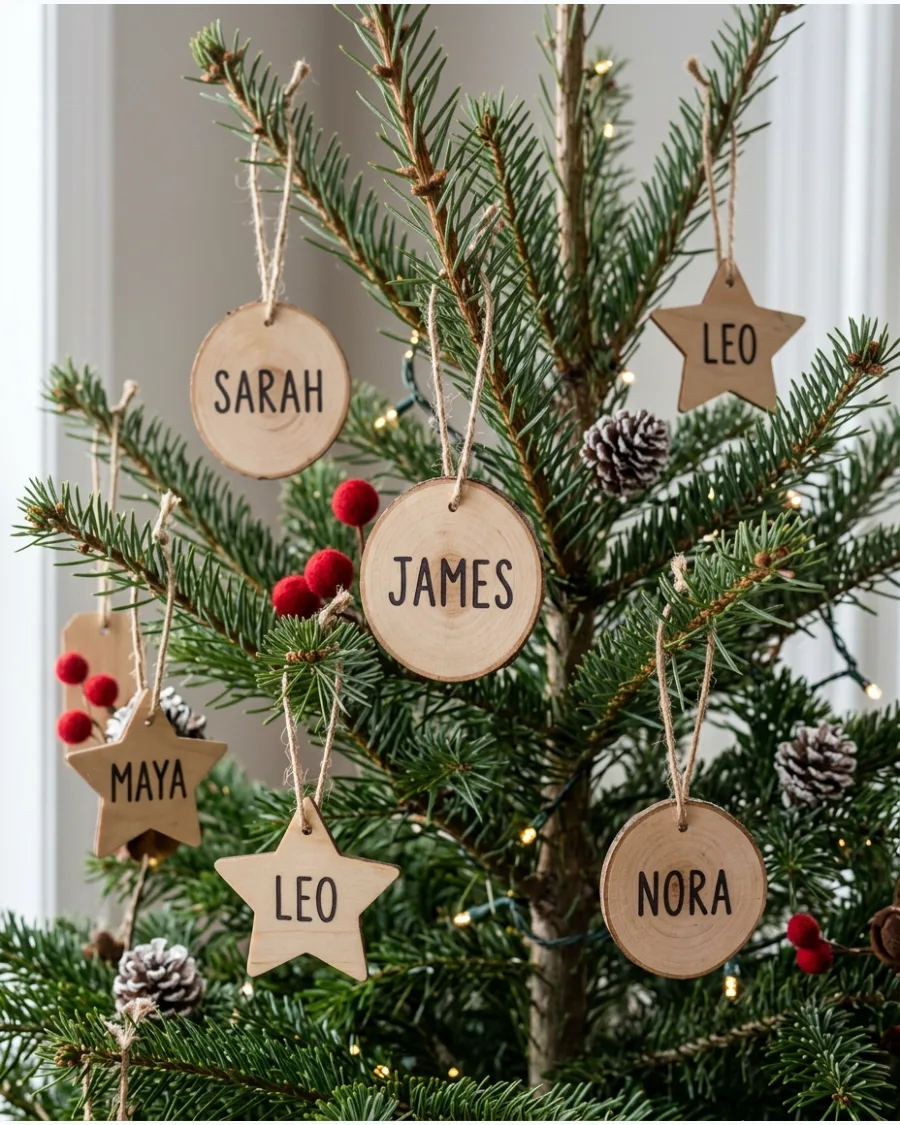
Use letter stamps or a steady hand to put family names on flat wooden stars or circles. Apply a light stain to the wood before lettering to give the ornament more depth and contrast. This creates a cohesive look even if everyone has a different style of ornament on the rest of the tree.
Natural wood tones provide a neutral base that fits into any color scheme.
- Timing: 20 minutes for a family of four.
- Test your stamps on a scrap piece of wood first to check ink saturation.
- Add a small wooden bead to the hanging string for an extra decorative touch.
Best shortcut: Use a white paint pen instead of black ink for a cleaner, high-contrast look on darker stained wood.
47. Family Initial Ribbon Ornaments
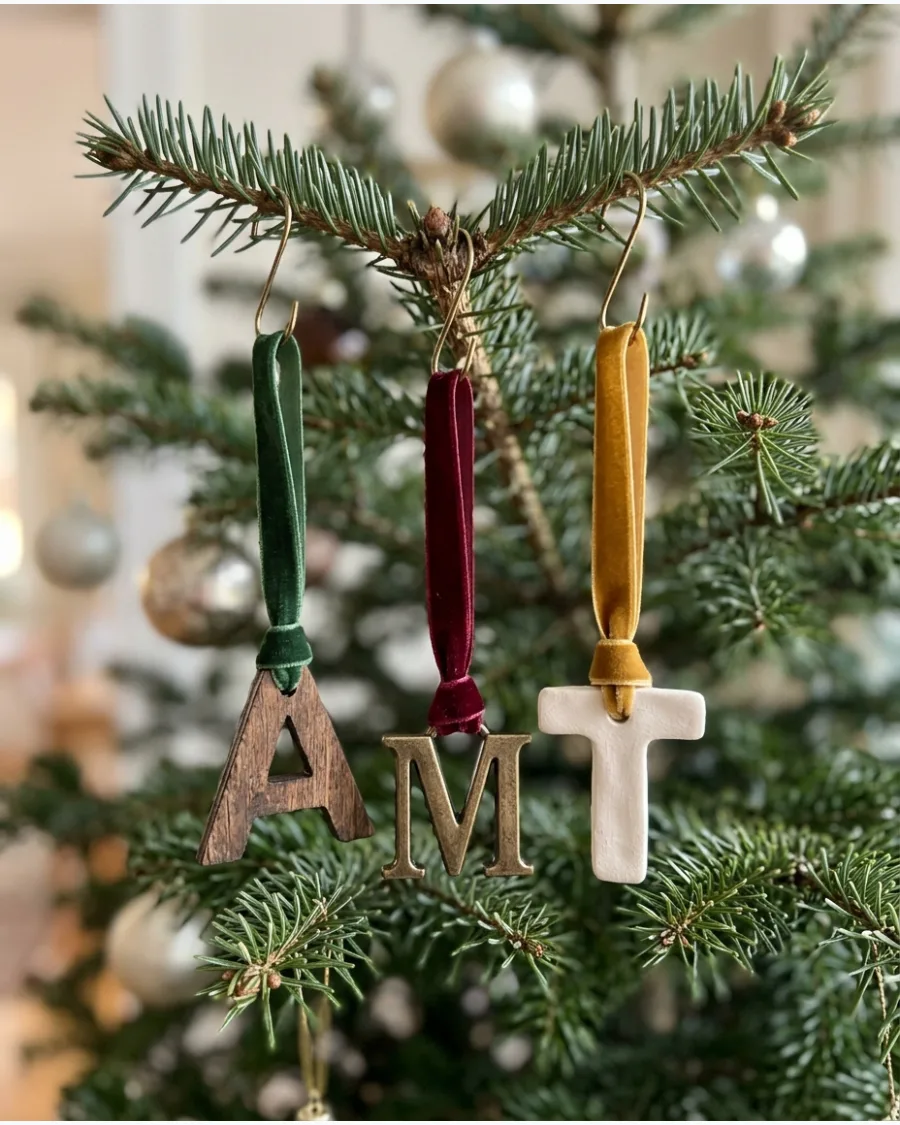
Slide a metal or painted wood initial onto a long loop of high-quality velvet ribbon. Tie the ribbon in a tight knot at the top to keep the letter from sliding off or hanging crooked. These are the fastest way to personalize a tree without a lot of crafting mess.
Choose a ribbon color that contrasts sharply with the green of the tree for the best visual impact.
- Budget: $12 for a spool of velvet ribbon and a set of initials.
- Use 3/8-inch wide ribbon to ensure it fits through the loops of standard charms.
- Cut the ribbon ends at a sharp angle to prevent fraying over time.
Quick win: Use different ribbon colors for different branches of the family to keep the tree organized and meaningful.
48. Memory Map Ornaments
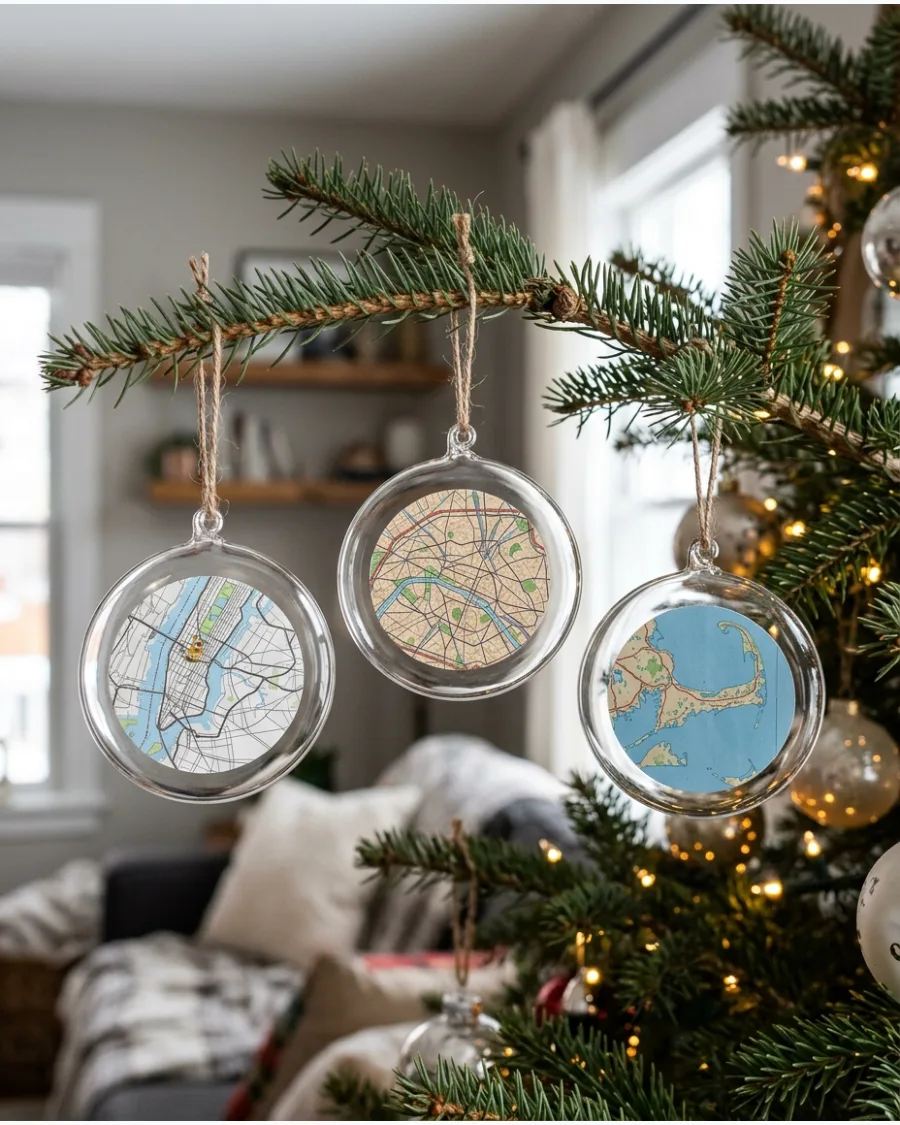
Cut circles out of old road maps or printed maps showing a significant location. Glue the map piece to a stiff cardboard backing to prevent the paper from warping inside a clear bauble or frame. It is a great conversation starter for guests who want to know the story behind the location.
Focus on maps with vibrant colors or interesting topographical lines for better detail.
- Timing: 15 minutes per ornament.
- Use a circle punch to get perfectly clean edges on the map paper.
- Mark the exact house or location with a tiny red heart sticker.
Most people skip this: Use maps from different eras to show how a hometown or favorite vacation spot has changed over the years.
VINTAGE AND NOSTALGIC DIY ORNAMENTS
49. Vintage-Inspired Tinsel Star Ornaments
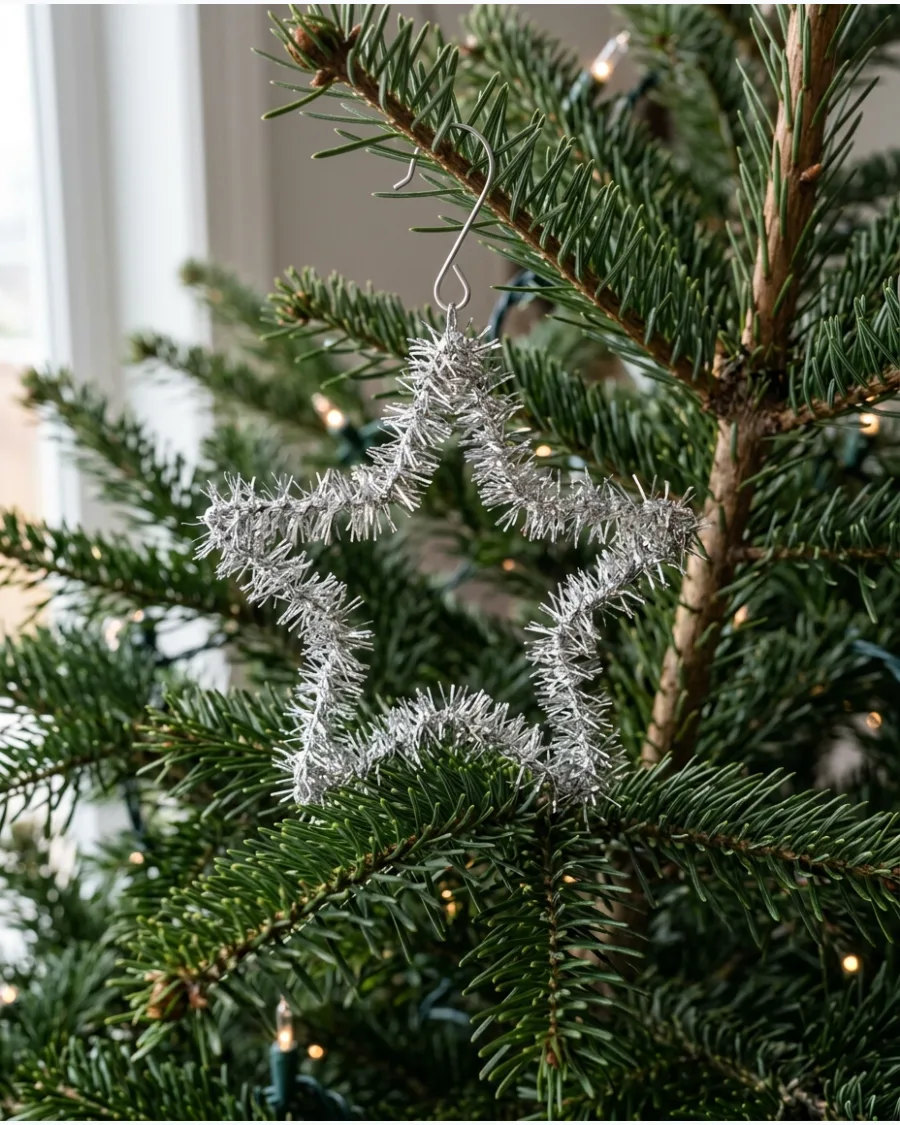
Wrap thin silver or gold tinsel tightly around a wire star frame until the metal is completely hidden. Use a small drop of hot glue at the start and end of the wrap to keep the tinsel from unraveling. This mimics the look of mid-century decor and catches the tree lights beautifully.
Fine-cut tinsel looks more sophisticated and vintage than the chunky modern versions.
- Budget: $6 for wire frames and tinsel garland.
- Choose tinsel with a wire core so it grips the star frame as you wrap.
- Store these in a hard-sided container to prevent the tinsel from getting crushed.
Best shortcut: If you cannot find wire star frames, bend a standard wire coat hanger into a star shape using pliers.
50. Victorian Paper Cone Ornaments
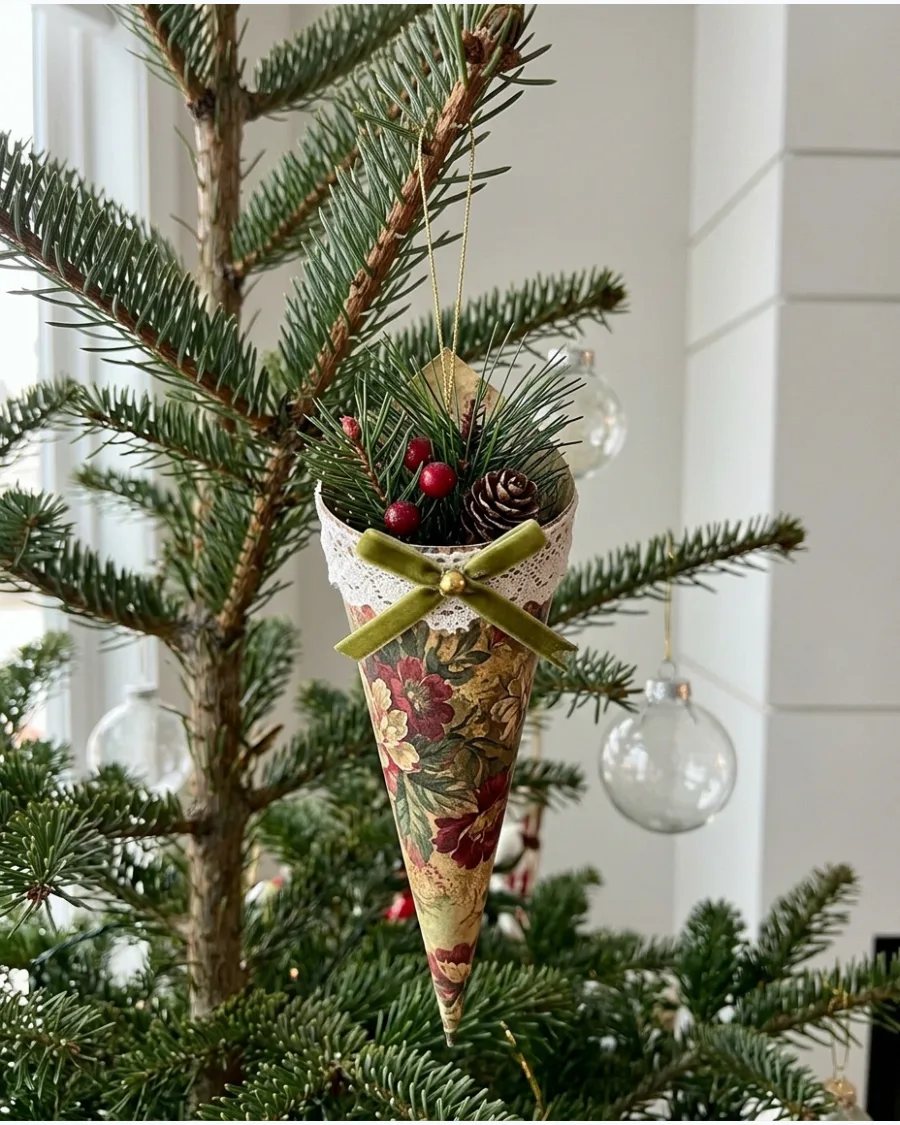
Roll heavy patterned paper into a cone shape and secure the edge with strong double-sided tape. Glue a strip of lace or tinsel around the top rim to hide the paper edge and add a touch of elegance. These were traditionally filled with small candies or sprigs of evergreen.
Use a stiff cardstock so the cone maintains its shape while hanging on a sturdy branch.
- Timing: 25 minutes for a set of three.
- Use a 6-inch square piece of paper for a standard-sized ornament.
- Attach the hanging cord to the inside of the rim so the cone hangs straight.
Quick win: Spray the finished cone with a light mist of glitter hairspray for a subtle, vintage-style shimmer.
51. Retro Beaded Icicle Ornaments
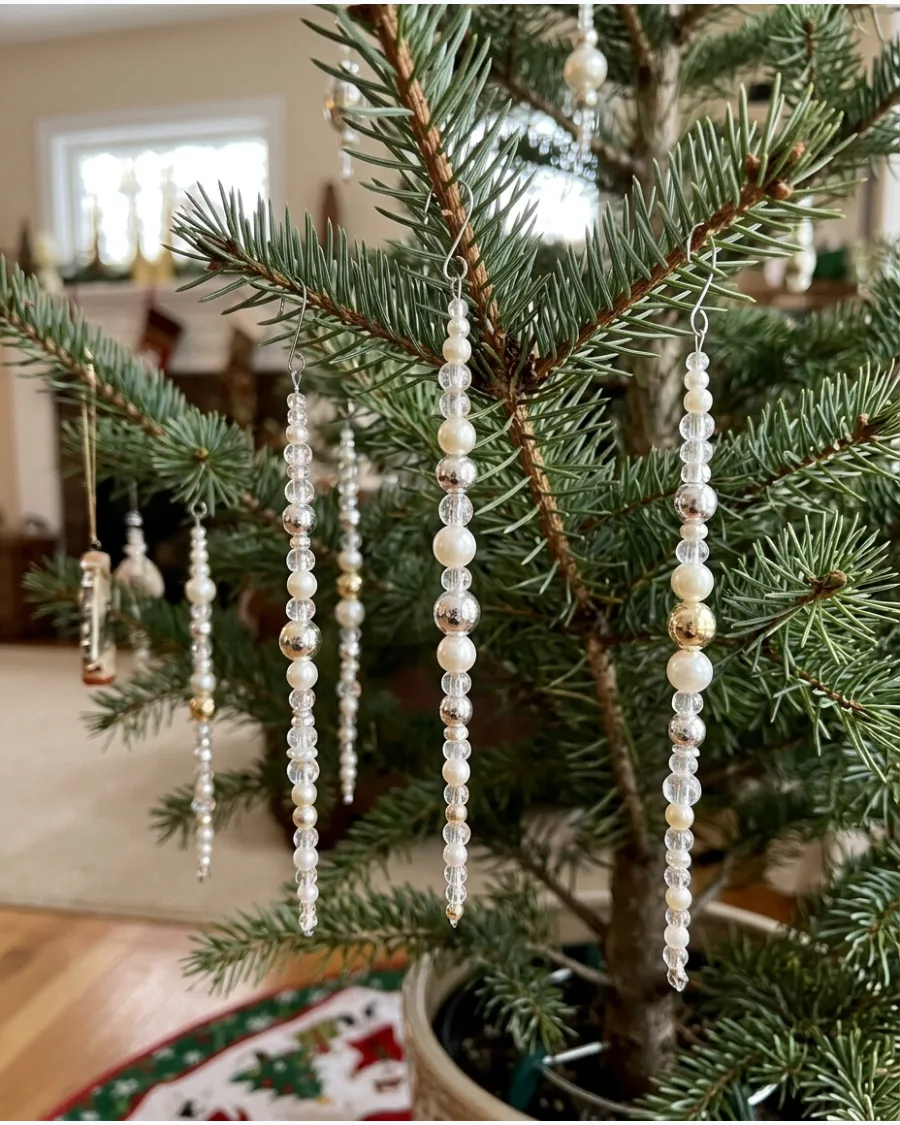
String translucent, pearl, and metallic beads onto thin wire or fishing line. Taper the size of the beads from top to bottom to mimic the natural look of ice.
Secure the bottom bead with a small loop or a crimp bead to keep the icicle shape intact. These catch the light beautifully and add a sense of height to the tree.
- $5-$10 for a variety pack of beads; takes 10 minutes per ornament.
- Thread beads onto 24-gauge jewelry wire for a stiff, straight hang.
- Swap metallic beads for iridescent ones to create a more modern, frozen look.
Most people skip this: Use a wire with a pre-formed loop at the top to save time and ensure a sturdy attachment point for the hook.
52. Mini Vintage Bell Ornaments
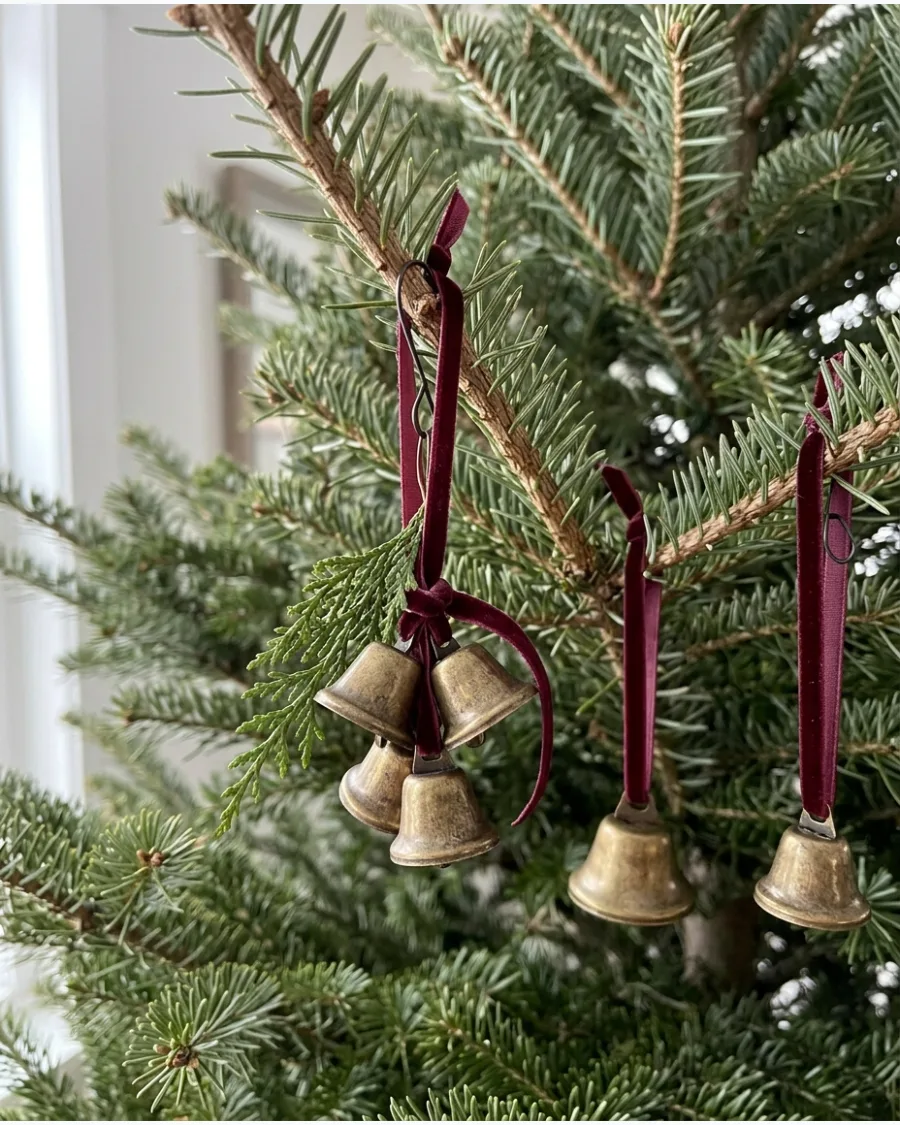
Cluster three small brass-look bells together using a thin wire or string. Tie a piece of velvet ribbon in a deep forest green or burgundy around the top to hide the wire and add a soft texture. Add a tiny sprig of faux cedar or boxwood for a classic holiday touch.
- $15 for a bulk bag of bells and a spool of ribbon; assembly takes 5 minutes.
- Use floral wire to bundle the bells tightly before adding the ribbon.
- Opt for larger cowbells instead of jingle bells for a more rustic, European feel.
Quick win: Scuff shiny new bells with a bit of fine-grit sandpaper to give them an authentic, aged patina instantly.
53. Nostalgic Chenille Candy Cane Ornaments
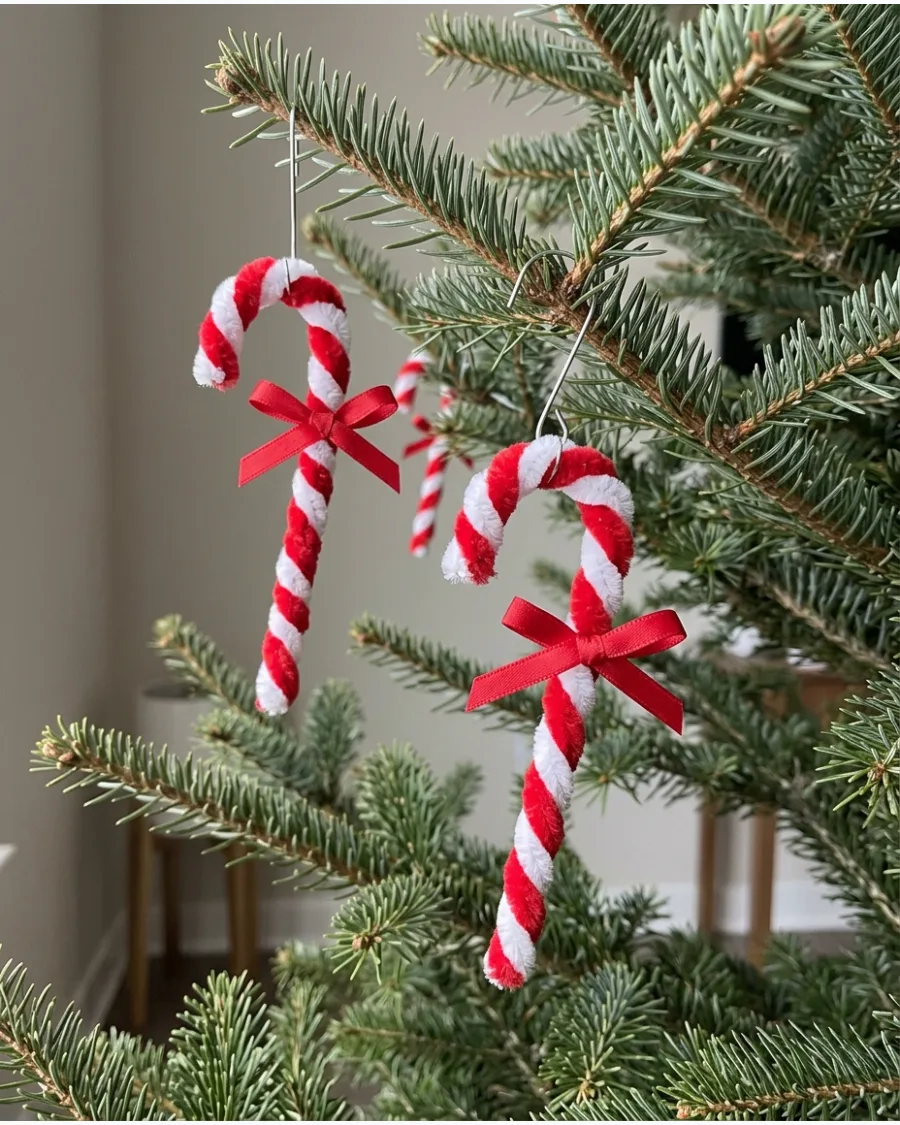
Twist one red and one white chenille stem together tightly to form a spiral pattern. Bend the top third of the twisted stems into a hook shape and trim the bottom to your desired length. These are lightweight and will not weigh down even the smallest branches.
- Under $5 for a pack of pipe cleaners; takes less than 2 minutes to make.
- Use wire cutters instead of kitchen scissors to avoid dulling blades on the metal core.
- Mix in a metallic gold stem for a fancy version of this retro craft.
Best shortcut: Twist the stems while they are flat on a table to ensure the spiral stays even throughout the whole length.
54. Miniature Retro Christmas Light Ornaments
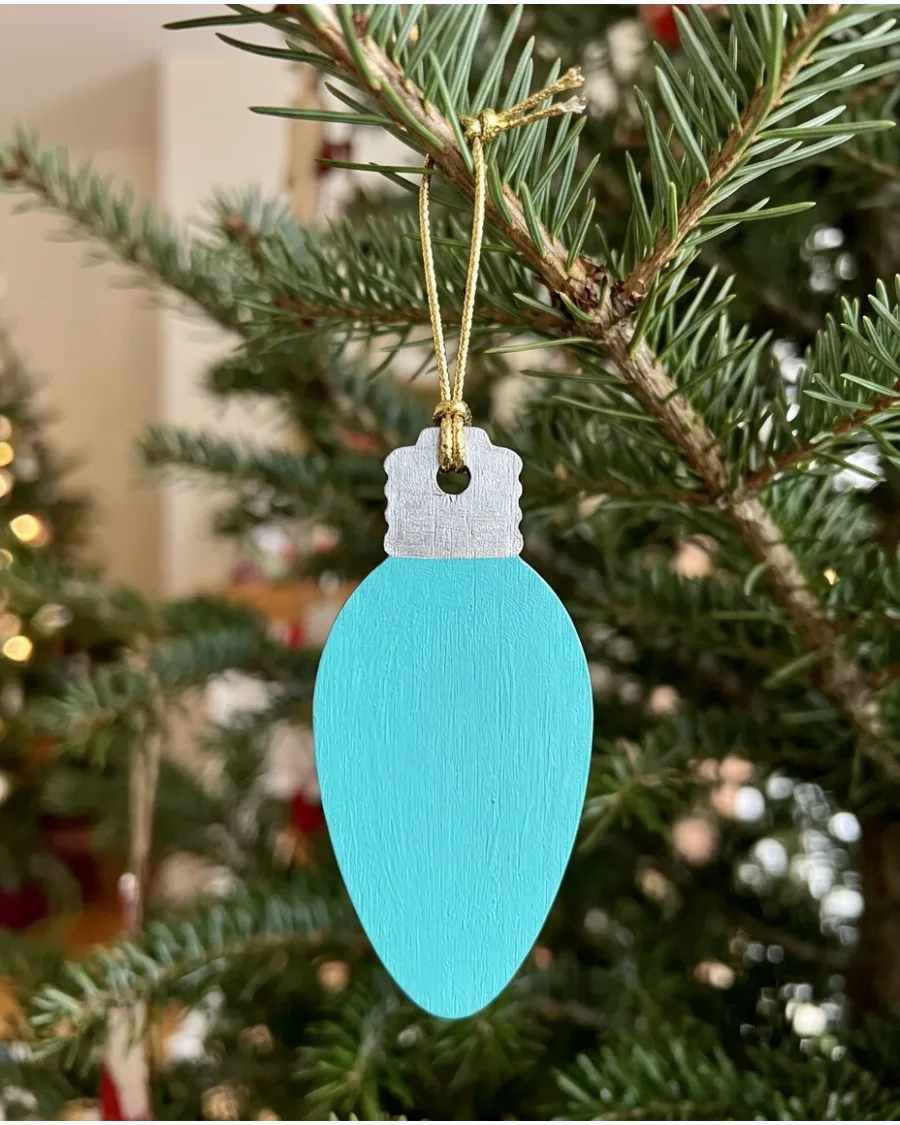
Cut oversized bulb shapes out of thick colorful cardstock or paint small wooden teardrop shapes in bright primary colors. Apply a coat of glossy sealer or clear nail polish to the bulb to give it a realistic glass-like shine. These mimic the large bulbs found on trees in the mid-century era.
- $10 for wood shapes and craft paint; 30 minutes active time plus drying.
- Drill a small hole at the top of the socket end for a gold thread loop.
- Use neon paint colors if you want a more vibrant, updated 1980s retro vibe.
Most people skip this: Paint the top base of the bulb silver or gold to make it look like a real screw-in light fixture.
CREATIVE 2026 DIY ORNAMENT IDEAS
55. Mini Food Christmas Ornaments
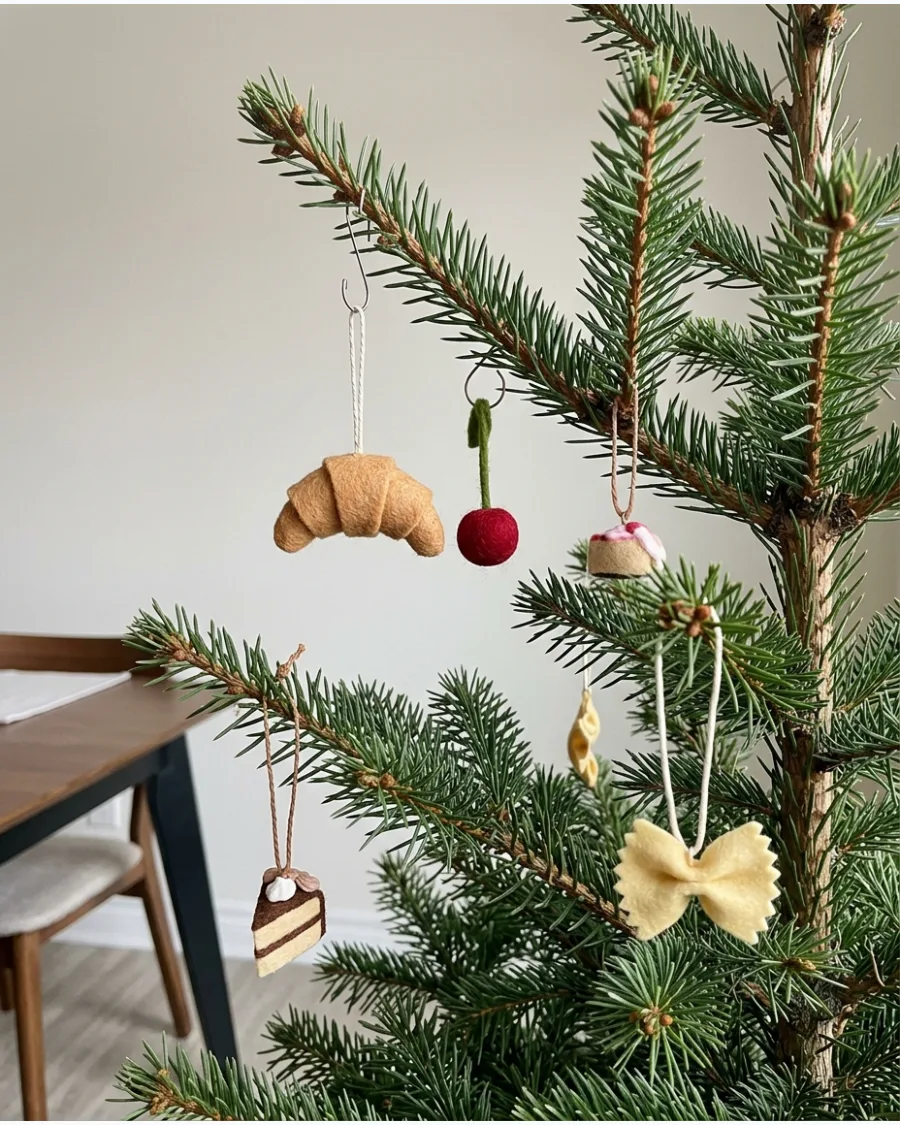
Mold tiny croissants, cakes, or pasta shapes out of air-dry clay or cut them from felt. Use a fine-liner brush to add small details like seeds on a strawberry or sprinkles on a donut for a professional finish. Food-themed trees are a huge trend for adding a playful, kitschy element to the dining room.
- $12 for a multi-color clay set; 20 minutes per food item.
- Seal clay items with a matte varnish to prevent them from cracking over time.
- Glue a small magnet to the back if you want to use them on the fridge after the holidays.
Quick win: Use a toothpick to texture the surface of bread or cake items to make them look more realistic.
56. Cocktail Glass Christmas Ornaments

Construct miniature martini or champagne glasses using clear acetate sheets or small plastic dollhouse accessories. Fill the glass with a bit of resin or clear glue and add a tiny red bead to represent a cherry or olive. This adds a sophisticated and celebratory touch to a bar cart or a party-themed tree.
- $15 for materials; assembly takes about 15 minutes plus resin cure time.
- Use a hot glue gun to attach a thin silver wire stem if building from scratch.
- Scale the size to match the tree; 2-inch tall glasses usually look best.
Best shortcut: Buy pre-made clear plastic dollhouse glasses and simply fill them with drink colors using tinted epoxy.
57. Personalized Hobby Ornaments
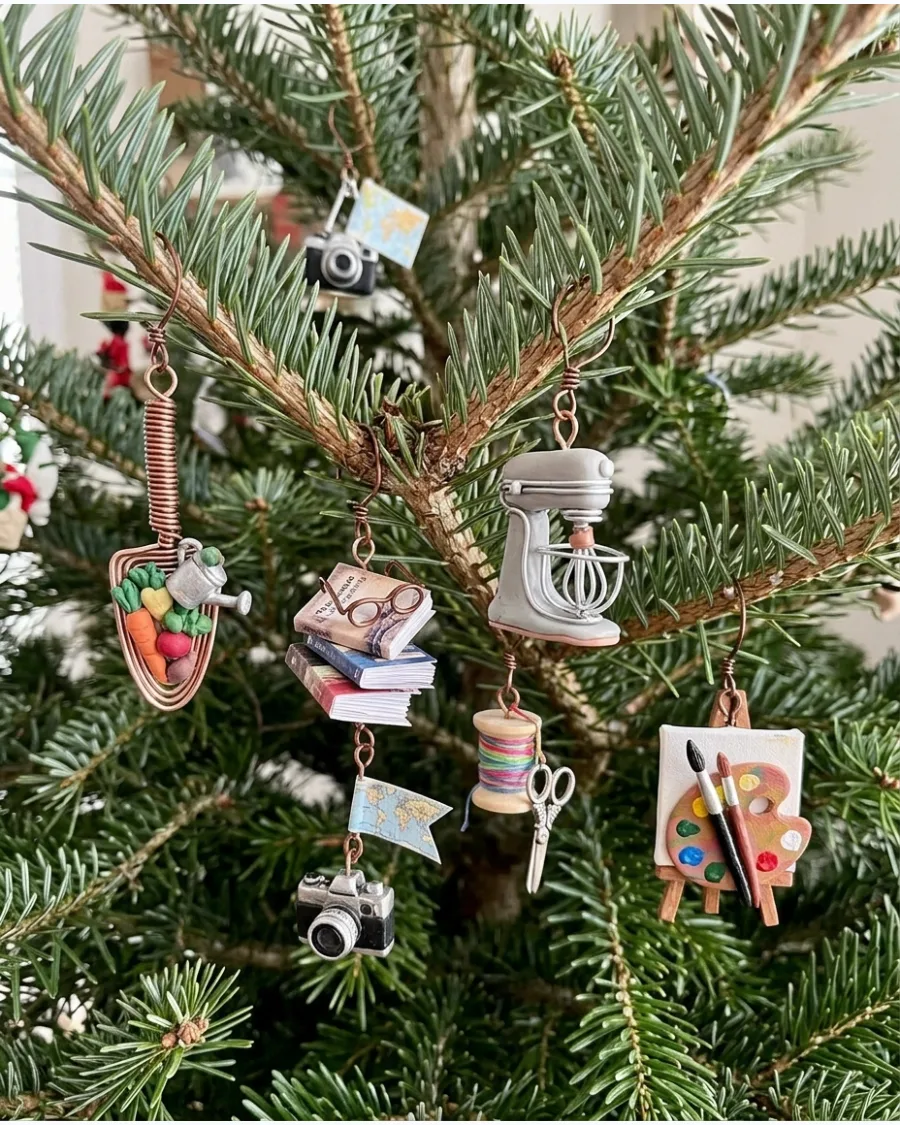
Gather small items that represent favorite activities, like a tiny spool of thread for sewing or a small paintbrush for art. Mount the item onto a small wooden disc or loop a colorful ribbon directly around the object to turn it into a hanging decoration. It makes the tree feel like a curated collection of a life's passions.
- Cost varies by hobby; most items can be found in a household junk drawer.
- Ensure the items are lightweight so they do not pull the branch down.
- Group three related small items together for a more visual story on the branch.
Most people skip this: Use a strong jewelry-grade glue like E6000 to ensure heavy hobby items stay attached to their hanging loops.
58. Thrifted Jewelry Christmas Ornaments
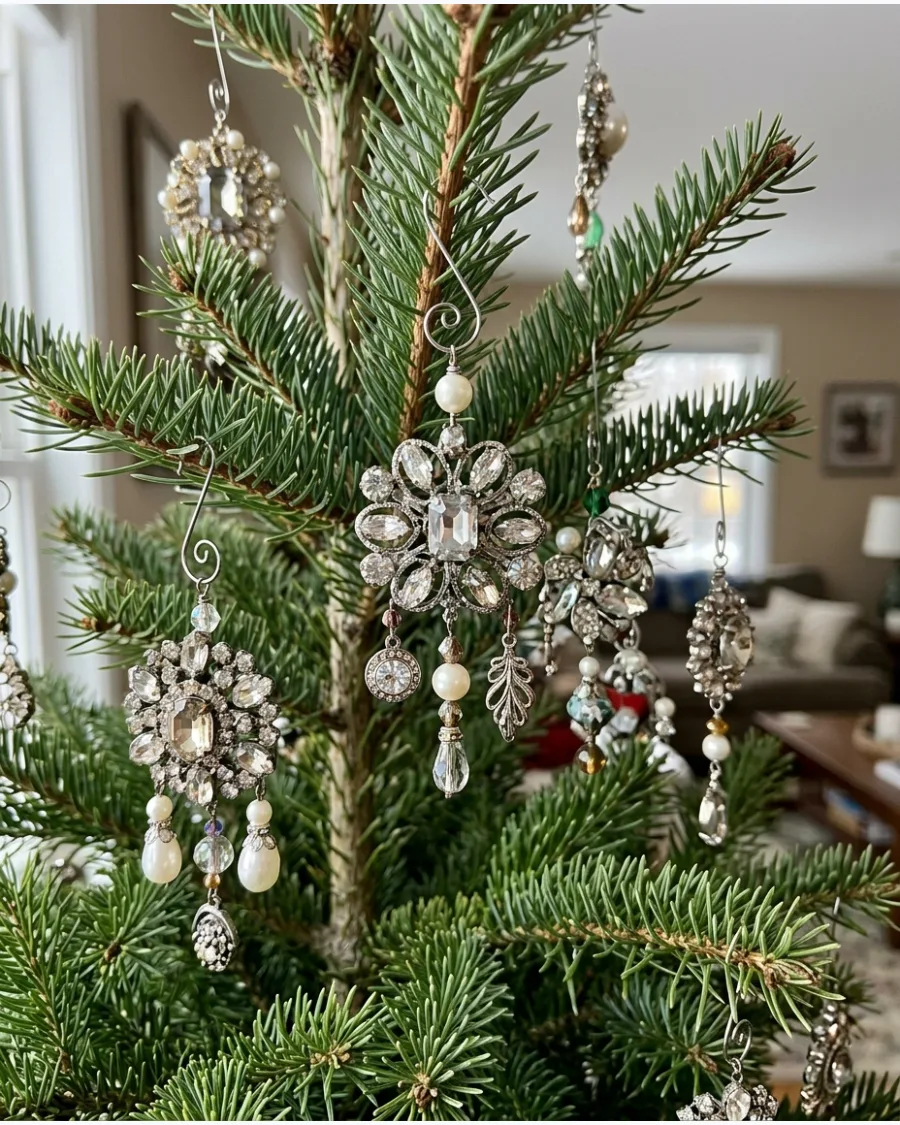
Take apart broken necklaces or use old brooches to create shimmering, high-end looking ornaments. Attach the jewelry pieces to a velvet-covered foam ball or hang a single large pendant from a wide satin ribbon. This is a great way to give new life to sentimental pieces that are no longer wearable.
- $5-$20 at local thrift stores; 5-10 minutes per piece.
- Use needle-nose pliers to remove old clasps or broken chains cleanly.
- Stick to a single metal tone like all gold or all silver for a cohesive look.
Quick win: If a brooch is too heavy, pin it directly to the sturdy inner branch of the tree instead of hanging it from the tip.
59. Mini Embroidered Hoop Ornaments
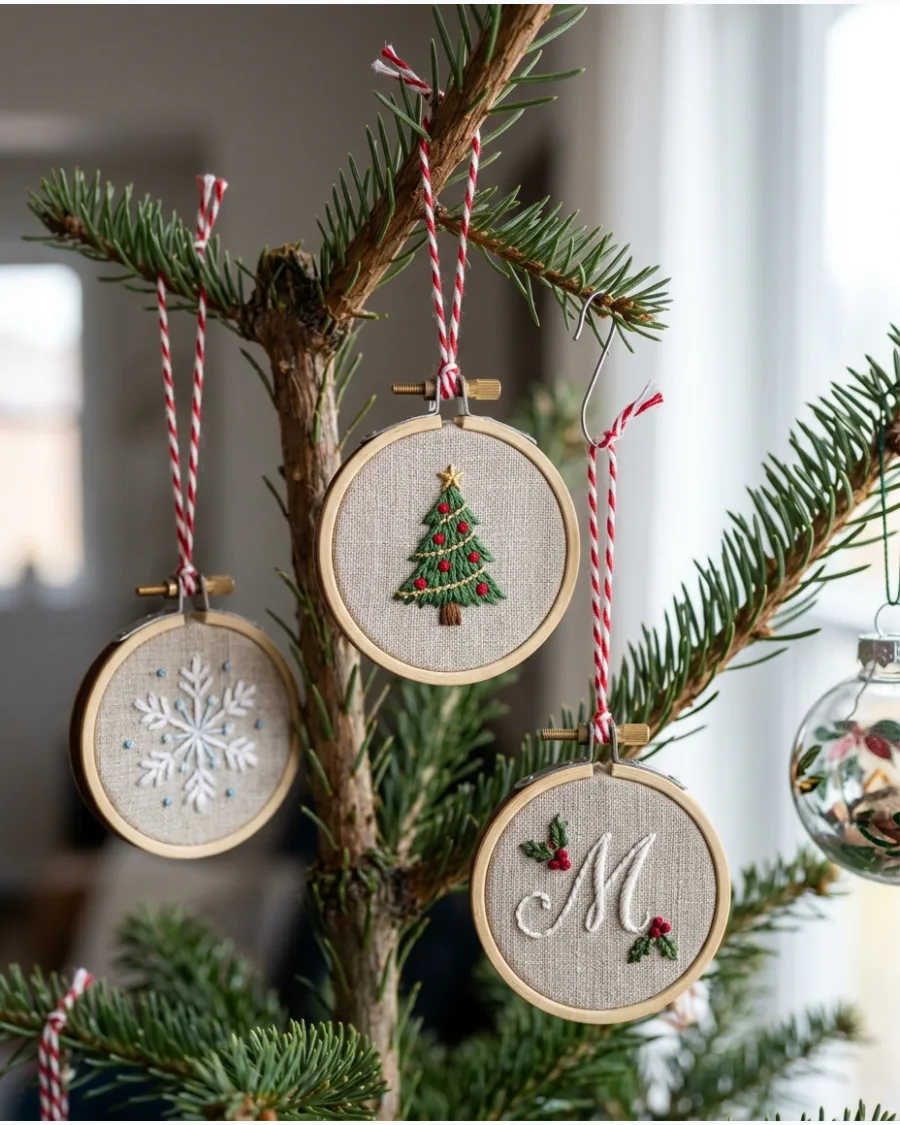
Use 3-inch embroidery hoops to frame small scraps of fabric featuring simple holiday designs. Stitch a quick initial or a tiny green tree onto linen and pull the fabric taut before tightening the hoop screw. These provide a cozy, handmade texture that balances out shiny glass ornaments.
- $2 per hoop plus fabric scraps; 30-60 minutes depending on the design.
- Trim the excess fabric on the back and glue it down for a clean finish.
- Use felt for the design if you want to avoid fraying edges while you stitch.
Best shortcut: Use a holiday-themed fabric print and simply frame a specific character or pattern in the hoop without doing any actual embroidery.
60. Handmade Ornament Memory Collection
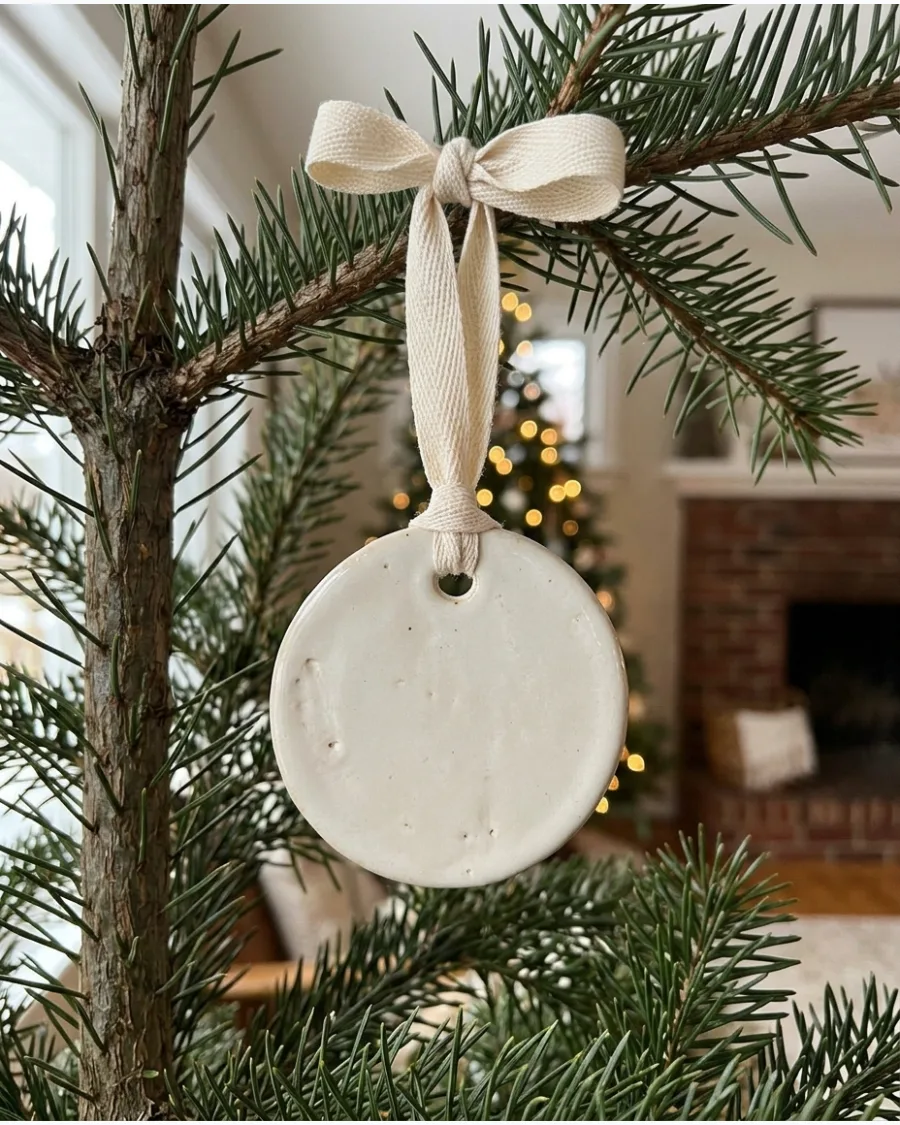
Start a tradition of making one ornament every year that represents a major milestone or memory. Write the year and a short note on the back of the ornament to remember the story behind it as you decorate. Over time, the tree becomes a visual timeline of family history.
- Minimal cost; one evening of crafting per year.
- Store these in a dedicated box so they do not get mixed in with generic decorations.
- Use a consistent material like wood or clay every year to make the collection feel unified.
Most people skip this: Take a photo of the ornament on the tree each year to keep a digital record of how the memory collection grows.
Frequently Asked Questions
What is the best glue for making DIY ornaments?
For wood and fabric projects, hot glue is the best choice because it provides an instant, sturdy bond. If you are working with glass or metal, use E6000 to ensure a permanent, industrial-strength hold that won't fail during temperature changes.
How do I make my handmade ornaments look professional and not 'crafty'?
To achieve a high-end look, stick to a sophisticated, limited color palette and use premium materials like velvet ribbon or linen. Avoid 'crafty' items like neon glitter or pipe cleaners, focusing instead on natural textures and metallic accents.
What are some shatterproof DIY ornament ideas for homes with pets or kids?
Felt cutouts and rustic wood slices are beautiful, durable options that won't break if knocked off the tree. You can also use clear plastic baubles filled with festive elements like faux snow or greenery to get the look of glass without the safety risk.
How can I dry orange slices for ornaments without them turning brown?
The secret to vibrant, translucent slices is baking them at a low temperature of 175°F to 200°F for three to four hours. Be sure to flip the slices every hour and remove them from the oven as soon as they are dry to prevent scorching.
What are the best clear ornaments to use for DIY fills?
Glass ornaments offer superior clarity for delicate fills, whereas plastic is much safer for heavy fillings or homes with active pets. Choose iridescent globes to add a soft glow to your tree, or use plain clear spheres to let your internal decorations be the star.