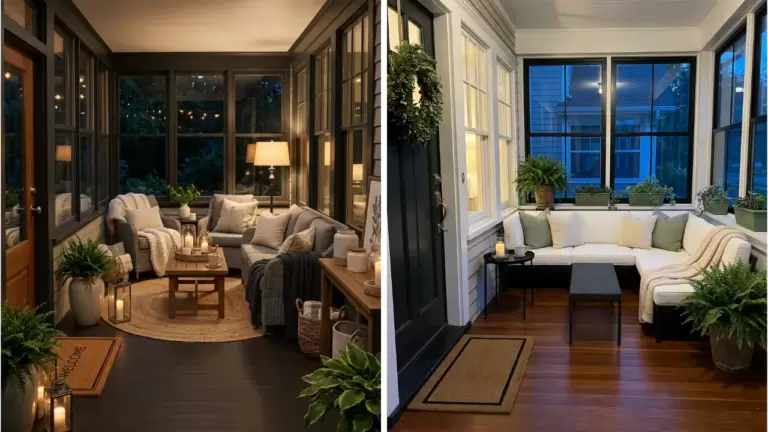
60 DIY Front Porch Christmas Decor Ideas

This post may contain affiliate links: full affiliate disclosure.
Creating a custom front porch for the holidays does not require a massive budget or store-bought kits. Focus on high-quality greenery and a few classic accents like velvet or brass to make the entrance feel expensive and intentional.
FRONT DOOR WREATH AND GARLAND IDEAS
1. DIY Oversized Evergreen Wreath With Velvet Bow
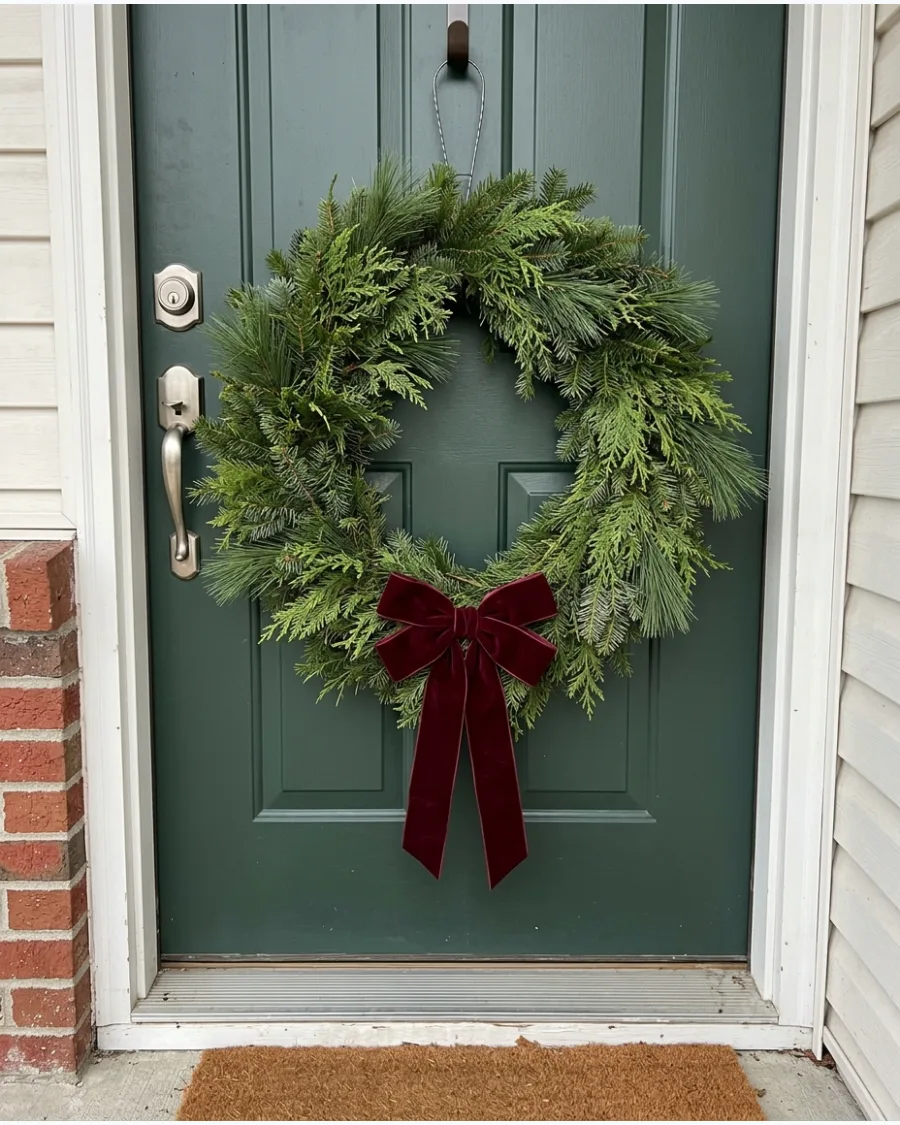
Use a heavy-duty wire frame to support the weight of real pine and cedar branches. Secure the greenery with floral wire to ensure the wreath stays full even in winter winds. A wide velvet bow adds a high-end texture that balances the wild look of natural boughs.
- Wire wreath frame and fresh boughs
- Attach greenery in overlapping layers
- Use weather-resistant velvet for durability
Quick win: Fluff the velvet loops by stuffing them with a small amount of plastic wrap to keep them from flattening outdoors.
2. DIY Mixed Greenery Christmas Door Garland
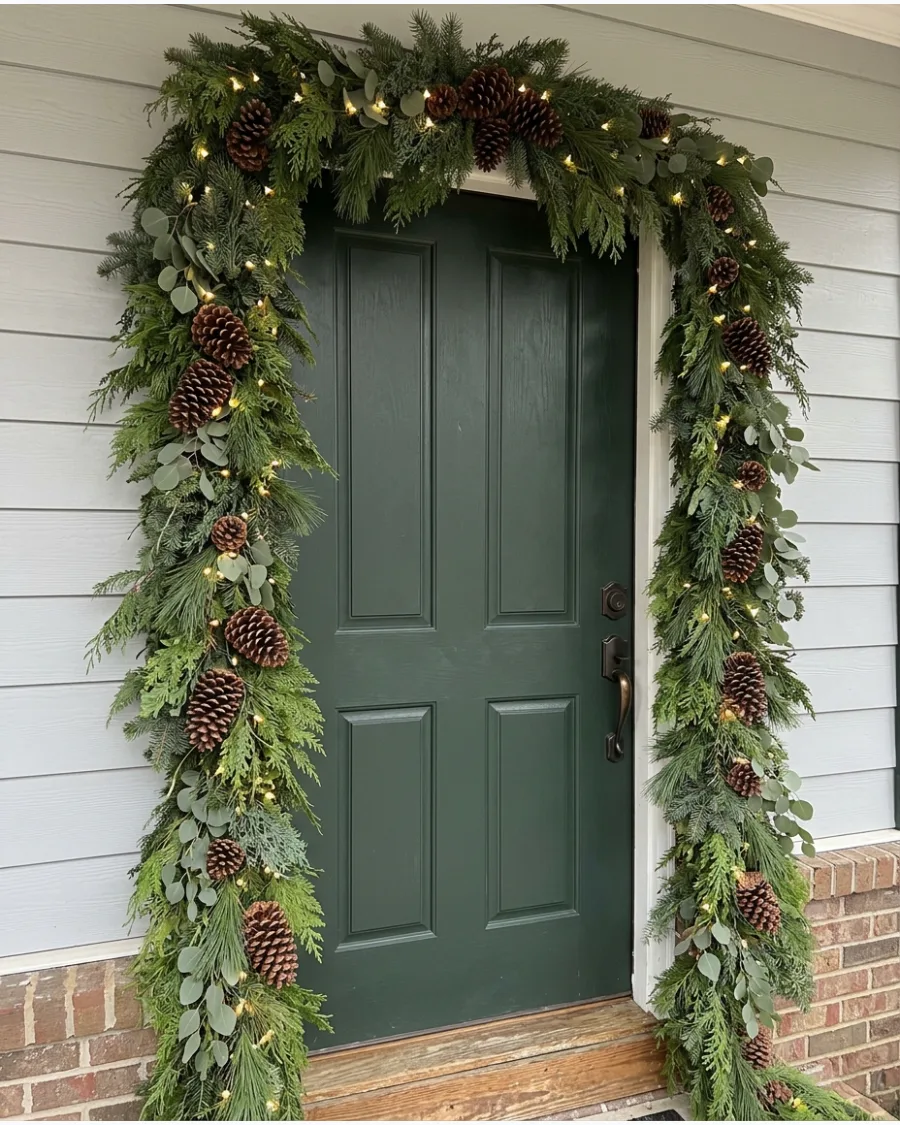
Layering different textures like soft cedar and stiff pine prevents the garland from looking flat or cheap. Incorporate warm white LED lights directly into the branches before hanging to hide the wires effectively. This natural look works best when the greenery spills slightly onto the porch floor at the base of the door.
- Fresh or realistic faux boughs
- Use command hooks or over-the-door hangers
- Battery-operated lights with timers save energy
Best shortcut: Use zip ties instead of wire to secure heavy branches to the main garland rope for a faster setup.
3. DIY Christmas Door Swag With Bells
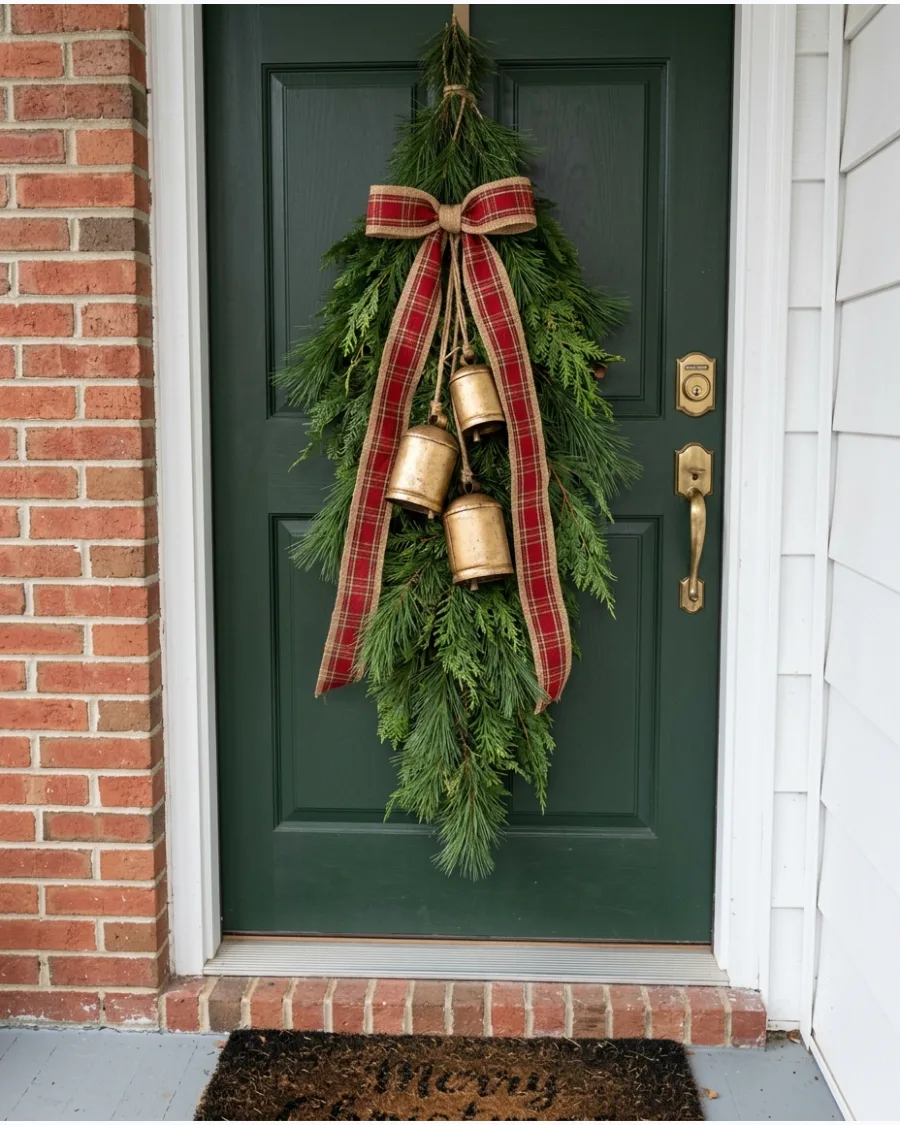
A vertical swag is an excellent alternative for narrow doors where a wide wreath might feel cramped. Bundle several long pine branches together and tie them at the top with a sturdy garden twine. Large brass bells hanging from the center provide a pleasant sound every time the door opens.
- Gathered pine or fir branches
- Heavy brass or antique gold bells
- Hang from a sturdy hook or door knocker
Most people skip this: Lightly spray the pine needles with an anti-desiccant to prevent them from drying out and dropping early.
4. DIY Dried Orange and Pinecone Christmas Wreath
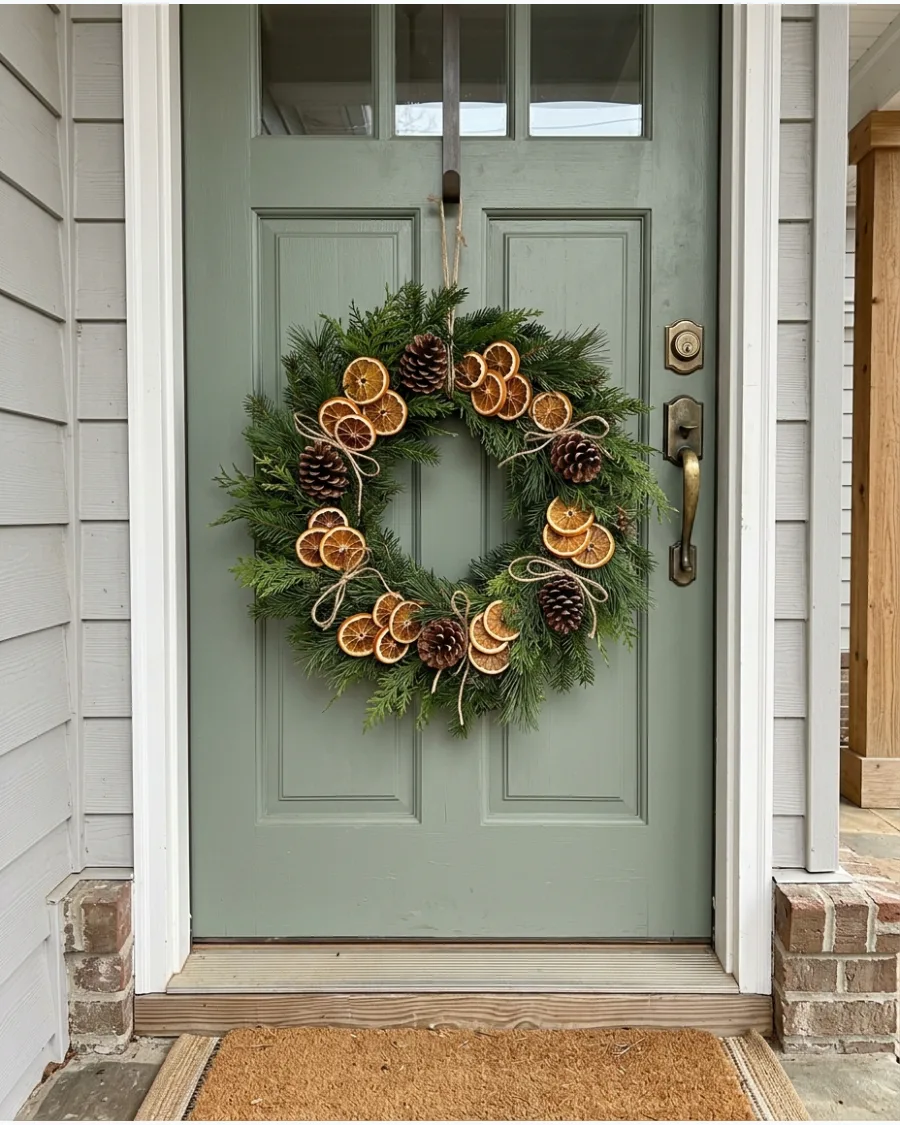
This organic style relies on the contrast between the dark green needles and the bright, translucent orange slices. Thread thin wire through the center of the dried fruit to anchor it firmly to the wreath base. Adding cinnamon sticks gives the decor a subtle scent that visitors notice immediately.
- Dehydrated orange slices and pinecones
- Wire or hot glue for assembly
- Natural grapevine or evergreen base
Quick win: Seal the dried orange slices with a clear matte spray to protect them from moisture and pests.
5. DIY Burgundy Velvet Christmas Door Garland
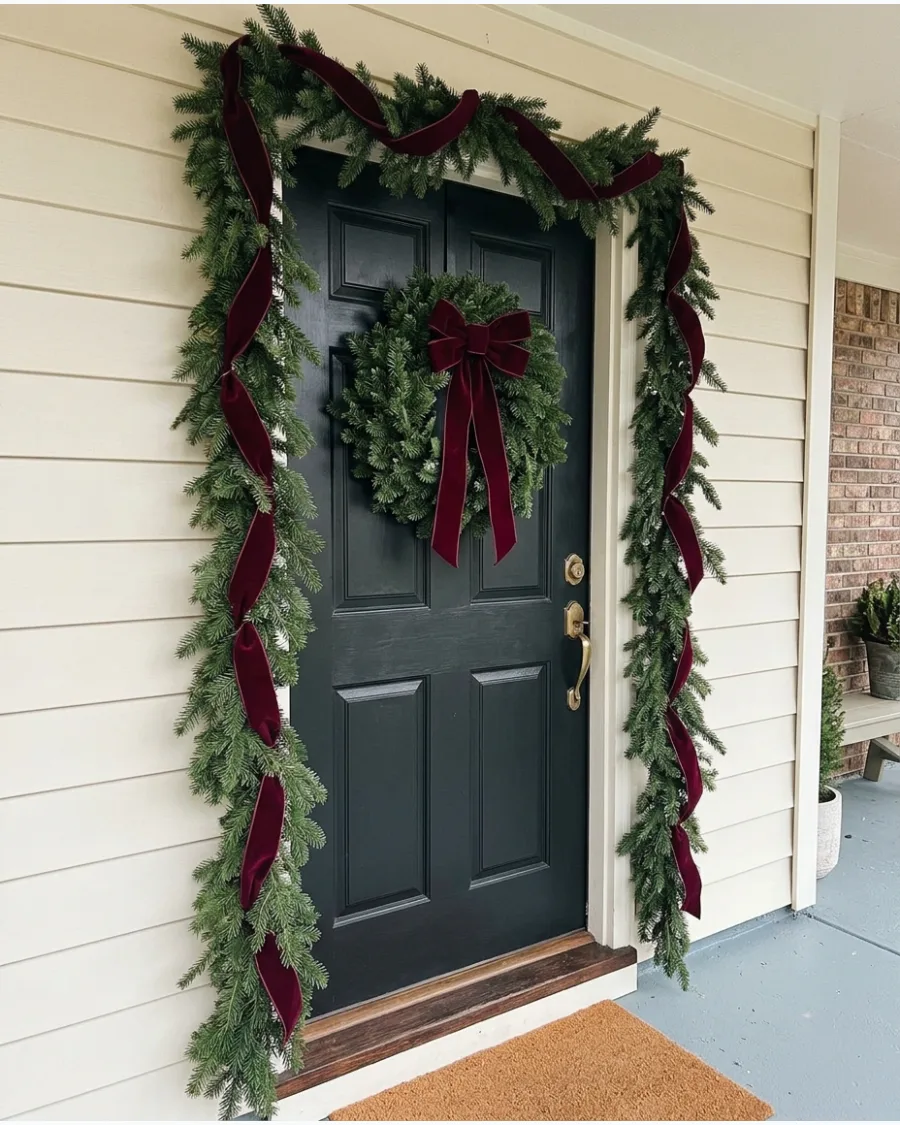
Deep burgundy provides a more sophisticated and modern look than standard bright red. Weave the ribbon loosely through the garland rather than wrapping it tightly to keep the greenery looking lush. This color choice pairs beautifully with dark-painted doors or brick exteriors.
- High-quality burgundy velvet ribbon
- Traditional evergreen garland base
- Floral wire to secure ribbon loops
Best shortcut: Buy wired ribbon so you can shape the loops and tails exactly how you want them to sit.
6. DIY Giant Christmas Bow for the Front Door
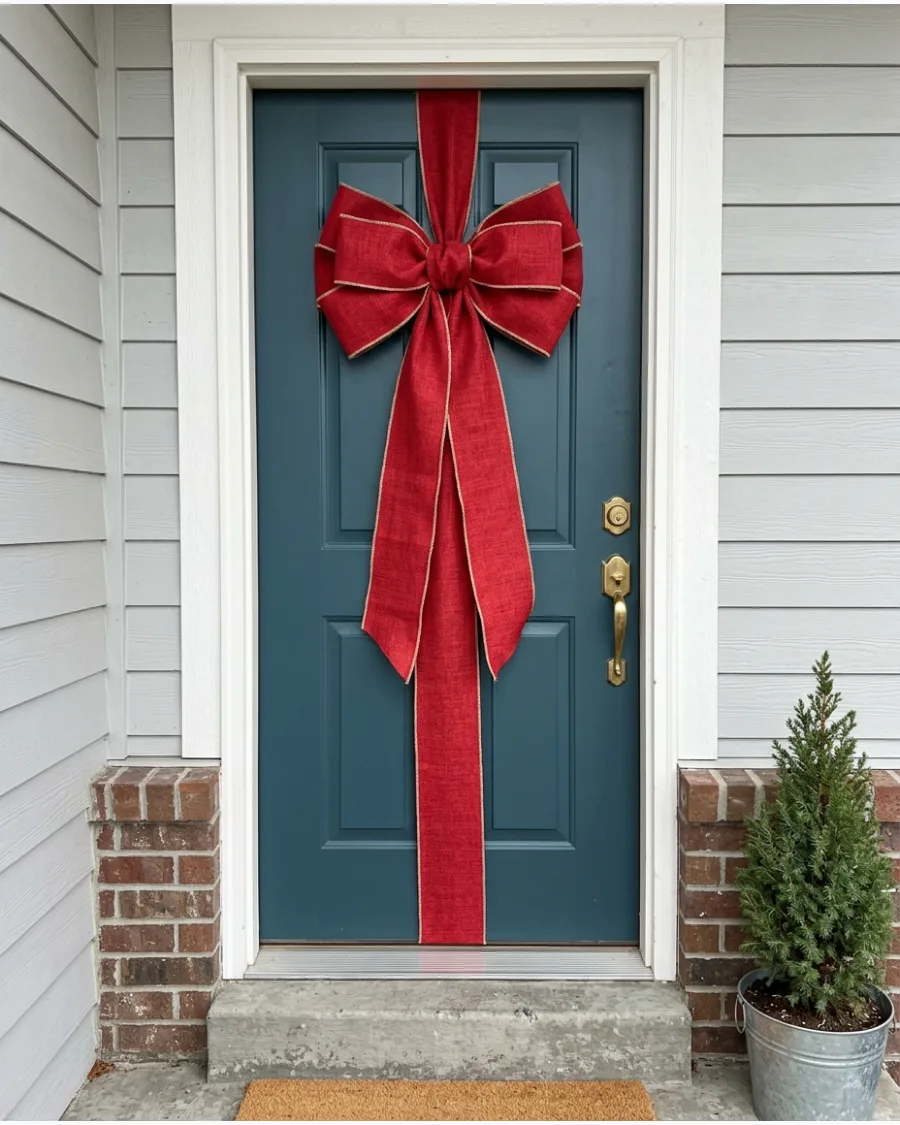
A single massive bow creates a high-impact look without the need for multiple smaller decorations. Choose a fabric that is stiff enough to hold its shape against the wind and snow. This approach is perfect for modern homes where minimal, bold statements look better than cluttered displays.
- Wide outdoor-rated fabric
- Stiff wire or structural mesh
- Over-the-door wreath hanger
Most people skip this: Use a small piece of fishing line to anchor the tails of the bow to the bottom of the door so they don't flap.
7. DIY Magnolia and Evergreen Christmas Wreath
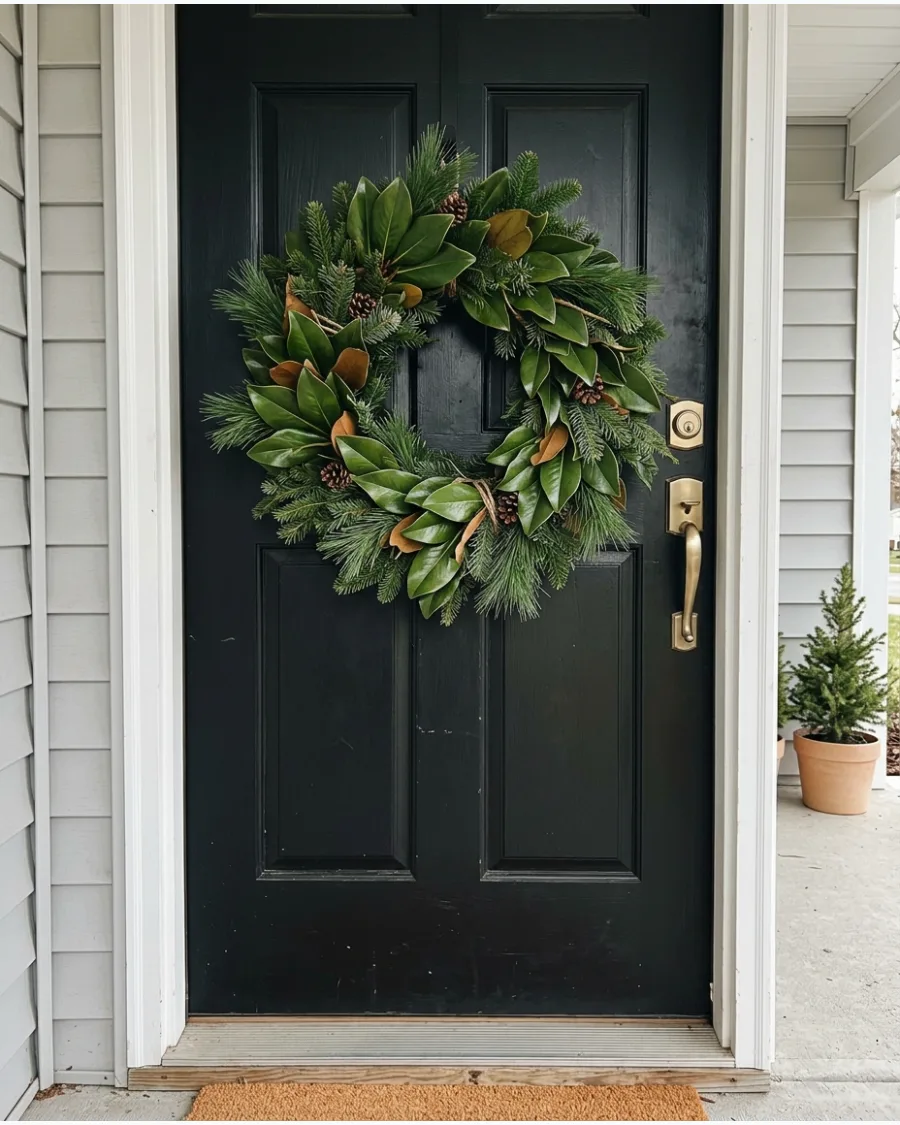
The broad, waxy leaves of the magnolia tree add a different shade of green and a smooth texture to a standard wreath. Mix the magnolia leaves in small clusters to create focal points around the circle. This style feels substantial and holds up well in colder climates because the leaves are quite hardy.
- Fresh or faux magnolia leaves
- Mixed evergreen base
- Large pinecones for added scale
Quick win: If using fresh magnolia, dip the stems in water for 24 hours before assembly to keep them green longer.
8. DIY Asymmetrical Christmas Wreath
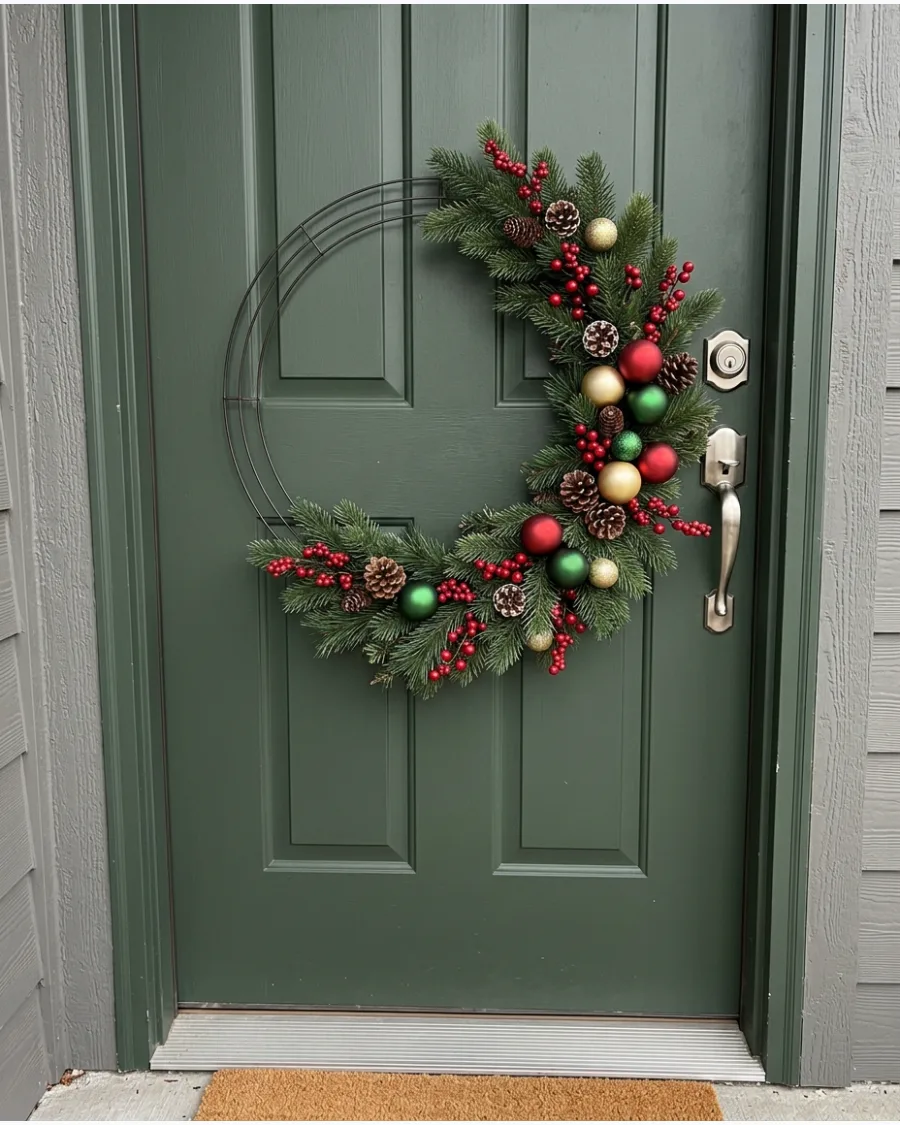
Using an asymmetrical design allows the natural beauty of the wreath frame to show through. Concentrate the heaviest greenery and ornaments on the bottom left or right side for a balanced but modern look. This project is ideal for those who prefer a minimalist or handmade aesthetic over traditional full wreaths.
- Metal or grapevine wreath hoop
- Small bundles of greenery and berries
- Floral wire and snips
Best shortcut: Start with the largest branch as your anchor point and build smaller layers on top of it.
9. DIY Vintage Bell Christmas Wreath
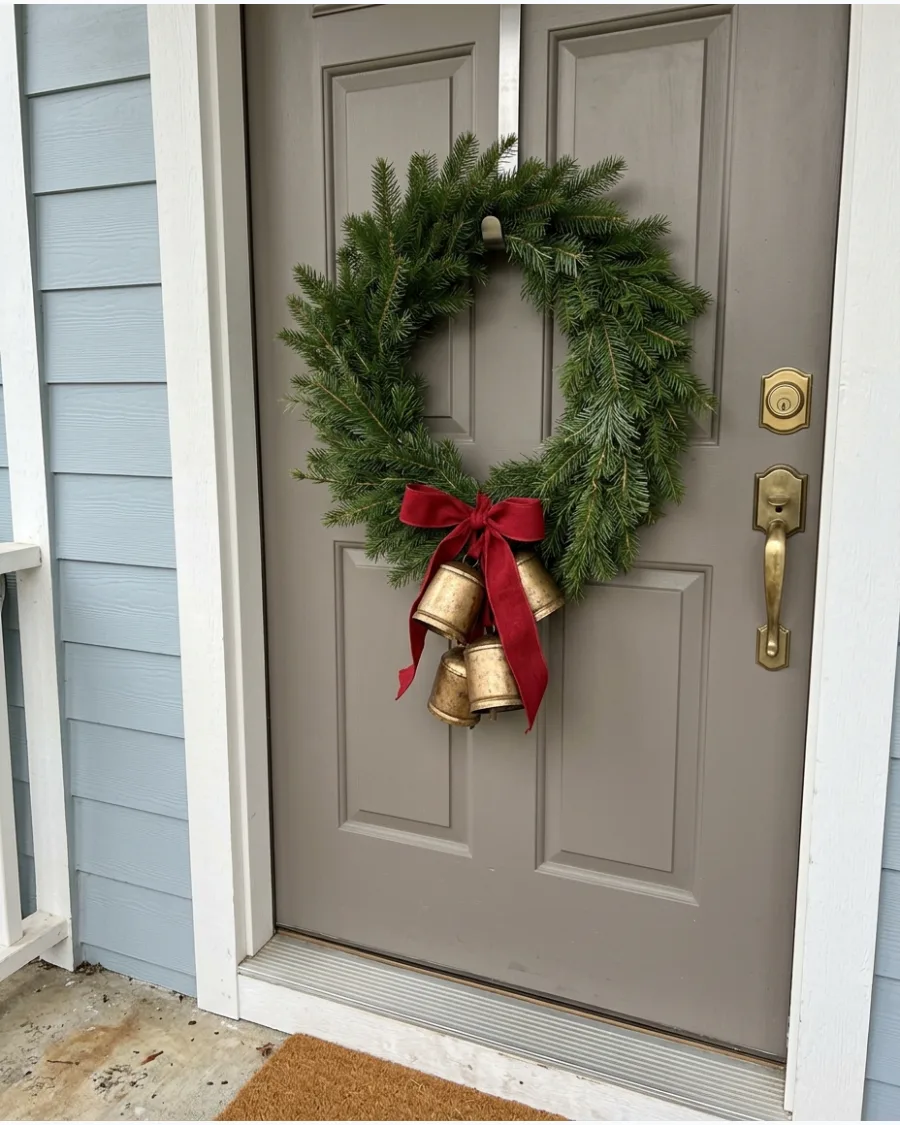
Aged brass bells give the porch a nostalgic, old-world feel that never goes out of style. Hang the bells at varying lengths from the center of the wreath using thick jute twine or ribbon. This design works best on a simple, unadorned evergreen base to let the metal accents stand out.
- Set of 3 to 5 vintage-style bells
- Plain evergreen wreath
- Jute twine or red ribbon
Most people skip this: Scuff new bells with a bit of sandpaper or dark wax to give them an authentic aged appearance.
10. DIY Cedar Garland With Red Berry Clusters
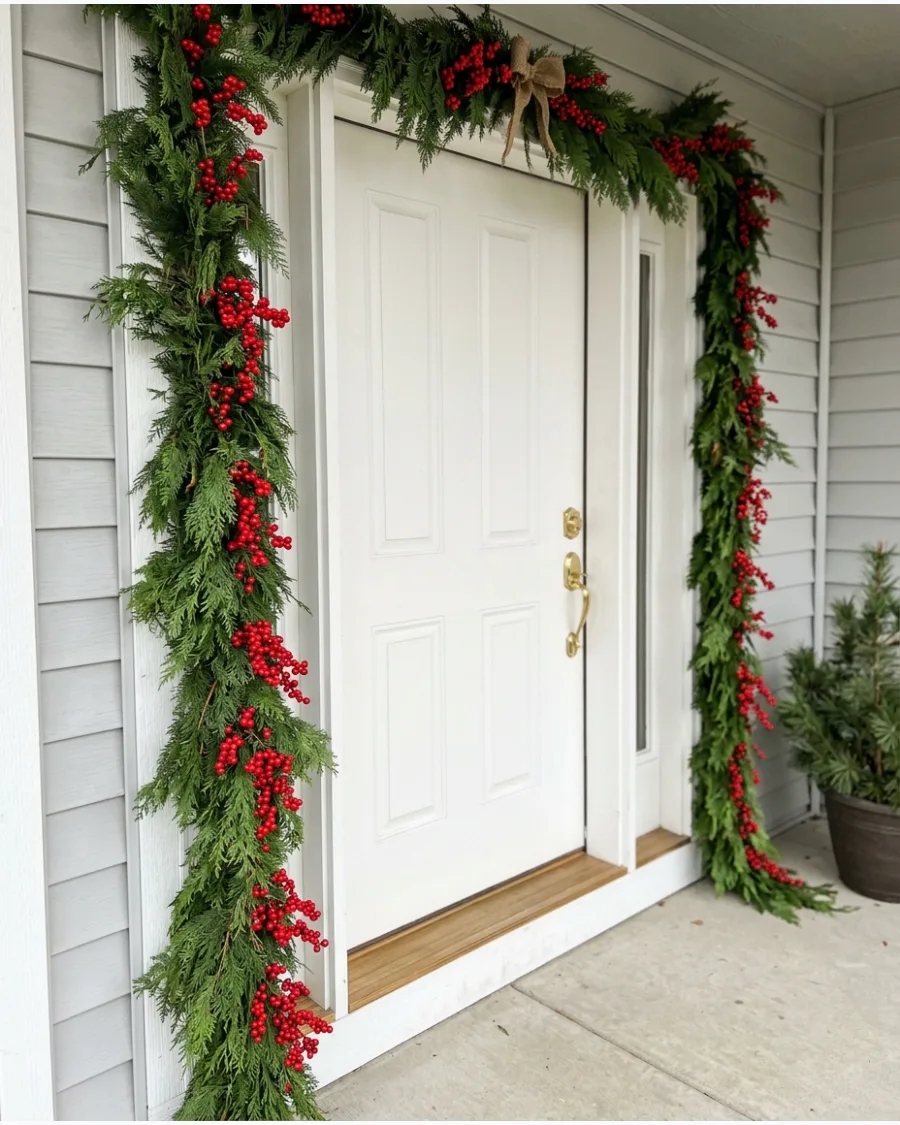
Cedar has a delicate, draping quality that looks more elegant than stiff pine or spruce. Tuck large clusters of artificial red berries into the foliage to create pops of color that are visible from the street. This combination is a classic choice that looks great on almost any style of home.
- Fresh cedar boughs
- Large red berry picks
- Outdoor Command hooks for hanging
Quick win: Use floral tape to bundle berry stems together before inserting them into the garland so they don't fall out.
DIY CHRISTMAS PORCH PLANTERS AND POTS
11. DIY Evergreen Christmas Porch Pots
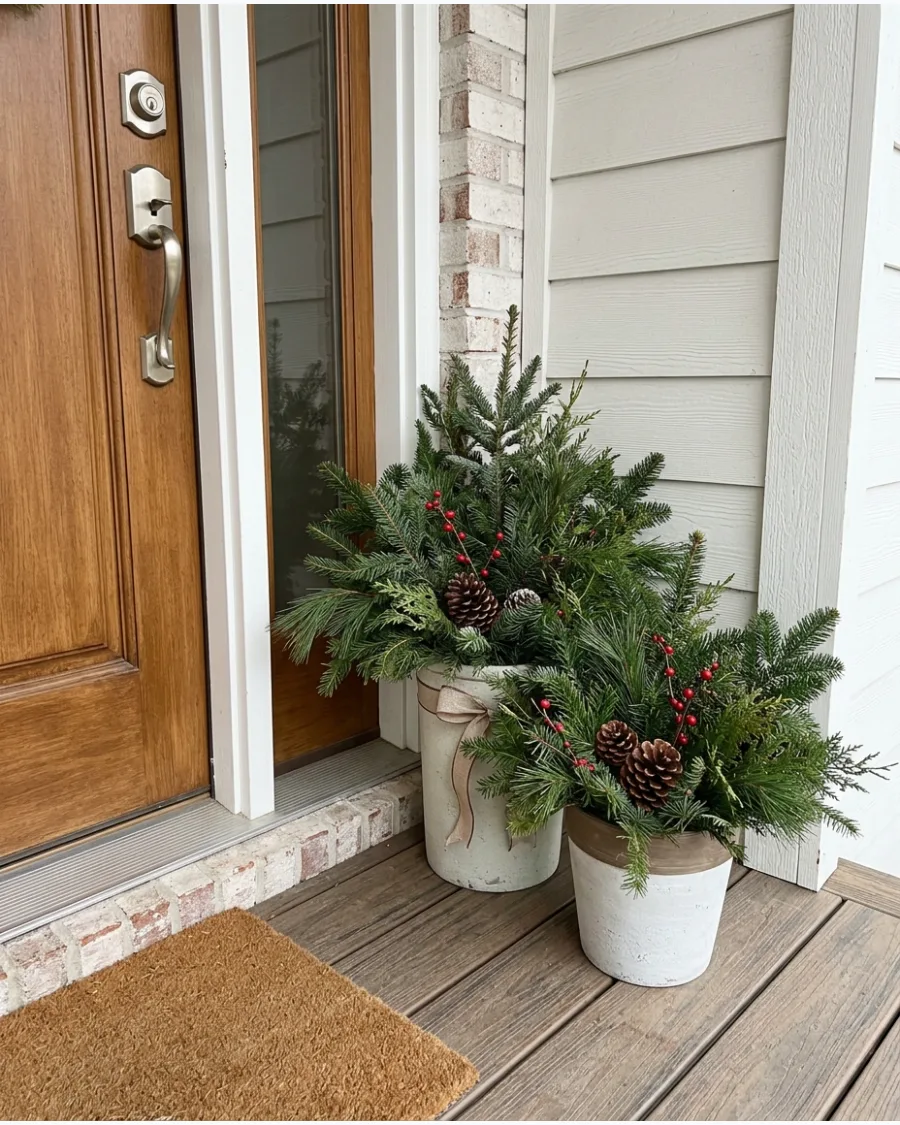
Fill two large porch planters with cut pine, cedar, and fir branches to create a lush, professional look. Arrange taller branches in the center and softer greenery around the edges for the most professional shape. Adding pinecones and berries provides a pop of color that lasts all season.
Symmetrical pots frame the door and make the whole house look more balanced from the street.
- Cut branches from your own backyard or buy bundles at a local tree lot for under twenty dollars.
- Pack the branches tightly into the dirt to ensure they stay upright during heavy snow or wind.
- Swap the red berries for blue or silver accents to match a modern or coastal home style.
Quick win: Use floral foam at the bottom of the pot to keep branches exactly where you want them.
12. DIY Birch Branch Christmas Planters
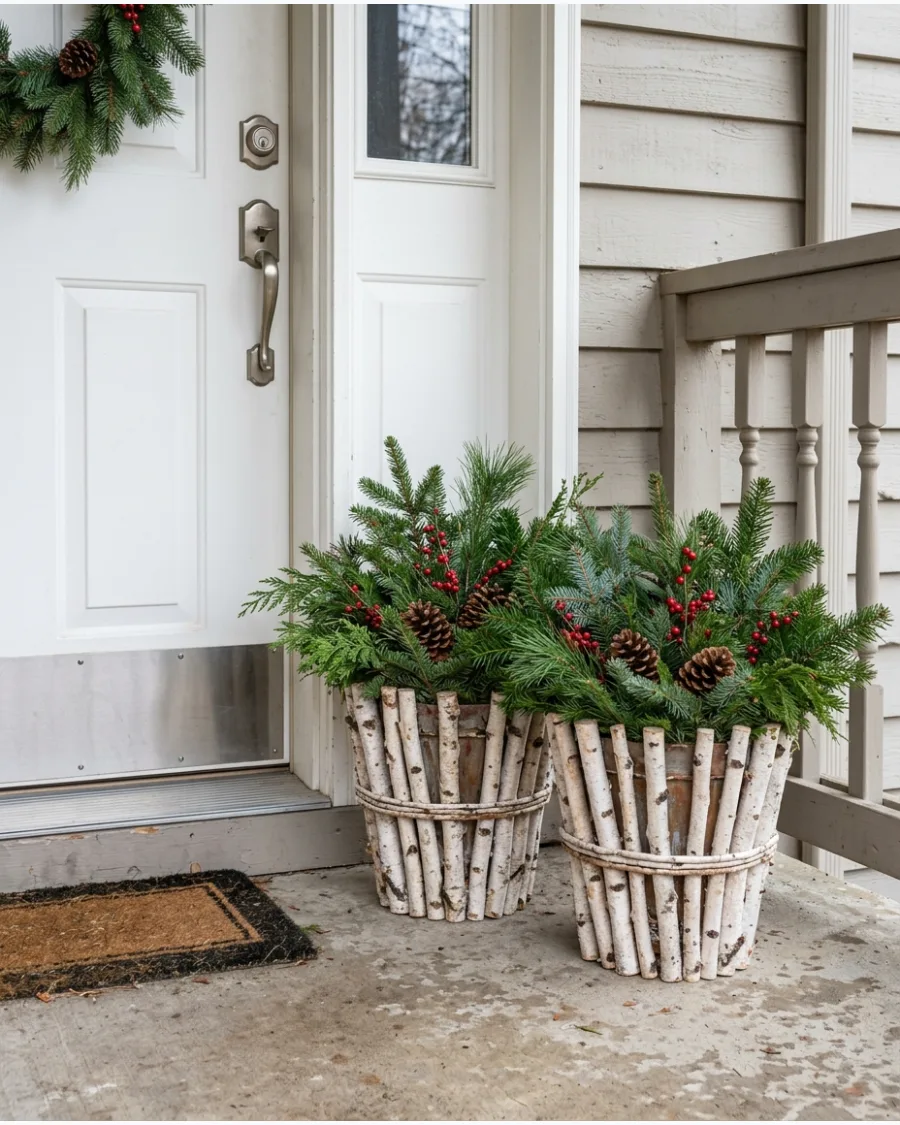
Create tall winter porch arrangements using white birch branches as the centerpiece surrounded by evergreen clippings. Stick birch poles deep into the soil or sand so they do not tip over during winter winds. Add red berries, pinecones, and warm lights to give the planters height and strong curb appeal.
Height is the secret to curb appeal, and birch poles provide that vertical line without a huge price tag.
- Purchase birch poles in bundles of three to create a balanced, triangular focal point in the pot.
- Secure the poles with heavy rocks at the base if you are using a lightweight plastic planter.
- Reuse the birch poles for spring decor by swapping the evergreens for faux tulips or pussy willow.
Best shortcut: Buy pre-cut bundles of greenery at a garden center to save time on foraging.
13. DIY Oversized Bell Porch Planters
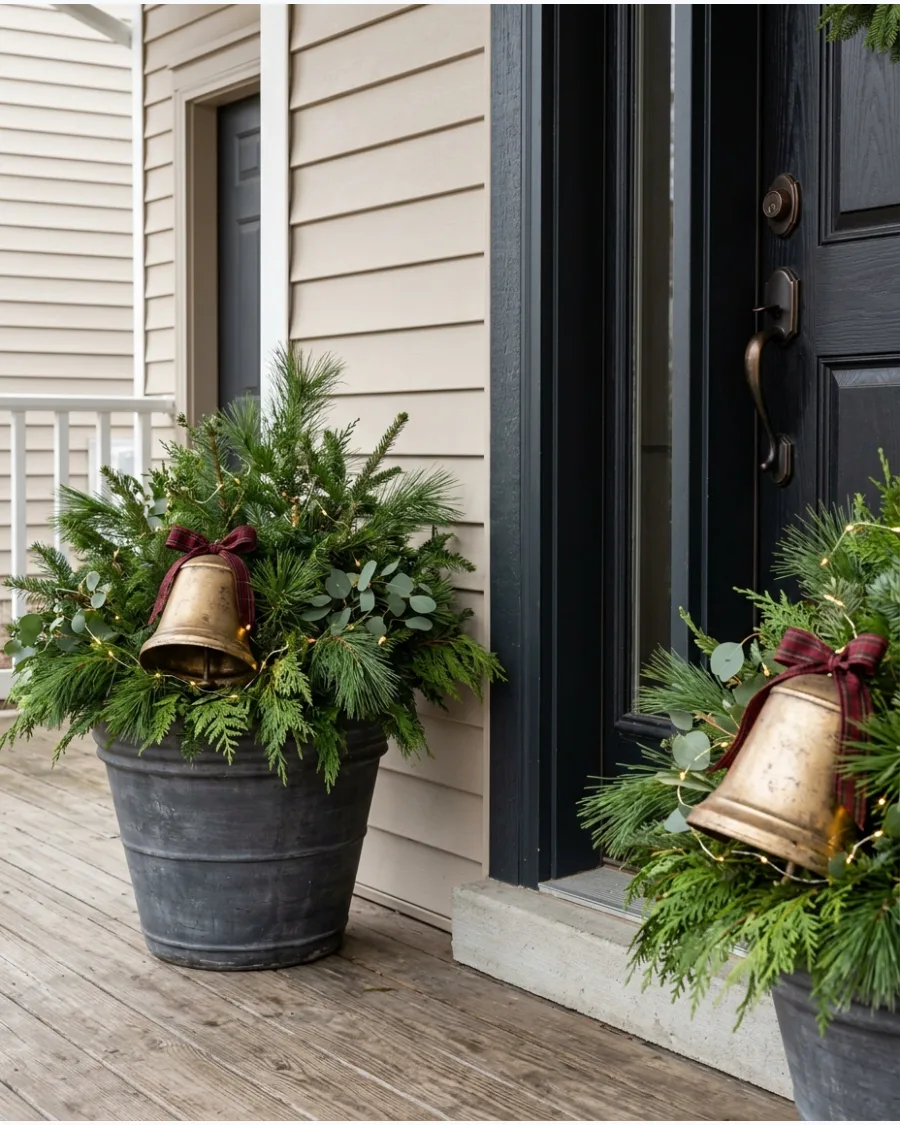
Fill large pots with thick greenery and position one oversized decorative bell prominently near the front of each arrangement. Nestle one large bell slightly off-center to create a focal point that draws the eye toward the door. Add ribbon and subtle lights so the bells remain the recognizable feature of the display.
One big statement piece looks cleaner and more intentional than a bunch of small, busy decorations.
- Look for lightweight metal or plastic bells to avoid putting too much weight on the branches.
- Use a zip tie to secure the bell to a sturdy interior branch so it doesn't roll out of the pot.
- Choose a bell color that contrasts with your house, like silver for red brick or gold for dark siding.
Most people skip this: Remember to water live greenery once a week if the weather is dry so it stays green through January.
14. DIY Red Ornament Christmas Porch Pots
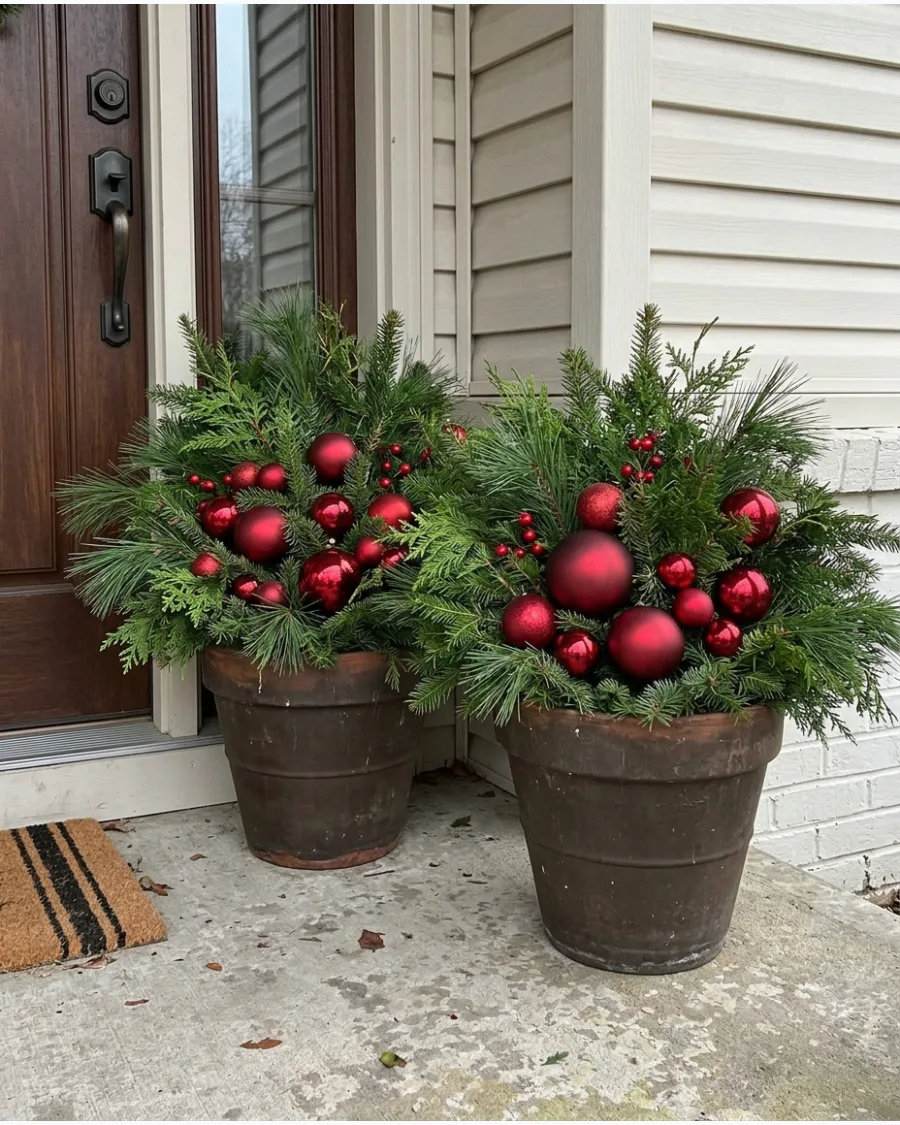
Start with evergreen branches and tuck weather-resistant red ornaments between the foliage.
Use shatterproof ornaments in several sizes to add depth and interest without the risk of broken glass on the porch. Instead of many colors, stick to red to produce a polished traditional entrance.
Sticking to one color like red keeps the porch looking coordinated even if the materials are different.
- Pick up a large tub of shatterproof ornaments at a big-box store for a low-cost decorating solution.
- Thread a piece of floral wire through the ornament loop and twist it around a branch to keep it in place.
- Mix matte and shiny finishes in the same color to give the arrangement a more expensive look.
Quick win: Group ornaments in clusters of three for a more designer-level appearance.
15. DIY Gold Ornament Evergreen Planters
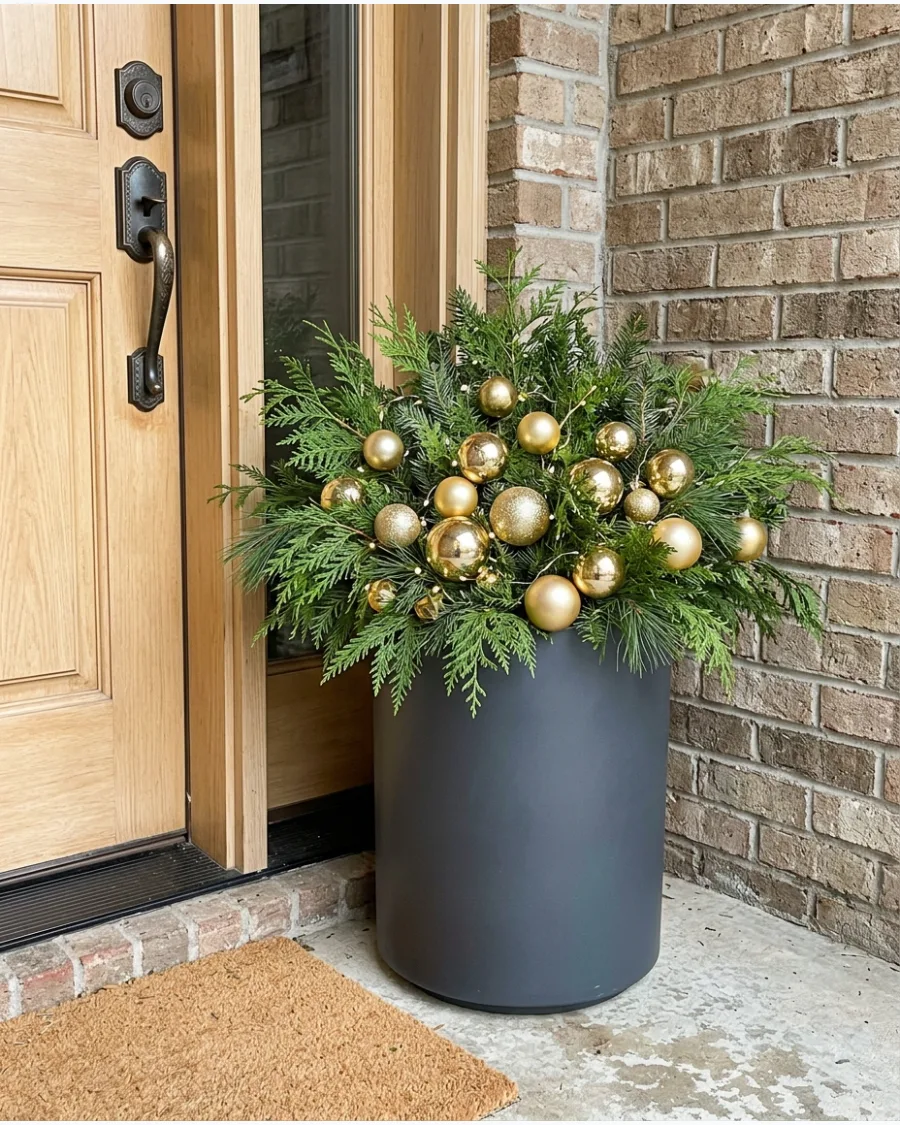
Combine fresh or faux greenery with matte and shiny gold ornaments, pinecones, and warm fairy lights. Mix matte, shiny, and glitter gold finishes to reflect light in different ways for a richer look. Place matching arrangements beside the door for a more elegant alternative to traditional red porch decorations.
Gold is a great choice for a sophisticated entrance that feels festive but not overly traditional.
- Select ornaments specifically labeled for outdoor use to prevent the gold finish from peeling.
- Place the largest ornaments near the base and smaller ones toward the top for a balanced look.
- Pair gold ornaments with warm white lights rather than cool white for a cozy, high-end feel.
Best shortcut: Use a battery-powered light strand with a timer so you don't have to turn the pots on every night.
16. DIY Winter White Christmas Porch Planters
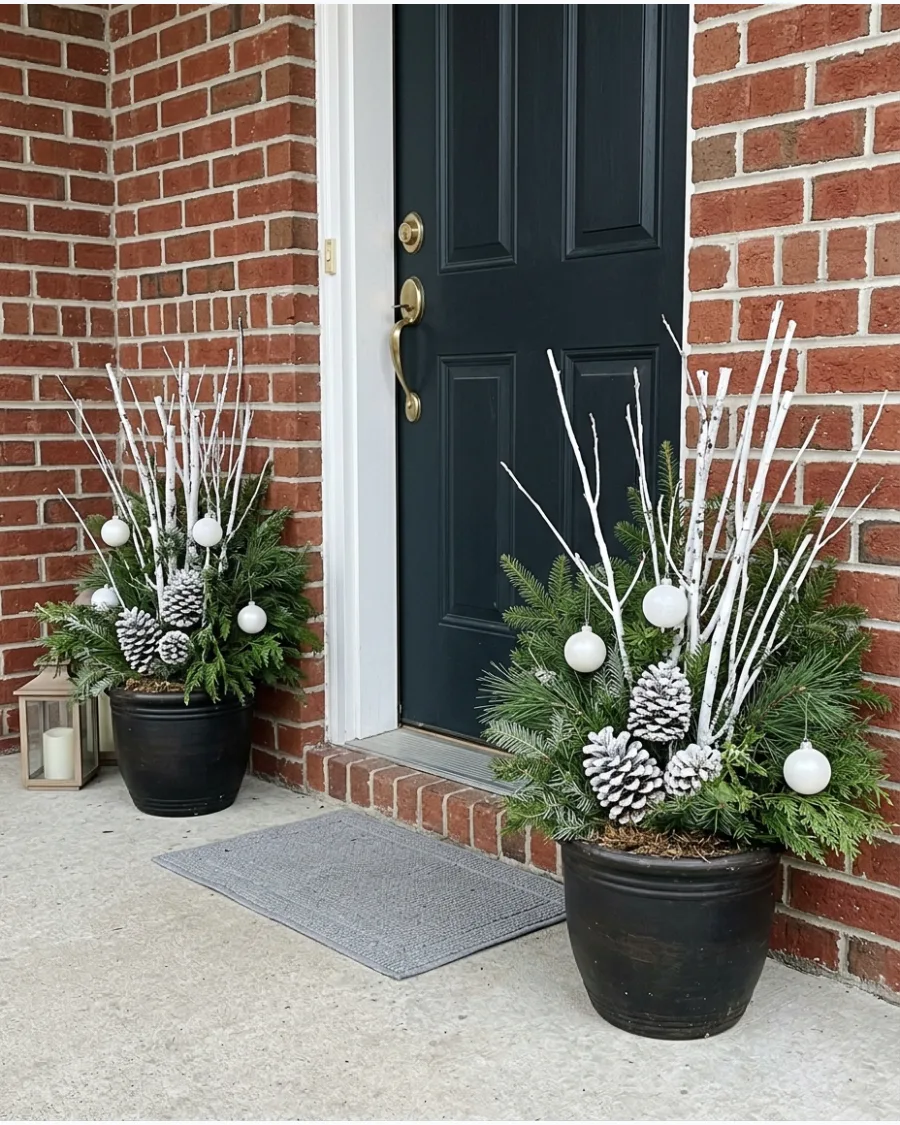
Use evergreen branches, white-painted twigs, snowy pinecones, and white ornaments to build winter-themed planters. Spray-paint natural branches white before adding them to the greenery to make the arrangement pop against dark house siding. This neutral palette works particularly well on brick houses and modern porches.
A white-and-green palette looks crisp and clean, especially if you live in an area without much natural snow.
- Use white birch, painted dogwood, or even spray-painted sticks from the yard for the vertical elements.
- Dust the tops of the evergreen branches with canned 'flocking' spray for a realistic snowy effect.
- Keep the look simple by using only two or three types of white elements to avoid a cluttered look.
Most people skip this: Use a matte white spray paint rather than glossy for a more natural, frosted appearance.
17. DIY Natural Pinecone Porch Planters
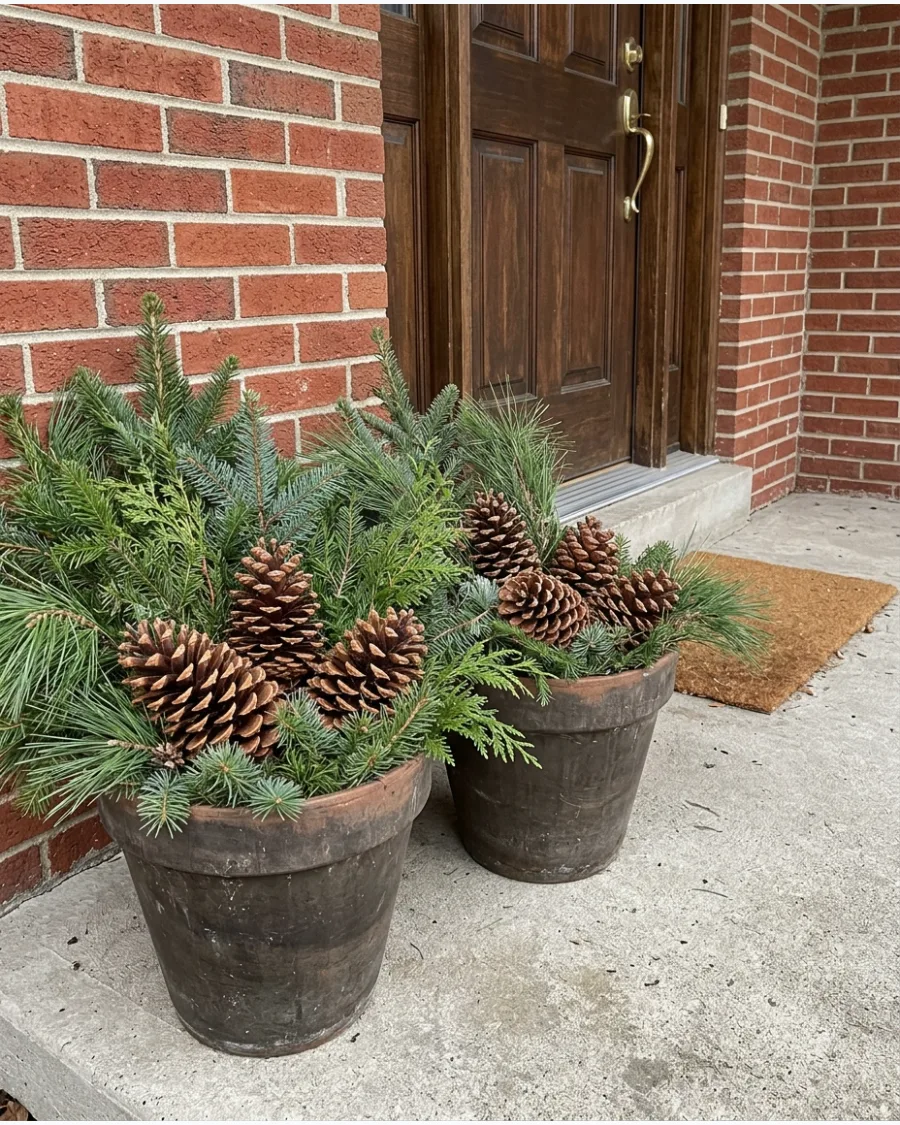
Fill existing outdoor pots with different types of evergreen branches and use oversized pinecones as the primary decoration. Wire the pinecones directly to the branches so they stay exactly where you put them through wind and snow. The project should feel woodsy and understated rather than heavily ornamented.
Big pinecones add a lot of texture and fill gaps in the greenery for almost zero cost.
- Collect pinecones from a local park or buy a bag of unscented large ones for a few dollars.
- Vary the sizes of the pinecones to make the arrangement look like it was gathered from the forest.
- Leave the pinecones natural for a rustic look or dip the tips in white paint for a 'frosted' style.
Quick win: Spritz the pinecones with a clear sealer to prevent them from closing up when they get wet.
18. DIY Red Twig and Evergreen Porch Pots
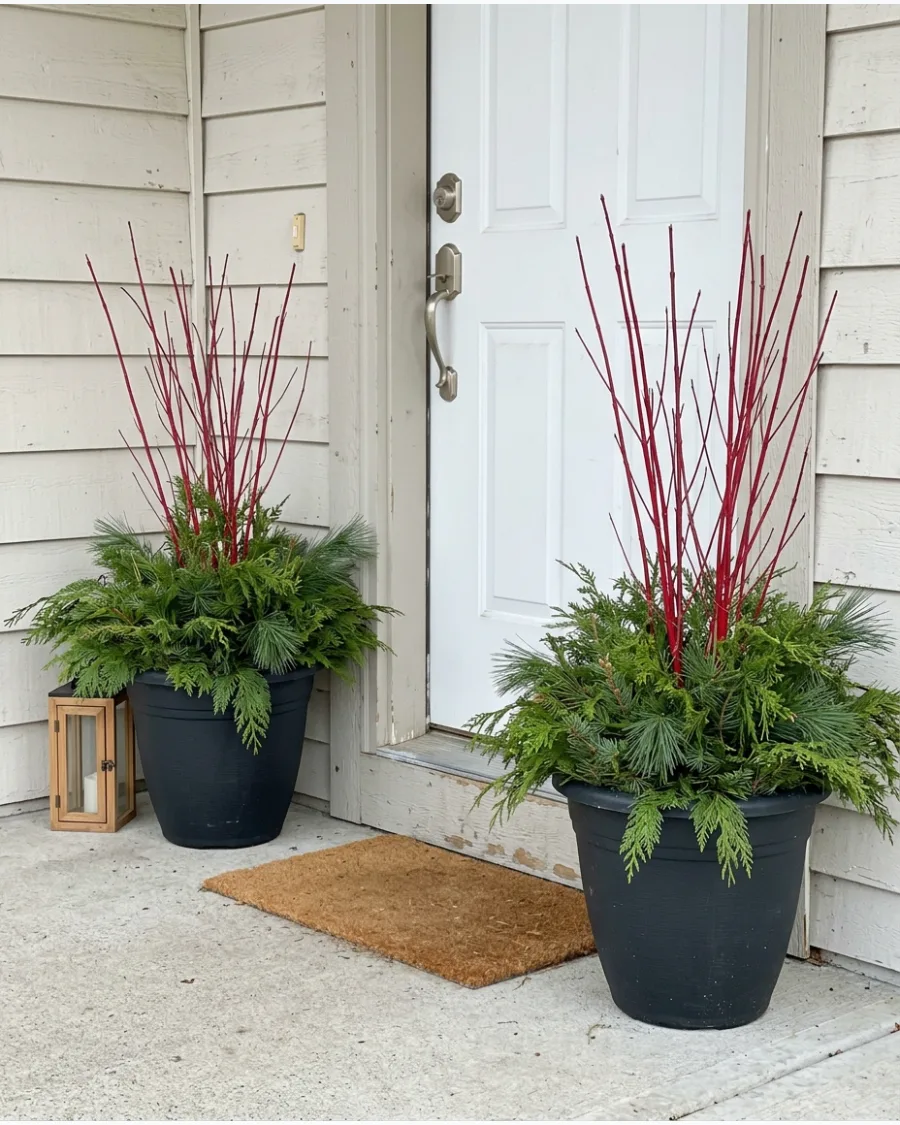
Place tall red dogwood-style branches in the center of each planter and surround them with cedar and pine. Bundle three to five red twigs together in the center of the pot to create a bold splash of color. The vertical red branches add color and height without requiring many ornaments or ribbons.
Red twigs are a smart way to get color high up in the arrangement without using ribbons that can get soggy.
- Buy real red twig dogwood from a nursery or use high-quality faux stems that won't fade in the sun.
- Push the stems at least six inches into the soil to ensure they remain stable during winter storms.
- Strip the bottom leaves off the evergreens so the red stems stay the clear star of the show.
Best shortcut: If you can't find red twigs, spray-paint standard bamboo stakes a bright cherry red.
19. DIY Christmas Planters With Dried Citrus
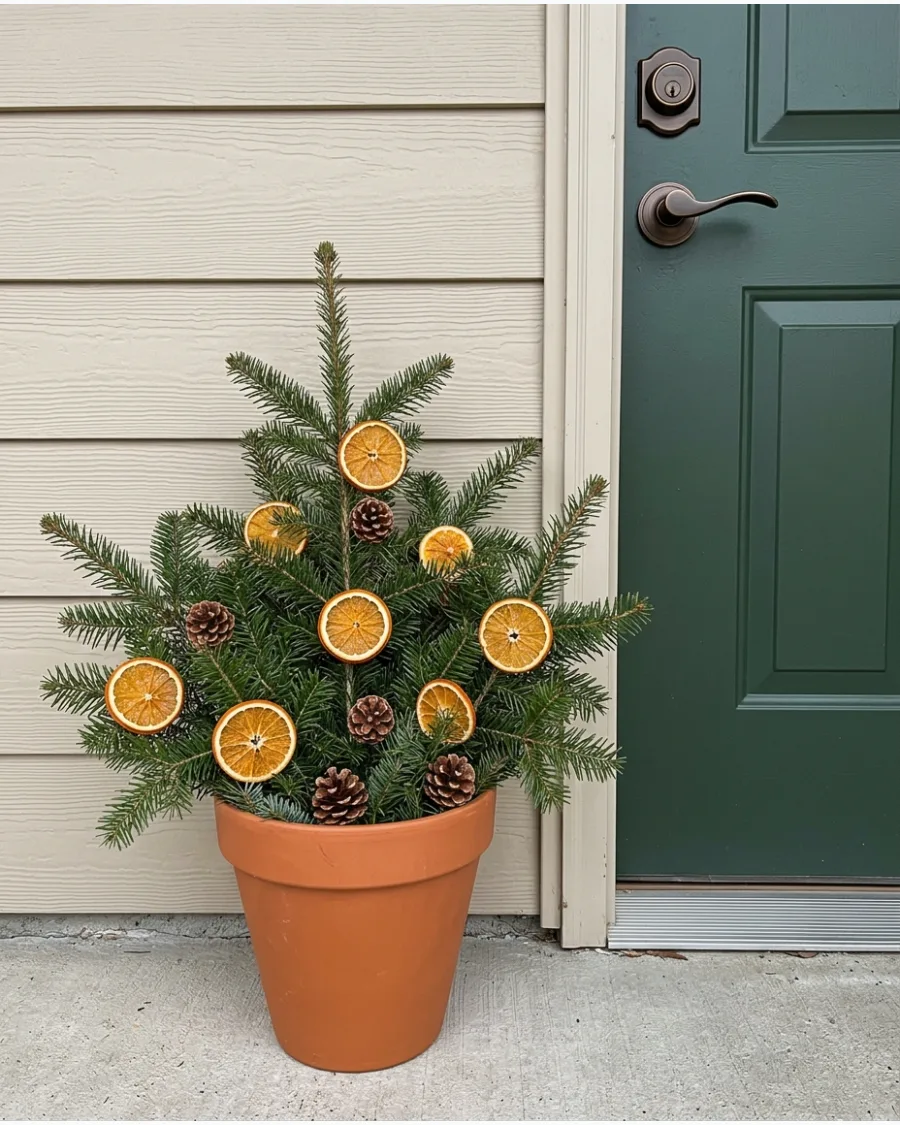
Layer evergreen clippings with pinecones, berries, and dried orange slices secured to floral picks. Seal dried citrus with a clear matte spray to protect the fruit from moisture and help the colors stay bright longer. This gives traditional porch pots a handmade natural detail.
Dried fruit adds a handmade, heritage feel that smells great whenever someone walks by the front door.
- Dry your own orange slices in a low-temperature oven for several hours until they are completely translucent.
- Use green floral wire to attach the slices to the tips of the evergreen branches for visibility.
- Combine the oranges with cinnamon sticks bundled with twine for an extra layer of natural texture.
Most people skip this: Place the citrus in spots where the sun can hit them; they look like stained glass when backlit.
20. DIY Lighted Christmas Porch Planters
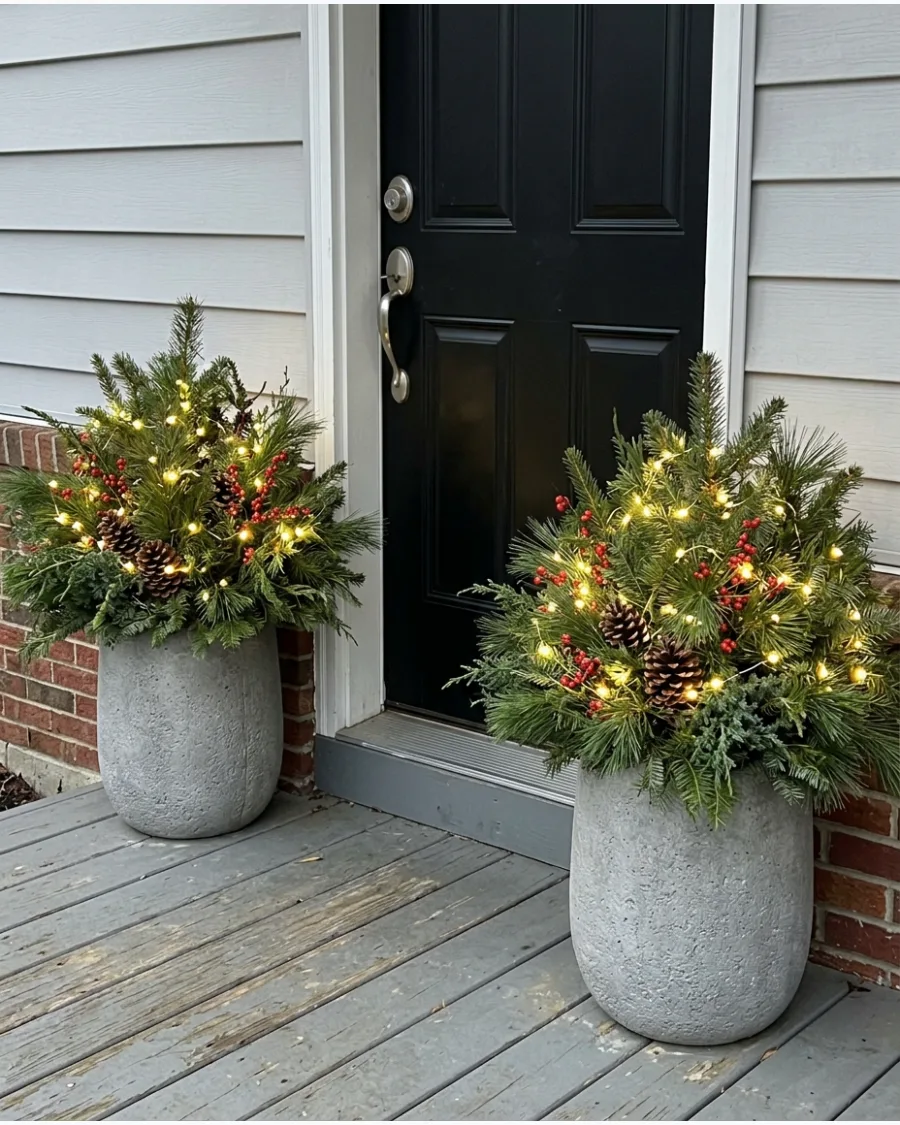
Build full evergreen arrangements in large pots and weave battery-operated or outdoor-rated warm white fairy lights through the branches. Hide the battery pack in a waterproof bag tucked deep inside the greenery to keep it safe from the elements. Concentrate the lighting within the greenery so the pots create a soft evening glow.
Subtle lighting in the planters makes the porch feel warm and welcoming after the sun goes down.
- Choose fairy lights with a green wire so the cord disappears into the evergreen needles.
- Test the lights before you finish the arrangement to ensure there are no dark spots in the greenery.
- Use a 'twinkle' setting rather than a 'flash' setting for a more sophisticated and calming porch look.
Quick win: Wrap the lights around a few of the central branches first to create depth from the inside out.
DIY MINI TREES AND CHRISTMAS TREE DISPLAYS
21. DIY Mini Christmas Tree Forest on the Porch
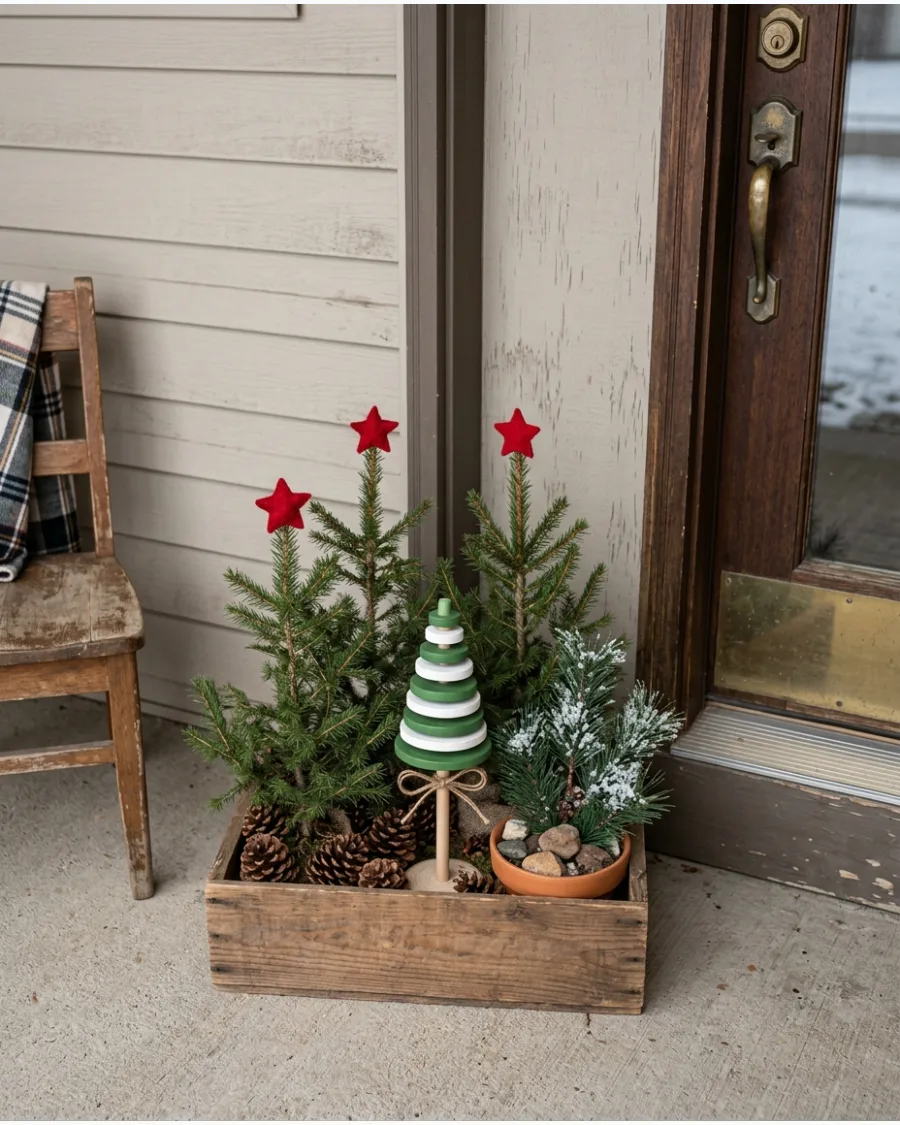
Small potted evergreens in varying heights create an inviting natural entrance. Keeping the decorations minimal with just a few lights allows the natural texture of the needles to stand out.
Group trees in odd numbers like three or five to create a natural, balanced look on the porch steps. This arrangement fills empty corners without looking cluttered.
- Buy small pre-potted trees from a local nursery for under twenty dollars each.
- Set the largest tree at the back and stagger the smaller ones forward for depth.
- Use plastic nursery pots and drop them into decorative planters to save money on expensive containers.
Quick win: Place a heavy brick in the bottom of lightweight plastic pots to keep them from blowing over in winter winds.
22. DIY Tomato Cage Christmas Trees
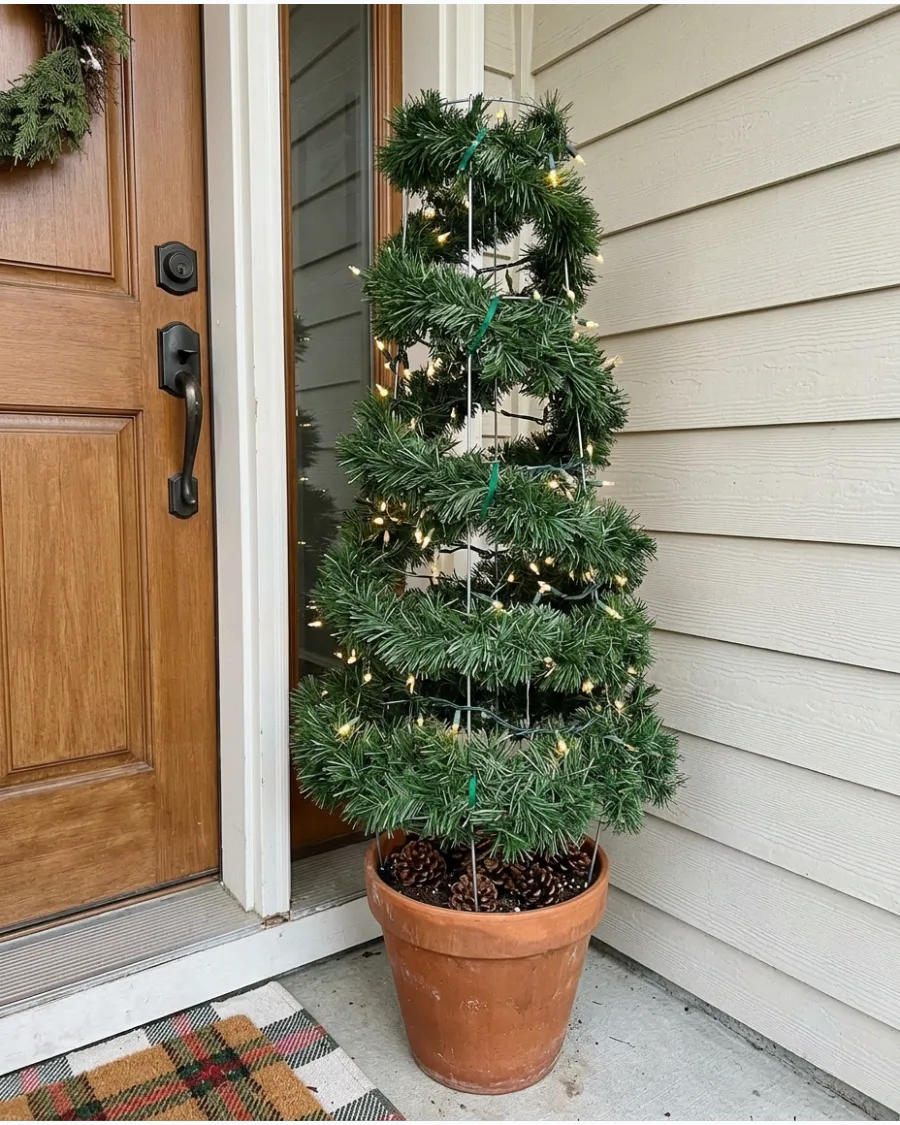
Inverting a metal tomato cage creates an instant cone shape for a DIY tree.
Wrapping the wire frame with thick evergreen garland and lights makes it look like a full, expensive topiary. Secure the garland to the metal wire with green zip ties so the wind doesn't unravel the shape. These are perfect for narrow porches where wide trees won't fit.
- Pick up standard tomato cages and green garland from any hardware store.
- Tie the top wires together with a rubber band to create a sharp point for the tree.
- Wrap the garland from the bottom up to ensure the layers overlap naturally like real branches.
Most people skip this: Use two strands of garland per cage to hide the metal wire completely for a professional look.
23. DIY Potted Christmas Trees With Red Bows
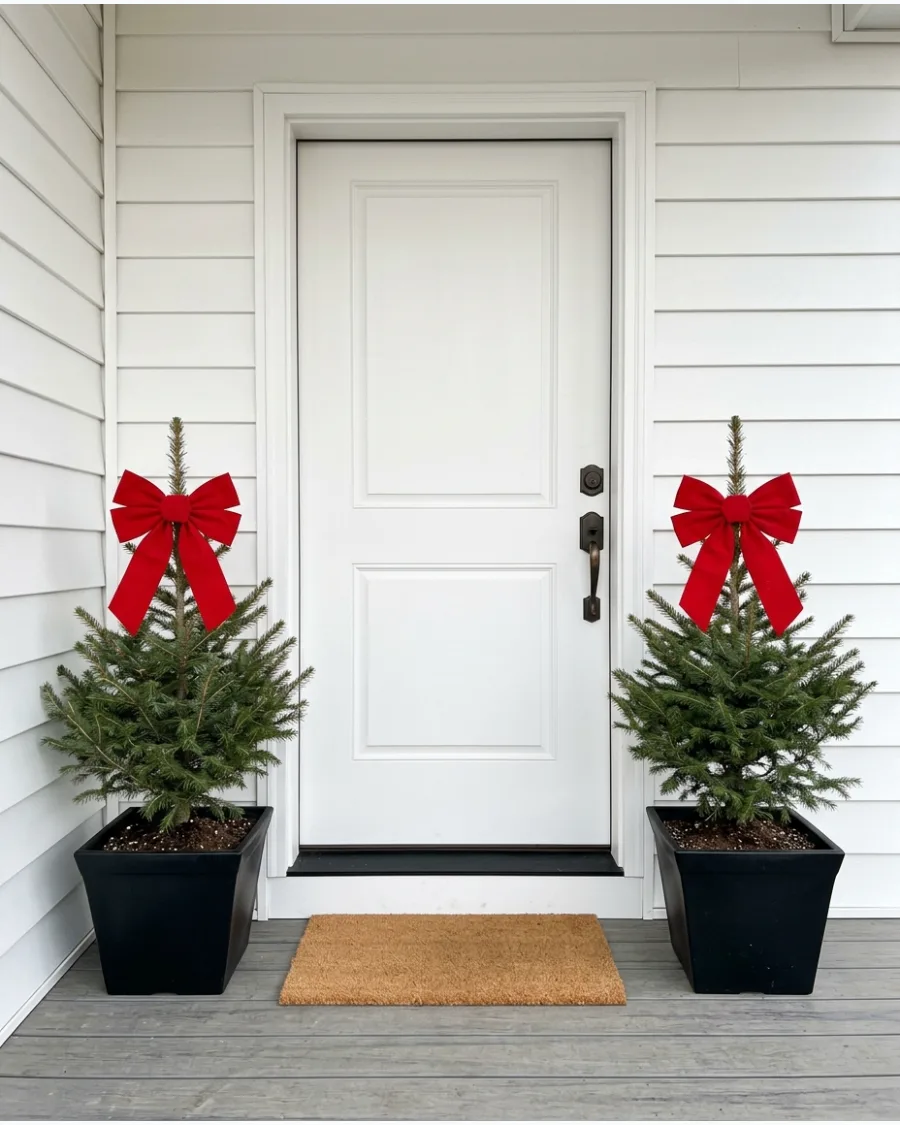
Symmetry is a powerful tool for making a front porch look professionally designed. Matching miniature evergreens in sturdy pots provide a clean, classic frame for the front door.
Use weather-resistant velvet ribbon for the bows to ensure they hold their shape and color through rain or snow. This simple addition provides a high-end look with very little effort.
- Coordinate your planter color with your front door hardware for a cohesive look.
- Standard four-inch wide ribbon works best for trees between three and four feet tall.
- Store the bows in a flat box after the season to reuse them next year.
Best shortcut: Use floral wire instead of the ribbon itself to attach the bow to the tree for a tighter, more secure hold.
24. DIY Rustic Basket Christmas Trees
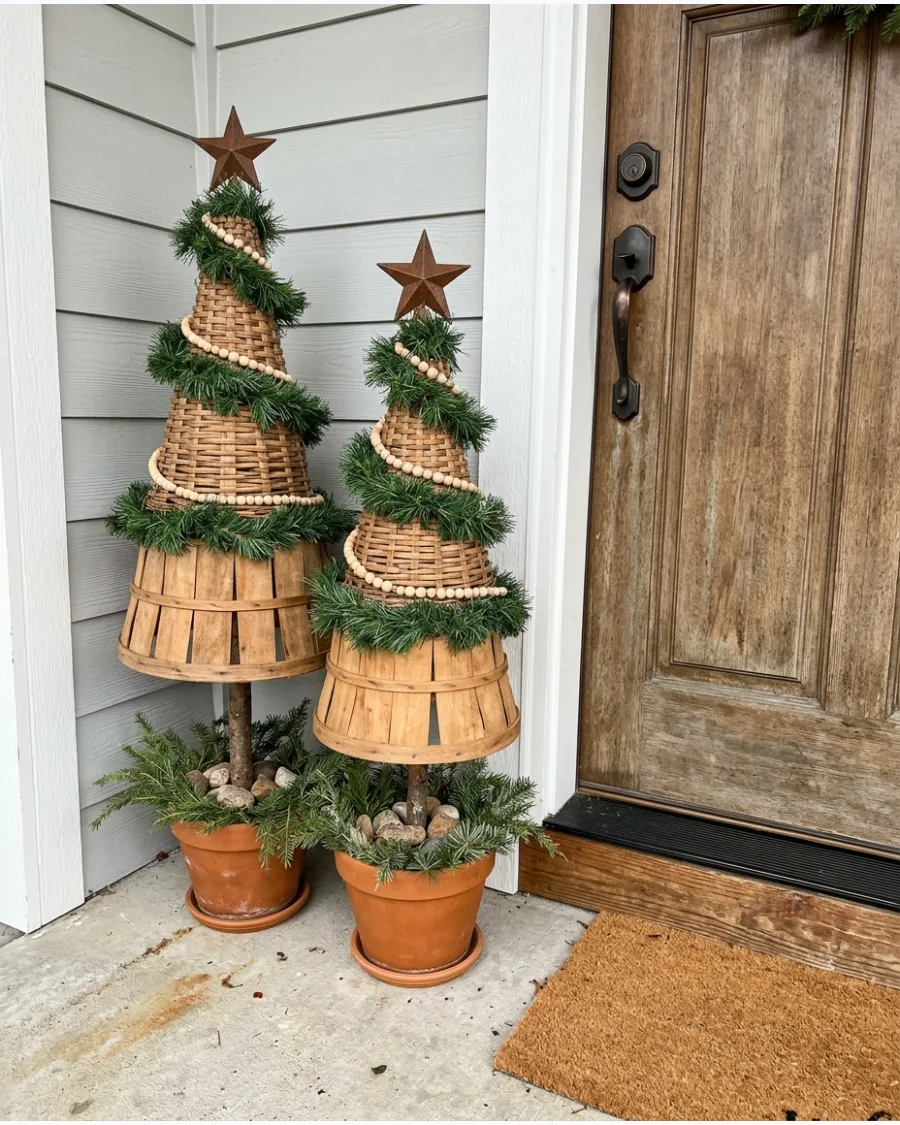
Woven baskets offer a softer, more organic texture than traditional ceramic or plastic pots. Placing small faux or real evergreens inside these baskets adds a cozy layer to the porch.
Line the bottom of the baskets with heavy stones to prevent the trees from tipping over during winter gusts. The neutral tones of the wicker allow the green of the tree to pop.
- Check thrift stores or craft shops for large, deep baskets that can fit a tree base.
- If using real trees, place a plastic tray inside the basket to catch water and prevent rot.
- Mix different basket weaves and colors for a more relaxed, gathered-over-time feel.
Quick win: Stuff old plastic grocery bags around the tree base inside the basket to keep the tree perfectly upright.
25. DIY Wooden Crate Christmas Tree Display
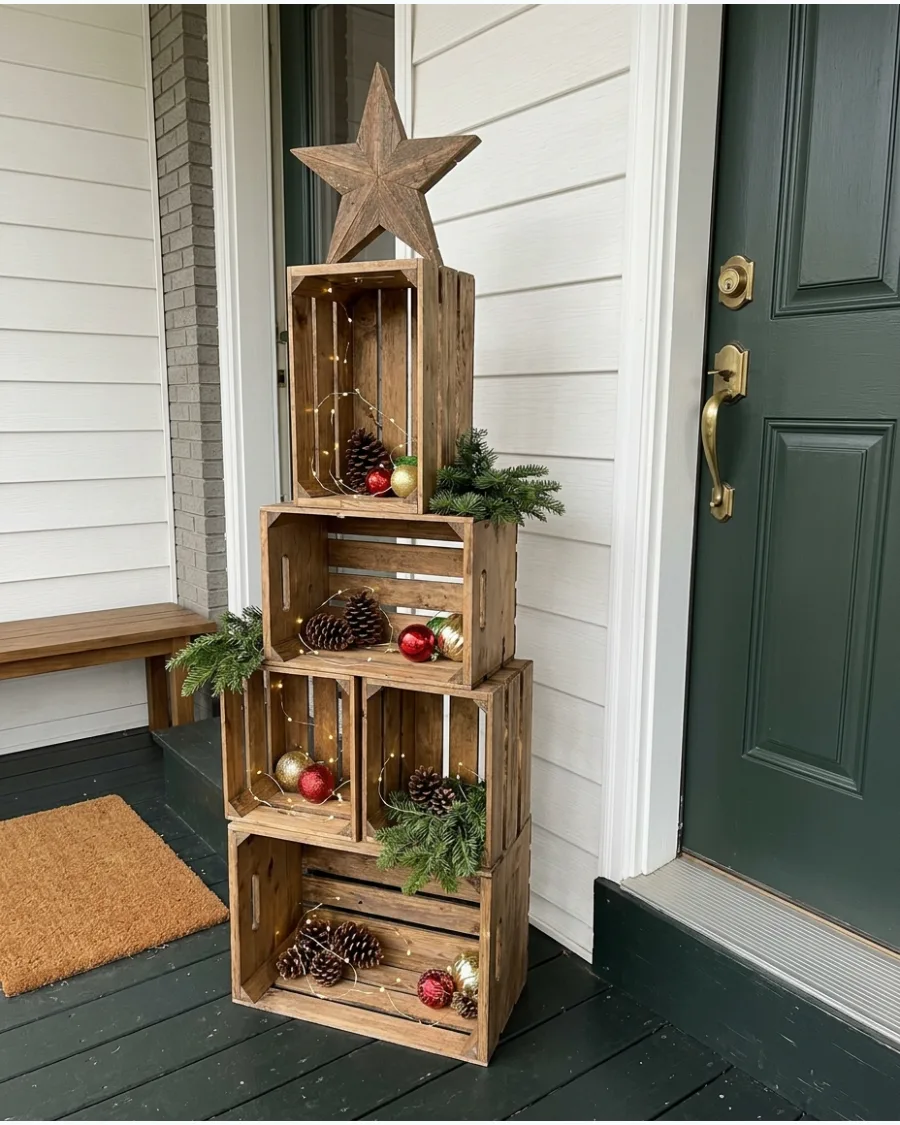
Elevating trees on wooden crates creates different levels of visual interest on the porch. This layered approach makes a small collection of decor feel much more substantial.
Invert the top crate to create a sturdy platform for the smallest tree in your arrangement. Adding pinecones or faux gifts around the base fills the gaps for a finished look.
- Unfinished pine crates are inexpensive and can be stained to match your porch floor.
- Stack the crates in a corner to protect the display from heavy wind.
- Fill empty crate space with birch logs or oversized ornaments for extra texture.
Most people skip this: Screw the crates together from the inside if you live in a high-wind area to keep the stack stable.
26. DIY Snowy Porch Christmas Trees
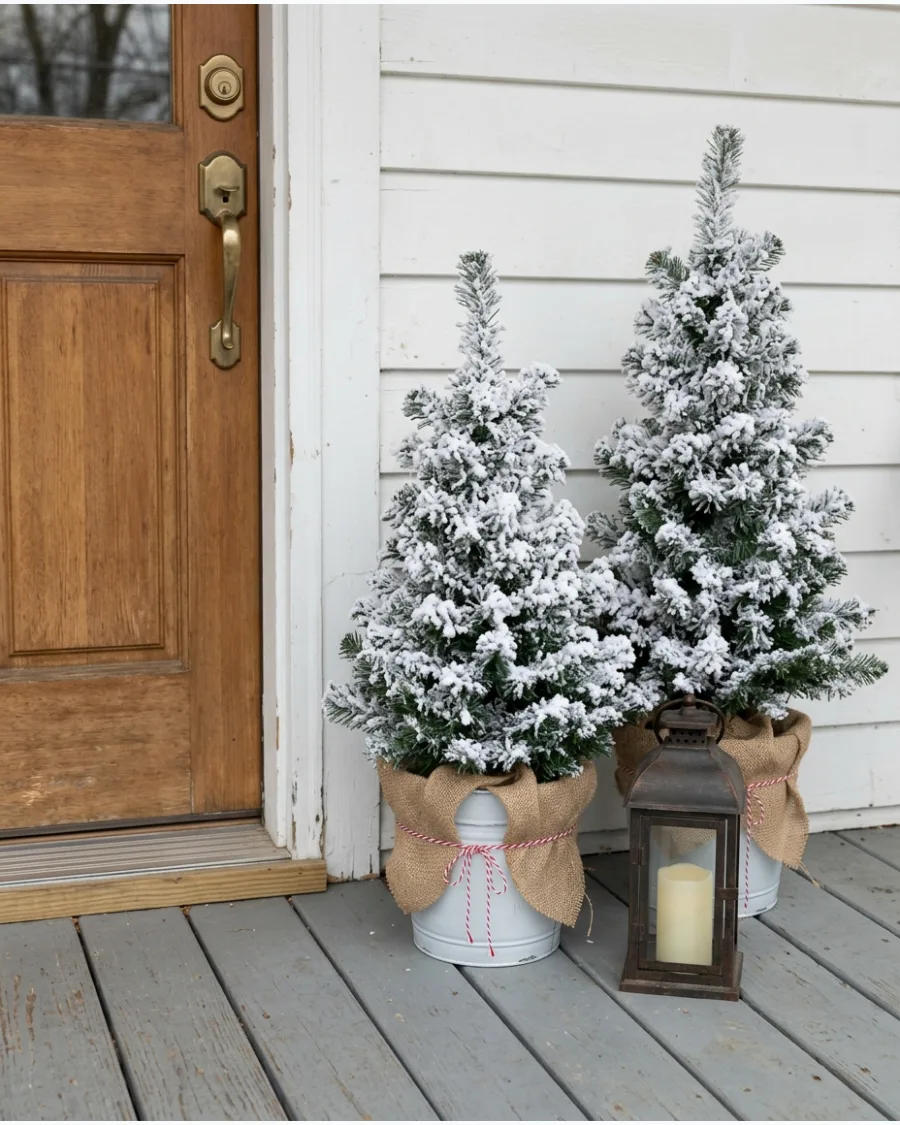
Faux snow adds a bright, wintery contrast to a dark porch or house exterior. Flocking small trees gives them a professional, high-end appearance that looks great even in broad daylight.
Spray the flocking outdoors on a calm day and let it dry completely before moving the trees onto the porch. It creates a bright, clean aesthetic that works well with modern or traditional homes.
- Use a spray-on flocking powder or canned artificial snow for the most realistic texture.
- Pair white trees with galvanized metal buckets for a crisp, winter-themed color palette.
- Focus the snow application on the tops of the branches where real snow would naturally land.
Best shortcut: Mist the tree with a little water before applying flocking powder to help the 'snow' stick better and last longer.
27. DIY Red and Gold Porch Christmas Trees
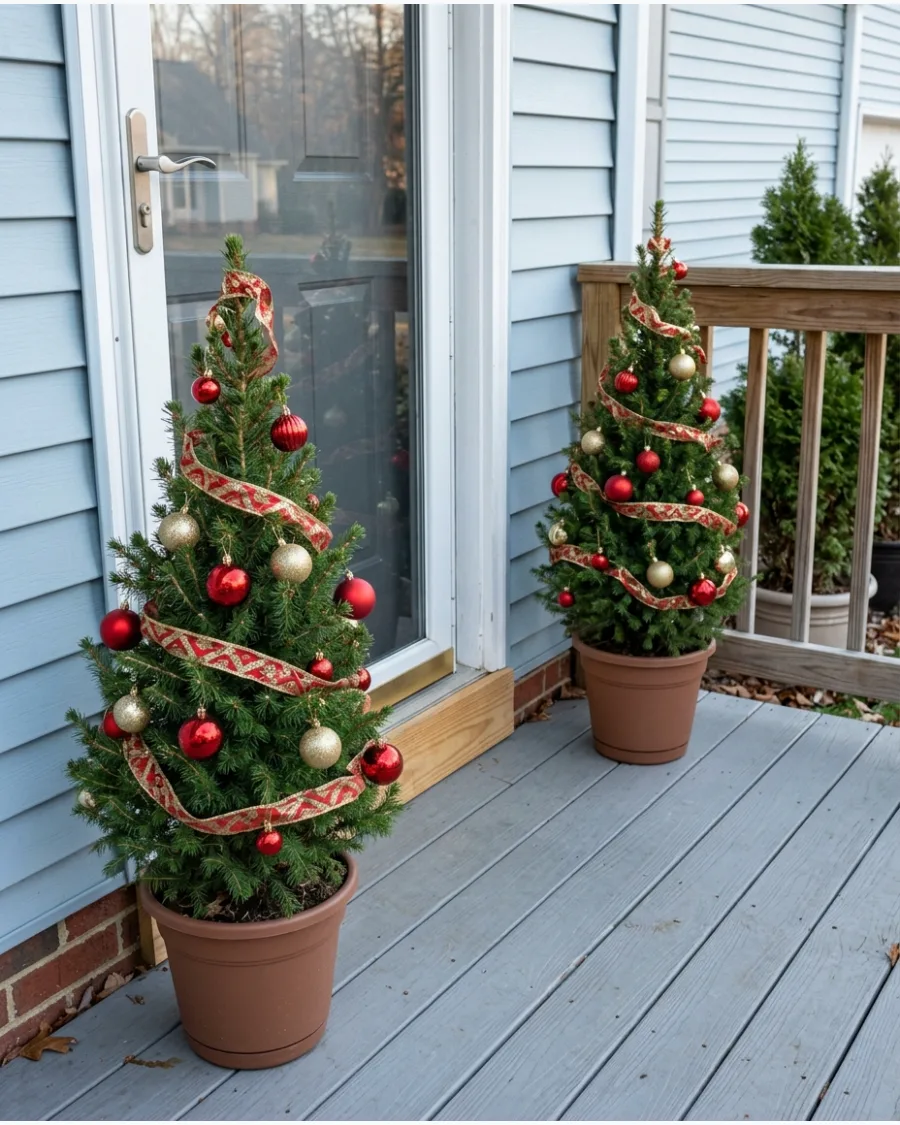
Using a classic color palette like red and gold makes your outdoor decor feel connected to your indoor style. Small trees decorated with shatterproof ornaments bring a festive, polished look to the entryway.
Thread floral wire through ornament loops and twist them tightly onto branches to keep them from blowing away. This setup is an easy way to add a splash of color to a neutral porch.
- Choose shatterproof plastic ornaments rather than glass to prevent breakage on hard porch floors.
- Mix matte, shiny, and glitter finishes in the same color to add visual variety.
- Stick to one or two ornament sizes to keep the small trees from looking overwhelmed.
Quick win: Use oversized ornaments at the bottom of the tree and smaller ones at the top to mimic the natural scale of a large tree.
28. DIY Natural Woodland Porch Trees
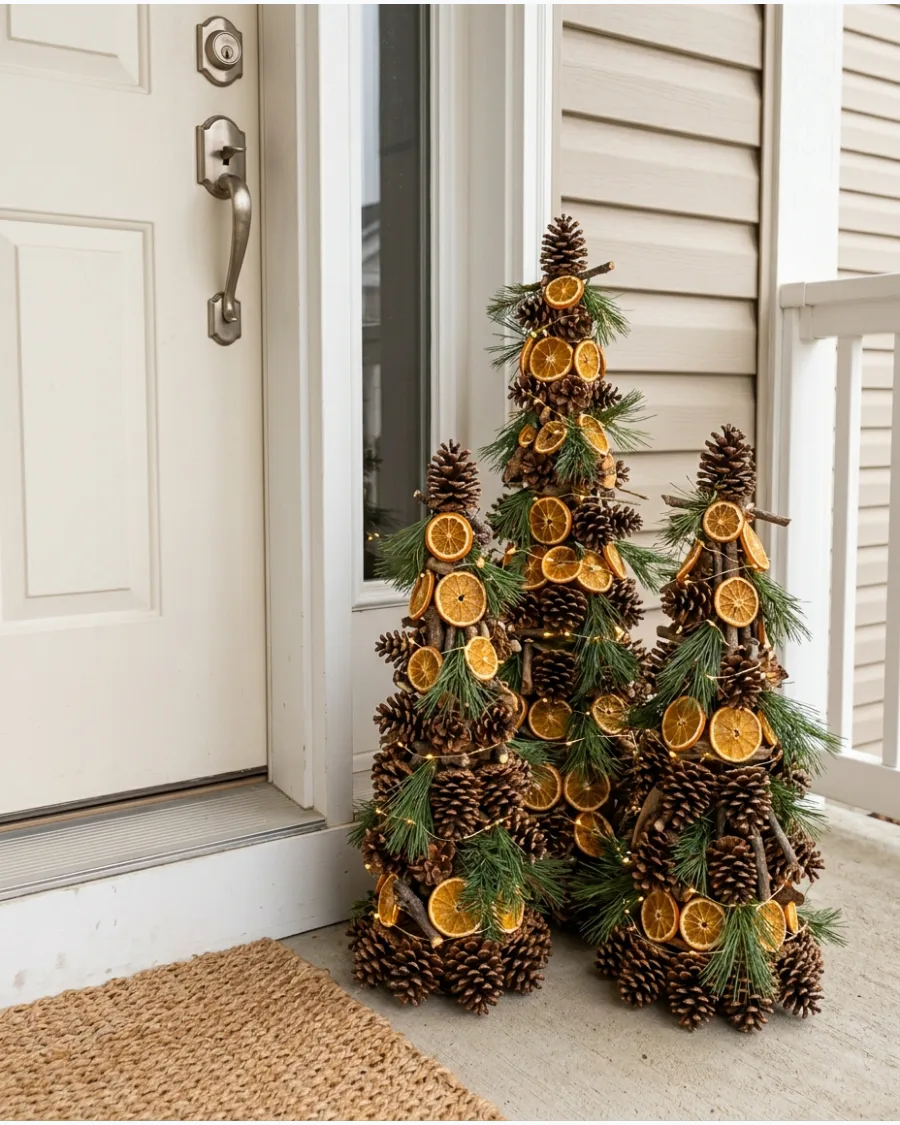
Natural materials like pinecones and dried citrus create a calm, organic holiday feel. This style works beautifully for those who prefer a more understated, handmade look.
Layer different textures like rough pinecones and smooth dried orange slices to give the small trees visual depth. The warm glow of lights against natural wood and fruit feels incredibly cozy.
- Dry your own orange slices in a low-temperature oven for a cost-effective DIY project.
- Use plain jute twine to hang ornaments to maintain the rustic, woodland theme.
- Incorporate small wooden stars or beads for a simple, non-plastic decorative element.
Most people skip this: Spray your dried citrus slices with a clear sealer to prevent them from absorbing moisture and molding outdoors.
DIY WOOD AND UPCYCLED PORCH DECOR
29. DIY Wooden Christmas Porch Sign
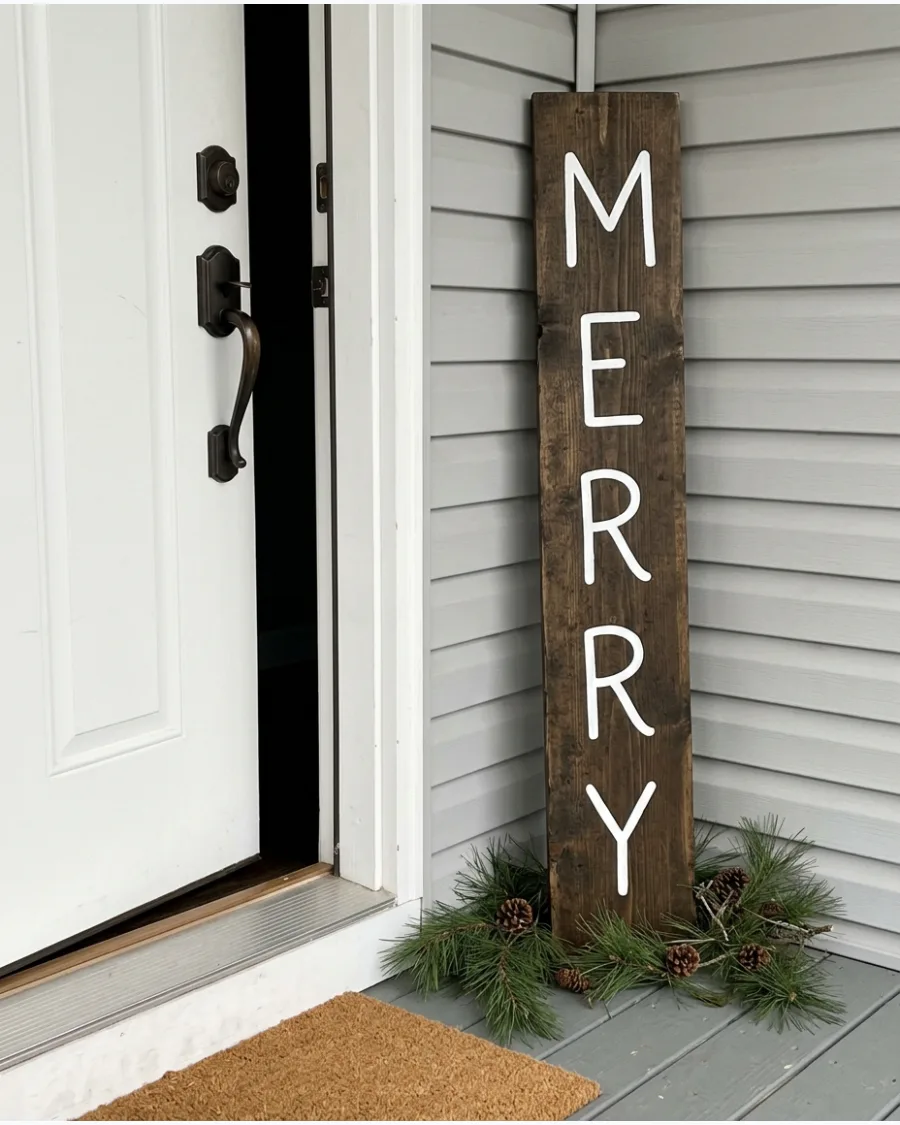
A vertical wooden sign adds height and a personal touch to your porch decor without taking up much floor space. Leaning it against the wall makes it a sturdy backdrop for smaller items like lanterns or greenery.
Seal the painted wood with a clear outdoor polyurethane spray to prevent the letters from peeling in the moisture. It is a simple weekend project that lasts for years.
- A standard 1×10 or 1×12 pine board from the hardware store is the perfect size.
- Use stencils for the lettering if you are not confident in your freehand painting skills.
- Choose a high-contrast paint color like white on dark wood so the message is readable from the street.
Best shortcut: Use a paint pen instead of a brush for the lettering to get much cleaner lines and better control.
30. DIY Wooden Christmas Trees for the Porch
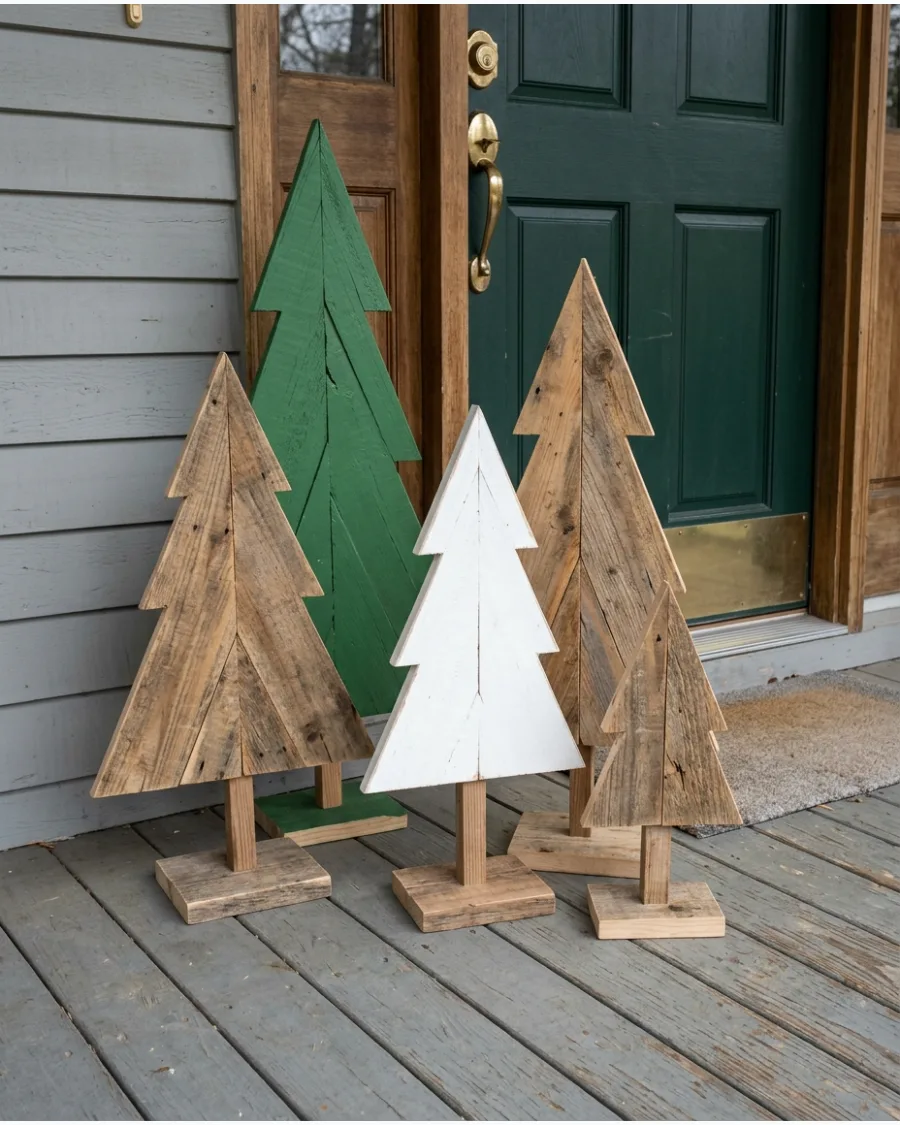
Triangular trees made from scrap wood offer a modern, minimalist take on holiday greenery. These freestanding structures are durable and can withstand winter weather much better than faux foliage.
Stagger the heights of the wooden triangles and overlap them slightly to create a more interesting 3D silhouette. They can be painted to match any house color or left natural for a clean look.
- Old fence boards or pallet wood are great free sources for this project.
- Build a simple 'L' bracket on the back of each triangle so they can stand on their own.
- Wrap a single strand of outdoor lights around the wood slats for a subtle evening glow.
Quick win: Use a miter saw to cut your angles at 30 degrees for a perfectly proportioned 'evergreen' triangle shape.
31. DIY Pallet Wood Christmas Tree
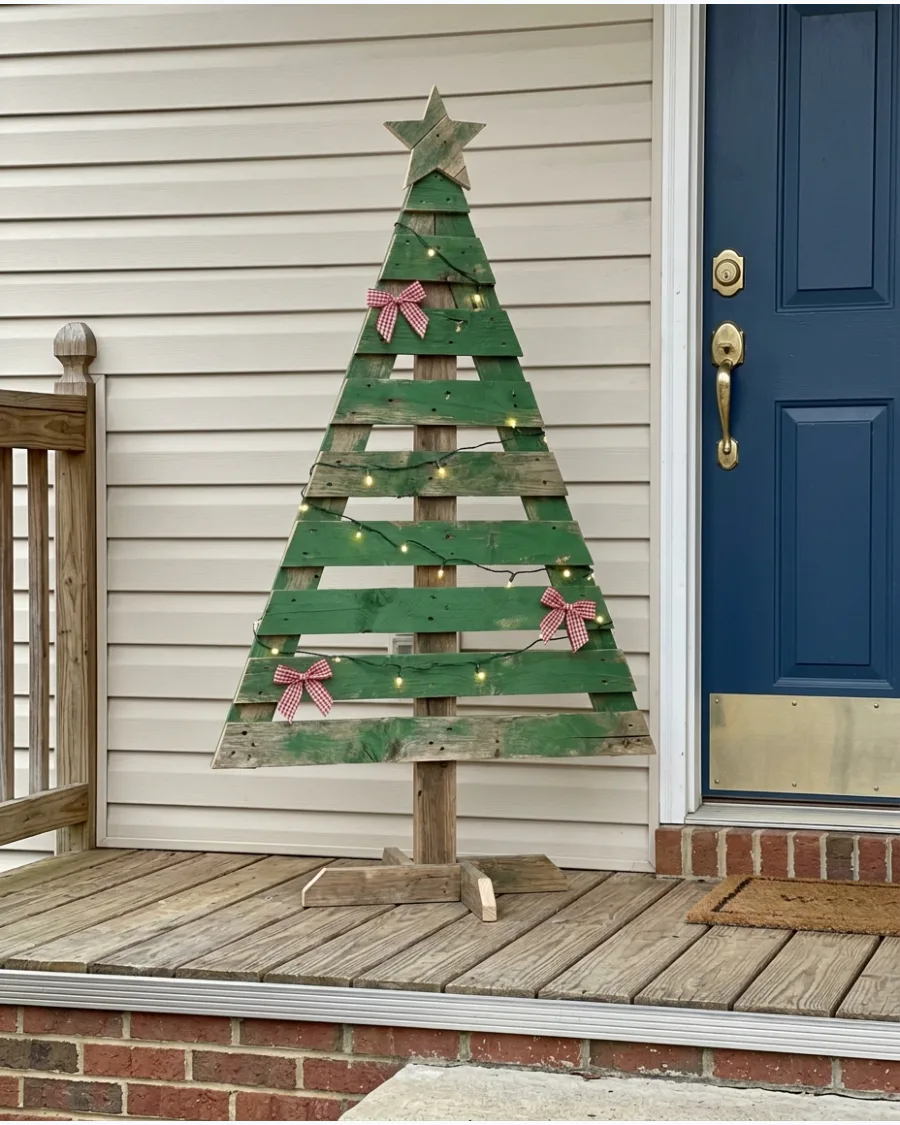
Transform reclaimed pallet boards into a flat triangular Christmas tree that can lean against the porch wall. Pallet wood is very porous, so applying an outdoor sealer is necessary to prevent the wood from warping in the snow.
Secure the horizontal slats to a central vertical board using exterior-grade wood screws for a sturdy frame.
- Find free pallets at local hardware stores or small businesses.
- Lean the tree at a 15-degree angle against a wall to ensure it stays upright.
- Paint the slats in alternating green and white for a more colorful look.
Quick win: Sand the edges of the pallet boards before assembly to prevent splinters while you handle the decor.
32. DIY Wooden Gift Box Decorations
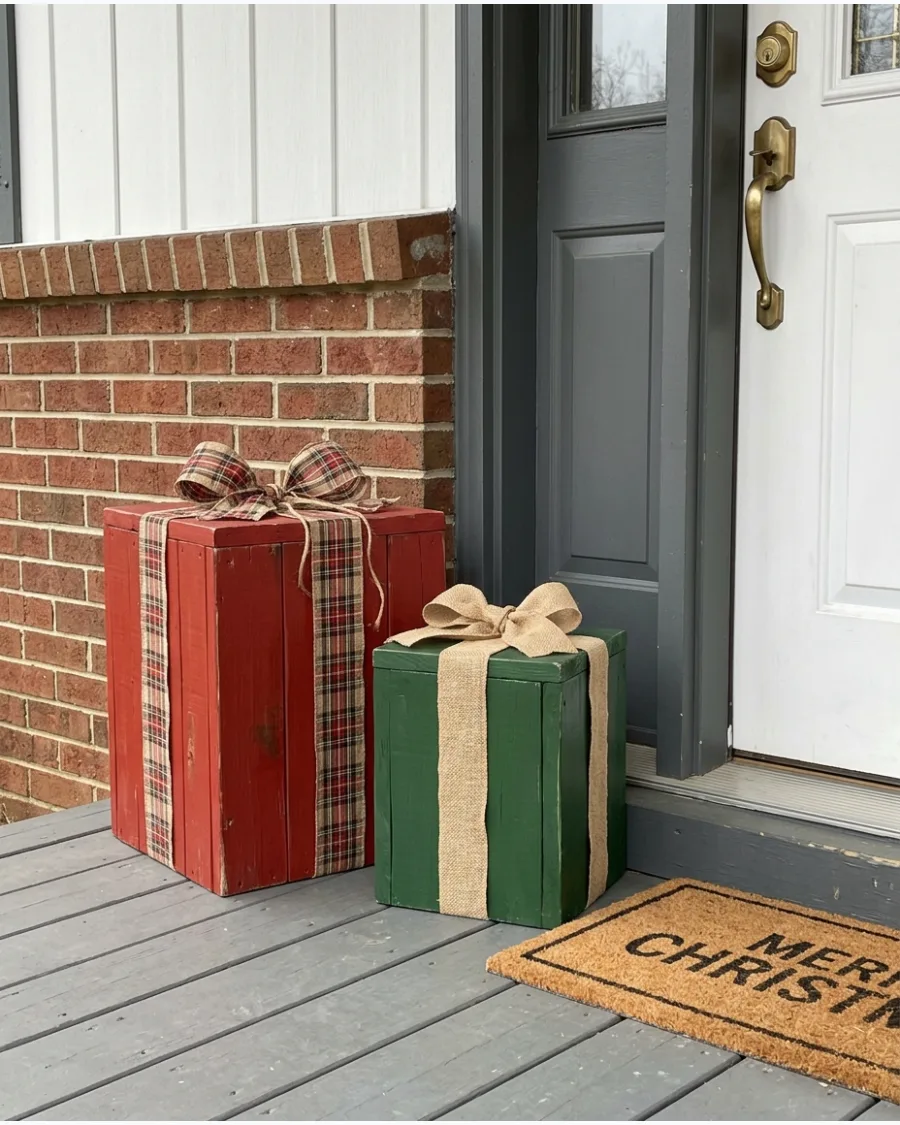
Build simple hollow gift-box shapes from scrap wood and paint or stain them for outdoor use. Building these with a hollow center keeps them light enough to move easily but heavy enough to stay put during a breeze.
Apply a coat of exterior paint or wood stain to protect the boxes from moisture before adding the ribbon.
- Use scrap 1×12 boards to create boxes of varying heights.
- Group the boxes in odd numbers like three or five for a professional look.
- Add adhesive vinyl house numbers to the boxes for a personalized touch.
Most people skip this: Drill a few small drainage holes in the bottom of the boxes so water doesn't pool inside during rain.
33. DIY Stacked Wooden Crate Christmas Display
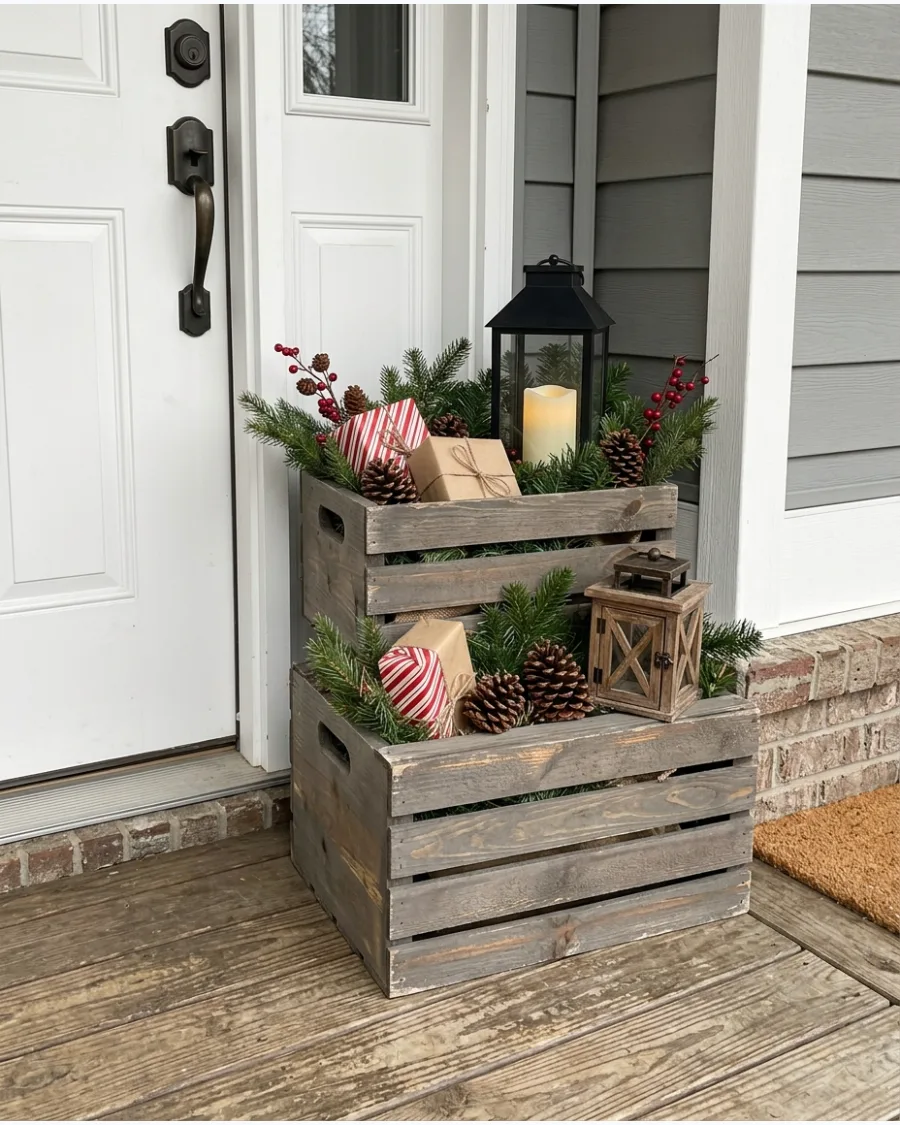
Stack two or three weathered wooden crates beside the entrance and fill them with evergreen branches and pinecones. Staggering the crates creates natural pockets for smaller items like ornaments or battery-operated candles.
Place the heaviest items in the bottom crate to anchor the display against winter winds.
- Pick up unfinished crates from a craft store and stain them a dark walnut color.
- Use zip ties to secure the stacked crates together if the porch is not sheltered.
- Line the inside of the crates with plaid fabric to add a pop of festive color.
Best shortcut: Use floral foam blocks inside the crates to hold greenery stems at the perfect angle.
34. DIY Vintage Sled Christmas Porch Display
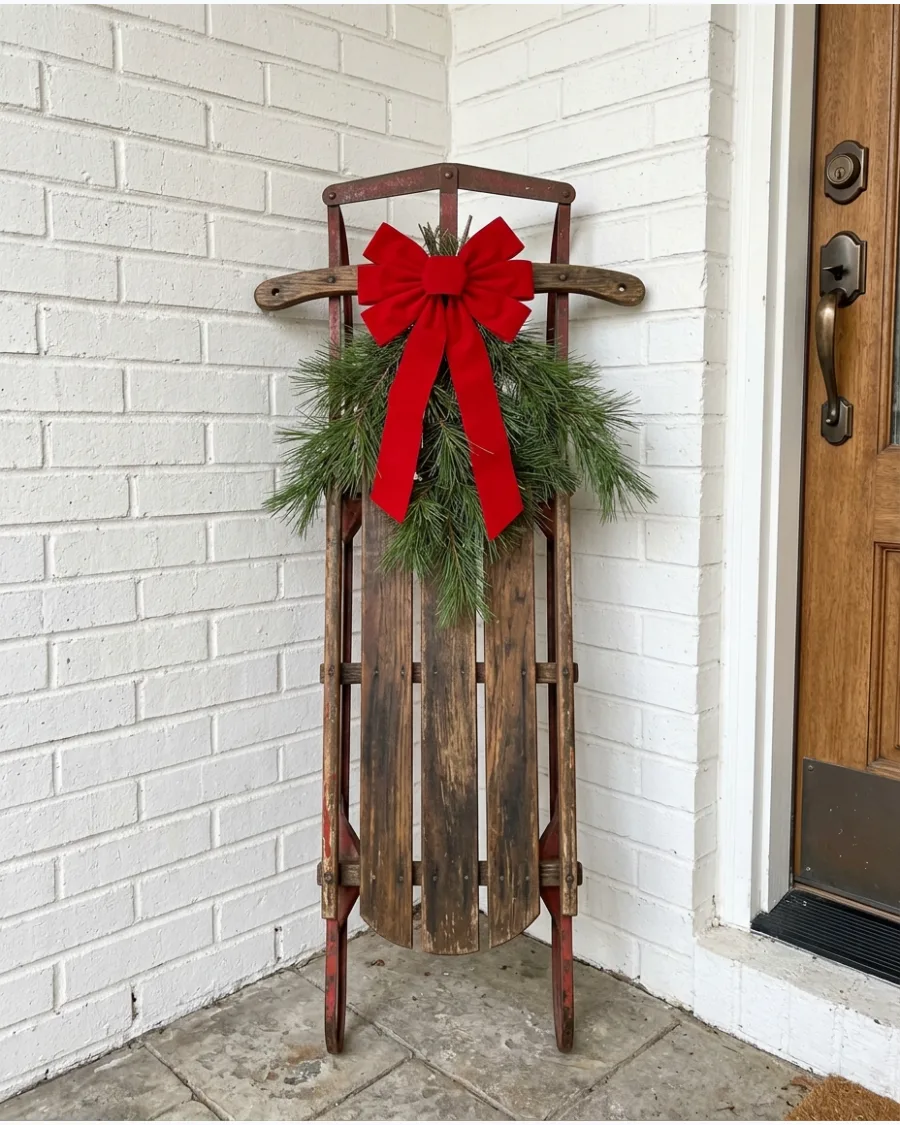
Use an old wooden sled or create a simple decorative version from scrap lumber, then lean it against the porch wall. A sled adds great height to a display without taking up much floor space, which is perfect for narrow porches.
Use floral wire to attach a bundle of evergreen branches and silver bells to the top steering bar of the sled.
- Look for old sleds at thrift stores or local antique malls.
- Angle the sled slightly in a corner so it does not block the walkway to the door.
- Paint the wood slats a bright festive red to make the sled stand out against light siding.
Quick win: Tie a string of bells to the sled so they jingle whenever the front door opens and closes.
35. DIY Vintage Ski Porch Decoration
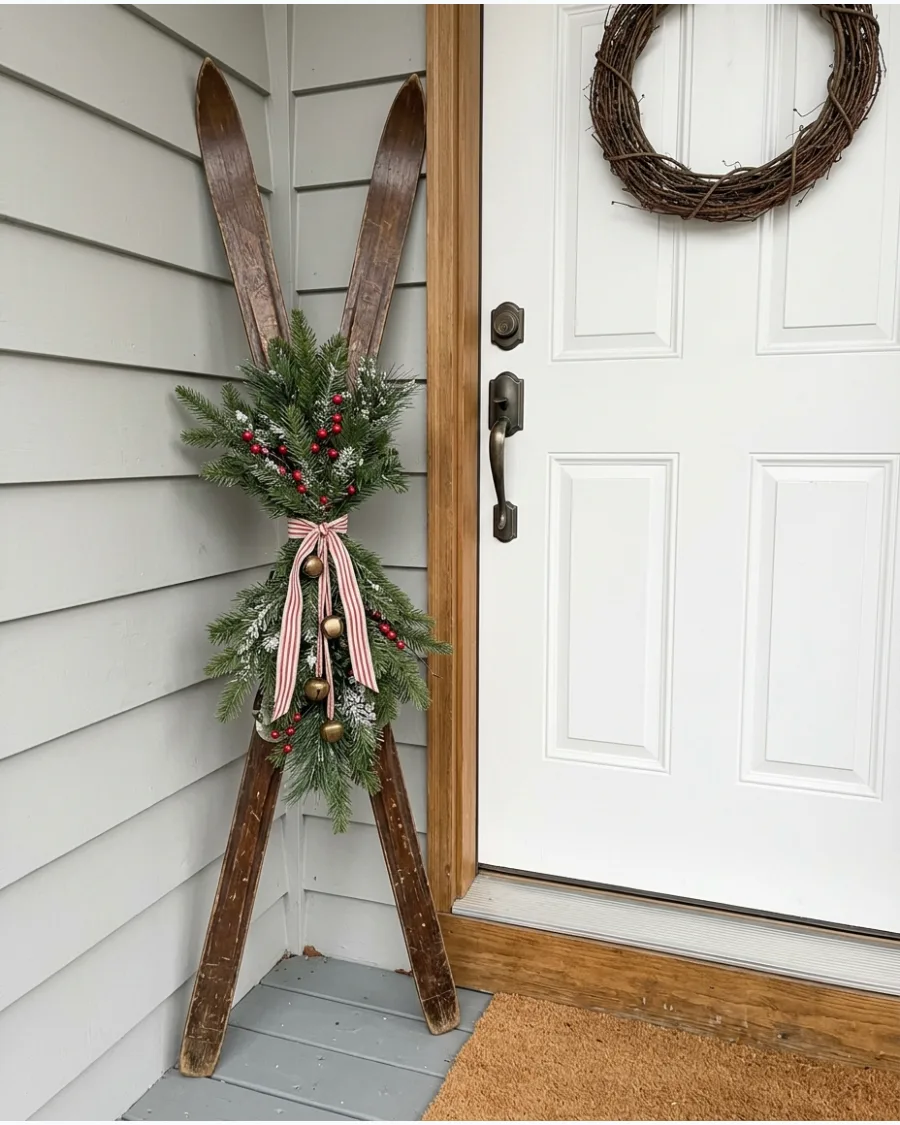
Lean a pair of thrifted or decorative wooden skis beside the front door and attach an evergreen swag where they cross. Crossing the skis in an X-shape provides a stable center point for mounting a heavy greenery arrangement.
Bind the skis together with heavy-duty twine or a bracket before hanging the greenery swag over the intersection.
- Search for old wooden skis at garage sales or secondhand sports shops.
- Lean them in a corner or against a porch railing to prevent them from tipping over.
- Wrap the skis in battery-operated fairy lights for a subtle glow at night.
Most people skip this: Check the bottom of the skis for sharp metal edges and cover them with felt pads to protect the porch floor.
36. DIY Christmas Ladder Display
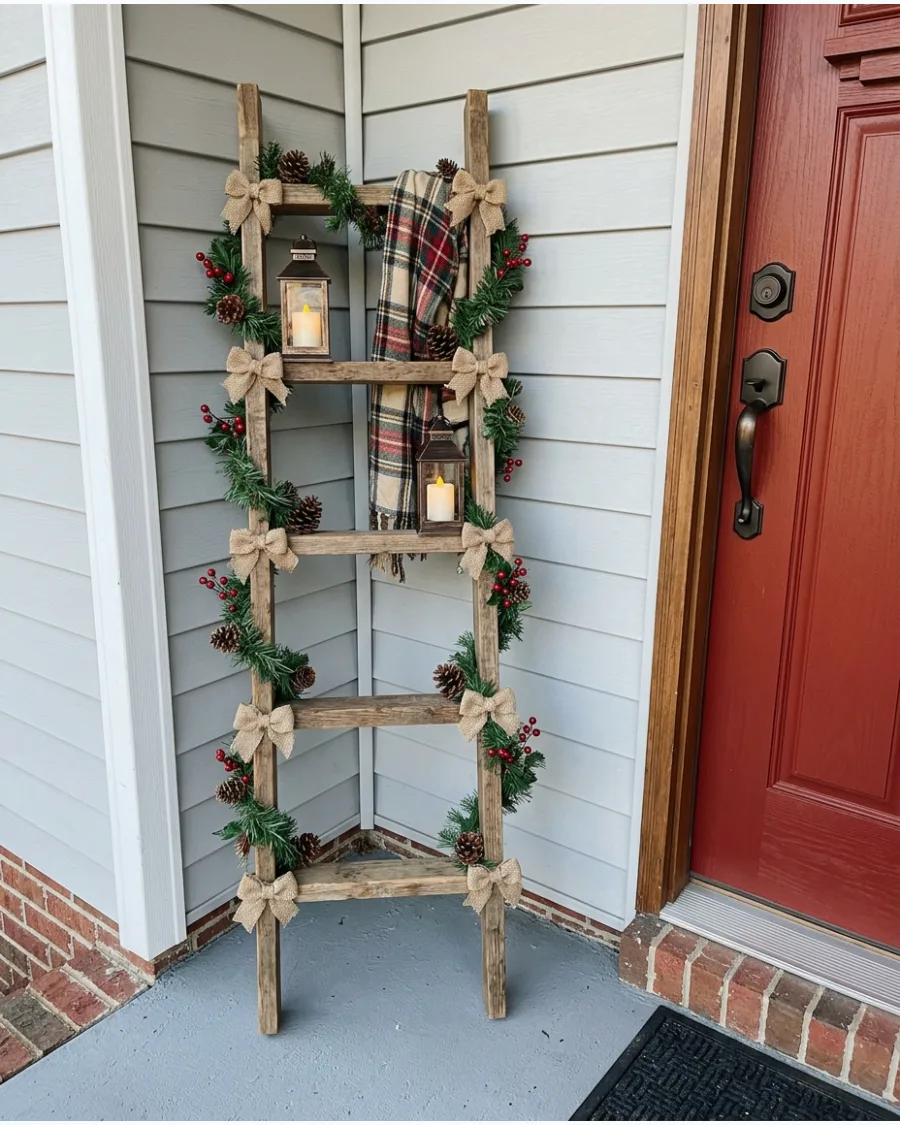
Lean a small wooden ladder securely against a sheltered porch wall and decorate each rung with greenery or ornaments. Using a shorter three-step or four-step ladder keeps the decor at eye level without overwhelming the entry.
Drape a thick pine garland over the side rails and use the flat rungs to hold small lanterns or potted poinsettias.
- Find old wooden step ladders at estate sales or in home workshops.
- Ensure the ladder is fully locked open or secured to the wall with a hook.
- Hang festive stockings from the rungs using S-hooks for a classic look.
Best shortcut: Use command hooks on the back of the ladder rungs to hide the wires for any lights you add.
37. DIY Repurposed Mailbox Christmas Arrangement
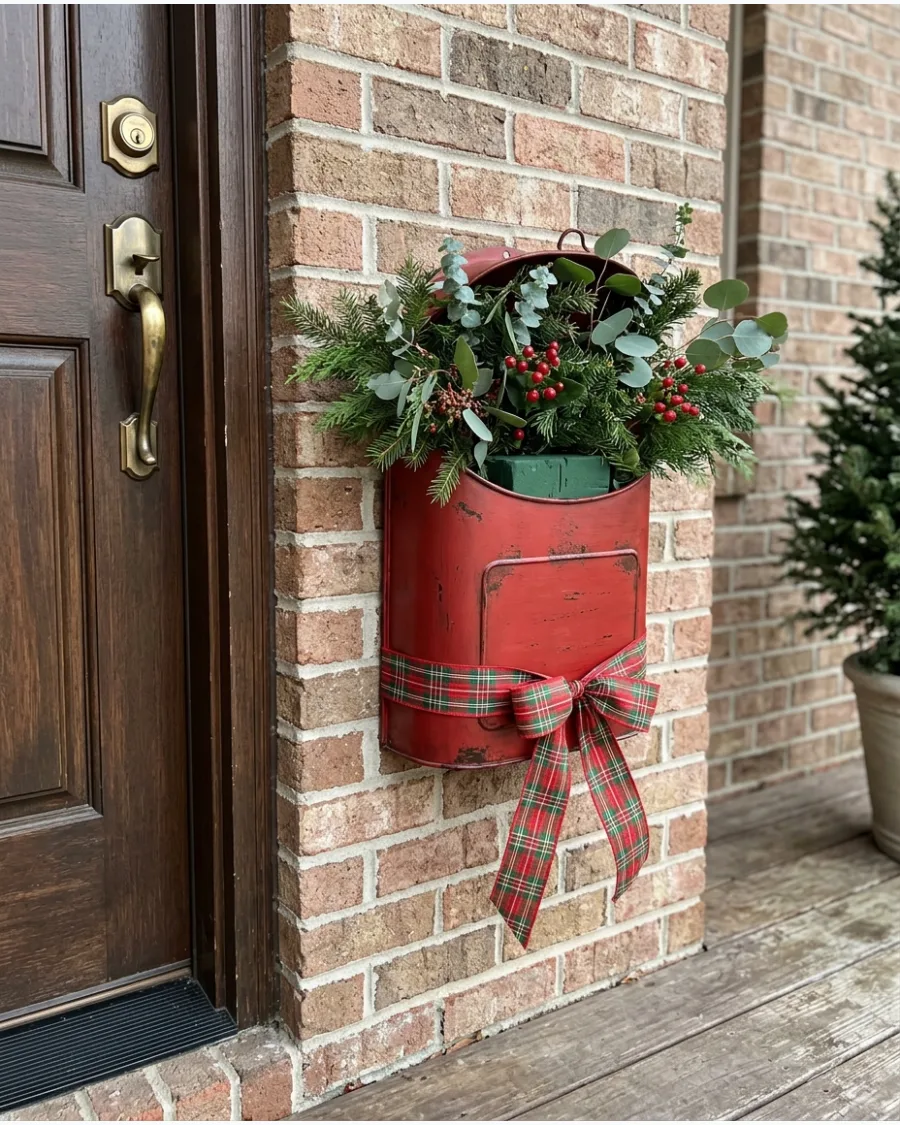
Decorate a vintage-style mailbox with cascading evergreen branches, berries, and ribbon. A wall-mounted mailbox can be stuffed with florist foam to keep the greenery branches exactly where you want them.
Tuck long sprigs of eucalyptus and pine into the mailbox opening so they spill over the edges naturally.
- Purchase a decorative metal mailbox from a hardware store or flea market.
- Mount the mailbox at shoulder height for maximum visibility next to the door.
- Add a 'Letters to Santa' decal to the front for a playful theme.
Quick win: Use artificial greenery for this project so the arrangement stays fresh-looking all season without watering.
38. DIY Wood Slice Christmas Porch Decorations
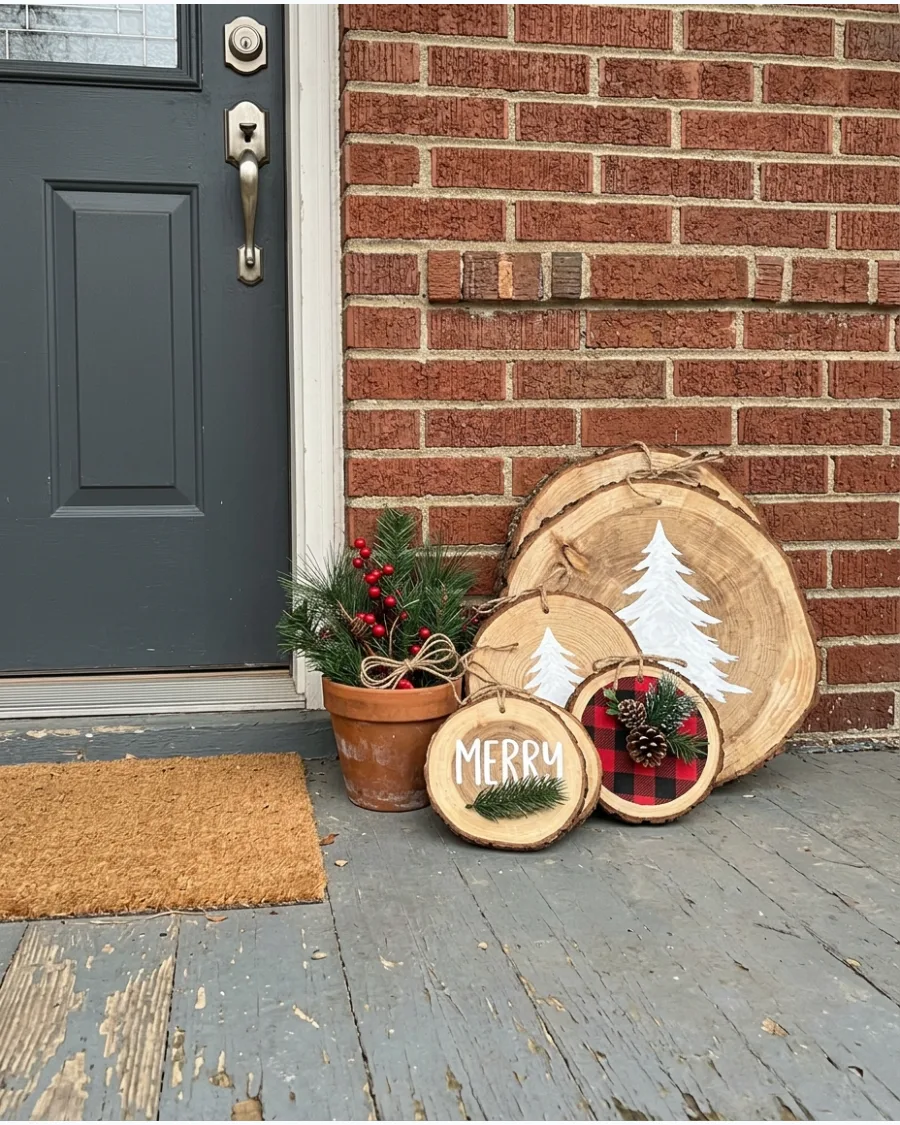
Use large wood slices to make rustic hanging signs or stacked porch ornaments. Sanding the face of the wood slice makes it much easier to paint clear, crisp letters or holiday designs.
Drill a small hole near the top of the wood slice and thread thick jute twine through it for a sturdy hanging loop.
- Buy pre-cut wood slices from a craft store or cut them from downed logs.
- Seal the wood with a clear outdoor spray to prevent the bark from peeling or the wood from cracking.
- Stack three different sizes of wood slices vertically to create a wooden snowman for the porch floor.
Most people skip this: Apply a wood conditioner before painting to prevent the paint from soaking too deeply into the grain and looking faded.
DIY LIGHTING AND LANTERN IDEAS
39. DIY Ornament-Filled Christmas Lanterns
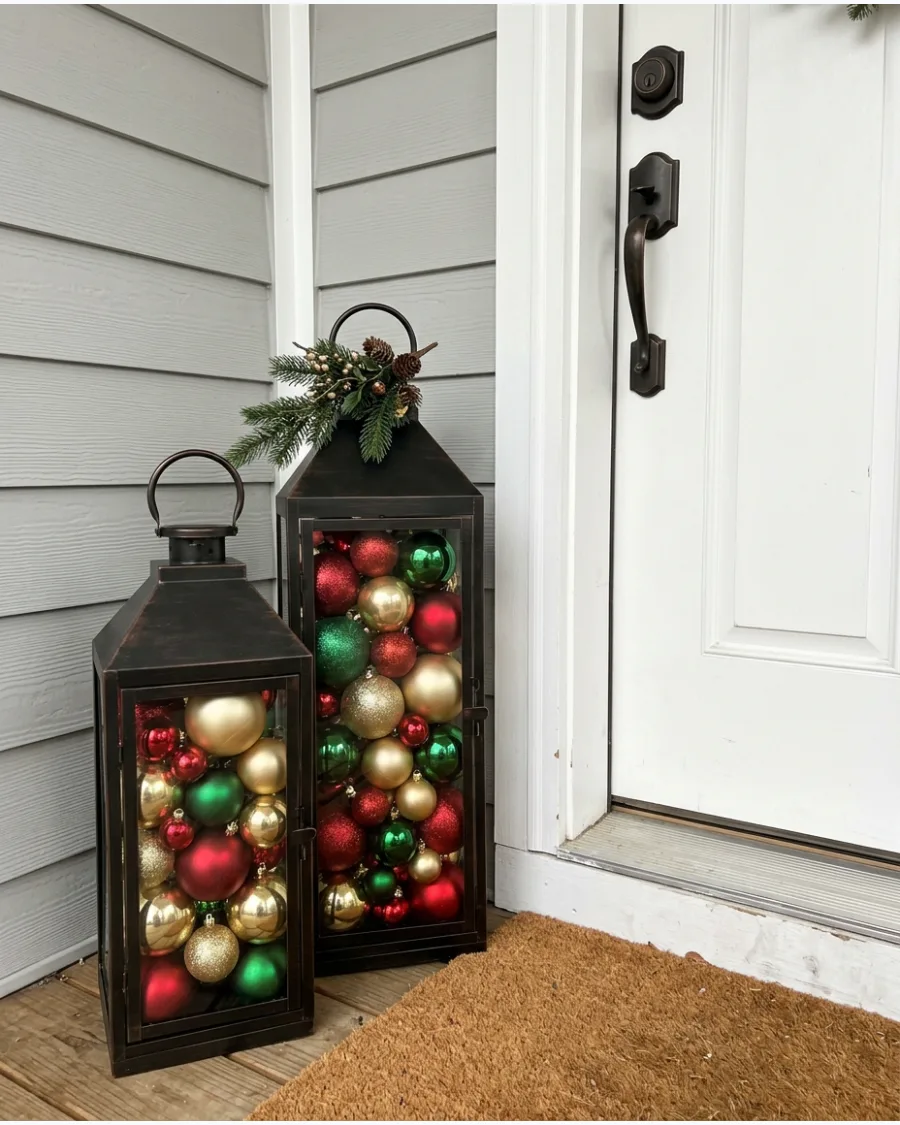
Fill large outdoor lanterns with weather-resistant Christmas ornaments instead of candles.
Shatterproof ornaments are a must for this project to avoid any mess if the lantern gets bumped by the wind.
Layer different sizes and finishes of ornaments, putting the largest ones at the bottom to fill the space quickly.
- Use plastic shatterproof ornaments in various colors to match the porch theme.
- Clean the glass panes of the lantern before filling to maximize the sparkle of the ornaments.
- Mix in a few large pinecones with the ornaments for a more natural texture.
Best shortcut: Weave a small string of battery-operated fairy lights through the ornaments as you fill the lantern for an extra glow.
40. DIY Snowy Christmas Lantern Scenes
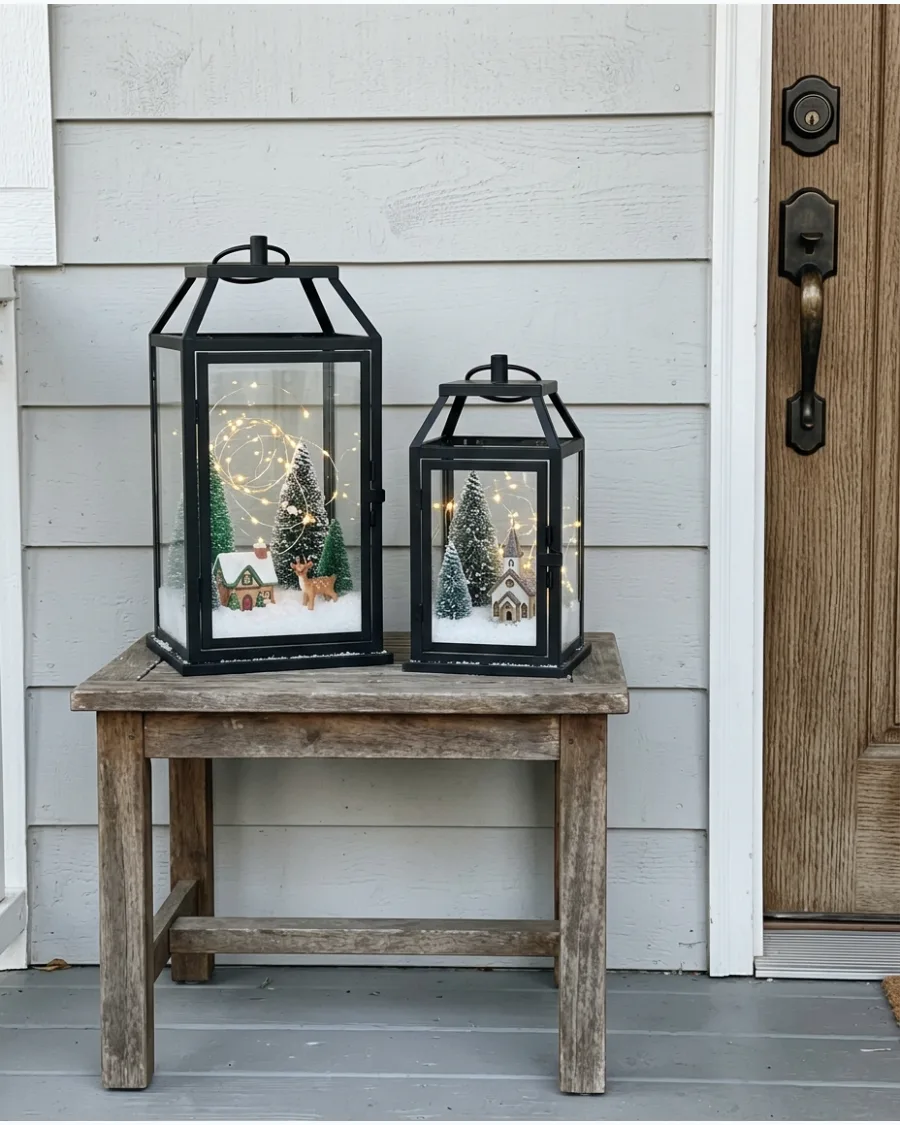
Turn outdoor lanterns into miniature winter scenes using faux snow and tiny bottle-brush trees. Using battery-operated tea lights inside the scene makes the faux snow glow beautifully after the sun goes down.
Pour an inch of faux snow or Epsom salts into the bottom of the lantern before nesting the miniature trees and houses inside.
- Collect miniature village accessories from a local hobby shop or craft store.
- Use a lantern with a side door for easy access to turn the battery lights on and off.
- Add a tiny deer figurine or a miniature bench to create a woodland theme.
Quick win: Use Epsom salts as the snow base because the crystals reflect light better than most plastic faux snow.
41. DIY Evergreen-Wrapped Porch Lanterns
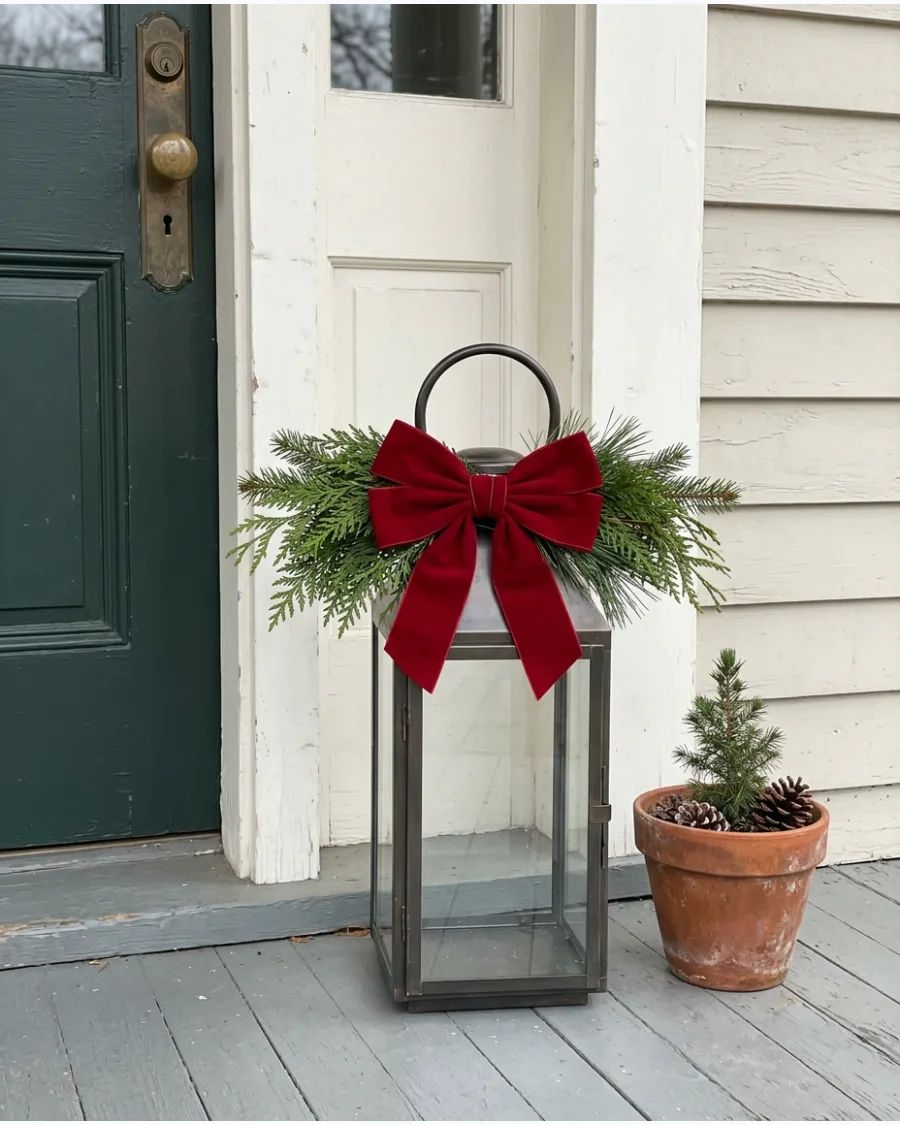
Use floral wire to attach small bundles of cedar and pine to the handle of a metal lantern. Secure a weatherproof velvet bow over the wire to hide the mechanics while adding a pop of color. This simple DIY upgrade helps ordinary lanterns coordinate with wreaths and garlands without replacing them.
- Cedar sprigs from the yard or a local garden center
- Use floral wire to wrap the greenery tightly around the lantern handle so it stays put in wind
- Swap the ribbon color to navy or gold for a different color scheme
Quick win: Lightly mist the greenery with water occasionally to keep the needles from drying out and turning brown.
42. DIY Clustered Lantern Christmas Display
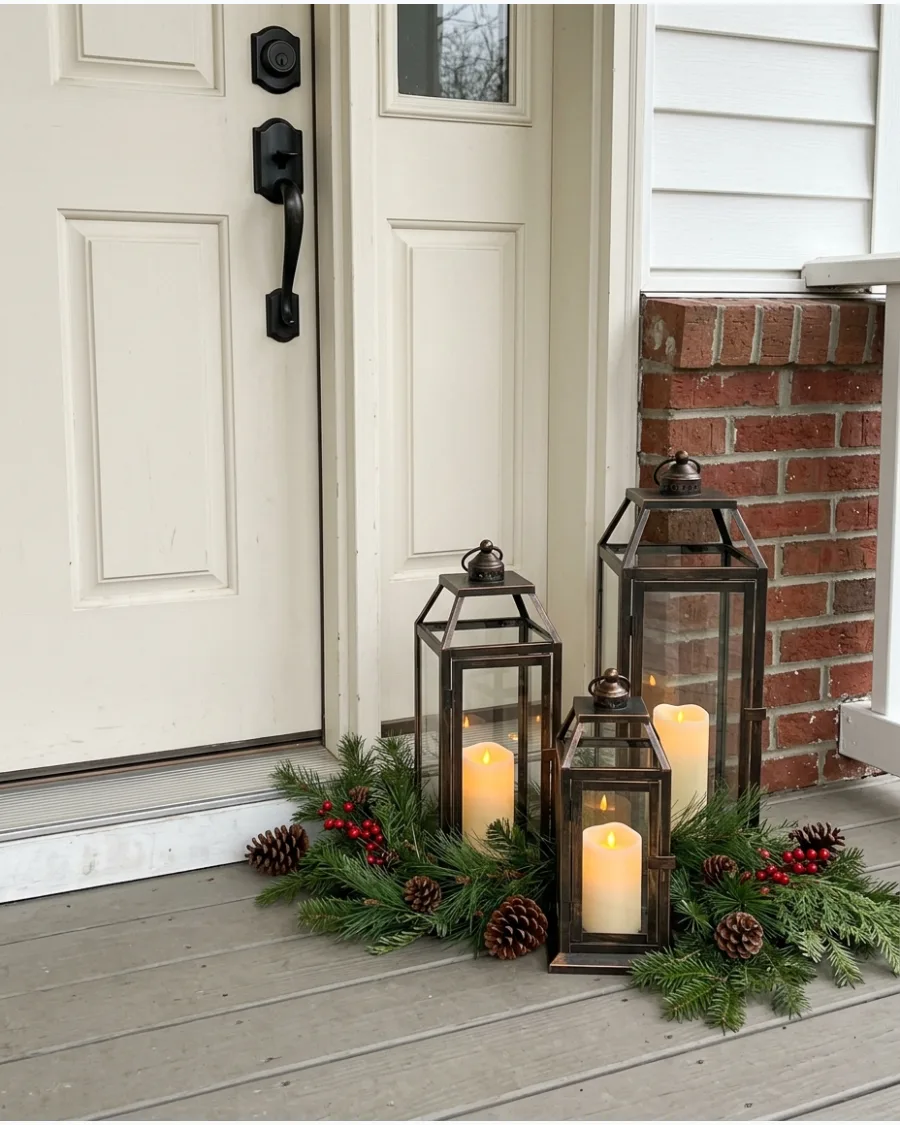
Group three outdoor lanterns of different heights beside the doorway to create an instant focal point. Tuck loose pine branches and large pinecones around the base of the lanterns to anchor the arrangement. Use warm battery-operated candles with timers to create an inviting glow after dark without any effort.
- Budget-friendly battery candles with built-in timers
- Place the tallest lantern in the back and smaller ones in front for a balanced look
- Renters can use this display since it requires no hardware or wall mounting
Most people skip this: Check the outdoor rating on your battery candles to make sure they can handle cold temperatures and humidity.
43. DIY Lighted Garland Around Porch Columns
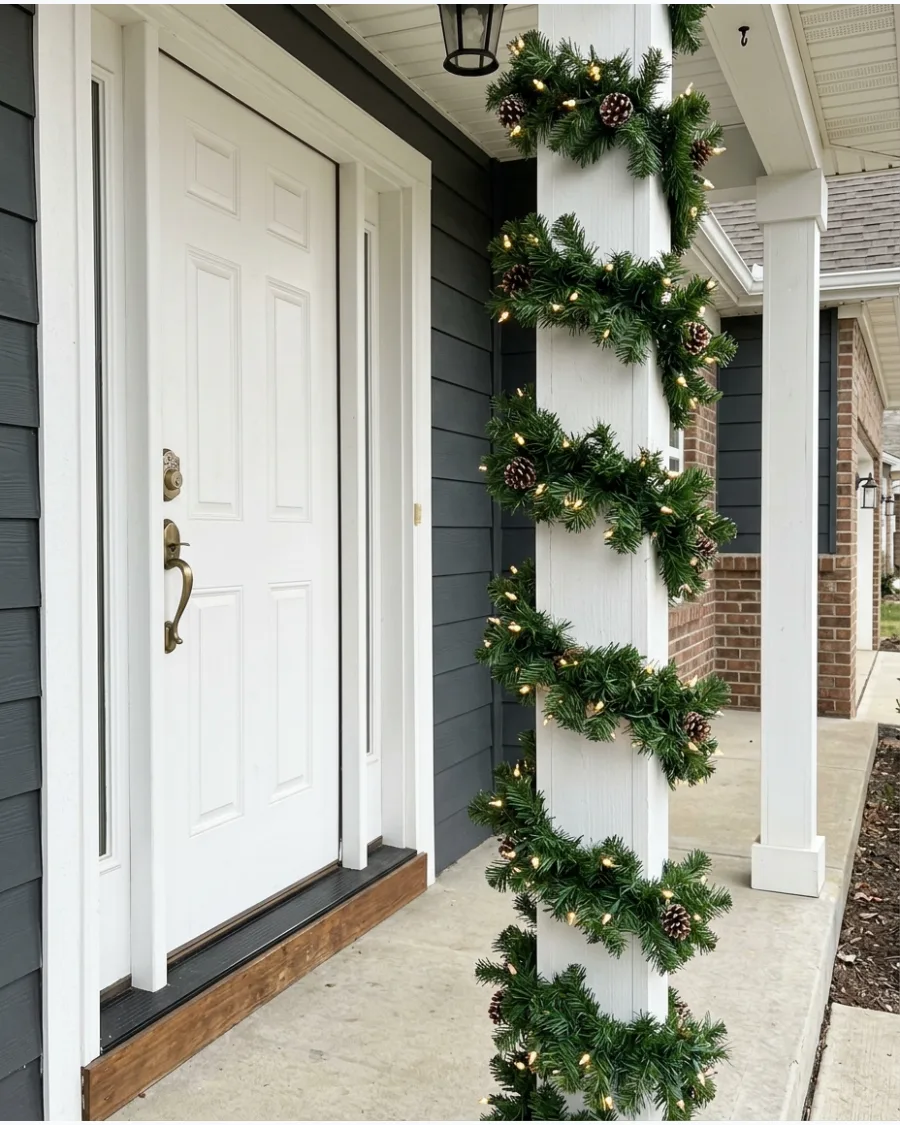
Wrap porch columns with evergreen garland for a high-end, traditional entrance. Space the wraps evenly and weave warm white LED string lights through the needles for a clean nighttime glow. This technique adds vertical interest and makes the home feel festive from the street.
- 9-foot garland sections from a craft store
- Use clear zip ties to secure the garland at the top and bottom of the column
- For thin columns, wrap the garland tighter for a fuller, more substantial appearance
Best shortcut: Use a command hook at the very top of the column to hold the weight of the garland without drilling holes.
44. DIY Glowing Christmas Branch Arrangement
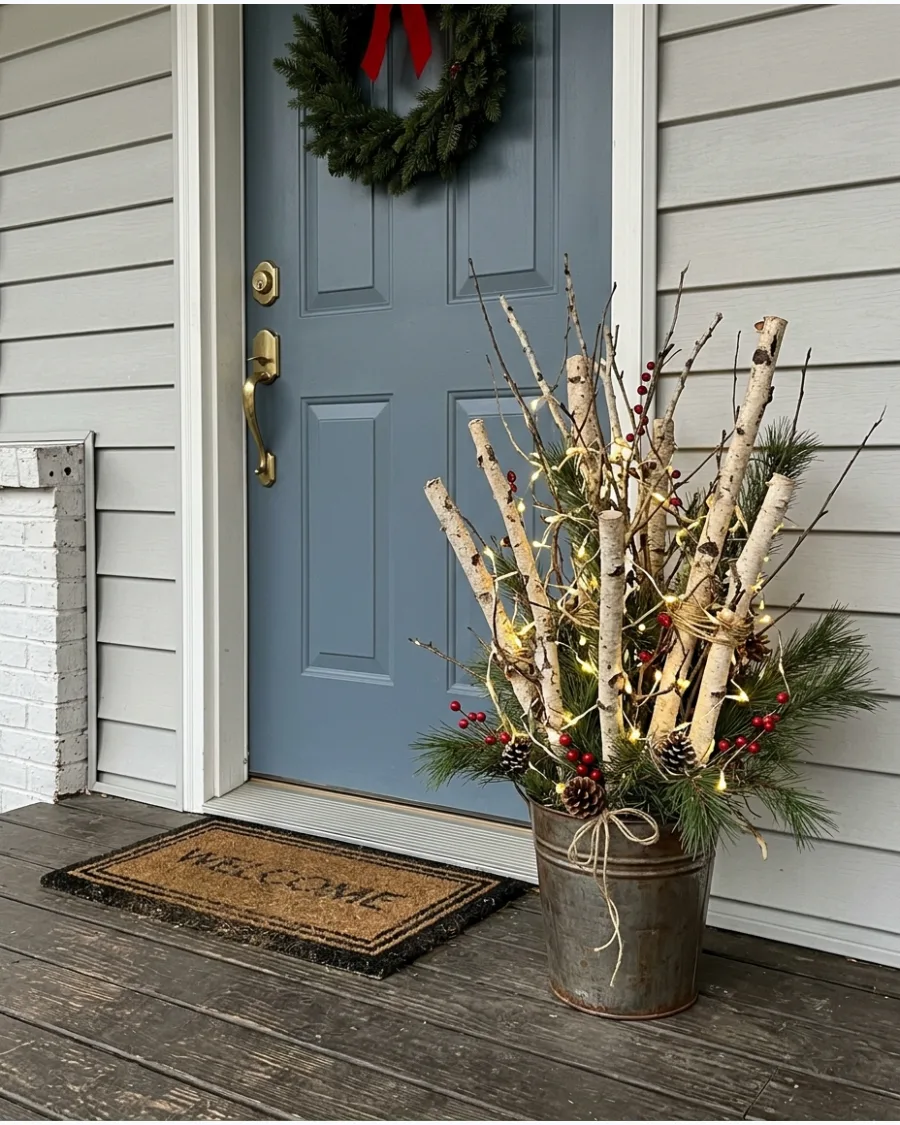
Gather bare branches and place them upright inside a heavy outdoor planter. Wrap the branches from base to tip with thin wire string lights to create a sculptural light feature. This minimalist approach works beautifully for modern porches that want a subtle holiday touch.
- Branches found in the yard or purchased at a floral shop
- Use sand or heavy rocks in the bottom of the pot to prevent the branches from tipping over
- Leave branches natural for a woodland look or spray paint them silver for extra shine
Quick win: Use battery-operated lights with a waterproof battery box so you don't have to run extension cords across the porch.
45. DIY Mason Jar Christmas Porch Lanterns
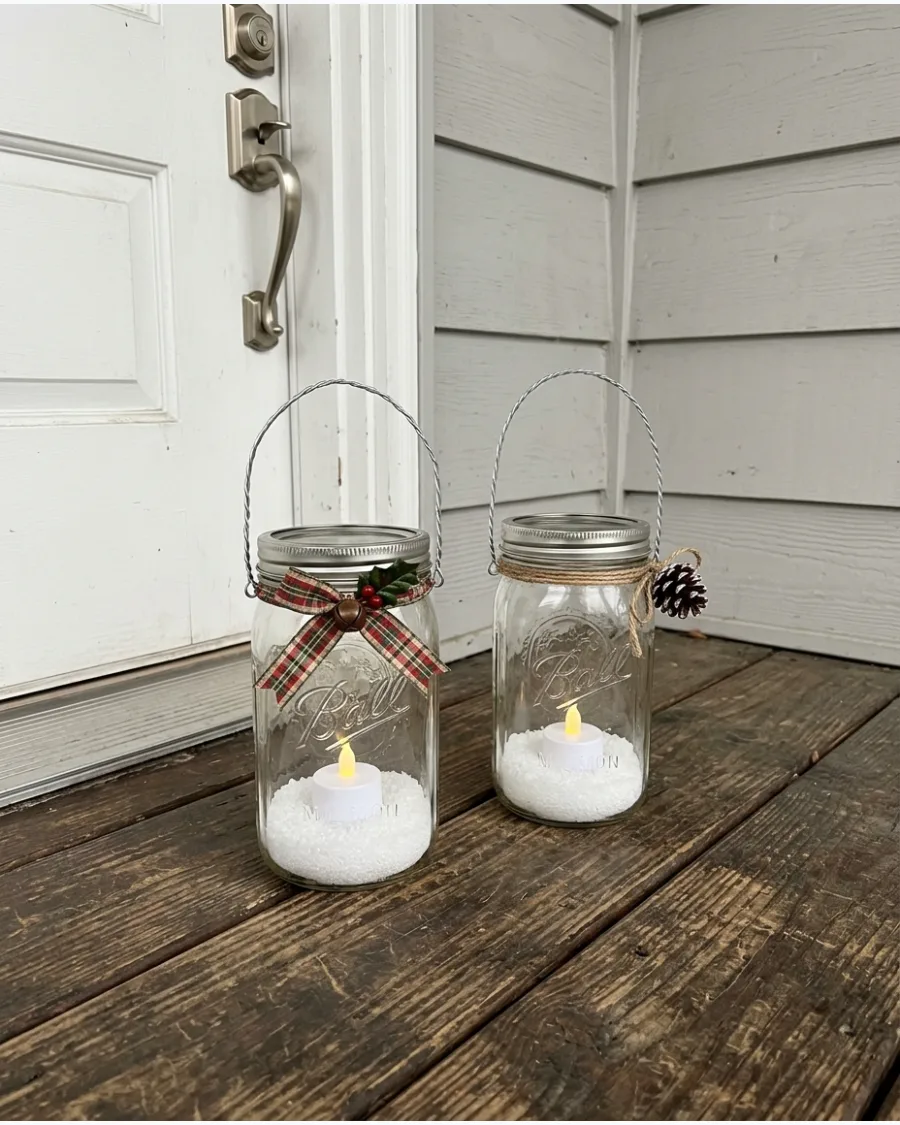
Place battery candles inside glass mason jars for inexpensive handmade holiday lighting. Tie a piece of jute twine and a sprig of fresh rosemary or pine around the rim for a handmade touch. Group the jars safely inside sheltered porch areas or line them up along the edges of the steps.
- Standard quart-sized mason jars
- Place jars in sheltered areas to keep them from filling with rain or snow
- Add a handful of Epsom salt to the bottom of the jar to look like faux snow
Best shortcut: Use wide-mouth jars so it is easier to reach inside and turn the candles on and off.
46. DIY Lighted Evergreen Stair Garland
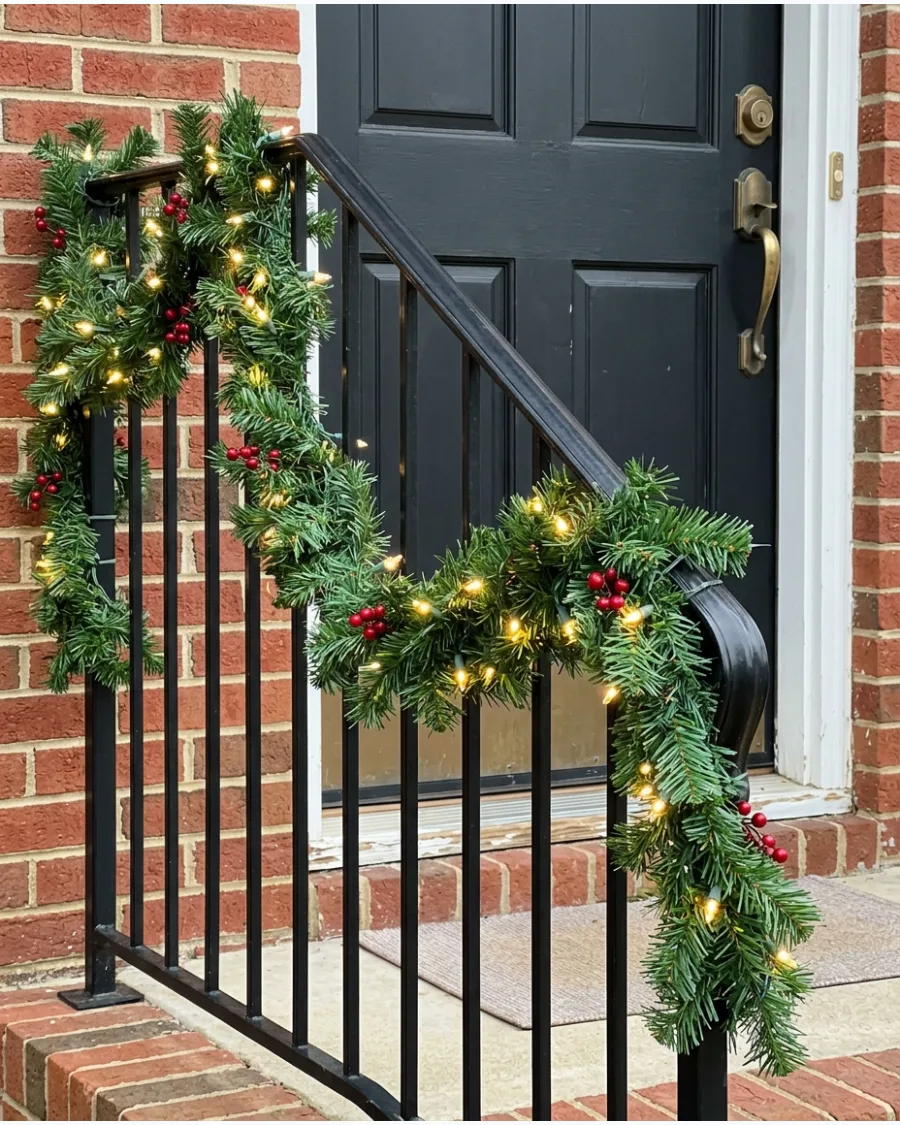
Attach thick evergreen garland along the porch stair railing to connect the walkway to the front door. Incorporate clusters of pinecones or red berries at each point where the garland dips to add visual weight. Adding lights to the stairs improves safety while creating a beautiful path for guests.
- Pre-lit garland or standard garland with separate light strands
- Use outdoor-rated zip ties that match the color of your railing to keep the garland secure
- For long railings, overlap the ends of two garlands and wire them together for a seamless look
Most people skip this: Make sure the garland is tucked toward the outside of the handrail so guests can still grip the rail safely.
WHIMSICAL AND NOSTALGIC DIY CHRISTMAS PORCH IDEAS
47. DIY Giant Candy Cane Porch Posts
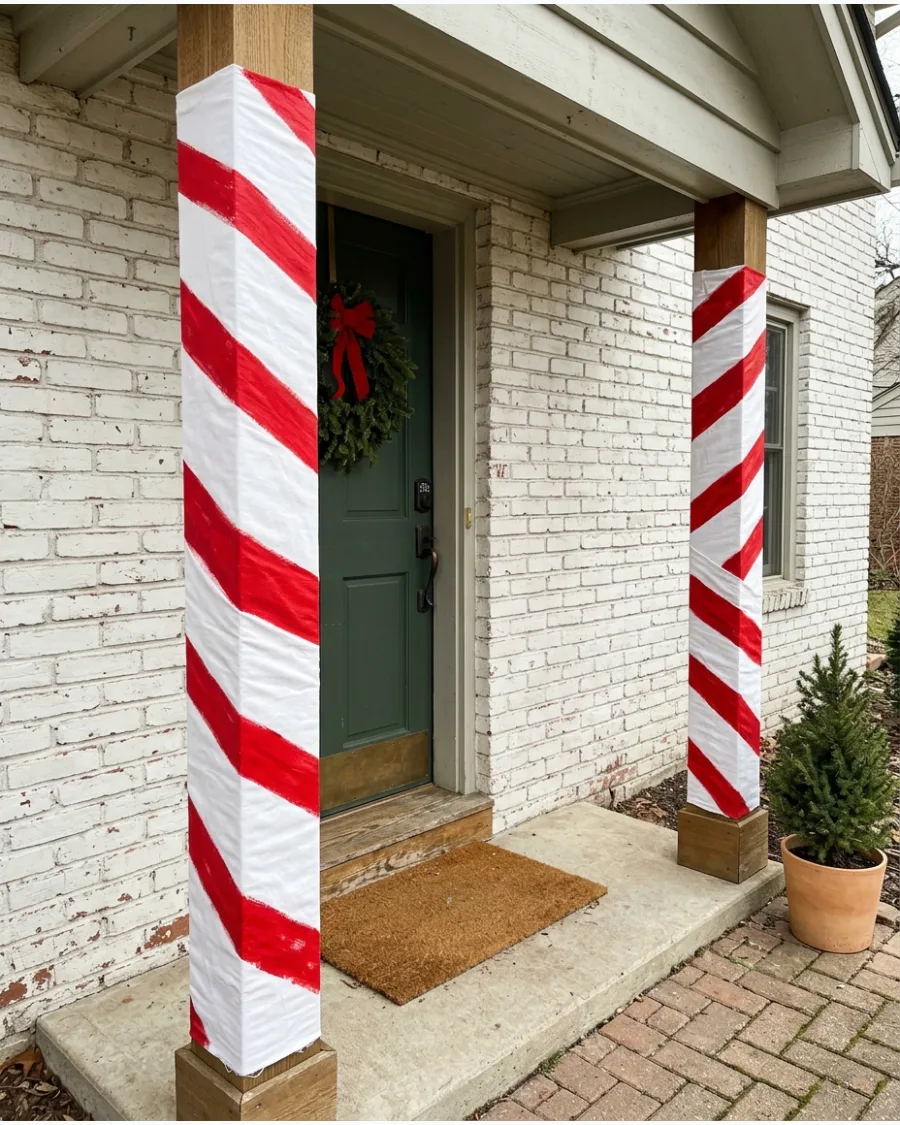
Create oversized candy canes from PVC pipe and wrap them in red-and-white stripes using vinyl tape. Place a matching pair beside the walkway or front steps to create a playful entrance without filling the entire porch with decorations. These tall decorations stand out against the house and provide a fun look for kids.
- 2-inch PVC pipe and red electrical or vinyl tape
- Secure the base in a heavy pot or zip-tie it to a porch railing for stability
- Make smaller versions to line the walkway leading up to the porch
Quick win: Use a piece of cardboard as a spacer while wrapping the tape to keep your stripes perfectly even all the way up.
48. DIY Peppermint Christmas Porch Decorations
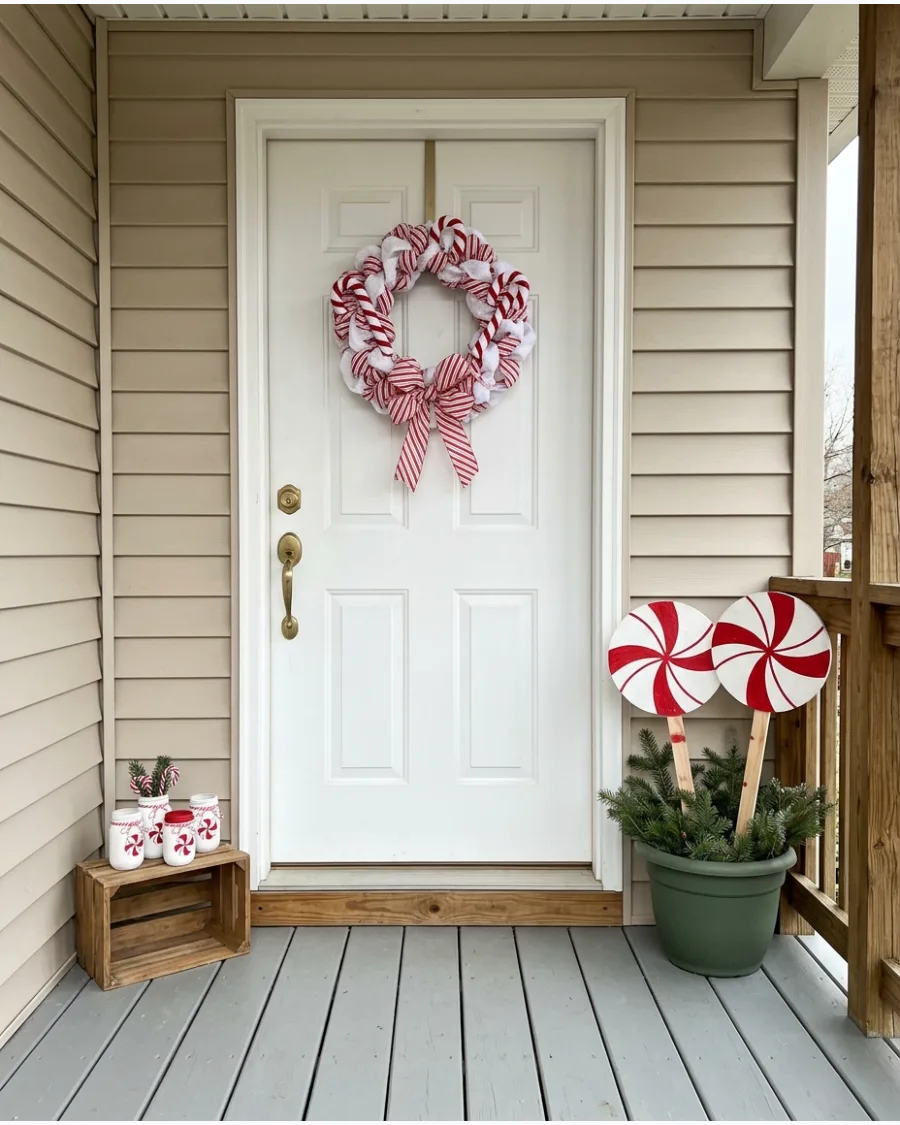
Cut large circles from lightweight outdoor-safe material and paint them as red-and-white peppermint candies. Paint white and red swirls from the center outward and finish with a coat of clear gloss for a candy-like shine. Arrange them among porch planters or hang them on the porch wall for a pop of color.
- Round plywood cutouts or large plastic bucket lids
- Use outdoor acrylic paint to ensure the colors don't run in the rain
- Wrap the finished candies in clear cellophane and tie the ends with ribbon to look like wrapped treats
Most people skip this: Prime the surface before painting so the red and white colors stay bright and don't soak into the material.
49. DIY Gingerbread House Front Door Trim
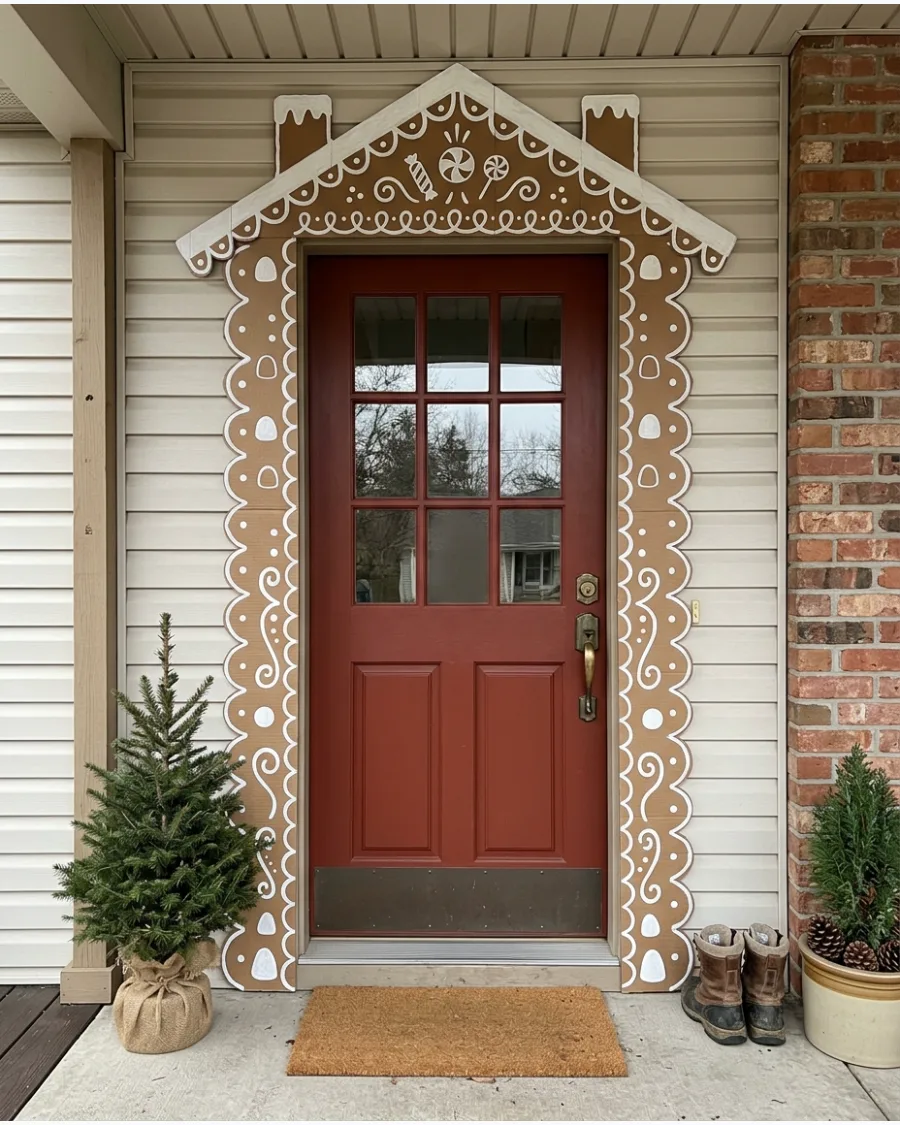
Create lightweight white foam-board trim shaped like icing around a sheltered front door. Attach colorful plastic ball ornaments to the foam to represent gumdrops and candy pieces. This temporary DIY project makes a standard entry feel like a storybook scene without any permanent changes to the house.
- White foam insulation board or thick poster board
- Use outdoor-rated double-sided mounting tape to attach the trim to the door frame
- Keep this design under a covered porch to protect the foam from heavy wind and rain
Best shortcut: Use a large bowl as a template to trace the scalloped icing edges for a perfectly uniform look.
50. DIY Oversized Christmas Ornaments
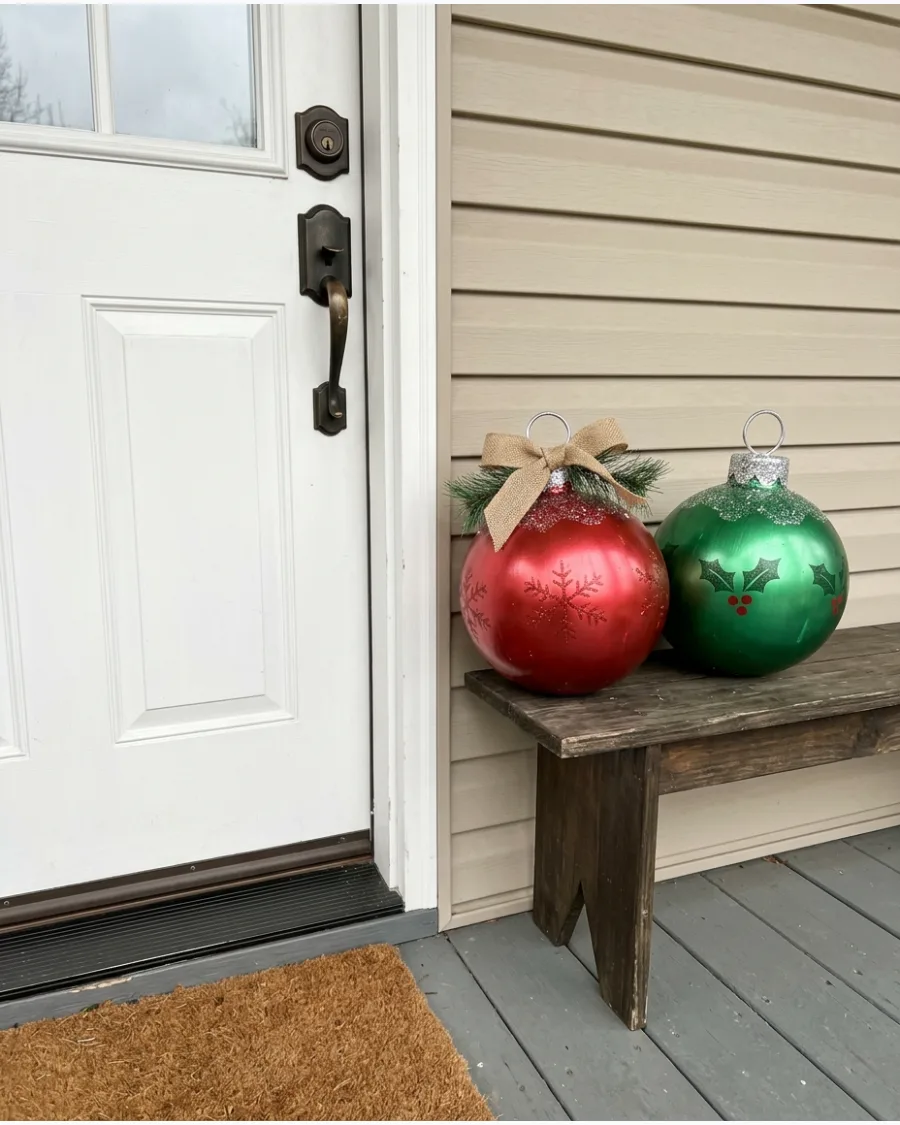
Turn lightweight plastic balls or large craft spheres into giant Christmas ornaments by adding simple ornament caps. Paint the spheres in metallic colors and arrange several near the porch steps in a coordinated color palette for a bold display. These large-scale items create a polished look that is easy to see from the street.
- Large plastic balls or smooth foam spheres
- Use high-gloss spray paint designed for plastic to get a professional finish
- Fill balls with a little sand before sealing if you live in a very windy area
Quick win: Use different textures, like one glittery ball and two matte ones, to make the cluster look more designer and less DIY.
51. DIY Christmas Porch Gnomes From Greenery

Use a tomato cage or a sturdy cone base to layer fresh evergreen branches for a gnome body. Top the greenery with a large, weather-resistant felt hat and a wooden ball or small potato for the nose.
Secure the branches with floral wire starting from the bottom and working upward to ensure a full look. These whimsical figures add personality to the entryway without requiring expensive store-bought statues.
- Fresh cedar or pine boughs from a local garden center or backyard.
- Place a heavy rock inside the base of the tomato cage to prevent tipping during winter wind.
- Swap the felt hat for a burlap one for a more natural or organic appearance.
Quick win: Spray the greenery with an anti-desiccant to keep the branches from drying out and turning brown before the holiday season ends.
52. DIY Giant Jingle Bell Porch Decorations
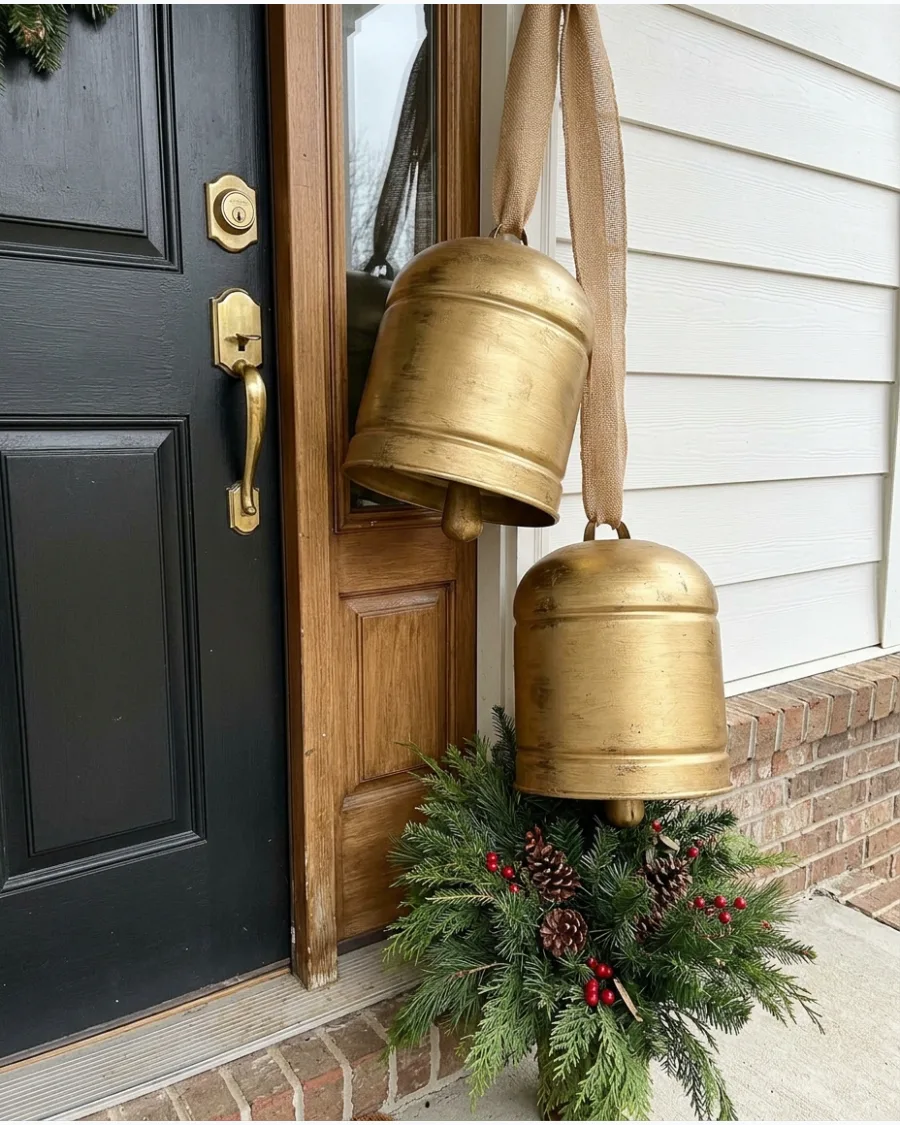
Transform plastic mixing bowls or large round containers into oversized bells with a few coats of metallic spray paint. Cut a small slit in the bottom to thread through a thick velvet or burlap ribbon for hanging.
Apply a clear outdoor sealant over the paint to prevent chips and scratches from winter weather. These look high-end when clustered near the door or tucked into large evergreen arrangements.
- Inexpensive plastic bowls from a dollar store or thrift shop.
- Hang them at staggered heights for the best visual impact in a corner or entryway.
- Use silver or copper paint to match existing porch hardware or lighting fixtures.
Best shortcut: Use a large metal washer as a clapper inside the bell to give it a realistic weight and a faint ringing sound.
53. DIY Nutcracker-Inspired Porch Decorations
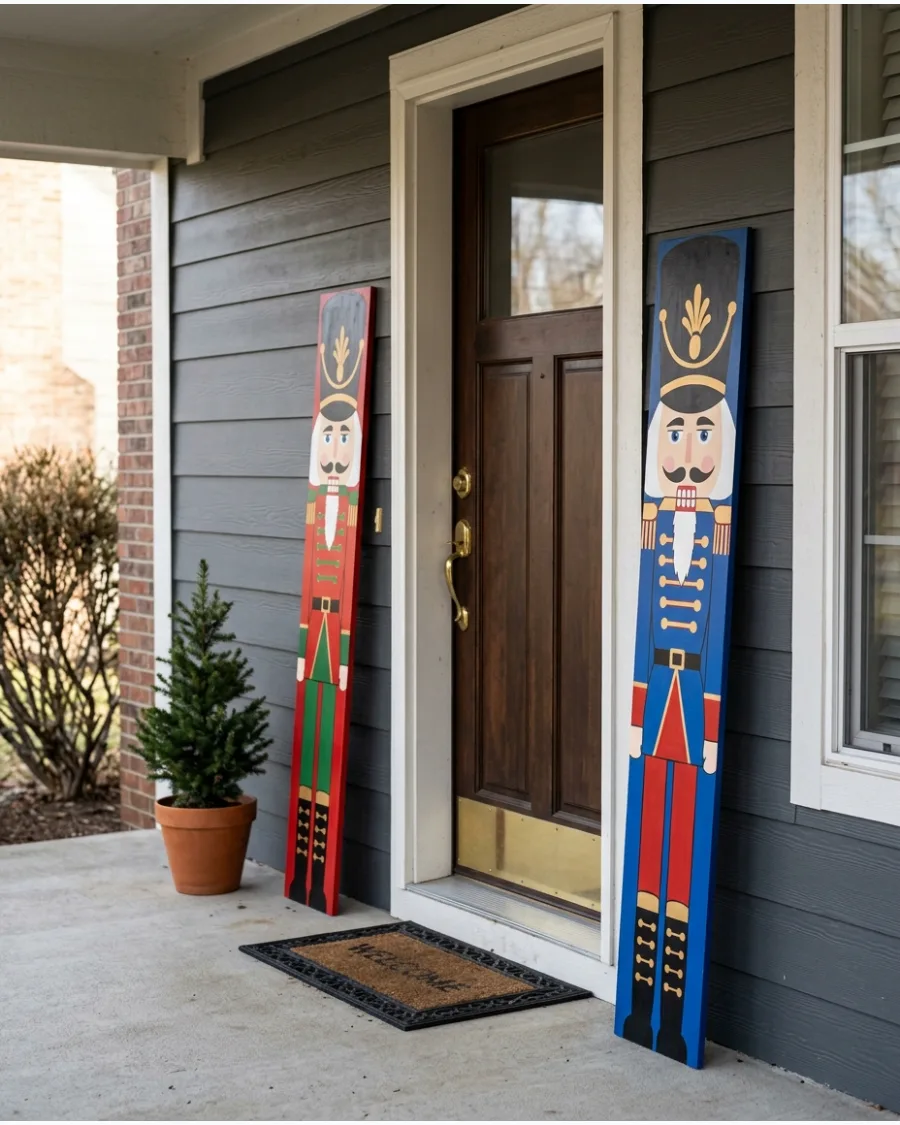
Paint six-foot cedar boards with outdoor acrylic paint to create tall, flat nutcracker figures. Focus on simple geometric shapes like rectangles for the coat and circles for the buttons to keep the project manageable.
Use painter's tape to get crisp, clean lines between the different colors of the uniform. Stand them symmetrically on both sides of the front door for a classic and formal greeting.
- Standard cedar or pine boards from a local lumber yard.
- Screw the boards into a heavy wooden base or a sandbag for stability on windy days.
- Paint the back of the board a solid neutral color for a finished look from all angles.
Most people skip this: Sand the edges of the boards before painting to prevent the wood from splintering or the paint from peeling over time.
54. DIY Retro Colorful Christmas Porch
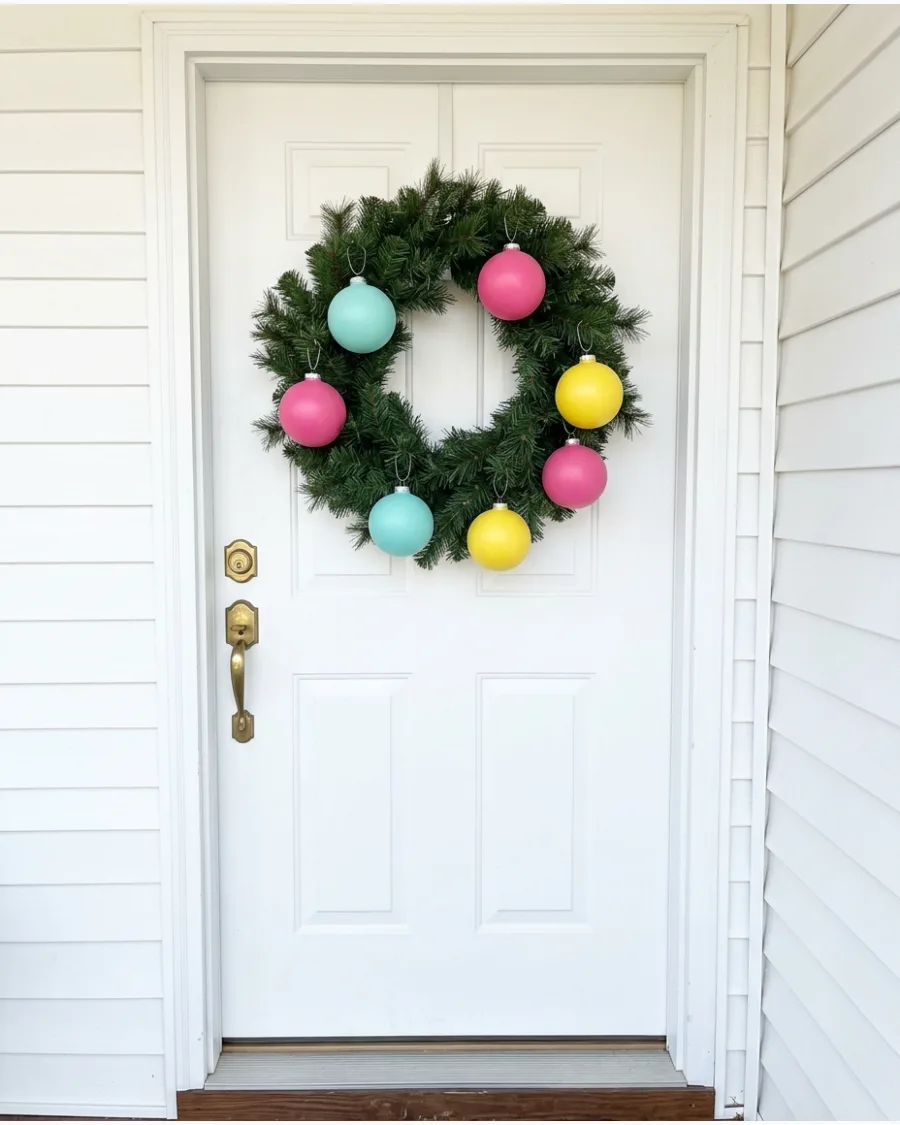
Swap traditional red and green for a vibrant palette of aqua, pink, and bright yellow. Paint inexpensive plastic ornaments or wooden cutouts in these retro shades to use on wreaths and garlands.
Keep the background greenery simple so the bright colors pop without looking cluttered. This style brings a cheerful, mid-century vibe to any modern porch entrance.
- Multi-colored spray paint and plain shatterproof plastic ornaments.
- Use warm white lights instead of colored ones to let the decor colors stand out.
- Add silver tinsel or tinsel garlands for an authentic 1950s holiday feel.
Quick win: Use a primer meant specifically for plastic to ensure the bright paint colors do not flake off in freezing temperatures.
ELEGANT, MODERN, AND NATURAL DIY PORCH IDEAS
55. DIY Scandinavian Christmas Front Porch
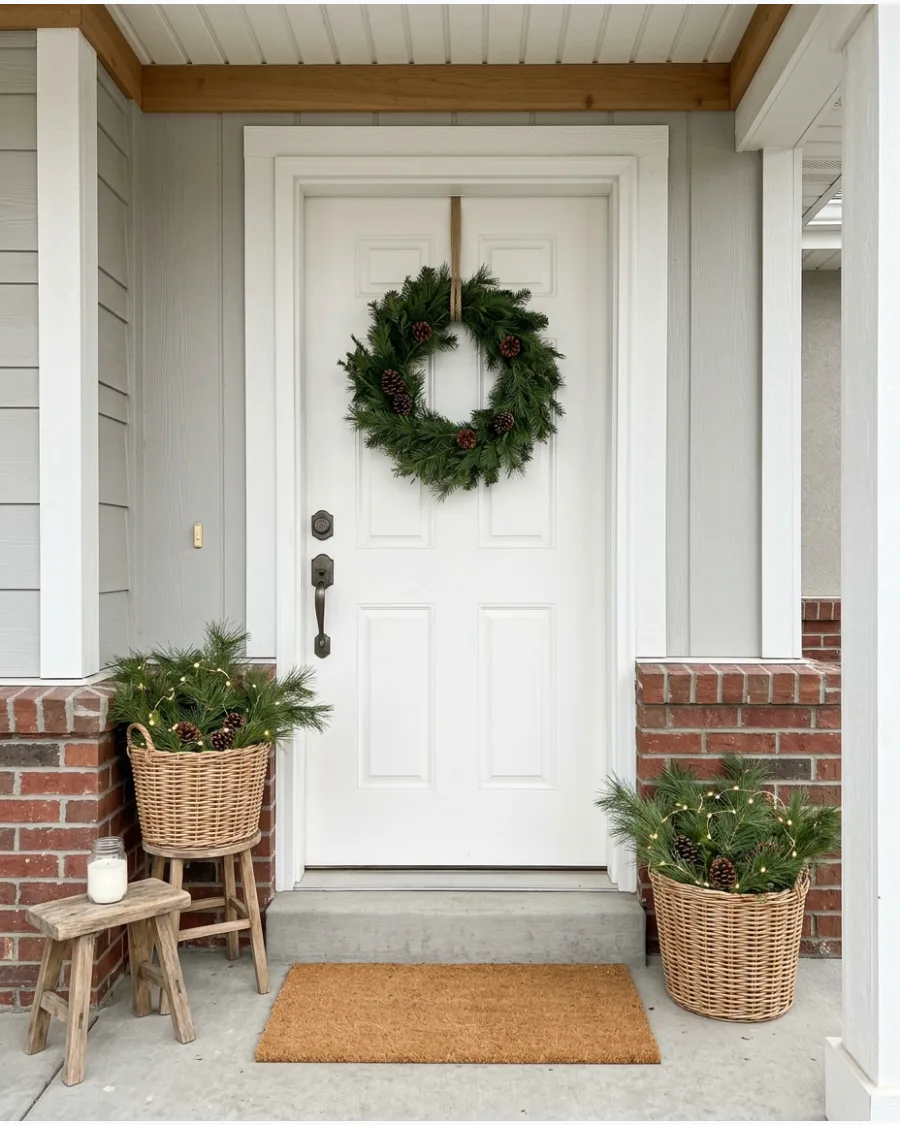
Focus on a less is more approach using raw wood, woven textures, and simple greenery. Place a few bare pine branches in a large wicker basket and wrap them in warm white fairy lights.
Stick to a neutral color palette of white, wood tones, and deep green to maintain the minimalist aesthetic. This look is easy to assemble and feels incredibly cozy during the dark winter months.
- Foraged pine branches and a thrifted or new woven basket.
- Use battery-operated lights with an automatic timer for easy daily operation.
- Add a simple sheepskin or faux-fur rug near the door to add extra texture.
Best shortcut: Place a heavy brick or stone inside the basket to keep the branches upright and prevent the basket from blowing away.
56. DIY Black, Green, and Gold Christmas Porch
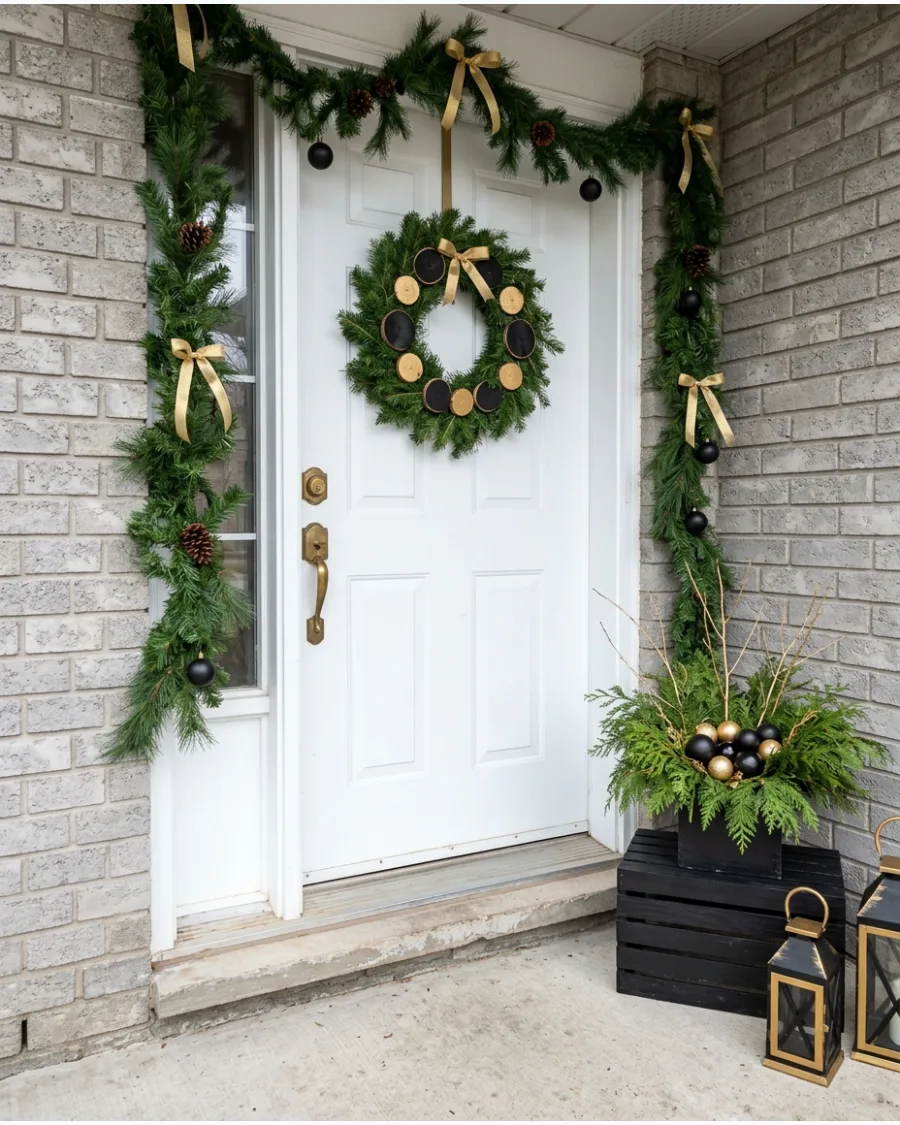
Create a sophisticated entrance by combining dark evergreen boughs with matte black accents and touches of gold. Paint old planters a flat black and fill them with dense cedar or fir branches.
Incorporate a few large gold-painted pinecones or ornaments to add a subtle glow under porch lights. This high-contrast look works perfectly for modern or transitional home styles.
- Matte black spray paint and large natural pinecones.
- Arrange branches in a fan shape to create a full, professional-looking display.
- Use gold grosgrain ribbon instead of ornaments for a more streamlined look.
Quick win: Use floral foam at the bottom of the planter to hold the branches at the exact angle you want for a full look.
57. DIY Burgundy and Evergreen Christmas Porch
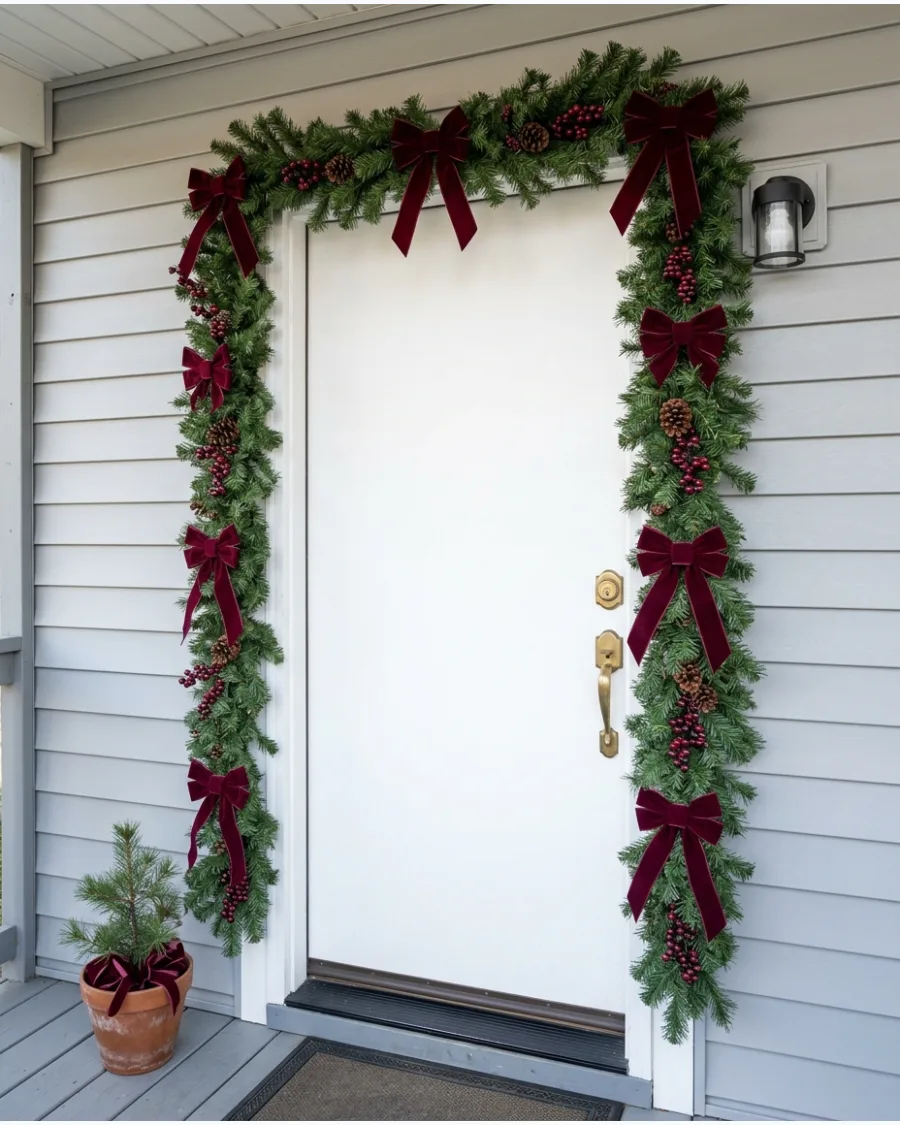
Shift away from bright red by using deep wine or burgundy tones for a more upscale feel. Tie large burgundy velvet bows onto your door garland and tuck matching berries into your porch pots.
Mix in natural elements like dried eucalyptus or pinecones to bridge the gap between the rich fabric and the greenery. The result is a moody, elegant entrance that looks expensive but is easy to build yourself.
- Burgundy velvet ribbon and artificial berry stems from a craft store.
- Use wire-edged ribbon to help the bows maintain their shape in winter wind.
- Swap burgundy for navy blue if you want a cooler, non-traditional color palette.
Most people skip this: Fluff the greenery branches forward before adding the ribbon so the bows look nestled into the garland.
58. DIY Woodland Christmas Porch With Natural Greenery
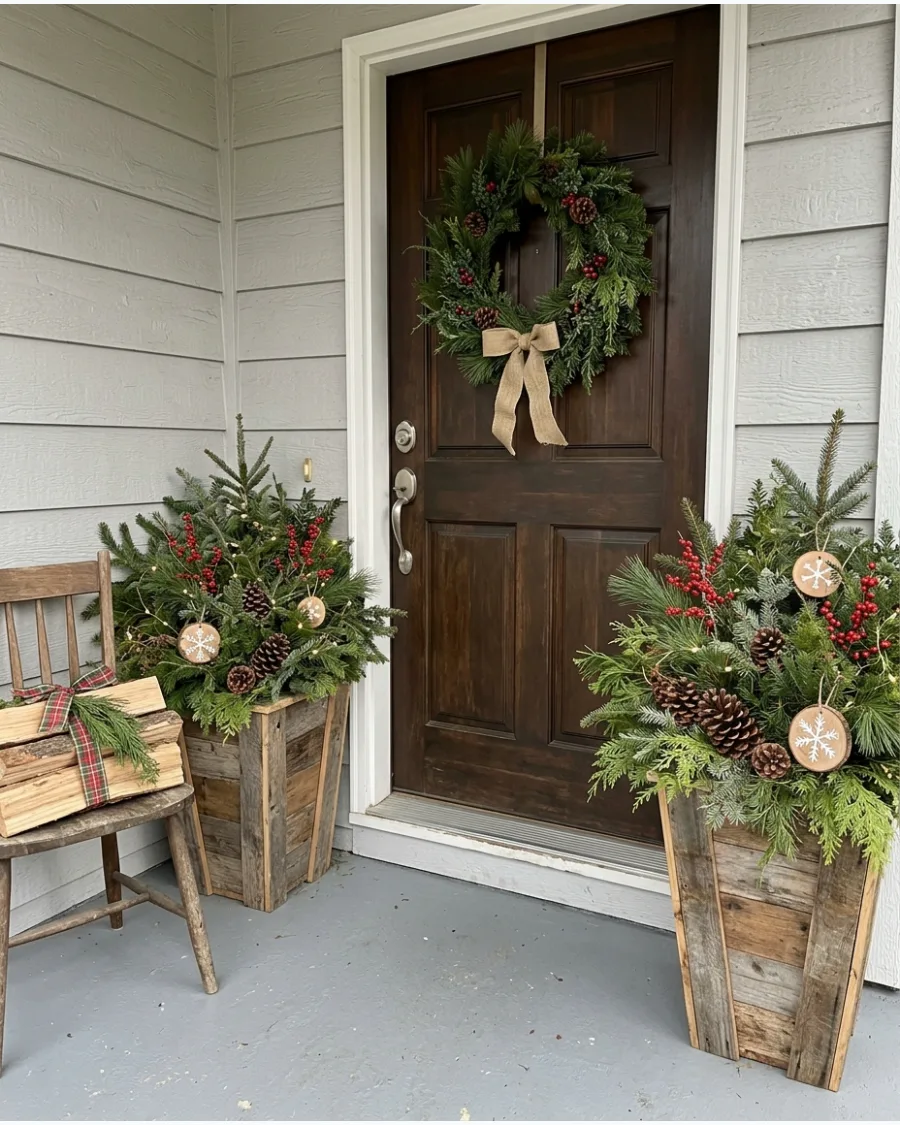
Lean into a forest-inspired look by using only natural materials found in the yard or a local park. Arrange birch logs, pinecones, and various evergreen clippings in galvanized buckets or wooden crates.
Avoid all plastic or shiny decorations to keep the focus on the organic textures of the wood and needles. This style is nearly free to create and fits beautifully with a cabin or nature-focused aesthetic.
- Foraged logs, branches, and pinecones from your own yard or park.
- Group items in odd numbers like three or five for a more natural arrangement.
- Use twine or jute instead of wire to secure items for a rustic, matte finish.
Best shortcut: Spray the pinecones with a clear matte sealer to prevent them from closing up when they get wet or cold.
59. DIY Small Front Porch Christmas Makeover
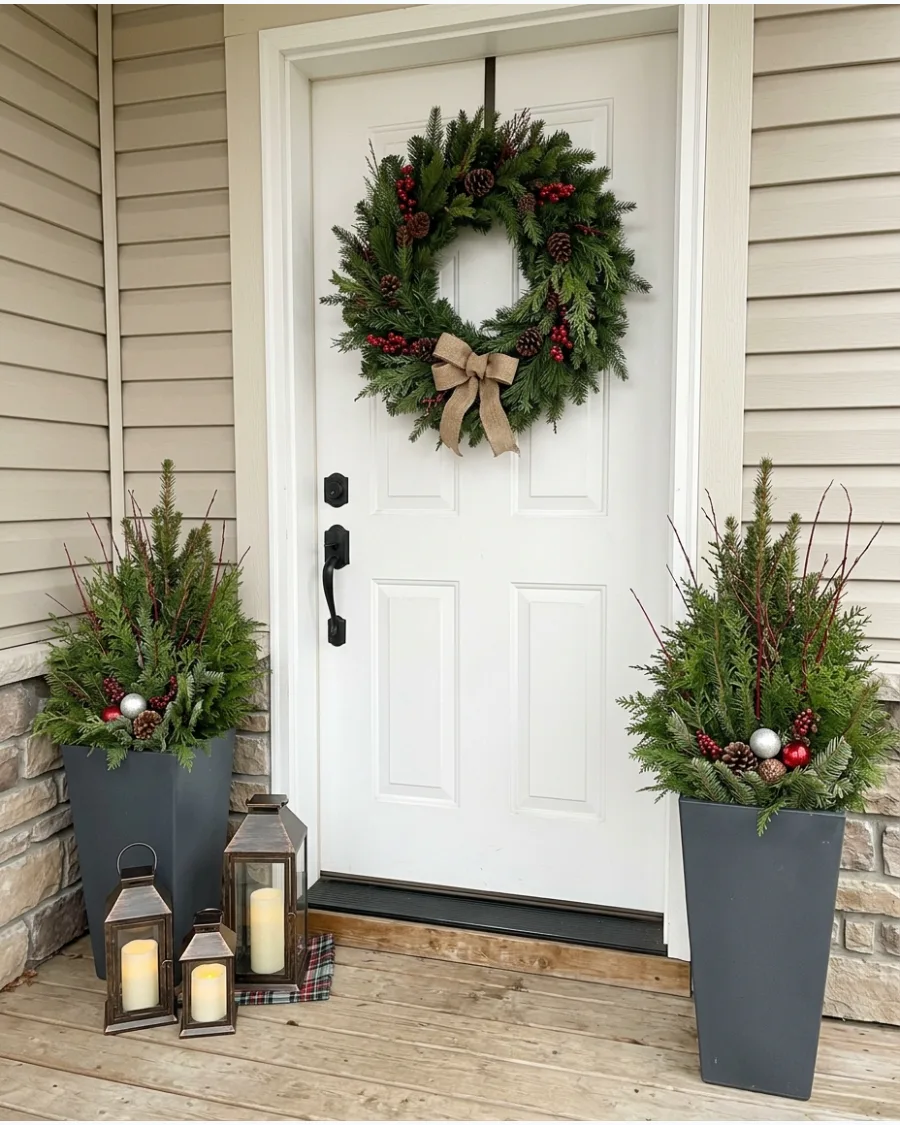
Maximize a tight entryway by focusing on vertical decor that does not eat up floor space. Hang a single, high-quality handmade wreath on the door and place two tall, slim planters on either side of the threshold.
Add a small cluster of lanterns or a door mat to ground the look without creating a tripping hazard. This approach ensures the porch looks festive and intentional despite its small footprint.
- Slim outdoor planters and a standard 24-inch evergreen wreath.
- Use over-the-door hangers to avoid drilling holes in small or rented spaces.
- Choose a bright or patterned door mat to add color at the ground level.
Quick win: Use command hooks on the siding or door frame to hang lightweight garlands without damaging the house exterior.
60. DIY Budget Christmas Porch With Thrifted and Foraged Decor
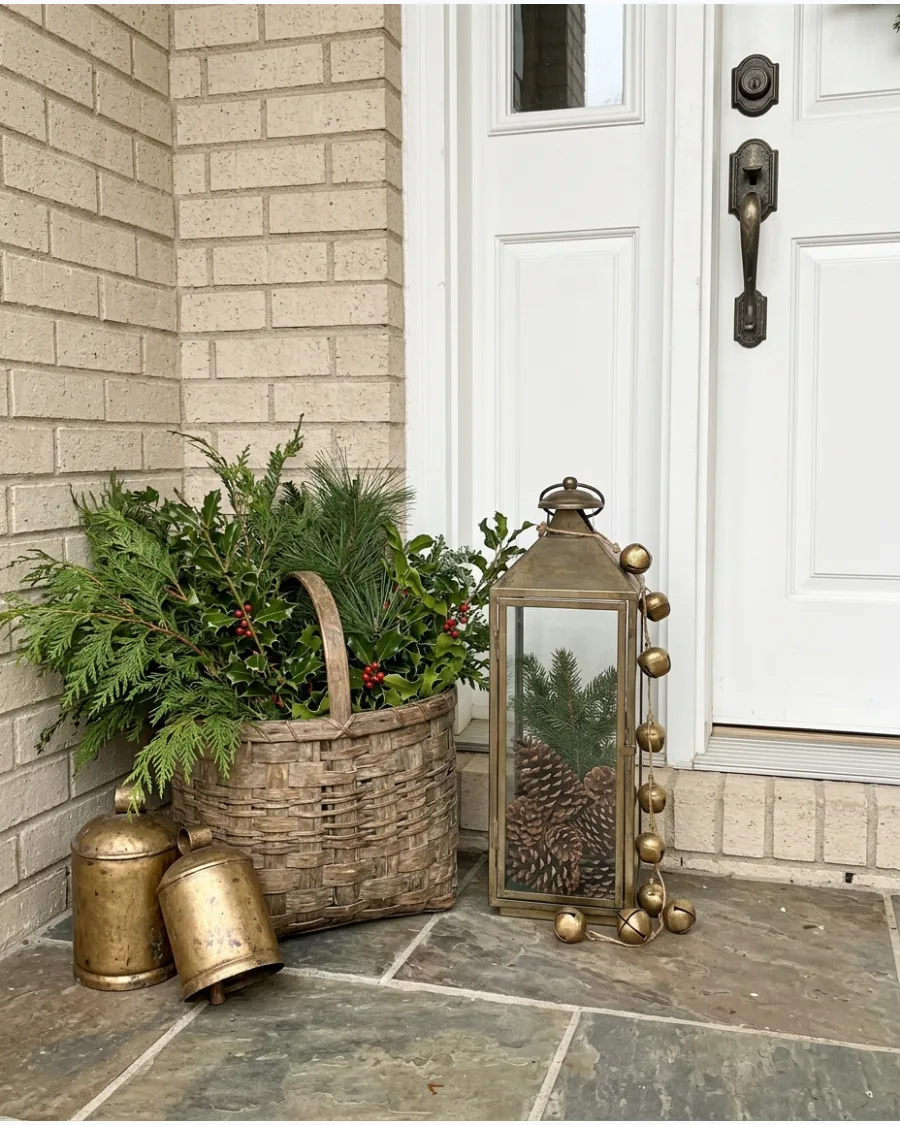
Create a high-end look on a tiny budget by mixing thrift store finds with foraged nature. Scour secondhand shops for old baskets, brass bells, or lanterns that can be refreshed with a bit of cleaning or paint.
Fill the containers with free clippings from your own trees or local Christmas tree lots to save on greenery costs. A cohesive color scheme makes the mismatched items look like a curated collection.
- Thrifted containers and foraged greenery from local yards or tree lots.
- Use leftover house paint to give old pots a fresh, matching look.
- Tie everything together with one roll of inexpensive red grosgrain ribbon.
Most people skip this: Ask at local tree lots for scraps or trimmings, which they often give away for free or for a very small fee.
Frequently Asked Questions
How do I make my DIY porch decor weatherproof?
To protect your creations from the elements, apply a few coats of outdoor-rated paint or a UV-protectant spray to prevent fading and moisture damage. You should also use heavy weights or sandbags hidden inside your displays to ensure they stay grounded during high winter winds.
What are the cheapest materials for large-scale outdoor DIYs?
You can create impressive displays on a budget by repurposing scrap wood, using PVC pipes for structural elements, and sourcing oversized plastic ornaments from local discount stores. These materials are durable and provide a high-impact look without a high price tag.
How can I decorate a small porch without it looking cluttered?
Focus on vertical decor by utilizing door hangers and lush garlands around the frame rather than crowding the floor space. This approach draws the eye upward and creates a festive atmosphere while keeping your entryway clear and functional.
What is the best way to hang heavy DIY wreaths on a metal or glass door?
For a secure hold without damaging your door, use heavy-duty magnetic hooks on metal surfaces or sturdy over-the-door hangers for glass. These practical solutions ensure your substantial DIY wreaths stay firmly in place throughout the holiday season.
How do I hide extension cords for my lighted DIY projects?
Keep your display looking professional by using cord covers that match your porch surface or tucking wires behind planters and benches. Strategic placement near outdoor-rated power strips will help streamline the setup and keep everything organized.