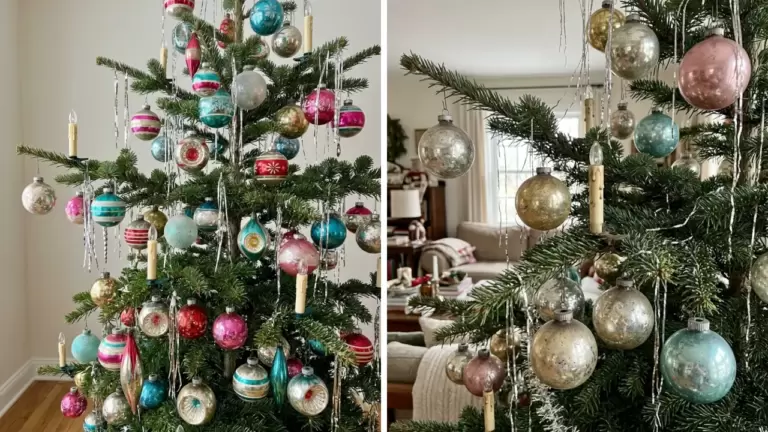
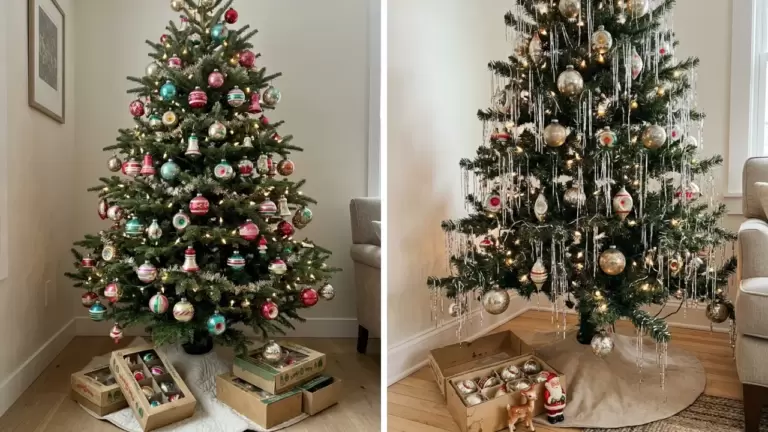
100 DIY Outdoor Christmas Decoration Ideas

This post may contain affiliate links: full affiliate disclosure.
Skip the expensive store aisles and create a high-end holiday look with simple materials like greenery and ribbon. These projects focus on weather-resistant materials that stand up to winter elements while making the front porch feel welcoming.
FRONT PORCH AND ENTRYWAY DIY CHRISTMAS DECORATIONS
1. DIY Oversized Evergreen Christmas Door Arch
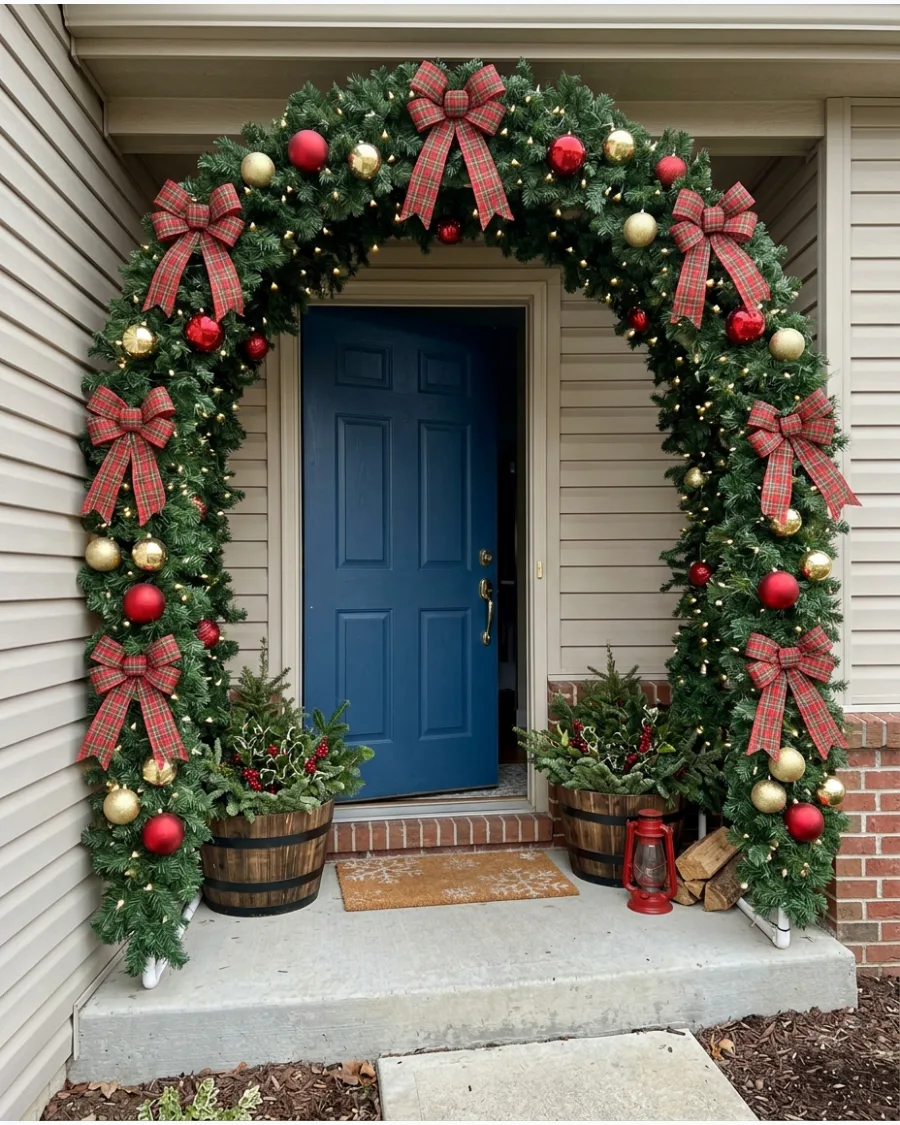
Build a frame around the door frame using PVC pipe and zip-tie heavy garland to the structure for a lush look. Layering different types of greenery like cedar and pine creates a professional depth that single-strand garlands lack. This keeps the entryway clear while framing the house with classic holiday style.
- PVC pipe or heavy-duty wire frame
- Zip-tie garland to the frame and plug in lights
- Use command hooks for renters or screw-in eye hooks for homeowners
Most people skip this: Use two different styles of garland to make the arch look twice as thick.
2. Giant Velvet Christmas Bow for the Front Door
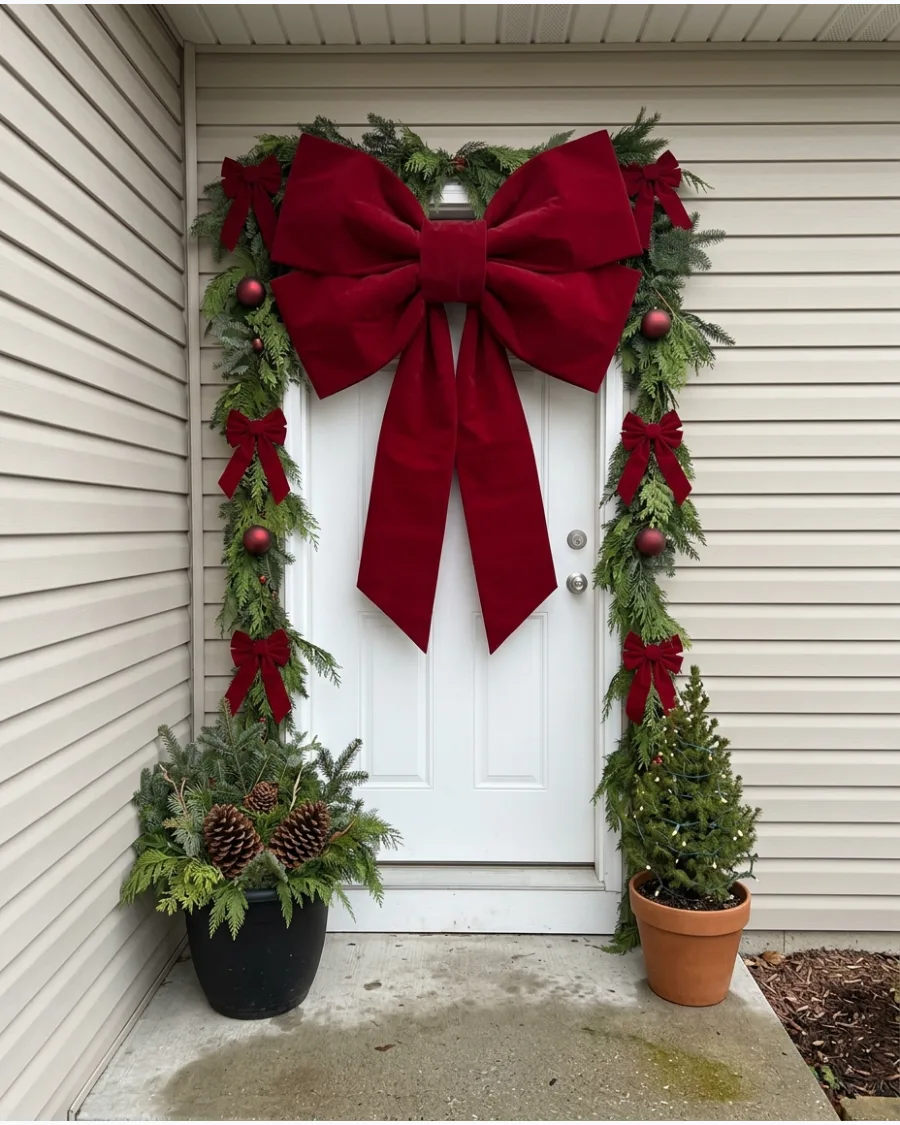
Use weather-resistant velvet ribbon to create a massive bow that acts as the main statement piece on the door. A single large-scale item often looks more expensive and intentional than a cluster of small decorations. Secure it with floral wire to ensure it does not shift when the door opens and closes.
- 4-inch wide outdoor velvet ribbon
- Wired ribbon helps the loops hold their shape in the wind
- Attach with a wreath hanger or heavy-duty fishing line
Quick win: Spray the bow with a fabric water-proofer to prevent the velvet from getting soggy in the rain.
3. DIY Christmas Porch Trees in Planters
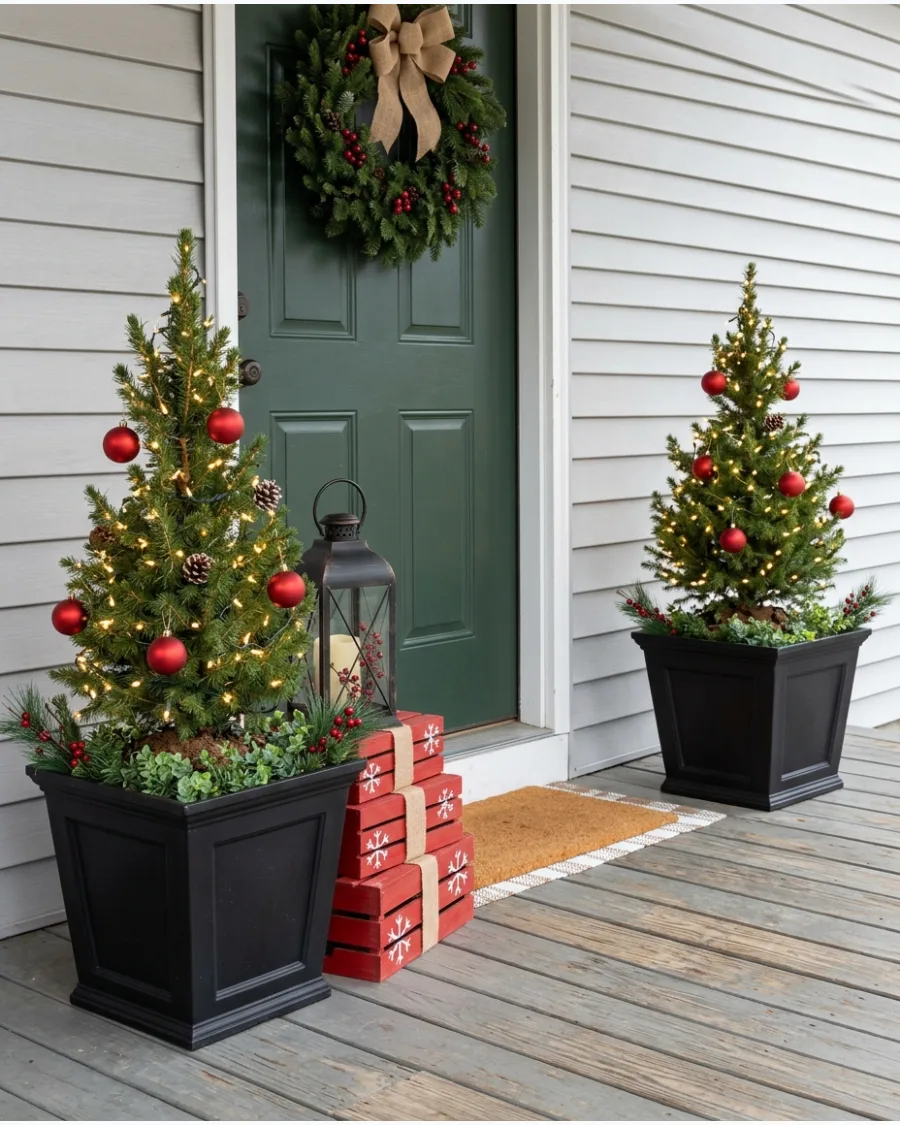
Repurpose summer planters by filling them with small evergreen trees or sturdy faux versions. Adding heavy stones to the bottom of the planters prevents the wind from tipping the trees over during winter storms. Drape them with lights and ribbon for a balanced, symmetrical look at the entryway.
- Heavy outdoor planters and small evergreens
- Use battery-operated lights with timers for convenience
- Fill gaps with real pinecones and birch sticks
Best shortcut: Use a tomato cage inside the planter to support smaller trees or create a tree shape from loose boughs.
4. DIY Stacked Christmas Present Porch Display
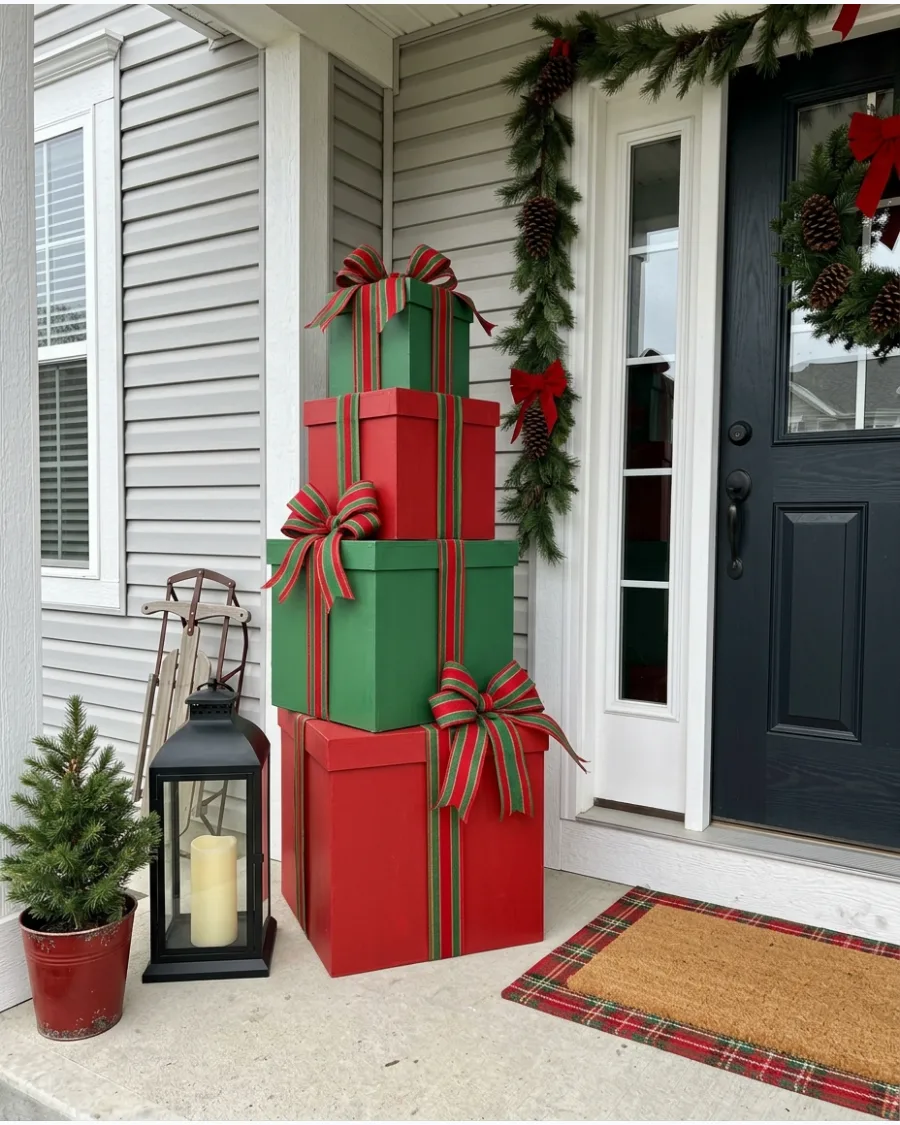
Wrap lightweight boxes in outdoor-safe vinyl or plastic tablecloths to create weather-proof gifts for the porch. Stacking three different sizes creates a vertical element that draws the eye upward and fills empty corners. Secure the boxes together with clear packing tape or glue before adding the final ribbon.
- Cardboard boxes and waterproof wrapping or fabric
- Clear tape and wide outdoor ribbon
- Arrange in a corner to keep the walkway clear
Quick win: Use plastic storage bins as the boxes to make them 100% waterproof and reusable next year.
5. DIY Christmas Snow Globe Lantern
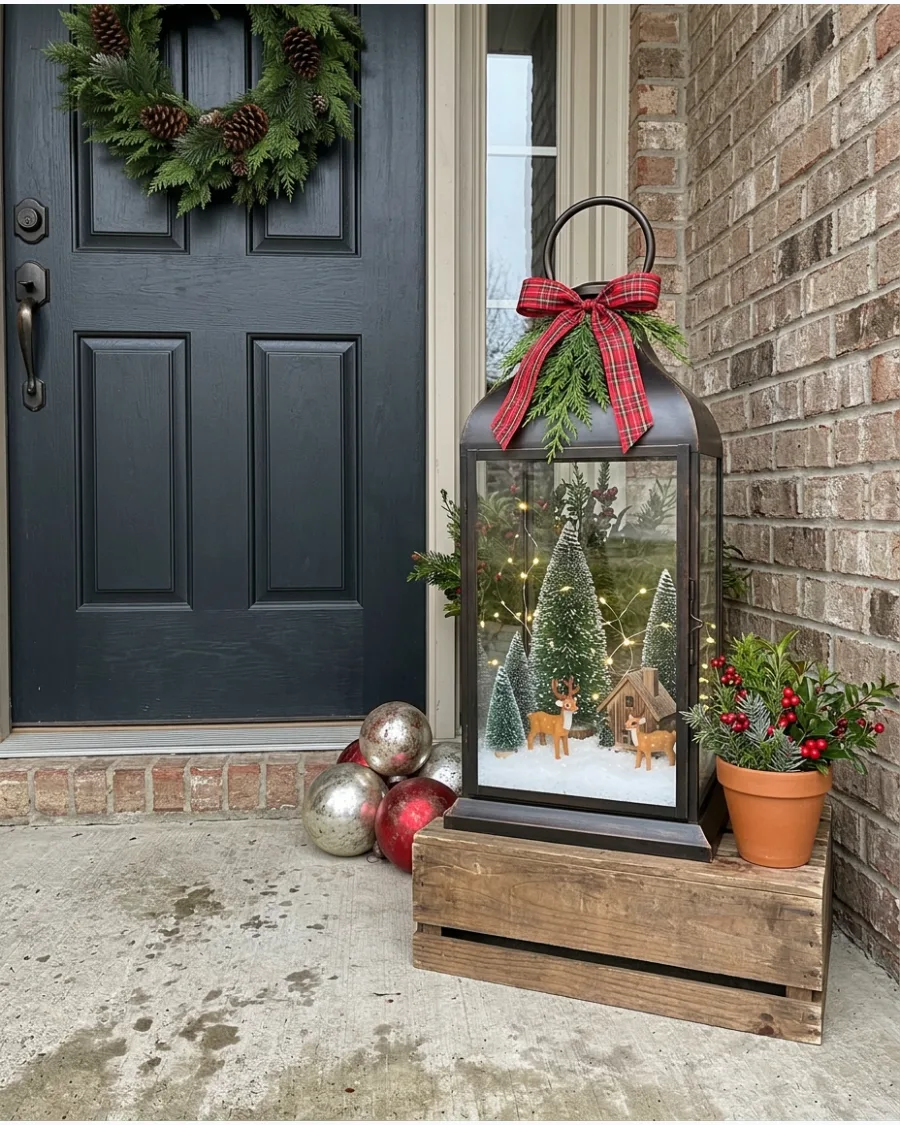
Transform a standard outdoor lantern by filling the base with faux snow and a few miniature winter figures. Using battery-operated fairy lights inside the lantern adds a soft glow that highlights the small details after dark. This is a great way to add charm to porch steps or side tables without much effort.
- Large glass lantern and faux snow or Epsom salt
- Miniature trees or reindeer figures
- Place on a stable surface like a step or side table
Most people skip this: Use a glue dot to secure the figurines so they do not tip over when the lantern is moved.
6. DIY Evergreen Front Door Swag
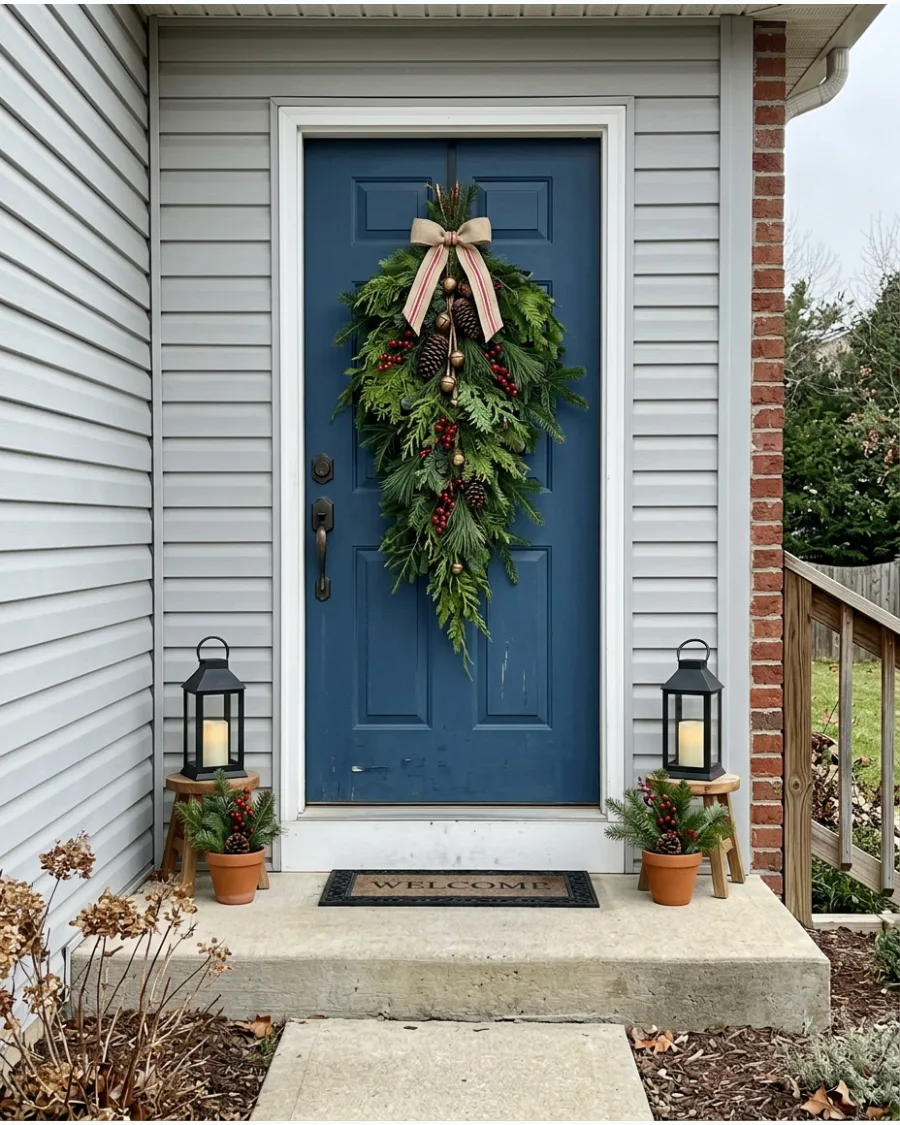
Bundle various greenery like cedar and fir into a long vertical shape for a more modern alternative to a wreath. Adding a cluster of bells at the top provides a pleasant sound every time the door opens. Use floral wire to bind the stems together tightly so they do not sag over time.
- Mixed evergreen clippings and floral wire
- Large ribbon and decorative bells
- Hang from a sturdy door hook or knocker
Best shortcut: Use a zip tie to bundle the branches; it is much faster and stronger than floral wire for heavy greens.
7. Oversized Christmas Bell Cluster for the Porch
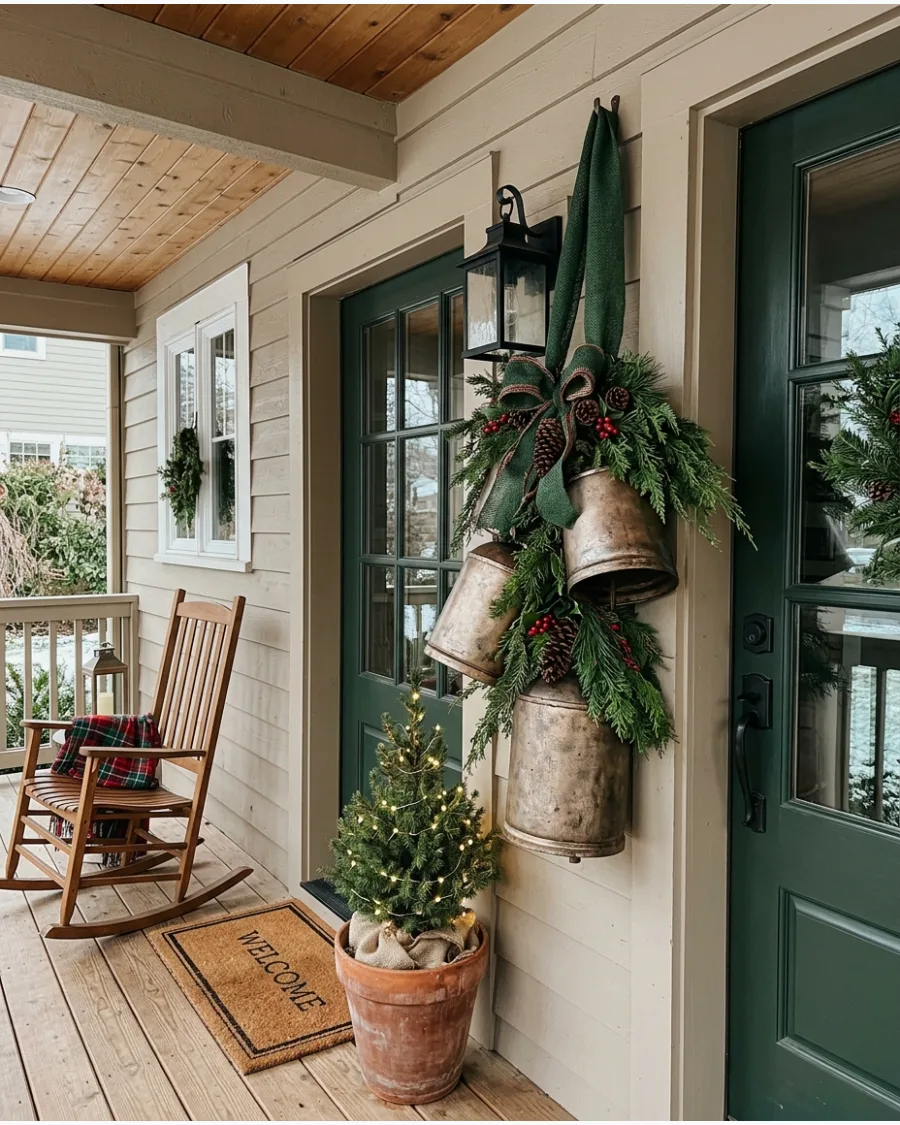
Hang a group of three large bells at different heights using thick jute rope or wide ribbon. Grouping items in odd numbers like three or five creates a more visually appealing and balanced arrangement. This works perfectly under a porch light or hanging from a corner beam.
- Three large metal bells and thick rope or ribbon
- Sturdy ceiling hook or wall bracket
- Vary the heights for the best visual impact
Quick win: If the bells are too shiny, rub them with a little black paint and wipe it off to create an antique look.
8. Candy Cane Wrapped Porch Columns
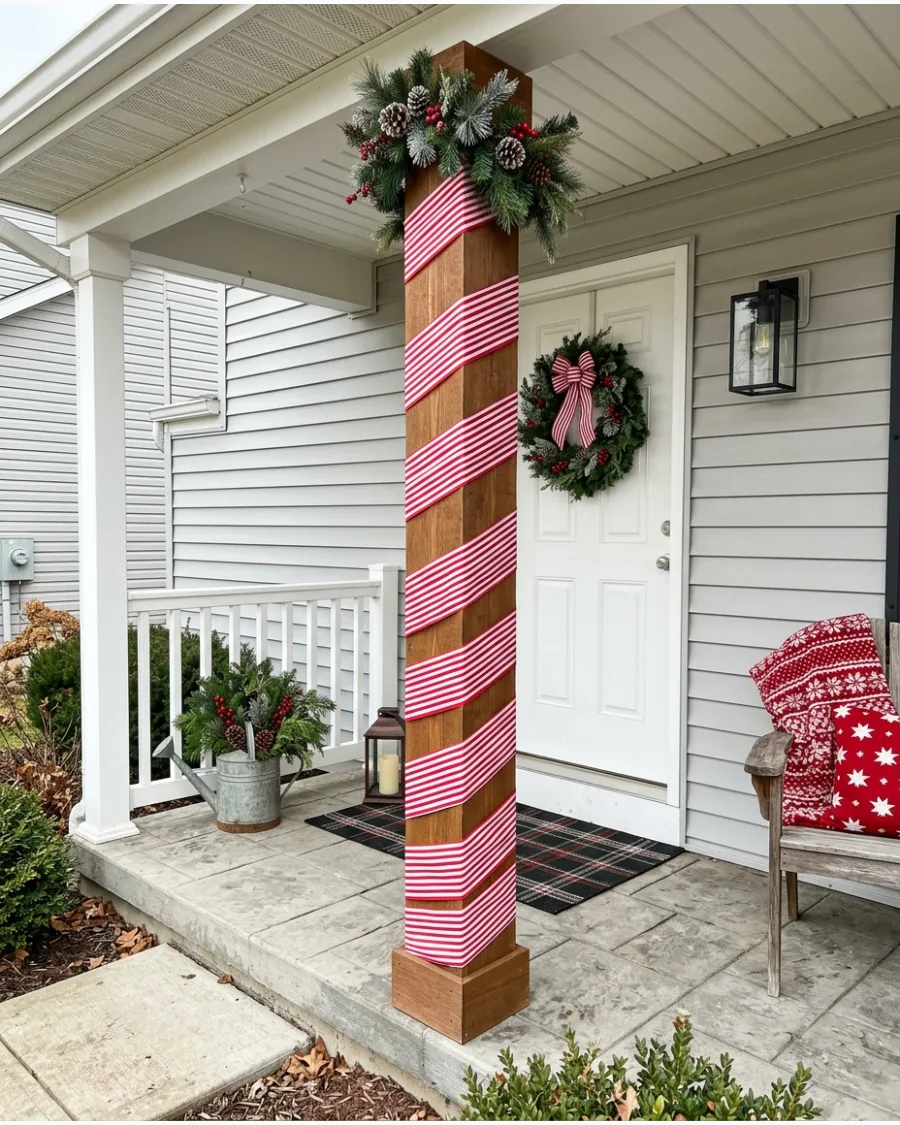
Use wide red ribbon or strips of red fabric to spiral around white porch columns for a classic candy cane effect. Keeping the spacing even between the red spirals is the key to making this look professional rather than messy. Finish the look by adding a small evergreen sprig at the top and bottom of the wrap.
- Wide red outdoor ribbon or fabric strips
- Clear tape or small tacks for securing
- Works best on white or light-colored columns
Most people skip this: Start from the bottom and work your way up to ensure the overlap sheds water instead of catching it.
9. DIY Christmas Window Box Display
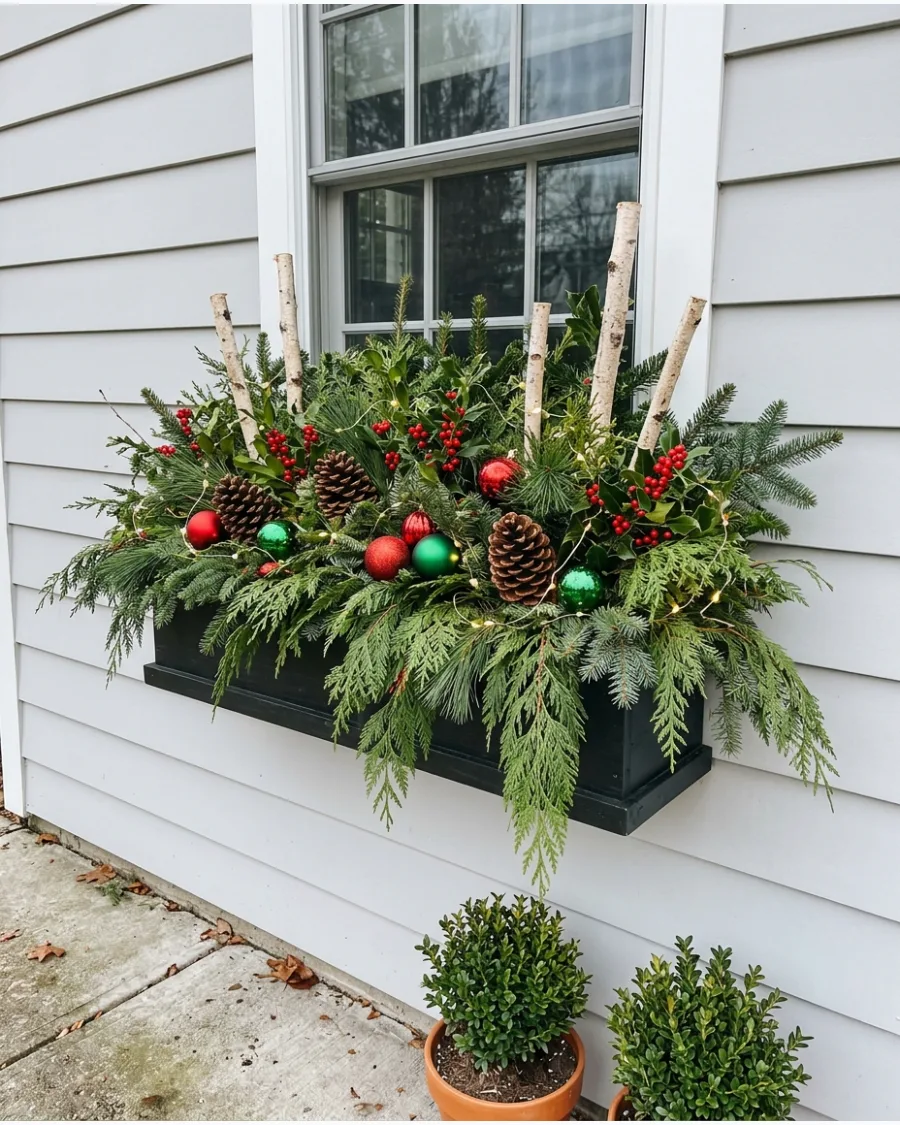
Fill window boxes with a mix of evergreen branches, birch poles, and bright red berries for a lush winter look. Pushing the stems deep into the soil or floral foam ensures the arrangement stays secure during high winds. Add a few outdoor-rated ornaments for a pop of color that stands out against the house.
- Mixed evergreen boughs and birch stems
- Outdoor ornaments and waterproof lights
- Use existing soil or floral foam to anchor stems
Best shortcut: Wet the soil before it freezes to lock the branches in place for the entire winter season.
10. DIY Evergreen Christmas Porch Gnomes
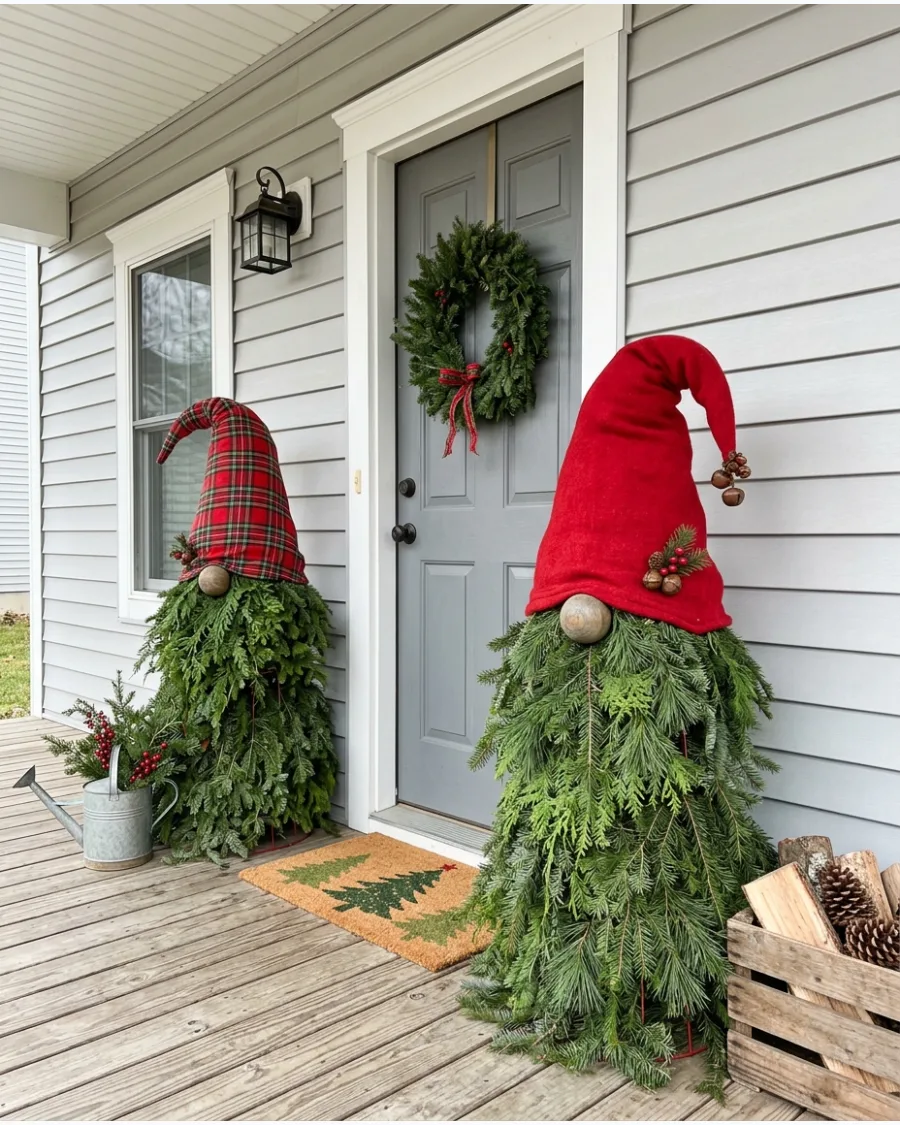
Turn a tomato cage upside down and zip-tie evergreen branches to it to form a cone-shaped gnome body. Adding a large red hat and a round wooden ball for a nose creates a whimsical character that neighbors will love. These look great tucked into corners or placed at the base of porch steps.
- Tomato cage and evergreen branches
- Large fabric hat and wooden ball for a nose
- Zip ties for securing branches
Quick win: Use a pair of old mittens tucked into the greenery to give your gnome hands for extra character.
DIY CHRISTMAS WREATHS, GARLANDS, AND PLANTERS
11. Giant Hula Hoop Christmas Wreath
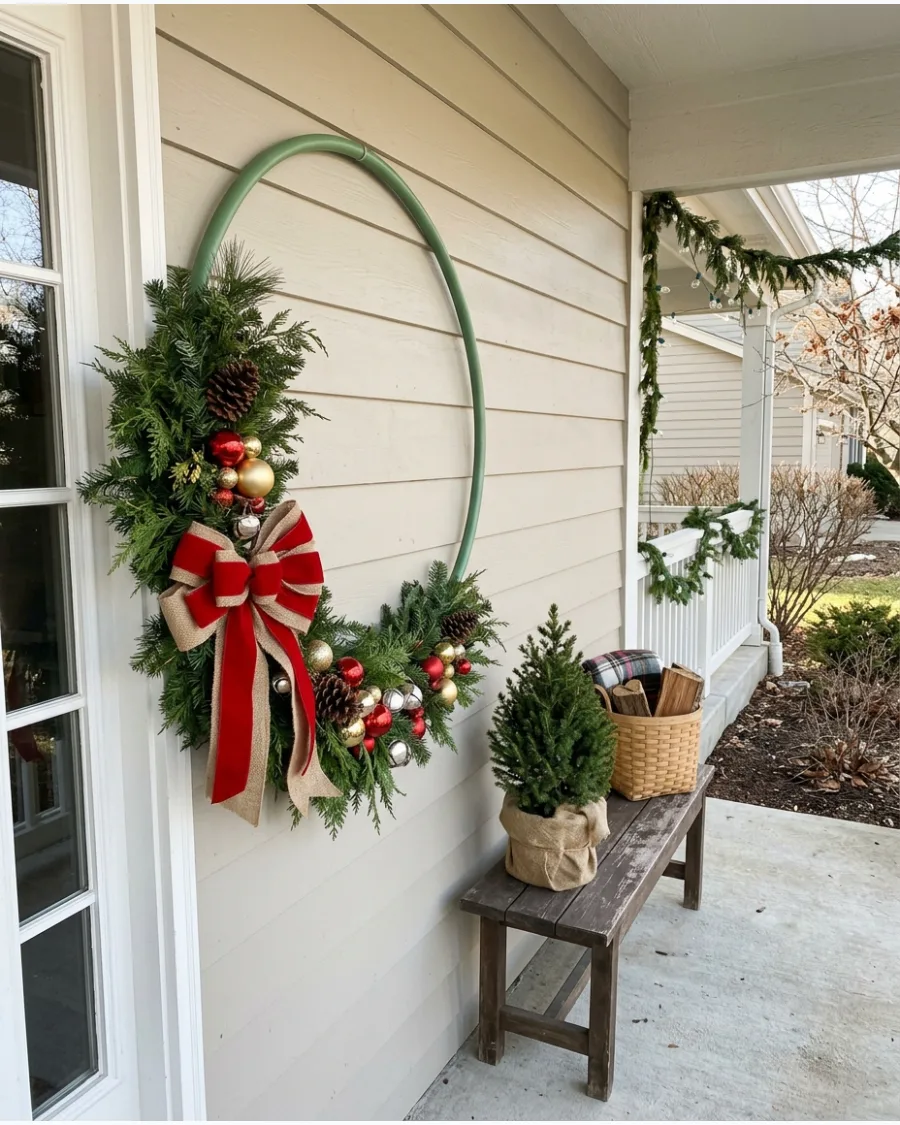
Spray-paint a plastic hula hoop gold or black to create a sturdy, oversized base for a massive wall decoration. Attach evergreen branches and large bells to just the bottom third for a professional, high-end look without the high price tag.
The massive scale of this wreath makes it the perfect focal point for a large blank exterior wall or a wide porch. High-contrast colors help the hoop stand out against the side of the house.
- Buy hula hoops at a dollar store for about five dollars.
- Use heavy-duty zip ties to secure the greenery to the plastic frame.
- Spray the hoop with a clear outdoor sealant to prevent the paint from chipping.
Quick win: Use floral wire to nestle a battery-operated light pack behind the greenery for a nighttime glow.
12. Rustic Pinecone Outdoor Christmas Wreath
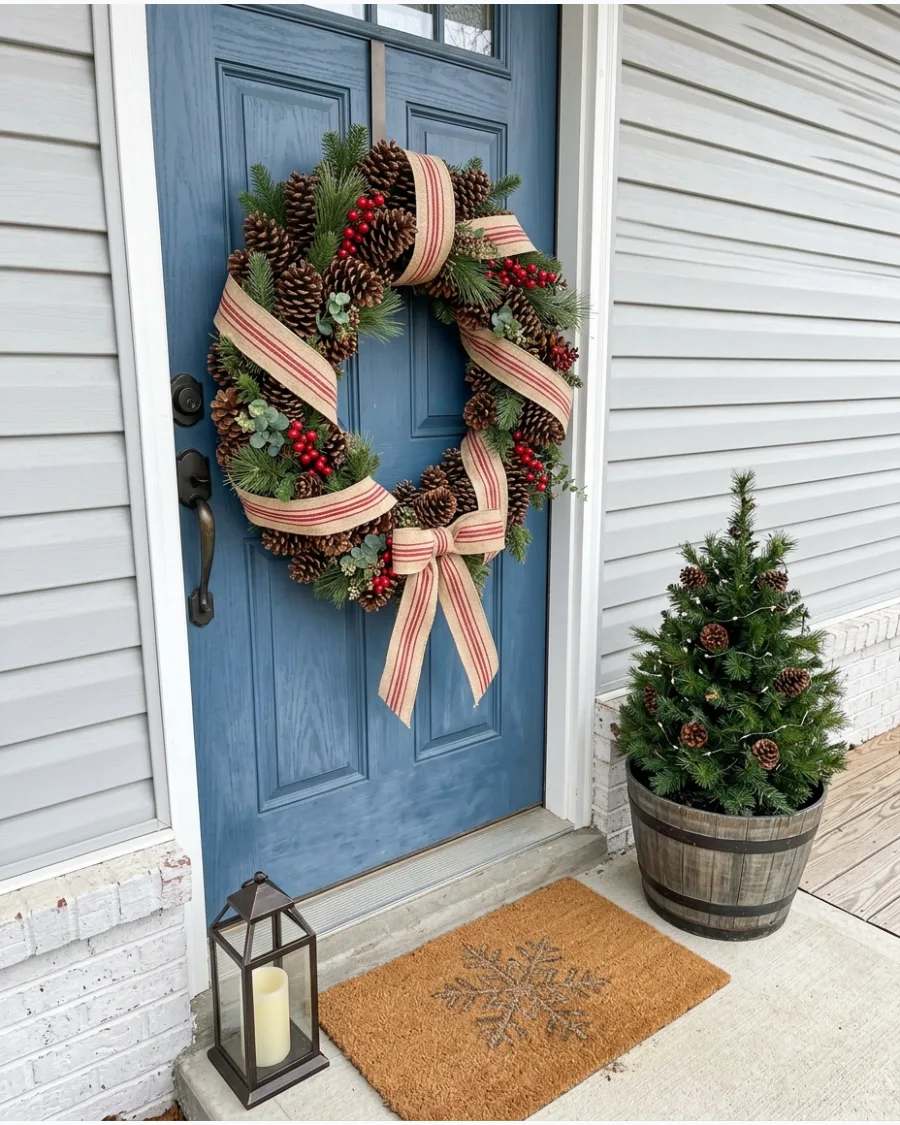
Use a wire wreath form and plenty of hot glue to create a texture-heavy decoration that stands up to wind and cold.
Mixing small and large pinecones fills every gap and gives the design a professional, layered appearance. Weather-resistant materials ensure this wreath stays looking sharp from early December through the first thaw. Natural textures work well with almost any siding color or door style.
- Gather pinecones from the yard or buy them in bulk online for under twenty dollars.
- Secure the form to the door using a sturdy over-the-door metal hanger.
- Add a splash of white spray paint to the tips of the cones for a snowy effect.
Best shortcut: Bake found pinecones at 200 degrees for 30 minutes to remove any sap or bugs before gluing.
13. Dried Orange and Evergreen Christmas Wreath
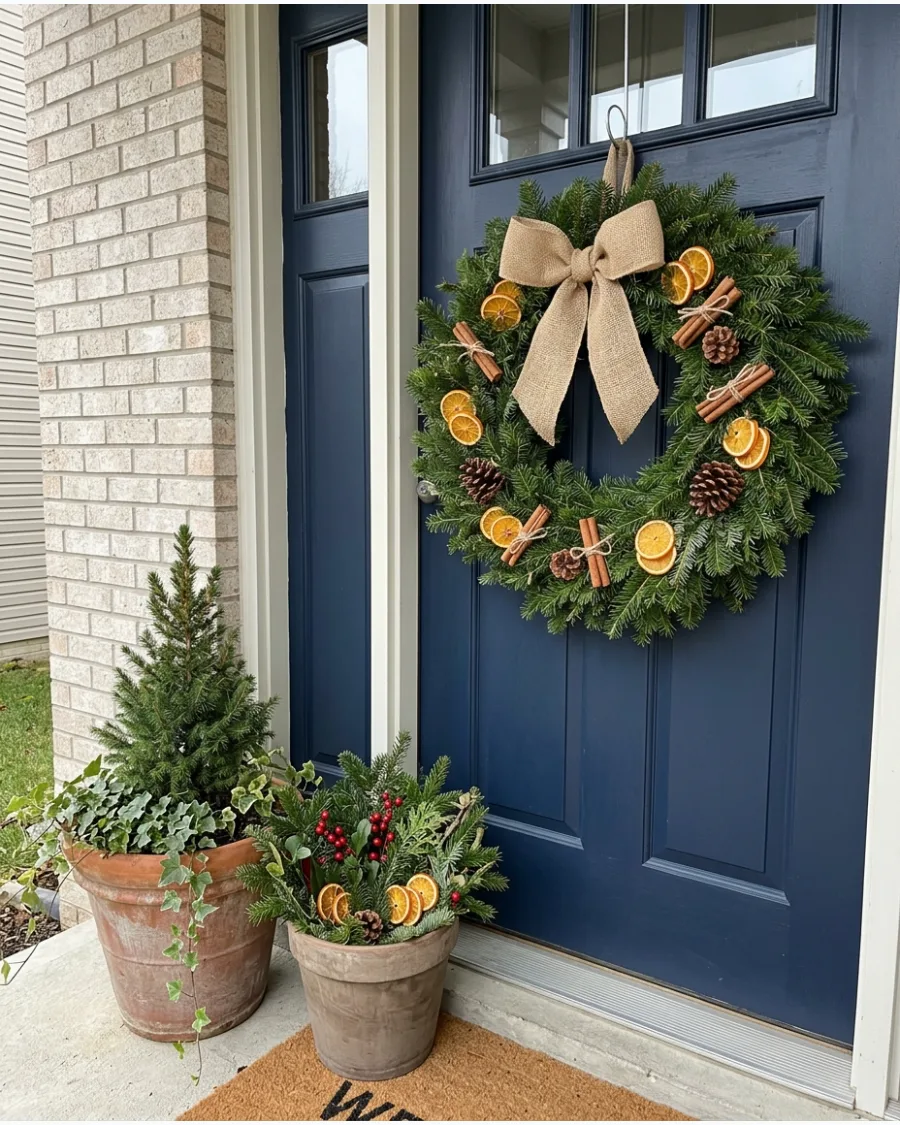
Slice oranges thinly and dry them in the oven to create translucent ornaments that glow when caught by the sun. Tie these slices onto a thick evergreen base along with cinnamon sticks and pinecones for a classic, organic feel.
The warm orange tones provide a beautiful contrast against deep green pine needles and natural wood doors. This style brings a traditional, handcrafted touch to a modern home exterior.
- Dry orange slices in a low oven for three hours until they are firm.
- Use thin florist wire to pierce the fruit and wrap it around the branches.
- Swap oranges for dried lemon or lime slices to change the color palette.
Quick win: Spray the dried fruit with a clear acrylic sealer to protect it from moisture and pests.
14. DIY Vintage Ornament Christmas Wreath
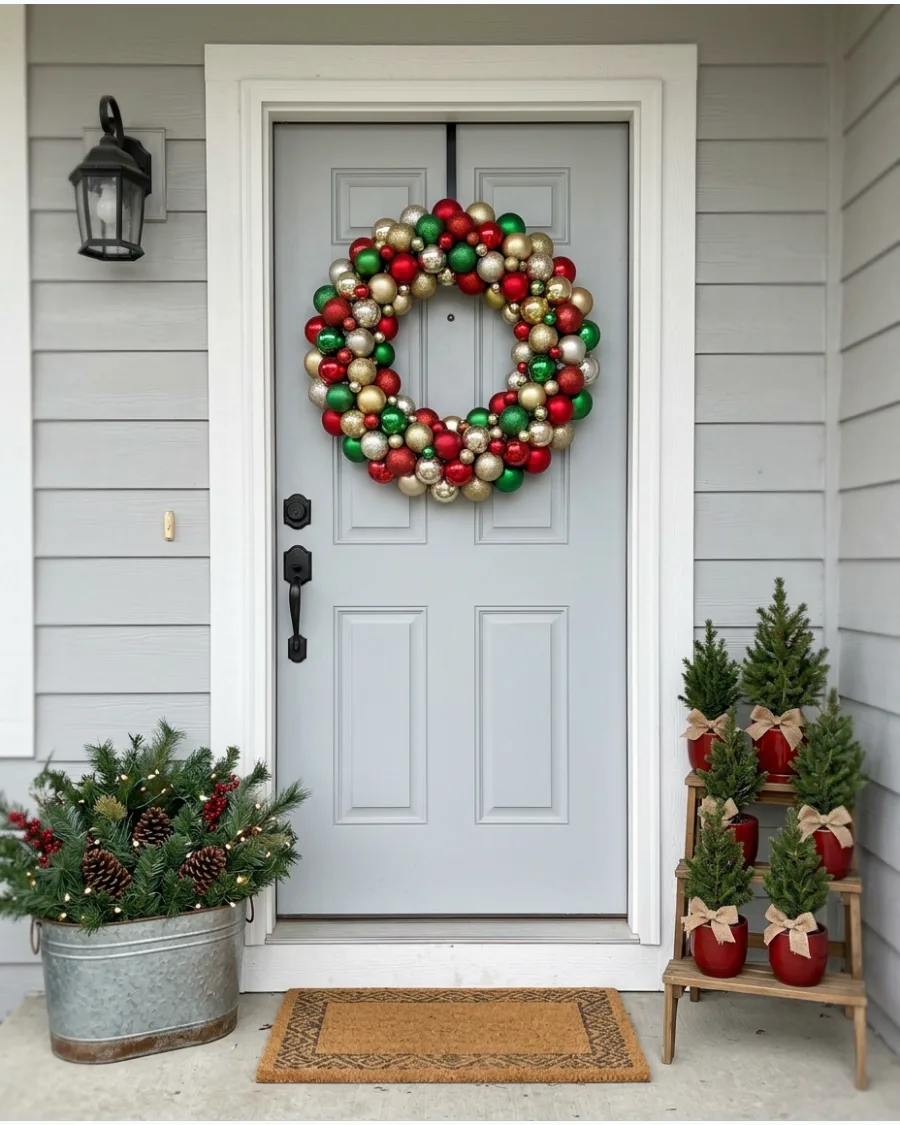
Glue bright, colorful ornaments onto a foam or straw wreath base to create a nostalgic look that pops from the street. Mixing different sizes and finishes like matte, glossy, and glitter adds depth and keeps the eye moving.
A colorful ornament wreath provides a high-impact visual that works perfectly on a front door or hanging in a window. Using shatterproof plastic ornaments is a smart move for outdoor durability.
- Check thrift stores for bags of inexpensive ornaments or buy shatterproof packs.
- Use a high-temperature glue gun for a permanent bond that won't melt in direct sun.
- Start with the largest ornaments first and fill the remaining gaps with the smallest ones.
Most people skip this: Wrap the wreath form in tinsel garland first so no part of the base shows through the ornaments.
15. Modern Asymmetrical Outdoor Christmas Wreath
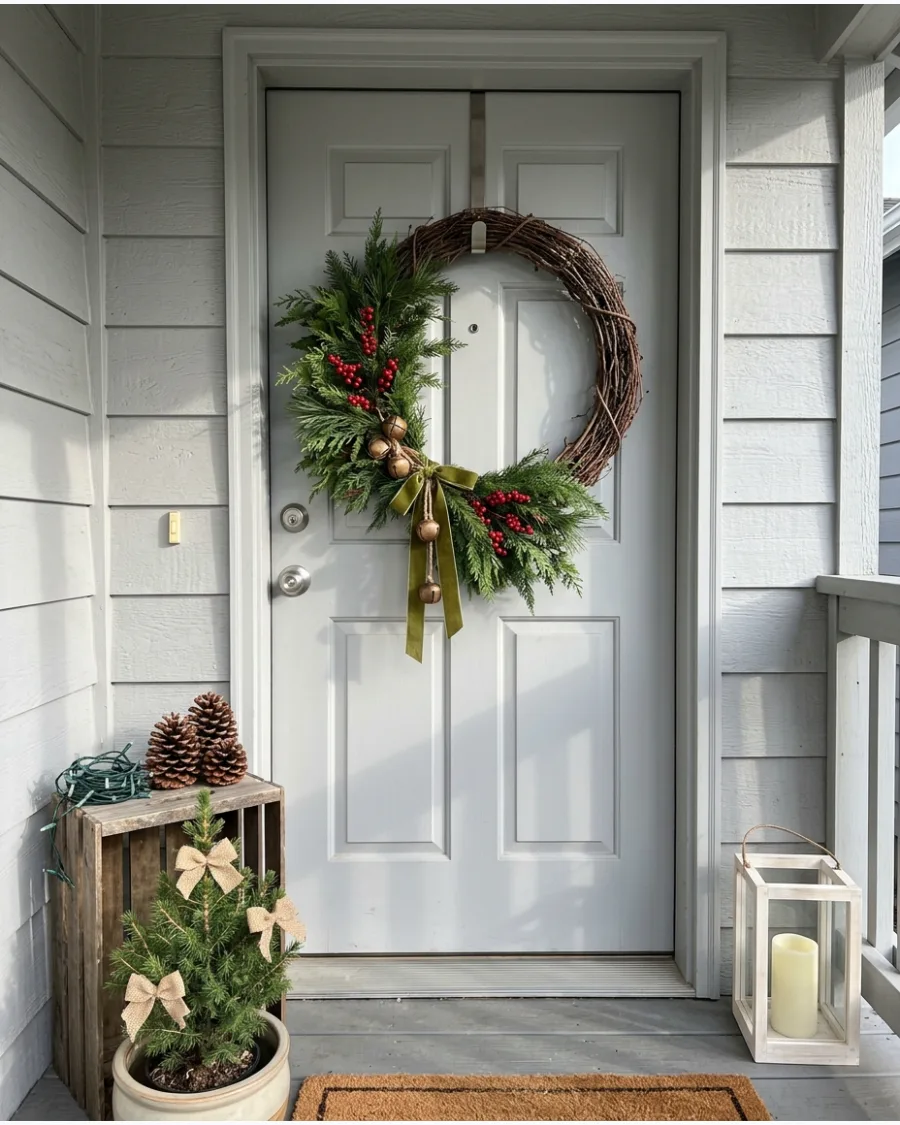
Choose a simple metal hoop or a dark grapevine frame and only decorate one side with greenery and ribbon. Leaving a large portion of the frame exposed creates a clean, minimalist look that feels fresh and current.
This asymmetrical design allows the architectural details of your door or wall to show through the decoration. It is an excellent choice for contemporary homes or anyone who prefers a less-is-more approach.
- Metal hoops are available in various sizes for less than ten dollars at craft stores.
- Secure the greenery with black zip ties to keep them invisible against a dark frame.
- Use a single, long-tailed ribbon to add vertical interest to the design.
Quick win: Use a magnetic hook for glass doors to hang the wreath without using nails or permanent adhesive.
16. Layered Evergreen Christmas Door Garland
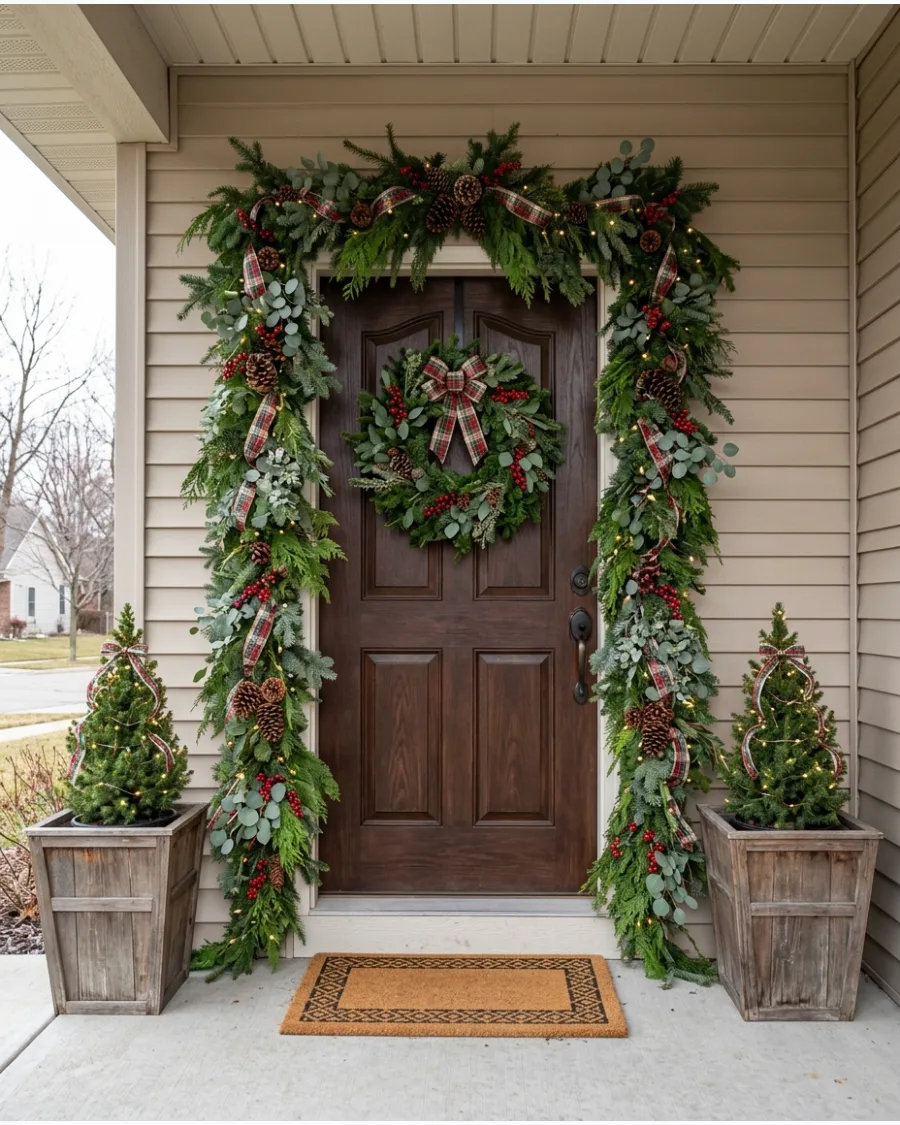
Drape multiple strands of different greenery like pine, cedar, and eucalyptus around the door frame for a thick, luxurious look. Mixing textures and shades of green makes the display appear more expensive and realistic than a single strand.
Layering different types of foliage creates a custom garland that frames the entrance with professional-grade fullness. Add a string of warm white lights to highlight the different textures at night.
- Buy three or four basic garlands and twist them together before hanging.
- Use adhesive outdoor hooks every twelve inches to support the weight of the heavy greenery.
- Tuck in real eucalyptus stems from the grocery store for a fresh scent and unique leaf shape.
Best shortcut: Use a tension rod inside the door frame to hang the top of the garland without drilling holes.
17. DIY Ornament Cluster Christmas Garland
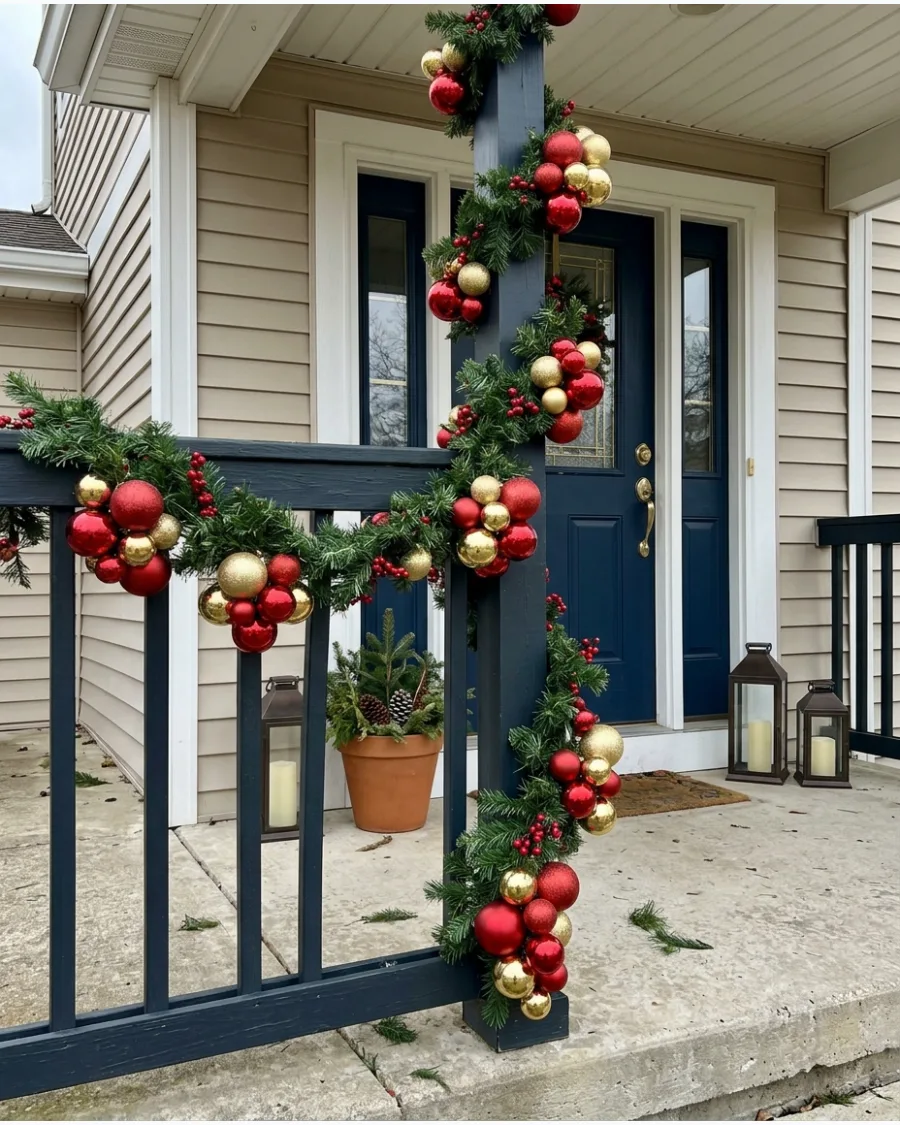
Group three to five ornaments together with wire and attach these clusters to a standard green garland. This technique creates concentrated bursts of color that are much easier to see from the sidewalk than individual ornaments.
The clustered ornaments give a standard garland a high-end designer look that feels intentional and full. Choose a single color or a tight palette to keep the design looking sophisticated.
- Thread a pipe cleaner through the ornament loops to create a cluster that is easy to twist onto the garland.
- Space the clusters about eighteen inches apart for a balanced look.
- Use oversized ornaments to ensure the decoration is visible from a distance.
Quick win: Use ornaments with different textures, like one glitter, one matte, and one shiny, in every cluster for extra depth.
18. Rustic Cedar and Pine Rope Garland
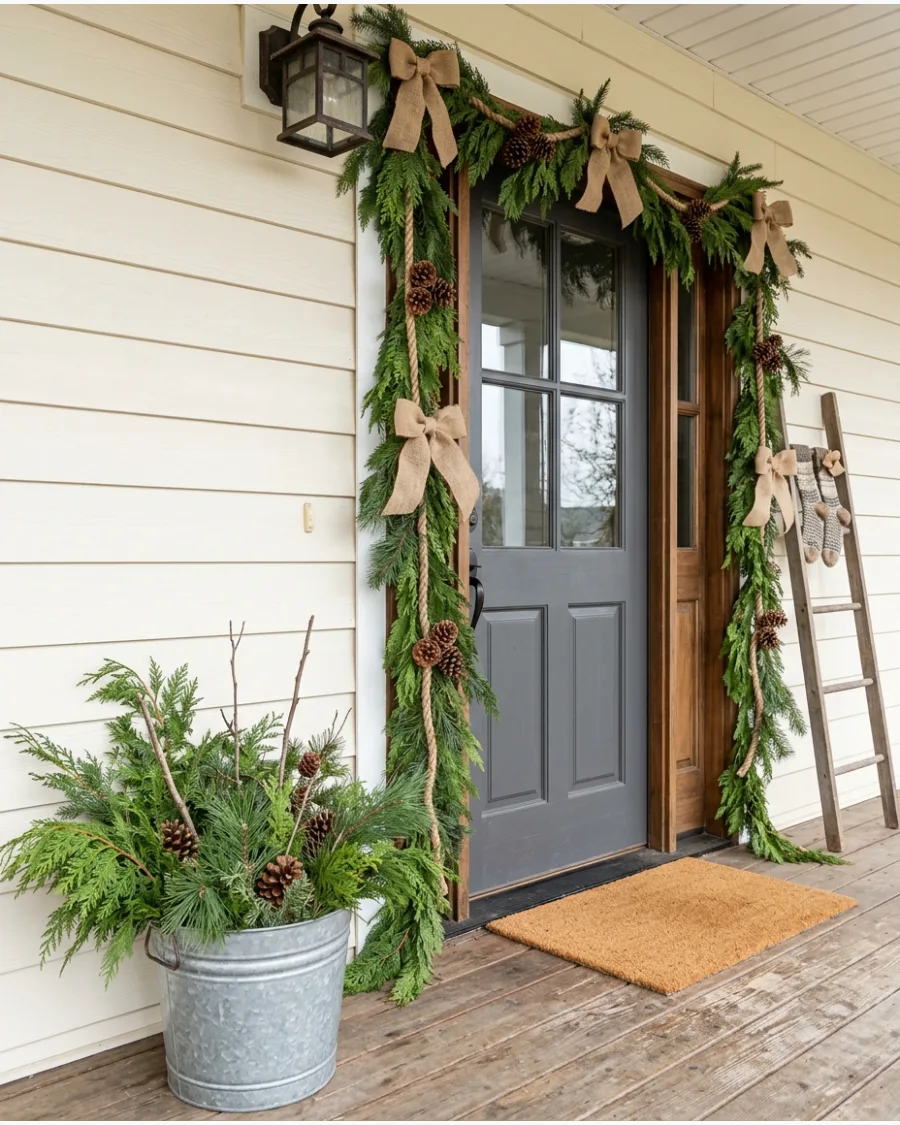
Use a thick manila or jute rope as the base and wire small bundles of cedar and pine along its entire length. This method creates a heavy, durable garland that drapes beautifully over porch railings or fences.
The visible rope base adds a rugged, natural element that fits perfectly with a relaxed outdoor aesthetic. It is a budget-friendly way to cover a large area with greenery.
- Purchase thick rope by the foot at a hardware store for a low-cost base.
- Use green florist wire to blend the branch bundles into the rope.
- Leave the ends of the rope exposed and tie them in a decorative knot for a finished look.
Most people skip this: Soak the rope in water before attaching the greenery to make it more flexible and easier to drape.
19. Matching DIY Christmas Urn Planters
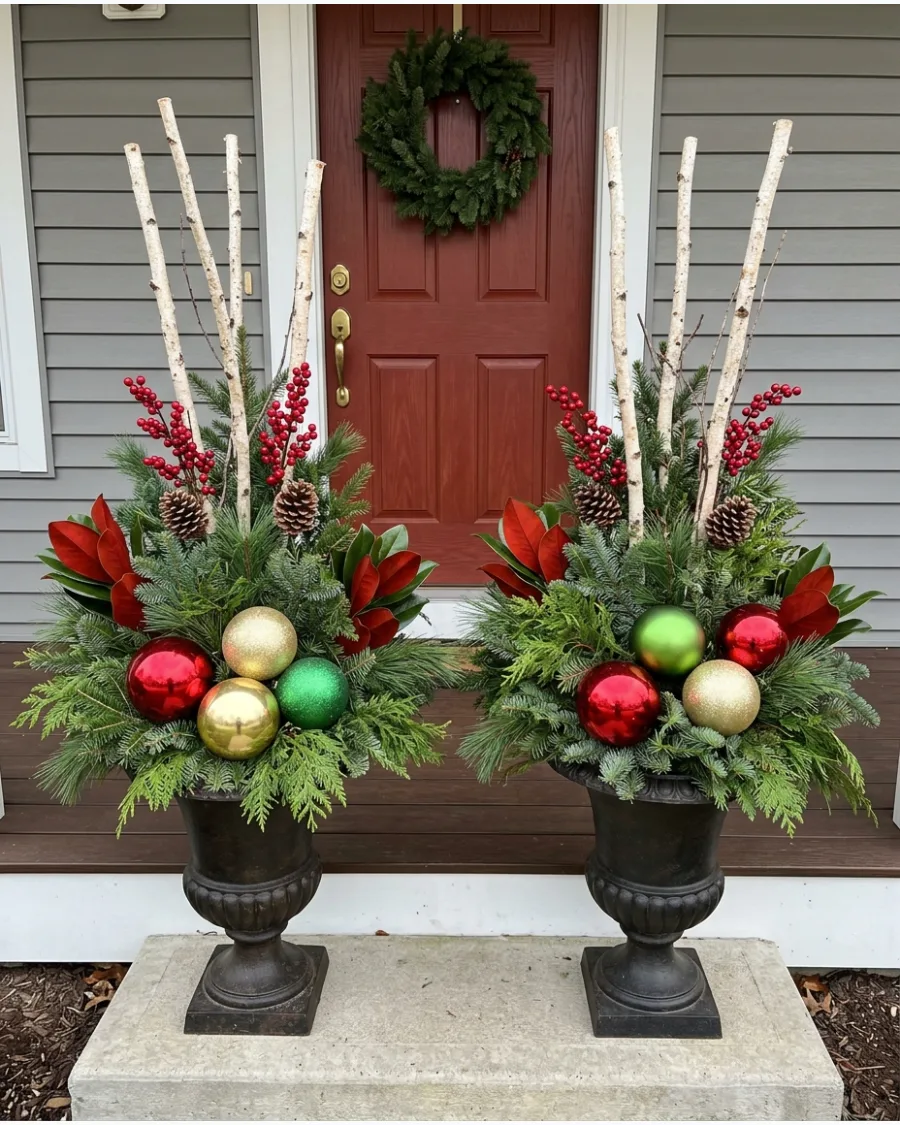
Fill two large urns with soil or floral foam and layer in evergreen branches, starting with the tallest pieces in the center. Add magnolia leaves and large ornaments to fill the gaps and create a lush, professional arrangement.
Symmetrical planters on either side of a front door create an instant sense of balance and holiday curb appeal. These heavy displays stay in place even during winter storms.
- Use heavy rocks at the bottom of the planters to keep them from tipping over in high winds.
- Stick the branches at least six inches deep into the soil to ensure they stay secure.
- Water the soil once and let it freeze to lock the branches in place for the winter.
Best shortcut: Use branches of different heights to create a 'thriller, filler, spiller' effect in the planter.
20. Birch Branch Christmas Porch Planters
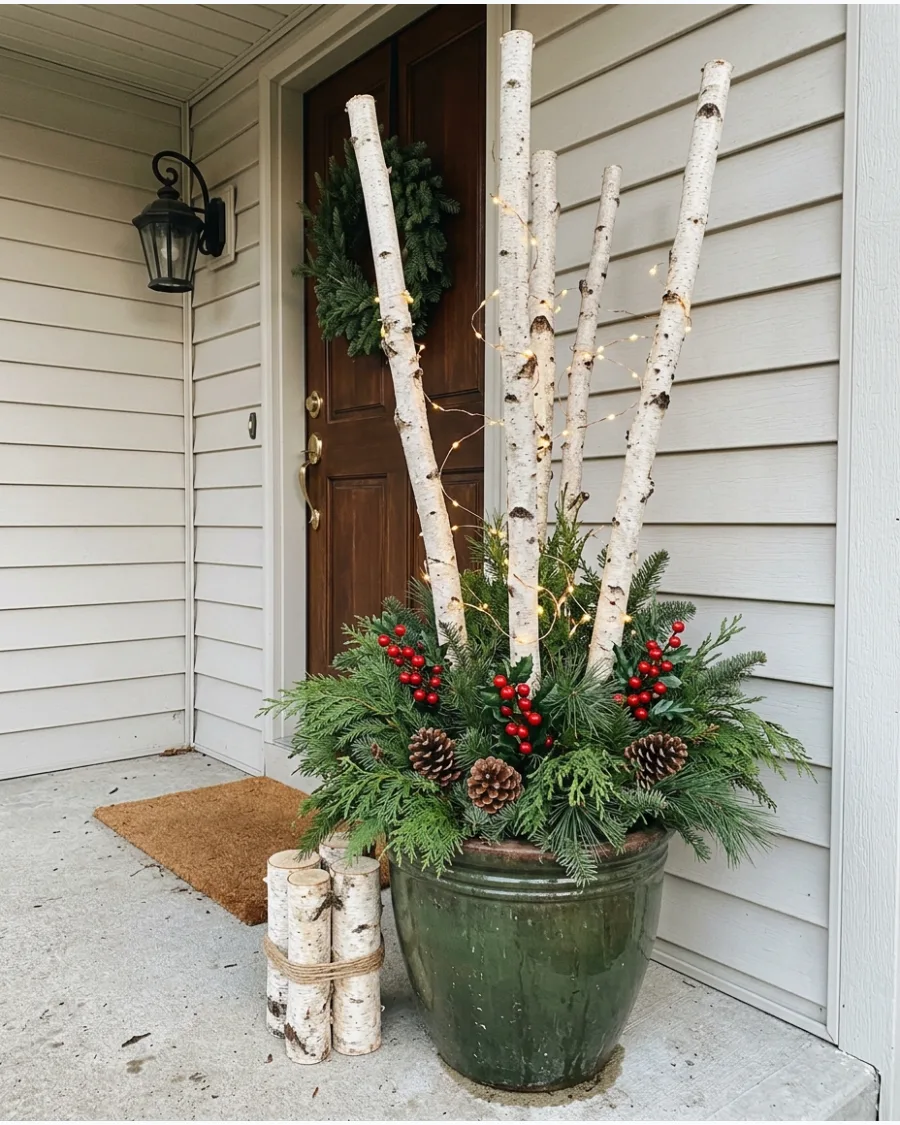
Stand three tall white birch poles in the center of a porch pot to add height and a bright vertical element to your decor. Surround the base with cedar and pine branches, then tuck in red berry stems for a classic color pop.
The white bark of the birch branches provides a clean, wintry contrast against dark green evergreens. This arrangement looks just as good during the day as it does when wrapped in lights at night.
- Look for birch poles at garden centers or craft stores in bundles of three.
- Secure the poles with zip ties to a heavy stake driven into the center of the pot.
- Wrap a single strand of battery-operated fairy lights around the white poles for a magical evening look.
Quick win: Angle the evergreen branches slightly downward over the edge of the pot to hide the rim and the soil.
LARGE DIY CHRISTMAS YARD DECORATIONS
21. Giant DIY Outdoor Nutcracker Soldiers
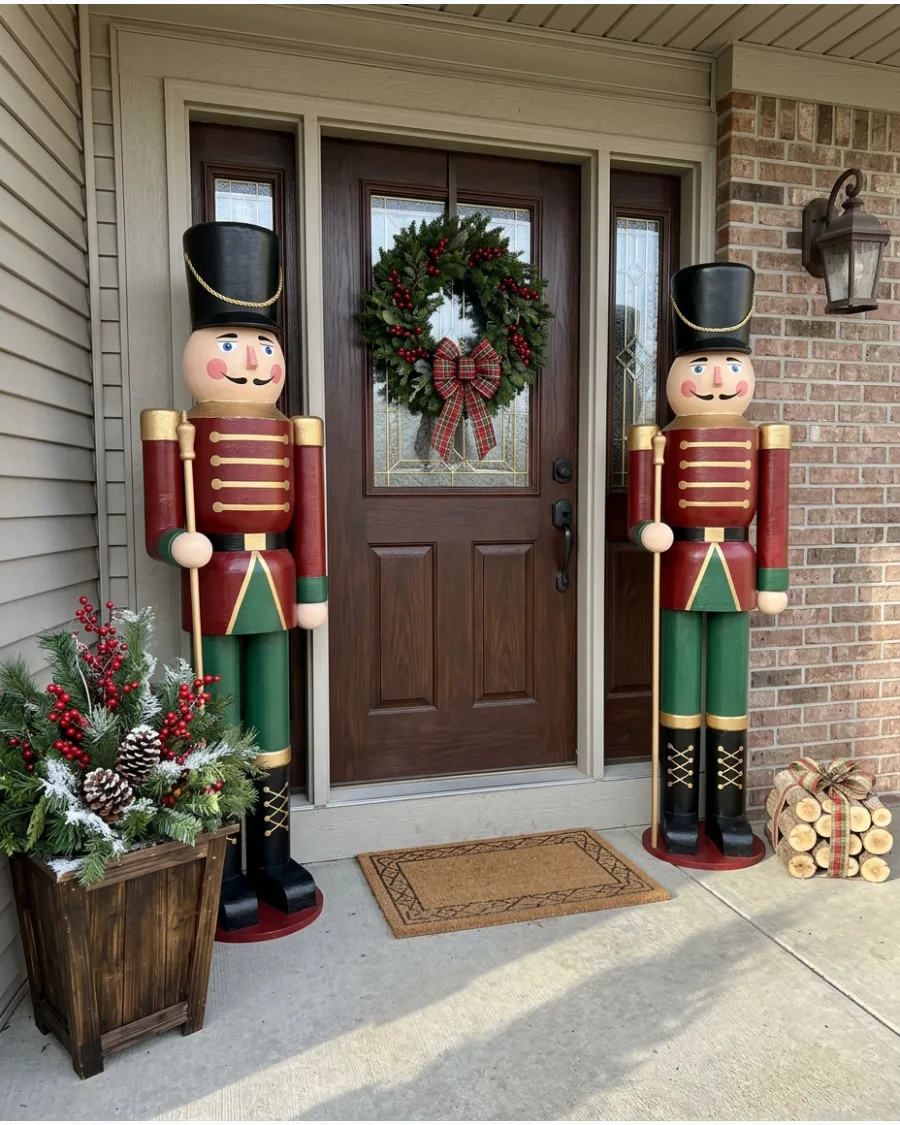
Constructing tall nutcracker figures from concrete form tubes or PVC pipe creates a grand, custom entrance. Paint the tubes with classic primary colors and use gold metallic accents for the buttons and trim.
Use heavy-duty exterior paint to ensure the colors do not fade or peel after the first winter storm. These provide instant architectural height that store-bought plastic versions simply cannot match.
- Budget: $40 to $80 for tubes and paint; 4 hours setup.
- Secure the bases to heavy wooden squares to prevent them from tipping over in the wind.
- Paint them in neutral silver and white for a more modern look if red feels too traditional.
Quick win: Use gold-painted plastic bowl lids for the nutcrackers' hats to add a three-dimensional shape without extra woodworking.
22. DIY Plywood Reindeer Yard Decorations
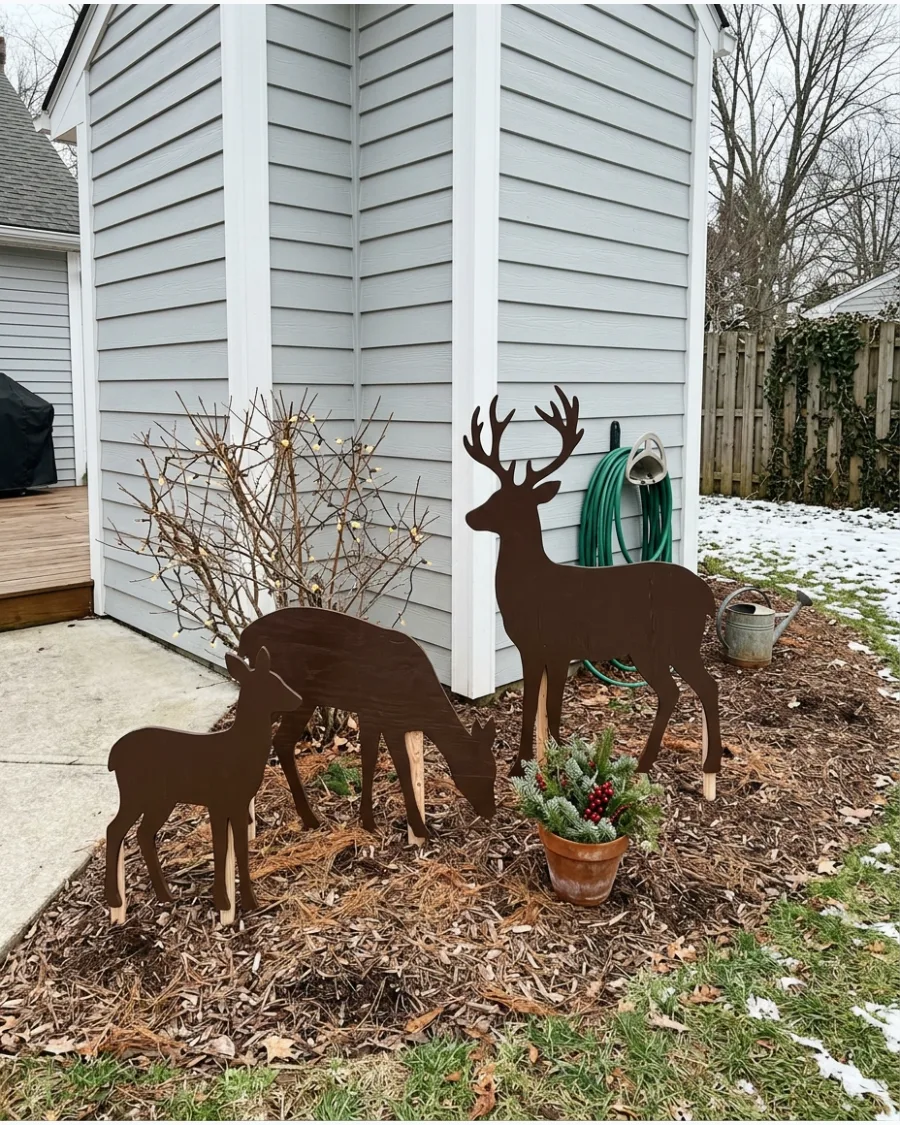
Simple reindeer silhouettes cut from exterior-grade plywood offer a clean and sophisticated look for a front lawn. Sand the edges smooth and apply a solid color like white or a dark wood stain to keep the design modern.
Seal every edge of the plywood with outdoor primer to prevent the wood from swelling in the snow. Simple silhouettes look much more sophisticated and high-end than colorful, busy lawn ornaments.
- Budget: $30 for a sheet of plywood; 2 hours cutting and painting.
- Attach metal U-stakes to the back of the legs to anchor them firmly into the ground.
- Scale the size down to create a smaller version for a porch or balcony space.
Most people skip this: Drill small holes in the antlers to thread a few battery-operated fairy lights for a subtle glow at night.
23. DIY Pallet Wood Christmas Tree
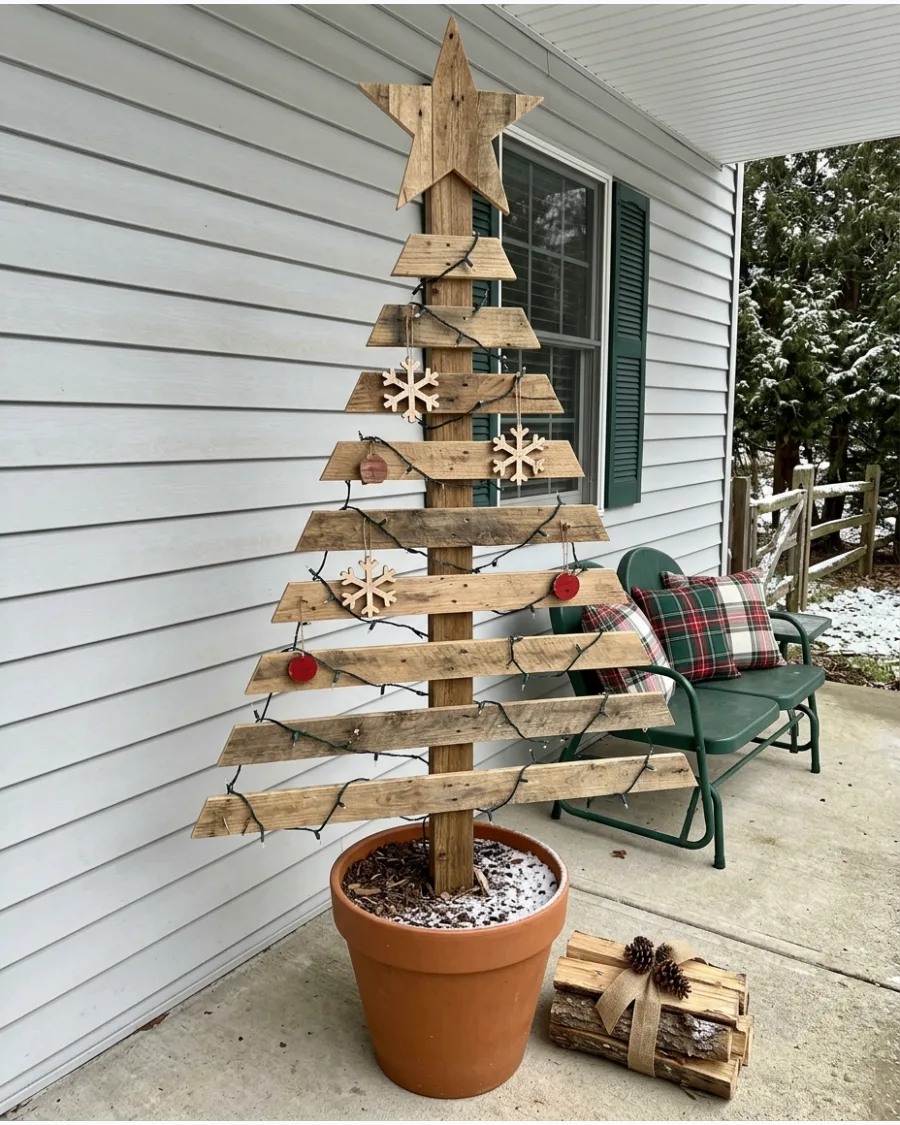
Reclaiming pallet boards is a cost-effective way to build a rustic, triangular tree for the yard or porch. Cut the boards into gradually decreasing lengths and nail them to a sturdy central 2×4 support.
Space the horizontal boards about two inches apart to let wind pass through so the tree does not blow over. This is the best way to get a large-scale decoration for almost zero dollars if you can find free pallets.
- Budget: Free to $10 for nails; 1 hour assembly.
- Lean the tree against the house or use a heavy outdoor umbrella stand as a base.
- Paint every other board a different shade of green for a more playful, striped look.
Best shortcut: Use a hammer to slightly distress the edges of the boards before painting to emphasize the wood grain.
24. Tomato Cage Christmas Trees
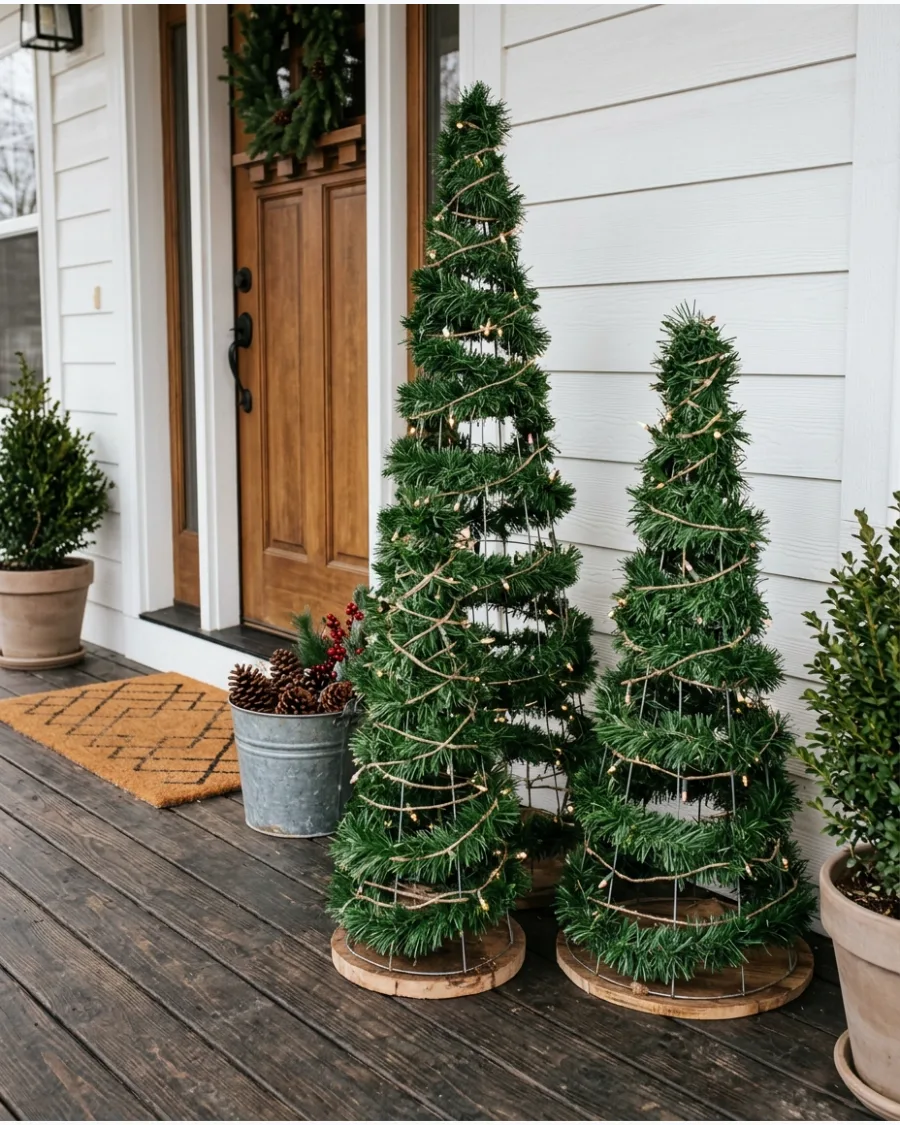
Turning tomato cages upside down creates an instant cone shape for a tabletop or porch tree. Wrap the wire frame in thick evergreen garland and secure it with green zip ties to hide the structure.
Zip-tie the top of the cage wires together into a tight point before you start wrapping the garland. Using different sizes of cages creates a professional-looking forest effect on a porch corner.
- Budget: $5 to $15 per tree; 20 minutes assembly.
- Wrap the lights around the cage first, then the garland, so the glow comes from within the branches.
- Use white tinsel instead of green garland for a snowy, winter-wonderland theme.
Quick win: Place the cages inside heavy ceramic planters to give them extra height and keep them from blowing away.
25. DIY PVC Christmas Mega Tree
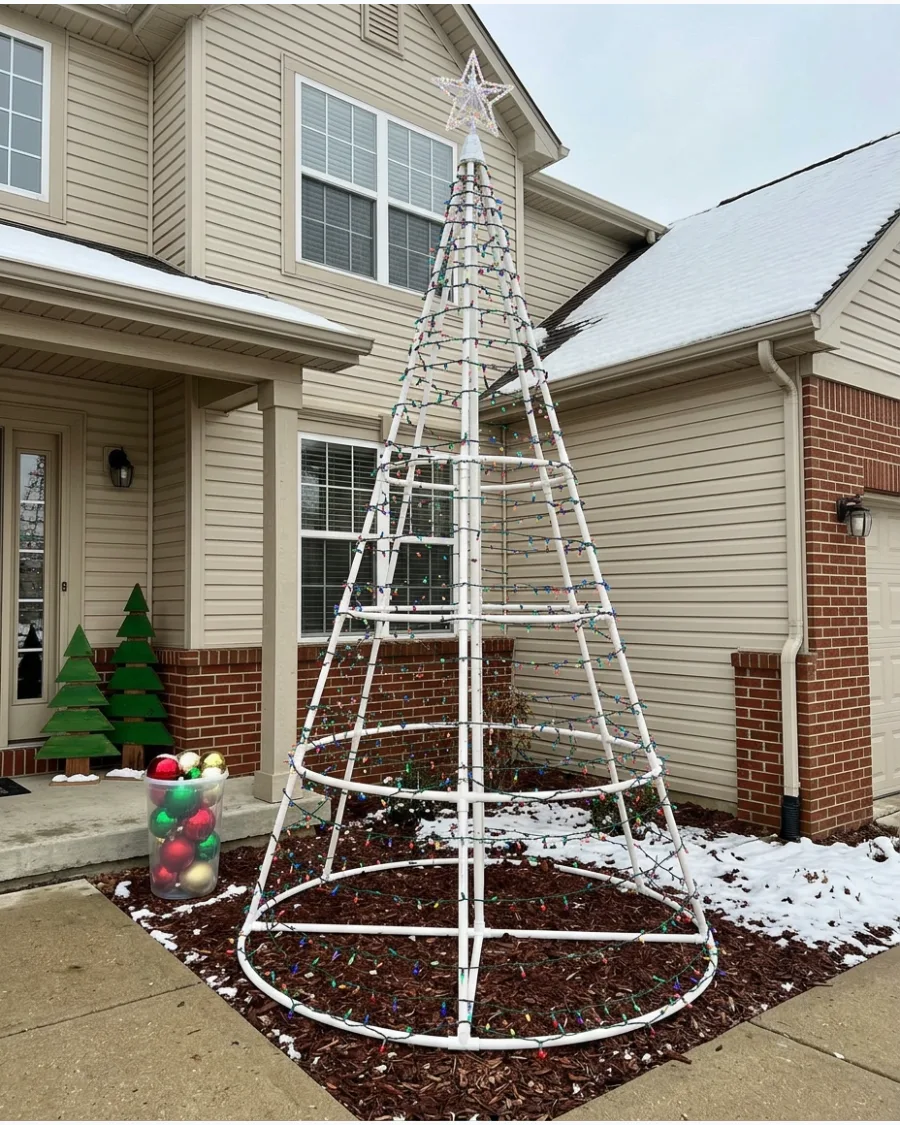
A mega tree uses a central pole and long strands of lights to create a massive light display in the yard. Attach a ring to the top of a PVC pole and run light strings down to ground stakes in a wide circle.
Drive a piece of rebar into the ground to slide the main PVC pole over for a stable center. This creates a massive visual impact that fills a large empty front yard without needing a real tree.
- Budget: $50 to $100 depending on light count; 3 hours setup.
- Use LED lights to prevent blowing a fuse when running multiple long strands.
- Adjust the diameter of the base circle to fit smaller yards or side gardens.
Most people skip this: Use a light controller to make the strands twinkle or fade for a more professional light-show appearance.
26. Giant Lighted Outdoor Christmas Star
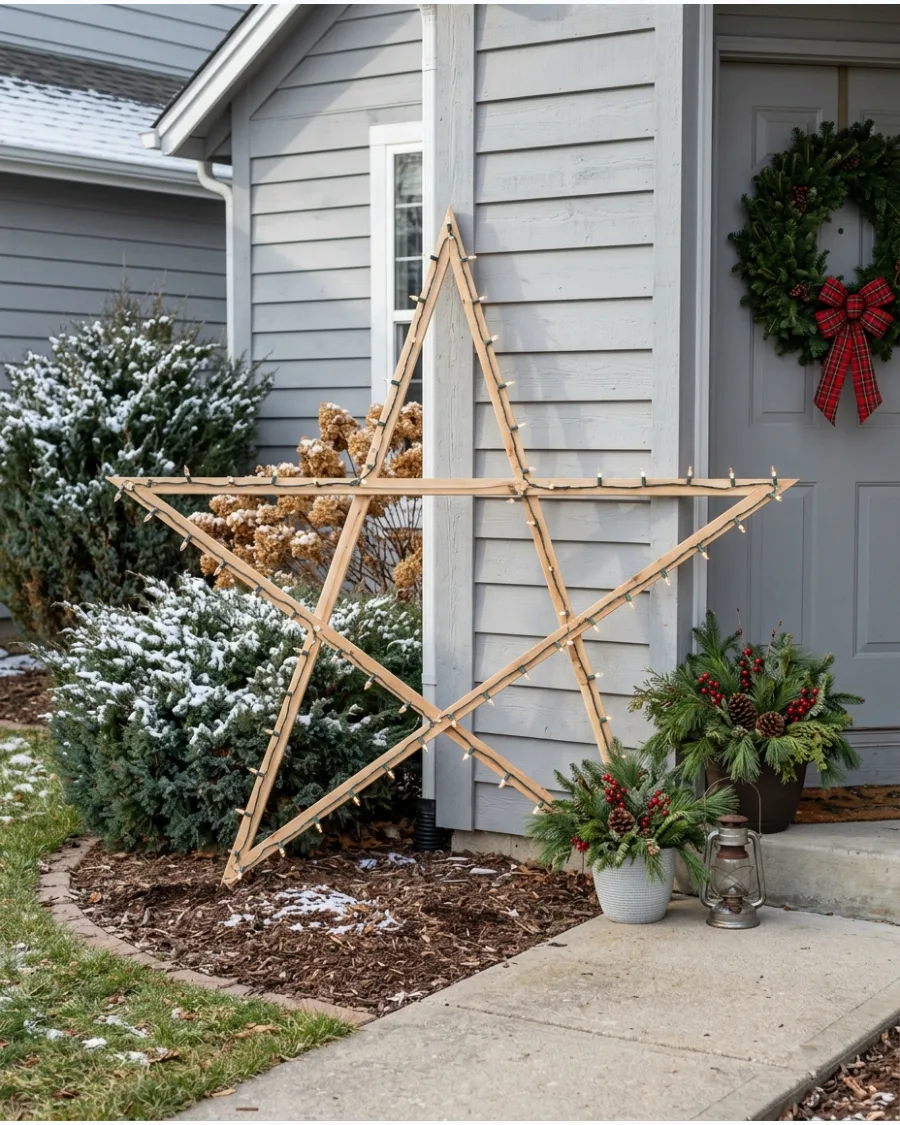
Build a large five-point star using thin wood strips or PVC pipe as a lightweight frame. Wrap the entire frame in warm white outdoor lights and hang it from a porch peak or lean it against the siding.
Use clear zip ties to attach the light strings so they stay perfectly aligned with the frame edges. A single, oversized star leaning against a house looks much more modern than many small decorations scattered around.
- Budget: $20 for wood and lights; 1 hour construction.
- Paint the frame the same color as your house so it disappears when the lights are off.
- Scale the star to fit inside a large front-facing window for an indoor-outdoor glow.
Best shortcut: Lay the star on the ground and use a staple gun to attach the lights quickly if you are using a wooden frame.
27. DIY Lighted Christmas Gift Boxes
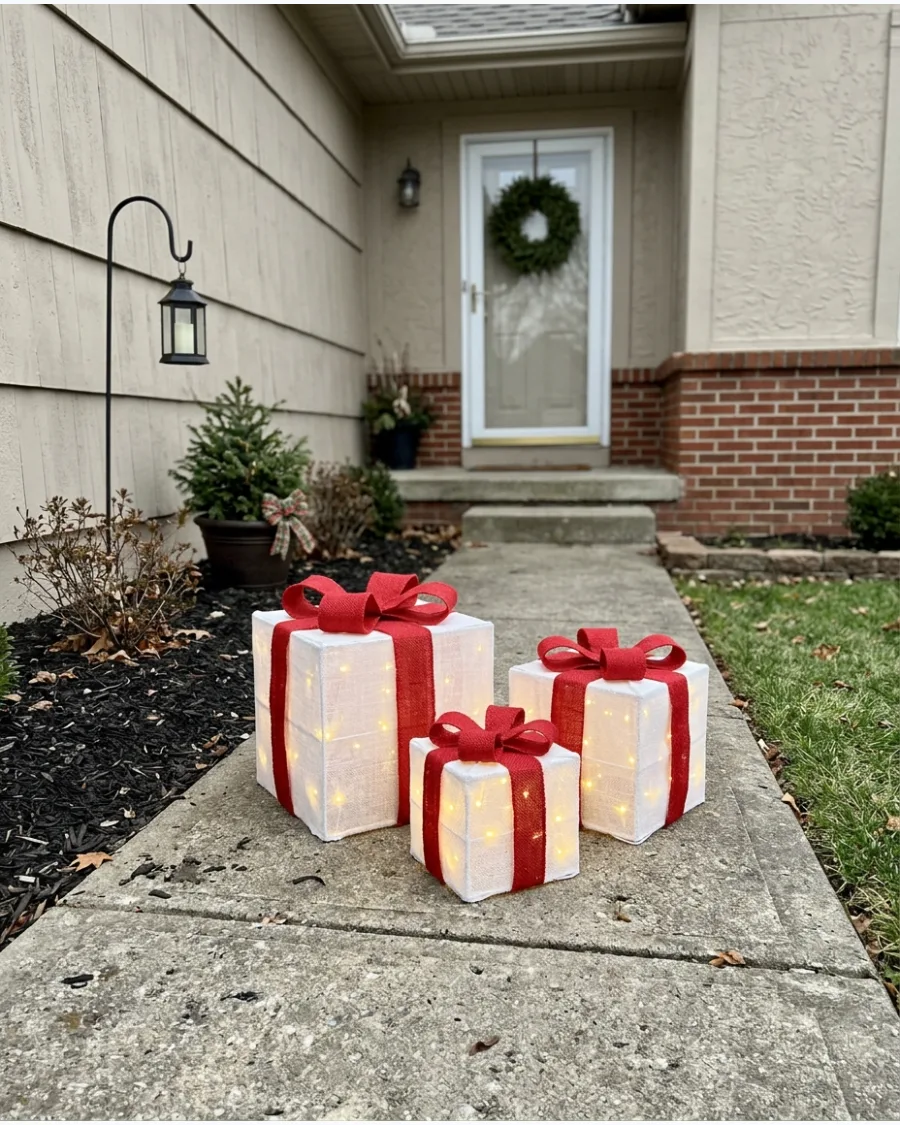
Construct cube frames from PVC or scrap wood and wrap them in weather-resistant fabric or mesh.
Place a set of outdoor lights inside each box and top them with a large, waterproof bow. Choose a translucent fabric like outdoor-rated mesh so the internal lights glow evenly without showing the bulbs. These work best when grouped in odd numbers of three or five to create a balanced visual weight.
- Budget: $15 to $30 per box; 1.5 hours assembly.
- Use different sizes to create a tiered display that mimics a real pile of gifts.
- Swap the fabric for colorful plastic wrap for a cheaper, more vibrant daytime look.
Quick win: Use battery-operated lights with timers so you do not have to run extension cords across the walkway.
28. Giant Christmas Ornament Yard Balls
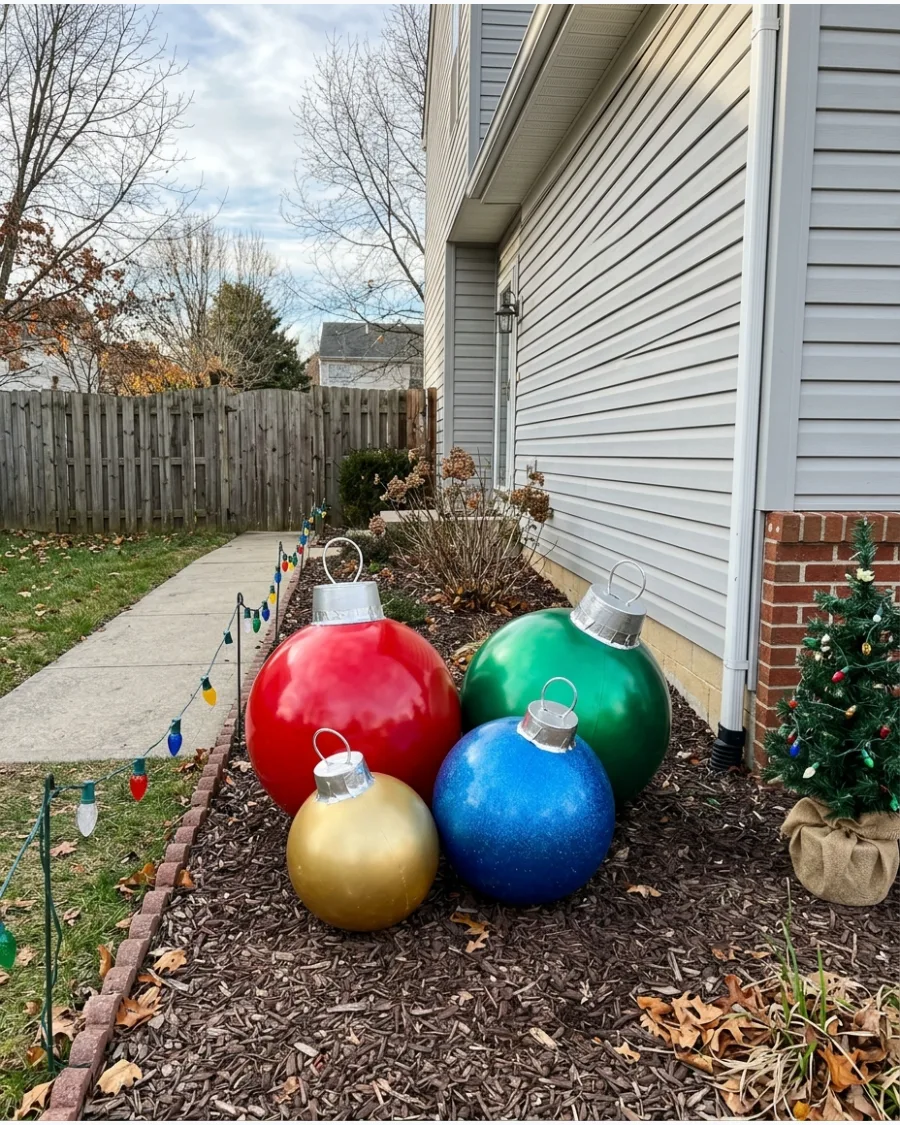
Transform large plastic balls or inexpensive exercise balls into oversized ornaments using high-gloss spray paint. Add a silver-painted plastic container to the top to act as the ornament cap and wire loop.
Use a plastic deli container painted silver as an easy, weather-proof cap for the top of the ornament. These look most effective when you use high-gloss spray paint to mimic the look of real glass ornaments.
- Budget: $10 to $20 per ball; 1 hour painting and drying.
- Fill the balls with a small amount of sand before sealing to keep them from rolling away.
- Group them in a large outdoor planter for a high-impact porch display.
Most people skip this: Apply a clear UV-resistant topcoat to the paint to prevent it from cracking in freezing temperatures.
29. Giant Candy Cane Yard Stakes
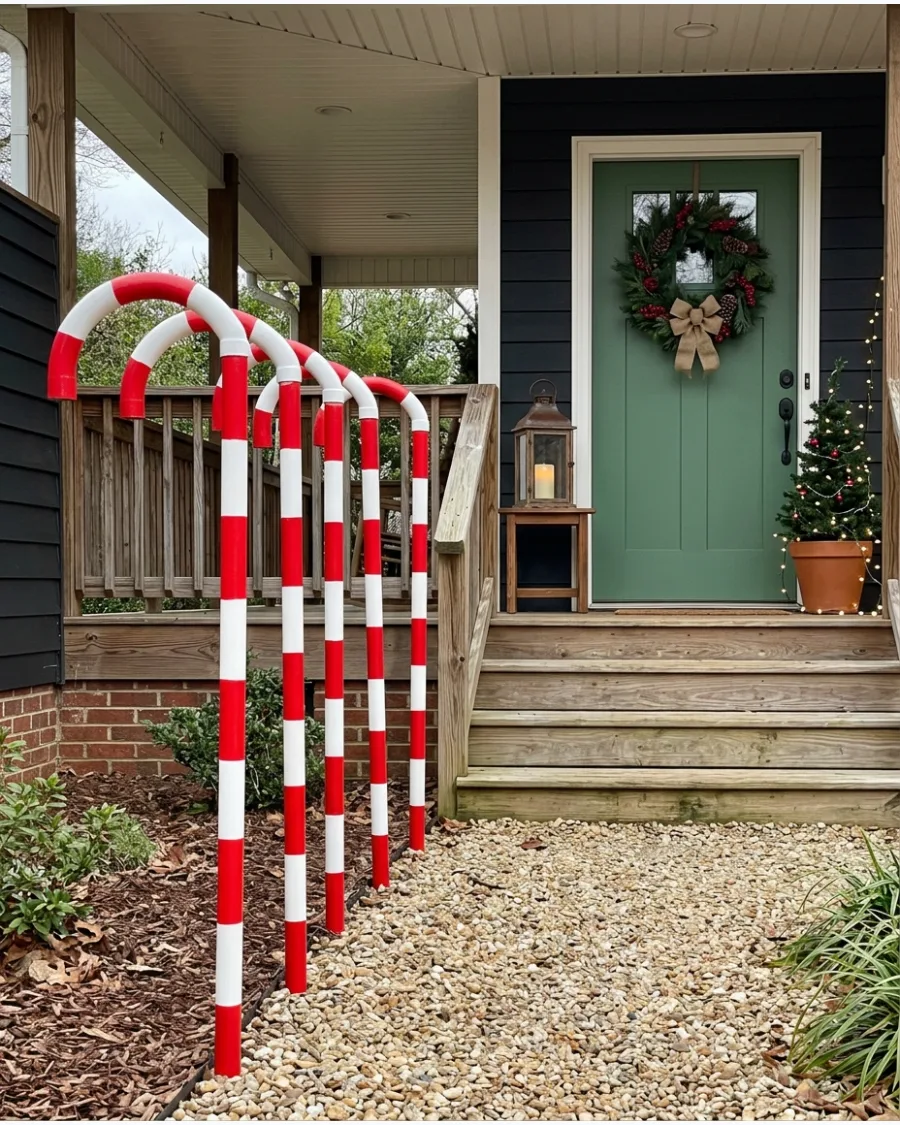
PVC pipe can be easily bent or joined with elbows to create tall, durable candy canes. Paint the pipe white and use tape or paint to add the iconic red stripes along the length.
Wrap red electrical tape around white PVC pipe at an angle to get perfectly crisp stripes that will not peel. Lining a walkway with these creates a clear path for guests while adding a playful, classic holiday feel.
- Budget: $5 per candy cane; 30 minutes assembly.
- Use 45-degree PVC elbows to create the 'hook' at the top for a clean, geometric look.
- Space them exactly two feet apart for a symmetrical and professional appearance.
Best shortcut: Use a heat gun to gently warm the PVC if you want to bend it into a smooth curve instead of using joint fittings.
30. DIY Outdoor Snowman Family
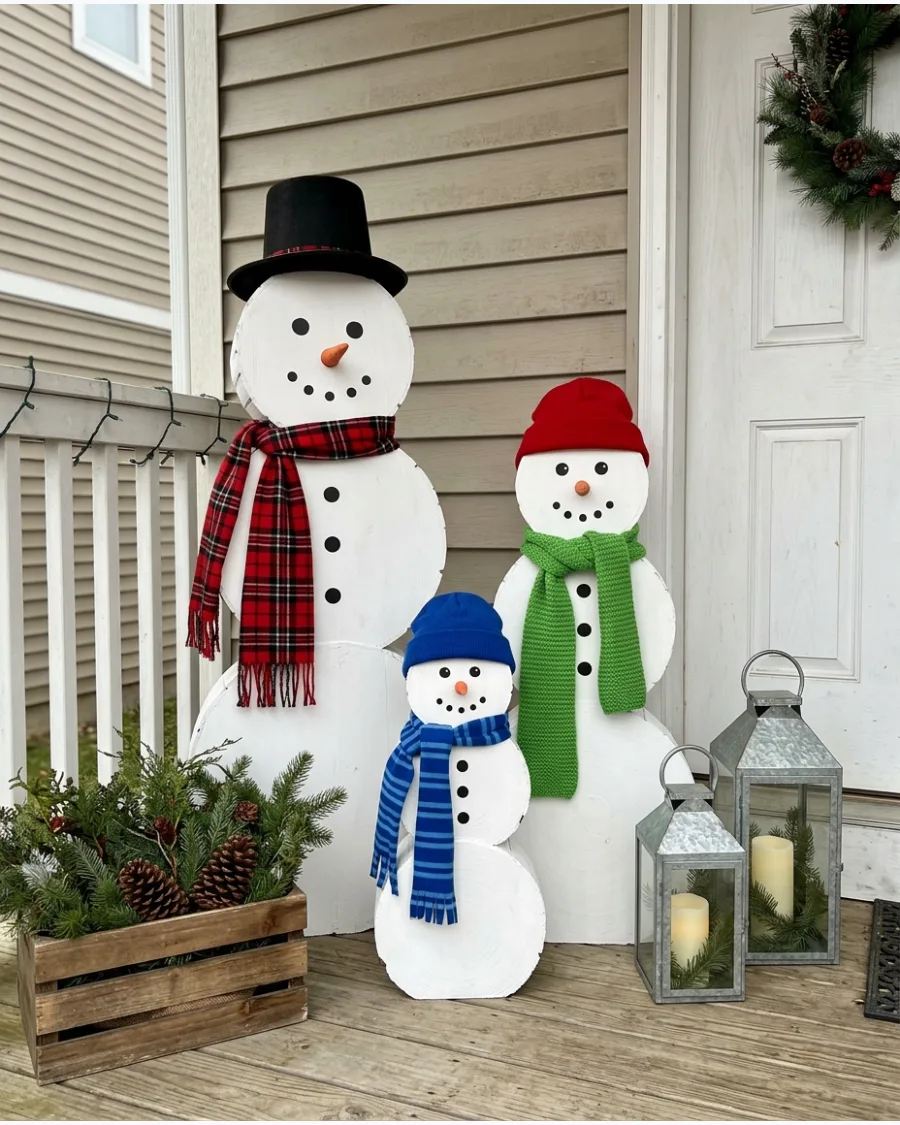
Build a weather-resistant snowman family using stacked wooden rounds or wire frames covered in white mesh.
Add personality with different heights and accessorize with real hats and scarves. Weight the bottom section with a few bricks or a bag of sand so the snowmen do not roll away in high winds. Giving each one a real fabric scarf adds a touch of movement and texture that makes them look custom-made.
- Budget: $20 to $40 for the set; 2 hours assembly.
- Use black spray-painted river stones for the eyes and buttons for a natural look.
- Store the fabric accessories in a dry place if a heavy rainstorm is expected.
Quick win: Use an old real-wood branch for the arms to give the snowmen a more authentic, handmade feel.
CANDYLAND AND GINGERBREAD OUTDOOR CHRISTMAS DECORATIONS
31. DIY Gingerbread People Yard Cutouts
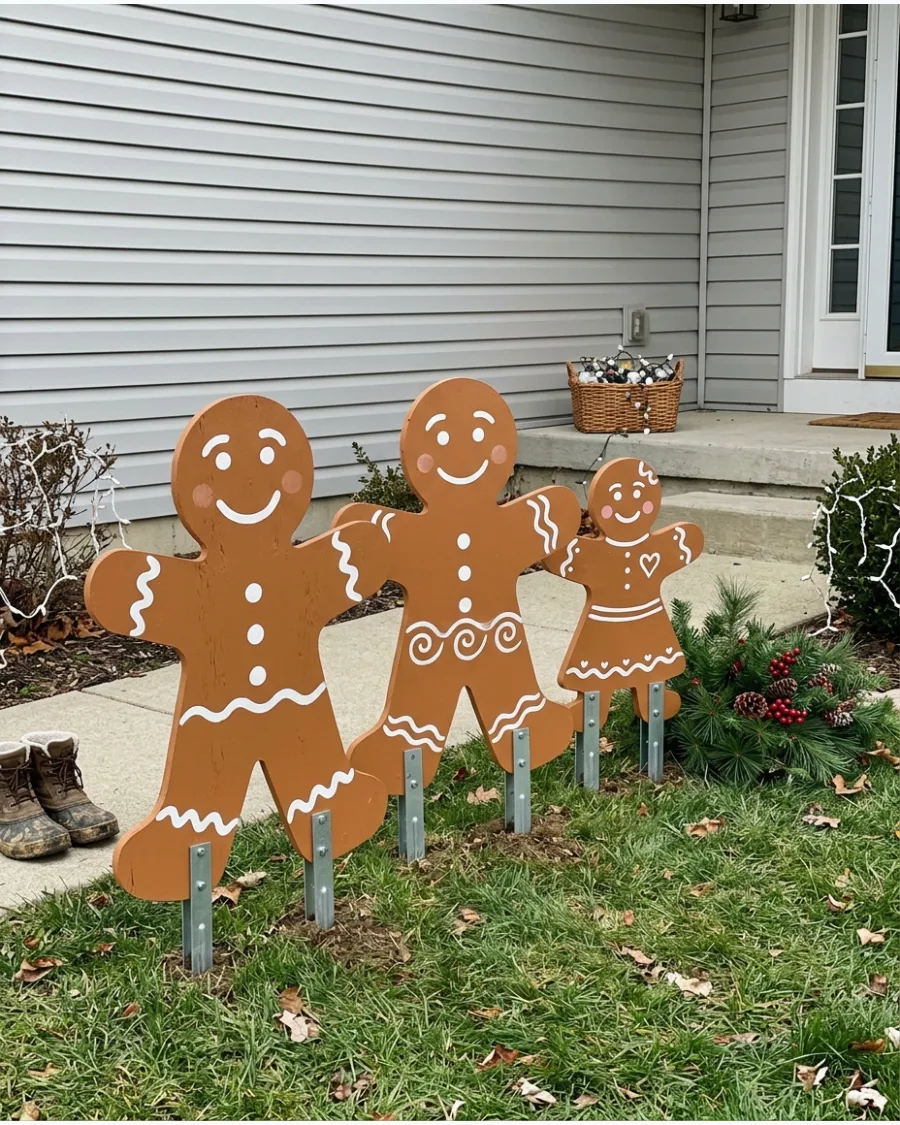
Cut large figures from exterior-grade plywood for a classic look that lasts all winter. Use white outdoor paint for the icing details to make the features pop against the brown wood.
Stake the figures into the ground using heavy-duty metal U-brackets to keep them upright against the wind. Plywood is a better choice than cardboard because it will not warp or sag when it rains.
- Exterior plywood and outdoor acrylic paint
- Attach 12-inch metal stakes to the back of each figure
- Paint both sides to protect the wood from moisture
Quick win: Use a white paint pen for the icing swirls to get cleaner lines than a brush.
32. Giant Christmas Lollipop Yard Stakes
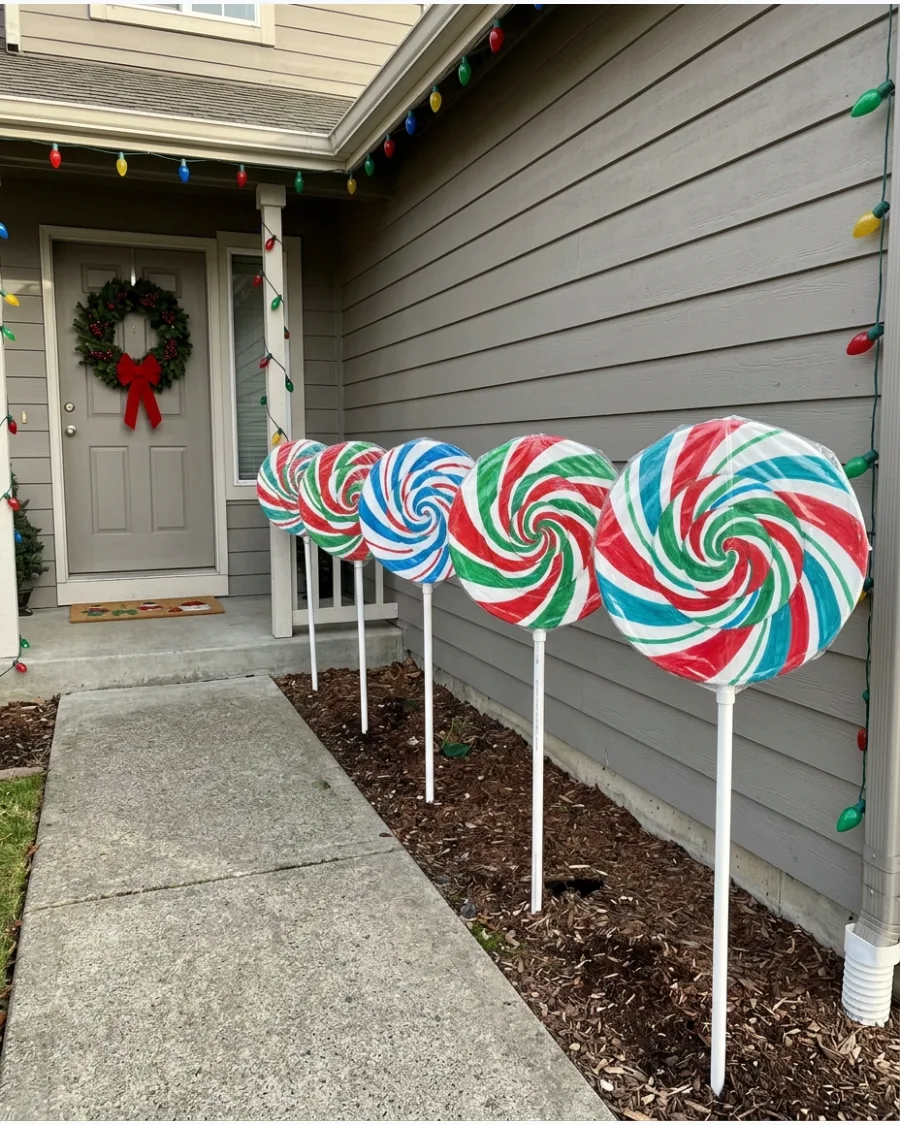
Use plastic foam discs or inflatable balls as the base for these oversized sweets. Wrap them in colorful cellophane and secure them to white PVC pipes to mimic real lollipop sticks.
Secure the cellophane at the base with a thick zip tie before adding a decorative ribbon bow. These look best when grouped in different heights along a path to create a whimsical garden feel.
- Foam discs, PVC pipe, and clear cellophane
- Hammer a rebar stake into the ground then slide the PVC over it
- Vary the heights between 3 and 5 feet for visual interest
Most people skip this: Use red or green duct tape to create the spiral pattern on the lollipop face before wrapping.
33. Giant Peppermint Candy Decorations
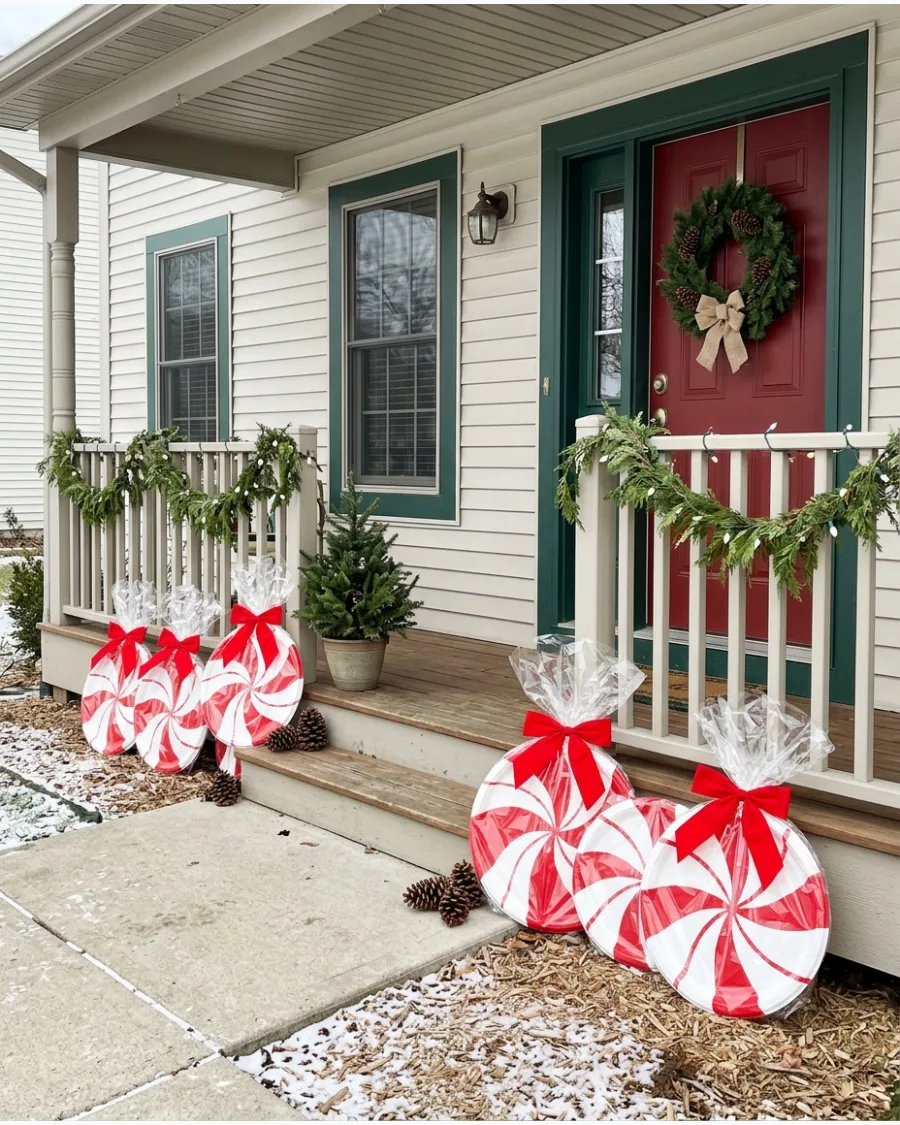
Turn white plastic plates or wooden circles into sweet accents for a fence or porch. Paint red wedges from the center outward to create the iconic peppermint swirl.
Apply a coat of outdoor clear gloss to give the candies a shiny, realistic hard-candy finish. These are lightweight enough to hang with simple outdoor command hooks or thin wire.
- Plastic plates or wood rounds and red paint
- Mount to surfaces using outdoor-rated adhesive strips
- Cluster three candies together for a high-impact focal point
Best shortcut: Use a paper plate as a template to trace perfect wedges onto your circles.
34. DIY Candy Cane Lane Walkway
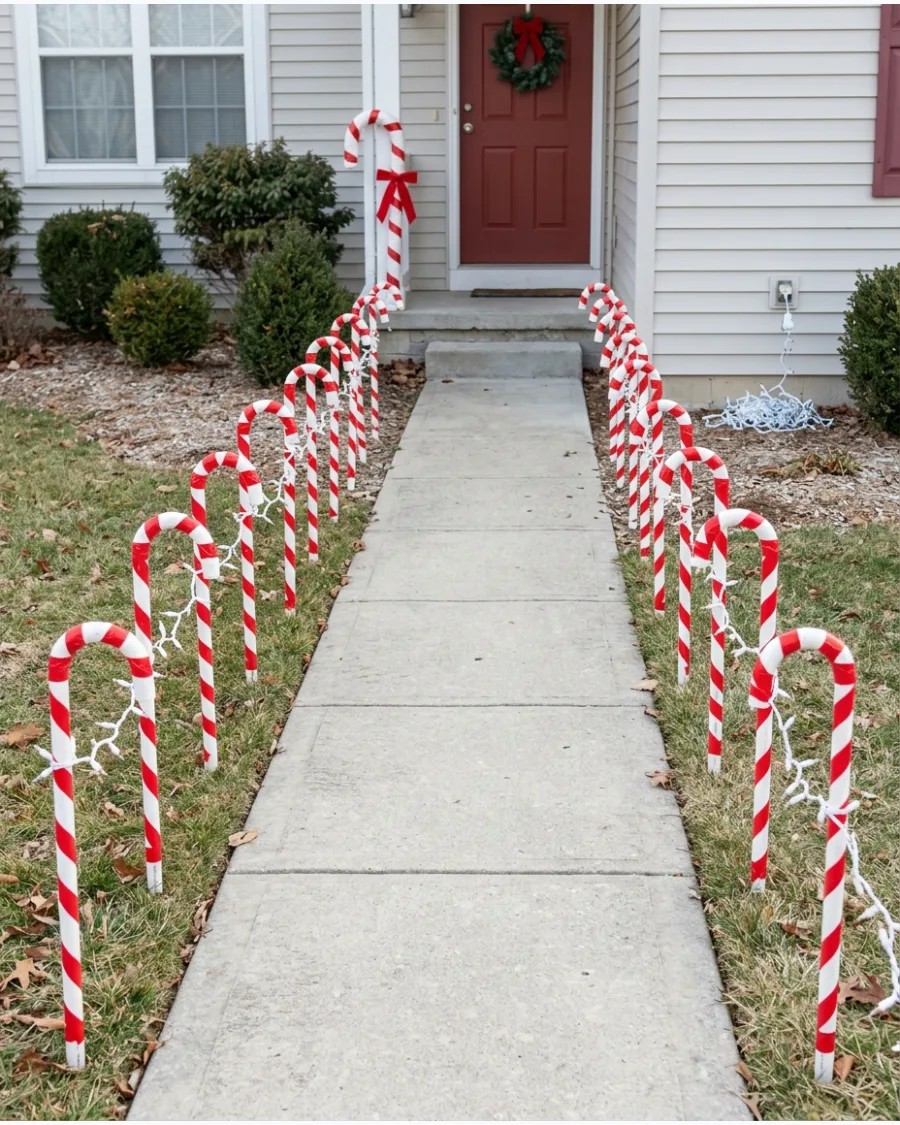
Line the entry path with homemade candy canes to guide guests toward the front door. Use white PVC pipes with curved tops or pre-made plastic candy canes for a uniform look.
Wrap the canes in warm white LED string lights to make the path visible and safe at night. Spacing them exactly two feet apart creates a professional and intentional appearance.
- Heavy-duty plastic candy canes and outdoor LED lights
- Space stakes evenly using a measuring tape for a tidy look
- Plug lights into a weather-proof timer for automatic operation
Quick win: Use red electrical tape for the stripes because it stretches easily around the curves of the pipe.
35. DIY Giant Gumdrop Yard Decorations
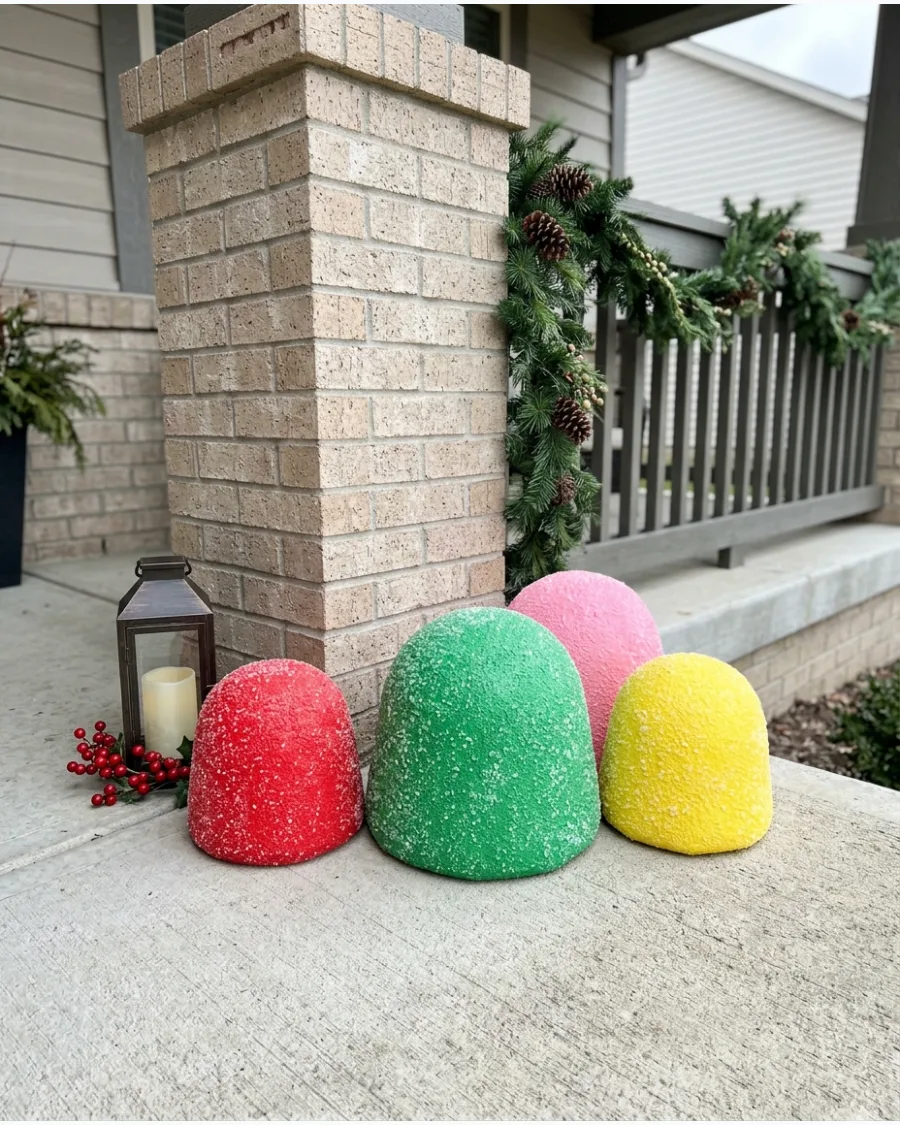
Plastic pails or dome-shaped forms work perfectly for creating these colorful lawn treats. Paint them in bright jewel tones and coat them with clear glitter or glass beads for a sugary texture.
Drill a small hole in the bottom of each gumdrop to stake it into the grass so they do not blow away. Bright colors like lime green and hot pink make the display feel modern and fun.
- Plastic pails, spray paint, and outdoor glitter
- Apply glitter while the paint is still tacky for the best bond
- Arrange them in a curved line to mimic a dropped candy trail
Most people skip this: Use a frosted spray paint finish to get that realistic sugar-coated look instantly.
36. Gingerbread House Front Porch Makeover
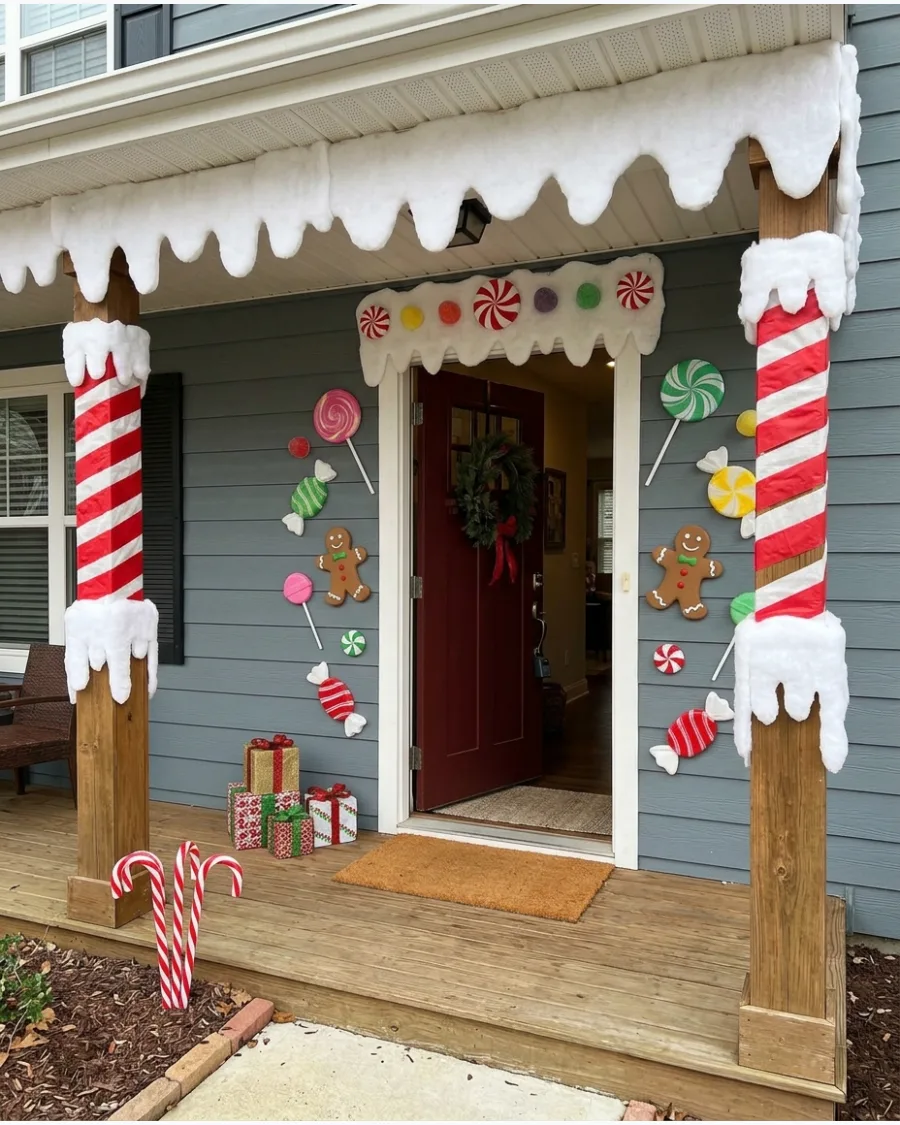
Turn the porch trim into a storybook scene with white scalloped boards that look like icing. Hang oversized candy shapes along the eaves and wrap porch columns in red ribbon to mimic candy canes.
Focus the decor on the roofline and corners to keep the main walkway clear for guests. Using white foam board for the icing trim is a budget-friendly way to get the look without heavy wood.
- White foam board, red ribbon, and colorful plastic balls
- Secure trim with outdoor mounting tape for damage-free removal
- Mix matte and glossy finishes to add depth to the display
Best shortcut: Use pool noodles wrapped in white tape for giant icing logs around the door frame.
37. DIY Candyland Christmas Door Arch
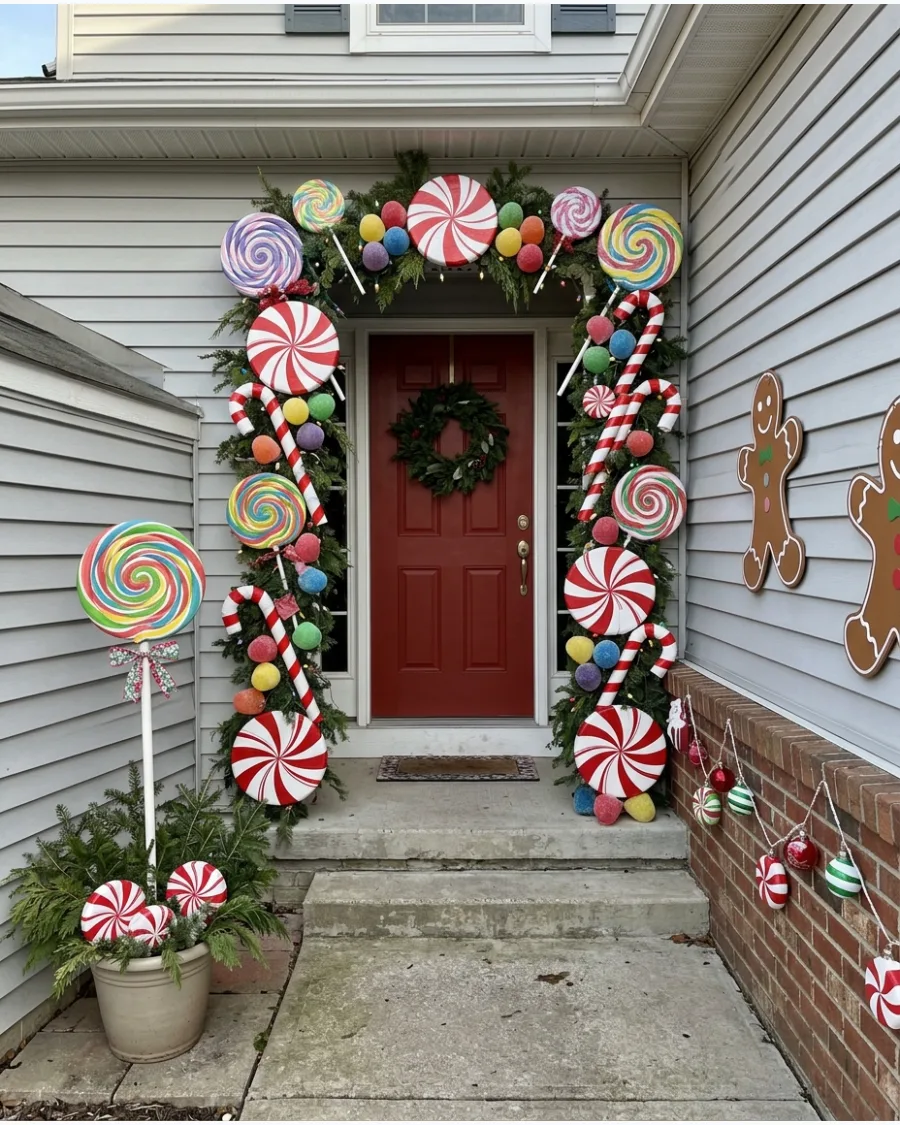
Frame the entrance with a burst of color using a mix of oversized sweets and greenery. Build a simple PVC frame around the door and zip-tie lollipops, peppermints, and gumdrops to the structure.
Tuck battery-operated fairy lights into the greenery to illuminate the candies without messy cords across the threshold. This creates a grand entrance that feels like stepping into a candy shop.
- PVC pipe frame, zip ties, and assorted candy props
- Weight the base of the PVC frame with sandbags or heavy pots
- Use oversized elements so the theme is visible from the street
Quick win: Use clear fishing line to hang lighter candies so they appear to be floating in the arch.
38. Giant Wrapped Candy Yard Decorations
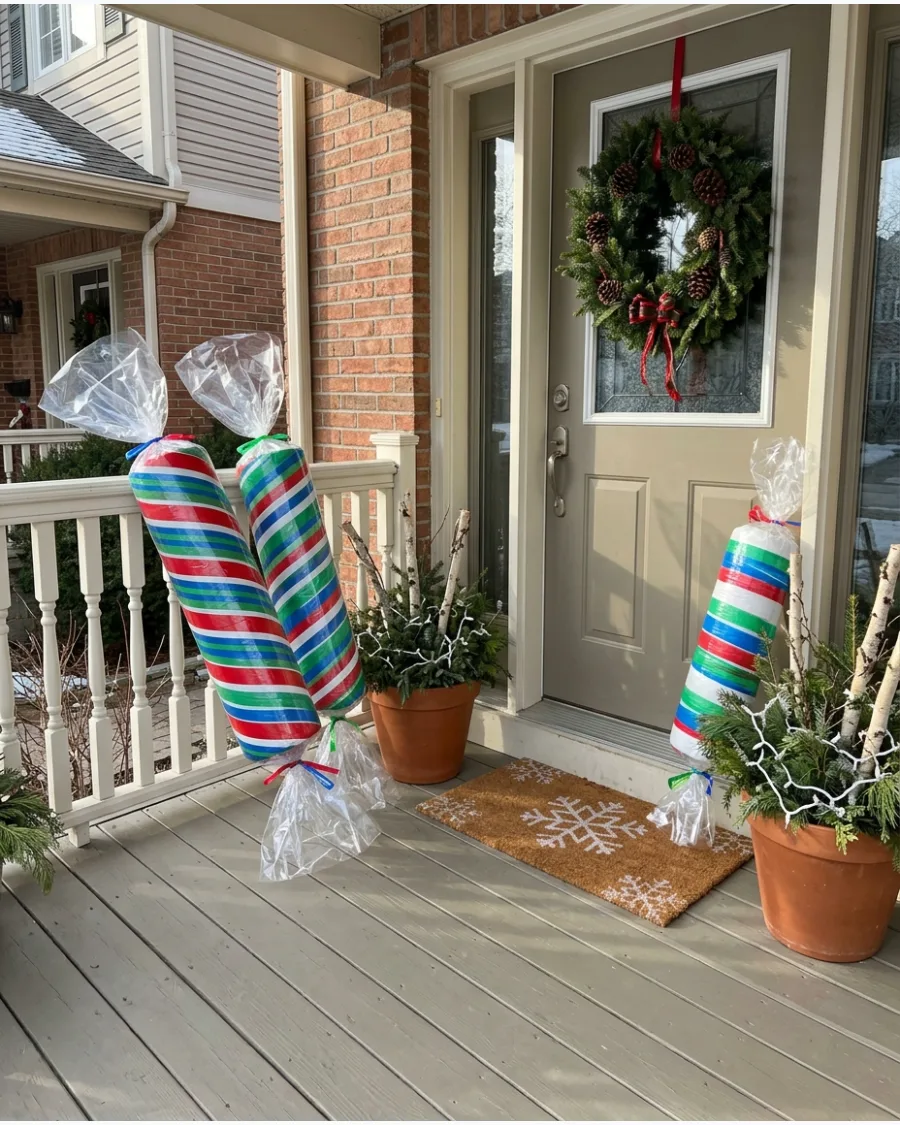
Use shipping tubes or plastic balls to create the center of these large hard candies. Wrap the base in bright fabric or plastic and twist the ends like a real candy wrapper.
Secure the twisted ends with colorful wire or ribbon to hold the shape against the wind. These look great tucked into garden beds or sitting on porch steps for a pop of color.
- Mailing tubes, colorful plastic tablecloths, and ribbon
- Use plastic tablecloths from the party store for a cheap waterproof wrap
- Group candies in odd numbers for a more natural look
Most people skip this: Stuff the wrapper ends with a little bubble wrap to keep them from flopping in the wind.
39. DIY Outdoor Hot Cocoa Christmas Display
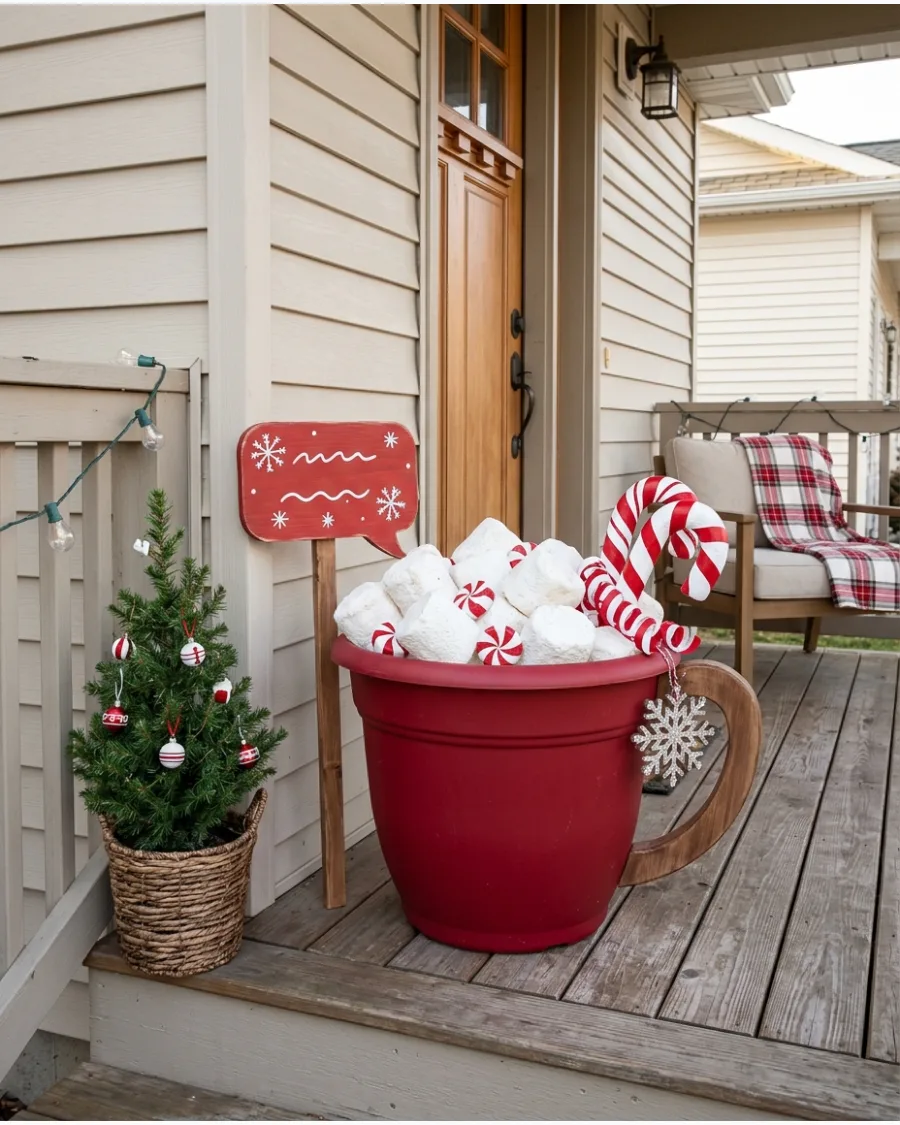
Transform a large planter or bucket into a giant mug filled with festive cheer. Use white spray-painted foam balls for marshmallows and a large painted PVC pipe for a peppermint stir stick.
Place the display on a small side table or stool to give it height and keep it out of the splash zone. A hand-painted sign nearby adds a charming, finished look to the porch setup.
- Large planter, foam balls, and a PVC pipe
- Fill the planter with crumpled paper before adding the marshmallows
- Use a white paint pen to add a Hot Cocoa label to the front
Best shortcut: Use a pool noodle painted with red stripes as a giant candy cane spoon.
40. DIY North Pole Christmas Signpost
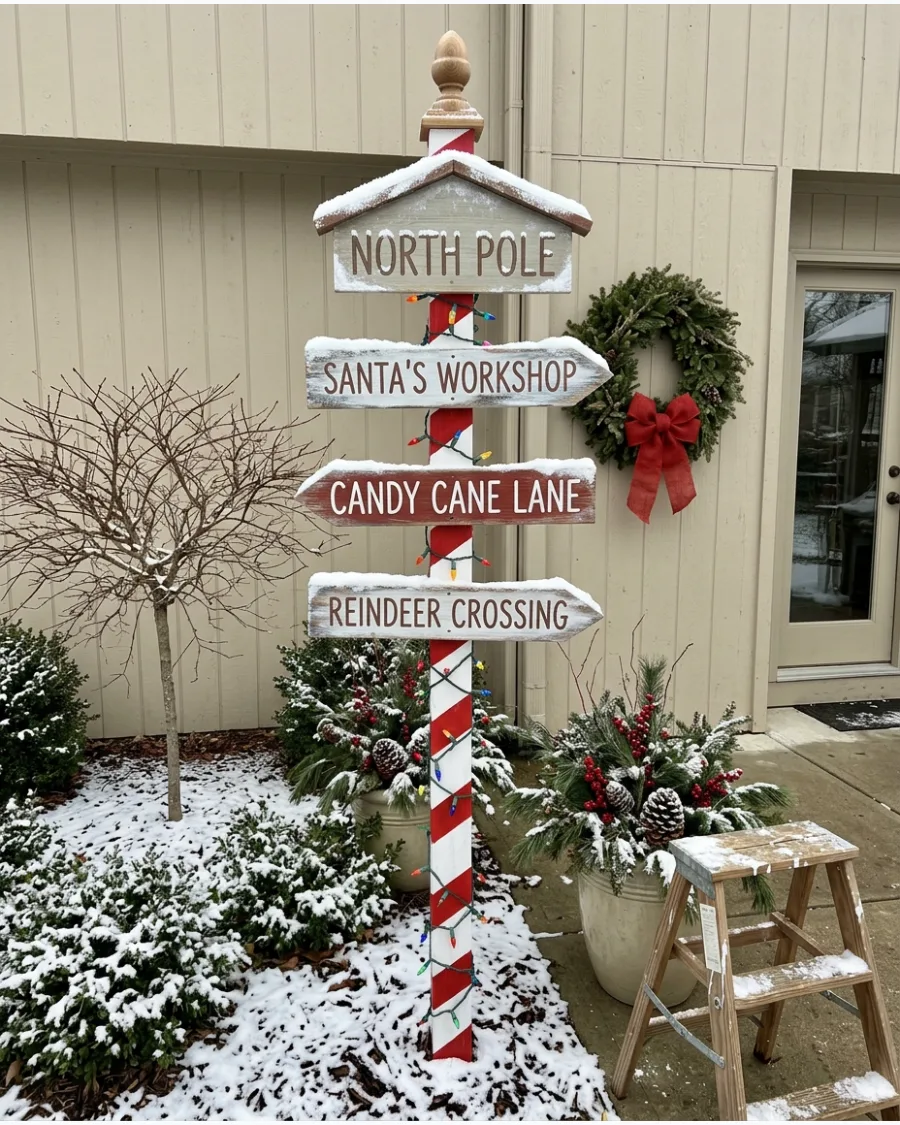
A striped post with directional signs brings a sense of adventure to the front yard. Paint a 4×4 wood post with red and white stripes and attach wooden arrows pointing toward Santa's Workshop or Reindeer Crossing.
Cap the post with a large gold ornament or a solar-powered light to make it look like a finished streetlamp. This project is a great way to use up scrap wood from other builds.
- 4×4 wood post, scrap wood for signs, and paint
- Use a solar fence post cap for an easy lighted top
- Bury the post at least 12 inches deep or use a heavy umbrella stand
Quick win: Use vinyl lettering for the signs if you are not confident in your hand-painting skills.
RUSTIC AND NATURAL DIY OUTDOOR CHRISTMAS DECORATIONS
41. DIY Log Reindeer for the Front Yard
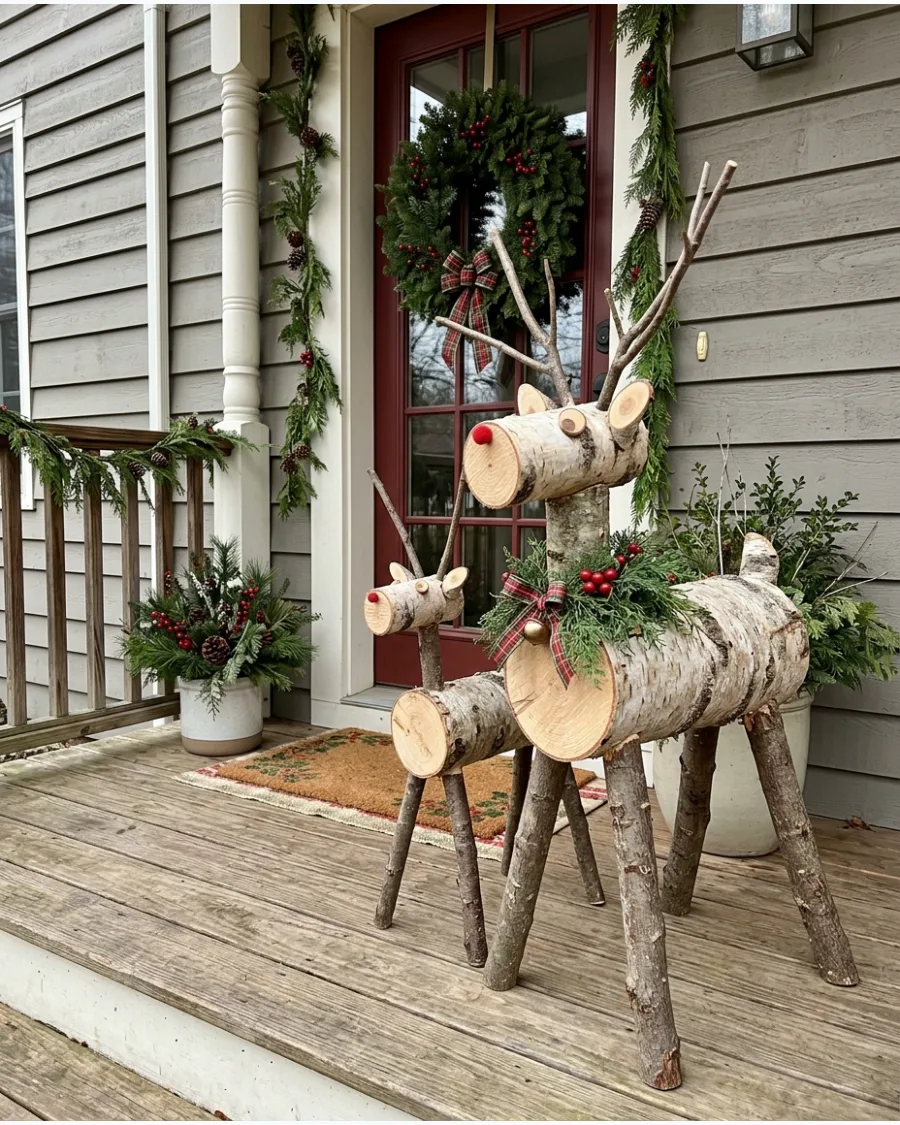
Build these classic figures using a thick log for the body and thinner branches for the legs and neck. Use small Y-shaped twigs for the antlers to keep the scale looking natural.
Secure the legs with wood glue and long screws so the reindeer stays stable in winter winds. A simple red ribbon around the neck adds just enough color without looking overdone.
- 1-2 hours; under $10 if using yard scrap.
- Drill pilot holes to prevent the logs from splitting during assembly.
- Seal the cut ends of the logs with clear wax to prevent rot.
Quick win: Use a red-painted wood ball or a large dried berry for the nose to create a subtle Rudolph look.
42. Birch Log Christmas Porch Bundle
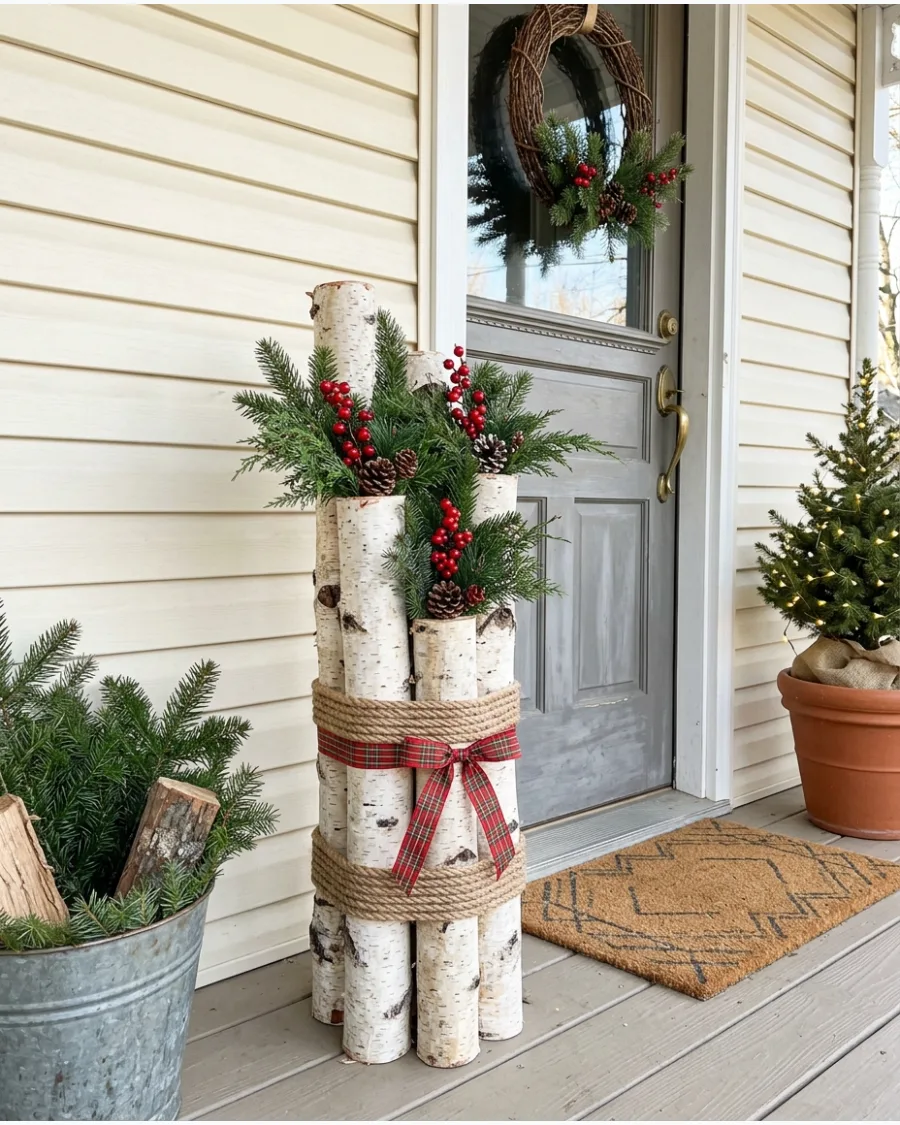
Group three or five white birch logs of varying heights to create a focal point on the porch. Wrap them tightly with thick jute rope or a wide plaid ribbon to hold the shape.
Tuck fresh evergreen clippings and red berry sprigs into the top of the bundle for a professional finish. This is the fastest way to add height to a porch display without buying furniture.
- 15 minutes; $20-$40 depending on wood source.
- Use logs of different diameters to make the arrangement look more organic.
- Place the bundle in a corner to protect it from being knocked over by wind.
Best shortcut: If real birch is too expensive, wrap PVC pipes in birch-patterned contact paper for a similar look from a distance.
43. DIY Wood Slice Christmas Garland
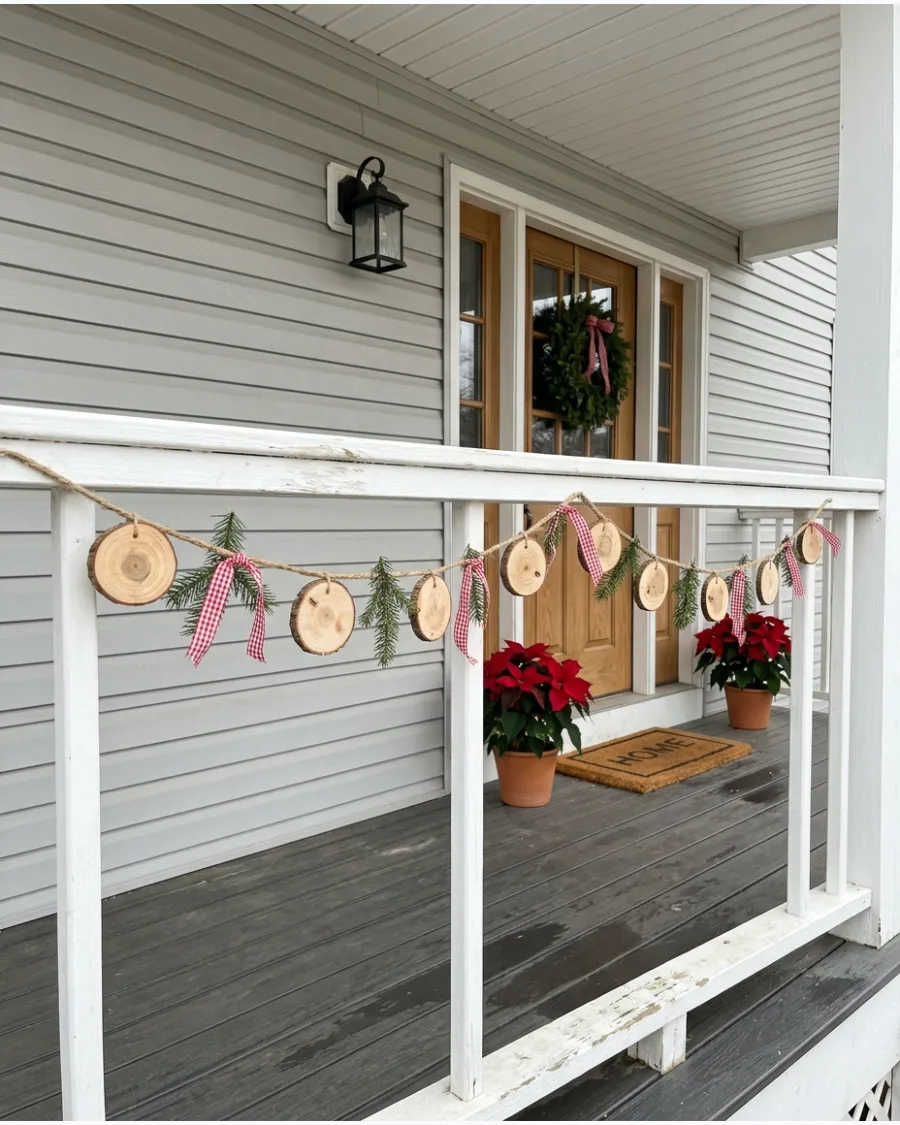
Slice a fallen branch into uniform discs about half an inch thick. Use a small drill bit to make holes in the top of each slice and thread them onto heavy-duty twine.
Alternate the wood slices with small bunches of cedar or pine to give the garland more texture. This looks much better on a porch railing than cheap plastic tinsel.
- 2 hours; $5 for twine and hardware.
- Use a clear outdoor sealant on the wood slices if you live in a very wet climate.
- Keep the spacing consistent so the garland hangs in even swags.
Most people skip this: Sand the faces of the wood slices quickly so any painted designs or natural grain pops against the porch.
44. Rustic Pallet Merry Christmas Sign
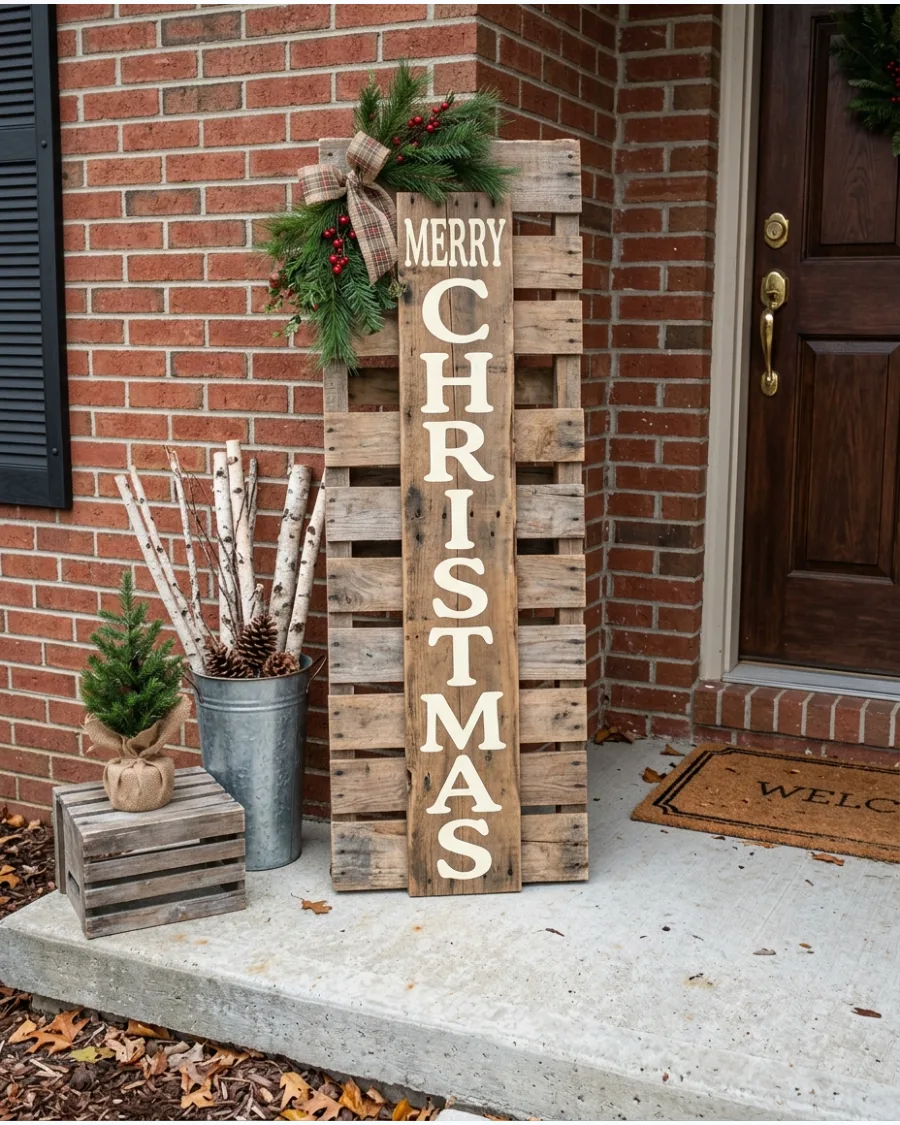
Take a clean pallet and sand down the front boards to remove splinters. Use a stencil or freehand a simple Merry Christmas message in white outdoor paint.
Attach a small evergreen wreath or a burlap bow to the top corner to add dimension to the flat wood. Lean it against the house near the front door for an instant rustic welcome.
- 1 hour; free if using a reclaimed pallet.
- Use a paint pen for the letters if you aren't confident with a brush.
- Secure the back of the pallet to a porch post with a zip tie to prevent it from falling.
Quick win: Lightly sand the edges of your painted letters to give the sign a weathered, cohesive look.
45. Christmas Crate and Evergreen Porch Display
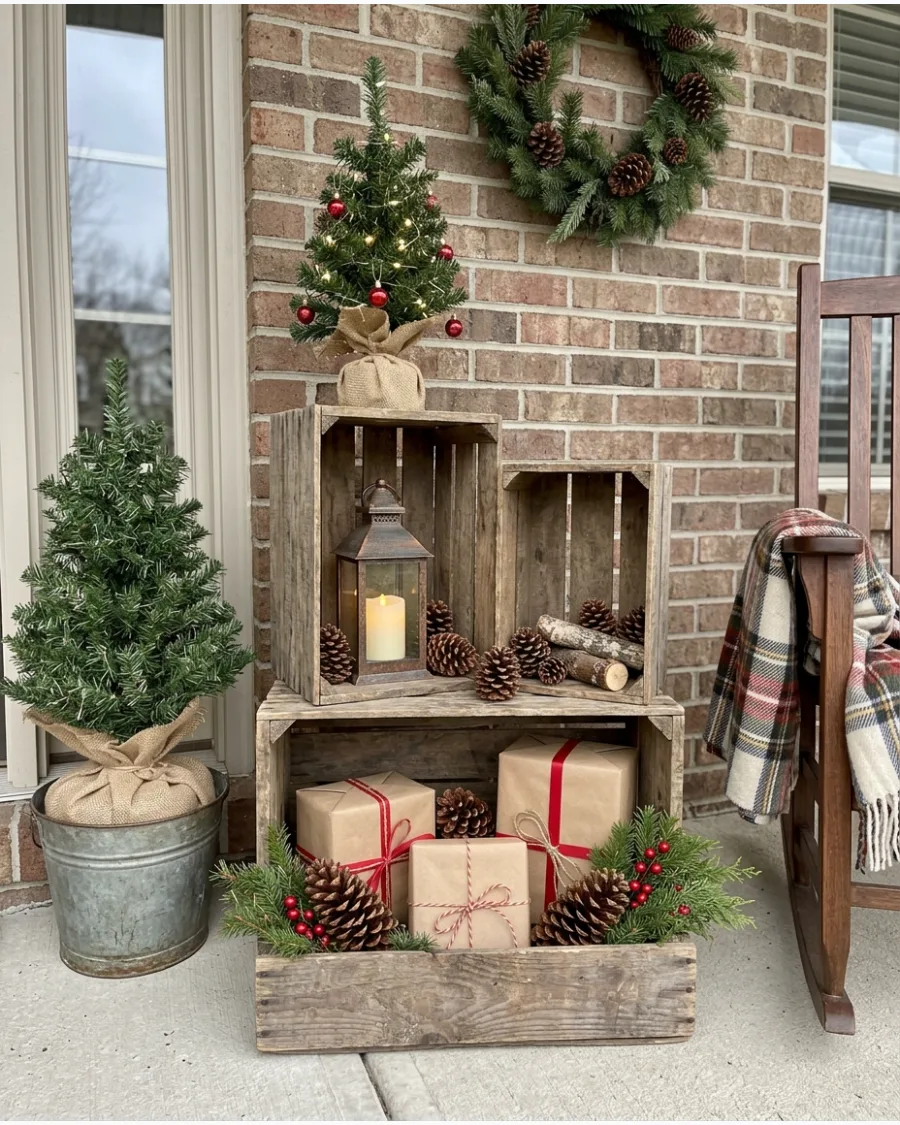
Stack two or three wooden crates on their sides to create small shelves for outdoor decor. Fill the openings with lanterns, oversized pinecones, and small potted evergreens.
Weight the bottom crate with a heavy brick or stone so the entire stack doesn't tip over in the wind. This setup works perfectly in a tight porch corner where a full tree won't fit.
- 30 minutes; $30 for crates.
- Use battery-operated lanterns with timers so you don't have to turn them on manually every night.
- Change out the greenery for different seasons to keep the crates useful all year.
Best shortcut: Use crates of slightly different sizes to create a more interesting, asymmetrical silhouette.
46. Rustic Barrel Christmas Arrangement
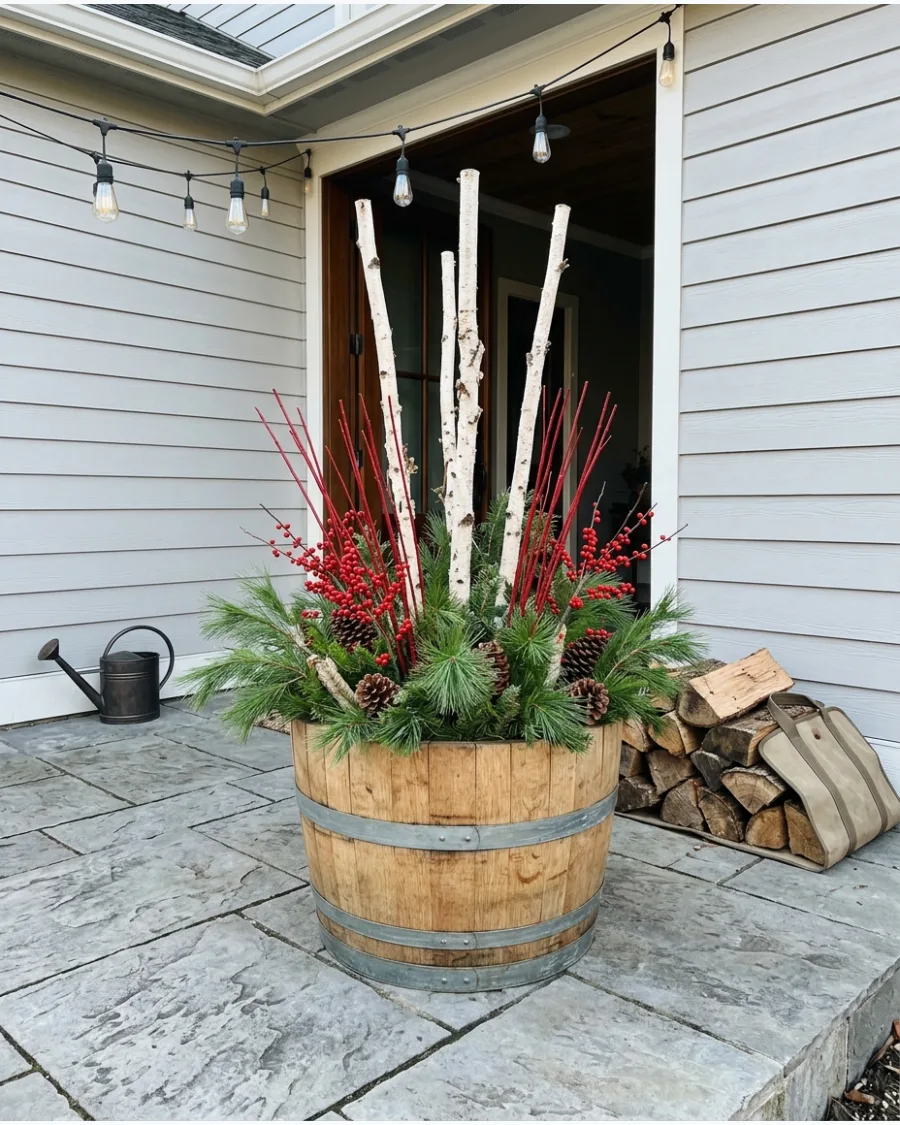
Start with a whiskey barrel or a large wooden planter as your base. Insert tall birch poles in the center and pack the space around them with dense evergreen boughs.
Add large natural pinecones and red dogwood branches to create a high-contrast look that stands out from the street. This heavy base stays put even during the worst winter storms.
- 45 minutes; $50-$80.
- Use floral foam or packed dirt in the bottom of the barrel to hold the branches upright.
- Spray the evergreens with an anti-desiccant to help them stay green longer in dry winter air.
Most people skip this: Use three different types of greenery, like pine, cedar, and fir, to give the arrangement a professional, layered appearance.
47. Vintage Sled Christmas Porch Decoration
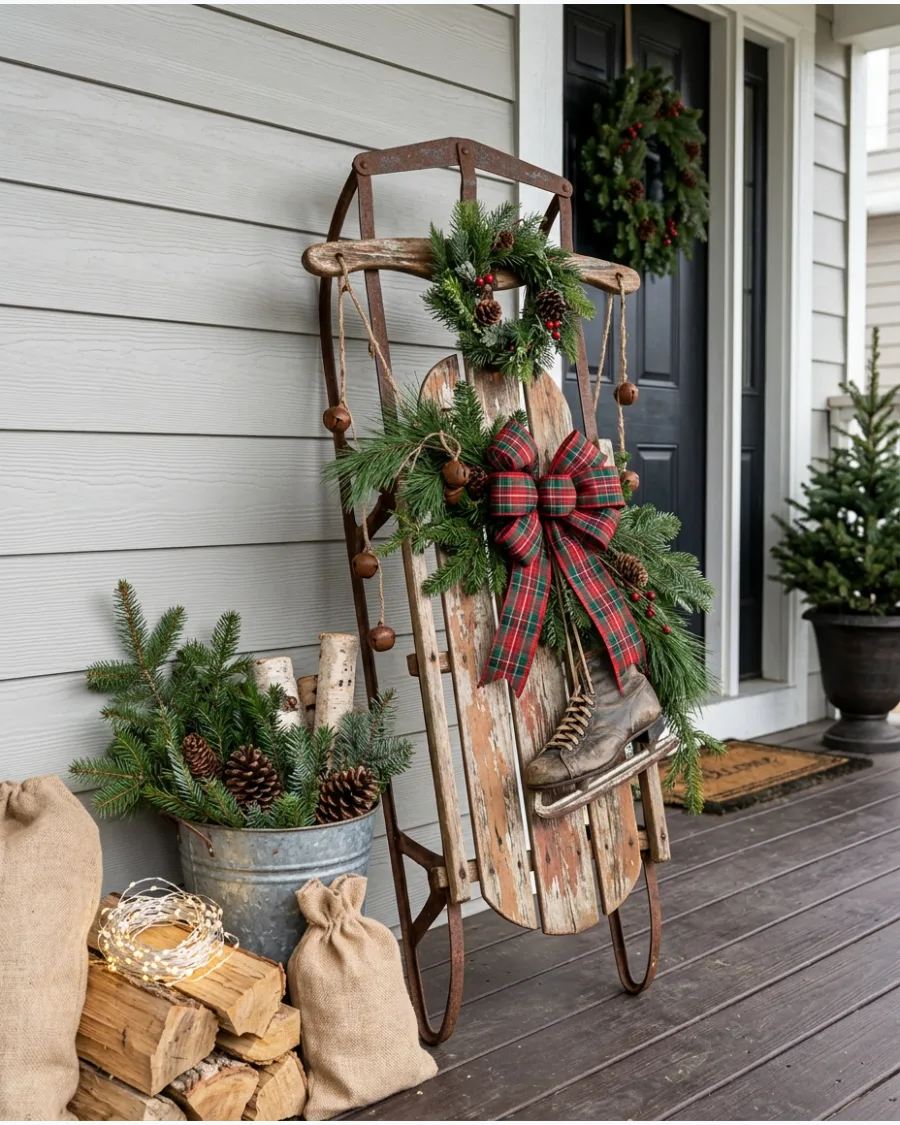
Lean a classic wooden runner sled against the wall next to your front door. Tie a bunch of evergreen branches and a pair of old ice skates to the top of the sled using plaid ribbon.
Position the sled at a slight angle so it feels casual rather than perfectly centered. This creates a nostalgic winter scene without needing any power or complicated assembly.
- 20 minutes; $0 if you own a sled.
- Check local thrift stores or antique malls for authentic wooden sleds with metal runners.
- Use a small piece of wire to secure the skates so they don't slide off the wood.
Quick win: Wrap a short string of battery-powered fairy lights around the runners to make the sled glow at night.
48. Vintage Ski Christmas Porch Display
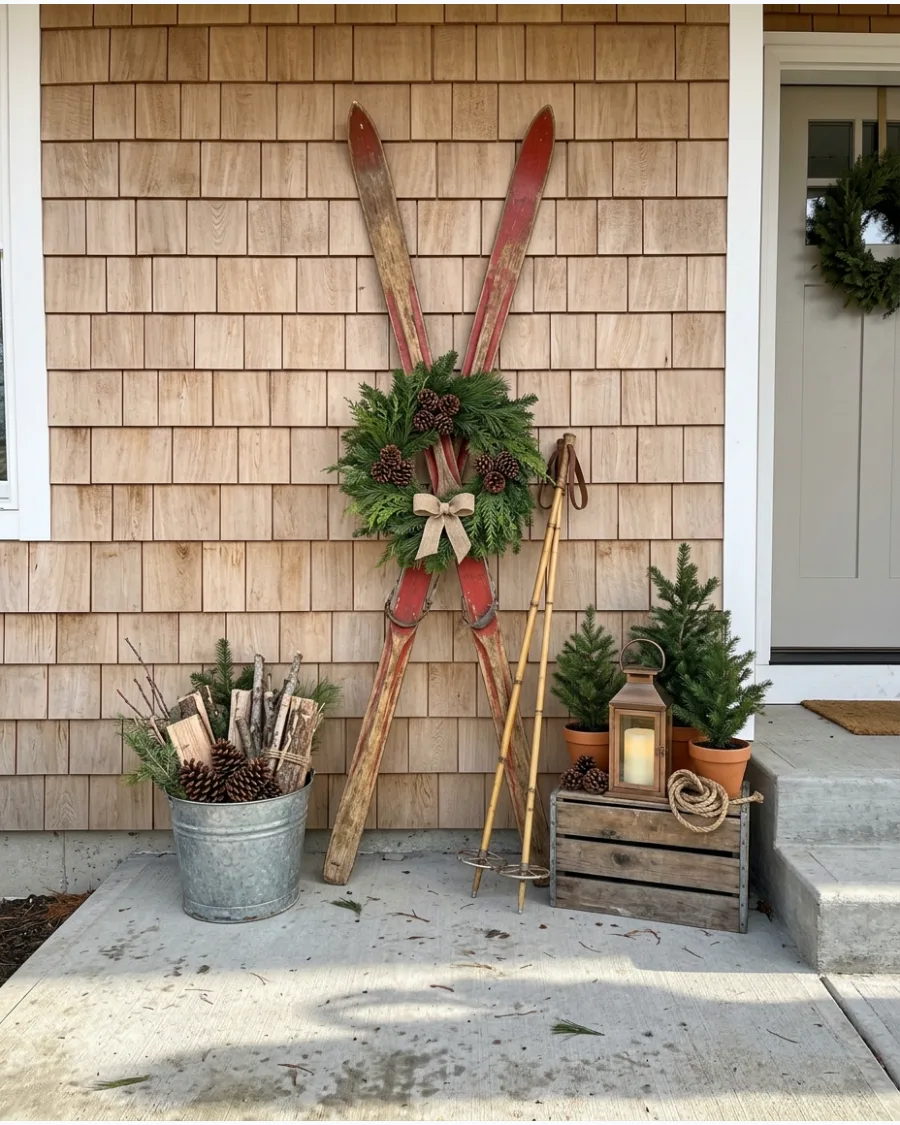
Cross two wooden skis in an X shape and secure them at the center with a heavy-duty zip tie. Cover the connection point with a small evergreen wreath or a cluster of large pinecones.
Lean the skis against a porch column or wall where they won't interfere with the walkway. This lodge-style look is a great alternative to traditional garlands or trees.
- 15 minutes; $40-$100 for vintage skis.
- If the skis are slippery, place a small rubber mat or adhesive grip under the tips to prevent them from sliding on the porch floor.
- Use neutral colors like cream or forest green for the ribbons to keep the look sophisticated.
Best shortcut: If you can't find vintage wood skis, paint modern thrifted skis a matte brown or deep red to mimic the old-school look.
49. Giant Pinecone Christmas Snowflakes
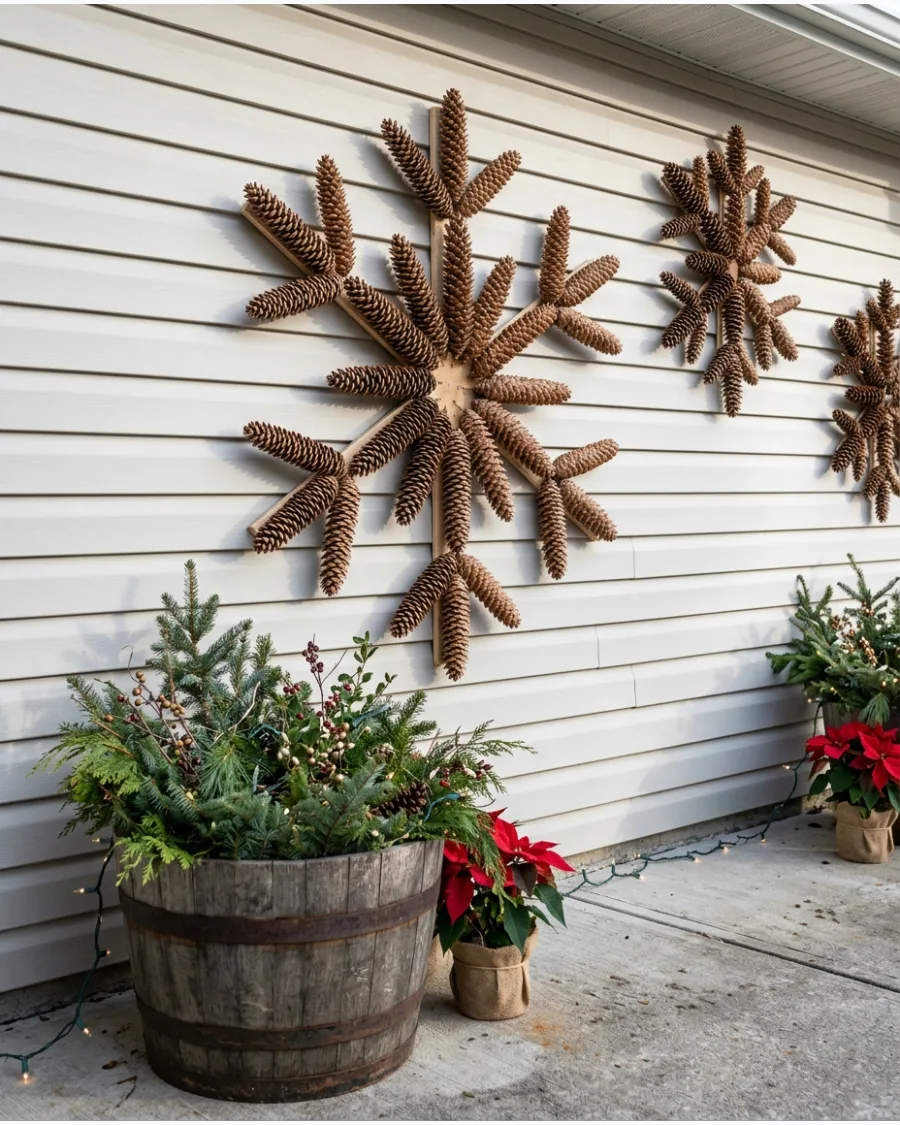
Collect long, slender pinecones and glue them to a small wooden disc in a radial pattern. Use hot glue for the initial bond and reinforce it with E6000 for outdoor durability.
Spray the finished snowflake with a light dusting of white spray paint to mimic the look of fresh snow. These look incredible hanging on a dark fence or the side of a shed.
- 1 hour plus drying time; under $15.
- Use a sturdy wire loop on the back of the center disc for easy hanging.
- Make sure the pinecones are completely dry before gluing so the bond holds through the winter.
Most people skip this: Bake your pinecones in the oven at a low temperature first to kill any bugs and open up the scales.
50. DIY Twig Christmas Stars
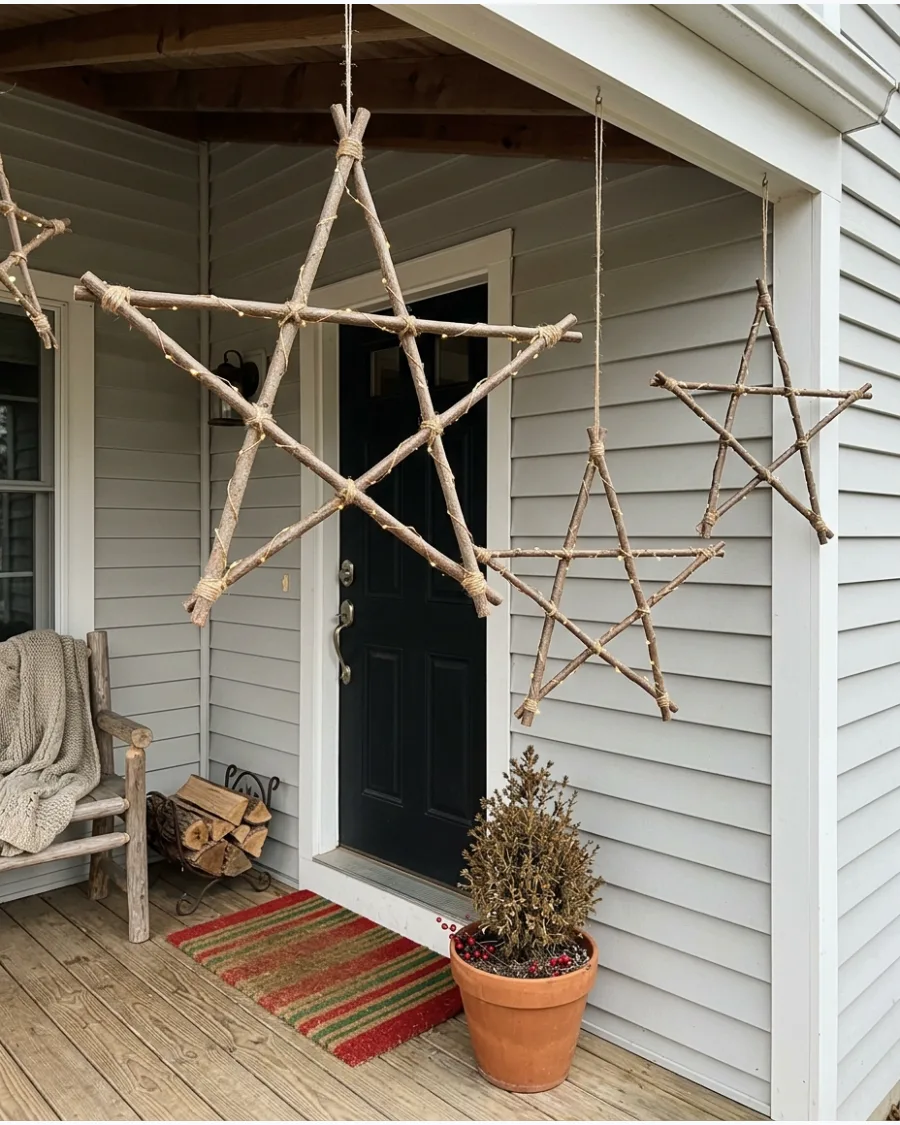
Gather five straight branches of equal length and arrange them into a star shape. Bind the points and the intersections with brown twine or thin wire to keep the structure rigid.
Wrap a single strand of warm white fairy lights around the twigs to make the star visible after dark. These look best when hung in groups of three at different heights on a porch or from a large tree.
- 30 minutes per star; free if using yard branches.
- Use branches that are at least half an inch thick so the star doesn't warp.
- If hanging from a tree, use clear fishing line to make the stars look like they are floating.
Quick win: Use found wood with interesting bark or moss to add extra texture to the stars during the day.
DIY OUTDOOR CHRISTMAS LIGHT DECORATIONS
51. DIY Christmas Light Tunnel
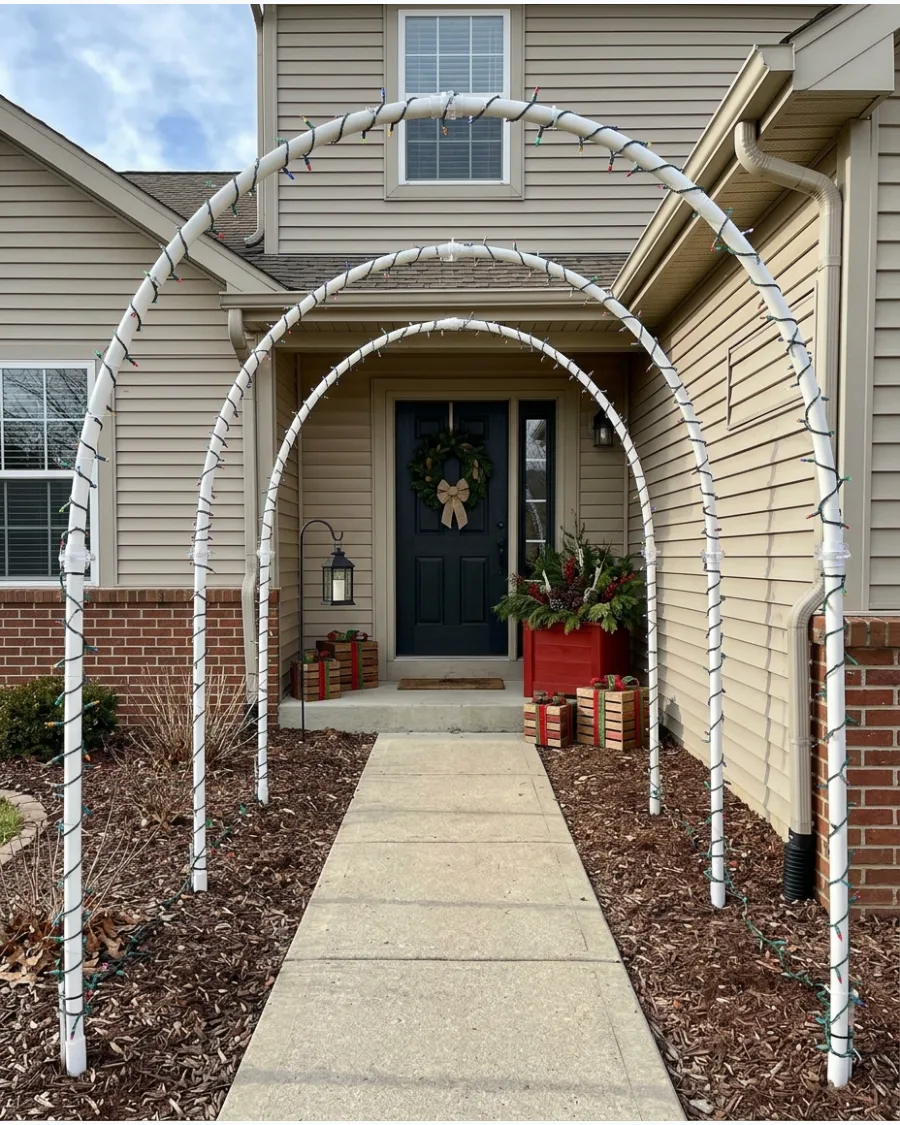
Create a glowing entrance by setting up a sequence of PVC or metal arches over your front walkway. Cover each frame completely with outdoor string lights to form a brilliant canopy.
The finished tunnel creates a glowing entrance leading toward the front door. Use white PVC pipe for the frame because it blends in better with the surroundings during the day.
- Expect to spend about two hours on assembly for a standard ten-foot walkway.
- Secure the base of each arch with rebar stakes driven into the ground for stability.
- Use battery-operated lights if you do not have an outdoor outlet near the path.
Quick win: Use white zip ties to attach the lights so they are invisible against the white PVC frames.
52. Lighted Christmas Pathway Globes
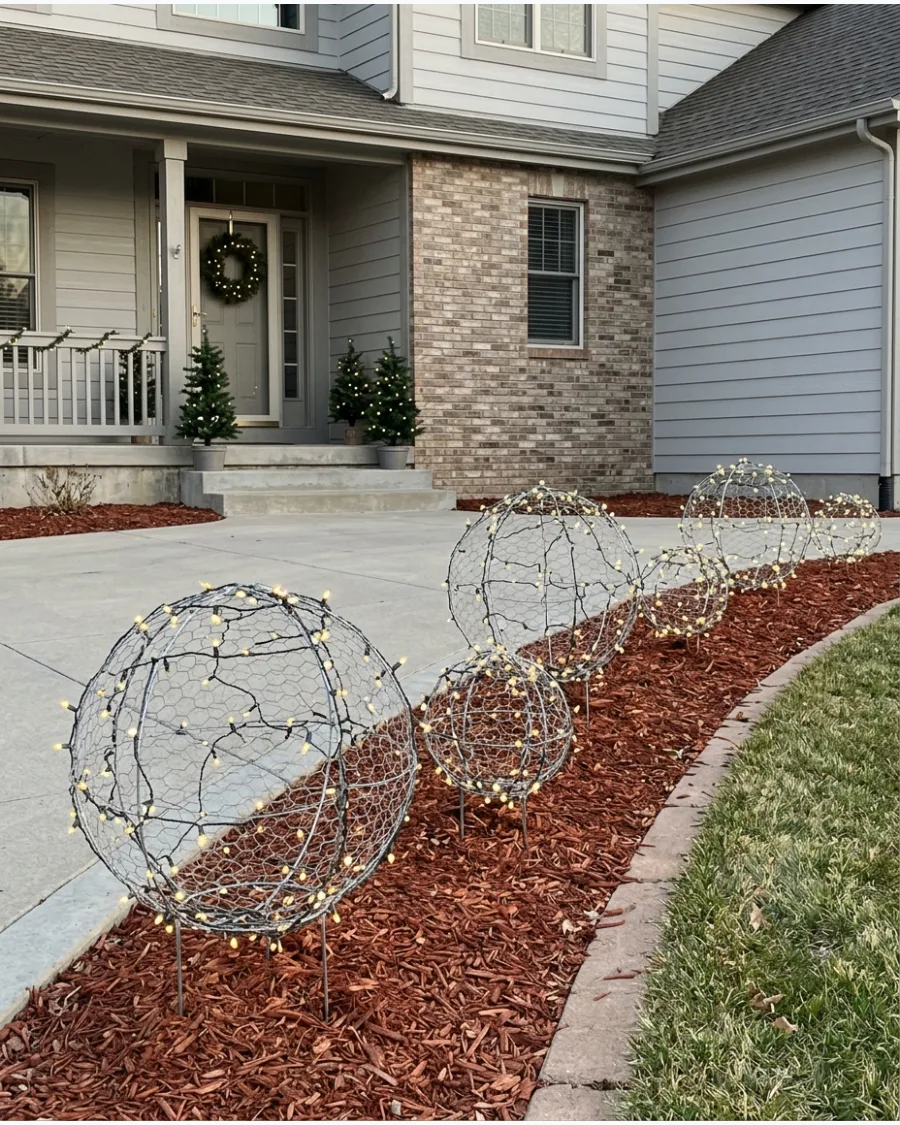
Wrap outdoor-rated lights around wire or mesh sphere frames to make glowing yard art. Stake these globes along the edge of a driveway or garden path for a high-end look.
Mix several sizes to create more visual depth across the yard. Chicken wire is the best material for the frame because it is easy to mold into a round shape by hand.
- Budget around fifteen dollars per globe for wire and a strand of lights.
- Place the globes in clusters of three to make a bigger impact from the street.
- Store these by nesting smaller wire frames inside larger ones to save space.
Most people skip this: Use U-shaped garden stakes to pin the globes down so they do not roll away in high winds.
53. Hanging Christmas Light Spheres
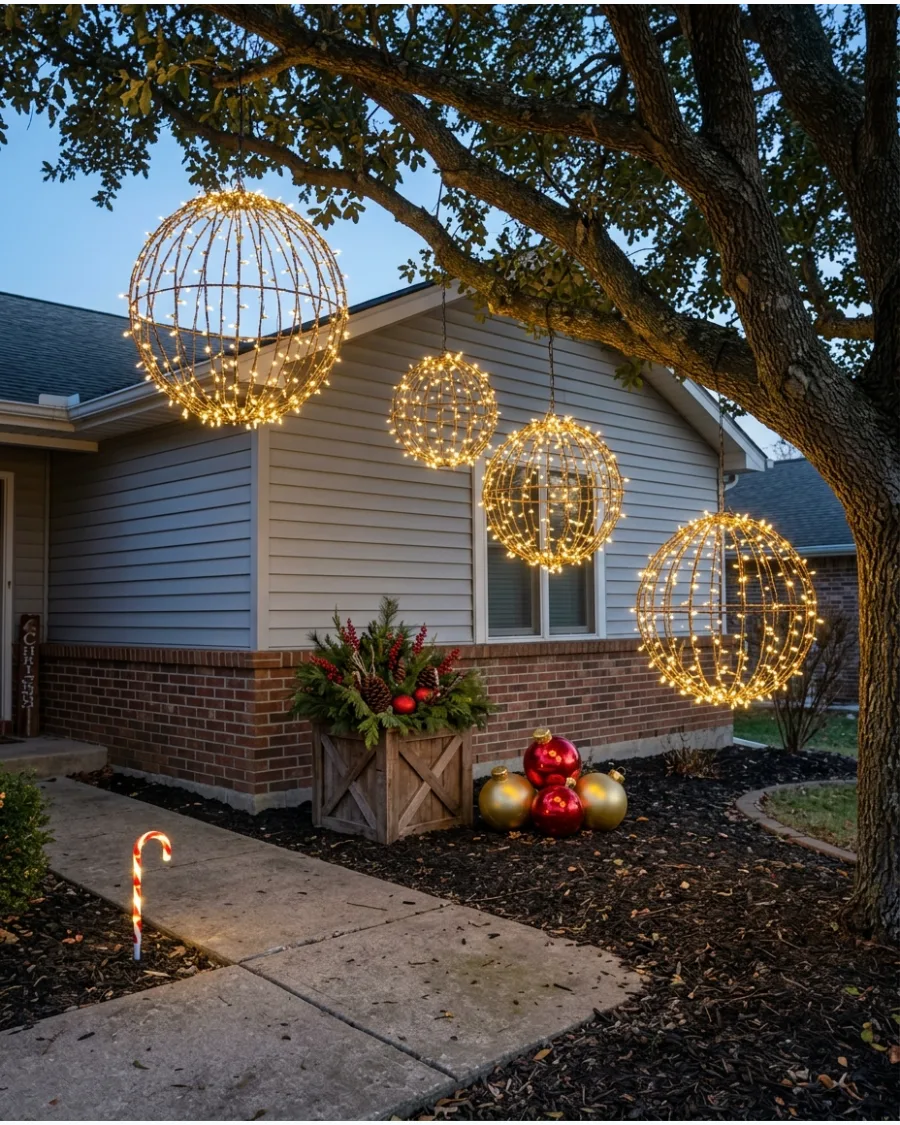
Build large wire spheres and wrap them in bright outdoor lights to hang from your trees. These look like oversized floating ornaments once the sun goes down.
Hang them at different heights to create a floating ornament effect after dark. Use heavy-duty fishing line for hanging to make the spheres look like they are hovering in mid-air.
- Large wire hanging baskets fastened together with zip ties make excellent sphere frames.
- Use an extension pole to reach higher branches without needing a tall ladder.
- Opt for LED lights to keep the spheres lightweight and cool to the touch.
Best shortcut: Buy pre-made folding metal light spheres if you want to skip the wire-shaping step.
54. Wrapped Tree Trunks With Christmas Lights
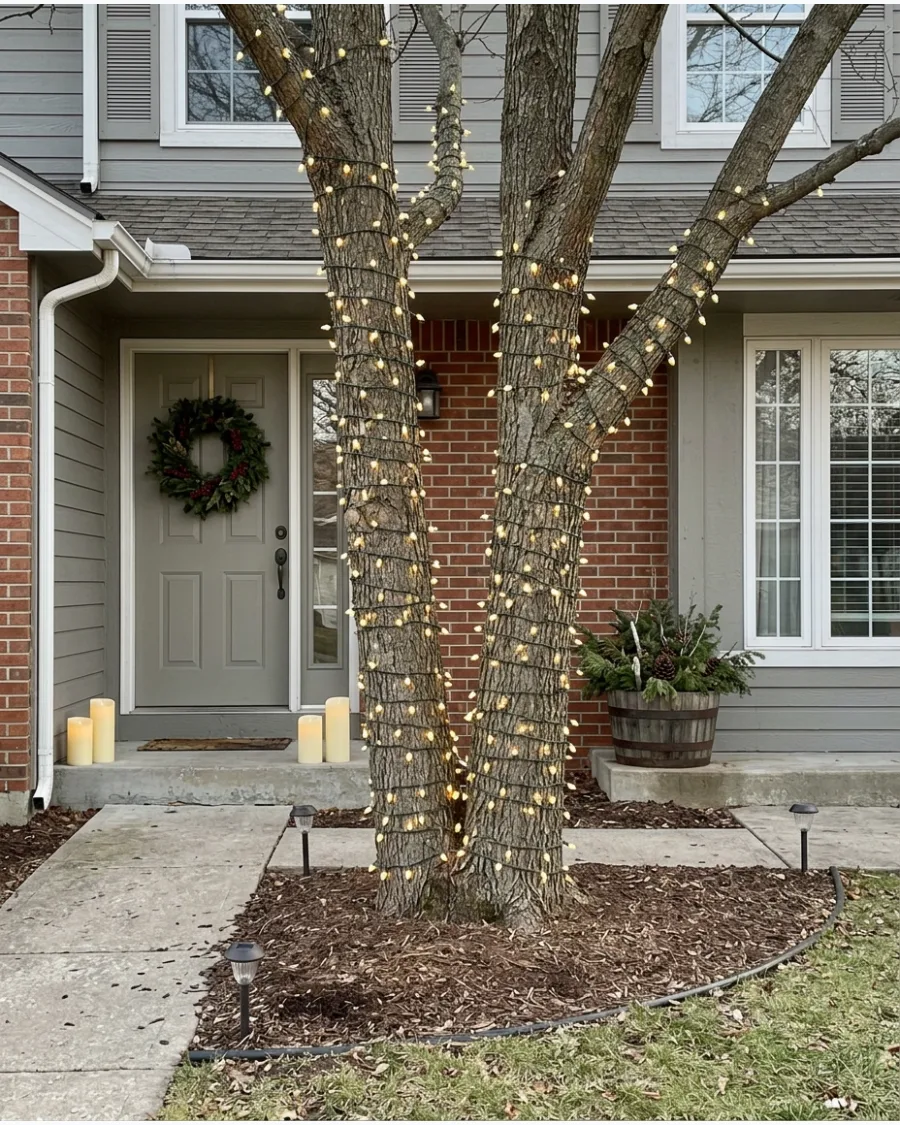
Wrap outdoor LED lights evenly around the main trunks and lower branches of your front-yard trees. This classic look highlights the architecture of your landscaping.
Keep the spacing consistent for a polished DIY lighting display. Start at the base of the tree and work your way up to ensure the plug ends up near the ground power source.
- Plan for about four strands of lights for a medium-sized deciduous tree trunk.
- Use electrical tape to secure the end of the light strand to a branch without damaging the bark.
- Choose brown-wire lights for a more natural look against the tree bark during the day.
Most people skip this: Check the light strands for burnt-out bulbs before you start wrapping to avoid taking it all down later.
55. DIY Starburst Christmas Light Stakes
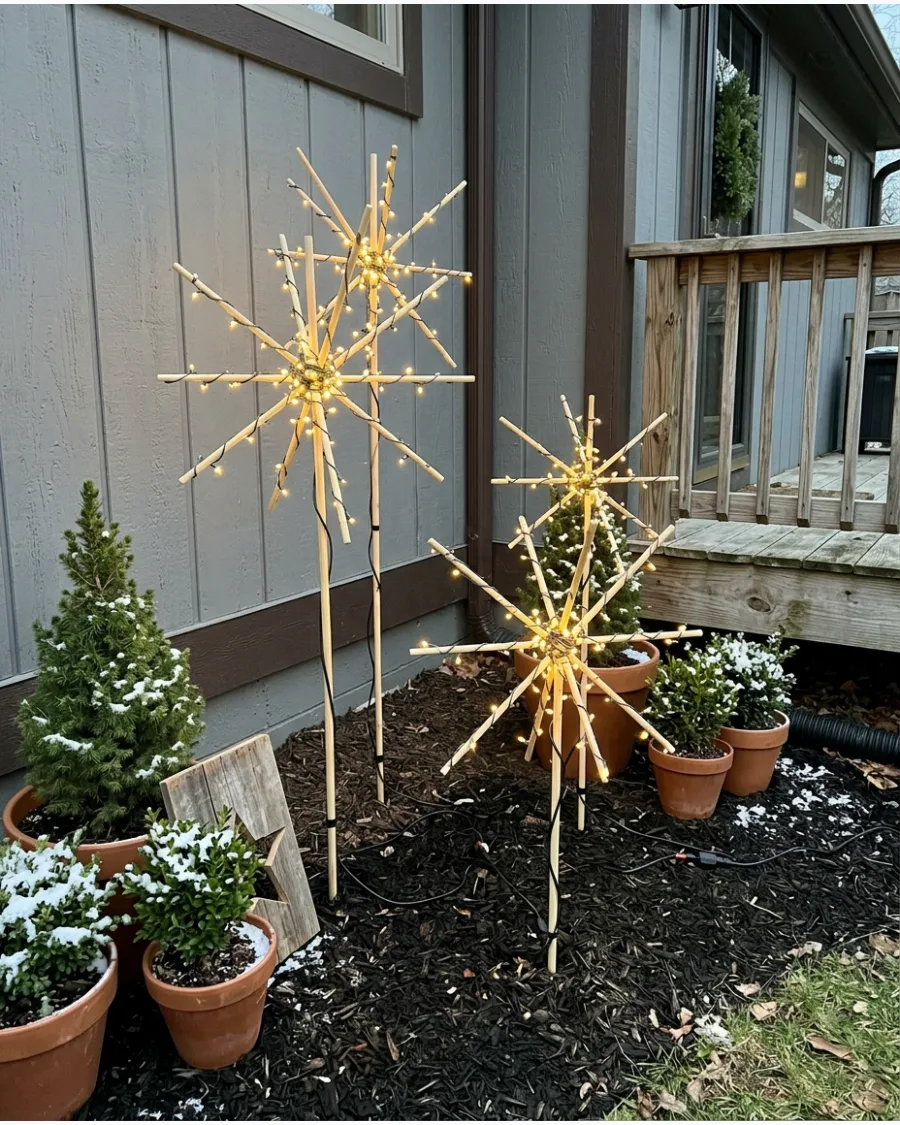
Attach thin rods around a center point to create starburst shapes and wrap them with tiny lights. These stakes add a modern, architectural feel to your garden beds.
Stake several throughout garden beds to create glowing bursts of light. Use reflective metallic tape on the rods to make the lights look even brighter.
- Wooden dowels or thin metal garden stakes work best for the starburst arms.
- Space the stakes about three feet apart to fill a large garden bed evenly.
- Use solar-powered fairy lights to avoid running extension cords through the mud.
Quick win: Spray paint the center hub silver or gold so it looks decorative even when the lights are off.
56. Lighted Christmas Tree Silhouette
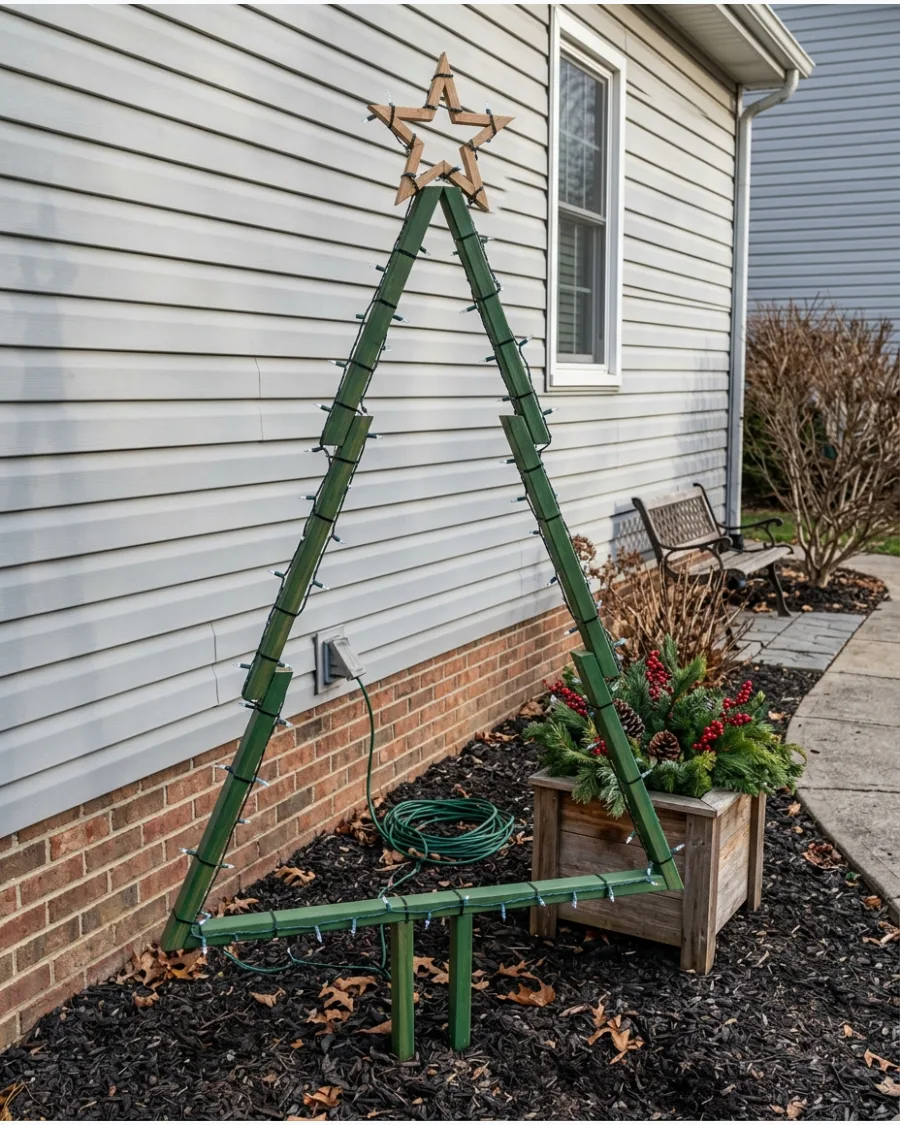
Build a simple triangular tree outline from wood or PVC and trace the shape with outdoor lights. This minimalist decoration works well in small yards where a real tree might be too bulky.
Add a star to the top and stake the structure securely into the lawn. Paint the frame the same color as your house or grass to make it disappear at night.
- Use 1×2 lumber for a lightweight frame that is easy to move and store.
- Secure the frame with tent stakes and twine to prevent it from tipping over in the wind.
- Wrap the lights in a zigzag pattern inside the triangle for a fuller look.
Best shortcut: Use a tomato cage turned upside down as a ready-made frame for a smaller tree silhouette.
57. DIY Lighted JOY Yard Sign
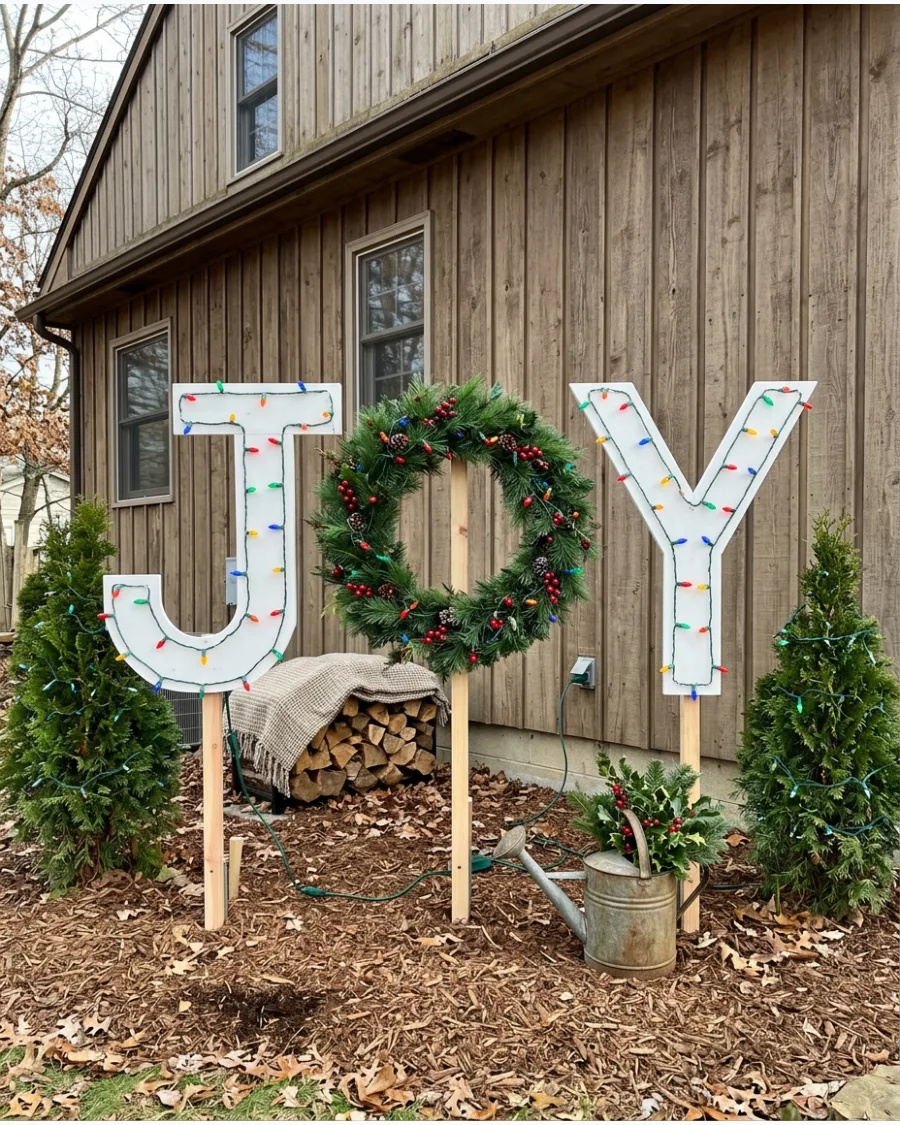
Build large J, O, and Y letter frames from wood or PVC and outline the edges with lights. This creates a bold focal point that can be seen from down the street.
Use a wreath as the O for a classic outdoor Christmas display. Mount the letters on a wooden base so they stay upright on uneven ground.
- Cut letters out of plywood for a sturdy sign that will last several seasons.
- Use a battery-operated wreath to avoid extra cords running to the center letter.
- Paint the back of the letters white to help reflect the light forward toward the street.
Most people skip this: Angle the letters slightly toward the main approach of your driveway for better visibility.
58. Lighted Outdoor Snowflake Wall
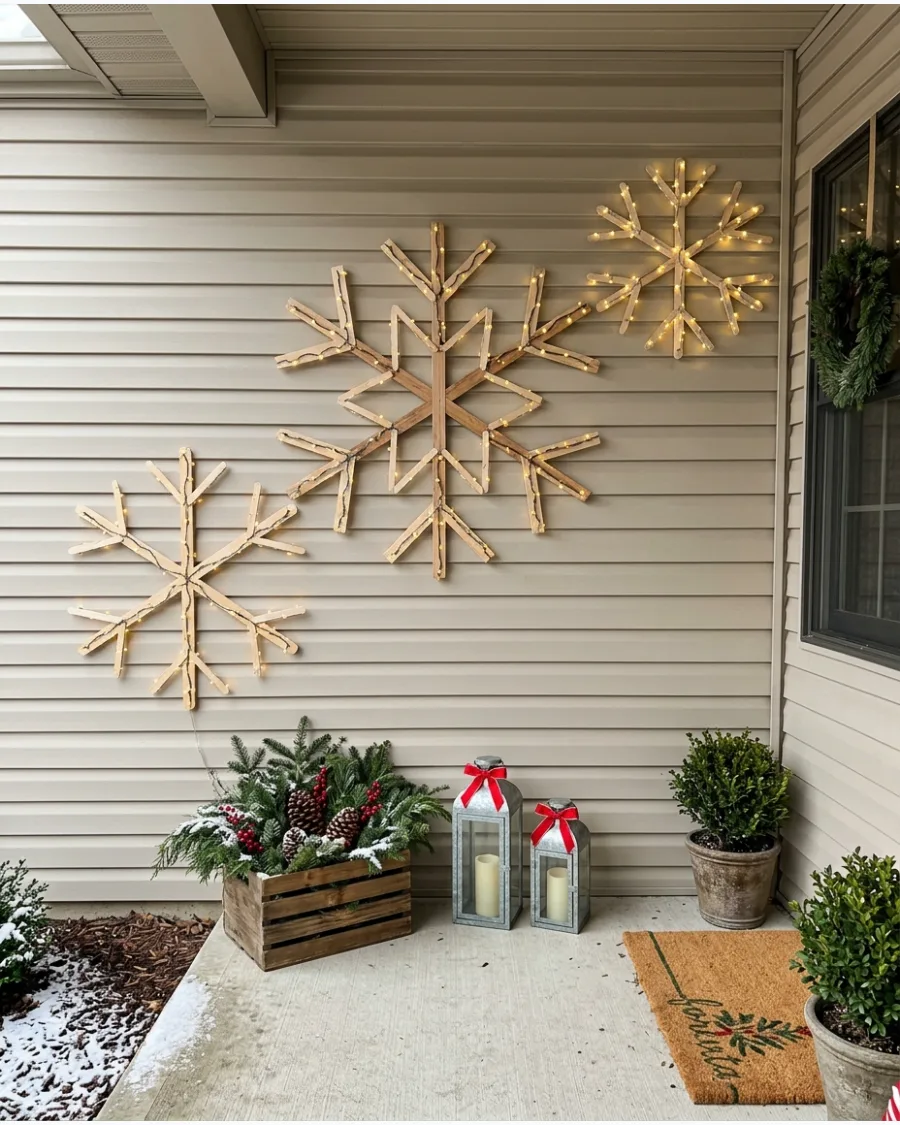
Create several oversized snowflakes from wood strips or PVC and outline them with weather-resistant lights.
Mounting these on a large blank wall fills empty space without needing a lot of floor area. Arrange them across a blank exterior wall. Use cool white or blue lights to mimic the look of real ice and snow.
- Use hot glue or outdoor adhesive to attach the lights directly to the snowflake frames.
- Hang the snowflakes using siding hooks to avoid drilling holes into your house exterior.
- Vary the sizes of the snowflakes to make the wall display look more natural.
Quick win: Use iridescent spray paint on the wood frames to give them a frosty shimmer during the day.
59. Twinkle Light Christmas Fence Garland
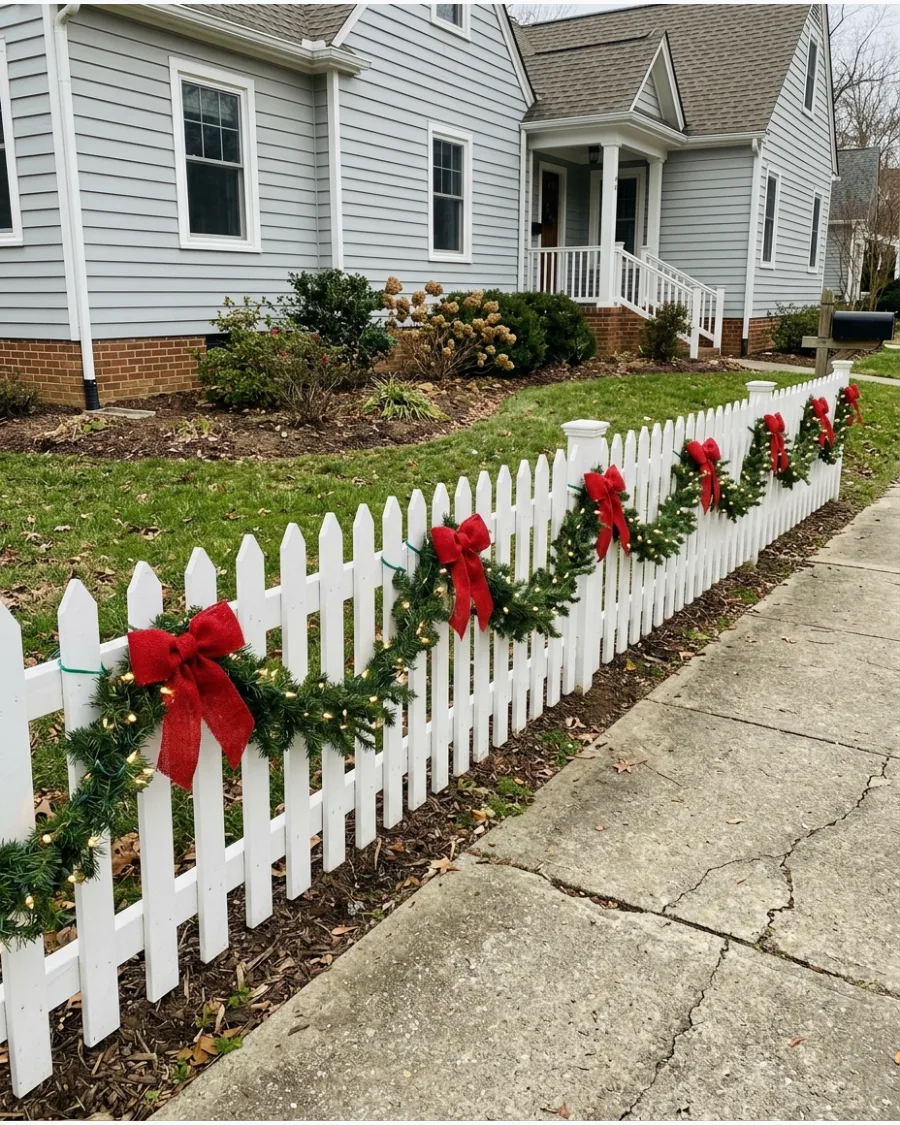
Attach evergreen garland across a front fence and weave warm white lights through the greenery. This frames your property line and makes the whole yard feel decorated.
Add evenly spaced bows or ornament clusters to create repetition across the property. Heavy-duty zip ties are the most reliable way to keep the garland from sagging over time.
- Measure your fence length before buying garland to ensure you have enough for deep swags.
- Use outdoor-rated extension cords with waterproof plug covers for safety.
- Space the bows exactly at each fence post for a symmetrical, professional appearance.
Best shortcut: Buy pre-lit garland to save hours of weaving lights through prickly pine needles.
60. DIY Cascading Icicle Light Display
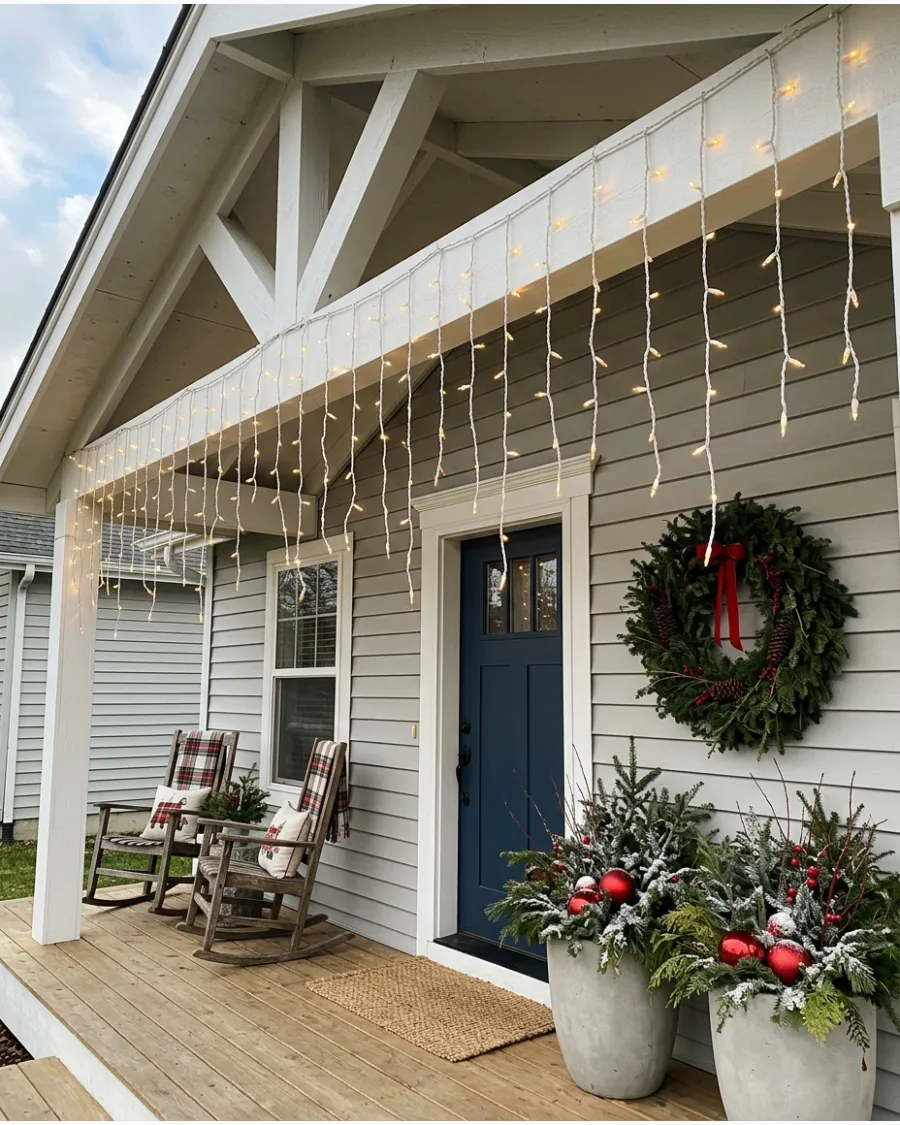
Create hanging strands of lights at varying lengths and attach them beneath porch eaves or a pergola. This handmade look mimics the way real icicles form on a roofline.
The staggered lengths create a handmade frozen-icicle appearance. Use white-wire lights so the cords blend in with the trim of your house.
- Zip tie light strands to a long wooden lath strip for easy one-piece installation.
- Mix in a few strands of 'twinkle' bulbs to add movement to the display.
- Hang the strands at least eight feet high to keep them out of the way of foot traffic.
Most people skip this: Use a laser level to make sure the main support line is perfectly straight across the roofline.
BUDGET AND UPCYCLED DIY OUTDOOR CHRISTMAS DECORATIONS
61. Pool Noodle Candy Cane Decorations
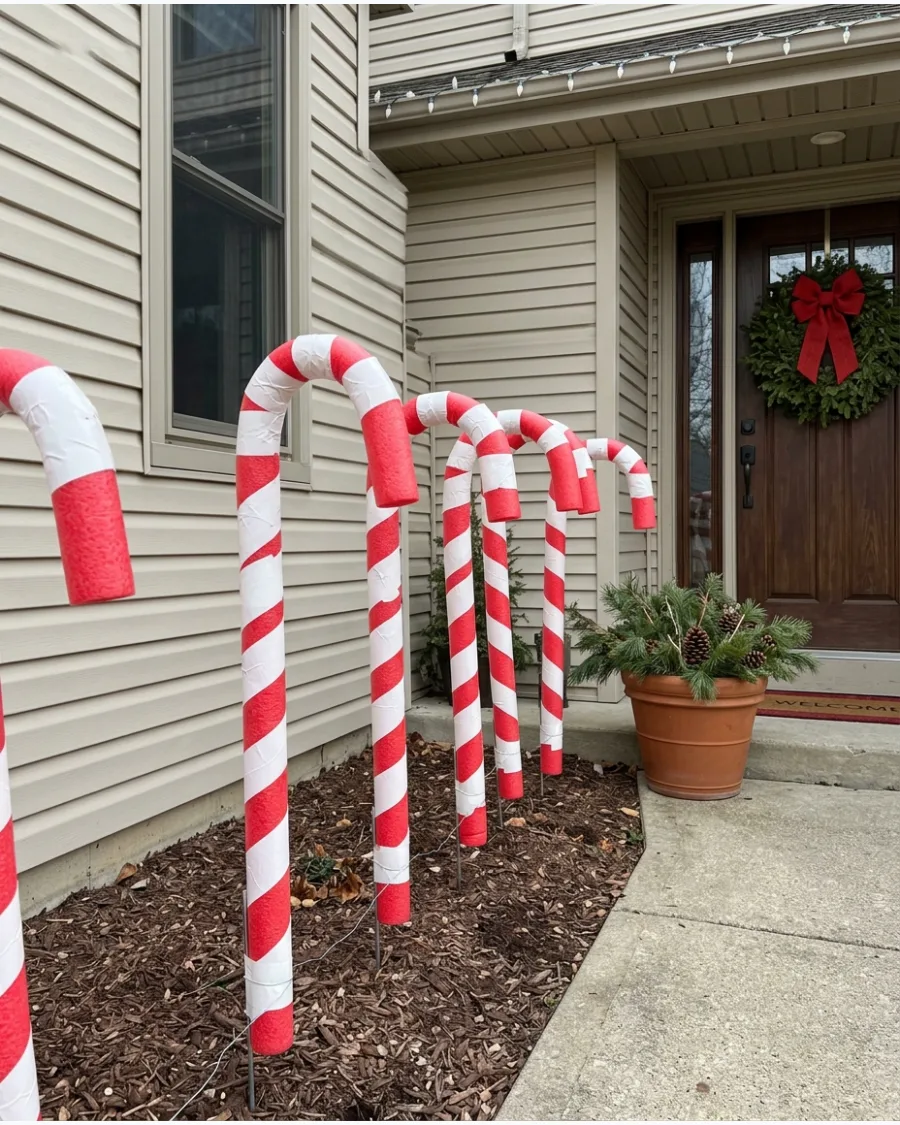
Bend a wire coat hanger and slide it into a red pool noodle to hold the hook shape. Wrap white duct tape around the noodle at an angle to create the classic stripe pattern.
Stake these into the ground along a front walkway for a playful entrance. These look best when grouped in pairs or trios rather than scattered randomly.
- Materials cost under five dollars per cane.
- Use garden U-pins to secure the bottom of the noodle into the mulch or grass.
- Swap the tape for white electrical tape if you want a narrower stripe.
Quick win: Use a heat gun on low for a few seconds to help the tape adhere better to the foam texture.
62. Plastic Bowl Giant Christmas Ornaments
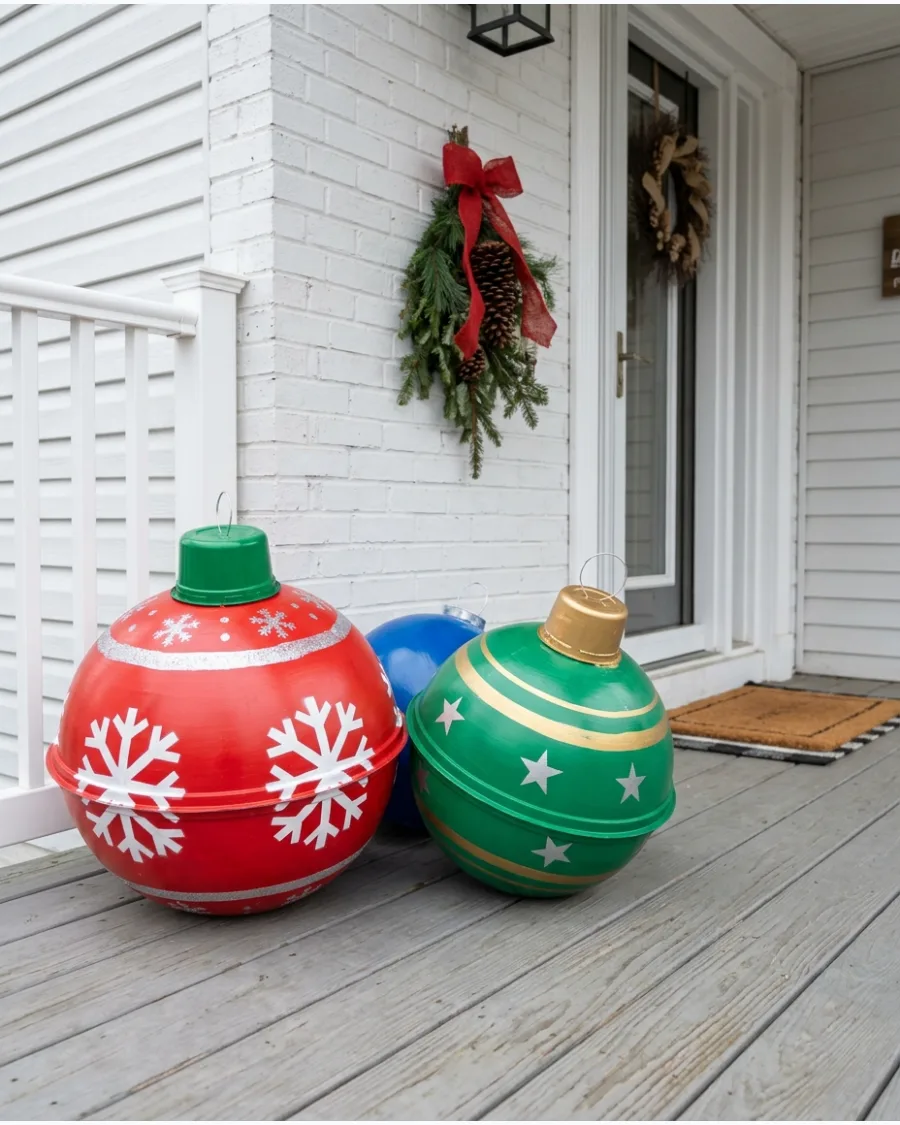
Use strong waterproof adhesive to join two identical plastic serving bowls at their rims. Spray paint the resulting sphere in a high-gloss metallic finish and glue a small silver plastic container on top to act as the ornament cap.
Thread a thick piece of wire through the cap to create a sturdy hanging loop. These oversized pieces provide a huge visual impact for the cost of a few dollar-store items.
- Expect to spend about thirty minutes per ornament plus drying time.
- Use industrial-strength glue to ensure the halves stay together in the cold.
- Fill the bottom bowl with a few rocks before sealing if you plan to sit them on the ground.
Most people skip this: Sand the rims of the bowls lightly before gluing to create a better bond for the adhesive.
63. Dollar Store Basket Christmas Planters
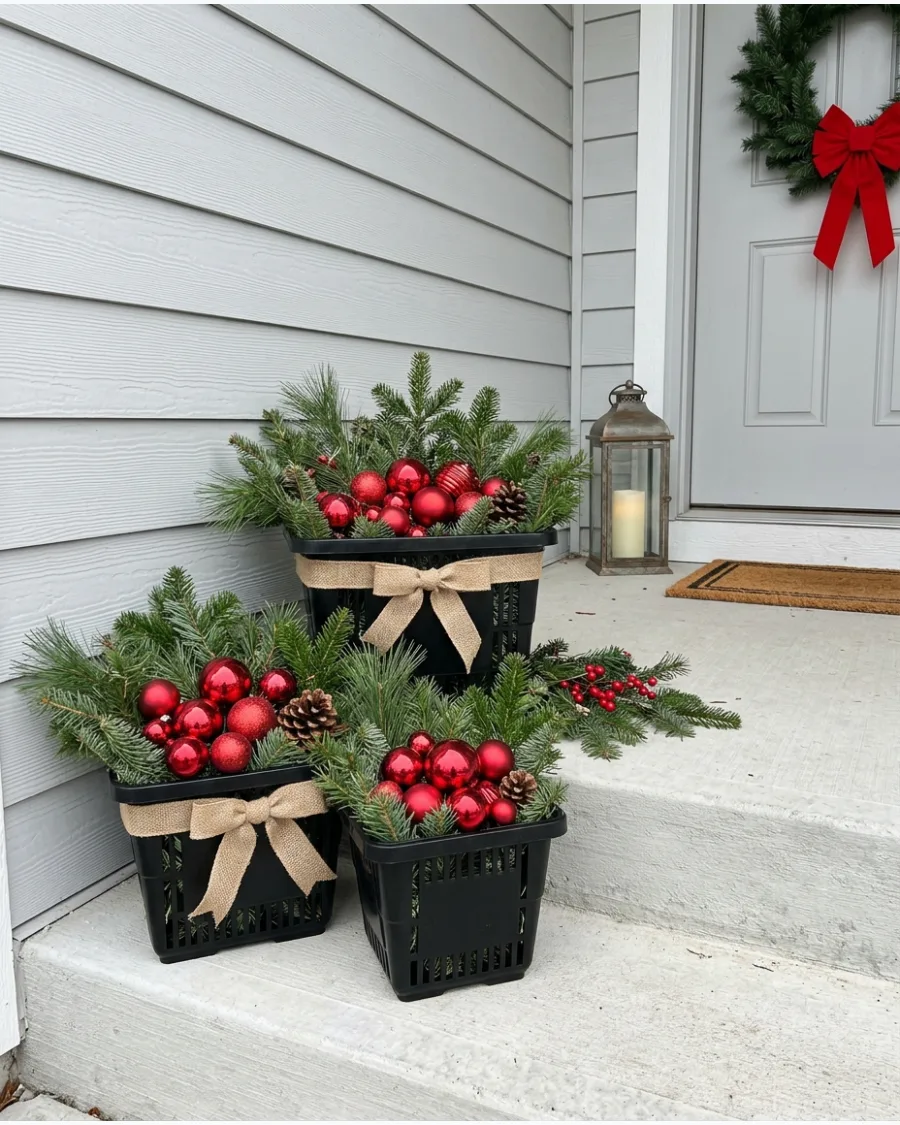
Transform plain plastic or wicker baskets into festive porch accents with a quick coat of spray paint. Fill them with floral foam or dirt and tuck in real evergreen clippings, large plastic ornaments, and weather-resistant ribbon.
Weight the bottom of the baskets with bricks so they do not tip over during winter wind gusts. High-contrast colors like black baskets with bright red berries make these look more expensive than they are.
- Find these baskets in the storage or garden aisle for a few dollars each.
- Place these on porch steps or flanking a front door for a symmetrical look.
- Add battery-operated fairy lights with a timer to make them glow at night.
Best shortcut: Use a mix of real cedar and faux pine to get the scent of live greenery with the fullness of artificial stems.
64. DIY Bucket Snowman Stack
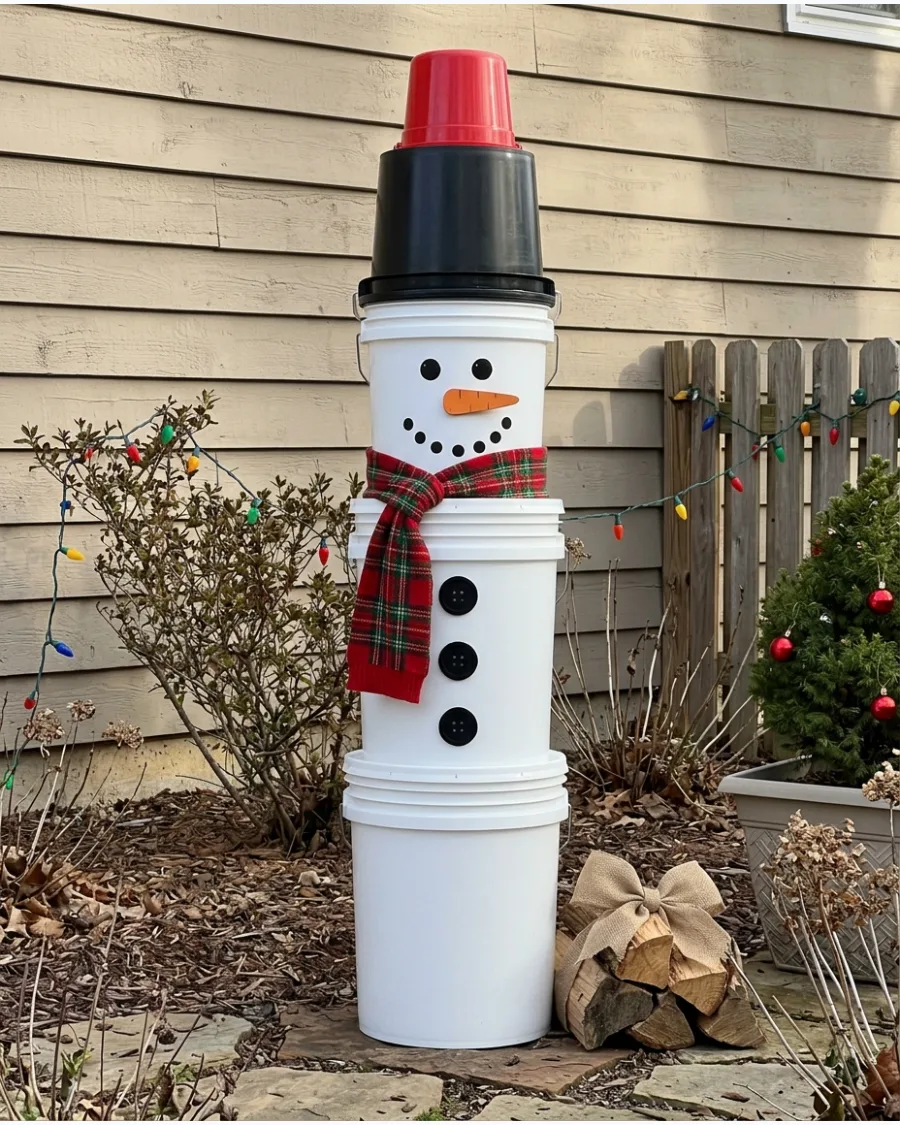
Clean three white plastic buckets of varying sizes and remove the metal handles. Stack them vertically from largest to smallest and use a strong outdoor adhesive or zip ties to keep them stable.
Paint a face on the top bucket and add three large black circles down the middle for coal buttons. A real scarf and an old top hat finish the look without needing any carpentry skills.
- Five-gallon buckets from a hardware store are the perfect size for the base.
- Drill a small hole in the bottom of each bucket to stack them over a central wooden stake.
- Use waterproof acrylic paint or outdoor vinyl decals for the face details.
Quick win: Place a heavy rock inside the bottom bucket before attaching the middle one to prevent the snowman from blowing away.
65. Tomato Cage Christmas Gnomes
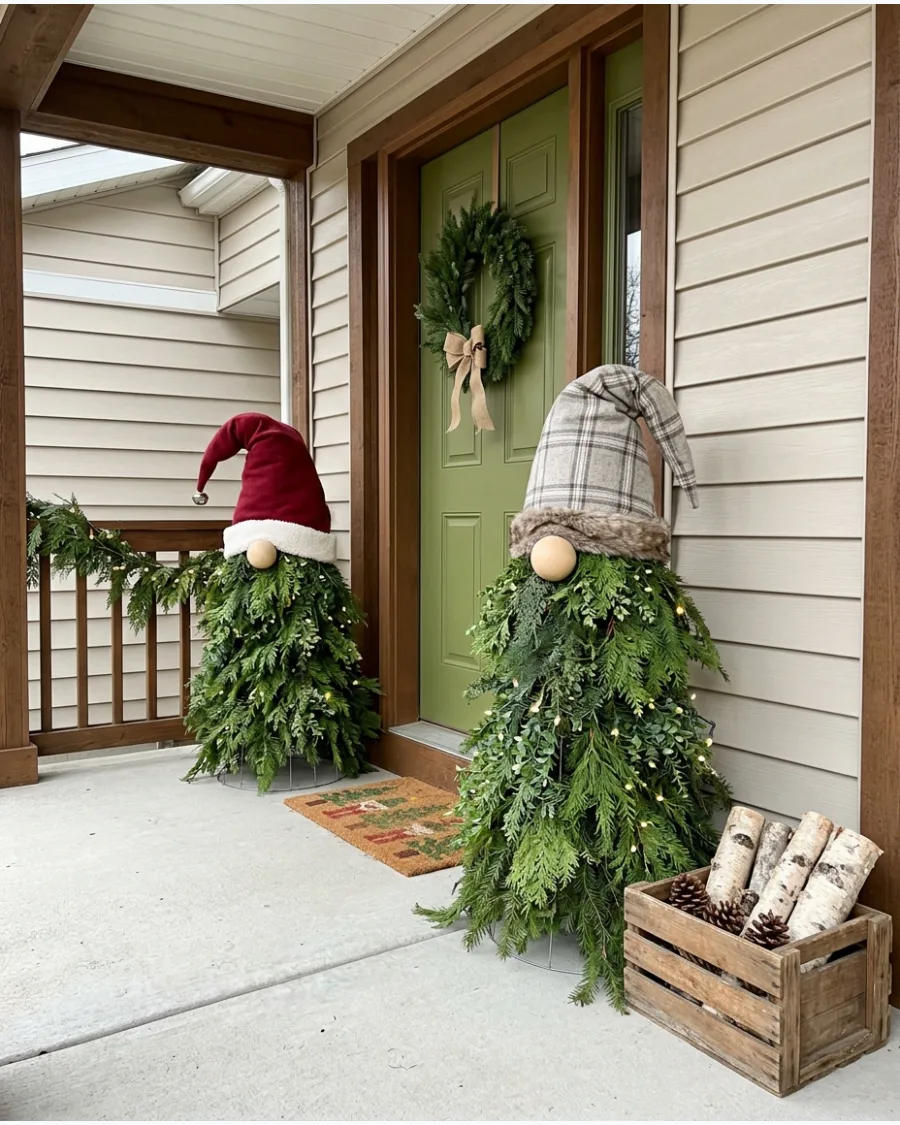
Turn a wire tomato cage upside down and zip-tie the prongs together at the top to create a cone shape. Wrap the frame in evergreen boughs or inexpensive garland until the wire is completely hidden.
Place a large red felt hat over the top point and tuck a round plastic ornament under the brim for a nose. These gnomes add a whimsical touch to a front porch or garden bed.
- Reuse old garden cages or buy new ones for under ten dollars.
- Use green floral wire to attach the greenery securely to the metal frame.
- Add a pair of oversized mittens tucked into the greenery for extra character.
Most people skip this: Fluff the greenery outward at the base to give the gnome a wider, more stable appearance.
66. Plastic Hanger Christmas Snowflakes
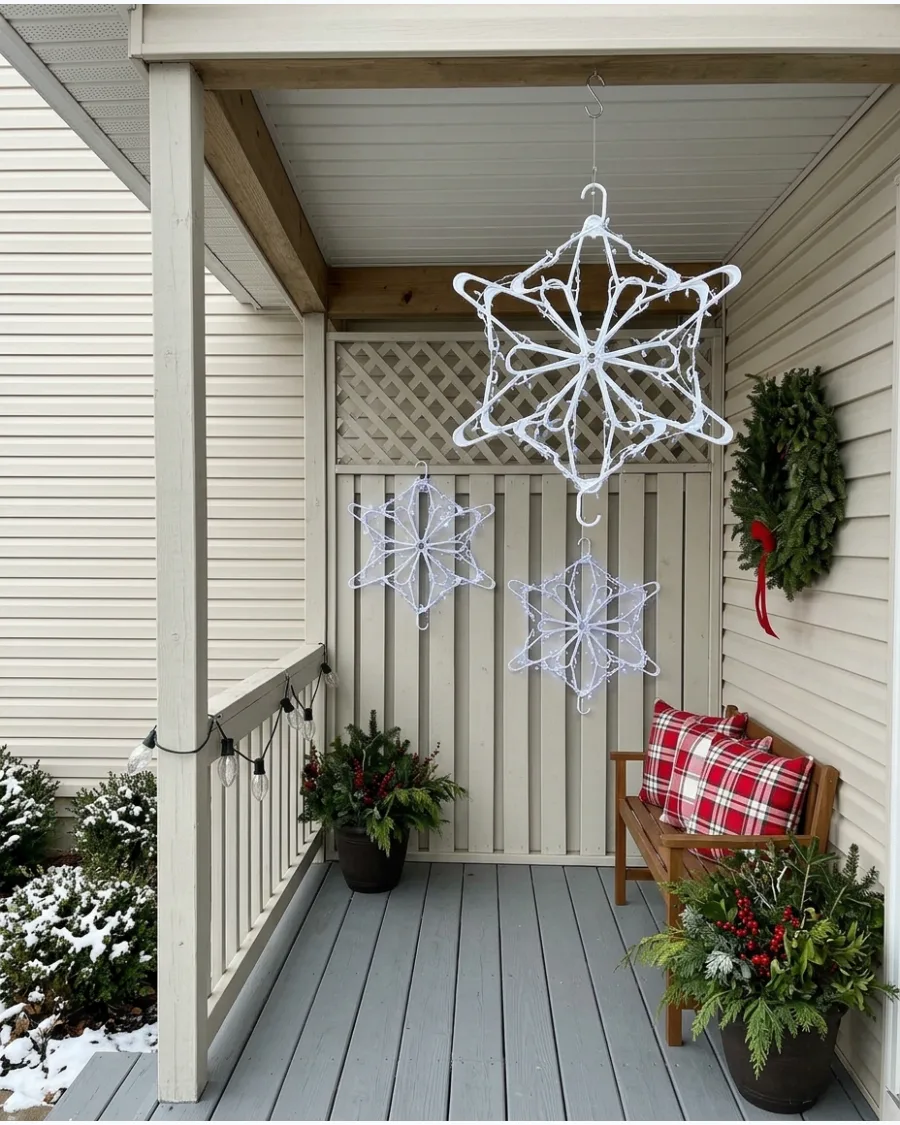
Arrange sixteen white plastic hangers in a circular pattern so the hooks point inward to form a star-like center. Use white zip ties to secure the hangers where they touch and trim the excess plastic from the ties.
Mount these large snowflakes to a porch railing or a dark exterior wall to make the white plastic pop. They are surprisingly durable and can be hosed off for easy storage at the end of the season.
- Standard white tubular hangers work best for a uniform look.
- Use at least two zip ties at every junction point to prevent warping.
- Wrap a single strand of battery-operated lights around the frame for night visibility.
Best shortcut: Buy hangers in bulk packs of twenty to ensure all your snowflakes match perfectly.
67. Upcycled Tire Christmas Snowman
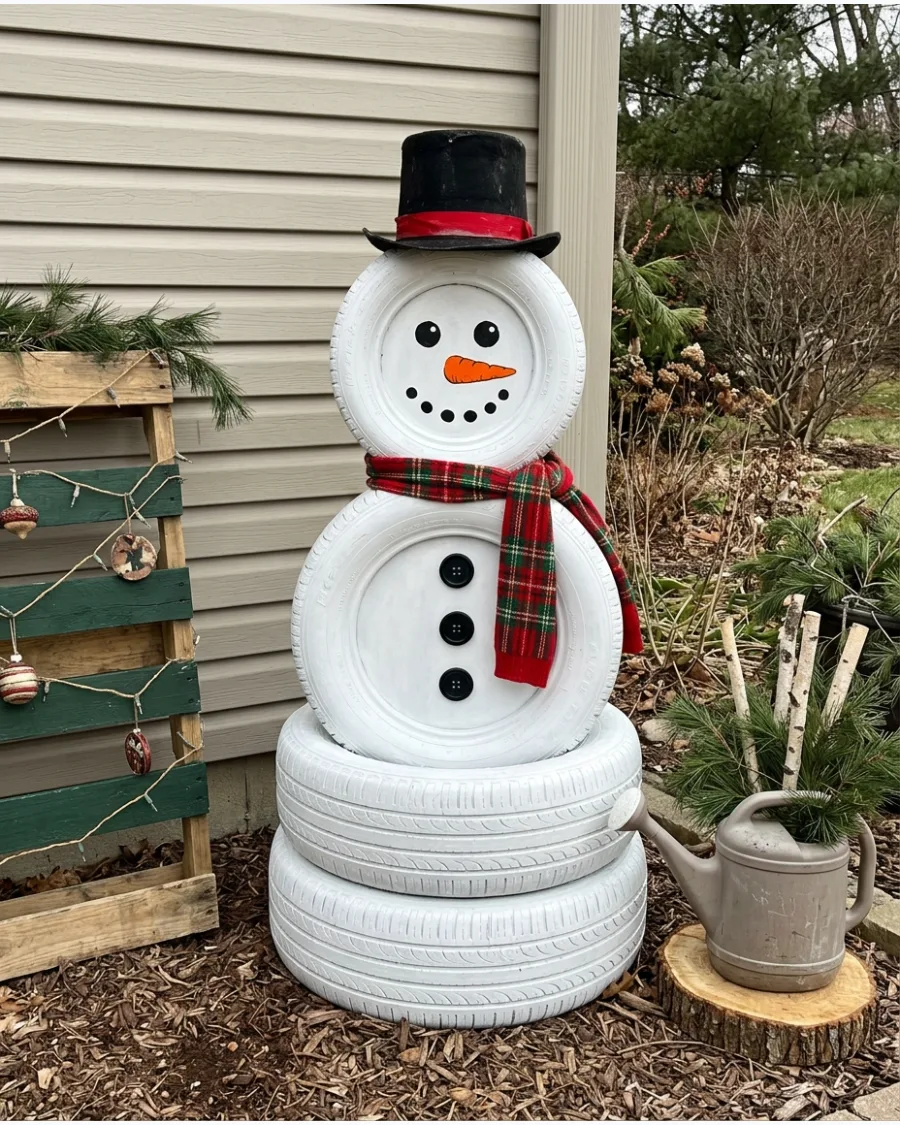
Stack three old tires that have been thoroughly cleaned and painted with white exterior spray paint. Use long bolts or heavy-duty construction adhesive between the layers to keep the stack from shifting.
Wrap a bright fleece scarf around the neck area and place a painted wooden board across the top for a hat base. This is a great way to repurpose old tires into a sturdy decoration that can withstand heavy snow.
- Check local tire shops for used tires they might be willing to give away.
- Use a primer specifically made for rubber to prevent the white paint from peeling.
- Fill the center of the bottom tire with sand or gravel for maximum weight.
Quick win: Use a black plastic bucket turned upside down as the top part of the snowman's hat.
68. Reclaimed Pallet Christmas Presents
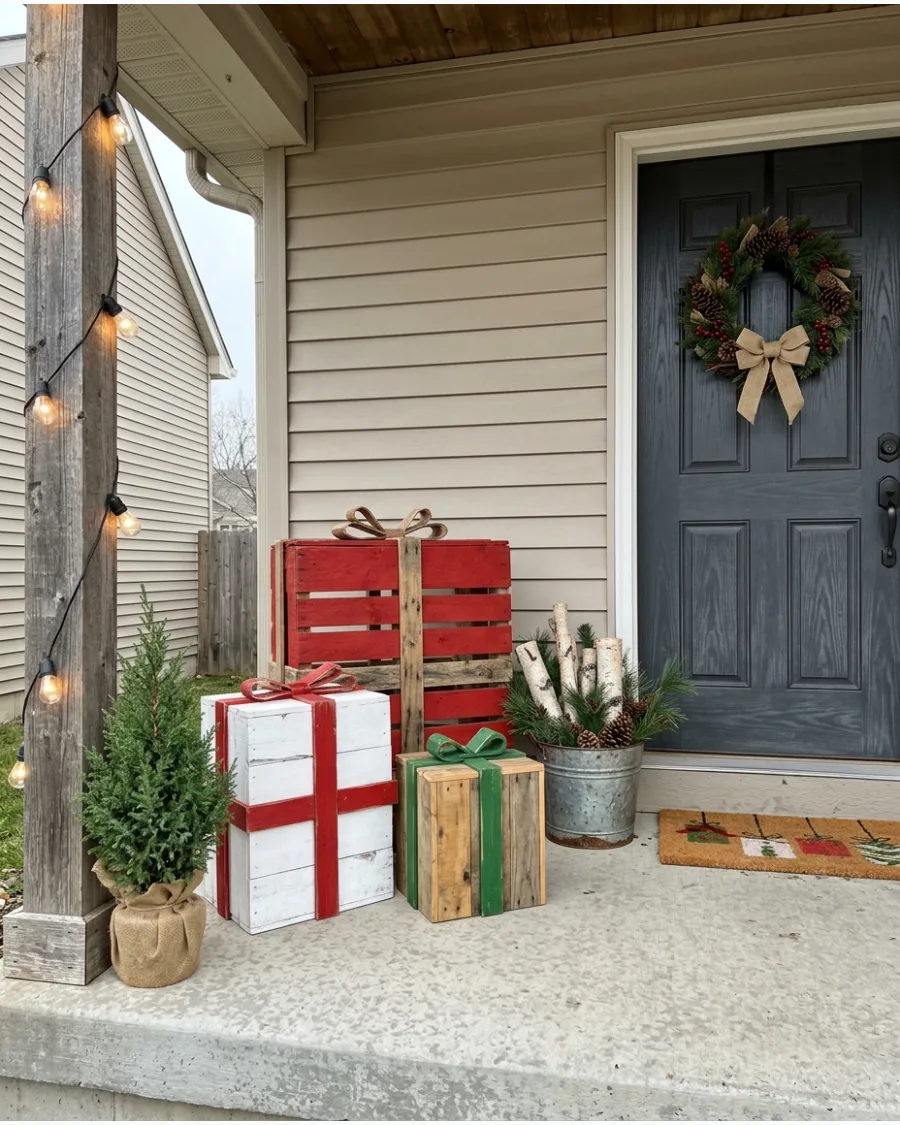
Cut pallet boards into equal lengths and nail them together to form simple square or rectangular boxes. Paint the wood in festive colors and use contrasting wood strips or thick burlap to mimic a ribbon and bow.
Group three different sizes together on a porch to create a tiered visual display. The rough texture of the pallet wood adds a nice contrast to shiny ornaments nearby.
- Source free pallets from local businesses, making sure they are stamped HT.
- Sand the edges slightly to prevent splinters during assembly.
- Apply a clear outdoor sealer if you want the painted colors to last for multiple years.
Most people skip this: Leave the bottom of the boxes open so you can nest them inside each other for compact storage.
69. Upside-Down Planter Christmas Bells
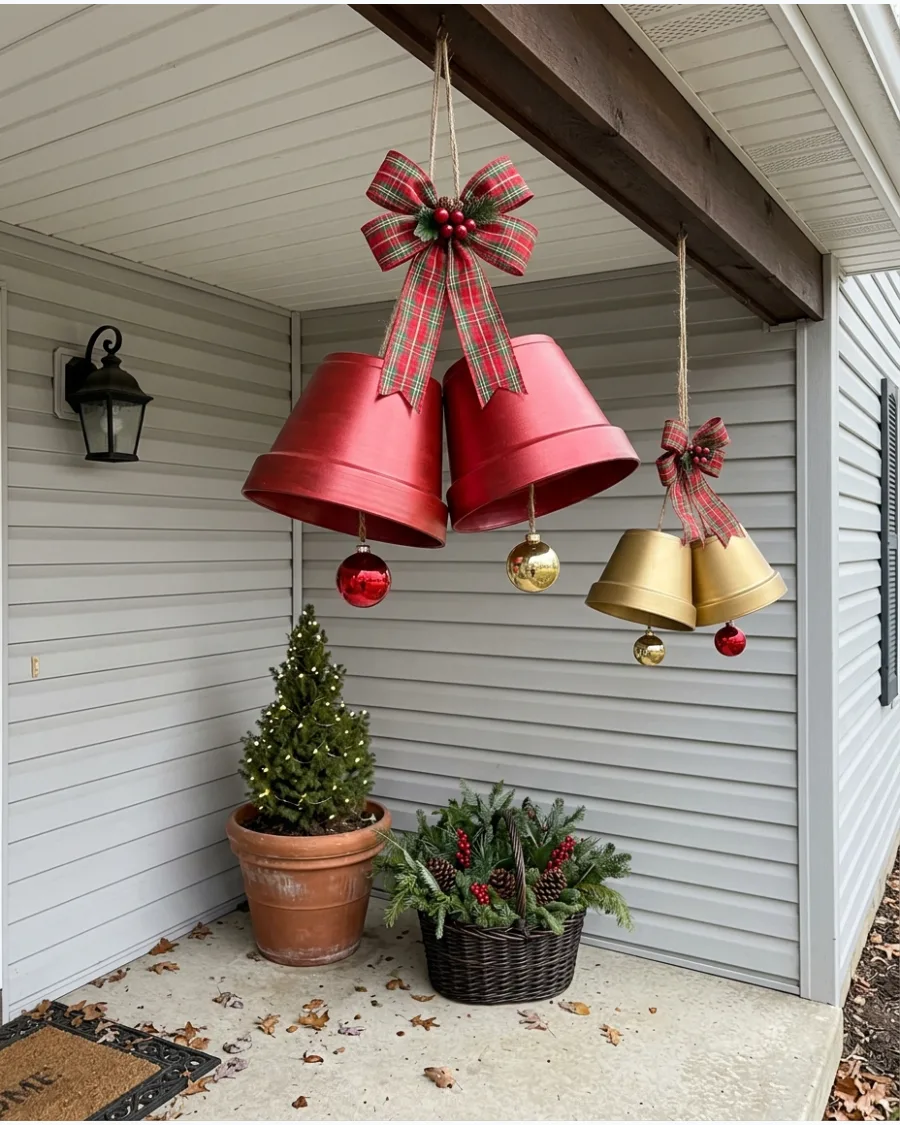
Select two matching plastic planters and spray paint them in a metallic gold or silver finish. Drill a small hole in the center of the bottom and thread a rope through, attaching a large round ornament to the end.
Tie the two ropes together and add a massive red bow at the junction point. These look fantastic hanging from a porch eave or a large tree branch.
- Lightweight plastic pots are easier to hang and safer than ceramic versions.
- Use a thick nautical rope or a wide ribbon to support the weight.
- Space the bells at slightly different heights to create a more dynamic look.
Best shortcut: Use a plastic gold charger plate as a spacer between the bell and the bow for a more finished look.
70. Recycled Container Christmas Light Posts
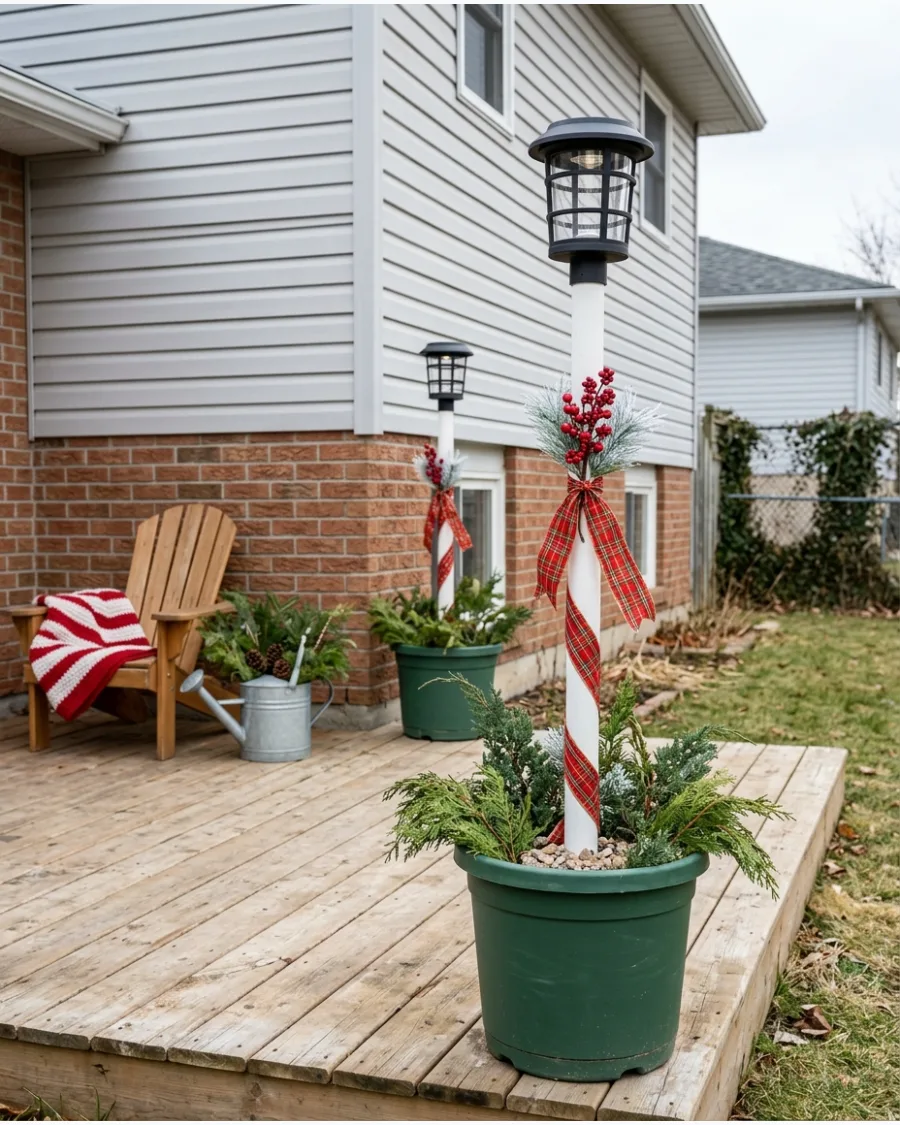
Paint a tall piece of PVC pipe black and secure it into a heavy plastic planter filled with stones or concrete. Mount a solar-powered lantern to the top of the pipe to create a functional and decorative light post.
Wrap the base with evergreen garland and a weather-proof bow to hide the structural parts. These are perfect for lighting up a dark corner of the yard without needing an electrical outlet.
- A four-foot length of PVC pipe is a standard height for a walkway post.
- Use a solar lantern with a flat base for the easiest attachment to the pipe cap.
- Spray paint the planter a matching black or a festive dark green.
Quick win: Use a PVC cap on the top of the pipe to give the lantern a wider, more stable surface to sit on.
CLASSIC AND NOSTALGIC OUTDOOR CHRISTMAS DECORATIONS
71. Classic Red Plaid Christmas Porch
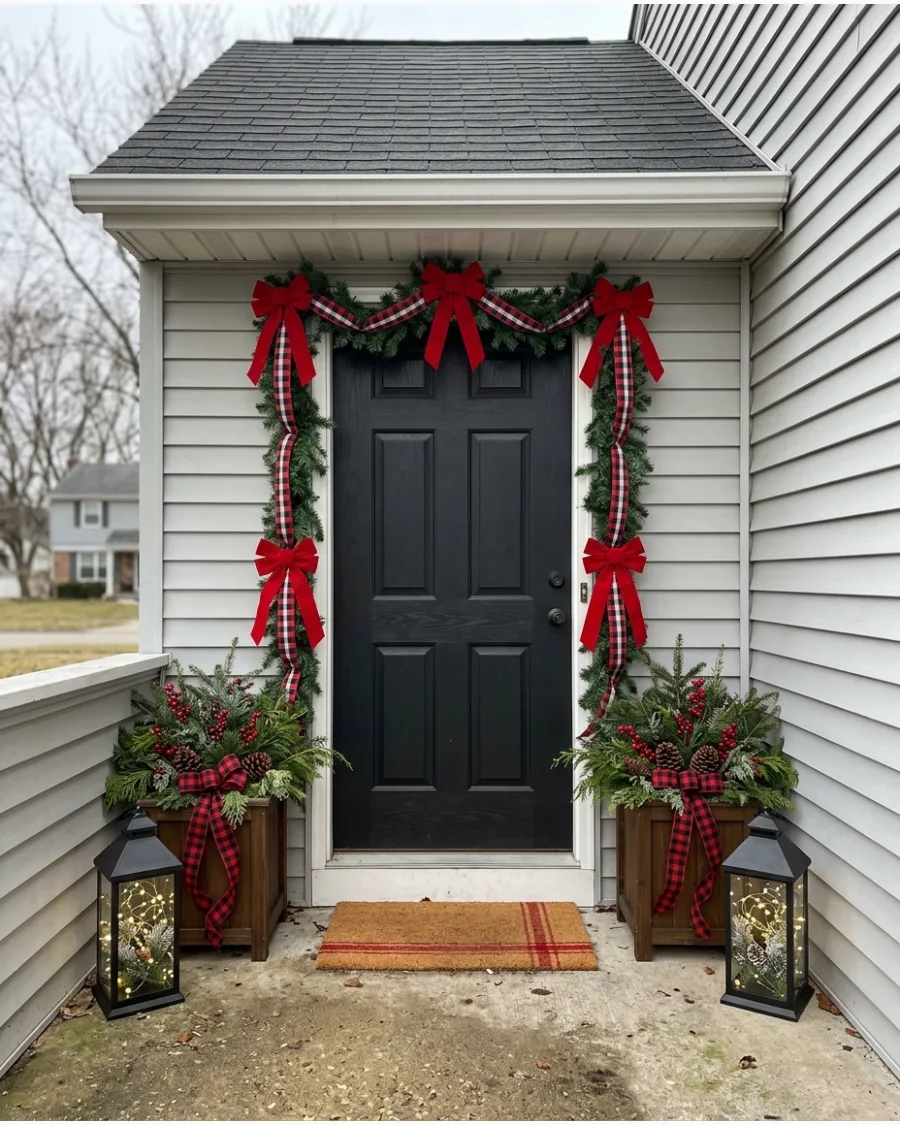
A coordinated porch look relies on repeating the same patterns and colors across different elements. Wrap thick red plaid ribbon around every pillar and weave it through the door garland for a cohesive feel. Using black lanterns provides a grounded contrast to the bright red and green.
This setup looks intentional rather than cluttered because it sticks to a strict four-color palette.
- Budget: $40-$80 for ribbon and greenery; Time: 2 hours
- Secure ribbon with zip ties behind pillars to prevent slipping in the wind
- Swap the plaid for solid red or burlap to fit a different house color
Quick win: Use heavy rocks at the bottom of lanterns to keep them from tipping over during winter storms.
72. Vintage Christmas Mailbox Greenery Display
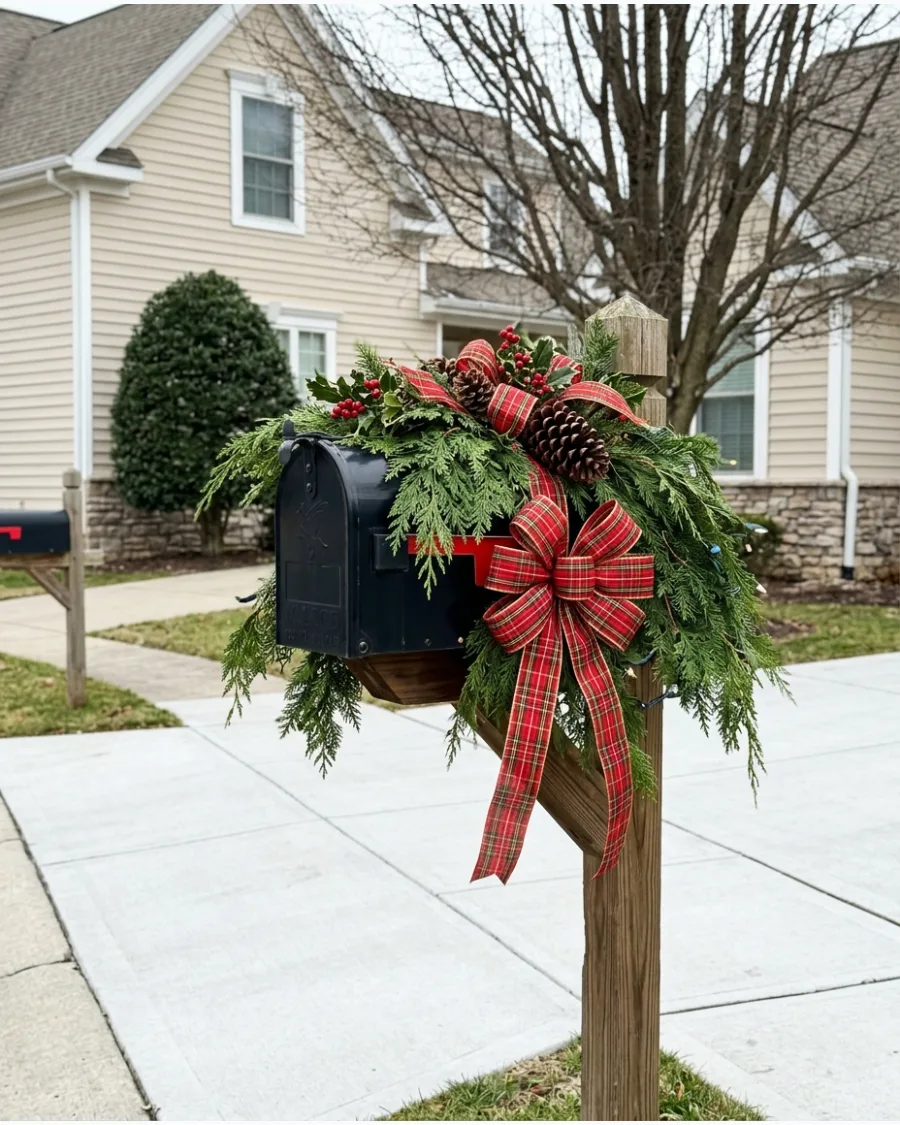
The mailbox is often the first thing guests see, so it deserves a festive touch. Secure a bundle of cedar and pine branches to the top of the post using heavy-duty floral wire. Adding a cluster of oversized pinecones and a weatherproof bow creates a high-impact look for very little money.
A well-placed swag adds curb appeal without interfering with daily mail delivery.
- Budget: $10-$20 using yard clippings; Time: 30 minutes
- Ensure the greenery does not block the mailbox door or the red flag
- Use faux greenery if real branches tend to brown too quickly in your climate
Most people skip this: Spray the greenery with an anti-desiccant to keep the needles green and hydrated all month.
73. DIY Christmas Caroler Yard Silhouettes
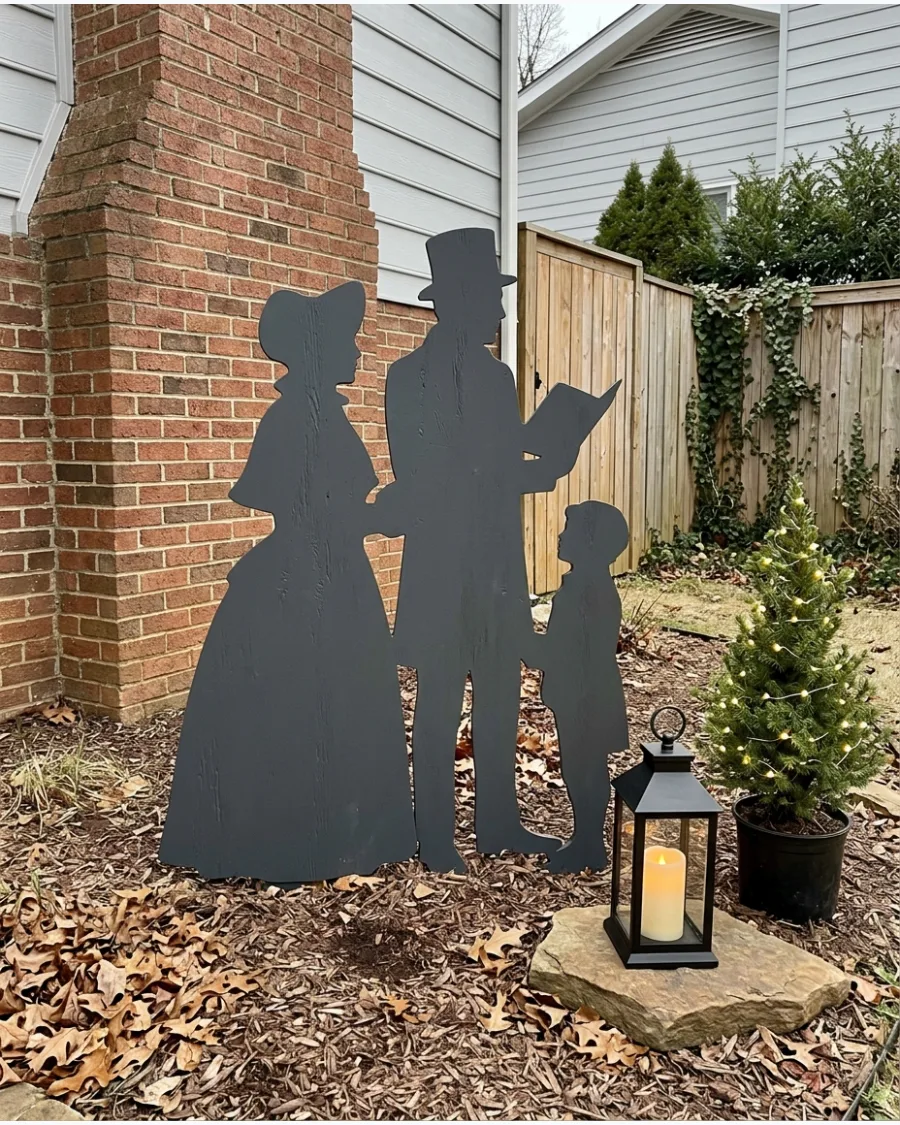
Wooden silhouettes offer a clean, graphic look that stands out against white snow or green grass. Trace caroler shapes onto exterior-grade plywood and cut them out with a jigsaw before painting them in a deep navy or black. Staging them near a porch light or a battery-operated lantern makes the scene come alive after dark.
Simple shapes are often more effective for distance viewing than detailed paintings.
- Budget: $30 for plywood and paint; Time: 4 hours
- Attach wooden stakes to the back with screws to secure them into the ground
- Scale the figures to at least three feet tall so they are visible from the street
Best shortcut: Use a projector to cast a caroler image onto the plywood for easy tracing without needing drawing skills.
74. Giant Traditional Christmas Bells
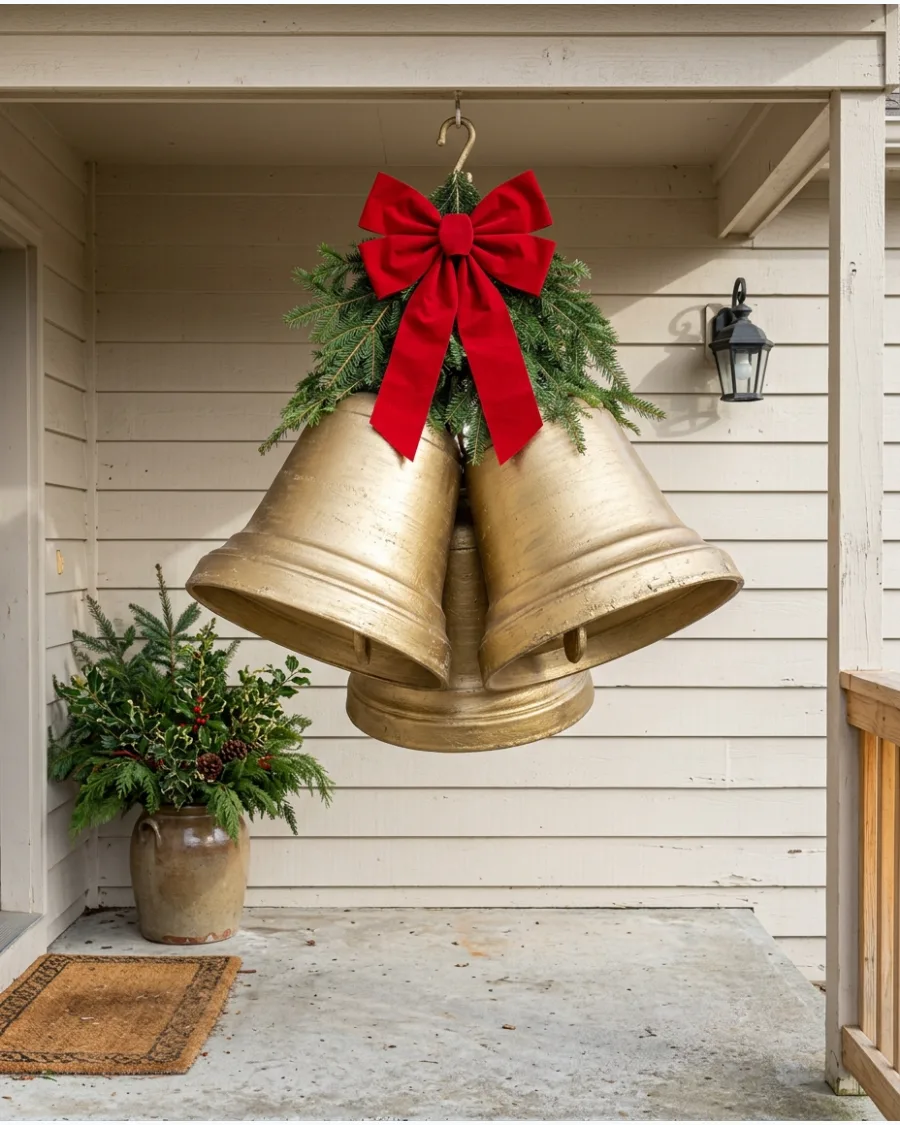
Oversized bells add a sense of scale that small ornaments cannot match. Paint two lightweight plastic planters with metallic gold spray paint and drill a hole in the bottom to thread a thick rope through. Hanging them together at slightly different heights creates a professional-looking focal point.
These look best when tucked into a corner of the porch or hanging from a sturdy beam.
- Budget: $15 for plastic pots and paint; Time: 1 hour
- Use a plastic ornament or a spray-painted tennis ball as the clapper inside the bell
- Apply a clear outdoor sealer to prevent the gold paint from chipping or fading
Quick win: Use a soldering iron to melt holes in plastic pots rather than a drill to avoid cracking the material.
75. Christmas Bows on Exterior Lanterns
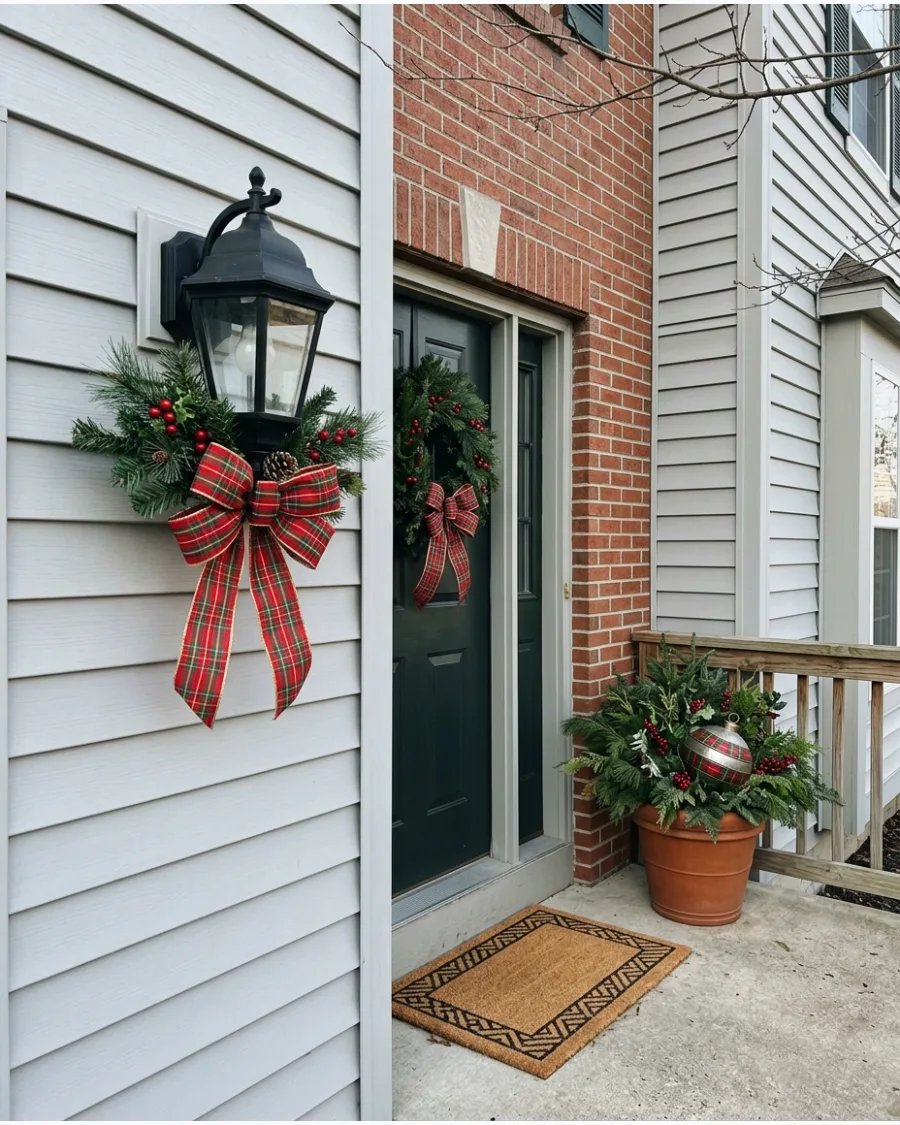
Decorating existing light fixtures is a fast way to spread holiday cheer across the entire house. Tie a large weatherproof bow around the neck of each garage or porch lantern and add a small sprig of holly. This creates a rhythmic, repeated look that makes the exterior feel designed.
It is important to keep the decor away from the glass to ensure the light remains bright and safe.
- Budget: $5 per lantern; Time: 10 minutes
- Use pipe cleaners or floral wire to attach the bows so they don't blow away
- Choose a ribbon color that contrasts sharply with your home's siding color
Most people skip this: Wipe down the glass on your lanterns before adding bows to maximize the holiday glow.
76. DIY Old-Fashioned Christmas Lamp Post
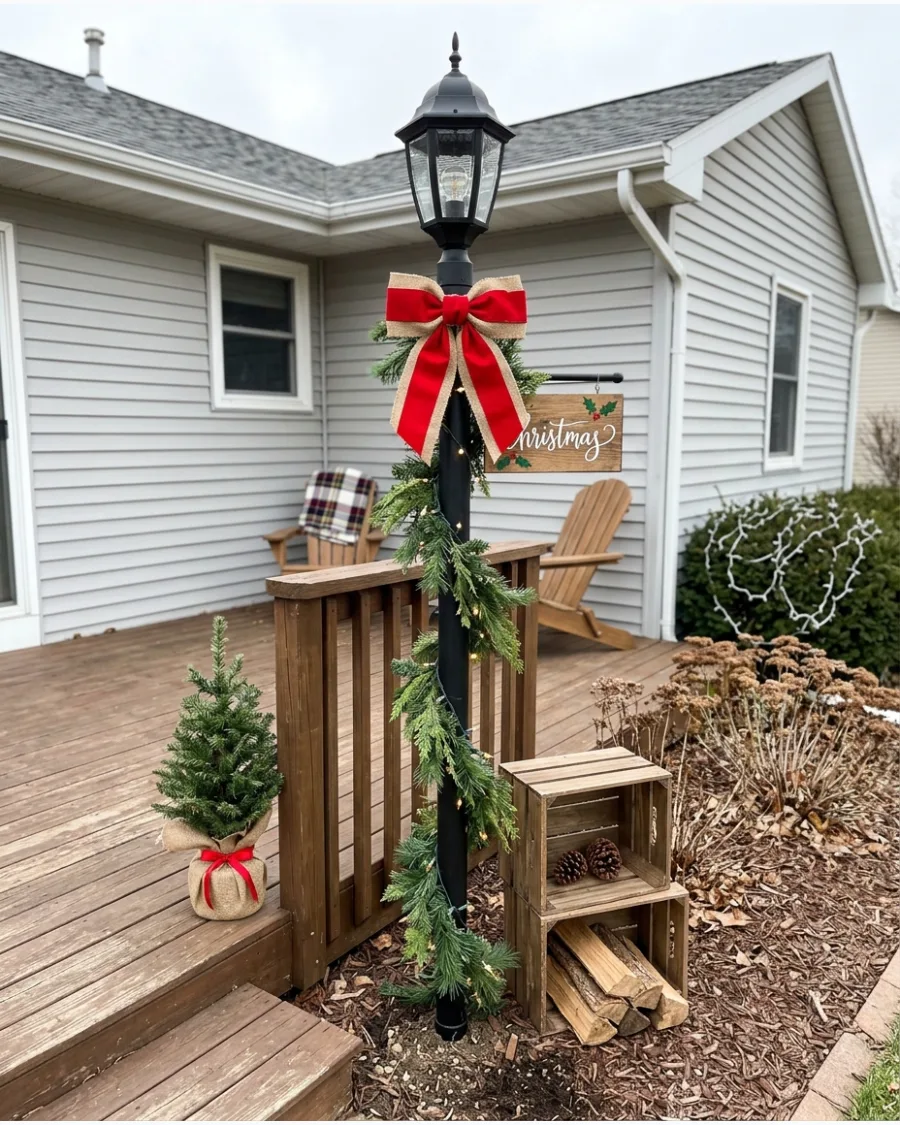
A freestanding lamp post brings light to dark corners of the yard or walkway. Assemble a post using 4×4 lumber or PVC pipe and top it with a solar-powered outdoor lantern. Wrapping the post in garland hides any seams and adds a lush, festive texture.
This project provides a classic look without the need for complicated electrical wiring.
- Budget: $40-$60; Time: 3 hours
- Set the post in a heavy planter filled with gravel for a portable but stable base
- Select a solar lantern with a "warm white" LED to mimic the look of traditional bulbs
Best shortcut: Use a pre-painted white PVC sleeve over a pressure-treated post to skip the painting and maintenance.
77. Matching Christmas Wreaths on Front Windows
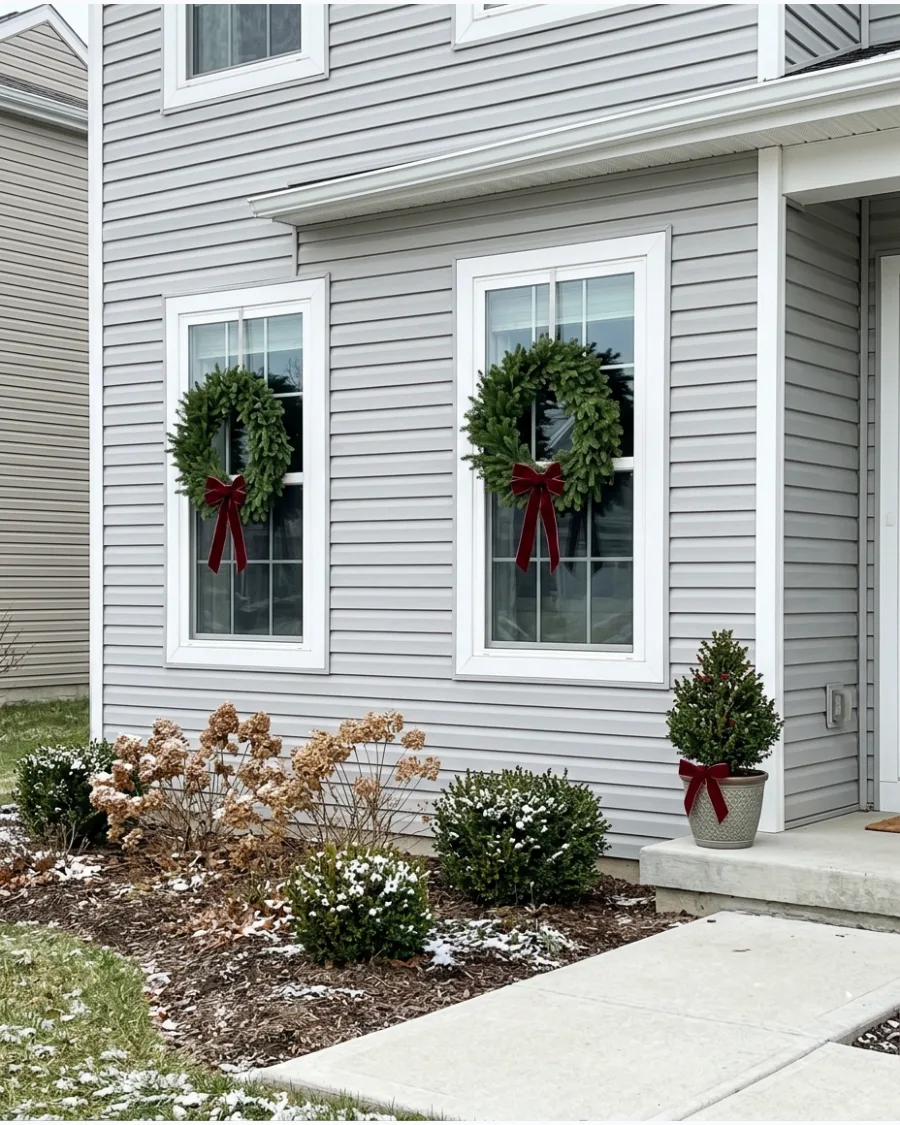
Symmetry is the secret to a high-end exterior holiday display. Hang identical 24-inch evergreen wreaths on every front-facing window using suction hooks or over-the-window hangers. Adding a single red bow to the bottom of each wreath creates a clean, uniform appearance.
This traditional approach works on almost any architectural style from modern to colonial.
- Budget: $15-$25 per window; Time: 1 hour
- Measure window widths first to ensure the wreaths don't look too small or too large
- Use fishing line looped over the top of the window sash for an invisible and secure hold
Quick win: If you have double-hung windows, lower the top sash, loop the ribbon inside, and close the window to lock the wreath in place.
78. Christmas Fence With Red Bows and Greenery
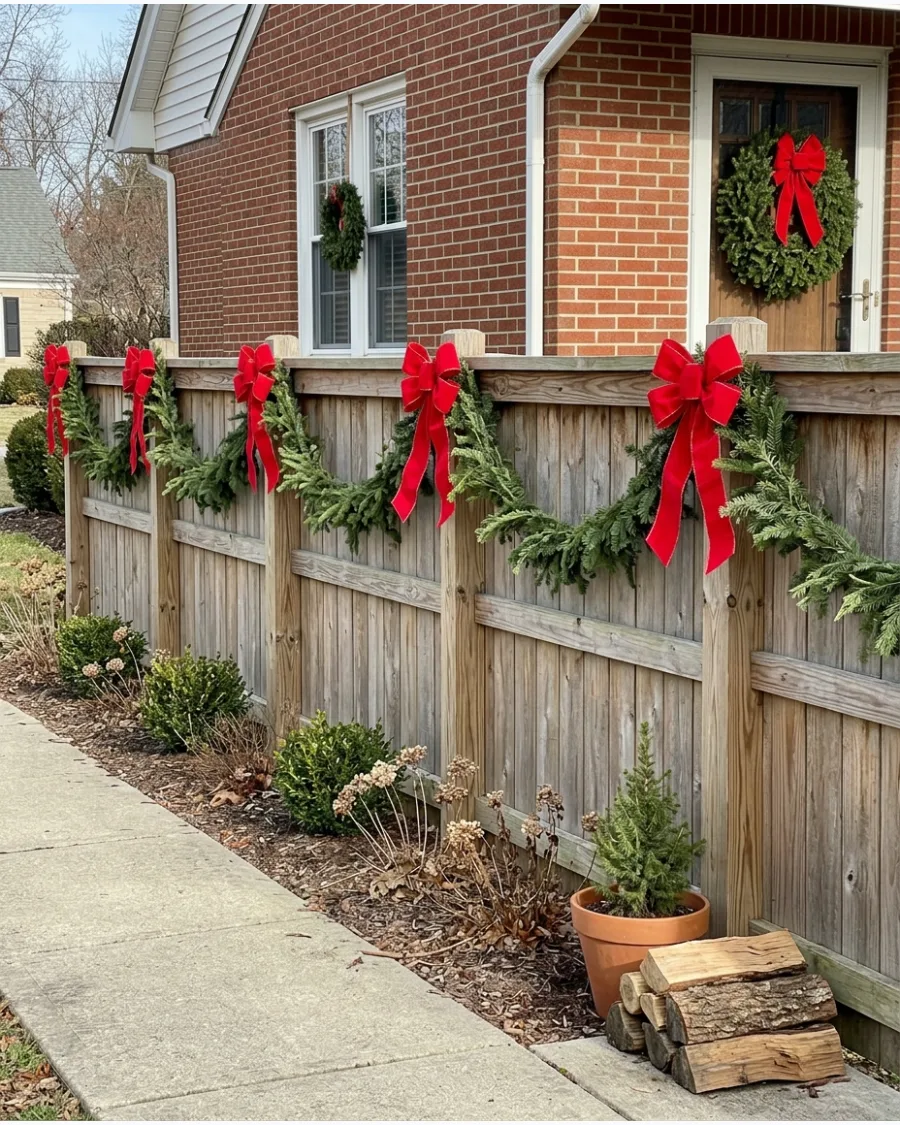
A decorated fence line extends the holiday spirit all the way to the edge of the property. Drape lightweight artificial garland in soft swags across the top rail and secure it at every post. Placing a large red bow at each attachment point hides the ties and adds a pop of color.
This looks best when the swags are consistent in depth across the entire length of the fence.
- Budget: $30-$100 depending on fence length; Time: 2 hours
- Use UV-resistant zip ties to secure the garland so it stays put through wind and snow
- Space the bows exactly the same distance apart for a professional, tidy look
Most people skip this: Fluff the artificial garland branches outward and upward before hanging to make it look twice as thick.
79. DIY Santa Sleigh Yard Decoration
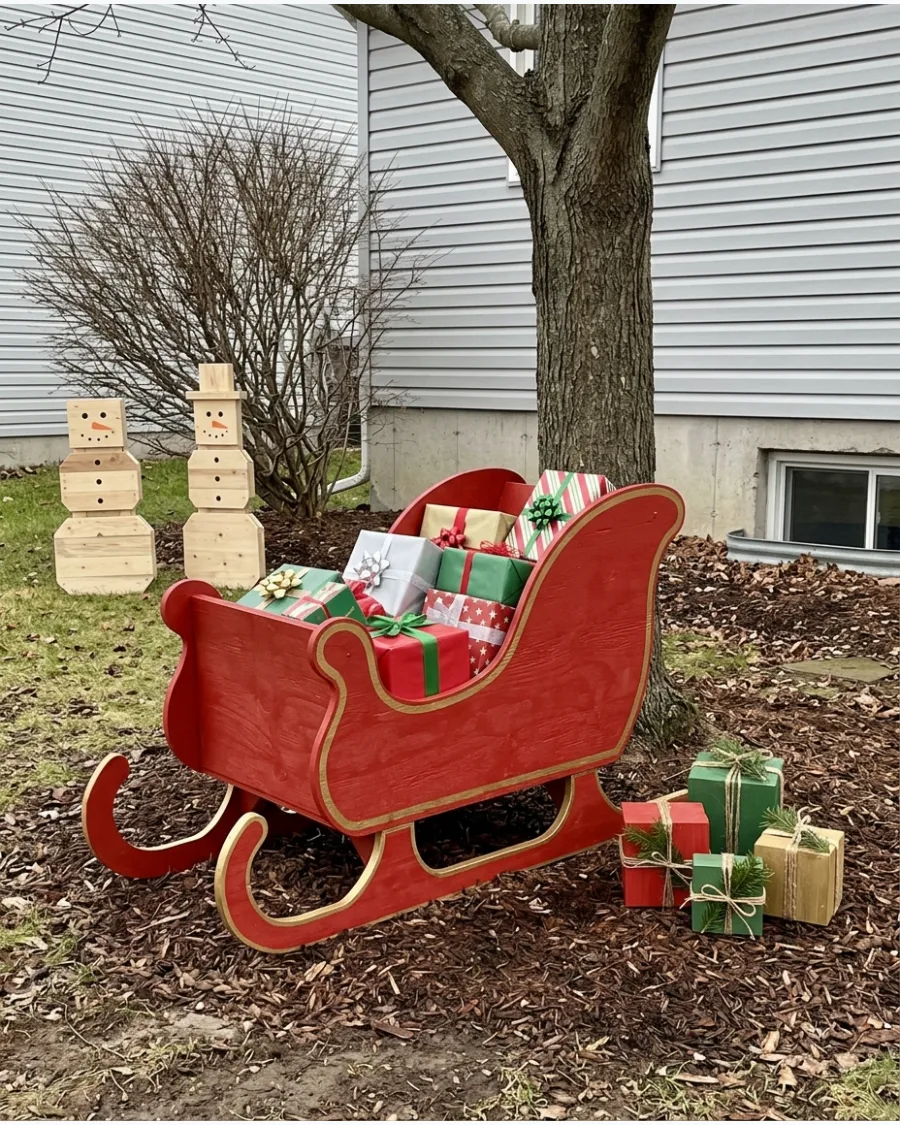
A bright red sleigh serves as a charming focal point for a large front lawn. Cut the side profiles of a sleigh from plywood, connect them with cross-braces, and paint the entire piece a bold cherry red. Filling the interior with empty boxes wrapped in colorful duct tape makes it look like it is ready for delivery.
It is a classic piece that can be disassembled and stored flat for the rest of the year.
- Budget: $50 for wood and paint; Time: 5 hours
- Use "gift boxes" made of bricks or heavy wood inside the sleigh to prevent it from blowing away
- Add a string of battery-operated lights inside the sleigh to make the "gifts" glow at night
Best shortcut: Use a jigsaw with a scroll blade to easily cut the curved runners and decorative swirls of the sleigh.
80. DIY Toy Soldier Porch Display
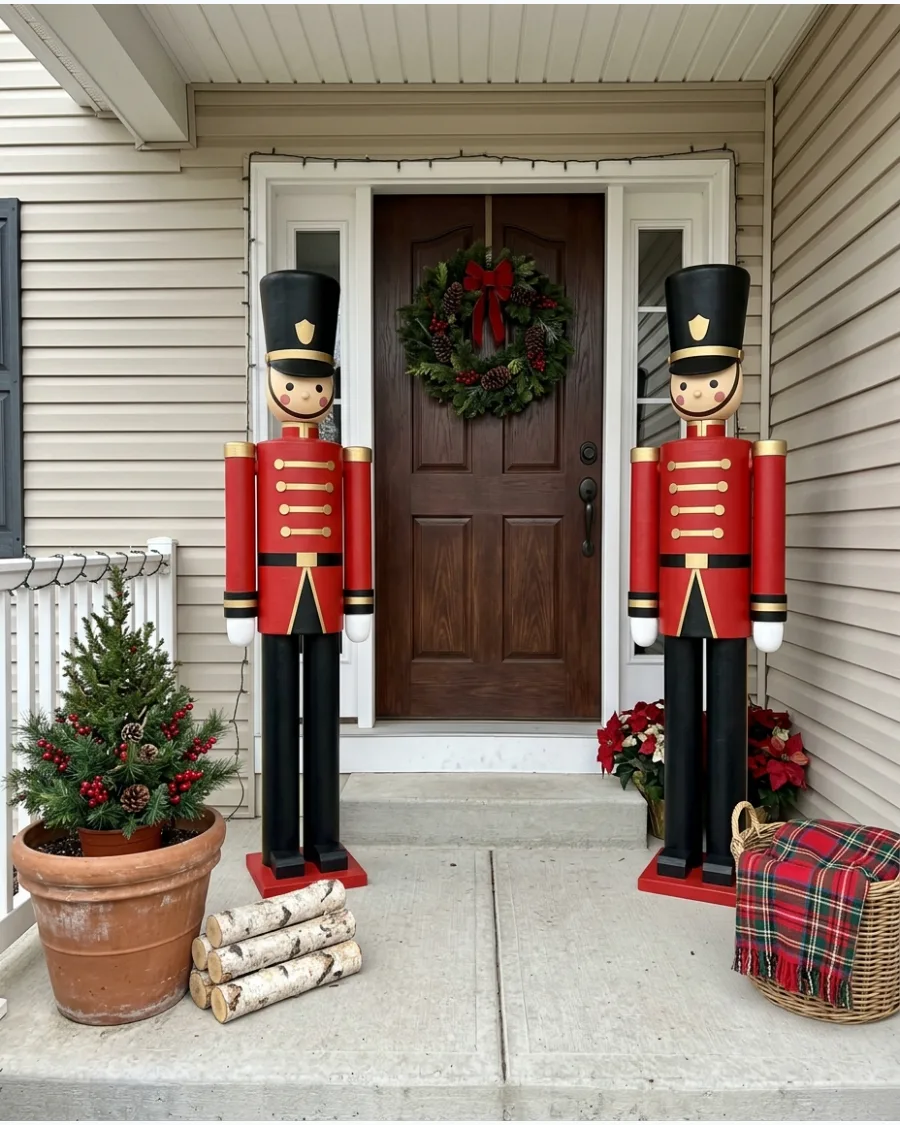
Standing guard at the front door, these soldiers add height and tradition to the entryway. Paint large PVC pipes or cardboard concrete forms with red, black, and gold exterior paint to create the uniform. Using a gold-painted plastic bowl for the hat and a round wood ball for the head gives the figure a finished look.
They are most effective when displayed in a matching pair on either side of the door.
- Budget: $40-$60 for materials; Time: 4 hours
- Secure the base to a heavy wooden square so the tall figures don't topple over
- Use high-gloss paint to give the soldiers a polished, store-bought appearance
Quick win: Use gold duct tape for the uniform straps and buttons to get perfectly clean lines without using a brush.
WINTER WONDERLAND AND ELEGANT DIY CHRISTMAS DECORATIONS
81. Frosted Evergreen Christmas Entry Arch
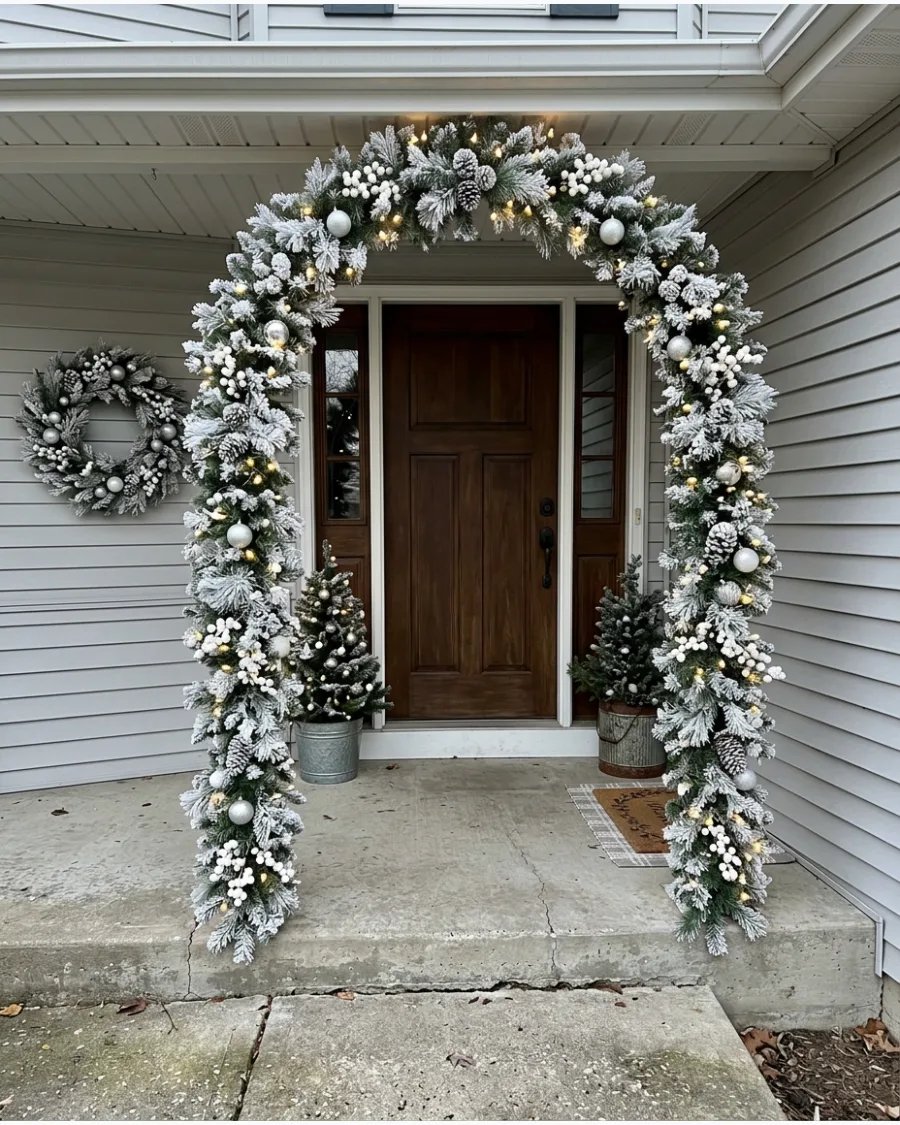
Use a PVC frame or heavy-duty wire to shape an arch around the front door. Attach frosted garland and layer in white berries and silver ornaments for a cohesive look.
Secure the base with heavy weights or zip ties to keep the arch from shifting in winter wind. A monochromatic white and green palette always looks more expensive than a rainbow of colors.
- $40-$60 for PVC and garland
- Zip-tie greenery to a pre-built frame
- Use plastic ornaments to prevent breakage
Quick win: Spray ordinary green garland with white floral spray for a custom frosted look.
82. DIY White Branch Christmas Trees
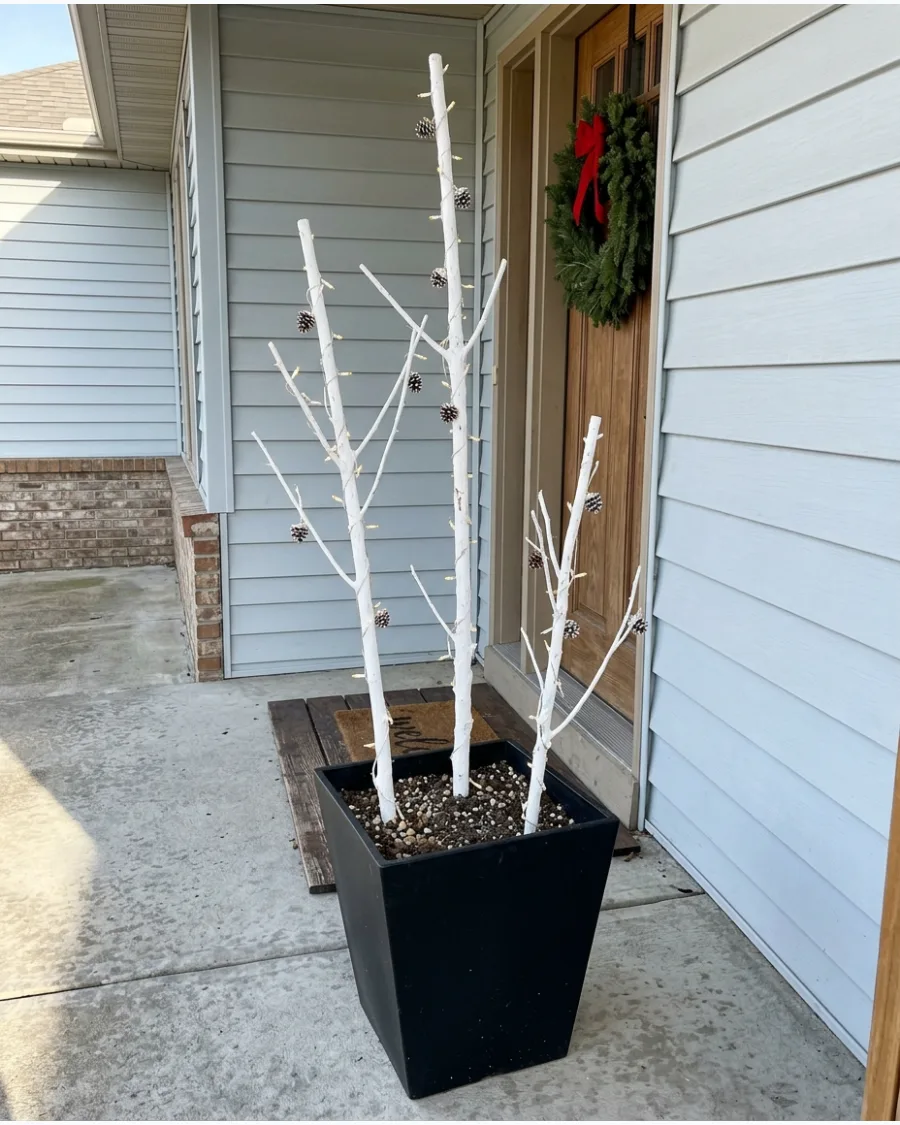
Gather sturdy branches and coat them in matte white paint for a clean, sculptural look. Place them in heavy planters filled with gravel to ensure they stay upright during storms.
Wrap thin wire fairy lights from the bottom up to highlight the natural shape of the wood. These look best when grouped in odd numbers like three or five.
- Free branches plus $10 paint
- Use spray paint for fast coverage
- Add heavy stones to the planter base
Most people skip this: Sand the branch tips slightly before painting to prevent the paint from peeling.
83. Giant White Outdoor Snowflakes
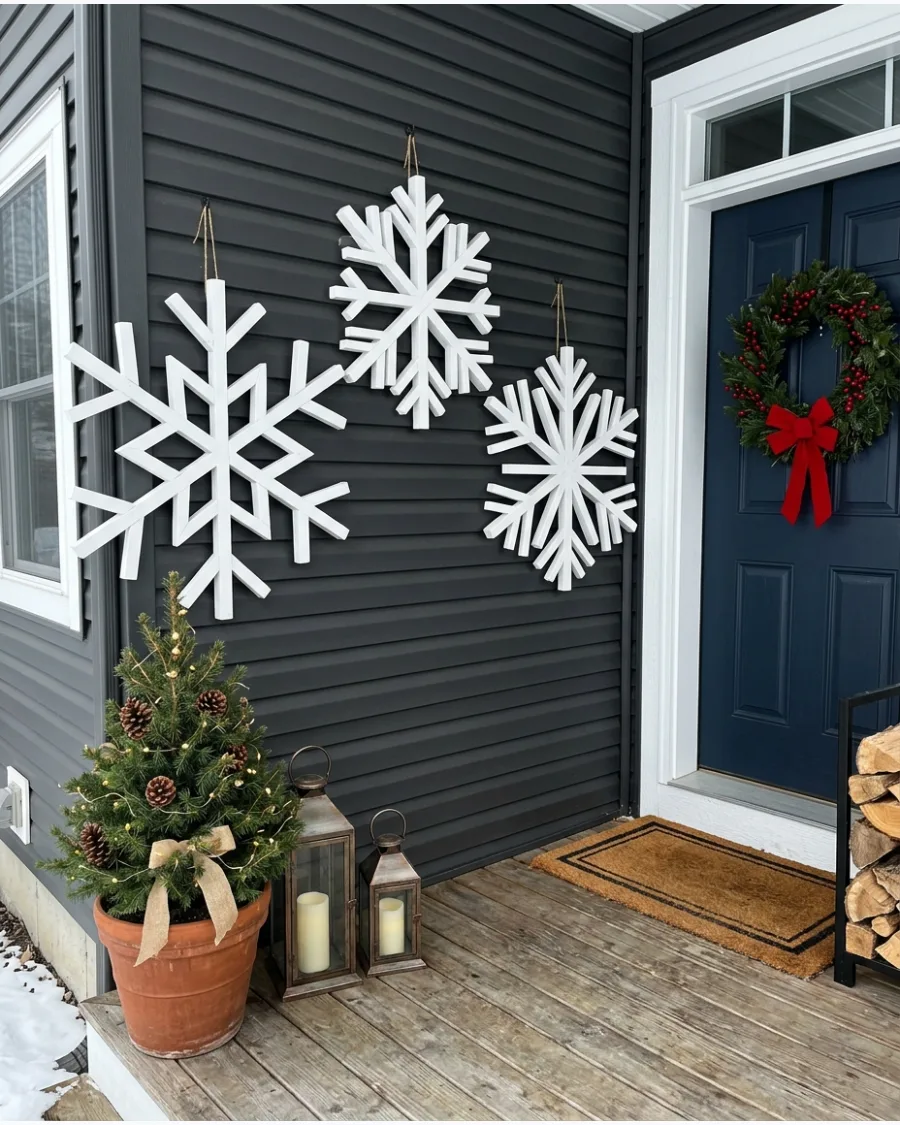
Cut thin wood strips or PVC lattice into geometric snowflake patterns and finish them with crisp white exterior paint. These large-scale pieces fill empty wall space or fence panels without much weight.
Mount them with spacers behind the frame to create a shadow effect against your siding. Simple patterns are easier to see from the street than intricate ones.
- $15 per snowflake
- Use outdoor-rated wood glue
- Hang with siding clips to avoid holes
Best shortcut: Use a miter box to get perfect 60-degree angles for the snowflake arms.
84. DIY Outdoor Ice Lanterns
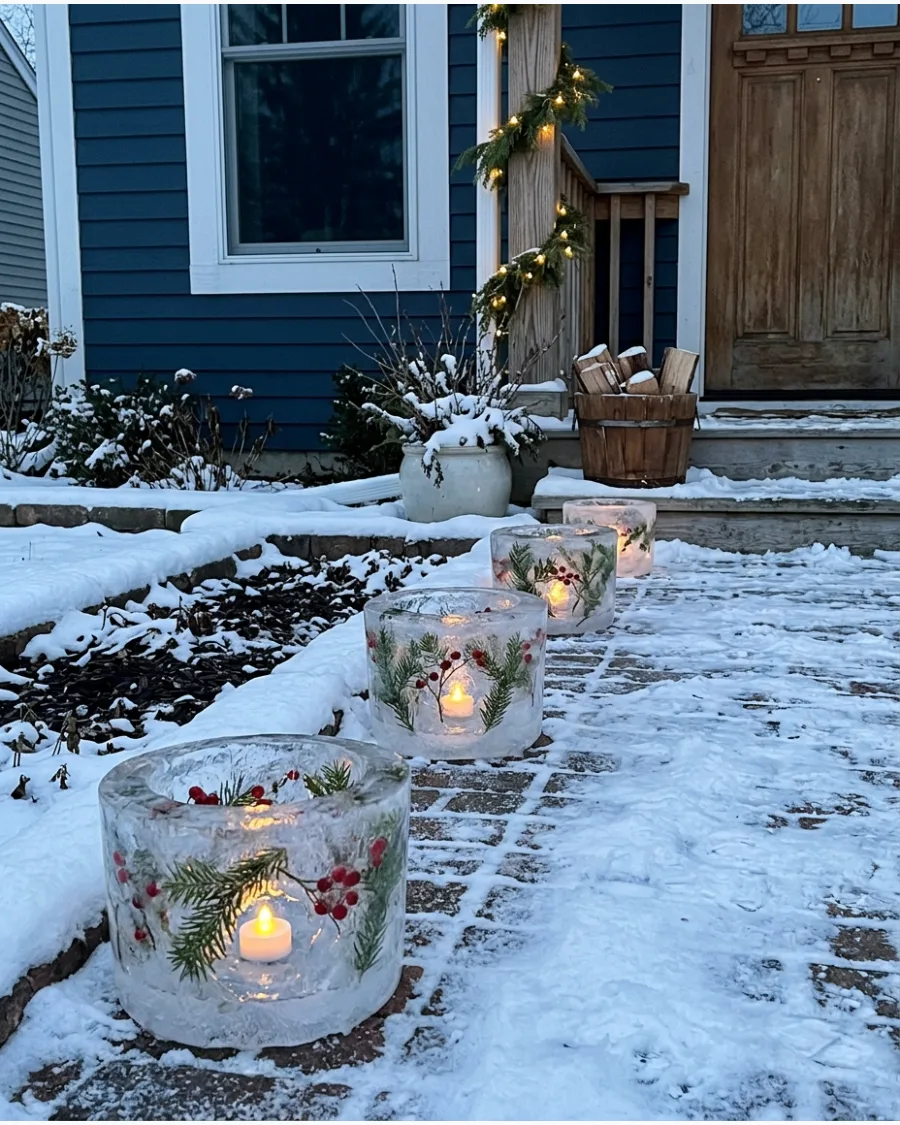
Use two different sized buckets to freeze a ring of ice that holds a hollow center. These temporary luminaries glow beautifully when placed along a snowy walkway or porch step.
Drop evergreen sprigs or red berries into the water before freezing for a pop of color. Only attempt this if the local temperature stays below freezing for several days.
- Free with recycled containers
- Freeze overnight in the freezer or outside
- Use battery-operated puck lights
Quick win: Use distilled water to get clearer ice without the cloudy white center.
85. DIY Polar Bear Christmas Door Decoration
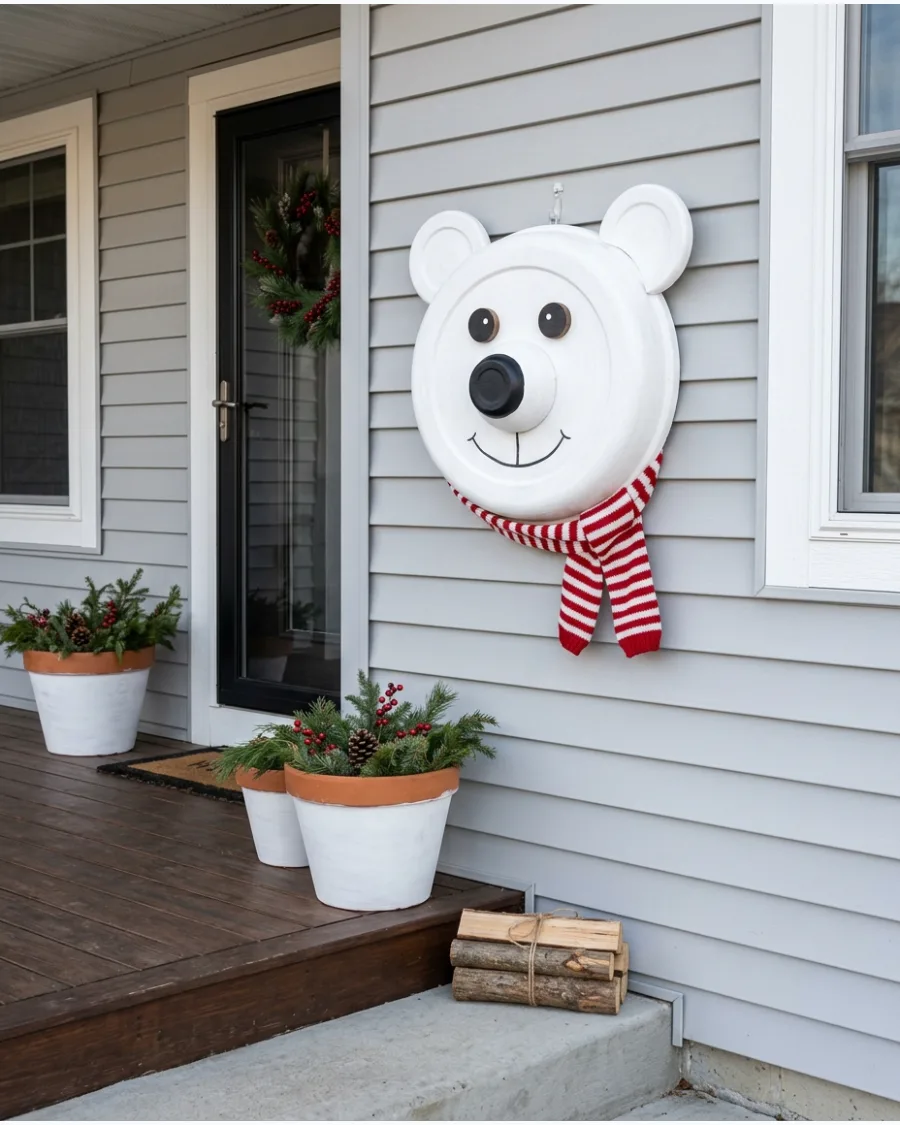
Create a large polar bear face using a white weather-resistant wreath form or a painted plastic tray.
Add felt ears and a black nose to give the character life without using expensive store-bought kits. Attach a real knit scarf around the base of the form to add texture and movement. This is a great alternative to a standard wreath for a playful look.
- $20 for materials
- Use hot glue for assembly
- Secure to the door with a sturdy wreath hanger
Most people skip this: Use outdoor-grade felt or fleece so the bear does not get soggy in the rain.
86. Modern Wooden Triangle Christmas Trees
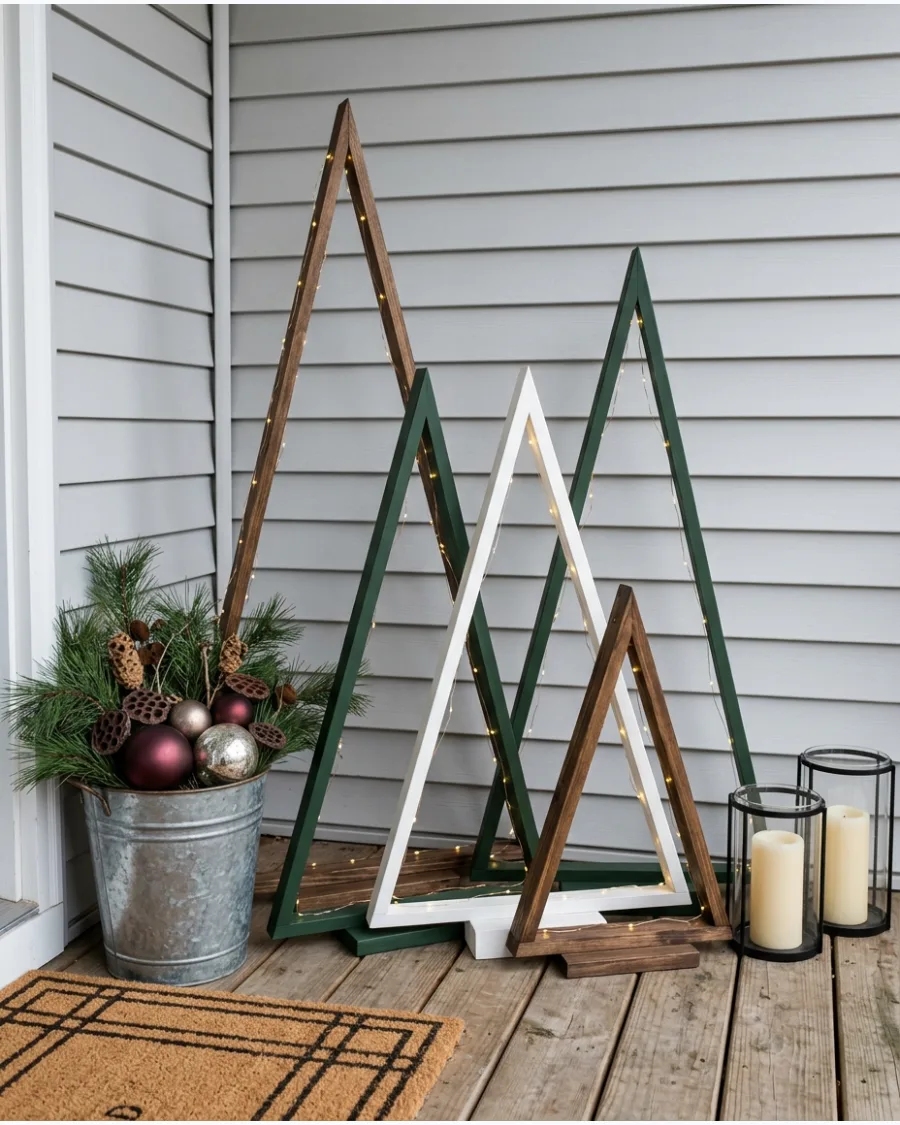
Build simple A-frame triangles using 1×2 pine boards for a minimalist take on the classic tree. Paint them in high-contrast colors like black or white to stand out against the house.
Staple a single strand of outdoor lights to the back of the frame for a clean glow. These are easy to flat-pack and store once the holidays are over.
- $10-$15 per tree
- Use wood screws for the joints
- Apply an outdoor sealant to protect the wood
Best shortcut: Use a staple gun to attach the lights quickly to the back of the wood.
87. Gold and Evergreen Christmas Planters
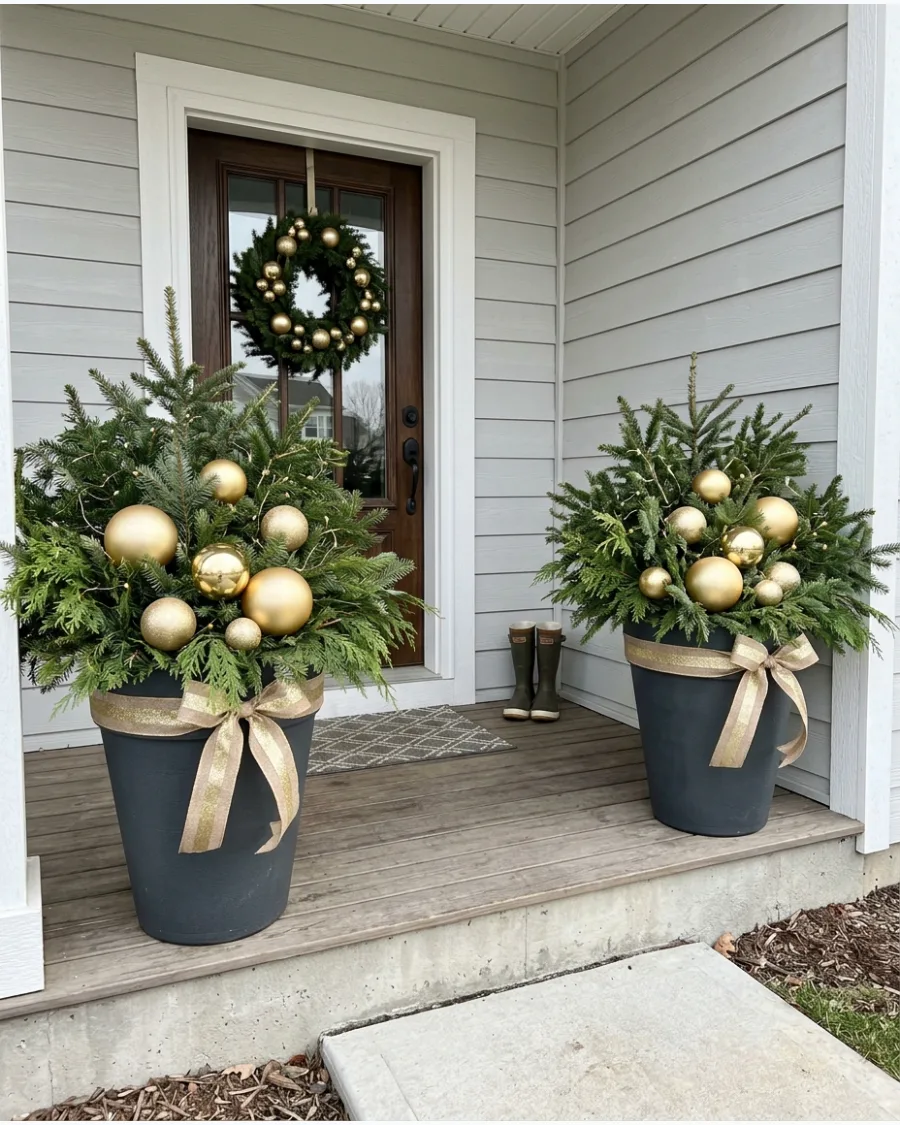
Fill existing porch pots with fresh cedar or pine boughs and tuck in oversized gold ornaments. The mix of natural green and metallic gold creates a high-end look that works from late November through January.
Wire the ornaments directly to the branches so they do not blow away in high winds. Stick to one shade of gold to keep the design sophisticated.
- Cost of greenery plus $15 ornaments
- Use floral wire for security
- Mist the greens weekly to keep them fresh
Quick win: Use matte gold ornaments instead of shiny ones for a more modern, expensive feel.
88. Black, Green, and Gold Christmas Porch
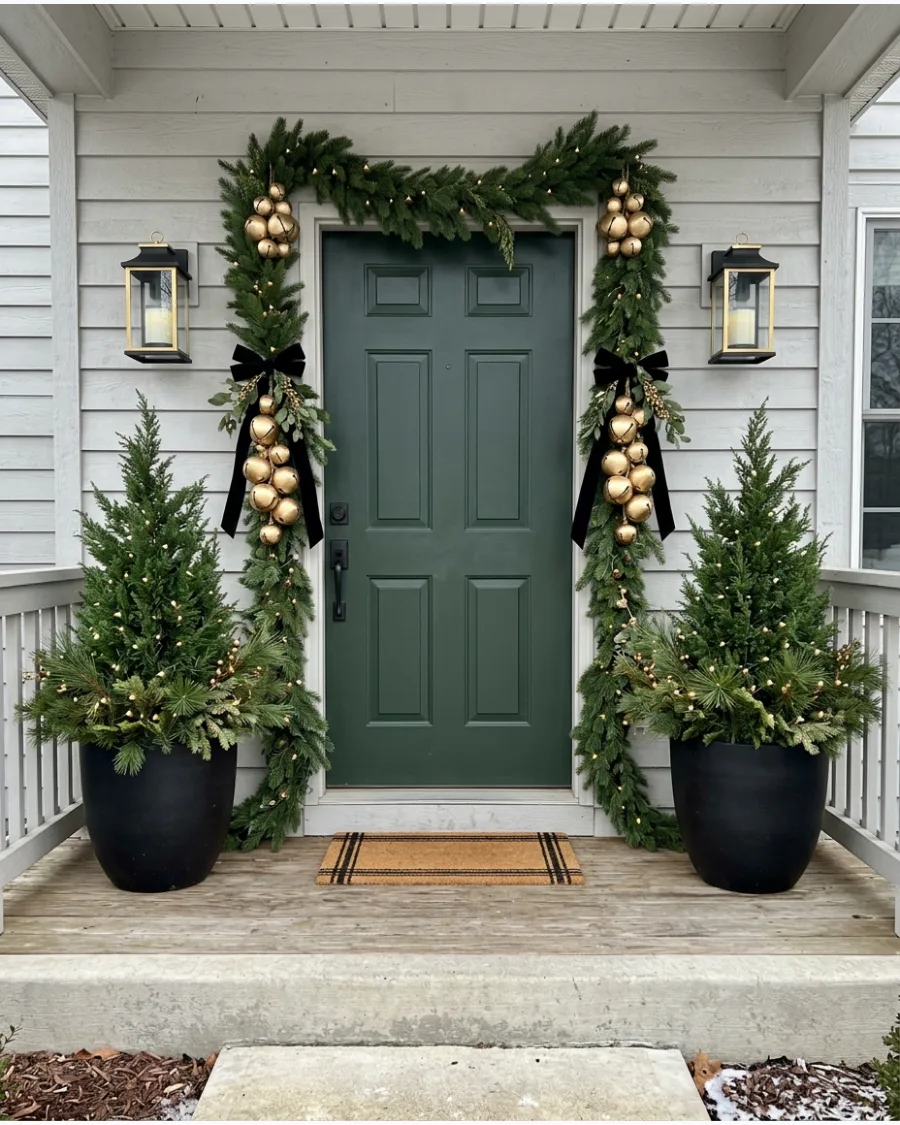
Frame the entry with a thick evergreen garland accented by black velvet ribbons and gold bells. This color palette is more modern than traditional red and green but still feels festive.
Hang the bells at different heights to create visual interest and a pleasant sound when the door opens. Symmetry on both sides of the door makes the space feel organized and intentional.
- $50 for high-quality ribbon and bells
- Use command hooks for the garland
- Choose wide velvet ribbon for impact
Most people skip this: Loop thin wire through the bells before tying the ribbon to ensure they stay attached.
89. DIY Snowball Yard Clusters
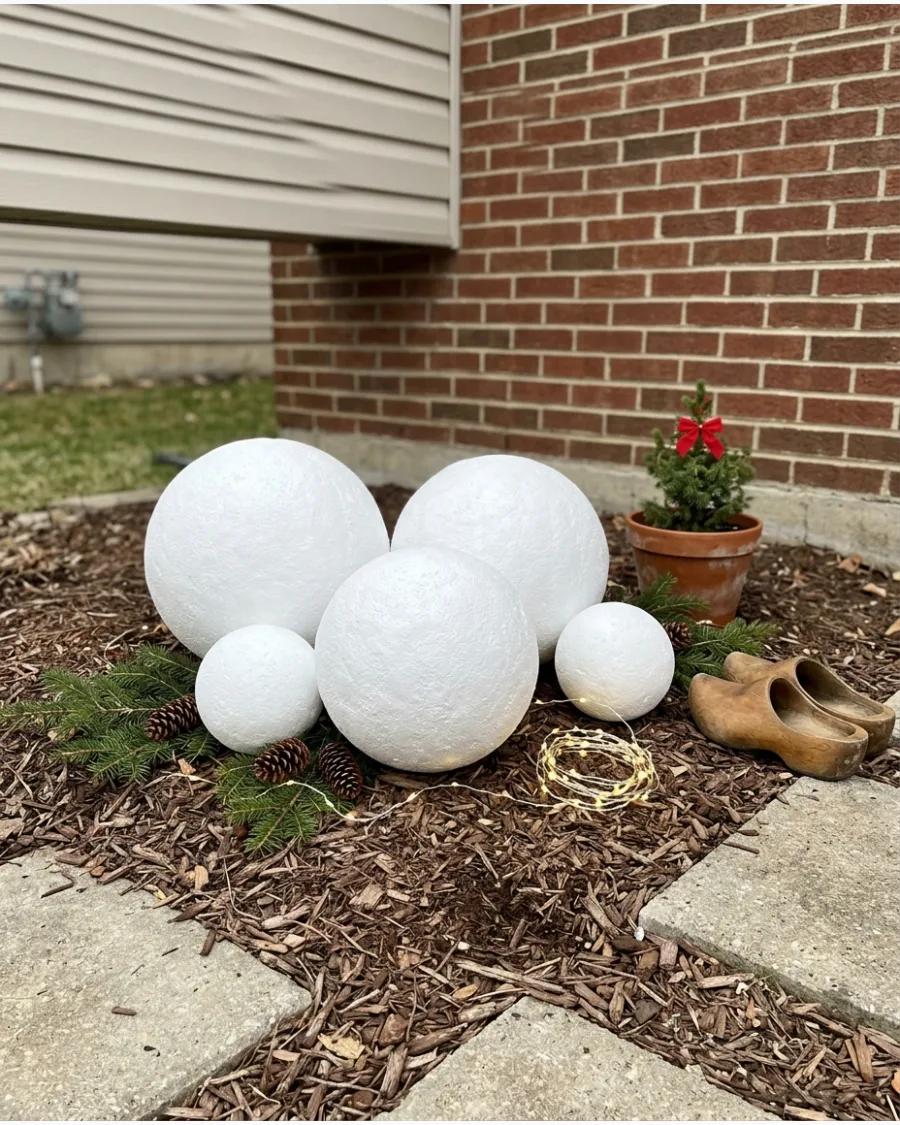
Cover various sizes of plastic balls or light globes with white textured spray paint or faux snow. Group them in clusters of three or five near the driveway or garden beds to mimic a fresh snowfall.
Tuck warm white string lights between the spheres to make the cluster glow at night. Using different sizes makes the arrangement look more natural.
- $30 for spheres and paint
- Use heavy-duty outdoor spray paint
- Anchor them with small garden stakes
Best shortcut: Use old bowling balls or basketballs from a thrift store as the base for the snowballs.
90. Illuminated Winter Wonderland Snowflakes
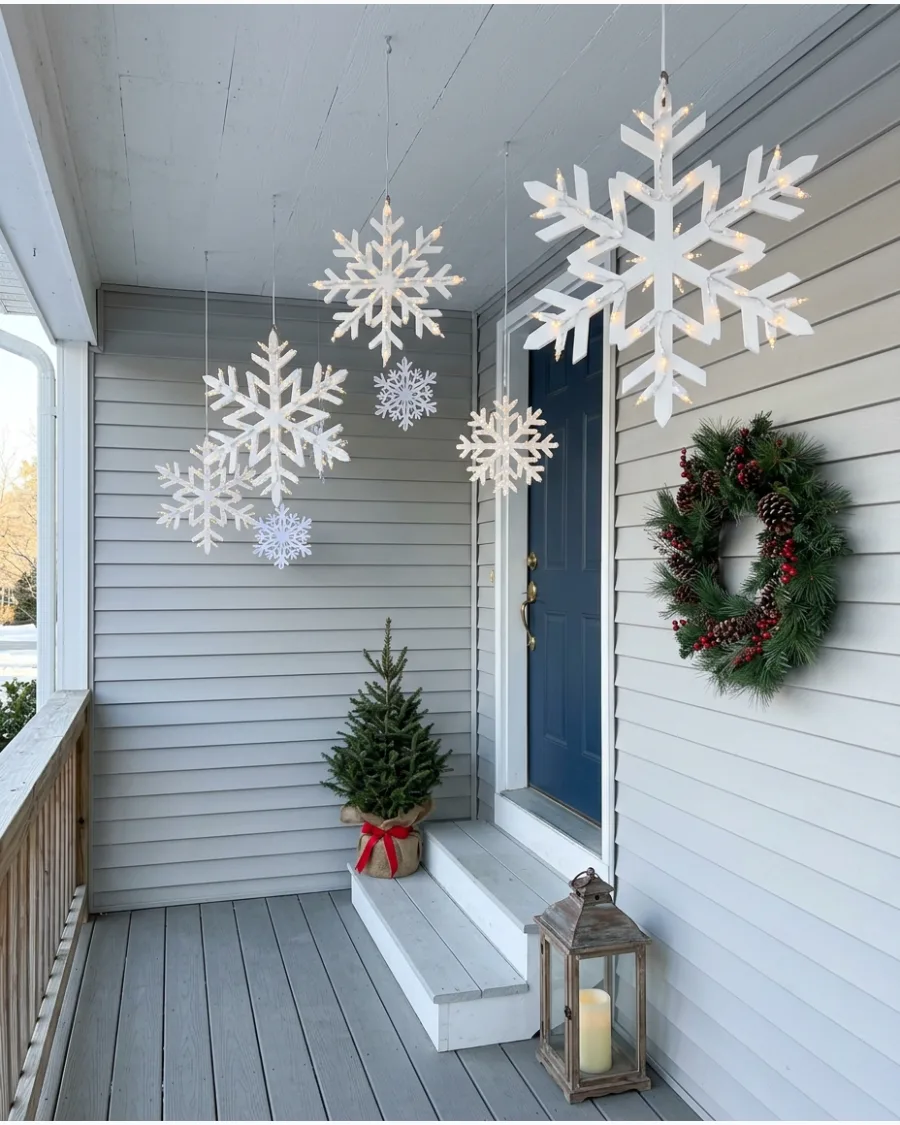
Hang oversized light-up snowflakes at different heights from a porch ceiling or a large tree. The varying levels create a sense of depth and make the area feel like it is caught in a snowstorm.
Use clear fishing line to hang the flakes so the support disappears at night. Cool white lights mimic the look of real ice better than warm yellow ones.
- $15-$25 per snowflake
- Use an outdoor power strip
- Space them at least 18 inches apart
Quick win: Use 20lb test fishing line to ensure the snowflakes stay up during winter gusts.
SMALL-SPACE AND FULL-EXTERIOR DIY CHRISTMAS DECORATIONS
91. DIY Christmas Balcony Railing Garland
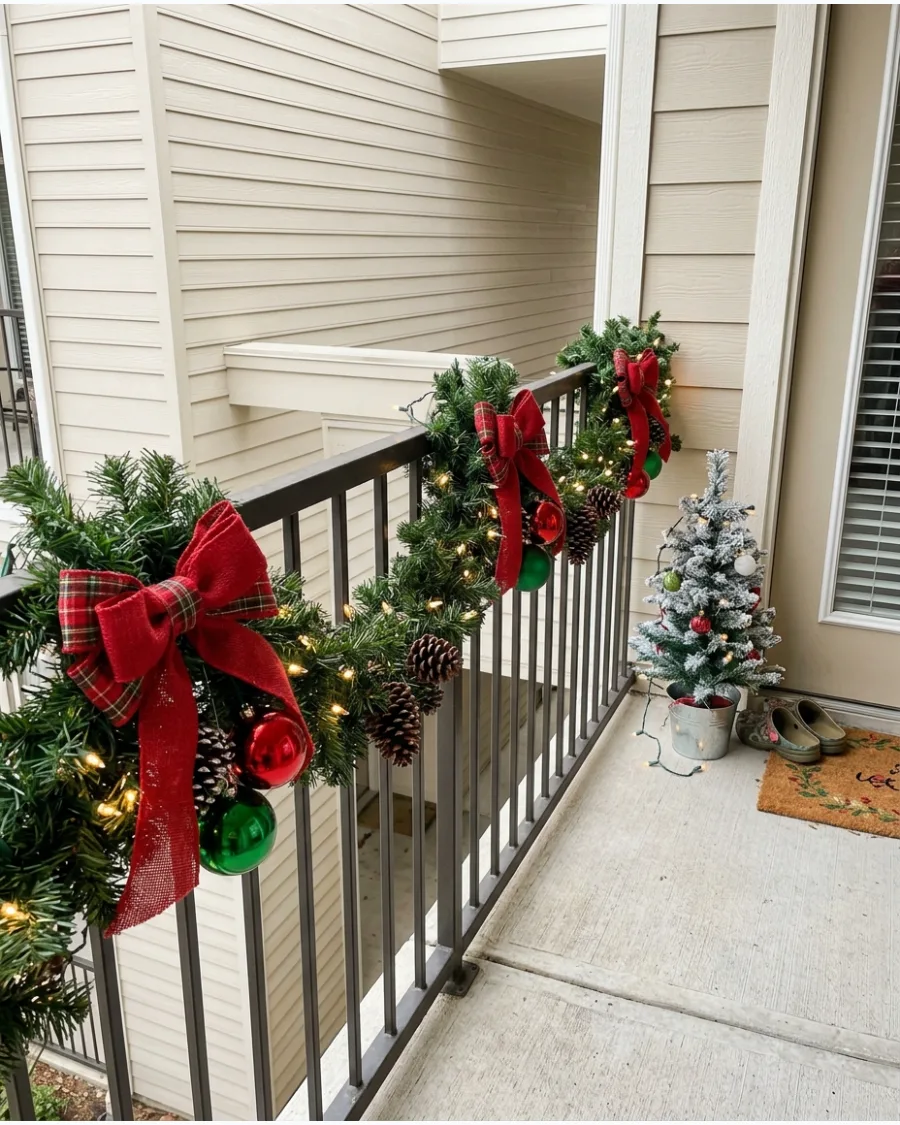
Wrapping a balcony railing with evergreen garland, lights, and bows creates a festive look without taking up valuable floor space. Use heavy-duty zip ties hidden under the greenery to keep everything secure against high winter winds. This method ensures the decor stays put even on higher floors.
High-contrast red bows make the green pop against white or dark railings.
- Expect to spend $15 to $40 depending on the total length of the balcony.
- Use zip ties every 12 inches for stability and to prevent the garland from sagging.
- This project is ideal for apartment dwellers or homes with narrow second-story porches.
Most people skip this: Double up on thin garland strands to create a professional, high-end look without the designer price tag.
92. Small Porch Christmas Planter Display
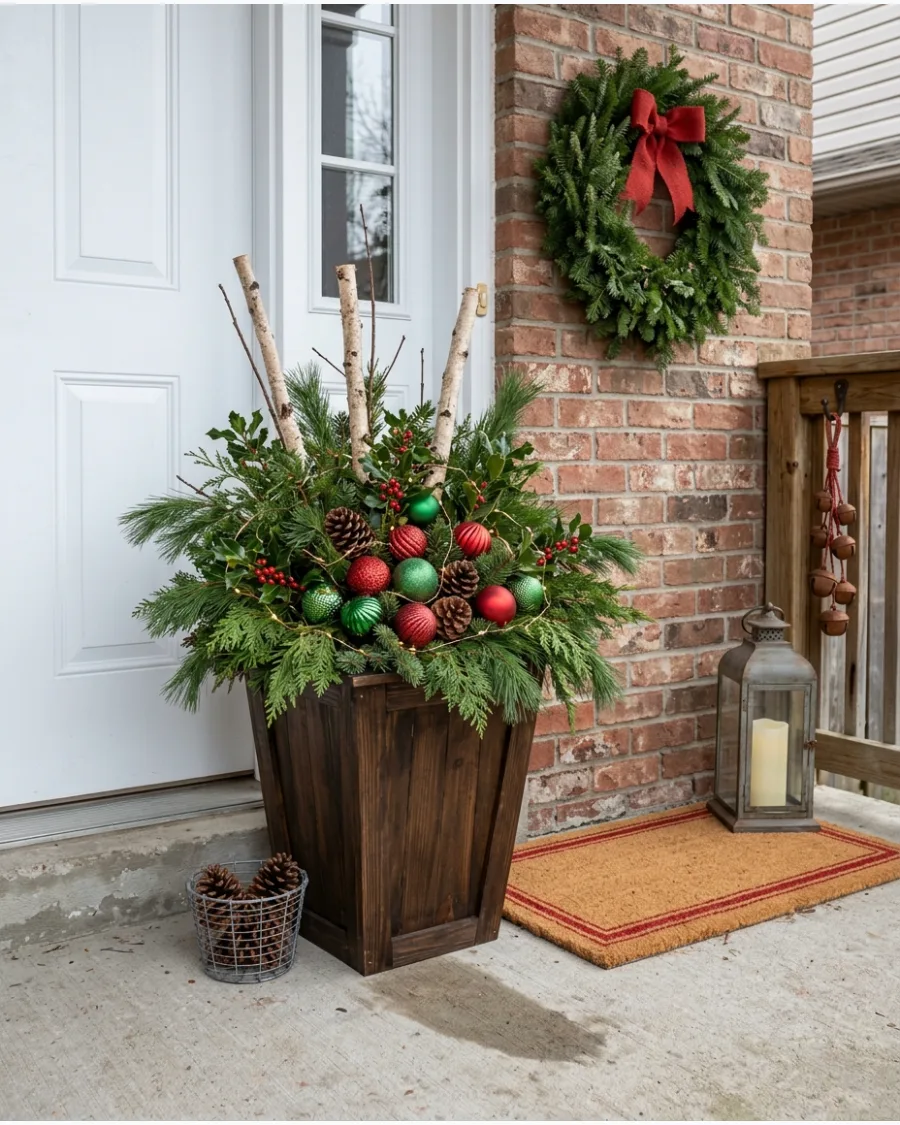
A single, well-composed planter makes a bigger statement on a tiny porch than several small pots. Combine upright birch branches with trailing cedar and bright red berries to add height and texture. This vertical approach keeps the walkway clear for guests while adding a lush feel.
Weight the bottom of the pot with bricks so it does not tip over in a storm.
- Budget around $25 for fresh greenery, berries, and decorative branches.
- Pack soil or floral foam tightly to hold heavy branches in place during the wind.
- Swap red berries for silver ornaments to change the color scheme for a modern look.
Quick win: Spray the greenery with an anti-desiccant to keep the needles from drying out and dropping before Christmas Day.
93. Christmas Fence Gift-Wrap Decoration
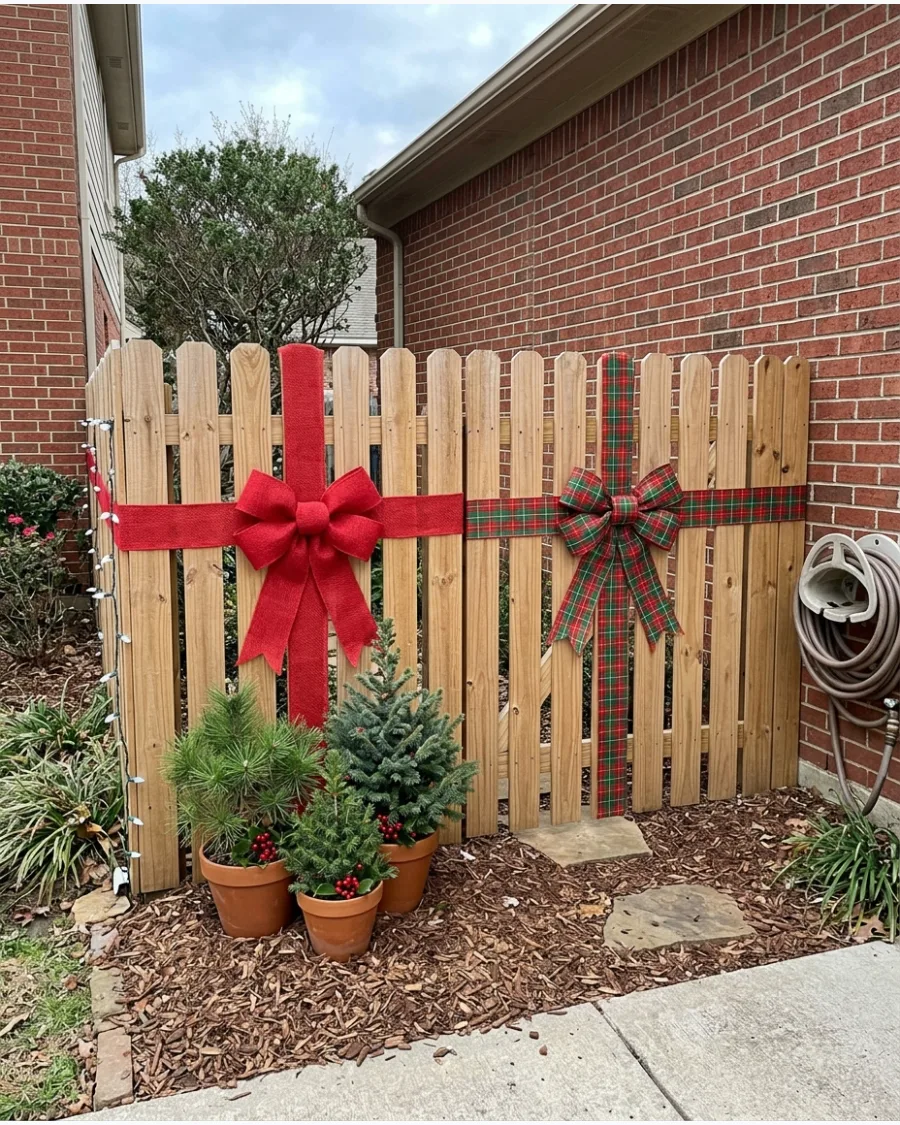
Turning a fence into a row of presents is a clever way to decorate a large perimeter on a tight budget. Wrap wide red weather-resistant ribbon vertically and horizontally around fence pickets to mimic a gift box. A large bow in the center of each section finishes the festive look.
This works best on flat-panel or picket fences where the ribbon can lay flat against the surface.
- Spend about $10 for a large roll of outdoor-rated plastic ribbon.
- Use heavy-duty outdoor staples or thin wire to attach the ribbon to the back of the pickets.
- Scale the ribbon width to match the size of your fence panels for the best visual balance.
Best shortcut: Use red duct tape for the vertical and horizontal lines on vinyl fences for a perfectly flat, wind-proof finish.
94. DIY Christmas Mailbox Topper
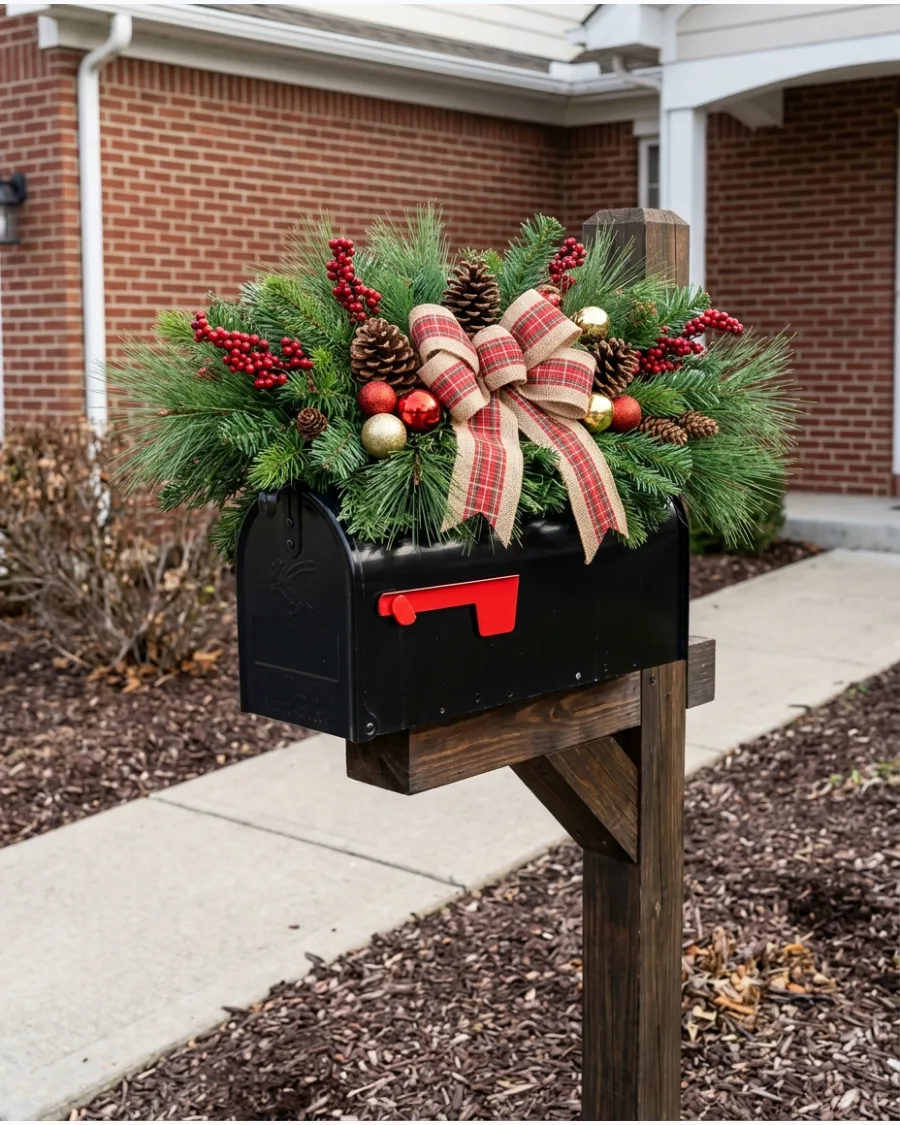
A mailbox topper adds instant curb appeal without blocking the daily mail delivery or the flag. Secure a greenery swag to the top of the mailbox using a flexible wire frame or strong magnets. Include waterproof ornaments and pinecones for extra detail that stands out from the street.
Check the door clearance to make sure the mailbox opens all the way without snagging.
- Materials cost around $15 for greenery, wire, and a few ornaments.
- Attach with heavy-gauge floral wire to prevent the arrangement from sliding forward.
- Choose battery-operated lights with an automatic timer for an effortless evening glow.
Most people skip this: Leave a two-inch gap between the greenery and the mailbox door to prevent the mail carrier from accidentally pulling the decor off.
95. Giant Christmas Bow Garage Door Decoration
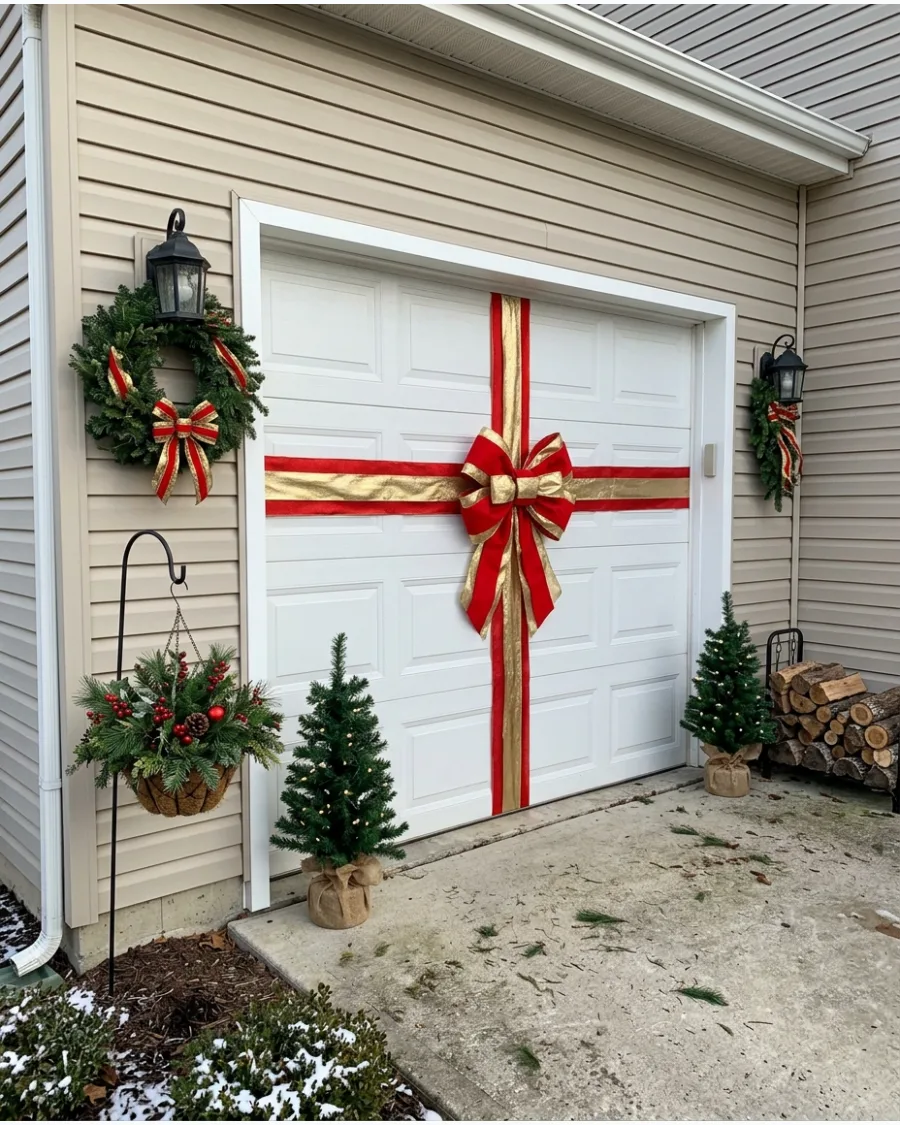
A garage door is a massive blank canvas that looks incredible when treated like a giant present. Run two long strips of wide fabric or vinyl ribbon across the door and secure them firmly at the edges. Place a massive bow at the intersection for a high-impact focal point that defines the front of the home.
Ensure the ribbon is tight enough that it will not snag when the door opens and closes.
- Budget $20 for bulk outdoor-rated fabric or heavy-duty vinyl ribbon.
- Use magnetic clips or adhesive hooks that will not damage the door finish or weather stripping.
- Opt for vibrant red or deep green to stand out against neutral house colors like beige or gray.
Quick win: Use wide strips of red felt; it is inexpensive, handles moisture well, and grips the door surface better than satin ribbon.
96. DIY Lighted Christmas Trees Along the Driveway
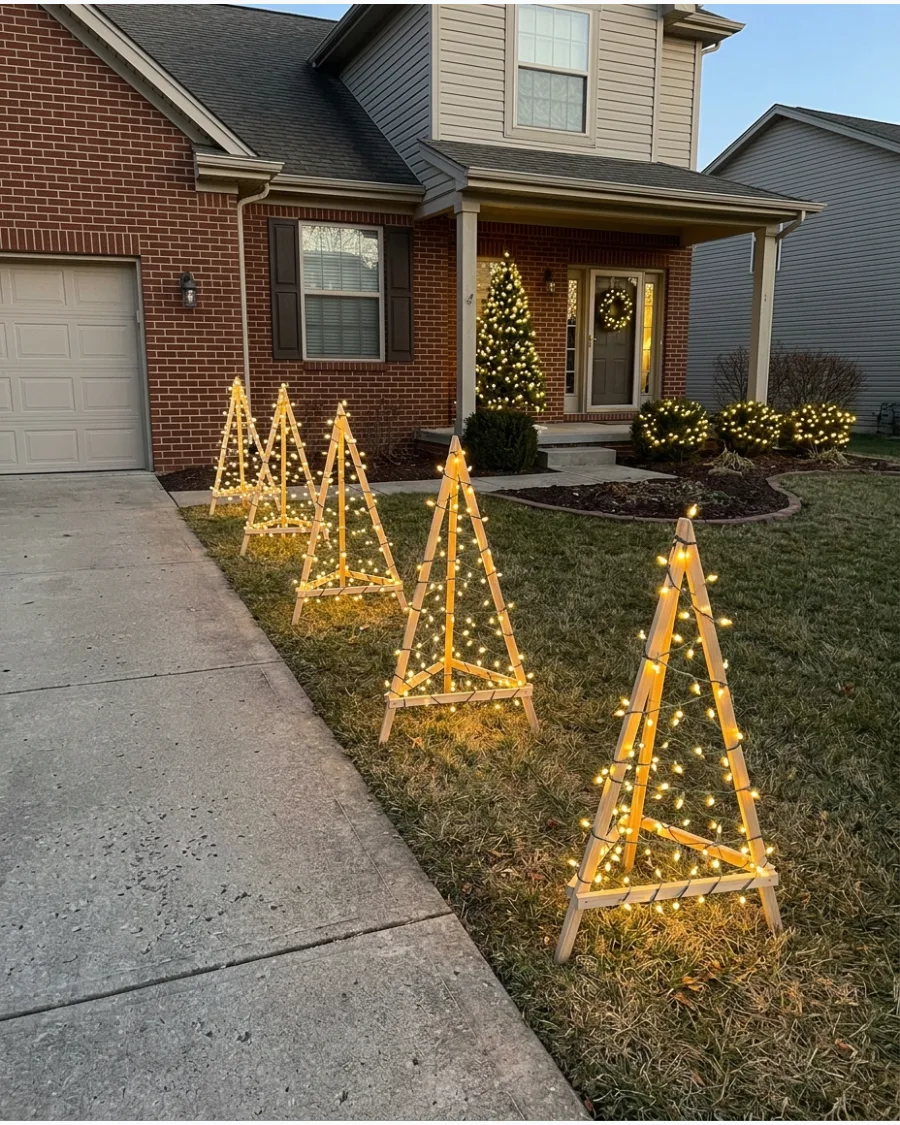
Lining a driveway with glowing trees creates a grand entrance for visitors and family. Construct simple wooden triangles or use wire cones and wrap them tightly with warm white string lights. Spacing them evenly creates a professional, rhythmic look that guides the eye toward the front door.
These low-profile decorations are easy to store flat once the holiday season is over.
- Spend approximately $30 per tree for the frames and outdoor light strands.
- Stake the bases into the ground with U-shaped garden pins to keep them upright in the wind.
- Use a single outdoor extension cord with multiple outlets to power the whole row efficiently.
Best shortcut: Use tomato cages turned upside down as the frames for a fast, no-build driveway tree solution.
97. DIY Hanging Christmas Stars for a Side Yard
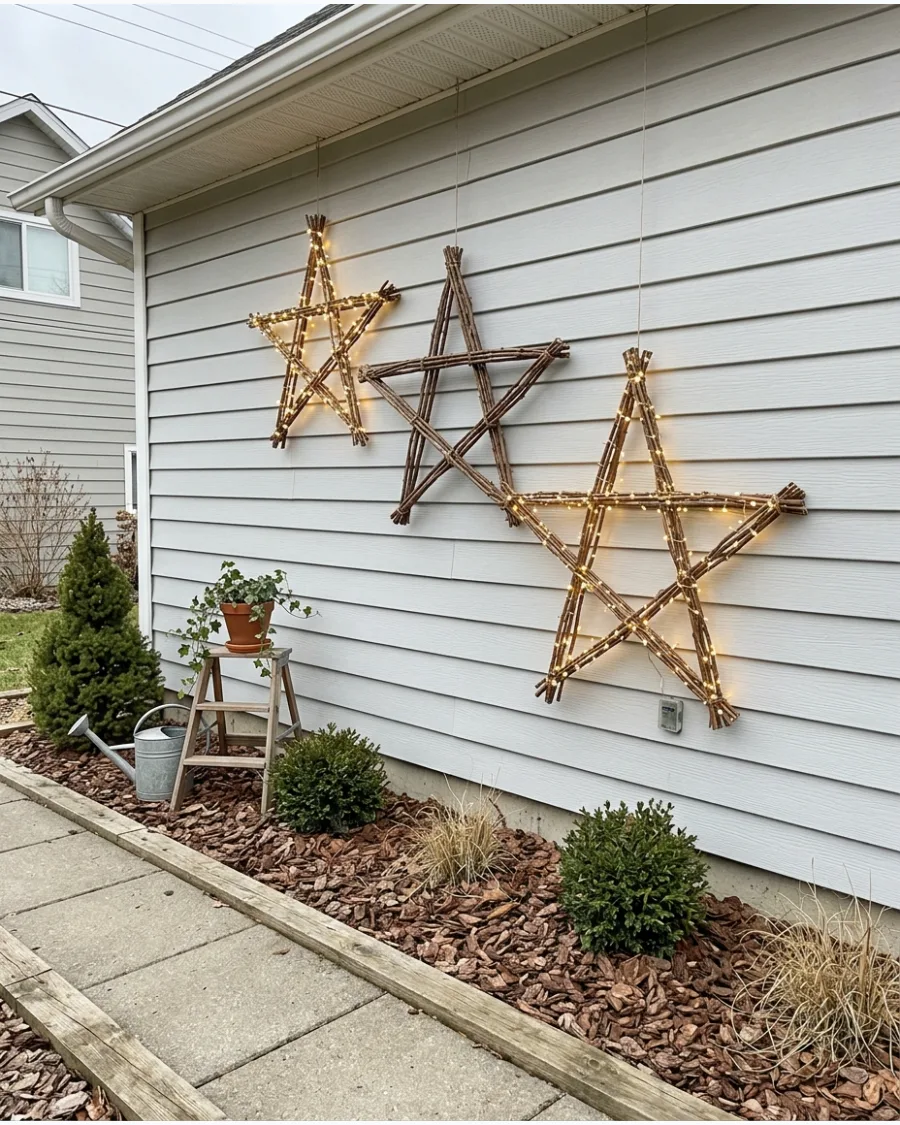
Hanging stars can turn a plain side wall or a dark fence into a festive focal point. Build stars out of thin wood lath or gathered twigs and wrap them in battery-operated fairy lights. Suspend them at different heights to create a falling star effect that adds depth to the yard.
This is an excellent way to use vertical space when the ground area is narrow or limited.
- Budget $10 per star for wood, fasteners, and a set of fairy lights.
- Use clear fishing line for a floating appearance that looks magical after the sun goes down.
- Apply a clear exterior sealant to the wood if you live in a climate with heavy rain or snow.
Most people skip this: Group the stars in odd numbers like three or five to create a more natural and visually pleasing arrangement.
98. Christmas Pergola Light and Greenery Canopy
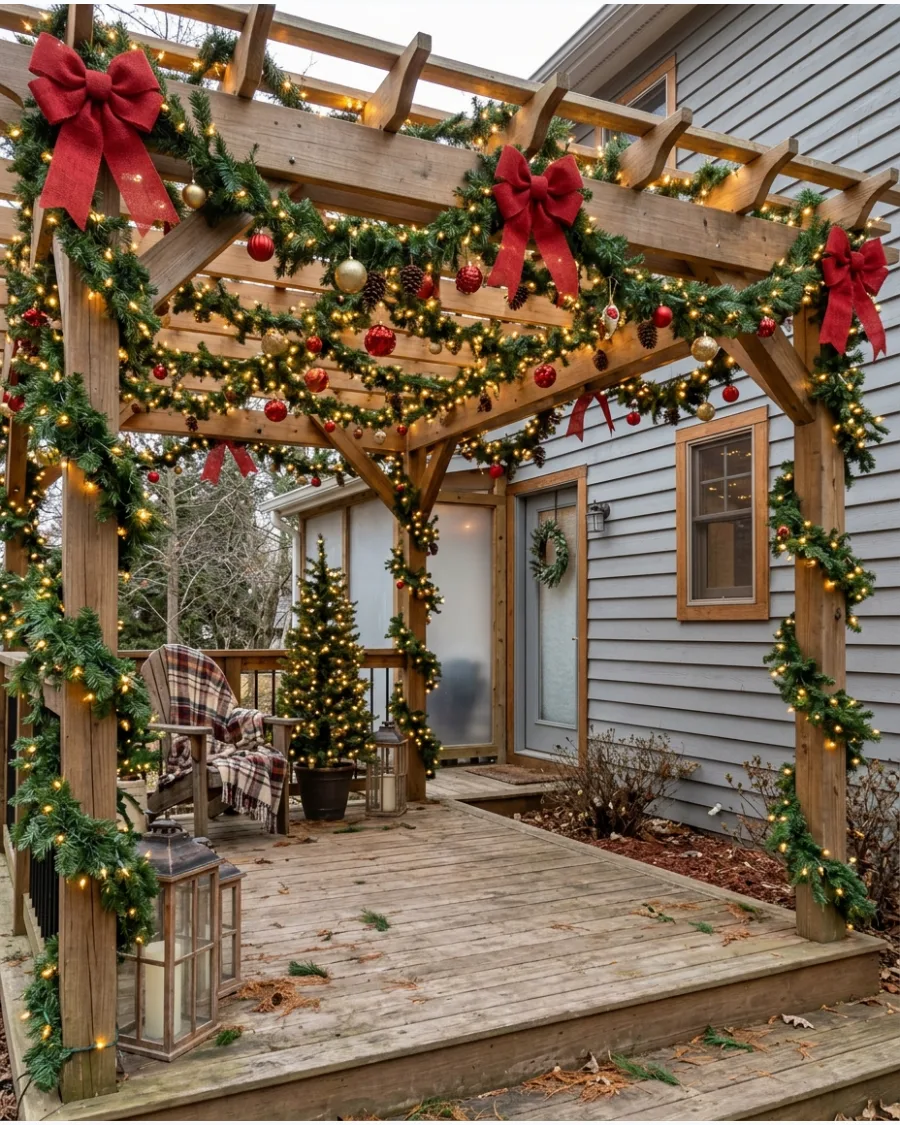
A pergola offers the perfect structure for a dramatic overhead holiday display that feels like an outdoor room. Drape heavy evergreen garlands along the main beams and interweave them with large-bulb Edison lights. This creates a cozy atmosphere for outdoor winter gatherings or hot cocoa nights.
Hanging a few oversized ornaments from the rafters adds a playful, finished touch to the structure.
- Expect to spend $50 or more depending on the size of the pergola and the amount of garland.
- Use S-hooks or screw-in hooks for a secure permanent mounting point that makes setup easy every year.
- Add weather-resistant curtains to the sides for extra wind protection and a high-end look.
Quick win: Use zip ties to attach the garland to the beams first, then loosely drape the lights for a layered, professional appearance.
99. DIY Outdoor Nativity Silhouette
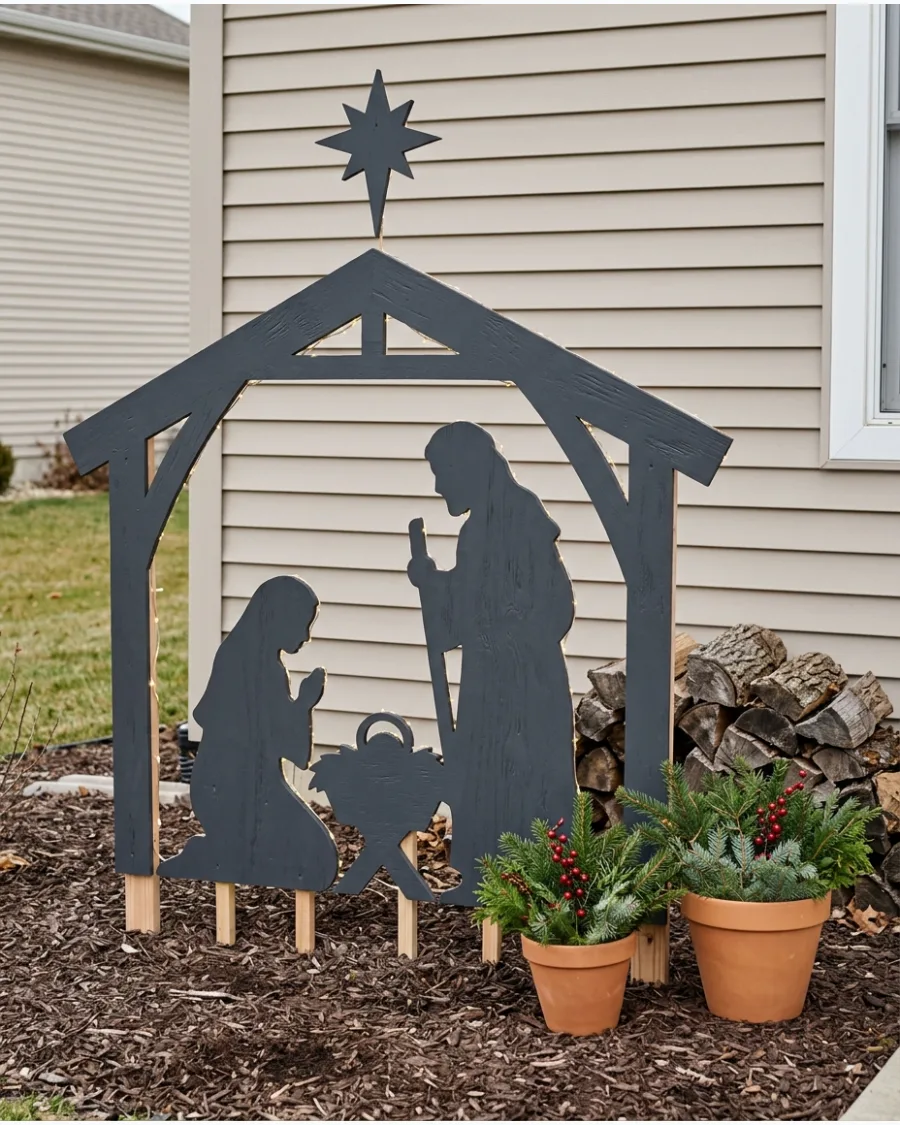
A silhouette nativity is a classic, peaceful display that looks sophisticated and clean from the street. Cut the figures out of a single sheet of exterior-grade plywood and paint them a solid neutral color like white or black. Place a single soft spotlight behind the figures to create a glowing halo effect that highlights the shapes.
This project is durable enough to last for many years with a simple fresh coat of paint.
- Budget $40 for a sheet of plywood, exterior paint, and a basic outdoor spotlight.
- Use 2×4 stakes on the back to secure the figures deep into the ground for stability.
- A matte black or crisp white finish provides the highest contrast against the night sky.
Best shortcut: Trace a projected image onto your plywood to get perfect proportions without needing any drawing skills.
100. DIY Outdoor Christmas Village Display
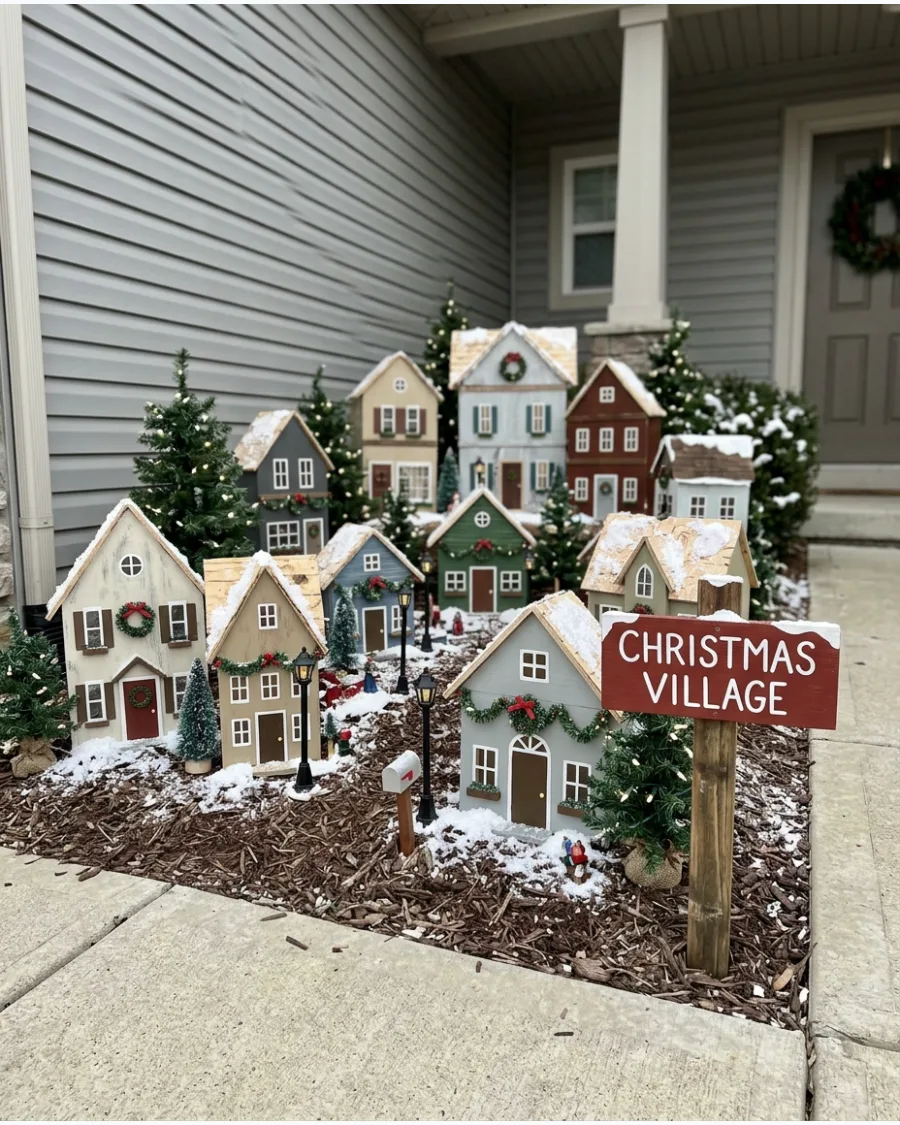
Building a miniature village in the front yard is a charming way to tell a holiday story on a larger scale. Create simple house facades from scrap wood and paint them with colorful doors and windows. Arrange them in a cluster with small faux evergreens and a dusting of white gravel or fake snow for texture.
Adding small battery-operated lights inside the windows makes the scene come alive after dark.
- This project costs about $30 if you use scrap wood and leftover exterior paint samples.
- Set the houses on a raised platform or bricks to keep them out of the mud and snow.
- Group the houses near a porch or walkway where the small details are easy for guests to see.
Most people skip this: Use reflective paint for the windows so they appear to glow even when the interior lights are turned off.
Frequently Asked Questions
How do I make DIY outdoor decorations weather-resistant?
To keep your creations looking great, always use exterior-grade paints and clear waterproof sealants. Choose durable materials like treated wood or plastic that can withstand moisture and freezing temperatures without warping.
What are the best ways to secure yard decor against high winds?
Secure your displays by driving rebar or heavy-duty ground stakes deep into the soil and tethering your decor to them. For items on hard surfaces, hidden sandbags or weighted bases provide the extra stability needed to prevent them from blowing away.
How can I hide extension cords for my outdoor DIY displays?
Keep your display looking polished by routing extension cords along your home's siding or tucking them neatly behind bushes. For paths or open areas, use weather-resistant cord covers that blend into the ground to maintain a clean, professional aesthetic.
What are the most budget-friendly materials for large-scale DIY decor?
PVC pipe and plywood are affordable, versatile staples for building large structures like archways or custom cutouts. You can also create high-impact, low-cost displays by turning inexpensive plastic balls into oversized ornaments with a bit of spray paint.
How do I ensure my DIY porch decor doesn't block my entryway?
Focus on vertical space by hanging wreaths or garlands to keep the floor clear of clutter. When placing items on steps or near the door, ensure there is a wide, unobstructed path to prevent trip hazards and allow the door to open fully.