50 DIY Tomato Cage Witch Ideas

This post may contain affiliate links: full affiliate disclosure.
Transform basic garden tomato cages into life-sized spooky figures for a fraction of the cost of store-bought animatronics. These structures provide a sturdy, conical base that holds up well against wind and weather on a front porch.
Easy Tomato Cage Witch DIY Ideas
1. Classic Black Tomato Cage Witch
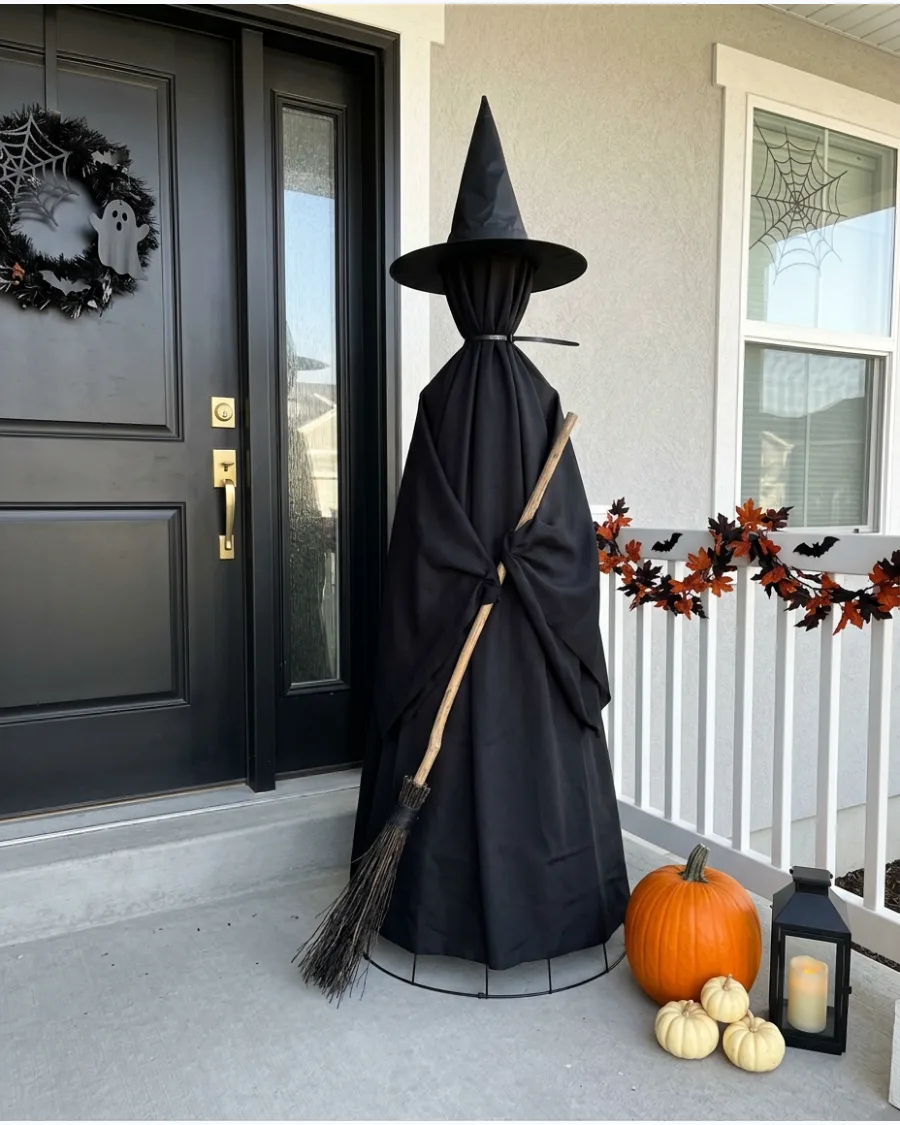
Flipping the cage upside down creates the perfect conical silhouette for a standing figure. Secure the top prongs with a heavy-duty zip tie to form a stable point for the head.
Drape a large piece of black polyester fabric over the frame to hide the wire completely. Using a dark, opaque fabric ensures the metal structure does not peek through during the day.
- Budget under $20 for all materials.
- Setup on a flat concrete porch or level lawn.
- Swap the fabric for velvet to get a more high-end look.
Most people skip this: Wrap the prongs in duct tape before adding the head to prevent the wire from poking through the foam.
2. No-Sew Tomato Cage Witch
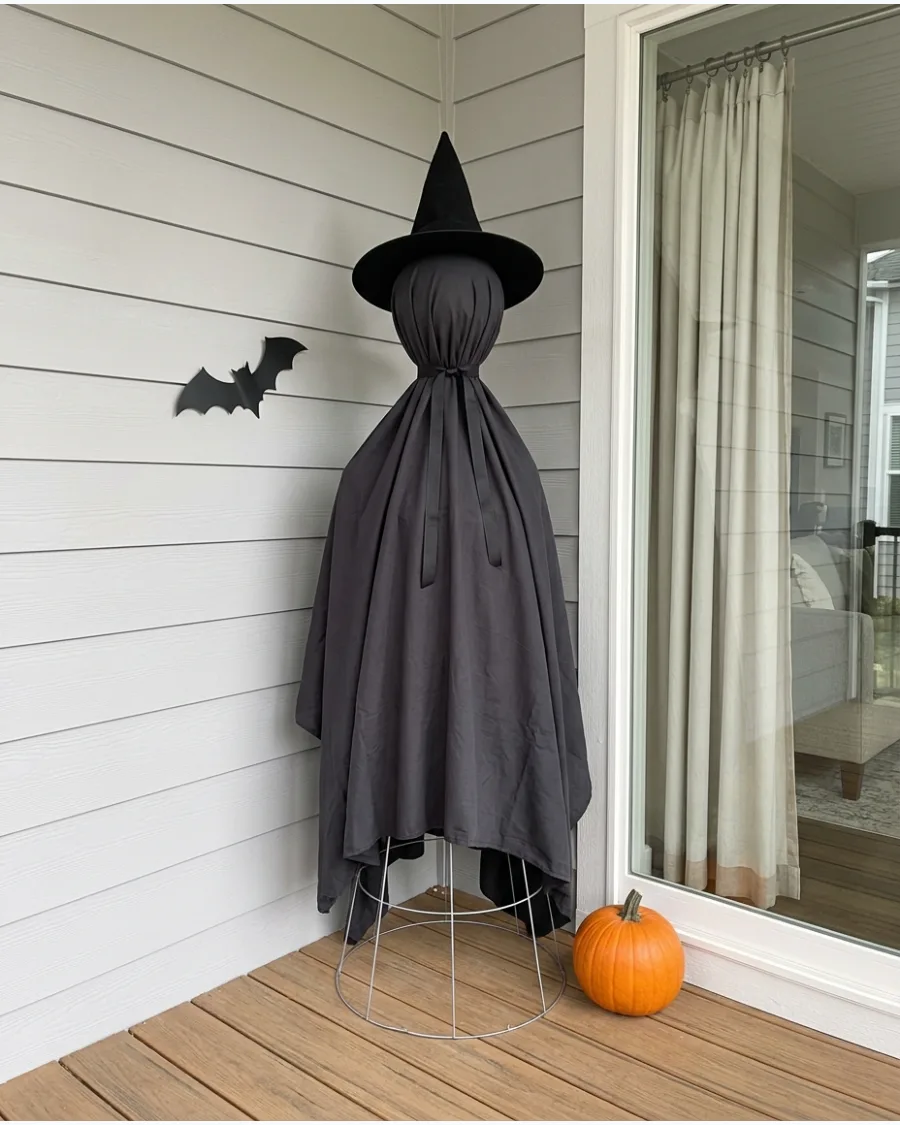
Skip the sewing machine by using a large fabric remnant or a flat bed sheet.
Center the fabric over the top of the cage and let it drape naturally to the ground. Use a length of black ribbon or twine to cinch the fabric tightly just below the head to create a defined neck. A defined neck prevents the witch from looking like a floating tent.
- Sourcing at a fabric store or thrift shop.
- Assemble in under 15 minutes.
- Use a patterned sheet for a more whimsical style.
Quick win: Use safety pins on the inside of the fabric to adjust the length without cutting the material.
3. Five-Minute Tomato Cage Witch
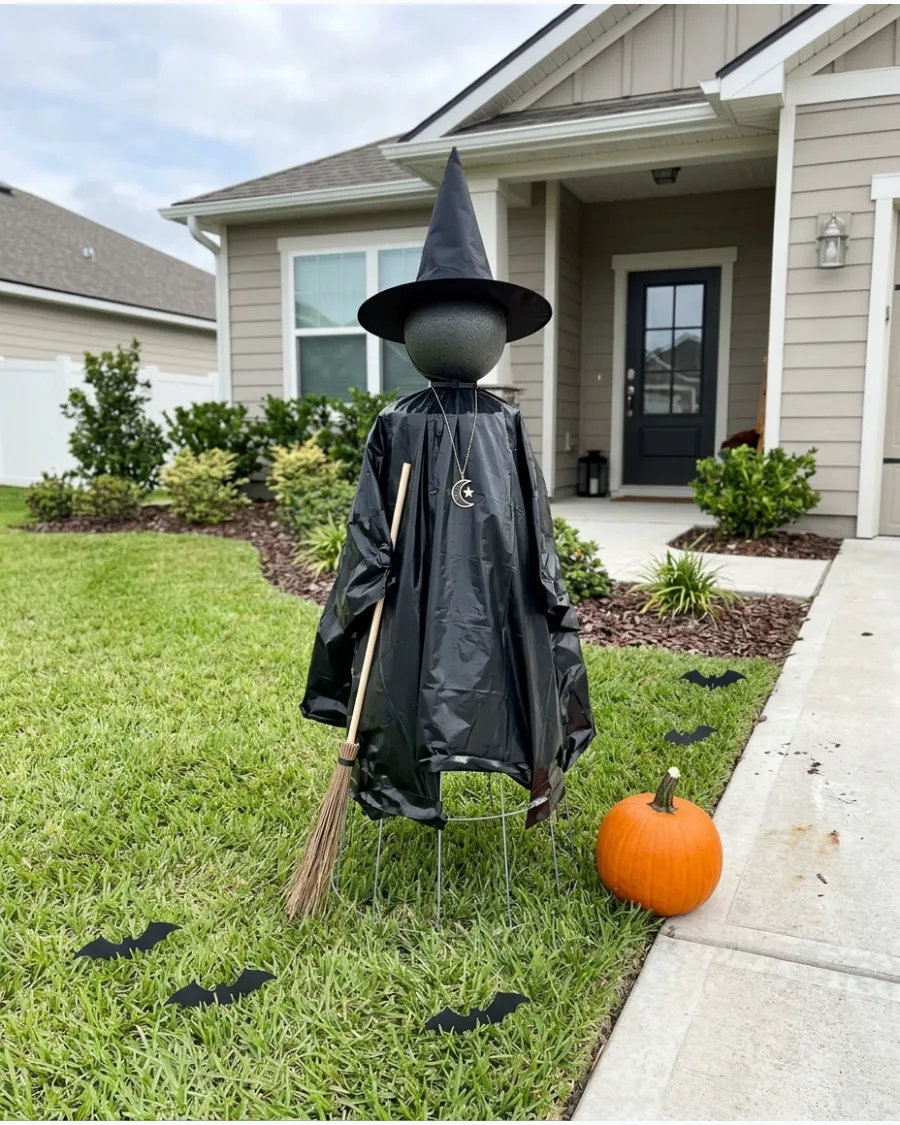
This version uses a plastic tablecloth for a fast and water-resistant costume. Secure a foam ball to the top of the cage with a zip tie before tossing the plastic over it.
Apply strong outdoor tape to the underside of the tablecloth to keep it from blowing away in high winds. Plastic is great because it wipes clean and does not get heavy when it rains.
- Budget under $10 per figure.
- Ideal for uncovered yards or walkways.
- Use two tablecloths for extra thickness and opacity.
Best shortcut: Use a black pool noodle cut into segments to bulk out the shoulders under the plastic.
4. Black Tulle Tomato Cage Witch
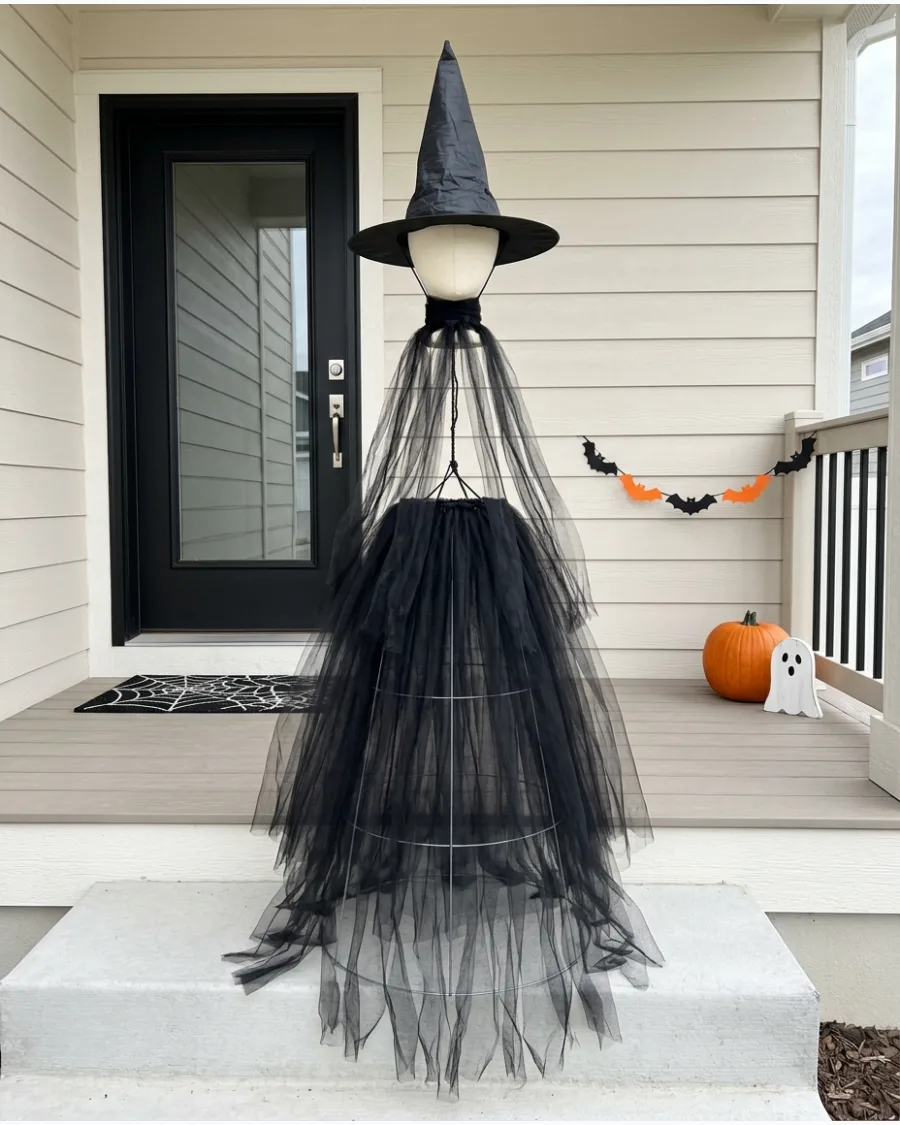
Layering tulle creates a soft, ethereal look that catches the light differently than flat fabric. Start with a solid black base layer so the cage is hidden, then tie long strips of tulle around the neck area.
Vary the lengths of the tulle strips to create a tattered, wispy hemline that moves in the breeze. Tulle adds a lot of volume without making the decoration heavy or difficult to move.
- Sourcing tulle bolts online for bulk savings.
- Layering takes about 30 minutes to complete.
- Add a few strips of purple tulle for a pop of color.
Quick win: Use a rotary cutter to slice the tulle into even strips quickly.
5. Trash-Bag Tomato Cage Witch
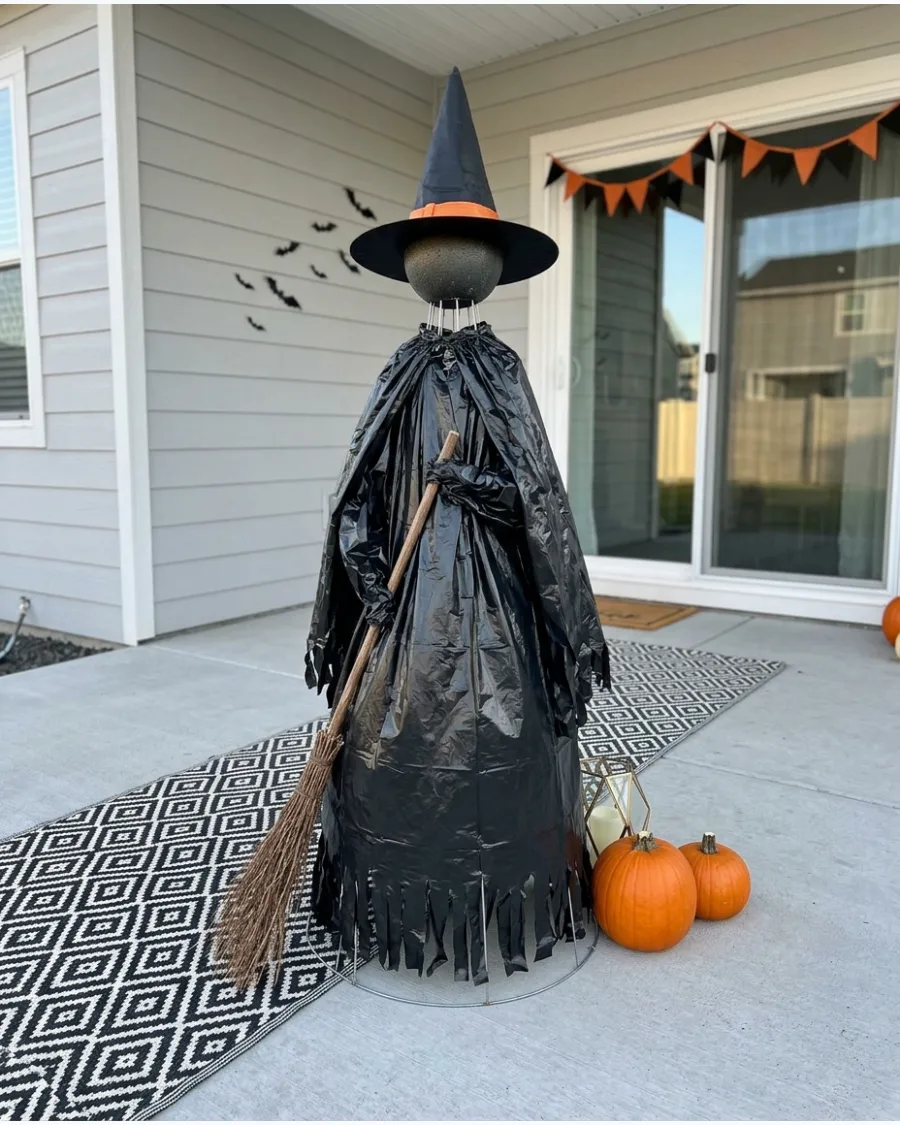
Heavy-duty contractor bags are surprisingly effective for creating a rugged, weathered look. Slide the bag over the cage and poke the top prongs through a small hole to mount the head.
Use scissors to fringe the bottom edge of the bag for a tattered appearance that looks like an old cloak. The sheen of the plastic mimics the look of dark leather from a distance.
- Sourcing from any local hardware store.
- Weather-proof for rainy or snowy climates.
- Use black electrical tape to hide any visible silver cage wires.
Most people skip this: Stuff the top of the bag with crumpled newspaper to give the witch more body near the chest area.
6. Fabric Tablecloth Witch
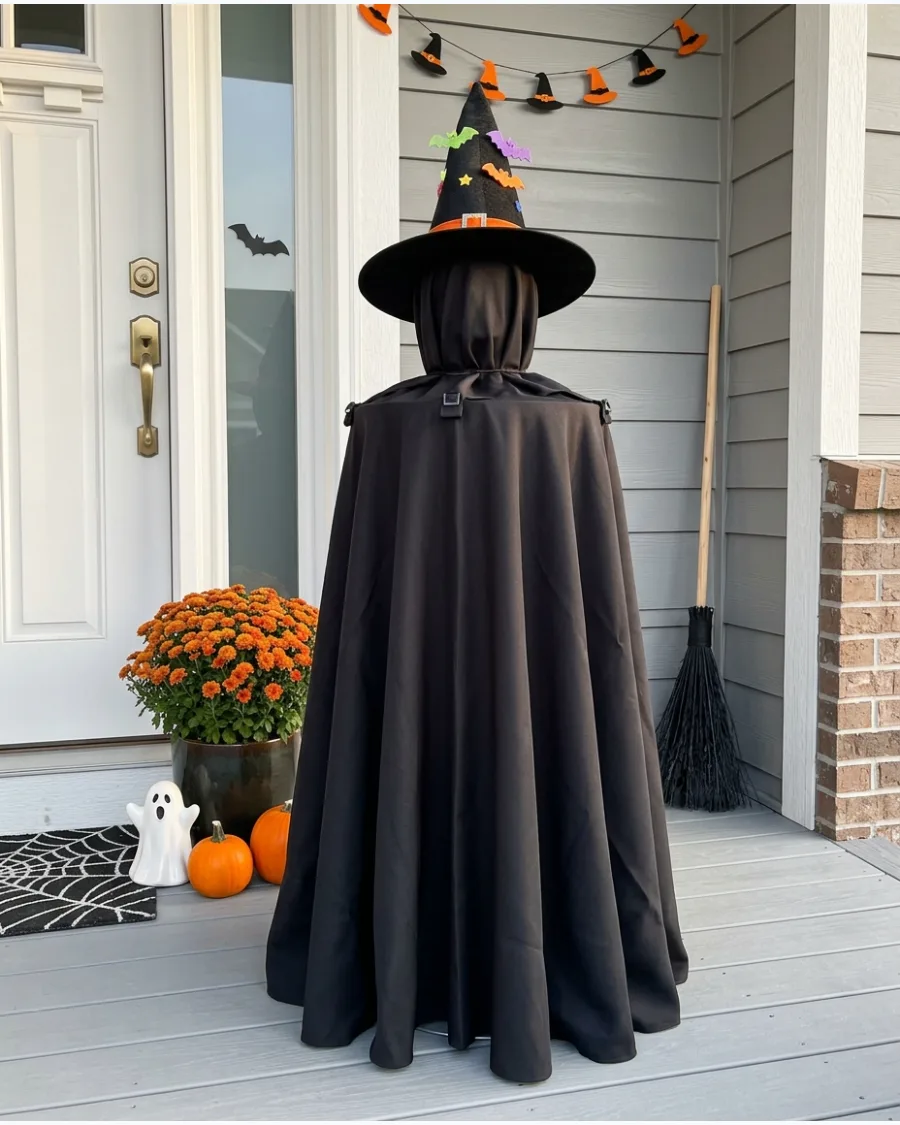
A round fabric tablecloth provides a perfectly even drape all the way around the tomato cage. Because it is already hemmed, it looks more finished than raw fabric scraps.
Position the center of the tablecloth directly over the foam head and let the fabric fall into natural pleats. Round cloths are superior to rectangular ones because they will not have awkward long corners dragging on the ground.
- Budget around $15 for a standard size.
- Washable for use year after year.
- Choose a heavy polyester to resist wrinkles.
Best shortcut: Spray the tablecloth with a fabric protector to keep it from fading in the sun.
7. Witch With a Ribbon Collar
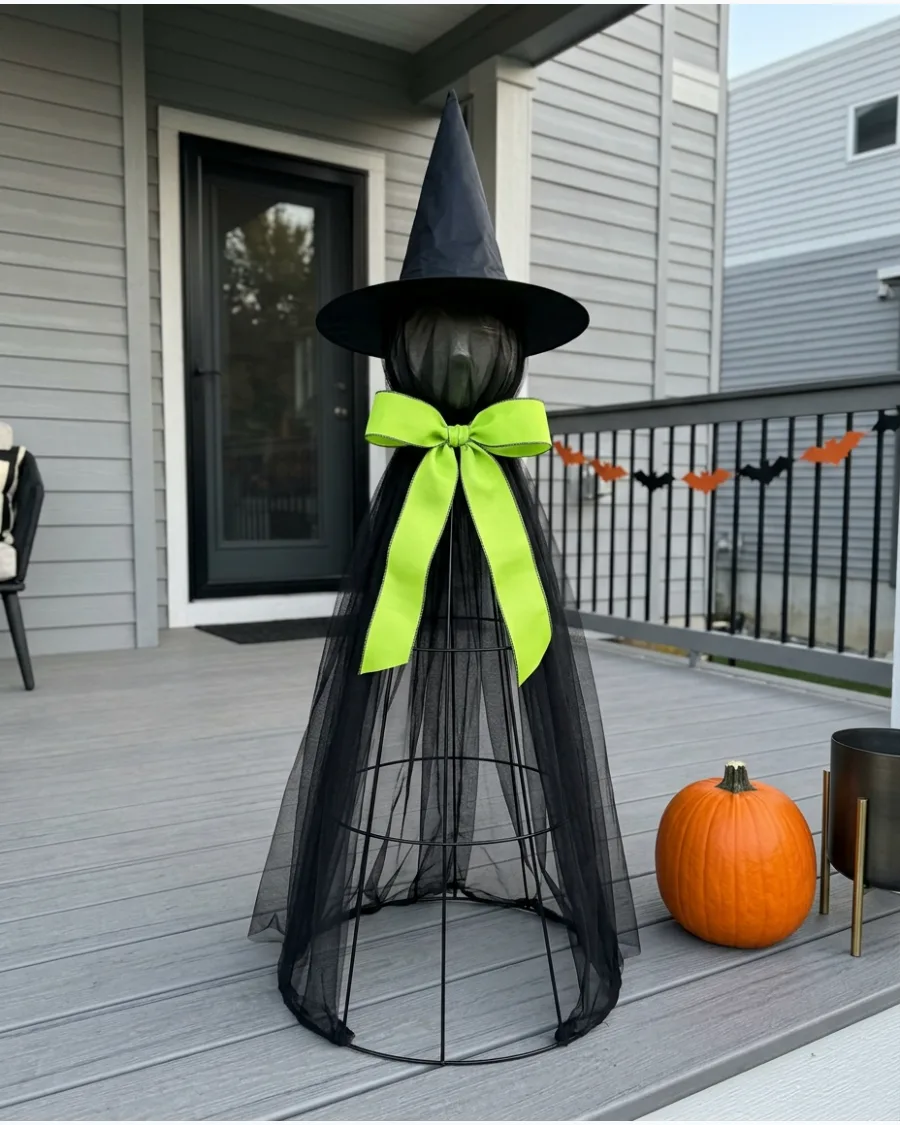
A bright ribbon adds a professional touch and breaks up the solid black silhouette. After the main fabric is in place, wrap a wide, wired ribbon around the neck and tie a large bow.
Choose a ribbon in a contrasting color like lime green or vibrant orange to make the witch stand out against a dark house. Wired ribbon is a must because it holds its shape against the wind.
- Sourcing at craft stores during seasonal sales.
- Takes 2 minutes to add this detail.
- Match the ribbon to your other porch decor for a cohesive look.
Quick win: Use a dab of hot glue to keep the bow from sliding down the fabric.
8. Small Tomato Cage Witch
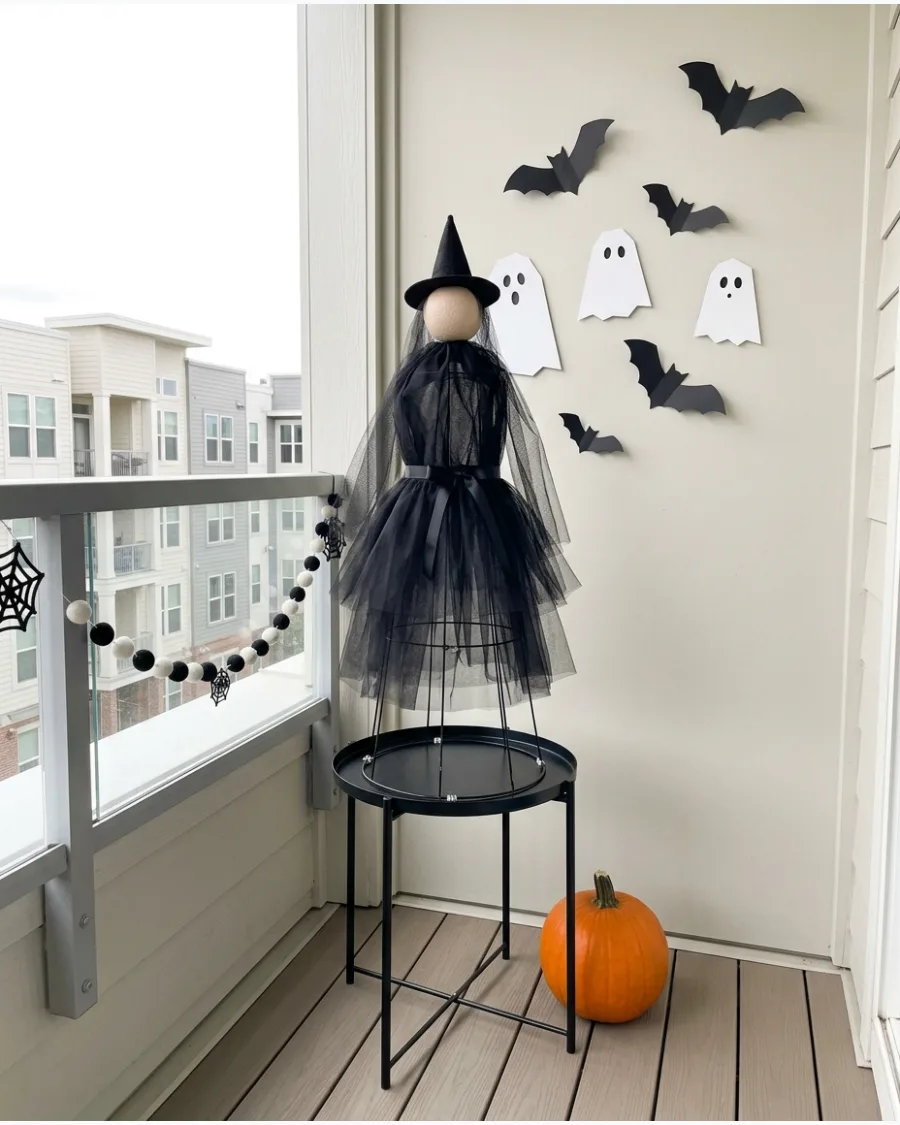
Not every decoration needs to be full-sized to make an impact. Use a 33-inch tomato cage to create a child-sized witch that fits perfectly in tight corners or on a side table.
Scale down the hat and head size so the figure remains balanced and does not look top-heavy. Smaller versions are much easier to store in a standard plastic bin during the off-season.
- Sourcing small cages at garden centers.
- Perfect for apartment balconies or small entries.
- Group three small witches together for a coven effect.
Most people skip this: Weight the bottom ring with a small brick to prevent the lightweight frame from tipping over.
Light-Up Tomato Cage Witch Ideas
9. Warm White Light-Up Witch
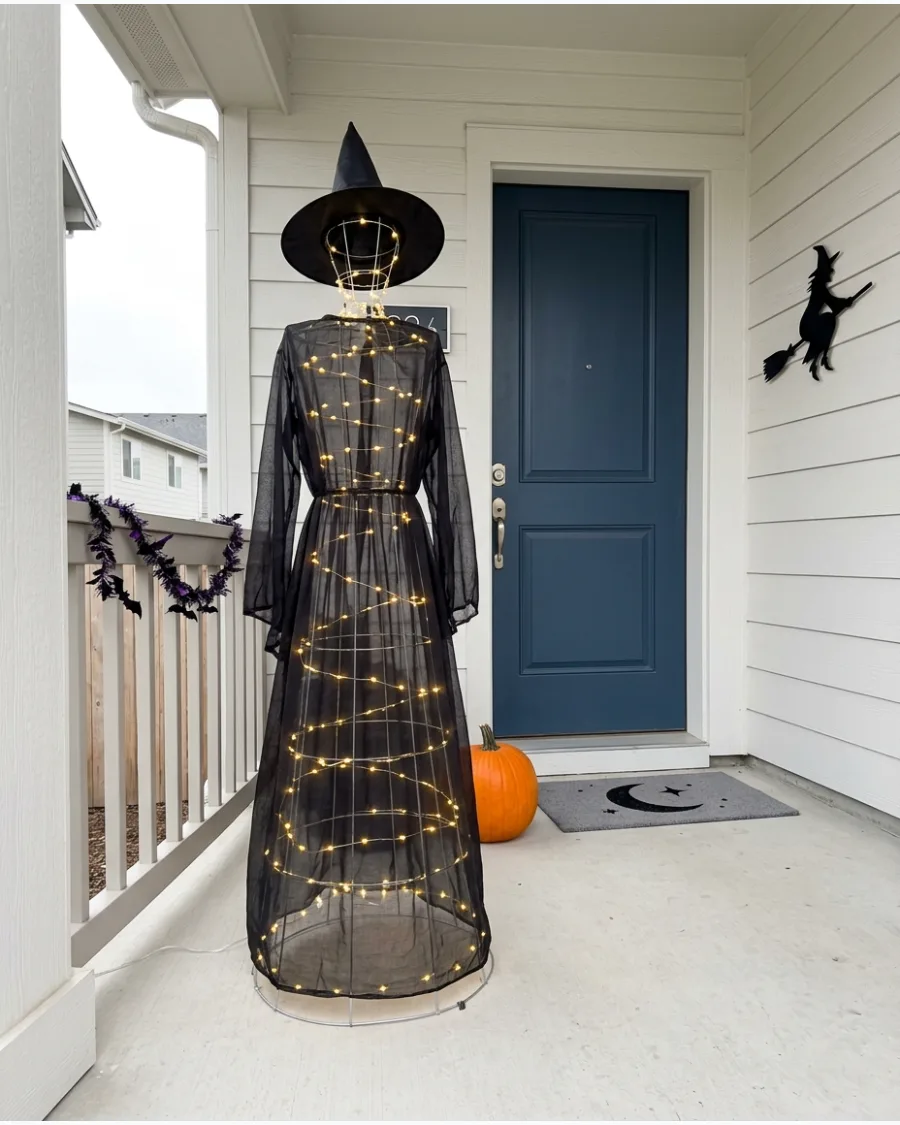
Adding lights inside the frame turns a daytime decoration into a nighttime focal point. Spiral a strand of battery-operated LED lights from the bottom of the cage up to the neck before adding the fabric.
Opt for a semi-sheer fabric like thin cotton so the warm glow can shine through the dress. Warm white lights look more classic and inviting than cool blue tones.
- Sourcing battery lights with timers for convenience.
- Wrap lights tightly to avoid snagging the fabric.
- Use 50 to 100 lights for the best brightness level.
Best shortcut: Zip tie the battery pack to the middle ring of the cage for easy access.
10. Green Glowing Tomato Cage Witch
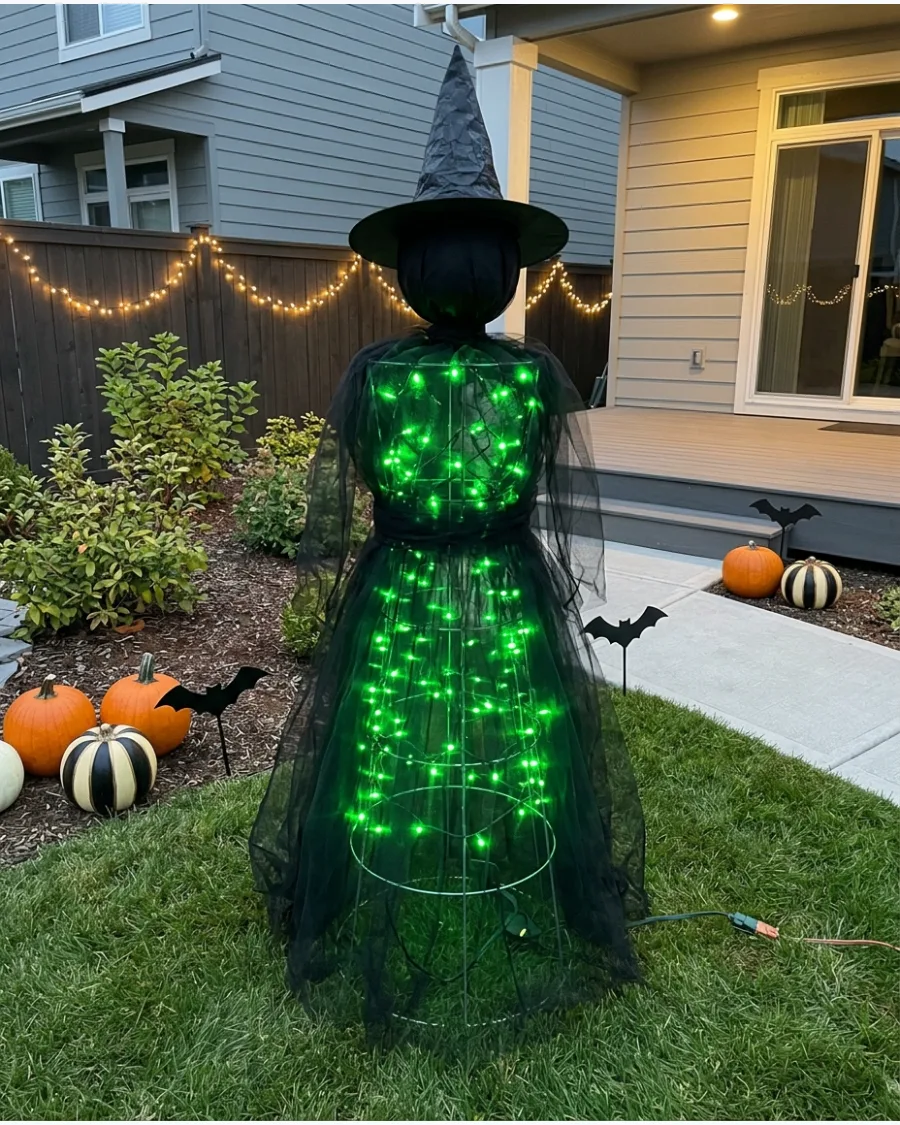
Green lighting gives the witch an eerie, supernatural vibe that is perfect for Halloween. Use green LED fairy lights or a green spotlight positioned inside the cage base.
Cover the cage with black tulle or mesh to allow the maximum amount of green light to escape. The contrast between the black silhouette and the green light creates a very spooky effect on a dark walkway.
- Sourcing green LEDs online or at holiday shops.
- Works best in very dark areas of the yard.
- Combine with a fog machine for a high-impact display.
Quick win: Use a green light bulb in a clip-on shop light if you have an outdoor outlet nearby.
11. Purple Light-Up Witch
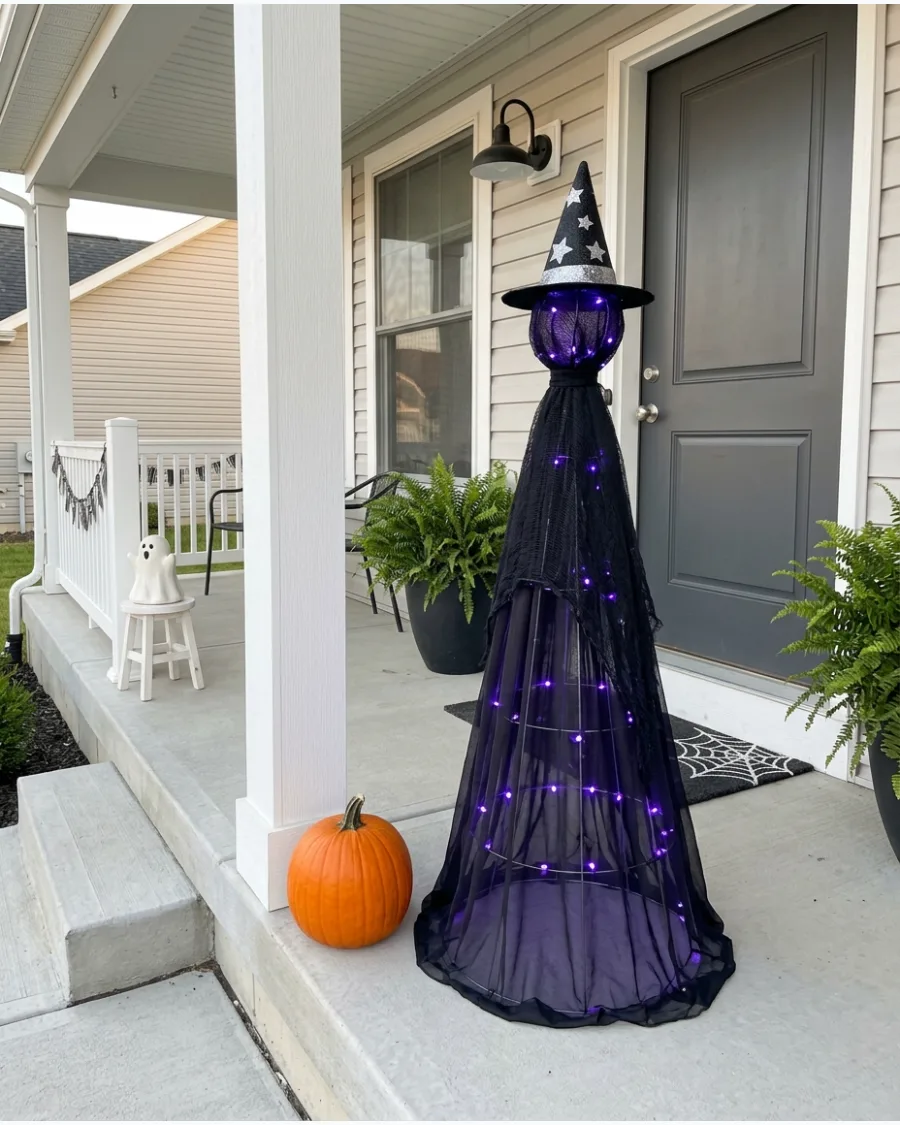
Purple lights add a mystical vibe that breaks up the standard black silhouette. Secure the lights to the cage with zip ties before adding the fabric to keep the wires hidden. A black hat with silver accents finishes the look.
Cool-toned purple LEDs provide a crisp glow that looks much more intentional than standard multi-color strands.
- Purple LED string lights ($10-$15).
- Zip tie the battery pack to the top ring of the cage for easy access.
- Use black mesh fabric to let the purple light shine through clearly.
Quick win: Use cool-toned purple LEDs to avoid a pinkish glow that looks more like a princess than a witch.
12. Orange Halloween Witch
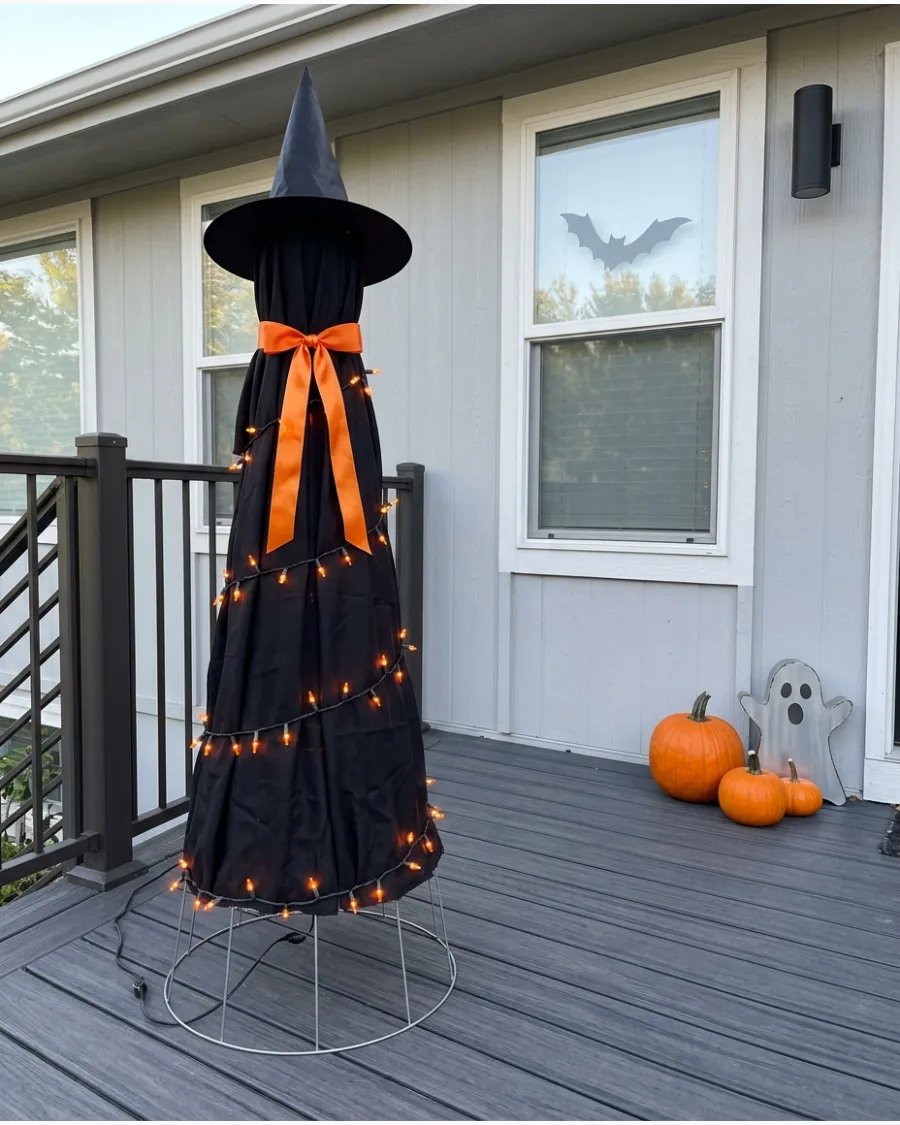
Orange lights create a classic, high-contrast look against black fabric. Wrap the lights in a spiral pattern from bottom to top for even coverage across the entire figure. Match the glow with a wide orange ribbon tied around the neck.
Using incandescent orange bulbs instead of LEDs provides a warmer, flicker-free glow that feels more traditional.
- Orange mini-lights ($8-$12).
- Spiral the lights around the cage struts for maximum visibility.
- Add an orange bow to the hat to tie the color scheme together.
Most people skip this: Use incandescent orange bulbs instead of LEDs for a warmer, flicker-free glow that feels more traditional.
13. Color-Changing Tomato Cage Witch
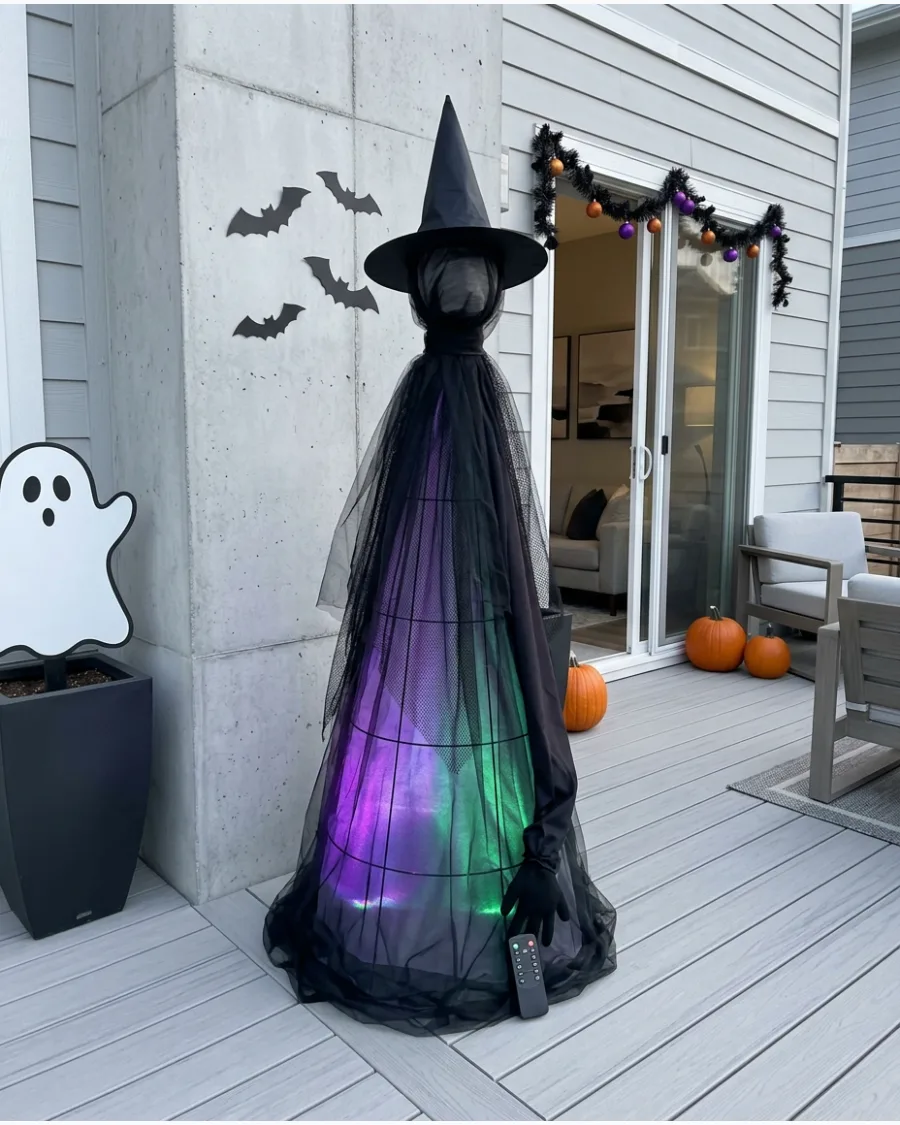
Battery-operated color-changing lights make the decoration dynamic without needing an outlet. Choose a light strand with a remote so you can cycle through colors or set a slow fade effect. The shifting colors prevent the display from looking static at night.
Setting the lights to a slow pulse rather than a fast flash keeps the spooky atmosphere sophisticated.
- RGB color-changing LED lights ($15-$20).
- Tape the remote sensor near the bottom edge of the fabric for easy access.
- Use white fabric underneath black lace to diffuse the colors better.
Best shortcut: Set the lights to a slow pulse rather than a fast flash to keep the spooky atmosphere sophisticated.
14. Glowing Witch Face
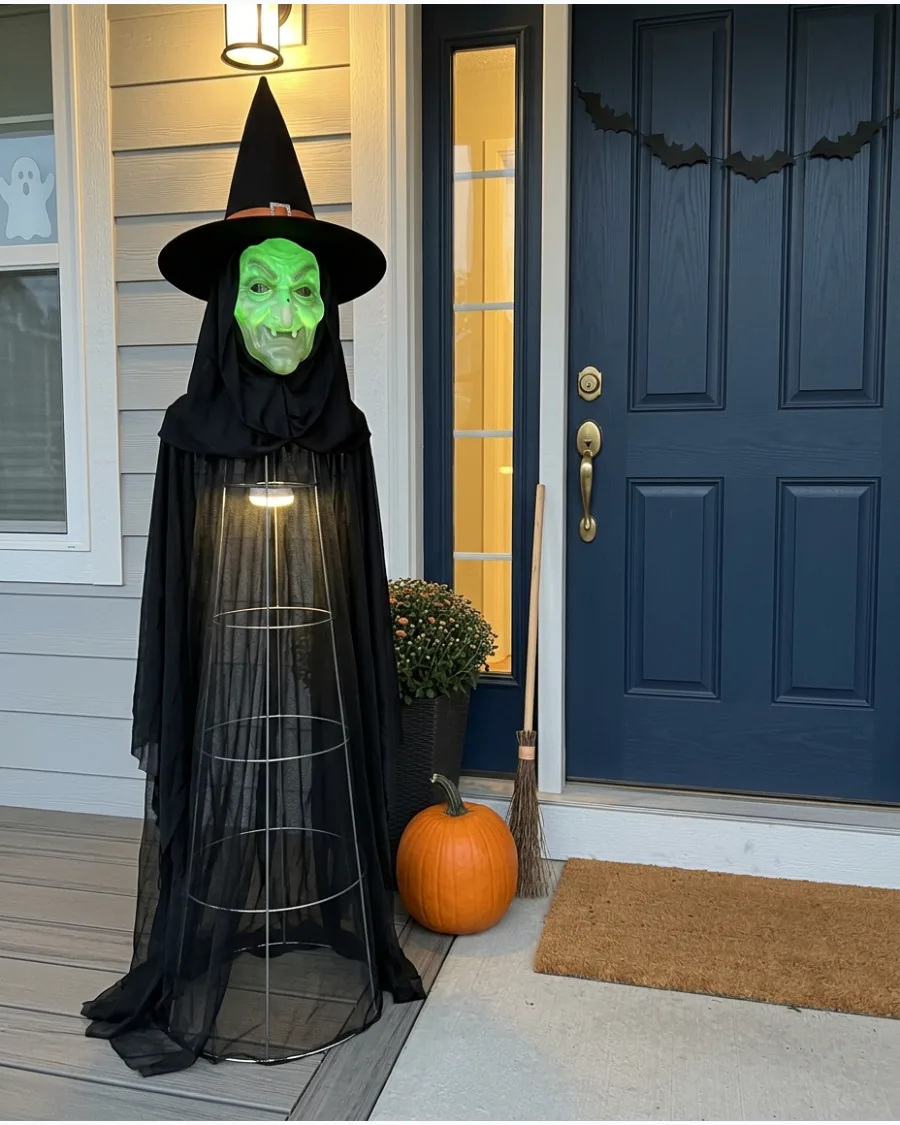
A soft glow behind the mask makes the witch feel more lifelike and imposing. Mount a small LED puck light inside the head support using heavy-duty mounting tape. This highlights the facial features without washing them out.
A warm-white puck light is better than cool-white to avoid a blue tint that makes the mask look cheap.
- Battery-powered LED puck light ($10).
- Use a thin plastic mask that allows light to pass through.
- Mount the light facing forward to avoid shadows on the face.
Quick win: Use a warm-white puck light instead of cool-white to avoid a blue tint that makes the mask look cheap.
15. Starry Witch Dress
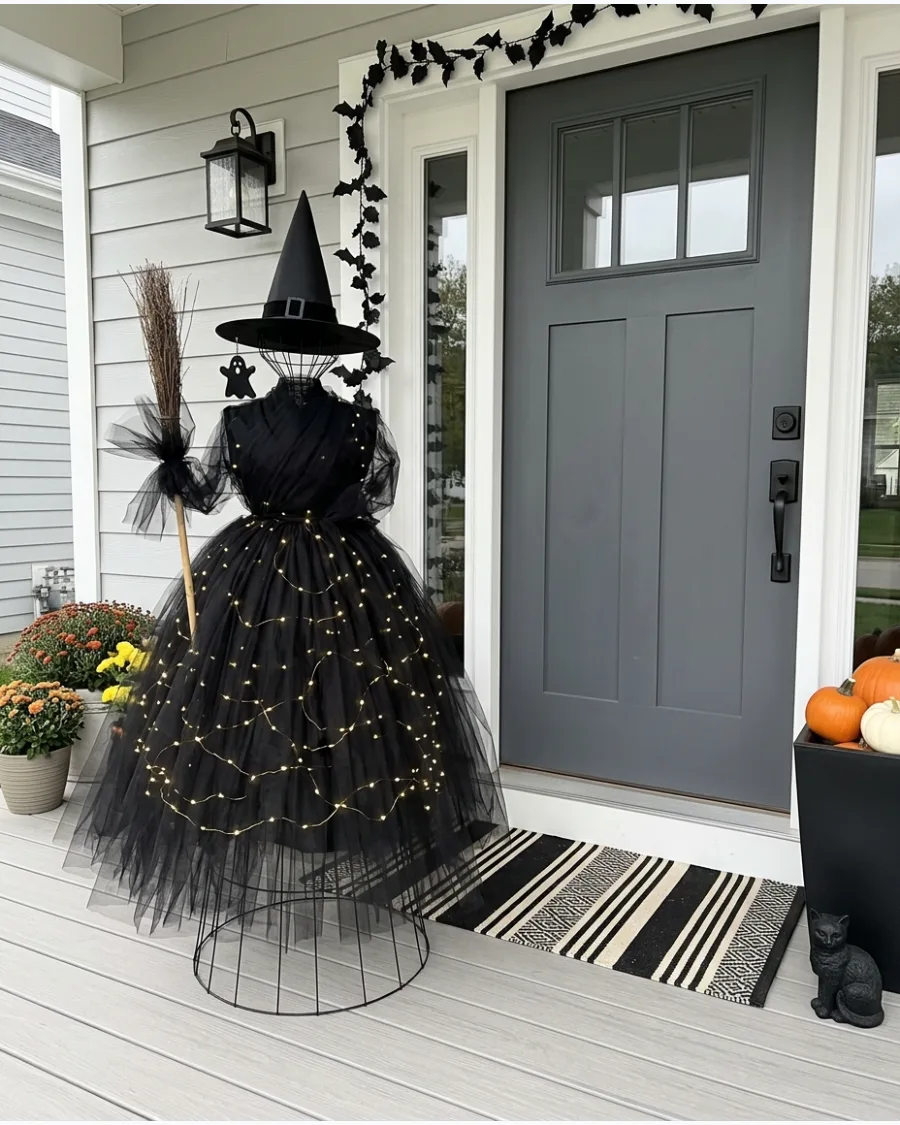
Tiny fairy lights tucked into layers of tulle create a shimmering, magical effect. Weave the lights through the outer layer of fabric rather than the cage to keep the stars visible. This adds depth and texture to the witch's silhouette.
Battery-operated lights with a timer ensure the stars come on automatically at dusk every night.
- Copper wire fairy lights ($12).
- Layer three or four sheets of tulle for a full, starry skirt.
- Use clear clips to hold the lights in place on the fabric.
Most people skip this: Use battery-operated lights with a timer so the stars come on automatically at dusk.
16. Solar-Powered Yard Witch
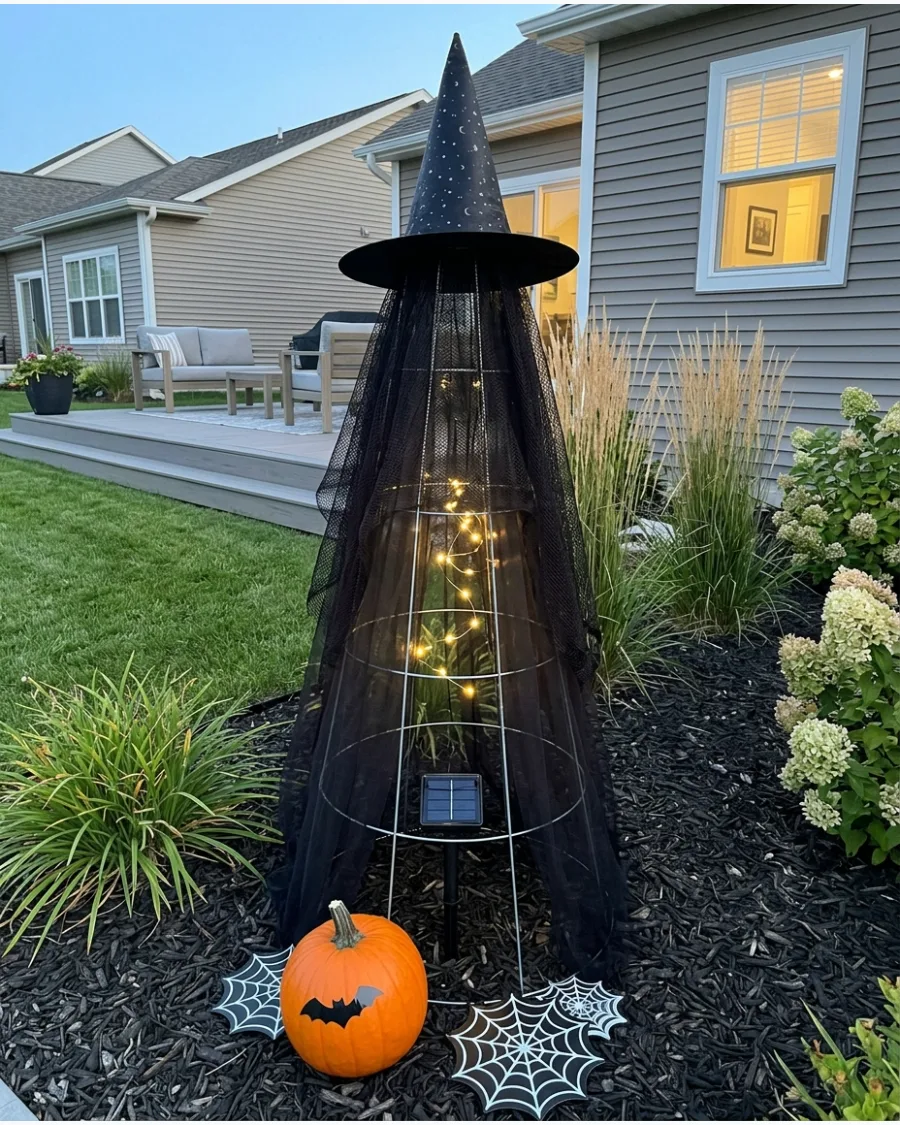
Solar lights are perfect for witches placed far from the house in the yard or garden. Position the solar panel on a stake at the base of the witch where it gets at least six hours of sun. This eliminates the need for extension cords across the lawn.
Choosing warm white solar lights prevents the blueish tint that often makes outdoor solar bulbs look unnatural.
- Solar-powered outdoor string lights ($15).
- Stake the cage into the ground with U-pins to prevent tipping in the wind.
- Hide the solar wire along one of the cage legs.
Best shortcut: Choose warm white solar lights, as cool white solar bulbs often have a blueish tint that looks unnatural outdoors.
Tomato Cage Witch Trio Ideas
17. Three Witches Around a Cauldron
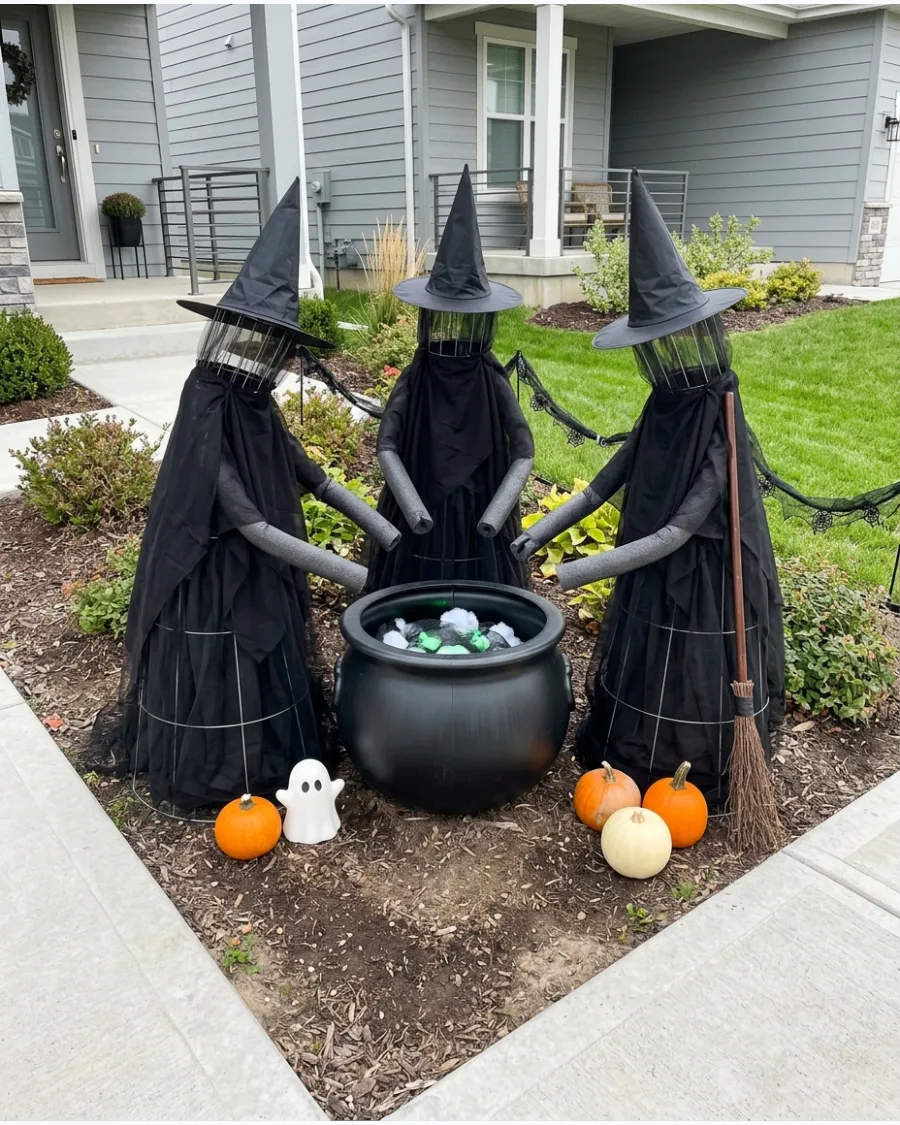
Grouping three witches creates a storytelling element that a single figure lacks. Tilt the top of each tomato cage slightly toward the center to make them look like they are leaning over the pot. A large plastic cauldron in the middle anchors the scene.
Stuffing old pool noodles into the sleeves creates realistic arms that reach toward the bubbling pot.
- Large plastic cauldron ($20).
- Use black zip ties to secure the hands of the witches to the cauldron rim.
- Fill the cauldron with dry ice or green lights for a bubbling effect.
Quick win: Stuff old pool noodles into the sleeves of the witches to create arms that reach toward the cauldron.
18. Different-Height Witch Coven
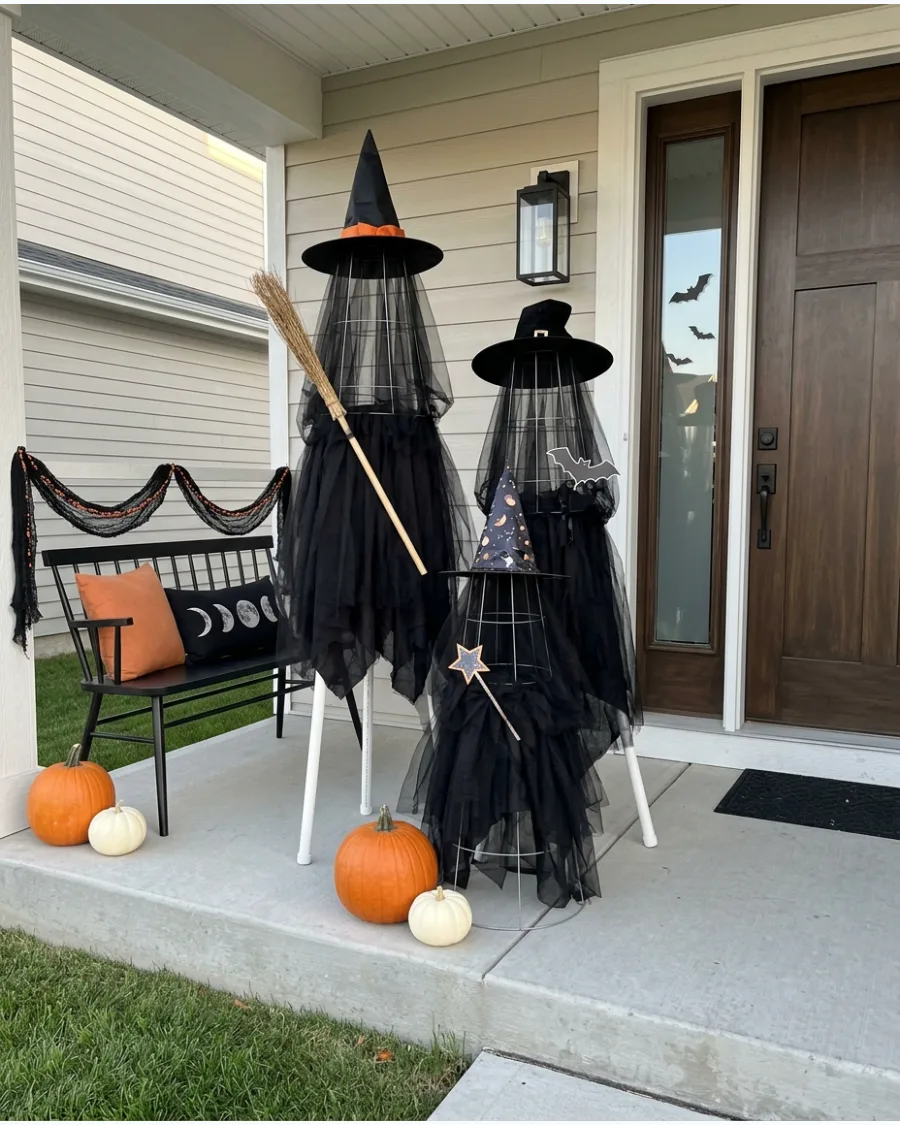
Using different cage sizes adds visual interest and makes the group look more realistic. Cut the legs off one cage and extend the legs of another with PVC pipe to vary the heights. Give each witch a unique accessory, like a broom or a different hat.
Placing the tallest witch in the back and the shortest in front creates a sense of depth in the display.
- Assorted tomato cage sizes (33, 42, 54 inches).
- Use different textures of black fabric like velvet, lace, and polyester.
- Add different colored wigs under the hats for personality.
Most people skip this: Place the tallest witch in the back and the shortest in front to create a sense of depth in the display.
19. Matching Witch Sisters
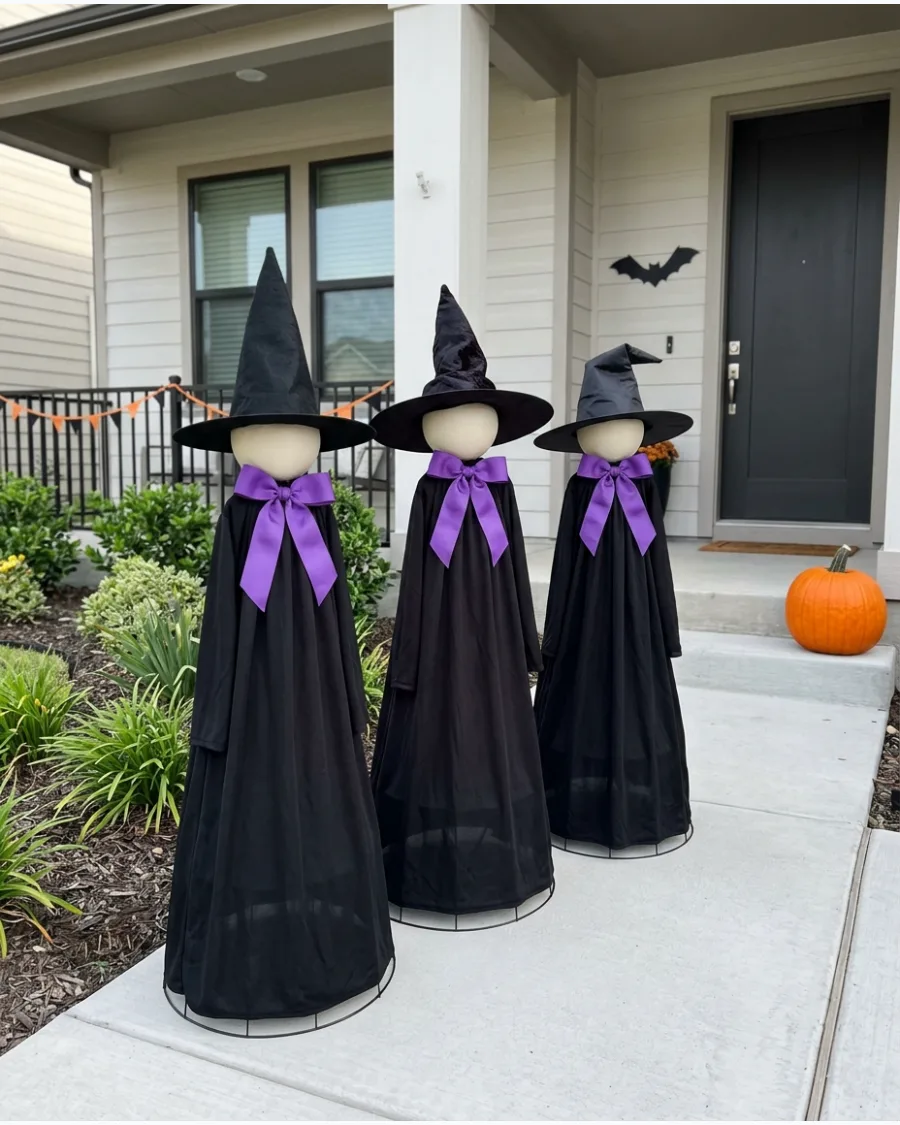
A uniform look with small variations creates a clean, intentional design. Use the same black fabric for all three dresses but give each witch a different hat shape or height. Matching purple ribbons at the neck tie the trio together visually.
Buying fabric in bulk bolts rather than by the yard saves money and ensures the dye lots match perfectly.
- 10 yards of black polyester fabric ($30).
- 3-inch wide purple grosgrain ribbon.
- Use identical foam heads to ensure the heights stay consistent.
Best shortcut: Buy fabric in bulk bolts rather than by the yard to save money and ensure the dye lots match perfectly.
20. Color-Coded Witch Trio
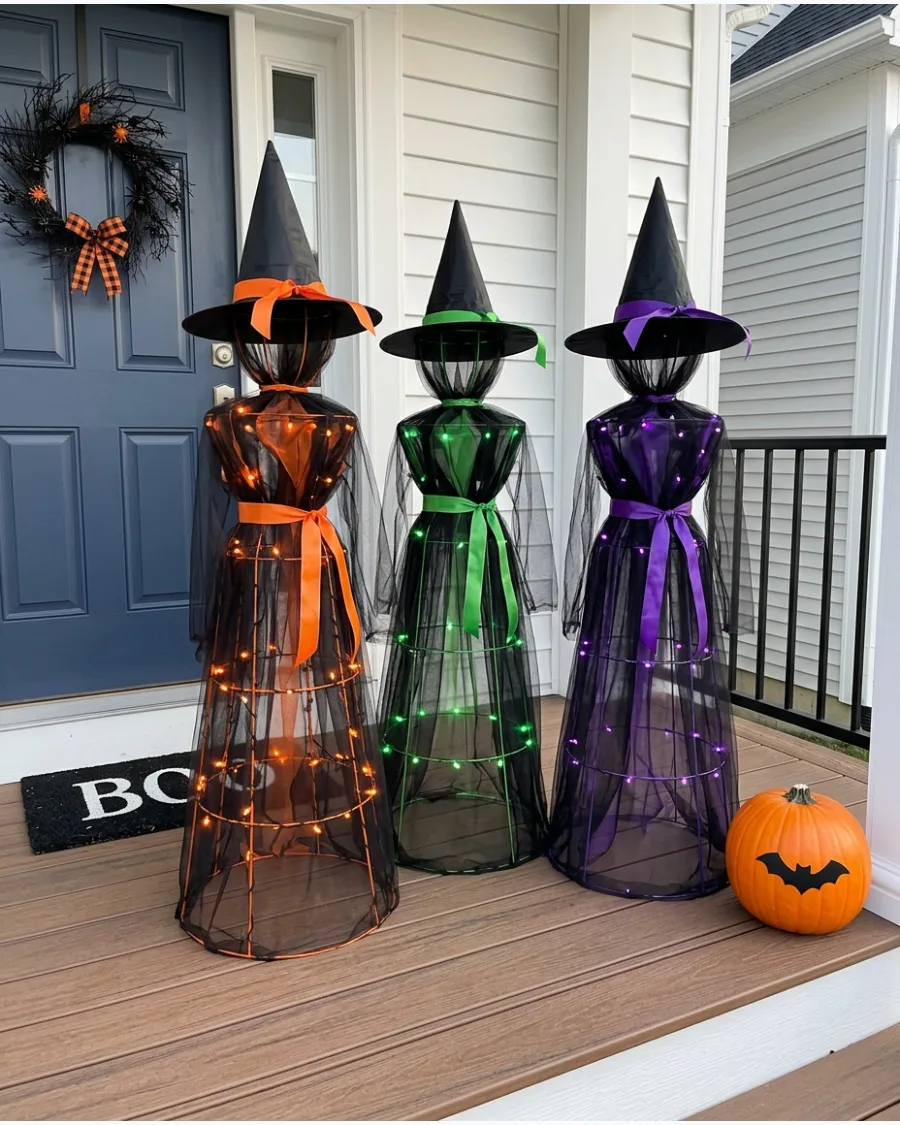
Assigning a specific color to each witch makes the display pop and helps differentiate the figures. Use purple, green, and orange lights and ribbons to give each sister her own identity. This is a great way to use standard Halloween colors in a coordinated way.
Spray painting the tomato cages the same color as the lights helps the metal frame blend in if the fabric shifts.
- Purple, green, and orange LED lights.
- Matching colored ribbon for the hats.
- Use color-coordinated ornaments or potions hanging from their hands.
Quick win: Spray paint the tomato cages the same color as the lights so the metal frame blends in perfectly if the fabric shifts.
21. Witch Coven With Joined Hands
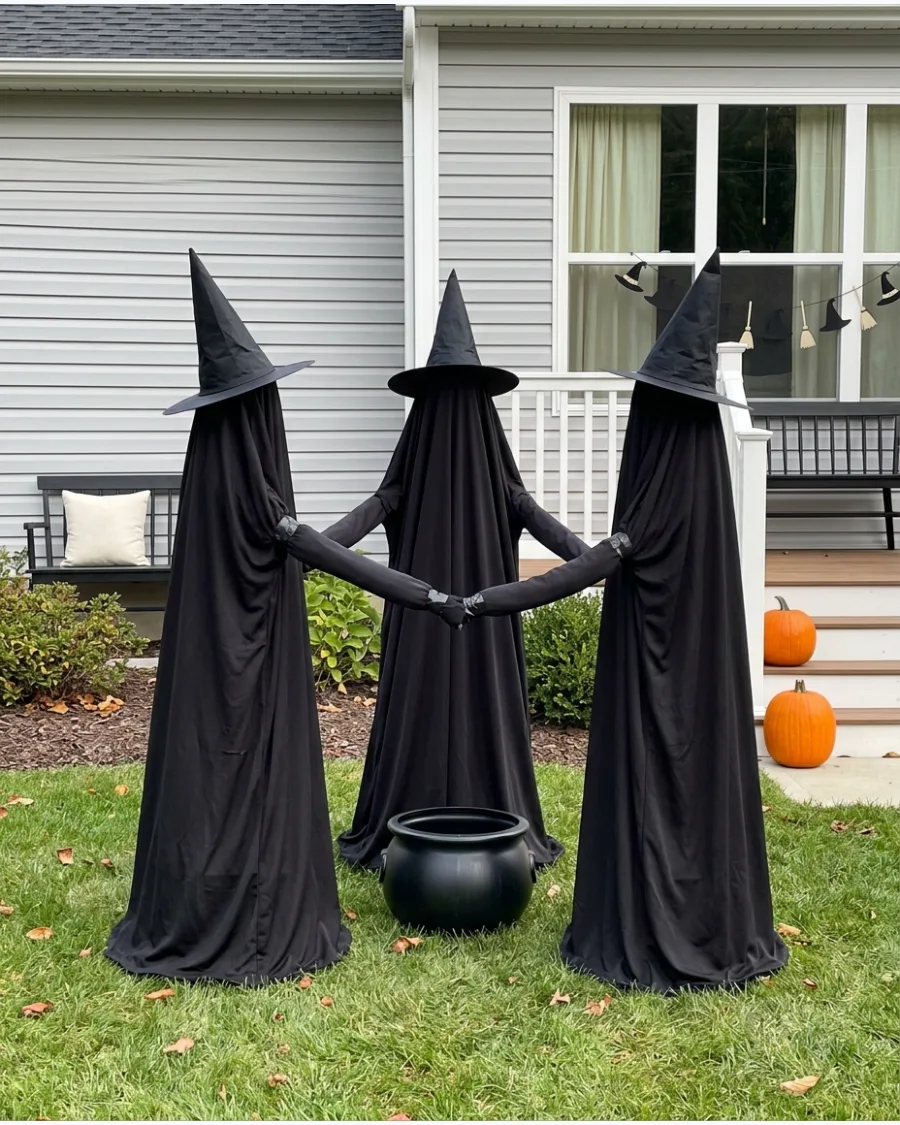
Build simple arms using pool noodles covered in black fabric to link the figures together. This setup creates a sense of movement and community that looks far more intentional than three separate statues.
Position the witches in a tight circle around a central prop like a cauldron to hide the cage bases. Expert opinion: Connecting the figures makes the whole display more stable against wind.
- Sourcing: Standard black pool noodles or pipe insulation from a hardware store.
- Setup: Zip tie the noodle arms to the top ring of the tomato cage before draping the main fabric.
- Adaptation: Use different heights of cages to create a more natural group look.
Best shortcut: Use black duct tape to secure the noodle arms to the cage before draping the fabric.
22. Three Glowing Green Witches
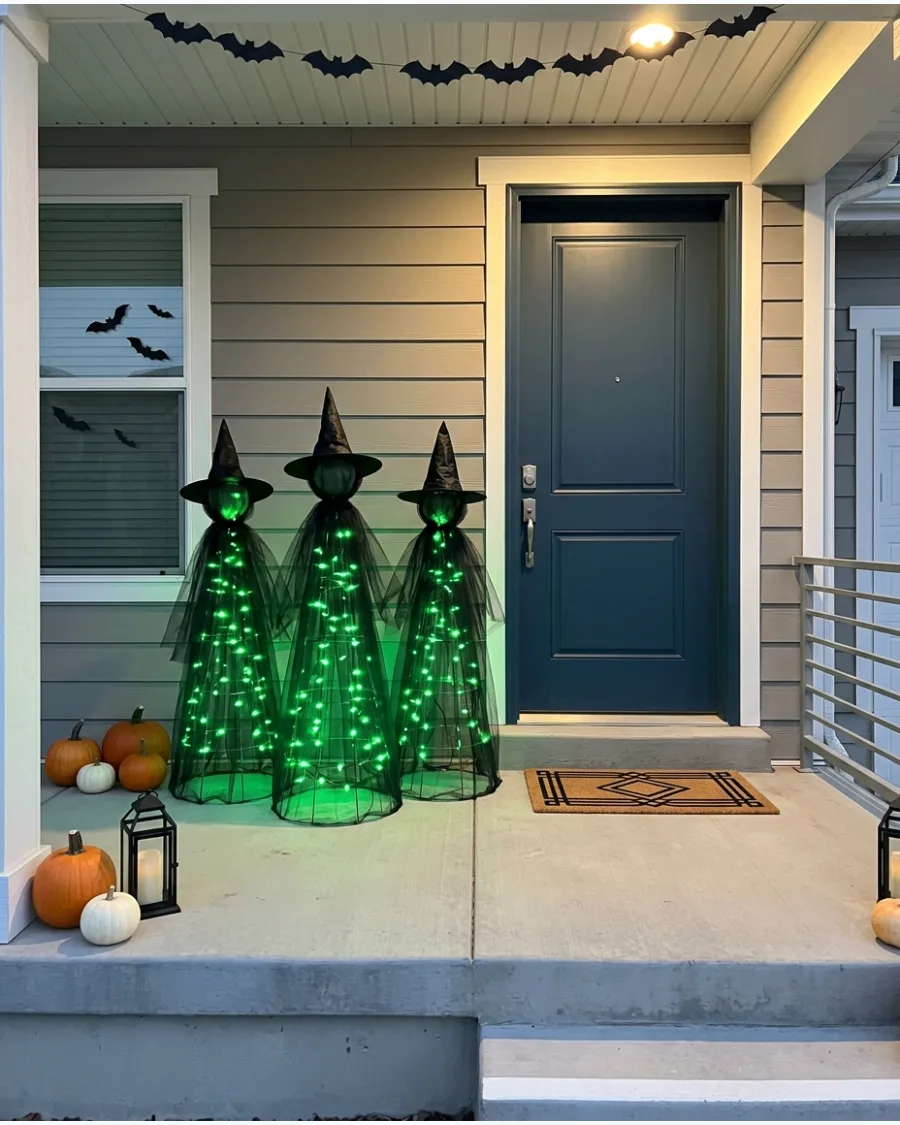
Tuck battery-operated green LED string lights inside each tomato cage frame before adding the fabric. The uniform color makes the trio look like a matched set and provides enough light to see the silhouettes from the street.
Choose a sheer black mesh or tulle so the green light can easily punch through the fabric layers. Expert opinion: Green light is the most visible color for night displays without being too harsh.
- Sourcing: Battery-operated LED fairy lights with a built-in timer.
- Setup: Wrap lights around the vertical wires of the cage to ensure the glow is even from top to bottom.
- Adaptation: Set the lights to a timer to save battery life throughout the month of October.
Quick win: Use green glow sticks for a one-night party if you do not want to deal with batteries.
23. Witch Trio With Different Hairstyles
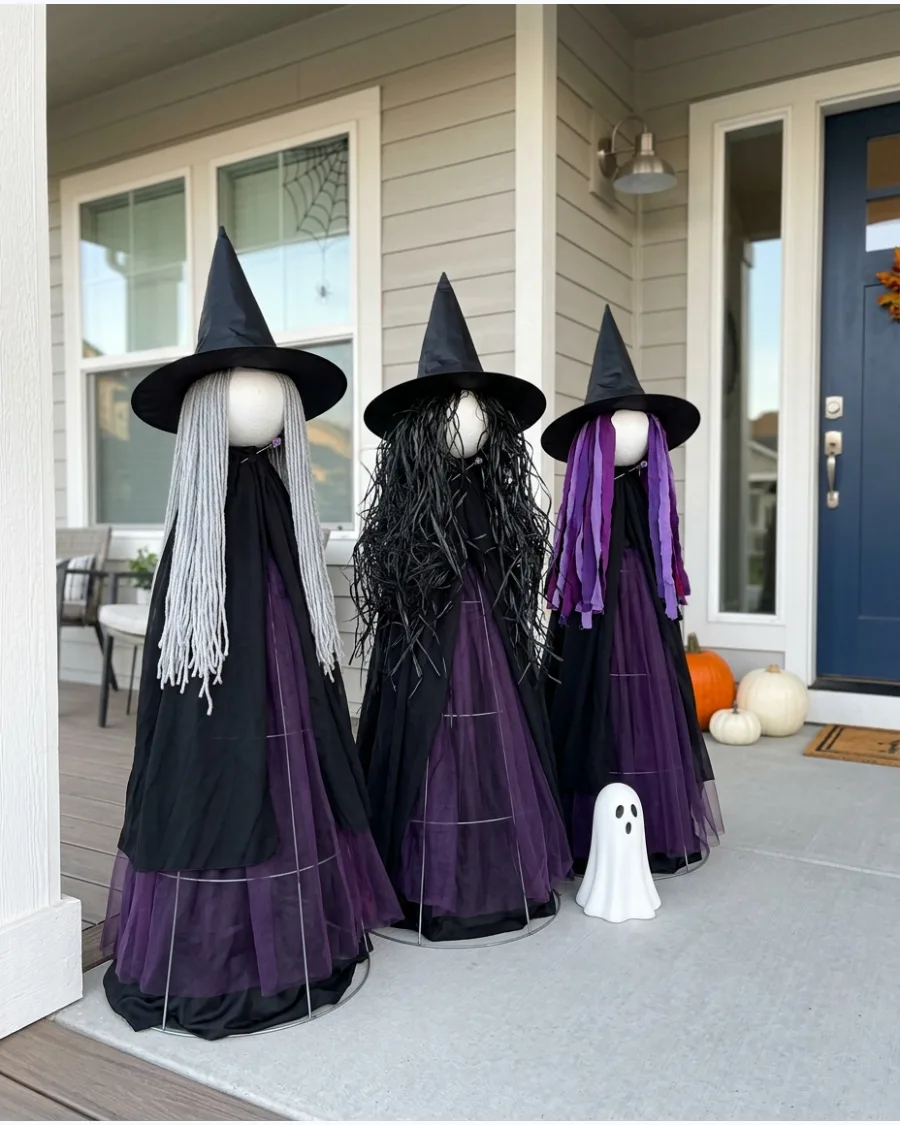
Distinguish each member of the coven by adding unique wigs made from gray yarn, black raffia, or strips of fabric. These lightweight materials will not tip the foam ball heads but add a lot of character to the simple shapes.
Secure the hair to the foam head with long floral pins before placing the hat on top. Expert opinion: Raffia gives a great swamp-witch texture that holds up well in rain.
- Sourcing: Raffia or bulky acrylic yarn from a craft aisle.
- Setup: Pin the hair materials to the top of a foam craft ball using U-shaped floral pins.
- Adaptation: Braid the yarn for a more structured, neat look on one of the witches.
Most people skip this: Trim the hair after the hat is on to make sure it does not cover the entire face area.
24. Family-Friendly Witch Coven

Swap spooky masks for smiling faces and bright, colorful ribbons to create a welcoming display. Surround the base of the witches with real or plastic pumpkins to ground the scene and add a pop of orange.
Use warm white lights instead of flickering or colored ones to keep the mood cheerful for young trick-or-treaters. Expert opinion: A friendly display is often more memorable for neighbors than a scary one.
- Sourcing: Artificial pumpkins and wide satin ribbon in bright colors.
- Setup: Cluster pumpkins around the bottom of the cages to hide the metal feet and provide weight.
- Adaptation: Use glittery fabric to make the witches look more magical than spooky.
Best shortcut: Use large outdoor-rated googly eyes for an instant friendly look.
Cute Tomato Cage Witch DIY Ideas
25. Friendly Faceless Witch
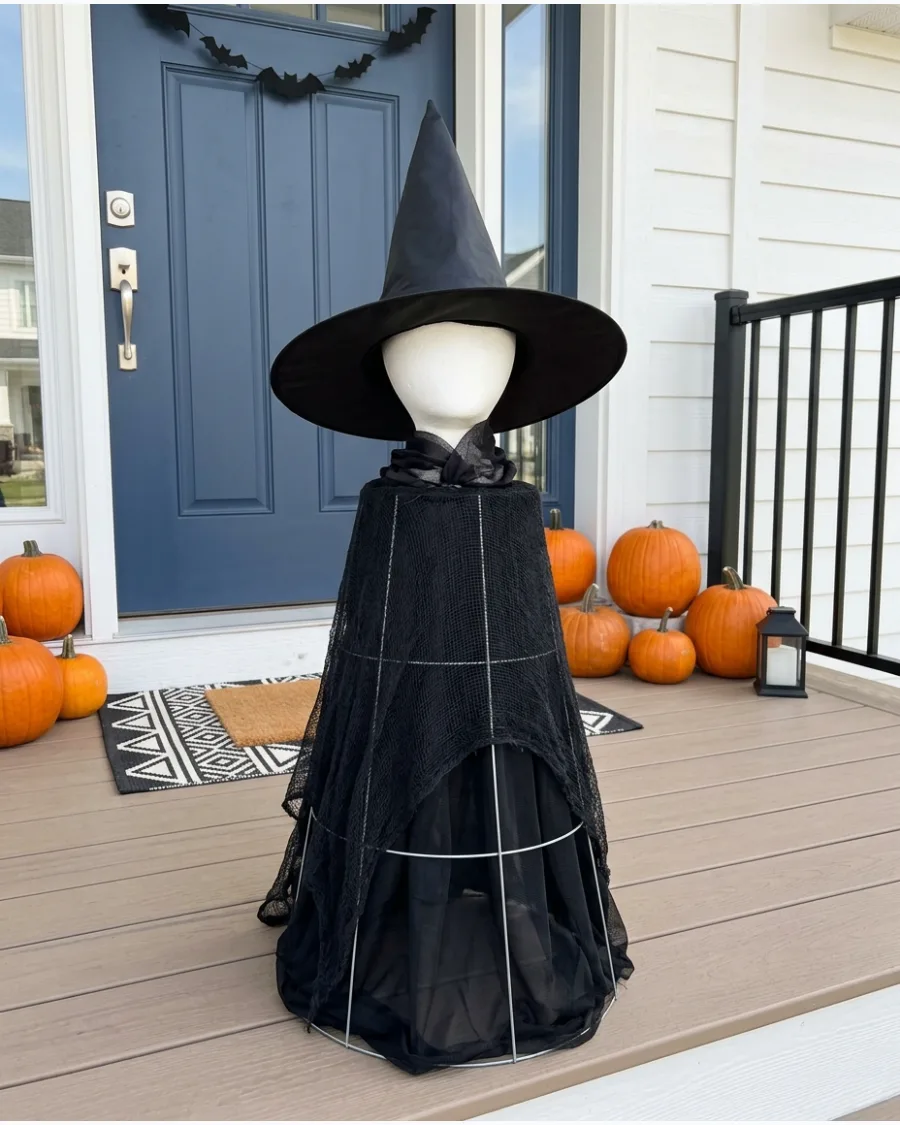
Skip the face details entirely and let the brim of the witch hat rest low on the foam ball head.
This minimalist approach looks modern and avoids the uncanny valley of poorly painted faces. Pull the hat down until only the very bottom of the head is visible to create a mysterious but cute silhouette. Expert opinion: Faceless decorations often look more expensive and professional than those with hand-painted features.
- Sourcing: Large foam craft ball and a standard felt witch hat.
- Setup: Push the foam ball onto the spikes of the inverted tomato cage for a secure fit.
- Adaptation: Paint the foam ball a solid color like green or purple if you want a pop of color without a face.
Quick win: Use a dab of hot glue to keep the hat brim at the perfect low angle.
26. Smiling Pumpkin-Head Witch
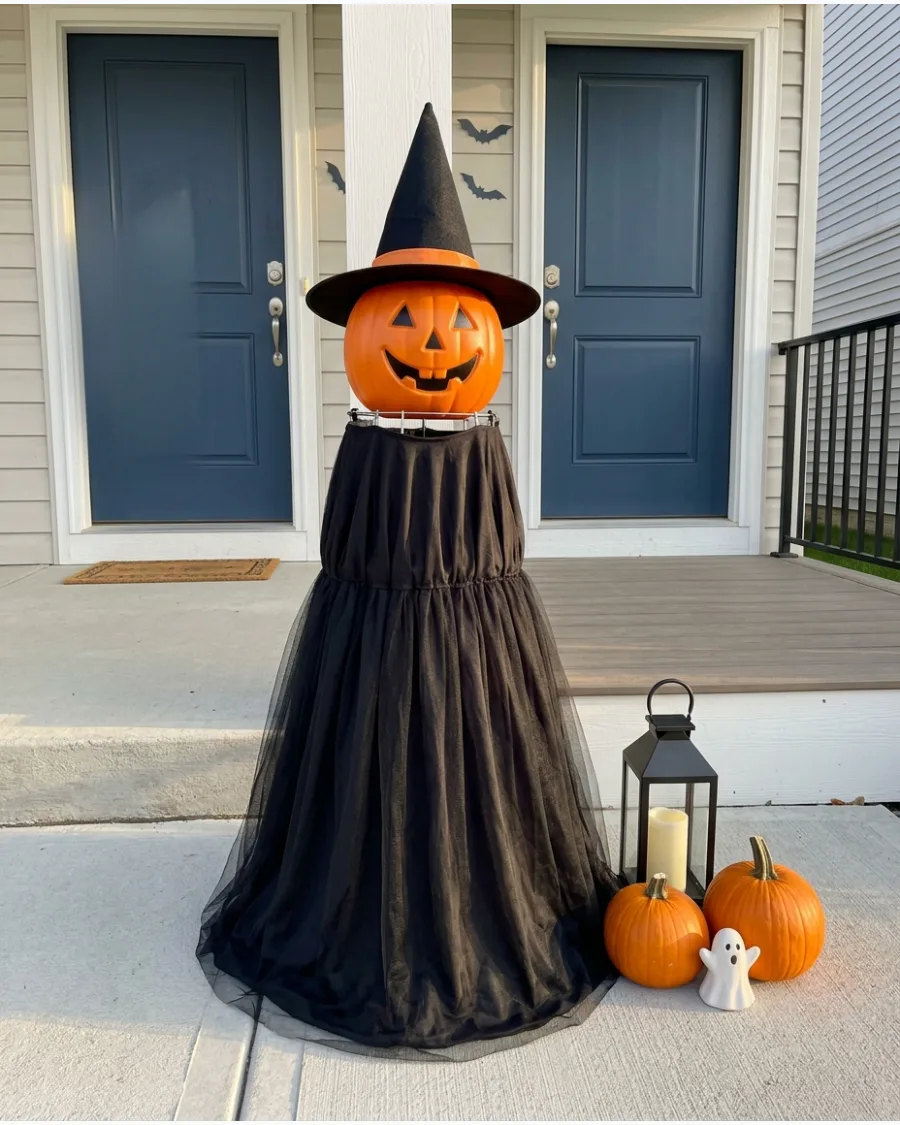
Replace the standard foam ball with a lightweight plastic jack-o-lantern for a classic Halloween mashup. The orange head provides a great contrast against the black dress and eliminates the need for extra lighting.
Choose a pumpkin with a flat bottom so it sits securely on the top ring of the cage. Expert opinion: Plastic pumpkins are much lighter than real ones and will not rot or attract pests.
- Sourcing: Plastic trick-or-treat buckets or lightweight foam pumpkins.
- Setup: Cut a small hole in the bottom of the pumpkin to fit over the cage wires.
- Adaptation: Use a white ghost pumpkin for a different color palette.
Most people skip this: Weight the bottom of the pumpkin with a few rocks if it feels top-heavy.
27. Polka-Dot Witch Dress
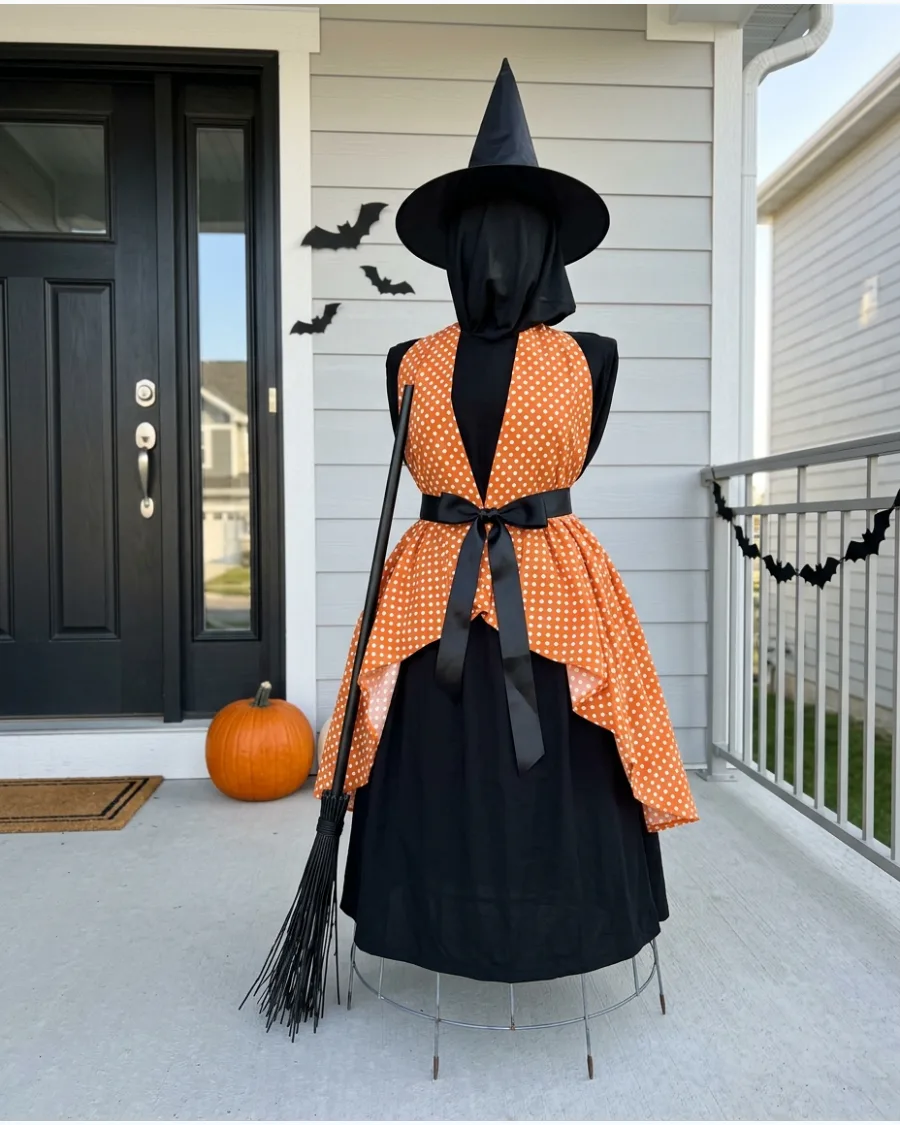
Layer a piece of patterned fabric over the basic black base to give your witch a more fashionable look. Polka dots in orange or purple add a playful, vintage feel that stands out from plain black decorations.
Secure the patterned fabric at the waist of the cage with a wide ribbon to create a flared skirt effect. Expert opinion: Mixing patterns makes a DIY project look like a high-end boutique find.
- Sourcing: One yard of cotton or polyester patterned fabric from a local craft store.
- Setup: Drape the pattern over the top and cinch it with a zip tie or ribbon.
- Adaptation: Use striped fabric for a more whimsical, Wizard of Oz style.
Best shortcut: Use a patterned tablecloth for a cheap, weather-resistant fabric option.
28. Pink Tomato Cage Witch
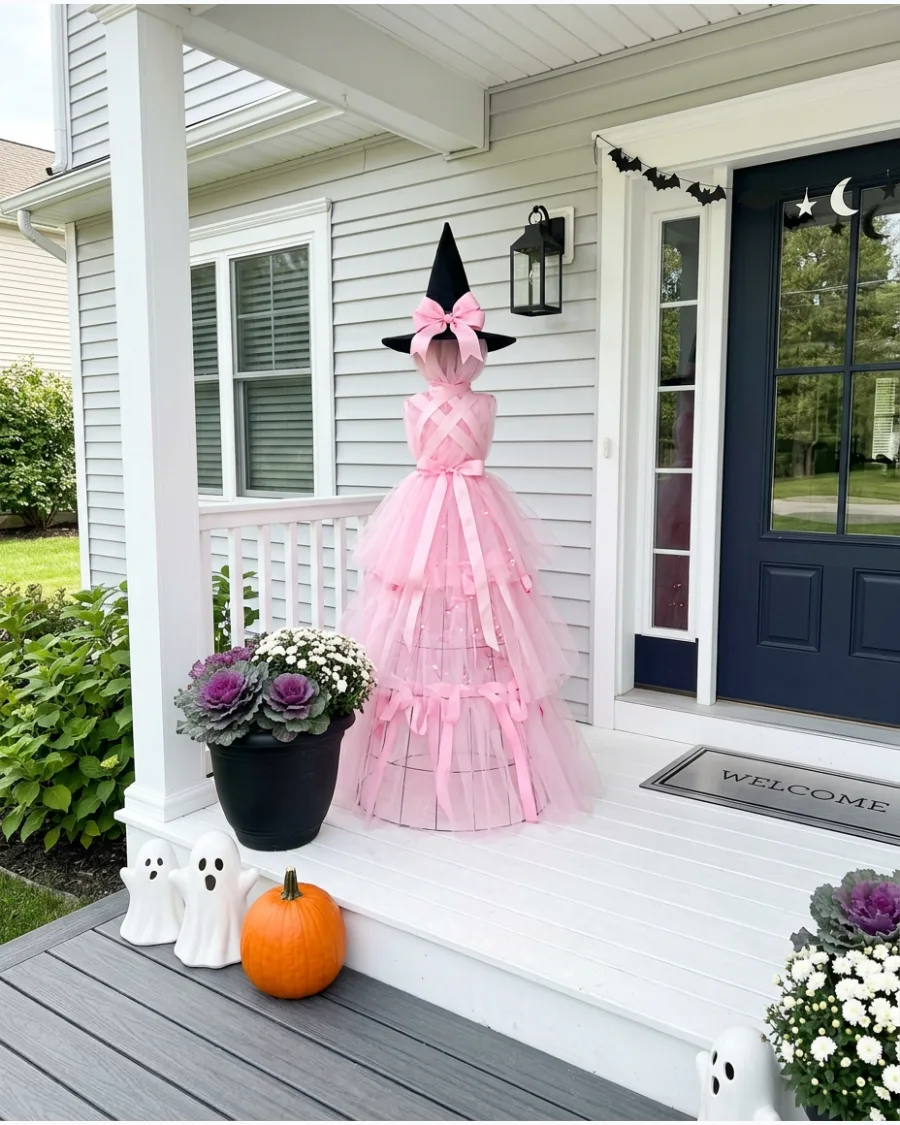
Move away from traditional colors by using pink tulle and ribbons for a good witch aesthetic. This look is perfect for a softer Halloween theme or to match a house with lighter exterior colors.
Wrap the cage in pink battery-operated lights to make the light-colored fabric glow brightly at night. Expert opinion: Pink is a huge trend in holiday decor right now and looks surprisingly great with black accents.
- Sourcing: Pink tulle rolls and pink LED lights.
- Setup: Layer pink tulle over a white or black base for extra volume.
- Adaptation: Add a silver wand or stars for a fairy-witch hybrid.
Quick win: Spray paint the tomato cage silver or white first so the dark metal does not show through the pink fabric.
29. Purple Witch With Striped Legs
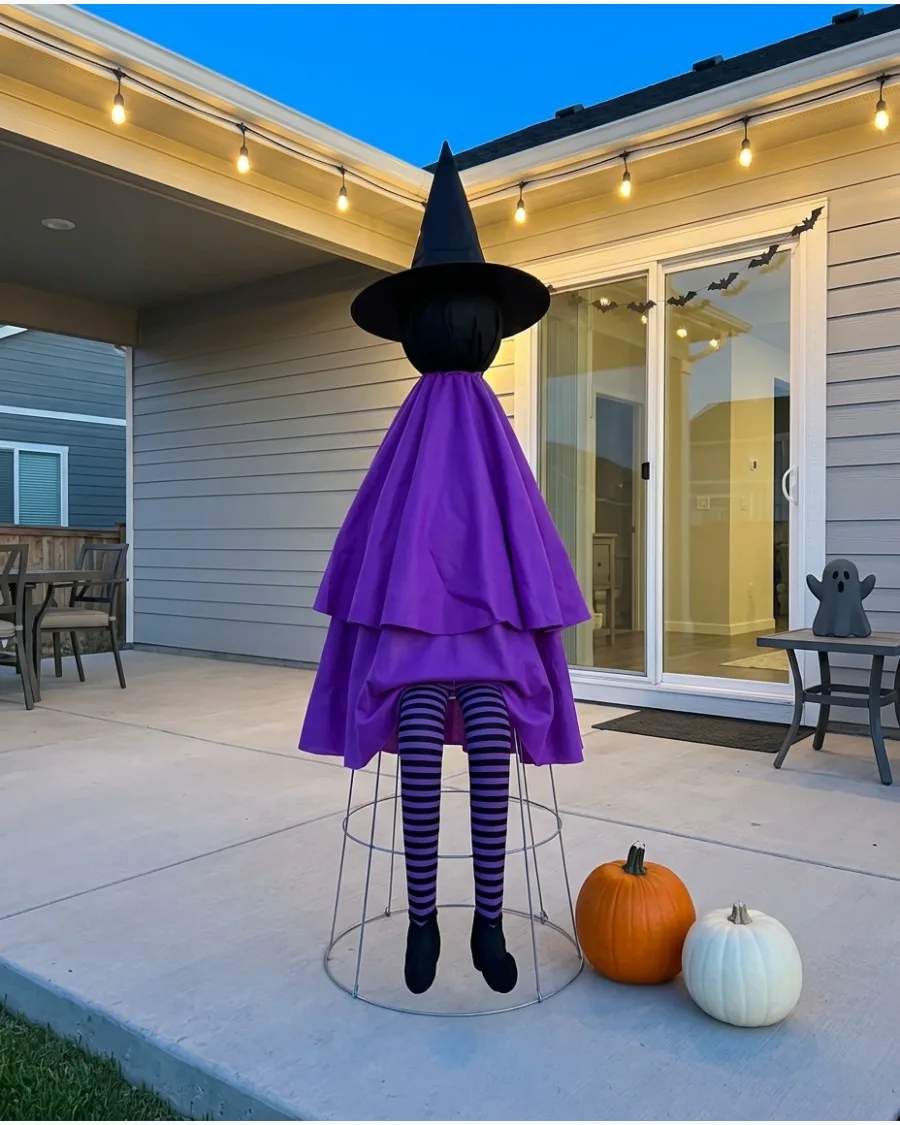
Give your witch a sense of scale by adding stuffed legs that peek out from under the fabric. Use striped tights filled with plastic bags or polyester stuffing and finish them with small pointed shoes.
Wire the top of the tights to the middle ring of the cage so they dangle naturally above the ground. Expert opinion: Adding legs makes the witch look like she is hovering, which adds a great spooky-cute effect.
- Sourcing: Striped Halloween tights and lightweight stuffing.
- Setup: Zip tie the top of the stuffed tights to the cage frame.
- Adaptation: Use pool noodles inside the tights for stiffer, more poseable legs.
Most people skip this: Stuff the feet with more material than the legs to help the shoes hold their shape.
30. Witch With a Tulle Tutu
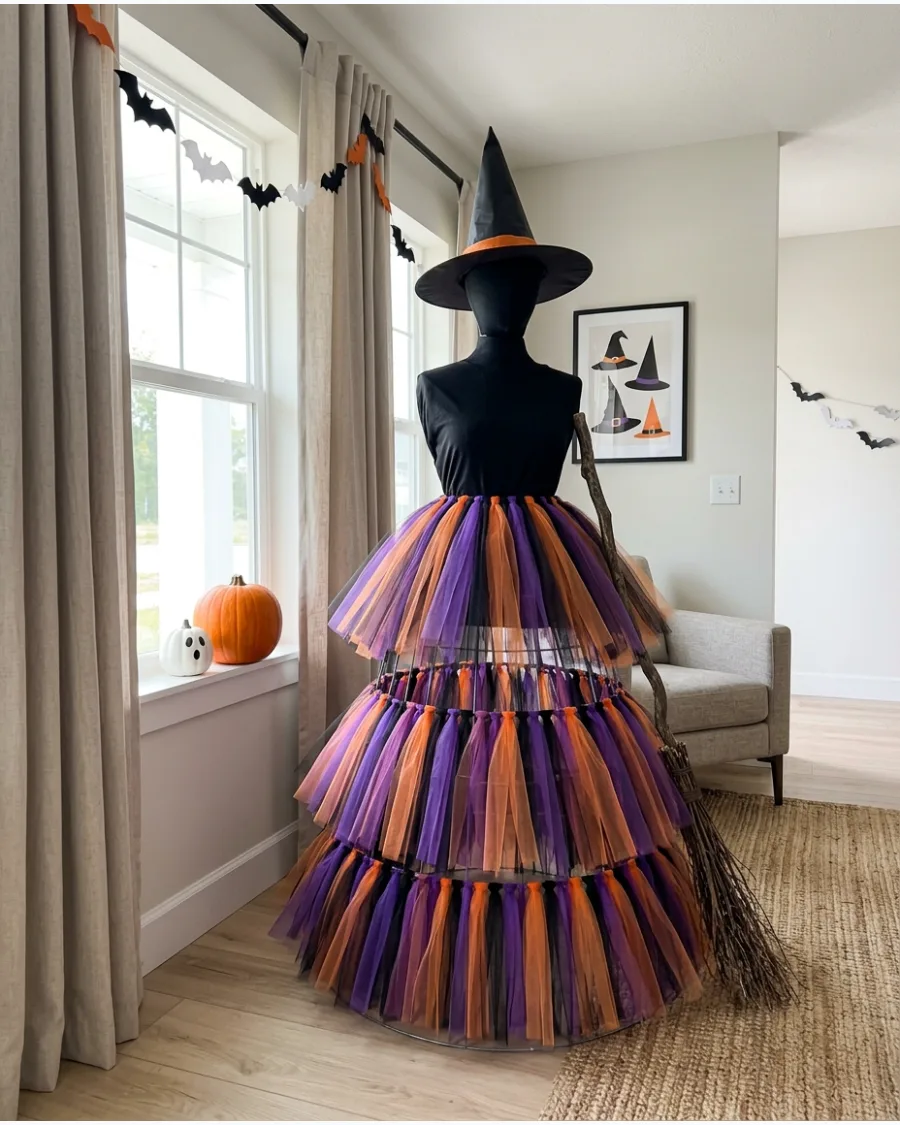
Create a voluminous skirt by tying hundreds of individual tulle strips to the cage wire. This no-sew method results in a very full, fluffy silhouette that looks much more expensive than a flat fabric drape.
Alternate colors like black, orange, and purple to give the tutu depth and visual interest. Expert opinion: The tutu style handles the wind better than a solid sheet because air can pass through the strips.
- Sourcing: Bulk rolls of six-inch wide tulle.
- Setup: Loop the tulle strips over the horizontal cage wires using a simple girth hitch knot.
- Adaptation: Add glitter tulle strips for extra sparkle under porch lights.
Best shortcut: Pre-cut all your tulle strips to the same length using a piece of cardboard as a guide.
31. Patchwork Witch Dress
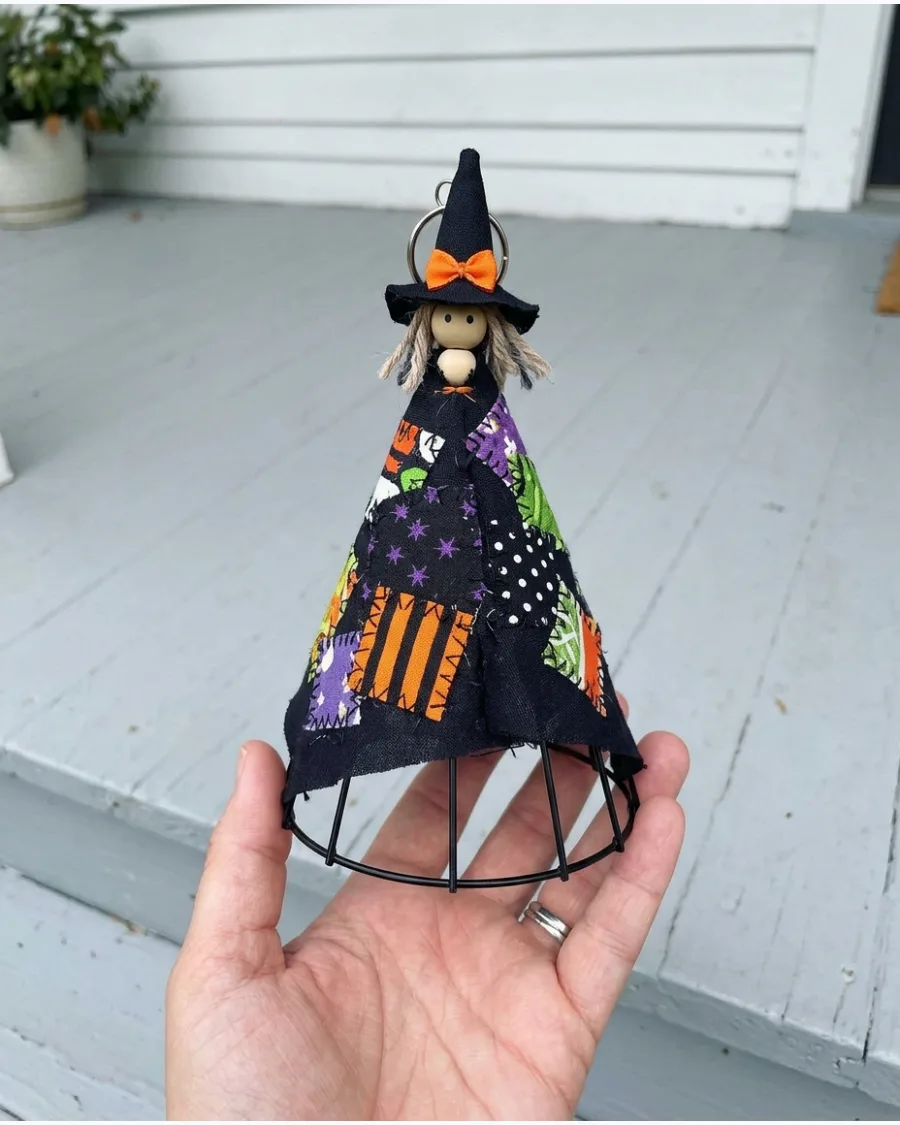
Layer scraps of patterned fabric like checks, stripes, and stars over a solid black base to give the figure a handmade charm. This technique adds texture and visual interest that a plain black sheet cannot provide.
Use a hot glue gun to secure the patches in a random overlapping pattern for the most authentic look. It transforms a simple silhouette into a detailed piece of decor that looks great in the daylight.
- Use fabric quarters from a craft store or old clothing scraps.
- Glue or pin the patches to the main black fabric base.
- Stick to a three-color palette to keep the patterns looking intentional.
Most people skip this: Iron the fabric scraps first so they lay flat against the cage and do not look messy.
32. Candy-Greeter Witch
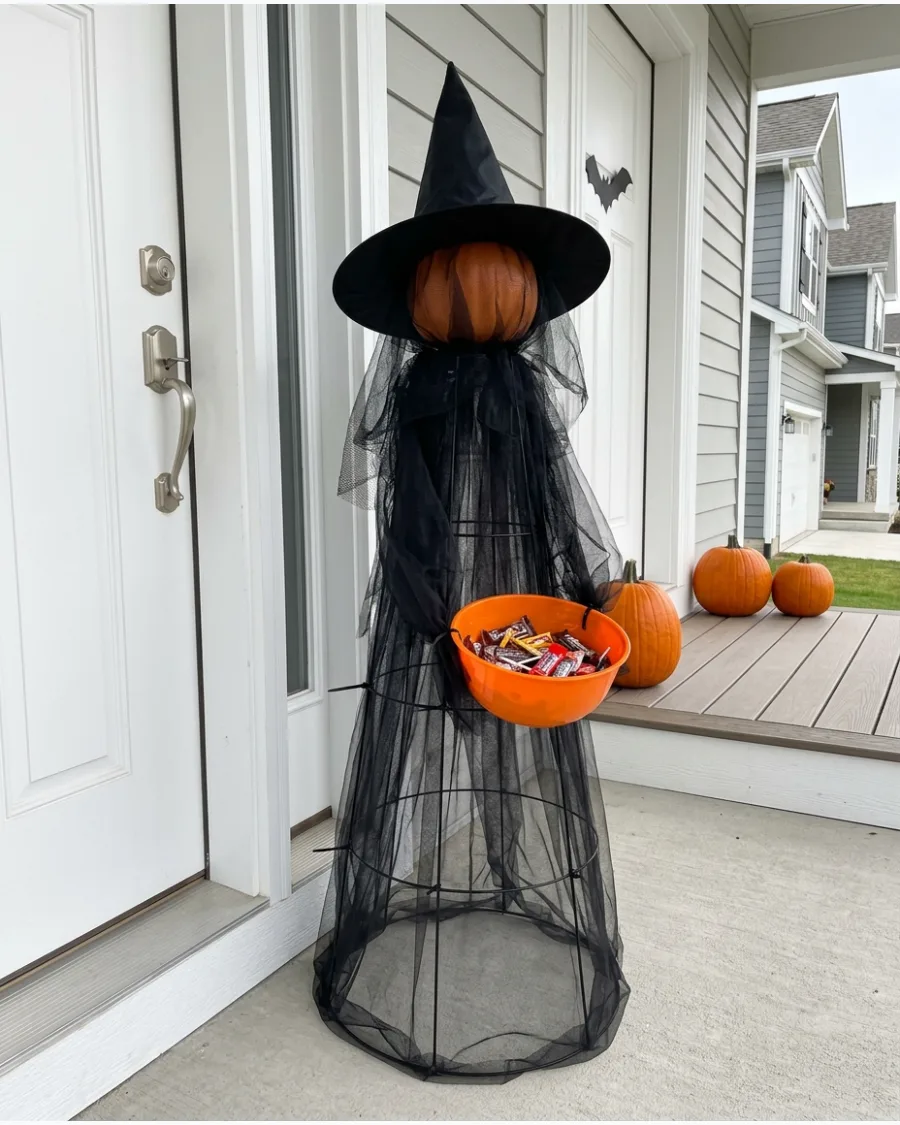
Set a small, lightweight plastic bowl in front of the witch to hold treats for neighborhood visitors. This makes the decoration functional and welcoming for trick-or-treaters on Halloween night.
Zip-tie the bowl directly to the tomato cage frame through the fabric to prevent it from tipping over. It creates a perfect interaction point right at your front door.
- Choose a lightweight plastic bowl to avoid pulling the cage forward.
- Position the figure near the front door or along the main walkway.
- Ensure the bowl is low enough for children to reach easily.
Quick win: Add a small sign hanging from the witch's hand that invites guests to take a treat.
Spooky Tomato Cage Witch Ideas
33. Faceless Hooded Witch
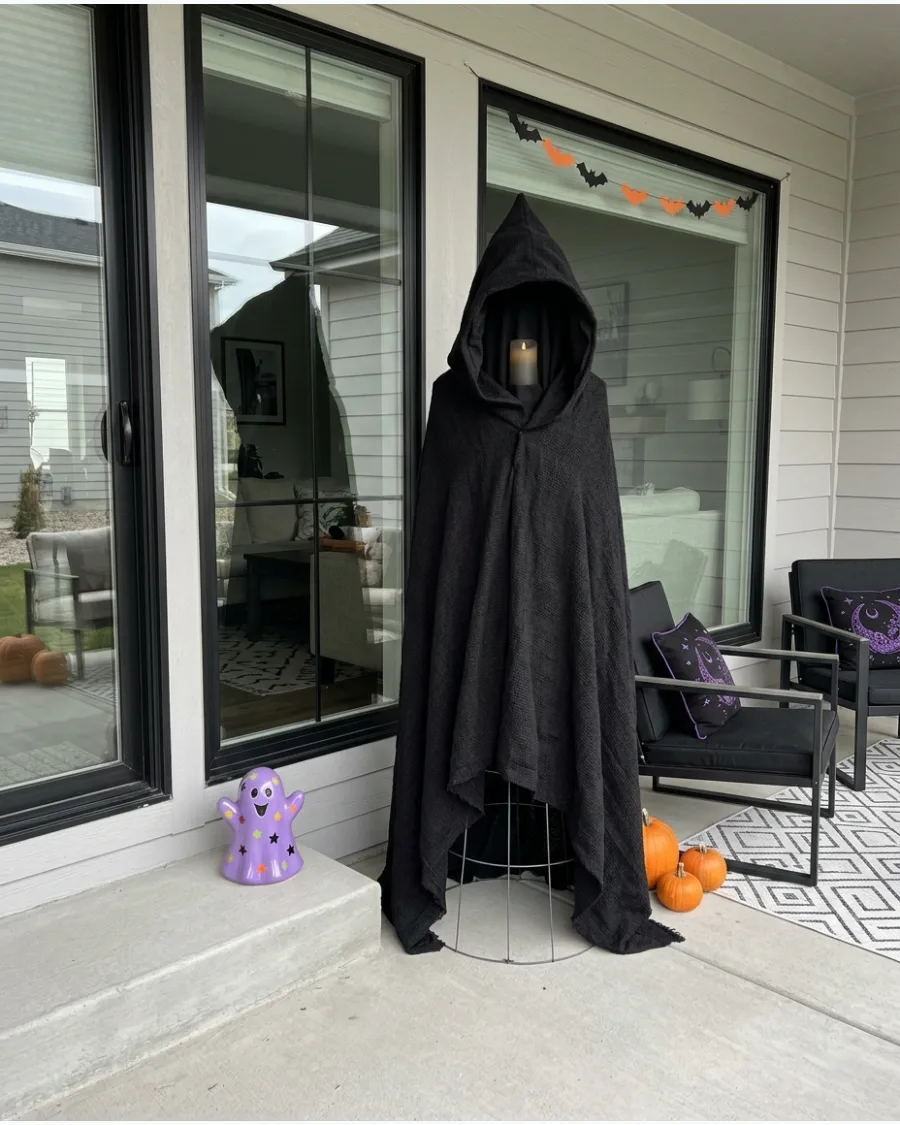
Skip the traditional pointed hat and use a large piece of black fabric to create a deep, pointed hood instead.
This hides the head area entirely, creating a mysterious and unsettling silhouette that relies on shadow. Place a single battery-operated candle deep inside the hood to cast a dim light from the empty face area. It is much more effective and eerie than using a standard plastic face mask.
- Use 2 yards of black jersey or fleece fabric for a heavy drape.
- Drape the fabric over a foam ball or a lantern at the top of the cage.
- Use black safety pins to shape the hood opening into a narrow slit.
Best shortcut: Use a dark fabric with some weight so the hood holds its shape even in a light breeze.
34. Gray-Haired Yard Witch
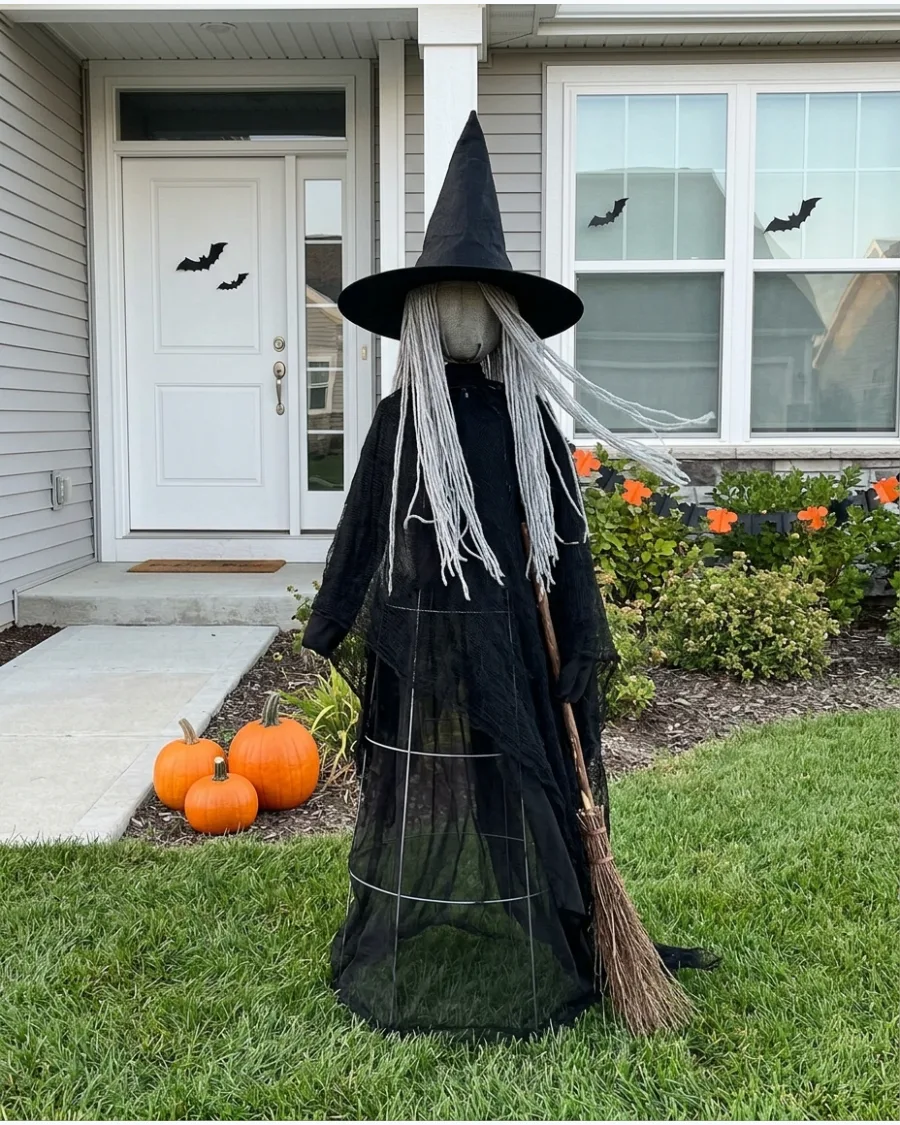
Add long strands of gray yarn or an inexpensive wig under the hat brim to give the witch a weathered appearance. The hair should hang unevenly to look like it has been exposed to the elements for a long time.
Tie the hair to the top of the tomato cage before putting the hat on to keep it from sliding off. It adds a layer of realism and movement that fabric alone cannot achieve.
- Use gray acrylic yarn or a synthetic costume wig.
- Secure the hair with a rubber band or zip tie to the cage top.
- Trim the hair into different lengths for a jagged and messy look.
Most people skip this: Brush out the yarn with a wide-tooth comb to make it look like real frizzy hair.
35. Ragged Cemetery Witch
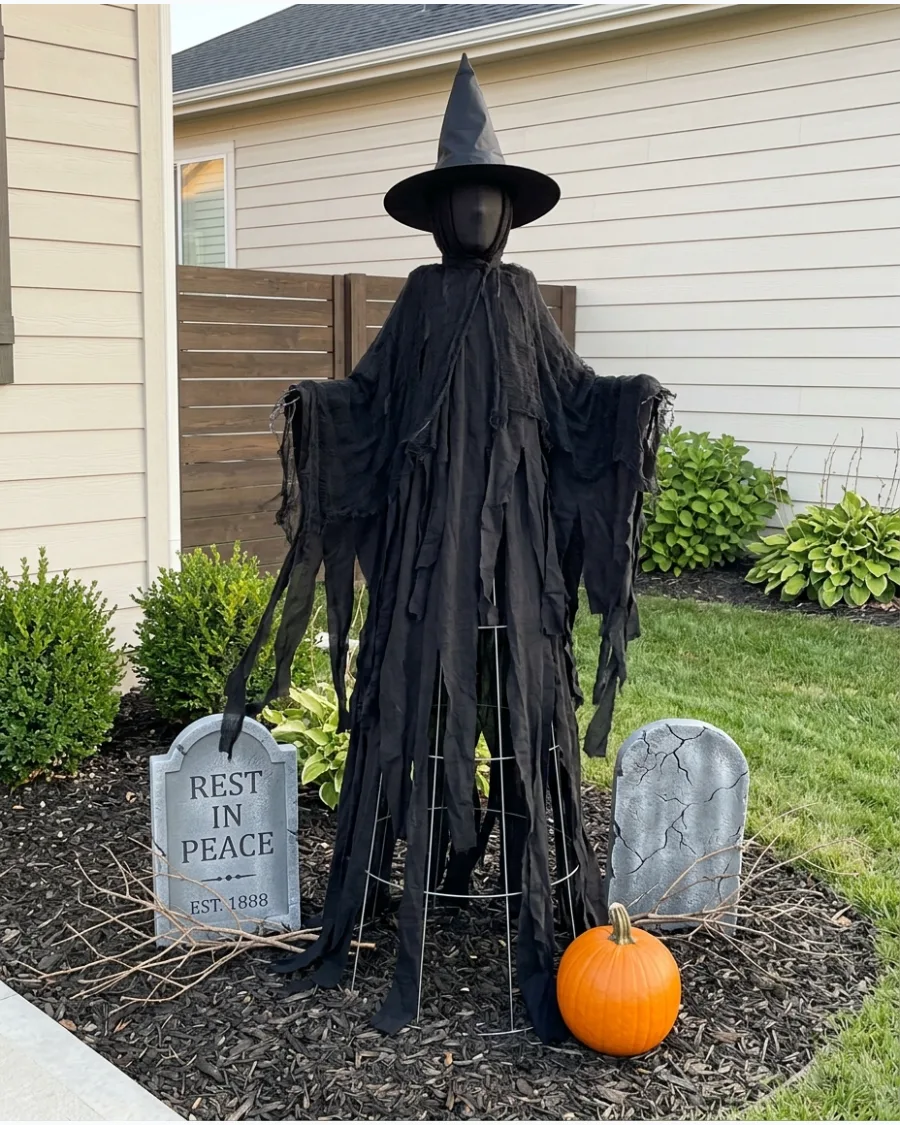
Cut the bottom of the black fabric into long, vertical strips of varying lengths to create a tattered look. Fray the edges by hand to make the witch look like she has been standing in a graveyard for years.
Position this witch next to a few foam tombstones and bare branches to complete the scene. The movement of the shredded fabric in the wind adds a creepy touch to any yard.
- Use sharp fabric scissors and black cotton fabric for easy fraying.
- Rip the fabric strips instead of cutting them for more natural edges.
- Use light gray spray paint to add a dust effect to the bottom of the dress.
Quick win: Rub a little real dirt or sand into the shredded ends to make them look authentically aged.
36. Witch With Glowing Eyes
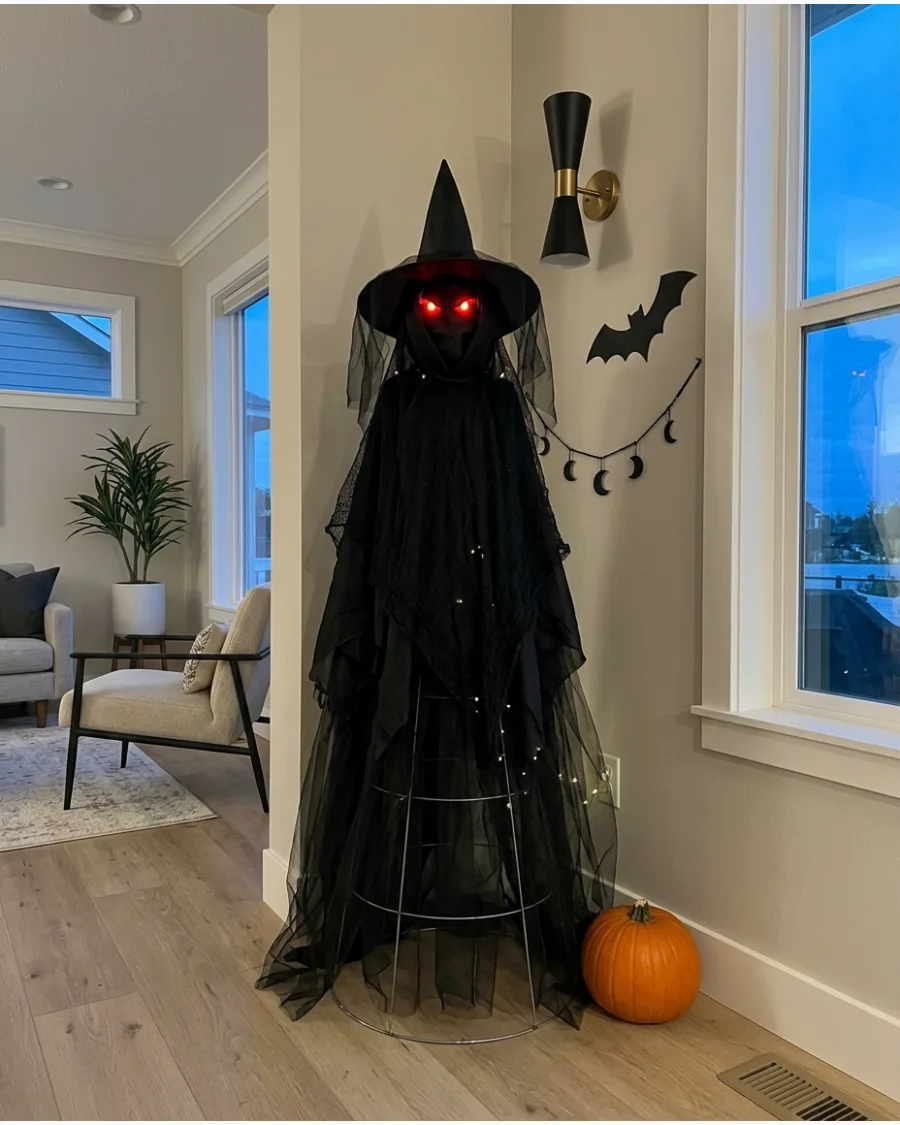
Tuck two small LED lights inside the head area of the witch to create a piercing, supernatural stare. Position them just under the brim of the hat so they are partially obscured by the shadow of the fabric.
Use red or yellow lights to create a more menacing look that stands out clearly at night. It is a simple way to add high-impact drama without using expensive animatronics.
- Use battery-powered LED tea lights or small finger lights.
- Tape the lights securely to a foam ball or the cage frame.
- Check the battery life and accessibility before Halloween night.
Best shortcut: Use a small piece of red cellophane over white LED lights if you cannot find red ones.
37. Crooked-Hat Witch
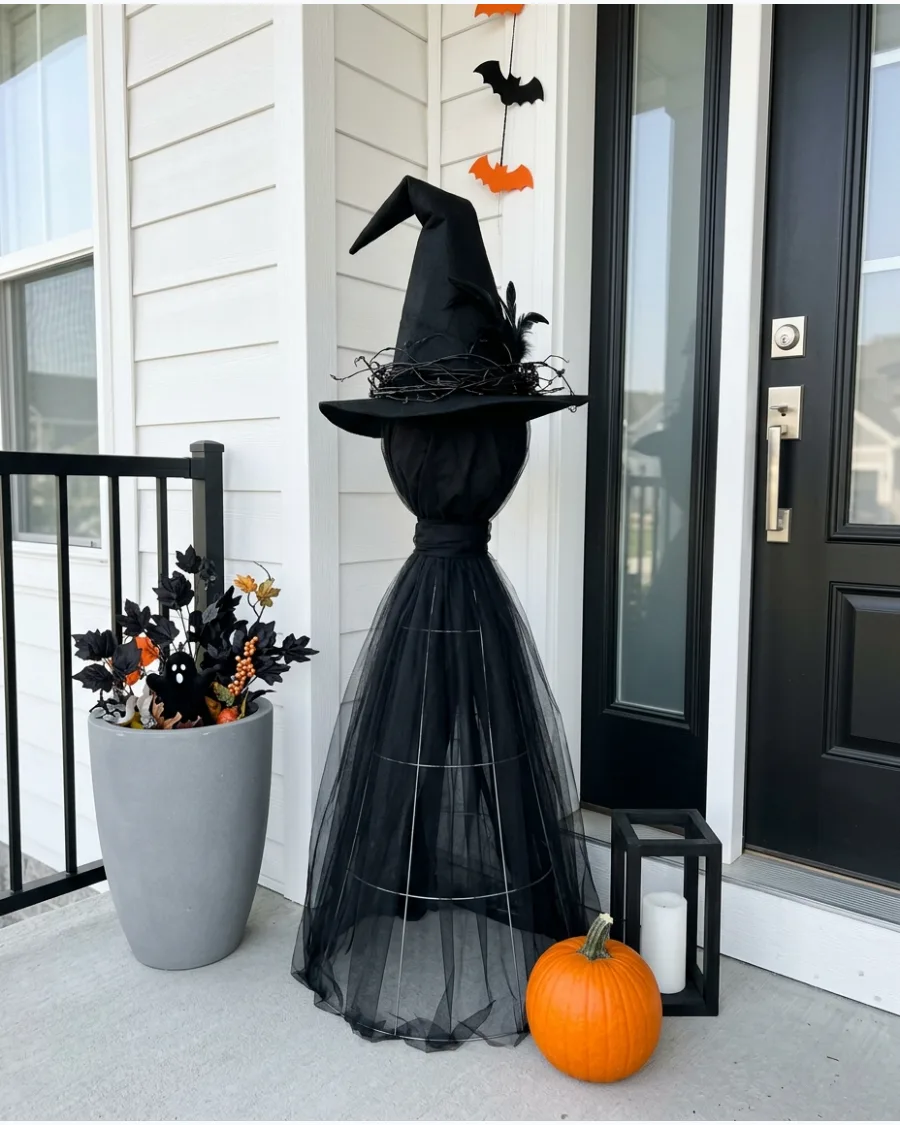
Insert a piece of floral wire or a coat hanger into the tip of a standard witch hat to make it bendable. Shape it into a sharp, jagged angle to give the witch a more whimsical or sinister silhouette.
Wrap thin black vines or feathers around the base of the hat to hide the wire work. A crooked hat instantly makes the figure more interesting than a perfectly straight one.
- Use 12-gauge floral wire and a standard fabric witch hat.
- Thread the wire through the inside seam or use hot glue to secure it.
- Secure the hat to the cage with a small dab of glue to prevent tilting.
Most people skip this: Stuff the hat with a little newspaper or plastic bags to help it hold the crooked shape.
38. Spiderweb Tomato Cage Witch
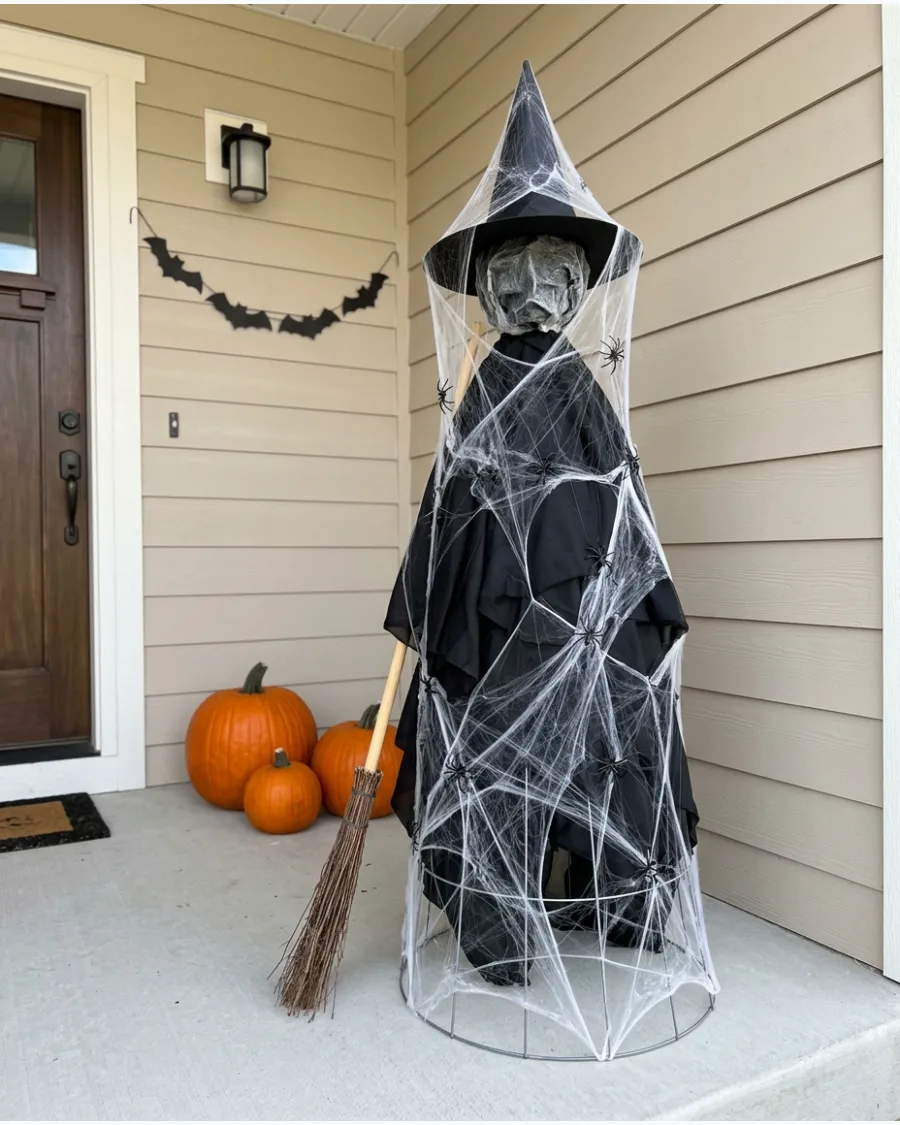
Drape white artificial spiderwebs over the entire witch figure from the top of the hat down to the floor. This makes the decoration look like it has been abandoned in a dusty attic or haunted woods.
Hook small plastic spiders into the web material so they stay in place without needing glue. It adds a layer of white contrast that makes the black silhouette pop against dark backgrounds.
- Use one bag of stretchable spiderweb and a pack of plastic spiders.
- Pull the web very thin for the most realistic and spooky look.
- Secure the edges of the web under the bottom of the tomato cage.
Quick win: Use a blacklight nearby to make the white spiderwebs glow brightly at night.
39. Raven Witch
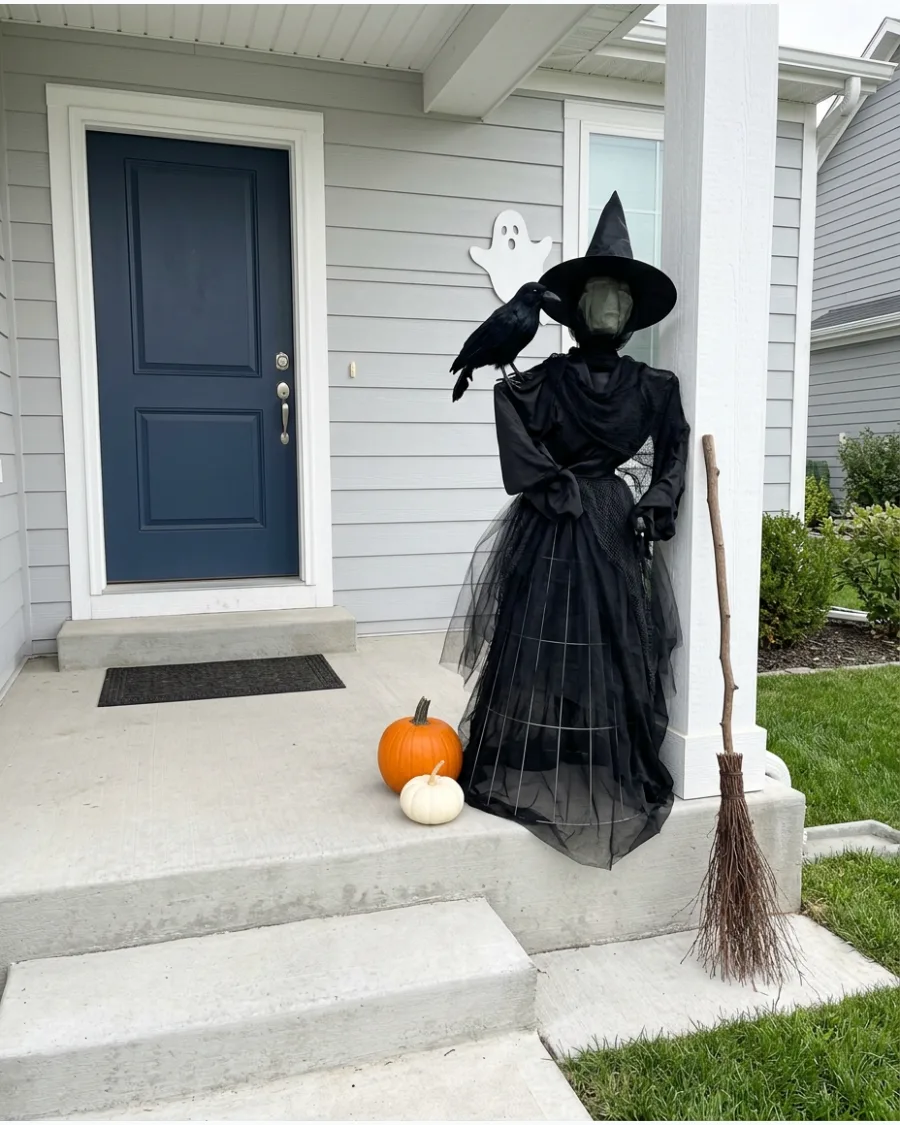
Perch a fake black raven on the shoulder or the top of the witch's hat to add a focal point. This adds a sense of dark nature and personality to the display that fabric alone cannot provide.
Secure the bird with a thin wire around the tomato cage frame so it does not blow away in the wind. Adding a specific prop like this makes the DIY project look professional.
- Use a lightweight feathered raven prop and thin floral wire.
- Position the bird so it looks like it is leaning toward the witch's face.
- Add a few loose black feathers to the neckline of the witch's dress.
Best shortcut: Use a raven prop with wire feet already attached to make the installation much faster.
40. Forest Witch
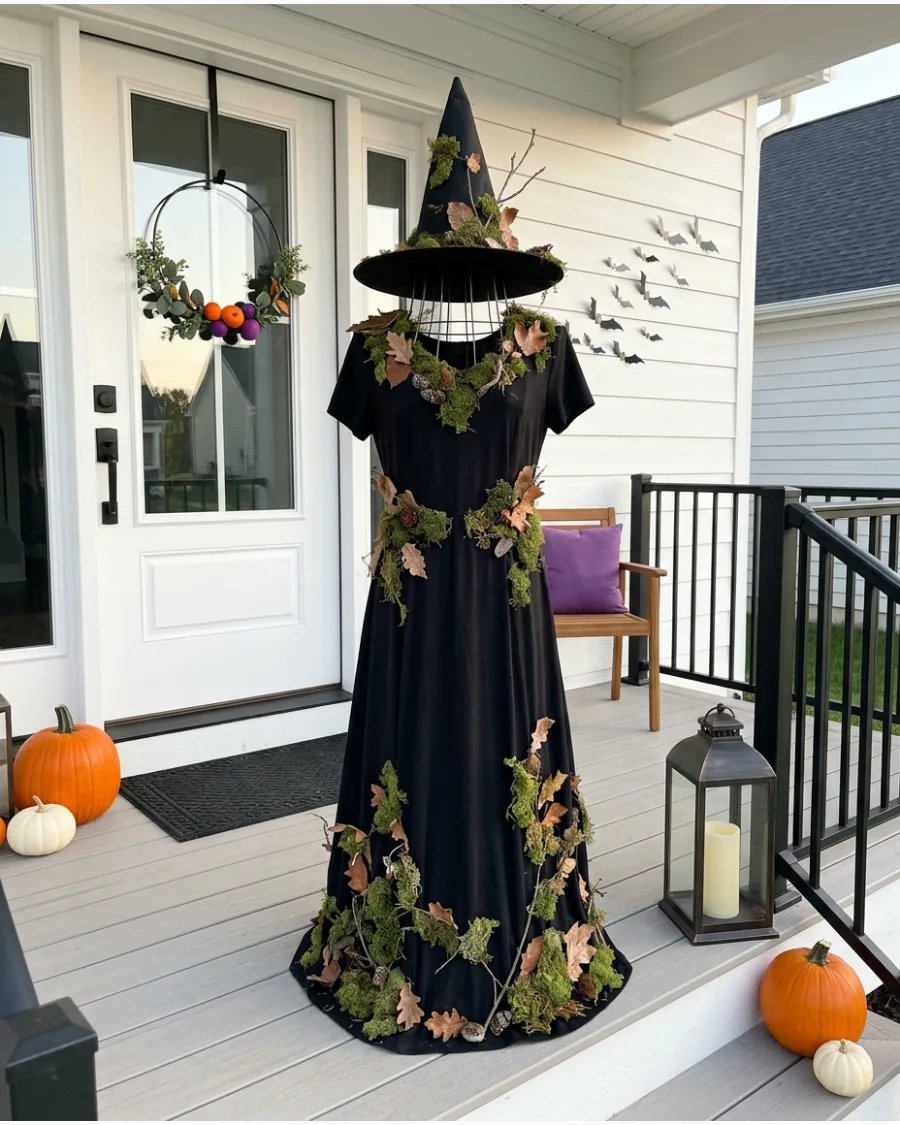
Decorate the black dress with pieces of faux moss, dried leaves, and small twigs to create a woodland aesthetic. This earthy look feels more organic and mysterious than a standard store-bought decoration.
Use hot glue to attach the moss in clusters around the neckline and the hem of the dress. It is a great way to blend your Halloween decor with your existing garden landscape.
- Use a bag of preserved moss and faux autumn leaves from a craft store.
- Mix earthy tones like dark green and brown for the best accents.
- Anchor the cage firmly if placing it in a garden bed or windy area.
Most people skip this: Mix different types of moss, like sheet moss and reindeer moss, for more realistic texture.
Tomato Cage Witch Porch Displays
41. Front-Door Greeter Witch

Place a witch beside the door with a broom and lantern to welcome your guests. Match the hat ribbon to your existing wreath or mat for a professional, coordinated look.
Position the broom handle so it leans naturally into the witch’s shoulder for a more lifelike silhouette. A lantern with a flicker bulb looks much more realistic than a static light.
- Budget: Under $20 using a used tomato cage and old black fabric.
- Place on the latch side of the door so it doesn't block the door's swing.
- Swap the hat ribbon color every year to match your changing porch decor.
Best shortcut: Zip-tie the broom handle directly to the tomato cage wire to prevent it from sliding down or blowing away.
42. Witch Beside a Pumpkin Stack
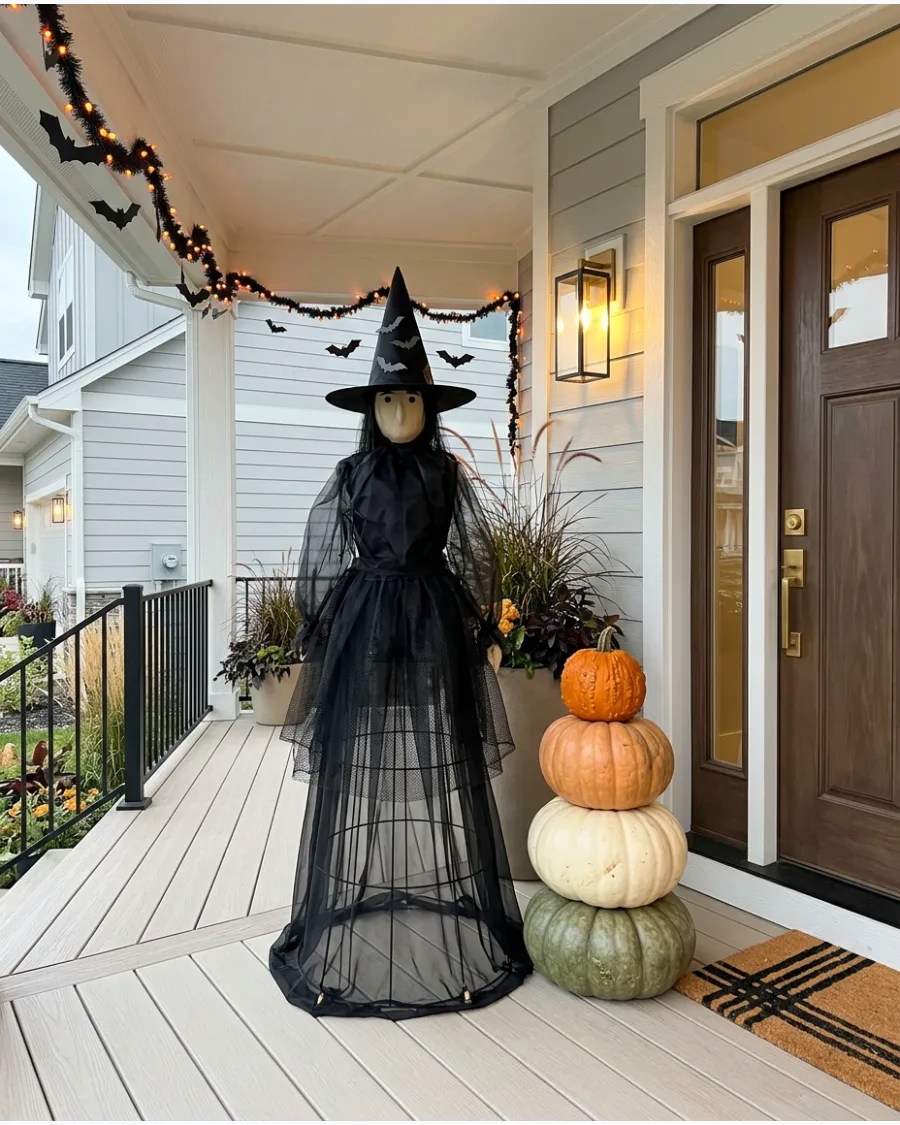
Build a column of pumpkins next to your witch to add vertical interest to the porch. Using different colors like white and muted green adds depth and keeps the display from looking flat.
Stack the pumpkins in a slightly staggered line to avoid a stiff, vertical look. Mixing real and fake pumpkins helps the display feel grounded and authentic.
- Sourcing: Use a mix of grocery store pumpkins and craft store foam versions.
- Place the stack in a corner to protect the pumpkins from strong winds.
- Use different sizes with the largest pumpkin on the bottom for better stability.
Quick win: Drive a thin wooden dowel through the center of foam pumpkins to keep the stack from toppling over.
43. Witch Broom Parking Display
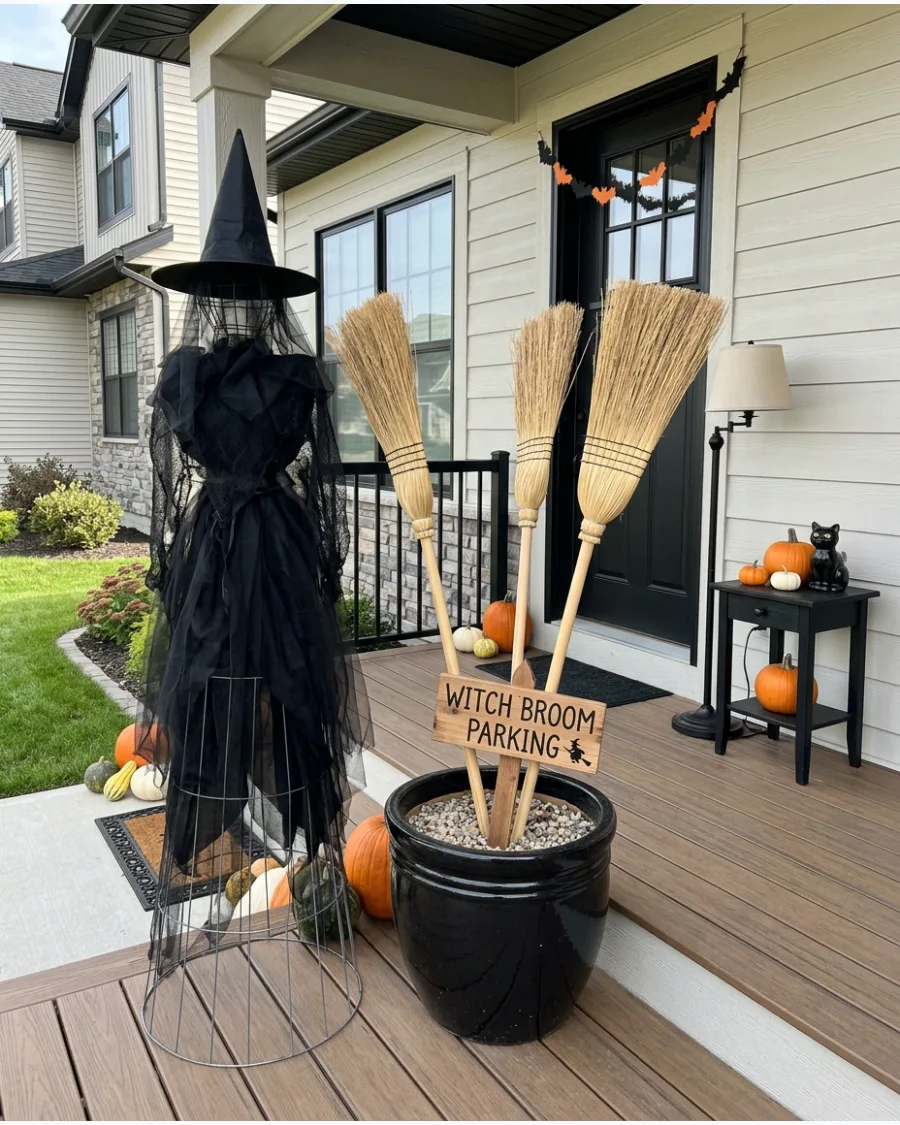
Set up several brooms next to the witch with a fun parking sign. A heavy pot or weighted container keeps the brooms from falling over in the breeze.
Lean the brooms at different angles to make the scene look busy and active. Plain straw brooms work best because they have a classic, timeless look that fits any Halloween style.
- Sourcing: Thrift stores often have old straw brooms for just a few dollars.
- Use sand or heavy rocks in the base of the broom container for weight.
- Place near a porch railing to provide an extra anchor point for the sign.
Most people skip this: Scuff the broom bristles on the driveway to give them a worn, used appearance.
44. Witch With a Welcome Sign
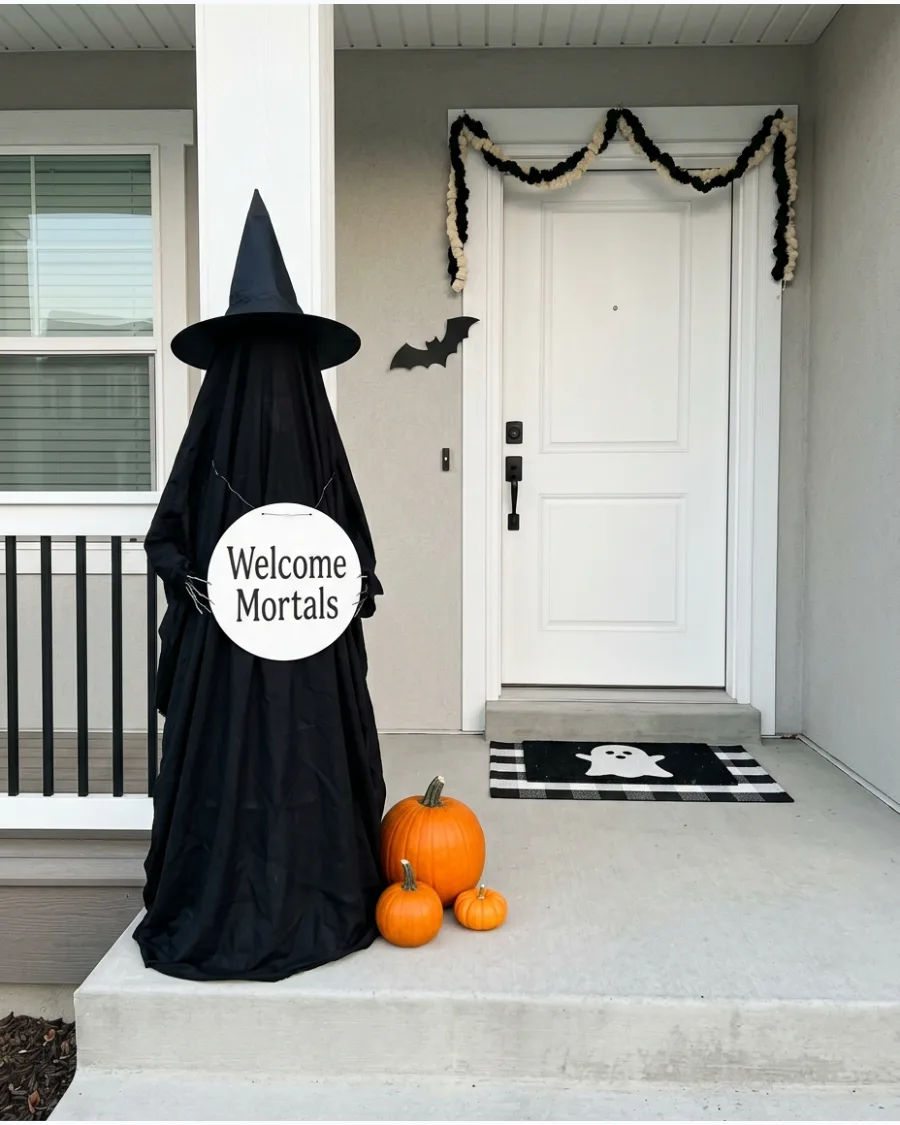
Hang a lightweight sign on the front of the witch to greet your neighbors. Keep the message short and easy to read from the street so it makes an impact.
Use thin floral wire to attach the sign so it stays centered on the cage. Avoid heavy wooden signs that might pull the fabric or tip the cage forward.
- Budget: Use a foam board circle and a permanent marker for a $2 sign.
- Attach the sign at waist height for the best visibility from the sidewalk.
- Store the sign flat between layers of cardboard after the season to prevent bending.
Quick win: Apply a coat of clear spray sealer to the sign if your porch isn't fully covered from the rain.
45. Witch and Black Cat Scene
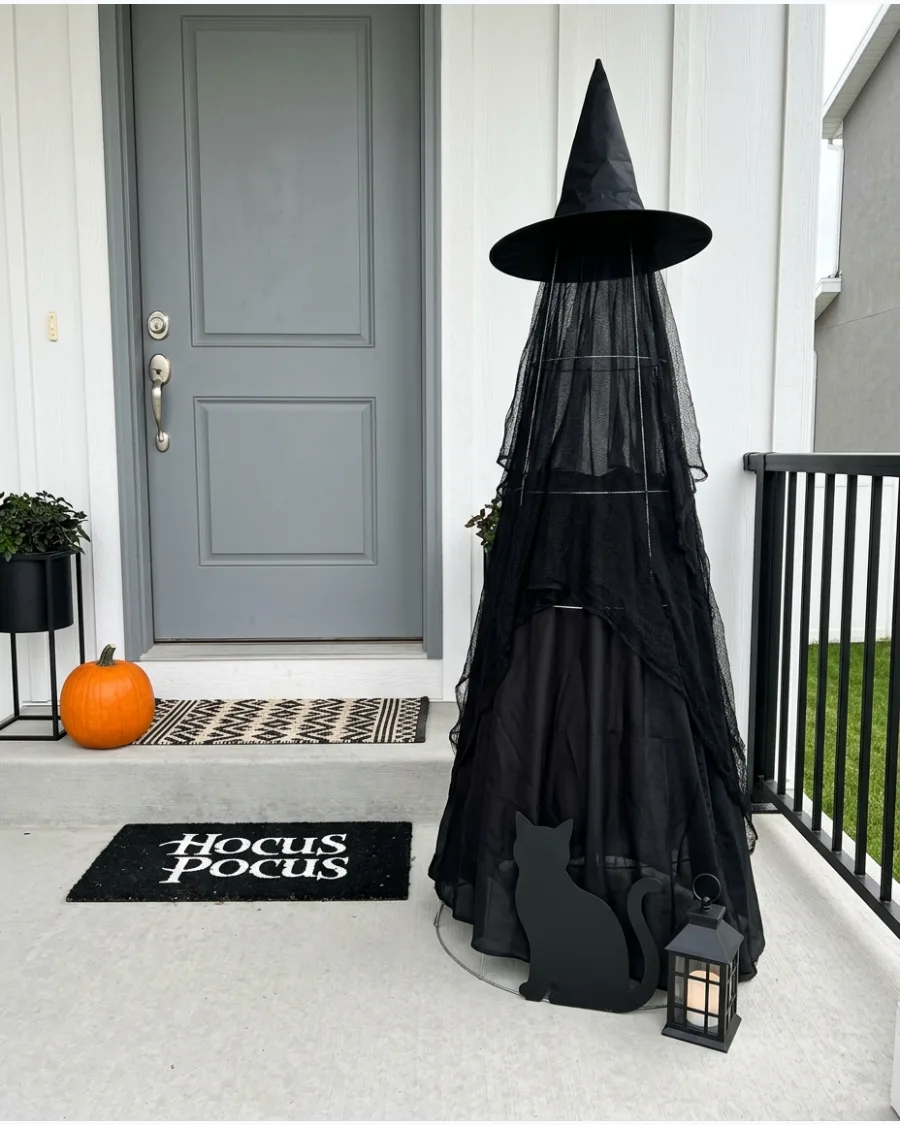
Put a black cat figure at the base of the witch's dress to create a small story. A small lantern nearby helps people see the cat at night when visibility is low.
Tuck the cat slightly under the edge of the fabric to make it look like it’s hiding. This small detail adds a lot of personality to a simple silhouette.
- Sourcing: Look for metal or plastic cat silhouettes at local garden centers.
- Place the cat on the side facing the walkway for maximum visual impact.
- Use a battery-operated tealight inside a nearby lantern to highlight the cat.
Best shortcut: Use a black plastic cat lawn stake and push the stake into a heavy potted plant base for stability.
46. Witch Under Floating Hats
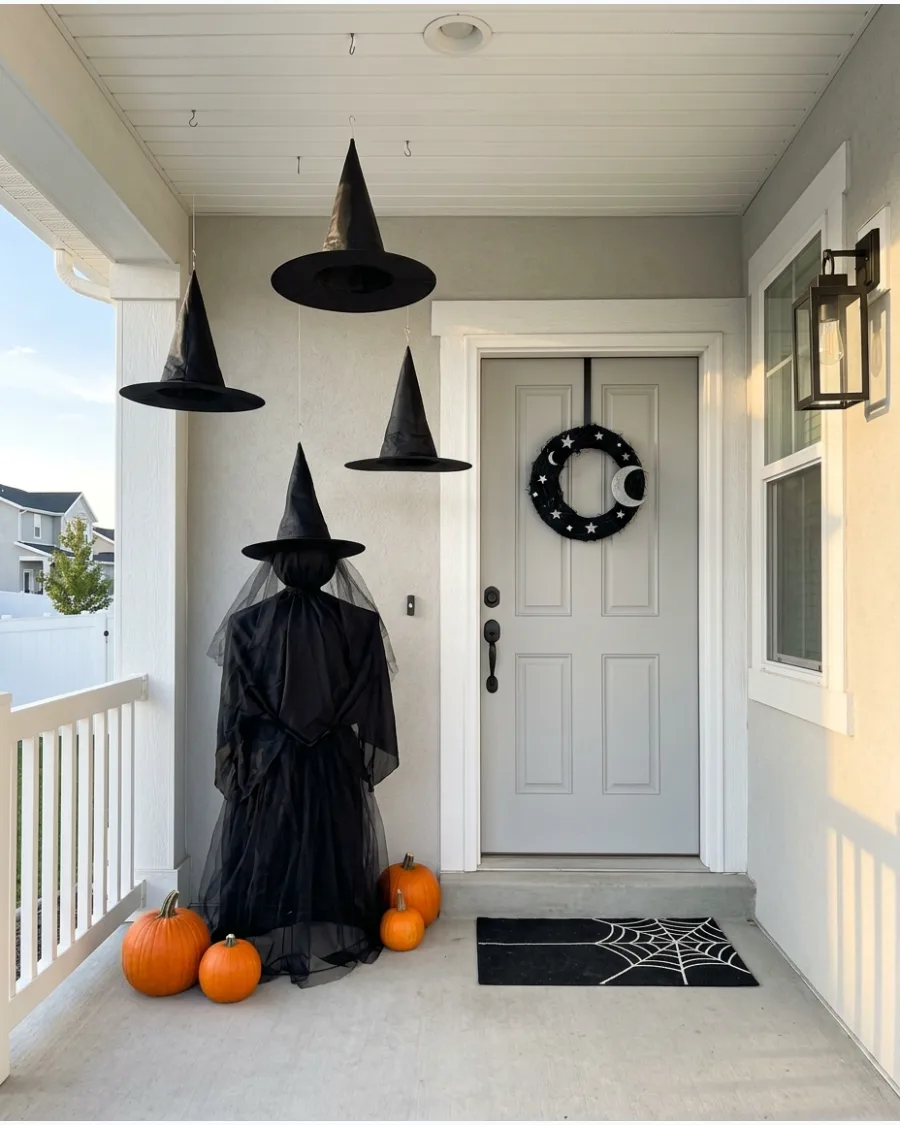
Hang extra witch hats from the porch ceiling using thin fishing line. Adding battery-operated lights inside the hats makes them glow beautifully after dark.
Space the hats at varying heights to create a sense of movement in the air. This fills the vertical space and makes the single witch look like part of a larger scene.
- Sourcing: Buy bulk packs of cheap nylon witch hats online to save money.
- Use Command hooks on the ceiling for a renter-friendly hanging solution.
- Tuck a small LED puck light inside each floating hat for an evening glow.
Most people skip this: Tie the fishing line to the very tip of the hat so it hangs perfectly straight.
Tomato Cage Witch Cauldron Displays
47. Bubbling Cauldron Witch
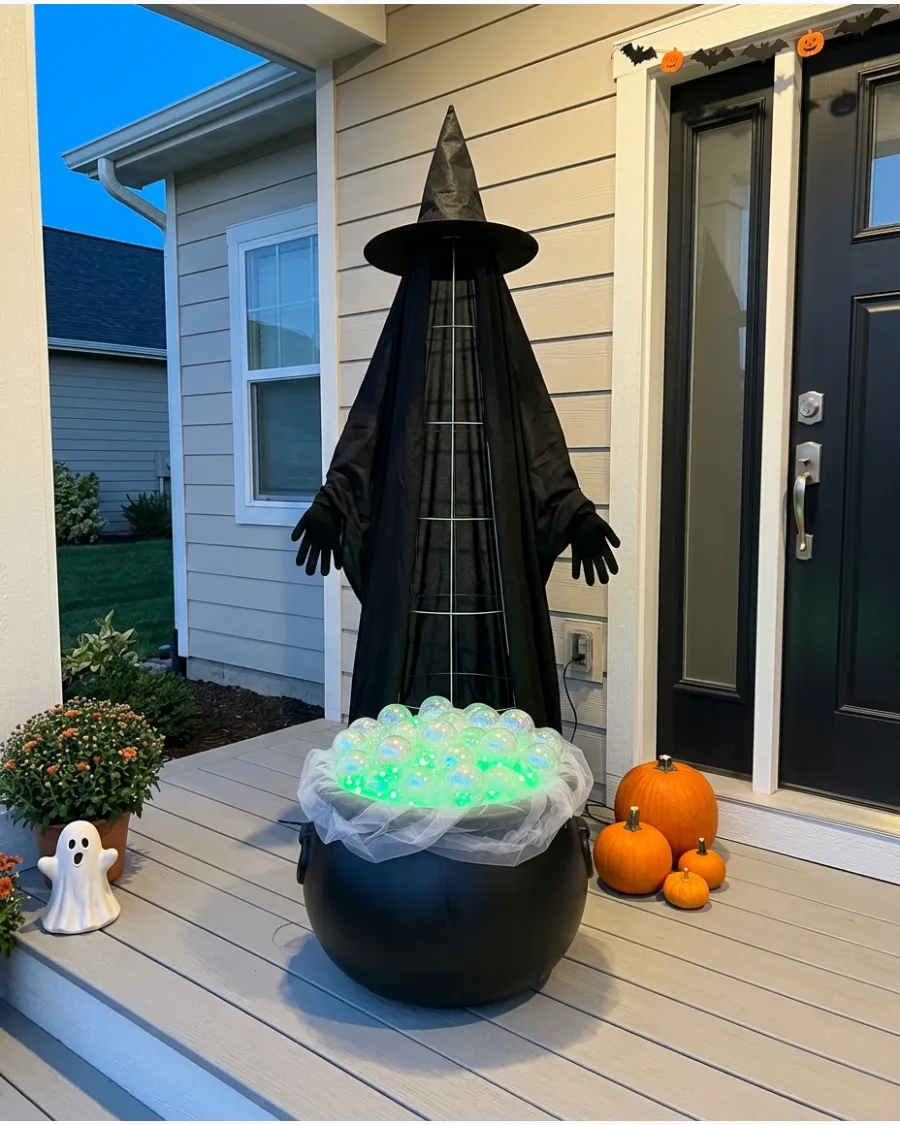
Place a cauldron in front of the witch and fill it with clear plastic ornaments. Green lights tucked underneath make the ornaments look like glowing bubbles.
Stuff white tulle around the rim to mimic rising steam from the brew. It’s a high-impact look that costs very little to put together with basic craft supplies.
- Budget: Use clear plastic Christmas ornaments from the dollar store for bubbles.
- Place the cauldron on a sturdy, flat surface so the ornaments don't spill out.
- Use a battery-powered light string so you don't have to trip over extension cords.
Quick win: Use different sizes of clear ornaments to make the bubbles look more natural and frothy.
48. Witch Stirring a Cauldron
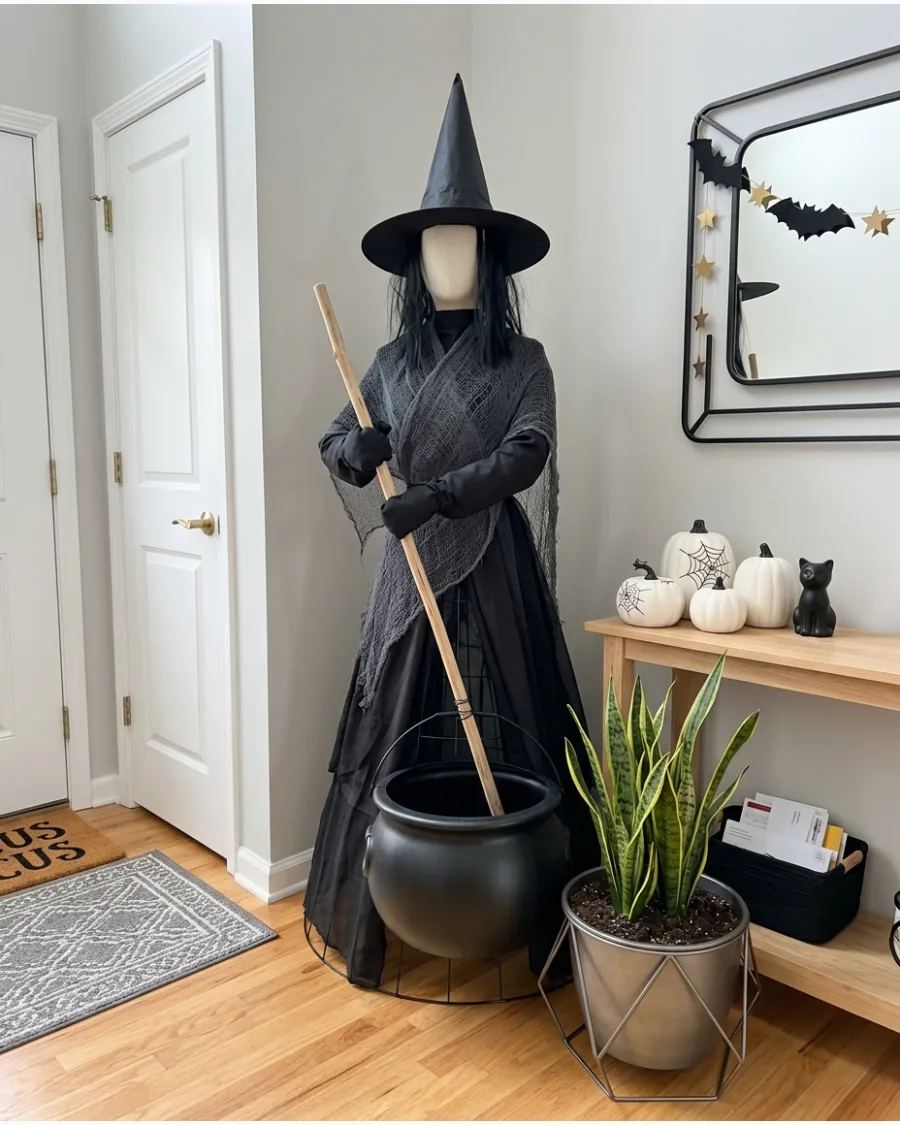
Give your witch arms so she can hold a stirring stick over her pot. A simple wooden dowel or a long branch found in the yard works perfectly for the stirrer.
Secure the stick to the cauldron rim with a bit of wire to keep it steady in the wind. This pose makes the decoration feel much more interactive and lifelike.
- Sourcing: Find a thick, straight branch in the yard for a free stirring stick.
- Use pool noodles or rolled-up bubble wrap to create the arm shapes.
- Position the cauldron close to the witch's base for better overall balance.
Best shortcut: Wrap the hands in black electrical tape to hide the padding and give them a creepy, claw-like look.
49. Witch Potion Station
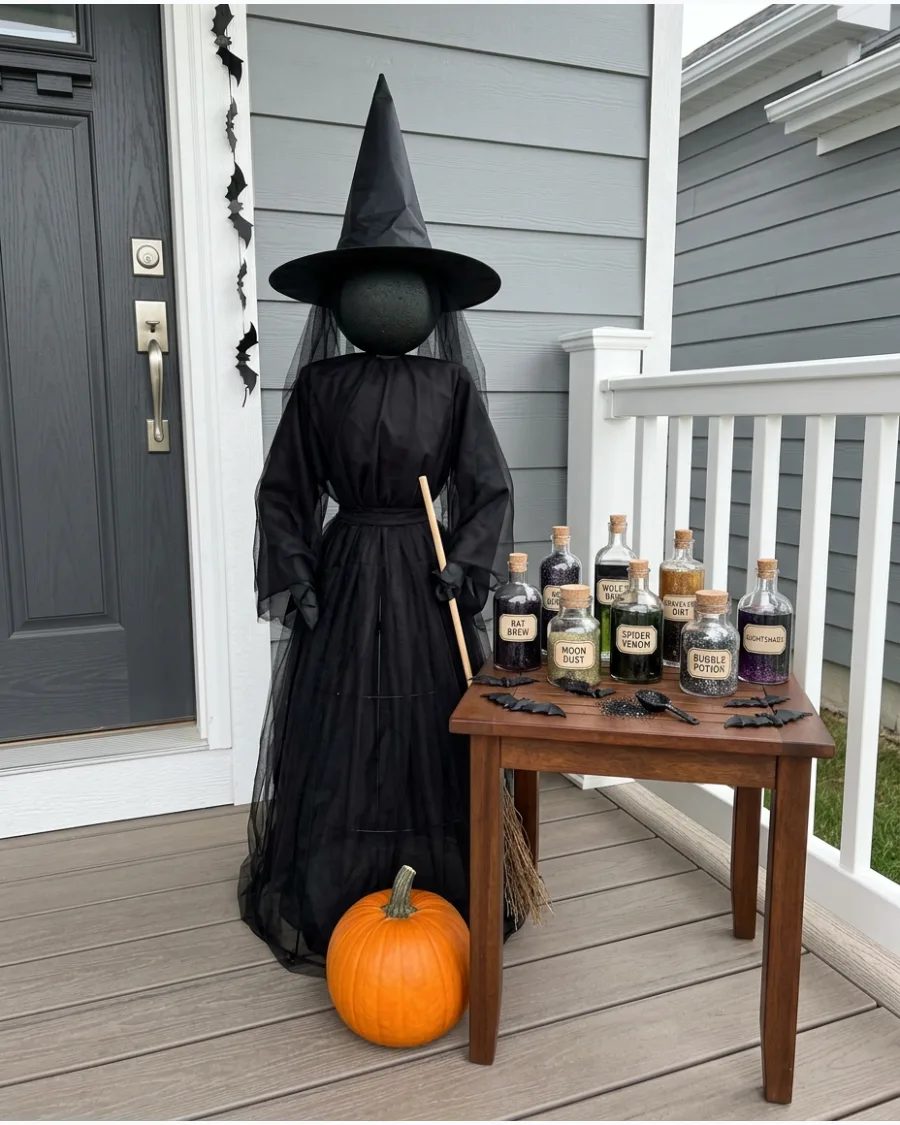
Surround the witch with labeled bottles and jars to create a potion station. Use names like Bat Brew or Moon Dust to set a spooky mood for trick-or-treaters.
Group the bottles on a small side table or crate to keep them off the ground. This creates a detailed vignette that looks great in daytime photos.
- Budget: Clean out old condiment jars and spray paint the lids black.
- Use a silver or gold paint pen to write the potion names directly on the glass.
- Bring the glass bottles inside if the weather gets extremely windy to prevent breakage.
Quick win: Fill the bottles with colored water and a drop of dish soap to create interesting bubbles and swirls inside.
50. Witch Coven Cauldron Scene
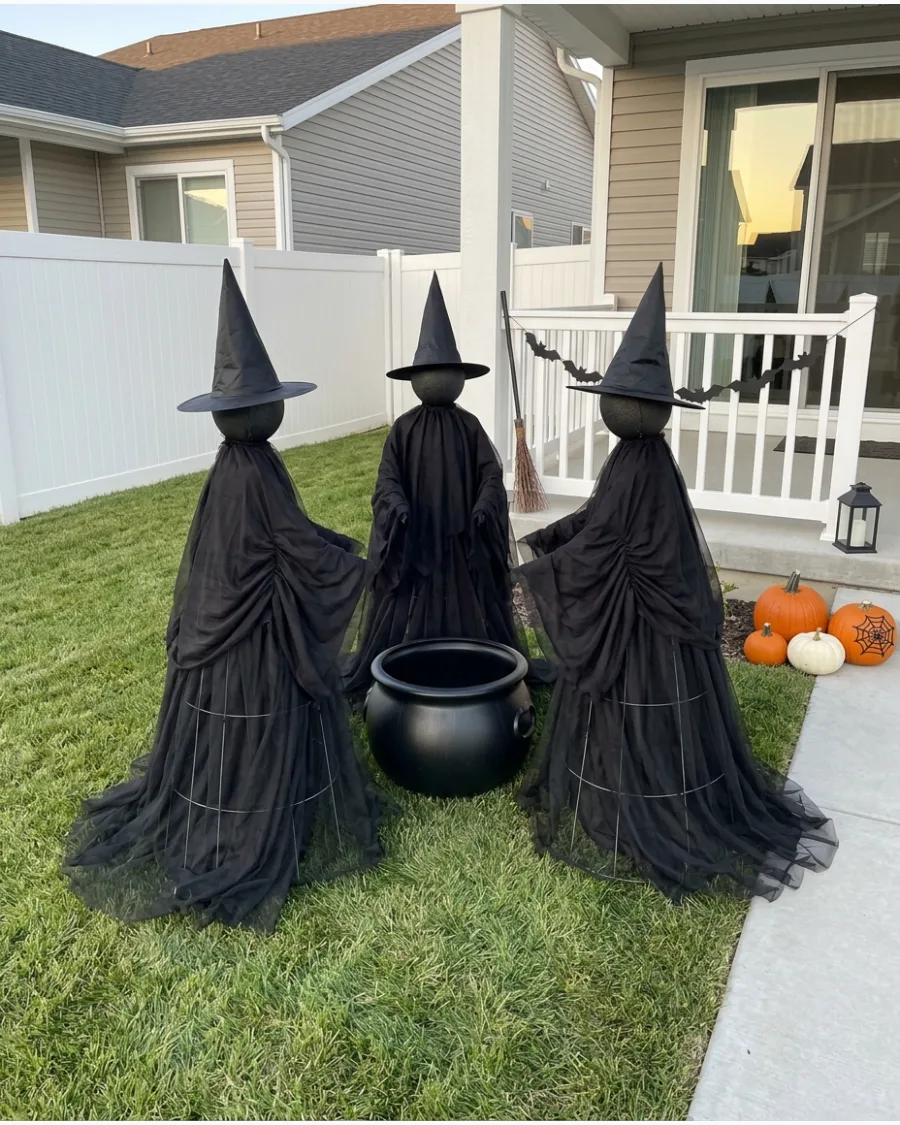
Create a circle of three witches around one large central cauldron for a major yard display. This fills a large space or a wide porch perfectly with minimal effort.
Angle each witch slightly toward the center to make the group look cohesive. It turns a simple DIY project into a high-impact neighborhood attraction.
- Sourcing: Buy tomato cages in bulk at the end of the gardening season to save.
- Space the witches about three feet apart so the display looks large but tidy.
- Use tent stakes to pin the bottom of the cages into the grass for security.
Most people skip this: Connect the hands of the witches with a thin black cord so they appear to be holding a circle around the pot.
Frequently Asked Questions
How do you keep a tomato cage witch from blowing over?
To secure your witch, drive garden stakes or tent pegs into the ground over the bottom wire ring. If you are placing her on a porch or hard surface, weighing down the base with a few heavy bricks will keep her steady during autumn gusts.
What is the best fabric to use for outdoor DIY witches?
Black landscape fabric is an excellent choice because it is weather-resistant and provides a spooky, matte look. You can also use cheap plastic tablecloths for a budget-friendly option or polyester mesh, which allows wind to pass through easily.
How do you attach the head to the top of the tomato cage?
When you invert the cage, use the protruding wire 'legs' to impale a foam craft ball for a secure fit. Alternatively, you can use zip-ties to fasten a plastic pumpkin bucket to the wire frame before adding your fabric and hat.
Can I add lights to my tomato cage witch?
Yes, adding lights is a great way to make your display pop after dark. Wrap battery-operated orange or purple LED fairy lights around the wire frame before you drape the fabric to create a magical, glowing effect.
What size tomato cage is best for a life-sized witch?
For a realistic, adult-sized height, choose a 42-inch or 54-inch heavy-duty tomato cage. These larger sizes offer the necessary height and structural support to make your witch appear life-sized once the head and hat are attached.