50 Spooky Halloween Walkway Ideas

This post may contain affiliate links: full affiliate disclosure.
Transform a standard front path into a festive entrance that guides guests safely to the door. These simple decorating strategies use light and height to build excitement without creating tripping hazards for trick-or-treaters.
Easy Halloween Walkway Ideas
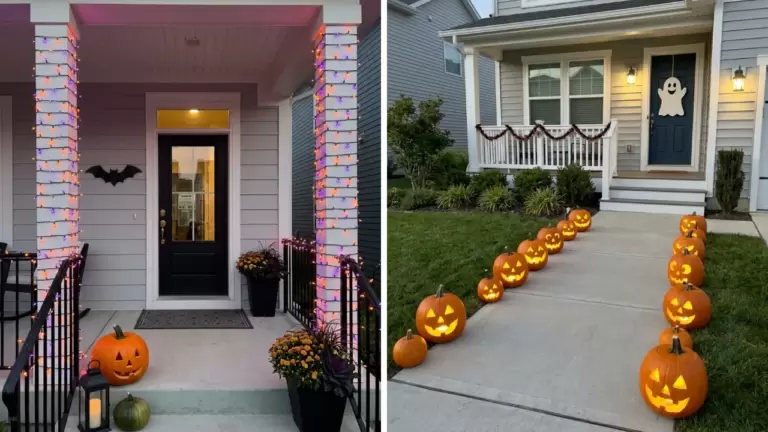
1. Classic Jack-o’-Lantern Walkway
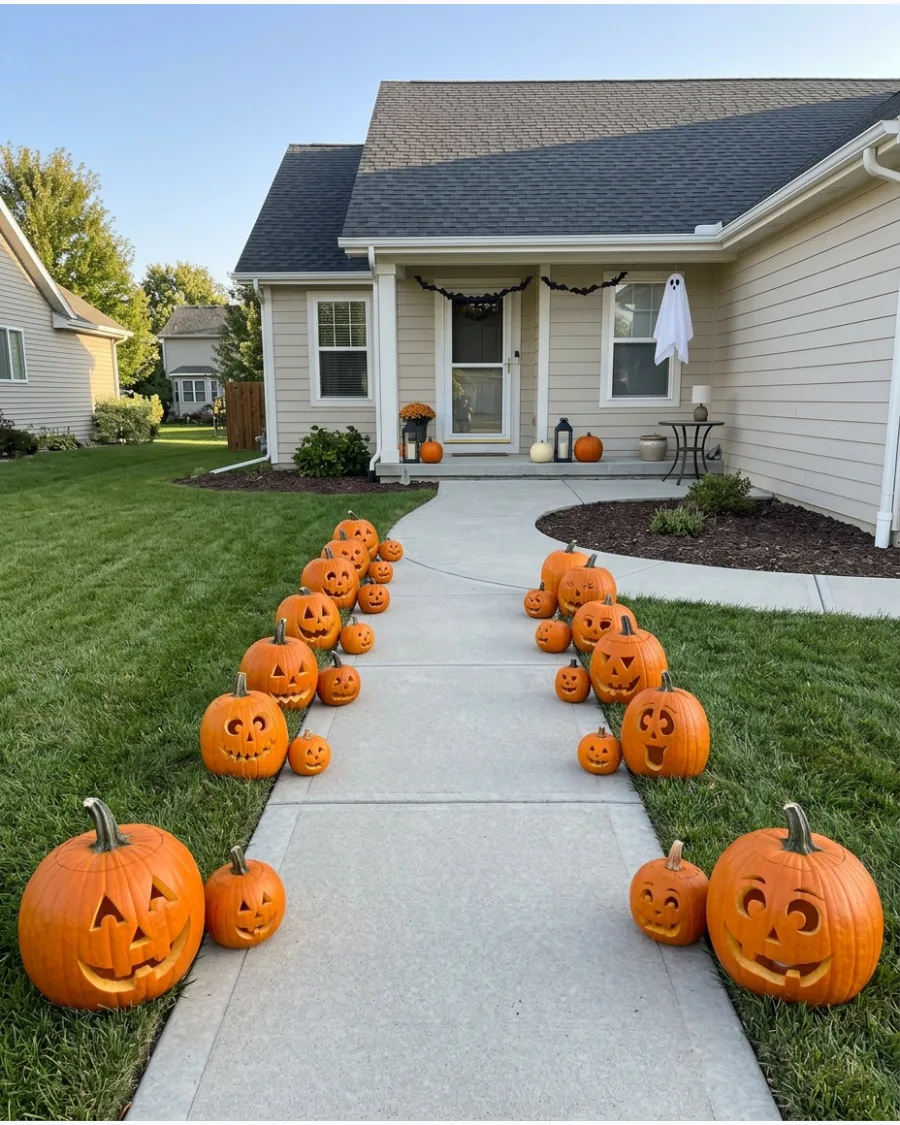
Line both sides of the path with carved or artificial jack-o’-lanterns. Mix different pumpkin sizes and facial expressions to make the arrangement feel collected rather than perfectly matched.
Place the largest pumpkins at the start of the path to anchor the design visually. Real pumpkins provide a traditional scent, but high-quality resin versions last all season without rotting.
- $10-$50 depending on pumpkin count.
- Set them two feet apart to allow plenty of walking room.
- Use faux pumpkins if you want to reuse the setup every year.
Quick win: Use battery-operated puck lights instead of tea lights for a much brighter glow that lasts all night.
2. Pumpkin and Lantern Path
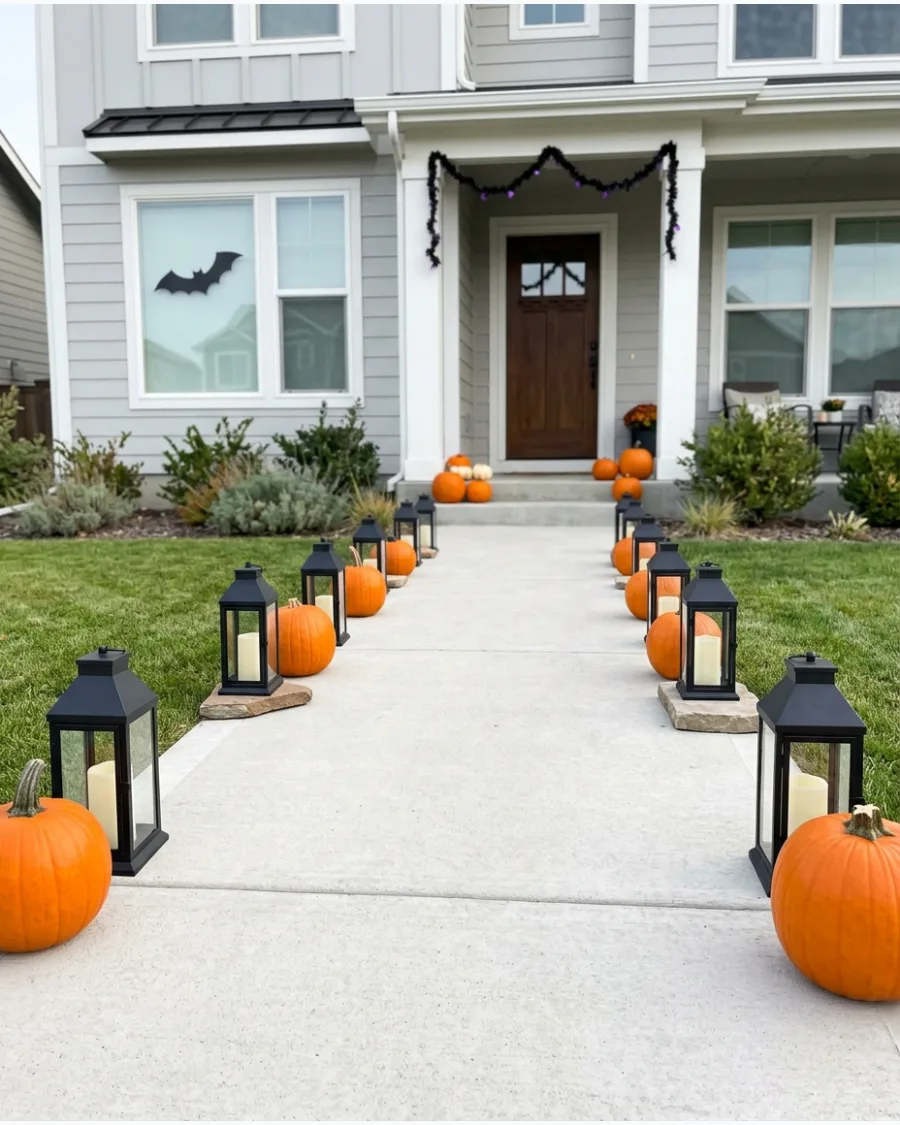
Alternate pumpkins with black outdoor lanterns along the walkway. Use flameless candles inside the lanterns to create a warm, flickering entrance.
Stagger the heights by placing some lanterns on small blocks or flat stones. This mix of textures looks more sophisticated than using a single type of decoration.
- $40-$100 for lanterns and pumpkins.
- Check lantern seals to ensure they are rated for outdoor moisture.
- Choose lanterns with a loop handle for easy morning repositioning.
Best shortcut: Buy lanterns in a set of three different sizes to create natural visual interest without extra effort.
3. Paper-Bag Ghost Luminaries
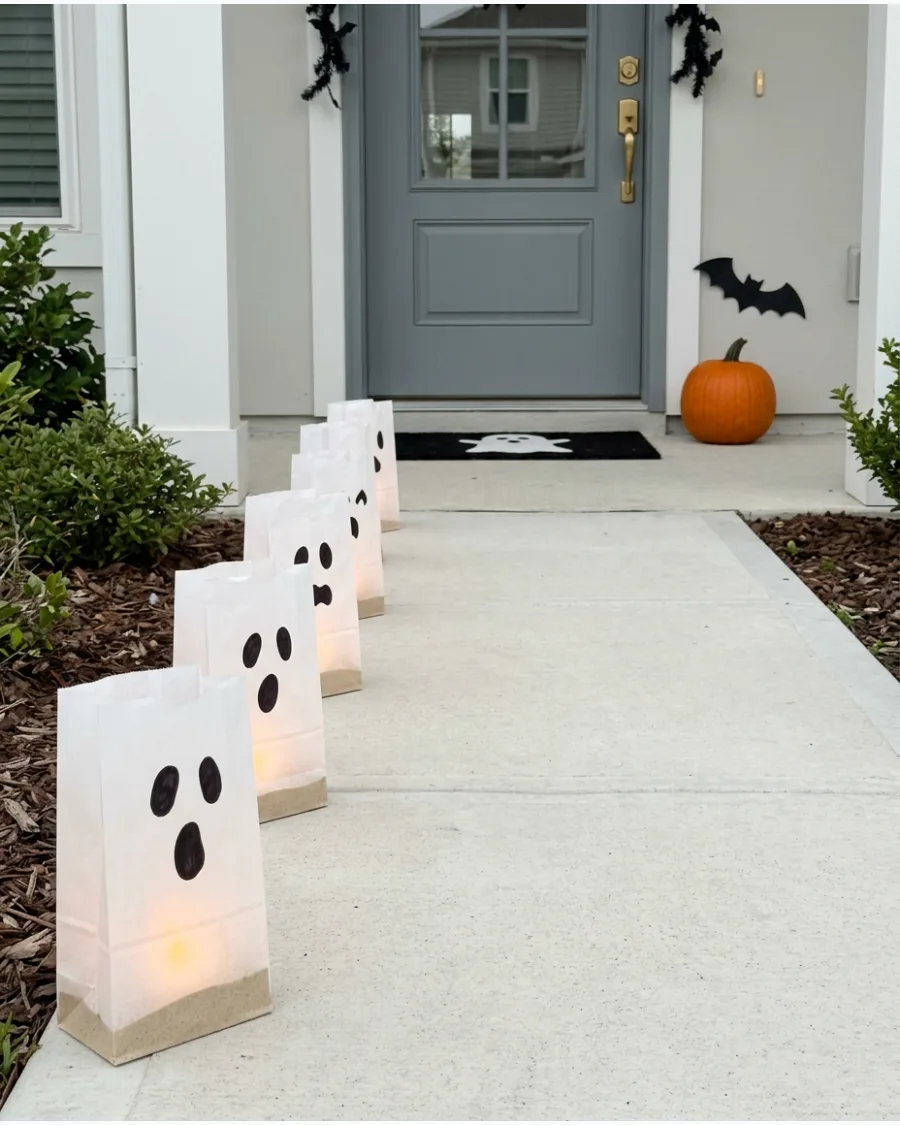
Decorate white paper luminary bags with simple ghost faces and illuminate them with battery-operated tea lights. Place them in a sheltered walkway area where they will remain dry.
Fill the bottom of each bag with two inches of sand to keep them from blowing away in the wind. This creates a soft, diffused light that is much safer than using open flames near costumes.
- Under $15 for a full set.
- Space bags every 18 inches for a continuous glowing line.
- Use heavy-duty white bags to prevent tearing during setup.
Most people skip this: Use LED tea lights with a built-in timer so the ghosts turn on automatically at dusk.
4. Mason Jar Halloween Lights
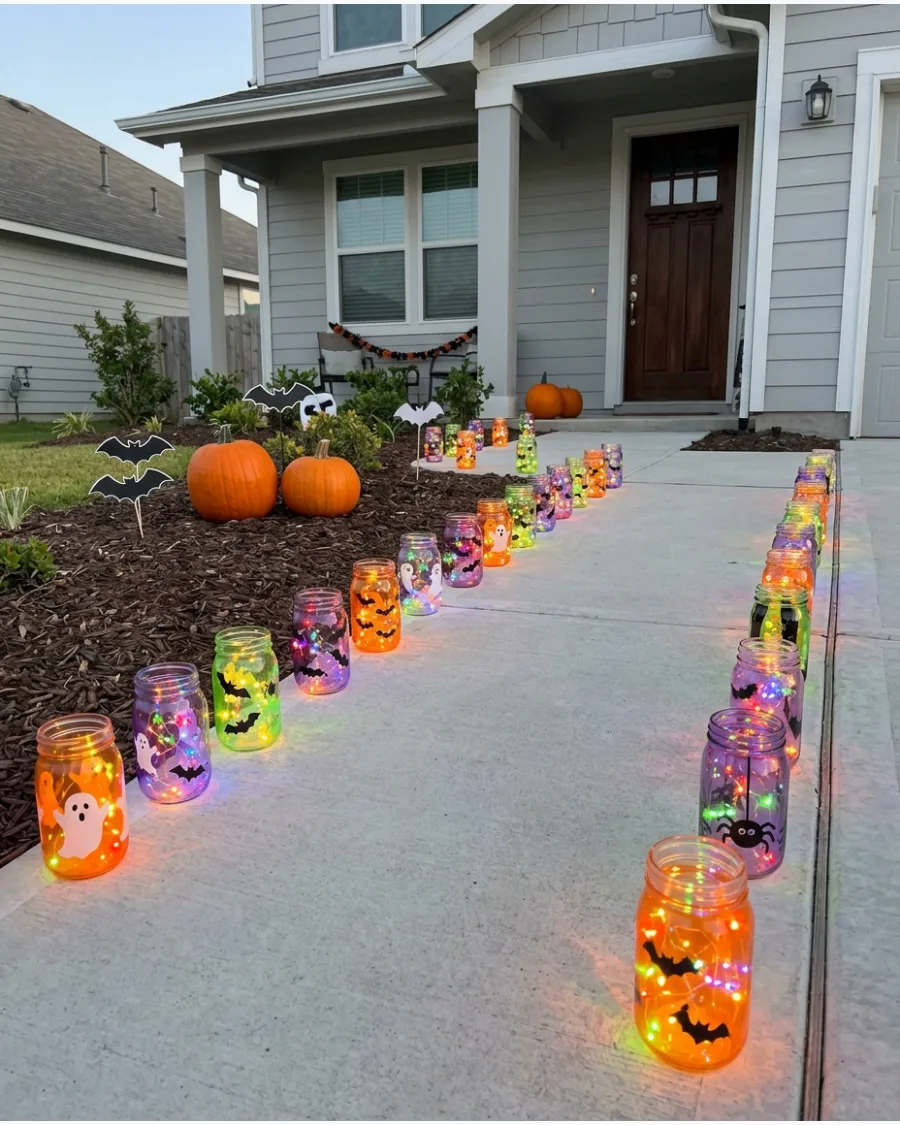
Paint clean glass jars with translucent orange, purple and green designs. Add battery lights and arrange the jars evenly along the front path.
Apply a clear sealant over the paint to prevent it from peeling if it rains. The colorful glass casts a playful, multi-colored glow onto the walking surface.
- $20 for paint and lights.
- Use wide-mouth jars to make it easier to reach the light switch inside.
- Arrange jars in small clusters of three for a more modern look.
Quick win: Use frosted glass spray paint first to help the colored paint stick better and glow more evenly.
5. Glowing Milk-Jug Ghosts
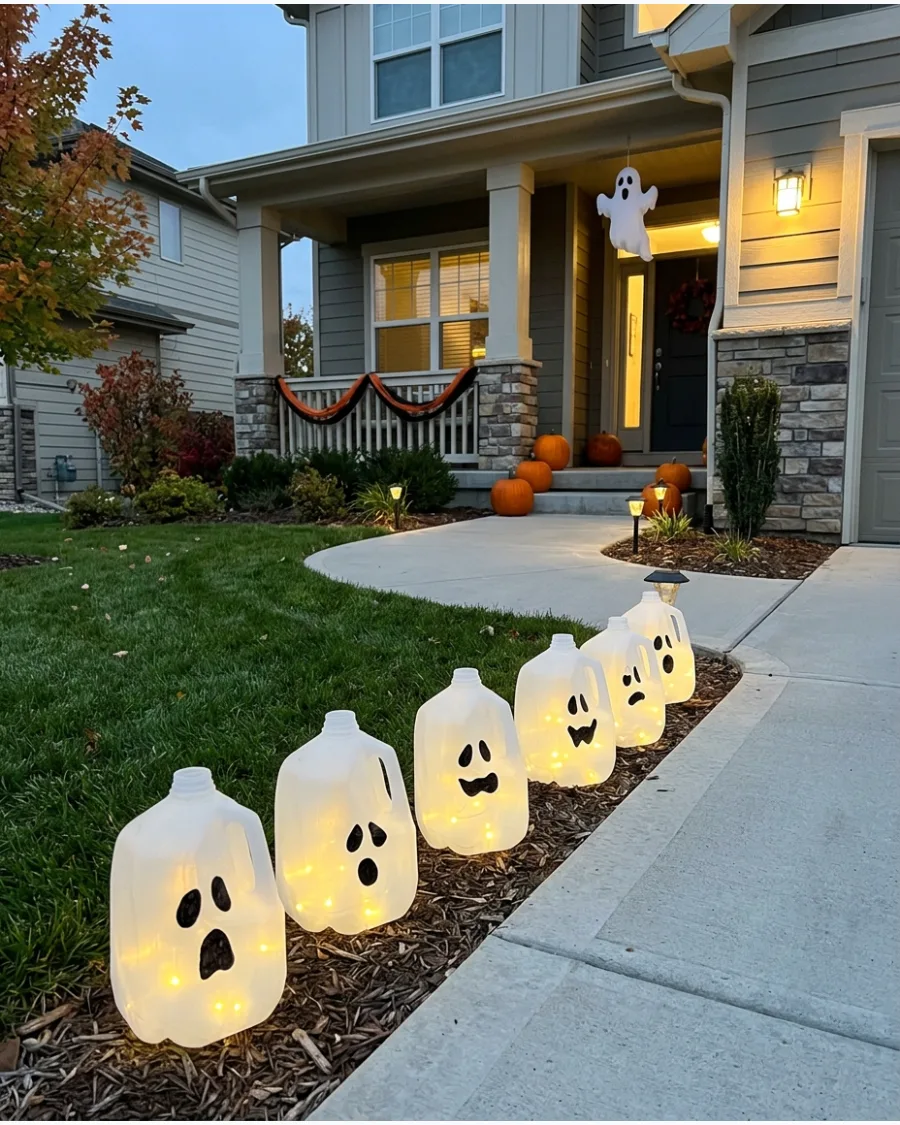
Draw ghost faces on clean translucent milk jugs and place battery lights inside. Line several along the walkway for an inexpensive glowing ghost display.
Group the jugs in uneven numbers like three or five to create a more natural crowd effect. This is a great way to recycle household plastics while adding significant light to a dark path.
- Nearly free if recycling household items.
- Remove all labels and residue with rubbing alcohol for the cleanest glow.
- Weight the jugs with a handful of gravel so they stay upright.
Best shortcut: Use a string of outdoor Christmas lights threaded through the back of the jugs to light them all with one plug.
6. Witch Hat Pathway Lights
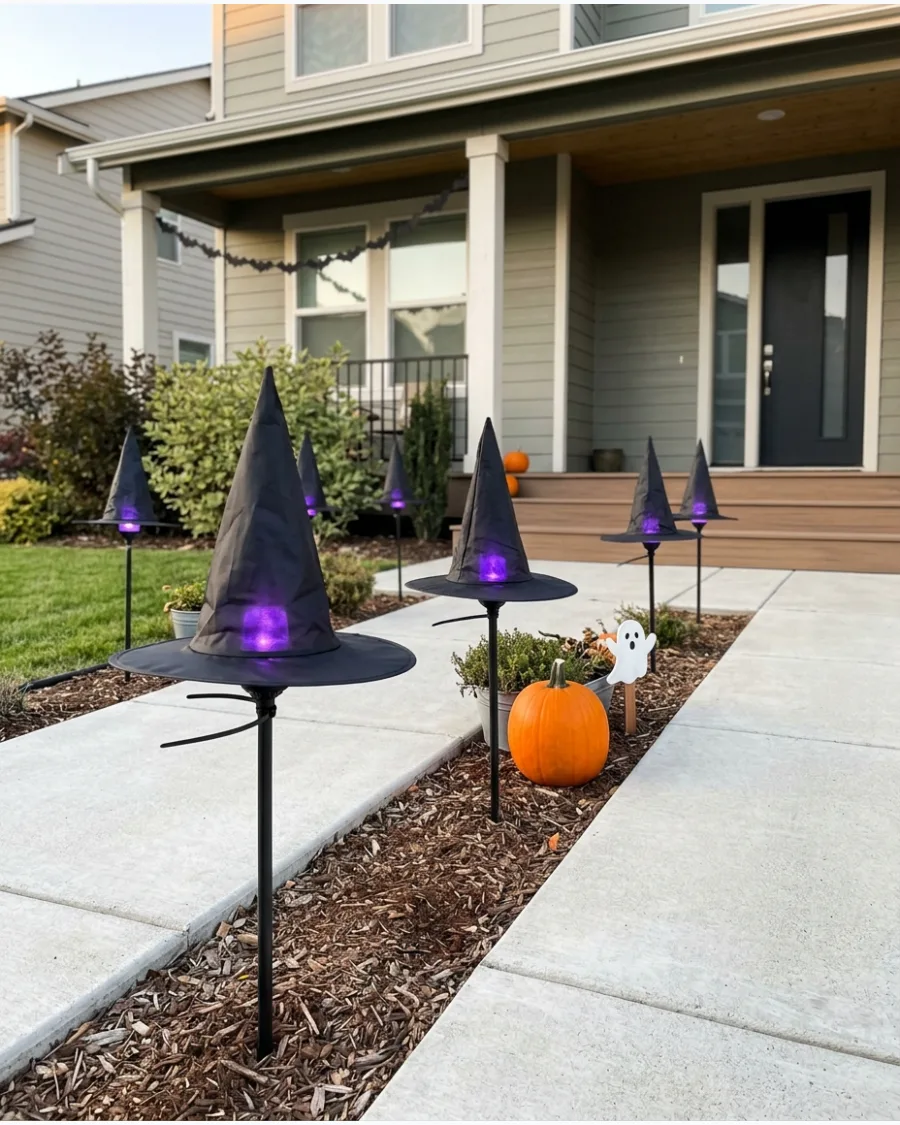
Place lightweight witch hats over safe battery-powered pathway lights. Use purple, green or orange lights so each hat glows from underneath.
Secure the hats to the light stakes with a small piece of clear packing tape or a zip tie. The cone shape of the hat directs the light downward, making the path very easy to see.
- $25-$40 for hats and stakes.
- Choose nylon hats rather than felt so they do not soak up rainwater.
- Space them evenly to mimic a row of floating witches.
Most people skip this: Stuff the top of the hat with a bit of bubble wrap to help it keep its shape in the wind.
7. Halloween Yard-Sign Trail
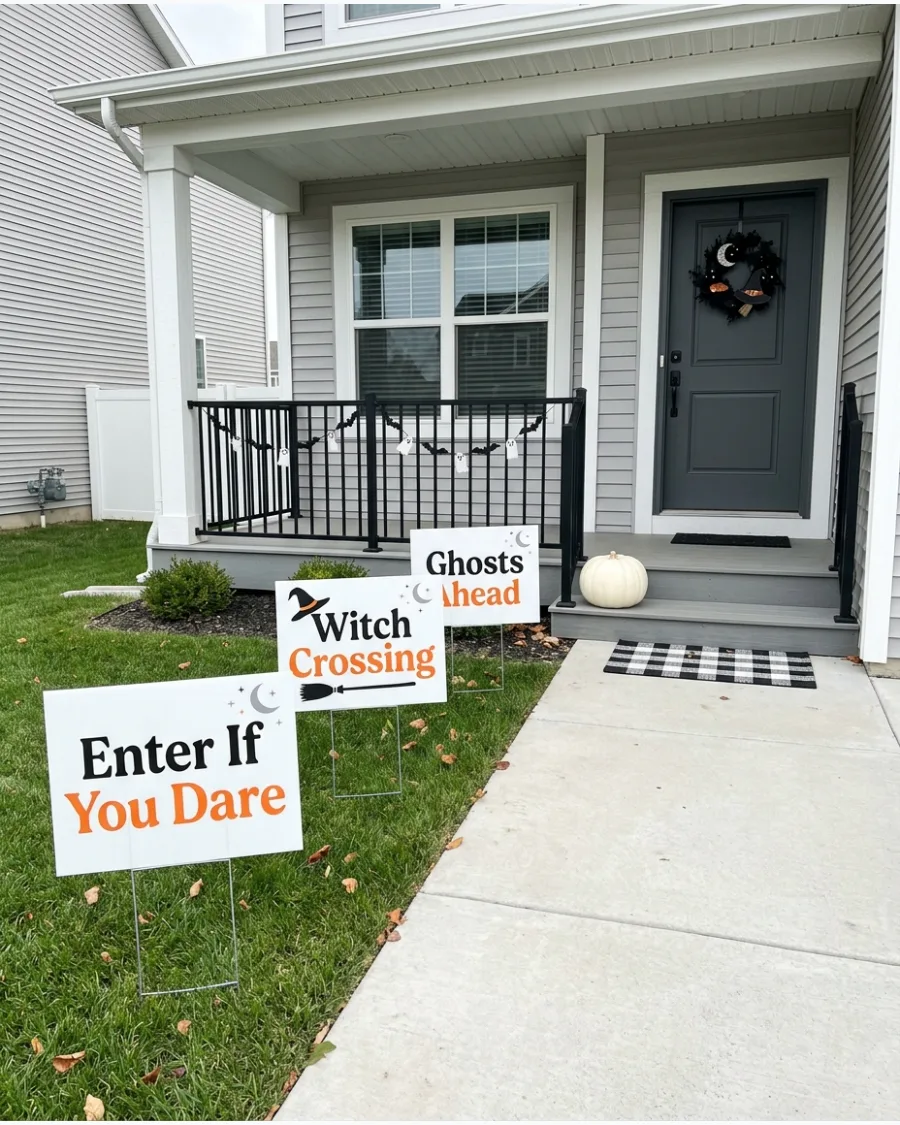
Create wooden or foam signs with messages such as “Enter If You Dare,” “Witch Crossing” and “Ghosts Ahead.” Position the signs at different points leading toward the porch. Angle the signs slightly toward the street so guests can read them as they approach. These signs add height to your decor without requiring a lot of ground space.
- $15-$30 for a set.
- Push stakes deep into the ground to prevent leaning after a rain.
- Use reflective paint for the lettering so it catches car headlights.
Quick win: Use a white paint pen instead of a brush for cleaner, more professional-looking lettering on dark signs.
8. Black Cat Walkway Markers
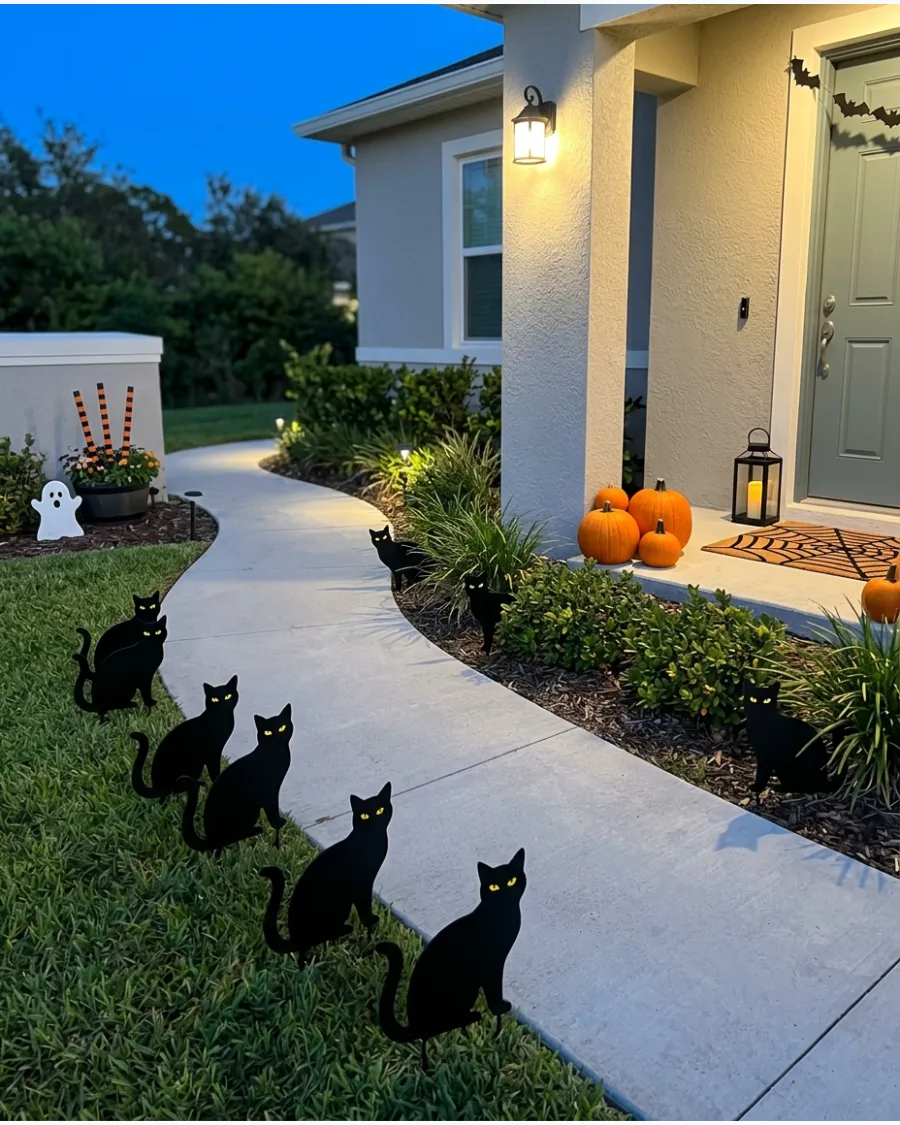
Cut black cat silhouettes from weather-resistant material and attach them to short garden stakes.
Arrange the cats so they appear to watch visitors approaching the house. Position some cats peeking out from behind bushes to add a sense of mystery. The solid black shapes create a striking contrast against green grass or gray concrete during the day.
- $20-$35 for a set.
- Use corrugated plastic or metal for the silhouettes to survive October weather.
- Face the cats in different directions to suggest movement.
Best shortcut: Stick yellow reflective tape on the eyes so they glow when a flashlight or porch light hits them.
9. Bat Stake Walkway
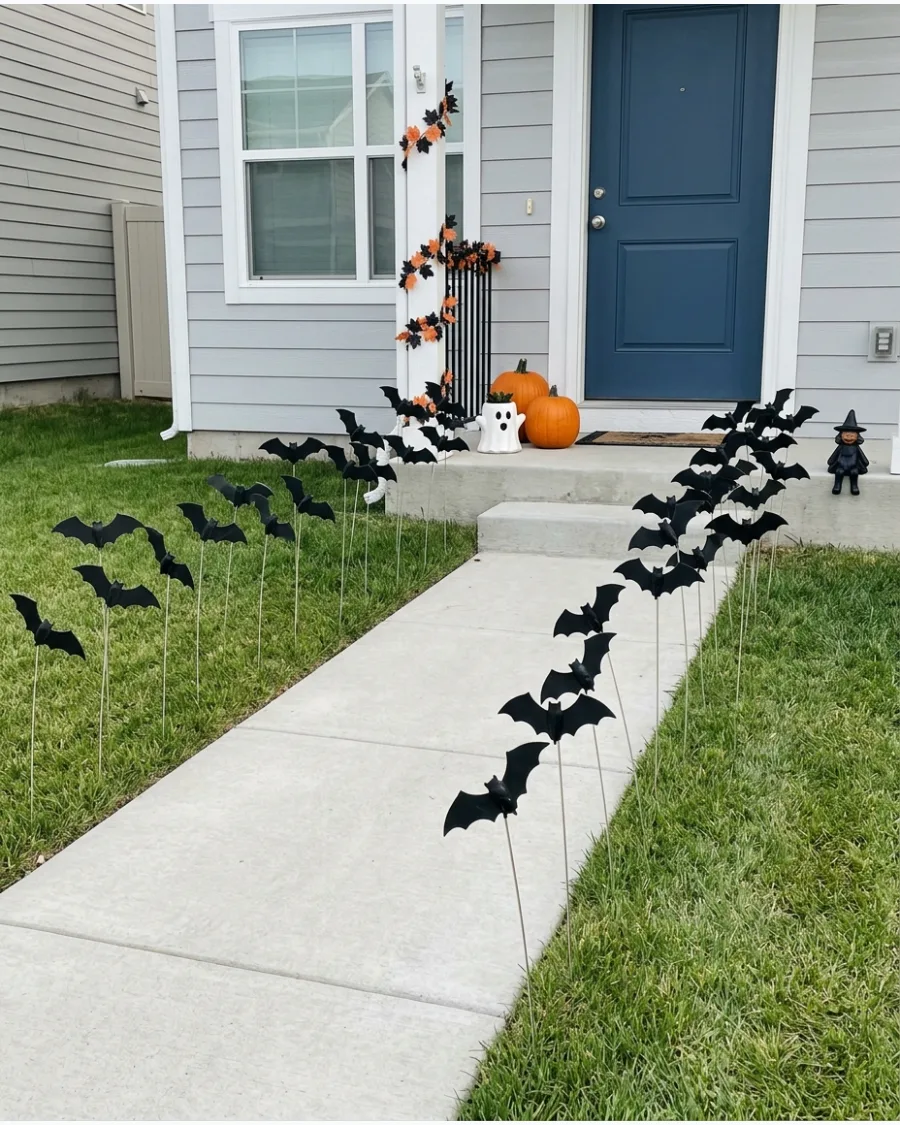
Attach black bat shapes to thin garden stakes at varying heights. Angle each bat differently to create the appearance of a swarm flying beside the path.
Group the bats closer together near the front door to create a focal point. Using thin, flexible stakes allows the bats to flutter slightly when the wind blows.
- $10-$20 for materials.
- Use waterproof adhesive to attach bats to stakes.
- Space the bats at least 12 inches apart to prevent them from tangling.
Quick win: Bend the wings of the plastic bats slightly to give them a three-dimensional, realistic look.
10. Orange-and-Black Ribbon Path
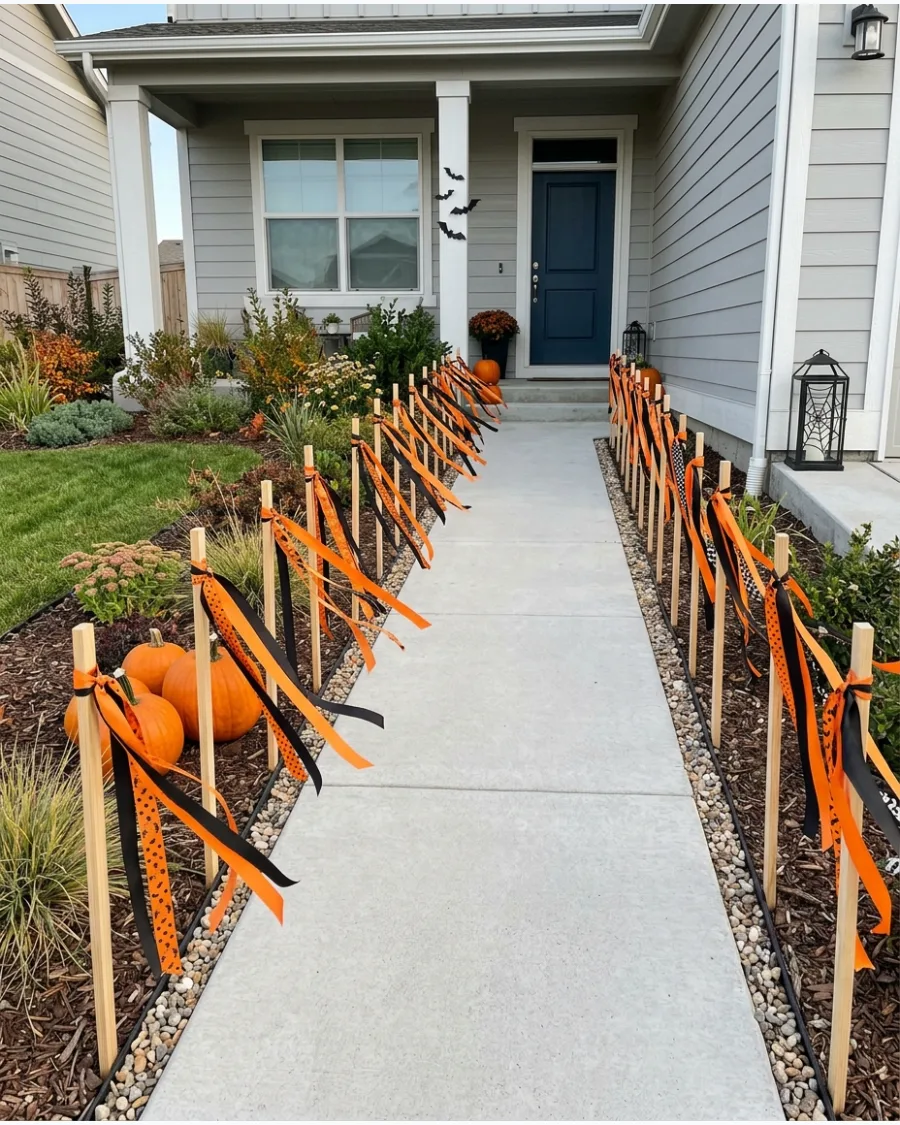
Tie strips of orange, black and patterned ribbon to short stakes along the walkway. Allow the ribbons to move naturally in the breeze for a simple Halloween border.
Mix different ribbon widths and textures like grosgrain and satin for a more custom look. This is a low-profile way to define the path edges without using bulky props.
- Under $15 for ribbon and stakes.
- Use 12-inch ribbon tails so they do not drag on the ground and get dirty.
- Seal the cut ends of the ribbon with a lighter to prevent fraying.
Most people skip this: Use wired ribbon so you can pose the bows and loops even when there is no wind.
Halloween Walkway Lighting Ideas
11. Orange Pathway Lights
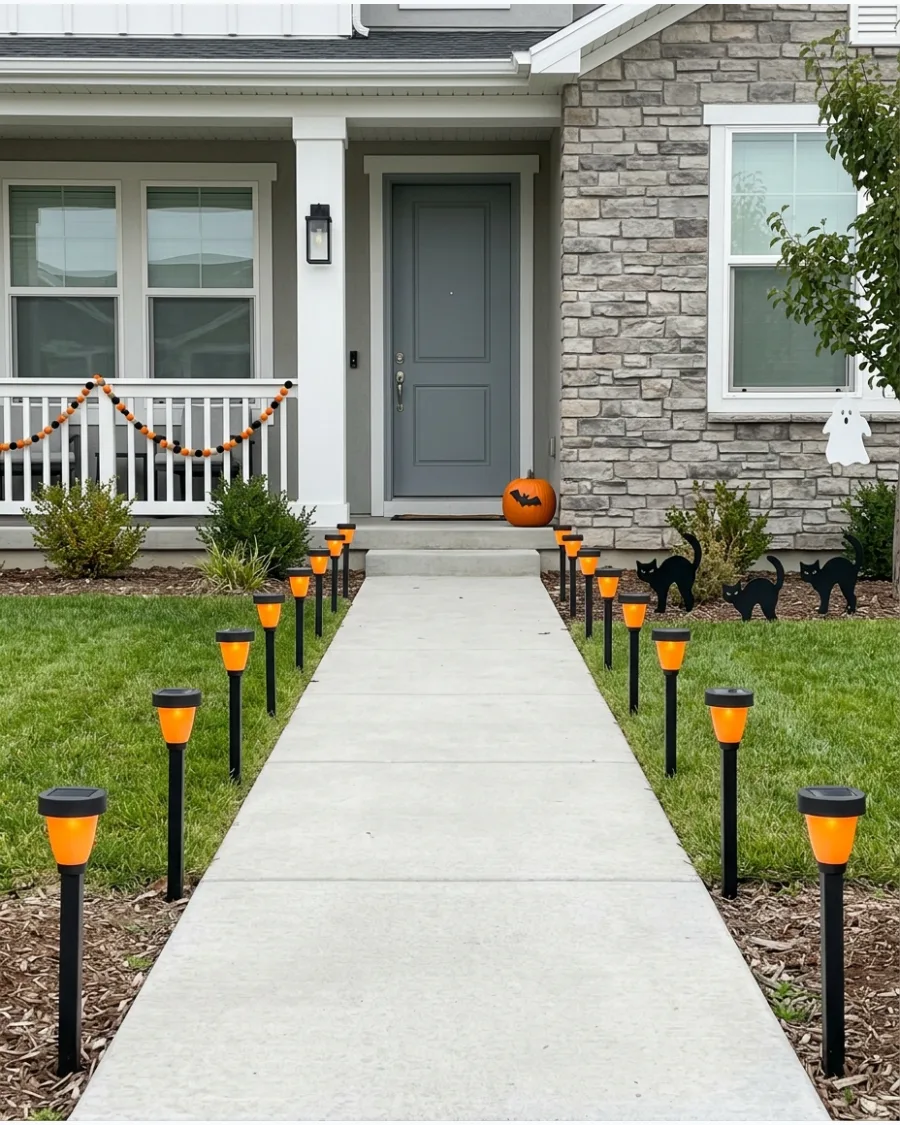
Swapping standard white bulbs for orange ones instantly changes the mood of your entry. Space the stakes exactly two feet apart to keep the lighting consistent without looking cluttered. Orange light provides a warm glow that signals the season without looking harsh against your home’s siding.
- Budget: $20-$40 for a set of six to eight solar stakes.
- Setup: Push the stakes into moist soil to avoid snapping the plastic stems during installation.
- Adaptation: Use orange bulb covers on existing low-voltage landscape lights for a quick, non-permanent swap.
Most people skip this: Clean the solar panels with a damp cloth once a week to ensure the batteries charge fully during shorter autumn days.
12. Purple and Green Lighted Walkway
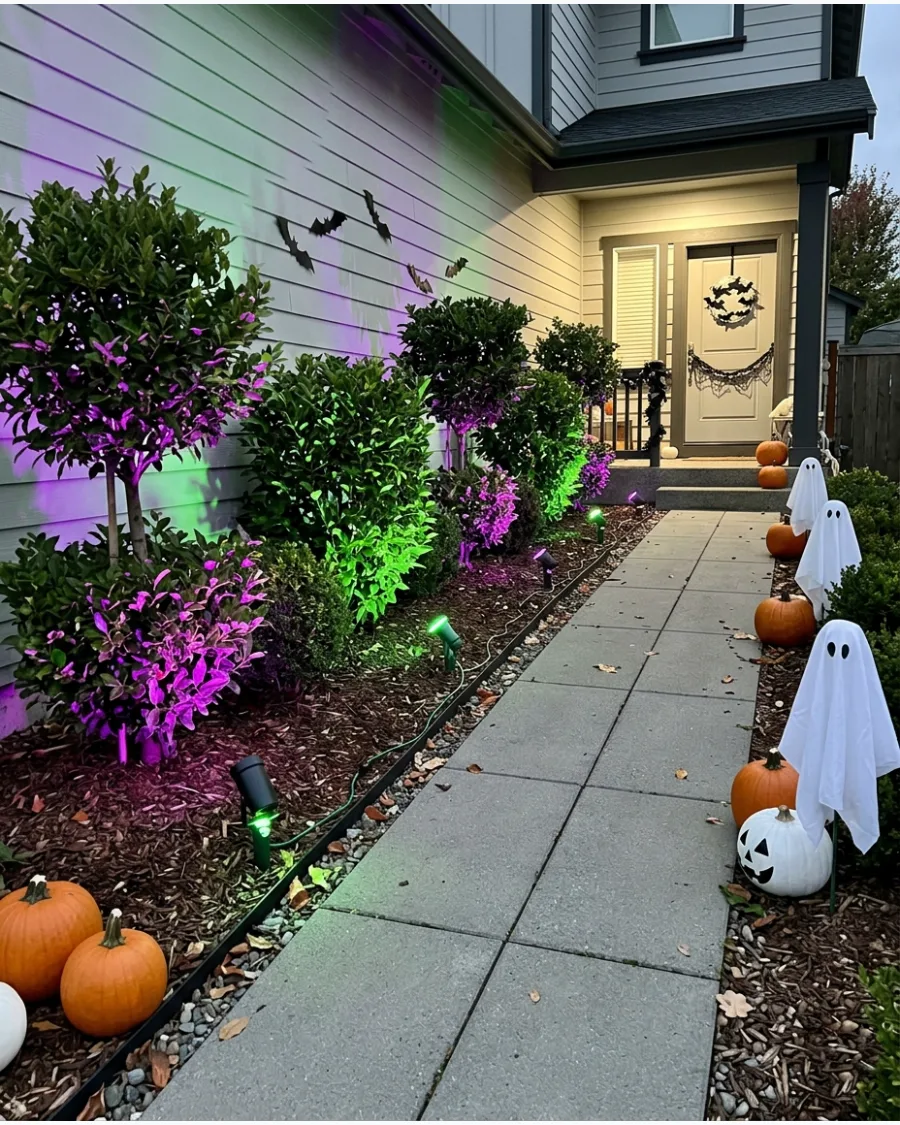
Using two contrasting colors creates a theatrical look that makes an ordinary sidewalk feel like a movie set. Position the lights at the base of shrubs to let the color wash upward against the foliage for a dramatic backdrop. This technique adds depth to the yard that single-color lighting cannot achieve.
- Budget: $30-$60 for a pair of high-output outdoor LED spotlights.
- Setup: Use heavy-duty outdoor extension cords and tuck them under mulch to prevent tripping.
- Adaptation: Renters can use battery-powered puck lights with color filters if outdoor outlets are unavailable.
Quick win: Place the green light near the most textured plant in your garden to highlight the leaves and create eerie shadows.
13. Flickering Candle Walkway
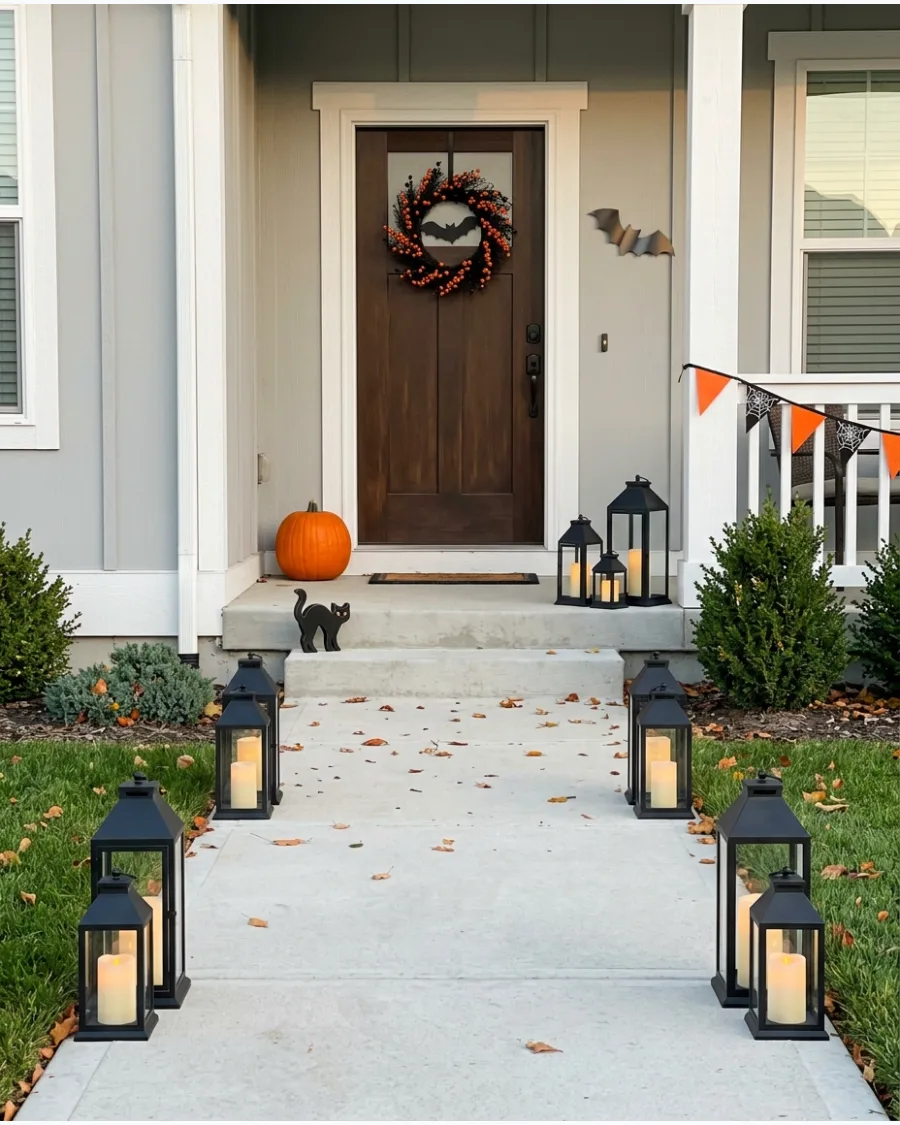
Lanterns offer a classic look that works with any home style from modern to traditional. Choose lanterns with glass panes to protect the flameless candles from wind and light rain while maintaining a clear view of the flicker. Varying the heights of the candles inside the lanterns adds a professional, layered look.
- Budget: $15-$30 per lantern depending on the size and material.
- Setup: Select flameless candles with a built-in 6-hour timer to save battery life throughout the month.
- Adaptation: Use plastic lanterns instead of metal ones if you live in a high-humidity coastal area to prevent rust.
Best shortcut: Buy a bulk pack of identical flameless candles so you only need one type of replacement battery.
14. Glowing Pumpkin Stakes
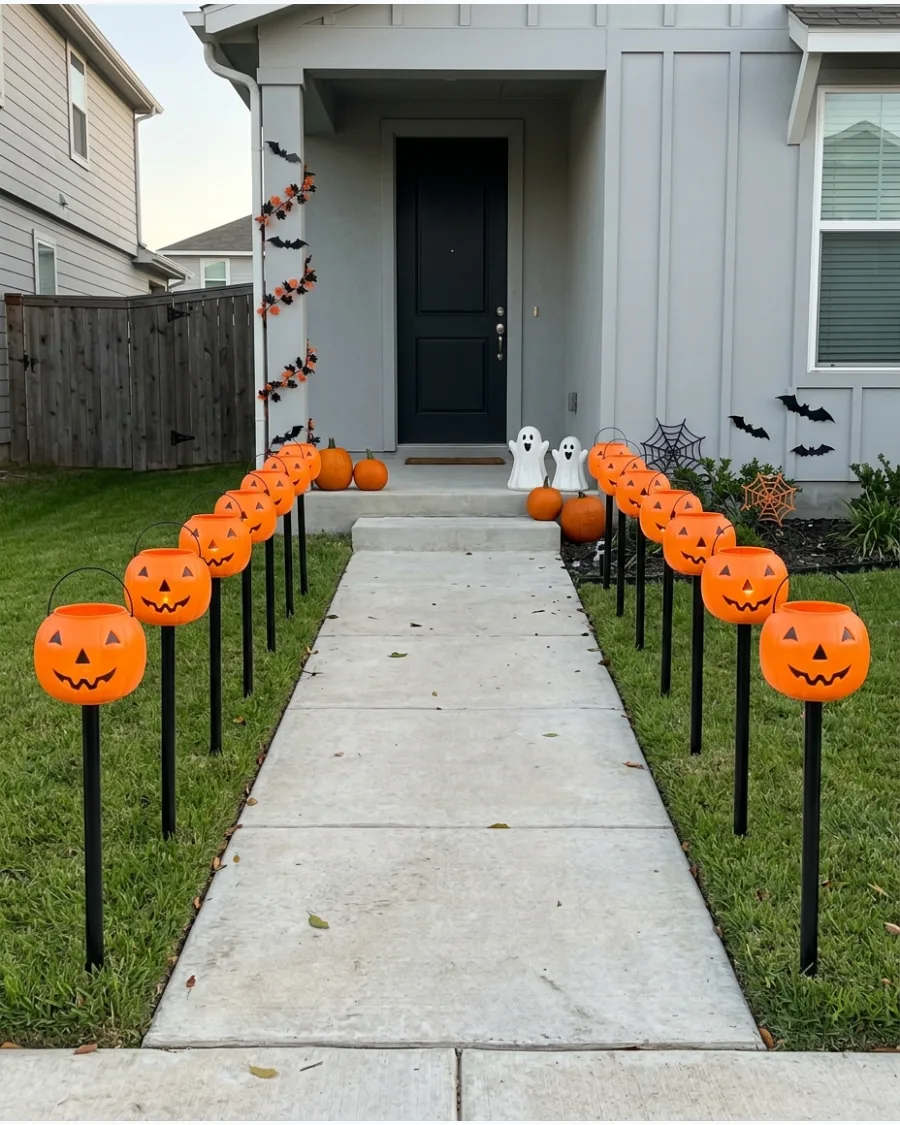
Elevating your pumpkins keeps them visible even if you have taller grass or low-lying plants along the path. Secure the stakes deep into the soil so the pumpkins do not tilt or fall over during heavy October winds. This approach is much cleaner than placing real pumpkins directly on the grass where they can rot.
- Budget: $25-$45 for a set of three to five pre-lit stakes.
- Setup: Arrange the pumpkins in a slight zigzag pattern rather than a straight line for a more organic look.
- Adaptation: If the soil is too rocky for stakes, zip-tie the pumpkins to porch railings or fence posts instead.
Quick win: Drill a small drainage hole in the bottom of the pumpkins to prevent rainwater from pooling inside and damaging the bulbs.
15. Color-Changing Pathway Lights
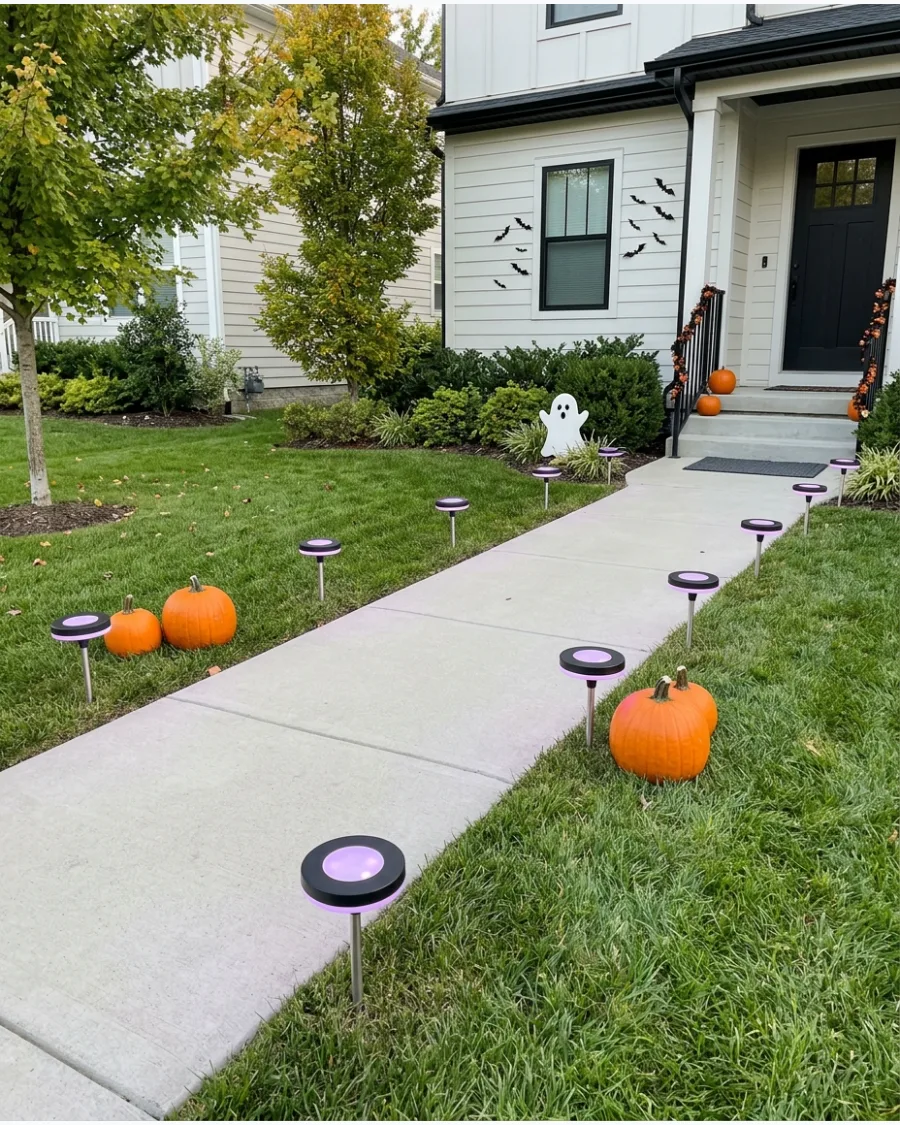
Smart pathway lights allow you to customize the atmosphere from a phone app. Set the transition speed to the slowest possible mode to avoid a distracting strobe effect for neighbors and drivers. These are a smart investment because the colors can be updated for every holiday throughout the year.
- Budget: $80-$150 for a high-quality smart lighting starter kit.
- Setup: Ensure your Wi-Fi signal reaches the front yard before burying the control wires.
- Adaptation: For a lower-tech version, buy color-changing solar lights that rotate through colors automatically.
Most people skip this: Group the lights into 'zones' in your app so you can have orange near the door and purple near the street.
16. Moonlit Blue Walkway
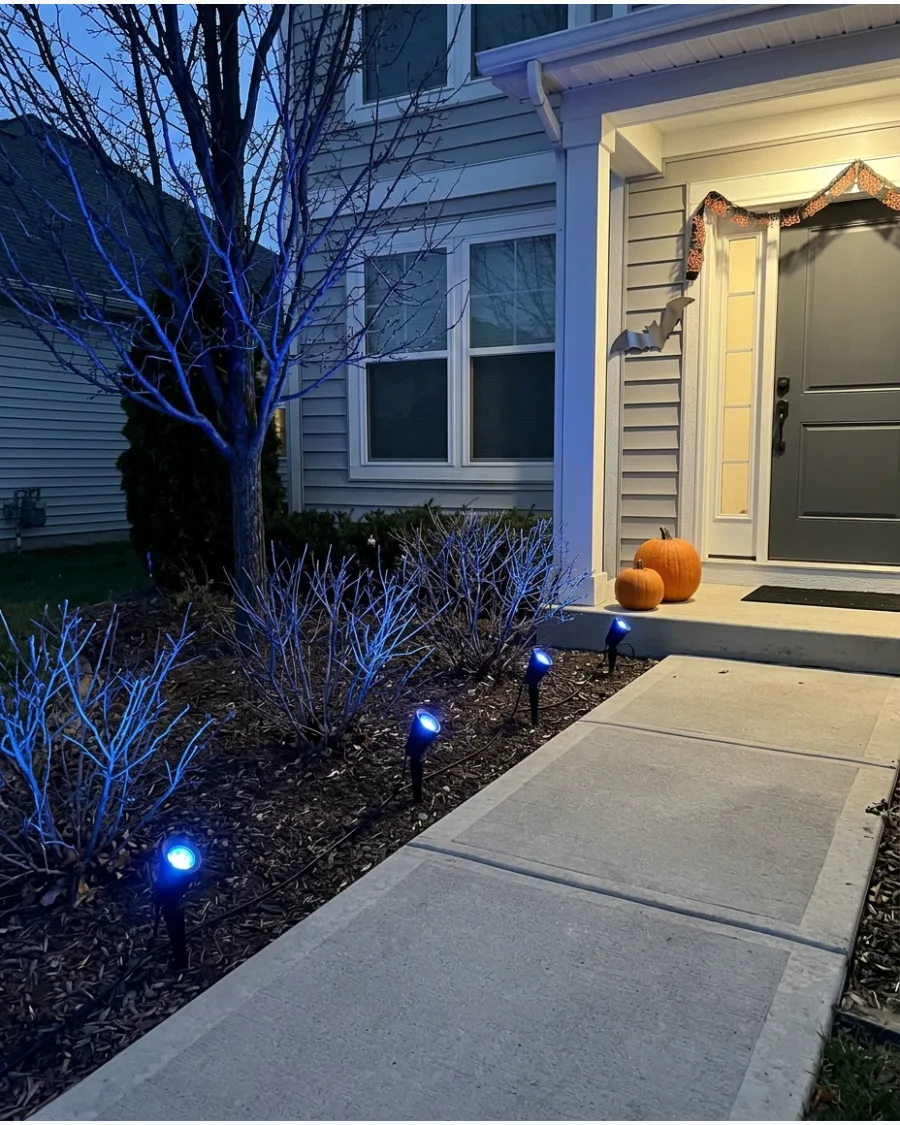
Cool-blue light mimics the look of a full moon and makes the shadows in your yard look deeper and more mysterious. Angle the blue spotlights slightly away from the path to prevent blinding guests as they walk toward the front door. This subtle lighting style is perfect for homes with a more minimalist or sophisticated decor theme.
- Budget: $20-$35 for a single high-intensity blue LED floodlight.
- Setup: Mount the light high in a tree or on a gutter to create a 'moonlight' effect from above.
- Adaptation: Use blue floodlight bulbs in your existing porch fixtures for the easiest possible setup.
Best shortcut: Place a blue light behind a large rock or bush to create a 'halo' effect that adds mystery without a visible light source.
17. Fairy-Light Garden Path
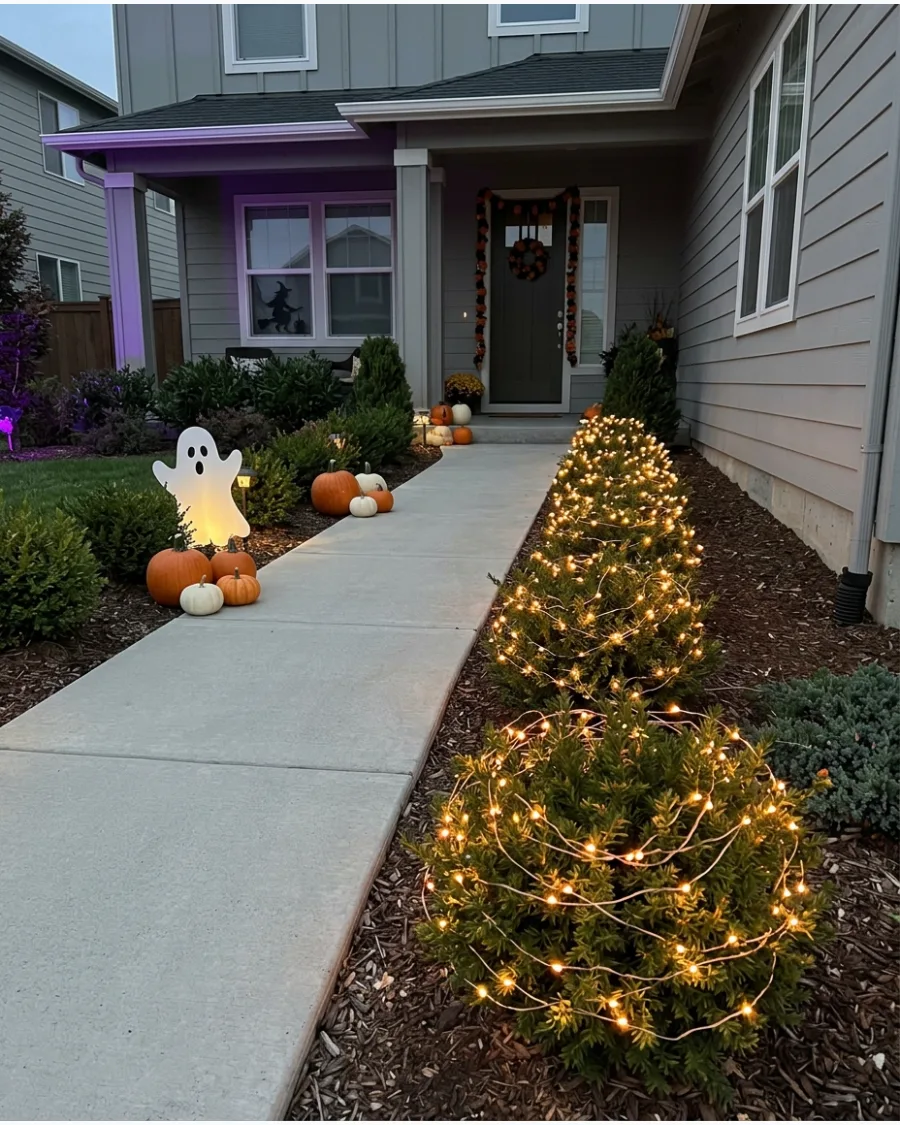
Weaving lights through your existing landscaping creates a magical glow that feels integrated rather than added on. Use battery-operated fairy lights with built-in timers so the display illuminates automatically at dusk without needing extension cords. Tucking the wires into the center of the bushes keeps the display looking tidy during the day.
- Budget: $10-$20 for a set of two long fairy light strands.
- Setup: Use green-coated wire or copper wire to help the strands blend into the foliage.
- Adaptation: Add small plastic spiders or bats to the bushes; the fairy lights will cast tiny shadows of the shapes onto the path.
Quick win: Wrap the battery box in a plastic sandwich bag before hiding it in the dirt to protect it from moisture.
18. Glowing Pebble Walkway
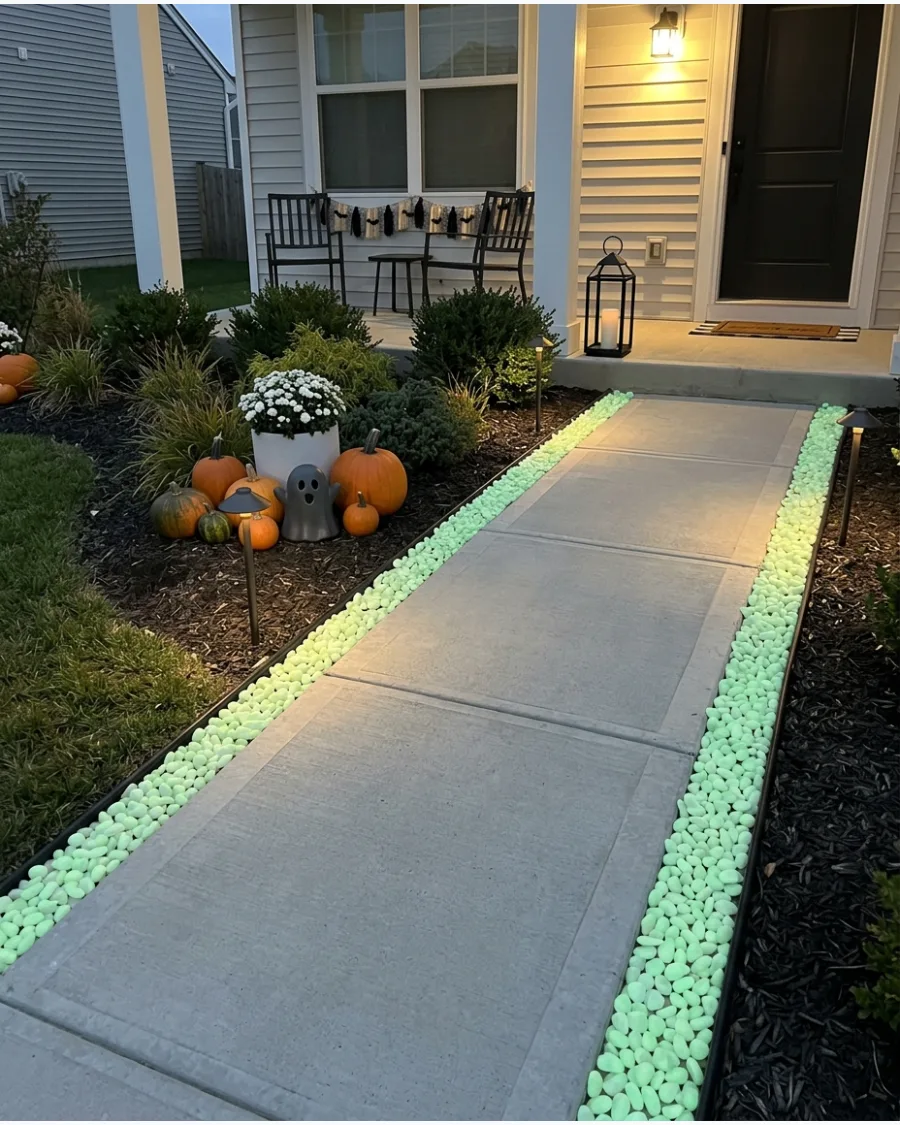
Glow-in-the-dark pebbles provide a unique, low-profile way to mark the boundaries of your path. Spread the pebbles in a dense two-inch border to ensure there is enough surface area to catch and hold the light. These work best when paired with a secondary light source, as the glow alone is often too faint for safety.
- Budget: $15-$25 for a 200-count bag of glowing resin pebbles.
- Setup: Place the pebbles in a spot that receives direct sunlight for at least six hours a day to 'charge' the resin.
- Adaptation: Line the top of a stone wall or the edges of porch stairs if you do not have a traditional grass border.
Most people skip this: Use these on a dark-colored walkway like asphalt to make the glow stand out more vividly.
19. Lanterns Hanging From Shepherd Hooks
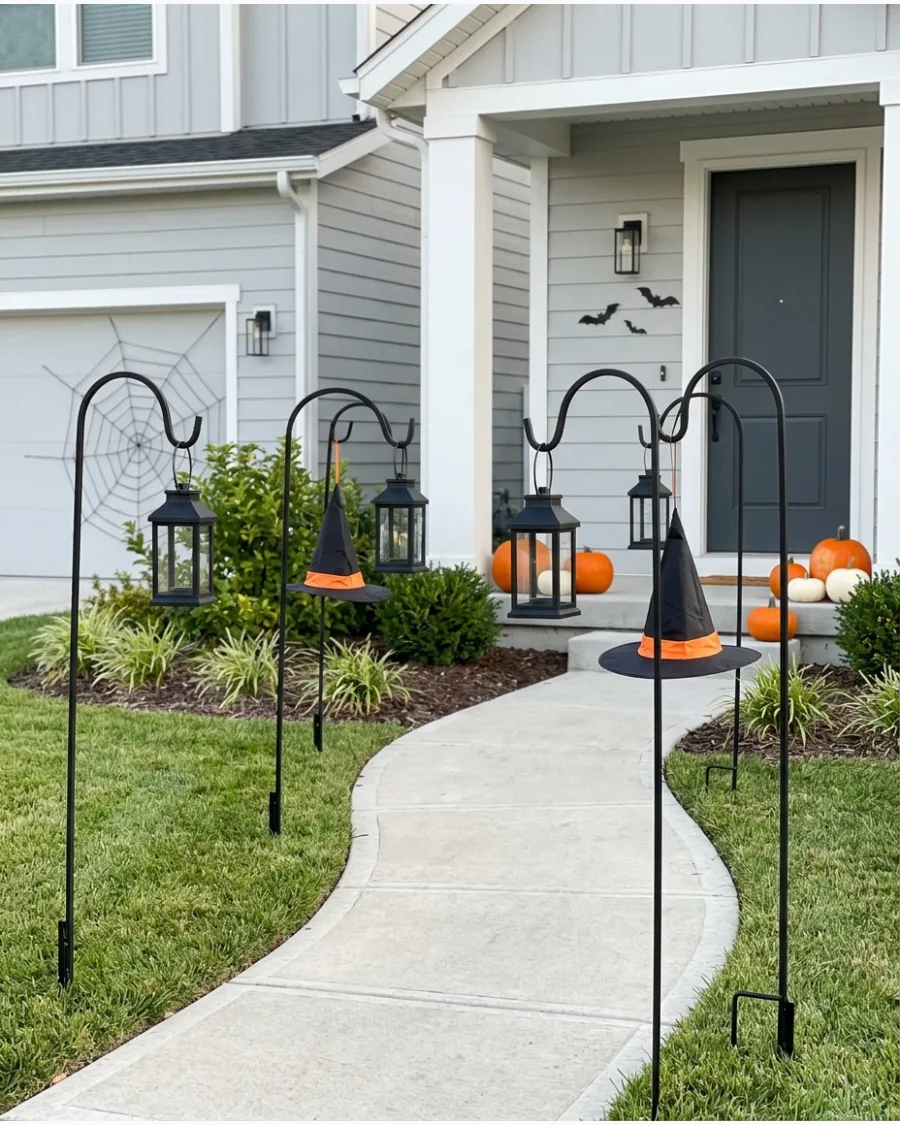
Using hooks keeps the walkway clear of tripping hazards while adding significant height to your outdoor decor. Heighten the visual interest by alternating the lanterns with lightweight decorative witch hats at the same level along the path. This setup is ideal for long driveways where ground-level lighting might get lost.
- Budget: $40-$70 for a set of four hooks and four basic lanterns.
- Setup: Ensure the hooks are perfectly vertical; use a level if necessary to prevent the lanterns from swinging unevenly.
- Adaptation: Use solar lanterns to eliminate the need for candles or batteries entirely.
Best shortcut: Tie a small piece of black floral wire around the lantern handle and the hook to prevent them from blowing off in high winds.
20. Layered Halloween Walkway Lighting
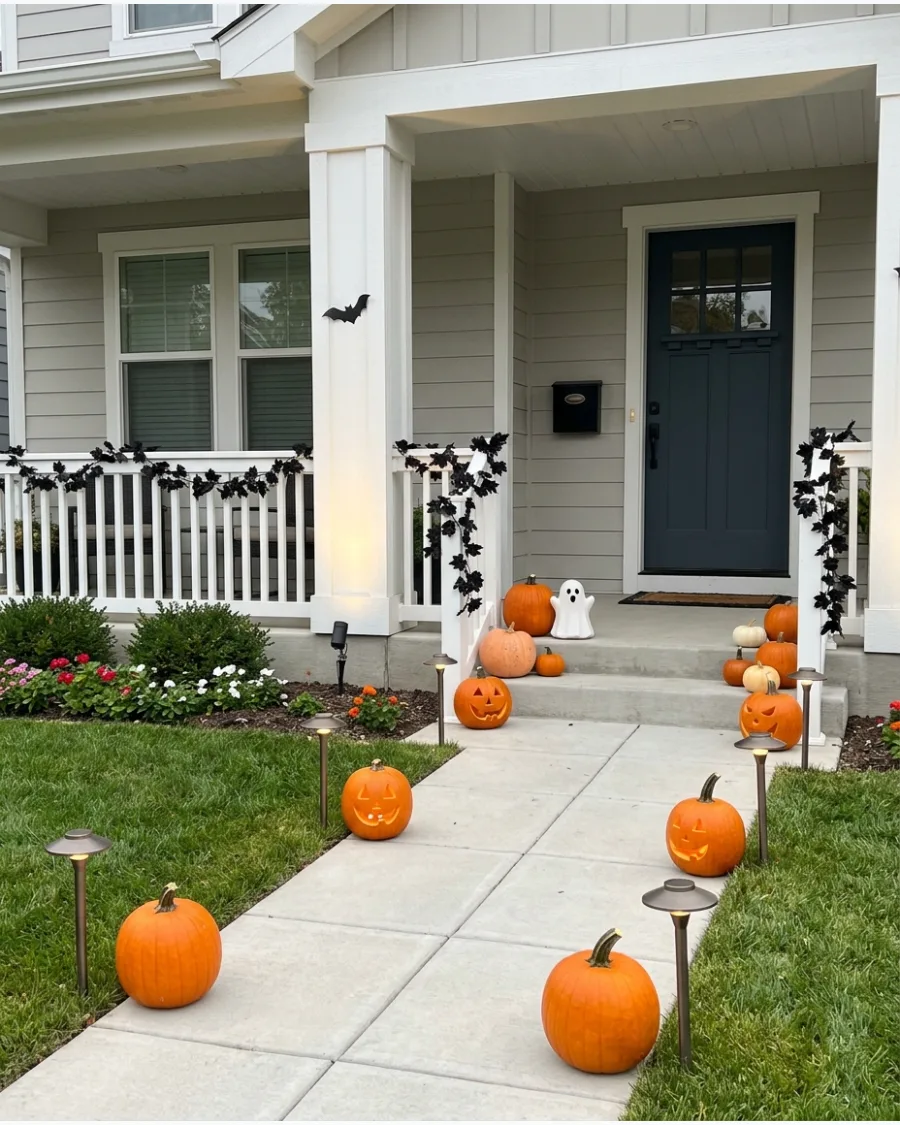
Layering light at different heights prevents the yard from looking like a flat, dark void between the street and the house. Focus your strongest uplighting on the architectural details of the porch columns to draw the eye toward the entrance. Mixing low path lights with mid-level pumpkins and high spotlights creates a professional-grade display.
- Budget: $100-$250 for a complete multi-level lighting setup.
- Setup: Start with the largest lights first, then fill in the gaps with smaller path lights and decorative elements.
- Adaptation: If you have limited outlets, use one powerful floodlight to illuminate the whole house and solar stakes for the path.
Quick win: Use warm-toned lights for the path and cool-toned lights for the house to create a sense of depth and contrast.
Ghost Halloween Walkway Ideas
21. Glowing Ghost Walkway
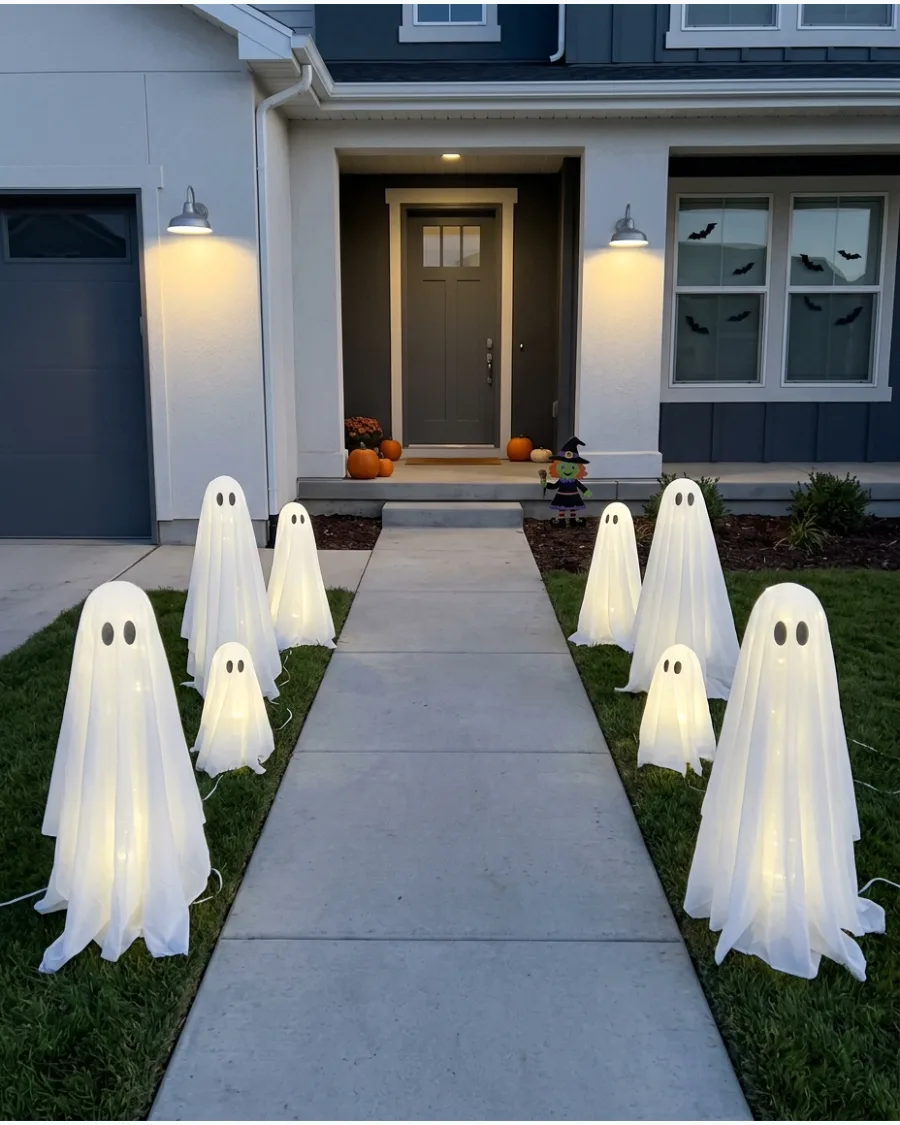
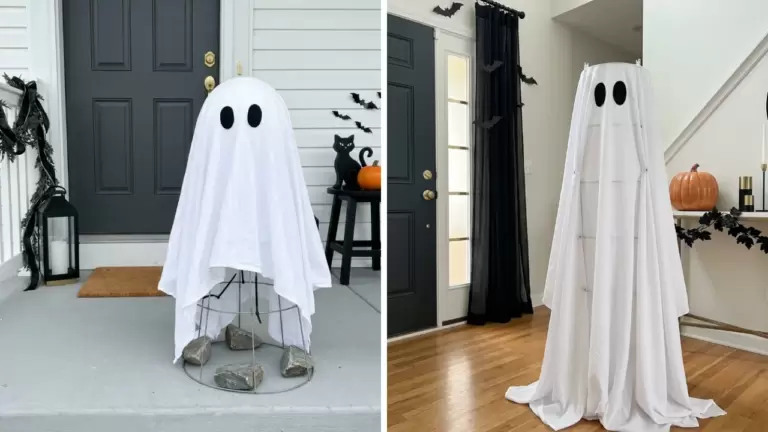
Place illuminated fabric ghosts of various sizes on both sides of your front path. Varying the heights and sizes makes the ghosts look like a natural gathering instead of a stiff line of identical props. This setup provides a soft glow that helps light the way for guests without being too bright.
- Use tomato cages and white bedsheets for a budget-friendly DIY version.
- Space the ghosts at least 18 inches away from the path to prevent tripping.
- Opt for battery-operated puck lights inside the fabric to avoid running long extension cords.
Most people skip this: Use a safety pin to secure the fabric to the base so wind does not blow the ghost heads off.
22. Ghosts Holding Lanterns
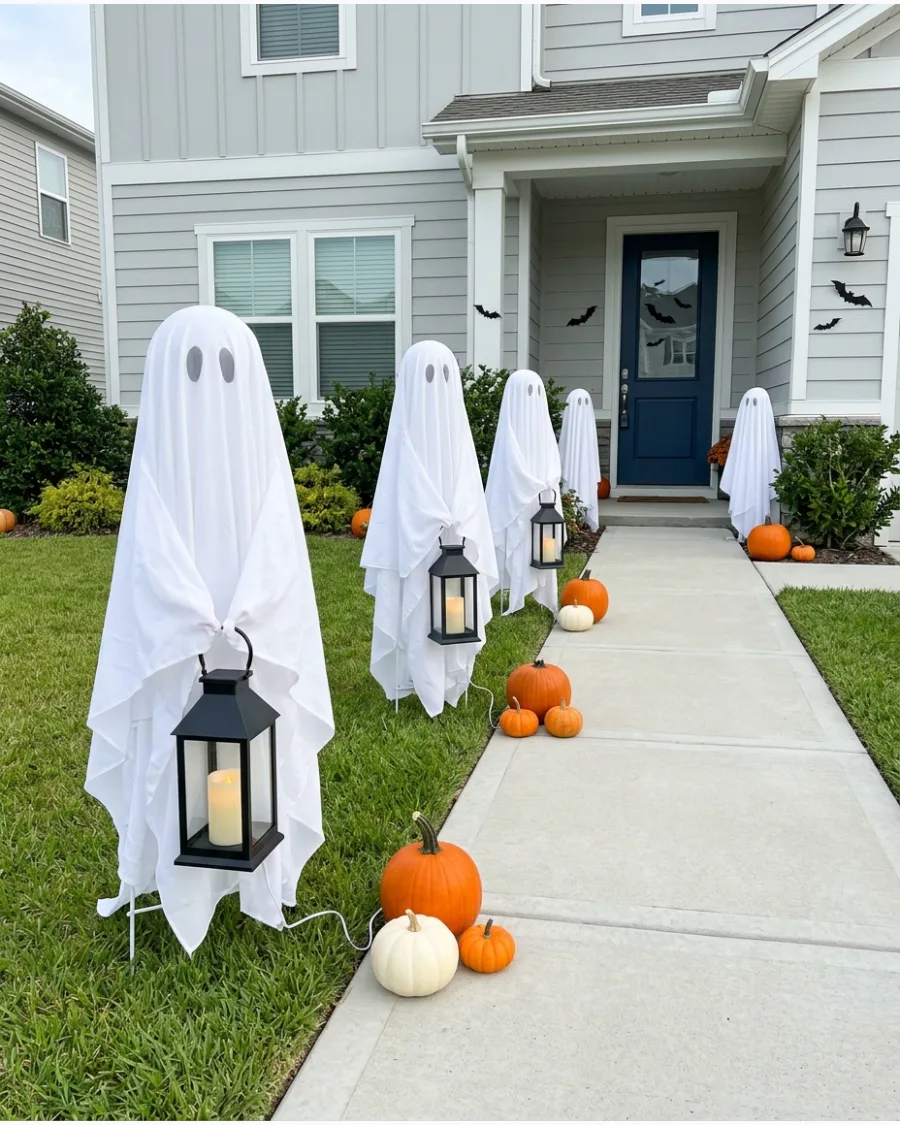
Create standing ghosts from white fabric and lightweight frames, then place a lantern next to each one. Arranging them as if they are guiding visitors toward the house creates a clear and inviting direction for the entry. This adds a classic storytelling element to your outdoor decor.
- Look for lightweight PVC or wire frames to keep the ghosts upright.
- Space the figures every four feet for the best visual impact along the walkway.
- Use LED lanterns instead of real candles to keep the fabric safe from heat.
Quick win: Angle the ghosts slightly toward the front door to emphasize the walkway direction.
23. Floating Ghost Path
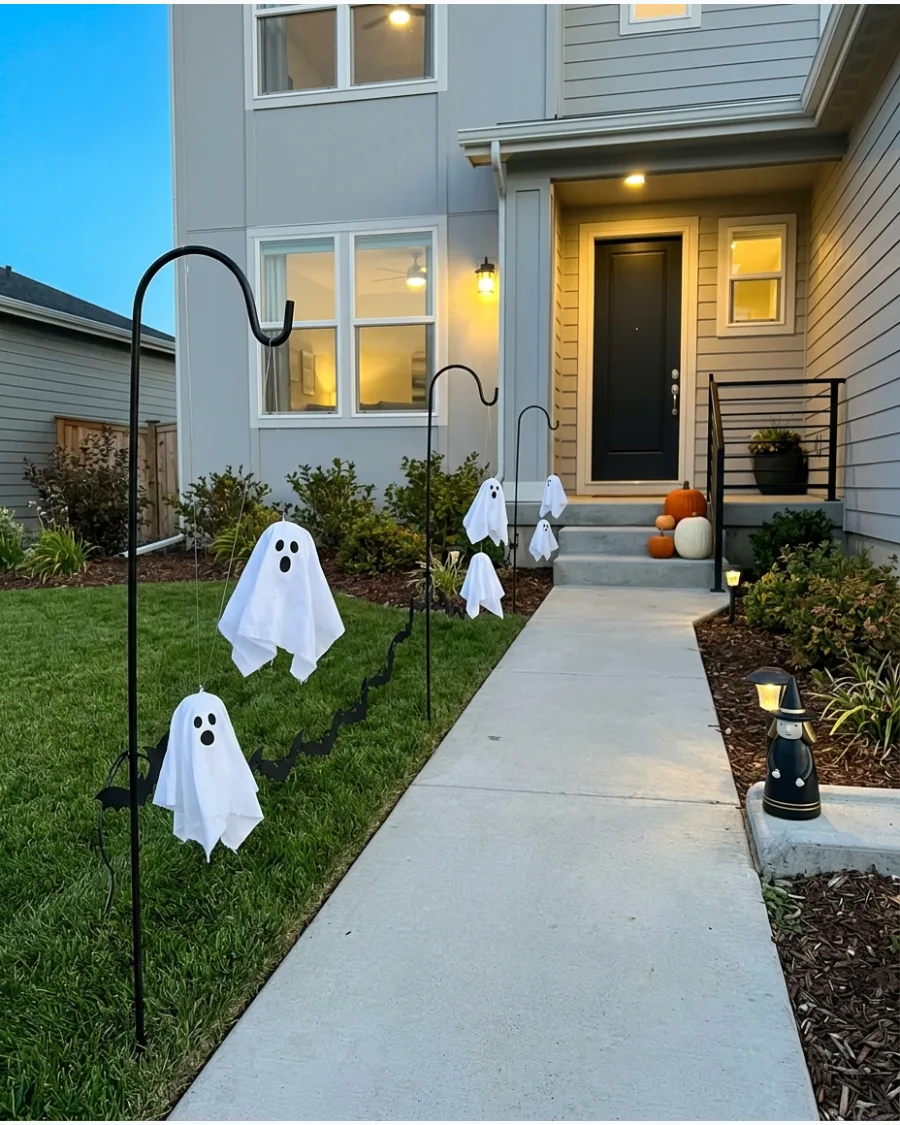
Suspend small white ghosts from tree branches or shepherd hooks using clear thread. Staggering the heights creates a realistic floating effect that catches the evening breeze and adds movement to the yard. This works especially well for walkways lined with trees or tall shrubs.
- Use 10-pound test fishing line to ensure the hanging material remains invisible.
- Attach the ghosts to black metal shepherd hooks if you do not have trees nearby.
- Pick lightweight foam heads so the ghosts stay afloat even in light wind.
Best shortcut: Use a small swivel hook on the hanging line to prevent the ghosts from tangling when it gets windy.
24. Ghost Family Entrance
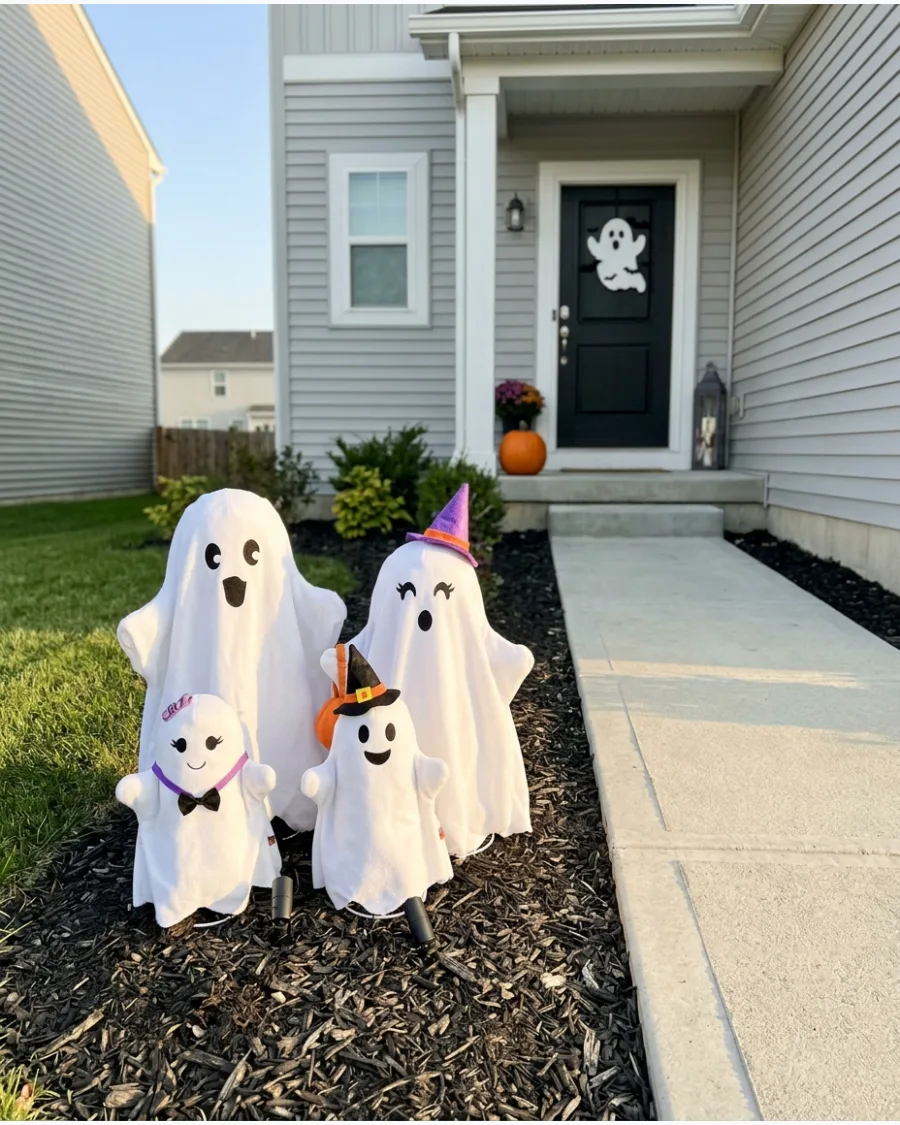
Build a family of ghosts in different sizes and arrange them near the start of the path. Giving each ghost a different expression or a simple accessory prevents the display from looking like a generic store-bought set. It creates a focal point that welcomes guests before they even reach the porch.
- Mix adult-sized and child-sized ghost forms to create a family dynamic.
- Cut eye shapes from black felt and glue them on for different facial expressions.
- Place the largest ghost closest to the street to anchor the group visual.
Quick win: Add a small bow tie or a fabric flower to one or two ghosts to give them distinct personalities.
25. Cheesecloth Ghost Walkway
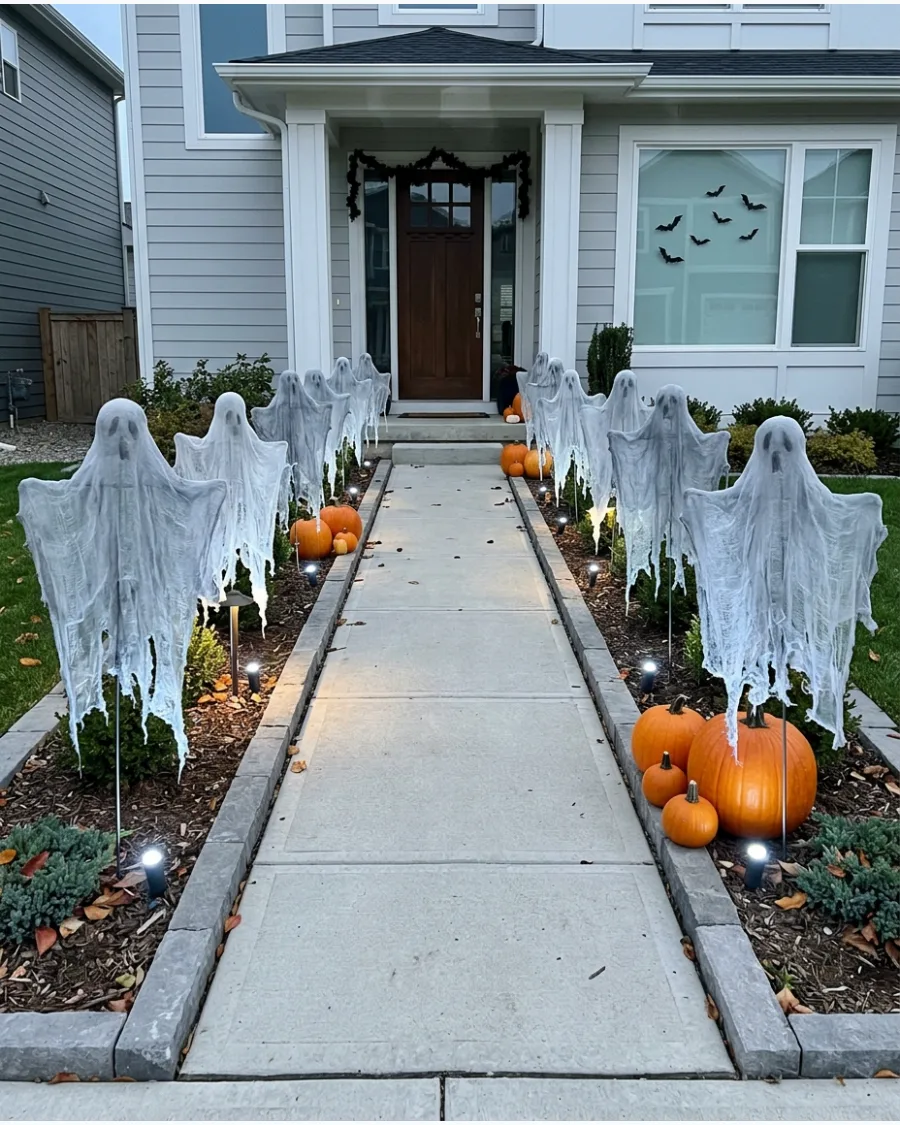
Create stiffened cheesecloth ghosts and place them on stands beside the path. Illuminating these from the ground with soft cool-white lights highlights the tattered, misty texture of the fabric. They look more spectral and delicate than traditional sheet ghosts.
- Apply two coats of fabric stiffener to ensure the ghosts hold their shape outdoors.
- Use small plastic bottles as temporary drying forms during the creation process.
- Place the ghosts on flat paving stones to keep the fabric off damp grass.
Most people skip this: Use cool-white LEDs instead of warm-white to give the cheesecloth a more spectral, eerie glow.
26. Ghost Luminary Trail
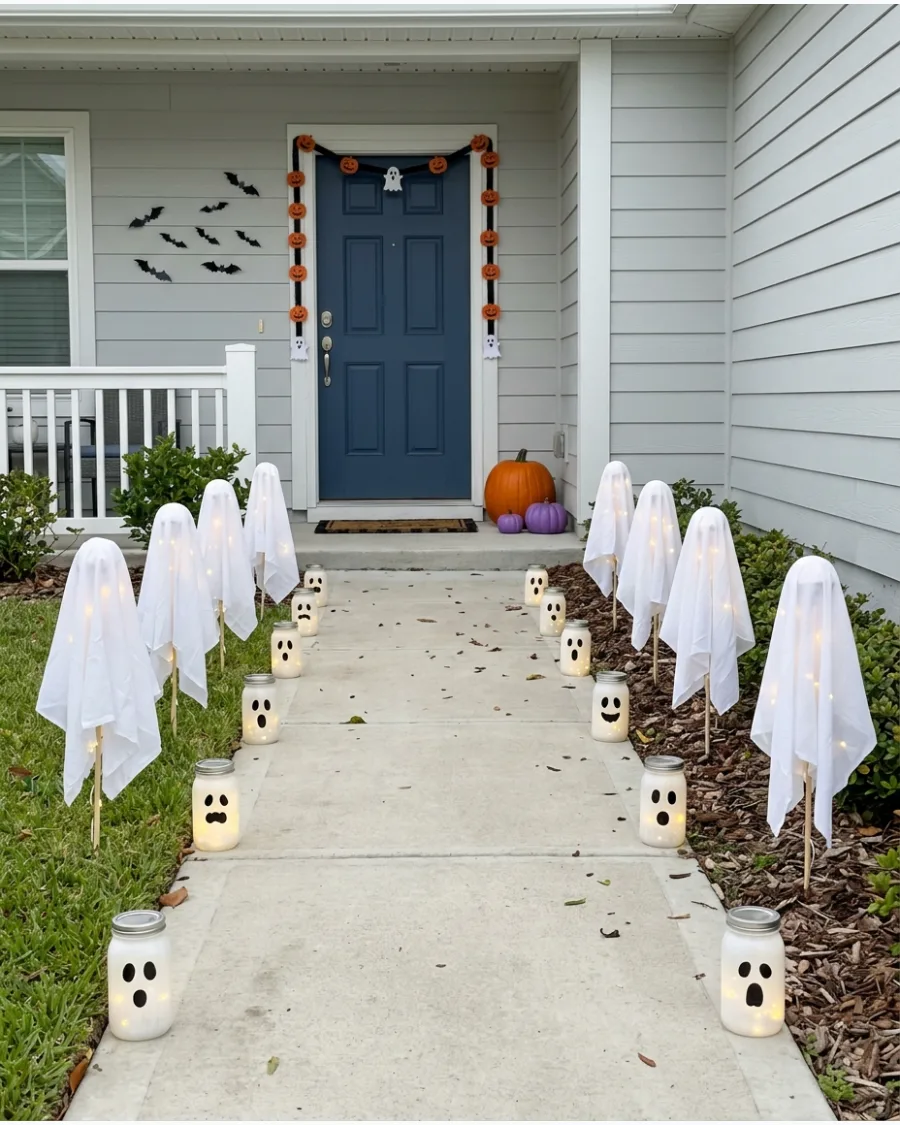
Alternate glowing ghost jars with larger white fabric ghosts along the edge of the walkway. The repeated ghost theme creates a coordinated display without requiring massive or expensive props. This is an effective way to light a long path on a budget.
- Use white frosted glass jars with black vinyl faces for a clean look.
- Space the luminaries exactly two feet apart for a professional, even appearance.
- Weight the larger fabric ghosts with small sandbags inside to keep them in place.
Quick win: Use a battery-operated timer for the lights so the entire trail turns on automatically at sunset.
27. Ghosts Peeking From Shrubs
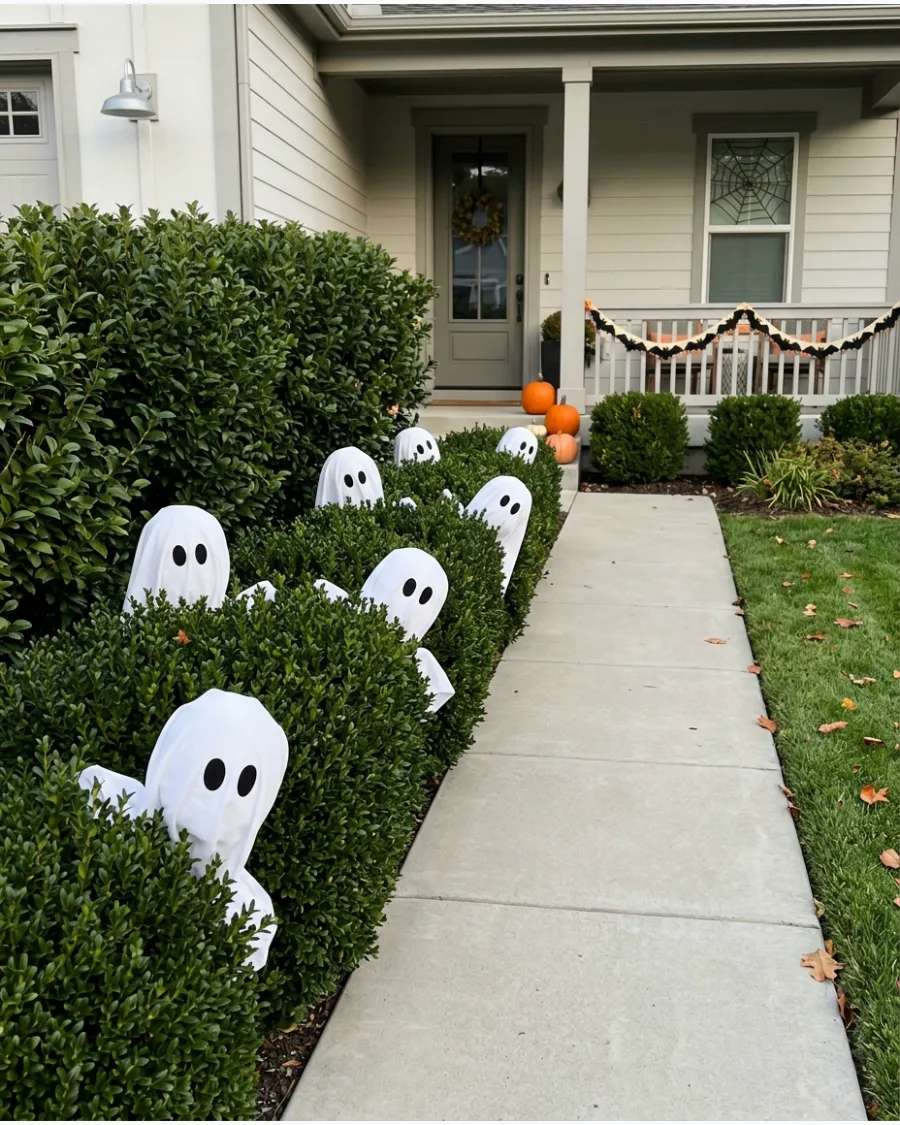
Position white ghost heads and fabric bodies partly inside the bushes lining the path. Adding subtle lights inside the bushes ensures their faces can be seen clearly after dark. It makes the garden feel lived-in and festive.
- Use foam balls covered in white fabric to create lightweight ghost heads.
- Secure the heads to branches using green floral wire to keep them hidden.
- Position the ghosts at eye level to create a surprising effect for visitors.
Best shortcut: Use battery-powered string lights wrapped around the ghost heads to avoid running long extension cords through the yard.
28. Dancing Ghost Circle
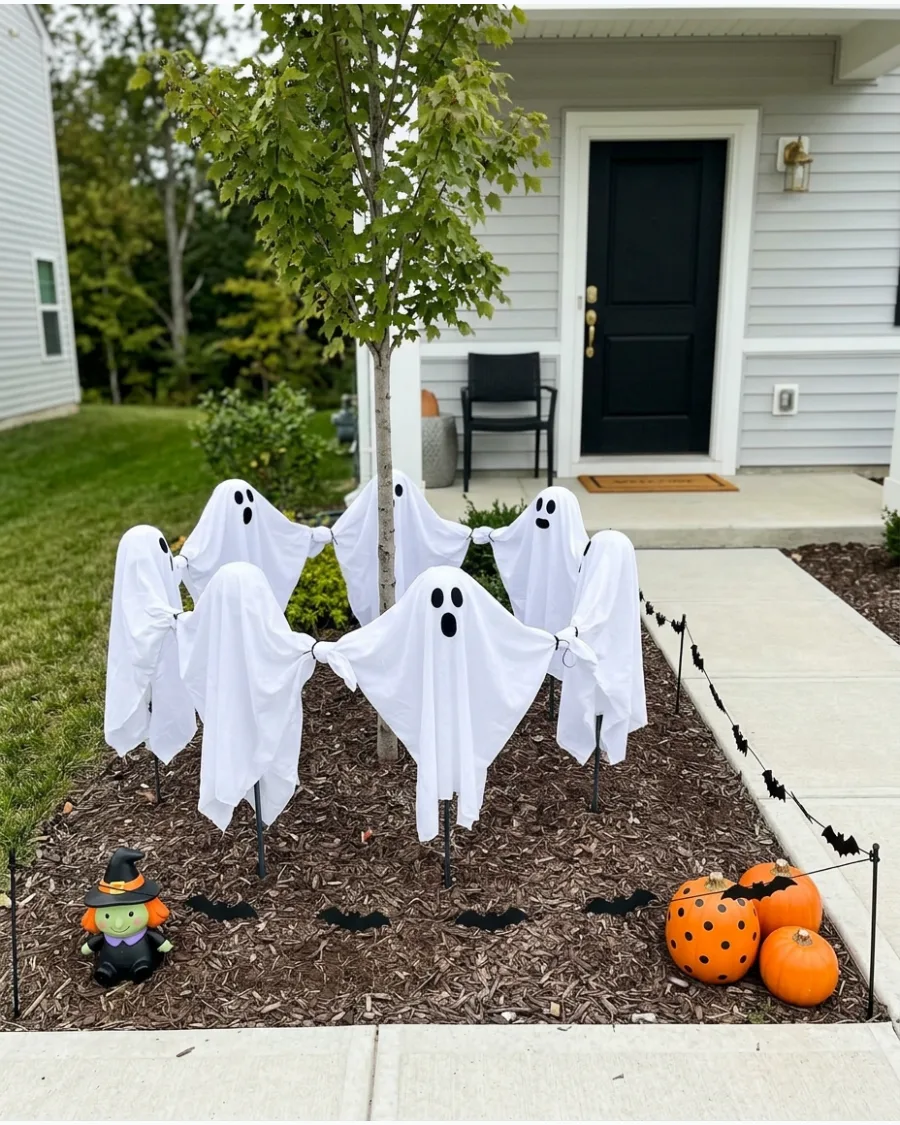
Arrange several lightweight ghosts in a circle and connect their fabric arms. Linking the arms makes the ghosts appear to be dancing together, which adds a playful energy to the walkway. This works best around a focal point like a tree or a central garden bed.
- Use thin white rope or extra fabric strips to connect the ghost hands securely.
- Drive garden staples through the base of the fabric to keep the circle symmetrical.
- Center the ghosts around a tree trunk or a large planter for a grounded look.
Most people skip this: Leave a small gap in the back of the circle so you can still access the center for watering or maintenance.
29. Friendly Ghost Welcome Path
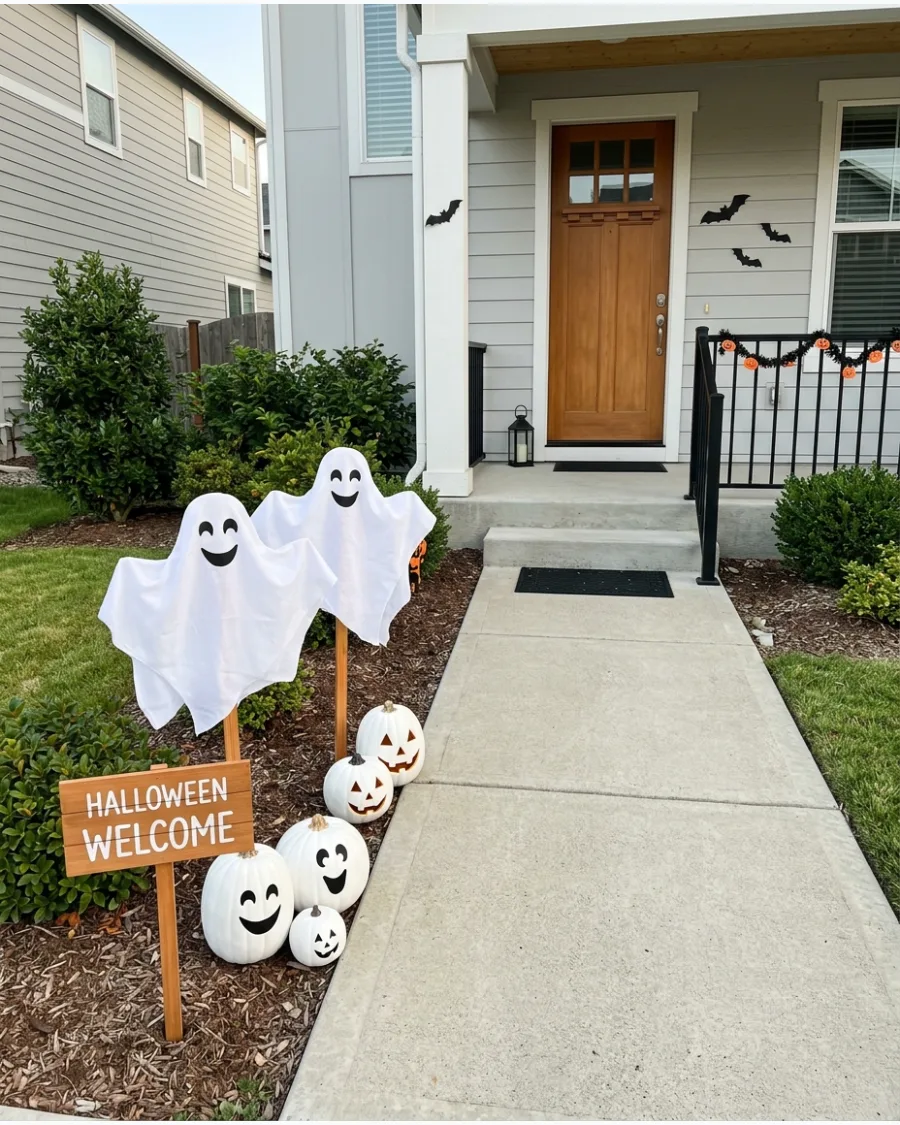
Use smiling ghost faces, white pumpkins, and warm lights to create a child-friendly entrance. Adding a cheerful Halloween welcome sign near the porch makes the path feel approachable for young trick-or-treaters. This style avoids scares in favor of a festive, cozy atmosphere.
- Choose ghosts with wide, round eyes and upward-curving smiles.
- Use warm-white LED lights to create a glow that feels inviting rather than eerie.
- Mix in real or craft white pumpkins to vary the textures along the porch edge.
Quick win: Use a white chalk marker on a black sign for a clean, modern look that is easy to read from the sidewalk.
30. Ghosts Emerging From the Ground
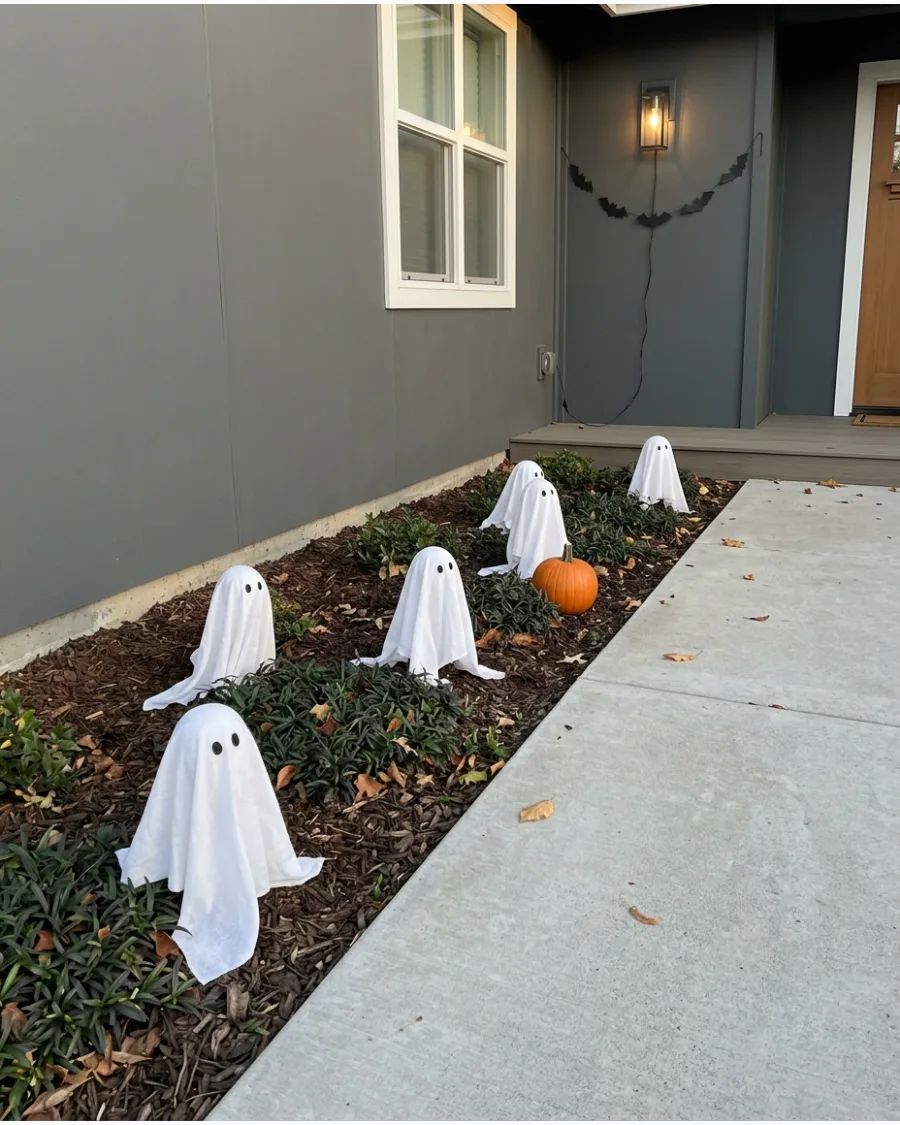
Place small ghost figures at different heights behind low plants and mulch. Positioning only the top half of each figure above the ground creates the illusion that they are rising directly out of the earth. This adds depth and a sense of mystery to your landscaping.
- Use short garden stakes to hold the ghost heads at different levels.
- Place the figures behind hostas or low shrubs to partially obscure the bases.
- Use battery-operated spotlights to cast shadows on the ground around the ghosts.
Best shortcut: Use white plastic bowls turned upside down and covered in fabric for a quick, weatherproof way to make ghost heads.
Skeleton and Graveyard Walkway Ideas
31. Skeleton Guard Walkway
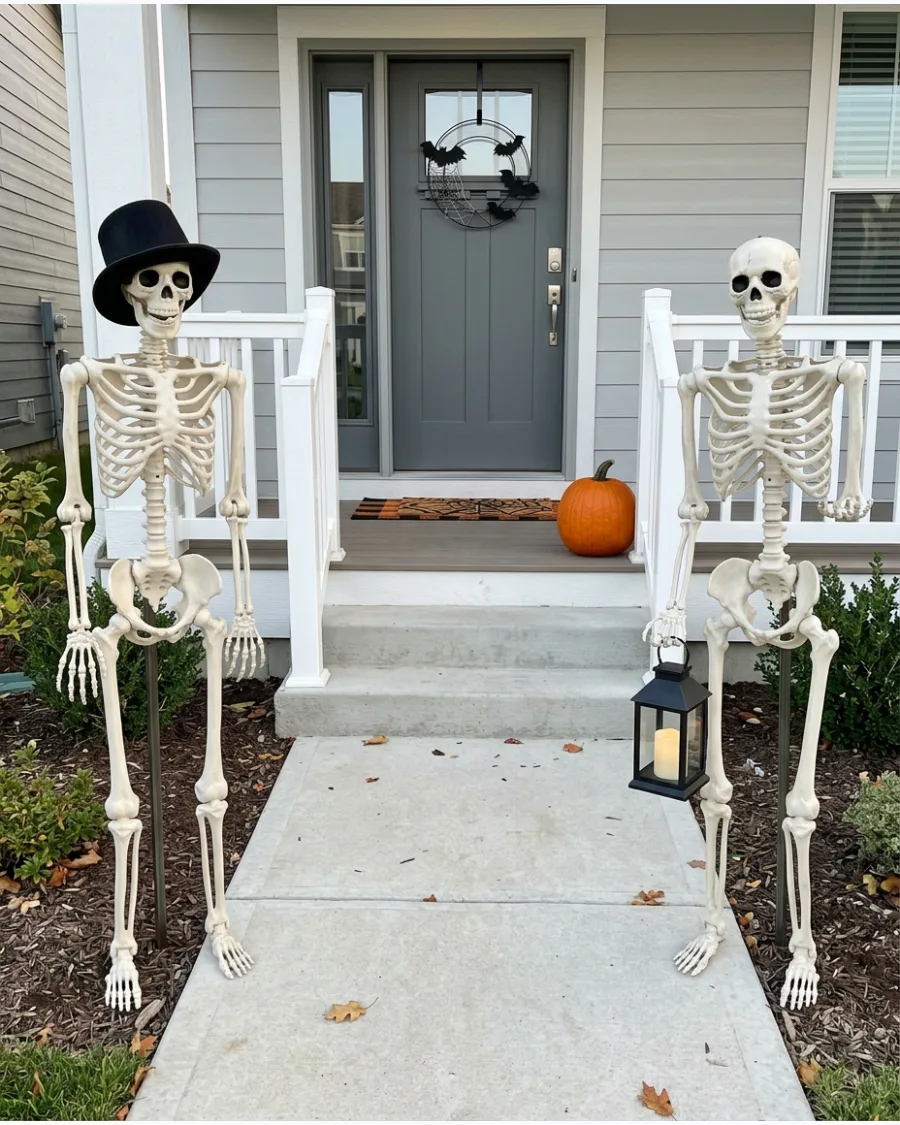
Place two standing skeletons at the start of a path to act as spooky sentries. Dressing them in hats or giving them a small welcome sign makes the display feel intentional rather than just a pile of bones.
Secure the skeletons to sturdy garden stakes or nearby porch posts so they do not topple over in the wind. Skeletons work best when they have a job, like holding a lantern for guests.
- Sourcing: Full-sized plastic skeletons from home centers.
- Setup: Use zip ties to attach skeletons to heavy-duty garden stakes.
- Adaptation: Add a colorful scarf or a festive hat to match the home's existing color palette.
Quick win: Use heavy-duty zip ties around the spine and a stake to keep skeletons upright through October storms.
32. Skeleton Lantern Bearers
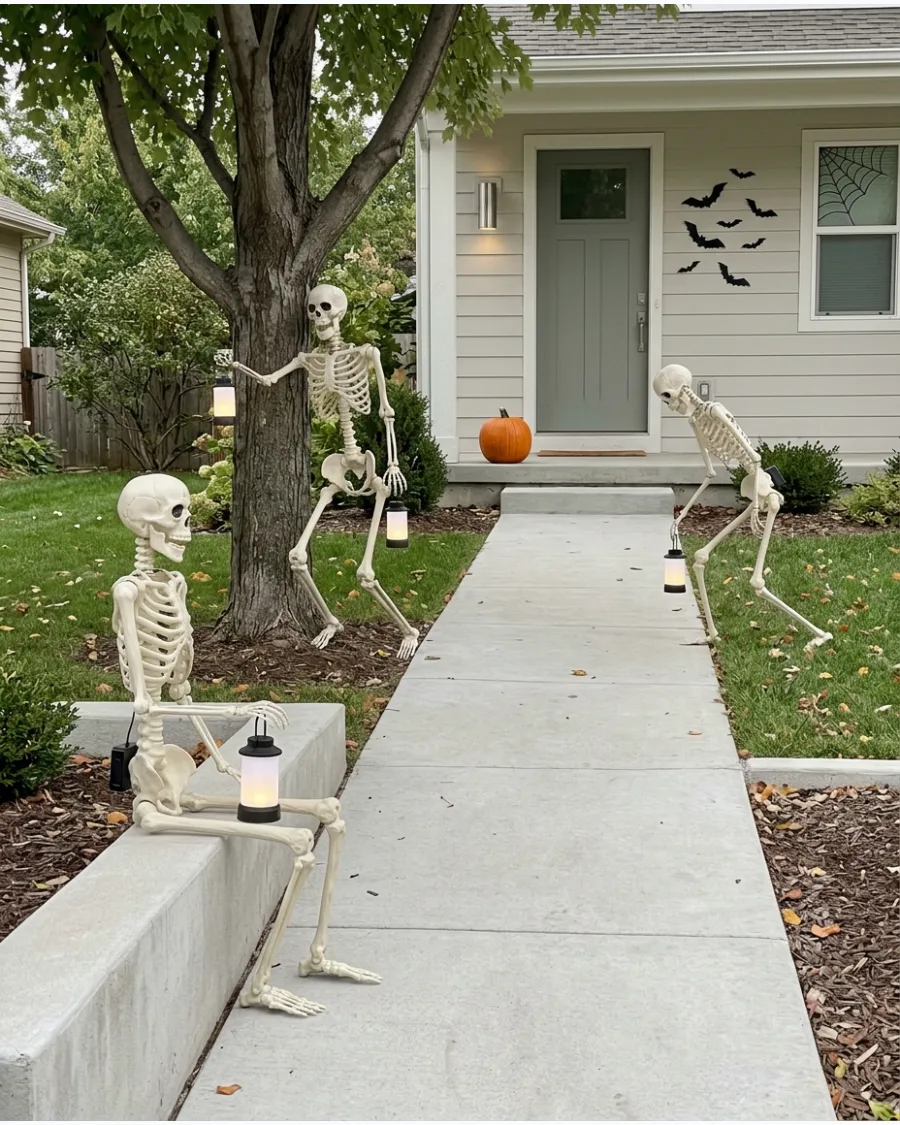
Pose skeletons in different positions along the path, such as sitting on a bench or leaning against a tree. Equipping each one with a battery-operated lantern provides functional light for trick-or-treaters while adding a playful element.
Vary the poses of the skeletons to create a sense of movement and storytelling as people approach the door. Static poses feel stiff, so bend the joints to look like they are walking with the guests.
- Sourcing: Posable skeletons with locking joints.
- Setup: Place lanterns with built-in timers to save battery life.
- Adaptation: For shorter paths, use just one skeleton seated in a chair near the steps.
Best shortcut: Buy skeletons with "stay-put" joints so you don't have to use wire to hold their arms in place.
33. Skeleton Hands Along the Path
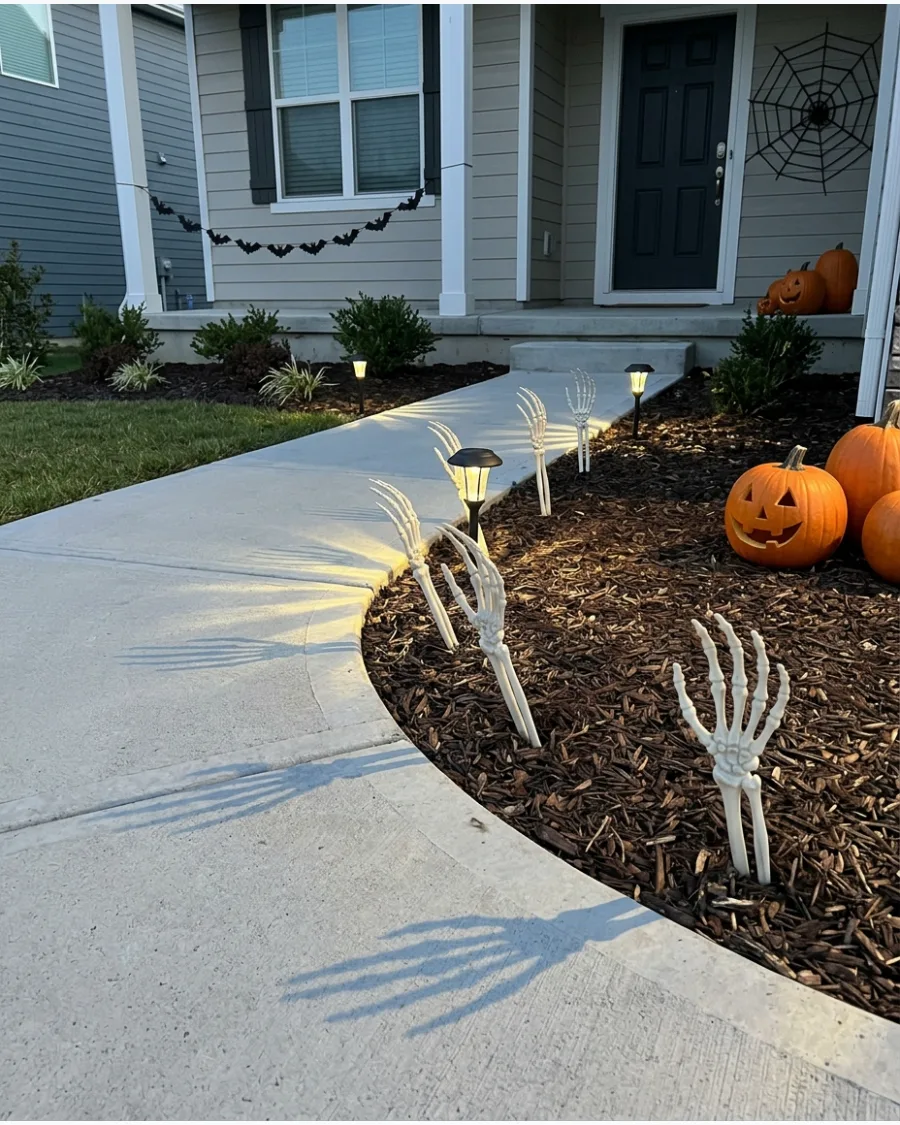
Install plastic skeleton hands directly into the soil or mulch bordering a walkway. Spacing them at irregular intervals makes it look like a crowd is reaching out from underground.
Angle the hands at different degrees to avoid a repetitive, store-bought look. Low-voltage ground lights placed behind the hands will cast long, creepy shadows across the pavement.
- Sourcing: Bulk packs of plastic skeleton hand stakes.
- Setup: Push the stakes deep into the ground to ensure they stay upright.
- Adaptation: Paint the hands with glow-in-the-dark spray for extra visibility at night.
Most people skip this: Point a small spotlight toward the hands from the side to create dramatic shadows on the path.
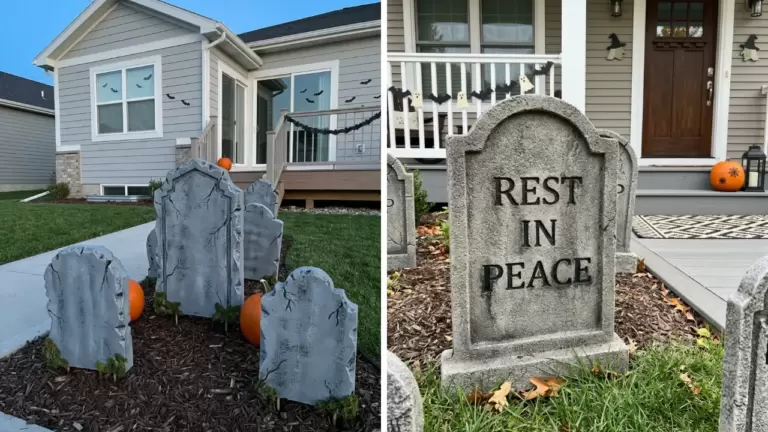
34. Graveyard Walkway
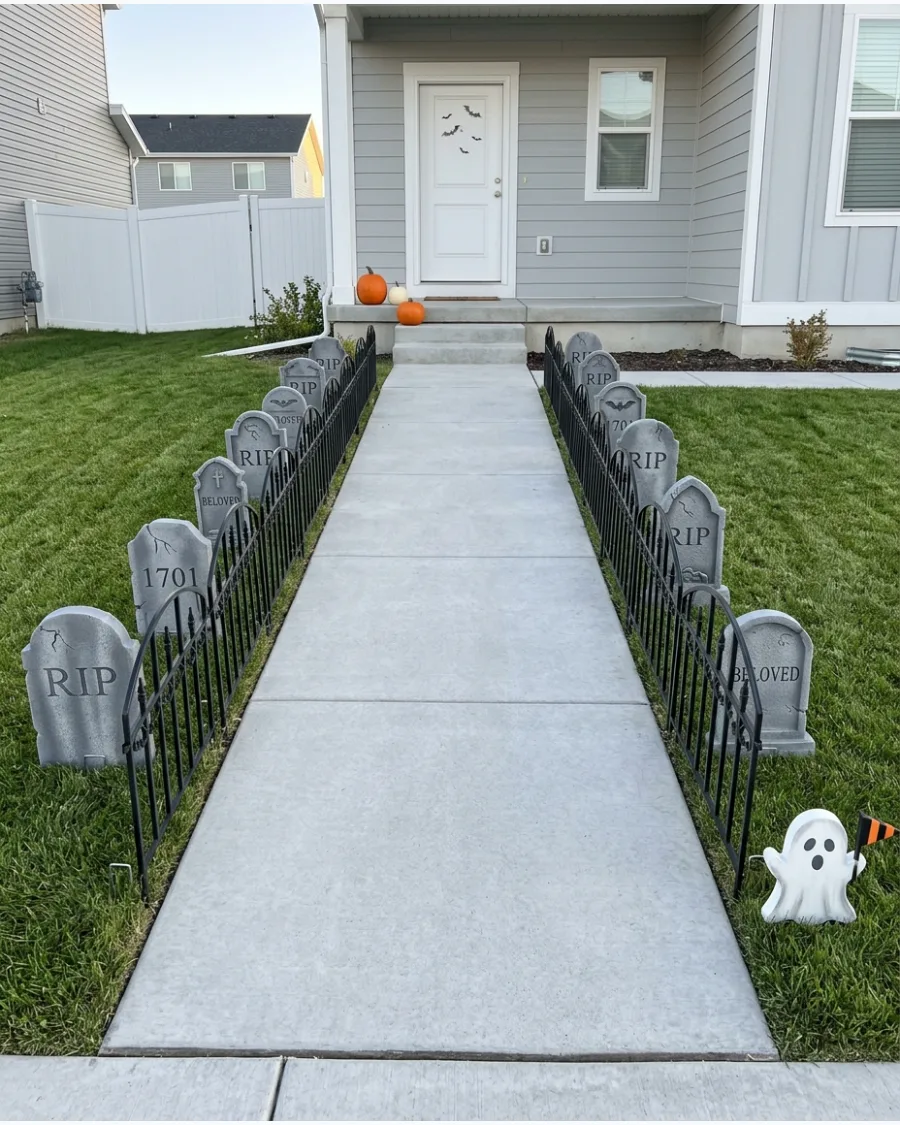
Line both sides of a path with foam tombstones and sections of low fencing to create a mini-cemetery. Keep the walkway itself completely clear of debris or props to ensure no one trips in the dark.
Weight down foam tombstones with metal garden staples so they do not blow away. This setup defines the path clearly while providing a high-impact visual for the neighborhood.
- Sourcing: Foam or plastic tombstone sets.
- Setup: Use U-shaped landscape staples to pin the base of each tombstone into the turf.
- Adaptation: Add a bag of gray craft moss around the bases for a more finished look.
Quick win: Group three tombstones of different heights together to create a more realistic graveyard "plot" look.
35. Tombstone Luminary Path
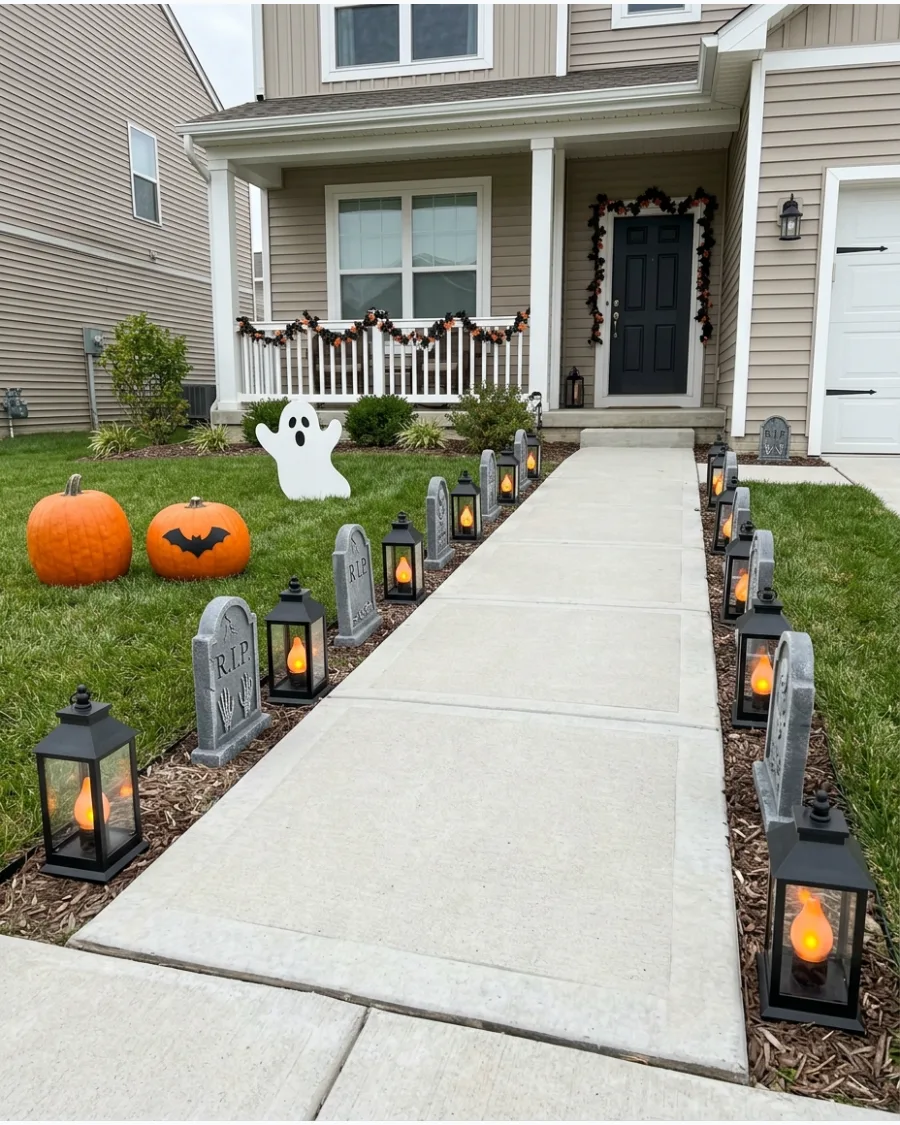
Alternate small tombstones with glowing lanterns or luminaries to light the way. The mix of heights creates a more interesting visual than a flat row of lights.
Choose lanterns with a flicker effect to mimic the look of real candles without the fire hazard. This method ensures the path is well-lit for safety while maintaining a spooky cemetery vibe.
- Sourcing: Small tabletop-sized tombstones and LED lanterns.
- Setup: Space each item about two feet apart to provide consistent light.
- Adaptation: Use battery-operated puck lights behind the tombstones if you don't want visible lanterns.
Best shortcut: Use lanterns with a 6-hour timer so the path lights up automatically at dusk every night.
36. Skeleton Grave Digger Scene
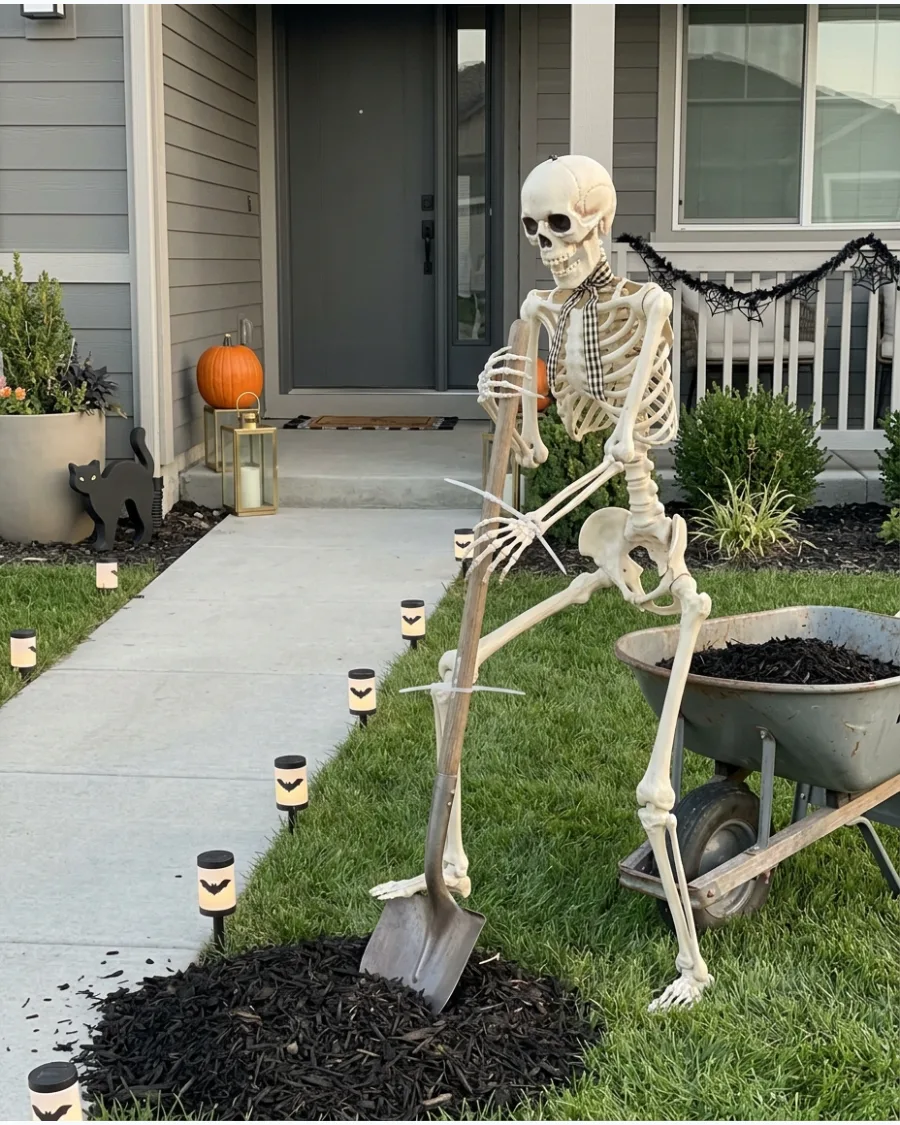
Set up a scene where a skeleton appears to be digging a grave right next to a walkway. A simple shovel, a pile of mulch, and a wheelbarrow are all you need to sell the effect.
Position the skeleton’s hands firmly on the shovel handle using clear zip ties. This creates a focal point that stops people in their tracks without blocking their path to the door.
- Sourcing: Real garden tools and a standard plastic skeleton.
- Setup: Lean the shovel against a hidden wooden stake for stability.
- Adaptation: Replace the dirt mound with a pile of autumn leaves for easier cleanup later.
Quick win: Use an old, rusted shovel for a more authentic "forgotten graveyard" look.
37. Skeleton Dog Path
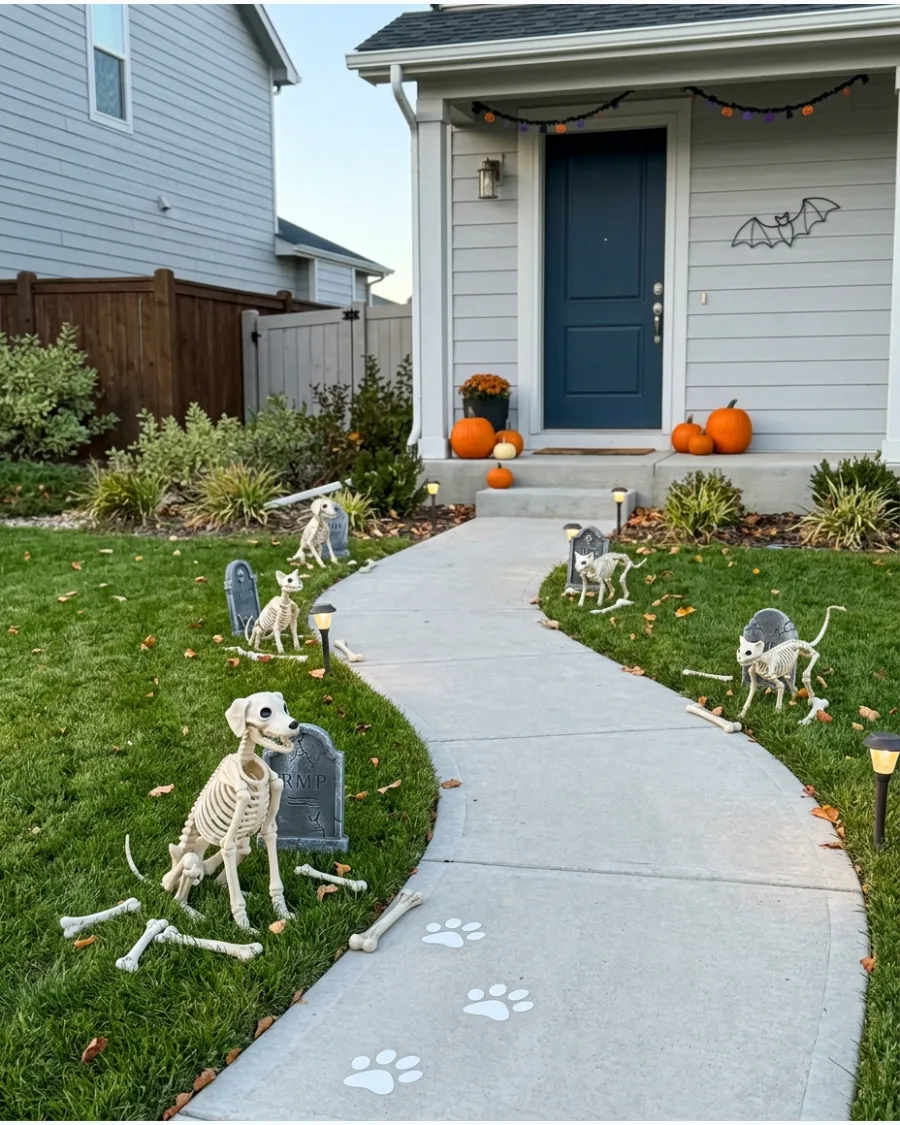
Place skeletal animal props, like dogs or cats, along the walkway to add a unique twist to the skeleton theme. Adding a fake bone or a small tombstone nearby gives the animal a reason to be there.
Line the path with white vinyl paw-print decals to lead guests toward the front door. These smaller props are perfect for narrow walkways where full-sized skeletons might feel too crowded.
- Sourcing: Plastic animal skeletons from holiday retailers.
- Setup: Place the dog on a flat surface or secure it with a small stake through the ribcage.
- Adaptation: Use reflective tape for the paw prints so they shine when hit by flashlights.
Most people skip this: Tie a tattered black ribbon around the skeleton dog's neck to act as a spooky collar.
38. Skeleton Garden Party
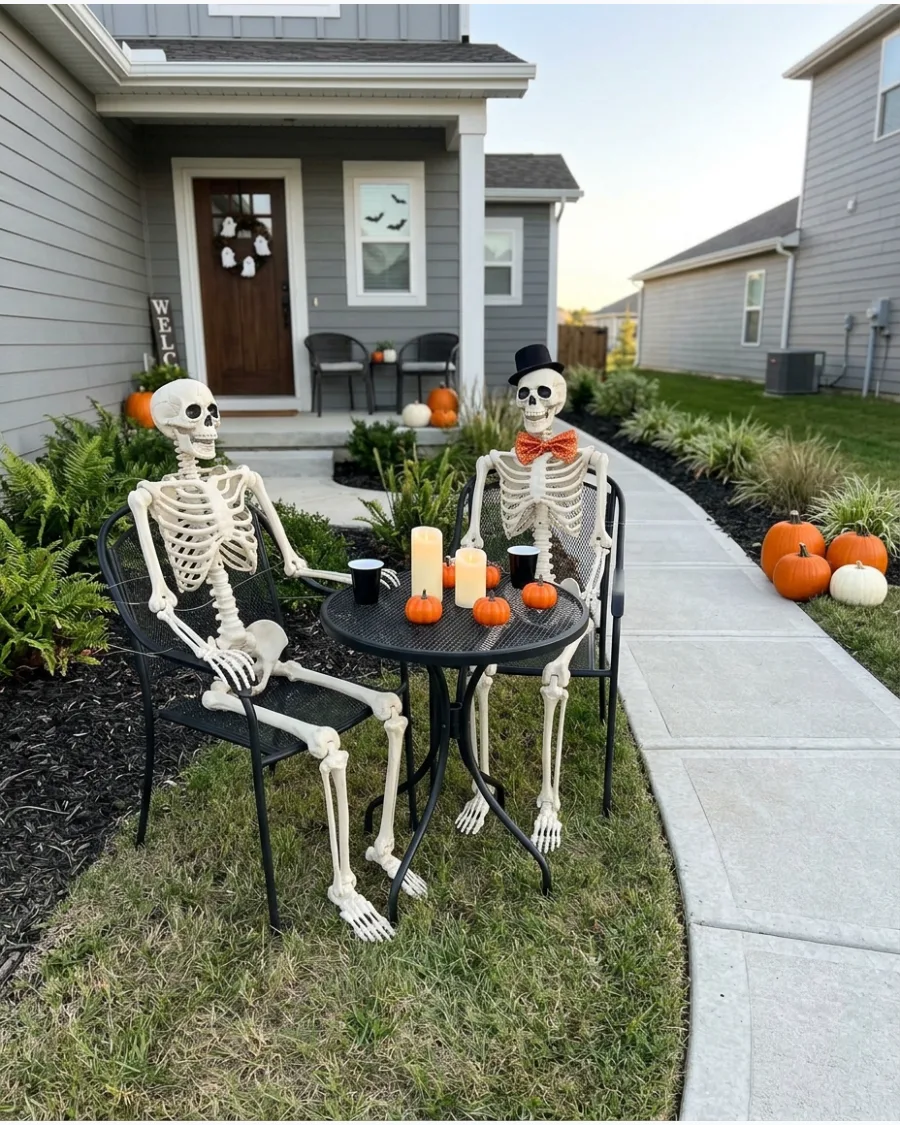
Arrange a group of skeletons around a small patio table or on lawn chairs beside the path. Set the table with plastic pumpkins and flameless candles to make it look like a festive gathering.
Secure the skeletons to the chairs with fishing line so they stay in a seated position. This idea adds humor to the spooky season and makes the home stand out.
- Sourcing: Use existing patio furniture or folding chairs.
- Setup: Use clear fishing line to wrap around the skeletons and the chair backs.
- Adaptation: Add a "Happy Halloween" banner across the table for a friendlier look.
Quick win: Use heavy-duty double-sided tape to keep plastic cups or pumpkins stuck to the table in high winds.
39. Cemetery Fence Walkway
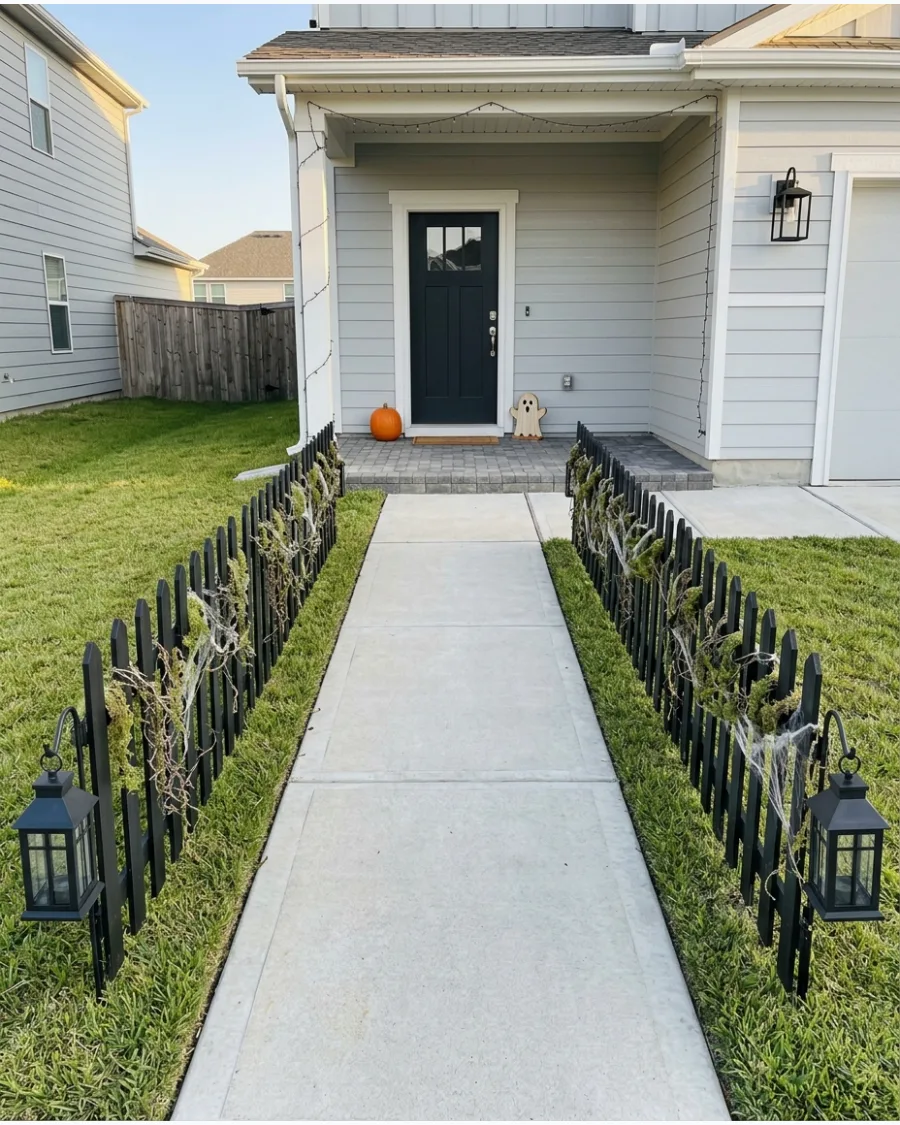
Use short sections of decorative black fencing to border a walkway, mimicking the entrance to an old churchyard. Intertwining artificial moss or dead vines into the fence adds texture and age.
Space the fence panels evenly along the edge of the grass to create a clean, professional-looking border. Adding a few lanterns at the "gate" area helps guide guests safely.
- Sourcing: Interlocking plastic garden fencing.
- Setup: Push the fence legs into the ground before the soil freezes.
- Adaptation: Wrap orange string lights around the top rail for extra visibility.
Best shortcut: Use black zip ties to connect fence panels that don't quite lock together perfectly.
40. Abandoned Churchyard Path
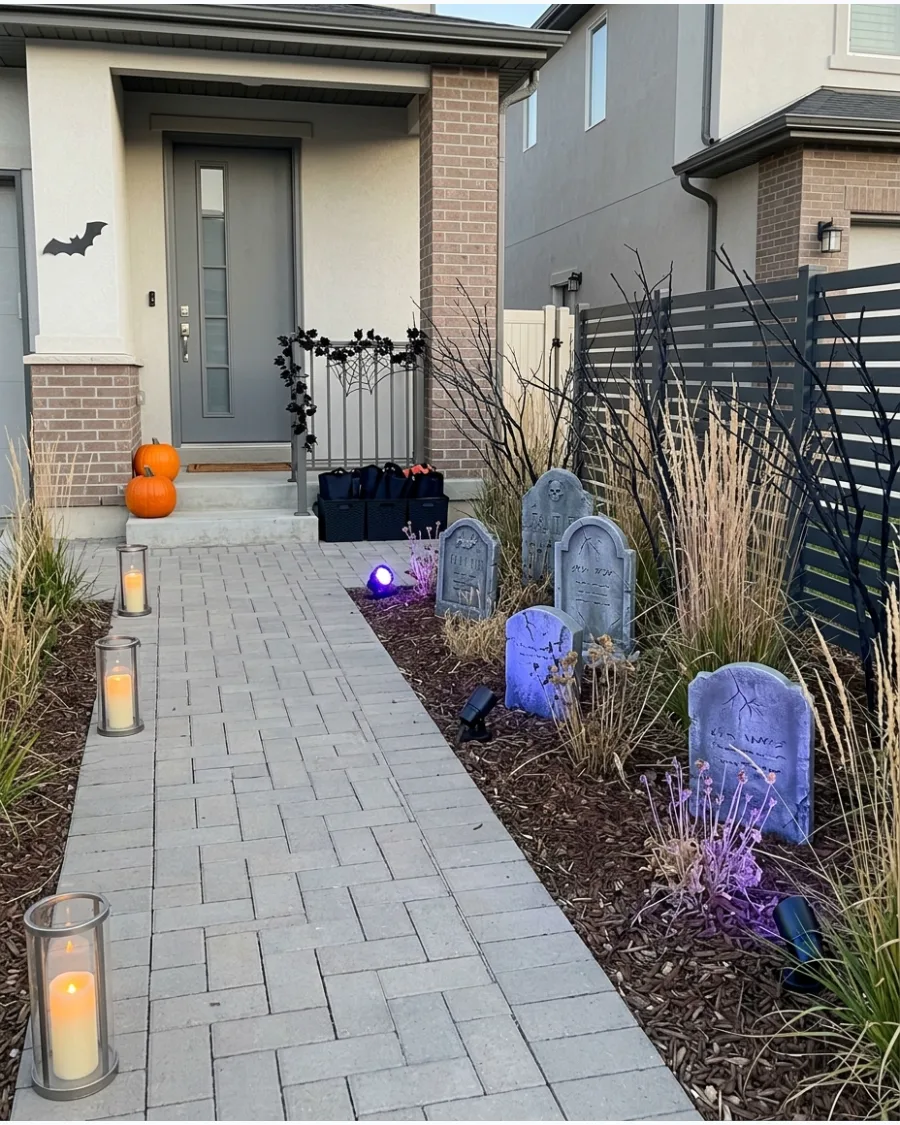
Create a moody, overgrown look by combining weathered tombstones with bare branches and dried flowers. Using blue or purple spotlights creates a cold, nighttime atmosphere that contrasts well with warm candlelight.
Lean bare branches against a fence or wall to add height and a sense of neglect to the scene. This layered approach feels more realistic and immersive than a single prop.
- Sourcing: Gather real fallen branches from the yard and buy foam tombstones.
- Setup: Stick branches into the ground behind the tombstones for stability.
- Adaptation: Use battery-operated candles inside lanterns for a safe, flickering light.
Quick win: Spray paint real dried branches matte black to make them stand out against the home's siding.
Halloween Walkway Arches and Entrances
41. Pumpkin Walkway Arch
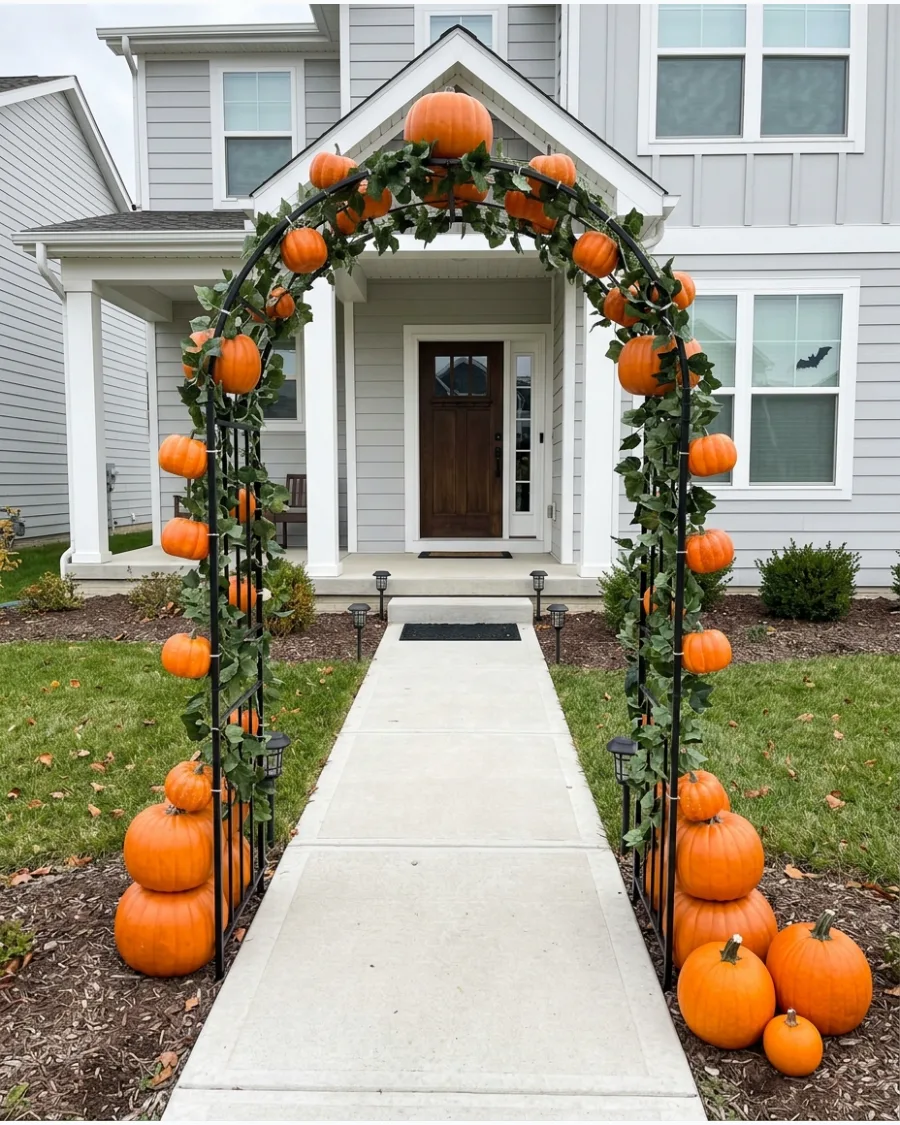
Build a lightweight arch over the start of the path using a garden trellis or PVC frame as a base. Cover the structure with artificial pumpkins and dark leafy vines to create a festive, welcoming portal.
Stack the largest pumpkins at the very bottom of the arch to provide a sturdy look and visual weight.
- Expect to spend about two hours on assembly and pumpkin attachment.
- Use heavy-duty zip ties to secure pumpkins and vines to the frame for wind resistance.
- Renters can use a freestanding metal arch that requires no permanent ground stakes.
Quick win: Use carvable foam pumpkins instead of heavy plastic ones to keep the weight of the arch manageable.
42. Giant Spiderweb Arch
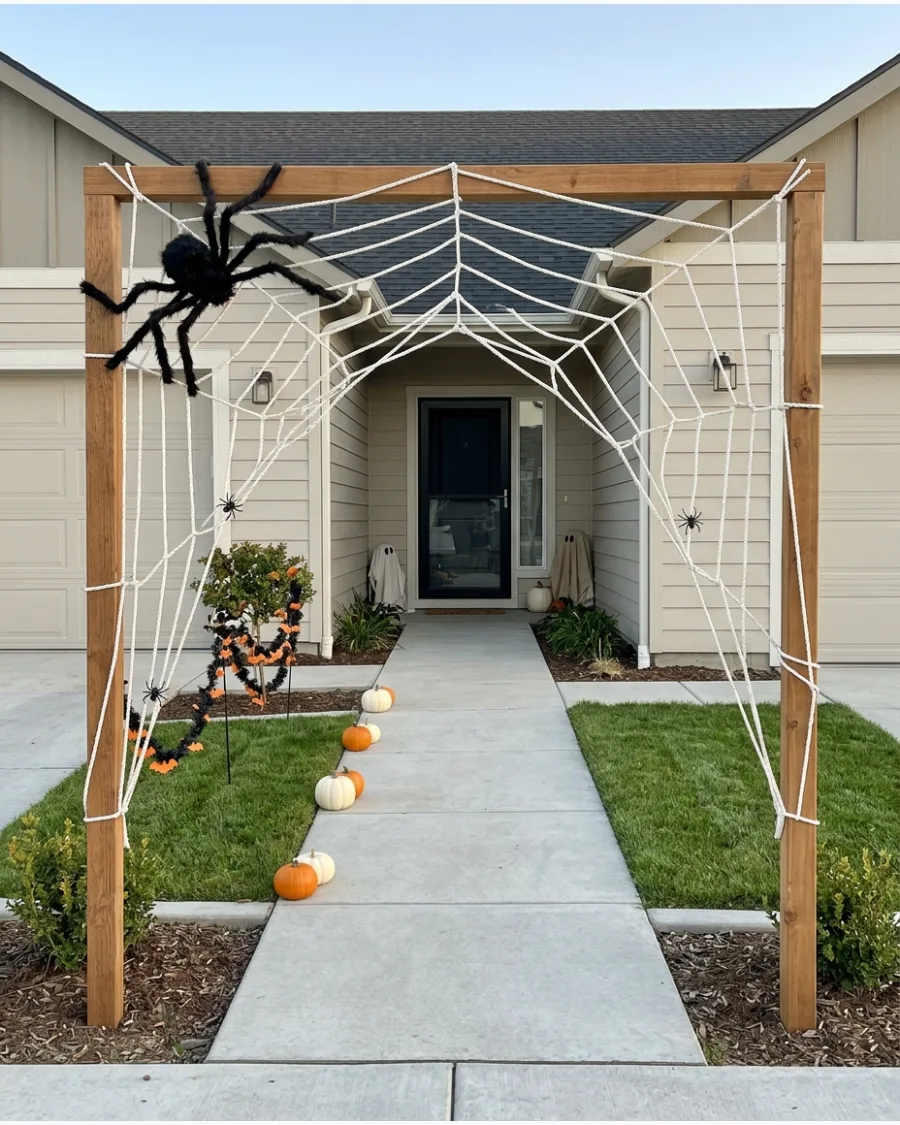
Stretch thick white rope or heavy-duty decorative webbing across a sturdy entrance frame to create a high-impact visual. This setup works well during the day and looks even better with a spotlight at night.
Attach one oversized fuzzy spider near the top corner and scatter smaller plastic spiders along the lower strands.
- Budget around twenty dollars for heavy-duty rope and a pack of spiders.
- Tie the main support ropes first to create a strong anchor for the thinner webbing.
- Use a white spotlight on the ground to make the webbing pop against the dark night sky.
Most people skip this: Use beef netting instead of cheap cotton webbing for a more realistic, professional look that won't sag in the rain.
43. Twisted Branch Entrance
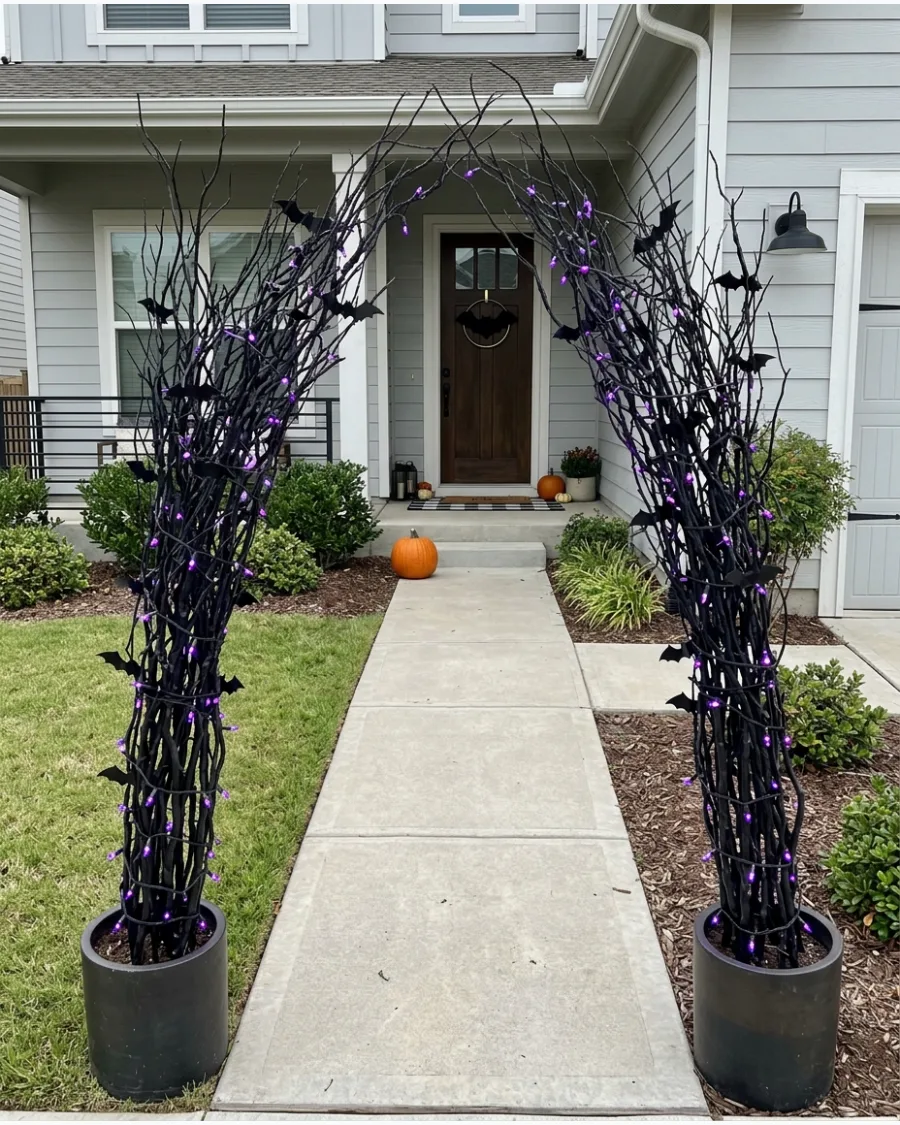
Create a dark, enchanted-forest entrance by securing bundles of tall artificial branches to frame the walkway. Intertwine purple LED string lights and small plastic bats to give the display a mysterious glow.
Secure the branches to heavy bases or existing porch railings so they stay upright during autumn wind gusts.
- Artificial branches can be reused for years and are easy to store in a long box.
- Bundle branches together with black wire for a thick, dense appearance.
- Swap purple lights for orange or green to change the mood of the entrance.
Best shortcut: Use black spray paint on inexpensive dried branches from a craft store if you can't find pre-made black ones.
Halloween Walkway Ideas
44. Suspended Glowing Witch Hat Path
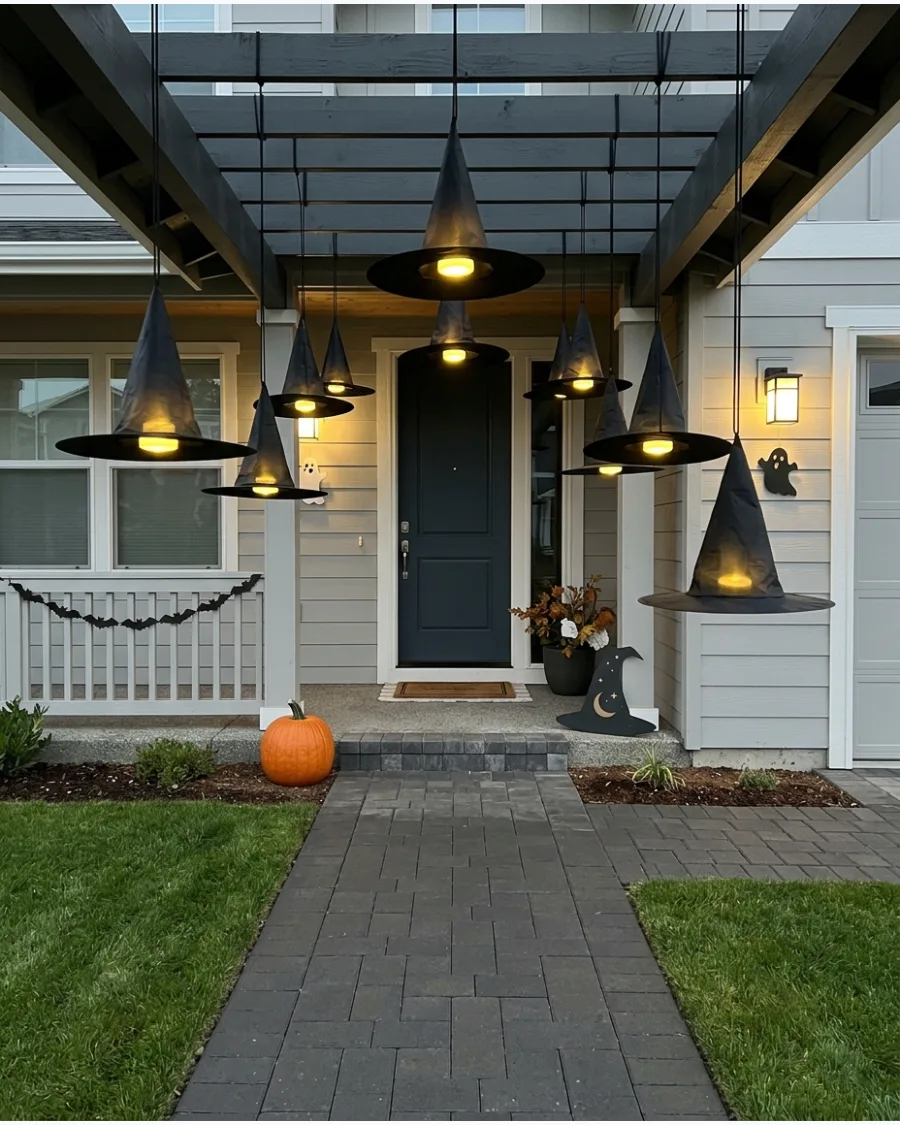
Creating an overhead tunnel requires hanging inexpensive nylon witch hats at varying heights along a porch or walkway. This setup transforms a standard entry into an immersive, whimsical experience that guides guests toward the front door.
Insert battery-operated LED puck lights inside each hat to create a warm, internal glow without visible wires. While many use fishing line for a floating effect, black paracord provides much better stability against autumn winds.
- Purchase bulk packs of black nylon hats and remote-controlled LED lights early in October to stay under a fifty-dollar budget.
- Use heavy-duty clear monofilament to suspend the hats from porch rafters or a temporary PVC frame for open-air paths.
- Adjust the heights so the lowest brim sits at least seven feet high to ensure the walkway remains accessible for all guests.
Most people skip this: threading the fishing line through a small black button inside the tip of the hat prevents the line from tearing through the thin fabric during a breeze.
Halloween Walkway Arches and Entrances
45. Haunted Cemetery Gate
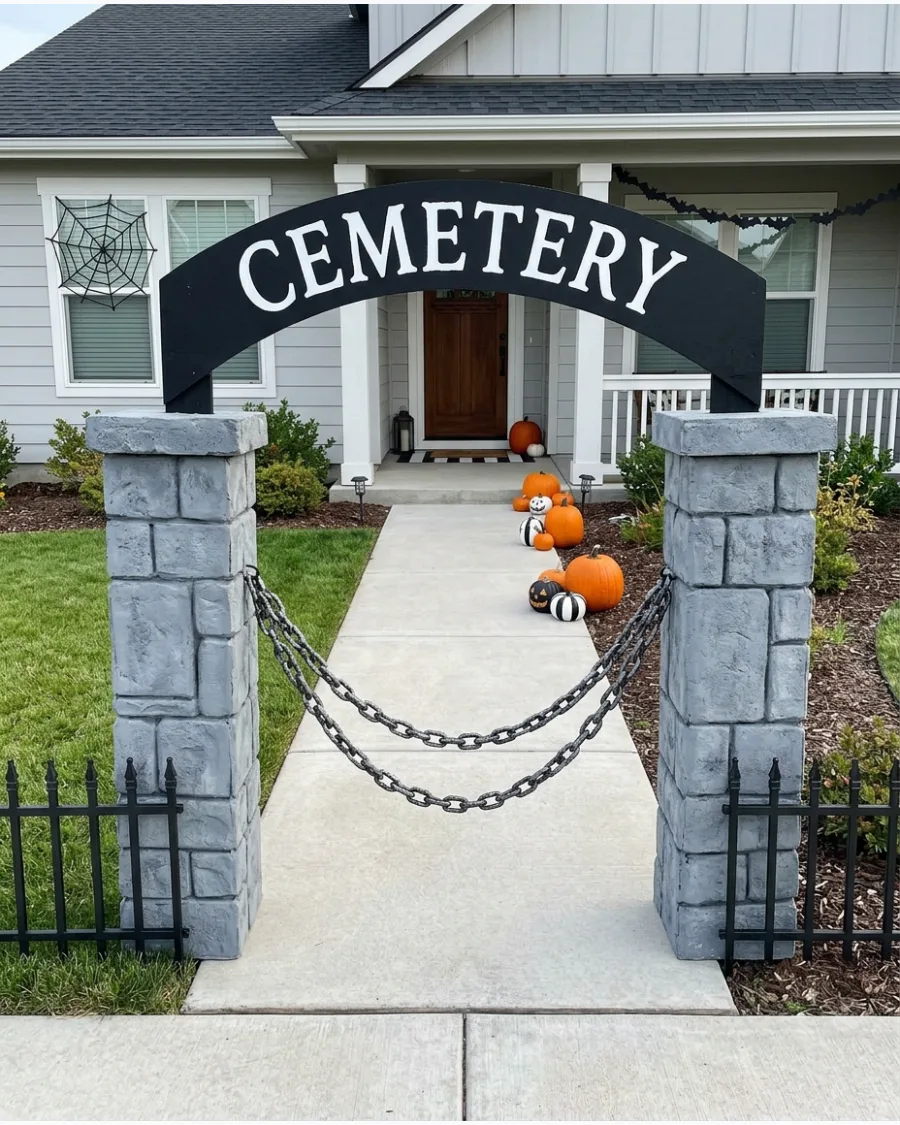
Set up two faux-stone pillars made from painted foam or wood on either side of the path entrance to mimic a graveyard gate. Connect them with a 'Cemetery' sign and add short sections of black plastic fencing to the sides.
Drape heavy plastic chains between the pillars to finish the look without adding significant weight or danger to the walkway.
- Foam insulation boards are the most budget-friendly material for building pillars.
- Weight the bottom of the pillars with sandbags hidden inside the base.
- Add a flickering lantern on top of each pillar for a classic haunted look.
Most people skip this: Use a sea sponge and dark gray paint to add texture to the pillars so they look like real weathered stone.
46. Monster Mouth Walkway Entrance
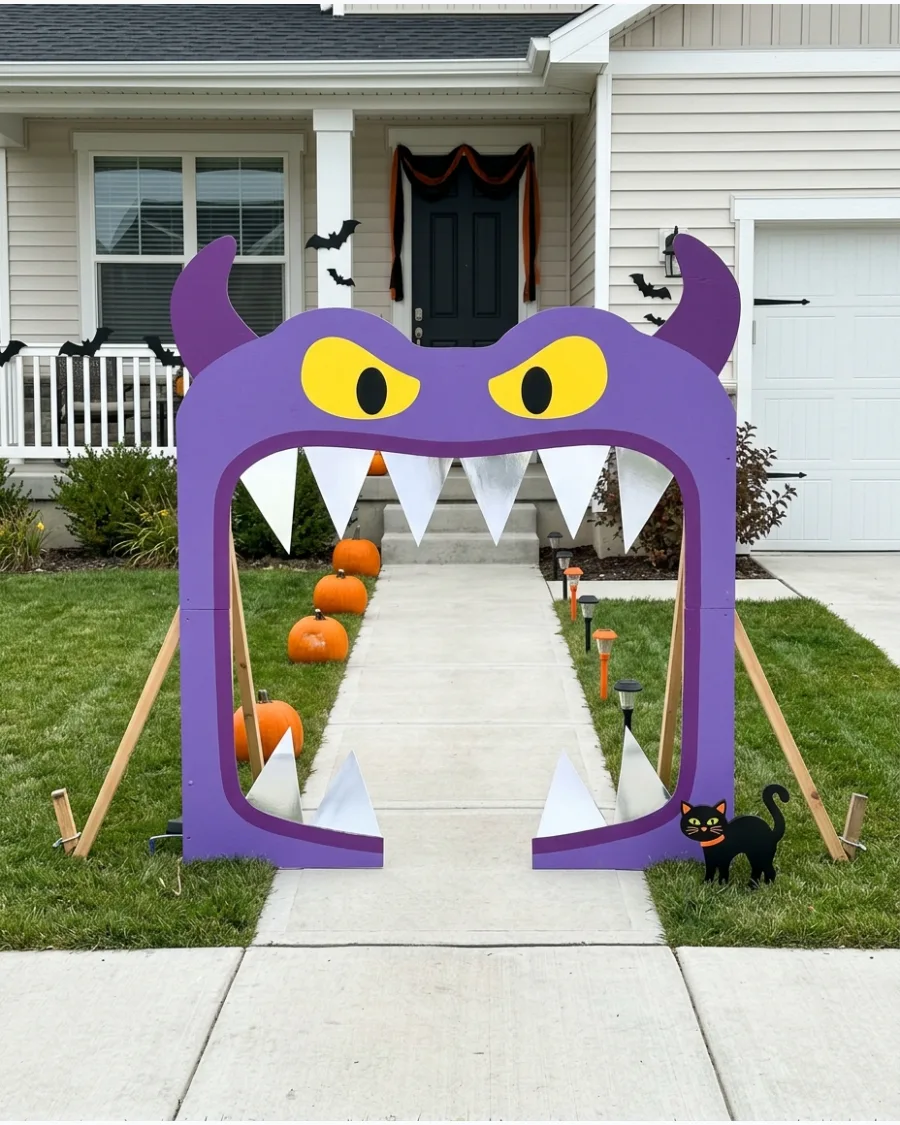
Construct a large monster face using painted plywood or corrugated plastic panels around the start of the path. Guests enter through the open mouth, creating a fun and immersive experience for trick-or-treaters.
Paint the teeth a bright, reflective white so they stand out clearly against the dark yard at night.
- Corrugated plastic is waterproof and much lighter than plywood for easier setup.
- Use zip ties to attach the face panels to a basic garden arch or wooden frame.
- Place a red spotlight on the ground inside the 'mouth' to create a glowing throat effect.
Best shortcut: Cut teeth from white foam board and glue them to the back of the frame for a clean, layered look.
47. Pumpkin Vine Tunnel
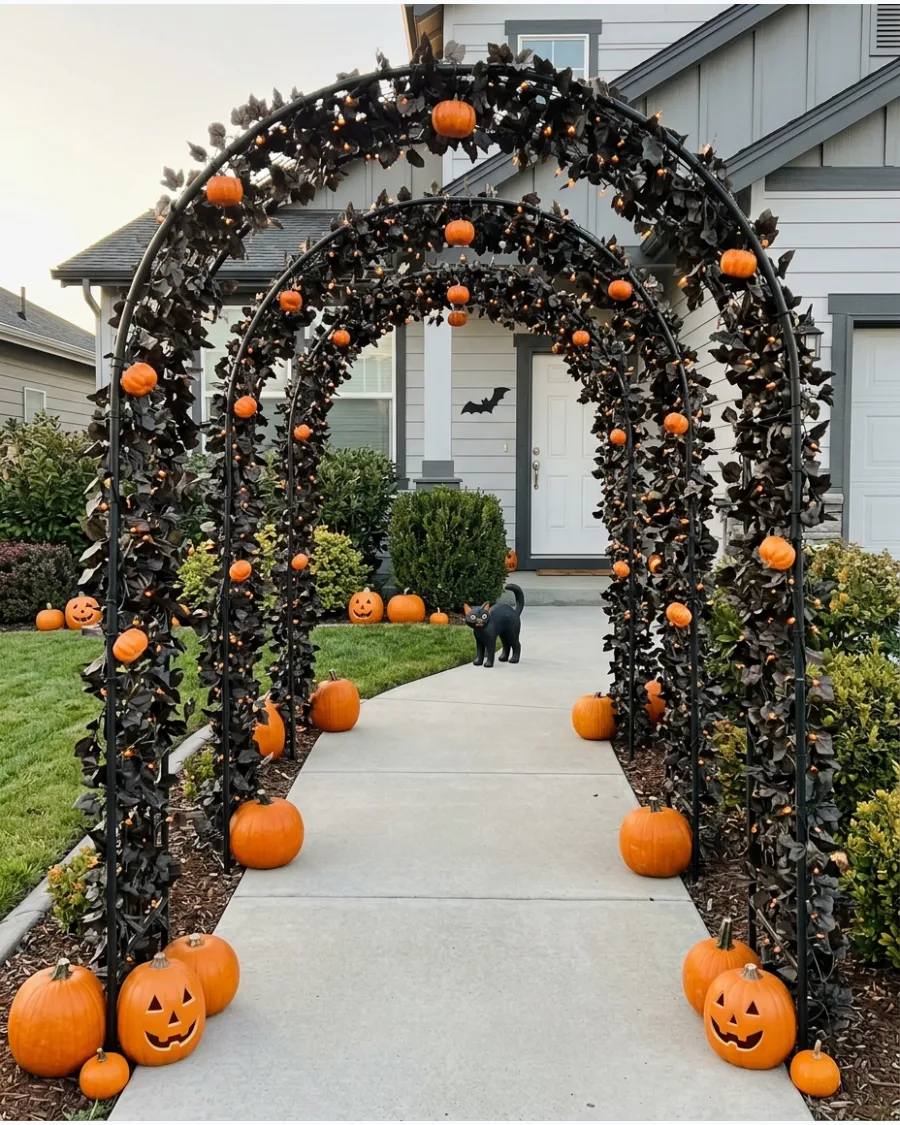
Wrap long, dark artificial vines around a series of garden arches to create a lush, overgrown tunnel effect. Attach miniature pumpkins throughout the greenery and weave in orange micro lights for visibility.
Use zip ties to secure the vines tightly to the frame so nothing hangs low enough to catch on clothing or hair.
- A three-arch setup covers about ten to twelve feet of walkway.
- Look for 'fall garland' in bulk to save money on the vine base.
- Add a few plastic crows perched on the arches to break up the orange and green.
Quick win: Use battery-operated lights with a timer so the tunnel turns on automatically at dusk.
48. Enchanted Witch’s Garden Path
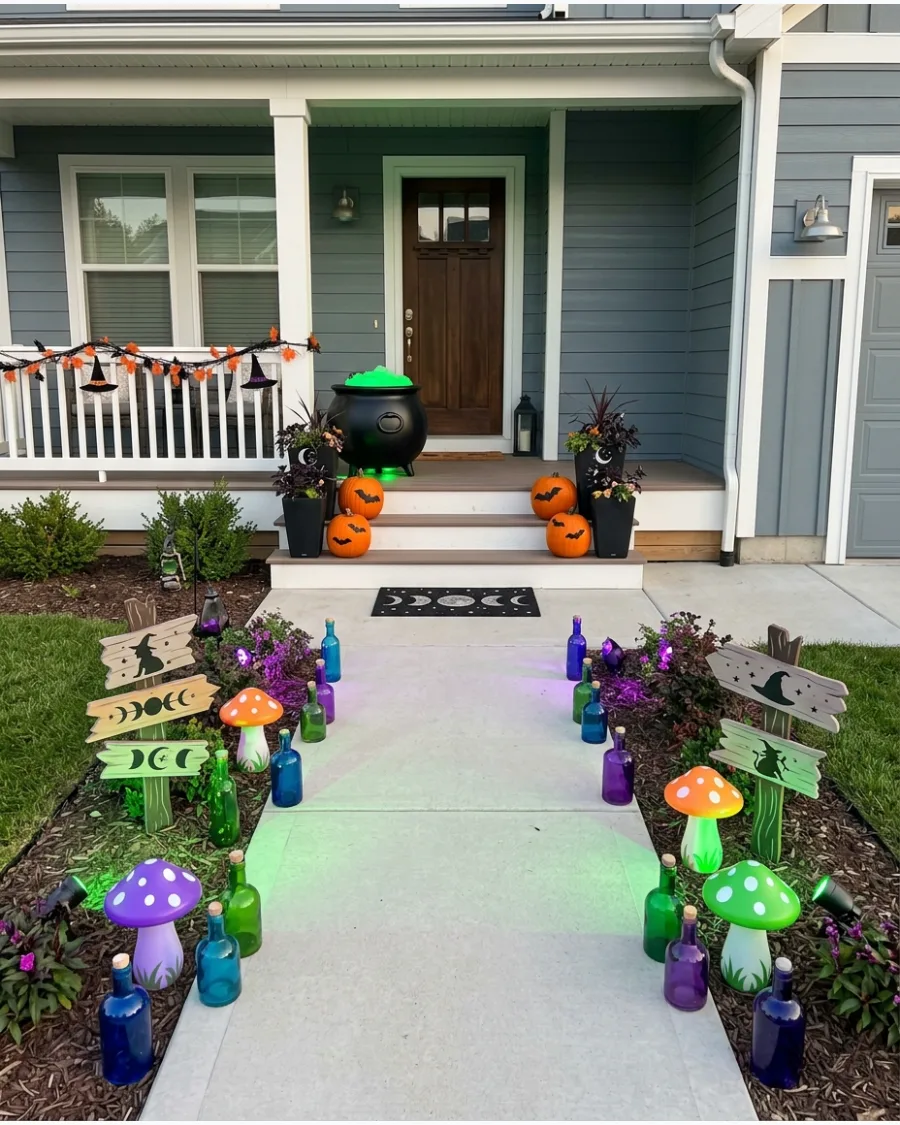
Line the walkway with glowing potion bottles, oversized plastic mushrooms, and crooked wooden signs to set a magical scene. Place a large black cauldron near the porch with a green light inside to simulate a bubbling brew.
Mix green and purple spotlights to give the entire garden bed an otherworldly, magical glow.
- Upcycle old wine or soda bottles by filling them with water and highlighter ink for a glow.
- Stake the mushrooms into the mulch to keep them from blowing away.
- Use a small fog machine tucked behind the cauldron for a realistic bubbling effect.
Most people skip this: Place a small mirror at the bottom of the cauldron to reflect the green light and make it look deeper.
49. Haunted Forest Walkway
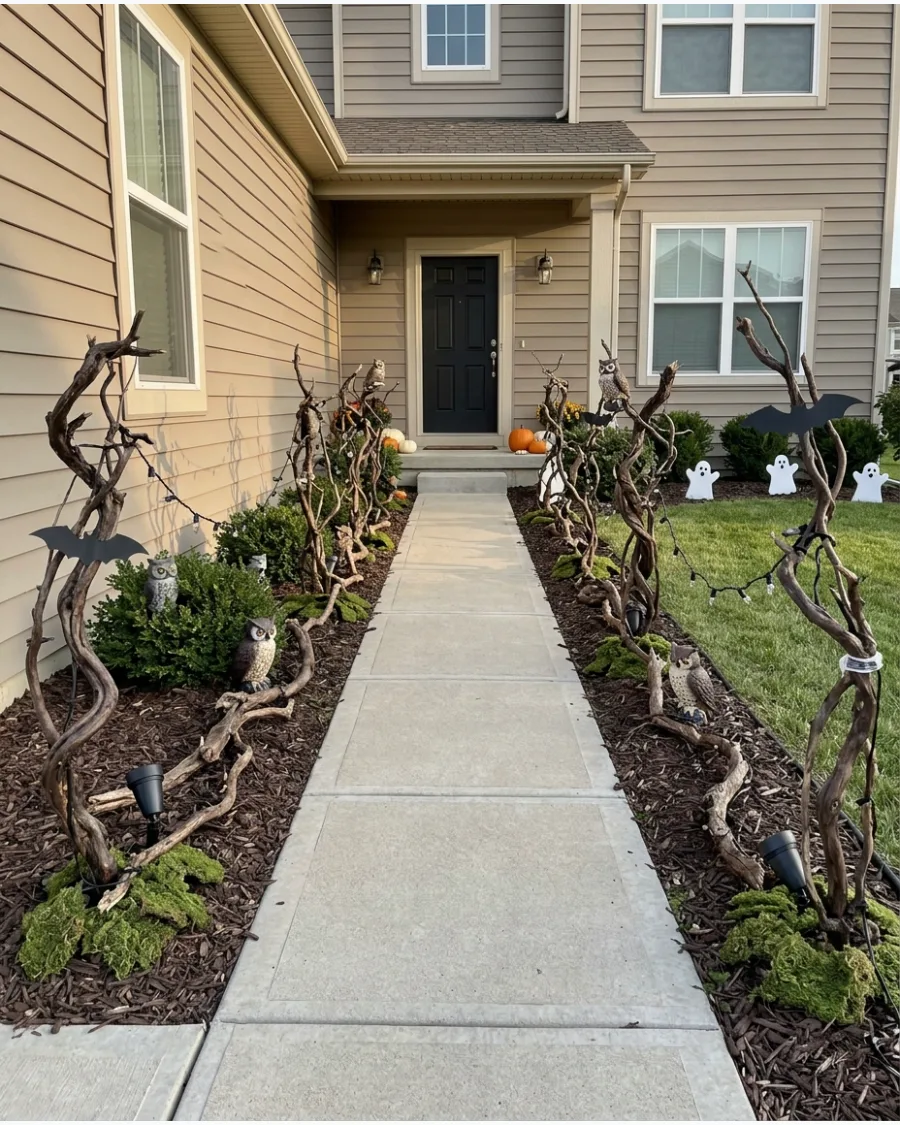
Place twisted branches and clumps of artificial moss along the edges of the path to mimic a dark, neglected woods. Add small owl figures and shadowy silhouettes tucked into the bushes for a sense of being watched.
Point small spotlights upward from the base of the branches to create long, creepy shadows on the house exterior.
- Collect real fallen branches from the yard to save money on decor.
- Use Spanish moss from a craft store to drape over the branches for a swampy look.
- Keep the path itself completely clear of moss to prevent guests from slipping.
Best shortcut: Use black bird netting over the bushes to give them a tangled, unkempt appearance without much effort.
50. Complete Halloween Walk-Through
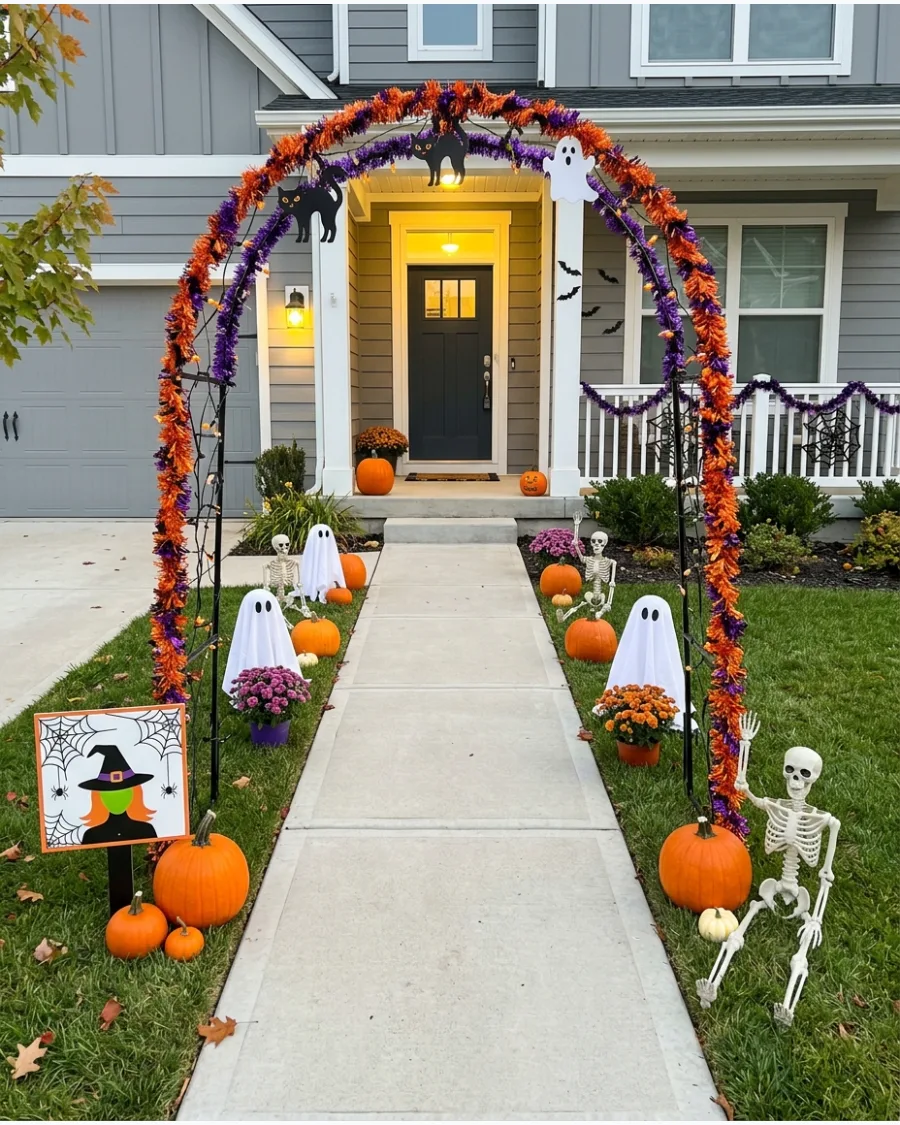
Design a progression that starts with a decorated arch and leads past various themed scenes like pumpkin patches and skeleton displays. End the journey at a fully decorated porch with a bright, welcoming light to guide guests.
Keep all decorations at least six inches away from the walking surface to prevent anyone from tripping in the dark.
- Map out the scenes on paper first to ensure you have enough space for each idea.
- Use consistent lighting colors across all scenes to make the display look cohesive.
- Check all power cords and cover them with heavy-duty cord protectors where they cross the path.
Most people skip this: Place the most detailed props closest to the door where guests will naturally slow down and look.
Frequently Asked Questions
How do I light my Halloween walkway without it being too dark for safety?
The best approach is to layer your lighting by using low-wattage colored bulbs for atmosphere alongside brighter, strategically placed white spotlights at steps or uneven surfaces. This ensures you maintain a spooky aesthetic while providing enough lumens for guests to navigate the path safely.
What are the best wind-proof walkway decorations?
Focus on weighted items like heavy plastic pumpkins filled with sand or decorations secured with deep-reaching metal ground stakes. Low-profile decor, such as flat wooden silhouettes or heavy stone-effect tombstones, is also less likely to catch the wind and blow away.
How can I decorate a walkway if I have a very small front yard?
Maximize your space by using vertical decor like hanging ghouls from porch eaves or wrapping your home's columns in festive lights. Utilizing the architecture of your house keeps the walkway clear for foot traffic while still delivering a high-impact holiday look.
Are there renter-friendly ways to line a concrete path?
Battery-operated LED luminaries and lanterns are excellent non-permanent options that don't require drilling or outdoor outlets. You can also use outdoor-rated Command hooks to secure light strings or garlands to your siding without leaving any lasting damage.
How do I hide extension cords across my walkway?
Use heavy-duty rubber cord ramps to prevent tripping, or tuck thin wires beneath a layer of mulch or pine needles along the edge of the path. For the easiest setup, consider switching to solar-powered stakes or battery-operated lights to eliminate the need for cords entirely.