60 Spooky DIY Halloween Graveyard Ideas

This post may contain affiliate links: full affiliate disclosure.
Setting up a graveyard is the best way to turn a front yard into a spooky scene without spending a fortune. Use these DIY methods to build realistic tombstones that look like heavy stone but stay easy to move and store.
Focus on textures and varied heights to create a professional look that lasts all season.
DIY Halloween Tombstone Ideas
1. Weathered Foam Tombstones
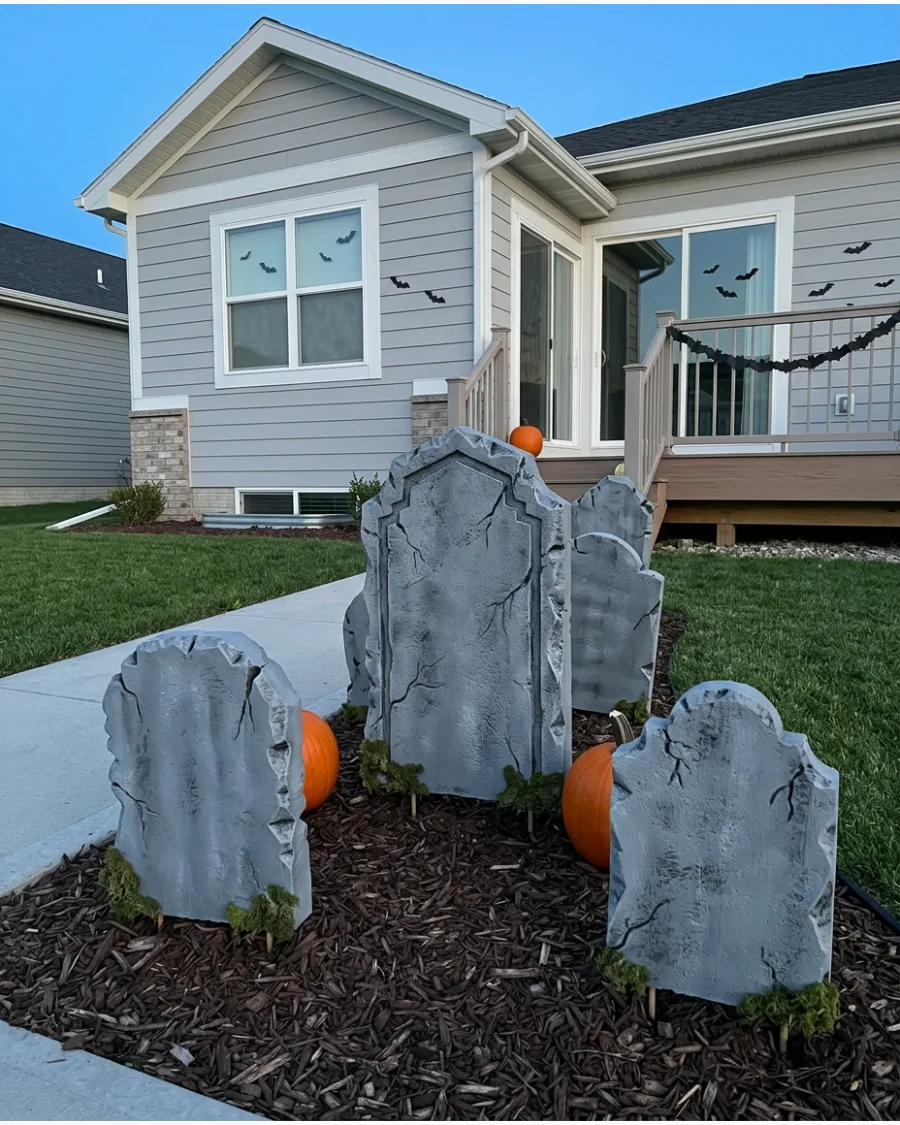
Insulation foam is the gold standard for realistic props because it is easy to carve and lightweight. After cutting your shapes, use a soldering iron or utility knife to etch deep cracks and chips into the edges.
Apply several thin layers of matte gray paint and highlight the crevices with a dark wash to create depth. A few patches of fake green moss at the base will make the stone look like it has been in the ground for decades.
- Buy 2-inch thick rigid foam insulation boards from a local hardware store.
- Secure the foam to the ground using rebar or long PVC pipes hidden behind the stone.
- Avoid spray paint unless it is specifically foam-safe to prevent the material from melting.
Quick win: Rub a handful of real dirt into the wet paint for an authentic, gritty finish that looks like real stone.
2. Dollar Store Tombstone Makeover

Inexpensive plastic tombstones often look shiny and fake, but a quick makeover fixes everything.
Use stone-textured spray paint to give the surface a gritty, heavy appearance that catches the light naturally. Wipe a mixture of black acrylic paint and water over the textured surface to make the engraved letters pop. This technique hides the cheap plastic seams and makes the props look like expensive resin versions.
- Select plastic tombstones with deep engravings for the best paint results.
- Apply spray paint in a well-ventilated outdoor area on a dry day.
- Hot glue artificial moss around the bottom edge to hide the hollow plastic base.
Most people skip this: Use two different shades of gray spray paint to create a mottled, natural stone look.
Outdoor Decor
3. Layered Plywood Gothic Headstones
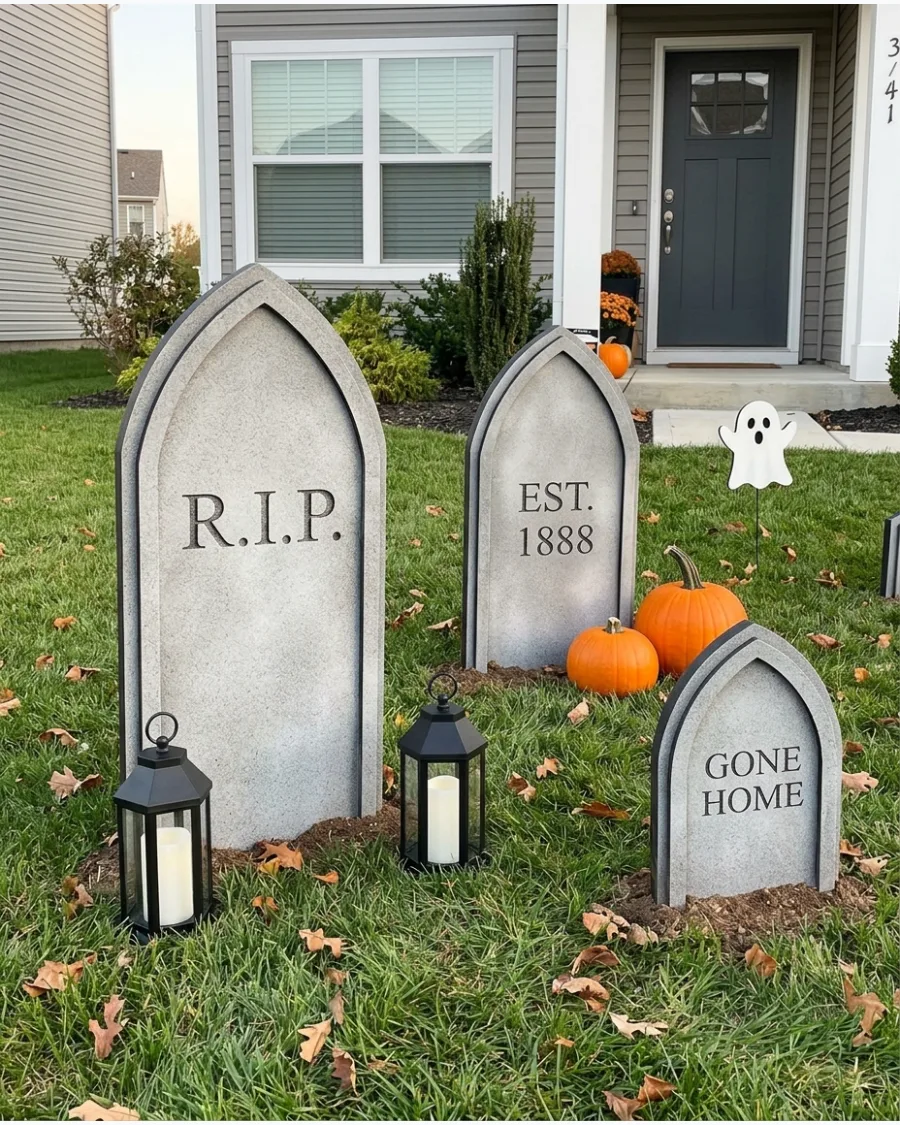
Custom-cut plywood headstones offer a durable and professional-looking alternative to flimsy foam versions found in stores. Using a jigsaw to create sharp Gothic silhouettes allows for a personalized graveyard that withstands autumn winds and rain.
Sand the edges thoroughly before applying a stone-texture spray paint to hide the wood grain and mimic aged granite. Heavier 3/4-inch plywood is superior to thin sheets because it resists warping and stays upright more reliably in wet soil.
- Purchase a single 4×8 sheet of exterior-grade plywood to yield five to six large headstones for a cost-effective display.
- Attach wooden stakes to the back using construction adhesive and short screws that will not pierce through to the front face.
- Paint each piece a slightly different shade of slate gray or charcoal to add visual depth and realism to the yard.
Quick win: Use a damp sponge to dab dark green or black paint around the base of the stones to simulate damp moss and rising moisture.
DIY Halloween Tombstone Ideas
4. Broken Cemetery Tombstones
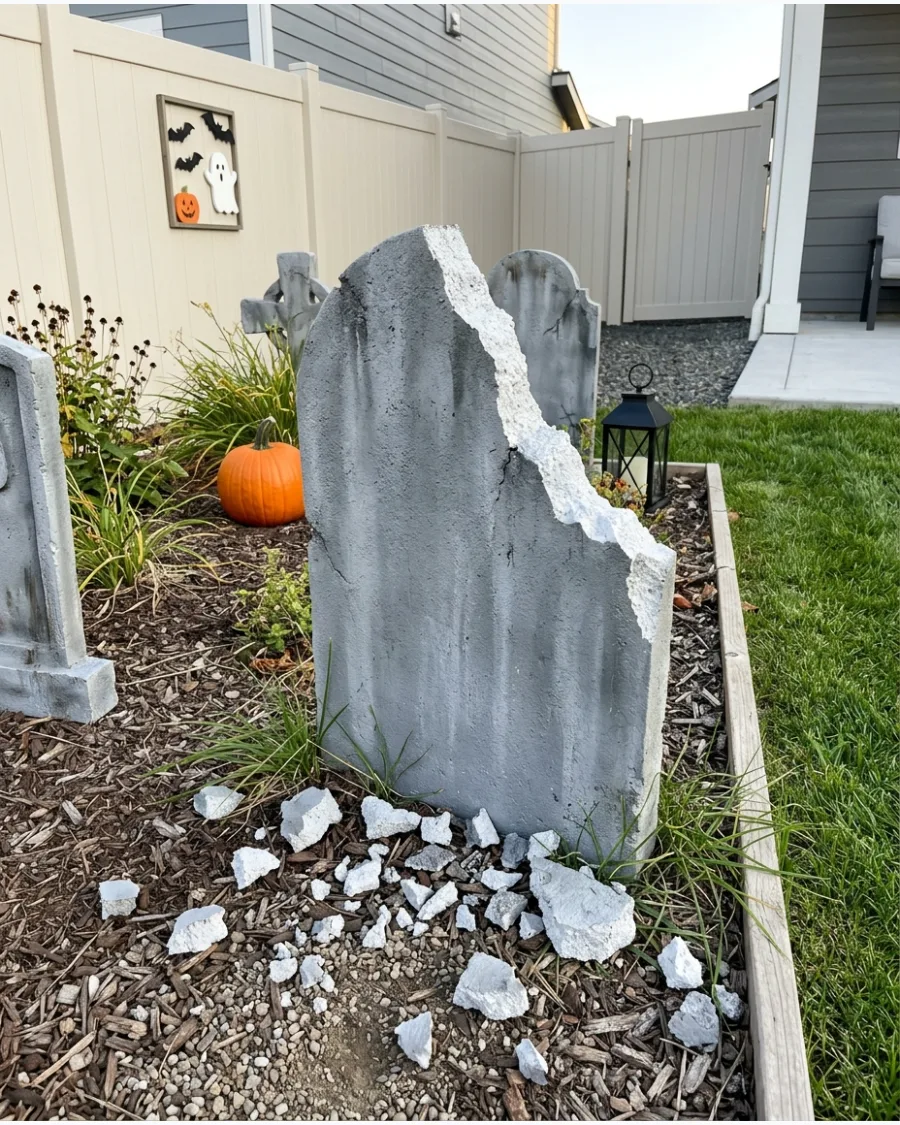
A perfect graveyard looks too intentional, so adding a few broken pieces creates a more realistic, neglected atmosphere. Cut one of your foam stones diagonally and leave a jagged, uneven edge where the break occurred.
Scatter the small foam fragments on the grass directly in front of the tombstone to look like fallen rubble. This simple detail adds a story to the yard and makes the scene feel much more immersive for visitors.
- Use a serrated knife to get a rougher, more natural-looking break in the foam.
- Paint the interior of the 'cracks' a darker shade of gray than the surface.
- Glue some fragments back on at odd angles to show where the stone is crumbling.
Most people skip this: Paint the 'inside' of the broken foam a slightly lighter color to mimic freshly exposed stone.
5. Layered Gothic Tombstones
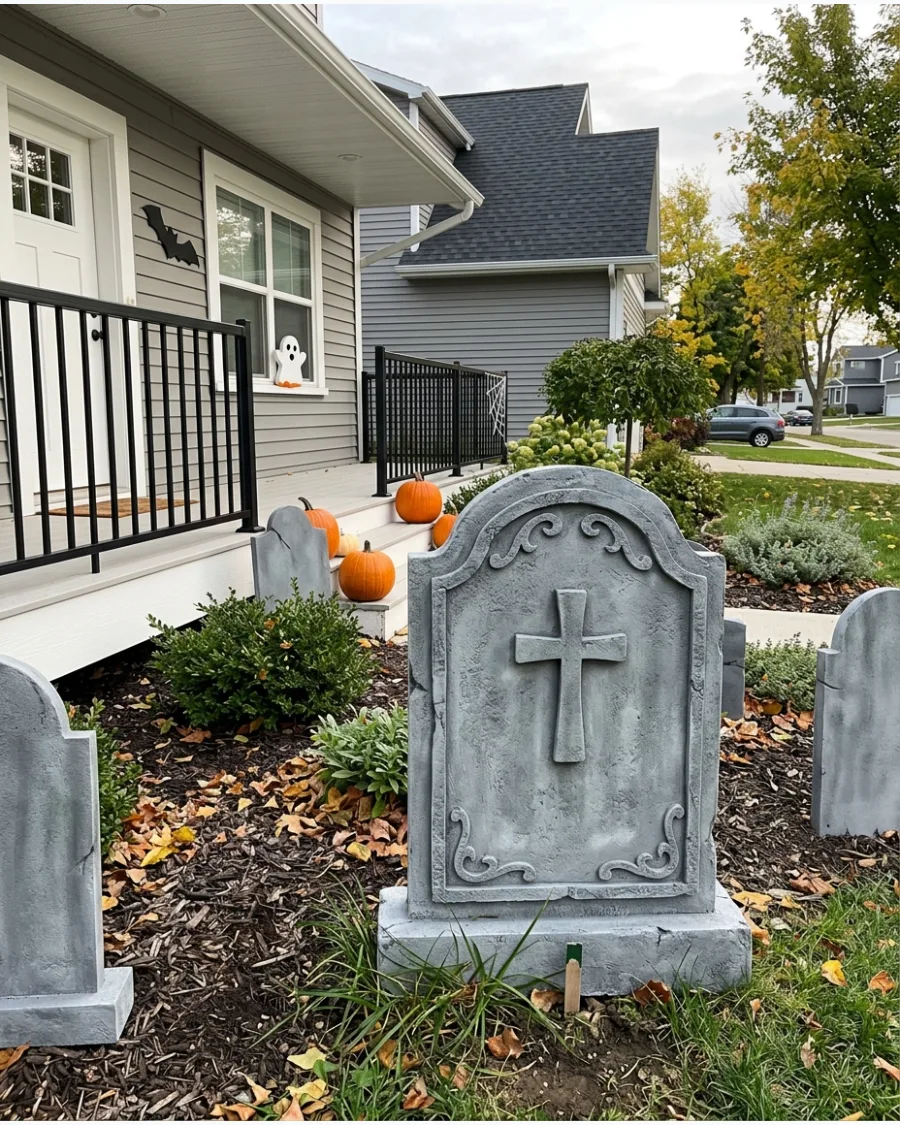
Add architectural interest by gluing smaller foam pieces onto a larger base to create 3D borders and columns. This layering technique gives the prop a heavy, expensive look that mimics old-world cemetery designs.
Use foam-safe adhesive to attach decorative arches or small skulls to the front of the main stone. Once painted, these layers create deep shadows that make the graveyard look much more intimidating at night.
- Cut thin foam strips for borders and use a ruler to keep them perfectly straight.
- Seal the gaps between layers with a bit of caulk before painting for a seamless look.
- Choose gothic stencils for the lettering to match the ornate structural style.
Quick win: Use a kitchen sponge to dab on paint rather than a brush to get a more realistic stone texture.
6. Funny Gravestone Collection
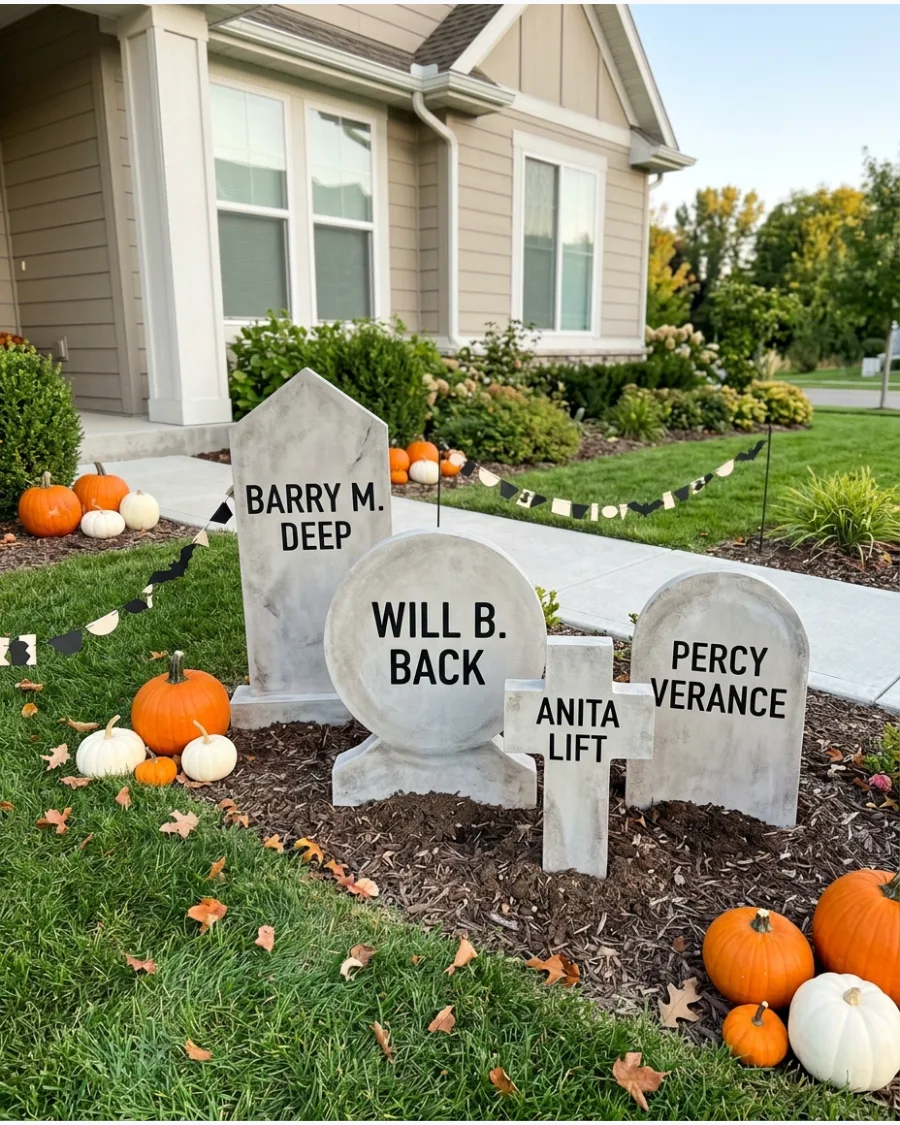
Lighten the mood of a spooky yard by including a few stones with humorous names and puns. Use different shapes like circles, crosses, and tall rectangles to keep the display from looking repetitive.
Write the names clearly using a black paint pen or a stencil to ensure they are readable from the sidewalk. Mixing serious-looking stones with funny ones creates a balanced display that keeps neighbors coming back to read every name.
- Use weather-resistant paint pens so the jokes don't wash away in the rain.
- Space the stones at different depths in the yard to create a full cemetery effect.
- Stick to a consistent color palette so the different shapes still feel like a set.
Best shortcut: Look up classic 'punny' names online to save time on brainstorming your epitaphs.
7. Family Name Cemetery
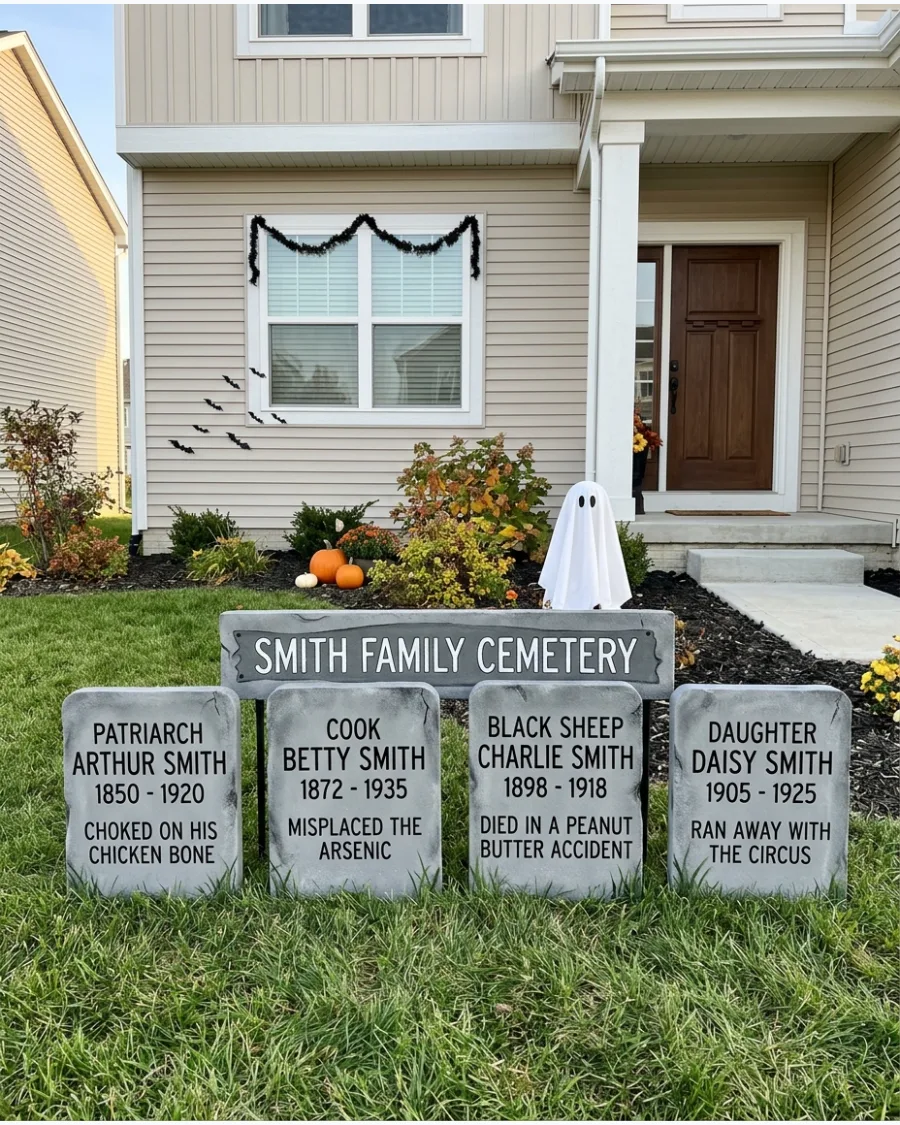
Creating a themed plot centered around one fictional family name makes the graveyard feel like a cohesive scene. Assign different roles to each stone, such as the patriarch, the cook, or the black sheep of the family.
Include specific dates and short, funny causes of death to give each character a distinct personality. This narrative approach turns a simple decoration into an interactive experience for people walking by your home.
- Keep the font style the same across all stones in the family plot for consistency.
- Arrange this group in a prominent corner of the yard to set them apart.
- Use slightly different weathering levels to show who 'passed away' first.
Quick win: Use stencils to ensure the shared family name looks identical on every stone.
8. Glowing Tombstone Letters
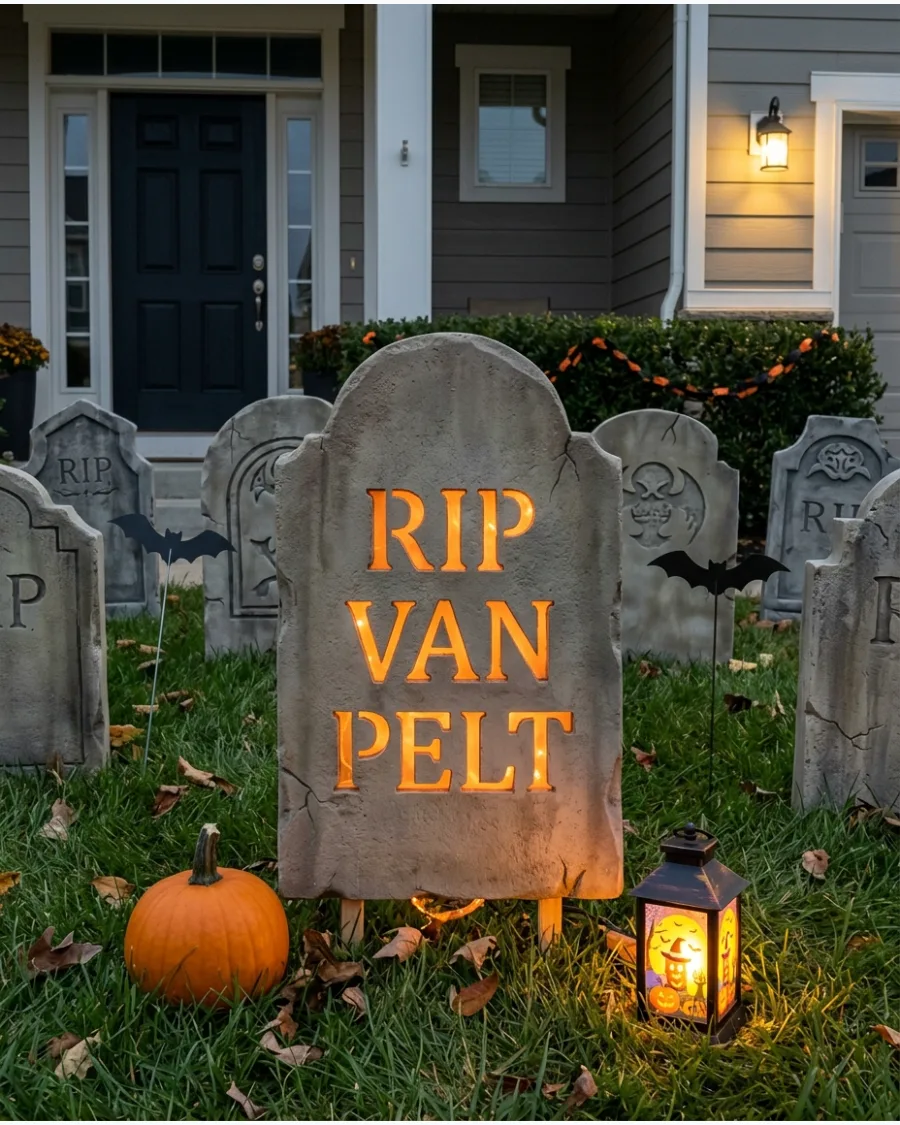
Tombstones can disappear into the dark at night, but glowing letters solve that problem instantly.
Carve your letters all the way through the foam and line the back with a thin sheet of translucent plastic or vellum. Tuck a battery-powered LED strand into a hollowed-out space behind the stone to make the name shine. This creates a haunting effect that draws the eye and ensures your hard work is visible long after the sun goes down.
- Use orange or purple LEDs for a classic Halloween glow that isn't too bright.
- Place the battery box in a small waterproof plastic bag to protect it from dew.
- Check the batteries a few days before Halloween to ensure they are still strong.
Most people skip this: Use a hot wire foam cutter for the cleanest edges when carving all the way through.
9. Angel-Wing Tombstone
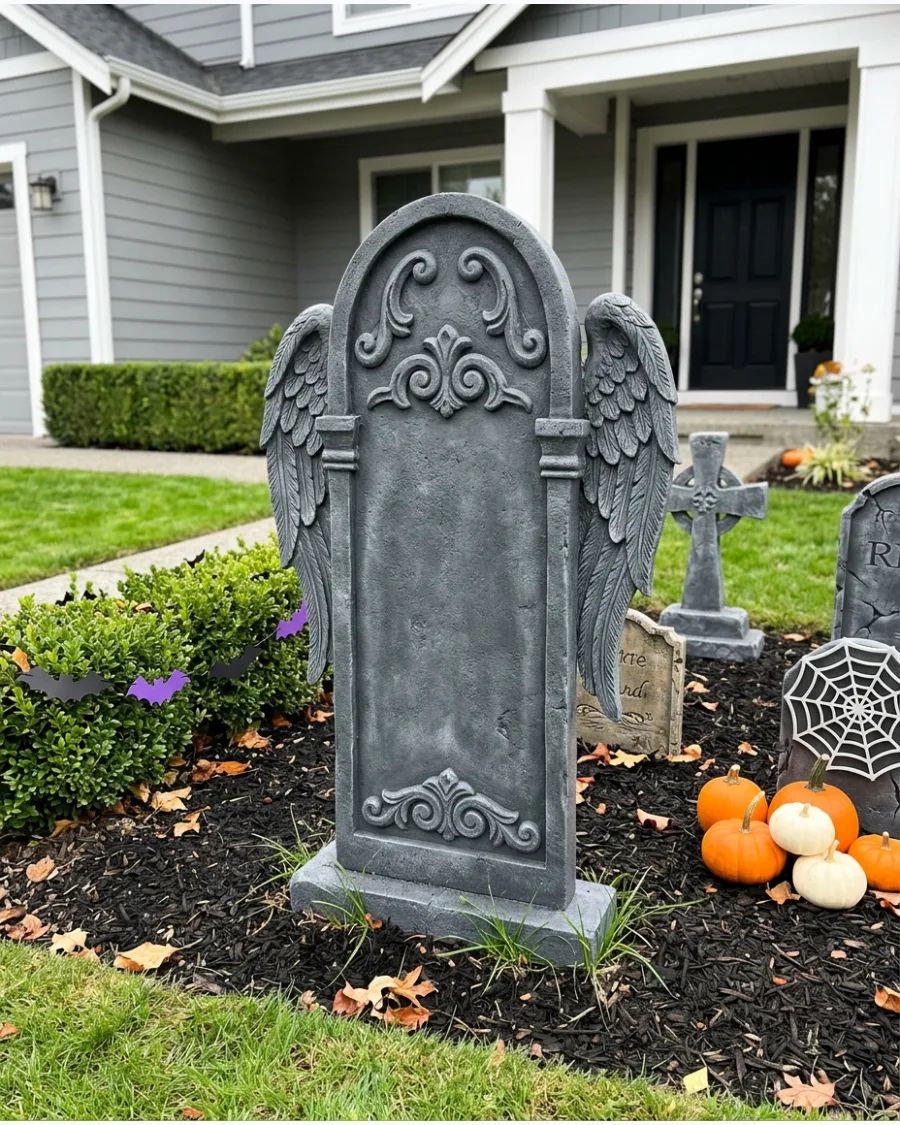
A large central tombstone with ornate details like angel wings creates a striking focal point for the yard. You can buy pre-made foam wings or cut them from thin craft foam and glue them to the sides of a tall headstone.
Coat the wings in the same stone-textured paint as the base to make the entire prop look like a single carved monument. This adds height and a touch of gothic elegance to an otherwise simple graveyard setup.
- Use a tall, 4-foot foam board as the base to make the wings look proportional.
- Apply a dark wash into the 'feathers' of the wings to make the carving stand out.
- Reinforce the wing attachment points with toothpicks and glue for extra stability.
Quick win: Lightly brush white paint over the edges of the wings to mimic the look of aged marble.
10. Skull Relief Headstone
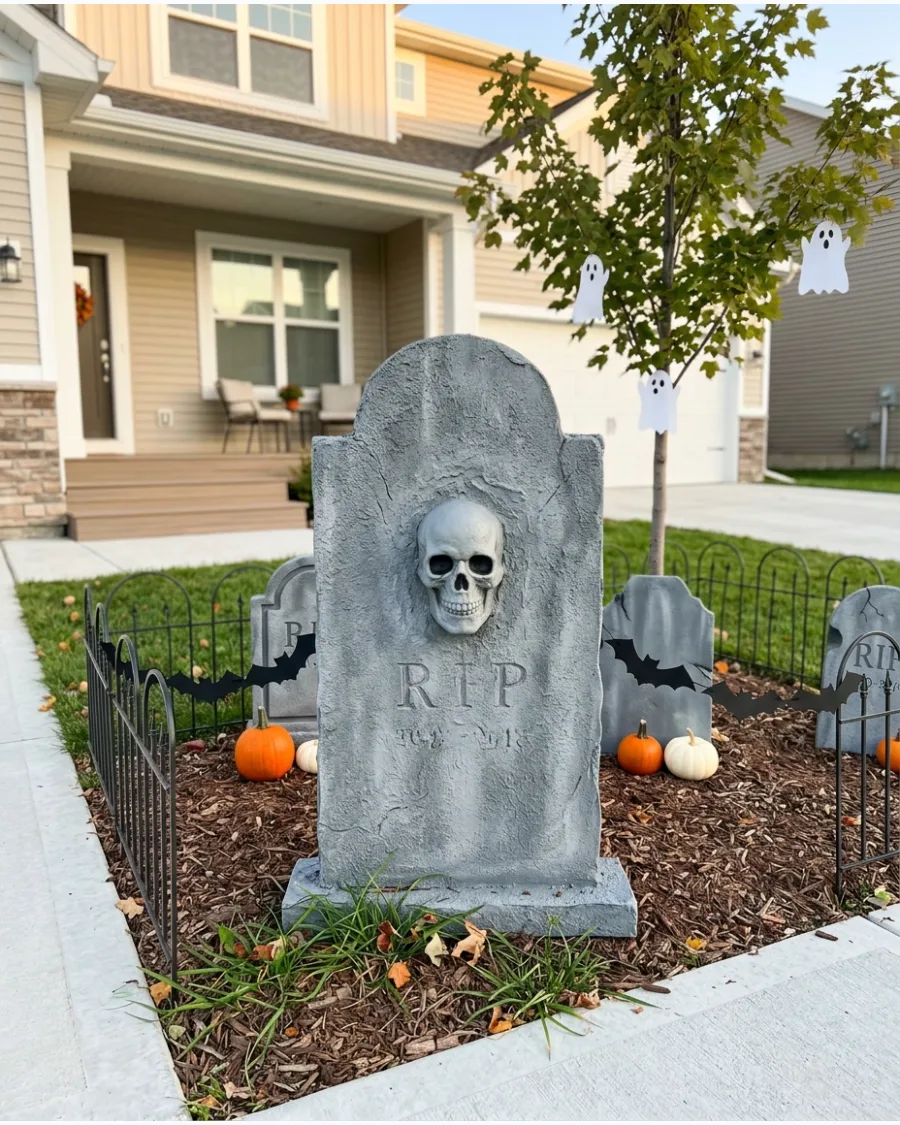
Adding a 3D element like a skull makes a tombstone look much more professional and eerie. Cut a plastic skull in half and glue it to the center of your foam board before you start painting.
Apply a thick layer of texture paste or joint compound around the edges of the skull to blend it into the stone. Once the entire piece is painted gray, the skull will look like it was carved directly out of the rock by a master stonemason.
- Use lightweight plastic skulls to ensure the tombstone doesn't become top-heavy.
- Sand the back of the skull half so it sits perfectly flush against the foam.
- Avoid using high-gloss paint on the skull so it matches the matte finish of the stone.
Best shortcut: Use a bit of caulk to fill the gap between the skull and the foam for a quick, smooth transition.
11. Celtic Cross Tombstone
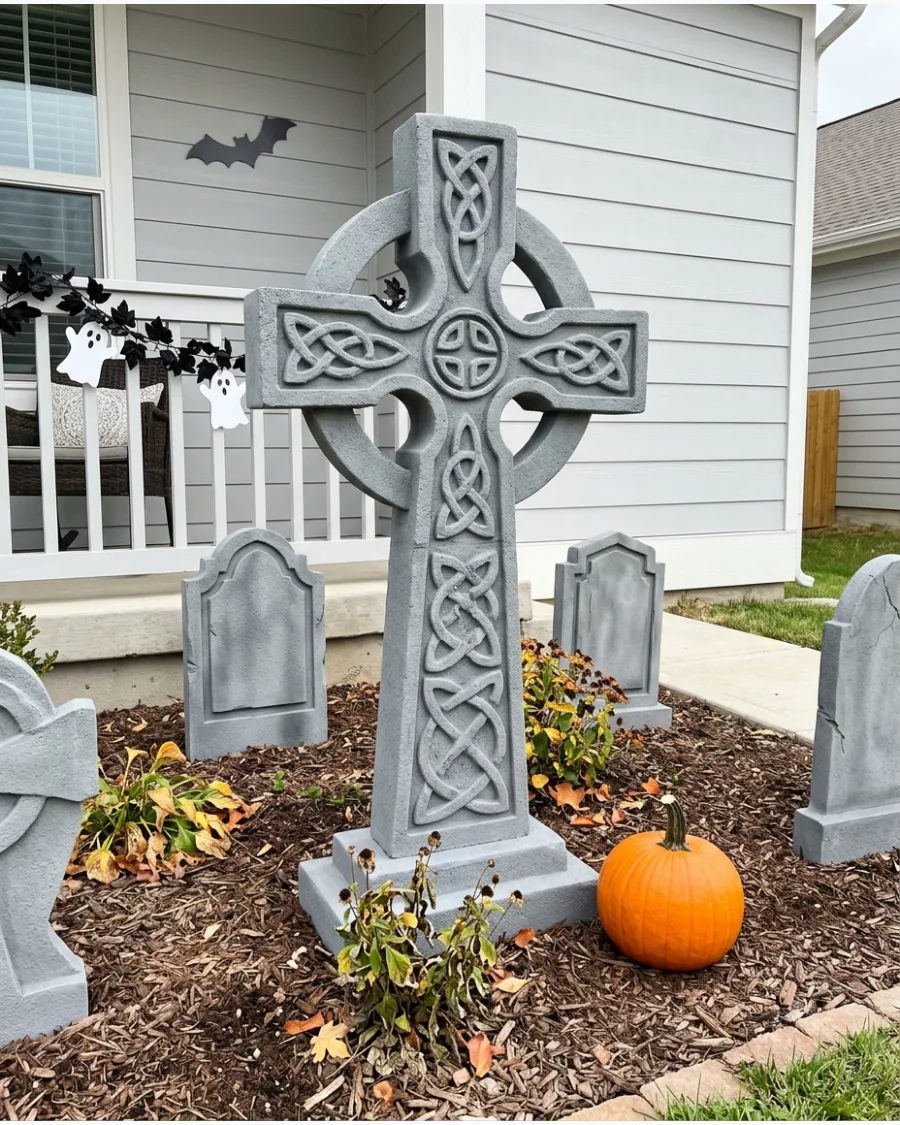
A Celtic cross adds a classic, historical feel to a handmade graveyard display. Use a thick sheet of insulation foam to cut out the cross and the supporting ring.
Use a soldering iron to melt intricate knot patterns into the foam before painting for a deep, carved look. The circular center provides extra support to the cross arms so they do not snap off in the wind.
- Rigid foam insulation board and a sharp utility knife.
- Draw the design with a marker before cutting to ensure the cross is centered in the ring.
- Seal the foam with a water-based primer before applying any spray paint.
Best shortcut: Use a paper template for the knotwork to keep the design perfectly symmetrical.
12. Victorian Cemetery Marker
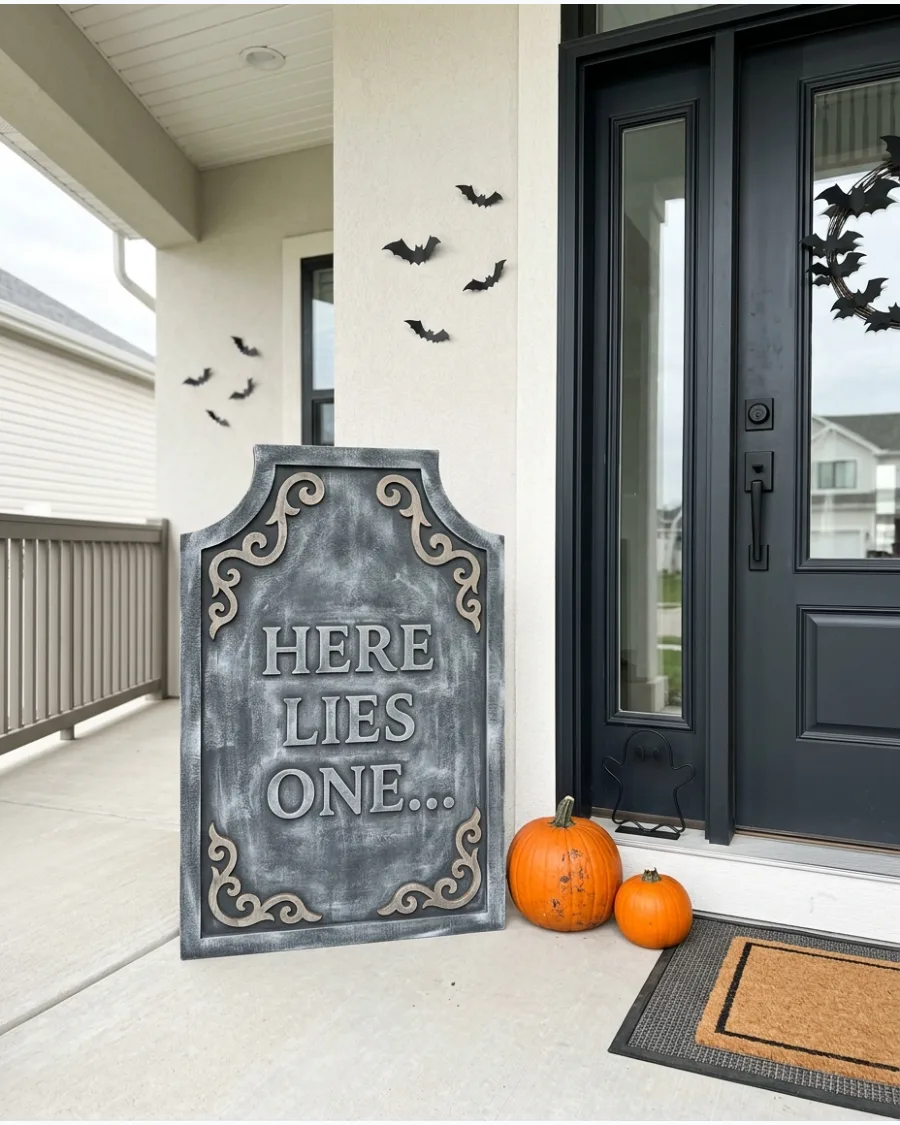
Victorian markers are known for their elegant, flowing shapes and heavy stone textures. Start with a tall foam slab and cut decorative curves into the top corners to create a regal silhouette.
Glue pre-cut wooden scrollwork from the craft aisle onto the foam to get professional-looking Victorian details without carving. A dark charcoal base coat with a light gray dry-brush finish highlights every decorative detail.
- Craft wood appliques and construction adhesive.
- Attach the wood details after the primary shape is cut but before any painting begins.
- Layer three shades of gray paint to create the appearance of aged granite.
Quick win: Use a sponge to dab on the final layer of light gray paint for a realistic granite texture.
13. Child-Sized Forgotten Grave
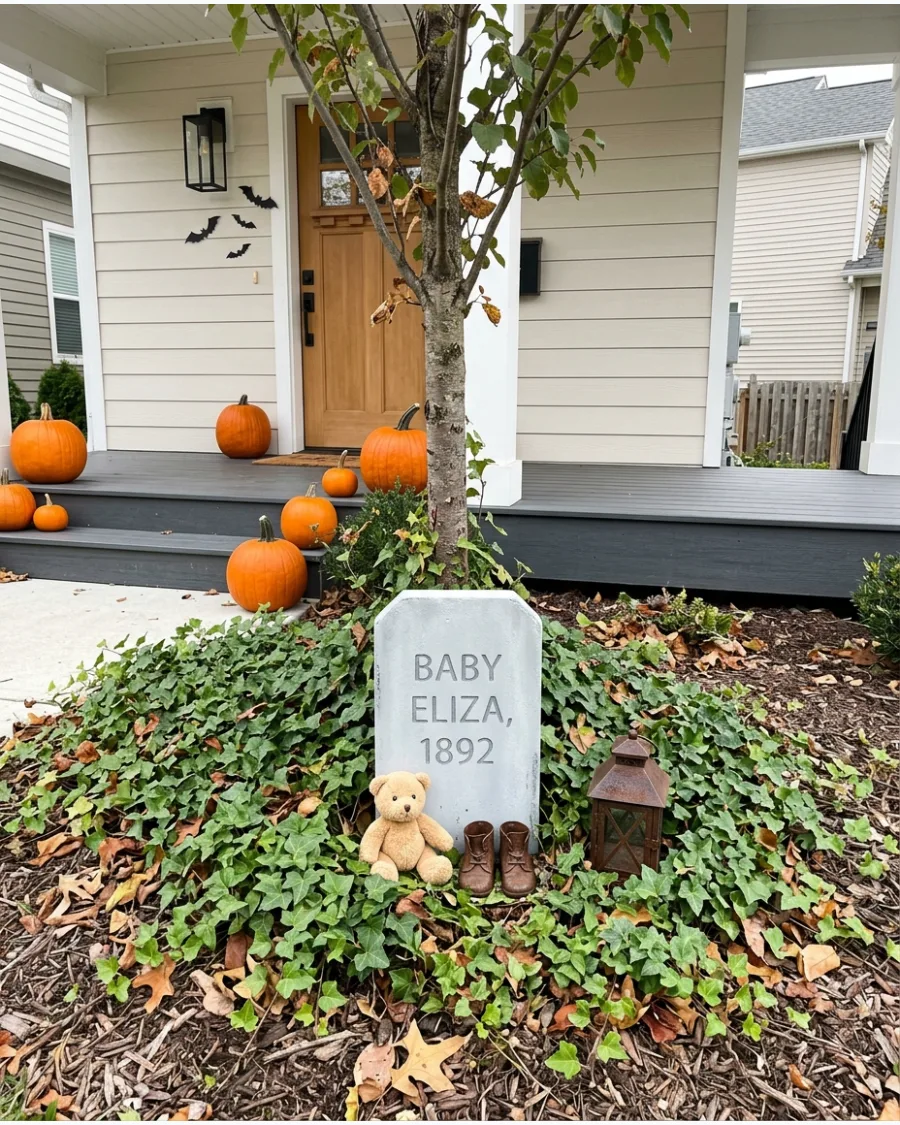
Creating a smaller grave site adds a layer of mystery and storytelling to the front yard. Use a smaller piece of foam for the headstone and keep the text simple, faded, and slightly worn down.
Place a single, weathered teddy bear or a small pair of rusted metal shoes at the base to tell a silent story. This setup works best in a quiet corner of the yard or under a small tree.
- Small foam scraps and outdoor acrylic paint.
- Place the stone in a low-traffic area like a garden corner or under a shrub.
- Use weather-resistant toys or seal fabric items with a clear spray to prevent mold.
Most people skip this: Use a battery-operated lantern with a built-in timer so it turns on automatically at dusk.
14. Tilting Ancient Headstones
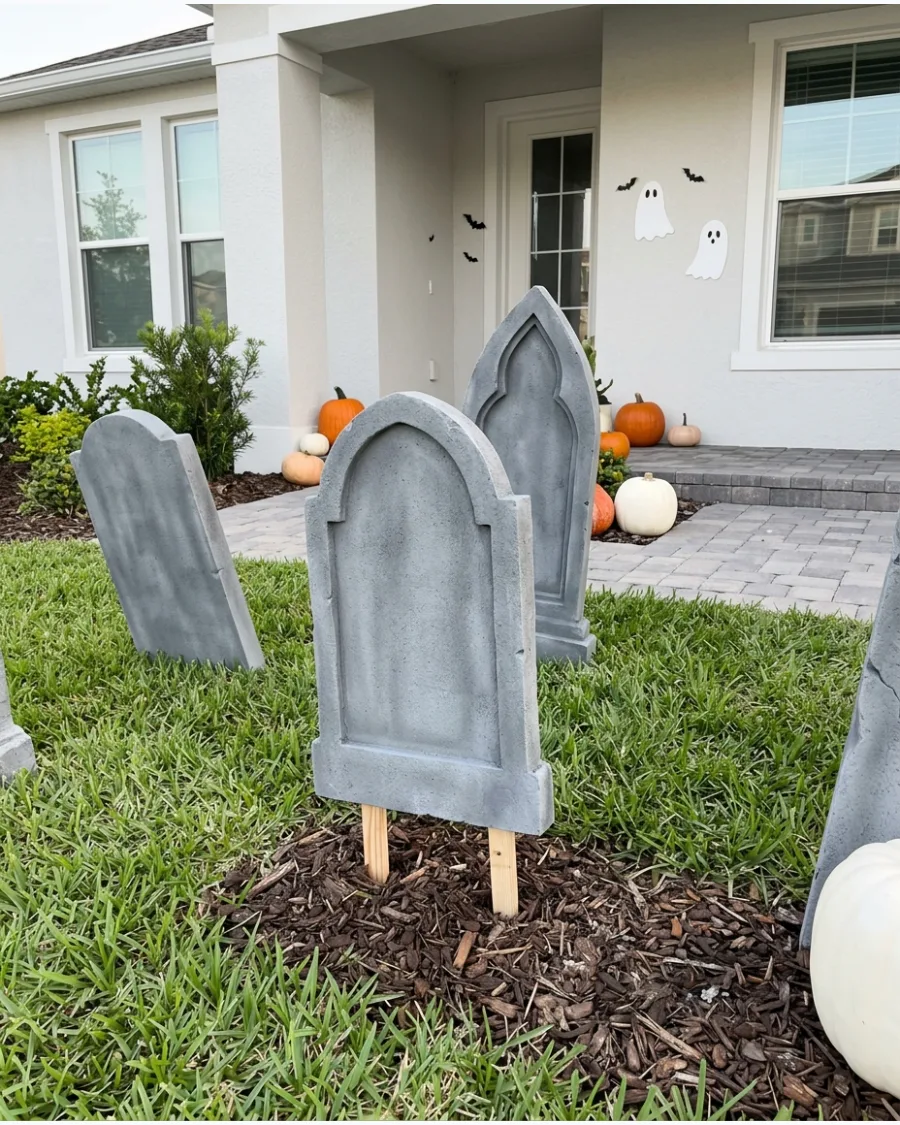
A graveyard where every stone is perfectly straight looks like a retail store display rather than a real cemetery. Real old graveyards have stones that have shifted over decades due to ground movement and settling.
Drive two wooden stakes into the ground at the desired angle and slide the hollow foam base over them to hold the tilt. This simple change makes the entire display feel much more authentic and creepy.
- Wooden garden stakes and a rubber mallet.
- Angle the stakes at 15 to 20 degrees for a noticeable but stable lean.
- Space the stones unevenly to mimic the look of a neglected family plot.
Best shortcut: Use rebar instead of wooden stakes for a much stronger hold in hard or dry soil.
15. Moss-Covered Forest Tombstones
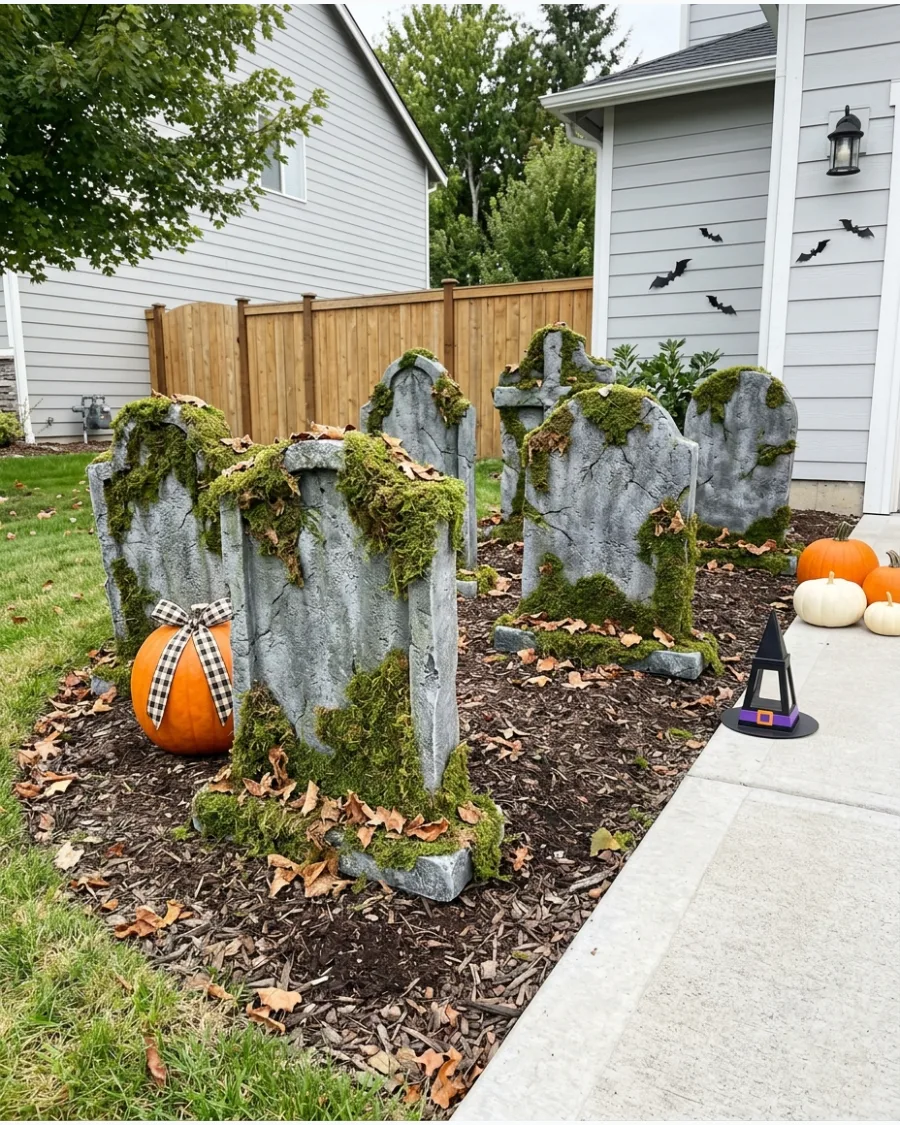
Adding greenery makes the graveyard look like it has been abandoned for years and reclaimed by nature. Focus the moss application on the north side of the stones or near the base where moisture would naturally collect.
Apply spray adhesive to the bottom third of the stone and press clumps of preserved sheet moss into the crevices. This layer of texture breaks up the flat surface of the foam and blends the prop into the lawn.
- Preserved sheet moss and waterproof spray adhesive.
- Apply the moss in irregular patches rather than a solid, straight line.
- Tuck a few dried leaves into the moss to make the growth look even more realistic.
Quick win: Mix a little dark green paint with the glue to make the moss look like it is growing directly out of the stone.
DIY Graveyard Fence and Entrance Ideas
16. PVC Pipe Cemetery Fence
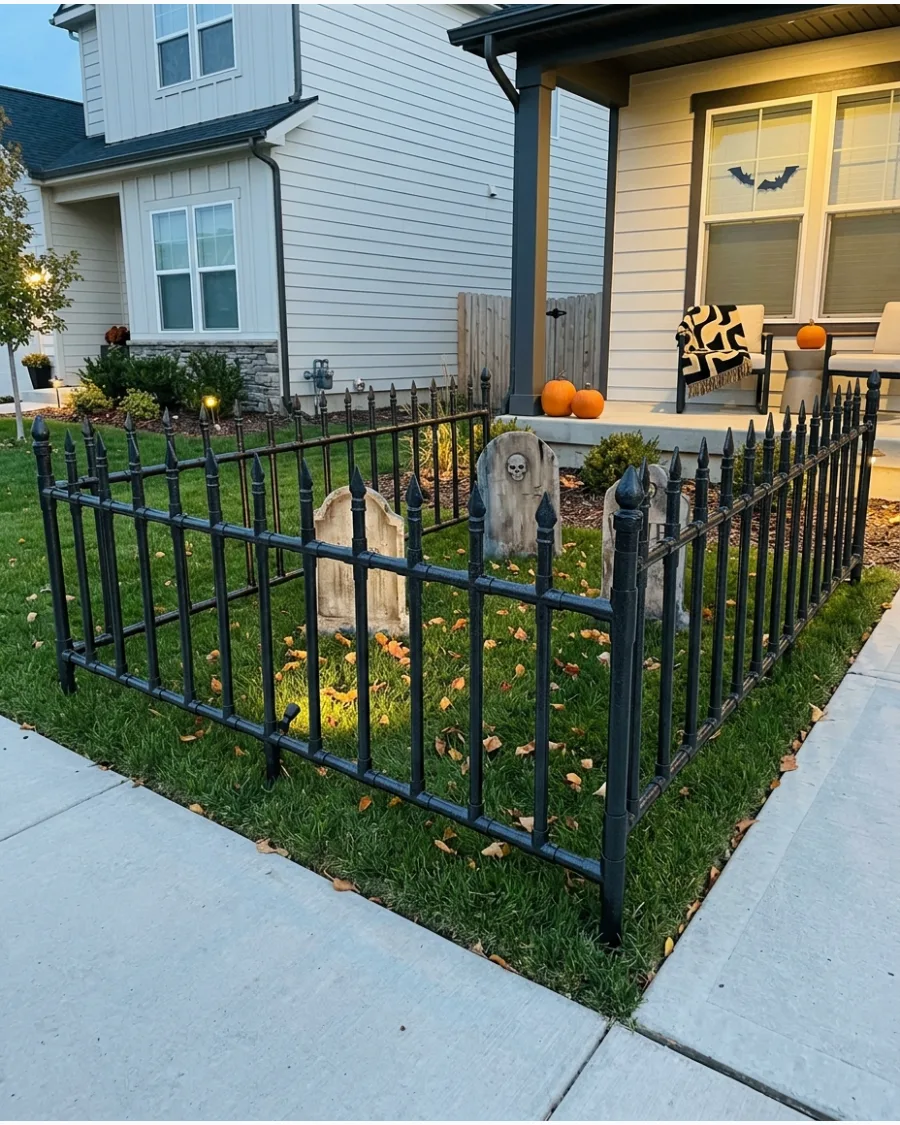
A fence keeps the graveyard contained and prevents trick-or-treaters from tripping over the props. PVC pipe is inexpensive, easy to cut, and looks just like heavy iron once it is painted.
Spray the finished fence with a textured hammered metal paint to hide the smooth plastic surface of the PVC. Connect the pipes using cross-fittings for a sturdy structure that can be disassembled for storage after October.
- 1/2-inch PVC pipe, fittings, and black spray paint.
- Measure and cut all vertical pickets to the same height for a uniform look.
- Use plastic finials on the top of each pipe to mimic the look of wrought iron.
Most people skip this: Drill small holes in the bottom of the horizontal PVC pipes to let rainwater drain out.
17. Wooden Pallet Graveyard Fence
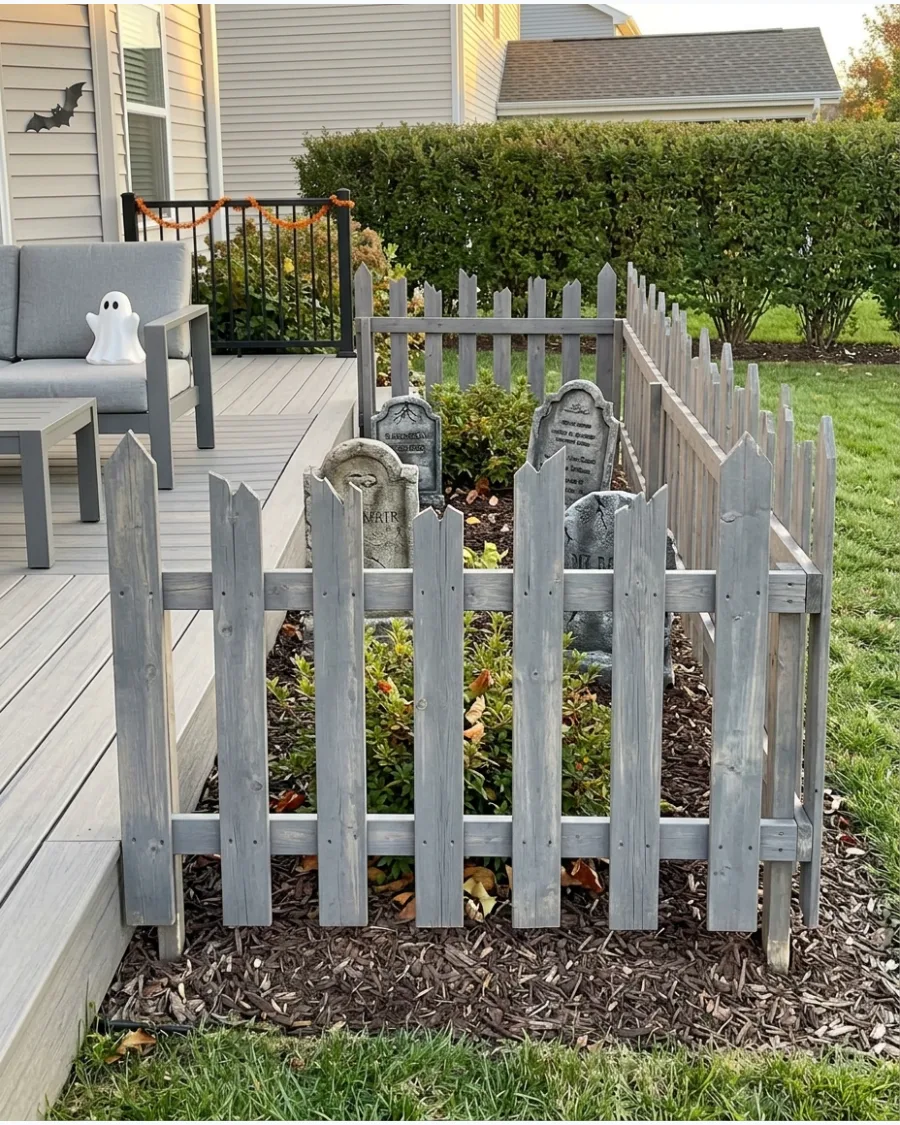
Pallet wood has a rough, aged texture that is perfect for a rustic cemetery boundary. Disassemble the pallets and use the individual slats to create short, jagged fence sections that look old and worn.
Stagger the heights of the vertical boards so the fence looks like it was built by hand a century ago. A light gray stain will give the wood a sun-bleached look that matches the tombstones.
- Reclaimed wood pallets and exterior wood stain.
- Secure the slats to two horizontal backer boards using outdoor screws.
- Leave 2-inch gaps between the slats to keep the fence from acting like a sail in the wind.
Quick win: Use a wire brush on the wood before staining to open the grain and make it look decades older.
18. Dollar Store Garden Fence Upgrade
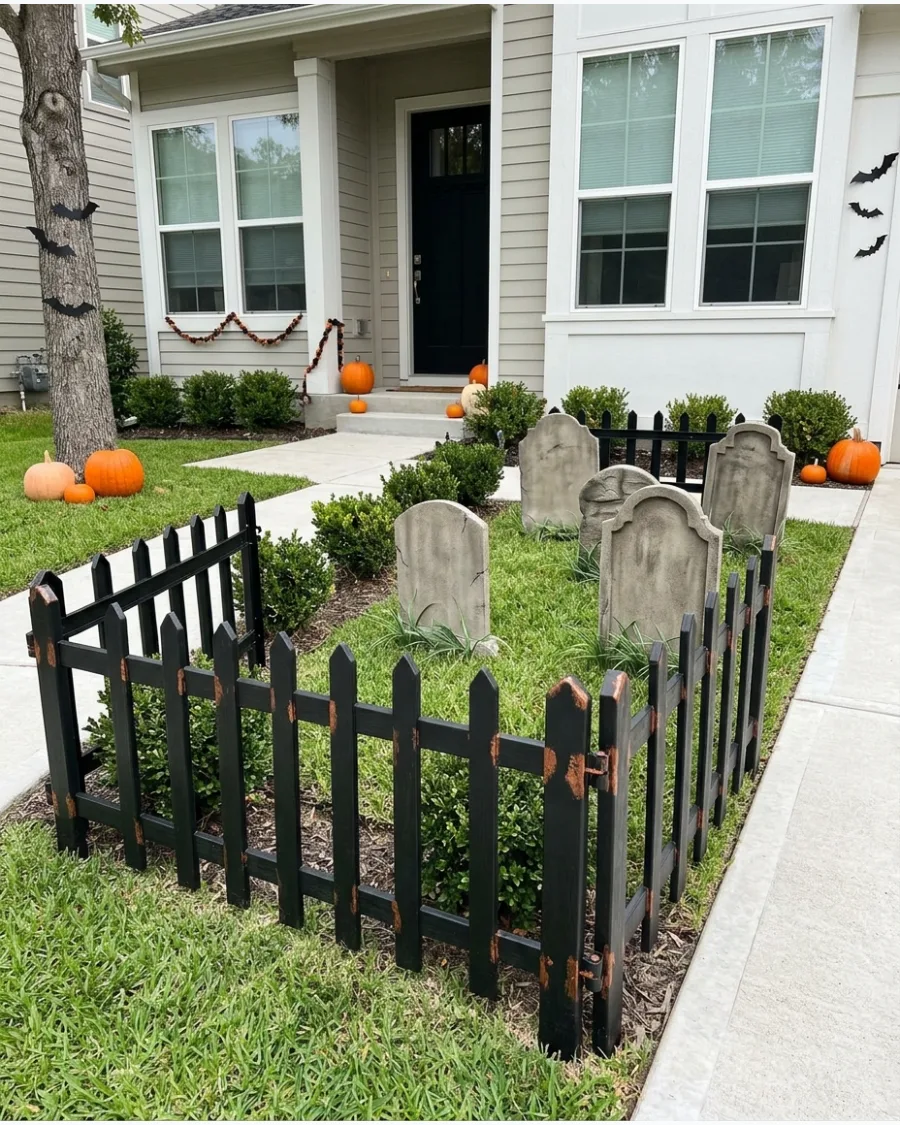
Inexpensive plastic fencing from a garden center can be transformed into a spooky border with a little bit of paint. The factory finish is usually too shiny and bright for a graveyard theme.
Dab a mixture of orange and brown acrylic paint onto the joints and corners to mimic real rusting. This technique adds a layer of realism that makes the plastic look like heavy, oxidized metal.
- Plastic garden fence panels and acrylic craft paint.
- Sand the plastic lightly before painting to help the color stick better.
- Push the stakes deep into the ground to keep the panels upright during storms.
Best shortcut: Zip-tie the fence panels together for a seamless look that will not fall over if bumped.
19. Crooked Cemetery Picket Fence
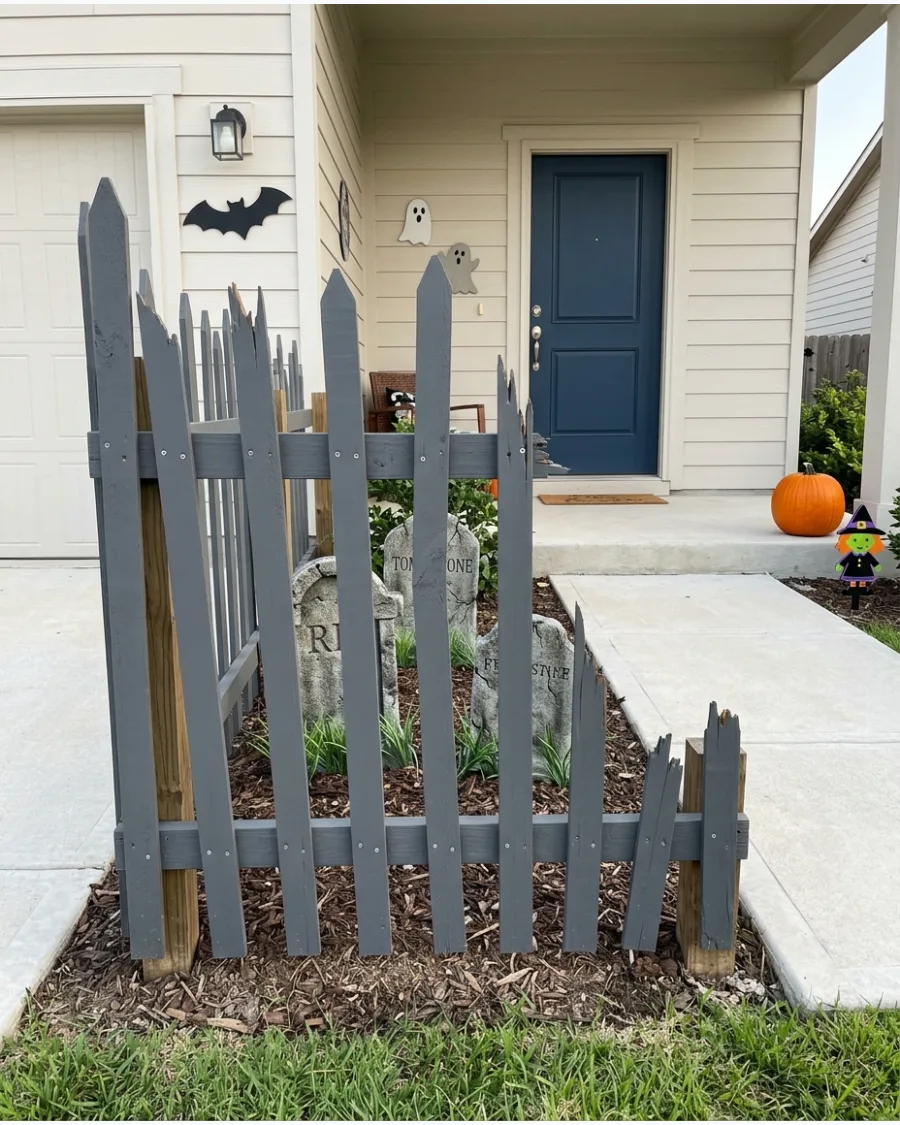
A crooked picket fence suggests a property that has been neglected for many years. Cut narrow strips of wood or thin foam board and paint them in a dull charcoal or slate gray.
Use a hand saw to splinter the tops of some pickets for a jagged, broken effect that looks more authentic. Space the pickets at irregular angles to reinforce the feeling that the graveyard is falling apart.
- Thin wood slats and charcoal gray exterior paint.
- Attach the pickets with only one nail at the top to allow them to tilt easily.
- Sand the edges of the broken pickets to remove any sharp splinters before setting them out.
Most people skip this: Paint the screws or nails black so they disappear into the dark wood finish.
Halloween Decor
20. Weathered Gothic Cemetery Gate
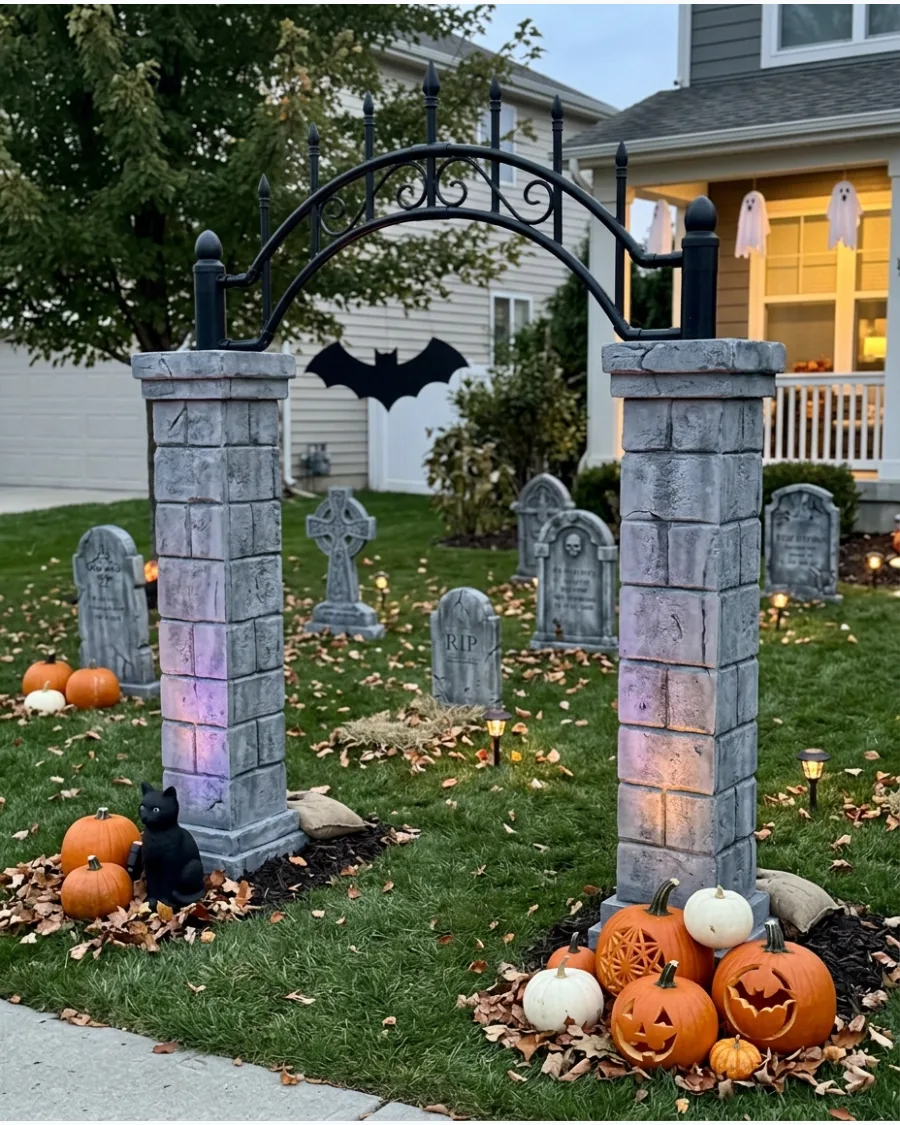
A grand entrance defines the boundaries of a DIY cemetery and sets an immediate spooky tone for guests.
Using lightweight foam insulation boards carved to look like ancient stone pillars provides a high-end look without the weight of real masonry. Construct the archway using two vertical pillars connected by a faux-wrought iron header made from painted PVC piping. While many focus on the height, ensuring the base is weighted with sandbags or rebar prevents the structure from tipping in autumn winds.
- Budget roughly $50 for foam boards and PVC, requiring a full weekend for carving and drying.
- Secure the vertical pillars by sliding them over rebar stakes driven twelve inches into the turf.
- Drape the top with synthetic spider webs or Spanish moss to hide any visible joints in the construction.
Most people skip this: painting the foam with a base layer of dark grey followed by a light grey dry brush technique creates a realistic stone texture that looks authentic even in daylight.
DIY Graveyard Fence and Entrance Ideas
21. Faux Stone Cemetery Pillars
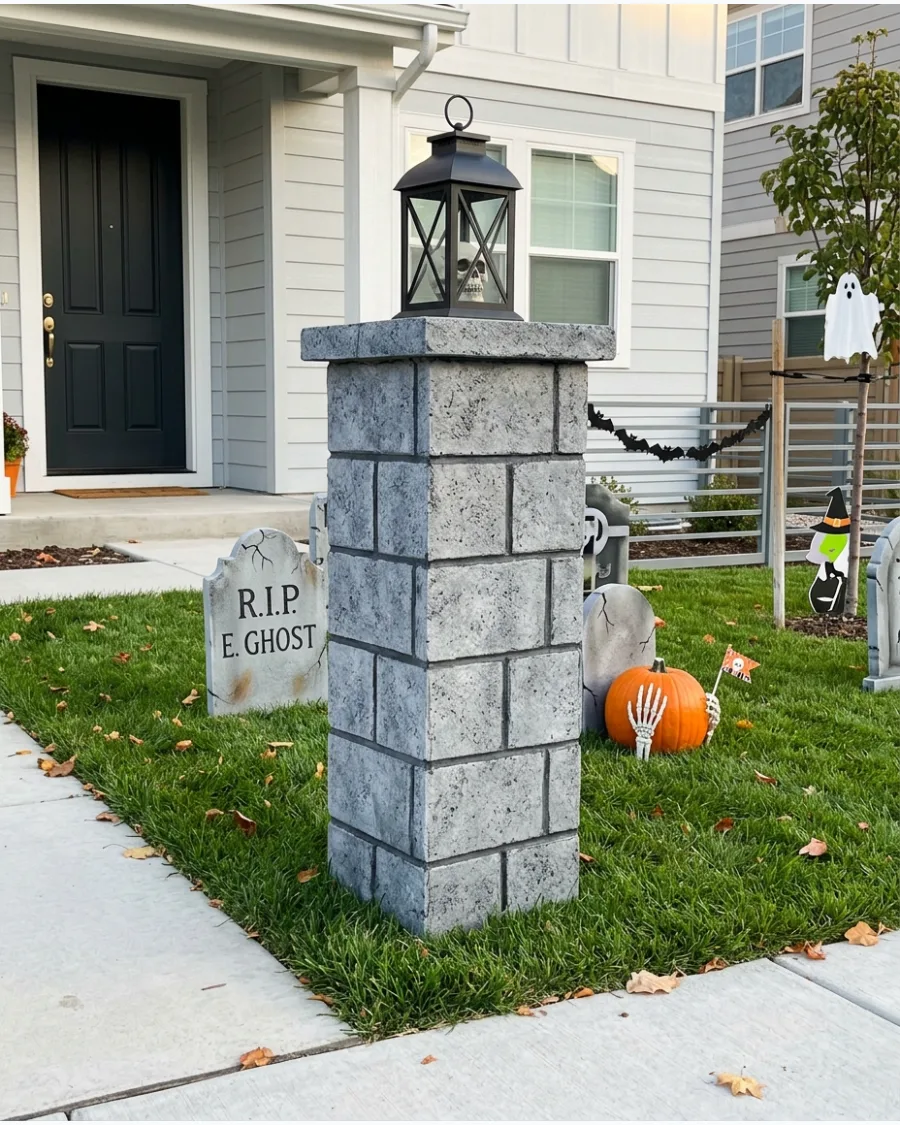
Build rectangular pillars using foam insulation sheets and paint them to look like heavy granite. These anchors give the yard a sense of permanence and professional scale.
Glue individual foam rectangles to the pillar frame before painting to create deep, realistic grout lines. A heavy skull or battery-powered lantern on top finishes the look.
- Foam insulation boards and gray spray paint from a home center
- Secure with rebar stakes driven into the ground
- Scale down for small porches or use cardboard for one-night parties
Quick win: Sprinkle fine sand onto the wet paint to give the foam a gritty, stone-like texture.
22. Skull-Topped Graveyard Gate
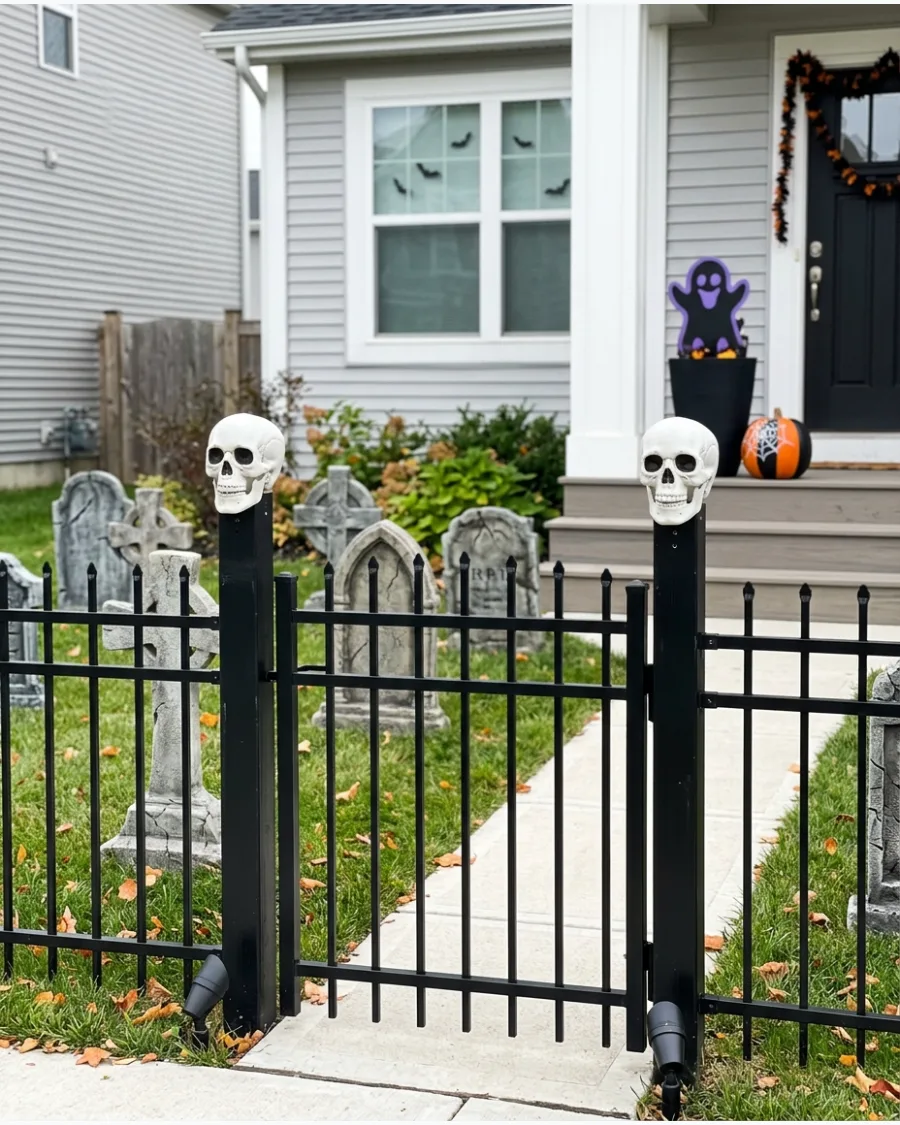
Top your entrance with skulls to warn visitors they are entering a spooky zone. This simple addition makes a standard black fence look custom and high-end.
Drill a small hole in the base of plastic skulls to mount them securely onto fence posts. Use low-profile spotlights at the base to cast long shadows upward at night.
- Plastic skulls and black zip ties
- Use a 1/2-inch drill bit for a snug fit on standard posts
- Paint skulls with a light tea stain for an aged look without the mess
Most people skip this: Paint the interior of the skull eye sockets black to hide the plastic molding marks.
23. Cemetery Name Sign
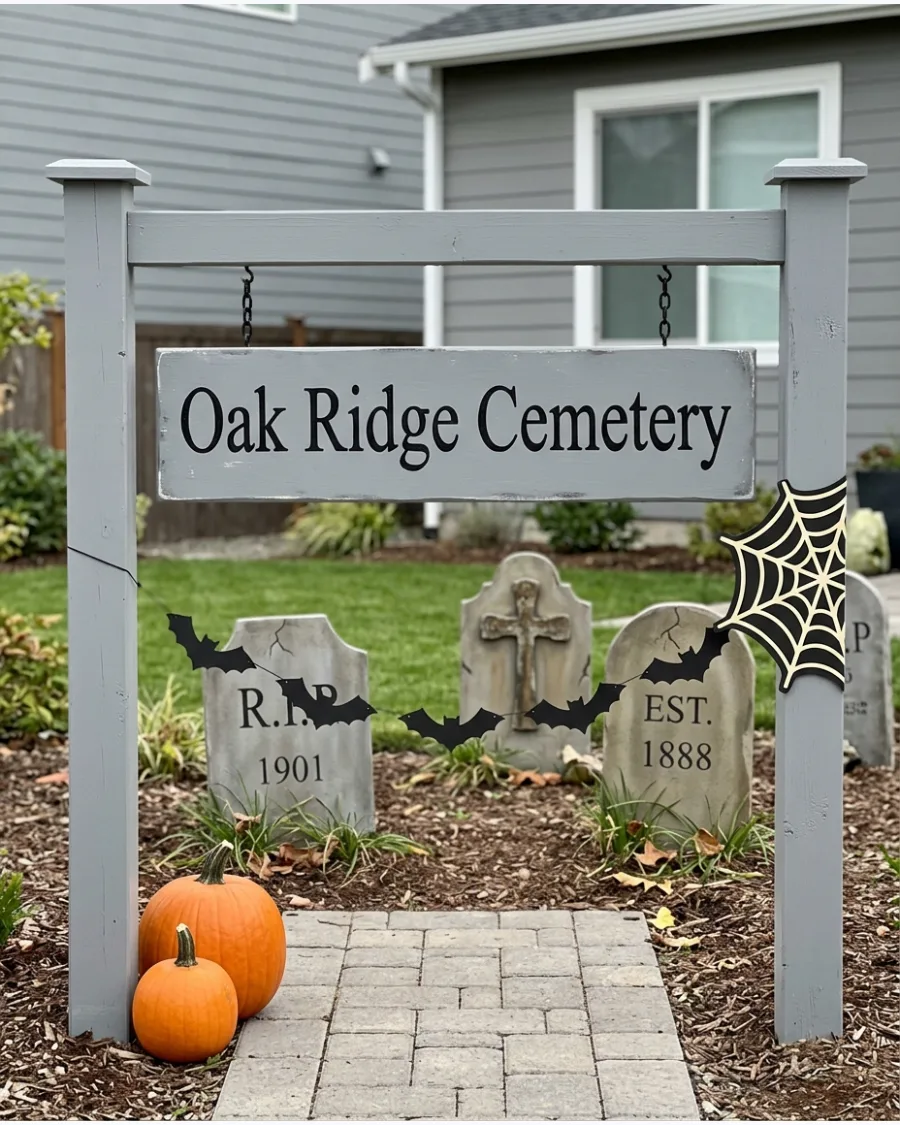
A custom sign gives your yard a specific story and professional theme. Use thin plywood or rigid foam to craft a plaque that hangs over your main entrance.
Paint the letters in a contrasting color and sand the edges to make the sign look like it has survived decades of weather. Hang it with black chains for an authentic, heavy metal appearance.
- Plywood scrap or foam board and black craft paint
- Use outdoor-rated spray sealer to prevent the paint from running in the rain
- Swap 'Cemetery' for your family name to personalize the display
Best shortcut: Use vinyl letter stickers as a stencil for perfectly clean, professional-looking font.
24. Abandoned Churchyard Entrance
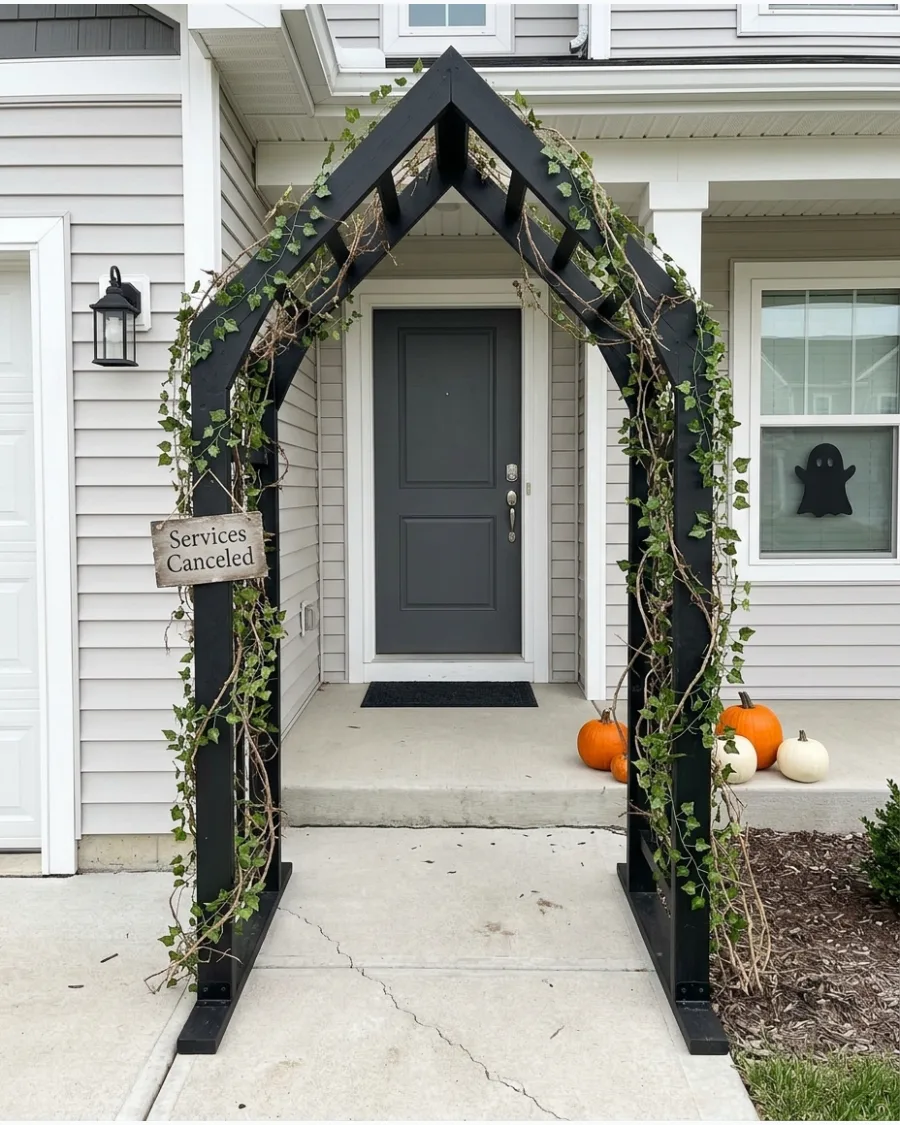
Create a gothic atmosphere by adding a pointed archway to your front path. This structure frames the graveyard and directs traffic toward your front door.
Wrap faux ivy or dried vines around the frame to suggest years of neglect and natural overgrowth. A small 'Services Canceled' sign adds a clever narrative touch.
- 2×2 lumber and faux ivy garlands
- Anchor the base with heavy sandbags hidden behind the pillars
- Use battery-operated flicker candles in lanterns for a safe, eerie glow
Quick win: Use dark green and brown spray paint on the ivy to make it look dead or dying.
25. Haunted Western Cemetery Gate
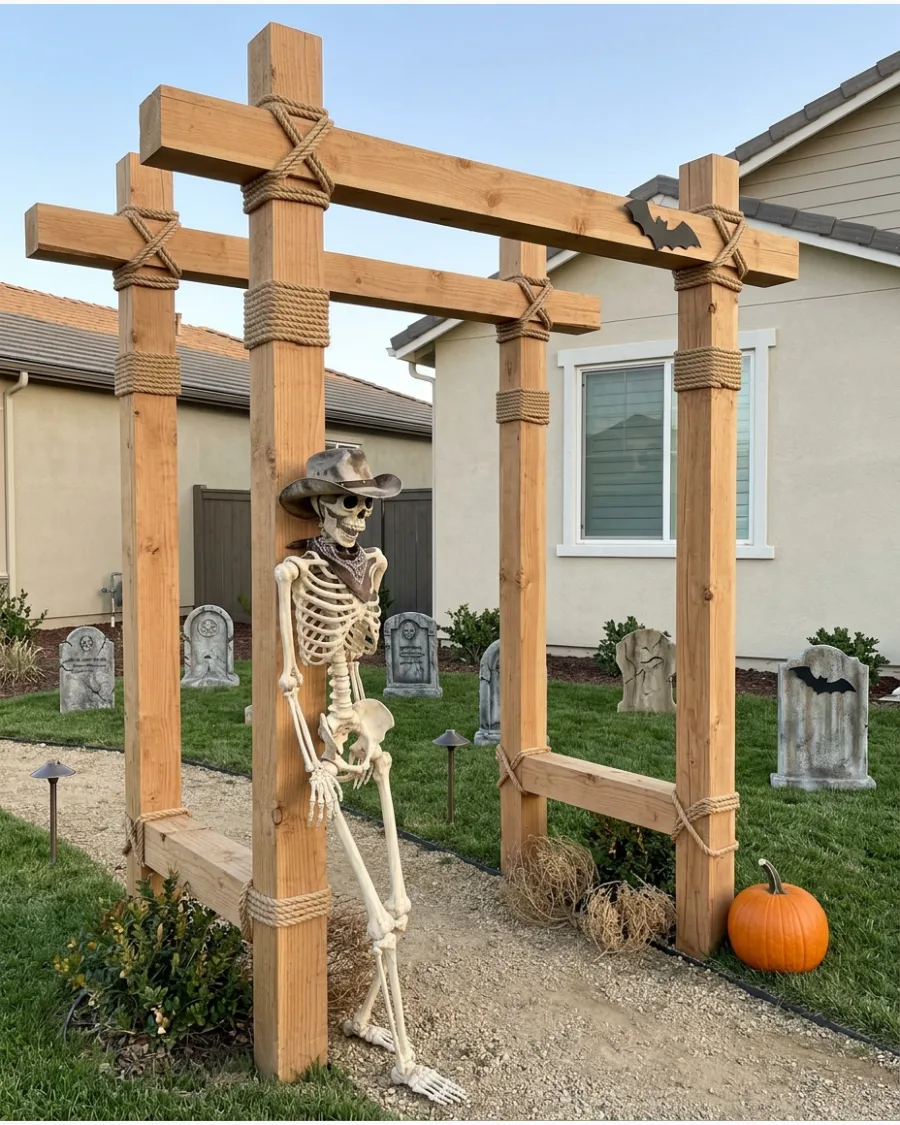
Give your display a frontier feel with a rough-cut timber entrance. This style works well with desert landscaping or simple gravel paths.
Tie crossbeams together with thick rope to mimic the construction style of an old mining town. Add a few tumbleweeds or a skeletal cowboy to complete the theme.
- Rough-sawn pine boards and manila rope
- Pre-drill holes for the rope to ensure the structure remains stable
- Lean a wagon wheel or wooden barrel nearby to reinforce the theme
Most people skip this: Use a wire brush on the wood grain before staining to make the boards look decades old.
DIY Skeleton Graveyard Scenes
26. Skeleton Rising From a Grave
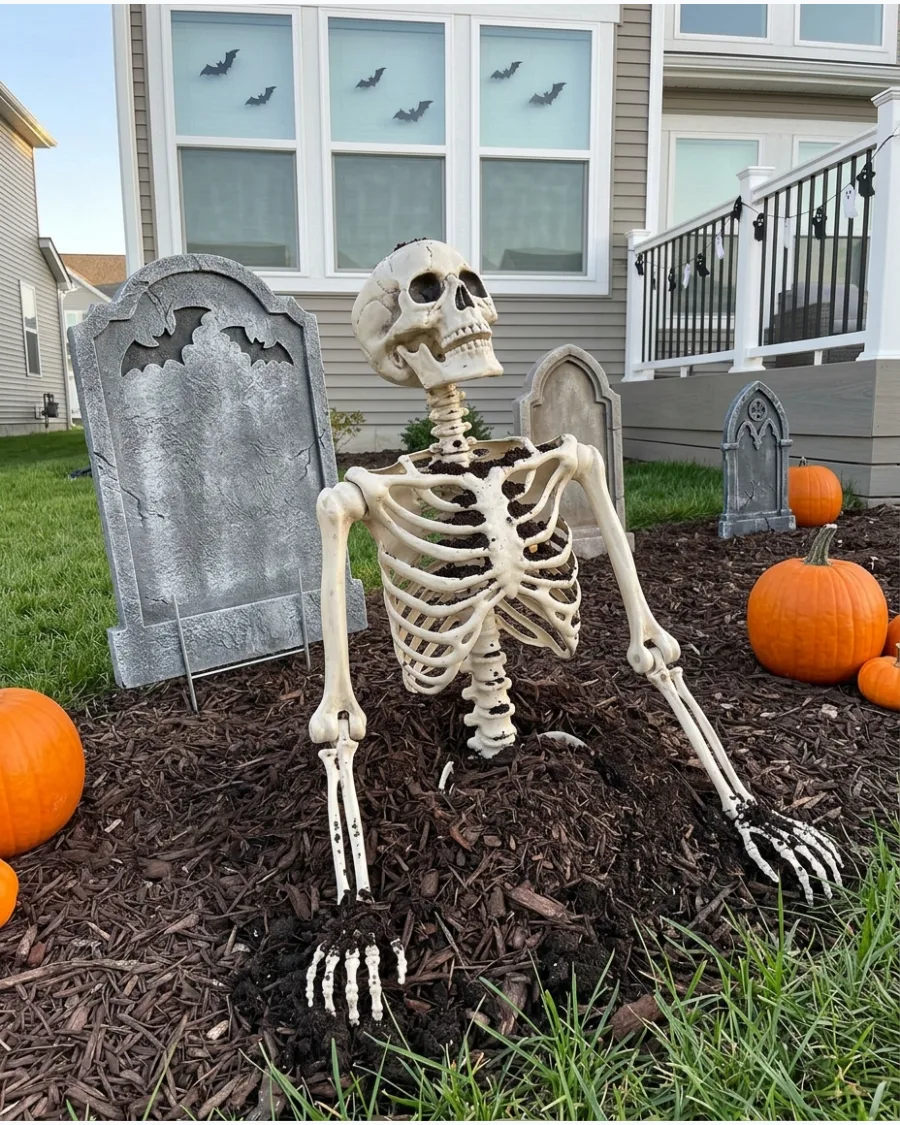
Create a sense of movement by showing a skeleton halfway out of the ground. This visual trick makes the graveyard feel active and much scarier for passersby.
Place a mound of dark mulch or potting soil around the skeleton's torso to hide the hip joints. Angle the head upward as if it is looking for its next victim.
- Posable plastic skeleton and two bags of dark mulch
- Use landscape staples to pin the arms firmly into the grass
- Place this near the sidewalk so guests see it immediately upon arrival
Best shortcut: Use a black plastic trash bag under the mulch to make cleanup easier after Halloween.
27. Skeleton Grave Digger
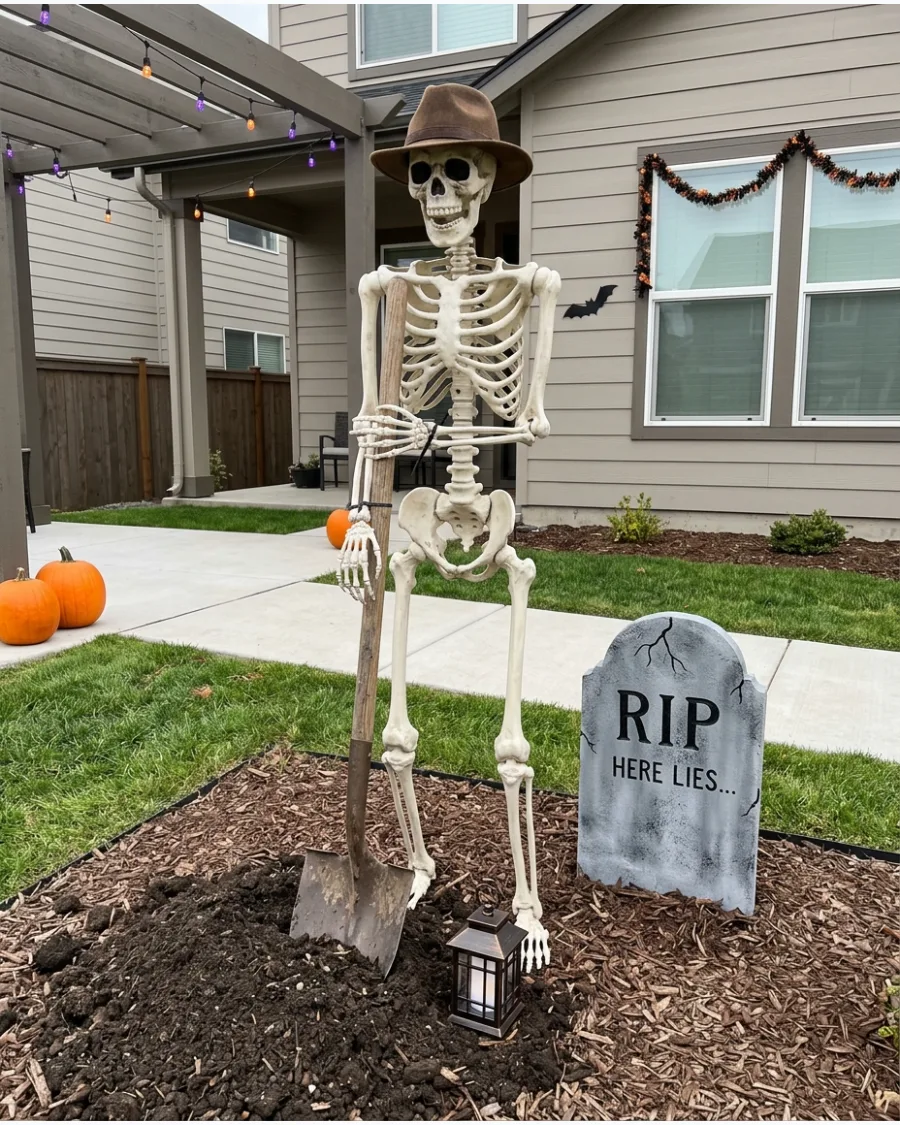
Tell a story by posing a skeleton as a cemetery worker. This setup fills empty space in the yard while adding a touch of dark humor.
Zip-tie the skeleton's hands to a real shovel handle so it remains upright even in high winds. A small lantern at the skeleton's feet provides the perfect low-light focal point.
- Full-size skeleton and an old metal shovel
- Secure the skeleton to a hidden rebar stake for extra stability
- Add an old burlap sack nearby to hold extra bones for the scene
Quick win: Stuff the sleeves of a cheap work shirt with plastic bags to give the skeleton a more realistic shape.
28. Skeleton Funeral Procession
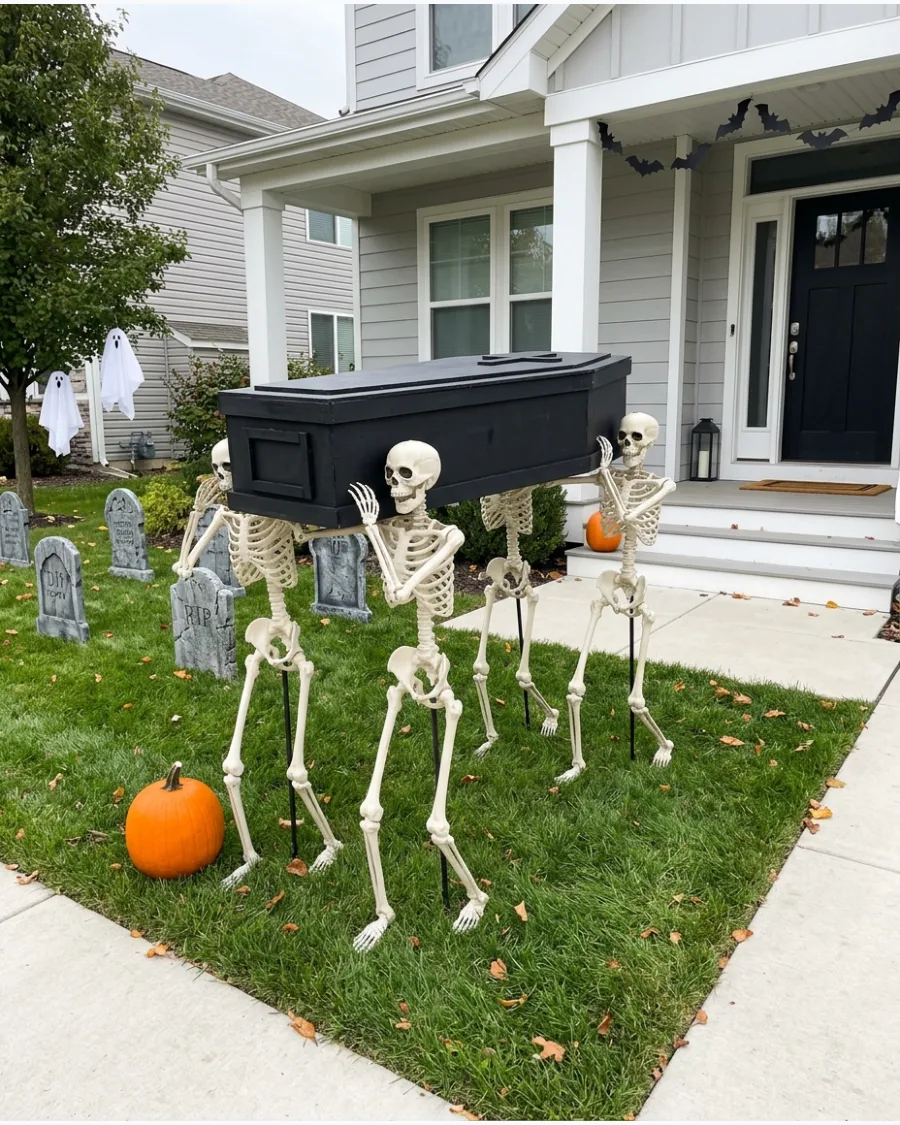
A group of skeletons carrying a coffin creates a striking and eerie silhouette. This is a great way to use multiple skeletons for maximum impact.
Build a lightweight coffin out of foam board to ensure the skeletons can carry it without tipping over. Position them in a line along your lawn to lead the eye toward the porch.
- Four plastic skeletons and black foam insulation board
- Connect the skeletons to each other with clear fishing line for stability
- Drape a scrap of black lace over the coffin for a Victorian feel
Most people skip this: Place one skeleton slightly out of step to make the movement look more natural and creepy.
29. Skeleton Sitting on a Tombstone
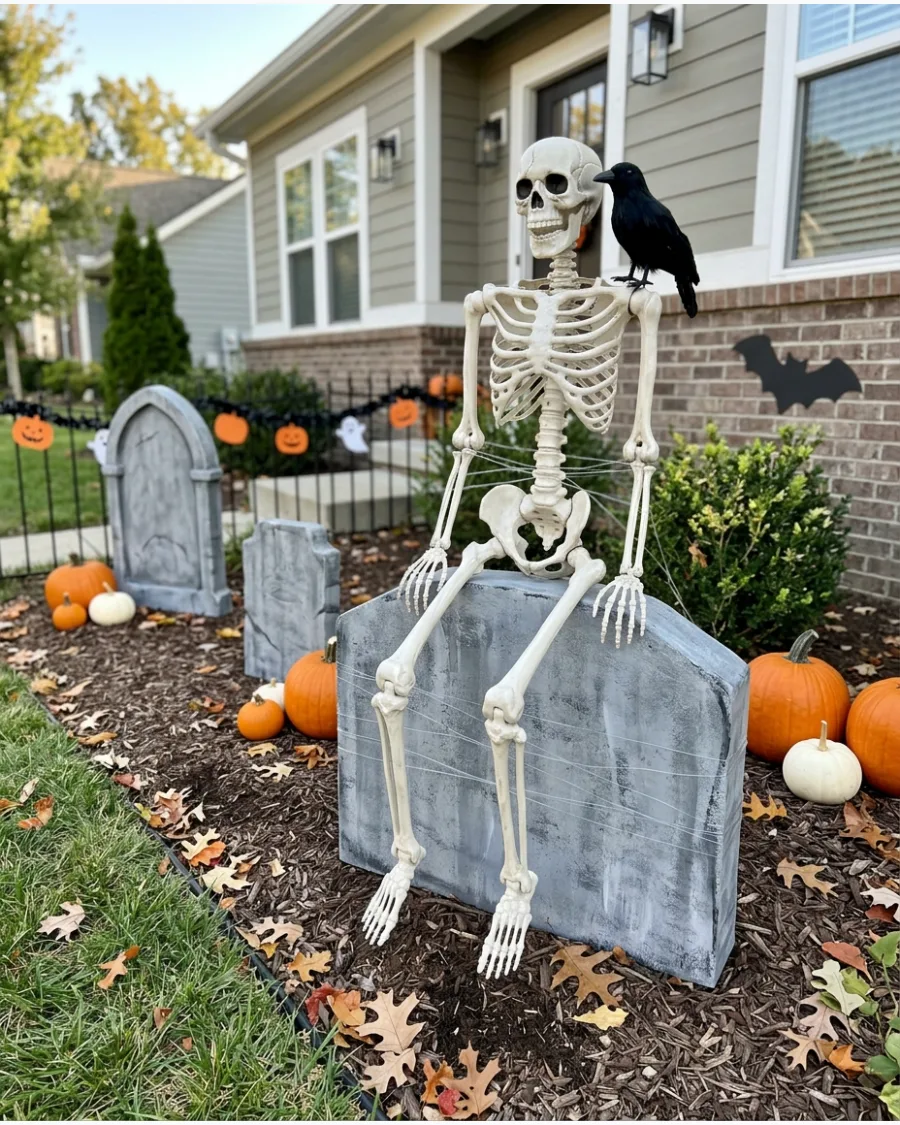
Make your graveyard feel lived-in by perching a skeleton on a wide headstone. This breaks up the vertical lines of the cemetery and adds a casual, spooky vibe.
Use clear heavy-duty fishing line to wrap around the skeleton's ribs and the tombstone to keep it seated. A plastic crow perched on the skeleton's shoulder adds an extra layer of detail.
- Posable skeleton and a sturdy wide tombstone prop
- Ensure the tombstone is anchored with stakes before adding the skeleton's weight
- Add a small LED tea light inside a nearby lantern to highlight the scene
Best shortcut: Use a skeleton with locking joints so it stays in the sitting position without drooping.
30. Skeleton Groundskeeper
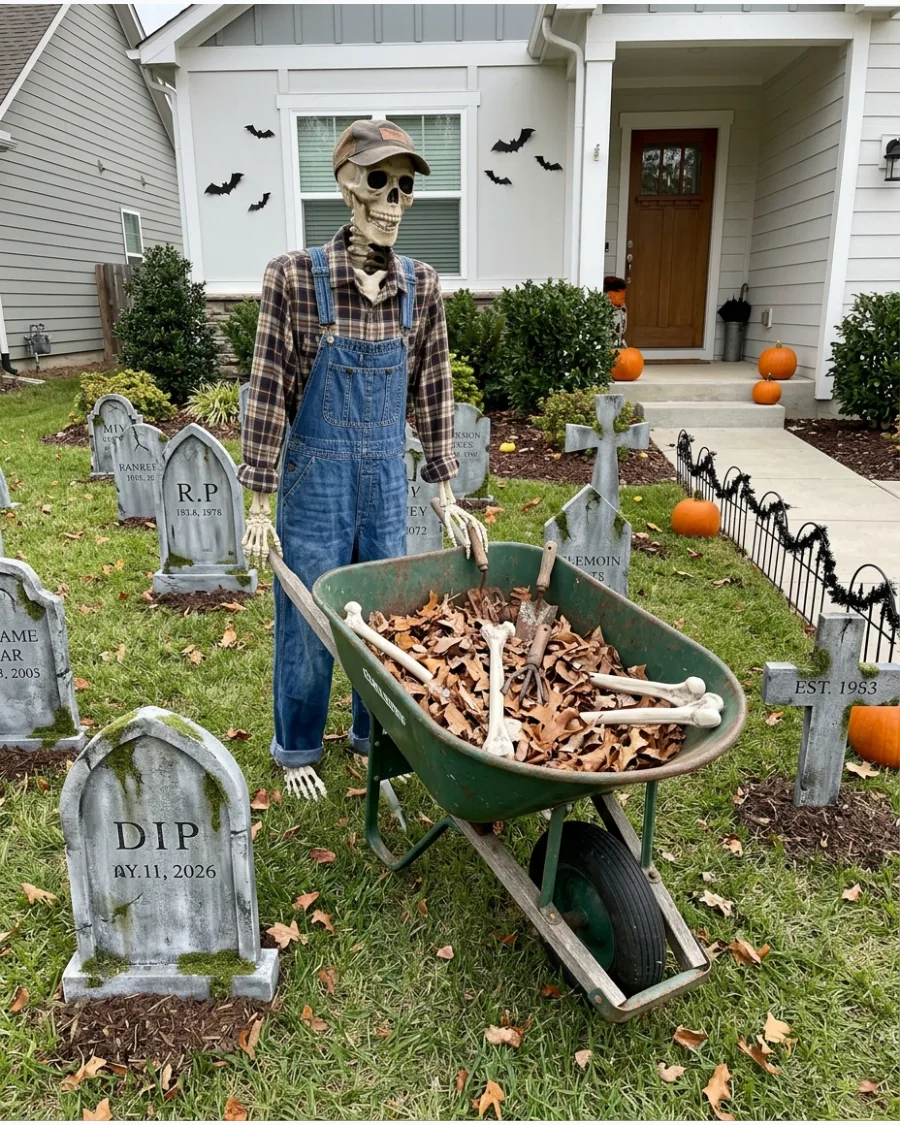
A groundskeeper skeleton adds a funny, narrative element to a large graveyard display. This character can be placed near the edge of the yard to greet guests.
Fill a standard garden wheelbarrow with plastic bones, dead leaves, and a few rusted garden tools. This detail makes the scene feel like a working cemetery rather than just a collection of props.
- Old wheelbarrow and a bag of misfit plastic bones
- Use a heavy rock in the bottom of the wheelbarrow to prevent it from moving
- Add a small wooden sign that says Staff Only to the side of the wheelbarrow
Quick win: Rub some brown acrylic paint into the joints of the skeleton to look like garden dirt.
31. Skeleton Couple on a Bench
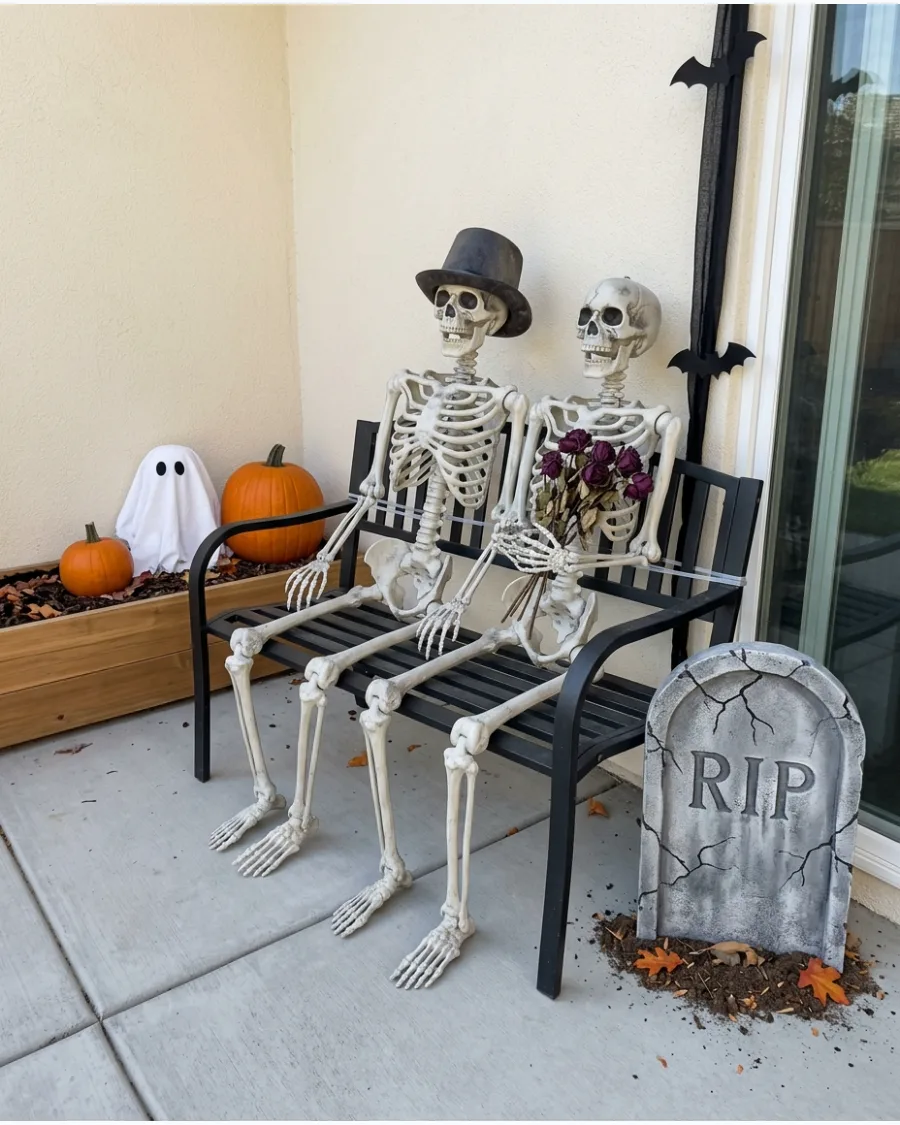
Arrange two skeletons on a standard garden bench to create a centerpiece that feels like a frozen moment in time. Use wire or zip ties to secure the poses so they don't slump over.
Adding a tattered umbrella or a wilted bouquet of dark flowers adds a layer of storytelling to the scene. Zip ties are the best way to keep skeletons from sliding off smooth bench slats during a windstorm.
- Sourcing: Standard 5-foot skeletons from big-box retailers ($30-$50 each).
- Setup: Use clear zip ties around the spine and bench back for stability.
- Style: Swap the hats for matching scarves if the weather is particularly cold or windy.
Quick win: Use fishing line to tilt their heads toward each other for a more natural, conversational look.
32. Skeleton Picnic in the Cemetery
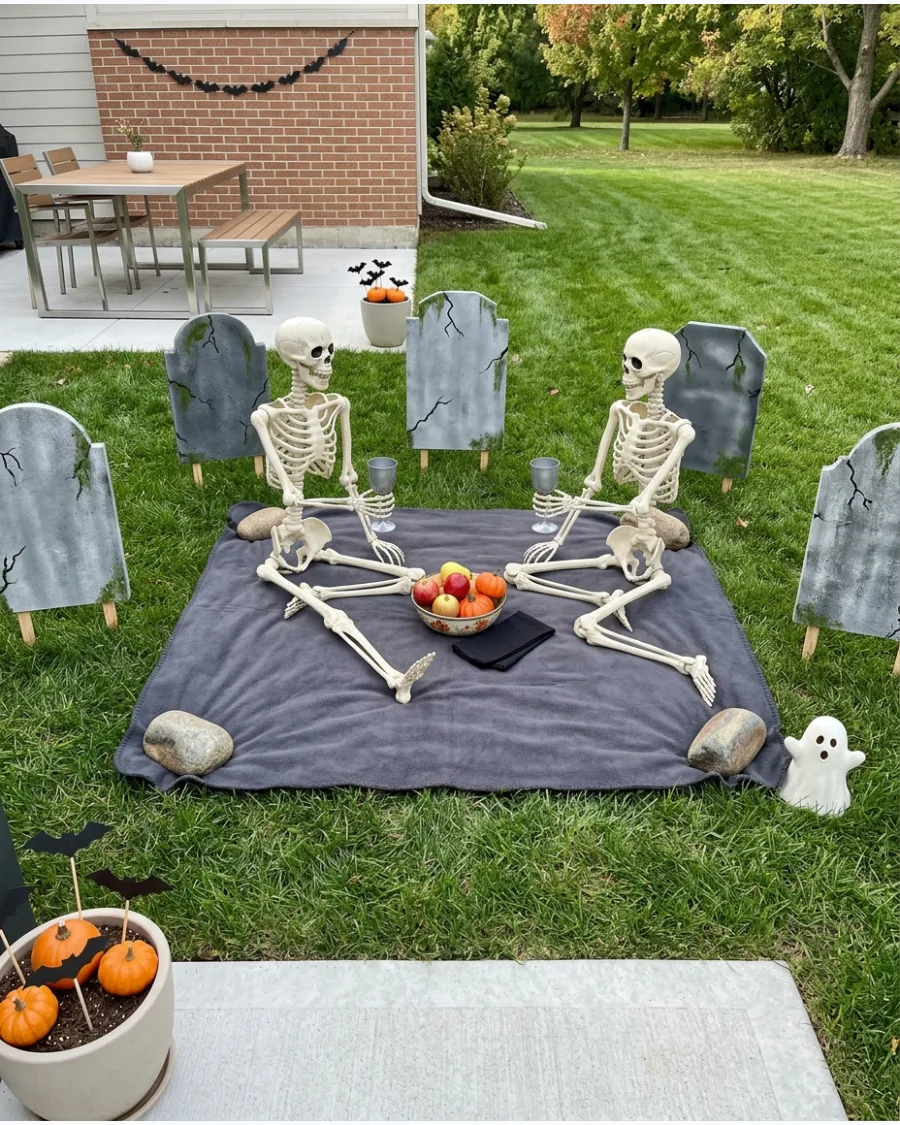
Lay a dark-colored outdoor blanket on the grass and surround it with a few DIY tombstones to define the space.
Place plastic skeletons in seated positions with empty chalices and a bowl of prop fruit. This setup works best when the skeletons are angled toward each other as if in mid-conversation.
Weight the corners of the blanket with heavy stones hidden under the skeletons to keep it from blowing away.
- Sourcing: Thrift a dark-colored sheet or blanket that can handle outdoor dirt.
- Setup: Use garden stakes through the blanket into the soil to prevent bunching.
- Adaptation: Add a plastic tray of 'moldy' bread made from painted foam for extra detail.
Most people skip this: Spray the blanket with a fabric water-proofer so it doesn't get heavy and soggy after a rain.
33. Skeleton Playing Cards
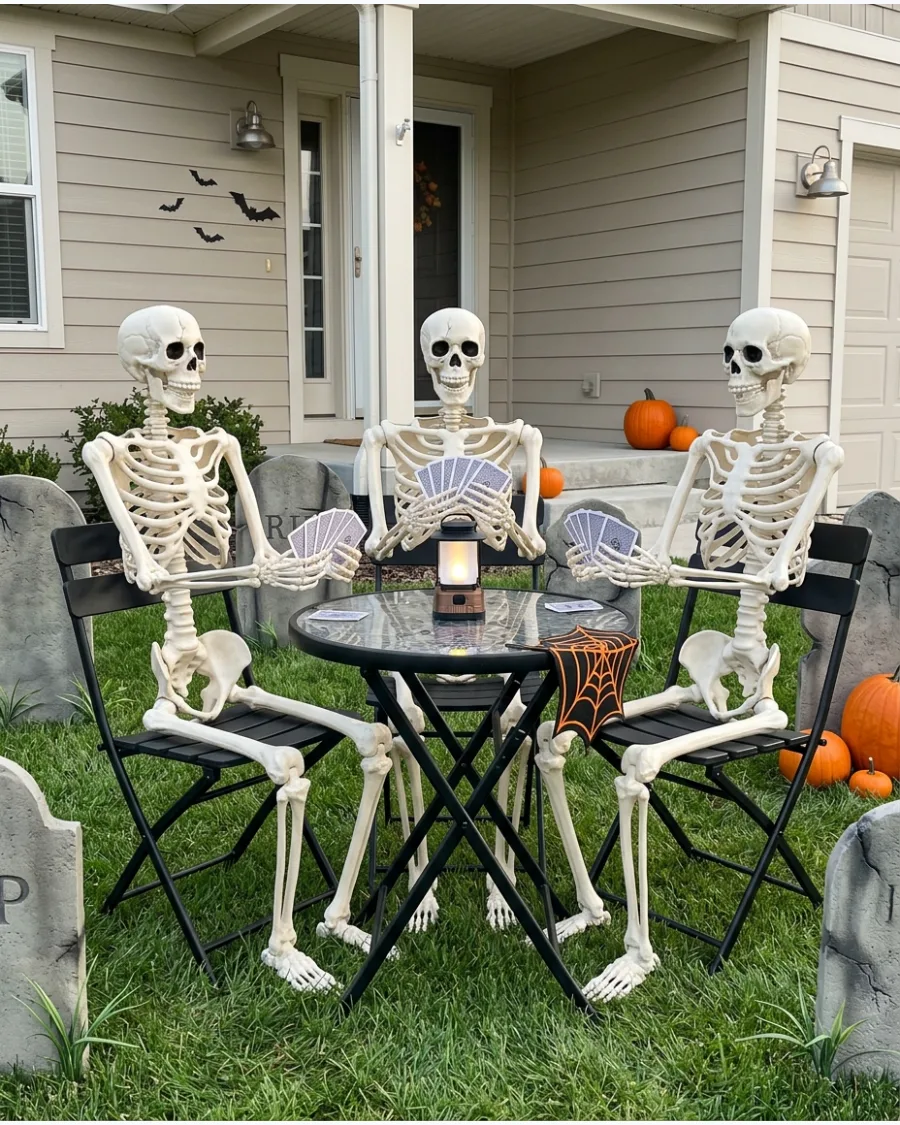
Set up a small folding table and chair set in the middle of a graveyard layout for a darkly humorous touch. Fan out a deck of cards and glue them to the skeletons' bony fingers for a realistic grip.
This scene creates a great focal point that neighbors will want to stop and inspect. Glue the cards to a piece of clear acrylic first, then attach that to the hand to make them look like they are being held loosely.
- Sourcing: Use an old card table or a small patio bistro set.
- Setup: Hot glue the cards to the skeletons' fingers so they stay put in the breeze.
- Adaptation: Place a stack of fake gold coins in the middle of the table to up the stakes.
Best shortcut: Use jumbo playing cards so neighbors can see the 'hand' clearly from the sidewalk.
34. Skeleton Choir
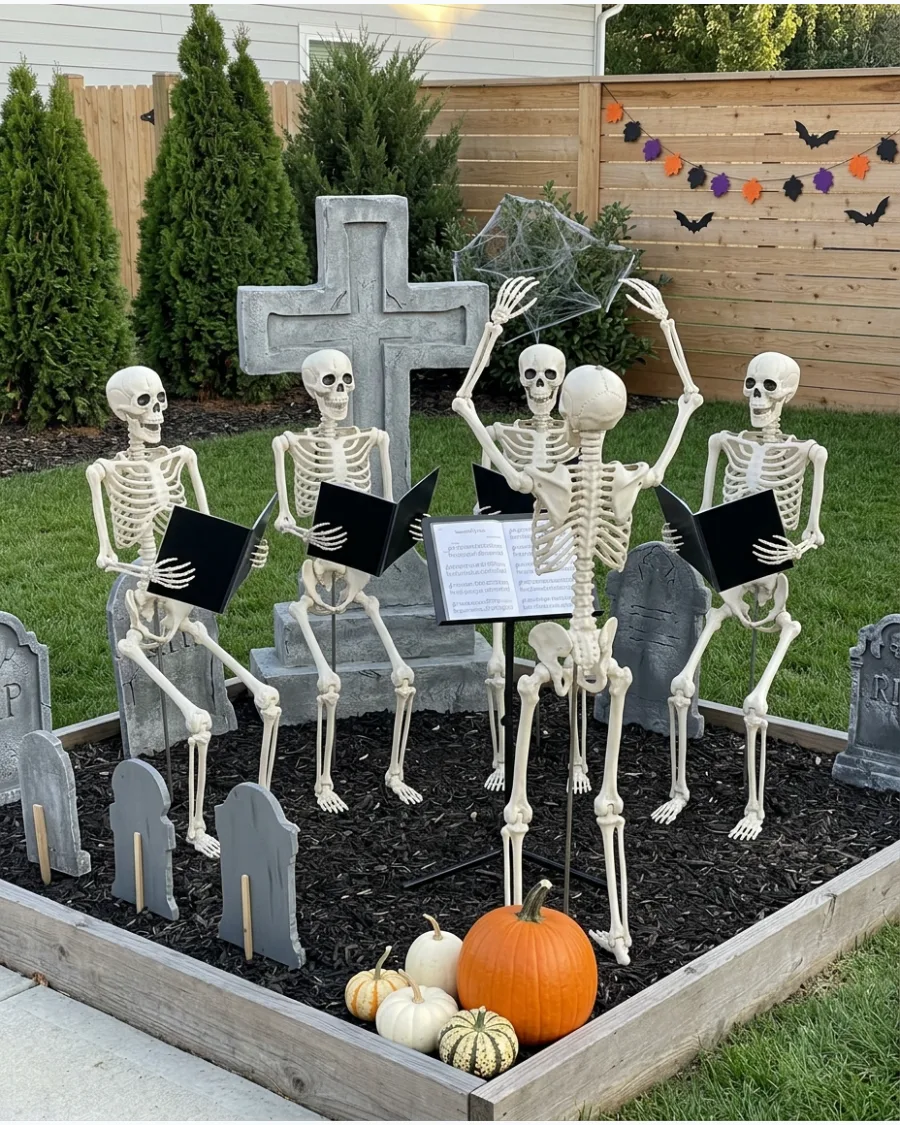
Group three or four skeletons together in a semi-circle facing the street to mimic a musical performance. Give each one a folder or sheet of paper printed with haunted lyrics to complete the look.
Position one skeleton a few feet in front with its arms raised to act as the conductor. Laminate the sheet music so the paper doesn't wilt or tear the first time it gets damp outside.
- Sourcing: Print music sheets on a home printer and use black cardstock for folders.
- Setup: Support the skeletons with rebar stakes driven into the ground behind their spines.
- Style: Drape them in matching black fabric scraps to serve as simple choir robes.
Quick win: Angle the skeletons at slightly different heights to make the group look more organic and less stiff.
35. Skeleton Dog Digging a Grave
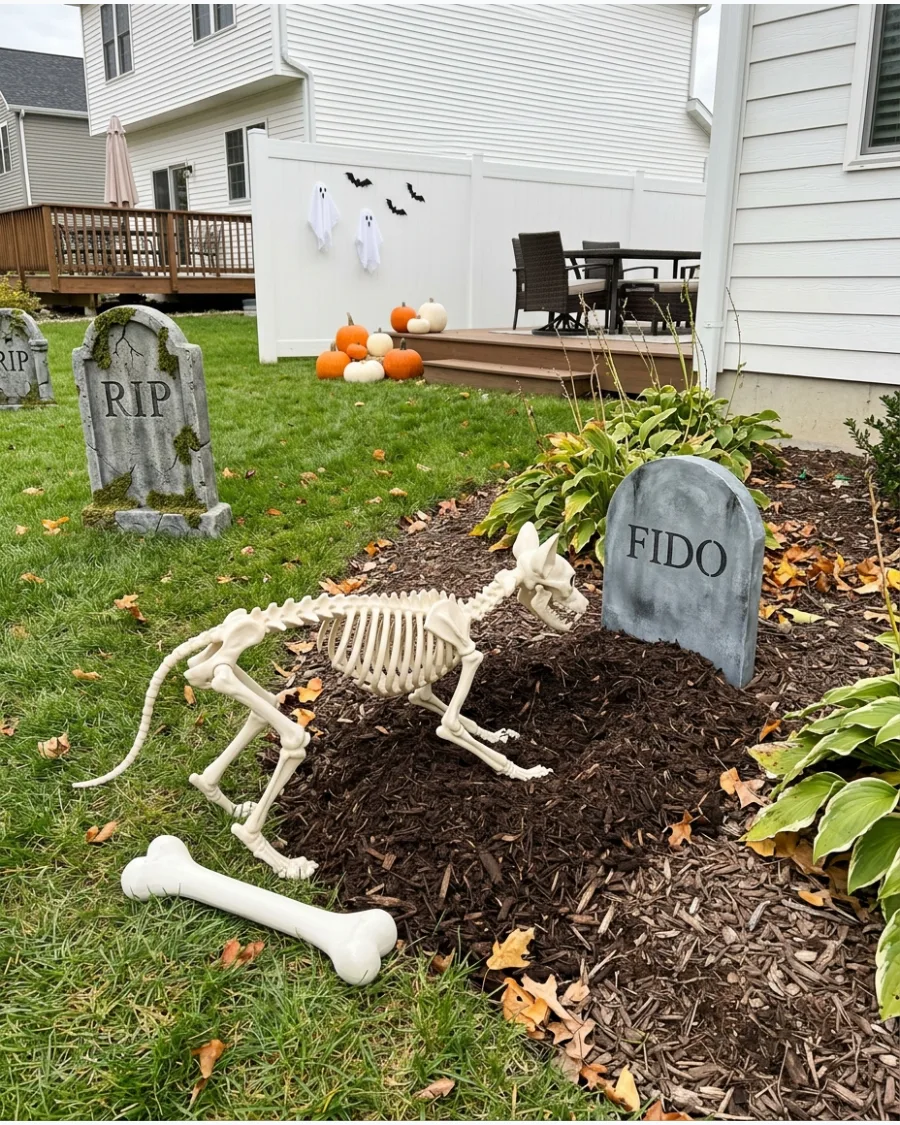
Create a small mound of fresh mulch or potting soil to look like a freshly dug hole in a garden bed. Position a skeleton dog with its front paws in the dirt and a plastic bone nearby to tell a quick visual story.
This is a great way to add character to the lower level of a graveyard display. Place a small tombstone right at the head of the dirt pile to make the scene feel like a miniature pet cemetery.
- Sourcing: Skeleton dogs are widely available at most seasonal Halloween shops.
- Setup: Use a small garden trowel to create a realistic 'dug up' texture in the mulch.
- Adaptation: Add a small DIY wooden sign that says 'Fido' for a personal touch.
Most people skip this: Scatter a few paw prints made from gray spray paint stencils leading up to the mound.
36. Skeleton Photographer
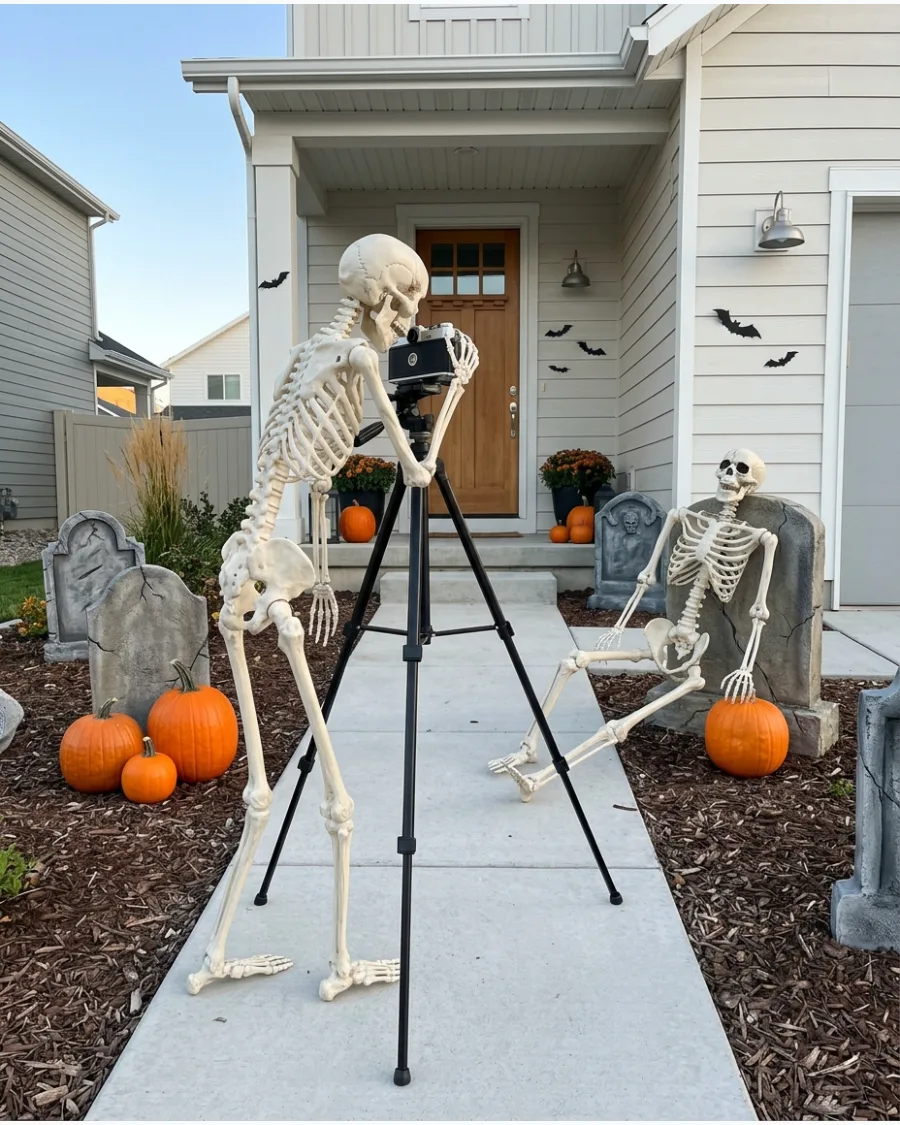
Mount an old, non-working camera onto a tripod and pose a skeleton as if it is looking through the viewfinder. Set another skeleton up against a nearby tombstone in a dramatic model pose to create a scene within a scene.
This setup is highly interactive and usually becomes a favorite for neighborhood photos.
Secure the camera to the tripod with a bolt or heavy-duty adhesive so it doesn't fall off when the wind hits the skeleton.
- Sourcing: Look for broken vintage cameras at thrift stores or garage sales.
- Setup: Weight the tripod legs with sandbags or tent stakes to prevent tipping.
- Adaptation: Wrap a 'press' pass around the photographer's neck for a funny character detail.
Best shortcut: Use a battery-powered clip light on the camera to simulate a flash that stays on at night.
37. Skeleton Wedding Ceremony
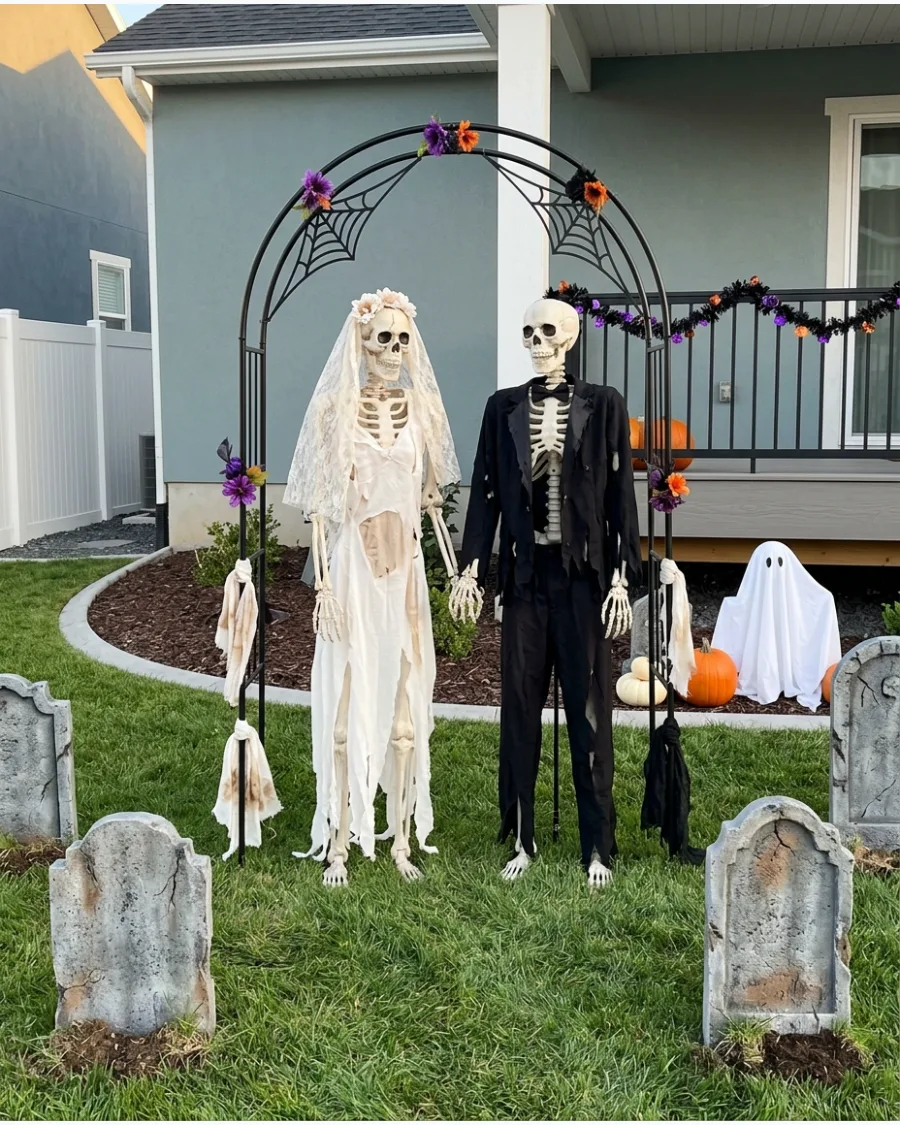
Use a simple garden arch as the centerpiece for a spooky outdoor wedding theme. Dress two skeletons in tattered white and black fabric and place them under the archway to act as the bride and groom.
This large-scale scene fills a yard quickly and provides a clear theme for the rest of the graveyard. Tear the fabric by hand and soak it in tea to give the wedding clothes a weathered, century-old look.
- Sourcing: Use an inexpensive metal garden arch from a hardware store.
- Setup: Anchor the arch firmly with ground stakes so it doesn't lean.
- Adaptation: Place a few skeleton 'guests' on folding chairs or the grass behind the couple.
Quick win: Use black artificial roses for the bouquet to keep the color palette consistent with a graveyard.
38. Coffin Escape Scene
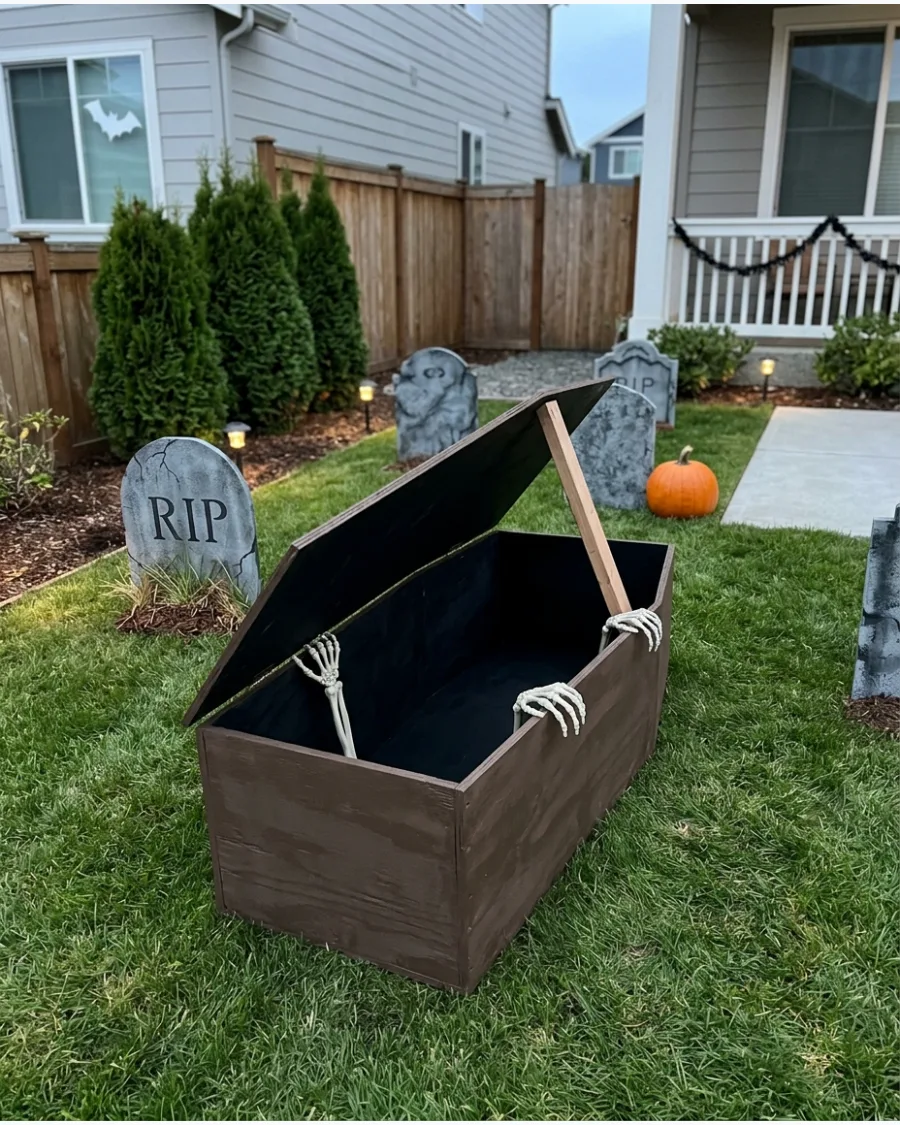
Build a simple toe-pincher coffin out of thin plywood or rigid foam board for a classic graveyard element. Prop the lid open about six inches and have skeletal hands gripping the edges as if someone is climbing out.
This creates a sense of movement and mystery in an otherwise static display. Paint the inside of the coffin matte black to create a sense of deep, endless space behind the hands.
- Sourcing: Use 1/4-inch plywood or insulation foam board for a lightweight build.
- Setup: Place the coffin on a slight angle to make it look like it is emerging from the earth.
- Adaptation: Add a small fog machine inside the coffin for a timed breath effect.
Most people skip this: Scuff the edges of the coffin with sandpaper to make it look like it was recently unearthed.
39. Skeleton Undertaker
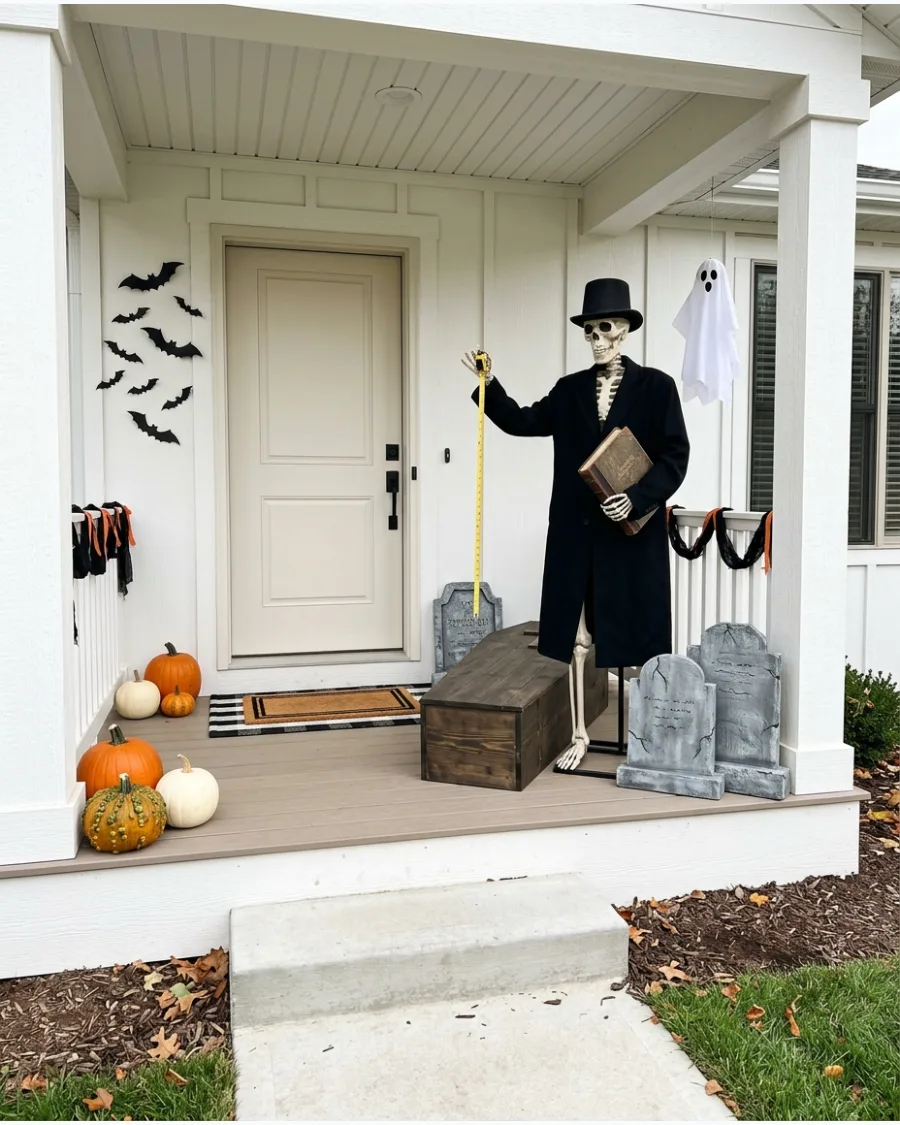
Position a skeleton standing tall next to a coffin or a stack of tombstones to act as the graveyard's keeper. Dress it in a long black coat and a top hat, holding a measuring tape or a large ledger for a darkly humorous touch.
This character helps anchor the scene and provides a sense of scale. Use a stiff wire inside the coat sleeves to give the arms a rigid, authoritative posture.
- Sourcing: Use an old trench coat or a cheap costume cape for the outfit.
- Setup: Secure the top hat to the skull with a small dab of hot glue or museum wax.
- Adaptation: Hang a 'Services Rendered' sign from the undertaker's hand.
Best shortcut: Use a retractable metal measuring tape and pull it out a few inches so it catches the light.
40. Skeleton Reading in the Graveyard
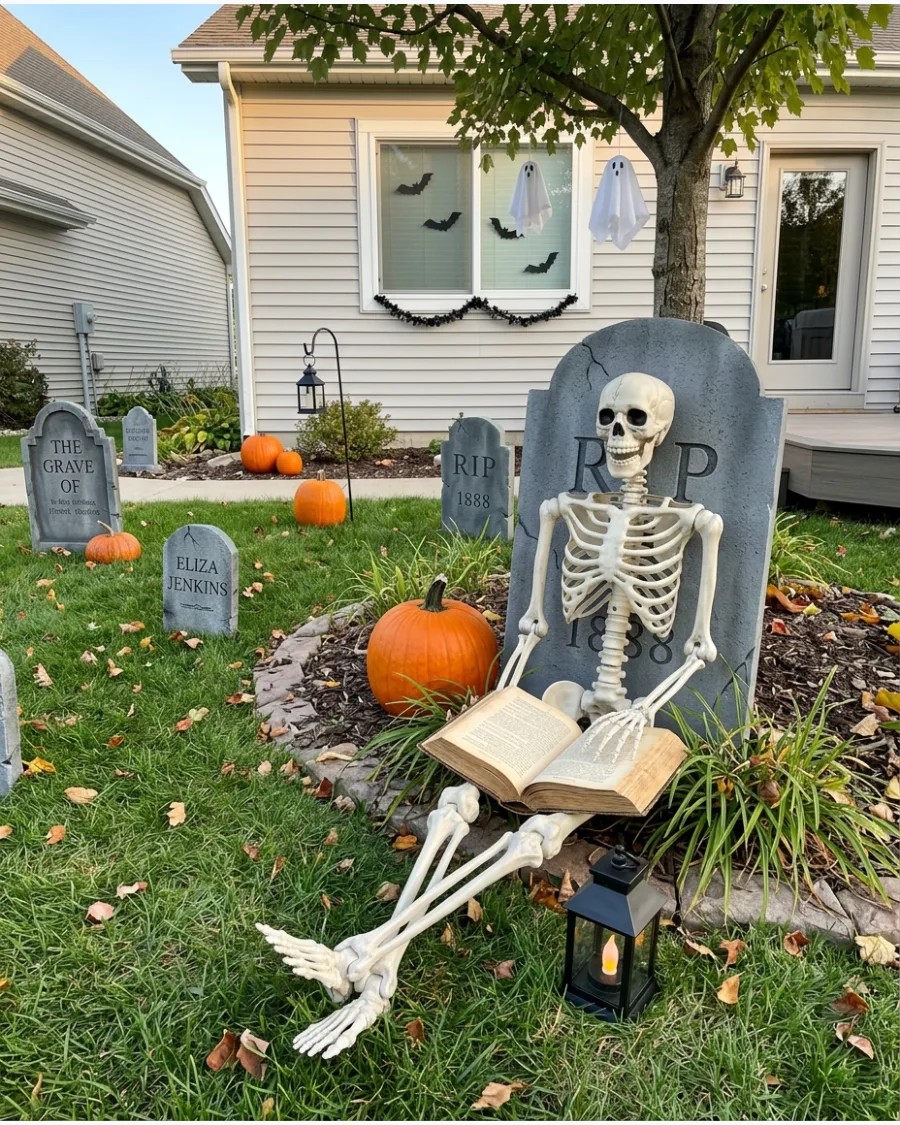
Lean a skeleton against a large, flat-backed tombstone in a relaxed sitting position for a more casual cemetery vibe. Place an old, thick book in its lap and rest its bony fingers on the pages to suggest a quiet moment.
This is a low-effort way to add personality to a corner of the yard. Spray the book pages with a clear matte sealer to prevent the paper from curling or rotting in the morning dew.
- Sourcing: Use an old hardcover book from a library sale or thrift shop.
- Setup: Cross the skeleton's legs to create a more casual, lifelike reading pose.
- Adaptation: Add a pair of wire-rimmed glasses to the skull for a scholarly look.
Quick win: Glue the book pages open to a specific scary story page so they do not flip in the wind.
Haunted Graveyard Lighting Ideas
41. Blue and Green Graveyard Spotlights
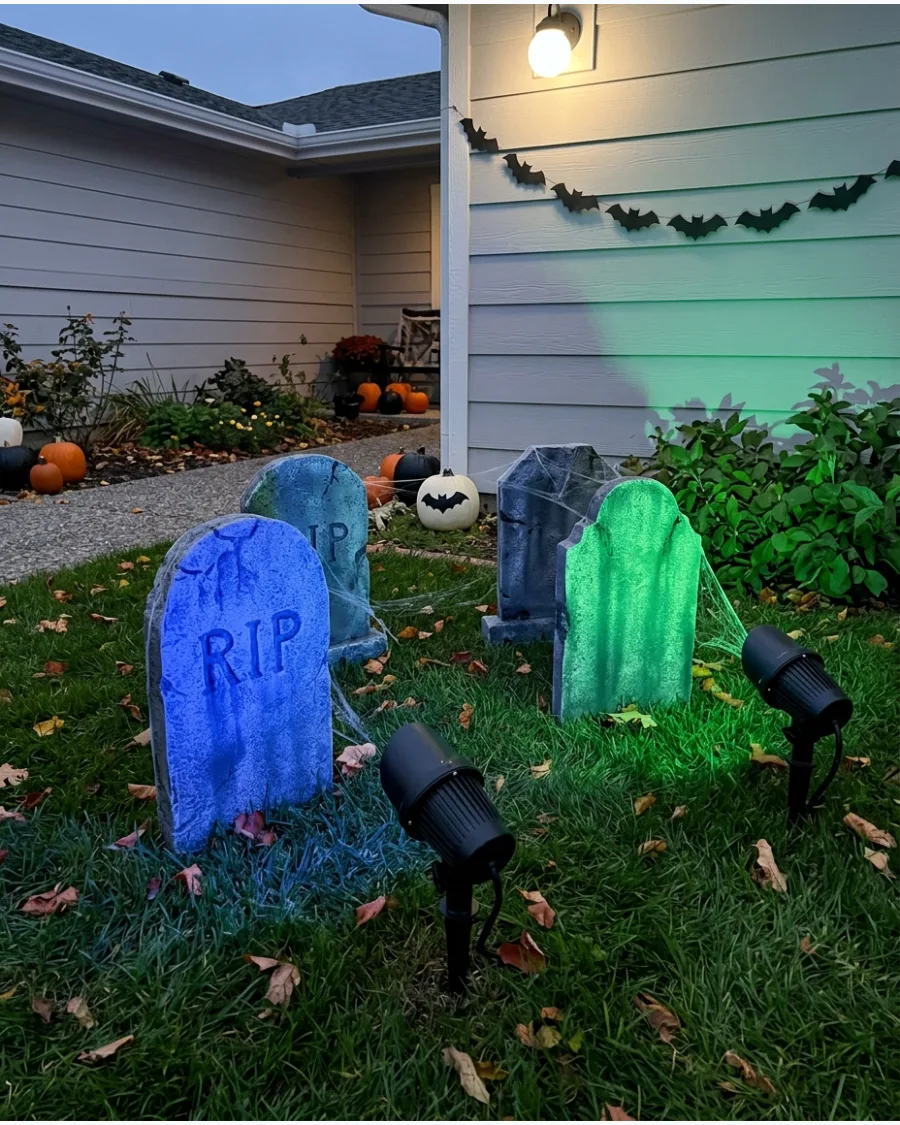
Use outdoor spotlights in cool tones like blue and green to wash over the cemetery display. Positioning the lights low to the ground creates dramatic, long shadows that make even small tombstones look imposing.
Aim the beams at an upward angle to highlight the texture of the foam or wood markers. Using two different colors adds depth and prevents the yard from looking flat.
- Buy LED stake lights at hardware stores for under $20.
- Space them four feet apart to prevent the colors from muddying together.
- Use waterproof outdoor extension cords tucked under the grass line for safety.
Quick win: Cross the beams of two different colors to create a custom teal hue where they overlap.
42. Flickering Cemetery Lanterns
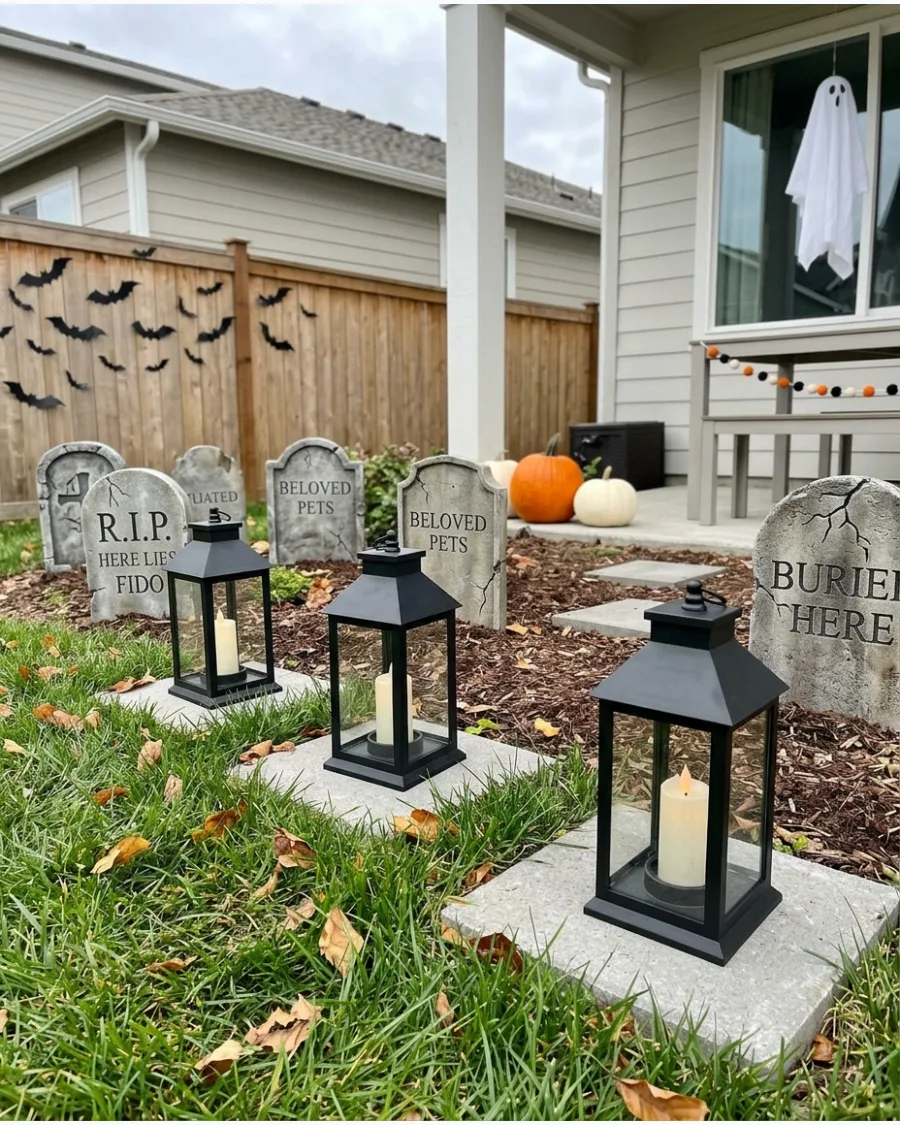
Line the path to the graveyard or space them between headstones using battery-operated lanterns. Choose models with a flickering effect to mimic the look of old-fashioned candlelight without the fire risk.
Set the lanterns on flat stones or pavers to keep them level and prevent them from tipping in the grass. This adds a layer of movement to an otherwise static display.
- Look for lanterns with built-in timers to save battery life.
- Place them along the main walkway to guide guests safely through the display.
- Choose warm white bulbs rather than bright white for a more realistic vintage glow.
Most people skip this: Rub a little gray acrylic paint on the lantern edges to make them look like weathered iron.
43. Glowing Grave Mounds
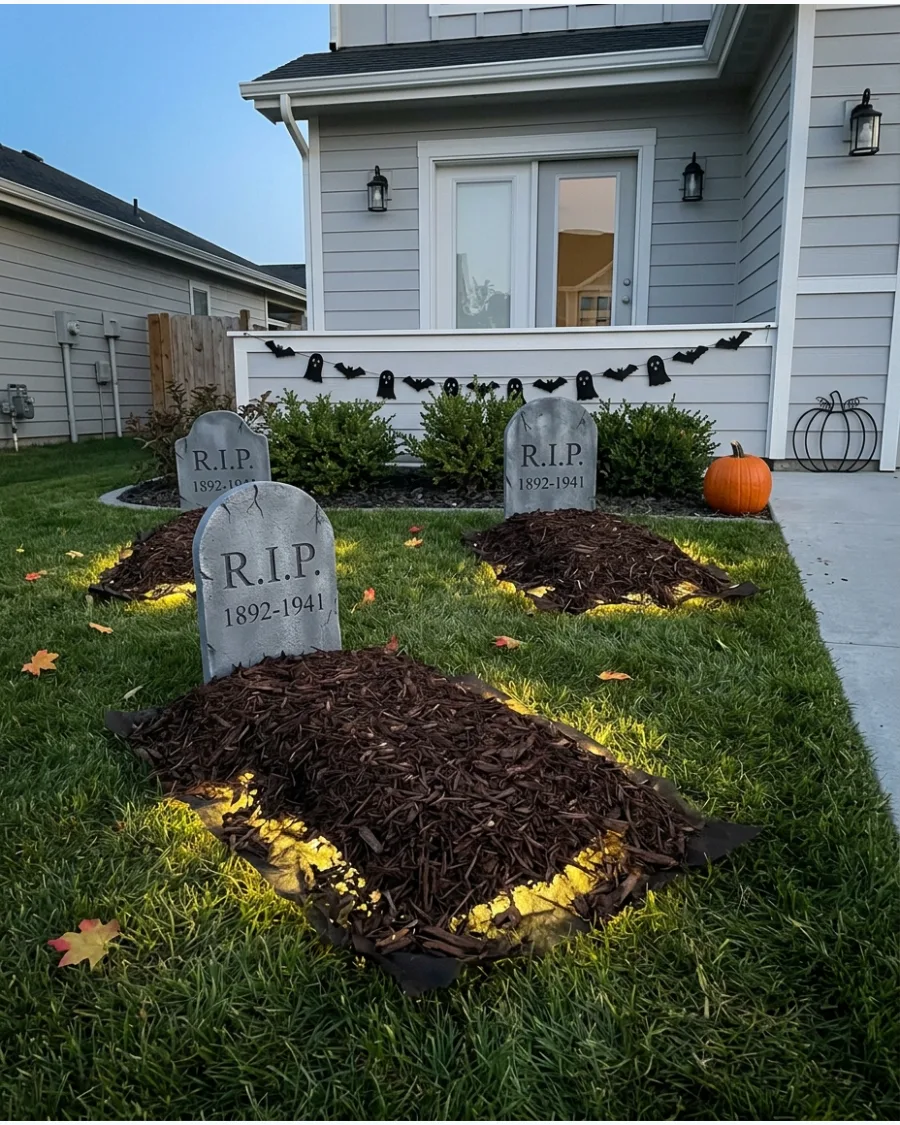
Create the illusion of something supernatural rising by hiding lights under the surface of the grave. Use landscape fabric or loose moss over a waterproof LED puck light to diffuse the glow.
Keep the mound low and wide so it looks like a natural disturbance in the soil. The soft light filter makes the graveyard feel active and eerie.
- Use battery-operated puck lights with remotes for easy control.
- Layer the covering material thinly enough for light to pass through but thick enough to hide the bulb.
- Secure the edges of the mulch or moss with landscape staples to prevent wind scatter.
Best shortcut: Use a translucent plastic bowl upside down over the light before adding mulch to keep the bulb clean and dry.
44. Purple Cemetery Fence Lights
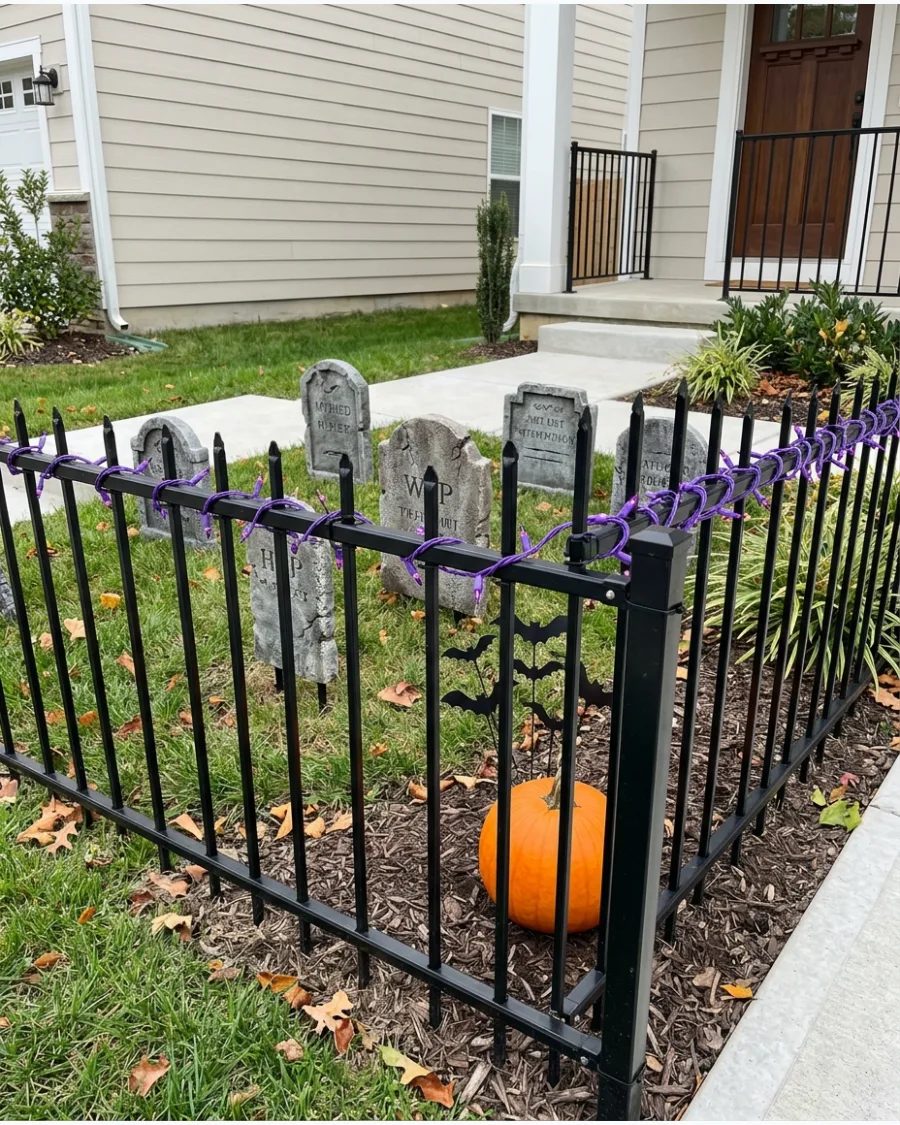
Define the boundaries of the burial ground by wrapping purple string lights along the top rail of a black fence. The purple hue provides a theatrical contrast to the gray tombstones while helping visitors see the perimeter in the dark.
Fasten the wires with black zip ties so the attachment points disappear against the fence posts. This creates a clean, professional look that frames the entire scene.
- Use LED string lights to prevent heat buildup and reduce energy use.
- Match the wire color to the fence color—usually black—to hide the cord.
- Connect multiple strands to a single outdoor-rated timer for automated lighting.
Quick win: Drape a few strands of faux spiderwebs over the lights to diffuse the purple glow even further.
45. Backlit Tombstone Silhouettes
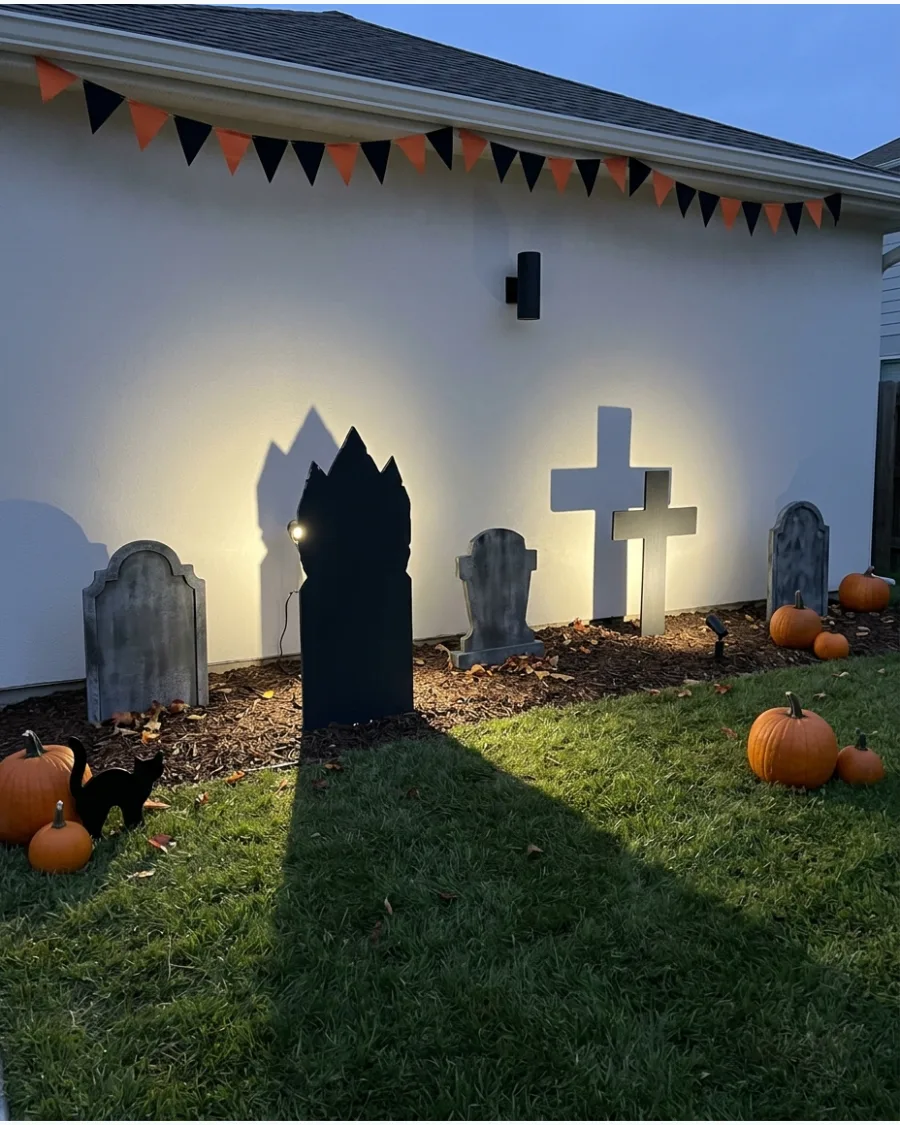
Instead of lighting the front of a tombstone, place a small spotlight directly behind it.
This creates a sharp silhouette against the grass or a wall and casts a long shadow toward the viewer. Use this technique on tombstones with unique shapes, like crosses or jagged peaks, to maximize the visual impact. It adds mystery by keeping the face of the stone in total darkness.
- Position the light source low enough that the bulb itself is hidden by the tombstone.
- Use high-lumen LED stakes for a crisp, sharp shadow edge.
- This works best in areas with minimal ambient street lighting.
Most people skip this: Angle the light slightly upward to catch any fog or mist hovering near the ground.
46. Red Haunted Mausoleum Light
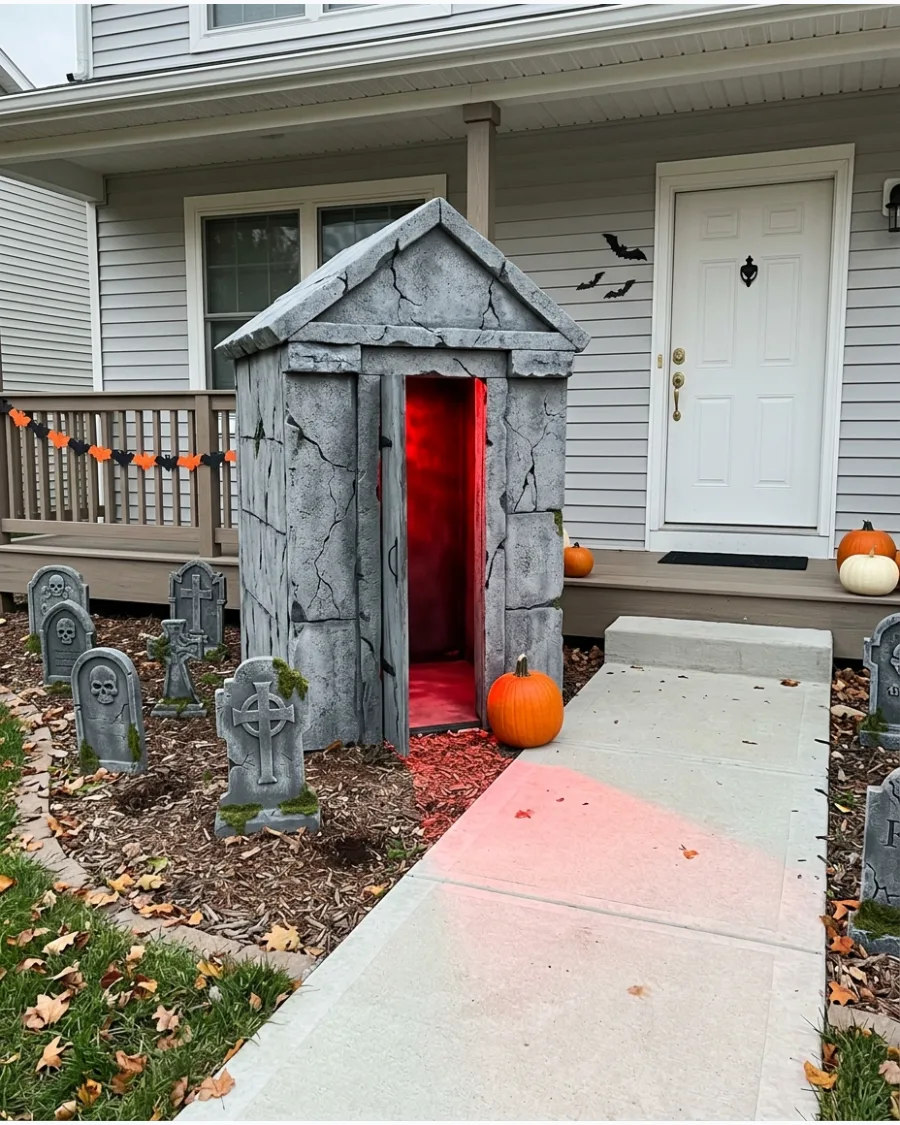
Give a DIY crypt or mausoleum an ominous feel by placing a red light inside the structure.
The red glow should spill out from the cracks, windows, or the main doorway to suggest something is happening inside. Use a low-wattage bulb to keep the glow subtle rather than overwhelming the rest of the graveyard. It serves as a perfect focal point for the center of the display.
- Use a plug-in red floodlight bulb for the most intense color saturation.
- Ensure the light fixture is rated for outdoor use if the mausoleum isn't fully waterproof.
- Place the mausoleum near the house to easily reach an outdoor outlet.
Best shortcut: Line the interior walls with aluminum foil to bounce the red light and make the glow look fuller.
47. Solar Graveyard Candles
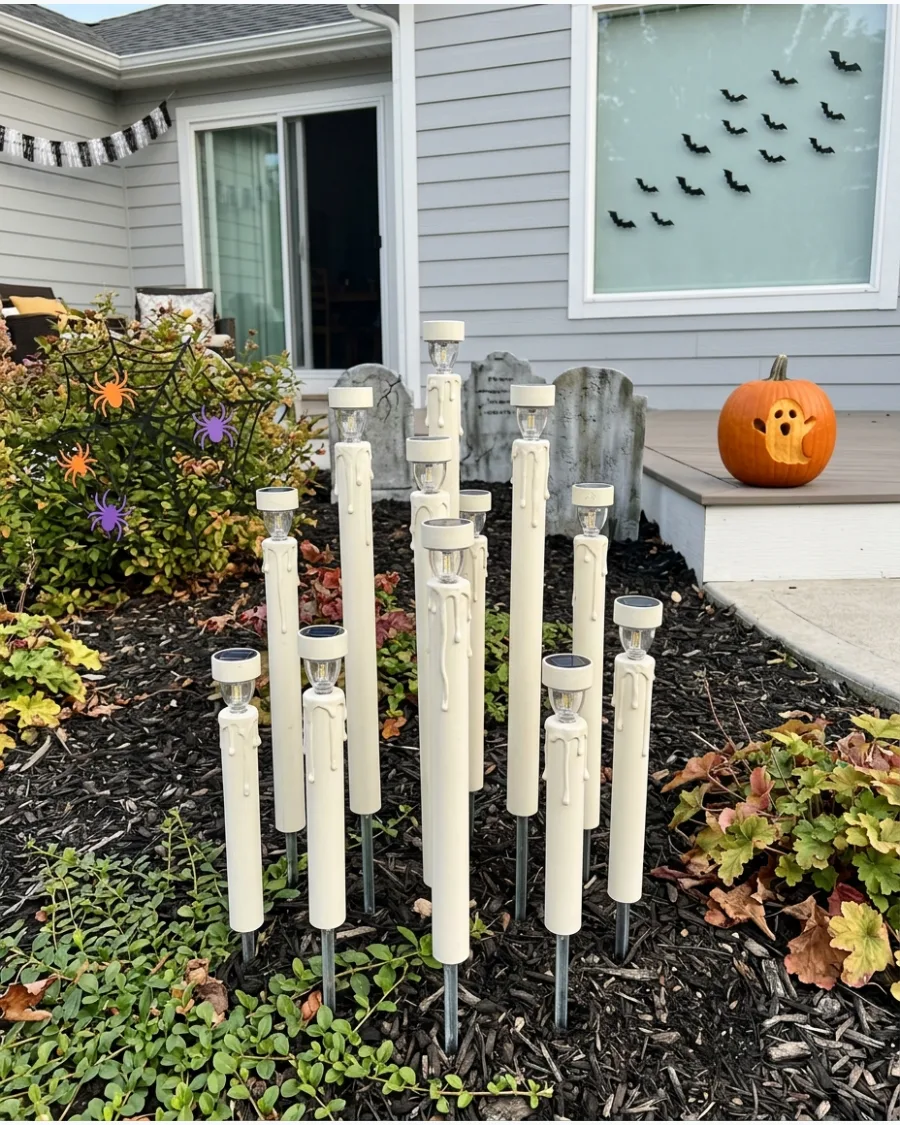
Turn standard solar garden lights into candles using plastic tubing. Slide the tube over the light stake and use hot glue to create wax drips down the side before painting it off-white.
Push the stakes deep into the ground so the candles stand at different heights for a realistic look. These will automatically turn on at dusk and require zero battery changes.
- Use 1-inch diameter PVC pipe for a standard candle size.
- Paint the tubes with a matte cream spray paint to mimic old wax.
- Choose warm white solar lights to get a yellow candle-like glow instead of blue.
Quick win: Use a hair dryer to soften the hot glue drips if they look too uniform or rounded.
48. Glowing Cemetery Cross
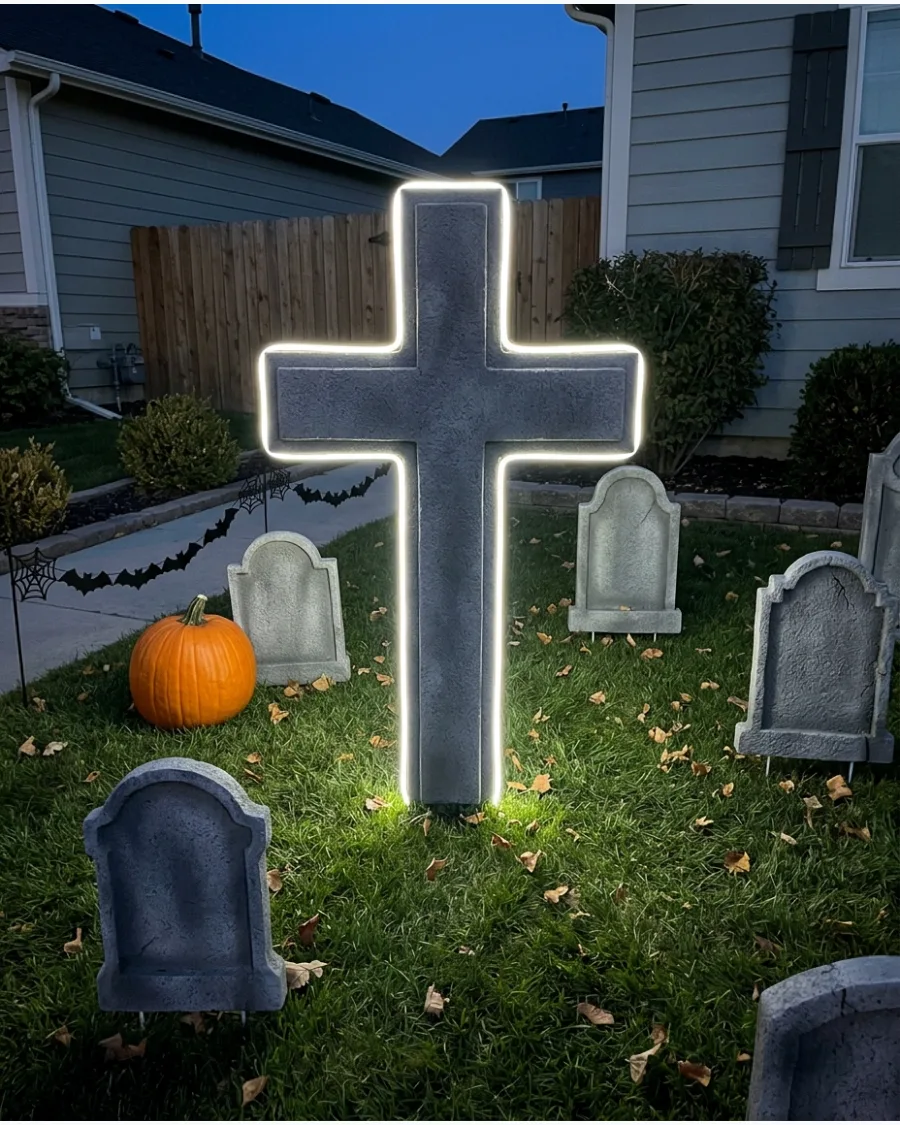
Make a large cross stand out as a centerpiece by outlining the back edge with LED tape or rope lights. This creates a halo effect that makes the cross appear to float in the darkness.
Secure the light strip to the back of the cross with adhesive clips to keep the light source invisible from the front. It provides a clean, modern look that contrasts well with textured foam stones.
- Use waterproof LED light strips with an adhesive backing for quick installation.
- Choose a battery-powered strip if the cross is located far from the house.
- Position the cross at the highest point of the yard for maximum visibility.
Most people skip this: Use a cool-white LED color to make the gray stone of the cross look more like real granite.
Halloween Decor
49. Recessed Glowing Tombstone Eyes
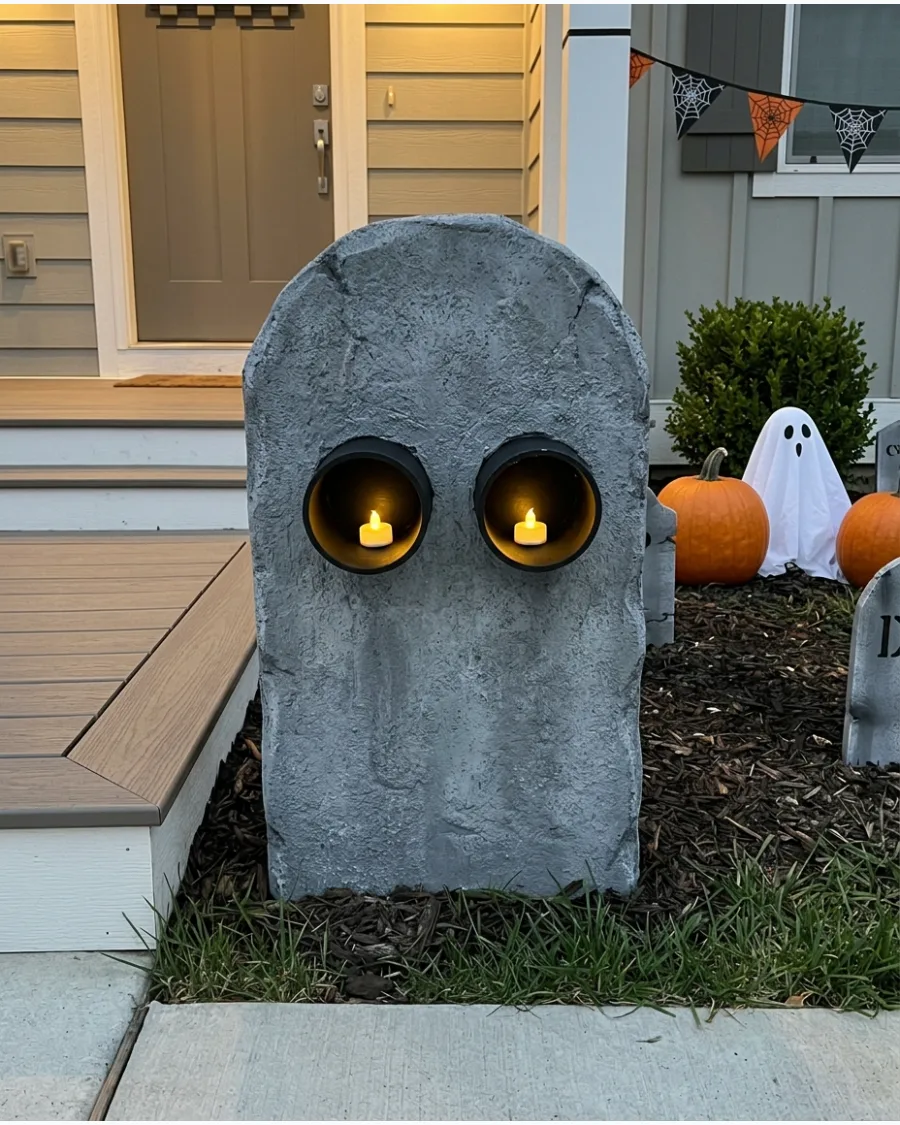
Adding depth to graveyard silhouettes creates a hauntingly realistic effect that catches the light from different angles. Insert short sections of PVC pipe into foam headstones to create deep sockets for battery-operated flickering lights. This method hides the light source from the side, ensuring the glow only reveals itself when viewers are directly in front of the display.
Painting the inside of the tubes matte black prevents unwanted internal reflections.
- Sourcing: Use scrap PVC pipe and standard battery-operated LED tea lights for a low-cost upgrade.
- Setup: Use a hole saw bit to cut perfectly round openings that match the diameter of the pipe inserts.
- Adaptation: Swap warm yellow lights for eerie purple or green LEDs to match a specific color theme.
Quick win: Seal the back of the PVC tubes with dark duct tape to prevent light from leaking out the rear of the headstone.
Haunted Graveyard Lighting Ideas
50. Moonlit Graveyard Effect
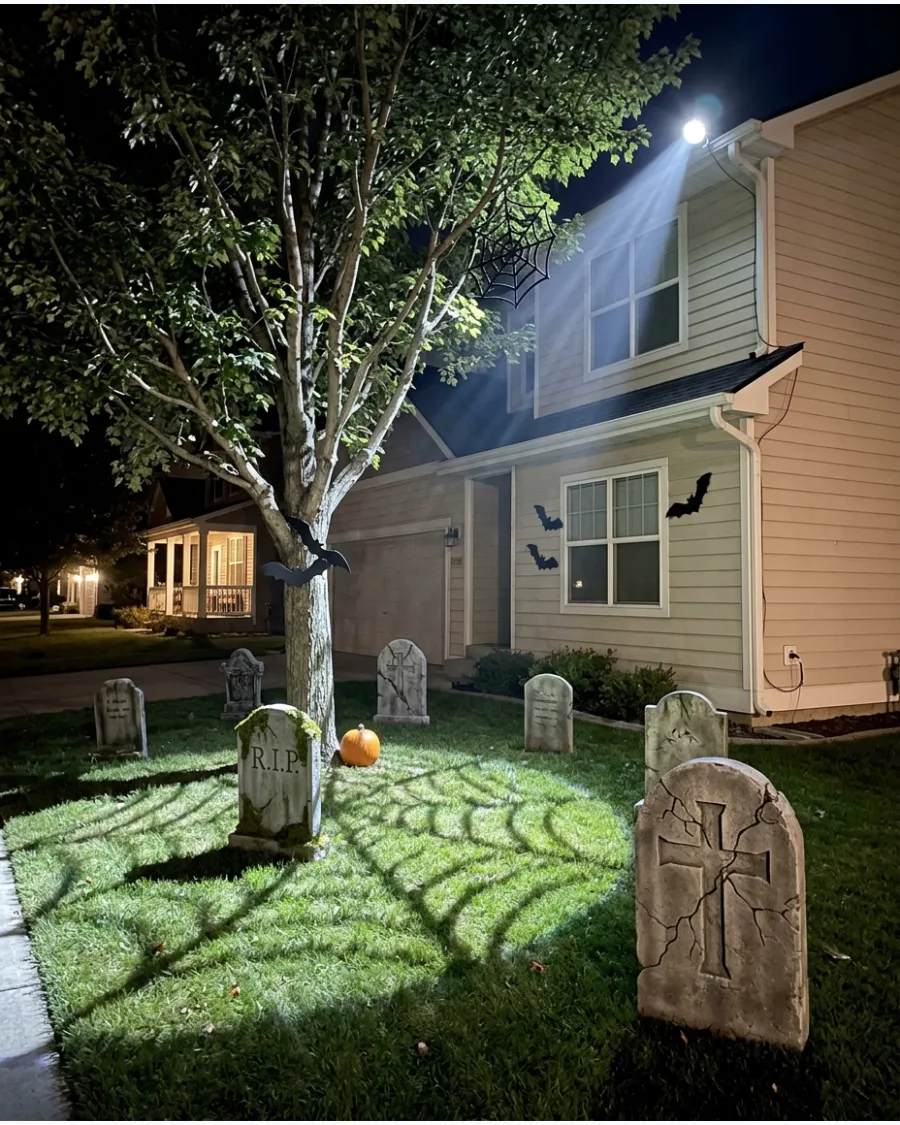
Mimic the look of a full moon by placing a cool white spotlight high up in a tree or on a second-story gutter. Aim the light downward through tree branches to cast natural, spindly shadows across the graveyard.
Ensure the light is angled at 45 degrees to avoid a theatrical look and make the moonlight feel realistic. This wash of light ties the entire graveyard together.
- Use a high-power outdoor floodlight with at least 1000 lumens for a strong moon effect.
- Secure the light with a sturdy clamp or mount that won't slip in the wind.
- Choose a 5000K color temperature bulb to get that crisp blue-white moon tone.
Quick win: If you don't have a tree, mount the light on a tall painter's pole hidden behind a corner of the house.
Home Decor
51. Low-Lying Graveyard Fog Chiller
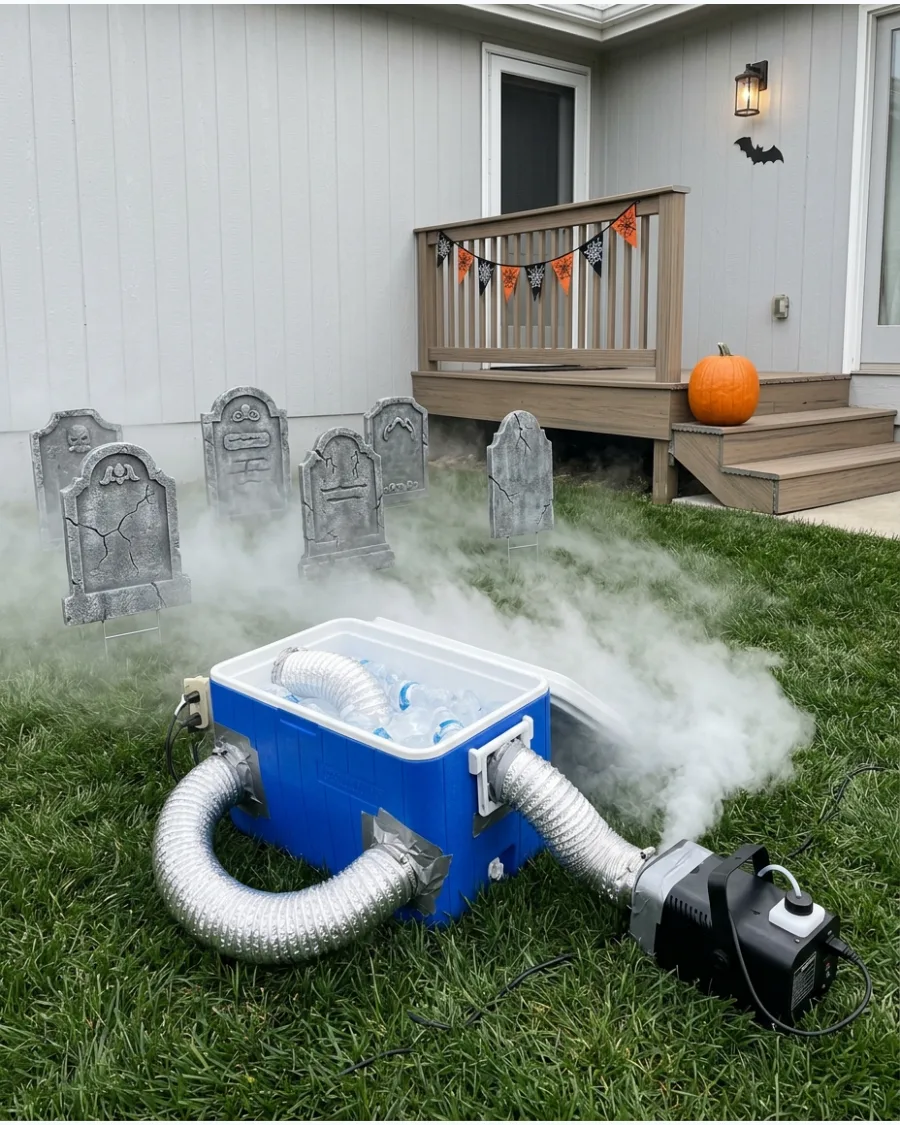
Creating a heavy, rolling mist requires cooling the fog before it hits the air to keep it hugging the grass. Build a simple fog chiller by routing a standard fog machine hose through a cooler filled with ice and coiled dryer vent tubing. This temperature difference prevents the mist from rising and disappearing, ensuring a dense, spooky atmosphere for any yard cemetery.
It is generally more effective to use frozen water bottles instead of loose ice to prevent the machine components from getting damp or messy.
- Purchase a 400-watt fog machine and flexible 4-inch dryer ducting during early October sales for under fifty dollars.
- Connect the fog output to the tubing inside a plastic cooler, surrounding the coils with ice packs for maximum cooling efficiency.
- Position the exit nozzle flush with the ground to ensure the mist flows outward across the lawn rather than upward into the air.
Quick win: Add a small amount of earthy-scented fog fluid to the reservoir to enhance the sensory experience of a damp, ancient graveyard.
Fog, Ghost and Special-Effect Ideas
52. Fog Emerging From a Grave
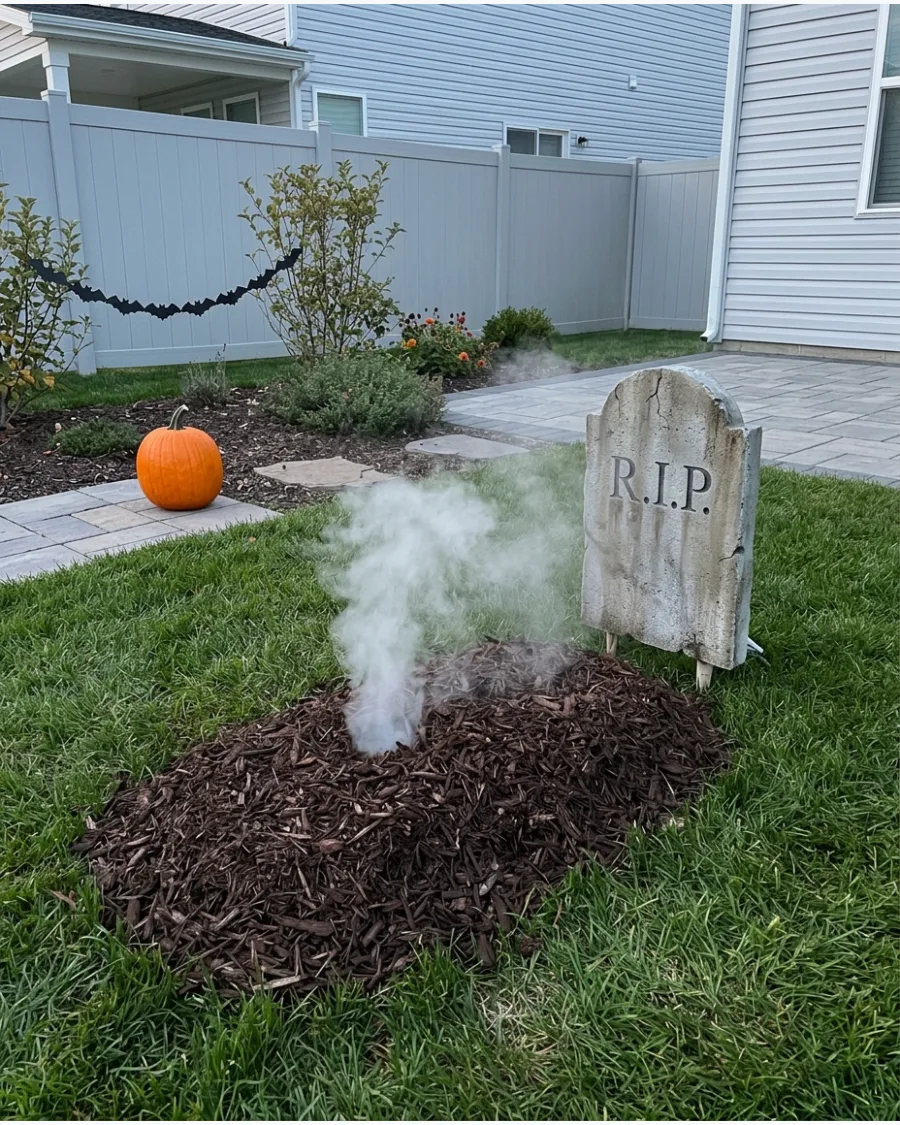
Creating a localized fog effect makes it look like something is stirring beneath the earth. By hiding the output inside a grave mound, the fog seeps out naturally rather than blowing across the yard.
Conceal the fog machine hose inside a pile of dark brown mulch to make the vapor look like it is seeping out of the earth. This focused effect is much scarier than a general fog machine because it tells a specific story.
- Flexible dryer vent tubing to extend the fog reach
- Position the outlet at the highest point of the mound for a chimney effect
- Use a remote-controlled fog machine to trigger the effect as guests walk by
Quick win: Place a small piece of chicken wire inside the mulch mound to keep the fog outlet from getting clogged with dirt or debris.
53. Floating Cheesecloth Cemetery Ghost
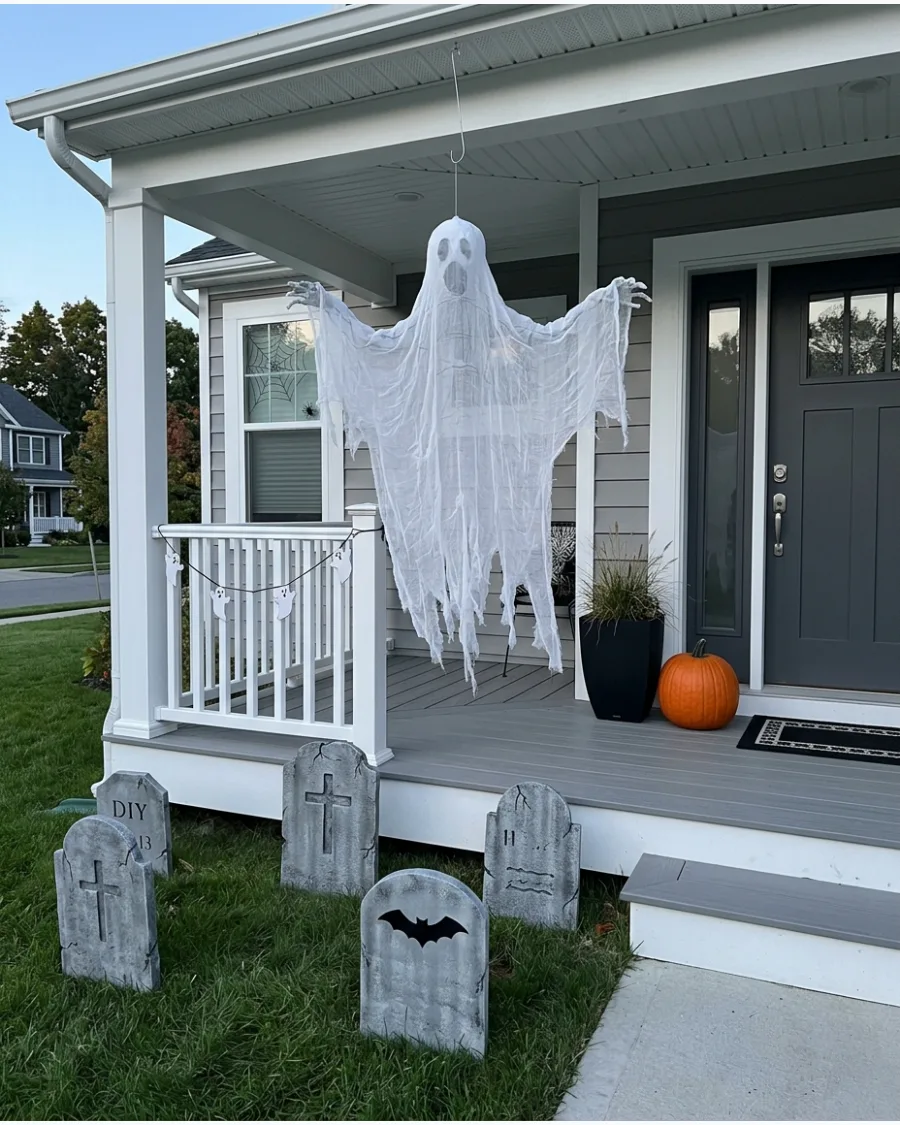
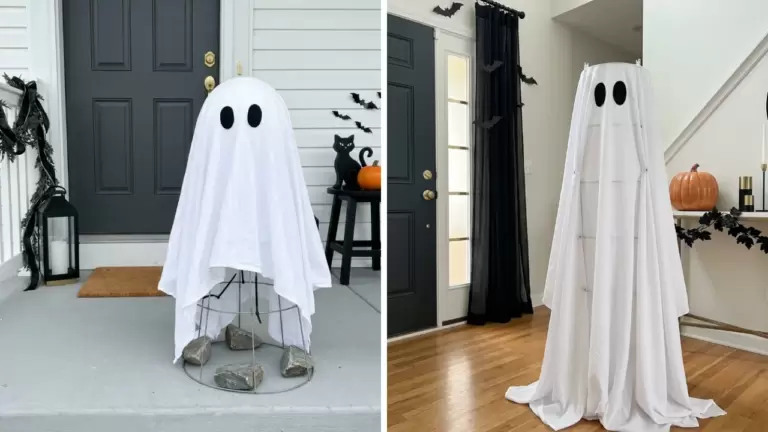
Cheesecloth is a classic material because it is lightweight enough to catch the slightest breeze. Suspending these figures above the graves creates a sense of movement in an otherwise static display.
Stiffen the cheesecloth with a mixture of white glue and water so the ghost maintains its shape even when the wind dies down. Cheesecloth is the best material for ghosts because it catches the light perfectly while staying translucent.
- Foam head form and 2-3 layers of cheesecloth
- Heavy-duty fishing line for hanging
- Position ghosts at least six feet above the ground
Best shortcut: Use a spray bottle of grey tea or watered-down black paint to stain the edges of the cloth for a more ancient look.
54. Ghost Behind a Tombstone
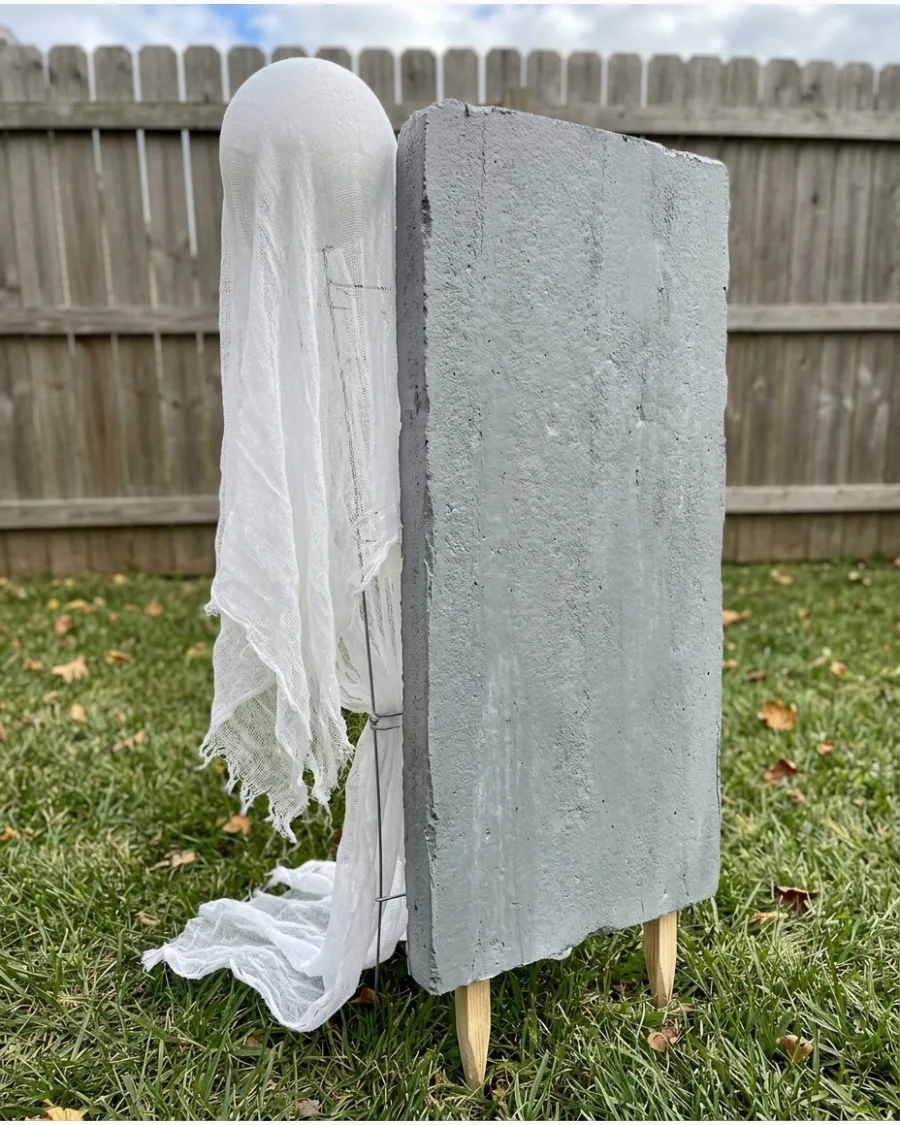
A ghost that is partially hidden feels more like a real sighting than one standing in the open. Tucking a figure behind a tall marker adds a layer of depth to the yard.
Set a small LED spotlight directly behind the figure to create a glowing halo effect that makes the ghost pop against the dark yard. Hiding half the figure makes the display feel more realistic and less like a store-bought decoration.
- PVC pipe frame to hold the fabric upright
- Pale blue or cool white LED spotlight
- Secure the base with a garden stake to prevent tipping
Most people skip this: Angle the light so it hits the ghost but doesn't shine directly into the eyes of people walking on the sidewalk.
55. Cemetery Tree Spirits
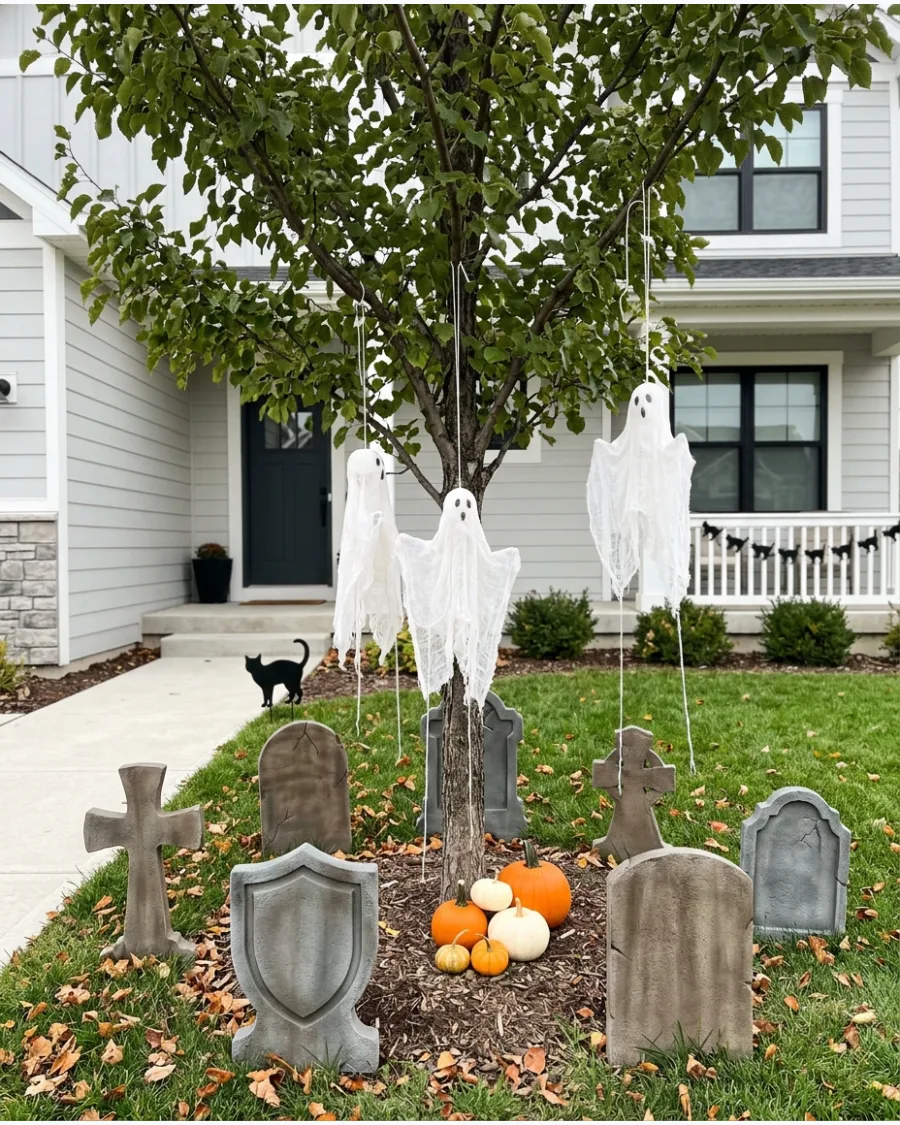
Do not forget to use the vertical space provided by your trees to expand the graveyard atmosphere. Hanging smaller spirits from branches creates a layered look that draws the eye upward.
Vary the lengths of the hanging lines to make the ghosts appear at different heights throughout the tree canopy. Using the vertical space in your yard makes the graveyard feel much larger and more immersive.
- White mesh fabric and black fabric markers for eyes
- Clear fishing line or thin wire
- Mix sizes to create a sense of perspective
Quick win: Tuck a small battery-operated tea light inside the head of each ghost to make them glow softly at night.
56. Hidden Cemetery Sound Effects
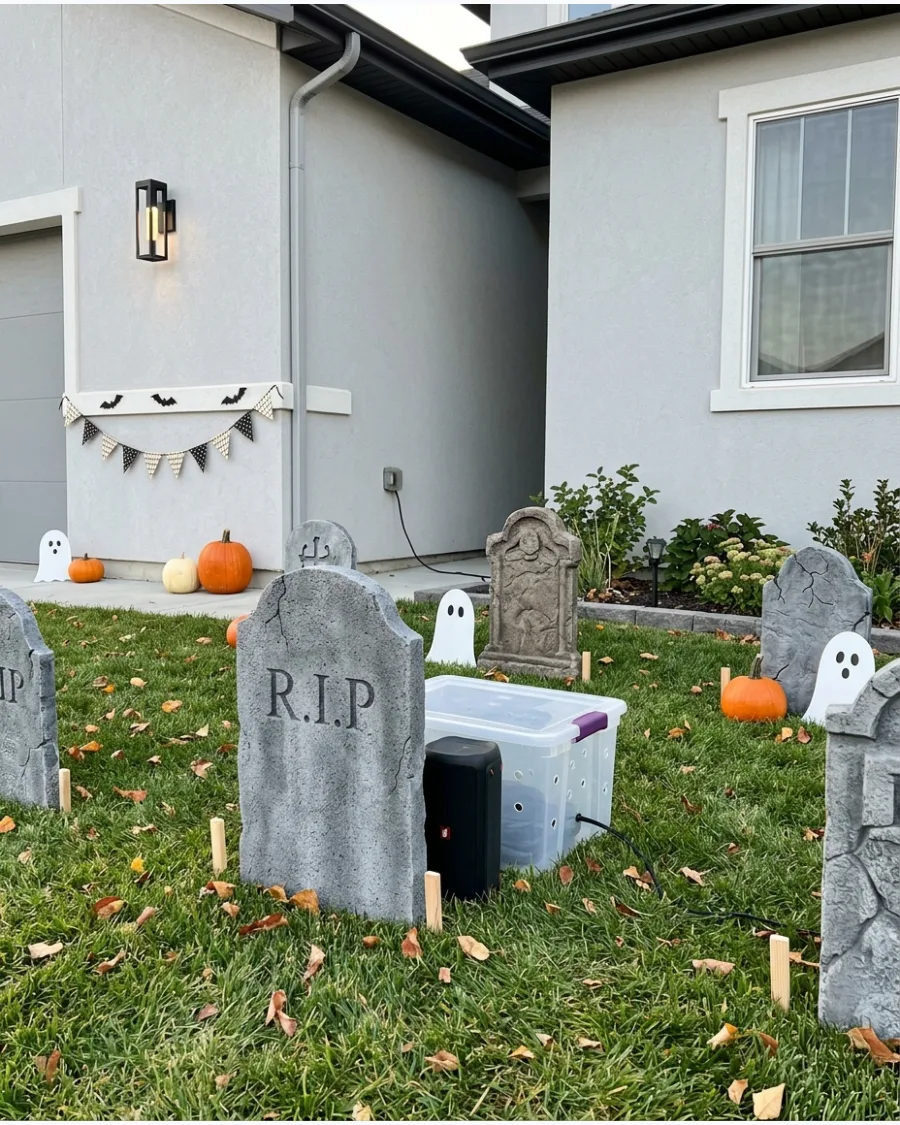
Sound is often the missing element in a DIY graveyard that keeps it from feeling professional.
A looping track of wind or distant bells can be hidden easily among the props.
Place the speaker inside a plastic storage bin with holes drilled in the side to protect it from moisture while letting the sound out. Low volume is key because sound should feel like it is happening in the distance, not coming from a box.
- Waterproof Bluetooth speaker
- Spooky ambiance audio track on a loop
- Hide the speaker in a corner where guests cannot see the wires
Best shortcut: Use a dedicated spooky ambiance playlist on a loop so you do not have to manage the audio throughout the evening.
57. Moving Graveyard Crow
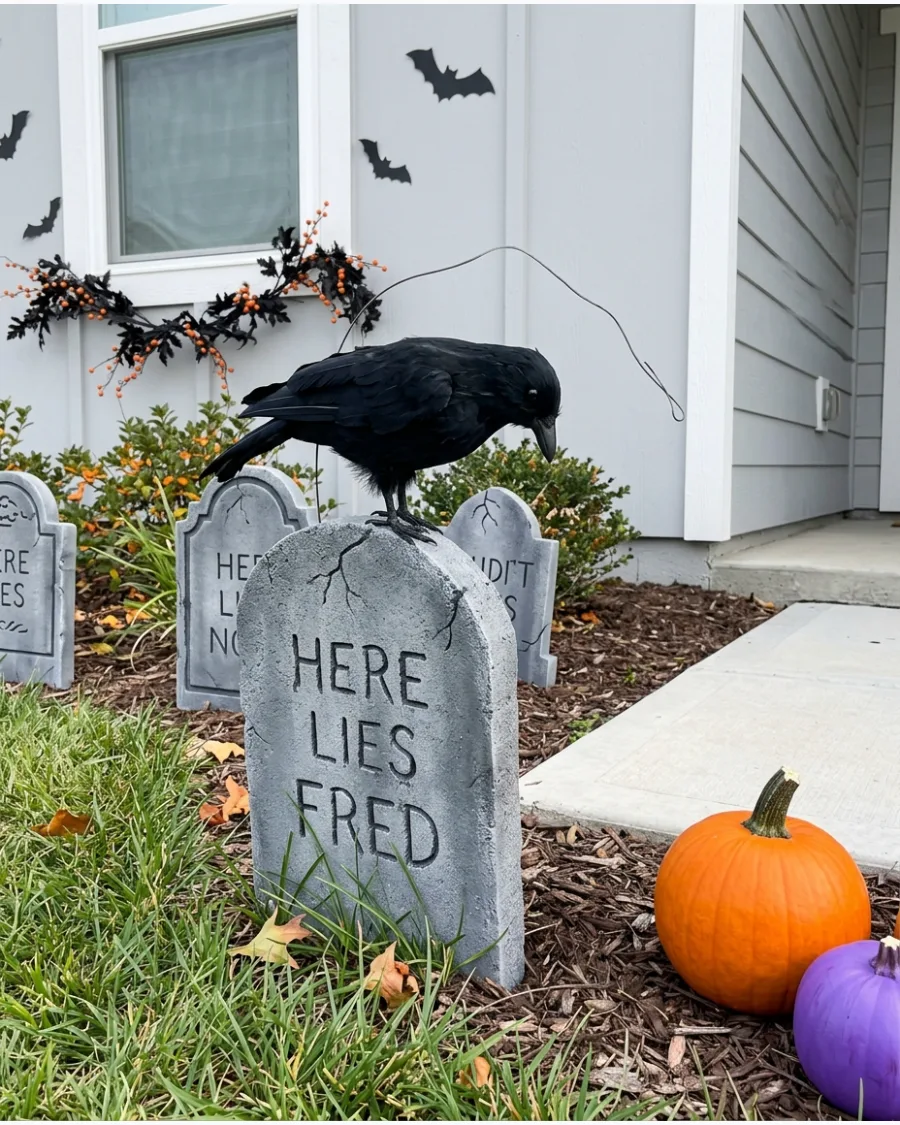
Static props are fine, but adding a single bird that moves can startle guests in a fun way.
Positioning a crow on top of a headstone adds a focal point that feels alive. Mount the crow on a thin, flexible wire so that even a light breeze makes the bird bob and sway realistically. Small, subtle movements are often more effective at catching the eye than large, motorized props.
- Feathered craft crow with wire feet
- Stiff 12-gauge wire for the mount
- Hot glue to secure the bird to the wire
Most people skip this: Position the crow so it is silhouetted against a porch light or a bright part of the house for better visibility.
58. Haunted Graveyard Mirror
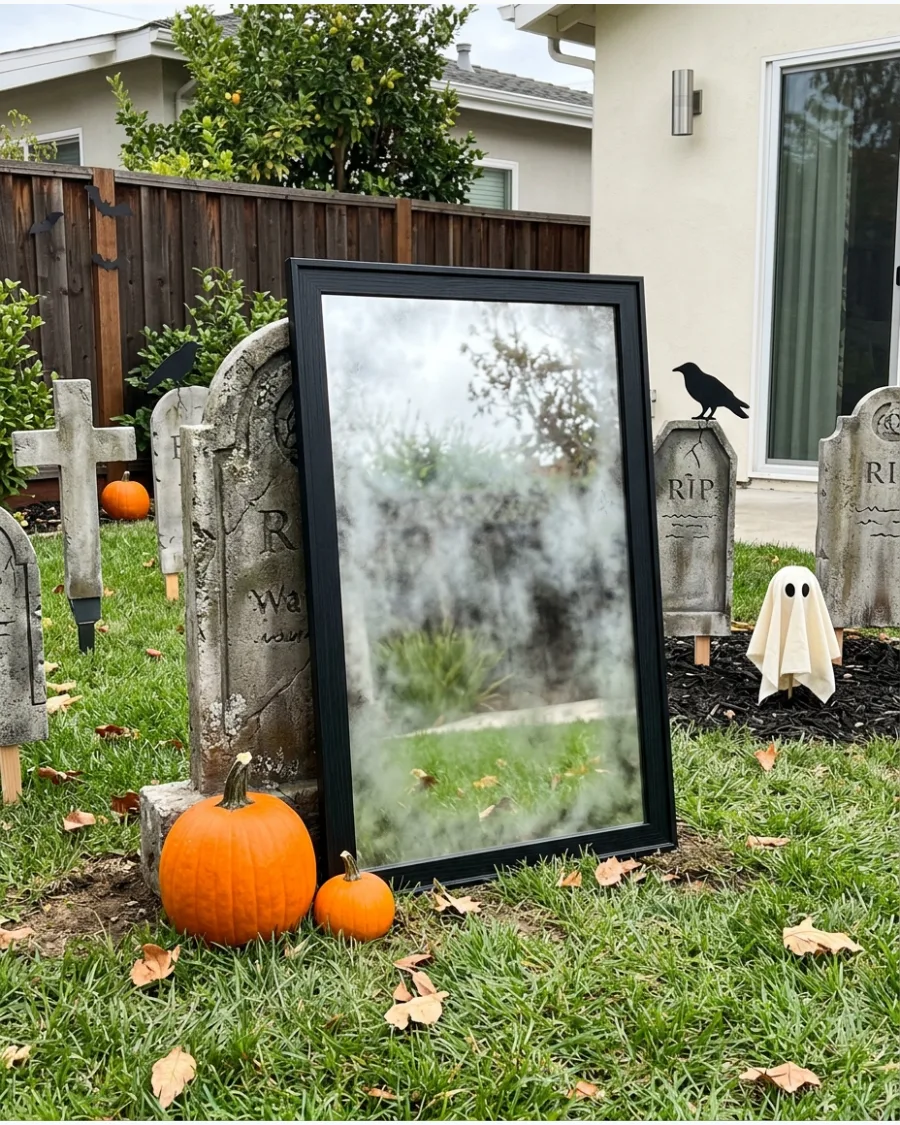
A mirror placed among the tombstones creates confusing reflections that make the yard feel crowded. Distressing the surface prevents it from looking like a standard household item.
Spray the back of an acrylic mirror with a light mist of black paint to create a cloudy antique look that hides the modern reflection. Mirrors add an unexpected layer of depth that makes visitors double-check what they just saw in their peripheral vision.
- Lightweight acrylic mirror for safety
- Black and silver spray paint for distressing
- Heavy-duty garden stakes to secure the mirror in place
Quick win: Angle the mirror slightly toward the ground so it reflects the grass and fog instead of the streetlights or passing cars.
59. Swampy Grim Garden Cemetery
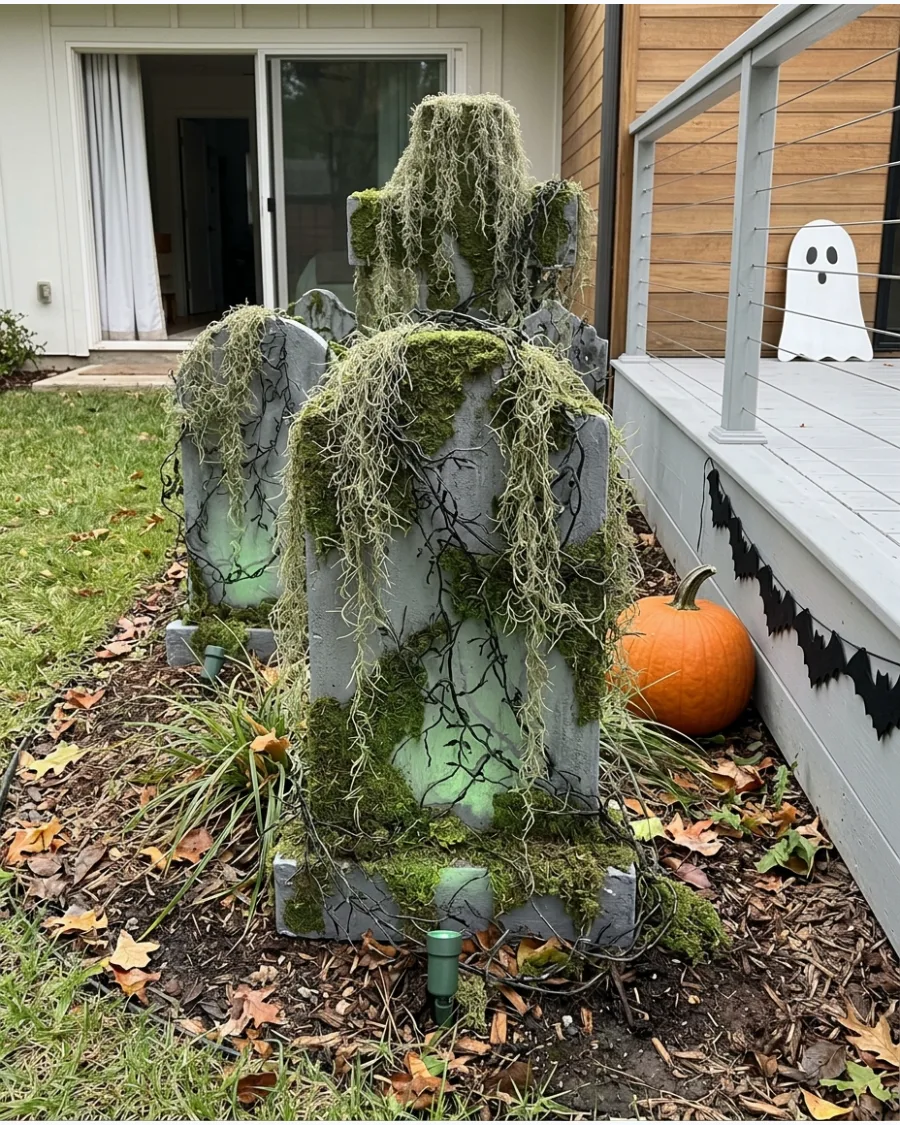
The Grim Garden style focuses on nature reclaiming the graveyard with vines and moss. This look is achieved by layering organic textures over your stone-painted props.
Drape long strands of faux Spanish moss over the tops of the tombstones to make the graveyard look like it has been abandoned for decades. Adding organic textures like vines and moss softens the sharp edges of DIY props and makes them look more authentic.
- Bag of preserved green or Spanish moss
- Plastic ivy or dark grapevines
- Green LED wash light for a swampy glow
Best shortcut: Use spray adhesive to apply the moss in patches rather than covering the entire stone for a more natural growth pattern.
60. Complete Abandoned Cemetery Display
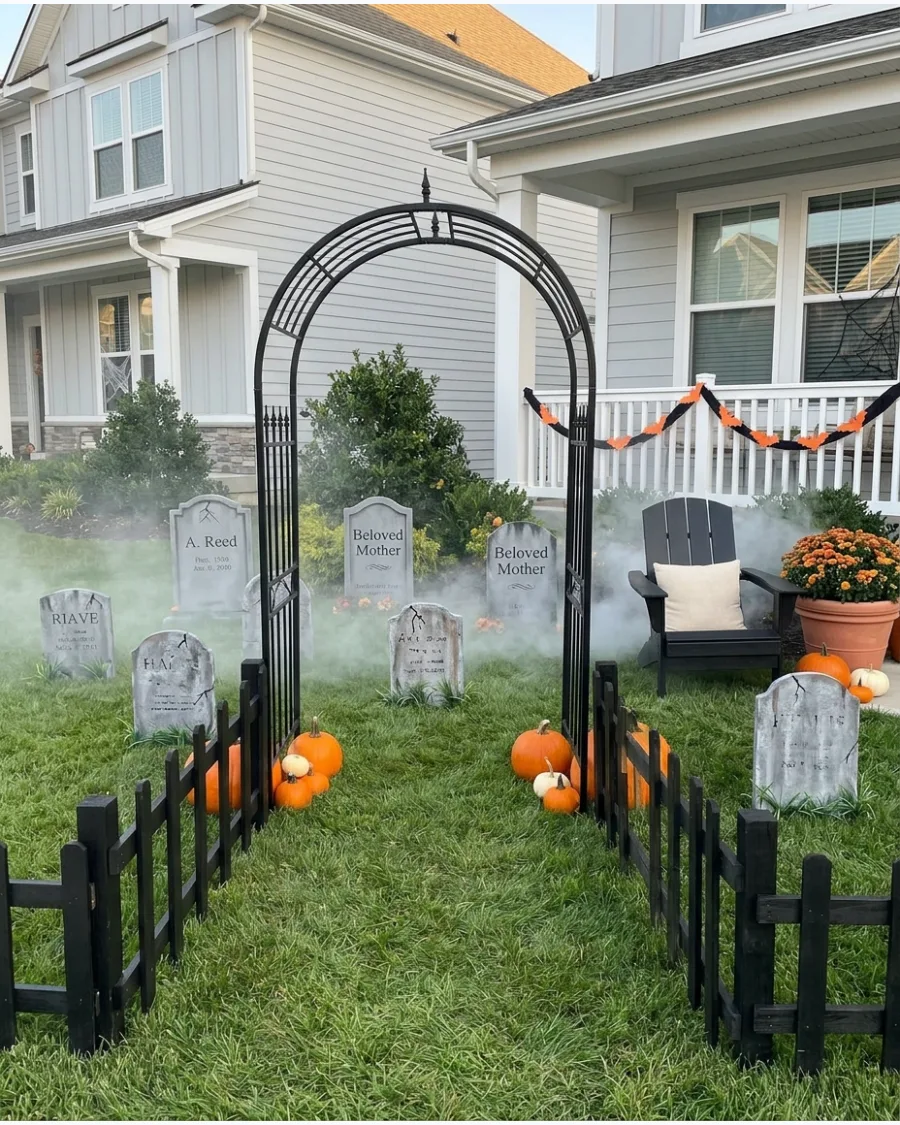
A full graveyard scene works best when every element has enough room to be seen clearly.
Mixing heights and textures across the lawn creates a professional-looking display. Arrange the largest tombstones in the back and the smaller ones in the front to create a sense of depth and scale in the yard. A successful graveyard needs a clear path for the eye to follow, so avoid cluttering the center of the lawn.
- Mix of foam and wood tombstone props
- Consistent gray and black paint scheme for all elements
- Battery-operated spotlights for every major focal point
Most people skip this: Take a photo of the display from the street during the day to check if the spacing looks balanced before the sun goes down.
Frequently Asked Questions
What is the best material for DIY outdoor tombstones?
XPS foam insulation board is the preferred choice because it is lightweight, weather-resistant, and much easier to carve than plywood. It allows you to create realistic cracks and stone textures that look professional while remaining easy to move and store.
How do I keep my DIY tombstones from blowing over?
The most reliable method is to glue PVC pipe sleeves to the back of the foam and slide them over rebar stakes driven into the ground. For displays on hard surfaces, weighted wooden bases or sandbags hidden behind the tombstone will provide the necessary stability.
How do I make foam look like real aged stone?
Start by lightly spraying acetone or using a heat gun to create realistic pitting and erosion on the foam surface. Apply a grey base coat and finish with a dark 'tea wash' of diluted black paint to fill the crevices and add dramatic depth.
What is the best way to light a graveyard at night?
Use low-voltage LED spotlights or solar uplights positioned at a low angle to cast long, spooky shadows upward. Stick to cool colors like blue, green, or purple to enhance the eerie mood without washing out the fine details of your carvings.
How can I make the 'ground' look like a fresh grave without digging up my lawn?
Lay down a piece of scrap plywood or landscape fabric and top it with a mound of dark mulch or potting soil. You can also pile up dried leaves and lightly dust them with dirt to simulate disturbed earth without damaging your grass.