50 Christmas Card Display Ideas

This post may contain affiliate links: full affiliate disclosure.
Transforming your holiday greetings into festive decor is a simple way to personalize your home during the Christmas season. These creative displays range from rustic wall-mounted trees and lush greenery garlands to minimalist grids and repurposed vintage items.
Use these ideas to organize your incoming mail and showcase your favorite family photos throughout your living space.
CHRISTMAS CARD WALL DISPLAY IDEAS
1. Christmas Card Gallery Wall
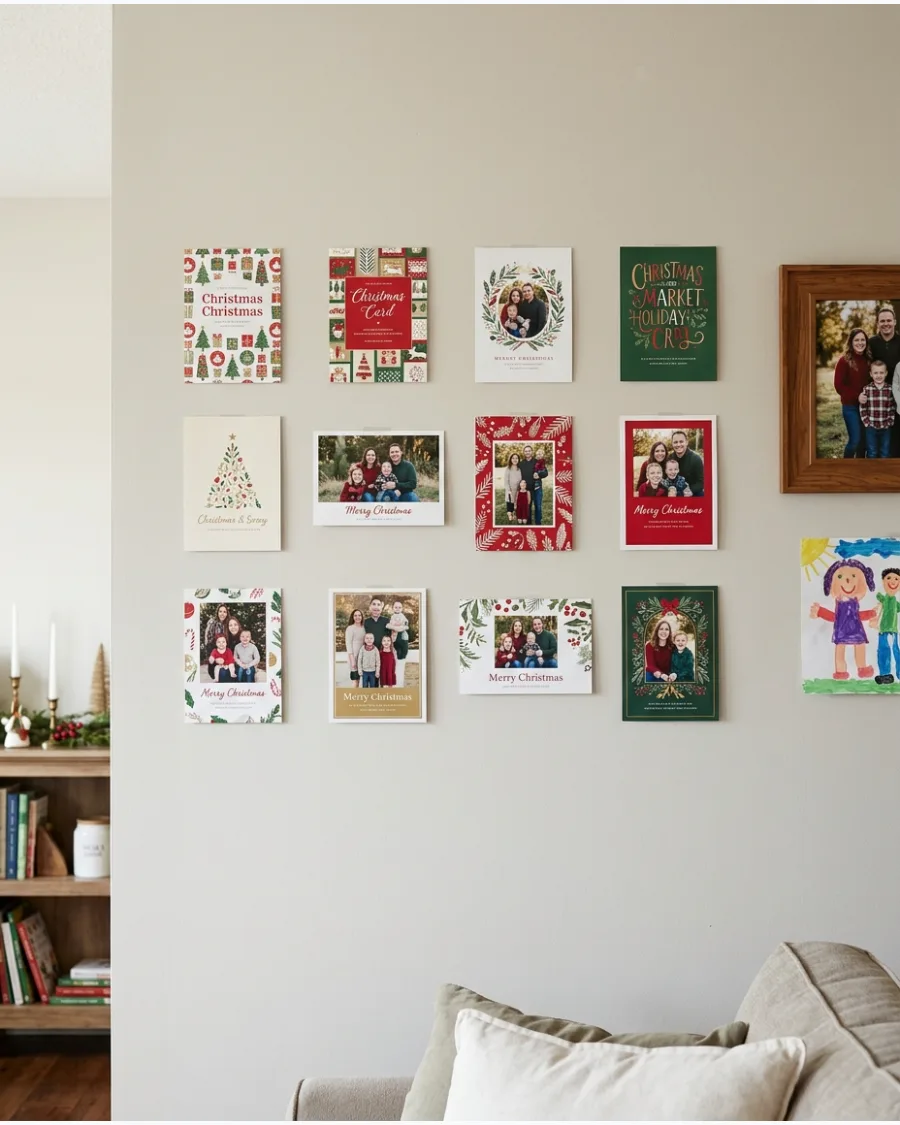
Transform a blank wall into a dynamic seasonal gallery by organizing your holiday mail into a structured grid or a free-flowing arrangement. Use small pieces of painter's tape or removable adhesive putty to secure the cards without damaging the wall surface. This method allows you to expand the display horizontally or vertically as more envelopes arrive throughout the month.
- Space cards at least 2 inches apart to prevent a cluttered appearance.
- Mix horizontal and vertical card orientations to add visual interest to the grid.
- Place cards with high-contrast family photos in the center of the arrangement as a focal point.
Level the first row of cards using a ruler or laser level to ensure the entire gallery looks professional and straight.
2. Christmas Tree Shaped Card Wall
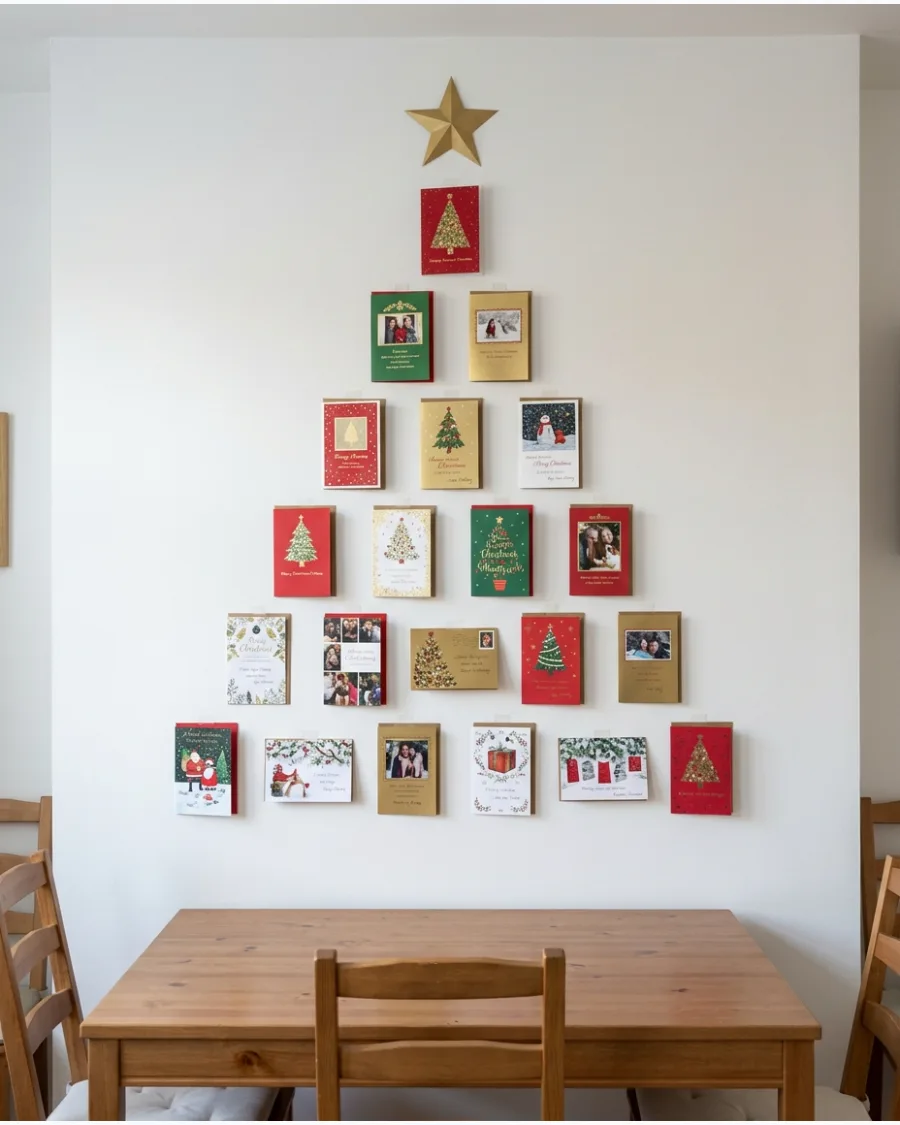
Create a festive silhouette by mounting cards in a triangular pattern that mimics the shape of a traditional evergreen. Position one card at the very top as the peak and increase the number of cards in each subsequent row below it to widen the base. This approach turns your collection into a temporary piece of wall art that requires zero floor space.
- Anchor the bottom row with your largest or heaviest cards to visually ground the tree shape.
- Top the arrangement with a paper star or a decorative bow for a finished look.
- Use clear removable mounting strips to keep the focus entirely on the card designs.
Lightly mark the triangular boundary with a pencil or masking tape before mounting to ensure the sides remain symmetrical.
3. Twine Christmas Tree Card Display
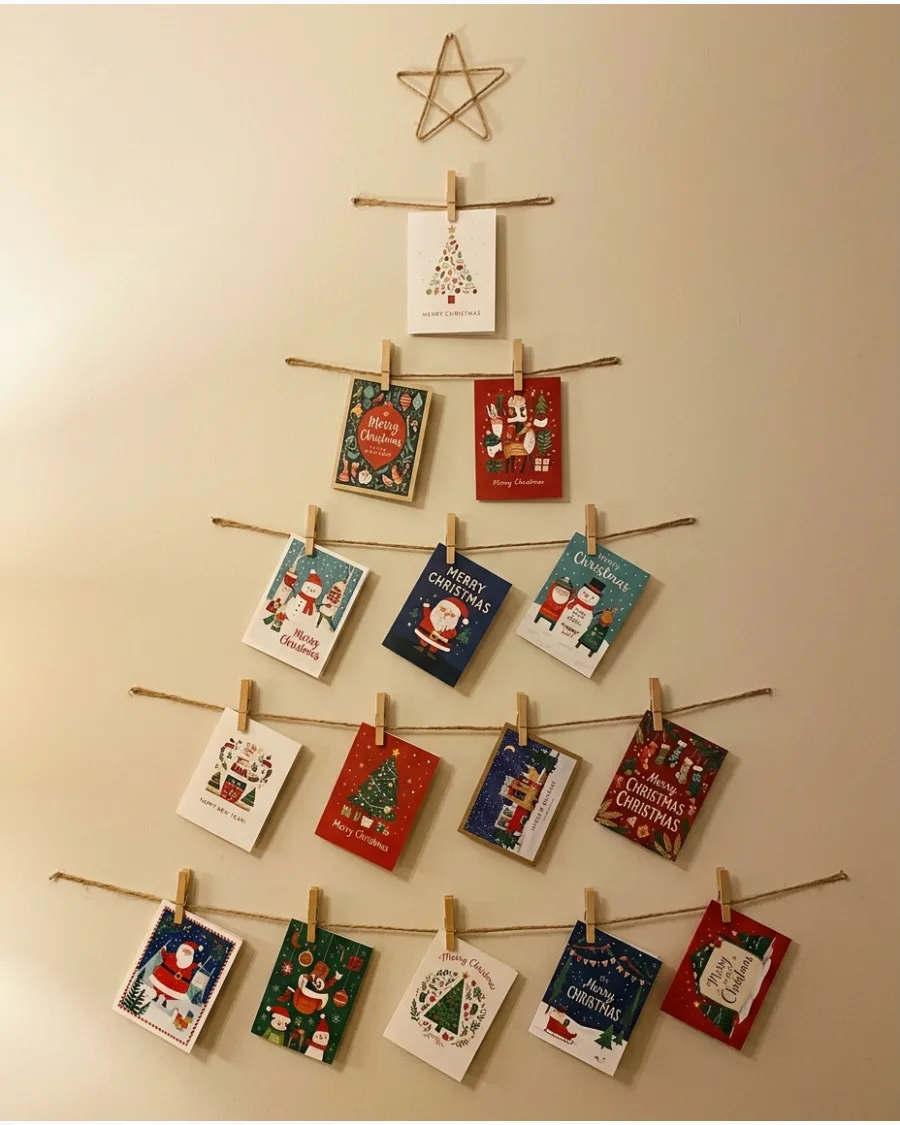
Construct a three-dimensional outline of a tree by stringing horizontal strands of natural jute or colorful twine across a wall. Cut the twine into progressively longer lengths, securing them from top to bottom to form a conical shape. Once the structure is in place, you can simply clip cards onto the lines as they arrive throughout the season.
- Use miniature wooden clothespins to hold cards securely without creasing the paper.
- Space the twine rows about 6 to 8 inches apart to accommodate taller card designs.
- Add a strand of battery-operated fairy lights along the twine for a glowing evening effect.
Use clear adhesive hooks at each end of the twine to support the weight of the cards without drilling holes into the wall.
4. Christmas Card Wall Grid
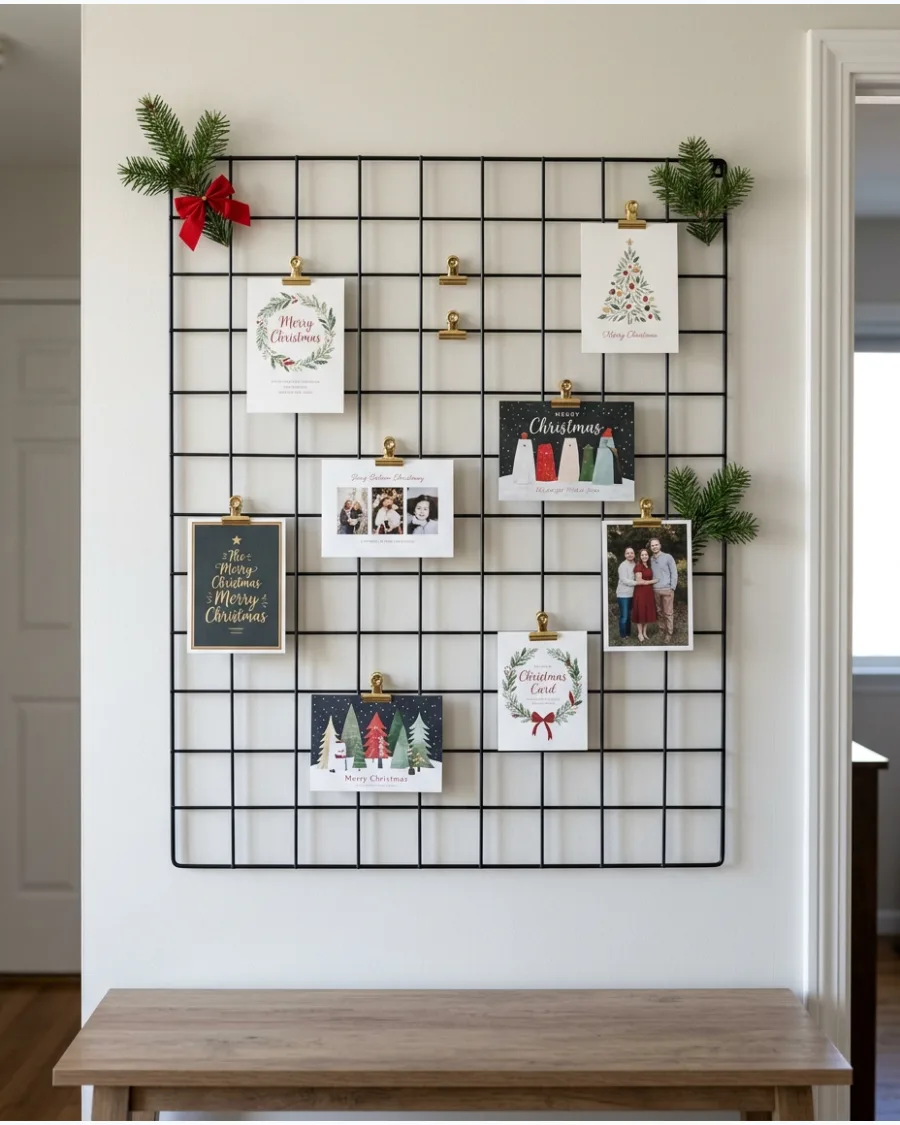
Repurpose a metal wire wall grid to serve as a versatile and modern holiday card station. Attach the grid to the wall or lean it against a console table, then use bulldog clips or decorative pins to mount your favorite greetings. This rigid structure provides a clean, industrial look that contrasts beautifully with traditional festive colors.
- Tuck fresh cedar sprigs or eucalyptus around the edges for a natural scent and texture.
- Leave several empty squares in the grid to accommodate late-December arrivals.
- Thread a red ribbon through the wire mesh to frame the display with seasonal color.
Group cards by color or theme within the grid sections for a curated, high-end editorial look.
5. Framed Christmas Card Display
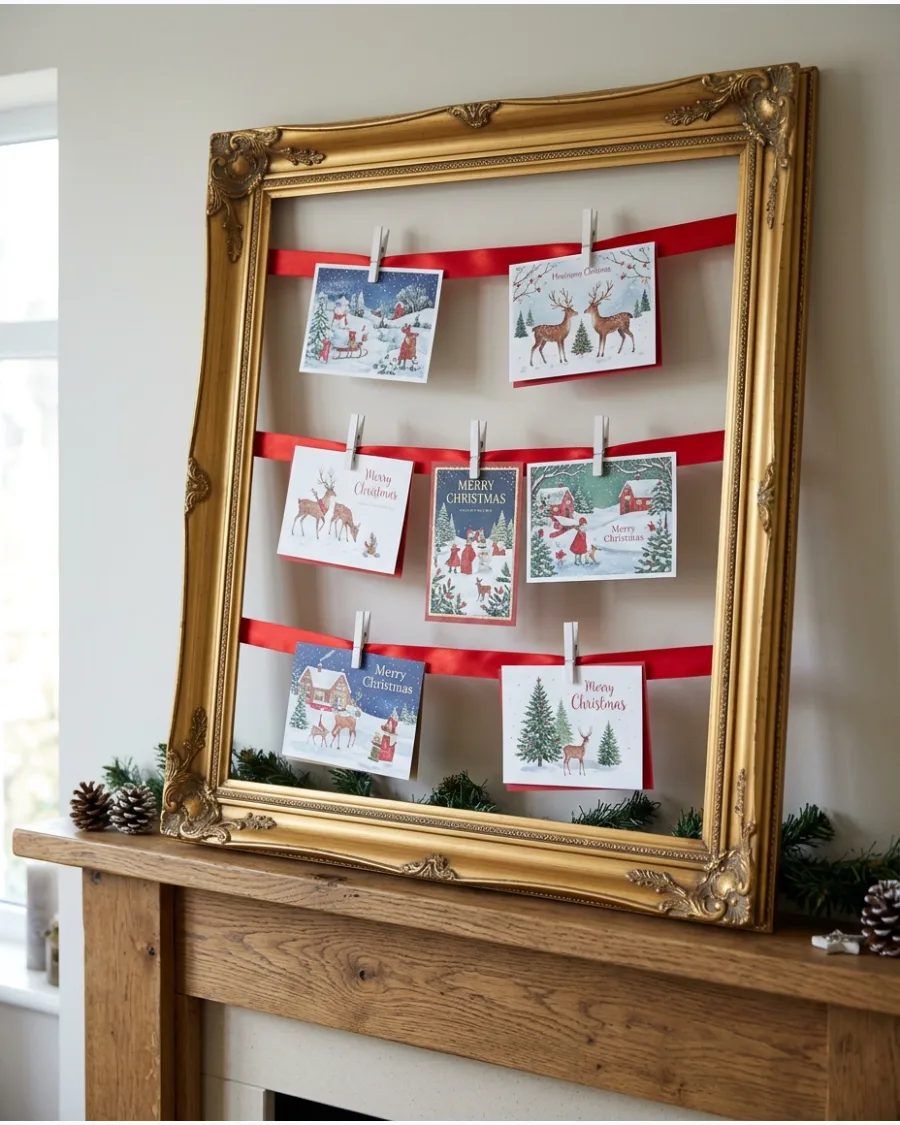
Give an old, oversized picture frame a second life by converting it into a dedicated holiday display board. Remove the glass and the backing to leave only the decorative outer frame, then staple several rows of ribbon across the rear of the opening. This creates a self-contained window of holiday memories that can be hung like a regular piece of art.
- Choose a frame in a metallic gold or distressed wood finish to match your holiday theme.
- Use clothespins that match the ribbon color for a cohesive and polished appearance.
- Overlap cards slightly if you have a large collection to create a rich, layered effect.
Secure the ends of the ribbon with heavy-duty staples on the back of the frame to ensure the lines do not sag under the weight of heavy cardstock.
6. Oversized Merry Mail Card Holder
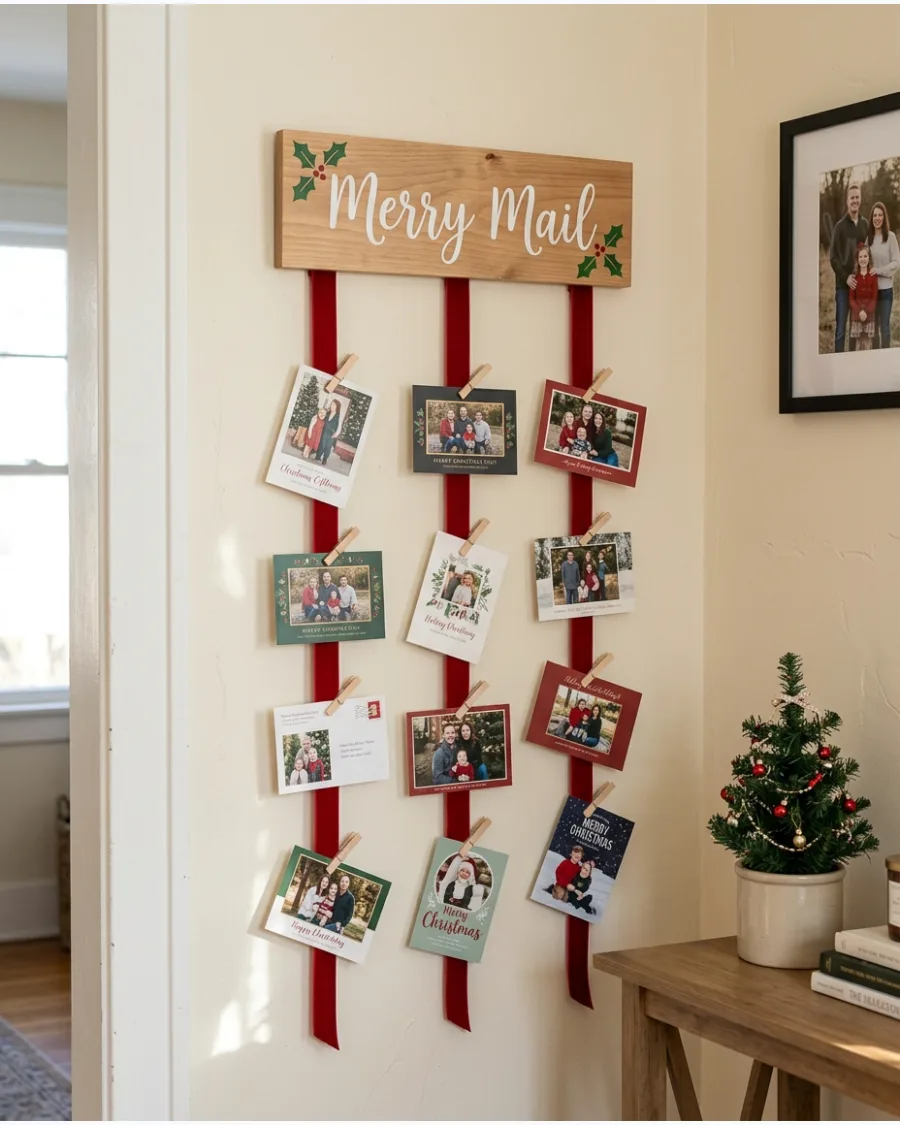
Create a vertical focal point by mounting a decorative wooden sign labeled "Merry Mail" high on a wall. Suspend several lengths of wide velvet or satin ribbon from the bottom of the sign to act as card hangers. This allows you to add cards gradually without needing additional wall space.
As you receive mail, use small clothespins to secure each card to a ribbon at varying heights.
- Space ribbons at least 4 inches apart to prevent cards from overlapping too much.
- Use coordinating ribbon colors like forest green or deep red for a cohesive look.
- Ensure the sign is securely anchored to handle the weight of dozens of cards.
Add a small weight, like a decorative bell, to the bottom of each ribbon to keep them hanging straight.
7. Christmas Card Peg Rail Display
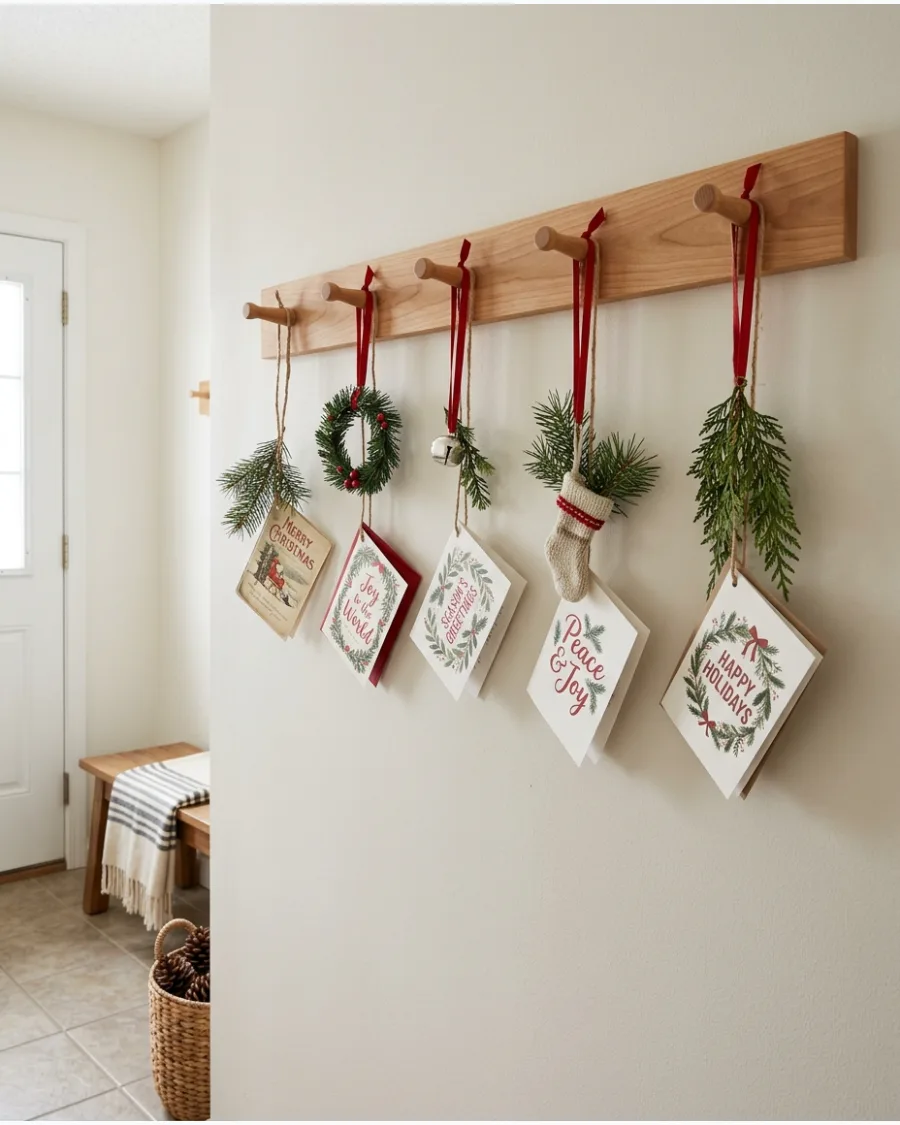
Transform an entryway peg rail into a festive display by utilizing the space beneath the hooks. Hang long loops of ribbon or individual card clips from the pegs to serve as anchors for your holiday correspondence. Interspersing the cards with small decorative elements prevents the rail from looking cluttered.
This approach keeps your cards organized and visible in a high-traffic area of the home.
- Alternate cards with miniature evergreen wreaths or brass bells for visual variety.
- Use wooden clothespins to attach cards to the hanging ribbons or strings.
- Keep the coat hooks clear for their usual functional use to maintain entryway utility.
Use varying lengths of ribbon to create a staggered, tiered effect that accommodates cards of different sizes.
8. Wood Slat Christmas Card Display
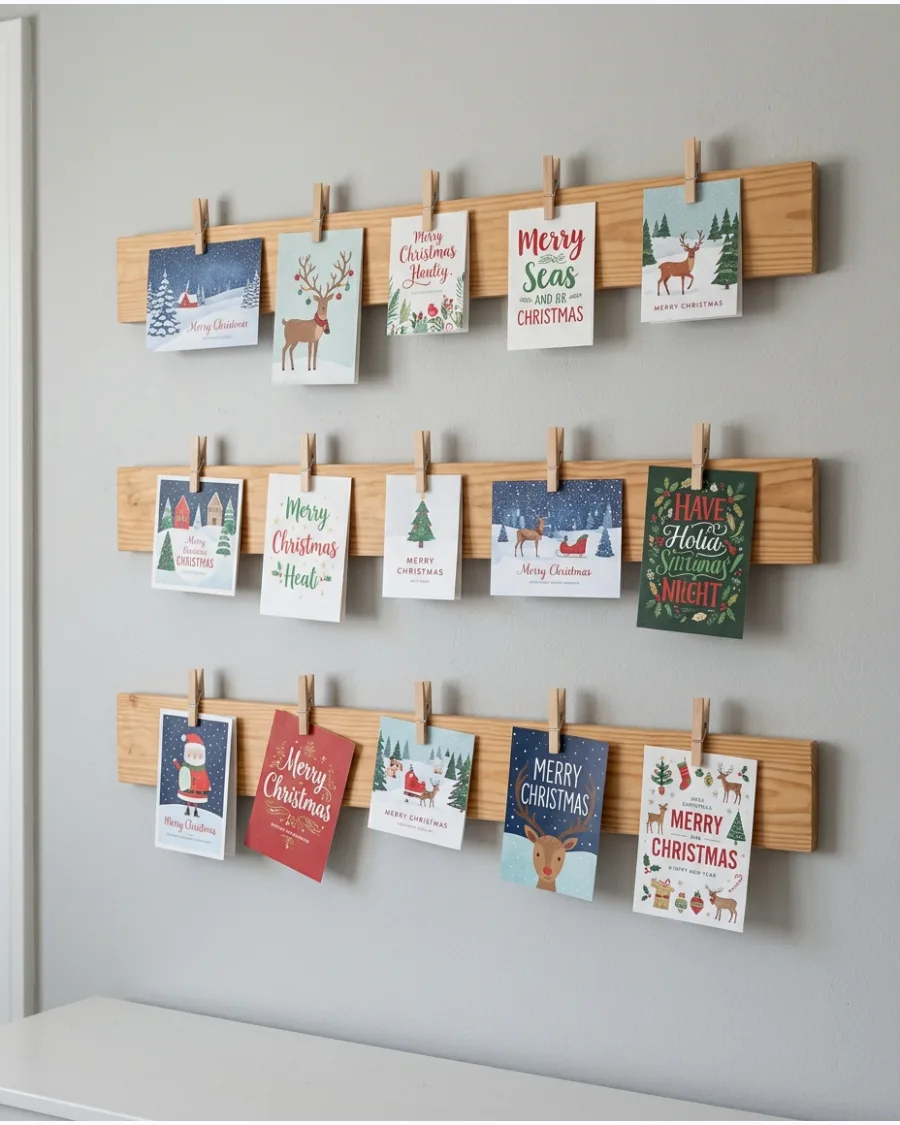
Build a rustic display using narrow wood slats arranged in a grid or a series of parallel lines. Mount the slats directly to the wall and use miniature wooden clips to hold your Christmas cards in place. You can leave the wood in its natural state for a farmhouse feel or paint the slats to match your existing holiday palette.
This rigid structure provides a clean, organized look compared to hanging strings.
- Sand the slats thoroughly before painting or staining to prevent splinters.
- Use heavy-duty adhesive strips for a renter-friendly way to mount the slats without nails.
- Arrange the slats horizontally to mimic a louvered shutter or vertically for a modern edge.
Measure the height of your tallest cards before spacing the slats to ensure every card fits comfortably without overlapping.
9. Cork Board Christmas Card Display
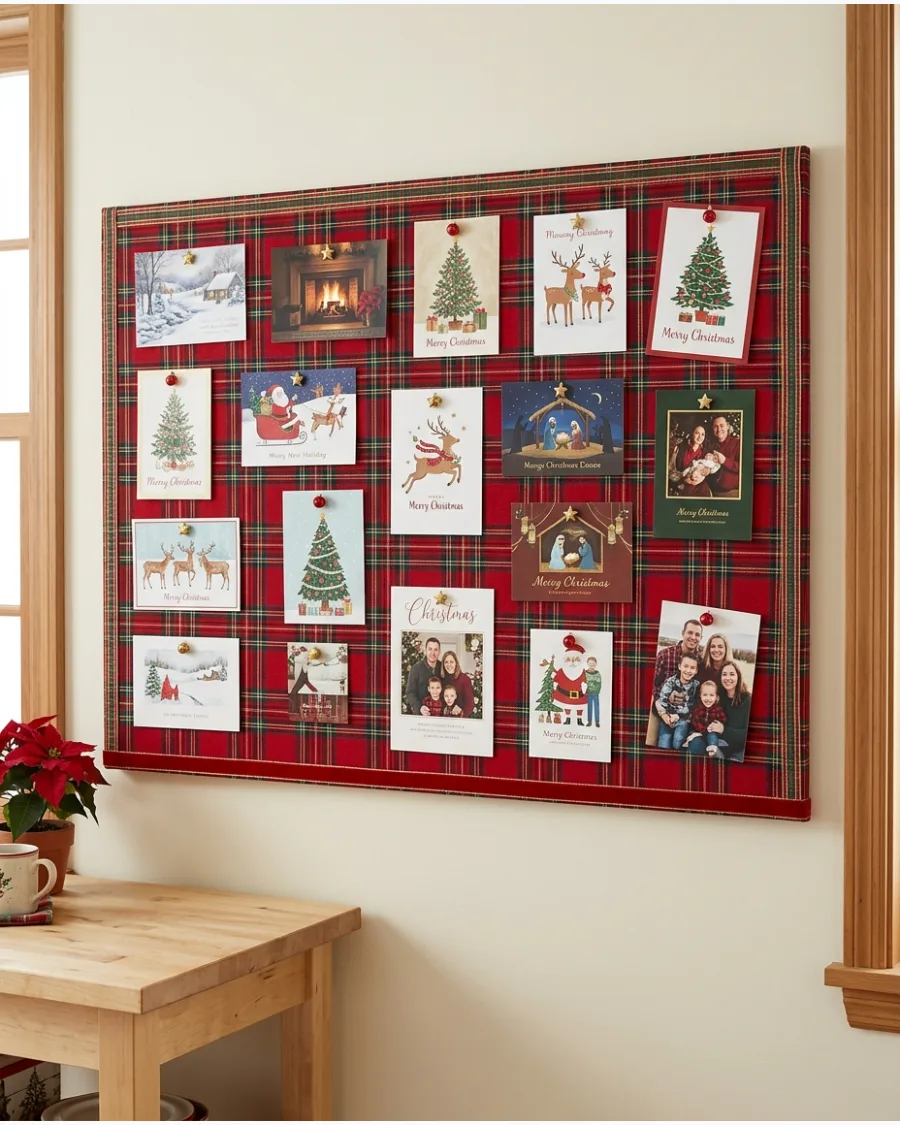
Give a standard office cork board a seasonal makeover by wrapping it in festive fabric or decorative paper. Pin your Christmas cards across the surface in a dense collage or an organized grid using decorative pushpins. To finish the look, stretch a wide ribbon around the outer edge of the frame to hide the staples or pins.
This method is perfect for those who want a large-scale display without putting numerous holes in the wall.
- Choose a low-pile fabric like linen or thin cotton so pins can easily reach the cork.
- Layer ribbons in a criss-cross pattern to tuck cards behind them if you prefer not to use pins.
- Use gold or silver thumb tacks for a touch of holiday sparkle on a neutral background.
Use a staple gun on the back of the frame to pull the fabric taut for a professional, wrinkle-free finish.
10. Minimalist Christmas Card Wall
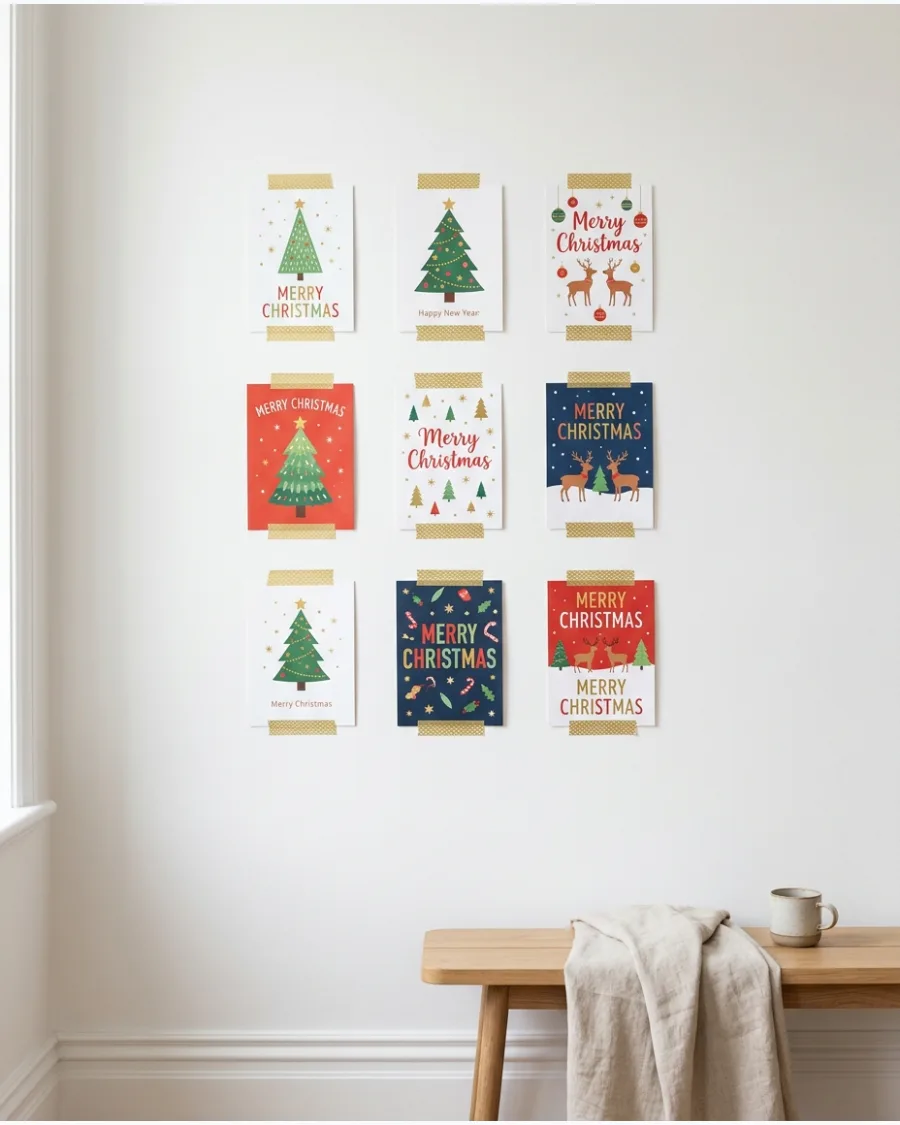
Embrace a modern aesthetic by featuring cards as individual pieces of art on a clean, neutral wall. Use small strips of decorative washi tape or removable adhesive clips to mount the cards in a perfectly spaced grid. This "less is more" approach allows the unique designs of each card to stand out without being overshadowed by bulky frames or ribbons.
Keep the surrounding decor very simple to maintain the focus on the holiday greetings.
- Use a laser level to ensure the rows and columns are perfectly aligned for a gallery look.
- Select washi tape in a single metallic or neutral color to keep the look cohesive.
- Limit the display to your favorite 10-12 cards for maximum visual impact.
Test the adhesive tape on an inconspicuous area of the wall first to ensure it won't damage the paint upon removal.
GARLAND AND GREENERY CHRISTMAS CARD DISPLAYS
11. Evergreen Garland Christmas Card Display
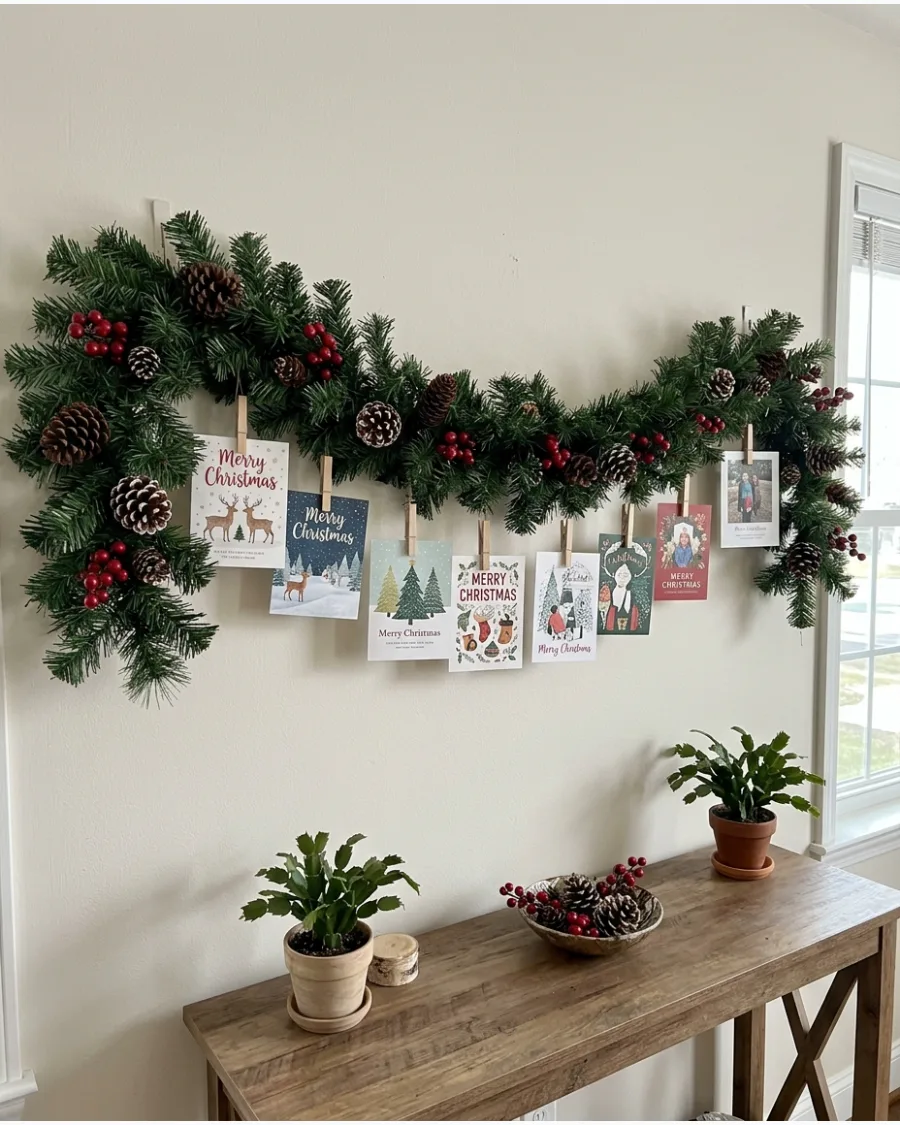
Use a lush evergreen garland as a natural anchor for your holiday mail on a wall or mantel. Clip your Christmas cards directly to the sturdy branches or just below the needles to keep them at eye level. This method allows the natural texture of the pine and spruce to frame your family photos and season's greetings.
Adding decorative elements like pinecones and berries creates a cohesive look that blends with your existing holiday theme.
- Use small wooden clothespins or decorative metal clips for a secure hold on the branches.
- Space cards evenly to prevent the garland from sagging under uneven weight on one side.
- Ensure the garland is securely anchored with heavy-duty command hooks or floral wire before adding cards.
Use "real touch" artificial greenery to avoid needle drop and ensure the display lasts all season without drying out.
12. Christmas Card Doorway Garland
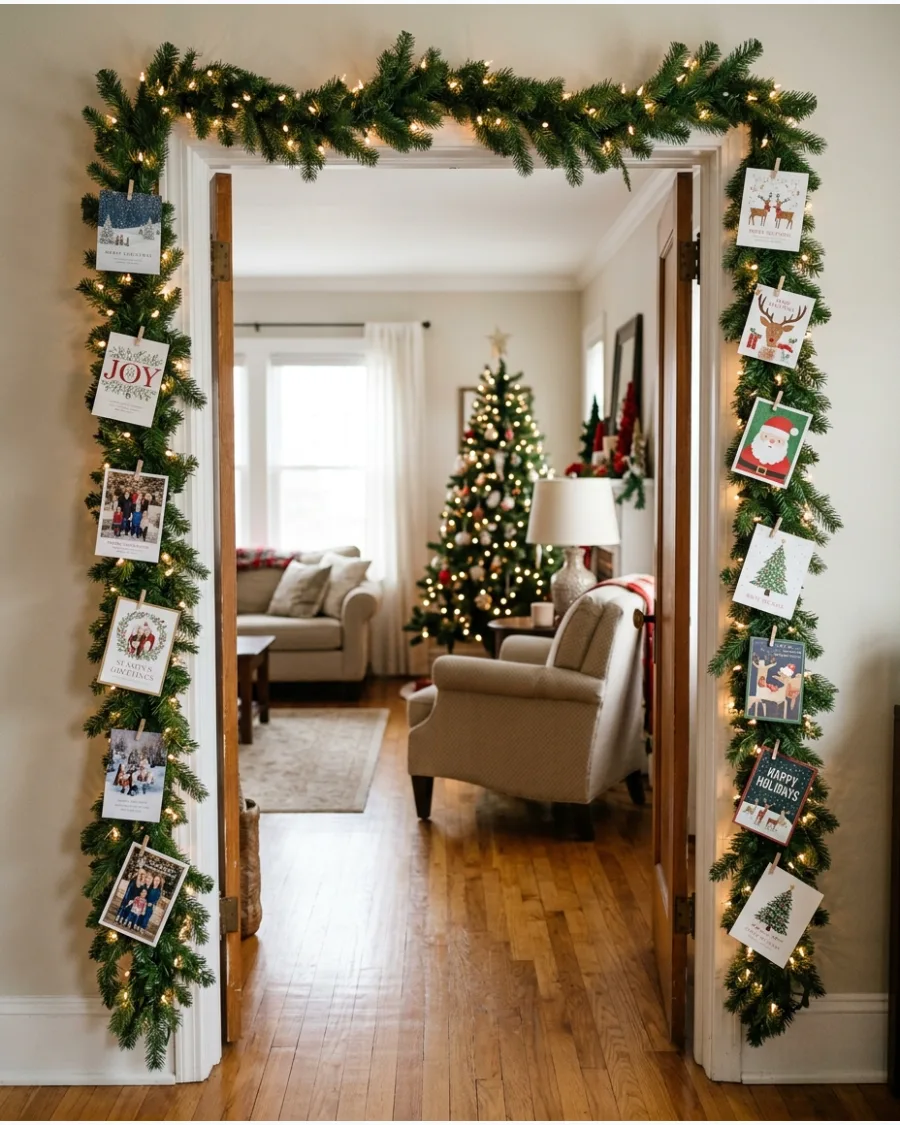
Framing a high-traffic doorway creates a celebratory entrance that expands as you receive more holiday mail. Attach your evergreen garland around the door casing and clip cards along the vertical sides to maximize visibility without blocking the path. By starting at the top corners and working your way down, you create a dynamic display that grows throughout December.
This vertical approach is perfect for small homes where wall space is at a premium.
- Keep cards tucked close to the garland to prevent them from catching on people passing through.
- Mix in a few battery-operated fairy lights to illuminate the cards and photos in the evening.
- Group cards by size or orientation for a more curated and organized aesthetic.
Use padded door frame clamps or removable adhesive hooks to protect your trim from permanent nail holes.
13. Hanging Ribbon and Greenery Card Display
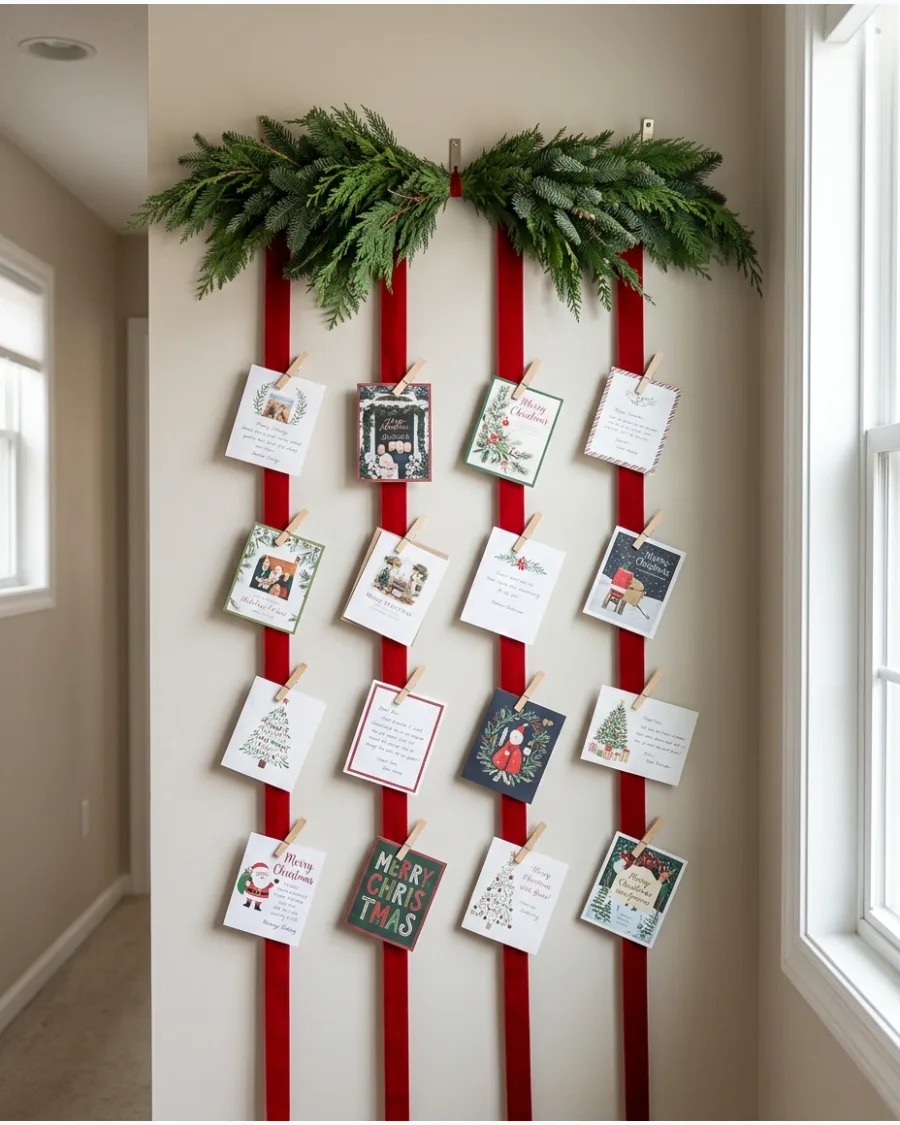
A horizontal swag of greenery serves as a beautiful header for a series of cascading ribbons. Mount the greenery swag to the wall and suspend several lengths of wide velvet or satin ribbon vertically beneath the branches. This design allows you to display a high volume of cards in a narrow space by utilizing the vertical height of your wall.
It’s an elegant solution that keeps the focus on the cards while providing a soft, textile-rich backdrop.
- Use 1.5-inch to 2-inch wide ribbon to provide enough surface area for clipping cards securely.
- Secure the ribbons to the back of the swag using floral wire or heavy-duty staples to hide the connection.
- Attach small bells or ornaments at the bottom of each ribbon to act as weights so they hang straight.
Color-coordinate the ribbon to your room’s decor or stick to traditional holiday red for a classic, high-contrast look.
14. Christmas Card Mantel Garland
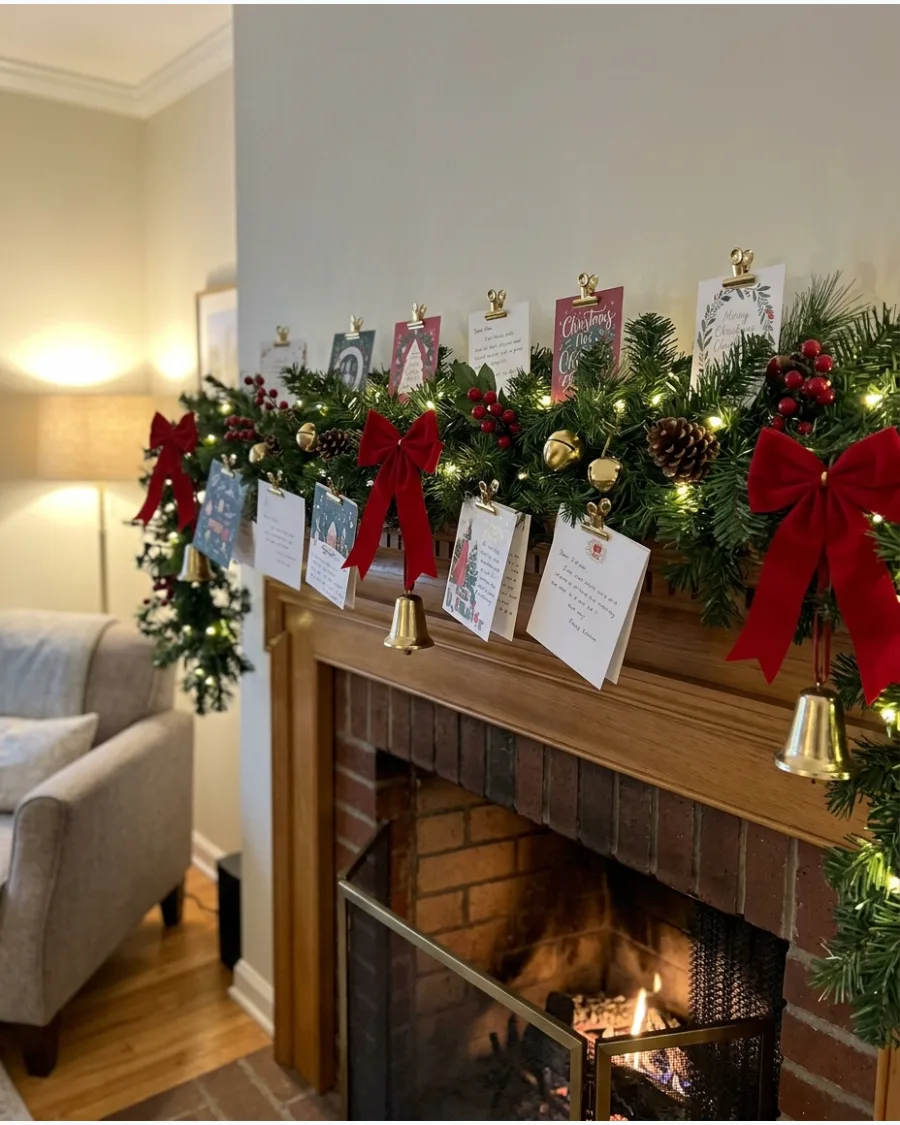
The fireplace mantel is the heart of holiday decor, making it a natural spot for a greeting card gallery. Clip your holiday cards along the length of an evergreen mantel garland using small brass or wooden clips to keep them neatly aligned. Intersperse the cards with festive accents like red bows, gold bells, and winter berries to balance the visual weight.
This arrangement ensures the cards remain visible while the mantel stays looking polished and professional.
- Position cards slightly above the firebox opening to prevent heat damage or curling of the paper.
- Use brass clips for a traditional, upscale look that complements other gold holiday accents.
- Ensure the garland is deep enough on the mantel shelf to support the weight of multiple heavy cards.
If using a real garland, mist it daily away from the paper cards to keep the greenery fresh and fragrant throughout the month.
15. Staircase Garland Christmas Card Display
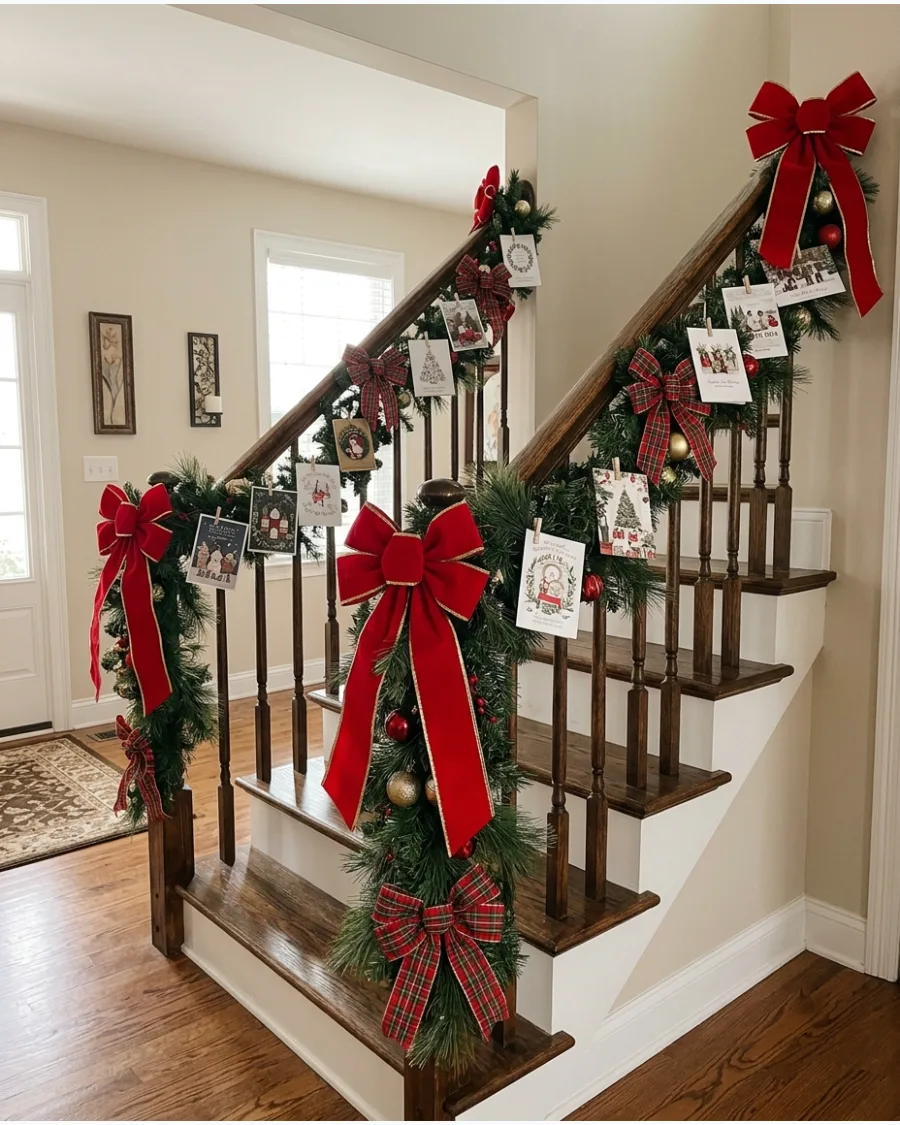
Turning your staircase into a card display utilizes a space that is often overlooked for functional decor. Secure cards to the greenery draped along your banister, spacing them carefully between larger bows and ornaments to maintain a balanced look. The upward angle of the stairs provides a unique tiered effect, making every card easy to see as you move between floors.
This method keeps the cards visible for guests without cluttering tables or shelves in the main living area.
- Use floral wire or zip ties to secure the garland to the banister before adding any cards.
- Angle the cards slightly outward so they are easily readable from the bottom of the staircase.
- Keep the handrail clear and safe for use by tucking the cards firmly into the greenery rather than over the top rail.
Place cards with personal family photos in the most visible spots at eye level on the main staircase landing.
16. Eucalyptus Christmas Card Garland
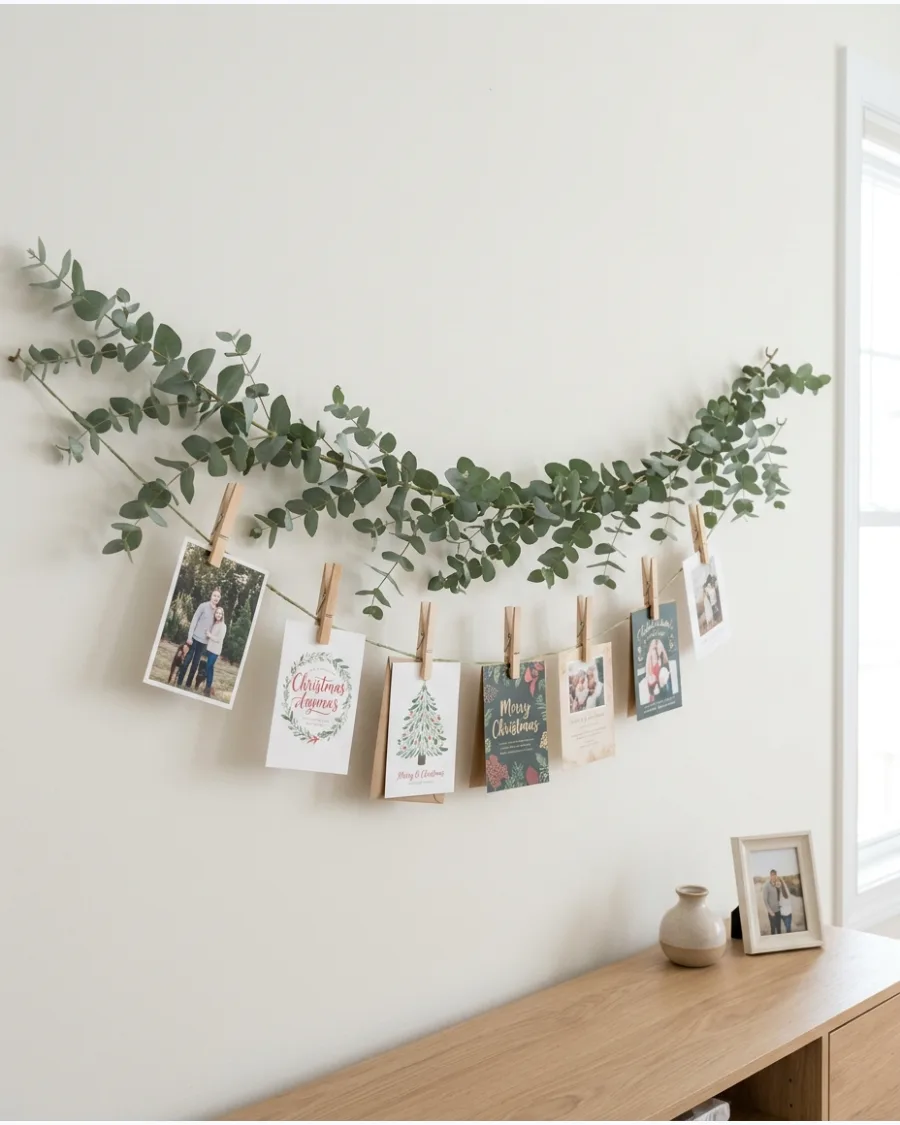
A eucalyptus garland offers a modern and airy alternative to heavy traditional evergreens. Its silvery-green leaves provide a soft backdrop that doesn't overwhelm smaller rooms or minimalist decor.
Secure a fresh or faux eucalyptus garland horizontally across a plain wall using clear adhesive hooks to create a lightweight anchor for your holiday mail. Use small wooden clothespins to attach cards directly to the sturdy main stem or thickest side branches.
- Space clips approximately 4 to 6 inches apart to prevent the leaves from being completely covered.
- Overlap the eucalyptus branches at the mounting points to hide the plastic hooks.
- Incorporate a few sprigs of dried berries or baby's breath for added texture among the cards.
If using fresh eucalyptus, choose the 'silver dollar' variety because its flat, round leaves provide a better surface area for cards to rest against.
17. Cedar and Velvet Ribbon Card Display
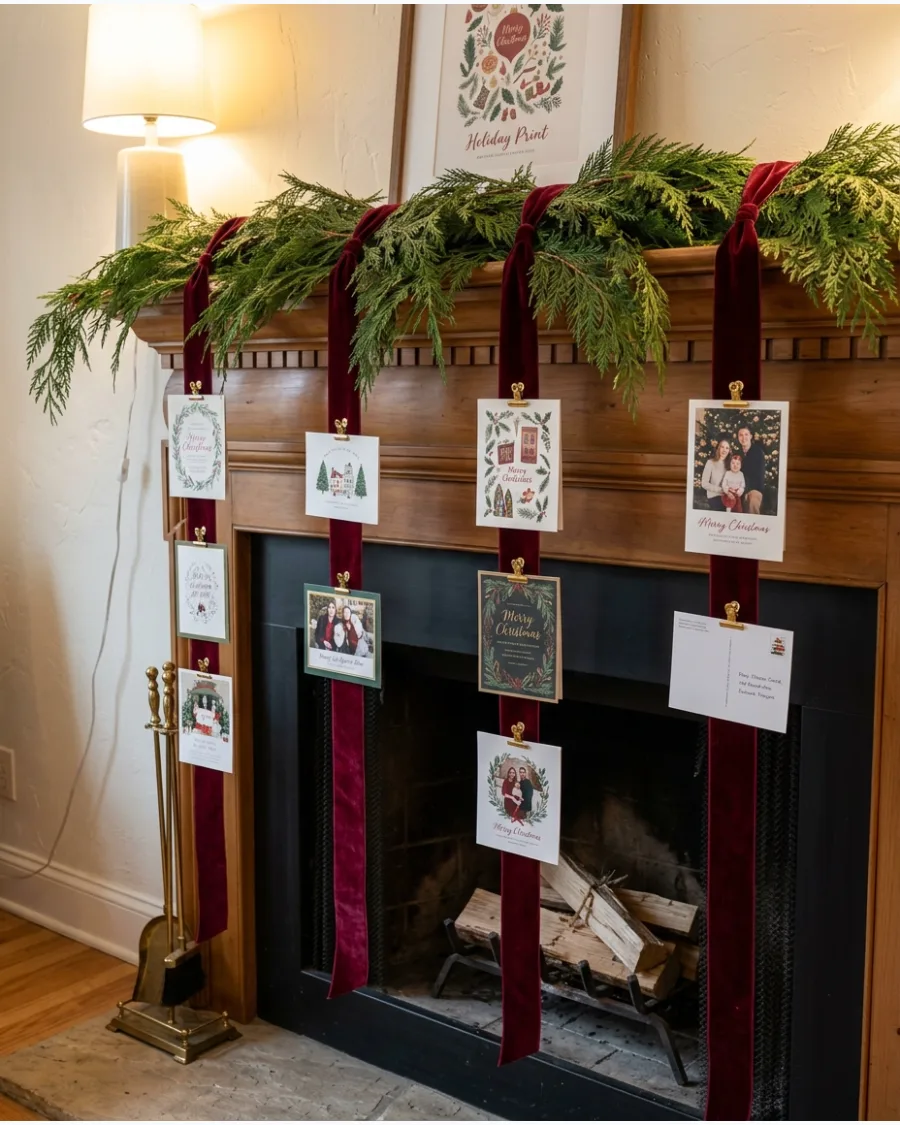
This setup combines the traditional scent and drape of cedar with the luxurious texture of velvet.
It is an excellent choice for homes with tall ceilings or narrow vertical wall spaces that need filling. Drape thick cedar boughs along a mantel or shelf and tie several long strands of velvet ribbon to the branches so they hang vertically toward the floor. The cards are then clipped onto the ribbons, allowing the display to grow downward as more mail arrives.
- Use heavy-duty velvet ribbon in deep jewel tones like burgundy, forest green, or navy.
- Attach a small weight or a decorative bell to the bottom of each ribbon to keep it hanging straight.
- Space the vertical ribbons roughly 8 inches apart to allow room for wide landscape-oriented cards.
To prevent the cards from sliding, place a tiny piece of double-sided tape on the back of the ribbon where the clip will be positioned.
18. Pinecone Christmas Card Garland
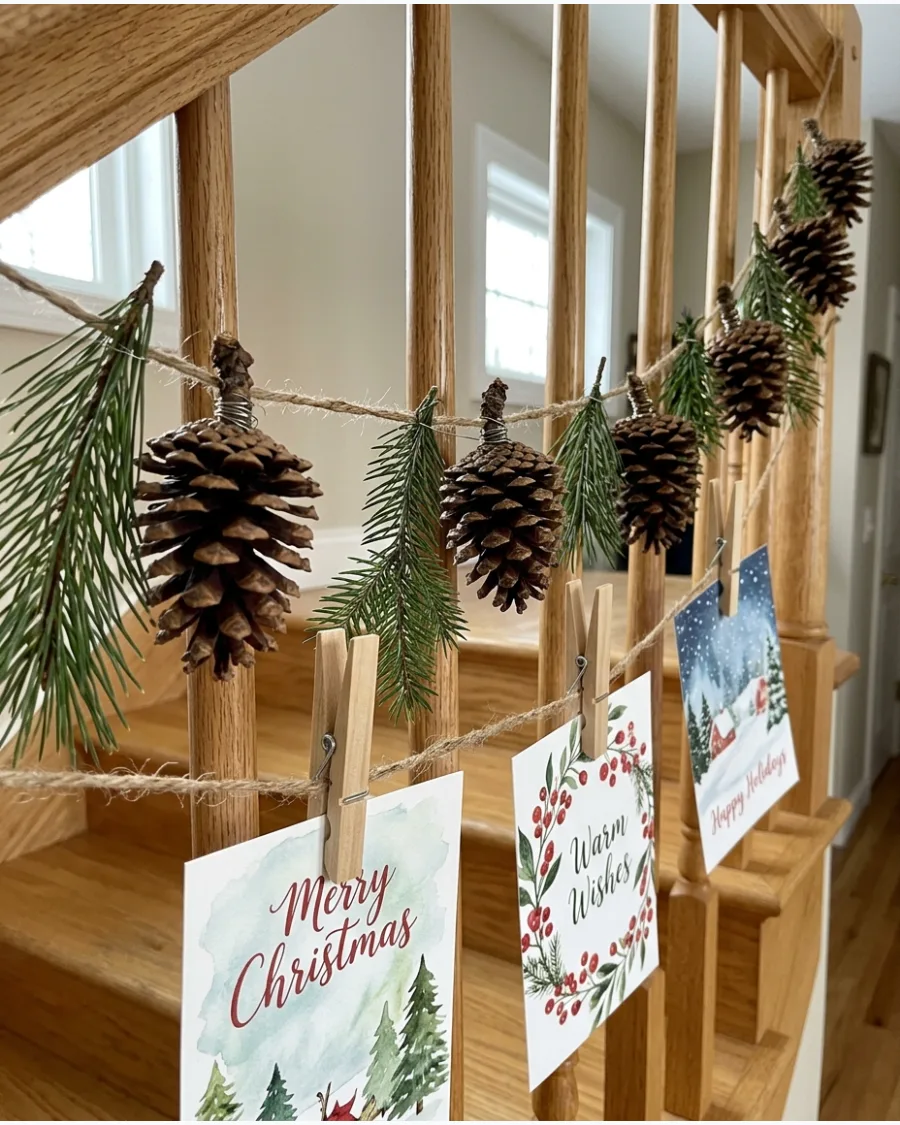
For a rustic or farmhouse aesthetic, a pinecone-heavy garland provides a tactile and organic way to organize holiday greetings. The natural brown tones of the cones create a neutral frame that works with any card design.
Alternate small pinecones and sprigs of greenery along a length of jute twine, leaving enough gap between elements to clip cards without obscuring the natural decorations. This method ensures the garland looks finished even before the first card is attached.
- Secure pinecones by wrapping thin 24-gauge floral wire around the base and twisting it onto the twine.
- Clip each card so it hangs slightly below the main twine line to maximize visibility.
- Use natural, unfinished wooden clothespins to match the earthy tones of the pinecones.
Bake gathered pinecones at 200°F for 30 minutes to kill any pests and melt excess sap before using them indoors.
19. Neutral Greenery Christmas Card Display
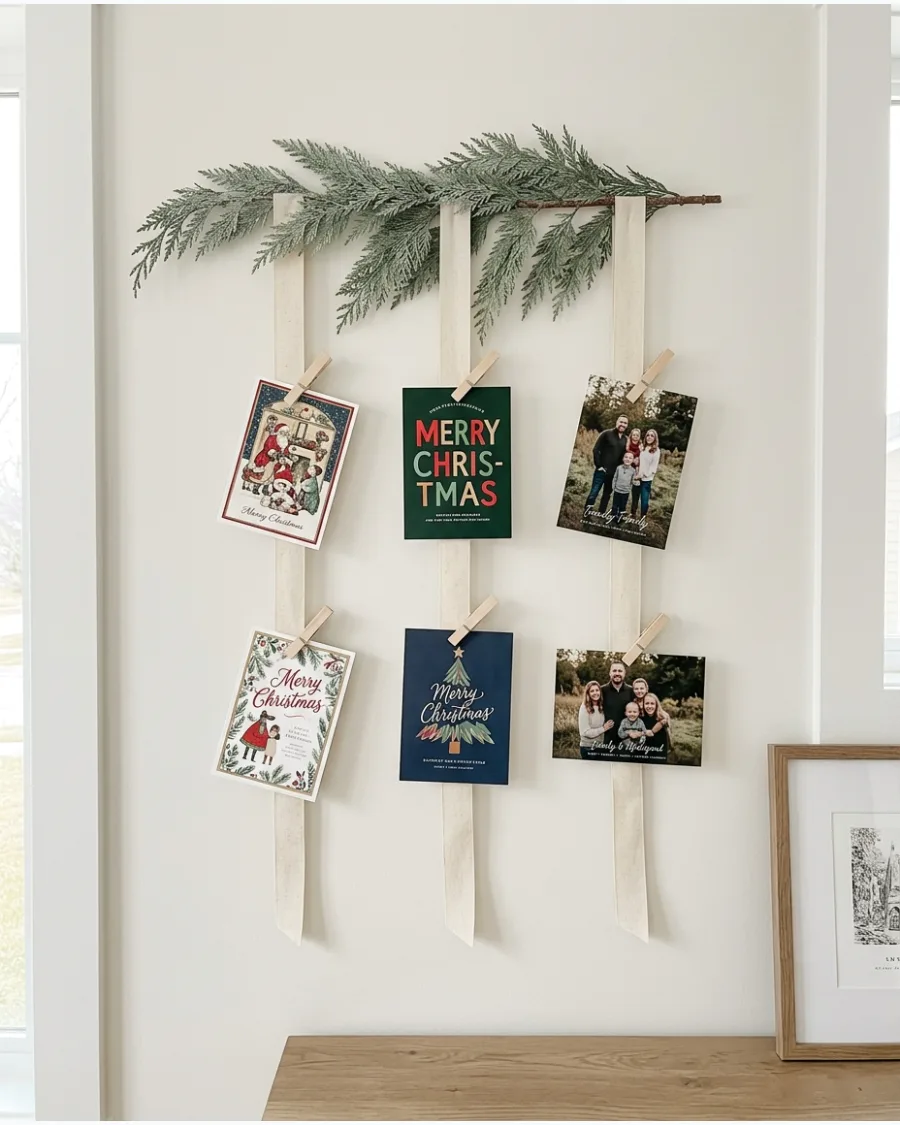
When cards come in a wild variety of colors and styles, a neutral display keeps the room feeling organized rather than cluttered. By using muted tones for the hanging hardware, you allow the photography and artwork of the cards to take center stage.
Focus on a palette of cream ribbons and natural wood to ensure the vibrant colors and diverse patterns of your Christmas cards remain the focal point. This approach is ideal for modern or Scandinavian-inspired interiors.
- Choose eucalyptus or 'frosted' cedar for a muted, silvery-green base color.
- Use cream-colored cotton or linen ribbon for a soft, matte texture.
- Avoid bright red or shiny gold clips to maintain the understated, cohesive look.
Mount this display against a dark-colored wall, such as navy or charcoal, to make the cream ribbons and greenery pop.
20. Kitchen Window Greenery Card Display
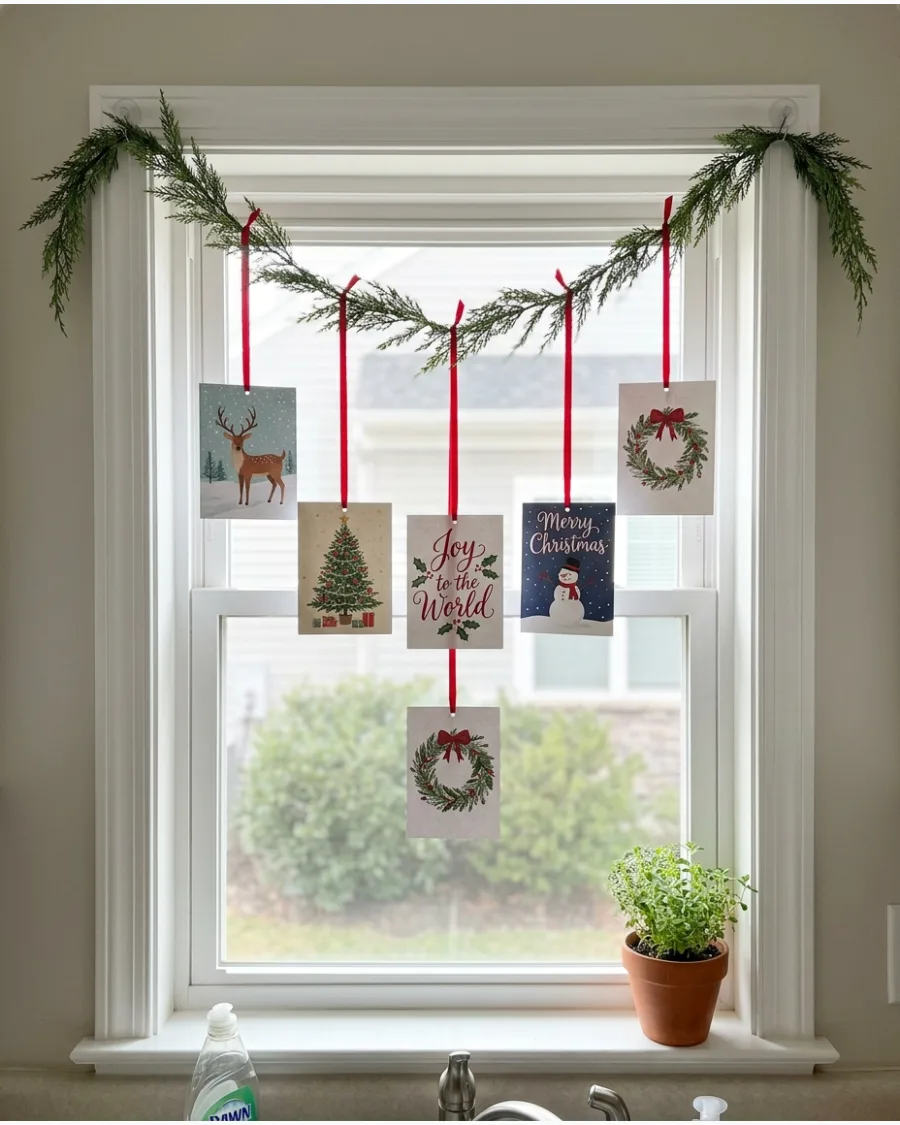
The kitchen is often the heart of holiday prep, but counter space is too valuable to lose to card stands.
Utilizing the window frame allows you to enjoy the cards while keeping them safe from spills and steam. Mount a slender evergreen garland across the top of your kitchen window frame and use thin ribbons to suspend cards in the upper third of the glass. This placement ensures the cards are visible from both inside and outside the home.
- Use clear suction hooks on the glass if you want to avoid putting holes in the window trim.
- Ensure ribbons are cut to lengths that keep cards well above the faucet to prevent water damage.
- Choose a faux garland for this location to avoid needle drop into the sink or food prep areas.
Hang the cards back-to-back with a small piece of tape so the display looks finished for people looking in from the porch.
CHRISTMAS TREE AND BRANCH CARD DISPLAYS
21. Christmas Card Tree on a Wooden Board
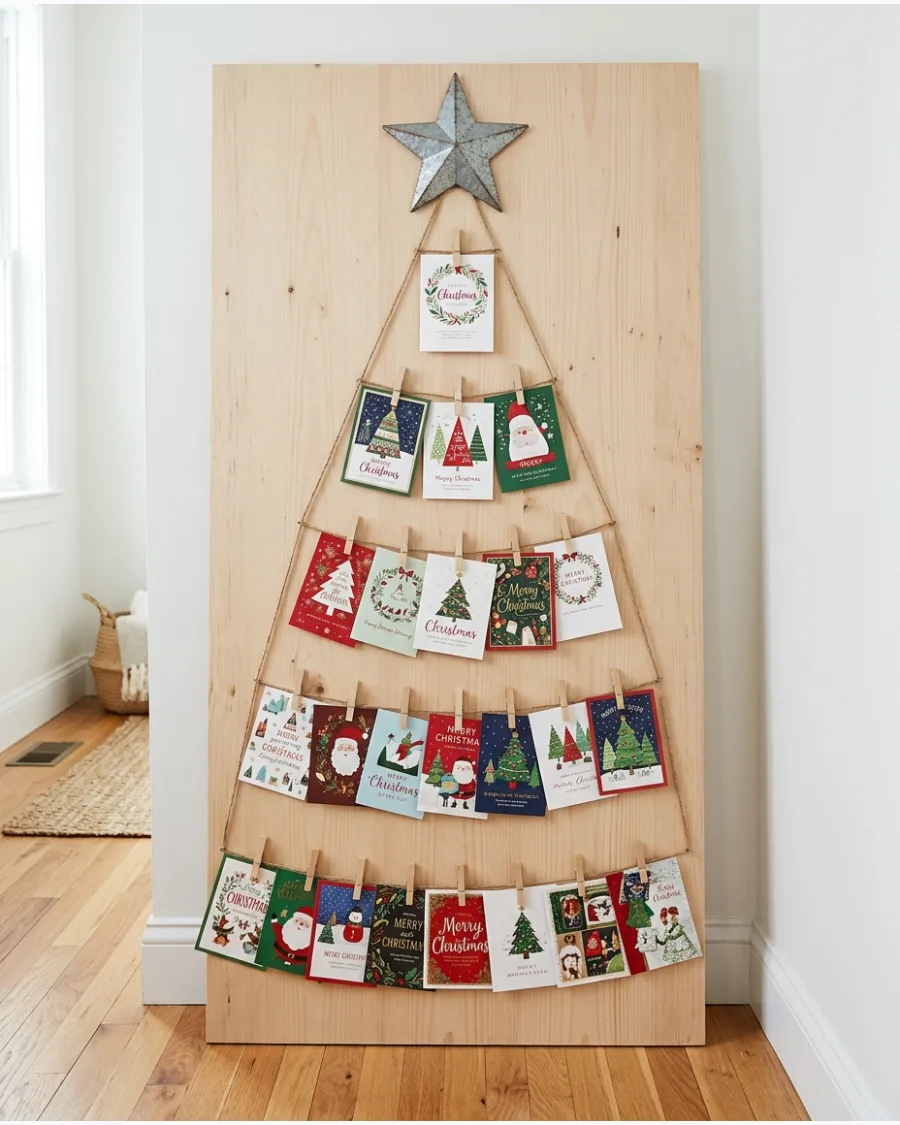
This vertical display uses a tall wooden plank as a sturdy backdrop for a festive, string-art-inspired tree. Space horizontal lengths of twine or cord from top to bottom, increasing each row's width to create a distinct triangular silhouette. Secure the ends of the strings with small tacks or staples on the edges of the board for a clean, professional finish.
The cards are then clipped onto the twine, filling in the shape with seasonal artwork and holiday greetings.
- Select a board at least four feet tall to provide enough 'branches' for a growing card collection.
- Use mini wooden clothespins or decorative metal clips to hang cards securely without weighing down the string.
- Mount a lightweight wooden or metal star at the very top of the board to complete the tree aesthetic.
If you are using a heavy reclaimed board, lean it at a slight five-degree angle and use furniture pads on the bottom to protect your floors and ensure stability.
22. Branch Christmas Card Tree
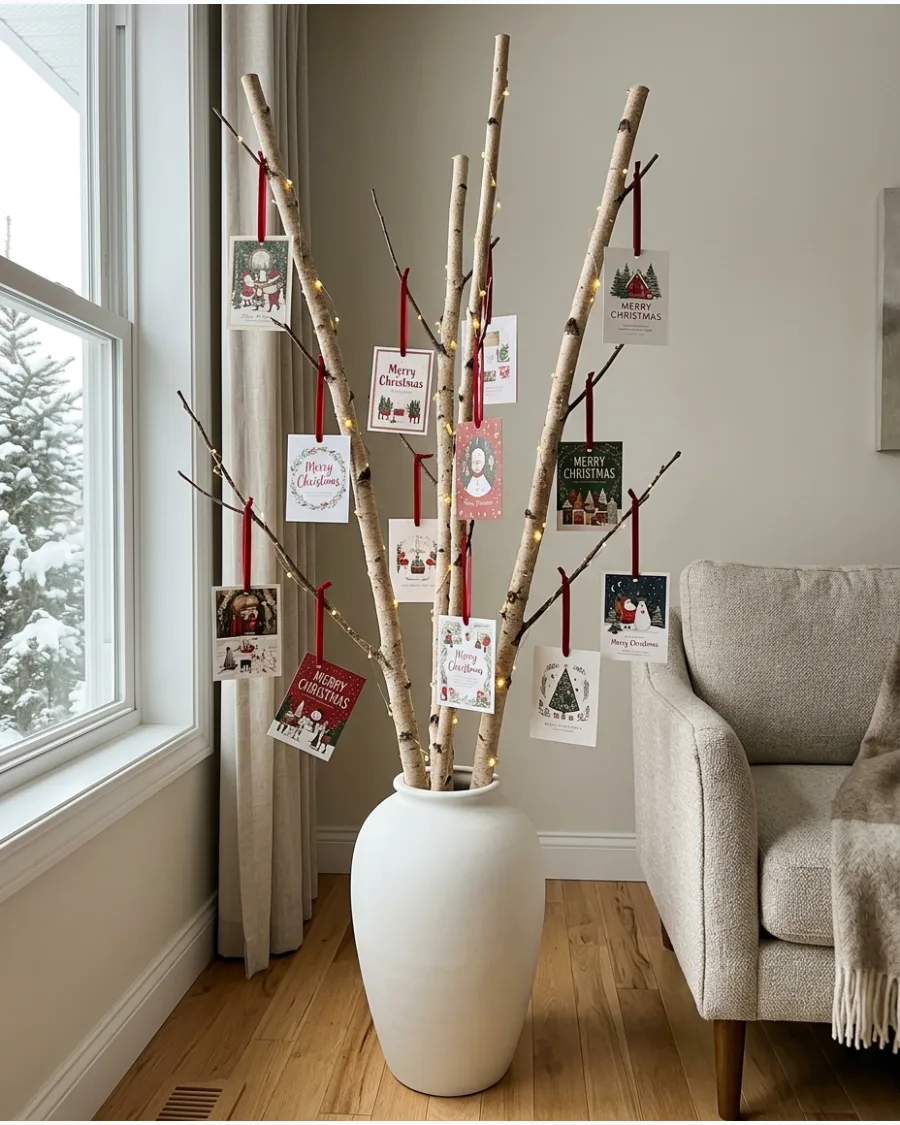
Create a sculptural, vertical display that saves wall space by using bare winter branches. Choose a selection of tall, sturdy branches with several offshoots to provide multiple natural hanging points for your collection.
Secure the branches in a heavy floor vase filled with decorative stones or sand to ensure the weight of the cards does not cause the arrangement to tip over. This 360-degree display works beautifully in a foyer or an empty living room corner.
- Attach cards using thin velvet ribbons or miniature wooden clothespins to keep the look cohesive and lightweight.
- Weave a single strand of battery-operated copper wire fairy lights through the branches for a subtle evening glow.
- Mix in a few shatterproof baubles in a single accent color to fill gaps between cards without adding excessive weight.
If you are using gathered branches from outdoors, lightly sand any rough patches to prevent the ribbons from snagging or the cards from tearing.
23. Tabletop Christmas Card Tree
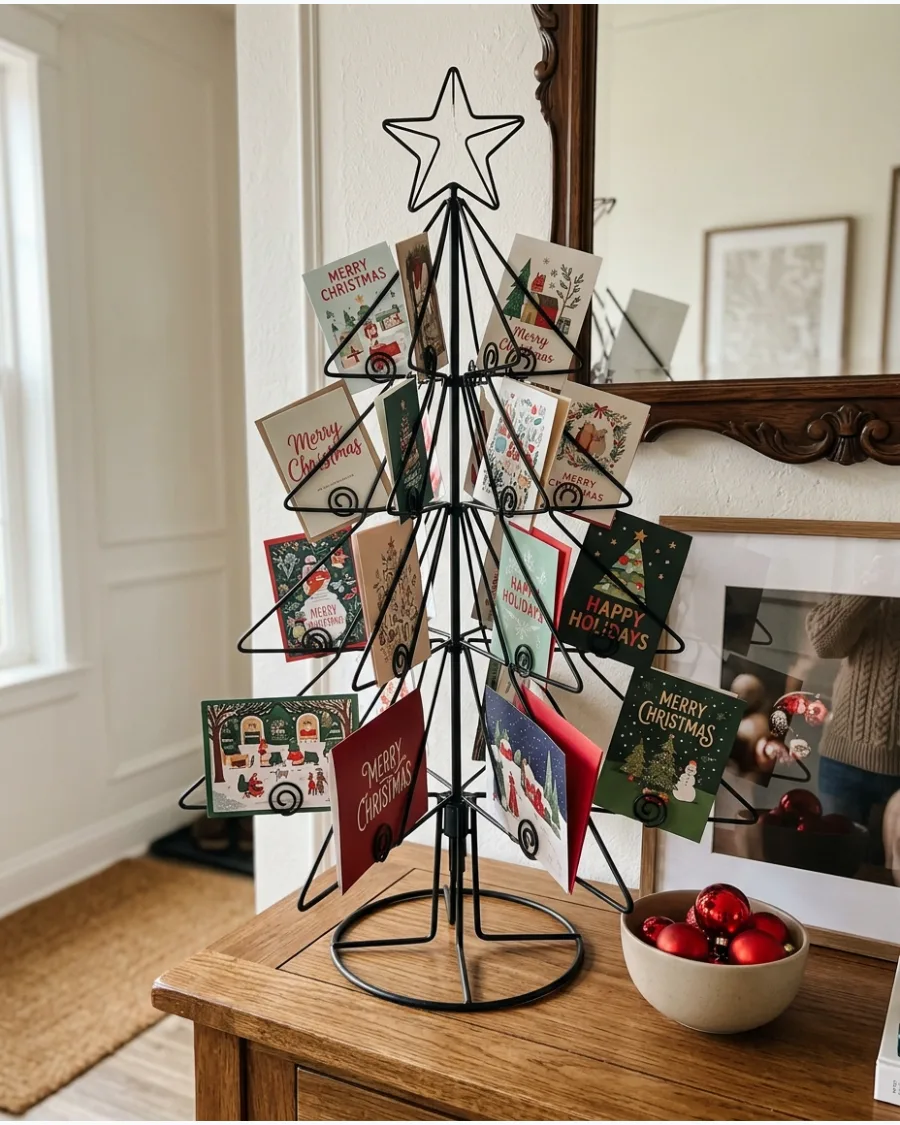
A tabletop tree holder provides a 360-degree view of your cards, making it an excellent centerpiece for a side table or entryway. Since it requires no wall mounting, it is a perfect solution for renters or those with limited wall space.
Arrange a metal or wooden tree-shaped card holder on a flat surface like a console table to keep your holiday greetings organized in a compact footprint. Simply slide the cards into the pre-made slots or use small clips to secure them to the tiered branches.
- Choose a weighted base to ensure the tree remains stable as you add heavier cardstock or photos.
- Rotate the tree occasionally to showcase different cards and keep the display looking fresh from every angle.
- Incorporate a few sprigs of real greenery or a short string of battery-operated fairy lights to enhance the festive look.
If your tree is made of thin wire, use lightweight mini clothespins instead of standard clips to prevent the branches from sagging.
24. Wire Christmas Tree Card Holder
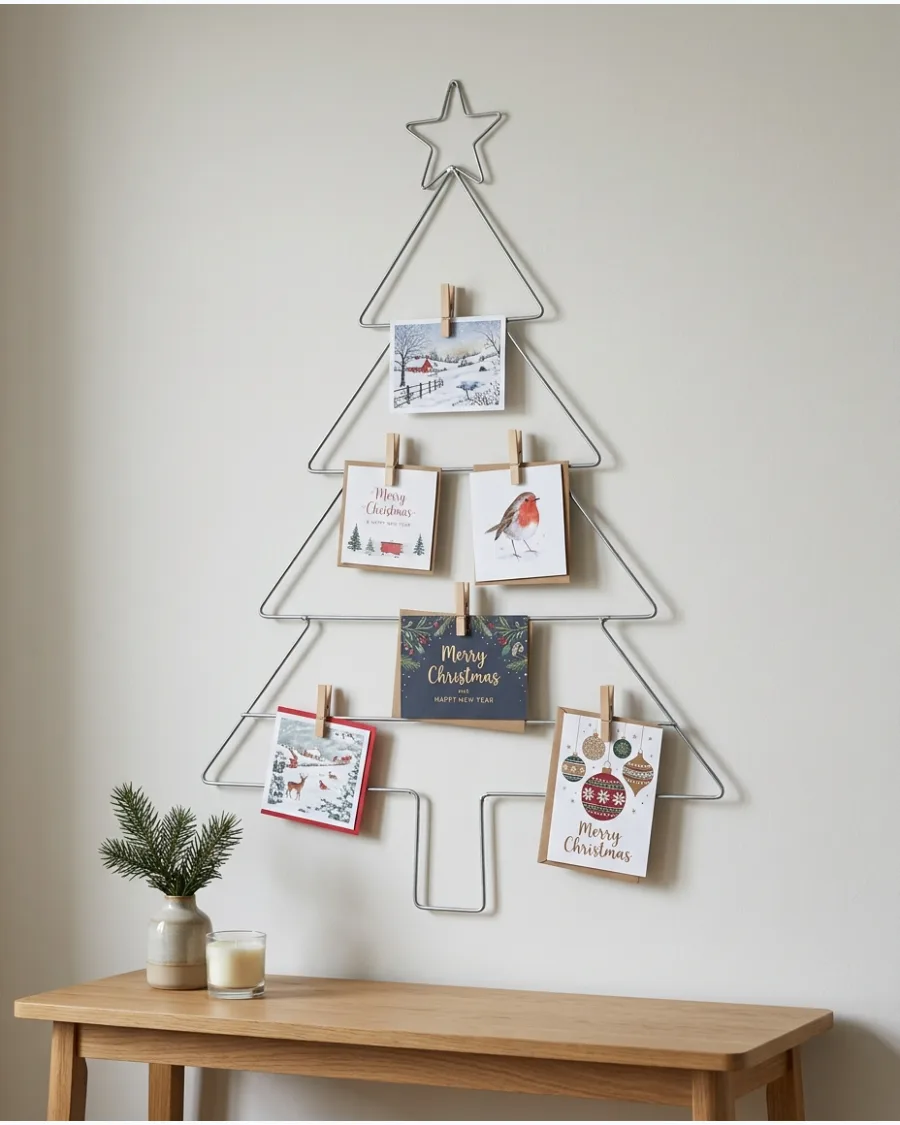
Create a minimalist wall-mounted tree that serves as a functional art piece by shaping a continuous length of craft wire. Bend the wire into a tiered triangular silhouette with internal horizontal cross-sections to provide multiple mounting points for your holiday mail. This open-frame design keeps the wall visible while providing a structured grid for card placement.
Secure the finished frame to the wall using small clear adhesive hooks or finish nails for a subtle, floating effect.
- Choose a 12 or 14-gauge aluminum or galvanized wire for enough rigidity to hold the weight of multiple cards without sagging.
- Space the horizontal wire tiers approximately 5 to 7 inches apart to prevent taller cards from overlapping the row below.
- Utilize mini decorative clothespins or small metal bulldog clips to fasten the cards securely to the horizontal wire sections.
Use needle-nose pliers to create tight, clean loops at the corners and joints of the wire tree for a more professional, finished look.
25. Christmas Card Ornament Tree
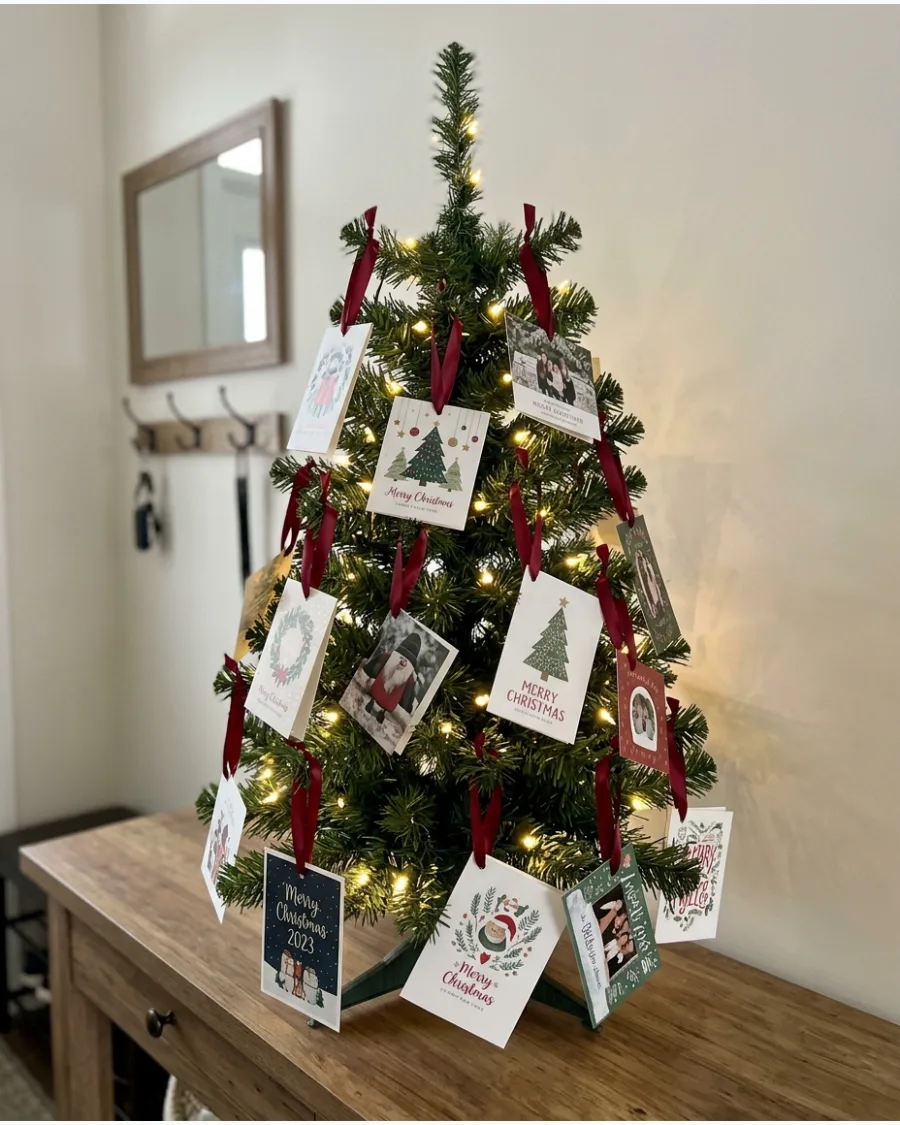
Transform a secondary, smaller tree into a dedicated archive for your holiday greetings. This approach keeps your main tree clutter-free while turning every card into a personal ornament.
Punch a single hole in the corner of each card and thread a thin velvet or satin ribbon through it to hang it securely from a branch. Keep the tree's own decorations minimal—just a few warm lights—so the focus stays on the photos and messages from friends and family.
- Use 1/8-inch ribbon in a single cohesive color to create a unified look across mismatched card designs.
- Distribute the heaviest cardstock pieces toward the inner center of the branches to prevent the tips from drooping.
- Angle the cards slightly outward so that the names or photos are clearly visible to guests walking by.
If you do not want to punch holes in the cards, use miniature decorative clothespins to clip the ribbons directly to the top edge of the cardstock.
26. Family Photo Card Christmas Tree
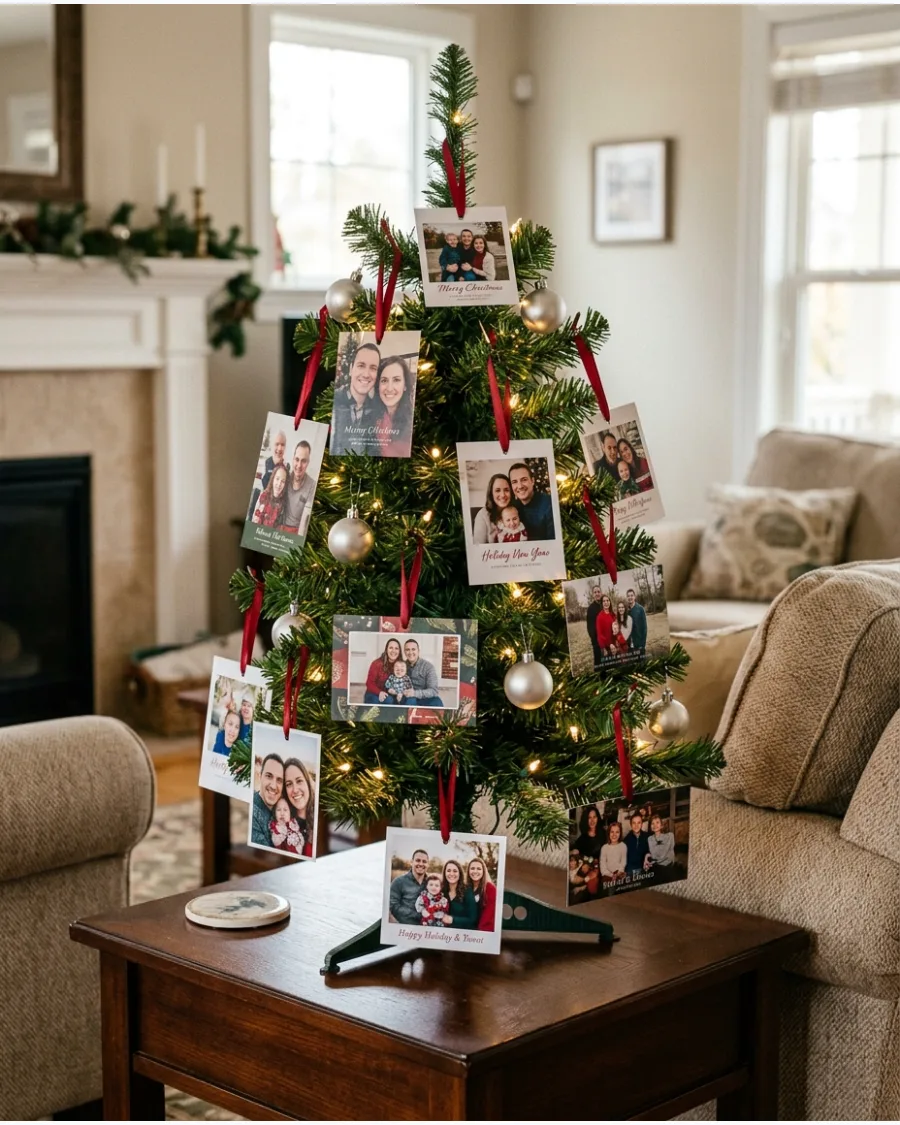
Reserve a smaller tabletop or secondary tree specifically for displaying photo cards from friends and family. Thread thin velvet or satin ribbons through small holes punched in the card corners to secure them securely to the branches. This creates a sentimental focal point that keeps the main tree clutter-free while celebrating your personal connections.
- Use a single-hole punch on the top left or center of each card to ensure they hang straight and even.
- Incorporate a few simple glass ball ornaments or wooden beads to fill the gaps between cards for a fuller look.
- Place the tree on a side table or credenza where guests can easily lean in to read the messages and see the photos.
If you want to preserve the cards without punching holes, use miniature decorative clothespins to clip the cards directly to the sturdier inner branches.
27. Wall Branch Christmas Card Display
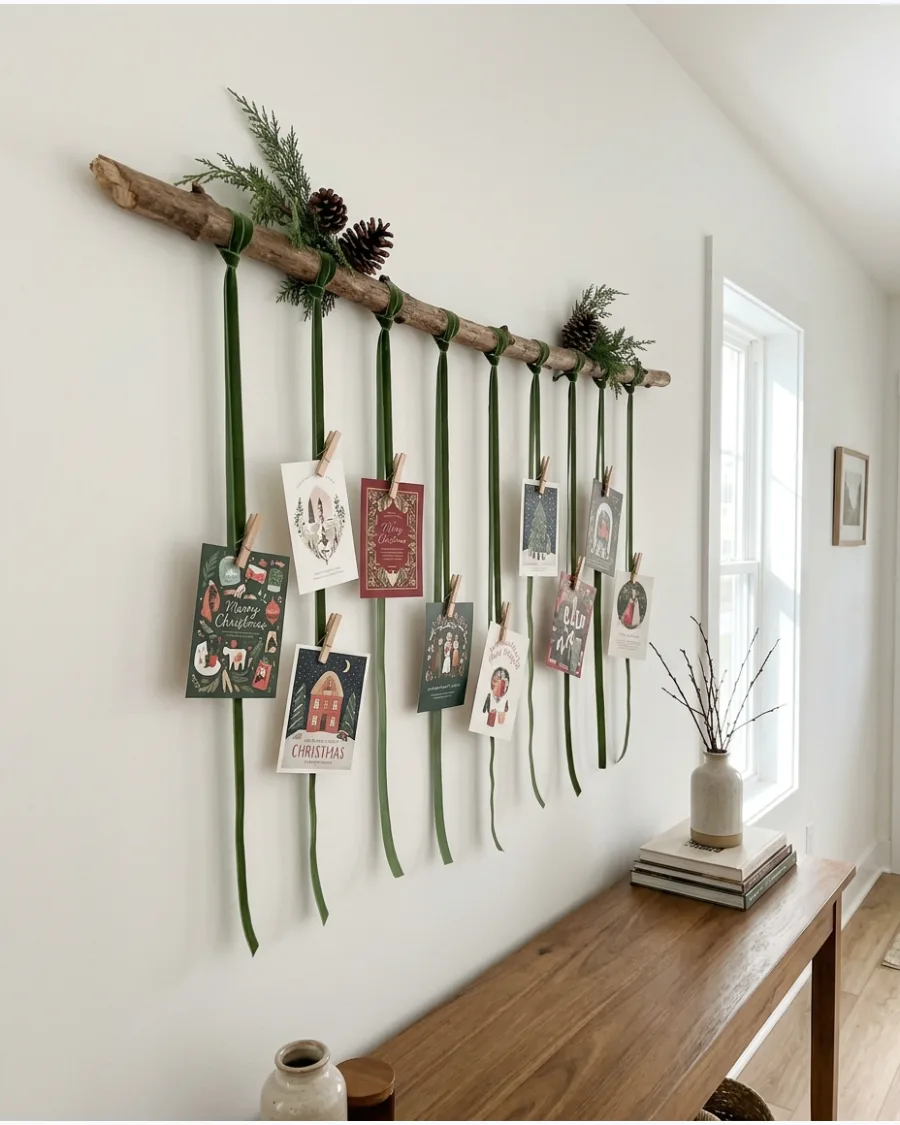
A natural branch brings an organic, rustic element to your wall while serving as a minimalist card holder. Secure a sturdy, cleaned branch to the wall horizontally using two discreet hooks or heavy-duty fishing line suspended from the molding. You can then tie ribbons of varying lengths to the wood to create a tiered, hanging gallery.
- Select a branch with interesting texture, such as oak or birch, and ensure it is dry and free of loose bark.
- Hot glue small pinecones or sprigs of dried eucalyptus to the ends of the branch for extra holiday flair.
- Use neutral twine or velvet ribbon to hang the cards, ensuring the colors complement your wall paint.
Balance the visual weight of the display by placing larger, heavier cards toward the top of the branch and smaller cards on the longer ribbons.
28. Birch Branch Christmas Card Display
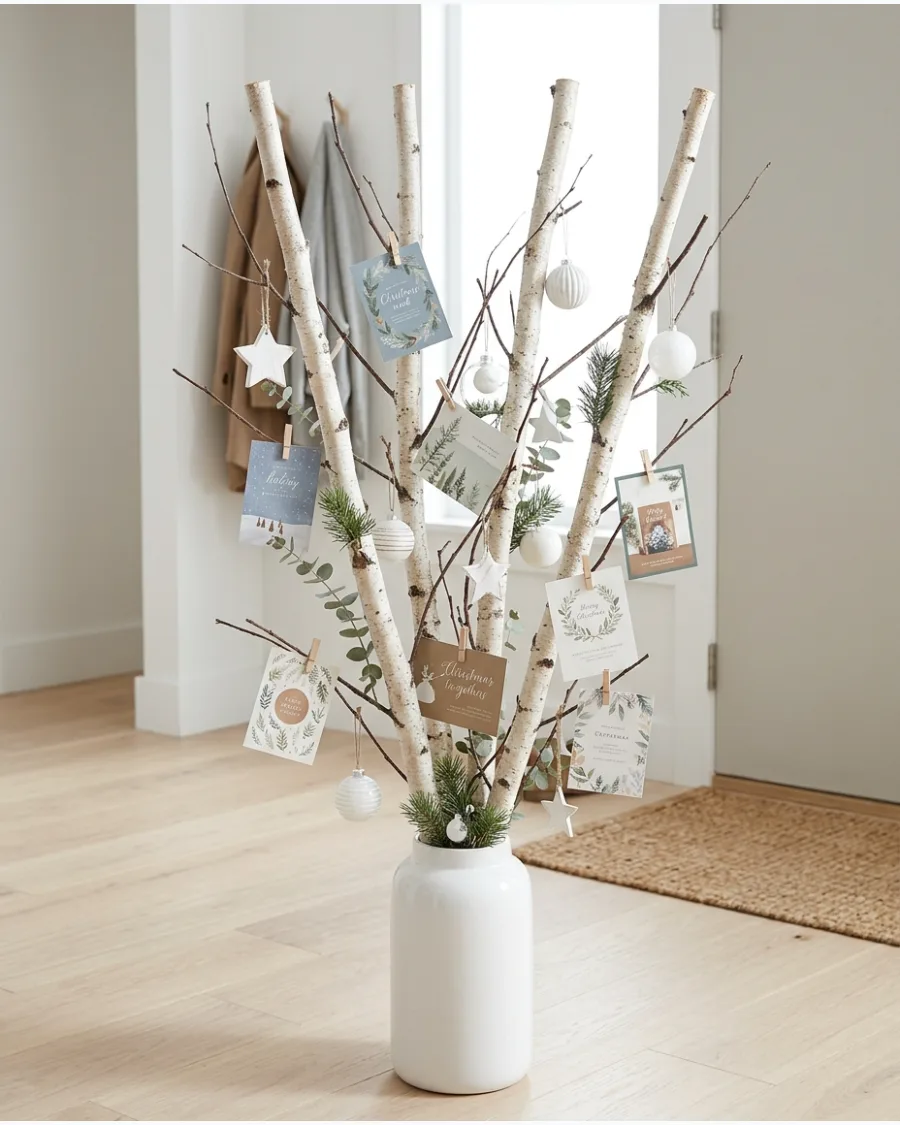
This Scandinavian-inspired arrangement uses the stark beauty of white birch to frame your holiday mail. Place several tall, pale birch branches into a heavy ceramic vase or glass vessel filled with decorative stones to keep the arrangement stable. Use tiny wooden clothespins or clear clips to attach your cards directly to the thinner twigs of the branches.
- Incorporate a few monochromatic white or silver ornaments to enhance the clean, wintry aesthetic.
- Keep the greenery sparse by adding just a few sprigs of cedar or pine at the base of the branches.
- Choose branches of varying heights and widths to create a more dynamic and natural-looking silhouette.
If you have heavy cards, clip them closer to the main trunk of the branch to prevent the delicate tips from bending or sagging.
29. Cascading Branch Card Display
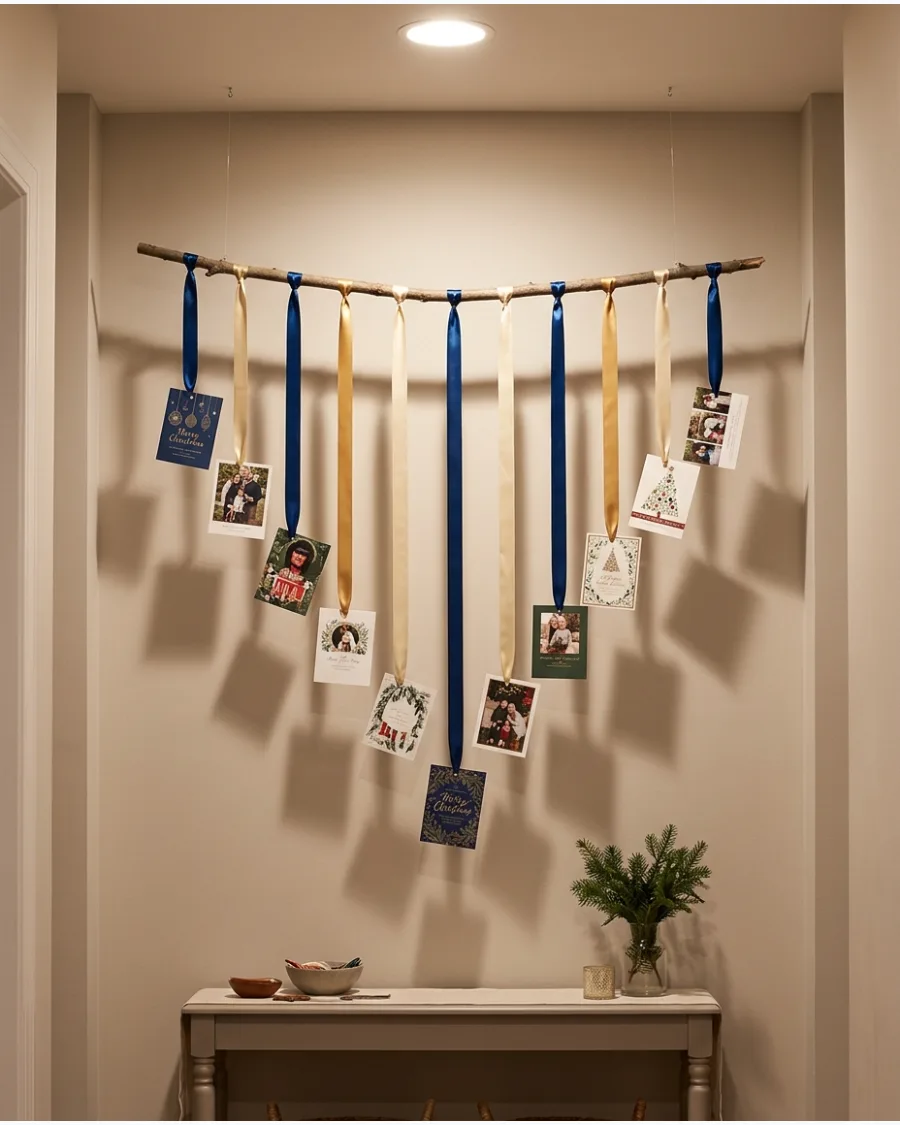
Create a hanging focal point that mimics the look of a holiday mobile or an inverted tree. Suspend one sturdy branch horizontally from the ceiling and hang ribbons in a 'V' shape, with the longest ribbons in the center and shorter ones toward the edges. This intentional arrangement gives the display a structured, professional appearance that fits perfectly over a console table.
- Use cardstock or cards in coordinating color palettes to maintain a cohesive look across the entire display.
- Secure the cards to the ribbons using decorative paperclips, gold binder clips, or tiny adhesive dots.
- Verify the branch is level before you begin hanging the ribbons to ensure the final cascade is symmetrical.
Use clear fishing line to hang the branch from the ceiling so it looks as if the cards are floating in mid-air.
30. Wooden Christmas Tree Card Stand
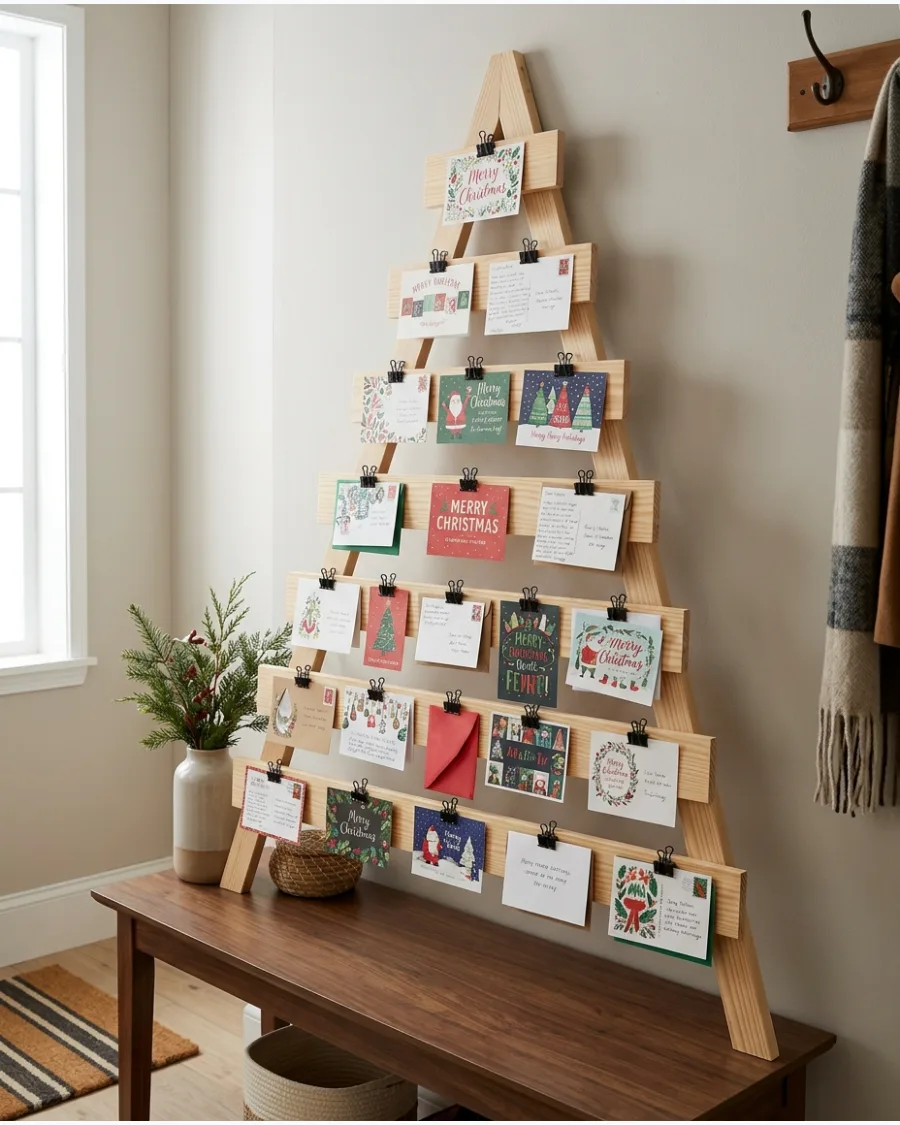
A wooden silhouette tree provides a structured, modern way to organize your holiday mail without taking up floor space. Construct or purchase a flat-backed wooden tree frame with horizontal crossbars that serve as rails for clipping on your cards. You can lean this lightweight frame against an entryway wall or place it atop a wide shelf as a sturdy alternative to wall-mounted displays.
- Paint the wood a crisp white for a modern look or leave the natural grain exposed for a rustic farmhouse feel.
- Use decorative clips or small pegs to keep the cards perfectly aligned along the slats for a tidy appearance.
- Place the stand in a high-traffic area like an entryway to make it easy to add new cards as they arrive daily.
Add a small basket or tray at the base of the wooden tree to hold outgoing mail or envelopes you want to keep for their return addresses.
RUSTIC AND REPURPOSED CHRISTMAS CARD DISPLAYS
31. Vintage Ladder Christmas Card Display
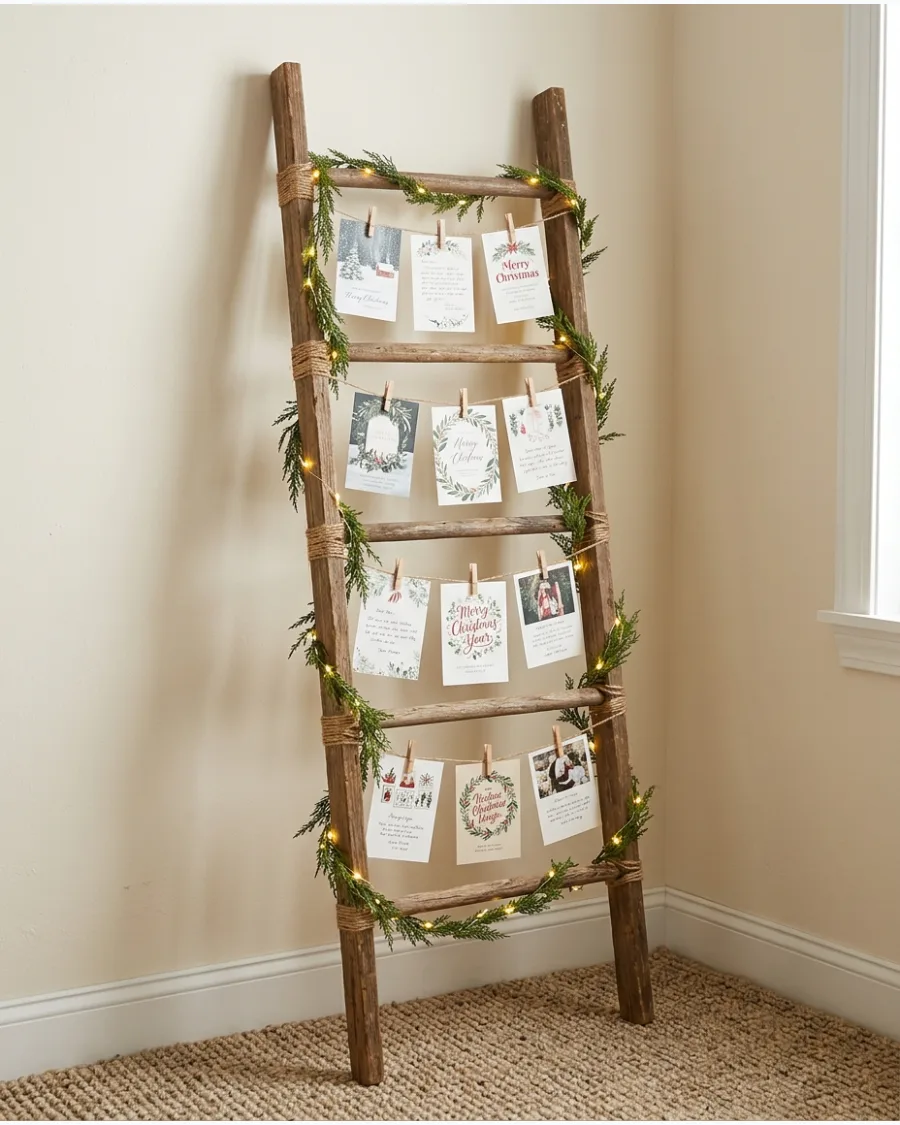
Repurpose a slim wooden ladder to create a vertical gallery that doesn't require permanent wall mounting or complex installation. Wrap strands of natural jute twine horizontally around the rungs or between the side rails, securing the ends with a discreet knot on the backside. This setup allows you to clip cards at varying heights while keeping the ladder's rustic texture visible.
Intersperse the cards with a thin strand of battery-operated fairy lights to add a warm glow to your holiday greeting collection.
- Use mini wooden clothespins to clip cards to the twine for a cohesive, rustic aesthetic.
- Drape a lightweight pine or eucalyptus garland along just one side of the ladder to add color without crowding the cards.
- Apply adhesive rubber pads to the ladder feet to prevent the display from sliding on smooth hardwood or tile floors.
If your ladder rungs are particularly wide, use two parallel strands of twine per rung to keep oversized cards from tilting forward.
32. Vintage Window Christmas Card Display
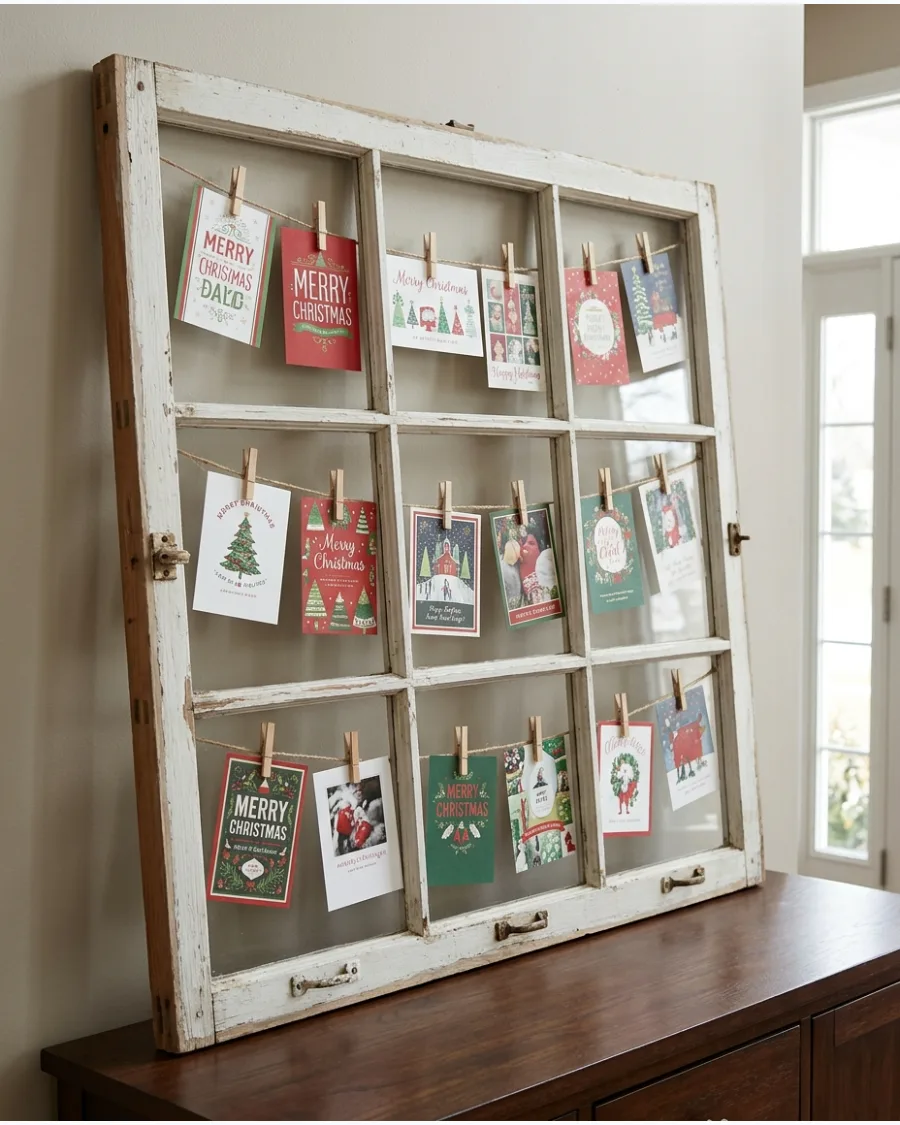
Use an old multi-pane window frame to create a structured yet rustic backdrop for your holiday mail. Secure thin florist wire or natural twine horizontally across the back of each window opening using small staples or tacks. This allows you to clip cards into specific quadrants, keeping the display organized even as it fills up throughout the season.
The weathered wood frame acts as a built-in border that highlights each card like a mini gallery piece.
- Space lines about 4 to 6 inches apart to ensure cards do not overlap and obscure the window's character.
- Use miniature wooden clothespins or decorative metal clips to keep the rustic aesthetic consistent with the repurposed wood.
- Lean the window against a wall or mantel for a renter-friendly option that avoids heavy wall-mounting hardware.
Clean the glass thoroughly before adding wires, as it is much harder to wipe away smudges once the cards are clipped in place.
33. Antique Shutter Christmas Card Holder
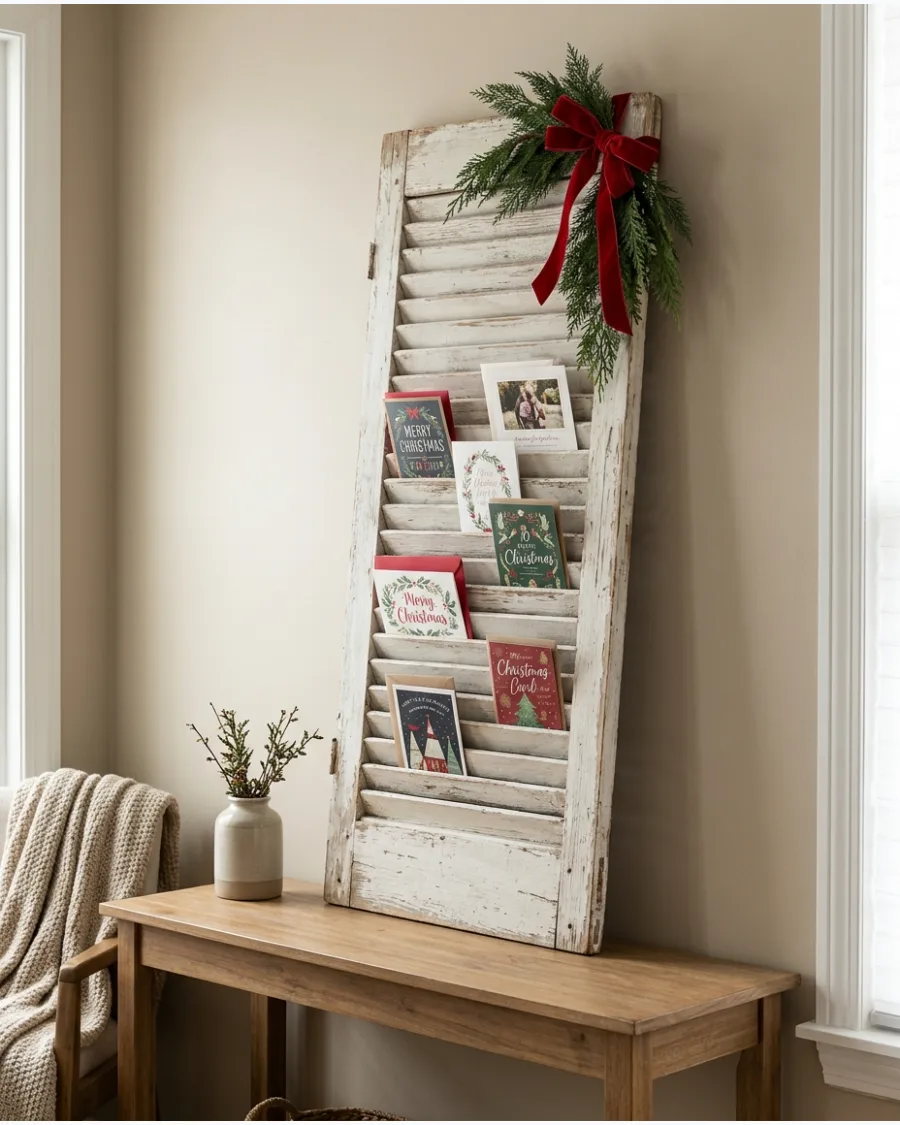
Repurpose a weathered architectural element to serve as a sturdy, vertical card organizer. The angled slats of a wooden shutter naturally grip the edges of greeting cards without the need for clips or tape.
Lean the shutter against a wall on a console table or mantel to create a rustic focal point that requires no wall hardware. This setup allows you to easily rearrange or add new mail as it arrives throughout the season.
- Choose a shutter with slightly open louvers to ensure thick card stock can slide in without bending.
- Drape a simple pine or cedar garland over the top corner for a festive touch that doesn't hide the wood texture.
- Leave some slats empty to maintain the aesthetic and prevent the display from looking cluttered.
If the shutter has a very slick or painted finish, use a small piece of double-sided removable tape on the back of heavier cards to keep them from sliding down.
34. Chicken Wire Frame Christmas Card Display
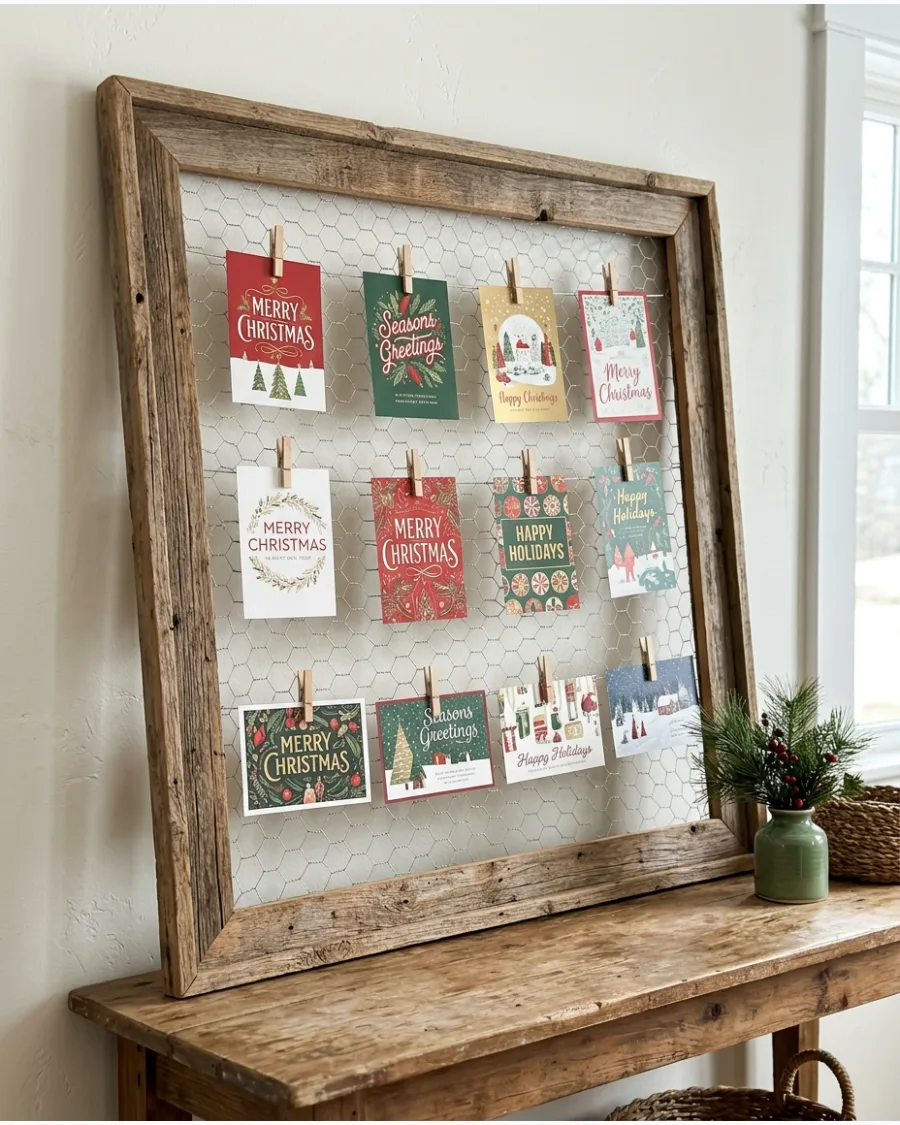
Repurpose an old window frame or a large wooden picture frame by replacing the glass with a functional mesh. Secure a piece of chicken wire to the back of a rustic wooden frame using a heavy-duty stapler to create a textured, open-grid backdrop. This setup allows you to clip holiday greetings anywhere on the wire without damaging the frame or the cards.
It works well as a standalone piece on a console table or mounted on a focal wall.
- Choose a frame with a distressed or natural wood finish to emphasize the farmhouse aesthetic.
- Use 1/2-inch or 1-inch hexagonal wire mesh to ensure there are plenty of attachment points for various card sizes.
- Utilize miniature wooden clothespins to hold cards securely against the wire while keeping the hardware subtle.
Trim any sharp edges of the chicken wire with wire cutters and cover them with duct tape or a thin wood trim on the back to protect your walls from scratches.
35. Rustic Pallet Christmas Card Display
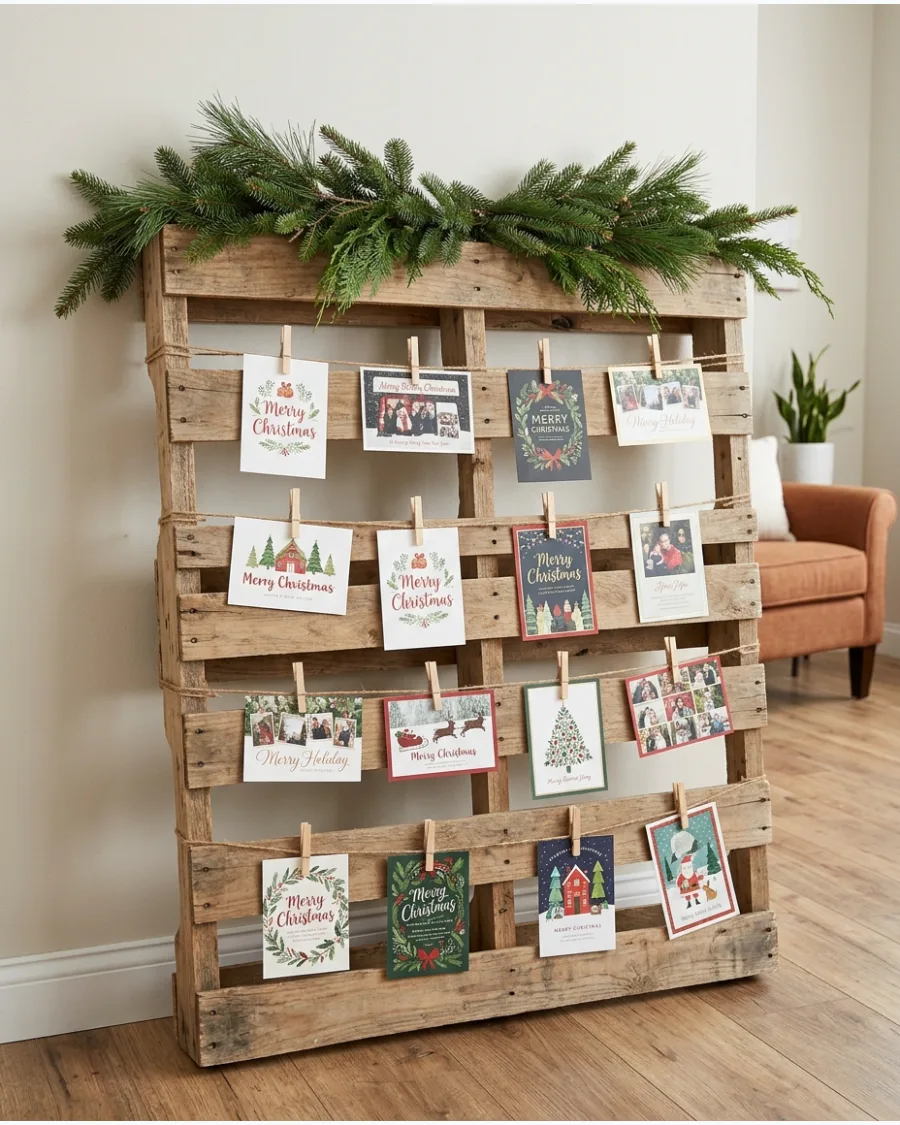
Transform a salvaged shipping pallet into a charming vertical gallery for your holiday mail. After cleaning and sanding the wood to prevent splinters, wrap several lengths of natural jute twine horizontally across the slats to create rows for hanging cards. Secure the twine on the back of the pallet with staples or small nails for a clean look.
This sturdy structure provides a grounded, farmhouse-style focal point that works well in entryways or living room corners.
- Attach a lush evergreen swag across the top board using floral wire to add a seasonal scent and color.
- Use mini wooden clothespins to secure cards, allowing you to easily swap or reorganize them as more mail arrives.
- Apply a light wood wax or clear coat to the pallet boards to enhance the natural grain and protect your interior walls.
If leaning the pallet against a wall, add felt pads to the back corners to prevent the wood from scratching your paint.
36. Farmhouse Christmas Card Ladder
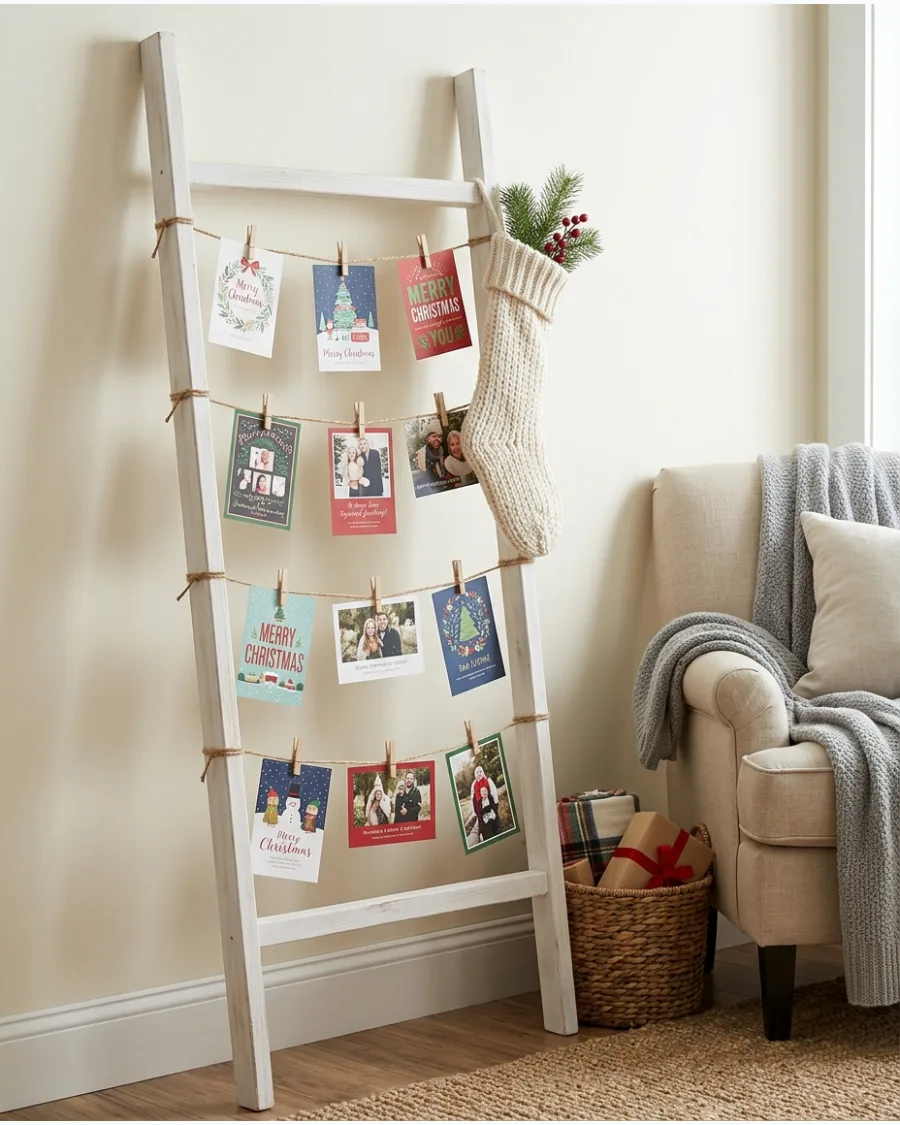
Use a decorative wooden ladder as a vertical gallery for holiday greetings to utilize height without requiring wall holes. This setup is perfect for temporary seasonal decor in small corners or entryways.
Tie lengths of twine horizontally between the ladder rungs and use small clothespins to secure your favorite cards.
- Drape a chunky knit stocking or a small wreath over one corner for added texture.
- Choose a white-washed finish for a bright cottage feel or natural wood for a classic rustic look.
- Position the ladder in an unused corner or next to the Christmas tree to integrate it into your existing decor.
Ensure the ladder feet are placed on a rug or have non-slip pads to prevent it from sliding on smooth flooring.
37. Vintage Sled Christmas Card Display
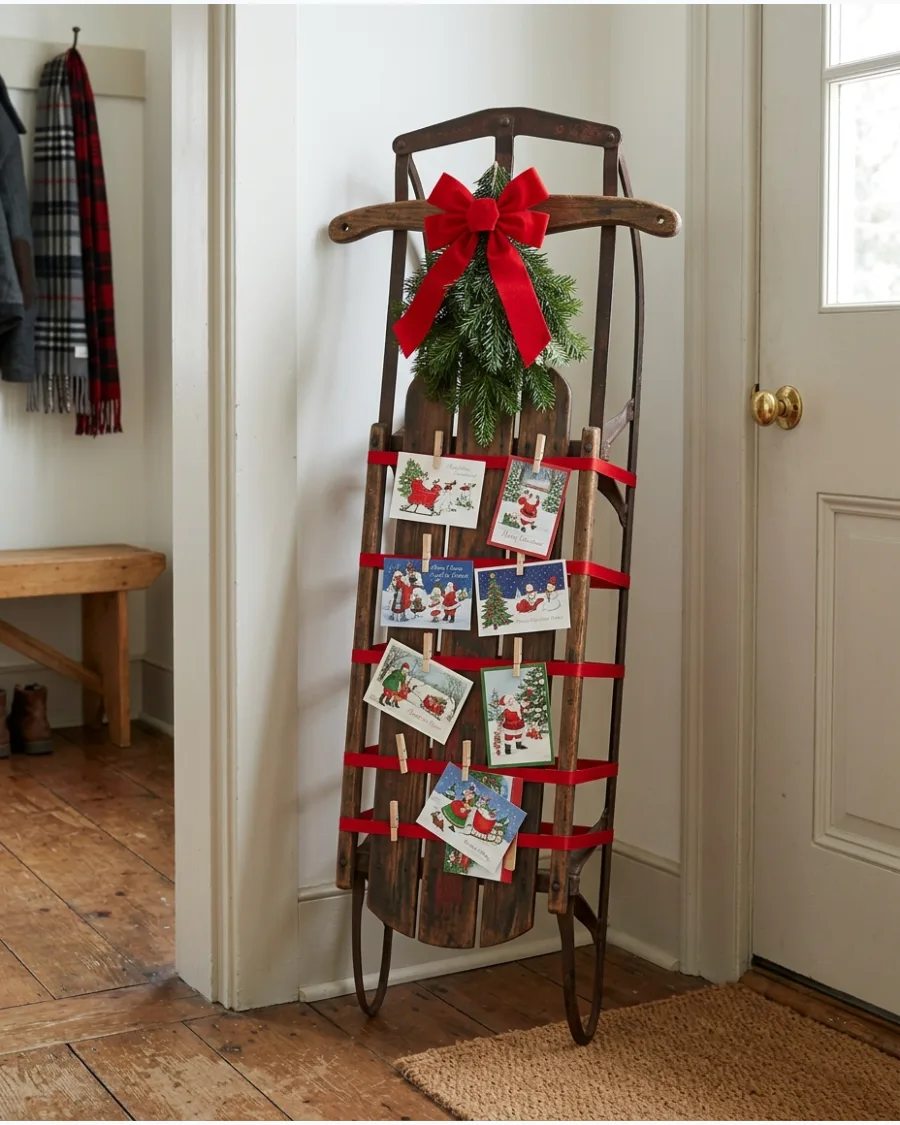
A vintage wooden sled adds instant nostalgia and vertical interest to an entryway or living space. By repurposing this classic winter icon, you create a dedicated station for festive mail that feels like a deliberate piece of art.
Wrap ribbon or twine tightly around the wooden slats and runners to provide a sturdy anchor for your card collection.
- Accent the top curve of the sled with a bundle of fresh pine branches and a large red velvet bow.
- Keep the cards arranged within the frame of the sled to preserve its recognizable silhouette.
- Use heavy-duty clips if the sled is placed in a high-traffic entryway to ensure cards stay in place.
If using a genuine antique sled, check for loose nails or rough splinters that could snag delicate card paper.
38. Old Door Christmas Card Display
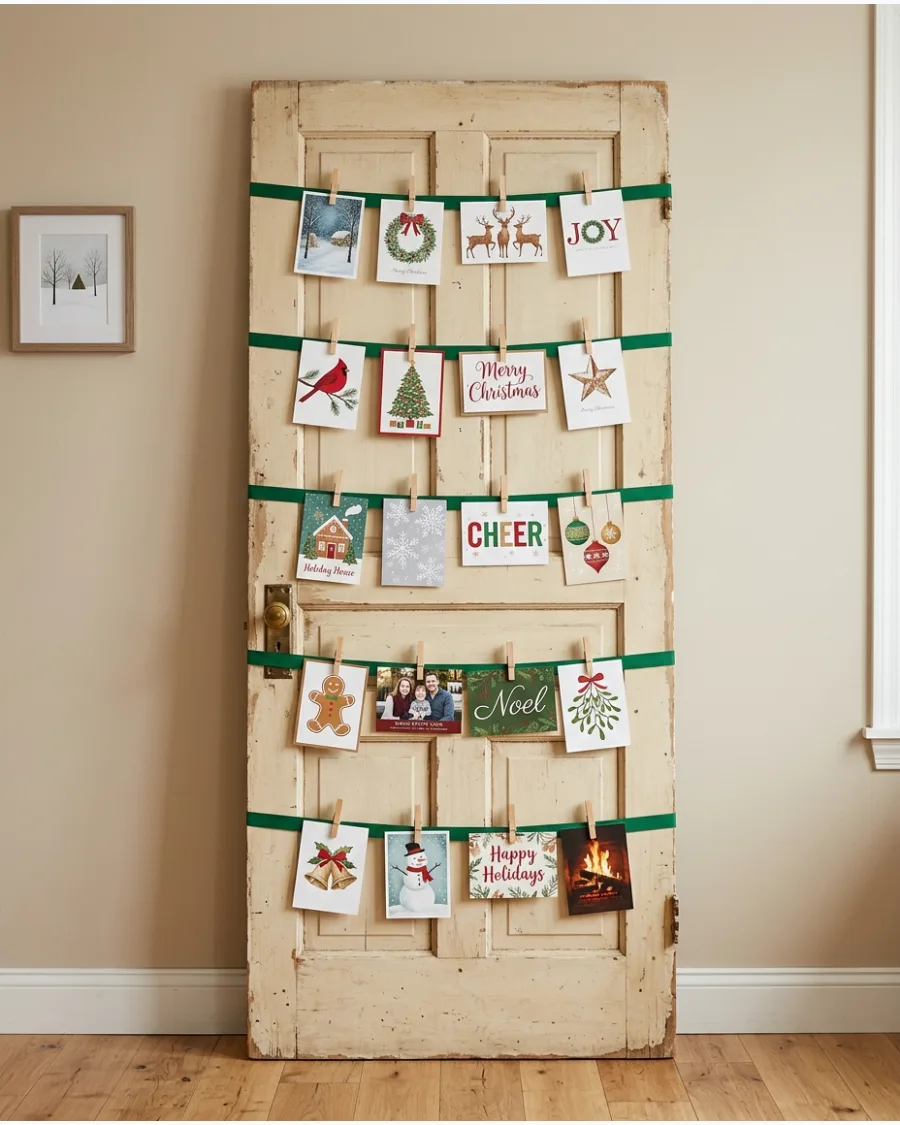
Reclaimed doors serve as substantial architectural backdrops for large collections of holiday cards. This setup is ideal for filling a wide wall space or a corner in a spacious living room without committing to permanent mounting.
Stretch rows of decorative ribbon horizontally across the recessed panels and secure them to the back or sides of the door frame.
- Use a narrow pantry door or a salvaged interior door with interesting molding to add character.
- Attach cards with small metal clips or painted clothespins for a uniform, organized look.
- Lean the door at a slight angle and secure it to the wall with furniture straps for safety in homes with children.
Apply painters tape on the back of the door to temporarily hold ribbon ends while you adjust the tension for a perfectly straight line.
39. Rustic Wood Board Merry Mail Display
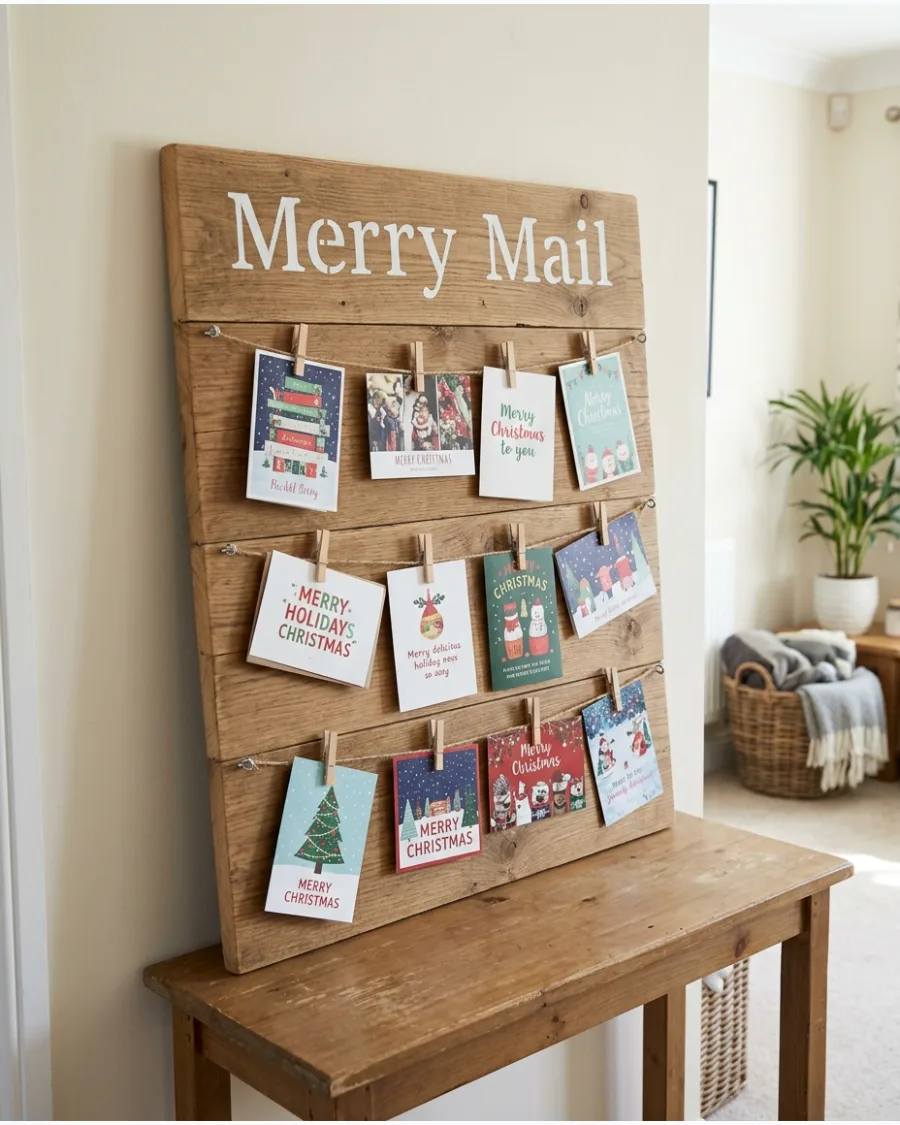
This DIY board keeps your holiday mail organized while adding a clear, festive title to your decor.
It functions like a large-scale bulletin board but with a more textured, rustic aesthetic that fits farmhouse themes.
Stencil the words 'Merry Mail' across the top of a wide reclaimed wood plank and staple horizontal rows of twine underneath.
- Sand the edges and surface of the board to prevent splinters while you are pinning and removing cards.
- Space the twine rows at least 6 to 8 inches apart to accommodate taller vertical cards without overlap.
- Add a heavy-duty sawtooth hanger on the back for wall mounting or simply lean it on a sideboard.
Use a white paint pen for the lettering on dark wood to ensure the title is legible from across the room.
40. Wooden Crate Christmas Card Display
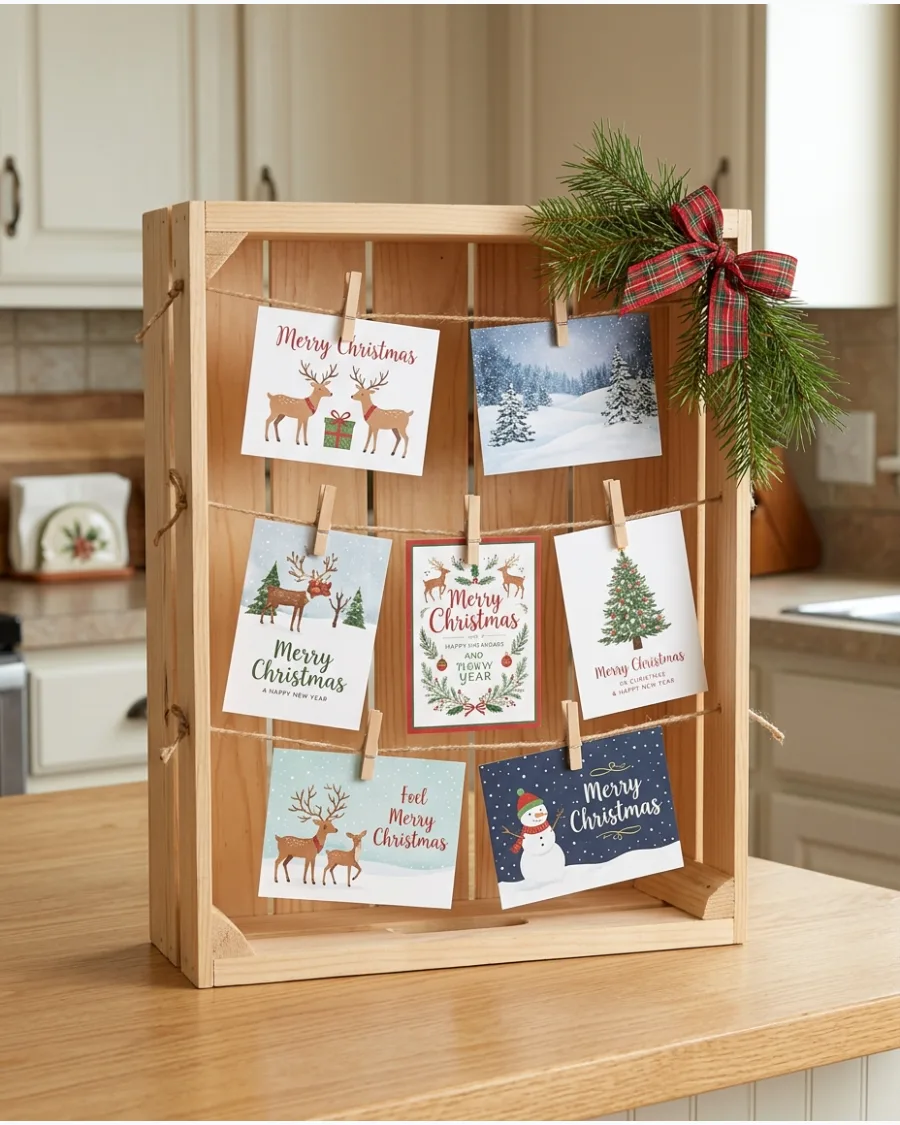
Convert a shallow wooden crate into a compact, self-contained card holder that fits perfectly on a countertop or fireplace hearth. Standing the crate on its narrow end provides the necessary vertical height for multiple rows of strings.
String twine back and forth across the open front of the crate and clip your cards along the lines for a shadowbox effect.
- Tuck a small sprig of fresh pine and a burlap bow into one of the top corners for a finished look.
- Use a crate with a depth of at least 3 inches to ensure it remains stable when standing vertically.
- Paint the interior of the crate a dark color like forest green or navy to make white and cream cards pop.
Pre-drill small holes in the side slats of the crate to thread the twine through for a cleaner, more secure finish than stapling.
SMALL-SPACE AND CREATIVE CHRISTMAS CARD DISPLAYS
41. Mirror Christmas Card Display
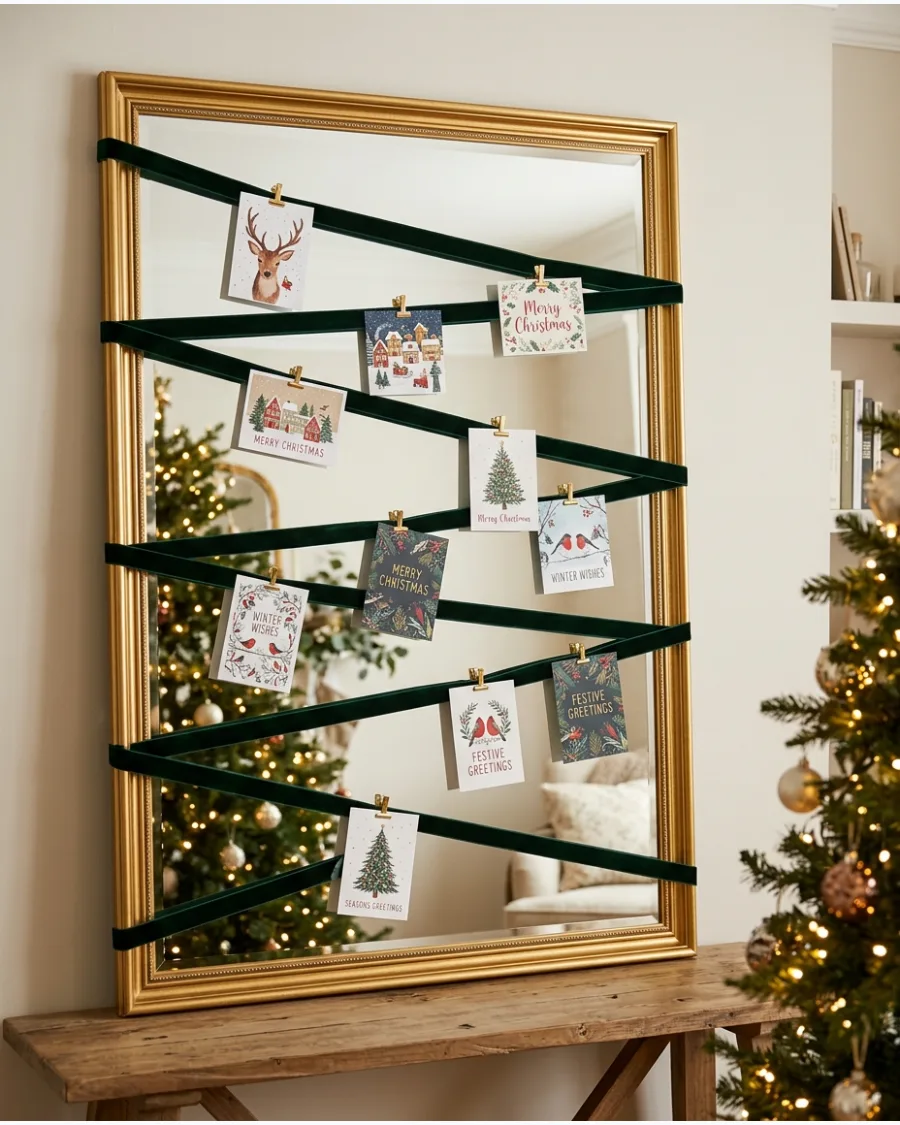
Use a large wall mirror as a backdrop for cards to double the visual impact of your holiday greetings. Stretch velvet ribbon in a loose zigzag pattern across the face of the mirror and secure the ends to the back or the frame with strong tape. This method allows the mirror to reflect ambient holiday lighting while showcasing your cards without damaging the glass.
Small clips or clothespins hold the cards in place while keeping the reflective surface visible.
- Use thin velvet ribbon to provide enough grip for the clips without adding excessive bulk.
- Position the zigzag so it covers the top two-thirds of the mirror for the best visibility.
- Leave gaps between the cards to allow the mirror to reflect nearby Christmas tree lights.
Use clear command hooks on the back of the mirror frame to anchor the ribbon ends without leaving residue on the glass.
42. Interior Door Christmas Card Display
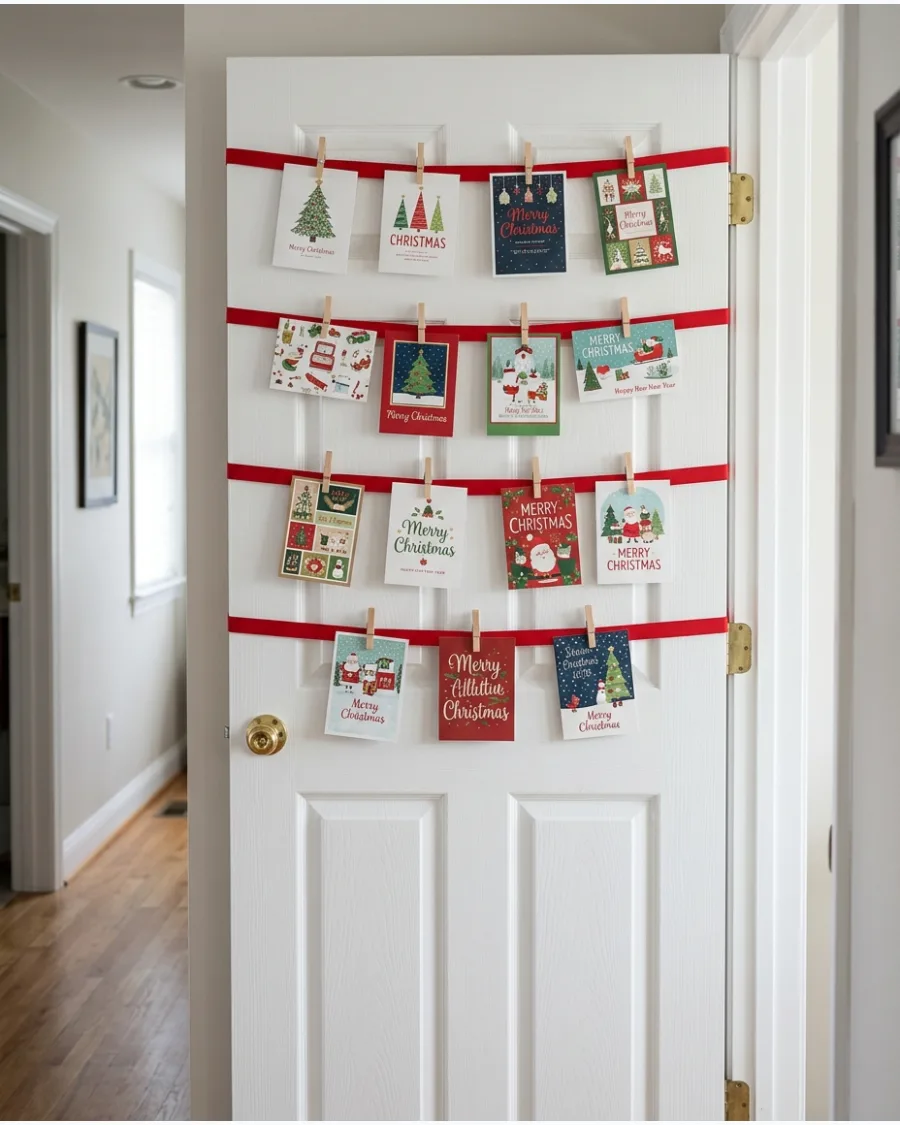
An unused interior door provides a large vertical canvas for seasonal mail without taking up floor space. Run several horizontal strands of ribbon or twine across the door and secure them to the side edges with flat tacks or heavy-duty tape. This approach keeps your cards organized and off the counters while keeping them centrally located.
It is particularly effective for renters or those in small apartments where wall space is limited.
- Tighten the ribbon strands before securing them to prevent sagging as the weight of the cards increases.
- Match the ribbon color to your existing room decor for a cohesive holiday look.
- Distribute heavier cardstock cards evenly across the rows to maintain structural balance.
If using a door that usually stays open, mount the display on the side that faces into the room to maximize visibility.
43. French Door Christmas Card Display
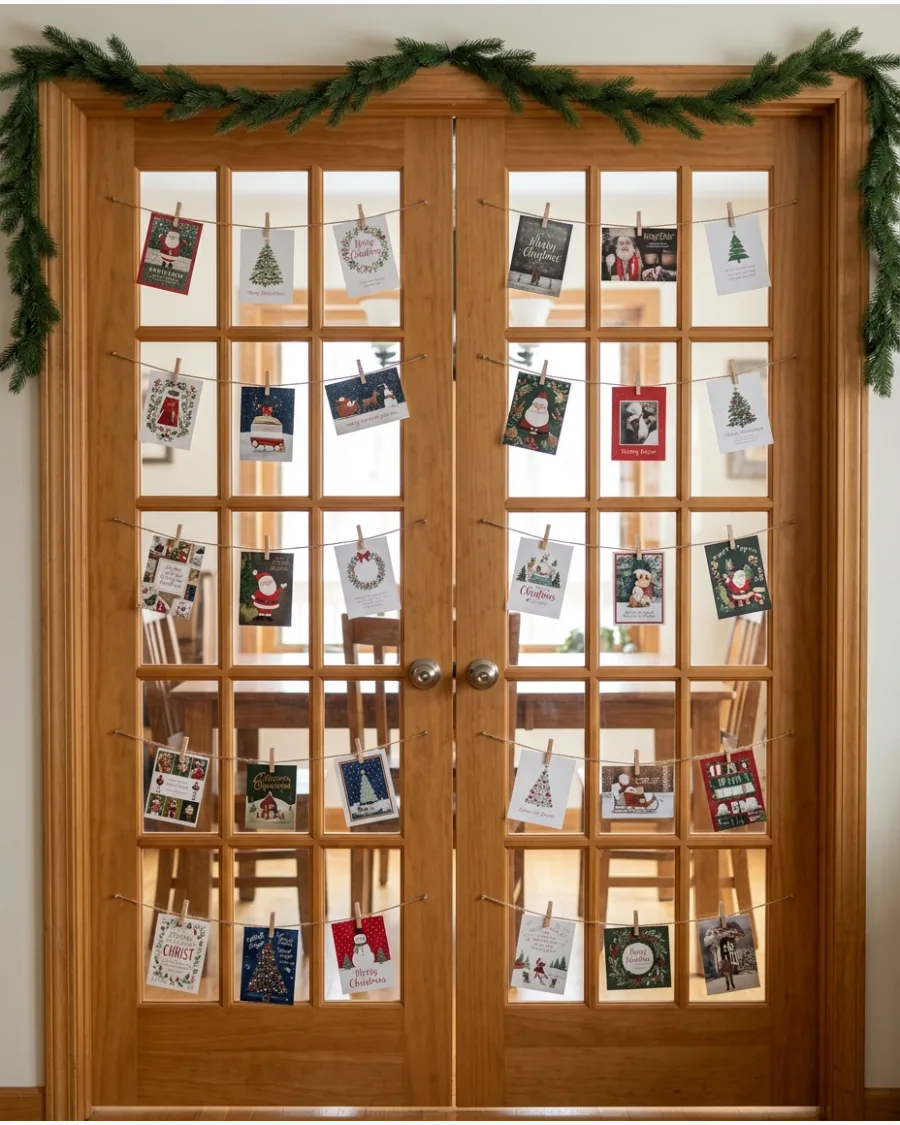
French doors offer a unique architectural grid that naturally frames a card collection. Stretch twine horizontally across the individual glass panes and clip a few cards to each row, ensuring the door remains functional and easy to open. To make the display feel like a deliberate part of your home's architecture, frame the entire doorway with a simple evergreen garland.
This setup turns a transitional doorway into a festive focal point in the room.
- Use lightweight natural jute twine to complement the glass and wood aesthetic.
- Ensure clips are small enough to allow the door to close without hitting the frame.
- Limit the number of cards per pane to keep the view through the glass relatively clear.
Apply small dabs of removable poster putty on the bottom corners of the cards to keep them from fluttering when the door is opened or closed.
44. Christmas Card String Light Display
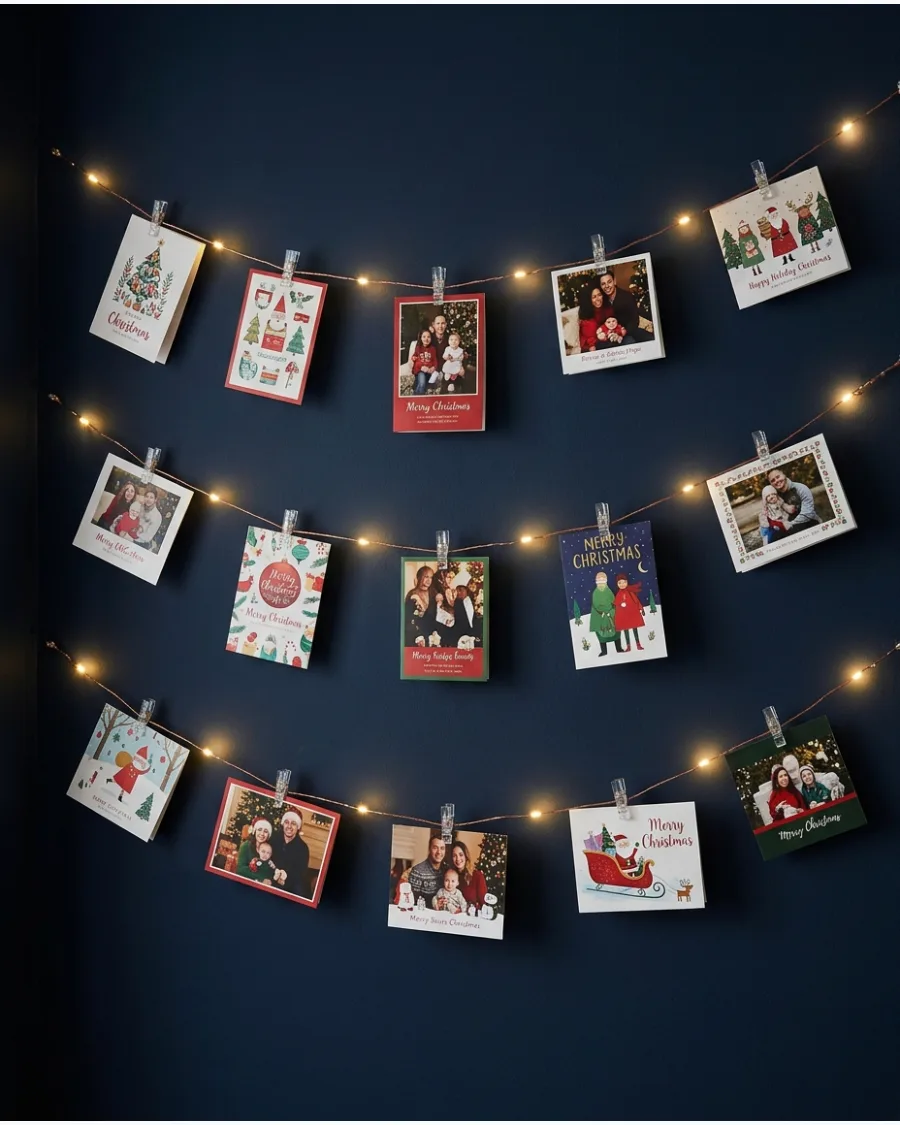
Illuminate your holiday greetings by combining them with soft ambient lighting on a blank wall. Hang warm LED string lights in a horizontal or scalloped pattern and use separate lightweight clips to display cards along the strands between the bulbs. This creates a glowing display that looks festive at night and clear during the day.
By spacing the cards carefully, you ensure the photographs stay visible without covering the light source.
- Opt for battery-operated lights to avoid trailing power cords across the floor.
- Use tiny transparent clips so they do not block the light or the card artwork.
- Select a wall near an outlet if using plug-in fairy lights to keep the setup tidy.
Choose 'warm white' LEDs rather than 'cool white' to give the paper cards a cozy, traditional holiday glow.
45. Christmas Card Curtain Display
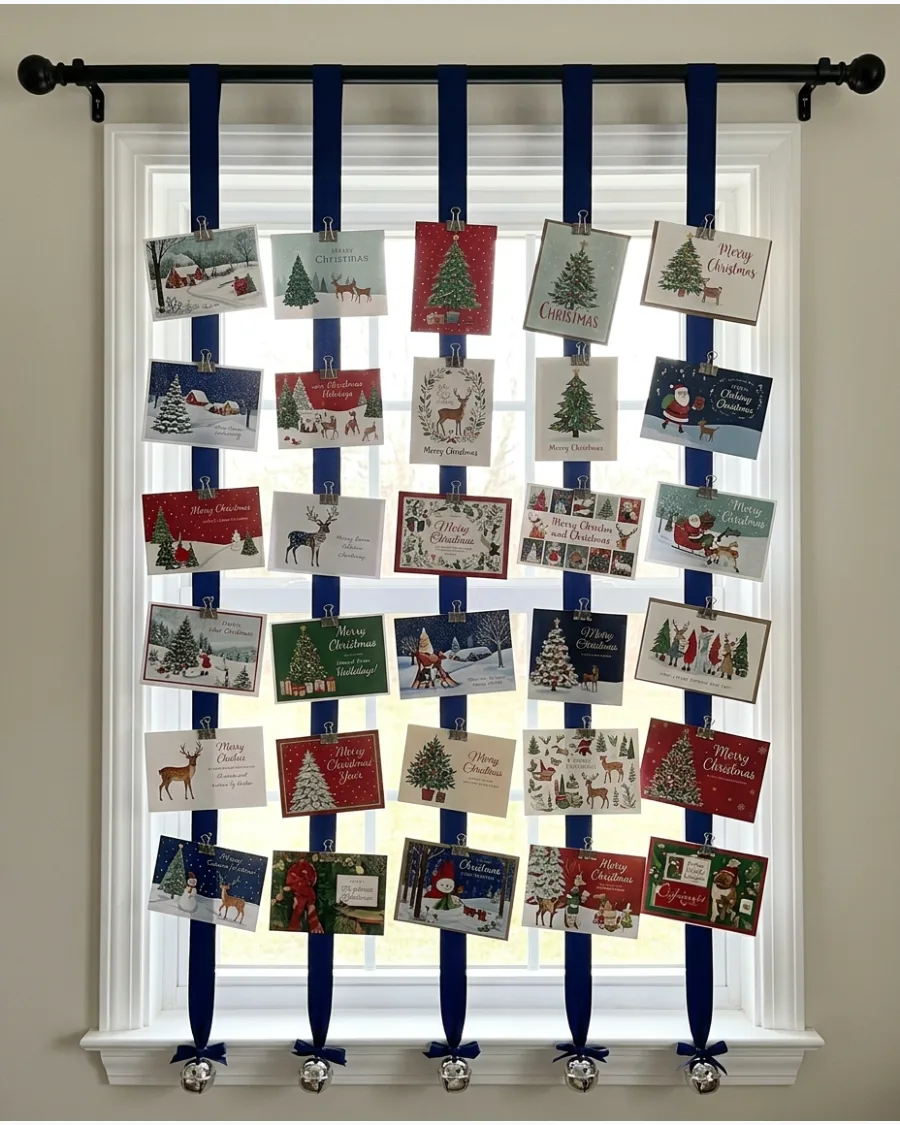
Transform a window or a narrow wall into a vertical gallery using a ribbon curtain. Hang several long ribbons vertically from a curtain rod or a temporary tension rod and clip cards in a descending line down each strand. This high-capacity display is perfect for households that receive many cards and need a system that can expand as new mail arrives.
It utilizes vertical space effectively, making it a smart choice for thin wall sections between windows.
- Weight the bottom of each ribbon with a small ornament to keep the lines hanging straight.
- Space the vertical ribbons roughly six inches apart to prevent the cards from overlapping.
- Vary the lengths of the ribbons for a more dynamic and tiered visual appearance.
Use grosgrain ribbon instead of satin; the ribbed texture provides better friction that keeps the clips from sliding down the ribbon.
46. Christmas Card Basket Display
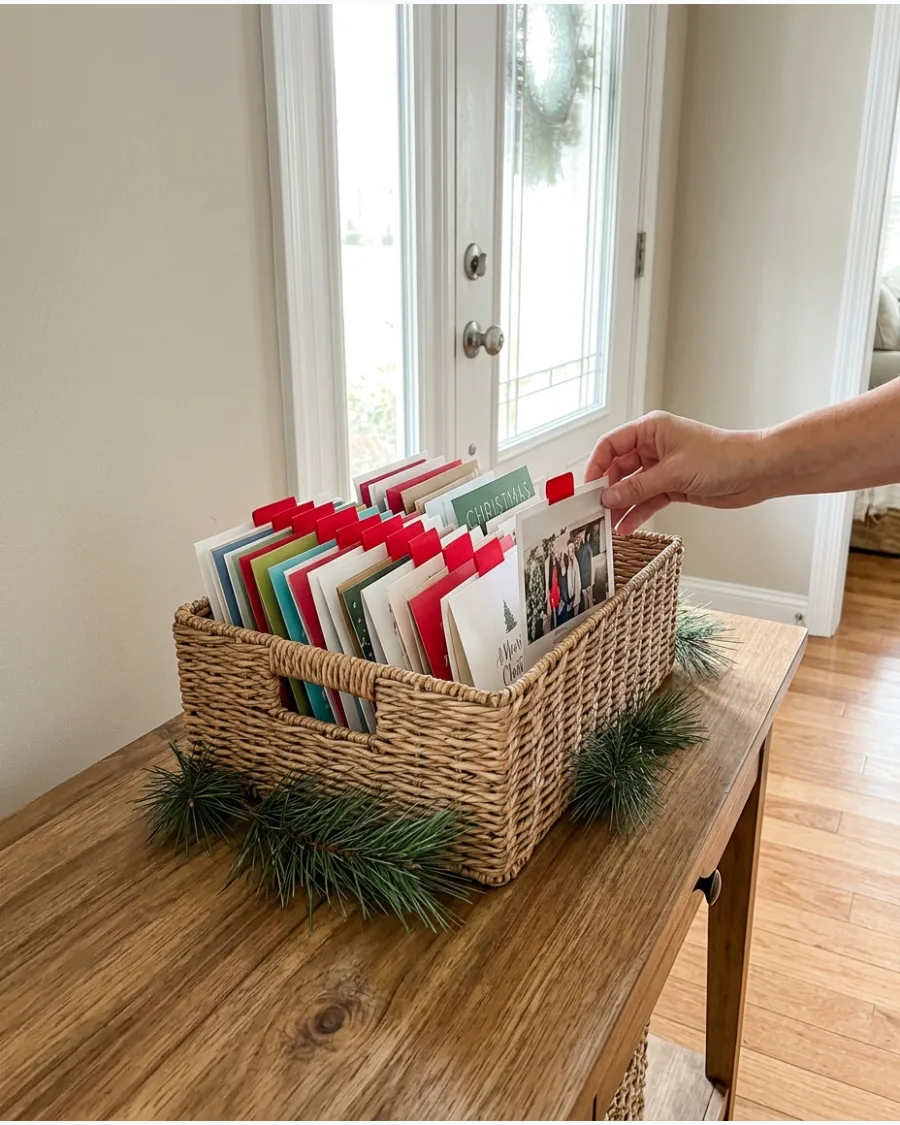
A basket display keeps cards accessible and organized without occupying wall or mantel space. Arrange your received cards upright within a woven basket and use labeled dividers or colorful ribbon tabs to separate them by family or date. This method encourages guests to flip through and read the messages instead of just viewing the covers.
Setting the basket on an entryway table makes it the first festive detail visitors see.
- Choose a basket with a low front profile so card designs are visible from a seated or standing position.
- Place a small sprig of fresh cedar or eucalyptus next to the basket to add a seasonal scent without burying the mail.
- Use stiff cardstock or decorative gift tags for the dividers to keep the arrangement tidy and easy to navigate.
If the basket is too deep, place a block of floral foam or a folded towel at the bottom to boost the cards to a visible height.
47. Christmas Card Tiered Stand
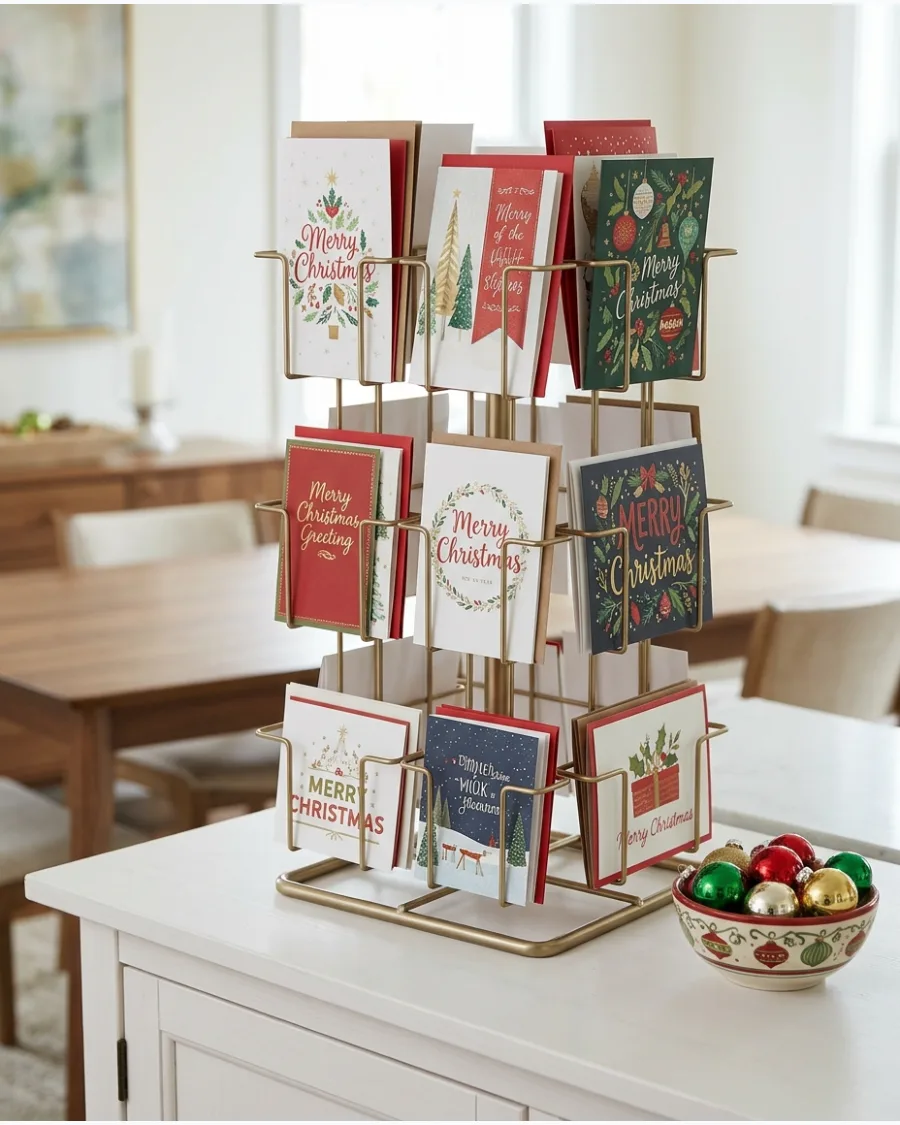
A tiered stand provides vertical interest while maximizing the visibility of different card sizes. Position taller 5×7 cards on the highest tier and place smaller 4×6 cards or square designs on the lower levels. This layering technique prevents larger items from overshadowing smaller, equally sentimental greetings.
It works exceptionally well on a dining room sideboard where it can serve as a conversation piece during holiday meals.
- Look for stands with wire slots or narrow grooves that hold cardstock securely without bending the edges.
- Rotate the cards throughout the season to ensure new arrivals get a turn in the front row.
- Coordinate the stand's finish, such as matte black or brushed gold, with your existing room hardware for a cohesive look.
Use small, clear adhesive dots on the bottom of the stand if it feels top-heavy when fully loaded with cards.
48. Christmas Card Entryway Console Display
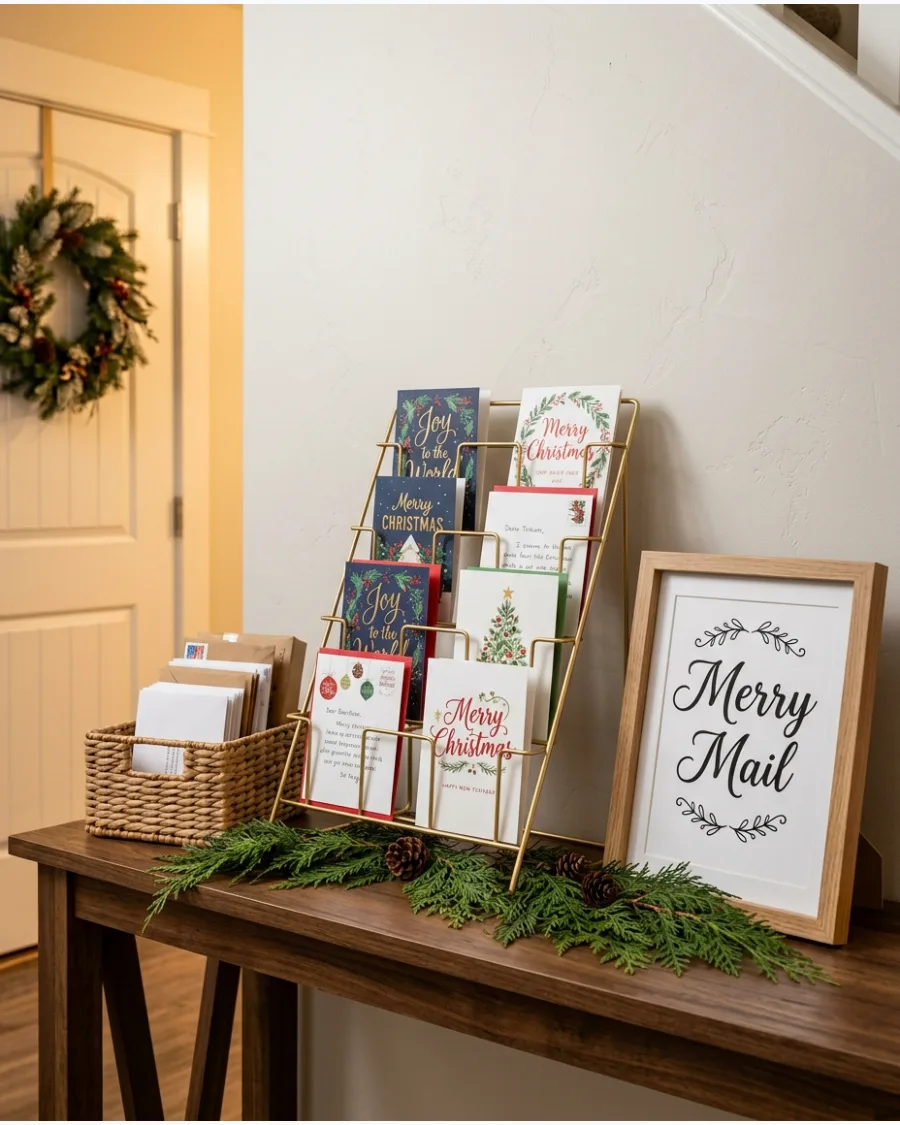
Transform your entryway into a festive hub by creating a dedicated Merry Mail station. Combine a small card holder with a nearby basket for envelopes and a framed holiday sign to define the display area on your console table. This dedicated zone keeps incoming holiday mail from cluttering kitchen counters or coffee tables.
Adding a few stems of greenery around the base of the stands ties the functional elements into the overall decor.
- Store empty envelopes in a neat stack or a separate small box tucked behind the main display to keep the surface organized.
- Frame a simple 'Merry Mail' or 'Season's Greetings' printable to serve as a backdrop for the card arrangement.
- Use a mix of standing card holders and flat-laying cards to create a dynamic, varied height profile.
Place a small tray under the entire arrangement to catch falling needles from any fresh greenery used.
49. Christmas Card Hanging Mobile
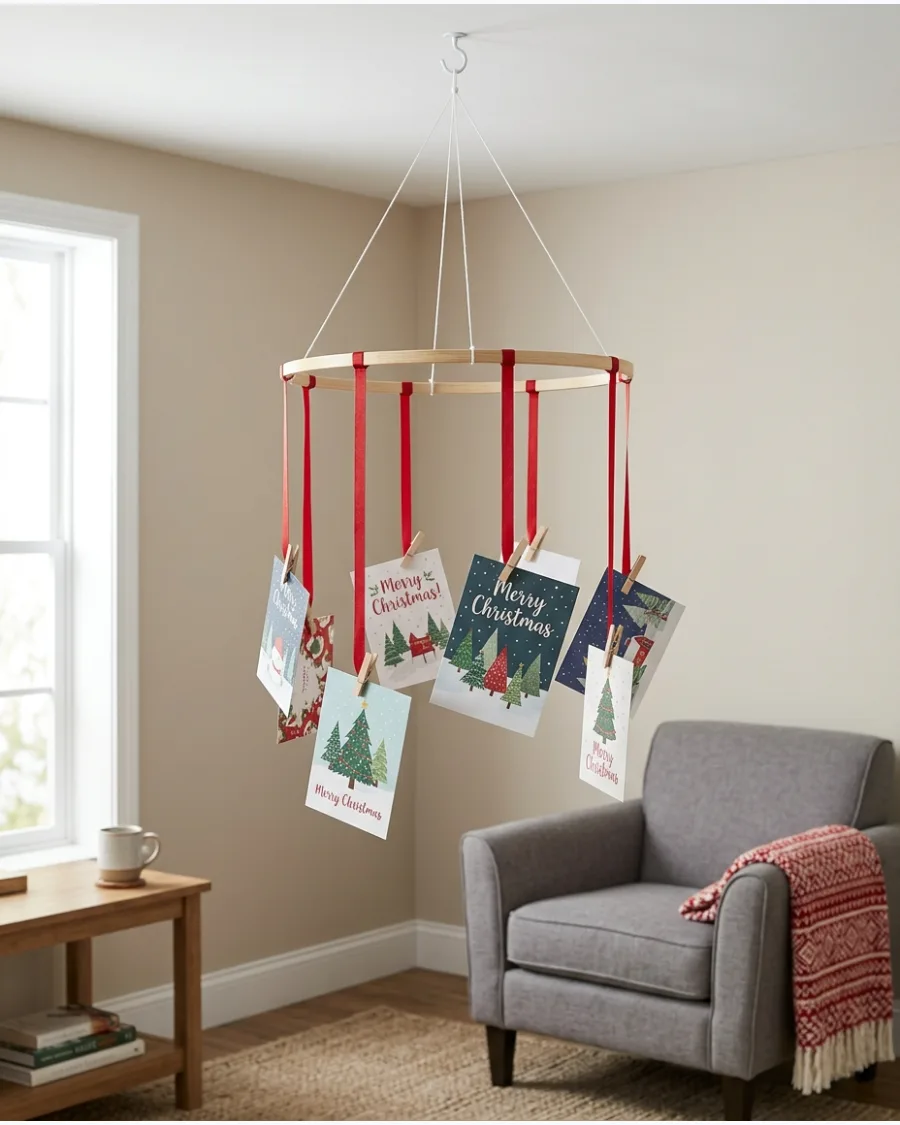
A hanging mobile offers a 360-degree view of your holiday greetings and makes use of vertical space. Attach cards to various lengths of thin velvet or satin ribbon and tie them around a lightweight wooden or metal hoop suspended from the ceiling. The gentle movement of the mobile adds a whimsical, kinetic element to your holiday decorations.
Ensure the weight is distributed evenly so the hoop hangs level and rotates gracefully.
- Use small clothespins or decorative paper clips to attach the cards to the ribbons without damaging the paper.
- Choose a variety of ribbon lengths—ranging from 6 to 18 inches—to create a tiered, chandelier-like effect.
- Secure the central hanging cord to a sturdy ceiling hook or a removable adhesive hook rated for the total weight.
If the mobile leans to one side, add a small decorative ornament to the lighter side of the hoop to act as a counterweight.
50. Christmas Card Memory Display
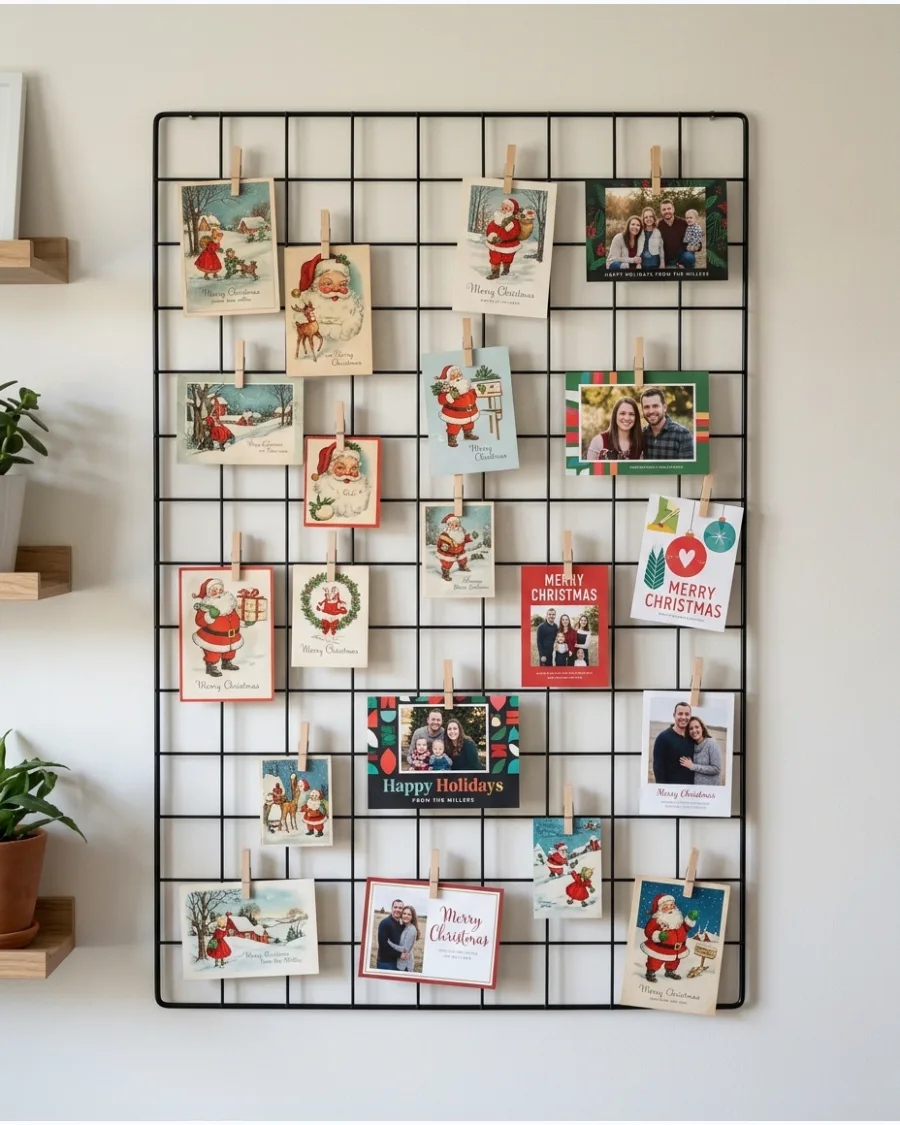
Celebrate the passage of time by mixing current arrivals with treasured cards from previous holidays. Mount a large wall grid or ribbon board and arrange a selection of vintage family cards alongside this year’s incoming mail. This approach turns your card display into a sentimental timeline that highlights how friends and family have grown.
Leaving open gaps in the arrangement allows the display to evolve as the mail arrives throughout December.
- Use small, dated tags or stickers on the corners of older cards to help distinguish them from current ones.
- Organize the cards chronologically from top to bottom or left to right to enhance the 'memory' theme.
- Opt for a neutral backing, like oatmeal linen or black wire, to let the diverse colors and eras of the cards stand out.
Take a photo of the completed display at the end of the season to remember which cards were featured before archiving them.
Frequently Asked Questions
How can I display cards without damaging my walls?
To protect your wall surfaces, use removable adhesive putty, painter’s tape, or temporary adhesive hooks. These allow you to secure cards or light structures like twine and ribbons without leaving permanent marks or stripping the paint.
What is the best way to organize holiday cards if I have limited space?
Vertical displays are ideal for small homes. Utilizing the height of doors, window frames, or narrow wall sections with ribbon curtains or cascading garlands allows you to showcase a high volume of cards without taking up floor or counter space.
How do I keep heavy photo cards from falling off ribbons or twine?
Ensure your twine or ribbon is pulled taut and securely anchored. Using stronger fasteners such as small metal bulldog clips or tight-spring wooden clothespins will provide a better grip on thick cardstock than basic paperclips.
Can these card displays be repurposed after the holidays?
Yes, many of these structures—such as wire grids, wooden slats, and frames—can serve as year-round organizers for invitations, postcards, or printed family photos once the holiday season ends.
Where is the most functional place to set up a Christmas card station?
High-traffic areas like entryways and hallways are excellent for visibility. Alternatively, placing a display on a mantel or a kitchen window frame keeps the cards as a focal point in the rooms where family members spend the most time.