50 Christmas Cloche Decorating Ideas

This post may contain affiliate links: full affiliate disclosure.
Creating a holiday vignette under a glass dome is an easy way to protect delicate ornaments and miniature scenes while adding a focused decorative element to any room. These ideas show how to combine textures, lighting, and small-scale figures to build a custom winter world on your mantel or tabletop.
CHRISTMAS VILLAGE AND SNOWY CLOCHE IDEAS
1. Mini Christmas Village Under a Cloche
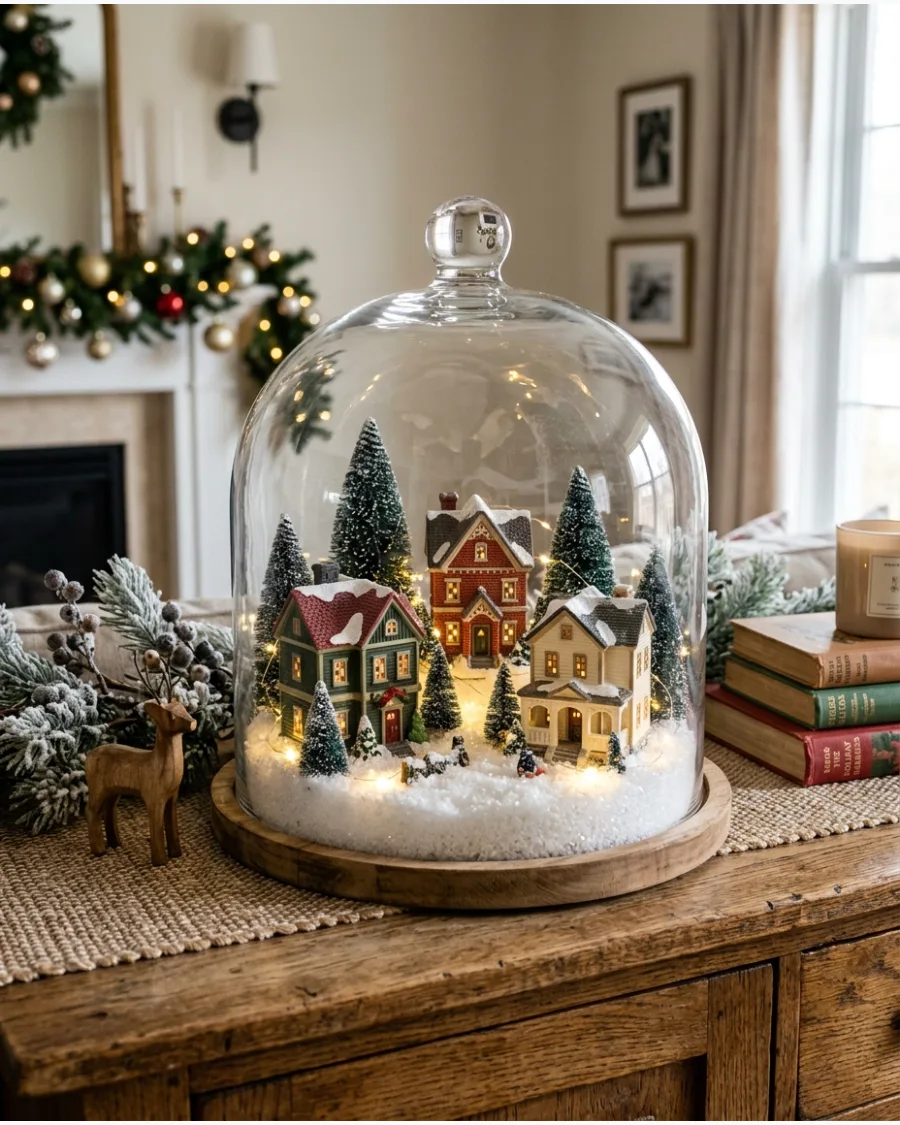
Building a miniature village under a glass dome allows for a controlled, dust-free holiday display. Arrange two or three miniature houses on slightly different levels using small wood blocks hidden by a layer of faux snow to create a tiered landscape. This method prevents the buildings from looking flat and allows you to see the details of every structure.
Surround the houses with varying sizes of bottle-brush trees to frame the scene.
- Check that the scale of the buildings matches the height and diameter of your glass dome to avoid a cramped look.
- Tuck a battery-operated micro-LED wire between the houses and trees to provide a warm glow without visible heavy cords.
- Place the largest house at the back and the smaller ones toward the front to create a sense of depth within the circular base.
Use long tweezers to place small accessories or figures once the main buildings are in position to avoid knocking over the trees.
2. Glowing Christmas Cottage Cloche
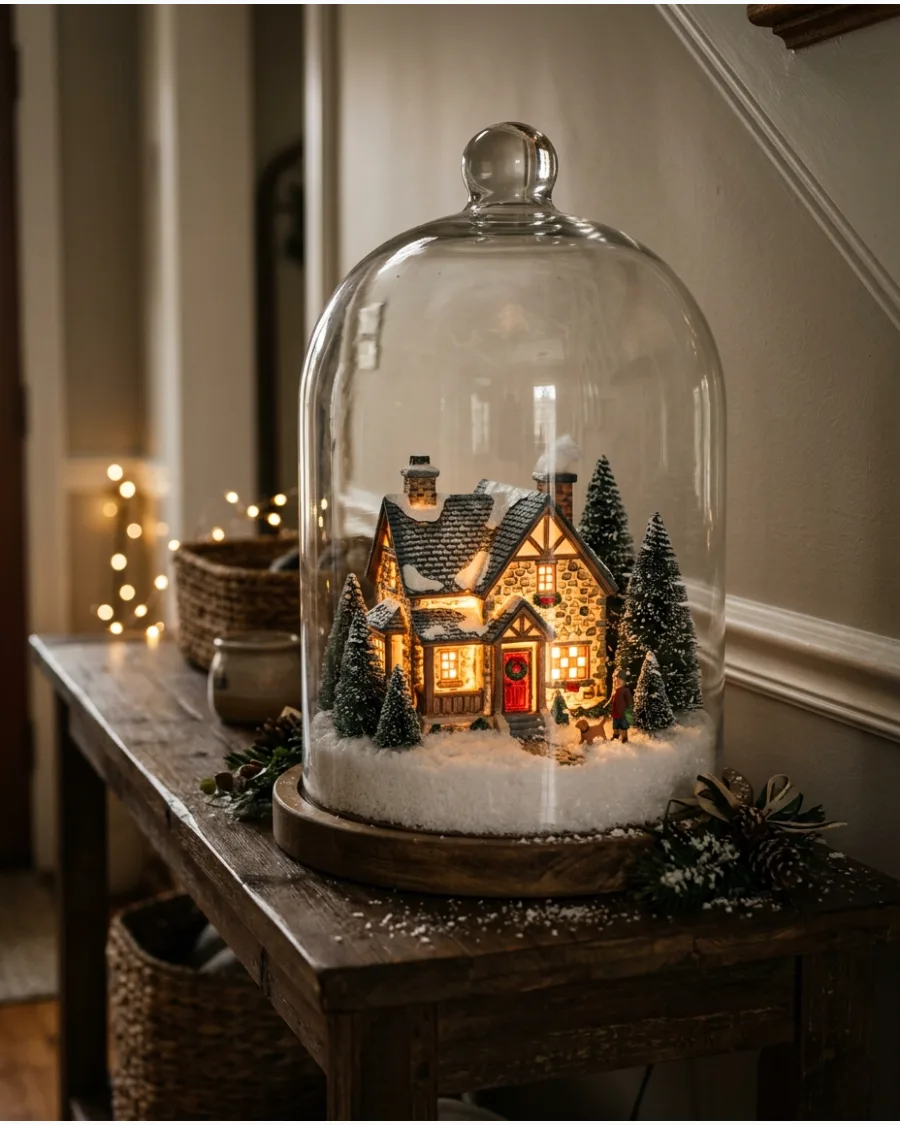
A single, high-detail cottage serves as a powerful focal point when centered under a cloche. Tuck a small string of micro-LED lights directly inside the hollow center of the cottage so the light only shines through the windows and doors. This technique mimics a real home at night and prevents the light from washing out the surrounding snowy details.
Keep the surrounding trees minimal and low to let the architecture stand out.
- Select a cottage with cut-out windows rather than painted-on details to ensure the light can actually pass through.
- Position the cottage slightly off-center if the dome is wide to leave room for a small cluster of snowy evergreens on one side.
- Verify that the battery pack is small enough to be hidden behind the house or tucked into a hollowed-out area in the base snow.
Choose warm-white lights instead of cool-white to create a more realistic and cozy indoor glow for the cottage.
3. Snowy Christmas Village Cloche
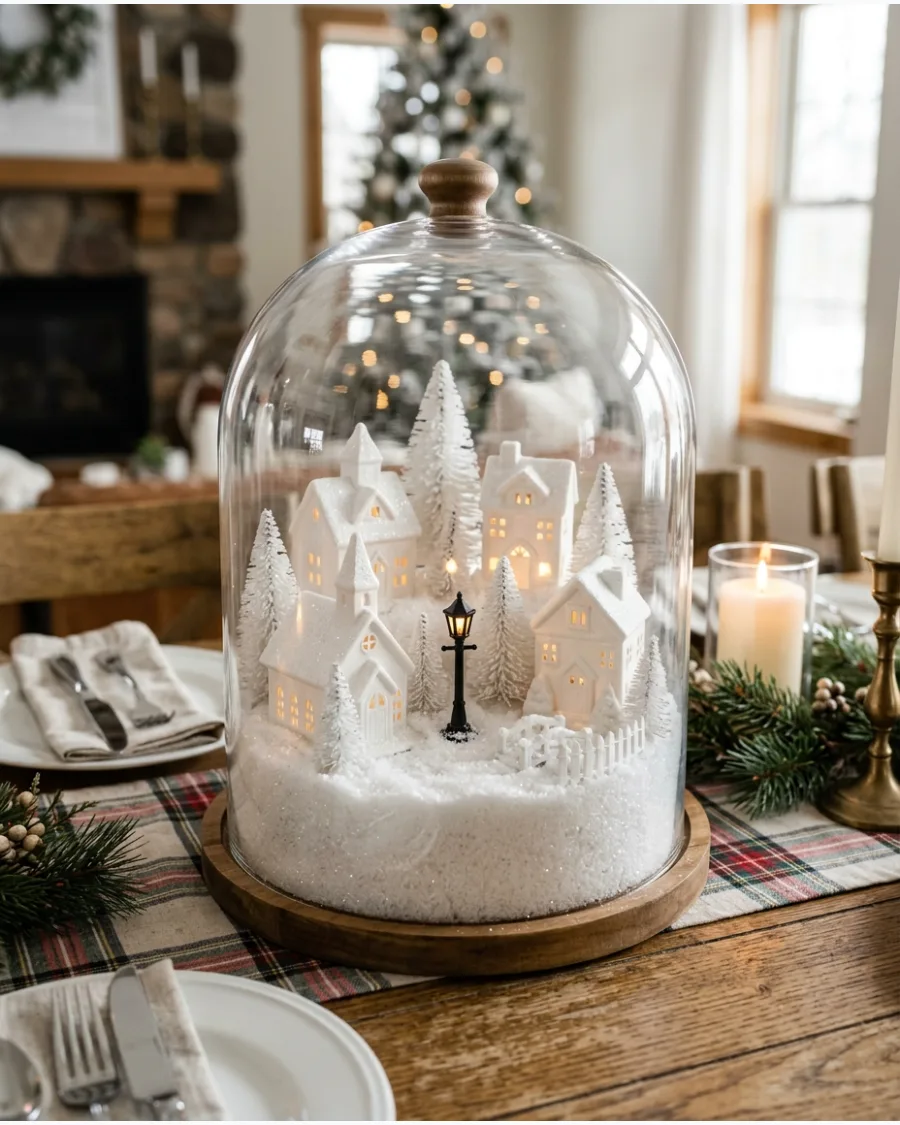
An all-white village scene creates a clean, sophisticated look for a winter display. Pile white mica or glitter snow deeply around the base of a miniature lamppost to anchor it firmly and hide its wiring. By using white houses and snow-covered trees, the focus shifts to the shapes and shadows within the cloche.
Position the micro lights behind the buildings to create a soft silhouette effect that makes the village appear to be in a quiet night setting.
- Look for ceramic or resin houses with a matte white finish to keep the monochromatic theme consistent.
- Use 'snow' made of fine flakes rather than large plastic chunks to better suit the small scale of the lampposts and trees.
- Check that the lamppost is tall enough to peek out over the deep layers of faux snow at the base.
Use a dry paintbrush to sweep excess snow off the roofs and windows of the houses for a tidy finish.
4. Christmas Village Street Cloche
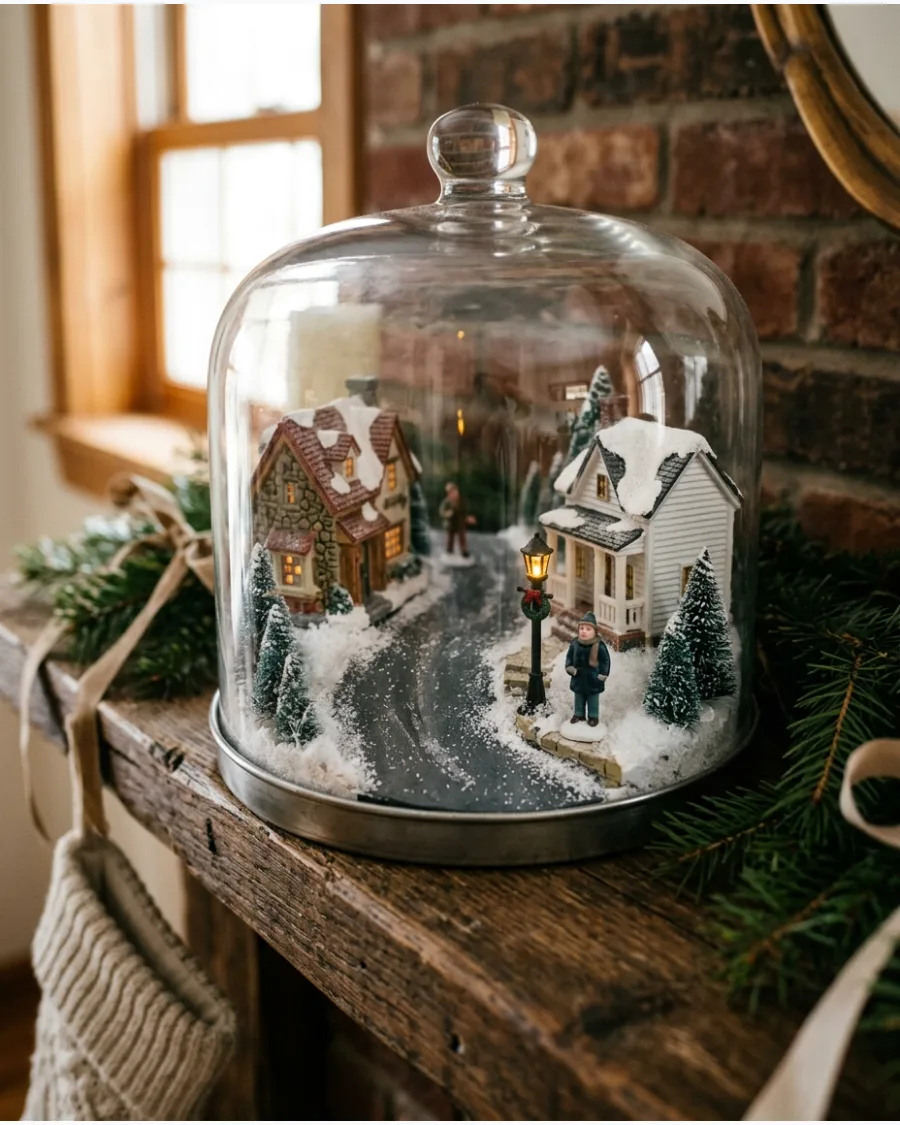
Creating a miniature street scene adds a sense of life and story to a holiday cloche. Lay down a narrow strip of dark grey cardstock or slate to act as a road before carefully dusting faux snow only along the edges of the path. Place two houses facing this street and add tiny figurines to suggest a busy town center.
A single lamppost at the end of the road helps ground the composition and provides a central light source.
- Select figurines that are in proportion to the door heights of your houses to maintain a realistic scale.
- Curve the 'street' slightly toward the back of the dome to create a more dynamic and less rigid layout.
- Secure the tiny people and lampposts with a small dot of removable museum wax so they do not shift when moving the cloche.
Avoid using too many figurines; two or three small people are enough to suggest a scene without cluttering the small space.
5. White Christmas Village Cloche
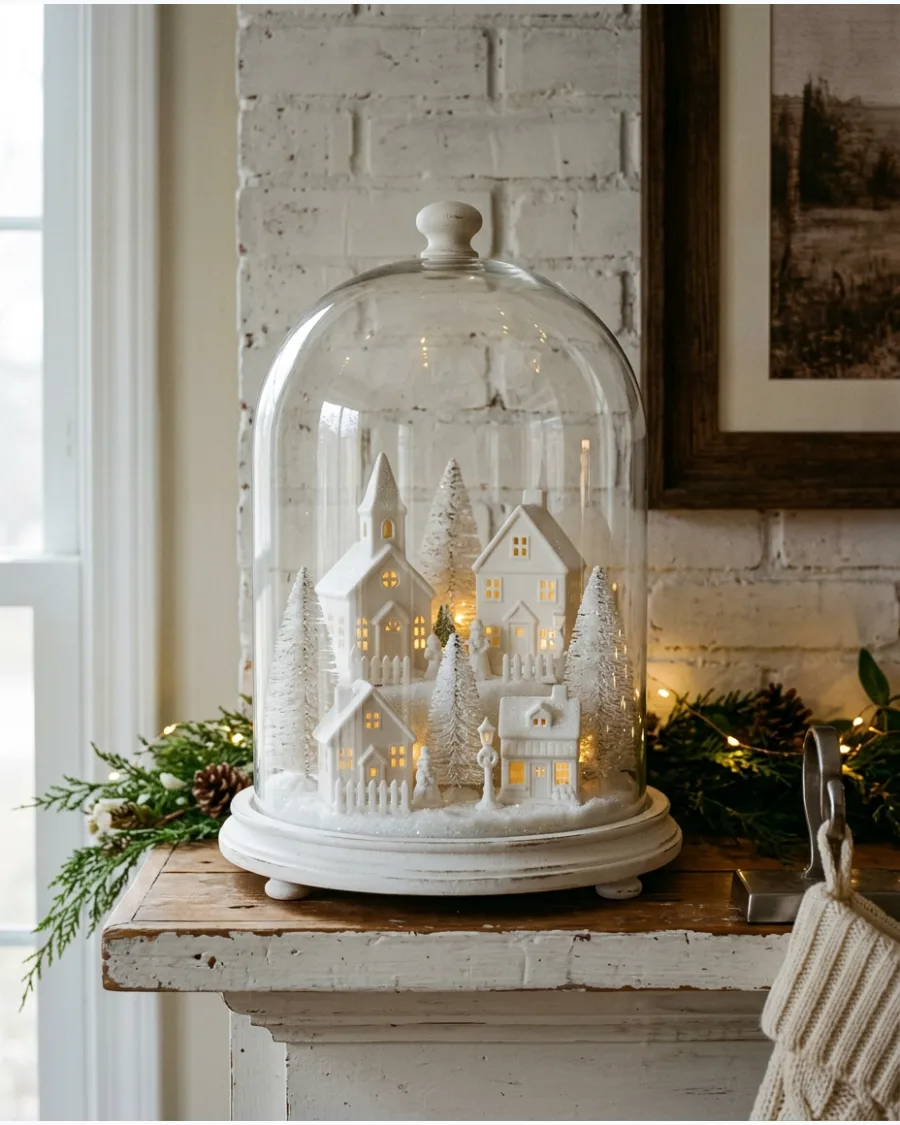
Texture variety is the key to making a monochromatic white cloche look interesting rather than flat. Stagger the heights of white ceramic houses by resting the rear buildings on small risers before covering the entire base in a thick layer of snow. Mix matte houses with glittered or glossy white trees to create contrast through finish rather than color.
Warm lighting is essential here to prevent the white elements from appearing blue or sterile.
- Choose a variety of house shapes, such as a tall church and a wide cottage, to create a more interesting silhouette.
- Verify the 'white' of your houses matches; some ceramics are cream-toned while others are bright white, which can look mismatched.
- Keep the glass dome clean and streak-free, as fingerprints are much more visible against an all-white background.
Place this cloche in front of a dark-colored wall or a mirror to provide a backdrop that makes the white village stand out.
6. Christmas Church Village Cloche
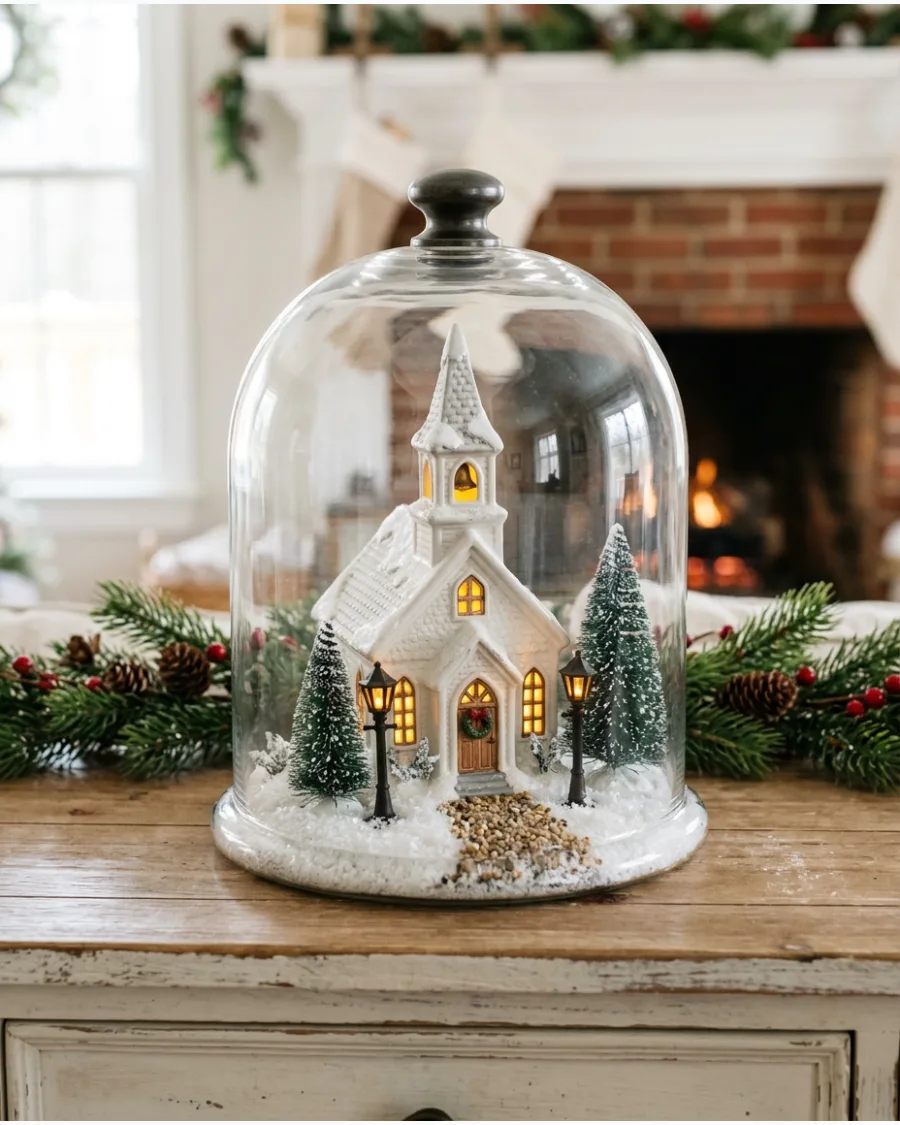
Center the vignette on a detailed miniature church to create a serene focal point. Surround the structure with varying sizes of bottle brush trees and a defined pebble or sand path leading to the entrance.
Tuck a small battery-operated tea light inside the hollow base of the church to illuminate the windows from within.
- Choose a church with translucent or cutout windows to ensure the internal light is visible through the glass dome.
- Place tiny lanterns along the pathway, ensuring they are smaller than the main church door to maintain a realistic scale.
- Use a cloche with a tall dome so the church steeple has at least two inches of clearance from the top of the glass.
Use tweezers to position the miniature lanterns precisely without disturbing the faux snow or the path.
7. Mountain Cabin Christmas Cloche
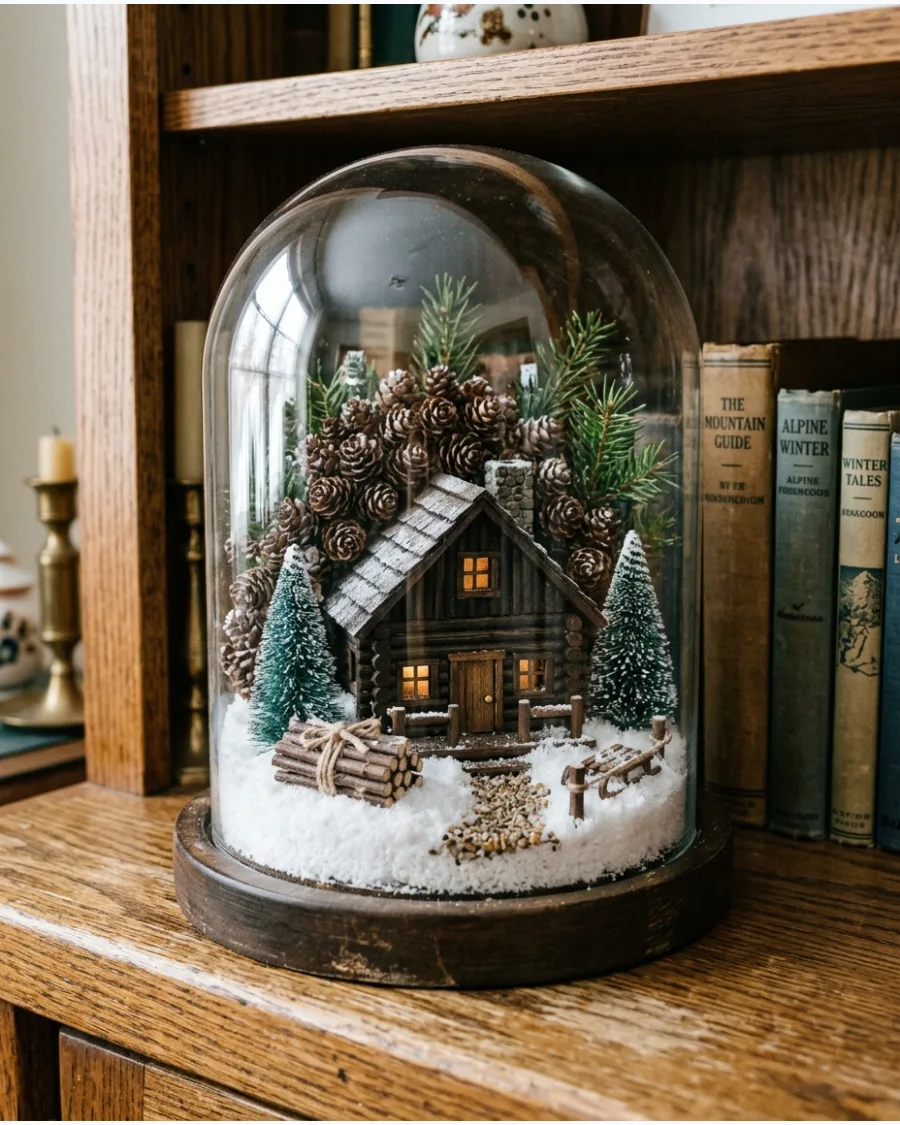
Build a rustic retreat using a miniature log cabin and natural textures like small pinecones. Arrange evergreen sprigs or miniature pines behind the cabin to mimic a dense forest.
Scatter tiny bundles of cut twigs tied with twine near the cabin door to represent firewood.
- Select a cabin made of wood or resin with visible log textures rather than smooth plastic for a more sophisticated look.
- Layer the base with white batting or coarse salt to create the appearance of heavy mountain snow drifts around the foundation.
- Keep the color palette strictly to brown, deep green, and white to maintain a nature-focused aesthetic.
Lightly dust the roof of the cabin and the tops of the pinecones with spray snow for a consistent weathered effect.
8. Christmas Village With Ice Skaters Cloche
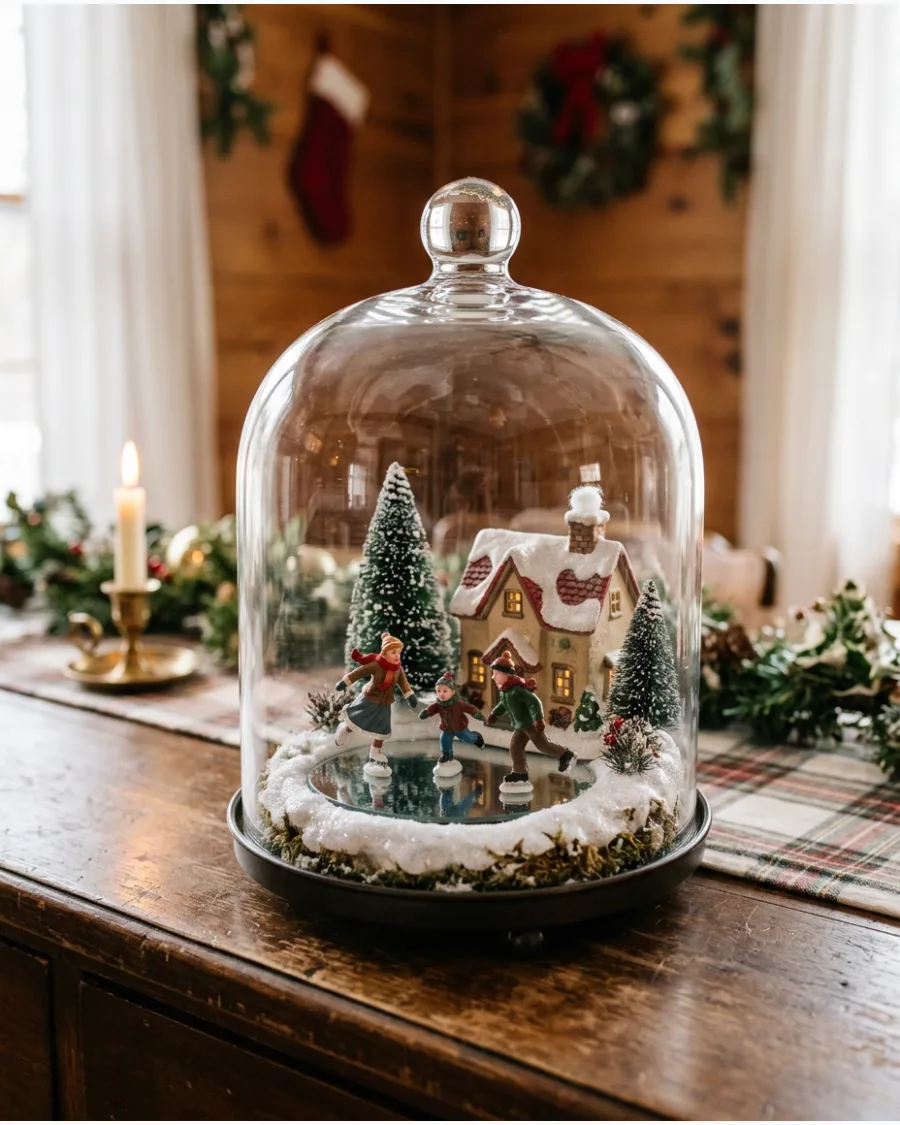
Set a nostalgic scene by placing a reflective surface at the center to act as a frozen pond. Position a small cottage and several evergreen trees on the perimeter to frame the skating area.
Place two or three miniature skating figures on the reflective surface, ensuring their height is proportional to the cottage windows.
- Use a small circular mirror or a piece of silver foil tucked under a thin layer of clear glass beads for the pond surface.
- Apply a light dusting of faux snow around the edges of the mirror to hide the transition between the ice and the snowy ground.
- Check that the figures are securely attached with a tiny dab of clear adhesive to prevent them from sliding on the smooth mirror.
Use frosted sugar snow rather than fluffy cotton snow to better mimic the crystalline texture of a frozen outdoor rink.
9. Snow Globe Style Christmas Cloche
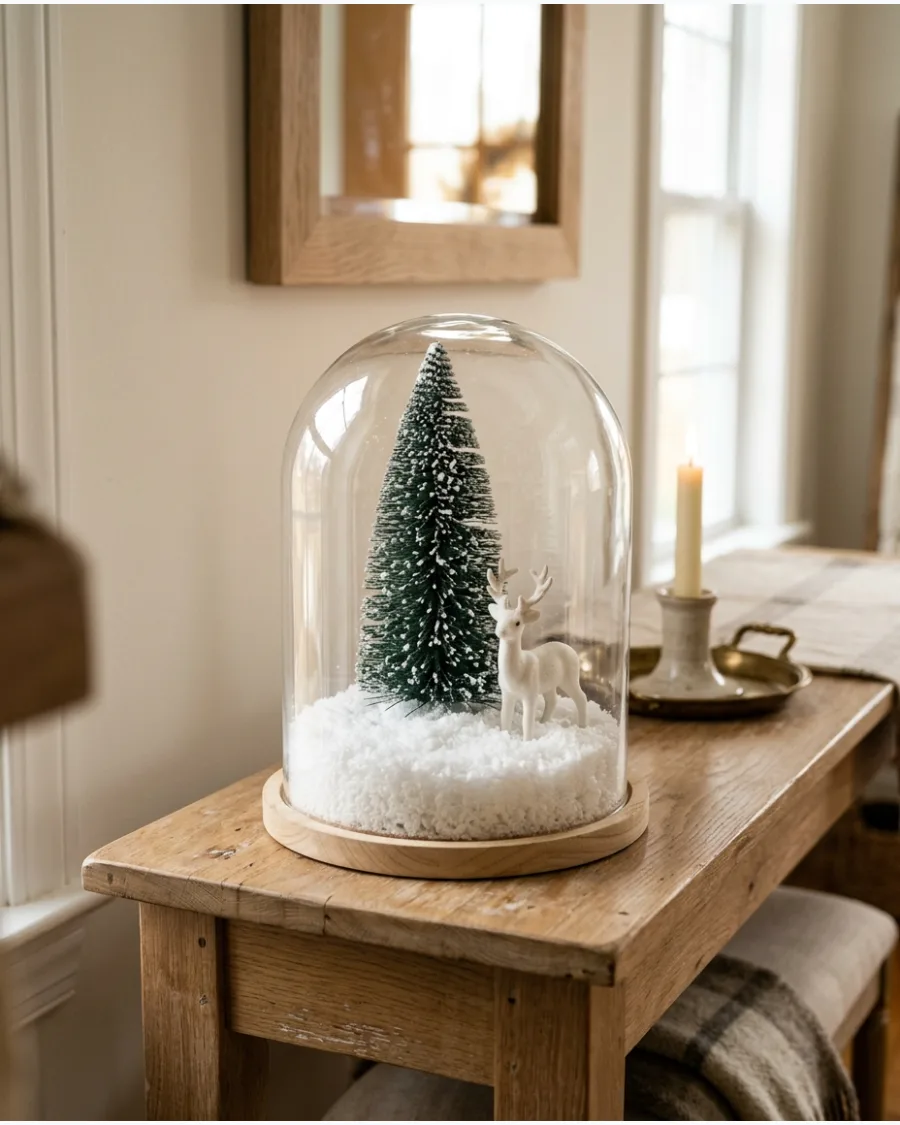
Replicate the charm of a classic snow globe without the liquid by using a simple, rounded glass dome and a wooden base. Focus on a single high-quality element, like a lone deer or a solitary decorated tree, to keep the design minimalist.
Fill the bottom third of the dome with loose, fluffy faux snow so the central figure appears partially submerged in a drift.
- Choose a light-colored wood base, such as pine or birch, to maintain a clean and airy appearance.
- Verify the height of your central figure to ensure it sits comfortably in the middle of the glass sphere without touching the top.
- Opt for figures with a matte or slightly glittered finish to avoid a cheap plastic look under the glass.
Wipe the interior of the dome with an anti-static cloth before assembly to prevent faux snow from sticking to the glass walls.
10. Christmas Eve Village Cloche
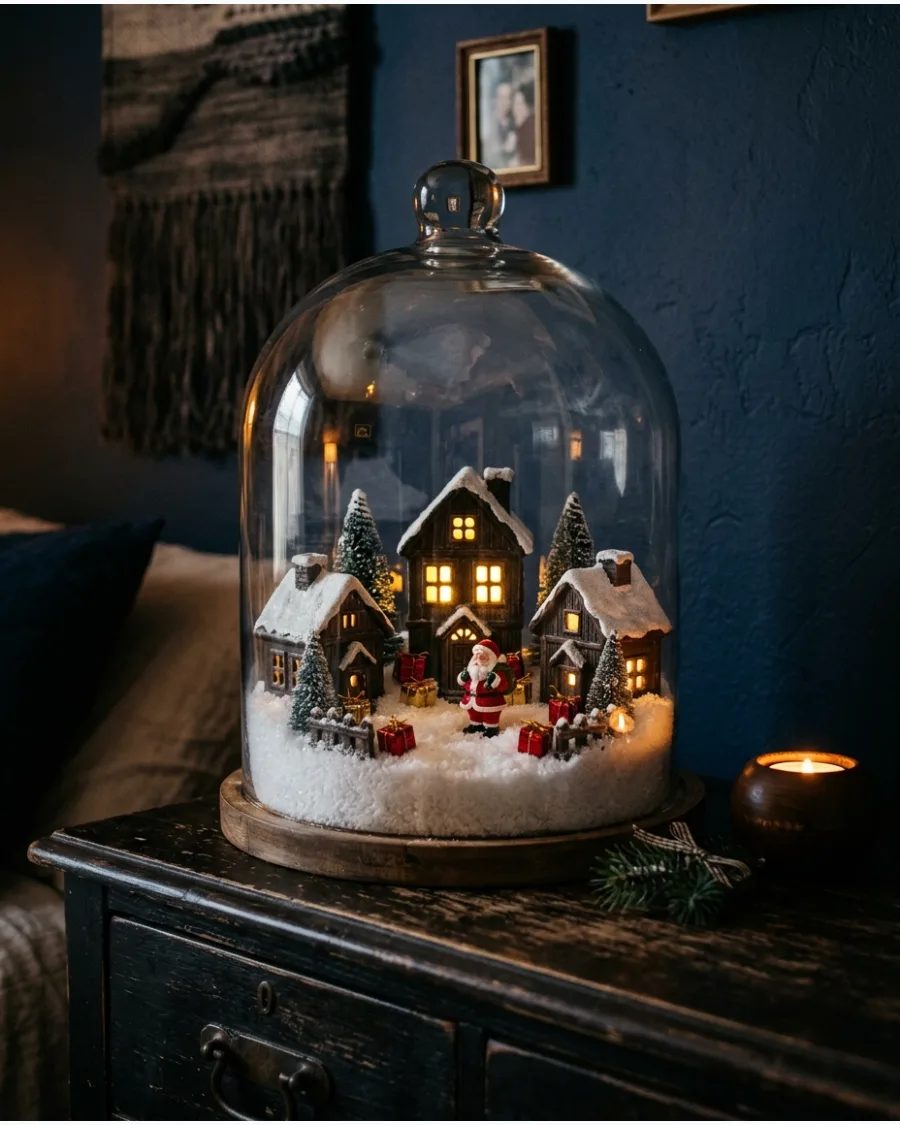
Capture the quiet energy of the night before Christmas by using dark-toned miniature houses and warm lighting. Arrange small wrapped boxes near the doors of the houses and place a tiny Santa figure near a chimney or entryway.
Hide a thin wire LED string under the snow, threading the bulbs into the back of each building to make the windows glow.
- Select houses with dark blue or gray roofs to contrast with the warm interior light and the white snow.
- Place a dark velvet or felt circle as the bottom layer under the snow to absorb light and enhance the nighttime feel within the dome.
- Look for a cloche base with a small notch or flat edge to allow the battery pack wire to exit discreetly without tilting the glass.
Position the finished cloche in a dim corner or on a dark shelf to let the internal illumination truly stand out.
MINI CHRISTMAS TREE CLOCHE IDEAS
11. Bottle Brush Christmas Tree Cloche
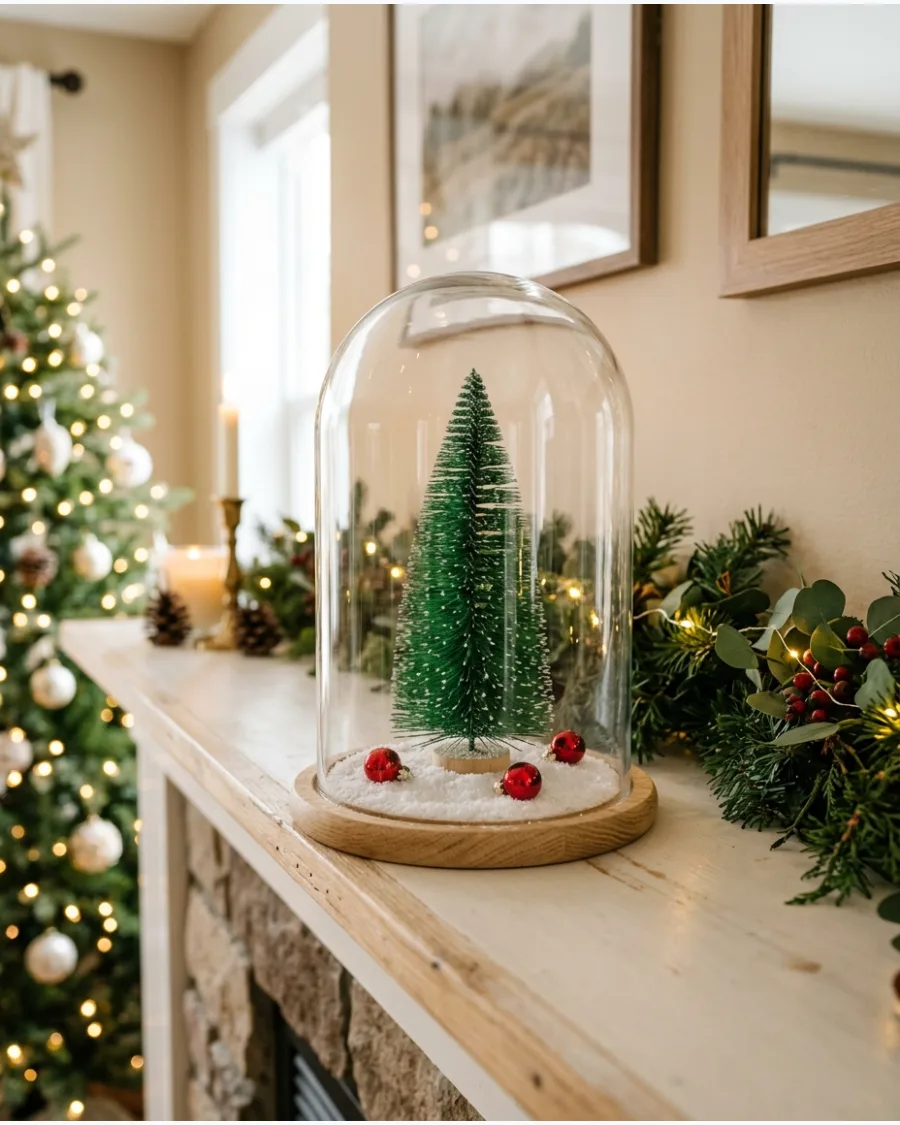
Select a single vintage-style bottle-brush tree with a stiff, wire-based texture. Center the tree on the cloche base and sprinkle a thin layer of faux snow around its perimeter to cover the stand. Add a few tiny, high-detail glass ornaments resting on the snow to suggest a finished, minimalist holiday scene.
- Check that the tree height leaves at least one inch of clearance from the top of the glass dome to prevent crowding.
- Gently fluff the bristles with a soft brush before placement to remove any flat spots from storage.
- Use a pair of tweezers to position miniature ornaments precisely on the snow layer without disturbing the tree.
Avoid trees with thick, globby glitter coatings that hide the individual bottle-brush bristles.
12. Mini Christmas Tree Forest Cloche
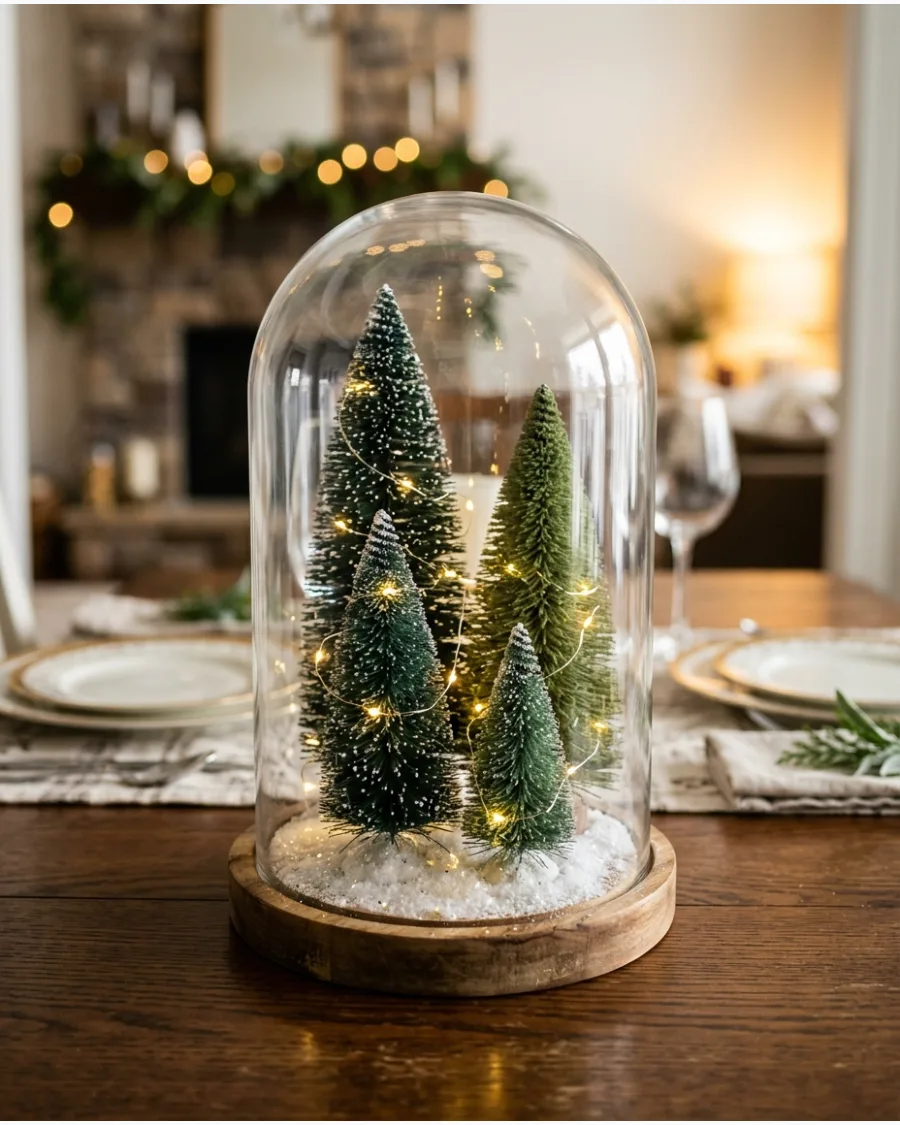
Group three to five bottle-brush trees of varying heights to create depth within the glass dome. Stagger the trees so the tallest is toward the back and smaller ones occupy the foreground for a natural forest look. This arrangement relies on the varying shades of green to look intentional rather than cluttered.
- Choose trees with slightly different needle densities to mimic the variety found in an outdoor landscape.
- Hide a micro-LED wire at the back of the base and weave it between the trunks for a soft internal glow.
- Ensure the glass dome can sit flush against the base without pinching the wire light leads.
Use a small piece of removable mounting putty under each tree base to prevent them from sliding during assembly.
13. Decorated Mini Christmas Tree Cloche
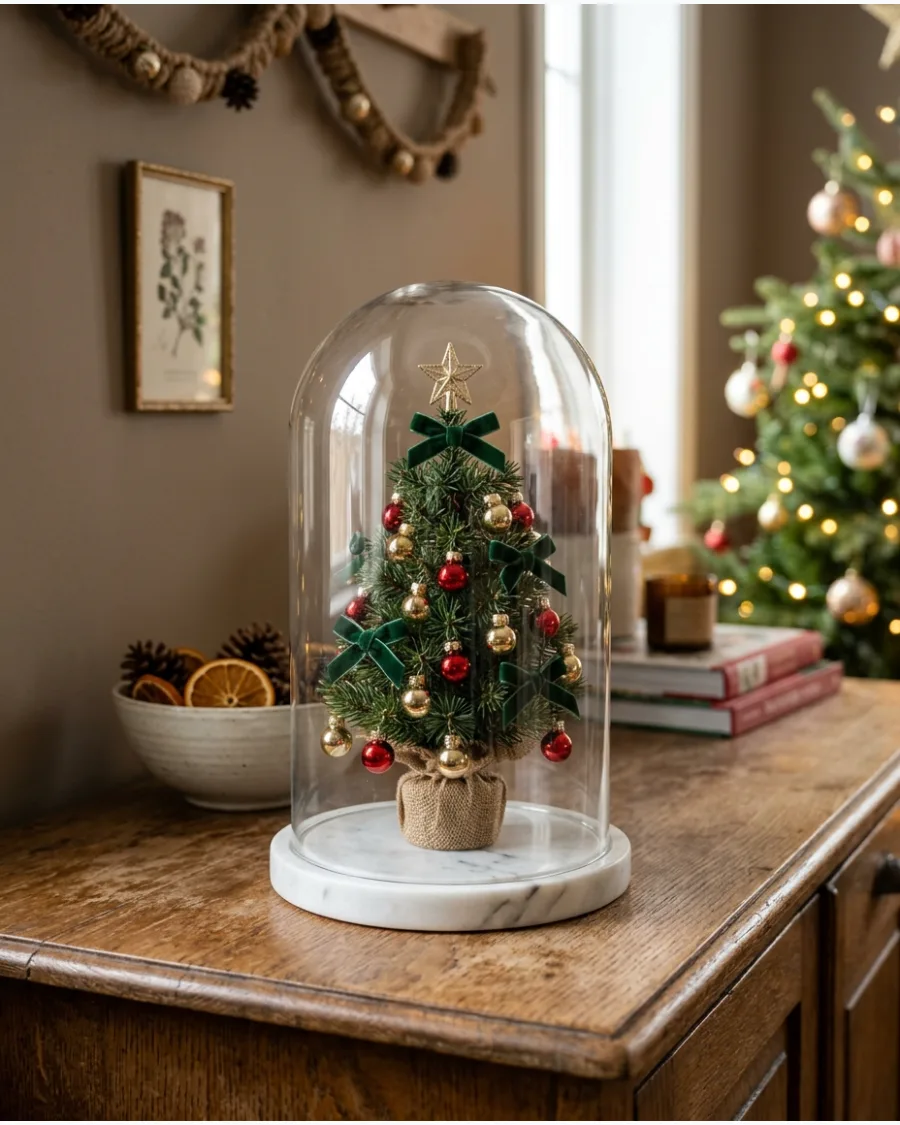
Turn a single miniature evergreen into a realistic centerpiece by adding tiny, proportional decorations. Fasten scaled-down glass baubles, miniature velvet bows, and a small star topper to the branches before placing the tree inside the dome. The goal is to make the tree look like a full-sized Christmas tree that has been perfectly shrunk for the table.
- Verify that the star topper does not touch the glass, which can create a distracting reflection point.
- Use a thin gauge of floral wire to secure decorations so they do not shift when you lower the glass dome.
- Choose ornaments no larger than a pea to maintain the correct scale for a miniature tree.
Match the ornament colors to your existing room decor to make the miniature scene feel integrated with the space.
14. Snow-Covered Christmas Tree Cloche
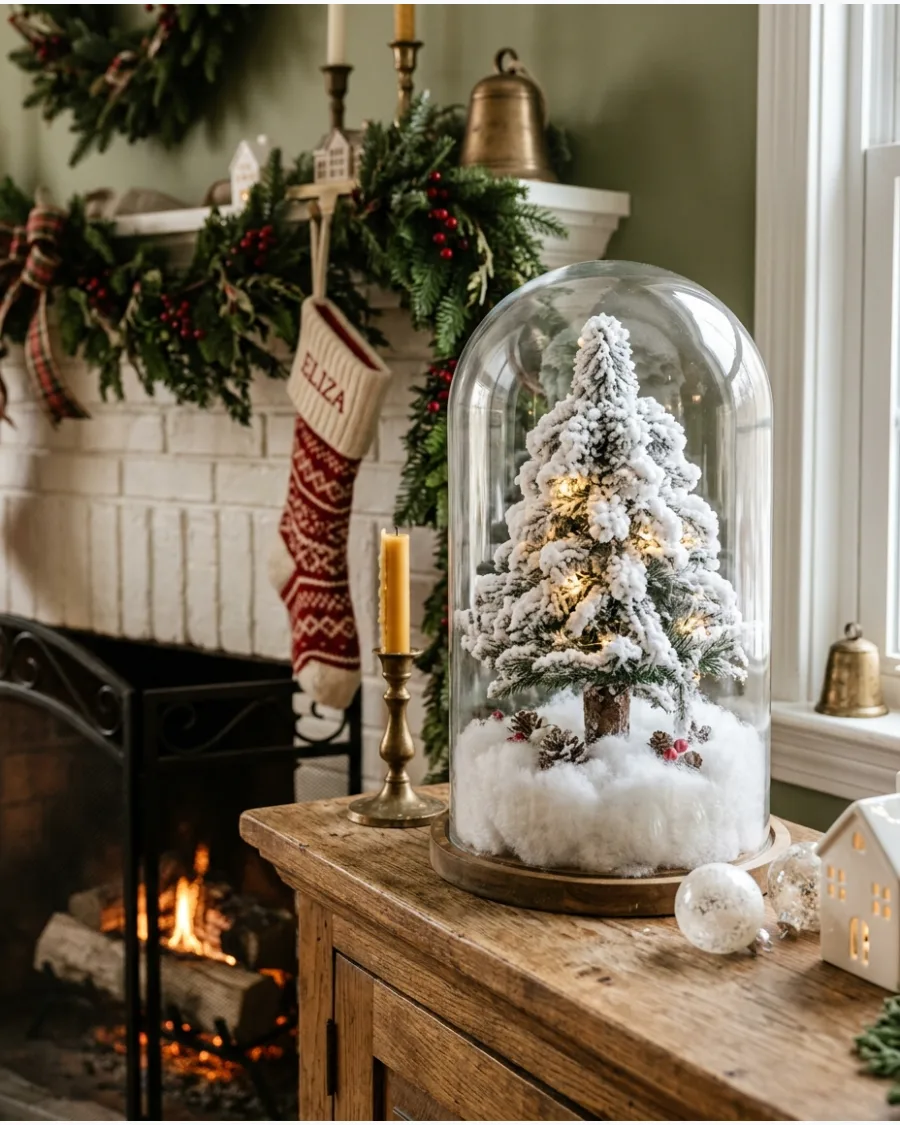
Focus on a winter-white aesthetic by using a tree with heavy white flocking that mimics a fresh snowfall. Place the flocked tree in the center and let faux snow settle naturally into the branches and around the base for a soft, wintry look. This monochromatic approach keeps the display calm and sophisticated on a mantel or sideboard.
- Select a tree where the flocking is applied unevenly to better simulate how snow sticks to real pine needles.
- Hide the battery pack for micro-lights beneath the cloche base or tucked under a thick layer of faux snow.
- Wipe the inside of the glass with an anti-static cloth before assembly to keep snow particles from sticking to the dome walls.
If the flocking is too thick, use a toothpick to clear small gaps so the green needles peek through for realism.
15. Gold Christmas Tree Cloche
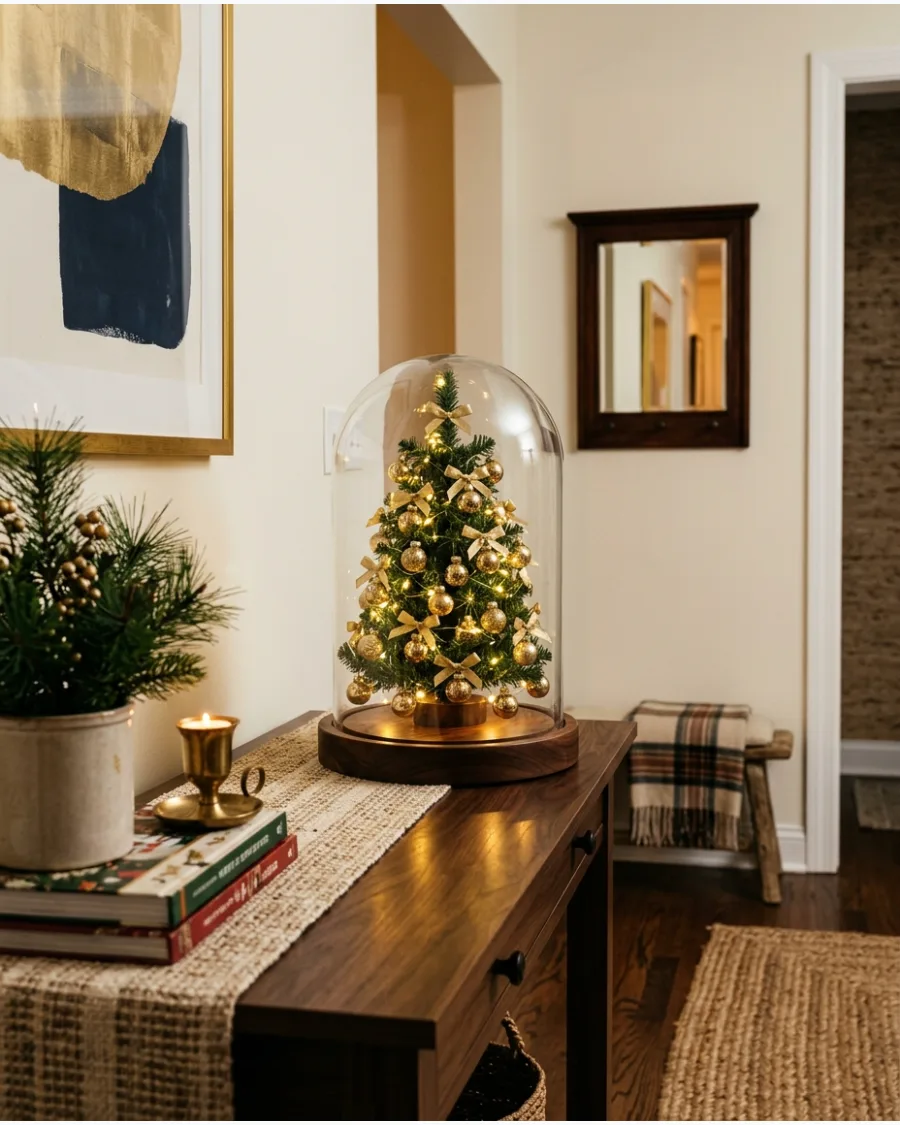
Elevate a miniature tree by using a rich color palette of gold and warm wood. Decorate the tree with tiny antique-gold ornaments and micro lights, then set it on a dark wood or brass-toned base to ground the display. The metallic accents reflect the internal lights, making the small scene stand out even in a dimly lit room.
- Choose a cloche base with a metallic rim or a dark walnut finish to complement the gold theme.
- Wrap the lights from the bottom of the trunk up to ensure the battery lead stays near the base for easier concealment.
- Use ornaments with a mix of matte and shiny gold finishes to create varied light reflections within the glass.
A small piece of gold ribbon tied around the cloche handle can tie the external look to the miniature scene inside.
16. Red and Green Christmas Tree Cloche
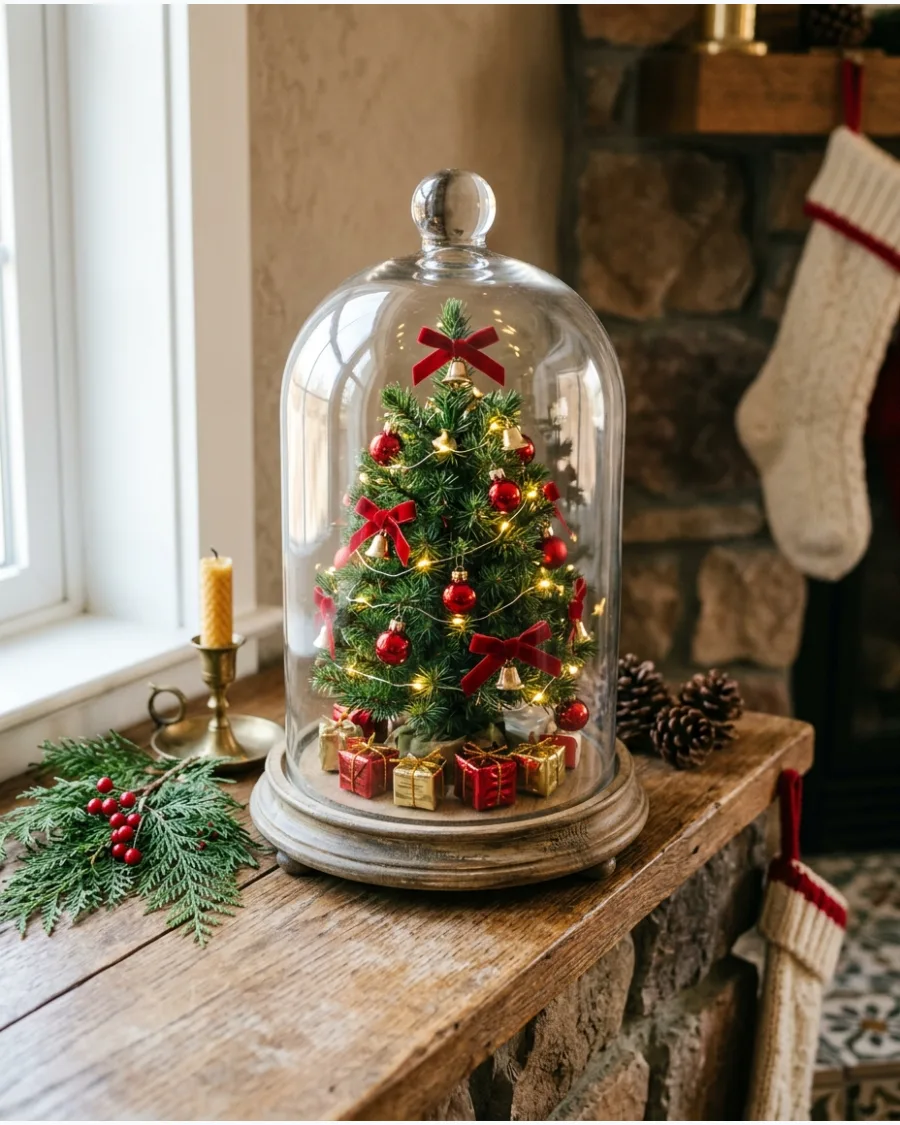
Build a traditional holiday vignette featuring a miniature evergreen decorated with classic red and gold accents. Use tiny red ornaments and gold bells to establish the theme before adding warm white LED string lights.
Arrange miniature wrapped gift boxes in various sizes around the base of the tree to simulate a classic Christmas morning scene.
- Select a tree with dense needles to support the weight of miniature bows and metal bells without drooping.
- Use a thin-gauge copper wire for the lights so the wiring remains discreet and blends into the branches.
- Group the larger presents near the back of the cloche to maintain a sense of depth and scale within the glass.
Use tweezers to place the smallest bells and ornaments precisely on the branch tips for a professional finish.
17. Neutral Christmas Tree Cloche
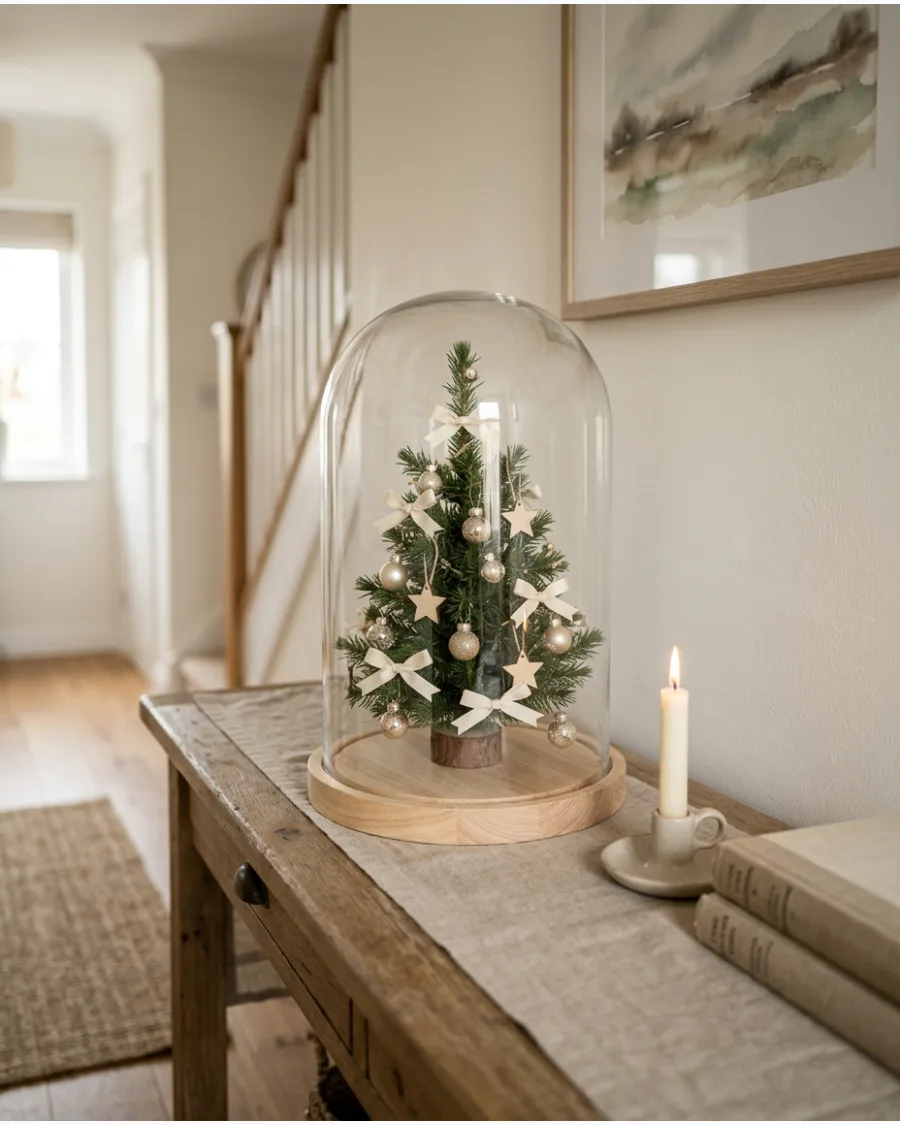
Focus on a soft, monochromatic palette by decorating a small tree with cream-colored bows and champagne-toned baubles. The addition of wooden ornaments adds organic texture that contrasts well with the clear glass dome.
Set the entire arrangement on a natural light wood base to anchor the calm, neutral aesthetic.
- Choose ornaments with matte or frosted finishes to avoid harsh light reflections against the cloche glass.
- Tie bows from narrow velvet or linen ribbon to keep the material scale appropriate for a miniature tree.
- Ensure the tree height leaves at least two inches of clearance from the top of the glass to prevent a cramped appearance.
Stick a small piece of adhesive putty to the bottom of the tree to keep it perfectly centered on the wooden base.
18. Scandinavian Christmas Tree Cloche
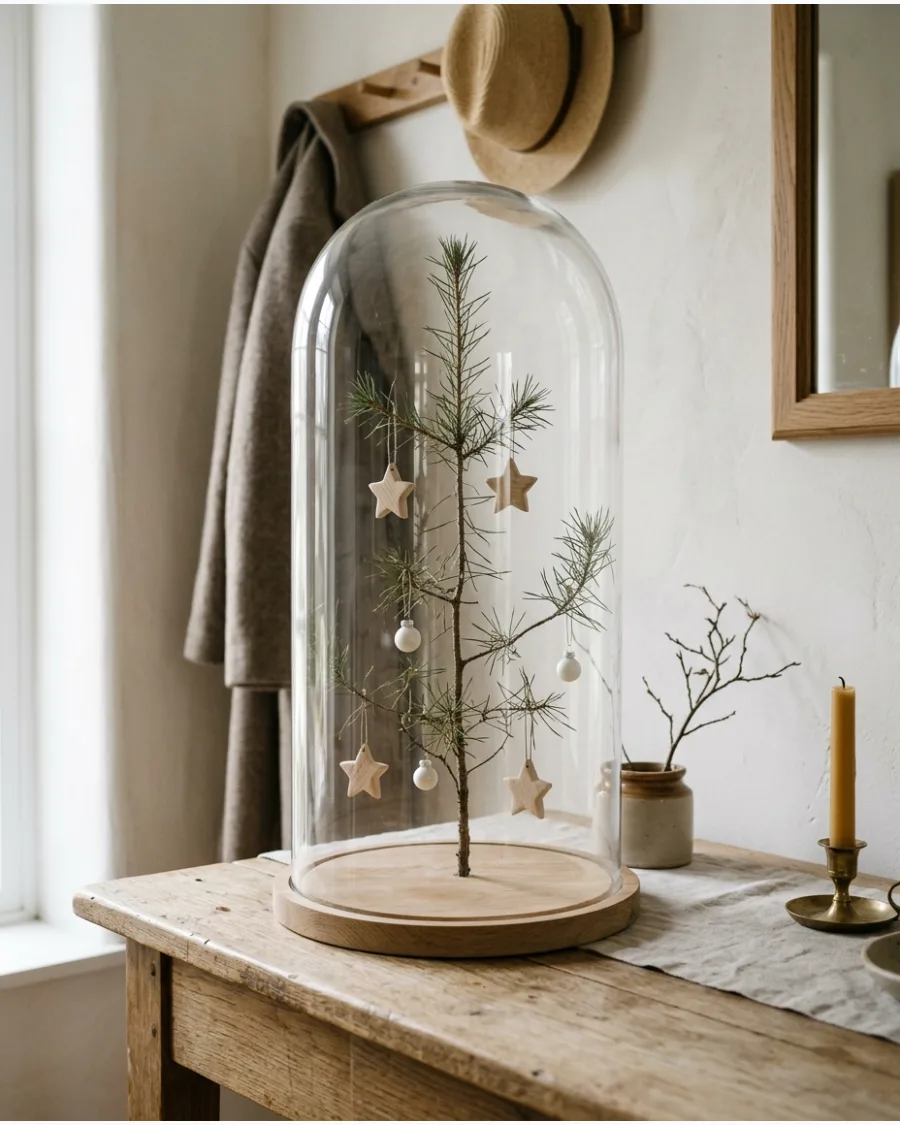
Achieve a minimalist look by selecting a sparse miniature evergreen that allows the branch structure to show through. Decorate with pale wooden stars and simple white ornaments to maintain a clean, airy feel.
Leave significant open space between the branches to emphasize the architectural shape of the tree and the clarity of the glass.
- Select a 'Charlie Brown' style or spindly alpine tree variety for an authentic Scandinavian silhouette.
- Use white cotton thread instead of metal hooks to hang the ornaments for a softer, more natural appearance.
- Keep the base simple with a thin layer of fine white sand or a bare wooden disc to match the minimalist theme.
Trim any stray needles that touch the glass to keep the perimeter of the scene sharp and tidy.
19. Vintage Ceramic Christmas Tree Cloche
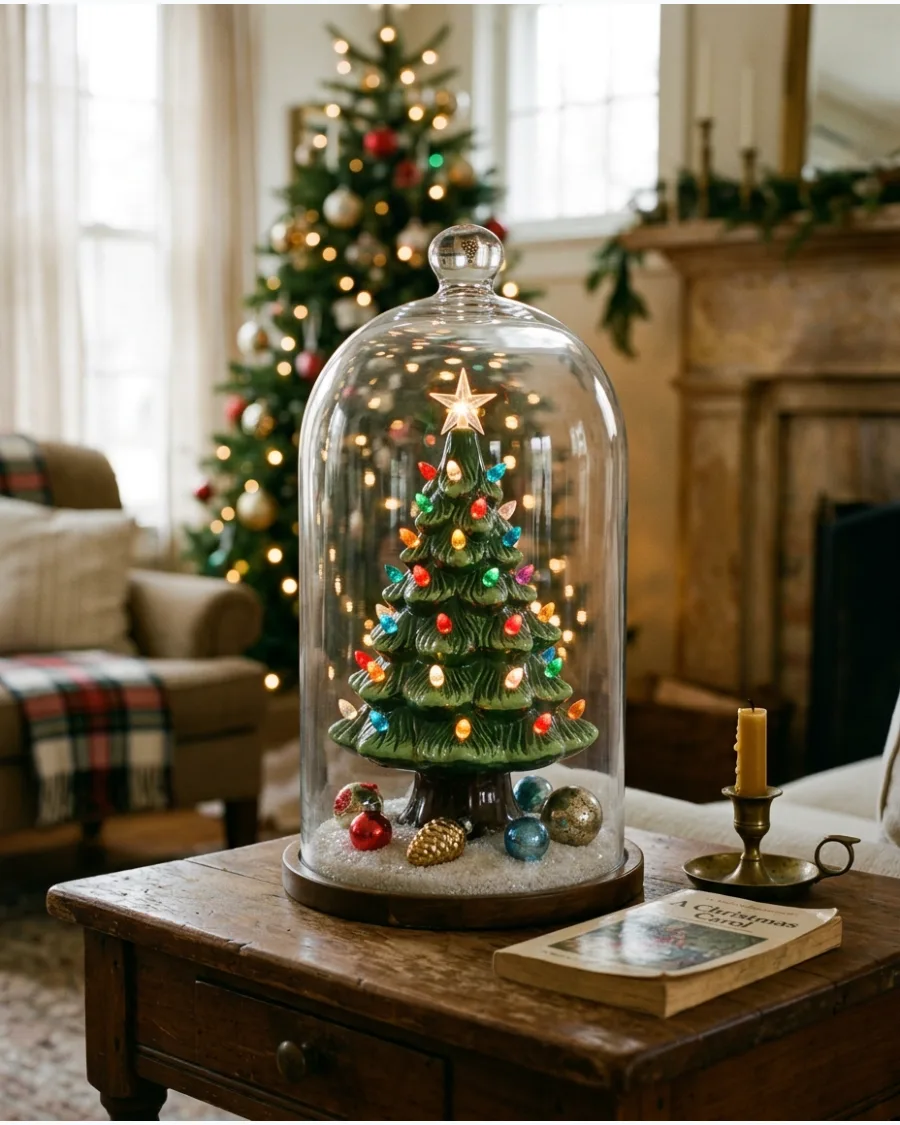
Center a nostalgic ceramic tree within a tall glass dome to protect and showcase its colorful plastic lights. This setup highlights the retro craftsmanship of the piece while keeping it dust-free on your tabletop.
Add a light dusting of fine faux snow around the base and tuck in a few vintage glass ornaments to ground the ceramic tree.
- Measure the diameter of the ceramic tree base to ensure it sits comfortably inside the cloche lip without touching the glass.
- Choose a cloche with a cord notch or a hollow base if the ceramic tree requires a plug-in power source.
- Use only enough faux snow to cover the base; excessive snow will obscure the bottom tier of ceramic lights.
If the tree uses a battery pack, hide it behind the back of the tree or underneath a specialized cloche base.
20. Christmas Tree With Presents Cloche
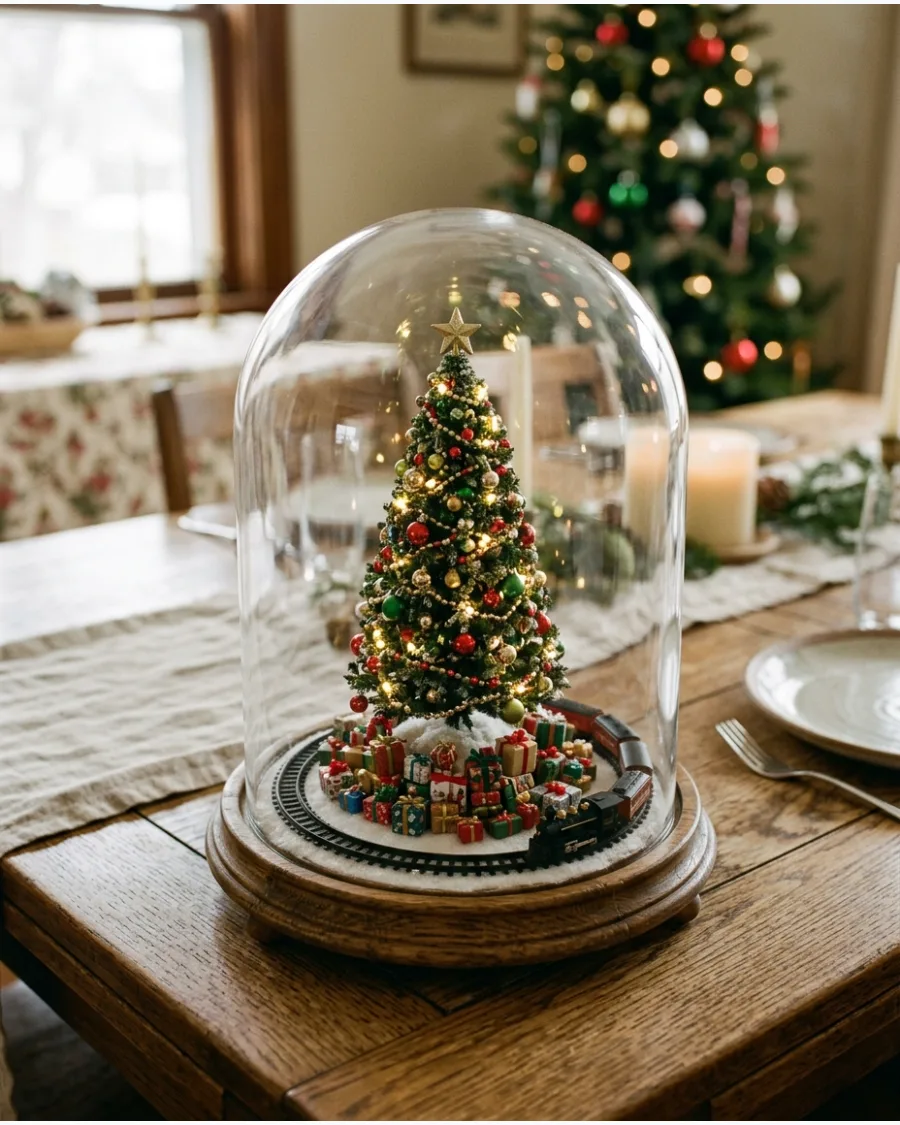
Create a dynamic miniature scene by surrounding a decorated tree with a tiny toy train and wrapped packages. Rather than a formal arrangement, cluster the presents at varying heights and angles for a lived-in look.
Place a miniature train track in a circle or semi-circle around the tree base to act as a frame for the gifts.
- Look for N-scale or Z-scale model train accessories to ensure the train doesn't overwhelm the size of the tree.
- Wrap small wooden blocks in scrap gift wrap and thin embroidery floss to create realistic-looking miniature presents.
- Place the tallest presents at the back and the smallest train cars in the foreground to create a forced perspective effect.
Use a small brush to sweep stray faux snow off the top of the presents and the train tracks for a clean finish.
GINGERBREAD AND WHIMSICAL CHRISTMAS CLOCHES
21. Gingerbread House Christmas Cloche
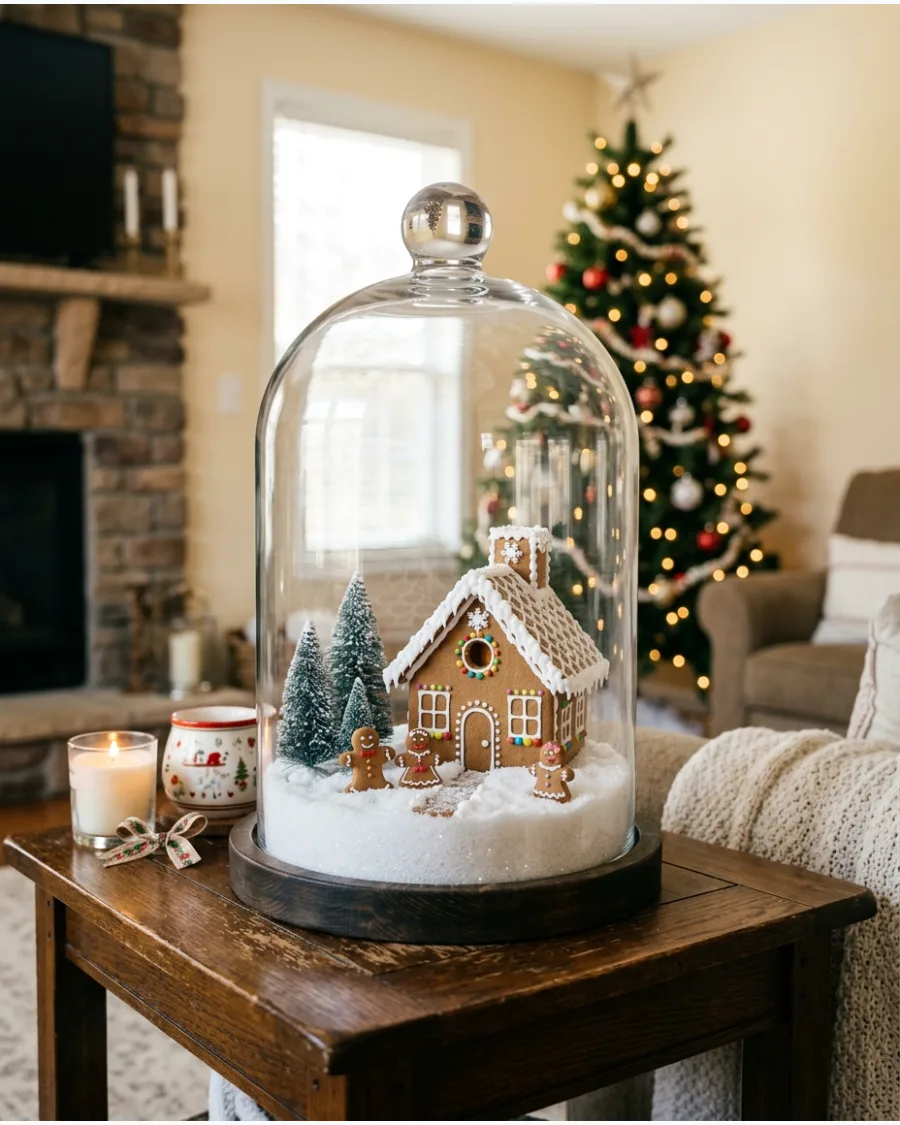
Set a single, highly detailed gingerbread house toward the back of a glass cloche to establish a clear focal point. Use fine faux snow to ground the structure and add miniature frosted trees on either side of the entryway.
Arrange tiny gingerbread figurines in the foreground to create a sense of depth and narrative within the dome.
- Choose a house with realistic frosting texture and architectural details rather than flat plastic surfaces to maintain a high-end look.
- Place the largest tree slightly behind the house and smaller shrubs in front to simulate a natural yard layout.
- If using a real gingerbread house, ensure it is completely dry and cooled to prevent condensation from clouding the glass interior.
Use a small paintbrush to sweep stray snow off the figurine faces and the house windows for maximum clarity.
22. Gingerbread Village Cloche
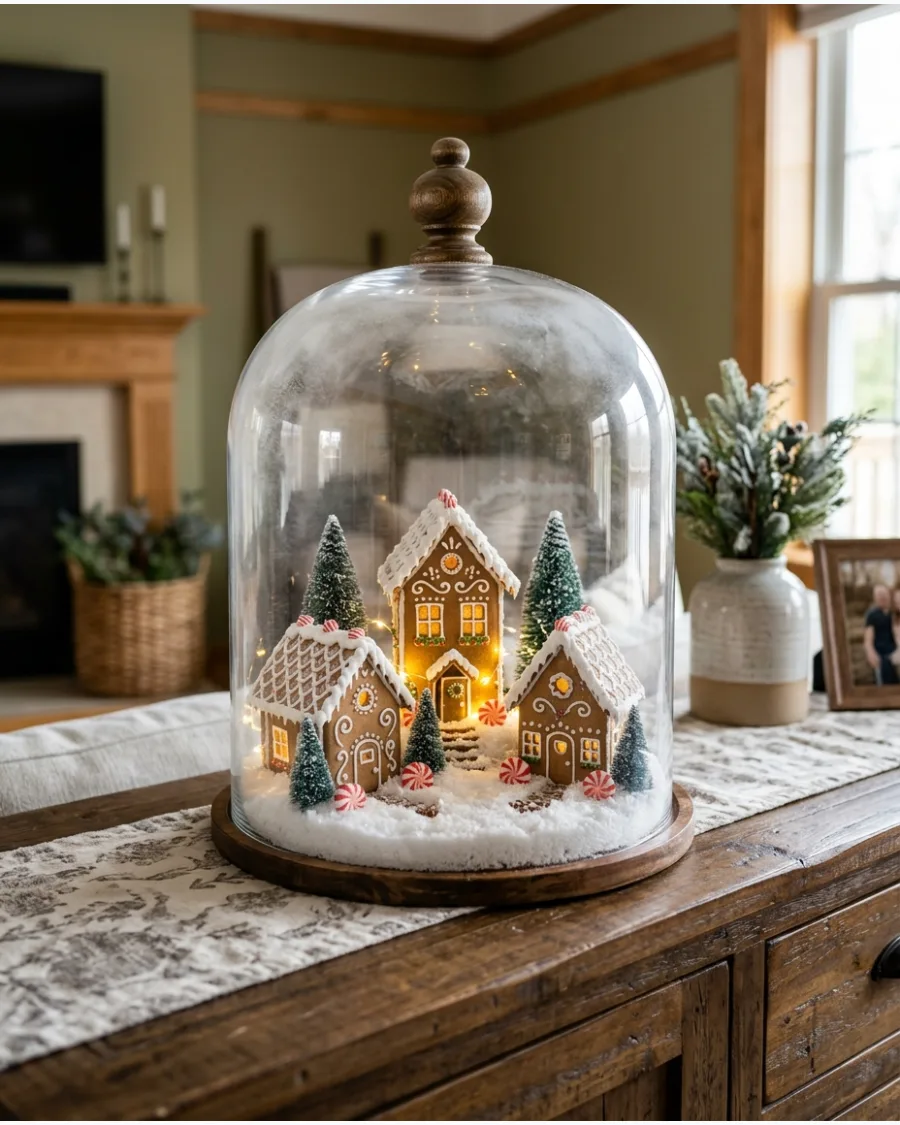
Combine several small-scale gingerbread houses to build a compact winter town inside a large cloche. Integrate warm LED micro-lights behind or inside the houses to create a soft, inviting glow through the windows.
Incorporate bottle-brush trees and tiny peppermint candies as decorative accents to fill the gaps between the buildings.
- Select houses of varying heights to avoid a flat horizontal line across the center of the display.
- Tuck battery packs under a hollow base or hide them behind the largest building to keep wiring invisible.
- Use a white or wooden base to complement the icing details and natural brown tones of the village.
Place the tallest building in the center and shorter ones at the edges to mimic the natural curve of the glass dome.
23. Gingerbread Man Christmas Cloche
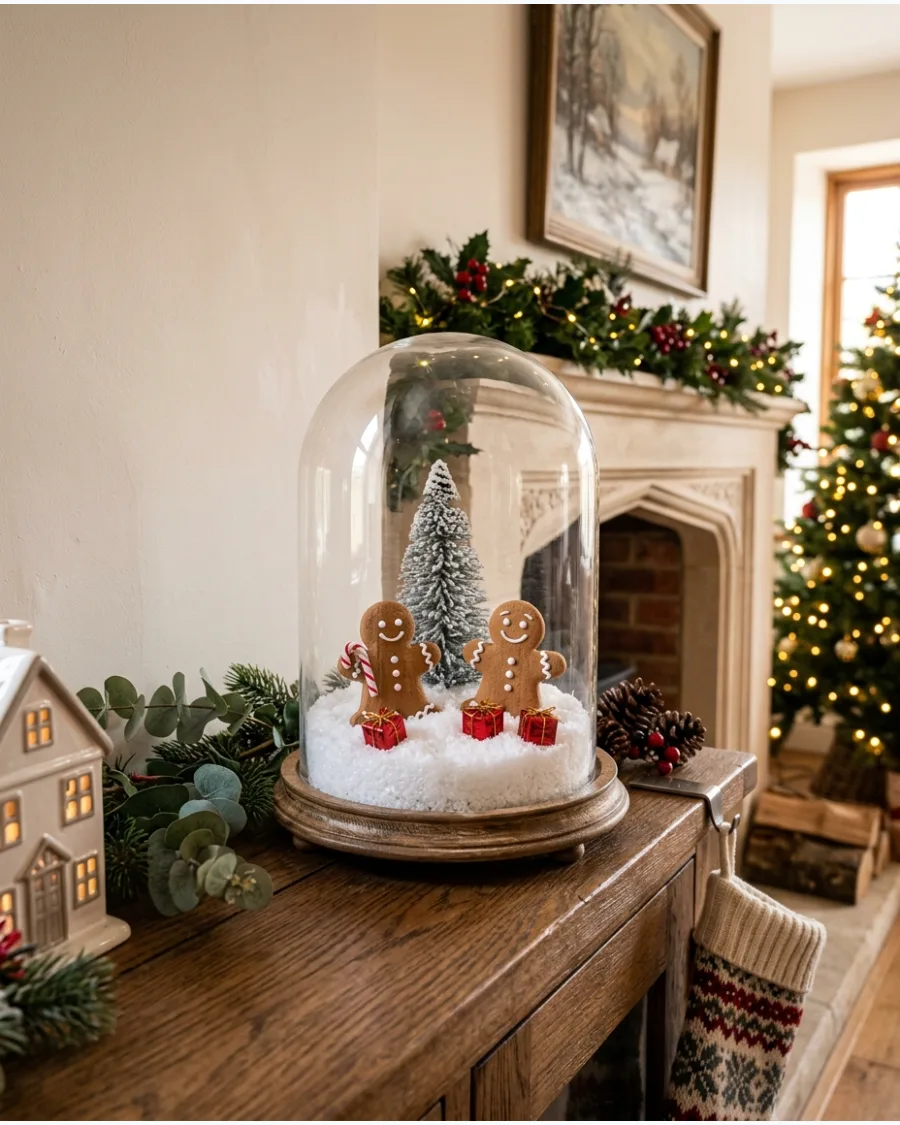
Focus on character and color by placing two or three gingerbread figurines in a snowy setting. Stick to a classic palette of brown, white, and red by using miniature candy canes and red-wrapped presents as props.
Position the gingerbread characters at slight angles to each other to make the scene feel more active and less like a static lineup.
- Check that the scale of the candy canes and presents matches the height of the gingerbread figures for a believable scene.
- Use a small amount of museum wax on the bottom of the figurines to keep them upright and stable during movement.
- Leave some clear space around the figures so the red and white accents do not clutter the central story.
Sprinkle a very thin layer of snow over the characters' shoulders to blend them into the wintry environment.
24. Gingerbread Bakery Cloche
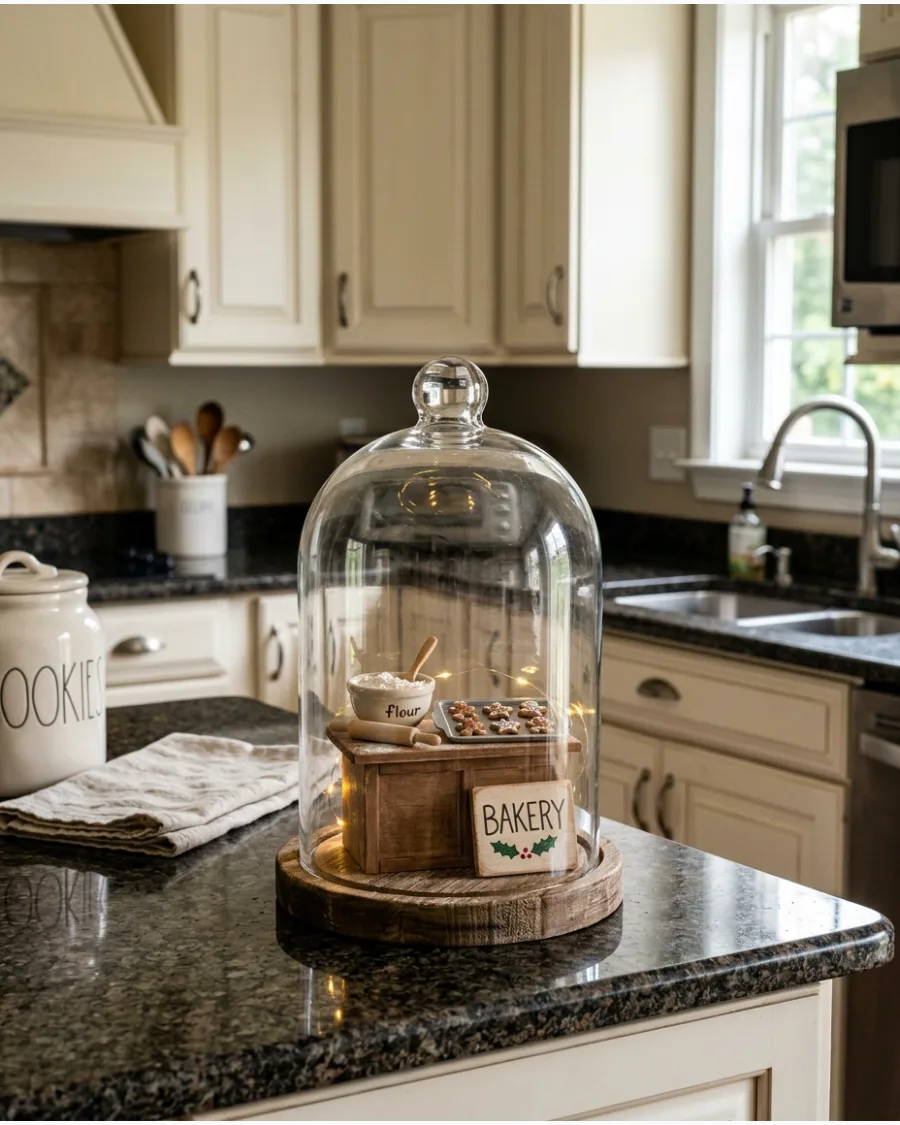
Design a specialized bake shop scene using a miniature storefront or a bakery facade as the backdrop inside the glass. Fill the interior with tiny details like rolling pins, mixing bowls, and a tray of miniature cookies to suggest a busy workspace.
Mount a small bakery sign at the entrance and use warm interior lighting to highlight the intricate kitchen tools.
- Look for 1:12 or 1:24 scale dollhouse accessories to find realistic metal or wood bakery tools.
- Place the largest furniture pieces, like a counter or shelf, against the back wall of the facade to maximize floor space.
- Ensure the cloche is tall enough to accommodate the bakery sign without the top touching the glass ceiling.
Use a pair of tweezers to precisely place the smallest baked goods on the shop counters.
25. Peppermint Christmas Cloche
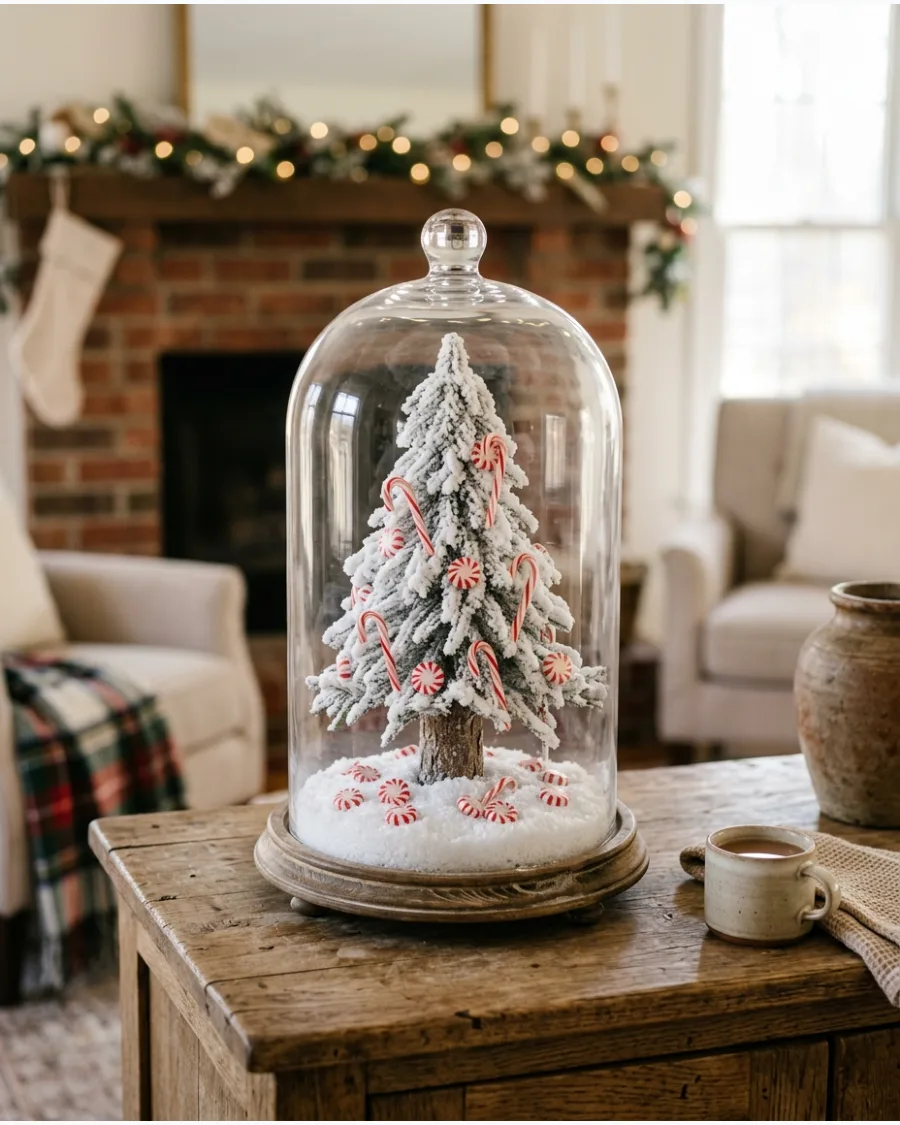
Create a vibrant red-and-white theme by layering peppermint swirls and miniature candy canes at different heights. Incorporate a single snowy white tree in the center to provide a neutral break between the bold candy patterns.
Vary the placement of the peppermint pieces by leaning some against the tree and laying others flat on the snowy base.
- Use high-quality resin or glass candy replicas to avoid the stickiness or fading associated with real sugar candies.
- Place larger peppermint swirls at the bottom and thinner candy canes toward the top to maintain visual balance.
- Clean the glass interior with a lint-free cloth before sealing to remove fingerprints that show up against the white snow.
Group three candy canes of different lengths together to create a focal point without overfilling the dome.
26. Candyland Christmas Cloche
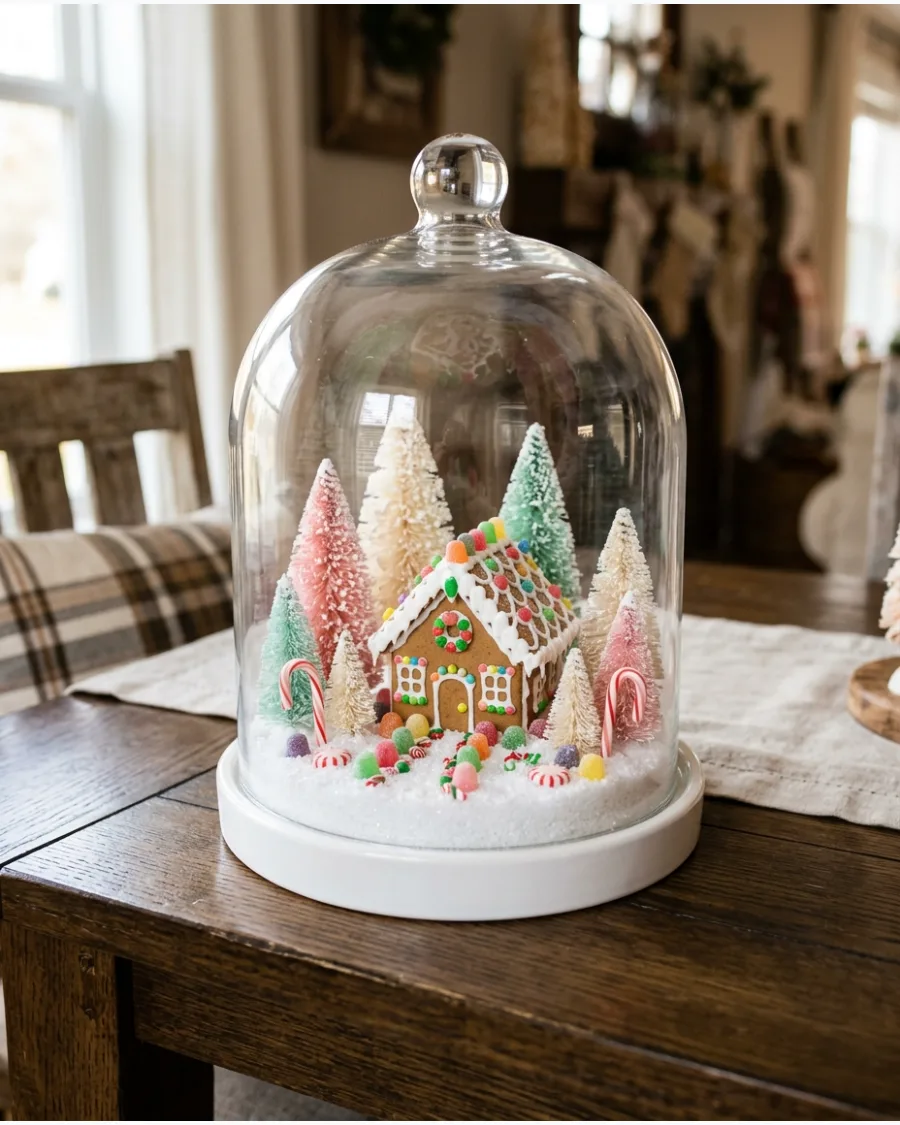
Build a whimsical miniature landscape using colorful lollipops and gumdrops to create a vibrant fantasy world. Layer pastel bottle brush trees and a miniature gingerbread house on a base of white sugar or fine faux snow to simulate a sugary ground. This approach uses candy elements as architectural and landscaping features rather than just scattered accents.
- Select candy decorations with realistic textures or matte finishes to avoid the look of shiny plastic toys.
- Vary the heights of the candy canes and lollipops to create a sense of depth within the curved glass.
- Check that the gingerbread house scale is larger than the gumdrops so the scene maintains a believable proportions.
Use a toothpick to pre-drill small holes in a foam base if you are having trouble standing the candy canes upright.
27. North Pole Christmas Cloche
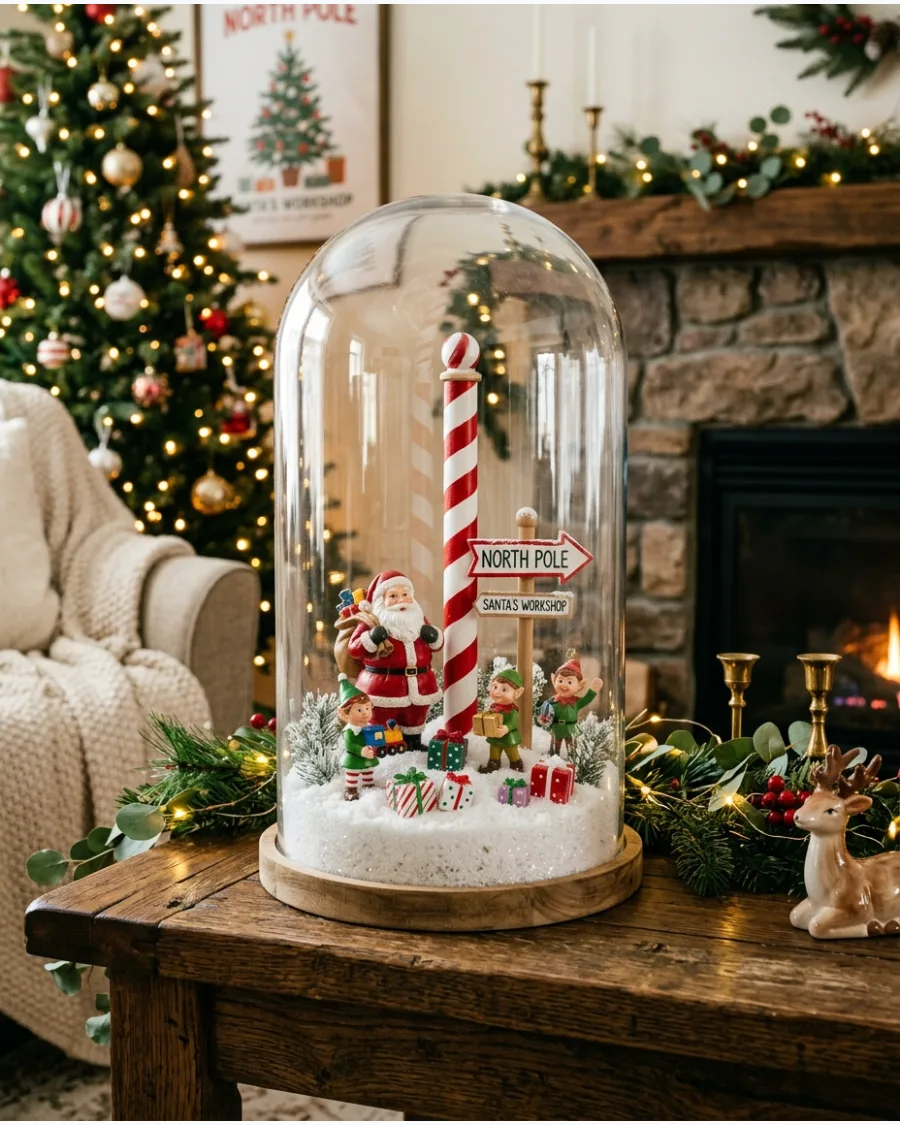
Create a storytelling scene centered around a miniature red-and-white striped North Pole. Place a detailed Santa figure beside a small directional sign and a pair of snow-dusted evergreen trees. The goal is to make the North Pole narrative immediately recognizable through careful placement of iconic elements.
- Choose a North Pole sign that is tall enough to be the vertical anchor of the scene without touching the top of the glass.
- Position one or two small elf figures slightly behind Santa to add layers and a sense of activity.
- Add tiny wrapped presents near Santa's feet to bridge the gap between the figures and the snowy floor.
Position the North Pole sign toward the back-third of the base so it doesn't obscure the smaller elf or Santa figures.
28. Santa Christmas Cloche
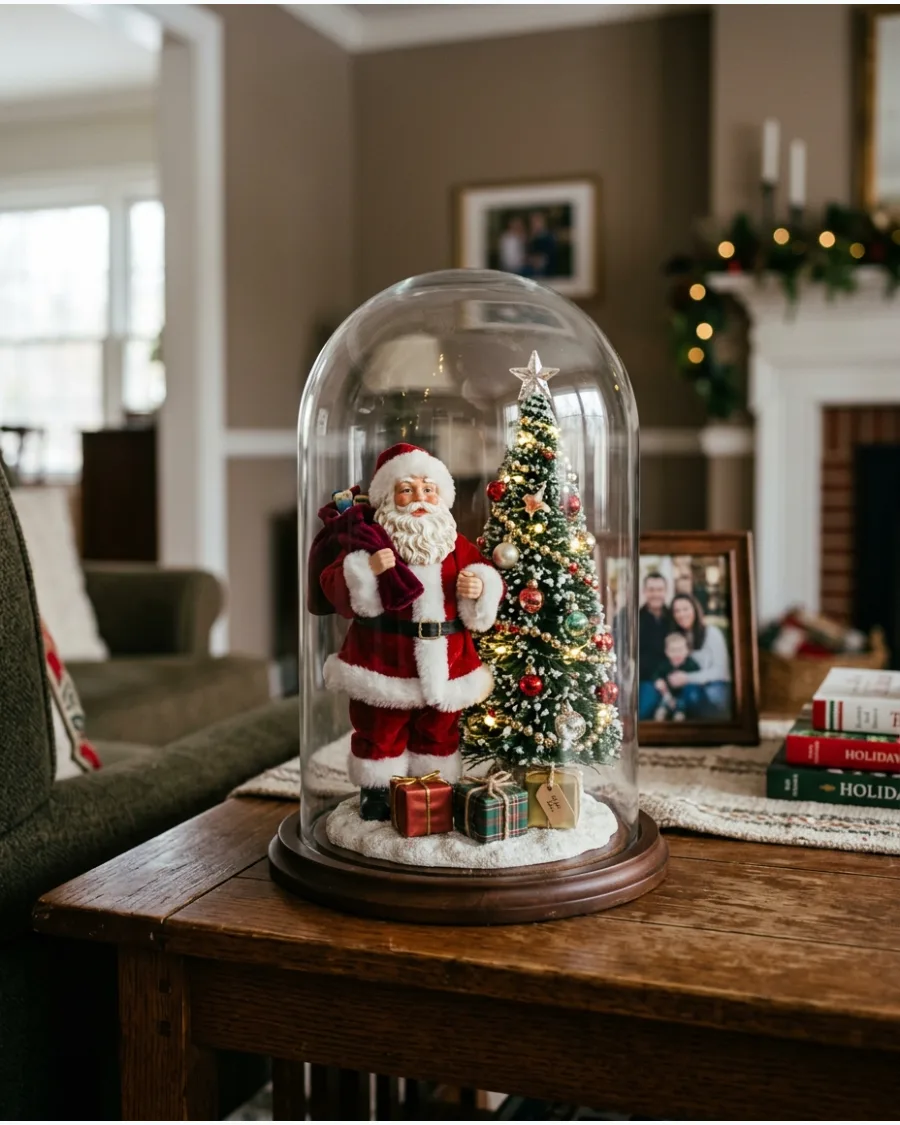
Design a display where a high-quality Santa figurine is the undisputed focal point. Arrange Santa next to a single decorated Christmas tree and a miniature velvet toy sack for a classic holiday look. Keeping the background simple prevents the glass dome from feeling cluttered or distracting from the main character.
- Select a Santa figure with a detailed face and textile clothing to give the display a more sophisticated feel.
- Place tiny wrapped gifts at various angles around the base of the tree to fill empty floor space naturally.
- Check that the tree height is slightly taller than Santa to maintain a realistic scale relationship.
Leave a half-inch of empty space between the figures and the glass wall to prevent reflections from distorting the view.
29. Santa's Workshop Cloche
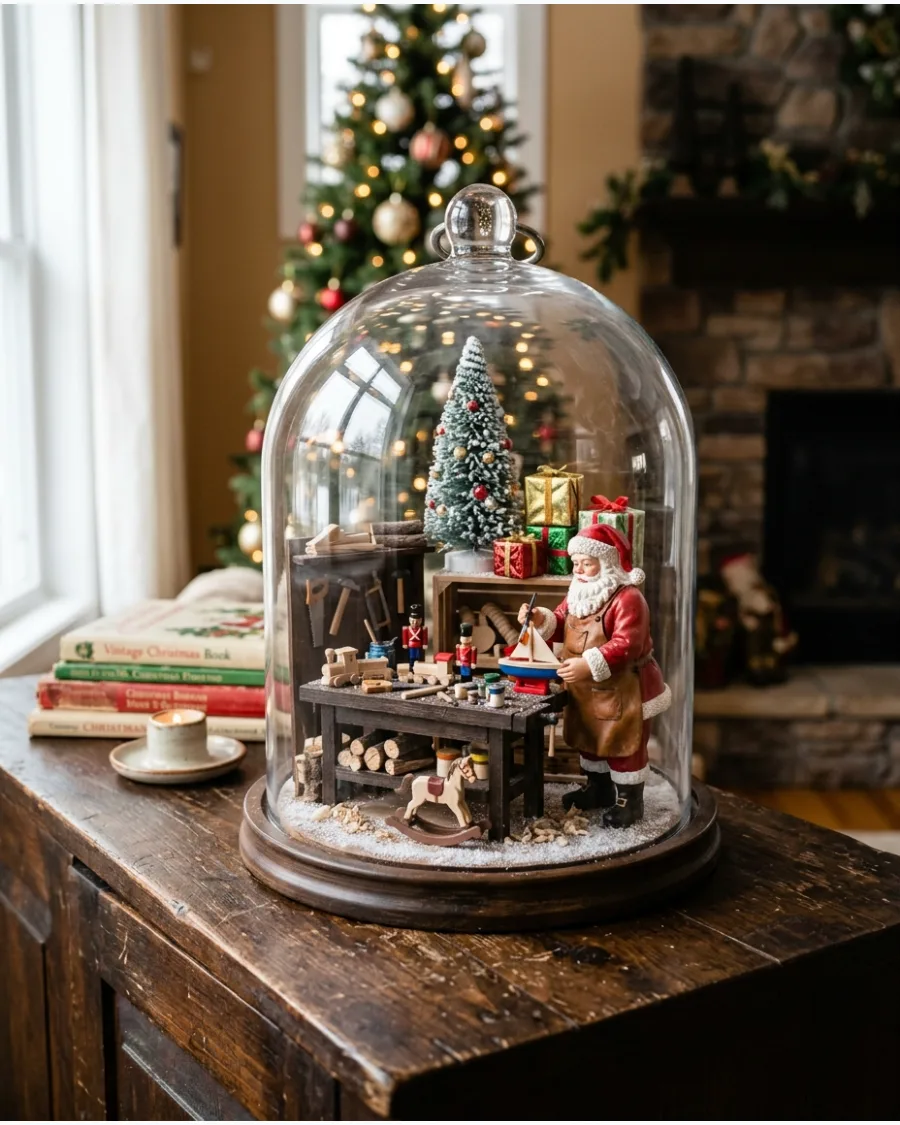
This vignette mimics a functional artisan space by grouping miniature craft supplies and half-finished toys around a central workbench. By avoiding a random sprawl of figurines, you create a narrative scene that feels intentional and highly detailed.
Anchor the scene with a small wooden table or bench and place Santa in an active pose next to it rather than centered in the dome. Small presents and a bottle brush tree fill the background corners to provide depth without crowding the main action.
- Select figurines with realistic wood or matte painted finishes to avoid the unnatural glare of shiny plastic under the glass dome.
- Position the smallest items, like tiny blocks or tools, using tweezers to ensure they stay within the active work area of the miniature bench.
- Dust the base and interior items with a soft makeup brush before sealing the cloche to prevent trapped lint from distracting from the scene.
Use a tiny dab of clear museum wax on the bottom of the workbench and Santa to keep them from sliding if the display surface is bumped.
30. Nutcracker Christmas Cloche
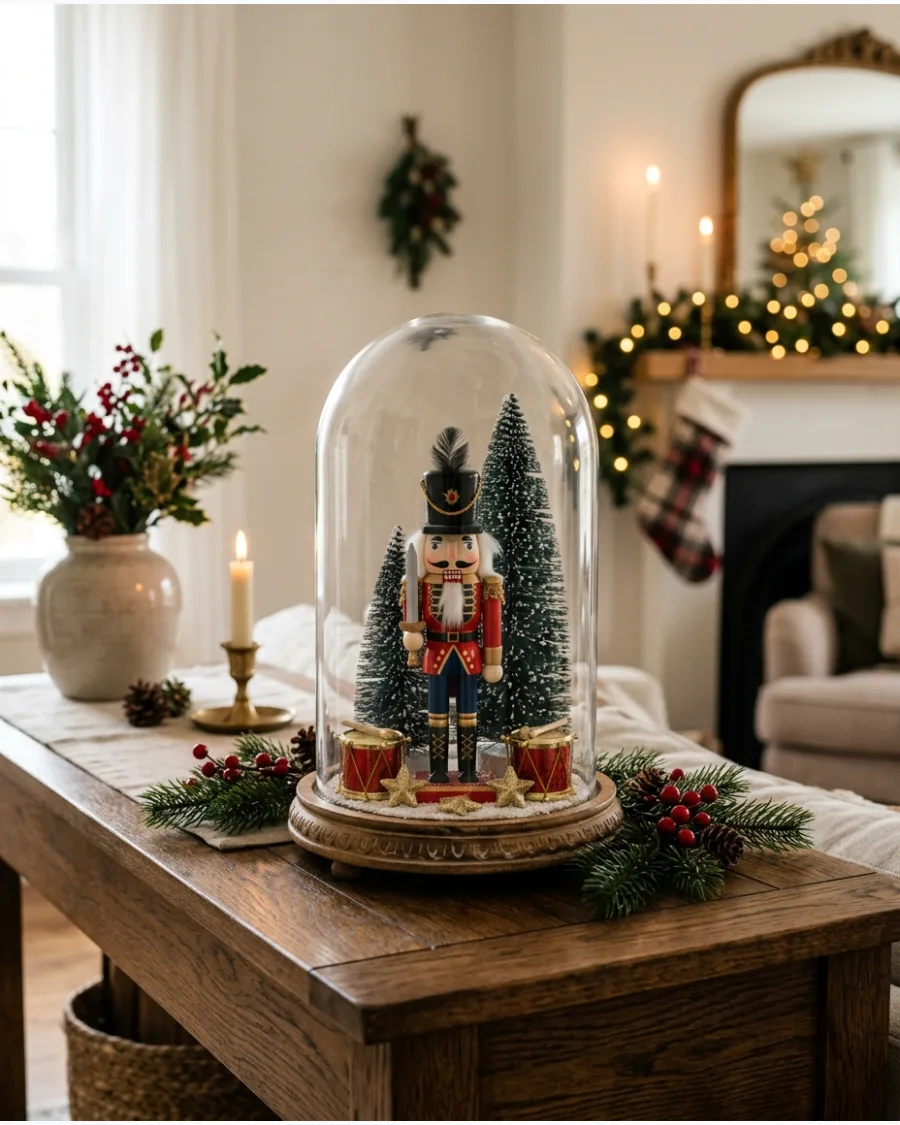
Create a traditional holiday display centered around a classic nutcracker figure. Incorporate tiny drums and gold stars around the base to evoke the atmosphere of the famous ballet. Use a strict palette of red, green, black, and gold to keep the vignette looking cohesive and formal.
- Select a nutcracker with a sturdy base to ensure it stays upright on the cloche's floor.
- Scatter gold star confetti or small metallic stars around the feet of the figure to catch the light through the glass.
- Add a single small evergreen tree to one side to provide a natural green contrast to the metallic and red tones.
Pair the cloche with a black or dark wood base to make the bright red and gold of the nutcracker stand out.
WOODLAND AND NATURAL CHRISTMAS CLOCHE IDEAS
31. Woodland Christmas Cloche
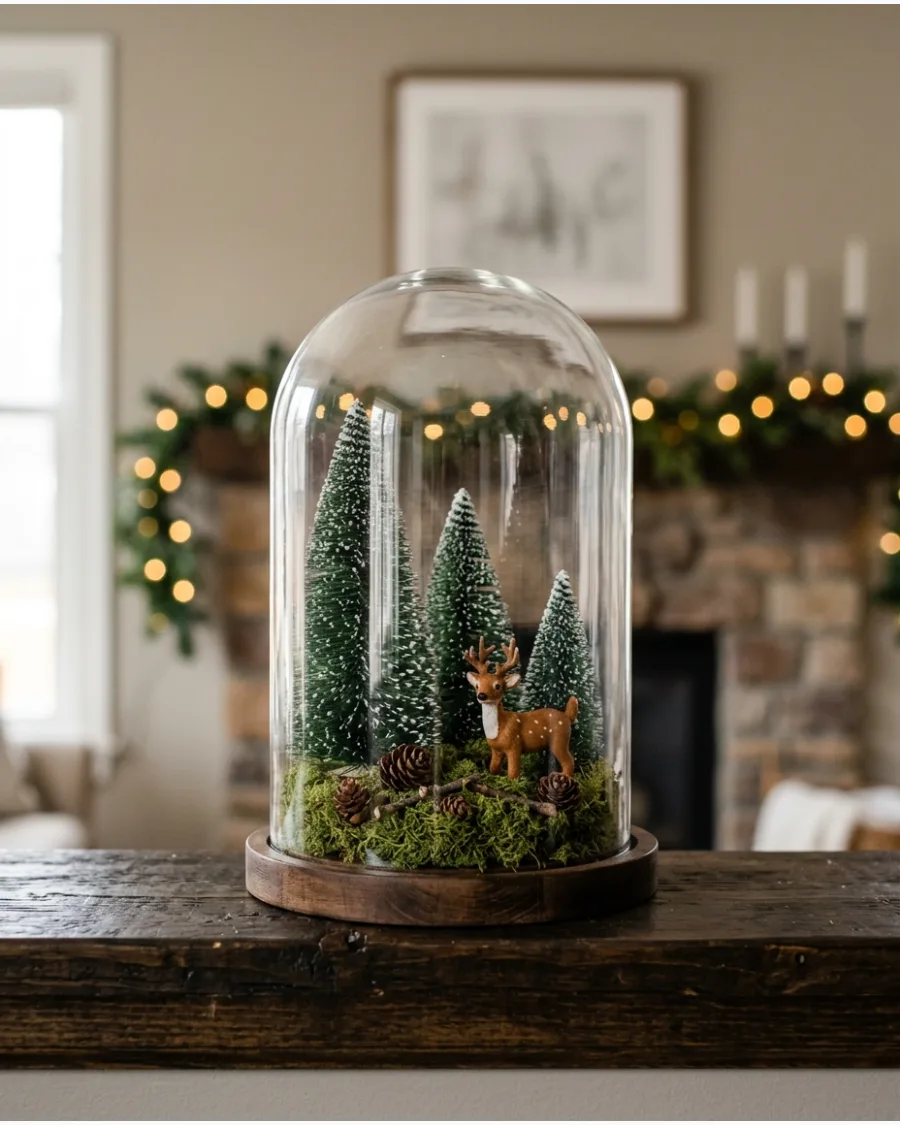
Build a textured forest scene using varying heights of miniature pine trees and natural elements. Layer dried green moss over the cloche base before positioning a single small deer figurine and real pinecones to establish a grounded, earthy look. Finish with a very light dusting of faux snow to suggest the first frost without burying the organic textures.
- Choose pinecones of different sizes to mimic the appearance of natural forest floor debris.
- Offset the deer figurine from the center of the base to create a more natural, candid composition.
- Use a cloche with a wooden base to complement the organic brown and green tones of the scene.
Use tweezers to place small moss patches around the deer’s feet for a seamless transition between the figurine and the landscape.
32. Deer in the Snow Christmas Cloche
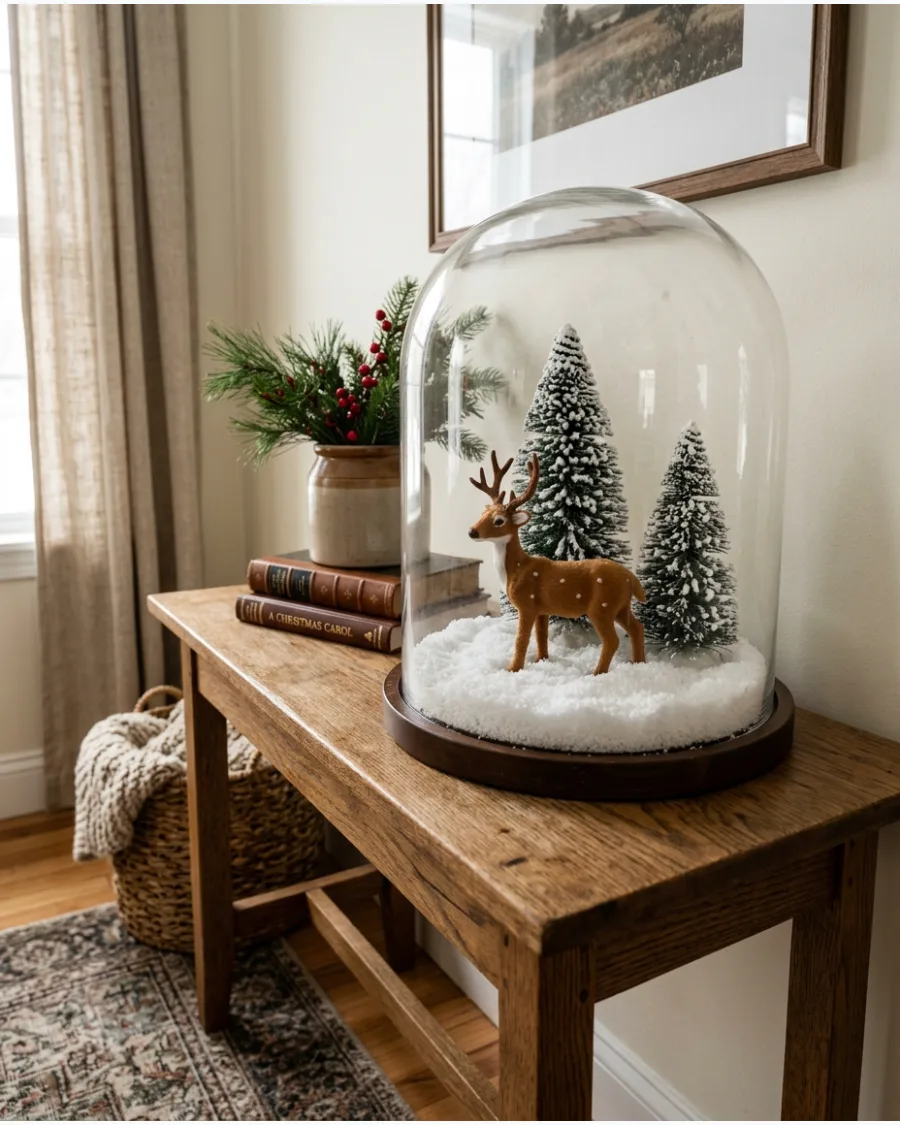
Focus on a minimalist winter scene by using a deeper layer of faux snow to anchor the decorative elements. Position a single miniature deer directly between two heavily flocked evergreen trees to create a framed focal point. This simplified layout emphasizes the contrast between the white snow and the dark forest tones protected under the glass dome.
- Select a cloche with enough vertical clearance so the tree tops do not touch or bend against the glass.
- Press the deer and trees firmly into the snow layer to prevent them from shifting if the surface is bumped.
- Wipe the inside of the glass with a microfiber cloth before assembly to remove fingerprints that become visible under direct light.
A small scoop of baking soda mixed with iridescent glitter creates a convincing, heavy-pack snow texture that stays in place.
33. Woodland Animal Christmas Cloche
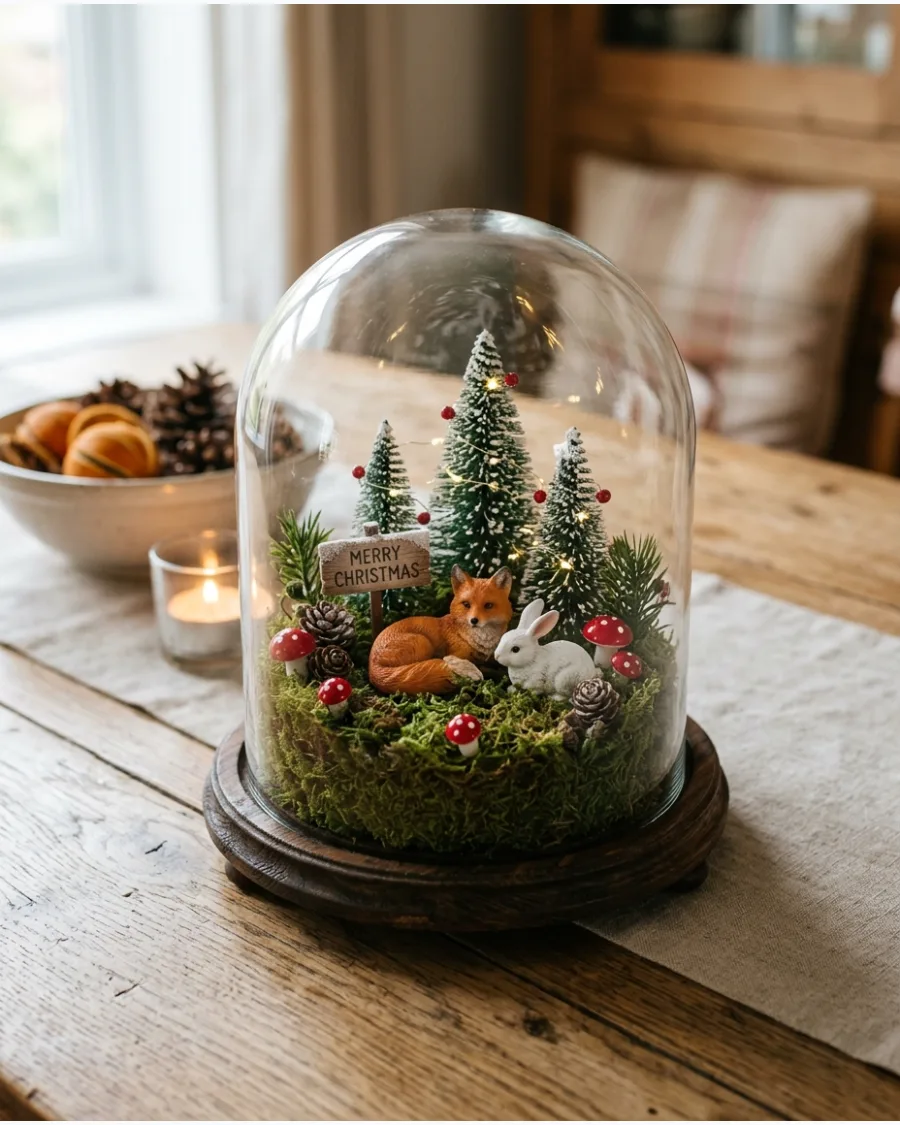
Assemble a lifelike miniature habitat by grouping a few compatible forest animals like a fox and a rabbit. Anchor the scene with clumps of preserved moss and miniature mushrooms to give the animals a realistic terrain to inhabit. Limit the number of figurines to two or three to ensure the scale feels appropriate for the diameter of your glass dome.
- Look for figurines with matte finishes to avoid the reflective plastic look of common toys.
- Cluster the mushrooms near the base of the trees to mimic how they naturally grow in forest environments.
- Use a few sprigs of dried greenery alongside bottle brush trees to add botanical variety to the landscape.
If figurines won't stand on uneven moss, glue a small flat pebble to the base of the animal to provide a stable footprint.
34. Mushroom Woodland Christmas Cloche
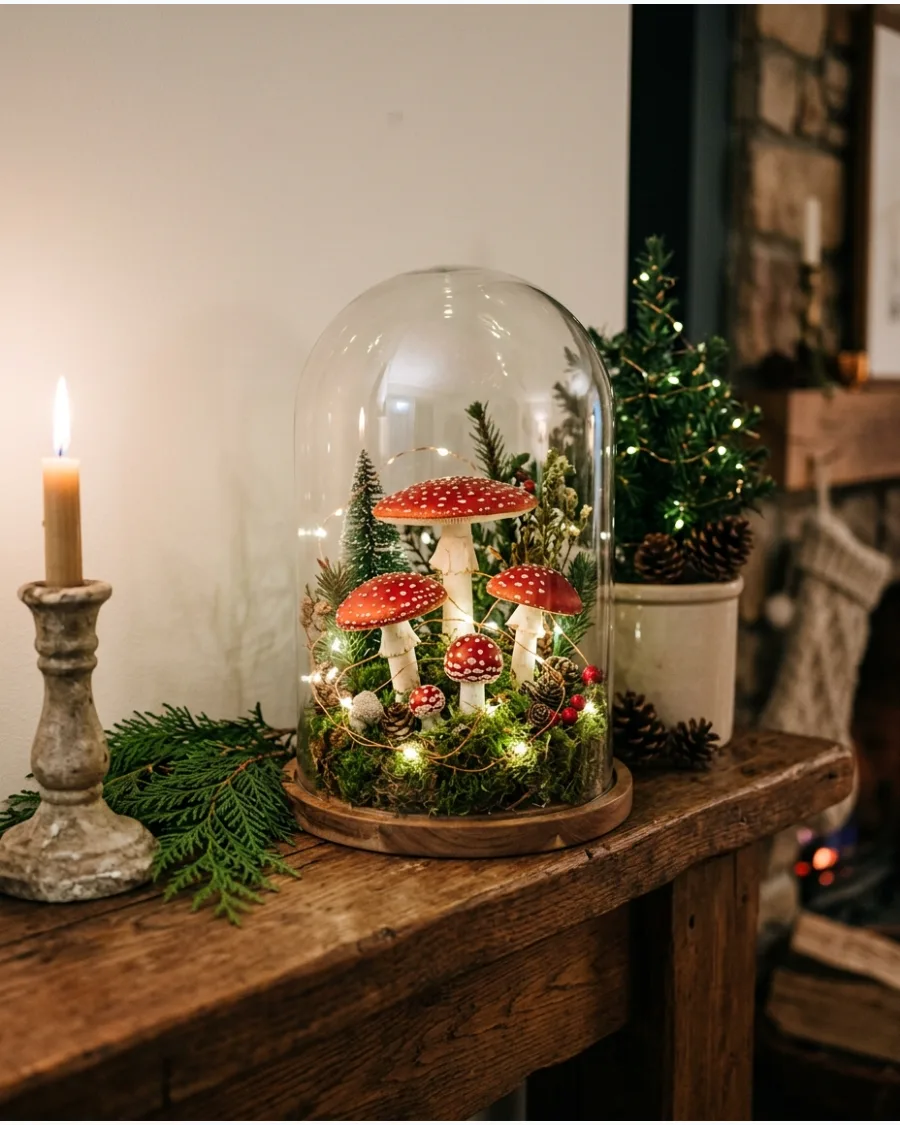
Incorporate vibrant red-and-white mushrooms as the primary color accent within an otherwise green and brown forest scene. Weave a short strand of copper-wire fairy lights through the moss and around the mushrooms to highlight the pops of color from within the dome. The soft glow transforms the natural textures into a warm, light-filled display for evening ambiance.
- Hide the battery pack behind a thick patch of moss or a larger pinecone at the back of the cloche base.
- Choose mushrooms with wire stems so you can easily adjust their height and angle within the moss layer.
- Use warm-white LEDs rather than cool-white to maintain the earthy, organic feel of the woodland theme.
Test the light placement with the glass dome on, as the glass can reflect the bulbs and change the appearance of shadows.
35. Enchanted Forest Christmas Cloche
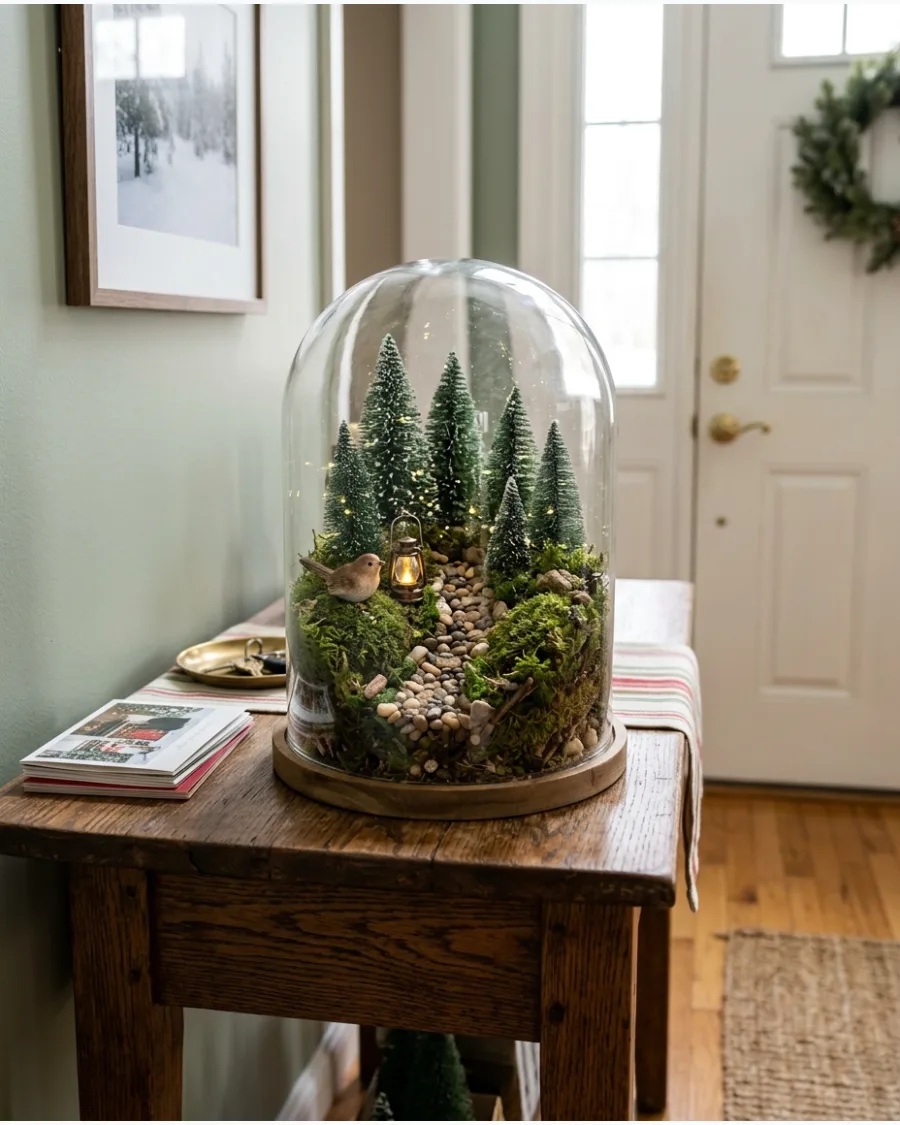
Build a sense of depth by creating a visible path that leads the eye through your miniature forest. Use small pebbles or fine sand to define a winding walkway between the mossy banks and miniature evergreen trees. Including tiny details like a miniature lantern or a small creature along the path makes the scene feel like a specific moment in a larger environment.
- Place the tallest trees at the back and sides to frame the path and keep the center of the scene open.
- Scale the lantern figurine to the size of the animals to maintain a consistent and believable miniature world.
- Secure the path materials with a light spray of adhesive if the cloche will be moved between surfaces frequently.
Angle the path diagonally across the base rather than straight back to create a more dynamic and interesting composition.
36. Pinecone Christmas Cloche
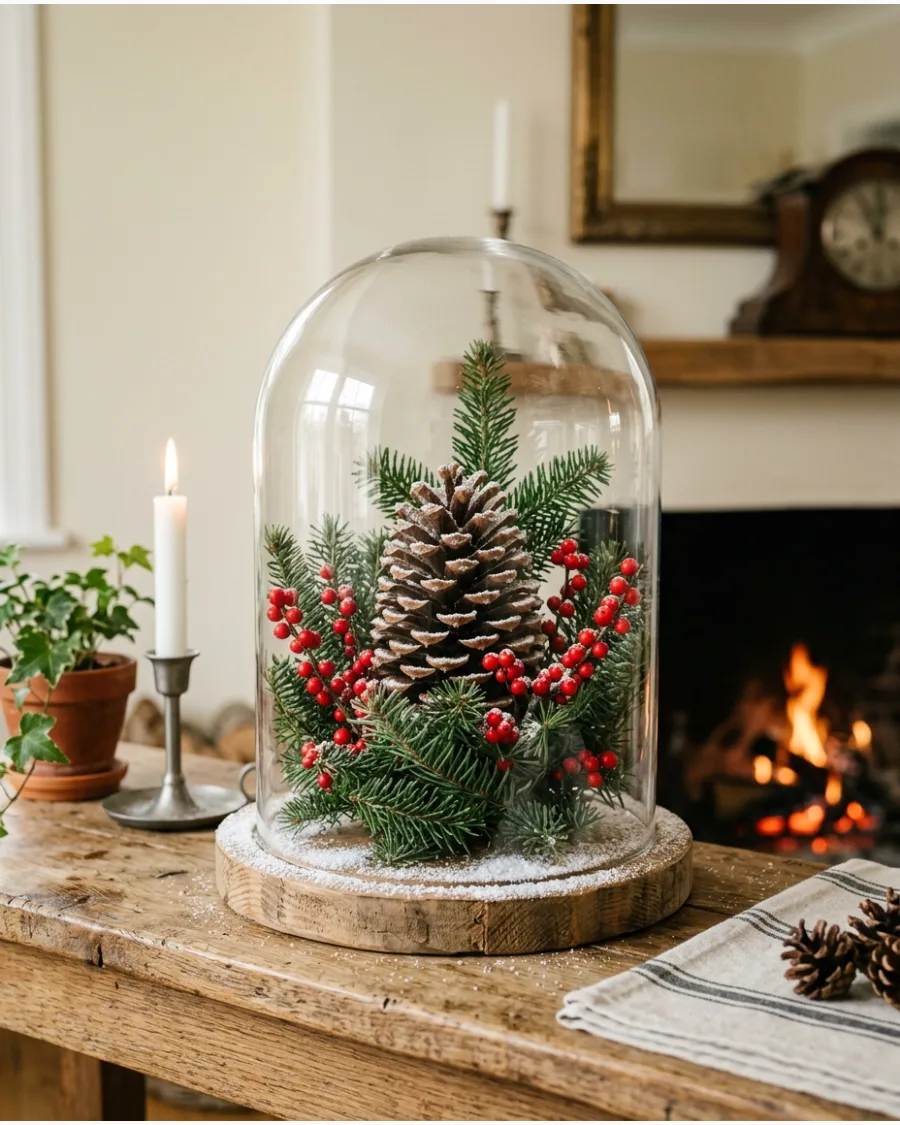
Highlight the texture of the forest by featuring pinecones as the primary centerpiece under glass. Choose a variety of scales or one oversized specimen to create a clear focal point.
Layer a light dusting of faux snow over a few evergreen sprigs and red berries to ground the arrangement. This natural setup works well on a rustic mantel or as part of a larger tabletop cluster.
- Check that the pinecones are cleaned and dried to prevent sap from sticking to the glass interior.
- Position the largest pinecone in the center and tuck the berries and sprigs around the base to hide any gaps.
- Use a glass dome with a narrow profile if placing the display on a shallow mantelpiece.
Use a soft paintbrush to flick faux snow onto the pinecone scales before lowering the glass dome.
37. Dried Orange Christmas Cloche
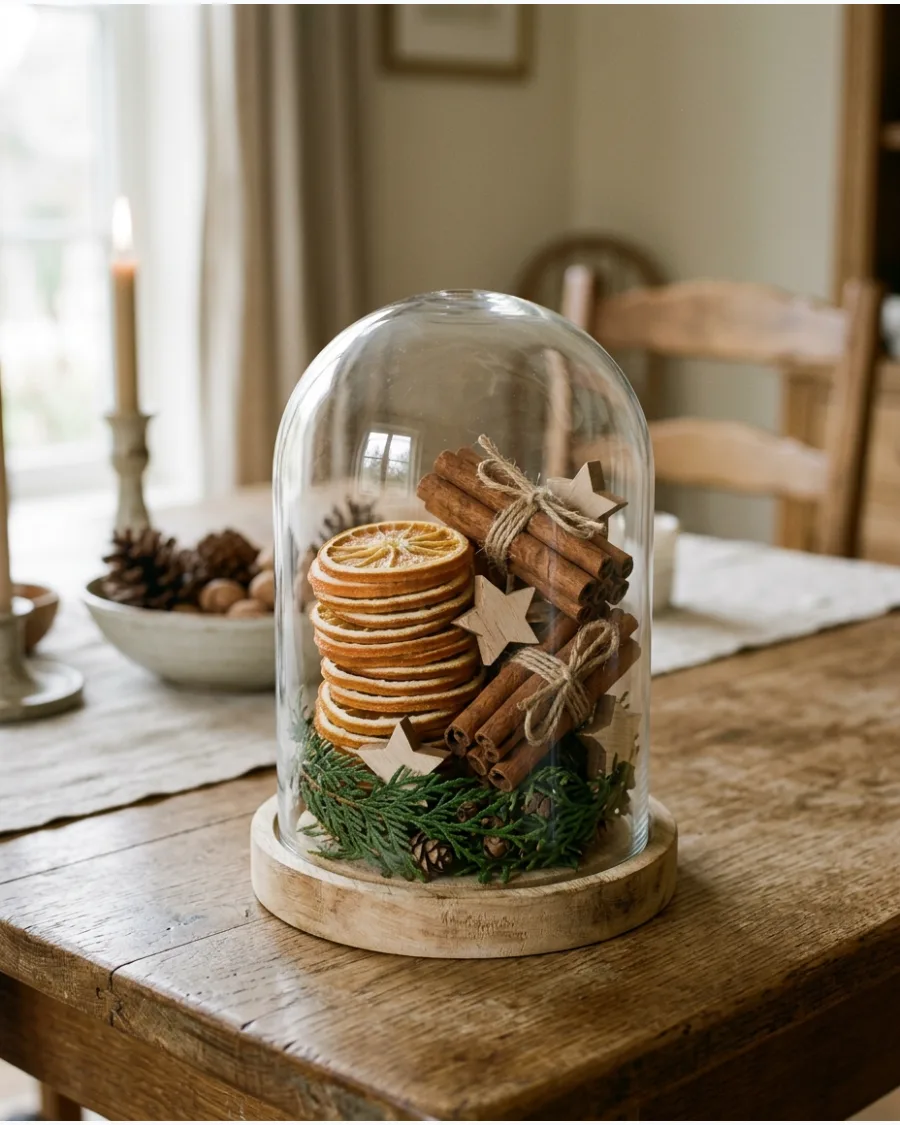
Incorporate warm tones and organic textures by stacking dried citrus and spices within a dome. The contrast between the translucent orange slices and the dark cinnamon sticks provides a natural color palette.
Arrange the elements on a raw wood base rather than a polished tray to maintain a handmade look. This display fits perfectly on a dining sideboard or kitchen counter.
- Select dried orange slices that are consistent in thickness so they can be leaned against cinnamon sticks or pinecones.
- Tuck wooden stars into the vertical gaps to add a geometric shape that contrasts with the round fruit.
- Avoid placing this cloche in direct sunlight to prevent the natural colors of the oranges from fading prematurely.
Secure a few orange slices to a cinnamon stick bundle with thin twine to keep the stack stable when moving the cloche.
38. Rustic Wood Slice Christmas Cloche
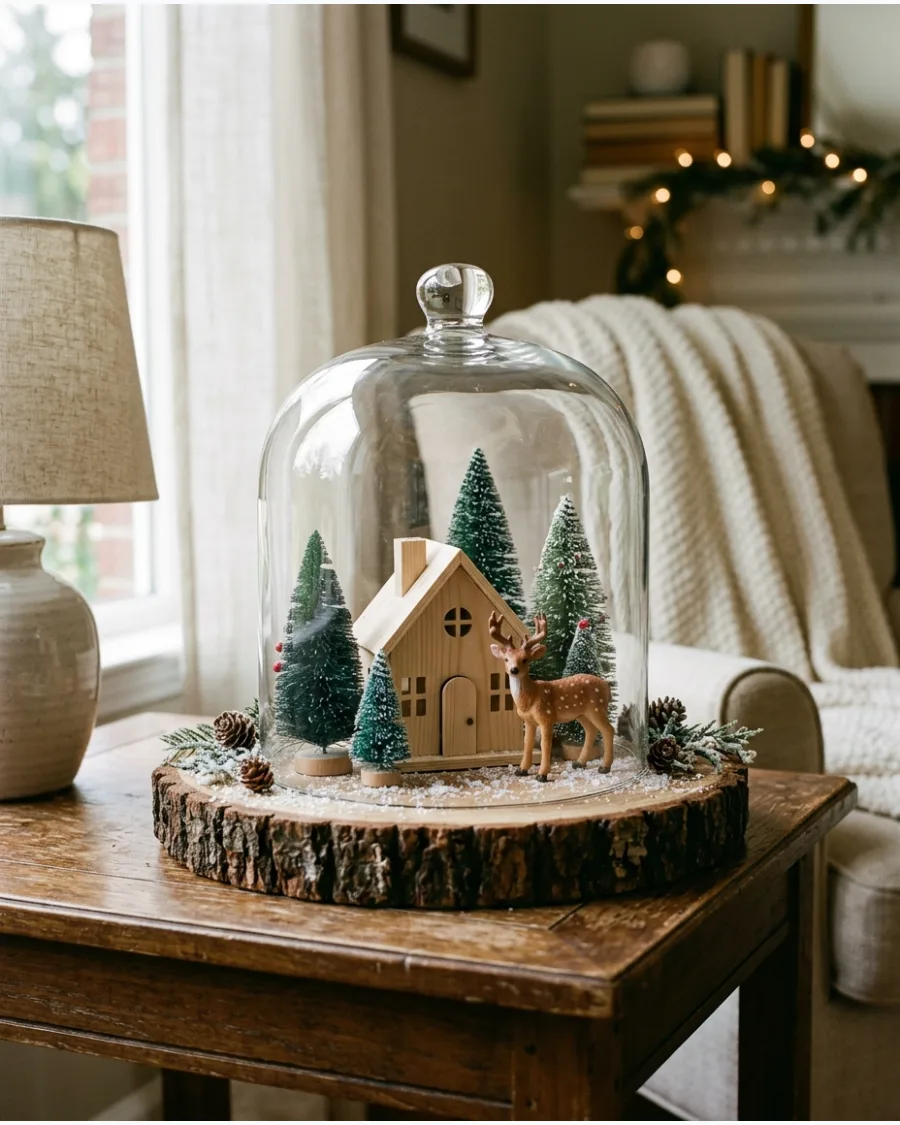
Build a miniature forest scene using a thick wood slice as the structural foundation. The visible bark on the edge of the base grounds the display in a rustic aesthetic.
Place a small wooden house and a miniature deer among tiny evergreen trees and pinecones to create a narrative scene. Ensure the glass dome fits securely within the diameter of the wood slice.
- Choose a wood slice that is at least one inch thick to provide a sturdy and visible platform for the figurines.
- Position the miniature deer slightly behind a small tree to mimic how wildlife is spotted in the woods.
- Check that the wooden house is scaled proportionally to the trees to avoid a jarring visual mismatch.
Sand the top surface of the wood slice lightly if the base of your miniature figurines needs a flatter surface to stand upright.
39. Winter Bird Christmas Cloche
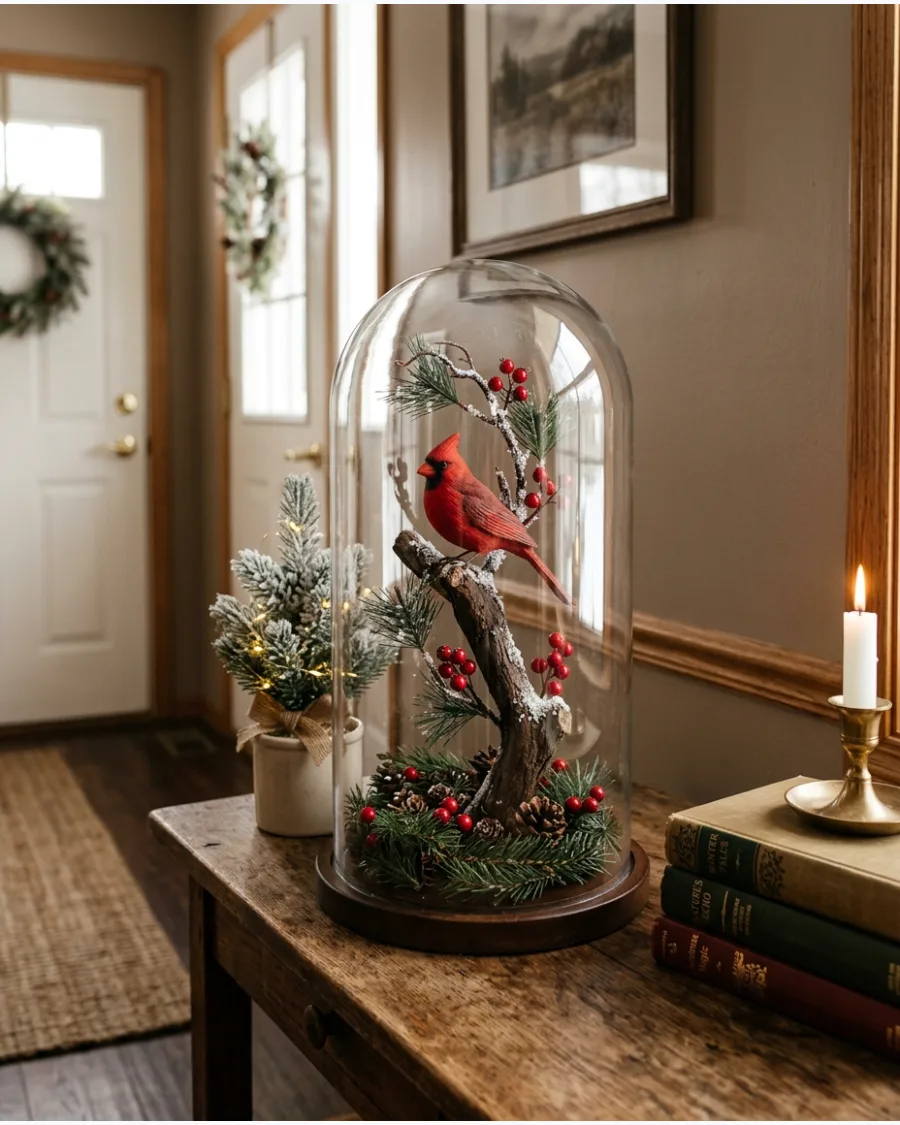
Focus on a single lifelike bird to bring a sense of movement to your holiday surfaces. Using a cardinal or chickadee adds a pop of color against a backdrop of muted greens.
Mount the bird on a small snowy branch or a cluster of evergreen sprigs to elevate it toward the center of the dome. This height ensures the detail is visible from across the room.
- Look for a bird figurine with realistic feather textures rather than a smooth plastic finish to maintain a sophisticated look.
- Anchor the branch in a small mound of floral foam or moss to keep it from tipping over inside the glass.
- Arrange red berries around the base of the branch to echo the colors of a cardinal or provide contrast for a chickadee.
Use a tiny dab of clear adhesive or museum putty to secure the bird’s feet to the branch for a stable display.
40. Natural Minimalist Christmas Cloche
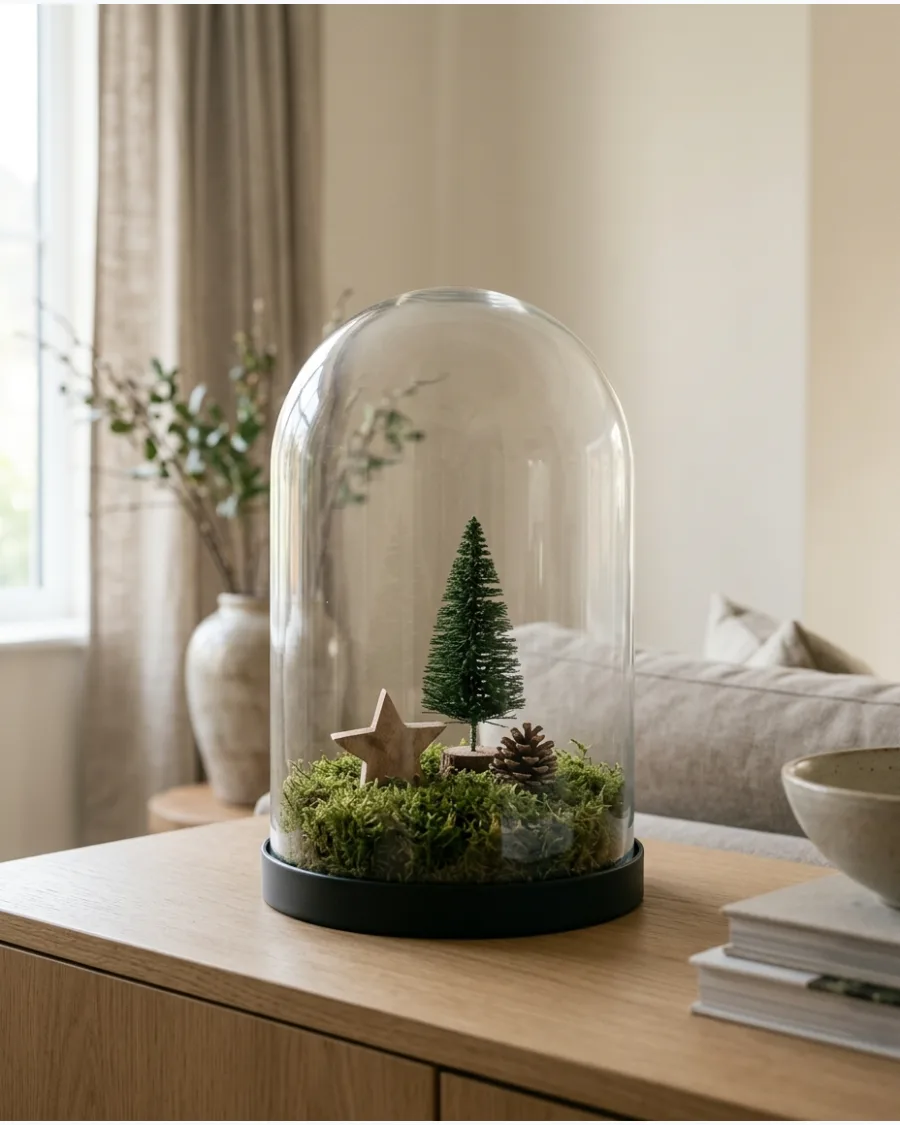
Emphasize simplicity by using only a few select items and leaving significant open space within the cloche. This approach prevents the display from feeling cluttered and highlights the quality of each individual piece.
Set a single tree alongside a pinecone and a wooden star on a bed of natural moss. The airy composition works best on modern coffee tables or sideboards.
- Choose a wooden star with a matte or raw finish to complement the organic texture of the moss.
- Limit the faux snow to a few scattered flakes on the moss rather than a heavy layer that covers the materials.
- Verify that the tree is perfectly vertical, as any lean is highly noticeable in a minimalist arrangement.
Use a pair of long tweezers to position the moss and small stars exactly where you want them without bumping the central tree.
VINTAGE, ELEGANT AND CREATIVE CHRISTMAS CLOCHE IDEAS
41. Vintage Christmas Ornament Cloche
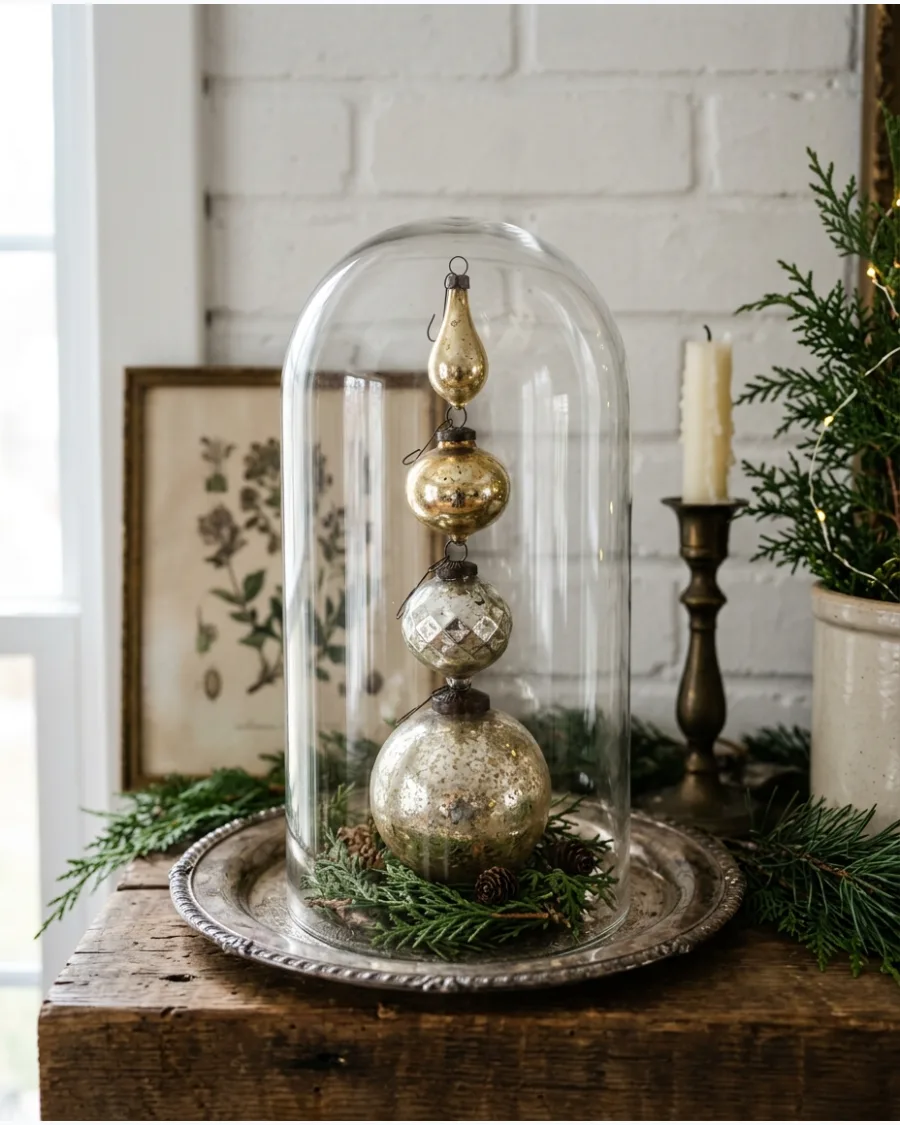
Showcase heirloom-quality ornaments by grouping them in a clear glass dome on a wooden or silver tray. Use ornaments with different diameters and mercury glass or hand-painted finishes to create depth.
Stack the larger ornaments at the bottom of the cloche and nestle smaller ones into the gaps to ensure the arrangement stays stable.
- Select ornaments with weathered patinas or mottled metallic finishes for a cohesive aged look.
- Tuck two or three short sprigs of fresh cedar or faux cypress around the base of the ornaments inside the glass.
- If the cloche has a narrow neck, use a pair of long tongs to place the ornaments without dropping them.
Use a small dab of removable museum wax on the bottom ornament to prevent the pile from shifting when the cloche is moved.
42. Vintage Santa Cloche
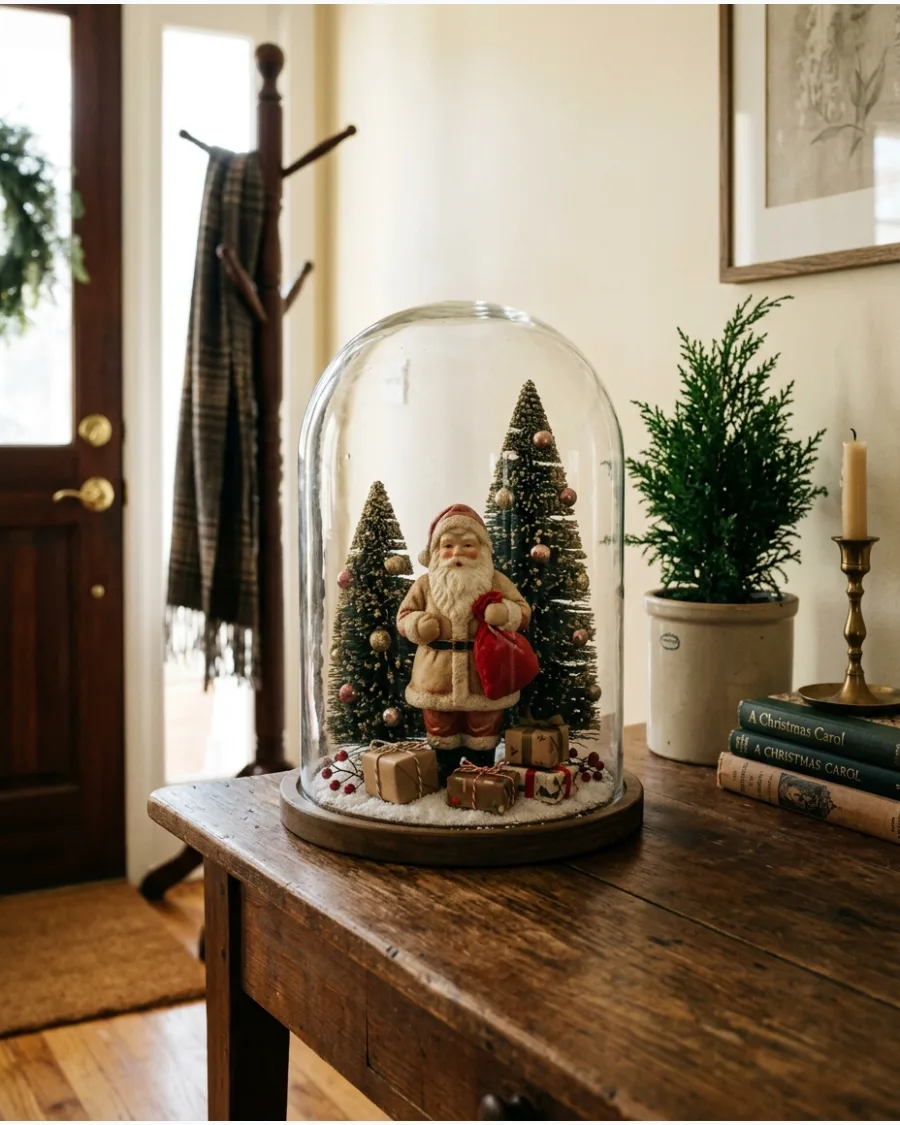
Capture a nostalgic feel by centering a classic Santa figurine inside a medium-sized glass dome. Surround the figure with miniature presents and a few faded red ornaments to ground the scene.
Position two small bottle-brush trees behind the Santa to provide a sense of height and a backdrop for the vignette.
- Look for figurines with matte painted finishes rather than glossy plastic for a more authentic vintage appearance.
- Leave a quarter-inch of space between the trees and the glass walls to avoid distorted reflections.
- Choose ornaments in muted shades like cranberry or brick to match the faded red color palette.
Dust the base of the figurine with a light pinch of fine-grain mica flakes to mimic fallen snow without obscuring the details of the feet.
43. Antique Toy Christmas Cloche
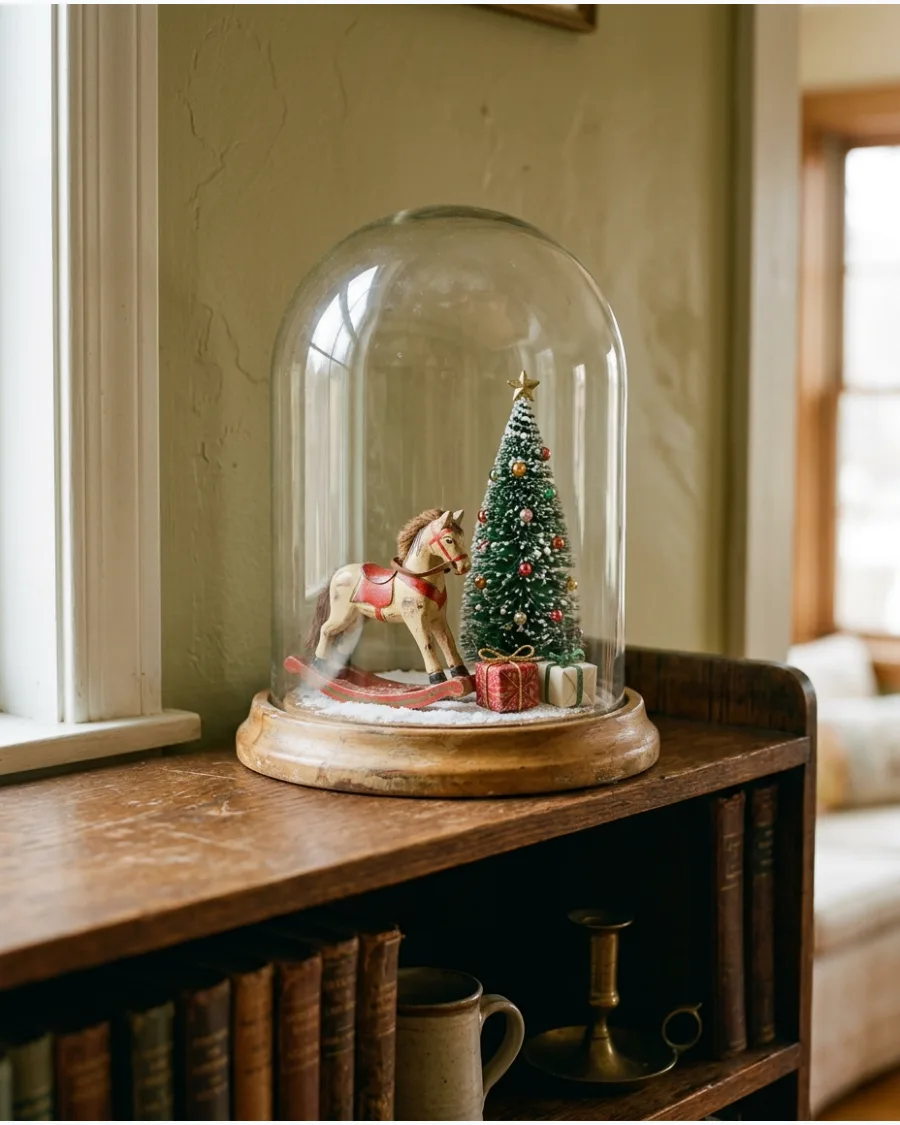
Recreate a miniature nursery scene using small-scale replicas of classic toys like a wooden rocking horse or a tiny train set. Build the scene on a flat wooden base to emphasize the traditional materials.
Arrange a tiny evergreen tree and a few meticulously wrapped miniature boxes next to the central toy to complete the Christmas morning look.
- Verify that the toy scale matches the miniature tree to keep the scene realistic.
- Tie miniature bows on the tiny gift boxes using thin twine or embroidery floss for a refined detail.
- Set the cloche on a side table near a lamp so the glass catches the light without needing internal wiring.
Use a thin layer of white felt on the base to represent a rug and provide a non-slip surface for the small components.
44. Brass Bell Christmas Cloche
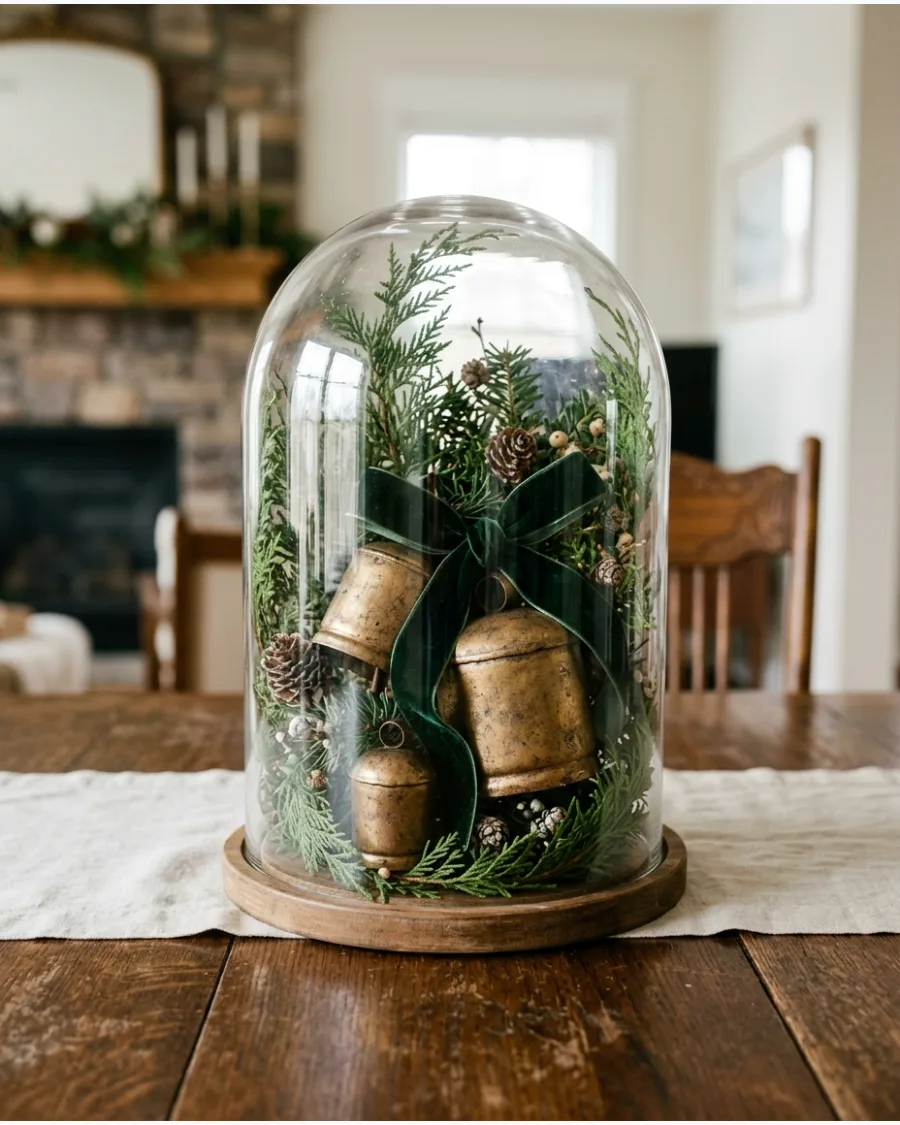
Arrange a cluster of aged brass bells on a bed of dark evergreen branches for a sophisticated tabletop display. The metallic tones provide a warm contrast against the deep green needles and velvet accents.
Wind a short length of dark green velvet ribbon loosely through the bells to bridge the gaps between the metal and the foliage.
- Select bells with varying heights and a dull or tarnished finish for an authentic antique appearance.
- Place one or two small, real pinecones near the base to add a natural texture to the arrangement.
- Ensure the greenery is completely dry before placing the glass dome over it to prevent moisture buildup.
Loop a matching piece of ribbon around the cloche handle on the outside to echo the colors used inside the dome.
45. Christmas Angel Cloche
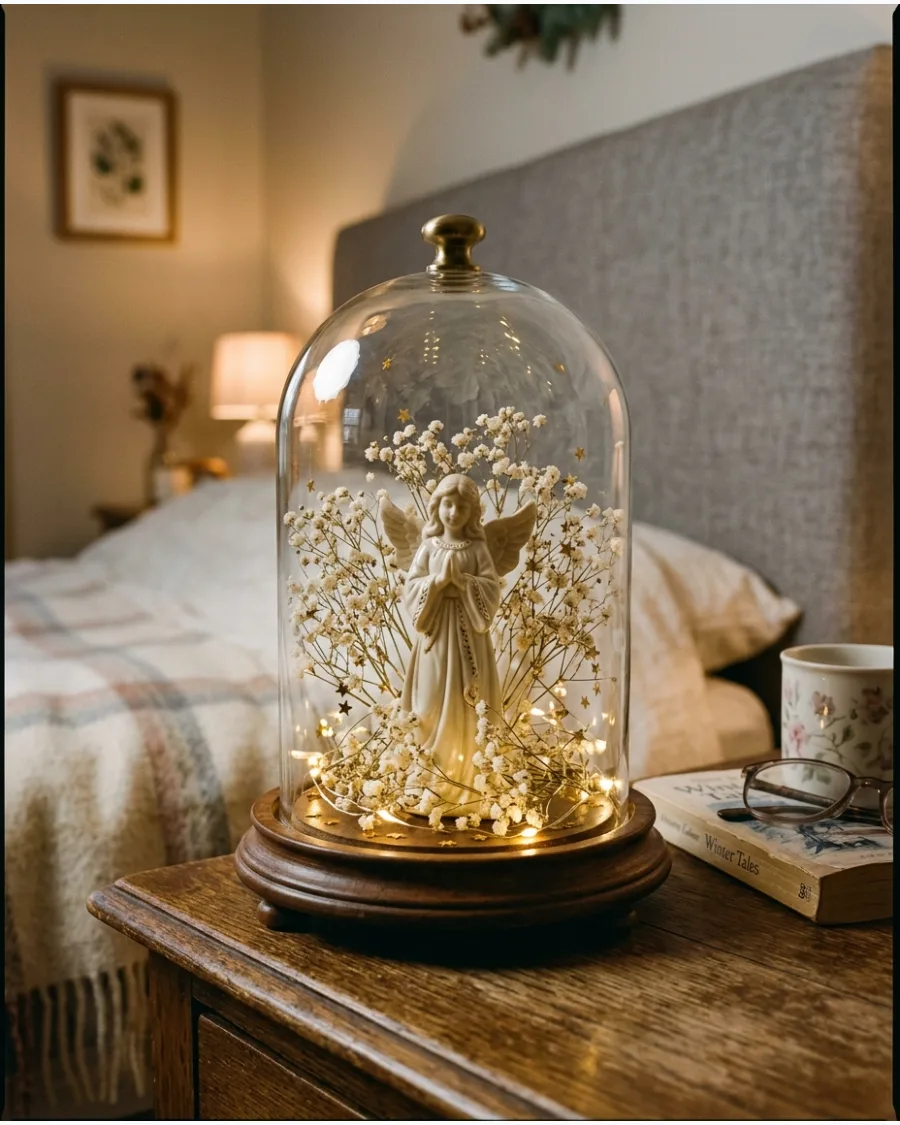
Create a serene display with a small angel figurine as the focal point, keeping the color palette restricted to white, cream, and gold. Surround the figure with delicate white dried flowers and tiny star-shaped accents to evoke a celestial atmosphere.
Tuck a thin strand of battery-operated micro-lights into the greenery at the base to illuminate the scene from within.
- Choose an angel made of porcelain, wood, or resin with a matte or pearlescent finish.
- Use a cloche with a notched base or a hollow pedestal to hide the battery pack and wires from view.
- Incorporate champagne-colored stars or ornaments to add warmth to the primarily white scene.
Use a small piece of double-sided tape to secure the battery pack to the back of the cloche base where it is less visible.
46. Nativity Christmas Cloche
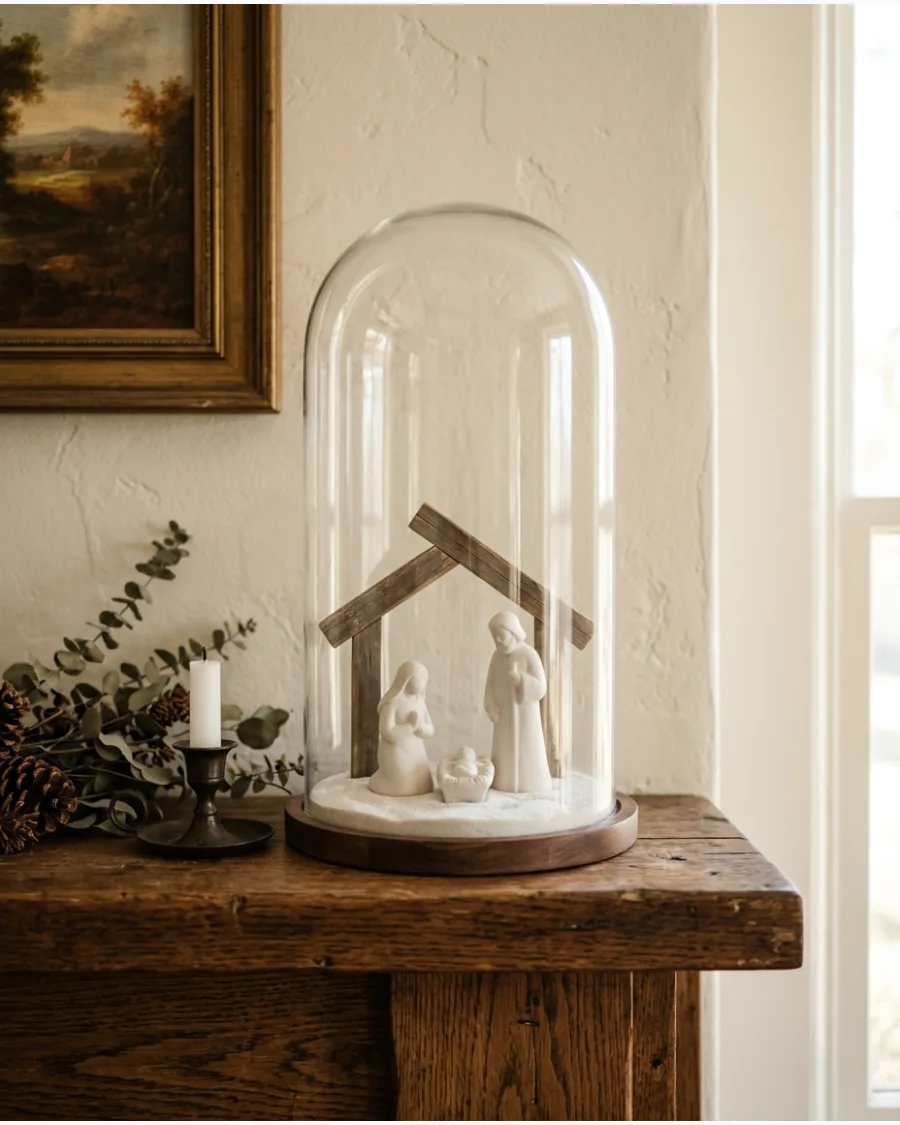
Arrange a simplified nativity set featuring Mary, Joseph, and baby Jesus inside a tall glass cloche. Choose figurines with a matte finish or carved wood texture to maintain a sophisticated look on a sideboard or mantel.
Center the holy family in front of a modest stable backdrop to anchor the scene without overcrowding the glass enclosure.
- Measure the height of your tallest figurine to ensure at least two inches of clearance from the top of the glass dome.
- Layer a thin circle of white felt or a light dusting of fine white sand on the base to hide any seams between the figurines and the platform.
- Angle the Mary and Joseph figures slightly toward the manger to create a sense of focus and intimacy within the circular space.
Use a small piece of removable museum wax on the bottom of each figurine to prevent them from shifting if the surface is bumped.
47. Christmas Candle Cloche With Flameless Candle
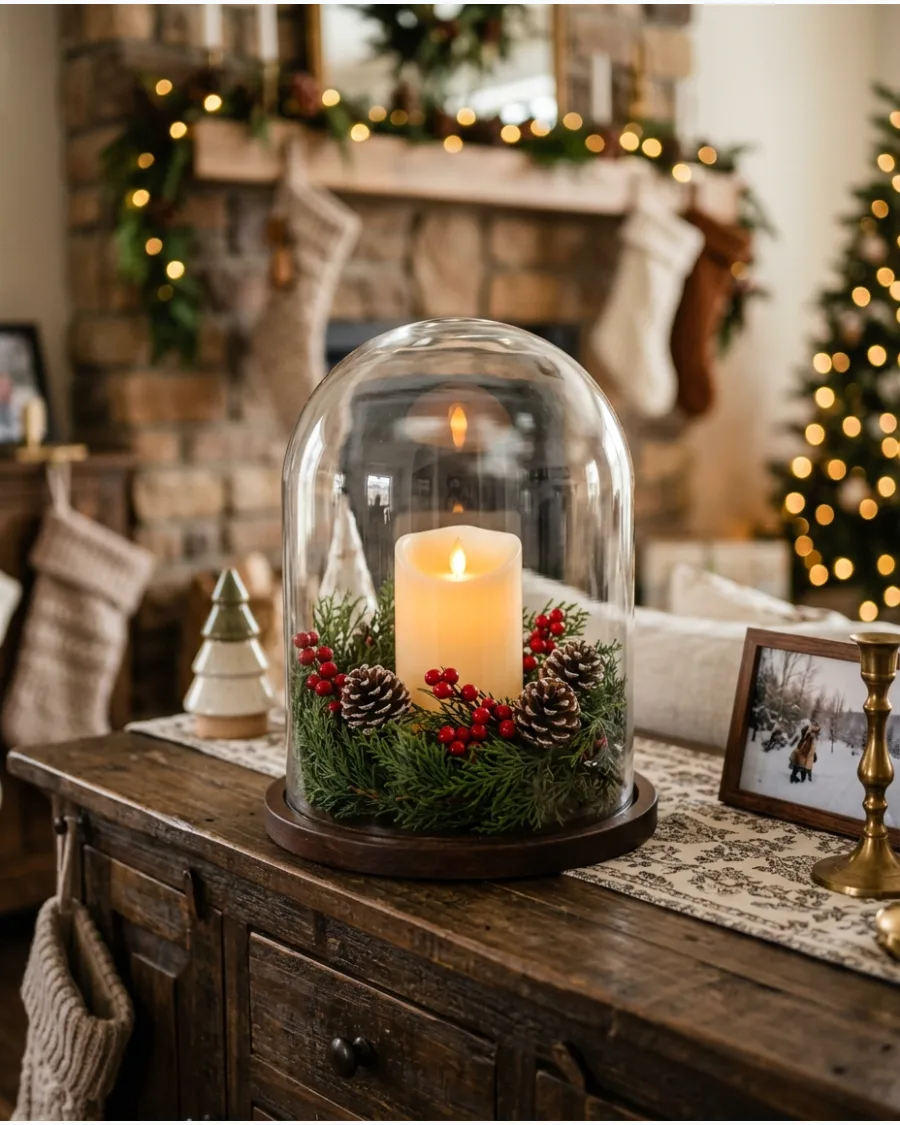
Using a flameless candle allows you to enjoy a warm light source within an enclosed glass space without heat or smoke concerns. Position a battery-operated LED pillar candle at the center of the cloche base and surround it with sprigs of evergreen, small pinecones, and red berries. This configuration works well as a centerpiece on a dining table or a sideboard where a traditional flame might be a hazard.
The glass dome protects the delicate greenery and keeps the arrangement neatly contained.
- Choose a candle with a realistic wax-like finish and a timer function to avoid lifting the dome to turn the light on and off manually.
- Nestle small ornaments and natural pinecones into the greenery to add layers of texture while hiding the candle's plastic base.
- Verify that the glass dome has at least two inches of overhead clearance to ensure the candle looks proportional to the surrounding greenery.
Dust the inside of the glass dome with a microfiber cloth before assembly to remove any streaks that could be amplified by the candle light.
48. Gold and Champagne Christmas Cloche
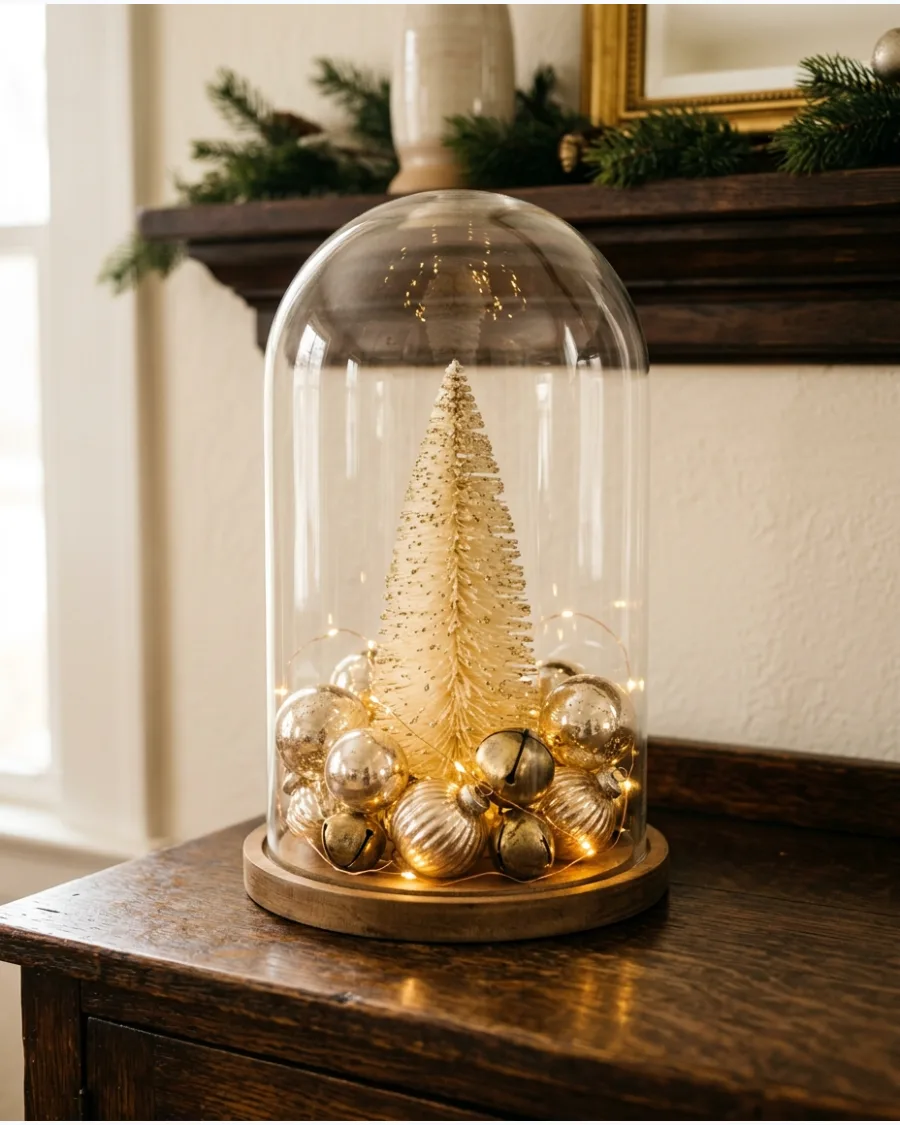
Combine metallic textures and soft tones by layering champagne-colored ornaments and antique-gold bells at the base of a glass dome. Place a slim cream or gold-toned miniature tree in the center to serve as the vertical focal point for the arrangement.
Thread a strand of warm-white micro LED wire between the ornaments and the tree branches to create reflections against the glass and metallic surfaces. This grouping works well on a dark wood sideboard or a white mantel where the warm tones can stand out.
- Look for bells with a matte or brushed finish to provide a subtle contrast against the high-shine finish of champagne glass ornaments.
- Stack larger ornaments at the bottom and nestle smaller stars or bells into the gaps to hide the battery pack or the wire entry point.
- Choose a cloche with a wooden or metallic base that matches the warm tone of the bells to maintain a consistent color palette.
Wipe the inside of the glass with a lint-free cloth before sealing the dome to remove fingerprints that become highly visible once the micro lights are turned on.
49. Christmas Ornament Tree Cloche
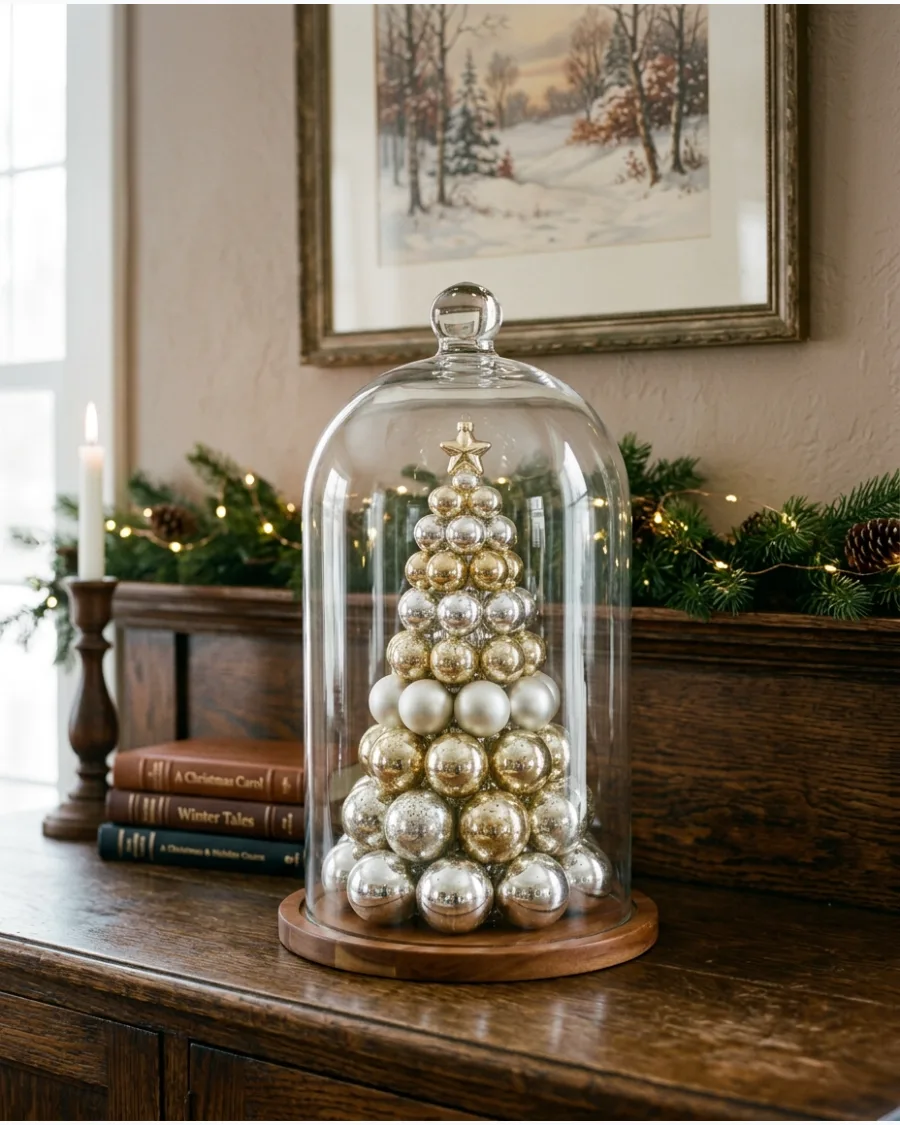
Stack glass or metallic ornaments inside a glass dome to create a geometric holiday focal point. Start with a circle of larger baubles at the base and layer progressively smaller ones to mimic the tapering shape of a pine tree.
Secure the ornaments with small dabs of museum wax or clear adhesive dots to prevent the stack from shifting during placement. This technique allows for a custom color palette that can match your existing tabletop decor.
- Choose ornaments in three distinct sizes—large for the base, medium for the middle, and small for the top—to ensure a smooth, tapered silhouette.
- Build the stack from the outside in for each layer, ensuring the heaviest ornaments are at the bottom to provide a sturdy foundation for the layers above.
- Store the ornaments in a partitioned container after the holidays to prevent any adhesive residue from attracting dust or causing scratches between pieces.
A pair of long-handled tweezers helps you precisely place the very top ornament if the glass dome is tall and narrow.
50. Christmas Memory Cloche
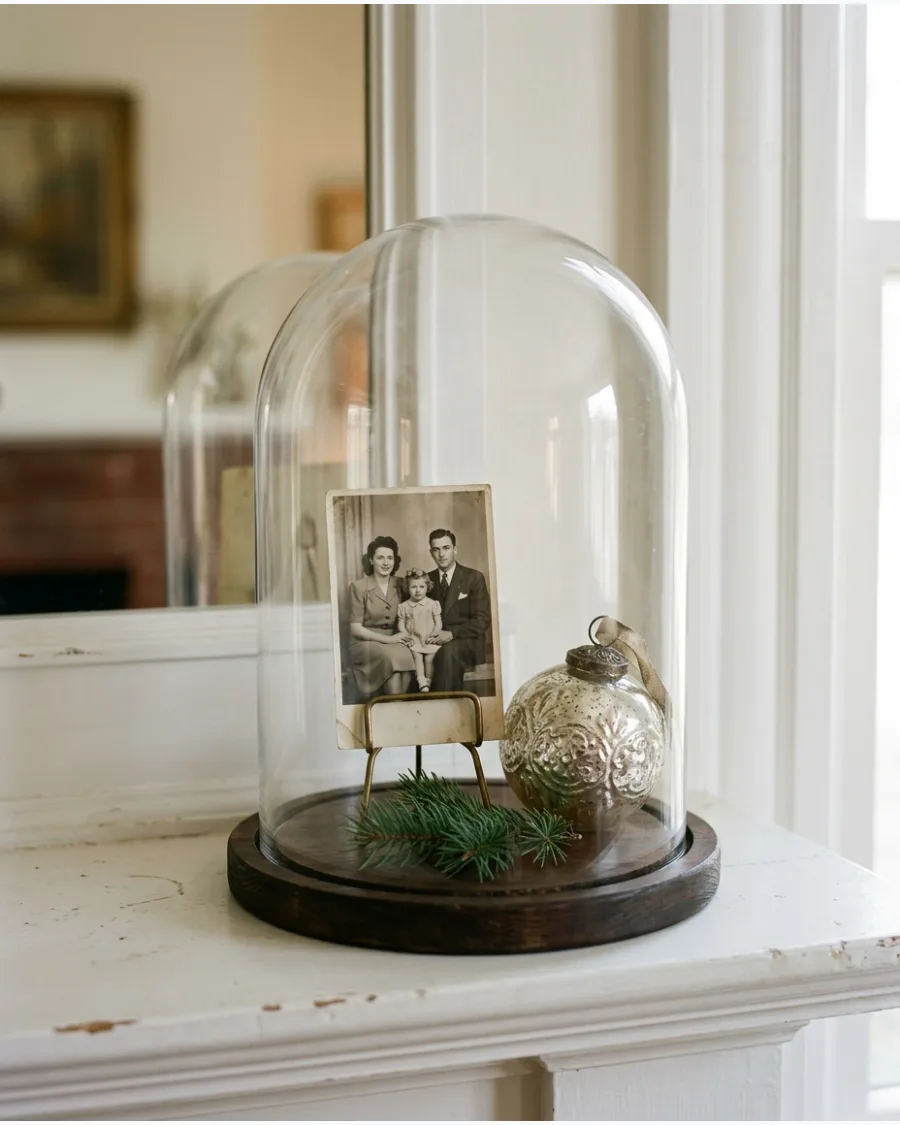
Style a sentimental display by focusing on a few meaningful family objects rather than a crowded holiday scene. Position a single heirloom ornament next to a small, upright vintage photograph to anchor the composition within the glass. Add a single sprig of greenery at the base to provide a natural texture that softens the hard edges of the frame and ornament.
Keep the upper portion of the dome clear to ensure the cloche acts as a protective gallery case for your treasures.
- Select a photograph with a matte finish to minimize light reflections and glare on the glass surface.
- Use a small, discreet wire photo holder or a slotted wooden block to keep the image perfectly upright without leaning it against the dome.
- Verify that any fresh greenery used is completely dry to prevent condensation from forming on the inside of the glass.
Clean the interior glass with a lint-free cloth just before placing the dome over the objects to remove any fingerprints or dust that might distract from the items.