50 Christmas Tiered Tray Ideas

This post may contain affiliate links: full affiliate disclosure.
Styling a tiered tray is an efficient way to add seasonal charm to a kitchen island, coffee bar, or entryway without using much space. These ideas offer a range of styles, from traditional red-and-green themes and rustic woodland scenes to whimsical gingerbread bakeries and vintage toy collections.
CLASSIC CHRISTMAS TIERED TRAY IDEAS
1. Classic Red and Green Christmas Tiered Tray
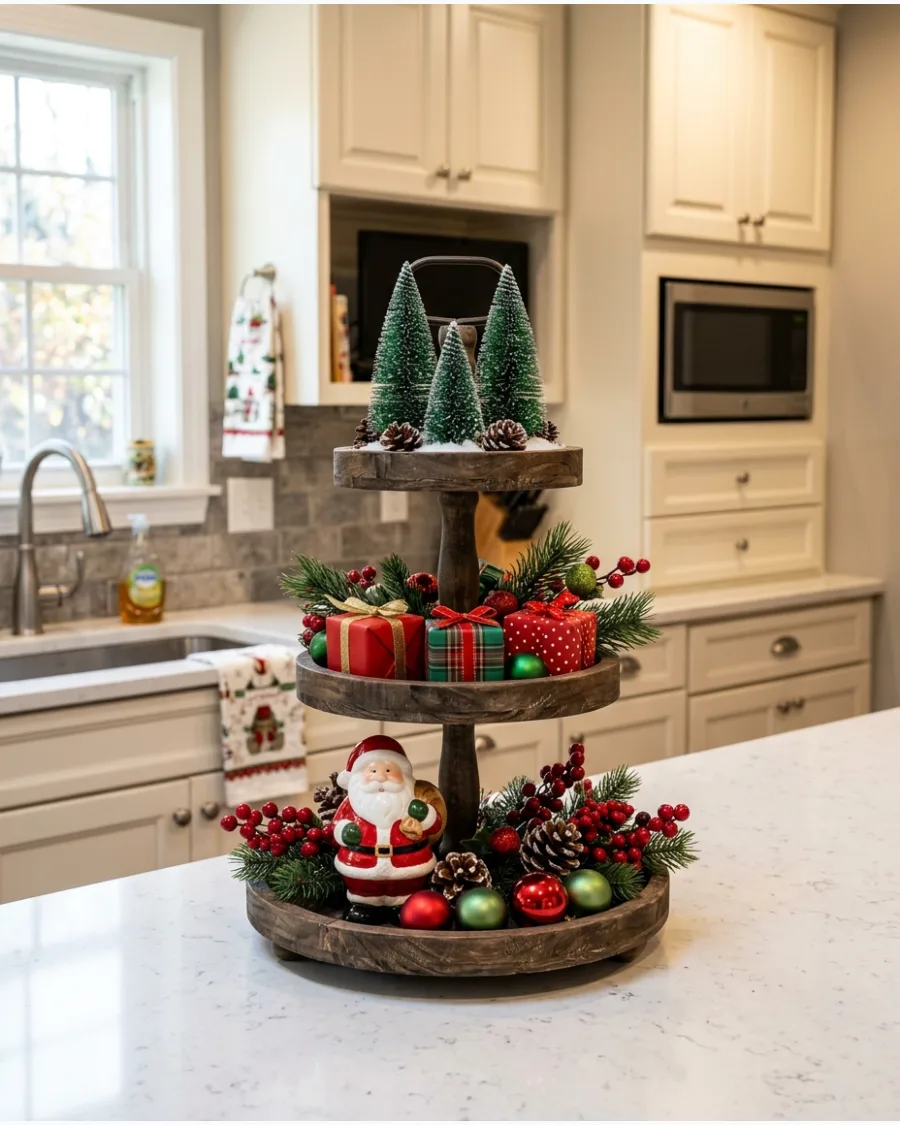
Build a traditional holiday vignette by layering artificial evergreen sprigs and small red accents across each level of a wooden or metal tray. Distribute miniature bottle brush trees and small Santa figures to establish a consistent scale from top to bottom.
Tuck tiny wrapped presents and red berry clusters into the gaps to create a full look without overhanging the tray edges. This approach ensures the display looks balanced from every angle on a kitchen island or sideboard.
- Choose shatterproof mini ornaments and resin figurines to ensure the tray remains lightweight and easy to move for cleaning.
- Place the largest items like the Santa figure or tallest tree on the bottom tier to provide a stable visual base.
- Check the back of the tray if it sits in an open area to ensure there are no bare spots or visible wire stems.
Use a small amount of removable museum wax under wobbly figurines to keep them upright if the tray is bumped.
2. Santa Claus Christmas Tiered Tray
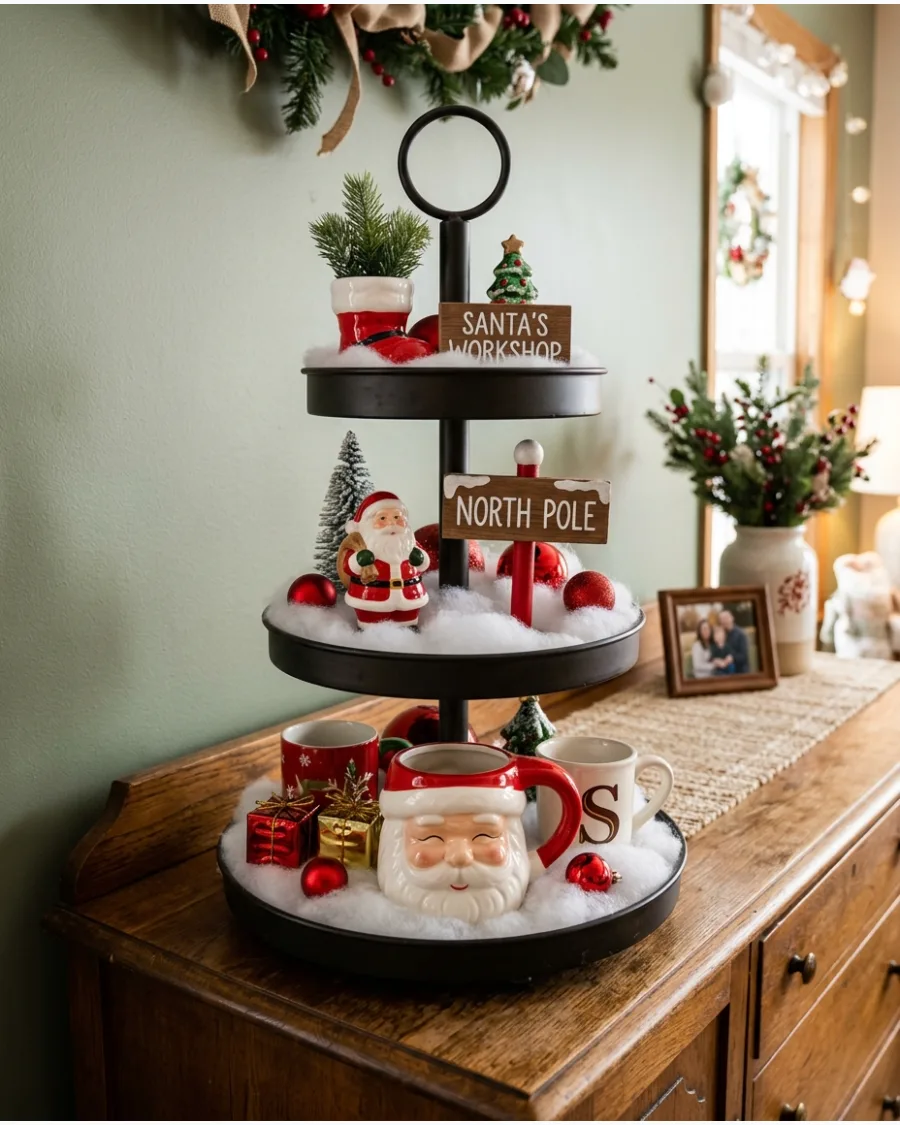
Center the arrangement around a collection of Santa Claus figures and themed mugs. Anchor the bottom tier with a heavy Santa mug or a larger figurine to provide a stable visual base. Weave in white accents, like faux snow or white ornaments, to contrast against the red and green elements.
- Select Santa figures in different poses or materials to add variety without breaking the specific theme.
- Position North Pole signs on the middle tier where they are at eye level and easily legible.
- Tuck small gift boxes into tight spaces where larger mugs or figurines will not fit.
Face Santa figurines slightly inward toward the center of the tray to create a more unified scene.
3. North Pole Christmas Tiered Tray
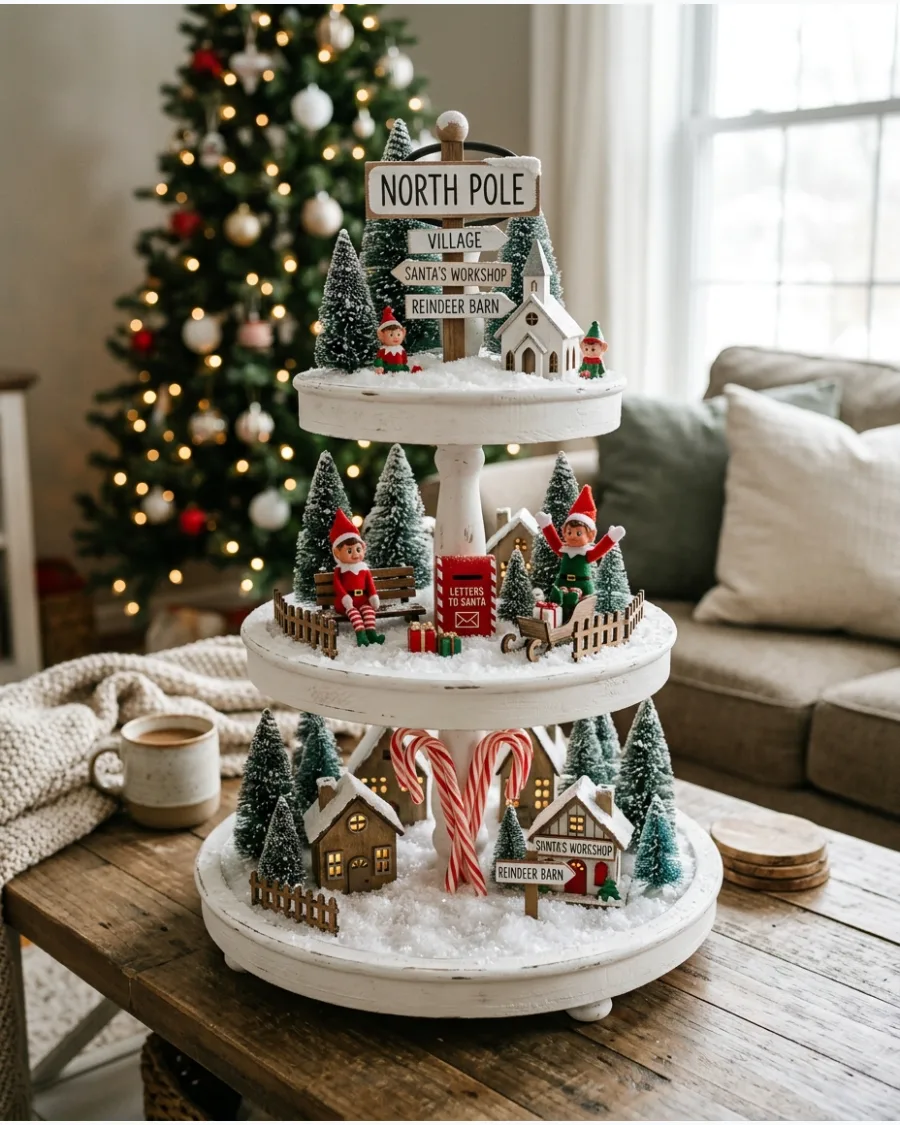
Build a miniature North Pole village using iconic symbols like elves and candy canes. Scatter loose faux snow or white felt around the base of each item to hide the tray surface and mimic a winter landscape. Place a miniature mailbox on one level to represent Santa's workshop correspondence and surround it with snowy trees.
- Choose bottle-brush trees with a heavy flocked finish to enhance the snowy winter effect.
- Place the North Pole sign on the highest tier to act as the primary focal point of the vignette.
- Use real or plastic candy canes to add height and vertical lines to the different levels.
Gently tap the tray after adding faux snow to let it settle naturally around the figurines.
4. Merry Christmas Tiered Tray
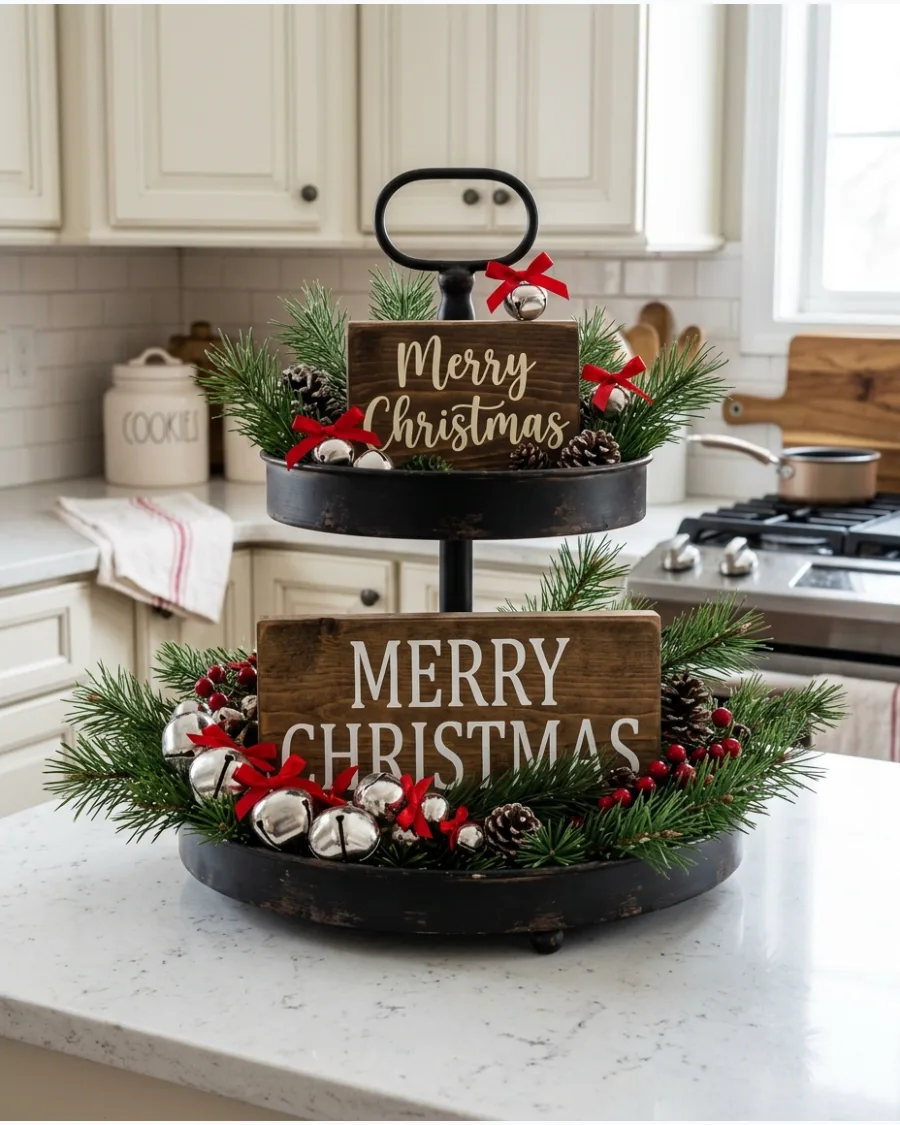
Focus on typography by using "Merry Christmas" signs as the structural anchors for each level. Vary the scale of the signs so the largest one sits on the bottom and the smallest rests on top to prevent the tray from looking top-heavy. Fill the remaining space with classic bells and evergreen sprigs for a clean look.
- Verify that the signs are double-sided if the tray will be placed in a spot where it is visible from all angles.
- Layer greenery directly behind the signs to make the lettering stand out clearly against the tray background.
- Tie small velvet ribbons to the bells to introduce more texture and color to the metal accents.
Lean larger signs against the center pole of the tray for extra stability if the tiers are shallow.
5. Christmas Ornament Tiered Tray
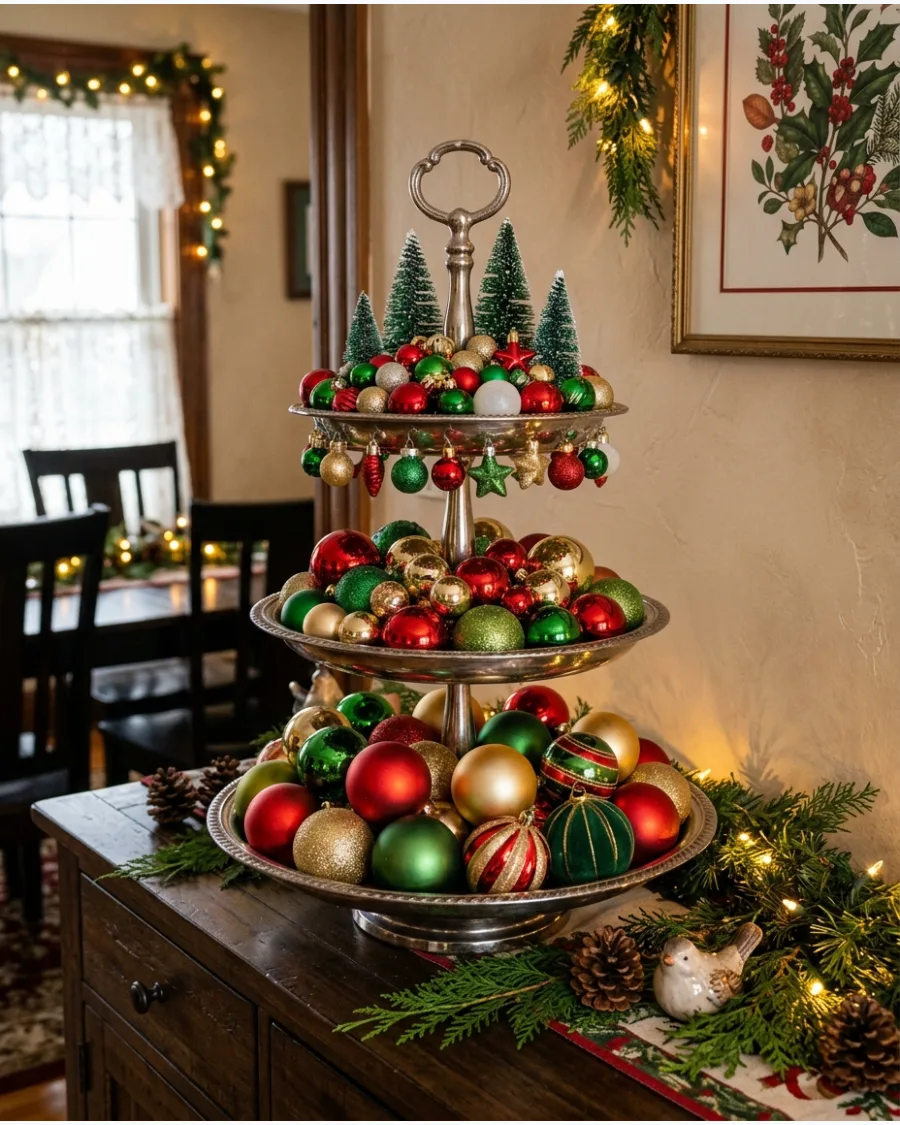
Create a shimmering display using a curated collection of spherical ornaments in holiday hues. Arrange the largest glass or plastic ornaments on the bottom tier and transition to miniature versions as you move upward. Intersperse small evergreen trees to break up the round shapes and provide a natural backdrop.
- Combine matte, shiny, and glitter-coated ornaments to create depth within the same color family.
- Check that the tray can support the weight if you are using solid glass ornaments instead of plastic.
- Fill small gaps between ornaments with loose greenery or gold tinsel to hide the center support pole.
Use a mix of round and teardrop-shaped ornaments to add variety to the overall silhouette.
6. Christmas Bell Tiered Tray
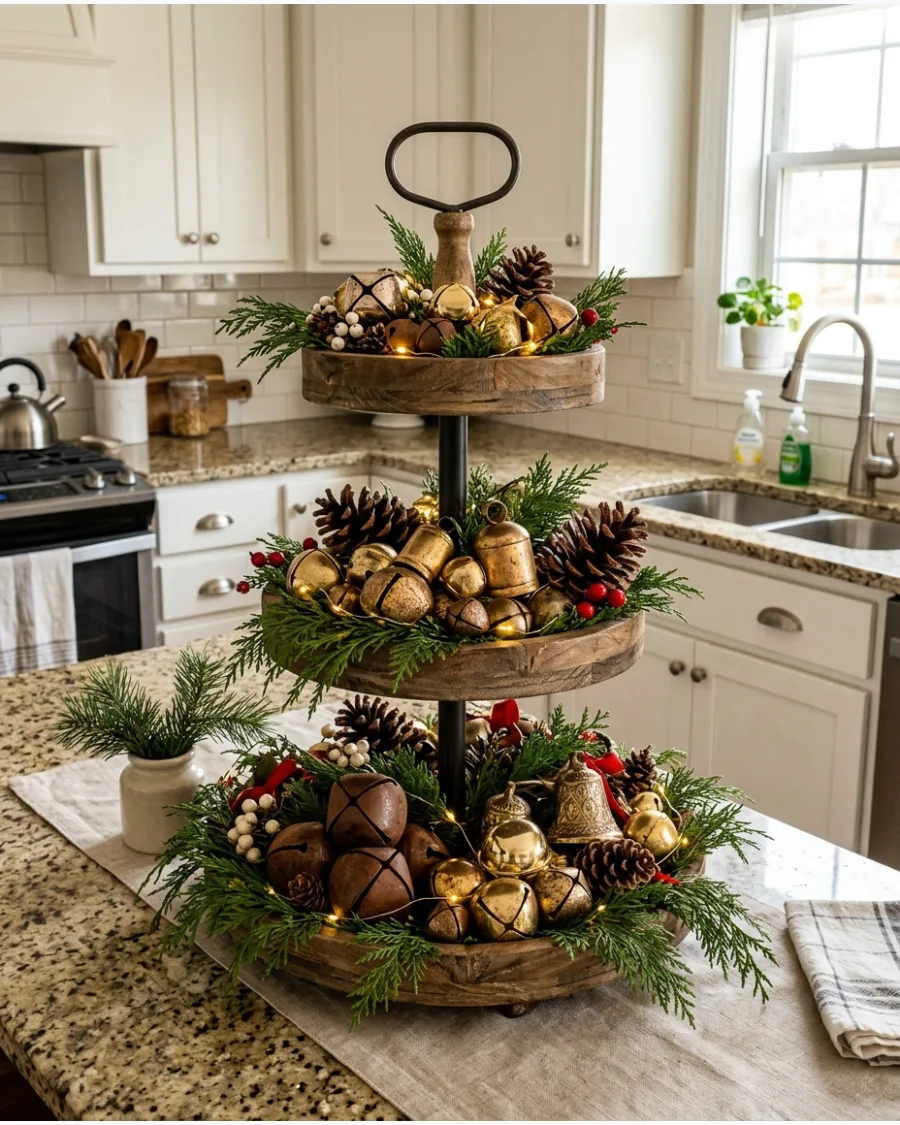
Emphasize texture by using metal bells as the unifying theme across all levels of the tray. Nestle various brass, gold, and red bells within evergreen sprigs to prevent them from rolling when the tray is moved. This mix of rustic metal and natural greenery creates a classic auditory and visual holiday element for a kitchen or entryway.
- Choose bells in varying sizes from tiny jingles to larger rustic cowbells to create scale and depth.
- Place the largest or heaviest bells on the bottom tier to ground the arrangement and prevent the tray from becoming top-heavy.
- Tuck small pinecones and miniature trees into the gaps to soften the hard metal edges and fill empty negative space.
Thread a thin velvet ribbon through the top of a few bells to hang them from the edge of the top tier for added height.
7. Christmas Presents Tiered Tray
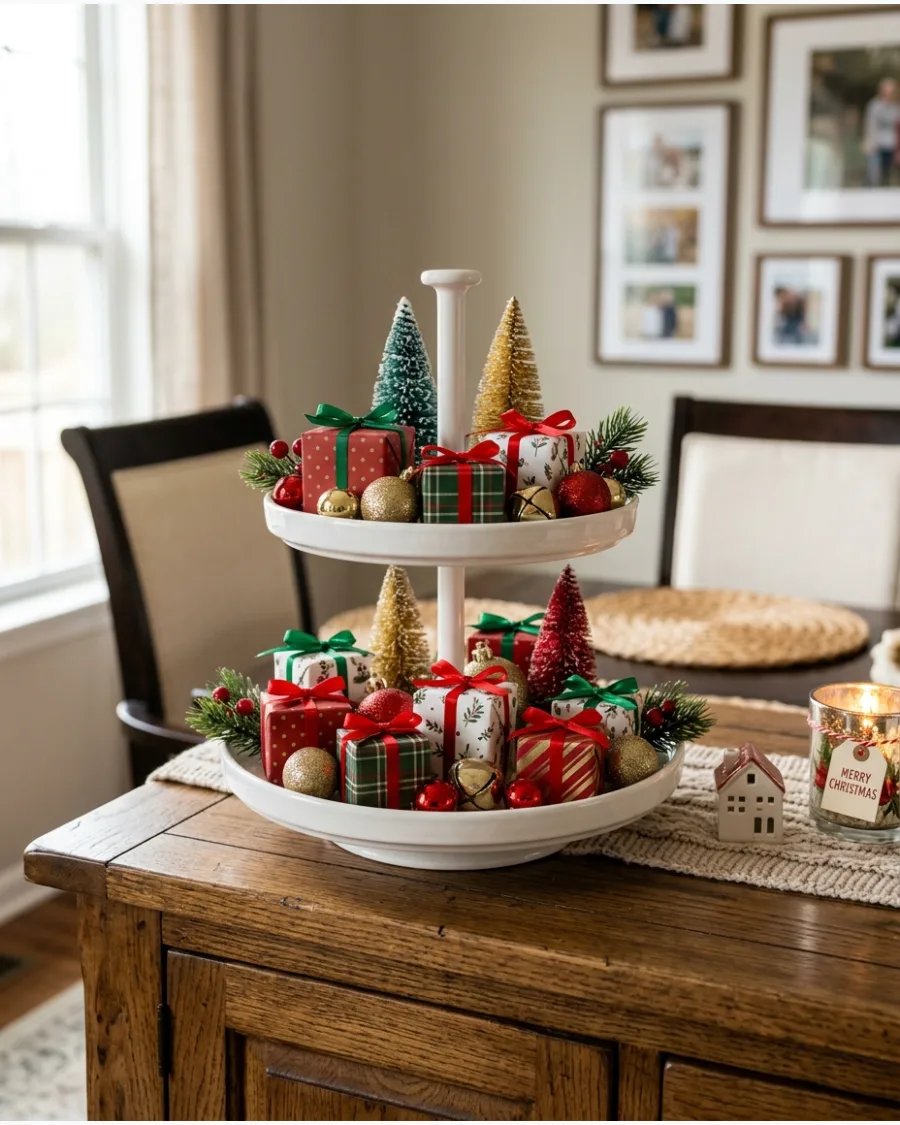
Style each level like a miniature version of Santa's workshop by grouping tiny wrapped gifts. Stack smaller boxes slightly behind larger ones on each tier to build depth without overcrowding the front edge. Combine these presents with small bows and toy accents for a cohesive, gift-heavy look.
- Use lightweight jewelry boxes wrapped in holiday paper to keep the overall weight of the tray manageable and safe.
- Secure small bows with a tiny dab of removable putty so they stay upright on the packages even if the tray is bumped.
- Fill the remaining space with round ornaments and tiny trees to mimic the scene found under a full-sized Christmas tree.
Use a mix of matte and metallic wrapping paper to help the small presents stand out against each other on the tray.
8. Christmas Tree Farm Tiered Tray
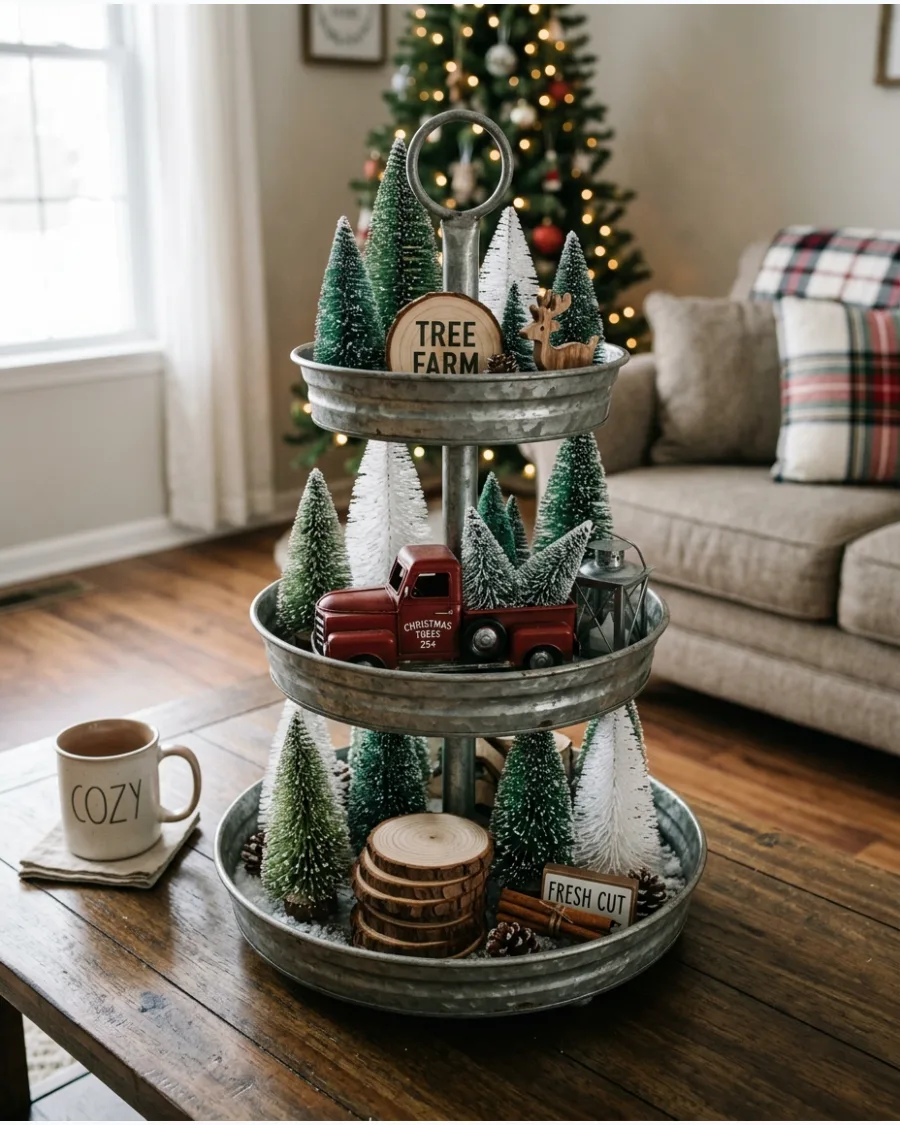
Transform the tray into a miniature tree farm using a variety of bottle-brush and wooden trees. Set tiny wooden trucks and tree-farm signs among snowy greenery to create a narrative scene on each level. Varying the height and color of the trees makes the arrangement feel more realistic and less uniform.
- Look for bottle-brush trees with snow-tipped bristles to add a wintery texture to the display.
- Use natural wood slices as platforms for the smaller trees to create different levels within a single tier.
- Drape a small amount of faux snow or cotton batting along the base of the tray to hide the tree stands.
Place the tallest tree in the center of the top tier to create a clear vertical focal point for the entire tray.
9. Christmas Countdown Tiered Tray
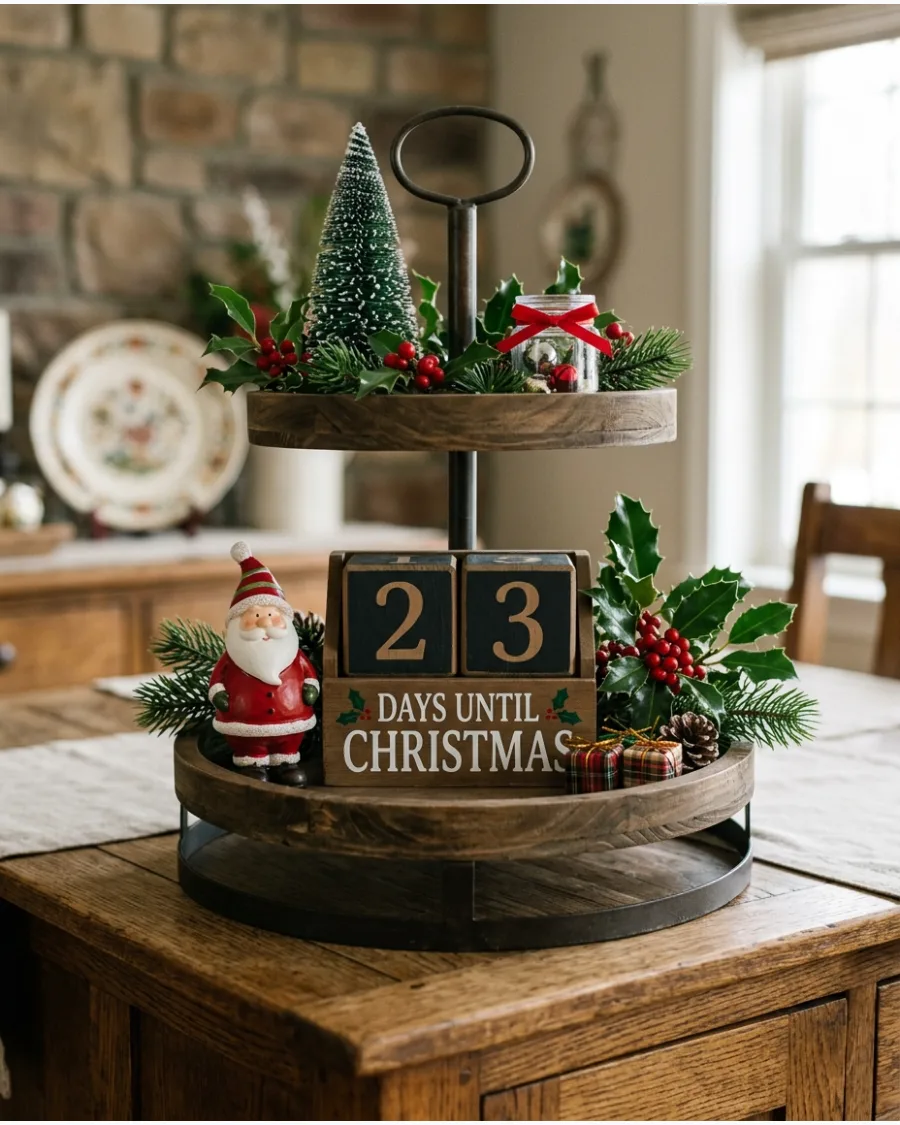
Center your display around a functional holiday countdown sign that is easy to reach every morning. Position the countdown blocks or dial on the middle tier where it is most visible and accessible for daily changes. Surround the calendar with Santa figures and greenery to frame the main feature without blocking its numbers.
- Select a countdown sign that fits the height of your middle tier without scraping the bottom of the tier above it.
- Leave a clear path in front of the countdown blocks so you do not have to move other decorations to update the day.
- Tuck miniature presents and trees around the base of the sign to integrate it into the seasonal vignette.
Use a countdown with high-contrast numbers so the date is readable from across the room.
10. Christmas Eve Tiered Tray

Capture the anticipation of the night before Christmas with a cozy, storytelling arrangement. Weave a thin strand of warm fairy lights through red and cream decorations to give the display a soft glow during evening hours. Include miniature milk-and-cookie accessories and a tiny Christmas book to complete the traditional theme.
- Use battery-operated fairy lights with a built-in timer so the tray illuminates automatically at dusk.
- Choose red, cream, and green elements like miniature stockings or tiny Santas to maintain a classic color palette.
- Place the battery pack behind a larger item like a small book or sign to keep it hidden from view.
Hide the wires of the fairy lights by tucking them under small evergreen sprigs or behind the tray's central pillar.
GINGERBREAD AND CANDY CHRISTMAS TIERED TRAYS
11. Gingerbread Christmas Tiered Tray
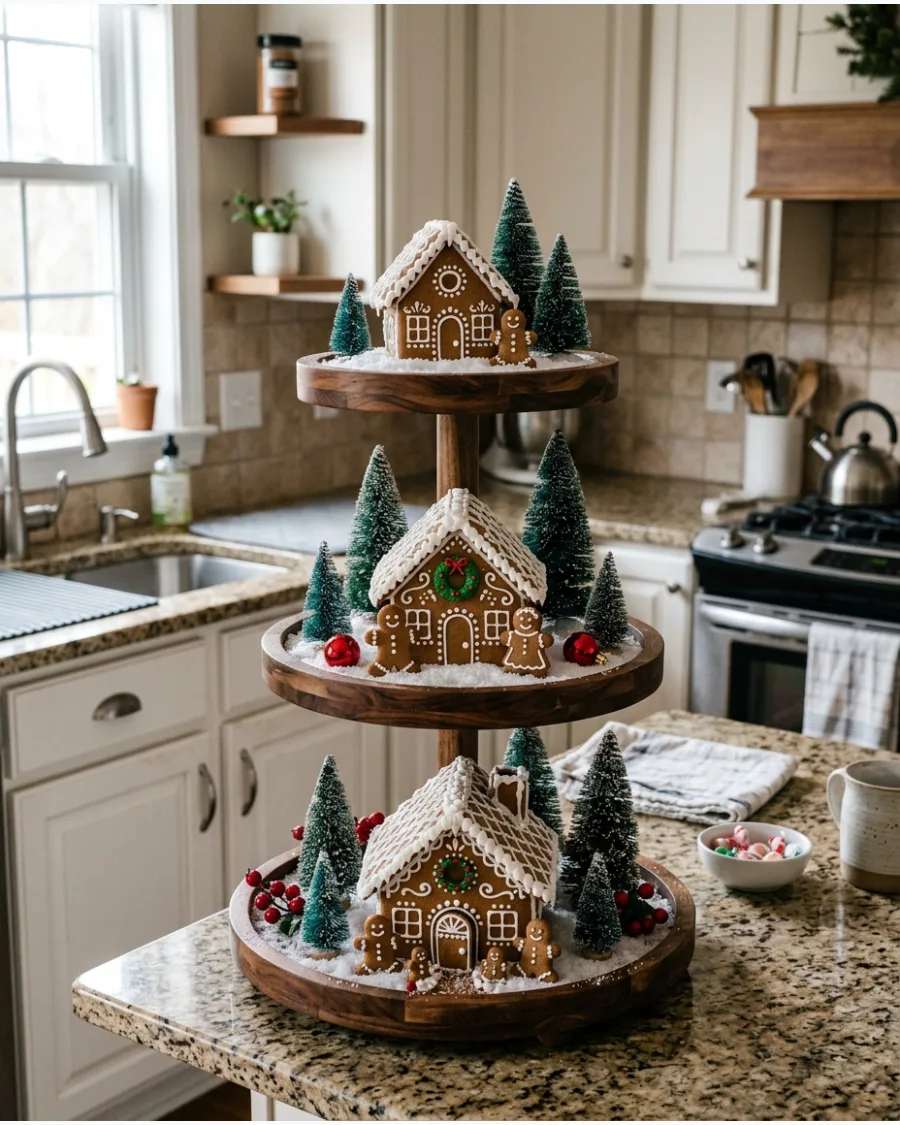
Create a warm, traditional display by focusing on the contrast between brown gingerbread tones and crisp white accents. Layer miniature gingerbread houses and figures across the tiers, anchoring the largest house on the bottom level for structural balance. Incorporate small green bottle brush trees to provide a natural counterpoint to the red and white icing details.
- Choose resin or ceramic gingerbread houses that are small enough to leave at least two inches of clearance from the tier above.
- Stagger the gingerbread people so they face different directions, creating a sense of activity within the vignette.
- Check that any faux cookies used are made of non-porous materials if they will be placed directly on a wooden tray surface.
Use white cotton batting or polyester fill around the base of the houses to hide gaps and mimic fresh snow.
12. Gingerbread Bakery Tiered Tray
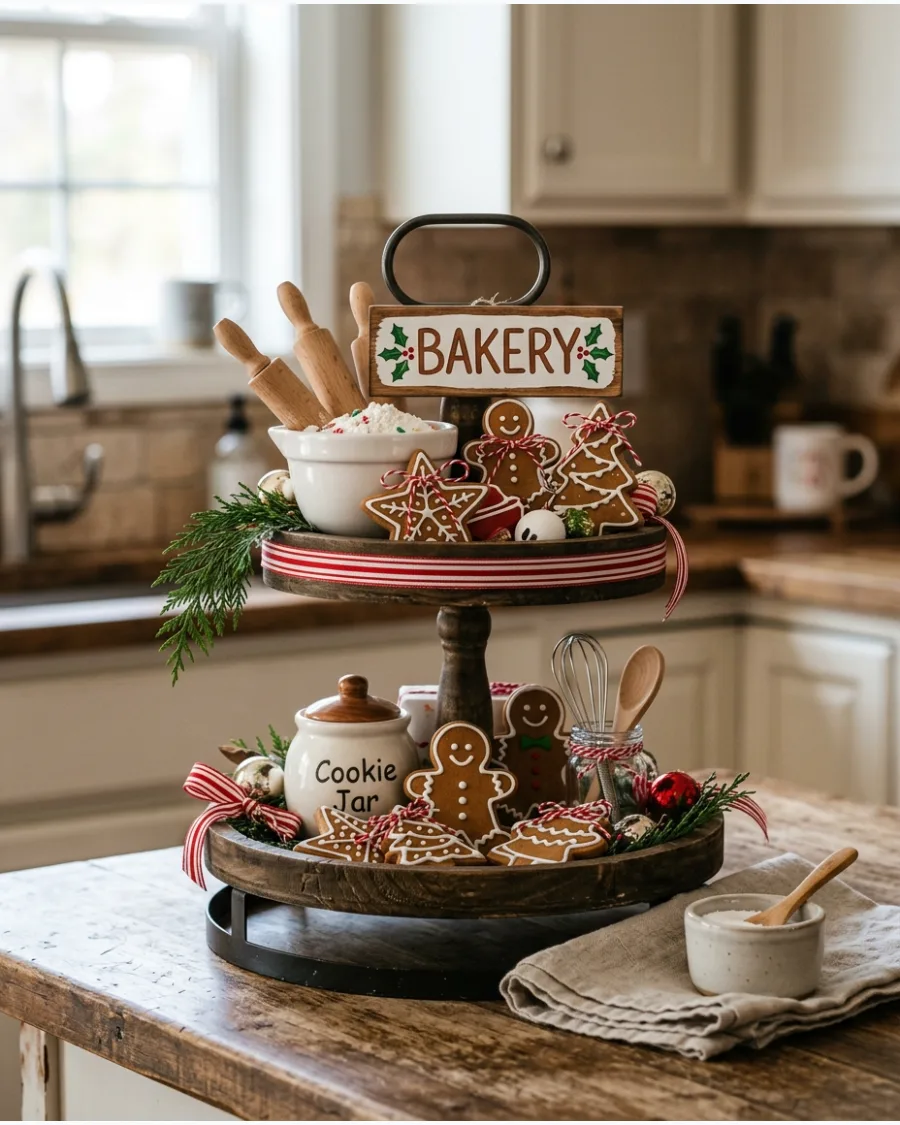
Transform your tiered tray into a miniature holiday baking station using scaled-down kitchen tools. Arrange tiny wooden rolling pins and small mixing bowls alongside gingerbread cookie cutouts and a themed bakery sign. Incorporate red-and-white checkered napkins or ribbons to emphasize the classic kitchen aesthetic.
- Select miniature rolling pins between 4 and proportionally sized long to ensure they fit within the tray's diameter without overhanging.
- Place a small 'Bakery' or 'Cookies for Sale' sign on the middle tier to serve as a central focal point.
- Verify that small mixing bowls are light enough to stay stable on higher tiers without causing the tray to tip.
Dust the tray surface lightly with a little flour or faux powdered sugar for a more authentic bakery appearance.
13. Gingerbread Village Tiered Tray
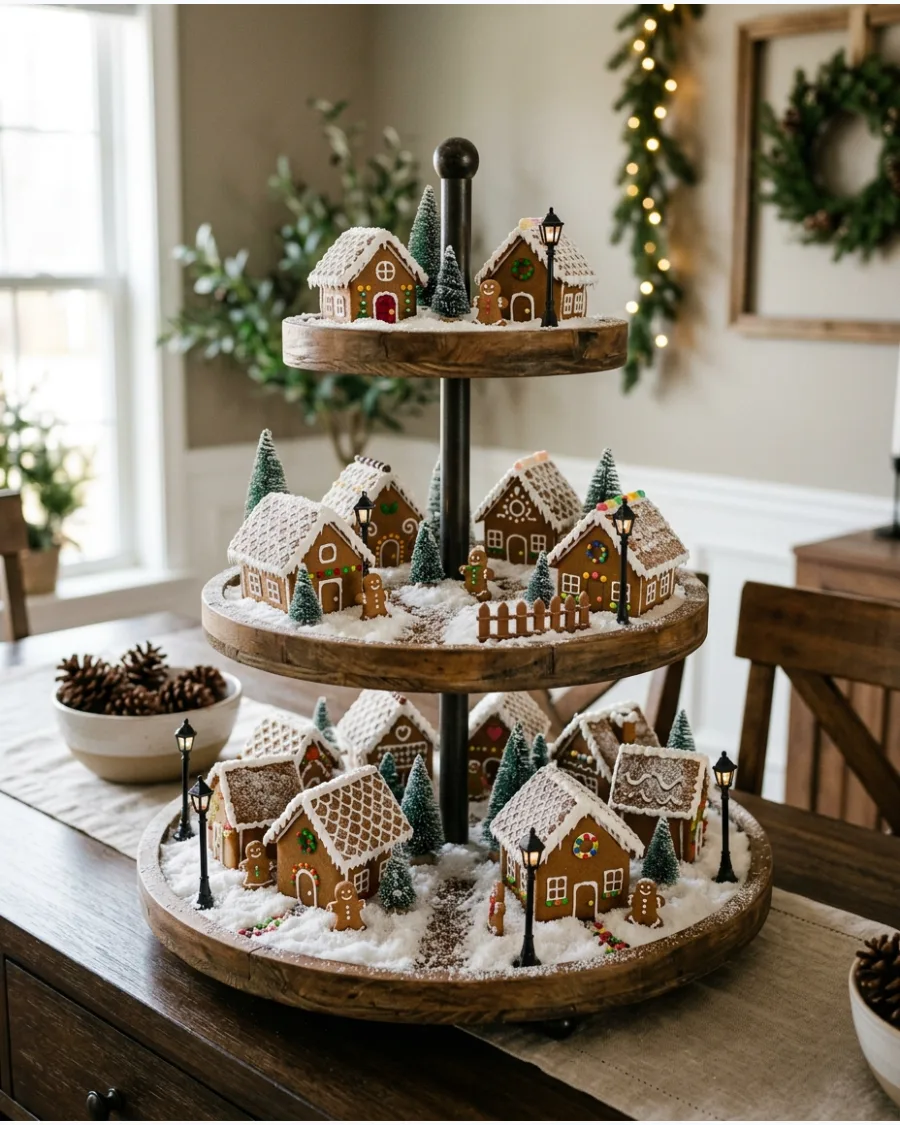
Treat the entire tiered structure as a single landscape rather than separate shelves. Nestle several small gingerbread houses into a base of faux snow, connecting the levels with tiny streetlights and miniature evergreen trees. Place gingerbread characters in the open spaces between buildings to create a sense of movement across the village.
- Use houses of the same material, such as all-wood or all-ceramic, to ensure the village looks like a matched set.
- Position the tallest building or a church with a steeple on the top tier to create a clear peak for the arrangement.
- Check that battery-operated streetlights have thin enough wires to be tucked behind the houses or under the snow layer.
Place the tray near a wall outlet if you plan to use plug-in village lights to avoid visible cords stretching across the counter.
14. Gingerbread Man Tiered Tray
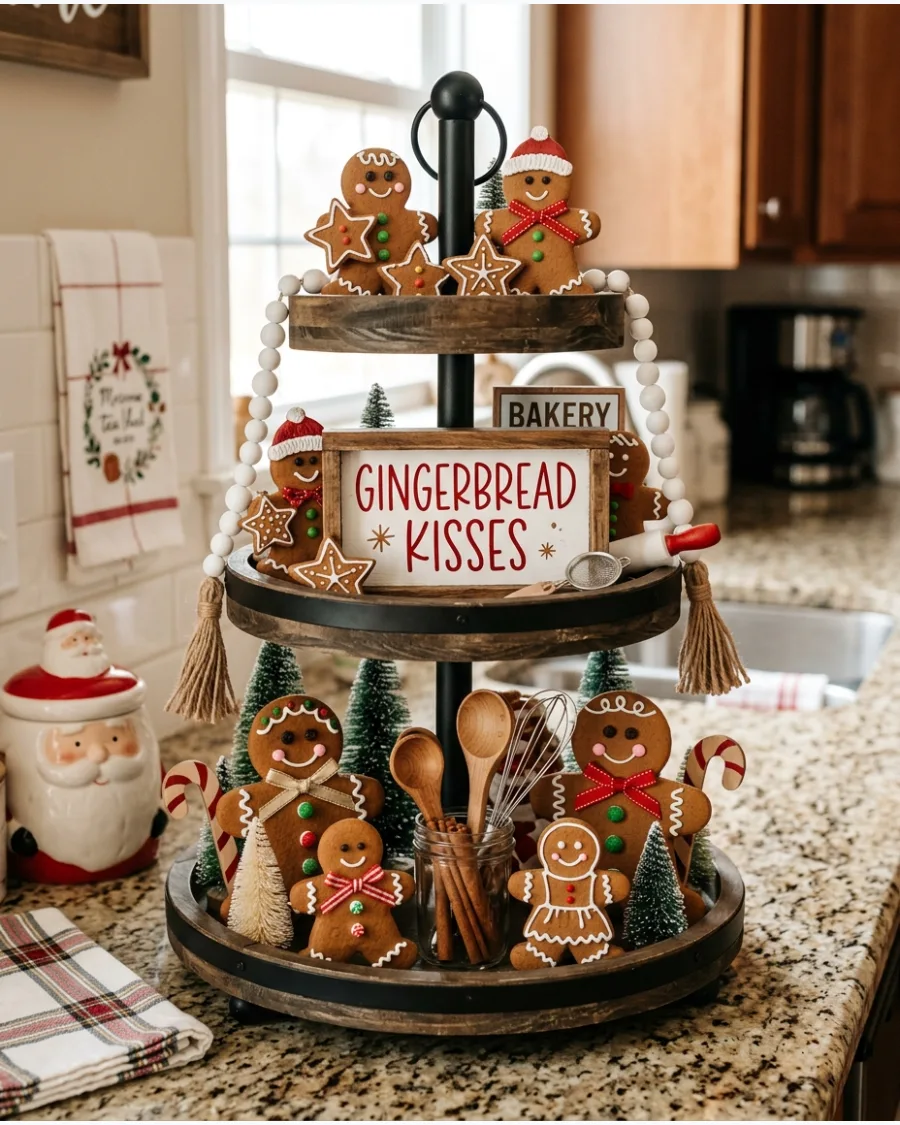
Focus the design on the gingerbread character by featuring various poses and sizes of the classic cookie man. Repeat white icing patterns on ornaments and signs to tie the collection together visually across every level of the tray. Mix in small wooden spoons or tiny whisks to reference the character's origins in the kitchen.
- Search for gingerbread man ornaments with different facial expressions to add variety to the display.
- Use small stands or lean figures against sturdier items like houses to keep the flat cookie-style characters upright.
- Choose white beaded garland to wrap around the tray pillars to mimic the look of piped frosting borders.
Place a single, larger gingerbread man plush or figurine on the top tier to act as the primary character for the display.
15. Peppermint Christmas Tiered Tray
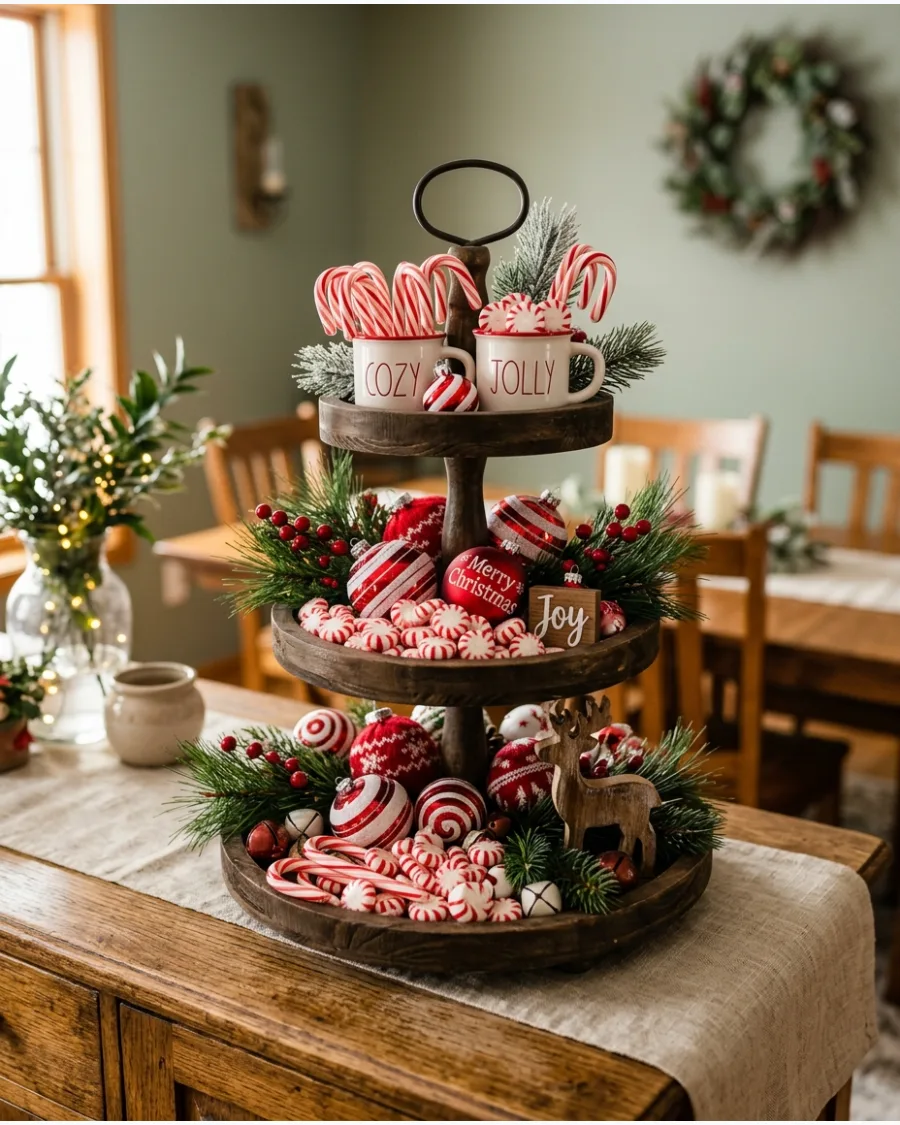
Build a high-contrast holiday display using a strict red-and-white color palette based on candy cane stripes. Alternate between candy canes in small glass jars and round peppermint-swirl ornaments to provide varied shapes on each level. Intersperse dark green pine sprigs sparingly to provide a natural background that makes the red pop.
- Select peppermint-themed signs with clean typography to avoid a cluttered look alongside the busy striped patterns.
- Balance the red distribution by placing larger red items on opposite sides of the tiers to keep the tray from looking lopsided.
- Check that any real candy canes are kept in their wrappers or a sealed jar to prevent them from becoming sticky in humid kitchens.
Use a red-and-white striped mug on the bottom tier to hold a bundle of tall candy canes for height and utility.
16. Candy Cane Christmas Tiered Tray
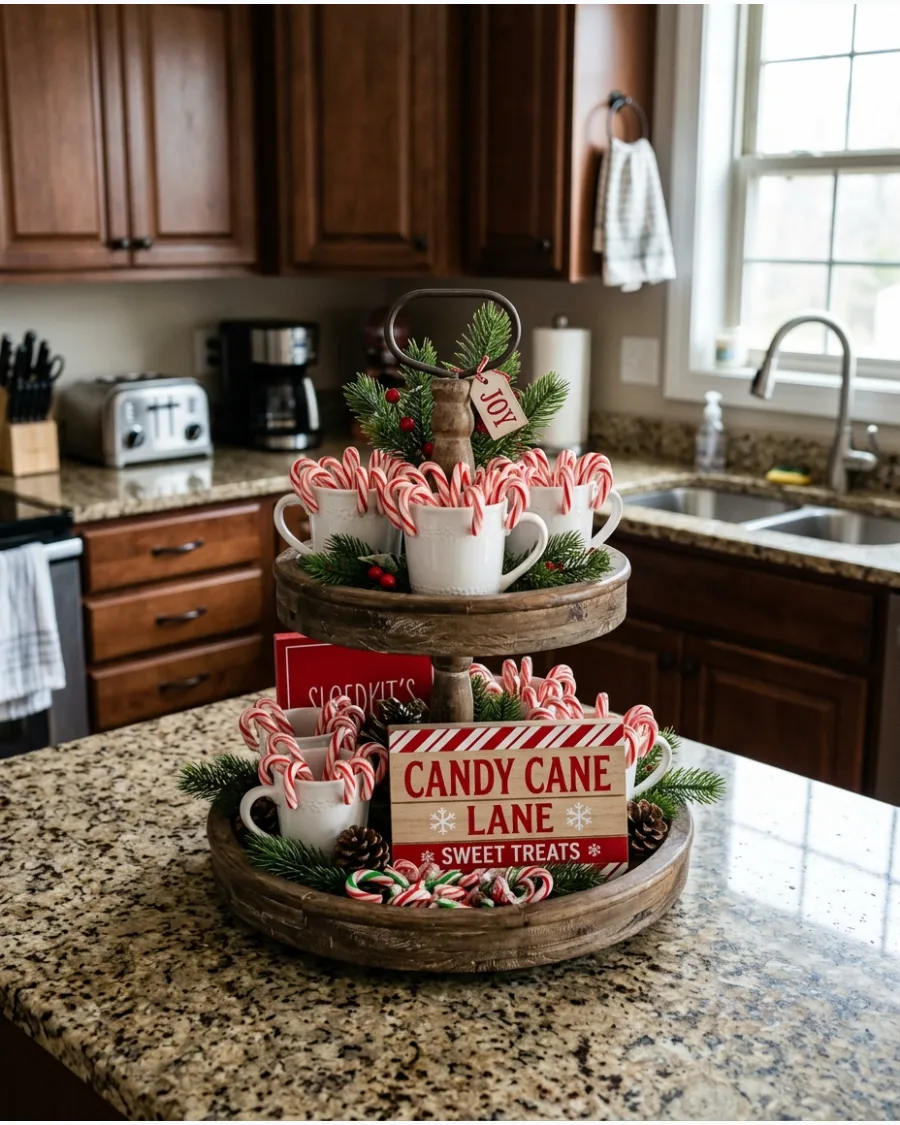
Use miniature candy canes in various containers like mugs, jars, and buckets to establish a red-and-white theme. Group these candy canes with striped signs, small ornaments, and evergreen sprigs to fill the gaps between tiers. Position some candy canes vertically in taller jars to draw the eye upward and create vertical layers.
- Select a mix of real peppermint sticks and durable plastic versions to ensure the display lasts all season.
- Place the largest containers on the bottom tier to provide a stable base and use smaller baskets on the upper level.
- Check the stability of vertical candy canes by wedging them into floral foam or salt inside the jars.
Use red-and-white striped ribbon to tie small bows around the handles of the mugs for a coordinated look.
17. Candyland Christmas Tiered Tray
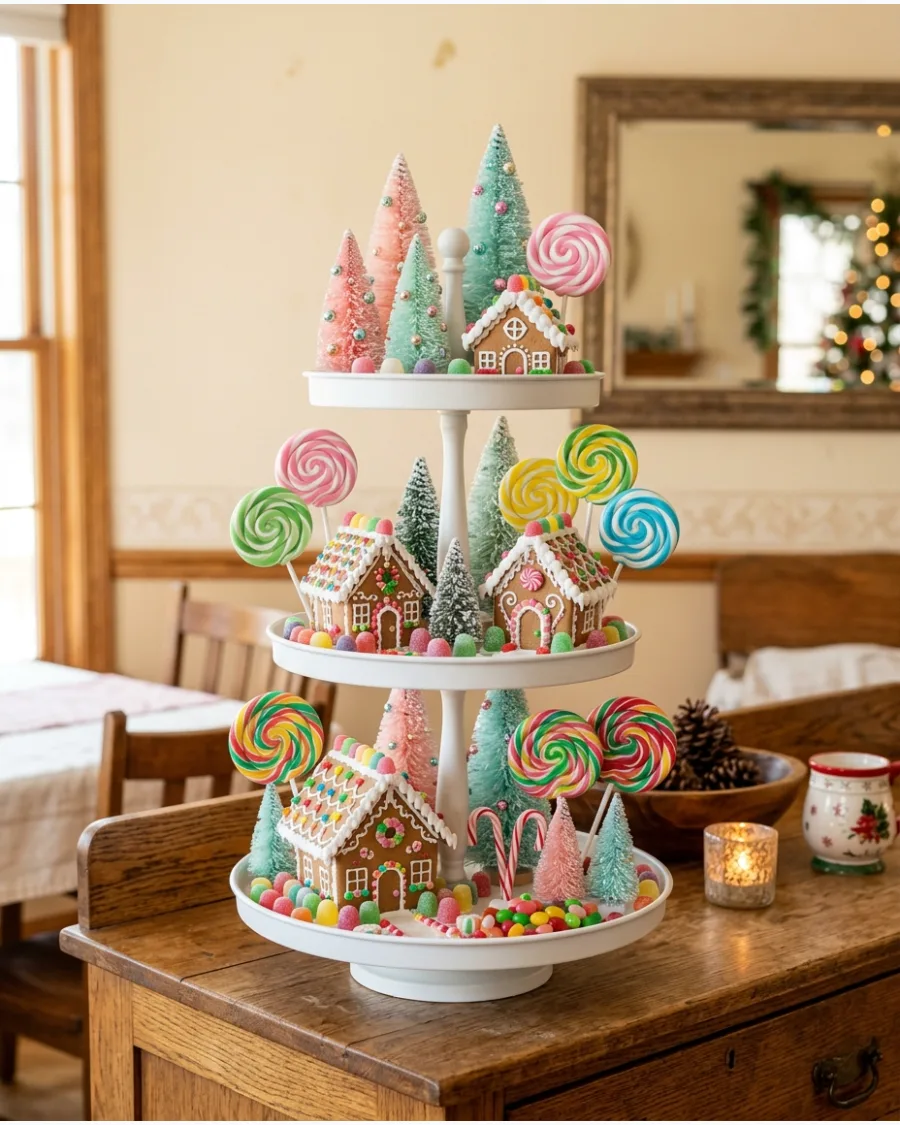
Build a vibrant, multi-colored display that captures the whimsy of a candy-themed village. Arrange miniature gingerbread houses alongside pastel-colored bottle brush trees and peppermint swirls to create a sense of depth. Vary the heights of lollipops and gumdrop props so every level of the tray feels busy and full without being messy.
- Choose a palette of mint green, baby pink, and white to keep the theme soft and cohesive.
- Tuck small gumdrops or faux sugar-coated beads into the empty spaces between the larger houses and trees.
- Measure the clearance between tray tiers before buying miniature gingerbread houses to ensure they fit standing upright.
Use clear acrylic risers or small overturned boxes to lift shorter items in the back rows for better visibility.
18. Red and White Christmas Tiered Tray
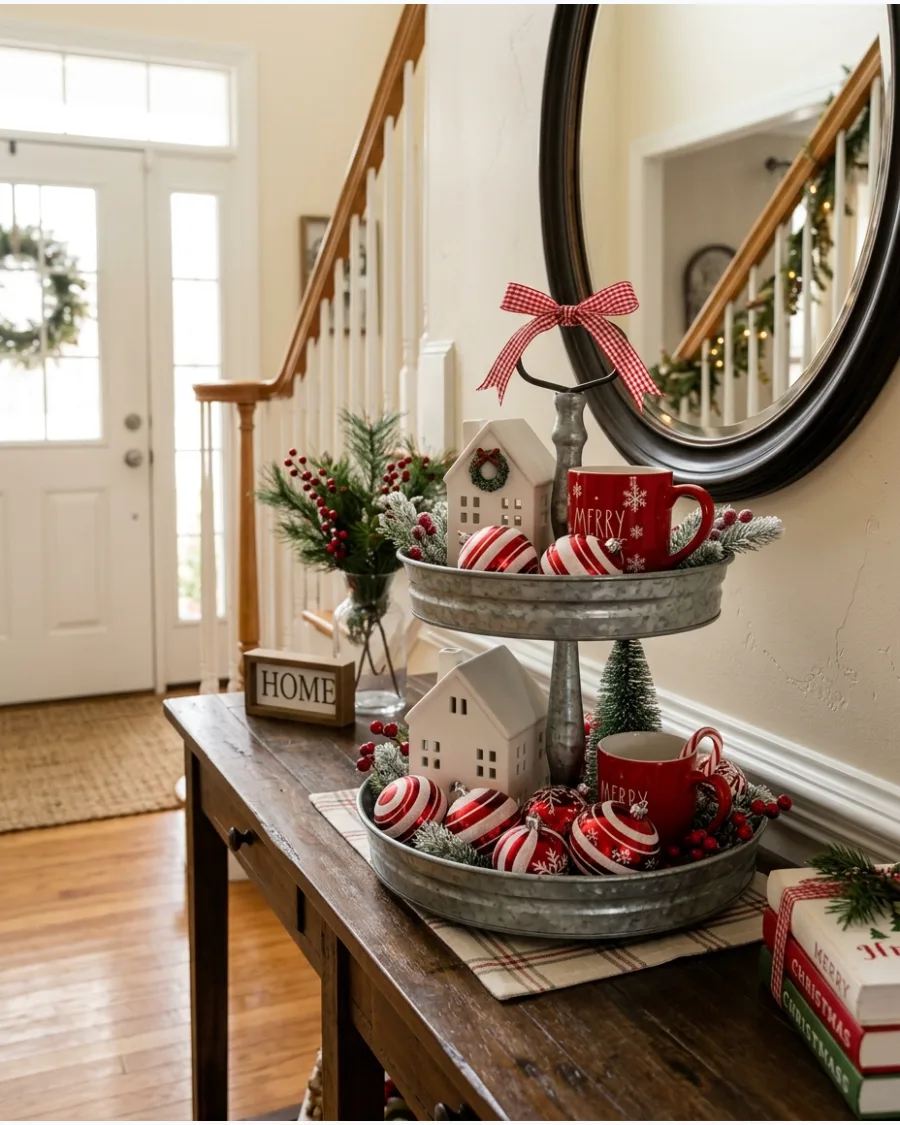
Stick to a strict two-tone color scheme to give even simple decorations a high-end, curated appearance. Combine white ceramic houses and red mugs with candy canes and red-and-white bows for a clean, unified look. This palette works particularly well on dark wood or galvanized metal trays where the colors can pop against the neutral background.
- Verify that all white items share the same undertone, such as bright white or cream, to prevent a mismatched look.
- Distribute the red elements evenly across all tiers to keep the eye moving throughout the entire display.
- Opt for matte finishes on the ceramic houses to contrast with the glossy finish of the candy canes and ornaments.
Use white faux snow or shredded paper as a base filler on each tier to hide the tray surface and ground the items.
19. Christmas Cookie Tiered Tray
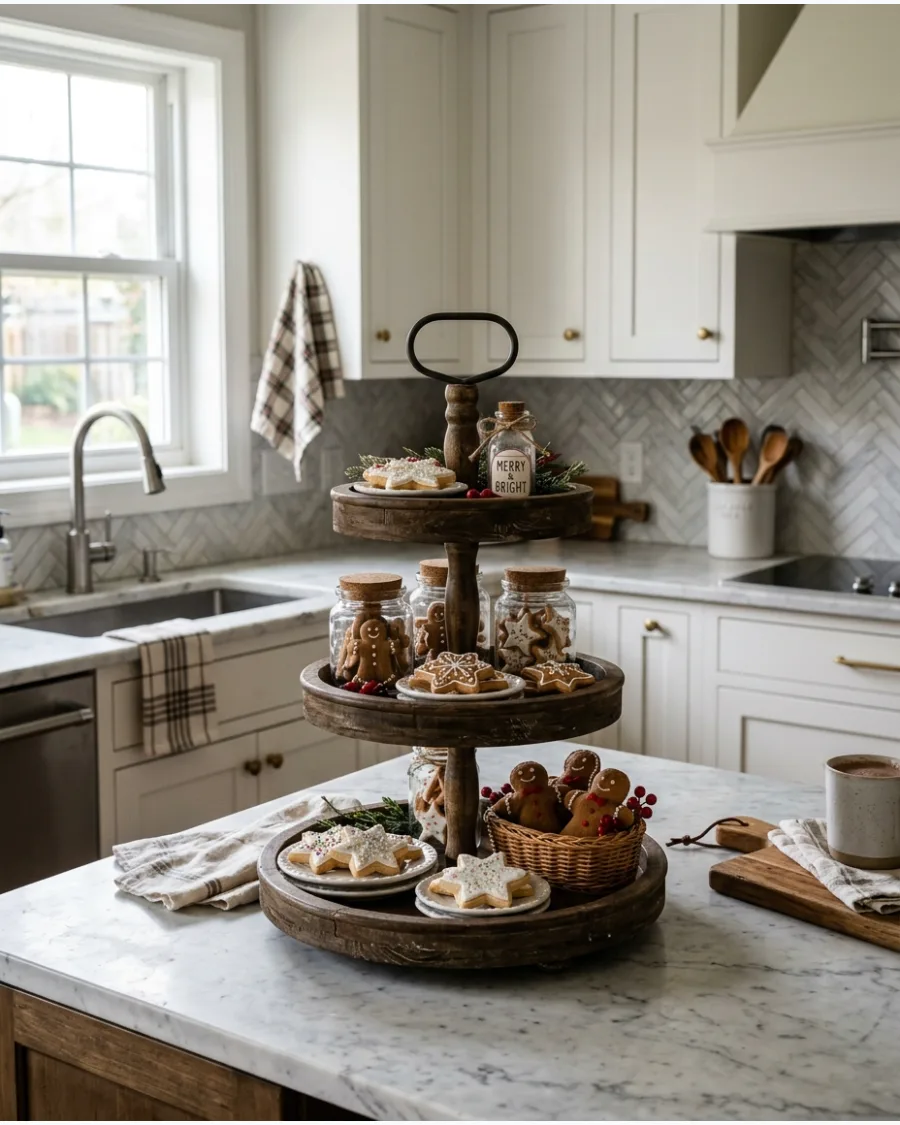
Recreate the charm of a holiday bake shop by using faux sugar cookies in classic shapes like stars and snowmen. Display your faux cookies on miniature plates and inside small glass jars to mimic a realistic kitchen scene. Adding tiny baskets filled with gingerbread people provides texture and keeps the theme grounded in a baking aesthetic.
- Look for faux cookies made of resin or salt dough that won't attract pests or crumble over time.
- Arrange the cookies at different angles, leaning some against jars and laying others flat on tiny plates.
- Select jars with airtight lids or narrow openings to keep the faux treats securely inside if the tray is on a high-traffic table.
Sprinkle a light dusting of white glitter over the cookies to simulate the look of fresh sugar crystals.
20. Mrs. Claus Bakery Tiered Tray
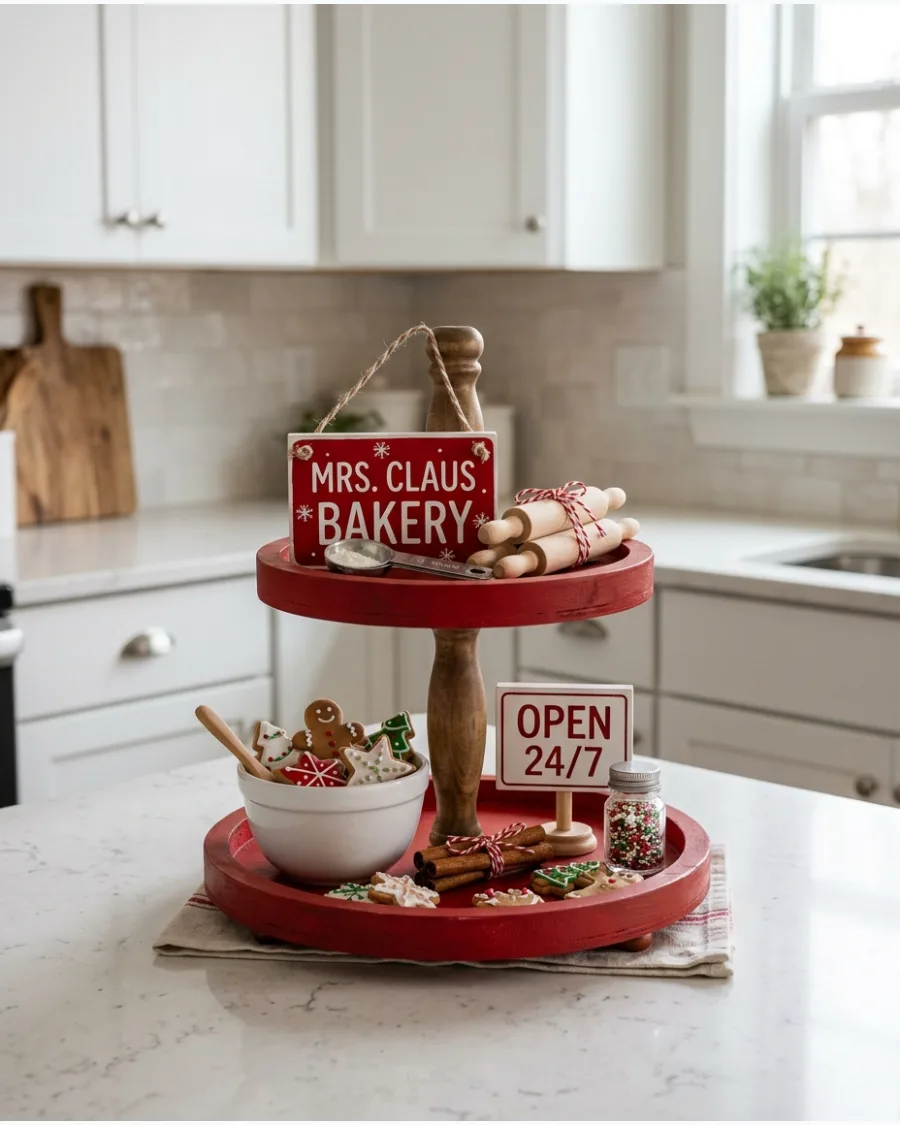
Transform your tiered tray into a miniature North Pole kitchen using tiny baking tools and accessories. Incorporate miniature rolling pins, small mixing bowls, and tiny aprons to establish the bakery theme. Adding red-and-white details like baker's twine and bakery-themed signs completes the festive, hardworking kitchen vibe.
- Check the scale of the kitchen utensils to ensure they are miniature enough to fit within the tier height without hitting the level above.
- Drape a small red-and-white checkered cloth or a tiny apron over the edge of the bottom tier for a soft fabric element.
- Use small wooden blocks to prop up bakery signs so they remain visible behind the bowls and rolling pins.
Tie a small piece of baker's twine around the handles of the rolling pins to add a hand-crafted detail.
HOT COCOA AND CHRISTMAS KITCHEN TIERED TRAYS
21. Hot Cocoa Christmas Tiered Tray
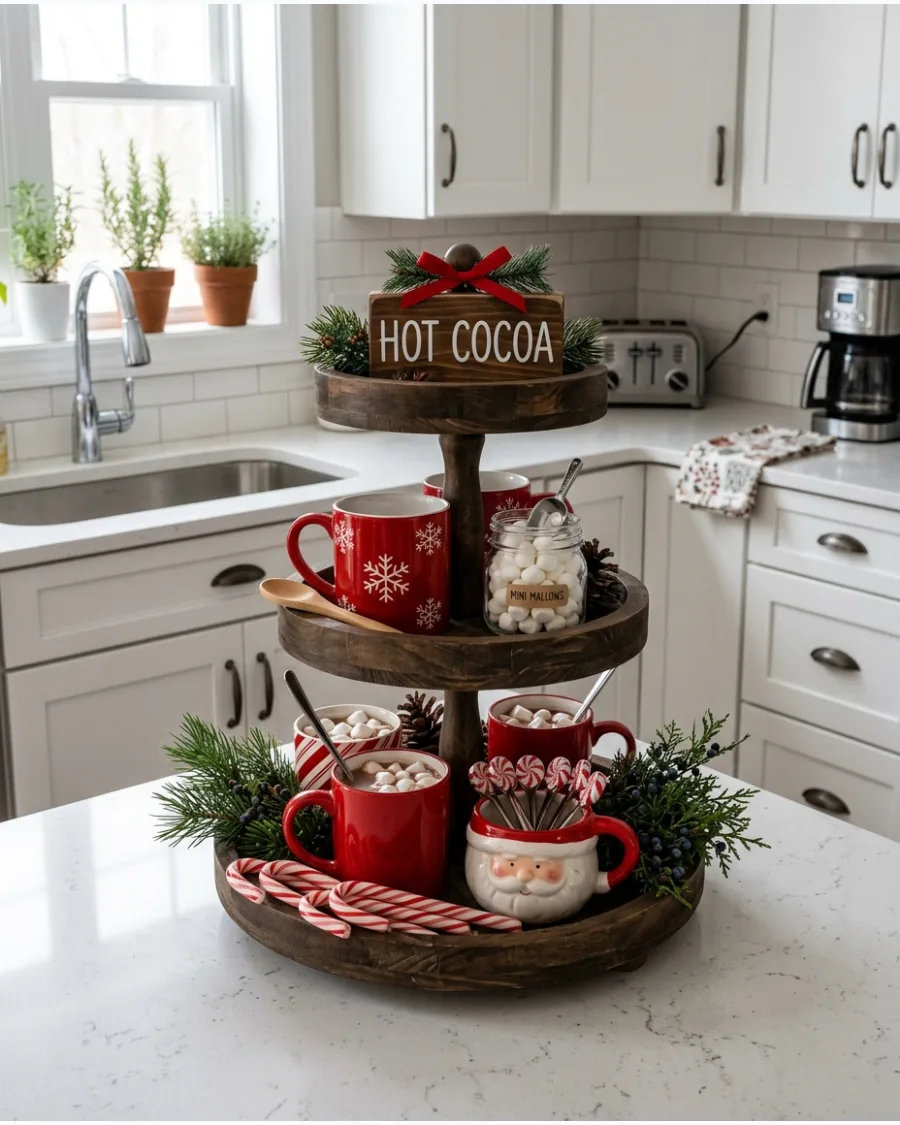
Transform your tray into a functional serving station for the winter months. Place canisters of cocoa powder or individual packets on the bottom tier alongside mugs for easy access by family and guests.
Fill small jars with marshmallows, chocolate chips, and candy canes to provide variety for every cup. Add a few miniature holiday figurines or signs to the top level to finish the look.
- Choose a tray with deep enough tiers to securely hold standard-sized mugs and glass jars.
- Position the heaviest items, like ceramic mugs and cocoa canisters, on the bottom tier to ensure the tray remains stable.
- Wash all jars and utensils thoroughly before filling them with edible toppings for the season.
Keep a small spoon in the marshmallow jar so guests do not have to reach in with their fingers.
22. Peppermint Hot Cocoa Tiered Tray
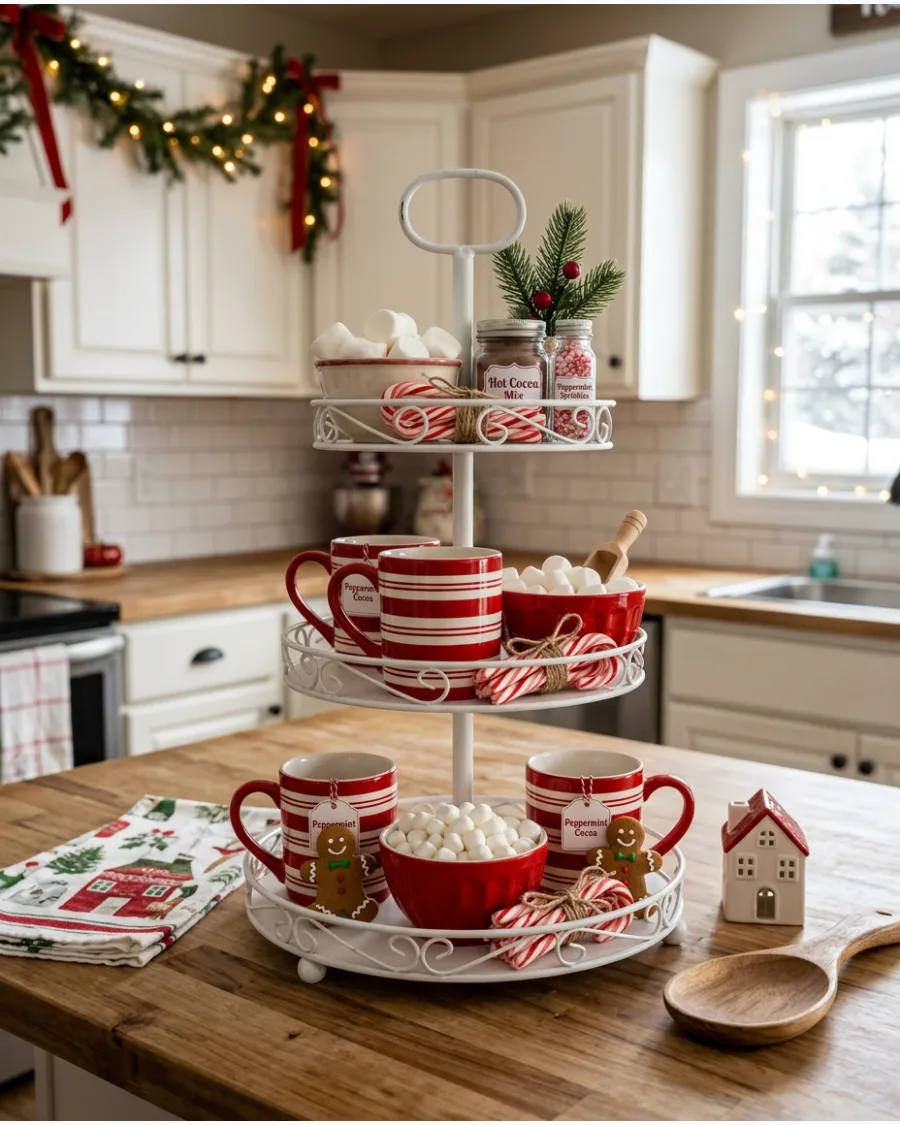
Use a crisp red and white color scheme to highlight the peppermint flavor profile. Repeat the striped pattern across all levels by alternating between peppermint stirrers, red mugs, and striped napkins. Scatter miniature gingerbread pieces around the base to add a touch of warmth to the cool peppermint theme.
The consistent color palette helps the station look organized rather than busy.
- Check that peppermint sticks or stirrers are individually wrapped to keep them fresh throughout December.
- Layer striped cloth napkins under the mugs on the bottom tier to catch drips and reinforce the visual theme.
- Swap out broken candy canes for fresh ones if they become sticky or damaged during frequent use.
Place a small red bowl of white marshmallows on the top tier to create a high-contrast focal point.
23. Christmas Coffee Bar Tiered Tray
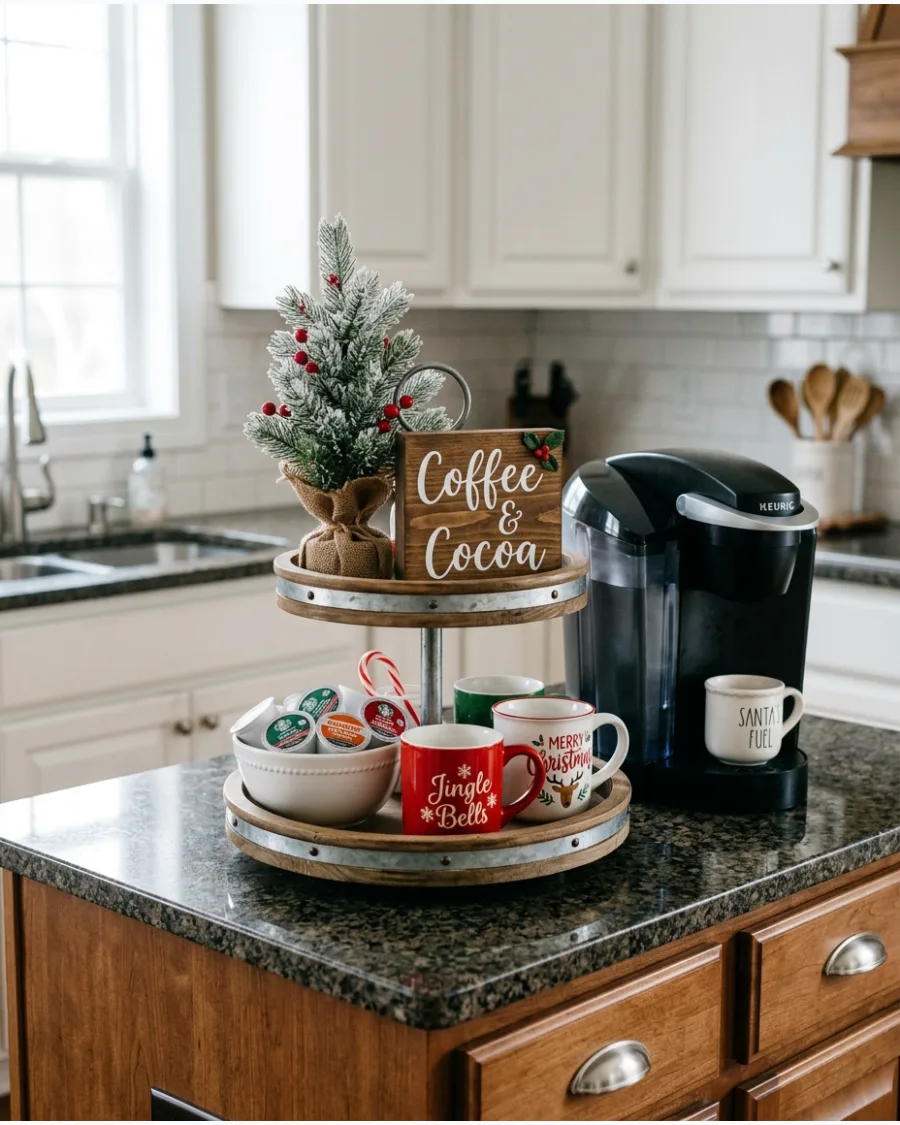
Enhance your morning routine by placing a decorative tray right next to your coffee machine. Organize your coffee pods, sugar containers, and stirrers on the lower tiers where they are easiest to reach during the morning rush.
Incorporate miniature pine trees and small wooden holiday signs to blend the functional supplies with the rest of your decor. This setup keeps your coffee essentials tidy while clearing up extra counter space.
- Select small canisters or jars that fit the height of your tray's middle tier to hold sugar and stirrers.
- Group coffee pods by roast or flavor in shallow bowls to prevent them from rolling off the tray edges.
- Wipe down the tray levels weekly to remove any coffee grounds or dust that accumulates near the machine.
Use a small bottle of holiday syrup with a pump to save space compared to multiple flavored creamers.
24. Gingerbread Hot Cocoa Bar Tiered Tray
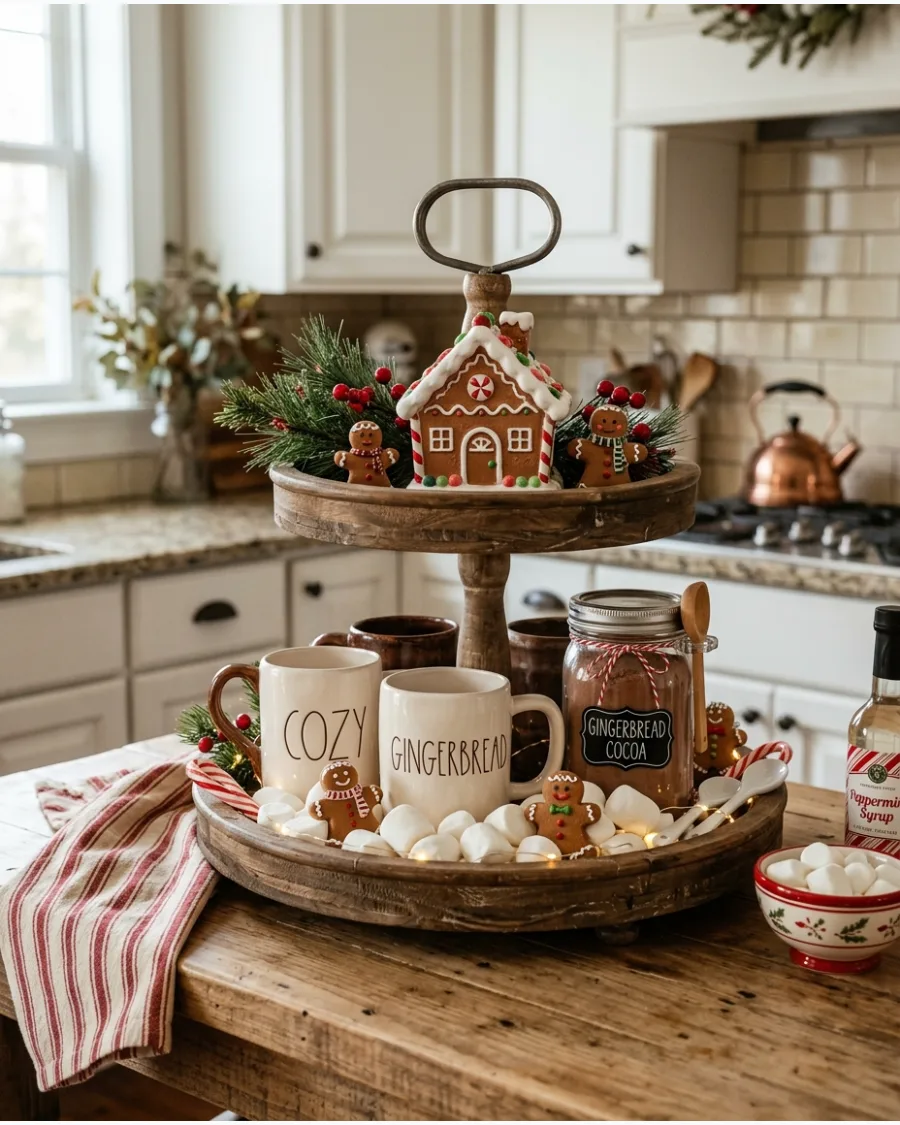
Create a cozy café atmosphere by mixing gingerbread elements with your hot chocolate supplies. Arrange miniature gingerbread houses and brown-toned decorations alongside jars of cocoa and marshmallows to establish a warm aesthetic. Use cream-colored mugs and red candy canes to provide a bright contrast to the earthy brown tones of the gingerbread pieces.
This theme works well in kitchens with wood accents or neutral countertops.
- Look for faux gingerbread houses made of resin or ceramic if you want a decoration that lasts for multiple years.
- Tuck brown and white checkered ribbons around the tiers to unify the gingerbread and cocoa themes.
- Store any real cookies or gingerbread pieces in airtight containers if you plan to include them for snacking.
Dust the tray lightly with a very small amount of faux snow to give the gingerbread houses a wintery look.
25. Christmas Baking Tiered Tray
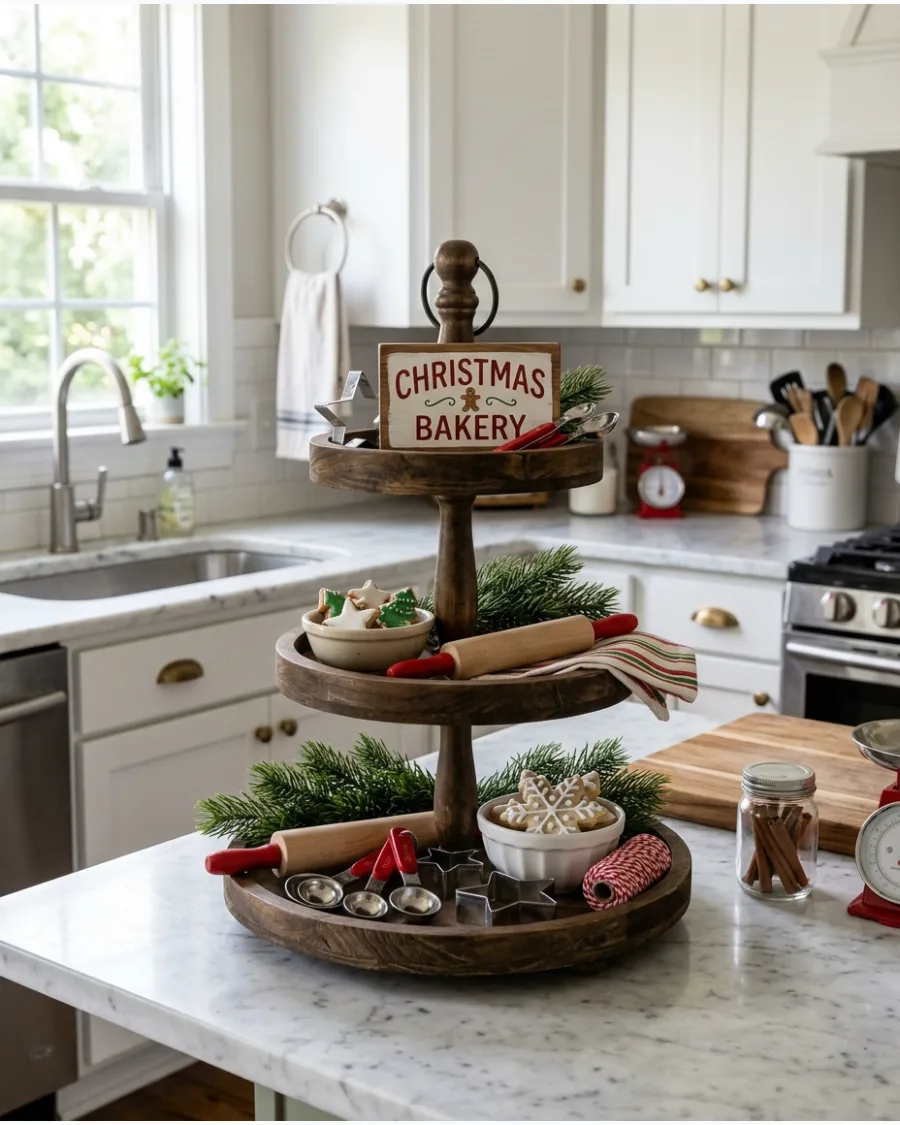
Create a miniature kitchen scene by grouping tiny rolling pins, measuring spoons, and metal cookie cutters on the tiers. Arrange faux sugar cookies and small ceramic baking bowls to ground the larger levels of the tray. Add a few recipe-themed signs to provide vertical height and a seasonal backdrop for the smaller utensils.
- Choose miniature wooden rolling pins with painted handles that coordinate with your kitchen’s existing accent colors.
- Tuck small sprigs of artificial cedar or pine into the gaps between the baking tools to create a festive texture without using real needles that drop debris into your kitchen space.
- Place the heaviest items like ceramic bowls on the bottom tier to ensure the tray remains stable and well-balanced during daily use.
Use a small blob of removable museum putty under the round rolling pins to prevent them from rolling off the edge of the tray tiers.
26. Christmas Kitchen Tiered Tray
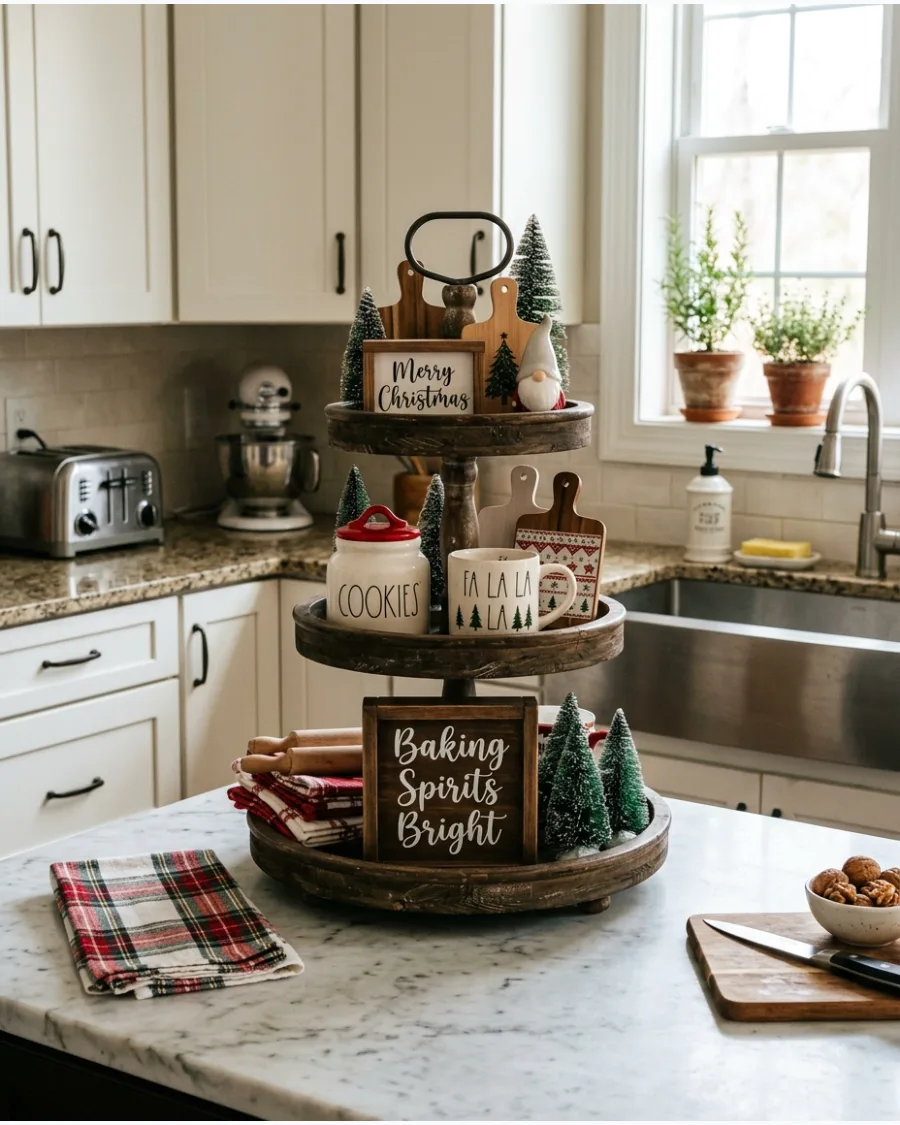
Style a tiered tray specifically for the heart of the home using culinary-inspired miniatures. Incorporate miniature wood cutting boards and small glass cookie jars alongside festive kitchen signs to maintain a functional theme. Choose colors that complement your existing cabinet hardware and backsplash for a seamless look.
- Select tiny bottle brush trees or wooden trees that fit the height of the tray's upper levels without touching the top plate.
- Place the largest items, such as a ceramic cookie jar or a full-sized holiday mug, on the bottom tier to provide a stable visual base.
- Use a small sprig of faux rosemary or cedar to fill gaps between the baking accessories and the tray edges.
Use a small piece of poster putty on the bottom of round ornaments or jars to prevent them from rolling when the tray is bumped.
27. Christmas Mug Tiered Tray
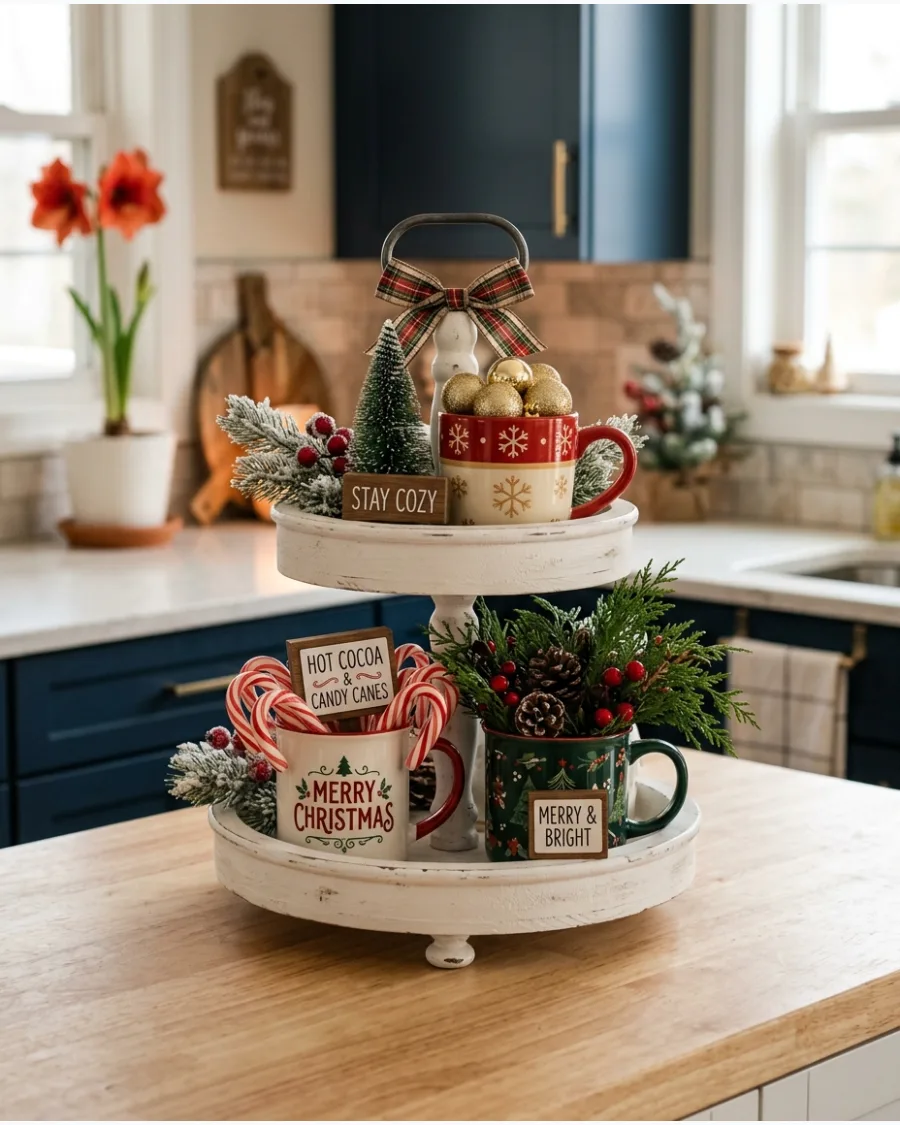
Highlight a collection of holiday mugs by making them the focal point of each tier. Fill the interior of each mug with candy canes, sprigs of greenery, or small ornaments to add height and texture. Balance the heavy ceramic pieces with lightweight elements like miniature wooden signs or fabric-wrapped trees.
- Choose mugs with consistent shapes or a unified color palette to prevent the display from feeling disjointed.
- Arrange two mugs on the bottom tier and one on the top, using the remaining space for smaller seasonal figurines.
- Swap out fresh candy canes for faux versions if the display will be out for several weeks to avoid stickiness from humidity.
Place a few marshmallows inside a mug for a realistic touch, then spray them with a clear matte sealant if you want to reuse them all season.
28. Candy Cane Coffee Bar Tiered Tray
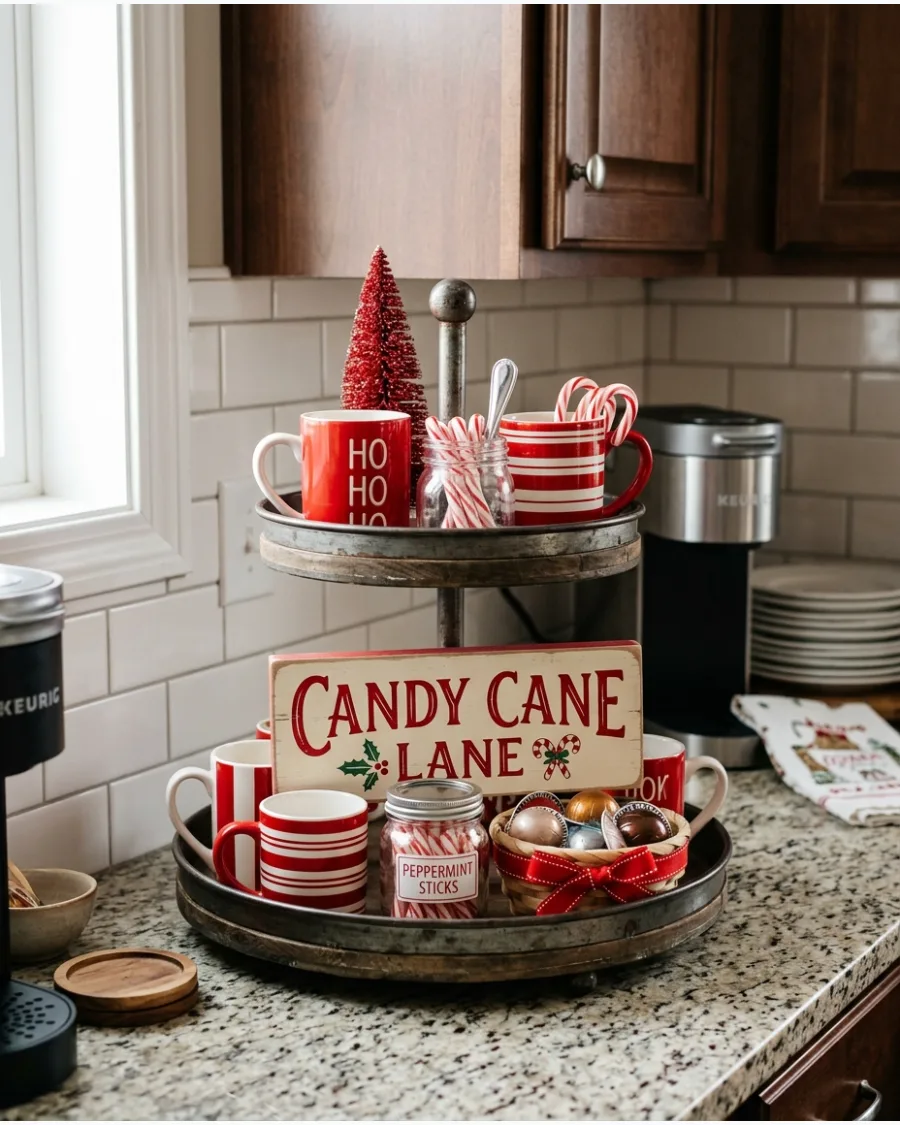
Organize your daily coffee essentials into a red-and-white holiday theme. Anchor the bottom tier with a small wooden sign featuring a coffee or peppermint theme to define the station's purpose. Use striped mugs and canisters to hold stirrers and pods, ensuring the setup is as useful as it is decorative.
- Check that the tray height allows for easy access to coffee pods or sugar packets without knocking over nearby decorations.
- Place a bundle of peppermint sticks or red-striped stirrers in a small glass jar to repeat the candy cane pattern.
- Tuck tiny red-and-white bottle brush trees into the corners of the tray to reinforce the color scheme.
Line the tray tiers with round paper doilies or red napkins to protect the surface from coffee drips or sugar spills.
29. Christmas Cookie Baking Station Tiered Tray
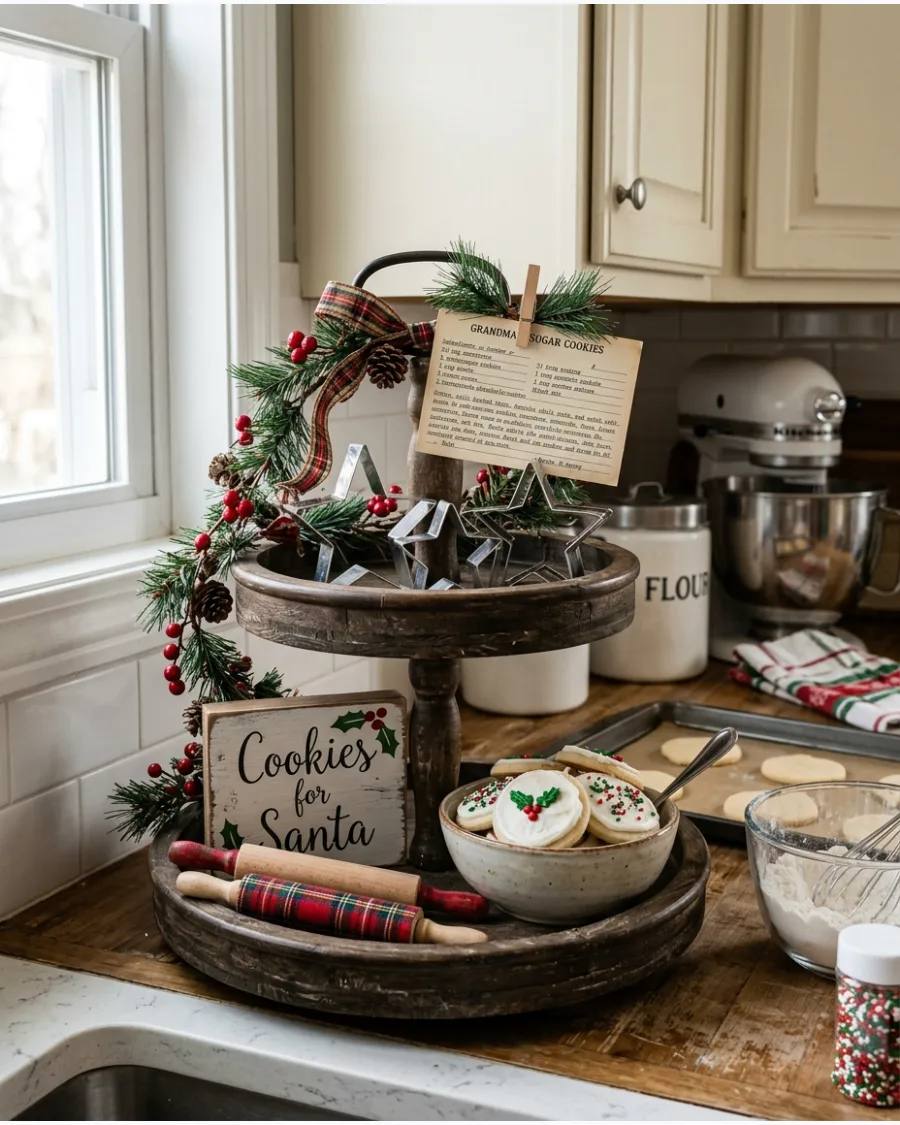
Capture the charm of holiday baking by arranging mini kitchen tools and ingredients on multiple levels. Position miniature rolling pins and small metal cookie cutters vertically against the tray's center post to save floor space on the tiers. Add a handwritten recipe card or a faux cookie display to create a lived-in kitchen vignette.
- Select tiny wooden utensils or whisk ornaments that are scaled to the size of the tray's compartments.
- Use small white containers labeled 'Flour' or 'Sugar' to provide a neutral background for colorful faux cookies.
- Clean metal cookie cutters with a soft cloth before placing them to remove fingerprints or dust that may show under kitchen lighting.
Lean a recipe card against a small easel or a mini cutting board to keep it visible and upright.
30. Christmas Kitchen Counter Tiered Tray
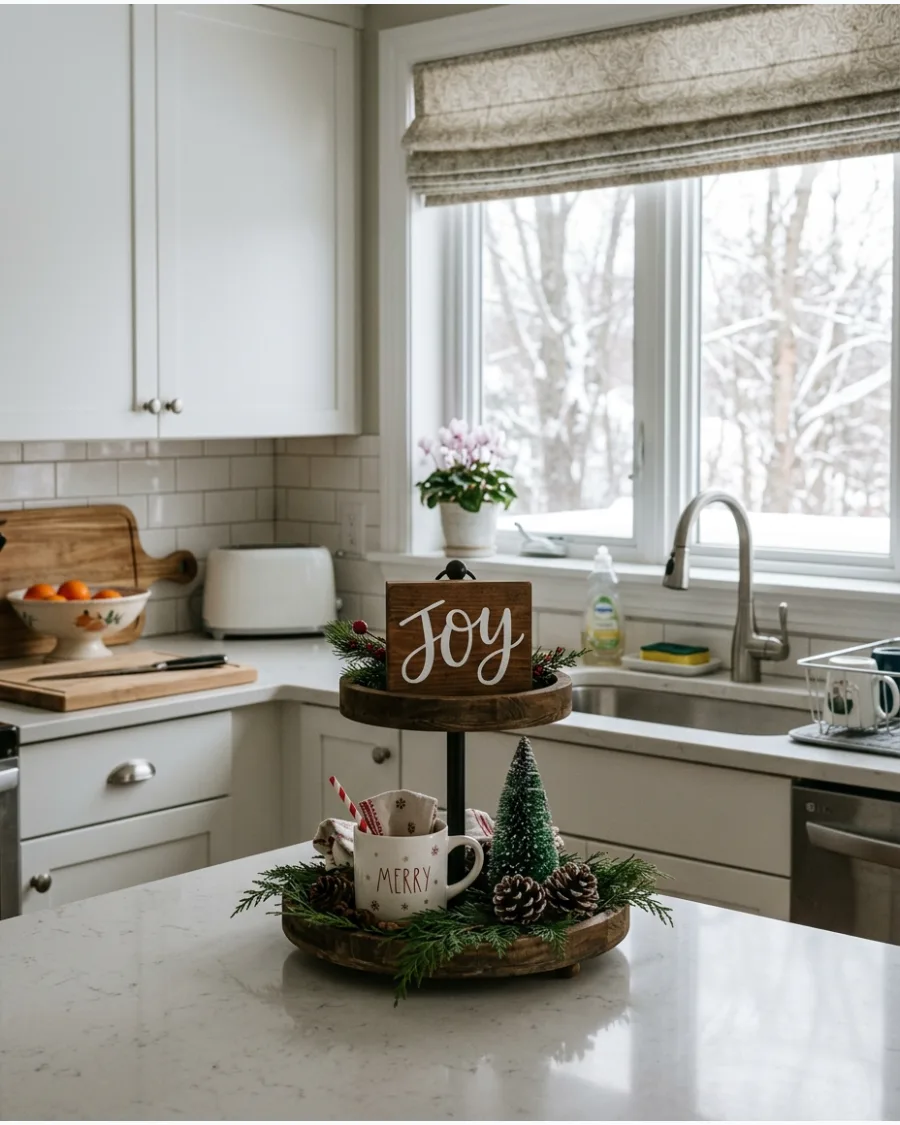
Create a festive accent that keeps your workspace clear for meal preparation. Limit the display to one miniature tree, one small sign, and a single holiday mug to ensure the tray remains compact and practical. Use low-profile greenery like flat cedar boughs to add a touch of nature without adding unnecessary bulk.
- Measure your countertop depth and under-cabinet clearance to ensure the tray fits comfortably without obstructing movement.
- Choose a tray with a small footprint, such as a round two-tier model, to maximize available prep space nearby.
- Select decorations made of durable materials like wood or ceramic that can withstand the occasional splash from the sink.
Place the tray on a small lazy Susan base if you need to access items from all sides on a deep counter.
FARMHOUSE AND RUSTIC CHRISTMAS TIERED TRAYS
31. Farmhouse Christmas Tiered Tray
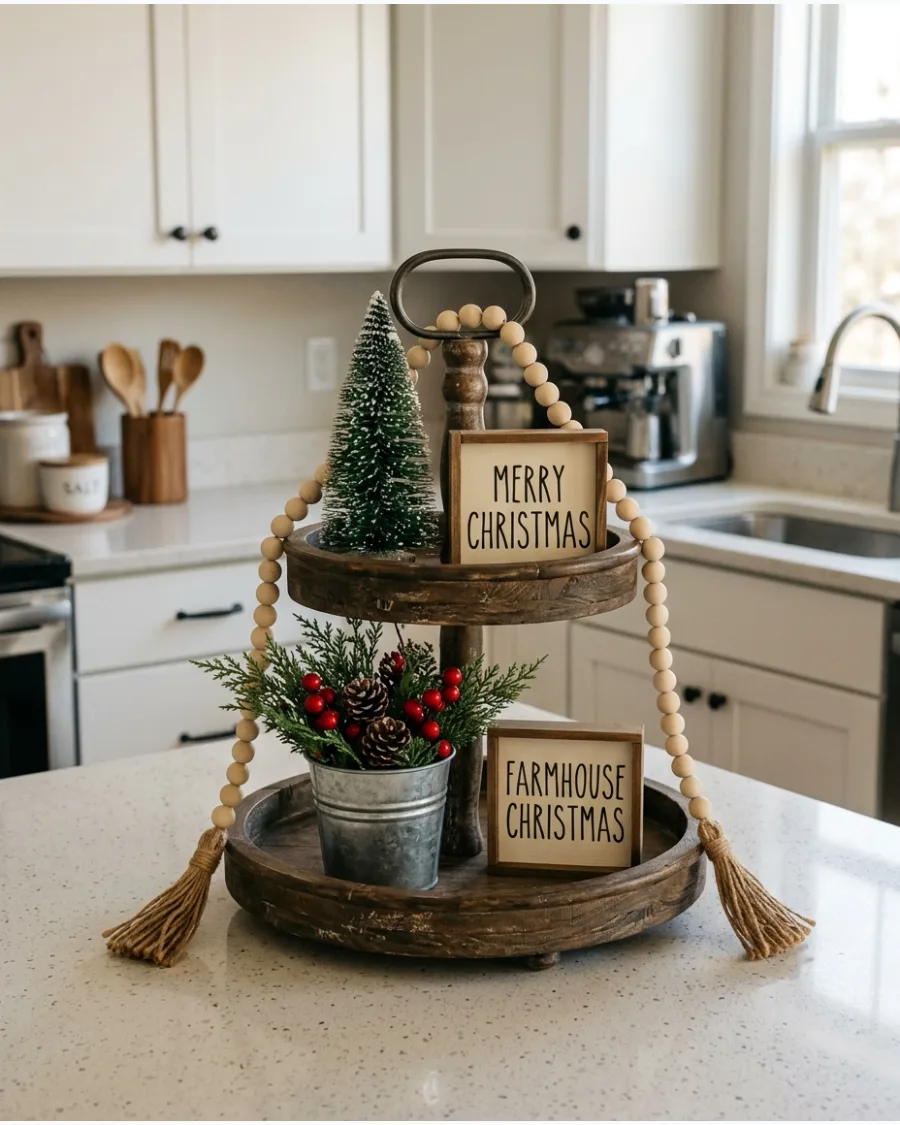
Create a rustic vignette by layering natural wood and matte metal finishes across the tiers. Drape a wooden bead garland loosely over the edges of the tray to connect the different levels visually. Use small faux pine trees and sprigs of greenery to fill the gaps between your larger focal pieces for a textured look.
- Select matte galvanized metal cups or small buckets to hold sprigs of cedar or pine without adding distracting shimmer.
- Lean miniature wooden signs with simple black lettering against the center pole to provide height and a clear farmhouse theme.
- Check that your red accents, such as small berries or a ceramic bird, are scattered evenly to lead the eye through the display.
Use a small bundle of cinnamon sticks tied with jute twine as a natural filler that adds a subtle seasonal scent.
32. Buffalo Plaid Christmas Tiered Tray
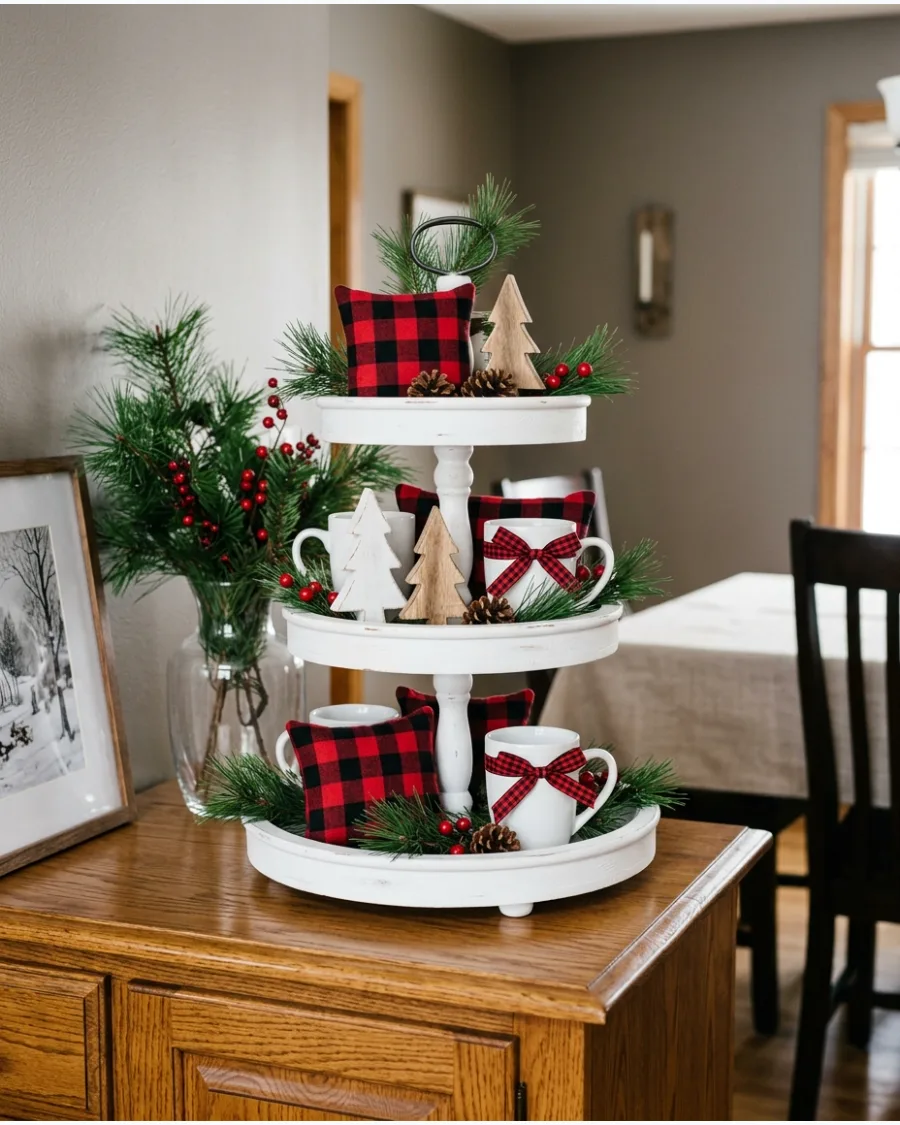
Build a cohesive look using the high-contrast red-and-black buffalo plaid pattern on ribbons and miniature pillows. Intersperse plain evergreen sprigs or white ceramic houses between the plaid items to provide a visual break from the bold pattern. This balance ensures the small tray feels curated rather than overwhelmed by the fabric prints.
- Verify that any mini pillows or fabric signs are small enough to sit within the tray's edge without overhanging and looking messy.
- Tie buffalo plaid ribbons around the handles of white ceramic mugs to coordinate with larger themed signs on different tiers.
- Group solid-colored wooden trees near patterned ornaments to help the red-and-black colors stand out clearly.
Limit the bold plaid pattern to three or four key items per tray to maintain a clean, organized look.
33. Rustic Woodland Christmas Tiered Tray
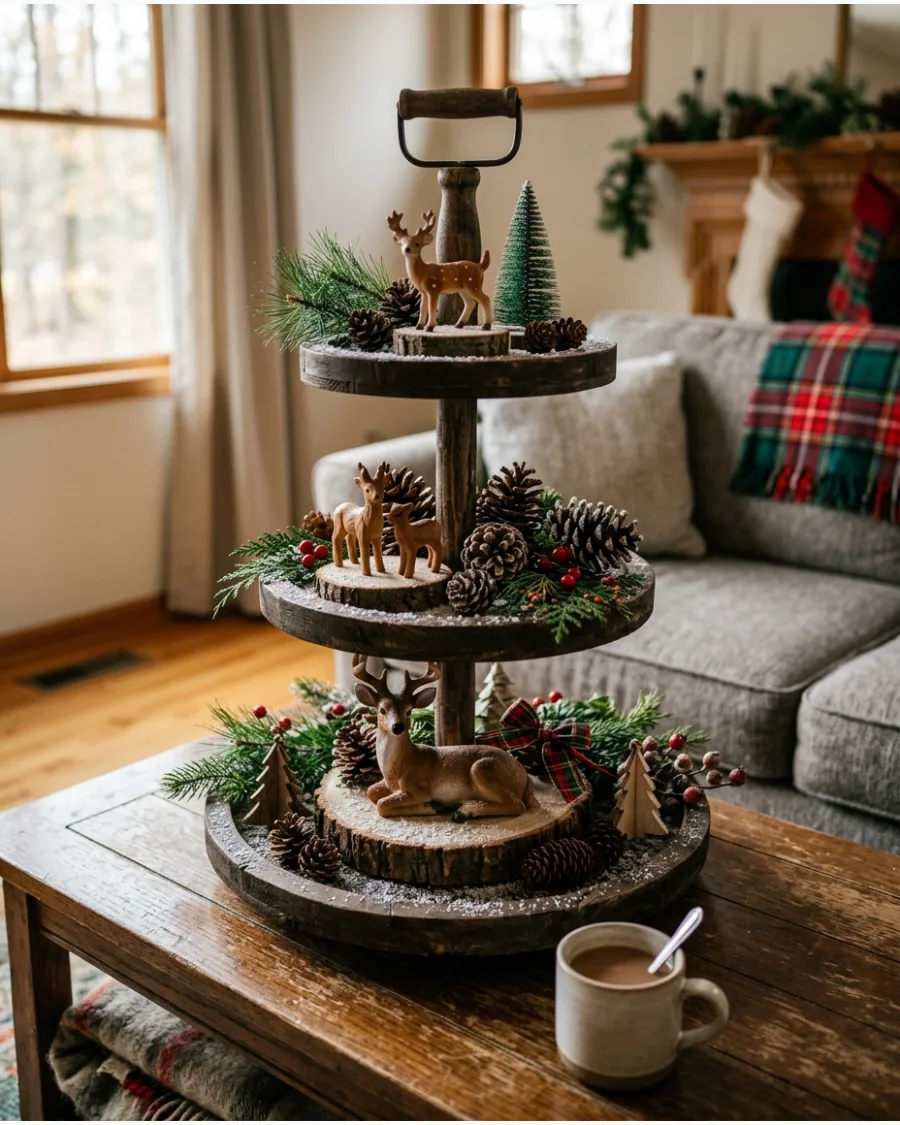
This theme mimics a quiet winter forest using natural wood tones and earthy textures. Layer small evergreen branches behind miniature deer figurines and woodland animals to create a sense of depth within the tray tiers. Stick to a neutral palette of brown, green, and cream to maintain the forest-inspired aesthetic.
- Choose deer figurines of varying heights and poses to create a more dynamic and layered woodland scene.
- Place flat wood slices under smaller animal figures to elevate them so they are visible behind other items.
- Check that any real pinecones or branches are clean and small enough to stay entirely within the tray's footprint.
Sprinkle a small amount of coarse white sand or faux snow on the tray surfaces to mimic the appearance of a snow-covered forest floor.
34. Pinecone Christmas Tiered Tray
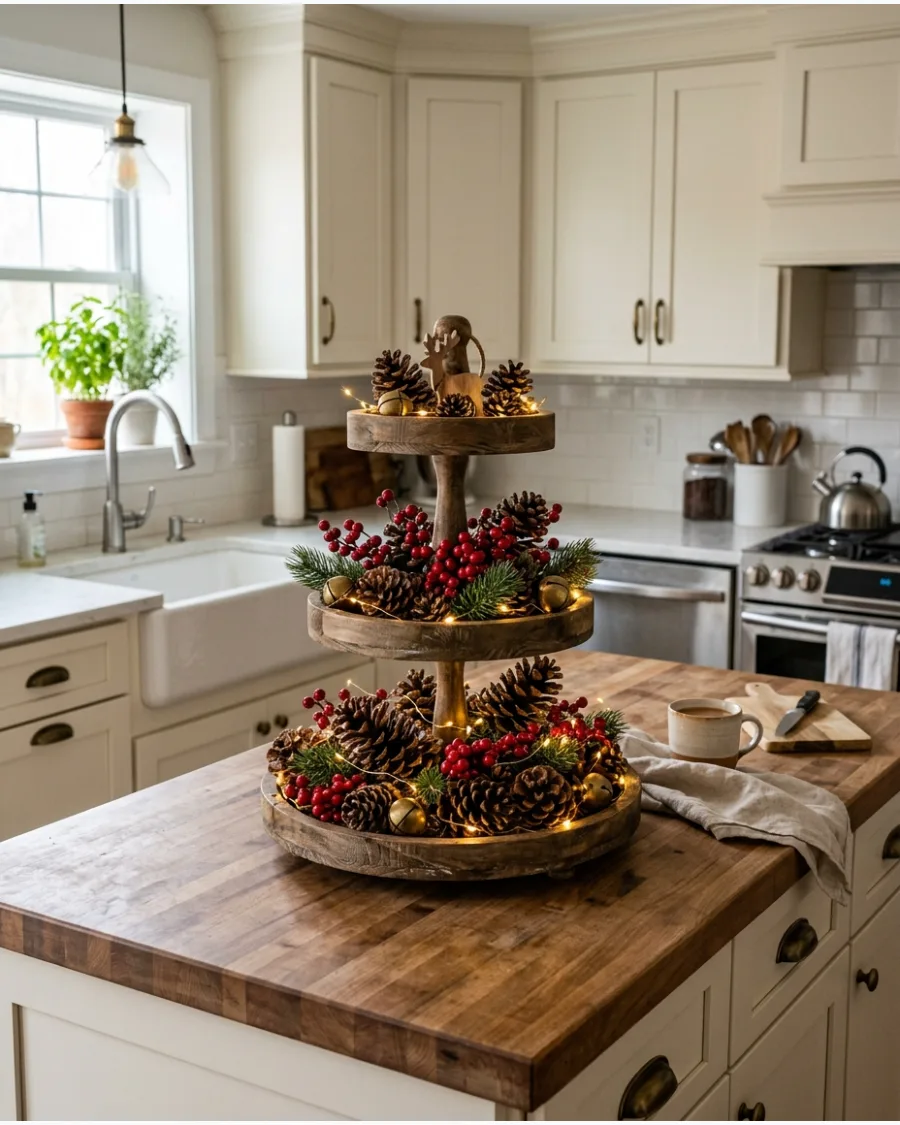
Utilize pinecones as the primary repeating element to ground the display in a natural, traditional look. Tuck miniature battery-powered string lights around the pinecones and berry clusters to highlight the different textures of the scales and needles. Combine these with small brass bells and wooden ornaments for a balanced seasonal arrangement.
- Mix frosted or tipped pinecones with natural ones to add color variation without using glitter or plastic.
- Sit the largest pinecones on the bottom tier to provide a stable base and use smaller ones for filling gaps on upper levels.
- Incorporate clusters of bright red berries or small brass bells to provide a sharp contrast against the brown pinecones.
If using foraged pinecones, bake them at an angle that suits the placementF for the product's recommended duration to ensure they are dry and free of pests before adding them to your decor.
35. Natural Christmas Tiered Tray
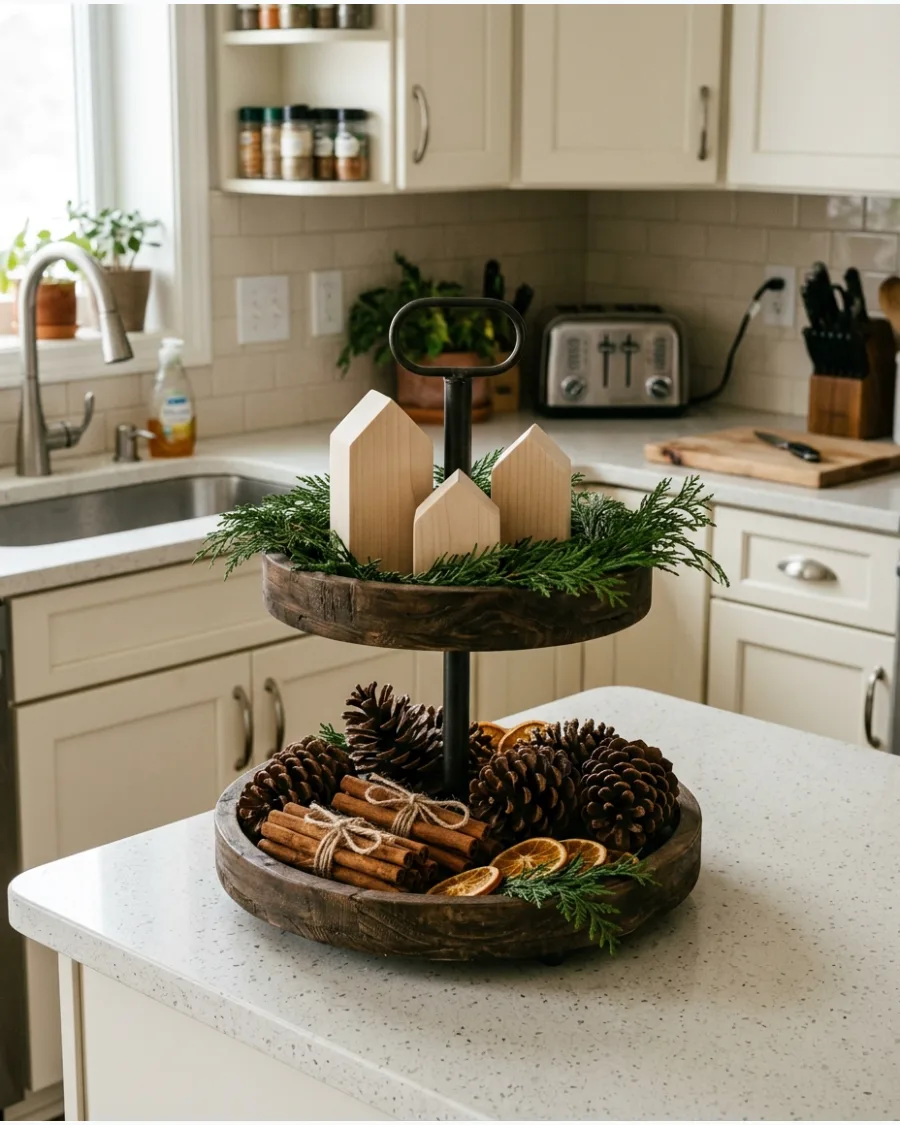
Build an organic holiday display using a combination of preserved greenery and dried pantry staples for a textured, earthy look. Arrange pinecones, bundles of cinnamon sticks, and dehydrated orange slices to fill the tiers without relying on bright plastic fillers.
Place small unpainted wooden houses on the top tier to anchor the scene with a neutral focal point.
- Select dried orange slices that are completely dehydrated to prevent moisture damage or sticking to the tray surface.
- Tuck short sprigs of preserved cedar or pine into the gaps between larger items to create a full appearance while maintaining a natural scent.
- Group cinnamon sticks together with jute twine or thin brown ribbon to keep them from rolling off the edges of the tiers.
Use a small amount of clear museum wax under the wooden houses to keep them upright if the tray is located in a high-traffic kitchen area.
36. Wood and Greenery Christmas Tiered Tray
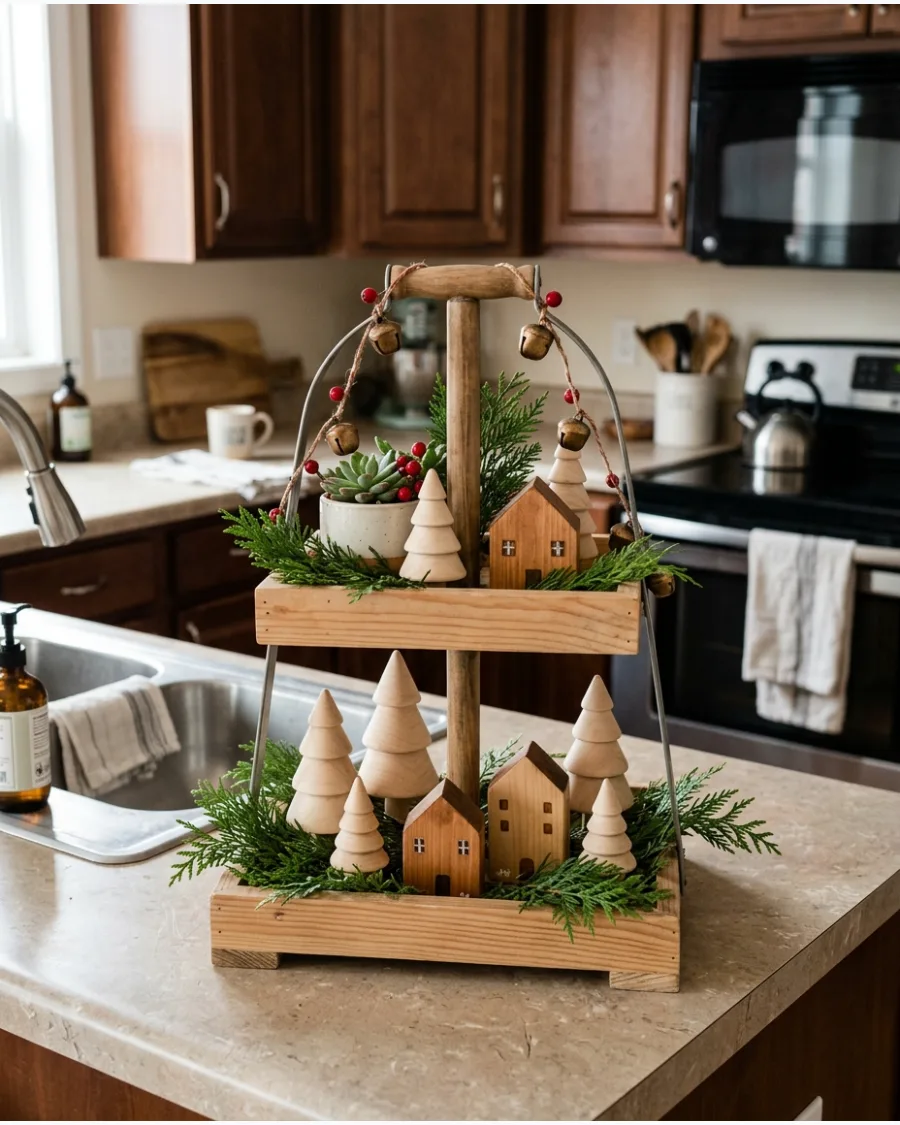
Focus on organic textures by pairing raw wood shapes with fresh or realistic faux evergreen sprigs. Tuck small bundles of cedar or pine into the gaps between wooden houses and stars to soften the hard edges of the tray tiers. This approach relies on a muted palette to create a calm, nature-inspired centerpiece for your kitchen.
- Choose wooden elements with varying heights to create vertical depth and keep the eye moving across each level.
- Layer the greenery toward the back of the tray to act as a dark backdrop for lighter wood signs and unfinished stars.
- Drape a short strand of brass bells over the top handle to add a metallic accent without overwhelming the natural theme.
Use wood slices or 'cookies' as mini pedestals to lift smaller wooden trees so they aren't hidden behind the tray's rim.
37. Farm Fresh Christmas Trees Tiered Tray
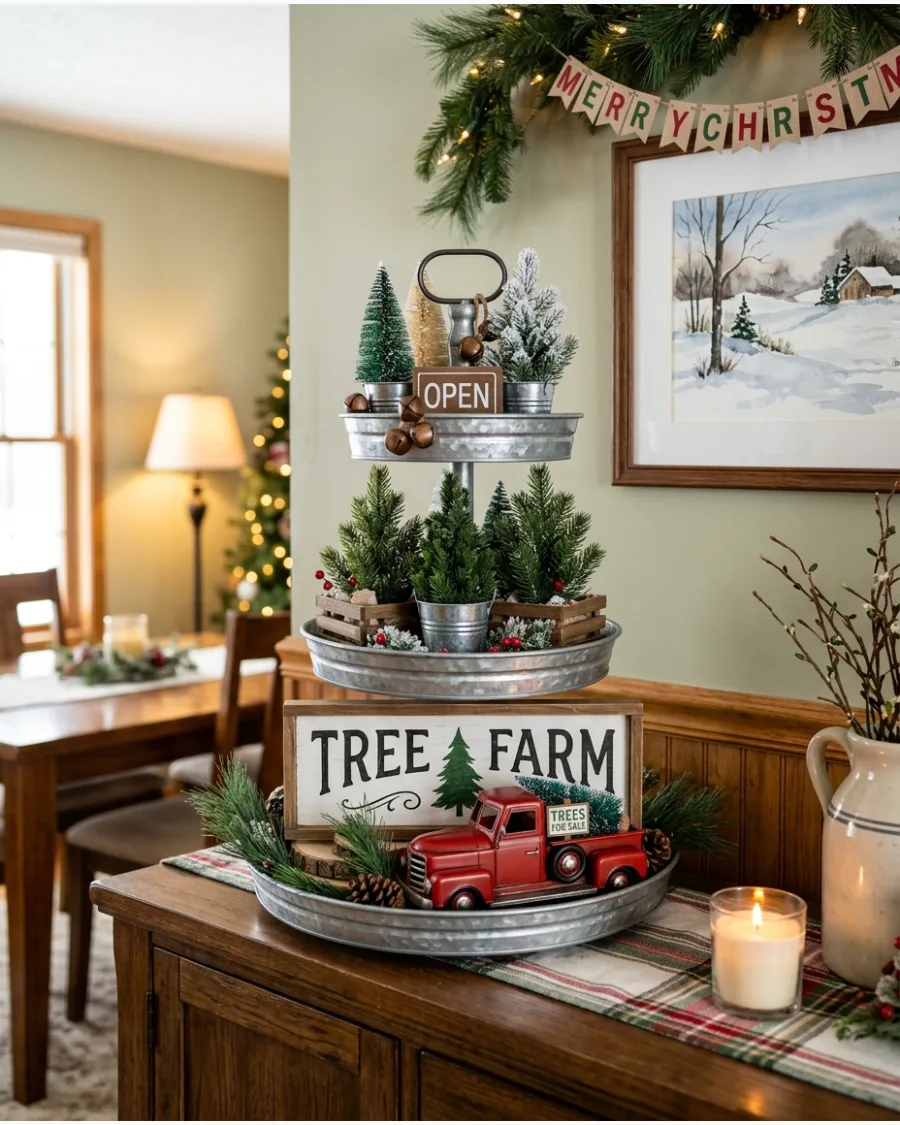
Transform your tray into a miniature tree lot by using vintage signage and various evergreen textures. Place a larger decorative truck or a sturdy wooden tree farm sign on the bottom tier to serve as the visual anchor for the entire display. Surround these larger pieces with smaller crates or buckets to reinforce the outdoor market theme.
- Select trees in different shades of green or with light flocking to mimic the diversity of a real tree forest.
- Set the smallest trees in mini galvanized buckets or wooden crates to add metallic and rustic textures to the arrangement.
- Fill any empty spaces with faux snow-covered greenery or white wool balls to tie the winter theme together.
Lean a small rectangular chalkboard sign against the center post to display 'Tree Prices' for a playful narrative detail.
38. Red Truck Christmas Tiered Tray
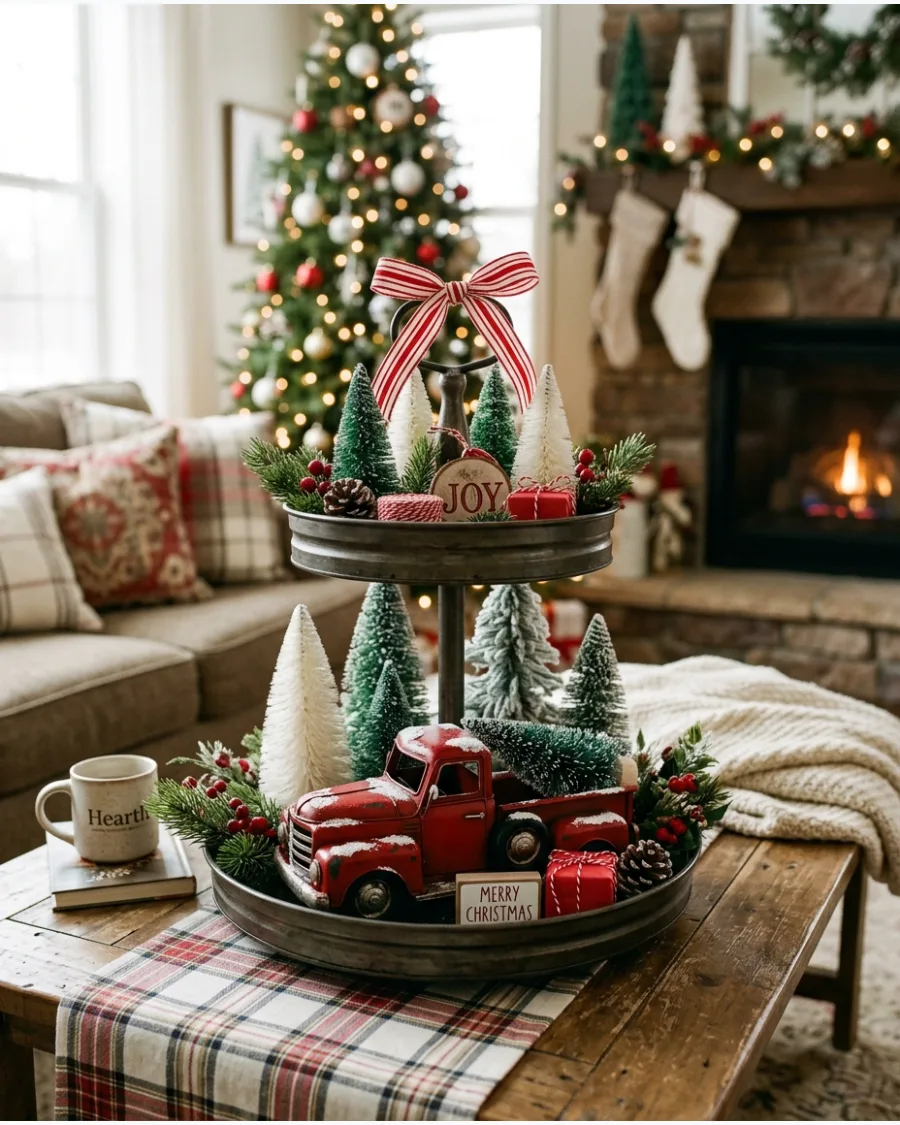
Build a nostalgic vignette around a vintage-style red truck carrying a tiny evergreen. Distribute small pops of red, such as miniature gift boxes or striped ribbons, across the middle and top tiers to balance the bold color of the truck. This repetition prevents the truck from overwhelming the rest of the tray and creates a unified look.
- Match the scale of your bottle-brush trees to the truck so the trees do not look awkwardly oversized next to the vehicle.
- Use white or cream bottle-brush trees on the same tier as the truck to help the red paint stand out visually.
- Add a 'Special Delivery' or 'Home for the Holidays' wooden sign to the top tier to provide thematic context for the scene.
Check that the truck’s wheels sit flat on the tray surface or use a small bit of museum wax to keep it from rolling if the tray is moved.
39. Rustic Cabin Christmas Tiered Tray
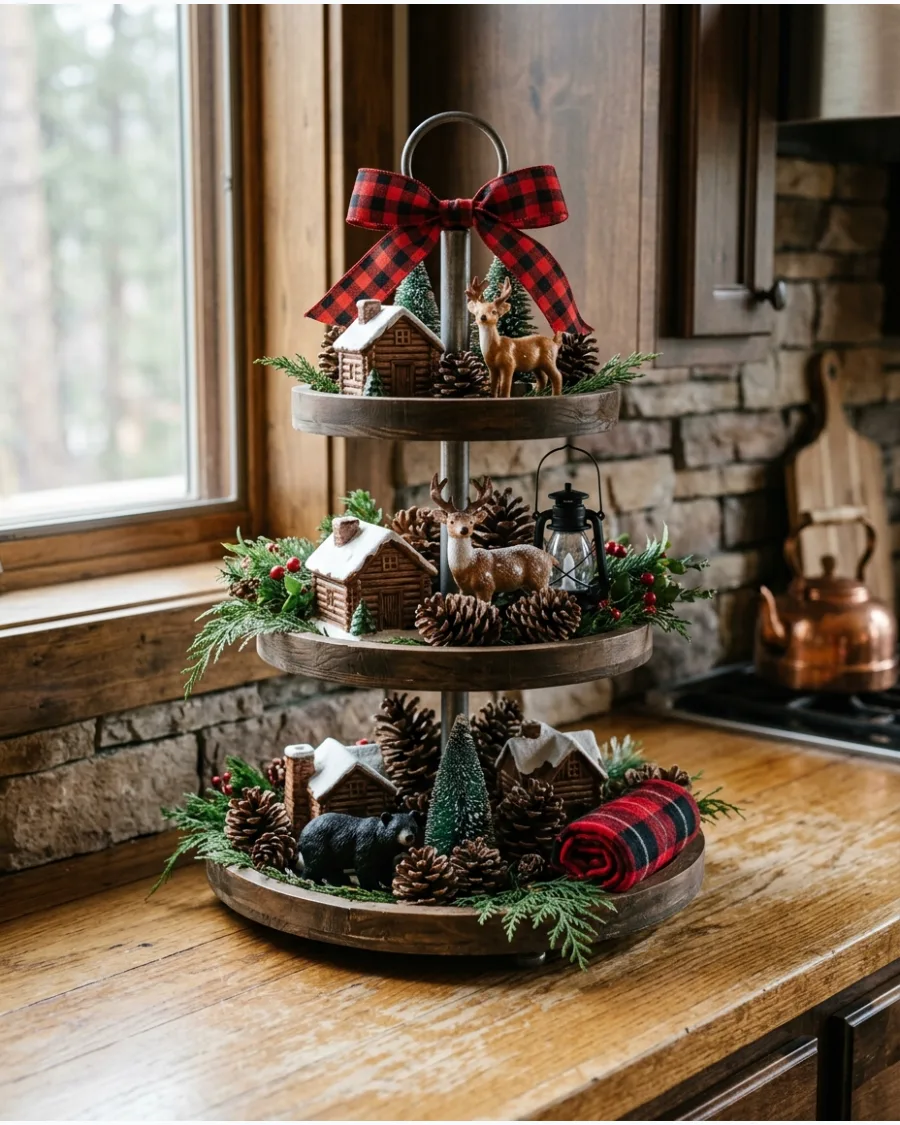
Mimic the feeling of a mountain retreat with a mix of forest elements and cozy textures. Incorporate a miniature lantern or a small plaid-wrapped ornament to introduce traditional cabin patterns into the greenery. Stick to earthy tones like deep green, warm brown, and cream to maintain a cohesive outdoorsy look for your living area.
- Position a miniature deer figurine near a cluster of pinecones to create a small narrative scene on one of the levels.
- Choose wooden signs with weathered or 'distressed' finishes to match the rugged cabin aesthetic.
- Use real pinecones of different sizes to fill gaps and add a natural texture to the display.
Group three small items together on the bottom tier to create a 'vignette within a vignette' for better visual balance.
40. Scandinavian Christmas Tiered Tray
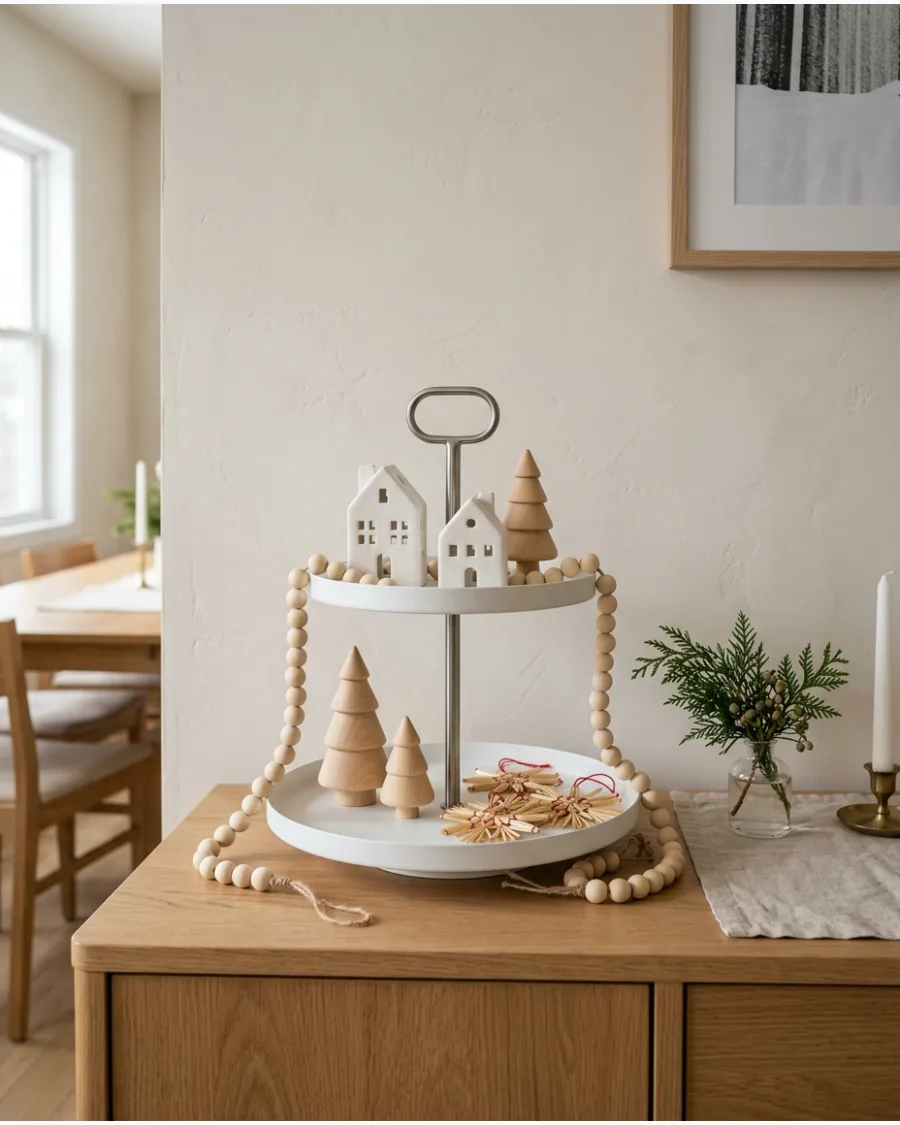
Achieve a minimalist aesthetic by focusing on clean lines and a restricted white-and-wood color palette. Leave plenty of visible space between each ceramic house or wooden star to ensure the arrangement feels open and airy rather than crowded. This style emphasizes high-quality individual pieces rather than a dense collection of decor items.
- Pair bright white ceramic houses with light-colored wood trees for a crisp, high-contrast look that matches modern decor.
- Drape a simple strand of raw wooden beads around the middle tier to connect the different elements without adding clutter.
- Use only a few sprigs of real evergreen to provide a single, natural pop of color against the neutral backdrop.
Avoid using traditional red or gold accents to stay true to the modern, muted Scandinavian design philosophy.
SNOWY, VINTAGE AND WHIMSICAL CHRISTMAS TIERED TRAYS
41. Snowman Christmas Tiered Tray
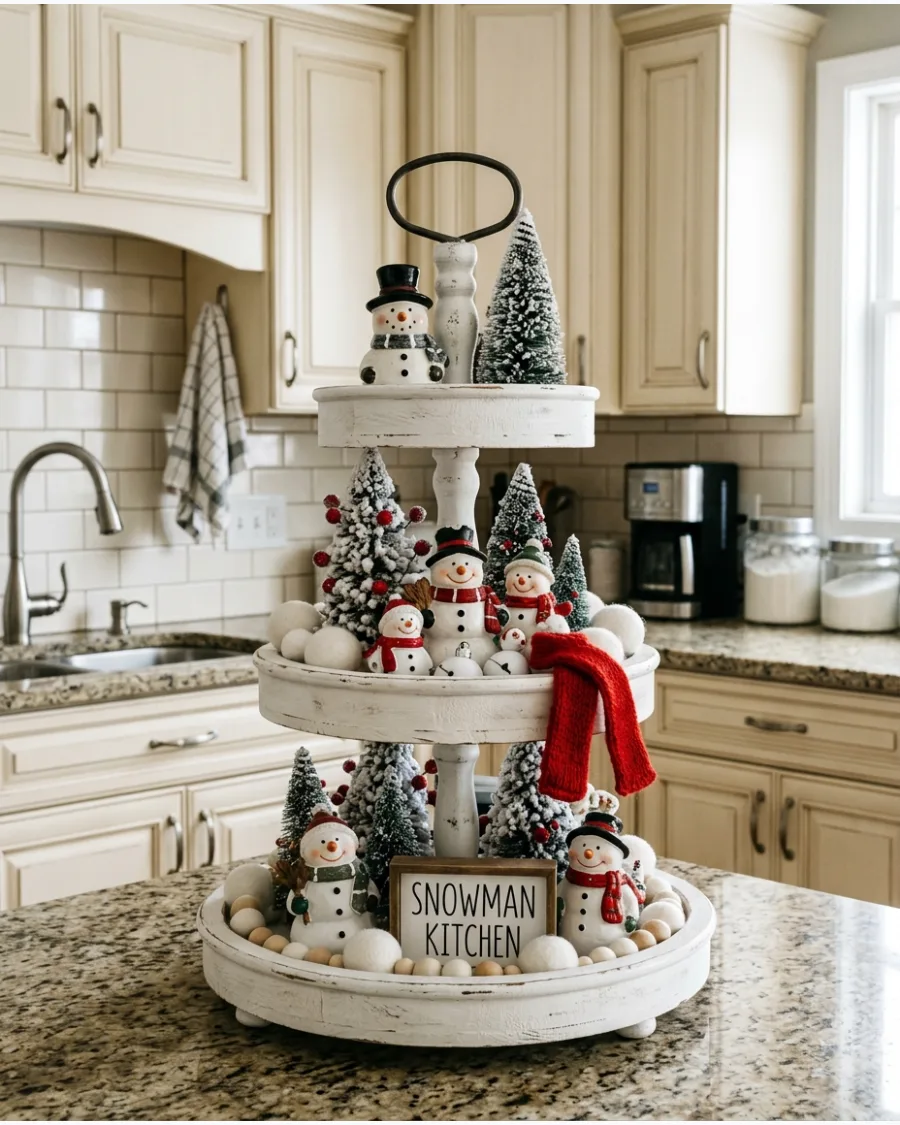
Create a playful winter scene by focusing on various snowman figurines across the levels of the tray. Intersperse small white ornaments and felt snowballs between your larger snowmen to fill gaps without adding bulk. Add miniature scarves and mittens to give the arrangement a soft, cozy texture.
- Select snowmen in a variety of heights to ensure they are visible on both the bottom and top tiers.
- Tuck small snowflake signs or wooden blocks against the center pillar to create a background for the figurines.
- Incorporate a few bright red or blue ornaments to provide contrast against the mostly white snowmen and trees.
Use a small amount of clear museum wax on the base of top-heavy snowman figurines to keep them from sliding on smooth tray surfaces.
42. Winter Wonderland Tiered Tray
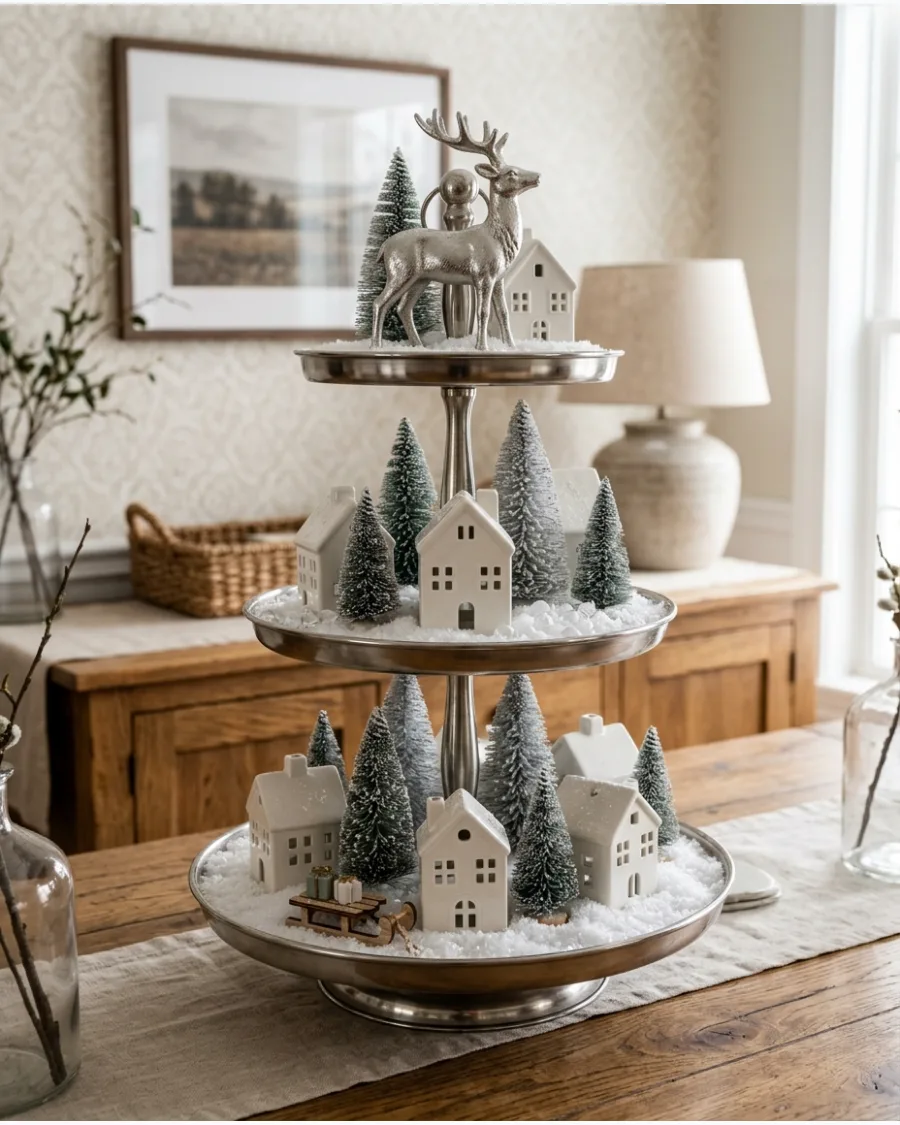
This display uses a silver and white palette to mimic a bright, frosty landscape. Arrange small white ceramic houses and frosted bottle-brush trees on the bottom tier to establish a grounded village scene. Top the tray with a silver reindeer or a large snowflake to act as the primary focal point.
- Check that any ceramic houses have open windows if you want to tuck a battery-operated tea light inside for a glow.
- Spread a thin layer of polyester fiberfill or faux snow across the tray surfaces to hide tree bases and mimic drifts.
- Use silver baubles in different finishes like matte and mercury glass to add depth while maintaining the monochromatic look.
Place the heaviest ceramic houses on the bottom tier to lower the center of gravity and ensure the tray stays stable.
43. White Christmas Tiered Tray
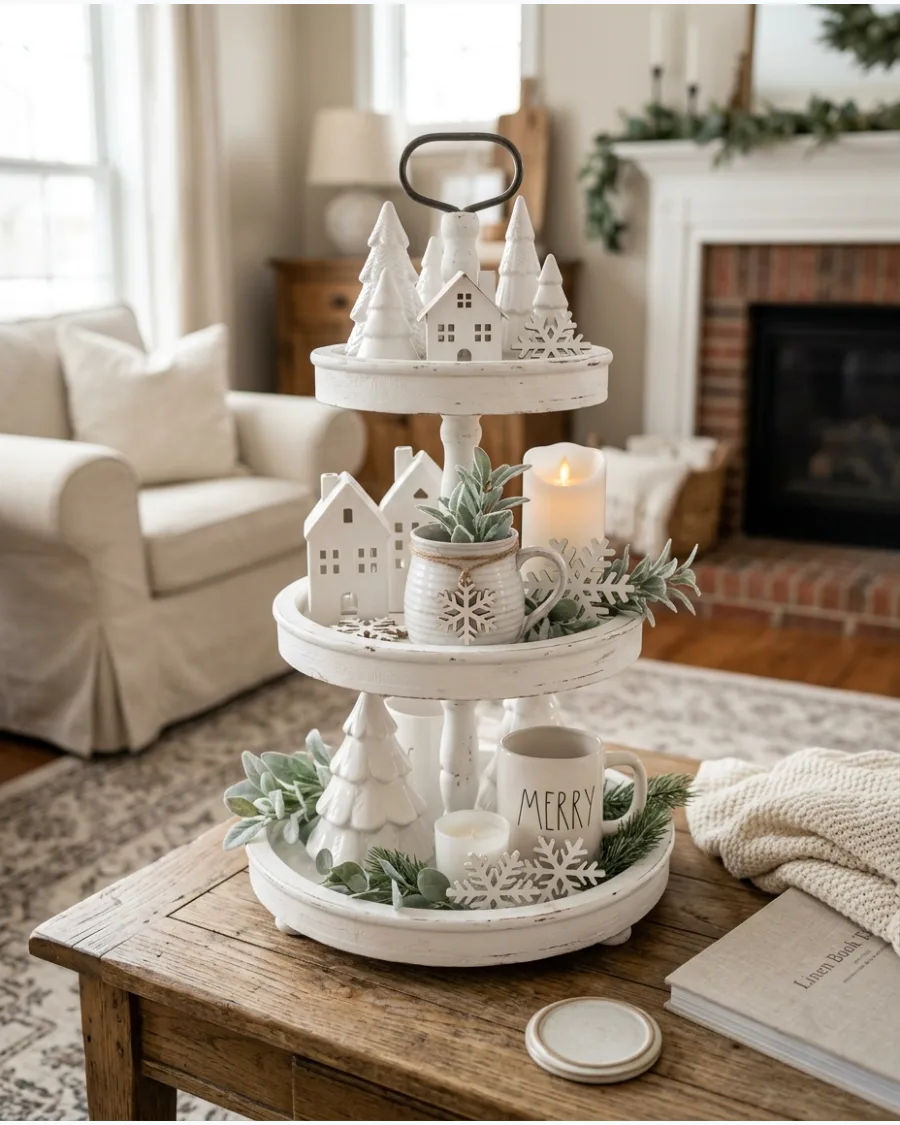
Focus on a clean, monochromatic look by using only white decor with small hints of greenery. Mix different textures like matte ceramic houses, glossy porcelain stars, and soft knit-patterned mugs to keep the single-color palette from looking flat. Use white flameless candles to add warmth and light to the display.
- Choose muted greenery like eucalyptus or silver-dollar sage to provide a soft bridge between the white elements.
- Lean flat white snowflake ornaments against the center post to provide height and a backdrop for smaller items.
- Wipe down ceramic pieces with a soft cloth before arranging to remove any dust that might dull the monochromatic effect.
Layering different finishes like glitter, velvet, and ceramic is the best way to add dimension to an all-white display.
44. Neutral Christmas Tiered Tray
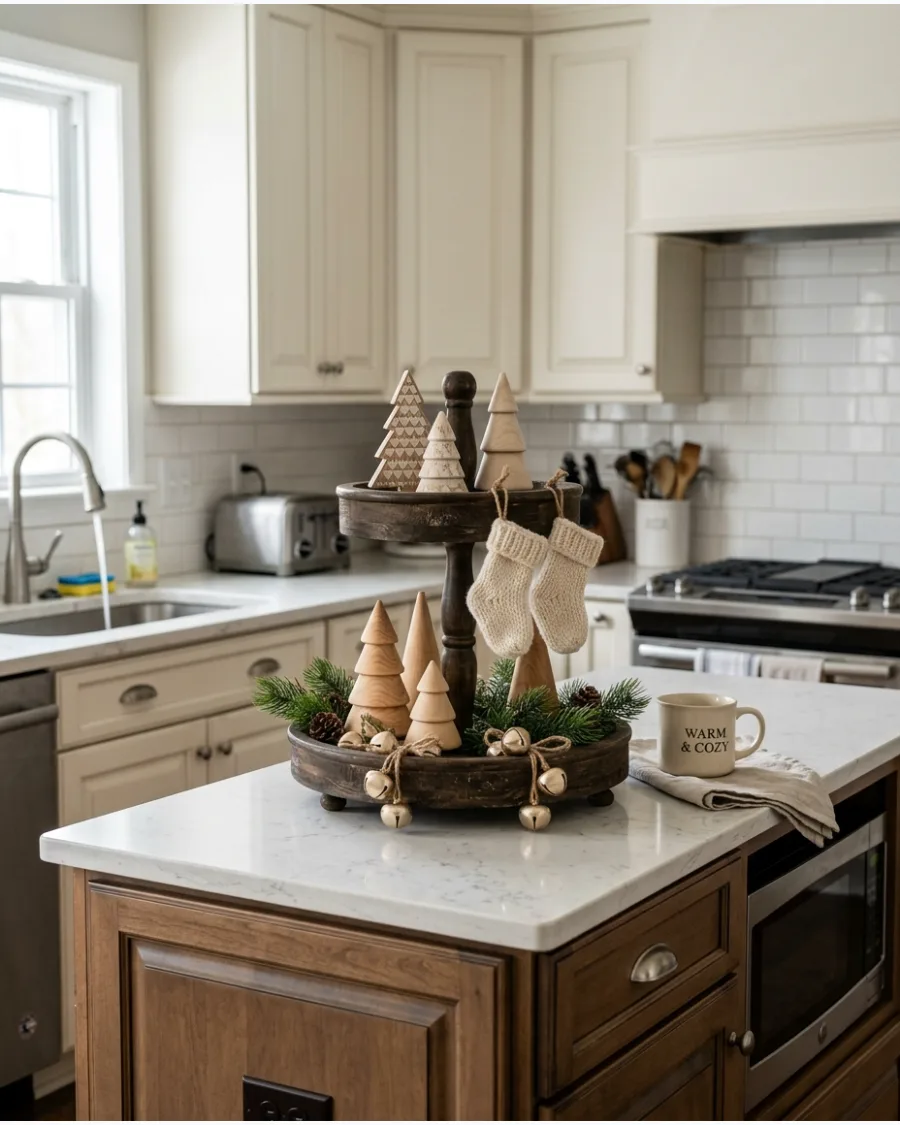
Swap traditional bright reds and greens for a calming palette of cream, beige, and natural wood. Combine unpainted wooden trees with champagne-colored bells and cream-colored knit elements for a soft, modern holiday style. This approach works well in rooms with existing minimalist or Scandinavian decor.
- Select wooden pieces with varied grains or stains to add warmth and interest to the neutral beige tones.
- Drape twine or jute strings through the handles of small bells and hang them over the tray edges.
- Check that any fabric or knit items are kept away from moisture if the tray is used near a kitchen sink.
Use a dark wood or black metal tray to provide a strong visual anchor for the lighter-colored neutral decorations.
45. Vintage Santa Christmas Tiered Tray
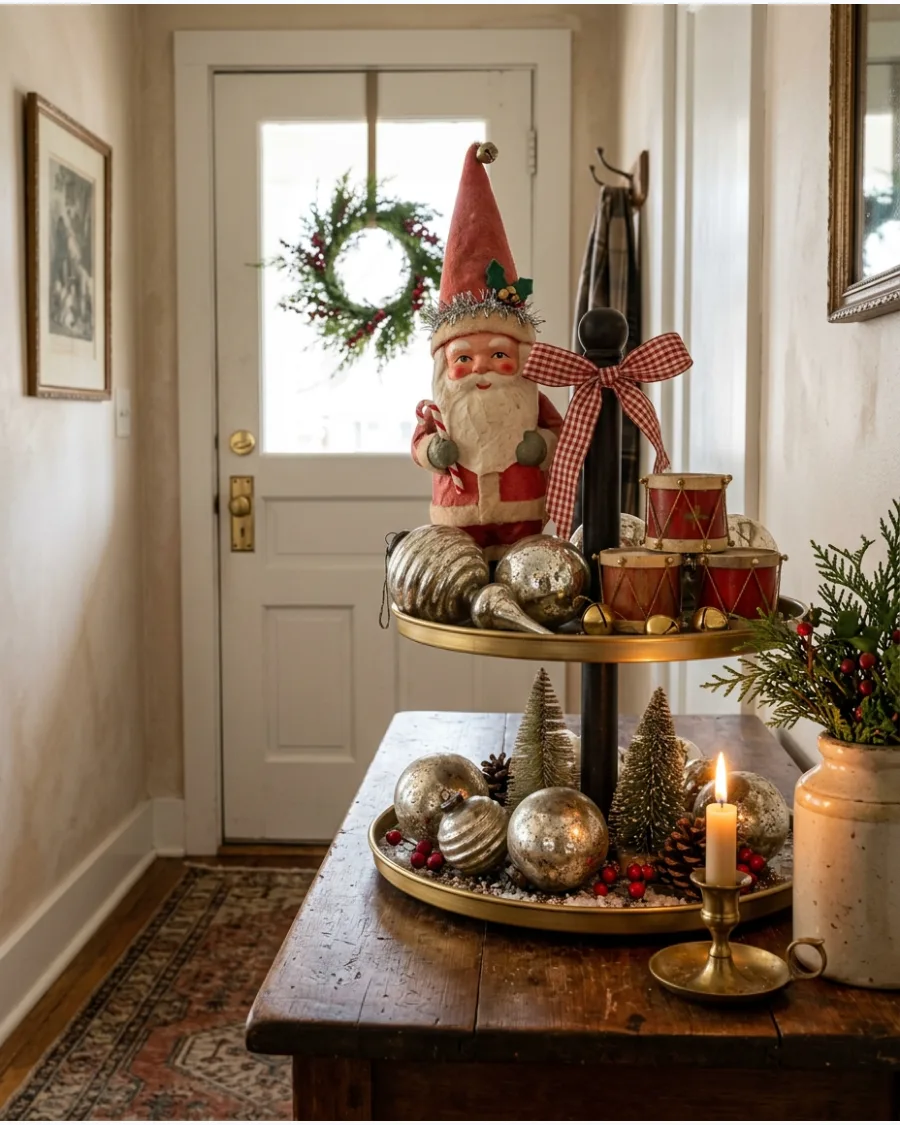
Embrace nostalgia by using retro-style Santa figures and aged-looking ornaments. Position a large vintage Santa figure as the center focal point and surround it with mercury glass baubles and miniature old-fashioned toys. Stick to a color palette of faded reds, antique golds, and creams to maintain an authentic retro feel.
- Look for Santa figurines with 'bottlebrush' beards or hand-painted details that mimic Mid-century styles.
- Place small brass or rusted iron bells near the edges of the tray to add a sense of weight and history.
- Wrap tiny matchboxes in brown paper and twine to serve as vintage-style packages that fill empty spots between figures.
Place genuine vintage ornaments toward the center of the tray levels where they are less likely to be knocked off and broken.
46. Retro Christmas Tiered Tray
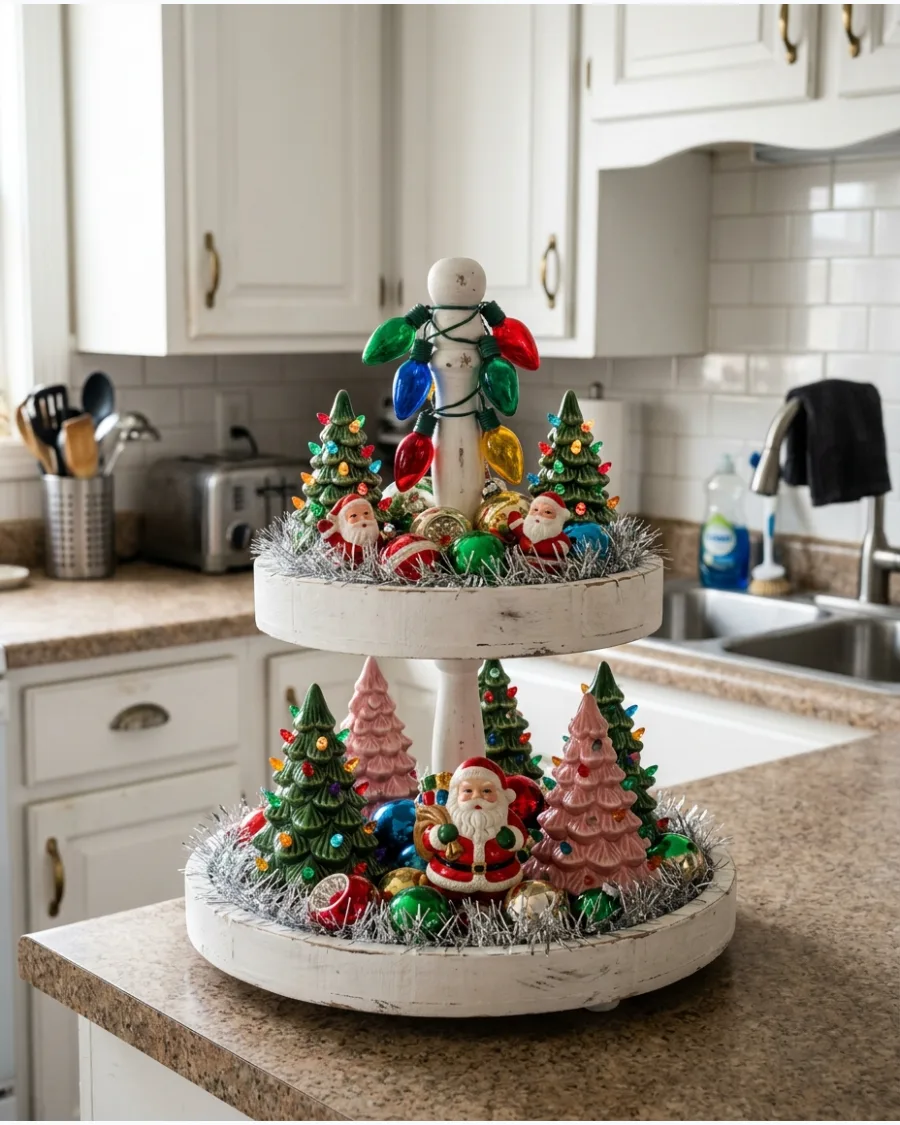
Combine mid-century charm with a mix of colorful ceramic trees and vintage ornament shapes across all levels. To ensure the display feels cohesive, repeat specific pieces like shiny Santa figures or old-fashioned light bulbs on every level.
Tuck thin strands of shiny silver tinsel around the base of each tier to hide gaps and mimic the look of a classic tree.
- Check that your ceramic trees are small enough to fit under the lip of the upper tray levels without touching the bottom.
- Group old-fashioned C7 or C9 bulbs in clusters of three to prevent them from rolling or looking cluttered.
- Mix vibrant shades of turquoise, pink, and red while keeping a consistent neutral background like white or wood.
Use small dabs of museum putty under top-heavy ceramic trees to prevent them from tipping over if the tray is bumped.
47. Nutcracker Christmas Tiered Tray
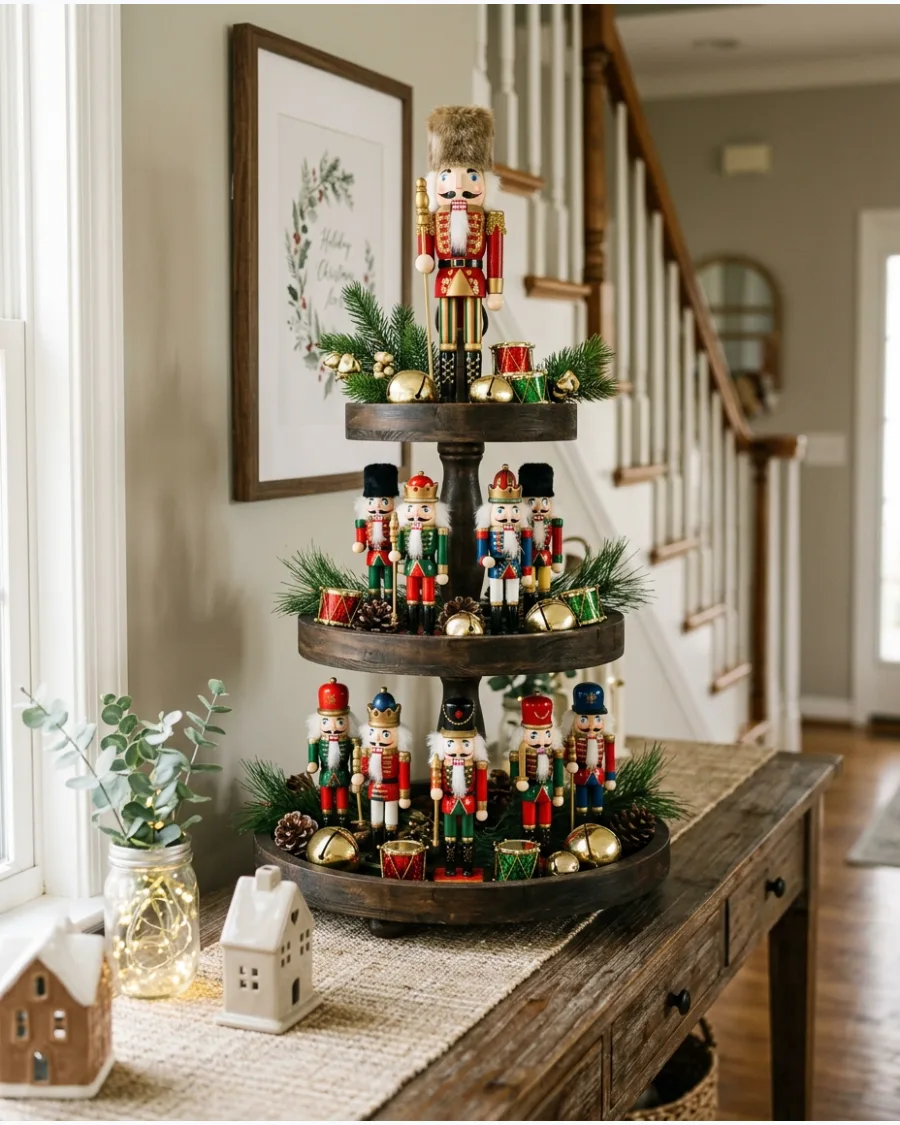
Build a regal display by featuring miniature nutcrackers in varying heights alongside classic toy soldiers. Focus on a strict color palette of red, green, black, and gold to keep the theme grounded across all tiers.
Place a larger focal nutcracker on the top tier and surround the lower levels with smaller gold bells and miniature drums.
- Verify that the nutcrackers have flat, stable bases that will not wobble on the tray surface.
- Scatter tiny wrapped presents or wooden blocks in red and green to fill empty spaces between the figures.
- Wipe wooden nutcrackers with a dry microfiber cloth before placement to remove dust that shows up under kitchen lights.
Tie small velvet ribbon bows on the handle of the tray to pull the classic toy soldier aesthetic together.
48. Christmas Gnome Tiered Tray
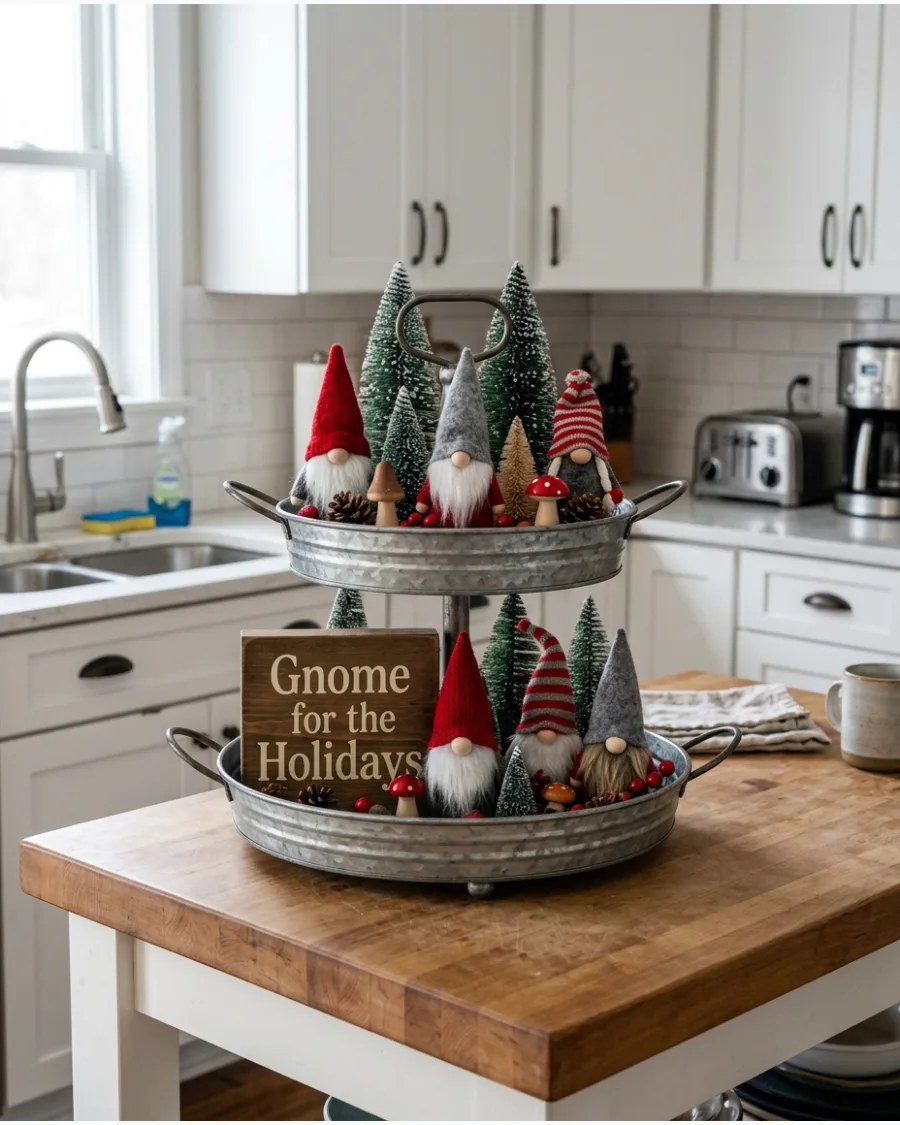
Arrange a whimsical vignette using small gnomes with pointed hats as your main characters. Pair them with miniature mushrooms and tiny evergreen trees to create a forest-inspired look.
Limit the gnomes to two or three coordinating colors so the different sizes and textures do not feel overwhelming on the tray.
- Choose gnomes with felt or fabric hats that can be bent slightly to fit into tighter tray clearances.
- Set small 'Merry Christmas' wooden signs against the center post to provide a backdrop for the smaller figurines.
- Place miniature red-and-white mushrooms in groups of two near the gnome feet for a natural-looking cluster.
If gnomes are too short for the back of the tray, sit them on top of a small upturned ramekin to vary their heights.
49. Grinch Christmas Tiered Tray
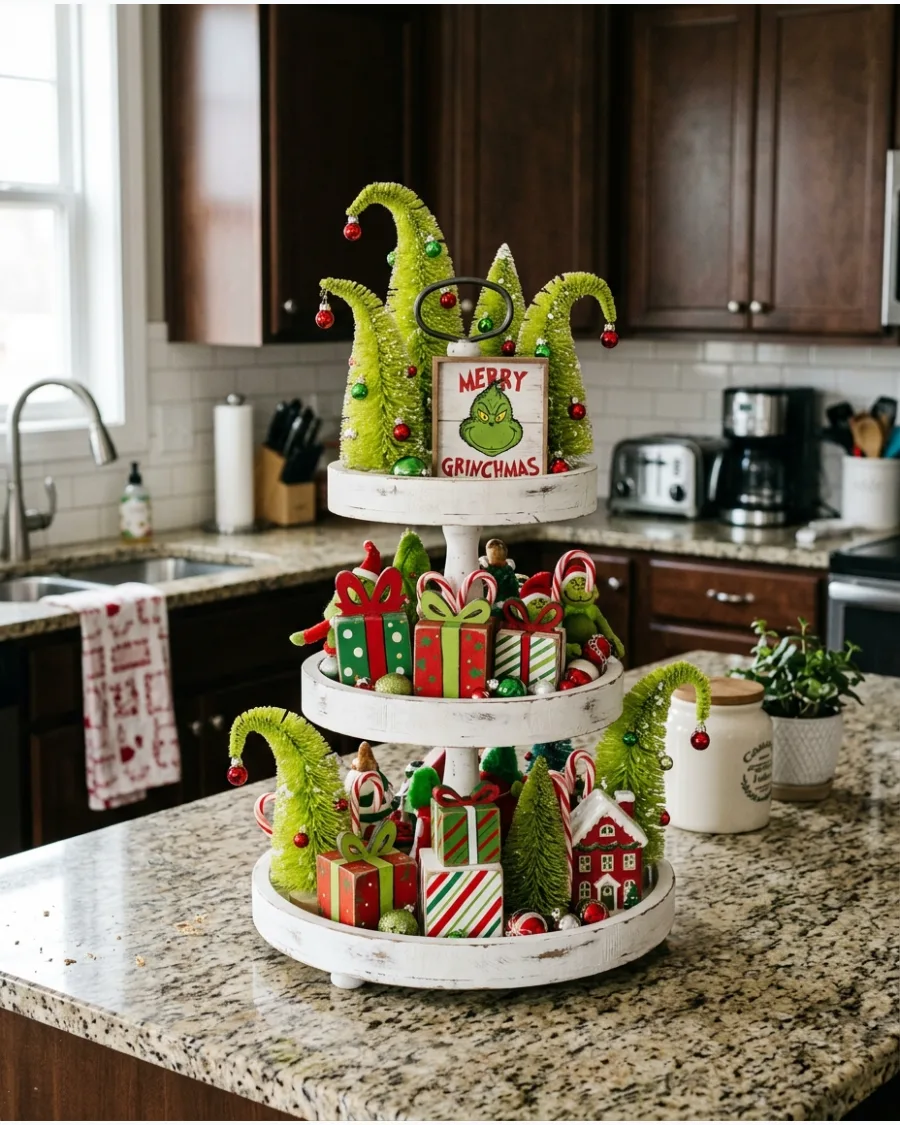
Lean into a playful Whoville aesthetic by using bright lime green as the primary accent color across all levels. Include crooked gift boxes, candy canes, and whimsical signs that feature classic quotes or characters.
Incorporate tiny green trees with bent tops to mimic the distinct look of the Grinch’s world.
- Select lime green ornaments and characters to ensure the color theme is immediately recognizable from across the room.
- Stack crooked miniature presents on the middle tier to add height without needing a single large object.
- Check that any Grinch-themed signs are legible and face forward to act as the visual anchor for each level.
Use white faux snow or cotton batting on the tray floor to make the lime green and red colors pop.
50. Vintage Christmas Toy Tiered Tray
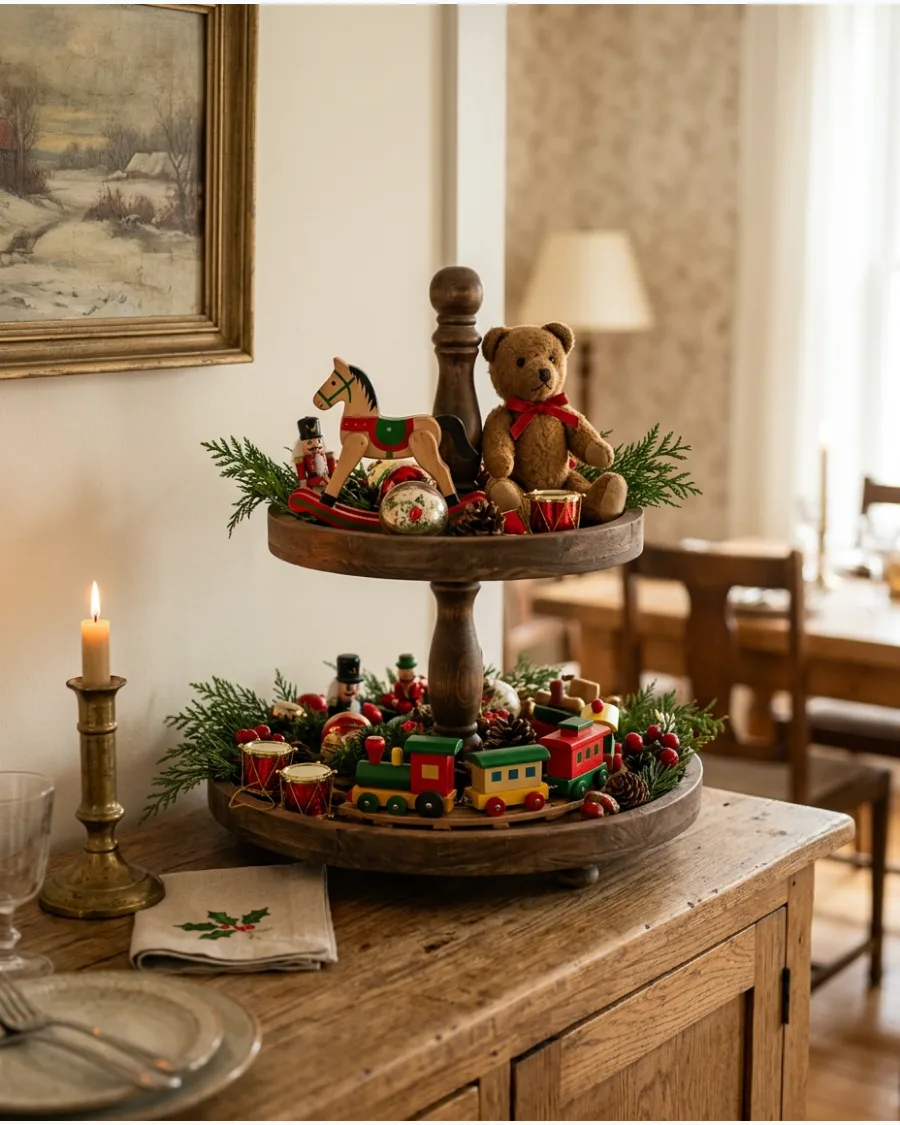
Transform your tray into a miniature toy shop filled with nostalgic items like rocking horses, trains, and teddy bears. Arrange these toys around small Christmas trees and sprigs of greenery to make each level look like a tiny scene from a classic Christmas morning.
Position a small wooden train so it appears to be circling the center post of the bottom tier.
- Look for wooden soldiers or drums that share a similar scale so the display looks like a deliberate set.
- Tuck sprigs of artificial cedar or pine behind the toys to provide a dark green background that makes the toys stand out.
- Place small 'wrapped' boxes near the teddy bears to reinforce the Christmas morning theme.
Group identical items, like three tiny drums, in one spot to create a stronger visual impact than scattering them.
Frequently Asked Questions
How do I make a tiered tray look full without it looking messy?
Stick to a consistent color palette and use small fillers like faux greenery, berries, or pinecones to bridge the gaps between larger decorative items.
What should I use to anchor tall items on the top tier?
Choose one primary focal point, such as a single figurine or a vertical sign, and ensure it is centered or leaning against the middle post for better stability.
Can these tiered trays be used for serving food?
While these styling ideas are decorative, you can incorporate wrapped treats or napkins if your tray is made of food-safe materials like ceramic or treated wood.
How can I prevent the tray from scratching my countertop?
Examine the bottom of the tray for rough metal or wood edges and apply small adhesive felt pads to the base to protect your surfaces.
Where is the best place to display a Christmas tiered tray?
Kitchen counters, dining sideboards, and coffee stations are ideal because they provide a flat, stable surface where the small details are easy for guests to see.