50 Tomato Cage Ghost Ideas for Halloween

This post may contain affiliate links: full affiliate disclosure.
Creating large-scale Halloween decor does not have to be expensive or difficult. Using tomato cages as a base provides a sturdy structure that holds up well against the wind and rain.
These projects allow for a custom look that fits any porch or yard size without the high price of store-bought statues.
Easy Tomato Cage Ghost DIY Ideas
1. Classic Tomato Cage Ghost
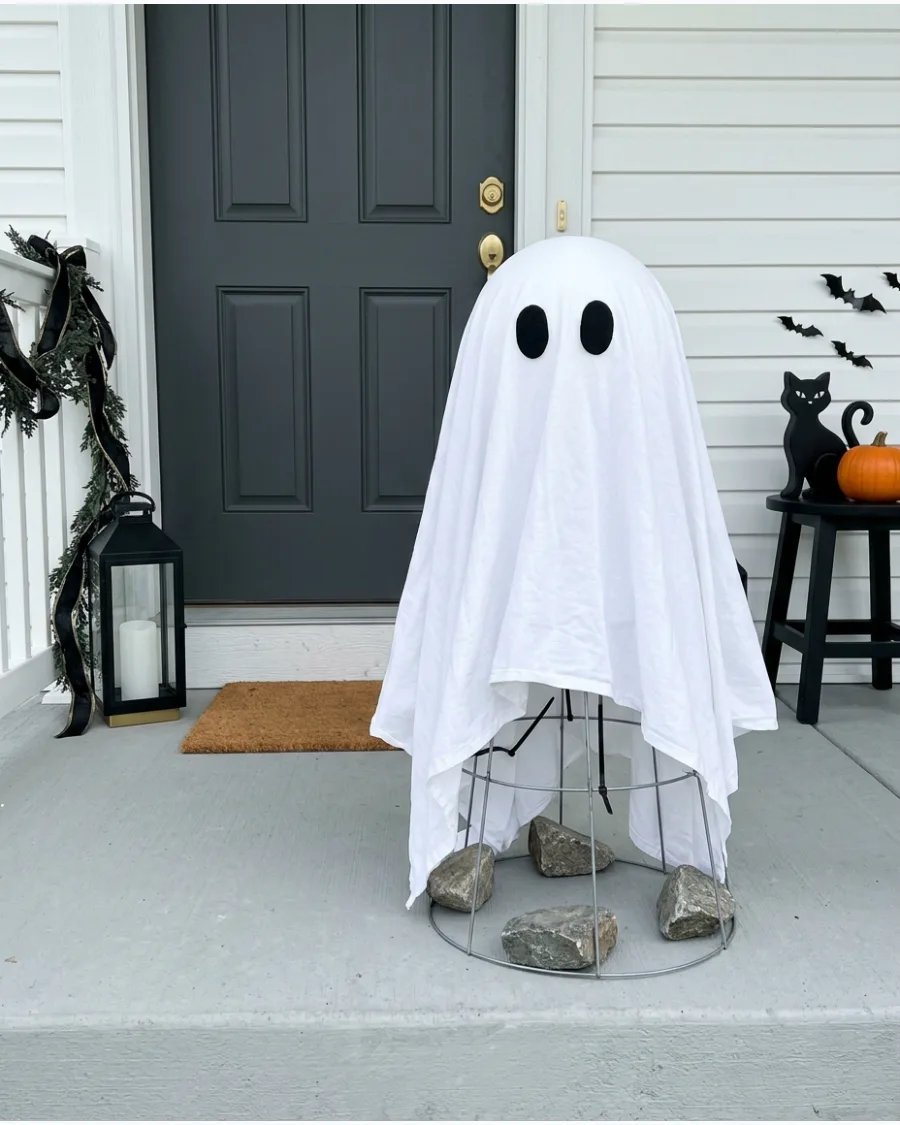
An upside-down tomato cage creates a perfect conical frame for a traditional ghost shape. Secure the loose wire prongs at the top with a zip tie to form a stable point for the head.
Place a six-inch foam ball on the point to give the ghost a rounded head shape. Heavy rocks placed on the bottom wire ring keep the ghost from tipping over in the wind.
- Materials cost under $15 at most hardware stores.
- Secure the top wires tightly to prevent the head from wobbling.
- Use a heavy rock or a brick on the bottom ring for outdoor stability.
Most people skip this: Tape the wire prongs together before adding the foam ball to prevent the wire from poking through the fabric.
2. No-Sew Tomato Cage Ghost
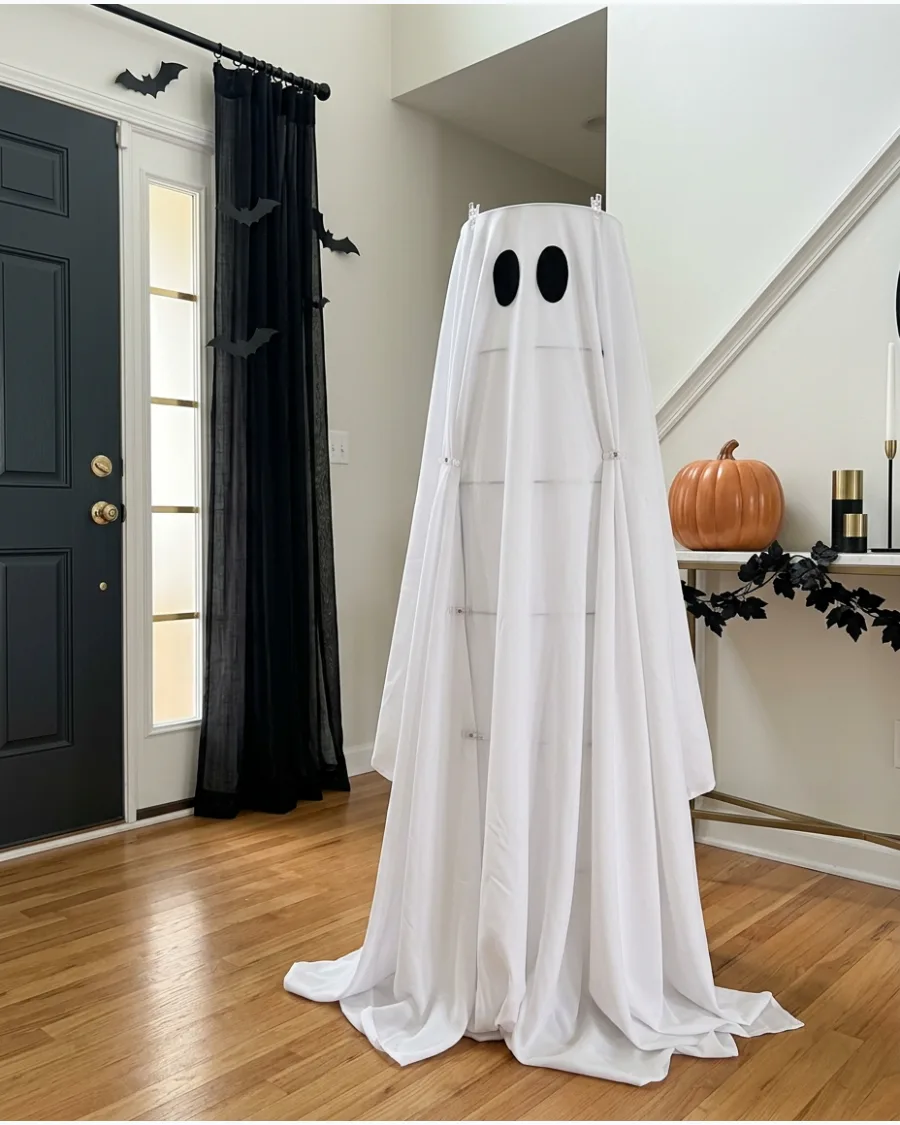
Skip the sewing machine and use simple clips to shape the fabric around the wire frame.
Drape a large piece of white polyester fabric over the cage and adjust the folds until it looks natural. Pin the fabric underneath the cage or gather it at the back to control the drape and volume. This method makes it easy to take the ghost apart and wash the fabric later.
- Assembly takes less than 10 minutes.
- Use safety pins on the inside of the fabric for a cleaner look.
- Choose a wrinkle-resistant polyester for a smooth appearance.
Best shortcut: Use binder clips from an office supply drawer to hold the fabric in place while you adjust the silhouette.
3. White Tablecloth Tomato Cage Ghost
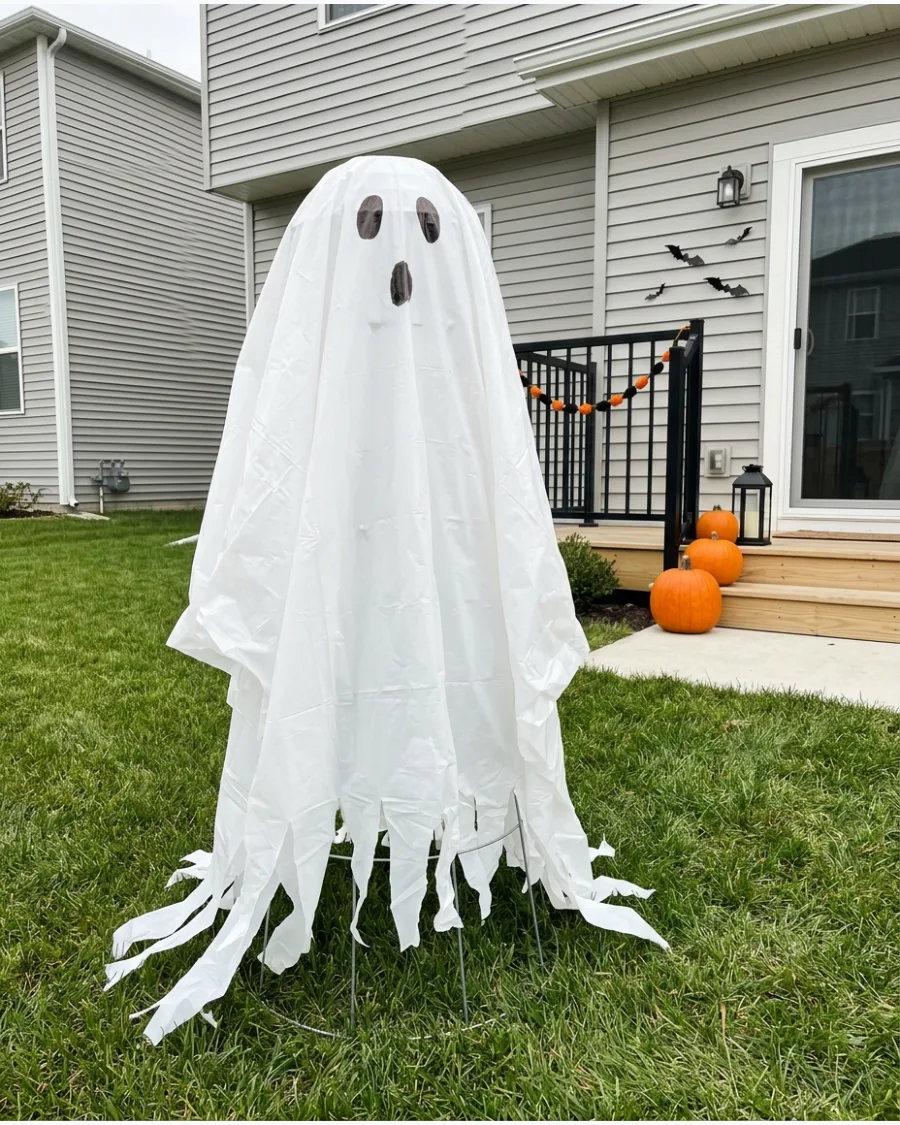
Plastic tablecloths are a smart choice for outdoor displays because they handle moisture better than cotton sheets. Layer two thin tablecloths to ensure the metal wire frame remains hidden from view.
Cut the bottom edge of the plastic into jagged strips to create a tattered, spooky effect. This lightweight material catches the breeze and gives the ghost realistic movement.
- Budget-friendly option at roughly $2 per ghost.
- Wipe down the plastic with a damp cloth to remove mud or dirt.
- Use heavy-duty plastic if the ghost will be in a high-wind area.
Quick win: Use a permanent black marker to draw the eyes directly on the plastic instead of glueing on heavy felt.
4. Fitted-Sheet Tomato Cage Ghost
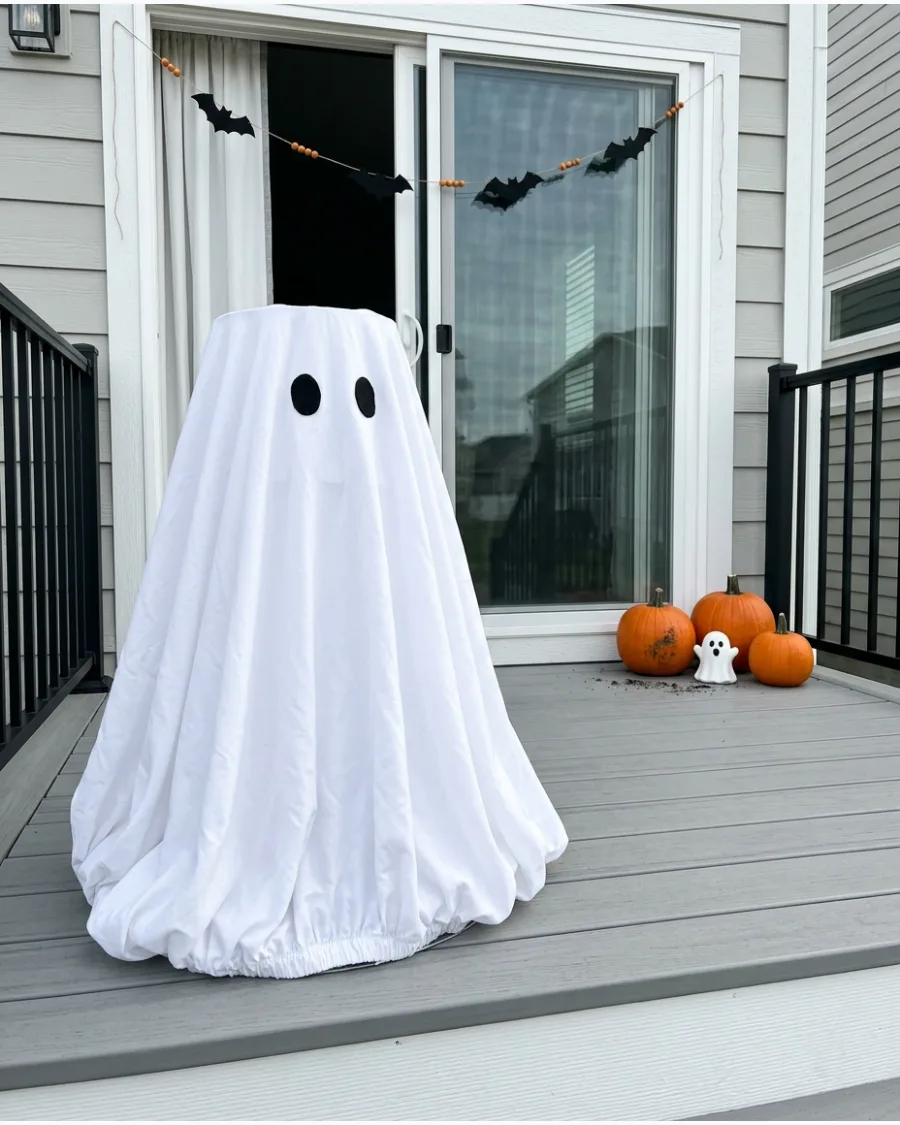
A twin-sized fitted sheet provides a lot of fabric that naturally bunches at the bottom for a floating look. Position the sheet so the elastic edges are tucked inward or resting on the ground.
Pull the center of the sheet over the top of the cage and let the elastic create a full, rounded base. The extra weight in the elastic helps keep the ghost grounded during light breezes.
- Excellent way to repurpose old bedding.
- Tuck the elastic under the bottom wire ring for a cleaner base.
- Wash the sheet on a heavy cycle after the season to remove outdoor debris.
Most people skip this: Steam or iron the sheet first to remove deep fold lines that can ruin the ghost's smooth look.
5. Pillowcase Tomato Cage Ghost
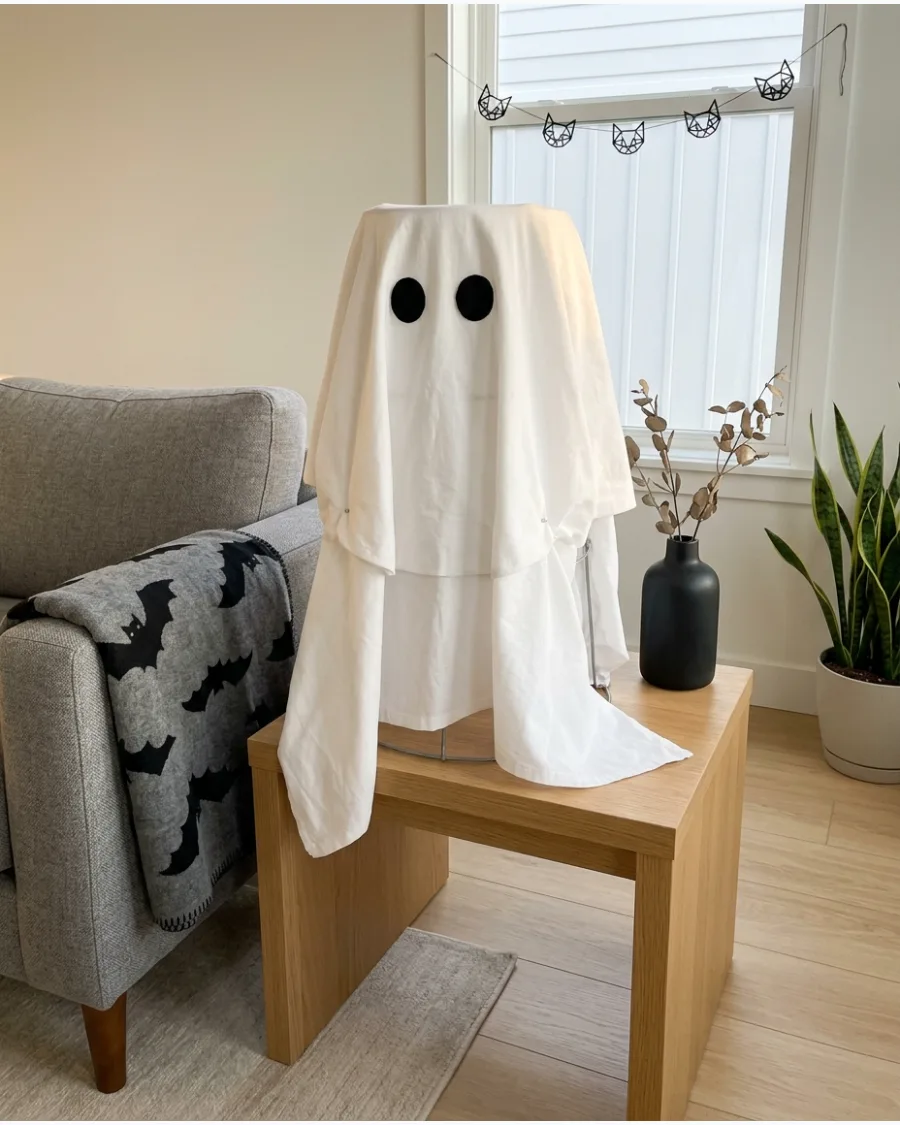
Standard white pillowcases are the perfect size for the upper half of a tomato cage. Place the pillowcase over the top of the frame and let it hang down to cover the head area.
Attach a second piece of white fabric or a second pillowcase below it to reach the floor. Layering fabric this way adds dimension and ensures the entire metal frame is covered.
- Uses common household items found in a linen closet.
- Best for indoor corners or sheltered porch areas.
- Use a standard size pillowcase for a snug fit on the top wire.
Best shortcut: Stuff the top of the pillowcase with a few plastic grocery bags to give the head a fuller shape.
6. Cheesecloth Tomato Cage Ghost
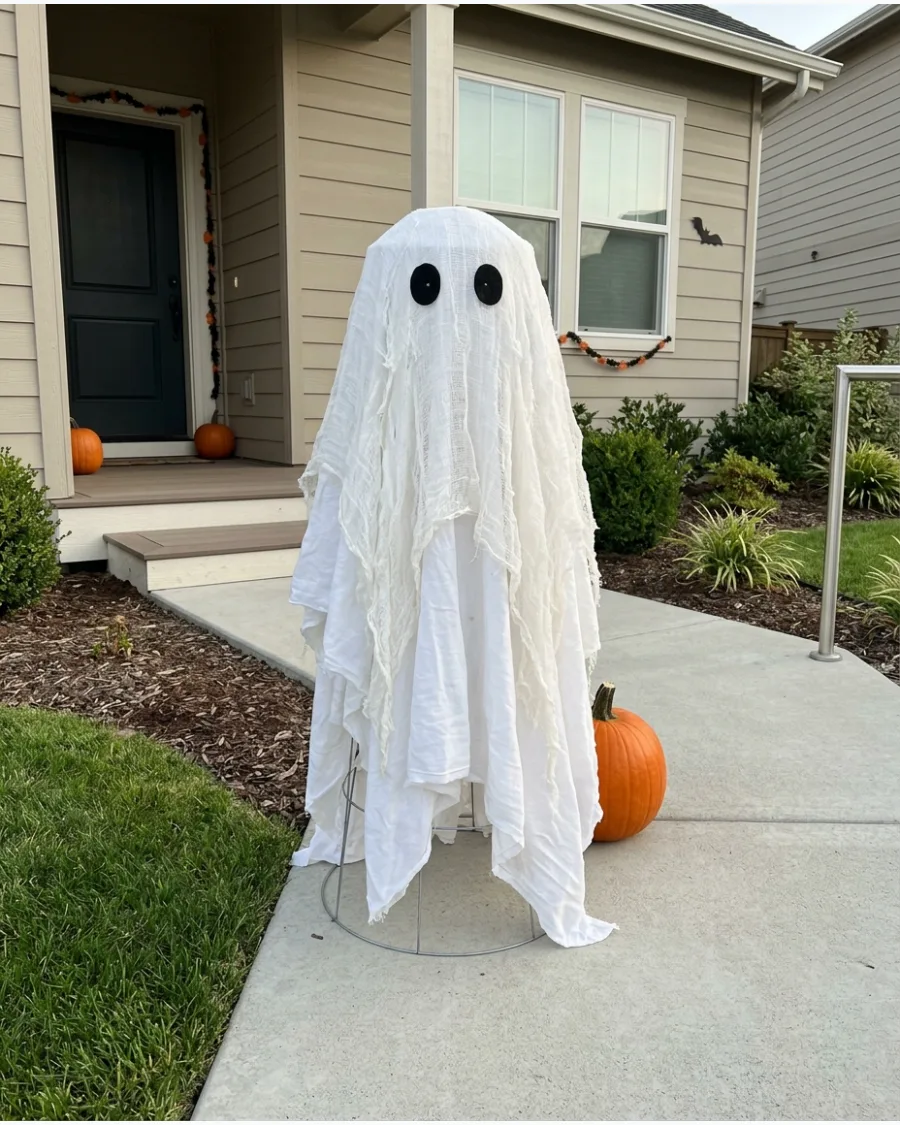
Layering cheesecloth over a solid white base creates a wispy, ethereal texture that looks high-end. Start with a plain white sheet to hide the wire, then drape several pieces of shredded cheesecloth over the top.
Soak the cheesecloth in a mixture of water and white glue to help it hold a specific shape as it dries. This creates a professional, haunted look that stands out in daylight.
- Requires a few hours of drying time if using a glue mixture.
- Use at least three layers of cheesecloth for a high-quality appearance.
- Keep this version away from direct rain to preserve the glue texture.
Quick win: Dip the ends of the cheesecloth in weak tea for a minute to give the ghost an aged, vintage look.
7. Mini Tomato Cage Ghost
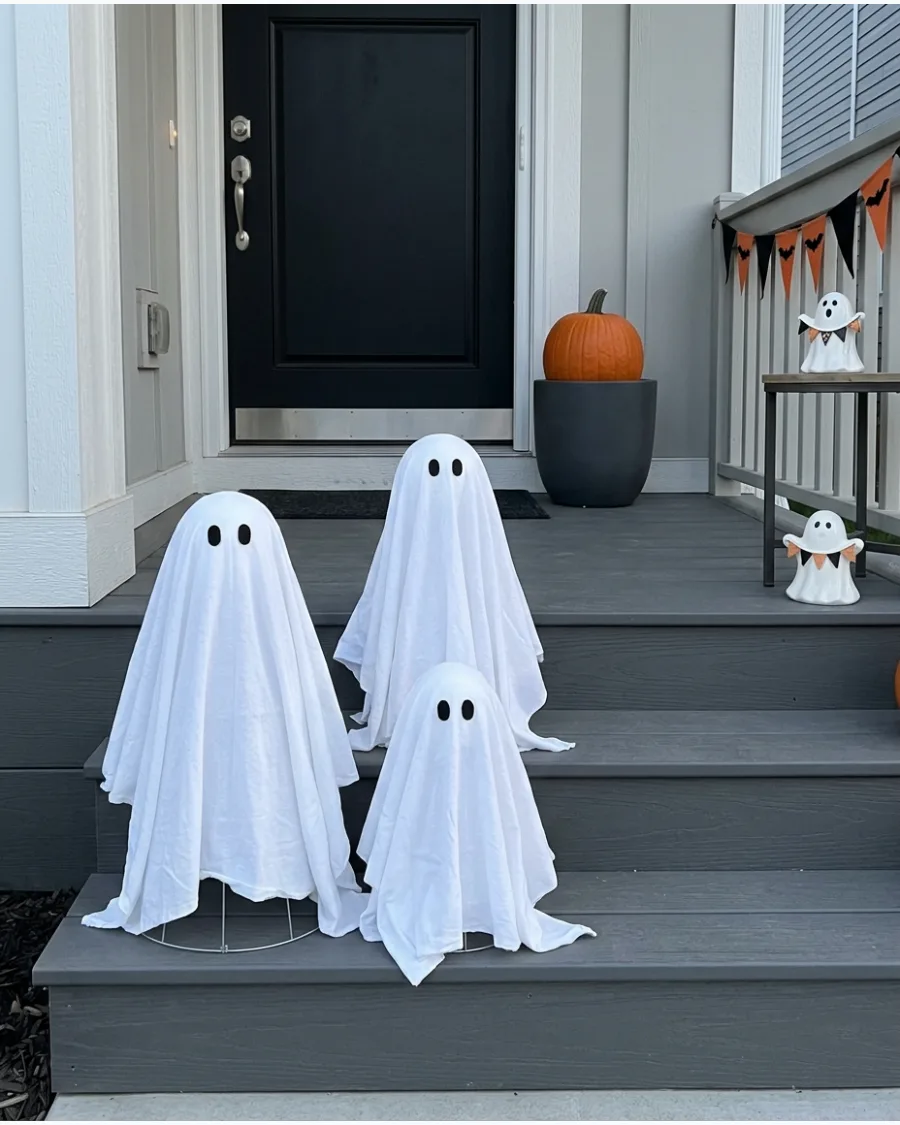
Short tomato cages designed for peppers are ideal for tabletop decor or small porch steps. Pair these with a small four-inch foam ball for the head to keep the proportions believable.
Arrange three mini ghosts together on a porch step to create a family of decorations. Their smaller size makes them much easier to store in a closet during the off-season.
- Ideal for small apartments or narrow entryways.
- Use 18-inch or 24-inch tomato cages for this scale.
- Secure the fabric with a small rubber band at the neck for better definition.
Most people skip this: Use a heavy candle holder or a brick inside the small cage to keep it from blowing over.
8. Five-Minute Tomato Cage Ghost
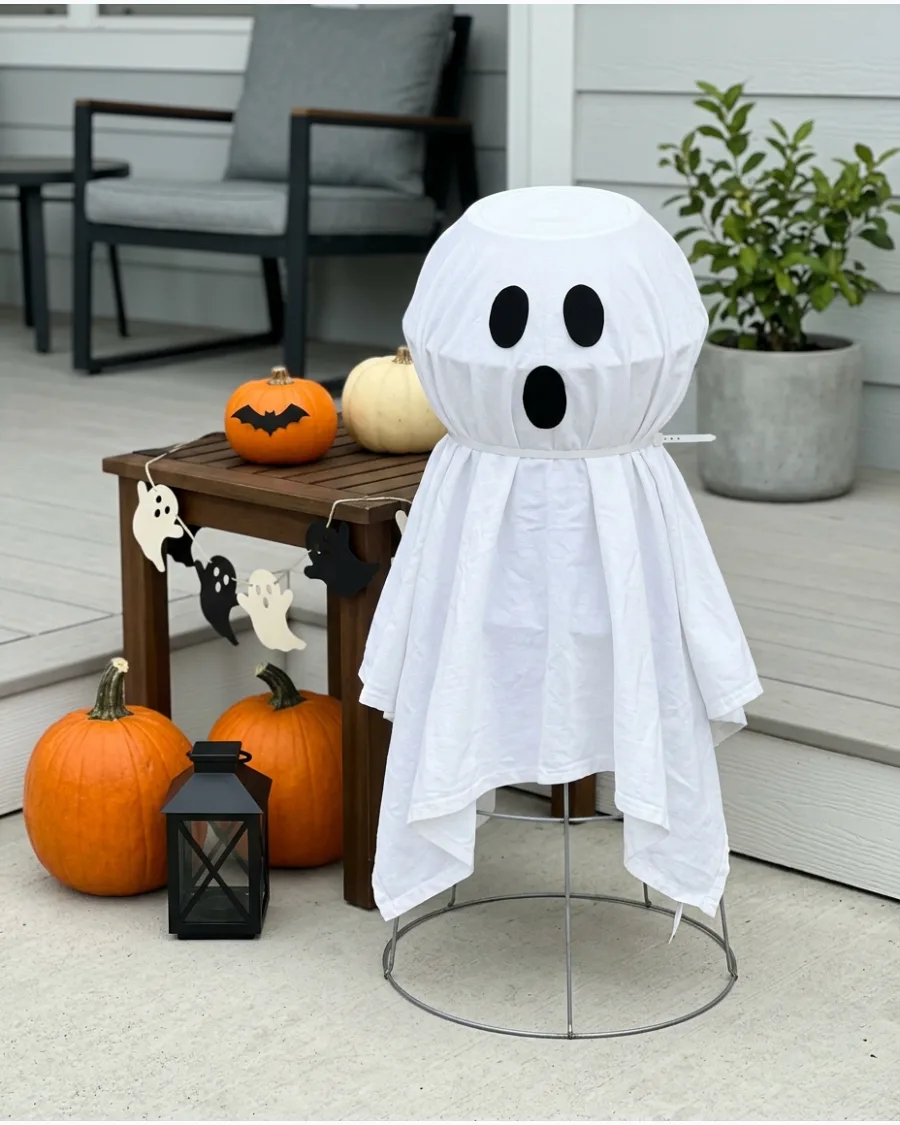
Speed is the main advantage of this assembly method for busy homeowners. Use a round plastic bowl flipped upside down on the top of the cage for an instant head shape.
Secure a white tablecloth over the bowl and cage using a single zip tie at the neck area. Adding pre-cut adhesive felt eyes finishes the project in record time without any glue.
- Materials cost under $10 per ghost.
- Use zip ties for the fastest possible assembly and disassembly.
- Perfect for last-minute party decorations or trunk-or-treat events.
Best shortcut: Use a black permanent marker to draw the eyes instead of waiting for glue to dry on felt pieces.
Light-Up Tomato Cage Ghost Ideas
9. Warm White Light-Up Ghost
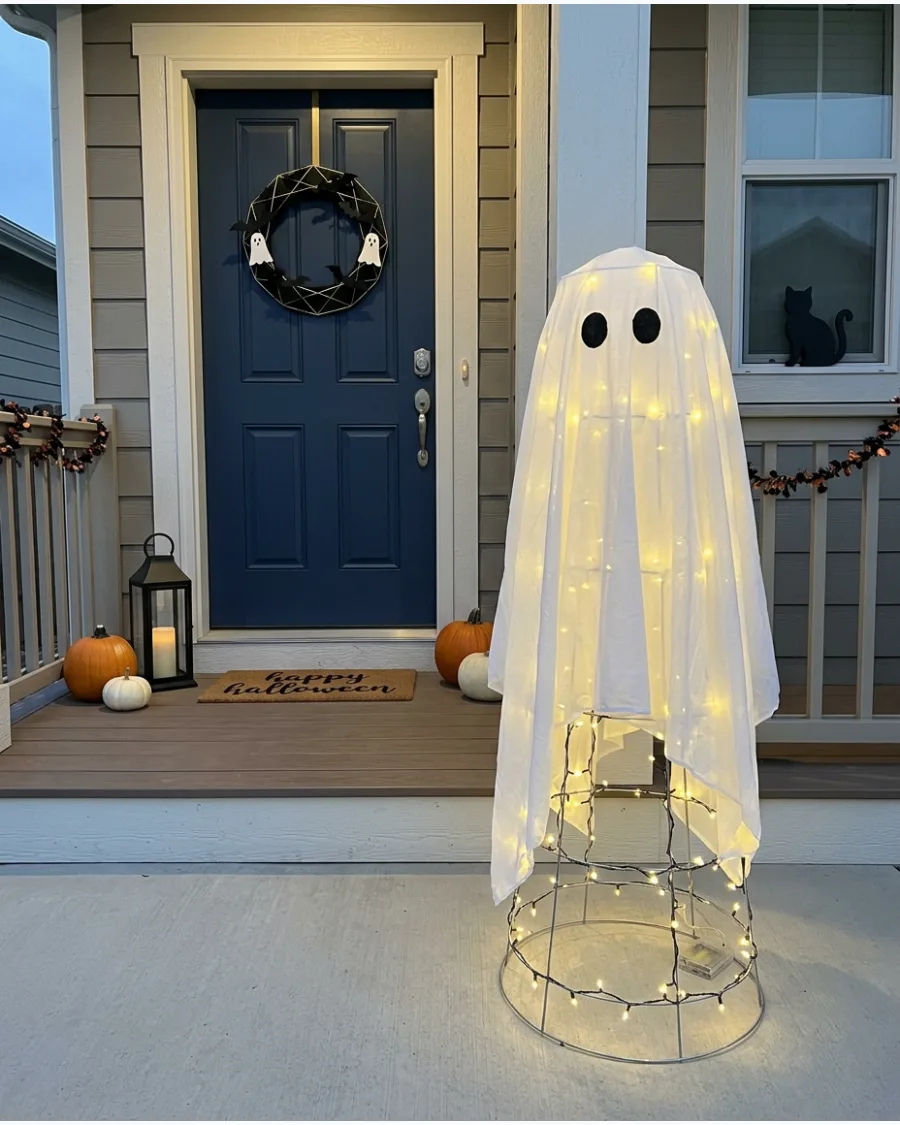
Lighting transforms a simple ghost into a glowing focal point for evening trick-or-treaters. Wrap a strand of warm white battery-operated LED lights around the metal frame before adding the fabric.
Position the battery pack near the bottom of the cage for easy access when you need to change batteries. A thin white sheet allows the soft glow to shine through clearly.
- Use 50 to 100 lights per cage for a bright effect.
- Choose battery-operated lights to avoid tripping over extension cords.
- Warm white bulbs provide a soft, inviting look for a residential porch.
Quick win: Use clear packing tape to secure the light strand to the wire frame so it does not slip down.
10. Bright White Glowing Ghost
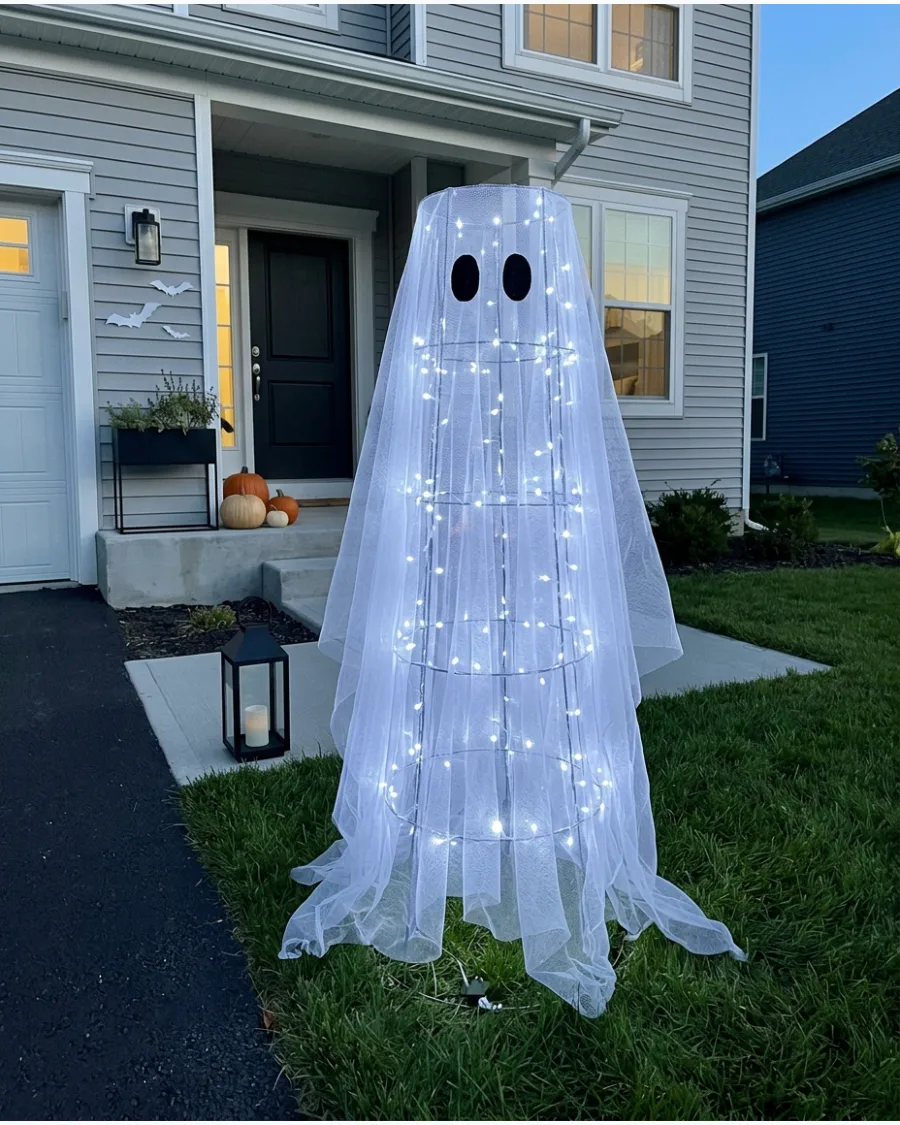
Cool white LED lights provide an intense, supernatural glow that is visible from the street. This high-contrast look works best when paired with sheer white mesh or thin polyester fabric.
Wrap the lights vertically up and down the cage ribs to ensure the entire ghost is illuminated evenly. The bright white light creates a more modern and spooky appearance compared to warm bulbs.
- Best for large yards or long driveways where visibility is key.
- Use weather-rated lights if the ghost is staying outside in the rain.
- Layer sheer fabric to hide the light bulbs while letting the light through.
Most people skip this: Use a timer for the lights so they automatically turn on at dusk and save battery life.
11. Twinkling Tomato Cage Ghost
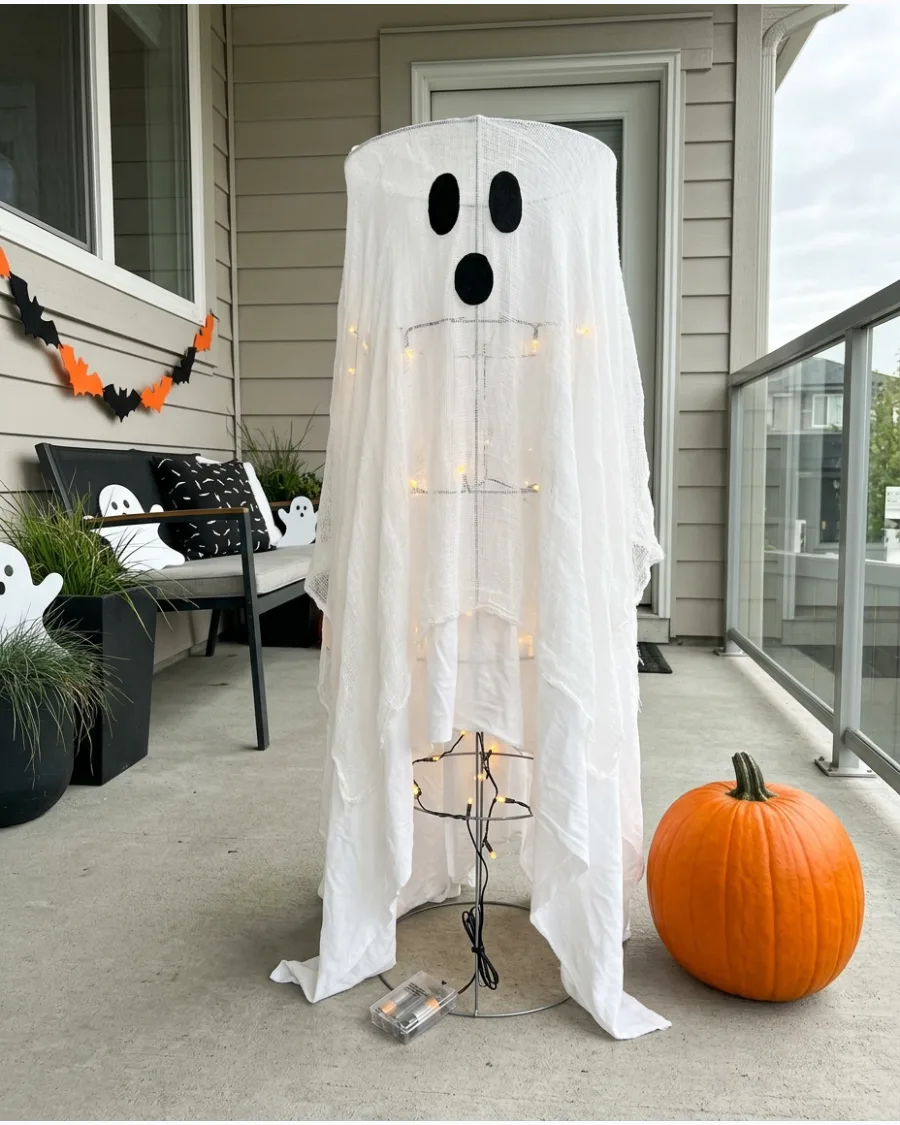
Battery-operated twinkle lights inside the cage provide a sense of movement. The changing light pattern makes the ghost more noticeable after dark.
Secure the battery pack to the center pole of the cage with a zip tie to keep it off the ground. Using lights with a timer function ensures the ghost glows every evening without manual effort.
- Twinkle lights ($5-10), zip ties, and a tomato cage
- Place on a covered porch to protect the battery pack from rain
- Switch to orange lights for a different holiday vibe
Quick win: Use lights with a remote so you can change the pattern from inside the house.
12. Color-Changing Ghost
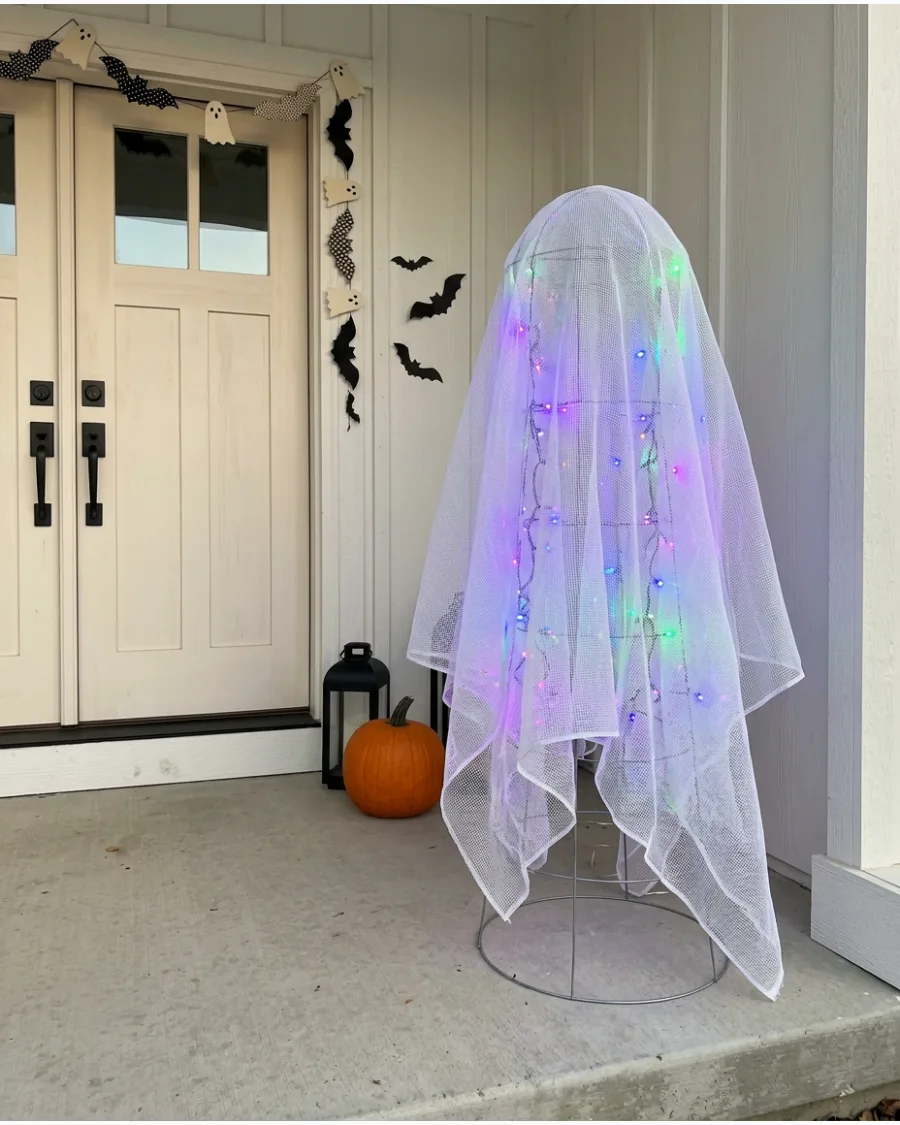
Wrap color-changing LED lights around the tomato cage for a magical glow. Purple, blue, and green tones give the decoration a modern look.
Choose a sheer fabric like polyester or mesh to let the shifting colors shine through clearly. This setup is perfect for a high-energy Halloween display.
- Color-changing LED strip or string and sheer fabric
- Wrap lights vertically to ensure even color distribution
- Use a waterproof LED strip for outdoor setups
Most people skip this: Test the light colors through your fabric before finishing the assembly to ensure the glow isn't too dim.
13. Green Glowing Ghost
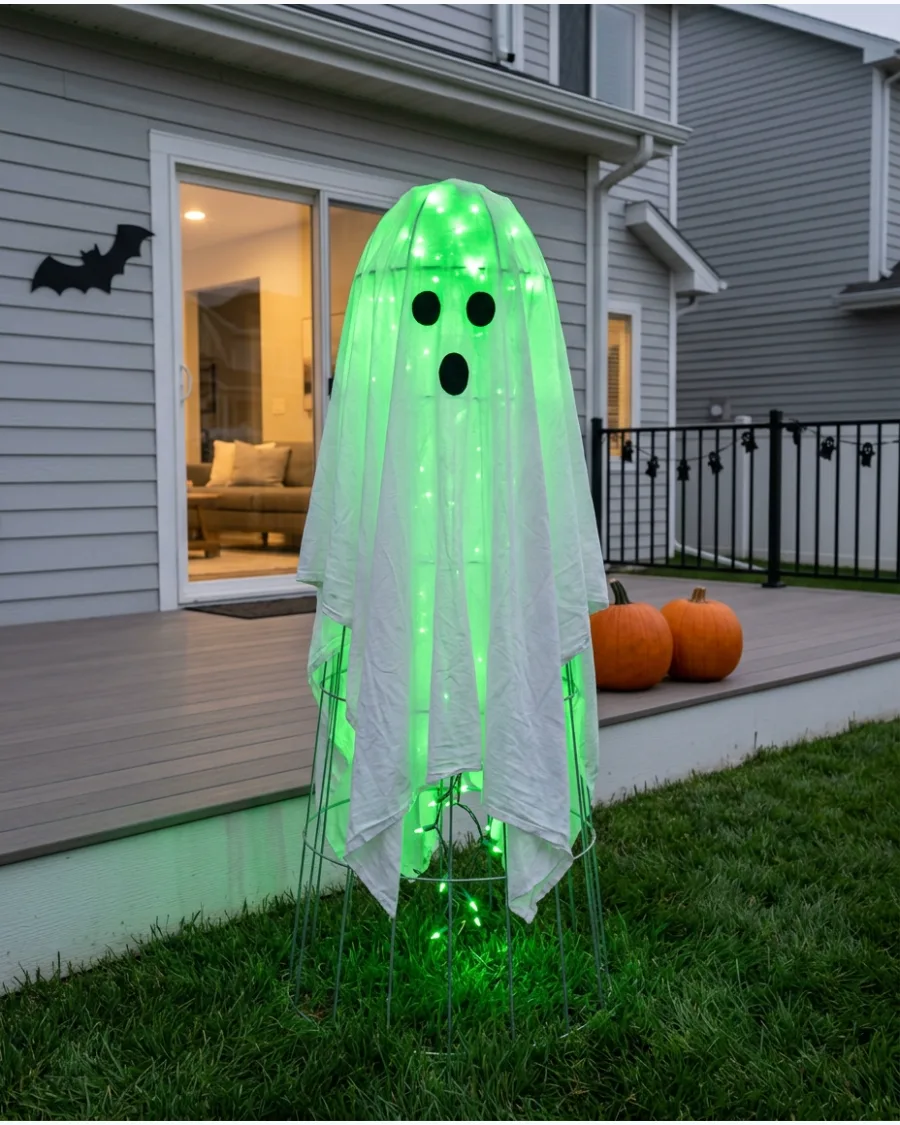
Use green LED lights underneath white fabric for a spooky yard decoration. Keep the face simple so the colored light remains the main feature.
Tuck the light strand into the top of the cage to concentrate the brightest glow near the head. This creates an eerie, radioactive effect that stands out in a dark garden.
- Green LED string lights and a white cotton sheet
- Stake the cage into the soil to prevent tipping in the wind
- Swap for red lights for a more aggressive look
Best shortcut: Use a green spotlight pointed at the base if you don't want to wrap lights around the cage.
14. Purple Light-Up Ghost
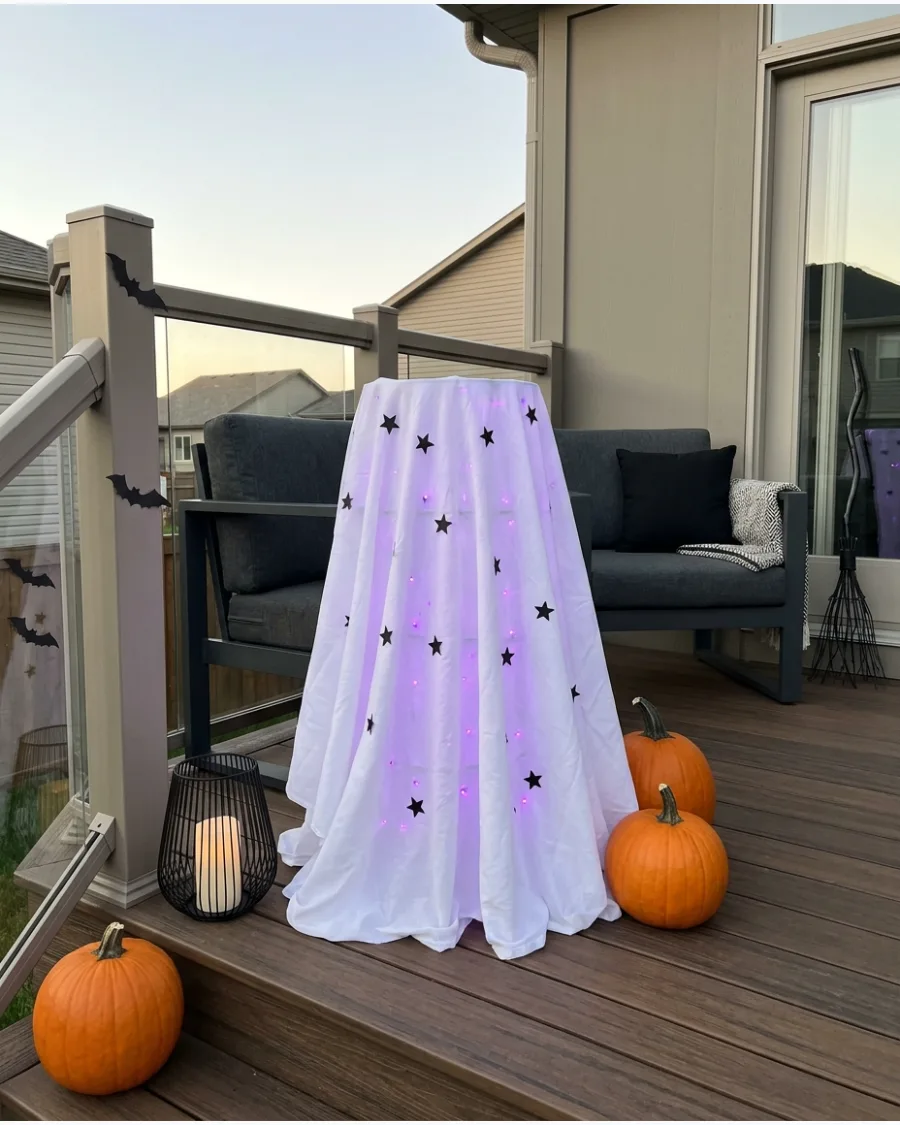
Add purple lights and small black stars to the outer layer of fabric. This design works well with witchy or celestial Halloween decorations.
Use fabric glue to attach lightweight plastic stars directly onto the sheet for a 3D effect. The purple hue provides a sophisticated alternative to traditional orange.
- Purple string lights and black star stickers or cutouts
- Layer a thin purple mesh over white fabric for deeper color
- Use battery lights to avoid tripping hazards on walkways
Quick win: Mix in a few black bats with the stars to add more character to the ghost's cloak.
15. Solar-Powered Tomato Cage Ghost
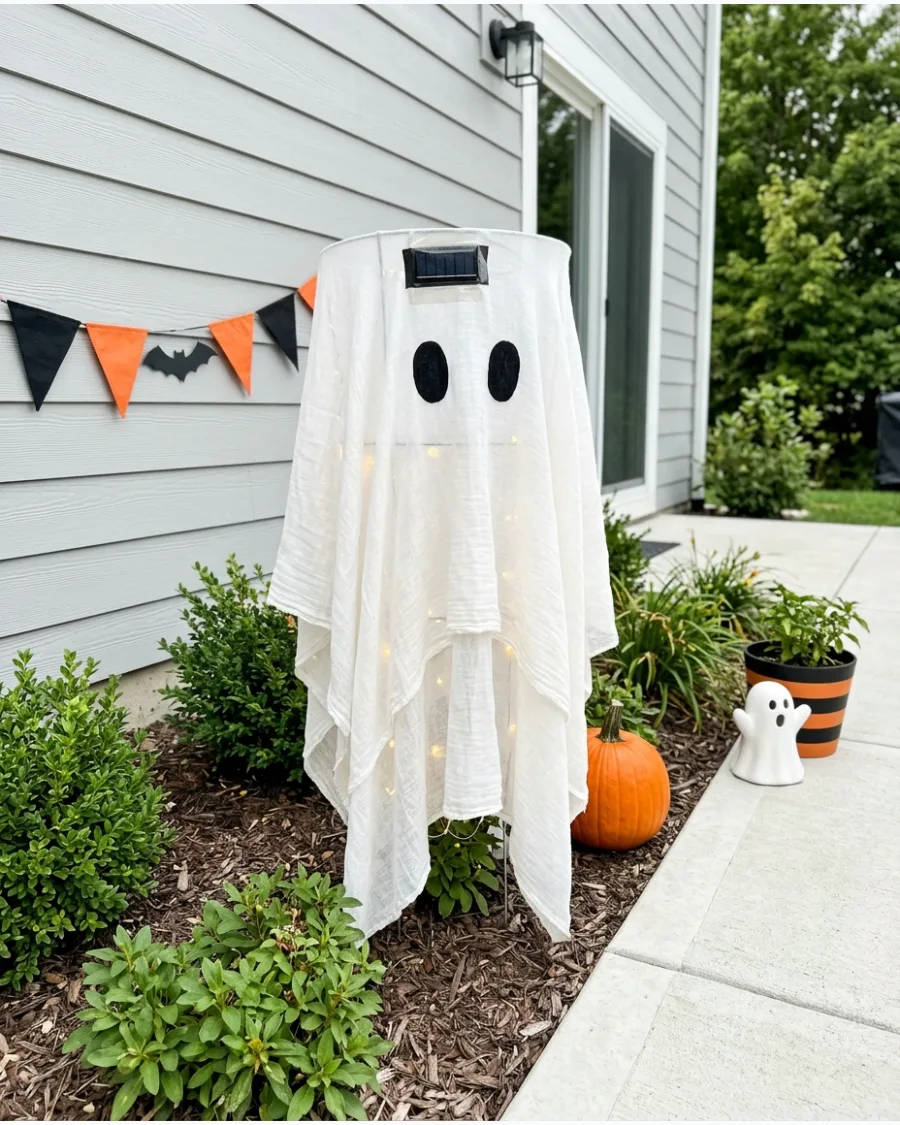
Use outdoor solar string lights when the ghost will be displayed away from an outlet. Position the solar panel where it receives enough daylight.
Tape the solar panel to the very top of the cage head before draping the fabric so it stays upright. This is the most eco-friendly and low-maintenance way to light up a yard.
- Solar string lights, tomato cage, and thin fabric
- Ensure the panel isn't completely covered by thick cloth
- Move to a sunny spot during the day for maximum night brightness
Most people skip this: Clean the solar panel every few days if it gets dusty to maintain charging efficiency.
16. Puck-Light Ghost Head
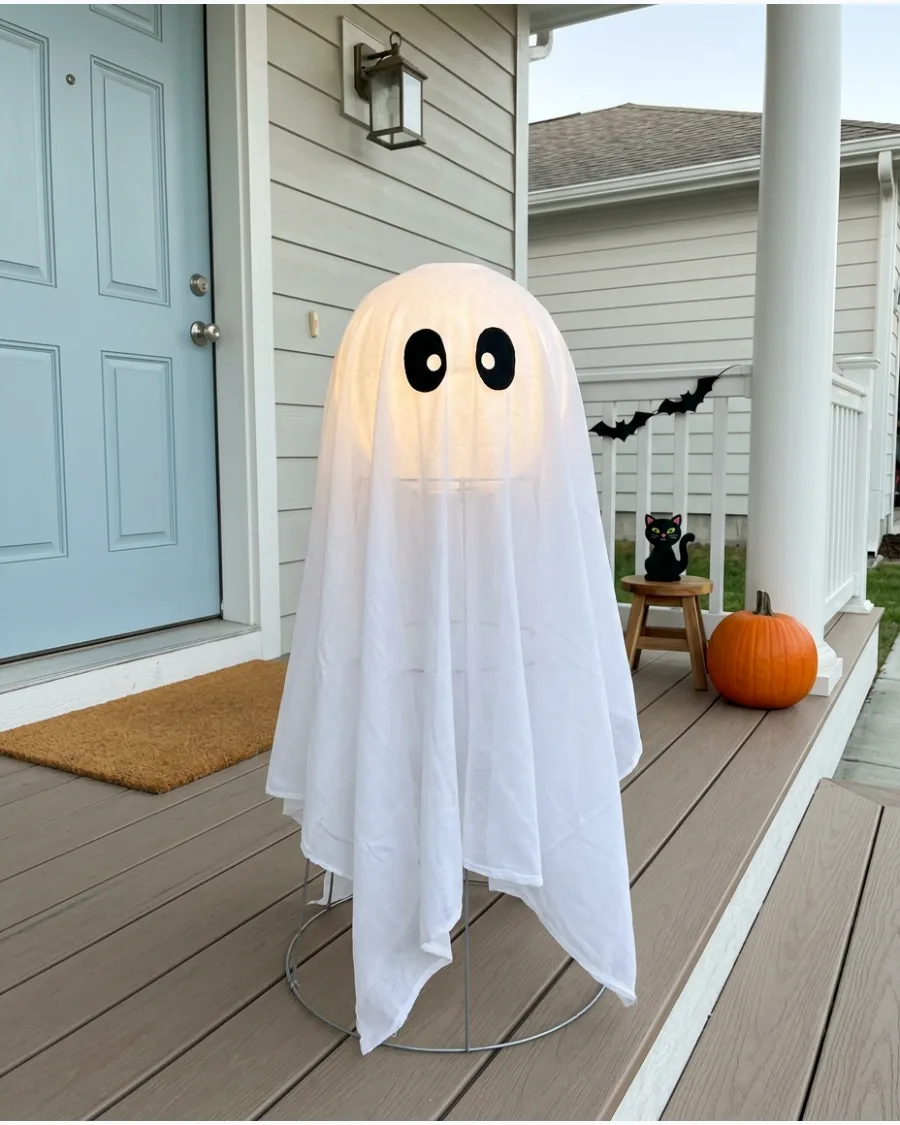
Place a battery-operated puck light below a thin translucent head covering. This creates a softly illuminated face without lighting the entire body.
Mount the puck light to the top of the foam ball or bowl using heavy-duty double-sided tape. The focused light makes the ghost's expression look more dramatic in the dark.
- LED puck light with remote and double-sided tape
- Use a light with a warm setting for a classic candle-like look
- Choose a light with a timer to save battery life
Best shortcut: Use a color-changing puck light to change the ghost's mood with a remote.
Tomato Cage Ghosts With Arms
17. Pool-Noodle Arms Ghost
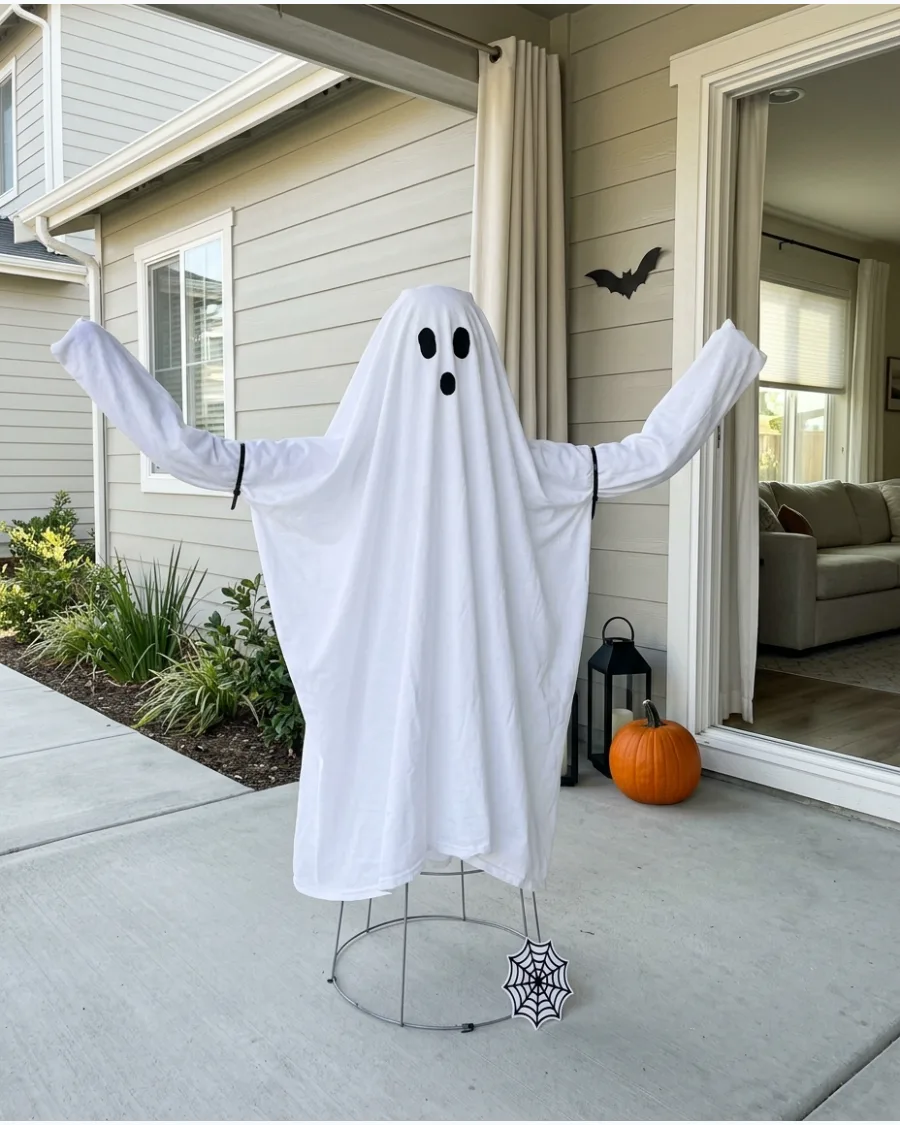
Run a flexible pool noodle across the upper section of the tomato cage. Cover it with the sheet and bend both ends upward to create raised arms.
Secure the center of the noodle to the cage with wire or zip ties to keep the arms from sagging. This adds volume and a more human-like shape to the decoration.
- Standard pool noodle, zip ties, and a large white sheet
- Cut the noodle to size if the arms look too long for the cage
- Use a gray noodle if your fabric is slightly transparent
Quick win: Slice a small slit in the noodle where it meets the cage wire to help it lock into place.
18. Waving Tomato Cage Ghost
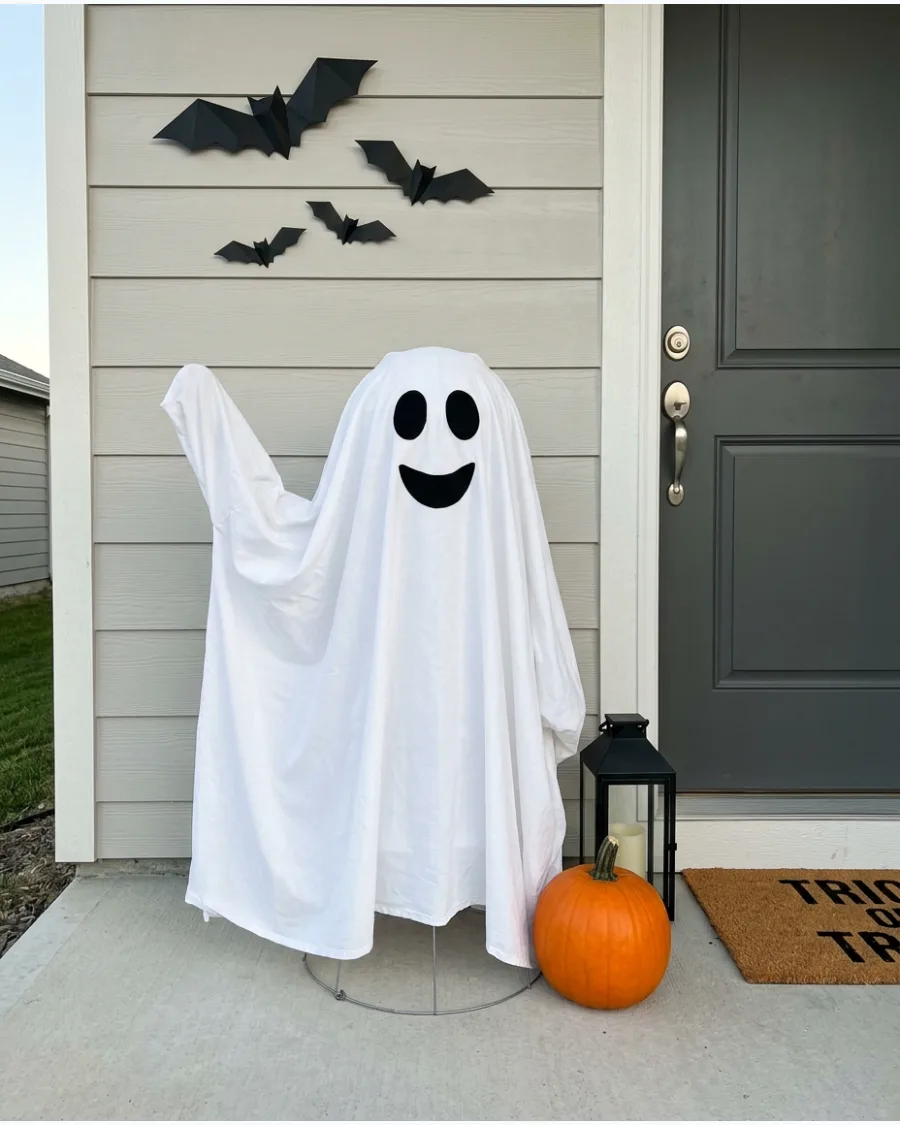
Position one arm higher than the other so the ghost appears to be waving. Add a happy face for a friendly front-door greeter.
Use a stiff wire inside a pool noodle or foam pipe insulation to hold the waving pose in place. This friendly ghost is perfect for homes with young children who might find scarier decor intimidating.
- Heavy-gauge wire, foam pipe insulation, and white fabric
- Anchor the base with a heavy rock to prevent the raised arm from catching wind
- Position the ghost at a slight angle toward the walkway
Most people skip this: Draw the face slightly higher on the head so the waving arm doesn't block the eyes from a distance.
19. Reaching Ghost
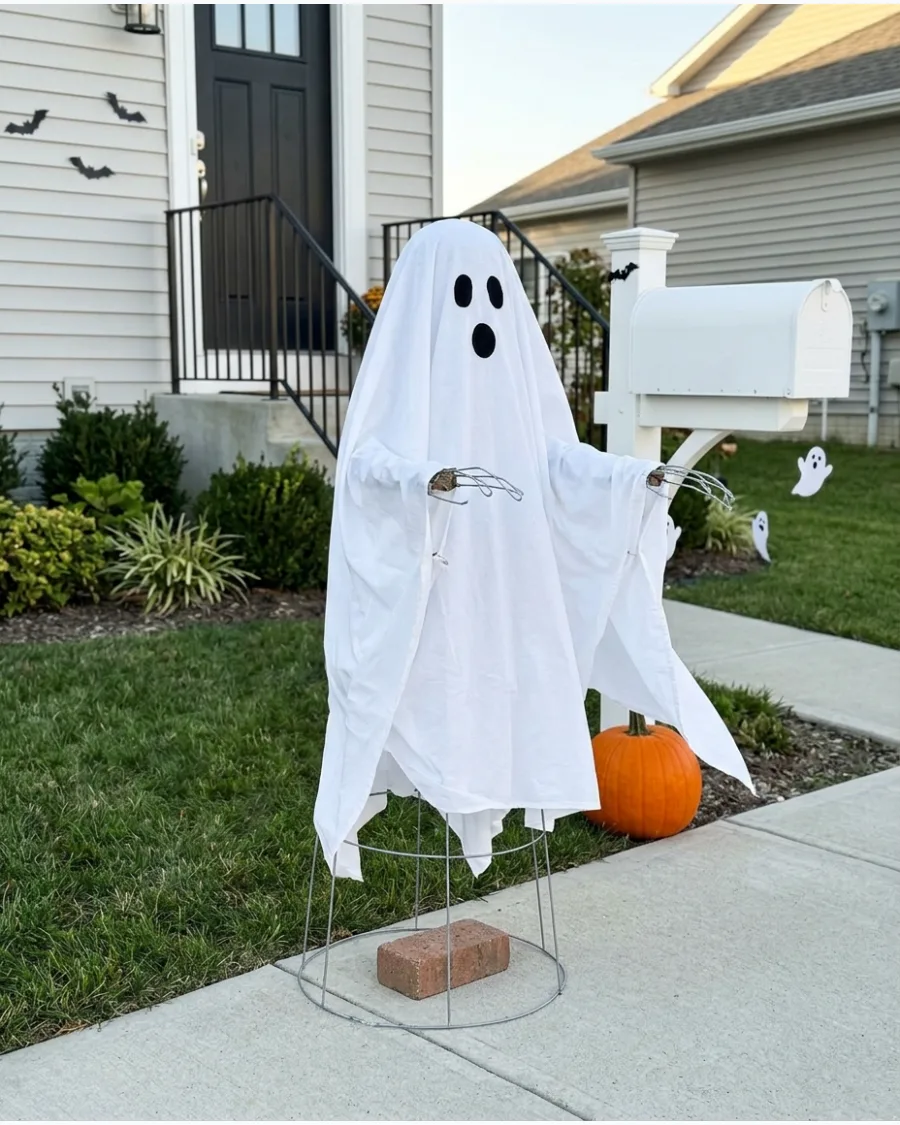
Extend both lightweight arms forward underneath the fabric. Place the ghost near a pathway so it appears to reach toward approaching guests.
Weight the back of the tomato cage base with a brick to balance the forward-leaning weight of the arms. The reaching pose creates a sense of movement and interaction.
- Lightweight foam arms, brick or sandbag, and a tomato cage
- Use a larger sheet to ensure the extended arms are fully covered
- Place near a motion-activated light for a jump-scare effect
Best shortcut: Use wire coat hangers bent into arm shapes if you don't have foam noodles available.
20. Dancing Tomato Cage Ghost
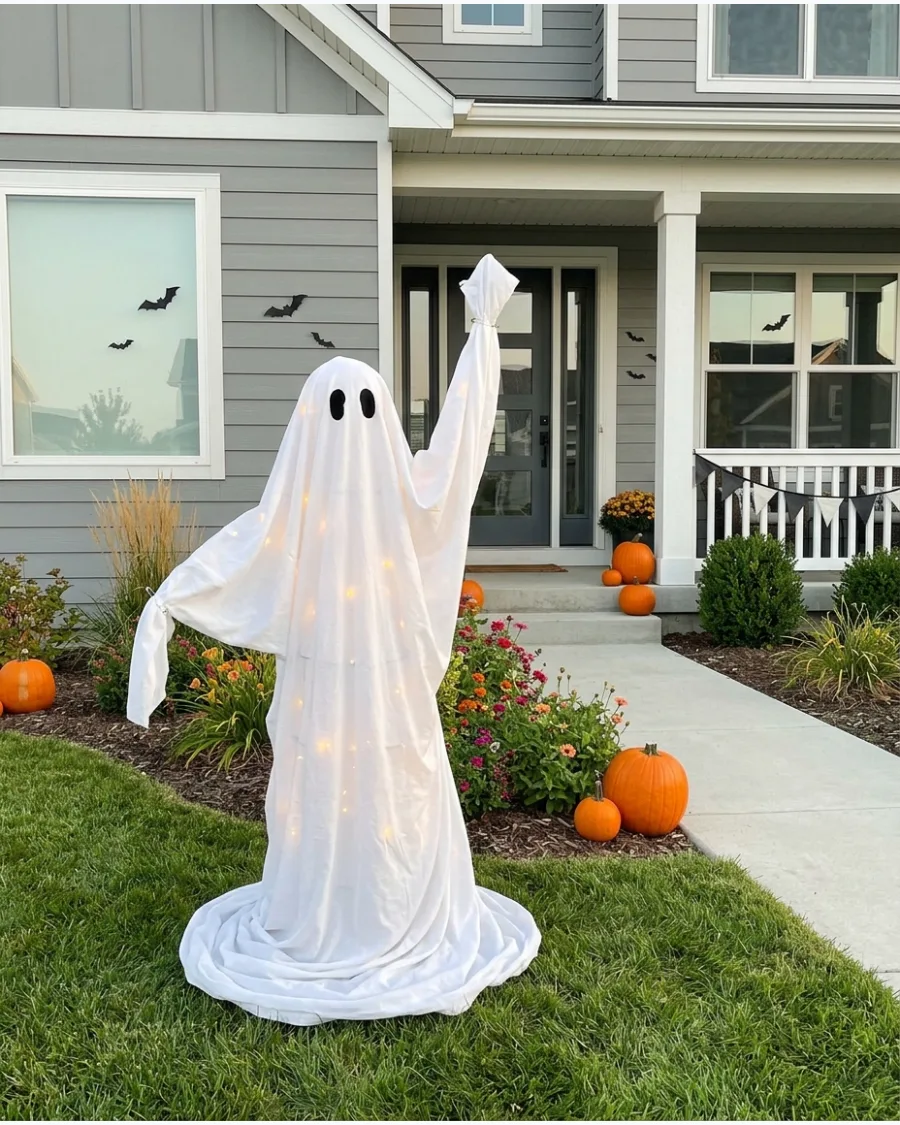
Bend the arms in opposite directions to create a playful dancing pose. Add twinkle lights inside the cage to emphasize the movement.
Secure the fabric to the ends of the arms with small safety pins to keep the hands defined. This lively ghost looks great when grouped with several others in a dance circle on the lawn.
- Flexible arm supports, safety pins, and twinkle lights
- Use a lightweight fabric like polyester that catches the breeze
- Set up three ghosts in a triangle for a more dynamic display
Quick win: Use a small fan hidden behind the ghost to make the fabric dance even on still nights.
21. Ghost Holding a Pumpkin
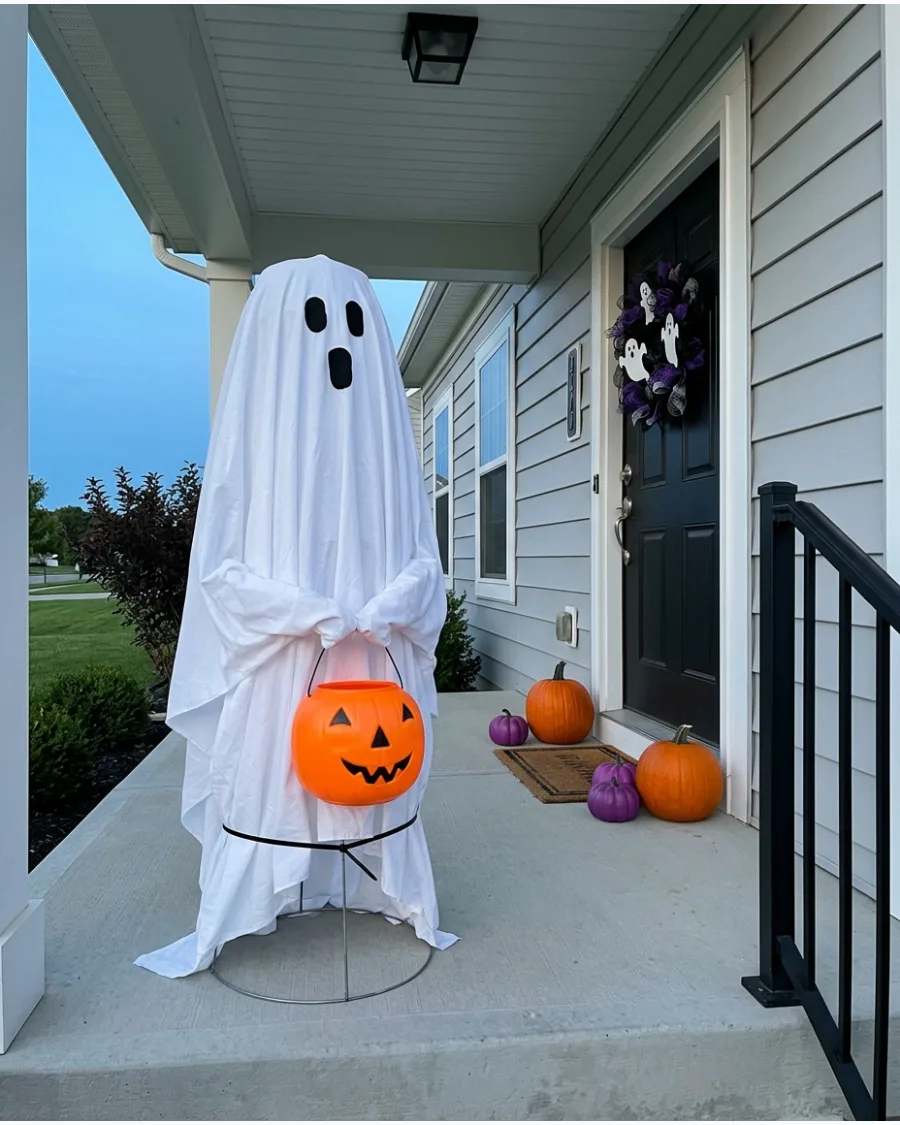
Position the arms around a lightweight artificial pumpkin to create a festive silhouette. Secure the pumpkin to the metal frame with zip ties so it stays in place during windy October nights. This setup works best when the pumpkin weight is centered low on the frame to prevent tipping.
Heavy real pumpkins will pull the tomato cage over immediately.
- Lightweight faux pumpkins from craft stores
- Use white zip ties or clear fishing line to anchor the pumpkin
- Swap for a teal pumpkin to signal allergy-friendly treats
Best shortcut: Poke two small holes in the back of the pumpkin and thread a wire through them to loop directly onto the tomato cage wire.
22. Ghost Holding a Halloween Sign
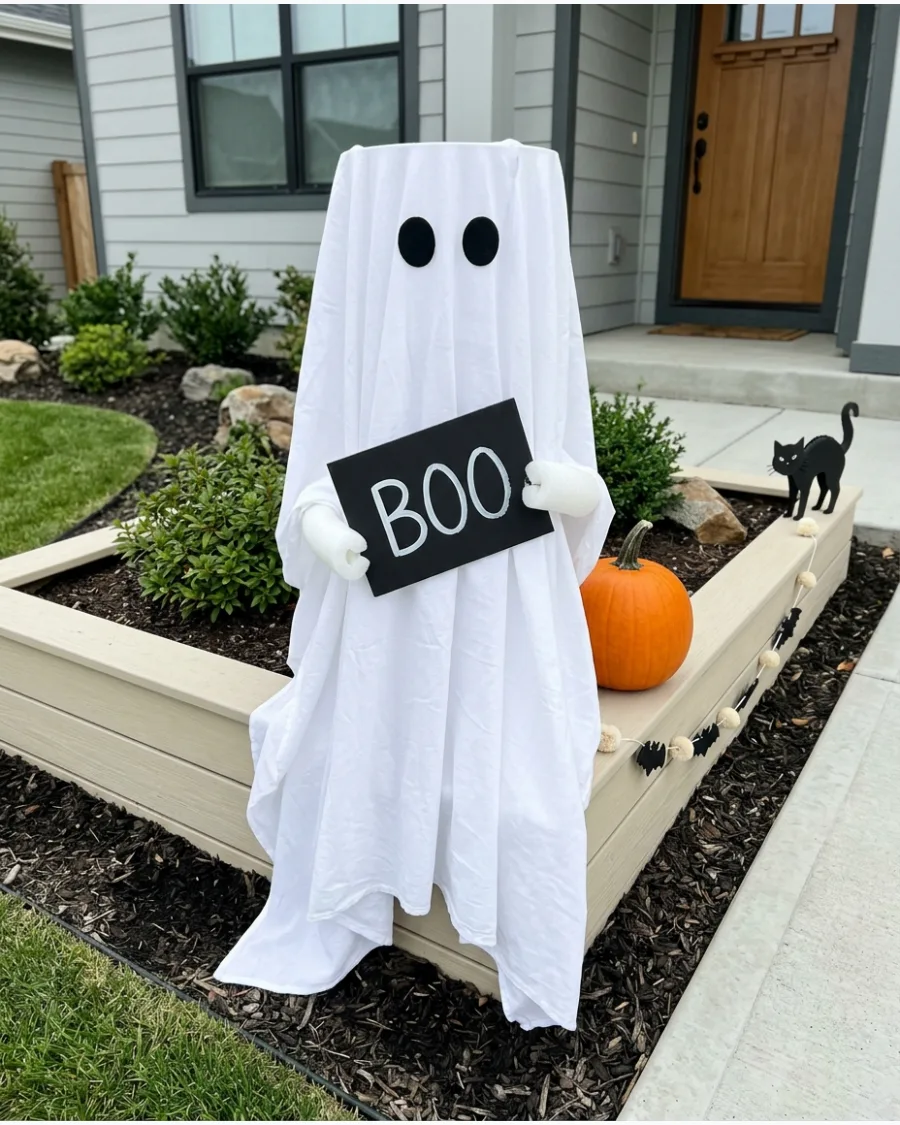
Attach a lightweight foam-board sign between the ghost’s hands for a custom greeting. Use a short message such as “Boo,” “Welcome” or “Happy Halloween.” Mount the sign at a slight angle to make the ghost look like it is actively presenting the message to guests. Foam board is the best material here because it will not weigh down the internal arm structure.
- Foam board or corrugated plastic signs
- Hot glue or wire the sign to the internal arm structure
- Use glow-in-the-dark paint on the sign letters for night visibility
Quick win: Use a sign with a matte finish to prevent glare from your porch lights or camera flashes.
Cute Tomato Cage Ghost Ideas
23. Smiling Tomato Cage Ghost
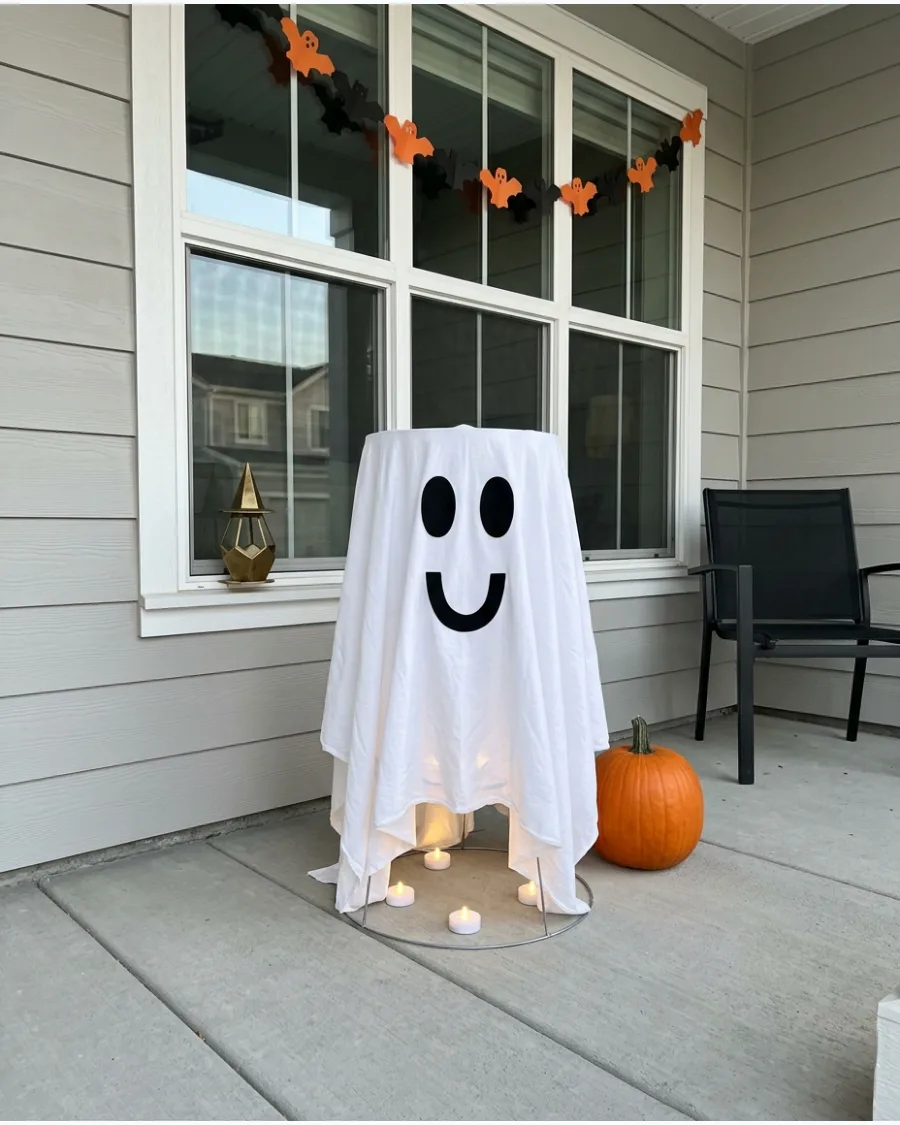
Give the ghost two oval eyes and a cheerful curved smile for a friendly look. This design is suitable for homes welcoming younger trick-or-treaters who might be scared by traditional decor.
Cut the mouth from black adhesive felt to get a clean, sharp line that will not fray in the wind. Friendly faces are often more effective for curb appeal than scary ones.
- Black adhesive felt or outdoor vinyl
- Scale the face so it occupies the top third of the ghost
- Use a template to ensure the smile is symmetrical before cutting
Most people skip this: Place the eyes slightly lower on the head to create a cuter or more infant-like appearance that feels approachable.
24. Blushing Ghost
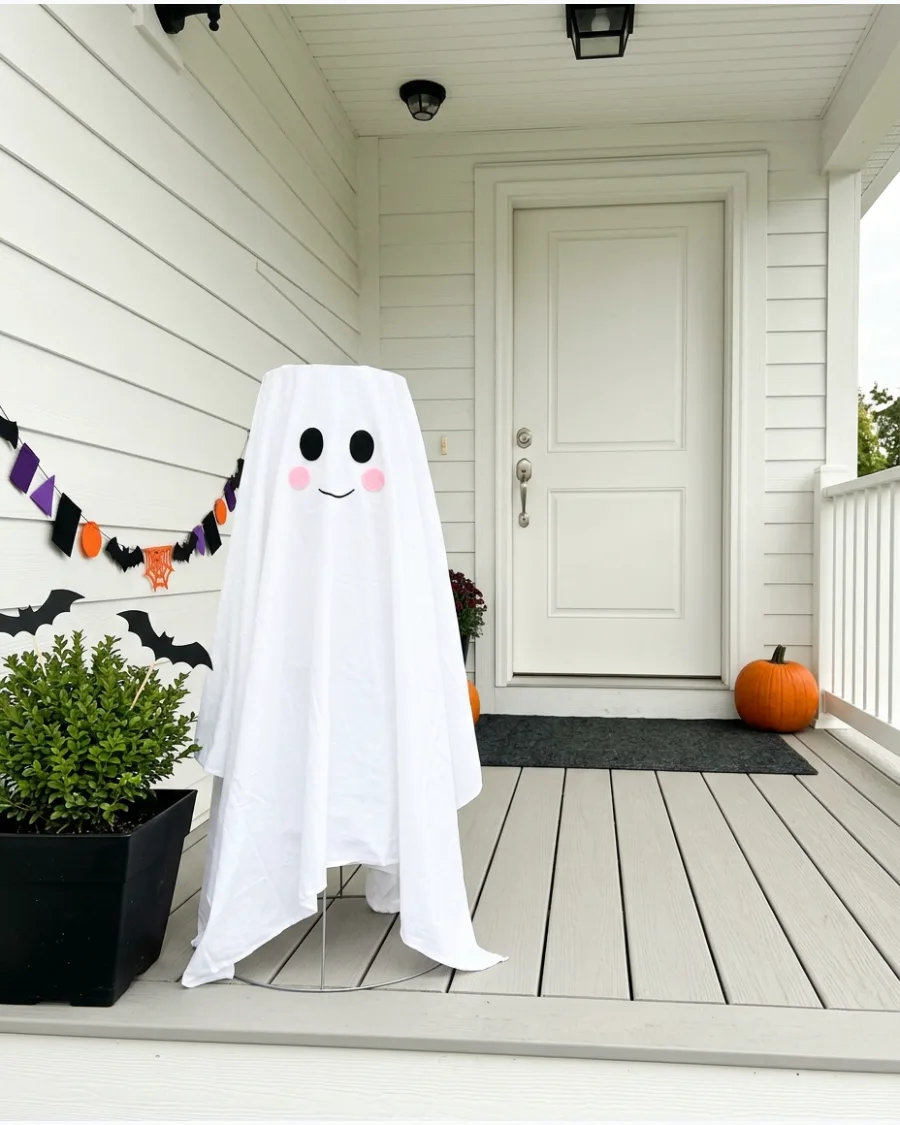
Add small pink felt circles beneath the eyes to give your ghost a shy personality. Pair the face with a soft smile for a unique Halloween porch decoration.
Use a hot glue gun on a low-temperature setting to attach the felt circles without melting the synthetic fabric of the ghost. Pink accents break up the monochromatic white and look great under soft porch lights.
- Pink felt or weather-resistant fabric
- Apply glue to the felt first then press onto the ghost
- Pick a bright pink that stands out against the white fabric from the street
Quick win: Use glittery pink cardstock for the cheeks if the ghost is staying under a covered porch to add a little sparkle.
25. Bow-Wearing Ghost
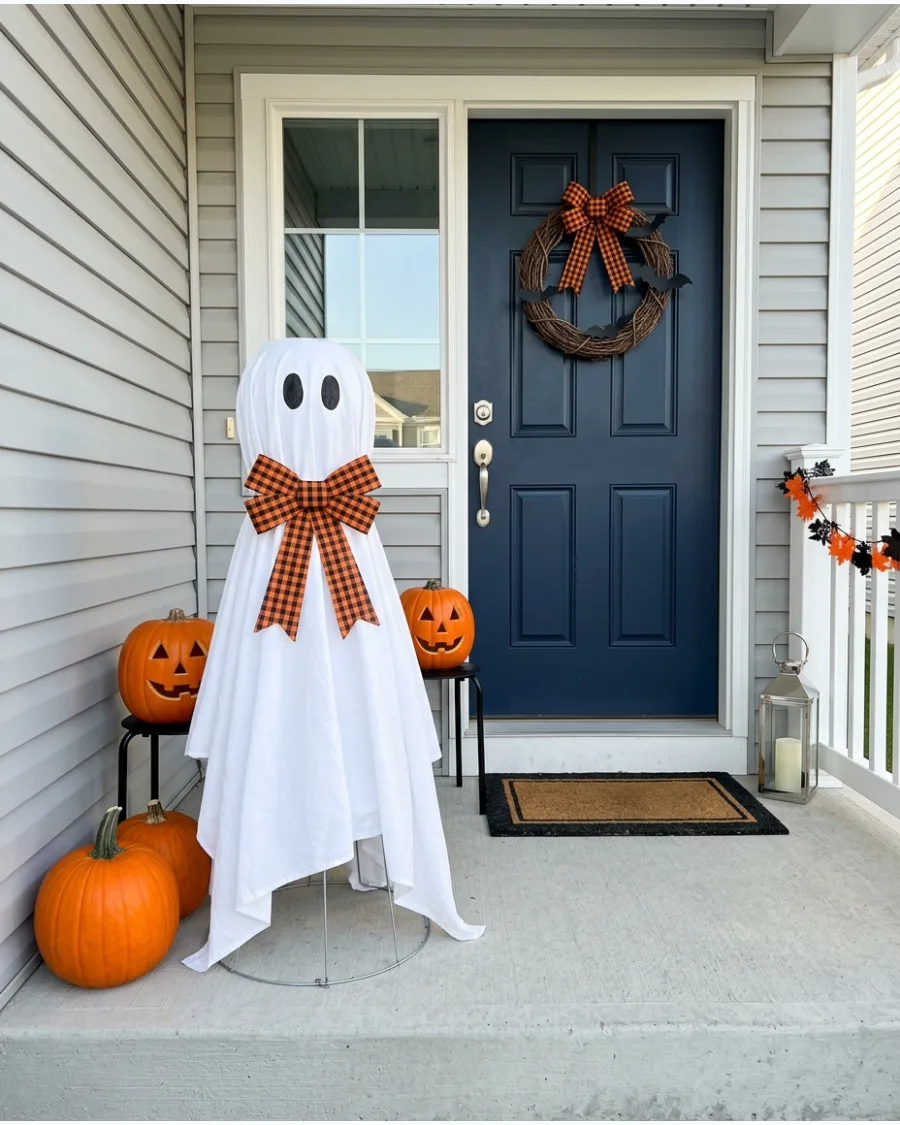
Attach an orange, black, or checkered bow below the ghost’s face for a polished look. Repeat the same ribbon in nearby wreaths or pumpkin decorations to create a cohesive theme.
Wire the bow directly to the tomato cage through the fabric to prevent it from sliding down over time. A large, stiff bow helps define the neck area of the ghost silhouette.
- Wired ribbon at least 2.5 inches wide
- Pipe cleaners or floral wire for attachment
- Match the ribbon pattern to your existing front door wreath
Best shortcut: Use wired ribbon so you can fluff the loops and keep the bow from looking flat after a rainstorm.
26. Pink Tomato Cage Ghost
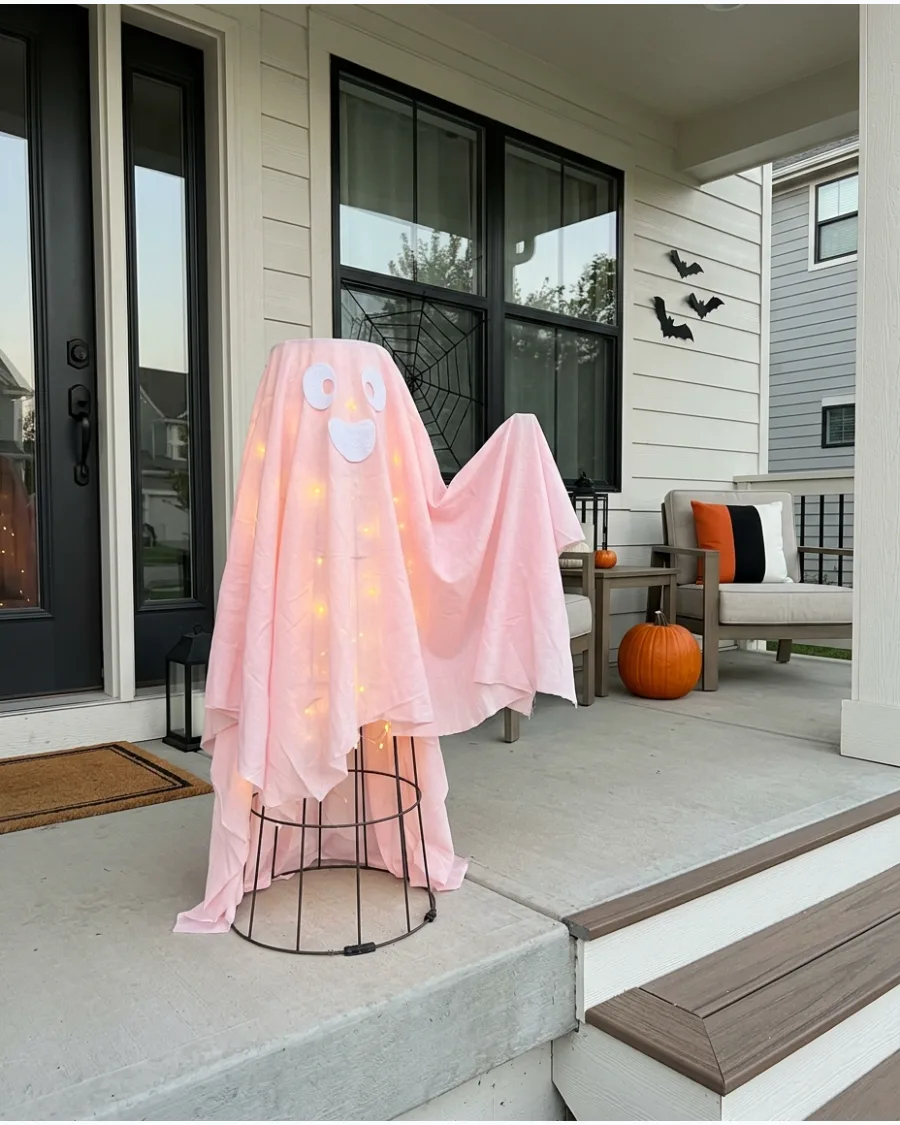
Use pale pink fabric instead of traditional white for a modern twist.
Add white facial features and warm fairy lights for a pastel Halloween display. Layer two sheets of thin pink fabric if the color looks too sheer against the dark metal cage. This is a perfect way to deviate from the standard orange and black color palette.
- Pink polyester fabric or tablecloth
- White felt or vinyl for the face
- Warm white LED string lights for an internal glow
Most people skip this: Use white lights inside a pink ghost rather than pink lights, which can make the color look muddy or red at night.
27. Polka-Dot Ghost
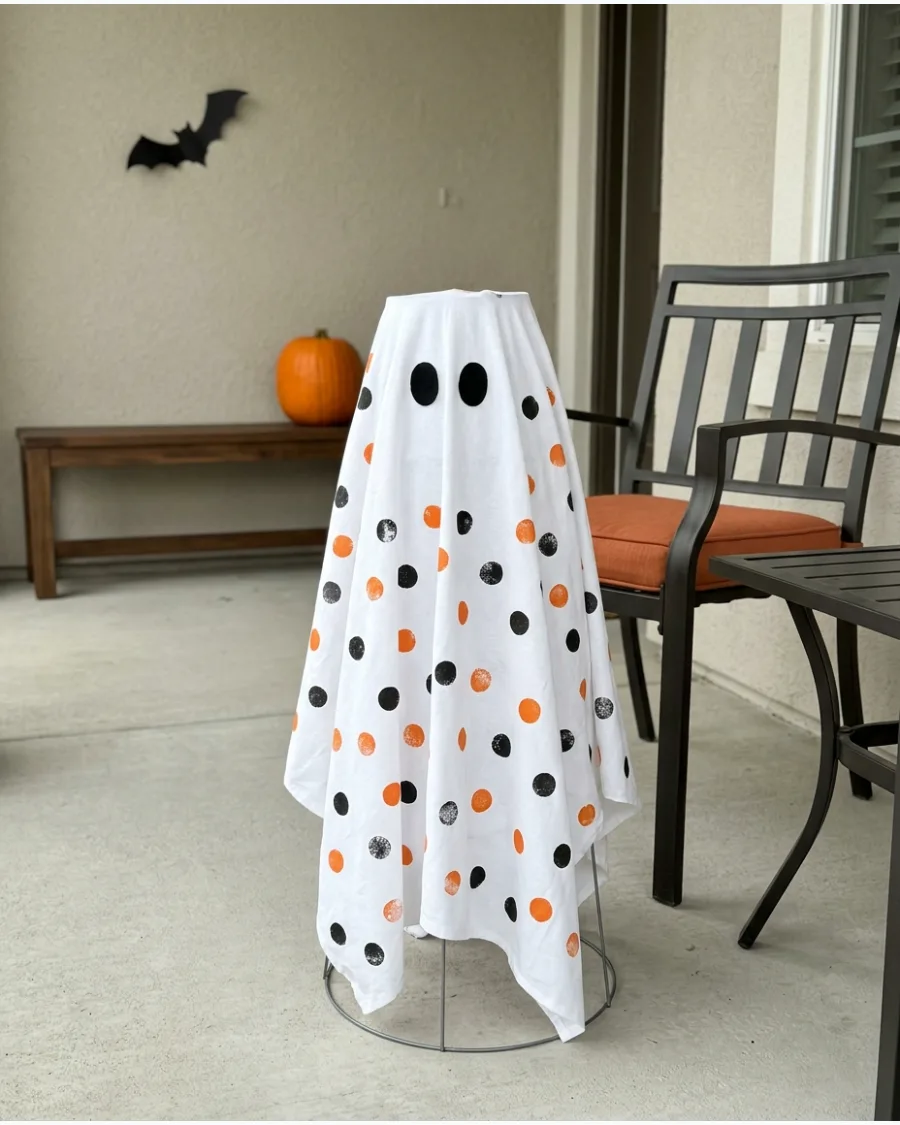
Decorate the outer fabric with black, orange, or metallic polka dots. Keep the pattern spread out so the ghost still looks light and airy.
Use a circular sponge brush to stamp the dots for a uniform look across the entire sheet. A scattered pattern makes the ghost look more like a custom boutique decoration than a DIY project.
- Outdoor acrylic paint or fabric paint
- Circular foam pouncer or stencil
- Allow the paint to dry completely before draping the fabric over the cage
Quick win: Space the dots about 6 inches apart to ensure the ghost does not look too busy or cluttered from a distance.
28. Starry Ghost
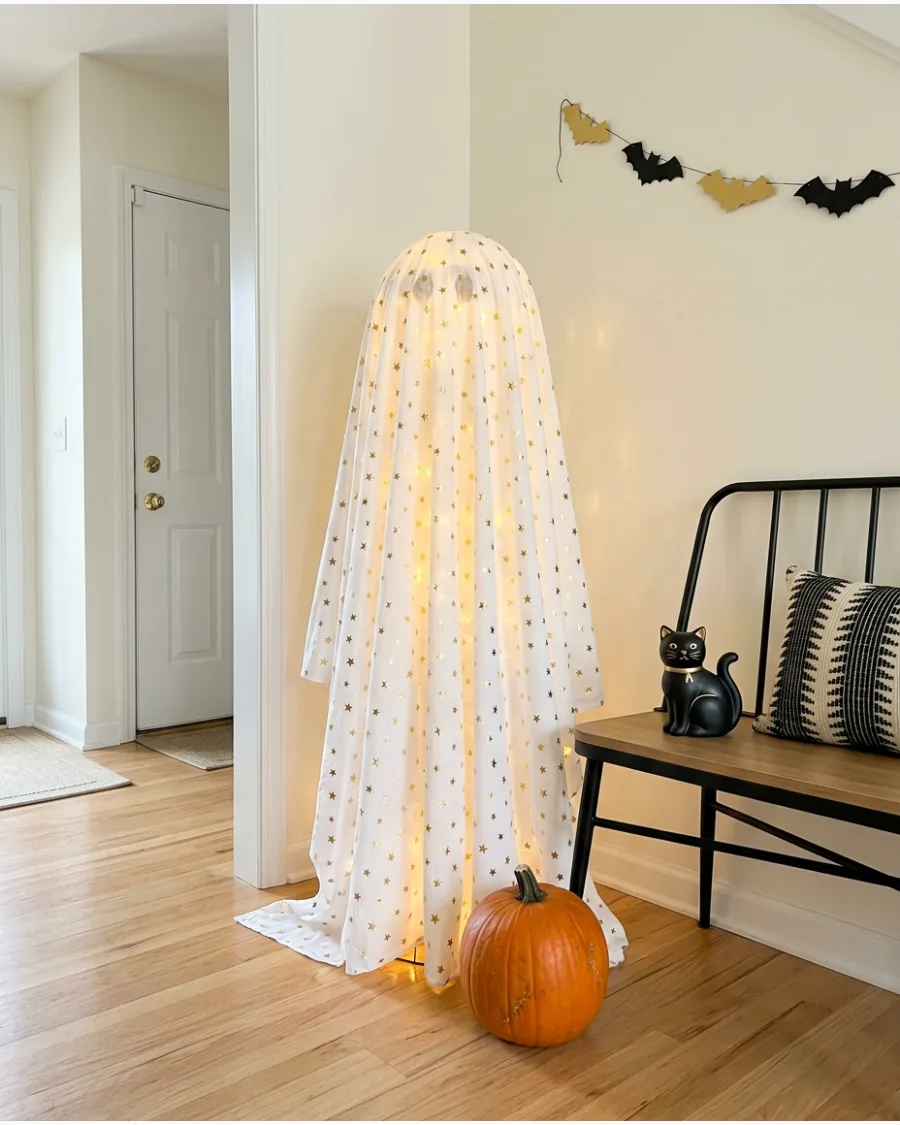
Attach black or gold stars to the white fabric for a whimsical effect. Small fairy lights underneath can make the ghost resemble a glowing night sky.
Choose metallic gold stars to reflect the light from the internal LEDs for a shimmering effect. This design works exceptionally well for an indoor entryway or a protected porch corner.
- Peel-and-stick felt stars or metallic vinyl
- Copper wire fairy lights for a delicate glow
- Clear tape or fabric glue for permanent placement
Best shortcut: Use a star-shaped paper punch on adhesive vinyl to create dozens of uniform stars in minutes.
29. Ghost With a Witch Hat
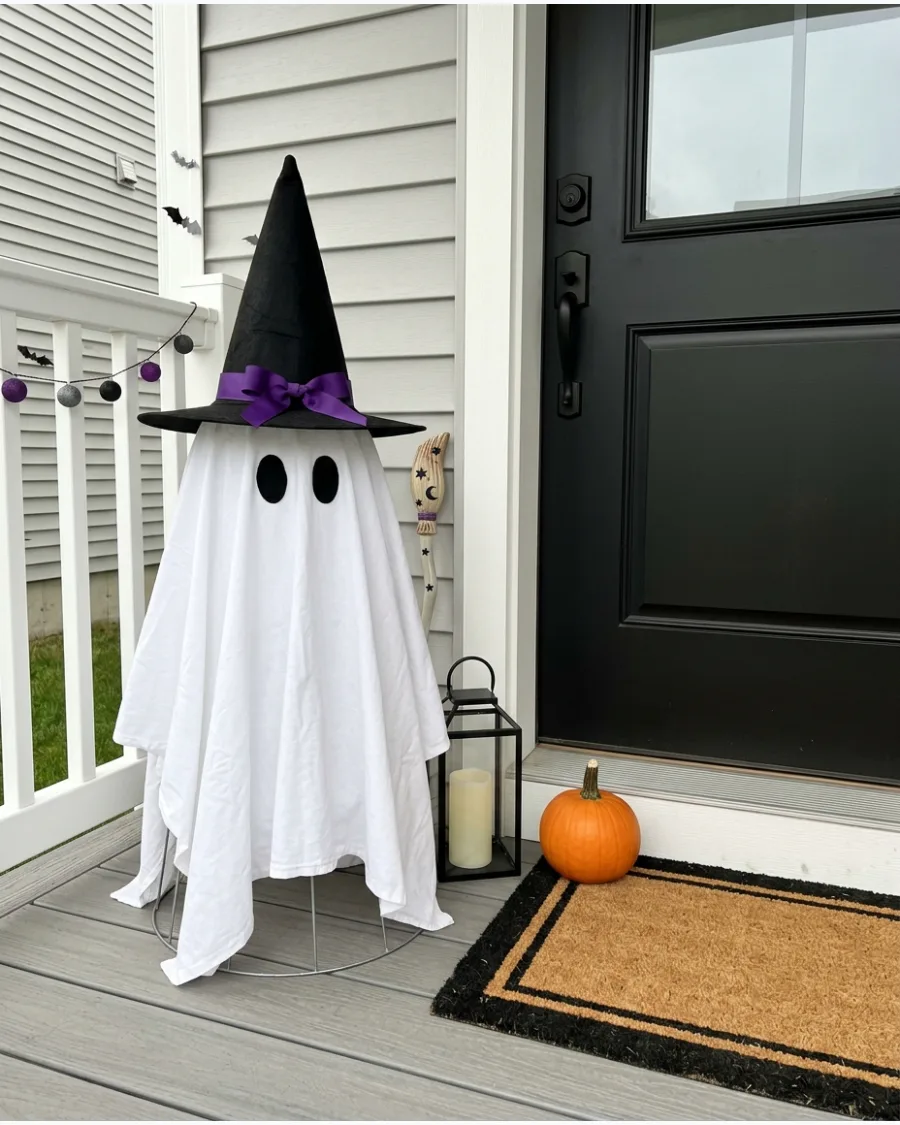
Place a lightweight pointed witch hat over the ghost’s head for a classic crossover look. Add a purple or orange ribbon around the hat for extra color.
Stuff the inside of the hat with plastic grocery bags to keep the point upright and prevent it from flopping over. The weight of the hat actually helps stabilize the fabric on top of the cage.
- Standard adult-sized witch hat
- Plastic bags or newspaper for stuffing
- Safety pins to secure the hat brim to the ghost fabric
Quick win: Tilt the hat slightly to the side to give the ghost a more playful and less rigid personality.
30. Ghost Trick-or-Treat Greeter
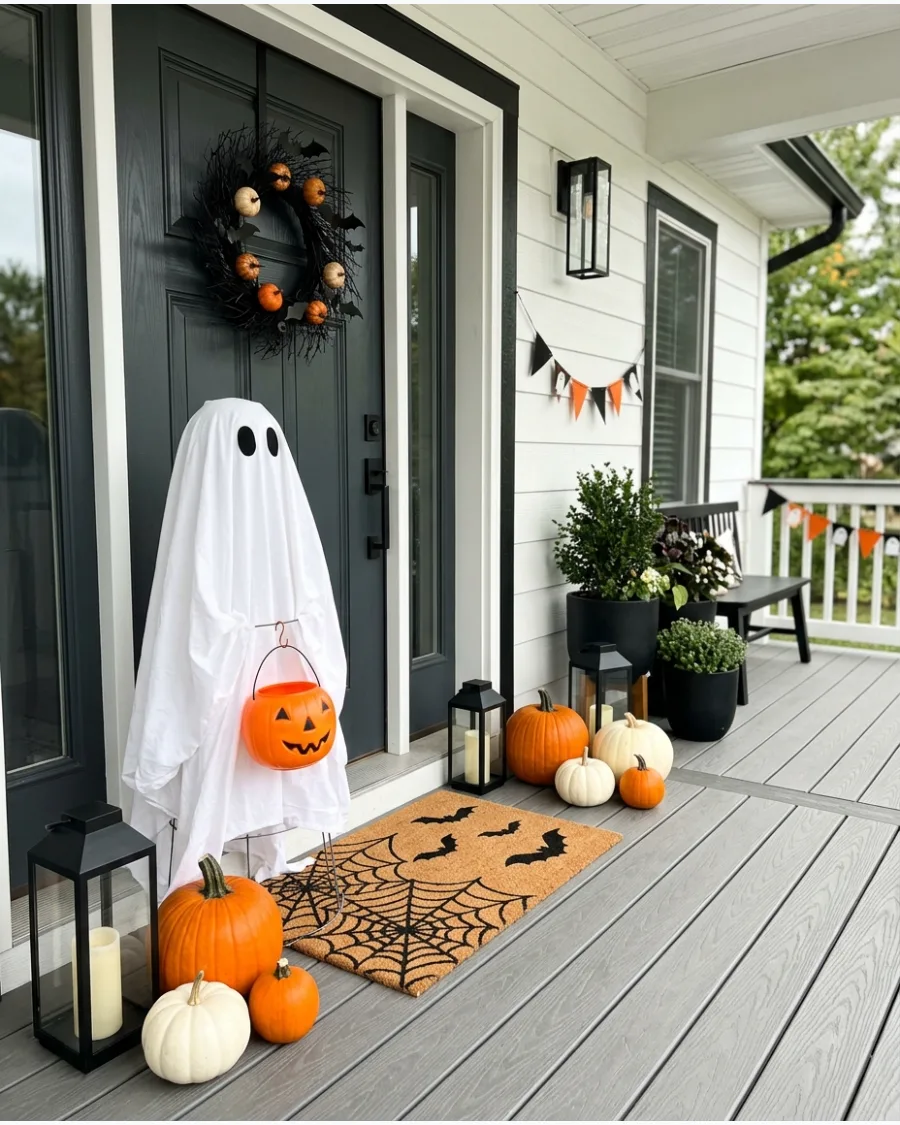
Give the ghost a small lightweight candy bucket to hold during supervised trick-or-treating. Place it beside the front door with pumpkins and lanterns to welcome guests.
Loop the bucket handle over a wire hook attached to the tomato cage so the weight does not tear the fabric. This makes the ghost a functional part of your Halloween night setup.
- Small plastic candy pail
- Heavy-duty wire or a S-hook for support
- Fill with lightweight foam candy if used only for display
Most people skip this: If you are actually serving candy from the bucket, weight the bottom of the tomato cage with a brick so it does not tip when kids reach in.
Tomato Cage Ghost Family Ideas
31. Three-Ghost Family
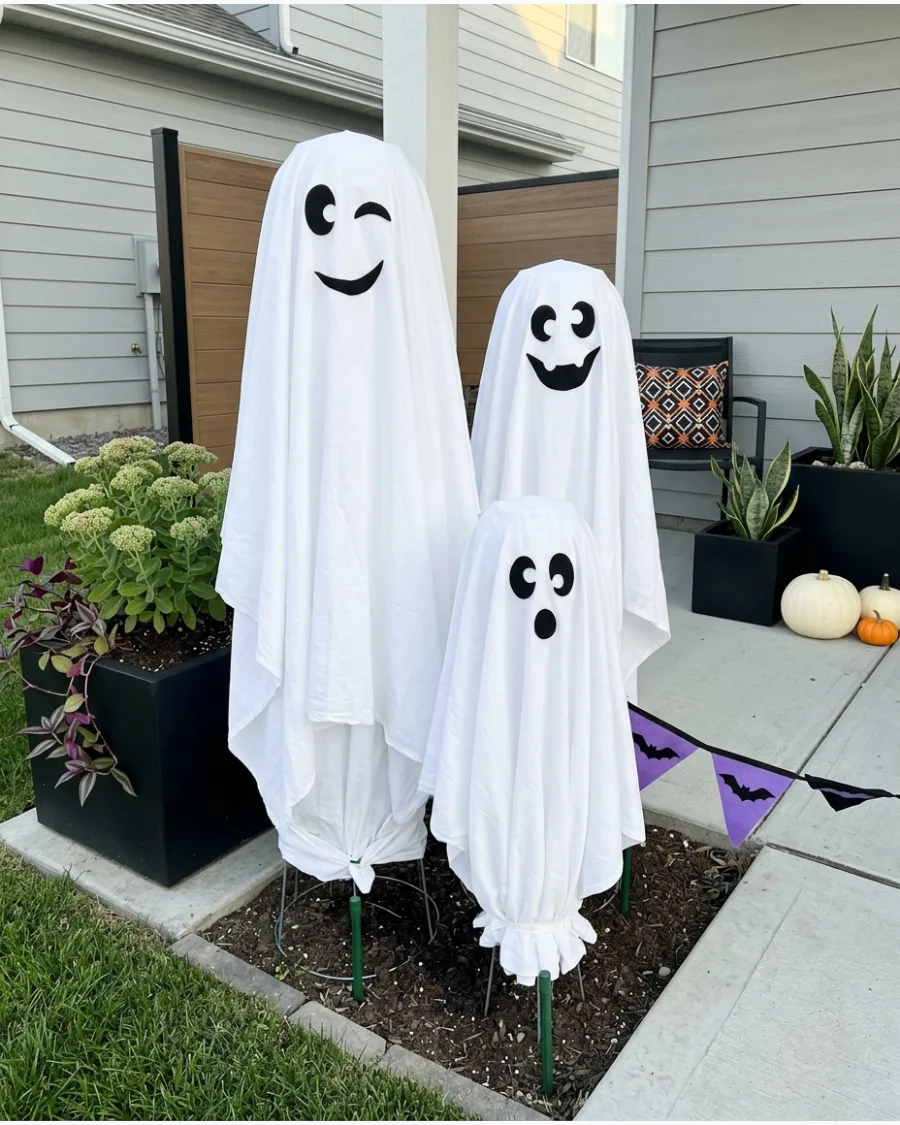
Set up a group of three ghosts using cages of varying heights to mimic a family portrait. Mixing different facial expressions like a wink, a wide smile, and a surprised look adds character to the cluster.
Secure the fabric at the base with garden stakes to keep the family from blowing away in the wind. Varying the heights makes the display look more intentional and professional.
- Sourcing three cages of different sizes from a garden center
- Assembly by inverting cages and draping with white cotton sheets
- Use different sized styrofoam balls for the heads
Best shortcut: Use a serrated knife to shave down the bottom of the foam head so it sits securely on the cage prongs.
32. Parent and Baby Ghosts
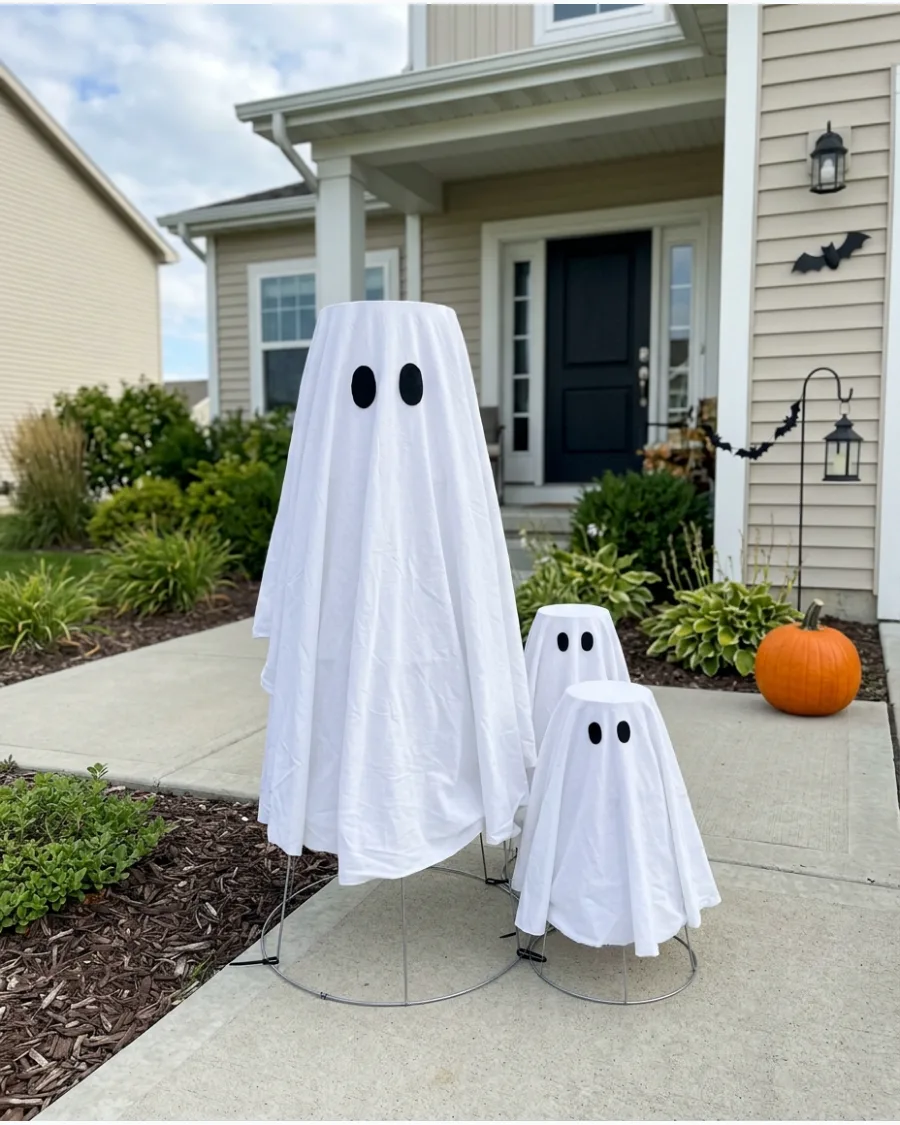
Use one standard 42-inch cage for the parent and two 12-inch mini cages for the smaller ghosts. Tucking the smaller figures slightly behind or beside the larger one creates a cute, protective scene.
Zip-tie the mini cages to the main one if you want them to stay in a tight cluster. This scale difference is much more effective than making everything the same size.
- One large and two mini tomato cages
- Drape with white cotton fabric or sheets
- Secure with clear elastic bands at the neck
Quick win: Use a white pillowcase for the baby ghosts to save money on fabric yardage.
33. Matching Ghost Trio
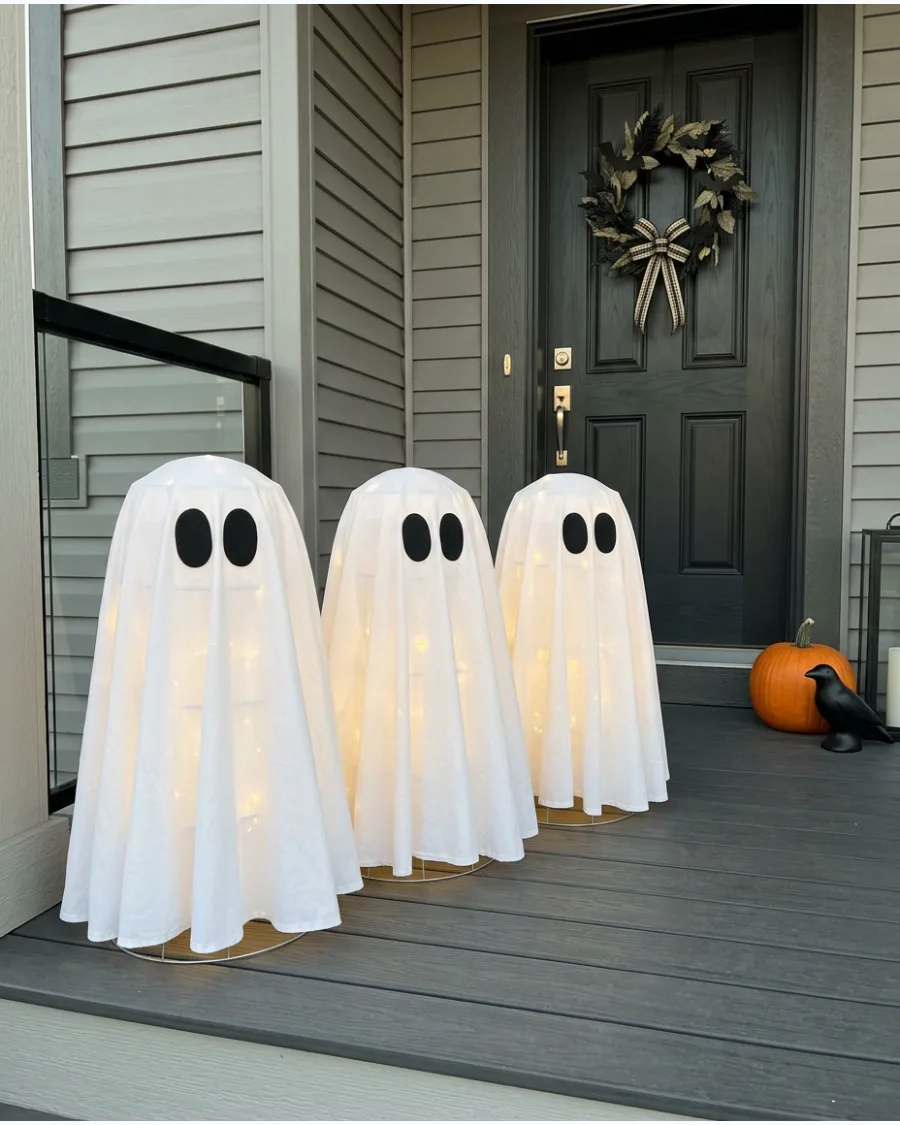
Line up three identical ghosts to create a clean, modern repetition across your porch. Using the exact same fabric and light temperature ensures the display looks like a high-end store set rather than a random collection.
Space the ghosts exactly twenty-four inches apart to create a balanced visual rhythm along your house. Consistency in the facial features is the key to making this work.
- Three identical 33-inch tomato cages
- Three sets of warm white LED string lights
- Matching white twin-size sheets
Most people skip this: Check the light temperature on the box to ensure all three sets are Warm White so the glow matches perfectly.
34. Color-Coded Ghost Family
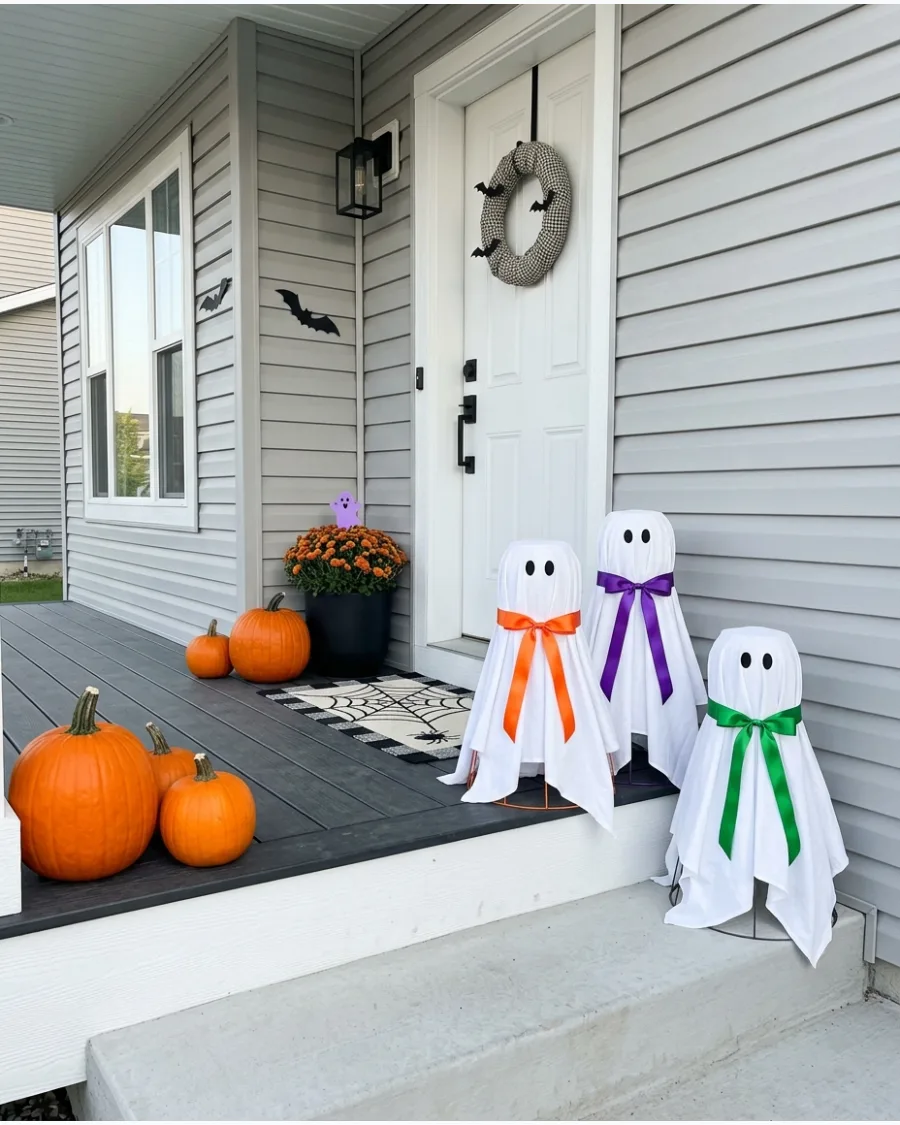
Distinguish each family member by adding a specific accent color through ribbons or internal lights. You can use orange for one, purple for another, and green for the third to stay within the classic Halloween palette.
Tie a thick satin ribbon around the neck of each ghost to secure the fabric while adding a pop of color. It helps guests identify the characters in your yard display.
- Colorful outdoor satin ribbon in orange, purple, and green
- Standard inverted tomato cages
- White polyester fabric drapes
Quick win: Use battery-operated colored spotlights inside each cage if you want the whole ghost to glow in that specific hue.
35. Dancing Ghost Circle
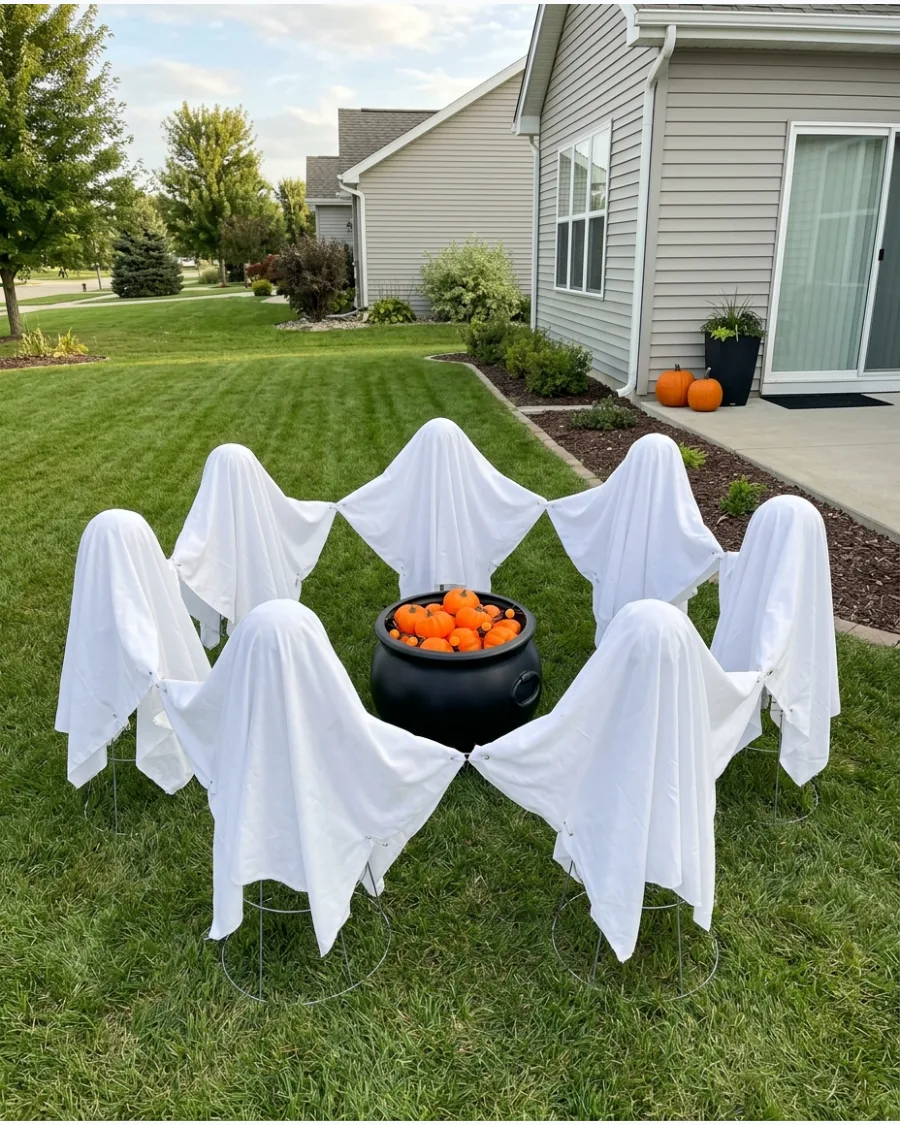
Arrange five or six ghosts in a ring on the lawn to simulate a spooky dance. Placing a cauldron or a pile of glowing pumpkins in the center gives the ghosts a focal point for their activity.
Connect the fabric edges of the ghosts with safety pins to make it look like they are holding hands. This setup works best in a large open yard where people can see the full circle.
- Five to six standard tomato cages
- Large black plastic cauldron
- Large white sheets or rolls of white landscape fabric
Best shortcut: Use landscape fabric for the ghosts if they are going in the yard; it handles rain much better than cotton sheets.
36. Ghost Family With Names
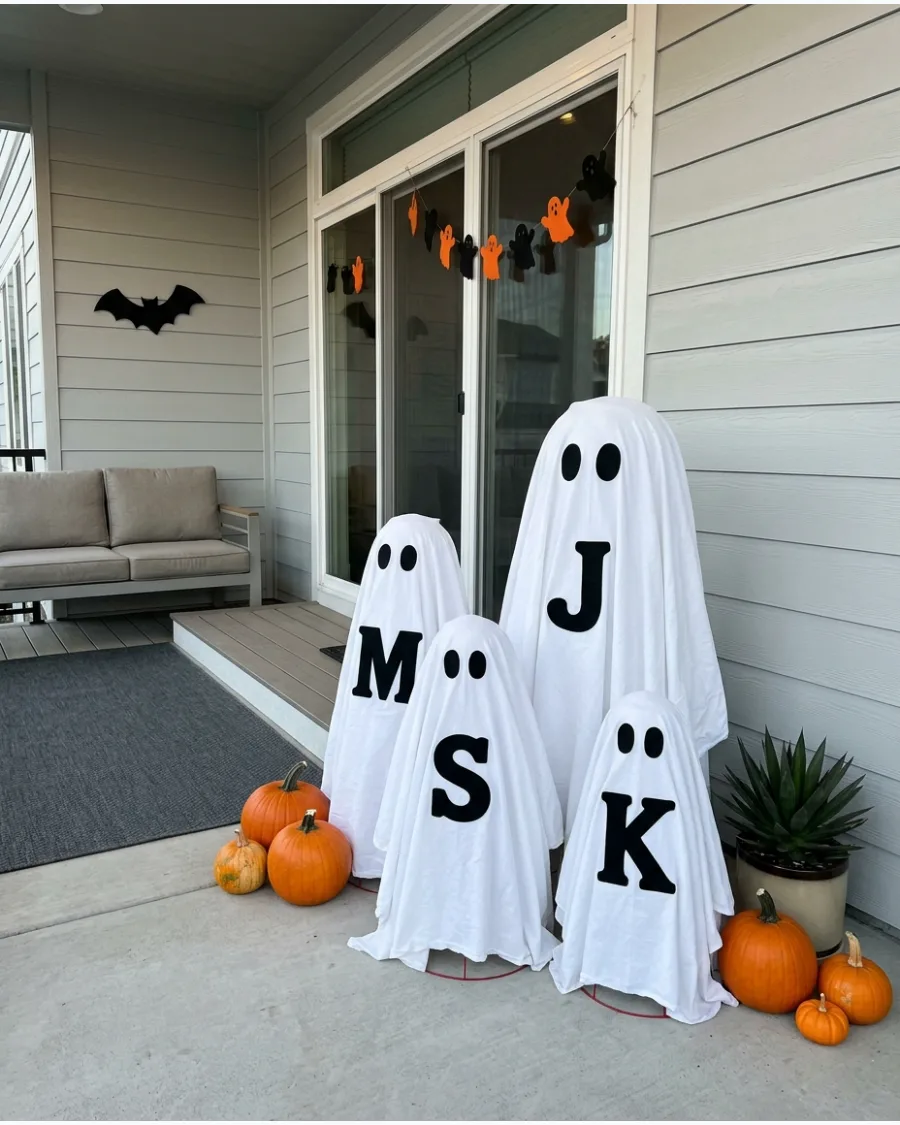
Personalize your display by adding names or initials to each ghost using black vinyl or felt letters. This is a great way to represent your own family members or create a specific story for your porch.
Apply the letters to the chest area of the ghost using fabric glue for a permanent bond that won't peel off in the cold. Keep the font bold and simple so it is easy to read from the street.
- Black felt sheets or pre-cut letters
- Outdoor fabric glue
- Assorted sizes of tomato cages
Quick win: Use pre-cut adhesive mailbox letters if you aren't confident in your freehand cutting skills.
37. Ghost Couple
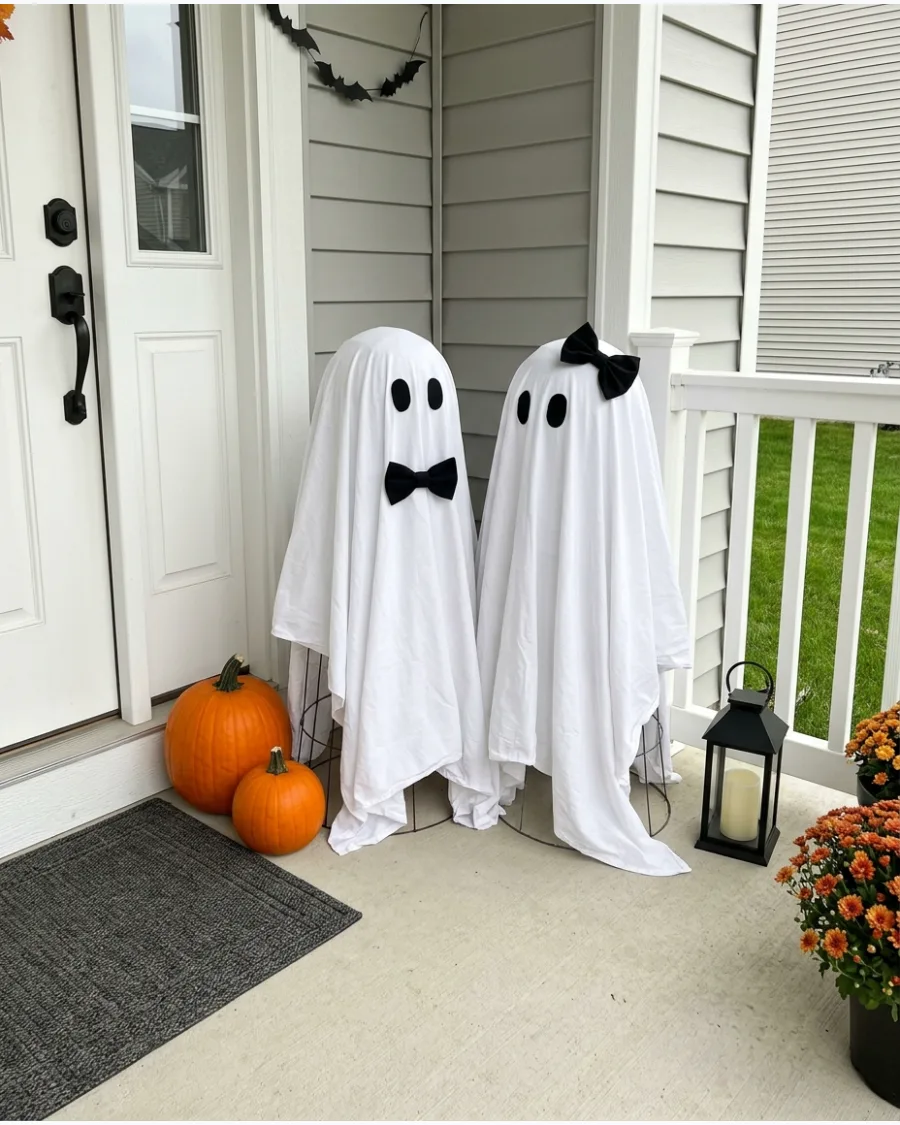
Create a pair of ghosts and position them close together to look like they are interacting. Adding a black bow tie to one and a hair bow to the other is a simple way to give them distinct personalities.
Angle the heads slightly toward each other to create a sense of conversation between the two figures. This is a perfect minimalist setup for a small entryway.
- Two matching tomato cages
- Black fabric or wide ribbon
- Two white fabric drapes
Most people skip this: Use a small piece of wire to stiffen the bows so they don't flop over when they get damp outside.
38. Friendly Ghost Gathering
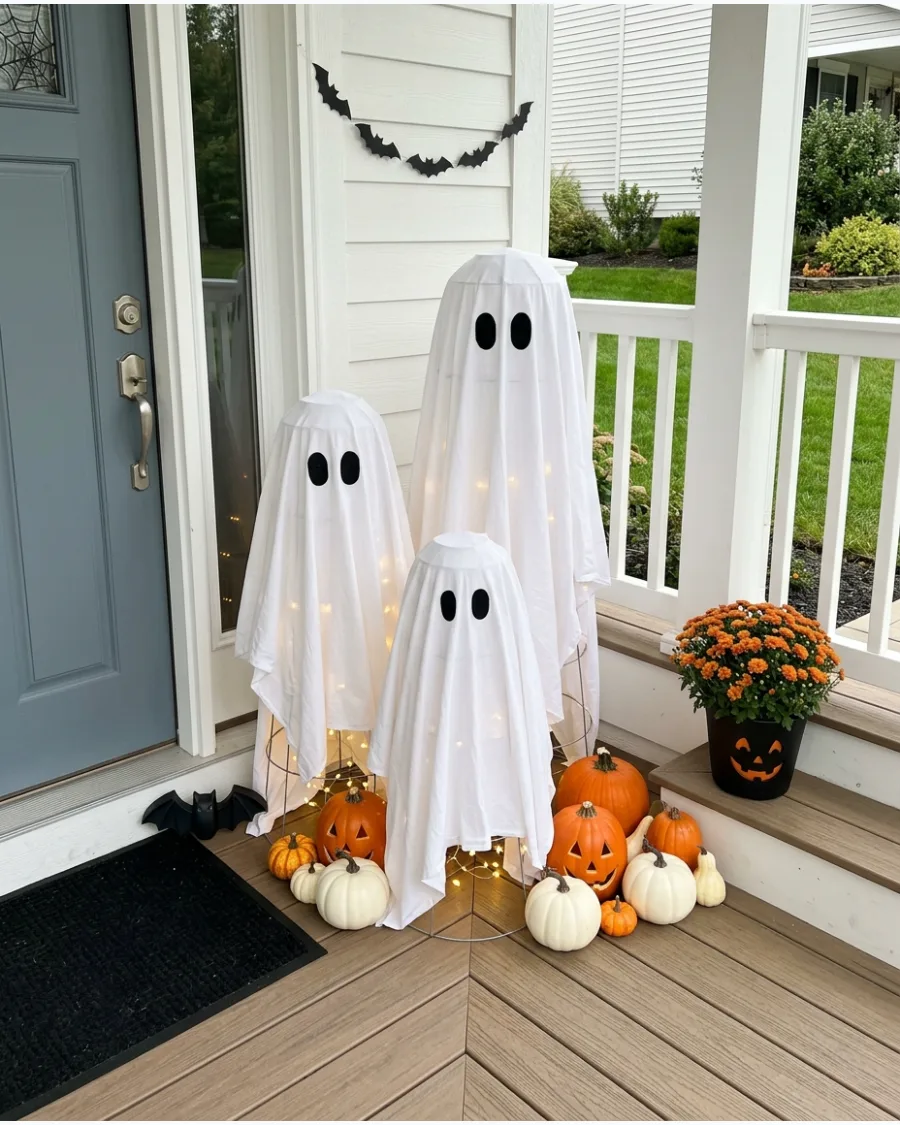
Surround a cluster of ghosts with real or faux pumpkins of different sizes to ground the display. Using the same warm white lights inside all the ghosts and tucked among the pumpkins creates a cohesive evening glow.
Vary the placement of the ghosts so some are slightly turned to make the gathering look more natural. This approach fills a large porch corner effectively.
- Assorted real or faux pumpkins
- Multiple tomato cages
- Warm white battery-operated lights
Best shortcut: Hide the battery packs for the lights inside a small plastic bag taped to the tomato cage to keep them dry.
Spooky Tomato Cage Ghost Ideas
39. Faceless Tomato Cage Ghost
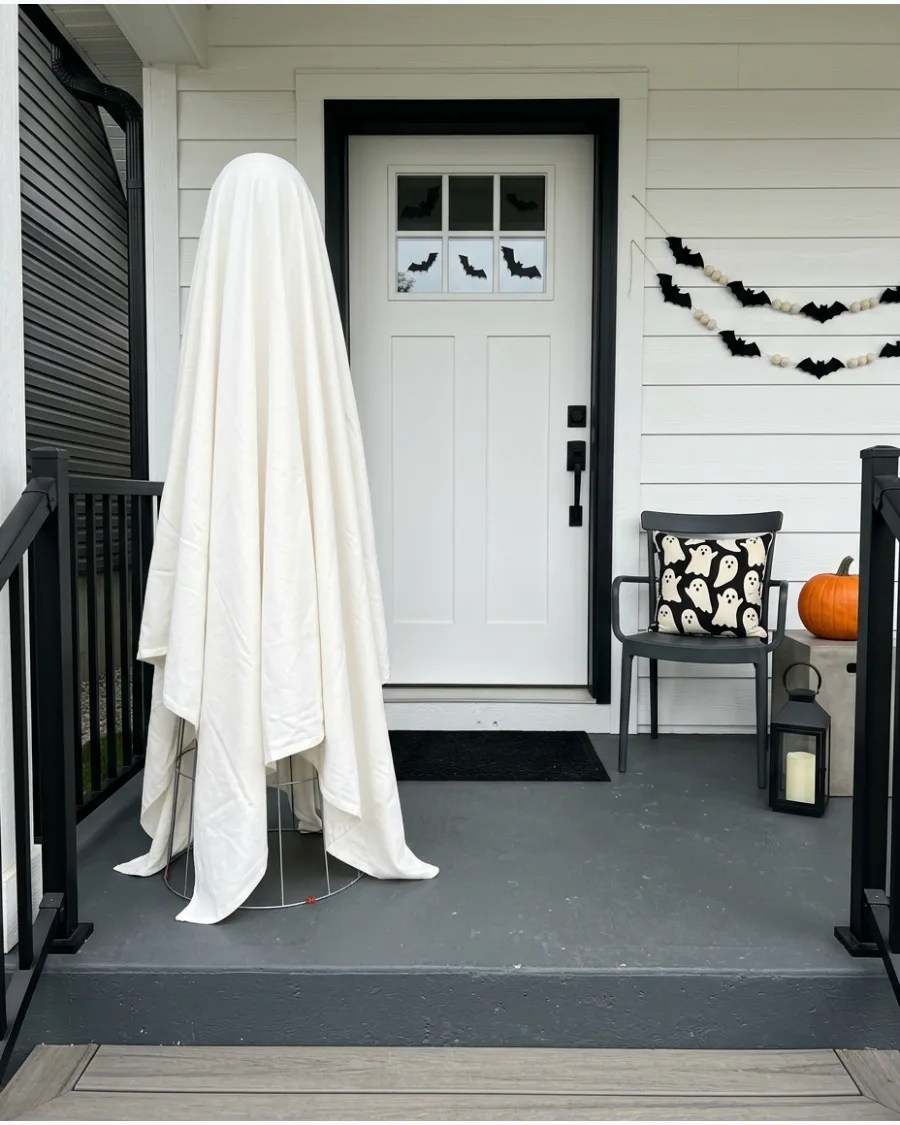
Skip the eyes and mouth entirely to create a more eerie, high-concept decoration.
Allowing the fabric to drape naturally over the head creates a silhouette that looks like a mysterious floating figure. Use a slightly heavier fabric like a thick tablecloth so the light doesn't reveal the cage structure underneath. This look is sophisticated and works well with modern home exteriors.
- Heavyweight white round tablecloth
- Large tomato cage
- Internal LED puck light
Quick win: Drape two layers of fabric if your material is too thin; the double layer hides the cage wires perfectly.
40. Hollow-Eyed Ghost
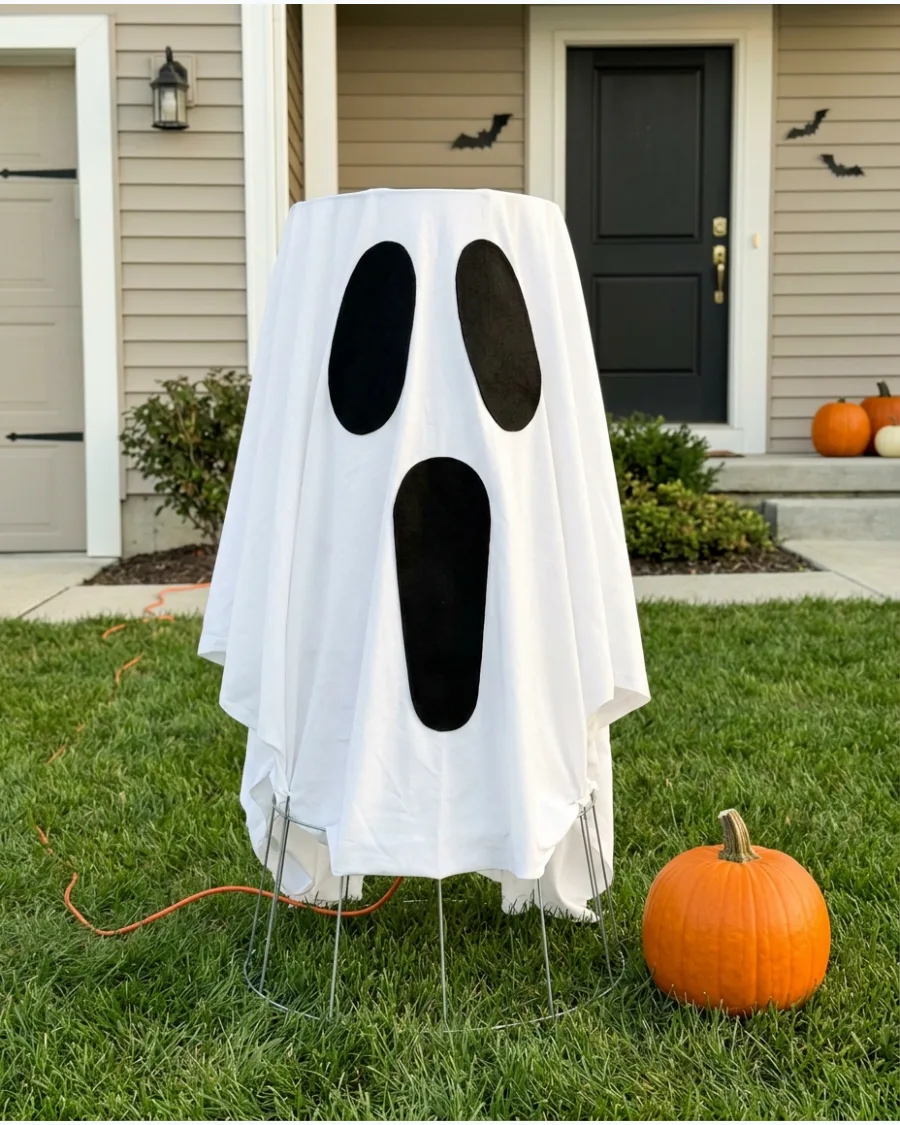
Cut large, exaggerated eye and mouth shapes out of black felt to give the ghost a classic screaming expression. The long, vertical oval for the mouth creates a much spookier vibe than a standard smile.
Make the eyes at least five inches tall so they are visible even when the internal lights are turned off. This traditional look is a favorite for trick-or-treaters.
- Large black felt sheets
- Sharp fabric scissors
- Tomato cage and foam head
Most people skip this: Position the eyes higher up on the head than you think; placing them too low makes the ghost look sad rather than spooky.
41. Ragged Ghost
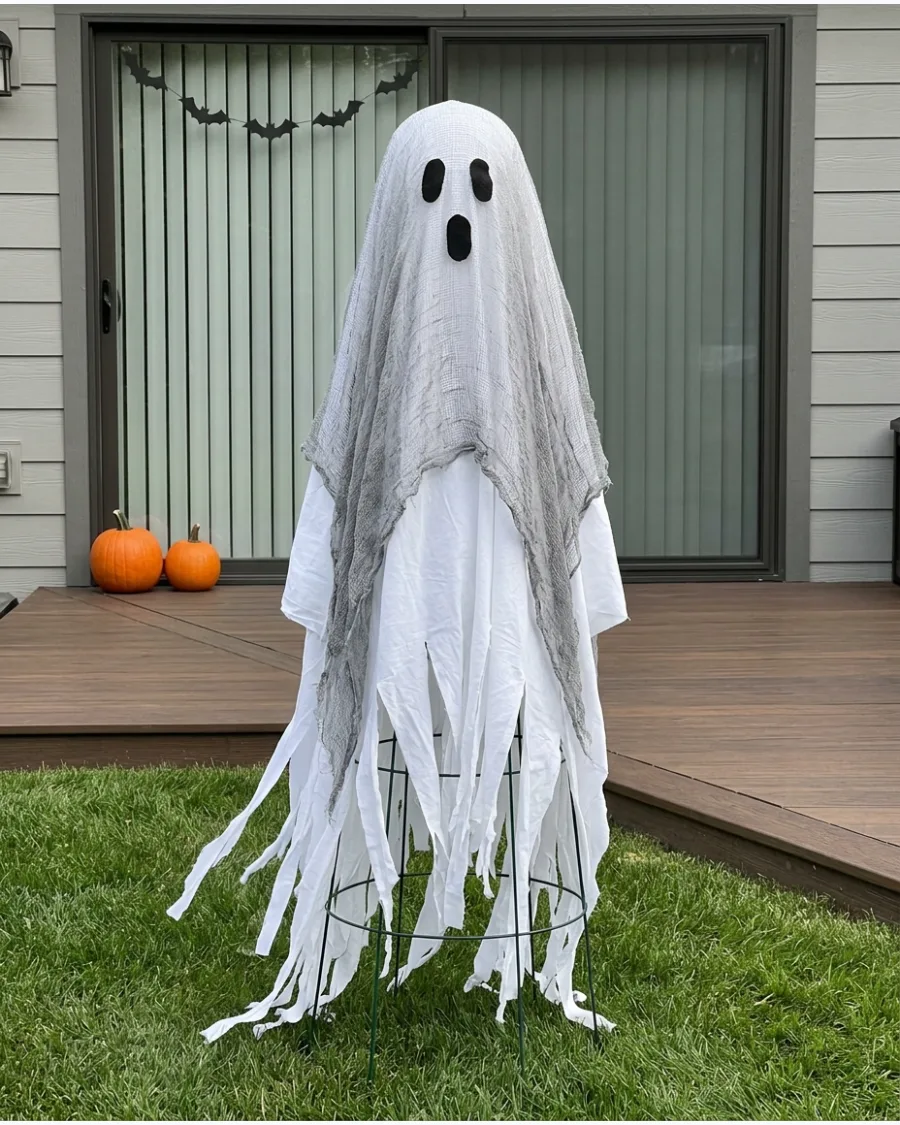
Use scissors to shred the bottom hem into long, jagged strips. Layering loose-weave cheesecloth over the main sheet adds instant texture and a weathered look.
Run the scissors vertically up the fabric about six inches to create a tattered edge that catches the wind. This technique makes a static decoration look like it is drifting through the yard.
- Buy white sheets and loose-weave cheesecloth from a craft store.
- Cut uneven strips with heavy-duty fabric shears for a natural look.
- Place the ghost in a windy spot to maximize the movement of the shredded fabric.
Quick win: Dip the very ends of the fabric strips in diluted black or brown paint for a dirty, aged graveyard look.
42. Gray Cemetery Ghost
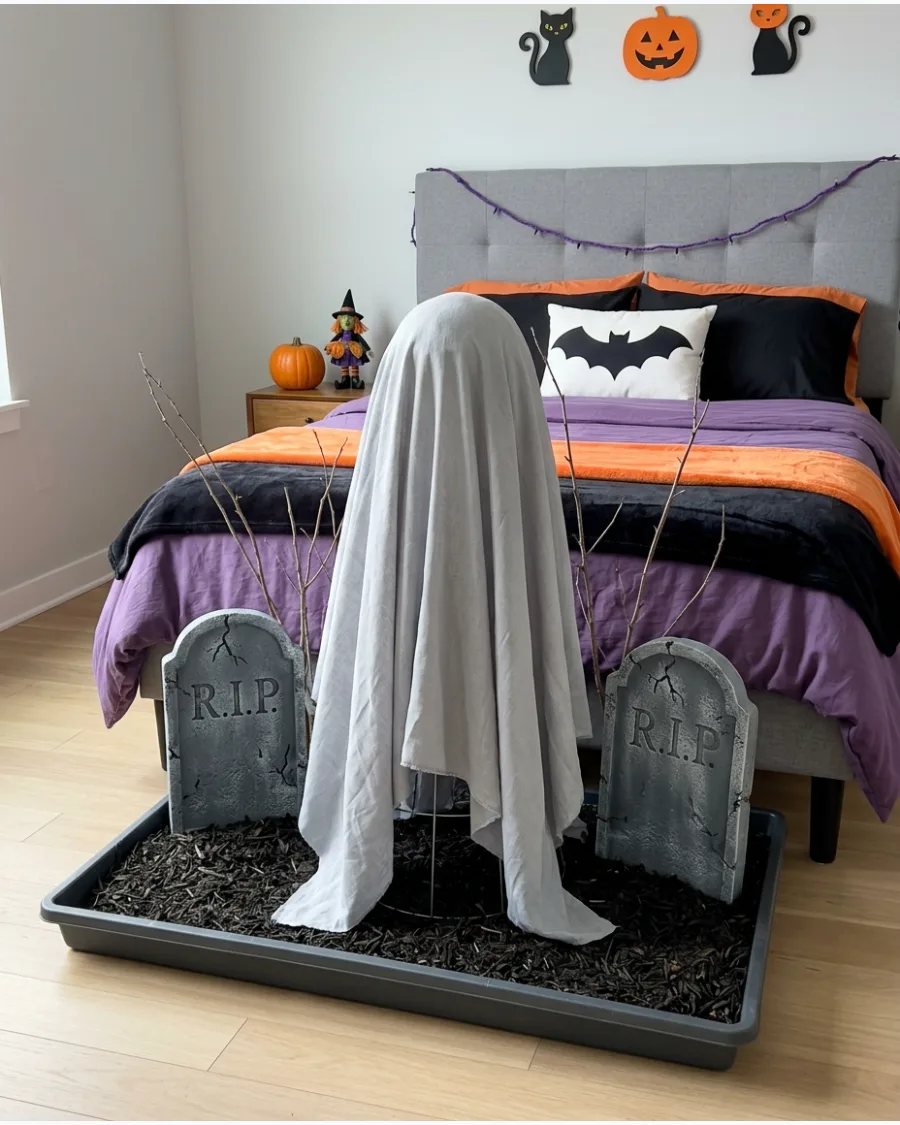
Swap the traditional white sheet for a pale gray fabric to create a more somber mood. This color blends into shadows better and looks more like a classic apparition.
Pair the gray figure with a few faux tombstones made of foam to anchor the scene. It provides a sophisticated alternative to bright, cartoonish decorations.
- Select a light gray cotton or polyester fabric for the best drape.
- Position the ghost near dark corners or garden beds for a spooky effect.
- Store the foam tombstones flat after the holiday to prevent them from snapping.
Best shortcut: Use an old gray bedsheet from a thrift store to save money on large-scale yard decorations.
43. Spiderweb Ghost
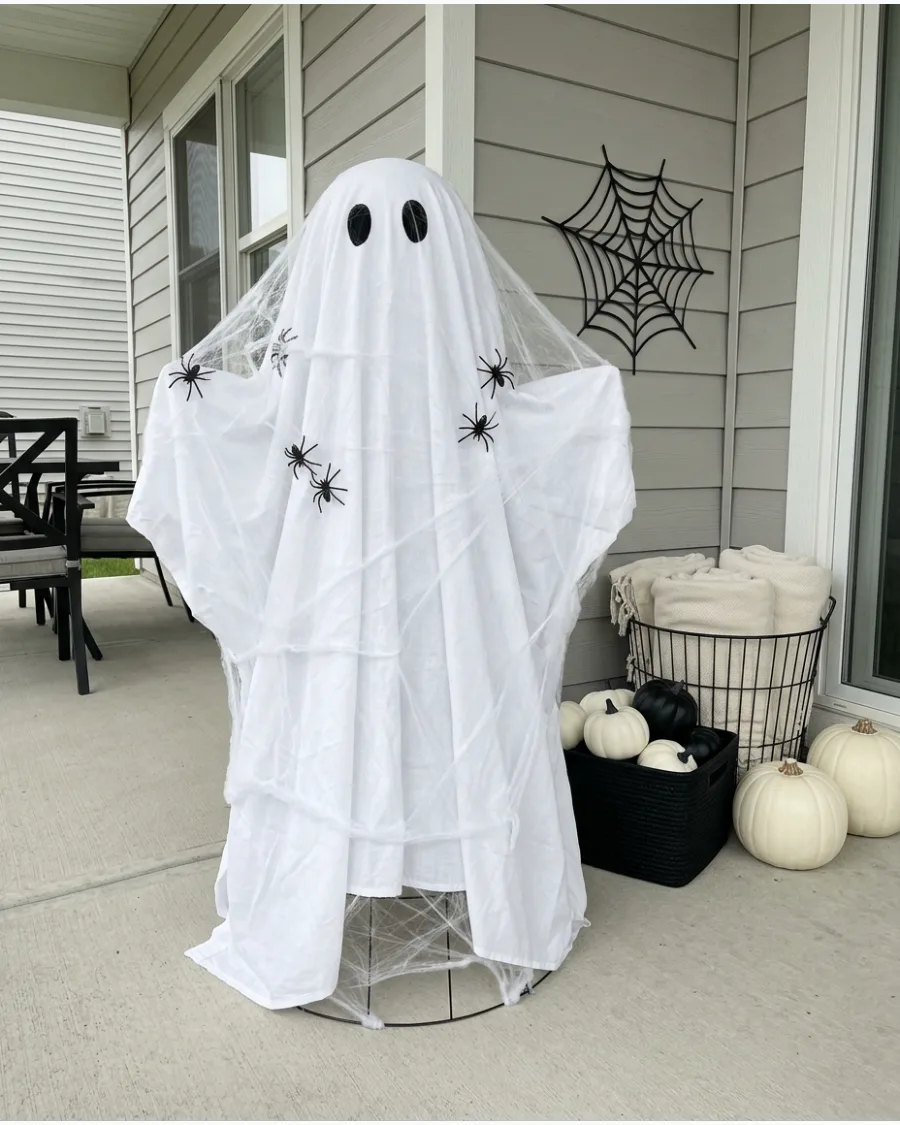
Stretch synthetic spiderwebs across the ghost’s body to give it an abandoned, haunted house feel. Adding a few plastic spiders near the shoulders makes the detail stand out from the street.
Pull the webbing very thin so the white fabric of the ghost still shows through underneath. This adds a layer of intricate detail without much extra cost or effort.
- Buy a bag of stretchable fake spiderwebs from any seasonal aisle.
- Hook the webbing onto the fabric fibers to keep it secure without glue.
- Use small plastic spiders with clips or hooks for easy removal later.
Most people skip this: Pull the webbing until it is almost invisible for the most realistic old-attic look.
44. Ghost With Glowing Eyes
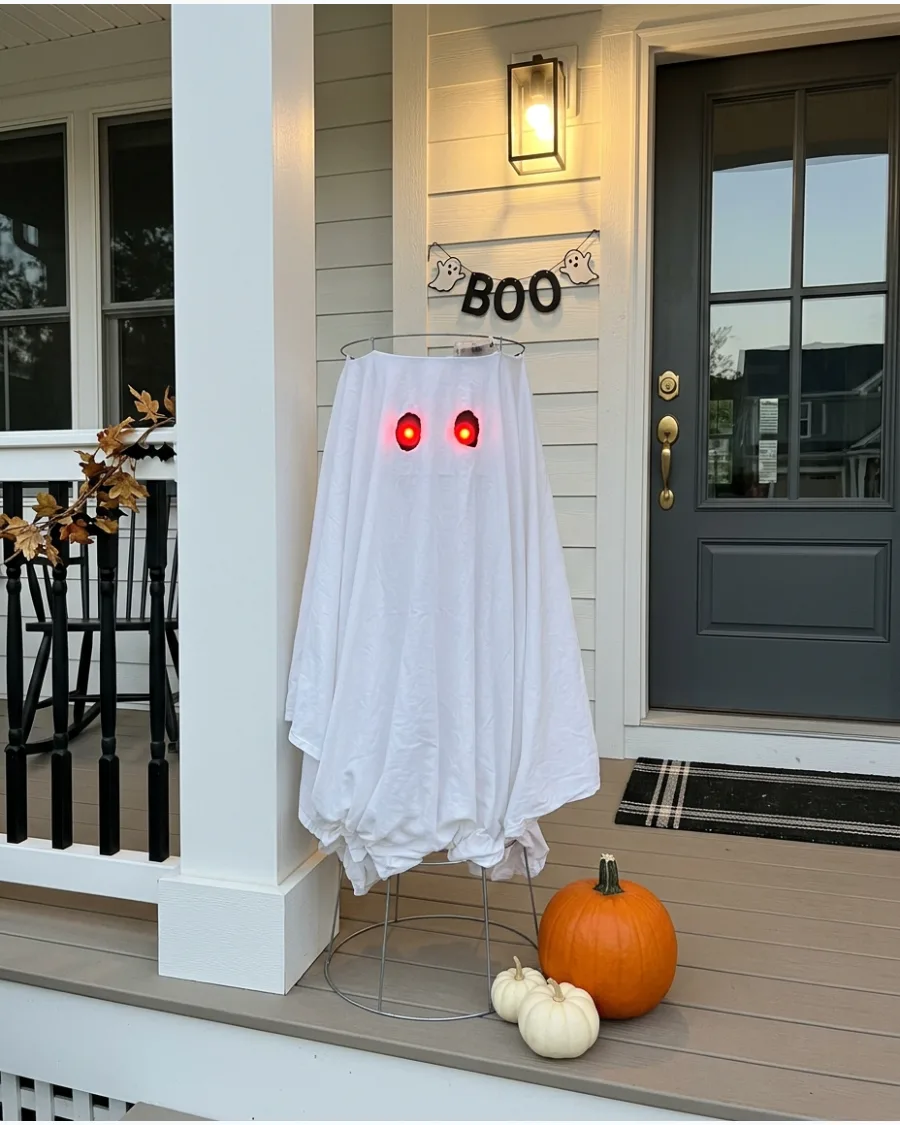
Cut small holes for eyes and place LED lights directly behind the openings. Keeping the battery pack tucked into the top of the tomato cage ensures the lights stay in place all night.
Use red or orange LED tea lights to give the ghost an eerie, supernatural stare. This makes the decoration effective even in complete darkness.
- Use battery-operated LED tea lights or fairy lights for safety.
- Secure the lights to the top of the cage with zip ties or strong tape.
- Choose red, orange, or green lights for a spooky, non-traditional glow.
Quick win: Use a small piece of black mesh over the eye holes to hide the light bulbs during the day.
Tomato Cage Ghost Porch and Yard Displays
45. Front-Door Greeter Ghost
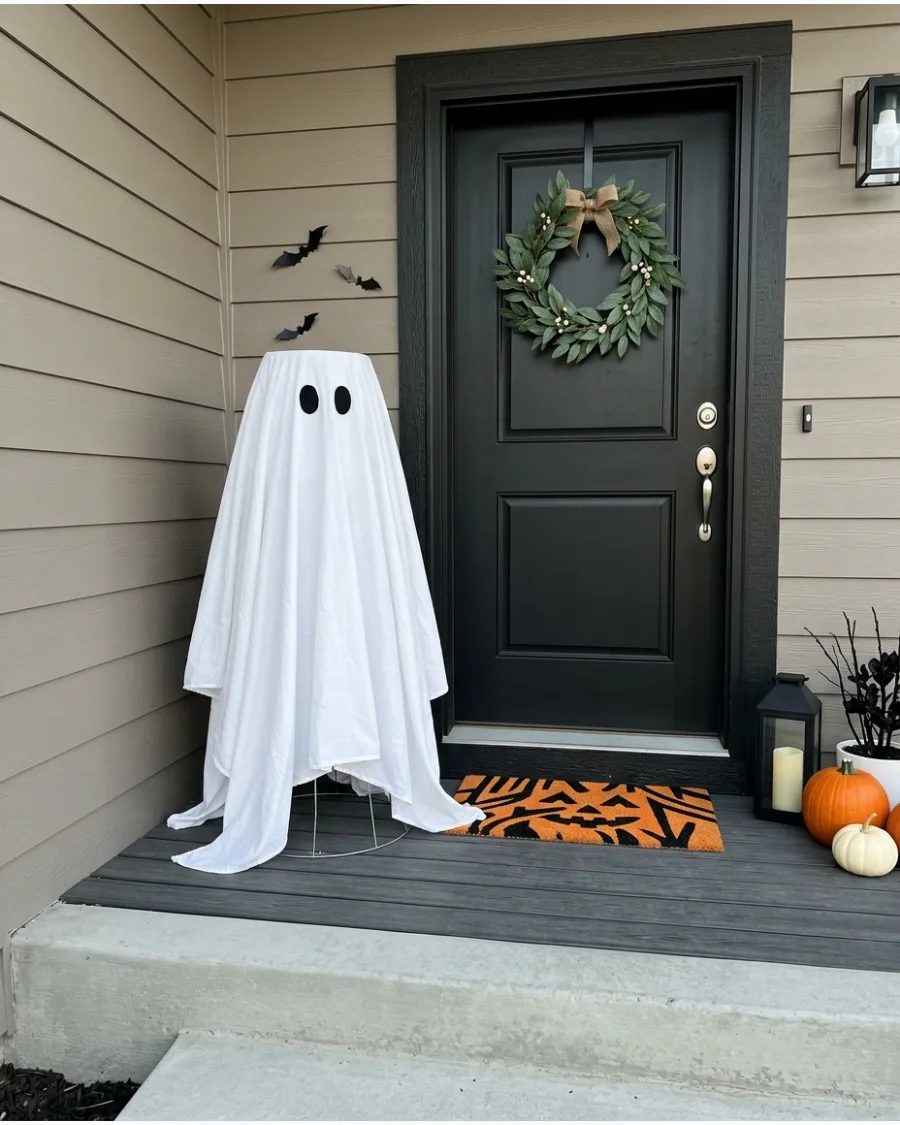
Position a single ghost right next to the entrance to welcome visitors. Style it with a seasonal doormat and a modern wreath to make the porch feel complete.
Place the ghost on the hinge side of the door so it does not block the path for guests. A single, well-placed figure often looks cleaner than a crowded display.
- Measure the porch width to ensure clear walking space for trick-or-treaters.
- Place a heavy rock at the base of the tomato cage to prevent tipping.
- Coordinate the fabric color with your house trim for a cohesive look.
Best shortcut: Use a command hook on the siding to tether the ghost if your porch is very windy.
46. Ghost Pathway
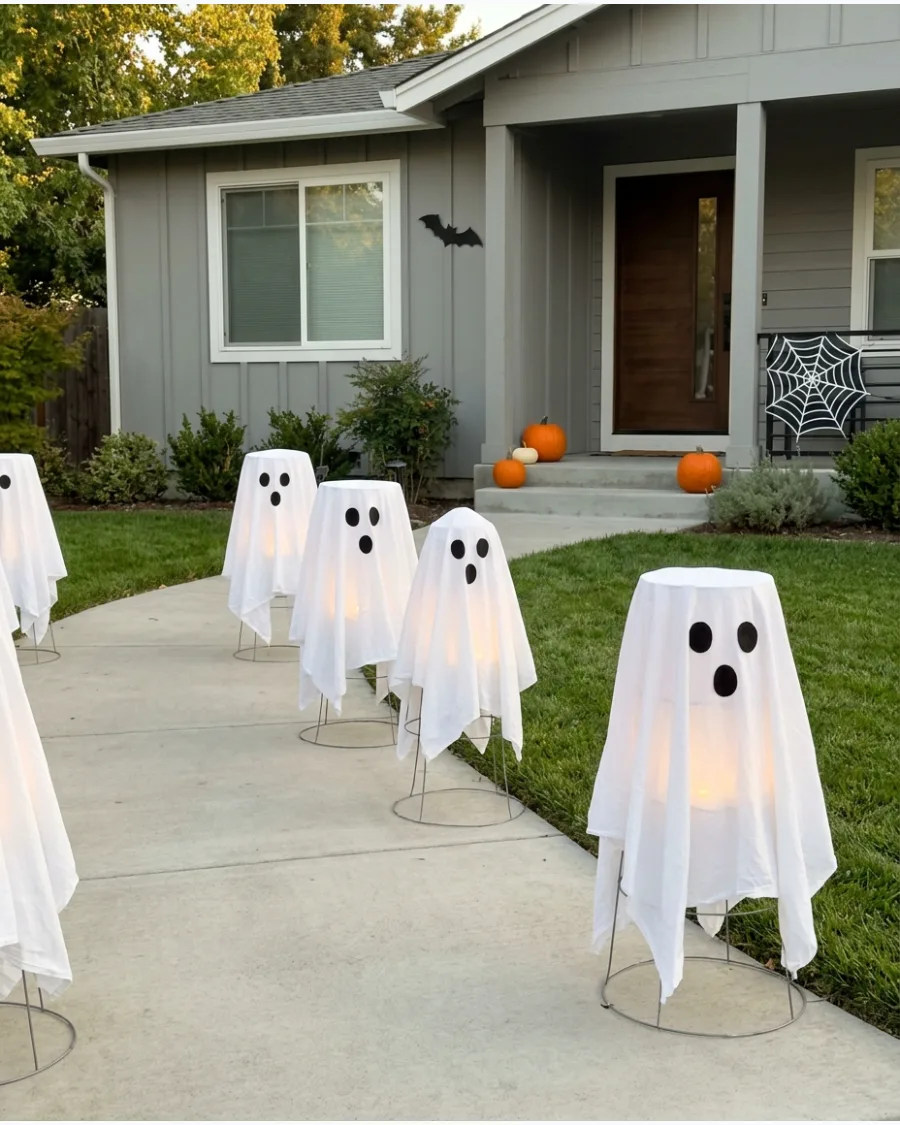
Line the edge of a sidewalk with several identical ghosts to create a clear path to the door. Using solar lights inside each one means they will turn on automatically at dusk.
Space the ghosts exactly three feet apart for a balanced, professional look. This creates a high-impact visual for trick-or-treaters walking up to the house.
- Use smaller tomato cages for a more compact and sturdy pathway look.
- Set solar stakes firmly into the ground inside the cages before adding fabric.
- Ensure the fabric is taut so it does not blow onto the walking path.
Most people skip this: Use garden staples to pin the bottom of the sheets to the grass so the line stays straight.
47. Ghost Pumpkin Patch
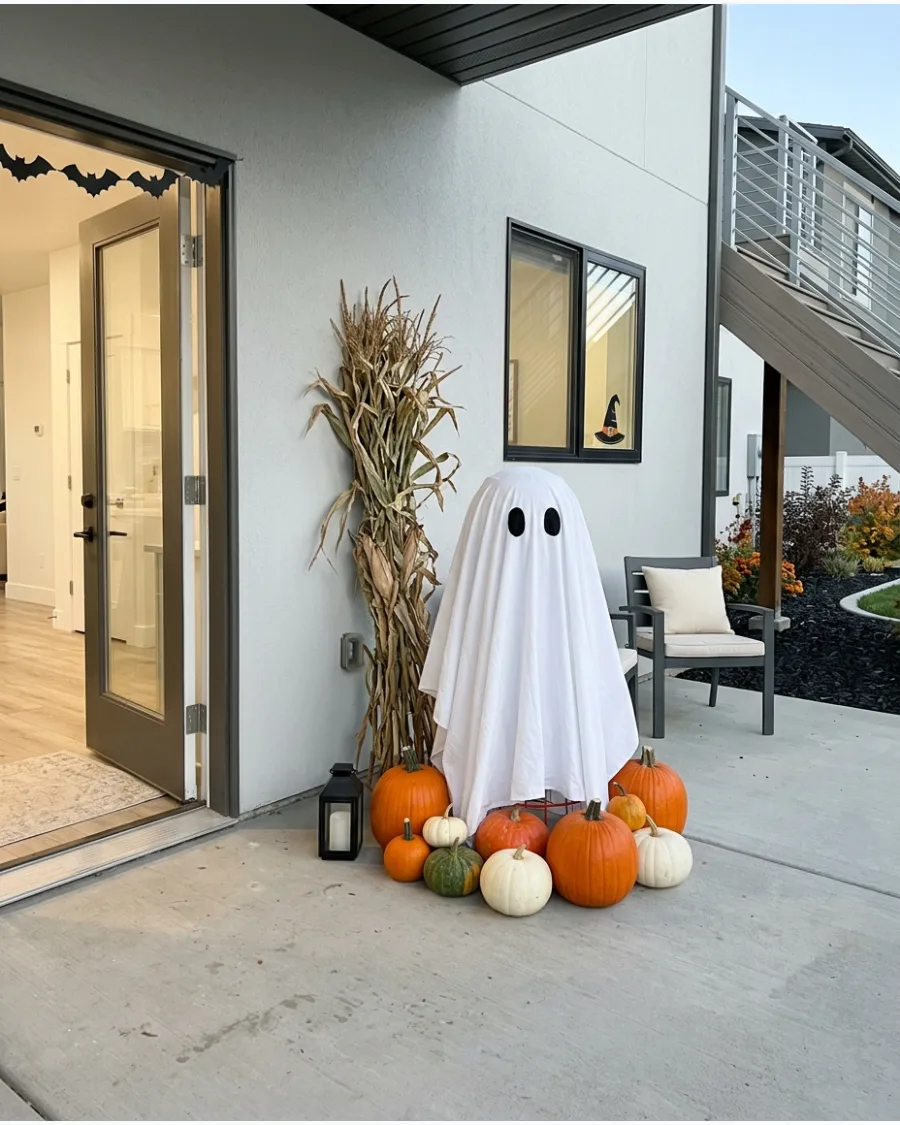
Create a focal point by grouping your ghost with a variety of pumpkins and gourds. Mixing different colors like orange, white, and green adds visual interest to the base of the decoration.
Tuck some dried cornstalks or a bale of hay behind the ghost to add height and texture. This turns a simple DIY project into a full seasonal scene.
- Buy a mix of real or high-quality foam pumpkins for a realistic look.
- Arrange pumpkins in odd numbers for the best visual balance.
- Keep hay away from wet areas to avoid a mess on your patio or deck.
Quick win: Use a ghost-white pumpkin near the base to echo the theme of the main decoration.
48. Ghost Graveyard Scene
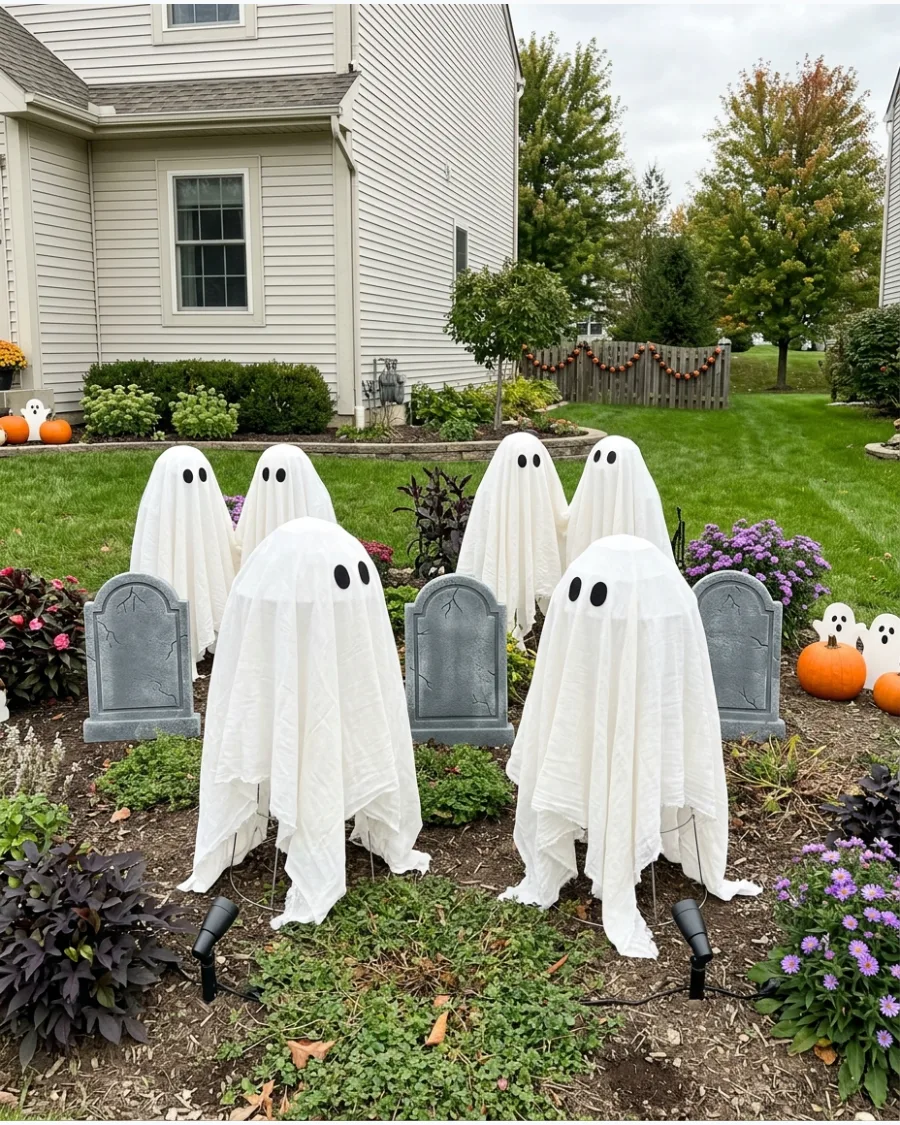
Place ragged-edged ghosts between rows of faux tombstones to build a miniature cemetery. Low-profile spotlights pointed upward will create dramatic shadows on the house or trees.
Angle the ghosts slightly toward each other to make them look like they are interacting. This setup tells a story rather than just filling empty yard space.
- Use foam tombstones with metal stakes for stability in the wind.
- Hide outdoor extension cords under mulch or leaves for a clean look.
- Add a small graveyard sign for extra character and detail.
Best shortcut: Use a battery-powered strobe light inside the ghost for a flickering, haunted effect.
49. Tomato Cage Dog Ghost
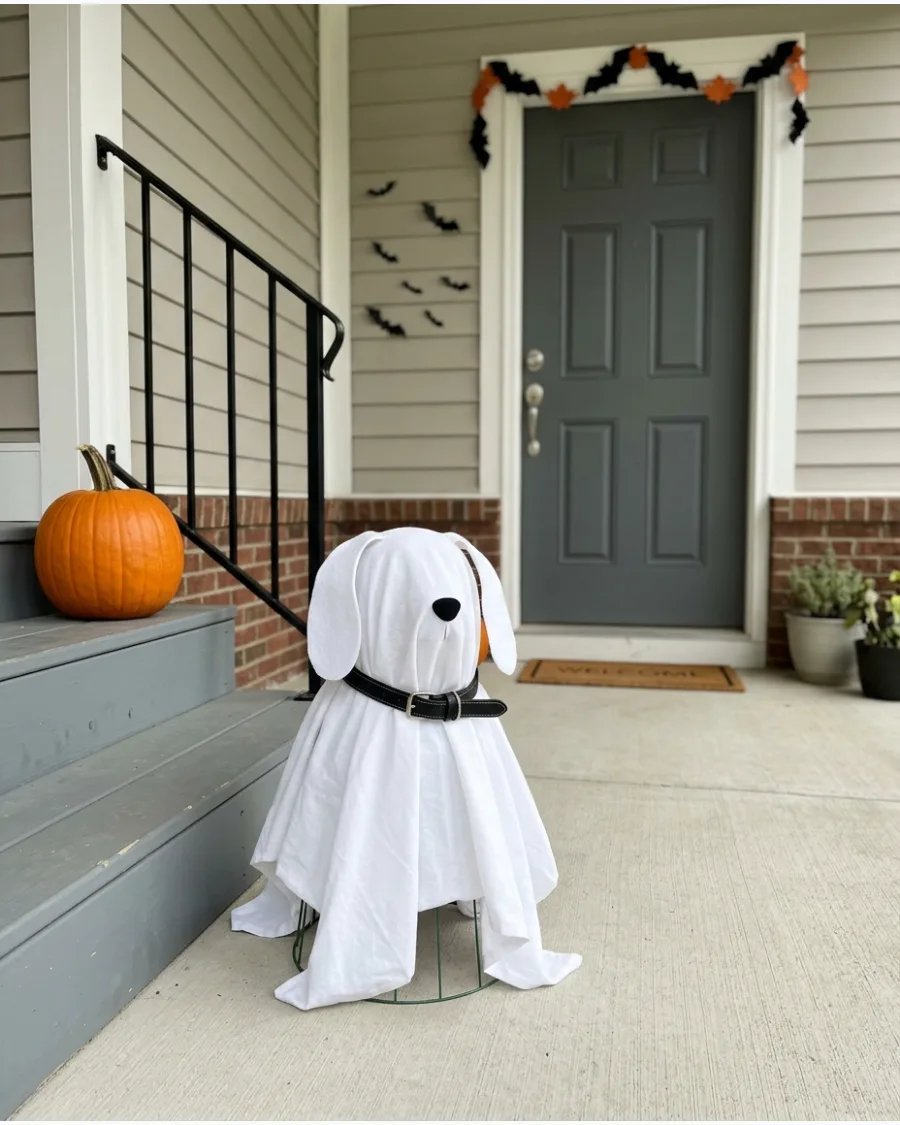
Use a small tomato cage to create a pet-sized ghost that sits lower to the ground. Adding floppy felt ears and a simple black nose gives the figure an instant canine silhouette.
Attach a real dog collar around the neck area to make the character recognizable. It is a playful addition that kids and pet lovers will enjoy.
- Use a 33-inch or smaller tomato cage for proper pet proportions.
- Cut ears from stiff white felt so they hold their shape in the wind.
- Place it near a larger ghost for a cute parent-and-pet family feel.
Most people skip this: Put a tennis ball inside the sheet near the mouth area for a cute, interactive detail.
50. Tomato Cage Cat Ghost
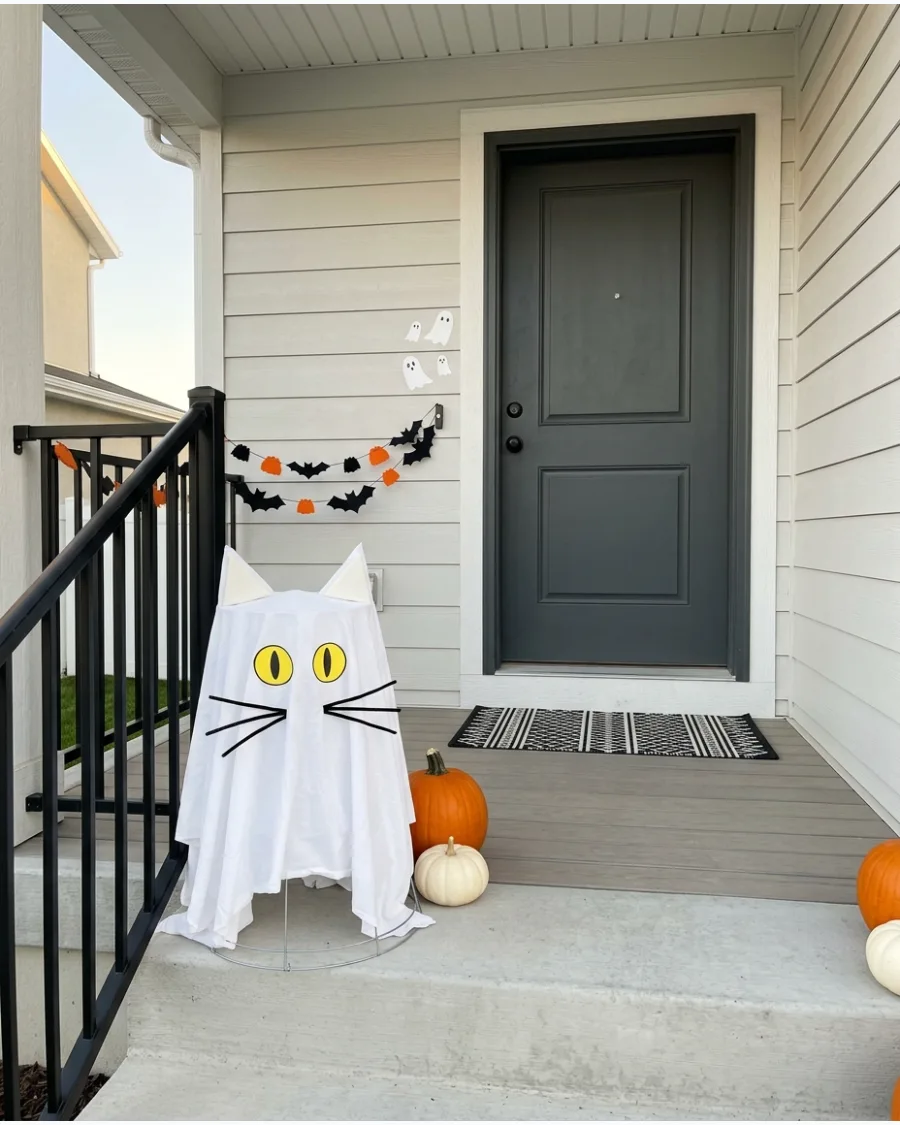
Construct pointed ears using foam triangles and secure them to the top of the cage before draping the fabric. Long black pipe cleaners make perfect whiskers when poked through the sheet.
Draw large yellow or green oval eyes to mimic a cat’s nighttime glow. This small-scale ghost works perfectly on a porch step or an entryway table.
- Shape ears from cardboard or craft foam for a sharp, pointed look.
- Use a permanent marker for the eyes to prevent smudging in the rain.
- Secure the whiskers with a dab of hot glue on the inside of the fabric.
Quick win: Curve a white pool noodle or wire under the sheet to create a tail that peeks out the back.
Frequently Asked Questions
How do I keep my tomato cage ghost from blowing over in the wind?
To prevent your ghost from toppling, secure the bottom wire rim to the ground using U-shaped garden stakes. For displays on hard surfaces like porches, simply weigh down the base with a few bricks or a small sandbag tucked inside the fabric.
What is the best fabric to use for an outdoor tomato cage ghost?
While traditional cotton sheets offer great durability and coverage against the elements, layering cheesecloth or white mesh creates a more ethereal, tattered look. For the best of both worlds, use a solid white sheet as a base and drape mesh over it to add spooky texture.
How do I add lights to a tomato cage ghost for a nighttime glow?
You can easily illuminate your ghost by wrapping battery-operated LED string lights around the wire frame and securing them with zip ties. Alternatively, place a bright LED puck light at the base or tape it inside the head area for a focused, eerie glow.
What should I use for the ghost's head on top of the cage?
A large Styrofoam ball or an inverted plastic mixing bowl works perfectly to create a sturdy, rounded head shape atop the cage. For a temporary and lightweight option, you can also use an inflated balloon, though foam is much more durable for outdoor use.
Can I use different sizes of tomato cages for a 'ghost family' display?
Absolutely, mixing 33-inch and 42-inch tomato cages is a fantastic way to create a dynamic 'ghost family' with varying heights. This variation adds visual interest to your porch or yard, making the display look more natural and inviting.