50 Staircase Wall Design Ideas
This post may contain affiliate links: full affiliate disclosure.
The wall along a staircase is often the largest blank canvas in a home but the hardest to decorate.
These design ideas turn the awkward diagonal transition into a stylish focal point that guides the eye upward. Focus on maintaining a consistent distance from the handrail to ensure the layout looks intentional and balanced.
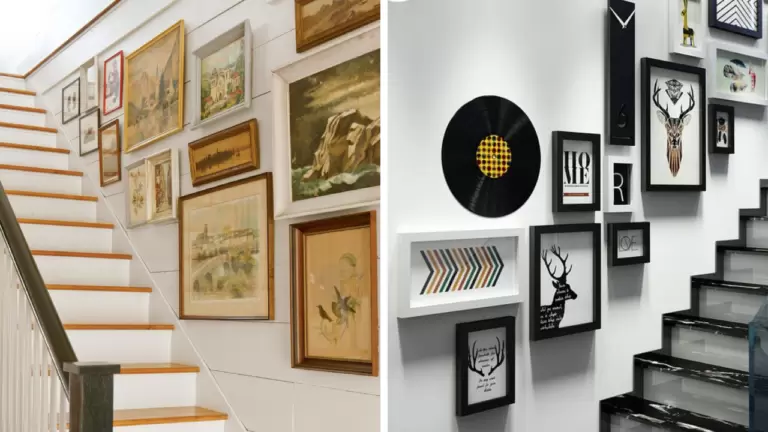
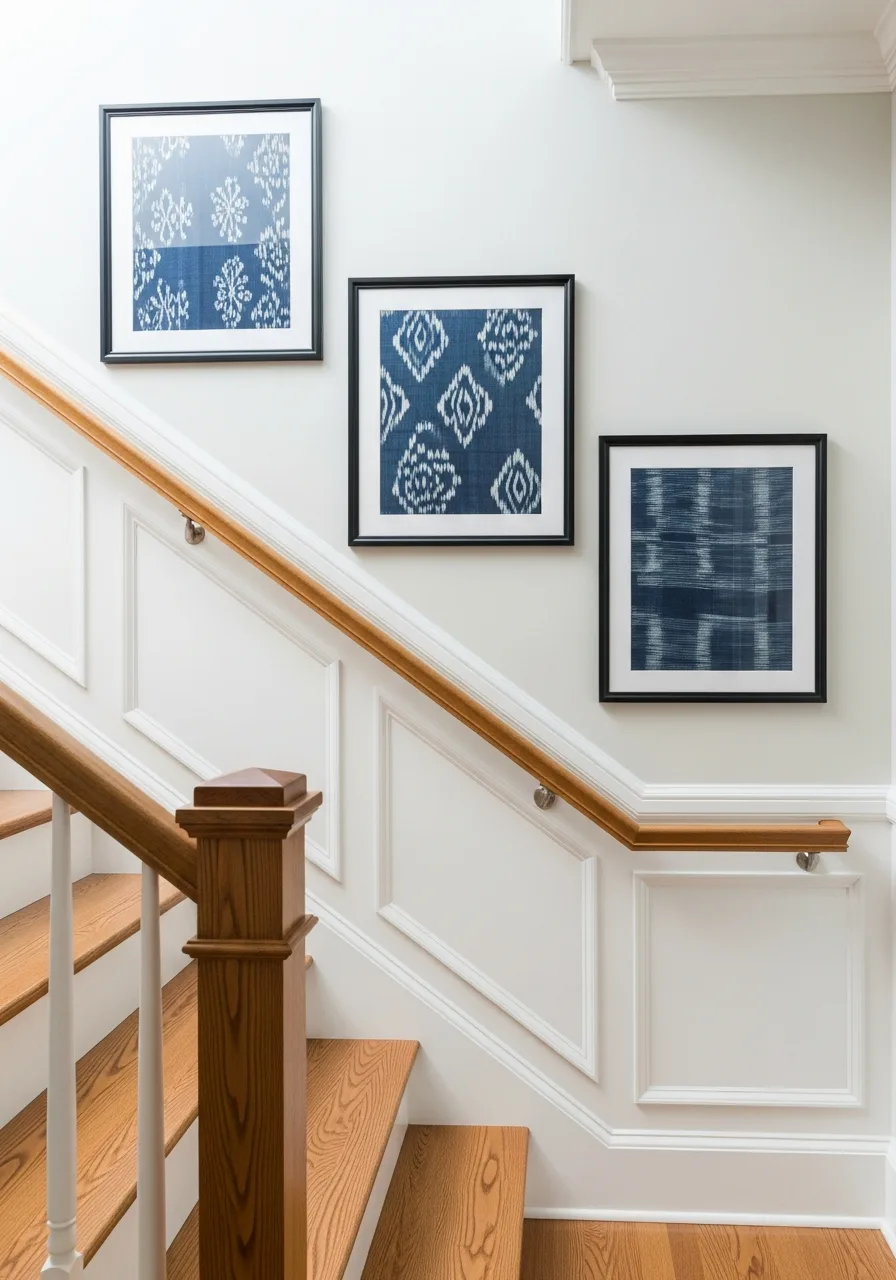
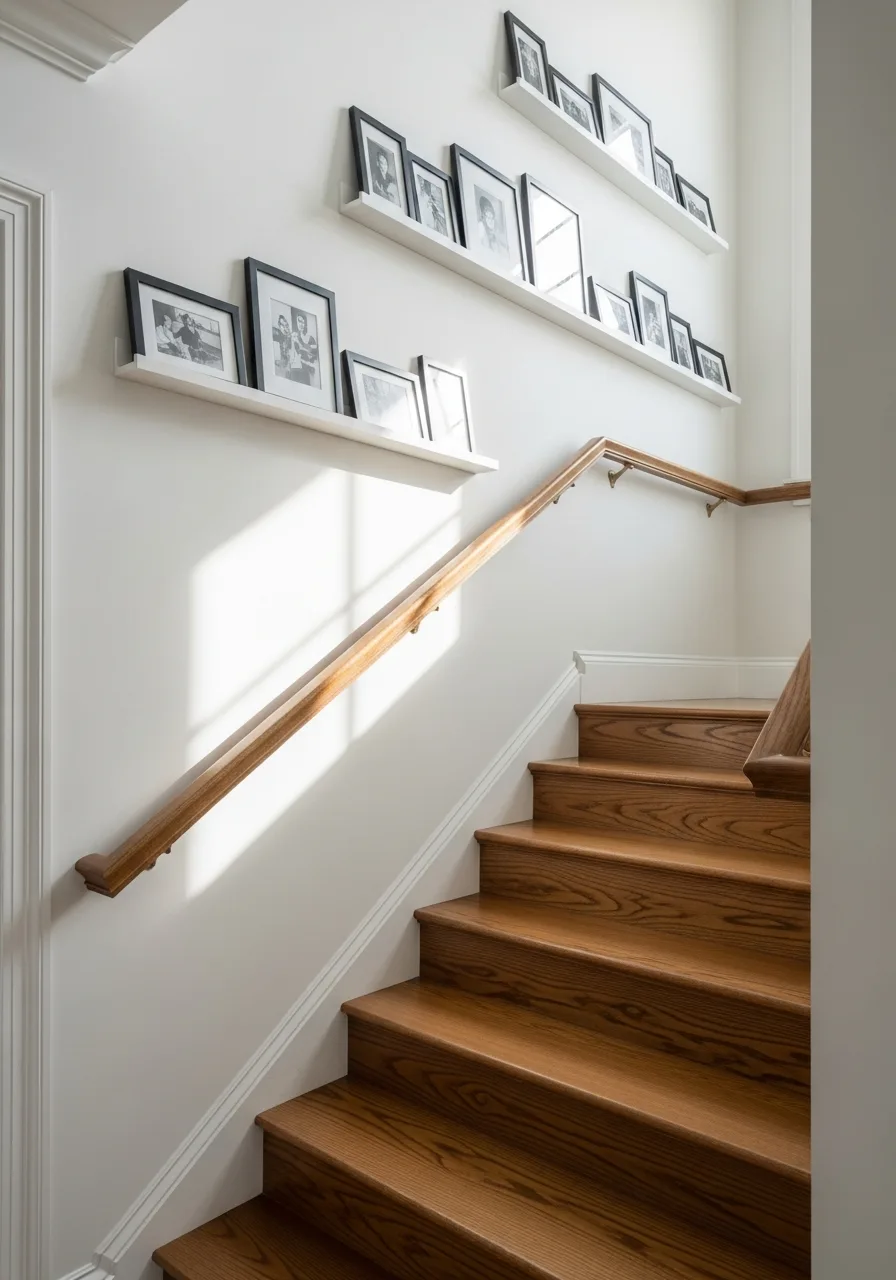
1. Uniform Grid Gallery
Using identical frames creates a clean and organized look that tames the chaotic angle of the stairs. Align the bottom row of frames exactly three inches above the handrail to maintain a consistent visual line. This method works best with black-and-white photos to keep the focus on the symmetry.
A grid provides a sense of order in a high-traffic transition area.
- Buy frames in bulk sets to ensure the finish and size match perfectly.
- Use a laser level or a paper template to mark every nail hole before hammering.
- Keep this look for modern or transitional homes where clean lines are a priority.
Most people skip this: Use adhesive strips on the bottom corners of each frame to keep them from shifting when people walk by.
2. Oversized Statement Art
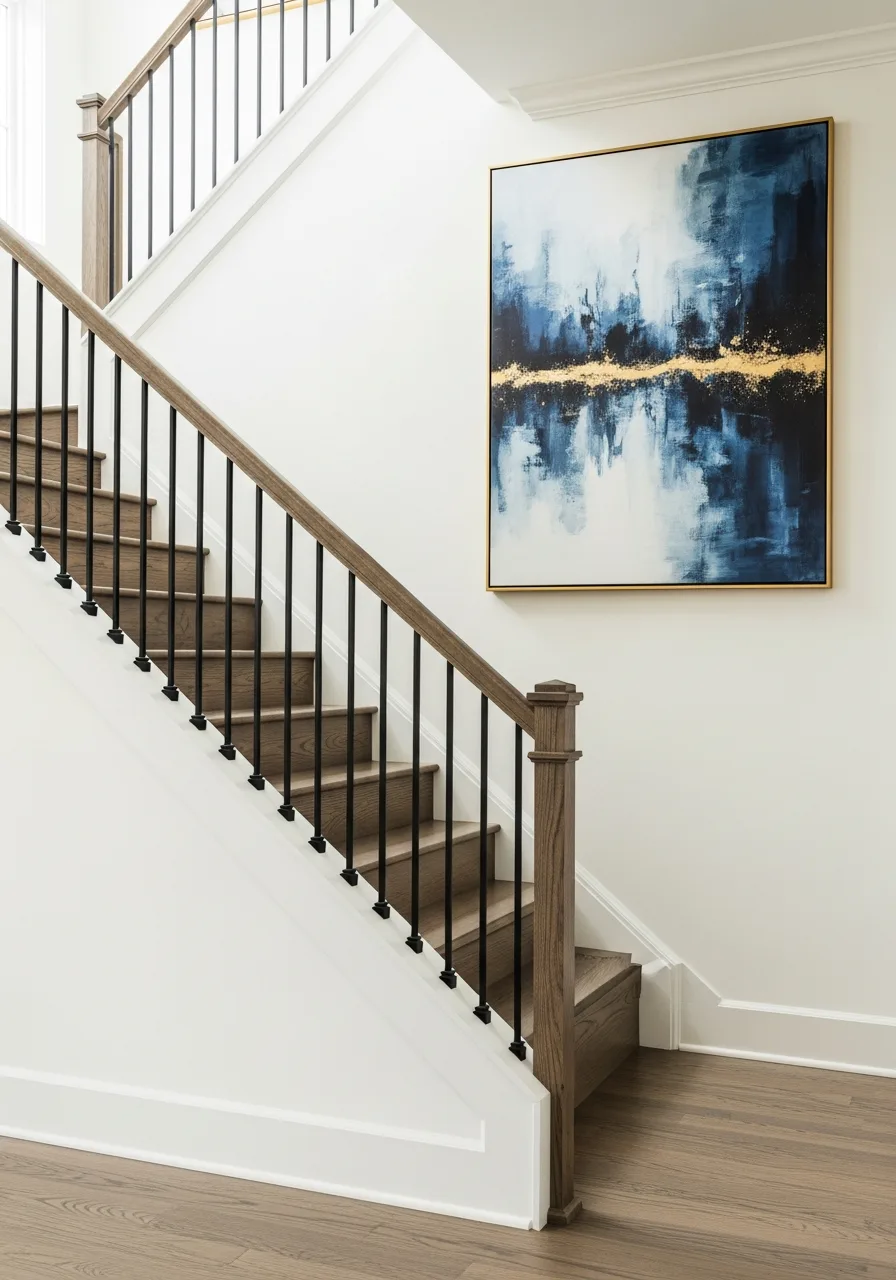
One large piece of art can fill the massive vertical space without looking cluttered. Center the piece on the largest section of the wall to anchor the entire staircase visually. This approach creates a sophisticated gallery feel and simplifies the decorating process.
It is the most effective way to handle a very tall or narrow stairwell.
- Select a piece that is at least 36 inches wide to fill the scale of the wall.
- Hang the center of the art at 60 inches from the floor of the nearest step.
- Choose a canvas over a glass-front frame to reduce glare from nearby windows.
Quick win: If the wall is exceptionally long, use two large matching pieces side-by-side instead of one giant one.
3. Classic Board and Batten
Adding architectural trim provides texture and shadow without taking up physical floor space. Paint the trim the same color as the wall for a subtle, high-end architectural feel that adds depth. This design makes the staircase feel like a permanent part of the home's structure rather than an afterthought.
It is a durable choice for families since wood trim handles scuffs better than drywall.
- Measure the angle of the stairs carefully to ensure the top rail of the trim is perfectly parallel.
- Use MDF boards for a smooth finish that is easy to paint and maintain.
- Space vertical battens 12 to 16 inches apart for a traditional look.
Best shortcut: Buy pre-primed wood strips to save hours on sanding and base-coating.
4. Staggered Floating Ledges
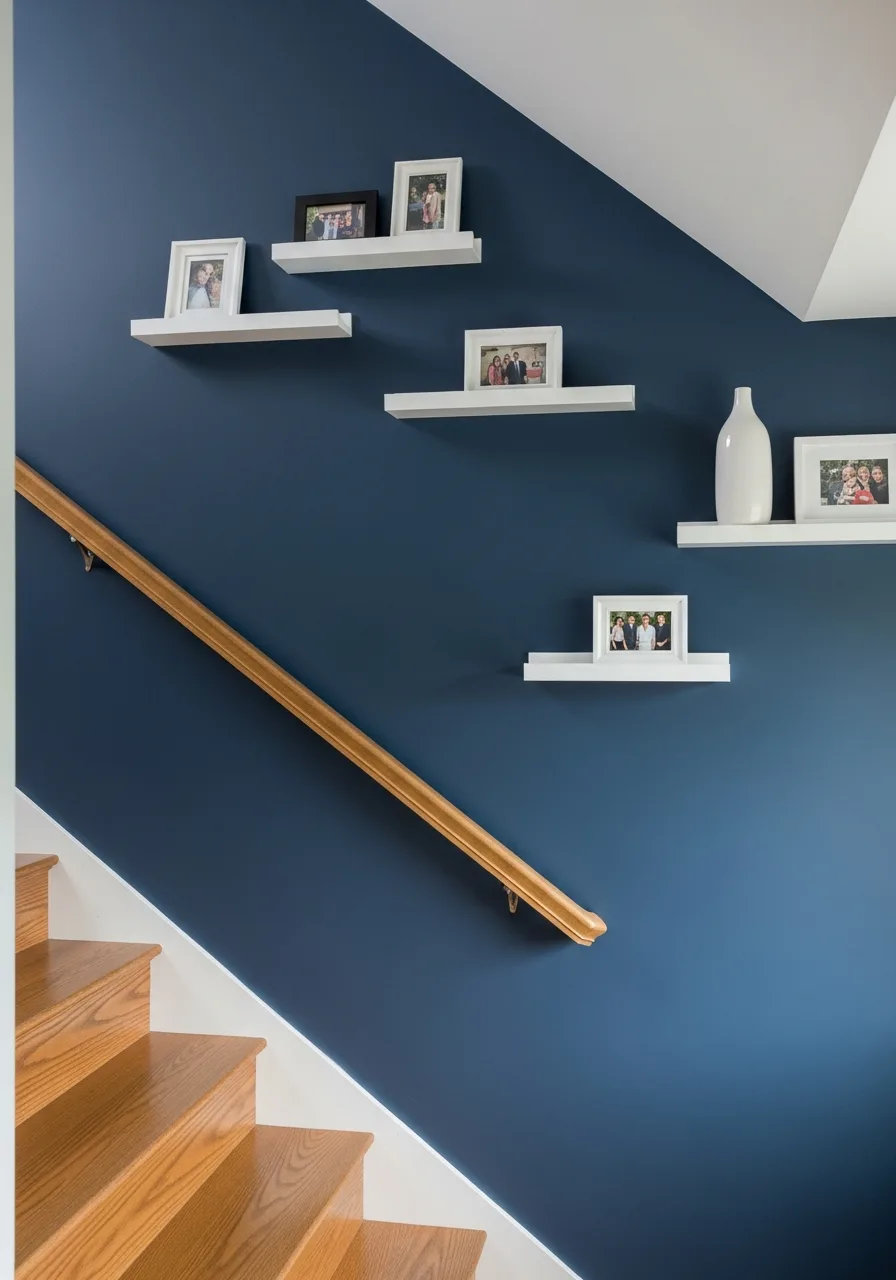
Ledges allow for a rotating display of art and objects without making new holes in the wall. Overstep the shelves so they follow the natural rise of the stairs for a dynamic and layered look. This is perfect for people who like to update their decor with the seasons.
It adds a three-dimensional element that standard frames cannot match.
- Install shelves that are no deeper than 4 inches to avoid bumping them while carrying items up the stairs.
- Secure the ledges directly into wall studs to support the weight of heavy frames.
- Mix framed art with small potted trailing plants for a lived-in feel.
Most people skip this: Lean the largest frames in the back and overlap smaller ones in the front to create depth.
5. Botanical Feature Wallpaper
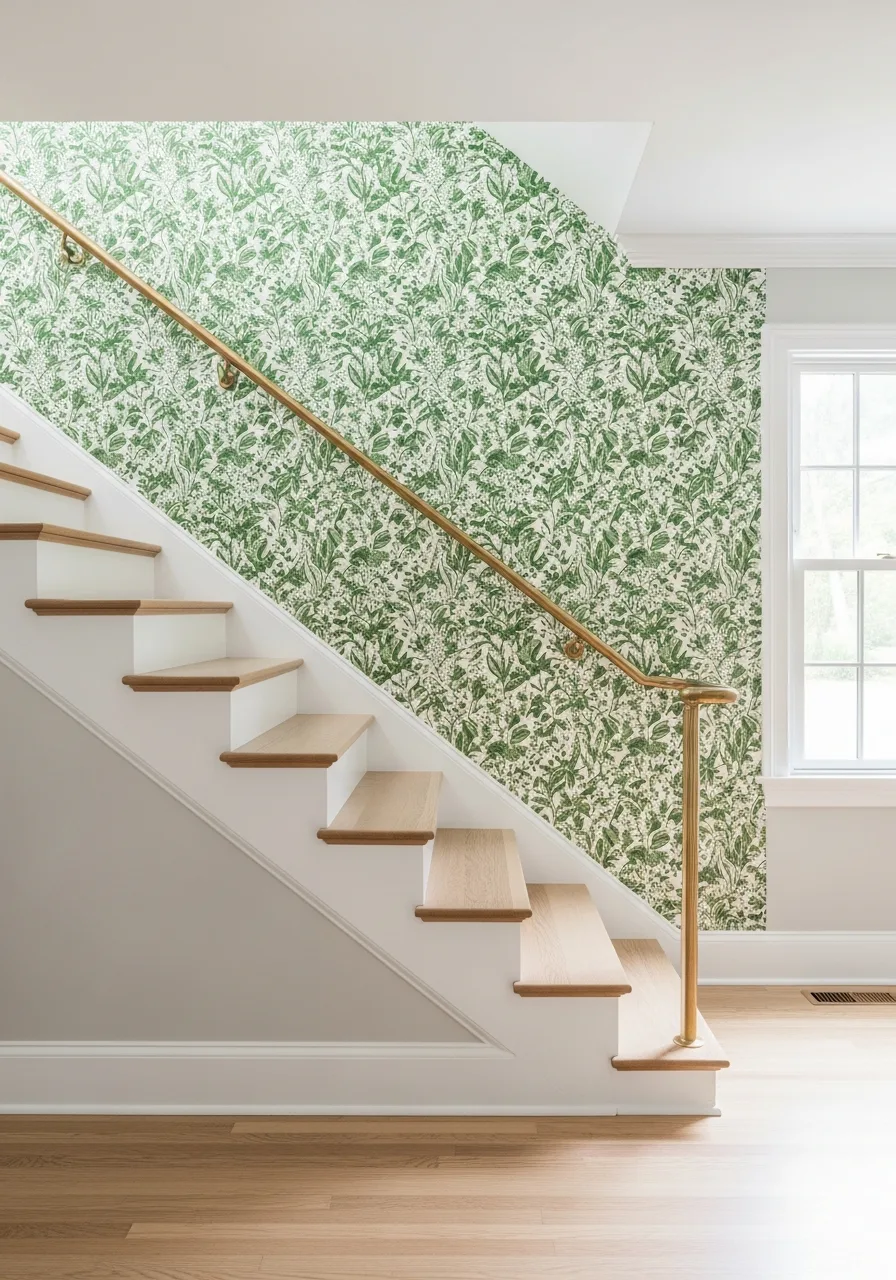
A bold pattern can transform a boring stairwell into a destination. Choose a pattern with a vertical flow to lead the eye upward toward the landing naturally. Wallpaper is an excellent way to hide minor wall imperfections or uneven drywall.
It provides a high-impact look with very little effort compared to a gallery wall.
- Use peel-and-stick wallpaper if you are a renter or want to change styles later.
- Order 15% more paper than you think you need to account for the diagonal cuts.
- Keep the opposite wall neutral to avoid overwhelming the narrow space.
Quick win: Small, busy patterns are better at hiding the seams on a staircase than large, geometric ones.
6. Vintage Mirror Collection
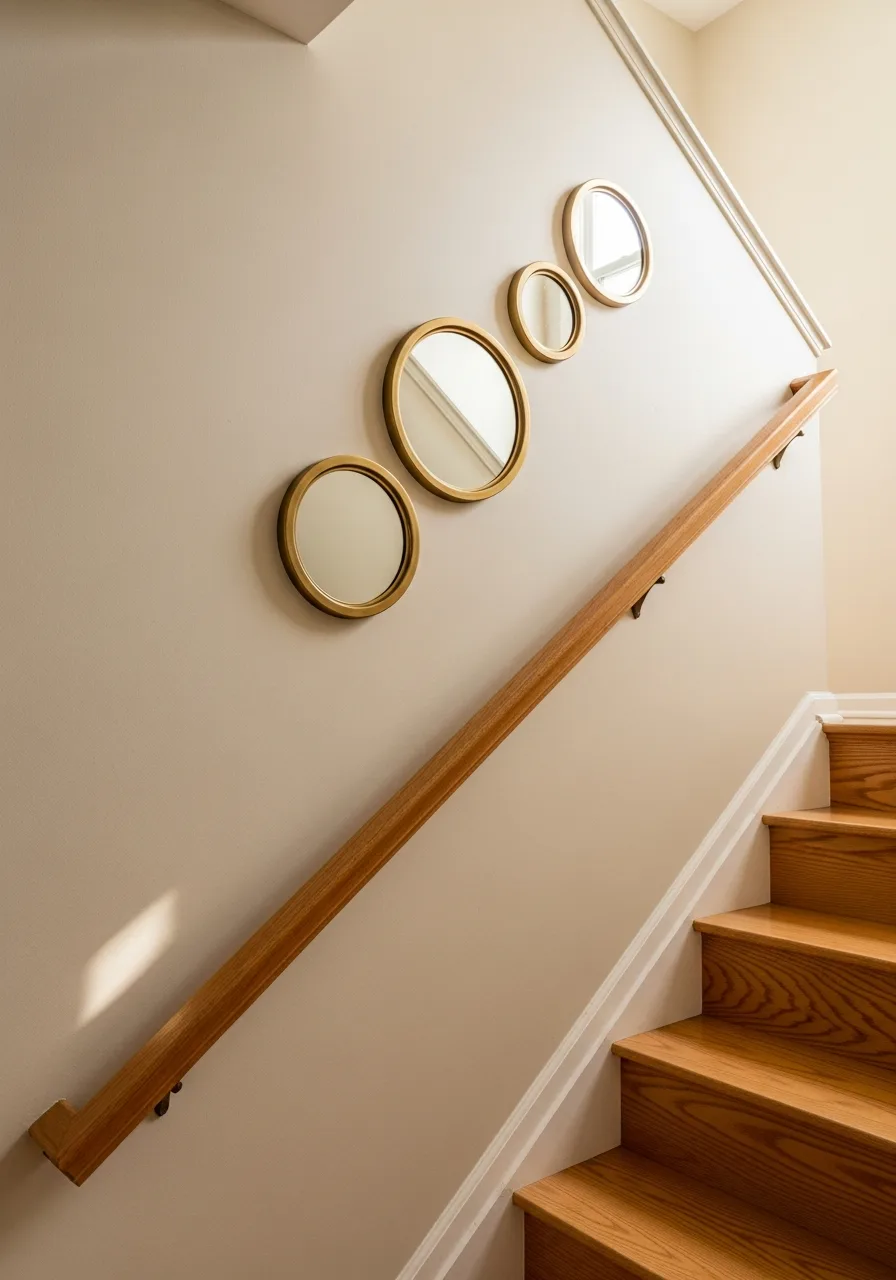
Mirrors are a functional way to brighten up a dark or enclosed staircase. Mix different frame finishes like brass and wood to add depth and character to the wall. The reflection makes a narrow hallway feel twice as wide and bounces light from the top floor down to the bottom.
It is a great way to showcase a collection of unique finds.
- Place the largest mirror at the eye level of someone standing on the middle step.
- Ensure mirrors are securely fastened with heavy-duty anchors to prevent vibrations from footsteps.
- Use a mix of shapes like oval and round to break up the straight lines of the stairs.
Best shortcut: Use a cluster of mirrors at the landing where they can reflect light from a nearby window.
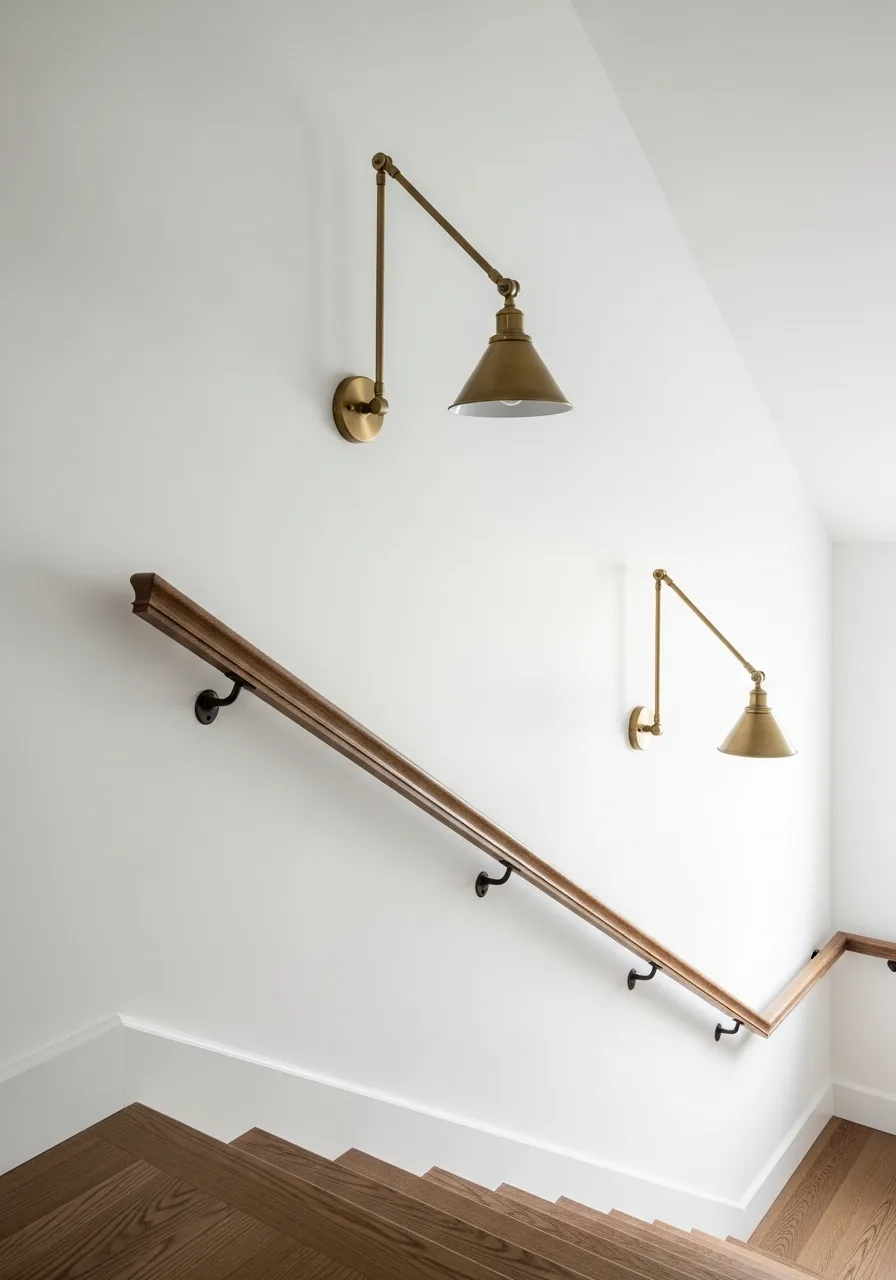
7. Linear Sconce Lighting

Lighting can serve as the primary decor when installed in a rhythmic pattern. Space the lights evenly every three steps to create a consistent glow that highlights the architectural lines. Modern sconces act like sculpture during the day and provide essential safety at night.
This eliminates the need for bulky frames in a tight space.
- Mount sconces at shoulder height so the light source is not directly in the eyes of someone walking up.
- Choose battery-operated LED sconces if you want the look without hiring an electrician.
- Pick a finish that matches your handrail brackets for a cohesive metal look.
Most people skip this: Install a dimmer switch to control the mood and reduce glare during the evening.
8. Woven Basket Cluster
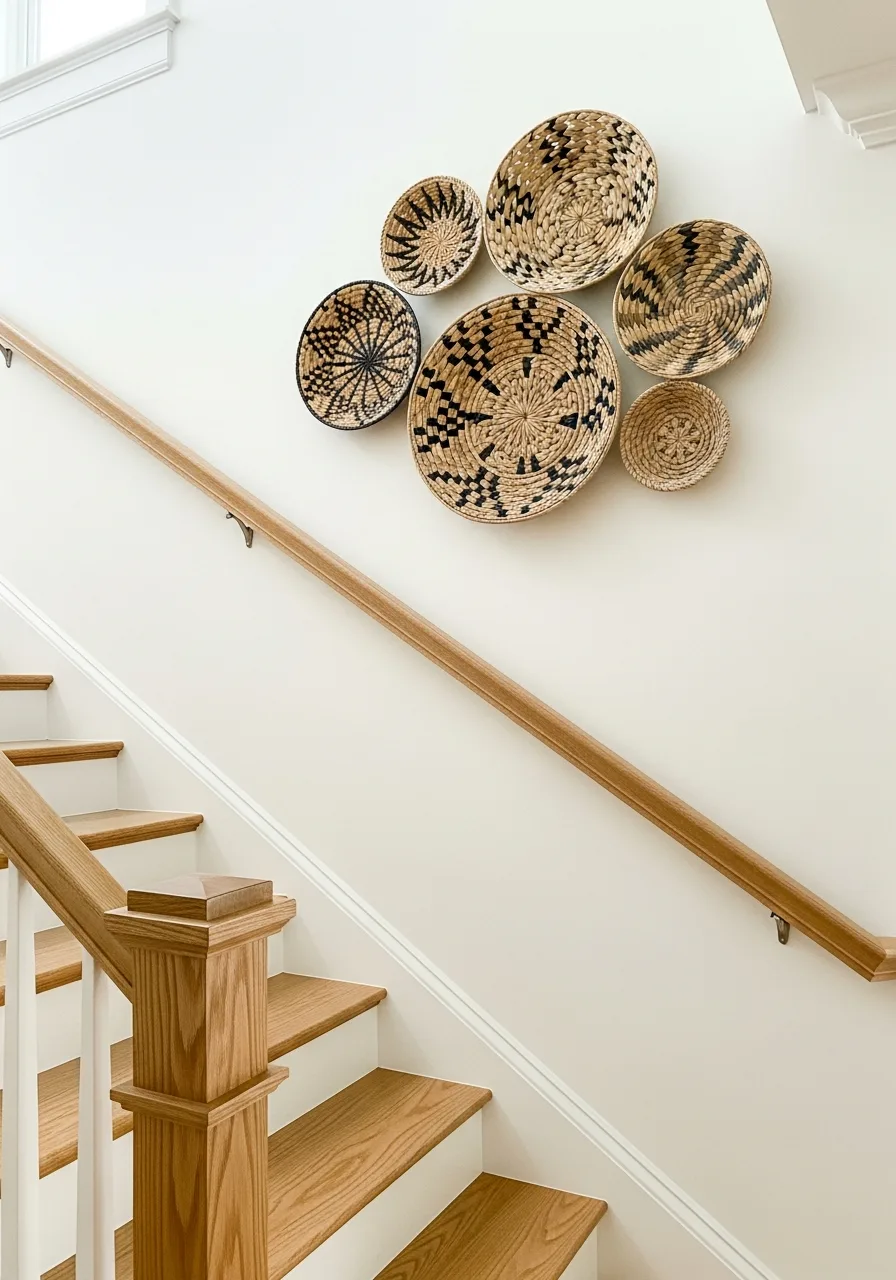
Natural textures soften the hard edges of a wooden or metal staircase. Use command hooks to hang flat-backed woven trays in a loose, organic cluster that mimics the upward motion. This is a lightweight and budget-friendly way to fill a large area.
It adds a global, bohemian feel that is very forgiving to arrange.
- Vary the depths and diameters of the baskets to create a three-dimensional effect.
- Start the cluster at the widest part of the wall and taper it as the stairs narrow.
- Stick to a neutral color palette like tan, cream, and black for a sophisticated look.
Quick win: Lightly mist the baskets with water if they arrive misshapen to easily mold them back to flat.
9. Curated Shadow Boxes
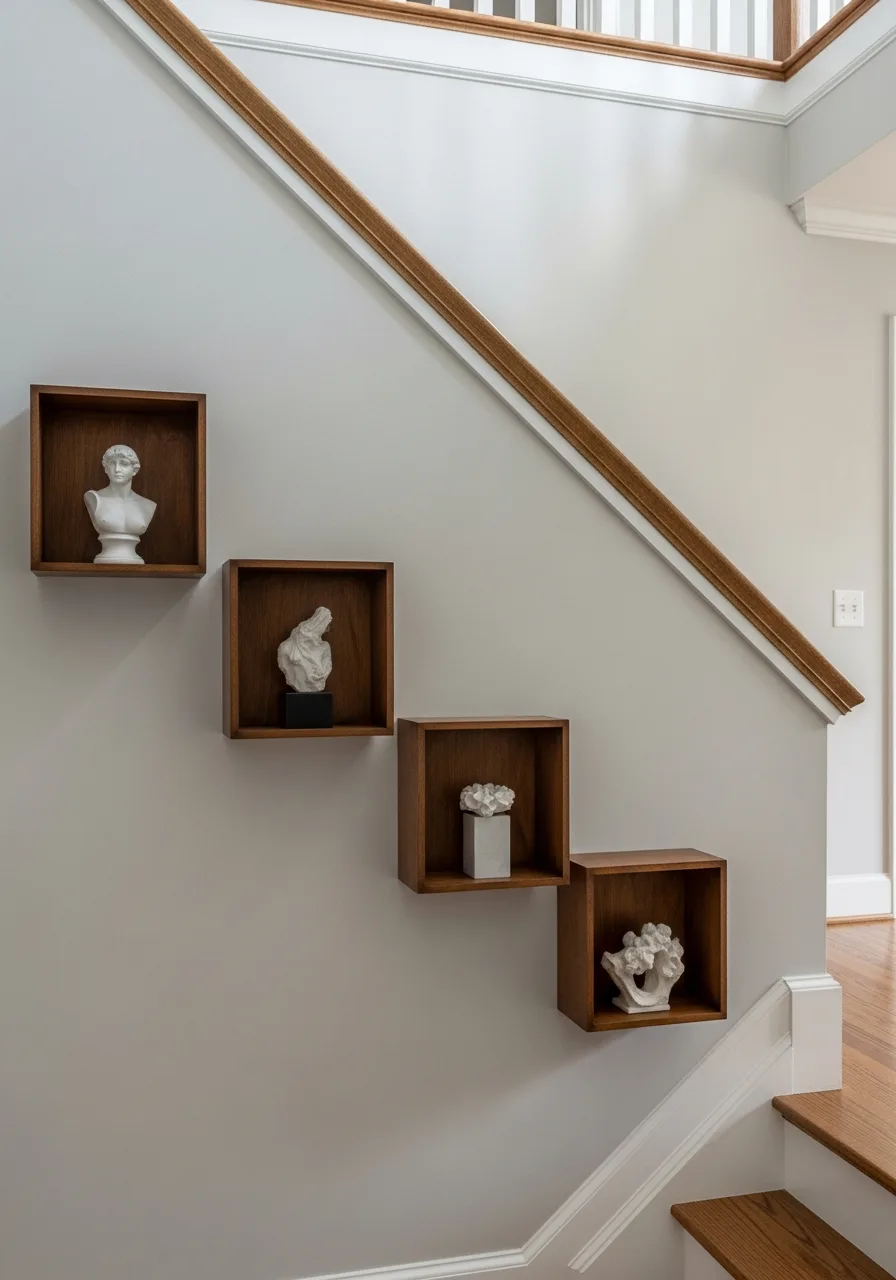
Shadow boxes turn small mementos into a professional-looking art display. Group boxes of varying depths to create a layered effect that makes the wall feel more substantial. This is the best way to display items that are too bulky for standard frames, like travel souvenirs or heirlooms.
It adds a personal touch that tells a story as you move between floors.
- Secure objects inside the boxes with clear museum gel to prevent them from sliding.
- Keep the frame colors identical to make the varied contents look like a cohesive collection.
- Place these higher up the wall to keep them out of reach of small children.
Best shortcut: Use boxes with magnetic front-opening doors to easily swap out items without taking them off the wall.
10. Mixed Material Gallery
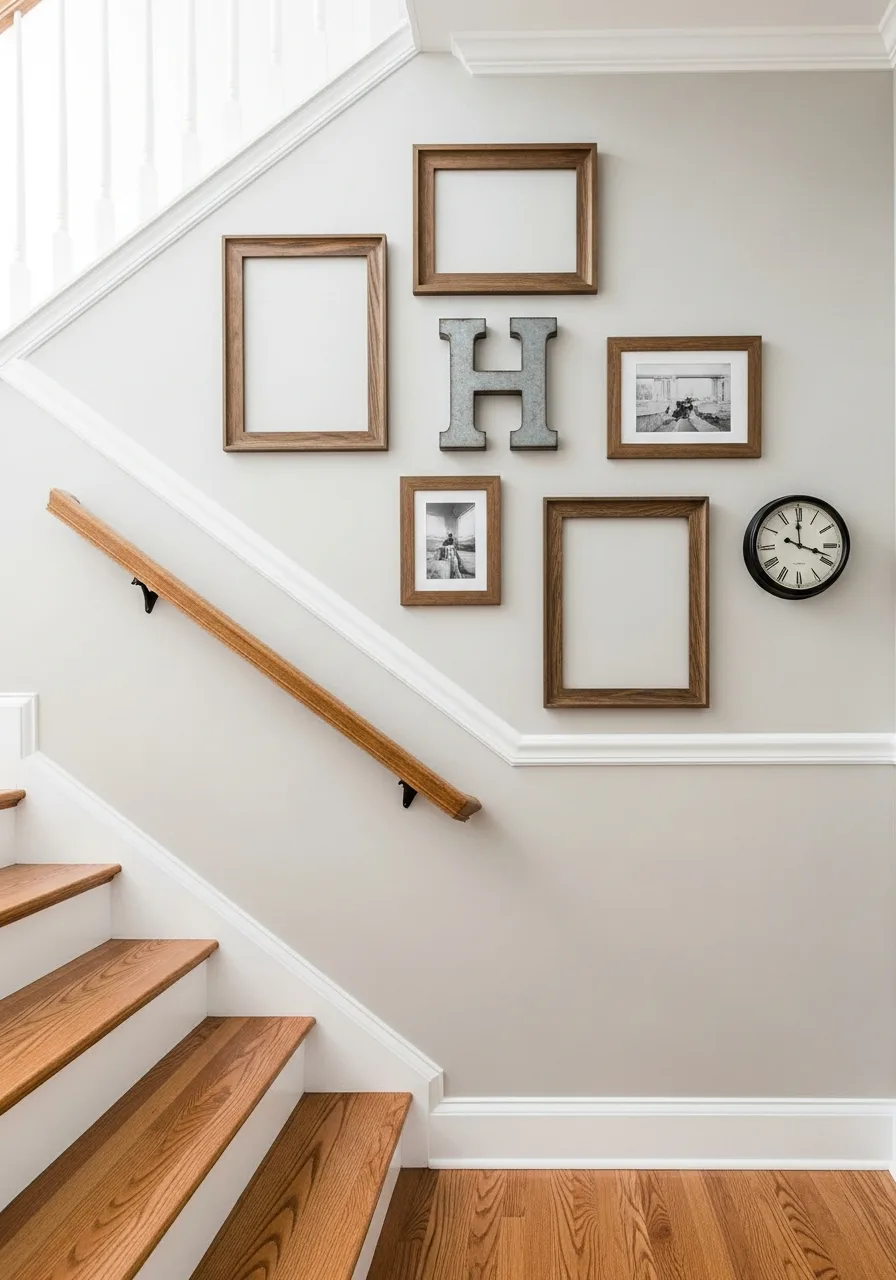
Combining wood, metal, and glass creates a rich, collected-over-time look. Lay all pieces on the floor first to find a balanced layout before hammering any nails into the wall. This style allows you to mix family photos with metal letters or wooden carvings.
It feels more casual and approachable than a rigid grid.
- Maintain a 2-to-3-inch gap between every item to prevent the wall from looking cluttered.
- Choose one 'anchor' piece that is significantly larger than the rest to start the layout.
- Keep the colors in the photos consistent to tie the different frame styles together.
Quick win: Trace your items on brown craft paper and tape the paper to the wall to test the layout first.
11. Floor-to-Ceiling Millwork
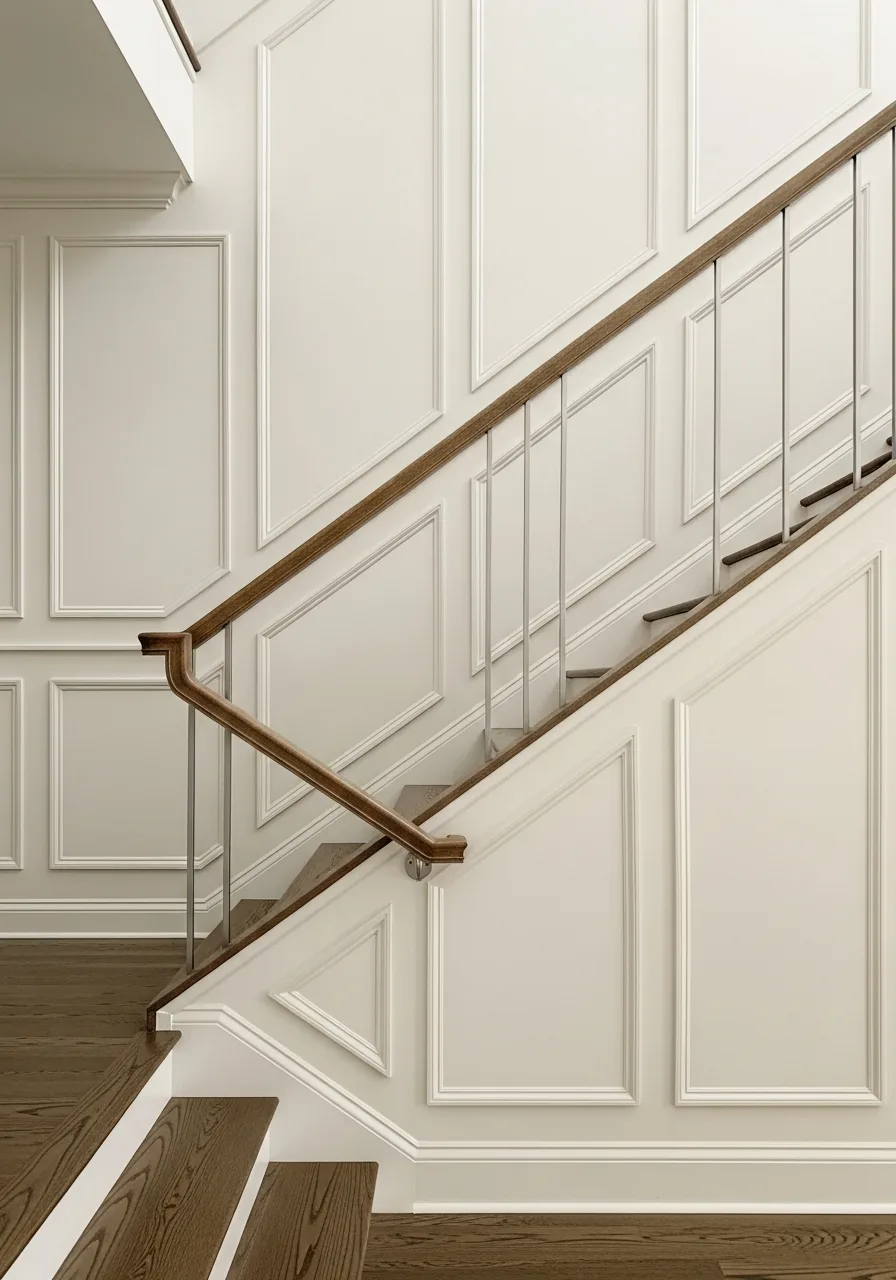
High-end molding can make a standard staircase feel like it belongs in a luxury estate. Carry the molding into the upstairs hallway for a seamless transition between the different levels of the home. Vertical lines in the paneling draw the eye upward, making the ceiling feel much higher.
It is a permanent design choice that adds significant value to the property.
- Use a miter saw to get the perfect 45-degree angles for the inner frame boxes.
- Paint the wall and the trim in a semi-gloss finish to make it easy to wipe down.
- Ensure the bottom of the molding sits just above the baseboard for a finished look.
Most people skip this: Fill all nail holes with wood filler and sand them smooth before painting for a custom look.
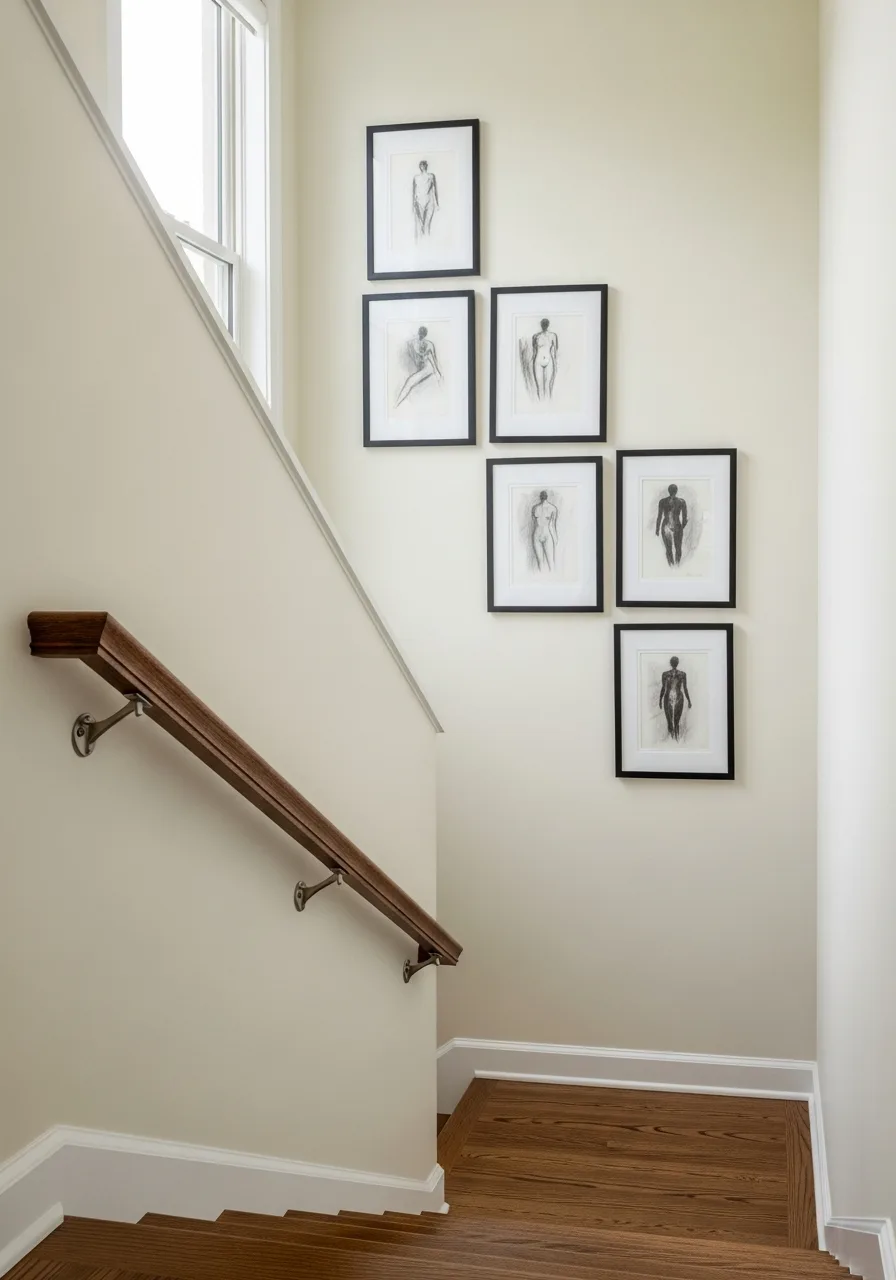
12. Minimalist Line Art
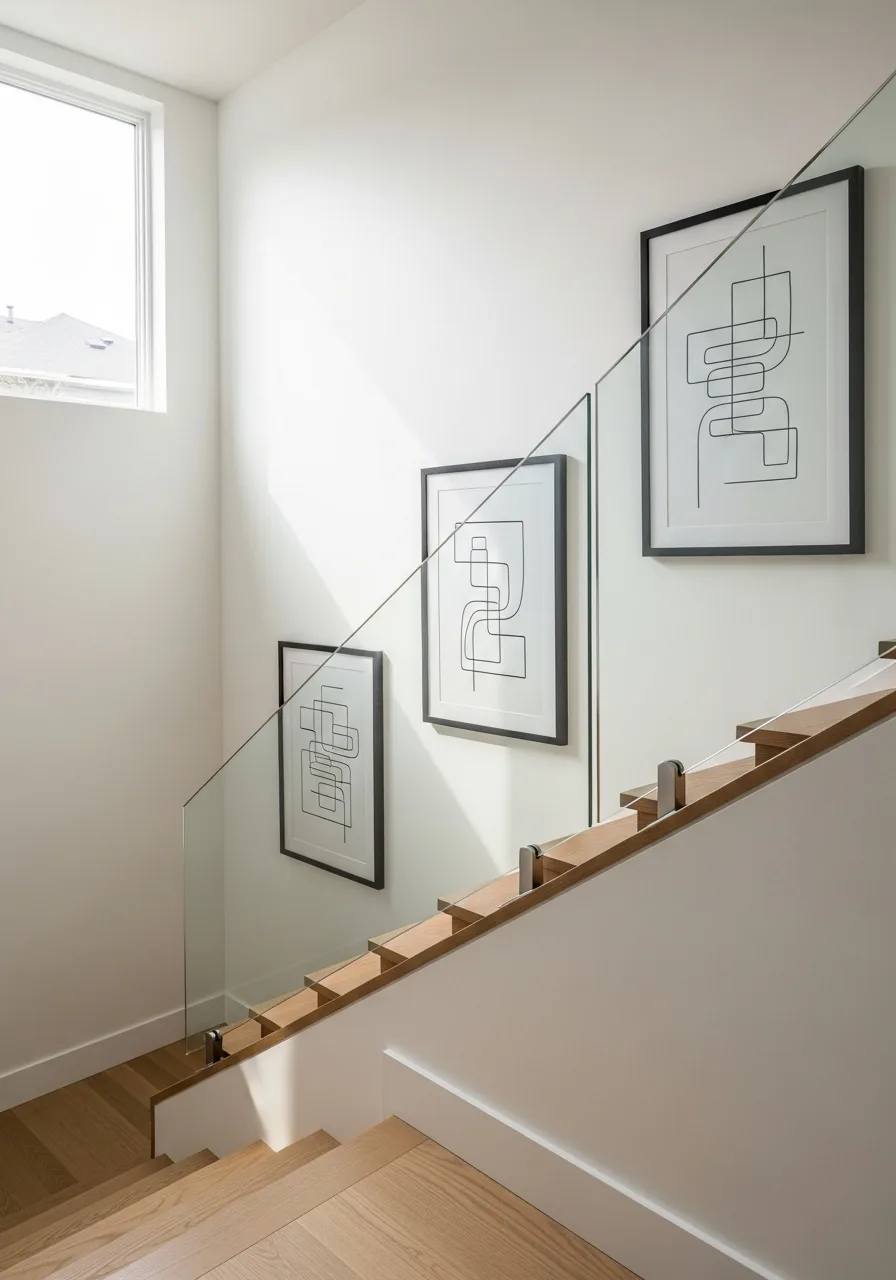
Simple sketches in thin frames provide a modern and airy feel to a cramped staircase. Use wide white mats around small sketches to give the art a gallery-quality presence on the wall. This style doesn't compete with other decor in the house and feels very sophisticated.
It is ideal for homeowners who prefer a 'less is more' aesthetic.
- Choose frames with thin profiles to keep the look light and unobtrusive.
- Hang the art in a straight diagonal line that mimics the pitch of the stairs.
- Stick to black ink on white paper for the highest contrast and impact.
Quick win: Use frames with acrylic instead of glass to make them lighter and safer in high-traffic areas.
13. Soft Textile Tapestry
Fabric wall hangings are an excellent way to absorb sound in a noisy, open-concept home. Mount a wooden rod slightly below the ceiling to hang a large linen or wool tapestry over the stairs. This adds warmth and movement to a space that is usually full of hard surfaces.
It is also an easy way to cover a large area with a single piece of decor.
- Choose a textile with a heavy weight so it hangs straight and doesn't flutter in drafts.
- Use a rod that is slightly wider than the fabric to give it a professional finished look.
- Vacuum the textile occasionally with a brush attachment to keep it dust-free.
Best shortcut: Use a decorative rug hanger to turn a beautiful runner into a wall-mounted tapestry.
14. Vintage Clock Gallery
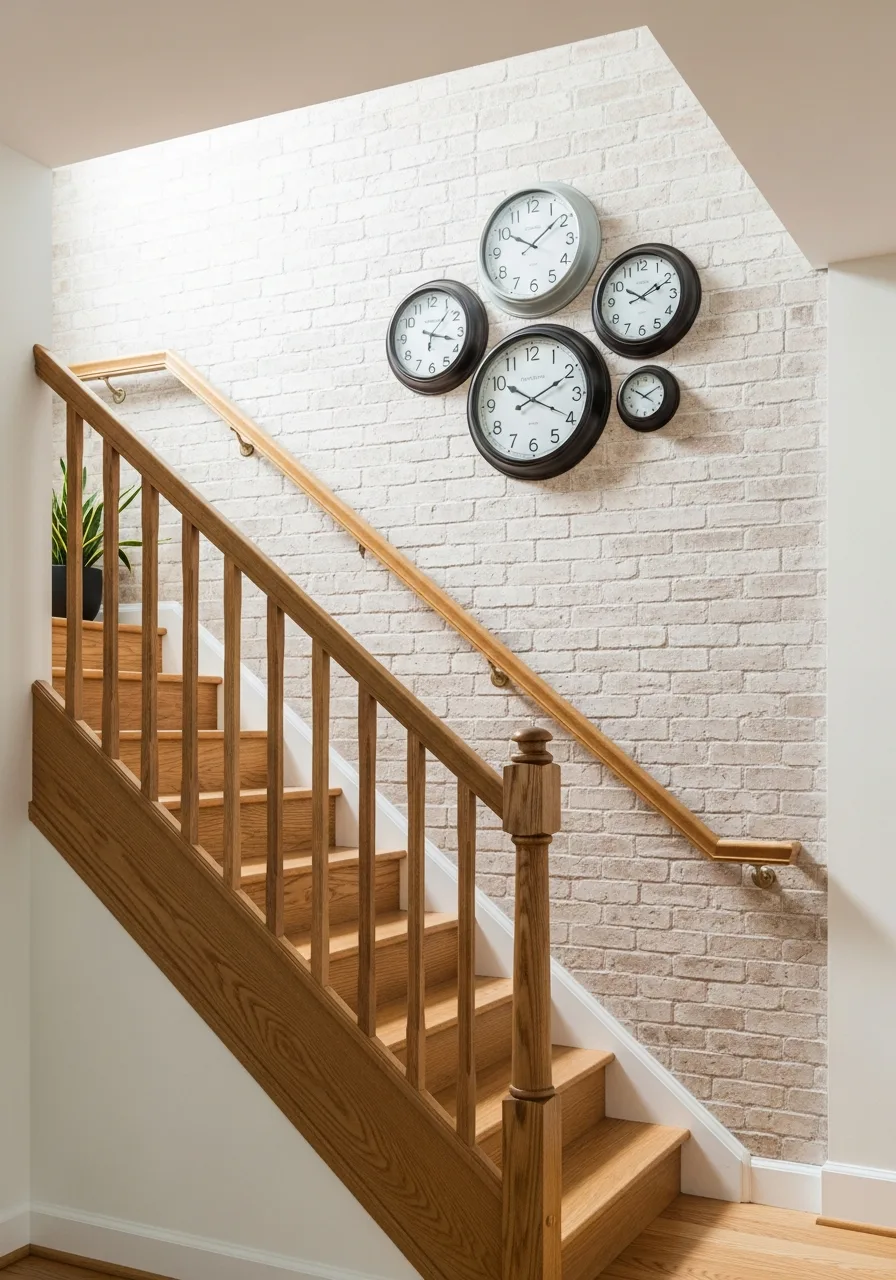
A collection of clocks creates a whimsical and interesting focal point. Vary the sizes of the clocks but keep the faces in the same color family for a cohesive look. This design works well in farmhouse or industrial-style homes.
It turns a functional object into a piece of art that fills the vertical space perfectly.
- Set the clocks to different time zones if you have family living in other parts of the world.
- Ensure the largest clock is the center of the arrangement to provide a focal point.
- Use silent-sweep movements to avoid a loud ticking sound in the hallway.
Most people skip this: Mix in one or two non-working vintage clocks for their aesthetic value and unique patina.
15. Magnetic Chalkboard Wall
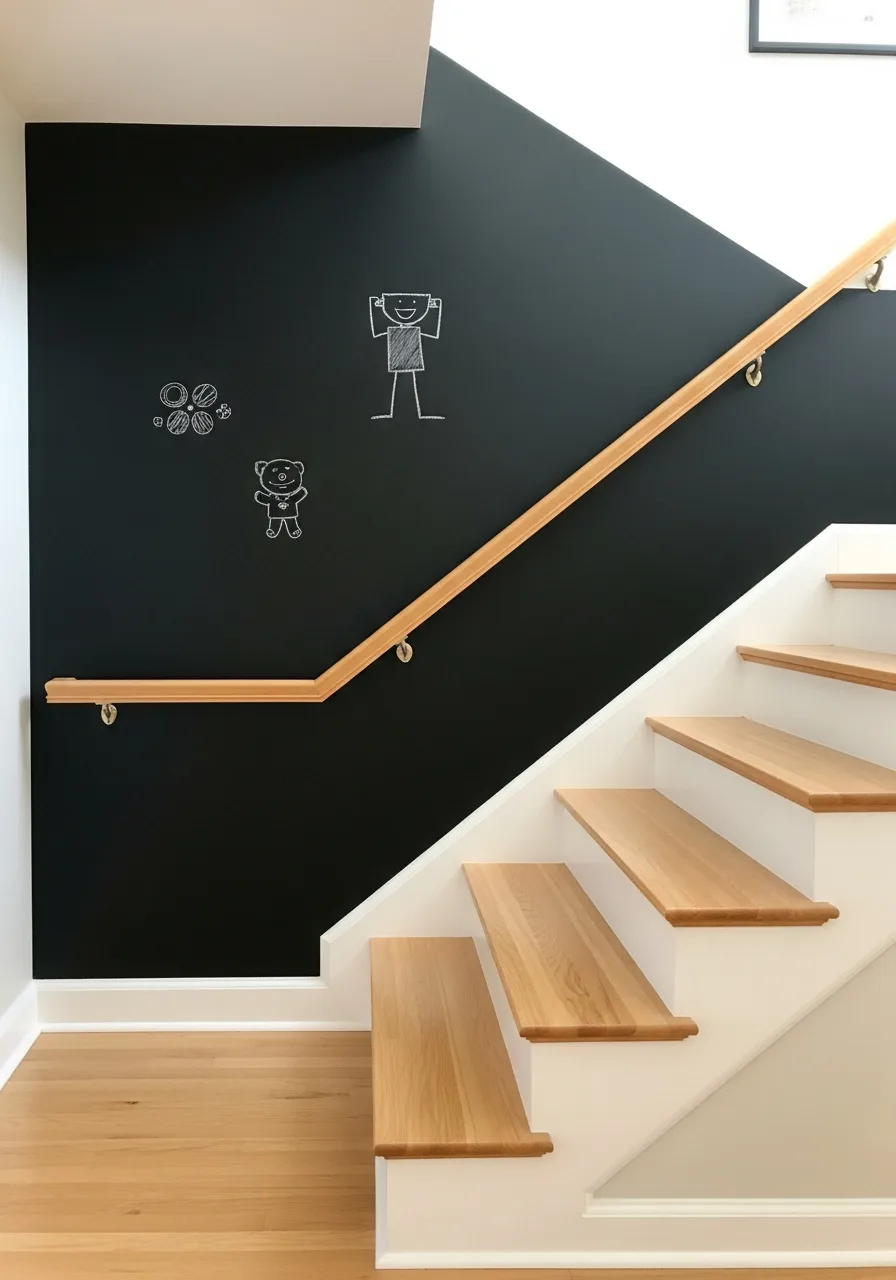
A chalkboard wall turns a transition space into an interactive family hub. Apply two coats of magnetic chalkboard paint to create a space for rotating notes and children's drawings. It adds a bold, dark accent that grounds the staircase and provides a place for creativity.
This is a practical and fun solution for homes with active kids.
- Season the board by rubbing the side of a piece of chalk over the entire surface and wiping it off.
- Use liquid chalk markers for a cleaner look that doesn't produce dusty residue.
- Install a small ledge at the bottom to hold chalk and an eraser.
Quick win: Use magnetic frames to easily display school photos or invitations directly on the chalkboard surface.
16. Vertical Natural Wood Slats
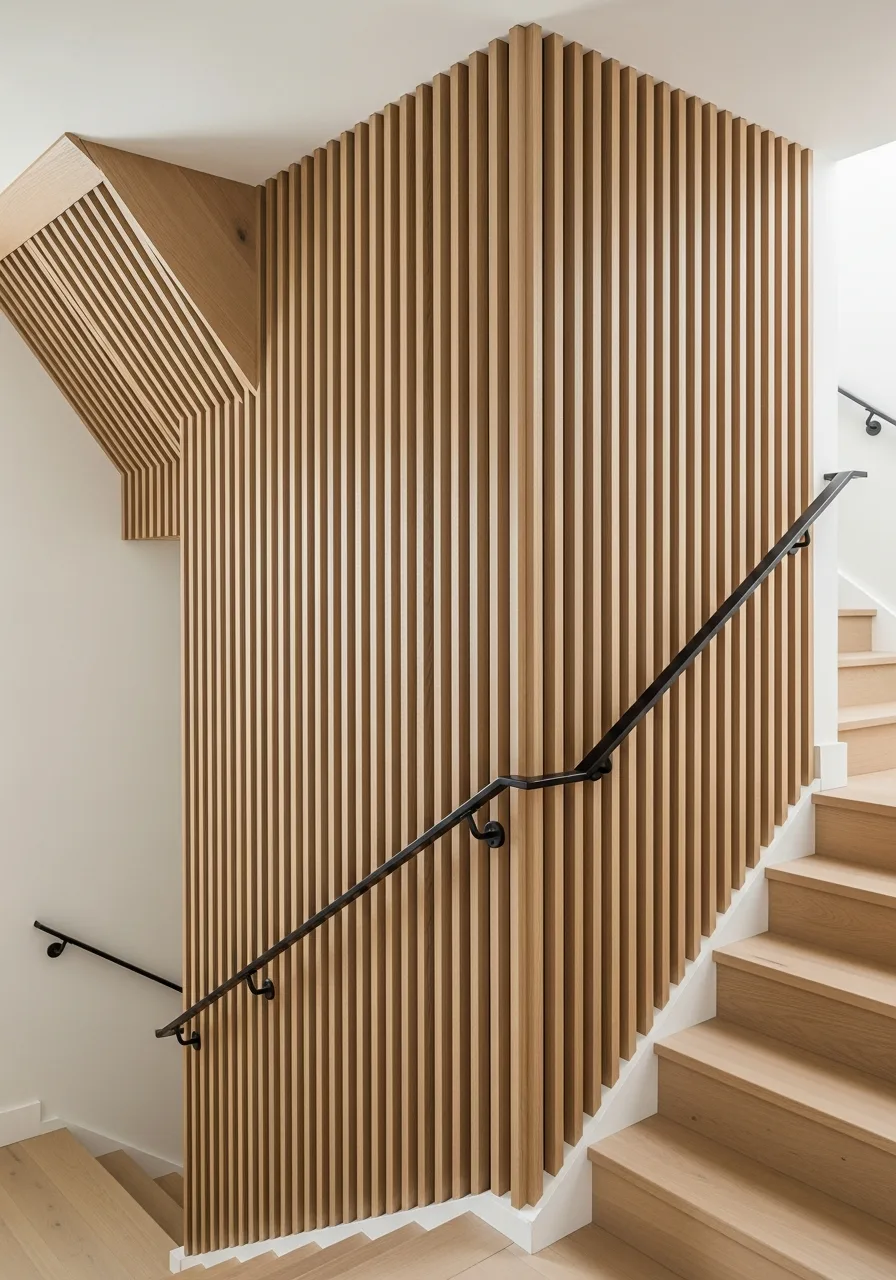
Vertical wood slats add texture and height to a staircase without needing extra decor. These thin strips of oak or pine create a rhythmic pattern that makes the ceiling feel higher.
Install the slats with a one-inch gap to create a rhythmic pattern that draws the eye upward. This approach works best on a long, straight wall where the repetition can really shine.
- Sourcing: Buy pre-cut wood lath or trim strips at a local lumber yard.
- Setup: Use a spacer block to keep the gaps between slats consistent during installation.
- Adaptation: Paint the slats the same color as the wall for a subtle 3D texture.
Most people skip this: Sand the edges of every slat before mounting to prevent snagging clothes as people walk by.
17. Recessed Wall Cubbies
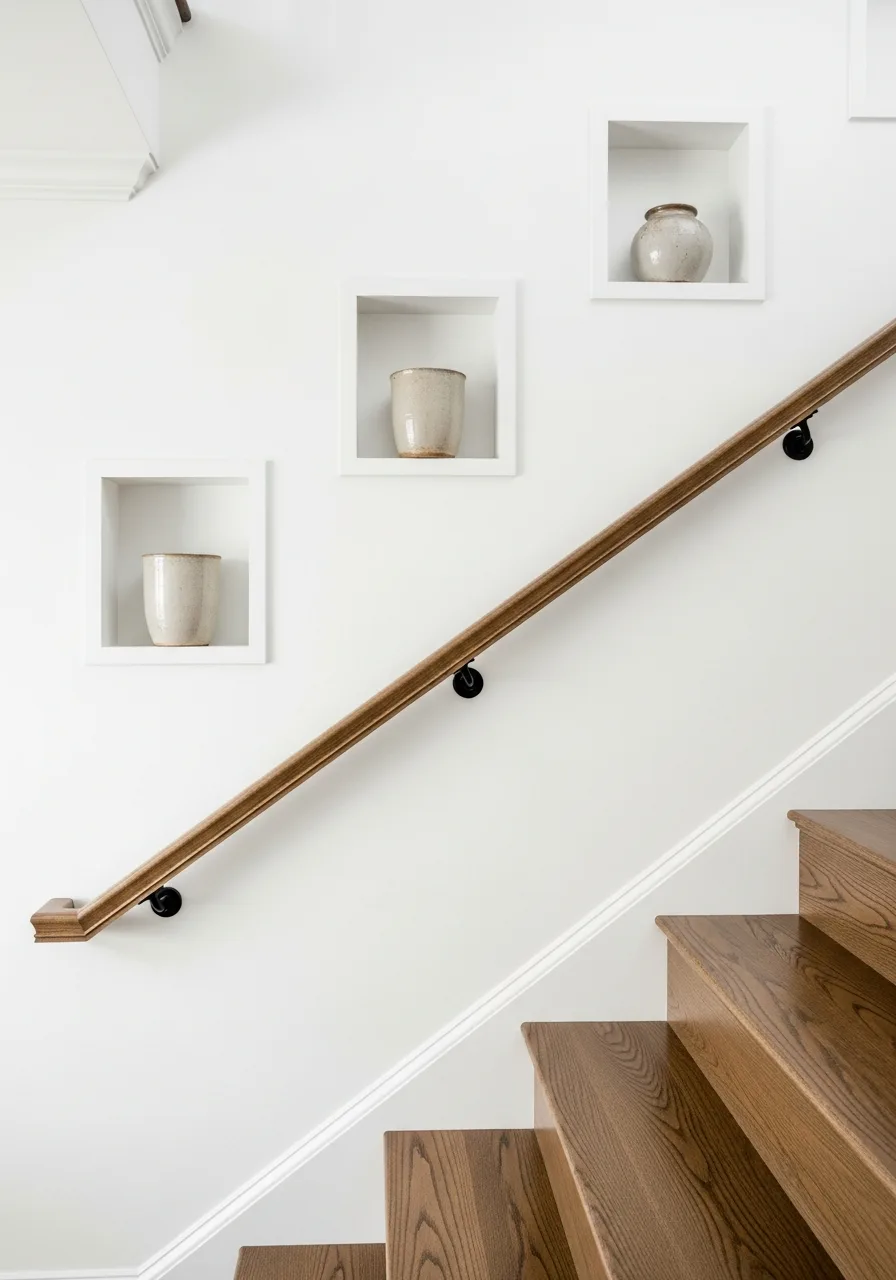
Built-in niches turn the wall itself into a storage solution for small treasures. These cutouts provide a safe place for breakables that might otherwise get bumped on a narrow staircase.
Paint the inside of the cubbies a contrasting color to make the display pop against the wall. It is a permanent architectural choice that adds value and character to the home.
- Sourcing: Hire a carpenter for structural niches or buy recessed shelf kits.
- Setup: Check for electrical wires or plumbing behind the drywall before cutting.
- Adaptation: Add battery-operated puck lights inside the cubbies for evening ambiance.
Quick win: Line the back of the niches with leftover wallpaper for an easy custom look.
18. Oversized Map Mural
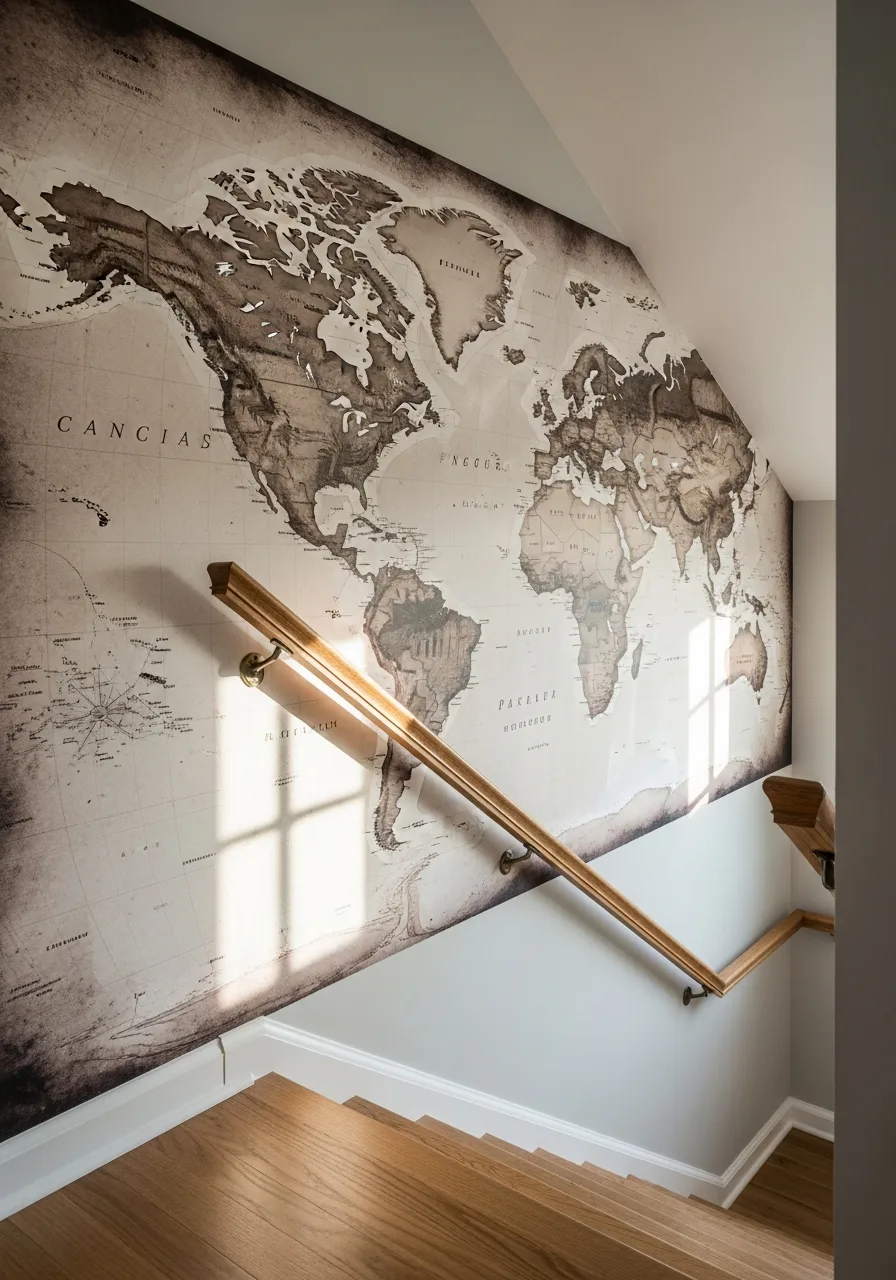
A large-scale map provides a focal point that fills the entire diagonal space easily. This works well because maps are naturally busy, so they do not require additional frames or accents.
Select a map with muted tones to keep the large-scale print from overwhelming the narrow walkway. It turns a transition space into a place where people actually stop to look.
- Sourcing: Order custom-sized peel-and-stick murals online.
- Setup: Apply the mural from the top down and use a squeegee to remove air bubbles.
- Adaptation: Use a map of a specific favorite city for a more personal touch.
Best shortcut: Choose a map with a matte finish to avoid glare from nearby windows or hallway lights.
19. Vintage Brass Plate Display
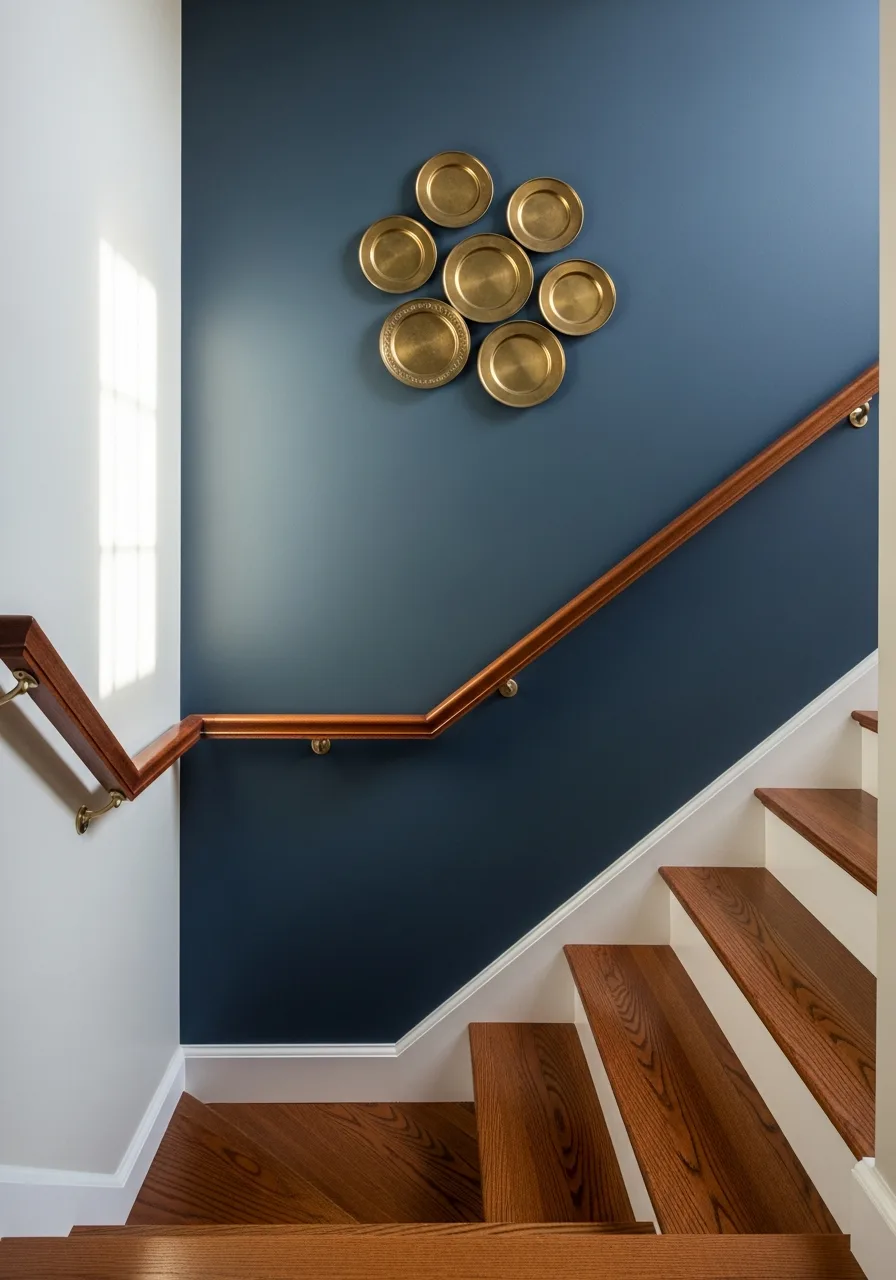
Metallic plates add a reflective quality that brightens up a dark stairwell. Brass or copper finishes feel warm and pair beautifully with wooden handrails.
Use adhesive plate hangers to keep the metal flush against the wall without visible wires. Mixing different sizes and rim patterns creates a collected, timeless feel.
- Sourcing: Look for solid brass plates at thrift stores or antique malls.
- Setup: Layout the arrangement on the floor first to find the best balance.
- Adaptation: Spray paint mismatched plates in a single metallic shade for a modern look.
Quick win: Group the plates tightly in the center of the wall to make a bigger visual impact.
20. Framed Textile Swatches
Framing pieces of fabric is an affordable way to add color and softness to the walls. Textiles like linen, mudcloth, or vintage scarves provide a tactile element that hard frames lack.
Iron the fabric before framing to ensure the patterns look crisp and professional. This is an excellent way to use up scraps from other sewing projects.
- Sourcing: Use fabric remnants or vintage handkerchiefs.
- Setup: Wrap the fabric around a foam core board before placing it in the frame.
- Adaptation: Use seasonal fabrics like heavy wool in winter and light cotton in summer.
Most people skip this: Use non-reflective glass in the frames so the texture of the fabric is visible from all angles.
21. Floating Hat Collection

Woven or felt hats serve as both storage and art when hung in a staircase. This idea turns a functional item into a textured wall display that feels casual and breezy.
Arrange the hats in a loose diagonal line that mirrors the slope of the handrail. It is a smart way to clear out closet space while decorating a hard-to-reach area.
- Sourcing: Use hats you already own or find inexpensive sun hats.
- Setup: Space the hooks at least 12 inches apart to avoid a cluttered look.
- Adaptation: Switch to beanies and flat caps for a more industrial or masculine vibe.
Quick win: Use clear command hooks so the hardware is invisible behind the hats.
22. Industrial Pipe Railing Accents
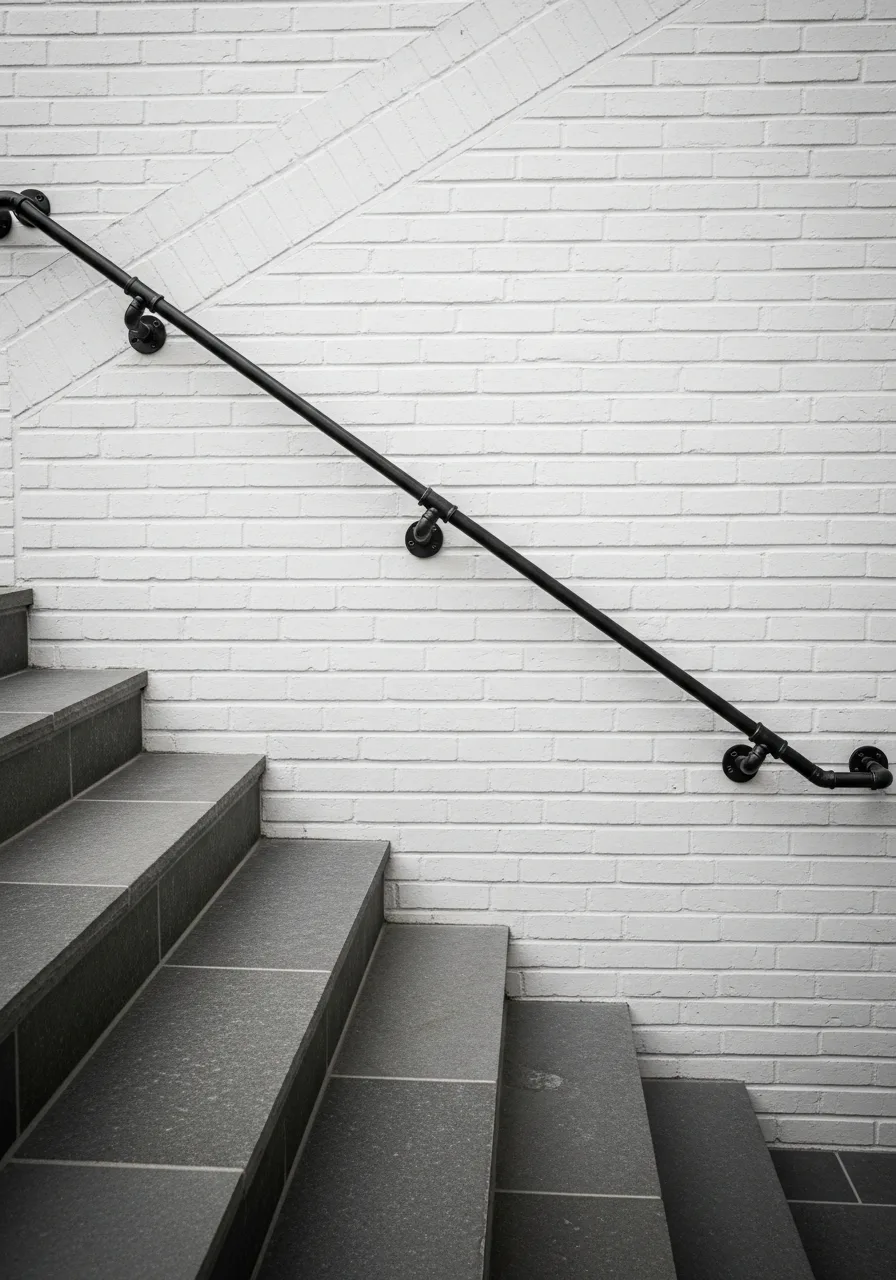
Replacing a standard wooden handrail with industrial black pipe adds instant edge. The hardware itself becomes the primary design element for the wall.
Mount the pipe brackets directly into wall studs to ensure the heavy metal stays secure. This style works perfectly in lofts or modern farmhouse homes.
- Sourcing: Purchase pre-cut pipes and fittings at a home improvement store.
- Setup: Clean the pipes with degreaser and seal them with clear coat to prevent rust.
- Adaptation: Paint the pipes gold or copper for a more glam industrial look.
Best shortcut: Use 'T' connectors for the brackets to give the railing a more authentic plumbing look.
23. Pressed Flower Herbarium Frames
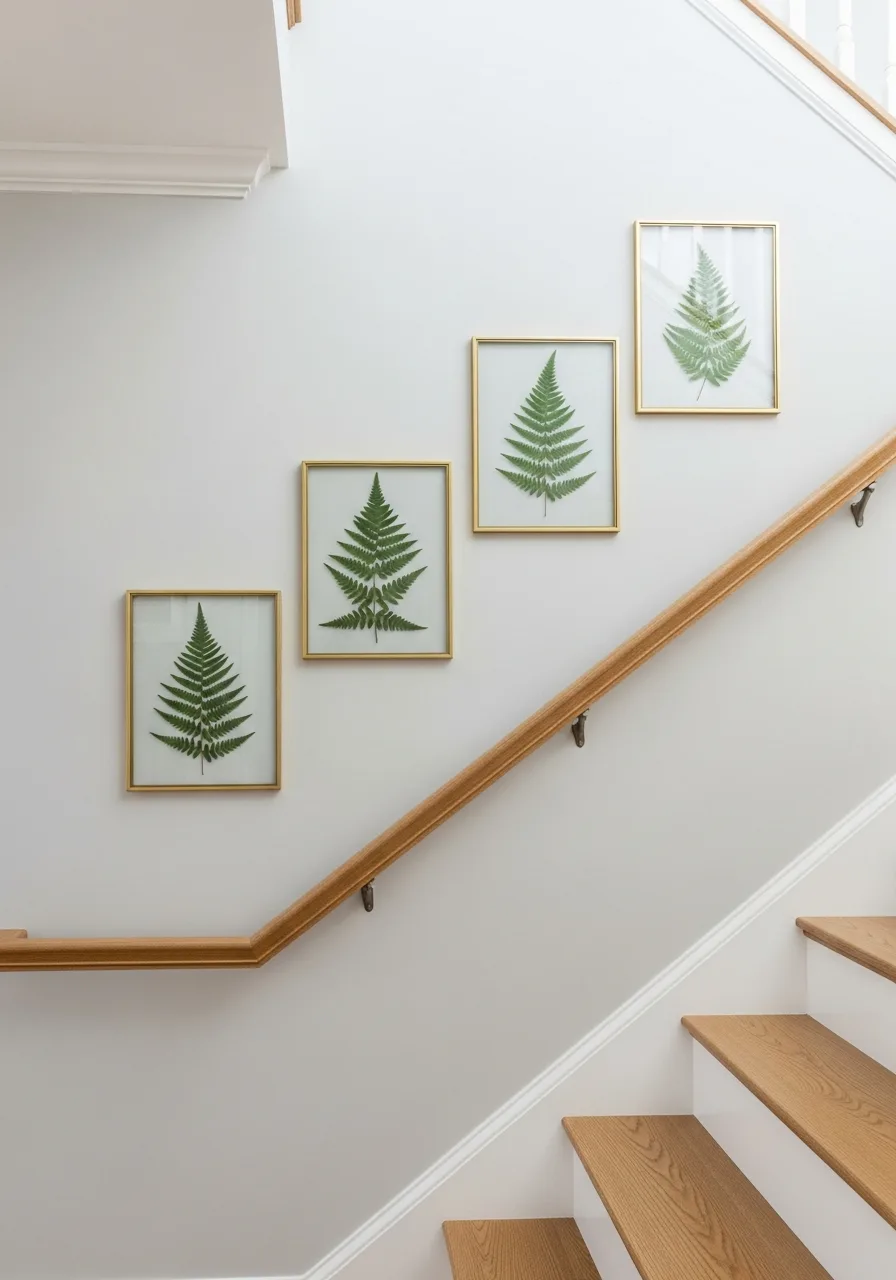
Double-paned glass frames allow the wall color to show through the art. Pressed botanicals offer a delicate, organic feel that softens the sharp lines of a staircase.
Hang the frames using clear spacers to create a floating effect that highlights the delicate petals. It brings a bit of the garden indoors in a very sophisticated way.
- Sourcing: Press your own flowers or buy pre-pressed botanicals.
- Setup: Use a tiny drop of clear glue to keep the plants from sliding inside the glass.
- Adaptation: Use autumn leaves for a warm, seasonal color palette.
Most people skip this: Keep these frames out of direct sunlight to prevent the organic colors from fading over time.
24. Architectural Salvage Window Frames
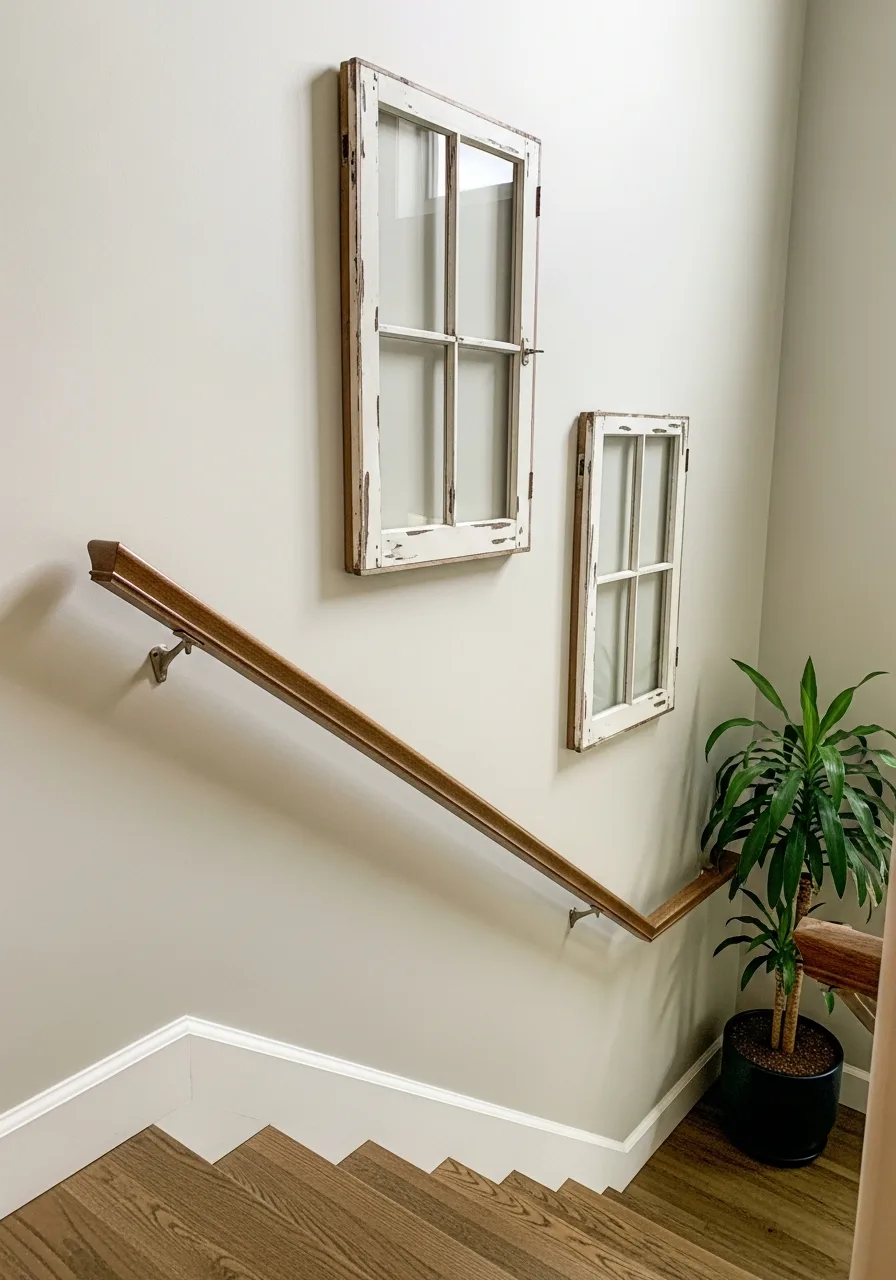
Old window frames add a sense of history and structural interest to a blank wall. Their large size makes them ideal for filling the big, awkward gap above a landing.
Lean the window frames against the wall at the landing for a relaxed, layered look. They provide a rustic charm that feels more substantial than standard framed art.
- Sourcing: Visit architectural salvage yards or flea markets.
- Setup: Secure the frames to the wall with heavy-duty D-rings even if they are leaning.
- Adaptation: Replace the glass with mirrors to help bounce light into a dark stairwell.
Quick win: Clean the wood with furniture wax to preserve the chippy paint without it flaking off.
25. Monochromatic Picture Ledges
Picture ledges allow you to swap out art without putting new holes in the wall. Painting them the same color as the wall keeps the look clean and modern.
Paint the shelves the exact same shade as the wall for a seamless, built-in appearance. This is the best solution for people who like to change their decor frequently.
- Sourcing: Buy unfinished wood ledges and paint them to match your walls.
- Setup: Use a level to ensure the ledges are perfectly horizontal on the slanted wall.
- Adaptation: Use ledges of different lengths to fit the specific angles of your stairs.
Best shortcut: Use museum putty on the bottom of frames to keep them from sliding if the stairs vibrate.
26. Ceramic Plate Collage
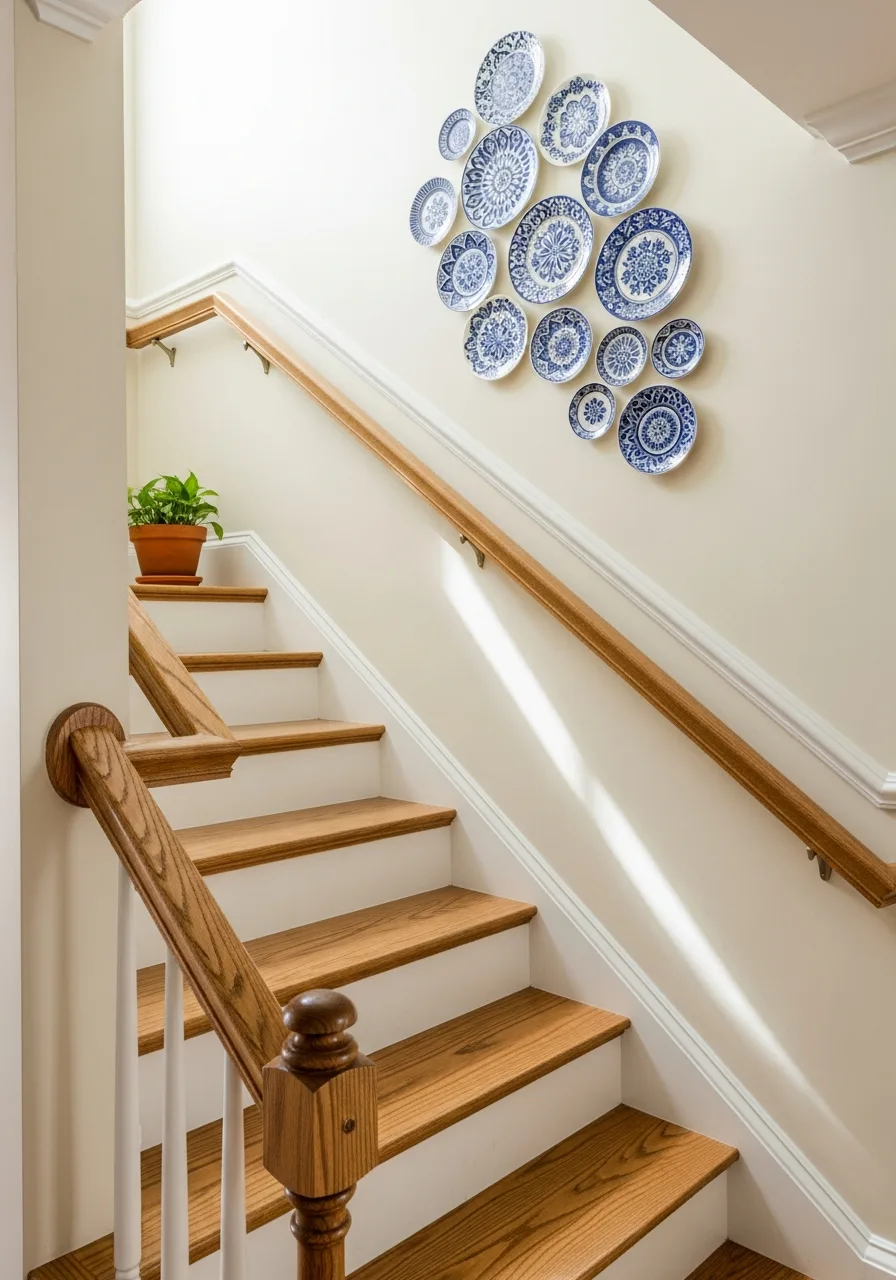
A collection of mismatched ceramic plates adds a cozy, cottage-inspired feel. The round shapes break up the harsh angles of the staircase and handrail.
Start the arrangement at eye level on the landing and branch out toward the stairs. It is an easy way to display heirloom china or unique finds from travels.
- Sourcing: Collect plates from thrift stores, yard sales, or estate sales.
- Setup: Trace each plate on paper and tape the templates to the wall to plan the layout.
- Adaptation: Use all-white plates with different textures for a more minimalist look.
Quick win: Mix in a few small platters or bowls to add depth and variety to the collage.
27. Large Scale Metal Typography
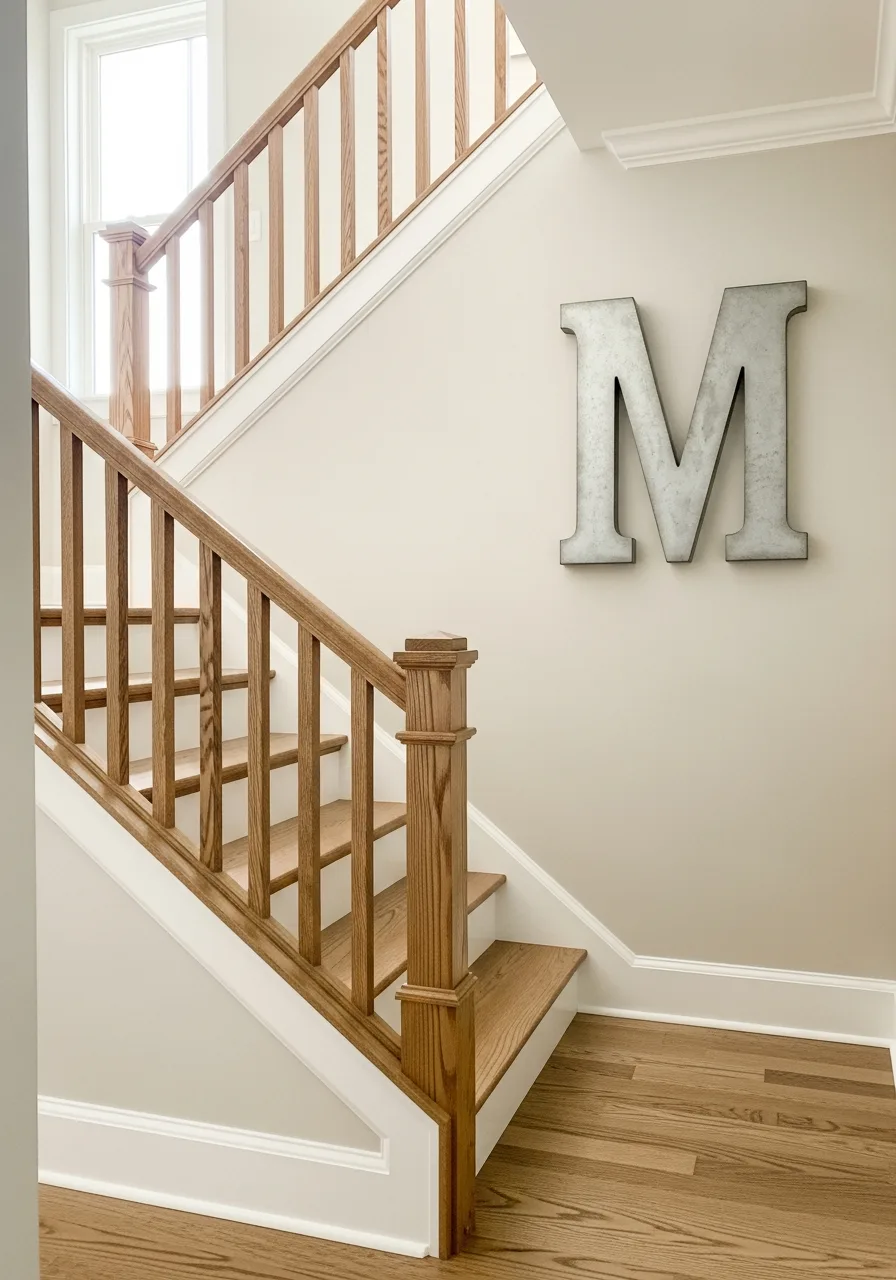
Single metal letters or short words make a bold, graphic statement. They are durable and stand out well against both light and dark paint colors.
Choose a matte black finish to provide a sharp contrast against a light-colored wall. This adds a personalized, modern touch that feels very intentional.
- Sourcing: Order custom metal letters from artisan shops or craft stores.
- Setup: Use stand-offs to mount the letters slightly away from the wall for a 3D shadow effect.
- Adaptation: Spell out a family name or a meaningful word like 'HOME' or 'RISE'.
Most people skip this: Ensure the metal is thick enough that it does not warp or bend during installation.
28. Vertical Plant Pockets
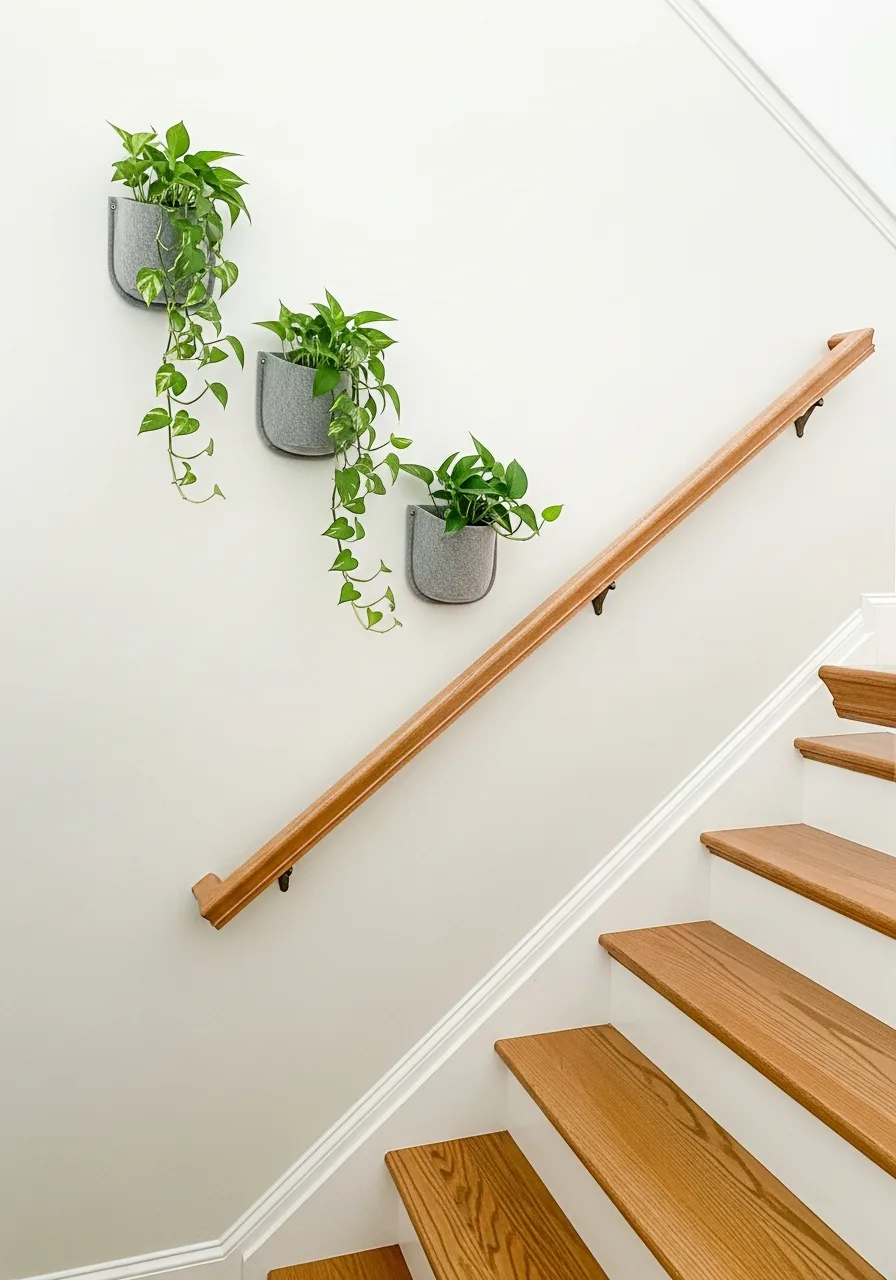
Wall-mounted planters bring life and freshness to a transition space. Pockets made of felt or ceramic allow for a vertical garden that follows the climb of the stairs.
Use moisture-resistant wall liners behind the pockets to protect the drywall from dampness. It is a great way to improve air quality in the center of the home.
- Sourcing: Buy breathable felt pockets or ceramic wall-mount pots.
- Setup: Choose low-light plants like snake plants or ivy if the staircase lacks windows.
- Adaptation: Use high-quality faux plants if the area is too difficult to reach for watering.
Best shortcut: Use a long-neck watering can or a small spray bottle to reach the plants without a ladder.
29. Framed House Blueprints
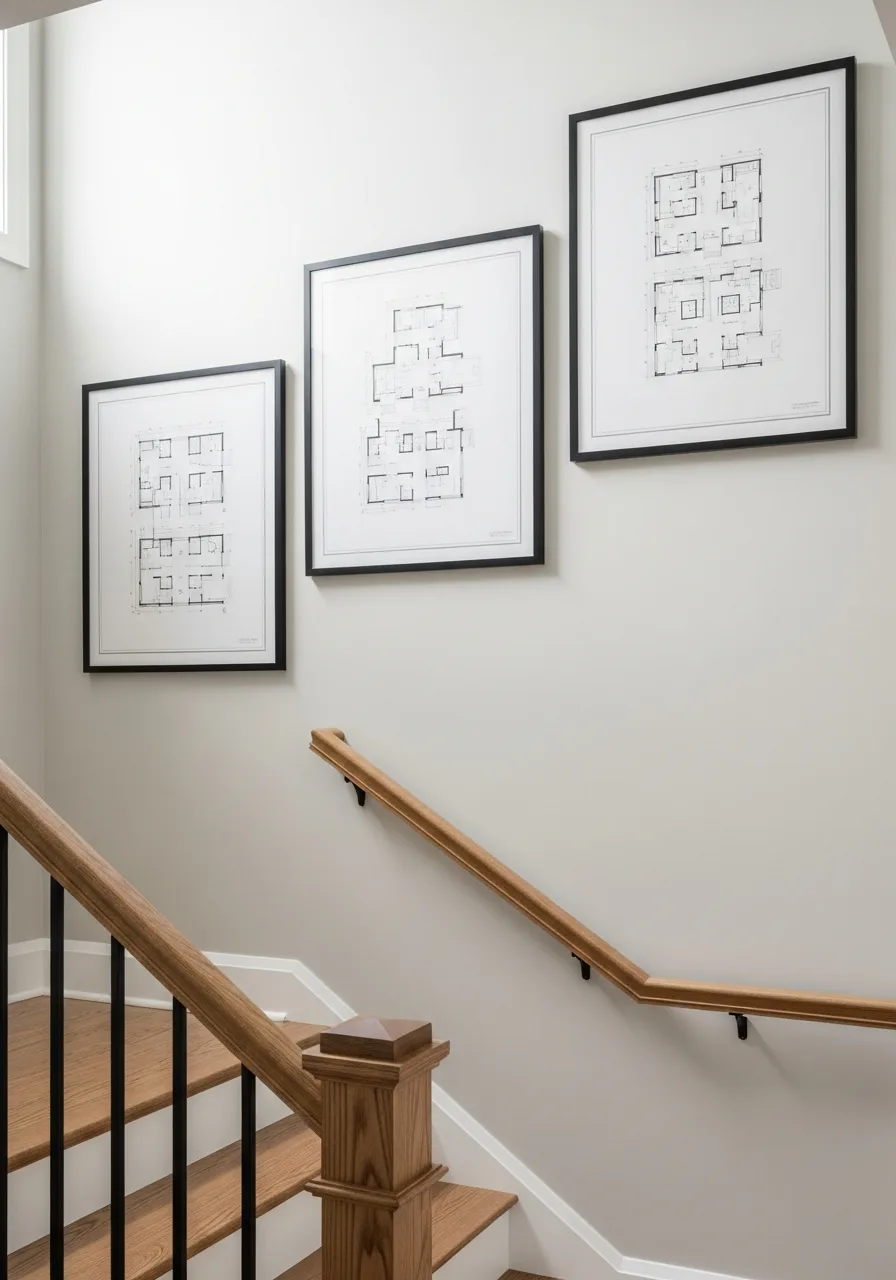
Framing the original blueprints of your home adds a sense of history and pride. The technical lines and blue or white tones offer a sophisticated, architectural look.
Use matching frames for all blueprints to give the technical drawings a cohesive feel. It is a wonderful conversation starter for guests as they move through the house.
- Sourcing: Look for original plans in home records or have digital copies printed.
- Setup: Use acid-free matting to prevent the old paper from yellowing or degrading.
- Adaptation: If blueprints aren't available, use vintage maps of the neighborhood instead.
Quick win: If the original paper is fragile, take a high-resolution photo and print a copy for display.
30. Geometric Paint Mural

A simple painted mural uses color instead of physical objects to decorate the wall.
Large triangles or chevrons can mirror the diagonal movement of the stairs. Use high-quality painter's tape to ensure the lines between the colors are perfectly sharp. This is the most budget-friendly way to make a huge impact on a large wall.
- Sourcing: Use leftover paint samples from other rooms in the house.
- Setup: Draw the design lightly in pencil first to make sure the proportions are right.
- Adaptation: Use a subtle two-tone approach with matte and glossy versions of the same color.
Best shortcut: Peel the tape off while the paint is still slightly damp to get the cleanest edge possible.
31. Tiered Floating Book Ledges
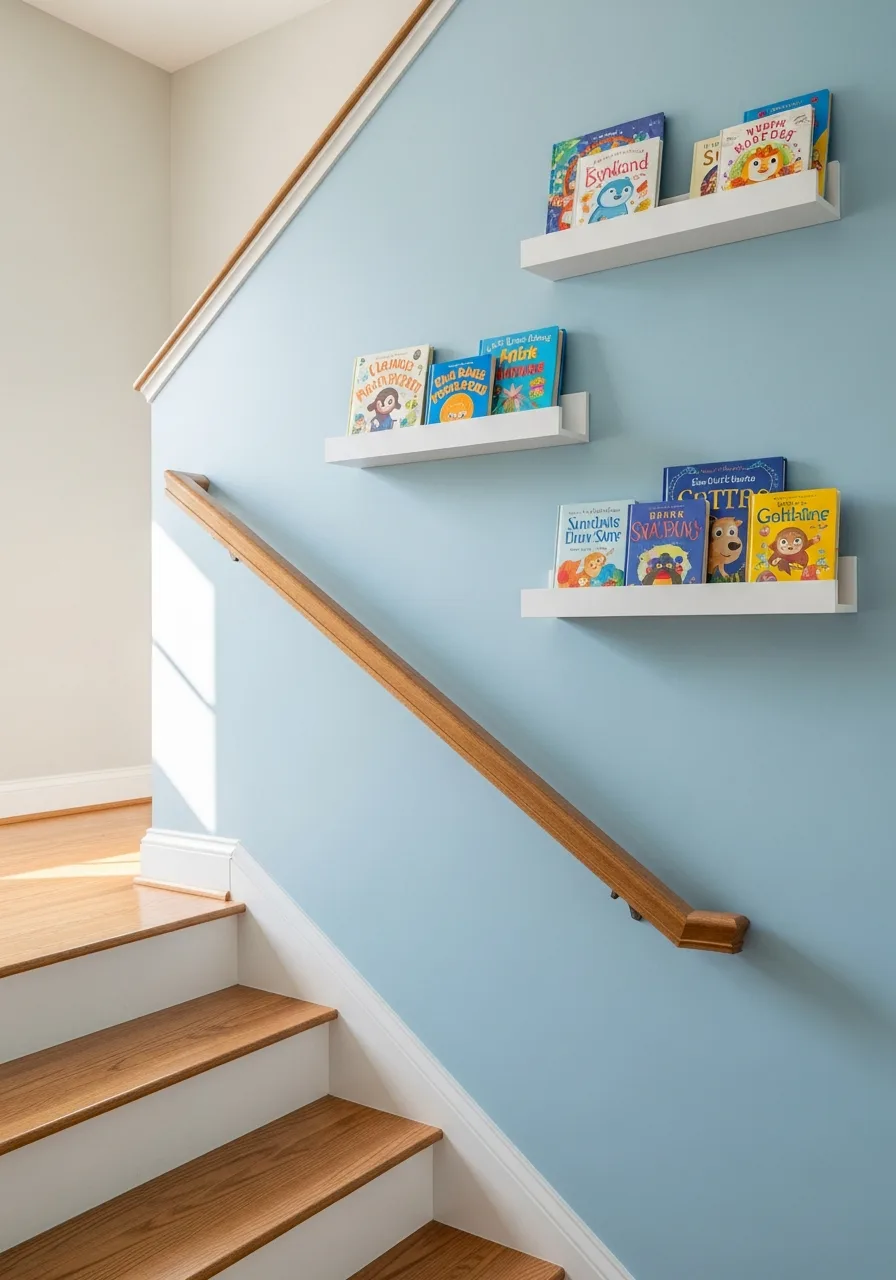
Small floating ledges turn a staircase into a functional library without blocking the walkway. This approach uses the vertical space efficiently while adding color and personality through book spines.
Mount the ledges at varying heights to follow the natural rise of the steps for a cohesive look. Ledges are a smarter choice than deep bookshelves in narrow stairwells to prevent a cramped feeling. Expertly curated books make the transition between floors feel like a lived-in part of the home.
- Buy pre-finished ledges for under thirty dollars to save time on painting.
- Check for wall studs before drilling to ensure the ledges can support the weight of heavy books.
- Swap books out seasonally to refresh the colors and themes without changing the hardware.
Quick win: Align the bottom of the lowest ledge with the height of the handrail for a balanced visual line.
32. Traditional Box Wall Molding
Traditional box molding adds architectural depth to a plain drywall staircase and makes the space feel more finished. This style creates a high-end look that mimics custom carpentry for a fraction of the cost.
Measure the distance from the handrail to ensure the molding boxes maintain a consistent gap throughout the climb. Painting the trim the same color as the wall creates a subtle, sophisticated texture. Simple trim is often a better choice than heavy patterns in tight, high-traffic areas.
- Use lightweight polyurethane molding strips for easier installation with just a miter saw and adhesive.
- Space the boxes about four inches apart to keep the design from feeling too busy.
- Paint the wall and molding in a semi-gloss finish to make cleaning scuffs and fingerprints easier.
Most people skip this: Use a level for every single horizontal piece of trim, as staircase floors are rarely perfectly straight.
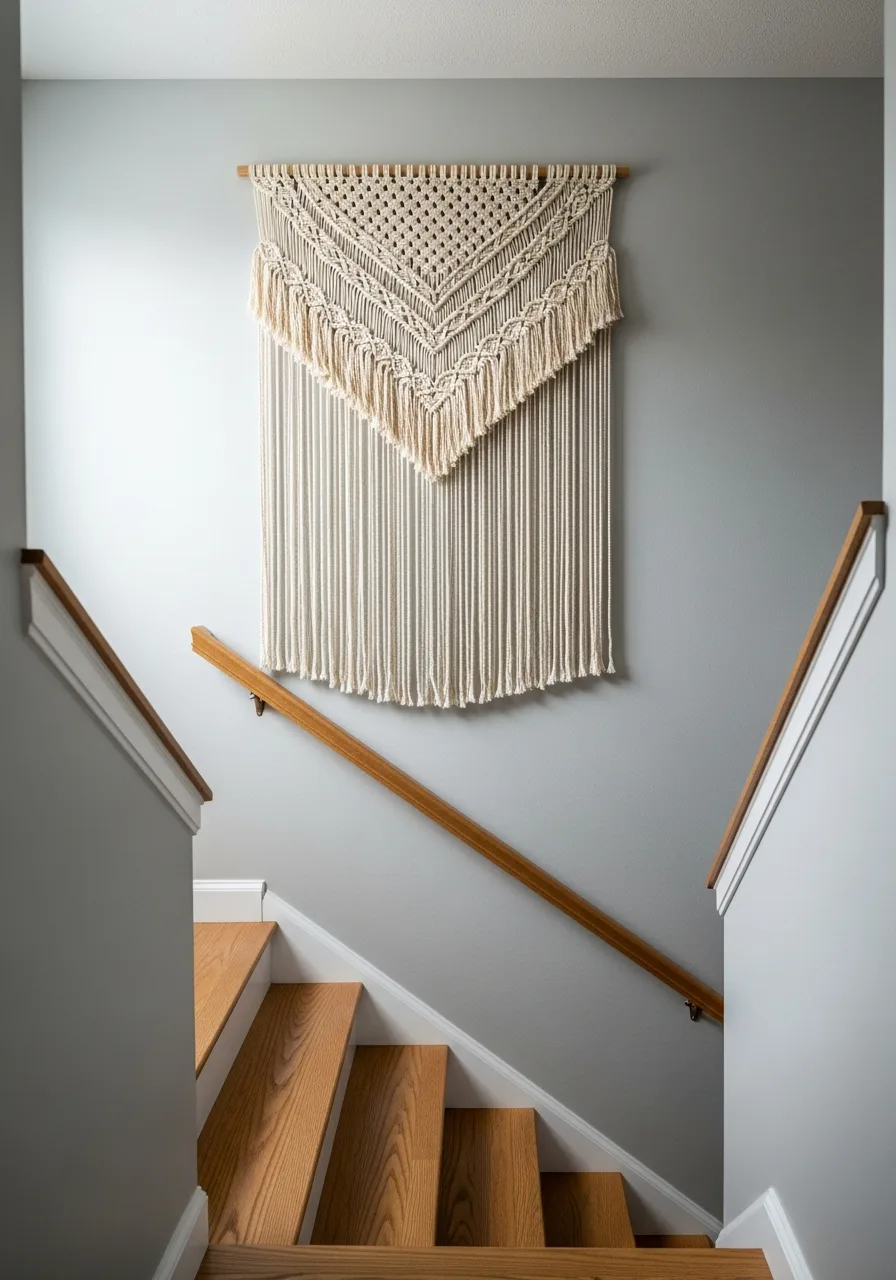
33. Bohemian Macrame Textile Art
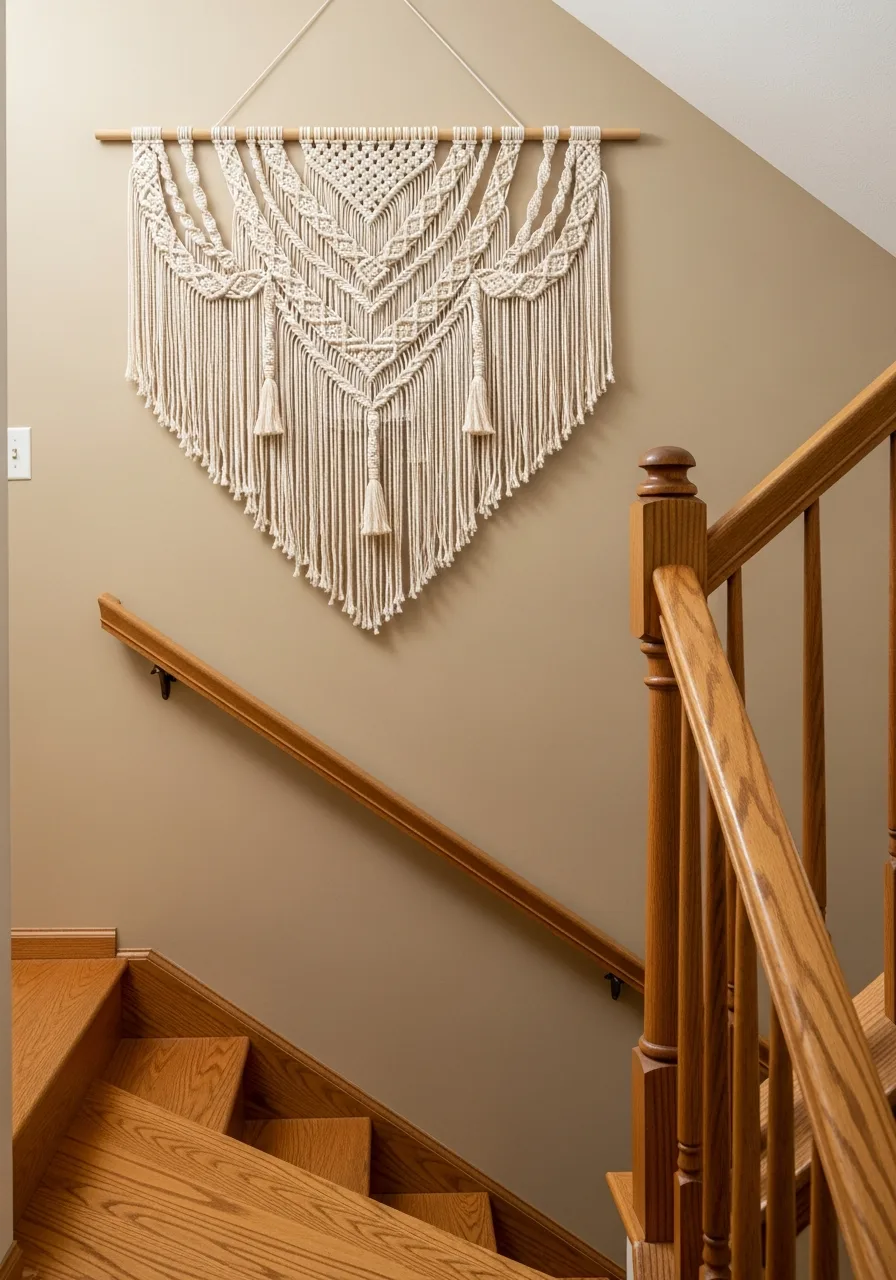
A large macrame wall hanging brings soft texture and a relaxed vibe to a sterile staircase. The fabric absorbs sound, which helps dampen the echo often found in tall, narrow stairwells.
Hang one oversized piece on the main landing wall to create a soft focal point that draws the eye upward. Natural cotton fibers contrast beautifully against dark wood banisters or metal railings. Choosing a single large piece is more effective than many small ones for a clean, modern look.
- Source handmade pieces from local craft fairs or online artisans for a unique, non-commercial feel.
- Use a sturdy wooden dowel or a decorative brass rod to support the weight of the textile.
- Avoid hanging fabric in stairwells with high humidity or near kitchen vents where grease can settle.
Best shortcut: Use a garment steamer on the fringe after hanging to remove any wrinkles from shipping or storage.
34. Framed Heirloom Key Display
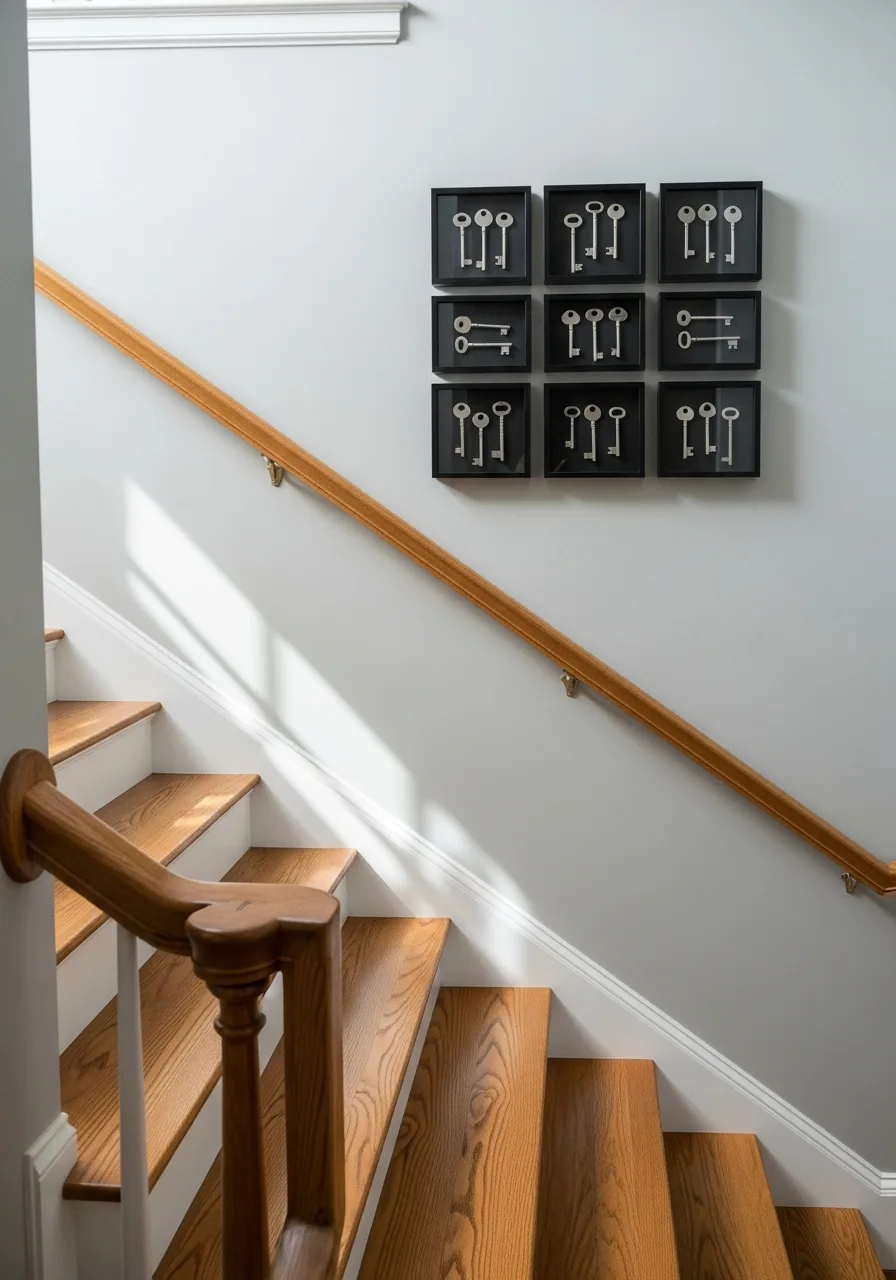
Small shadow boxes containing vintage or heirloom keys add a sense of history and mystery to the wall. This is a great way to display sentimental items that would otherwise stay hidden in a drawer.
Arrange several small frames in a tight cluster at eye level for a curated museum effect. Using matching frame finishes keeps the display from looking like a random collection of junk. Small, detailed objects work best when the background wall color is a solid, neutral shade.
- Find vintage keys at thrift stores or flea markets for a low-cost collection.
- Mount the keys inside the frames using clear fishing line or small dabs of hot glue.
- Use frames with glass to protect the keys from dust and oils from hands.
Quick win: Place a small piece of dark velvet behind the keys to make the metal details pop.
35. Deep Saturated Accent Wall
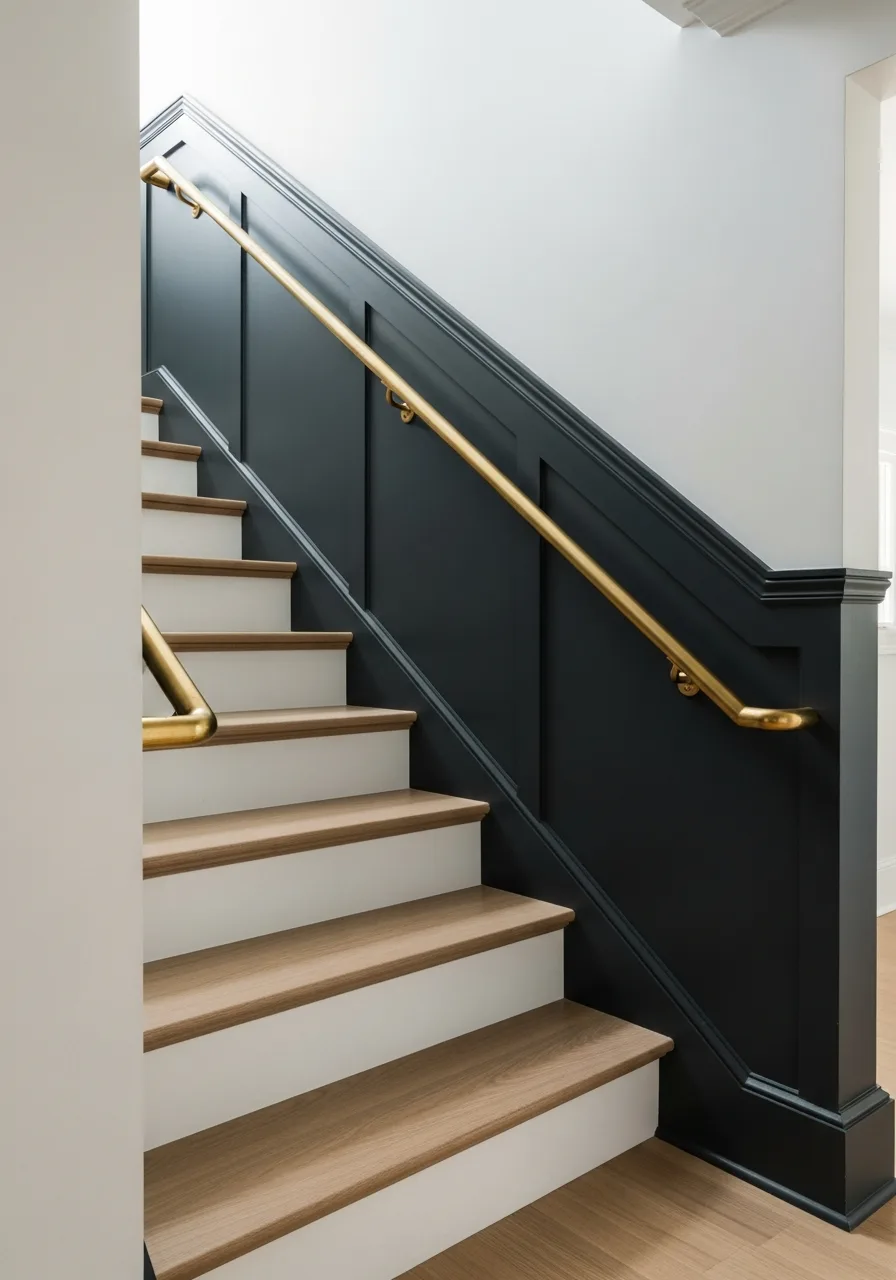
Painting the staircase wall a deep, saturated color creates a dramatic backdrop that makes architectural details stand out. Dark colors like navy, charcoal, or forest green make a large wall feel more intimate and intentional.
Choose a matte or eggshell finish to minimize the appearance of wall imperfections and glare from overhead lights. A bold wall color allows light-colored artwork or wooden handrails to become the stars of the space. Dark walls work best when there is ample natural light or a well-placed window nearby.
- Buy a small sample pot first to see how the dark color looks at different times of the day.
- Use a high-quality primer to ensure the dark pigment adheres evenly without streaks.
- Keep the ceiling and adjacent walls white to prevent the staircase from feeling like a dark tunnel.
Most people skip this: Paint the outlet covers the same color as the accent wall so they disappear into the background.
36. Framed Chinoiserie Wallpaper Panels
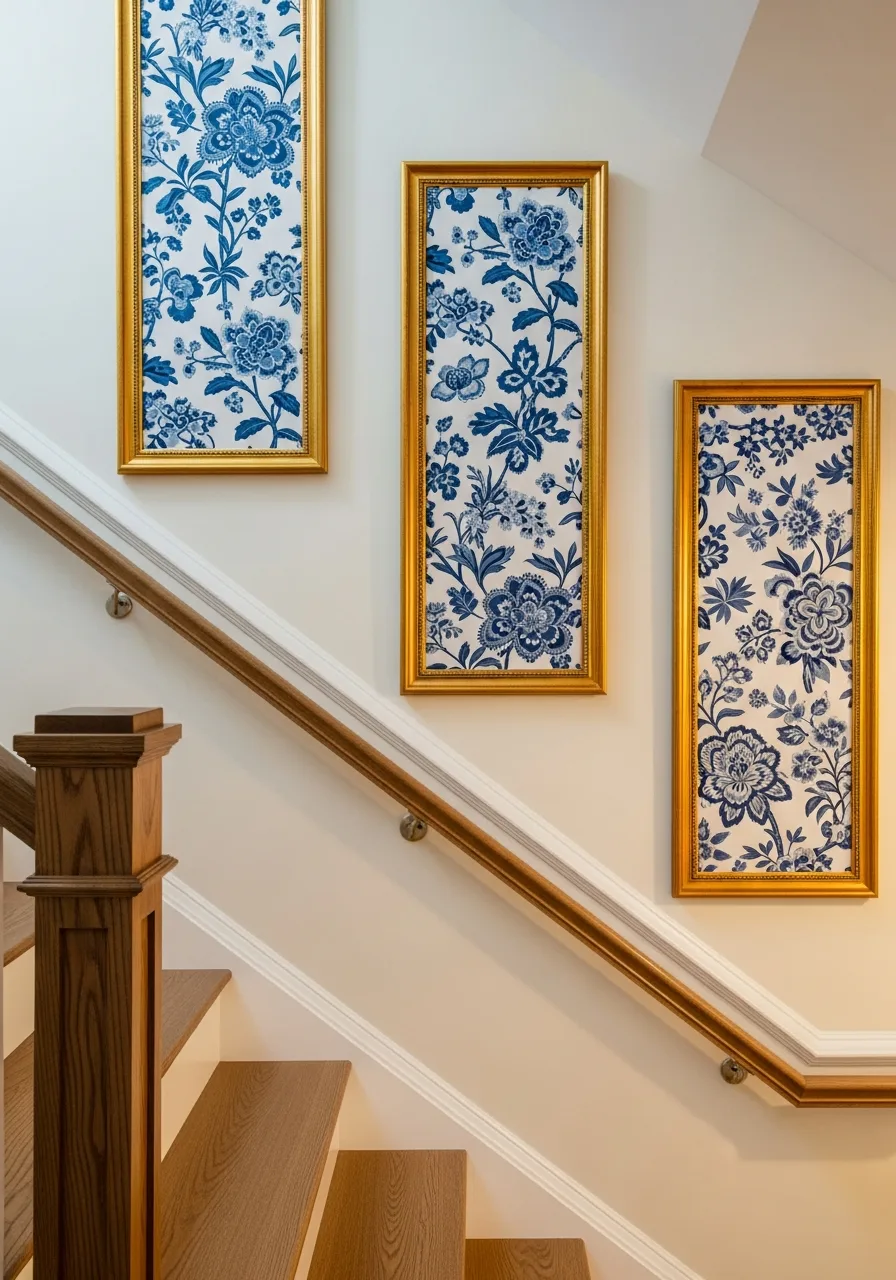
Framing sections of high-end wallpaper creates the look of expensive art without the cost of a full room installation. Chinoiserie patterns with birds and vines provide a traditional, elegant feel that guides the eye up the stairs.
Use large, thin frames to enclose vertical strips of the pattern for a sophisticated paneled look. This method is perfect for renters or those who want a bold pattern without a permanent commitment. It is best to choose a wallpaper with a large-scale print so the details are visible from a distance.
- Order wallpaper samples or a single roll to get enough material for several large frames.
- Use a spray adhesive to mount the wallpaper onto foam board before placing it in the frame.
- Align the pattern across the frames if they are hung side-by-side for a continuous visual flow.
Best shortcut: Use poster frames if you are on a budget; once they are on the wall, the plastic looks just like glass.
37. Horizontal White Shiplap Planking
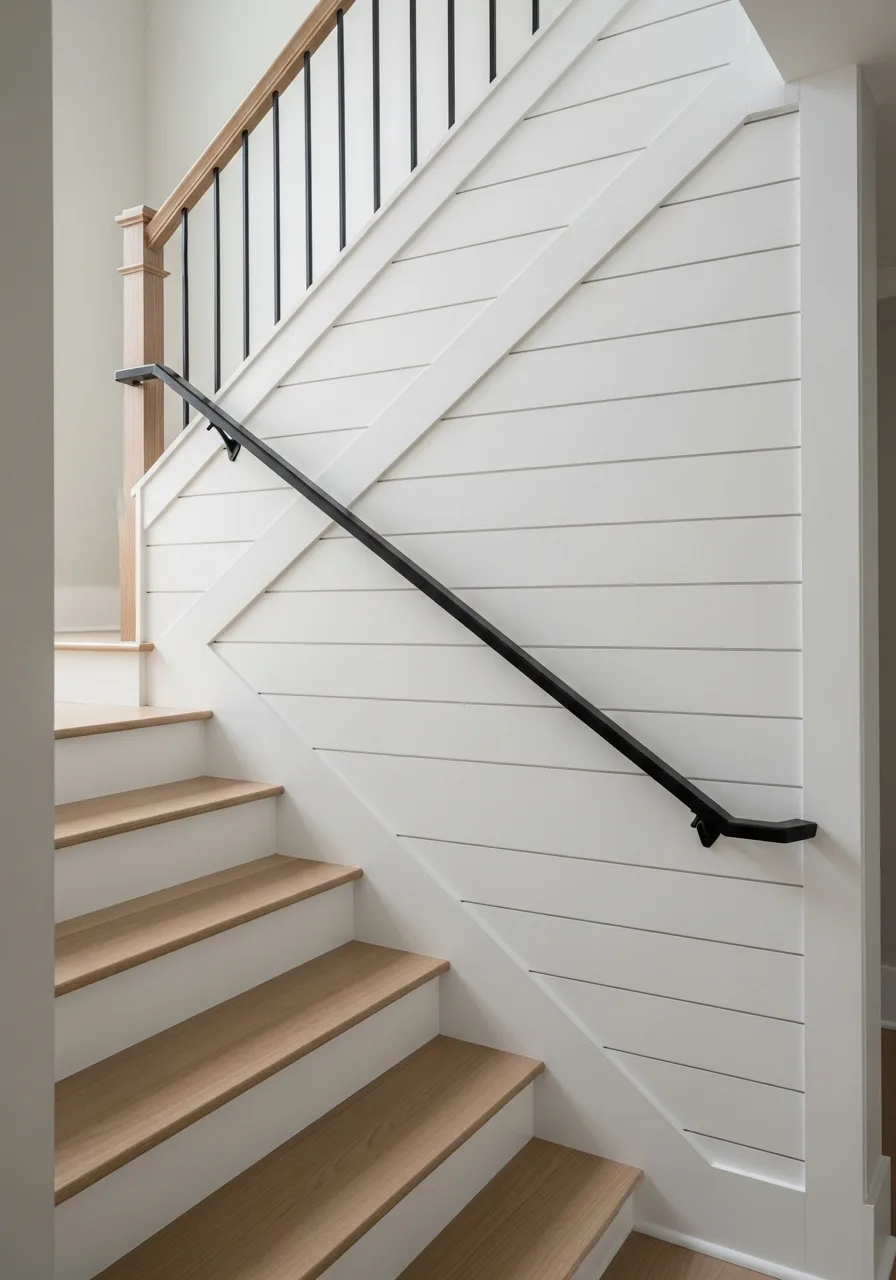
Horizontal shiplap adds a clean, farmhouse-inspired texture that makes a staircase feel wider. The long lines of the planks draw the eye along the path of the stairs, creating a sense of movement.
Install the planks with a nickel-gap spacing to ensure the shadows between the boards are visible and defined. White shiplap is a durable choice that hides small dents and scratches better than plain drywall. This texture works well in coastal, rustic, or modern cottage homes.
- Buy pre-primed MDF shiplap boards to cut down on painting time and cost.
- Use a nail gun for installation to keep the holes small and easy to fill with wood putty.
- Finish the edges with a simple corner trim for a professional, gap-free look.
Quick win: Start the first board at the top of the wall and work down to ensure the most visible part is perfectly level.
38. Leaner Art on Landings
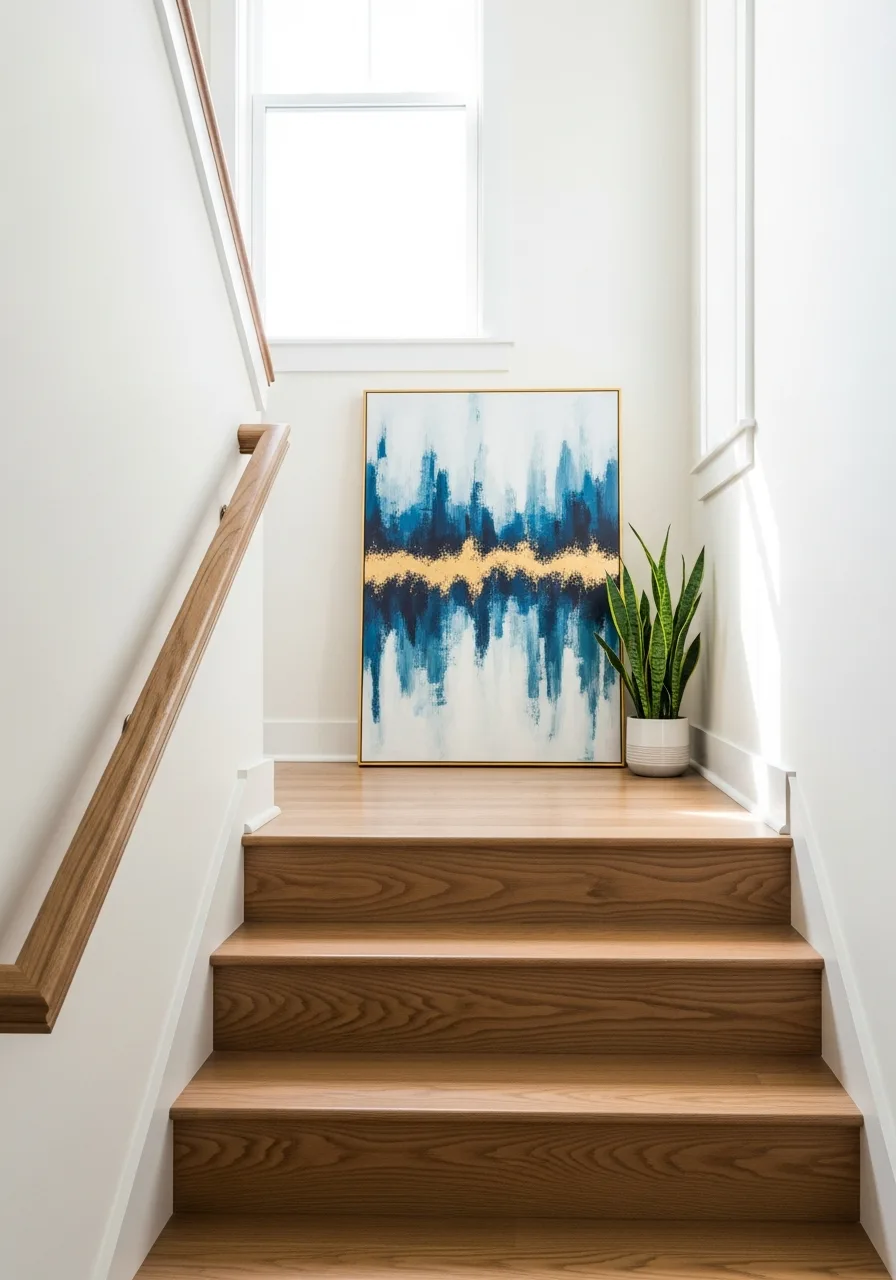
Placing large-scale art directly on the floor of a staircase landing creates a modern and casual gallery feel. This avoids the need for drilling into difficult-to-reach walls or angled surfaces.
Choose a piece that is at least 36 inches tall to ensure it has enough presence against the large wall. Leaning art is easy to swap out whenever the mood strikes, making it a flexible design choice. It works best on wide landings where there is no risk of the frame being kicked or bumped.
- Select lightweight canvases rather than heavy glass-fronted frames for safety in high-traffic areas.
- Add a small piece of non-slip rug padding behind the frame to prevent it from sliding on the floor.
- Pair the art with a tall potted plant to fill the corner and add a layer of greenery.
Most people skip this: Clean the baseboards behind the leaning art regularly, as dust tends to settle there quickly.
39. Wire Photo Clip String
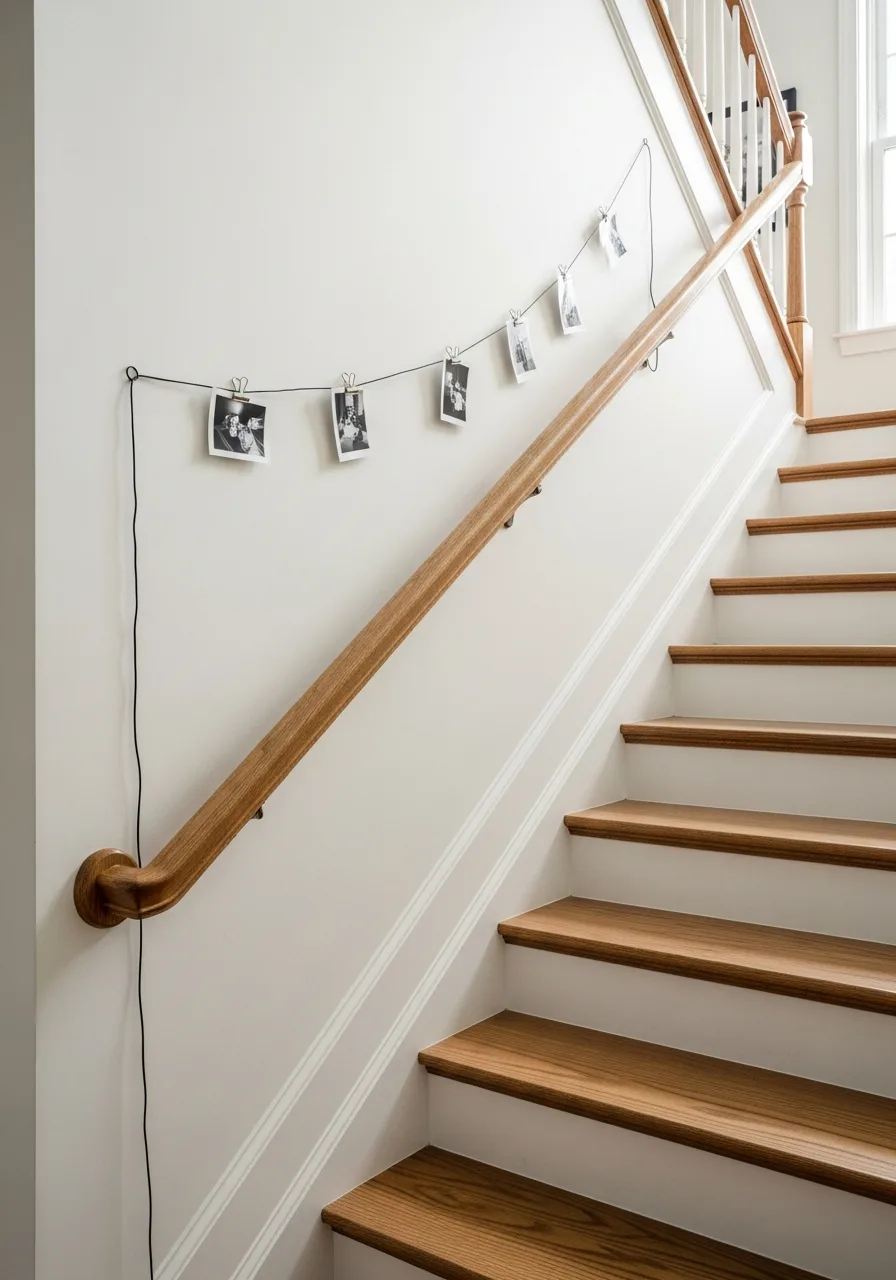
A simple wire with clips allows for a rotating display of family photos and travel mementos. This is a low-profile solution that adds a personal touch without the bulk of traditional frames.
Stretch the wire diagonally to match the angle of the stairs for a playful and intentional look. It is a great way to fill a long wall without spending a lot of money on professional framing. This style is particularly effective in casual homes or children's play areas near the stairs.
- Use heavy-duty command hooks to secure the wire ends if you want to avoid making holes in the wall.
- Print all photos in the same color tone, like sepia or black and white, for a more cohesive appearance.
- Space the clips about six inches apart to prevent the wire from sagging under the weight.
Best shortcut: Use a laser level to mark the start and end points of the wire so the angle perfectly matches the stair incline.
40. Architectural Wood Corbel Accents
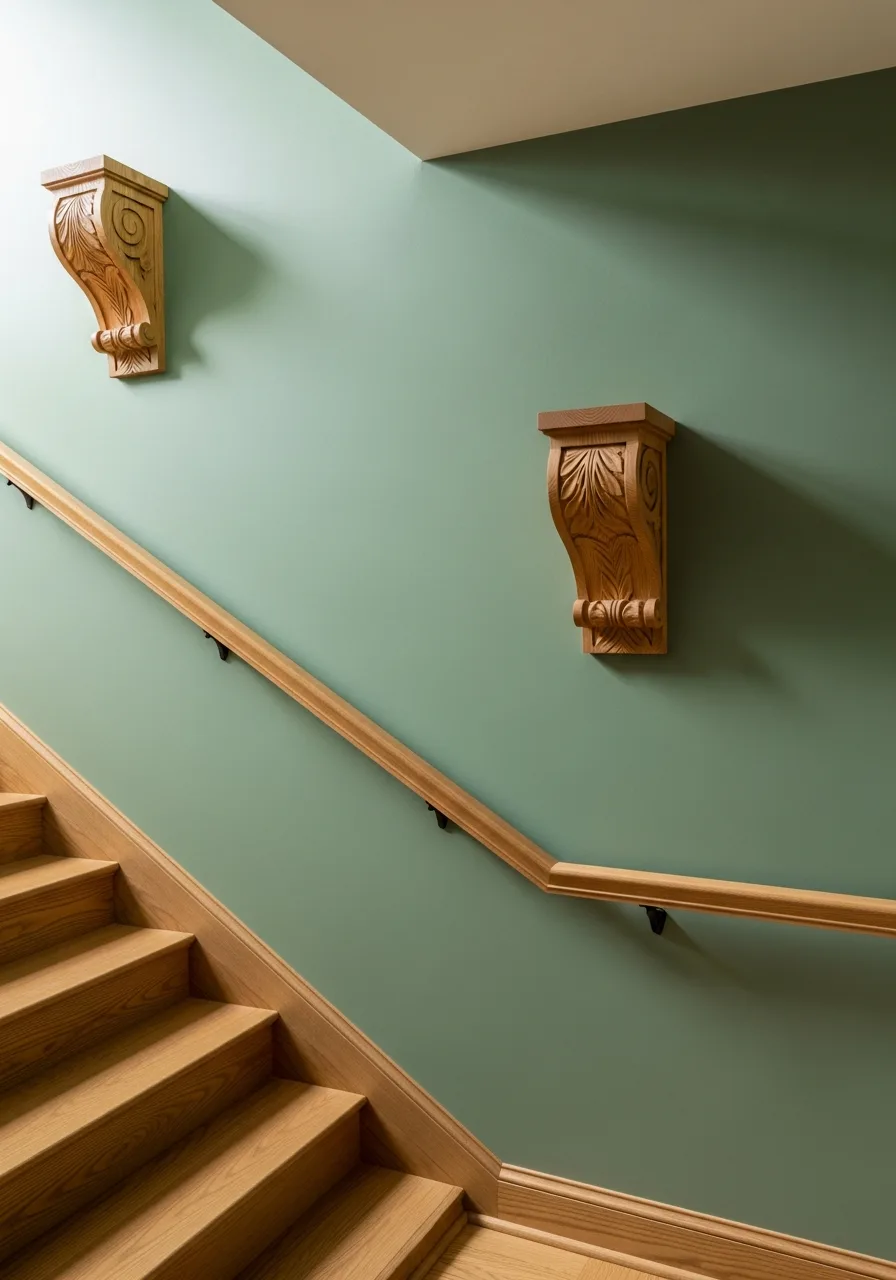
Decorative wood corbels mounted directly to the wall add a touch of vintage architectural charm. These pieces act like 3D sculptures that bring interest to a flat surface.
Mount a pair of matching corbels at the top of the stairs to act as a visual entrance to the upper floor. Distressed wood finishes work well for a rustic look, while painted corbels feel more modern. They are a great way to fill small, awkward wall sections where a frame might not fit.
- Look for reclaimed corbels at architectural salvage yards for authentic character.
- Use heavy-duty wall anchors to ensure the corbels stay securely attached to the drywall.
- Top the corbels with a small, flat board to create a tiny shelf for a single decorative object.
Quick win: Rub a bit of dark wax into the carvings of the corbel to highlight the intricate details.
41. Wrought Iron Medallion Decor
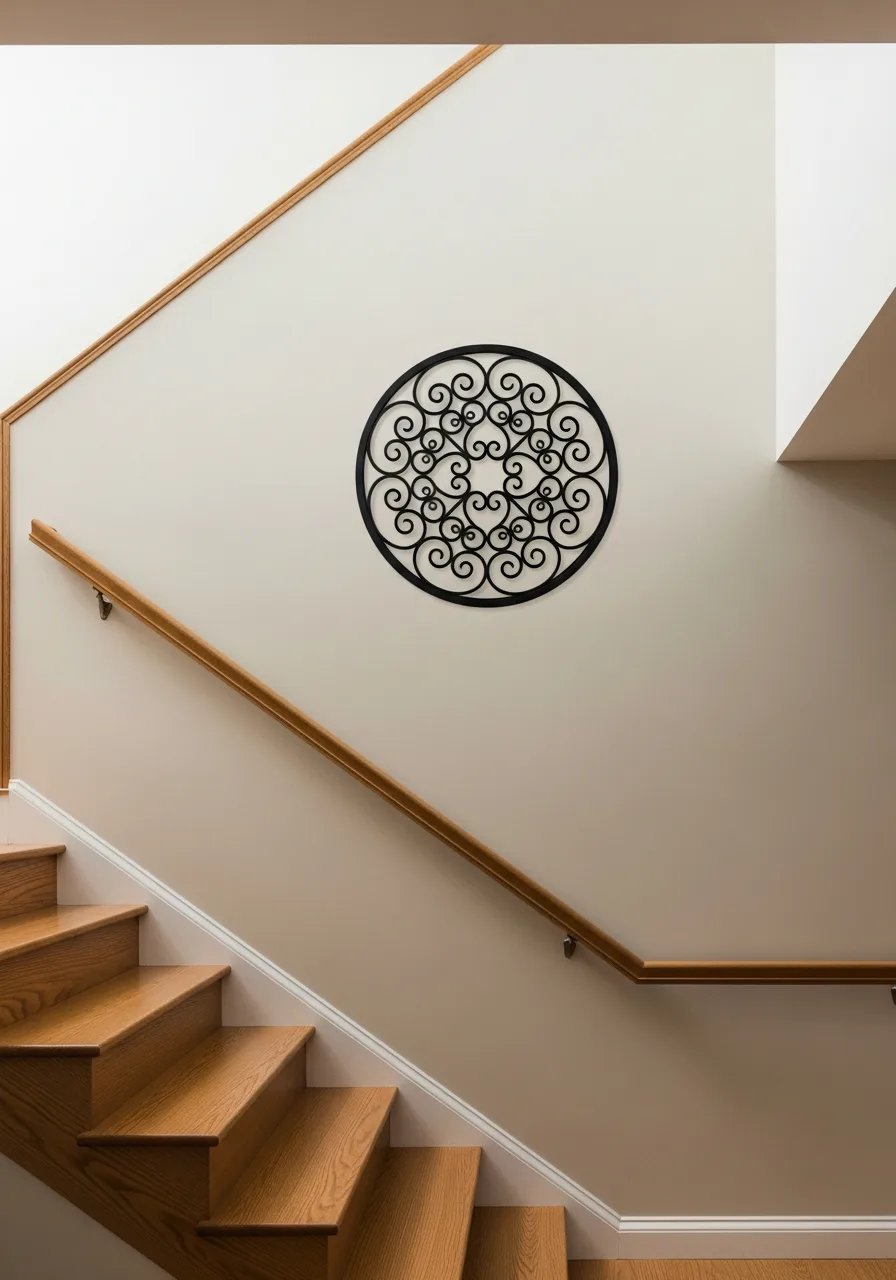
A large wrought iron medallion provides a classic, timeless look that works in almost any home style. The open-work design allows the wall color to show through, keeping the space feeling light and airy.
Center one large medallion on the widest part of the staircase wall to act as a statement piece. Metal decor is extremely durable and won't fade in sunlight, making it ideal for stairs near windows. It adds a touch of weight and permanence to the transition area of the home.
- Choose a medallion that contrasts with your wall color, such as black on white or silver on navy.
- Wipe the metal down with a microfiber cloth once a month to prevent dust buildup in the small crevices.
- Secure the piece with a screw into a stud, as metal wall art can be surprisingly heavy.
Most people skip this: Place small clear rubber bumpers on the back of the medallion to prevent it from scratching the wall paint.
42. Geometric Cork Tile Pattern
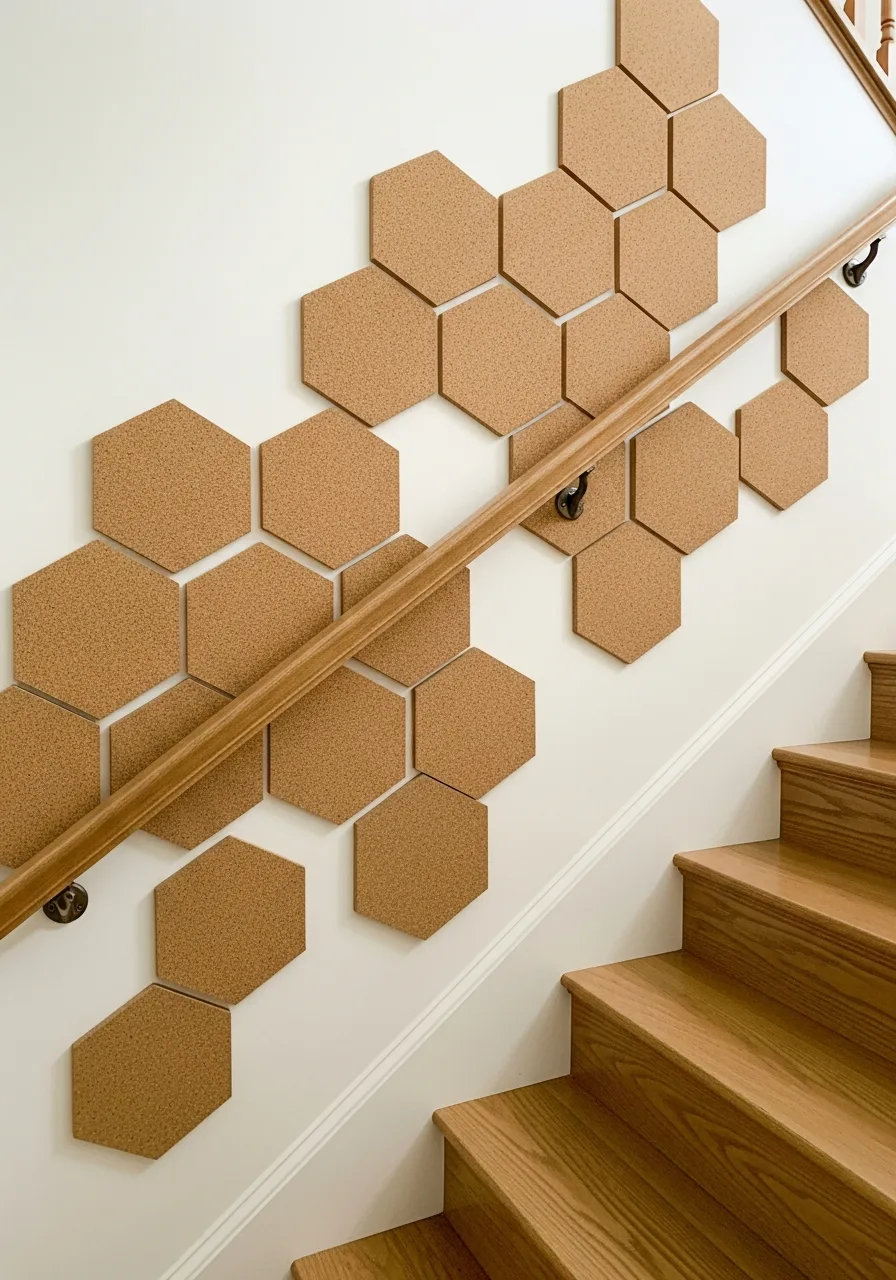
Hexagon cork tiles create a functional and stylish wall feature that doubles as a giant bulletin board. This is a clever way to keep the family organized by pinning schedules and reminders in a high-traffic area.
Arrange the tiles in a honeycomb pattern that flows upward with the stairs for a modern geometric look. The natural texture of the cork adds warmth and helps with sound insulation. It is a practical choice for families with school-aged children who need a place to display artwork.
- Use self-adhesive cork tiles for a quick project that requires no extra glue or nails.
- Paint a few of the tiles in a coordinating accent color before hanging to add a pop of interest.
- Keep the display tidy by using uniform push pins in a single color like gold or black.
Best shortcut: Layout the pattern on the floor first to get the spacing right before sticking them to the wall.
43. Slim Vertical Mirror Panels
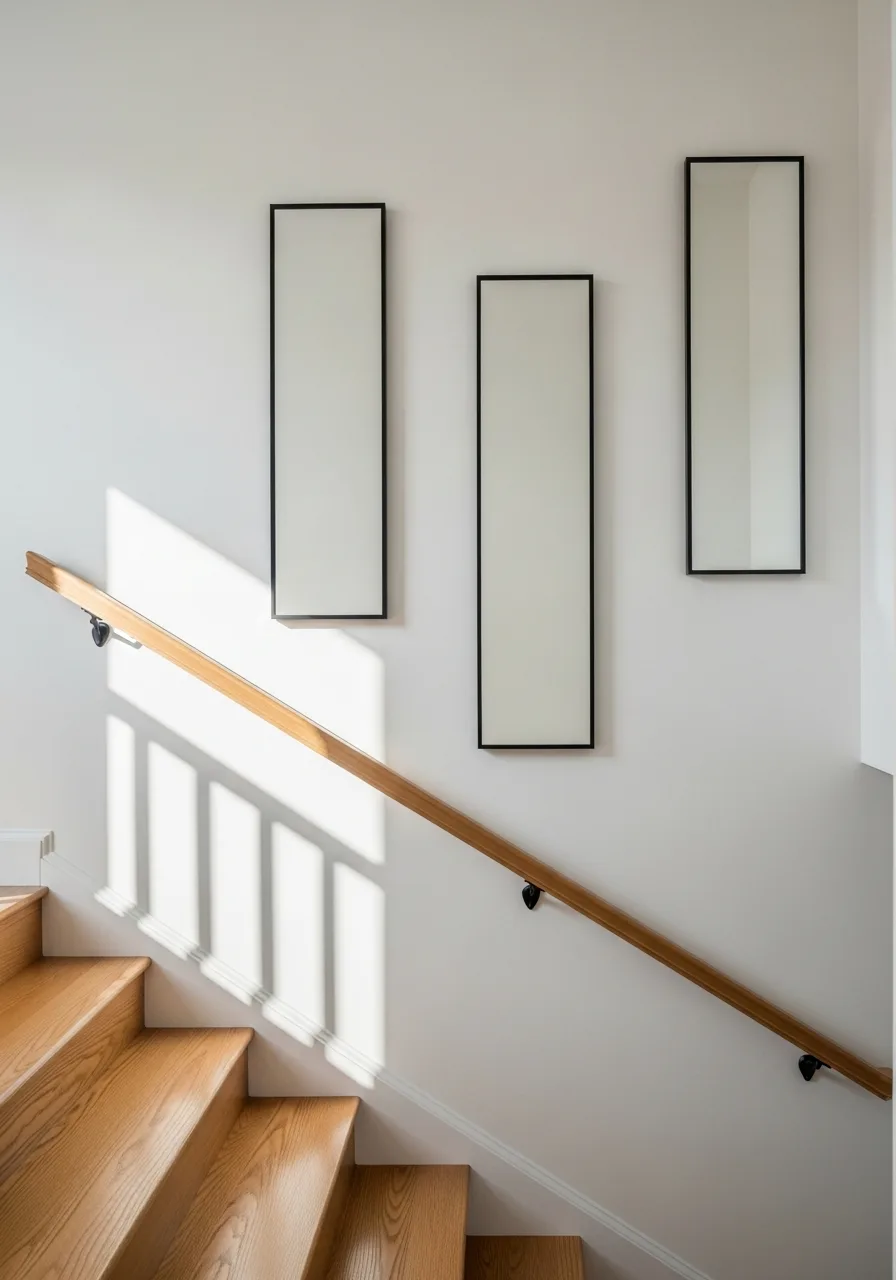
Tall, narrow mirrors can make a cramped staircase feel twice as wide by reflecting light and space. Placing them vertically creates an illusion of height, which is perfect for homes with low ceilings.
Space three identical slim mirrors evenly along the wall to create a rhythmic, window-like effect. Mirrors also help brighten dark stairwells by bouncing light from nearby rooms or windows. This is a clean, minimalist approach that feels sophisticated without being cluttered.
- Buy mirrors with pre-installed hanging hardware to ensure they sit flush against the wall.
- Clean the mirrors weekly with a streak-free glass cleaner to maintain the bright, reflective quality.
- Avoid placing mirrors directly opposite a cluttered area, as they will double the visual mess.
Quick win: Hang the mirrors so the center point is at the average eye level of the people living in the home.
44. Natural Woven Palm Fans
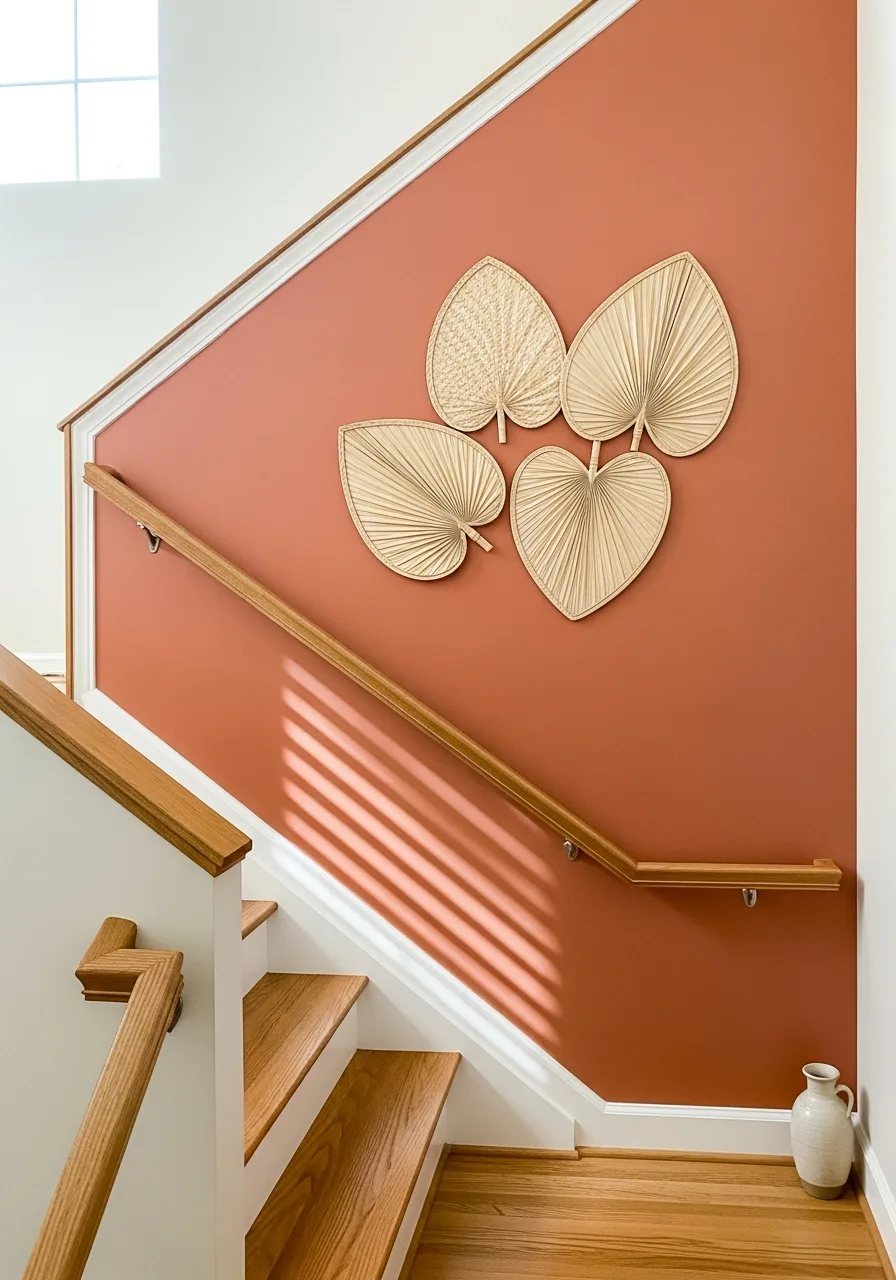
Woven palm fans bring a global, organic feel to a staircase and are incredibly lightweight. Their unique shapes and textures add a layer of interest that feels more artful than a standard picture frame.
Arrange a trio of fans in a staggered line to follow the incline of the handrail. The neutral, earthy tones work well against white, terracotta, or sage green walls. Because they are so light, they are the safest option for walls where you might worry about heavy items falling.
- Use small clear finishing nails to hang the fans by their handles for a nearly invisible mount.
- Group fans of slightly different sizes and weave patterns to create a more curated look.
- Dust the fans regularly with a soft brush to keep the natural fibers looking fresh.
Best shortcut: If the fans arrive flattened, lightly mist them with water and reshape them by hand before they dry.
45. Vintage Framed Sheet Music
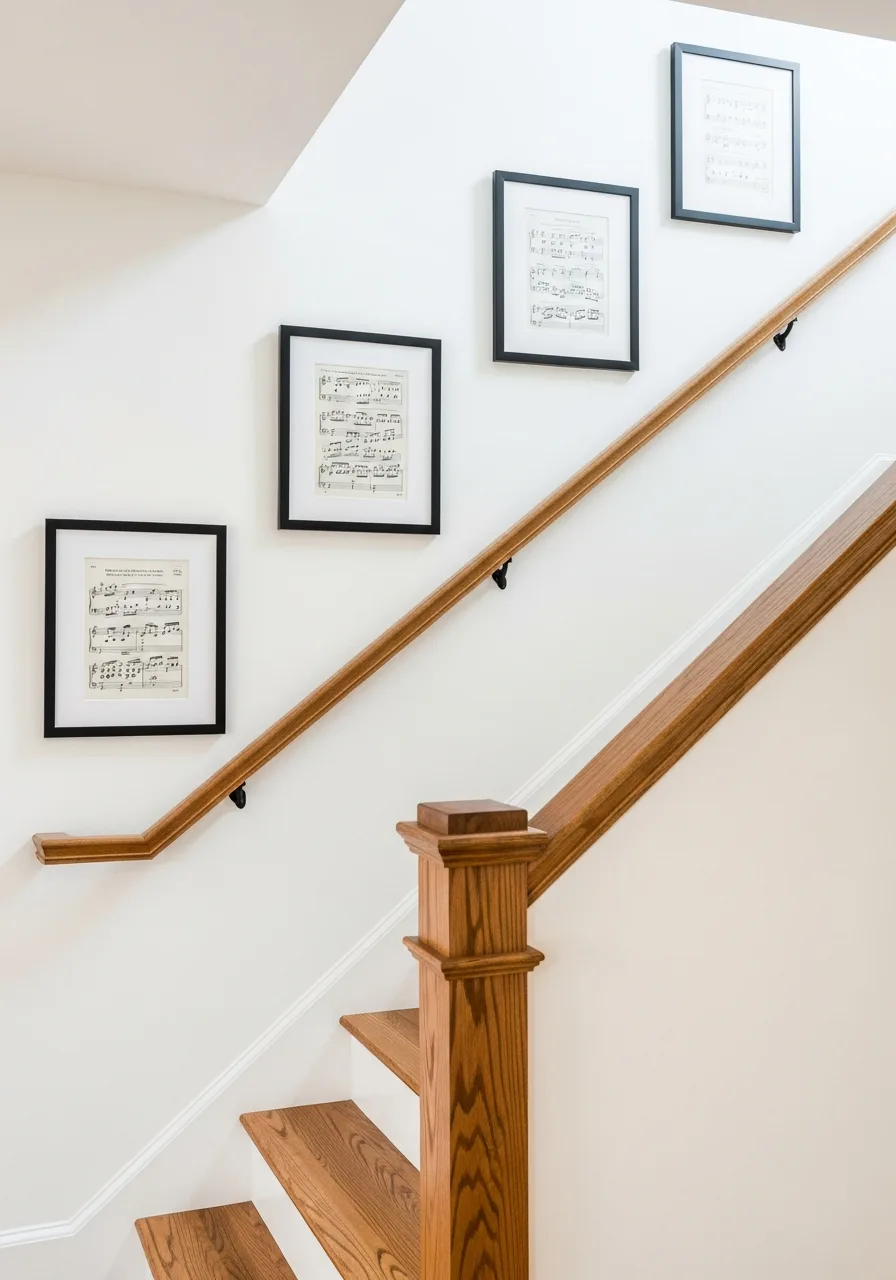
Framed vintage sheet music adds a touch of nostalgia and elegance to a staircase wall. The yellowed paper and classic typography provide a sophisticated look that feels like a collection of fine art.
Use matching black frames with white mats to give the old paper a clean, modern edge. This is a great way to showcase a love for music or to use up old books that are falling apart. The repetitive nature of the musical notes creates a calm, rhythmic visual as you walk up the stairs.
- Search for 'antique sheet music' at local used bookstores or online auctions for authentic aged paper.
- Use acid-free mats to prevent the paper from yellowing further or becoming brittle over time.
- Select pieces with interesting titles or beautiful cover illustrations for added visual appeal.
Most people skip this: Choose music from a specific era or composer to give the gallery a meaningful theme.
46. Adjustable Brass Swing-Arm Sconces
Lighting on a staircase provides both safety and a high-end look. Swing-arm sconces allow for directing light toward specific steps or art pieces without a full rewire.
Mount these at shoulder height to ensure the light pool hits the wall and the treads evenly. Using brass finishes adds a warm glow that makes the transition between floors feel more inviting. Brass is a timeless choice that keeps a narrow staircase from feeling cold or utilitarian.
- Budget around eighty dollars per lamp for a mid-range brass finish.
- Install the mounting plates into wall studs to support the weight of the metal arms.
- Choose battery-operated LED bulbs to avoid the need for an electrician in older homes.
Quick win: Use battery-operated puck lights inside hardwired-look sconces to avoid calling an electrician.
47. Framed Charcoal Sketch Gallery
Black and white sketches offer a sophisticated look that does not overwhelm a narrow passage. Use identical thin black frames to keep the focus on the artwork rather than the hardware.
Space the frames exactly four inches apart to maintain a cohesive rhythm as you move up the stairs. Keeping the palette neutral prevents the diagonal line of the stairs from feeling chaotic. Sketches feel more personal and less mass-produced than generic prints.
- Source sketches from local art markets or print digital files onto heavy cardstock.
- Use a laser level to ensure the frames follow the exact pitch of the staircase.
- Swap the charcoal sketches for colorful botanical prints to change the mood for spring.
Most people skip this: Measure the distance from the nose of the stair tread, not the floor, to keep your gallery perfectly level.
48. Oversized Round Porthole Mirror
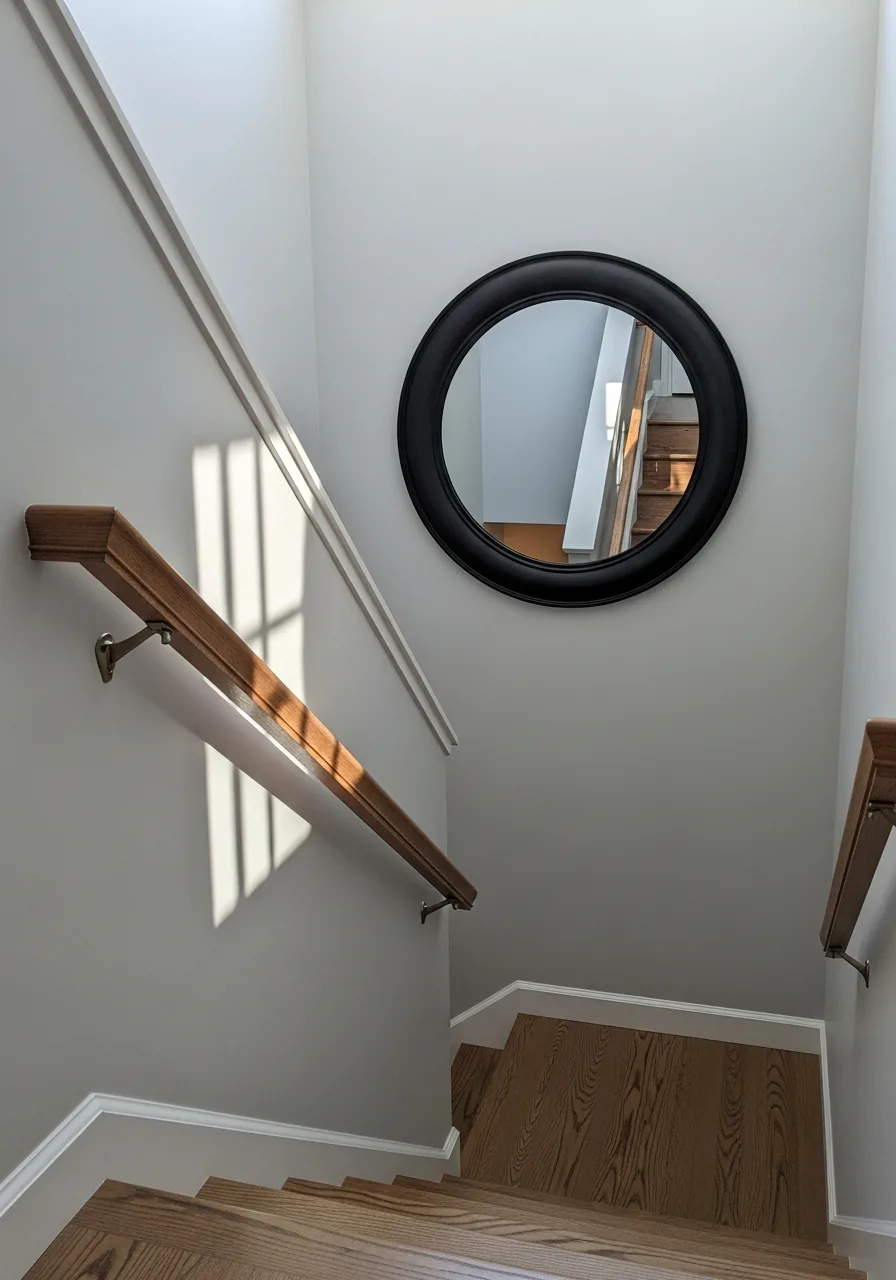
A single large round mirror breaks up the harsh diagonal lines of a staircase wall. This shape reflects light from nearby windows and makes a cramped landing feel twice as large.
Position the center of the mirror at eye level for the person standing on the middle landing step. Mirrors are the most effective way to add light to a space that lacks windows. One large piece is usually better than several small ones on a landing wall.
- Look for a mirror with a diameter of at least thirty-six inches for the best impact.
- Use heavy-duty wall anchors rated for at least fifty pounds to secure the frame.
- Renters can use a large floor mirror leaned against the landing wall if drilling is not allowed.
Best shortcut: Trace your mirror on brown paper and tape it to the wall first to check the scale before drilling.
49. Uniform Square Canvas Wraps
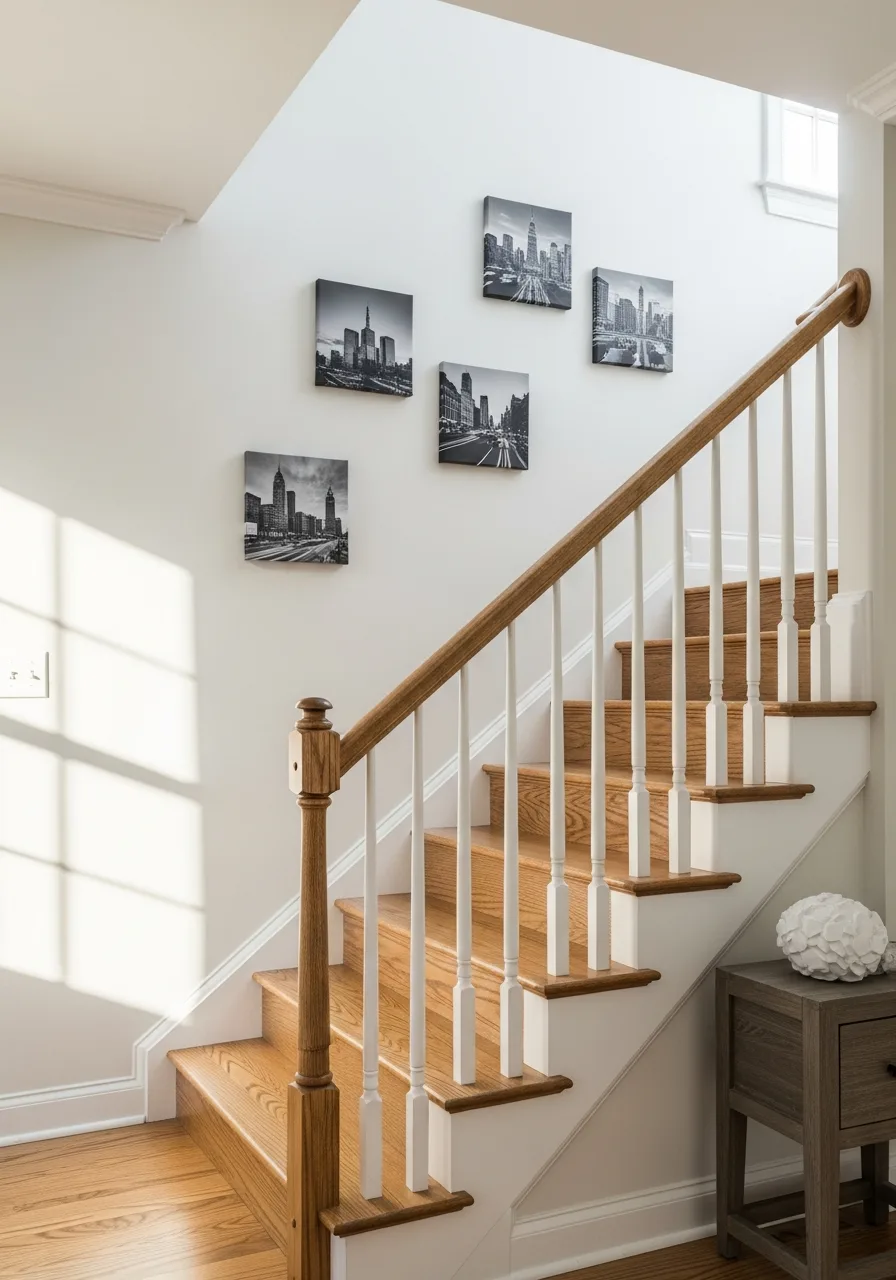
Canvas wraps provide a clean, frameless look that works well in modern homes. Choosing a single theme like black and white photography creates a professional-grade gallery feel.
Align the bottom edge of each canvas exactly twelve inches above the handrail for a consistent flow. This method hides the mounting hardware entirely, keeping the focus on the images. Canvas wraps are lighter and safer for high-traffic staircases than heavy glass frames.
- Order canvas wraps in sixteen-by-sixteen inch squares for a balanced look.
- Space the canvases six inches apart to allow the wall color to breathe between images.
- Use monochromatic family photos to create a cohesive look without clashing colors.
Quick win: Use Command strips for canvas wraps to prevent wall damage and make leveling easier.
50. Scalloped Paint Border
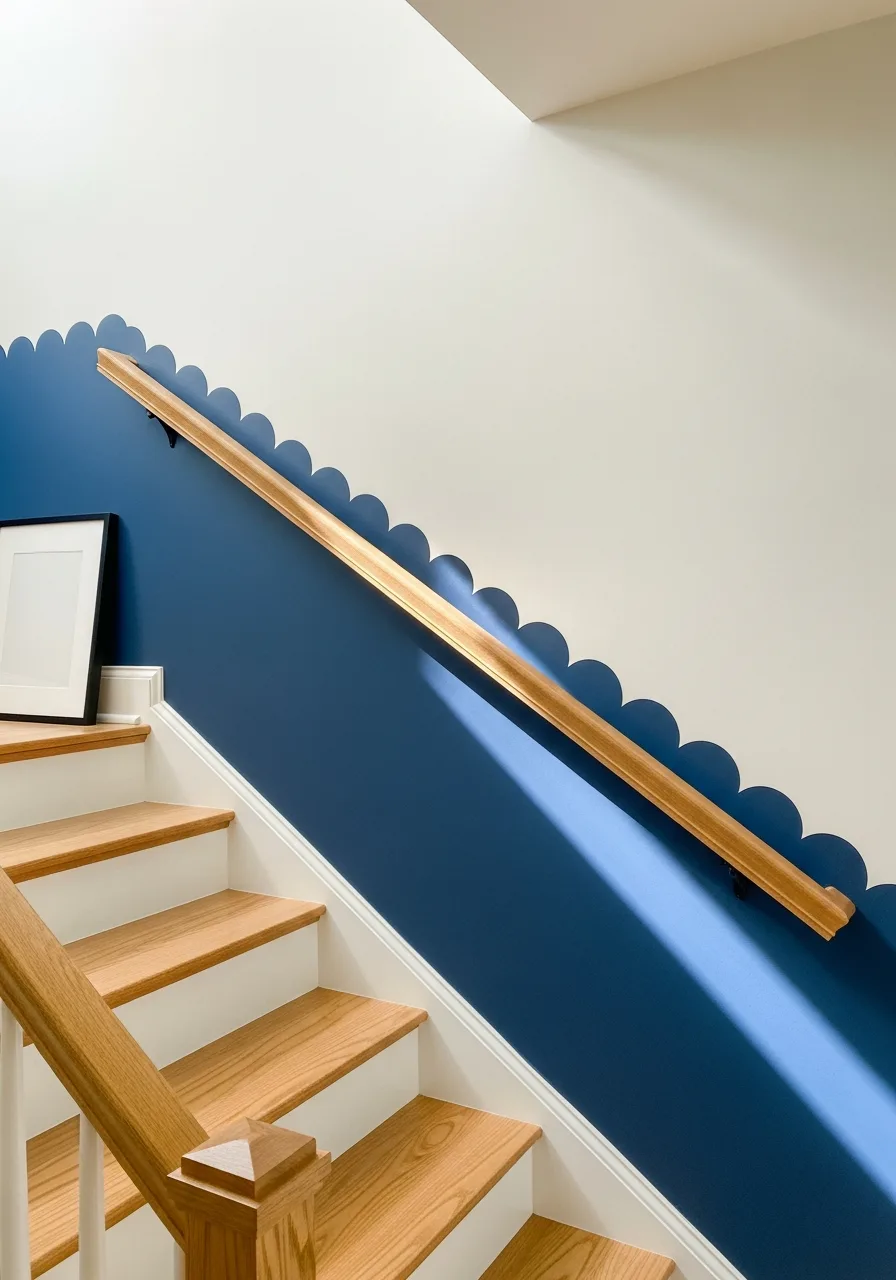
A painted scalloped edge along the bottom of the wall mimics the movement of the stairs. This project adds a playful architectural detail without the cost of heavy molding.
Use a round template like a plastic lid to trace the curves before painting with a small angled brush. This technique is perfect for adding color to a staircase without darkening the entire hallway. Two-tone walls hide scuff marks from shoes much better than solid white.
- Purchase one quart of interior latex paint in a satin finish for easy cleaning.
- Apply painter's tape along the top edge of the baseboard to ensure a crisp bottom line.
- Use a light grey or sage green for the scalloped section to keep the space feeling airy.
Most people skip this: Paint the handrail the same color as your bottom wall section for a custom, built-in look.
Frequently Asked Questions
How high should I hang art on a staircase wall?
Aim to hang the center of your artwork about 57 inches from the floor, adjusting this height for each step to follow the incline. This ensures the gallery remains at a comfortable eye level as you move up or down the stairs.
Should I follow the angle of the stairs with my frames?
A staggered diagonal layout that mimics the slope of the staircase is the most popular way to create a sense of movement. However, if you have a large flat landing, a centralized grouped layout can serve as a stunning focal point.
What is the best way to fill a very tall staircase wall?
Utilizing vertical molding or floor-to-ceiling wallpaper can effectively ground a massive space while adding sophisticated texture. You can also opt for oversized statement art or a series of large-scale panels to fill the height without it feeling empty.
How do I decorate a staircase wall without making it look cluttered?
Maintain a clean look by using consistent frame colors and ensuring there is plenty of white space between each piece. Choosing a few larger-scale items rather than many small trinkets will make the design feel intentional and organized.
Are there renter-friendly ways to style a staircase wall?
Command hooks are perfect for hanging lightweight frames and tapestries without damaging the drywall. For a bigger impact, try using peel-and-stick decals or removable wallpaper to add color and pattern that can be easily pulled away when you move.