35 Best RV Shelter Ideas for Any Budget
This post may contain affiliate links: full affiliate disclosure.
Protecting a motorhome requires more than just a roof overhead. These structures ensure clearance for slide-outs and shield the exterior from sun damage and heavy snow.
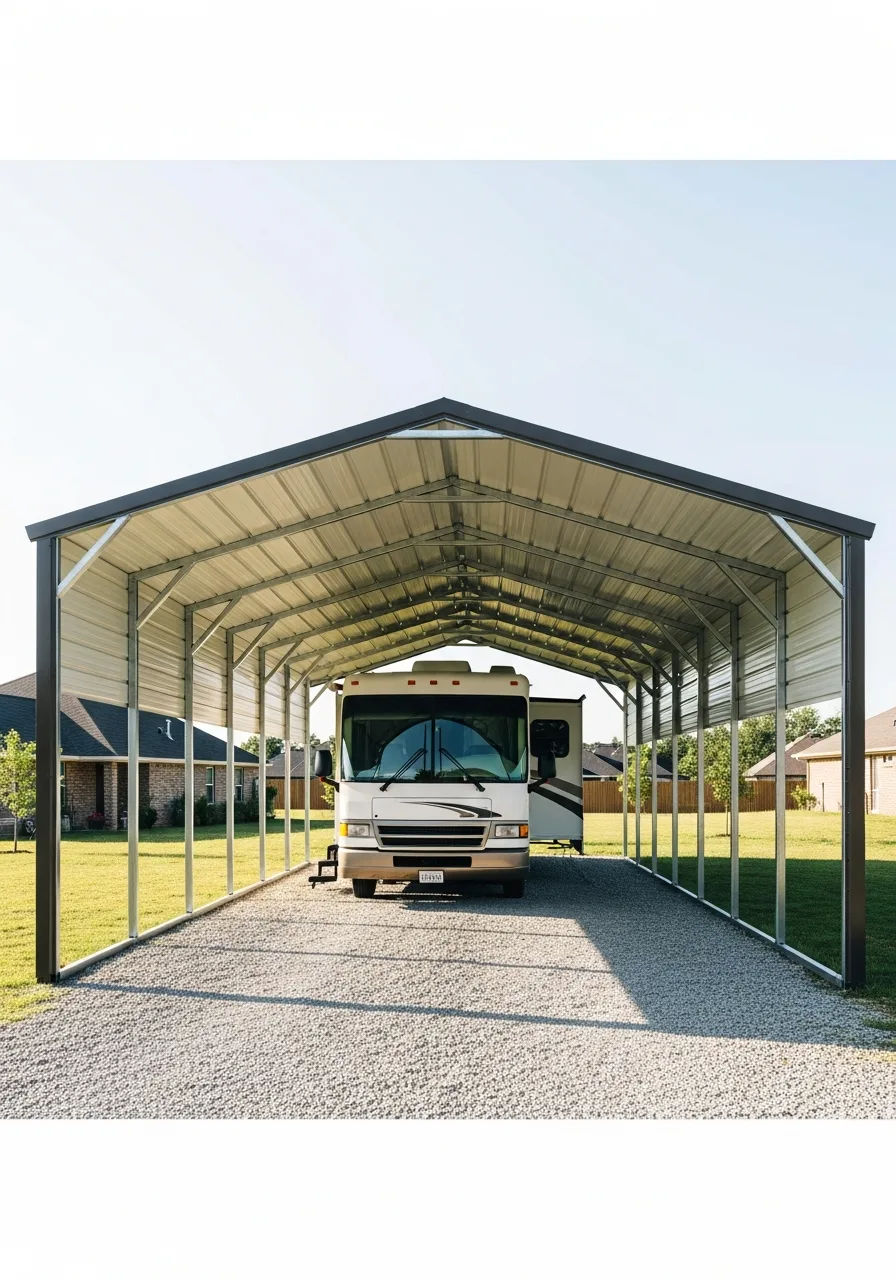
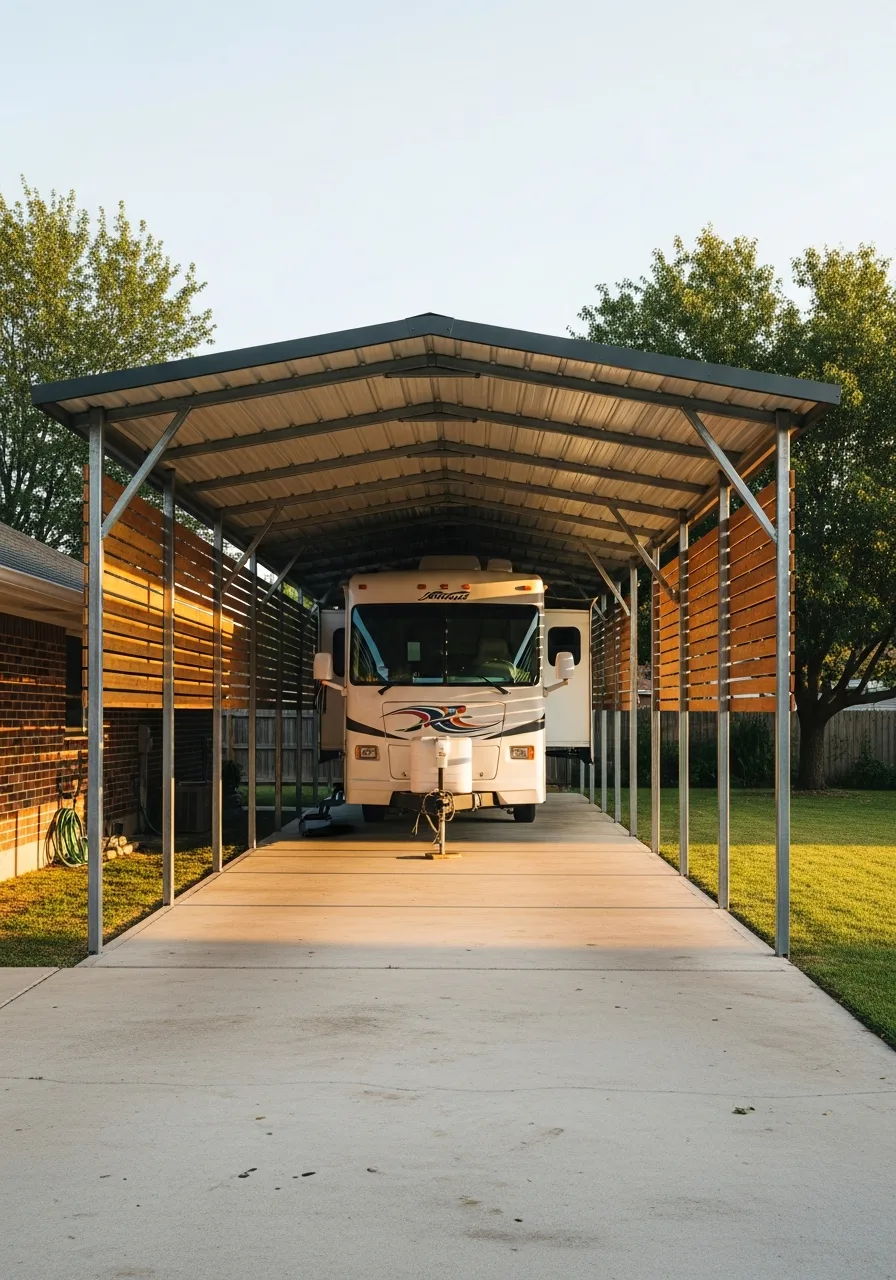
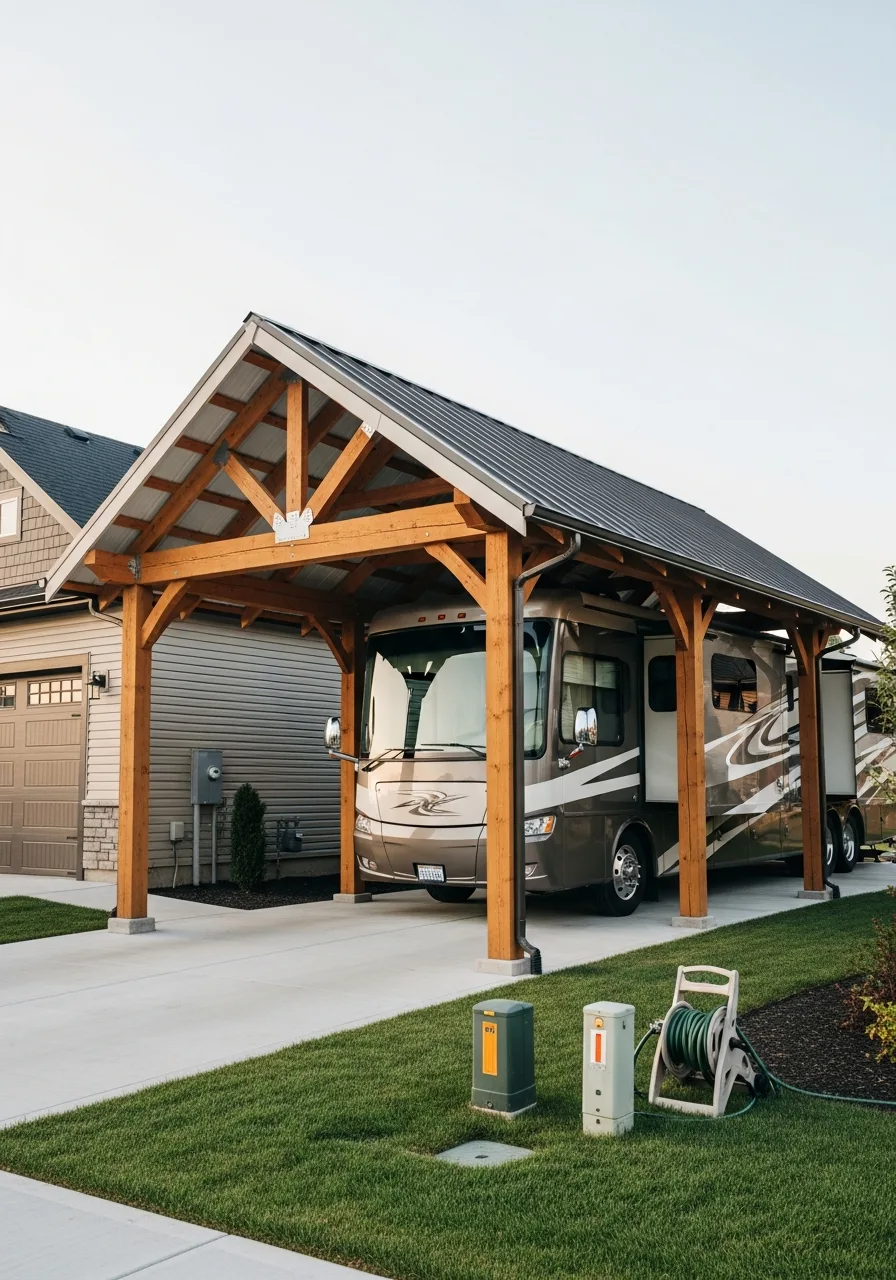
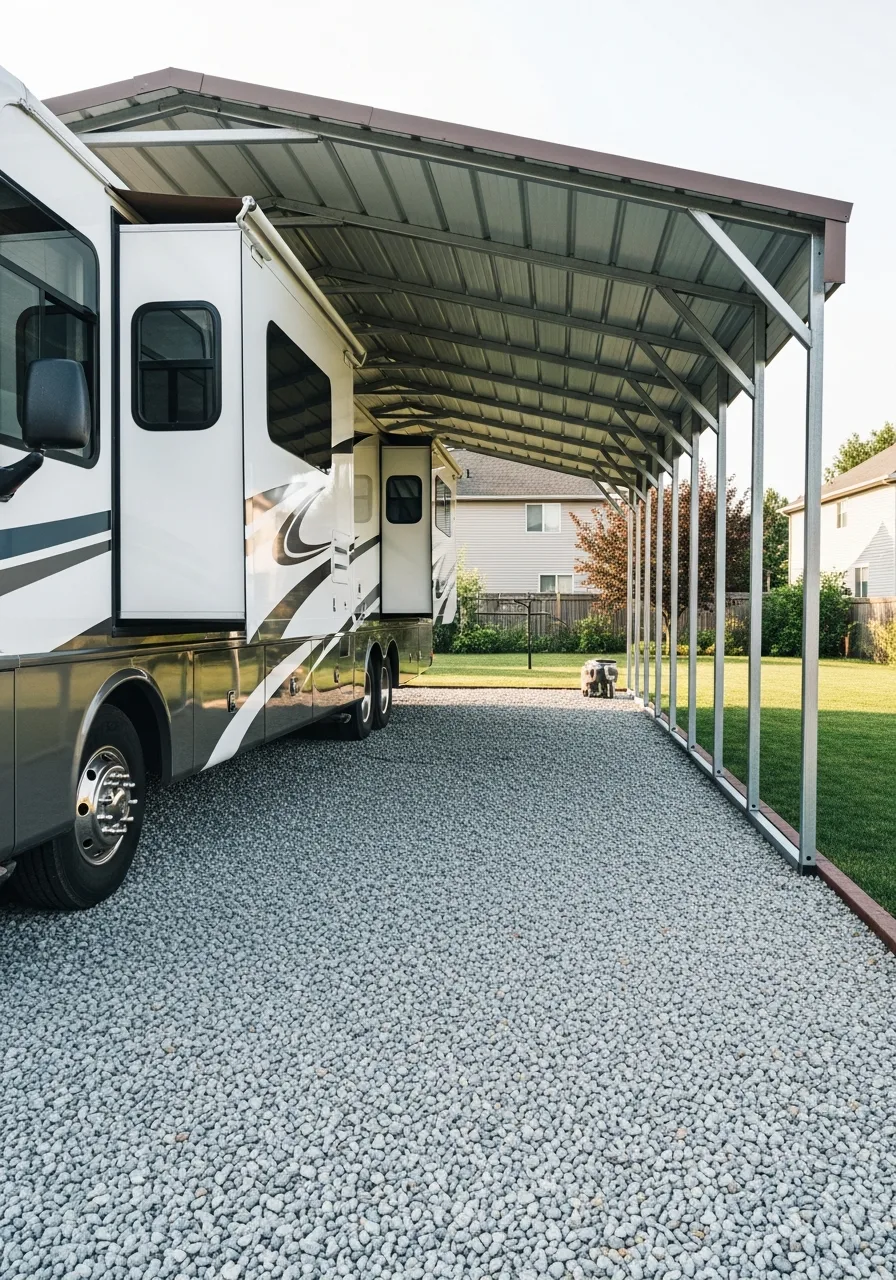
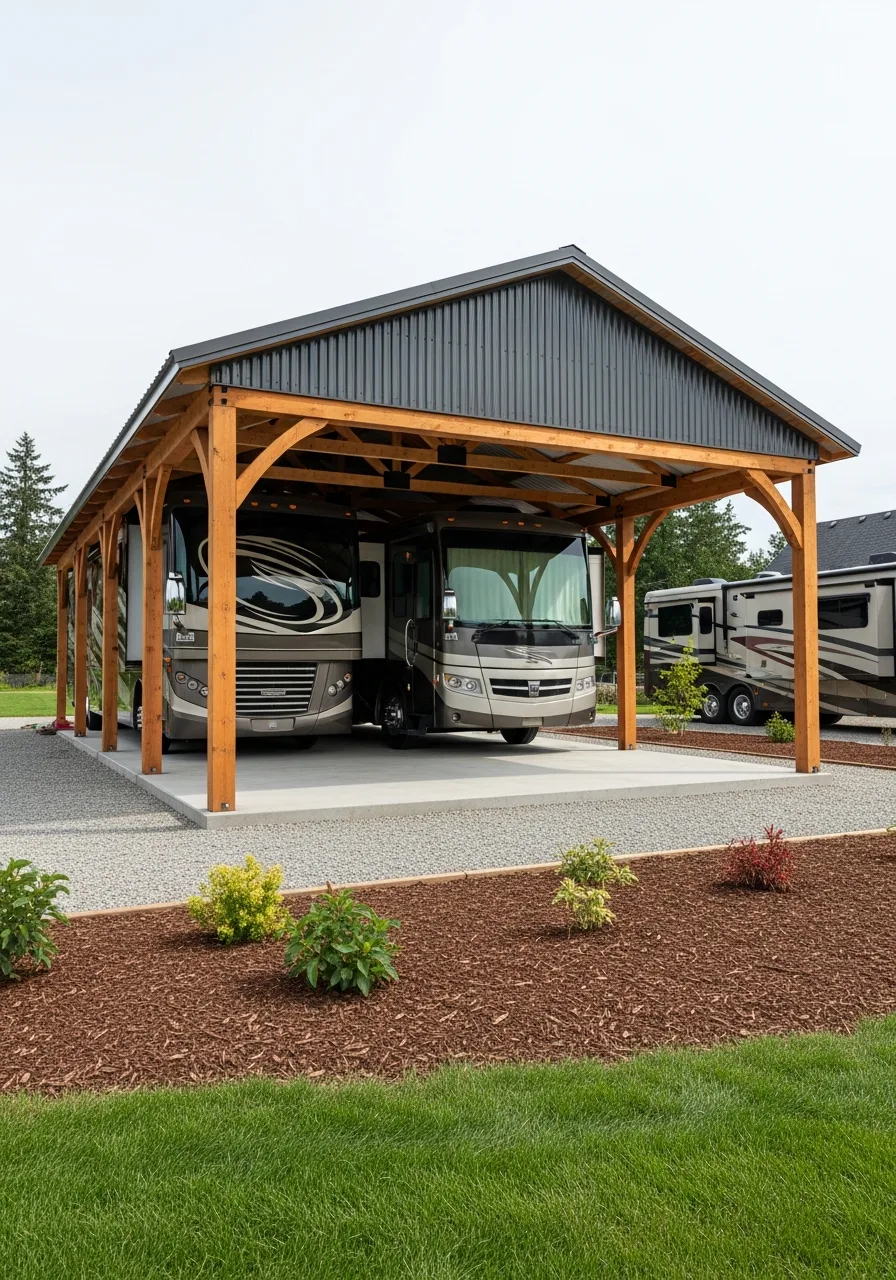
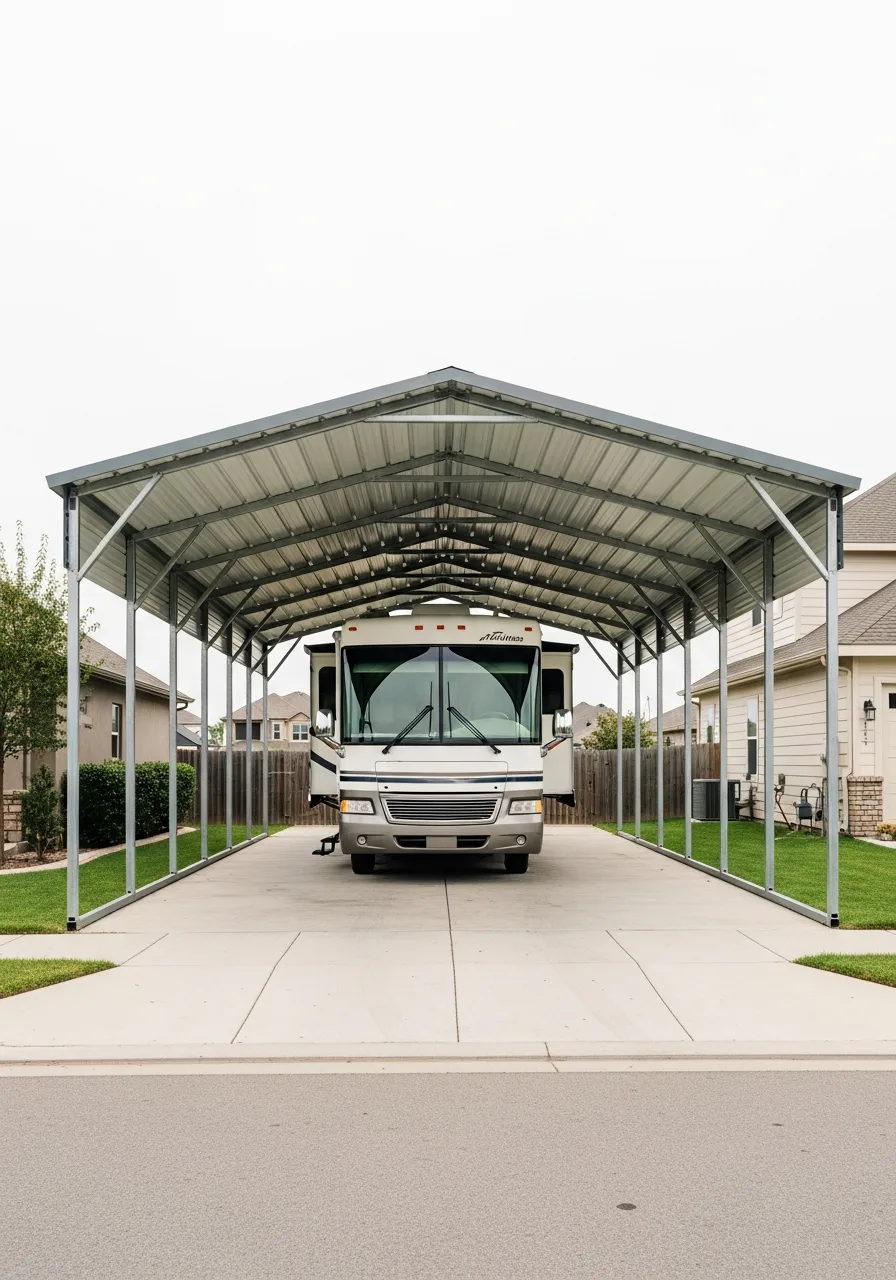
1. Metal RV Carport
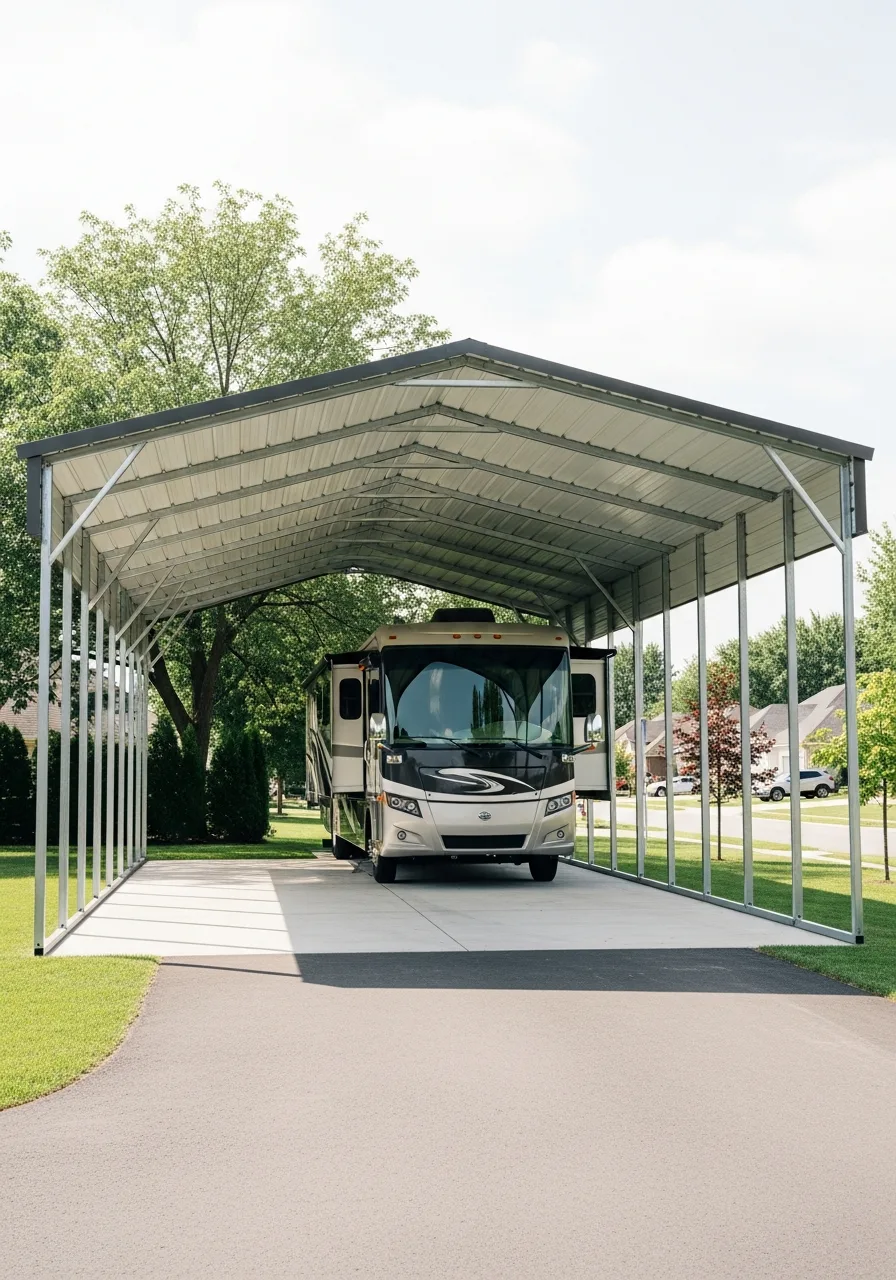
Use a tall metal carport to protect your RV from sun, rain, and falling debris while keeping the structure simple and practical. This option works well because the open sides prevent moisture from getting trapped against the vehicle body.
Mount the structure on a level concrete base to ensure the legs remain stable during high winds.
- Check for rust-resistant coatings before the winter season starts.
- Use heavy-duty anchors to secure the frame to the ground pad.
- Look for local steel fabricators to save on high shipping costs.
Design Secret: Paint the metal frame to match the trim on the main house for a more cohesive look.
2. Enclosed RV Garage
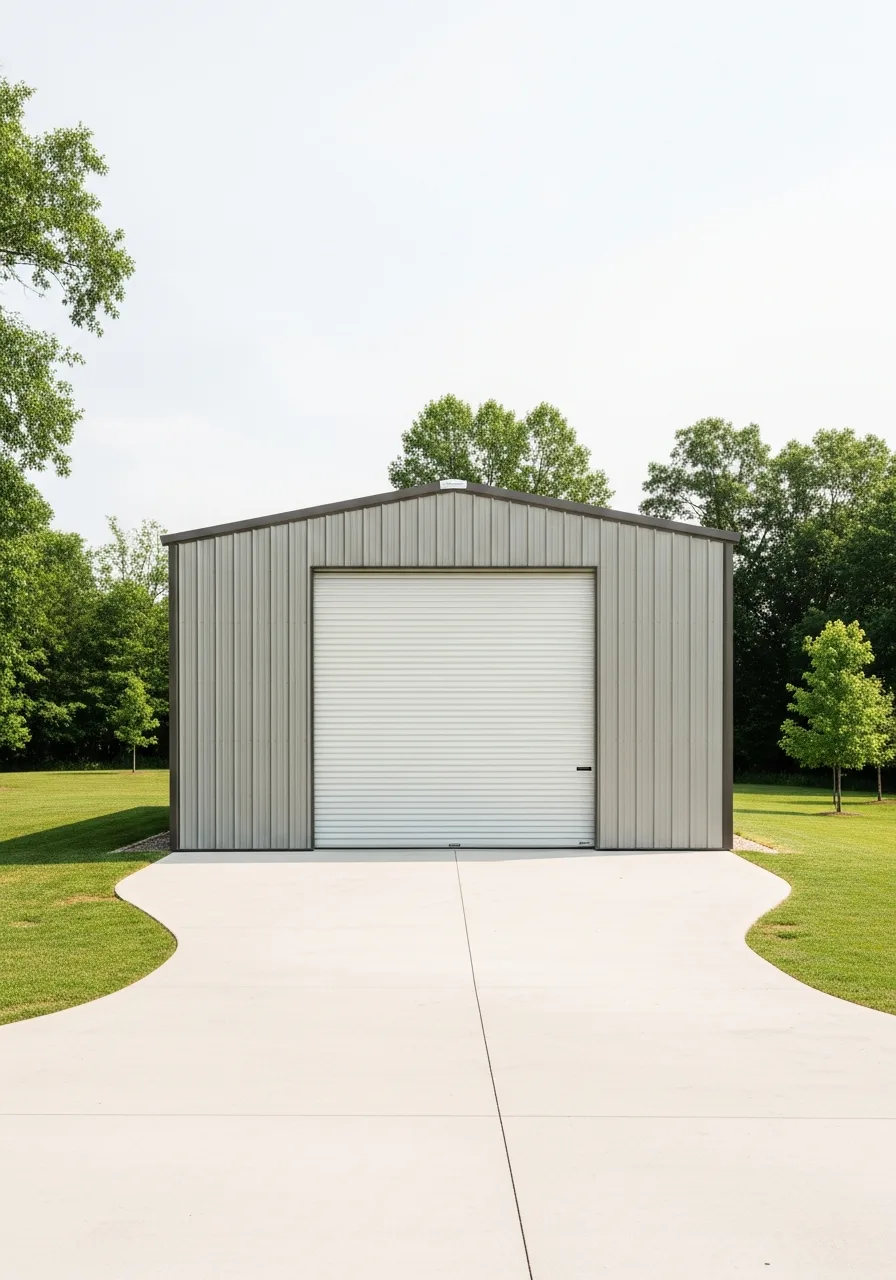
Build a fully enclosed garage if you want the most protection from weather, dust, theft, and long-term outdoor exposure.
This structure keeps the interior of the RV clean and prevents rodents from nesting inside the cabin. Install a high-clearance roll-up door to make backing in and pulling out stress-free.
- Add a dehumidifier to the interior space to prevent mold growth.
- Seal the floor with epoxy to make oil spills easy to clean.
- Use salvaged barn wood for siding to lower the cost of materials.
Design Secret: Include a walk-through side door so the main bay door stays shut when just grabbing supplies.
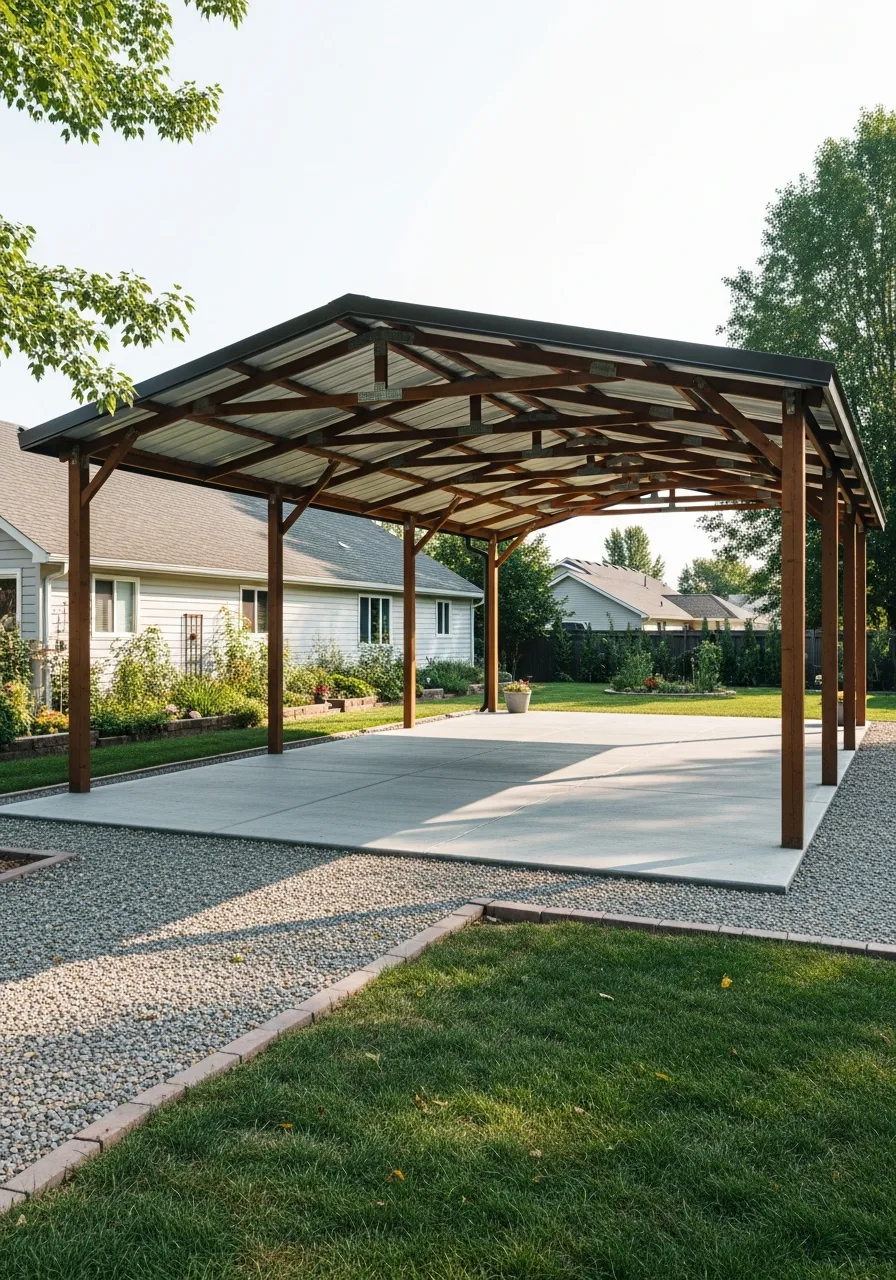
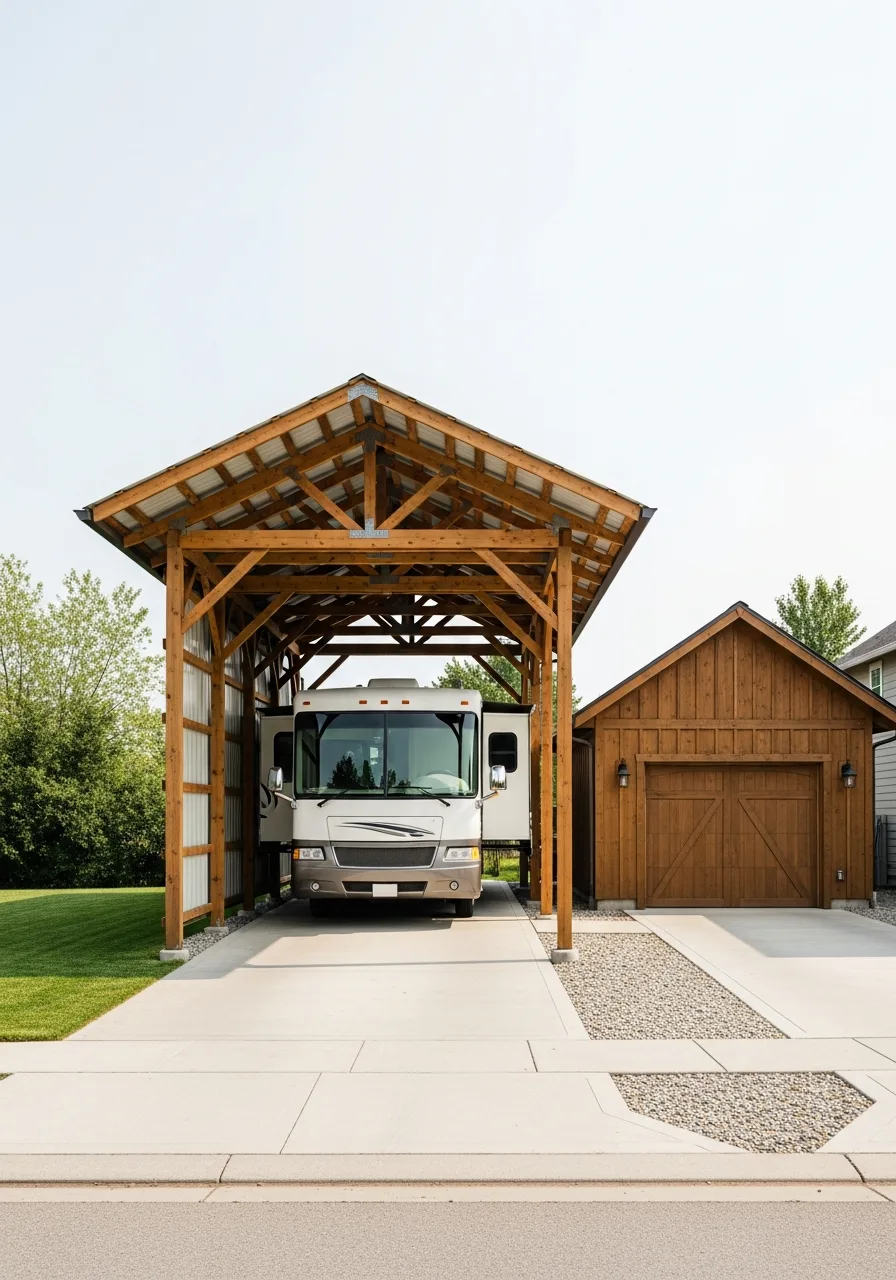
3. Pole Barn RV Shelter
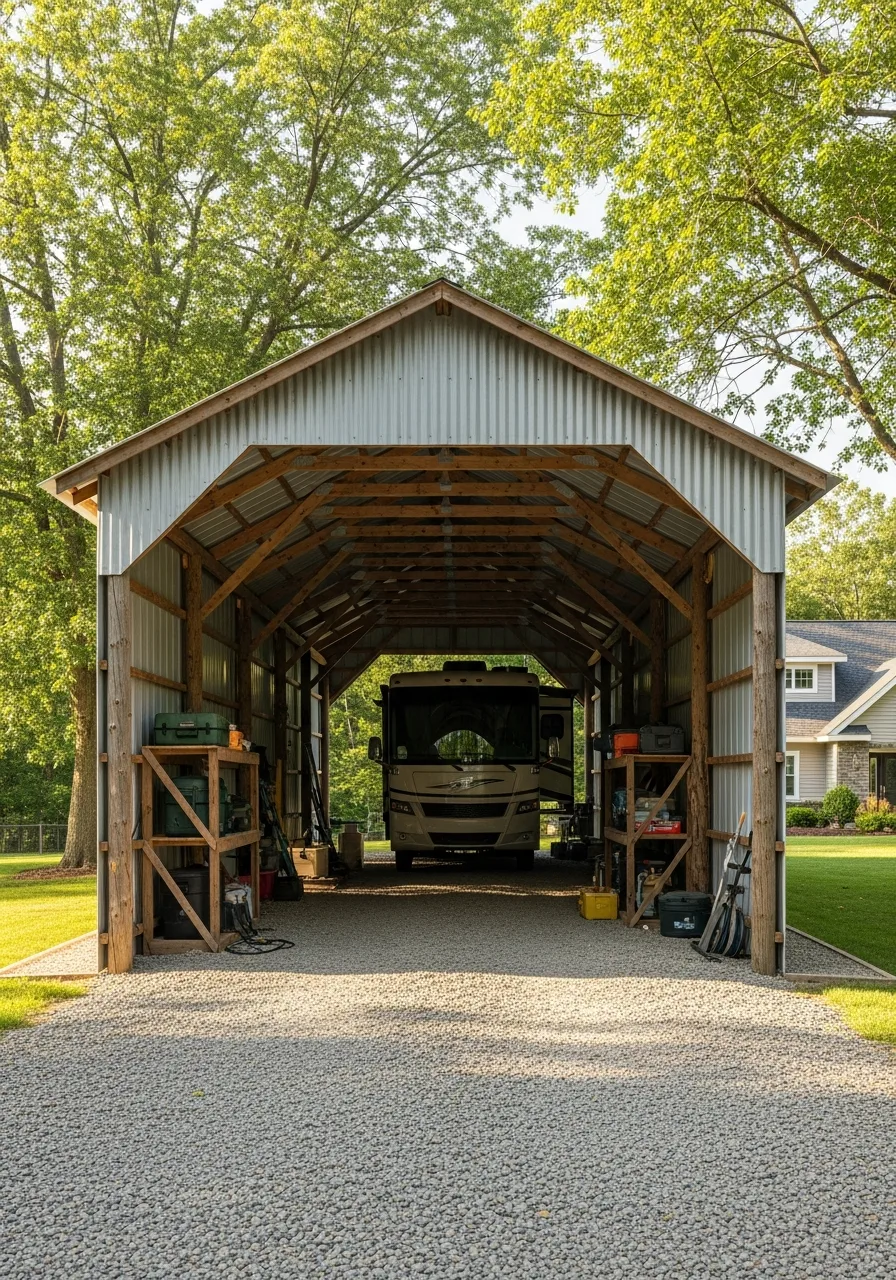
A pole barn gives your RV a large covered space with a rustic look and room for extra storage. It works for properties with uneven ground because the deep-set posts do not require a traditional foundation.
Leave at least three feet of clearance on each side to allow for easy maintenance and cleaning.
- Treat all ground-contact posts with wood preservative to prevent rot.
- Use solar-powered motion lights on the support beams for visibility.
- Source utility-grade lumber for the roof trusses to keep the project under budget.
Design Secret: Wrap the base of the wooden poles in stone veneer to give the structure a high-end look.
4. RV Shelter With Lean-To
Add a lean-to beside a garage, barn, or workshop to create a covered RV parking area without building a full separate structure. This saves money by using one existing wall for structural support and stability.
Slope the roof away from the main building to prevent water from pooling near the foundation.
- Install flashing at the junction point to keep rain from leaking between roofs.
- Use heavy-duty lag bolts to secure the header beam to existing wall studs.
- Buy corrugated metal panels in bulk to cover the roof area affordably.
Design Secret: Match the roofing material to the main house so the addition looks intentional.
5. Vertical Roof RV Shelter

Choose a vertical roof design to help rain, leaves, and snow slide off more easily than a flat or horizontal roof. The panels run from the ridge down to the eaves, preventing heavy weight from building up on top.
Opt for a vertical design in areas with heavy snowfall to prevent structural failure.
- Clear the gutters once a season to prevent ice dams from forming.
- Use self-tapping screws with rubber washers for a watertight seal.
- Check local scrap yards for discounted metal panels with minor cosmetic dings.
Design Secret: Choose a light-colored roof to reflect heat and keep the RV cooler during the summer.
6. A-Frame RV Carport
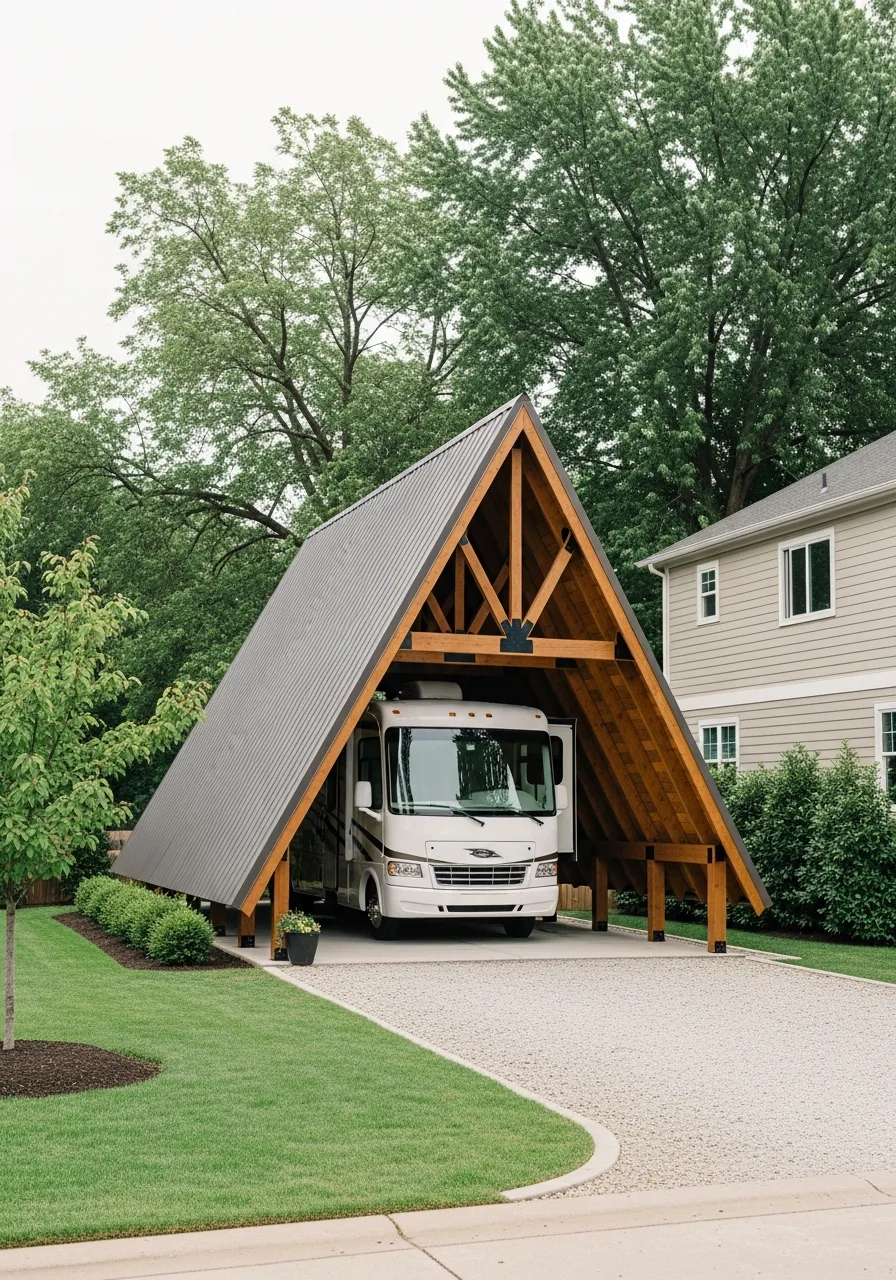
Use an A-frame carport for a cleaner, more house-like look that works well beside a driveway or backyard parking pad. The peaked roof mimics residential architecture and blends into a neighborhood much better than industrial frames.
Extend the roof overhang by twelve inches to provide extra protection against driving rain.
- Apply a UV-resistant sealant to the metal to prevent color fading.
- Use magnetic hooks on the metal frame for hanging extension cords.
- Buy a DIY kit to save on the high labor costs of professional installation.
Design Secret: Add decorative gable trim to the front of the peak to mirror the style of the house.
7. Boxed Eave RV Shelter
A boxed eave shelter gives the RV cover a more finished appearance while still staying practical and budget-friendly. It provides an A-frame look using horizontal roof panels which is cheaper than a full vertical roof.
Ensure the horizontal ribs are kept clear of debris to prevent rust spots from standing water.
- Spray the roof with a hose monthly to wash away acidic bird droppings.
- Use pilot holes when drilling into the frame to prevent metal cracking.
- Look for B-grade metal panels at local suppliers for significant discounts.
Design Secret: Trim the eaves with a contrasting color to give the shelter a crisp outline.
8. RV Shelter With Storage Room
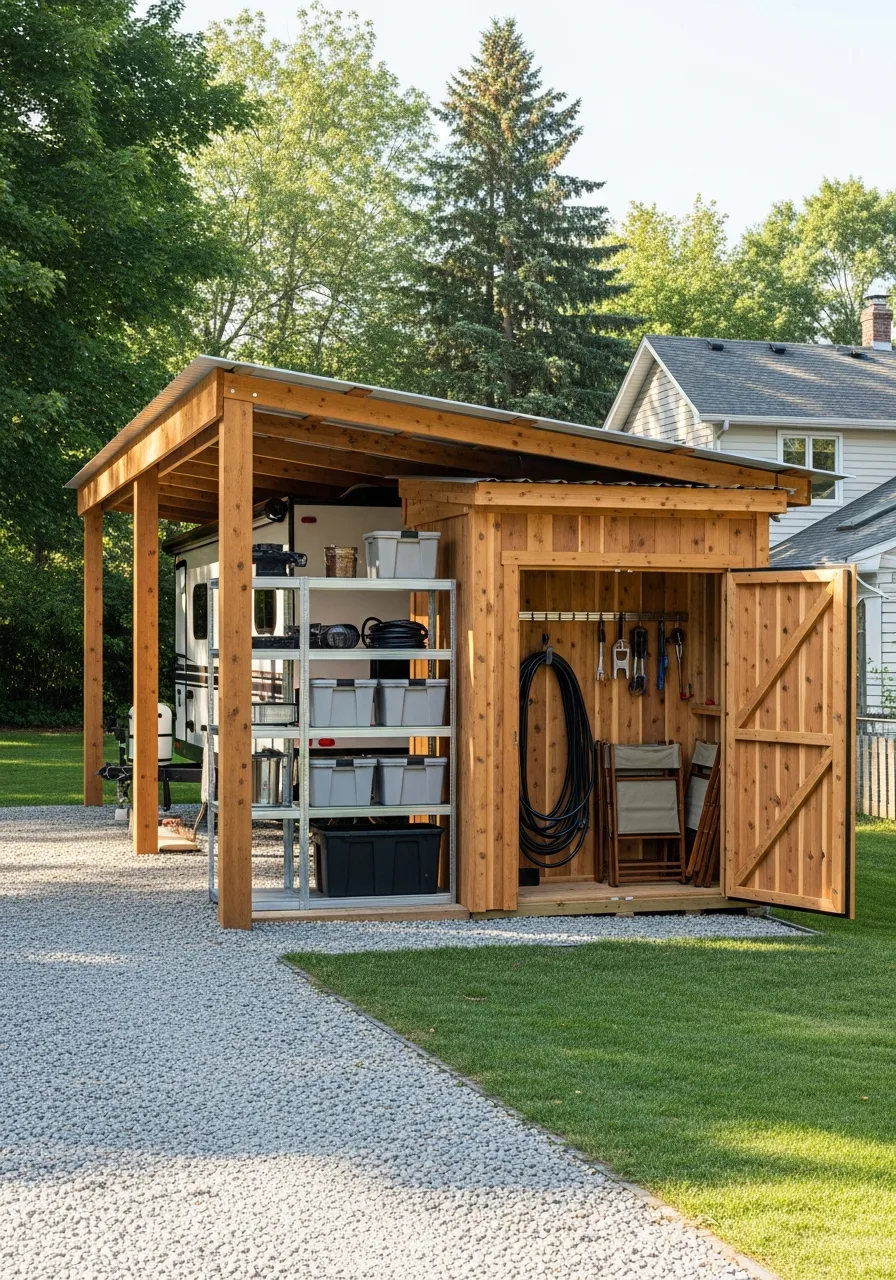
Add a small enclosed storage room at the back or side for camping gear, tools, hoses, and outdoor chairs. This keeps the RV interior uncluttered by moving bulky maintenance supplies to a dedicated shed area.
Install sturdy shelving units inside the storage area to maximize the vertical space.
- Use weather-stripping on the storage room door to keep moisture out.
- Anchor the storage unit directly to the concrete pad for stability.
- Reuse old kitchen cabinets in the storage room for a low-cost organization system.
Design Secret: Place the storage room on the side closest to the RV door for quick access.
9. RV Carport With Side Panels
Install side panels to block wind-driven rain, harsh sun, and extra exposure while keeping the shelter partly open.
This prevents the RV decals from fading on the side most exposed to the afternoon sun. Position the panels on the side that faces the prevailing winds to keep the parking area dry.
- Use perforated panels if you need protection but still want airflow.
- Secure the panels with heavy-duty rivets to keep them from rattling.
- Use exterior-grade plywood painted to match the frame for a cheaper wall option.
Design Secret: Leave the bottom twelve inches of the wall open for proper ventilation.
10. Fully Covered RV Pad
Pour a concrete or gravel pad under the shelter to create a cleaner parking area with better drainage. A solid base prevents the ground from becoming soft and allows for easier leveling of the vehicle.
Pour the concrete pad at least four inches thick to handle the weight of a heavy motorhome.
- Slope the concrete slightly toward the edges to ensure water drains away.
- Use expansion joints in the concrete to prevent cracking during freezes.
- Use compacted crushed stone instead of concrete for a budget-friendly base.
Design Secret: Stamp the edges of the concrete with a brick pattern for a high-end look.
11. Detached RV Shelter
Build the RV shelter away from the house or garage if you have enough land and want easier parking access. This is the best choice for large lots where the rig can be tucked away from the main view.
Clear a wide path for the approach to ensure there is plenty of room for turning.
- Plant a row of tall shrubs around the structure to help it blend in.
- Use a wireless driveway alarm to get notified if someone enters the area.
- Use reclaimed timber for the main supports to create a rustic aesthetic.
Design Secret: Align the shelter with the natural tree line to make the large structure feel smaller.
12. Attached RV Shelter
Attach the shelter to an existing garage or home exterior for a cleaner layout and easier access to power. This configuration makes it simple to run water lines for maintenance or guest use.
Consult a structural engineer to ensure the existing house wall can support the added roof load.
- Use high-quality caulking where the new roof meets the house to prevent leaks.
- Install a motion-sensor light on the house wall to illuminate the area.
- Use a simple shed-roof design to minimize the amount of lumber needed.
Design Secret: Use the same siding material as the house so the shelter looks original.
13. RV Shelter Beside Garage
Use the side of the garage for a tall covered parking space that keeps the RV close but separate from everyday vehicles.
This allows for a shared driveway, which reduces the amount of paving needed on the property. Check local zoning laws to ensure the structure meets the required setback from the property line.
- Install a heavy-duty gate at the front of the shelter for added security.
- Use gravel between the garage and shelter for a low-maintenance path.
- Purchase a pre-fabricated metal kit to reduce the time spent on construction.
Design Secret: Paint the garage door and the carport frame the same color to unify them.
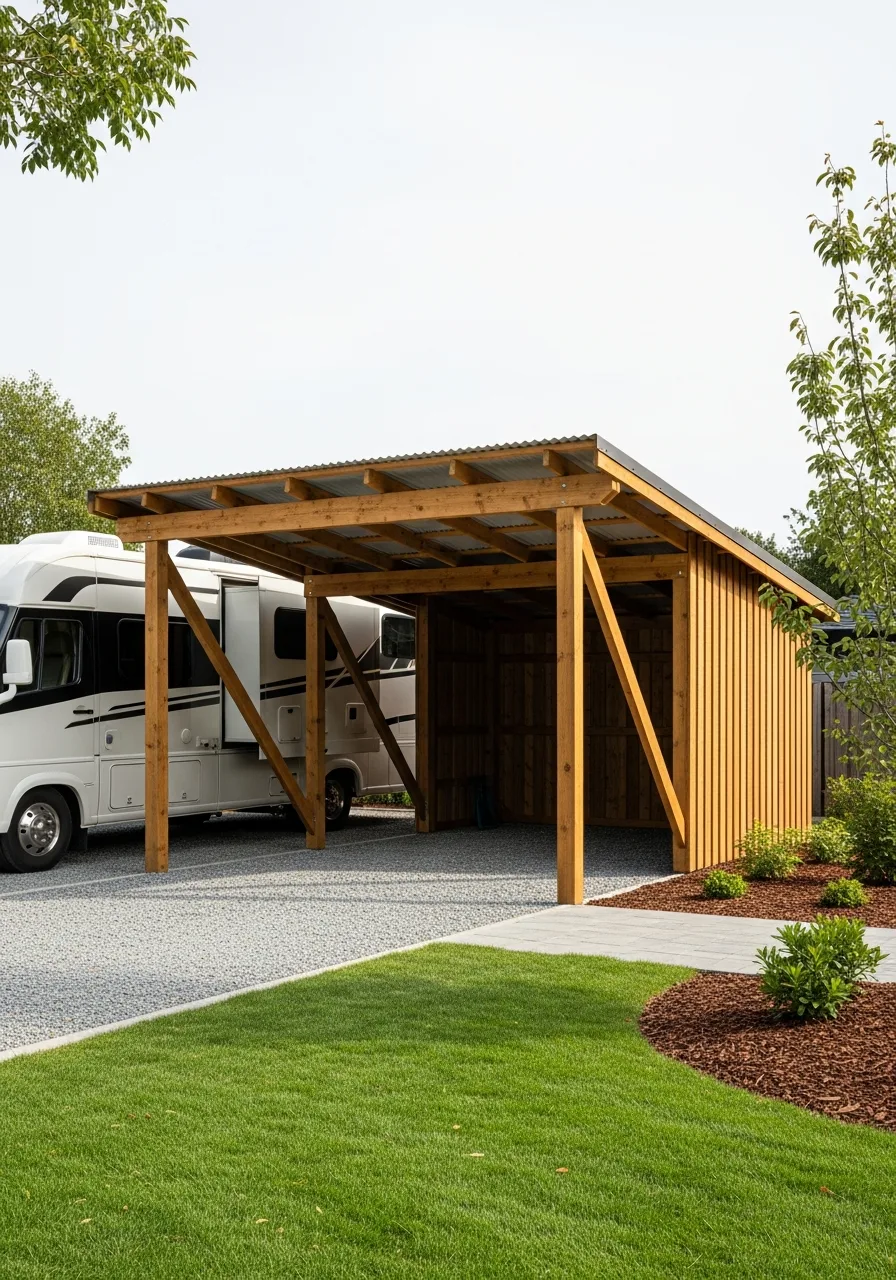
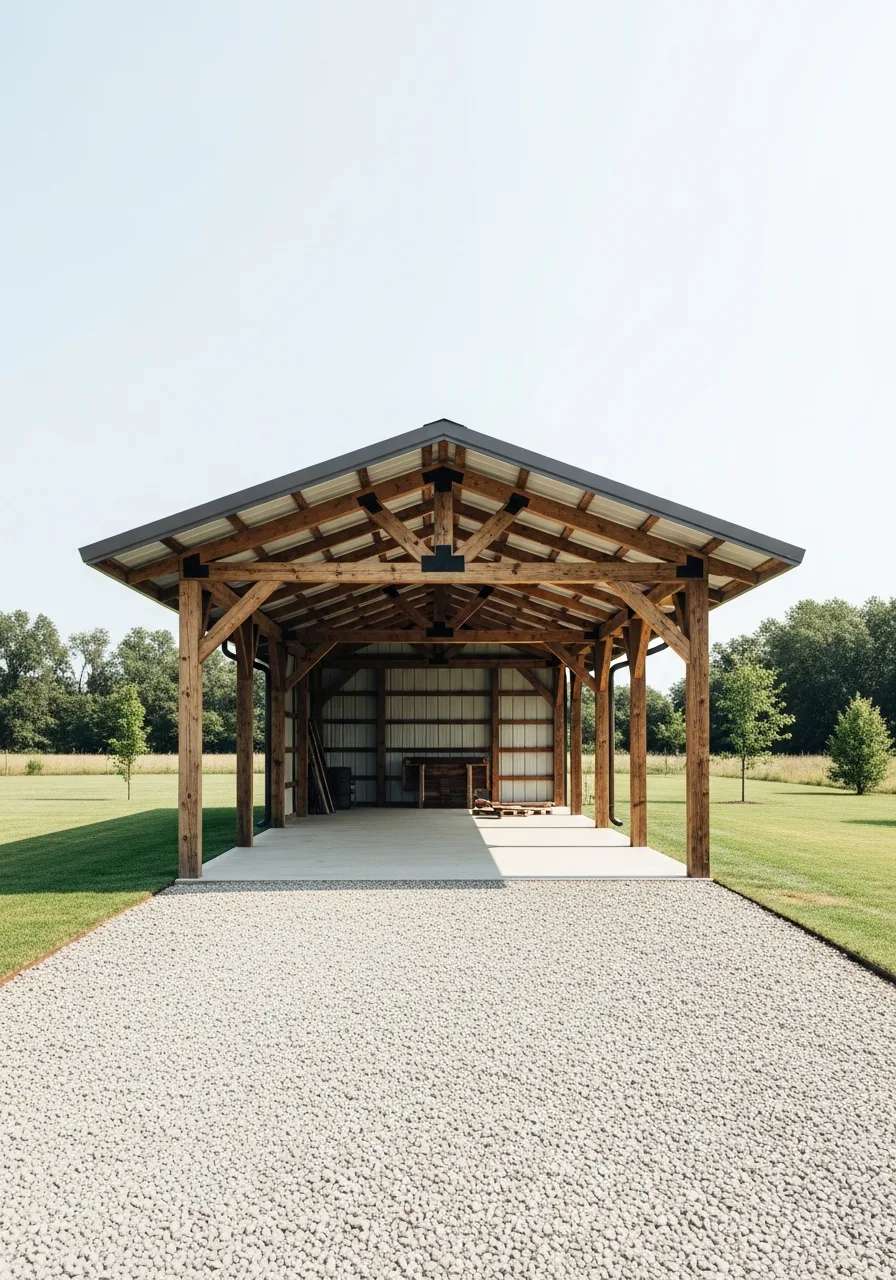
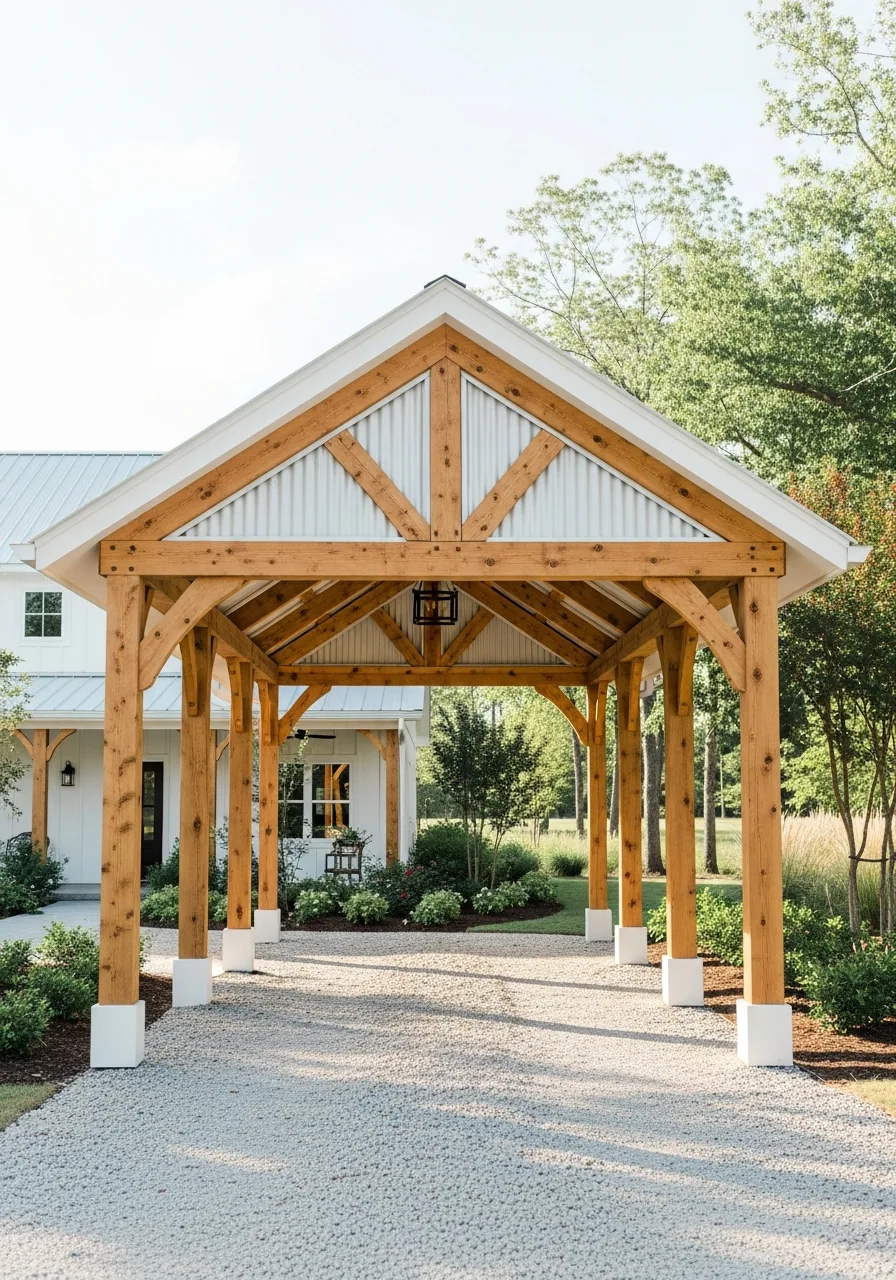
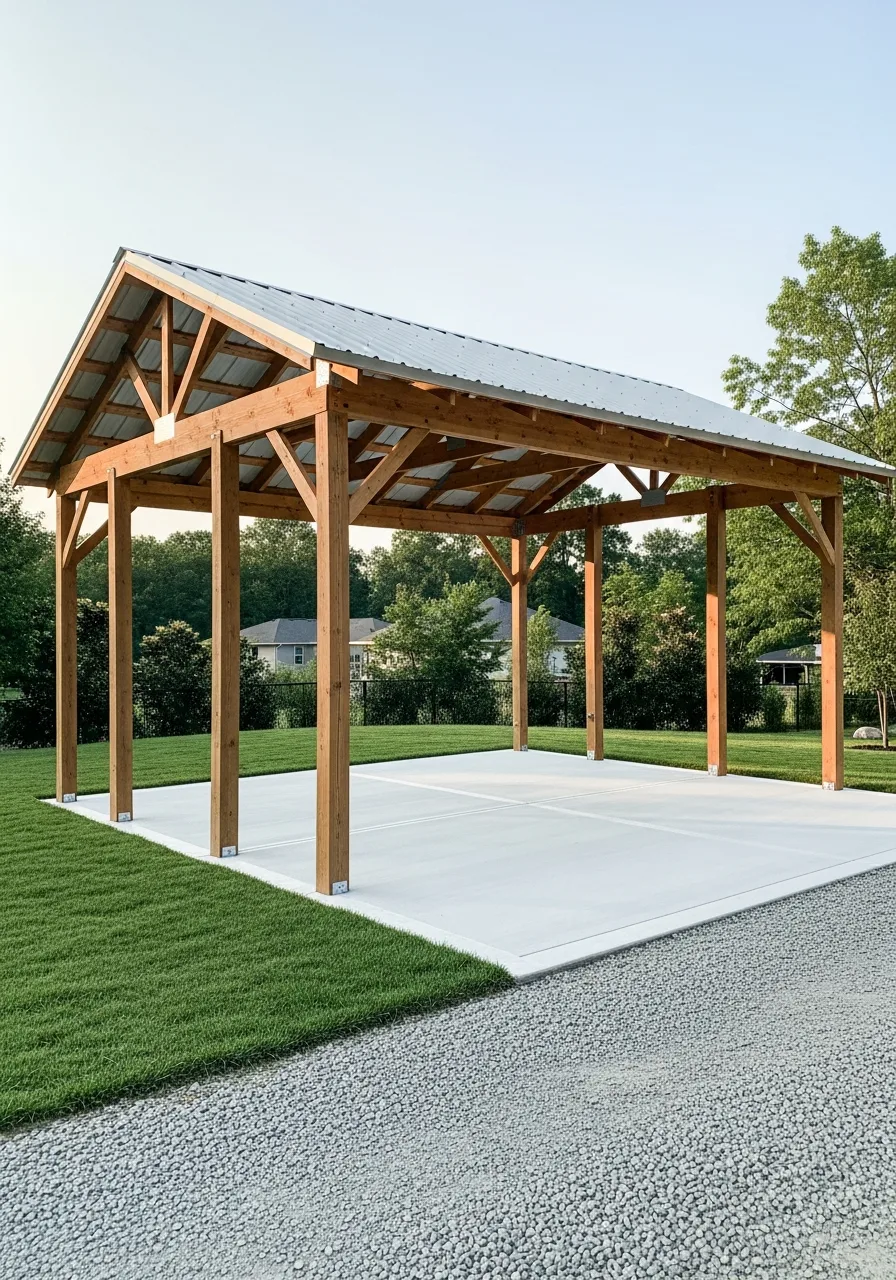
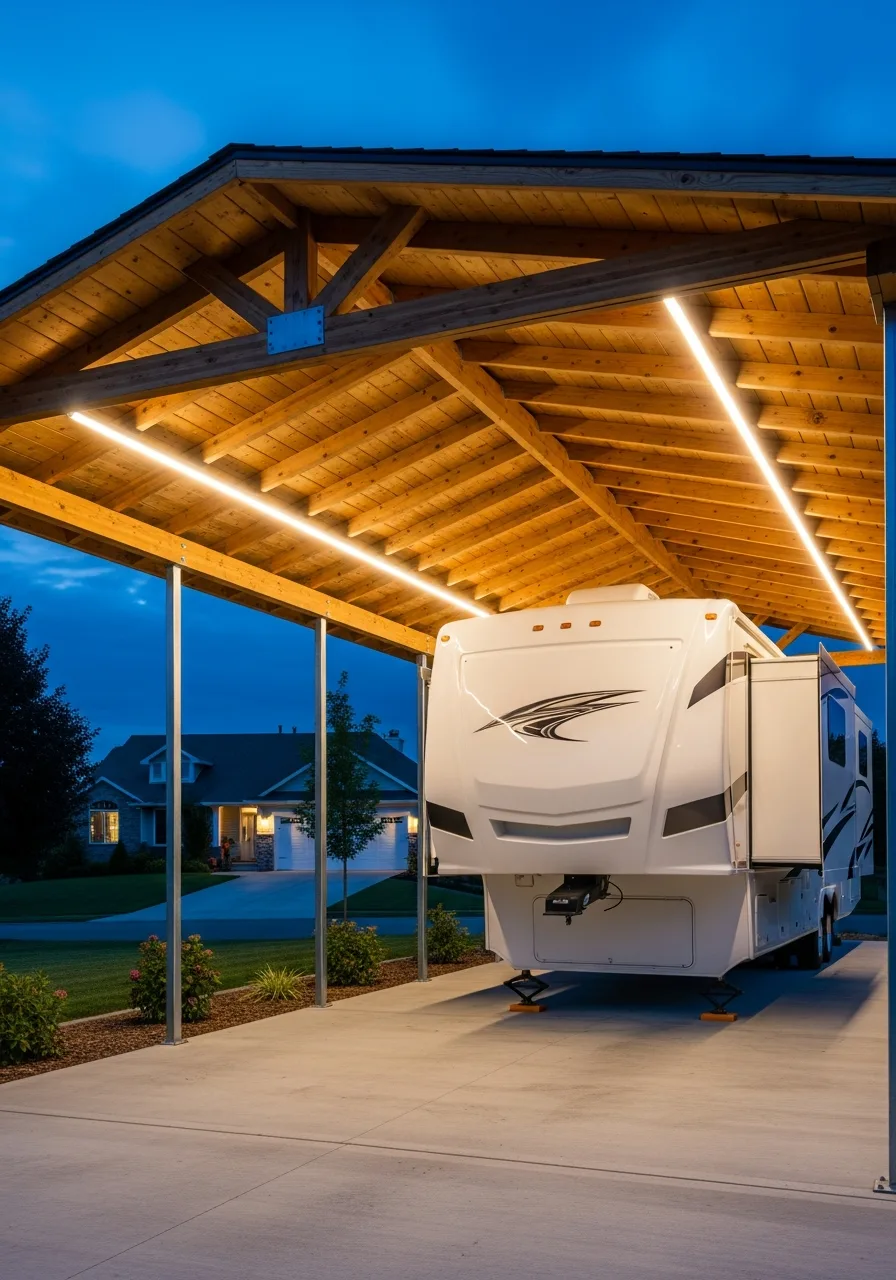
14. Timber Frame RV Shelter
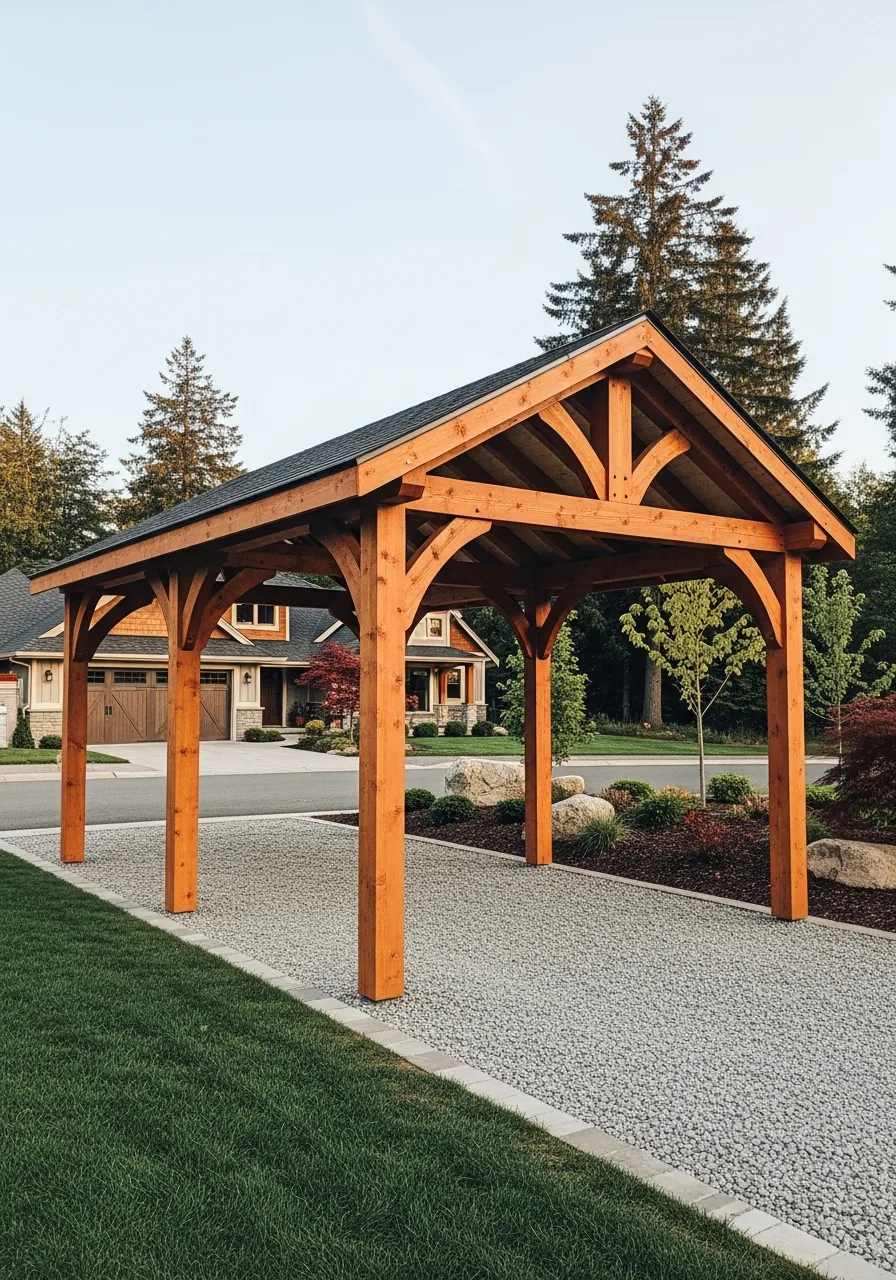
Choose a timber frame cover if you want a warmer, more decorative look than a standard metal carport. This option is perfect for homes with a natural aesthetic that would be clashed by an industrial shed.
Apply a high-quality wood stain every three years to protect the beams from UV damage.
- Use decorative metal plates at the joints to add strength and style.
- Set the wooden posts in metal bases to keep them off the wet ground.
- Source local cedar or hemlock to save on transportation costs for heavy timbers.
Design Secret: Leave the rafters exposed on the underside to showcase the wood joinery.
15. Modern RV Carport
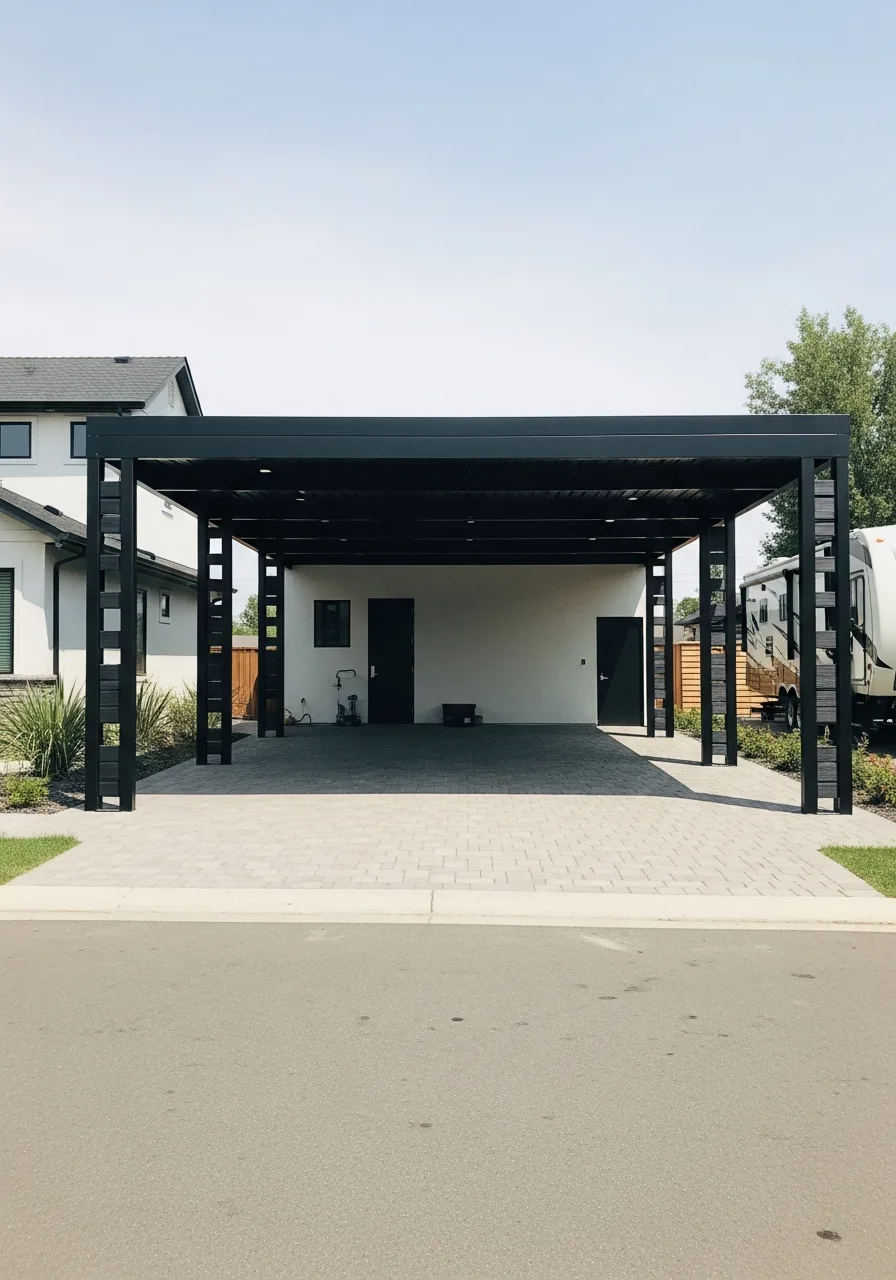
Use clean lines, black metal, and a sleek roof shape for a modern RV shelter design. This style works well with contemporary homes and avoids the bulky appearance of traditional carports.
Use square steel columns instead of round ones to emphasize the sharp architectural lines.
- Install LED strip lighting along the interior beams for a hidden light source.
- Use hidden fasteners for the roofing panels to maintain a smooth surface.
- Use corrugated plastic panels for the roof if you want a modern look on a budget.
Design Secret: Add a horizontal slat wall on one side to provide privacy while keeping it airy.
16. Farmhouse RV Shelter
This shelter uses wood posts and a metal roof to match a classic home style. It blends into the property much better than a shiny silver box.
Paint the wooden supports to match the main house trim for a cohesive look.
- Use pressure-treated lumber to prevent rot from ground moisture.
- Wrap post bases in stone veneer to hide metal anchors.
- Source reclaimed barn wood for decorative gable ends.
Design Secret: Add a cupola on top to break up the long roofline.
17. RV Shelter With Covered Porch
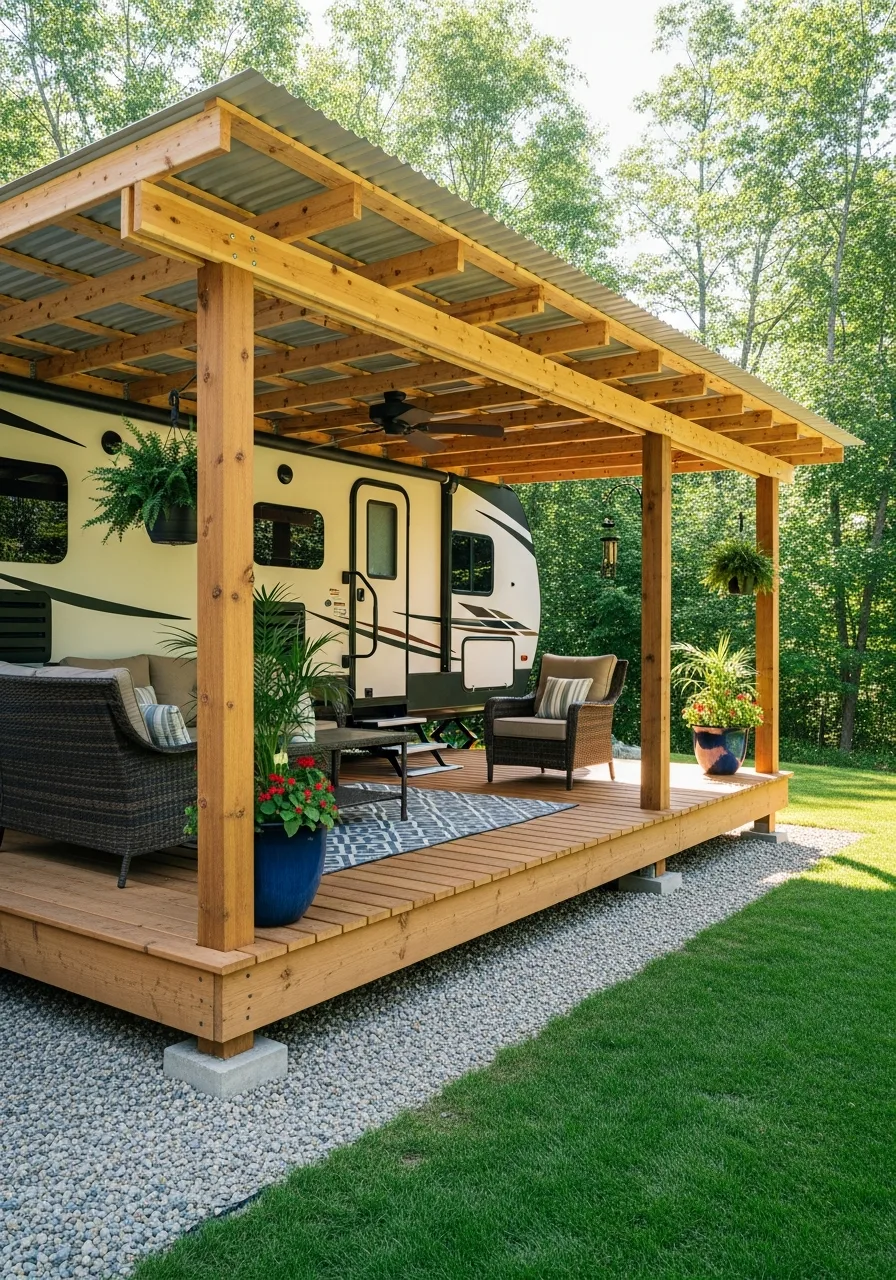
An attached porch creates a dedicated spot for outdoor seating right next to the camper. This setup turns a simple parking spot into a functional outdoor living room.
Build the porch deck at the same height as the RV steps for easy entry.
- Use outdoor-rated rugs to keep dirt from tracking inside.
- Hang heavy-duty sun shades on the porch side for afternoon comfort.
- Build the deck frame with 4×4 posts set in concrete for stability.
Design Secret: Install a ceiling fan on the porch to keep bugs away.
18. RV Shelter With Solar Panels
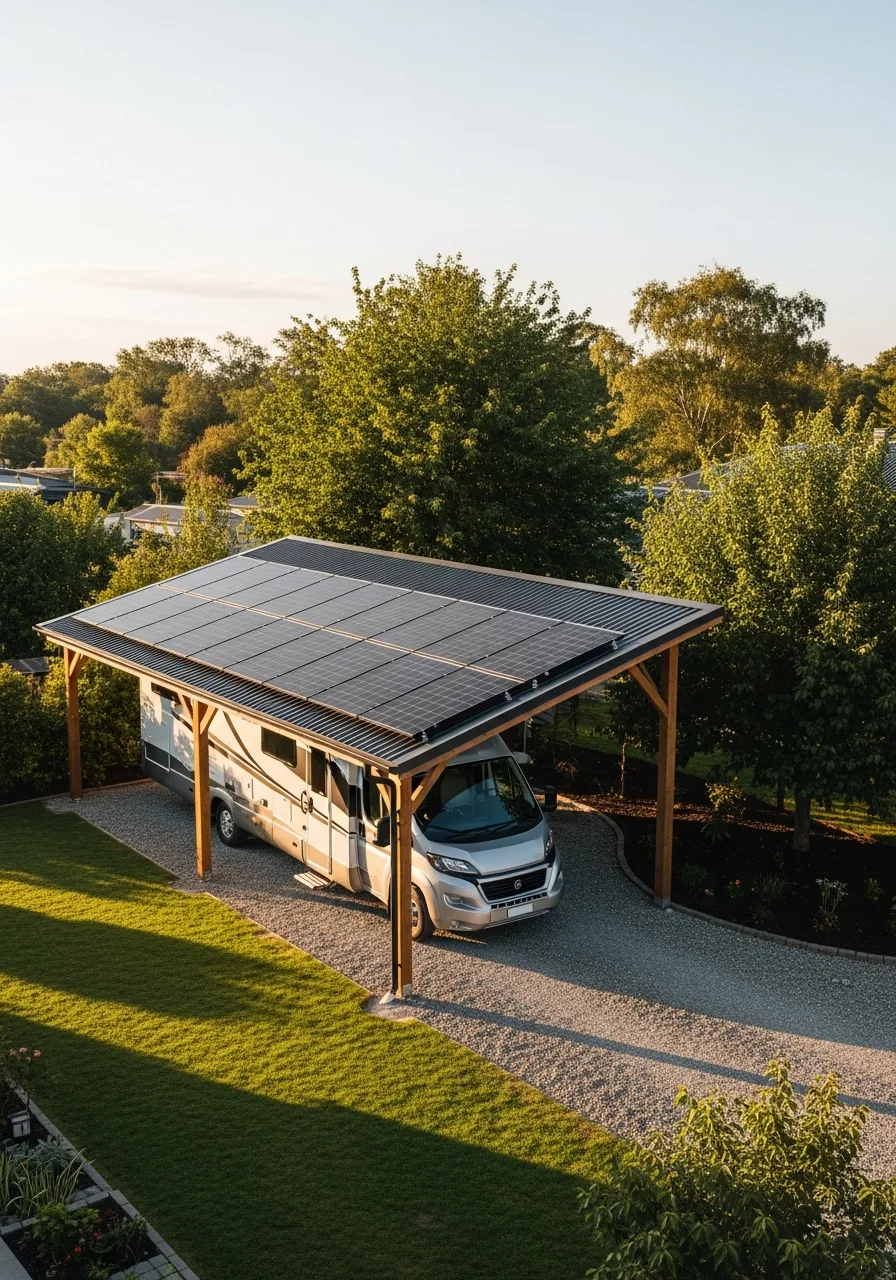
Large shelter roofs provide the perfect surface for mounting a solar array. This generates power for the camper batteries while providing consistent shade.
Angle the roof toward the south to maximize sun exposure throughout the day.
- Install a battery bank inside a weather-proof box on the ground.
- Use specialized mounting brackets to avoid roof leaks.
- Look for local tax credits that apply to solar-integrated structures.
Design Secret: Use a micro-inverter system so one shaded panel doesn't kill the whole output.
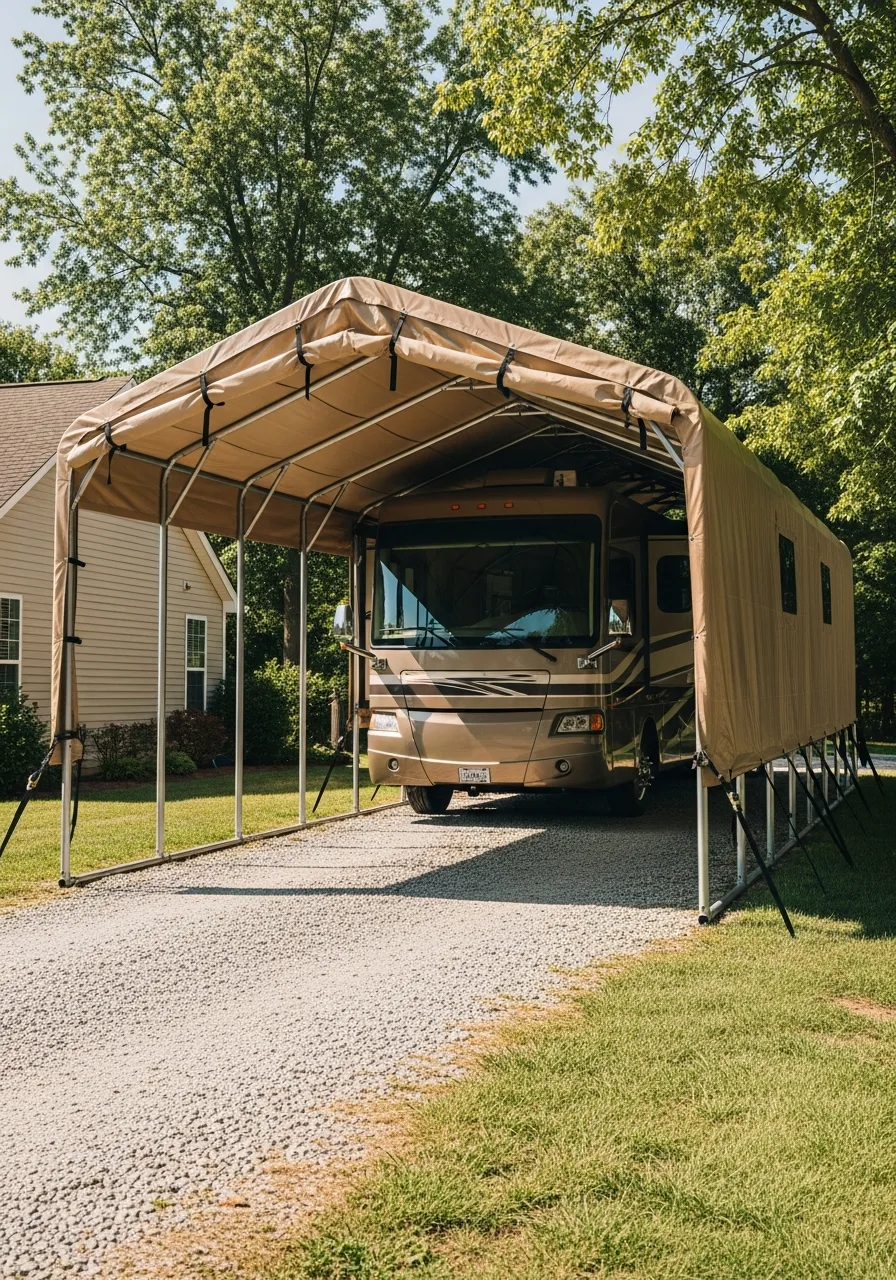
19. Portable RV Cover
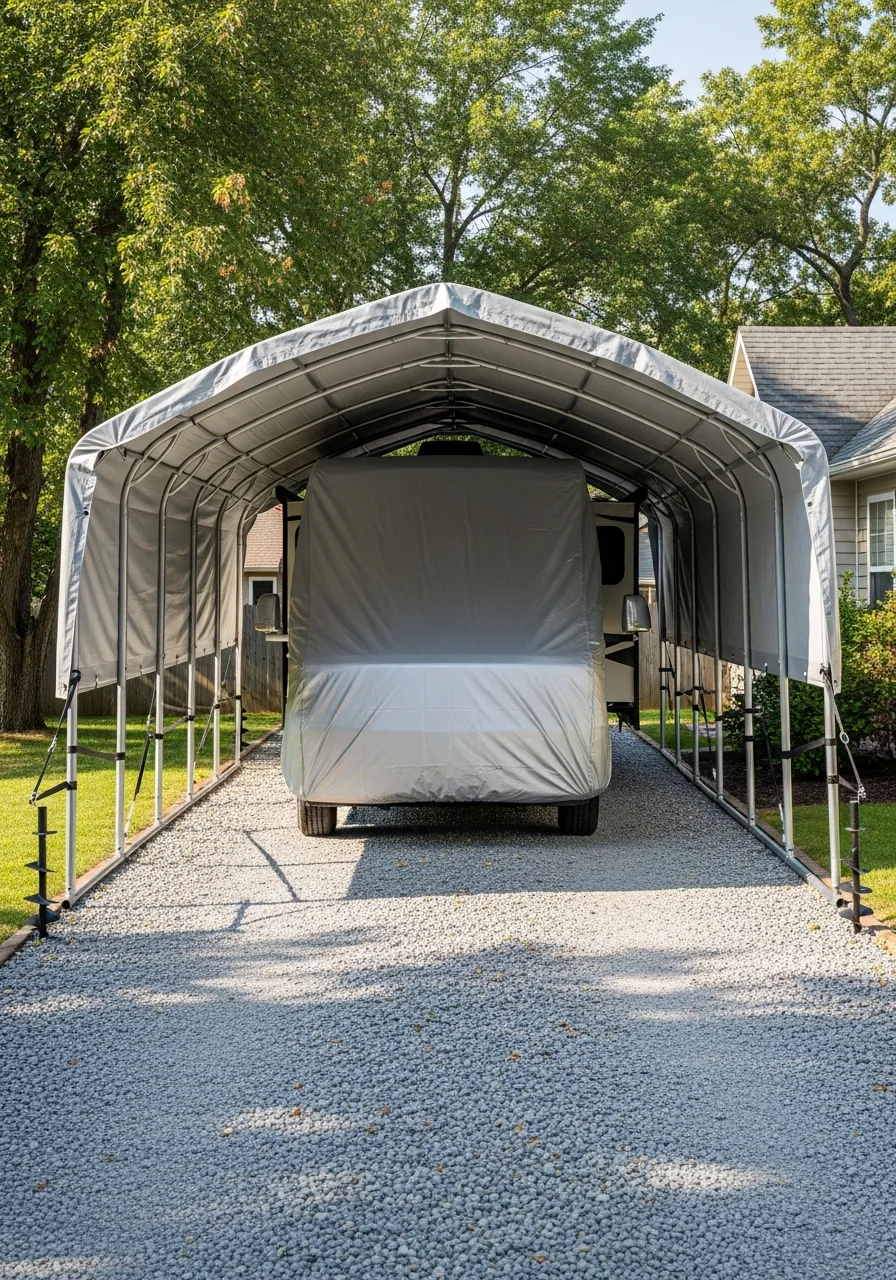
A portable cover is a fabric-based frame that can be moved or taken down as needed. It offers a quick way to block UV rays and debris without a permanent permit.
Secure the frame with heavy-duty auger anchors to prevent wind lift.
- Clean the fabric every season to prevent mold and mildew growth.
- Use pool noodles over sharp RV corners to prevent fabric tears.
- Buy a kit with a zippered door for easy interior access.
Design Secret: Place tennis balls on the ends of the frame poles to protect the cover fabric.
20. Canvas RV Shelter
This option uses a heavy-duty steel frame and a thick canvas top. It is a smart middle-ground solution for those who want more durability than a tarp but less cost than metal.
Tighten the ratchet straps every month to keep the cover from flapping in the wind.
- Choose a light-colored canvas to reflect heat away from the RV roof.
- Apply a UV-protectant spray to the fabric once a year.
- Use sandbags at the base for extra weight on paved surfaces.
Design Secret: Make sure the canvas has vents at the top to prevent moisture buildup.
21. RV Shelter With Gravel Base
A thick layer of gravel provides an affordable and well-draining parking surface. It keeps the tires out of the mud and prevents moisture from rising into the undercarriage.
Lay down a heavy-duty weed barrier before pouring the gravel to stop growth.
- Use crushed limestone or pea gravel for the best compaction.
- Install a timber border to keep the gravel from spreading into the lawn.
- Top off the gravel every few years to fill in low spots.
Design Secret: Use 3/4-inch minus gravel because it packs down much tighter than round stones.
22. RV Shelter With Concrete Slab
A concrete slab is the gold standard for a permanent and level parking area. It makes maintenance tasks easier and provides a clean surface for loading gear.
Slope the concrete slightly away from the center to prevent water from pooling.
- Seal the concrete to prevent oil stains from the engine or generator.
- Use rebar reinforcement to handle the heavy weight of a motorhome.
- Hire a professional to ensure the pad is perfectly level for the fridge.
Design Secret: Add a broom finish to the wet concrete for better tire traction.
23. Extra-Tall RV Shelter
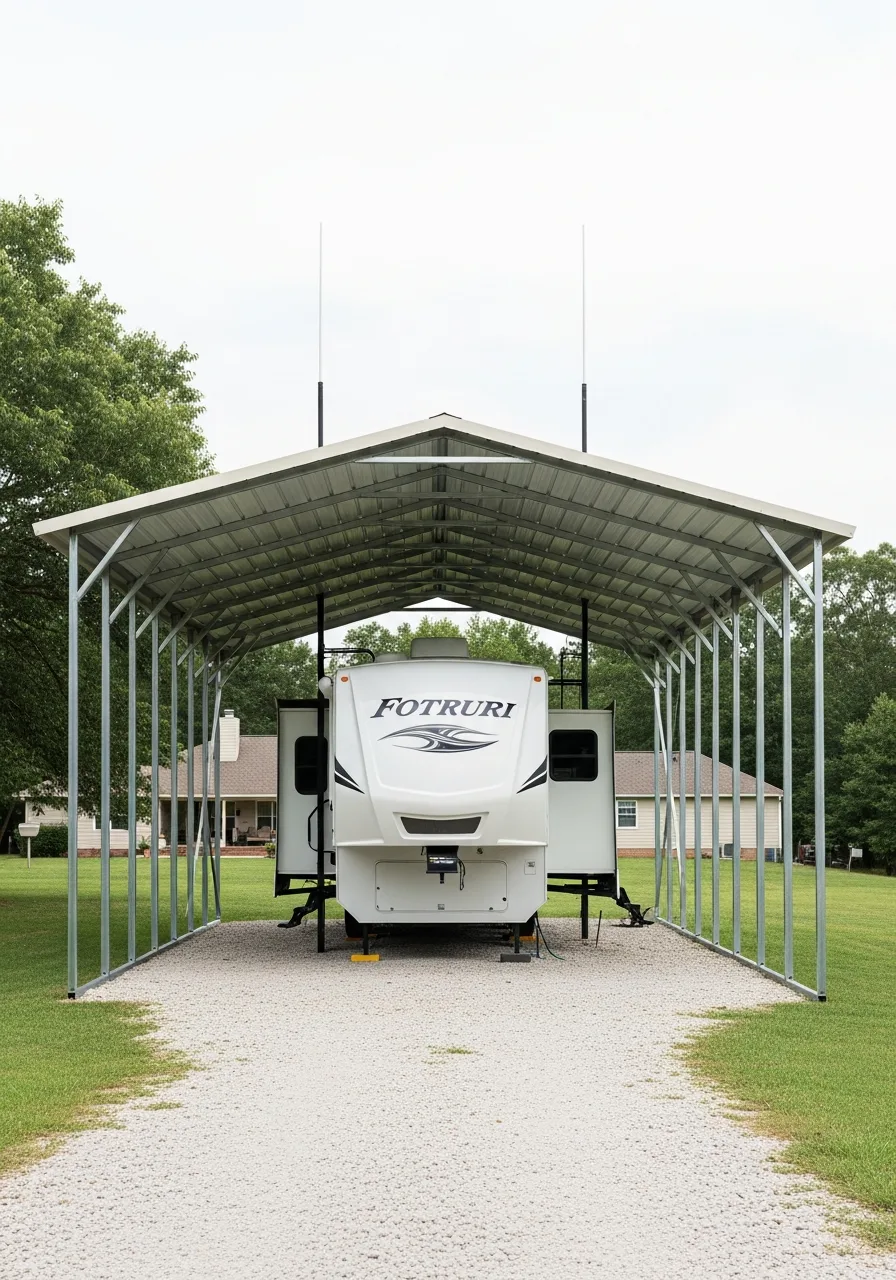
These structures are built with 14-foot or higher legs to accommodate large fifth wheels. The extra height ensures that roof-mounted AC units and antennas have plenty of clearance.
Measure the RV with the antennas up to determine the minimum height needed.
- Use cross-bracing on the legs to handle the increased wind load.
- Check local zoning laws for height limits on backyard structures.
- Install a height clearance bar at the entrance to prevent accidents.
Design Secret: Paint the top two feet of the support posts a bright color as a visual guide.
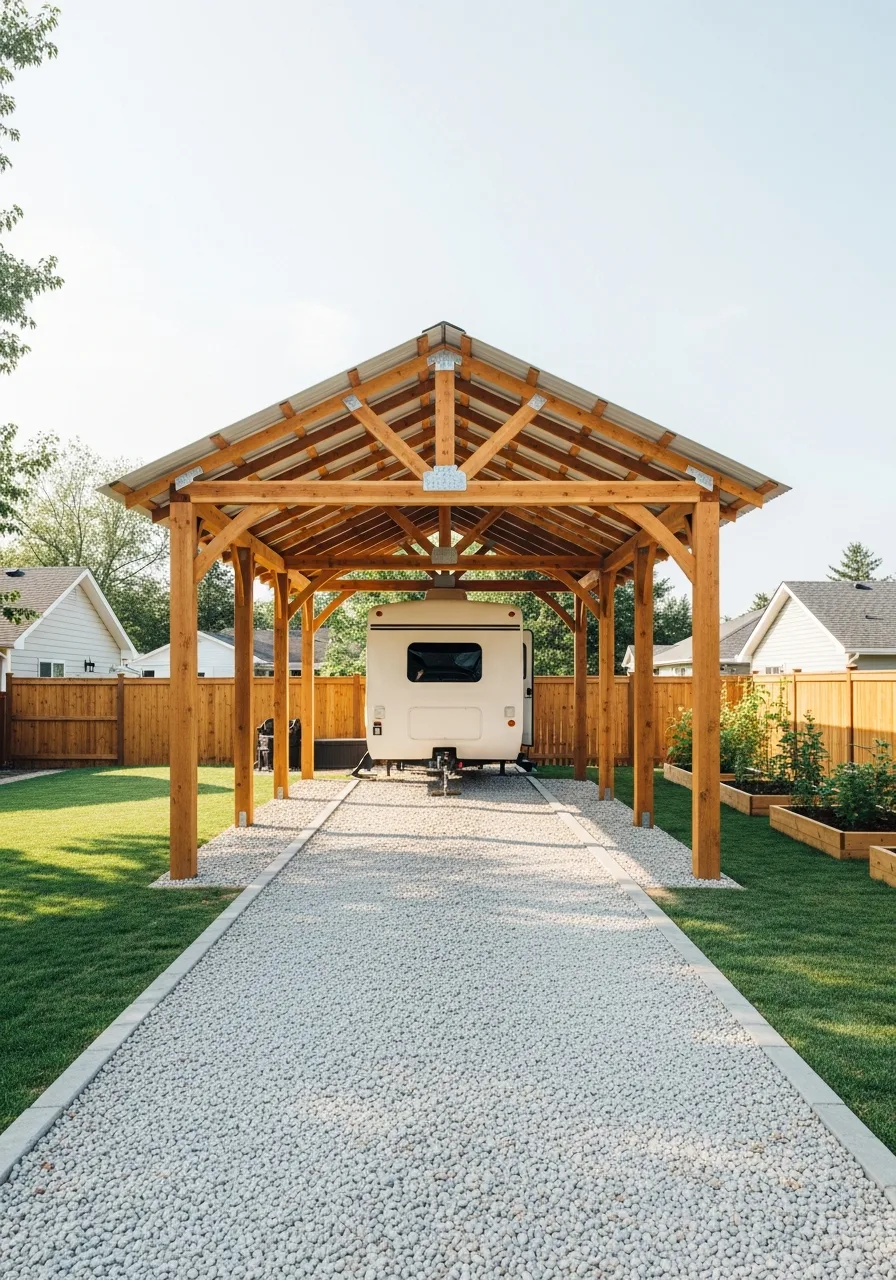
24. Wide RV Shelter Design

A wide shelter provides enough room to extend slide-outs while the unit is parked. This allows for cleaning, loading, or using the RV as a guest room without moving it.
Allow for at least four feet of space on each side of the RV.
- Keep the ground clear of debris so slide-out seals don't get damaged.
- Install extra support beams if the roof span exceeds 20 feet.
- Use the extra width for built-in shelving along the sides.
Design Secret: Mark the floor with tape to show exactly where the slide-outs will land.
25. Double RV Shelter
A double-wide structure can house two campers or an RV and a daily driver. This is a smart way to consolidate all vehicle storage under one roof.
Place a center support post only if the span is too large for a single header.
- Designate one side for the taller vehicle to save on material costs.
- Use separate light switches for each bay to save energy.
- Ensure the driveway approach is wide enough for two vehicles to turn.
Design Secret: Use different colored gravel or paint to define the two parking lanes.
26. RV Shelter With Workshop
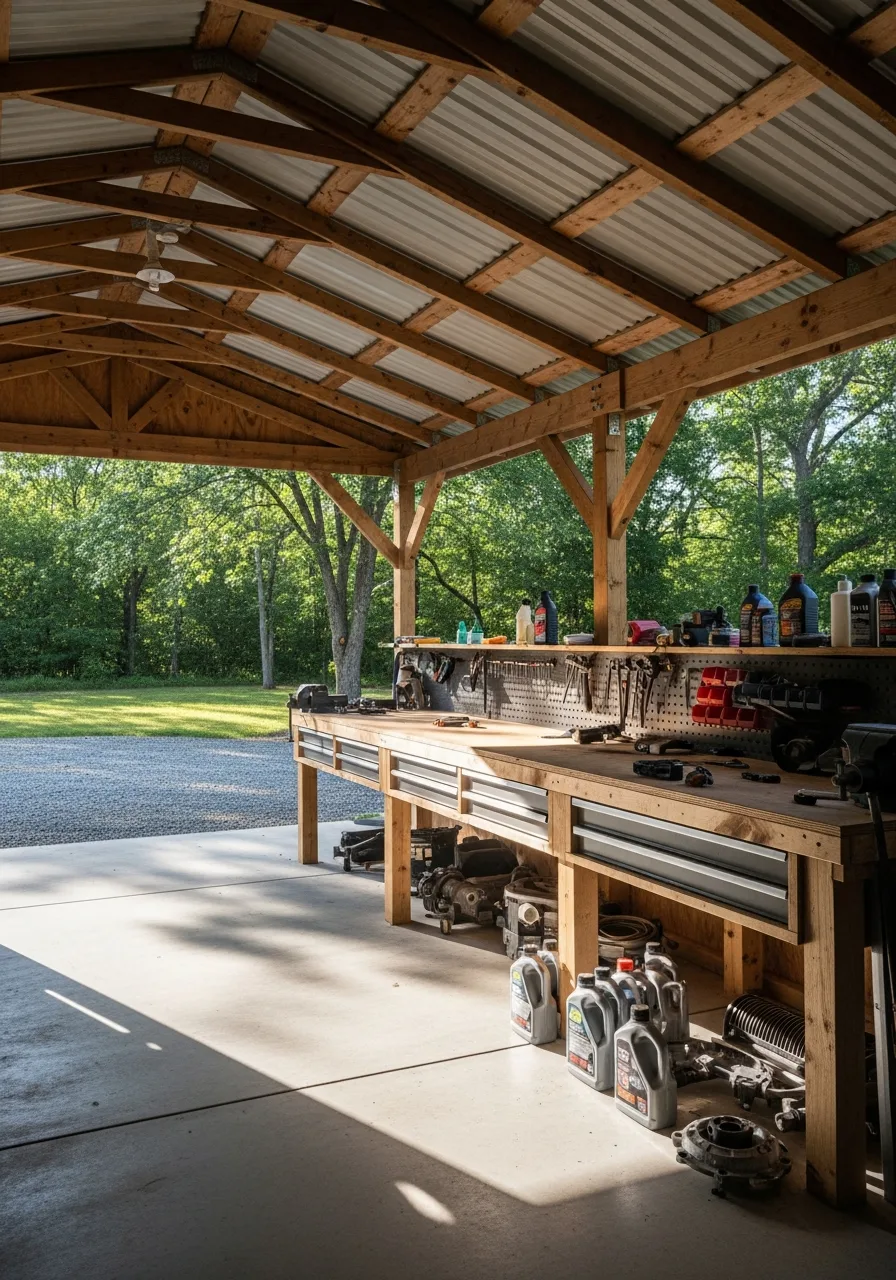
Combining a shelter with a small workshop creates a central hub for all camping maintenance. It keeps tools, lubricants, and spare parts organized and out of the elements.
Install a sturdy workbench along the back wall for easy project access.
- Add a pegboard wall to keep wrenches and hoses within reach.
- Ensure the workshop area has its own ventilation for fumes.
- Use locking cabinets to keep chemicals and sharp tools safe.
Design Secret: Install a rubber floor mat in the workshop area to save your knees.
27. RV Shelter With Utility Hookups
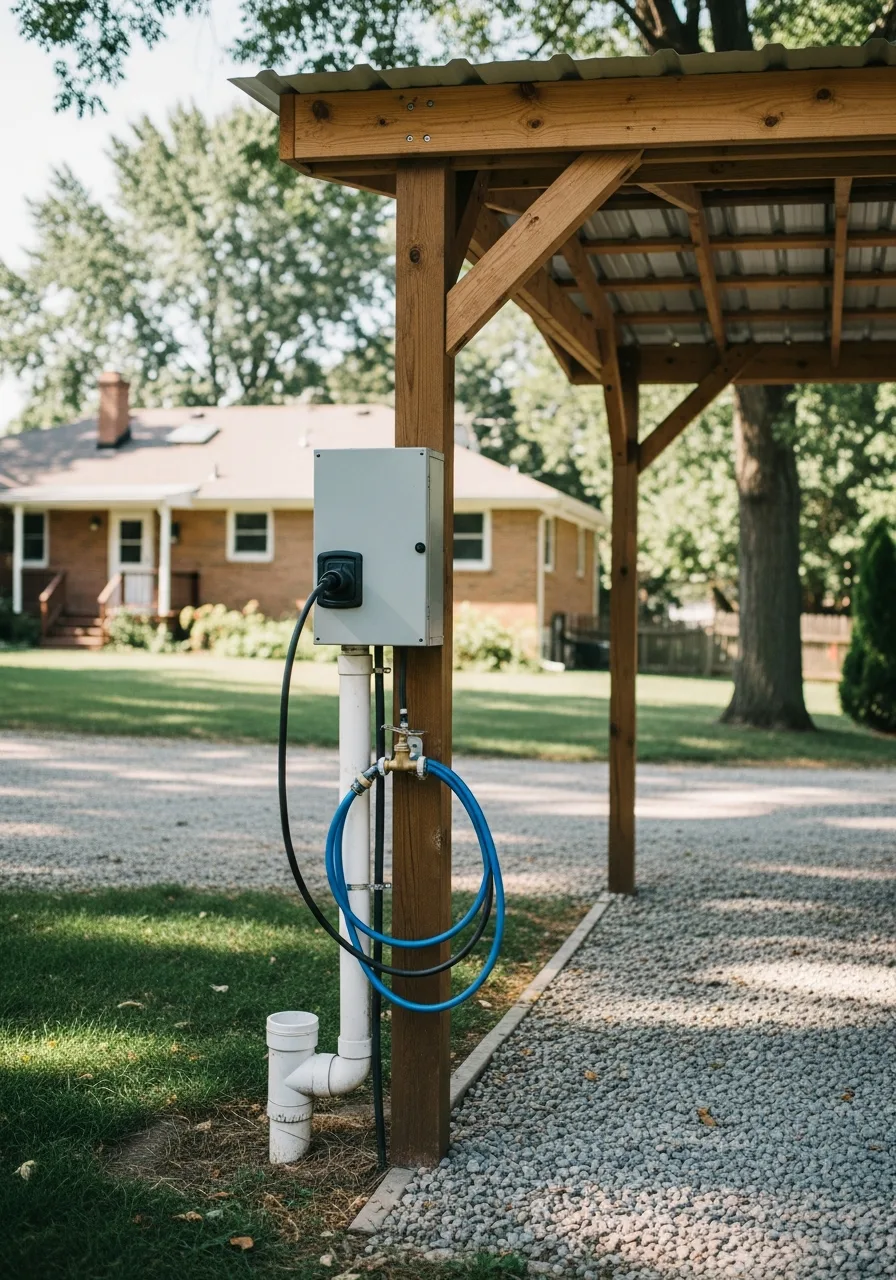
Adding power, water, and sewer connections makes the shelter a fully functional site. This is ideal for keeping the fridge running or hosting guests during the holidays.
Mount the electrical box at waist height for easy plug-in access.
- Use a heated water hose to prevent freezing during winter storage.
- Install a 30-amp or 50-amp outlet that matches the RV's power cord.
- Run plumbing lines below the frost line to avoid burst pipes.
Design Secret: Install a hose reel right next to the water spigot to keep things tidy.
28. Backyard RV Shelter
Tucking the shelter into the backyard keeps the front of the home looking clean and uncluttered. It provides more privacy and security for the vehicle when it isn't in use.
Choose a location with a clear, straight path for backing the trailer in.
- Check for overhead branches that might snag the roof of the RV.
- Use decorative lattice on the sides to help the structure blend in.
- Ensure the ground is stable enough to support the weight in the backyard.
Design Secret: Use solar-powered path lights to mark the edges of the backyard route.
29. Driveway RV Shelter
A driveway shelter is the most convenient option for quick departures and arrivals. It uses existing pavement to save on the cost of a new parking pad.
Position the shelter so it doesn't block the view of the street when pulling out.
- Check with the HOA to ensure front-yard shelters are permitted.
- Use bolt-down anchors to secure the metal frame directly to the asphalt.
- Install a motion-sensing light to greet you when you arrive home late.
Design Secret: Match the roof metal color to the shingles on the main house.
30. RV Shelter With Lighting
Proper lighting makes it much safer to park or pack the RV after the sun goes down. It also helps deter pests and intruders from hanging around the storage area.
Use LED strip lights along the top beams for even, shadow-free illumination.
- Install a timer so the lights turn off automatically late at night.
- Choose warm white bulbs to avoid a harsh, industrial look.
- Use battery-powered puck lights inside storage compartments for visibility.
Design Secret: Point one light toward the hitch area to make hookups effortless.
Outdoor Infrastructure
31. Tiered Timber Sloped RV Pad
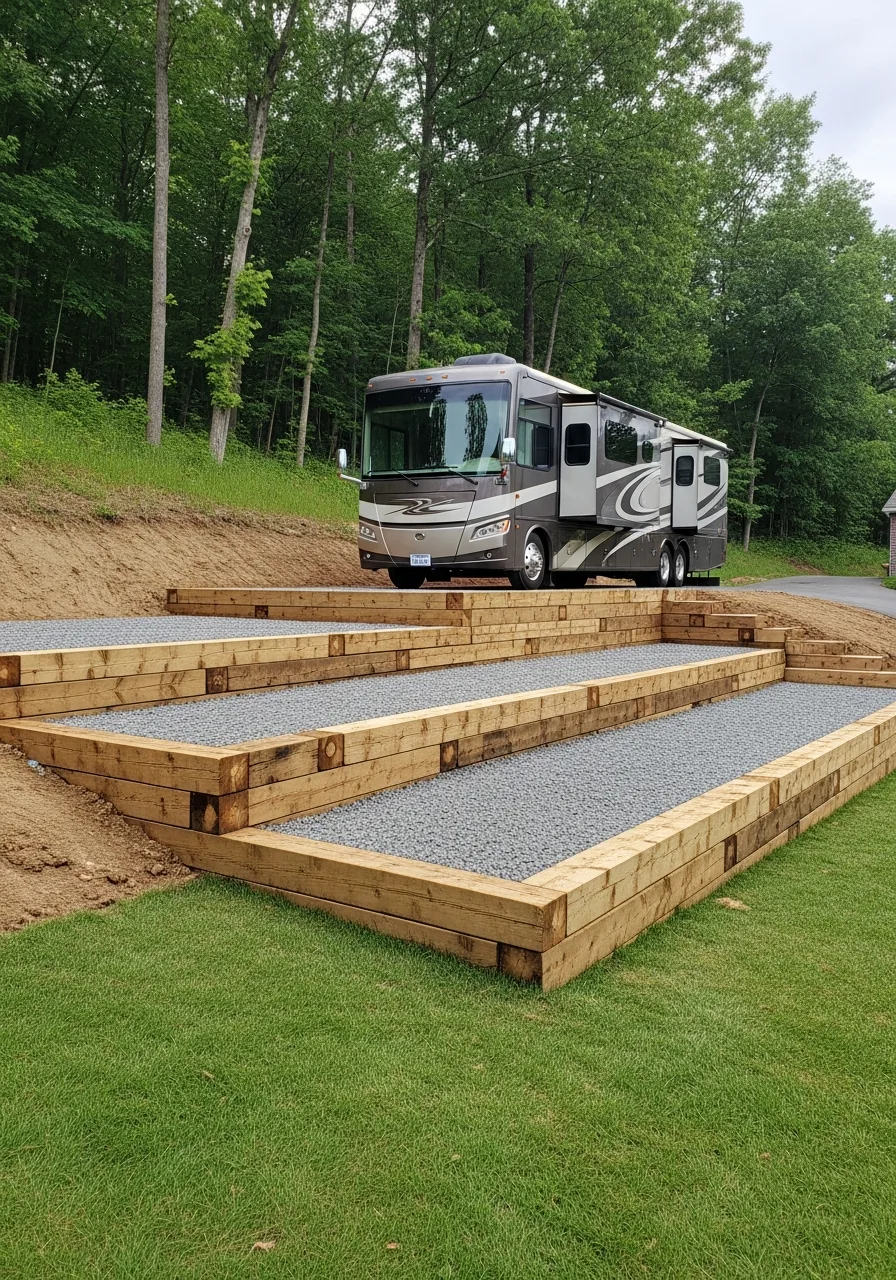
A tiered timber terrace converts steep, unusable inclines into a secure and level parking foundation for heavy vehicles. This structural approach prevents soil shifting while defining a clear boundary between the driveway and the surrounding landscape. Use a base of compacted crushed stone to provide a stable, all-weather surface that supports the weight of the rig.
- Expect a 4-day timeline for excavation and assembly; materials range from $1,500 to $4,000 for high-grade lumber.
- Anchor the retaining walls with deep-set rebar spikes to ensure the structure remains stationary under heavy loads.
- Extend the lower terrace to create a built-in patio area for outdoor furniture and easy access to storage bays.
Stability Secret: Fill the internal cavity of the terrace with several inches of angular riprap before adding the top layer of gravel to maximize weight distribution.
32. Permeable Paver RV Pad
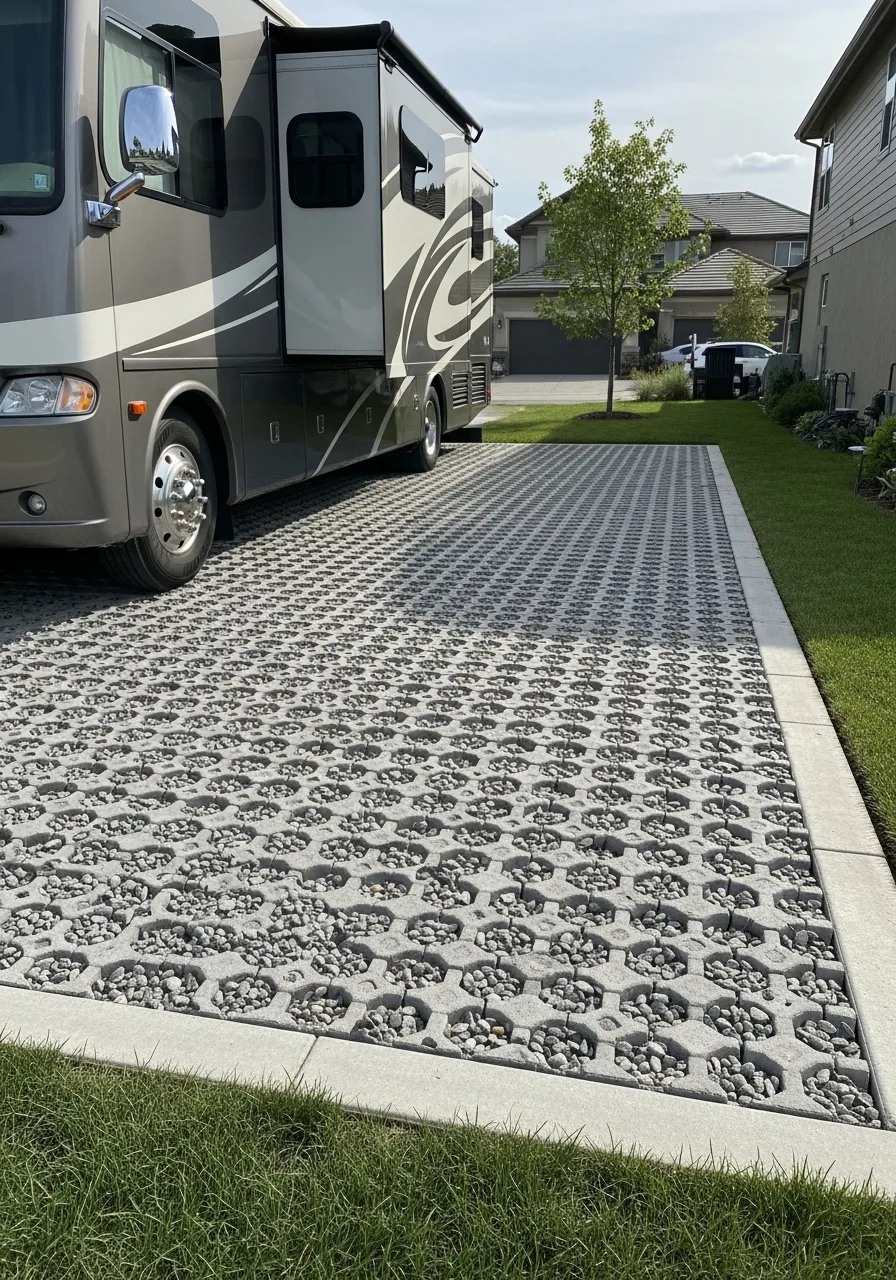
Permeable pavers allow rainwater to soak directly into the ground through the gaps between the stones. This setup eliminates large puddles and prevents the soil erosion common with heavy vehicles on dirt or grass.
Fill the paver grids with crushed pea gravel to create a stable, non-slip surface that remains firm even during heavy rainstorms.
- Layer a heavy-duty geotextile fabric beneath the pavers to prevent weeds from growing through the base.
- Interlock the pavers tightly and use a plate compactor to ensure the surface doesn't shift under the RV's weight.
- Buy plastic permeable grid systems in bulk online to save money compared to stone pavers.
Design Secret: Choose light-colored gravel to reflect heat away from the RV tires, which helps prevent dry rot.
33. Living Wall RV Screen
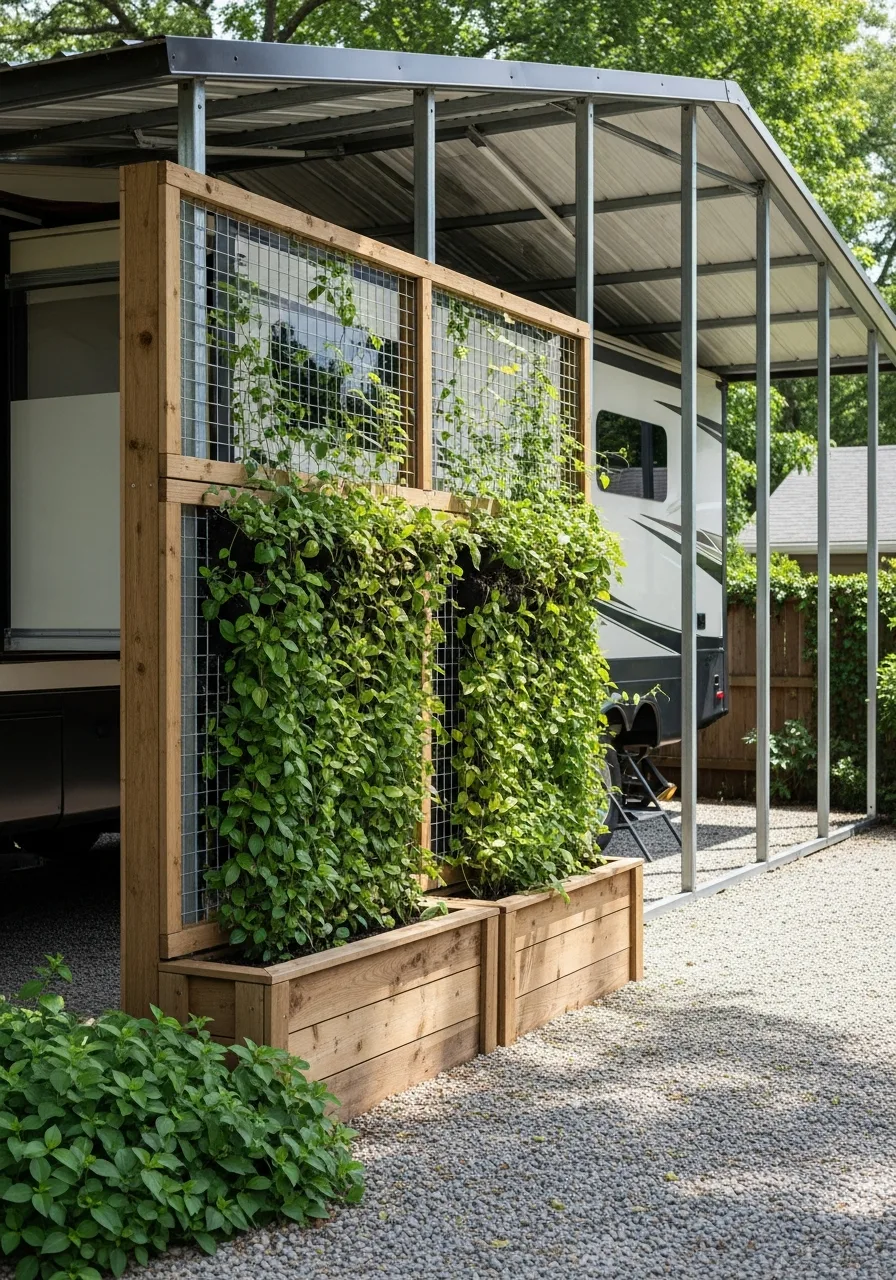
A living wall screen uses vertical planters or climbing vines to hide the side of an RV shelter. It softens the look of a large metal structure and helps the parking area blend into the surrounding landscape.
Attach a sturdy wire mesh or cedar lattice to the shelter posts to give climbing plants a permanent place to grow.
- Select evergreen vines like English Ivy or Star Jasmine to maintain a green screen during the winter months.
- Mount self-watering planter boxes at the base of the shelter for a low-maintenance vertical garden.
- Use simple cattle panels from a farm supply store as an affordable and heavy-duty trellis material.
Design Secret: Leave a one-foot gap between the plants and the RV to maintain airflow and prevent mold growth on the vehicle’s exterior.
34. Industrial I-Beam Shelter
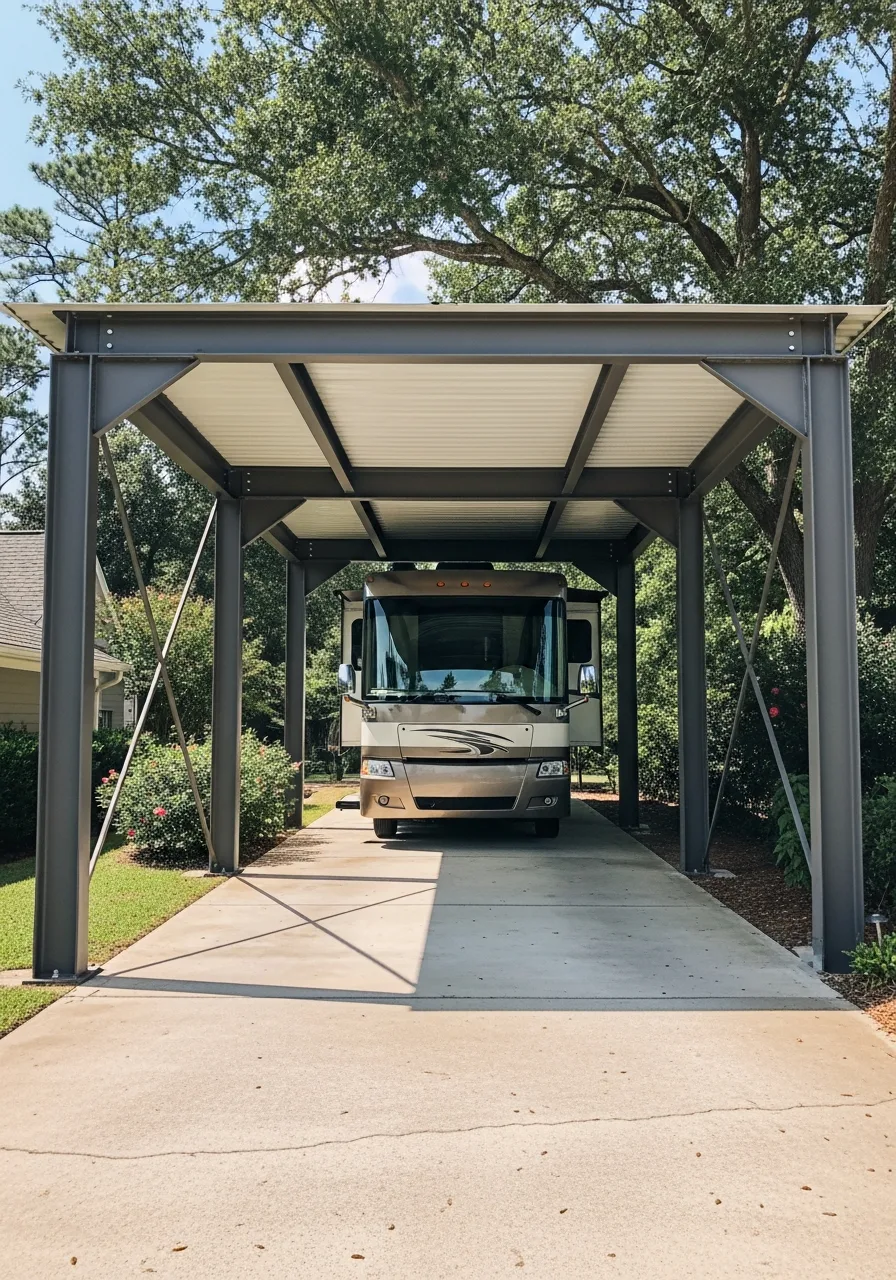
An I-beam shelter uses heavy structural steel to provide maximum clearance without the need for many interior support posts. This design is perfect for large Class A motorhomes that require a wide, unobstructed path for maneuvering.
Paint the steel beams with a rust-inhibiting outdoor coating to ensure the structure lasts for decades without maintenance.
- Apply a thick layer of zinc-rich primer to all joints to prevent moisture from causing structural corrosion.
- Bolt the base plates into a thickened concrete footing to handle the high wind loads of a tall roof.
- Check local metal scrap yards for surplus steel beams to significantly reduce the cost of the raw materials.
Design Secret: Weld small hooks to the inner flange of the I-beams for an easy way to hang heavy-duty power cords and hoses.
35. Translucent Roof RV Cover
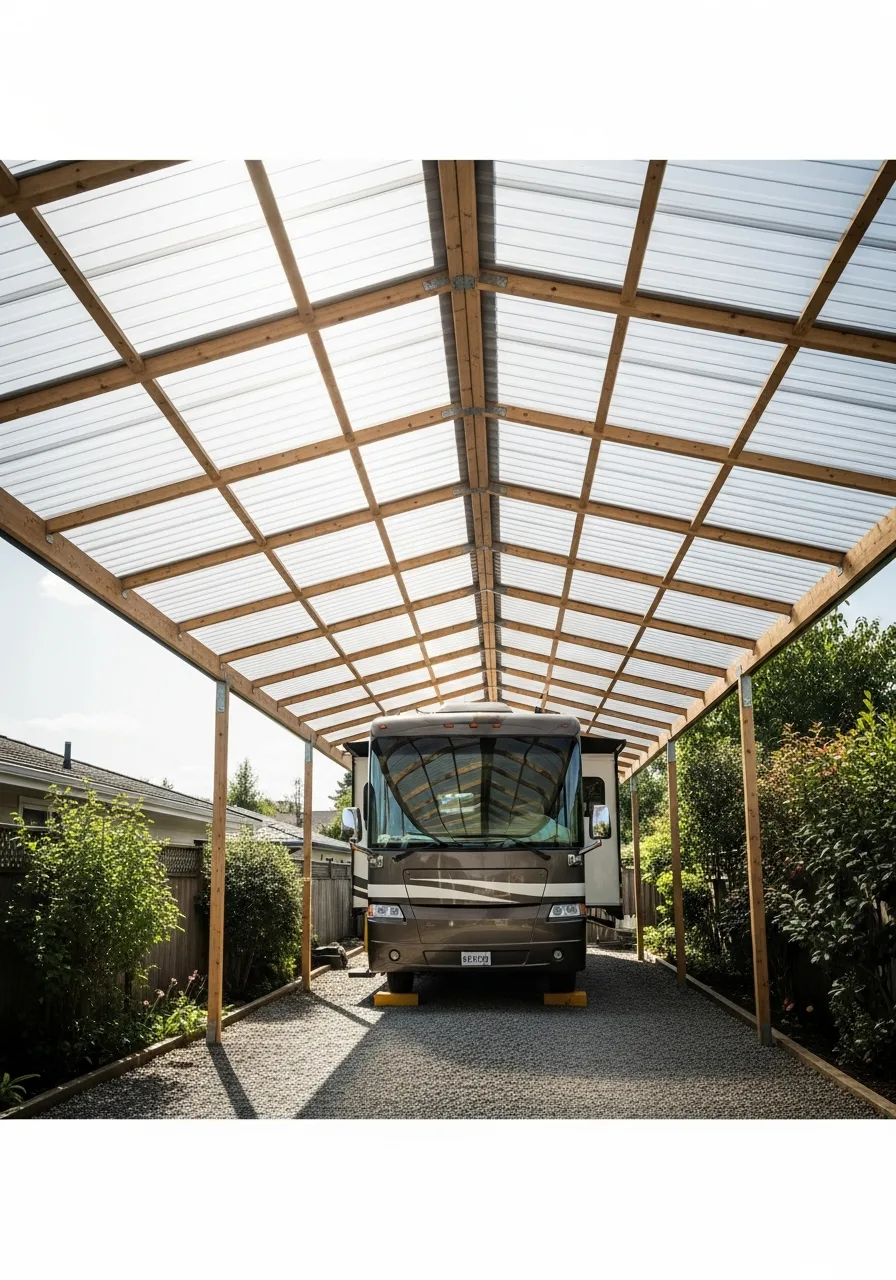
A translucent roof uses polycarbonate panels to let natural light filter into the parking area while blocking UV rays. It makes it much easier to perform maintenance or clean the RV without needing to install expensive overhead electric lights.
Overlap the panels by at least two ribs and use neoprene-backed screws to create a completely watertight seal.
- Choose UV-protected polycarbonate sheets to prevent the roof from yellowing or becoming brittle in the sun.
- Install foam closure strips at the eaves to block birds and insects from nesting in the roof gaps.
- Look for seconds or slightly scratched panels at roofing supply warehouses for a deep discount on materials.
Design Secret: Use tinted panels instead of clear ones to reduce glare while still providing plenty of working light.
Frequently Asked Questions
How much height clearance do I need for a standard RV shelter?
You should aim for at least 14 feet of clearance to safely accommodate roof-mounted air conditioners and satellite dishes. Choosing a 16-foot height is even better for future-proofing your space if you ever upgrade to a larger model.
Is a concrete slab or a gravel pad better for an RV shelter?
A concrete slab is the gold standard for stability and low maintenance, but a well-compacted gravel pad is a fantastic budget-friendly alternative. When paired with a vapor barrier, gravel offers superior drainage to keep your tires and undercarriage dry.
Do I need a building permit for a metal RV carport?
In most areas, you will likely need a permit because metal carports are considered permanent structures once they are anchored. It is always best to check with your local building department to ensure your project meets specific square footage and safety codes.
How wide should an RV shelter be to accommodate slide-outs?
While a standard RV is about 8.5 feet wide, you will want a shelter width of at least 18 to 20 feet to account for slide-outs on both sides. This extra room allows you to fully extend your slides and move around the vehicle comfortably for cleaning or repairs.
What are the benefits of a vertical roof vs. a horizontal roof for RVs?
Vertical roofs are superior because they allow snow, rain, and debris to slide off the sides effortlessly, preventing dangerous weight buildup. This design also eliminates standing water, which is a common cause of rust and leaks in horizontal roof structures.