50 DIY Fall Table Centerpieces
This post may contain affiliate links: full affiliate disclosure.
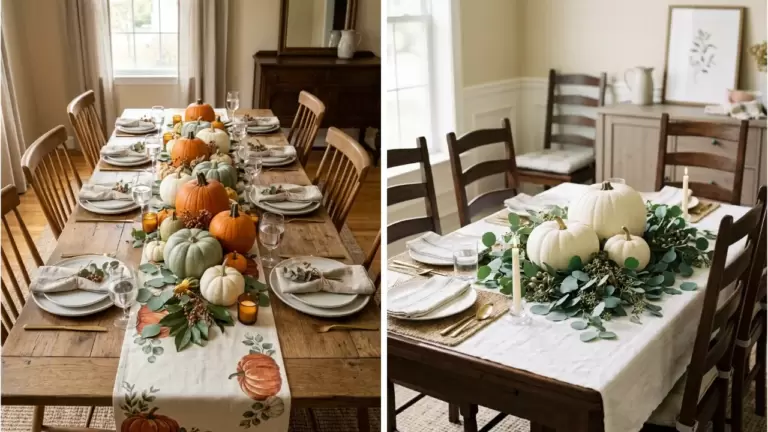
Creating a festive table does not require a large budget or professional floral skills. Focus on natural textures and low profiles to keep the setting functional for guests while adding seasonal warmth.
1. Bleached Pinecone Dough Bowl
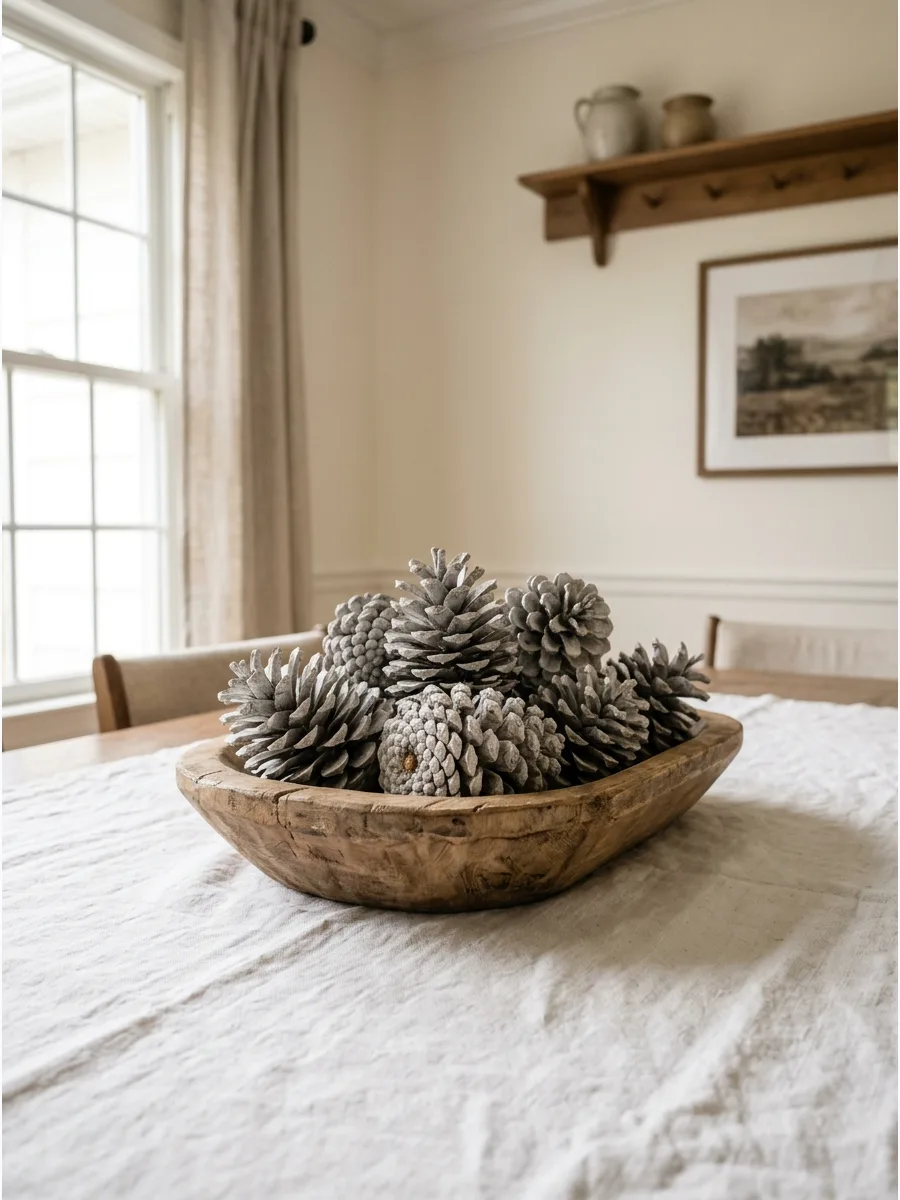
Natural pinecones often look too heavy for a light-colored table setting. Soak large pinecones in a mixture of water and bleach for 24 hours to achieve a weathered, driftwood-gray finish. This process strips away the dark brown sap and makes the organic shapes look high-end.
Avoid overcrowding the bowl so the unique textures of the scales remain the focal point.
- Costs under $10 for a gallon of bleach and collected pinecones.
- Requires 24 hours for soaking and 12 hours for air drying.
- Swap the wooden bowl for a silver tray to fit a more formal dining room.
Most people skip this: Dry the pinecones in a 200-degree oven for 30 minutes after bleaching to ensure the scales open back up fully.
2. Mason Jar Wheat Bundles
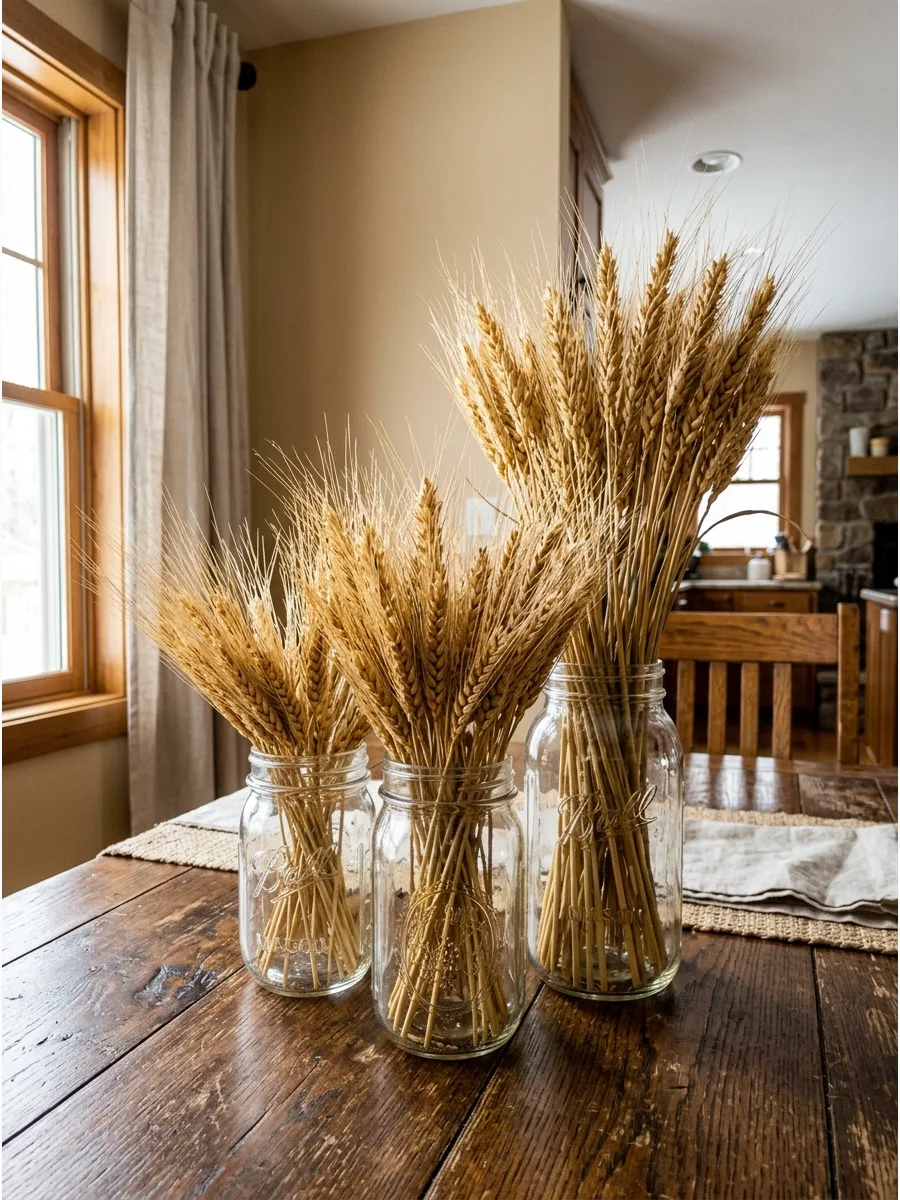
Dried wheat provides instant height without blocking the view across the table. Tie a bundle of dried wheat stalks with a simple piece of jute twine and drop them into clear wide-mouth mason jars. The vertical lines draw the eye upward and create a sense of airy space.
Using an odd number of jars creates a more balanced visual flow along a rectangular table.
- Sourced from craft stores or local farms for roughly $15.
- Takes 5 minutes to assemble and requires no water maintenance.
- Use amber-colored glass jars to add a warm, golden glow to the table.
Quick win: Give the wheat stalks a light mist of hairspray to prevent the seeds from shedding onto the dinner plates.
3. Painted Heirloom Mini Pumpkins
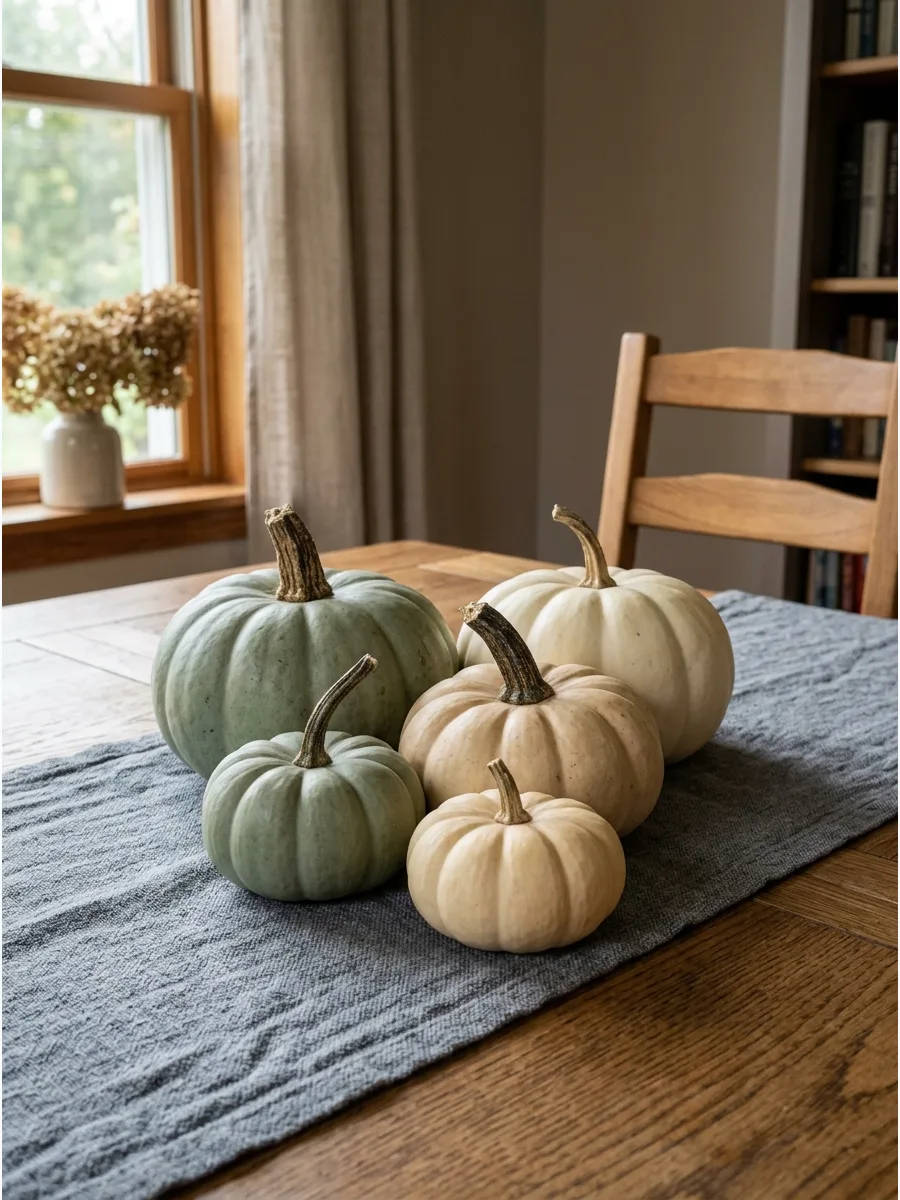
Standard orange pumpkins can sometimes clash with modern interior color palettes. Apply two coats of matte acrylic paint in shades of sage green, cream, or dusty blue to small heirloom pumpkins. This creates a sophisticated look that feels seasonal but refined.
Mixing different sizes and shapes prevents the arrangement from looking too stiff or manufactured.
- Acrylic craft paint costs about $2 per bottle.
- Allow 30 minutes of drying time between paint coats.
- Paint only the bottom half for a modern, dipped-look effect.
Best shortcut: Use a sponge brush instead of a bristle brush to avoid leaving visible stroke marks on the smooth pumpkin skin.
4. Cinnamon Stick Pillar Candles
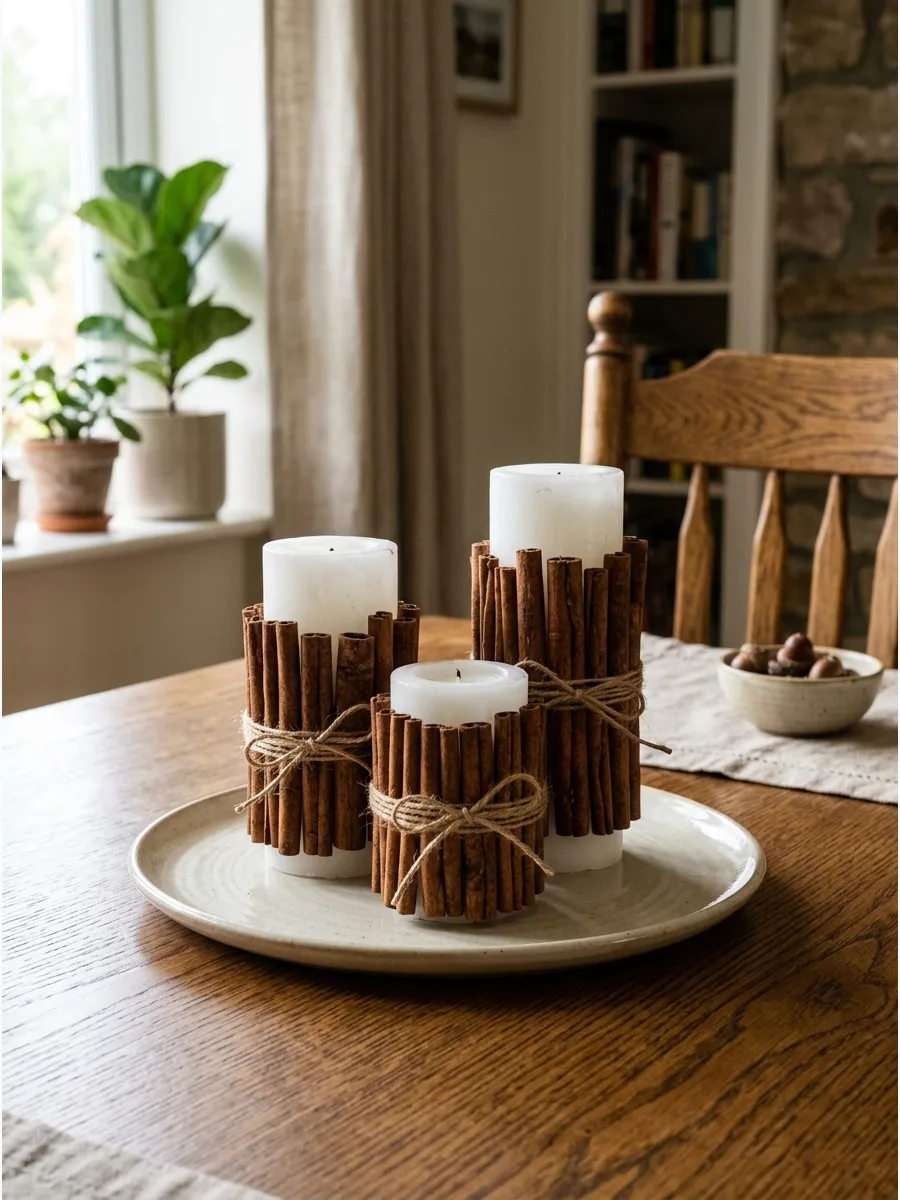
Fragrance is a key part of the dining experience, but heavy perfumes can overwhelm the food.
Secure vertical cinnamon sticks around a plain white pillar candle using a thick rubber band, then cover the band with twine. As the candle warms, it releases a subtle, natural spice scent that complements fall meals. This adds a chunky, rustic texture that works well on a simple ceramic plate.
- Bulk cinnamon sticks are available for $12 to $15.
- Assembly takes 10 minutes per candle.
- Substitute the twine with velvet ribbon for a softer, more elegant texture.
Most people skip this: Use unscented candles so the natural cinnamon aroma is the only scent present at the table.
5. Acorn Filled Glass Hurricanes
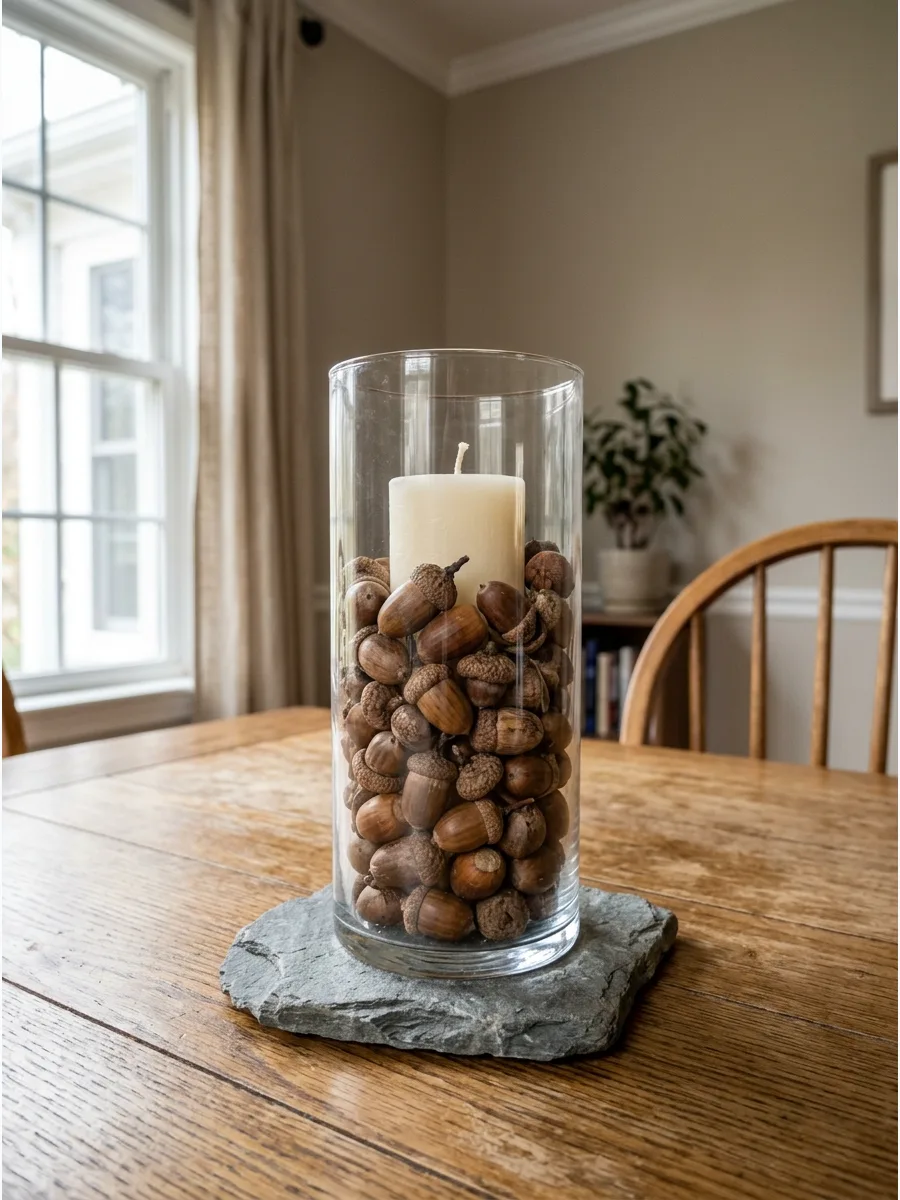
Filling the base of a glass vessel provides a sturdy foundation for candles. Fill the bottom third of a glass hurricane lantern with dried acorns before nesting a glass-encased tealight in the center. The natural brown tones of the acorns look beautiful when the candlelight hits them.
It is a simple way to bring the forest floor to the table without the mess of loose dirt or leaves.
- Acorns can be gathered for free or bought in bulk for $20.
- Takes 2 minutes to pour and level the filling.
- Use dried cranberries instead of acorns for a pop of deep red color.
Quick win: If gathering acorns from outside, bake them at 200 degrees for 20 minutes to kill any tiny insects hiding inside.
6. Wood Slice Tiered Stand
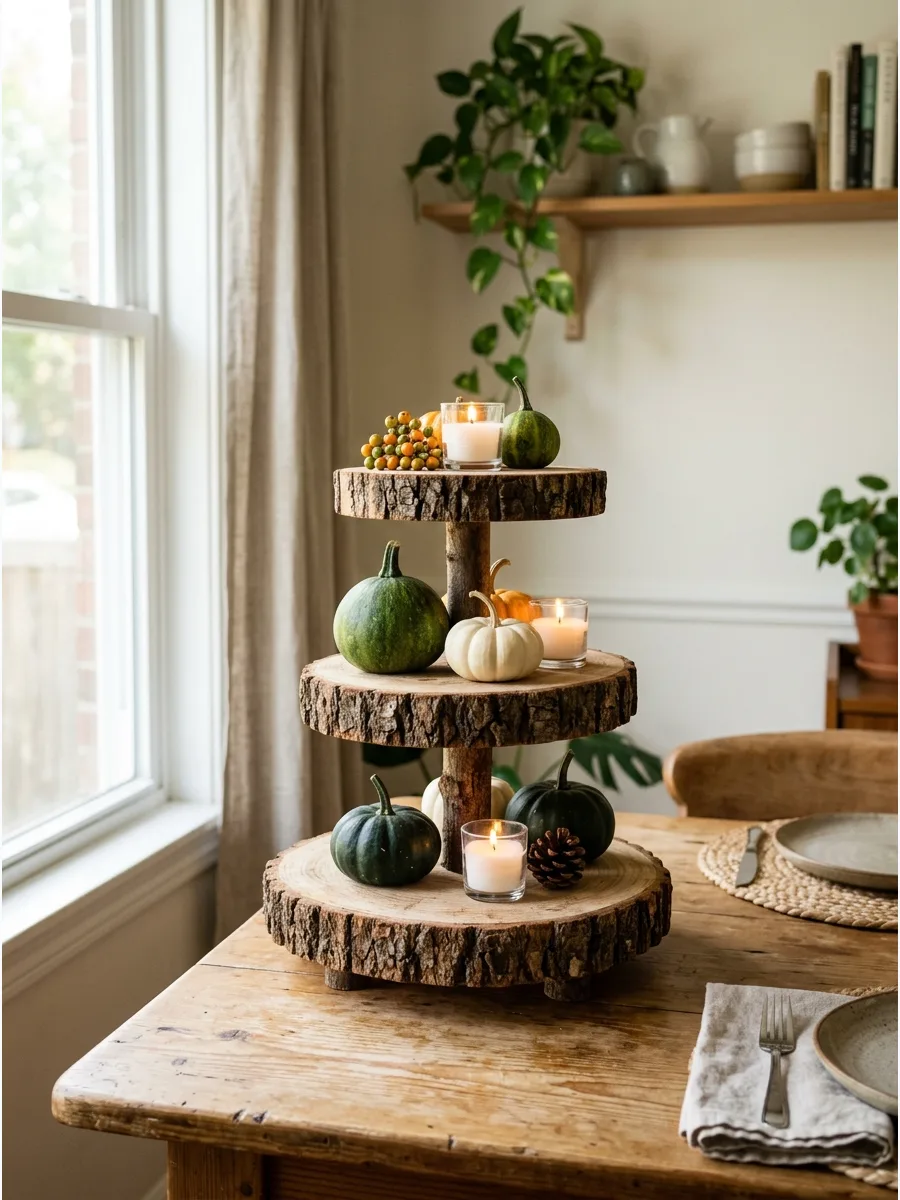
Varying heights on a table keeps the eye moving and makes the display feel professional. Stack three different-sized kiln-dried wood slices on top of each other using small blocks of wood or empty thread spools as spacers. This creates a rustic pedestal for small gourds, candles, or sprigs of greenery.
It provides the look of a tiered server without the high cost of a metal or ceramic version.
- Wood slices cost $15 to $25 depending on the diameter.
- Use wood glue for a permanent stand or just stack them for easy storage.
- Paint the edges of the wood slices gold for a touch of holiday sparkle.
Best shortcut: Look for kiln-dried wood slices to ensure the bark stays attached and does not crumble onto the table.
7. Dried Eucalyptus and Copper
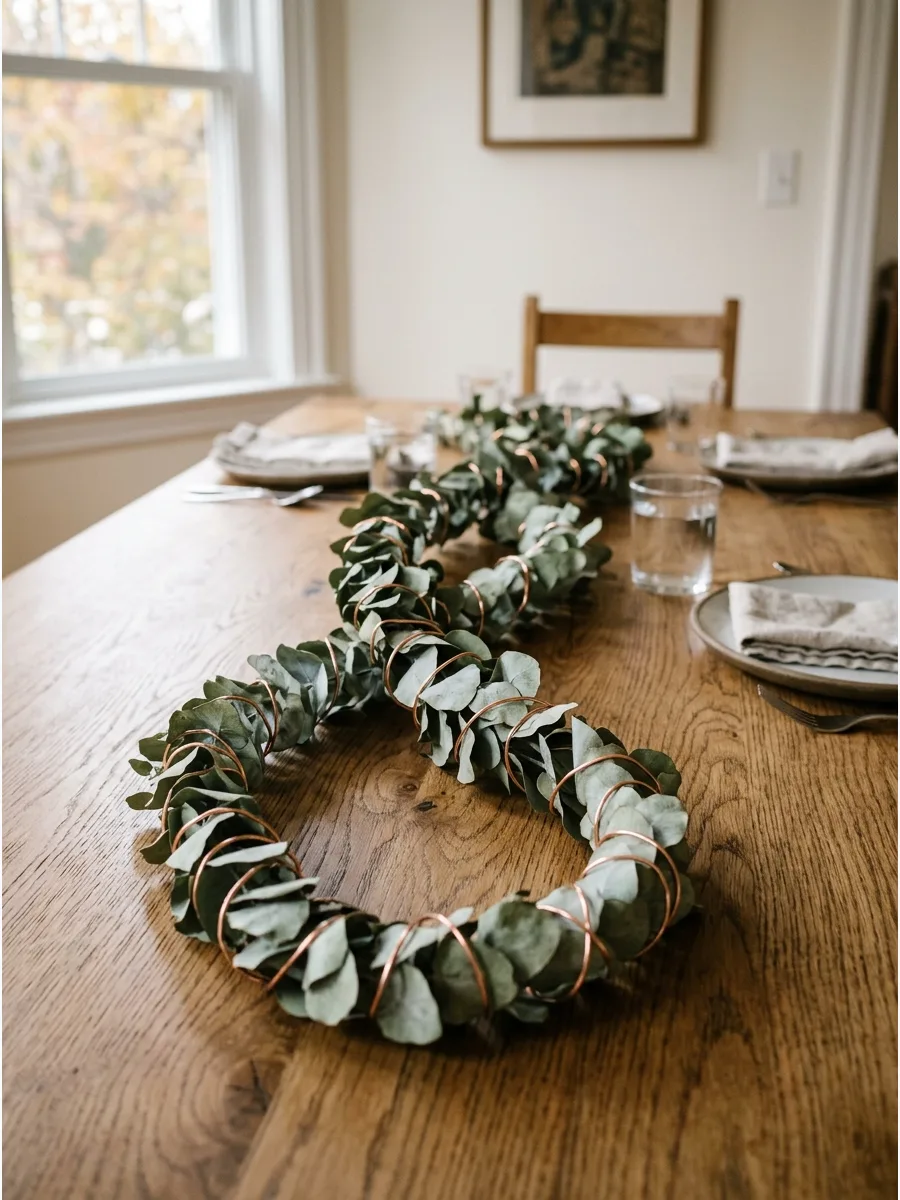
Greenery does not have to be fresh to look vibrant on a fall table. Weave sprigs of dried eucalyptus together and wrap them loosely with thin copper wire to create a flexible garland. The blue-green leaves contrast sharply with the warm metallic copper.
This low-profile runner allows guests to see over the decor easily while providing a full, lush look.
- Dried eucalyptus bundles cost about $20 and last for years.
- Takes 20 minutes to wire the sprigs into a continuous strand.
- Add small battery-operated fairy lights for extra evening ambiance.
Most people skip this: Gently crush a few leaves before guests arrive to release the fresh eucalyptus scent.
8. Hollowed Gourd Flower Vases
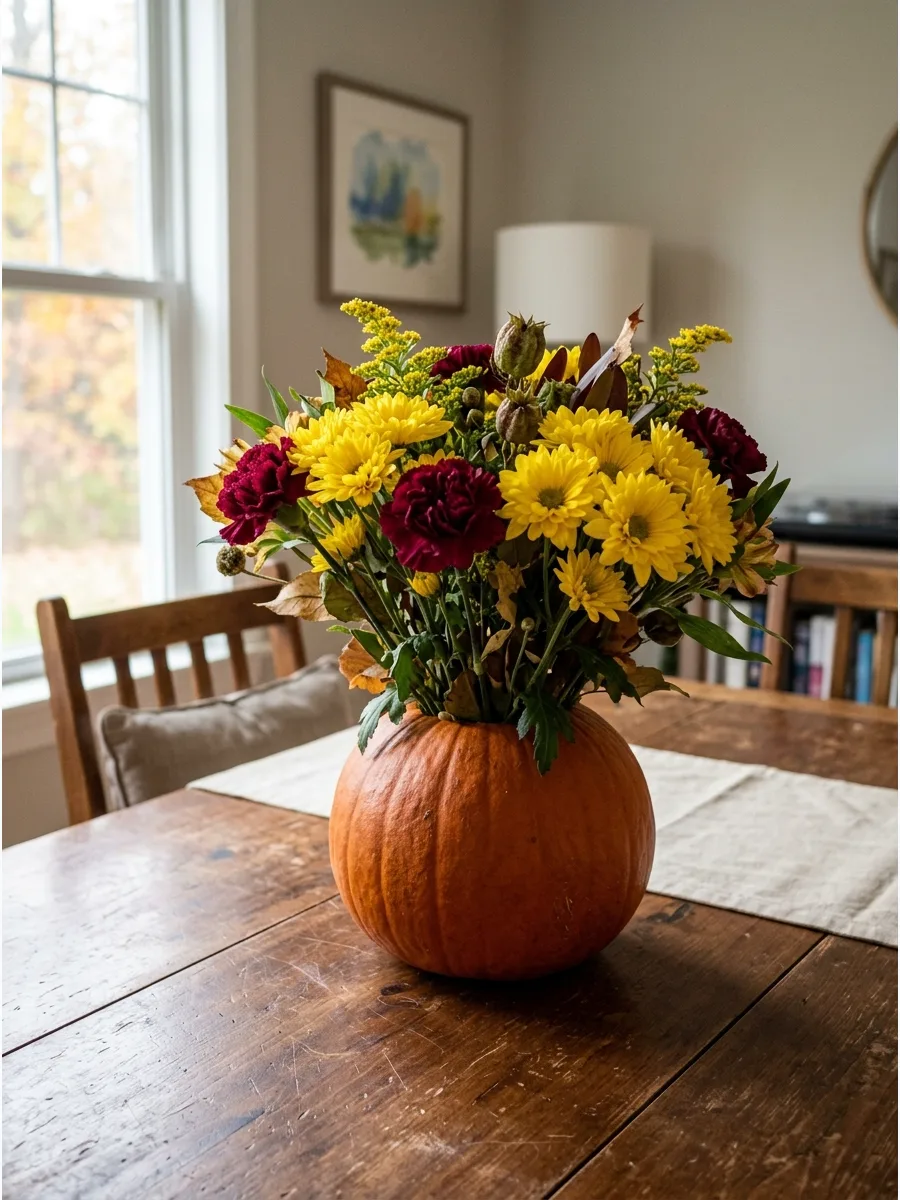
Standard glass vases can feel a bit cold during the autumn months. Slice the top off a medium-sized gourd and scoop out the seeds to create a natural, organic vessel for fall flowers. Place a small glass jar inside the gourd to hold the water and keep the gourd from rotting.
This adds a heavy, grounded element to the table that feels very intentional.
- Gourds cost $3 to $7 at local grocery stores.
- Requires a sharp knife and a large spoon for scooping.
- Choose flat-bottomed gourds to prevent the centerpiece from tipping over.
Quick win: Rub the cut edge of the gourd with petroleum jelly to keep it from shriveling and browning too quickly.
9. Burlap Wrapped Herb Pots
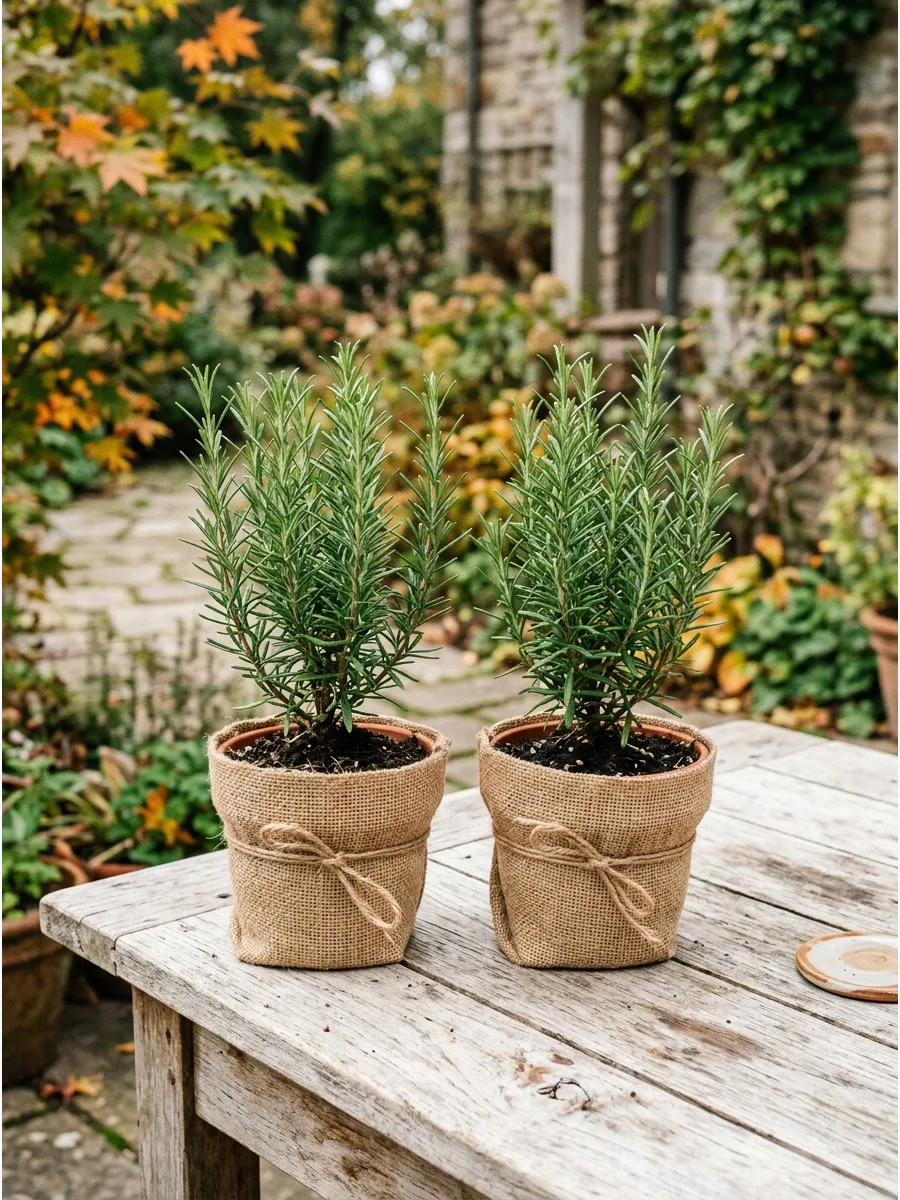
Edible decor is practical and smells wonderful throughout a meal. Wrap small terra cotta pots of rosemary or sage in squares of natural burlap and tie them with a simple string. The silvery-green leaves of these herbs fit the fall aesthetic perfectly.
Placing one at each end of the table provides a cohesive look that guests can actually interact with.
- Herbs and pots cost roughly $5 per unit.
- Takes 5 minutes to wrap and tie the fabric.
- Let guests take the plants home as party favors after the dinner.
Best shortcut: Use pinking shears to cut the burlap so the edges have a decorative zig-zag pattern and don't fray.
10. Corn Husk Table Runner
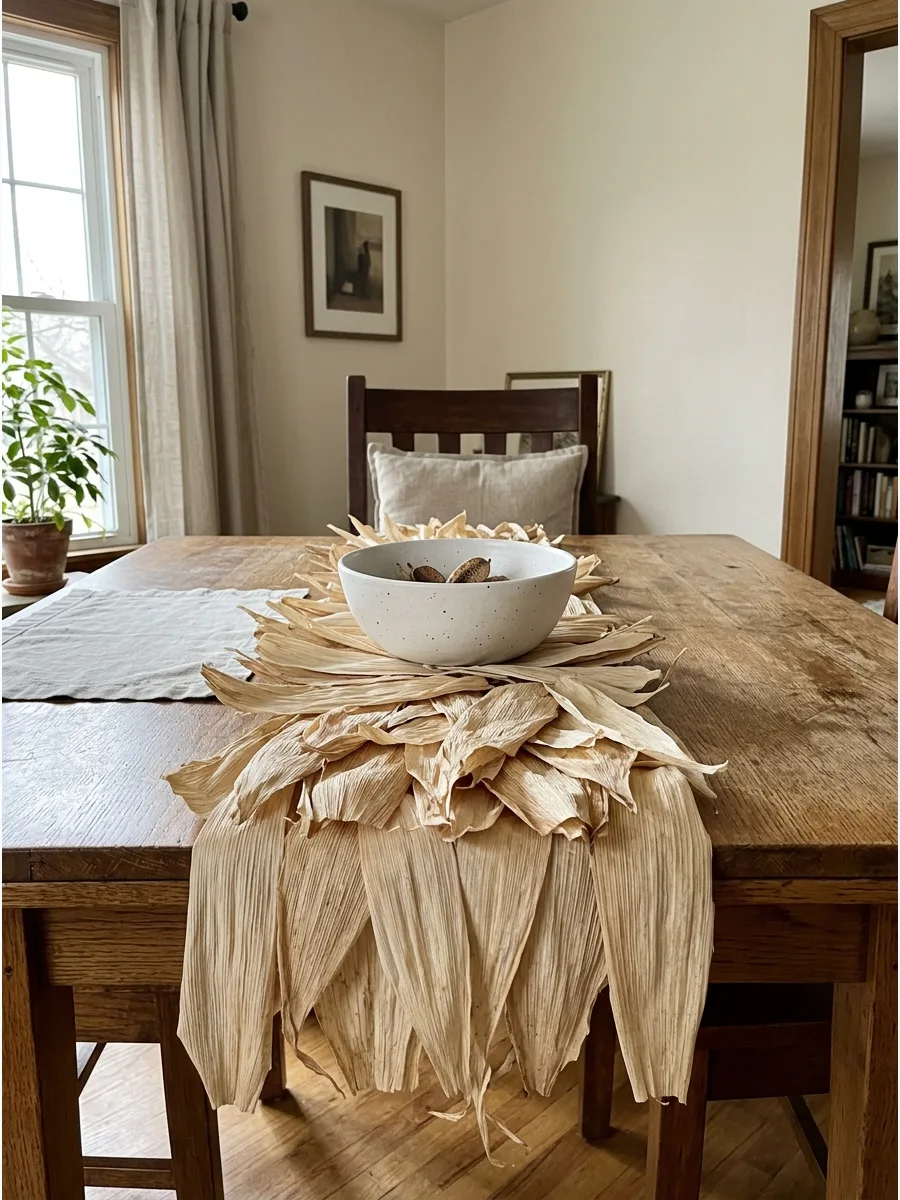
Texture often matters more than color when designing a rustic table. Layer dried corn husks in an overlapping pattern down the center of the table to create a thick, textured runner. The pale straw color provides a neutral base that makes colorful plates or napkins pop.
It is an inexpensive way to cover a large area with a material that feels very seasonal.
- A large bag of husks costs about $10 in the international food aisle.
- Takes 15 minutes to arrange and layer the husks.
- Lightly iron the husks on a low setting if they are too curled to lay flat.
Most people skip this: Slightly dampen the husks with a spray bottle to make them more pliable and easier to layer without cracking.
11. Apple and Tealight Trough

Red apples add a vibrant splash of color that contrasts well with typical brown fall decor. Line a narrow wooden trough or tray with bright red apples and nestle white tealight candles in between them. The shiny skin of the fruit reflects the candlelight beautifully.
This linear arrangement works perfectly for long harvest tables where you want a consistent look from end to end.
- Apples cost $5 to $10; candles are roughly $0.20 each.
- Assembles in under 10 minutes.
- Use green Granny Smith apples for a brighter, more modern kitchen look.
Quick win: Use real apples instead of plastic ones; the weight keeps them from rolling around in the trough.
DIY Fall Table Centerpieces
12. Bittersweet Vine Table Wreath
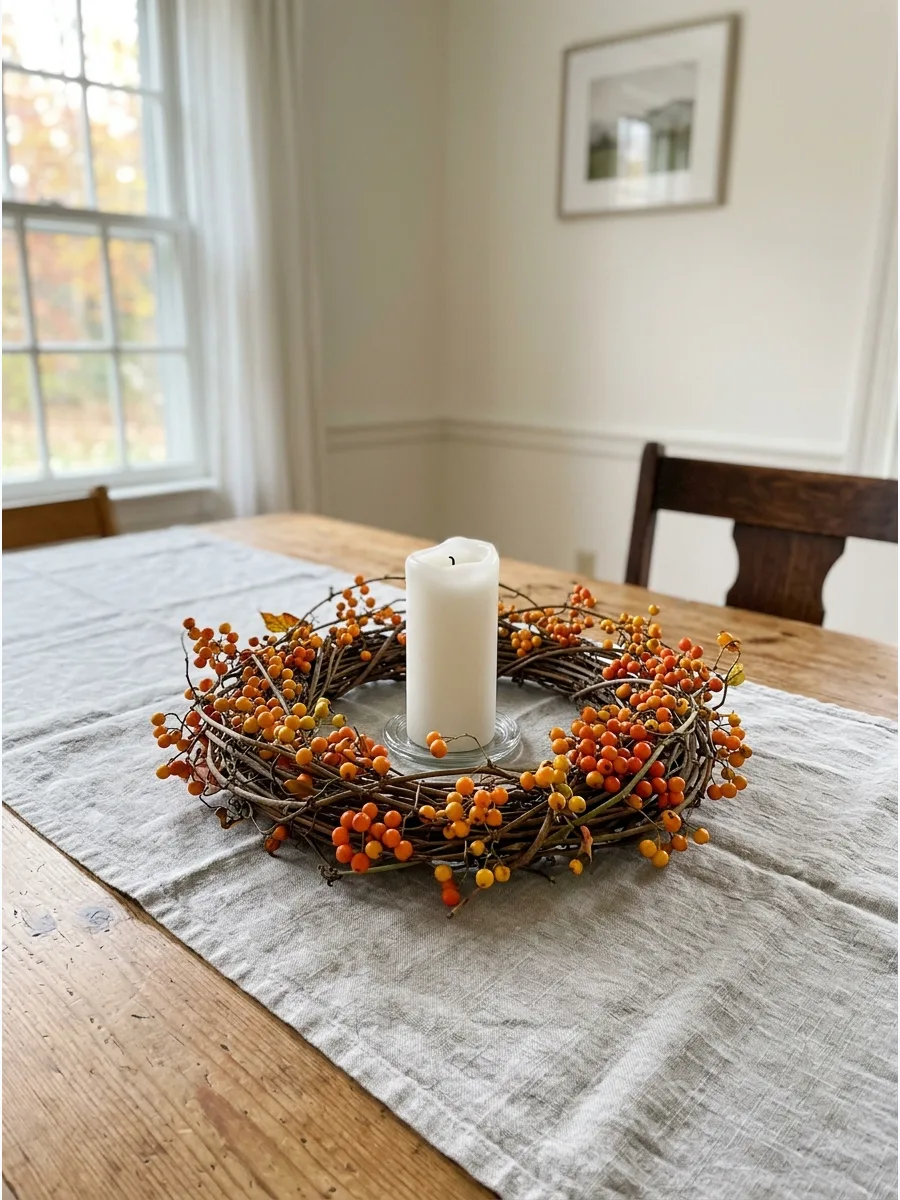
A bittersweet branch wreath serves as a vibrant, natural focal point that brings high-contrast texture to a dining setting. These flexible vines are easily coiled into a loose circle, allowing the bright orange berries to pop against a neutral runner.
Twist three or four long stems together and secure them with thin florist wire to maintain a sturdy circular shape. An organic, slightly asymmetrical arrangement often feels more authentic and sophisticated for autumn gatherings than a perfectly manicured loop.
- Source fresh or high-quality faux bittersweet vines in early October for the most vibrant berry color.
- Overlap the vine ends by four inches and wrap tightly with brown floral wire to hide the joints.
- Scale the wreath diameter to leave at least twelve inches of space for place settings on all sides.
Quick win: Lightly mist fresh bittersweet berries with clear acrylic spray to prevent them from shriveling or dropping off the vine too quickly.
13. Velvet Fabric Pumpkins
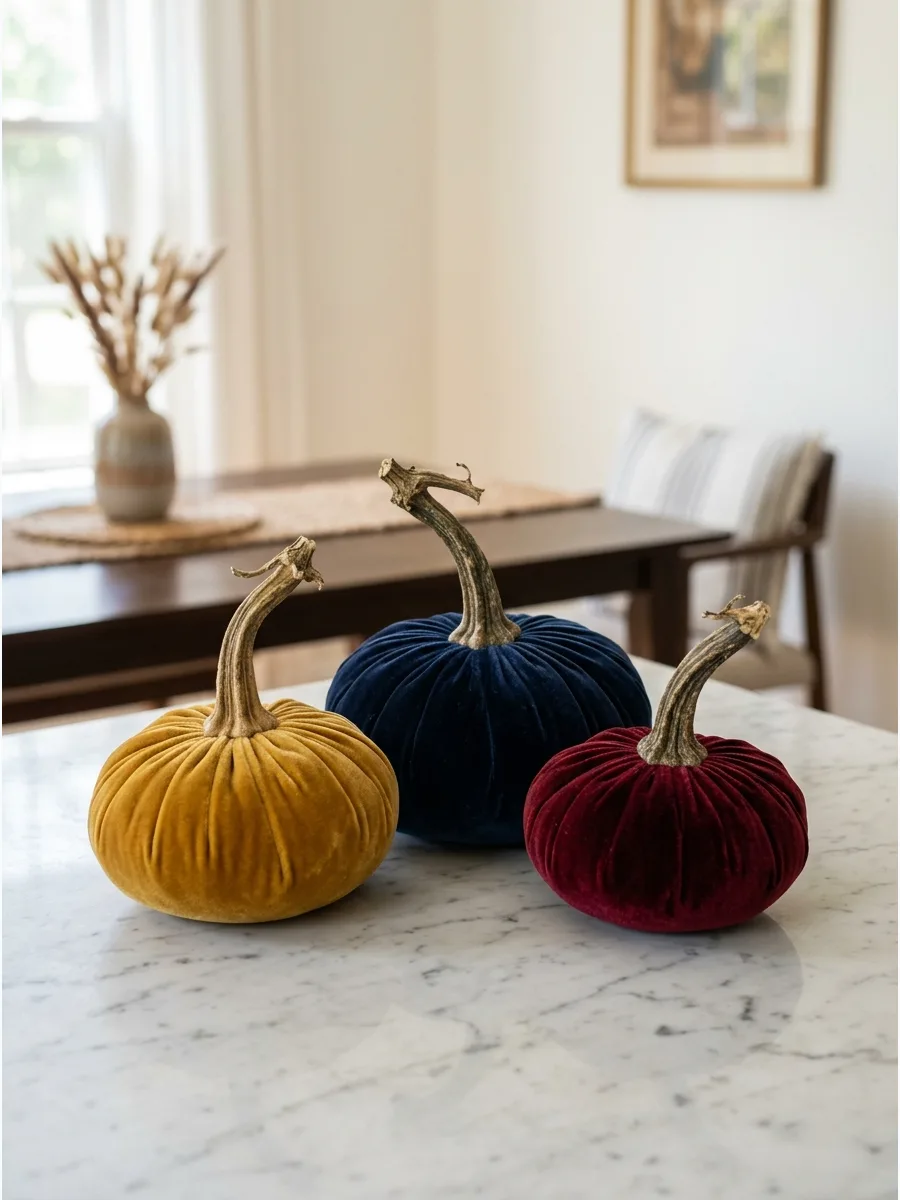
Velvet adds a sense of luxury and softness that balances out hard wooden tables. Stuff small circles of velvet fabric with batting and gather the edges around a real dried pumpkin stem. The weight of the fabric allows them to sit perfectly without rolling.
These are durable enough to be stored and reused for several years without losing their shape or color.
- Fabric remnants can be found for $5 to $10.
- Requires basic hand-sewing skills and 15 minutes per pumpkin.
- Mix in a few metallic painted pumpkins to add a bit of shine to the group.
Quick win: Use real stems from last year's pumpkins or buy them online to make the DIY versions look authentic.
14. Gold Leafed Pressed Leaves

Ordinary fallen leaves can become sophisticated decor with a little metallic detail. Apply a thin layer of gold leaf or metallic gold paint to the edges of large, pressed maple leaves. Scatter them down the center of the table or use them as unique place cards for guests.
The gold catches the light and elevates the natural brown tones of the dried foliage.
- Gold paint pens cost $5; foraged leaves are free.
- Requires 24 hours to press leaves flat before painting.
- Use a clear sealant spray to prevent the leaves from becoming brittle and breaking.
Most people skip this: Press leaves between heavy books for at least two days so they lay perfectly flat on the table surface.
15. Artichoke and Succulent Mix
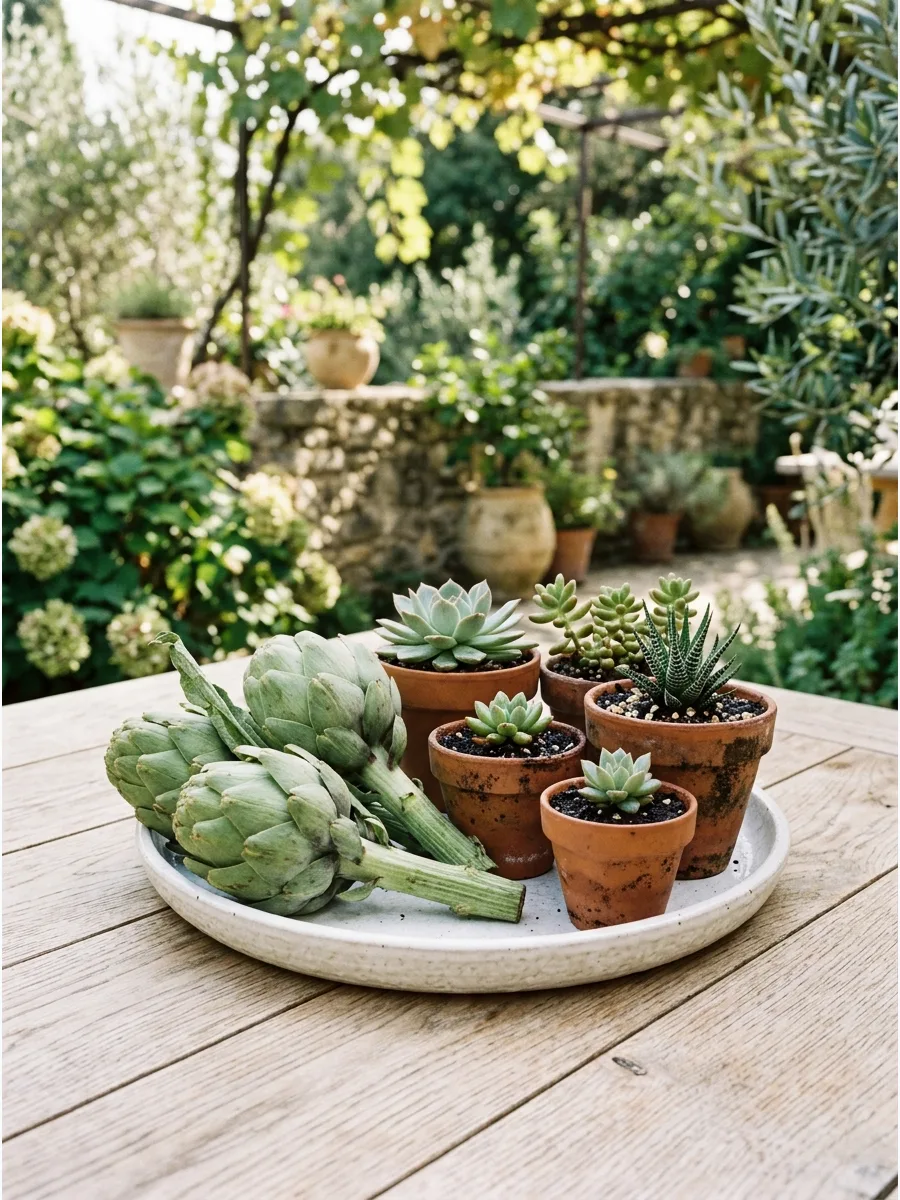
Fresh produce offers a texture that plastic decor simply cannot replicate. Nestle fresh green artichokes among small potted succulents and clumps of moss on a low ceramic tray. The deep purples often found in artichoke leaves pair beautifully with the dusty greens of the succulents.
This arrangement stays very low to the table, making it perfect for dinner party conversation.
- Fresh artichokes cost $2 to $3 each at the market.
- Assembles in 5 minutes and stays fresh for about a week.
- Replace succulents with small white gourds if you prefer a more traditional look.
Best shortcut: Use a bed of damp moss to keep the succulents hydrated so you do not have to move the centerpiece to water them.
16. Chalkboard Painted Wine Bottles
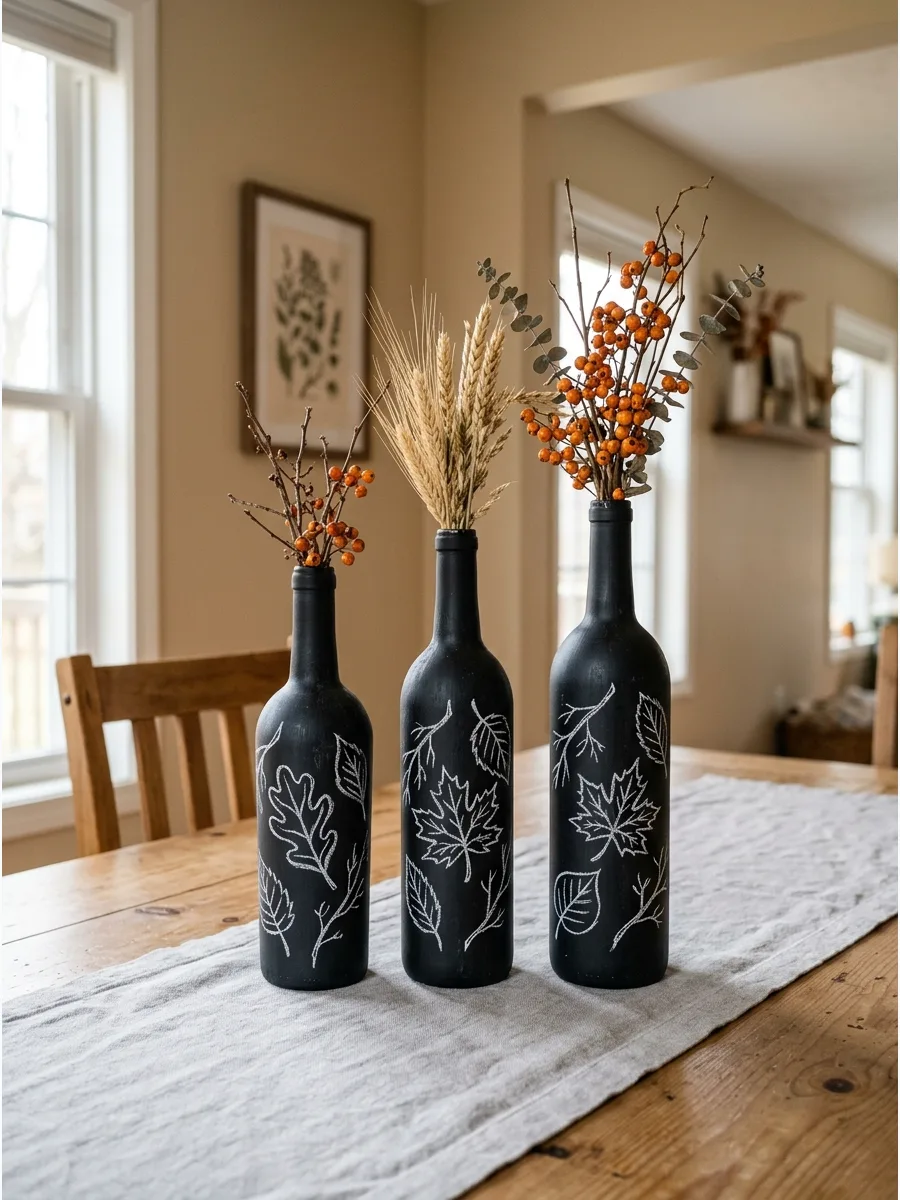
Recycling old wine bottles with a coat of matte black paint creates a modern canvas for autumn art. This works because the dark background makes white chalk drawings of leaves or pumpkins pop.
Apply two thin coats of chalkboard spray paint to clean bottles and use a chalk marker for precise seasonal doodles. Using bottles of different heights adds visual interest and prevents the table from looking too flat.
- Collect three empty bottles and one can of chalkboard spray for under ten dollars.
- Arrange the bottles in a cluster of three at the center of the table for a balanced look.
- Switch to a gold paint pen for a more permanent and formal holiday appearance.
Quick win: Use a damp cloth to erase mistakes and update the drawings as the season moves from September to November.
17. Copper Painted Pomegranate Bowl
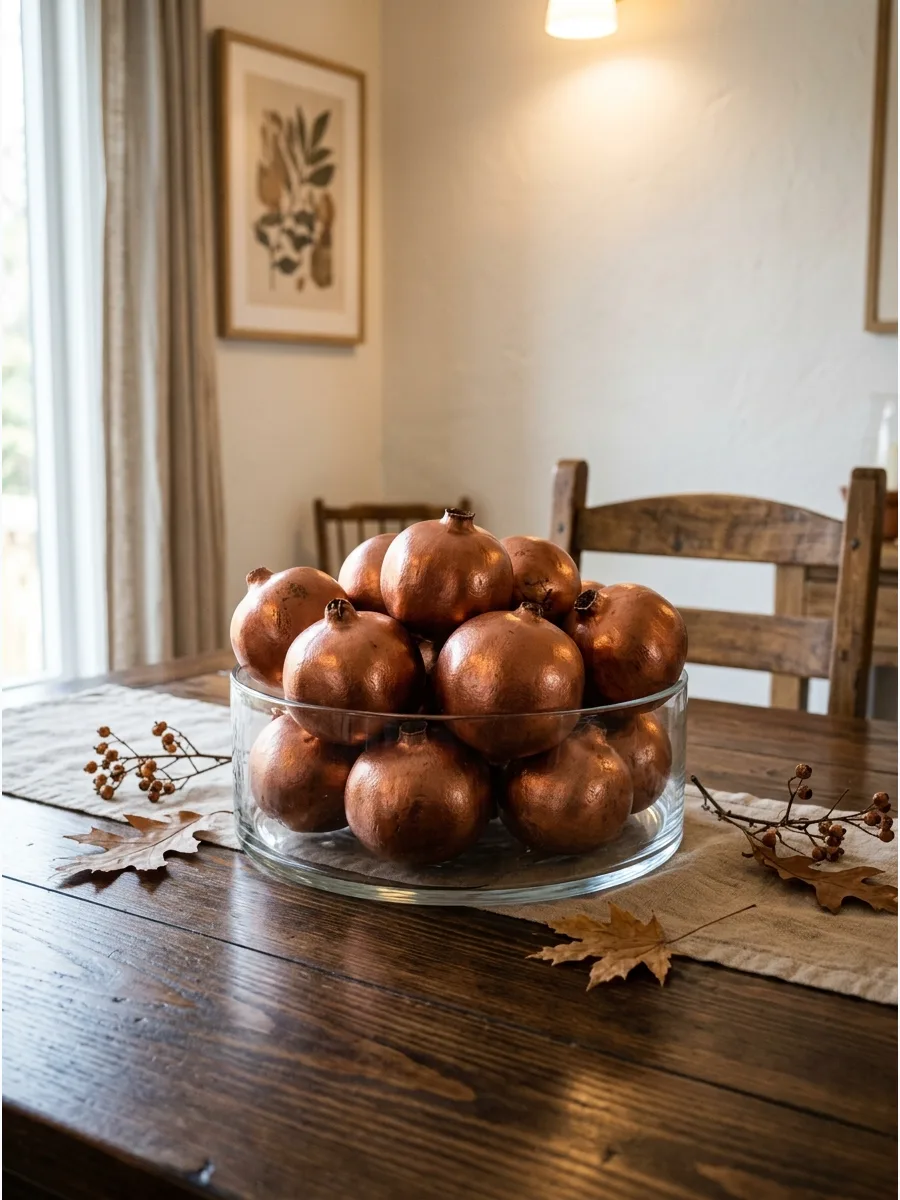
Metallic finishes bring an instant sense of luxury to natural shapes like fruit. This setup works because the copper tone reflects candlelight and warms up the dining room.
Spray-paint six real or faux pomegranates with a metallic copper finish and pile them into a simple glass bowl. High-shine fruit creates a sophisticated focal point that does not require floral maintenance.
- Purchase faux pomegranates in bulk to reuse this centerpiece every year.
- Set the bowl on a dark wood surface to make the metallic copper stand out.
- Swap pomegranates for pears or small apples to change the silhouette for a different look.
Most people skip this: Lightly sand the faux fruit before painting to help the metallic spray stick without peeling.
18. Split Pea Glass Vases
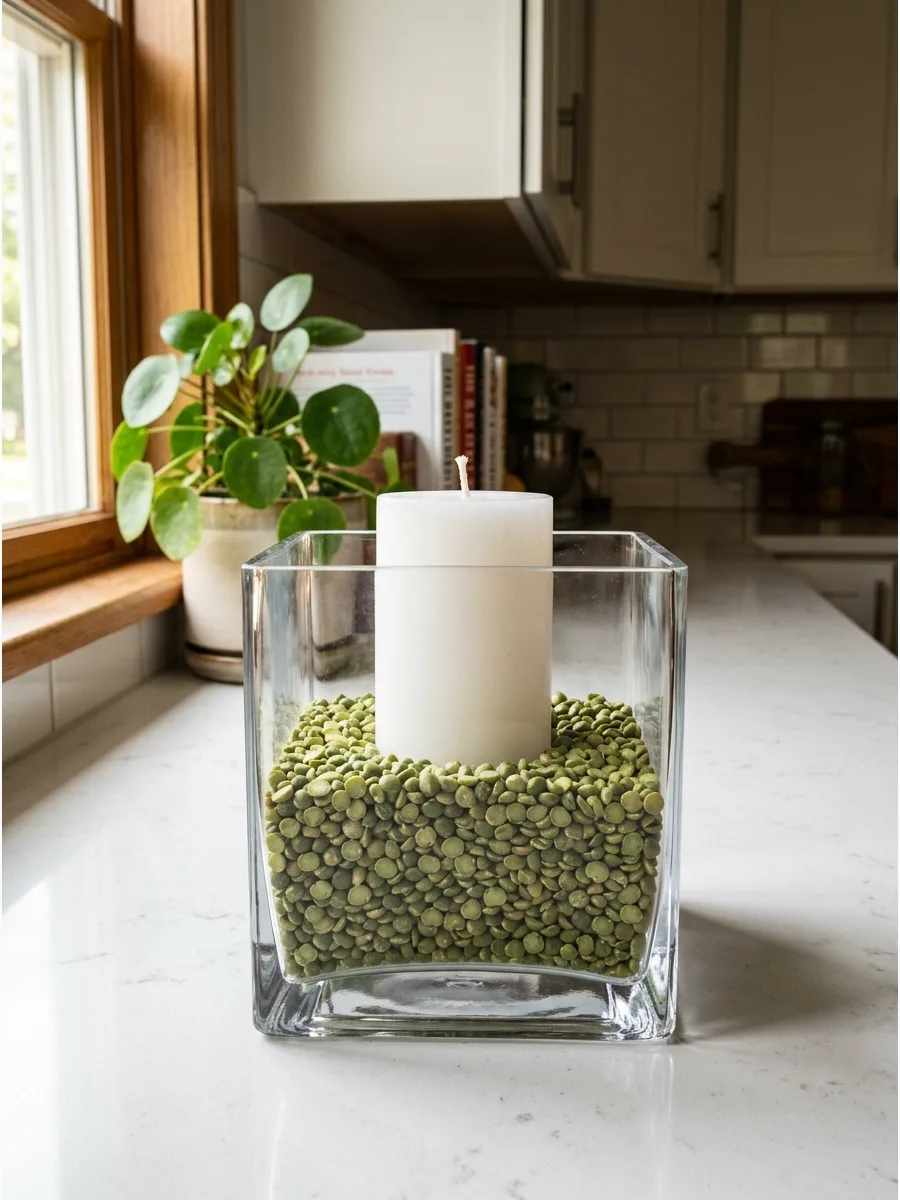
Dried split peas offer a vibrant green texture that mimics the look of moss without the mess. This works because the weight of the peas holds candles securely in place.
Fill the bottom third of a square glass vase with dried green split peas and nestle a white pillar candle inside. The contrast between the organic green and the crisp white wax feels fresh and modern.
- Buy a large bag of dried split peas from the grocery store for a very low-cost filler.
- Place the vase on a white runner to keep the green color looking bright and clean.
- Mix in yellow split peas for a variegated look that matches autumn leaves.
Best shortcut: Use a funnel to pour the peas around the candle to keep the glass walls clean and dust-free.
19. Cotton Boll Table Garland
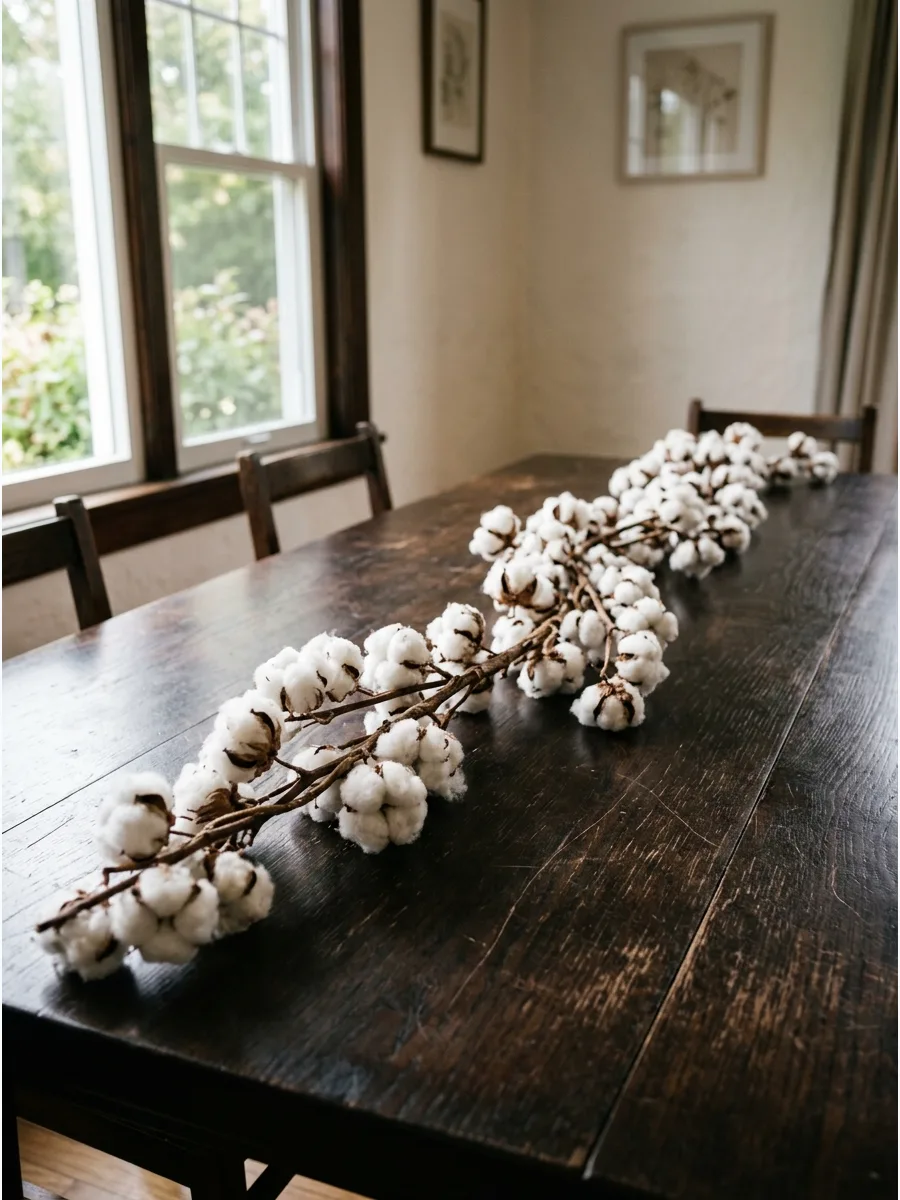
A cotton boll garland provides a soft, farmhouse feel that bridges the gap between summer and fall. This works because the neutral white and brown tones match almost any dining room color scheme.
Stretch a single long cotton boll garland down the center of the table and tuck in a few real oak leaves for color. Low-profile garlands are perfect for long tables because they do not block the view of guests sitting across from each other.
- Order a six-foot garland to cover most standard dining tables in one step.
- Weave the garland around existing salt and pepper shakers to integrate it into the meal.
- Add a string of battery-operated fairy lights into the cotton for a soft evening glow.
Quick win: Fluff the cotton tufts by hand after unpacking to give the garland a more realistic and expensive look.
20. Pecan Filled Metal Lanterns
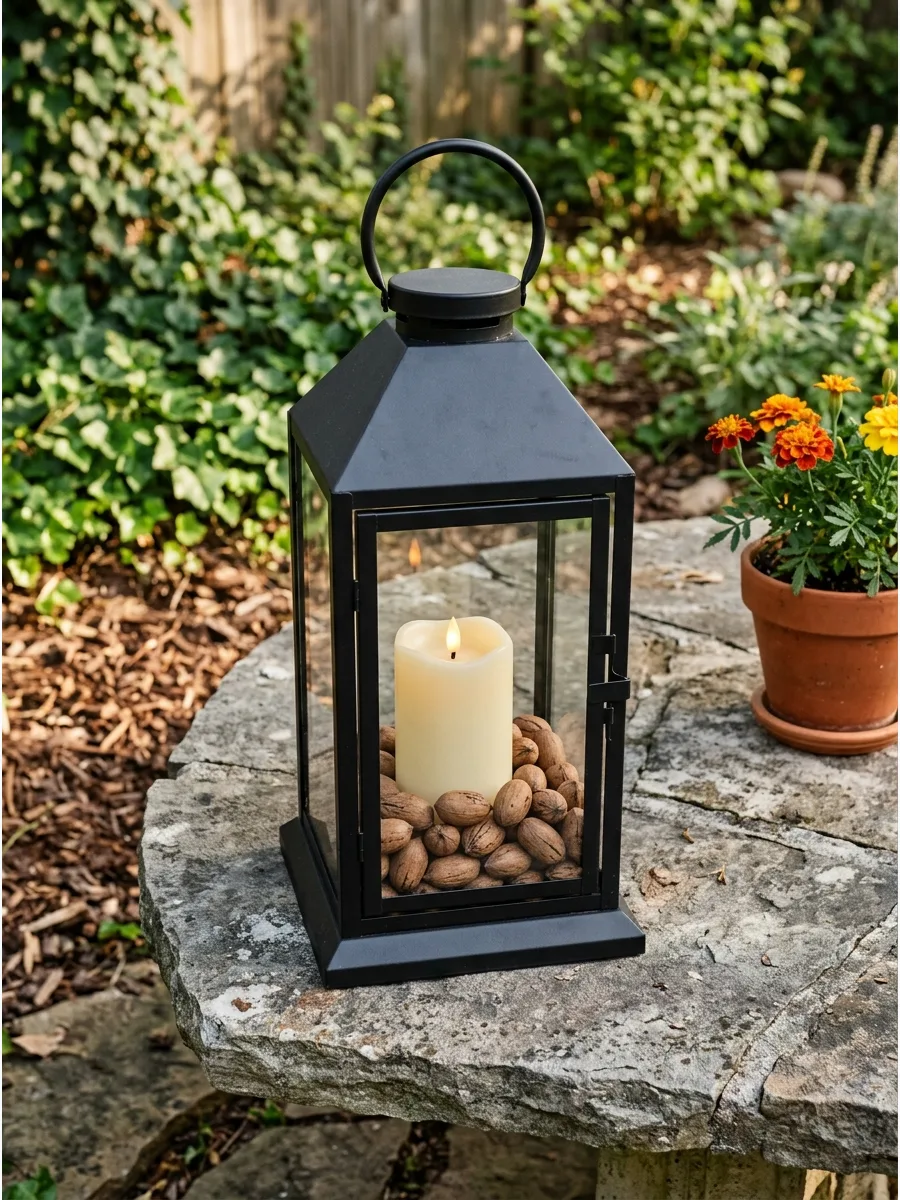
Using nuts as a base in a lantern adds a harvest theme that feels grounded and earthy. This works because the pecans provide a sturdy, level surface for a flickering light.
Fill the bottom of a black metal lantern with two inches of whole pecans in their shells and place an LED candle on top. Pecans bring a rich brown texture that balances the hard lines of metal decor.
- Pick up a bag of unshelled pecans at a local market or grocery store during the fall.
- Set a pair of lanterns at opposite ends of the table for a symmetrical and formal layout.
- Substitute pecans with walnuts or almonds to vary the texture and color of the base.
Most people skip this: Always use LED candles instead of real flames when using dry nut shells to prevent a fire hazard.
21. Dried Citrus and Cinnamon
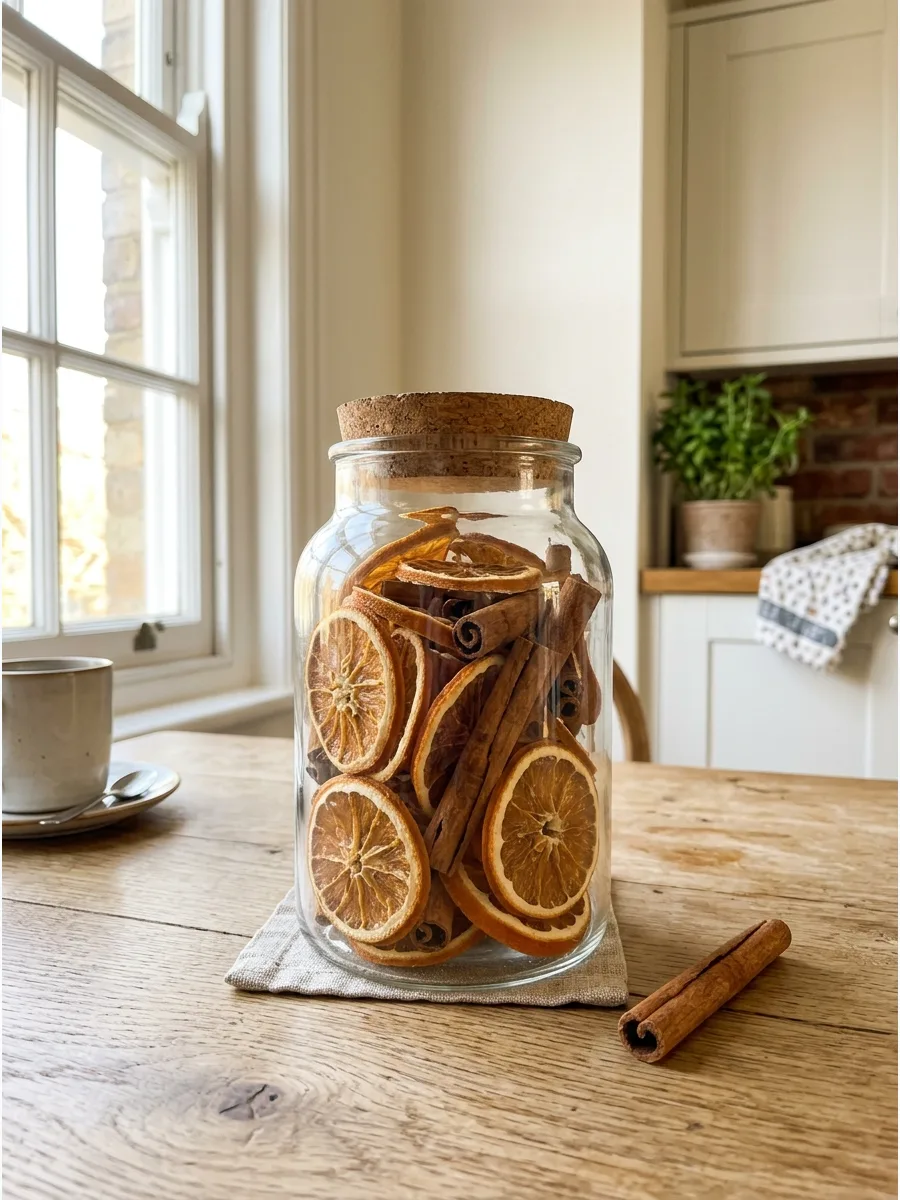
Dried oranges and cinnamon sticks create a centerpiece that appeals to both sight and smell. This works because the translucent fruit slices catch the light beautifully.
Fill a large clear glass jar with layers of dried orange slices and whole cinnamon sticks for a simple vertical display. This compact idea is excellent for small kitchen tables where space is limited.
- Dry your own orange slices in a low-temperature oven over a rainy afternoon.
- Place the jar near a window so the sun shines through the orange slices.
- Add star anise or cloves to the mix to enhance the spicy autumn fragrance.
Best shortcut: Buy pre-dried citrus slices if the oven-drying process feels too time-consuming for a busy schedule.
22. Twig Wrapped Votive Holders
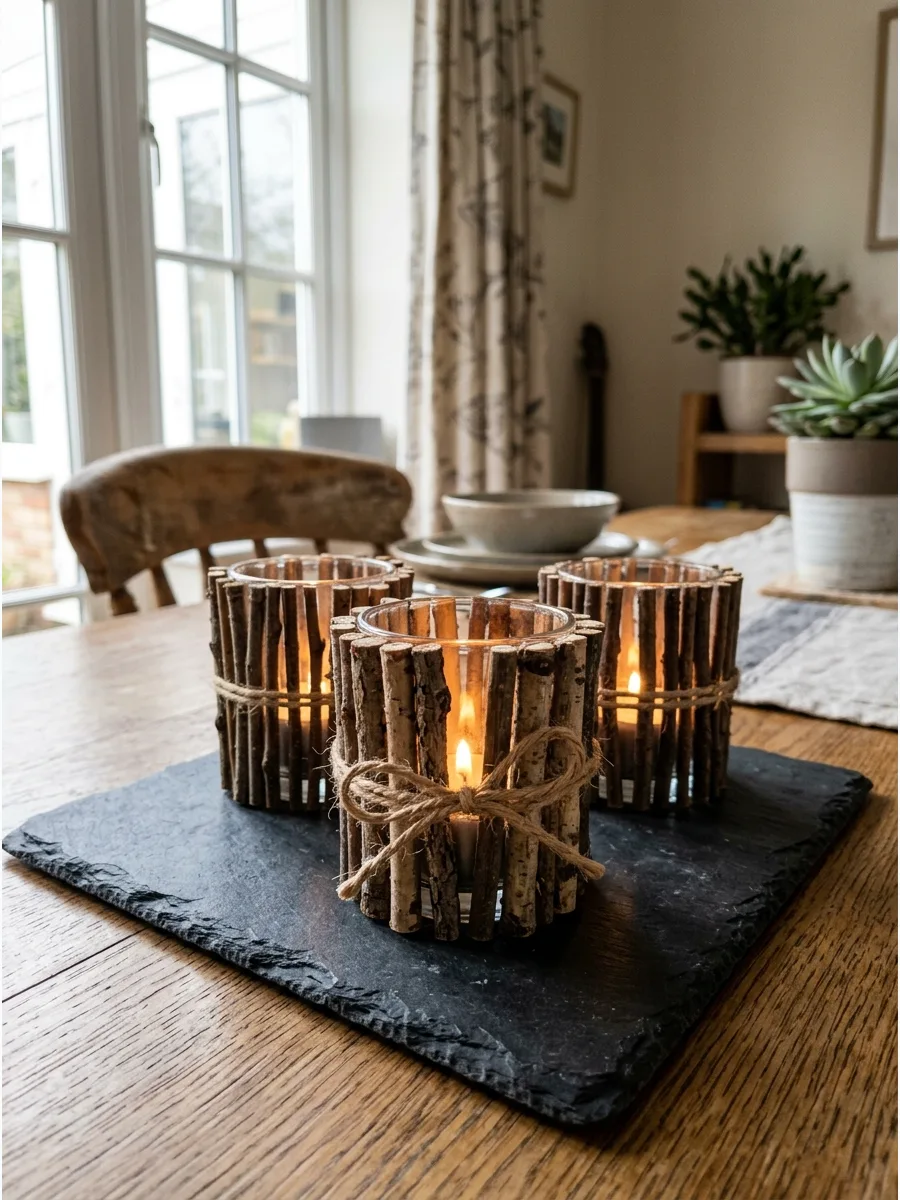
Bringing small elements of the woods to the table creates a cozy, rustic atmosphere. This works because the natural gaps between the twigs allow candlelight to flicker through.
Glue small, uniform twigs vertically around the outside of a glass votive holder and secure them with a piece of twine. These handmade holders look best when grouped in odd numbers like three or five.
- Gather small fallen branches from the yard for a free and authentic material source.
- Trim all twigs to the same height using garden shears for a clean, professional finish.
- Use white birch twigs for a brighter, more wintry transition as the season changes.
Quick win: Use a hot glue gun to attach the twigs quickly so they stay perfectly vertical while the twine is tied.
23. Feather and Wheat Jar
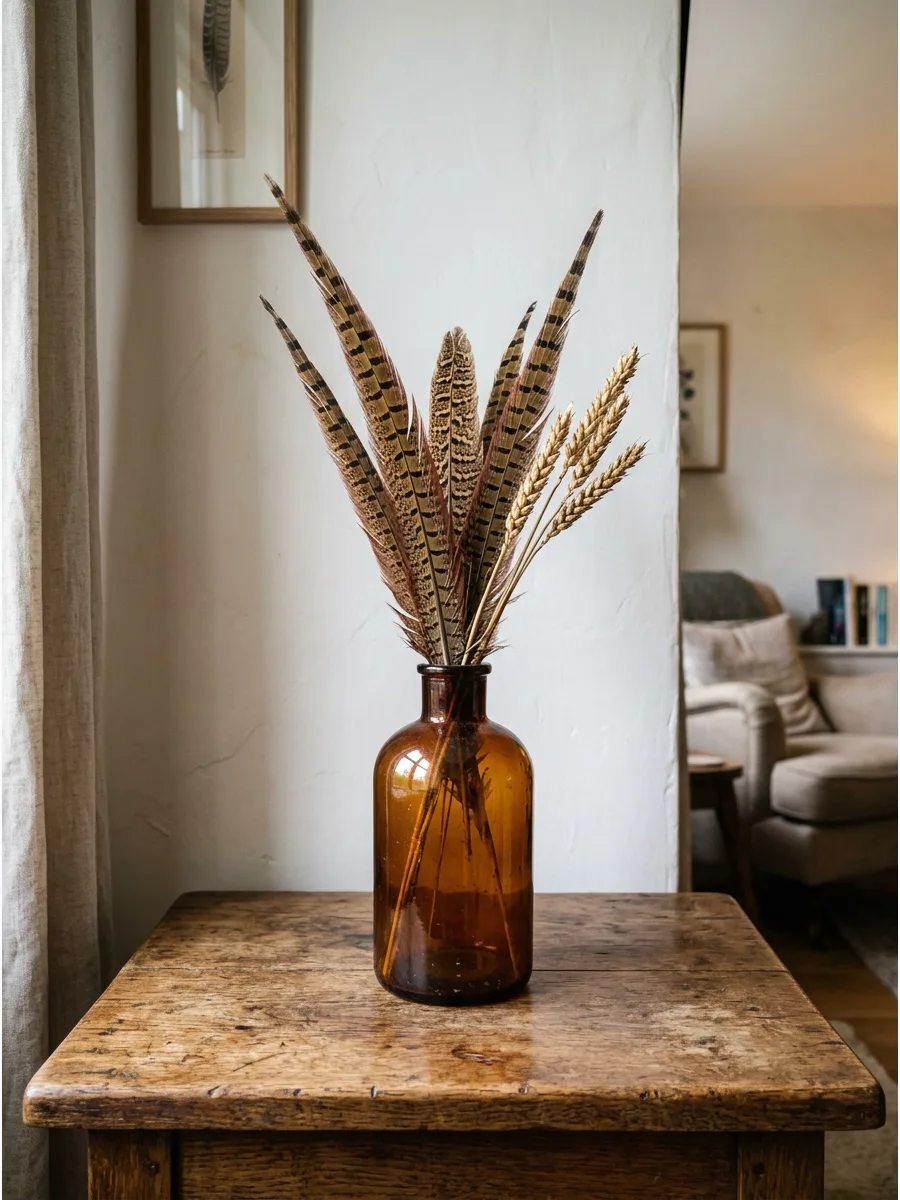
Feathers add an unexpected texture that feels elegant and wild at the same time. This works because the tall, vertical lines of the feathers add height without creating a bulky barrier.
Place three long pheasant feathers into an amber glass bottle along with a few sprigs of dried wheat. Amber glass complements the brown and gold tones of the feathers perfectly.
- Sourcing feathers online is the easiest way to find clean, uniform pheasant tails.
- Position this tall arrangement at the end of a buffet line where it won't block conversation.
- Swap the amber bottle for a clear one filled with sand to keep the tall feathers from tipping.
Most people skip this: Lightly spray the feathers with hairspray to keep the fibers from fraying or catching dust over time.
24. White Bean Candle Tray
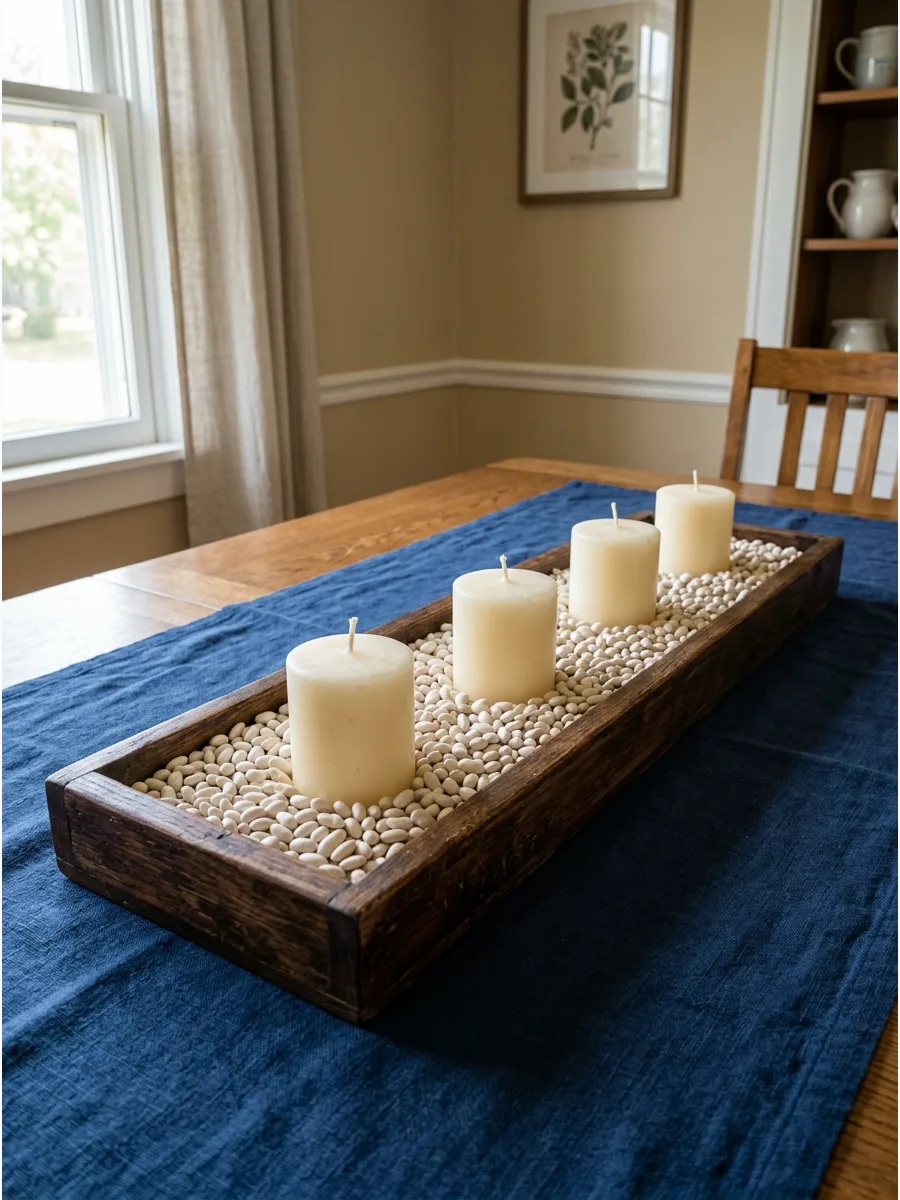
A tray filled with white beans creates a clean, minimalist base that feels upscale. This works because the white-on-white look is sophisticated and allows the candle flame to be the star.
Fill a long wooden tray with dried white navy beans and space out four short cream-colored pillar candles. The wood tray adds just enough warmth to keep the white beans from looking too cold.
- Use two large bags of navy or cannellini beans for a full, lush appearance in the tray.
- Place the tray on a dark tablecloth to create a high-contrast, dramatic look.
- Mix in a few silver or gold painted beans for a touch of holiday sparkle.
Best shortcut: Use a rectangular baking dish if a wooden tray is not available; the beans will hide the bottom of the dish completely.
25. Sage and Pear Platter
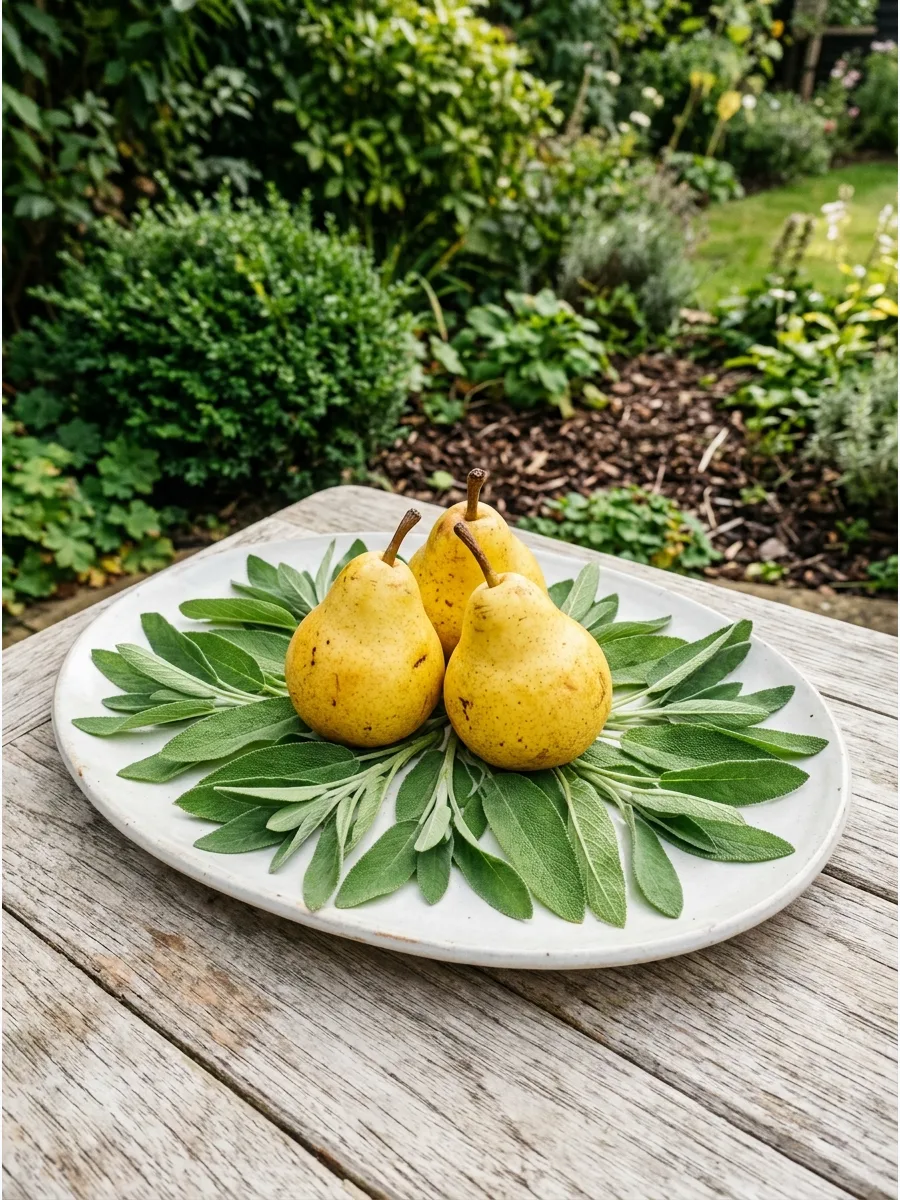
Combining fresh herbs with fruit creates an organic centerpiece that feels straight from the garden. This works because the muted green of the sage perfectly complements the soft yellow of ripe pears.
Arrange a bed of fresh sage leaves on a white ceramic platter and nestle three yellow pears in the center. This is a perfect last-minute idea that uses grocery store staples.
- Buy fresh sage in the produce aisle for a centerpiece that costs less than five dollars.
- Mist the sage leaves with water occasionally to keep them looking crisp during a dinner party.
- Replace the pears with green apples if yellow pears are out of stock at the store.
Quick win: Use 'Bosc' pears for their unique long necks and bronze skin to add a more antique feel to the table.
26. Floating Cranberry Glass Vases
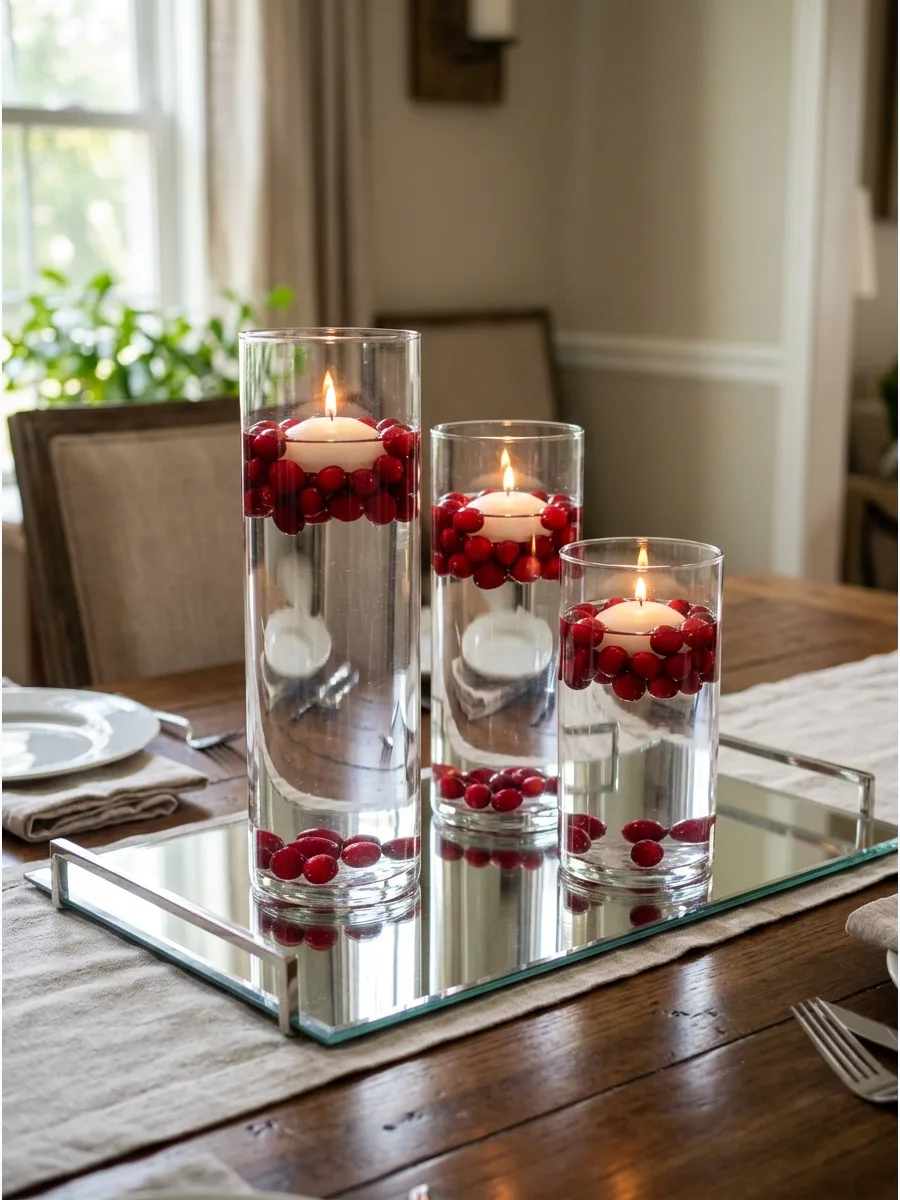
Water-based centerpieces add movement and a sense of lightness to a heavy fall table. This works because the bright red cranberries float naturally, creating a colorful layer at the top.
Fill three cylindrical vases of different heights with water and a handful of fresh cranberries, then top with floating tea lights. The reflection of the flame in the water makes the red berries glow.
- Pick up a bag of fresh cranberries in the refrigerated section of the grocery store.
- Set the vases on a mirrored tray to double the light and color reflected from the berries.
- Add a drop of bleach to the water to keep it clear if the centerpiece needs to last several days.
Most people skip this: Use distilled water to prevent bubbles from forming on the inside of the glass or on the berries.
27. Book Page Paper Pumpkins
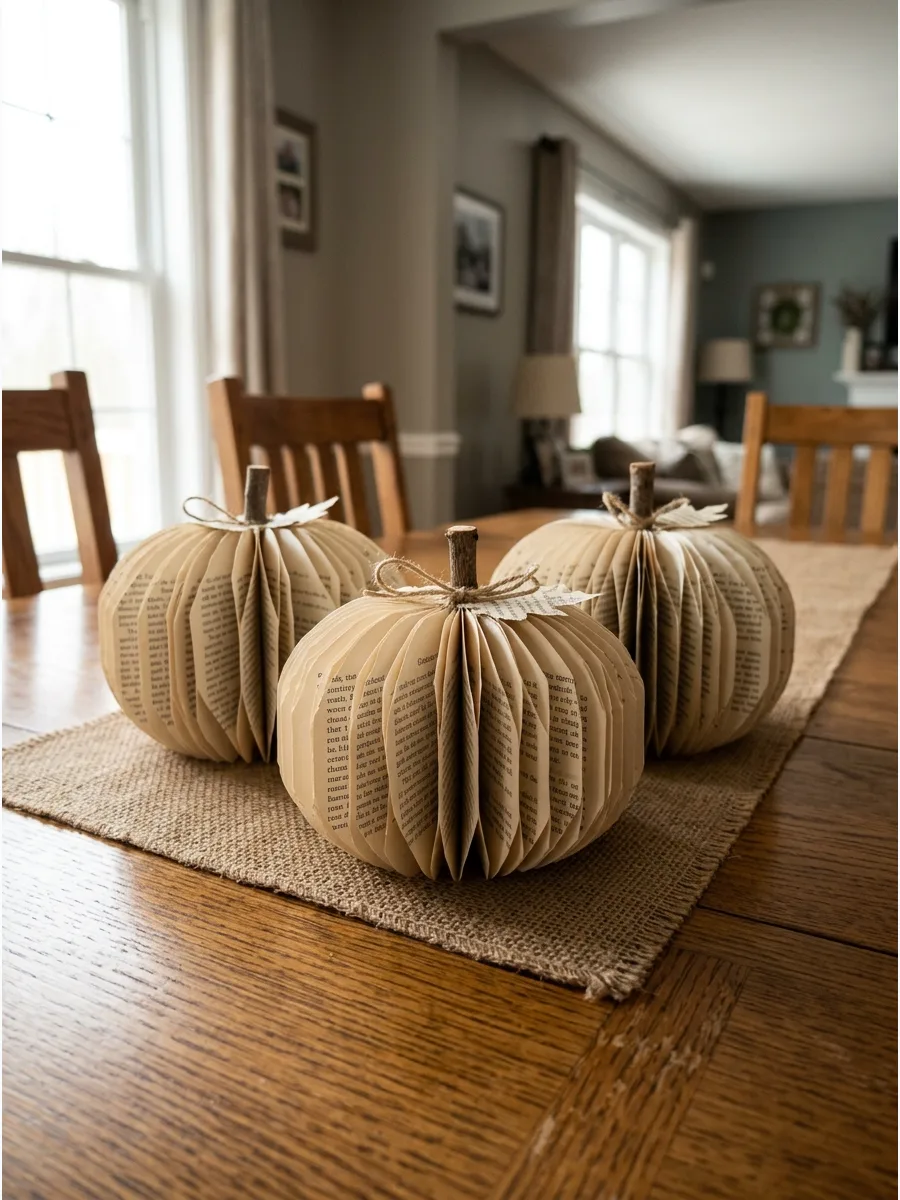
Upcycling old books into pumpkin shapes creates a whimsical and literary centerpiece. This works because the cream-colored paper and black text provide a neutral, textured look.
Cut identical pumpkin shapes from old book pages, fold them in half, and glue them back-to-back to create a 3D sphere. These paper decorations are lightweight and won't scratch delicate table surfaces.
- Use a thrift store book or an old catalog to keep the project costs near zero.
- Add a small stick from the yard as a stem to give the paper pumpkins a realistic touch.
- Group several sizes together on a tray for a more impactful and cohesive display.
Best shortcut: Use a hot glue gun for assembly to avoid the paper warping that can happen with liquid school glue.
28. Birch Log Tealight Trio
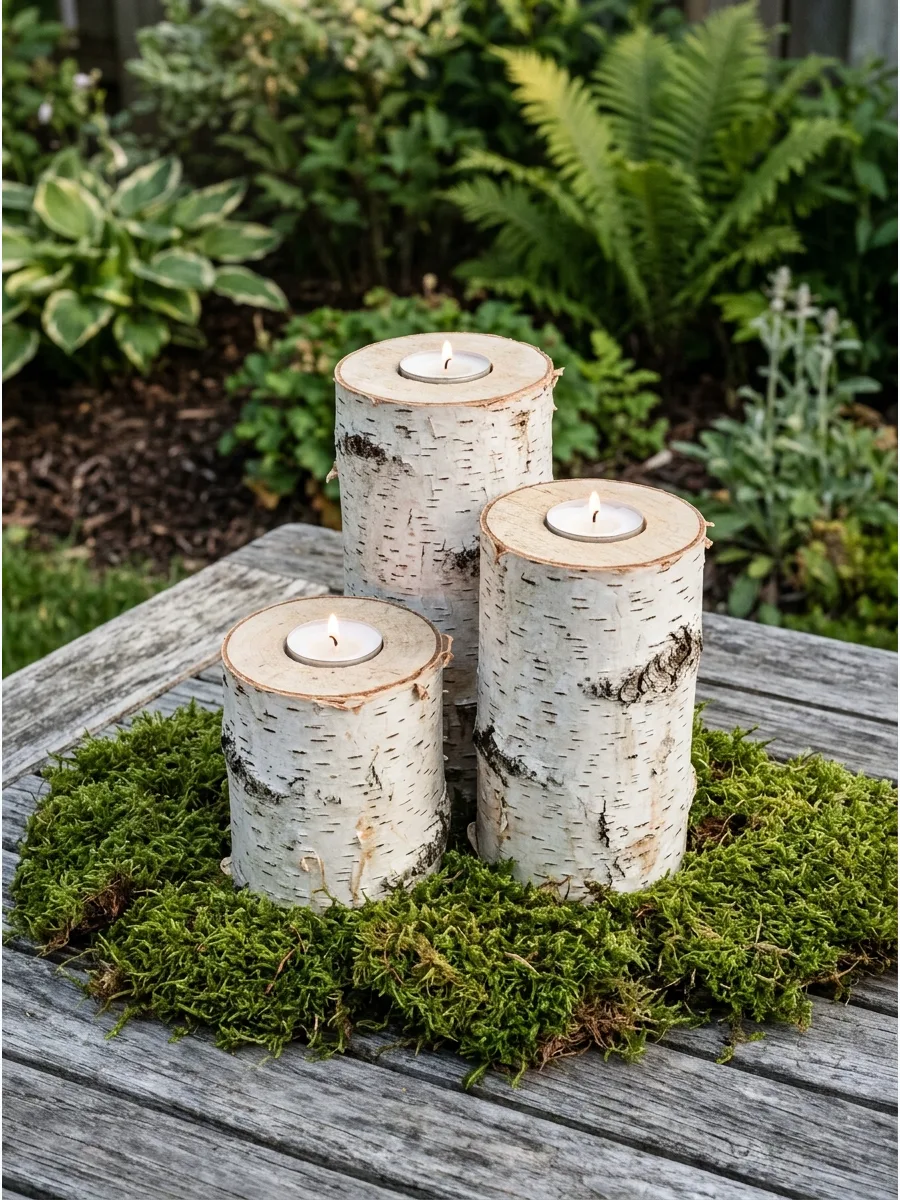
Raw wood logs bring a powerful outdoor element directly to the dining experience. This works because the white bark of birch wood feels clean and bright against dark autumn colors.
Use three birch log sections of different heights and drill a shallow hole in the top of each for a tea light. Natural wood logs provide a sturdy base that won't tip over during a busy meal.
- Purchase pre-cut birch logs from a craft store if you do not have access to a saw.
- Place the logs on a moss runner to protect your table from any loose bark or debris.
- Use battery-operated tea lights to avoid getting melted wax on the natural wood surface.
Most people skip this: Sand the bottom of the logs so they sit perfectly flat and don't wobble when the table is bumped.
29. Moss and Stone Bowl
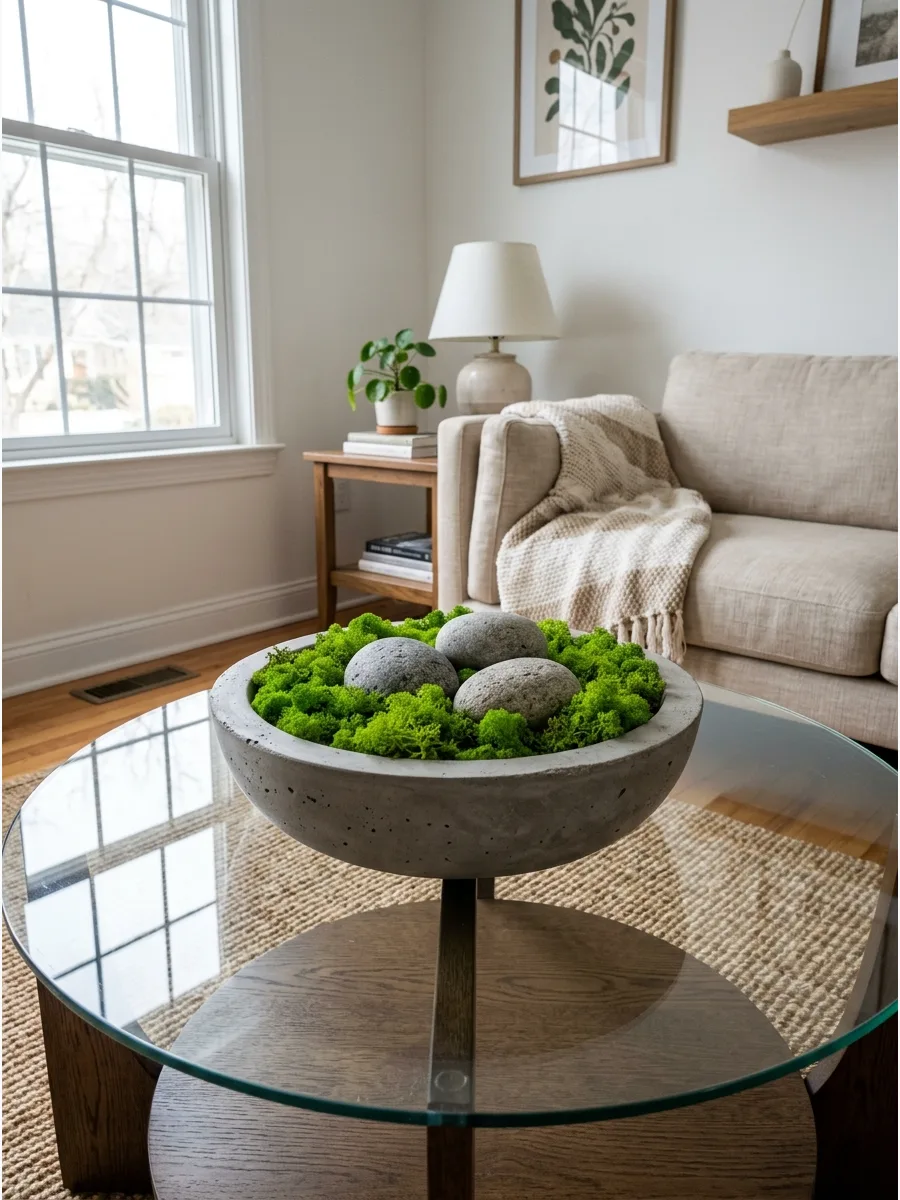
A moss and stone arrangement offers a calm, Zen-like alternative to traditional harvest decor. This works because the vibrant green of the moss stays bright all season long.
Fill a shallow concrete or stone bowl with preserved reindeer moss and place three smooth gray river stones on top. This low-profile design is perfect for coffee tables or casual kitchen islands.
- Use preserved moss rather than live moss to avoid the need for watering or sunlight.
- Choose a heavy bowl to ground the centerpiece and provide a sense of permanence.
- Select stones with interesting shapes or colors, like white quartz or dark slate, to add contrast.
Quick win: Tuck in a few small pinecones among the stones to subtly transition the look into the late fall season.
30. Terracotta Pot Pumpkin Stack
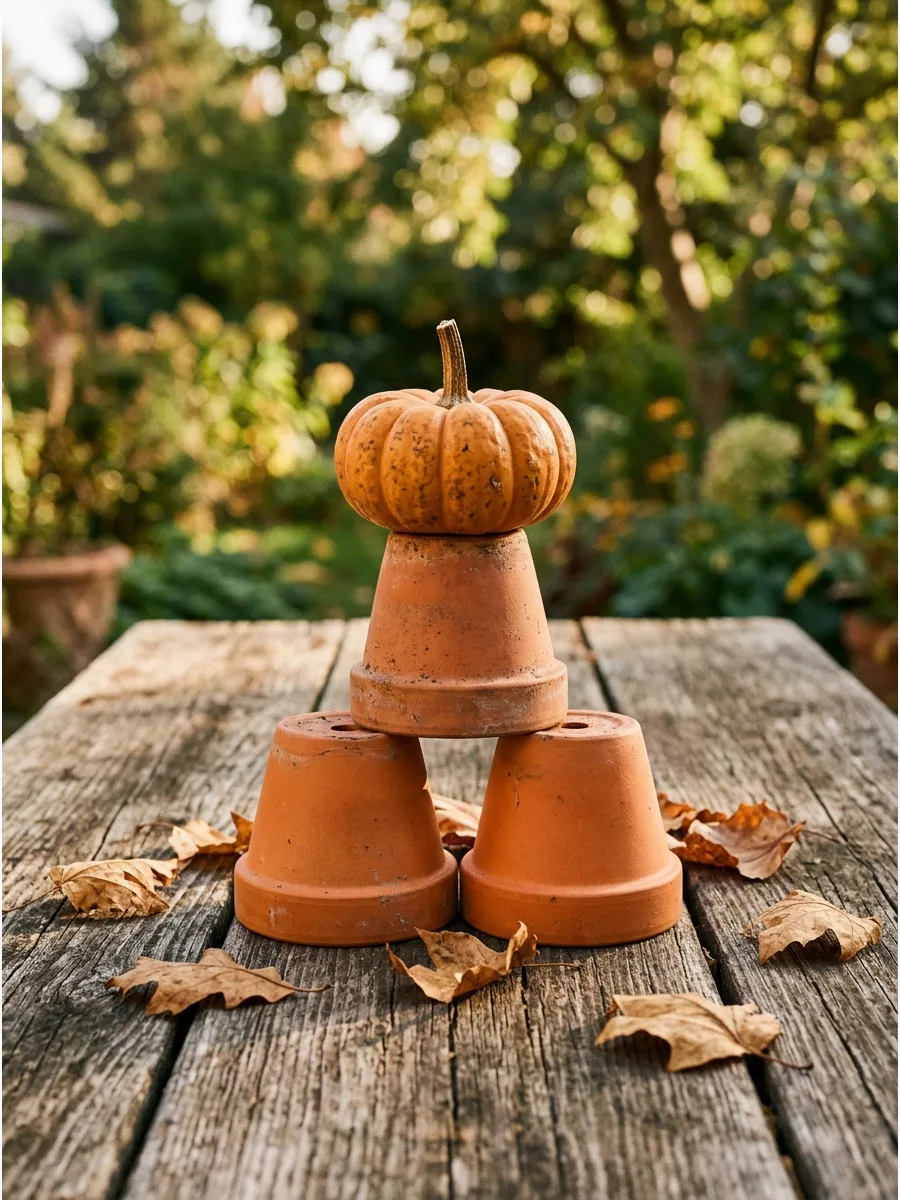
Stacking terracotta pots is a clever way to add height and a classic garden feel to the table. This works because the burnt orange color of the clay is a quintessential fall tone.
Stack three small terracotta pots upside down from largest to smallest and top the stack with a mini faux pumpkin. This vertical arrangement takes up very little horizontal space, leaving more room for food.
- Buy basic terracotta pots from a hardware store for a very budget-friendly project.
- Paint a simple house number or a 'Welcome' message on the pots using a white paint pen.
- Use a bit of museum putty between the pots to keep them stable and secure in the stack.
Best shortcut: If the pots look too new, rub them with a little white flour or lime to give them an aged, weathered look.
31. Rosemary and Persimmon Garland
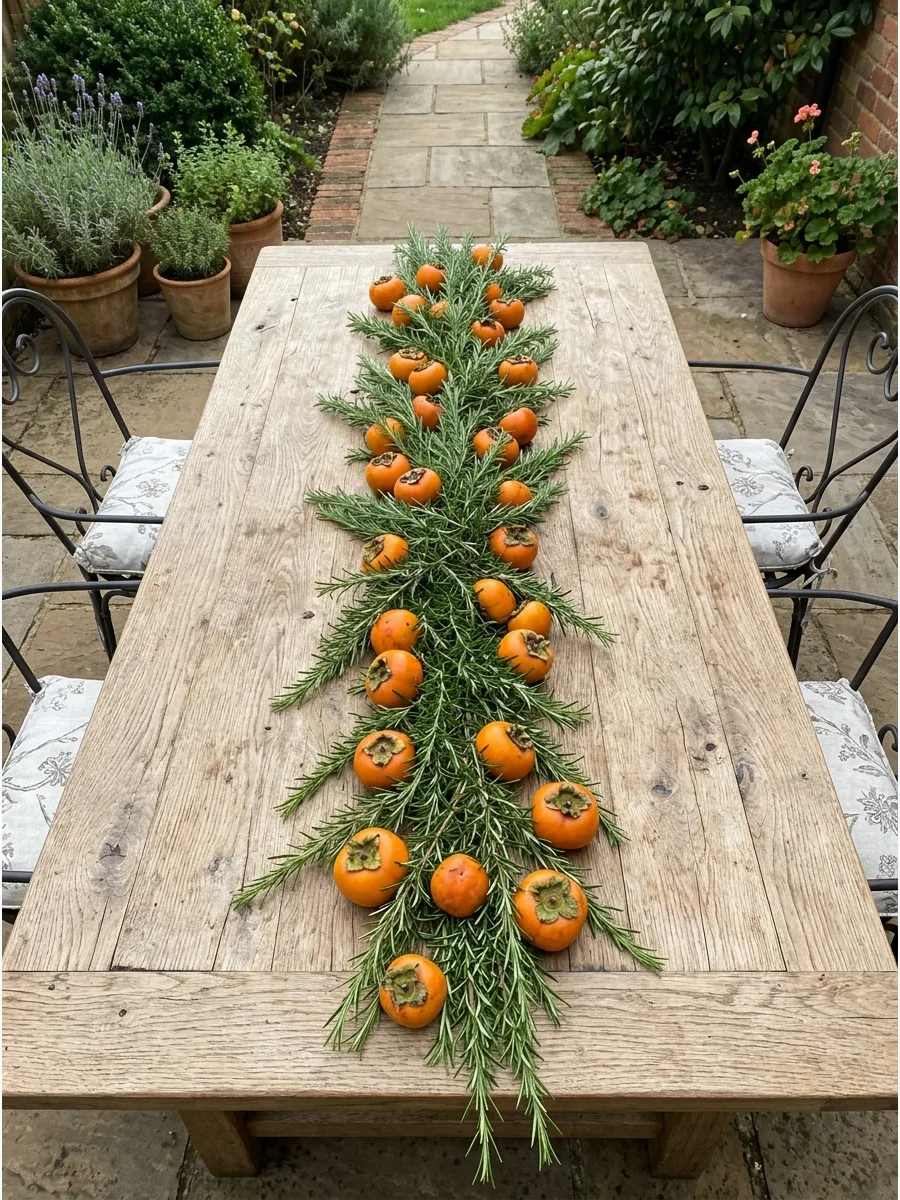
Lay fresh rosemary sprigs end-to-end down the center of the table to create a fragrant, green base. Tuck in bright orange persimmons every six inches to provide a bold pop of color against the dark herbs. Greenery looks best when it feels lush, so double up the sprigs to avoid a thin, spindly appearance.
This setup smells amazing and stays fresh for several hours without water.
- Buy fresh rosemary in bulk from a grocery store or garden center for under fifteen dollars.
- Overlap the woody ends of the rosemary under the leafy tips of the next piece to hide the stems.
- Swap persimmons for small pomegranates or oranges if you want a different shade of red or gold.
Quick win: Spritz the rosemary with a fine mist of water an hour before guests arrive to keep the leaves looking vibrant.
32. Hand-Drawn Kraft Paper Runner
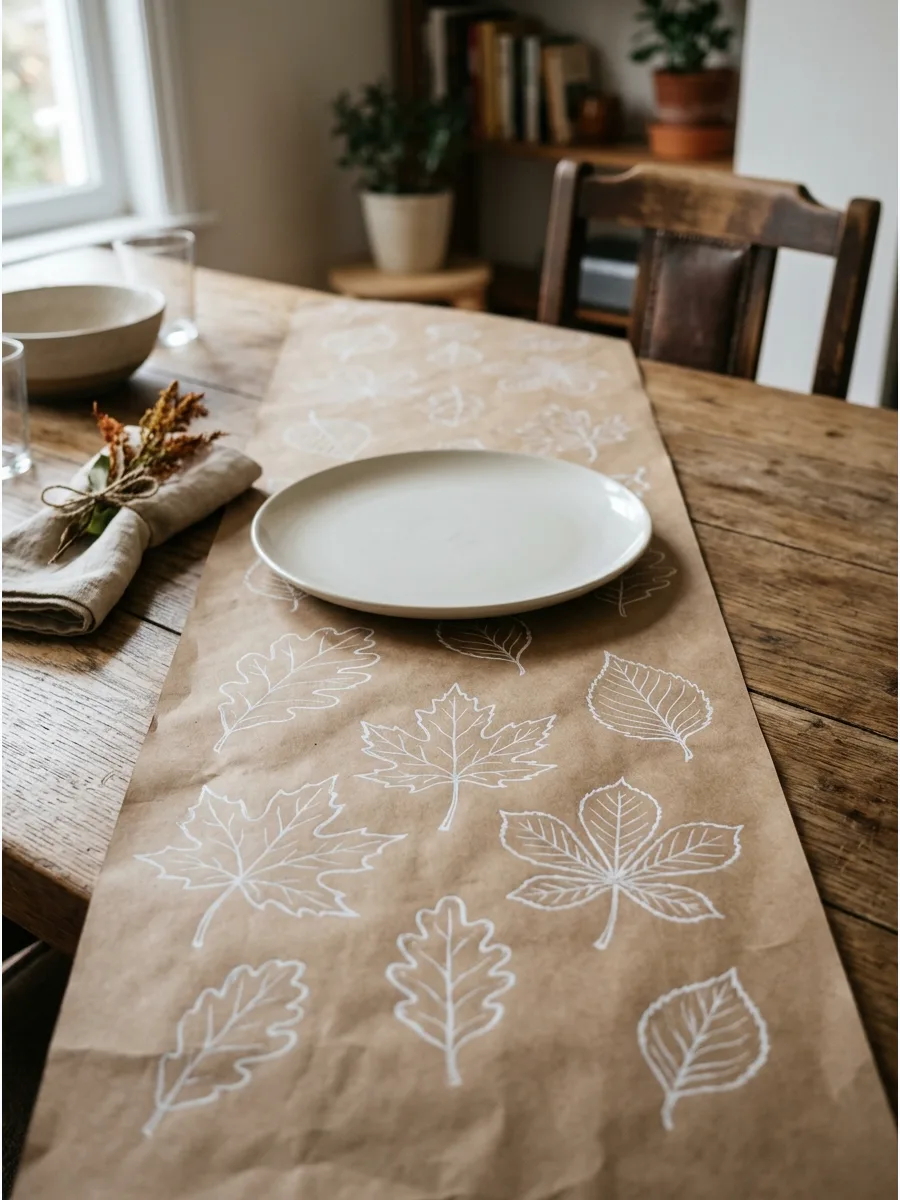
Roll out a strip of brown kraft paper and use a white paint pen to draw simple leaf outlines or write guests' names. This creates a casual, interactive vibe that encourages conversation and makes cleanup as easy as rolling up the paper. Avoid busy patterns so the actual food and plates remain the focal point.
This is a perfect solution for a kids' table where they can color between courses.
- One roll of kraft paper costs less than ten dollars and covers multiple dinner parties.
- Cut the paper so it hangs exactly six inches over each end of the table for a tailored look.
- Use a metallic gold marker instead of white for a slightly more formal evening event.
Most people skip this: Use double-sided tape on the underside of the paper corners to prevent the runner from sliding during the meal.
33. Tied Indian Corn Cluster
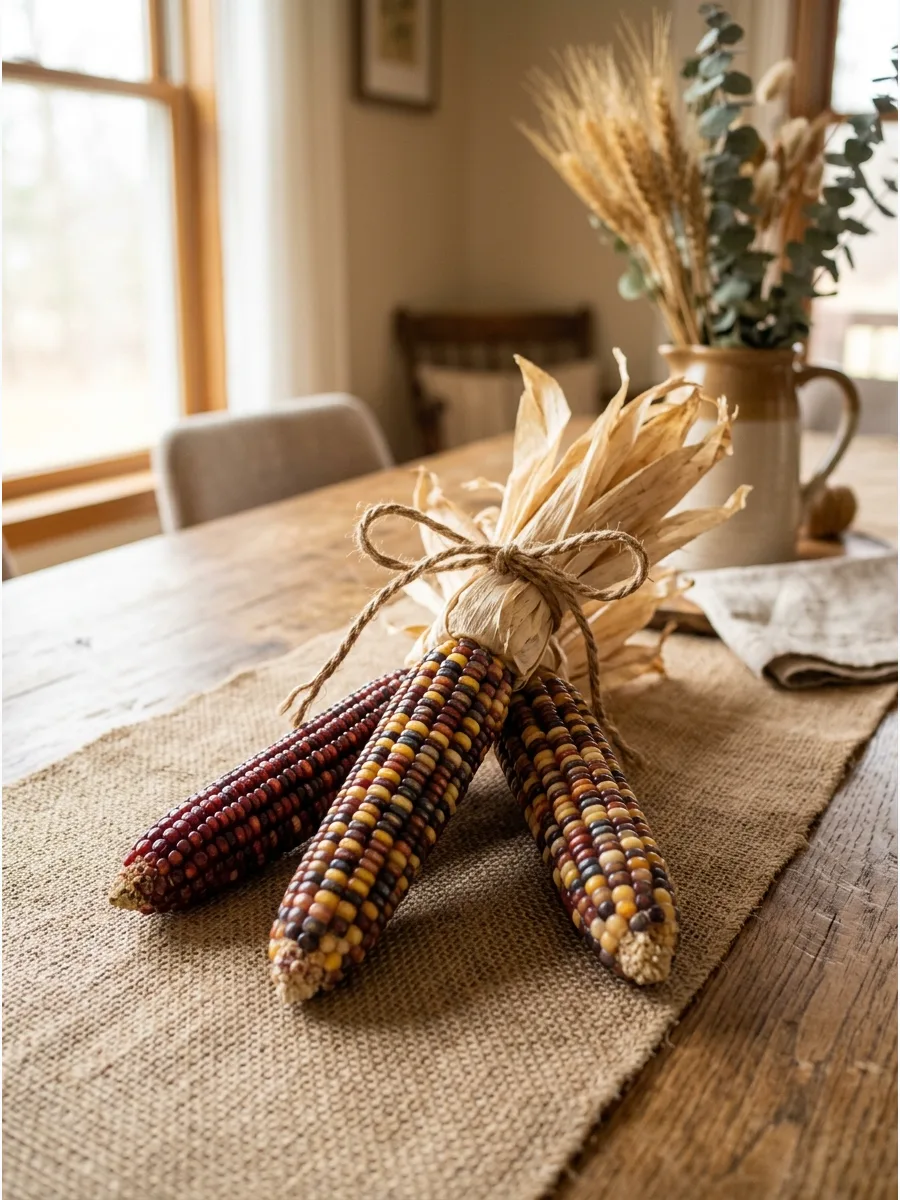
Tie three ears of dried Indian corn together with thick jute twine and lay them flat on a neutral runner. Peel the husks back completely to expose the multi-colored kernels and create a fan-like shape at the top of the cluster. Using an odd number of items creates a more balanced and professional look than even pairings.
These are durable enough to be reused every year if stored in a cool, dry place.
- Sourcing dried corn from a local farm stand is usually cheaper than buying from a craft store.
- Position the clusters in the center of the table or at each end for a symmetrical layout.
- Lightly spray the kernels with a clear gloss sealer to make the colors pop and prevent dust buildup.
Best shortcut: If the husks are too brittle to bend, wrap them in a damp paper towel for ten minutes to make them flexible again.
34. Walnut Filled Wood Box
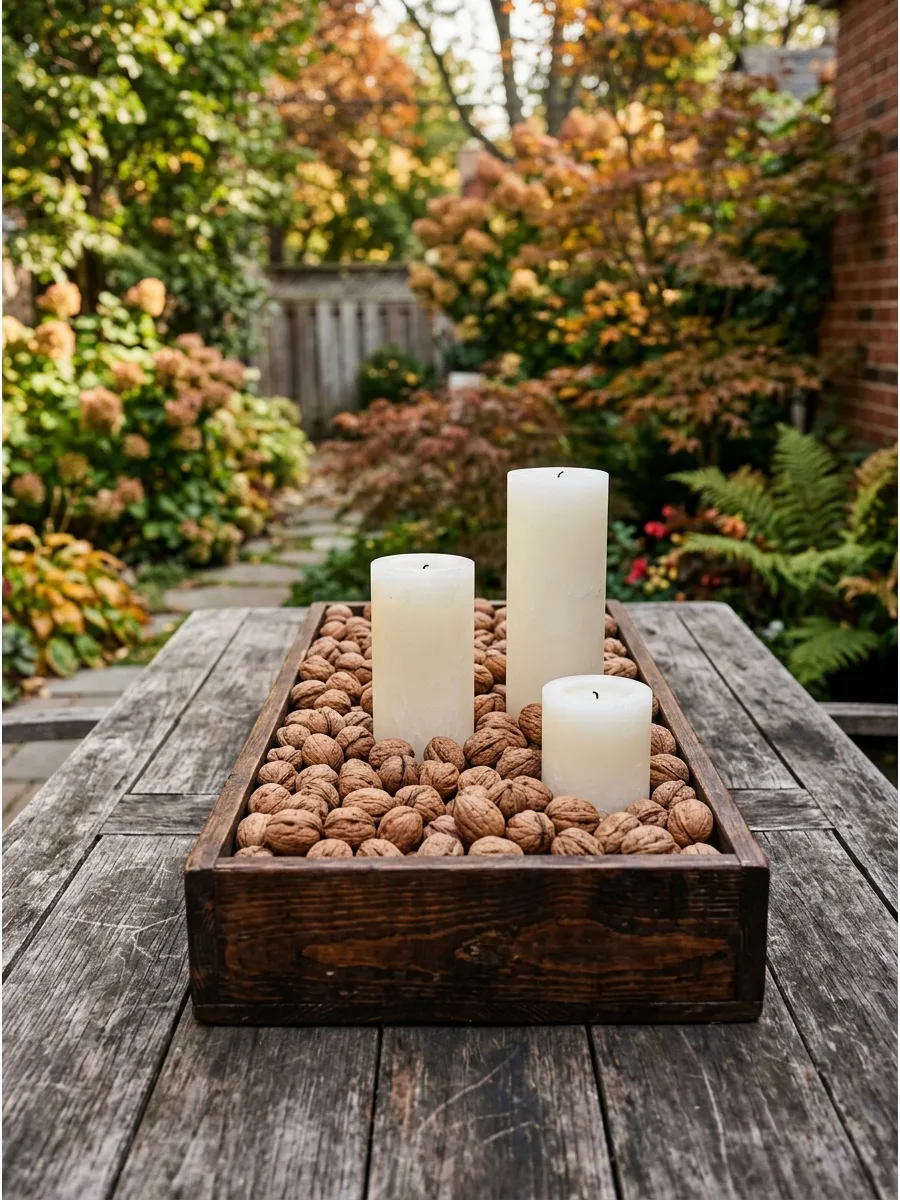
Fill a long, narrow wooden planter box with whole walnuts in their shells and nestle three white pillar candles inside. The earthy brown of the shells provides a rugged contrast to the smooth, clean wax of the candles. Make sure the candles are tall enough to clear the top of the box to prevent the wood from overheating.
This low-profile arrangement allows guests to talk easily without a tall centerpiece blocking their view.
- Buy walnuts in bulk bags during the fall to save money on filler material.
- Place the candles inside glass chimney holders first if you are worried about wax dripping on the nuts.
- Substitute walnuts with hazelnuts or almonds for a different texture and lighter color palette.
Most people skip this: Use a piece of floral foam at the bottom of the box to prop up the candles so you don't need as many walnuts to fill the space.
35. Amber Bottle Bud Vases
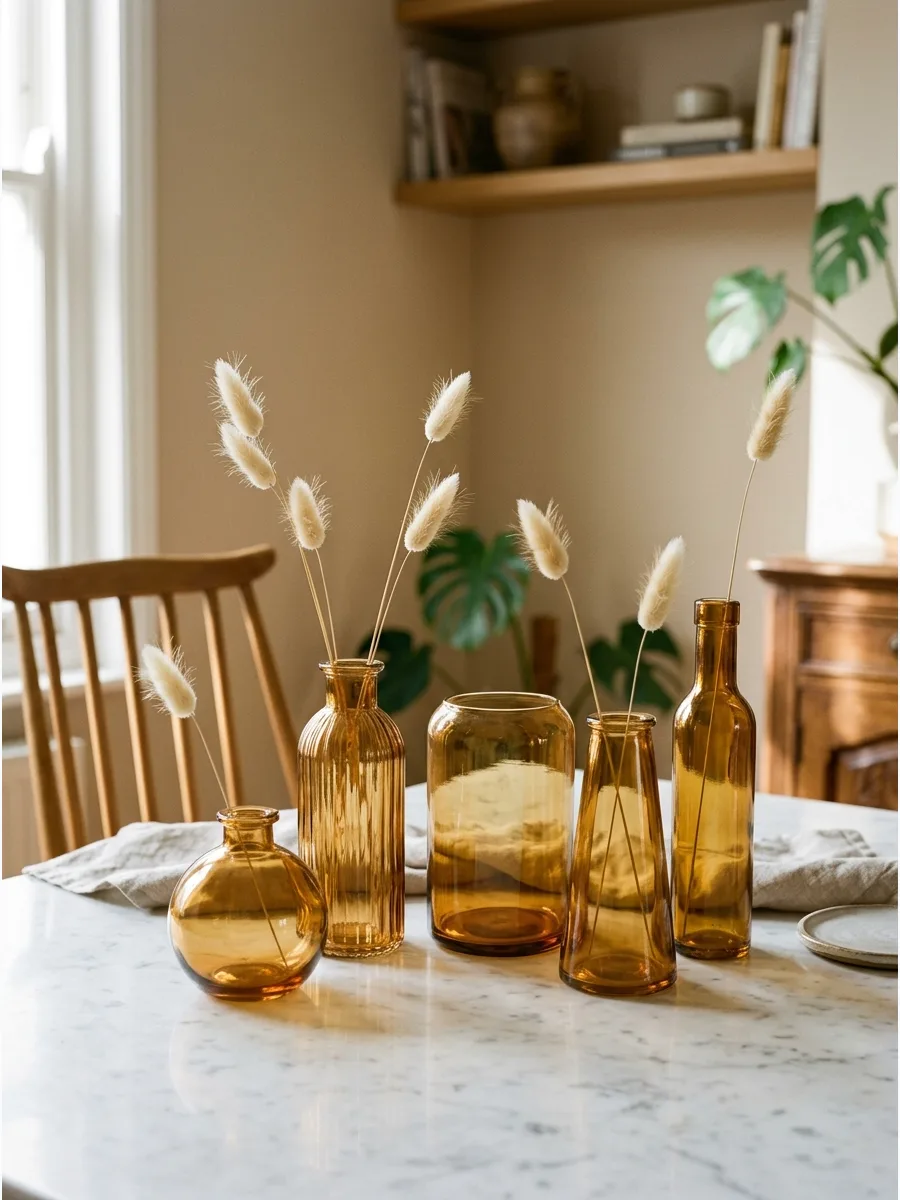
Group five amber glass bottles of varying heights in the center of the table and place a single dried grass stem in each. The dark glass adds instant warmth and mimics the cozy glow of a sunset even before the candles are lit. Keep the stems short and airy so they don't overwhelm the small bottles.
Minimalist arrangements like this work best when you use an odd number of containers at different heights.
- Collect empty glass medicine or vanilla extract bottles to create this look for free.
- Arrange the bottles in a tight cluster for a small table or space them out for a long one.
- Mix in one or two clear bottles to break up the color if the amber feels too heavy.
Quick win: Use dried botanicals like wheat or pampas grass so you don't have to worry about water rings on your table.
36. Braided Raffia Napkin Rings

Braid three strands of natural raffia together and tie them into simple loops to hold linen napkins. This adds a tactile, organic touch that pairs beautifully with plain white ceramic plates and wooden chargers. Natural fibers are a great way to soften a table that has a lot of hard glass or metal surfaces.
These rings take only minutes to make and cost almost nothing per guest.
- One bundle of raffia can make dozens of rings for a very low budget.
- Leave the ends of the raffia slightly long and frayed for a more rustic, unfinished look.
- Thread a small dried flower or a sprig of thyme into the braid for extra detail.
Best shortcut: Braid one long three-foot strand first, then cut it into smaller sections and tie the ends to save time.
37. Gilded Walnut Place Cards
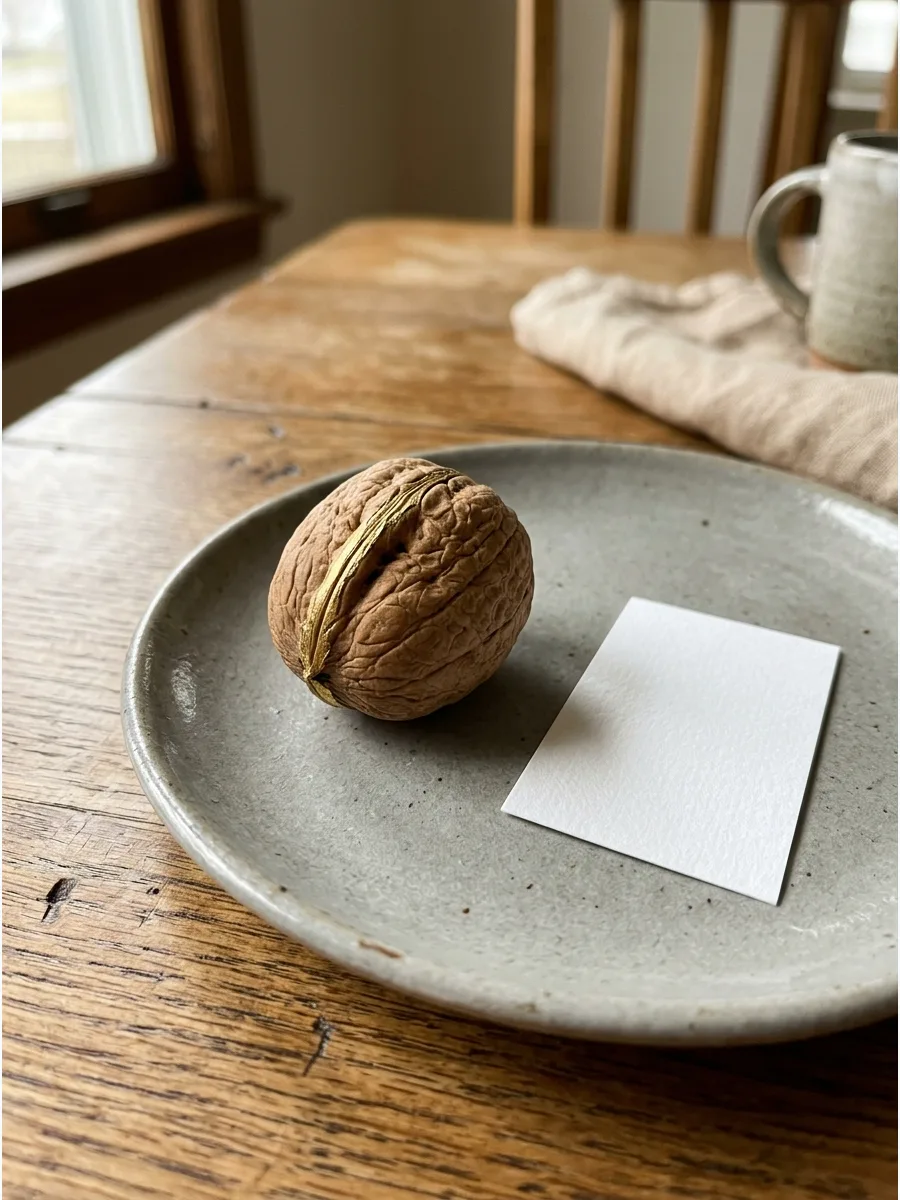
Paint the edges of whole walnuts with gold acrylic paint and prop a small cardstock name tag against them. This tiny detail adds a touch of sophistication to each setting without requiring expensive materials or professional skills. High-shine metallics look best when used sparingly as accents rather than covering the whole object.
It is a practical way to guide guests to their seats while adding to the overall decor.
- Use a small sponge brush to dab the paint on the ridges of the walnut shell for a textured look.
- Write names in simple black ink to keep the focus on the gold accent.
- If the walnuts won't stay upright, sand a tiny flat spot on the bottom of the shell.
Quick win: Use a gold paint pen instead of a brush for better control and a faster drying time.
38. Dried Lotus Pod Bowl
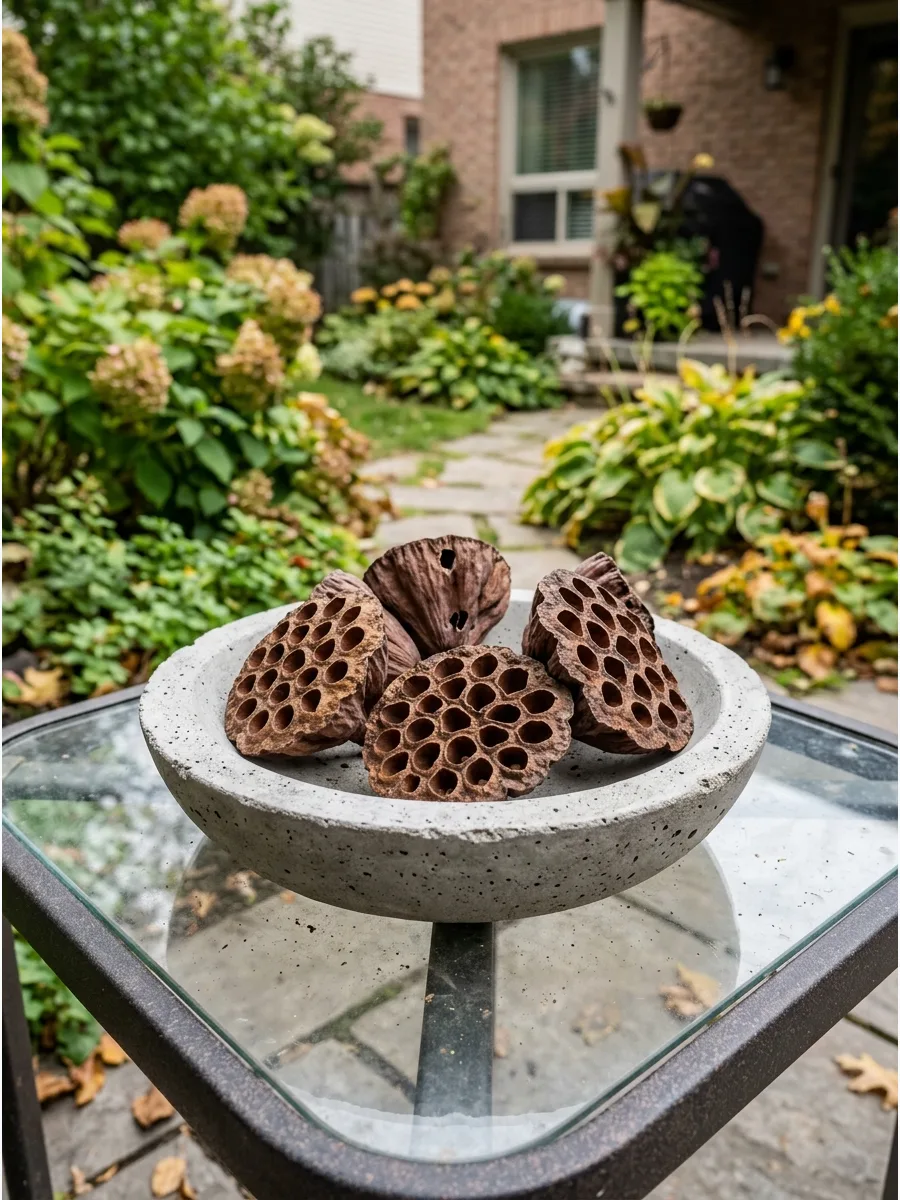
Arrange several dried lotus pods in a shallow concrete bowl for an architectural and unexpected autumn display. The dark brown, hole-filled textures offer a sophisticated alternative to traditional pumpkins and gourds. Concrete containers provide a heavy, grounded feel that balances the light, airy look of dried botanicals.
This centerpiece is completely dry, meaning it can sit on your table all season long without maintenance.
- Lotus pods can be found at most craft stores or ordered online in bulk packs.
- Mix in a few smooth river stones to fill the gaps between the pods for a fuller look.
- Choose a bowl with a wide rim to give the pods plenty of space to be seen clearly.
Most people skip this: Turn some pods upside down or on their sides to show off the different textures of the stems and faces.
39. Lentil Layered Glass Jars
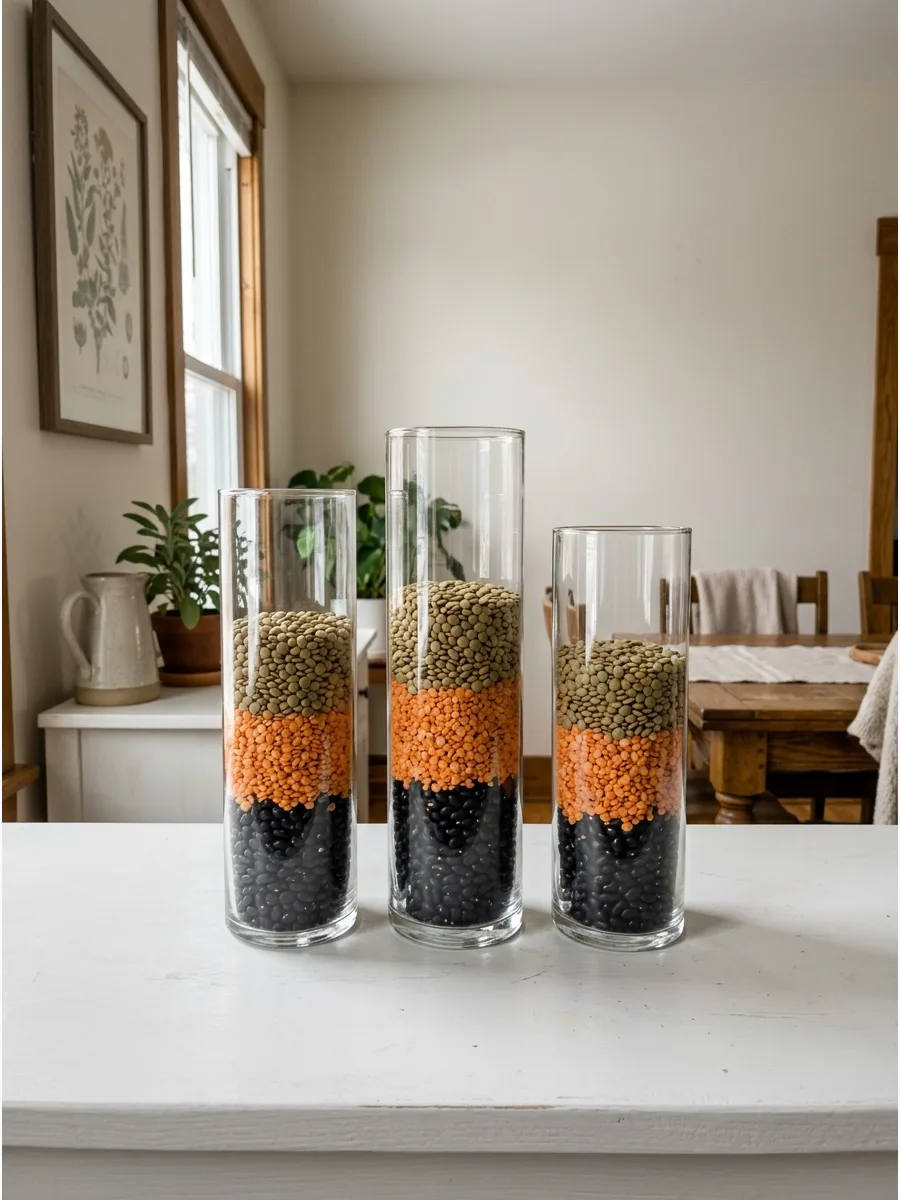
Pour layers of green lentils, orange split peas, and black beans into clear glass cylinders to create earthy, colorful stripes. Top the jars with a simple white tea light to create a warm, flickering glow that highlights the different textures of the legumes. Clean, distinct layers look much more intentional than a random mix of colors.
This is a very budget-friendly way to add height and color to a long table.
- Use a funnel or a rolled-up piece of paper to pour the layers neatly without mixing them.
- Standard grocery store bags of dried beans are usually enough to fill three medium jars.
- Keep the layers at least one inch thick so the pattern is visible from across the room.
Best shortcut: Tap the side of the glass gently after each layer to level the beans before adding the next color.
40. Twine Wrapped Wine Bottles
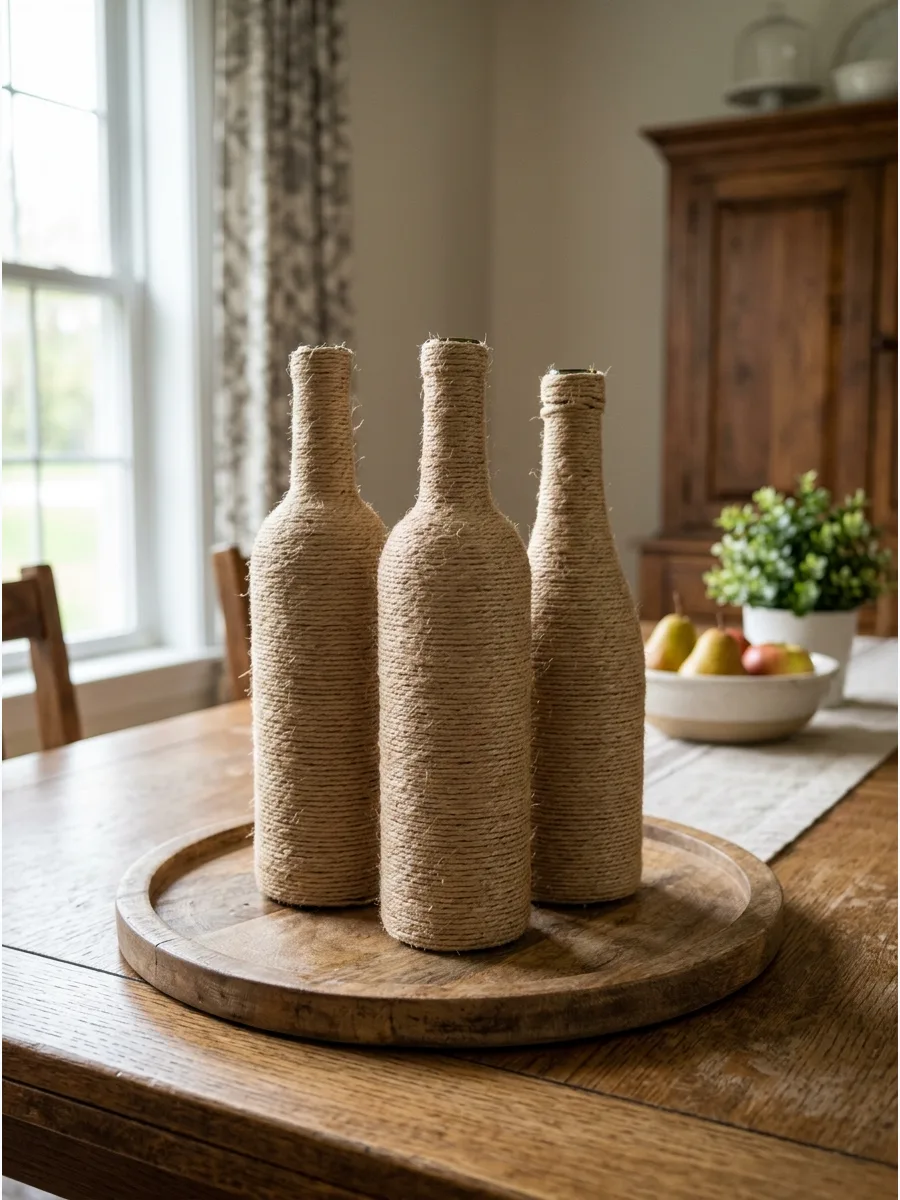
Apply hot glue to the base of an empty wine bottle and wrap natural twine tightly around it until the glass is completely covered. These look best when grouped in sets of three on a round wooden tray to create a cohesive and textured focal point. Mixing different twine thicknesses adds subtle visual interest without breaking the monochromatic color palette.
This project is an excellent way to upcycle glass waste into high-end looking decor.
- Soak bottles in warm soapy water first to remove labels and sticky residue easily.
- Use a low-temperature glue gun to avoid burning your fingers while pressing the twine into place.
- Finish the neck of the bottle with a small knot or a clean cut for a professional look.
Most people skip this: Wrap the twine as tightly as possible to ensure no glass shows through the gaps.
41. Potted Cabbage and Kale
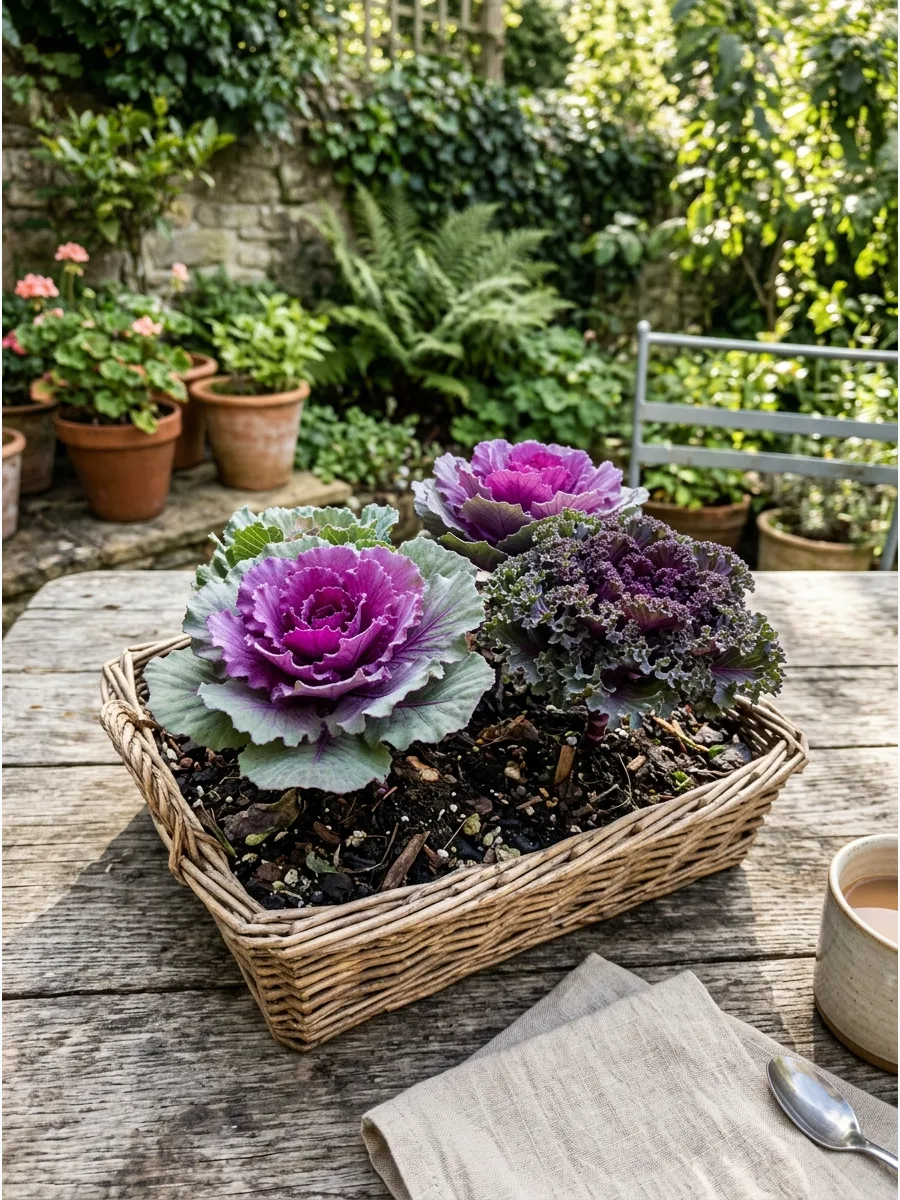
Place small pots of ornamental purple cabbage and flowering kale inside a low wicker basket for a living centerpiece. The ruffled leaves and deep jewel tones provide a refreshing break from the usual orange and yellow fall palette. Keep the plants in their plastic nursery pots and hide the rims with a layer of dried moss for a cleaner look.
These plants love cool temperatures, making them perfect for a drafty dining room or a porch table.
- Select plants that are roughly the same height to keep the basket looking uniform.
- Water the plants sparingly and only at the base to avoid getting moisture on the basket.
- Move the basket to a sunny window between dinner parties to keep the plants healthy.
Quick win: Use a dark-colored wicker basket to make the vibrant purples and greens of the kale stand out.
42. Scrabble Tile Place Settings
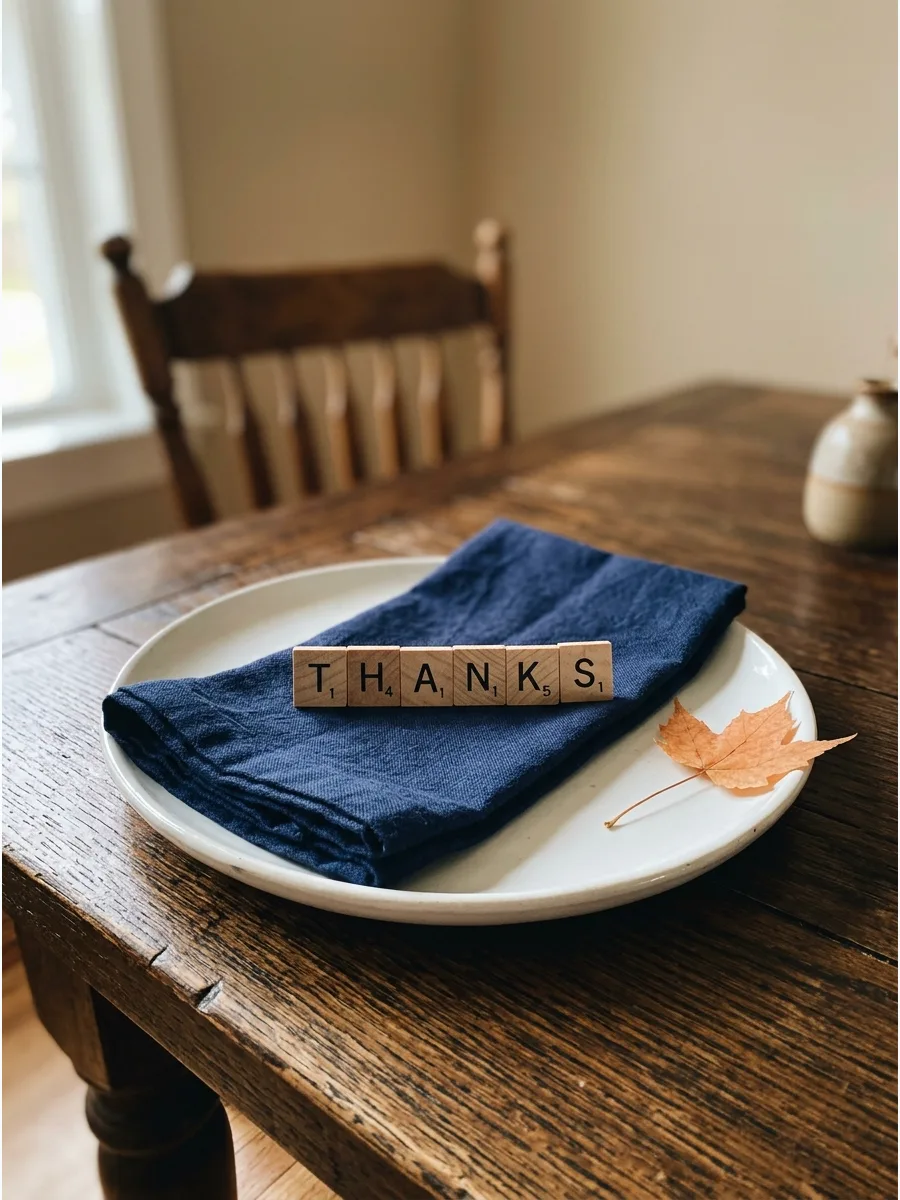
Spell out guests' names or festive fall words like "Grateful" using wooden game tiles and line them up at each setting. This is a fun, interactive element that works especially well for family gatherings and keeps guests engaged at the table. Wooden tiles look most high-end when paired with high-quality linens rather than paper napkins.
It is a whimsical way to personalize the meal without needing calligraphy skills.
- Buy a bag of replacement wooden tiles online if you don't want to raid your board games.
- Place the tiles directly on the napkin or on a small piece of slate for extra contrast.
- Glue the tiles to a small strip of wood if you want guests to be able to take them home as favors.
Best shortcut: Use a small amount of museum putty under the tiles to keep them perfectly aligned on the fabric.
43. Galvanized Bucket Mum Centerpiece
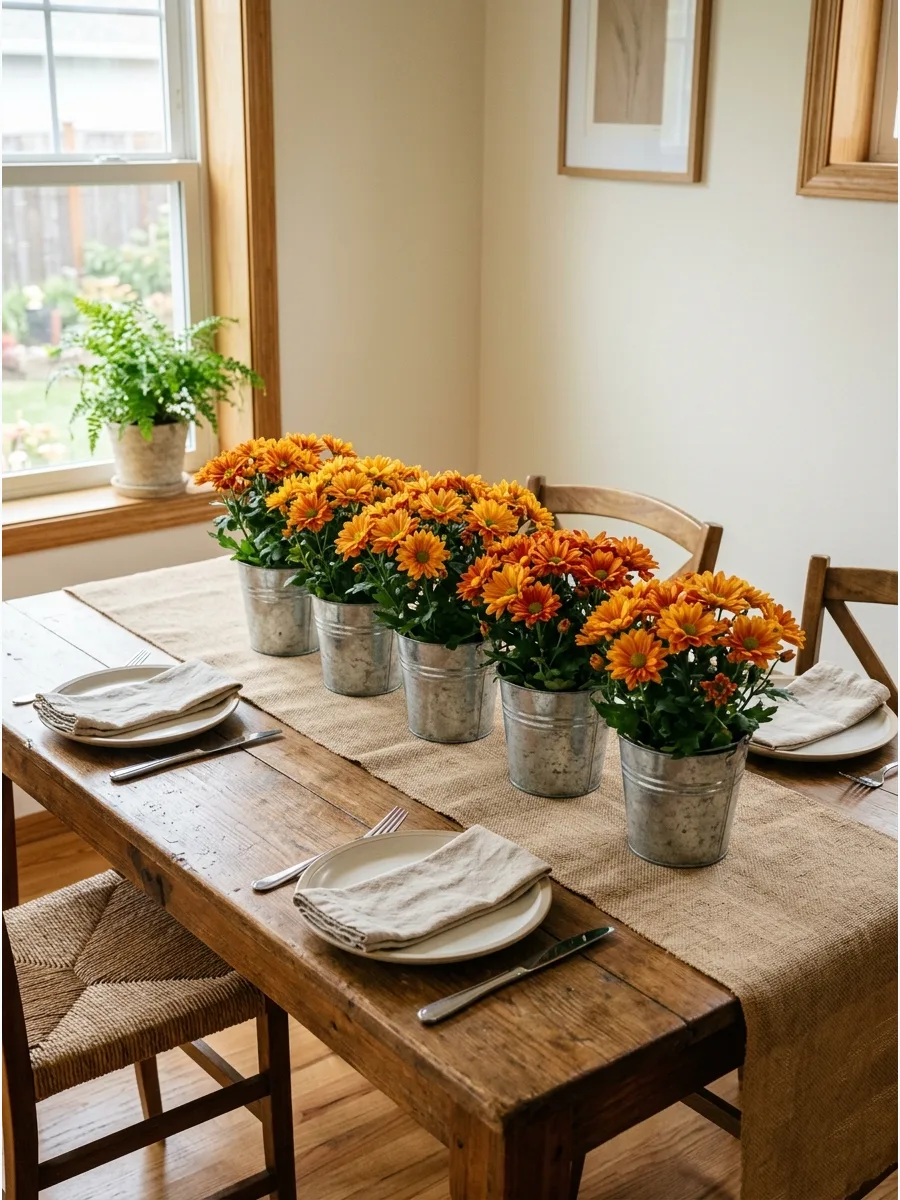
A cluster of small galvanized buckets creates a rustic, modular centerpiece that adapts to any table length. This arrangement works because it maintains a low profile for easy conversation while adding a crisp, metallic texture to the autumn palette.
Line three to five mini pails down a burlap runner and drop in 4-inch potted mums for an instant display. Using odd numbers creates a more natural visual balance than even pairings.
- Purchase 4-inch mums and small metal buckets at a local garden center for a budget-friendly project under $30.
- Keep the mums in their plastic nursery pots to make watering and post-season cleanup easier.
- Swap the burlap for a plaid textile or velvet ribbon to shift the look from farmhouse to traditional.
Most people skip this: Place a small plastic saucer or a piece of heavy-duty foil inside the bottom of each bucket to prevent moisture from seeping through the metal seams onto the tabletop.
44. Pine Needle Nest Centerpiece
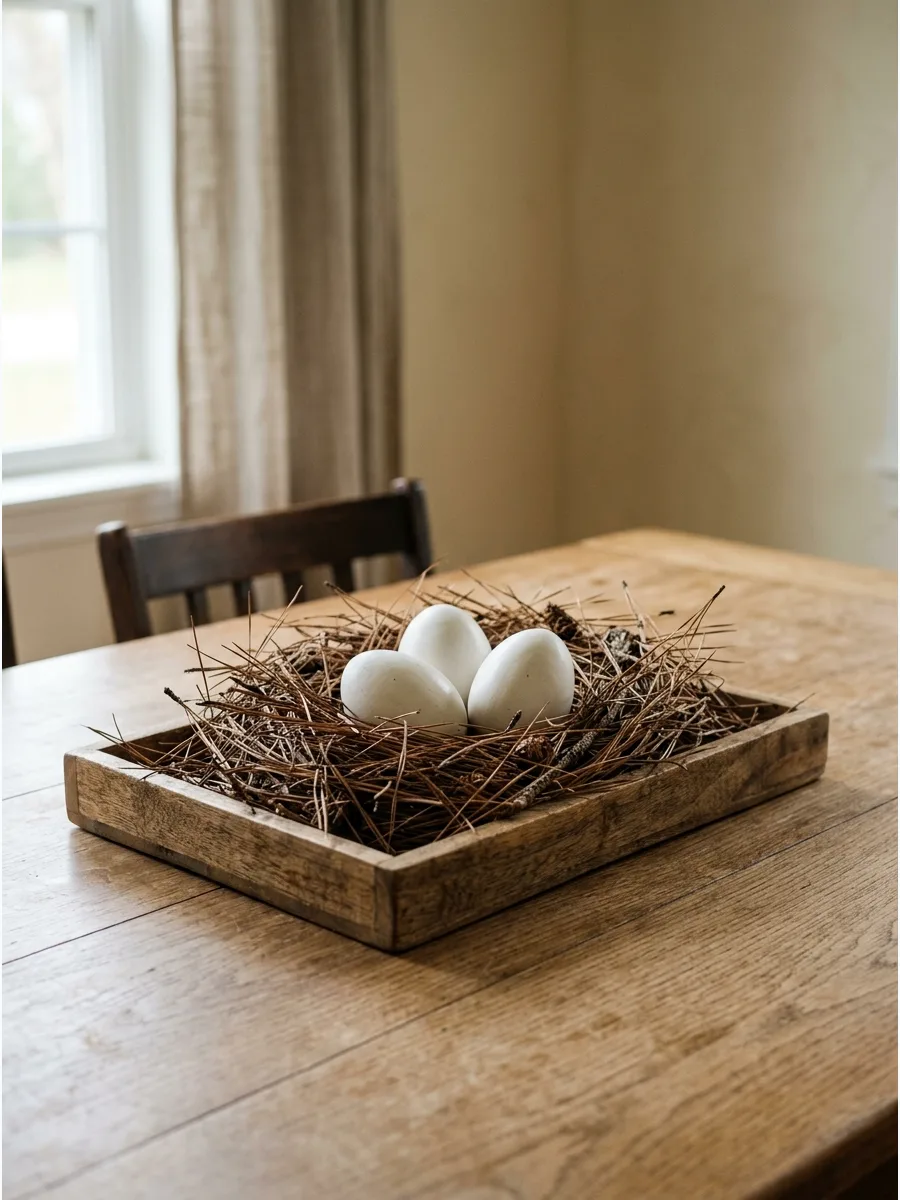
Shape dried pine needles into a loose nest shape inside a shallow wooden tray and place three white ceramic eggs in the center. This foraged look brings a bit of the forest floor to the dining room in a controlled, elegant way. The contrast between the rough, brown needles and the smooth, bright ceramics is what makes this simple idea work.
It is a quiet, neutral option for those who prefer a more organic and less colorful autumn style.
- Gather pine needles from your yard for free, or buy cleaned bundles from a craft supplier.
- Ensure the needles are dry and free of sap before placing them in the tray to protect your surfaces.
- Swap the eggs for small white pumpkins if you want a more traditional fall theme.
Most people skip this: Lightly toast the pine needles in the oven at a very low temperature for five minutes to release a subtle, natural scent.
45. Felt Leaf Table Scatter
Cut simple leaf shapes out of wool felt in shades of mustard, burgundy, and olive and scatter them around the base of your centerpiece. Felt has a matte, soft finish that looks much more expensive and modern than plastic or silk foliage. Using a variety of sizes and colors makes the scatter look more natural and less like a store-bought kit.
These are reusable year after year and won't wilt or make a mess like real leaves.
- Use a real leaf as a stencil to get accurate shapes and vein patterns.
- Wool blend felt stays flat and resists fraying better than cheap synthetic craft felt.
- Scatter the leaves in a loose, irregular pattern to mimic how they fall in nature.
Quick win: Use pinking shears on the edges of some leaves to give them a jagged, realistic texture.
46. Handcrafted Corn Husk Blooms

Soaking dried husks in warm water makes them pliable enough to fold into realistic flower petals. Secure the base of each bloom with floral wire before attaching it to a sturdy wooden skewer for height. These look best when grouped in a simple stoneware pitcher to balance the rustic texture.
Adding a few drops of glycerin to the soaking water keeps the husks from becoming brittle once they dry.
- Purchase dried corn husks in the international food aisle for a few dollars.
- Trim the skewers to different lengths so the blooms don't sit on the same level.
- Swap the pitcher for a vintage milk glass vase to make the look more formal.
Most people skip this: Lightly mist the finished flowers with matte sealant to prevent them from absorbing humidity and drooping.
47. Potted Ornamental Pepper Display
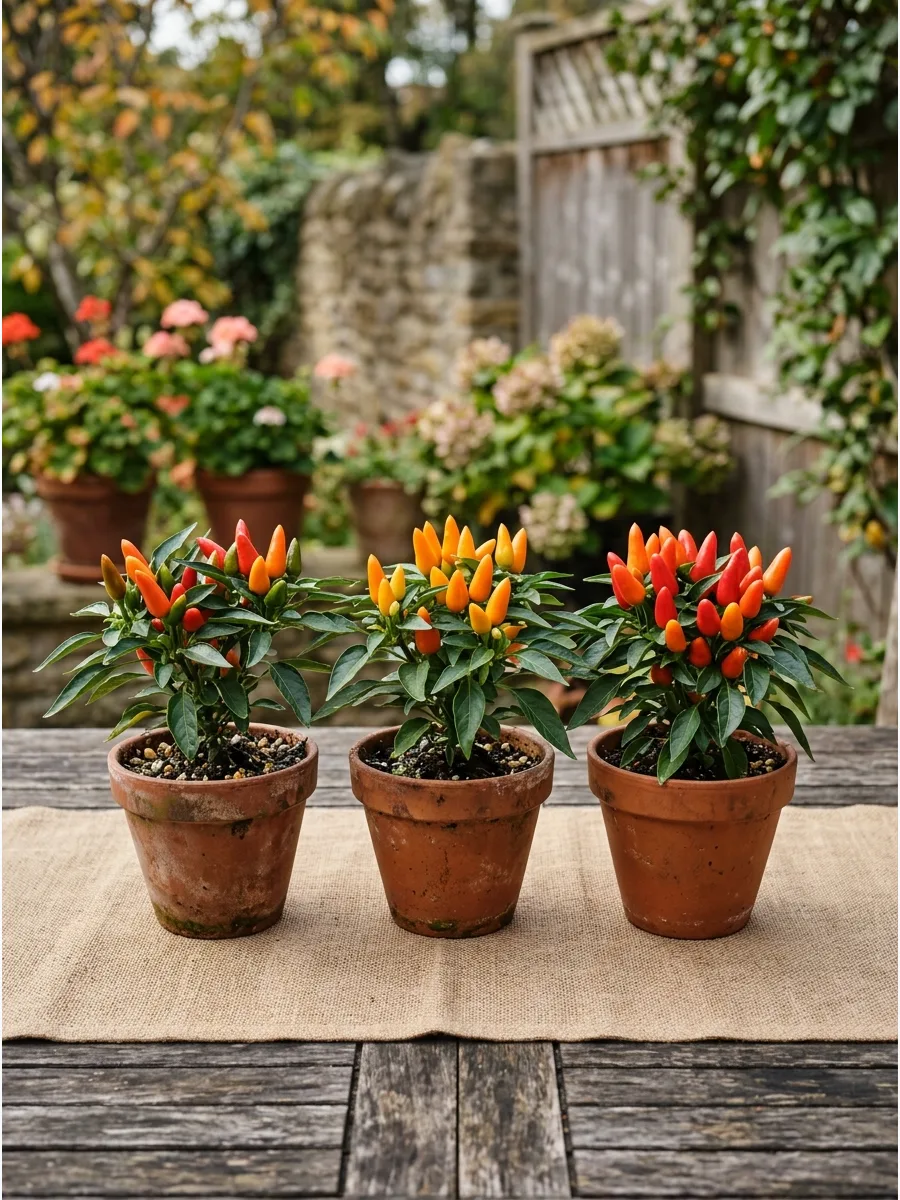
Small pots of Medusa or Bolivian Rainbow peppers provide instant color and a natural, living element. Place three small terracotta pots in a straight row down the center of a neutral linen runner. These plants are affordable and offer a more vibrant alternative to traditional gourds.
Selecting pots with a natural weathered patina prevents the display from looking too stark or brand new.
- Find these plants at local garden centers or grocery stores starting in late August.
- Place a small plastic saucer inside each terracotta pot to catch water and protect your table.
- Paint the pots with a thin wash of white acrylic paint for a French country aesthetic.
Quick win: Snip off any peppers that start to shrivel to keep the plant looking fresh and healthy through the holiday.
48. Brass Candlestick Strawflower Accents
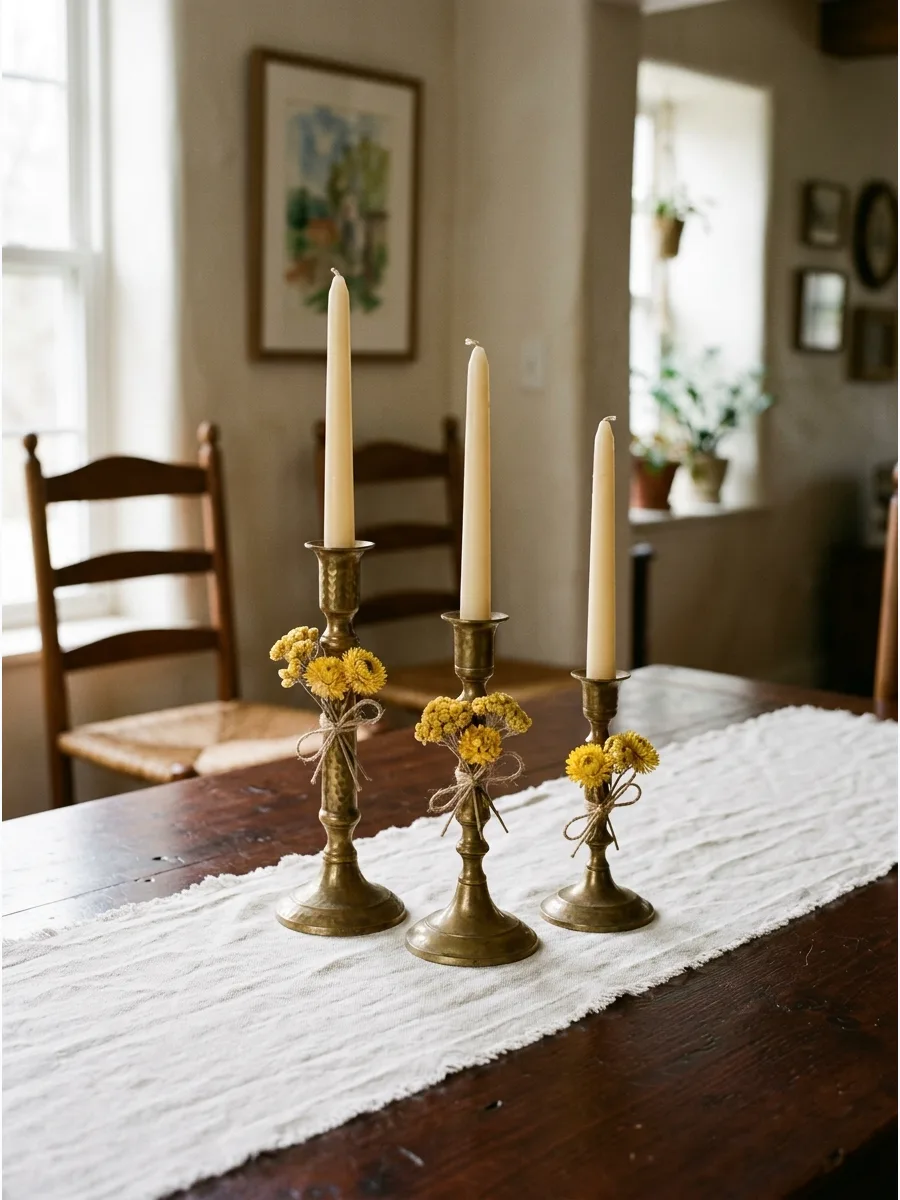
Transform standard candle holders by attaching small clusters of dried strawflowers to the stems. Use a tiny dab of clear floral adhesive to secure the dried flower heads directly onto the metal neck of the candlestick. The metallic shine of the brass reflects the warm tones of the dried petals beautifully.
A heavy base is essential here to ensure the added weight of the flowers doesn't make the display top-heavy.
- Source vintage brass sticks from thrift stores for a mismatched, curated feel.
- Clean the metal with a mixture of lemon and salt before adding the flowers to ensure the glue sticks.
- Use battery-operated tapers if you are worried about heat near the dried floral elements.
Best shortcut: Use sticky floral putty instead of glue if you want to remove the flowers and reuse the candlesticks later.
49. Burlap Wrapped Pear Basket
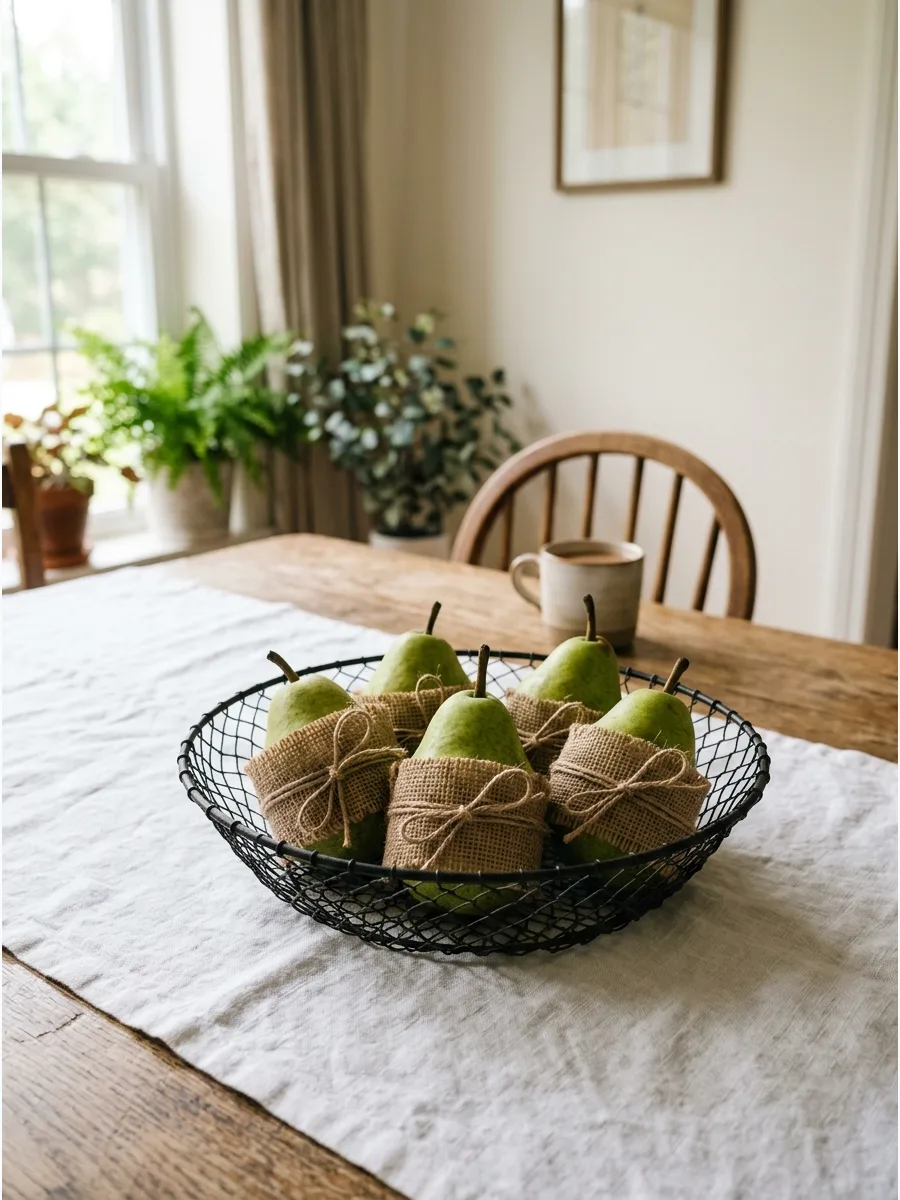
Fresh pears offer a more graceful, tapered shape than round pumpkins and fit well in narrow spaces. Wrap the bottom half of five firm pears in small squares of rough burlap and tie them with thin black twine. This adds a tactile, farmhouse layer that contrasts with the smooth fruit skin.
Using under-ripe fruit ensures the centerpiece stays firm and attractive for a full week of entertaining.
- Select Bosc or Anjou pears for their deep greens and browns that match autumn colors.
- Line the bottom of the basket with a few dried bay leaves for an extra layer of scent.
- Substitute the burlap for scrap velvet fabric to create a more luxurious, moody table.
Most people skip this: Wipe the pears with a very light coating of vegetable oil to give them a subtle, healthy glow under dining room lights.
50. Floating Fern Shadow Box Runner
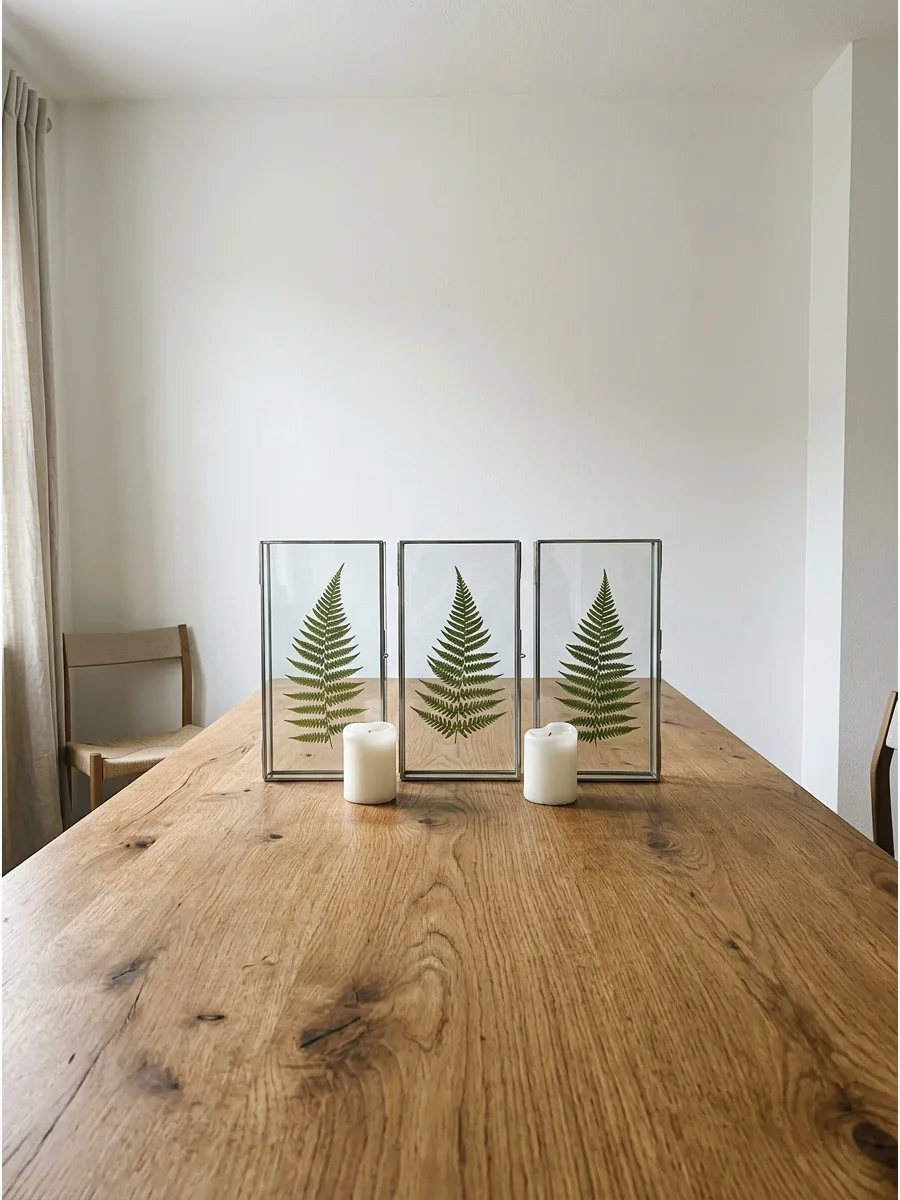
Preserve the late-season forest floor by displaying pressed ferns within glass frames to create a vertical table runner. Sandwich fronds between two panes of glass to allow candlelight to pass through the greenery. This setup provides visual height without blocking cross-table conversation.
Using varied frame sizes adds a rhythmic, organic flow to a long harvest table.
- Gather ferns during early autumn walks or purchase pre-pressed botanicals for a low-cost alternative.
- Clean glass panes with a streak-free solution before sealing to prevent fingerprints from showing under dining room lighting.
- Mix in dried oak leaves or gold leaf flakes to transition the look from early to late fall.
Most people skip this: Apply a tiny dot of clear museum gel to the bottom of each frame to ensure they remain upright if the table is bumped during a meal.
Frequently Asked Questions
How tall should a DIY fall centerpiece be?
To ensure your guests can easily see each other and converse, keep the main bulk of your arrangement under 12 to 15 inches tall. If you prefer more height, use very thin elements like spindly branches that won't obstruct sightlines across the table.
How do I keep real pumpkins and gourds from rotting on the table?
Wipe your pumpkins down with a mild bleach and water solution to kill bacteria and help them last much longer. It is also a good idea to place them on a tray or plate rather than directly on porous linens to prevent any damage if they start to soften.
What are the best budget-friendly fillers for fall vases?
You can find excellent fillers right in your pantry, such as dried beans, unpopped popcorn kernels, or split peas. These affordable items add beautiful autumn texture and provide a sturdy base to stabilize your floral stems.
How do I style a long rectangular table vs. a round one?
For long rectangular tables, apply the 'rule of three' by spacing out multiple smaller arrangements to create a balanced look. Round tables look best with one central focal point that anchors the design in the middle of the surface.
Can I use scented candles in a centerpiece?
It is best to stick with unscented candles for your dining table so the fragrance doesn't clash with the smell of your food. This allows your guests to enjoy the warm, flickering ambiance without distracting from the flavors of the meal.