50 Under Stairs Mudroom Ideas

This post may contain affiliate links: full affiliate disclosure.
Converting the awkward gap beneath a staircase into a functional entryway zone maximizes every square inch of the home. This sloped area provides a natural nook for seating and storage that keeps shoes and coats out of the main hallway.
These built-in solutions turn a dead corner into an organized hub for the daily transition in and out of the house.
BUILT-IN UNDER-STAIRS MUDROOMS
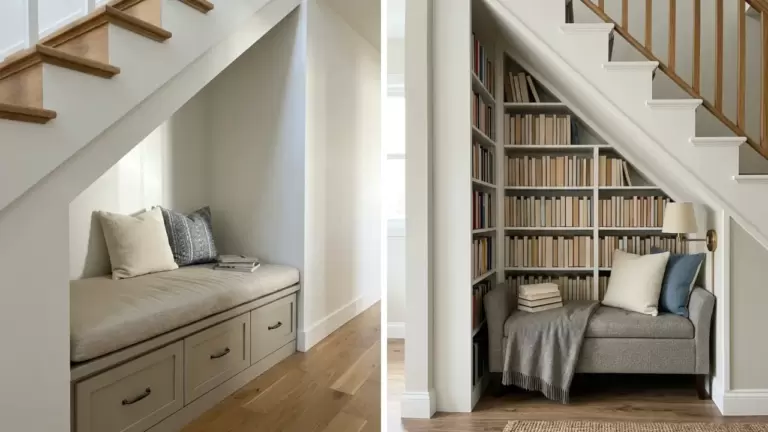
1. Built-In Mudroom Bench Under Stairs
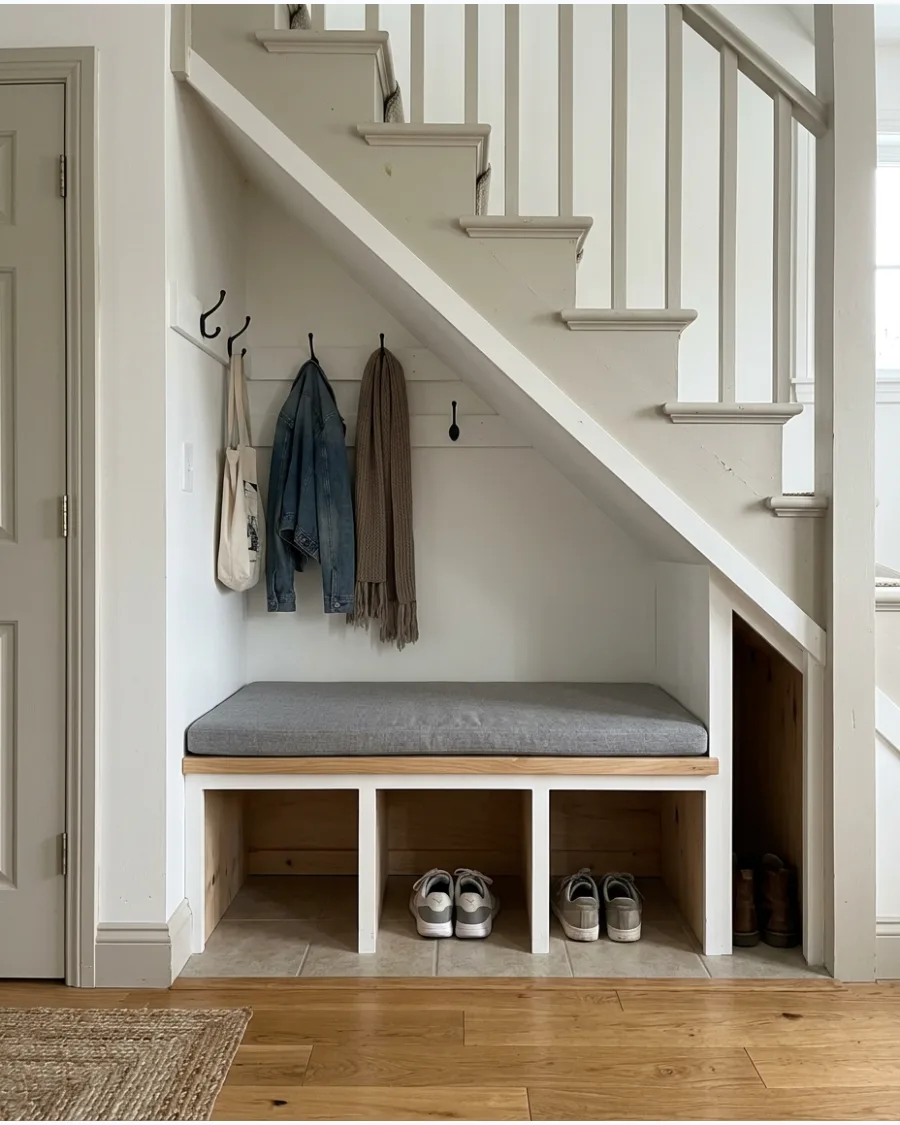
A custom bench fits perfectly into the triangular alcove created by the staircase. This provides a dedicated spot for putting on shoes while utilizing the height for hooks.
Measure the depth of the stairs to ensure the bench doesn't stick out into the hallway. Benches that align flush with the stair stringer look the most intentional.
- Budget around $300 to $800 for lumber and a custom-cut foam cushion.
- Secure the bench frame directly into the wall studs for maximum weight capacity.
- Renters can use a freestanding low bookcase as a mock built-in bench.
Most people skip this: Install a washable indoor-outdoor fabric on the cushion to handle wet raincoats and messy gear.
2. Under-Stairs Mudroom With Bench and Hooks
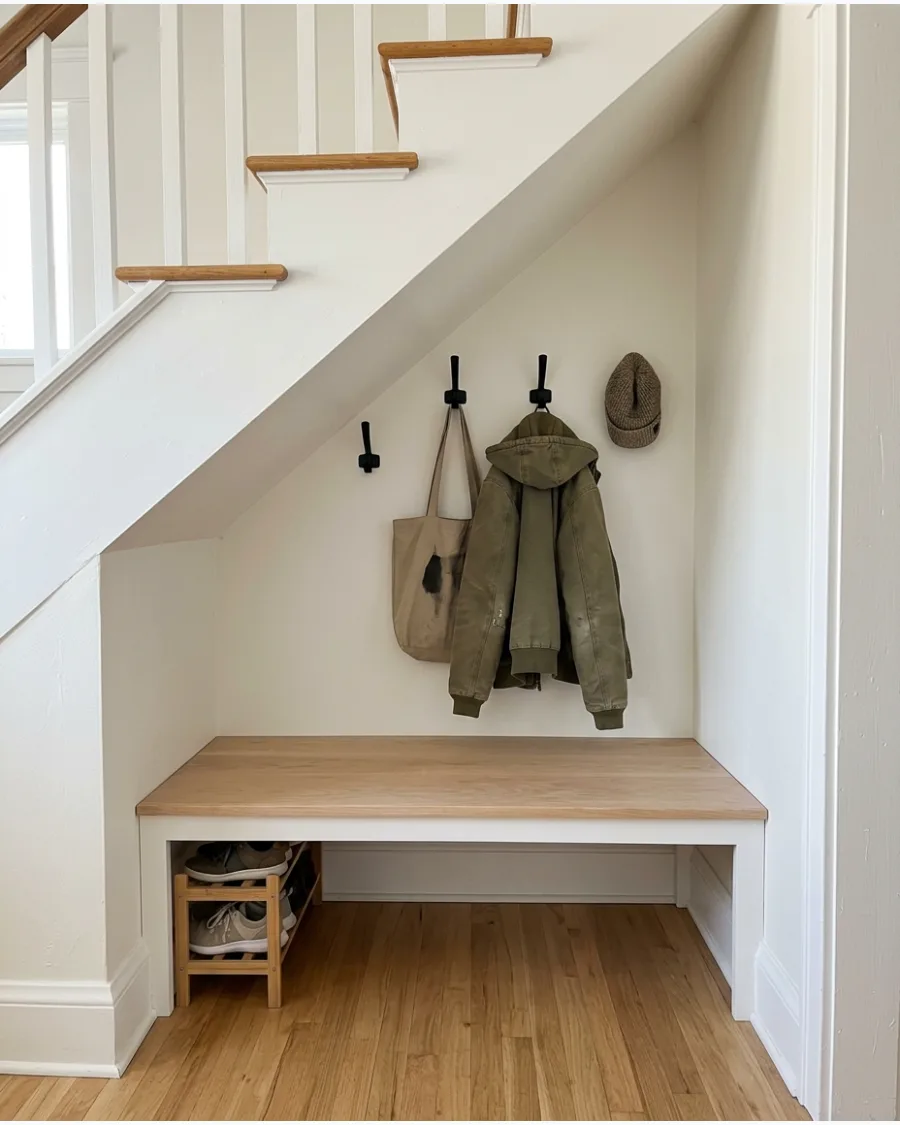
This setup pairs a sturdy seating platform with a vertical row of hooks for immediate organization.
It is the most efficient way to manage bags and jackets in a narrow foyer. Space hooks at least twelve inches apart to prevent bulky winter coats from overlapping. Staggering the hook heights can also help accommodate items of different lengths.
- Expect to spend $50 on heavy-duty hardware and $150 on wood materials.
- Mount hooks onto a 1×4 backing board to protect the drywall from scuffs.
- Use double-pronged hooks to hold both a hat and a coat on a single mount.
Quick win: Match the hook finish to your front door hardware for a cohesive entryway look.
3. Under-Stairs Mudroom With Storage Drawers
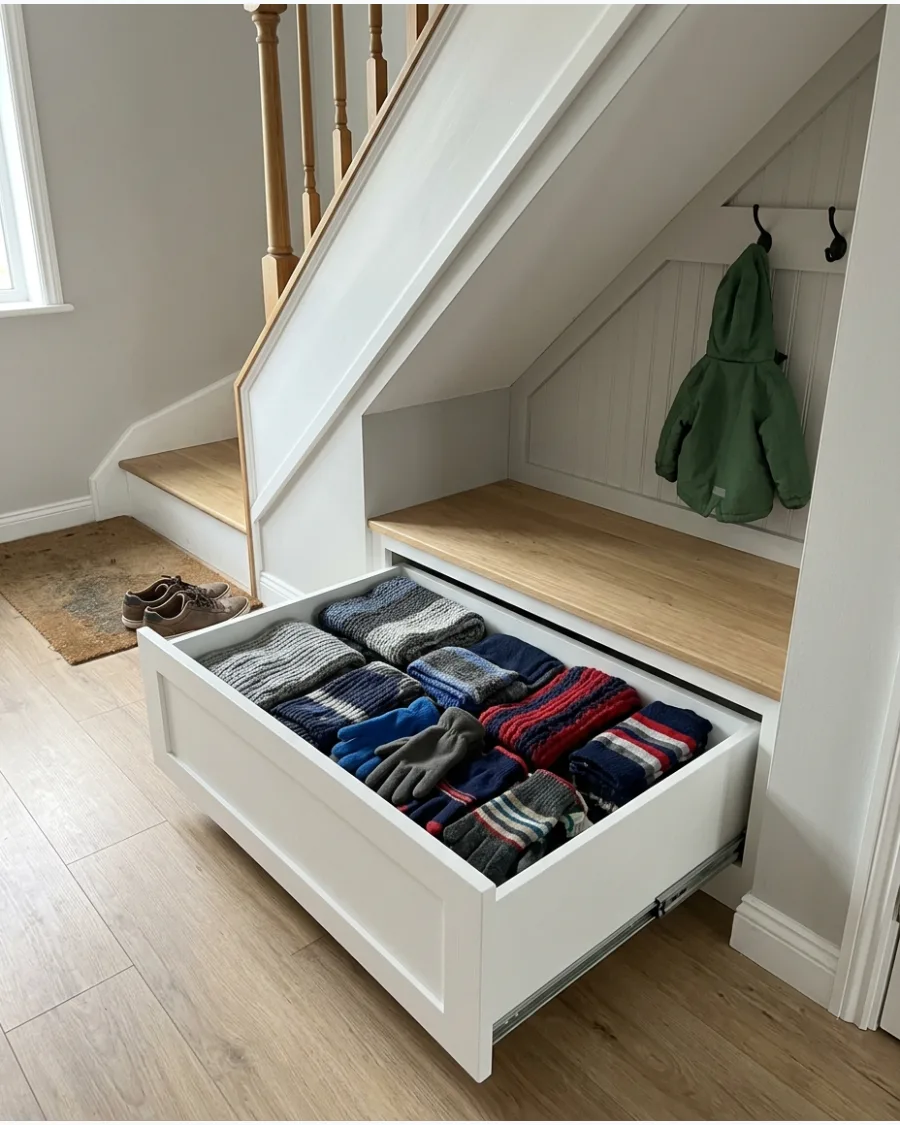
Deep drawers built into the base of the bench provide a hidden spot for seasonal items. This keeps the entryway looking tidy by tucking away clutter like umbrellas and dog leashes.
Install heavy-duty drawer slides to handle the weight of multiple pairs of heavy boots. Drawers are often easier to organize than open cubbies because items stay contained.
- Drawer slides and plywood for two large drawers typically cost $120.
- Use full-extension slides so you can reach the items at the very back.
- Add dividers inside the drawers to separate shoes from smaller accessories.
Best shortcut: Use pre-made kitchen cabinet drawer boxes to save time on the construction process.
4. Under-Stairs Mudroom With Open Shoe Cubbies
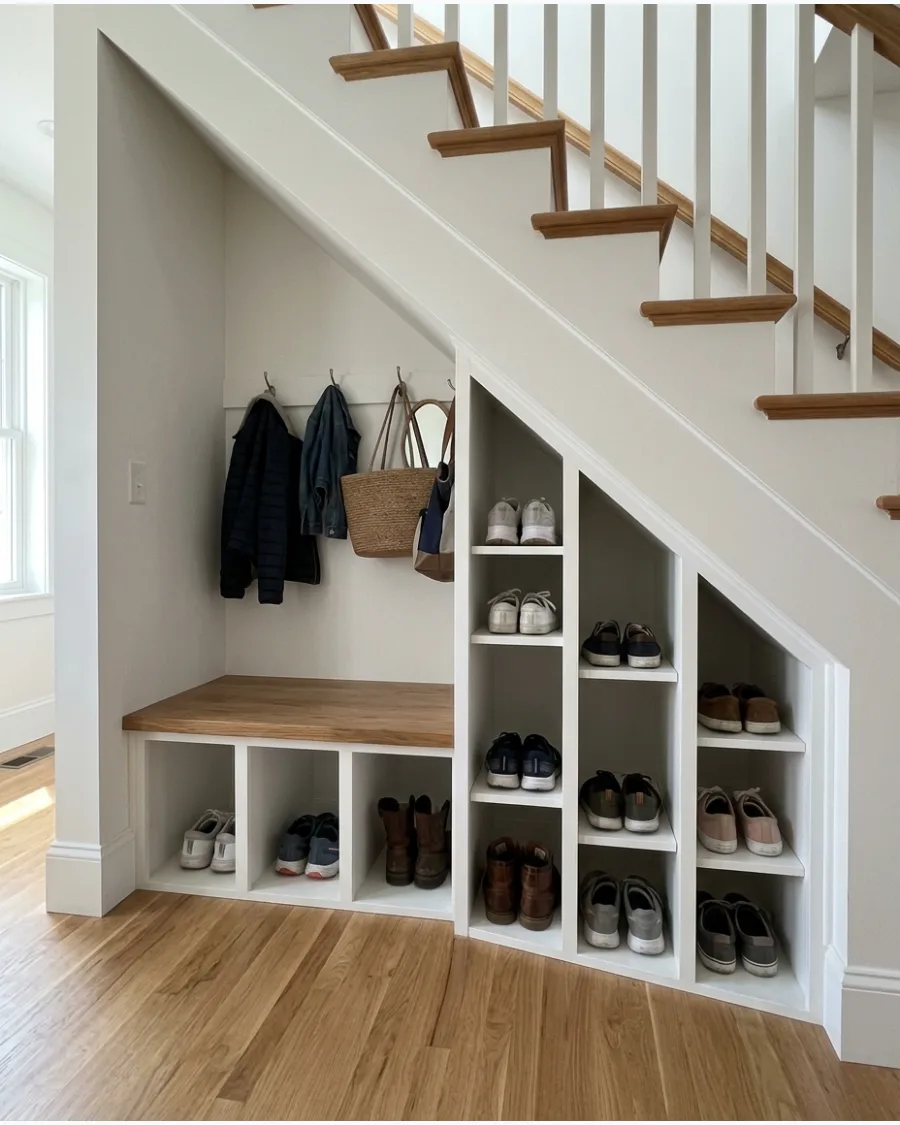
Open cubbies beneath the seating area offer the fastest access for family members on the go. This design encourages everyone to put their shoes away immediately upon entering.
Size the cubbies to fit your largest shoes so nothing hangs over the edge. Airflow in open cubbies also helps damp shoes dry out faster.
- Materials for a basic cubby unit cost roughly $100 for plywood and trim.
- Paint the interior of the cubbies a dark color to hide dirt and scuff marks.
- Add a rubber boot tray nearby for exceptionally muddy or wet days.
Quick win: Line the bottom of each cubby with a removable plastic mat for easy cleaning.
5. Under-Stairs Mudroom With Upper Storage Shelf
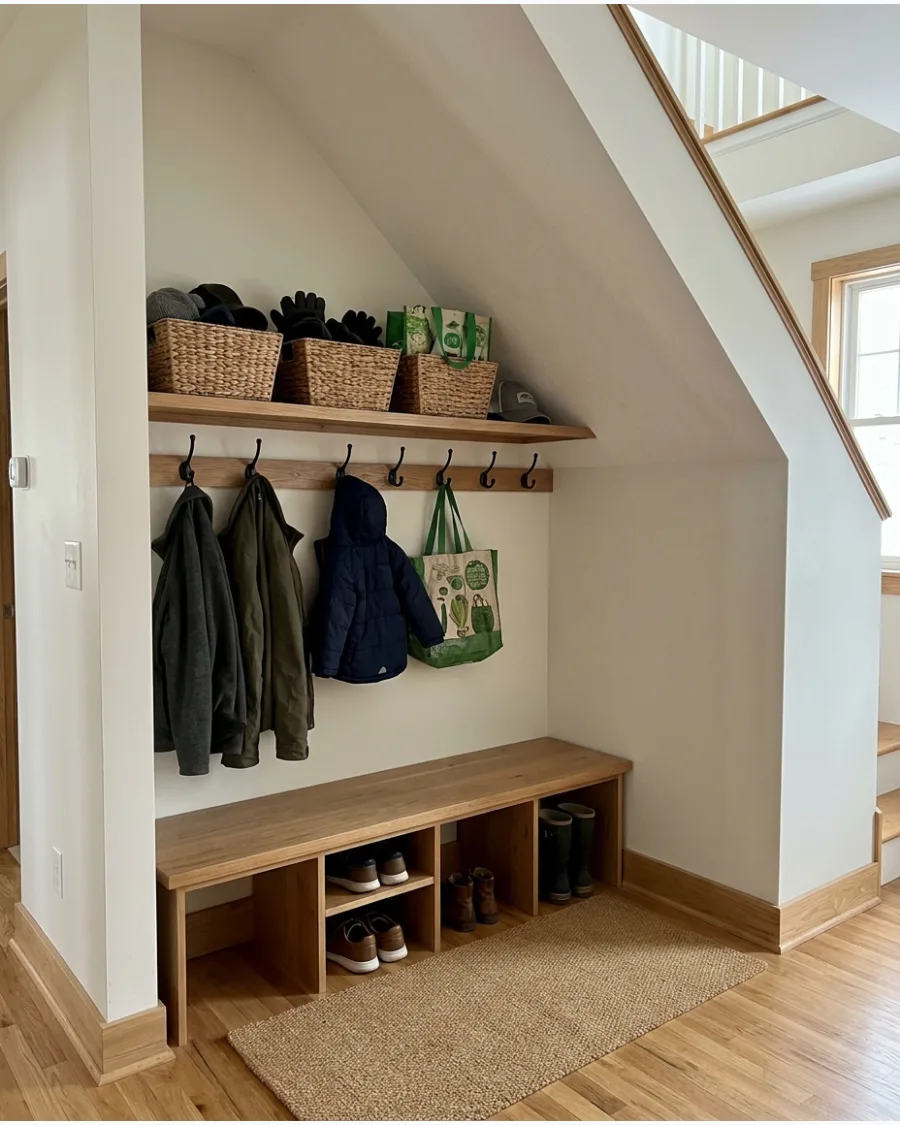
Adding a long shelf above the hook line makes use of the higher clearance near the top of the stairs. This is the perfect spot for items you don't need every day, like bike helmets or out-of-season hats.
Use woven baskets on the upper shelf to hide small items like sunglasses and keys while keeping the look clean. A shelf also provides a visual 'cap' to the mudroom zone.
- A 6-foot shelf and brackets cost approximately $60 at most hardware stores.
- Ensure the shelf is deep enough to hold a standard storage basket without overhang.
- Install a small lip on the front of the shelf to prevent items from sliding off.
Most people skip this: Leave at least 10 inches of clearance between the shelf and the ceiling to easily pull baskets in and out.
6. Floor-to-Ceiling Under-Stairs Mudroom Built-In
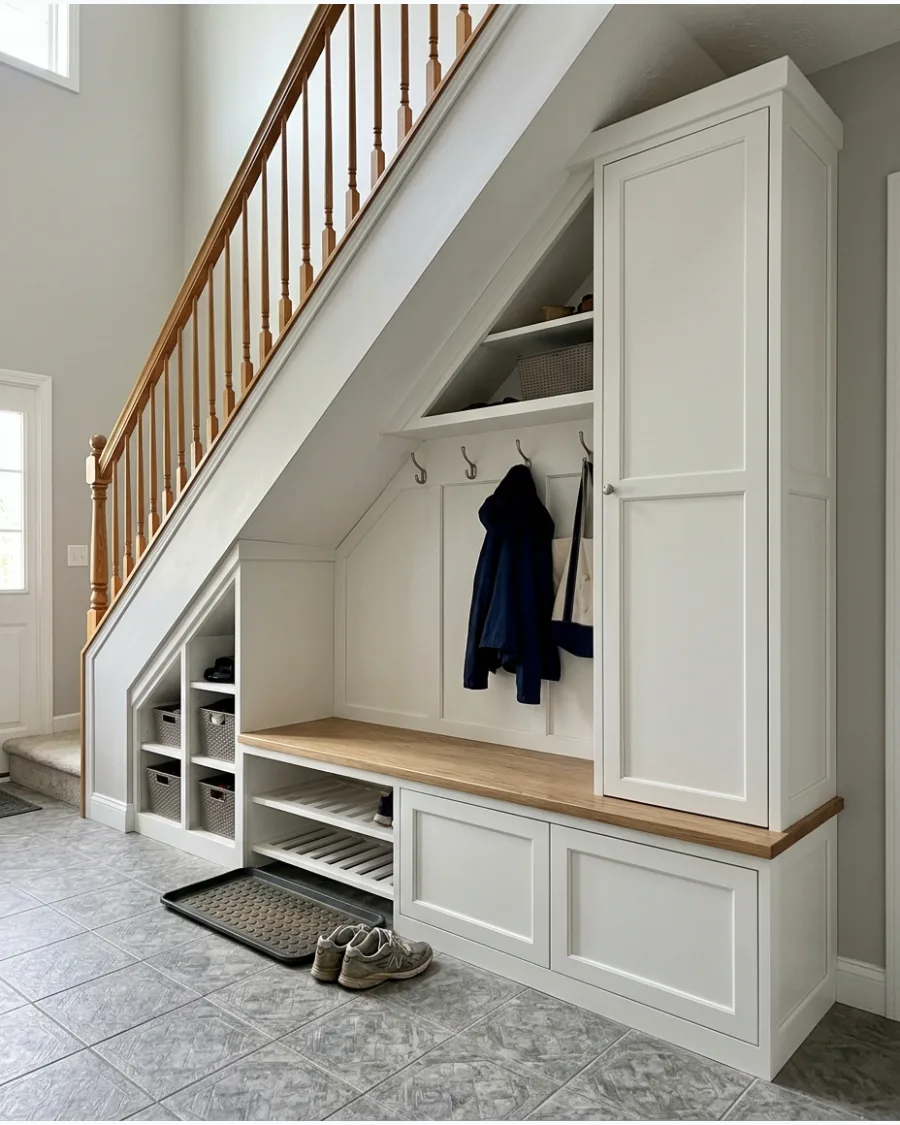
Maximizing the entire triangular wall creates a high-capacity storage center. This approach combines seating, hanging space, and cabinetry into one seamless unit.
Utilize the tallest part of the triangle for full-length coats and the shortest part for shoe racks. This makes every inch of the awkward slope functional.
- Professional custom built-ins for this scale can range from $1,500 to $4,000.
- Plan the layout on the wall with painter's tape before starting any construction.
- Incorporate a mix of open and closed storage to balance accessibility and aesthetics.
Best shortcut: Use a combination of stock pantry cabinets and a DIY bench to get the built-in look for less.
7. Under-Stairs Mudroom With Shaker Cabinets
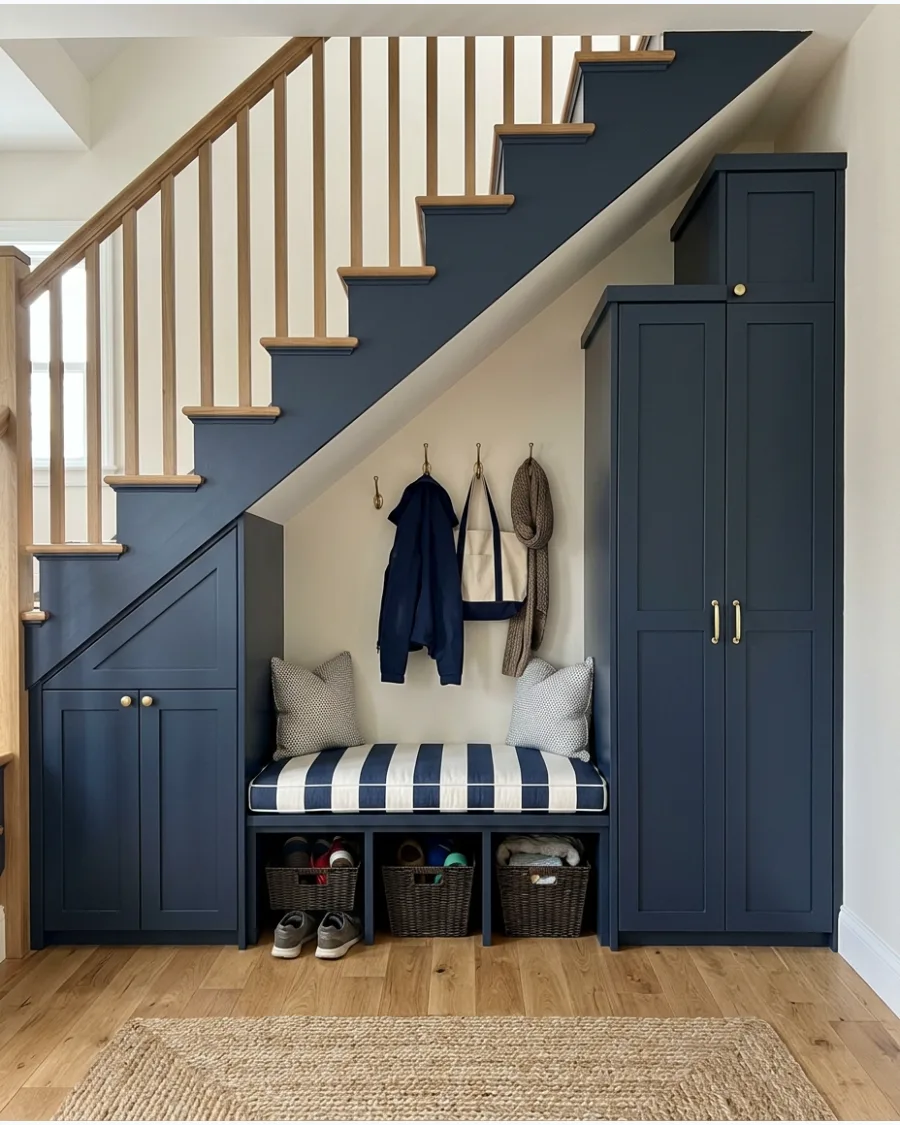
Shaker-style doors provide a classic, clean look that conceals the inevitable mess of a busy entryway. This style works well in traditional or modern homes to keep the foyer looking formal.
Paint the cabinet doors the same color as the staircase trim for a seamless, high-end appearance. Closing the doors instantly hides mismatched shoes and bulky bags.
- Custom Shaker doors can be ordered online for around $50 to $100 per door.
- Use soft-close hinges to prevent the doors from banging against the built-in frame.
- Choose a semi-gloss or satin paint finish for easier wiping and durability.
Quick win: Add a decorative toe kick at the bottom of the cabinets to make them look like high-end furniture.
8. Under-Stairs Mudroom With Hidden Storage Bench
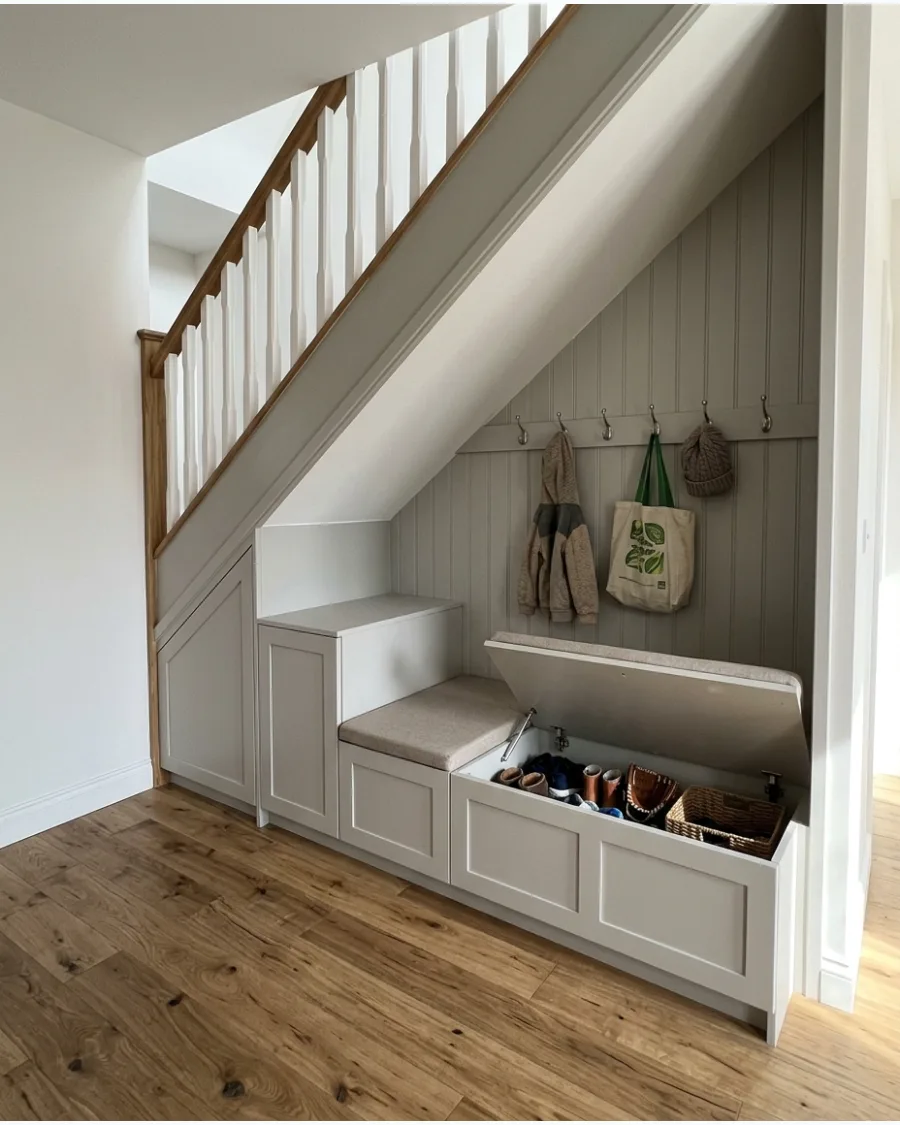
A bench with a flip-top lid offers a massive amount of storage for items that don't fit in drawers. It is an ideal spot for sports equipment, heavy blankets, or bulkier winter boots.
Add a safety hinge to the lid to prevent it from slamming down on fingers. This design keeps the floor clear while providing a sturdy place to sit.
- A piano hinge and safety stay will cost roughly $30 total.
- Ensure the interior is ventilated if you plan to store damp sports gear.
- Paint the interior a light color so it is easier to see items at the bottom.
Most people skip this: Drill a few small holes in the back of the bench for airflow to prevent odors from building up.
9. Under-Stairs Mudroom With Built-In Lockers
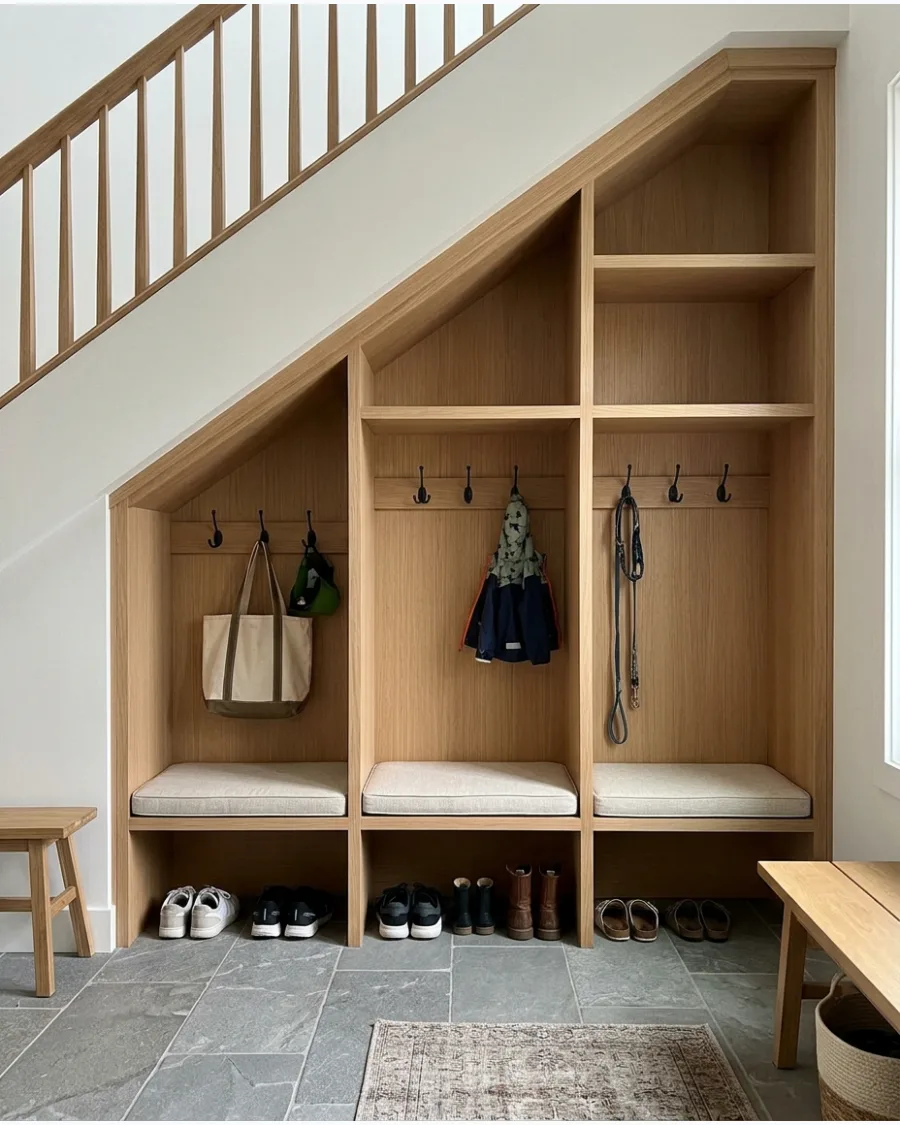
Dividing the under-stair space into vertical sections gives every family member their own 'locker.' This eliminates the morning scramble for lost bags or shoes. Label each locker section with a small nameplate or letter to give every family member their own spot. Individual cubbies at the top and bottom of each locker keep items organized.
- Materials for a three-section locker unit cost about $250 in plywood.
- Adjust the width of each locker based on the number of people in the house.
- Install two hooks in each locker—one high for coats and one low for bags.
Best shortcut: Use 3/4-inch plywood for the dividers to ensure the structure is rigid and durable.
10. Under-Stairs Mudroom With Pull-Out Storage
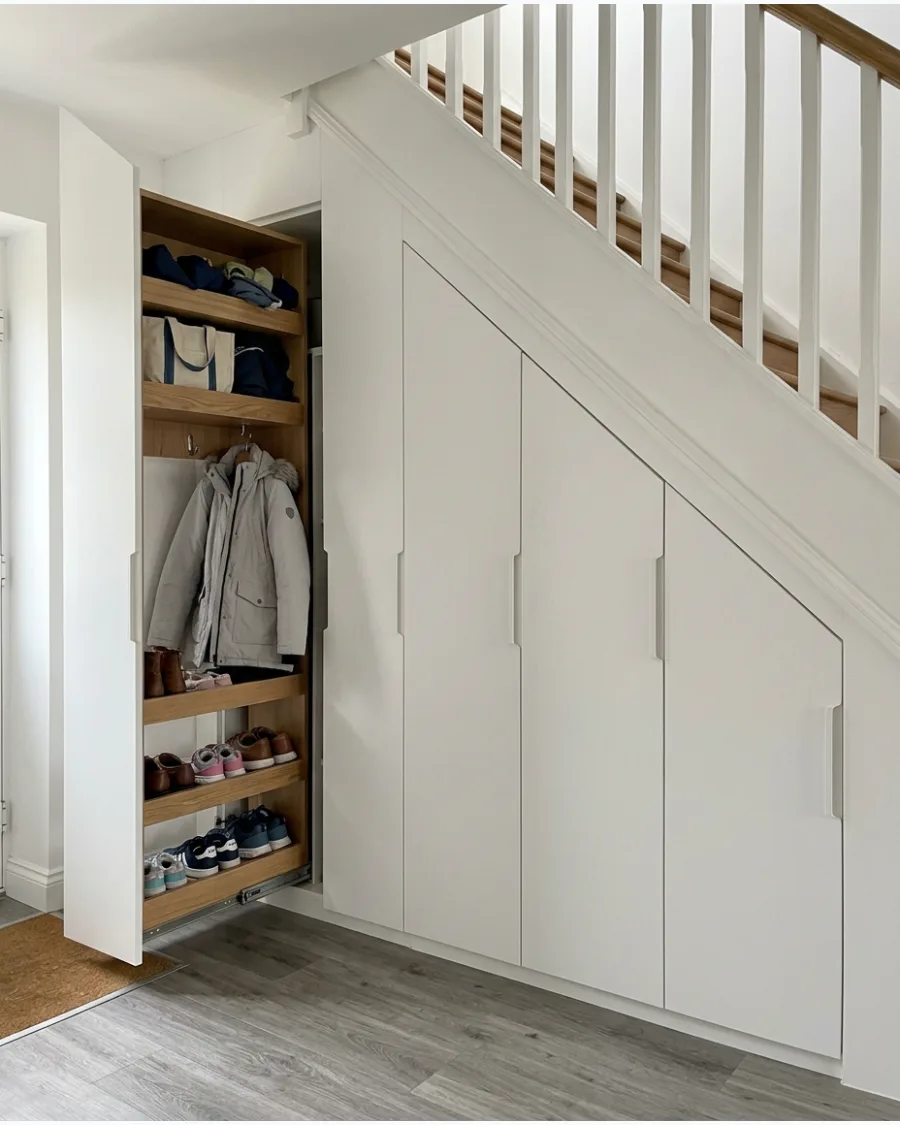
Pull-out towers that slide out from the side of the stairs offer the most storage density. This design allows you to access the full depth of the space under the stairs without crawling inside.
Mount pull-out units on high-quality tracks so they glide smoothly even when fully loaded with gear. When closed, the mudroom completely disappears into the wall.
- Heavy-duty slide hardware for these units can cost $150 to $300 per pull-out.
- Build the frames from lightweight material to reduce the strain on the slides.
- Install a handle that matches your other interior door hardware for a integrated look.
Quick win: Use a magnetic catch to keep the pull-out units perfectly flush with the wall when closed.
SMALL & SPACE-SAVING UNDER-STAIRS MUDROOMS
11. Small Under-Stairs Mudroom
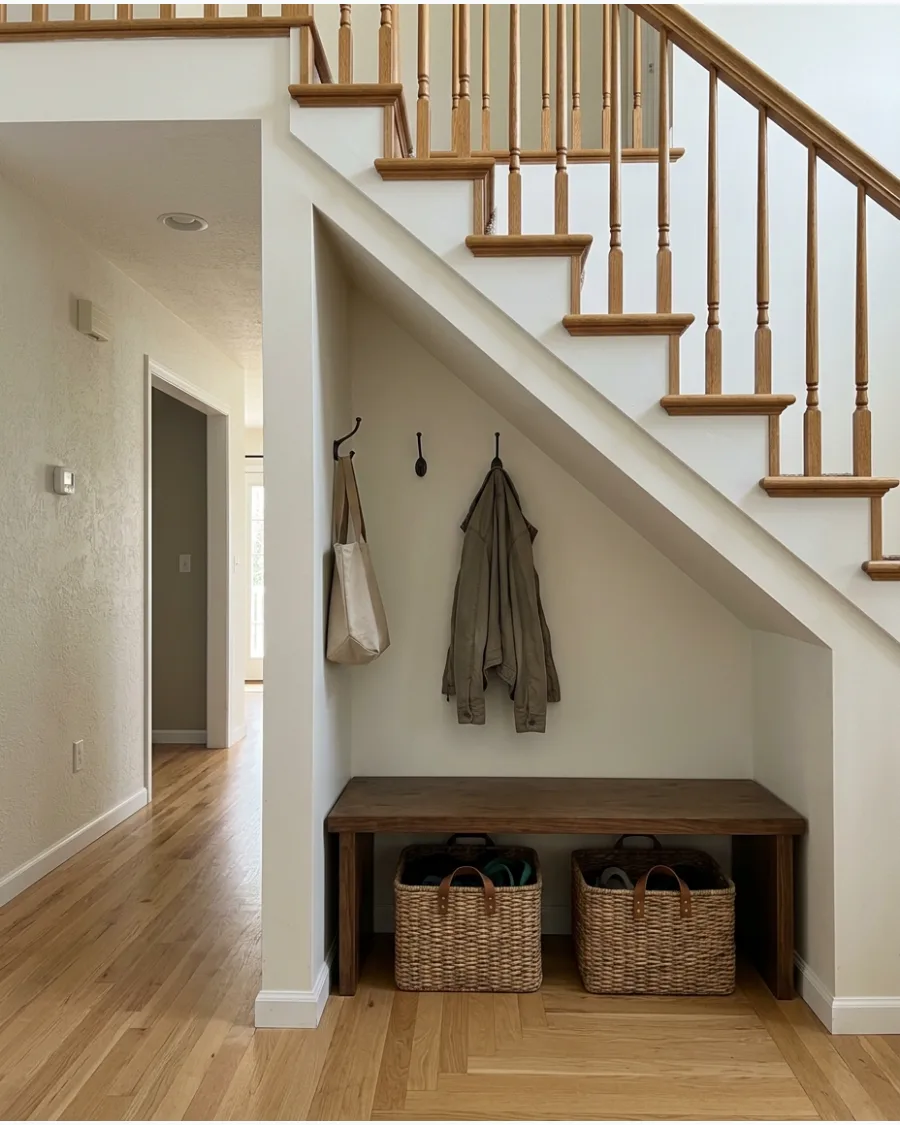
A compact setup provides essential storage without requiring a major renovation.
It uses a short bench and a few well-placed hooks to turn a tiny alcove into a functional exit point. Hang hooks at staggered heights to fit more bags and coats without them overlapping in a tight space. This layout works because it defines the zone without overwhelming the hallway.
- Budget-friendly project that can be completed in a single afternoon.
- Measure the wall width carefully to ensure the bench does not stick out past the stairs.
- Perfect for small apartments or homes with limited entryway square footage.
Quick win: Use heavy-duty wall anchors for hooks to prevent them from pulling out of the drywall under the weight of heavy backpacks.
12. Narrow Under-Stairs Mudroom
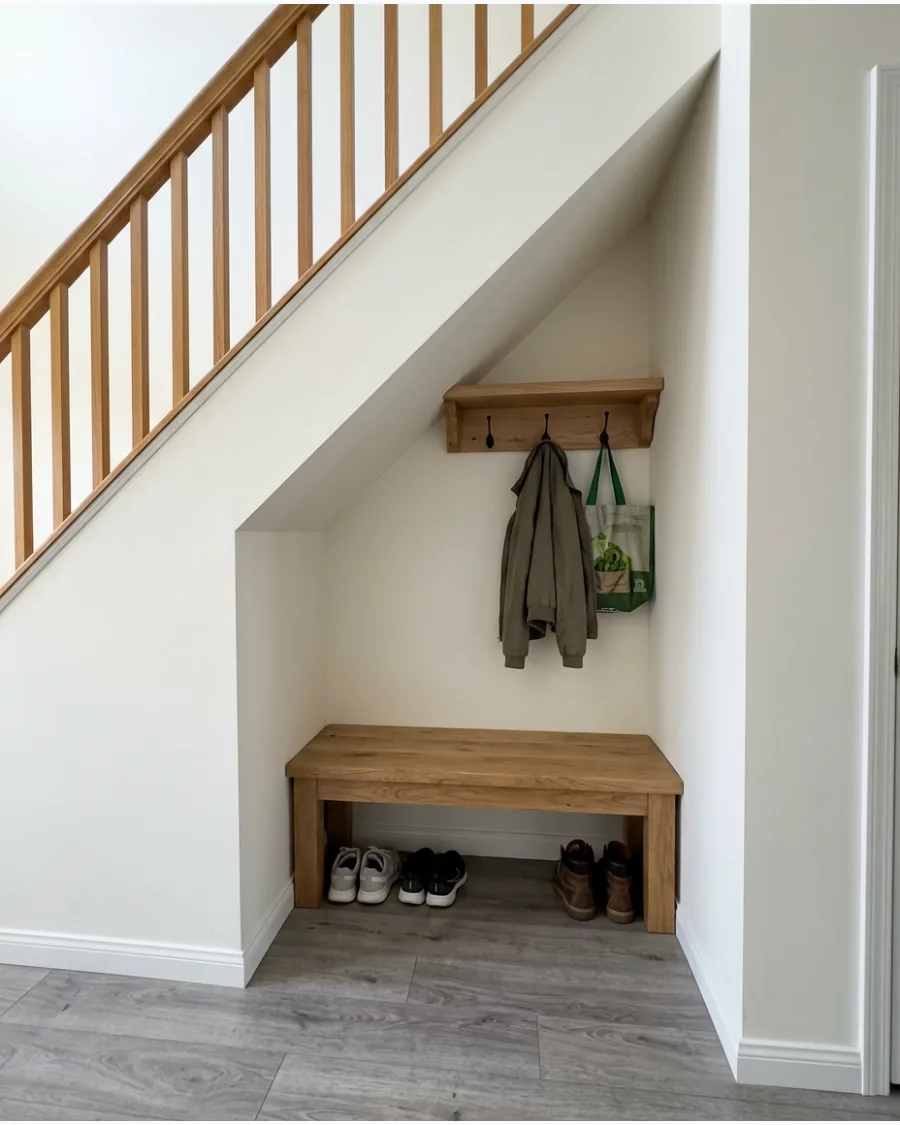
Narrow hallways require furniture that maintains a clear walking path. A shallow bench provides a place to sit while keeping the floor footprint as small as possible.
Select a bench no deeper than twelve inches to keep the walkway clear for high-traffic areas. This approach prevents the mudroom from feeling like an obstacle in the middle of the house.
- Sourcing a slim-profile bench is key to maintaining hallway flow.
- Mount hooks higher up the wall to keep long coats from dragging on the floor.
- Ideal for long, skinny foyers where every inch of floor space counts.
Most people skip this: Check the clearance of nearby doors to make sure the bench doesn't block them from opening fully.
13. Tiny Under-Stairs Drop Zone
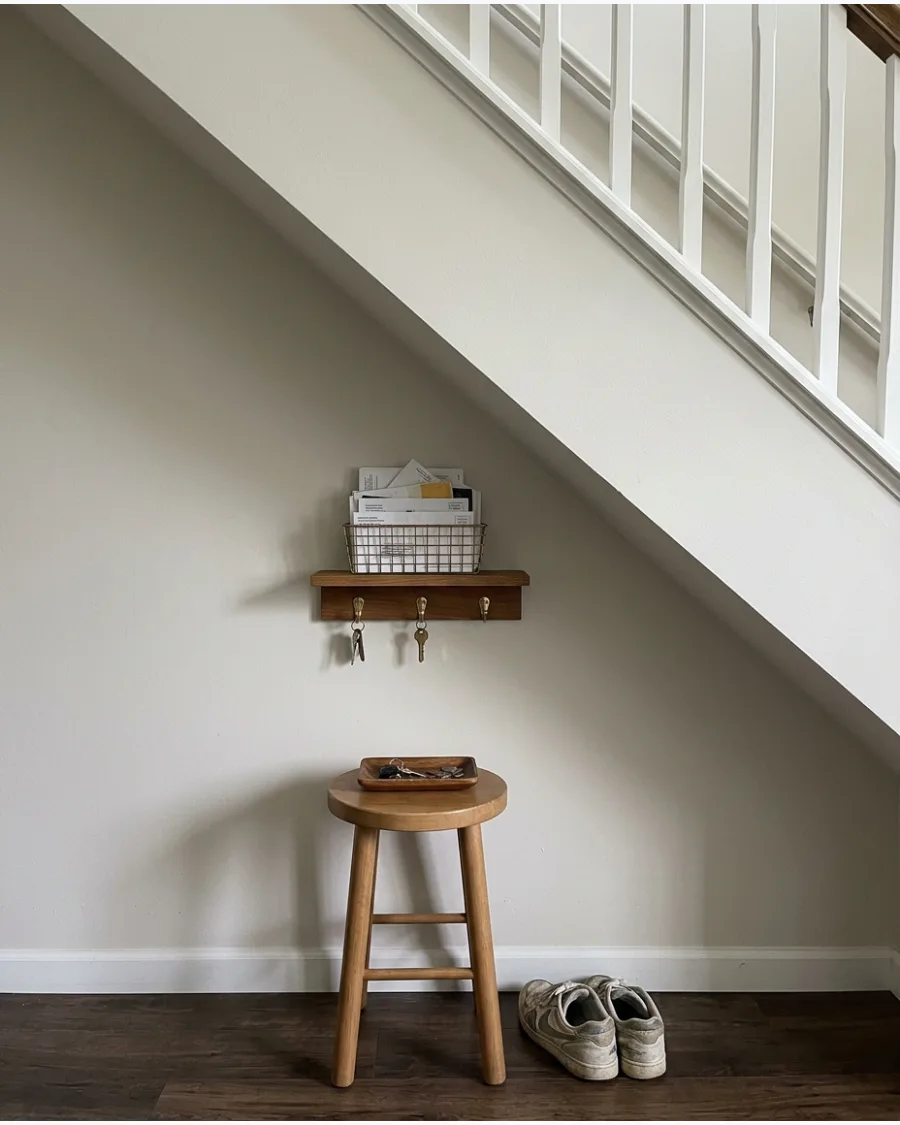
When space is at a premium, focus on the absolute essentials like keys, mail, and one pair of shoes. A minimal landing spot keeps daily items organized so they do not end up on the kitchen counter.
Add a small tray on the bench for keys and mail to prevent clutter from spreading across the surface. This setup proves that even a few square feet can be highly productive.
- Minimal investment required for a stool and a wall-mounted organizer.
- Place the stool directly under the key hooks to save floor space.
- Great for renters who need organization without installing permanent cabinets.
Best shortcut: Use command strips for key hooks if you want to avoid drilling holes in the wall.
14. Under-Stairs Mudroom With Floating Bench
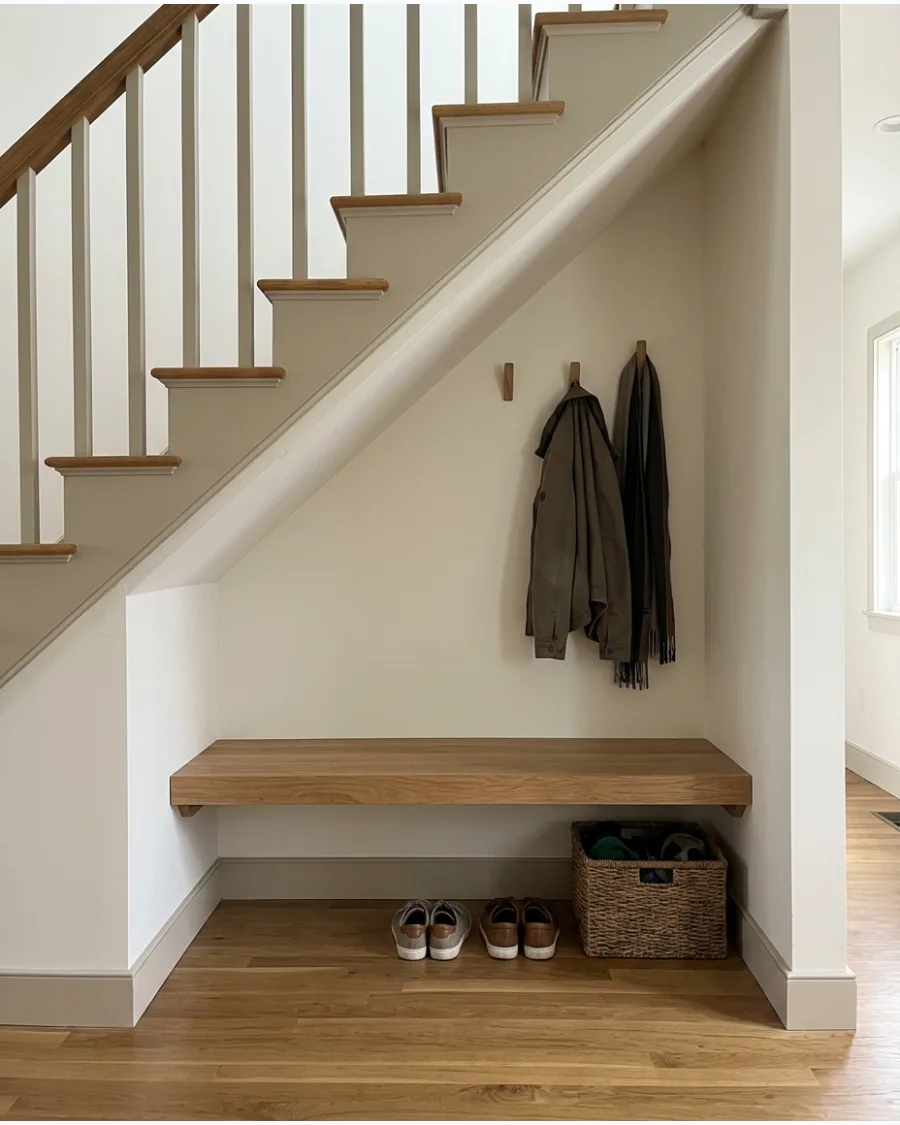
A floating bench creates a modern look and keeps the floor visible, which makes the area feel larger. Removing the legs of the bench provides extra room for bulky boots or large storage bins.
Secure the bench to wall studs using heavy-duty brackets to ensure it supports the weight of an adult. This design is sleek and makes cleaning the floor much faster.
- Requires basic carpentry skills and a stud finder for safe installation.
- Mount the bench at standard chair height, which is usually 18 inches from the floor.
- Works well in modern or minimalist homes where clean lines are preferred.
Quick win: Paint the support brackets the same color as the wall to make them practically invisible.
15. Under-Stairs Mudroom With Basket Storage
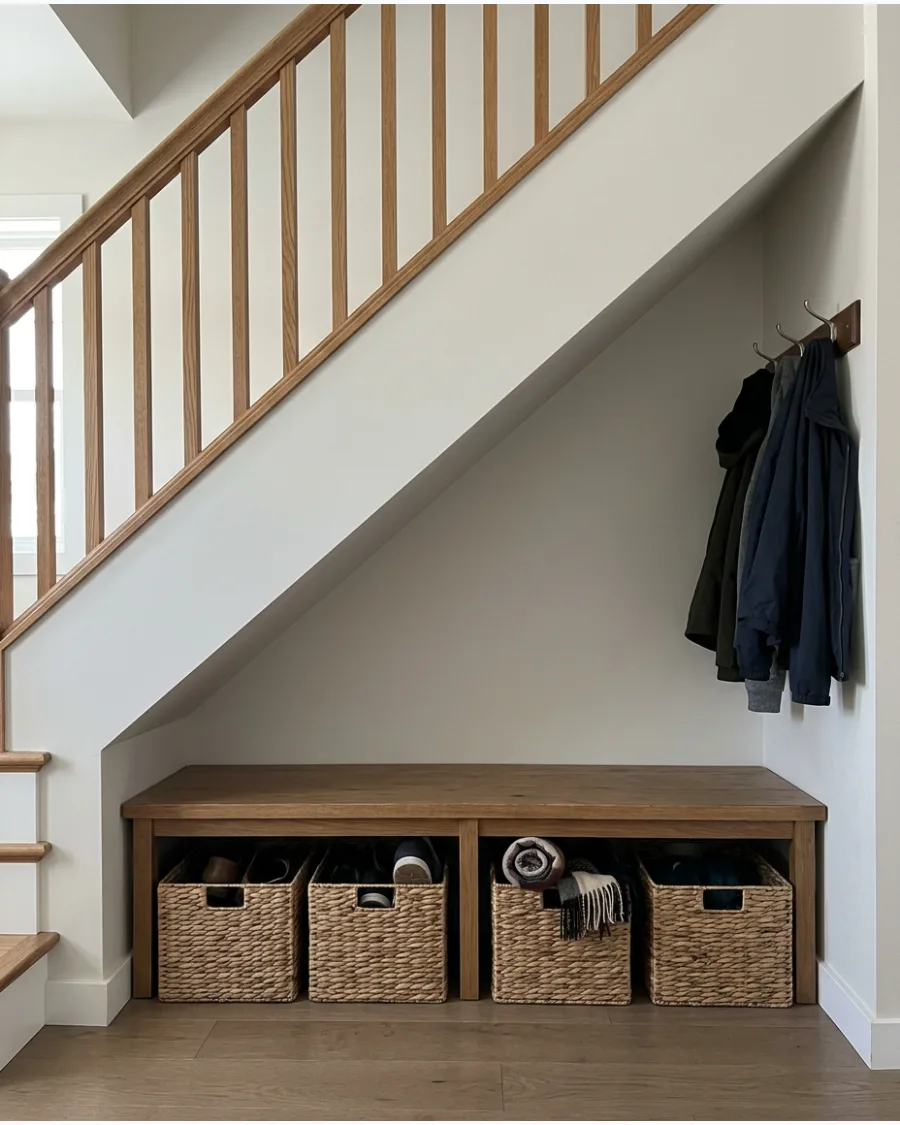
Baskets are the most flexible way to hide messy items like gloves, scarves, and dog leashes. Using matching containers creates a uniform look that hides visual clutter instantly.
Label each basket with a name or category so family members can find their gear quickly. This is an affordable alternative to custom drawers or cabinets.
- Buy baskets in bulk to ensure they match perfectly in size and color.
- Measure the height under your bench before shopping to get a snug fit.
- Swap out the contents of the baskets seasonally to keep the mudroom relevant.
Most people skip this: Line wicker baskets with fabric to prevent delicate scarves from snagging on the natural fibers.
16. Open Under-Stairs Mudroom
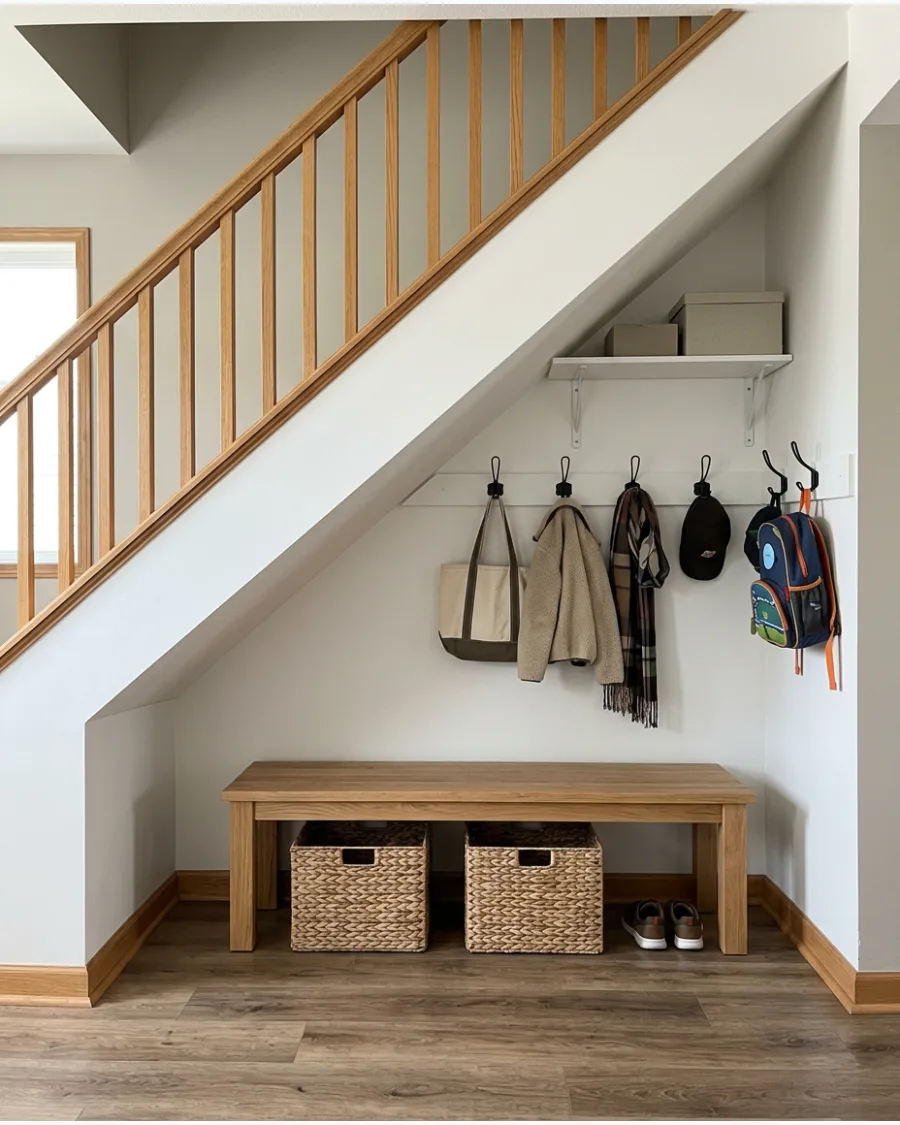
An open design avoids the heavy look of traditional cabinetry and keeps everything within reach. It relies on a simple combination of shelving and hooks to stay organized.
Use matching bins and hooks to give the open space a cohesive and intentional look. This style is perfect for busy households where kids need to grab their bags and go.
- Very easy to install using standard wall-mounted shelving tracks.
- Keep the floor clear by using a bench with open space underneath.
- Ideal for dark hallways because it doesn't block light like solid cabinets do.
Best shortcut: Use a wall-mounted rail system so you can easily adjust the height of shelves and hooks as kids grow.
17. Under-Stairs Mudroom With Peg Rail
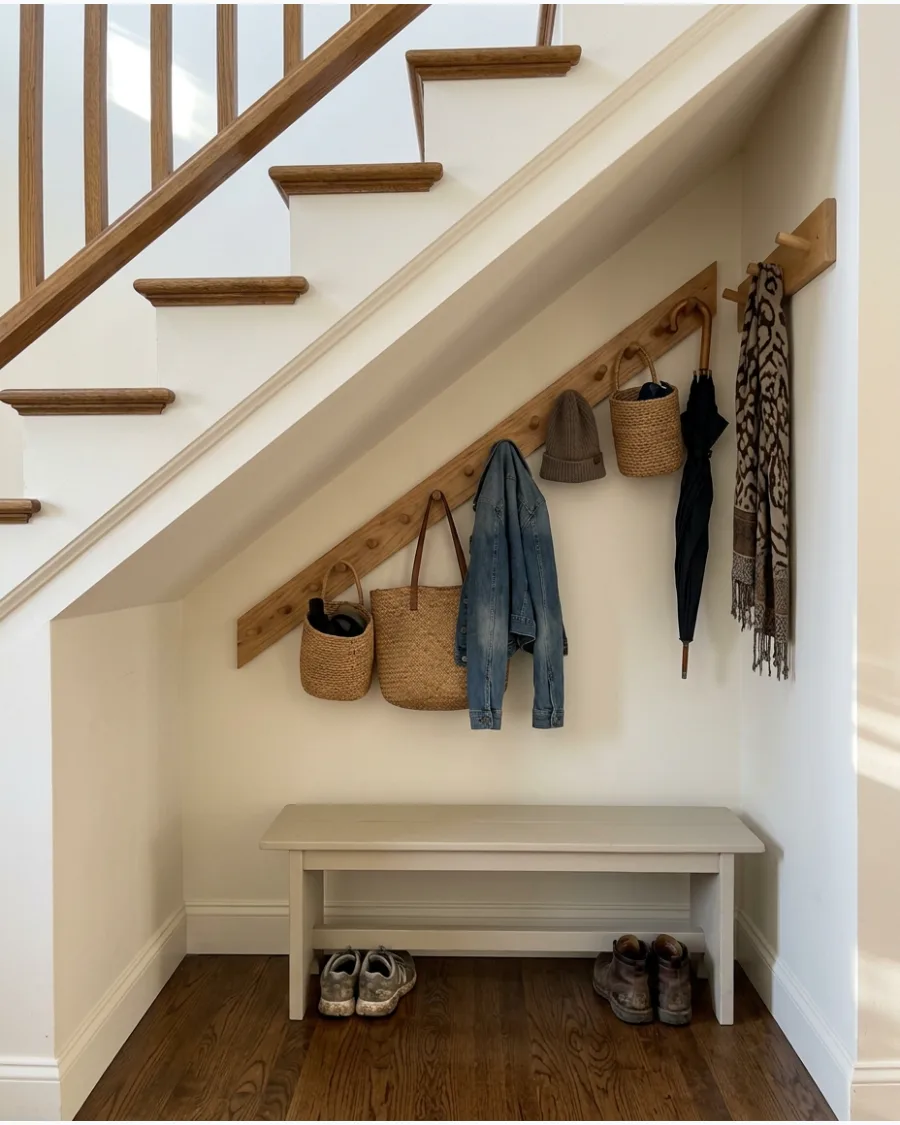
Peg rails offer a timeless look and extreme flexibility for hanging everything from heavy coats to light umbrellas. They follow the line of the stairs perfectly, making use of every inch of the sloped wall.
Mount the peg rail along the entire length of the sloped wall to maximize every inch of vertical space. This is a classic solution that never goes out of style.
- Affordable material cost and very simple to screw into the wall.
- Space the pegs at least six inches apart to prevent items from crowding each other.
- Paint the rail the same color as the wall for a subtle, integrated look.
Quick win: Hang a small basket from one of the pegs to hold smaller items like sunglasses or keys.
18. Under-Stairs Mudroom With Wall-Mounted Shoe Rack
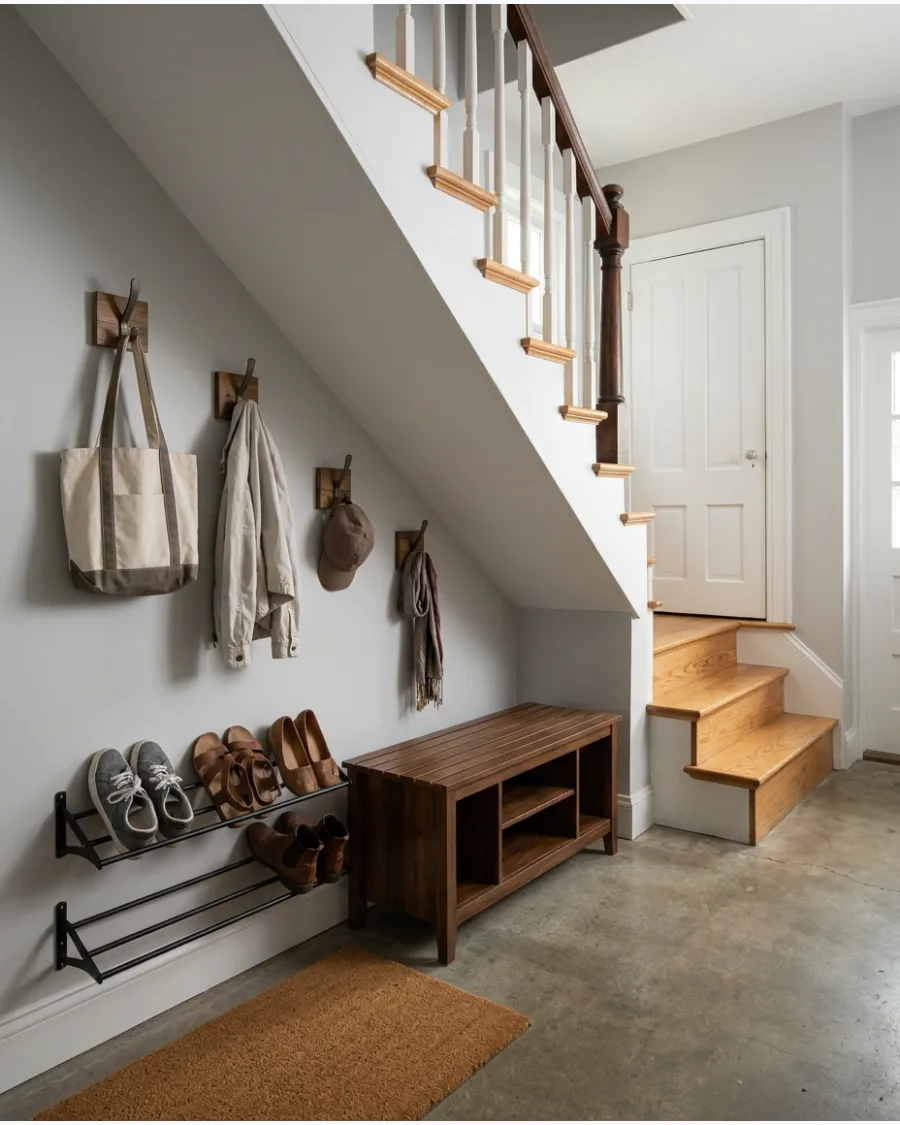
Getting shoes off the floor is the fastest way to make a mudroom look organized. Wall-mounted racks use vertical space that usually goes to waste under the stairs.
Install the shoe rack a few inches off the floor to make sweeping and mopping easier. This keeps the floor clear and prevents a pile-up of footwear at the door.
- Saves floor space in narrow entries where a floor rack would be too wide.
- Choose a rack with a drip tray if you live in a climate with lots of rain or snow.
- Great for organizing specific categories like gym shoes or everyday flats.
Most people skip this: Mount the rack slightly tilted to ensure shoes stay securely on the rails without falling off.
19. Under-Stairs Mudroom Without Built-Ins
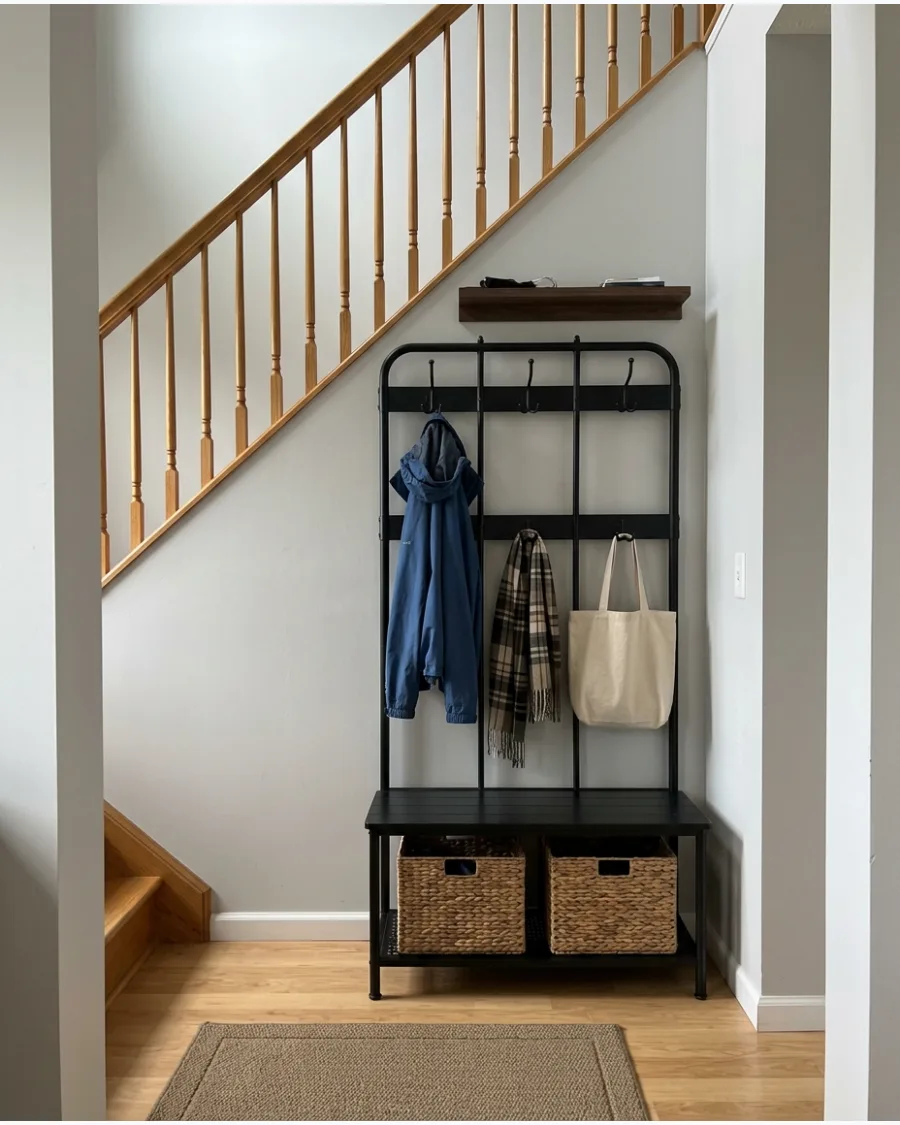
You do not need custom carpentry to have a great mudroom. A freestanding hall tree provides a bench, hooks, and shelving in one portable unit.
Choose a freestanding hall tree that fits the height of the lowest part of the stairs. This is the best option for people who want a mudroom today without a long construction project.
- No permanent installation required, making it perfect for renters.
- Can be moved to a different room if you decide to change the layout later.
- Available in many sizes to fit different staircase widths and heights.
Best shortcut: Always use the included tip-over restraint kit to secure freestanding units to the wall for safety.
20. Corner Under-Stairs Mudroom
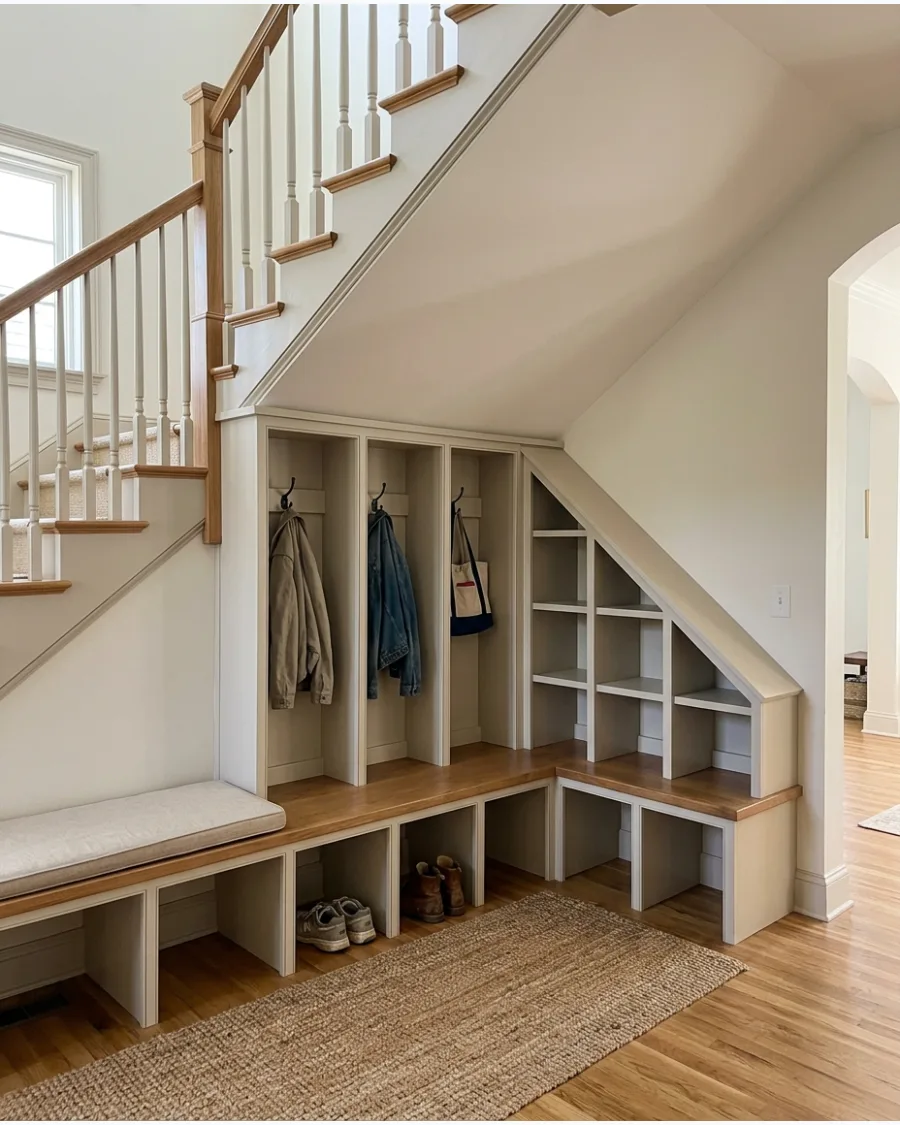
Awkward corners are often wasted, but they are the perfect spot for a wrap-around bench.
This layout maximizes seating and storage in a space that would otherwise be empty. Place a corner bench in the deepest part of the nook to provide a comfortable seat for putting on shoes. It makes the entryway feel like a deliberate, cozy room rather than just a hallway.
- Utilizes the depth of the staircase that is often hard to reach.
- Provides more seating area than a standard straight bench.
- Add a corner shelf above the bench for extra storage of hats or decor.
Quick win: Use a corner-specific bench to avoid gaps between the furniture and the wall where items can fall.
MODERN UNDER-STAIRS MUDROOMS
21. Modern White Oak Under-Stairs Mudroom
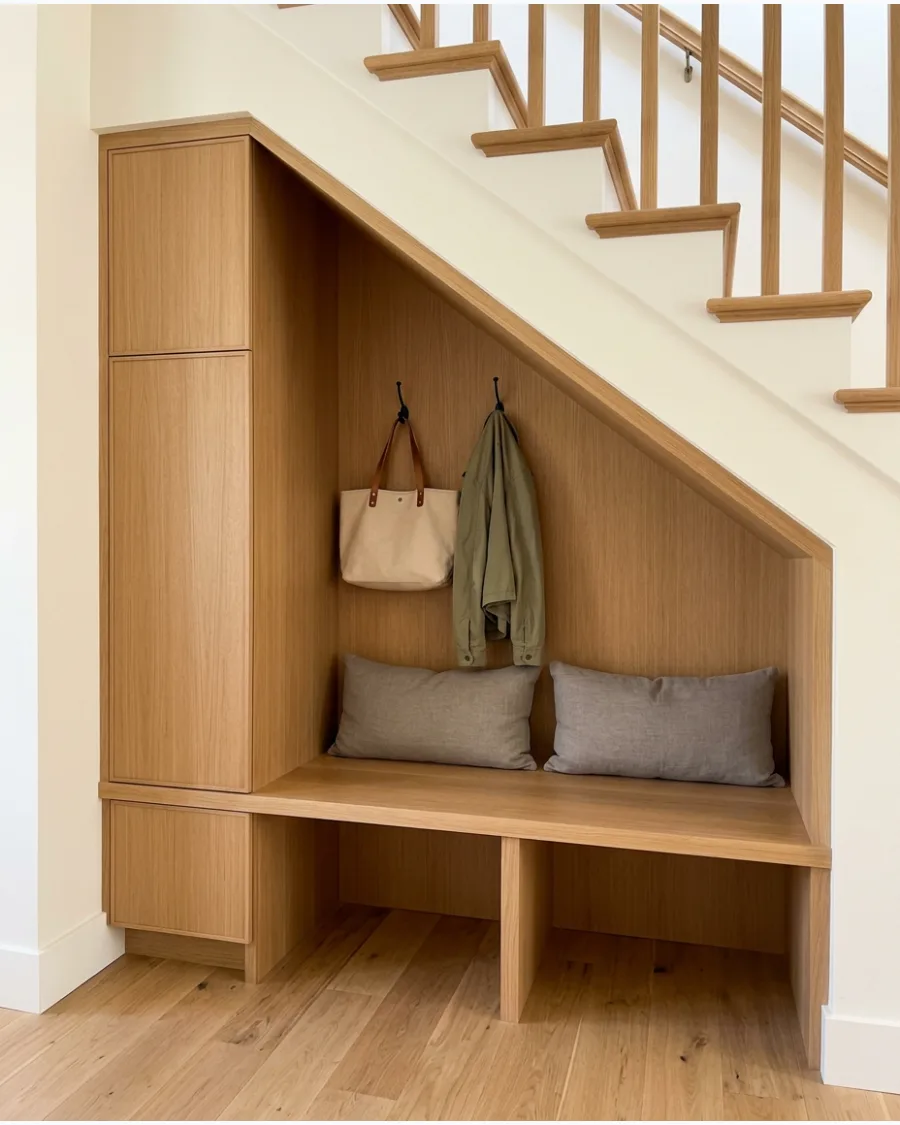
White oak brings a high-end feel that does not overwhelm a small hallway. Install cabinetry with a vertical wood grain to draw the eye upward and make the low ceiling feel taller. The light wood hides dust and small scratches better than dark painted finishes.
- Custom cabinetry starts at $1,200 while DIY oak plywood builds cost around $300.
- Use soft-close hinges on all doors to prevent slamming in high-traffic hallways.
- Swap the fabric cushion for a leather one to make it easier to wipe down after rain.
Most people skip this: Seal the oak with a matte clear coat to protect from wet coats without adding a shiny, dated look.
22. Modern Black Under-Stairs Mudroom
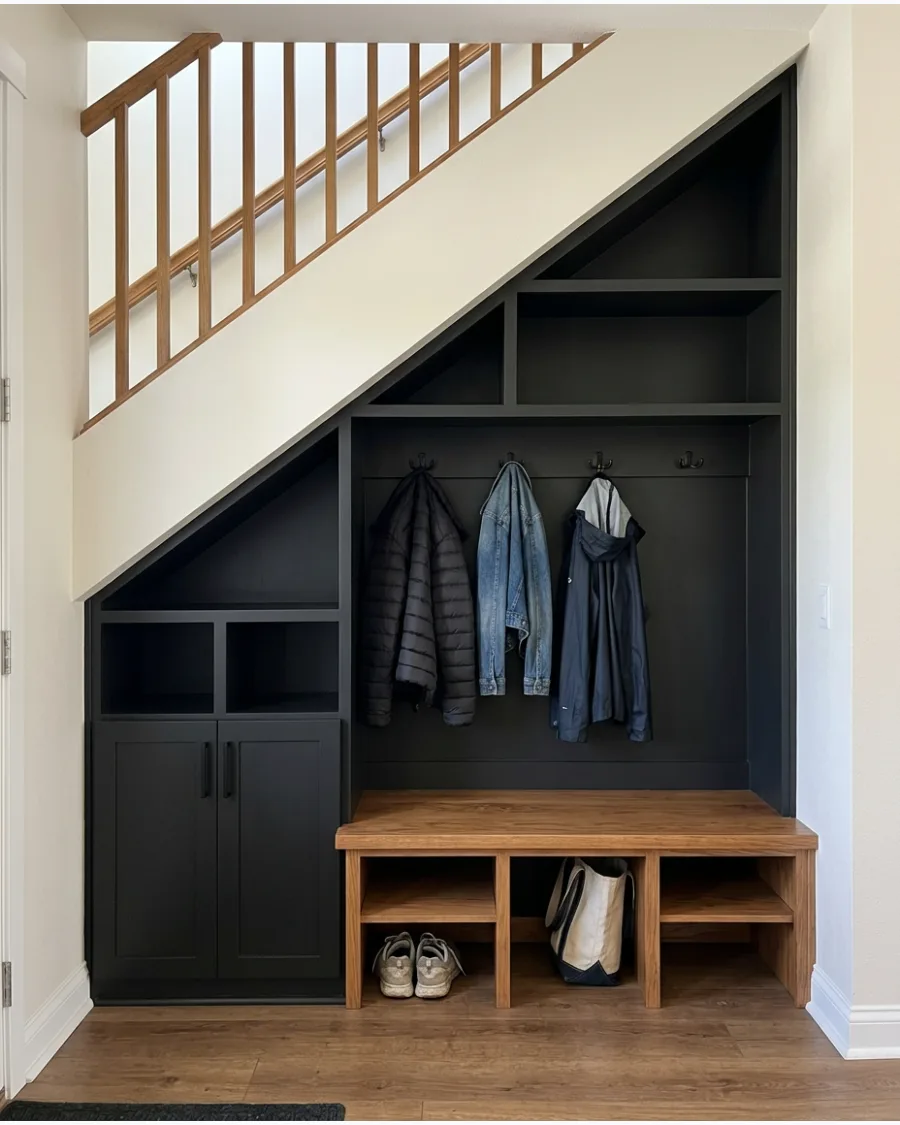
Deep black paint creates a focal point that anchors an open-concept floor plan. Pair the dark cabinetry with a light-colored wood bench to prevent the alcove from looking like a dark hole. This high-contrast look works best in areas with plenty of natural light.
- Specialty cabinet paint kits cost $80, while custom units can exceed $2,000.
- Mount hooks at different heights to accommodate both long coats and short jackets.
- For small spaces, use a semi-gloss finish to reflect light back into the hallway.
Quick win: Use a microfiber cloth for daily dusting, as dark matte surfaces show fingerprints more than lighter colors.
23. Modern Olive Green Under-Stairs Mudroom
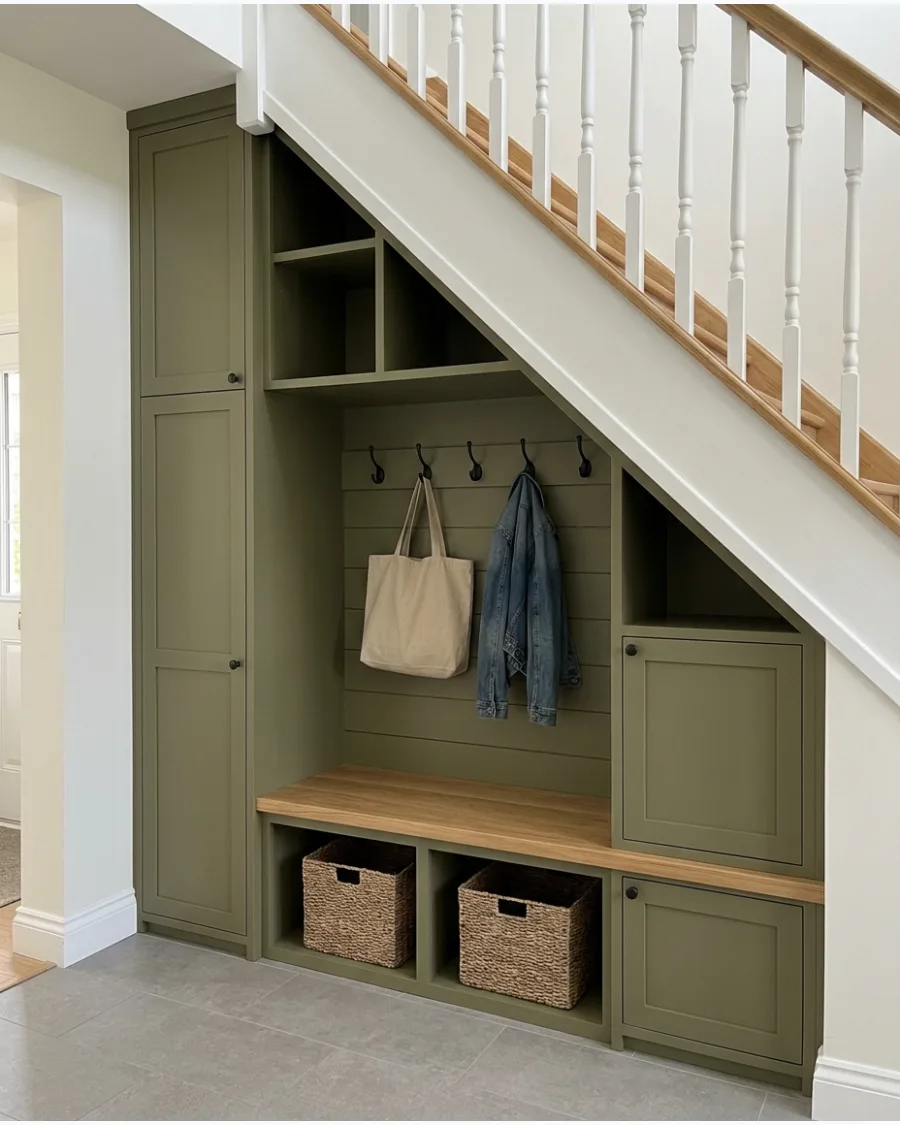
Olive green acts as a neutral that feels more interesting than grey or white. Tuck woven baskets into the open space under the bench to hide colorful shoes and daily clutter. Brass hardware adds a touch of warmth that complements the earthy green tones beautifully.
- One gallon of quality cabinet paint costs $45 and seagrass baskets are around $60.
- Position the bench at 18 inches high for the most comfortable seating height.
- Use a washable runner rug in front of the unit to protect the floor from mud.
Best shortcut: Buy unfinished baskets and spray them with a clear sealant to prevent the fibers from snagging on delicate socks.
24. Moody Navy Under-Stairs Mudroom
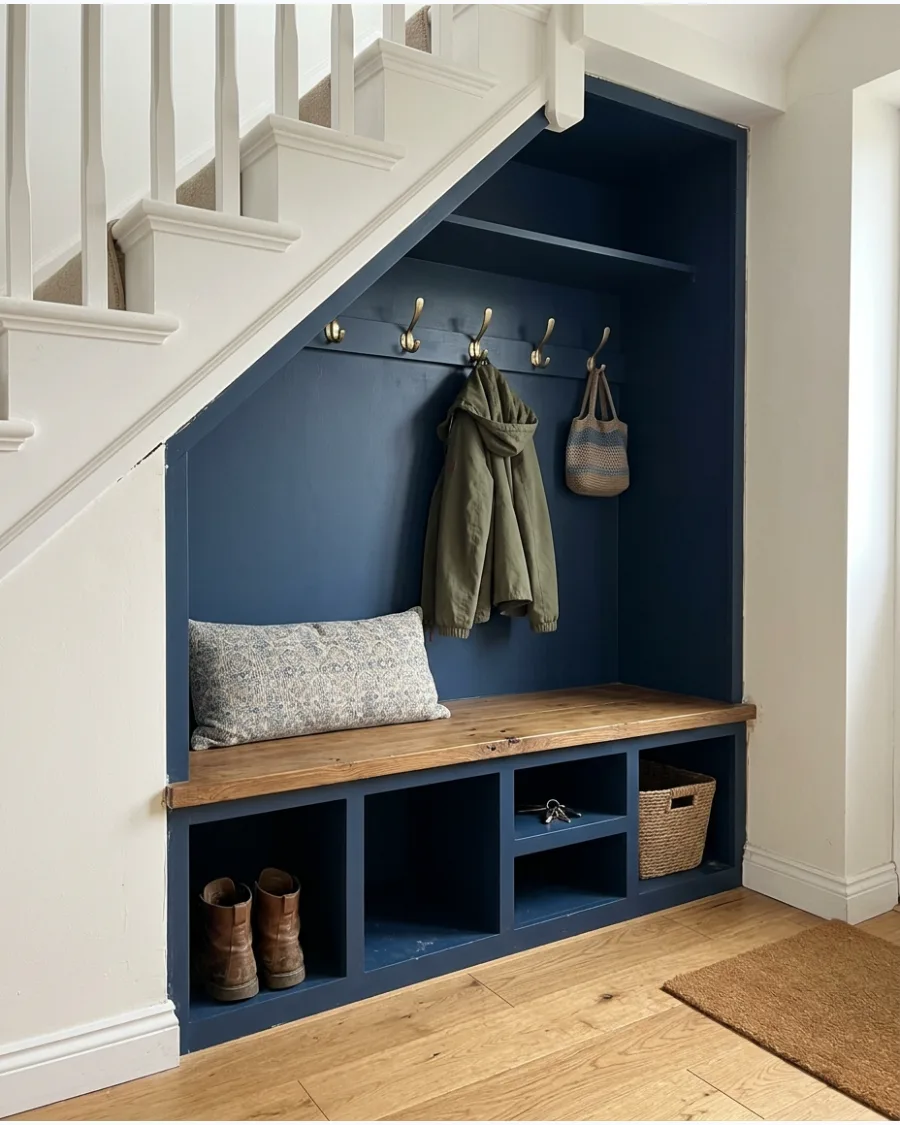
Navy blue is a classic choice that feels sophisticated and hides scuff marks from boots. Add a patterned seat cushion to break up the solid block of color and introduce some personality. The deep blue looks intentional and polished against crisp white walls.
- Navy paint costs $50 and a custom foam cushion is approximately $100.
- Secure the unit to the wall studs to handle the weight of heavy winter gear.
- Renters can use navy contact paper on flat-front furniture to get the look without paint.
Quick win: Choose a navy with grey undertones so it does not look like bright primary blue under artificial hallway lights.
25. Warm Brown Under-Stairs Mudroom
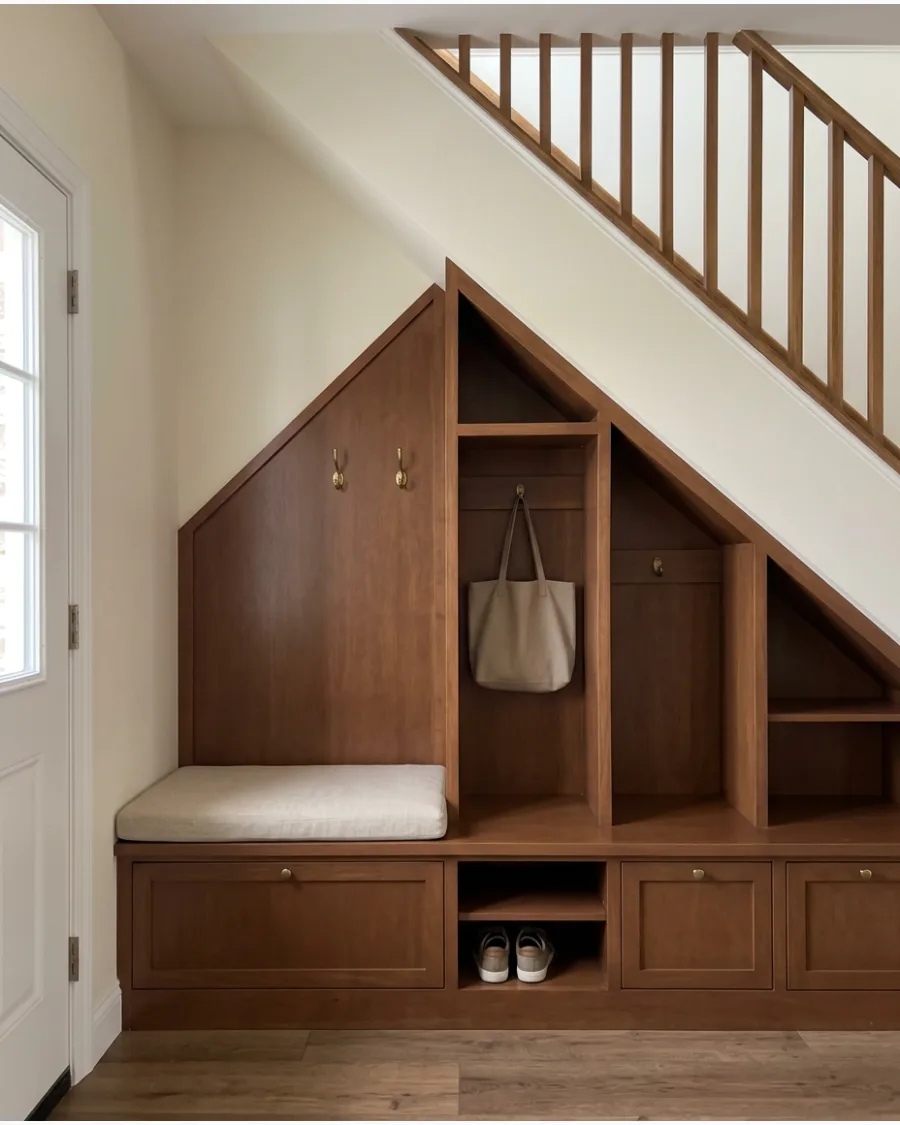
A tonal brown palette creates a cozy and inviting entryway for family and guests. Mix different textures like linen cushions and aged brass hooks to keep the monochromatic look from feeling flat. This style works perfectly in homes with traditional architecture that need a modern storage update.
- Walnut stain costs $15 and linen fabric for a DIY cushion is about $30.
- Sand the wood thoroughly between stain coats for a professional, smooth-to-the-touch finish.
- Use a medium-toned brown to hide dirt without making the space feel cramped.
Most people skip this: Match the metal finish of your hooks to the door hardware in the rest of the house for a cohesive look.
26. Two-Tone Under-Stairs Mudroom
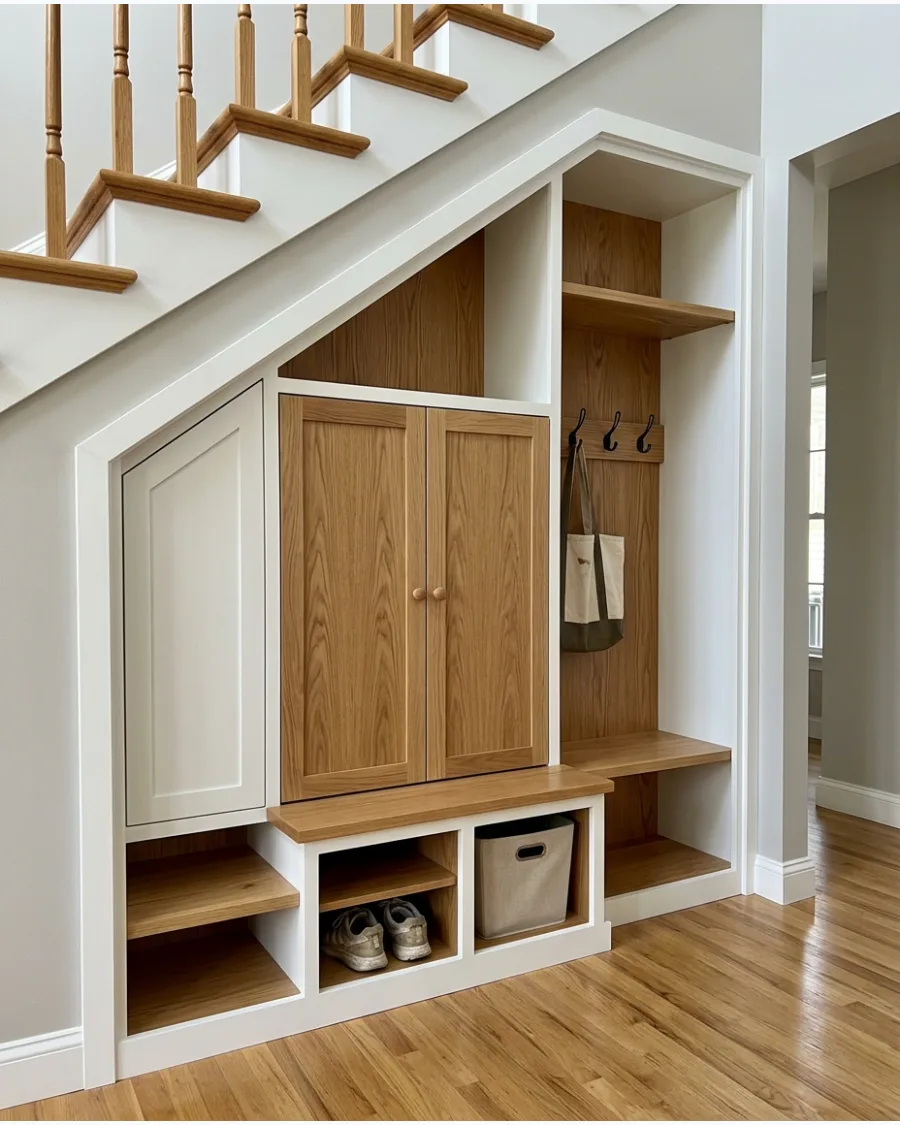
Using two different finishes defines the different functions of the space. Paint the outer frame a light color and use a natural wood for the interior bench and shelves to create depth. This visual trick makes a shallow alcove look deeper than it actually is.
- Two quarts of paint cost $60 and wood planks for the interior are roughly $150.
- Install the darker material on the surfaces that take the most abuse, like the seat.
- Apply a durable polyurethane to the wood sections to prevent water rings from wet umbrellas.
Best shortcut: If you are not building from scratch, paint the walls of the alcove a dark color and keep the furniture light.
27. Minimalist Under-Stairs Mudroom
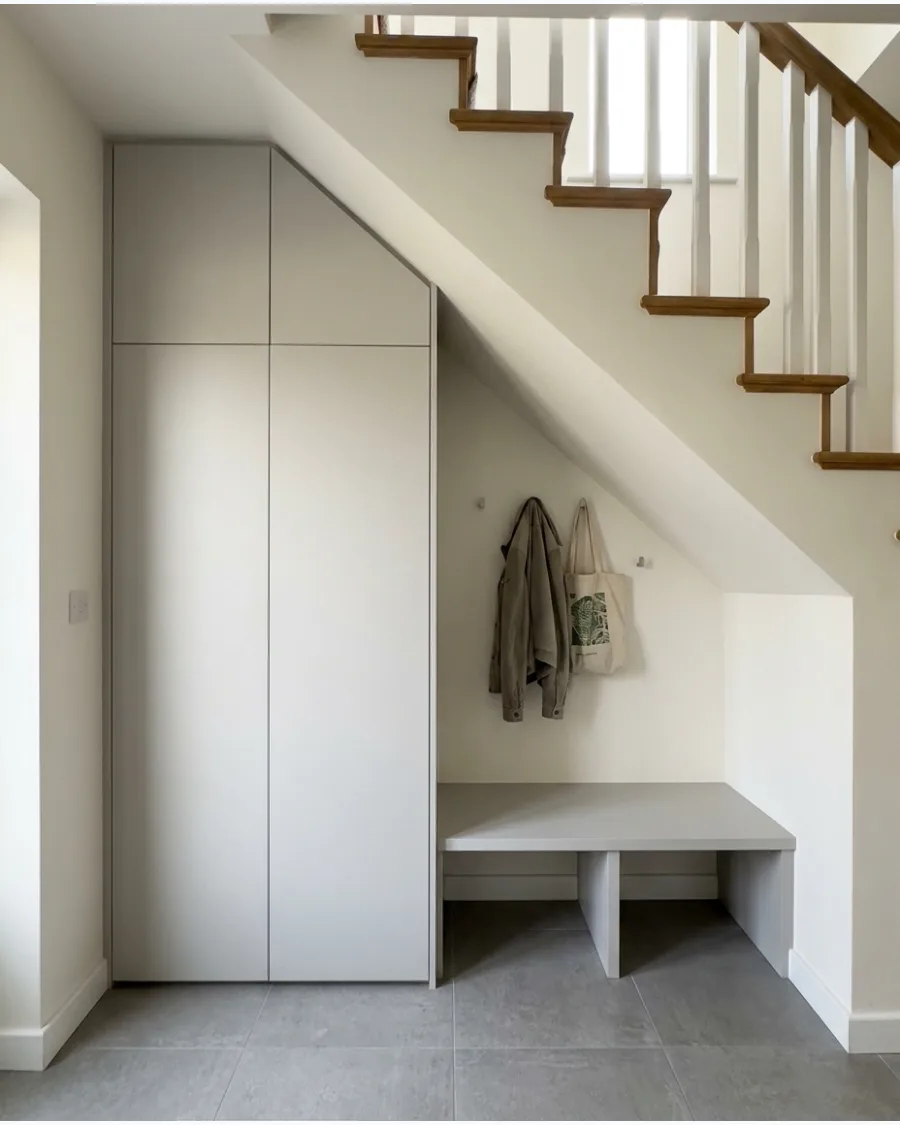
Flat-front cabinetry hides the visual noise of a busy family entryway. Use push-to-open latches instead of traditional handles for a sleek and seamless appearance. This design is ideal for narrow hallways where protruding knobs might catch on clothing.
- Push latches cost $20 for a set and MDF panels are around $200.
- Ensure a 1/8-inch gap between cabinet doors for a clean shadow line.
- Choose a high-quality primer to ensure the paint sticks to the smooth cabinet surfaces.
Quick win: Store only the current season's items inside to keep the minimalist look functional rather than overcrowded.
28. Organic Modern Under-Stairs Mudroom
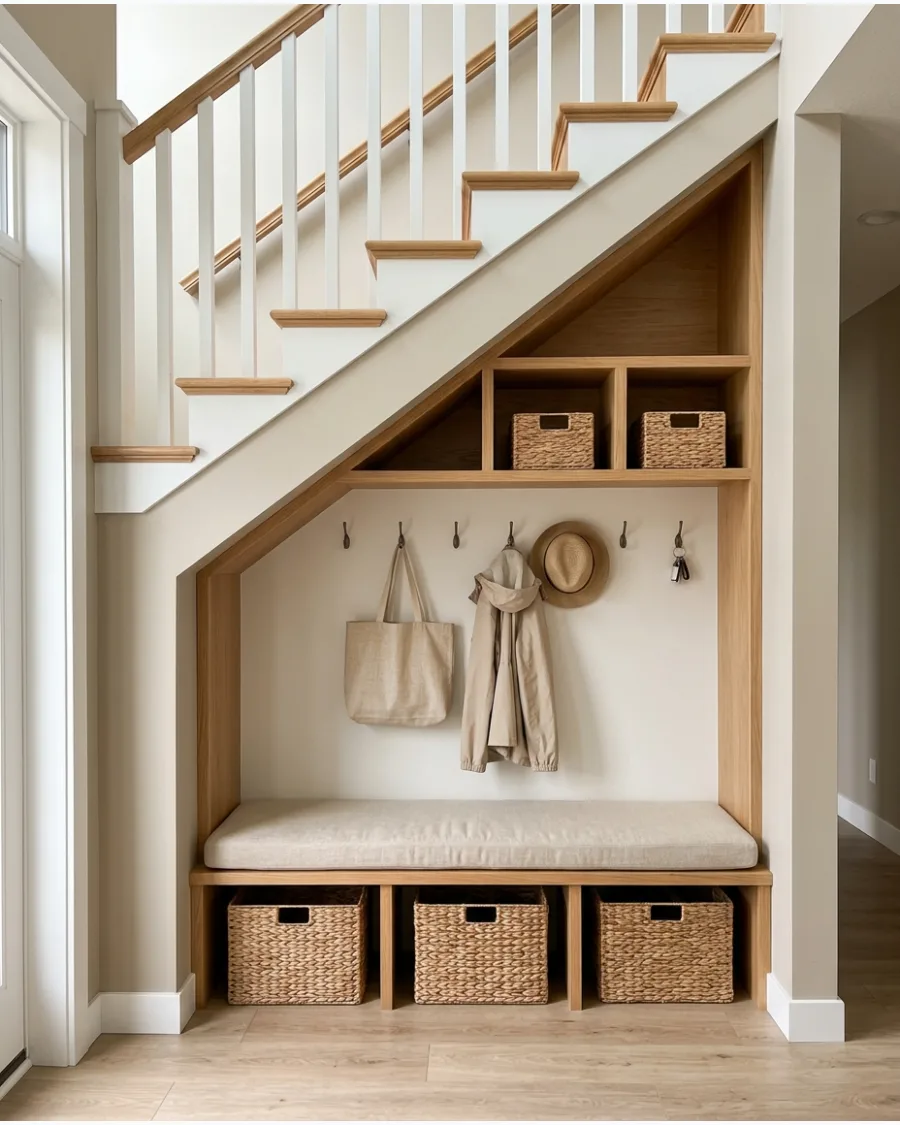
This style focuses on natural materials and soft, rounded edges to create a calm entry. Layer a jute rug in front of the bench to add texture and catch dirt before it enters the main house. Warm neutrals and raw wood finishes make the space feel organized.
- A small jute rug costs $40 and a simple oak bench is about $250.
- Keep the color palette to three main tones: wood, cream, and one soft earth tone.
- Use heavy-duty wall anchors for hooks to prevent them from pulling out of the drywall.
Most people skip this: Round the corners of the bench seat with a sander to prevent painful bumps in a tight walkway.
29. Under-Stairs Mudroom With Fluted Wood Paneling
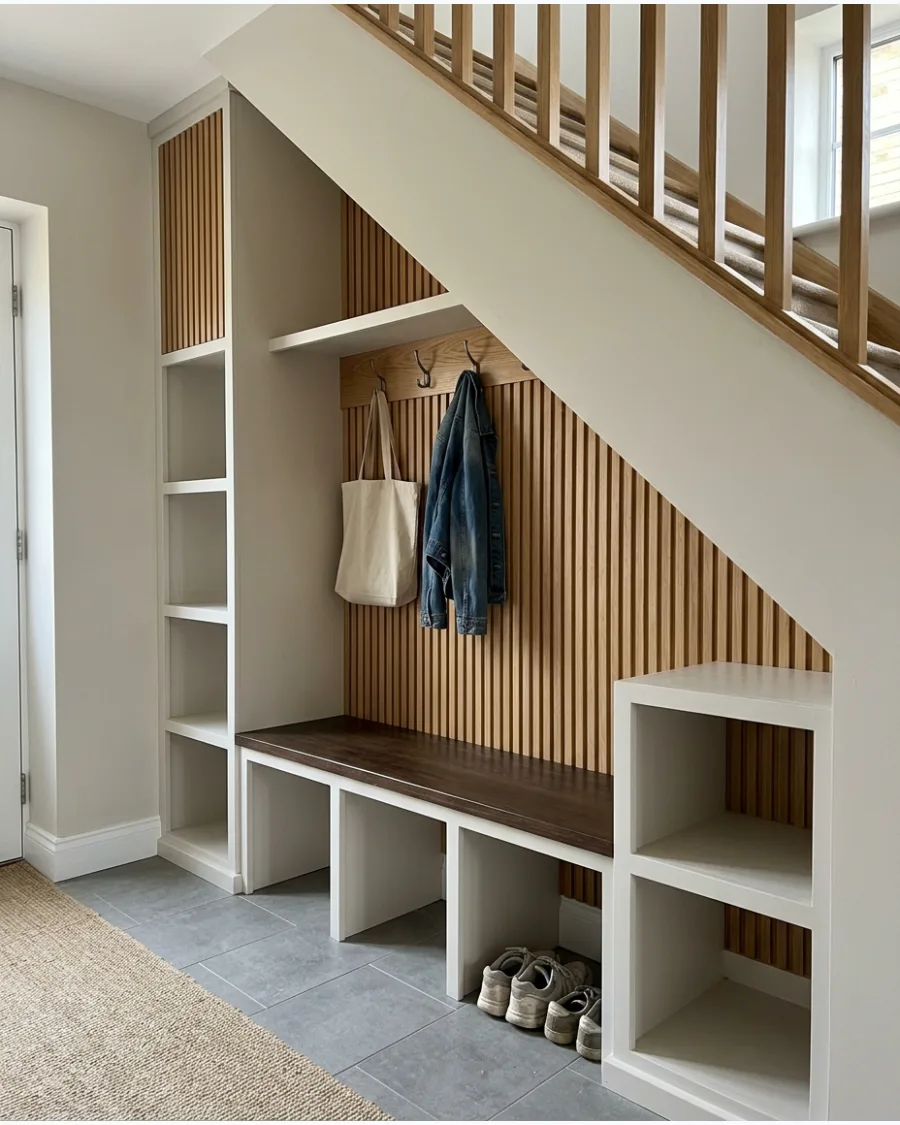
Fluted wood slats add a high-end architectural detail to a basic storage unit. Run the slats vertically behind the bench to create a stunning backdrop that hides wall imperfections. The texture catches the light and adds a layer of sophistication to the mudroom.
- Fluted panels cost $150 and construction adhesive is around $10.
- Use a miter saw to cut the slats at the exact angle of the staircase for a custom fit.
- Paint the wall behind the slats a dark color to make the wood texture pop.
Best shortcut: Use pole wrap or pre-made tambour panels to get the fluted look without installing individual wood strips.
30. Under-Stairs Mudroom With Arched Details
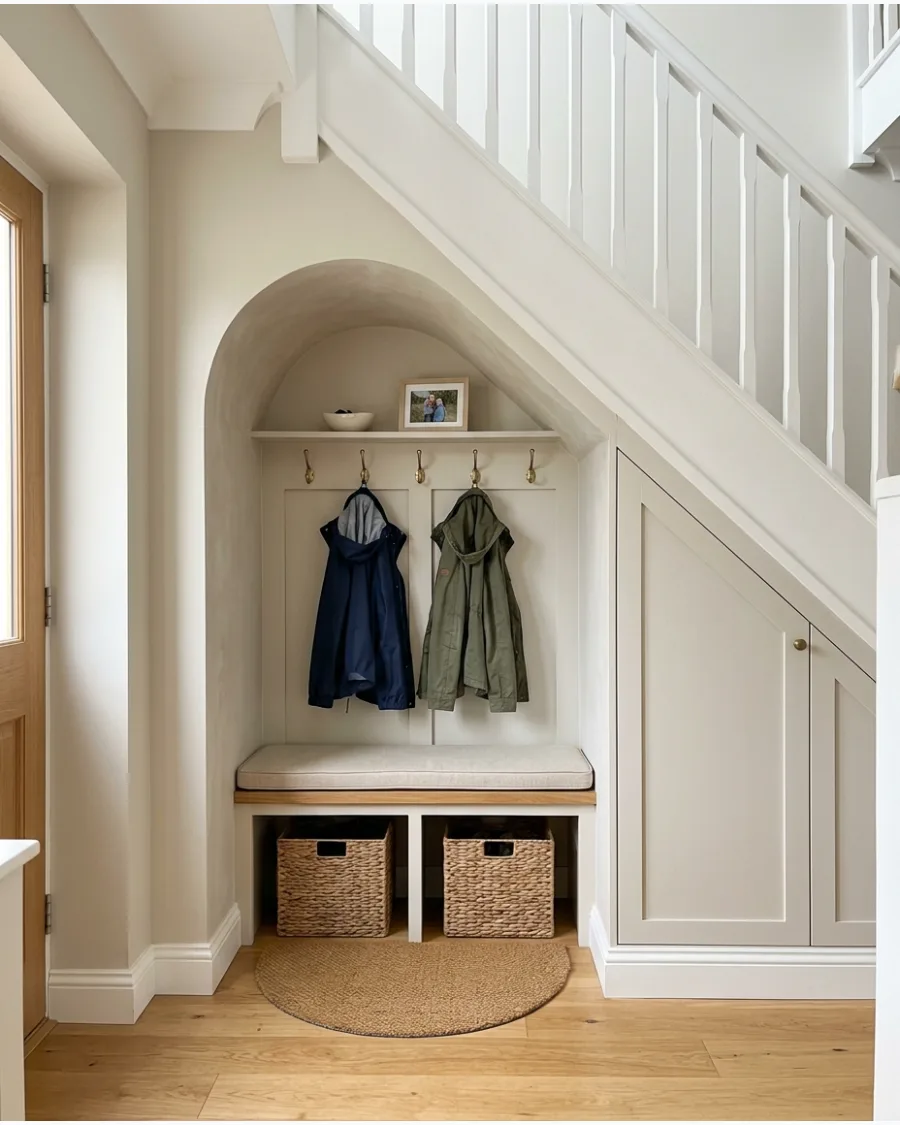
An arched opening breaks up the harsh diagonal lines of the staircase. Frame the mudroom nook with a soft curve to turn a functional storage spot into a design feature. This custom touch makes the built-in feel like an original part of the home's architecture.
- Drywall repair kits cost $40 and flexible arch corner bead is about $20.
- Use a template made of cardboard to ensure the arch is symmetrical before cutting.
- Install a small battery-operated puck light inside the arch to highlight the space at night.
Quick win: Paint the inside of the arch one shade darker than the hallway to create a sense of depth and coziness.
FARMHOUSE & COTTAGE UNDER-STAIRS MUDROOMS
31. Farmhouse Under-Stairs Mudroom
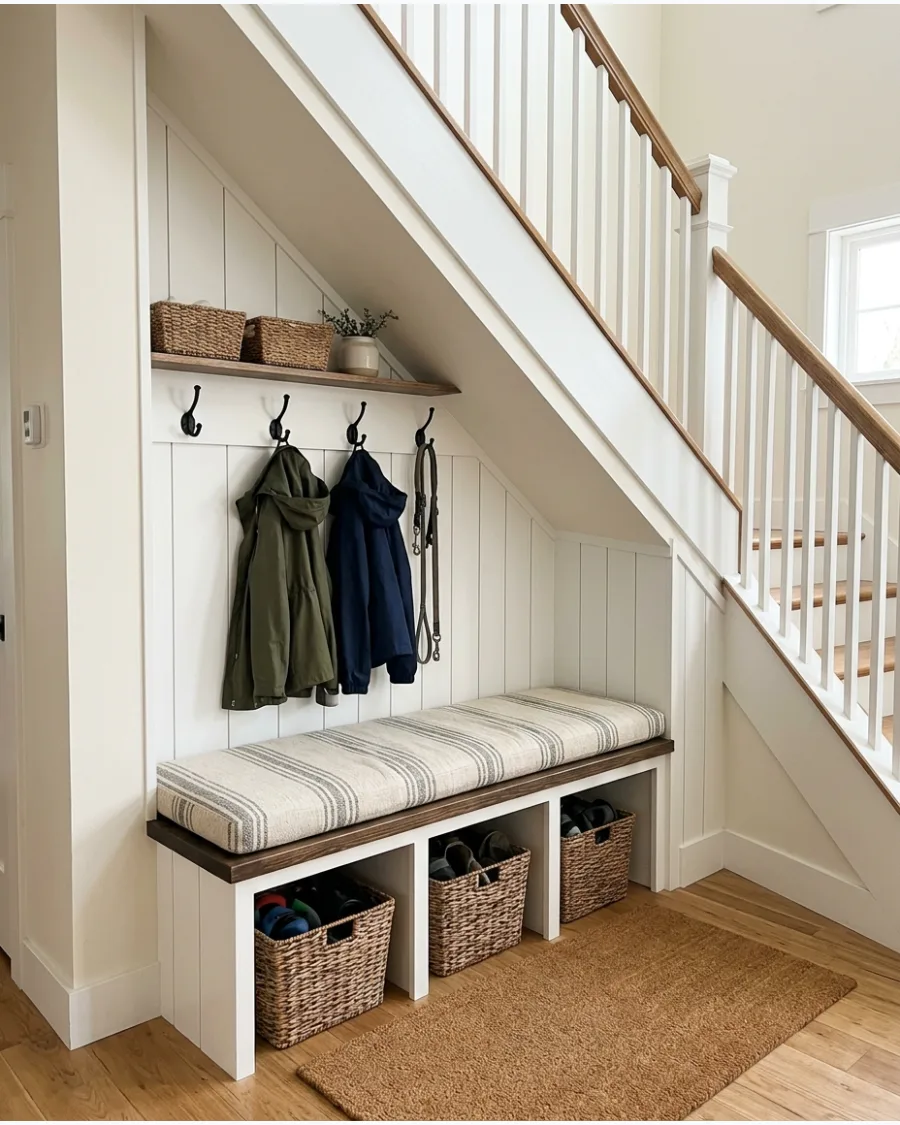
Mix a dark stained wood bench with crisp white wall paneling to create high contrast. Black iron hooks provide a sturdy place for heavy coats while wicker baskets keep shoes out of sight.
Anchor the space with a thick seat cushion in a neutral linen to make the transition from the stairs feel intentional. High-contrast palettes keep small alcoves from feeling cluttered or dark. This layout works well because it balances modern clean lines with traditional materials.
- Budget: $200-$500 for materials.
- Mount hooks into wall studs or use heavy-duty toggle bolts for weight support.
- Swap wicker for wire baskets to lean into a more industrial farmhouse look.
Quick win: Use a bench with a small lip on the back edge to prevent shoes from scuffing the wall paint.
32. Under-Stairs Mudroom With Beadboard
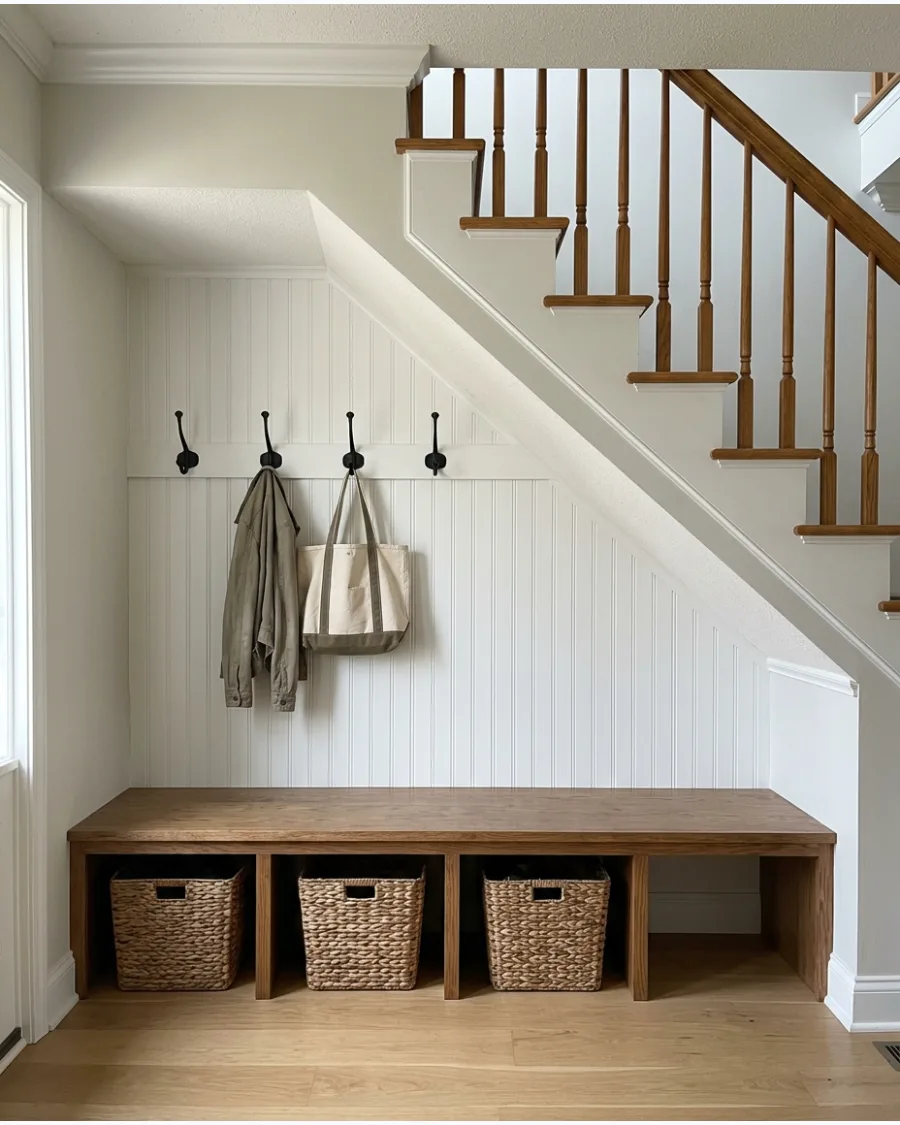
Beadboard paneling adds a classic architectural detail that also serves as a durable barrier against daily scuffs. Paint the paneling the same color as your baseboards for a seamless, custom-built look.
Run the beadboard from the floor to the highest point of the slope to unify the awkward angles. It is an affordable way to make a basic bench feel like a permanent part of the home. The vertical grooves help the small space feel taller and more organized.
- Budget: $100-$300 for wood panels and trim.
- Use construction adhesive and finish nails to ensure the panels stay flat against the drywall.
- Paint with a semi-gloss or satin finish to make cleaning mud splashes much easier.
Best shortcut: Buy pre-primed beadboard sheets at the hardware store to save hours of prep and sanding time.
33. Under-Stairs Mudroom With Vertical Shiplap
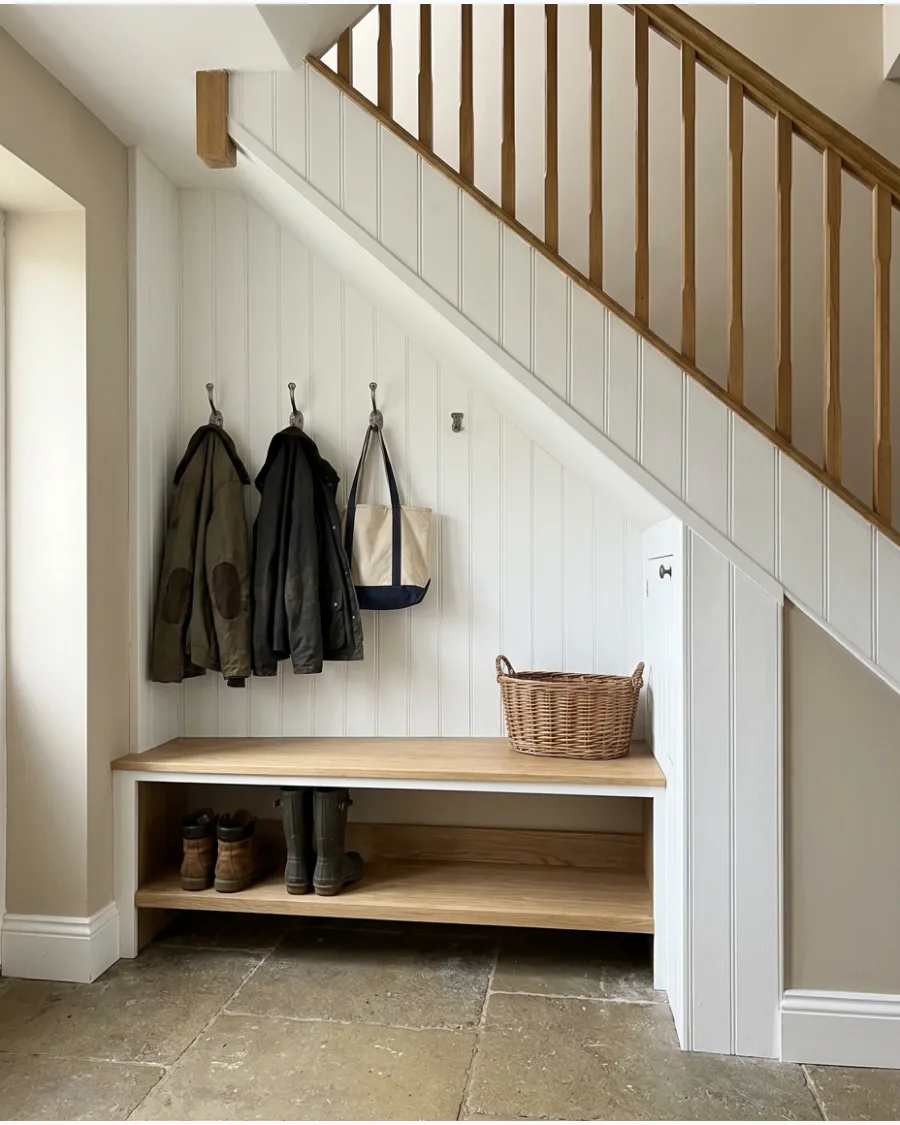
Vertical lines draw the eye upward, which helps the low clearance at the end of the stairs feel less cramped. Shiplap provides a clean, modern take on traditional wall treatments.
Space the boards slightly apart to create deep shadow lines that add depth to the small alcove. This texture effectively hides small imperfections in the drywall behind it. It is a great choice for high-traffic zones because wood is much harder to dent than standard plaster.
- Budget: $150-$400 depending on wood species.
- Use 1×6 or 1×8 pine boards for the shiplap to get the best scale for the space.
- Paint the shiplap a soft off-white to keep the entry area bright and welcoming.
Most people skip this: Paint the gaps between the boards before you nail them up so the old wall color doesn't peek through the cracks.
34. Cottage Under-Stairs Mudroom
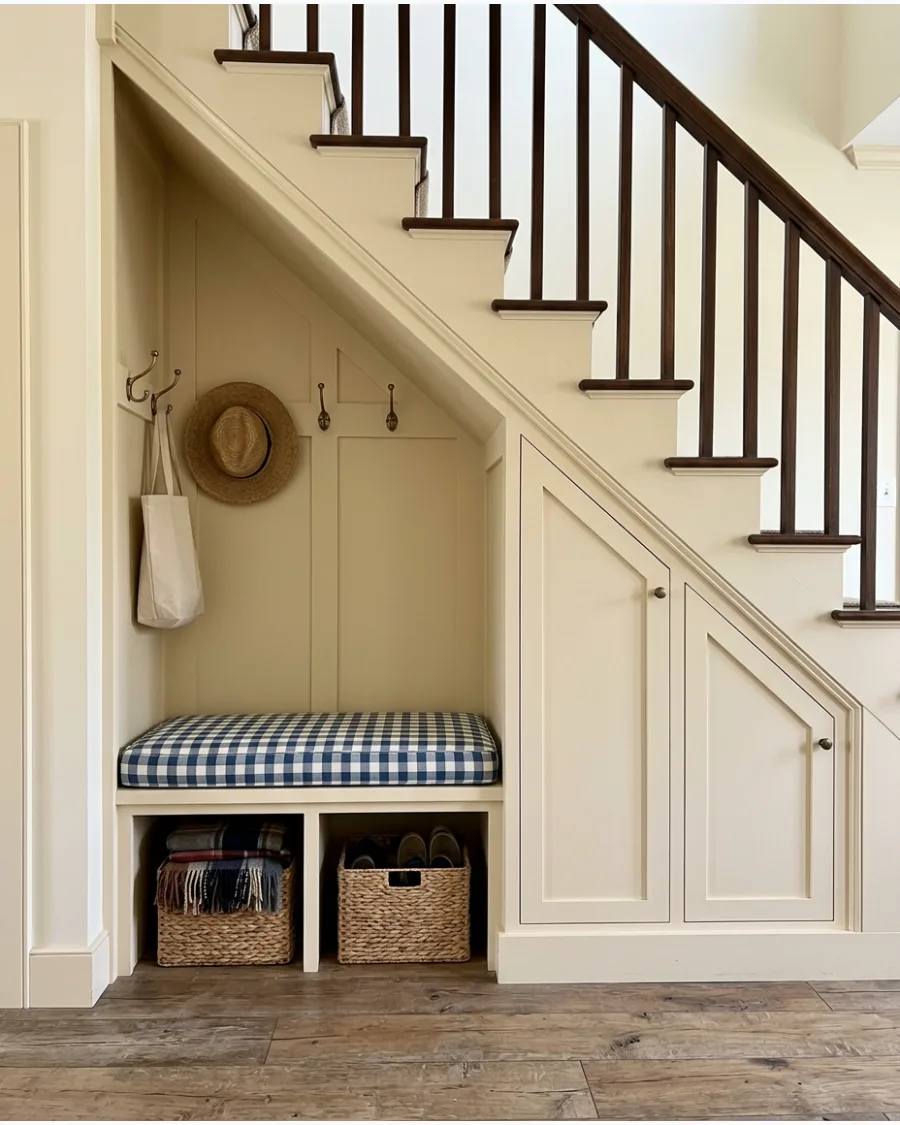
Soften the hard lines of the staircase with a warm, creamy paint color on the cabinetry. Add a soft cushion in a subtle floral or gingham print to introduce a touch of pattern.
Incorporate vintage-style brass hooks with rounded ends to protect delicate sweaters and scarves. This style focuses on comfort and a lived-in feel rather than strict minimalism. It turns a dark corner into a cozy, inviting nook for the whole family.
- Budget: $300-$700 for custom paint and textiles.
- Choose a cushion fabric with a high rub count for better daily durability.
- Use baskets with fabric liners to prevent natural fibers from snagging your clothes.
Quick win: Adding a scalloped edge to the bench apron instantly creates that custom cottage charm.
35. English Country Under-Stairs Mudroom
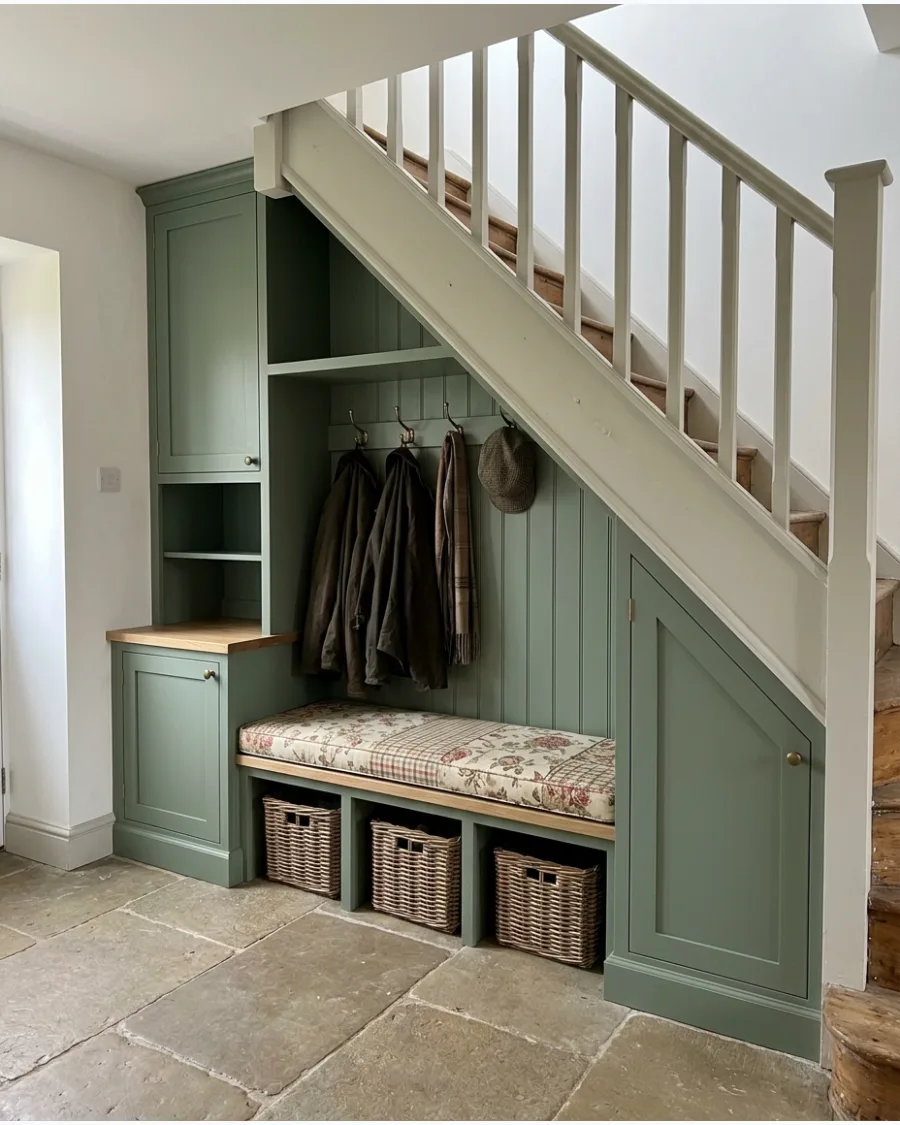
Muted sage green or dusty blue cabinetry creates a sophisticated, grounded atmosphere. Pair these tones with unlacquered brass hardware that will develop a natural patina over time.
Layer a small patterned rug in front of the bench to add warmth and catch outdoor debris. The goal is a space that looks like it has been part of the house for decades. Natural wood bench tops provide a warm contrast to the painted surfaces.
- Budget: $500-$1,200 for paint, hardware, and rugs.
- Use historical paint colors like muted greens or grays for an authentic feel.
- Install a small wall-mounted picture light above the hooks for extra ambiance.
Best shortcut: Mix and match different hook styles in the same finish for a collected, antique look.
36. Rustic Under-Stairs Mudroom
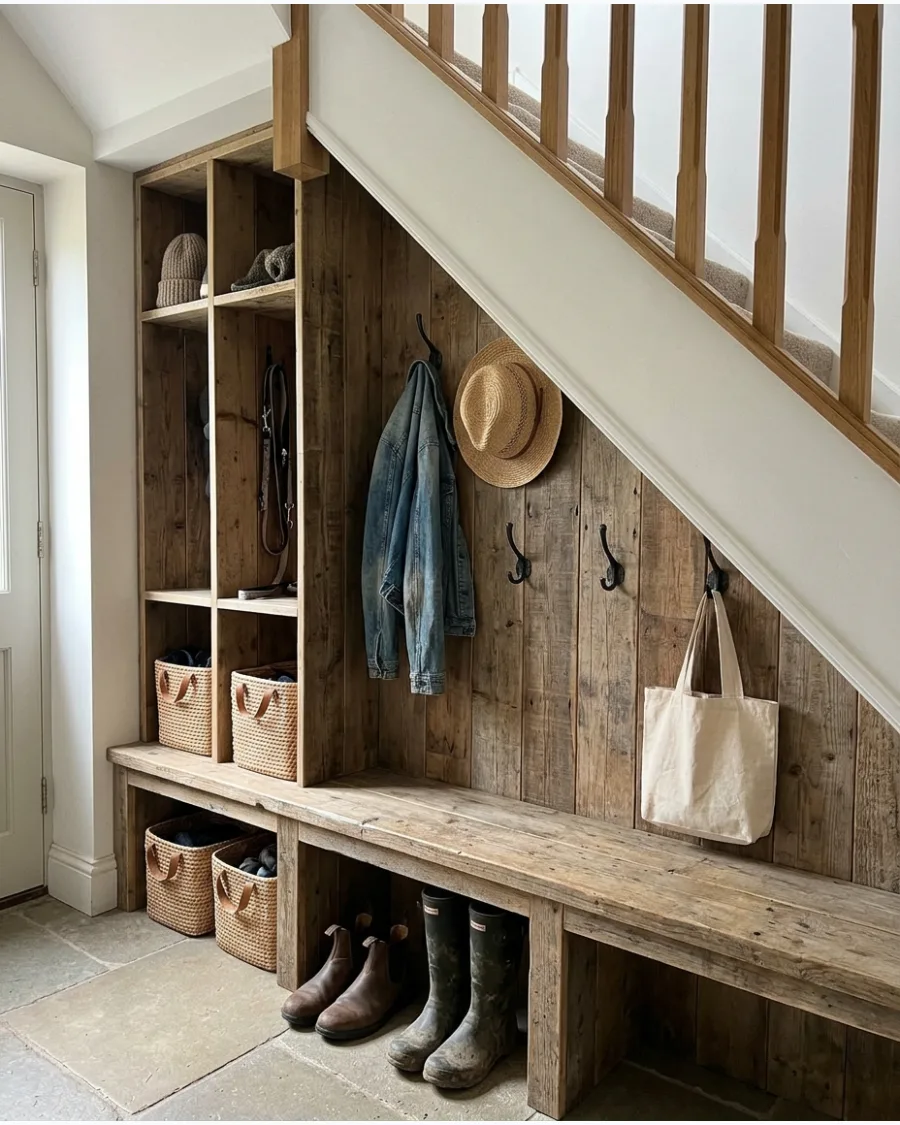
Reclaimed wood brings instant character and stands up well to the heavy use of an entryway. Open cubbies allow for quick access to shoes without the fuss of opening doors.
Use heavy-duty cast iron hooks that can handle the weight of winter parkas and heavy backpacks. Natural textures like jute and wood make the space feel sturdy and reliable. This style is very forgiving of the scratches and dings that naturally happen in a mudroom.
- Budget: $250-$600 for reclaimed lumber and hardware.
- Sand reclaimed wood thoroughly and apply a clear coat to prevent splinters.
- Use a matte sealer to protect the wood while keeping the natural, dry look.
Quick win: Use a flat-head screw with a dark finish to match cast iron hooks for a more authentic rustic appearance.
37. Under-Stairs Boot Room
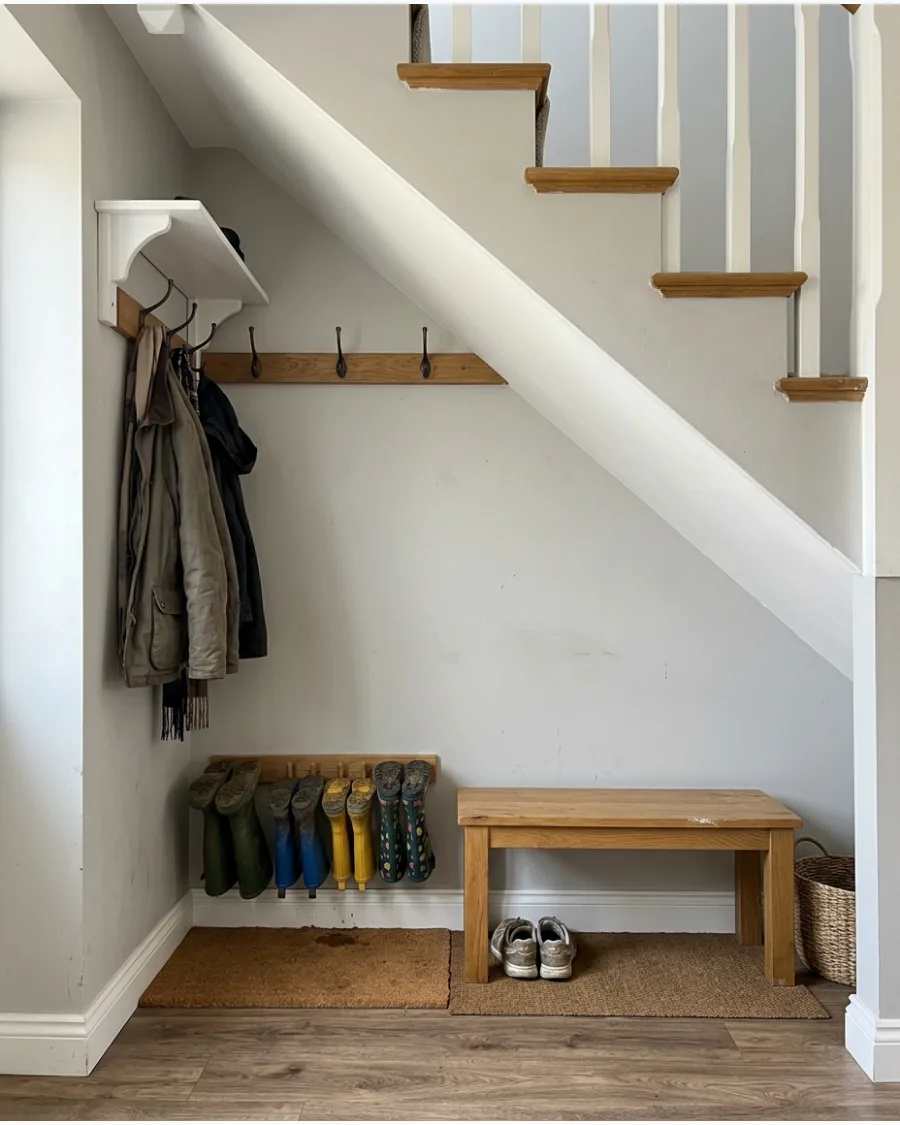
Maximize the tallest part of the staircase slope for long coats and the lowest part for tall boots. Dedicated boot racks keep muddy footwear off the main floor and allow them to dry faster.
Add a small shelf above the hooks for hats and gloves to keep the bench clear for seating. This setup is perfect for active families who spend a lot of time outdoors.
It keeps the mess contained to one specific, easy-to-clean zone.
- Budget: $200-$450 for shelving and racks.
- Install a boot tray filled with river stones beneath the rack to catch water.
- Use vertical boot stands to help footwear maintain its shape and dry out quickly.
Most people skip this: Leave at least 18 inches of vertical clearance if you plan to store tall wellington boots.
38. Vintage Under-Stairs Mudroom
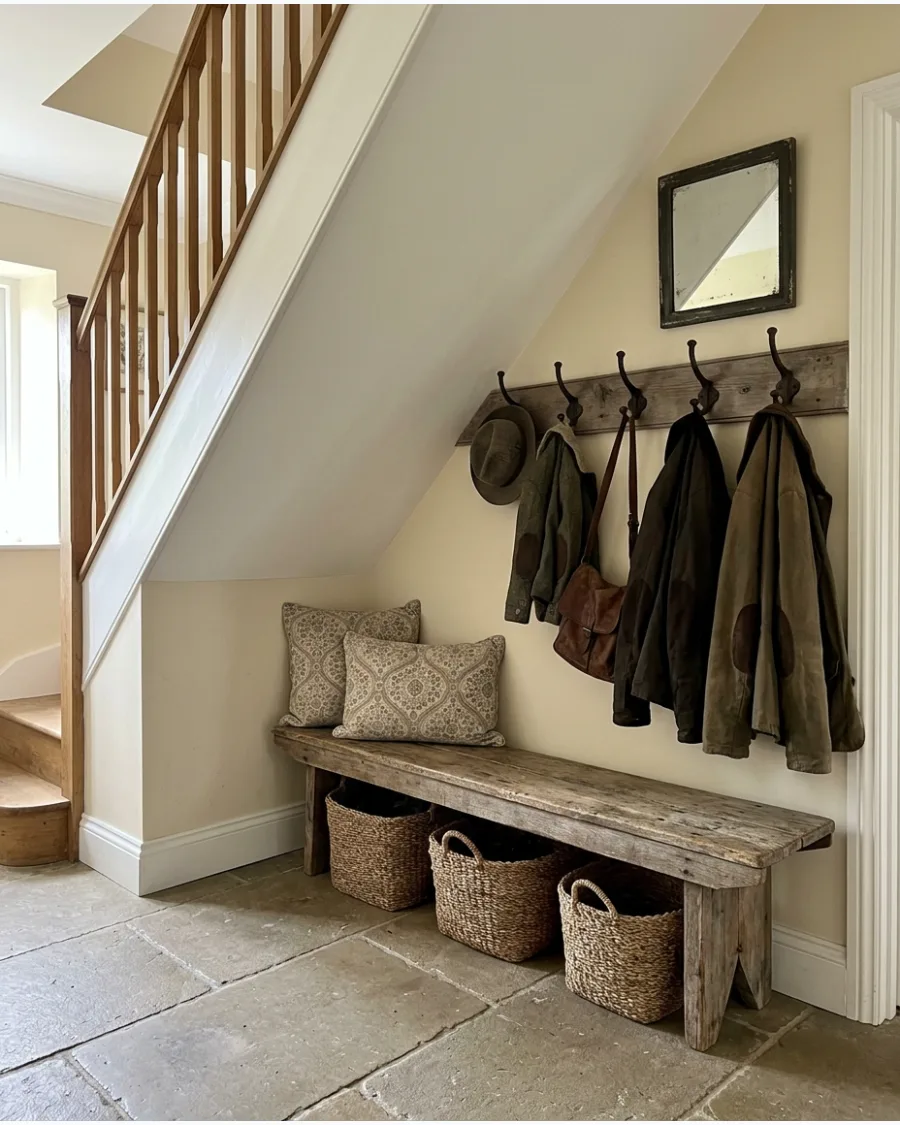
Hunt for an antique wooden bench that fits the dimensions of your alcove for a unique look. Weathered finishes hide new scratches and scuffs better than pristine paint.
Mix in old metal locker baskets for a touch of industrial history and ventilated shoe storage. It is an easy way to add soul to a new construction home without a full renovation. Mismatched hooks can add to the charm if they share a similar metal finish.
- Budget: $150-$400 depending on thrift store finds.
- Search local flea markets for benches that are narrow enough for hallway clearance.
- Clean old metal hooks with steel wool and a bit of oil before mounting them.
Best shortcut: Rub a bit of dark furniture wax into new wood to give it an aged, vintage appearance instantly.
39. Under-Stairs Mudroom With Plaid Bench Cushion
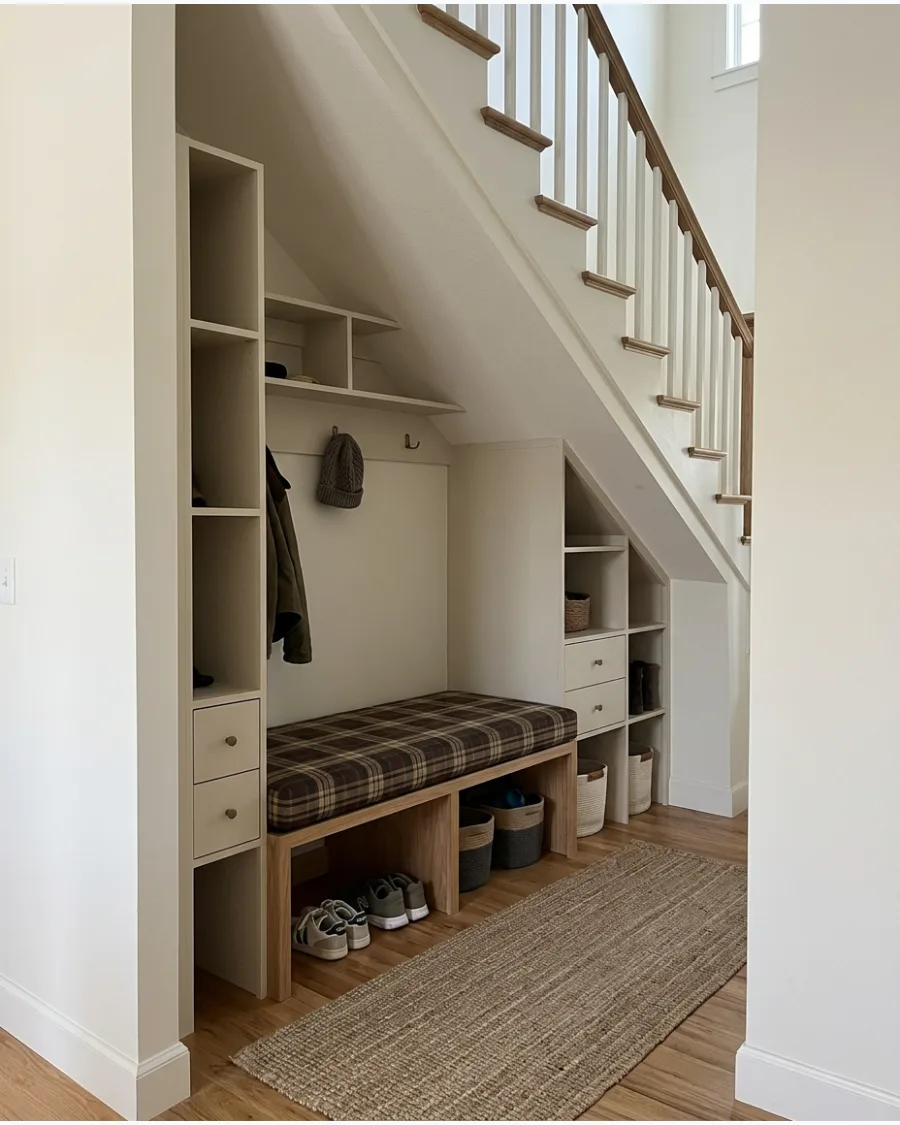
A plaid cushion in forest green or deep burgundy adds an instant seasonal feel to a neutral mudroom. It provides a comfortable spot to sit while putting on shoes or checking the mail.
Choose a fabric with a tight weave to prevent pet hair and dirt from getting trapped in the fibers. This simple textile change can update the entire look of the entryway without any construction. It is a low-cost way to make the space feel finished and intentional.
- Budget: $50-$150 for custom or ready-made cushions.
- Use Velcro strips on the bottom of the cushion to keep it from sliding off the bench.
- Coordinate the plaid colors with your existing wall paint for a professional look.
Quick win: Buy a cushion with a hidden zipper so you can remove the cover for easy machine washing.
40. Under-Stairs Mudroom With Wallpaper
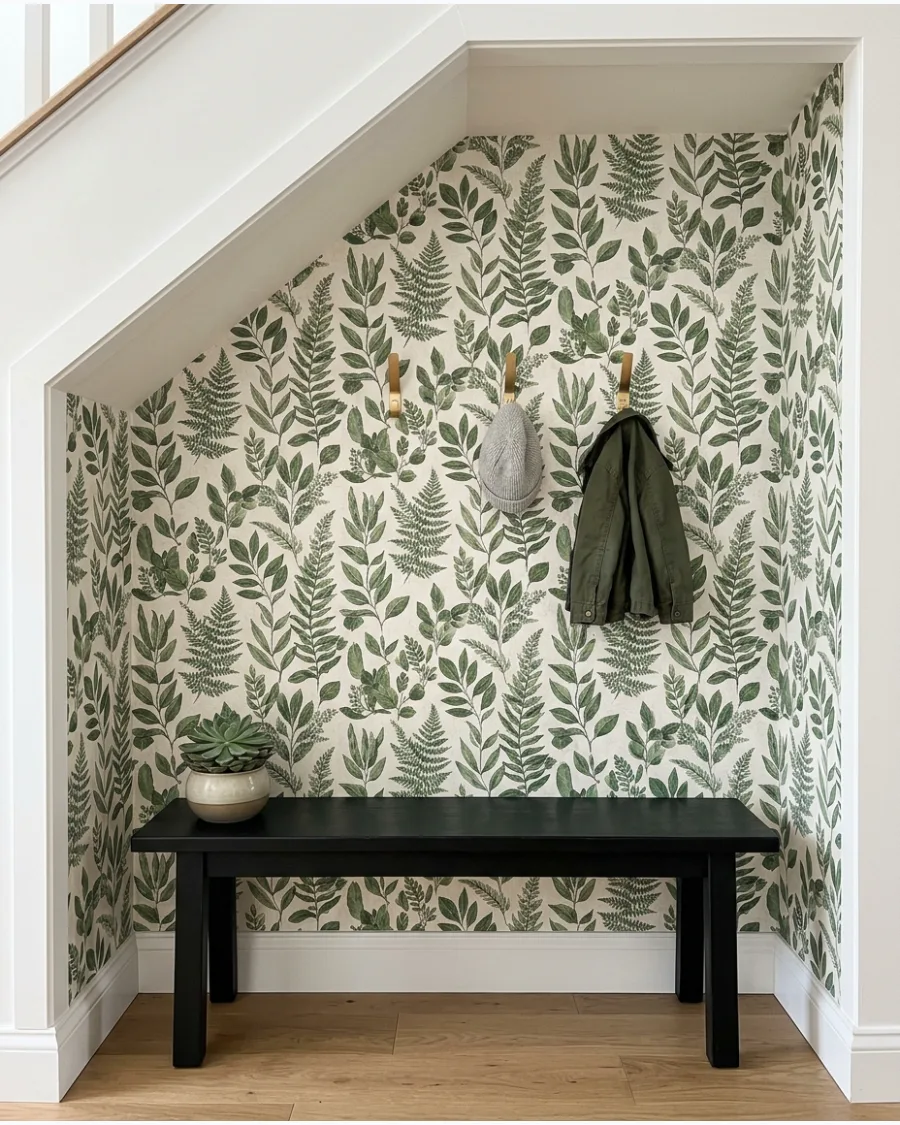
Wallpapering the small wall area under the stairs creates a focal point in an otherwise plain hallway. Botanical or geometric prints add visual interest without taking up any physical floor space.
Select a vinyl or scrubbable wallpaper that can withstand the occasional bump from a coat or bag. It turns a utilitarian storage zone into a designed feature of the home. Darker patterns are excellent for hiding the inevitable marks from hanging gear.
- Budget: $100-$250 for paper and adhesive.
- Use peel-and-stick wallpaper for an easy DIY project that is renter-friendly.
- Ensure the wall is perfectly smooth and clean before application for the best stick.
Most people skip this: Order one extra roll of wallpaper to account for the tricky diagonal cuts needed along the stair line.
FAMILY & ORGANIZATION-FOCUSED MUDROOMS
41. Family Under-Stairs Mudroom Lockers

Assigning specific zones to each person stops the hallway from becoming a dumping ground. Use vertical dividers to create tall, narrow slots that mimic school lockers without the heavy metal doors.
Install a nameplate or label above each section to give everyone clear ownership of their own mess. This system ensures that one person's oversized winter coat doesn't bury everyone else's gear.
- Custom cabinetry or plywood dividers
- Mount hooks at different heights for adults and children
- Add metal nameplate holders or small chalkboards
Quick win: Use baskets for small items like gloves and hats to keep the locker floors clear for shoes.
42. Kids' Under-Stairs Mudroom
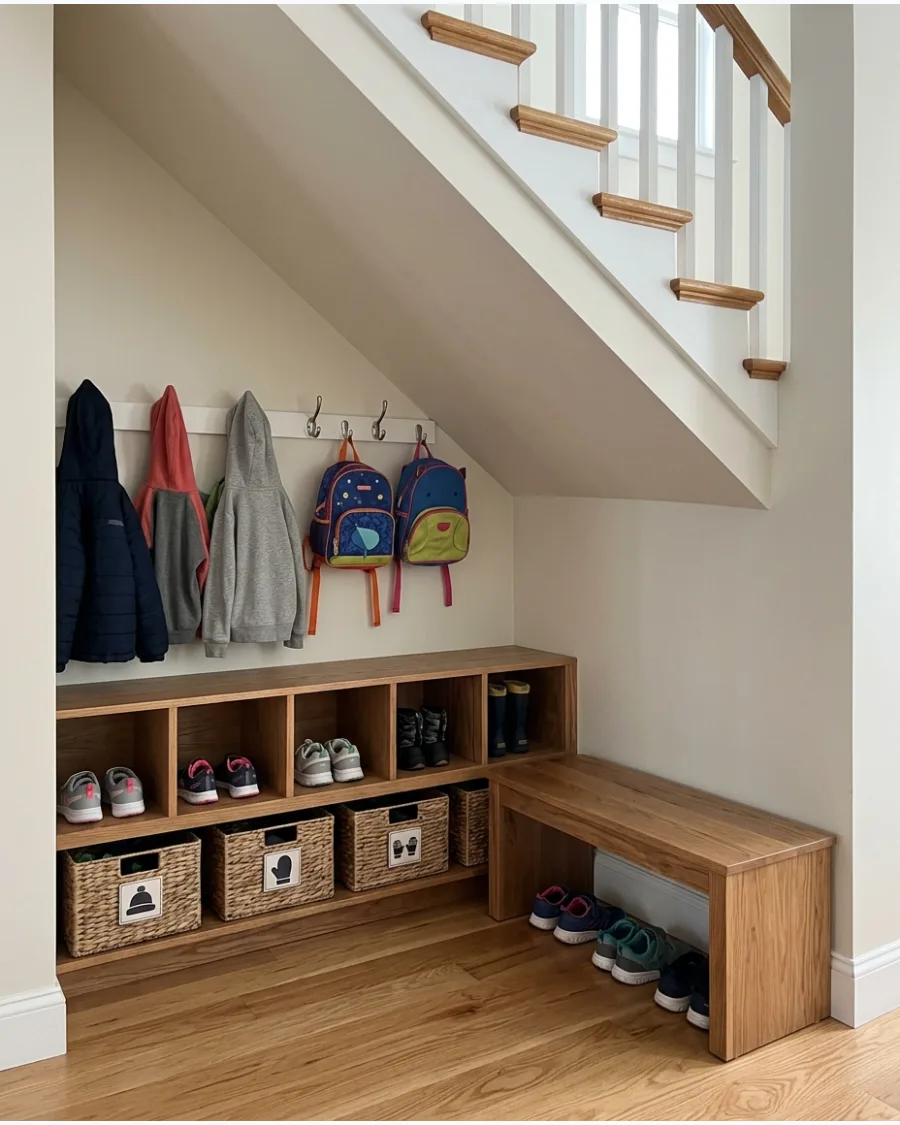
Small children struggle with high hooks and heavy closet doors, so bring everything down to their level. Use the lowest part of the staircase slope for their shoe cubbies and a sturdy, low-profile bench.
Mount large, easy-to-grab hooks no higher than four feet to encourage kids to hang up their own coats. Making the space accessible builds better habits and keeps the floor clear for walking.
- Low-profile wooden bench for seating
- Sturdy plastic or rounded metal hooks
- Rubber floor mat for muddy shoes
Best shortcut: Use different colored hooks for each child so they know exactly where their stuff belongs without needing to read a label.
43. Under-Stairs Backpack Drop Zone
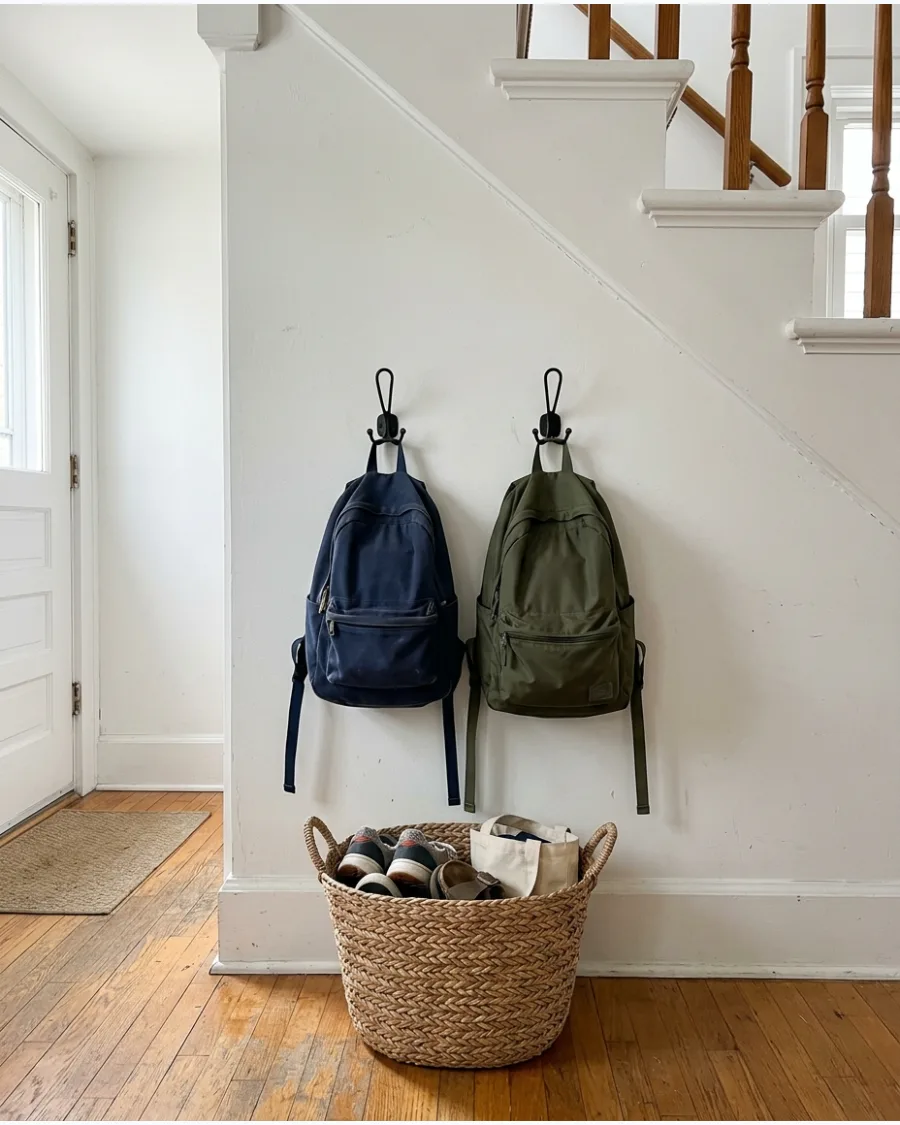
Heavy backpacks often end up in the middle of the kitchen floor because they are too bulky for standard coat hooks. Dedicate the middle section of the under-stairs area to reinforced double hooks that can handle the weight of school books.
Place a deep basket or a sturdy shelf directly below the hooks to catch any loose papers or lunchboxes. This creates a specific landing strip that makes the morning rush much smoother.
- Heavy-duty wall anchors for weight support
- Reinforced metal double hooks
- Large floor baskets for loose items
Most people skip this: Check that the hooks are screwed into studs or use heavy-duty toggle bolts, as backpacks can weigh over twenty pounds.
44. Under-Stairs Coat and Shoe Storage Mudroom
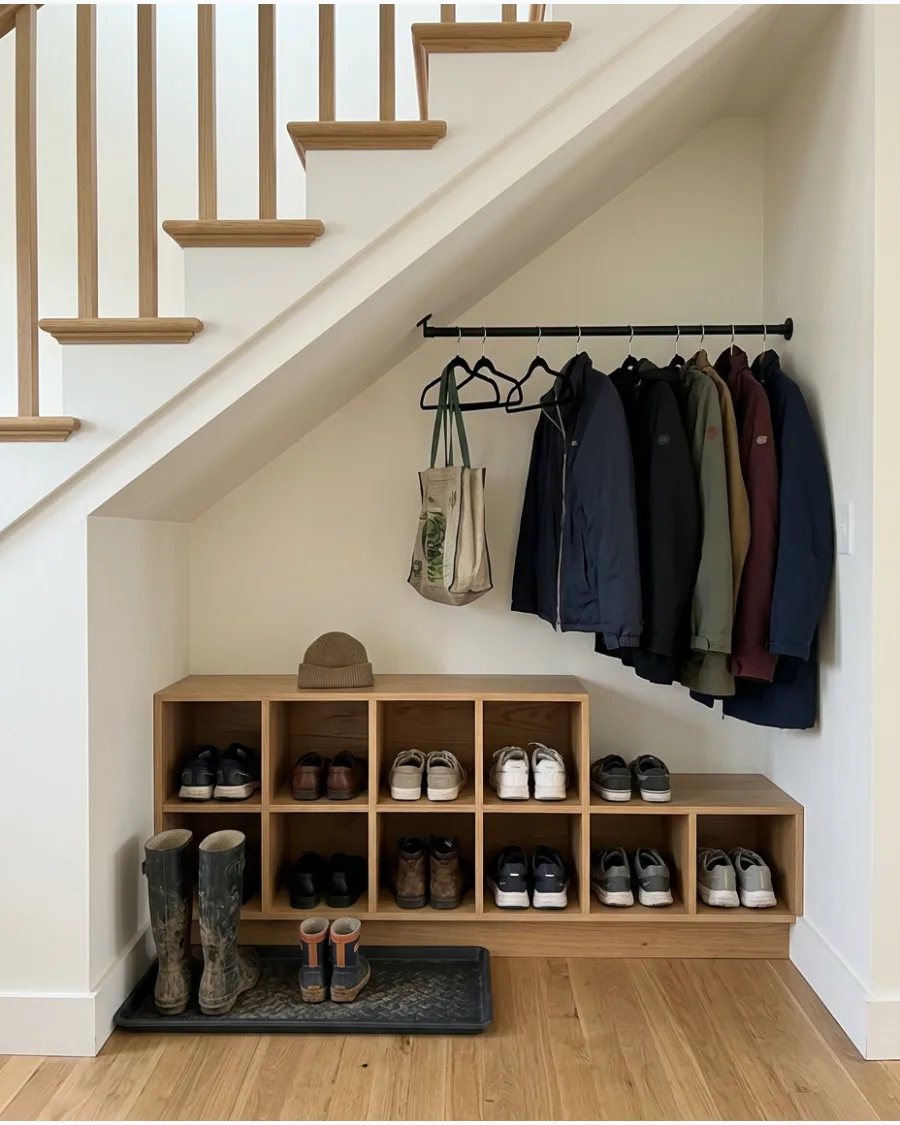
Most entryway clutter comes from a pile of shoes and a mountain of coats. Maximize the diagonal space by installing a long rail for hangers in the tall section and tiered shoe racks in the lower section.
Use a boot tray on the very bottom level to protect your flooring from salt and melting snow. This simple division of labor keeps the two biggest clutter culprits organized and accessible.
- Tension rod or fixed closet rail
- Tiered shoe rack or custom shelving
- Waterproof boot tray for the floor
Quick win: Use matching hangers to make the open storage look like a deliberate design choice rather than a messy closet.
45. Under-Stairs Mudroom With Closed Coat Closet
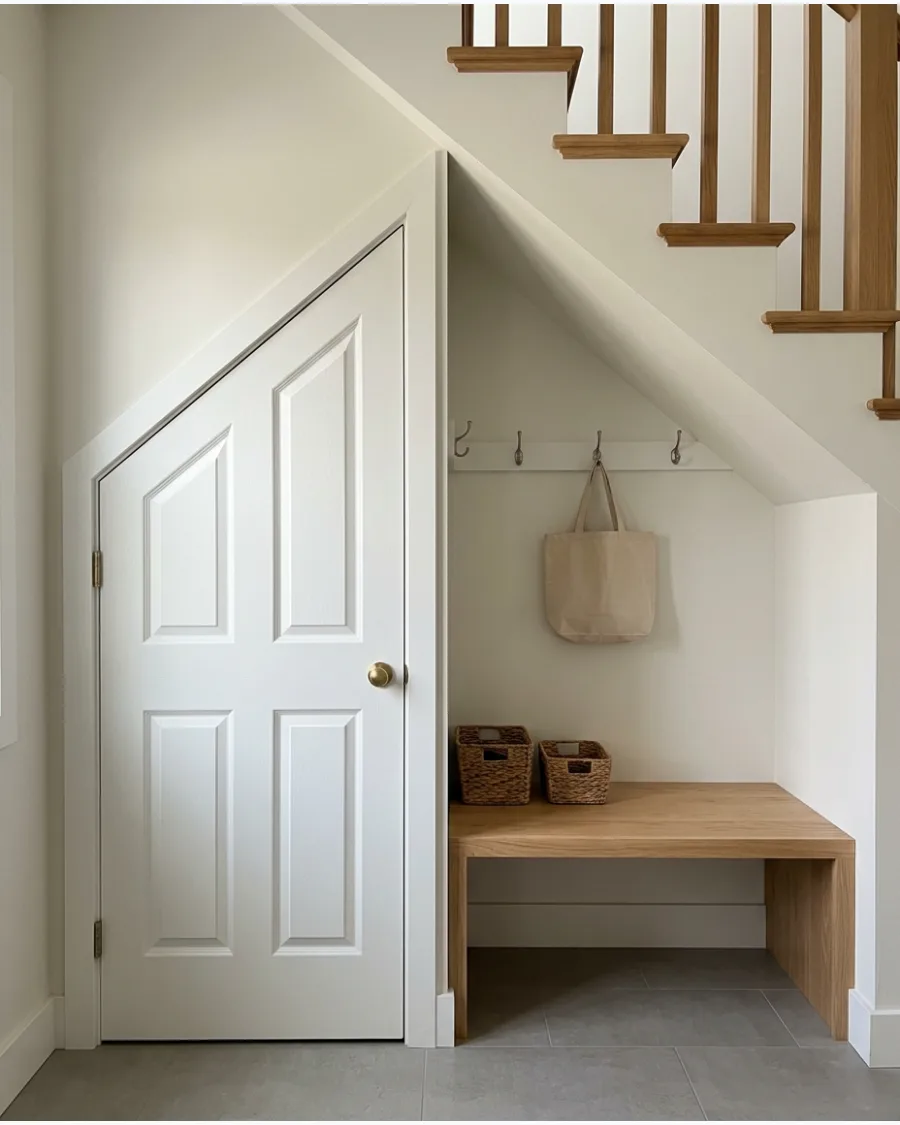
If you prefer a clean look, hide the bulkier items behind a custom-fit door in the tallest part of the staircase. This leaves the lower, open section for a bench where guests can sit to remove their shoes.
Paint the closet door the same color as the wall to help the storage blend seamlessly into the hallway. It provides the best of both worlds: hidden storage for bulky gear and open access for daily use.
- Custom-cut MDF or wood door
- Magnetic door catches for a flush finish
- Concealed hinges for a modern look
Best shortcut: Use a touch-latch or a simple finger pull instead of a bulky handle to keep the profile slim in a narrow hallway.
46. Under-Stairs Mudroom With Pull-Out Coat Rack
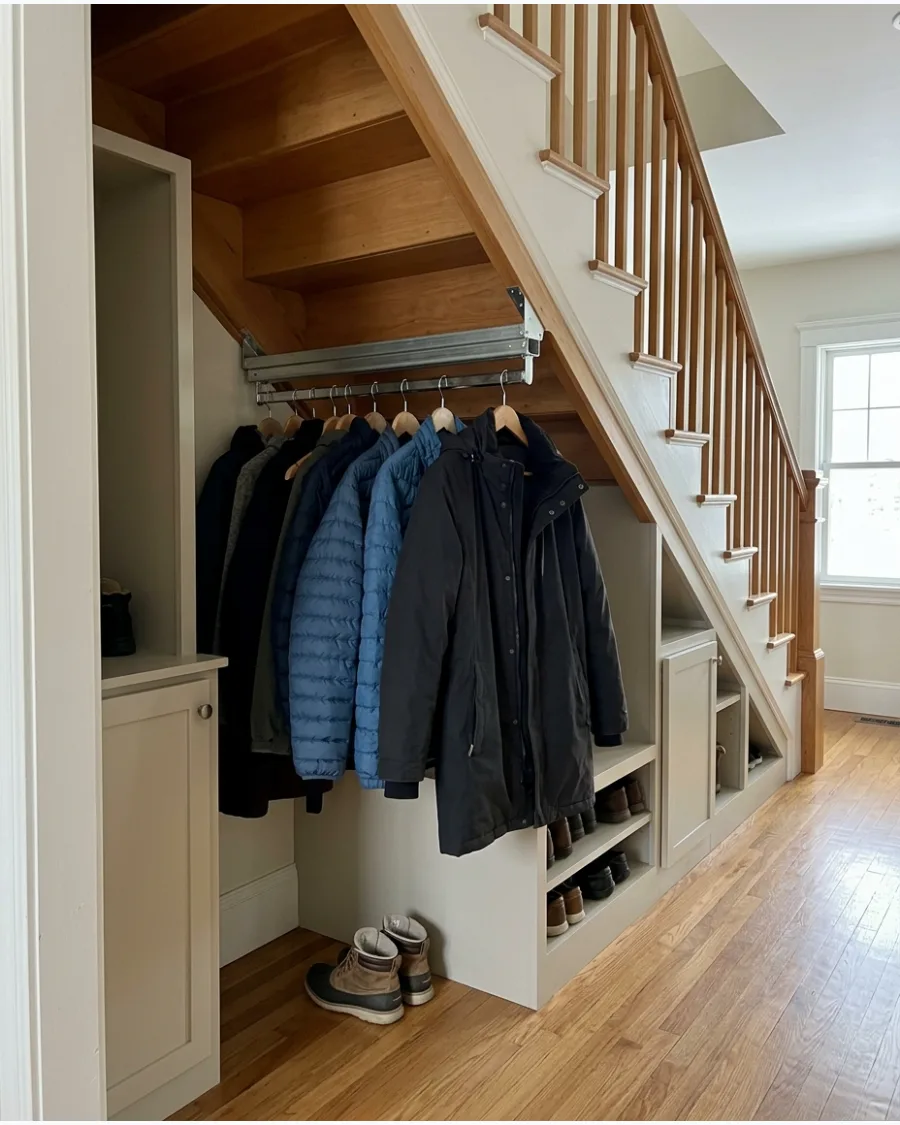
Deep spaces under stairs are often wasted because items get lost in the dark back corners. Install a heavy-duty pull-out rack that brings the coats out into the light for easy selection.
Mount the sliding hardware to the underside of the stairs to utilize the full depth of the cavity. This is the most efficient way to store a large volume of clothing in a narrow, deep footprint.
- Heavy-duty side-mount or top-mount drawer slides
- Sturdy wooden or metal frame for the rack
- Front pull handle for easy operation
Most people skip this: Ensure the slides are rated for at least 100 pounds to account for the weight of heavy winter parkas.
47. Under-Stairs Mudroom With Mail and Key Drop Zone
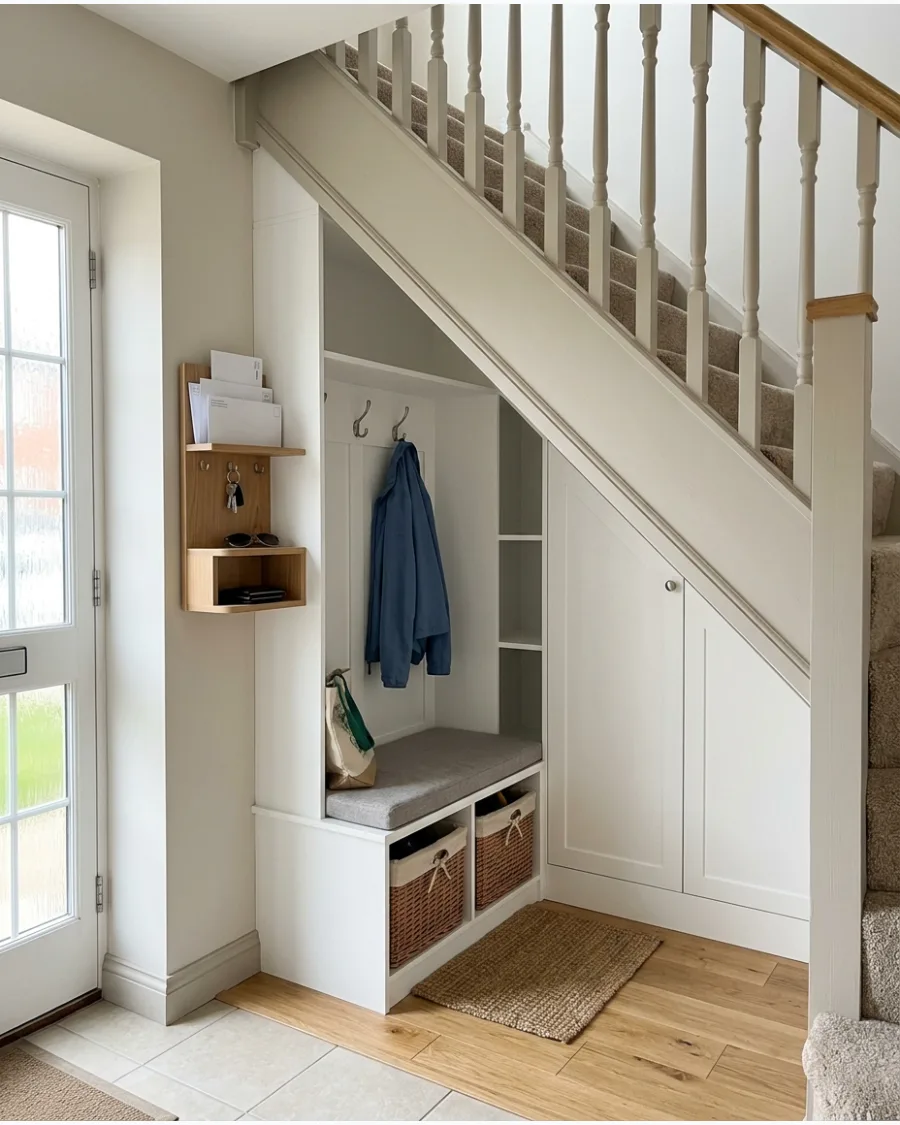
Entryways often get buried under mail, keys, and sunglasses that have no home. Add a slim floating shelf or a wall-mounted organizer at waist height next to your mudroom bench.
Install a small row of key hooks underneath the shelf to keep fobs from getting lost in seat cushions. This small addition transforms a basic coat nook into a fully functional command center.
- Slim floating shelf for mail
- Wall-mounted mail sorter
- Small magnetic key bar or hooks
Quick win: Place a small bowl on the shelf for loose change and sunglasses so they do not roll off or get scratched.
48. Under-Stairs Mudroom With Sports Gear Storage
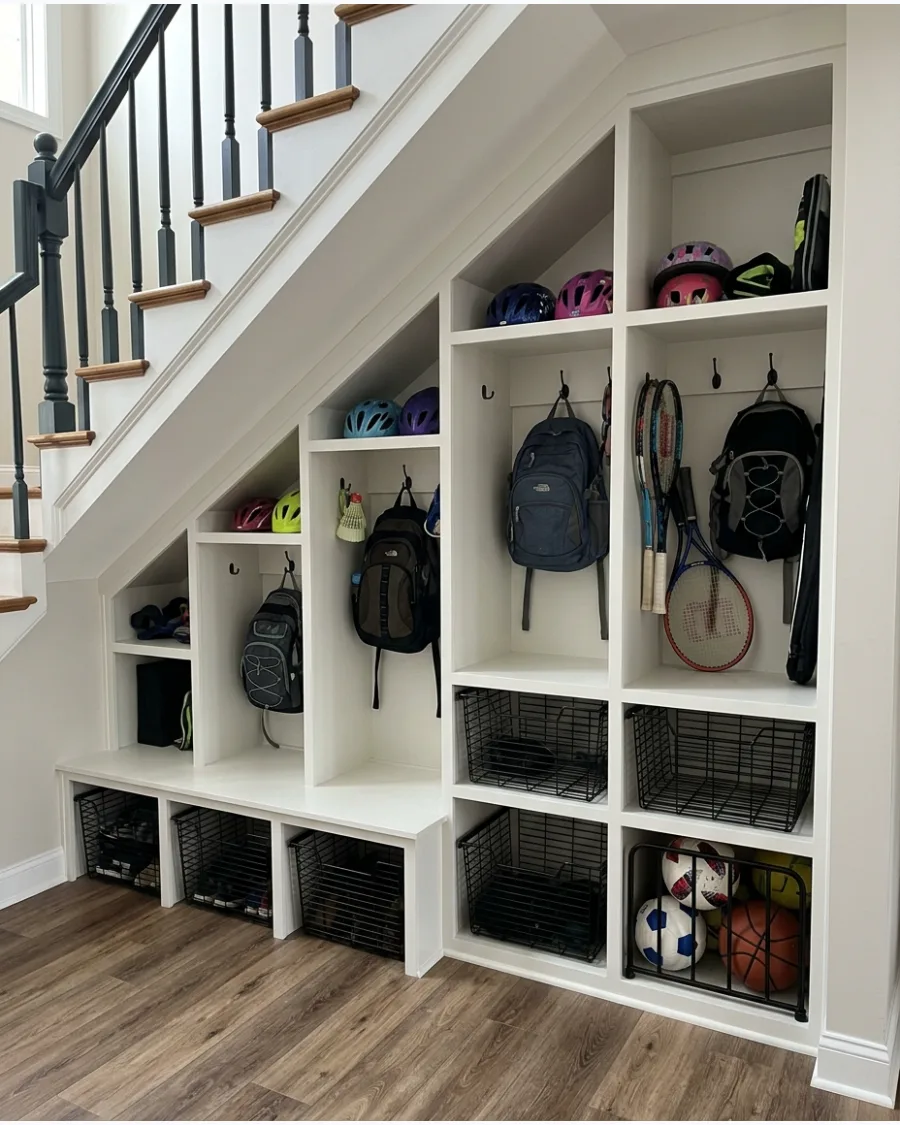
Sports equipment is notoriously difficult to store because of its odd shapes and sizes. Use deep, open-front bins or wire baskets that allow air to circulate around sweaty gear.
Screw a mesh bag or a vertical bungee cord system into a narrow corner to corral basketballs and soccer balls. This keeps the equipment contained while making it easy for athletes to grab what they need on their way out the door.
- Heavy-duty wire or plastic bins
- Vertical bungee cord ball rack
- Wall-mounted racket clips
Best shortcut: Use wire baskets instead of solid plastic bins so you can see exactly what is at the bottom without digging.
49. Under-Stairs Mudroom With Dog Station
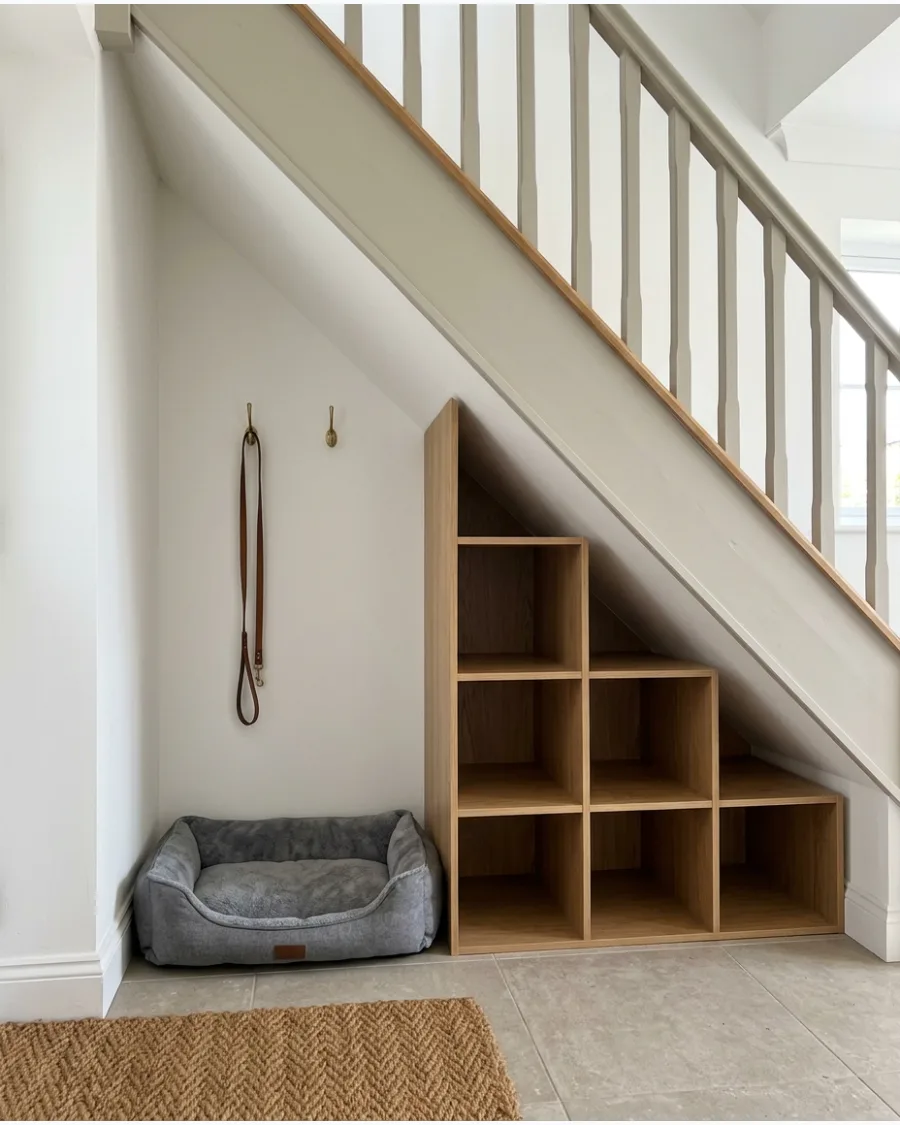
A mudroom is the perfect place to manage pet gear and keep the rest of the house cleaner. Carve out a cozy nook for a dog bed at the lowest point of the stairs where humans can't easily fit.
Mount a few dedicated hooks nearby for leashes, harnesses, and a towel for wiping muddy paws. This keeps all the walking essentials in one spot and gives the dog a quiet place to rest.
- Washable pet bed that fits the footprint
- Dedicated leash and harness hooks
- Small drawer for treats and waste bags
Most people skip this: Use a semi-gloss or washable paint in the dog nook, as pets tend to lean against walls and leave marks over time.
50. Multi-Purpose Under-Stairs Entryway Mudroom
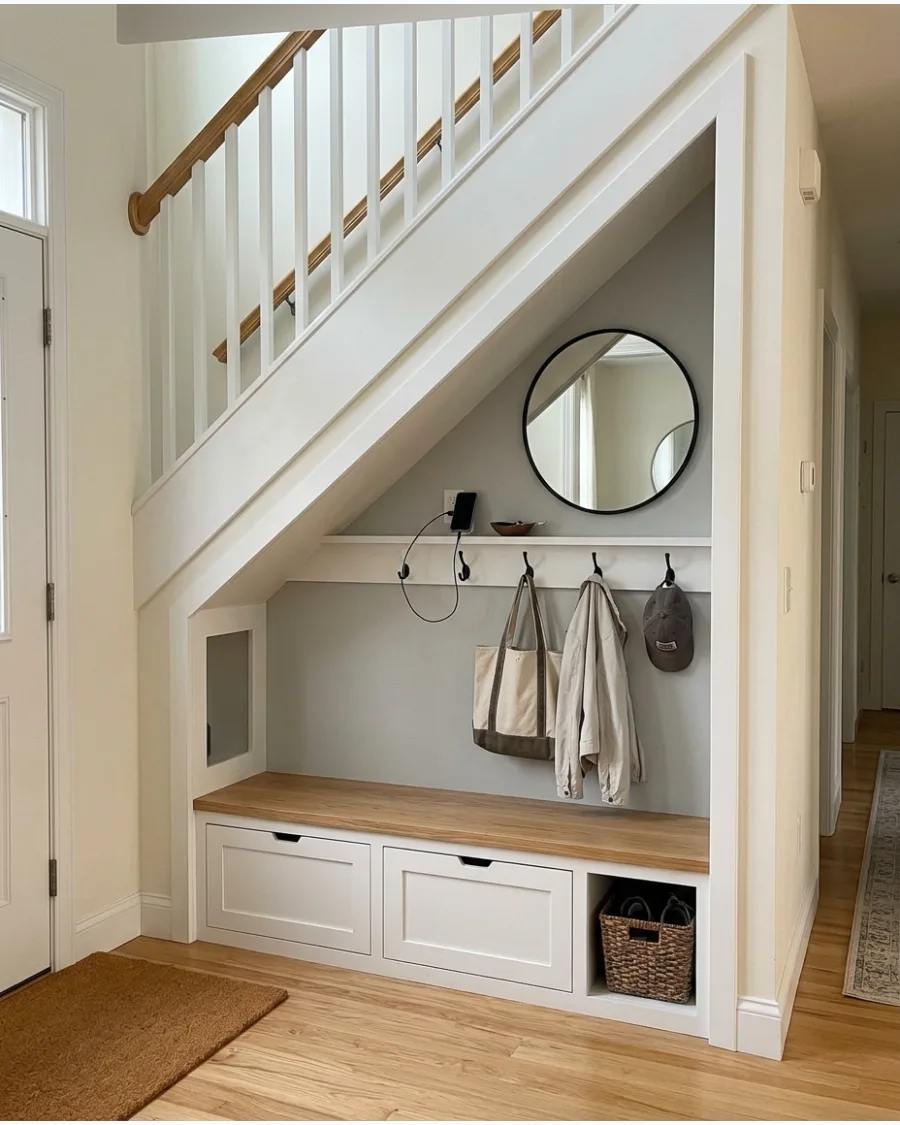
To get the most out of a large staircase, combine several storage types into one cohesive unit. Mix open hooks for daily coats with closed cabinets for seasonal items and a mirror for last-minute checks.
Incorporate a small landing shelf for phones and chargers to make the space work for modern life. This comprehensive approach ensures every square inch of the dead space serves a practical purpose.
- Round or rectangular wall mirror
- Combination of hooks and cabinets
- Built-in charging station or outlet
Quick win: Adding a mirror not only helps you check your hair but also reflects light into what can often be a dark, cramped corner.
Frequently Asked Questions
How do I handle the very lowest part of the under-stairs slope?
The lowest point is perfect for low-profile items like boot trays or a built-in pet feeding station. You can also use custom rolling bins that slide out easily, making every inch of that awkward 1-2 foot clearance functional.
Is open or closed storage better for a small under-stairs mudroom?
While hooks offer quick access, pull-out drawers or cabinets are usually better for minimizing visual clutter in tight spaces. If you prefer an open look, try a mix of a few decorative hooks for daily coats and hidden bins for seasonal gear.
How can I light a dark mudroom area under the stairs?
Since these nooks are often deep and dark, battery-operated motion sensor LEDs are a simple, wire-free solution. Recessed puck lights are also excellent for illuminating the triangular corners without taking up valuable head clearance.
What is the best flooring for an under-stairs entryway?
Choose a durable, water-resistant material like luxury vinyl plank or tile to handle wet shoes and heavy foot traffic. To make the space feel cohesive, use a transition strip that matches your existing hallway flooring for a seamless, intentional look.
Can I build an under-stairs mudroom if my stairs are carpeted?
Yes, you can definitely create a mudroom here by adding a clean wood or MDF trim along the carpeted stringer. This framing creates a clear boundary between the soft stairs and the functional storage, making the entire unit look custom-built.