60 DIY Thanksgiving Decorations

This post may contain affiliate links: full affiliate disclosure.
Creating your own holiday decor is a great way to save money while making your home feel more personal. These projects focus on high-end results using simple materials like paint, ribbon, and fabric.
You can achieve a professional look without needing advanced crafting skills or expensive tools.
PUMPKIN DIY THANKSGIVING DECORATIONS
1. DIY Velvet-Ribbon Pumpkin Decorations
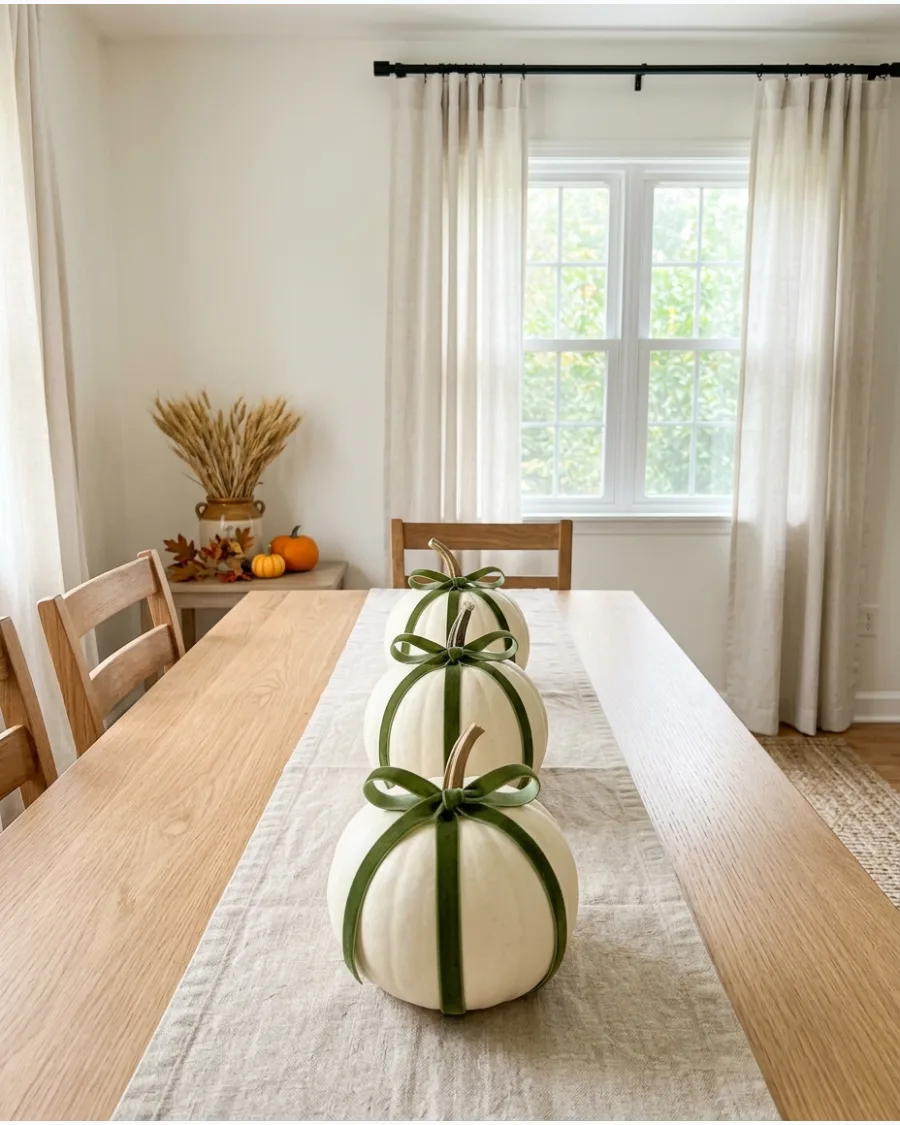
Velvet ribbon adds instant luxury to standard miniature pumpkins. Use deep autumnal shades like burgundy or olive to create a sophisticated look that complements a formal table.
Tie the ribbon in a simple knot or bow around the stem to secure it without needing messy glue. These small accents work perfectly at each place setting on a holiday table.
- Buy velvet ribbon in various widths from any craft store.
- Place one pumpkin on each guest's dinner plate for a personalized touch.
- Mix and match ribbon colors like gold, navy, and plum for a rich palette.
Quick win: Use a tiny dab of hot glue under the ribbon to keep it from sliding off smooth pumpkin skins.
2. DIY Neutral Painted Pumpkin Set
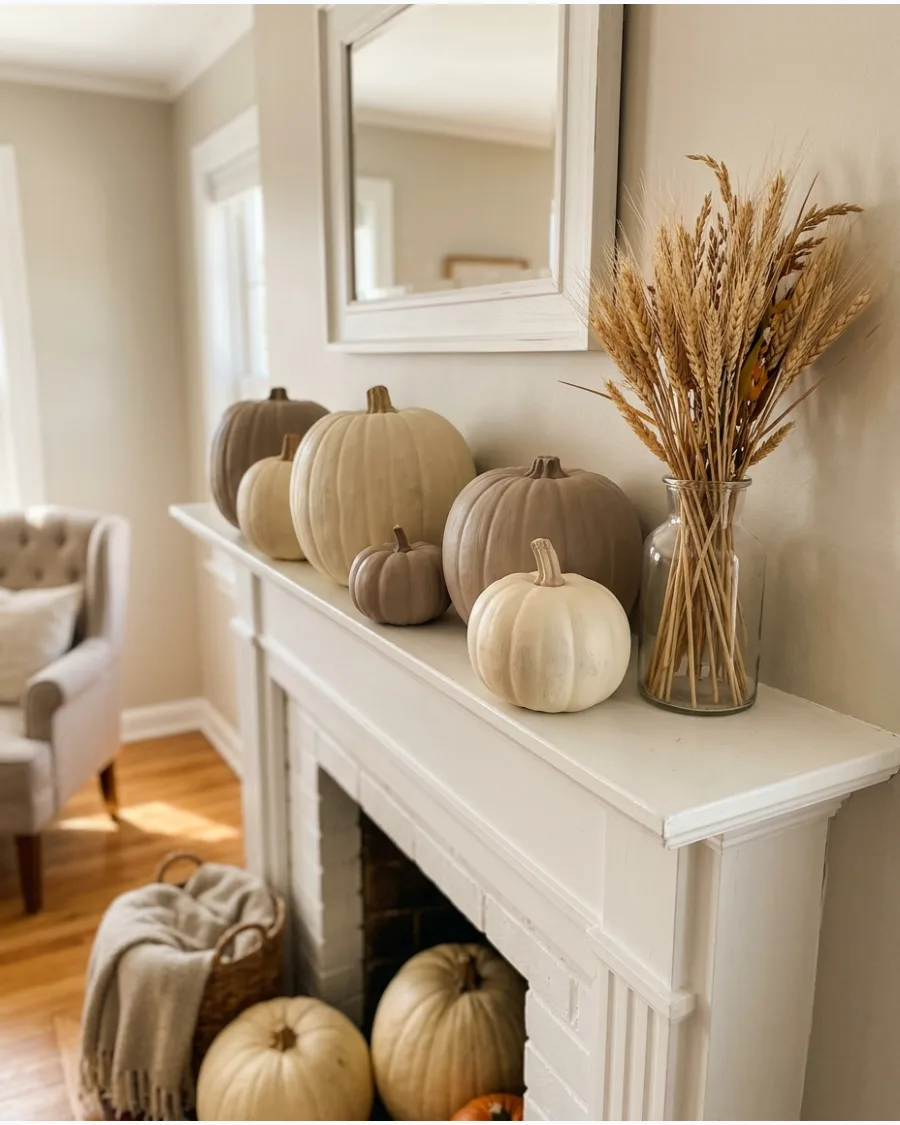
Bright orange pumpkins can sometimes clash with modern home interiors. A coat of matte paint in cream, taupe, or sage creates a cohesive and calming display.
Apply two thin coats of chalk paint for a soft finish that hides imperfections on the pumpkin surface. Grouping these colors together makes a striking centerpiece for a mantel or console table.
- Use matte chalk paint or acrylic paint for a non-reflective finish.
- Arrange pumpkins in odd numbers to create a more balanced look.
- Include various pumpkin shapes and sizes to mimic a natural harvest.
Quick win: Paint the stems a dark metallic bronze or black to make the neutral colors pop.
3. DIY Fabric-Covered Pumpkins
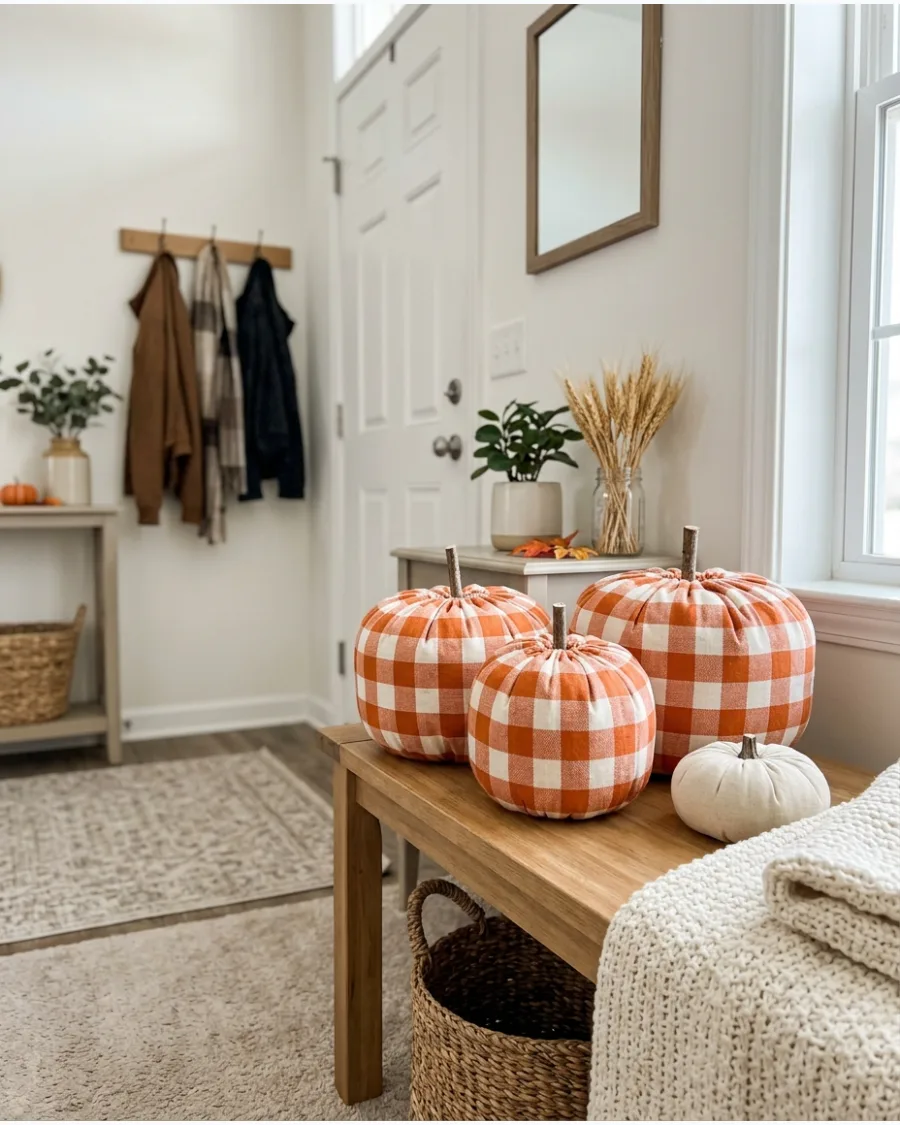
Fabric pumpkins introduce texture and pattern to a Thanksgiving display without the mess of carving. Choose plaid, gingham, or block-print fabrics in warm harvest tones to match existing room decor.
Stretch the fabric tightly over a foam pumpkin form and tuck the edges into the top hole before inserting the stem. These are lightweight and easy to store for use in future years.
- Use fabric remnants or old cloth napkins to save on material costs.
- Standard foam pumpkin forms are available at most hobby shops.
- Secure the fabric with hot glue or small fabric pins at the base.
Most people skip this: Iron the fabric first to ensure the patterns look crisp and professional on the rounded surface.
4. DIY Twine-Wrapped Pumpkins
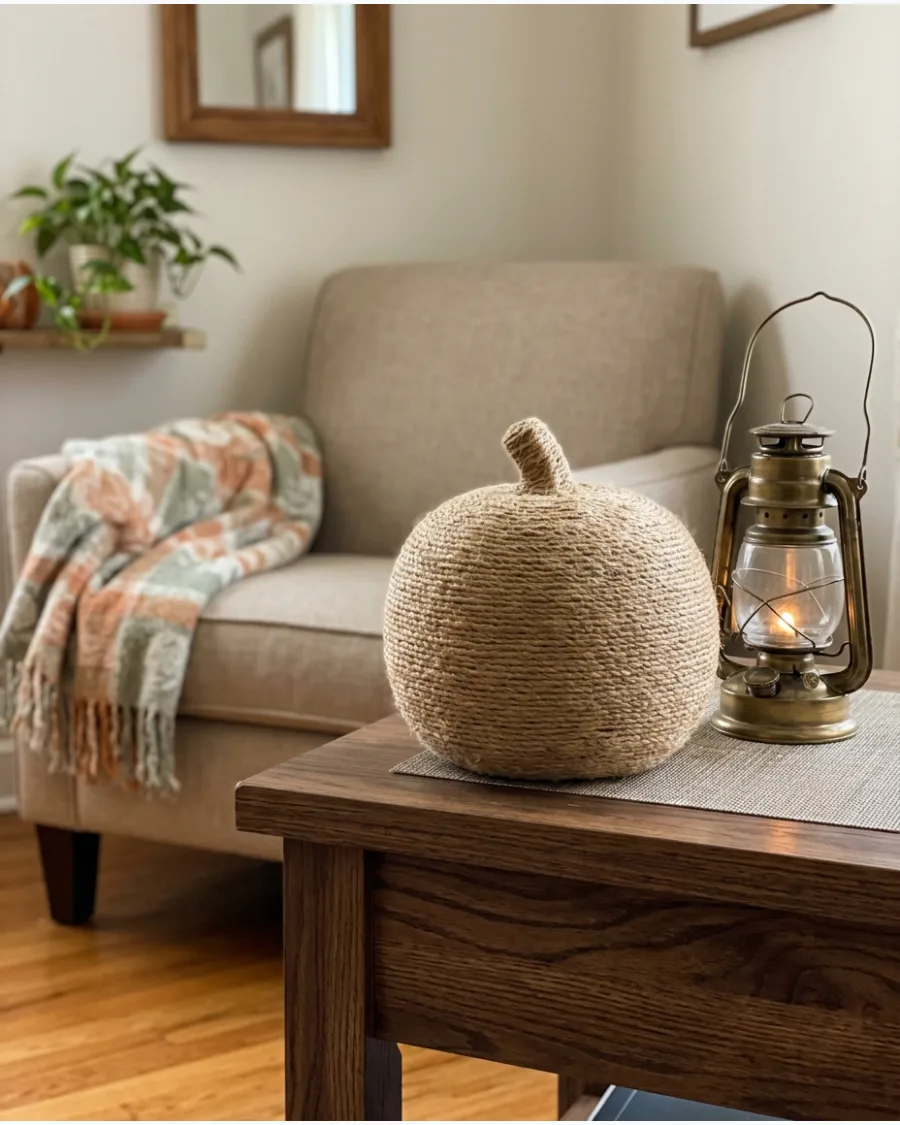
Natural jute twine provides a rugged, organic texture that fits perfectly with a harvest theme. This project turns cheap plastic or foam pumpkins into high-end decorative pieces.
Start wrapping at the base and use a spiraling motion to cover the entire surface while applying hot glue every few inches. A real twig or piece of driftwood makes a convincing and stylish stem.
- Select natural jute or sisal twine for an earthy tan color.
- Use a foam pumpkin base so the glue adheres quickly and securely.
- Finish the top with a small piece of real wood for authenticity.
Quick win: Use different thicknesses of twine on different pumpkins to create a more curated, collected look.
5. DIY Book-Page Pumpkins
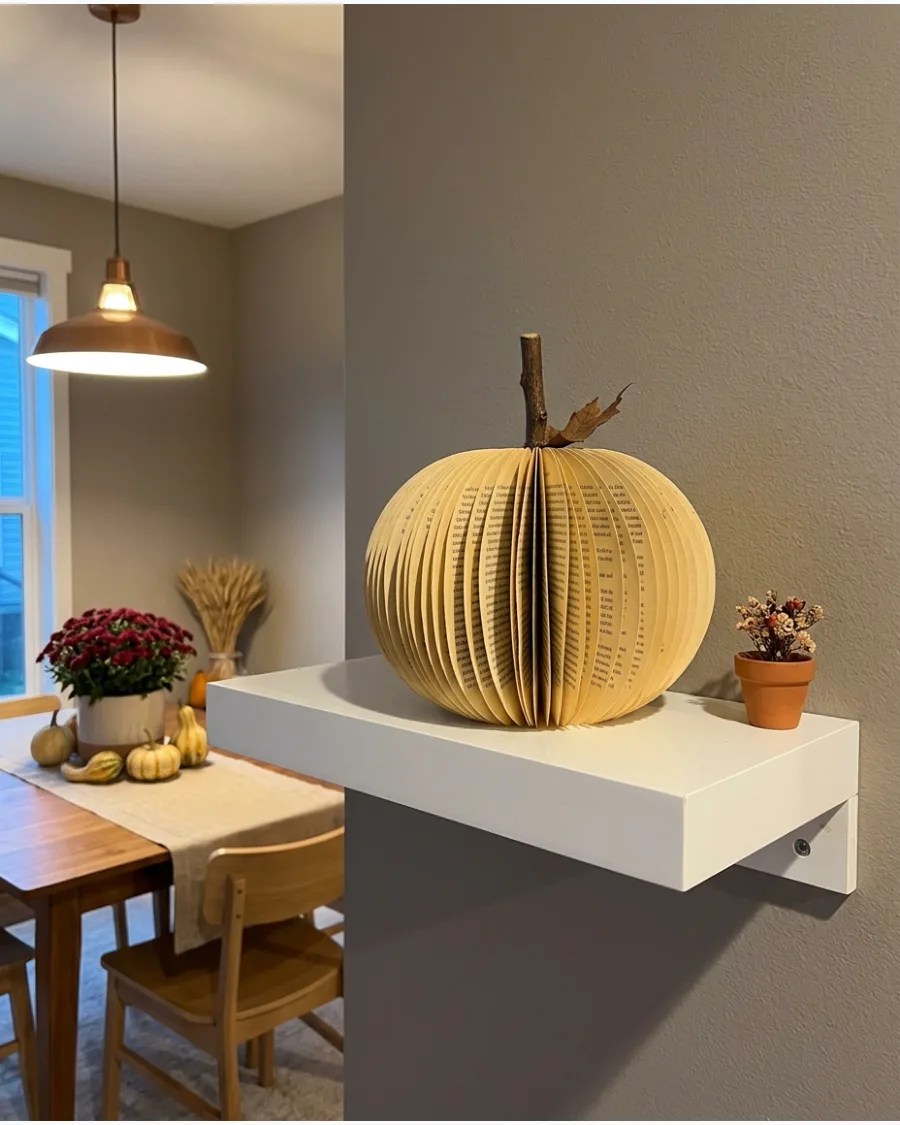
Repurposed book pages create a unique, intellectual vibe for a holiday table or bookshelf. The cream-colored paper and black text act as a neutral pattern that complements any color scheme.
Cut several dozen identical pumpkin silhouettes from old book pages and glue them along the center fold to create a 3D sphere. These look best when displayed in small clusters under a glass cloche.
- Source old books from thrift stores or use discarded newspapers.
- Use a simple glue stick or staples to connect the paper layers.
- Add a dried twig or a rolled piece of brown paper as a stem.
Best shortcut: Lightly brush the edges of the paper with brown ink or tea to give the pumpkin an aged appearance.
6. DIY Sweater Pumpkins
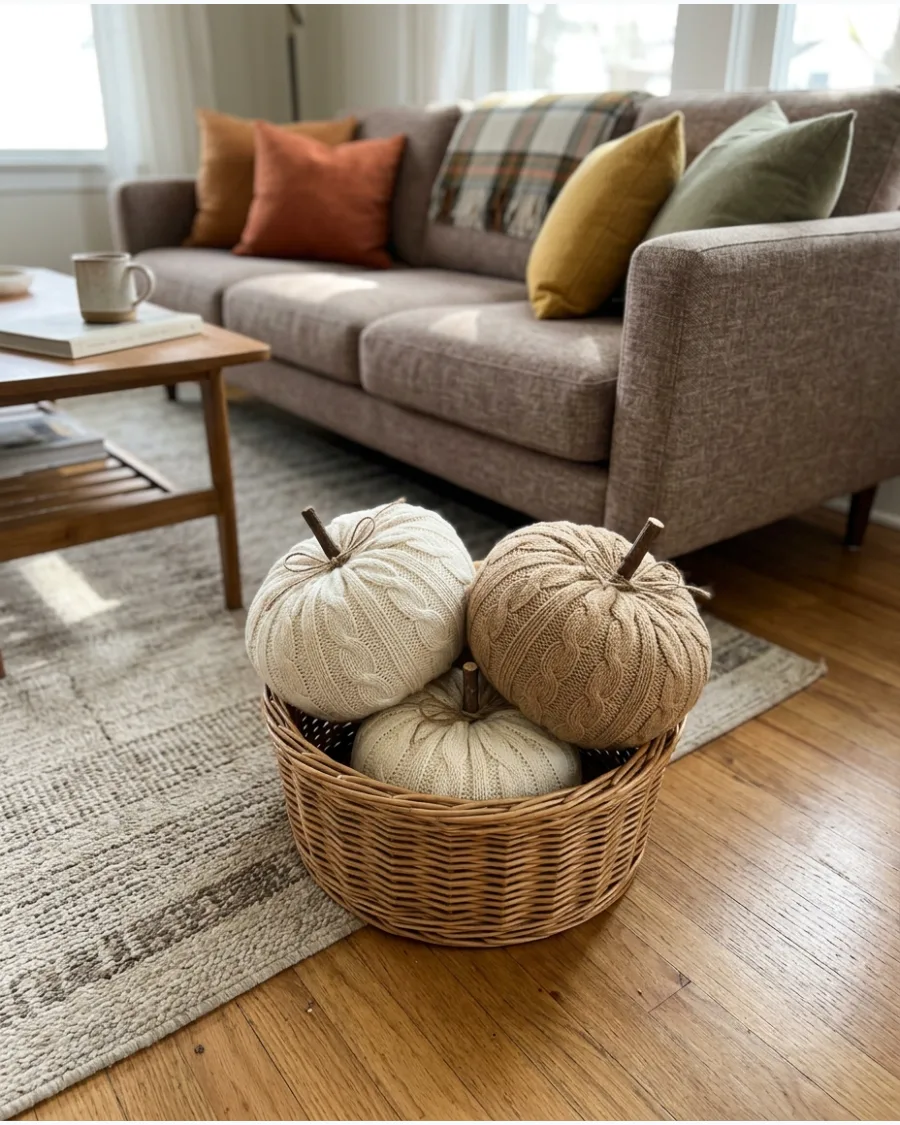
Upcycling old knitwear is a great way to add a cozy feel to a room's atmosphere. The chunky textures of cables and ribs mimic the natural ridges of a pumpkin.
Cut a sleeve from an old sweater, tie one end shut, fill it with stuffing, and cinch the top around a wooden stem. These soft decorations are ideal for homes with small children because they are unbreakable.
- Use thrifted sweaters or old knits that are no longer wearable.
- Fill the forms with polyester fiberfill or even dried beans for weight.
- Cinch the top with twine or a thin strip of matching yarn.
Most people skip this: Add a handful of dried beans or rice to the bottom of the pumpkin to give it weight so it sits upright.
7. DIY Wood-Bead Pumpkins
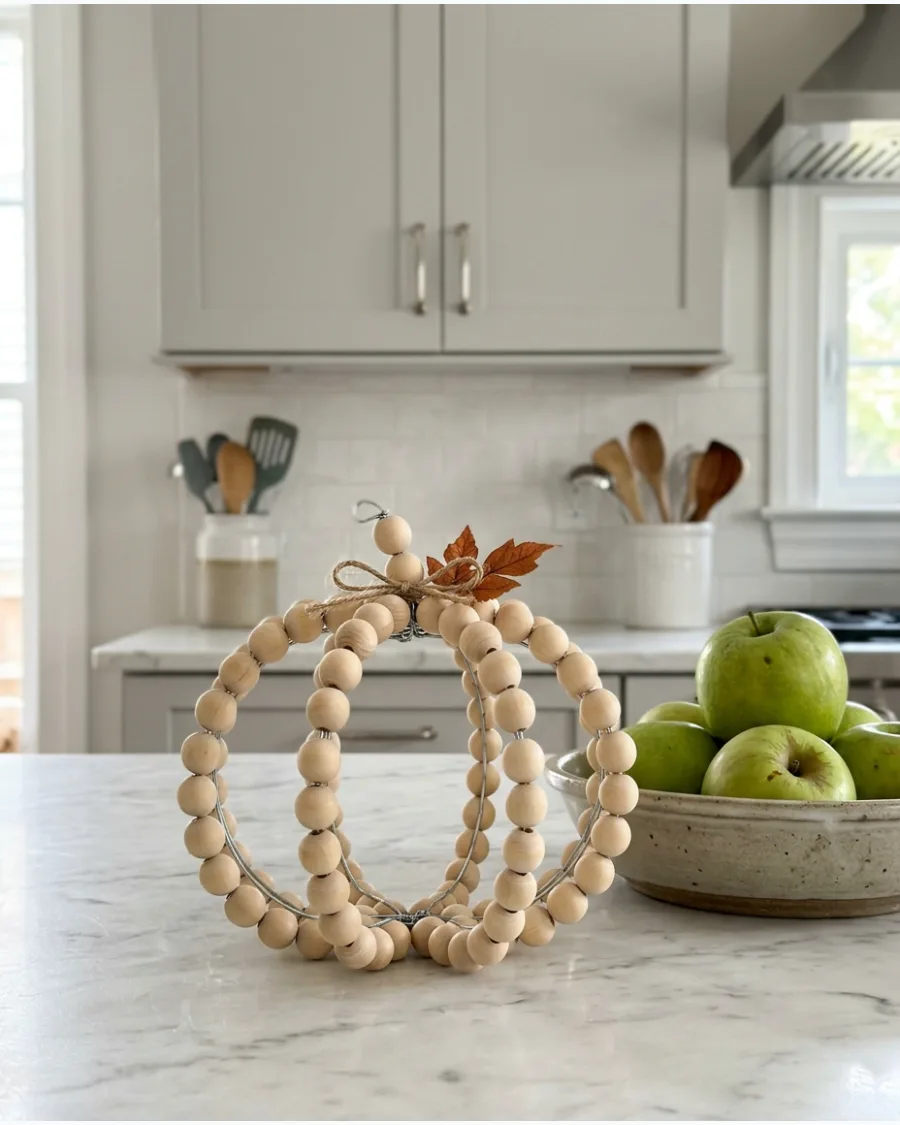
Wooden beads offer a minimalist and modern take on traditional autumn shapes. This project creates a silhouette of a pumpkin rather than a solid form, keeping the decor feeling light and airy.
Thread natural wooden beads onto flexible wire and shape the loops into a pumpkin form before twisting the ends into a stem. These look excellent on tiered trays or nestled into a centerpiece.
- Use unfinished wooden beads for a clean, natural look.
- Pick 20-gauge floral wire because it is strong but easy to bend.
- Add a small piece of brown felt or a real leaf to the stem.
Quick win: Leave the beads unfinished for a Scandinavian look, or stain them a dark walnut for more contrast.
8. DIY Terracotta Pumpkin Decorations
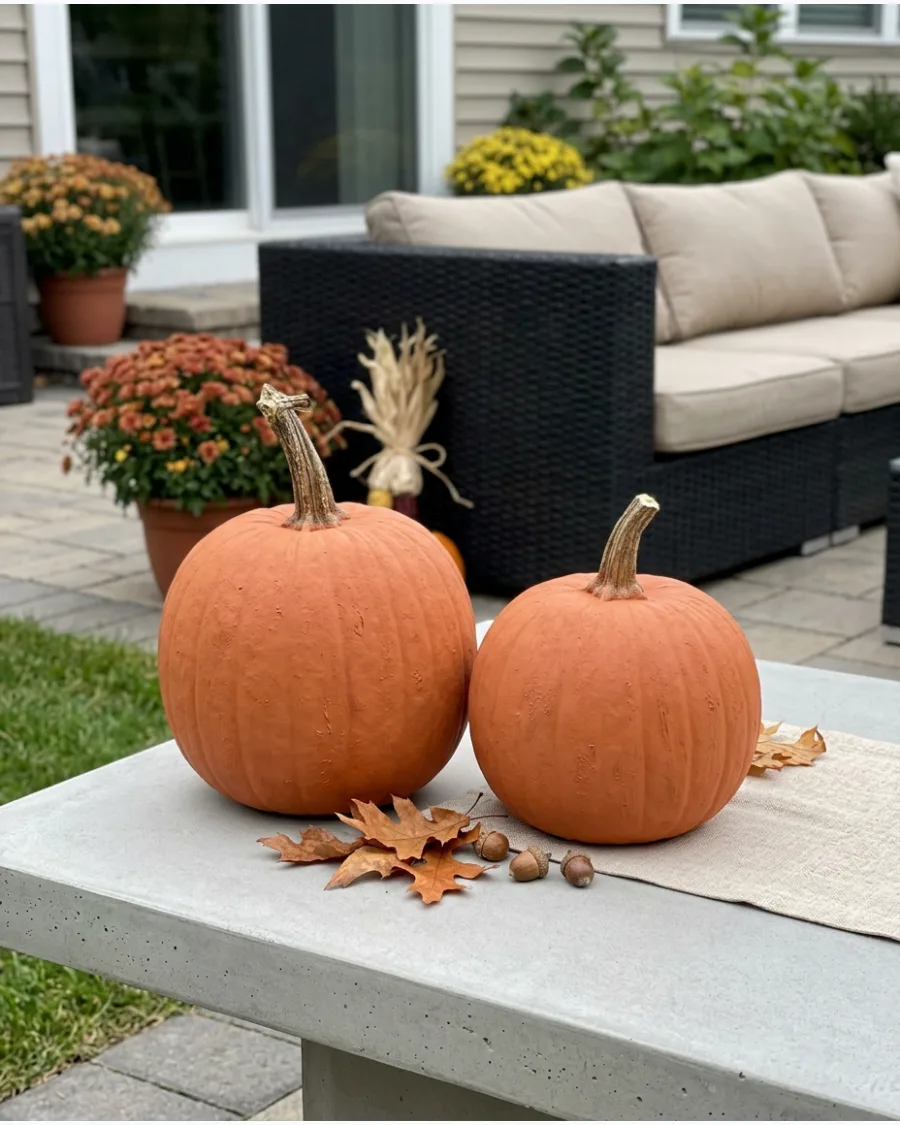
The earthy, matte look of terracotta is a timeless choice for fall. You can achieve this high-end pottery look on plastic pumpkins with a simple paint mixture.
Mix acrylic paint with a tablespoon of baking soda to create a thick, gritty texture that mimics real clay. Pair these with natural elements like dried eucalyptus or pinecones for an organic display.
- Mix orange and brown acrylic paint to get the perfect clay shade.
- Standard baking soda creates the necessary grit for the texture.
- Apply the mixture to inexpensive foam or plastic pumpkins.
Most people skip this: Use a sea sponge or a stiff brush to dab the paint on rather than stroking it to enhance the clay-like texture.
9. DIY Mini Pumpkin Topiary
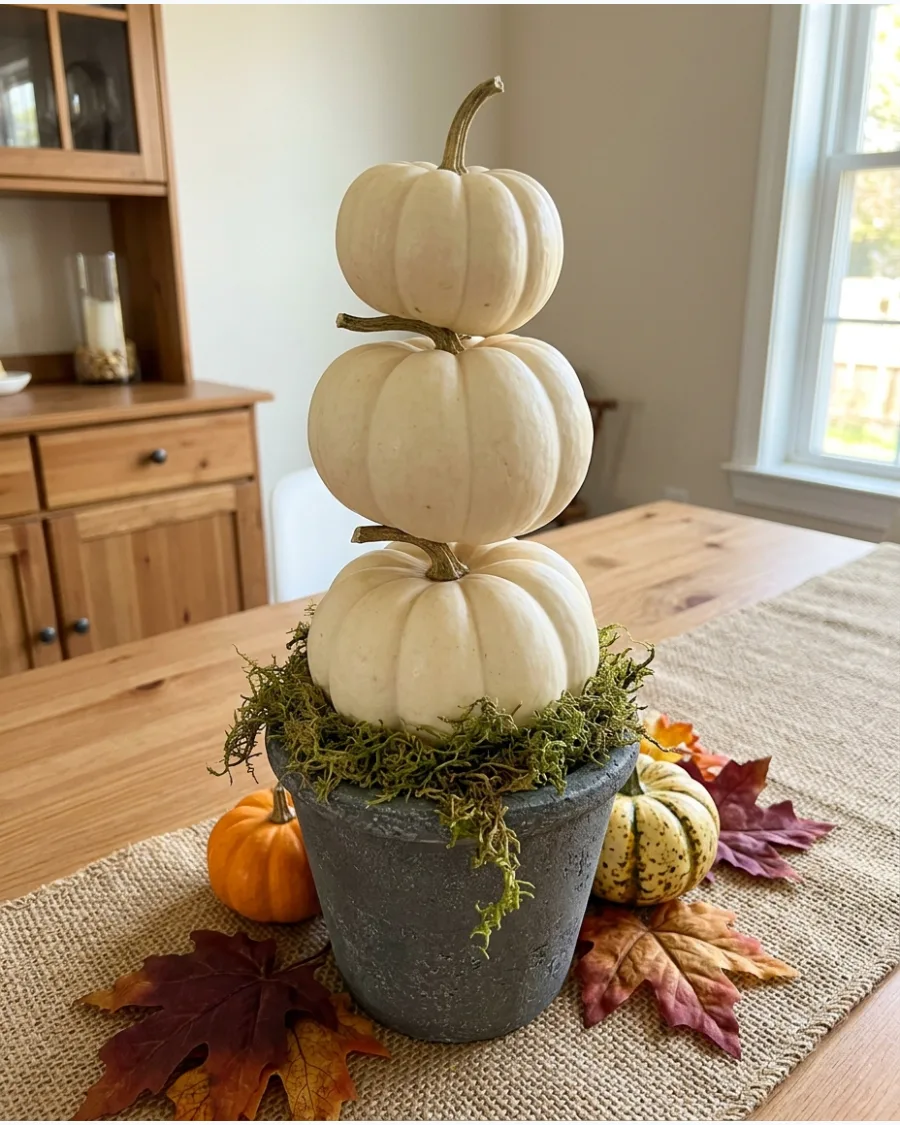
A topiary adds height to a table or entryway without taking up much horizontal space. Stacking pumpkins creates a classic harvest look that feels intentional and professional.
Hot glue three pumpkins of decreasing size together and place them in a small urn or terracotta pot. Fill the gaps around the base with preserved moss to hide the mechanics and add a pop of green.
- Select three pumpkins in graded sizes for a stable stack.
- Use a small decorative urn or pot that fits the base pumpkin snugly.
- Hot glue and floral moss are essential for a finished look.
Best shortcut: Use a thin wooden dowel through the center of all three pumpkins to keep the stack perfectly straight and stable.
10. DIY Floral Pumpkin Arrangement
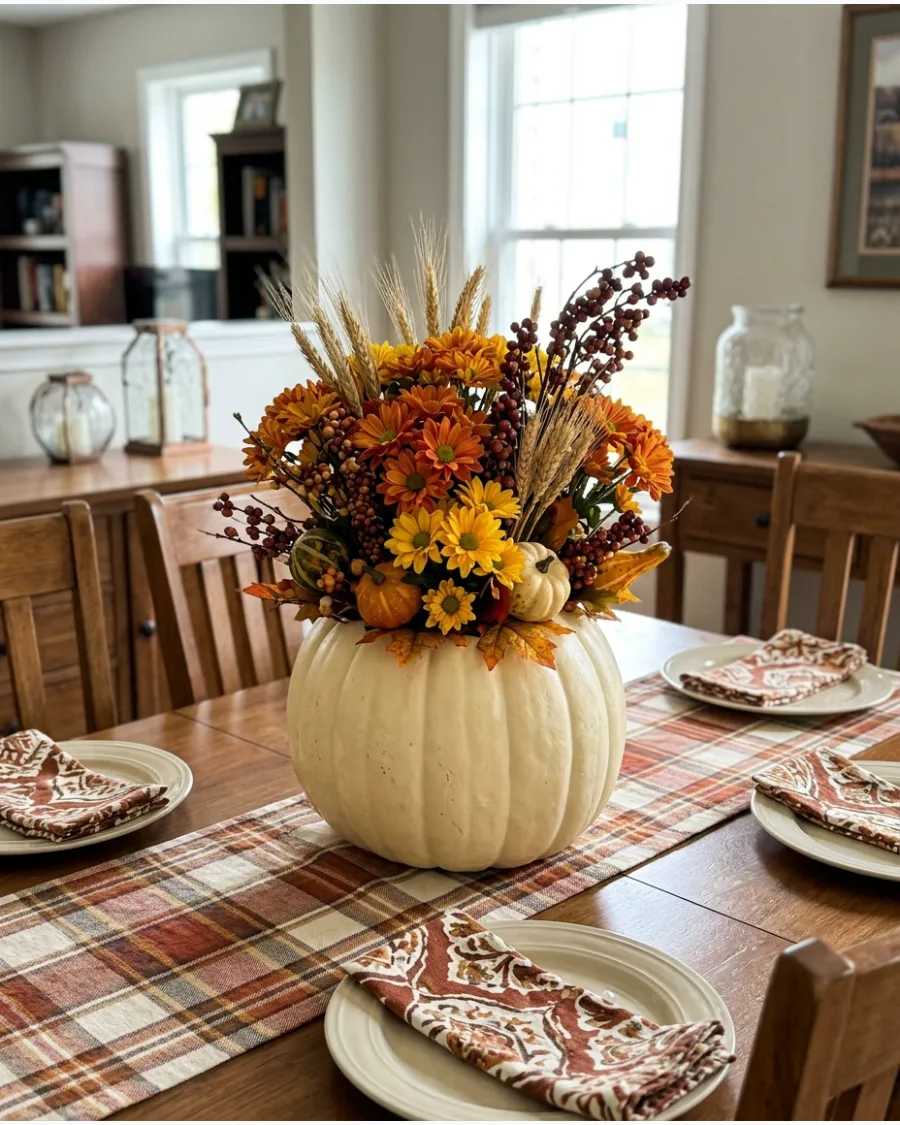
Using a pumpkin as a vase is a stunning way to display seasonal blooms. This reusable version uses a faux pumpkin so the arrangement lasts the entire month of November.
Carve a hole in the top of a foam pumpkin and insert a plastic container or floral foam to hold the stems. Fill it with a mix of dried hydrangeas and orange mums for a classic Thanksgiving centerpiece.
- Choose a high-quality faux pumpkin that is labeled as carvable.
- Use floral foam to keep heavy stems in their exact place.
- Mix dried or silk flowers so the arrangement never wilts.
Quick win: Choose a carvable faux pumpkin rather than a hard plastic one to make cutting the opening much easier.
DIY THANKSGIVING WREATHS & DOOR DECOR
11. DIY Dried Leaf Thanksgiving Wreath
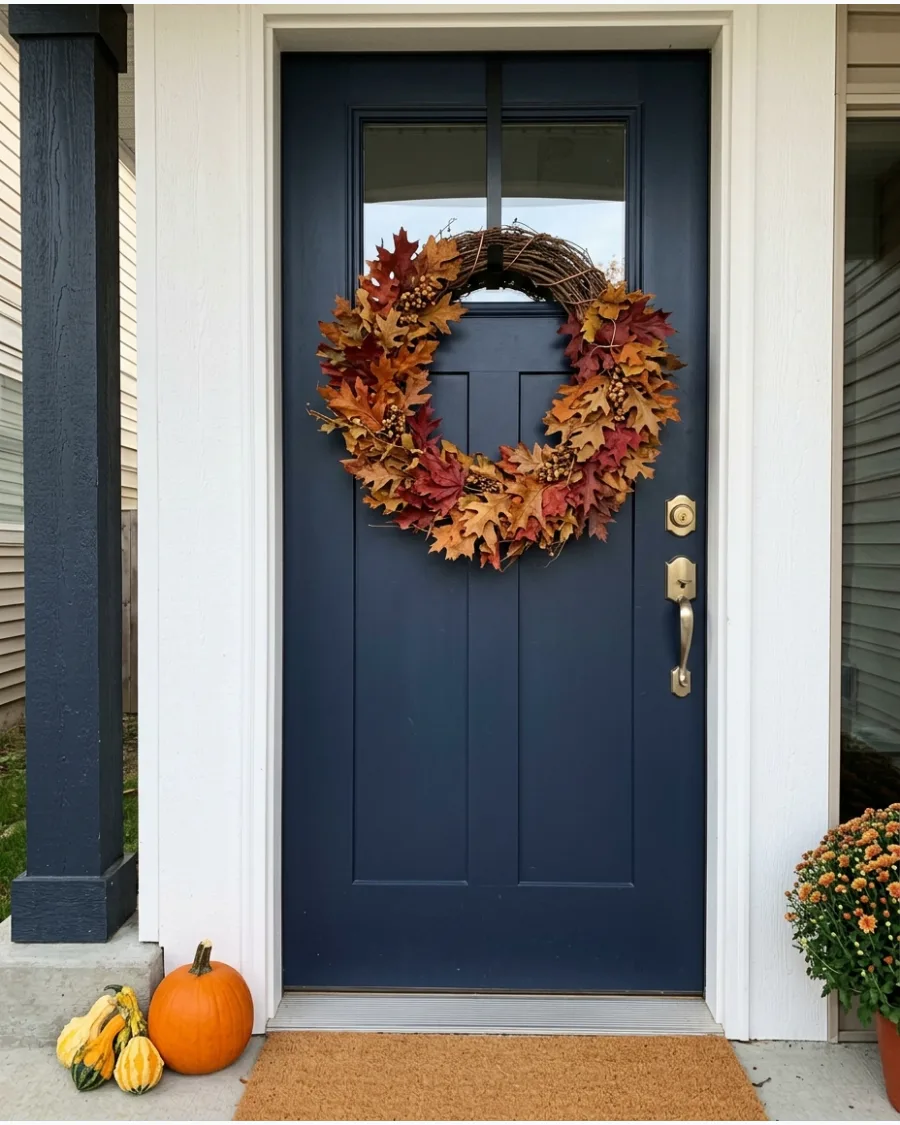
Use a grapevine base to secure preserved leaves in warm shades of rust and gold. Overlap the leaves tightly to hide the wreath form and create a lush, full appearance. Natural leaves work best when they are preserved with glycerin so they stay flexible and do not crumble easily.
- Preserved leaves cost about $15 for a large pack
- Assemble in 30 minutes with a hot glue gun
- Use faux leaves for a wreath that lasts multiple seasons
Quick win: Spray the finished wreath with a clear acrylic sealer to prevent the leaves from fading if the door gets direct sunlight.
12. DIY Wheat Thanksgiving Wreath
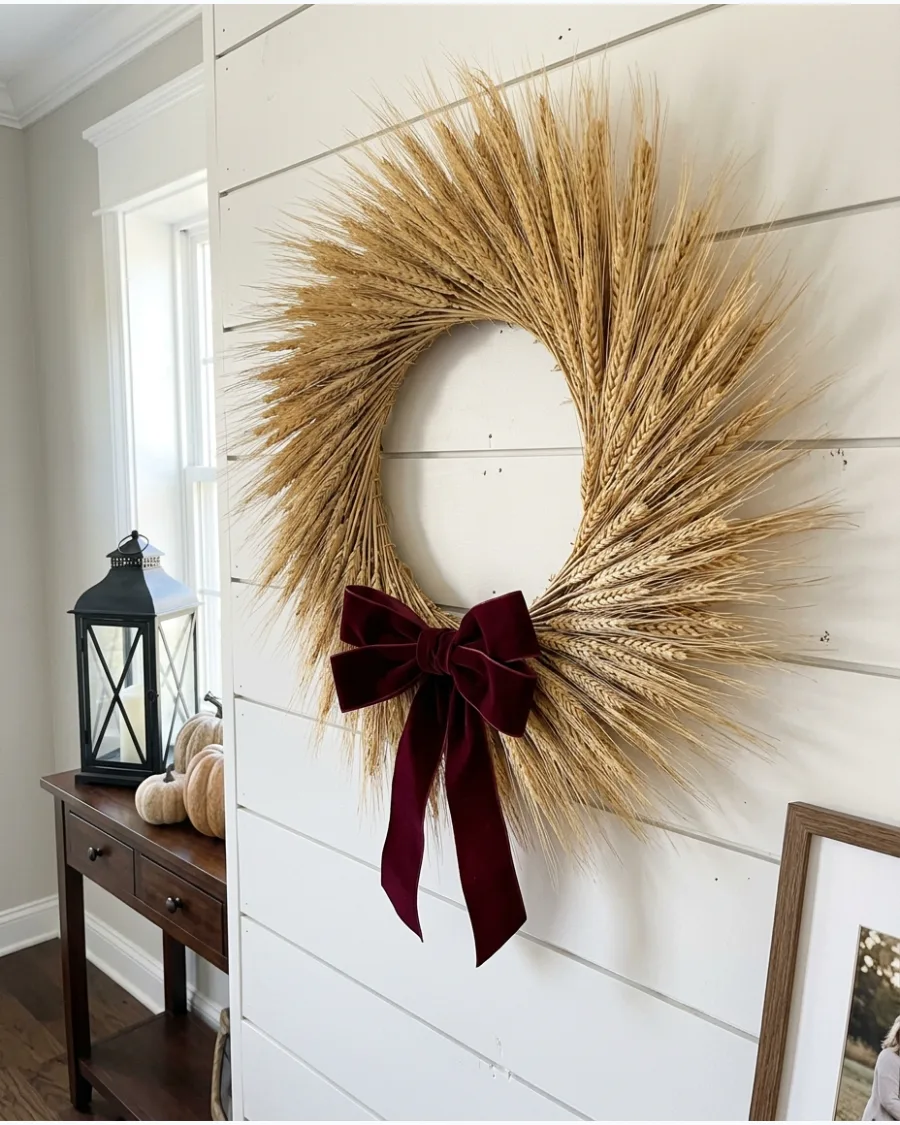
Group dried wheat stalks into small bundles and wire them onto a flat wreath form in a sunburst pattern. Trim the stems to a uniform length before attaching them to keep the inner circle looking clean and professional. A simple velvet ribbon in a deep chocolate brown adds the perfect finishing touch to this harvest look.
- Dried wheat bundles are available at most craft stores
- Use thin floral wire to secure stems to the frame
- Swap the ribbon color to match your porch rug or door color
Best shortcut: Use a straw wreath form as the base to make pinning the wheat bundles much faster than using a wire frame.
13. DIY Mini Pumpkin Wreath
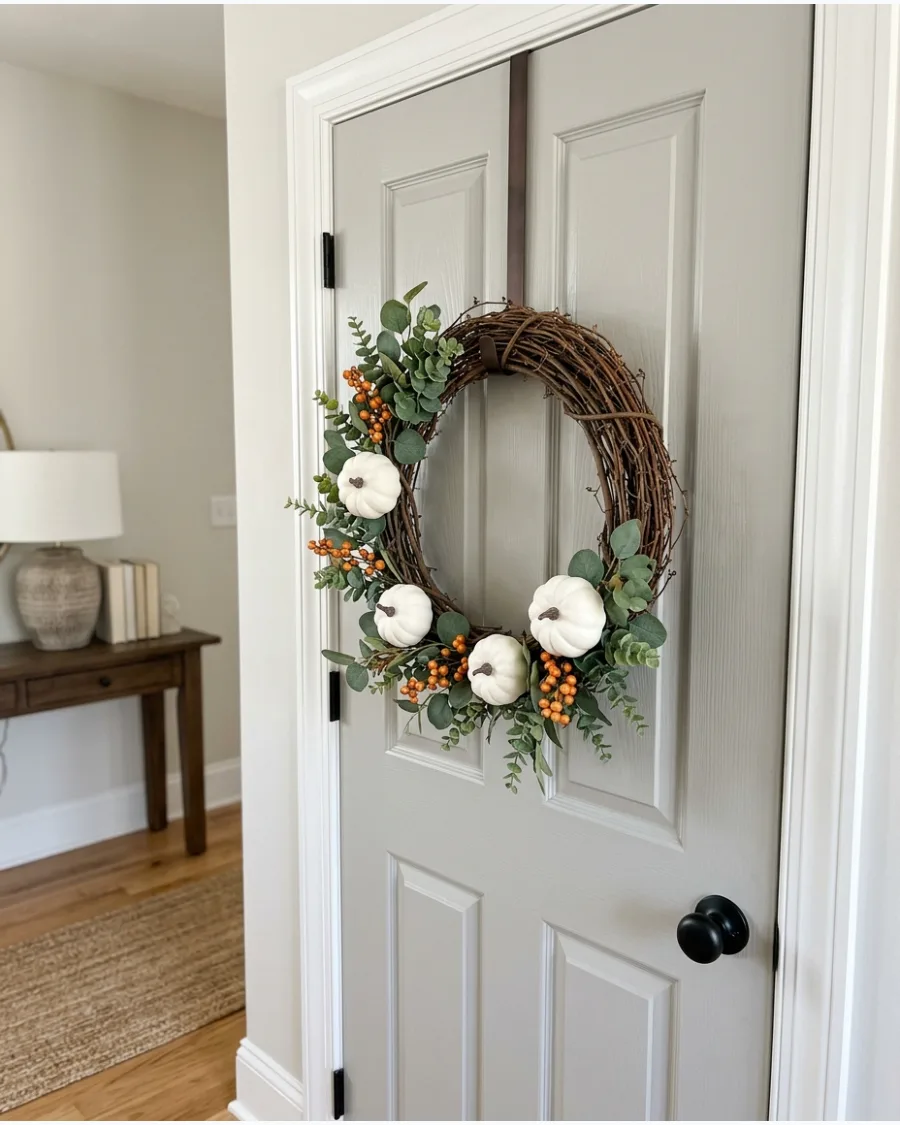
Combine lightweight foam pumpkins with sprigs of eucalyptus and artificial berries on a sturdy grapevine frame. Distribute the weight by placing the largest pumpkins at the bottom of the wreath first to ensure it hangs straight. This design fills empty wall space or adds a festive welcome to a kitchen pantry door.
- Foam pumpkins are significantly lighter and easier to glue than real ones
- Secure the pumpkins with a combination of hot glue and floral wire
- Scale the pumpkins to the size of your wreath base for visual balance
Most people skip this: Paint the pumpkin stems a dark brown or matte black to make them look more realistic and high-end.
14. DIY Corn Husk Thanksgiving Wreath
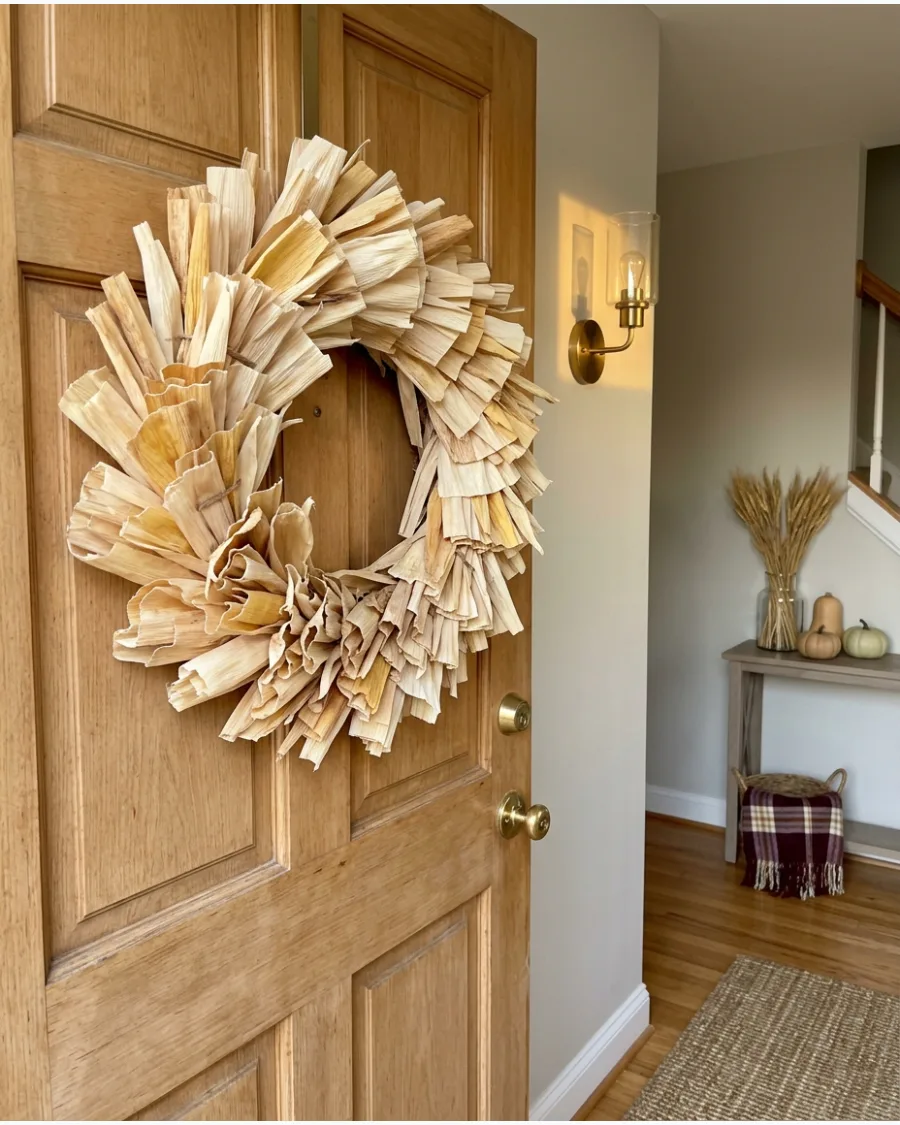
Create a textured, neutral statement piece by folding dried corn husks and gluing them in layers around a foam ring. Soak the husks in water for a few minutes to make them pliable enough to fold without snapping. The natural cream and tan tones offer a sophisticated look that fits any modern home style.
- Buy dried husks in the grocery store ethnic food aisle for the best price
- High-temp hot glue works best for a permanent bond
- Keep this wreath in a covered area to avoid moisture and mold
Quick win: Use a hairdryer on a low setting to easily remove any lingering hot glue strings from the husks once finished.
15. DIY Magnolia Leaf Thanksgiving Wreath
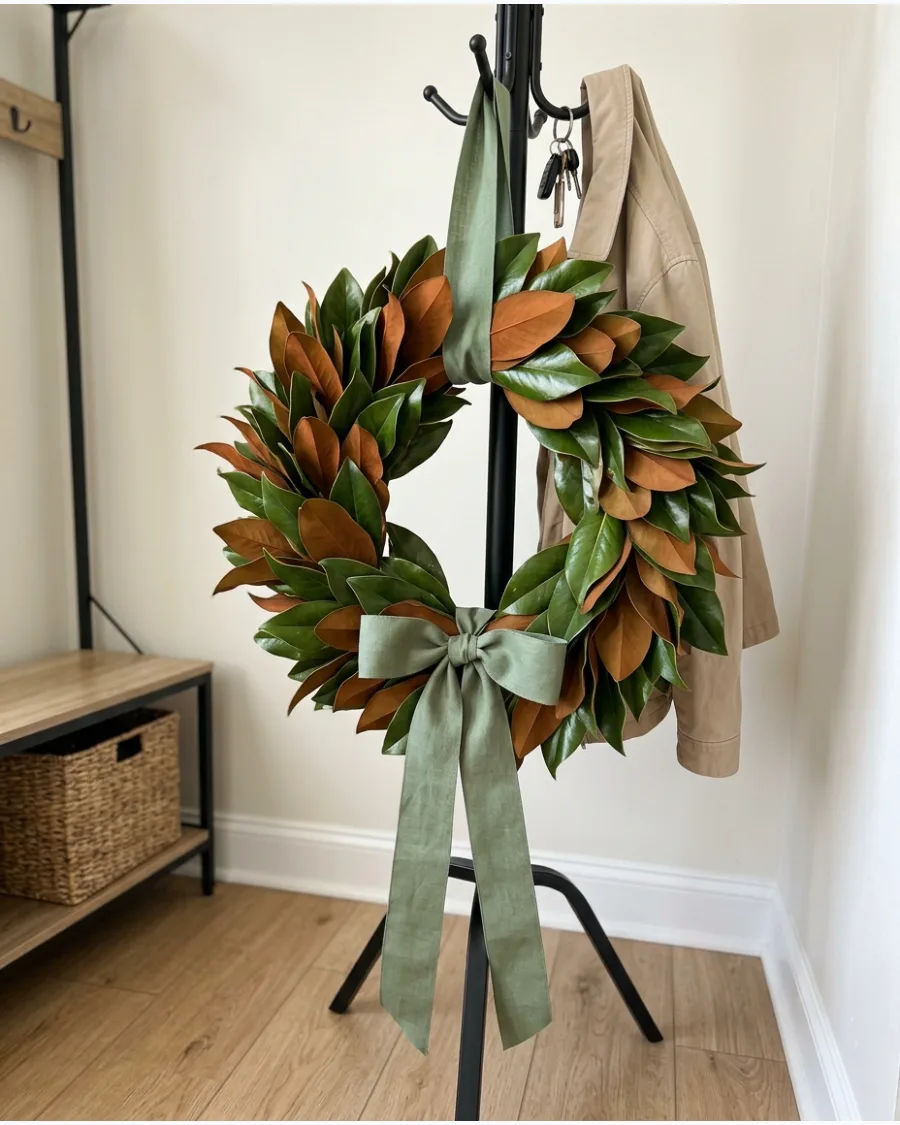
Layer glossy green magnolia leaves with their fuzzy brown undersides showing for a classic two-tone effect. Staple or wire the leaves to a straw form in a consistent clockwise direction for a balanced look. A wide satin ribbon makes this feel polished and expensive without the high boutique price tag.
- Fresh leaves will dry naturally to a beautiful matte brown over time
- Requires about 40 to 50 leaves for a standard 18-inch wreath
- Great for minimalist, traditional, or transitional home styles
Best shortcut: Use floral pins (U-pins) to secure leaves quickly to a straw or foam base instead of using glue.
16. DIY Pinecone and Acorn Wreath
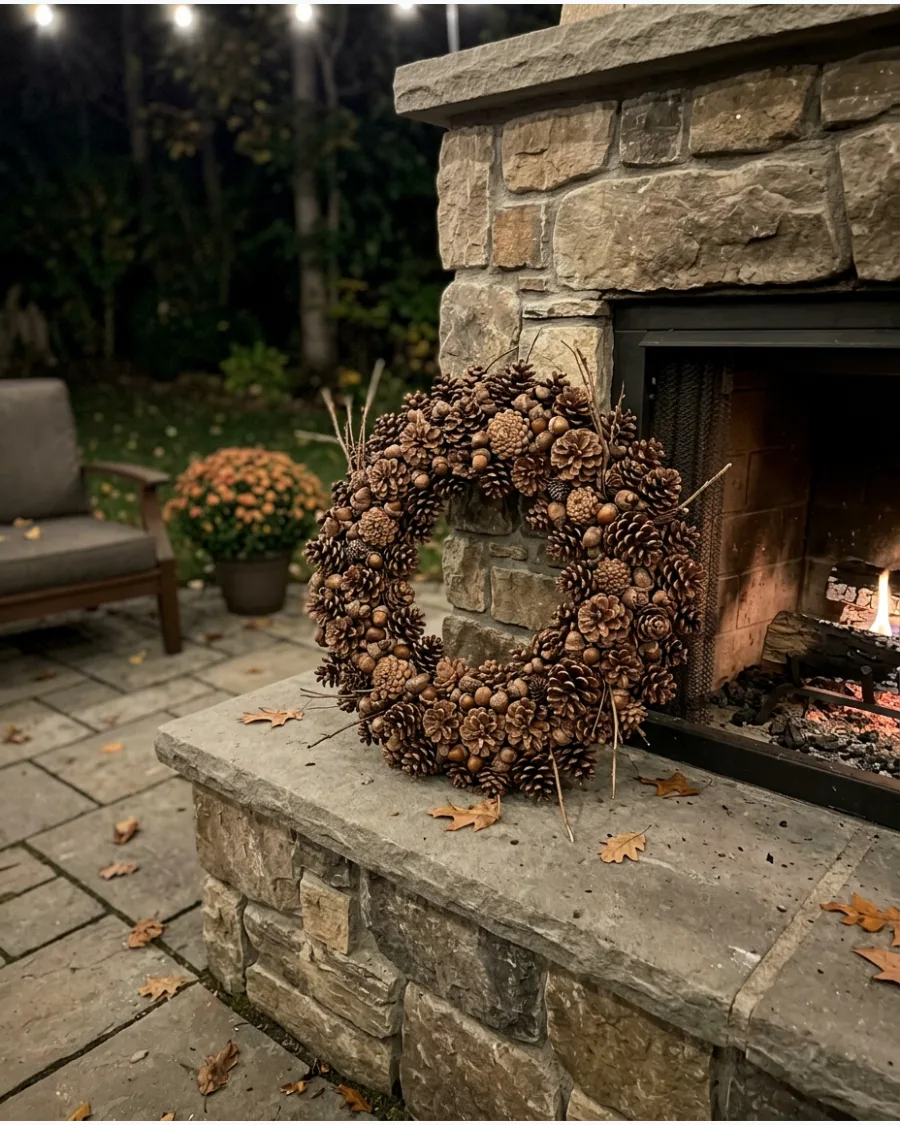
Gather various sizes of pinecones and acorns to create a dense, woodland-inspired wreath. Fill the largest gaps with pinecones first, then use small acorns to cover the remaining spots of the wreath form. This project is virtually free if you forage the materials from your own backyard or a local park.
- Clean foraged items in a low oven to remove any hidden pests
- Use high-temp hot glue for a strong, long-lasting bond
- Add a light dusting of gold spray paint for a touch of holiday shine
Most people skip this: Bake foraged pinecones at 200 degrees for 20 minutes to kill bugs and melt away sticky sap before crafting.
Thanksgiving Decor
17. Layered Foraged Branch Swag
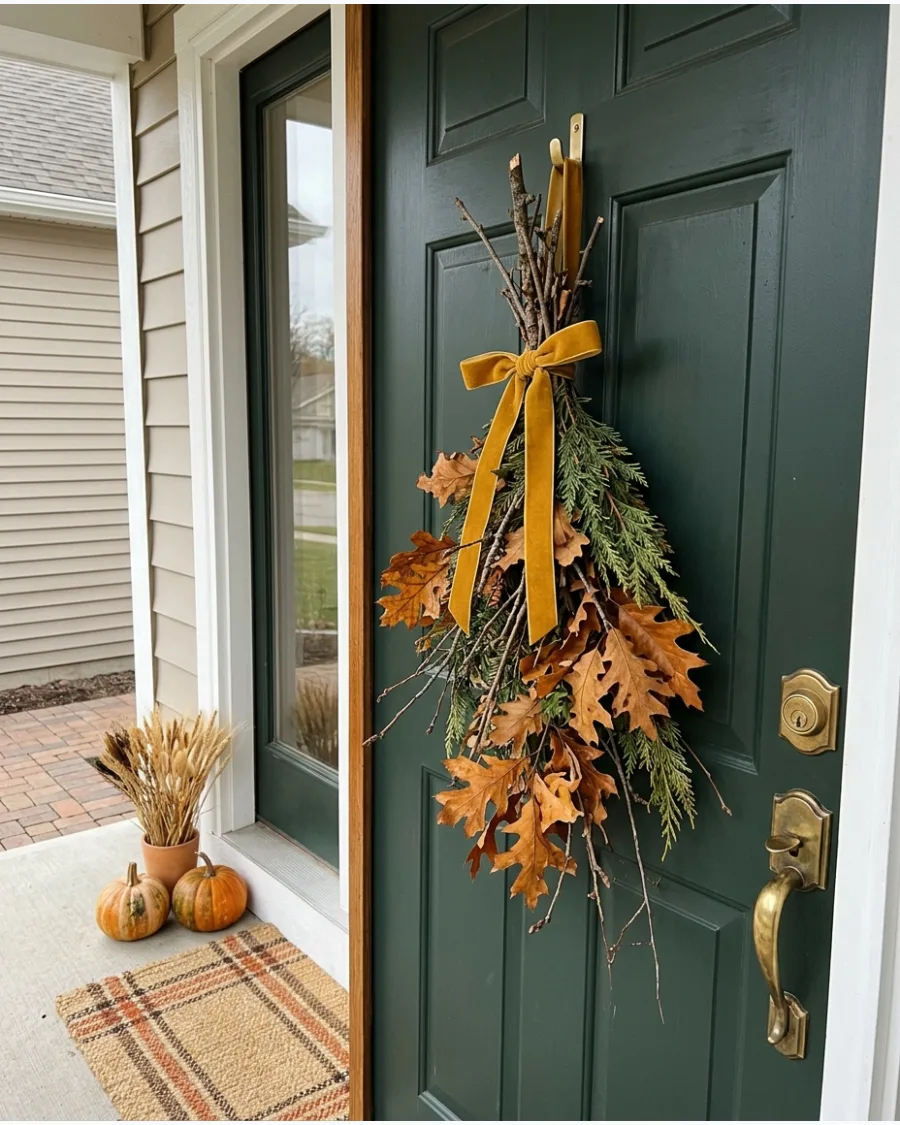
A vertical door swag offers a modern alternative to traditional circular wreaths by highlighting the natural silhouette of seasonal greenery. Gather three to five branches of varying lengths and secure them tightly at the top with floral wire. This arrangement works best when mixing textures like cedar, dried oak leaves, and berry-laden twigs for visual depth.
Heavy-duty velvet ribbon in a deep ochre or burgundy provides the necessary weight to keep the arrangement grounded against autumn winds.
- Collect branches from the backyard or local parks after a windy day for a zero-cost base.
- Stagger the branch heights so the longest piece sits at the back to create a structured, tiered look.
- Switch the ribbon color to metallic gold or silver to transition the piece from Thanksgiving into the winter holidays.
Quick win: Spray the back of the branches with a clear sealant to prevent sap or debris from staining the door surface.
DIY THANKSGIVING WREATHS & DOOR DECOR
18. DIY Plaid Ribbon Thanksgiving Wreath
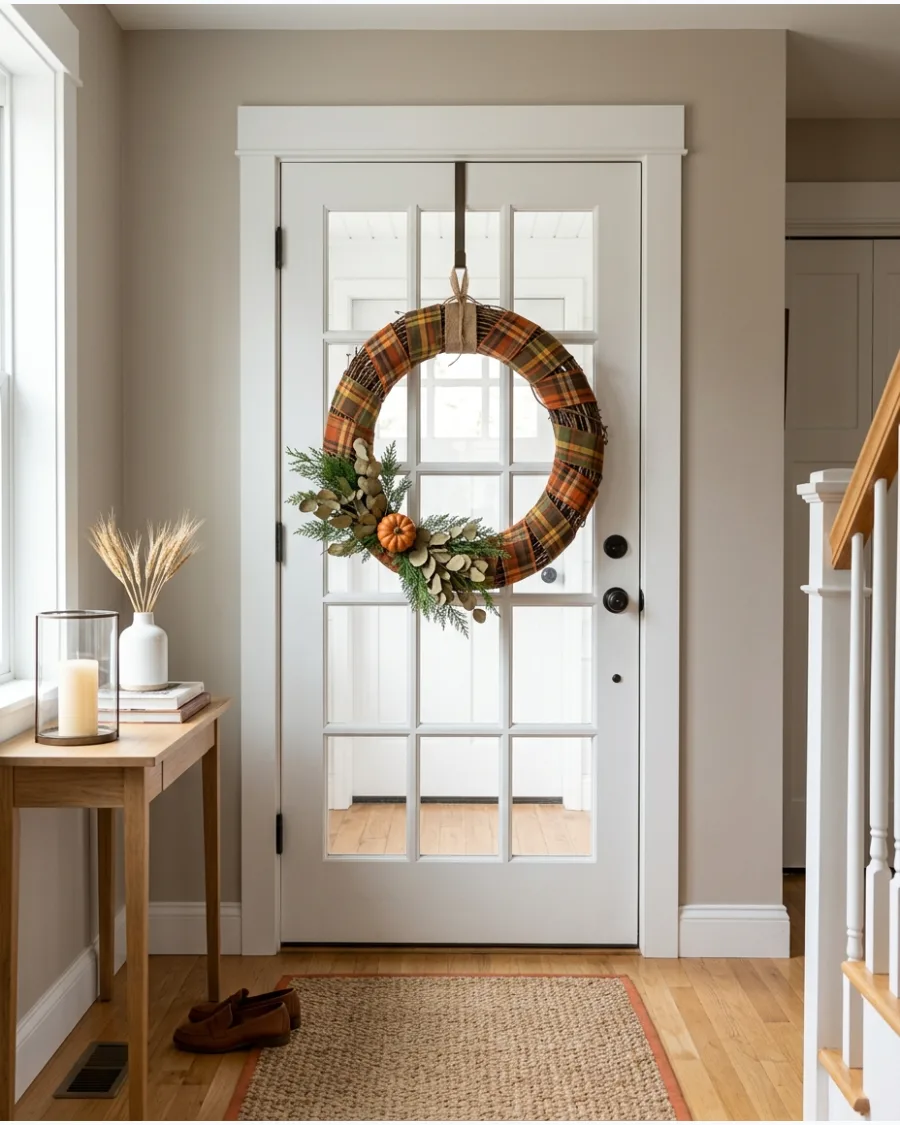
Wrap a foam or straw wreath form completely in a warm plaid fabric or ribbon. Add a small cluster of greenery and a single mini pumpkin to one side to create a focal point that does not overwhelm the pattern. This brings an instant cozy, textile element to your Thanksgiving entryway or mantel.
- Use 2.5-inch wide wired ribbon for easier and smoother wrapping
- Secure the ribbon ends with T-pins or hot glue on the back side
- Choose a classic tartan or buffalo check for a timeless autumn look
Best shortcut: Use a rotary cutter and a ruler to cut fabric strips if you cannot find the perfect plaid ribbon at the store.
19. DIY Wooden Bead Thanksgiving Wreath
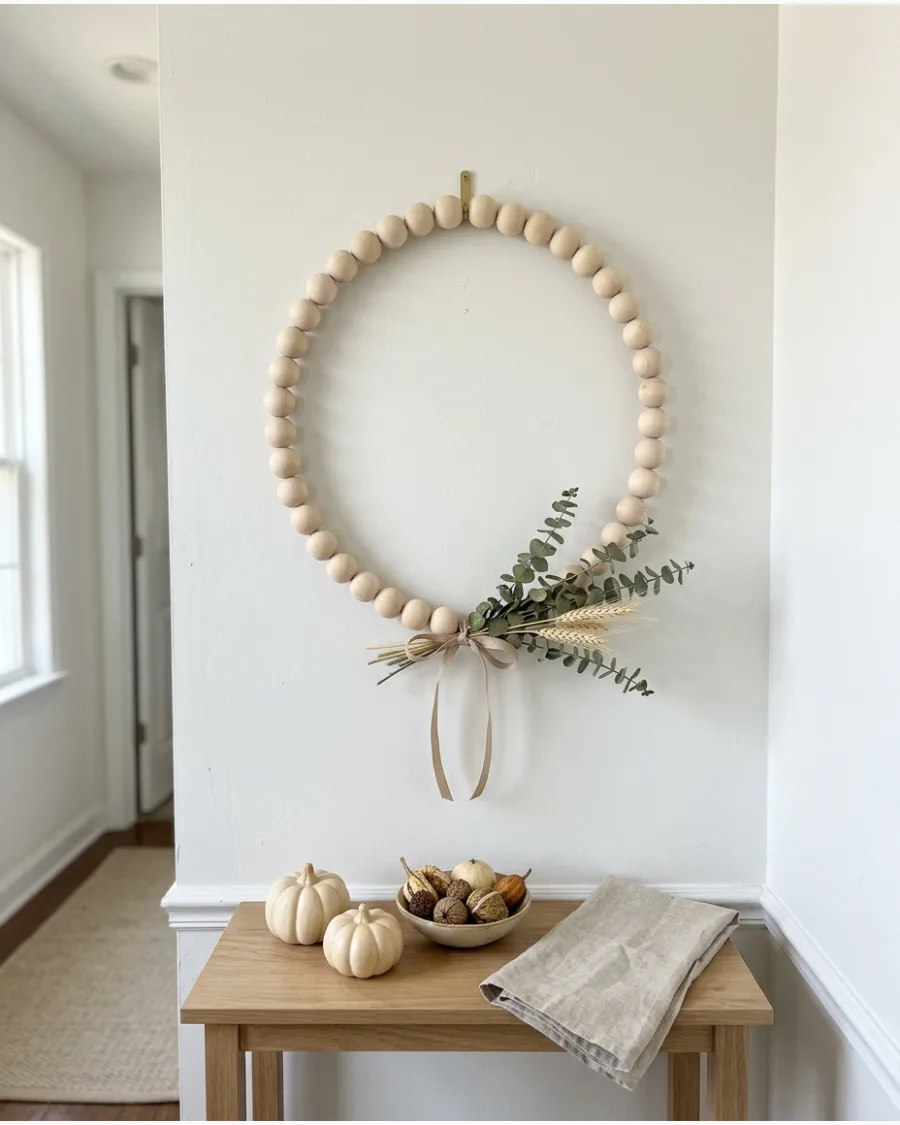
Thread large unfinished wooden beads onto a thick wire hoop for a modern, minimalist holiday look. Attach a small bunch of dried eucalyptus and a thin velvet ribbon to the bottom or side for a pop of color. It provides a clean aesthetic that works well in contemporary or Scandinavian-style homes.
- Use a heavy-gauge wire or a pre-made hoop to keep the circle shape
- Mix different bead sizes for a more organic and custom feel
- Very lightweight and easy to hang with a single small nail
Most people skip this: Sand any rough edges on the wooden beads before stringing them to prevent the wire from snagging or scratching your door.
DIY Thanksgiving Decorations
20. Harvest Basket Door Display
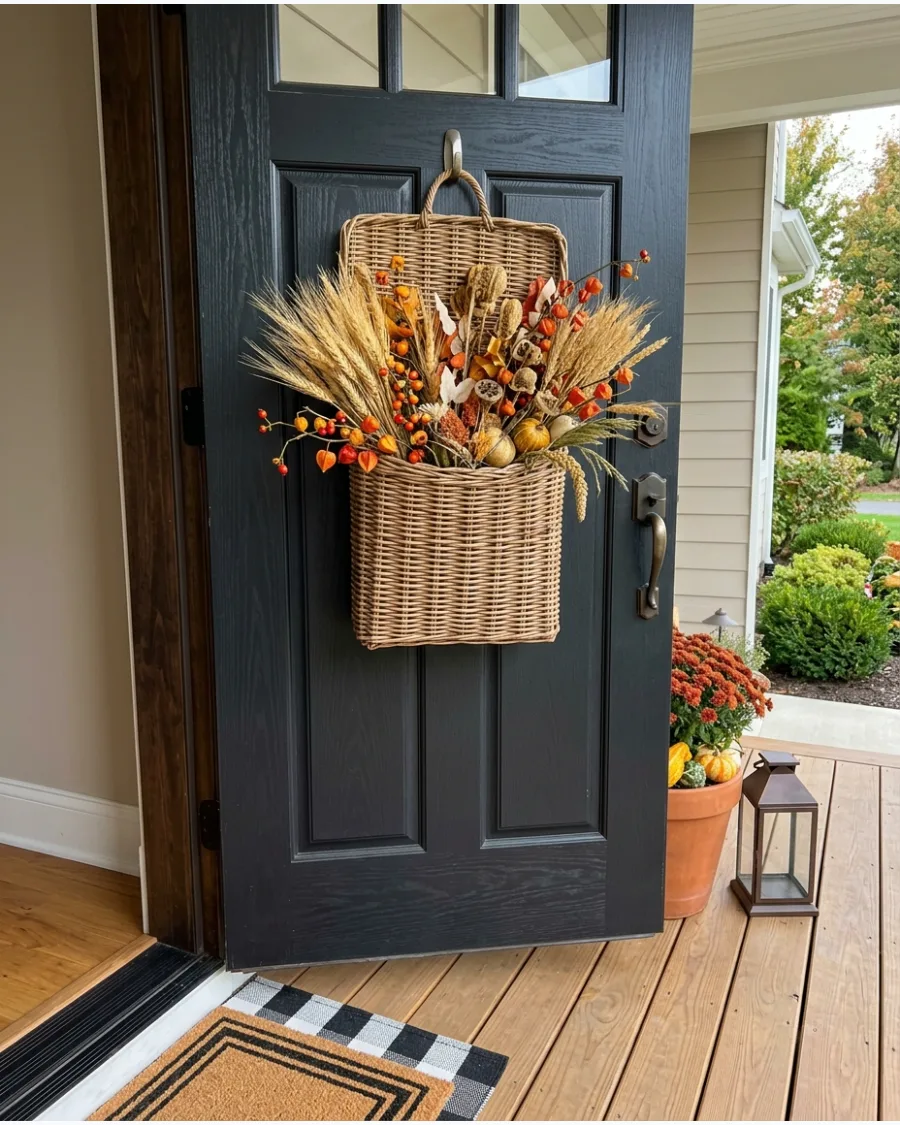
A flat-backed wicker wall basket offers a textural alternative to the traditional circular wreath. This arrangement uses dried wheat stalks, faux bittersweet vines, and small velvet pumpkins to create a layered autumnal look.
Secure the heavier items at the bottom of the basket with floral foam to prevent shifting when the door opens. While fresh greens smell wonderful, high-quality silk foliage ensures the display remains vibrant from early November through the holiday feast.
- Source a flat-backed tobacco basket or woven wall pocket from a local craft store or thrift shop for under twenty dollars.
- Layer the tallest elements like tall grass or branches in the back, filling the front with colorful gourds or fabric pumpkins.
- Swap the velvet pumpkins for pinecones and evergreen sprigs to transition the basket into the winter season immediately after Thanksgiving.
Quick win: Use a command hook placed upside down on the interior side of the door to loop the hanging ribbon over the top, hiding the hardware completely.
DIY GARLANDS & MANTEL DECORATIONS
21. DIY Dried Orange Thanksgiving Garland
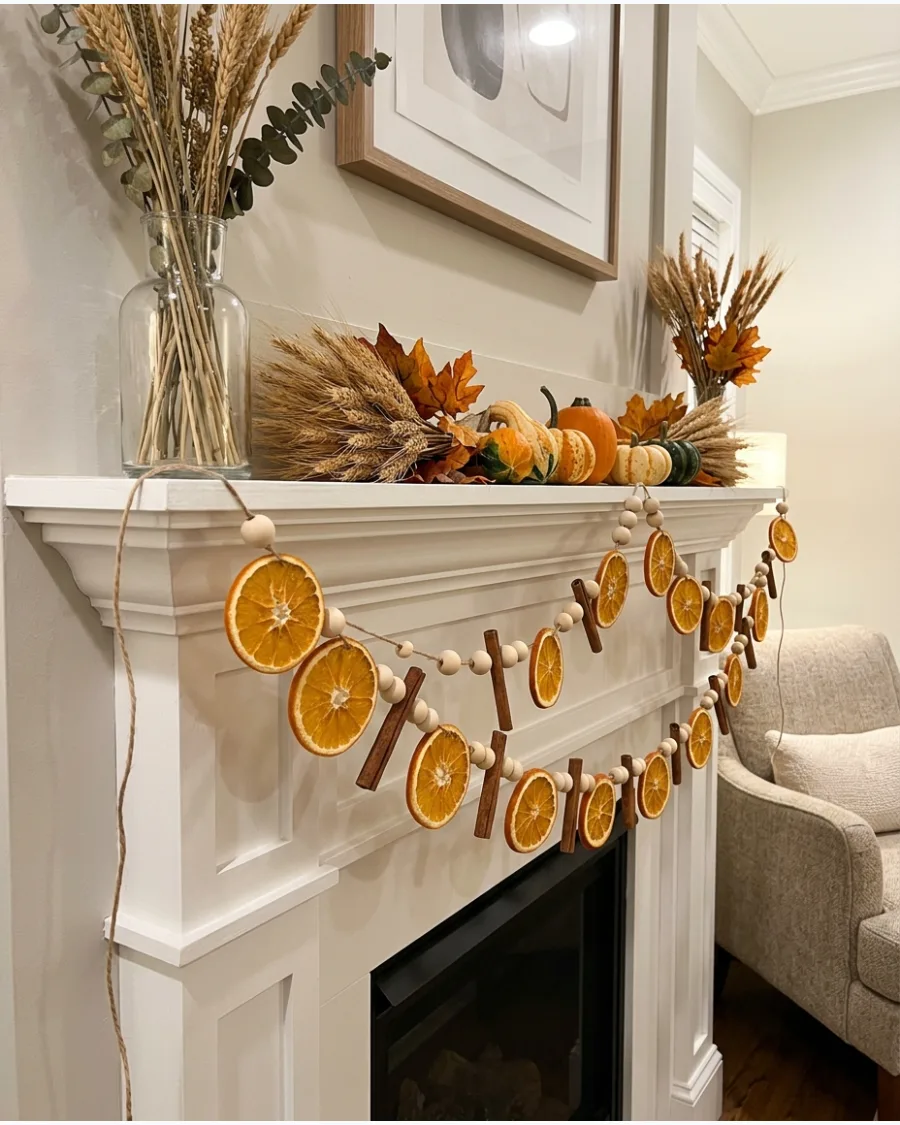
Dried citrus adds a bright pop of color and a light scent to any room. Slicing oranges thinly ensures they dry evenly in a low-temperature oven without burning.
Thread the slices through their centers using a large embroidery needle and thick jute twine. This natural look pairs well with cinnamon sticks for a classic harvest feel.
- Oranges, twine, and wood beads
- Bake slices at 200 degrees for 3-4 hours
- Use lemon or lime slices for a different color palette
Quick win: Blot the orange slices with a paper towel before baking to speed up the drying process.
22. DIY Felt Leaf Garland
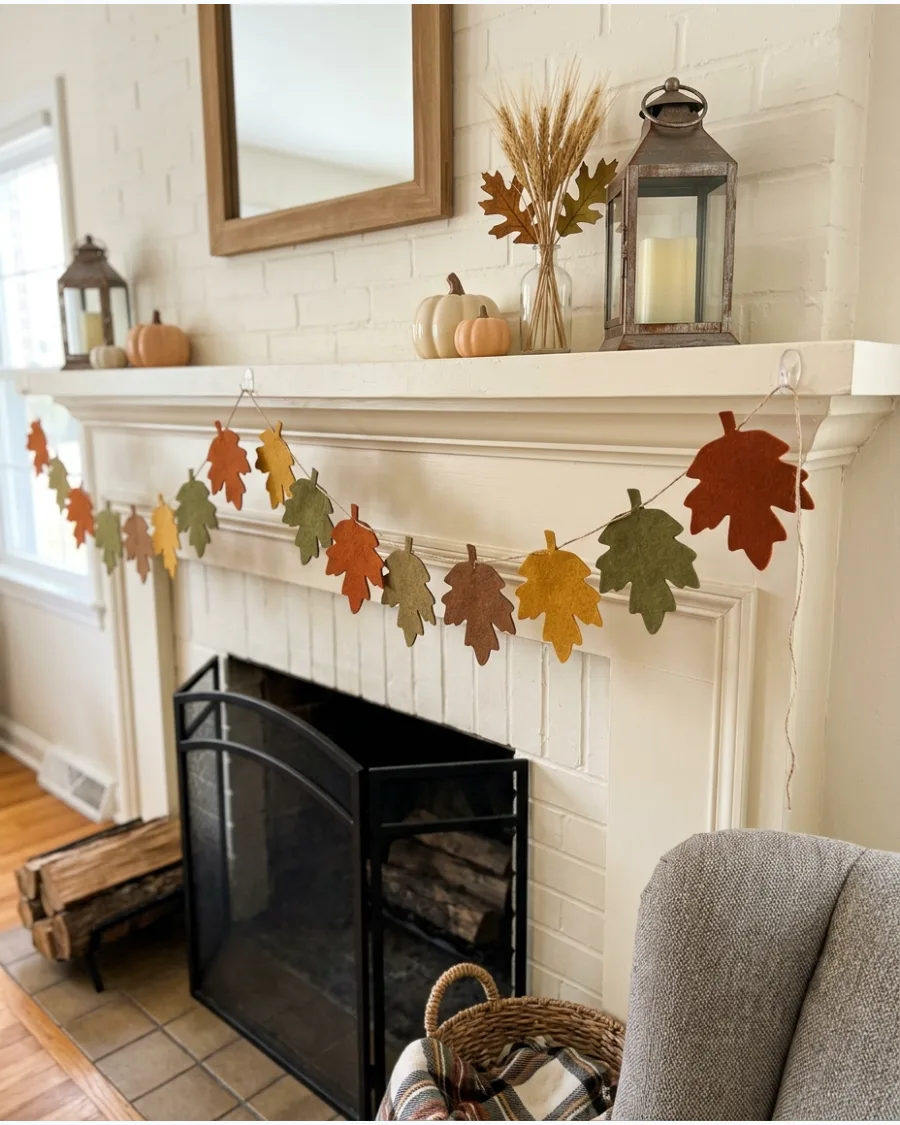
Felt is an ideal material for garlands because it does not fray and holds its shape perfectly. Choose a mix of autumn tones like mustard and rust to create a cohesive seasonal look.
Trace leaf shapes onto the felt with a fabric marker before cutting them out with sharp fabric shears. This reusable piece adds soft texture to a mantel or window frame.
- Wool felt sheets and twine
- Space leaves 3 inches apart for the best visual balance
- Scale up the leaf size for large rooms or high ceilings
Best shortcut: Use a sewing machine to quickly stitch a straight line through the center of each leaf to connect them.
23. DIY Paper Leaf Garland
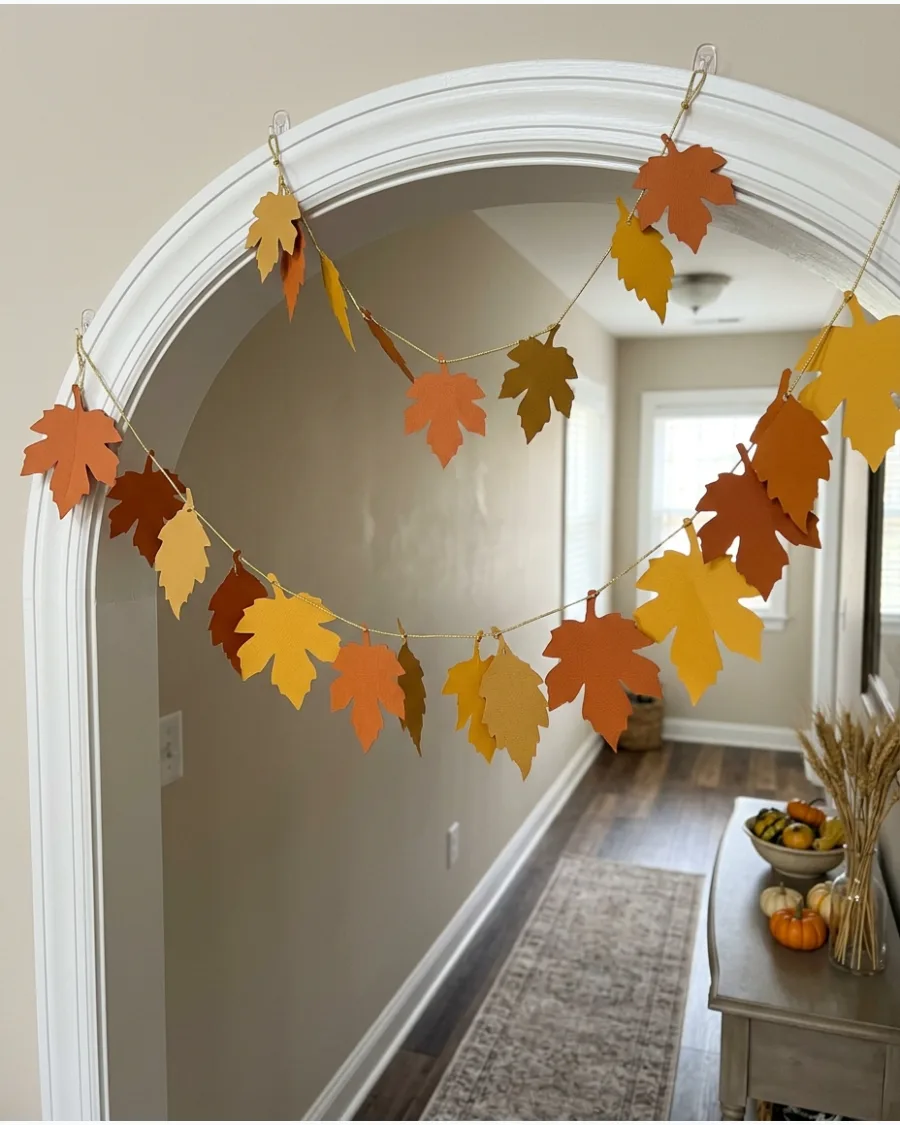
High-quality cardstock provides enough weight to prevent the leaves from curling over time. Using various shades of the same color creates a sophisticated ombre effect across the display.
Fold each paper leaf down the center to create a realistic vein and a 3D effect. It is a budget-friendly way to fill a large wall space or a wide doorway.
- Cardstock paper and string
- Use a hot glue gun to secure the stems to the cord
- Switch to metallic paper for a more formal dining room look
Quick win: Use a paper leaf punch to save time if you want smaller, uniform leaves.
24. DIY Mini Pumpkin Garland
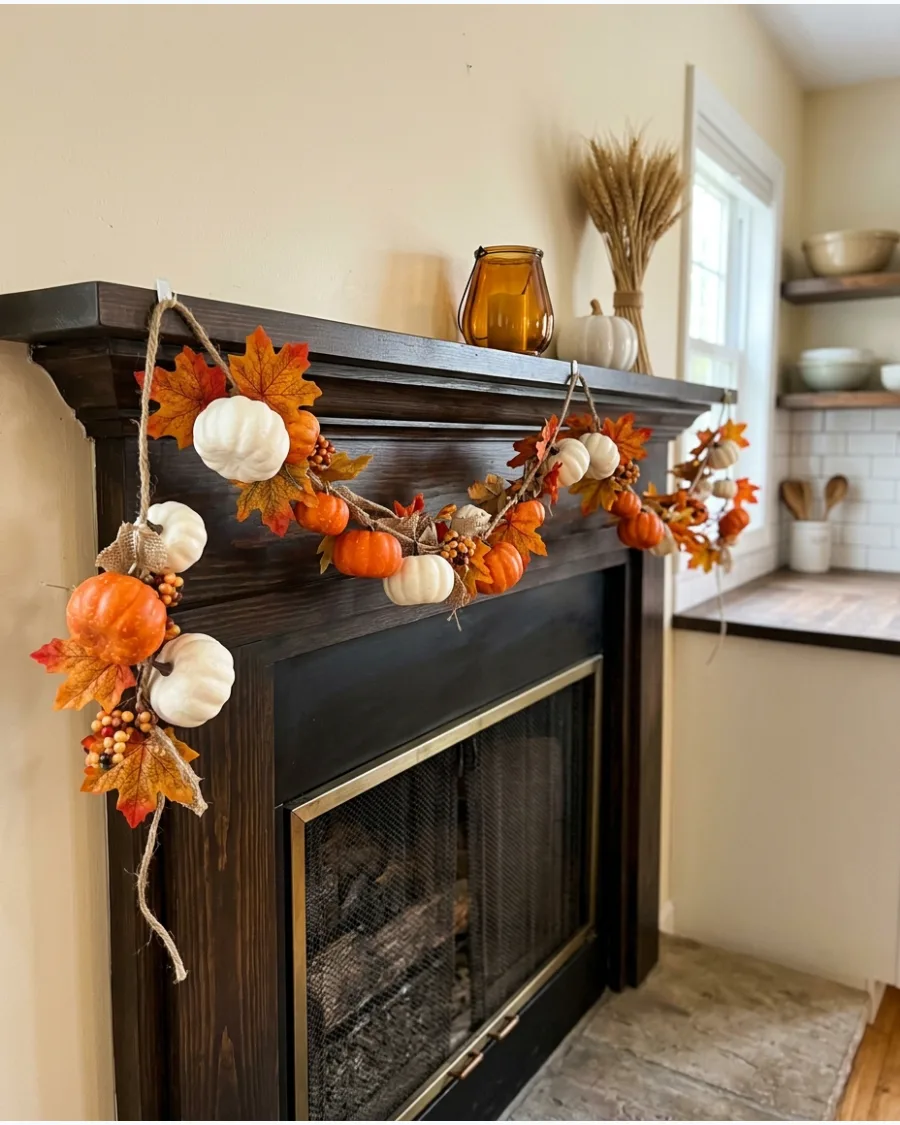
Lightweight foam pumpkins are the best choice for this project to avoid putting too much weight on the string. Mixing the pumpkins with faux silk leaves helps the garland look fuller and more natural.
Poke a small hole through the center of each pumpkin with a skewer before threading the twine. This playful decoration works well in kitchens or on dining room sideboards.
- Mini foam pumpkins and faux leaves
- Secure the ends of the twine with command hooks for a damage-free hang
- Use all-white pumpkins for a modern, clean aesthetic
Most people skip this: Tie a small knot in the twine on both sides of each pumpkin to keep them from sliding toward the center.
25. DIY Wood-Bead Fall Garland
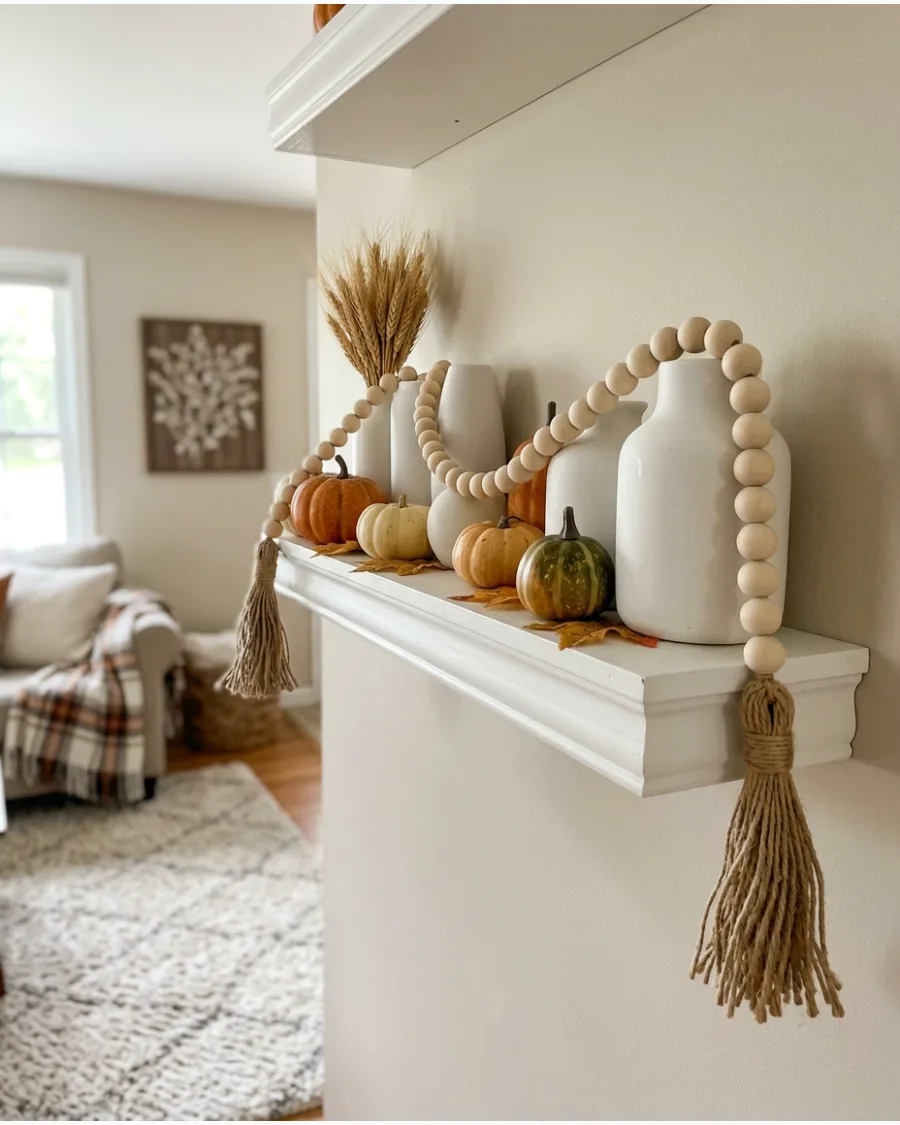
Natural wood beads bring a clean, organic element to Thanksgiving decor that fits almost any style. Adding large tassels to the ends gives the garland a finished, professional appearance.
Intersperse small wooden leaf cutouts between every five or six beads to break up the pattern. This versatile piece looks just as good coiled in a bowl as it does on a mantel.
- Assorted wood beads and jute twine
- Use a variety of bead sizes to create more visual interest
- Paint a few beads in copper or gold for a touch of shine
Best shortcut: Use a piece of scotch tape on the end of your twine to act as a needle for easier threading.
DIY Thanksgiving Decorations
26. Felted Wool Acorn Garland
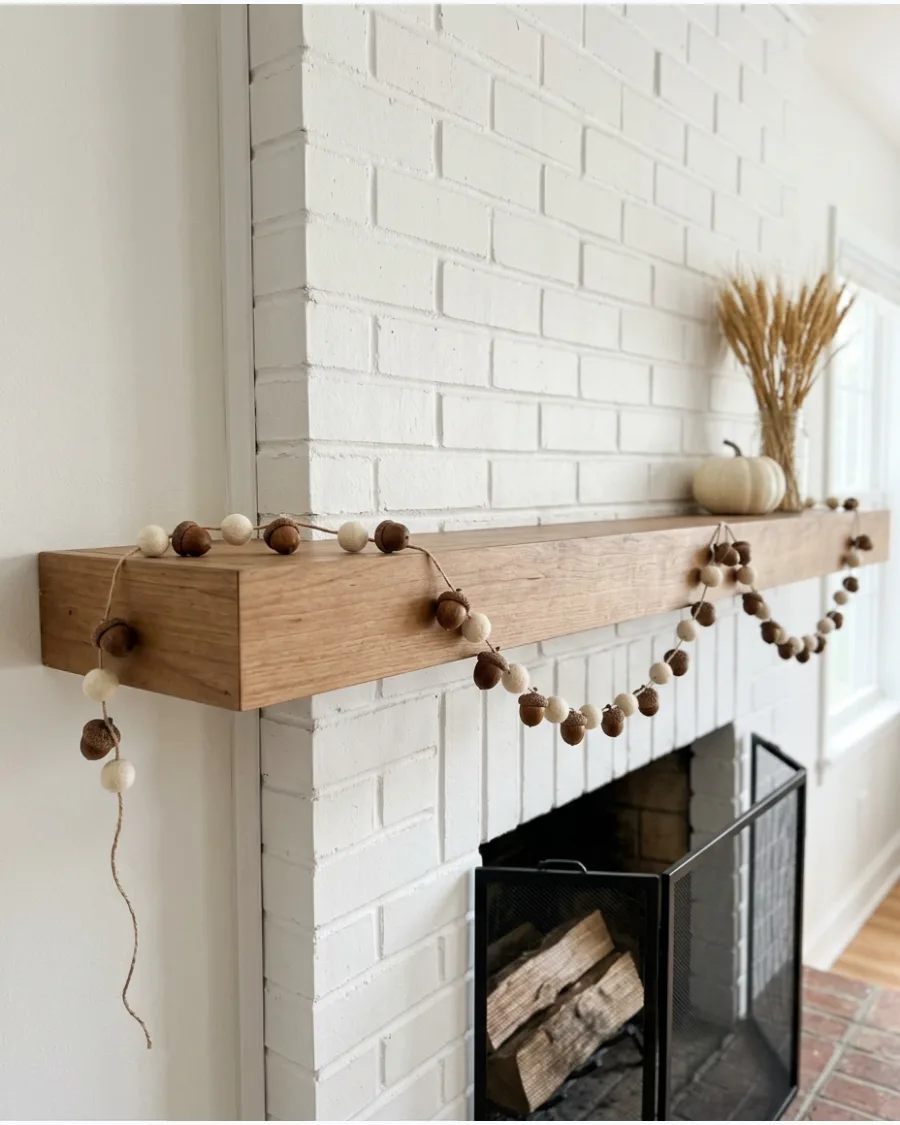
Natural acorn caps paired with colorful felted wool beads create a textured, earthy accent for a Thanksgiving mantel. This project bridges the gap between rustic foraging and modern craft aesthetics while remaining durable for years to come.
Hot glue small wool spheres into cleaned, dried acorn caps before threading them onto a length of rustic twine. Real acorns often contain small insects, so using wool centers avoids the mess of traditional drying while adding a soft visual contrast.
- Collect acorn caps from the yard for free or buy them in bulk online for under fifteen dollars.
- Clean caps with a damp cloth and let them dry completely to ensure the hot glue adheres properly.
- Swap cream wool for deep ochre or burnt orange tones to match specific table runner colors.
Quick win: Use a needle and embroidery floss to pierce through the wool balls horizontally rather than trying to string the caps themselves.
DIY GARLANDS & MANTEL DECORATIONS
27. DIY Thanksgiving Banner With Vintage Letters
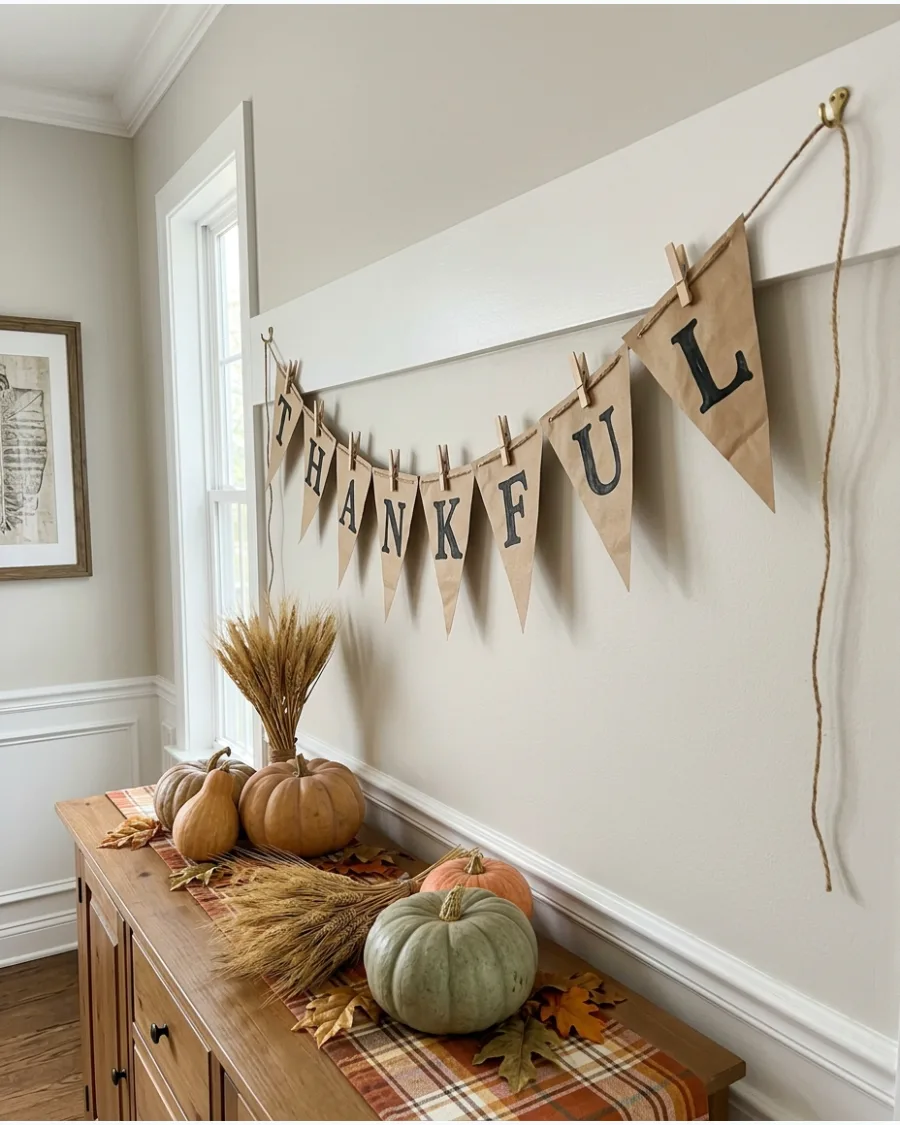
A lettered banner serves as a clear focal point for the room and sets a grateful tone for the holiday. Kraft paper or linen fabric offers a sturdy base that feels classic and warm.
Stencil the letters with black acrylic paint or use iron-on vinyl for a crisp, clean finish. Hanging the pennants with mini clothespins allows for easy adjustment and spacing.
- Kraft paper or fabric and twine
- Measure the mantel width first to ensure the word is centered
- Use felt letters for a softer, more kid-friendly look
Most people skip this: Space the letters slightly further apart than you think you need to account for the drape of the string.
28. DIY Book-Page Leaf Garland
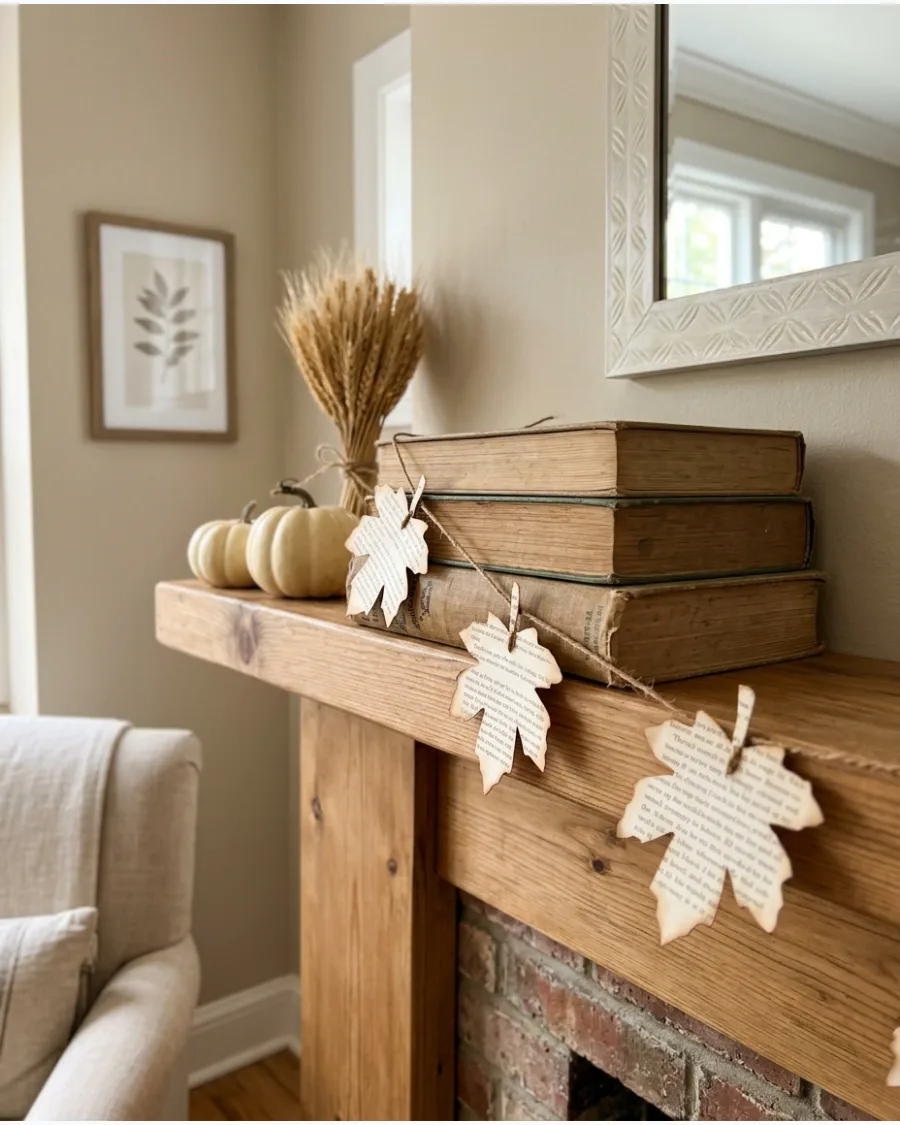
Old books provide a unique texture and a neutral color palette that complements any fall theme. The yellowed edges of vintage paper add a sense of history and warmth to the mantel.
Apply a light layer of gold paint to the leaf edges for a subtle metallic shimmer. This project is a great way to repurpose damaged books into something beautiful.
- Old book pages and thin thread
- Use a leaf template to keep shapes consistent
- Mix in a few real dried leaves for a blend of textures
Quick win: Use a sponge to dab a little brown ink on the edges of the paper for an aged look.
29. DIY Eucalyptus and Pumpkin Mantel Garland
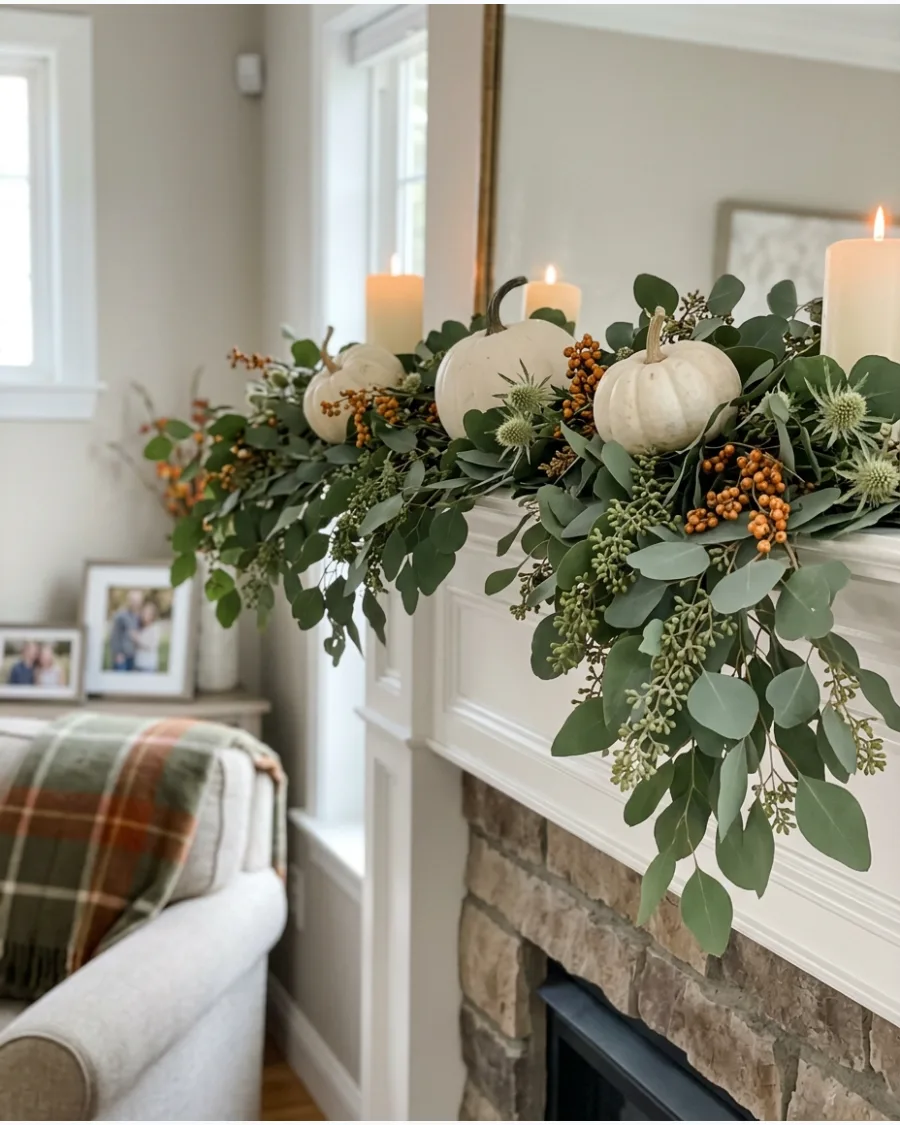
Eucalyptus provides a soft, silvery-green base that makes traditional orange pumpkins pop. Layering multiple strands of greenery creates a lush, professional look without the high cost of fresh floral arrangements.
Nestle battery-operated LED candles deep within the leaves to create a safe, warm glow. This setup stays fresh throughout the entire month of November.
- Faux eucalyptus and mini pumpkins
- Use floral wire to secure the pumpkins to the greenery
- Add pinecones or acorns to fill in any small gaps
Best shortcut: Buy garland style eucalyptus instead of individual stems to save time on layering.
30. DIY Autumn Branch Mantel Display
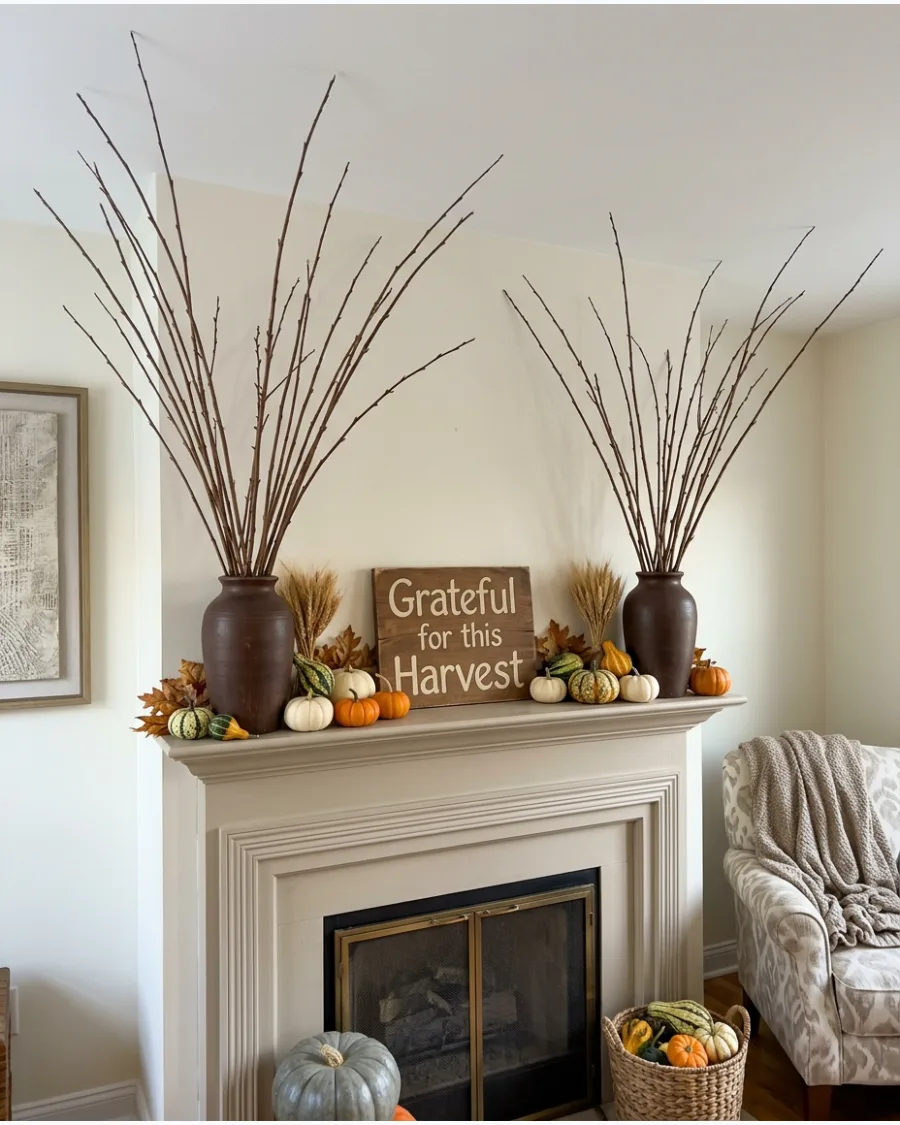
Tall branches add height and drama to a fireplace without cluttering the surface. Foraging for branches with interesting curves or remaining dried berries creates an organic, high-end feel.
Place heavy stones or floral foam inside the vases to keep the tall branches from tipping over. This minimalist approach works perfectly in modern or traditional homes.
- Large vases and foraged branches
- Choose branches of varying heights for a more natural look
- Hang a few lightweight ornaments or tags from the twigs
Quick win: Lightly mist the branches with hairspray to prevent any small dried bits from falling onto the hearth.
DIY THANKSGIVING TABLE & CENTERPIECE DECOR
31. DIY Pumpkin Dough Bowl Centerpiece
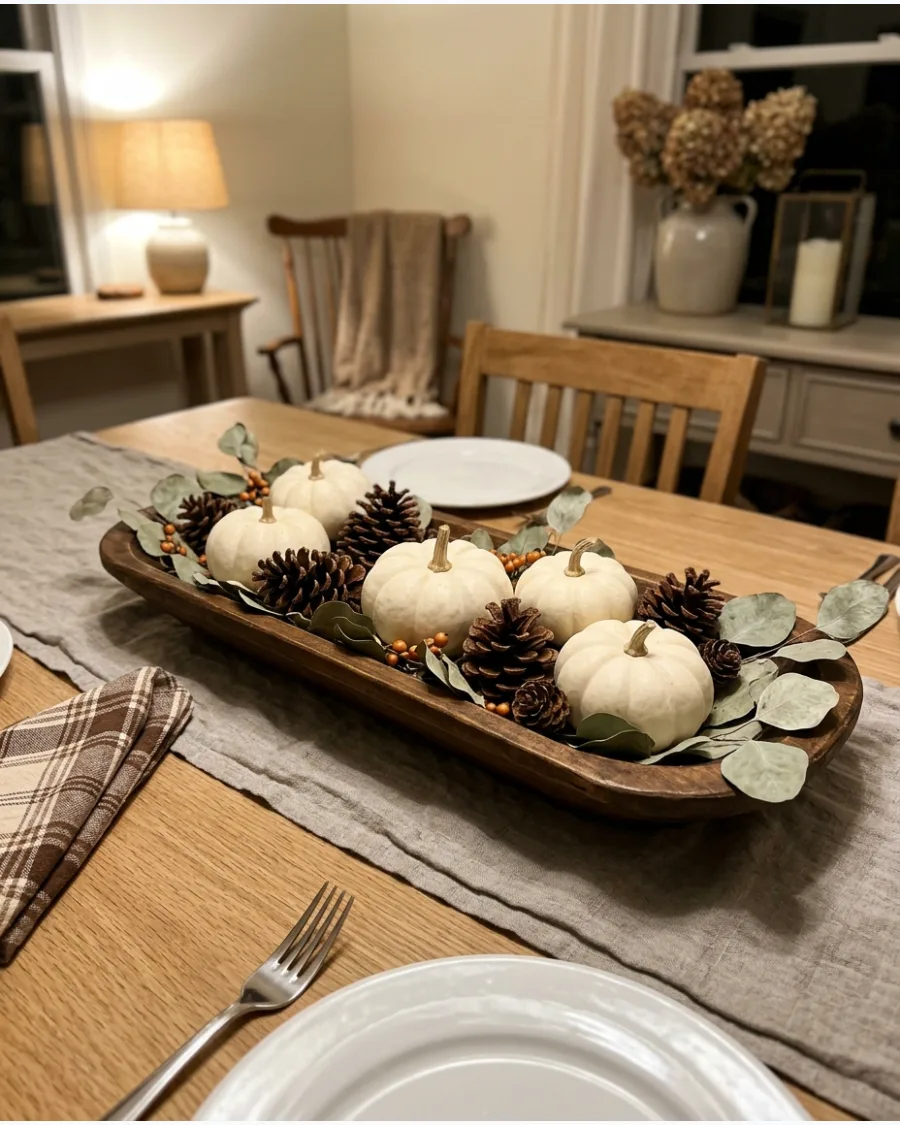
Fill a long wooden dough bowl with mini pumpkins, pinecones, acorns, eucalyptus, and dried foliage for an abundant Thanksgiving centerpiece. A mix of textures like smooth gourds and prickly pinecones creates a professional, layered look. This arrangement fills a long table without blocking conversation.
- Buy a 24-inch paulownia wood dough bowl for under $30.
- Place the largest pumpkins first to anchor the design.
- Swap the foliage for evergreen sprigs to transition into December.
Best shortcut: Use crumpled brown paper at the bottom of the bowl to add height so you need fewer pumpkins to fill the space.
32. DIY Amber Bottle Centerpiece
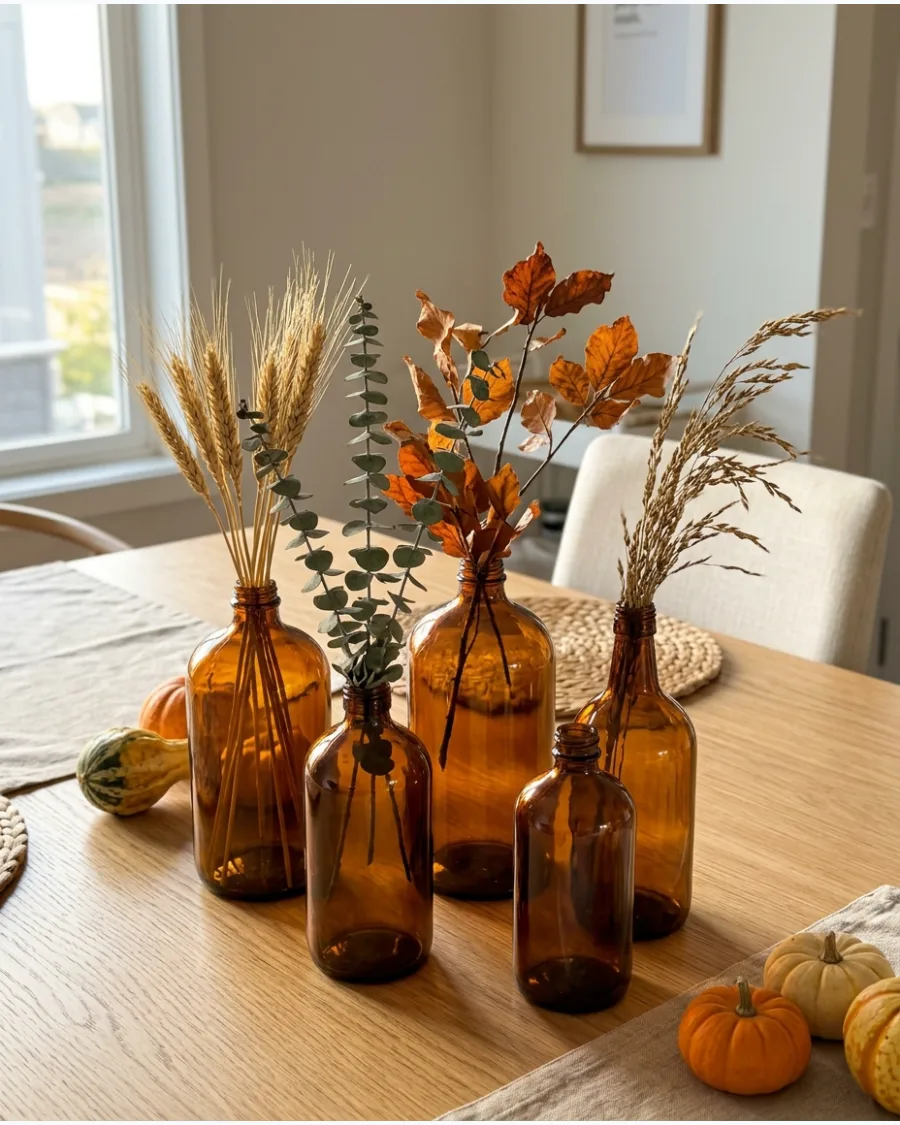
Collect amber bottles in different shapes and fill each one with a few dried flowers, wheat stems, or autumn branches. Grouping bottles in odd numbers like three or five makes the arrangement feel more intentional. The warm glass glows beautifully when it catches the afternoon sun.
- Look for vintage-style amber bottles at thrift stores or online.
- Trim stems to different heights to keep the eye moving across the table.
- Use narrow-neck bottles to support thin stems like dried bunny tails or wheat.
Quick win: Rinse the inside of old bottles with a mix of rice and warm soapy water to remove stubborn residue.
33. DIY Mason Jar Thanksgiving Candleholders
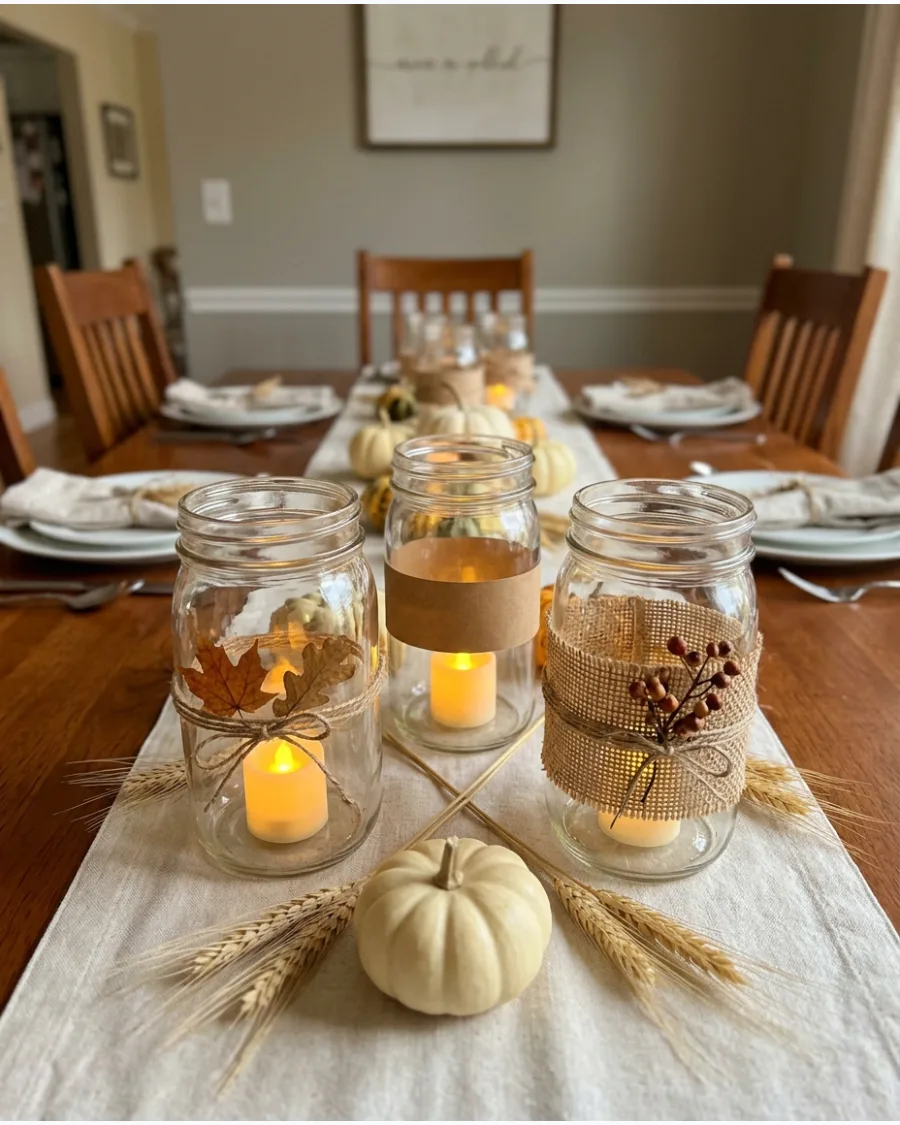
Decorate clear jars with twine, pressed leaves, or kraft labels and place battery-operated candles inside for a warm table display. Using battery-operated candles prevents the glass from getting too hot and eliminates soot marks. These look best when scattered down the center of a long table or tucked into a bookshelf.
- Use clear matte spray or Mod Podge to secure real pressed leaves to the glass.
- Wrap the rim of the jar three times with jute twine for a finished look.
- Choose flicker-style LED candles for a more realistic glow.
Most people skip this: Add a handful of unpopped popcorn kernels or dried lentils to the bottom of the jar to hold the candle upright.
34. DIY Gourd Candleholders
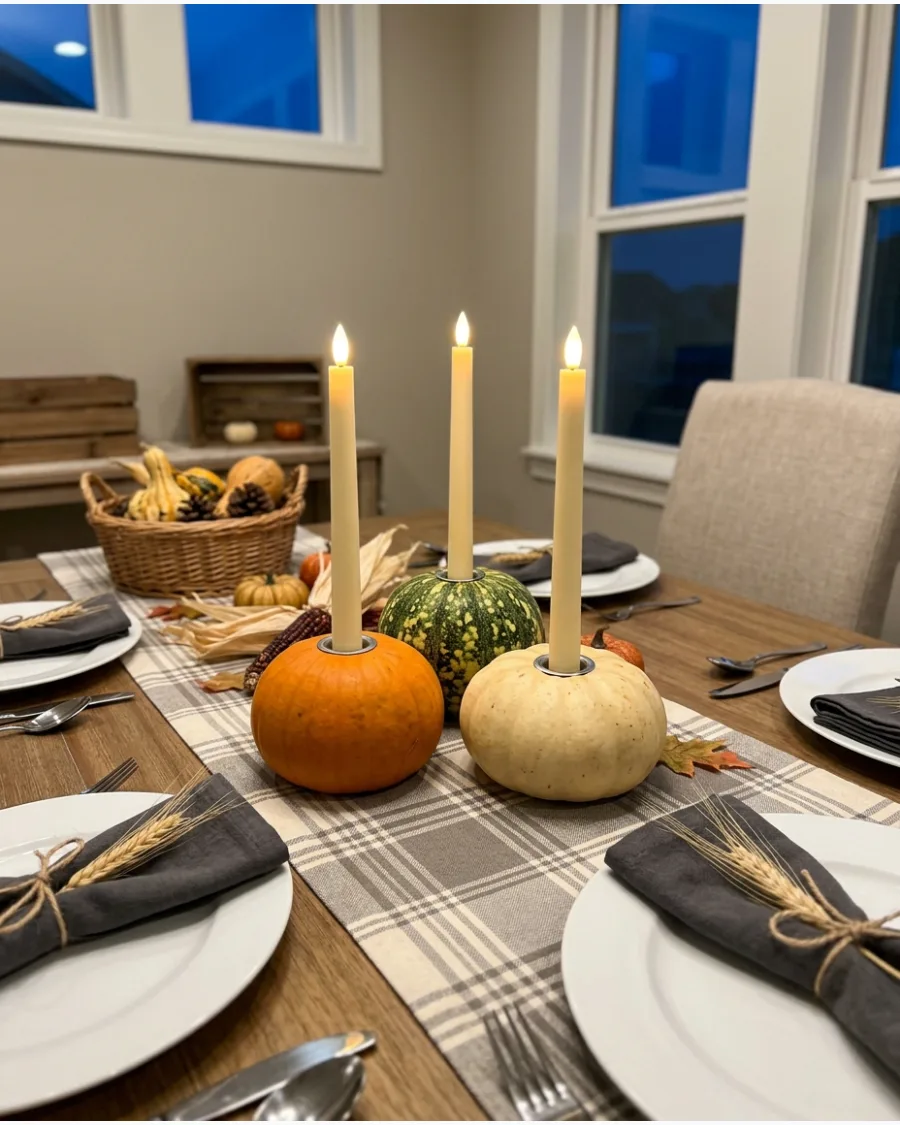
Hollow out sturdy decorative gourds to securely hold appropriately sized candle cups or battery-operated tapers for a creative seasonal centerpiece. Selecting gourds with flat bottoms ensures your candles stay upright and safe throughout dinner. This organic look beats any plastic store-bought holder for a harvest theme.
- Use a small paring knife or a drill bit to create a hole that matches your candle width.
- Clean out the seeds and pulp thoroughly to prevent early spoilage.
- Apply a thin layer of petroleum jelly to the cut edges to keep the gourd fresh longer.
Best shortcut: Use battery-operated tapers so you do not have to worry about wax dripping onto the gourd or table.
35. DIY Pear and Greenery Table Garland
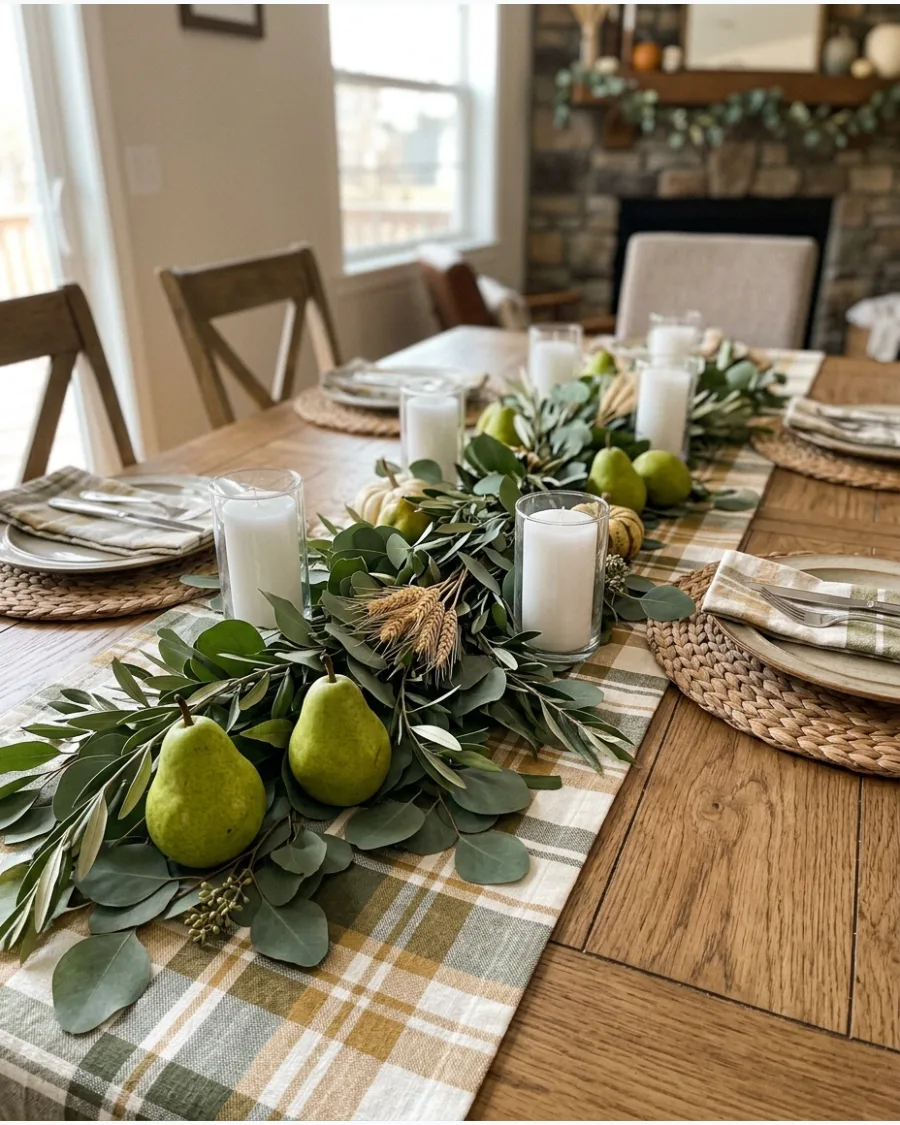
Arrange fresh pears along loose eucalyptus or olive branches and add candles between them for an elegant DIY table decoration. Green pears provide a sophisticated pop of color that feels more modern than traditional orange. Add white pillar candles between the fruit for a high-end restaurant vibe.
- Buy Bosc or Anjou pears for their elegant shapes and muted colors.
- Lay the greenery down first as a base, then nestle the fruit into the leaves.
- Wipe the pears with a damp cloth to give them a subtle, clean shine.
Quick win: Use artificial pears if you want to set the table several days in advance without worrying about fruit flies.
36. DIY Wheat Bundle Centerpieces
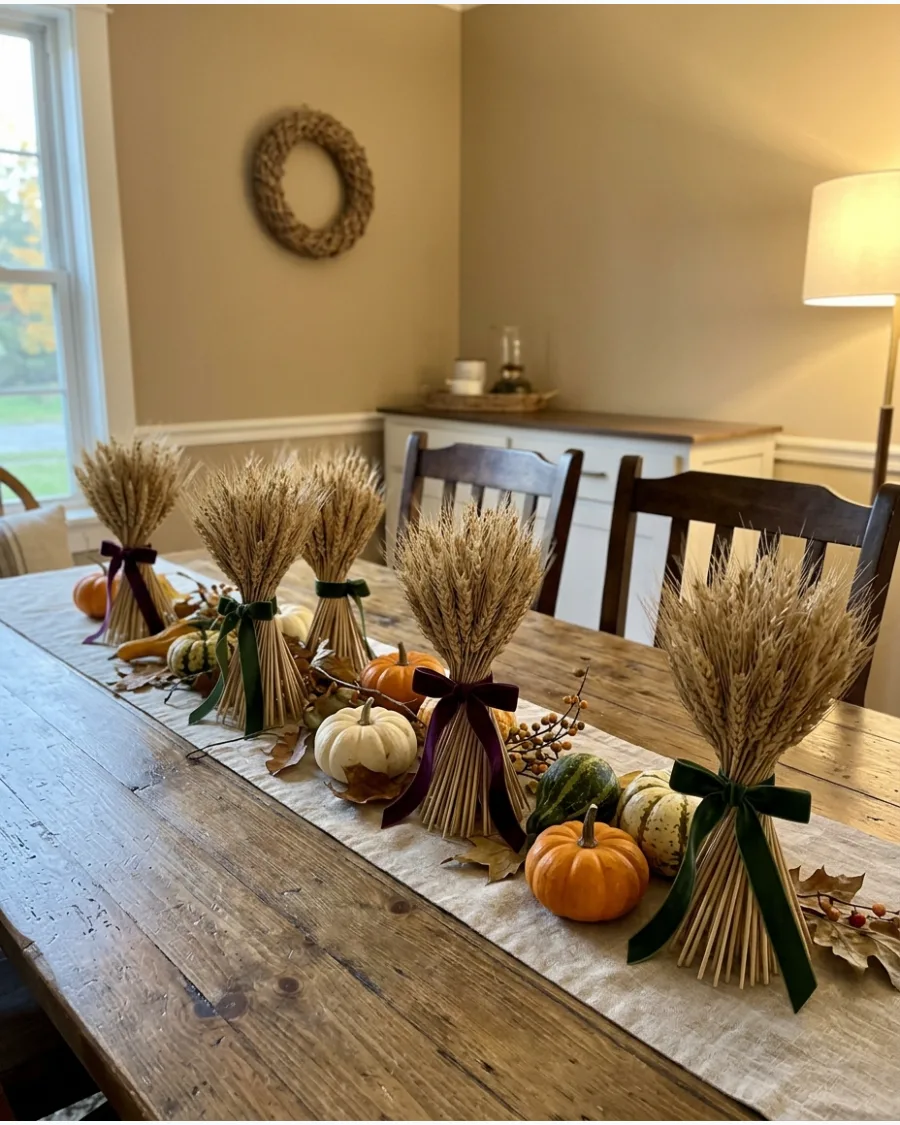
Tie dried wheat into small bundles with velvet ribbon and arrange several down a dining table or buffet. Velvet ribbon in deep plum or forest green adds a touch of luxury to the humble dried stalks. These bundles stand up well on their own if the bottoms are trimmed perfectly flat.
- Buy pre-dried wheat from a craft store to ensure it does not drop too many seeds.
- Use a rubber band to secure the bundle first, then hide the band with your ribbon.
- Cut the stalks to about 8 inches for a standard table height.
Most people skip this: Give the wheat a light spray of hairspray to prevent the delicate tips from shedding on the table runner.
37. DIY Dried Hydrangea Thanksgiving Arrangement
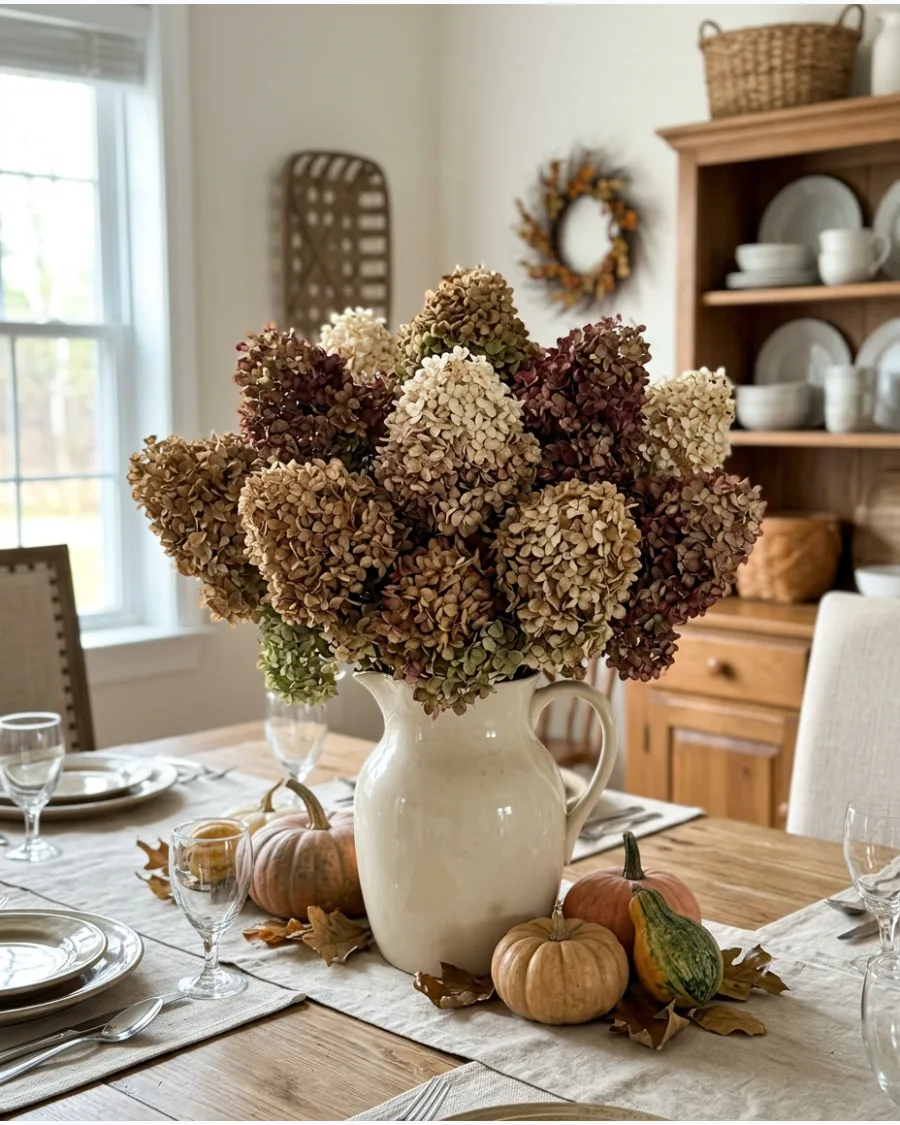
Fill a vintage pitcher or ceramic vase with dried hydrangeas in muted brown, cream, burgundy, and green tones. Dried hydrangeas maintain their volume, making it easy to create a full arrangement without a lot of filler. These flowers bring a soft, romantic feel to a rustic holiday table.
- Harvest hydrangeas in late summer and hang them upside down in a dark room to dry.
- Choose a vase with a narrow neck to help the heavy flower heads stay upright.
- Mix in a few dried eucalyptus stems for a different leaf texture.
Best shortcut: If your dried flowers look too dusty, use a hair dryer on the cool and low setting to gently blow off debris.
38. DIY Wooden Crate Thanksgiving Centerpiece
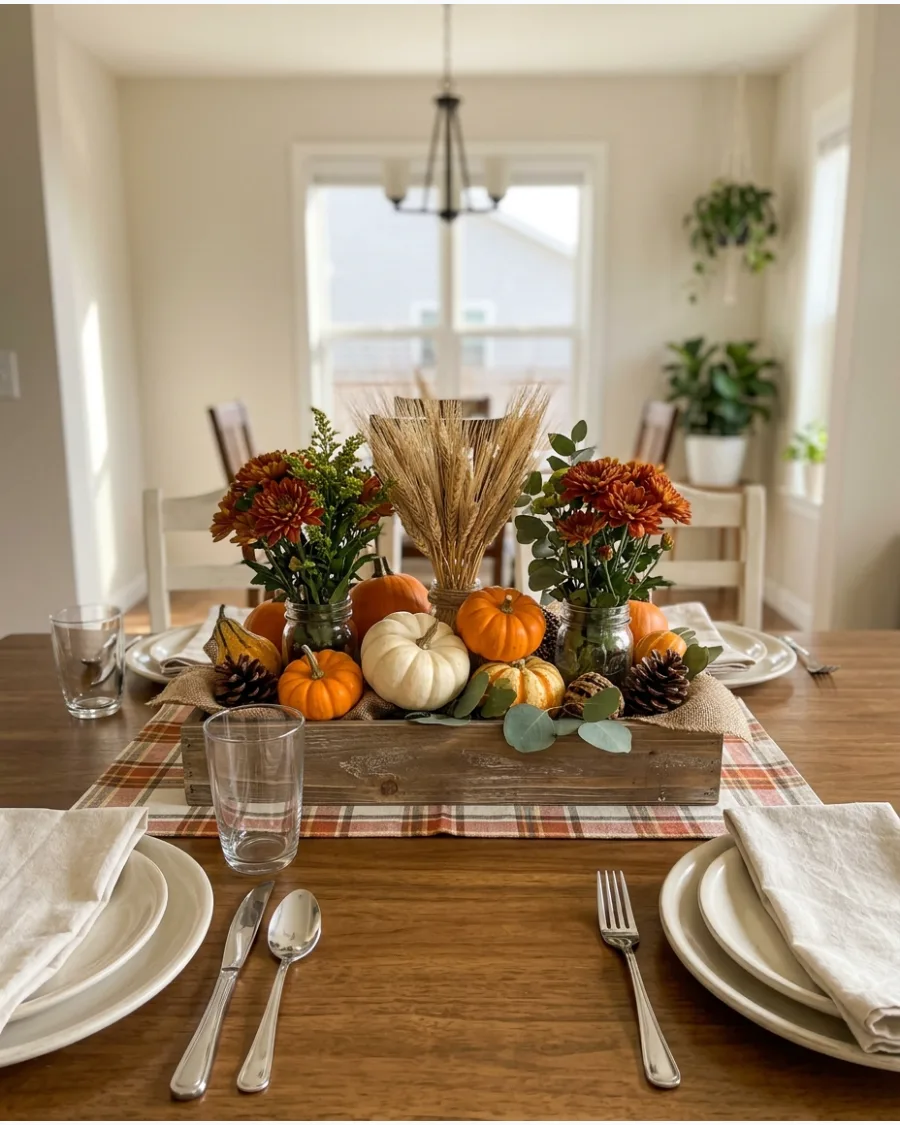
Fill a small wood crate with pumpkins, jars of flowers, wheat, pinecones, and greenery for a farmhouse-style display. The low profile of a crate allows guests to see each other across the table easily. This setup is easy to lift and move if you need more space for serving platters.
- Use a crate no longer than 12 inches for a standard square or round table.
- Place tall items like wheat or flowers in the center and shorter pumpkins at the ends.
- Line the crate with a plastic tray if you are using fresh flowers in water.
Quick win: Paint the crate a creamy white or dark charcoal to make the orange pumpkins pop more than they would against plain wood.
39. DIY Thanksgiving Candle Tray
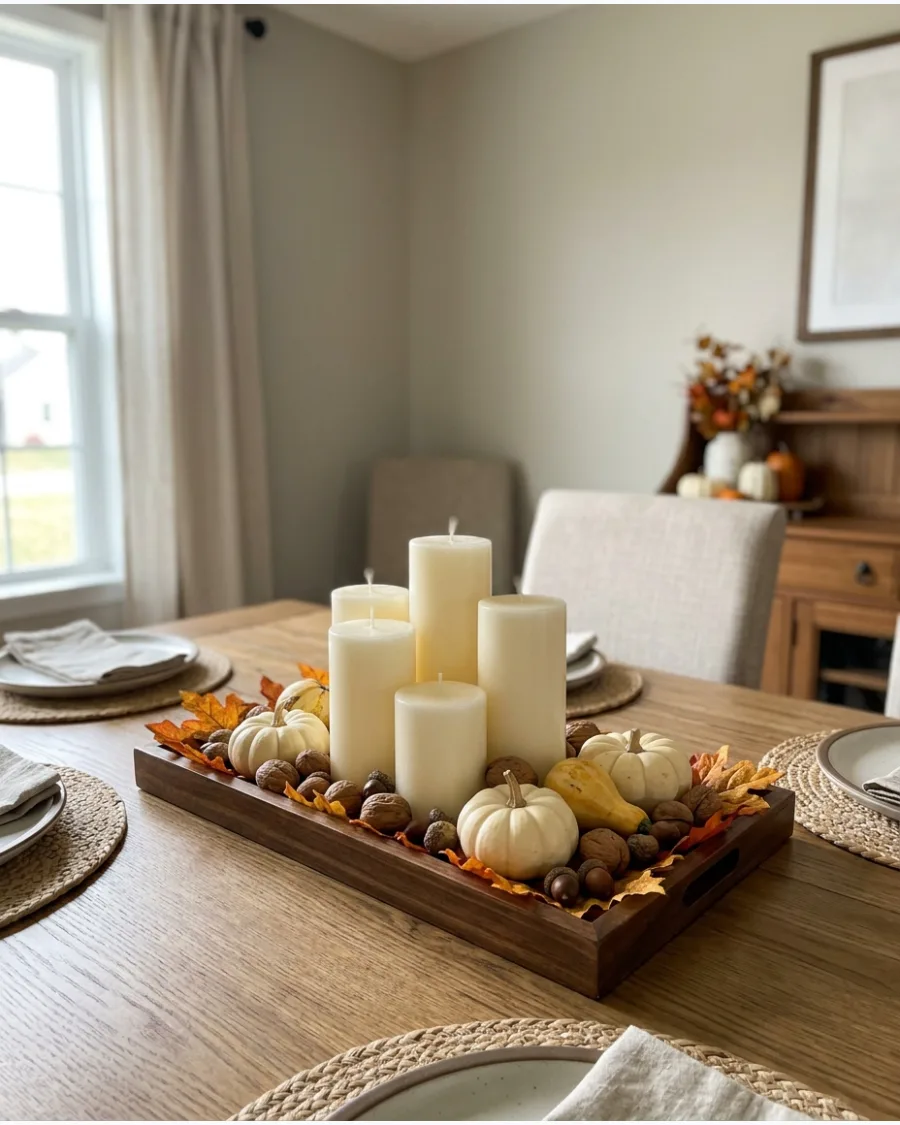
Arrange ivory candles on a wood tray and surround them with mini pumpkins, walnuts, acorns, and autumn leaves. Grouping candles of different heights on a single tray creates a dramatic focal point without looking cluttered. The wood tray protects your table from any accidental wax drips.
- Use odd numbers of candles, like three or five, for a balanced look.
- Choose unscented candles so the smell does not compete with the Thanksgiving meal.
- Scatter small items like acorns or walnuts last to fill in the gaps.
Most people skip this: Place a small piece of double-sided tape under the candle bases to keep them from sliding when the tray is moved.
40. DIY Thanksgiving Cloche Display
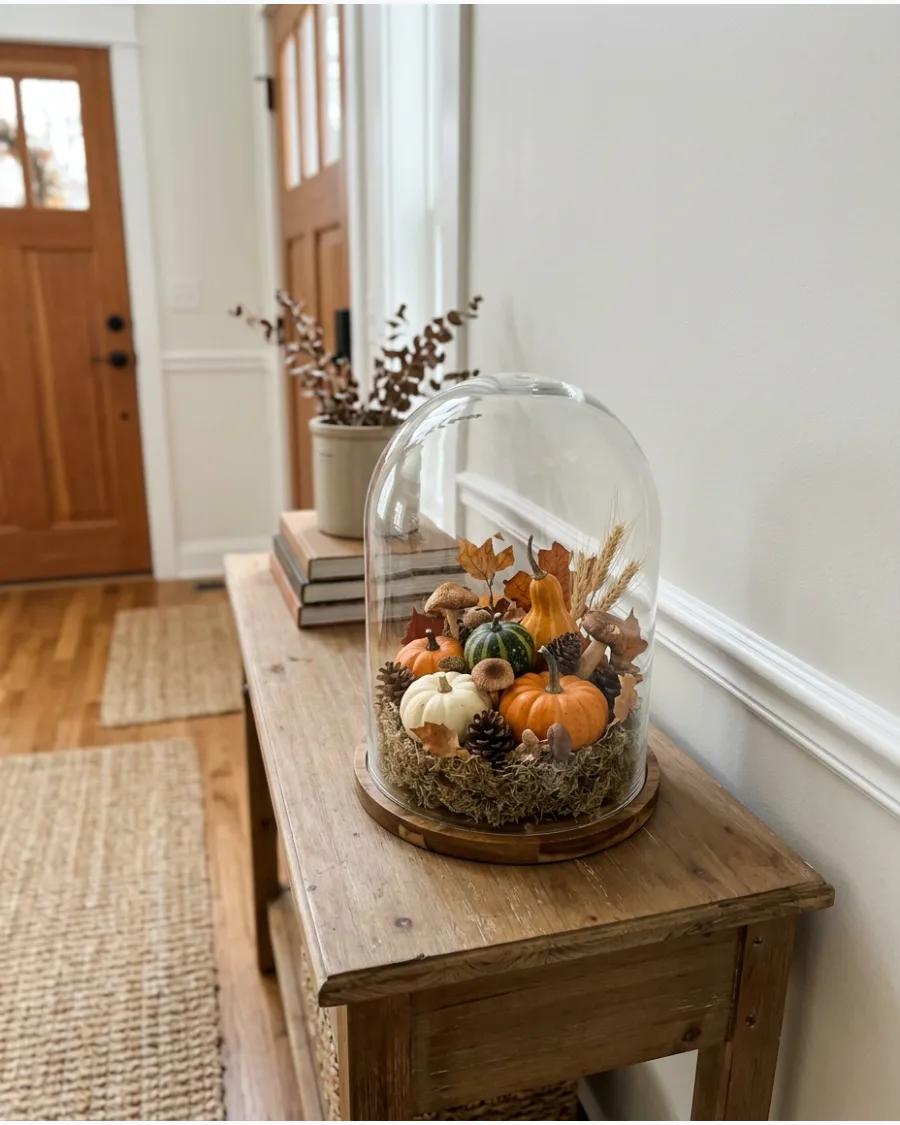
Create a miniature seasonal scene beneath a glass cloche using moss, tiny pumpkins, pinecones, mushrooms, and dried leaves. A glass dome makes small, simple items look like a curated museum display. This works perfectly as a centerpiece or as a decorative accent on an entryway console.
- Start with a base of preserved green moss to give the scene a natural foundation.
- Layer in one main object, like a white mini pumpkin, and accent it with two smaller items.
- Make sure the items do not touch the sides of the glass for a cleaner look.
Best shortcut: Use a glass cake stand base if you do not have a specific cloche tray to give the display more height.
NATURAL, PAPER & UPCYCLED THANKSGIVING DECOR
41. DIY Pressed Leaf Wall Art
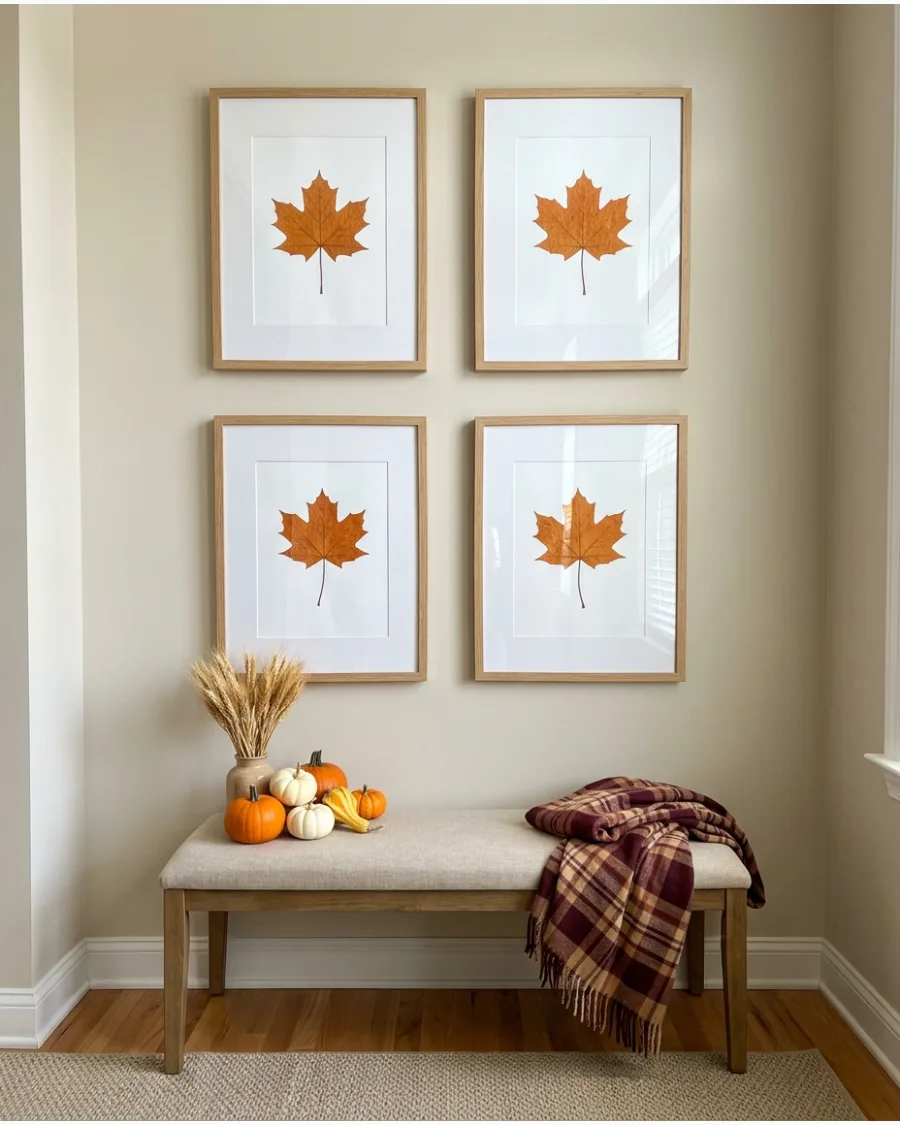
Real autumn leaves bring a sophisticated, organic feel to any empty wall space. Gather vibrant maple or oak leaves and press them between heavy books for several days to ensure they stay flat.
Secure the dried leaves to a cream-colored cardstock backing using a small drop of clear glue before placing them in a simple wood frame. Grouping three or four frames together creates a high-end gallery look for very little money.
- Collect leaves after a dry spell to prevent mold during the pressing process.
- Use frames with glass or acrylic to keep the leaves flat and protected from dust.
- Vary the leaf species and colors across the frames for visual interest.
Quick win: Use a warm iron on a low setting between two pieces of parchment paper to speed up the drying process.
42. DIY Botanical Fall Print Frames
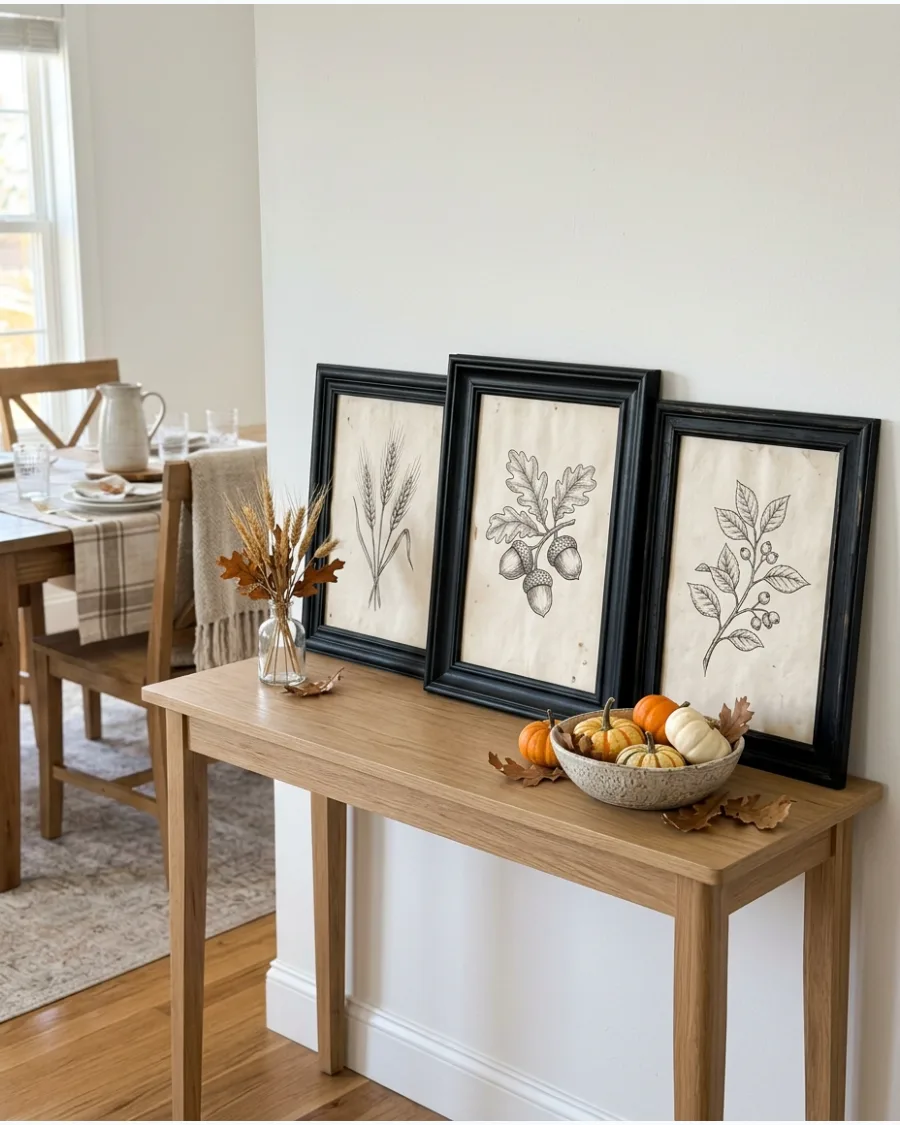
Vintage-style botanical prints add a classic touch to a Thanksgiving dining room or entryway. Look for public domain illustrations of wheat stalks, acorns, or turning leaves to print on textured paper.
Place the prints in mismatched thrifted frames painted in a unified matte black or gold for a curated aesthetic. This project fills large wall gaps without the weight or cost of traditional art.
- Search for high-resolution public domain botanical images online for the best print quality.
- Use cardstock or watercolor paper to give the prints a more expensive, textured feel.
- Standardize the look by using the same color of spray paint on frames from different sources.
Best shortcut: Dab a damp tea bag onto white paper to give new prints an instant vintage, sepia-toned look.
43. DIY Paper Pumpkin Decorations
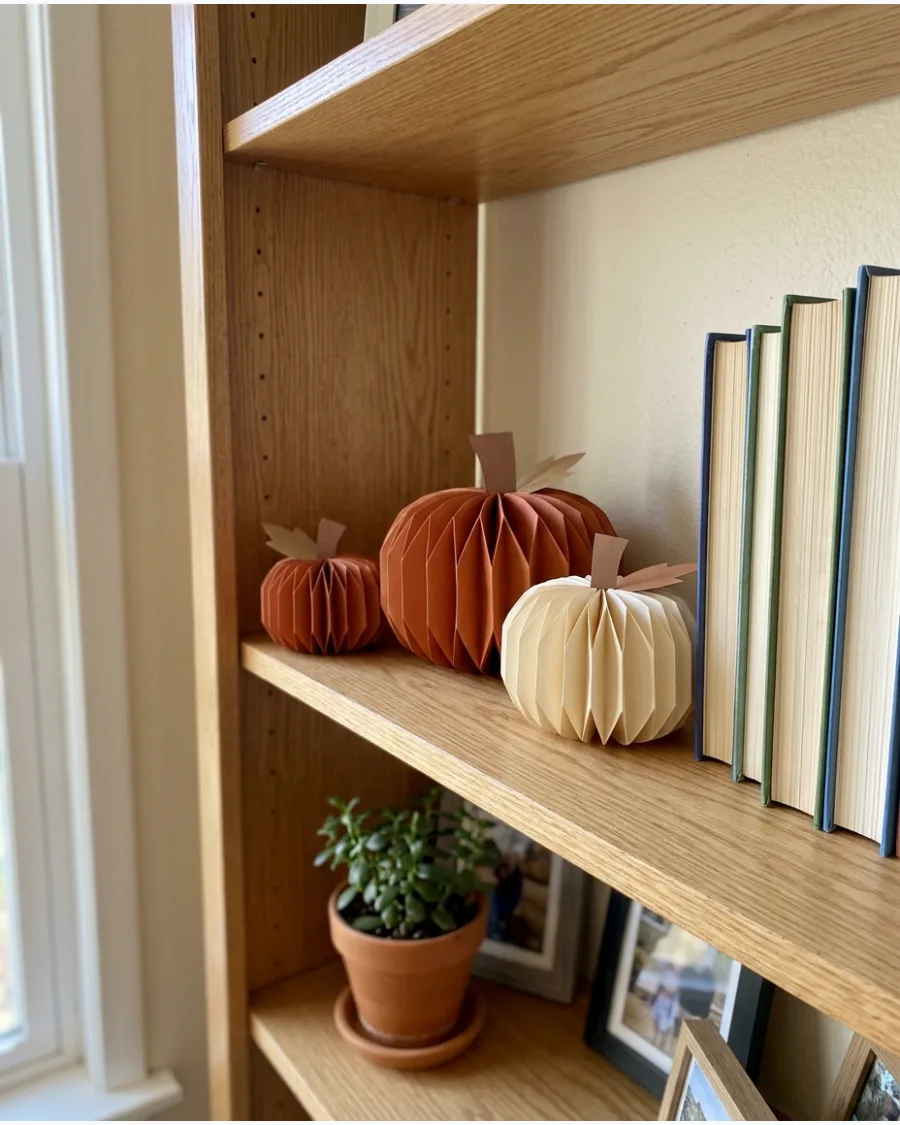
Dimensional paper pumpkins are a modern alternative to bulky plastic versions and take up very little storage space after the holidays. Use thick cardstock in shades of rust, mustard, and cream to create accordion-folded circles that pop into a pumpkin shape.
Finish the look by hot-gluing a small twig or a rolled piece of brown paper to the top as a stem. These look best when clustered in groups of three on a bookshelf or as part of a centerpiece.
- Use 65lb or heavier cardstock to ensure the pumpkins hold their shape and do not sag.
- Vary the heights by cutting different lengths of paper strips before folding.
- Add a small dab of hot glue to the top and bottom of the folds to keep the circle tight.
Most people skip this: Score your fold lines with a ruler and a dull edge first for crisp, professional-looking pleats.
44. DIY Paper Feather Turkey Decoration
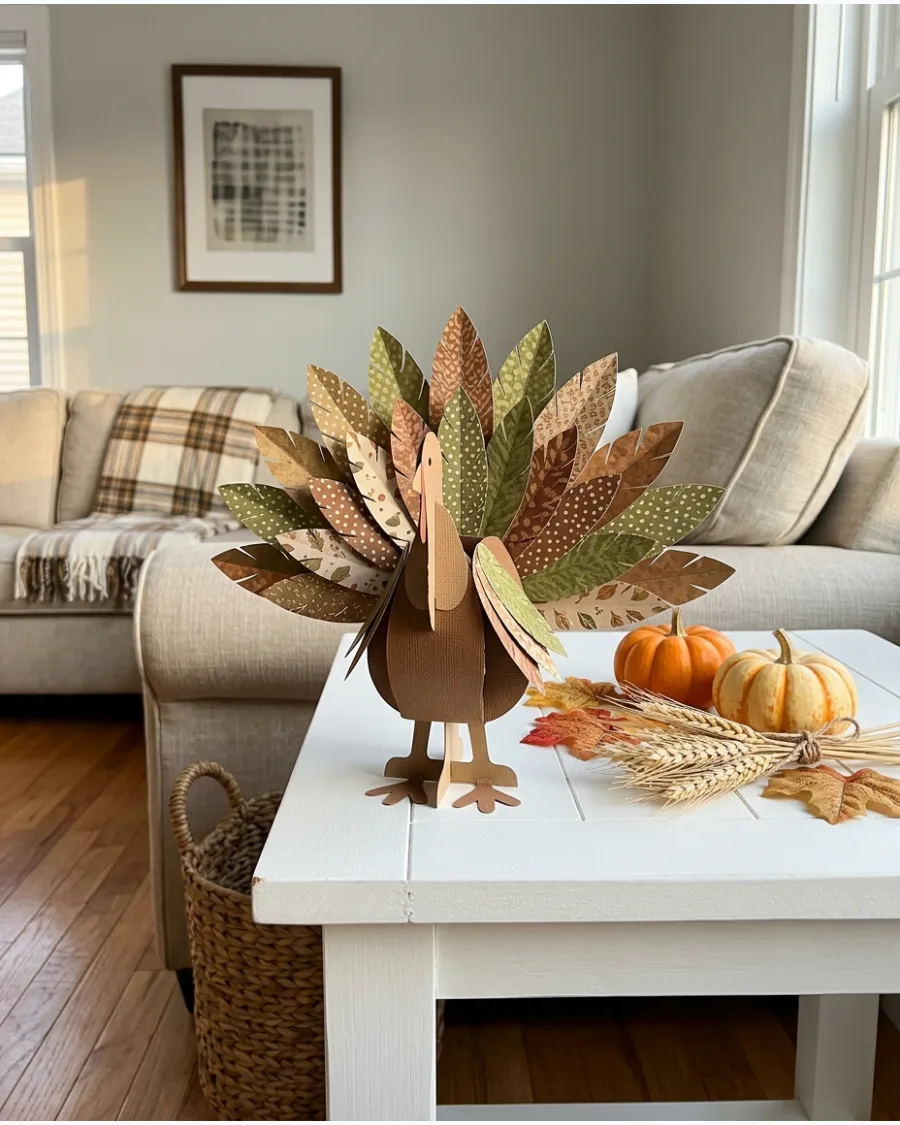
This project elevates the traditional turkey motif into something stylish enough for a main living area. Cut long feather shapes from patterned scrapbook paper in earthy tones like olive green and deep burgundy.
Layer the paper feathers in a fan shape behind a simple circular wood cutout to create a sophisticated silhouette. It provides a whimsical touch that still feels coordinated with adult decor.
- Mix patterns like plaid, dots, and solids to give the feathers more depth and visual texture.
- Use a wood circle or a thick cardboard base for the turkey body to provide stability.
- Secure the feathers with double-sided foam tape to create a 3D effect instead of lying flat.
Quick win: Use pinking shears or decorative edge scissors to give the edges of the paper feathers a realistic, fringed texture.
45. DIY Kraft Paper Thankful Tree
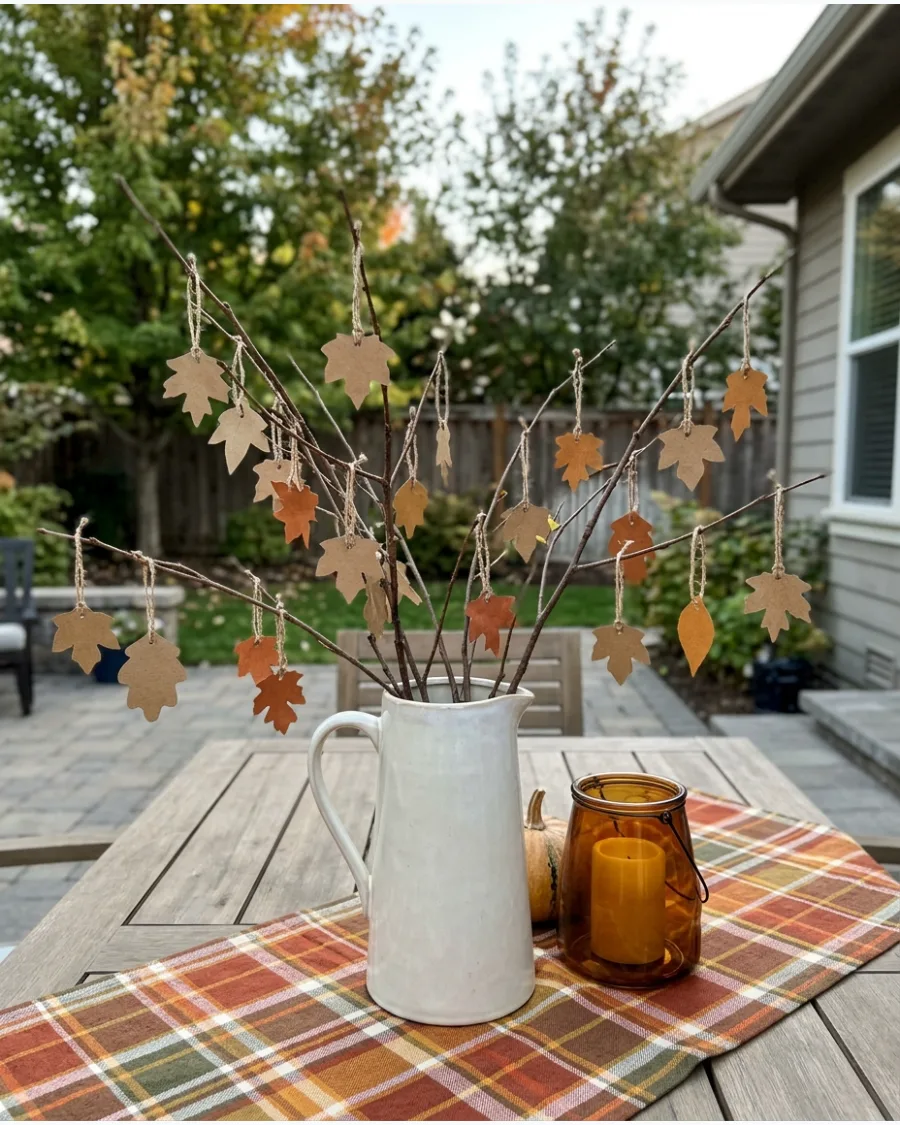
A thankful tree serves as both a decorative focal point and a meaningful holiday activity for guests. Gather a few sturdy, bare branches from the yard and secure them in a heavy ceramic pitcher or vase.
Cut leaf shapes out of brown kraft paper and punch a small hole in each so guests can write messages and hang them with twine. This creates a beautiful, evolving display that fills vertical space on a buffet or entry table.
- Anchor the branches with floral foam or large stones at the bottom of the vase to prevent tipping.
- Provide a fine-tip permanent marker next to the tree so the writing is easy for everyone to read.
- Use different shades of brown and tan paper to mimic the look of real dried autumn leaves.
Best shortcut: Buy a pre-cut pack of kraft paper tags to save time on cutting individual leaf shapes by hand.
46. DIY Pinecone Turkey Decorations
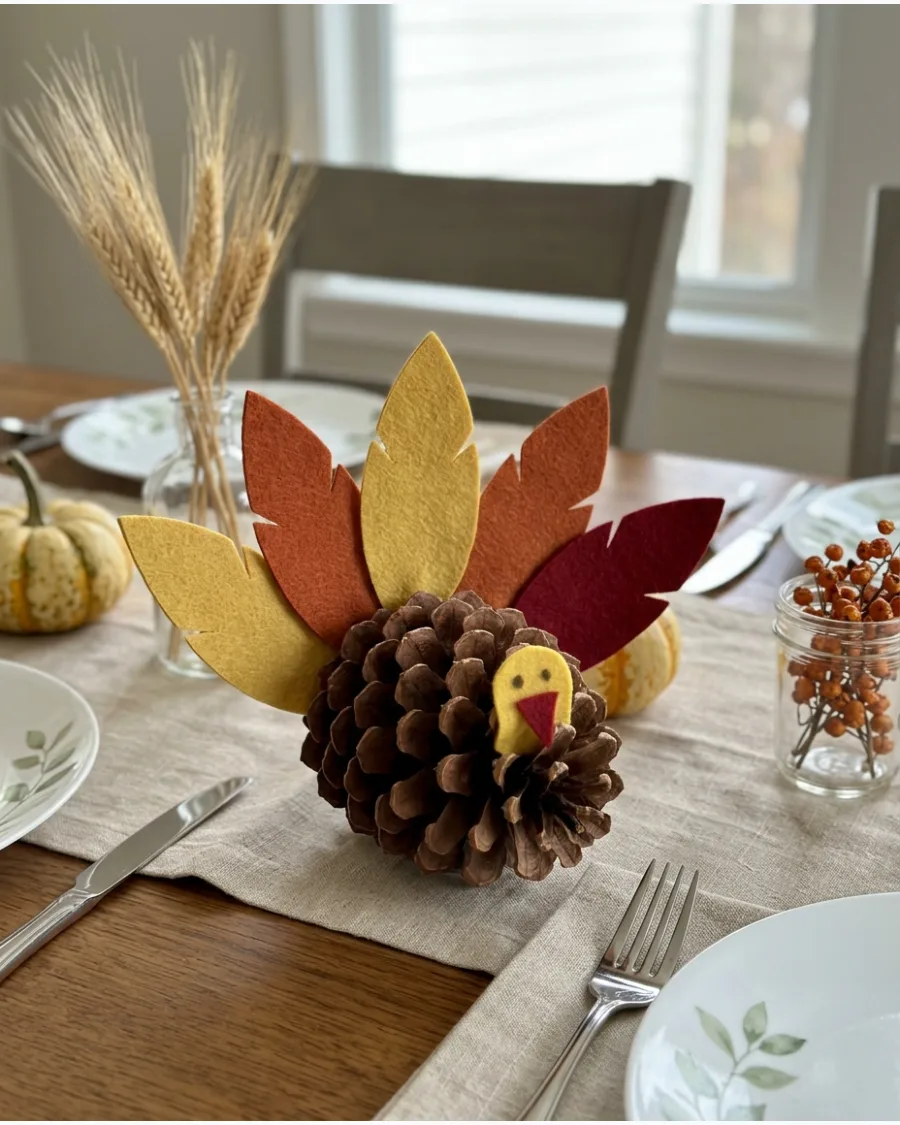
Pinecone turkeys are a classic craft that works well for place settings or a festive mantel display. Choose large, open pinecones that can stand upright on their own or with a little help from a flat base.
Attach small felt or stiff paper feathers to the back of the pinecone and add a simple head made from a wood bead or felt scrap. Using muted, natural colors keeps these looking intentional rather than like a primary school project.
- Bake foraged pinecones at a low temperature for 30 minutes to clear out any hidden pests before using them.
- Use a high-temp hot glue gun to ensure the felt pieces bond securely to the rough scales of the pinecone.
- Select pinecones with a flat bottom so they do not roll over when placed on the table.
Most people skip this: Give the pinecones a light dusting of gold spray paint for a subtle shimmer that catches the light.
47. DIY Upcycled Tin Can Lanterns
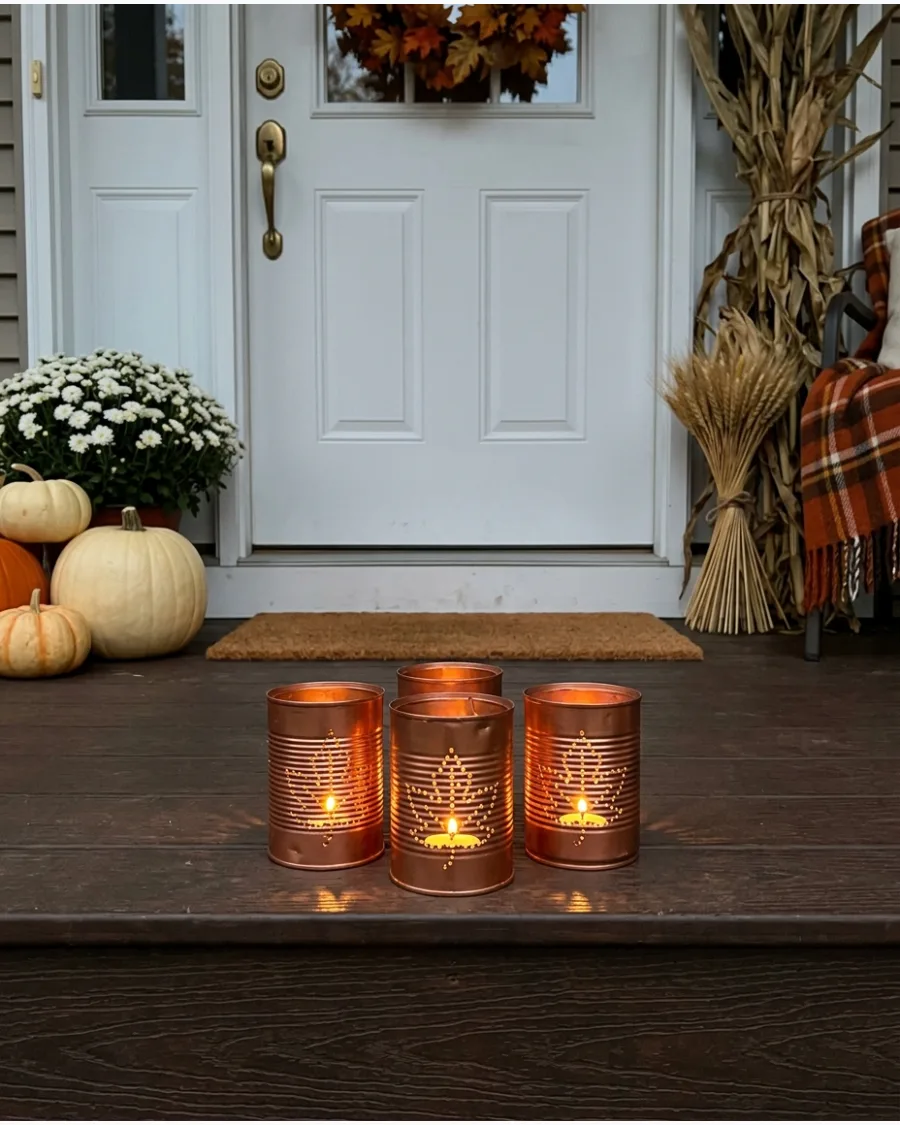
Tin can lanterns provide a warm, flickering glow that is perfect for a Thanksgiving porch or walkway. Clean out metal food cans and fill them with water to freeze before punching holes to prevent the metal from denting.
Use a hammer and a large nail to create leaf or wheat patterns in the metal, then paint the exterior in a copper or bronze finish. Once a battery-operated tea light is placed inside, the pattern projects beautifully onto nearby surfaces.
- Apply a clear sealant over the paint if the lanterns will be used outdoors to prevent rusting from moisture.
- Space the punched holes about a quarter-inch apart to make the leaf shapes recognizable from a distance.
- Stick to battery-operated candles to avoid the metal cans becoming dangerously hot to the touch.
Quick win: Use a printed template taped to the can to guide your nail for perfectly symmetrical leaf or star patterns.
48. DIY Wine Bottle Thanksgiving Vases
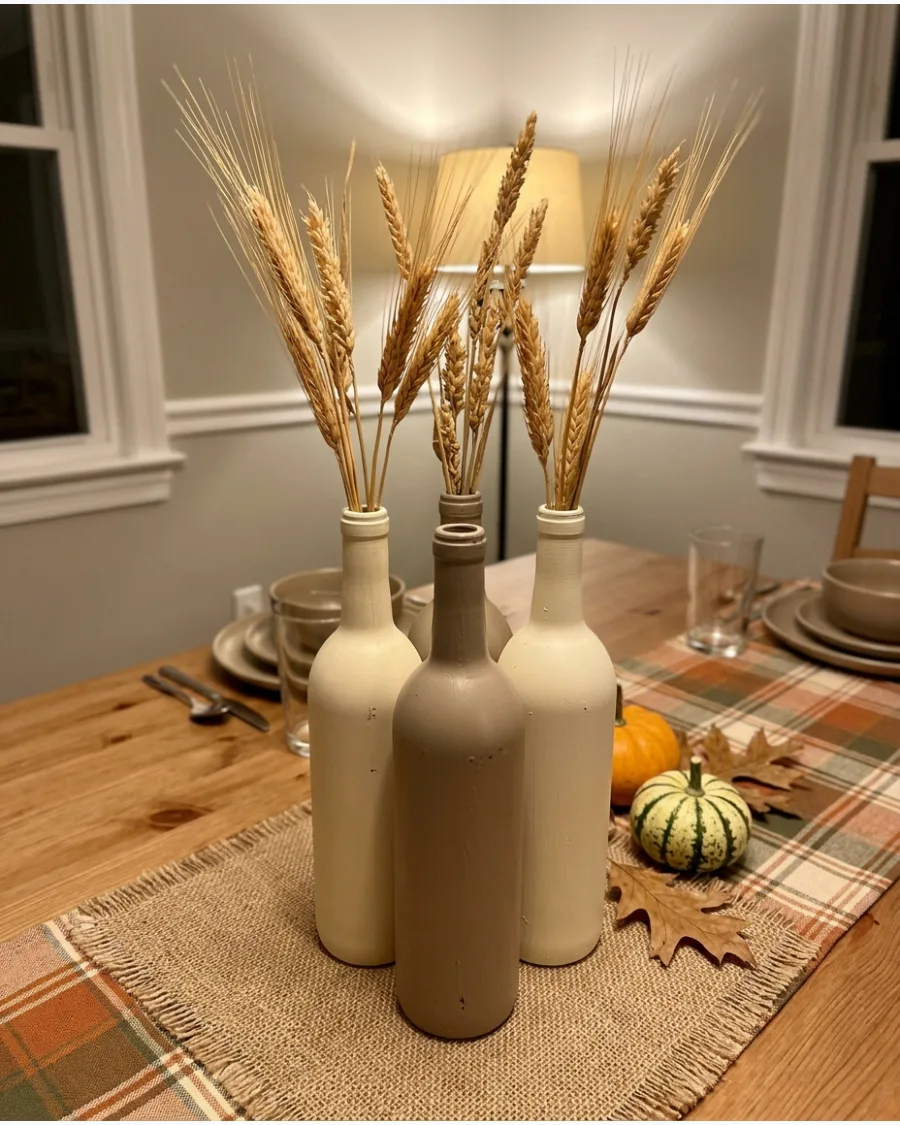
Empty wine bottles have a great silhouette for displaying tall, architectural fall stems. Thoroughly remove labels and any sticky residue before applying a coat of matte spray paint or wrapping the glass in twine.
Group three bottles of varying heights in the center of the table and fill them with dried wheat stalks or pampas grass for an instant centerpiece. Neutral colors like cream, taupe, or charcoal allow the natural colors of the plants to stand out.
- Use a mixture of baking soda and oil to easily scrub off stubborn adhesive from the glass surface.
- Mix different bottle shapes, like a stout Burgundy bottle with a tall Rhine bottle, for a more interesting silhouette.
- Wrap the neck of the bottle with a few loops of jute twine to add a touch of texture to the smooth glass.
Best shortcut: Use 'chalk' style spray paint for a completely flat, non-reflective finish that hides imperfections in the glass.
49. DIY Thrifted Vase Fall Makeover
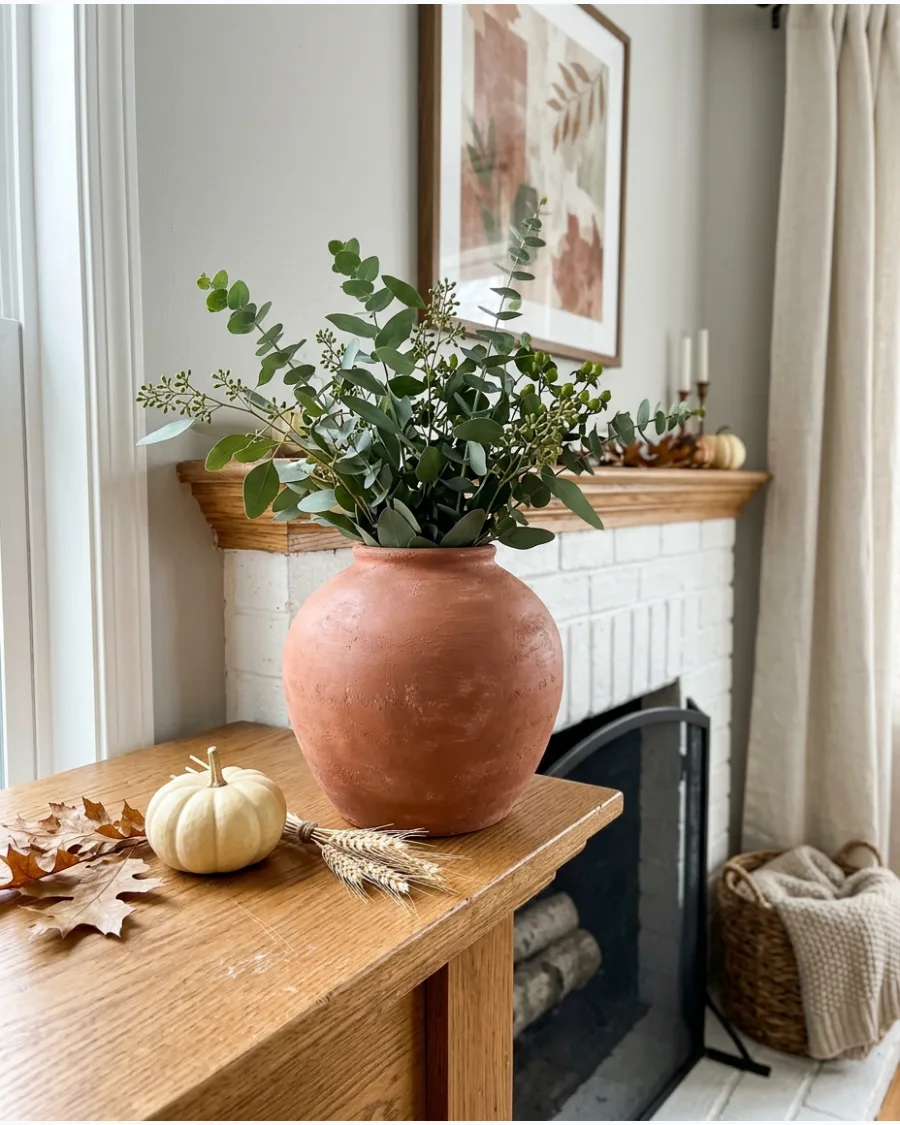
Give old, dated vases a high-end look by adding texture and a fresh color palette. Mix a little baking soda into acrylic paint to create a thick, ceramic-like paste that hides chips and weird patterns.
Apply the mixture in thin layers using a sponge or a coarse brush to create an earthy, stone-like finish. These transformed pieces look beautiful holding fresh eucalyptus or dried fall flowers on a mantel or shelf.
- Experiment with the ratio of baking soda to paint; more soda creates a rougher, more primitive stone texture.
- Let the first coat dry completely before adding a second to prevent the texture from becoming muddy or slumped.
- Seal the finished vase with a matte clear coat if you plan on using it to hold water for fresh flowers.
Most people skip this: Sand the original glossy finish of the thrifted vase lightly so the new textured paint sticks better.
50. DIY Cardboard Leaf Bowl
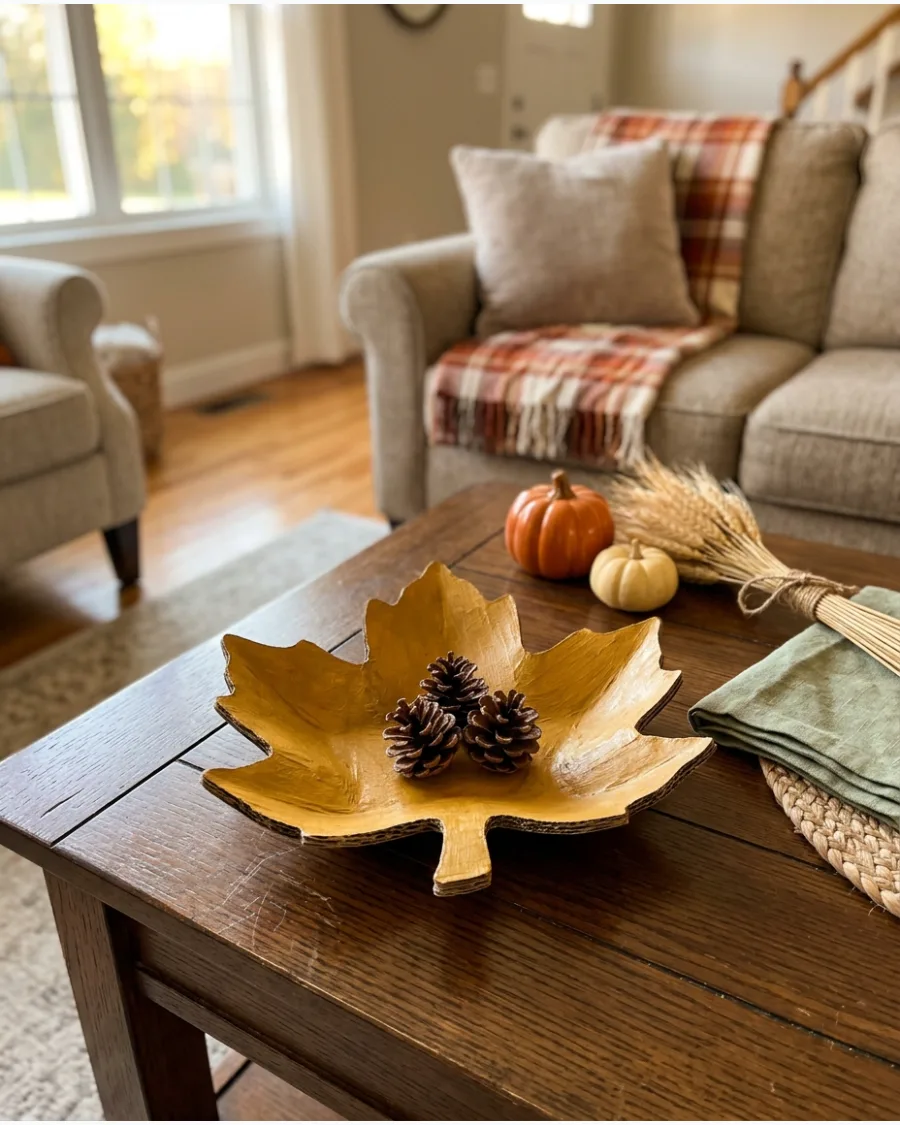
A leaf-shaped bowl is a functional piece of decor that can hold lightweight items like pinecones or faux acorns. Cut a large leaf shape out of thick cardboard and gently curve the edges upward to create a shallow bowl form.
Cover the cardboard in a layer of papier-mâché or textured paper, then paint it in a deep forest green or golden yellow. It adds a handmade, artistic element to a coffee table or dining room buffet.
- Reinforce the underside of the bowl with extra strips of cardboard to help it maintain its curved shape over time.
- Use a real large leaf as a stencil to get the proportions and vein patterns exactly right.
- Finish with a satin or gloss sealer to make the colors pop and give the bowl a more finished, ceramic look.
Quick win: Use a metallic gold paint pen to trace the 'veins' of the leaf after the base color is dry for an elegant touch.
DIY THANKSGIVING PORCH & HOME ACCENTS
51. DIY Harvest Porch Sign
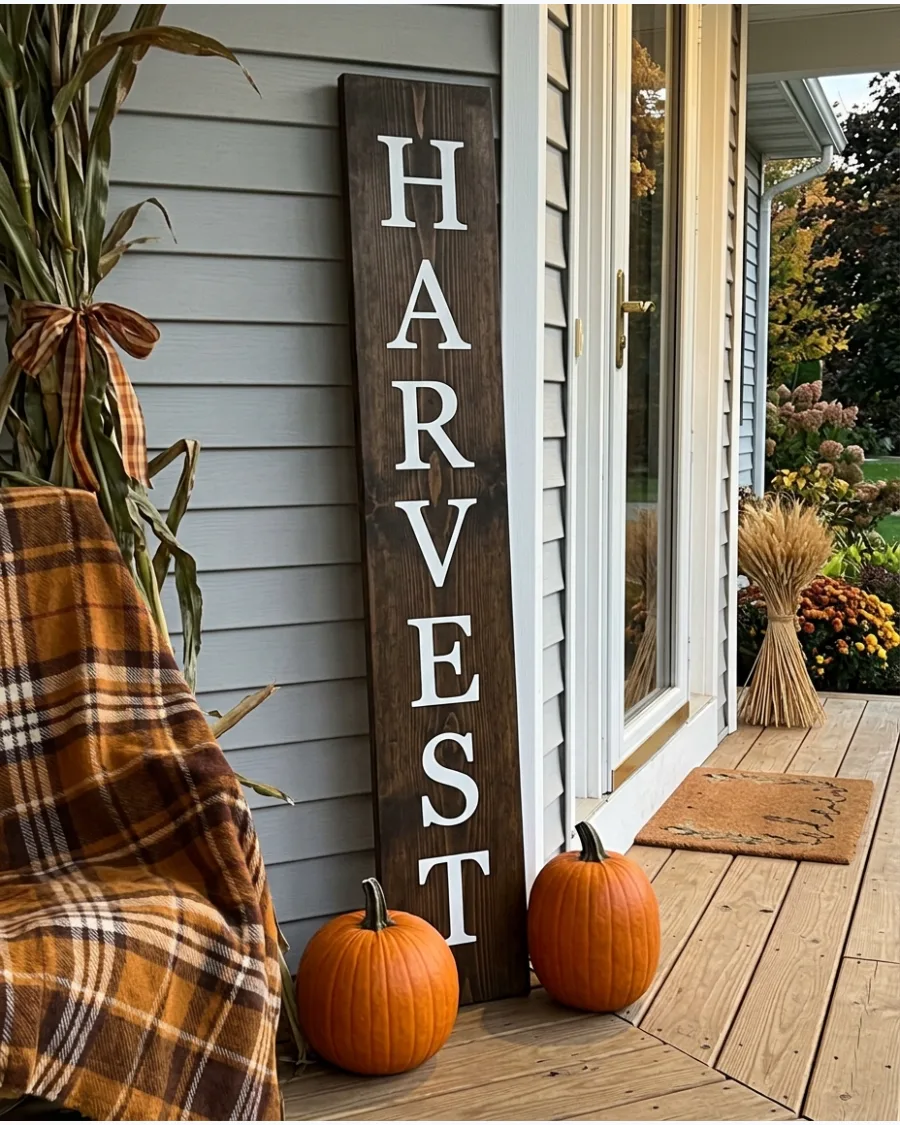
A tall wooden sign creates a vertical focal point that draws the eye upward on a porch. Using a stencil ensures the lettering looks professional even if hand-painting isn't a strength.
Seal the wood with a clear outdoor spray to prevent the paint from peeling in damp November weather. This project works best with a board at least four feet tall to balance the scale of the front door.
- Source a 1×10 pine board from a local lumber yard for under fifteen dollars.
- Use a large letter stencil and white outdoor acrylic paint for the lettering.
- Lean the sign in a corner or secure it with a small bracket to keep it stable during wind.
Best shortcut: Use a paint pen instead of a brush for cleaner edges on the letters.
Home Decor
52. Minimalist Wood Bead Door Wreath
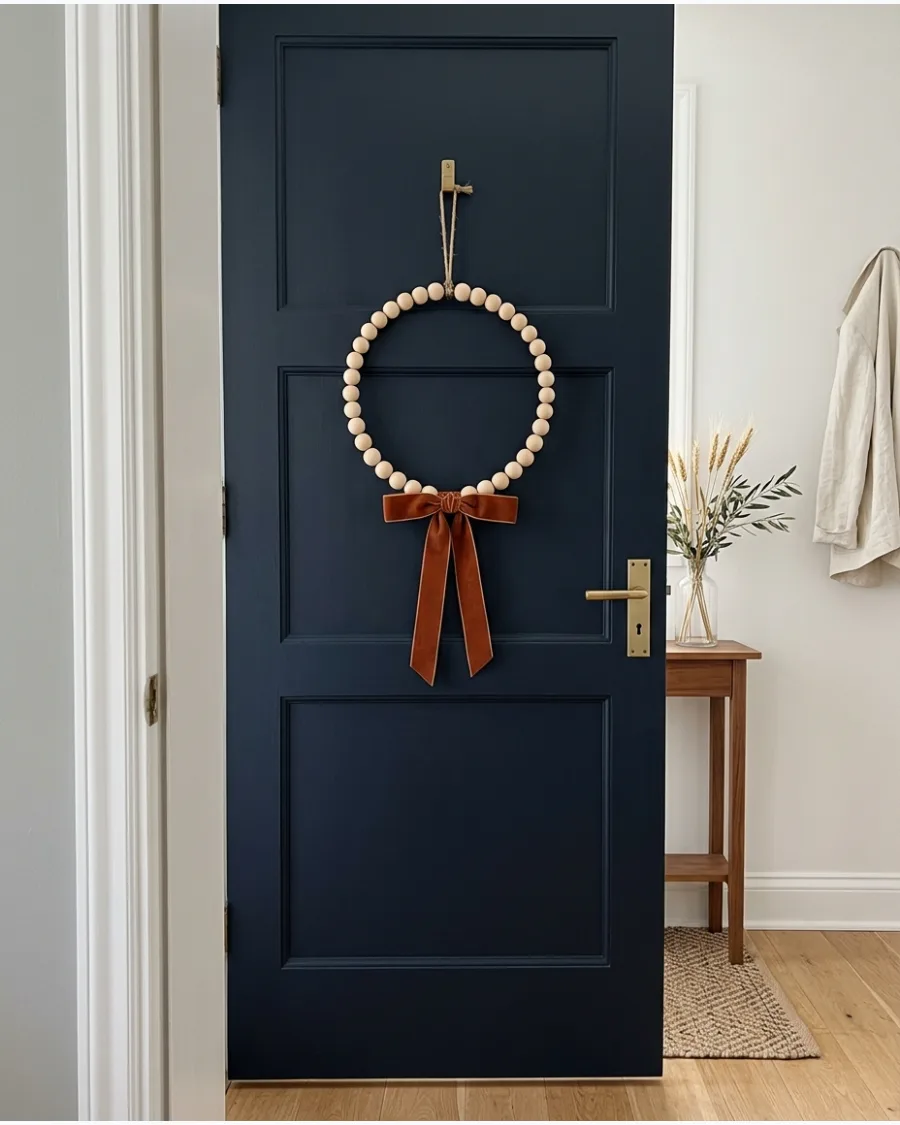
This door hanger uses oversized raw wood beads and a simple wire frame to create a modern, textural alternative to traditional floral wreaths. It works because the neutral tones bridge the gap between early autumn and the late November holiday.
Thread twenty-millimeter beads onto a heavy-gauge floral wire ring and finish with a single oversized velvet ribbon in a burnt orange hue. Natural wood provides a grounding element that prevents holiday decor from feeling cluttered or kitschy.
- Purchase pre-drilled 20mm wood beads in bulk online for under twenty dollars to save time and money.
- Use a sturdy 12-inch wire wreath form or thick floral wire to ensure the beads maintain a perfect circular shape under their own weight.
- Swap the ribbon color for deep plum or sage green to customize the look for different porch color schemes.
Most people skip this: Sanding the inner holes of cheaper wood beads with a small file prevents the wire from snagging and ensures a smooth, even hang.
DIY THANKSGIVING PORCH & HOME ACCENTS
53. DIY Pumpkin Porch Lantern Display
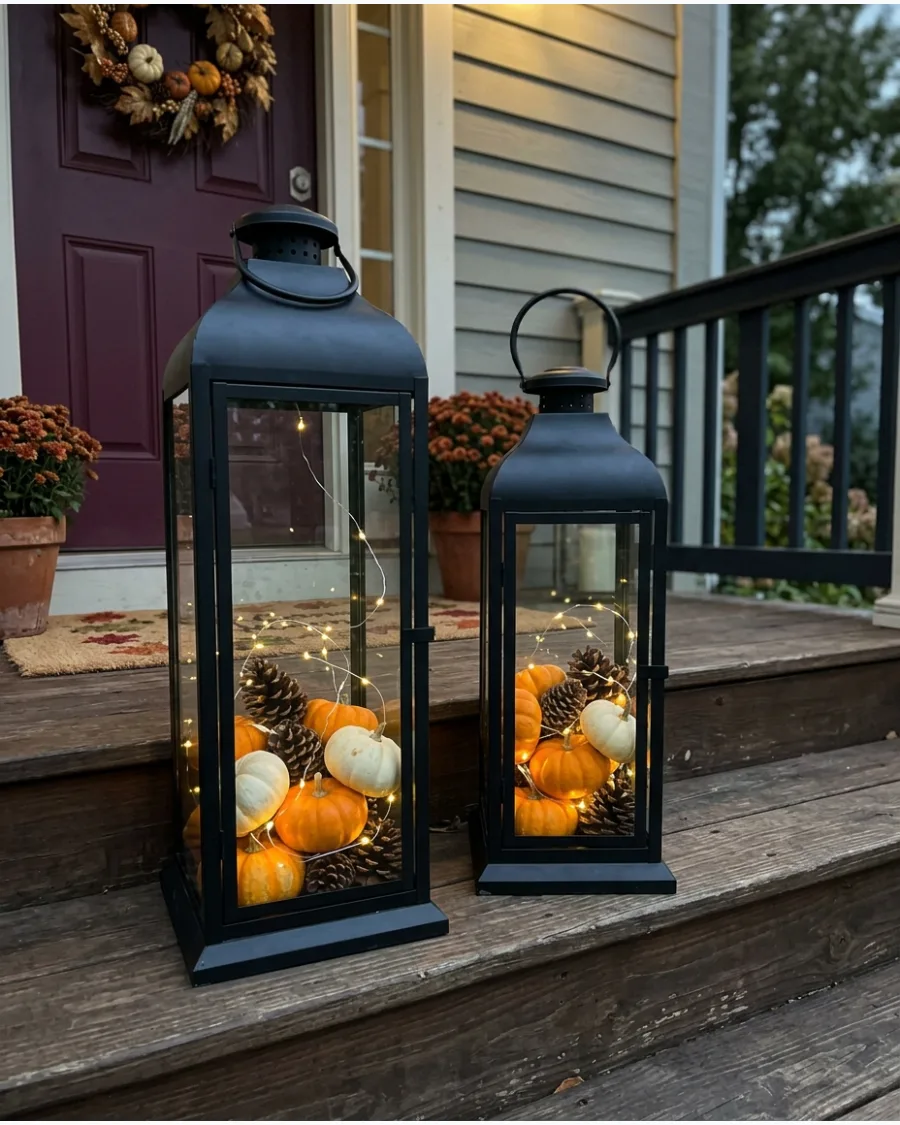
Large metal lanterns become seasonal art when filled with textures other than wax candles. Layering different sizes of mini pumpkins and pinecones creates a rich, harvested look inside the glass.
Use battery-powered fairy lights tucked between the gourds to make the display glow safely without the risk of melting plastic. This setup stays looking fresh all the way through the holiday weekend.
- Use existing outdoor lanterns or find affordable metal options at a craft store.
- Wipe down the glass panes inside and out before filling to ensure the lights sparkle.
- Place the lanterns in a protected corner to keep the gourds dry and prevent rotting.
Most people skip this: Place the smallest pumpkins at the bottom to provide a stable base for the larger ones on top.
54. DIY Fall Basket Porch Arrangement
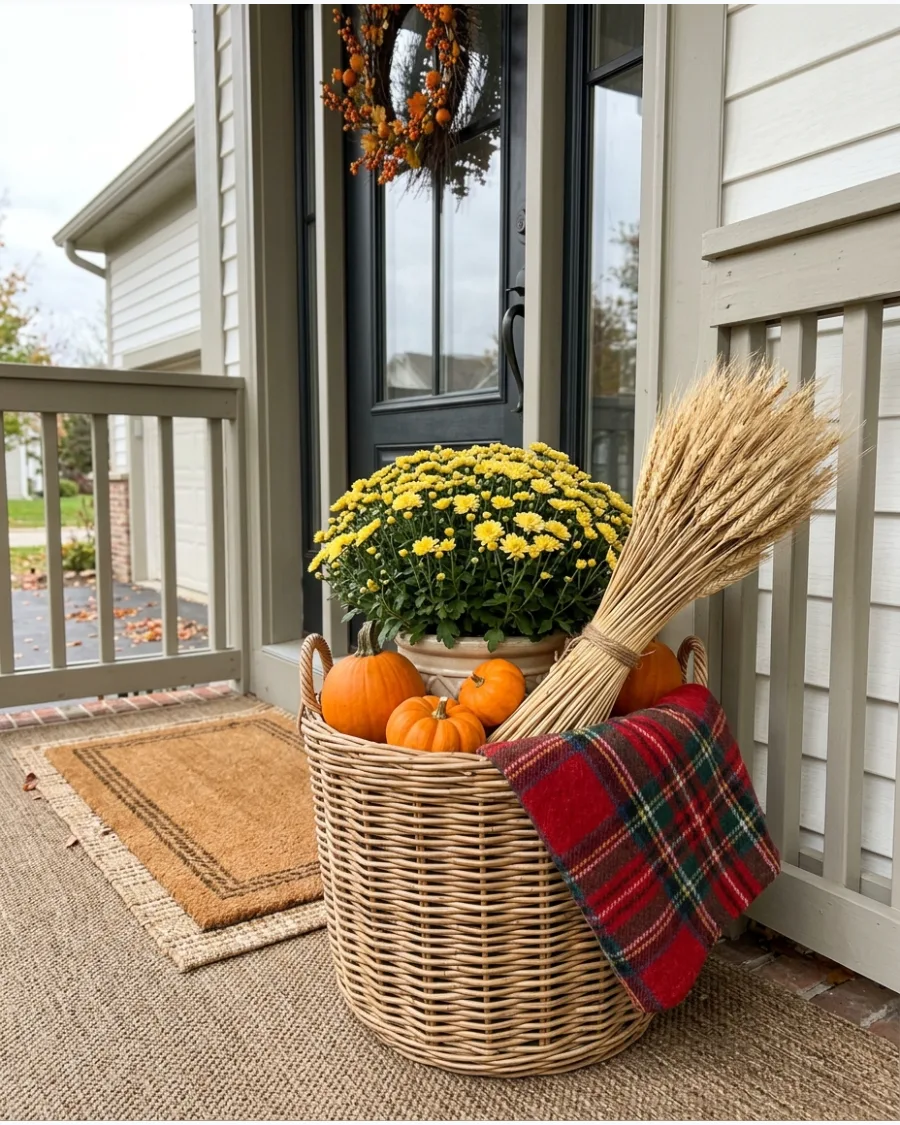
A woven basket offers a softer, more organic texture than traditional plastic or ceramic planters. Mixing live mums with dried elements like wheat or branches adds variety in height and color.
Tuck a plaid wool blanket or textile into one side of the basket to add a layer of cozy pattern and fill empty gaps. This is the fastest way to decorate a porch without needing permanent garden beds.
- Select a sturdy basket with a wide base to prevent it from tipping over in the wind.
- Keep the mums in their plastic nursery pots and place a tray underneath to catch water.
- Use tall dried branches or cornstalks in the back for extra height and drama.
Best shortcut: Use floral foam at the bottom of the basket to hold heavy branches exactly where you want them.
55. DIY Cornstalk Porch Bundle
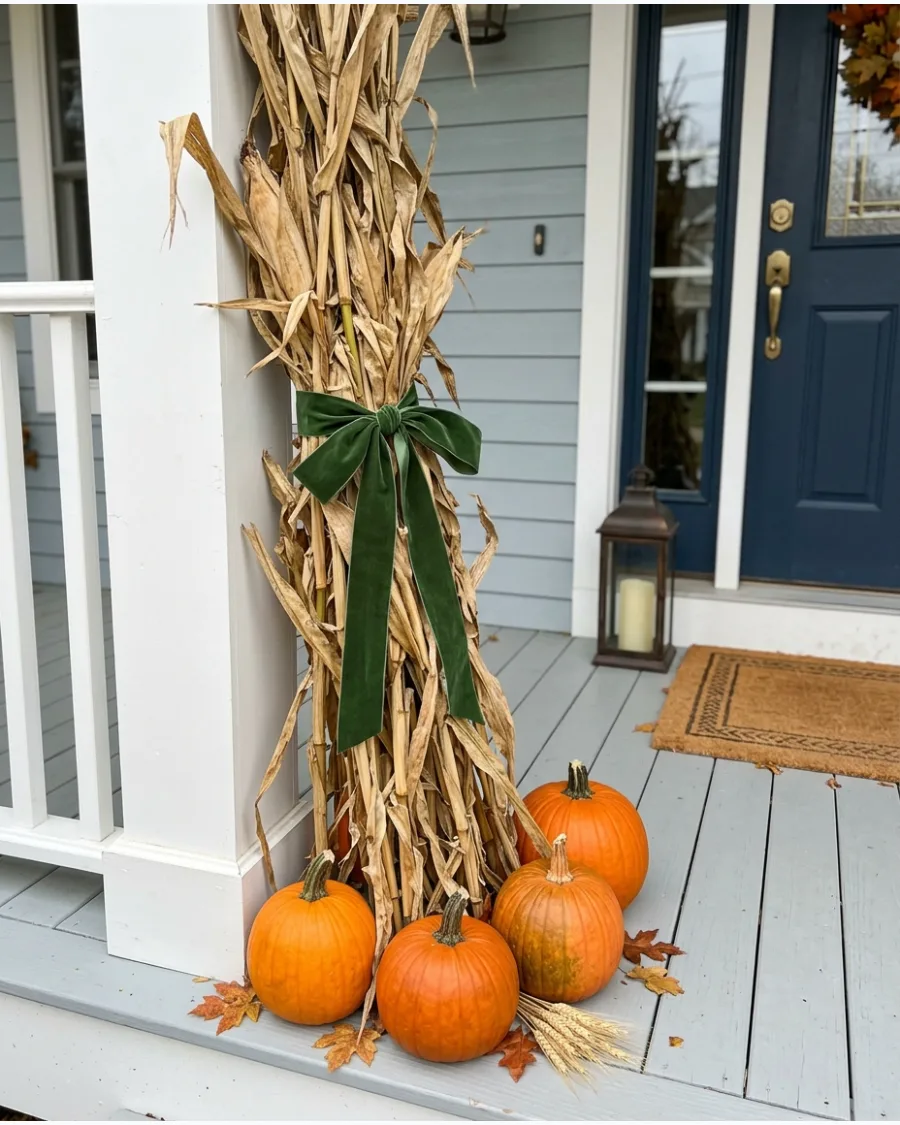
Cornstalks provide instant height and a classic harvest feel to any entryway. Tying them in a tight bundle makes them look intentional and tidy rather than just leaning against the house.
Wrap a wide velvet or burlap ribbon around the center of the stalks to hide the twine and add a pop of color. They serve as a great backdrop for smaller pumpkins and gourds clustered at the bottom.
- Purchase dried cornstalks from a local farm stand or garden center in early November.
- Use heavy twine to secure the stalks to a pillar or railing so they don't blow away.
- Position the bundle away from walkways to ensure the dry leaves don't catch on guests' clothing.
Quick win: Lightly mist the stalks with water if they become too brittle to handle without breaking.
56. DIY Thanksgiving Stair Garland
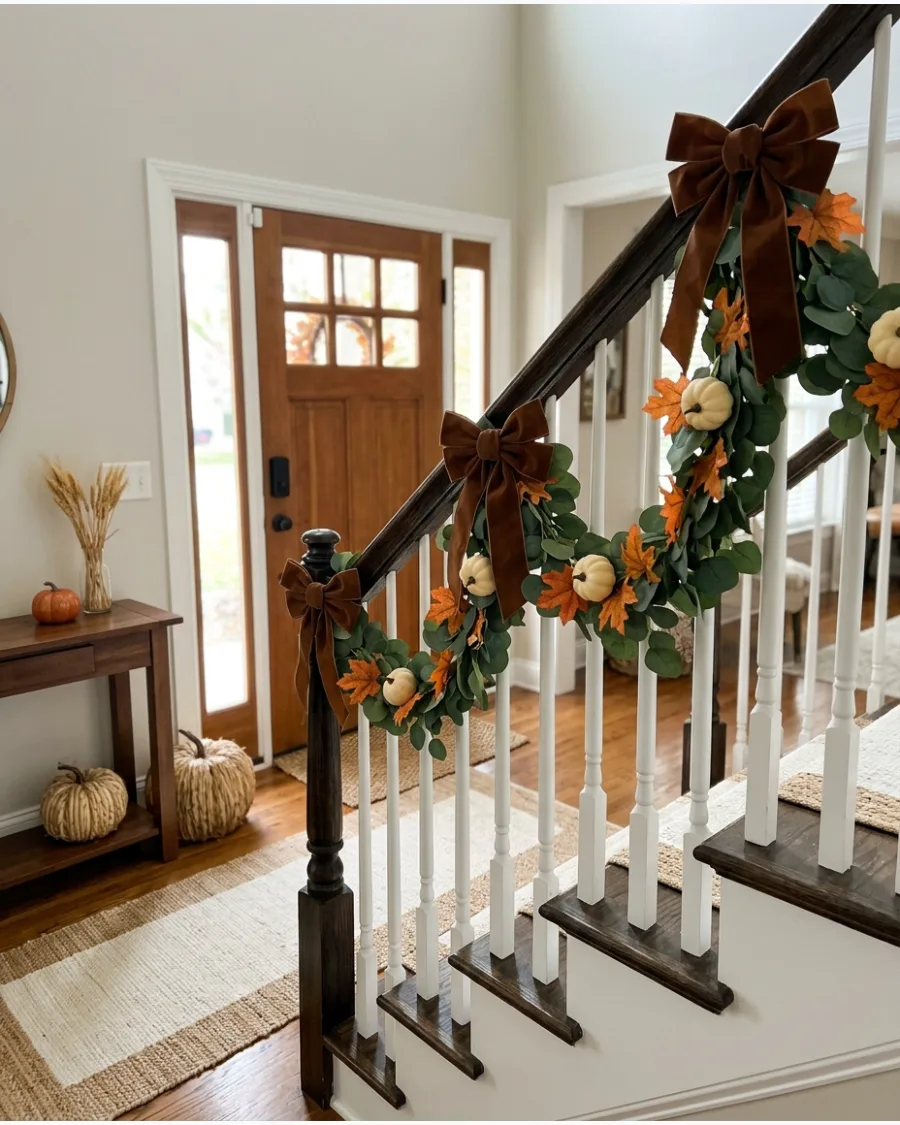
An indoor staircase is the perfect place to bring the colors of the season into the center of the home. Using a mix of faux greenery and real dried leaves creates a lush look that won't wilt before dinner.
Attach lightweight foam pumpkins to the garland using floral wire to add visual weight without pulling the greenery down. This decoration makes the transition from the entryway to the living areas feel seamless.
- Use zip ties or floral wire to secure the garland to the banister without damaging the finish.
- Space the decorative elements evenly to ensure the garland looks balanced from every angle.
- Mix in a few strands of warm battery-operated lights for a cozy evening glow.
Most people skip this: Check that the garland doesn't block the handrail, as safety should always come before style.
57. DIY Thankful Wood Sign
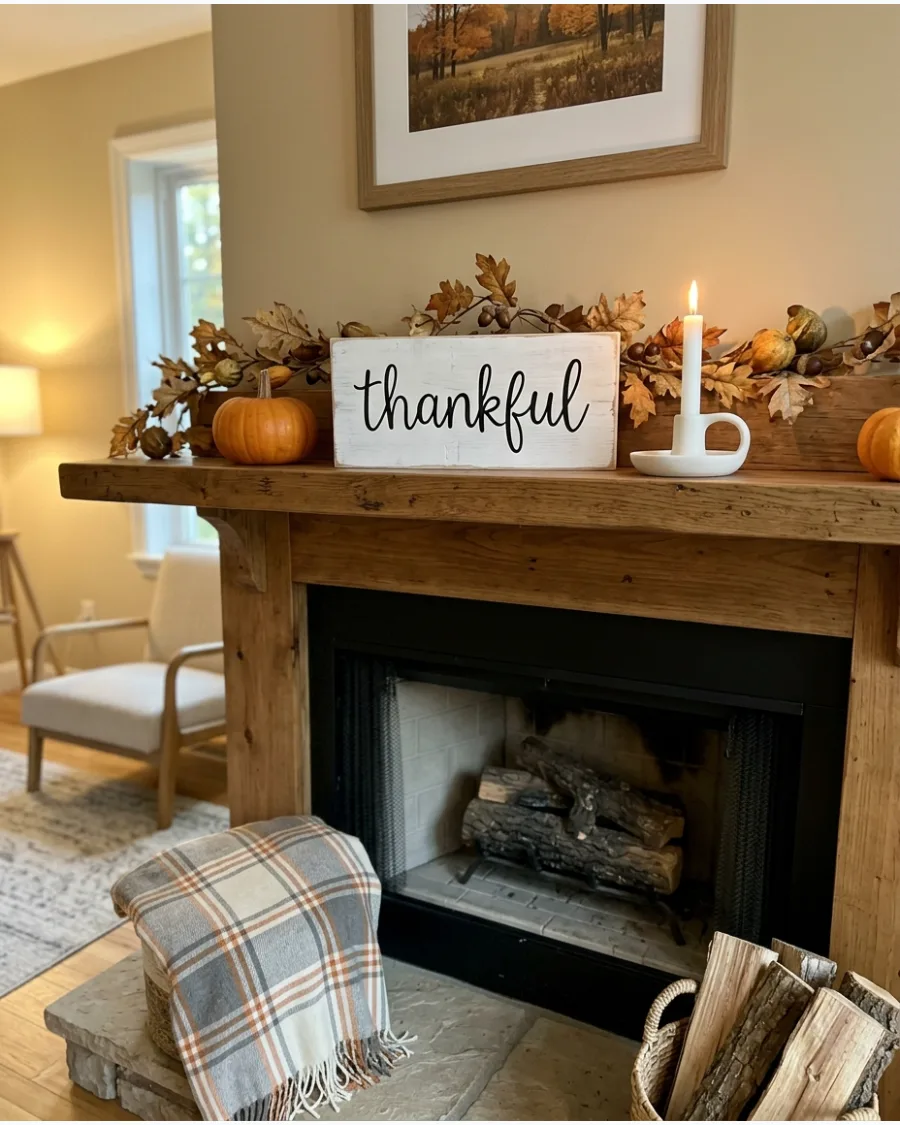
A small, handmade sign adds a personal touch to a mantel or bookshelf display. Using a simple font and neutral colors allows the message to stand out without clashing with other decor.
Sand the edges of the wood block after painting to give it a slightly polished, finished look. It acts as a great anchor piece for a collection of smaller seasonal items.
- Use a scrap piece of 2×4 or a pre-cut wood plaque from a craft store.
- Apply a matte topcoat to protect the paint and give it a high-end look.
- Style the sign alongside different heights of candles and foliage for a layered effect.
Best shortcut: Use a vinyl decal for the lettering if you want a perfect look without using a stencil.
58. DIY Thanksgiving Pillow Covers
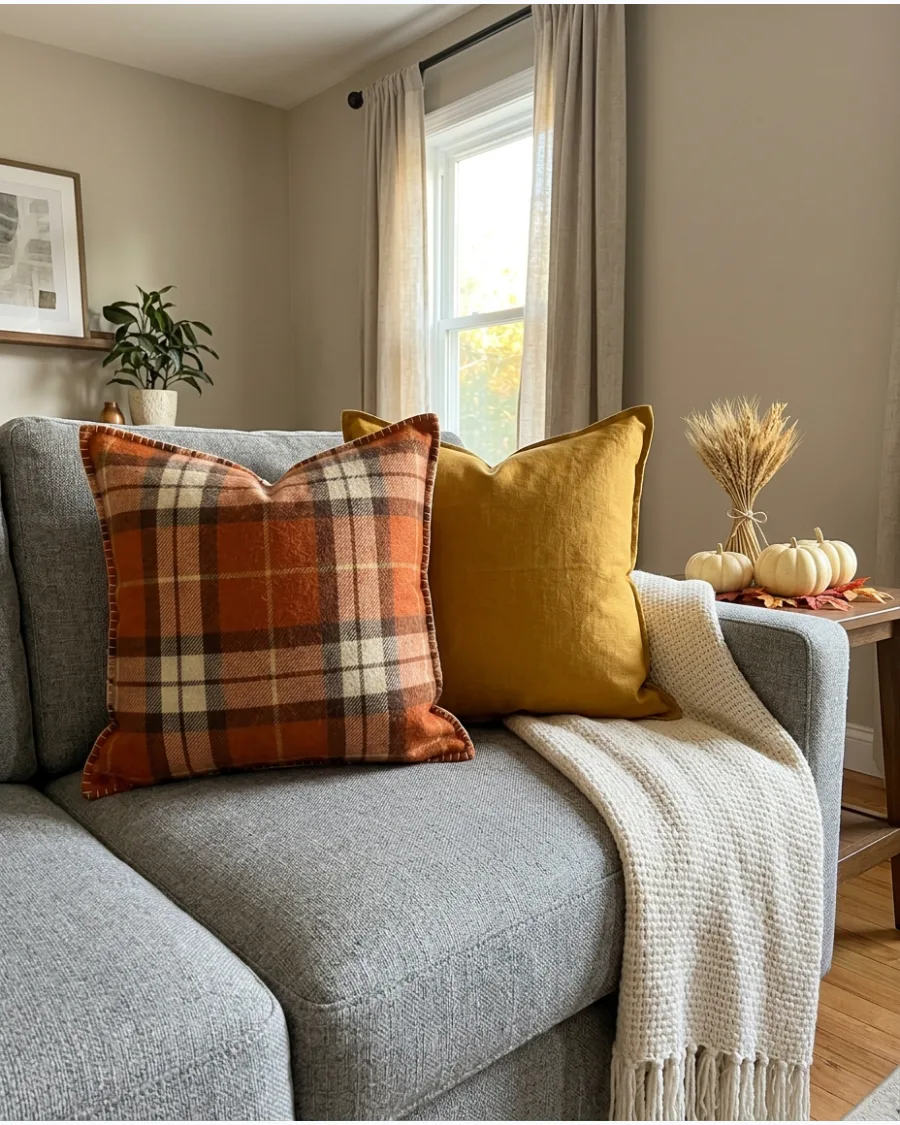
Swapping out pillow covers is the easiest way to change the mood of a room for the holidays. Earthy tones like rust, mustard, and deep green instantly warm up a neutral sofa.
Choose fabrics with different textures, like wool plaid and smooth linen, to make the seating area look more inviting. Envelope-style covers are simple to sew and don't require any zippers or buttons.
- Measure existing pillow inserts and cut fabric two inches wider for a comfortable fit.
- Use heavy-duty thread and a straight stitch for durable seams that last through the season.
- Store the covers flat during the off-season to save space compared to full pillows.
Quick win: Iron the fabric before cutting and sewing to ensure the measurements are precise.
59. DIY Fall Candle Lantern Jars
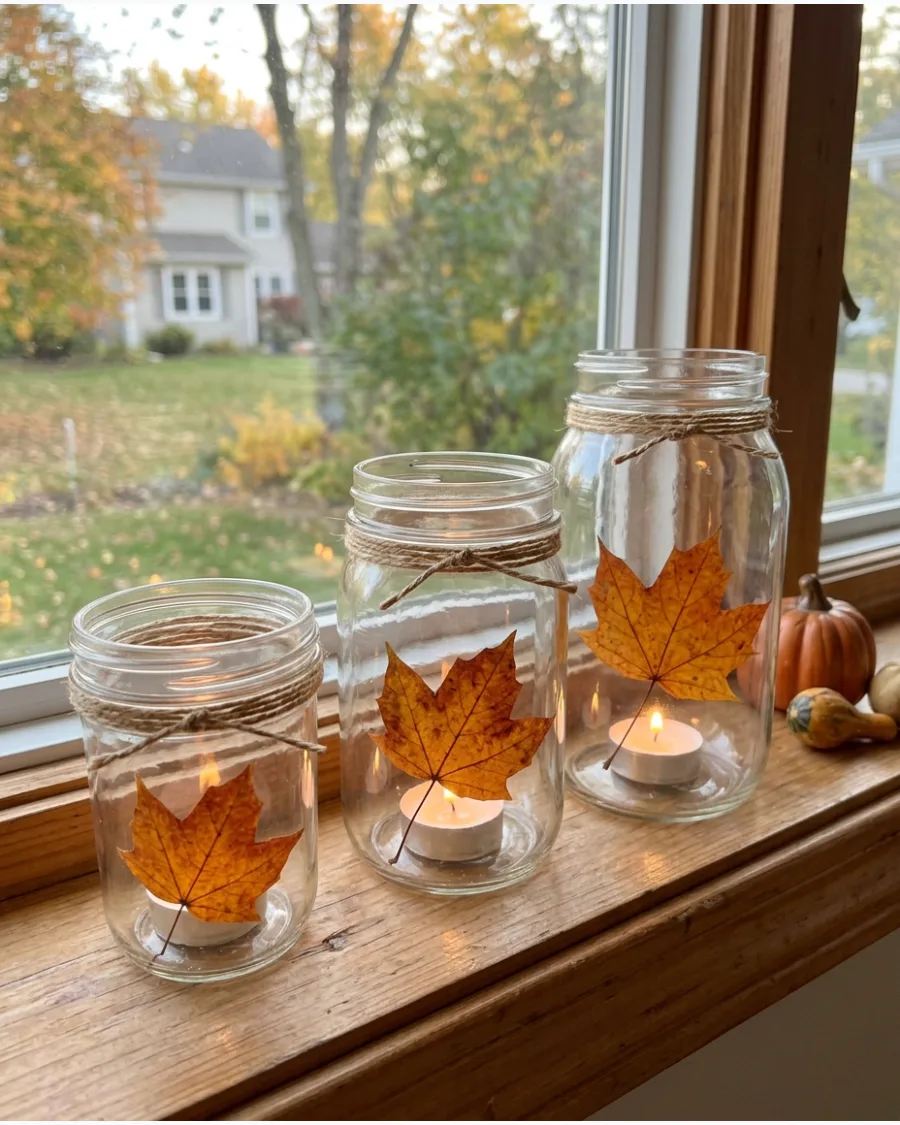
Upcycled glass jars can be transformed into glowing lanterns with just a few simple materials. Wrapping them in translucent paper or thin twine creates a soft, diffused light that feels very cozy.
Secure real pressed leaves to the outside of the glass with a thin layer of decoupage glue for a botanical look. These look best when grouped in odd numbers on a windowsill or porch ledge.
- Clean jars thoroughly with rubbing alcohol to ensure the glue or twine adheres properly.
- Use battery-operated tea lights for a flicker effect that is safe around children and pets.
- Arrange the jars on a tray to make them easy to move from the window to the dining table.
Most people skip this: Use a matte finish glue to avoid shiny streaks on the glass around the leaves.
60. DIY Thanksgiving Entryway Display
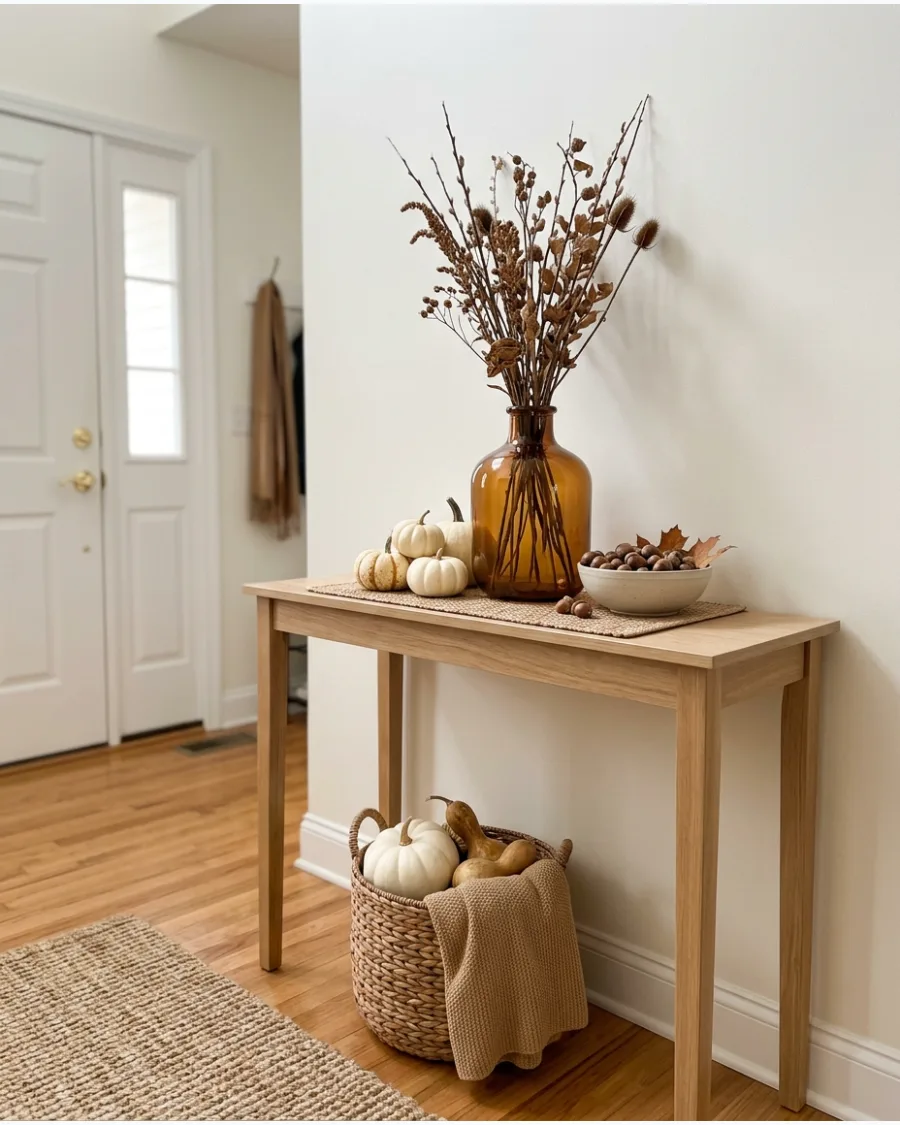
A coordinated entryway vignette sets the tone for the entire home the moment guests walk through the door. Mixing different materials like ceramic pottery, woven baskets, and natural wood creates a curated, high-end feel.
Place the largest items, like a tall vase of branches, at the back of the display and work forward with smaller pieces. This creates a sense of depth that makes the arrangement look professionally styled.
- Incorporate a mix of heights and textures to keep the eye moving across the display.
- Add one handmade element, like a small sign or a bead garland, to personalize the space.
- Keep the color palette limited to three main tones for a cohesive and calm appearance.
Best shortcut: Use command hooks to hang a wreath or sign above the table without damaging the wall.
Frequently Asked Questions
How can I make DIY Thanksgiving decor look expensive?
Elevate your handmade pieces by sticking to a sophisticated monochromatic color palette and incorporating natural textures like wood and stone. Pair your DIY centerpieces with high-quality basics such as linen napkins or classic glassware to create a polished, high-end look.
What are some last-minute DIY Thanksgiving ideas?
You can quickly create elegant decor using items from your pantry or backyard, like filling glass bowls with seasonal fruits or nuts. For a simple touch, tie bundles of fresh rosemary or sage with twine to create fragrant, beautiful place cards for your guests.
How do I transition my Fall decor into Thanksgiving decor?
To shift from general autumn vibes to a Thanksgiving focus, swap out generic pumpkins for specific hosting elements like personalized place cards. Introduce a dedicated centerpiece that highlights gratitude, making the table the heart of your holiday celebration.
What are the best budget-friendly materials for Thanksgiving DIYs?
Stick to affordable staples like butcher paper for table runners and twine for wrapping napkins or candles. You can also forage for branches and colorful leaves in your yard or pick up inexpensive gourds from the grocery store to add natural charm.
How can I involve guests in the Thanksgiving decorations?
Create an interactive gratitude tree where guests can write what they are thankful for on paper leaves to hang on foraged branches. You can also provide materials for guests to help hand-letter menus or place cards, making them feel part of the holiday preparation.