50 DIY Witch Broom Ideas for Halloween

This post may contain affiliate links: full affiliate disclosure.
Skip the plastic costume props this year. These handmade witch brooms use natural materials to create high-impact decor for any porch or entryway.
Easy DIY Witch Broom Ideas
1. Classic Twig Witch Broom
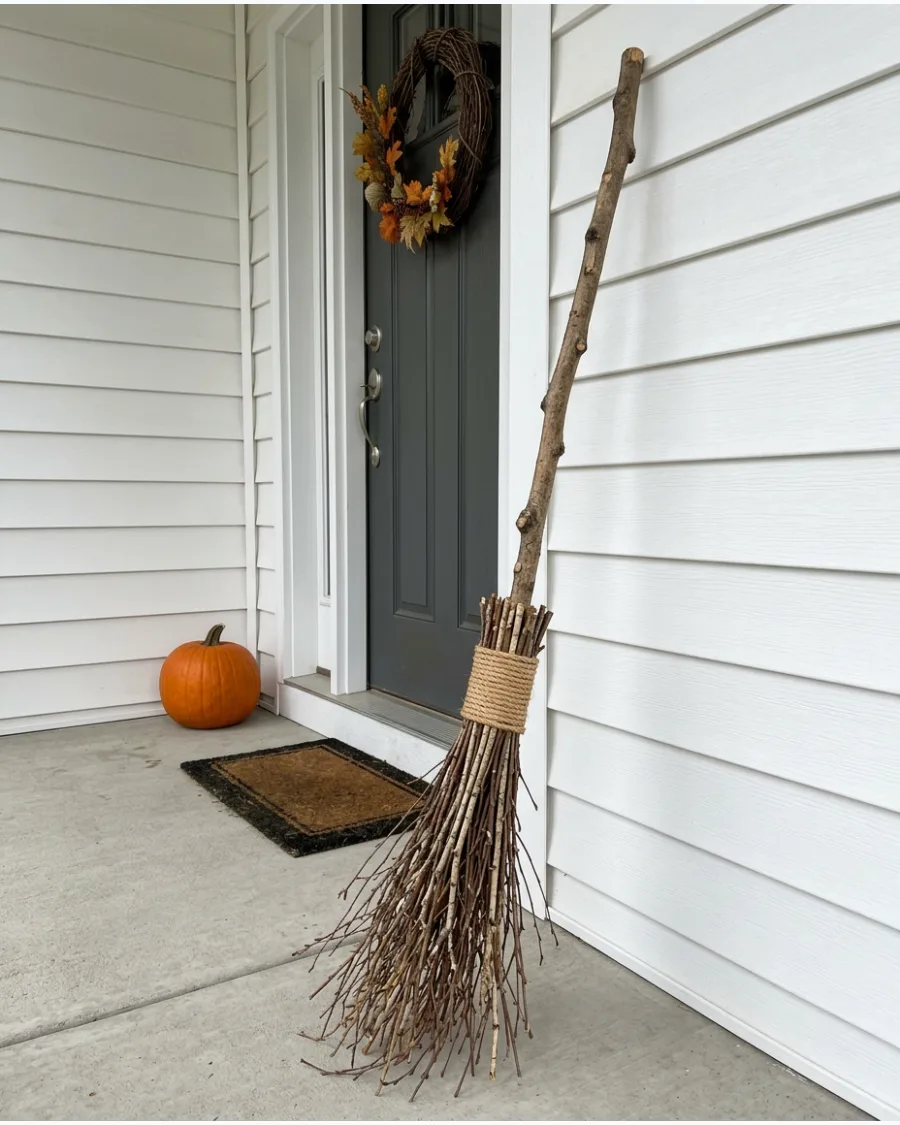
Gather a bundle of thin twigs and arrange them around the bottom of a sturdy tree branch. Tightening the rope with a pair of pliers ensures the bristles never slip out during storage. Secure the bundle tightly with jute rope to create a traditional rustic witch broom.
- Use twigs from the yard or a craft store.
- Lean it against a porch wall or next to the front door.
- Natural wood holds up well for several seasons.
Quick win: Use a drop of wood glue on the handle before wrapping the rope to prevent the bristles from sliding down.
2. Five-Minute Witch Broom
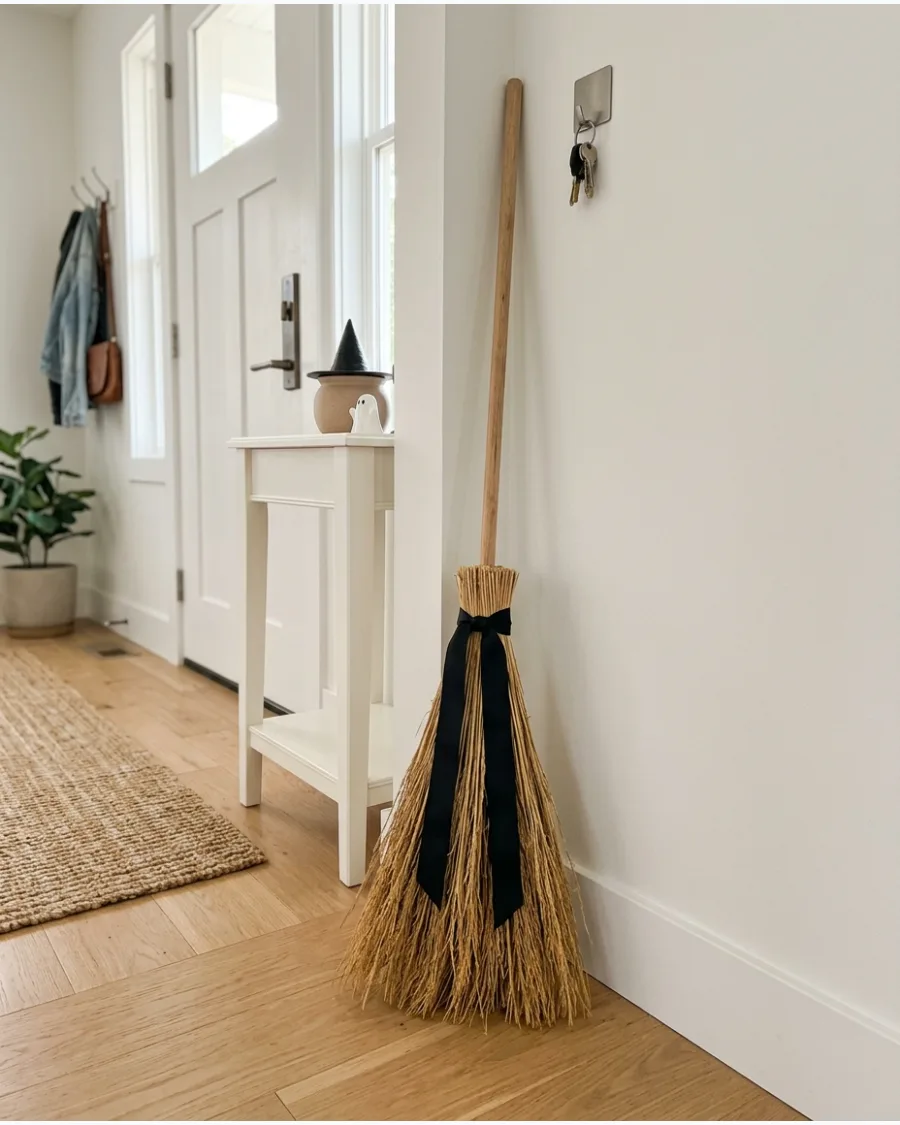
Tie a bundle of long decorative grass around a wooden dowel or fallen branch. Using a textured ribbon like grosgrain adds a high-end finish to a quick project. Wrap black ribbon around the connection point to hide the ties.
- Decorative grass is found in the floral aisle of most craft stores.
- Prop the broom in an entryway corner for a minimalist look.
- Swap the ribbon color to match your specific Halloween theme.
Most people skip this: Lightly mist the grass with hairspray to prevent it from shedding inside the house.
3. No-Glue Witch Broom
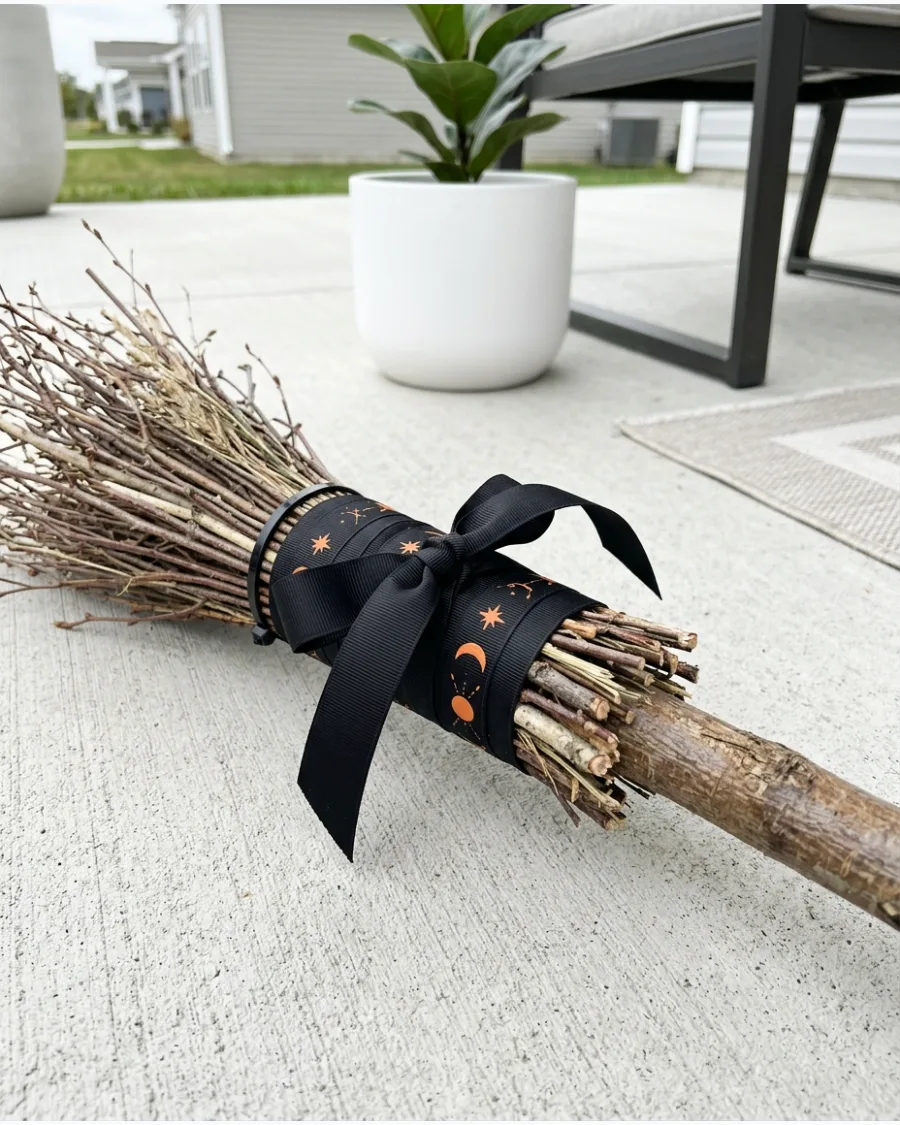
Arrange thin twigs around a broom handle and secure them with several strong zip ties. Zip ties provide a mechanical grip that glue just can't match on irregular wood surfaces. Cover the zip ties with rope or ribbon for a finished appearance.
- Industrial zip ties and natural rope are the main materials.
- Hang the finished broom on a wall hook as a 3D art piece.
- This build is durable enough for windy outdoor porches.
Best shortcut: Use black zip ties so they are less visible if the rope or ribbon shifts over time.
4. Wooden-Dowel Witch Broom
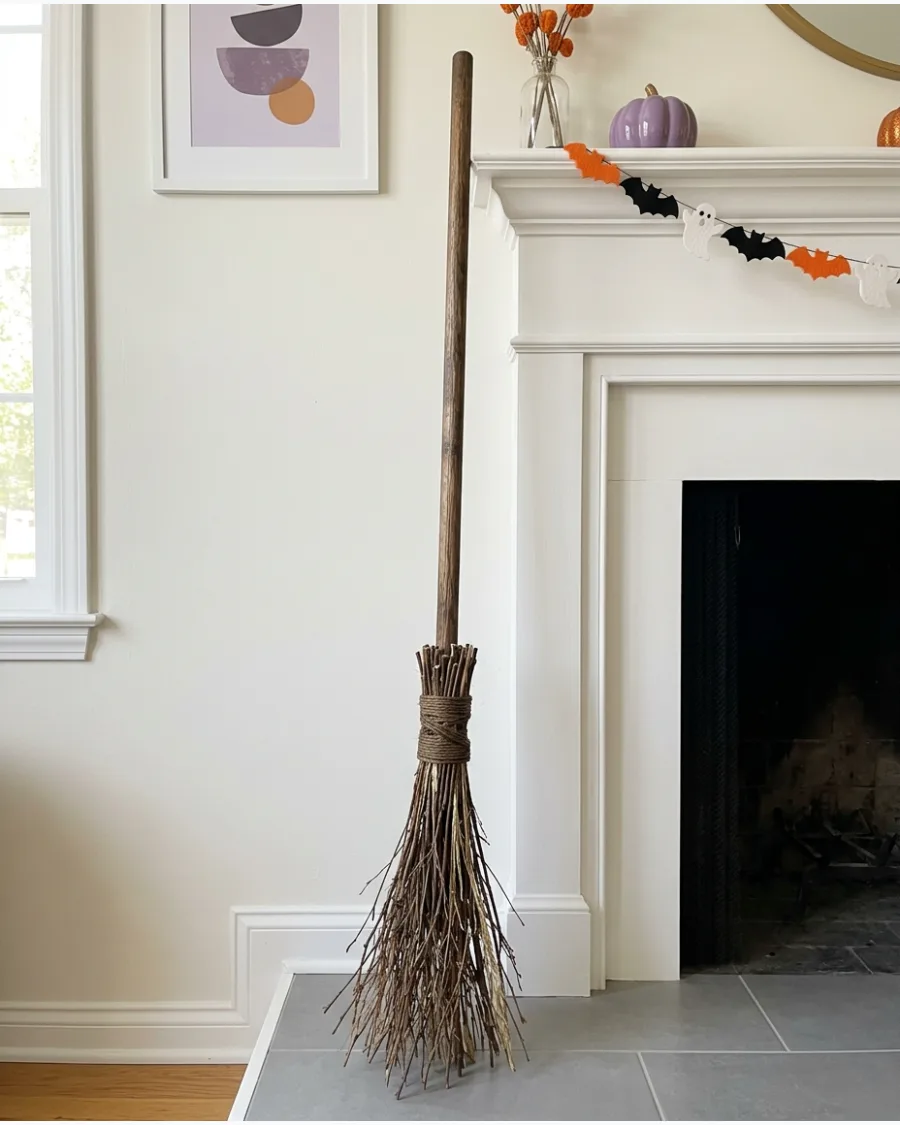
Use a wooden dowel as the broomstick and stain it a dark brown. A dark walnut stain makes a cheap hardware store dowel look like an expensive antique find. Attach bundles of thin branches around the bottom and finish them with natural twine.
- Standard 1-inch wooden dowels work best for the handle.
- Stand the broom next to a fireplace hearth for a cozy vibe.
- Wipe the stain on with a rag for the most even color coverage.
Quick win: Sand the ends of the dowel before staining to avoid a factory-cut look.
5. Small Branch Witch Broom
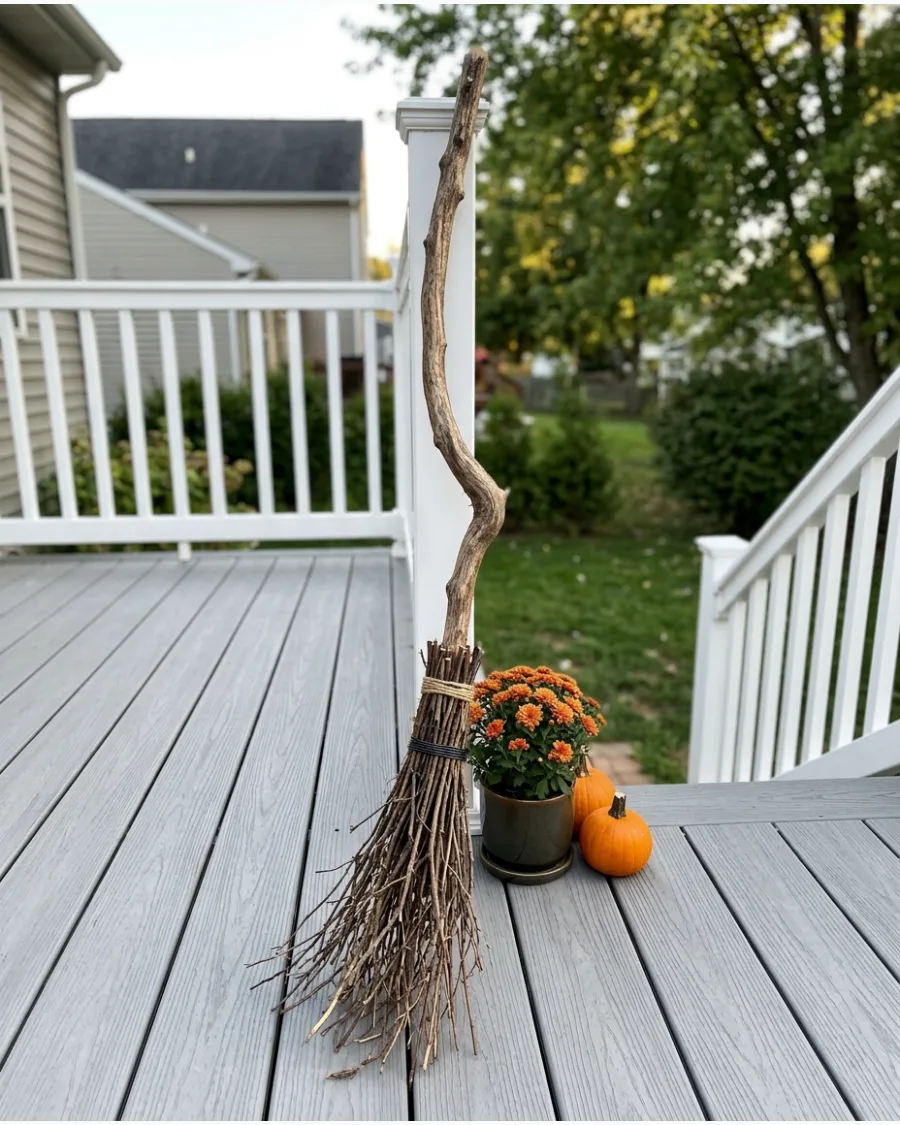
Choose a slightly crooked branch from the yard to give the broom handmade character. Natural imperfections like knots and bends are what make this project stand out from store-bought versions. Add uneven twigs at the bottom for a naturally aged look.
- Forage for branches after a storm for the best selection.
- Position the broom on a porch step alongside pumpkins.
- Leave the bark on the branch to provide extra texture.
Most people skip this: Scrub the branch with a stiff brush to remove loose dirt and bugs before bringing it inside.
6. Raffia Witch Broom
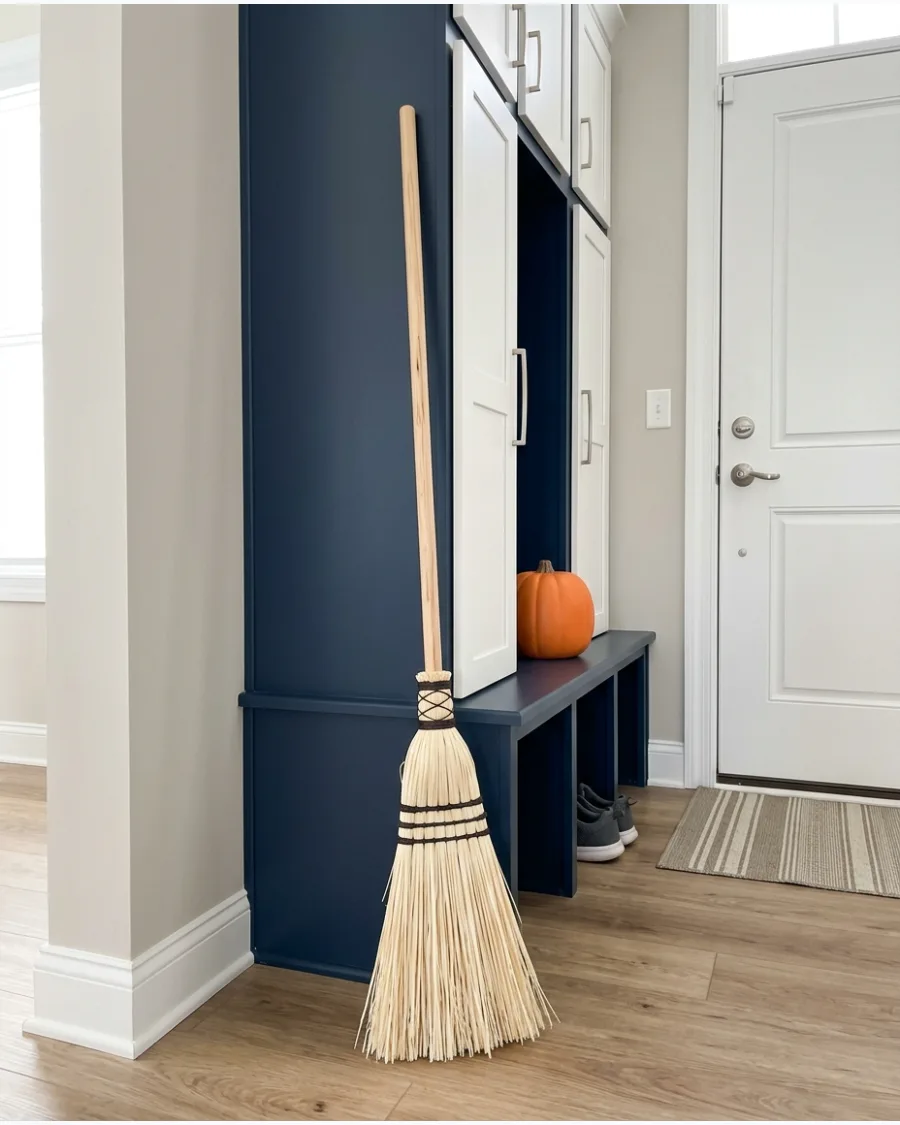
Tie several bundles of natural raffia around the bottom of a wooden handle. Raffia gives a much softer, fuller look than wood twigs while remaining lightweight. Trim the raffia into a soft rounded broom shape.
- Bundled natural raffia is available in large packs for a low price.
- Lean the broom against a mudroom bench or entryway wall.
- Use sharp fabric shears to get a clean, even edge on the bristles.
Best shortcut: Steam the raffia over a kettle for a few seconds to remove any kinks from the packaging.
7. Straw Witch Broom
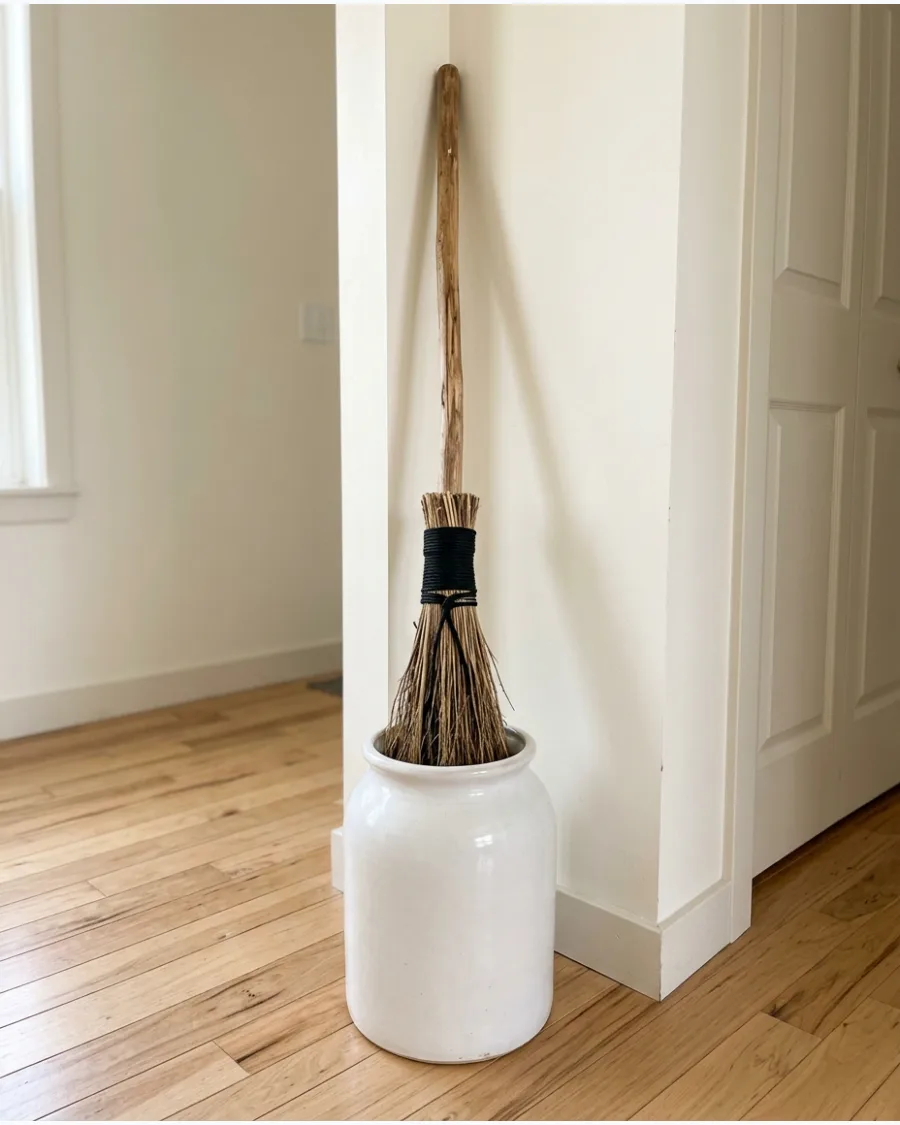
Use natural craft straw to create full broom bristles. Real straw provides that classic Cinderella broom silhouette that feels nostalgic and festive. Wrap the top of the straw with black cord to keep it securely attached to the handle.
- Natural craft straw creates a very dense and traditional bristle.
- Place the broom in a tall ceramic umbrella stand for easy display.
- Tighten the cord with a slipknot to keep the straw from falling out.
Quick win: Soak the top inch of the straw in water for ten minutes to make it more flexible before tying it to the handle.
8. Black Witch Broom
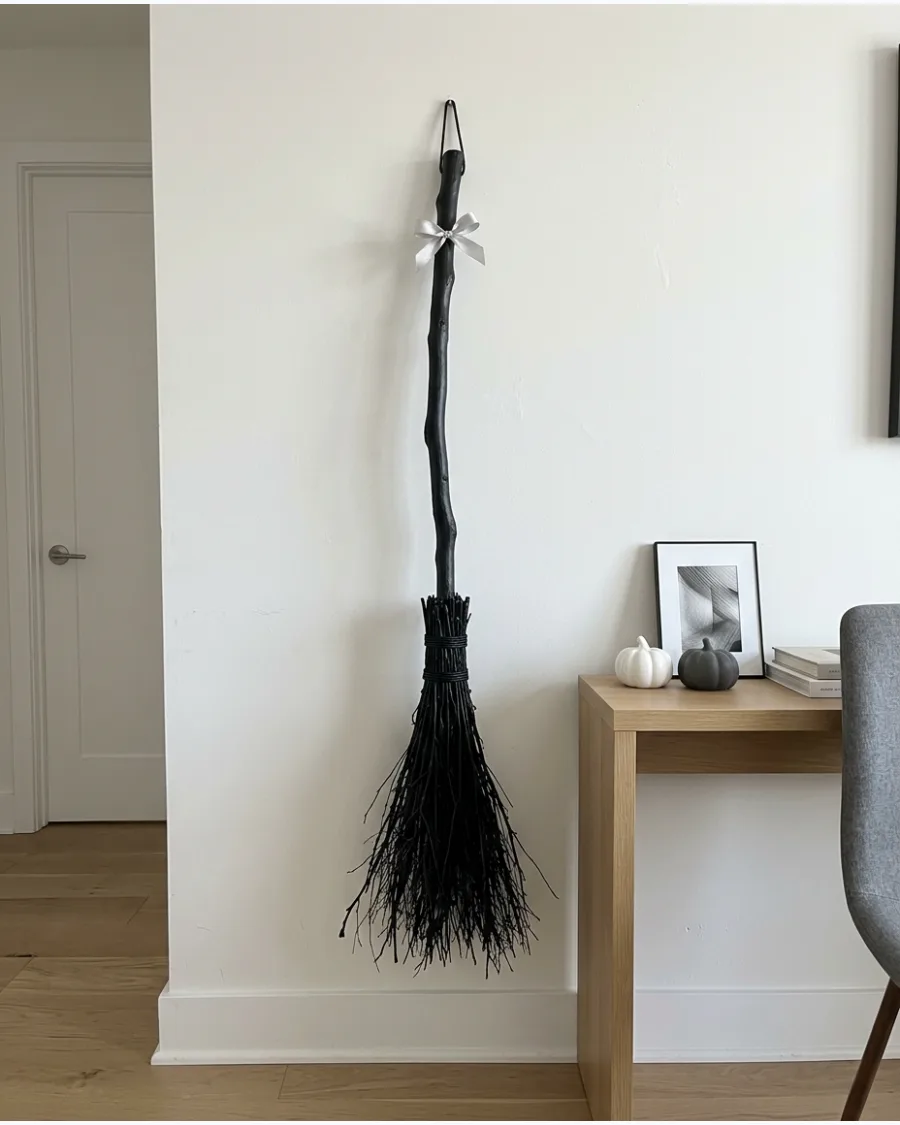
Paint the handle and bristles matte black for a dramatic monochrome design. A matte finish absorbs light and makes the broom look more sophisticated and mysterious than a glossy one. Add a small silver or purple ribbon near the top of the bristles.
- Matte black spray paint covers wood and twigs easily.
- Hang the broom horizontally over a doorway for a unique accent.
- Use a metallic ribbon to provide a pop of contrast against the dark paint.
Most people skip this: Paint the broom in sections, letting the bristles dry completely before rotating to avoid sticky clumps.
Natural and Rustic Witch Broom DIYs
9. Dried Grass Witch Broom
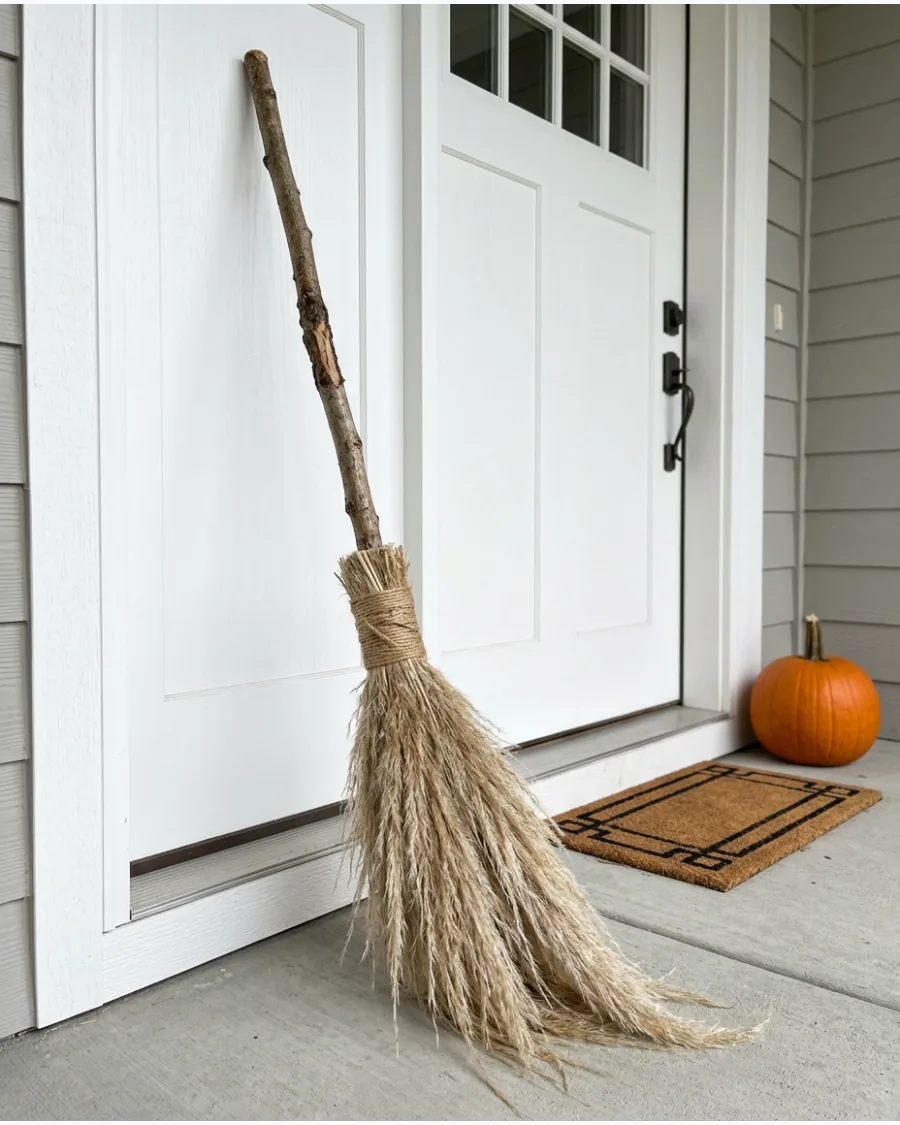
Gather long dried ornamental grass and attach it around a sturdy branch. Dried grasses offer a feathery, airy quality that twigs simply can't provide. Leave the grass slightly uneven to maintain its natural texture.
- Foraged or store-bought ornamental grasses work well here.
- Prop the broom in an entryway for a soft, seasonal touch.
- Use floral wire to secure the grass base before adding decorative rope.
Best shortcut: Use a small amount of hot glue between the grass layers to keep them from shifting once the wire is tight.
10. Fountain Grass Witch Broom
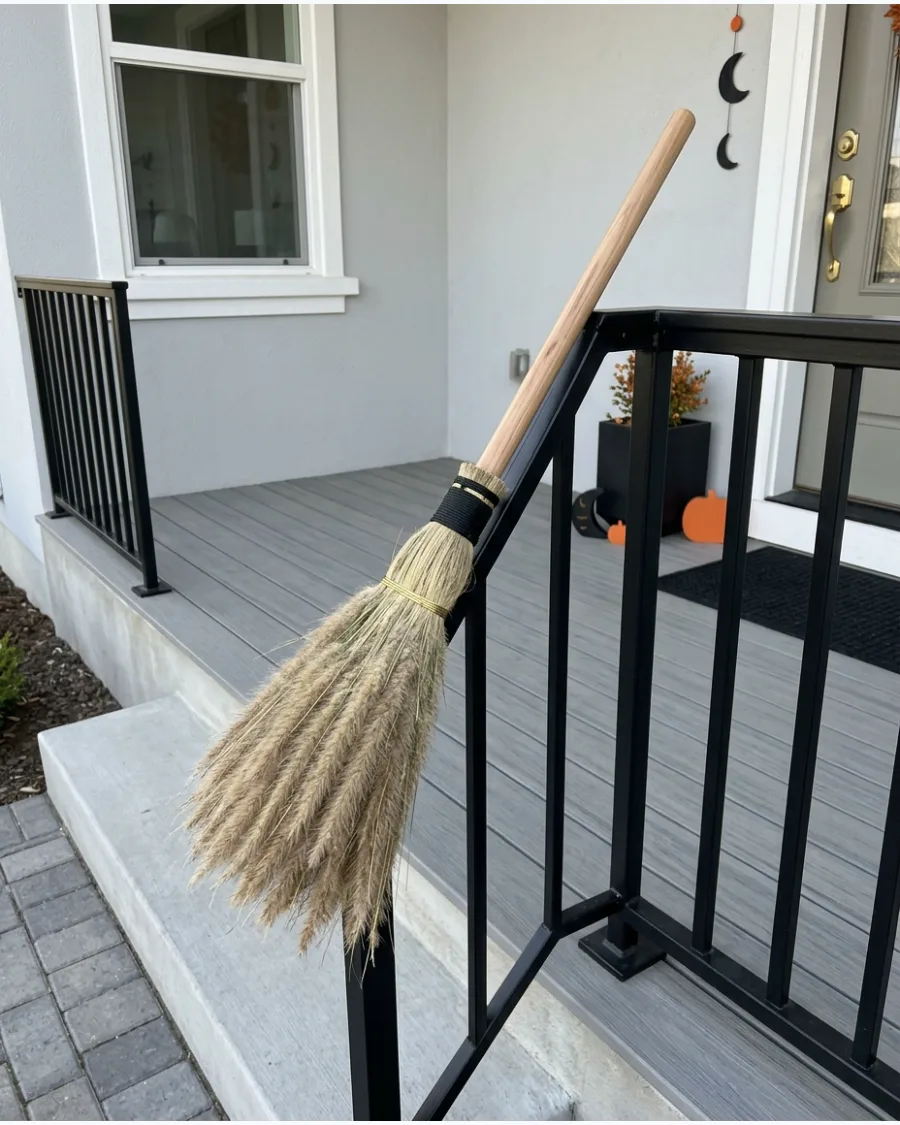
Use dried fountain grass to create soft, feathery broom bristles. Fountain grass seed heads add a unique fuzzy texture that makes the broom look magical. Trim the ends lightly while preserving their wild and wispy appearance.
- Dried fountain grass seed heads provide a unique, organic shape.
- Lean the broom against a porch railing or a garden gate.
- Shake out the grass before assembly to remove any loose seeds.
Quick win: Spray the finished bristles with a clear acrylic sealer to preserve the color and keep the grass intact.
11. Birch Branch Witch Broom
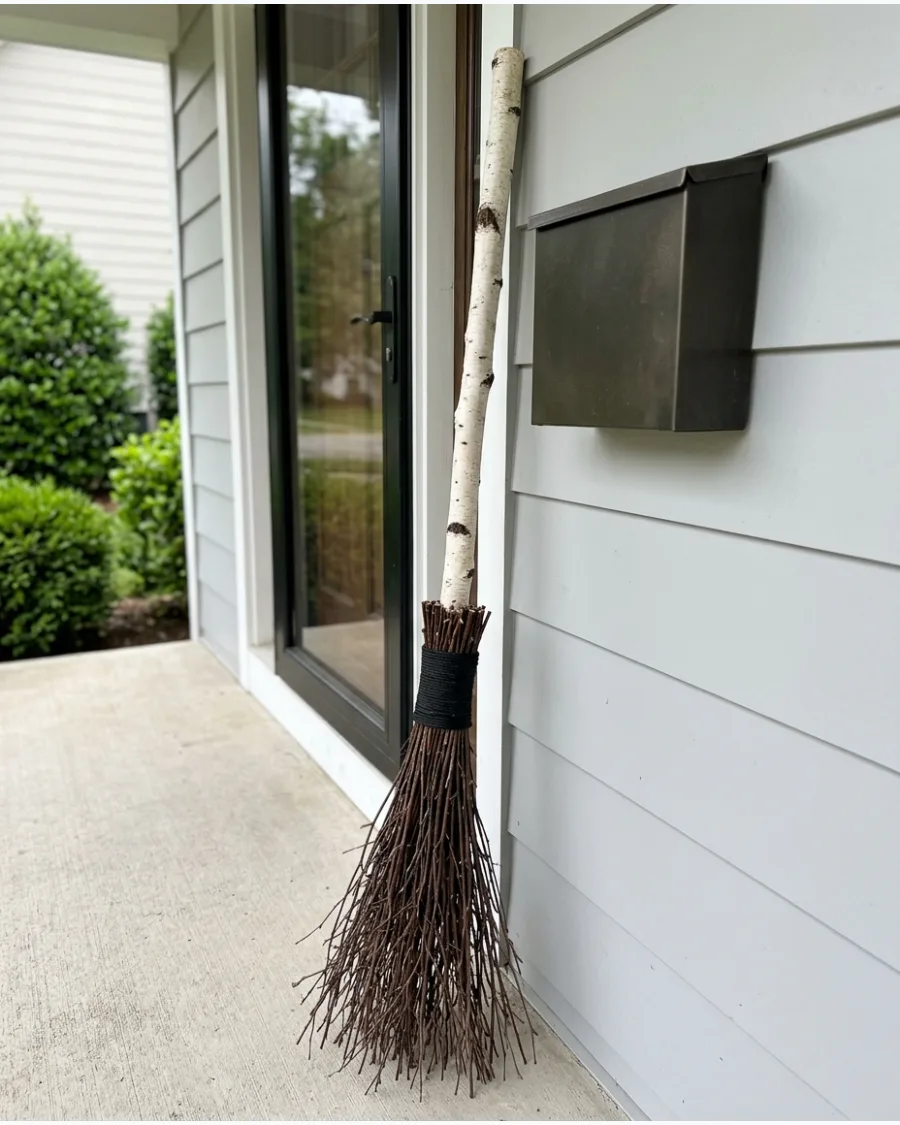
Use a pale birch branch for the handle and pair it with dark brown twigs. The contrasting natural colors create a beautiful woodland-inspired broom.
Secure the twigs with heavy-duty floral wire before covering the connection with a thick layer of black cotton cord. Natural birch bark adds instant texture without needing paint or stain.
- Gather birch branches from the yard or purchase craft-grade bundles.
- Wrap wire tightly around the twig bundle to prevent shedding.
- Use a clear matte sealant to stop the birch bark from flaking over time.
Most people skip this: Sand the very top of the birch handle to prevent splinters when moving the decor.
12. Curved Branch Witch Broom
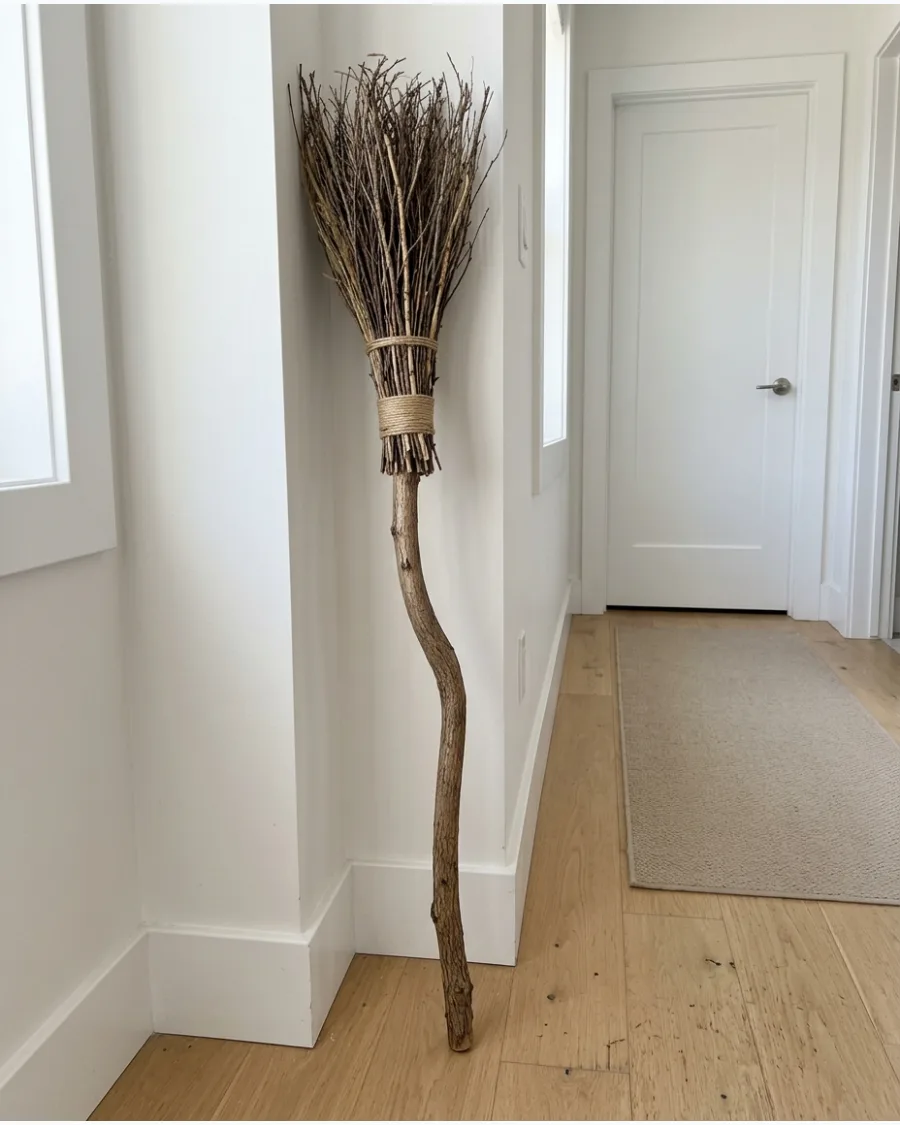
Use a naturally curved tree branch instead of a perfectly straight handle.
Its unusual shape will make the broom look older and more magical. Balance the weight of the bristles against the curve of the wood so it stays upright when leaned. A crooked handle adds character that a store-bought dowel can never match.
- Oak or maple branches offer the best durability for curved handles.
- Test the balance of the broom before gluing the bristles in place.
- Keep the bristles long to exaggerate the height of the curved wood.
Quick win: Soak the branch in water for a day if it needs a very slight adjustment in shape before drying.
13. Moss-Covered Witch Broom
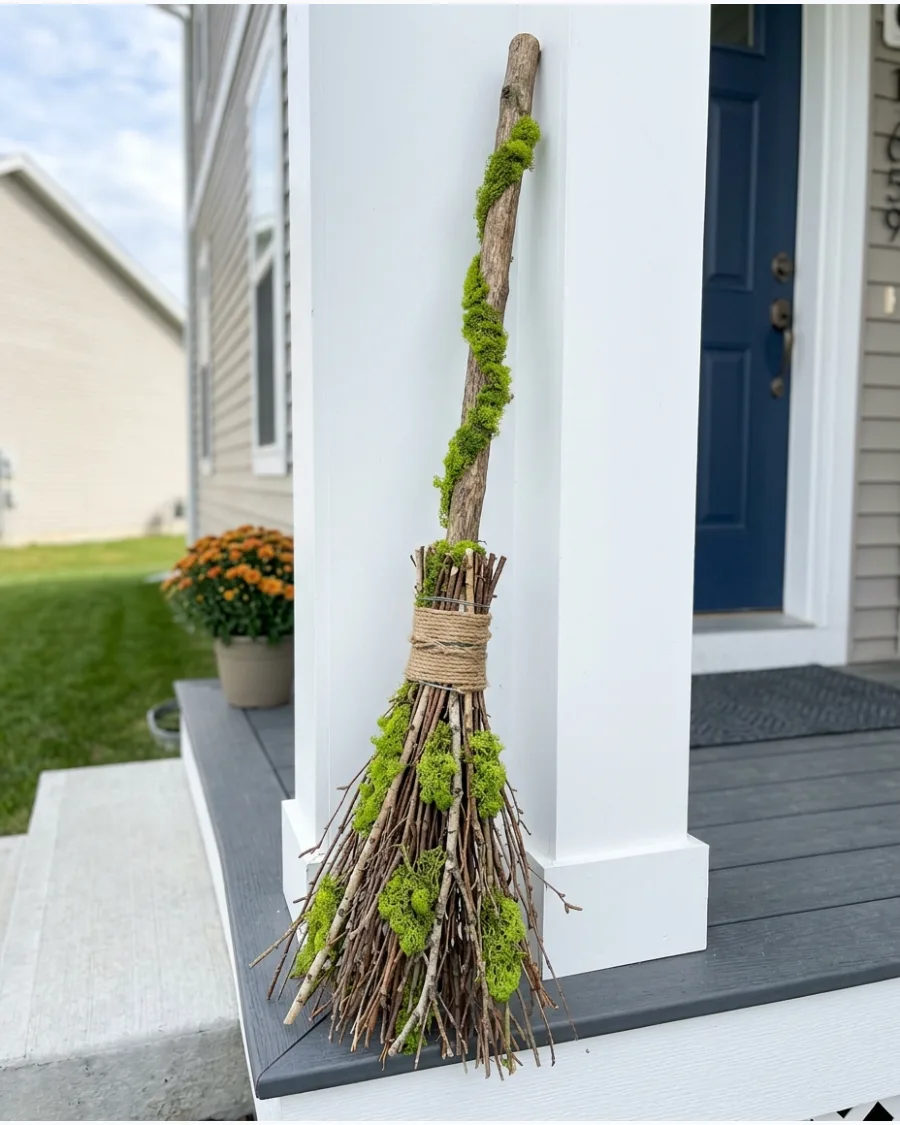
Attach small pieces of faux moss around the broom handle and bristles. Add a few artificial vines to create an enchanted forest appearance.
Use a hot glue gun to spot-treat the moss so it looks like it is growing naturally out of the wood crevices. Greenery breaks up the plain brown of traditional brooms.
- Use preserved sheet moss or reindeer moss for different textures.
- Wrap thin faux ivy around the handle for an overgrown look.
- Store the broom in a dry place to prevent the moss from fading.
Best shortcut: Use spray adhesive for the first layer of moss bits, then hand-glue the larger chunks for depth.
14. Dried Leaf Witch Broom
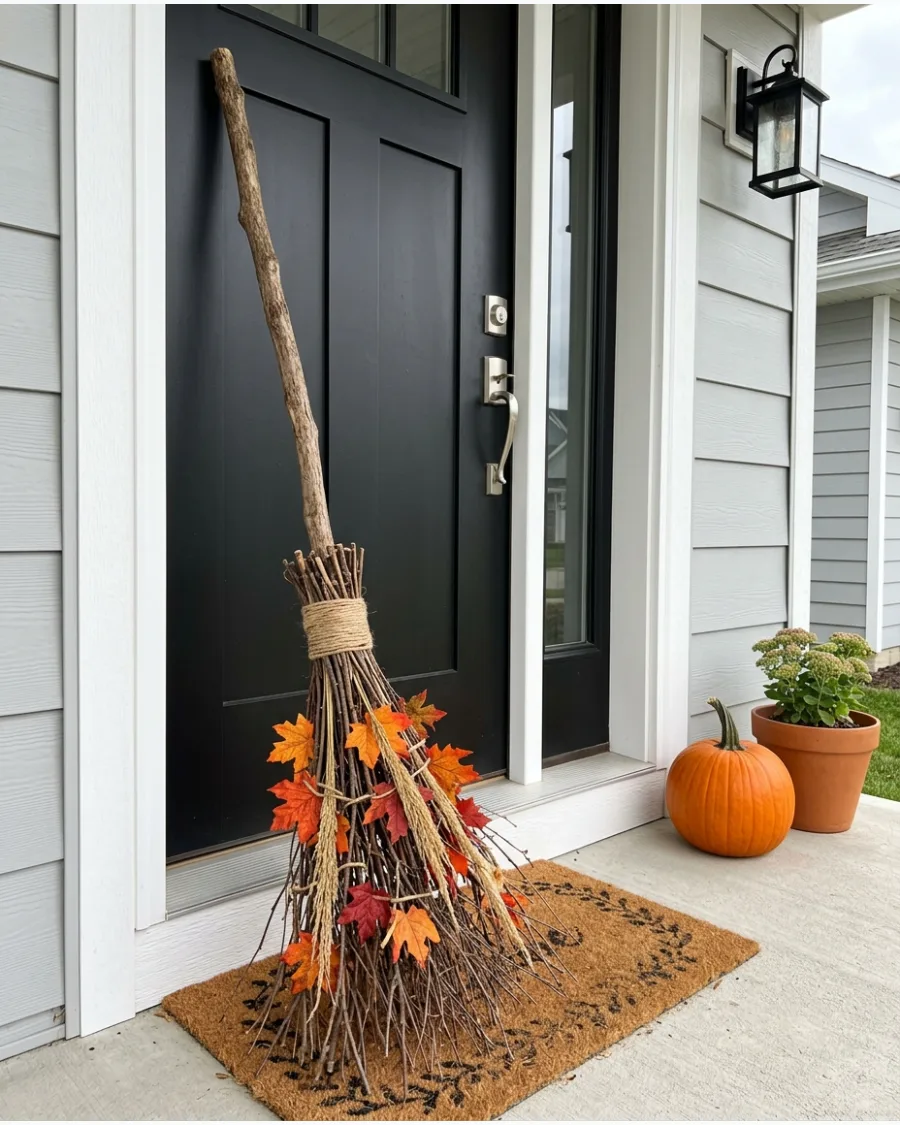
Tuck dried or artificial autumn leaves between the broom bristles. Use orange, red and brown leaves for a seasonal fall design.
Layer the leaves starting from the top of the bristles and working downward for a cascading effect. This adds a pop of color that ties the broom into other fall porch decorations.
- Faux silk leaves last longer than real dried leaves for outdoor use.
- Apply a small dab of glue to the leaf stems to keep them secure.
- Mix different leaf sizes and colors for a more realistic appearance.
Most people skip this: Spray the leaves with a UV-resistant clear coat if the broom will sit in direct sunlight.
15. Woodland Witch Broom
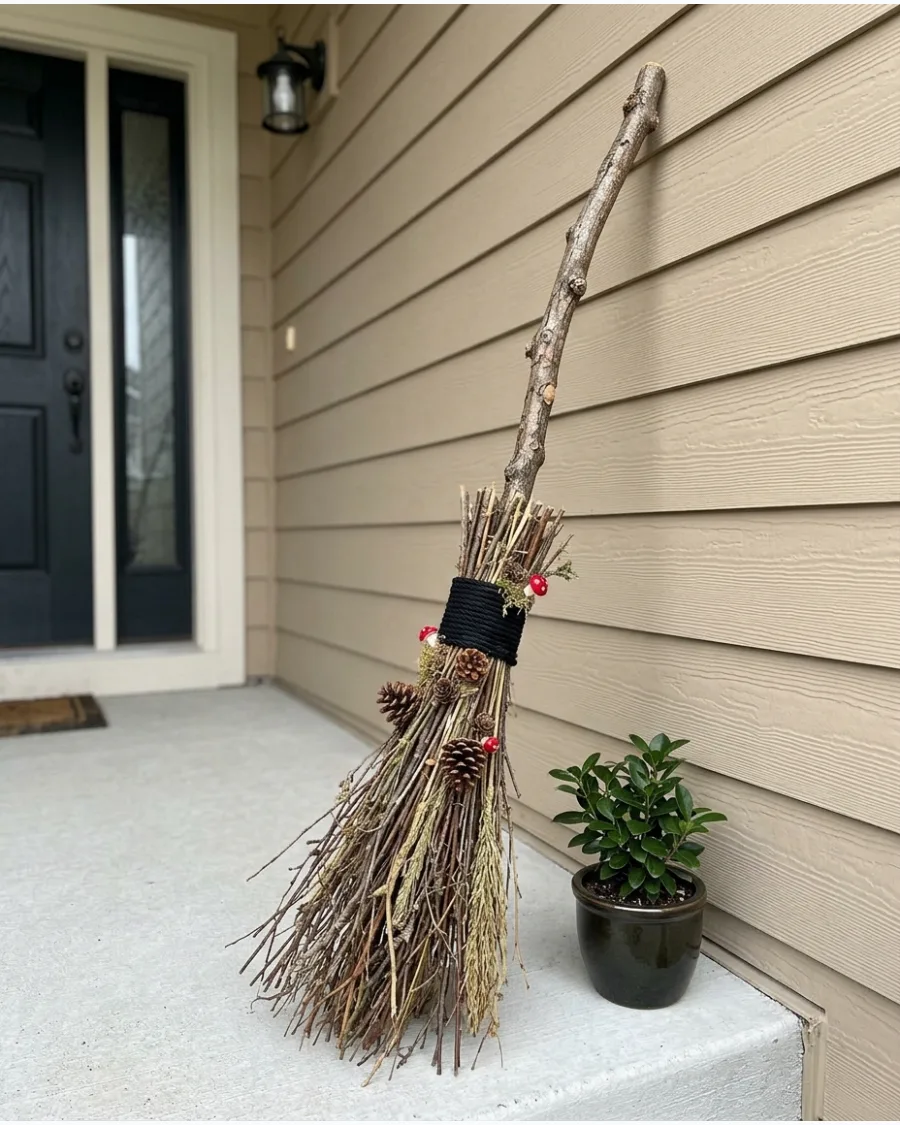
Decorate a natural broom with moss, small pinecones, mushrooms and dark greenery. Keep the decorations concentrated near the top of the bristles.
Group the heavy items like pinecones near the handle junction to keep the broom from becoming top-heavy. This style works well for a more detailed, textured look.
- Select small pinecones and craft mushrooms for better scale.
- Use thin floral wire to anchor heavy items to the handle.
- Add dark green faux ferns or eucalyptus for a forest feel.
Quick win: Use wire instead of just glue for the pinecones so they do not fall off when the broom is bumped.
16. Weathered Witch Broom
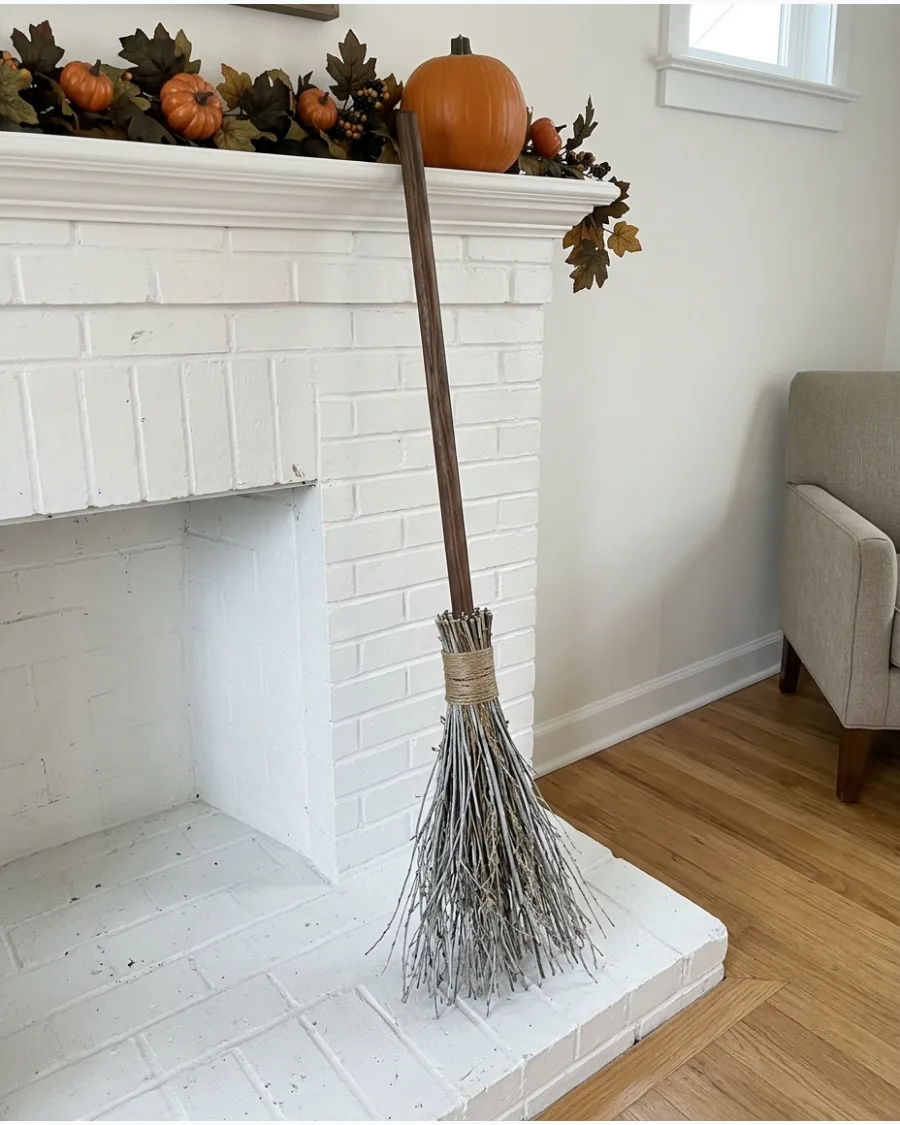
Apply a dark stain to the wooden handle and lightly sand selected areas. Use gray-brown twigs to make the broom appear old and well used.
Wipe away the stain quickly in the center of the handle to mimic the look of natural wear from hands. Gray-toned bristles look more authentic than bright tan ones.
- Choose a dark walnut or ebony wood stain for high contrast.
- Use 120-grit sandpaper to scuff the edges after staining.
- Source gray-tinted dried twigs or branches for the bristles.
Best shortcut: Use a gray weathering wash over brown twigs to get that aged look instantly.
Home Decor
17. Scented Modern Witch Broom
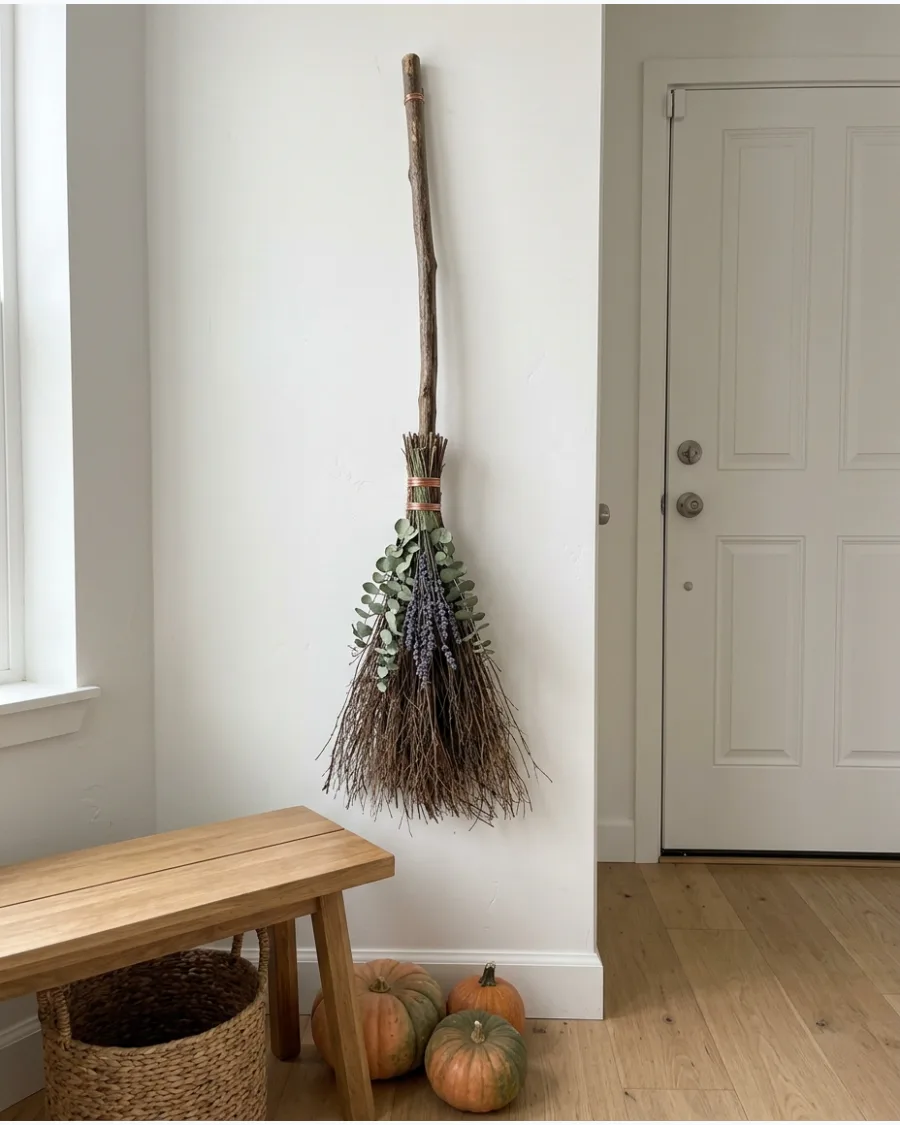
Cinnamon brooms offer a nostalgic autumn scent while serving as a rustic focal point for entryways or hearths. Bundle dried eucalyptus and sprigs of lavender around the base of the broom using copper wire for a refined aesthetic. This layered approach transforms a standard grocery store find into a custom piece of wall art.
Authentic cinnamon oils can be overwhelming in small spaces, so hanging them near a drafty window helps distribute the fragrance gently throughout the house.
- Purchase standard cinnamon brooms in early September when stock is high and prices are lowest.
- Use floral wire or twine to secure botanical accents tightly to the handle, ensuring they do not slip as the broom dries.
- Swap out the greenery for velvet ribbons or dried orange slices to transition the look from early fall to late winter.
Most people skip this: Lightly mist the broom bristles with water every two weeks to reactivate the natural cinnamon scent without adding synthetic sprays.
Dollar Store Witch Broom Ideas
18. Dollar Store Plunger Witch Broom
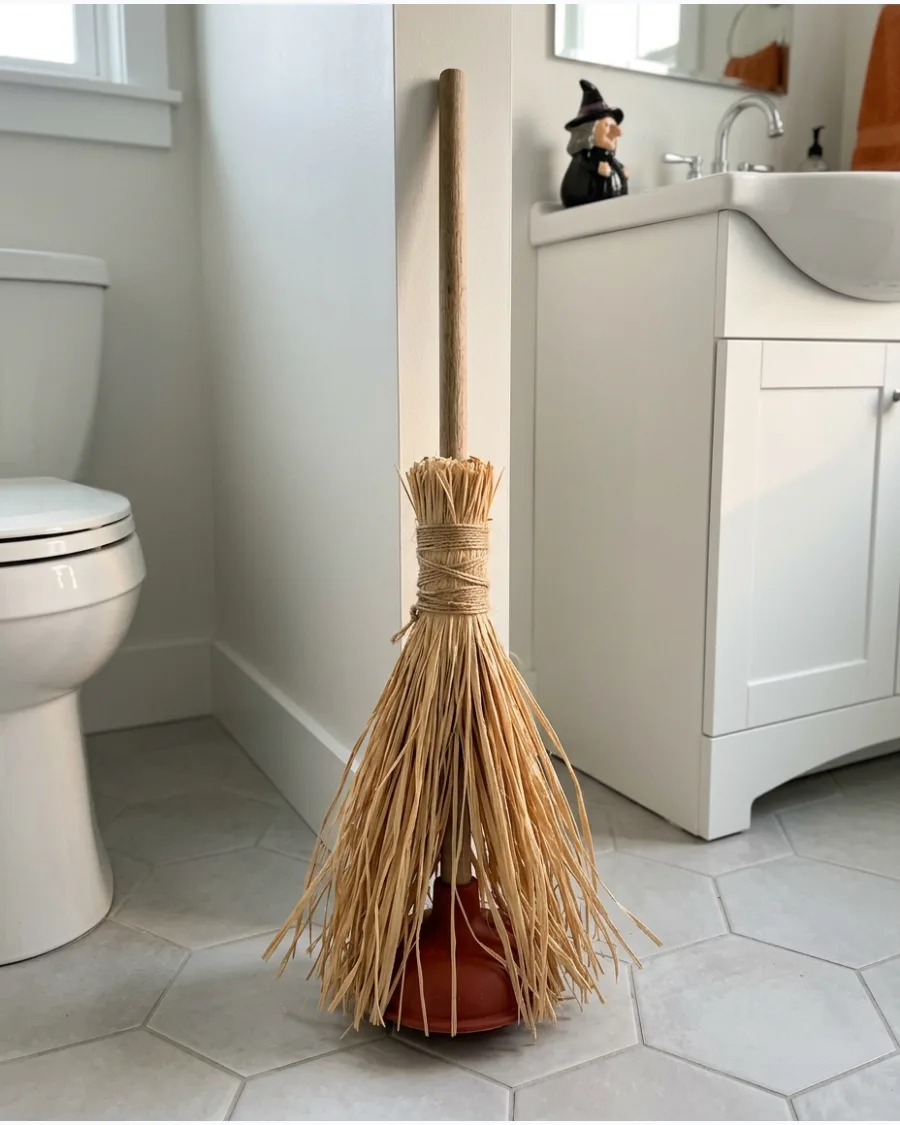
Use a new wooden-handled plunger as the hidden base. Cover the rubber section completely with long raffia, straw or twig bundles.
Angle the bristles outward from the rubber cup to create a full, flared shape that stands up on its own. The heavy rubber base makes this broom very stable for floor displays.
- Use a new wooden-handled plunger for the correct handle length.
- Gather 2-3 bundles of long raffia to cover the rubber base.
- Secure the top of the raffia with hot glue or heavy rubber bands.
Quick win: Paint the rubber part black before adding bristles so any gaps in the raffia are not noticeable.
19. Dollar Store Mop Witch Broom
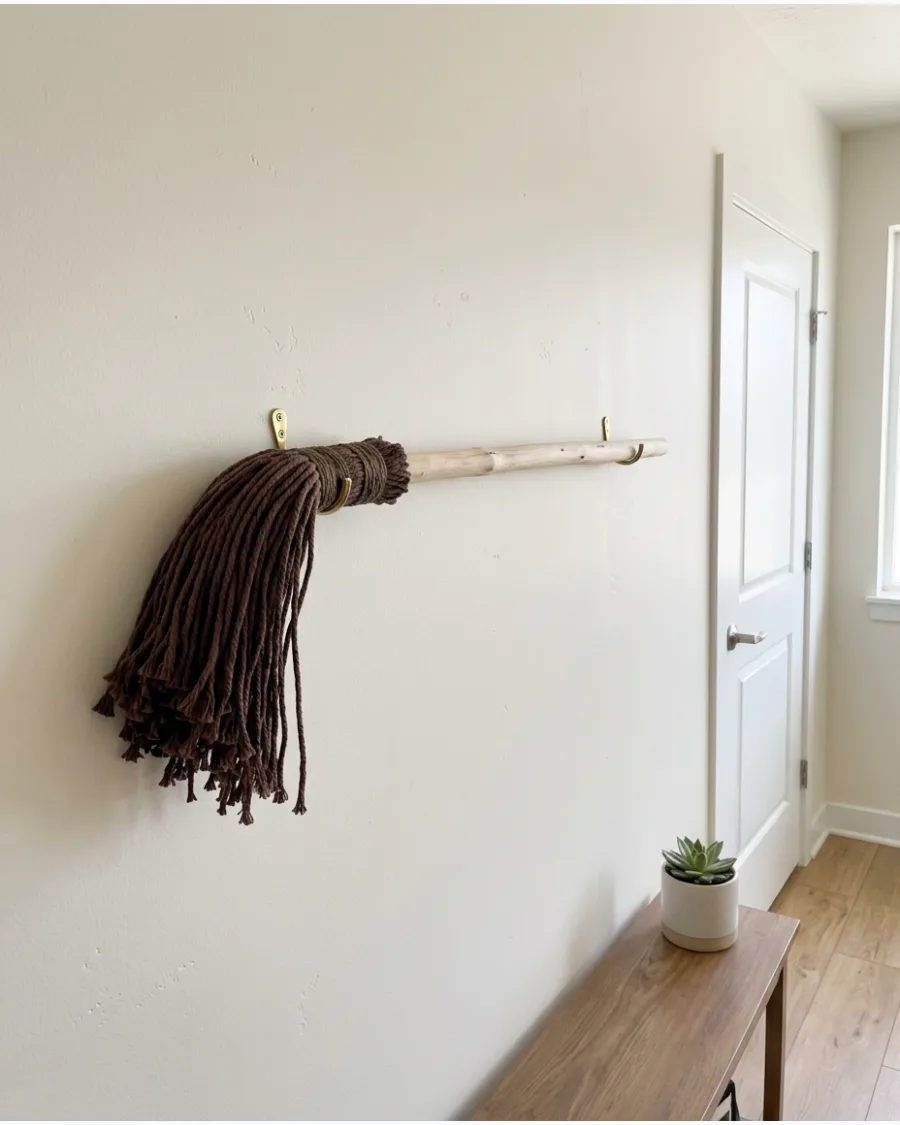
Attach brown or black mop strands around a lightweight wooden handle. Separate and trim the strands to resemble soft broom bristles.
Dip the ends of the cotton mop strands in dark tea or coffee to give them a grimy, realistic color. This is the lightest DIY option, making it great for hanging on a wall.
- Buy a cotton string mop head and remove the plastic bracket.
- Use brown fabric dye or strong tea for a weathered look.
- Attach the strands to a lightweight wood dowel or broom handle.
Best shortcut: Use a wire pet brush to comb the mop strands so they look like coarse hair or fiber.
20. Plastic Tablecloth Witch Broom
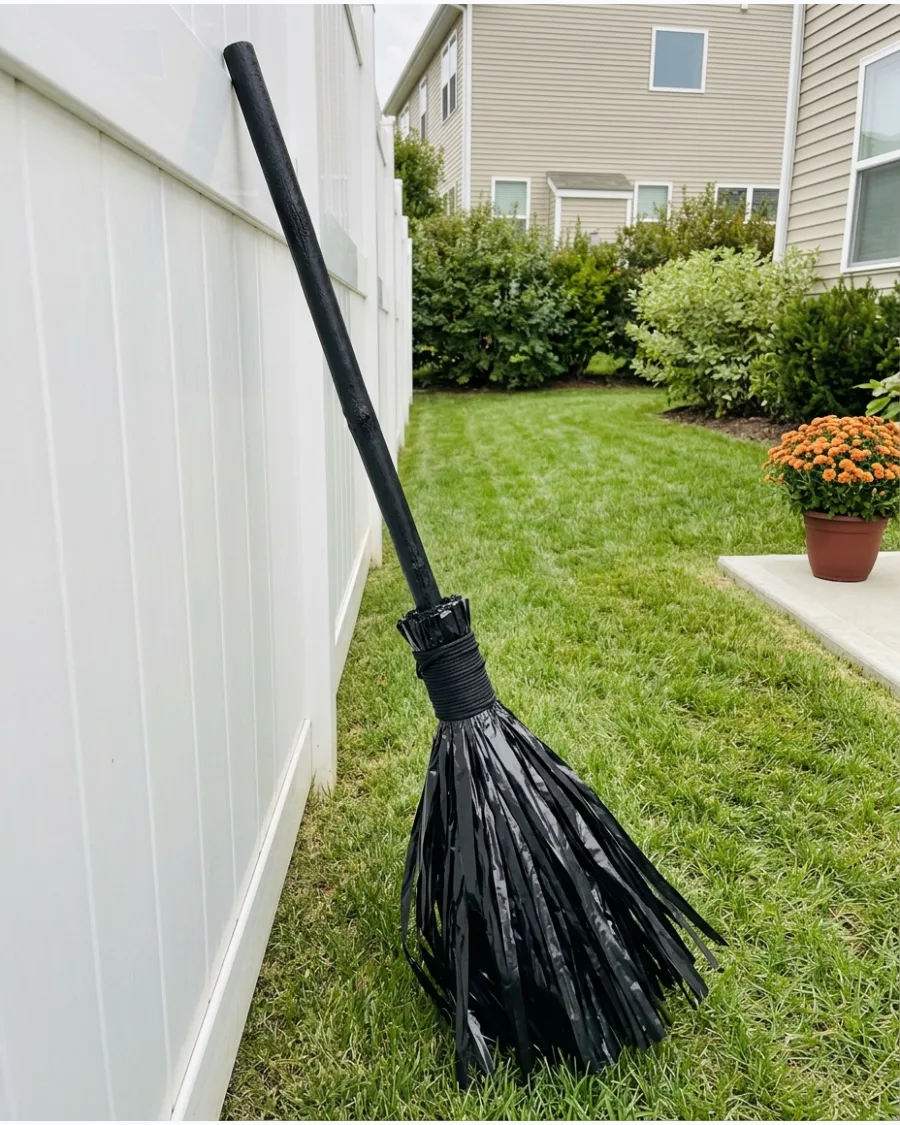
Cut a black plastic tablecloth into long narrow strips. Tie the strips around a broom handle to create an inexpensive weather-resistant decoration.
Vary the lengths of the plastic strips to give the broom a ragged, wind-blown appearance. This material holds up perfectly in the rain on an uncovered porch.
- Use a black plastic rectangular tablecloth for the most material.
- Cut strips with scissors or a rotary cutter for faster prep.
- Use black electrical tape for a smooth finish at the top wrap.
Most people skip this: Static electricity will make the plastic stick together; spray the strips with a little anti-static spray or water to keep them flowing.
21. Dollar Store Tulle Broom

This project uses inexpensive rolls of tulle to create a voluminous, airy look for a decorative broom. Layering multiple colors like black, orange, and purple gives the piece depth and a festive feel.
Knot the strips close together to hide the bottom of the dowel completely. Tulle is a great way to add high-impact volume without adding any heavy weight to the handle.
- Purchase three rolls of tulle and one wooden dowel for under five dollars.
- Tie six-inch strips of tulle around the base of the dowel using a simple double knot.
- Add more layers of tulle to make the broom look fuller for larger rooms or outdoor porches.
Quick win: Use a rotary cutter and a mat to slice the tulle into even strips in half the time.
22. Decorative Grass Stem Broom
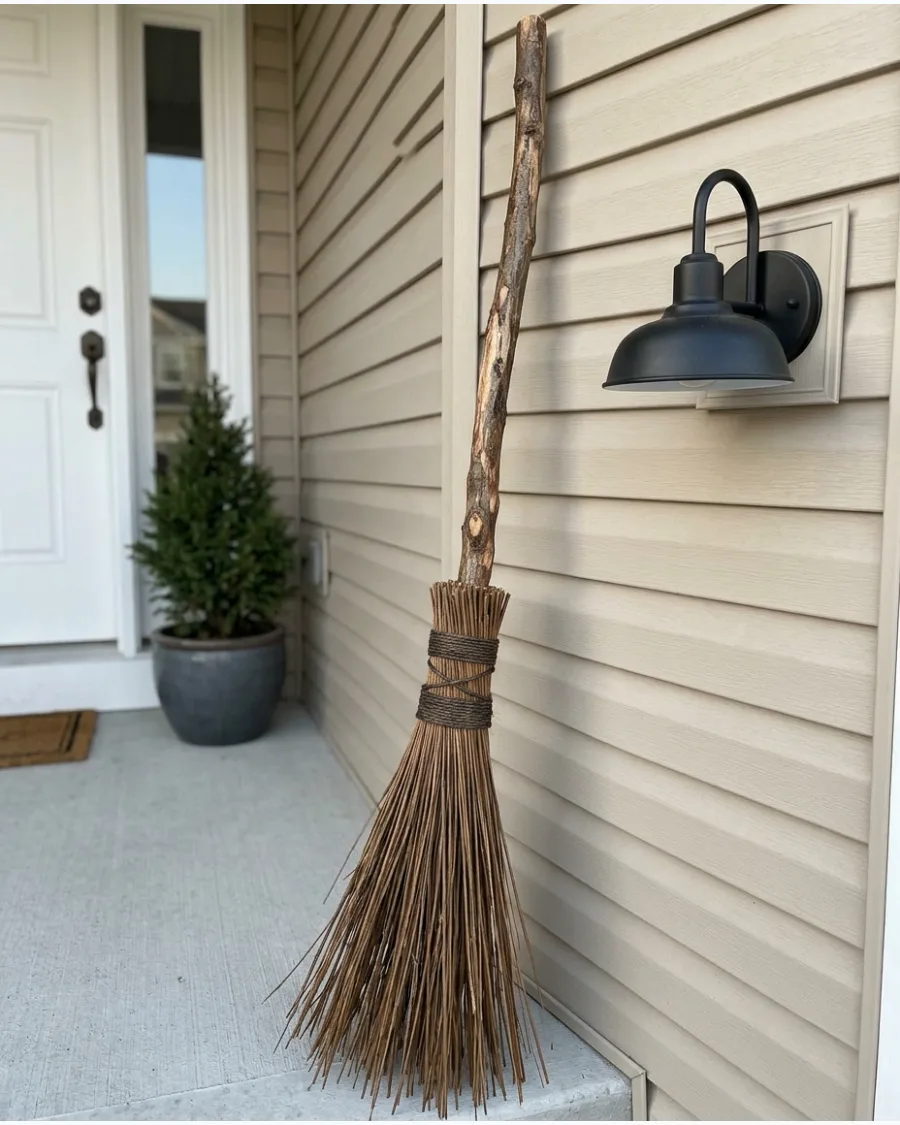
Artificial grass stems provide a more controlled and uniform look than real dried materials. Bundle these stems around a natural branch to bridge the gap between store-bought and handmade.
Wrap the twine tightly around the bundle several times before tying the final knot to prevent slipping. Faux stems are better for long-term use because they will not shed or become brittle over time.
- Look for 'autumn grass' or 'wheat' stems in the floral aisle of a discount shop.
- Secure the stems to the handle using heavy-duty jute twine or floral wire.
- Mix different shades of brown and tan stems to create a more realistic, organic appearance.
Most people skip this: Fan the stems out slightly by hand after securing them to give the broom a wider, more traditional shape.
23. Bamboo Skewer Mini Broom
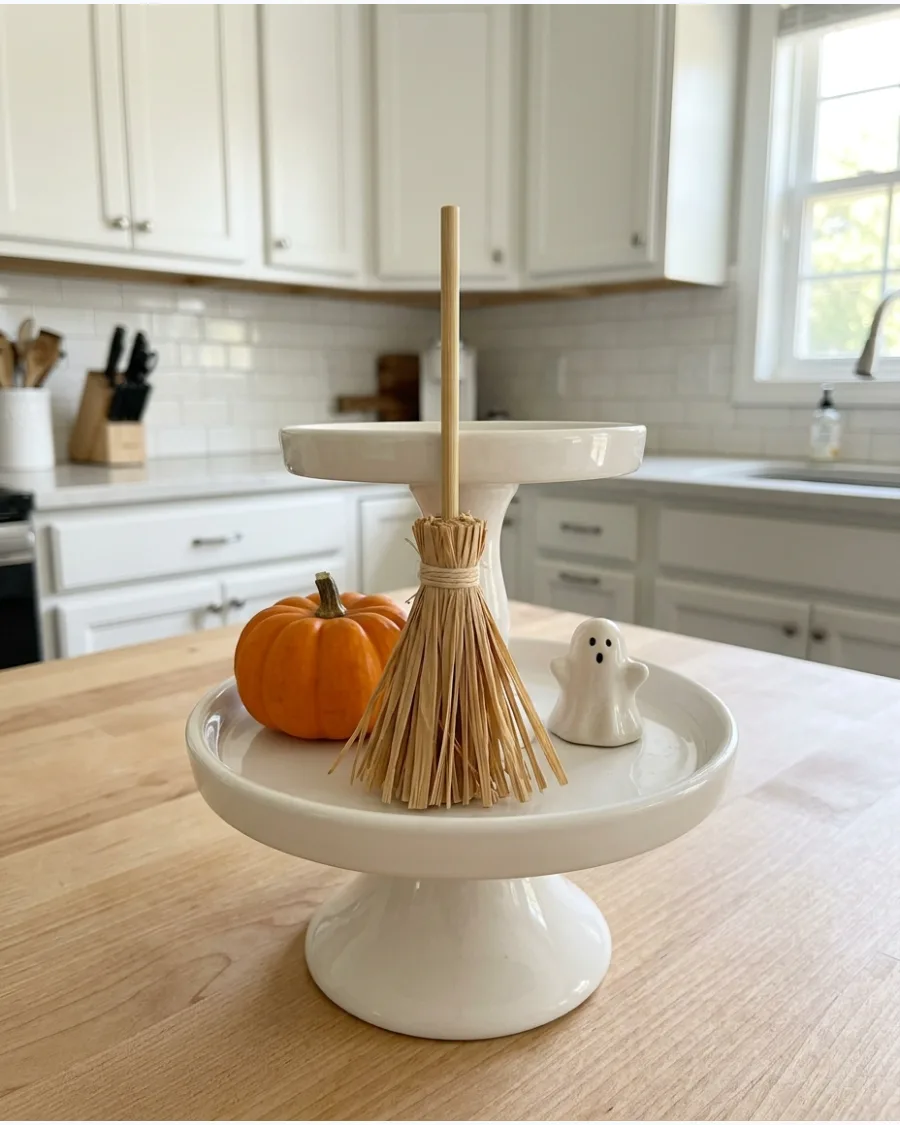
Miniature brooms are perfect for adding a spooky touch to wreaths, garlands, or even table place settings. A single bamboo skewer serves as the handle, while a small pinch of raffia creates the bristles.
Trim the raffia ends with sharp fabric scissors to get a clean, straight edge on the mini bristles. Small scale decor adds a thoughtful, detailed touch to a tiered tray or a holiday centerpiece.
- One pack of skewers and a bundle of raffia can create over twenty mini brooms for a few dollars.
- Use a tiny drop of hot glue to keep the raffia from sliding off the end of the skewer.
- Leave the handles long for floral arrangements or snap them shorter for use on a wreath.
Best shortcut: Use a black permanent marker to color the skewer handles if you want a dark, moody look without the mess of paint.
24. Paper-Bag Witch Broom
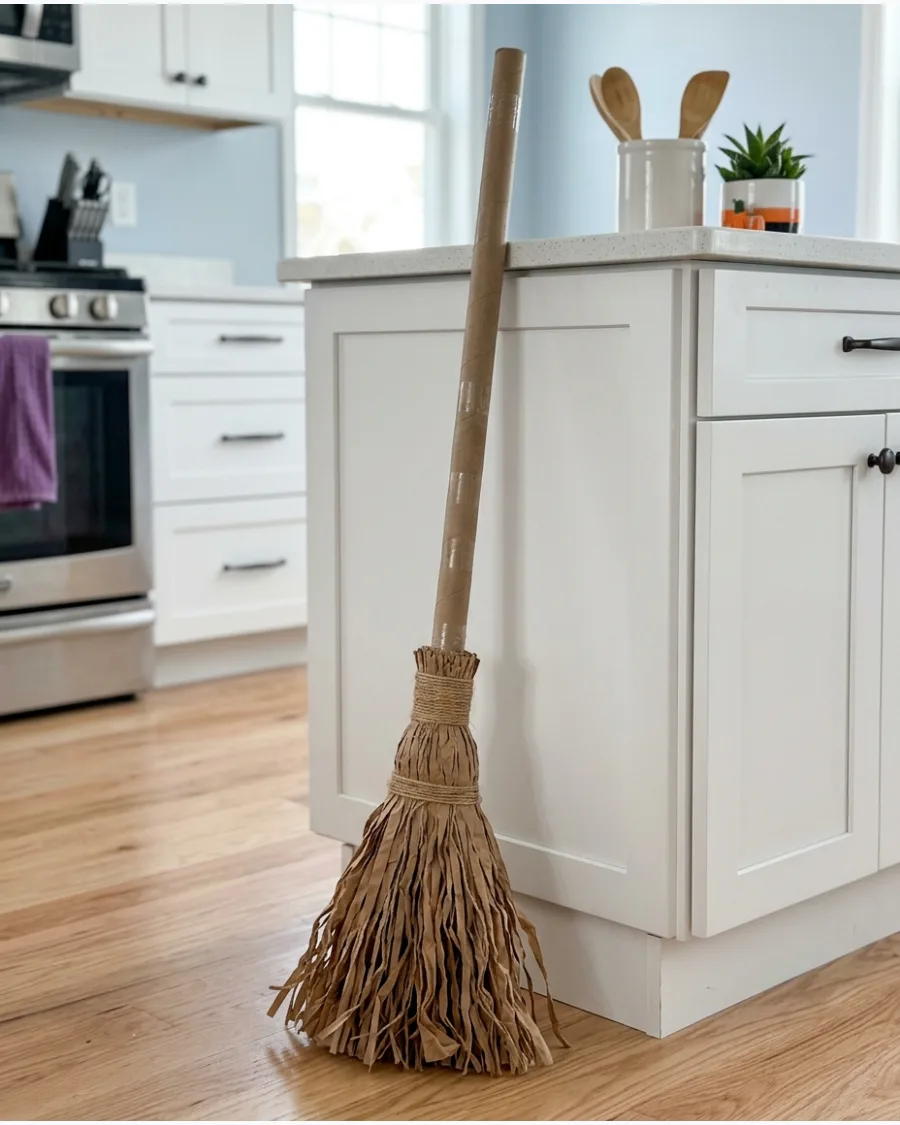
Standard brown grocery bags can be transformed into lightweight bristles for an indoor broom prop. Cut the bags into thin fringe while keeping the top edge intact for easy wrapping.
Crumple the paper strips slightly before attaching them to give the broom more texture and life. This is a smart way to reuse household items for a project that is light enough to hang on a command hook.
- Collect two or three large brown paper bags and one sturdy cardboard shipping tube.
- Wrap the fringed paper around the tube in layers, securing each layer with clear tape or glue.
- Stain the cardboard tube with a wet tea bag to give it a darker, wood-like appearance.
Quick win: Use pinking shears to cut the paper for a jagged, more 'magical' edge on the bristles.
Colorful and Whimsical Witch Brooms
25. Purple Witch Broom
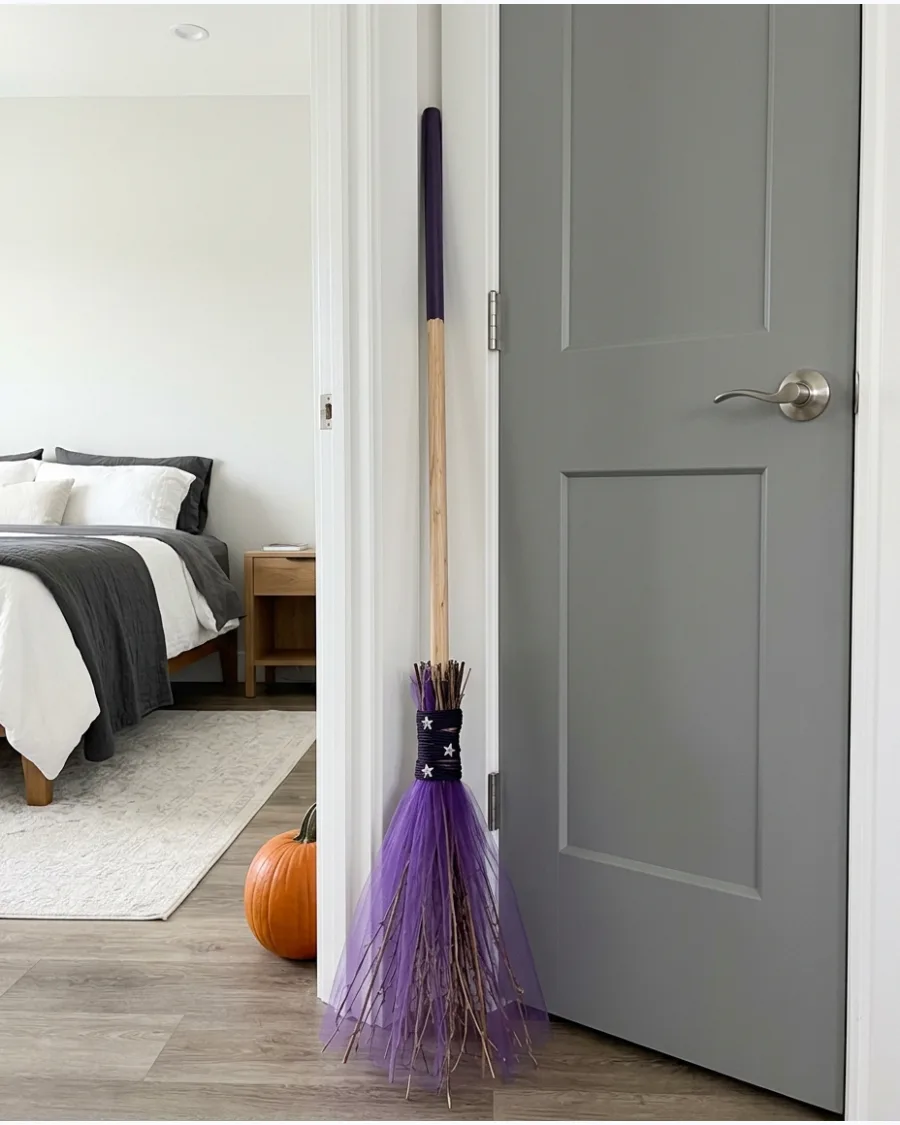
A deep purple theme offers a sophisticated and moody alternative to the traditional orange Halloween palette. Painting the handle a matching shade creates a cohesive, high-end look for a custom prop.
Use a hot glue gun to secure silver stars directly onto the tulle for a floating effect. Jewel tones like purple stand out beautifully against white or light gray interior walls.
- Apply two coats of purple acrylic paint to a wooden dowel and let it dry completely before assembly.
- Layer different shades of purple tulle to create a gradient effect in the bristles.
- Finish the look with a wide black velvet ribbon tied in a simple bow at the neck.
Most people skip this: Lightly sand the handle between coats of paint for a smooth, professional-grade finish.
26. Orange-and-Black Witch Broom
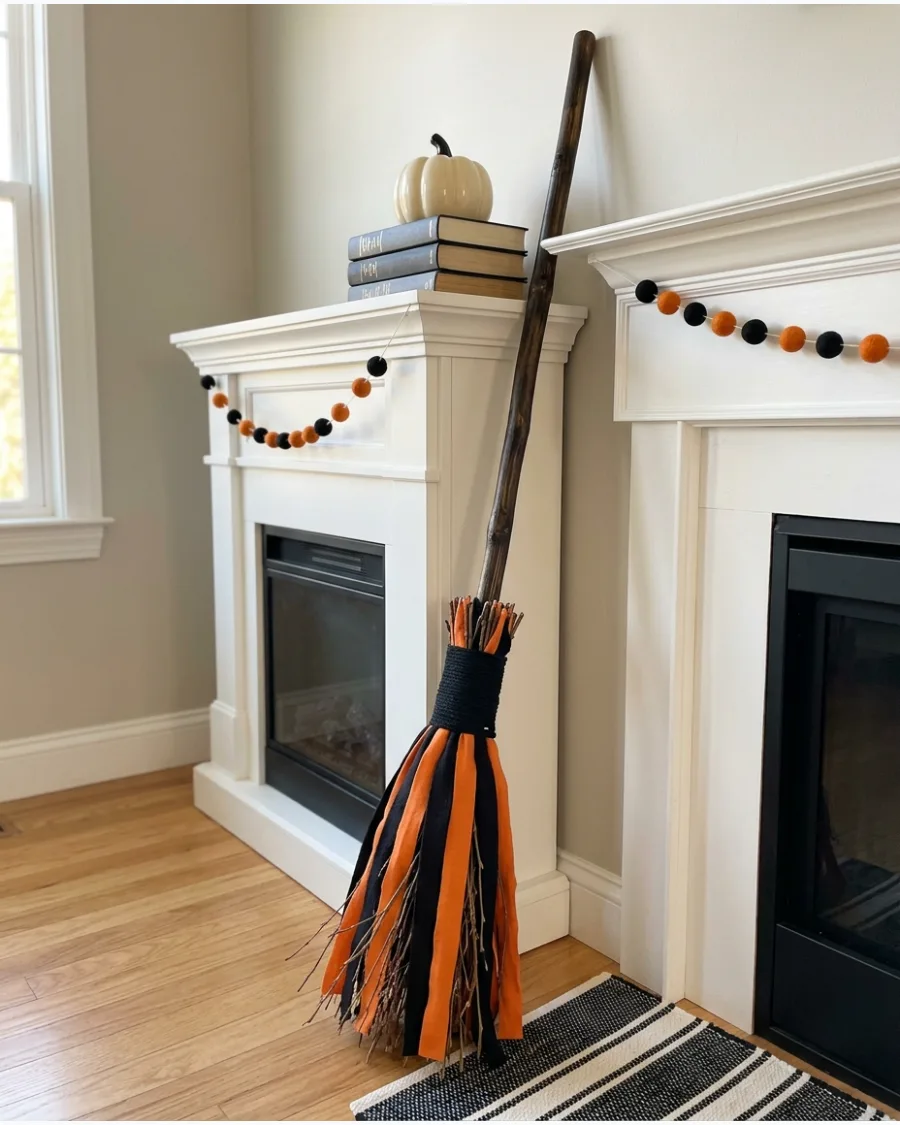
Alternating fabric strips in classic Halloween colors creates a bold, graphic statement piece. This style works well for homes that favor traditional decor with a handmade twist.
Tear the fabric strips instead of cutting them to create a slightly frayed, authentic look. High-contrast colors ensure the broom is visible and recognizable even from across a large room.
- Use cotton fabric scraps or inexpensive fat quarters in solid orange and black.
- Tie the strips to the handle using a staggered pattern to mix the colors evenly.
- Add a large checkered bow at the top of the bristles to tie the color scheme together.
Best shortcut: Use a thick rubber band to hold the first layer of fabric in place while you tie the permanent knots.
27. Pink Halloween Witch Broom
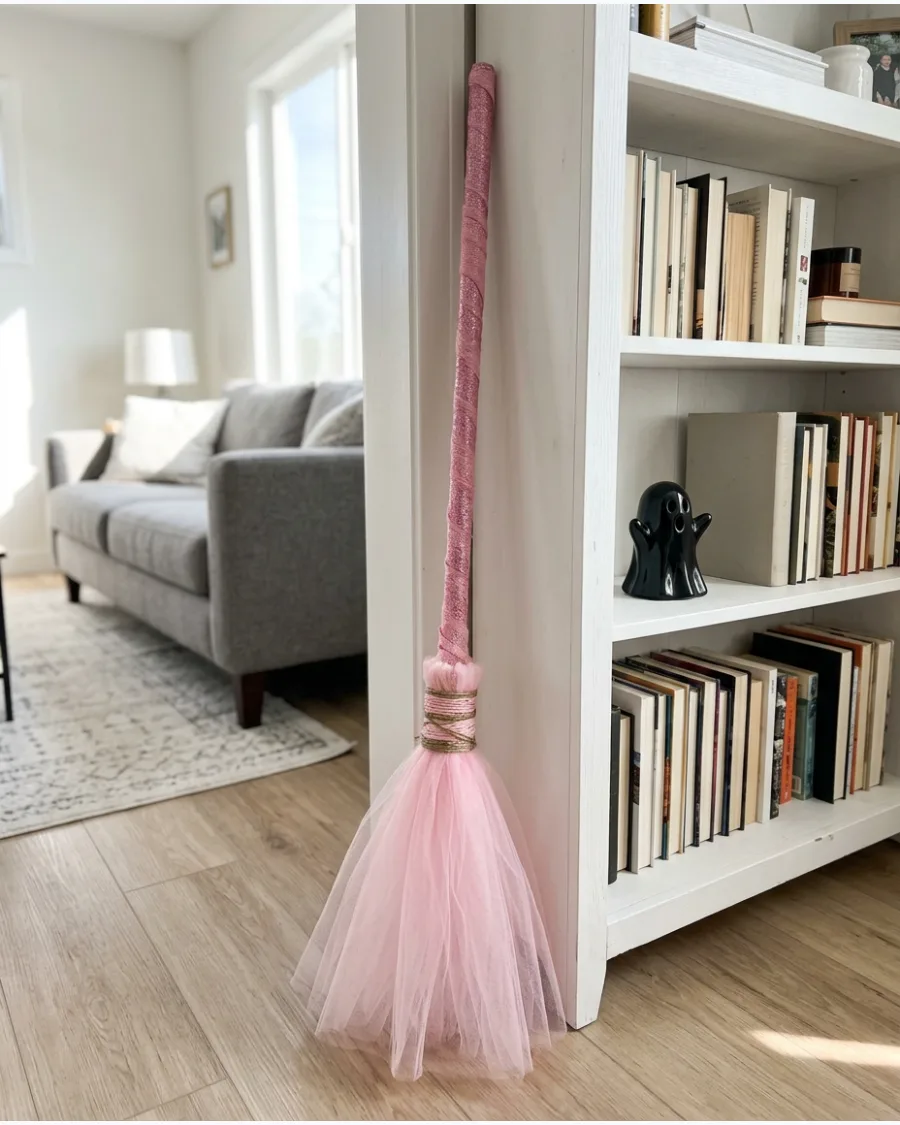
Pastel Halloween decor is a growing trend that softens the holiday's spooky vibe for a more playful aesthetic. A glittery pink handle paired with soft pink tulle creates a whimsical prop that fits perfectly in a child's room or a bright office.
Seal the glitter on the handle with a clear spray topcoat so it doesn't flake off in the house. This style proves that Halloween decorations do not always have to be dark and scary.
- Look for iridescent or chunky pink glitter for the most visual impact on the handle.
- Pair the pink tulle with a few strands of black ribbon to maintain a subtle Halloween connection.
- Choose a thinner dowel to keep the broom looking delicate and feminine.
Quick win: Wrap the handle in pink glitter washi tape for a mess-free alternative to loose glitter and glue.
28. Rainbow Witch Broom
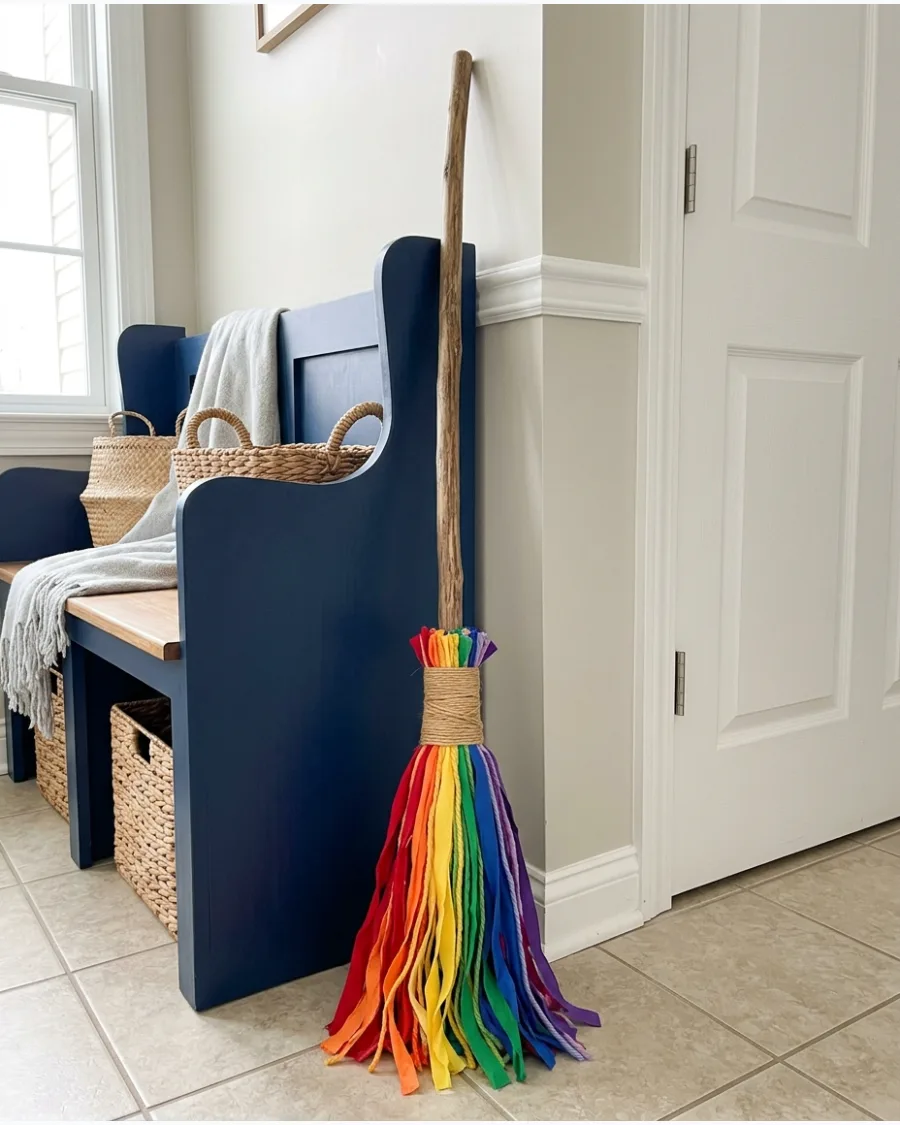
A rainbow-themed broom is a cheerful addition to a kid-friendly Halloween party or a bright entryway. Using a variety of ribbon or tulle colors allows you to customize the piece to match any vibrant decor.
Group three strips of each color together to ensure the rainbow pattern is clearly visible from a distance. This design is especially effective for families who want to celebrate the season without any 'fright' factor.
- Select seven different ribbon colors and cut them to equal lengths before starting.
- Attach the colors in the 'ROYGBIV' order around the circumference of the broomstick.
- Use a plain, light-colored wood handle to let the vibrant rainbow colors take center stage.
Most people skip this: Use ribbons of varying widths and textures to add extra visual interest to the rainbow bundle.
29. Polka-Dot Ribbon Broom
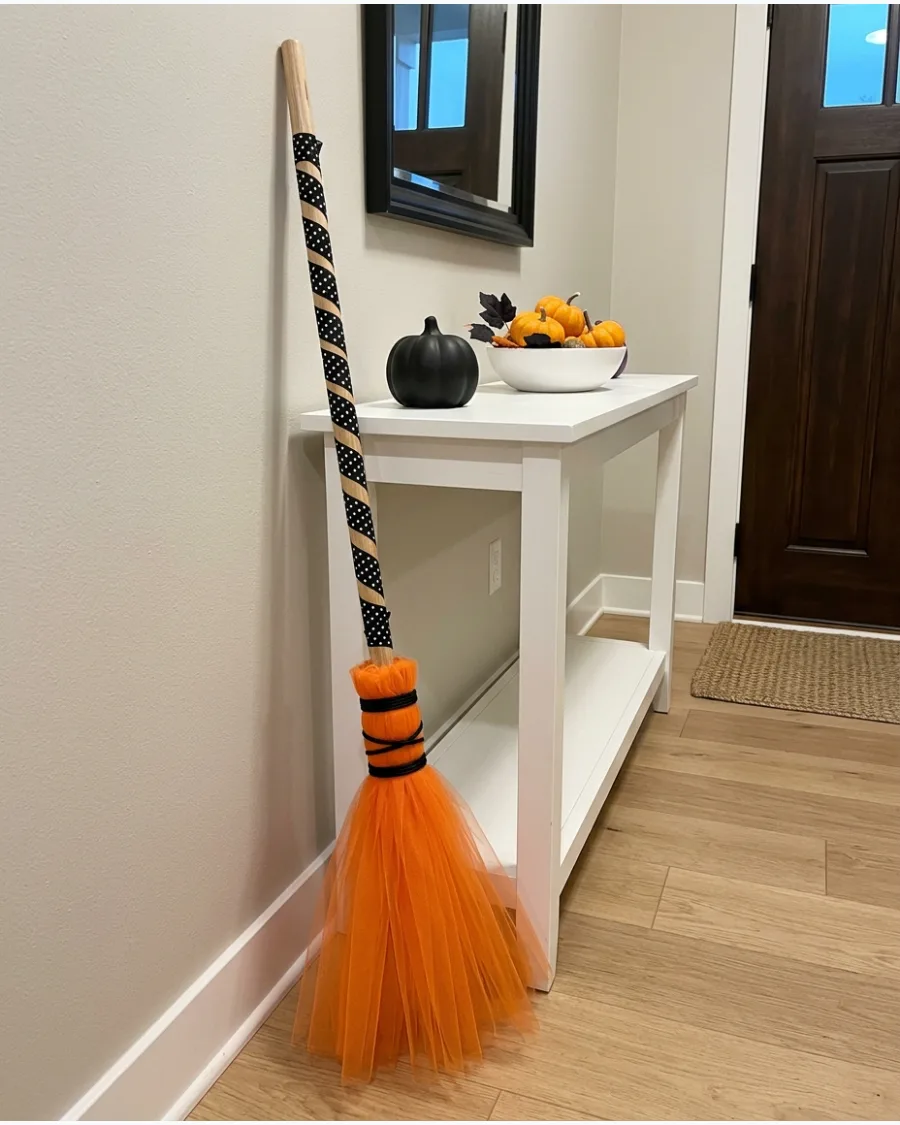
Wrapping the handle in a patterned ribbon is an easy way to add detail without the need for advanced painting skills. Black and white polka dots provide a graphic, modern contrast to bright orange tulle bristles.
Overlap the ribbon by a quarter-inch as you wrap the handle to prevent any wood from peeking through. Patterns like polka dots add a playful, designer-inspired element to basic holiday shapes.
- Apply a small dab of hot glue at the top and bottom of the handle to secure the ribbon ends.
- Choose a wired ribbon if you want to add a large, structural bow that holds its shape.
- Match the tulle color to the secondary color in your ribbon for a coordinated look.
Best shortcut: Use double-sided tape along the length of the handle to keep the ribbon perfectly straight as you wrap it.
30. Striped Witch Broom
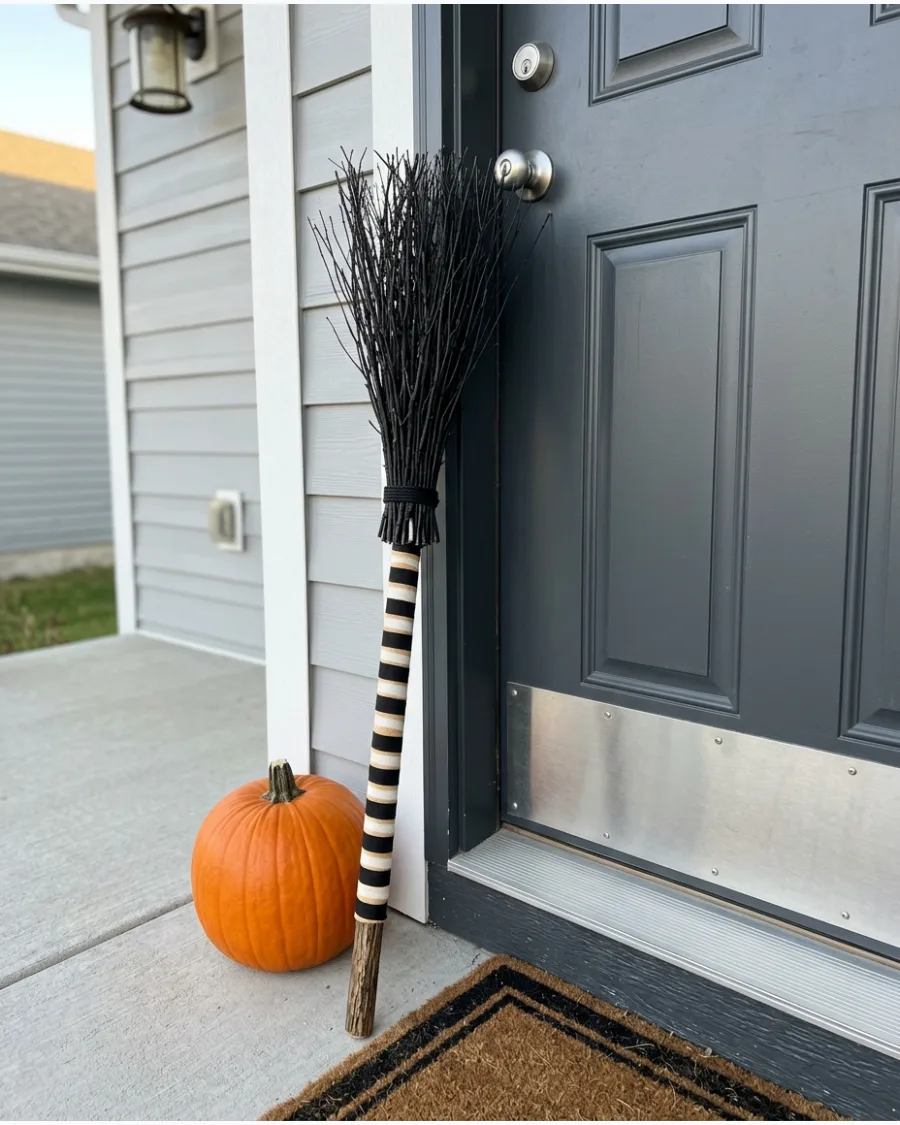
Bold black and white stripes on a handle create a classic 'wicked witch' look that feels crisp and modern. Pairing this graphic handle with solid black bristles keeps the focus on the pattern.
Use painter's tape to get crisp, clean edges between the black and white stripes on the handle. Striped patterns are a timeless choice that works with almost any style of Halloween porch or interior display.
- Paint the entire handle white first, then tape off sections and paint the remaining stripes black.
- Ensure the black bristles are thick and opaque to balance the weight of the striped handle.
- Seal the finished handle with a matte or glossy clear coat to protect the paint from outdoor elements.
Quick win: Space your tape strips using a spare piece of tape as a guide to ensure every stripe is the exact same width.
31. Candy Corn Witch Broom
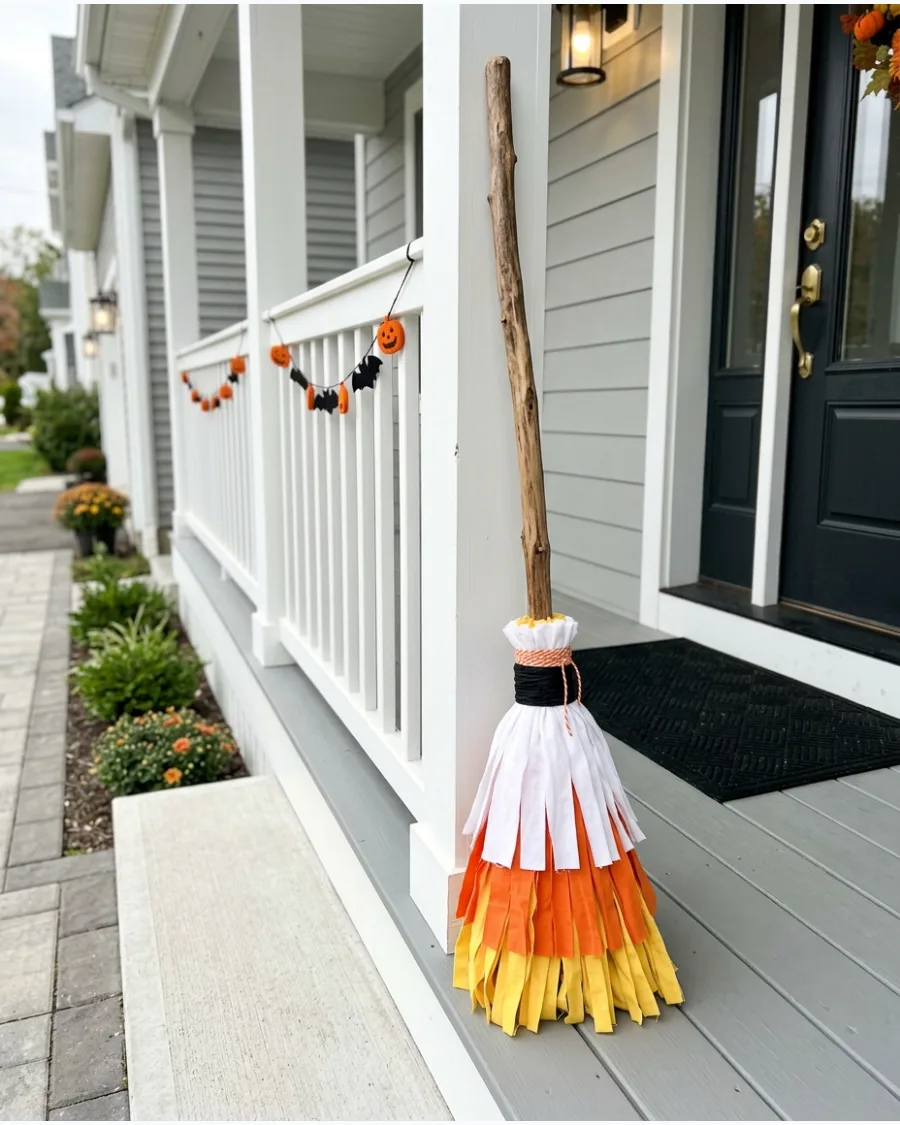
Layered fabric strips in white, orange, and yellow mimic the classic candy corn pattern. Use cotton or polyester scraps for a clean, vibrant look that resists fraying over time.
Stack the yellow strips at the bottom and the white ones at the top to keep the color order accurate. This approach adds a bright pop of color to a porch without looking messy or disorganized.
- Use fabric scraps or inexpensive fat quarters from a craft store.
- Tie strips tightly around the handle base using a simple overhand knot.
- Vary the strip lengths to create a fuller, more tapered broom shape.
Most people skip this: Use pinking shears to cut the fabric strips to prevent fraying and add a decorative edge.
32. Checkered Witch Broom
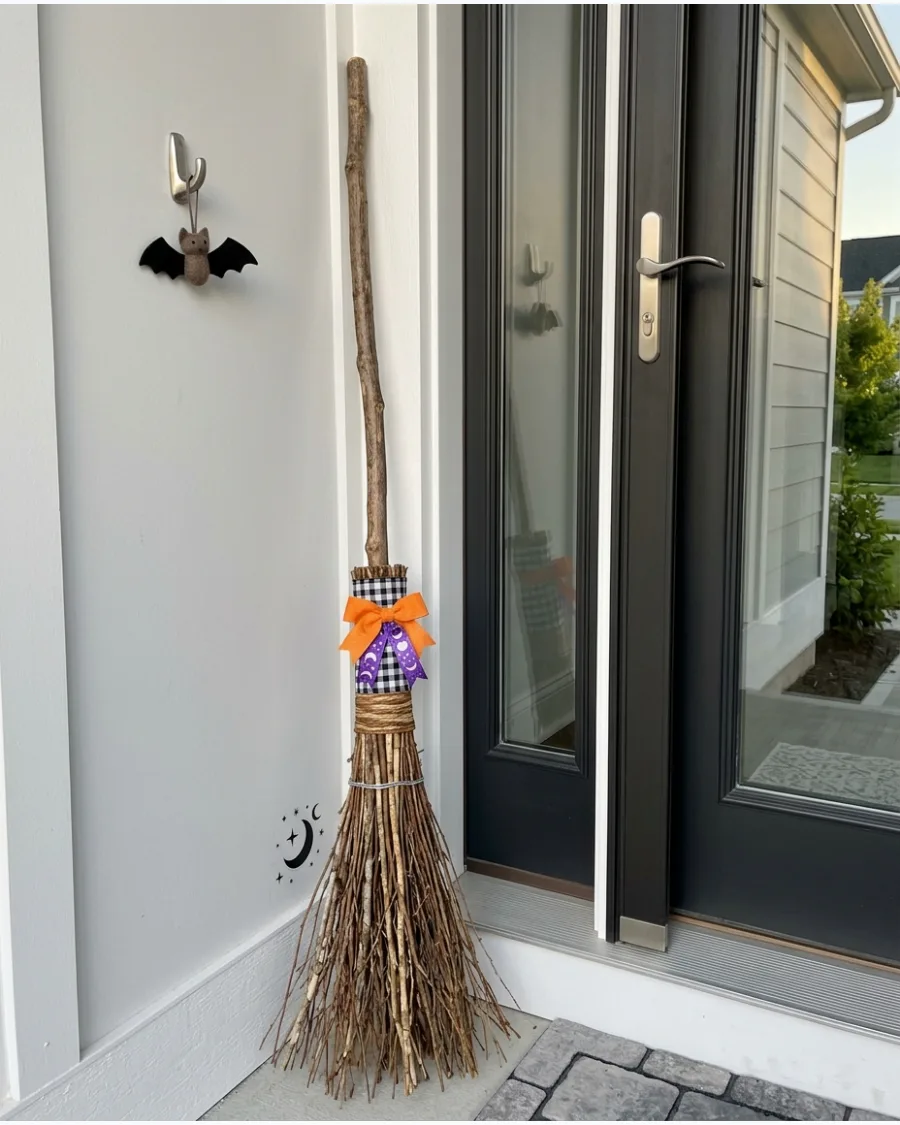
A checkered ribbon adds a modern, graphic element to a traditional broom shape. Wrap the ribbon tightly around the area where the handle meets the bristles to hide any construction wire.
Secure the final loop with a small orange bow to provide a bright focal point. High-contrast patterns like this help the decor stand out against light-colored doors or walls.
- Buy 1.5-inch wide wired ribbon for easier shaping and a secure grip.
- Use a small dab of hot glue to secure the ribbon ends behind the handle.
- Scale the bow size to match the width of the broom for visual balance.
Quick win: Use wired ribbon so the bow loops stay full and don't sag in humid October weather.
Floral and Decorative Witch Brooms
33. Dried Flower Witch Broom
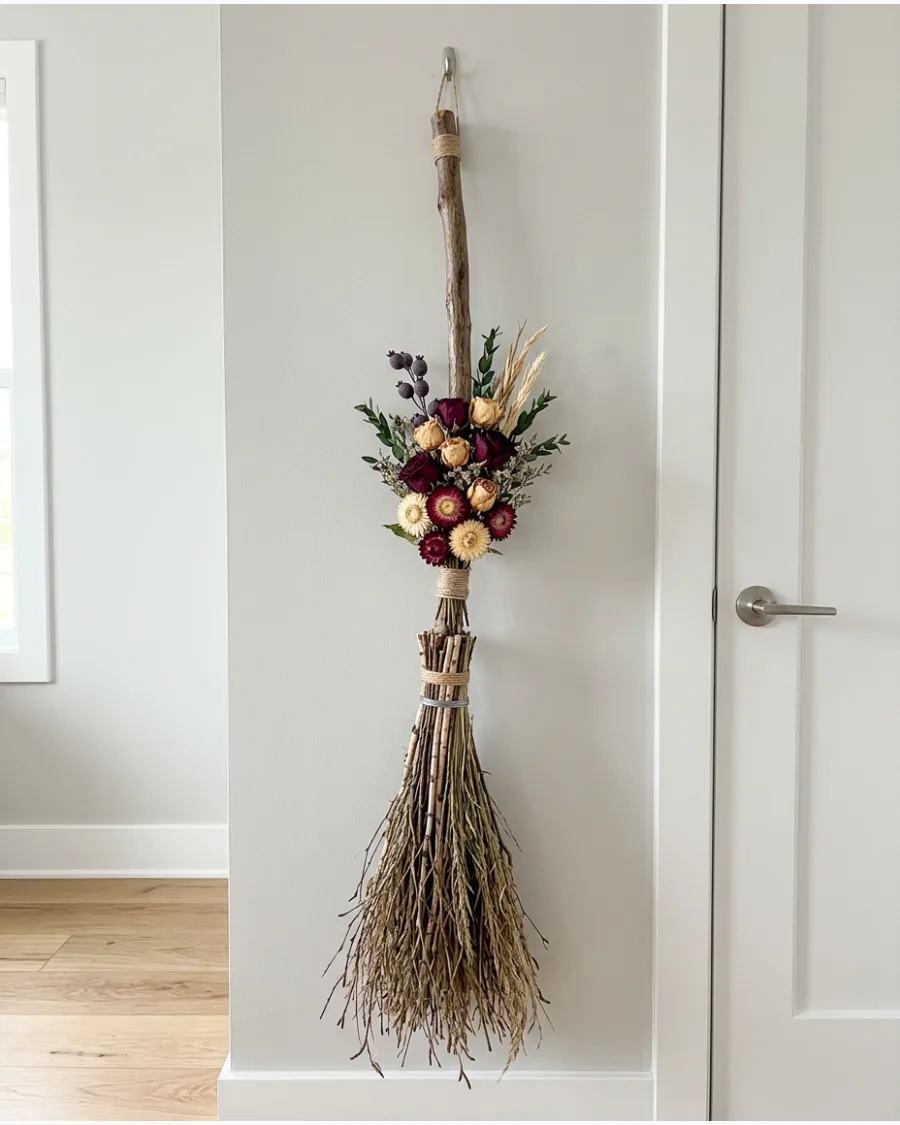
Dried flowers offer a sophisticated, organic texture that works well for indoor displays. Glue the stems along one side of the bristles to create a cascading, asymmetrical effect.
Select burgundy and cream flowers to maintain a mature and intentional autumnal palette. This style is perfect for a mantle or a wall hanging where the delicate petals will not be bumped.
- Source dried flowers from a local florist or a craft supply store.
- Apply glue to the stems rather than the petals for a cleaner look.
- Choose flat-backed flowers like strawflowers to ensure they sit flush against the bristles.
Best shortcut: Spray the dried flowers with a light coat of unscented hairspray to prevent shedding.
34. Black Rose Witch Broom
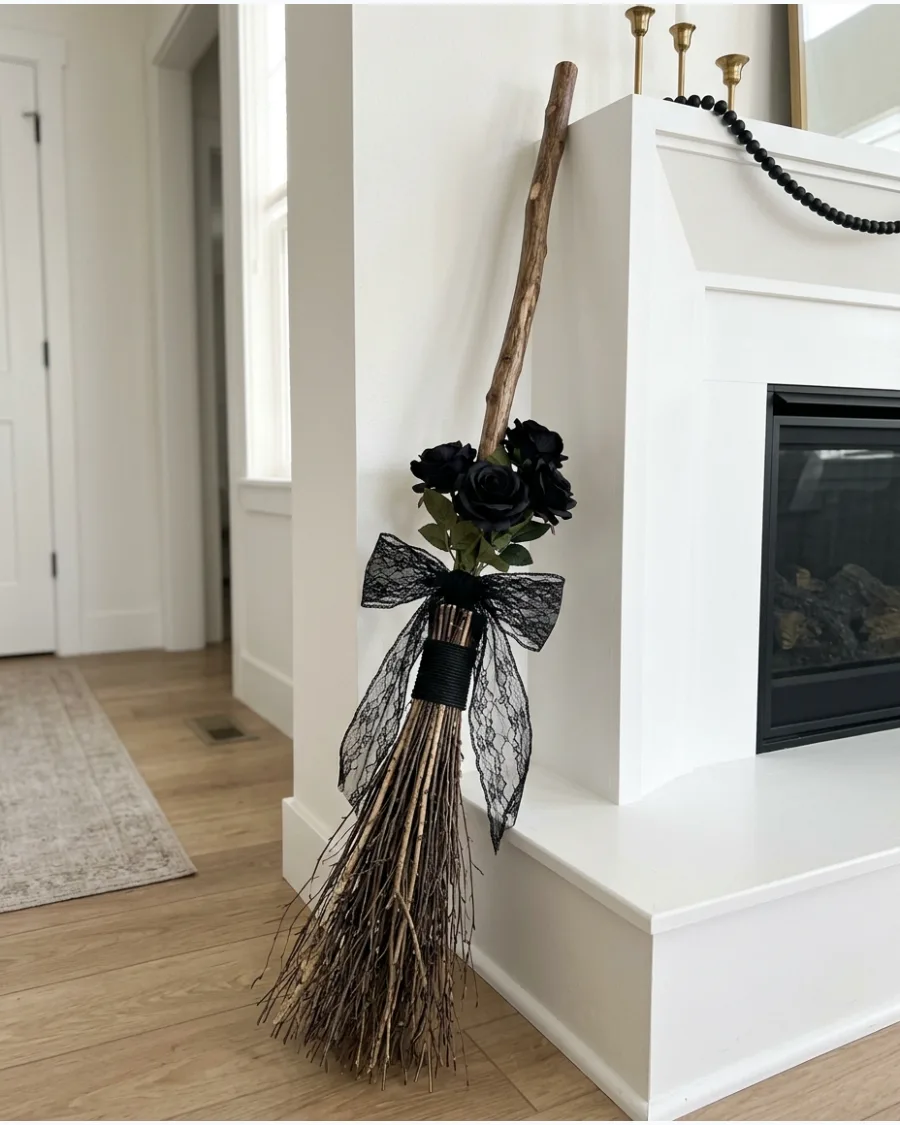
Artificial black roses and dark leaves create a moody and elegant piece of holiday decor. Use hot glue to attach the flower heads in a dense cluster just above the bristles.
Tie a black lace bow directly underneath the roses to add a soft, textured finish to the handle. This broom works best in a formal entryway or next to a clean fireplace hearth.
- Pick roses with realistic petal textures to avoid a cheap plastic look.
- Cluster three to five flowers together for a high-impact visual center.
- Swap the lace for velvet ribbon if a heavier, more dramatic look is preferred.
Quick win: Dust the black roses with a tiny bit of silver glitter for a subtle, magical shimmer.
35. Purple Floral Witch Broom
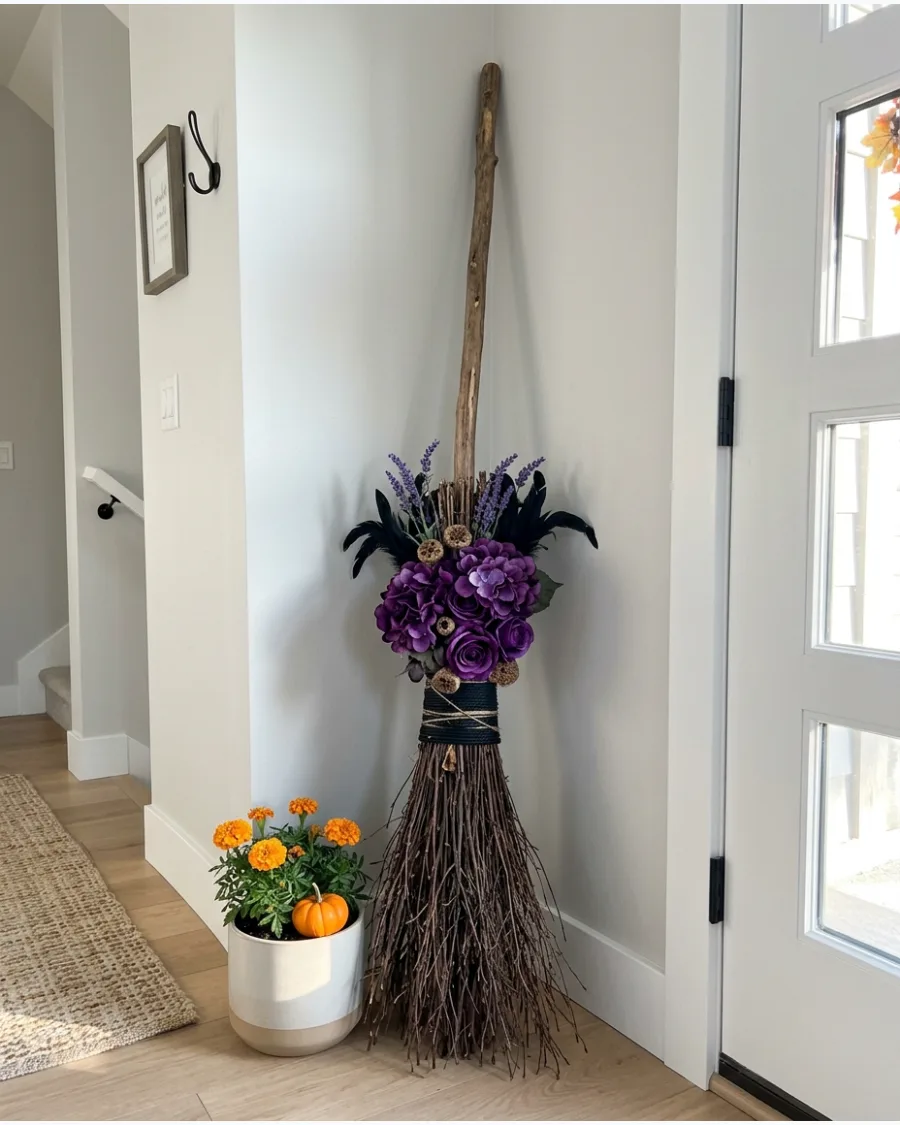
Purple florals and black feathers give the broom a magical and airy appearance. Position the lavender-colored leaves so they point downward into the bristles for a seamless transition.
Mix in a few long black feathers to add height and movement to the floral arrangement. This design looks best in a brightly lit room where the deep purple tones can truly pop.
- Use silk flowers for durability if the broom will be near a drafty door.
- Secure the feathers with floral wire before gluing the flowers over the top.
- Limit the color palette to two shades of purple for a coordinated look.
Most people skip this: Strip the bottom inch of leaves off the flower stems for a tighter, cleaner bond to the handle.
36. Sunflower Witch Broom
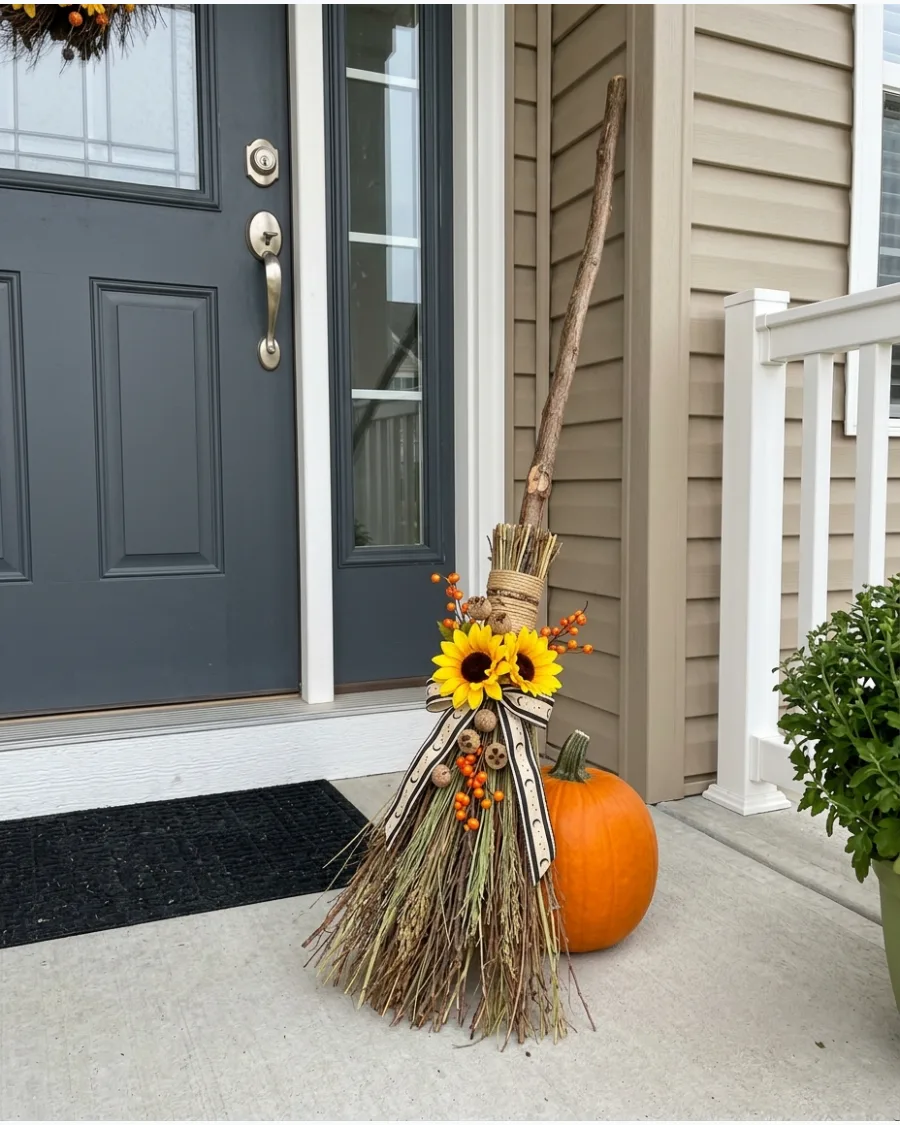
Sunflowers and autumn berries create a cheerful look that transitions easily from September through October. Use floral wire to wrap the stems around the handle to ensure they stay in place during use.
Tuck orange berries between the sunflower petals to fill in any gaps in the arrangement. This bright setup is highly visible from the street when placed on a front porch.
- Select sunflowers with different head sizes to create visual depth.
- Place the largest sunflower in the center to act as a focal point.
- Add a few faux maple leaves to reinforce the autumn theme.
Best shortcut: Use a pre-made sunflower garland and wrap it around the handle for a five-minute assembly.
37. Gothic Floral Witch Broom
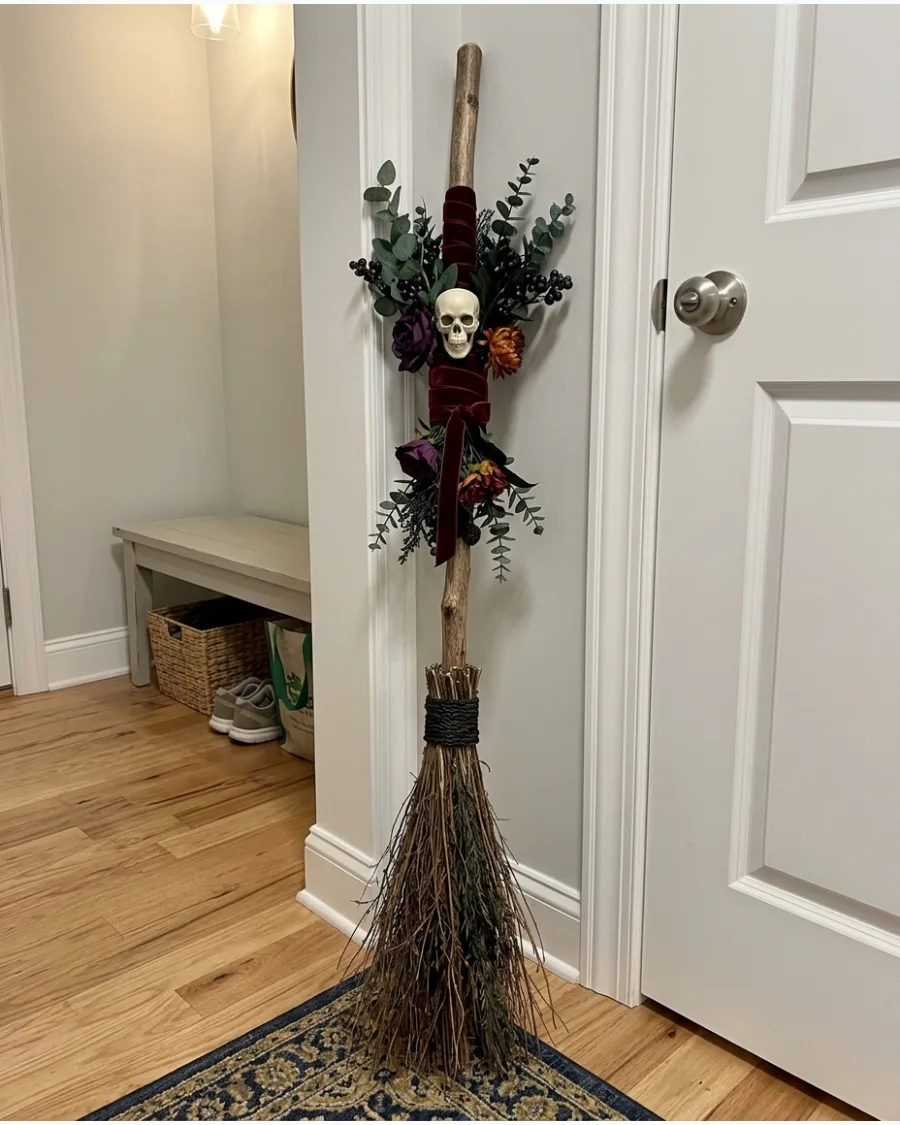
A gothic floral design uses deep-red roses and dark greenery for a dramatic and moody effect. Incorporate a small decorative skull or raven into the center of the floral cluster for a traditional holiday touch.
Wrap the handle in dark red velvet ribbon to tie the whole color scheme together. This style adds a sophisticated edge to standard entryway decorations.
- Use a matte-finish plastic skull to keep the look sophisticated and modern.
- Apply a generous amount of glue to the back of the skull for a secure hold.
- Choose dark eucalyptus or ivy leaves for the greenery base.
Quick win: Use a black permanent marker to add detail to the skull's eye sockets for extra depth.
38. Moon and Stars Witch Broom
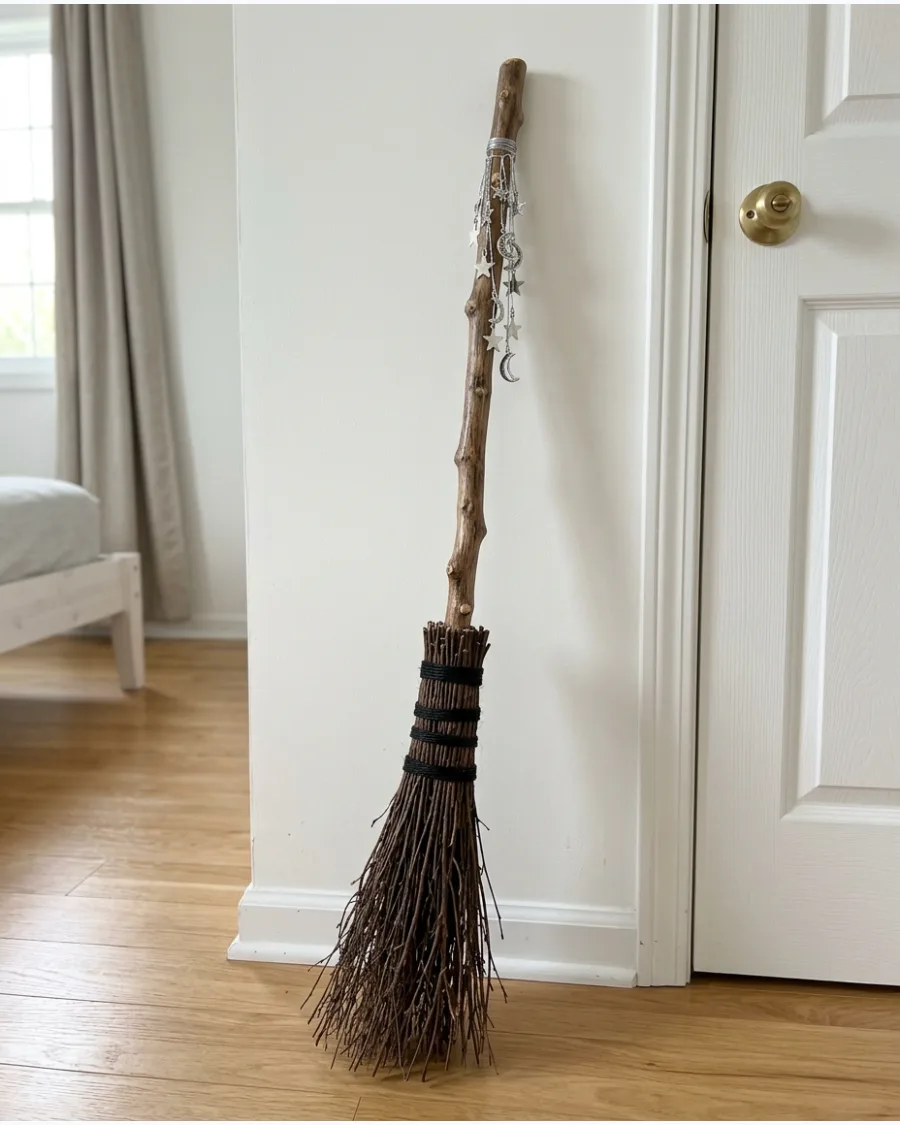
Metallic moon and star ornaments bring a celestial theme to a holiday setup.
Use thin silver or gold cord to hang the ornaments at varying lengths from the broom handle. Space the ornaments out so they do not tangle when the broom is moved or bumped. This design works well in a window or a hallway where the metallic surfaces can catch the light.
- Look for lightweight plastic or cardstock ornaments to prevent weighing down the broom.
- Tie the cords at different heights for a more dynamic and interesting look.
- Use a silver paint pen to add small dots to the handle for extra detail.
Most people skip this: Use clear fishing line instead of cord if you want the ornaments to look like they are floating.
39. Crystal-Inspired Witch Broom
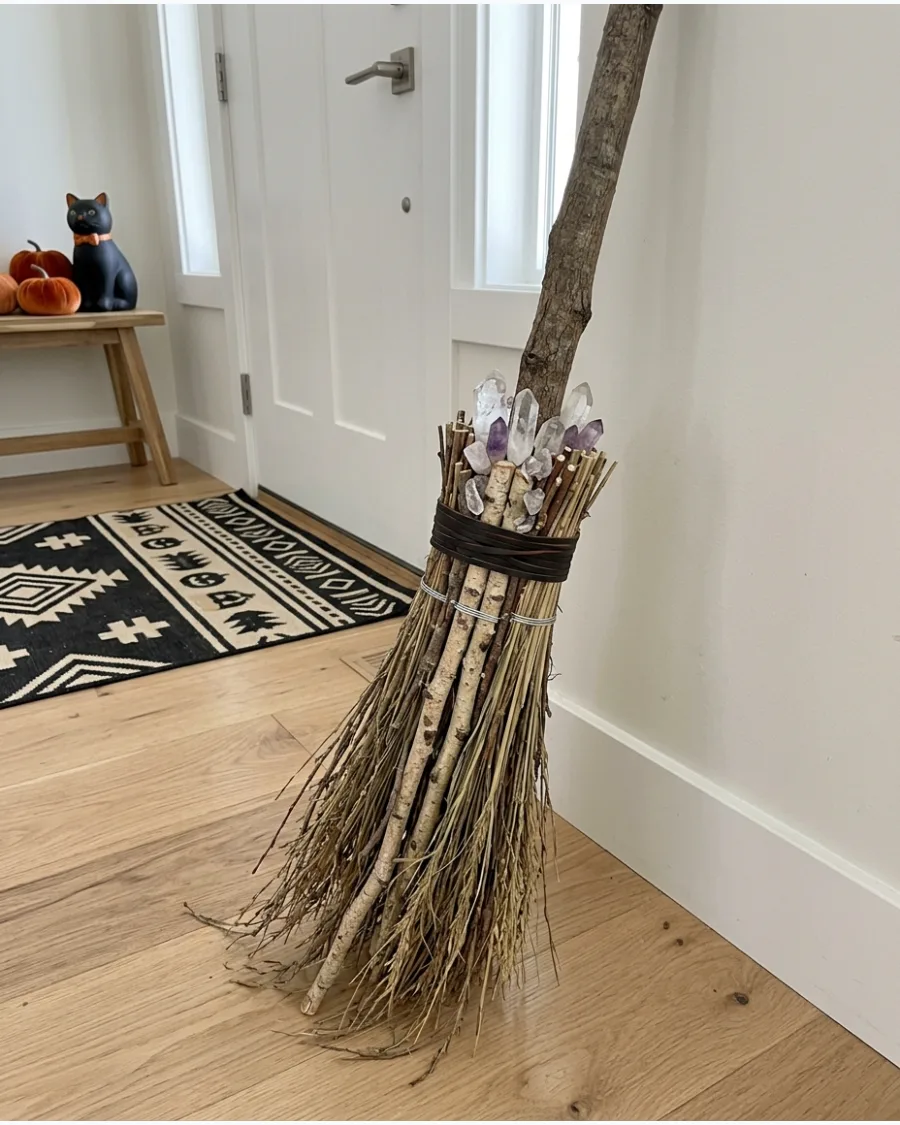
Clear acrylic crystals and celestial charms add a touch of sparkle to the base of the broom. Use a strong clear adhesive to attach the crystals around the top of the bristles where they meet the handle.
Pair the crystals with a simple black ribbon to keep the design looking clean and intentional. This is a fast way to update a plain broom with minimal effort.
- Choose acrylic crystals over glass for a lighter finished product.
- Focus the crystals on the front-facing side of the broom only.
- Add one or two small star charms between the crystals for variety.
Best shortcut: Use self-adhesive rhinestones for a mess-free way to add sparkle to the handle.
40. Raven Witch Broom
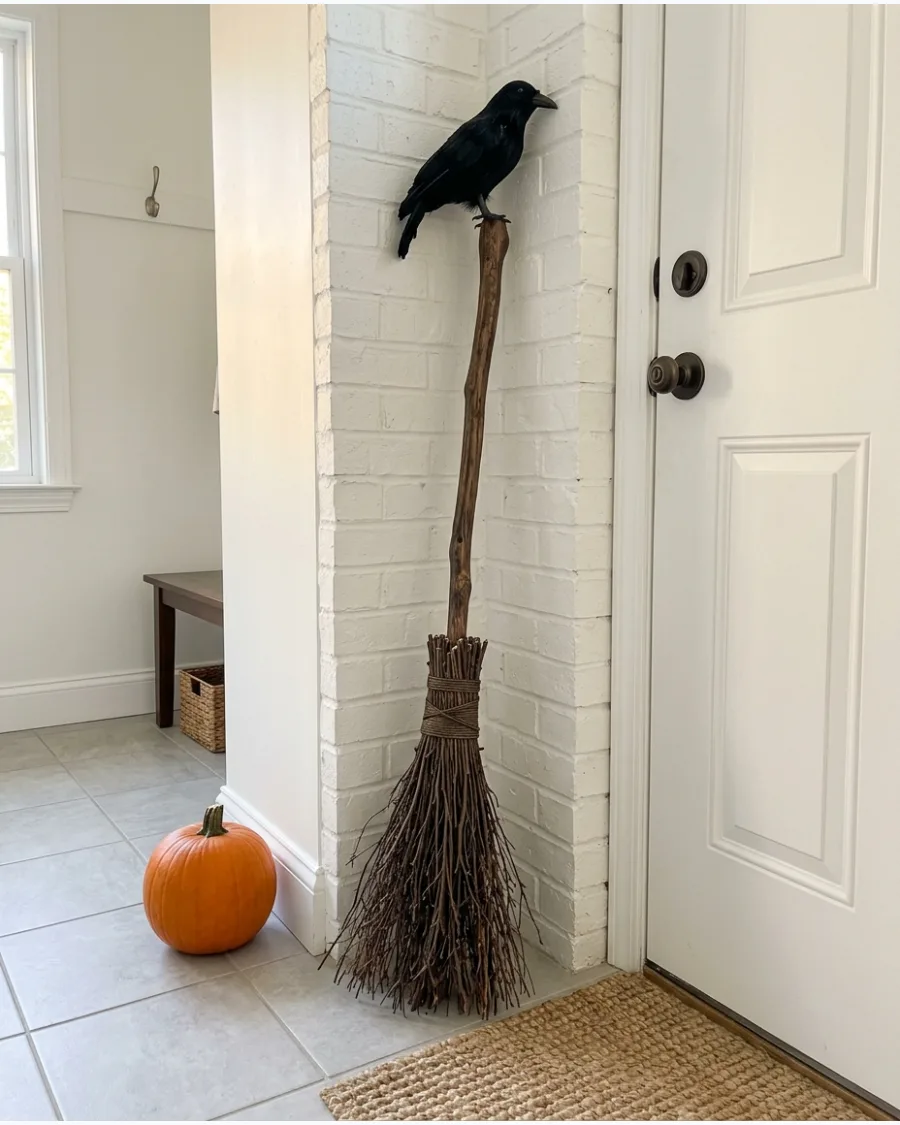
An artificial raven perched on the handle creates an instant and dramatic focal point. Secure the bird with wire hidden under torn fabric strips for a layered and textured appearance.
Use black feathers to blend the bird’s base into the broom handle naturally. This design is high-impact and looks authentic when placed in a dimly lit entryway or corner.
- Purchase a raven with wire attached to its feet for easy mounting.
- Tear strips of black cheesecloth to create a rugged, textured look.
- Angle the raven slightly to the side so it faces the center of the room.
Quick win: Use a small piece of black floral foam under the fabric to give the raven a more stable perch.
Light-Up DIY Witch Brooms
41. Fairy-Light Witch Broom
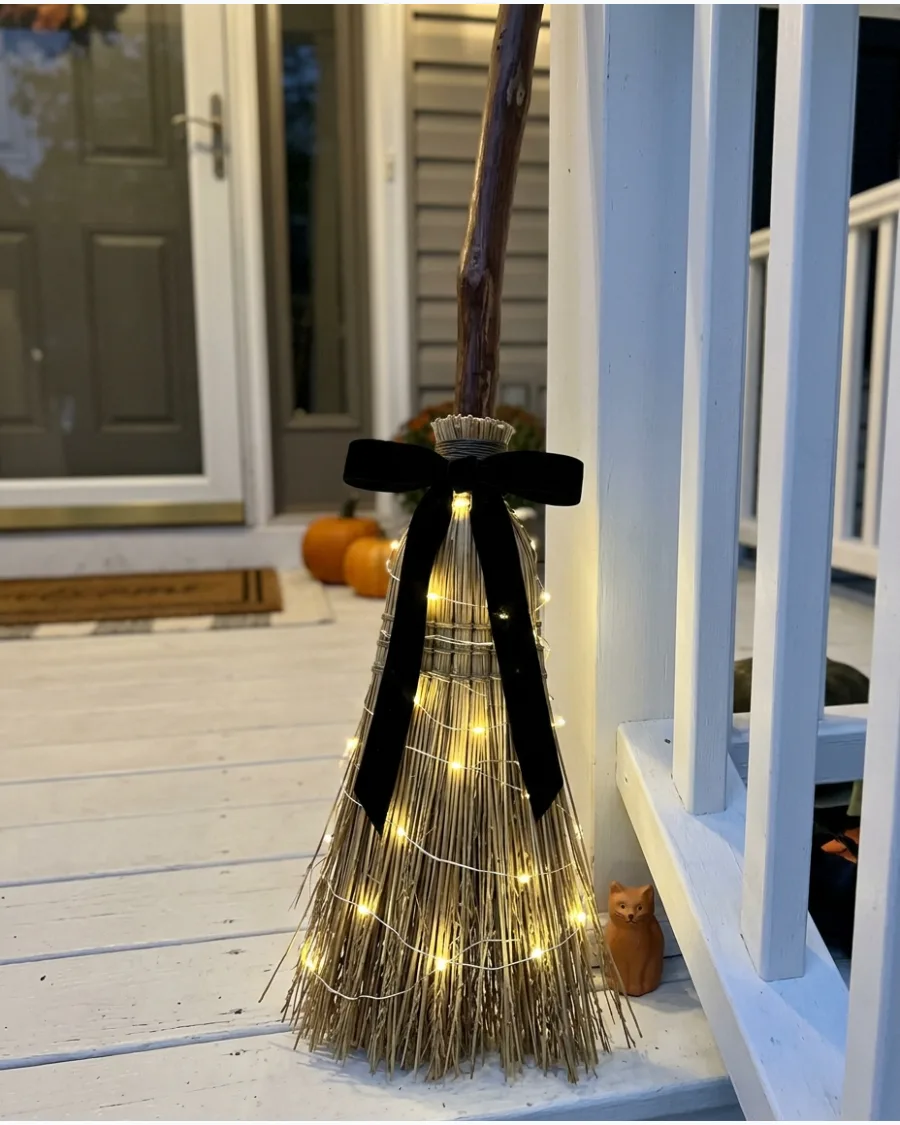
Weave battery-operated fairy lights through the bristles and around the handle to create a soft, magical glow. Hide the battery pack beneath a wide fabric bow to keep the hardware out of sight. Using warm white lights provides a more sophisticated look than colored versions.
- Sourcing: Spend about $10 to $15 for a light strand and a roll of ribbon.
- Setup: Allow 15 minutes to wrap the lights and secure the battery pack.
- Adaptation: Use warm white for a classic look or orange for a spooky vibe.
Quick win: Use thin floral wire to secure the light strand if the handle is too smooth for the lights to stay in place.
42. Purple Light-Up Broom
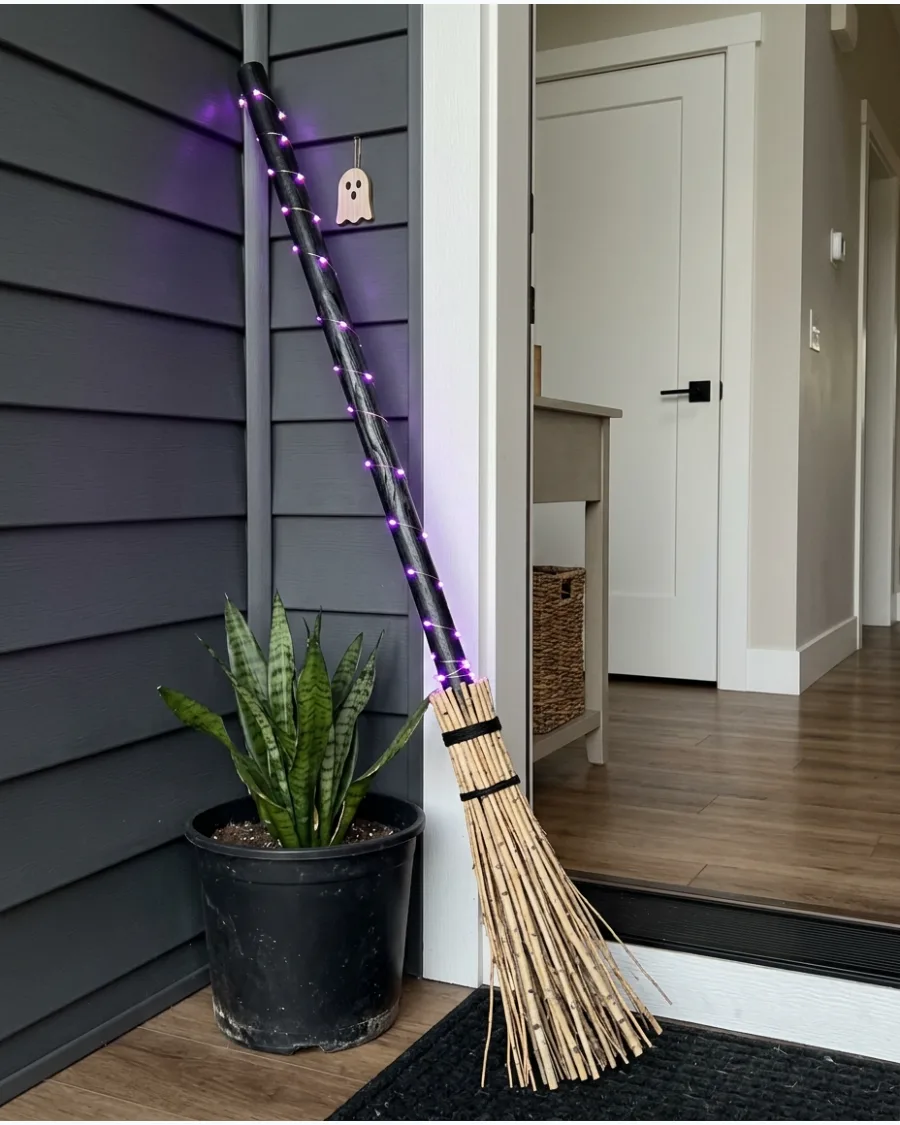
Wrap purple LED lights around a black-painted broomstick for a bold, neon-inspired Halloween accent. Place the finished broom beside a cauldron or a dark entryway bench to maximize the color's impact. Purple lighting creates a high-contrast look that stands out better in low light than yellow or white.
- Sourcing: Find LED string lights at most hardware or craft stores.
- Setup: Wrap the lights tightly around the stick to prevent them from sliding down.
- Adaptation: Switch to battery-powered lights for areas without an outdoor outlet.
Most people skip this: Paint the battery pack black so it blends in perfectly with the handle.
43. Green Glowing Witch Broom
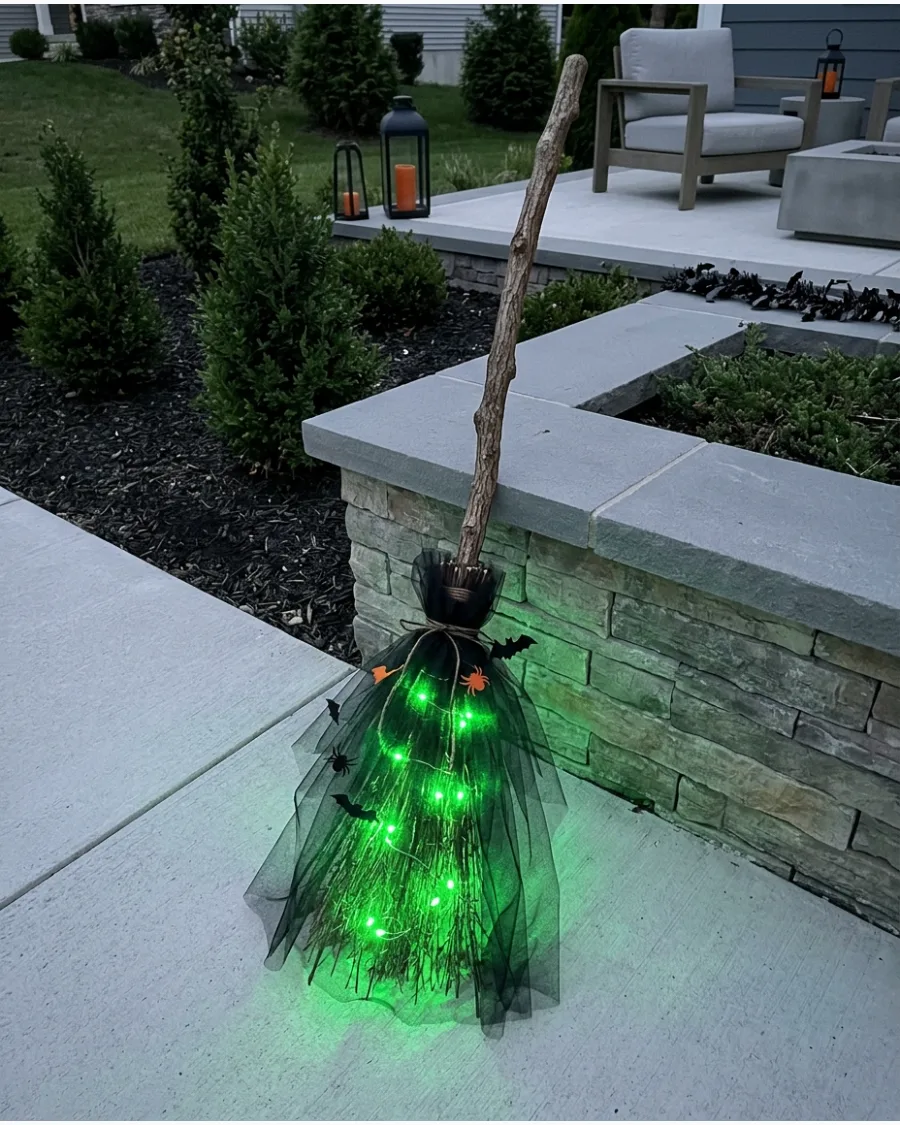
Thread green lights through layers of loose black tulle to mimic the look of a bubbling potion. Secure the tulle with clear fishing line so the green glow appears to float within the fabric. This method adds volume to the broom without adding heavy weight.
- Sourcing: Tulle is very inexpensive at fabric stores or online.
- Setup: Bunch the tulle loosely to let the light shine through the gaps.
- Style: This design works best in dark corners or covered entryways.
Best shortcut: Use a green light strand with a green wire to make the hardware invisible against the tulle.
44. Solar Witch Broom
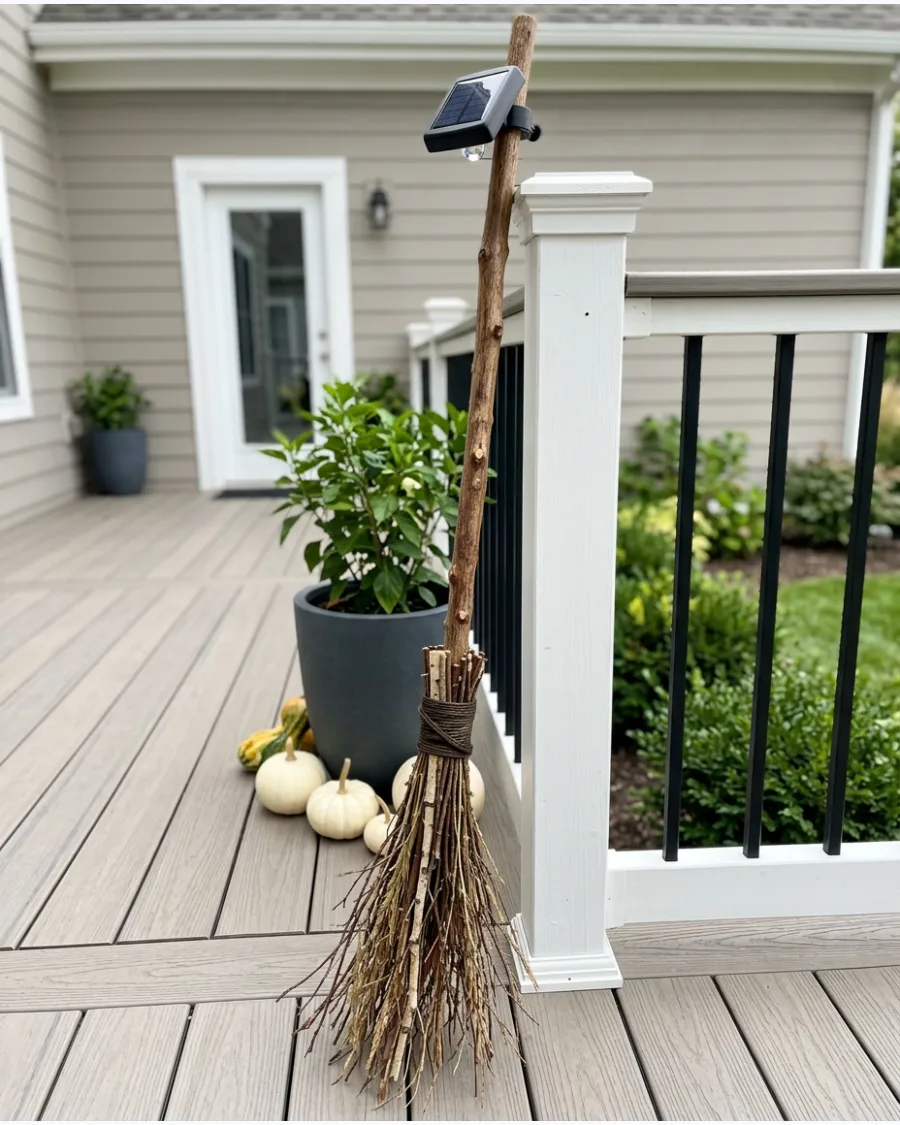
Use outdoor-rated solar lights to illuminate a broom kept on a porch or walkway. Position the solar panel in a spot that receives direct daylight so the broom glows automatically at sunset. This is a smart choice for low-maintenance decor that doesn't require batteries or plugs.
- Sourcing: Solar string lights are usually under $20 and very durable.
- Setup: Ensure the sensor faces south for the maximum charge.
- Adaptation: Use weather-resistant materials for the bristles to handle rain.
Quick win: Tape the solar panel to the back of the handle where it is hidden from the street but still catches the sun.
45. Starry Night Witch Broom
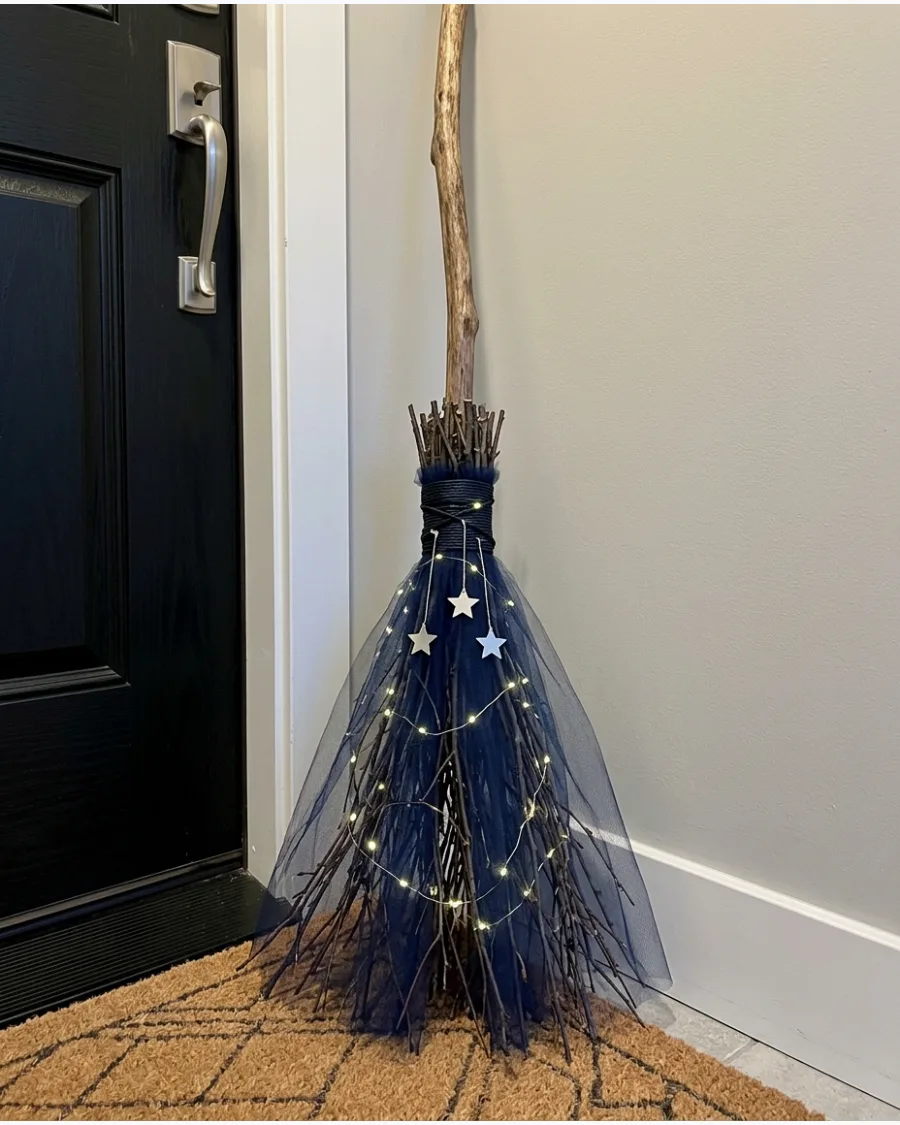
Combine tiny warm-white lights with dark blue and black fabric to create a celestial theme. Attach small silver star charms along the handle to catch the light from the LEDs. This theme offers a whimsical alternative to traditional orange and black decorations.
- Sourcing: Buy star charms in bulk from a craft store or jewelry supplier.
- Setup: Mix blue and black fabric layers for more visual depth.
- Style: This theme complements modern or whimsical Halloween styles.
Most people skip this: Use a dark blue handle instead of black to make the silver stars pop.
Witch Broom Porch and Yard Displays
46. Witch Broom Parking Display
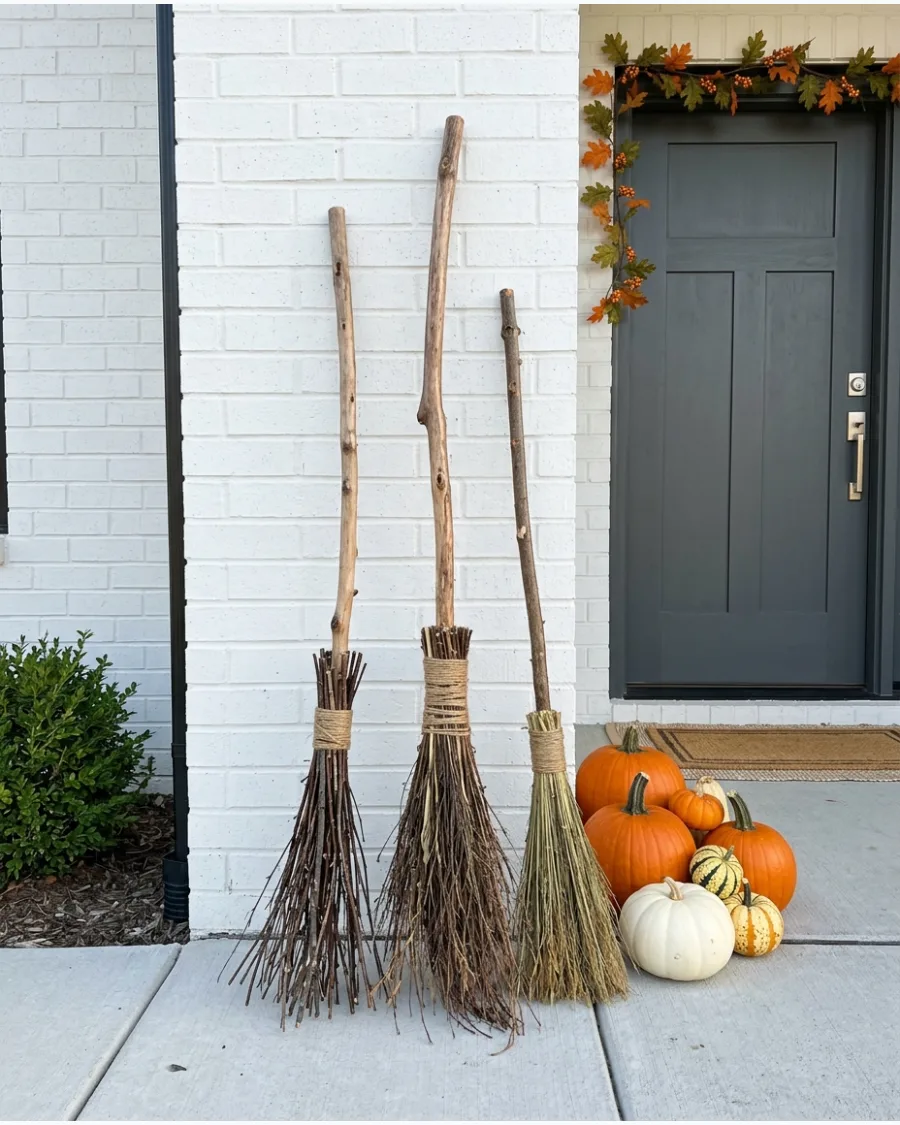
Group several handmade brooms of different heights together to create a themed parking area. Lean the brooms against a wall near the front door and add a simple sign to define the space. Surrounding the base with pumpkins of various sizes helps ground the display.
- Sourcing: Use gathered branches for a free handle option that looks authentic.
- Setup: Lean the brooms at different angles for a natural look.
- Adaptation: Use heavy pumpkins at the base to keep the brooms from blowing over.
Best shortcut: Use a small chalkboard for the sign so you can change the message every year.
47. Witch Brooms in Planters
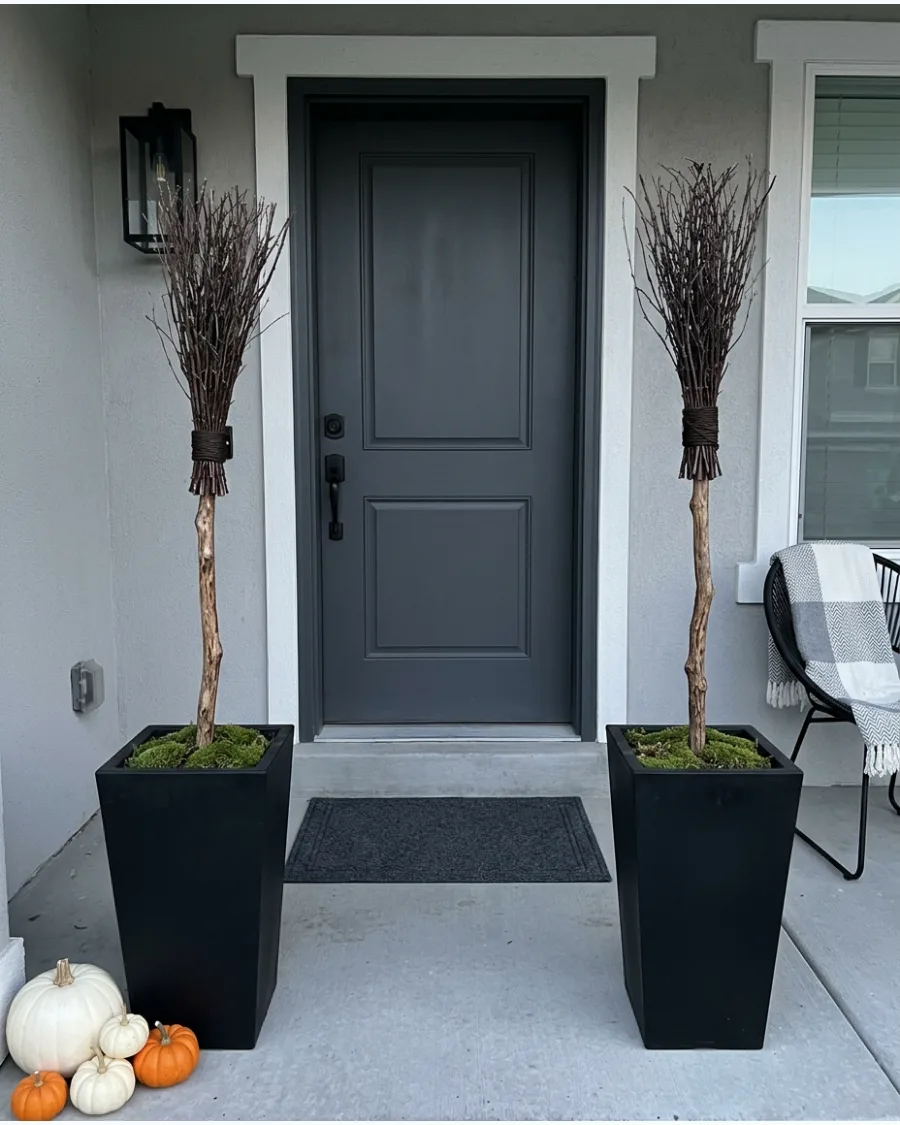
Stand brooms upright in large porch planters to add vertical interest to an entryway. Fill the planters with sand or heavy gravel to keep the handles stable in windy weather. Covering the top with moss or faux fall leaves creates a finished, professional look.
- Sourcing: Buy new planters or reuse ones you already have for the season.
- Setup: Pack the filler material tightly around the handle to prevent leaning.
- Style: Mix in tall dried grasses for extra texture and height.
Quick win: Use a piece of PVC pipe inside the planter to act as a sleeve for the broom handle.
48. Witch Broom Door Decoration
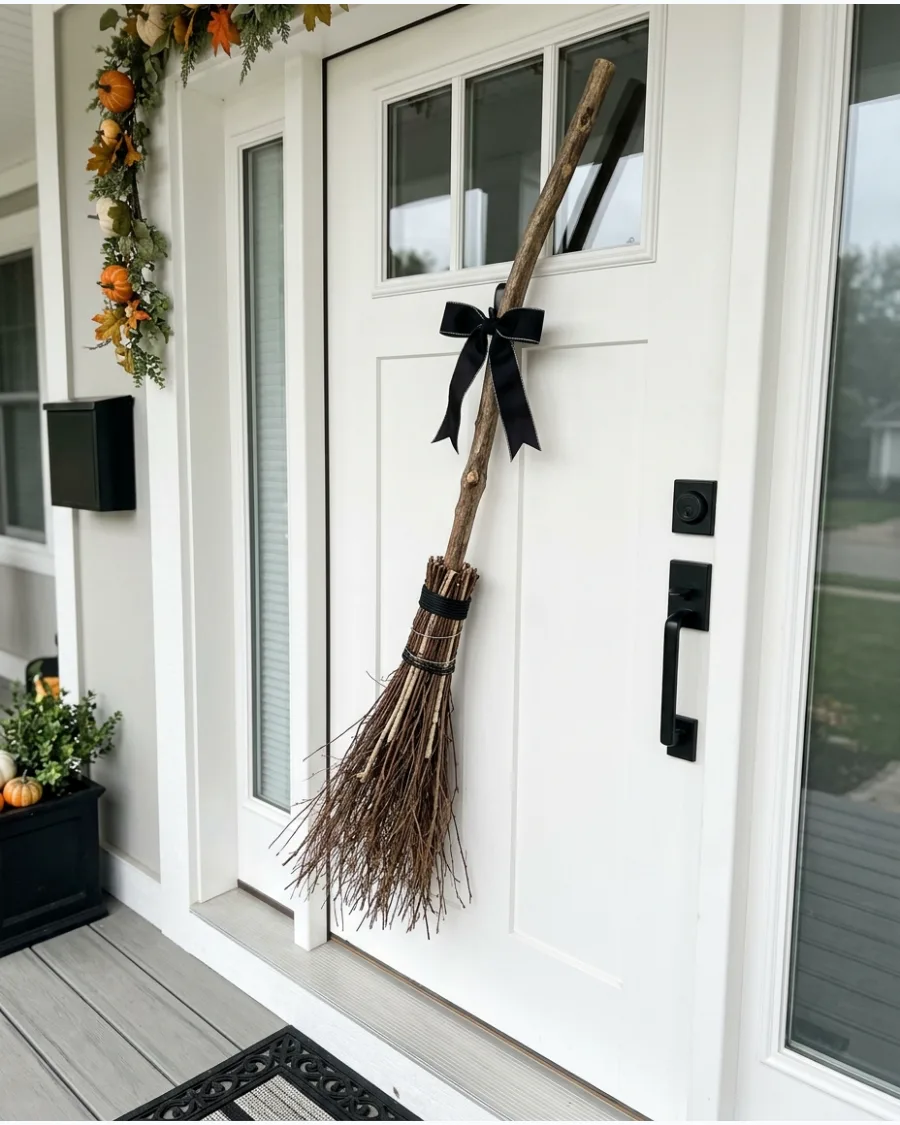
Swap the traditional wreath for a decorative broom hung diagonally across the front door. Secure the broom using a heavy-duty magnetic hook or a ribbon tied to the door knocker. Adding a large bow and lightweight ornaments makes the broom feel like an intentional piece of art.
- Sourcing: Lightweight materials like raffia are best for hanging on doors.
- Setup: Use clear command hooks to avoid damaging the paint or finish.
- Adaptation: Add a small bell to the handle for a festive sound when the door opens.
Most people skip this: Check the weight of the broom before hanging to ensure it won't swing and bang against the door.
49. Witch Broom and Cauldron Display
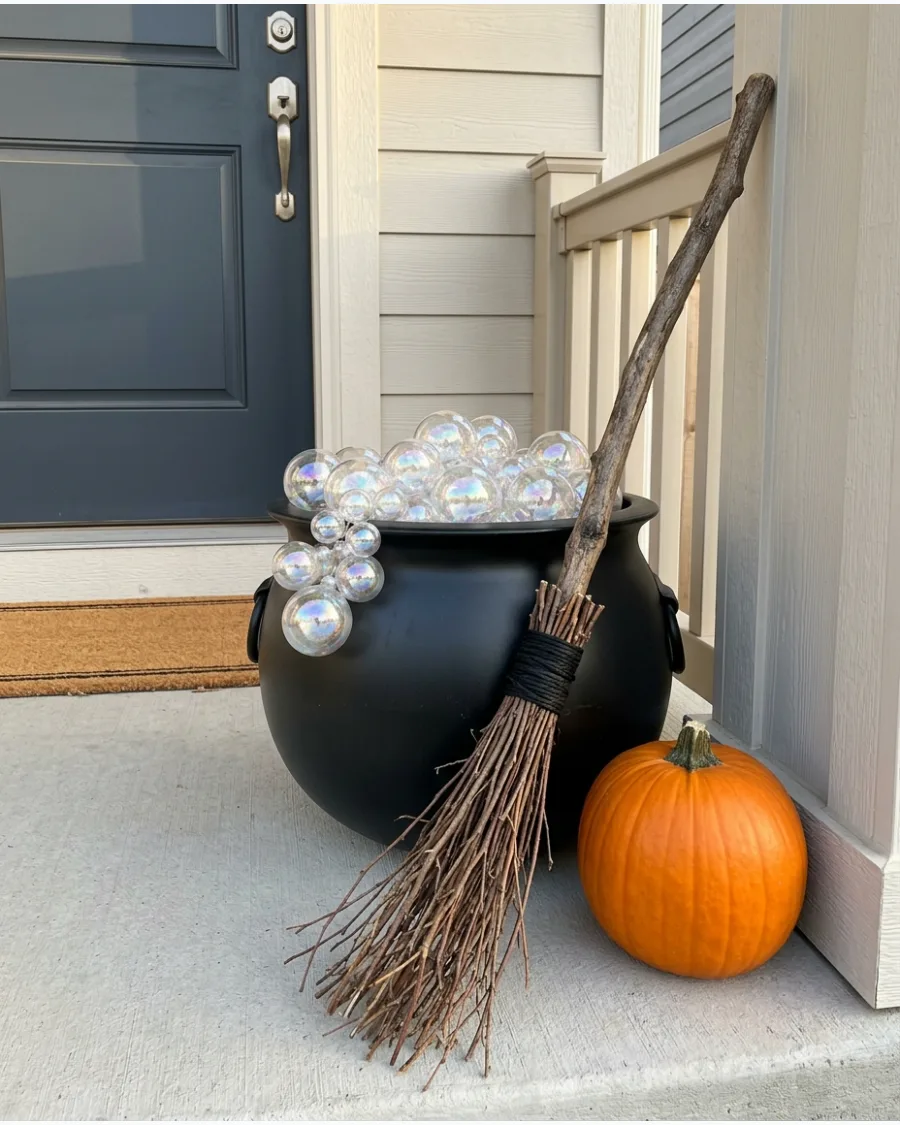
Create a focal point by leaning a rustic broom against a large decorative cauldron. Fill the cauldron with green lights and clear plastic ornaments to look like rising bubbles. This setup tells a story and works well on a porch or in a fireplace hearth.
- Sourcing: Plastic cauldrons are readily available at most party stores.
- Setup: Place the cauldron on a flat surface to keep it from tipping.
- Style: Use a small fog machine inside for a more dramatic effect.
Best shortcut: Use a green spotlight on the ground to make the bubbles glow from beneath.
50. Flying Witch Broom Display
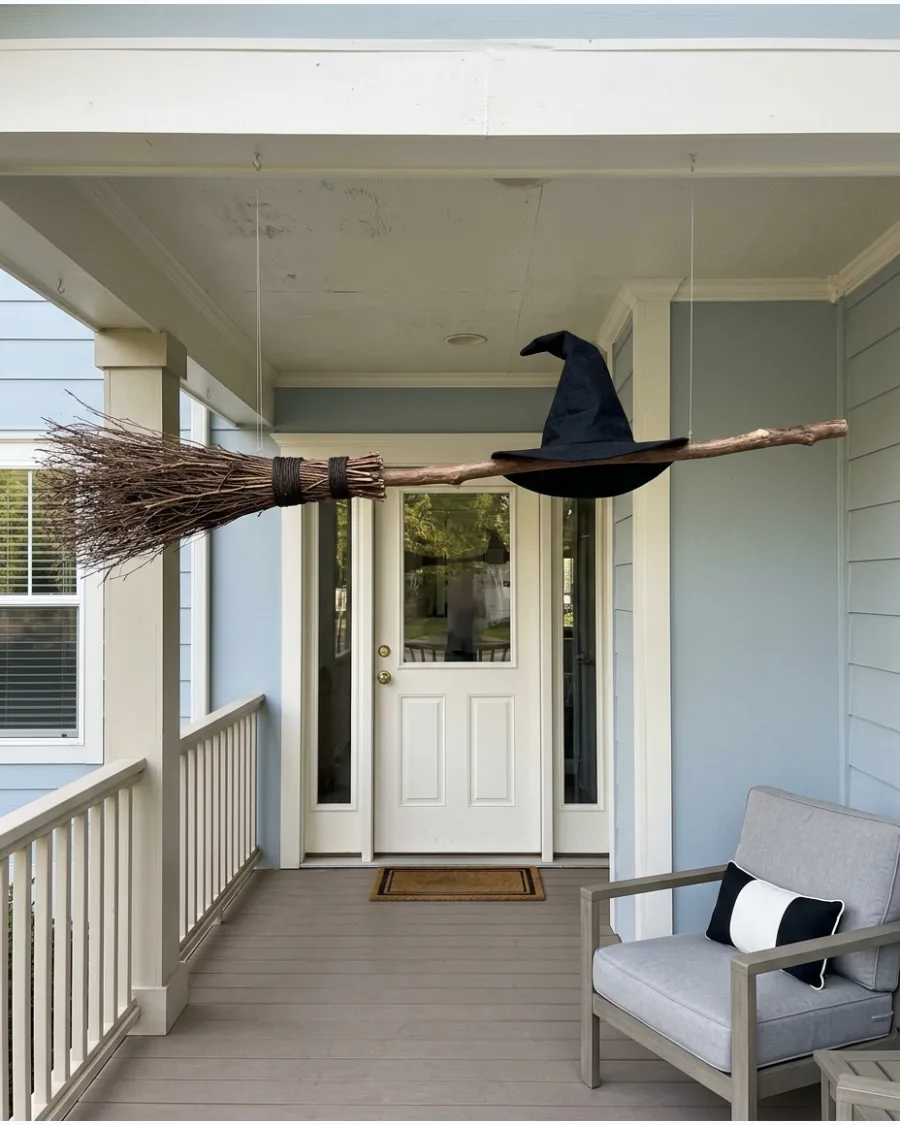
Suspend a lightweight broom horizontally to give the illusion of it flying through the air. Use clear fishing line or thin wire attached to porch rafters to keep the supports invisible. Adding an empty witch hat or flowing fabric near the handle completes the magical effect.
- Sourcing: High-test fishing line is the best way to ensure the broom stays up.
- Setup: Balance the broom carefully before securing the final knots.
- Adaptation: Hang it at a slight upward angle for more dynamic movement.
Quick win: Attach the fishing line to at least two points on the broom to prevent it from spinning in the wind.
Frequently Asked Questions
What are the best materials to use for DIY witch broom bristles?
Birch twigs and broom corn offer a classic, rustic look, while raffia is perfect for a softer, more whimsical finish. For a cozy seasonal touch, you can even incorporate cinnamon sticks to give your broom a wonderful autumn scent.
How do you secure the bristles so they don't fall out?
Start by tightly binding your bristles to the handle with floral wire to create a firm, non-slip foundation. For extra security, apply lines of heavy-duty hot glue between the layers and finish with a decorative twine wrap to hide the mechanics.
Can I use a DIY witch broom outdoors on my porch?
You certainly can, but it is best to apply a clear weatherproofing spray to the wood to prevent rot. Stick with hardy materials like birch or stiff twigs, as raffia can become limp and moldy in high humidity.
How long should a decorative witch broom be?
For a striking floor-standing porch display, aim for a height between 3 and 5 feet to ensure it has great visual scale. If you are designing a piece for a wall hanging or indoor accent, a smaller 1 to 2-foot size is usually more manageable.
How do I make my DIY broom stand up on its own?
The easiest way is to trim the bottom of stiff bristles perfectly flat to create a stable 'tripod' effect. If the bristles are too soft, you can hide small weights inside the bundle or use a clear Command hook for discreet support against a wall.