50 DIY Outdoor Halloween Decorations
This post may contain affiliate links: full affiliate disclosure.
Outdoor holiday decor should withstand wind and rain without looking like a pile of trash by morning. These projects use sturdy materials and simple techniques to create a high-end look on a shoestring budget.
1. Tomato Cage Fabric Ghosts
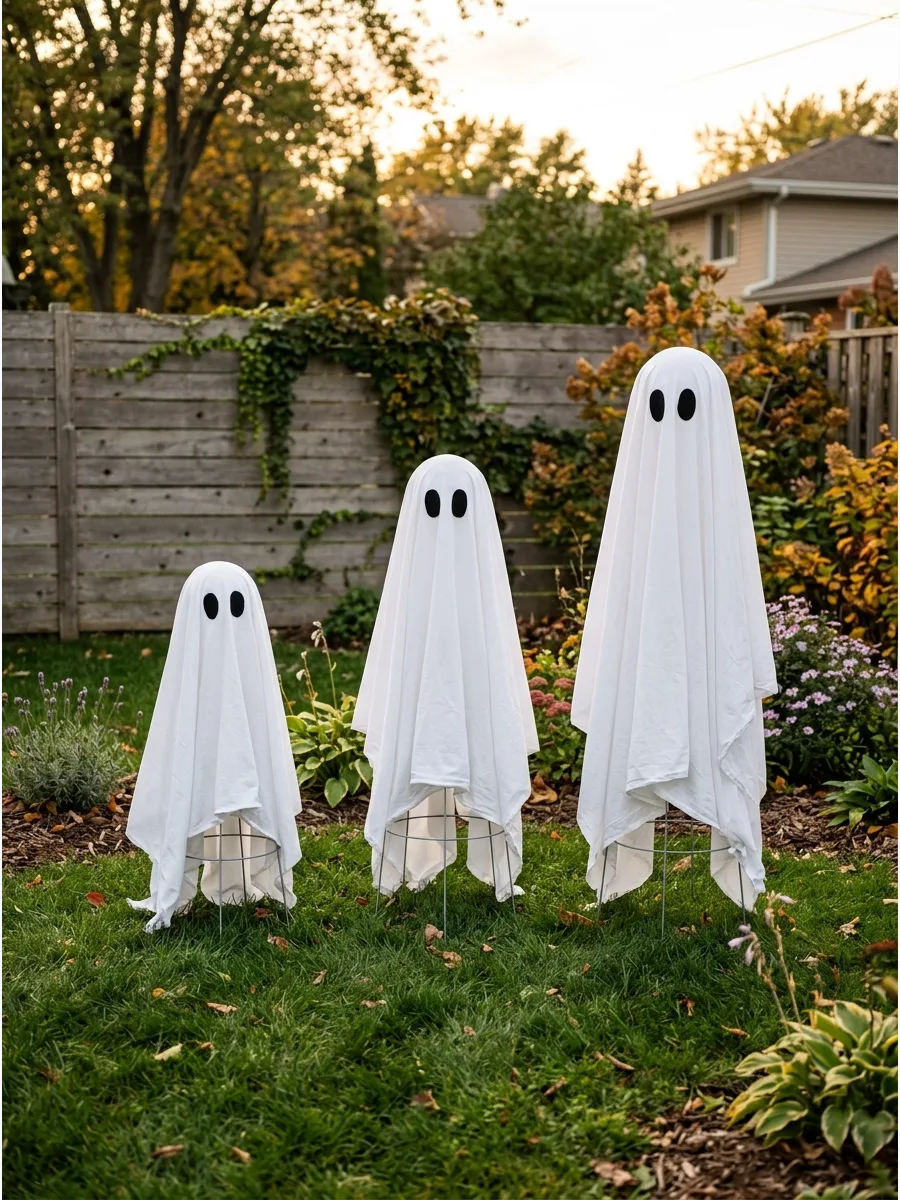
Use upside-down tomato cages as a sturdy frame for white fabric ghosts. Secure the fabric with zip ties at the top and bottom to prevent it from blowing away during autumn storms. Black felt circles work best for eyes because they do not peel off like stickers.
Plastic cages are better than metal ones because they will not rust if the fabric gets damp.
- Buy cages at garden centers in the off-season for half price.
- Use garden stakes to pin the bottom rim into the dirt.
- Swap white sheets for cheesecloth for a more tattered, spooky effect.
Quick win: Stuff a plastic grocery bag into the top of the cage to create a rounded head shape.
2. Floating Witch Hat Lights
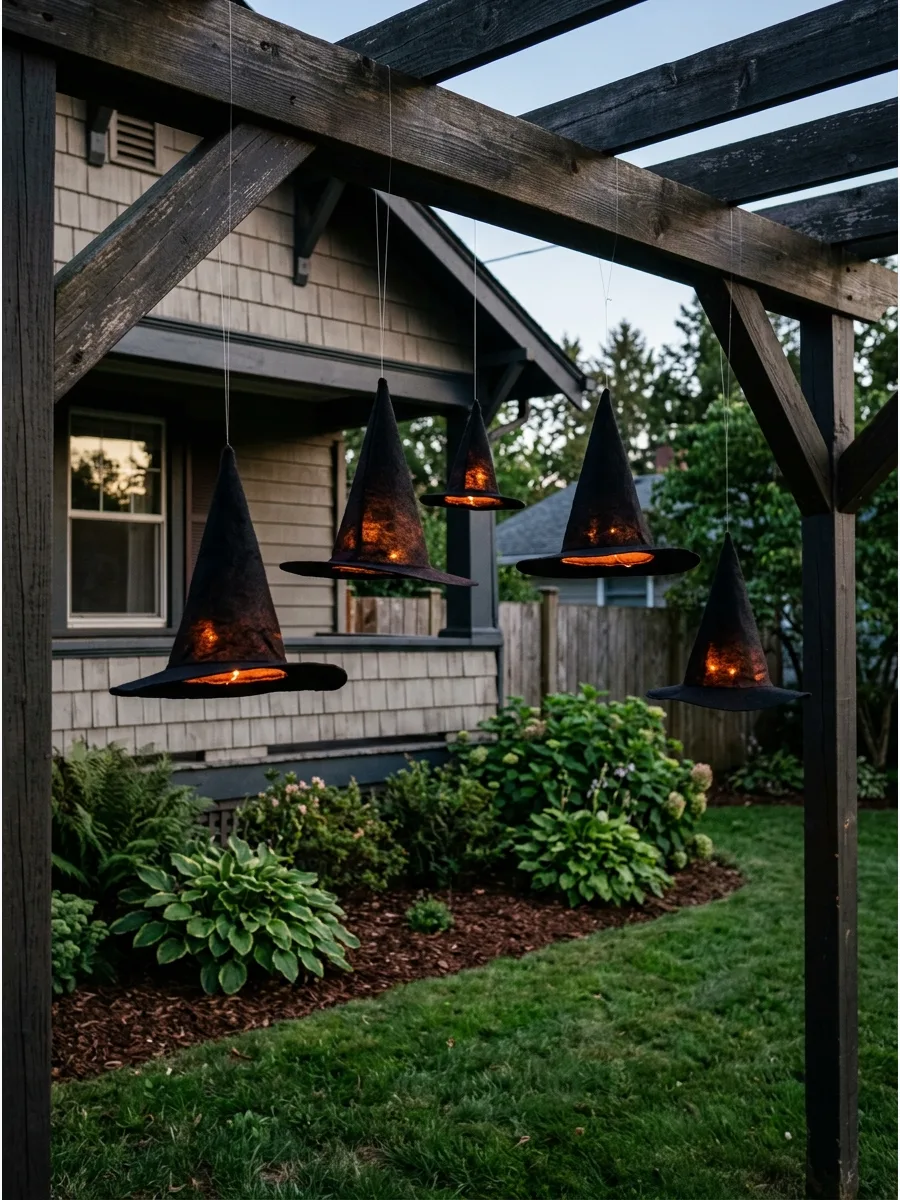
Hang black witch hats from a porch ceiling using clear fishing line. Thread the line through the point of the hat and tie it to a battery-operated tea light tucked inside. This creates a magical floating effect that looks incredible after dark.
Using high-test fishing line is essential so the wind does not snap the display.
- Pick up a multi-pack of hats online to save over retail prices.
- Use adhesive hooks on the ceiling to avoid drilling permanent holes.
- Cluster them at different heights to add depth to a small entryway.
Most people skip this: Use a dab of hot glue to secure the tea light to the interior peak so it does not wobble.
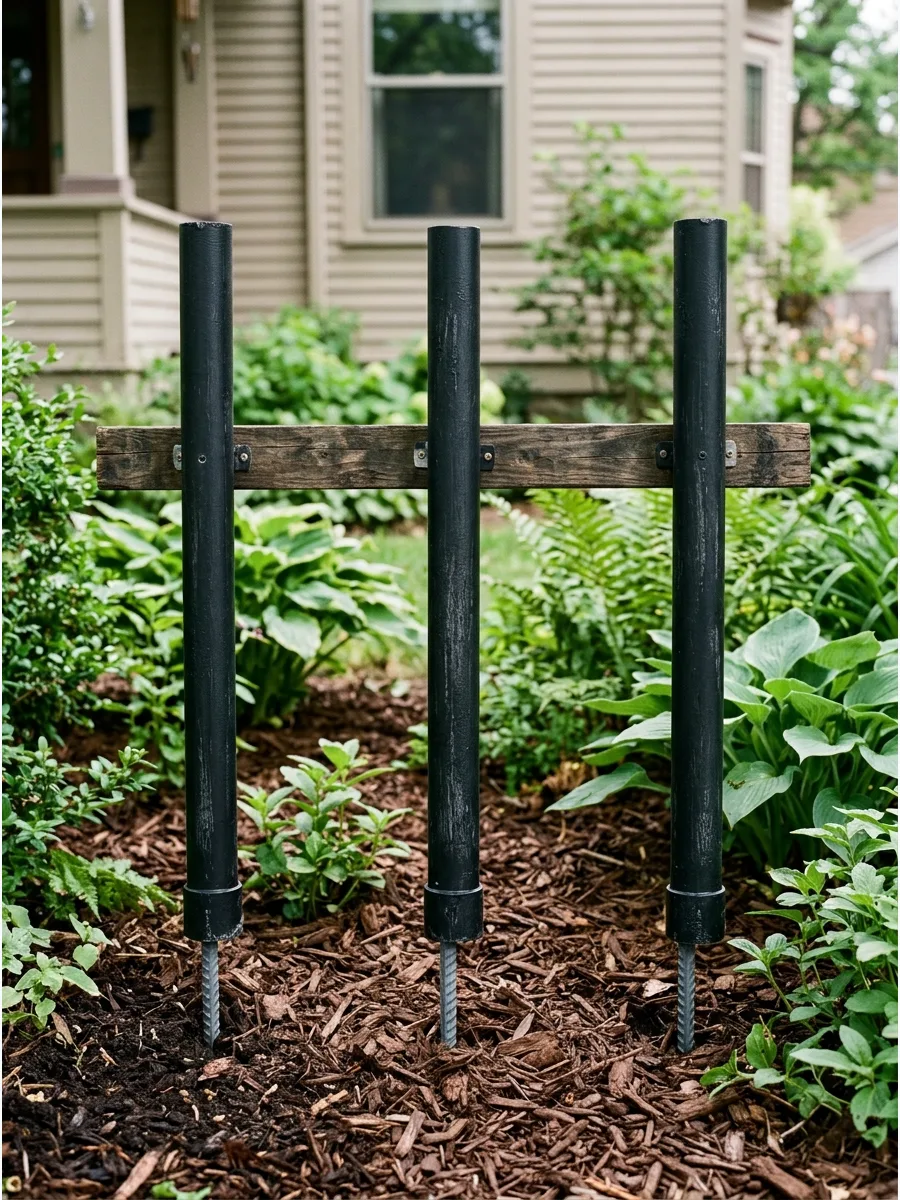
3. Plywood Lawn Silhouettes

Cut large shapes like cats or bats out of thin plywood and paint them matte black. Drive wooden stakes into the back of the plywood so you can push them deep into the soil. These flat shapes create a striking look against a lit house or a sunset.
Matte paint is better than glossy because it will not reflect streetlights and ruin the silhouette effect.
- One sheet of 4×8 plywood can yield three or four large yard figures.
- Use a jigsaw with a fine-tooth blade to prevent the wood from splintering.
- Scale the size down for window boxes if the yard is small.
Best shortcut: Use a projector to trace a design onto the wood for perfect proportions.
4. Chicken Wire Garden Spirits
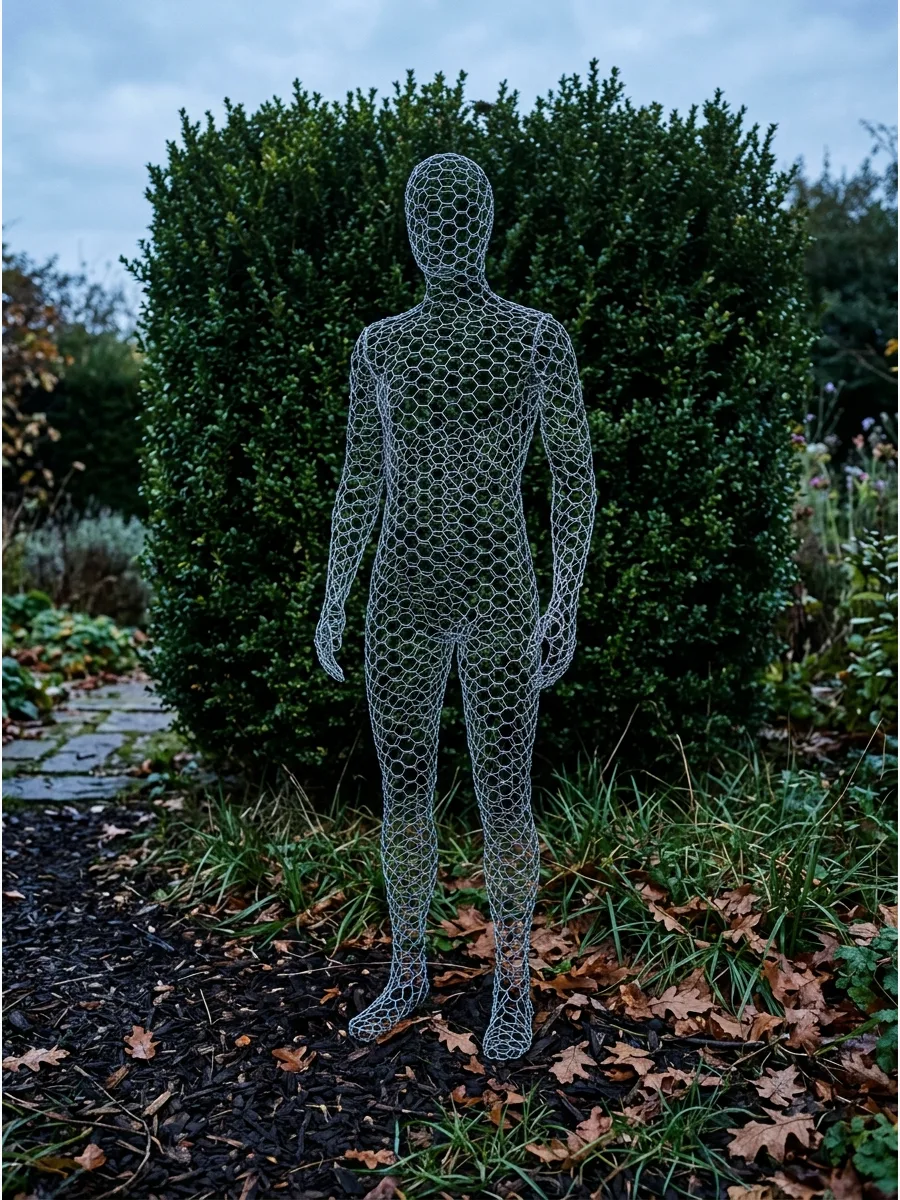
Mold chicken wire into human shapes to create translucent, eerie figures for the garden. Spray the finished wire forms with glow-in-the-dark paint to make them pop against the dark landscape. These are virtually weatherproof and let the wind blow right through them.
Wear heavy-duty gloves while bending the wire to avoid small cuts on the hands.
- A 25-foot roll of wire is enough for two life-sized figures.
- Use zip ties to join the head, torso, and limbs together securely.
- Dress them in old tattered clothes for a more solid, traditional ghost look.
Quick win: Use a plastic mannequin head as a mold to get a realistic face shape in the wire.
5. Giant Rope Spider Web
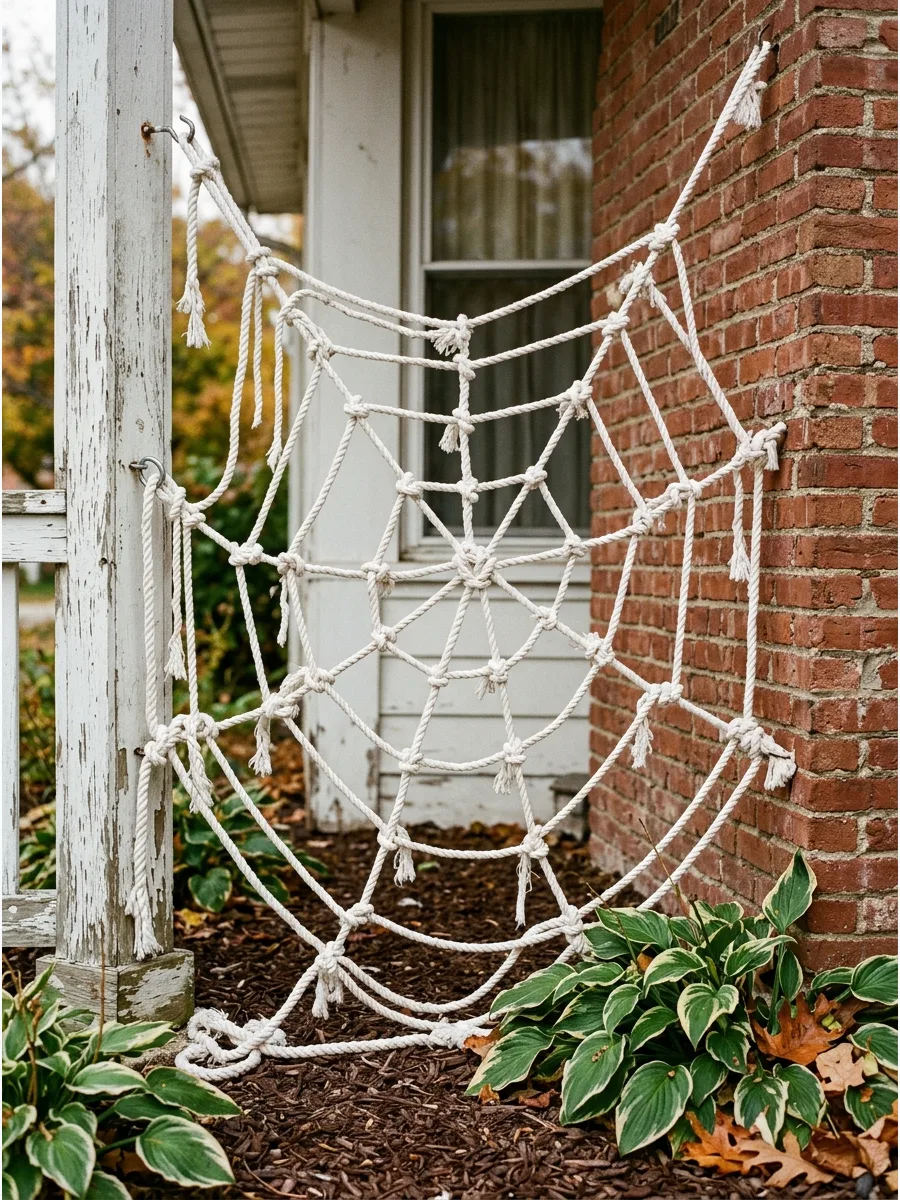
Use thick white nylon rope to weave a massive web across a porch or between two trees. Tie the main support lines first to create a strong frame before weaving the circular rings. This creates a focal point that fills a large space for very little money.
Nylon rope is superior to cotton because it will not sag or rot when it gets wet.
- Look for clothesline rope at hardware stores for the most budget-friendly option.
- Use carabiners on the ends of the main lines for fast setup and teardown.
- Scale it down to fit a single window frame for a subtler look.
Most people skip this: Leave some slack in the rope so the web can sway without pulling on the house trim.
6. Glowing Eye Hedges
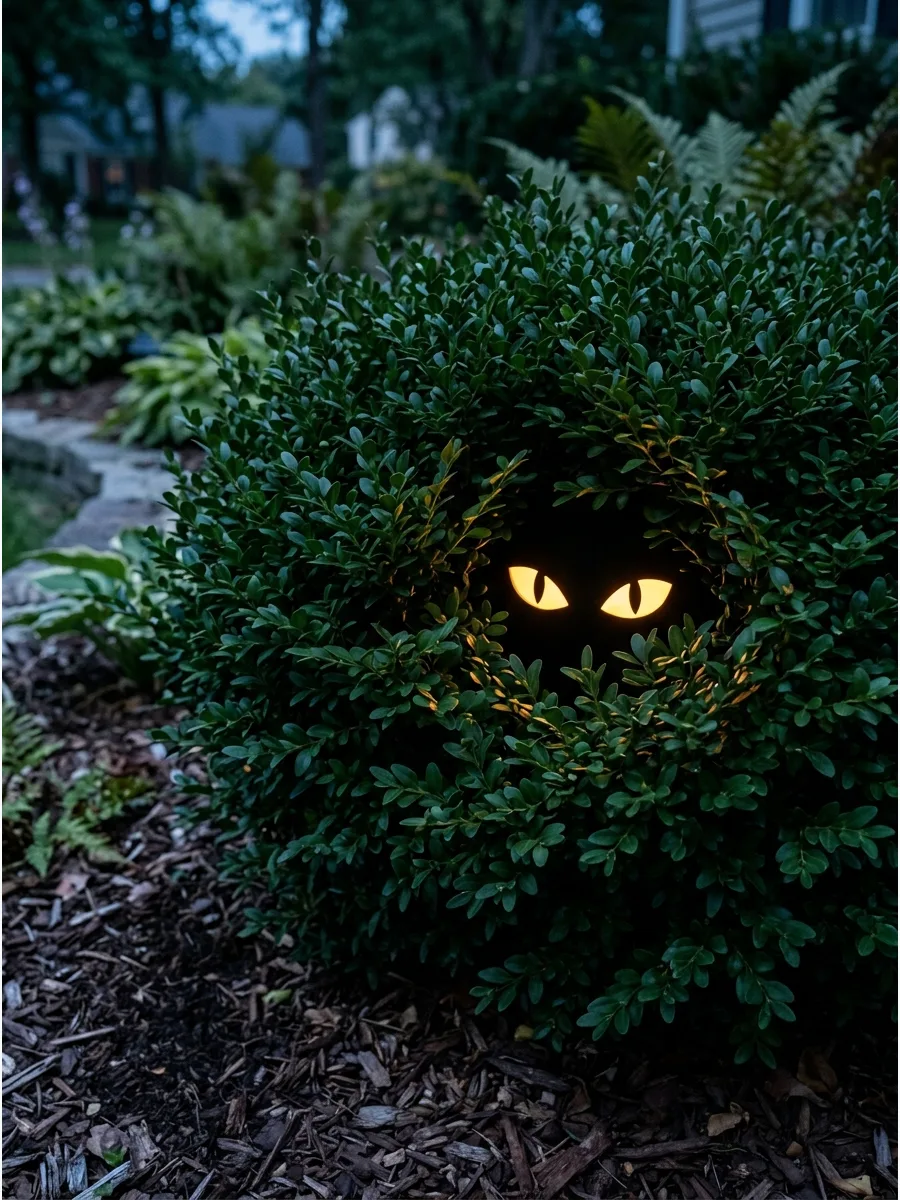
Cut eye-shaped slits into empty cardboard tubes and tuck glow sticks inside. Hide the tubes deep inside thick bushes or hedges so only the glowing eyes are visible to passersby. This is a classic low-cost trick that works especially well for long driveways.
Duct tape the ends of the tubes to keep the glow sticks from sliding out.
- Save paper towel and toilet paper rolls for a month to get enough for the whole yard.
- Use 8-hour glow sticks for Halloween night or battery LEDs for a longer season.
- Paint the tubes black so they disappear into the foliage during the day.
Best shortcut: Use red glow sticks for a more menacing look that stands out against green leaves.
7. Vertical Pumpkin Topiary
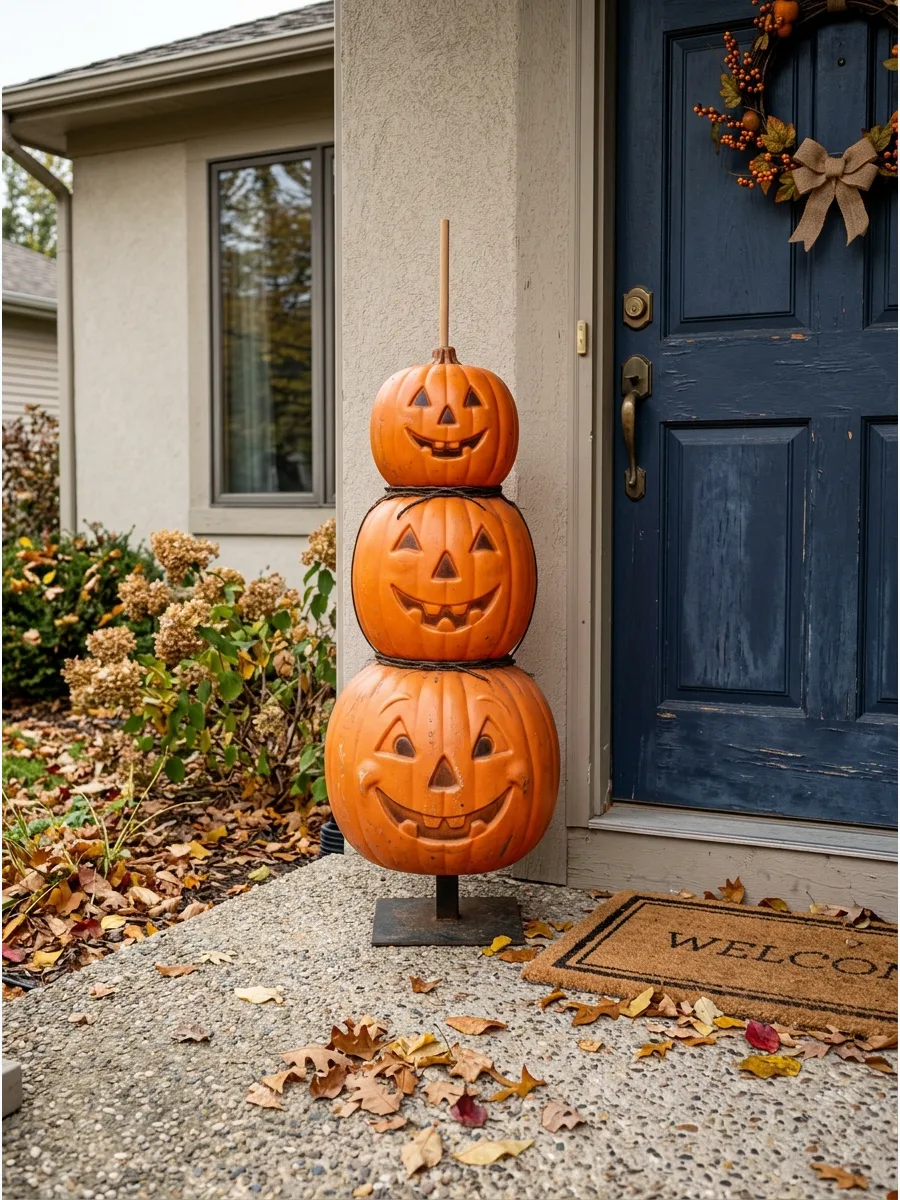
Stack plastic pumpkin buckets or faux gourds on a central dowel to create a vertical display. Drill a hole through the center of each pumpkin and slide them onto a sturdy garden stake driven into the ground. This adds height to a front porch without taking up much floor space.
Weighting the bottom pumpkin with a few stones keeps the whole tower from vibrating in the wind.
- Find plastic buckets at thrift stores for a few cents each.
- Mix different sizes with the largest on the bottom for better visual balance.
- Paint the pumpkins metallic silver or gold for a modern, chic entrance.
Quick win: Fill the pumpkins with potting soil and plant ivy in the top one for a living decoration.
8. Floating PVC Candles
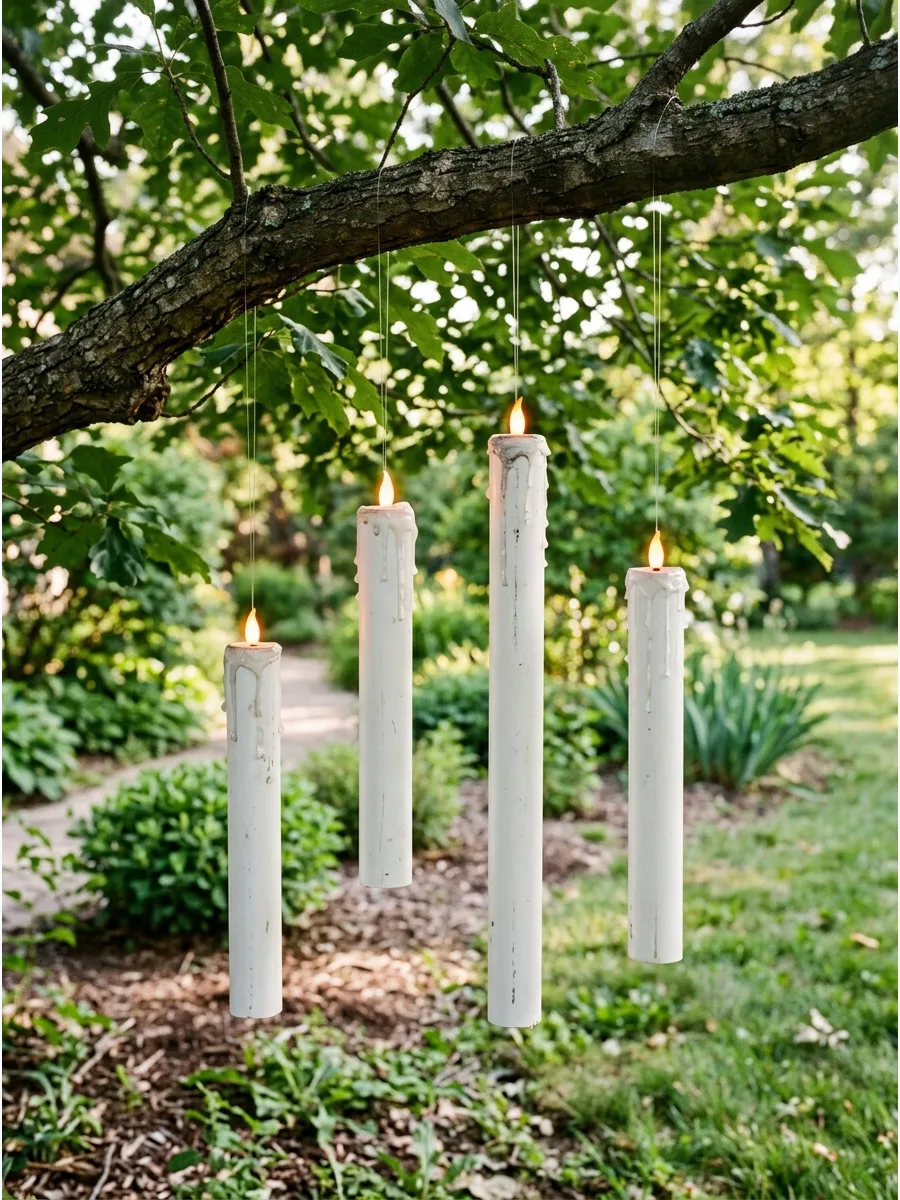
Cut PVC pipes into varying lengths and use hot glue to create dripping wax down the sides. Insert battery-operated flickering tea lights into the top of the pipes and hang them from tree branches. These look like enchanted candles and are completely waterproof.
Paint the pipes an off-white or cream color rather than pure white for a more realistic aged wax look.
- Use 1-inch or 1.5-inch diameter PVC pipe to fit standard tea lights.
- Use coarse sandpaper on the pipes before painting so the color sticks better.
- Cluster them in groups of three for the most realistic floating effect.
Most people skip this: Stuff a bit of paper towel inside the pipe to hold the tea light at the very top.
9. Monster Garage Face
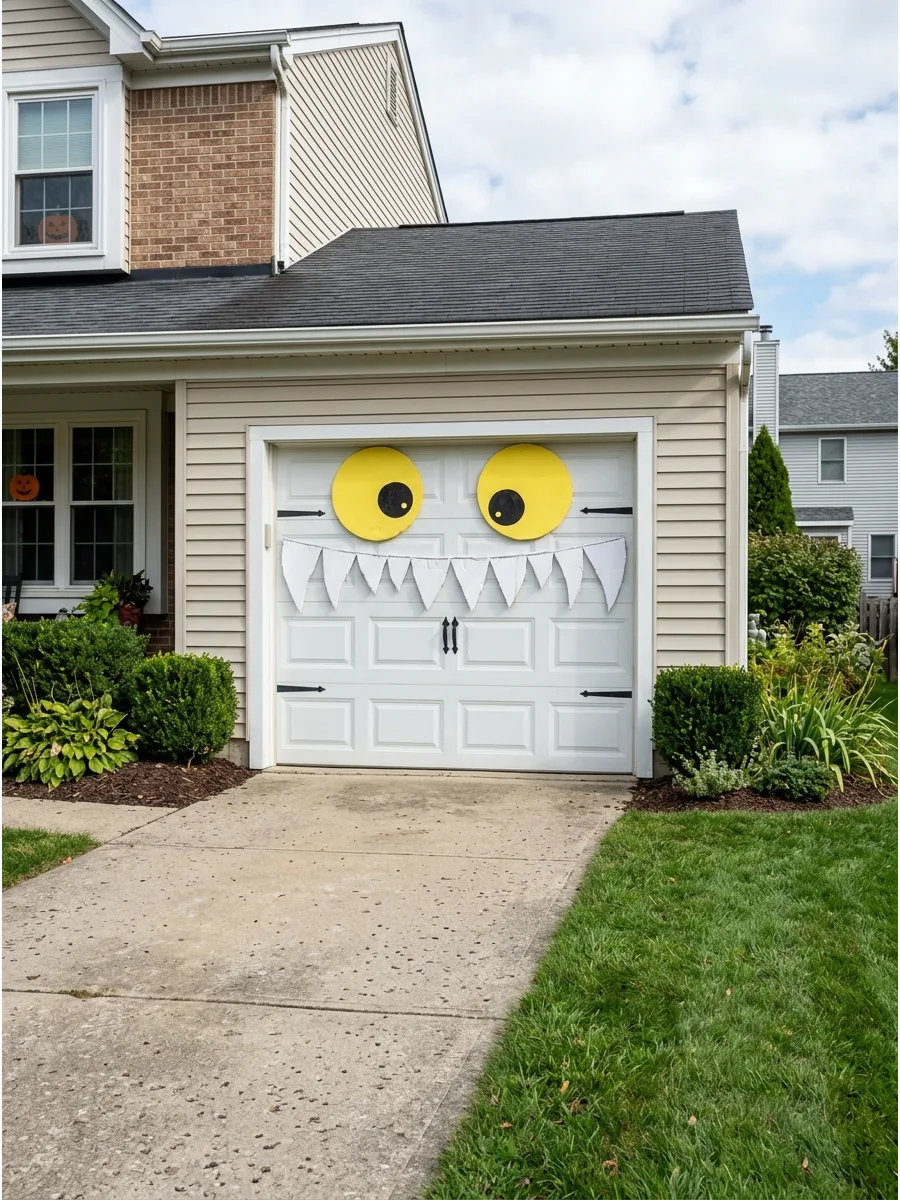
Create a giant monster face on a garage door using weather-resistant foam sheets.
Mount the teeth and eyes with heavy-duty mounting tape that will not damage the paint. This turns the largest part of the house into a decoration that can be seen from down the street. Cut the shapes into smaller sections that fit between the garage door panels so the door can still open.
- Use 5mm thick EVA foam sheets for a durable material that will not flop over.
- Clean the garage door with rubbing alcohol first to ensure the tape sticks.
- Use magnetic strips instead of tape if the garage door is metal.
Best shortcut: Use a bright green or purple foam for the eyes to make them pop against a neutral house color.
10. Roof Climbing Skeleton
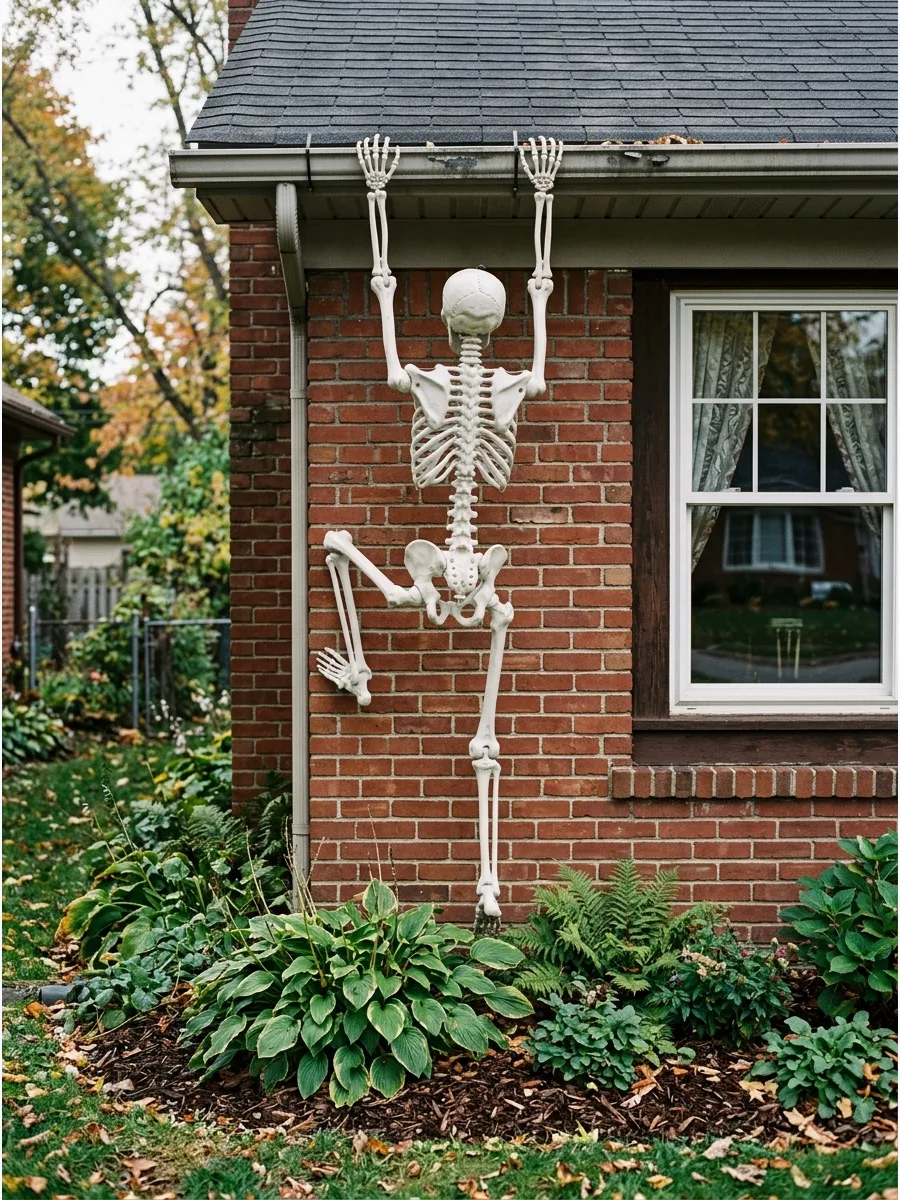
Position a plastic skeleton so it looks like it is climbing up the side of the house or over the gutter. Use zip ties to secure the skeleton hands and feet to the gutter or a sturdy downspout. This adds a surprising vertical element that catches the eye of everyone driving by.
Adding a small spotlight on the ground pointed up at the skeleton makes it visible at night.
- Look for skeletons with poseable joints to create a realistic climbing motion.
- Use black zip ties so they blend in with the skeleton shadows.
- Add a second skeleton pulling the first one up for a more dynamic scene.
Quick win: Wrap the zip ties around the skeleton wrists and ankles first to make the ladder climb easier.
11. Crashed Witch Planter
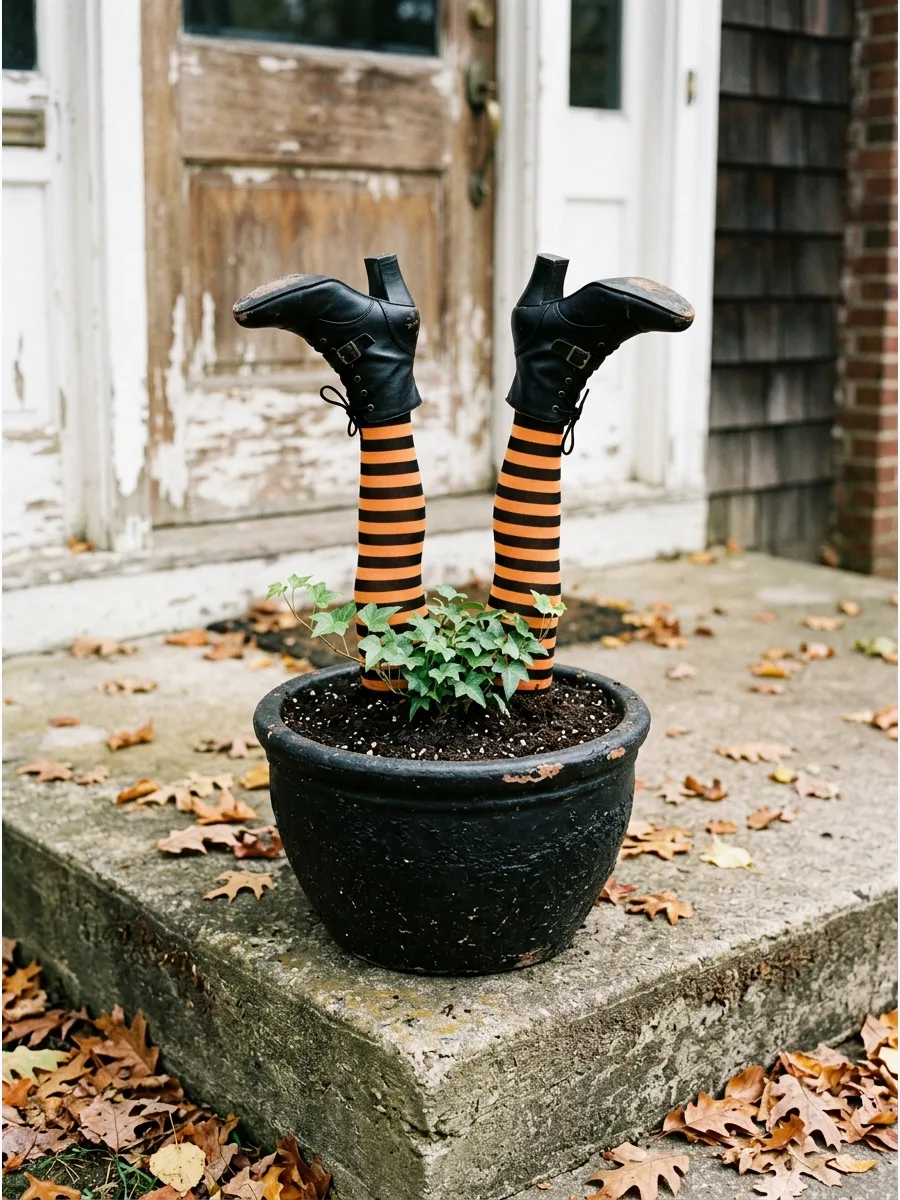
Stick a pair of striped stockings stuffed with pool noodles into a large porch planter. Place a pair of old black boots on the ends of the noodles and point them upward so it looks like a witch crashed. This is a fun, whimsical project that uses items already in the closet.
Use pool noodles instead of newspaper for stuffing because they will not get heavy or soggy in the rain.
- Use a standard 2-inch pool noodle for the perfect leg thickness.
- Secure the boots to the noodles with a single screw through the heel for a permanent hold.
- Surround the legs with purple kale or orange mums to hide the base of the noodles.
Most people skip this: Angle the legs slightly outward to make the crash look more accidental and funny.
12. Milk Jug Walkway Luminaries
Draw spooky faces on clean, empty plastic milk jugs and line them up along a walkway. Fill the bottom with an inch of sand or gravel to keep them from blowing away in the wind. These provide a safe, soft glow that guides guests to the front door.
Use a permanent marker with a wide tip to make the faces bold enough to be seen from the street.
- Use a craft knife to cut a small hole in the back of the jug for a light source.
- String a set of outdoor Christmas lights through the back holes to light them all at once.
- Paint the jugs neon colors for a toxic waste look that glows under a blacklight.
Best shortcut: Use battery-operated puck lights for a brighter, more consistent glow than standard tea lights.
13. Giant Trash Bag Spiders
Fill large black trash bags with leaves or crumpled paper to create the body of a giant spider. Use black foam pipe insulation for the legs and attach them to the body with duct tape. These are massive decorations that cost almost nothing and fill up a large space.
Stuff the legs with wire coat hangers if they need to hold a specific bent shape.
- Use heavy-duty contractor bags for the body to prevent accidental rips.
- Secure the legs to the ground with U-shaped garden stakes so the spider does not crawl away.
- Make a nest of smaller spiders using black balloons to complete the look.
Quick win: Use white spray paint to add hair or stripes to the legs for more detail.
14. Aged Cardboard Coffin
Construct a classic toe-pincher coffin shape out of large appliance boxes. Paint the cardboard with a wood-grain tool or dark brown paint to mimic aged timber. This makes a great centerpiece for a yard haunt or a prop for a skeleton to sit in.
Seal the cardboard with a clear outdoor spray to prevent it from wilting if it gets foggy.
- Visit local appliance stores to ask for refrigerator boxes for free.
- Use a hot glue gun for the main assembly and reinforced tape on the inside seams.
- Add plastic chains and a fake lock to make it look like a high-security vampire crate.
Most people skip this: Cut the lid into two pieces so the top half can stay open for a prop to peek out.
15. Packing Tape Ghost Figure
Wrap a mannequin in plastic wrap and then several layers of clear packing tape to create a hollow shell. Carefully cut the shell off and tape the seam back together to create a life-sized, translucent spirit. These look incredibly eerie when lit from below because they appear to be made of mist.
Use at least three layers of tape to ensure the figure holds its shape when it is removed from the mold.
- Use a plastic mannequin as a base to avoid having to wrap a real person for hours.
- Use a sharp pair of bandage scissors to cut the form off without scratching the mold.
- Hang them from trees with thin wire to make them look like they are floating through the yard.
Quick win: Place a small LED spotlight inside the torso of the ghost to make the whole body glow.
16. Faux Weathered Window Boards
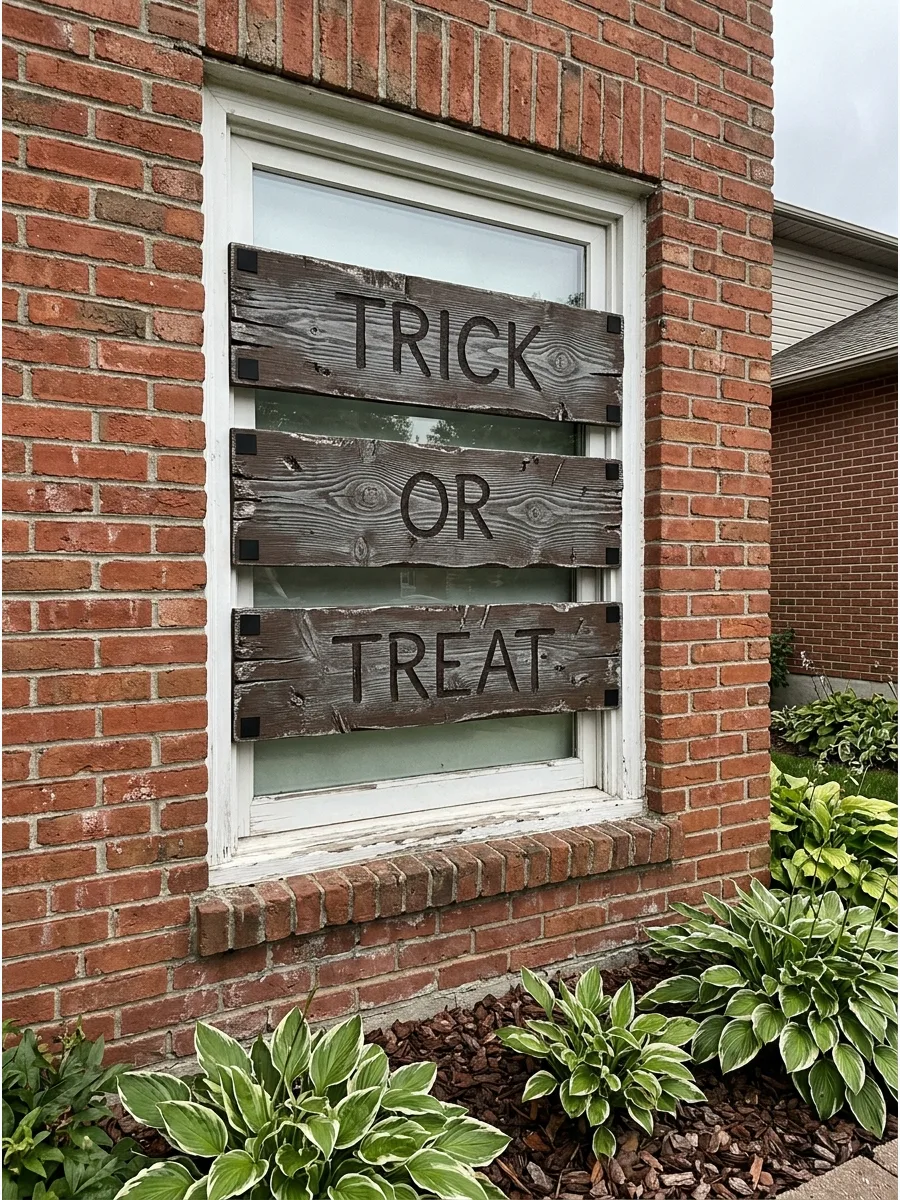
Transform your home into a haunted estate using lightweight foam insulation. Cut the foam into strips and paint them to look like rotted wood boards.
Mount the boards over your windows with heavy-duty mounting tape to ensure they stay secure against the wind. This look creates a sense of mystery without damaging your exterior trim.
- Foam board costs under twenty dollars at local hardware stores.
- Cut with a utility knife and stack pieces for a layered wood look.
- Use brown acrylic paint for a quick-drying, weather-resistant finish.
Most people skip this: Paint the edges of the foam to hide the bright pink or blue factory color.
17. Skeleton Hands Garden Border
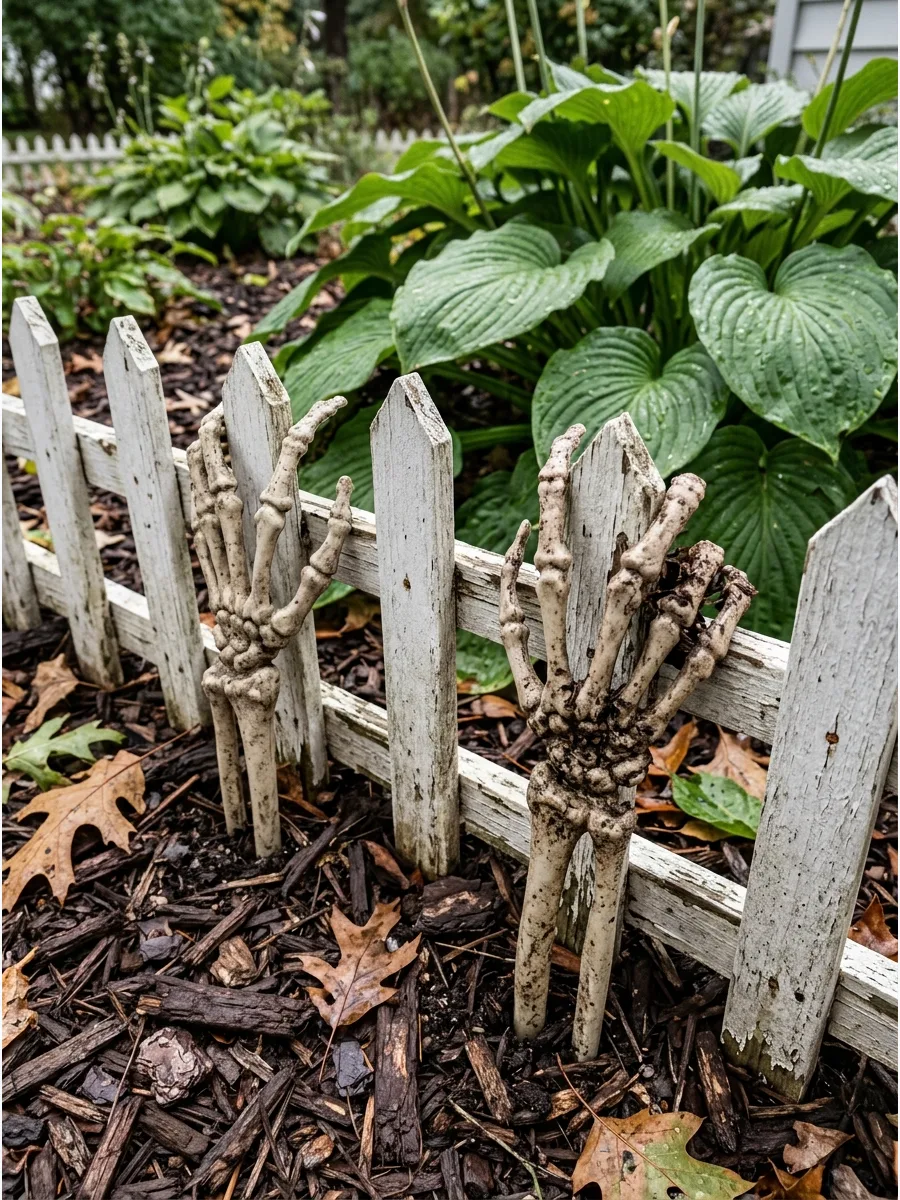
Turn your flower beds into a miniature graveyard with plastic skeletal remains. Push the wrists of plastic skeleton hands into the soil so they look like they are reaching for the surface.
Space the hands irregularly throughout the garden bed to make the scene feel more natural and startling. This simple trick uses existing landscaping to create a high-impact visual.
- Plastic hands are available in bulk packs for low-cost decorating.
- Push the wrists deep into the mulch to keep them upright during wind.
- Mix in a few plastic skulls to create a more complete scene.
Quick win: Spray the hands with a light coat of matte gray paint to make them look like aged bone.
18. Hanging Skull Tree Lanterns
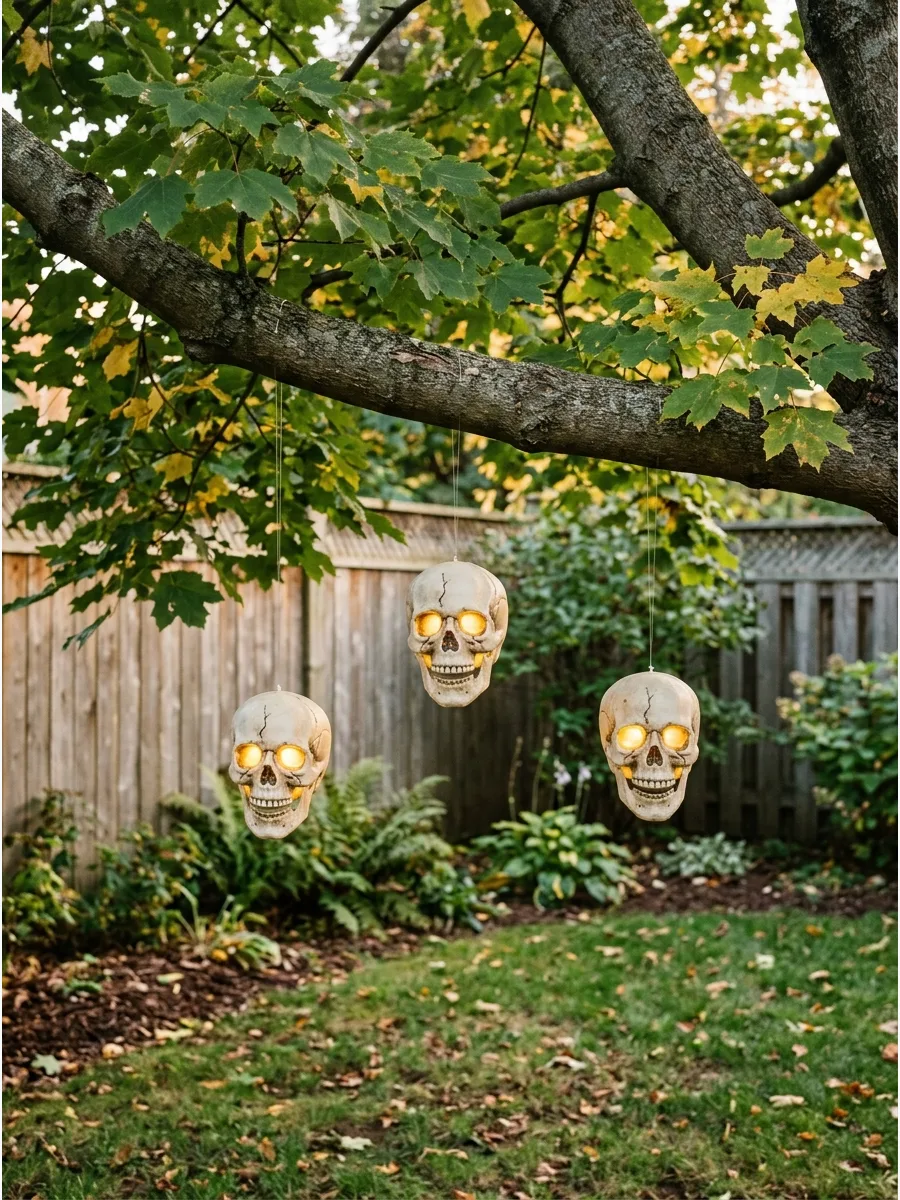
Light up your yard with eerie skulls hanging from the trees. Drill a small hole in the top of a plastic skull and thread a battery-operated LED light inside.
Tie the skulls to sturdy branches using clear fishing line so they appear to be floating in the dark. The soft glow creates enough light to guide trick-or-treaters without being too bright.
- LED puck lights or glow sticks provide hours of illumination.
- Drill through the jaw or top of the head for easy hanging points.
- Arrange them in groups of three for the best visual balance.
Best shortcut: Use remote-controlled LED lights so you do not have to climb a ladder every night.
19. Woven Grass Porch Monster
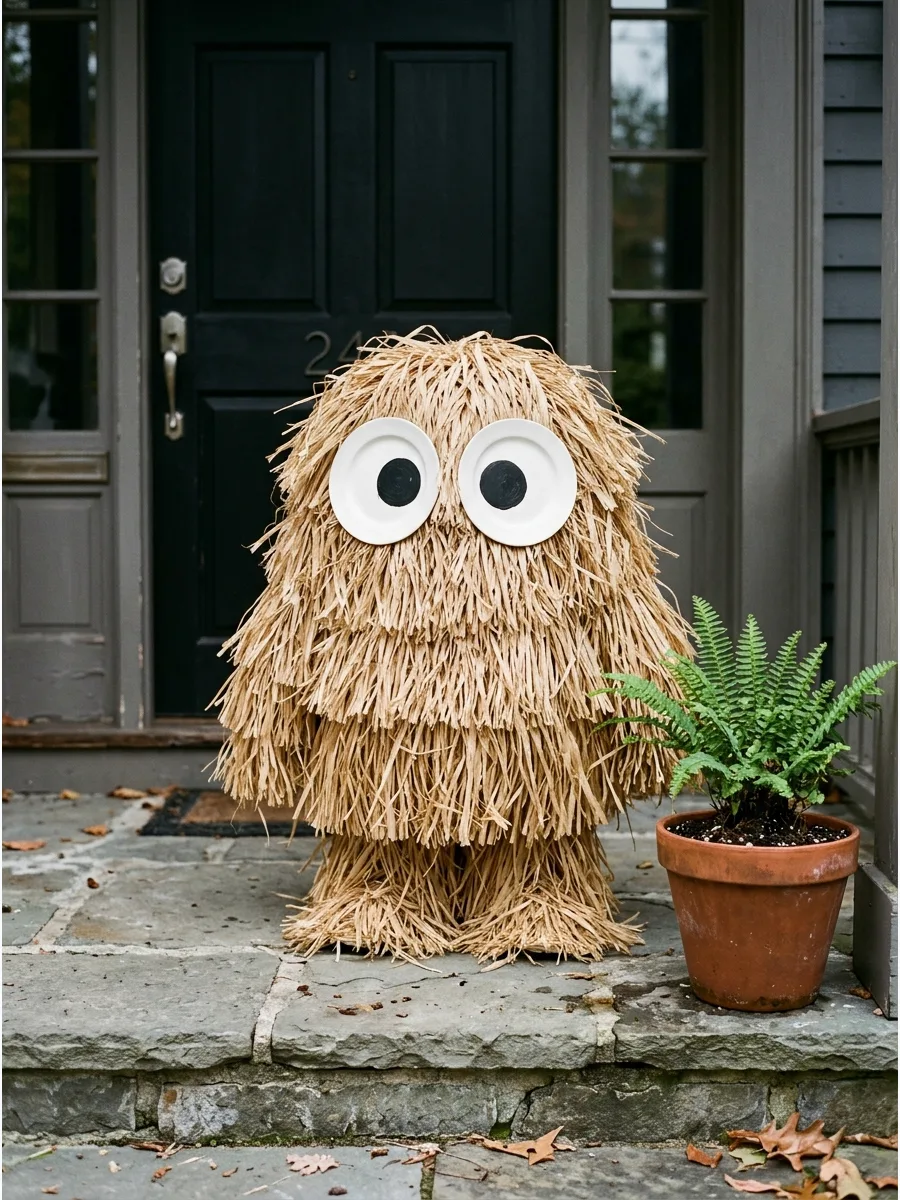
Use tan hula skirts to build a shaggy porch monster that looks like a classic movie creature. Wrap the skirts around a tall wire frame and secure them with zip ties at the top.
Add two large white paper plates with black circles for eyes to give the creature a friendly or spooky personality. This project adds great texture and movement when the wind blows.
- Raffia skirts are affordable and cover large areas quickly.
- Zip tie the skirts to a tomato cage or wooden tripod frame.
- Store the frame flat by removing the skirts at the end of the month.
Most people skip this: Layer two skirts on top of each other for a much fuller, high-end look.
20. Staring Eyeball Door Wreath

Create a focal point on your front door with a wreath made of staring eyes. Glue dozens of white plastic balls to a foam ring and paint colorful pupils on each one.
Mix different eye colors like blue, green, and yellow to make the wreath look more chaotic and interesting. It is a fun way to use repetitive shapes for a bold graphic effect.
- Ping pong balls are the lightest option for a front door wreath.
- Use a hot glue gun to secure the balls to a straw or foam base.
- Swap the pupil colors to match your overall porch color scheme.
Quick win: Use a red fine-tip marker to draw tiny veins on the white spheres for a bloodshot effect.
21. PVC Pipe Grim Reaper
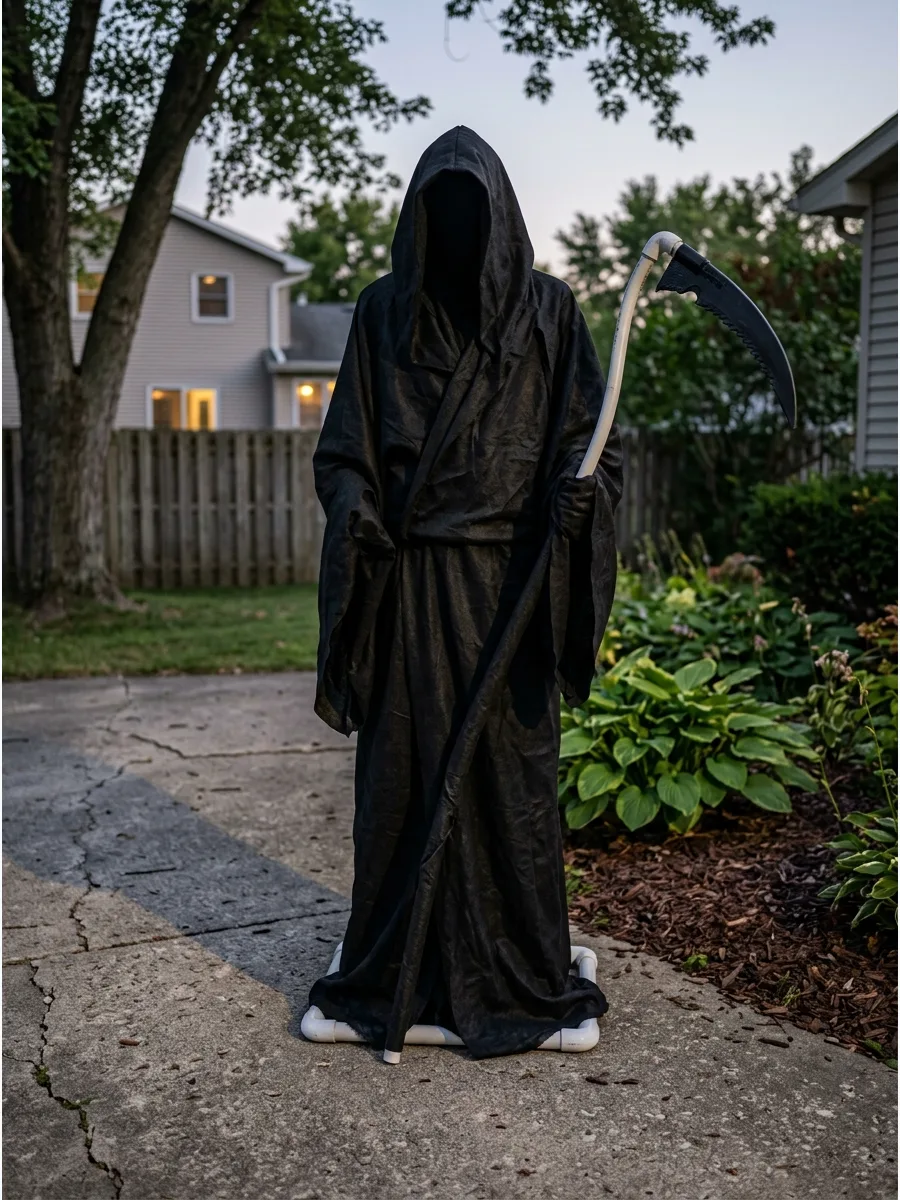
Build a tall, faceless figure to guard your entryway using basic hardware store supplies. Create a simple T-frame from PVC pipe and drape it in long layers of black landscaping fabric.
Secure the fabric with safety pins or wire so it does not blow away during October storms. The height of the figure creates an imposing presence that store-bought decor rarely matches.
- Landscaping fabric is sold in large rolls for under thirty dollars.
- Use duct tape to connect the PVC joints for extra stability.
- Drape the fabric in uneven layers to create a tattered, ancient look.
Best shortcut: Weight the bottom of the PVC frame with sandbags to keep the reaper from tipping over.
22. Magnetic Spider Mailbox Swarm
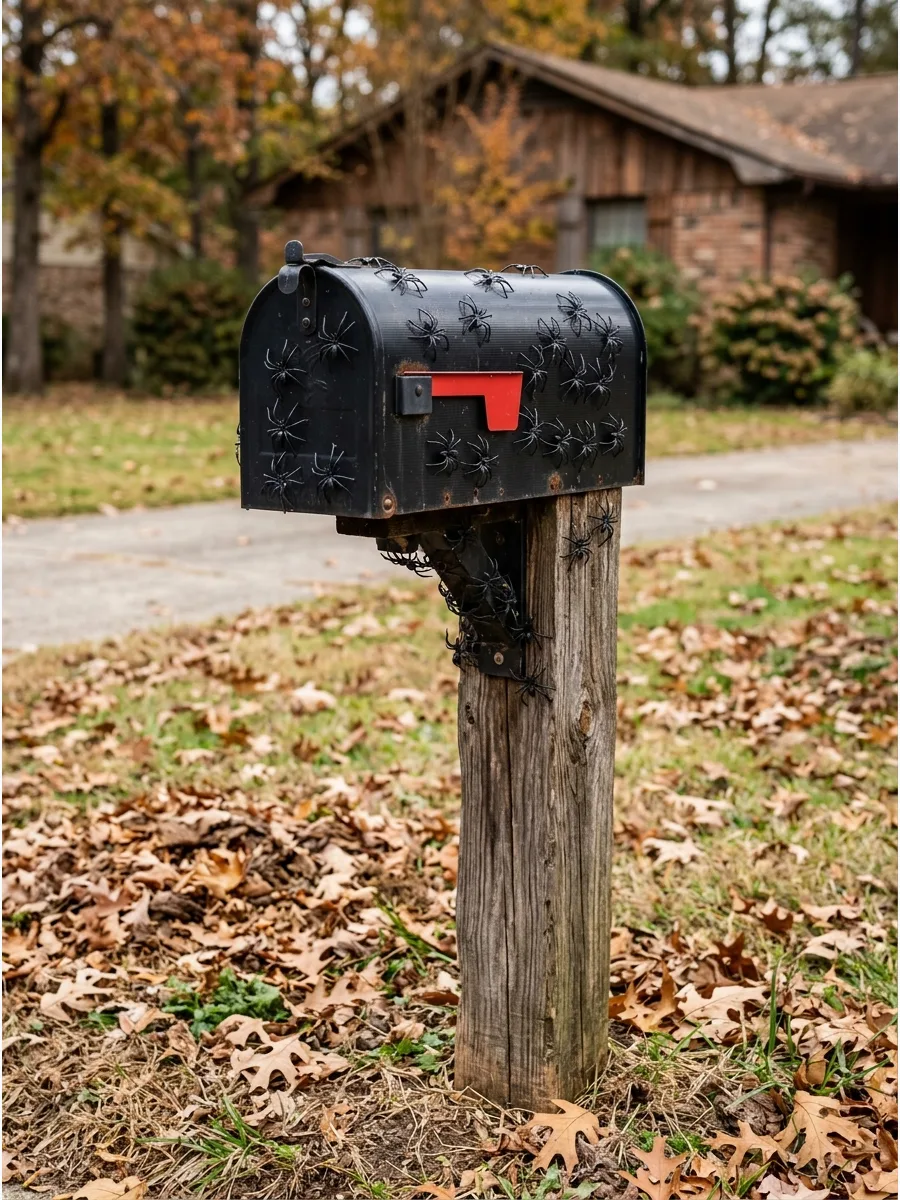
Make it look like spiders are invading your home by decorating the mailbox. Attach small magnets to the underside of plastic spiders so they stick to metal surfaces without glue.
Cluster the spiders near the door of the mailbox and spread a few out toward the post for a realistic trail. This is a great choice for renters because it leaves zero residue behind.
- Small craft magnets can be glued to any plastic insect or spider.
- Move the spiders around throughout the month to surprise neighbors.
- Wipe the mailbox clean before applying to prevent scratches on the paint.
Quick win: Use various sizes of spiders to make the swarm look more convincing and creepy.
23. Burlap Ghost Lawn Stakes
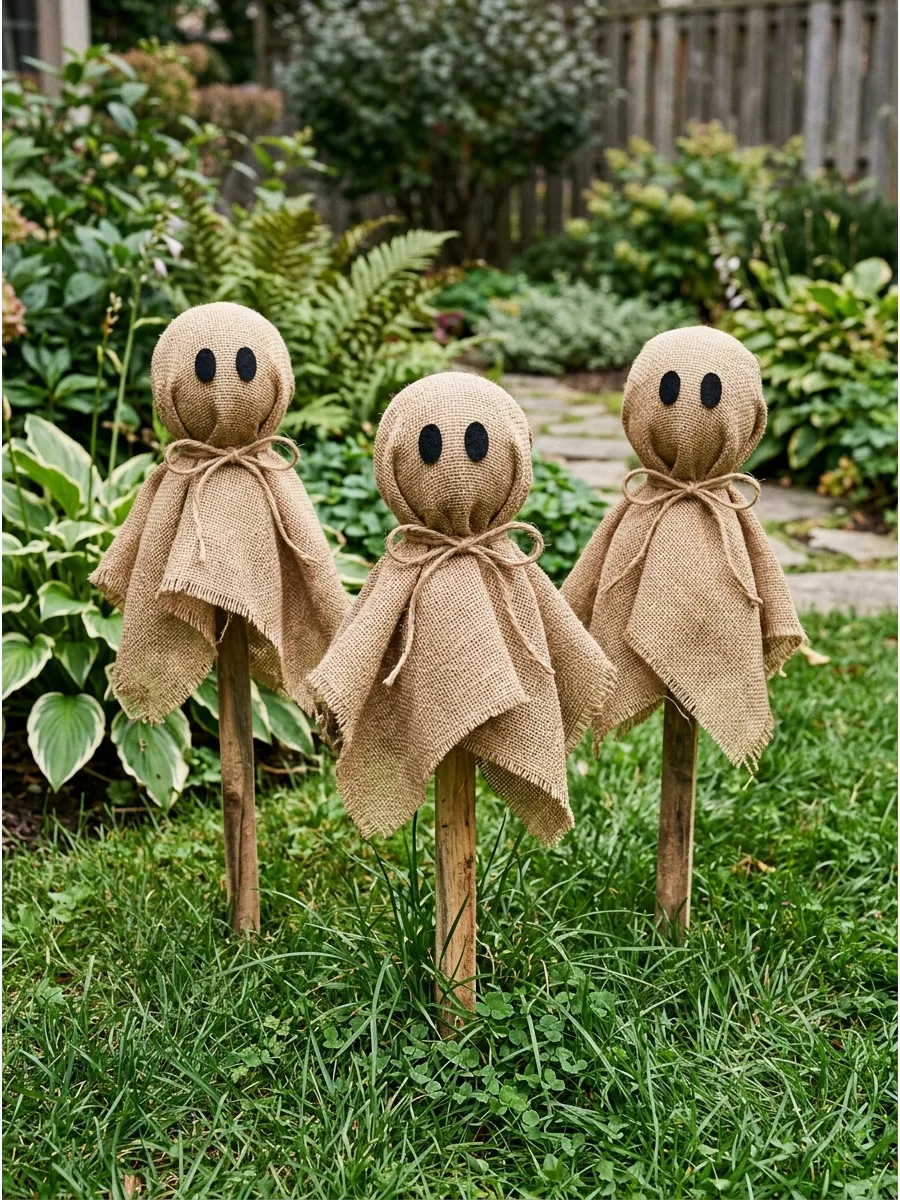
Give your lawn a rustic feel with ghosts made from natural burlap. Stuff the center of a burlap square with plastic bags and tie it onto a wooden garden stake.
Draw simple, elongated faces with a black permanent marker to mimic the look of vintage Halloween decorations. These hold up surprisingly well in the rain compared to paper or thin cotton.
- Burlap is a durable natural material that handles moisture well.
- Use garden stakes or rebar to anchor the ghosts into the ground.
- Stuff the heads with old plastic bags to help them maintain their shape.
Most people skip this: Spray the burlap with a clear fabric sealer to prevent it from fraying in the wind.
24. Suspended Twig Broomsticks
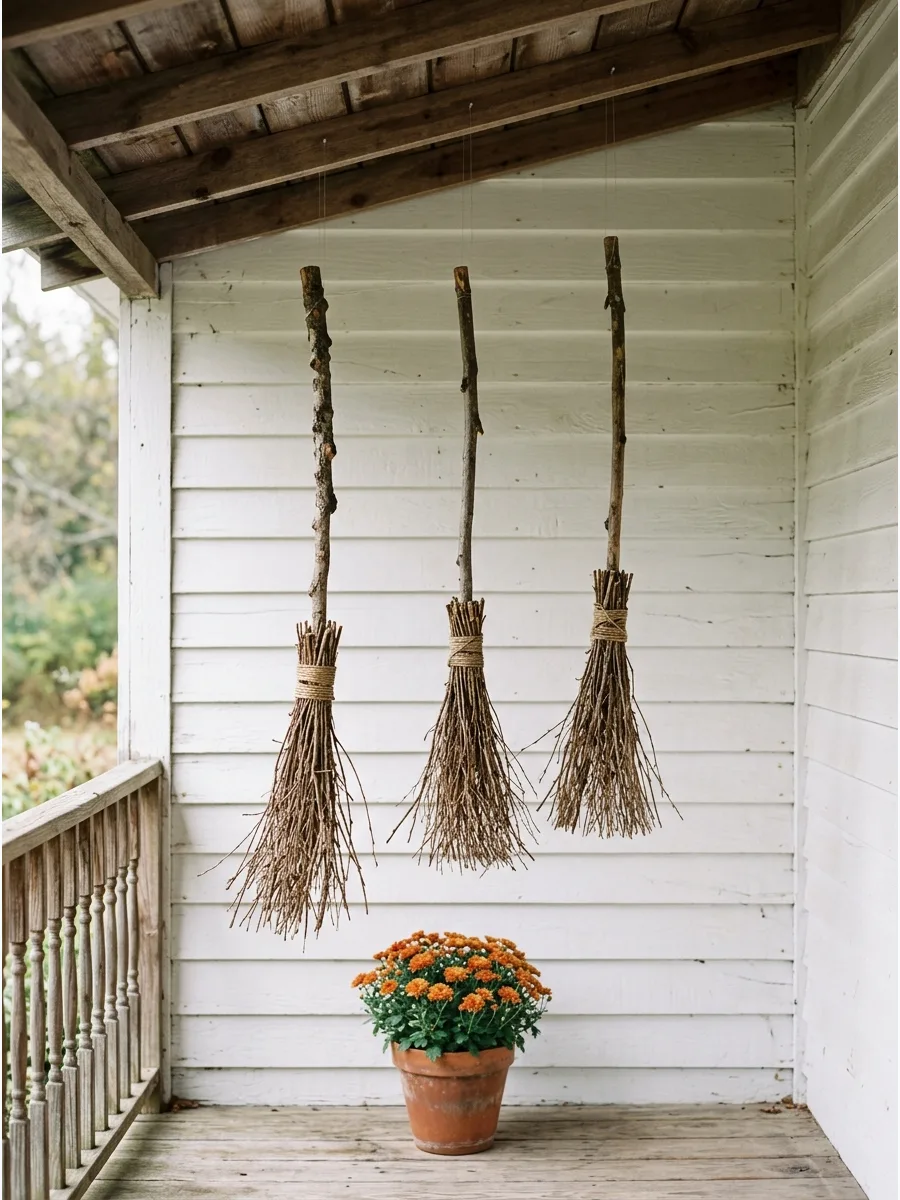
Decorate your porch with broomsticks that seem to be hovering on their own. Collect long, straight branches and tie bundles of twigs to the bottom with twine.
Balance the broomsticks by finding the center point before hanging them with thin wire from the porch rafters. It creates a magical, whimsical atmosphere that works well for all ages.
- Gather free materials from your yard or a local wooded area.
- Use 20-pound test fishing line for a nearly invisible suspension.
- Angle the brooms slightly upward to suggest they are in mid-flight.
Best shortcut: Rub a little dark wood stain on the branches to give them an antique, weathered finish.
25. Hanging Mesh Egg Sacs
Hang creepy mesh bundles from your porch ceiling to mimic spider egg sacs. Fill white stockings or cheesecloth with lightweight batting and glue small plastic spiders to the outside.
Vary the lengths of the sacs to create a sense of depth and variety across the porch eaves. The way they sway in the breeze adds an extra layer of ick factor for guests.
- Cheesecloth provides a realistic, web-like texture for the sacs.
- Fill with cotton batting or bubble wrap to keep the weight low.
- Hang with small cup hooks or staple guns under porch rafters.
Quick win: Place a single battery-operated tea light inside each sac for a faint, pulsating glow.
26. Black Paper Window Shadows
Use your interior lights to create a spooky show for neighbors. Cut large silhouettes out of black poster board and tape them directly to the inside of your windows.
Place a lamp a few feet behind the window to cast a sharp, dark shadow that is visible from the street. This is one of the most budget-friendly ways to decorate a large area quickly.
- Poster board is a very inexpensive way to cover large windows.
- Trace shapes with a white pencil before cutting for better accuracy.
- Reuse the cutouts year after year by storing them between cardboard sheets.
Most people skip this: Use painter's tape to avoid leaving sticky residue on your window glass.
27. Glowing Latex Glove Hands
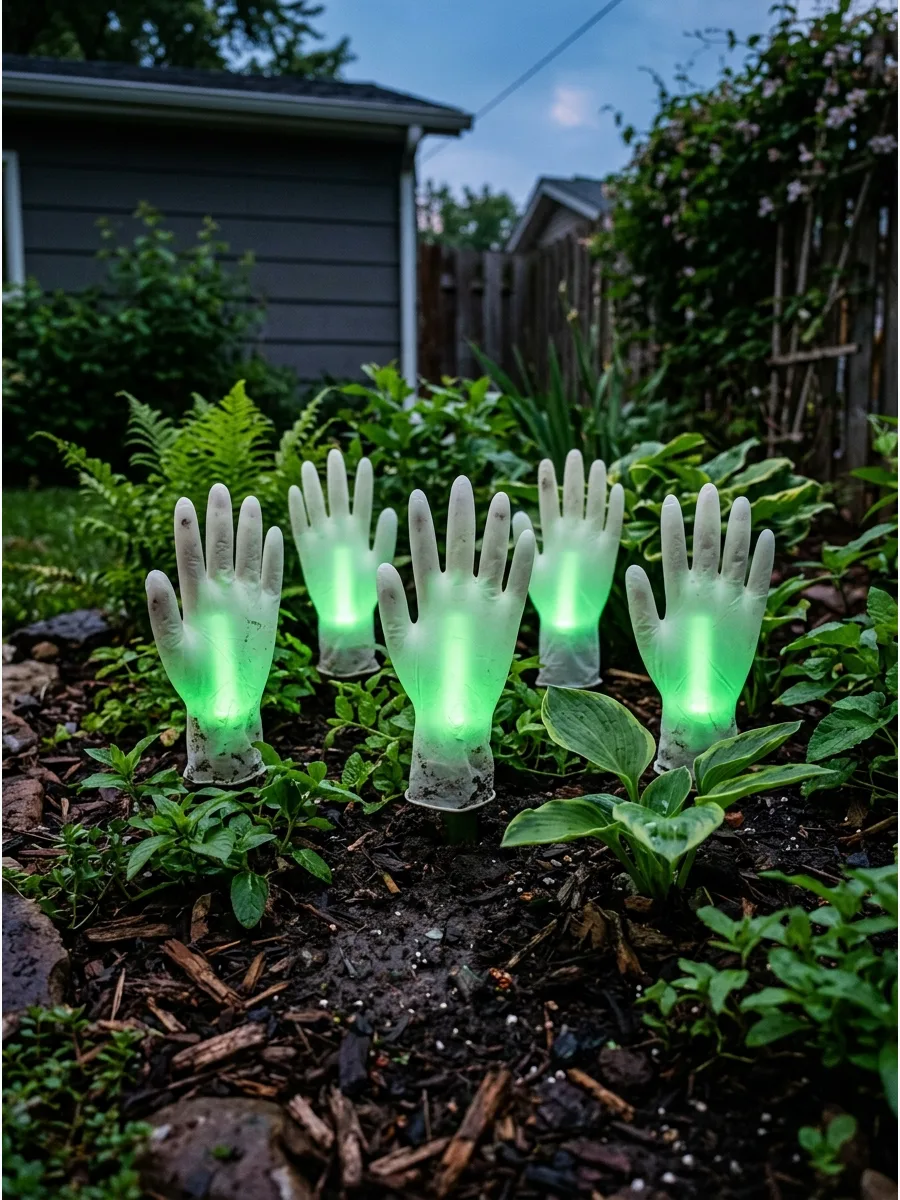
Light up your walkway with glowing hands that emerge from the grass. Insert a green or blue glow stick into a translucent latex glove and inflate it slightly before tying it off.
Tuck the base of the glove into the grass or behind a rock to hide the knot and make the hand stand upright. They look best when grouped in small clusters of three or five.
- Buy latex gloves in bulk for a few dollars at most drugstores.
- Use 8-hour glow sticks for a full night of spooky lighting.
- Cluster them near paths to help guide guests to the front door.
Best shortcut: Fill the gloves with water instead of air to give them a heavy, more realistic feel.
28. Foam Pumpkin Entry Arch
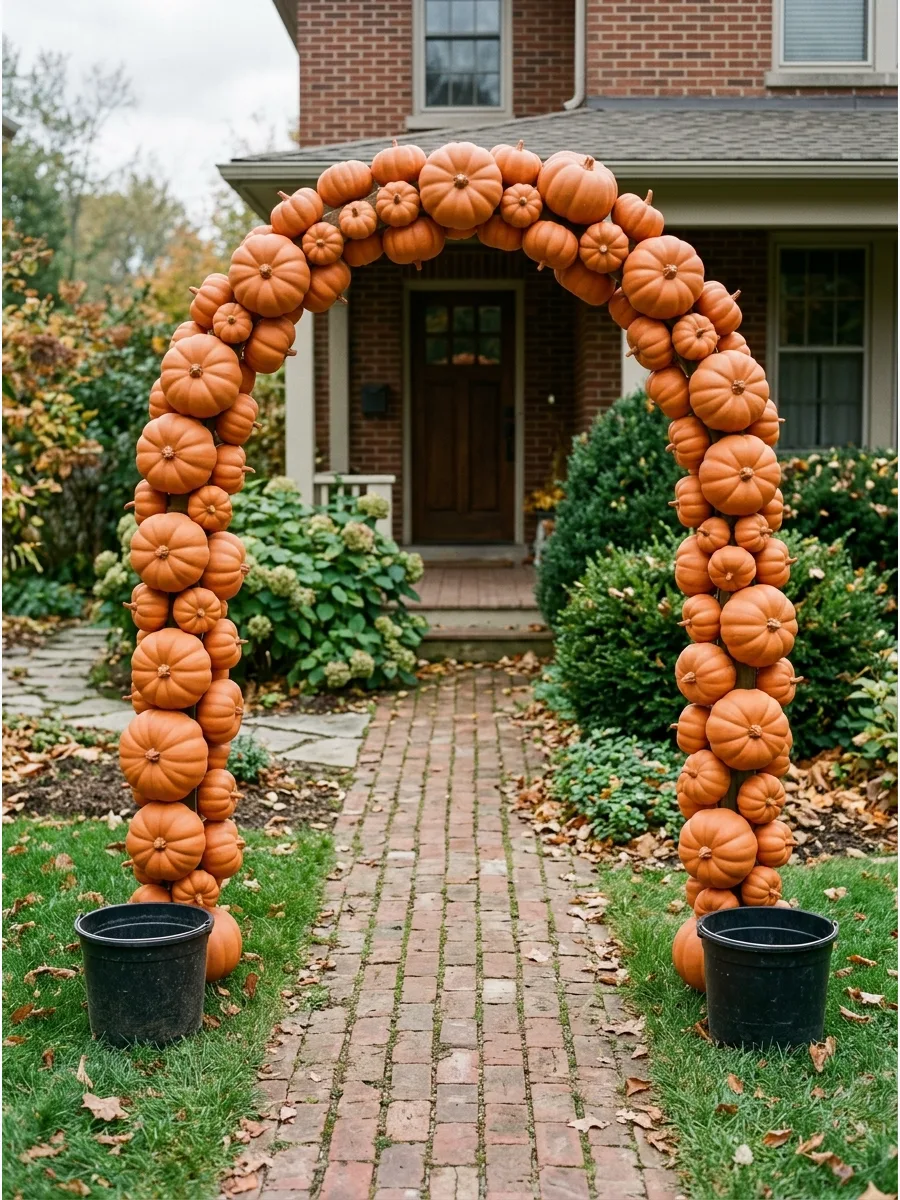
Build a grand entrance with a custom arch made of hollow foam pumpkins. Thread a flexible PVC pipe through the centers of carvable pumpkins and anchor the ends in heavy buckets.
Use pumpkins of different sizes at the base and smaller ones at the top to keep the arch stable. This project takes some time but serves as a perfect backdrop for family photos.
- Foam pumpkins are lightweight and easier to stack than real ones.
- Use a 1-inch PVC pipe for the core to prevent the arch from sagging.
- Anchor the buckets with gravel or sand to prevent tipping in the wind.
Quick win: Use a hot knife to cut the holes in the pumpkins for perfectly smooth edges.
29. Fogging Porch Cauldron Setup
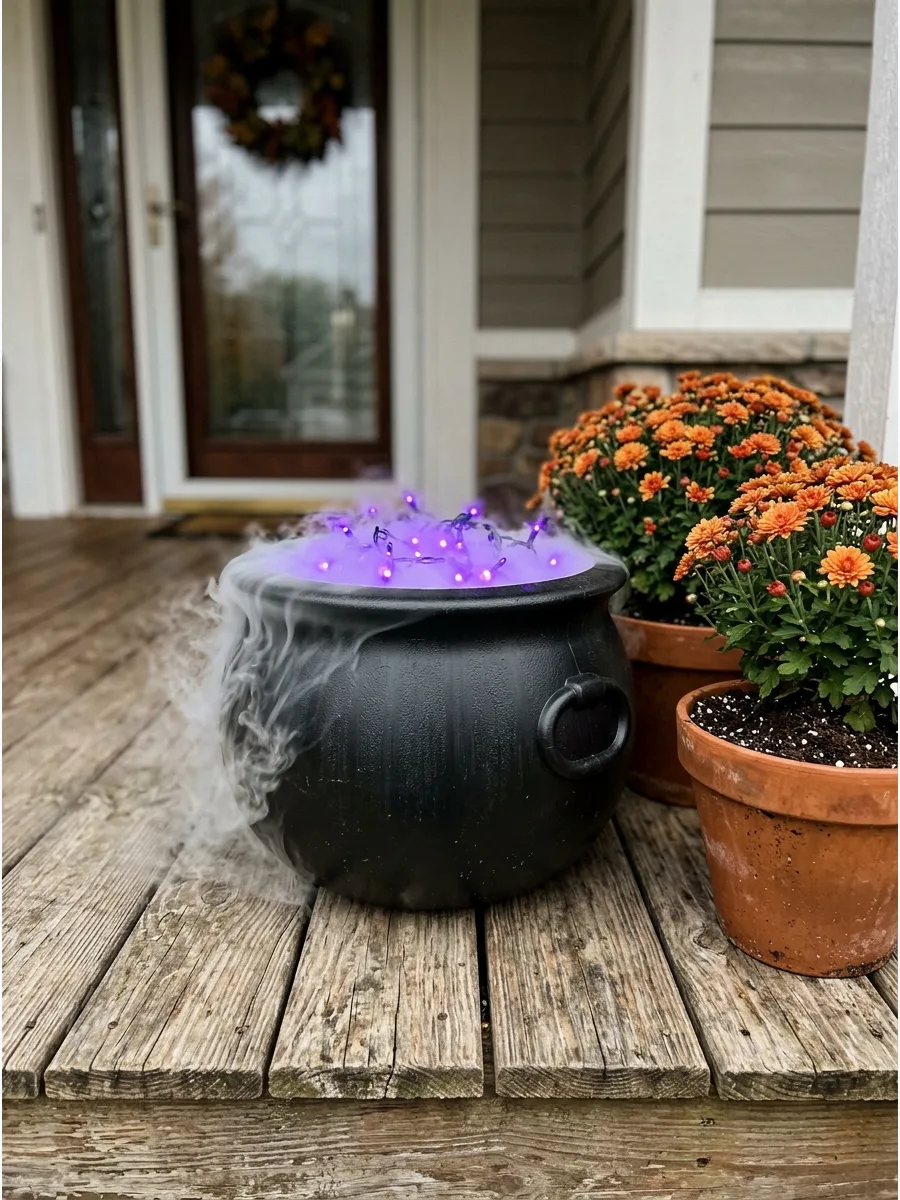
Create a classic bubbling effect on your porch with a large black tub and a fog machine. Place the fog machine inside the tub and use a plastic tube to direct the mist over the edges.
Fill the tub with purple or green string lights to give the potion an inner glow through the fog. It provides constant movement and a professional-looking atmosphere.
- Small fog machines are available for under forty dollars online.
- Use a plastic liner inside the cauldron to protect any electronics.
- Hide the machine with black fabric or faux spider webs on the deck.
Most people skip this: Use fog juice specifically designed for low-lying fog to keep the mist on the floor.
30. Fabric Wrapped Ghost Pillars
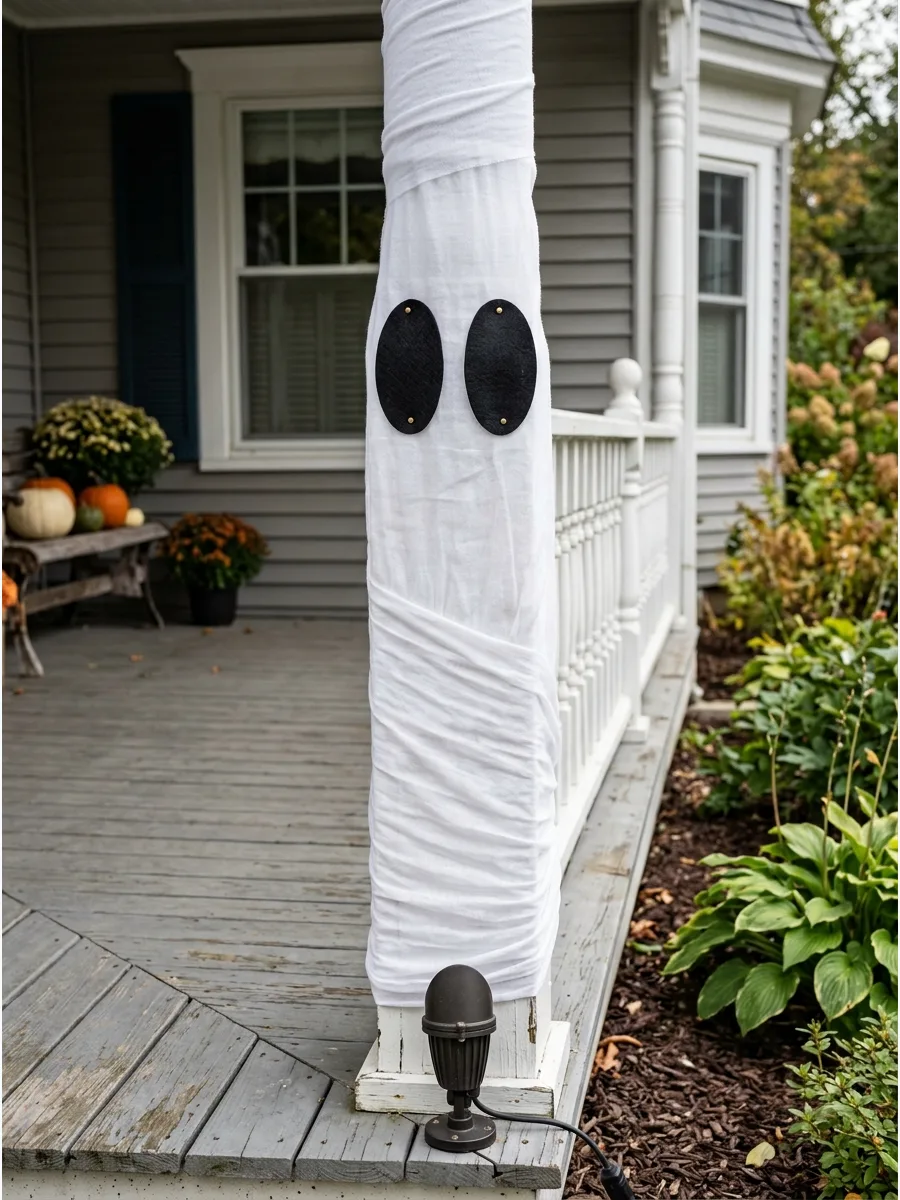
Wrap porch pillars or fence posts in white fabric to create tall, stationary ghosts. Secure the fabric with white twine and add large felt cutouts for the eyes and mouth.
Position a small spotlight at the base of the pillar to make the white fabric shine brightly after the sun goes down. This uses your home's existing architecture to save on construction time.
- Use old white bedsheets or cheap cotton fabric by the yard.
- Secure the fabric at the top and bottom with heavy-duty zip ties.
- Replace felt eyes with reflective tape for an extra glow at night.
Best shortcut: Use a staple gun on the backside of wooden posts to keep the fabric perfectly taut.
31. Floating Cheesecloth Ghosts

Lightweight cheesecloth dipped in fabric stiffener creates a haunting, airy shape for your trees. Drape the wet cloth over a balloon or foam ball to set the head size while it dries.
Hang them from tree branches with clear fishing line to make them dance in the wind. These look much more professional than plastic bags and hold up well in dry weather.
Stiffener keeps the shape even if the wind picks up.
- Use bulk cheesecloth and liquid fabric starch for a low-cost project.
- Secure the fishing line to small screw-in hooks on the branches.
- Spray with a clear sealer to help the fabric resist light morning dew.
Best shortcut: Use spray starch for a quicker set time if you are not making complex 3D shapes.
32. Pallet Wood Jack-O-Lanterns
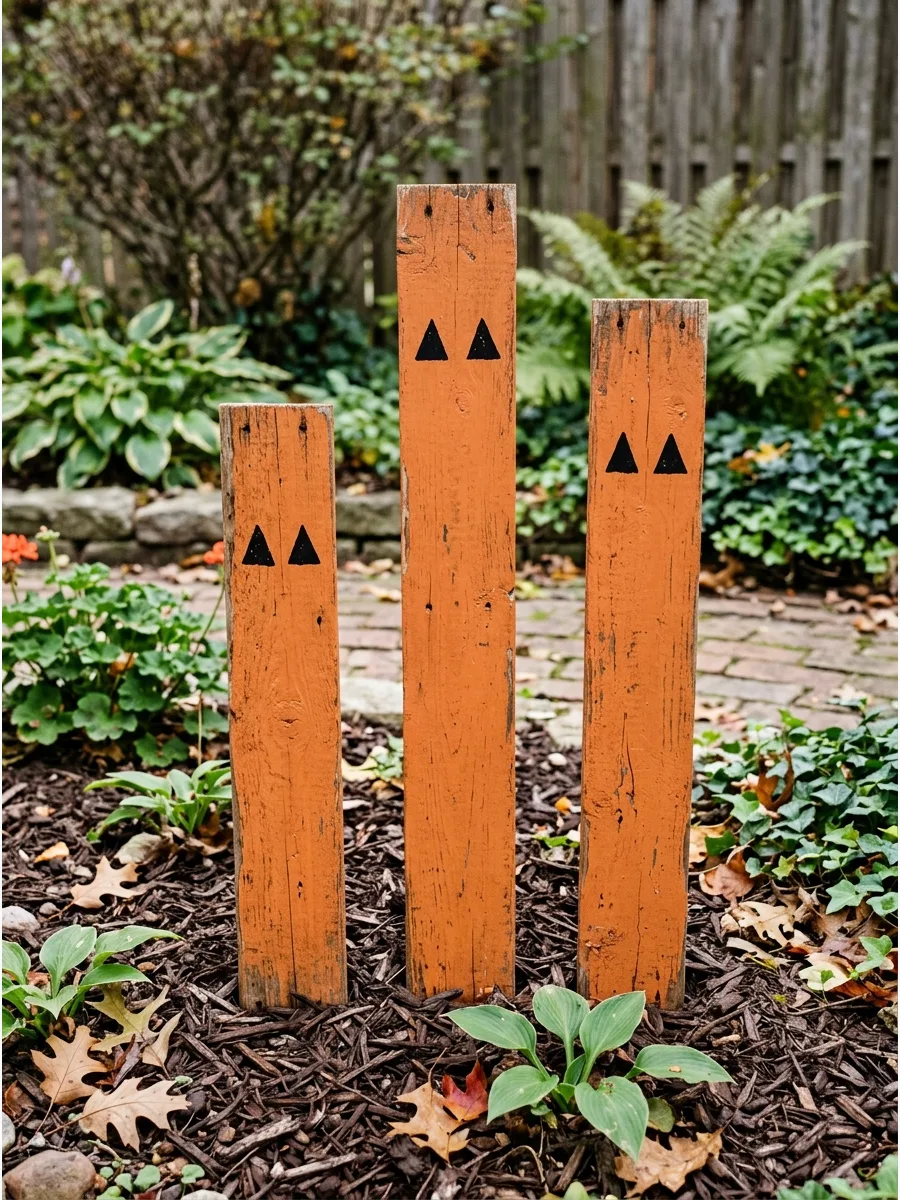
Reclaimed pallet wood provides a rustic, heavy-duty base for lawn decor that won't blow away. Cut the boards into varying heights and paint simple, jagged faces with outdoor acrylics.
Screw the boards to a 2×4 stake and hammer them directly into the soil for stability. The natural wood texture adds a layer of grit that store-bought plastic lacks. They look great clustered in groups of three.
- Find free pallets at local hardware or grocery stores.
- Use a jigsaw to create rough, uneven edges for a more organic look.
- Sand the back of the boards to prevent splinters during setup and storage.
Quick win: Use a dark brown wash over the orange paint to give the wood an aged, rotted look.
33. Concrete Hand Planters

Filling rubber gloves with quick-set concrete creates eerie, realistic hands for a garden bed. Once the concrete is dry, peel away the rubber and position the hands as if they are reaching out of the dirt.
Place a small battery-operated tea light or a dark purple mum in the palm to finish the look. Heavy concrete won't blow away during October windstorms. It is a subtle way to add a creepy element to existing landscaping.
- Mix quick-dry cement and use standard rubber dish gloves as molds.
- Bury the wrists slightly in the dirt to hide the flat edges.
- Seal the finished hands with matte spray to prevent crumbling over time.
Most people skip this: Vibrate the glove while pouring to remove air bubbles that cause fingers to snap off later.
34. Plastic Pumpkin Fence Toppers
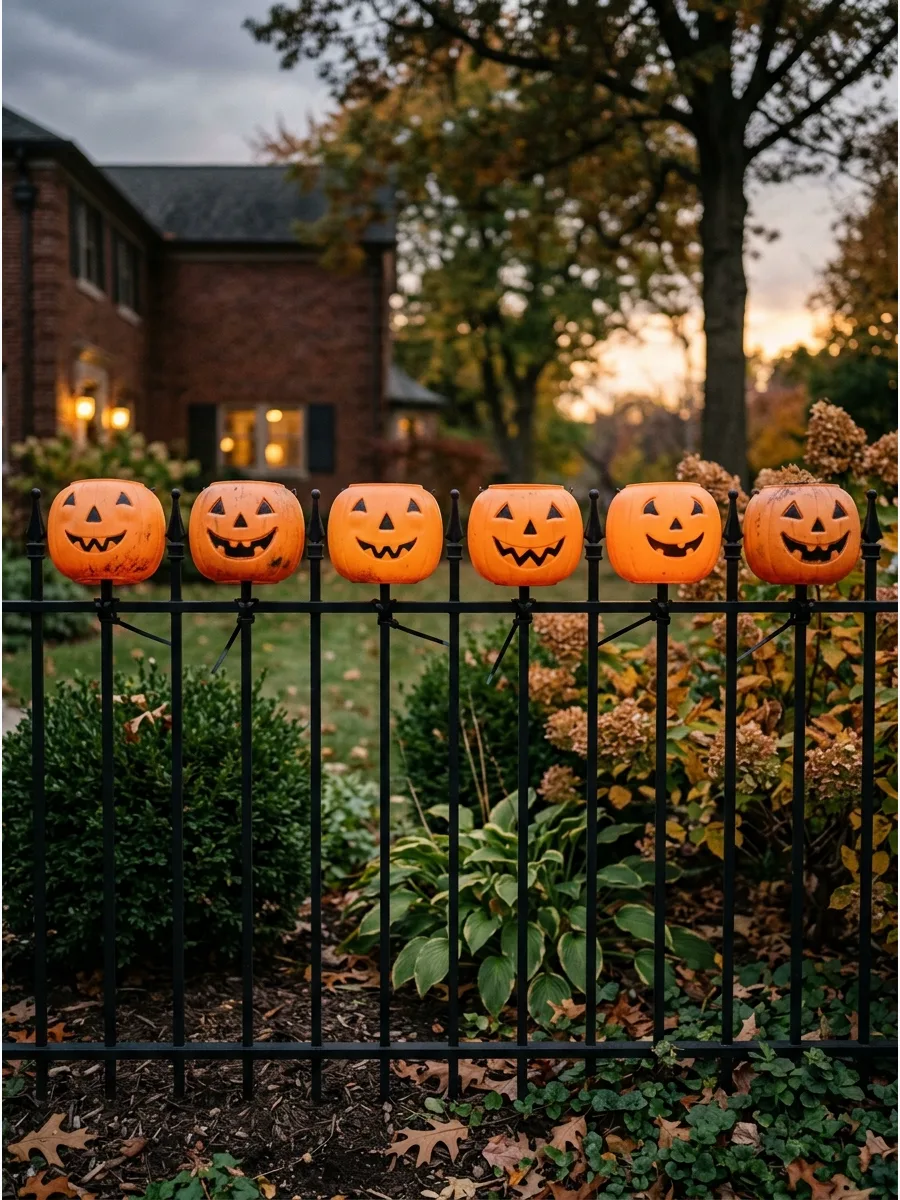
Inexpensive plastic trick-or-treat buckets can be transformed into glowing fence accents. Cut a small X in the bottom of each bucket and slide them onto the vertical pickets of a metal fence.
Secure the base with a zip tie so they do not slide down or rattle in the wind. This creates a uniform line of light that defines your property edge. It is much safer than placing glass lanterns on a thin railing.
- Pick up pumpkin buckets from a dollar store or thrift shop.
- The bottom opening fits most half-inch metal fence pickets.
- Stack the buckets inside each other for compact storage in the off-season.
Quick win: Drop a glow stick inside each one for a cordless light source on Halloween night.
35. Pool Noodle Giant Snakes
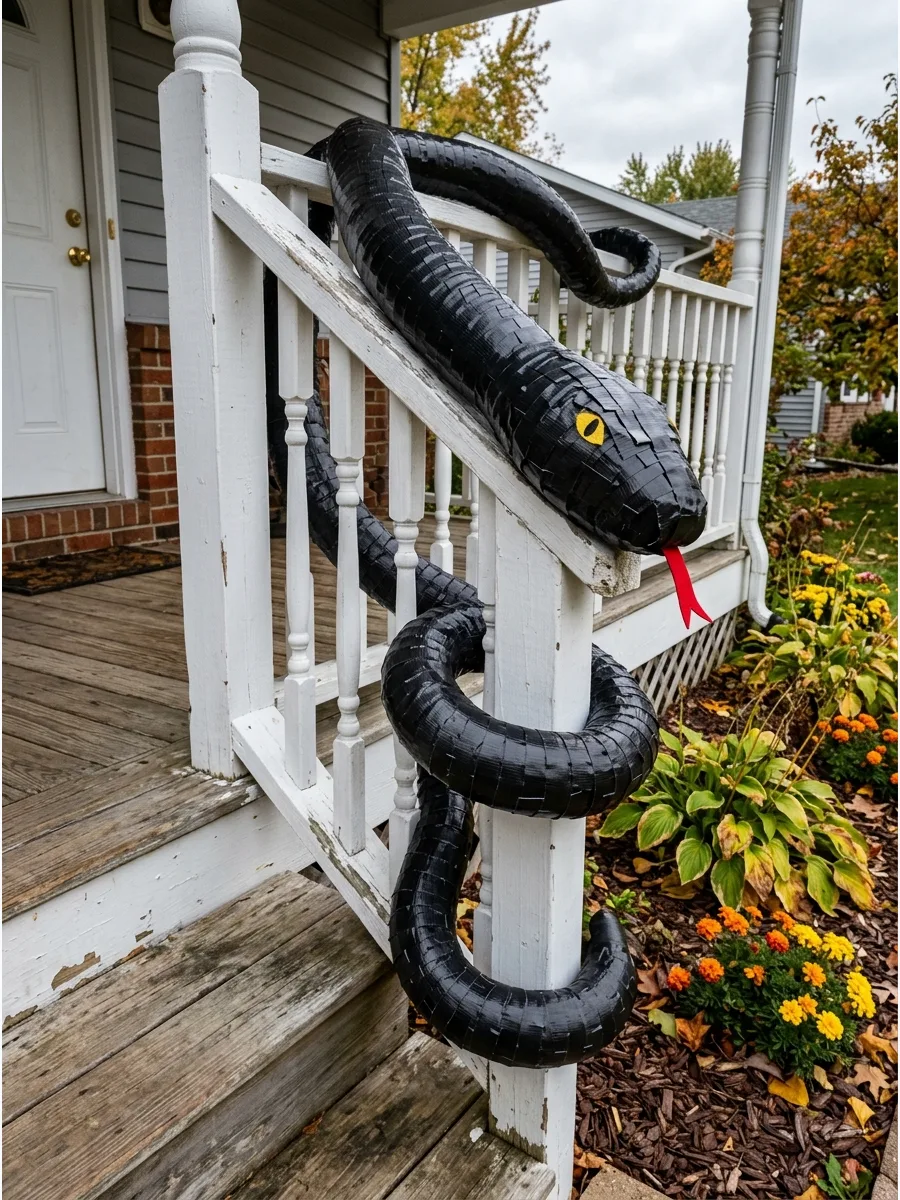
Black pool noodles can be wired together to create massive, slithering snakes for a porch railing. Use duct tape to taper the tail and a heat gun to gently curve the foam into a realistic S-shape.
Wrap the snakes around columns or banisters using black zip ties for a secure grip. High-contrast yellow eyes made of felt will make them pop against dark porch paint. They provide a lot of visual volume for very little money.
- Buy noodles at end-of-summer clearance sales for the best price.
- Use wire coat hangers inside the foam for more permanent shaping.
- Store them flat or coiled loosely in a garage or shed.
Best shortcut: Use a serrated bread knife to quickly cut scales into the foam surface.
36. Glowing Hula Hoop Portals
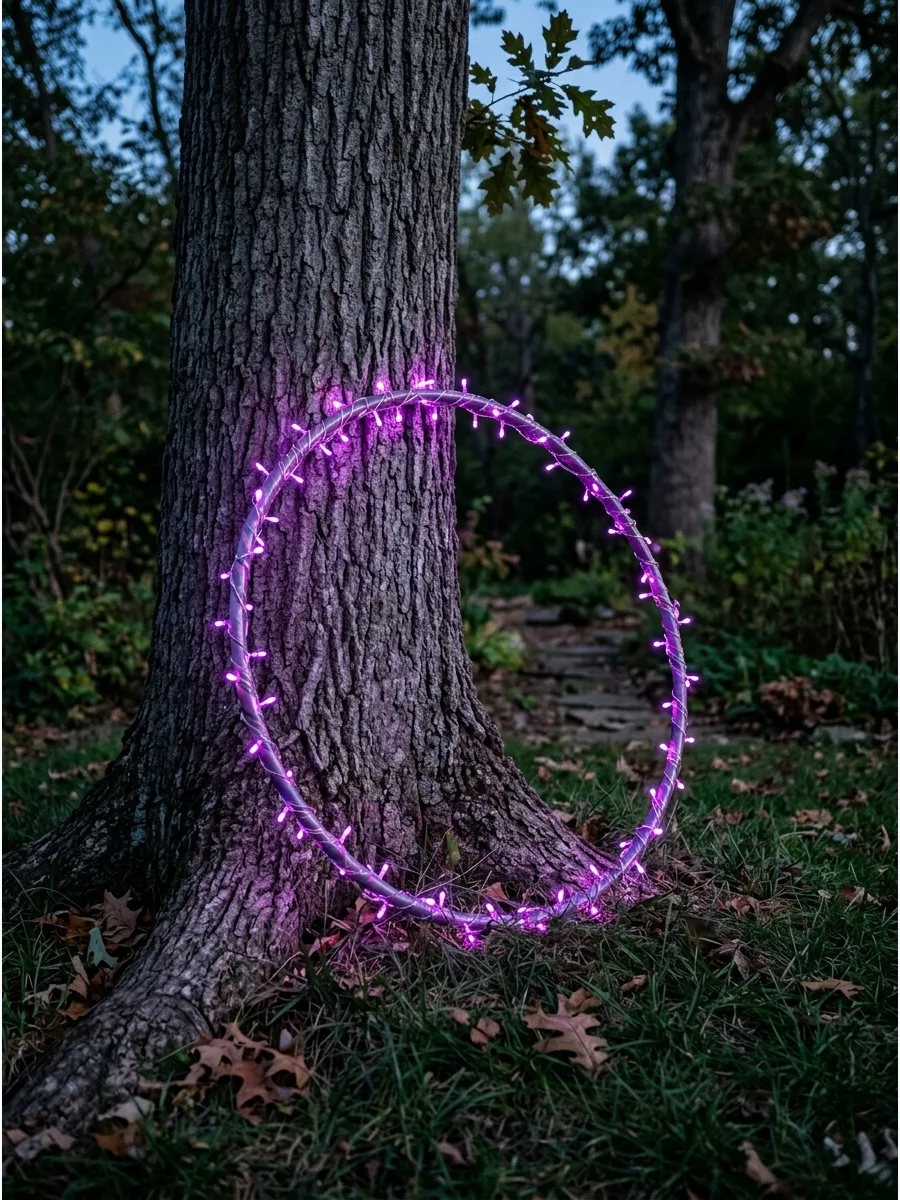
Large hula hoops wrapped in purple or green LED string lights look like mystical gateways in a dark yard. Lean them against trees or hang them from a porch ceiling to add depth to the display.
Zip-tie the battery pack to the back of the hoop so it stays hidden from view. These provide a modern, neon aesthetic that breaks up traditional orange decor. They are lightweight and easy to reposition if you change your mind.
- Standard plastic hula hoops and battery-operated LEDs work best.
- Use clear zip ties to keep the lights in place for a clean look.
- These work well as a simple photo backdrop for trick-or-treaters.
Quick win: Paint the hoop black first so the plastic frame disappears entirely at night.
37. Painted Rock Eyeballs
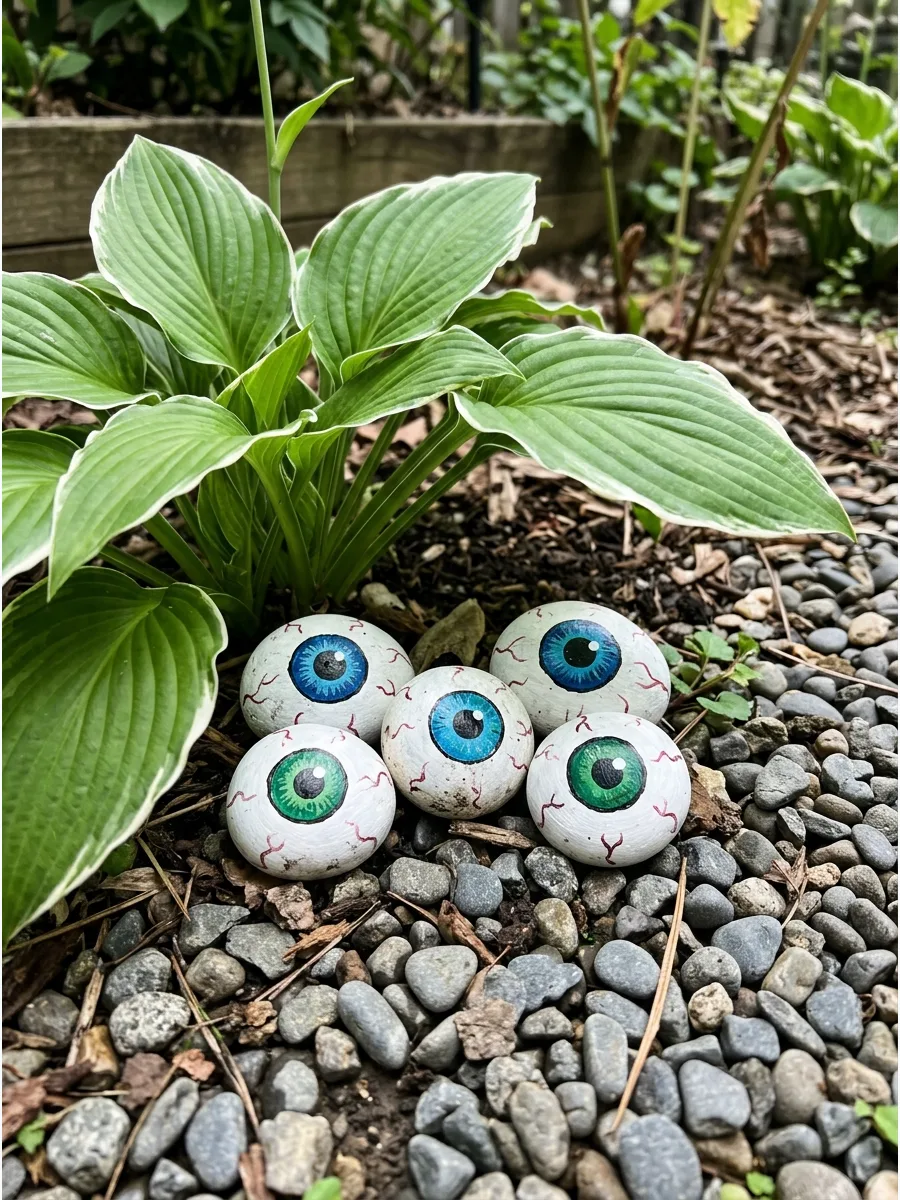
Smooth river stones are the perfect canvas for weatherproof eyeball decorations in garden beds. Use white outdoor paint for the base and bright colors for the irises to make them visible from the sidewalk.
Cluster them in groups of three or five to create the illusion of a creature hiding in the bushes. This is a great way to use natural materials that will not clutter the garage after the holiday. They are heavy enough to stay put even in heavy rain.
- Source smooth stones from a garden center or your own backyard.
- Use outdoor acrylic paint pens for fine detail on the pupils.
- Scatter them in mulch, gravel, or at the base of large trees.
Most people skip this: Apply a thick coat of glossy outdoor sealer to give the eyes a wet, realistic shine.
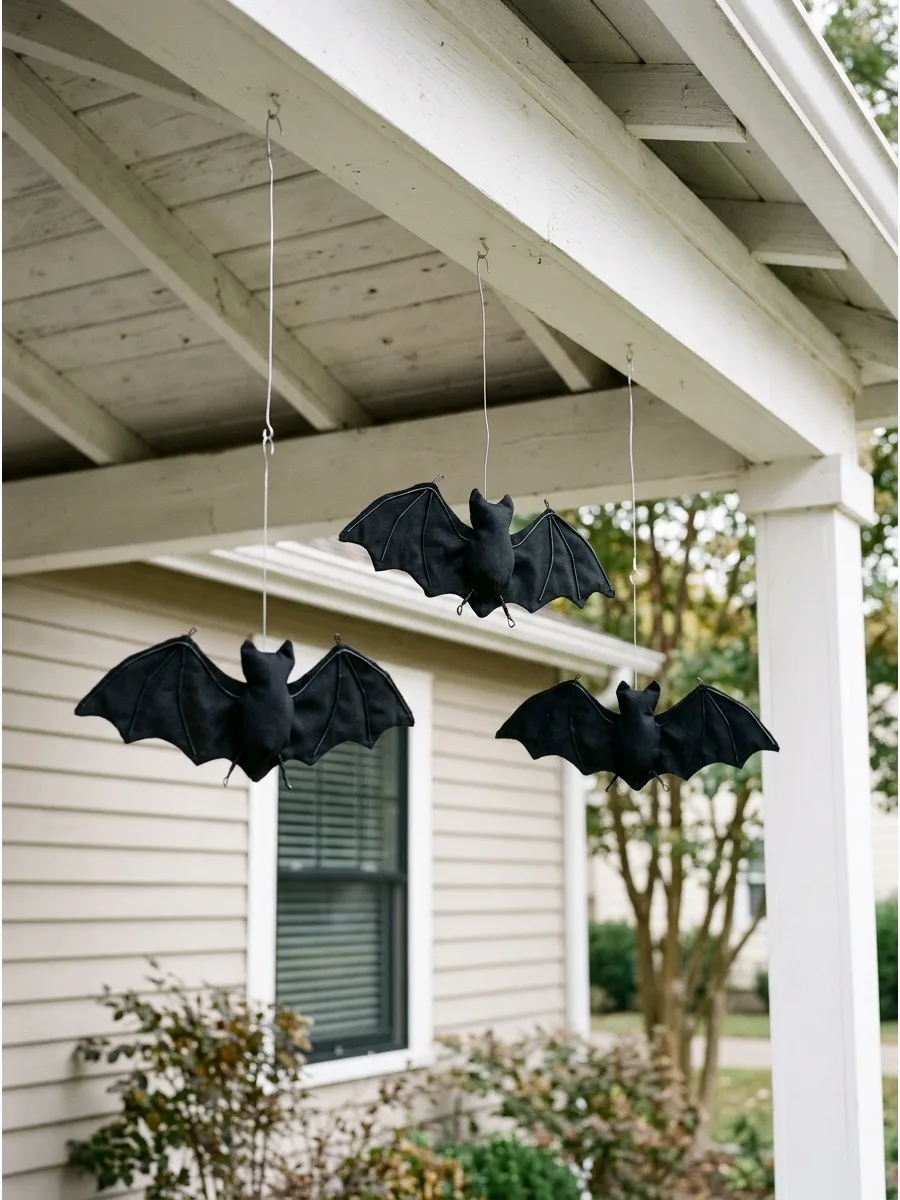
38. Felt Bat Tree Swarm
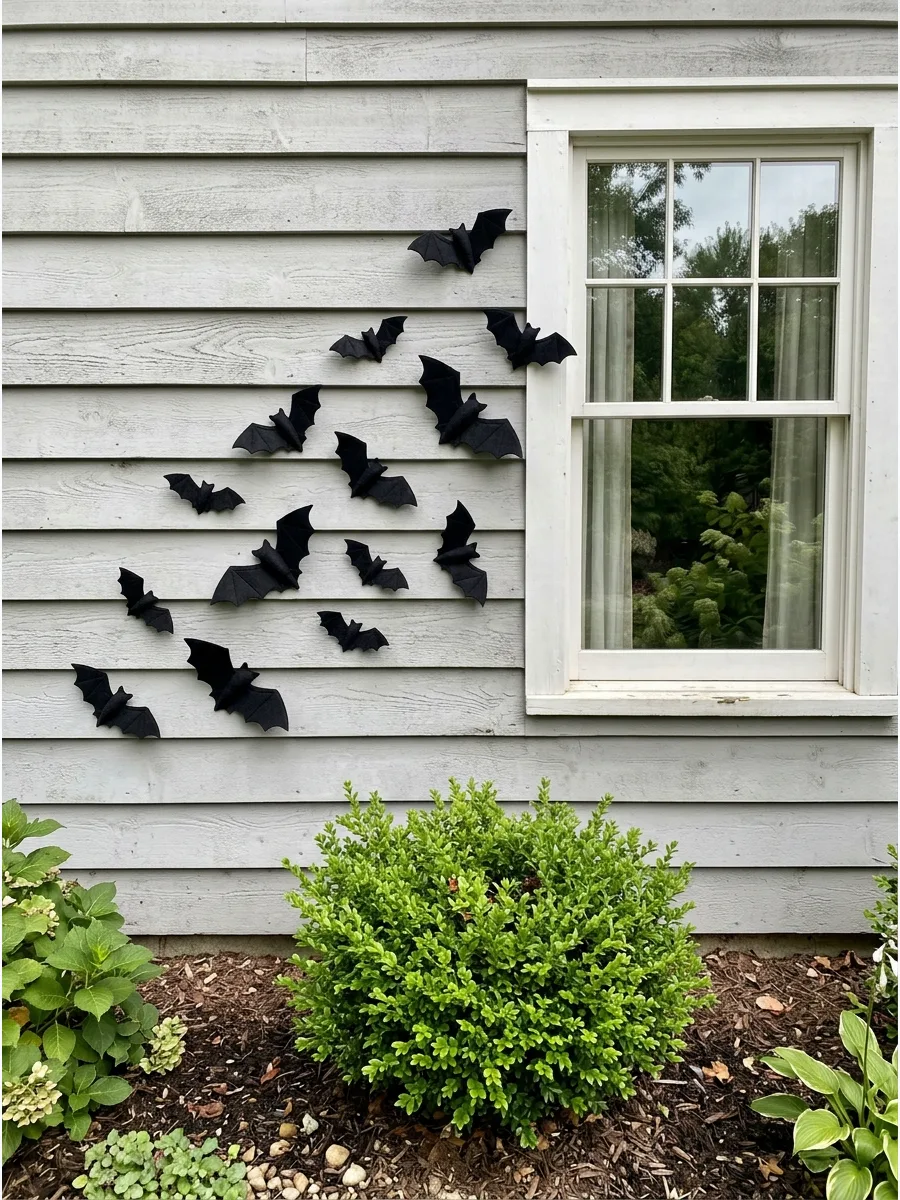
Stiff black felt is more durable than paper for outdoor bats that need to survive rain. Cut various sizes and fold the wings slightly to create a 3D effect when attached to the house or trees.
Use stainless steel pins or small finishing nails to secure them to tree bark or siding. A large swarm moving diagonally across a surface creates a sense of motion. Felt holds its color much better than construction paper under the sun.
- Heavyweight stiff felt sheets are essential to prevent drooping.
- Use outdoor-rated double-sided tape for brick or stone surfaces.
- Store them flat in a large envelope to keep the wings crisp for next year.
Best shortcut: Use a simple cardboard template to trace and cut multiple bats at once.
39. Tin Can Lantern Path
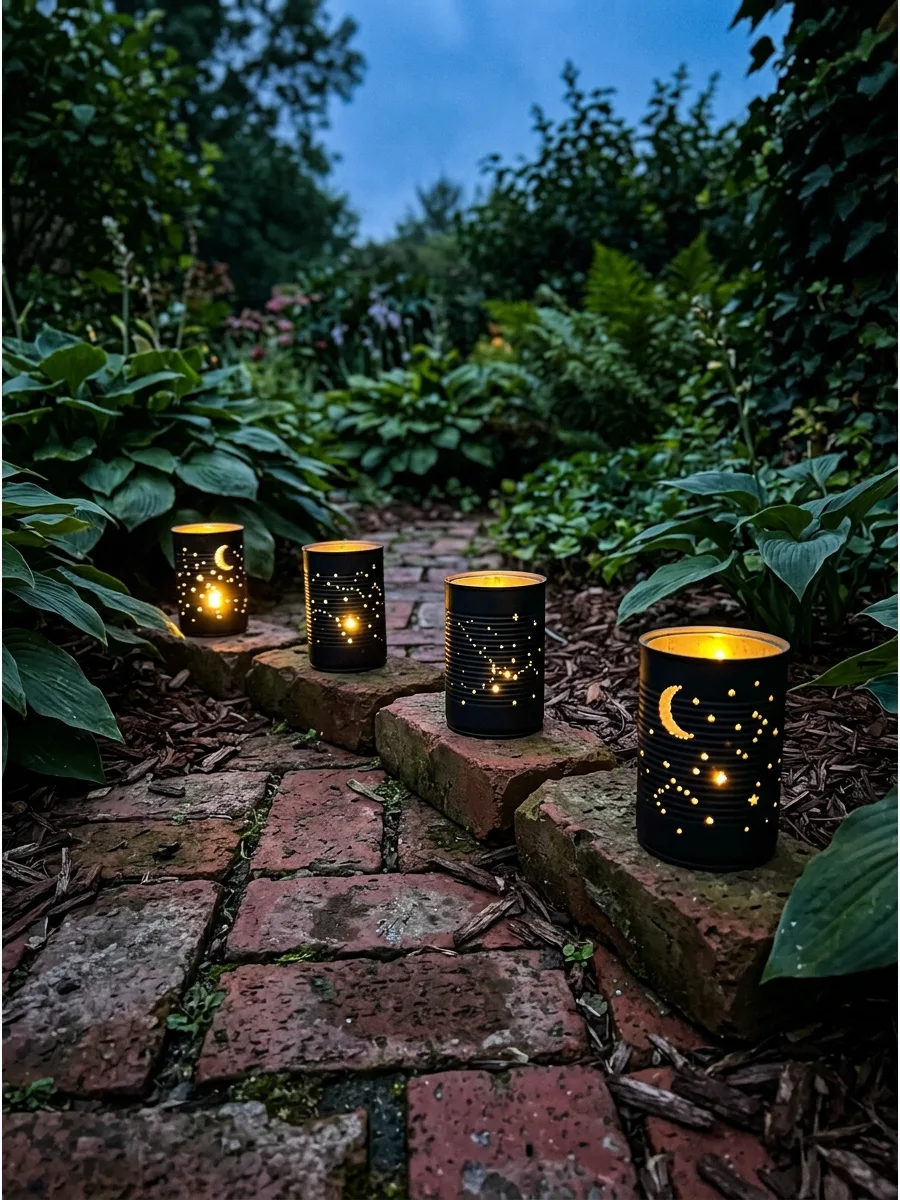
Recycled tin cans with punched patterns make durable, wind-proof lanterns for a front walkway.
Fill the cans with water and freeze them before punching holes to keep the metal from denting. Spray the finished cans with matte black paint to make the glowing patterns stand out at night. These are heavy enough to stay put without extra stakes.
They add a classic, handmade charm to any entry.
- Save clean soup or coffee cans throughout the month.
- Use a hammer and a large nail to punch your designs.
- Place them on flat surfaces like porch steps or paved paths.
Most people skip this: Use battery-operated puck lights instead of candles to avoid soot buildup inside the cans.
40. Branch and Vine Scarecrow
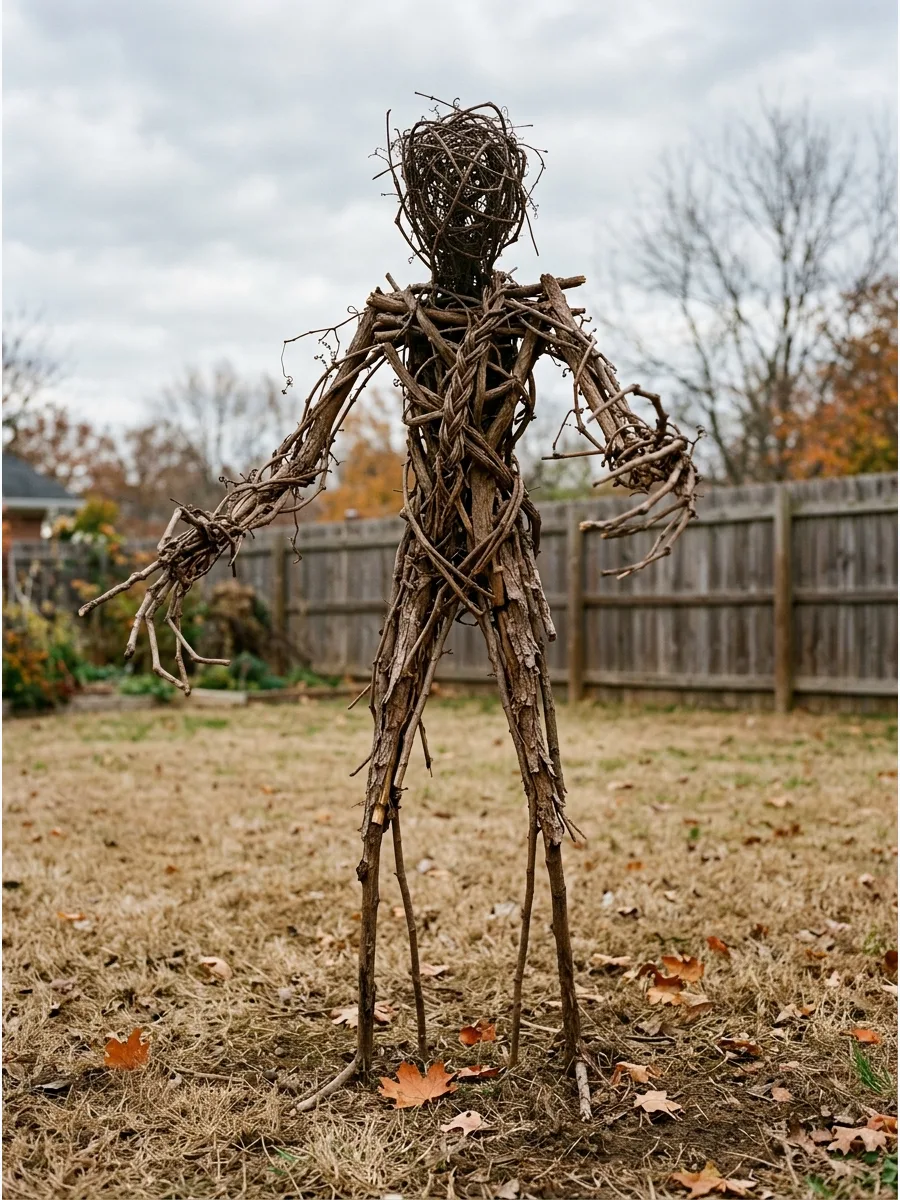
Creating a figure out of fallen branches and dried vines gives the yard a folk horror vibe. Lash long sticks together with twine to form a tall, spindly frame that looks more skeletal than a traditional hay scarecrow.
Wrap the joints with extra grapevine or raffia to hide the twine and add bulk. This natural look blends perfectly with autumn leaves and dead garden plants. It is a great way to use yard waste for free decor.
- Forage for free yard debris or fallen limbs in a wooded area.
- Use heavy twine or wire for the main structural frame.
- Anchor the base with a rebar stake to keep it upright in the wind.
Quick win: Drape a few strands of Spanish moss over the shoulders for an aged, swampy texture.
41. Old Doorway to Nowhere
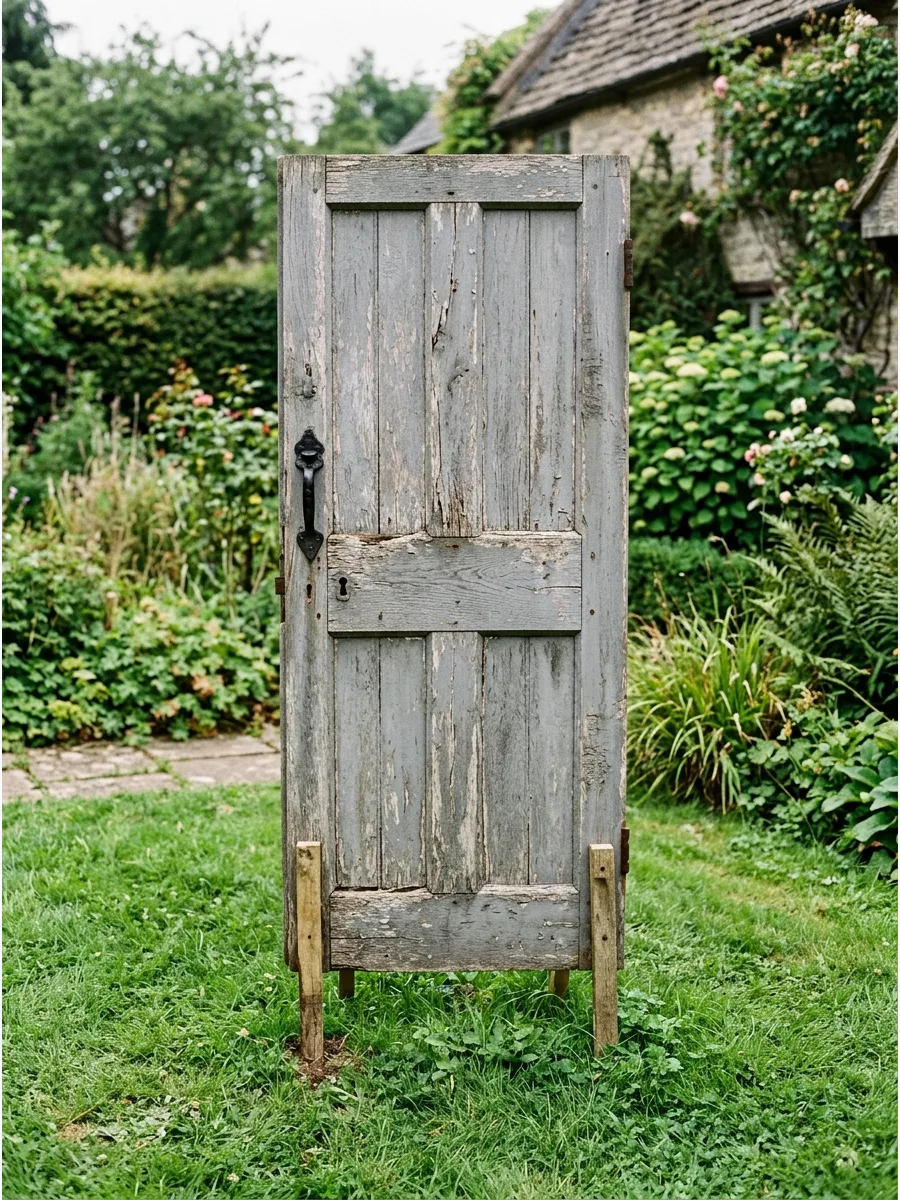
A freestanding vintage door placed in the middle of a lawn creates a surreal and creepy focal point. Paint it a weathered gray or deep red and add a heavy iron handle for character.
Secure the door to heavy-duty fence posts hidden behind the frame so it does not tip over. This setup is perfect for placing a skeleton peering through the crack.
It creates a sense of story that simple lawn ornaments cannot match.
- Check local architectural salvage yards or online marketplaces for cheap doors.
- Use exterior-grade hinges if you want the door to actually swing open.
- This project usually requires two people for a safe and level setup.
Most people skip this: Add a Keep Out sign or a faux deadbolt to make the door feel more mysterious.
42. Wire Hanger Bat Silhouettes
Reshaping old wire hangers and covering them with black pantyhose creates lightweight, weather-resistant bats.
Bend the wire into a wing shape and stretch the fabric tight for a smooth, matte finish. Hang them from porch eaves with thin wire so they appear to be diving toward visitors. These are much more durable than cardboard and catch the light beautifully.
The fabric stays taut even after getting wet.
- Use metal coat hangers and cheap black tights or pantyhose.
- Needle-nose pliers help in shaping the sharp points of the wings.
- They can be easily bent back into shape if they get crushed during storage.
Best shortcut: Use a dab of hot glue to secure the fabric at the center where the wire body meets.
43. Stuffed Clothing Porch Sitters
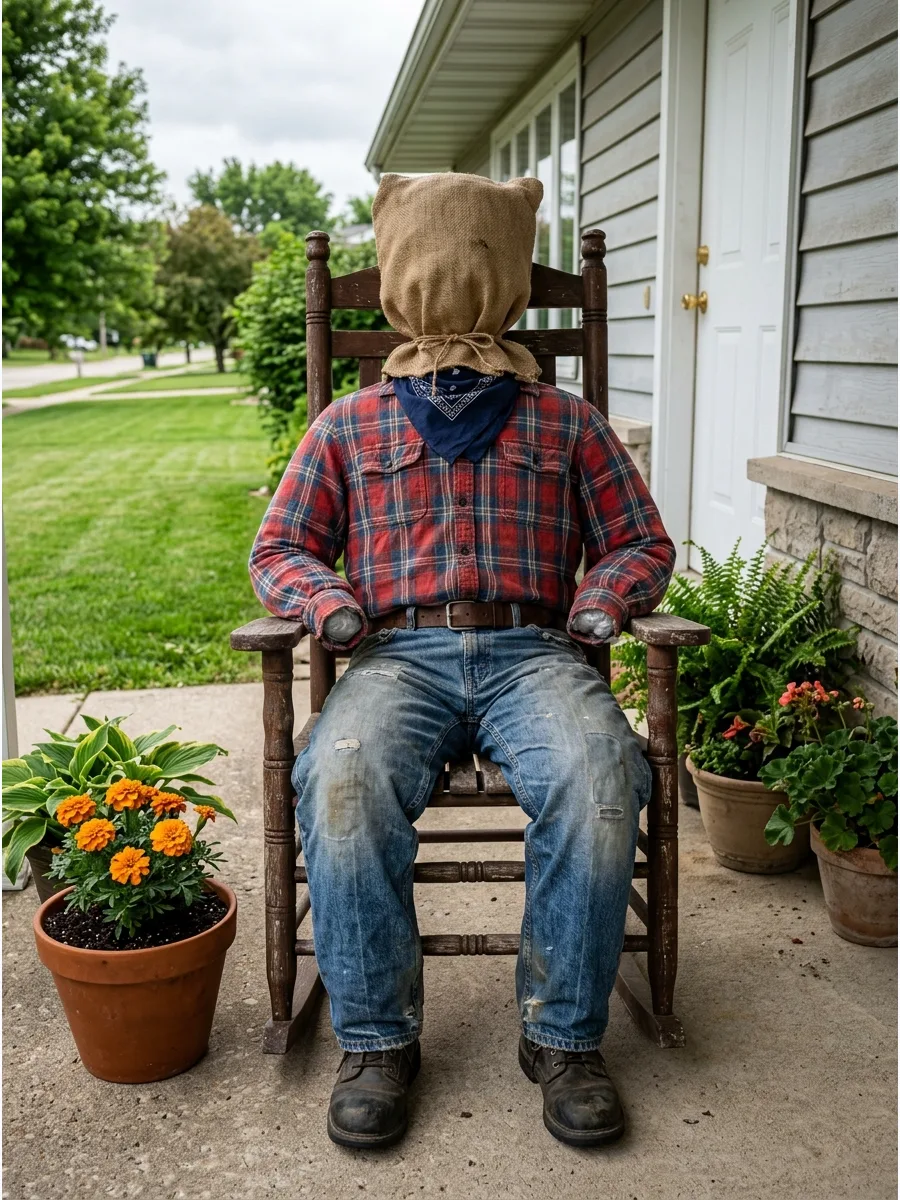
Old flannels and jeans stuffed with plastic grocery bags create realistic figures for porch chairs. Using plastic bags instead of hay ensures the person does not get soggy or attract pests if it rains.
Tuck a plastic pumpkin or a burlap sack into the collar to serve as a head. This is the most effective way to fill empty seating and make the porch feel lived-in. It is a classic DIY that never fails to startle guests.
- Use thrift store clothes that you do not mind getting weathered.
- Safety pins work well to join the shirt and pants together.
- Store the clothes in a bin and reuse the plastic bags next year.
Quick win: Put a pair of old boots at the bottom of the jeans to give the figure a grounded, realistic weight.
44. Reflective Tape Ghost Outlines
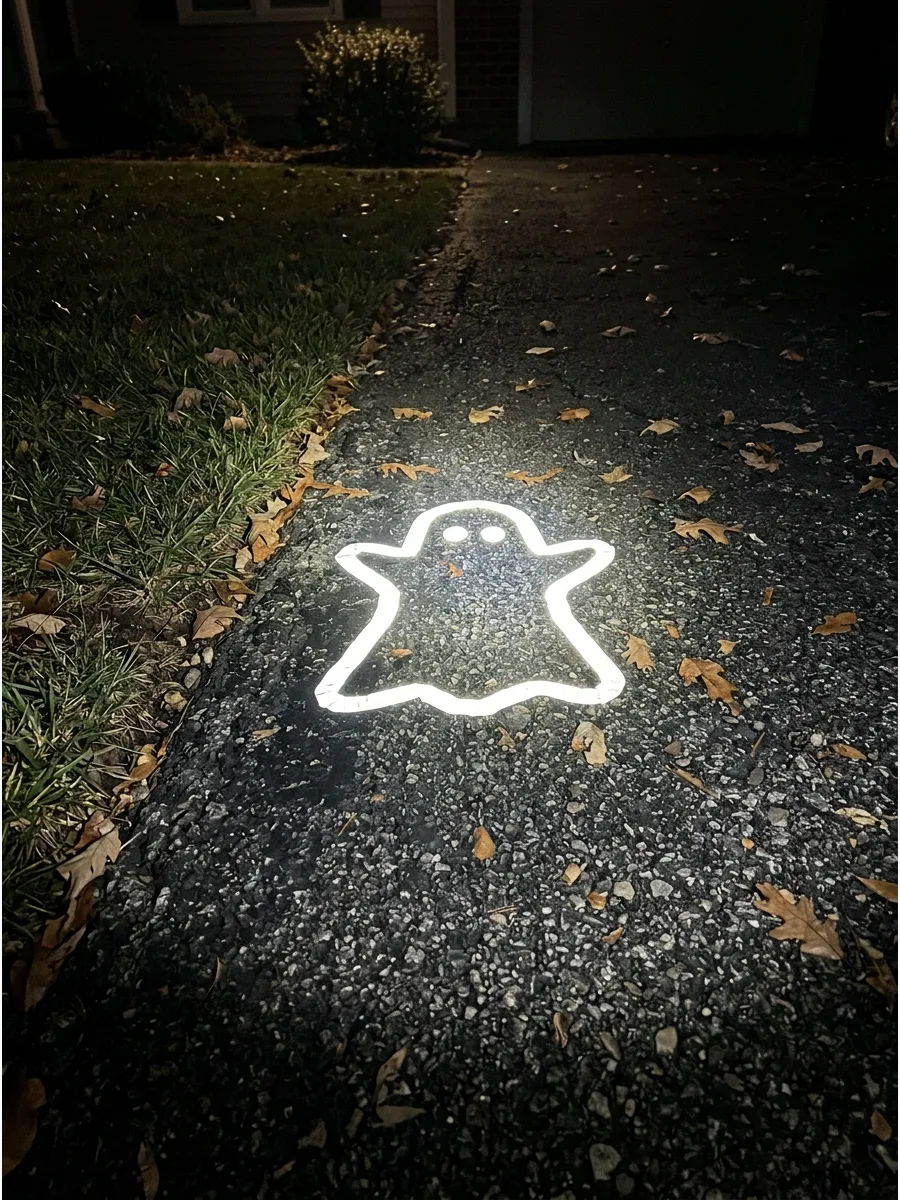
Silver or white reflective tape can be used to create hidden ghosts on driveways or garage doors. The outlines remain subtle during the day but glow brightly when hit by car headlights or flashlights.
Apply the tape in simple, jagged shapes to mimic a classic sheet ghost silhouette. This is a low-profile way to add a surprise element for neighbors driving by at night. It works on any dark, flat surface.
- Look for outdoor-rated reflective tape for the best adhesion.
- This project works best on dark asphalt or black-painted garage doors.
- The tape peels off easily without leaving heavy residue after the holiday.
Most people skip this: Test the tape with a phone flash first to ensure you have angled the pieces for maximum glow.
45. Laundry Basket Cage
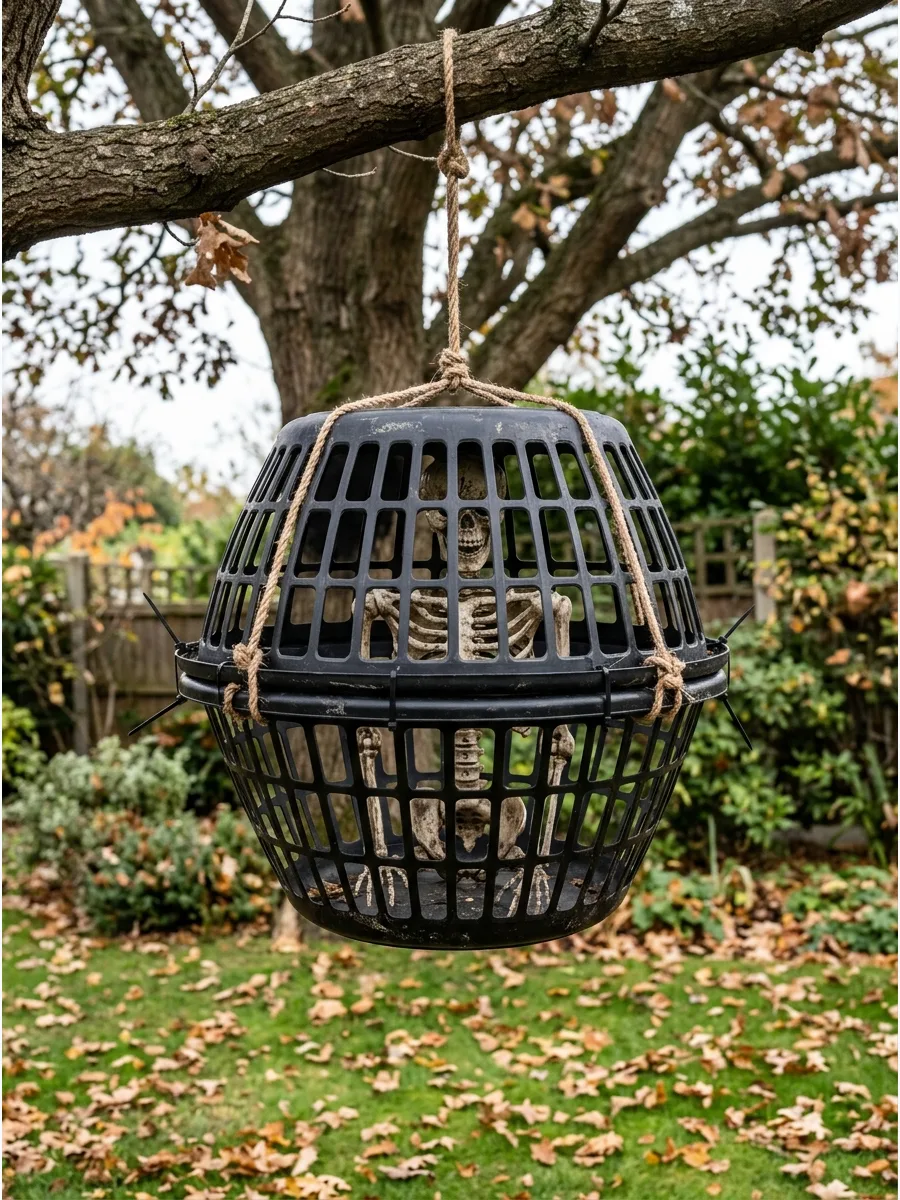
Two plastic laundry baskets joined at the rims make a perfect cage for skeleton parts or oversized spiders. Use black spray paint on the baskets to make them look like heavy iron bars.
Secure the two halves with black zip ties and hang the cage from a sturdy tree limb. It is a high-impact prop that uses common household items. The open weave of the basket makes the contents visible from all angles.
- Pick up standard round laundry baskets from a dollar store.
- Use matte black spray paint to eliminate the plastic shine.
- The cage is lightweight enough to hang from most medium-sized branches.
Best shortcut: Use a soldering iron to melt small holes for the zip ties instead of trying to drill through the plastic.
46. Giant Beach Ball Eyeballs
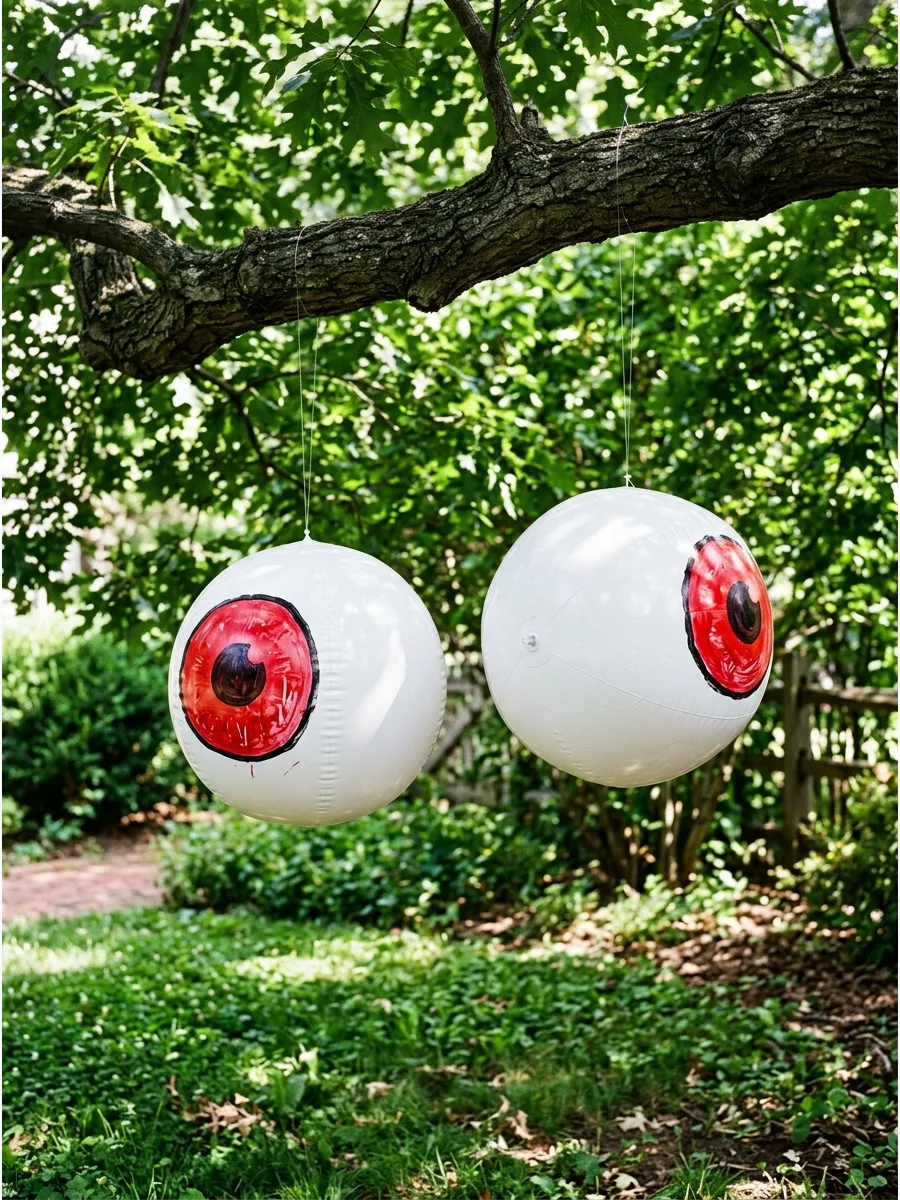
Transform inexpensive white beach balls into massive staring eyes for your trees or bushes. Use outdoor-grade acrylic paint to add a large colorful iris and a black pupil to the center of each ball.
Hang these from tree branches at different heights to make it look like the woods are watching your neighbors. They are lightweight and hold up well against wind and light rain.
High-contrast colors like bright yellow or neon red show up much better from the street than dark blues or greens.
- Sourcing and budget: Buy beach balls in bulk online for under twenty dollars to cover a whole yard.
- Setup and logistics: Use clear fishing line tied to the air valve to make the eyeballs look like they are floating.
- Adaptation: Place them inside thick evergreen bushes instead of hanging them if your yard lacks tall trees.
Quick win: Use a permanent marker to draw thin, squiggly red veins on the white parts for a bloodshot effect.
47. PVC Pipe Graveyard Fence
Build a realistic gothic fence using lightweight PVC pipes and a few wood strips. Spray paint the entire assembly with a flat black finish to mimic the look of heavy wrought iron.
Secure the pipes into the ground using rebar or wooden stakes to keep the fence from leaning or blowing over in October winds. This creates a clear boundary for a front yard cemetery scene. Flat black paint hides the plastic texture much better than glossy finishes which tend to look cheap under porch lights.
- Sourcing and budget: Standard half-inch PVC is very cheap at any local hardware store.
- Setup and logistics: Drill holes through the horizontal rails so the vertical pipes can slide through for easy assembly.
- Adaptation: Glue plastic finials or painted toy arrows to the tops of the pipes for a more ornate look.
Most people skip this: Scuff the plastic pipes with sandpaper before painting so the color doesn't flake off during storage.
48. Tattered Burlap Porch Shrouds
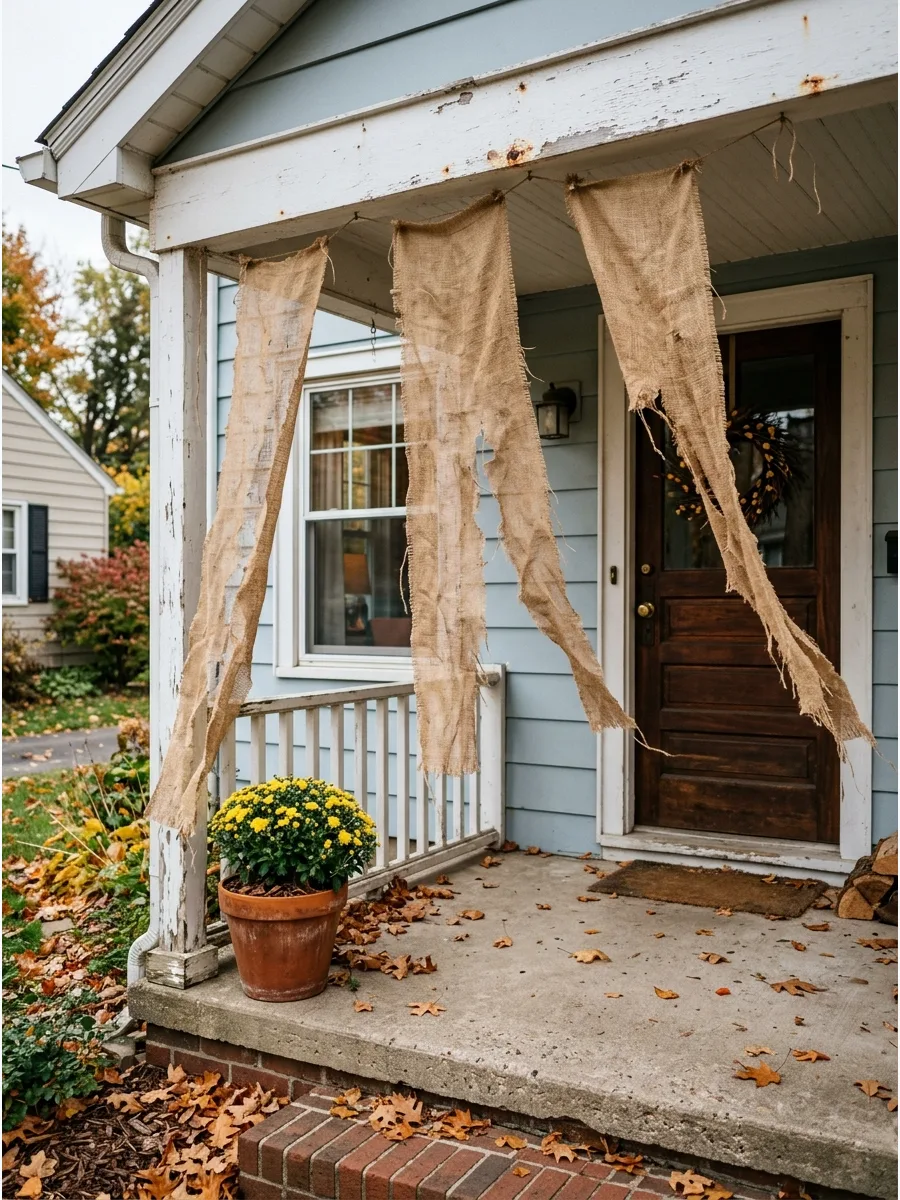
Hang long strips of natural burlap from your porch eaves to create a creepy, abandoned look. Shred the bottom edges with a utility knife and pull at the horizontal threads to create a weathered, centuries-old appearance. These shrouds add movement to your home exterior as they catch the breeze.
Dark tea or coffee stains applied with a spray bottle add realistic age and grime to brand-new burlap fabric.
- Sourcing and budget: A single large roll of upholstery burlap can cover an entire front porch for very little cost.
- Setup and logistics: Secure the top of the fabric to the trim using a staple gun for a fast setup and easy removal.
- Adaptation: Use black burlap or spray-painted gray fabric for a more charred or ghostly aesthetic.
Best shortcut: Soak the bottom third of the burlap in a bucket of water before shredding it to make the fibers pull apart faster.
49. Duct Tape Web Door
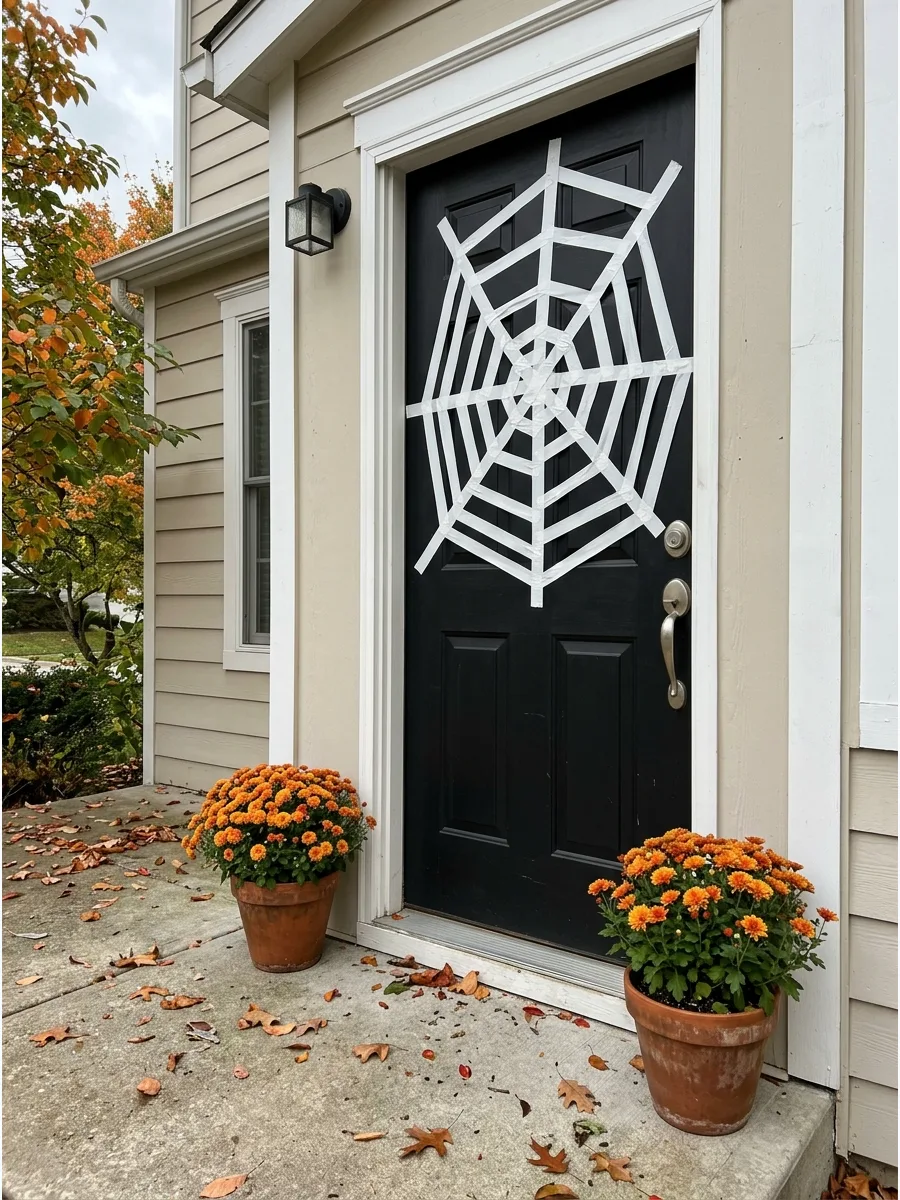
Create a massive spider web directly on your front door using only white duct tape. Start with long diagonal strips that cross in the middle to form the main spokes before adding the connecting circular rings. This project is weather-proof and stays sticky even in high humidity.
Avoid using masking tape or painter's tape because they tend to peel and leave a messy residue when exposed to direct sunlight.
- Sourcing and budget: One roll of standard white duct tape is enough to cover a standard-sized door.
- Setup and logistics: Clean the door surface with a damp cloth and let it dry completely before applying the tape.
- Adaptation: Add a large plastic spider to the center of the web using a small piece of double-sided mounting tape.
Quick win: Keep the tape strips slightly loose rather than pulling them tight to prevent the web from warping if the door temperature changes.
50. Cardboard Window Monster Teeth
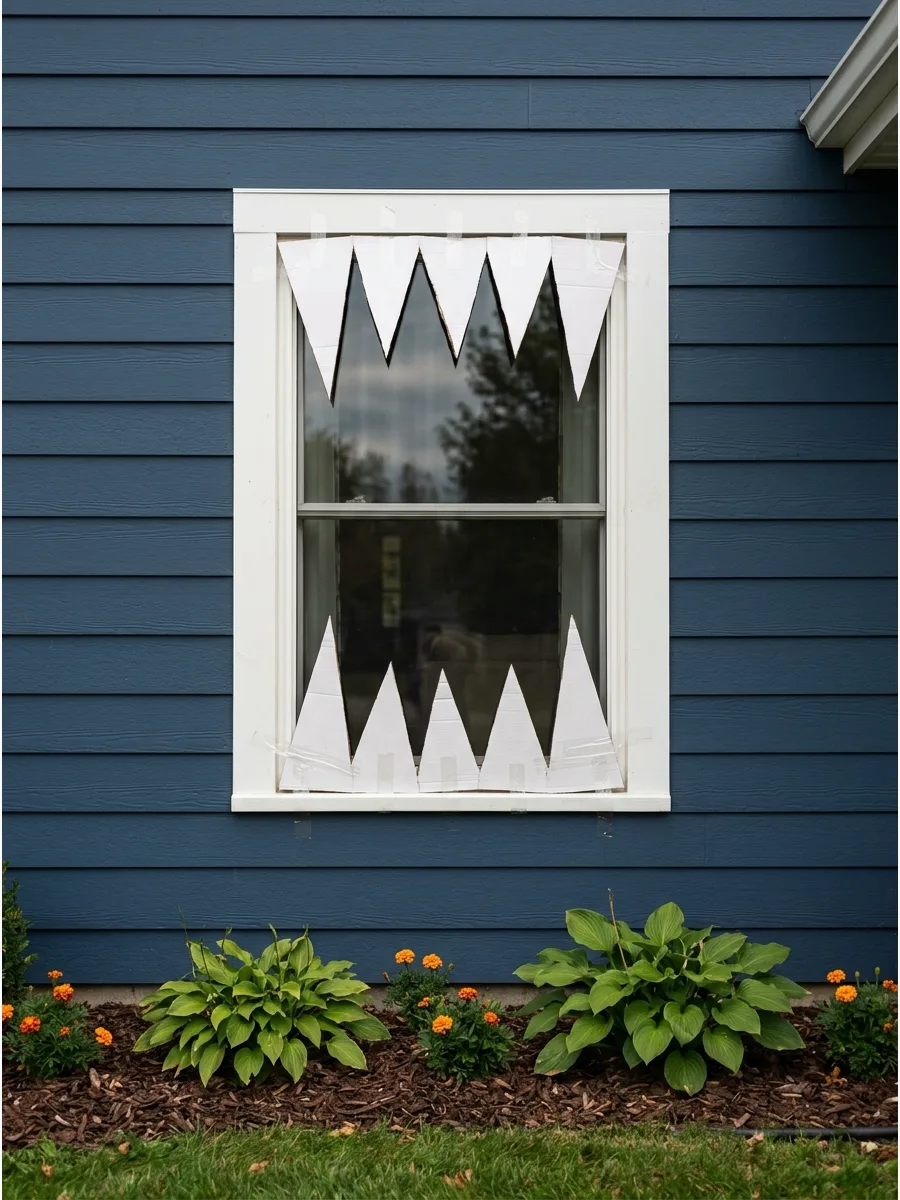
Turn your entire house into a giant monster by adding jagged teeth to your window frames. Cut large triangles from white foam board or sturdy cardboard and paint them a bright, clean white.
Tape the teeth to the inside of the window glass so they frame the view without blocking all the natural light. When the indoor lights are on at night, the teeth create a terrifying silhouette. Backlighting the window with a purple or orange bulb makes the teeth stand out significantly more after dark.
- Sourcing and budget: Use recycled shipping boxes and white acrylic paint for a near-zero-cost project.
- Setup and logistics: Use heavy-duty packing tape on the cardboard side and painter's tape on the glass side to protect your windows.
- Adaptation: Cut different shapes like fangs or serrated rows to give each window a unique monster personality.
Most people skip this: Paint the back of the cardboard black so the teeth don't look messy from inside your living room.
Frequently Asked Questions
How do I make outdoor Halloween decorations windproof?
To keep your displays steady, drive rebar or heavy-duty tent stakes into the ground and secure your items with zip ties. For lightweight props, hiding sandbags or bricks inside the base provides the necessary weight to withstand strong autumn gusts.
What are the best weather-resistant materials for DIY yard decor?
PVC piping and pressure-treated wood are excellent choices for frames that can withstand moisture without rotting. For fabric elements, use outdoor-rated textiles or plastic tablecloths to ensure your decorations stay looking great through October rain.
How can I light my DIY decorations without an outdoor outlet?
Solar-powered spotlights are a fantastic hands-off option that charge during the day and automatically illuminate your yard at night. You can also use battery-operated LED strands tucked into waterproof battery boxes to keep your display glowing safely.
What is the cheapest way to make large-scale outdoor ghosts?
Drape white plastic tablecloths over inverted tomato cages for quick, budget-friendly spirits that stand on their own. For a more custom look, mold chicken wire into ethereal shapes for a high-impact display that costs very little in materials.
How do I secure DIY decorations to a brick or siding house without damage?
Use vinyl siding clips or brick clamps to hang your decor securely without drilling permanent holes into your home's exterior. Outdoor-rated adhesive hooks are also a great temporary solution for lighter items, as they are designed to peel off cleanly after the holiday.