30 Smart DIY Yard Decor Ideas
This post may contain affiliate links: full affiliate disclosure.
Transforming a plain yard into an inviting retreat does not require a massive budget or professional landscapers. Simple projects add character and make outdoor spaces feel like a natural extension of the home.
Focus on durable materials and smart layouts to get the best results without unnecessary stress.
1. Solar Bottle Lanterns
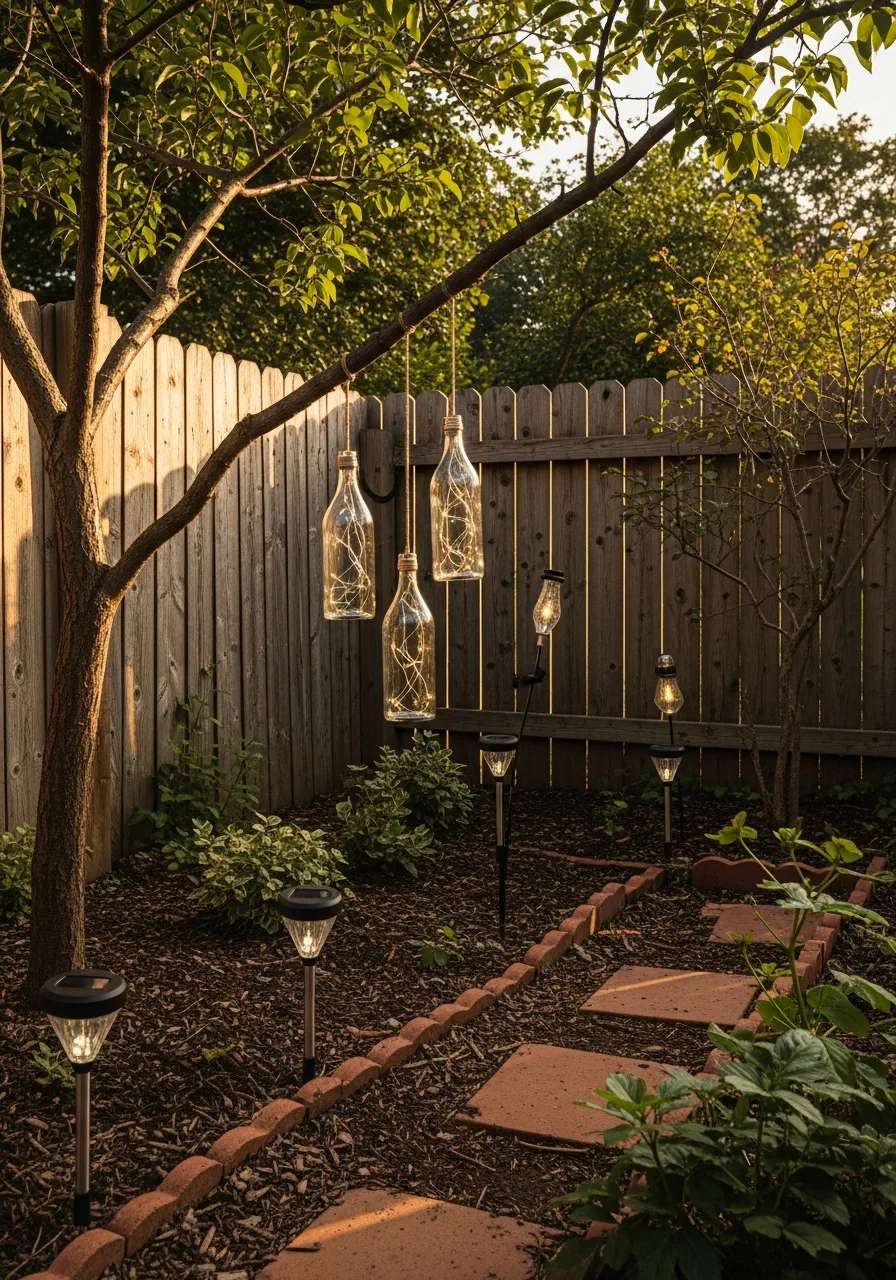
Use old glass bottles to create unique lighting. Insert solar-powered stakes or string lights into the bottles.
Hang these from low tree branches for instant evening ambiance. What works: Grouping three bottles at different heights creates a strong focal point.
- Save glass bottles from the recycling bin for a zero-cost project.
- Use sturdy wire to wrap the necks for secure hanging on branches.
- Swap clear glass for blue or green to change the light color.
Most people skip this: Clean the glass thoroughly to ensure the solar panels get maximum light.
2. Painted Cinder Block Planters
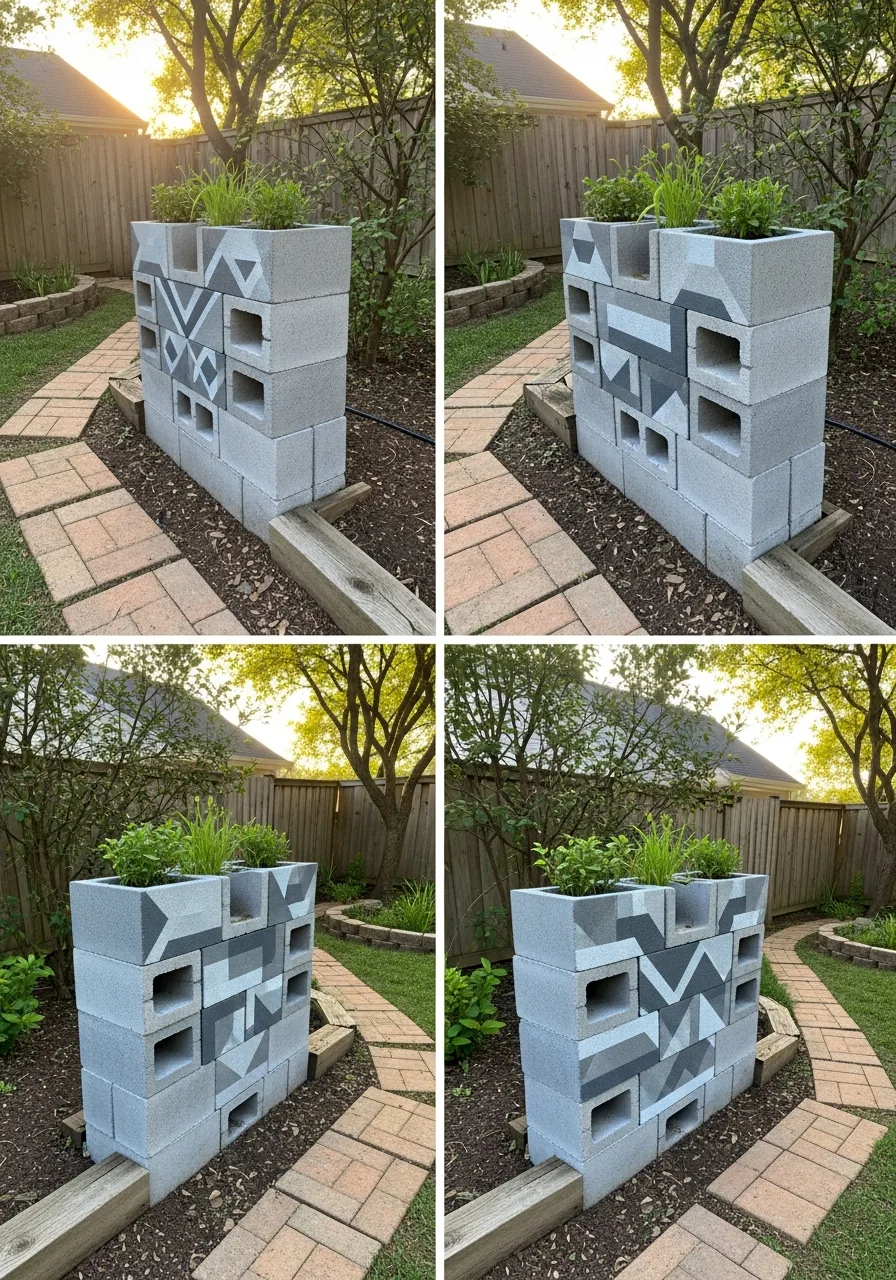
Stack standard cinder blocks to create a custom planter wall. Use outdoor-rated spray paint to give the gray concrete a high-end look.
Apply a coat of outdoor-rated spray paint to give cheap blocks a high-end look. Worth doing: Geometric patterns look more modern than solid colors.
- Buy standard blocks at any hardware store for just a few dollars.
- Use liquid nails to secure stacks taller than two layers for safety.
- Fill bottom holes with gravel for better drainage before adding soil.
Quick win: Use painter’s tape to create crisp lines for a professional finish.
3. Vertical Pallet Garden
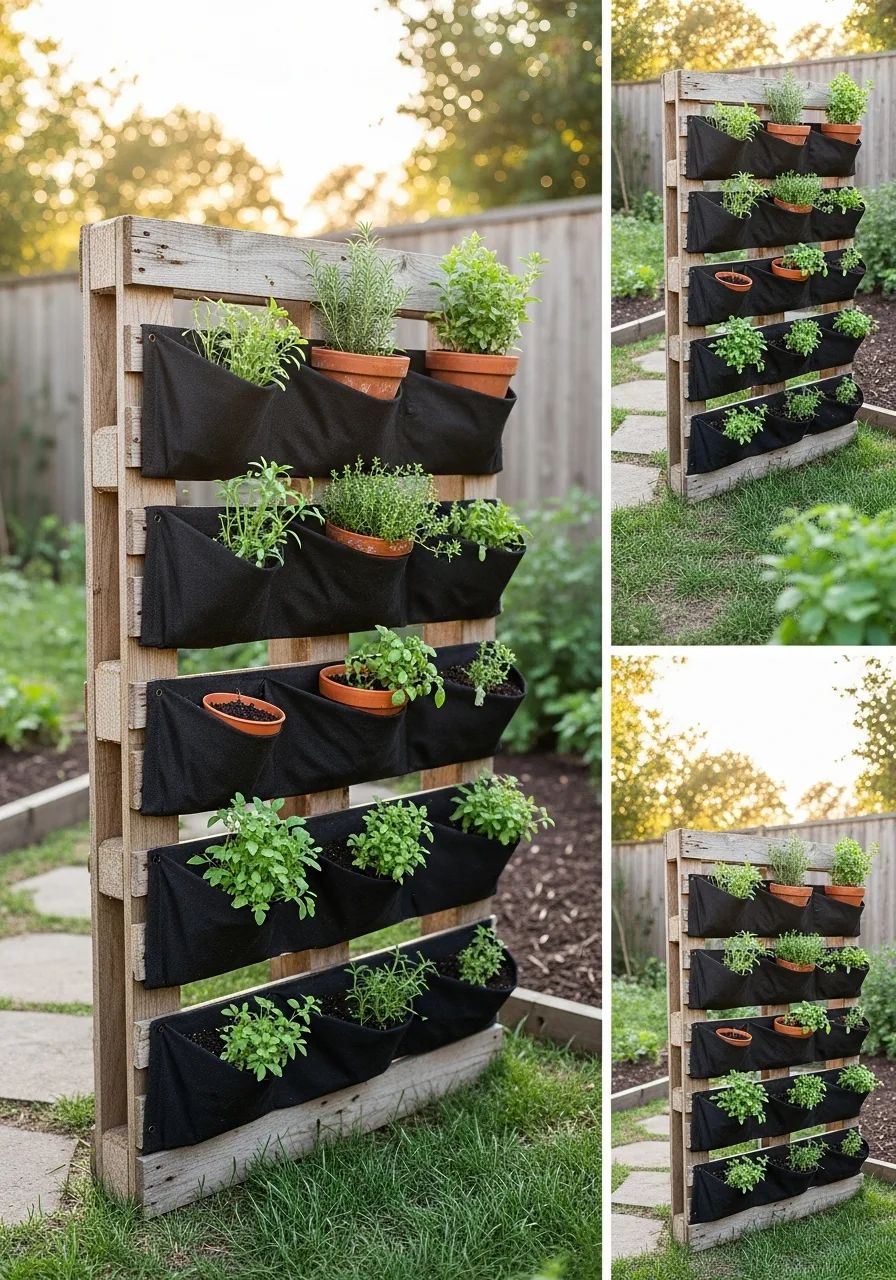
Lean a wooden pallet against a fence or wall to save ground space. Staple landscape fabric to the back and bottom of the rungs to create pockets.
Staple heavy-duty landscape fabric to the back and bottom of the pallet to hold soil in place. Best move: Use this for herbs near the kitchen door.
- Find heat-treated pallets marked with HT for safety around plants.
- Lean the pallet at a slight angle to prevent it from tipping over.
- Choose shallow-root plants like succulents or lettuce for best growth.
Best shortcut: Sand the wood first to prevent splinters while harvesting herbs.
4. Terra Cotta Bird Bath
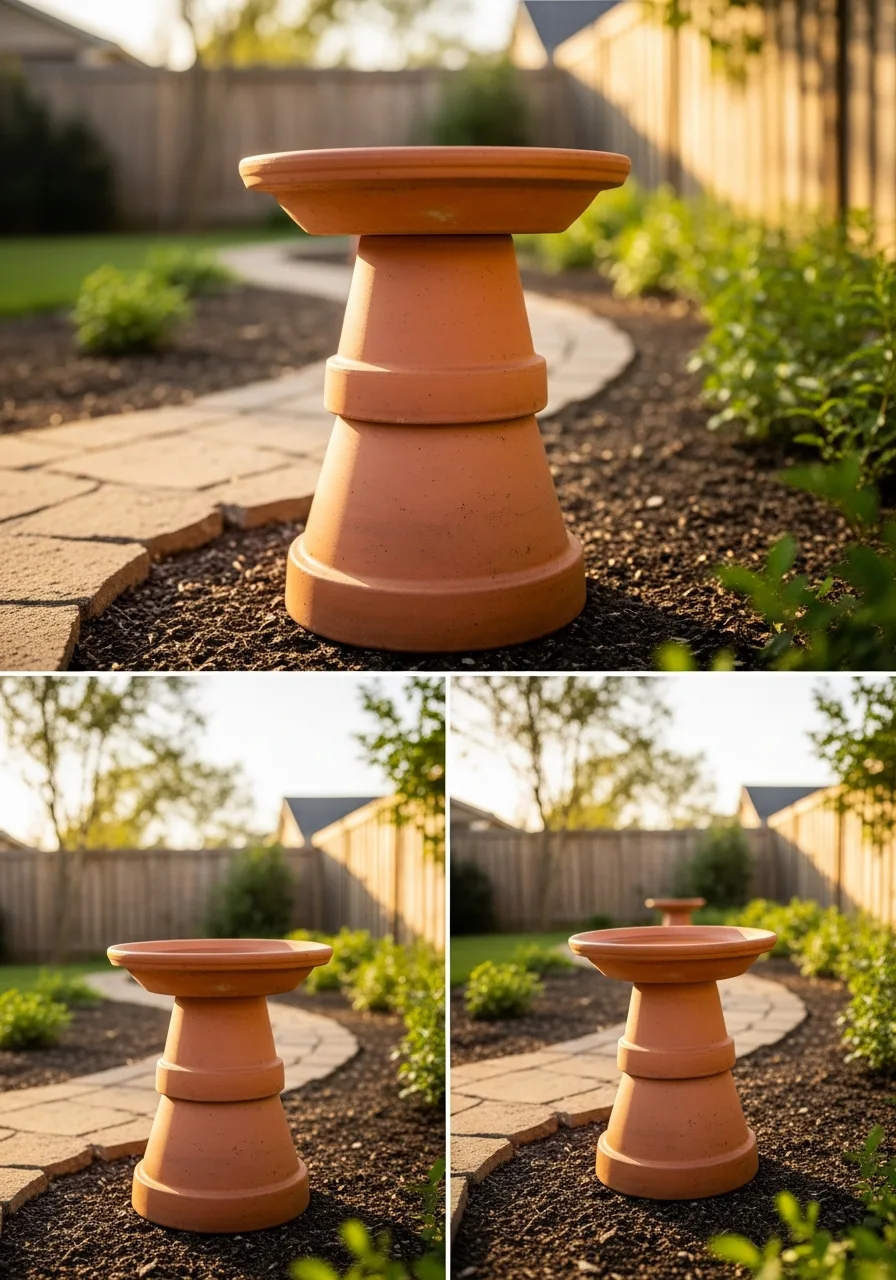
Stack three graduated terra cotta pots upside down to form a pedestal. Place a large saucer on top to hold the water.
Glue three graduated pots together with waterproof construction adhesive for a sturdy base. Smart shortcut: Leave the pots unpainted for a classic rustic look.
- Use a large saucer for the top basin to accommodate multiple birds.
- Place the assembly on level ground or a flat paver to prevent wobbling.
- Add a few stones to the water for bees and butterflies to land on.
Most people skip this: Change the water every two days to keep it fresh and mosquito-free.
5. Tire Swing Planter
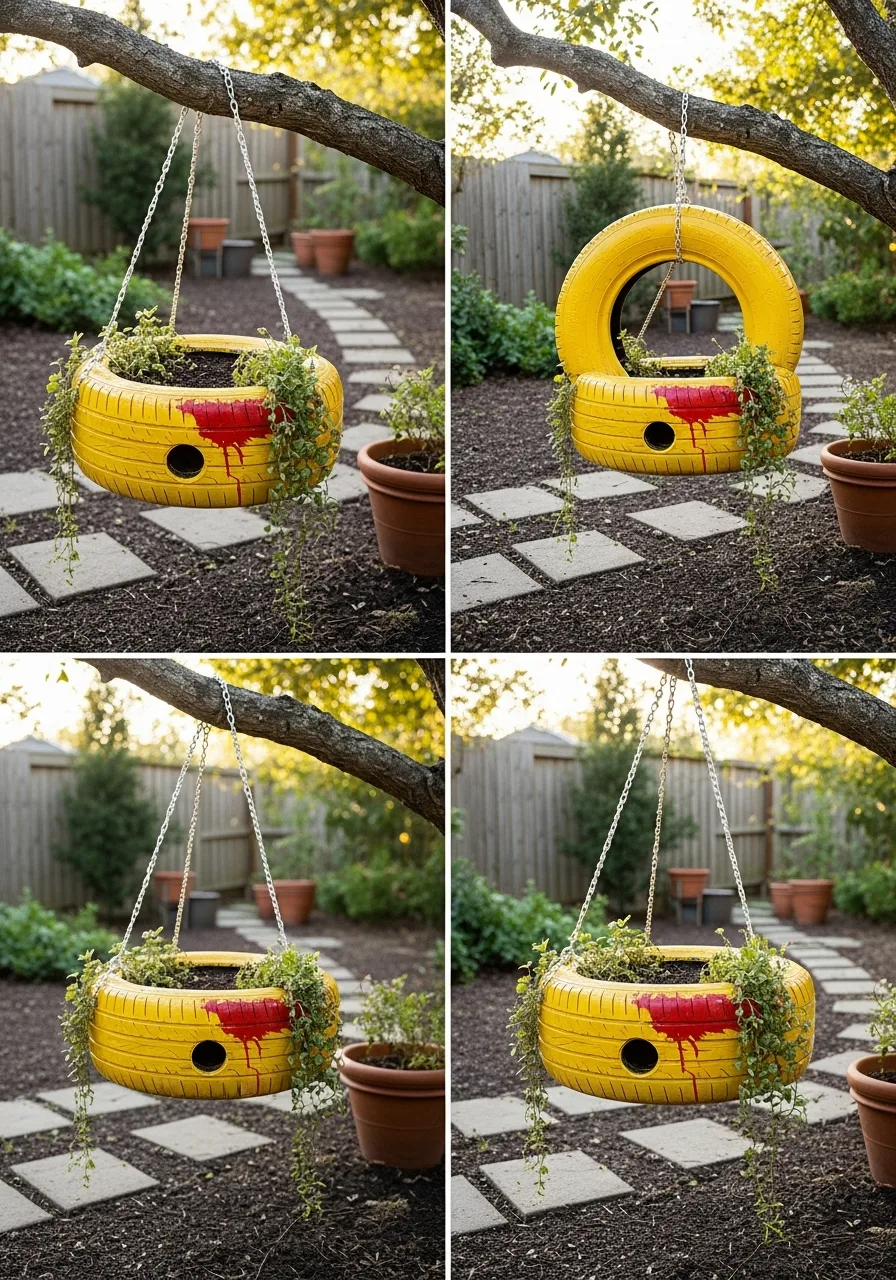
Reuse an old tire by hanging it from a sturdy tree limb. Fill the bottom curve with soil and trailing plants.
Drill several large holes in the bottom of the tire to prevent water from pooling. What works: Bright yellow or red paint makes the garden pop.
- Use a heavy-duty rope and a thick tree limb for secure support.
- Prime the rubber before painting for better adhesion and longevity.
- Plant trailing vines like ivy or petunias to cover the sides.
Quick win: Use a pressure washer to clean the tire before you start painting.
6. Galvanized Bucket Side Table
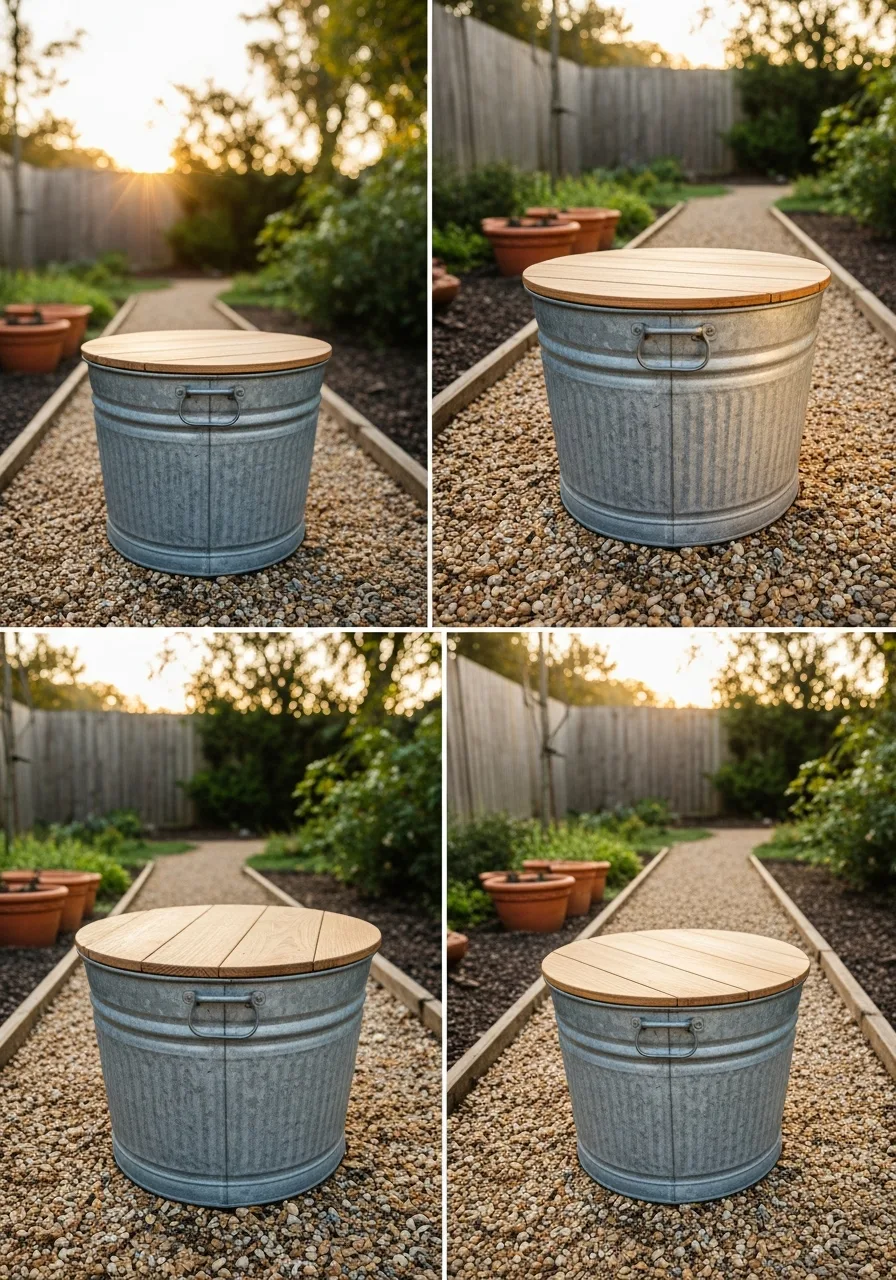
Flip a large galvanized wash tub upside down to act as a patio table. Attach a pre-cut round wood panel to the bottom for a flat surface.
Screw a pre-cut round wood panel to the bottom of an upside-down wash tub. Worth doing: This provides hidden storage for garden tools.
- Look for vintage tubs at flea markets for a weathered appearance.
- Seal the wood top with polyurethane for weather protection.
- Match the metal finish to existing patio furniture for a cohesive look.
Best shortcut: Use a large plastic planter if metal is too heavy or expensive.
7. Stone Garden Markers
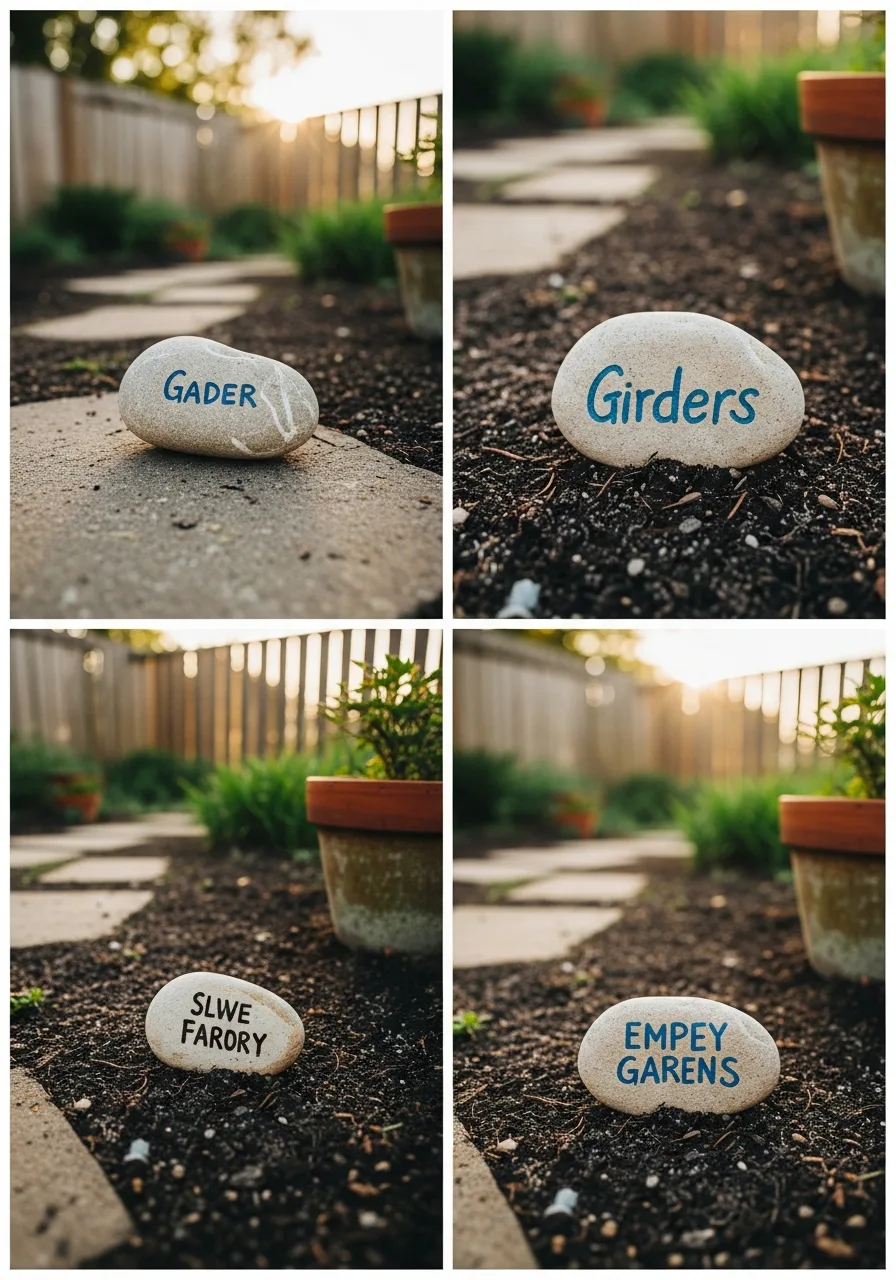
Find smooth river stones to label your vegetable garden. Use a permanent paint pen to write the names of your plants.
Use a permanent paint pen to label smooth river stones for a natural look. Best move: Flat stones stay in place better than upright plastic tags.
- Collect stones from the yard or buy a bag of river rock for consistency.
- Apply a clear coat of sealer to prevent the ink from fading.
- Keep lettering simple and bold for easy reading from a distance.
Most people skip this: Wash the stones with soap and water so the ink sticks properly.
8. Hanging Gutter Garden
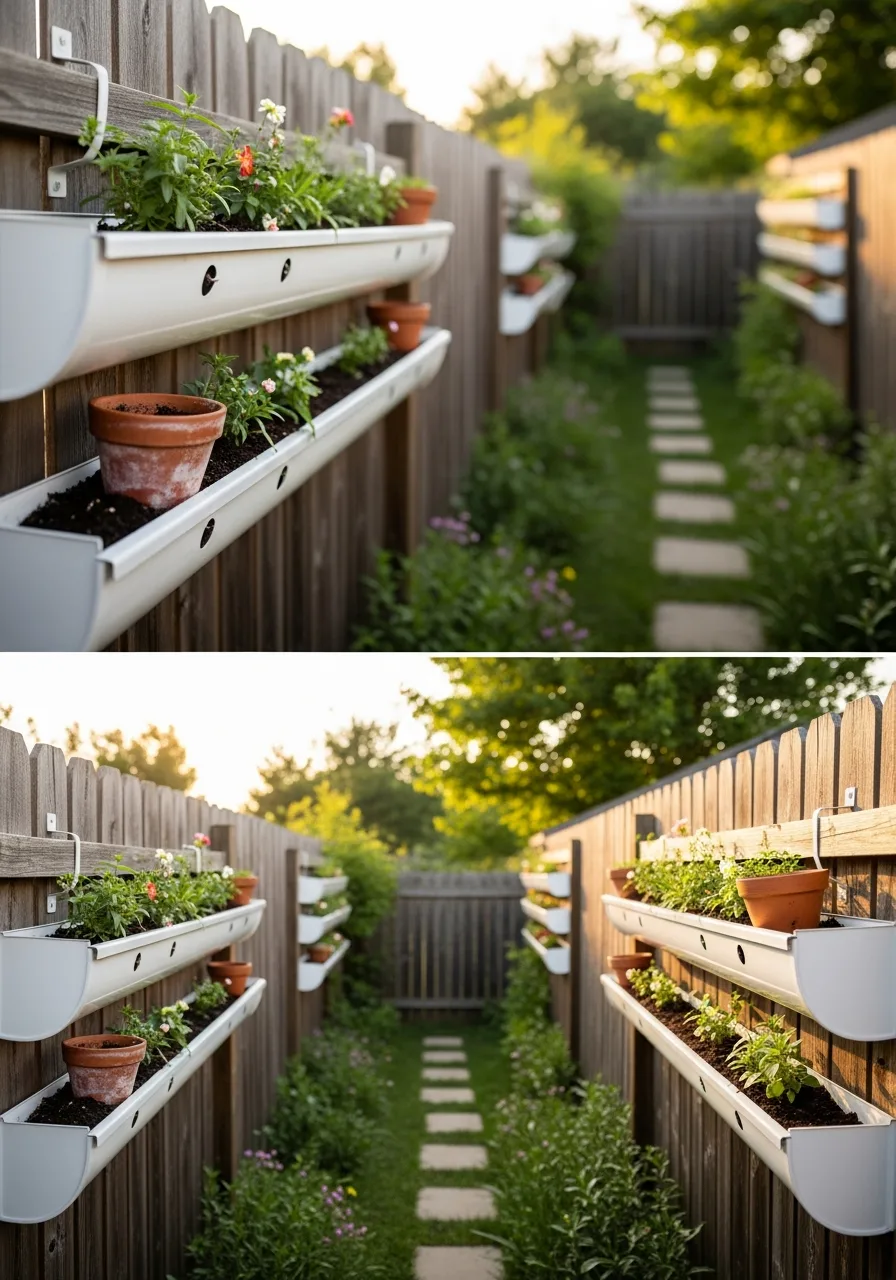
Mount vinyl gutter sections directly to a wooden fence. Fill them with potting soil and small flowers or herbs.
Drill small drainage holes every six inches along the bottom of the gutter. Smart shortcut: Use white vinyl gutters for a clean, modern aesthetic.
- Buy standard gutter sections and end caps at any hardware store.
- Mount at eye level for easy watering and maintenance.
- Grow strawberries or small flowers to save precious ground space.
Quick win: Use a level during installation to ensure even water distribution.
9. Log Fairy House
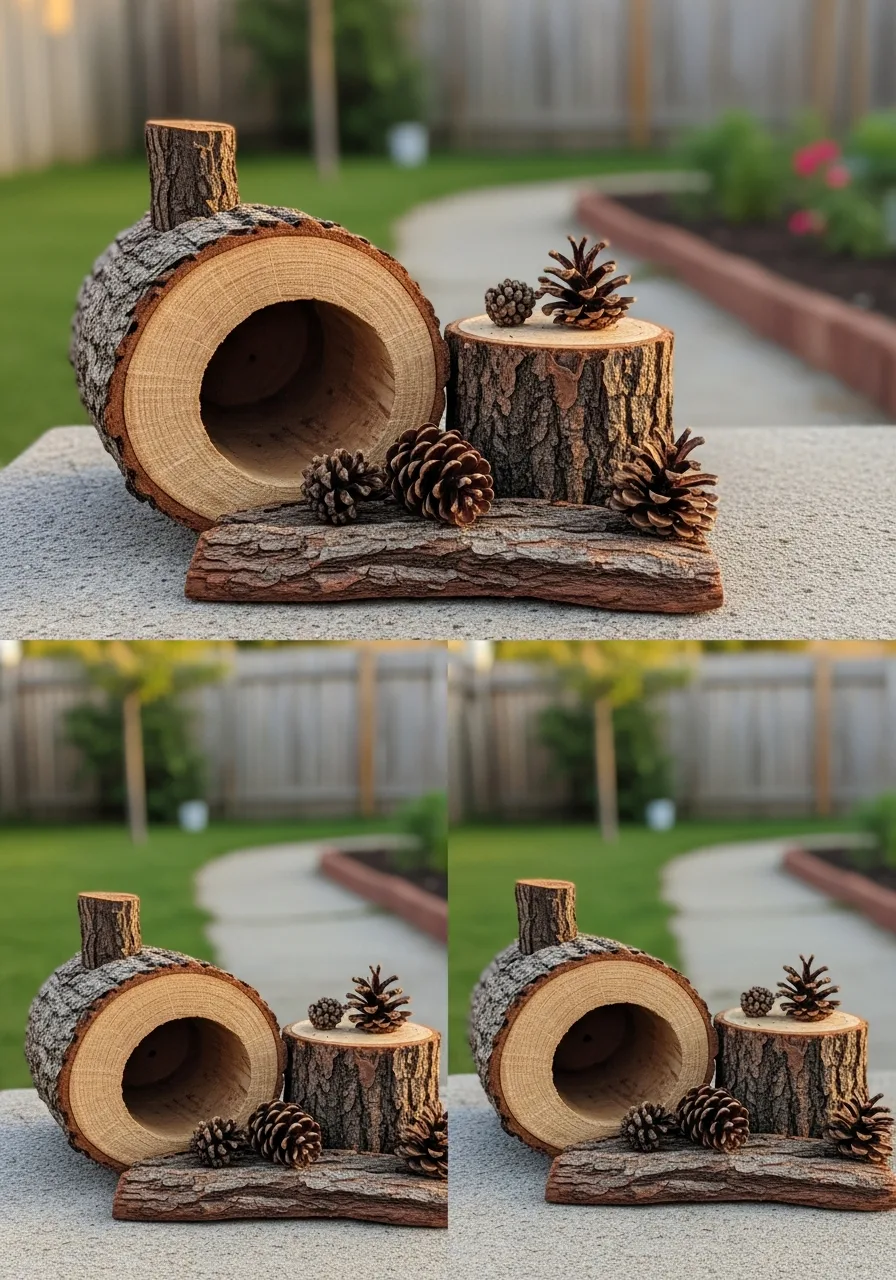
Transform a hollow log or stump into a decorative garden feature. Attach small pieces of bark or pinecones to create a miniature roof.
Attach small pieces of bark or pinecones with outdoor wood glue to create a roof. What works: Tucking these into flower beds adds a touch of whimsy.
- Use fallen branches found after a storm for free building materials.
- Place the finished house on a bed of moss for a polished look.
- Invite kids to help find unique stones or twigs for the decoration.
Most people skip this: Treat the wood with a clear preservative to prevent rot.
10. String Light Poles
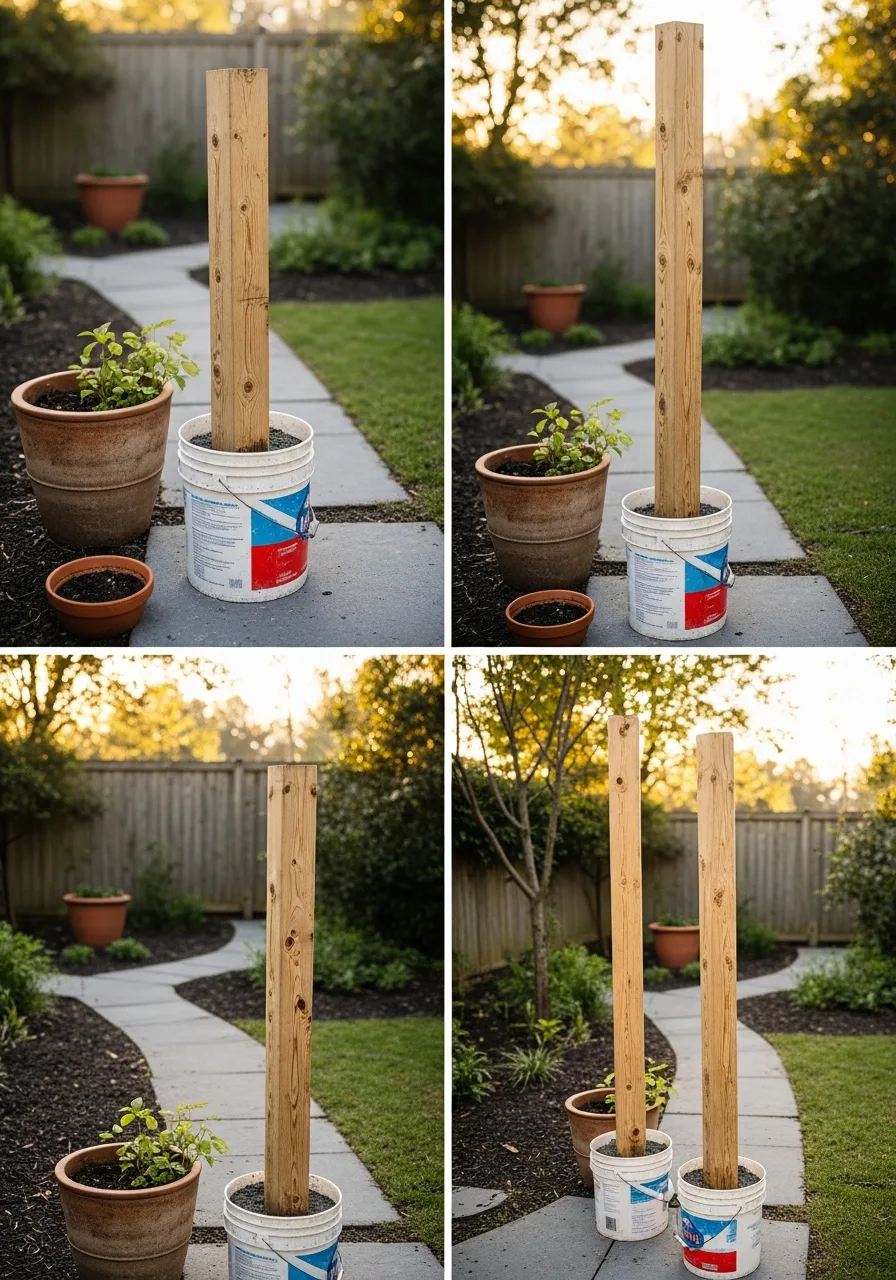
Create portable supports for outdoor string lights using buckets and cement. Insert heavy wooden posts into the wet mix and let them set.
Set heavy wooden posts in buckets of quick-dry concrete to create portable light hangers. Worth doing: This allows for overhead lighting without trees.
- Use 8-foot 4×4 posts for enough height above head level.
- Cover the concrete with mulch or pebbles for a cleaner look.
- Space poles about 10 feet apart for the best light drape.
Best shortcut: Add a metal hook to the top of the pole before the concrete sets.
11. Old Ladder Plant Stand
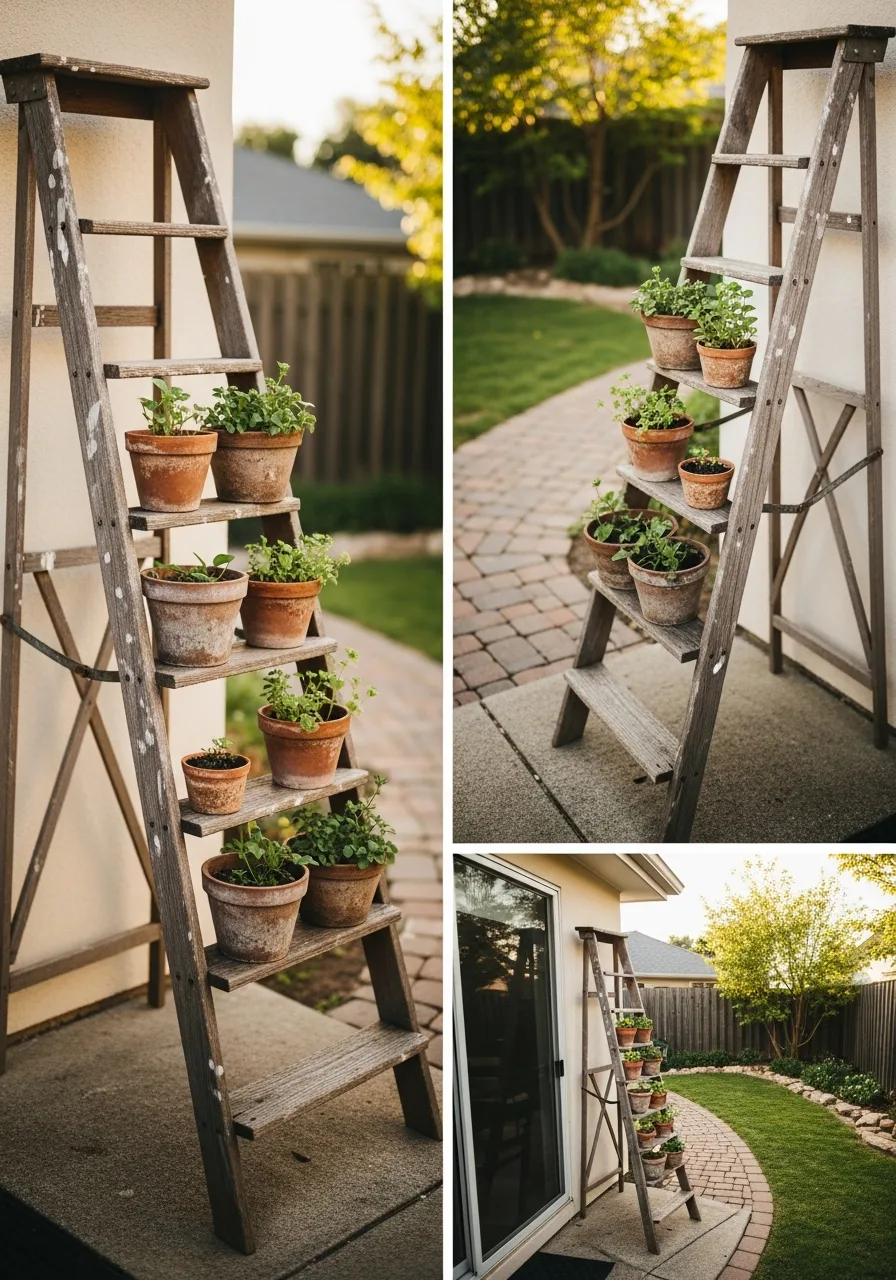
Lean an old wooden ladder against a wall to create a vertical display. Place wide wooden planks across the rungs to act as shelves.
Place wide wooden planks across the rungs to create deep shelves for potted plants. Best move: This adds vertical interest to a flat patio.
- Sand down any rough spots to prevent snags or splinters.
- Paint the ladder a bold color to make it a focal point.
- Secure the top to the wall if the area experiences high winds.
Most people skip this: Use a level on the planks to ensure pots do not slide off.
12. Paver Walkway Edging
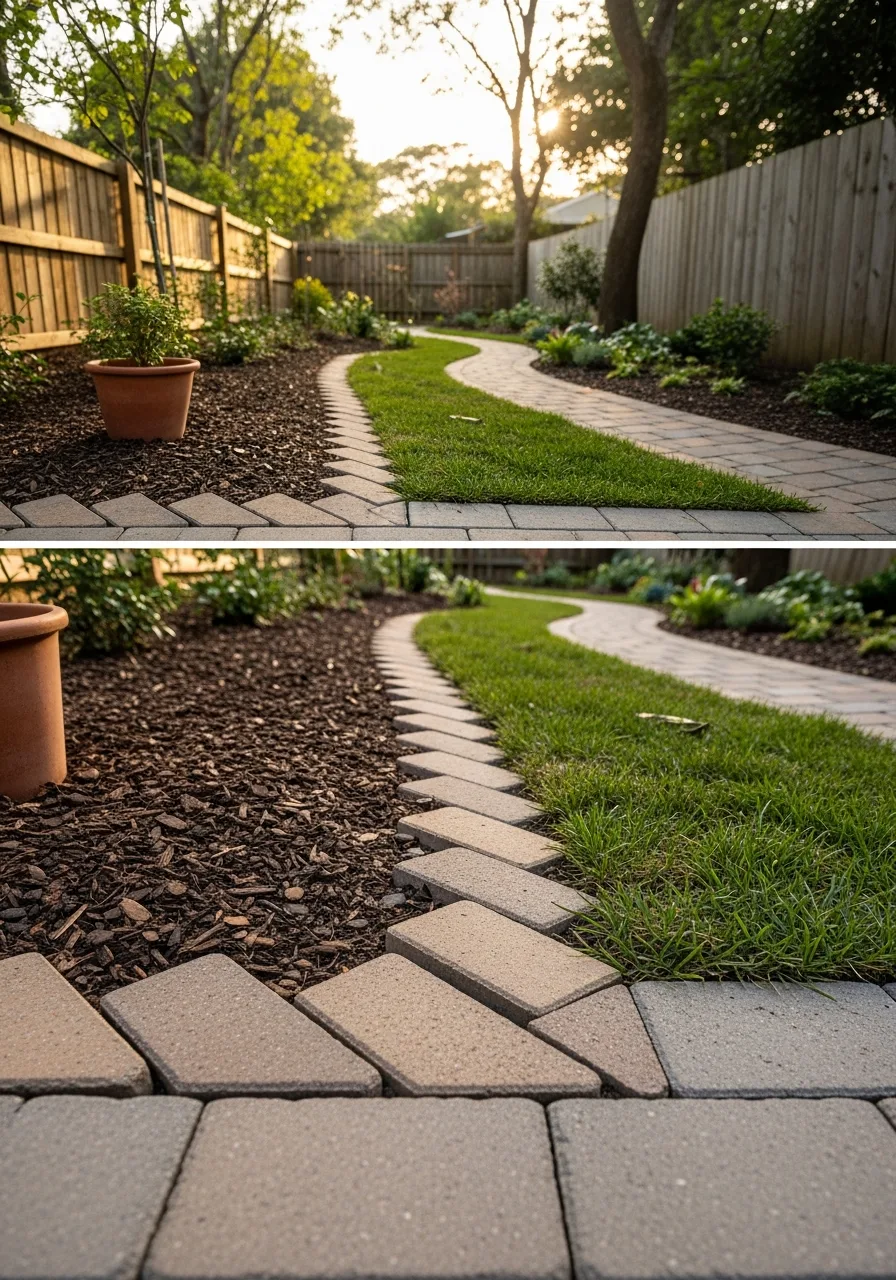
Define your garden beds by setting bricks or pavers at an angle. Tilt them at a 45-degree angle to create a jagged, decorative border.
Tilt brick pavers at a 45-degree angle to create a jagged, decorative border. Smart shortcut: This keeps mulch in the beds and grass out.
- Use standard red bricks or concrete pavers for a budget-friendly fix.
- Pack soil tightly around the base of the bricks to keep them upright.
- Ensure the line is straight by using a piece of string as a guide.
Quick win: Use a rubber mallet to tap the bricks into place without cracking them.
13. Wine Bottle Border
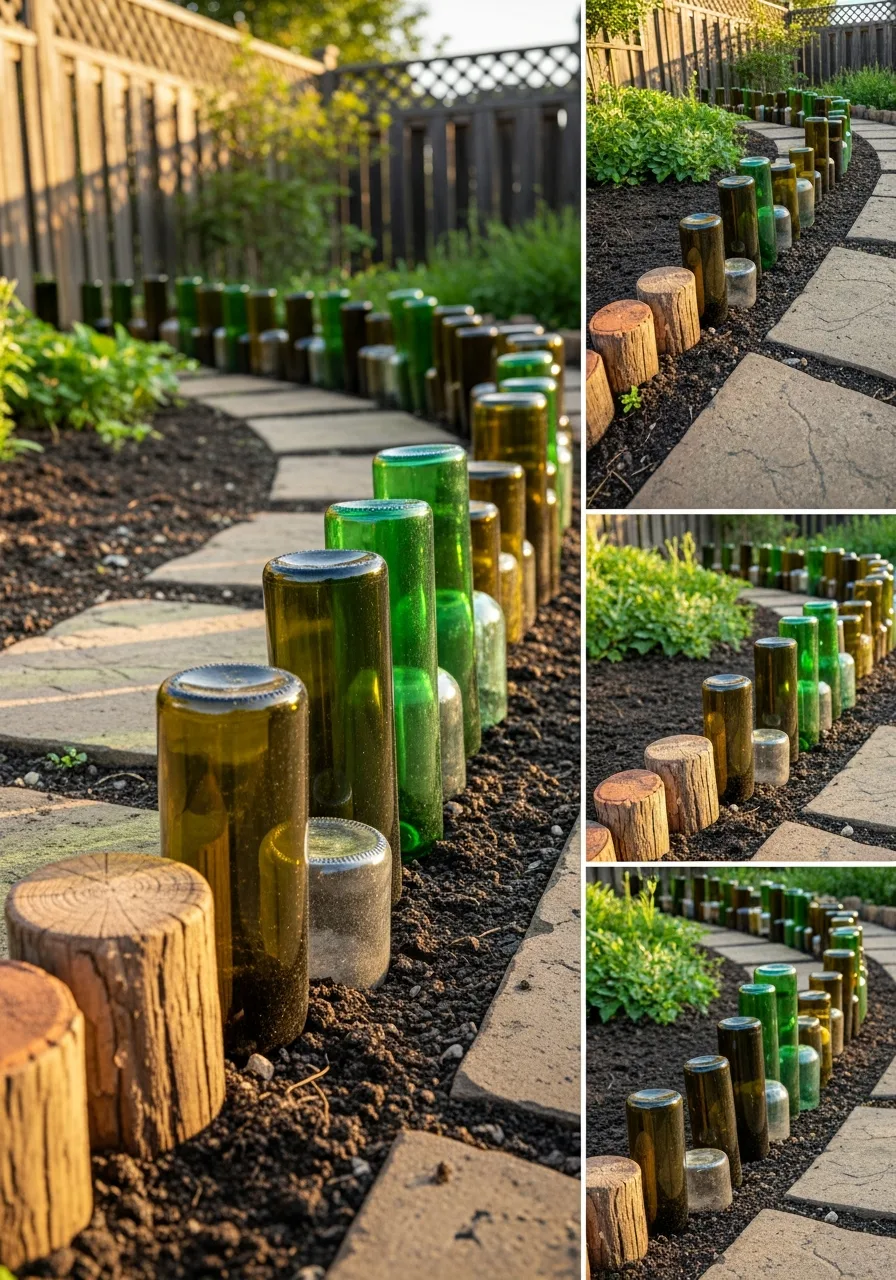
Dig a shallow trench along the edge of a flower bed. Place empty wine bottles upside down in a row to create a border.
Bury empty glass bottles neck-down to create a colorful and recycled garden edge. What works: Mixing different heights of bottles adds a custom feel.
- Use bottles of the same color for a uniform and sophisticated look.
- Ensure the ground is soft or wet before pushing bottles into place.
- Space them tightly to prevent soil from washing through the gaps.
Most people skip this: Remove the labels entirely for a much cleaner appearance.
14. Tree Stump Table
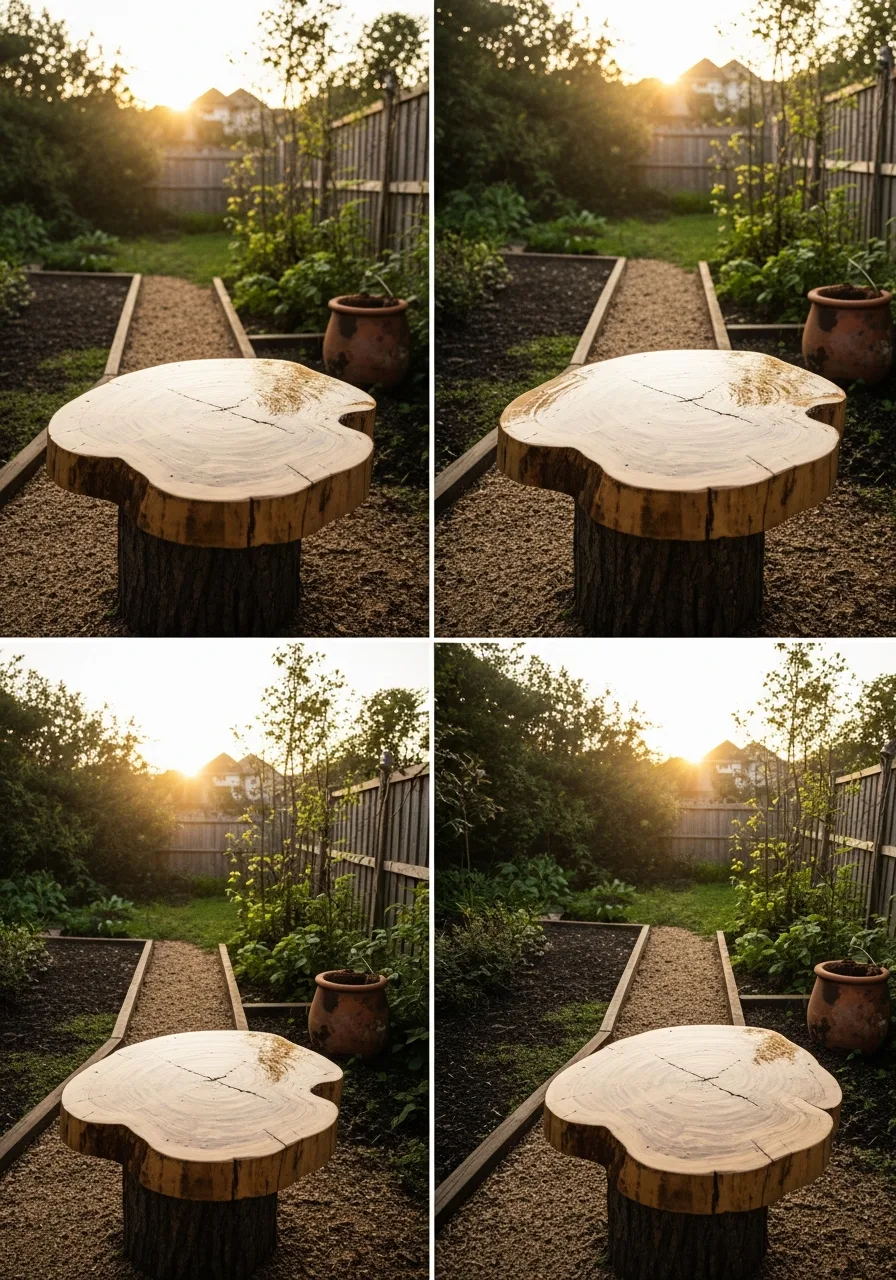
Sand the top of a level tree stump to create a rustic side table. Apply an exterior-grade varnish to protect the wood from the elements.
Apply three coats of exterior-grade varnish to a level tree stump for a rustic side table. Best move: This turns an eyesore into furniture.
- Ensure the wood is completely dry before applying any sealer.
- Use a heavy-duty sander to get a smooth and flat top surface.
- Add small furniture feet to the bottom to improve airflow underneath.
Best shortcut: If the stump is still in the ground, just level the top and use it as a plant stand.
15. Mirror Wall Decor
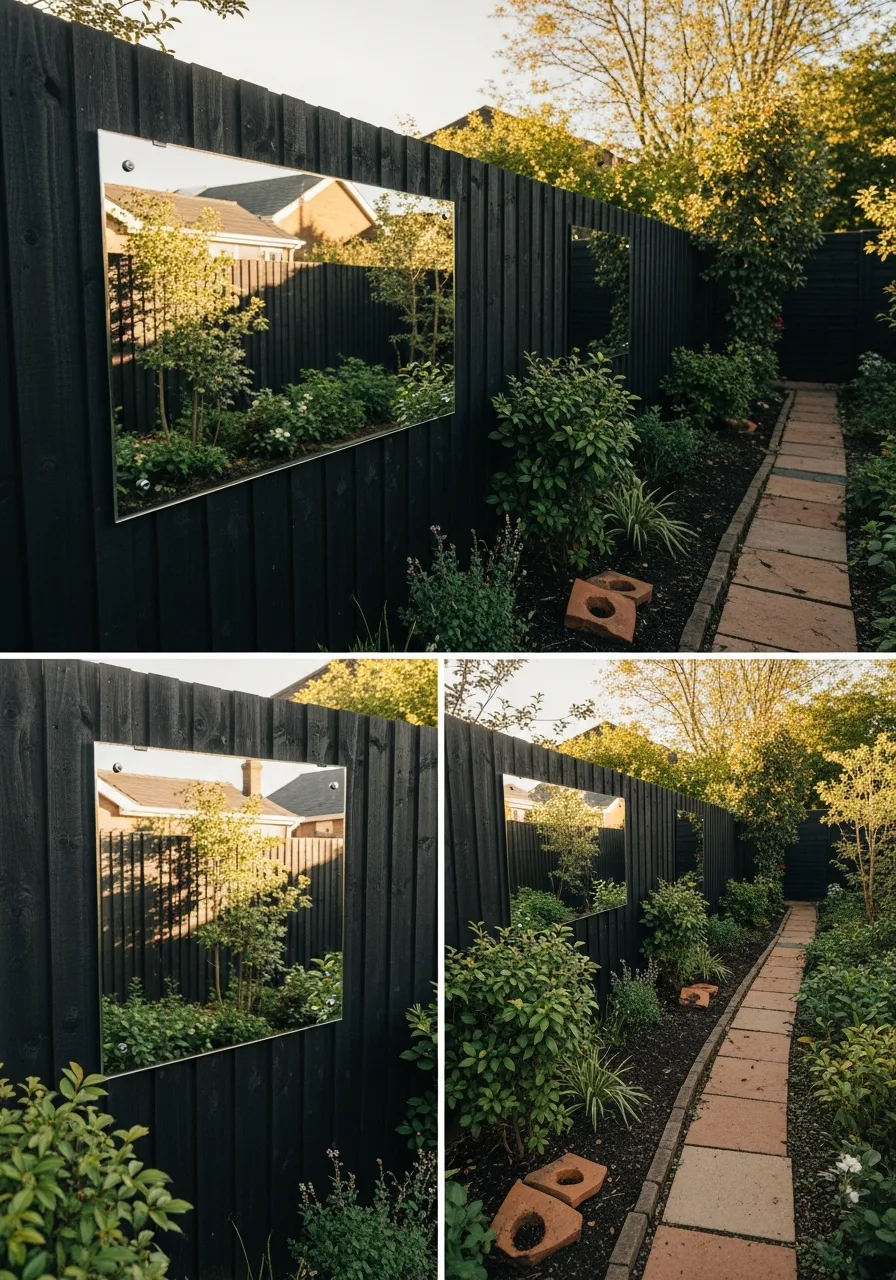
Mount a weather-resistant mirror on a dark fence to brighten up the yard.
The reflection makes a small outdoor space feel much larger. Mount a weather-resistant mirror on a dark fence to make a small yard feel twice as large. Worth doing: Reflection adds light to shady corners.
- Use an acrylic mirror sheet to prevent accidental shattering.
- Frame the edges with cedar or treated pine for a finished look.
- Angle the mirror slightly downward to avoid reflecting the sun into eyes.
Quick win: Use heavy-duty outdoor mounting tape if you cannot drill into the fence.
16. Outdoor Chalkboard Sign
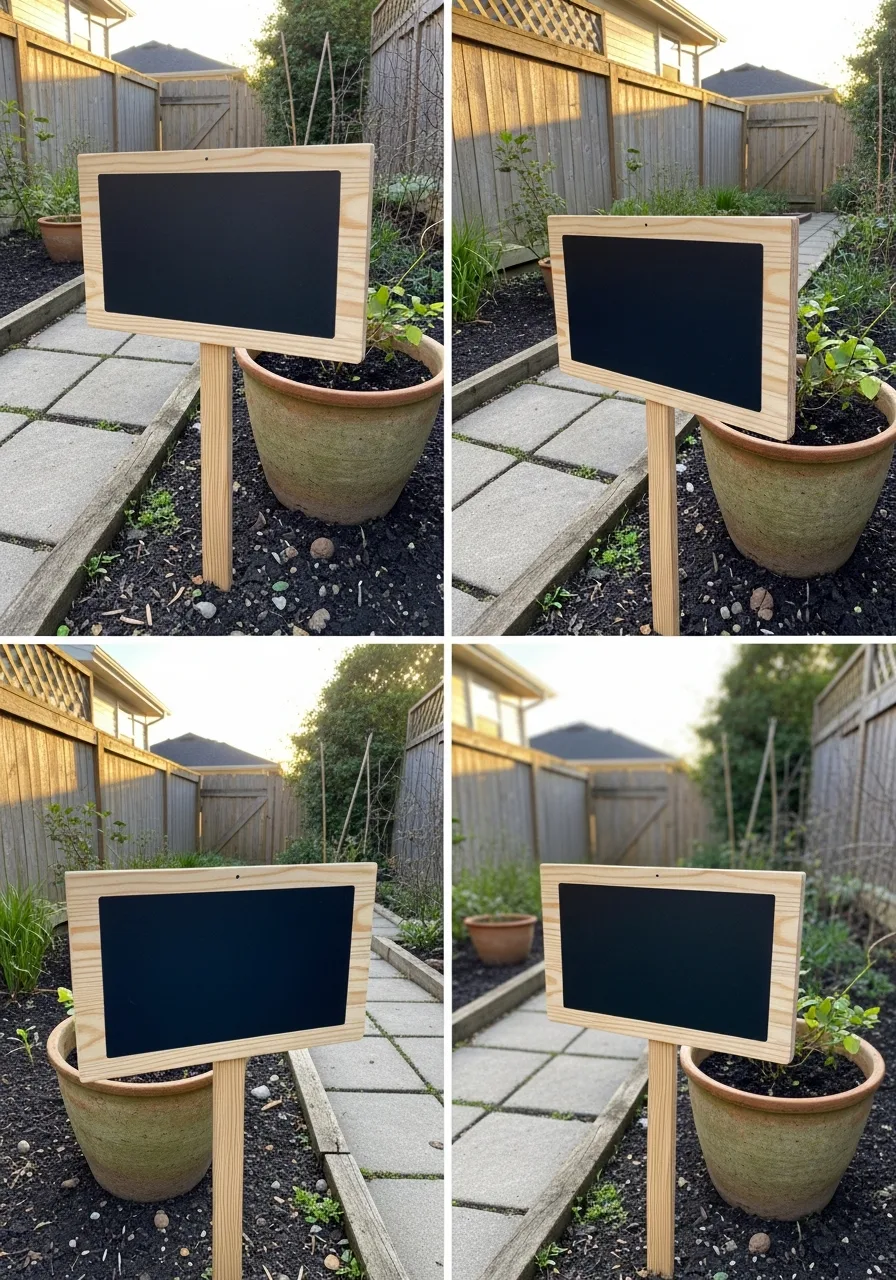
Use a sheet of exterior-grade plywood and weather-resistant chalkboard paint to create a focal point.
Mount the board to a fence or a pair of sturdy stakes to keep it upright during wind. It serves as a rotating space for seasonal quotes or menu items during a barbecue. Best move: Seal the edges of the wood with silicone caulk to prevent water damage over time.
- Costs $20 to $40 and takes about two hours of drying time.
- Position in a shaded area to prevent the paint from cracking in direct sun.
- Swap the chalkboard paint for whiteboard paint if you prefer a modern, clean look.
Quick win: Use a chalk marker instead of traditional chalk for sharper lines that won’t smudge in the breeze.
17. Copper Pipe Wind Chimes
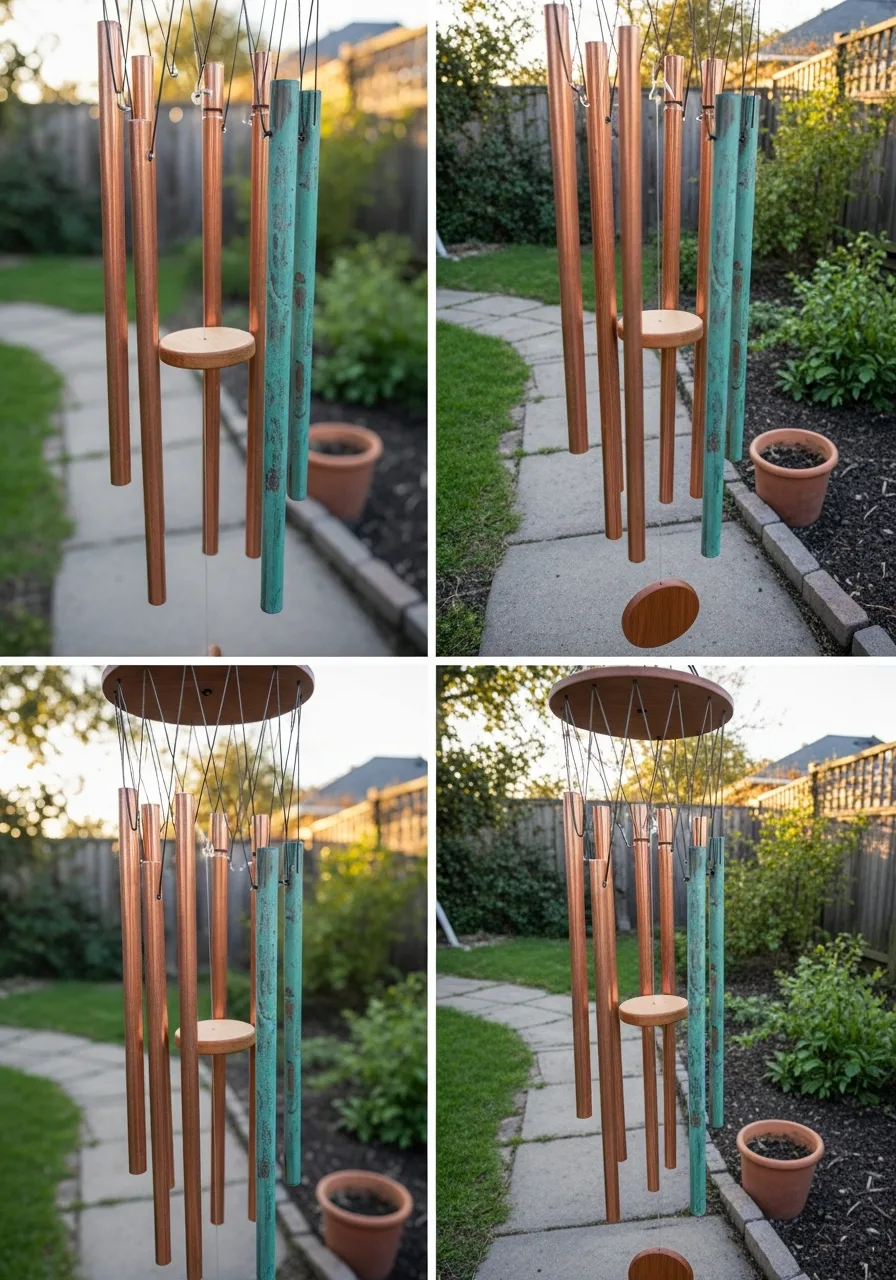
Cut copper pipes into varying lengths to produce different musical notes when they strike each other. Drill small holes at the top of each pipe and thread them with heavy-duty fishing line for a floating effect. The copper will develop a beautiful green patina as it ages in the elements.
Worth doing: Use a wooden disk as the center striker for a softer, more melodic tone.
- Around $30 for materials; requires a pipe cutter and a standard drill.
- Hang from a sturdy tree limb or a porch hook away from bedroom windows.
- Adjust the length of the pipes to change the pitch from deep bass to high treble.
Most people skip this: Sand the cut edges of the copper pipes to prevent sharp burrs from cutting the hanging line.
18. Shutter Privacy Partition
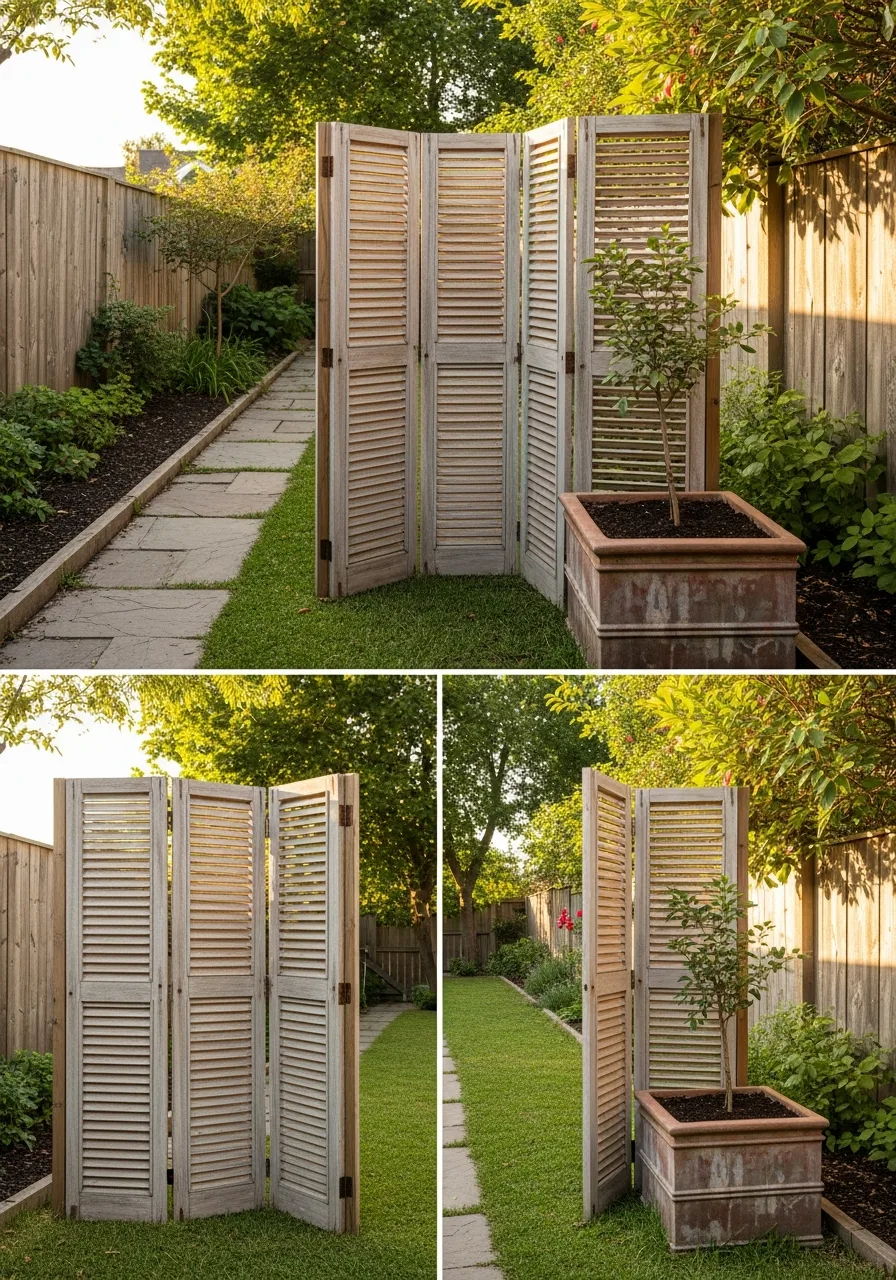
Connect three or four old wooden shutters with outdoor-rated hinges to create a folding partition. Apply a fresh coat of exterior latex paint to protect the wood from rot and moisture. This setup hides ugly trash cans or provides a sense of seclusion on a small patio.
What works: Bolt the bottom of the screen to heavy planters to prevent it from blowing over.
- Find shutters at thrift stores for under $10 each; assembly takes one afternoon.
- Place on level ground or a deck surface to ensure the hinges operate smoothly.
- Use louvered shutters to allow airflow while still blocking the direct line of sight.
Best shortcut: Use self-drilling screws to attach the hinges so you do not have to pre-drill every hole.
19. Rope Wrapped Tire Ottoman
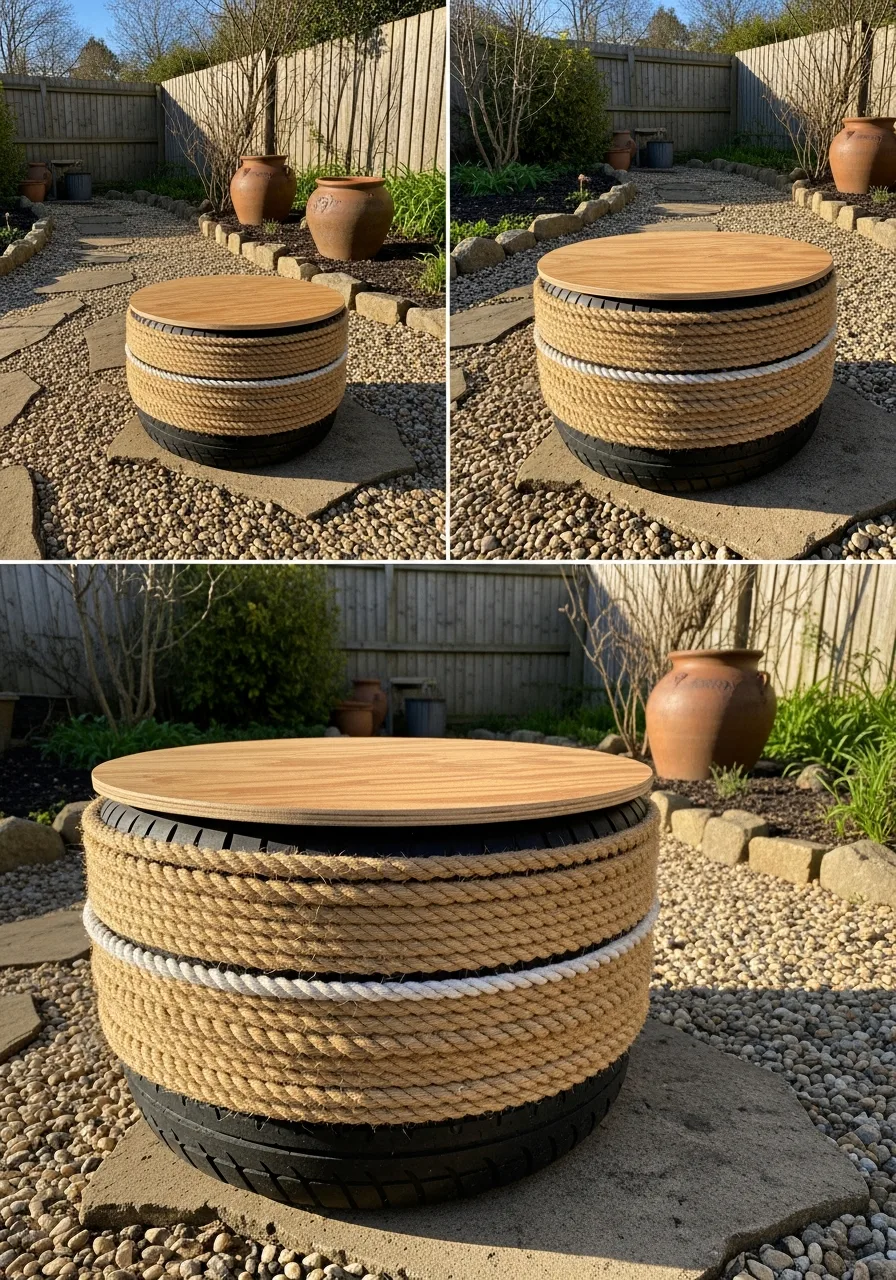
Transform a discarded tire by wrapping it entirely in thick sisal or manila rope using a high-strength adhesive. Attach a circular plywood base to the top and bottom to create a stable, flat surface for sitting. This piece adds a nautical or rustic texture to any seating area.
Smart shortcut: Use a pneumatic staple gun to secure the rope every few inches for extra durability.
- Free tires are often available at auto shops; rope costs about $25.
- Store under a cover during heavy rain to keep the rope from getting waterlogged.
- Add heavy-duty casters to the bottom plywood so you can roll the ottoman across the patio.
Quick win: Apply a coat of clear outdoor polyurethane over the rope to stop it from fraying or turning grey.
20. Concrete Leaf Stepping Stones
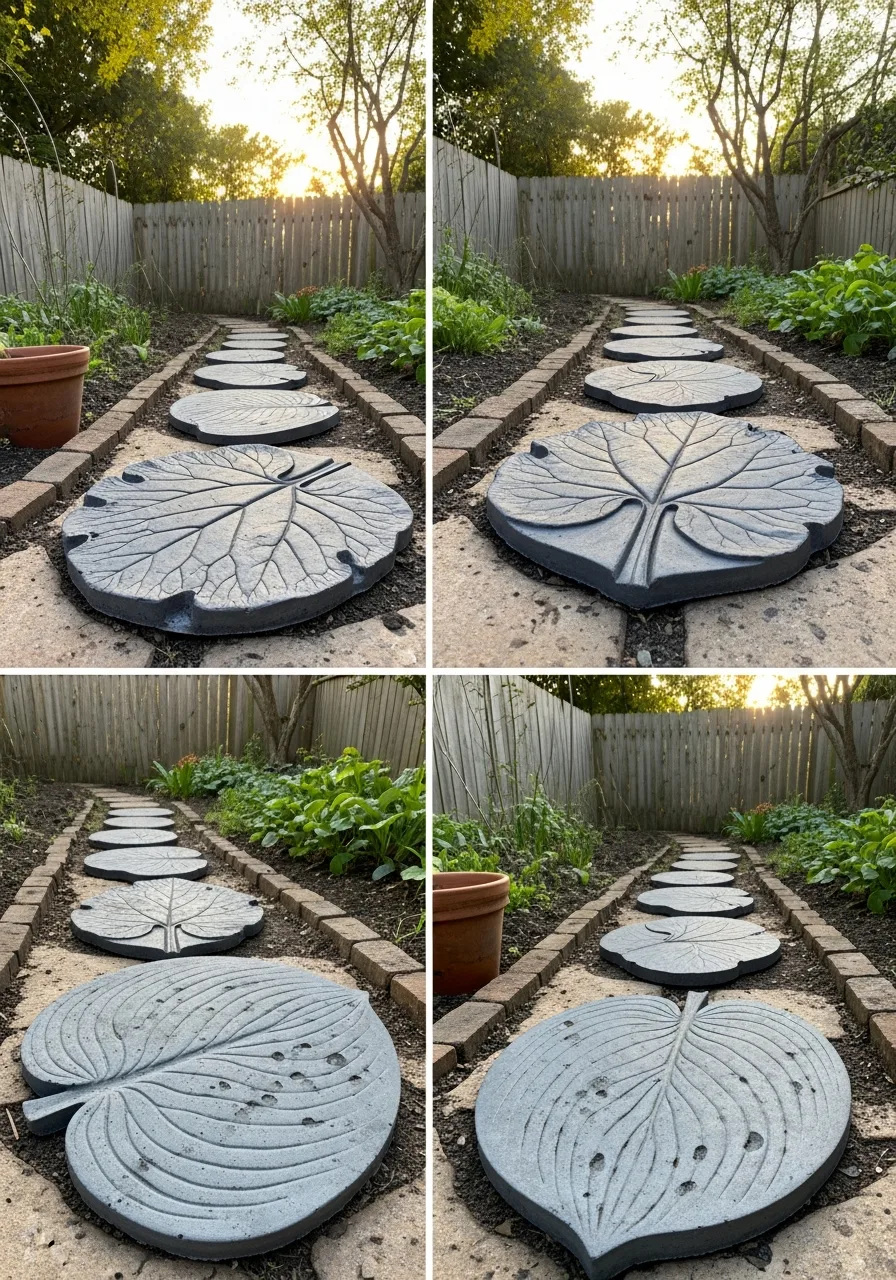
Use large rhubarb or hosta leaves as molds for unique, textured garden paths. Press a thick layer of wet concrete onto the back of the leaf to capture every detail of the veins. Once dry, peel the leaf away to reveal a stone that looks like it grew right out of the ground.
Best move: Reinforce the concrete with a small piece of wire mesh to prevent cracking under foot traffic.
- A bag of concrete mix is under $10 and makes several stones.
- Dig a shallow hole for each stone so they sit flush with the soil level.
- Paint the cured concrete with a stone sealer to make the leaf details pop.
Most people skip this: Sift the dry concrete mix to remove large pebbles for a smoother, more detailed leaf impression.
21. Natural Tree Branch Trellis
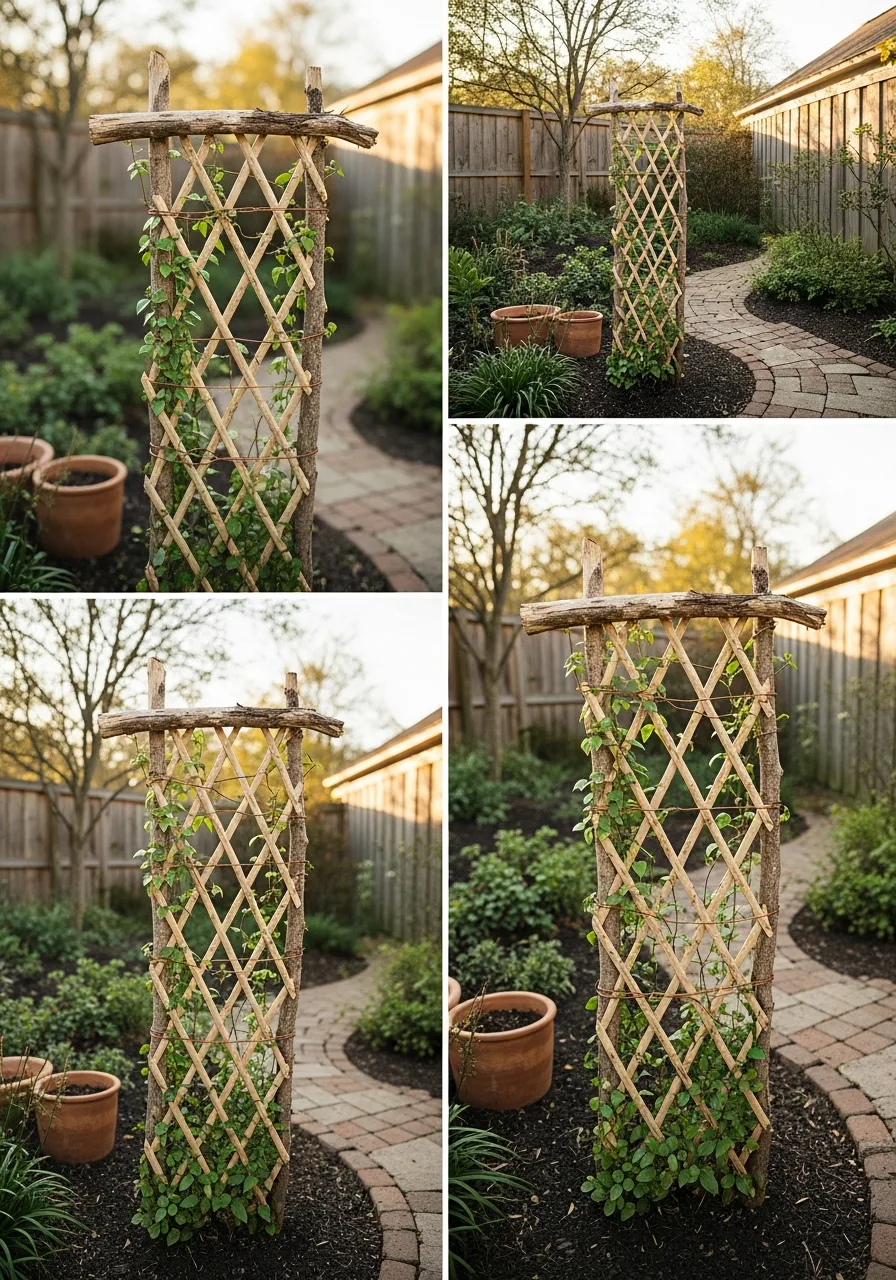
Collect fallen branches of similar thickness to build a natural support for climbing vines. Lash the branches together in a diamond pattern using sturdy garden twine or copper wire. This project blends perfectly into a wooded or cottage-style landscape.
Worth doing: Push the main vertical branches at least eight inches into the soil for stability.
- Free materials from the yard; takes about one hour to assemble.
- Position against a wall or fence where climbing roses or ivy can easily grab hold.
- Use cedar or locust branches if possible, as they resist rot longer than pine.
Best shortcut: Use a few small zip ties to hold the branches in place while you wrap the twine for a cleaner look.
22. Tin Can Punch Lanterns
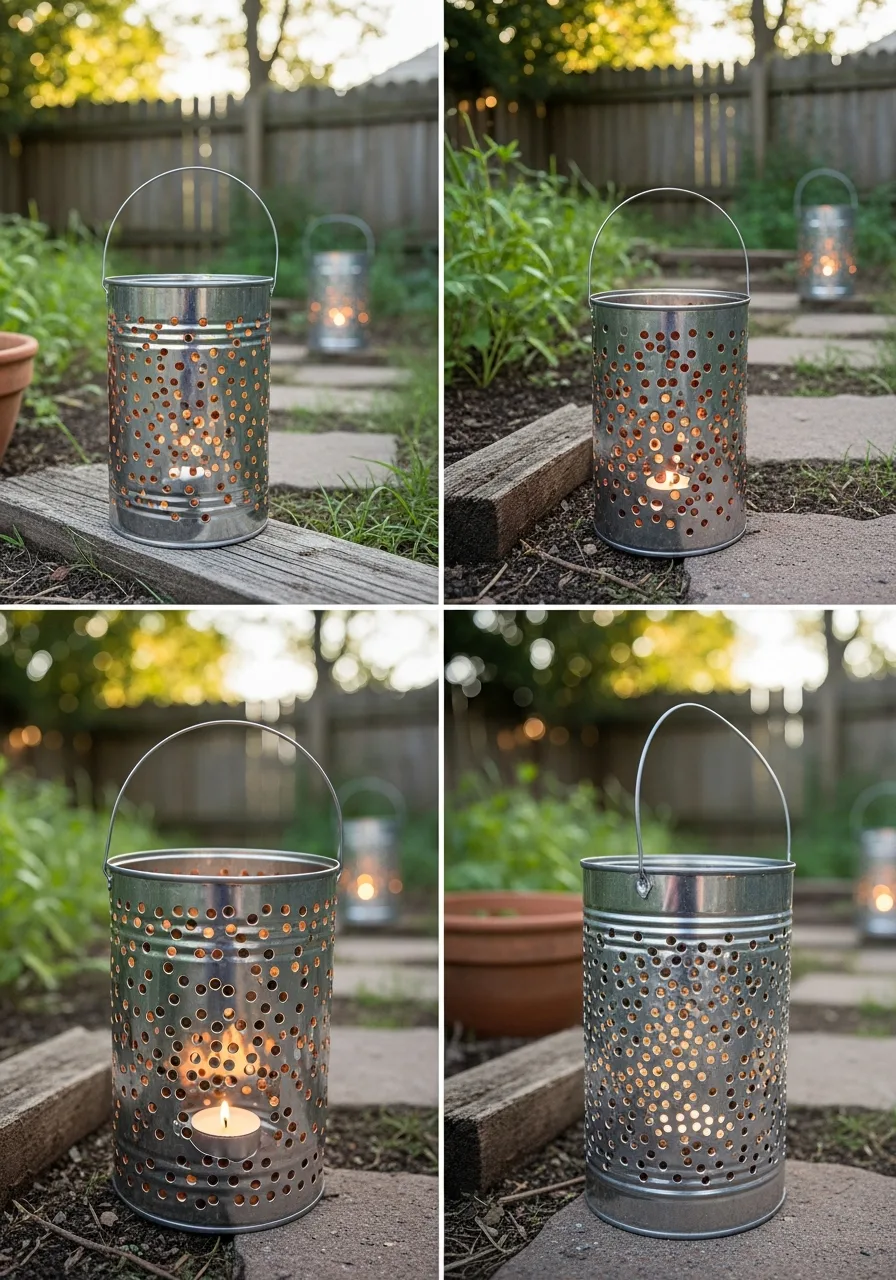
Clean out large soup or coffee cans and fill them with water to freeze before punching designs. Use a hammer and a large nail to poke holes in decorative patterns while the ice keeps the metal from denting. When the ice melts, place a candle inside to cast beautiful shadows across the yard.
What works: Paint the cans with high-heat spray paint for a polished look that resists rust.
- Zero cost for recycled cans; takes thirty minutes plus freezing time.
- Line them up along a walkway or hang them from fence posts using wire handles.
- Switch to battery-operated tea lights to make them safe for use near dry grass.
Quick win: Draw your pattern on a piece of paper first and tape it to the can to guide your nail hits.
23. Woven Willow Bed Edging
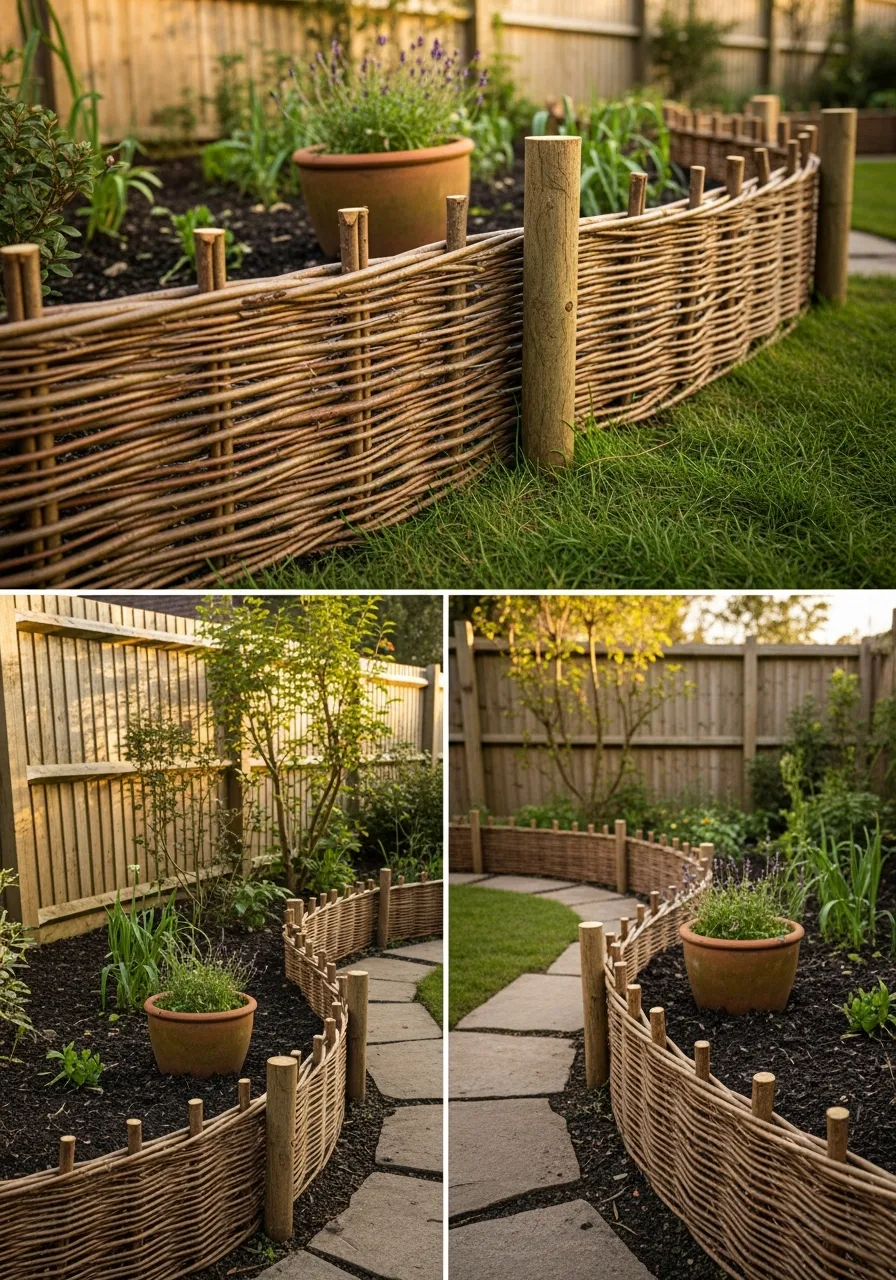
Create a rustic border for flower beds by weaving long, flexible willow or hazel branches between upright stakes. Hammer sturdy wooden stakes into the ground every twelve inches to act as the frame for your weaving. This traditional technique keeps mulch in place and adds height to flat gardens.
Smart shortcut: Soak the branches in a tub of water overnight to make them extra bendy.
- Budget-friendly if you have access to willow; takes a full afternoon for a long bed.
- Install in early spring when the ground is soft enough to drive stakes easily.
- Vary the height of the weave to create a tiered look for different sections of the yard.
Most people skip this: Treat the bottom of the stakes with wood preservative to keep them from rotting in the damp soil.
24. Painted Stone River Bed
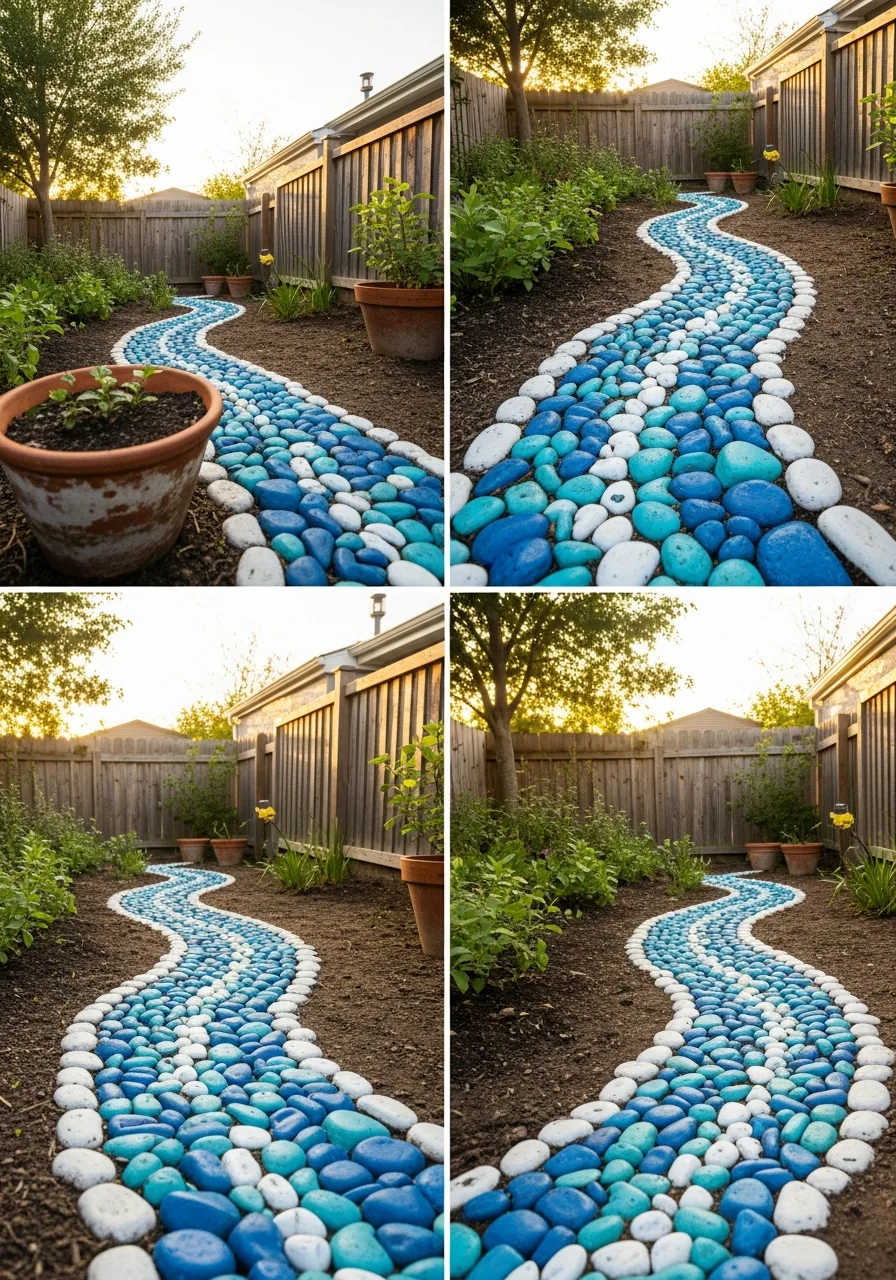
Arrange smooth river stones in a winding path to mimic the look of a flowing stream without the maintenance. Paint the stones in varying shades of blue, teal, and white to create depth and movement. This is an excellent solution for dry spots where grass refuses to grow.
Best move: Lay down landscape fabric first to prevent weeds from growing up through your river.
- Around $30 for river rocks and outdoor acrylic paint.
- Place the river in a natural low spot of the yard to make the design feel intentional.
- Incorporate real driftwood or larger boulders along the edges to enhance the realistic look.
Best shortcut: Use a sponge instead of a brush to dab on different colors for a more natural, blended appearance.
25. Colander Hanging Flower Baskets
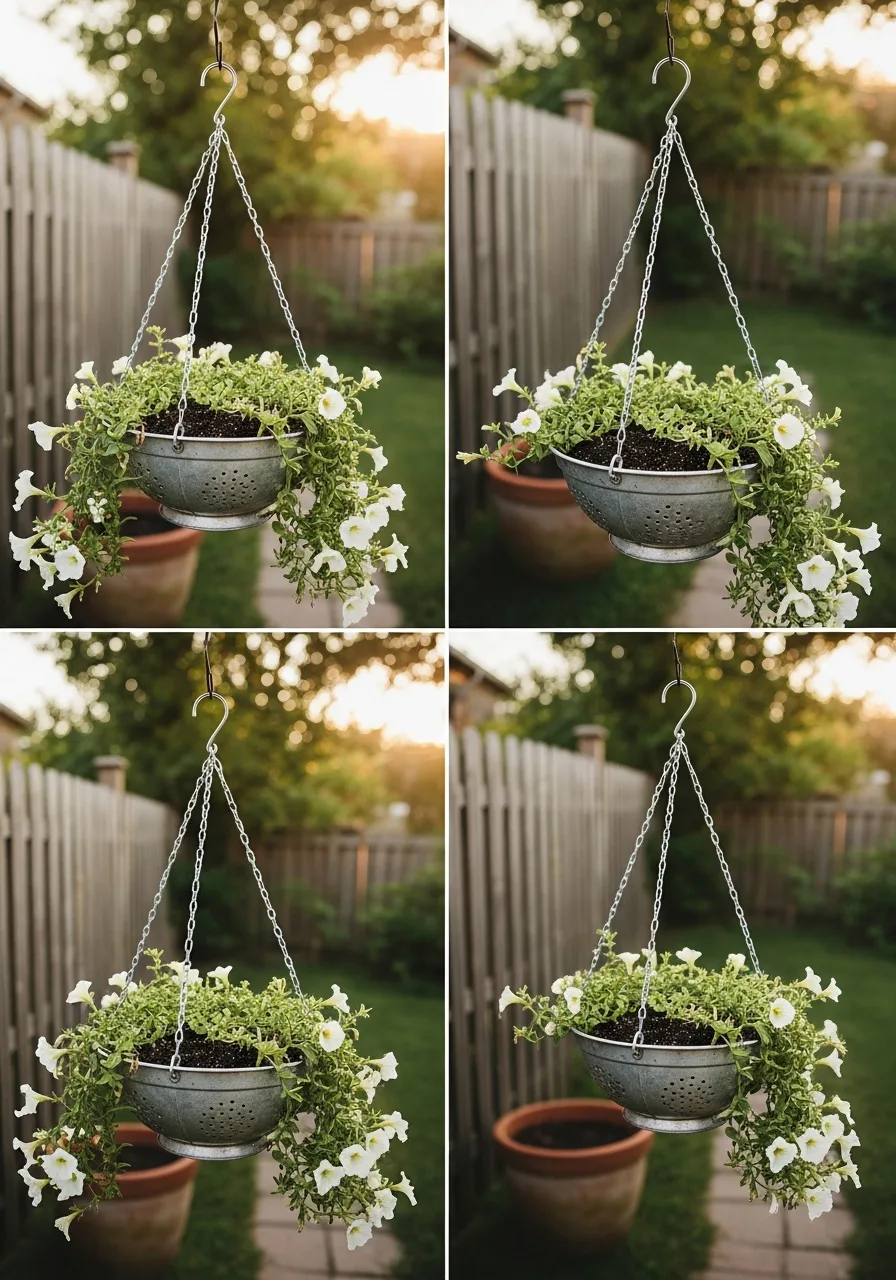
Repurpose vintage metal colanders into unique hanging baskets that offer perfect built-in drainage. Attach three lengths of lightweight chain to the rim using S-hooks for a balanced and secure hang. These are ideal for trailing plants like petunias that need plenty of air for their roots.
Worth doing: Line the bottom with a small piece of landscape fabric to keep the soil from washing out.
- Find metal colanders at yard sales for $5; assembly takes ten minutes.
- Hang from porch eaves or shepherd’s hooks in sunny locations.
- Choose bright, powder-coated colanders to add a pop of color to a neutral exterior.
Quick win: Use a carabiner at the top of the chains to make it easy to take the planter down for watering.
26. Vintage Bicycle Plant Stand
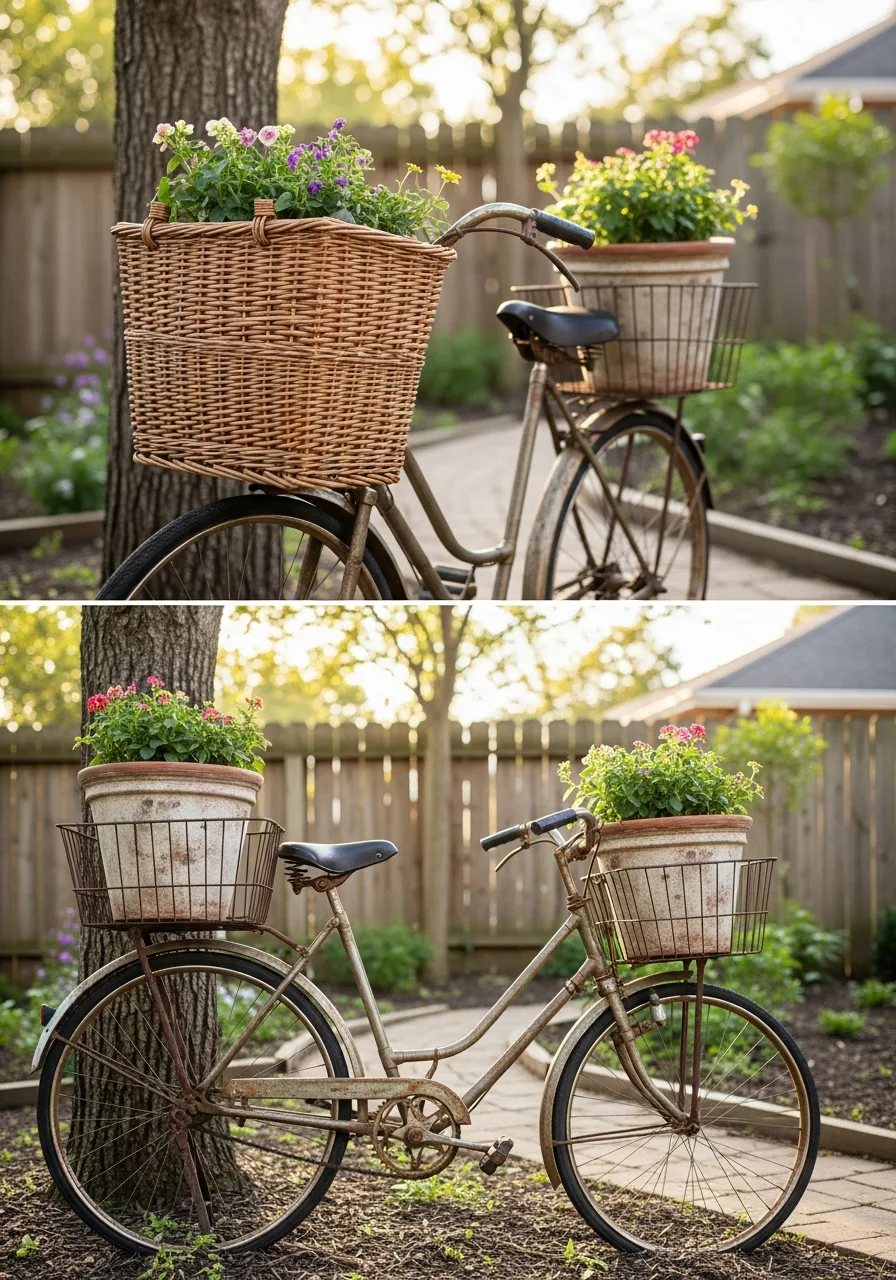
Lean an old, vintage-style bicycle against a tree or fence to serve as a whimsical plant stand. Secure large wicker or wire baskets to the handlebars and the rear rack to hold pots of seasonal blooms. This adds a nostalgic, lived-in feel to any corner of the garden.
What works: Spray the entire bike with a clear matte sealer to freeze the rusty look without letting it degrade further.
- Check local classifieds for junk bikes; costs range from $0 to $20.
- Anchor the wheels into the ground with U-shaped garden staples so it does not tip over.
- Swap the plants every season, using pansies in spring and mums in the fall.
Most people skip this: Remove the chain and grease the moving parts before setting it outside to prevent messy stains on your patio.
27. Floating Wood Deck Tiles
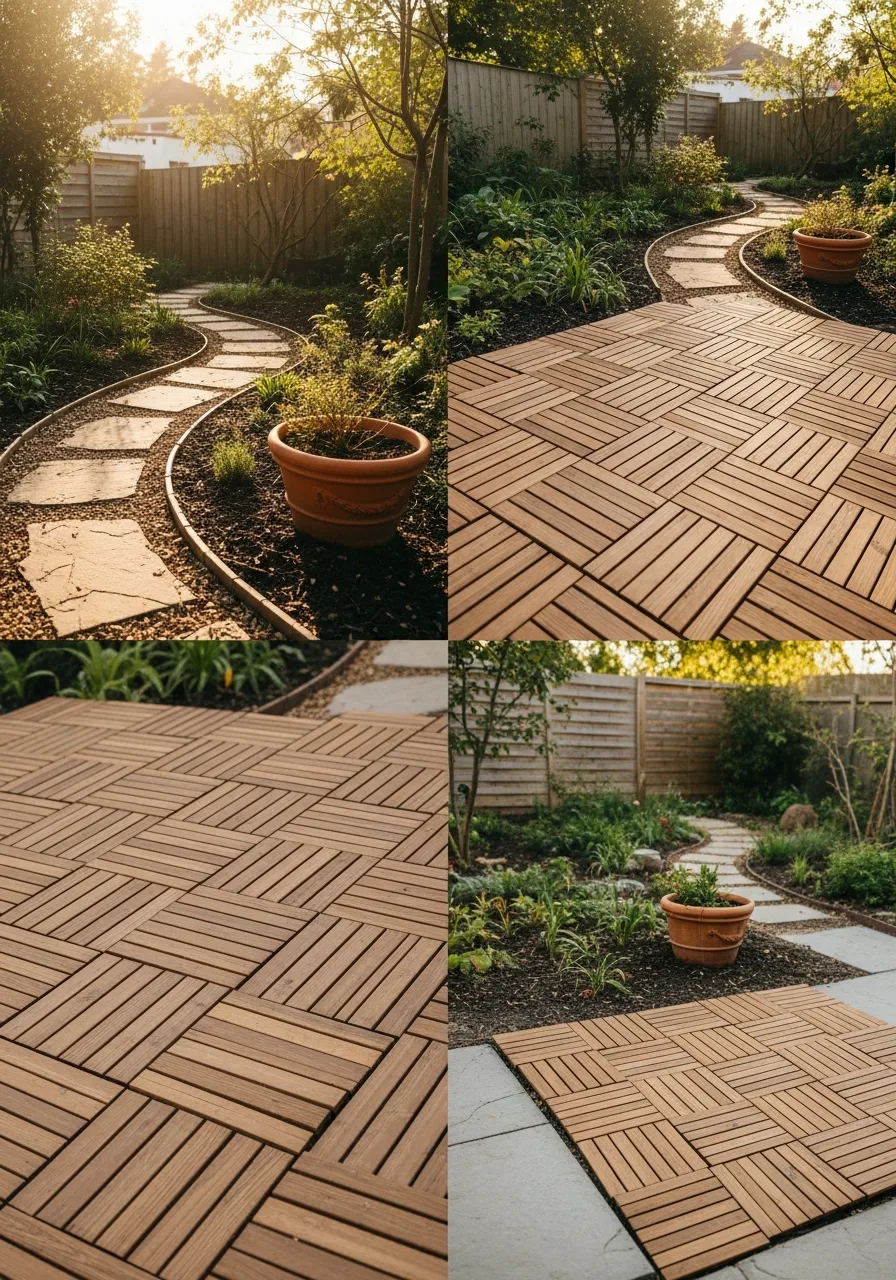
Cover a boring concrete slab or a patch of dirt with interlocking wood tiles for an instant patio upgrade. Snap the tiles together in a grid pattern to create a flat, slip-resistant surface for outdoor furniture. These tiles allow water to drain through, keeping the surface dry.
Smart shortcut: Use a jigsaw to trim the edge tiles if you need to fit them around a curved garden bed.
- Costs $50 to $150 depending on the area size; installation is extremely fast.
- Ensure the ground is level and compacted before laying the tiles to avoid wobbling.
- Apply a fresh coat of teak oil once a year to keep the wood from fading to grey.
Best shortcut: Lay down a thin layer of sand first to help level out minor bumps in the dirt or concrete.
28. Wine Barrel Umbrella Stand
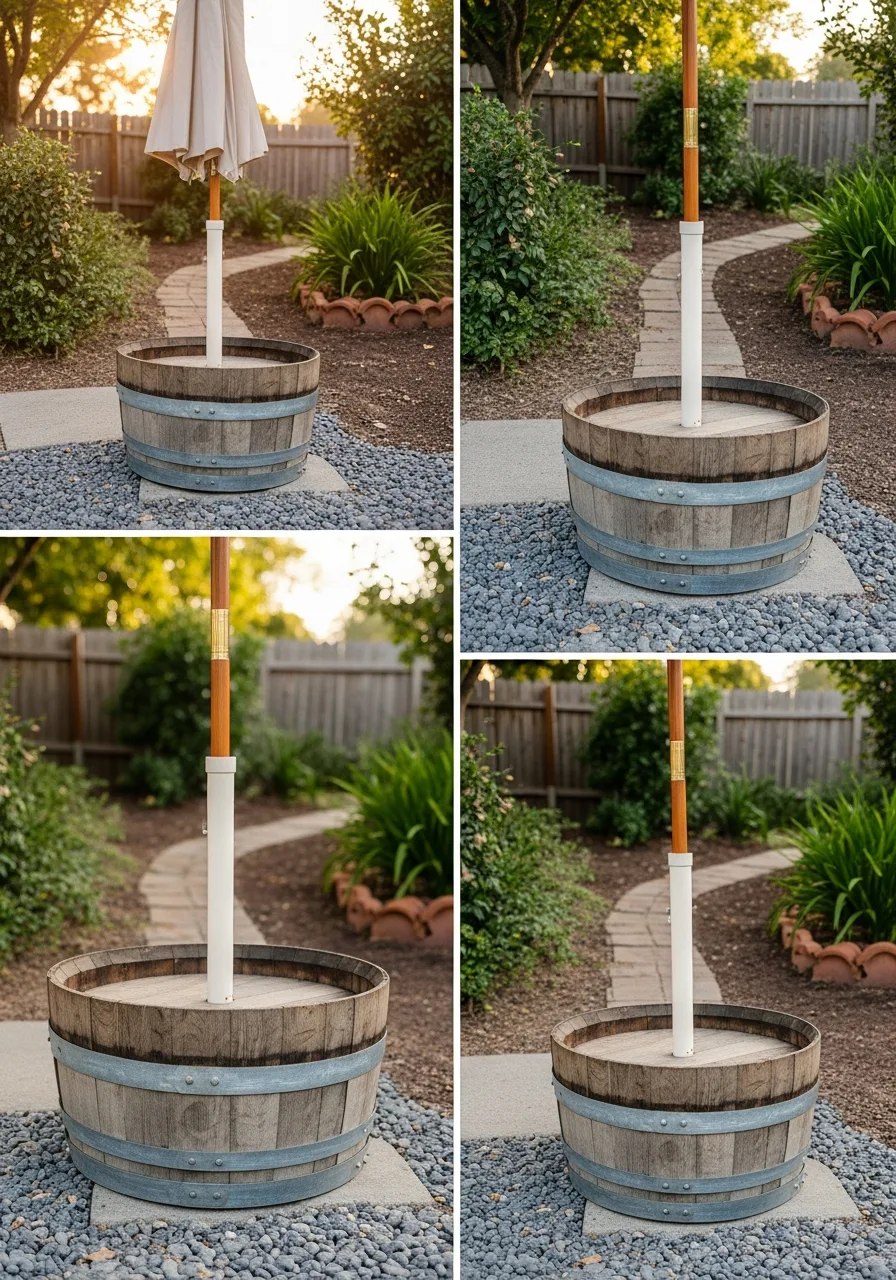
Use a half-wine barrel filled with heavy gravel or concrete to create a wind-proof base for a patio umbrella.
Insert a PVC pipe into the center before filling the barrel to create a perfectly sized sleeve for the umbrella pole. This DIY stand is heavy enough to stay put during summer storms.
Best move: Drill drainage holes in the bottom of the barrel so it does not collect standing water.
- About $40 for a half barrel plus gravel; requires some heavy lifting.
- Place the barrel exactly where you want it before filling it, as it will be hard to move.
- Plant flowers in the top few inches of soil above the gravel to hide the umbrella sleeve.
Quick win: Use a PVC pipe with a slightly larger diameter than your umbrella pole so it is easy to remove for winter storage.
29. Succulent Birdcage Vertical Garden
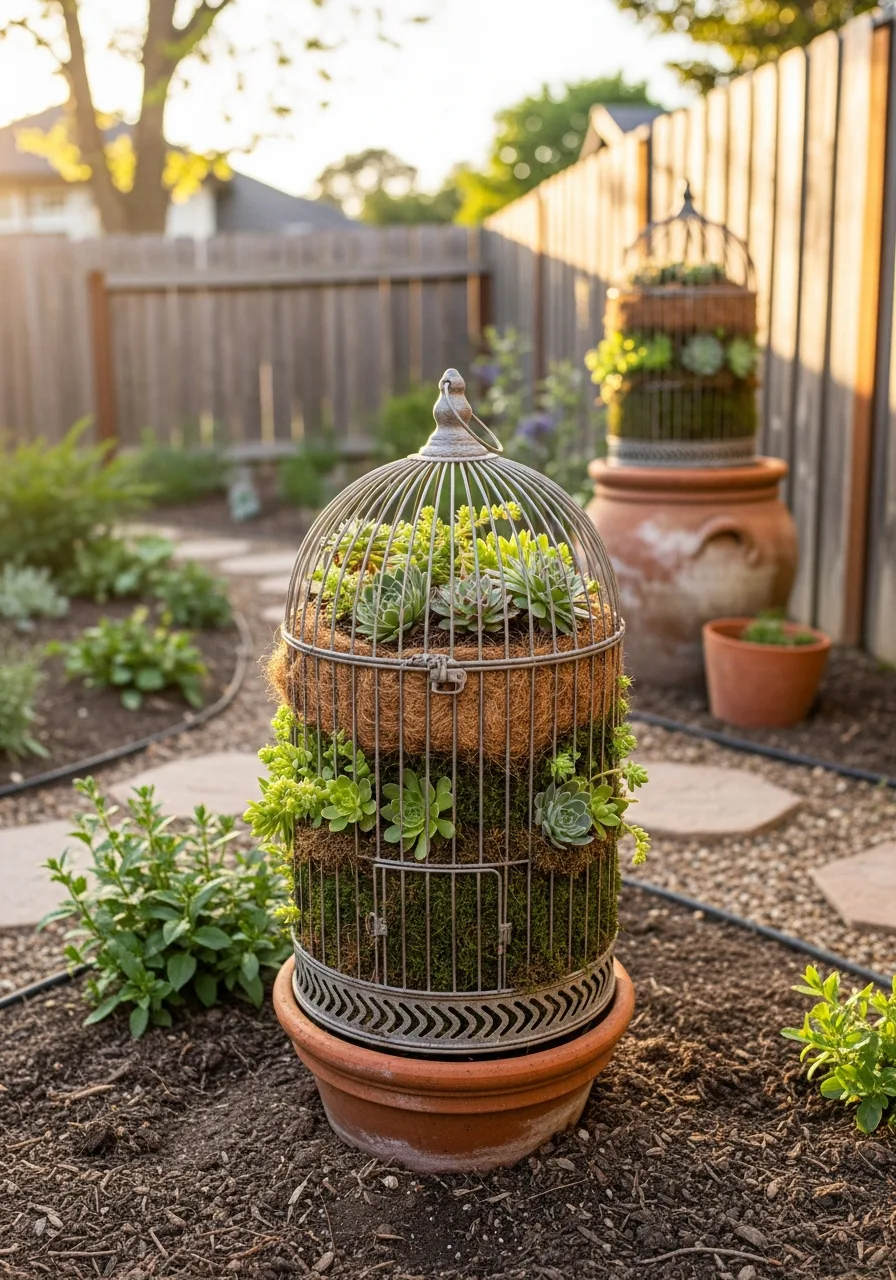
Fill an antique metal birdcage with a mix of coco coir and sphagnum moss to create a living sculpture. Tuck various types of succulents through the bars of the cage until the entire surface is covered in greenery. This vertical garden is low-maintenance and looks stunning hanging from a porch.
Worth doing: Use hens and chicks succulents as they are hardy and spread quickly.
- Around $15 for a thrifted cage; takes about one hour to plant.
- Hang in a spot that gets bright, indirect light to prevent the plants from scorching.
- Water by misting the moss or briefly dunking the entire cage in a bucket of water.
Most people skip this: Line the bottom with a thick layer of moss first to prevent the soil from falling through the cage floor.
30. Driftwood Fence Wall Art
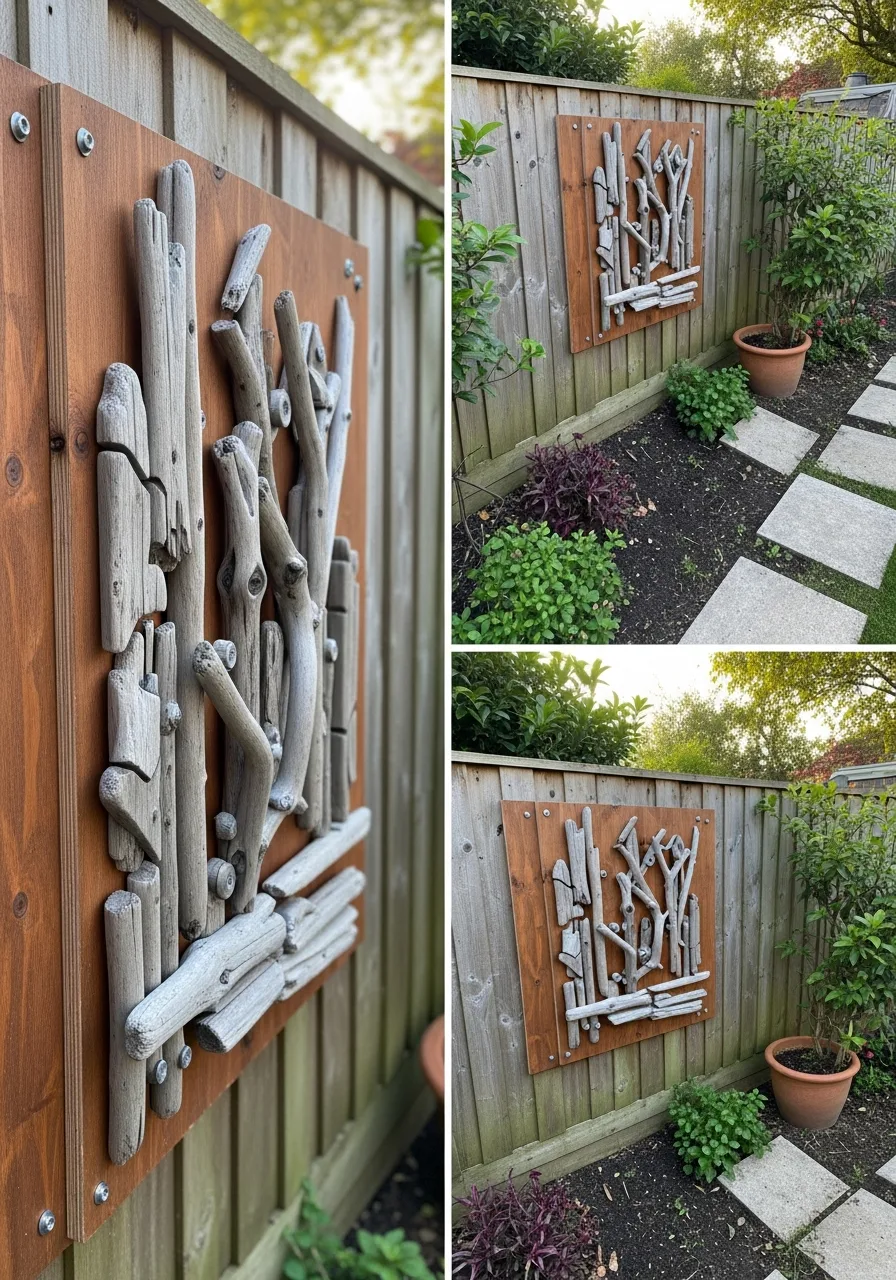
Create custom art for your fence by cleaning and arranging pieces of driftwood into a geometric or abstract shape. Mount the wood pieces onto a backing of stained plywood or screw them directly into the fence for a permanent installation. The silver-grey tones provide a beautiful contrast against green foliage.
What works: Use stainless steel screws to prevent rust streaks from running down your fence.
- Free if you live near water; otherwise, $20 for bulk driftwood online.
- Arrange the pieces on the ground first to finalize the design before you start drilling.
- Incorporate air plants into the crevices of the wood for a living wall effect.
Best shortcut: Use a high-strength construction adhesive for smaller pieces of wood to avoid visible screw heads.