25 Clever Bunk Bed Ideas For Campers
This post may contain affiliate links: full affiliate disclosure.
Camper bunk beds usually feel like an afterthought in most RV designs. You have to get creative to make these small spaces both useful and comfortable.
I’ve found that a few simple changes can turn a cramped bunk into a cozy retreat.
1. Clip-on Reading Lights
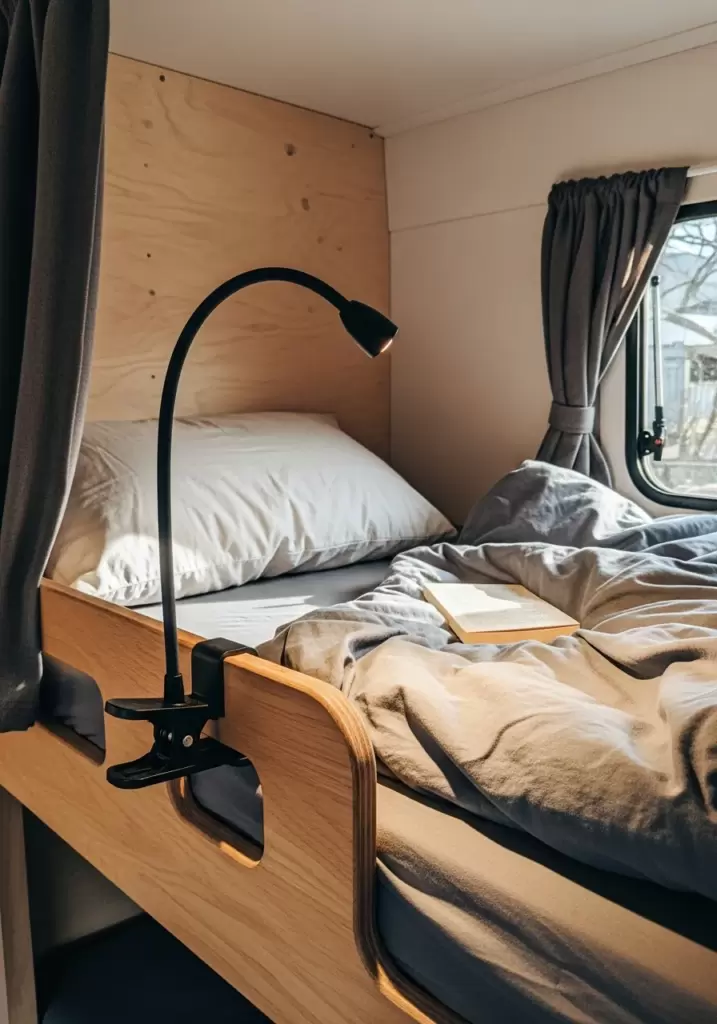
Clip-on reading lights attach directly to the bed frame or a nearby shelf. They provide focused light for reading without waking up everyone else in the camper.
My take: these are a total game changer for late-night readers.
- Buy lights with dimmable settings.
- Use rechargeable batteries for convenience.
- Clip them away during travel.
Pro Tip: Quick win: get lights with flexible necks for better positioning.
2. Mesh Wall Pockets
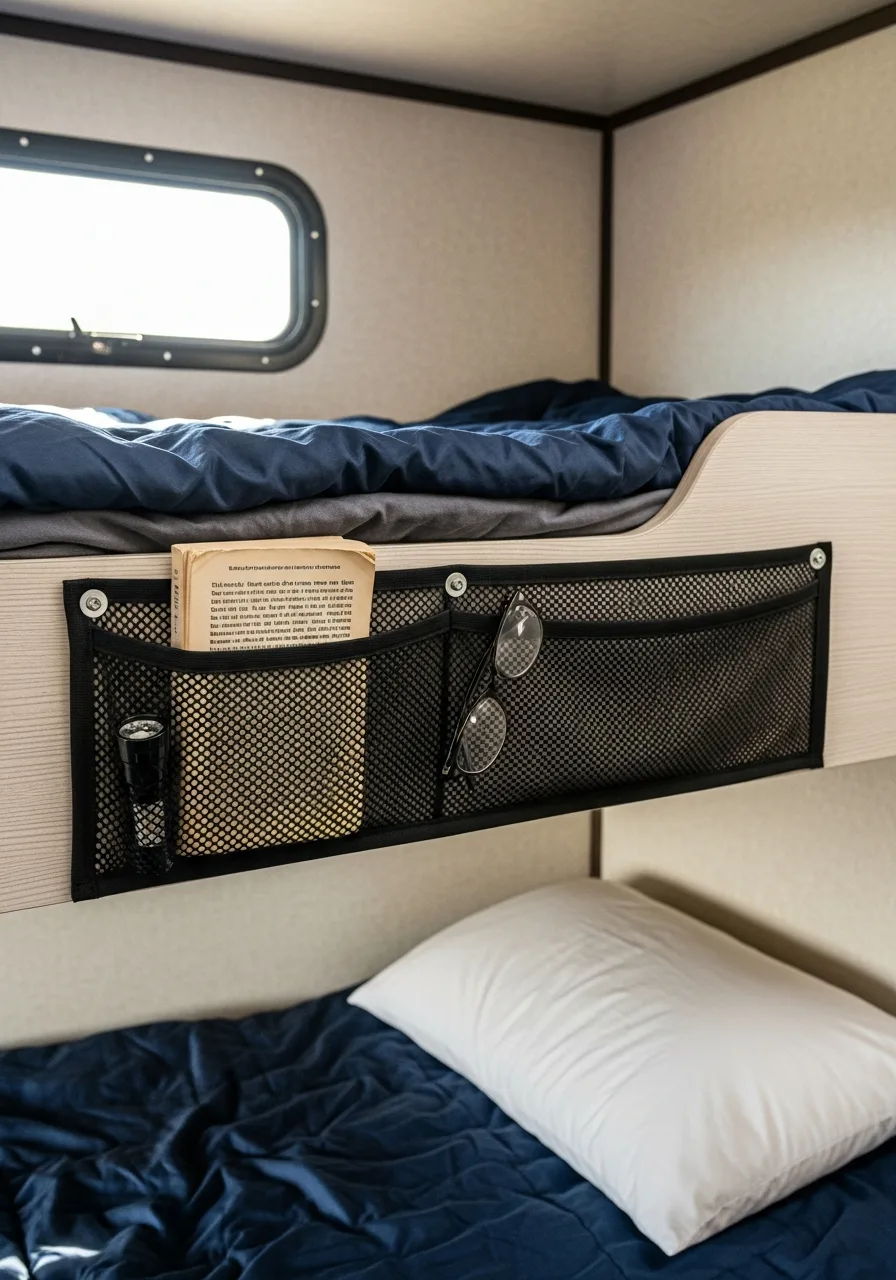
Mesh pockets can be screwed or stuck onto the wall inside the bunk. They are perfect for holding small things like glasses or remote controls.
Honestly, these are the best way to keep clutter off the mattress.
- Use heavy-duty adhesive strips.
- Place them near the head board.
- Buy the multi-pack for extra storage.
Pro Tip: Here’s what I do: use them for snacks on long trips.
3. Custom Rail Covers
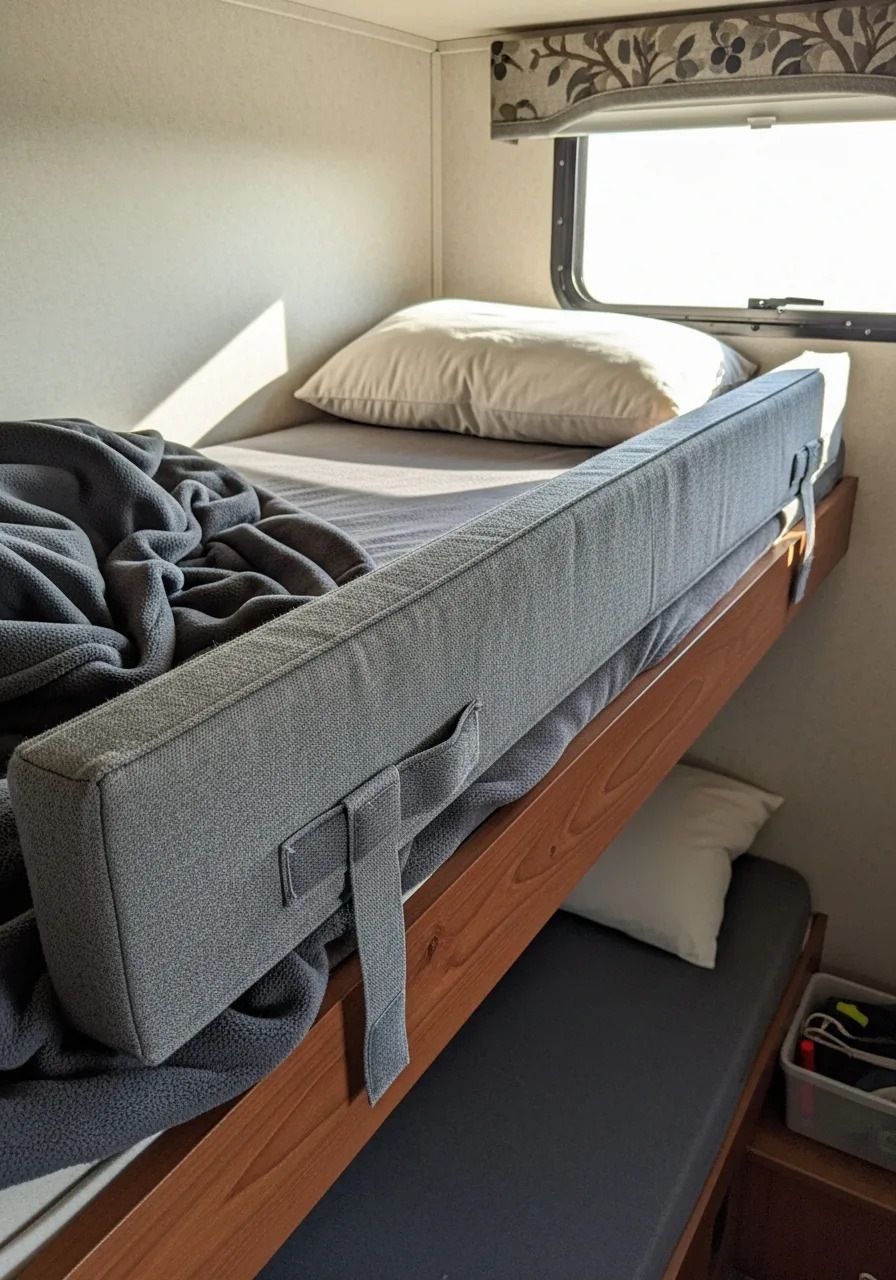
Padded fabric covers wrap around the metal safety rails of the bunk. They prevent painful bumps and make the rail softer to touch.
Honestly, metal rails feel cold and industrial without a cover.
- Use velcro for easy removal.
- Choose a machine-washable fabric.
- Match the pattern to the bedding.
Pro Tip: Quick win: add a small pocket for glasses.
4. Blackout Curtains
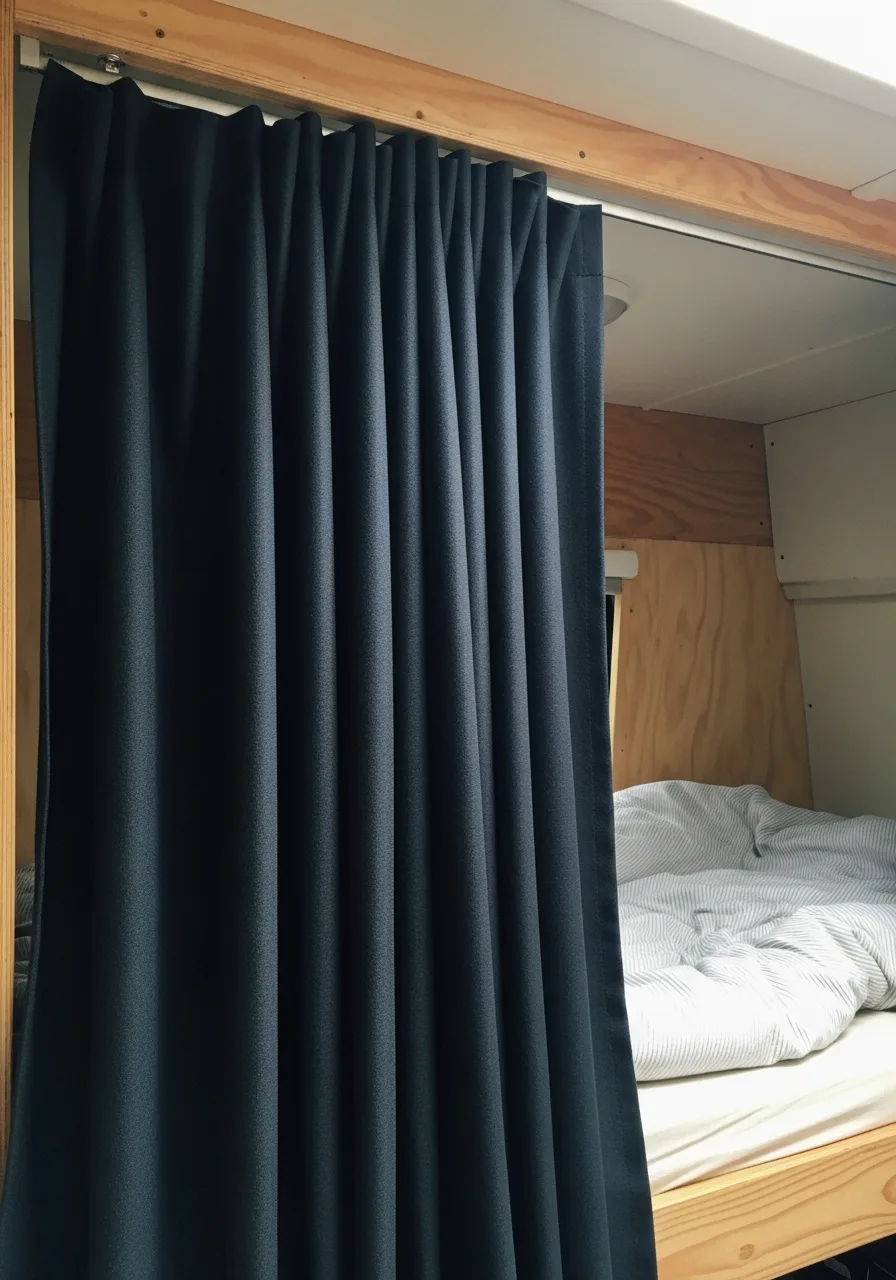
Heavy blackout curtains block out early morning sun and campsite lights. They create a private sleeping pod feel even in a crowded RV.
I always recommend dark colors to maximize the light-blocking effect.
- Use a sturdy tension rod.
- Hem them to clear the floor.
- Add a velcro strip for seals.
Pro Tip: Quick win: use fabric clips to keep them from sliding.
5. Bamboo Bed Trays
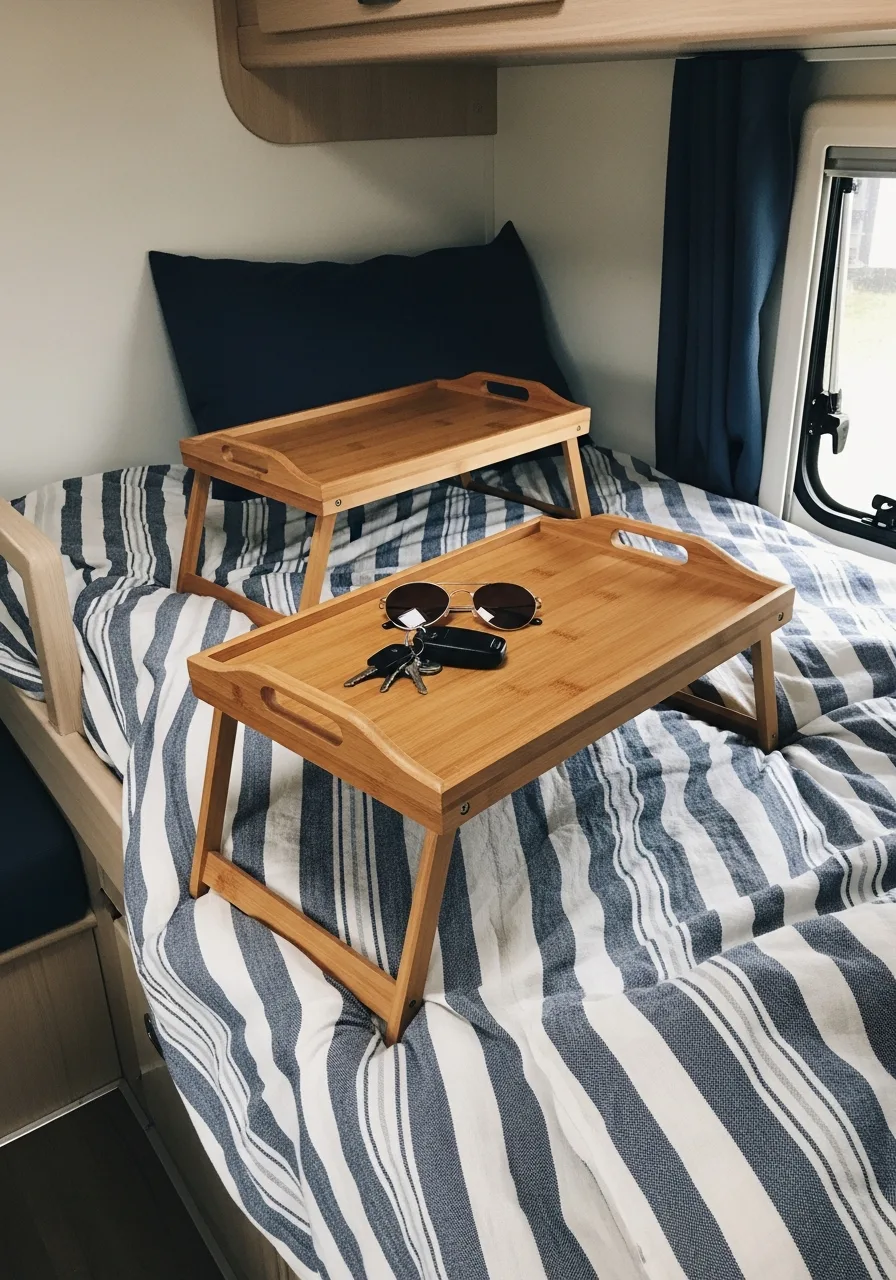
These small trays have folding legs and a flat top surface. They provide a stable place for kids to eat or draw.
My take: these help keep crumbs off the sheets.
- Get a tray with a lip.
- Store it under the mattress.
- Wipe it down after every use.
Pro Tip: Here’s what I do: use it for laptop work.
6. Adhesive LED Strips

These light strips stick to the underside of the top bunk or the ceiling. They provide a soft glow that makes the space feel cozy and safe.
My take: color-changing lights are a huge hit with younger campers.
- Clean the surface before sticking.
- Use a remote-controlled set.
- Hide the wires behind trim.
Pro Tip: Quick win: use the dimming feature for a nightlight.
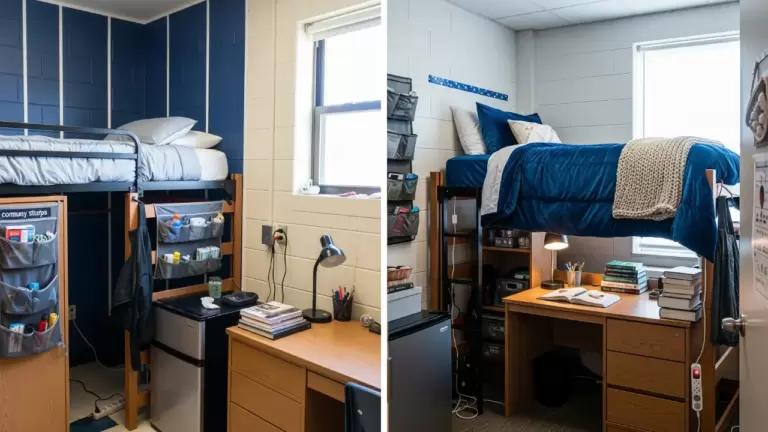
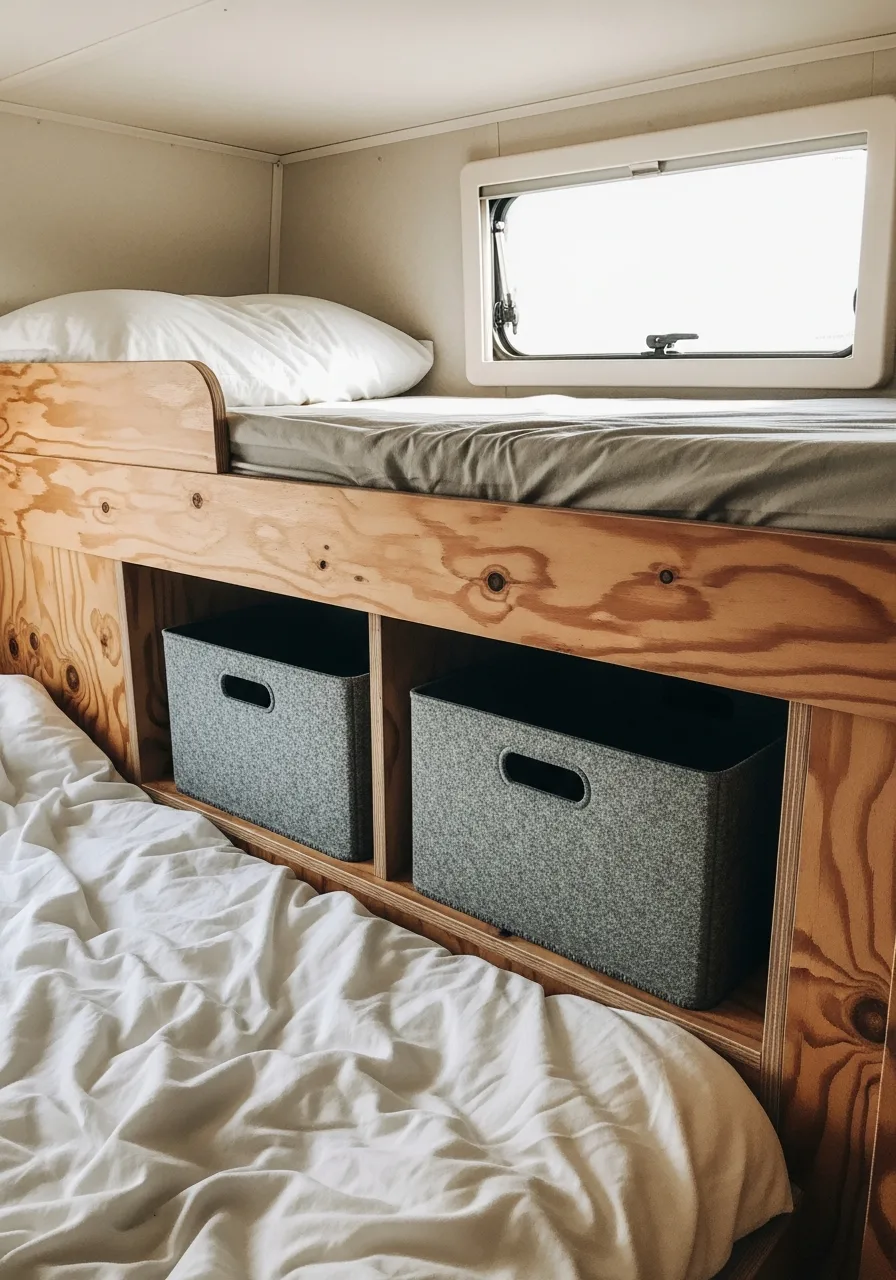
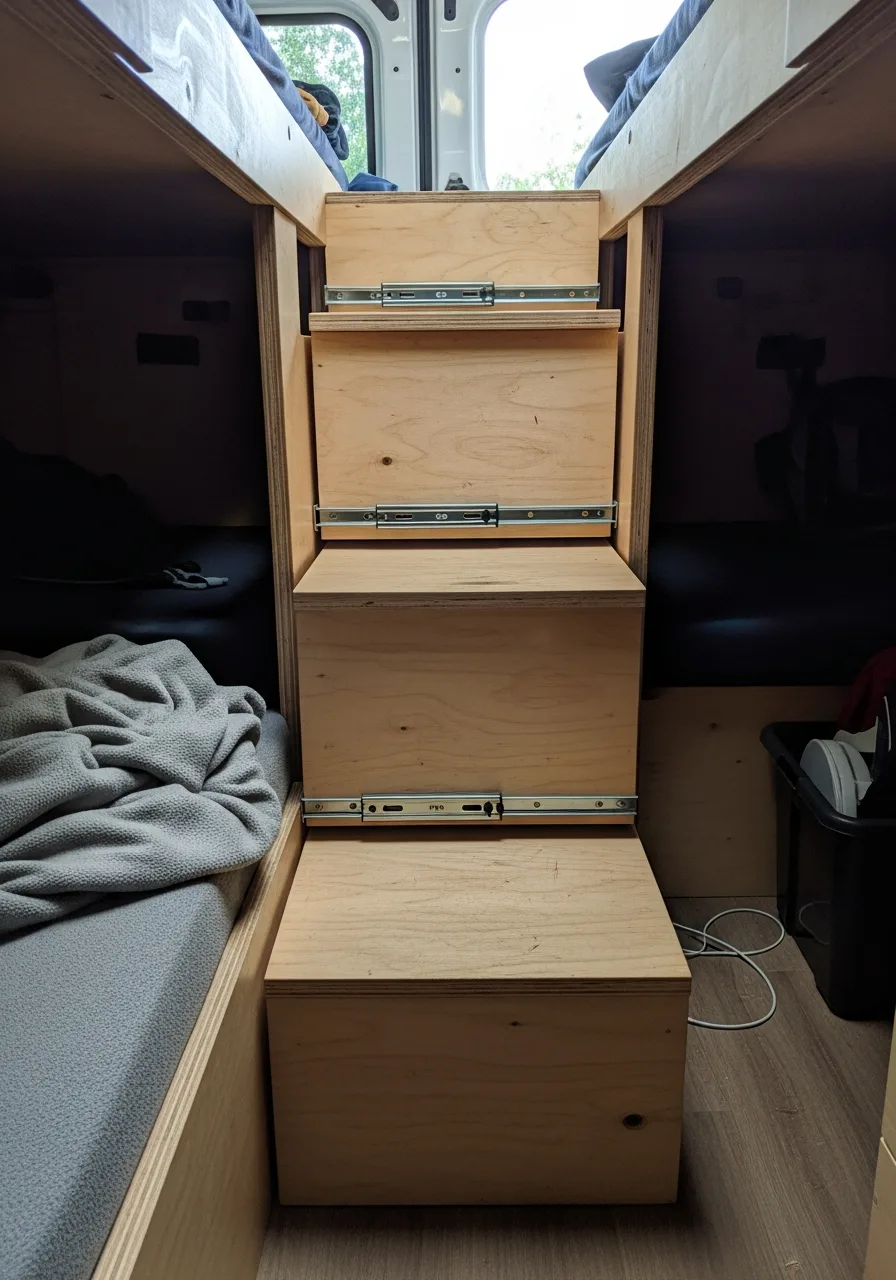
7. Under-Bunk Storage Drawers
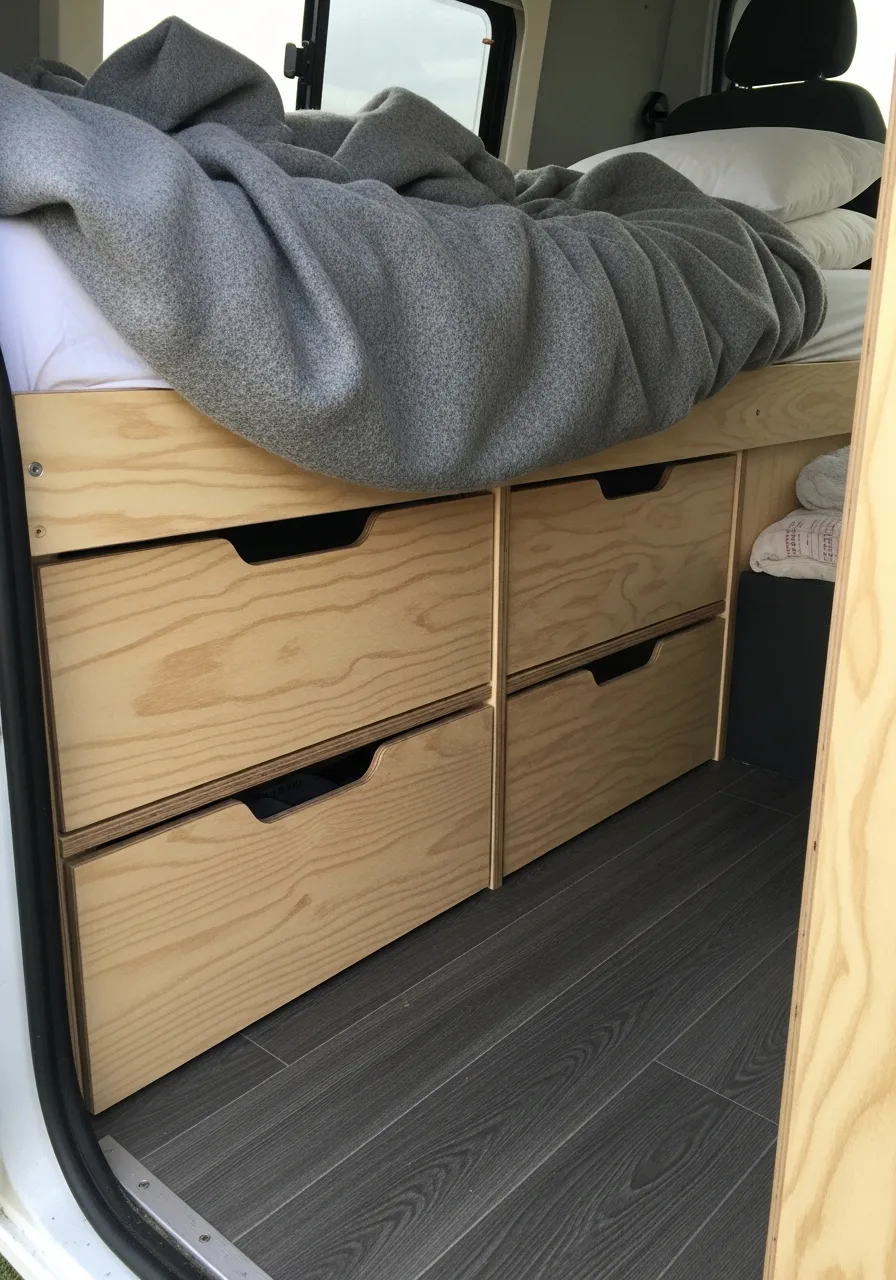
Sliding drawers fit perfectly in the gap beneath the bottom bunk. This utilizes dead space for heavy items like shoes or tools.
Honestly, you are wasting space if you leave this area empty.
- Measure the height twice before buying.
- Use clear bins to see contents.
- Add felt pads to prevent scratches.
Pro Tip: Here’s what I do: label each drawer for organized access.
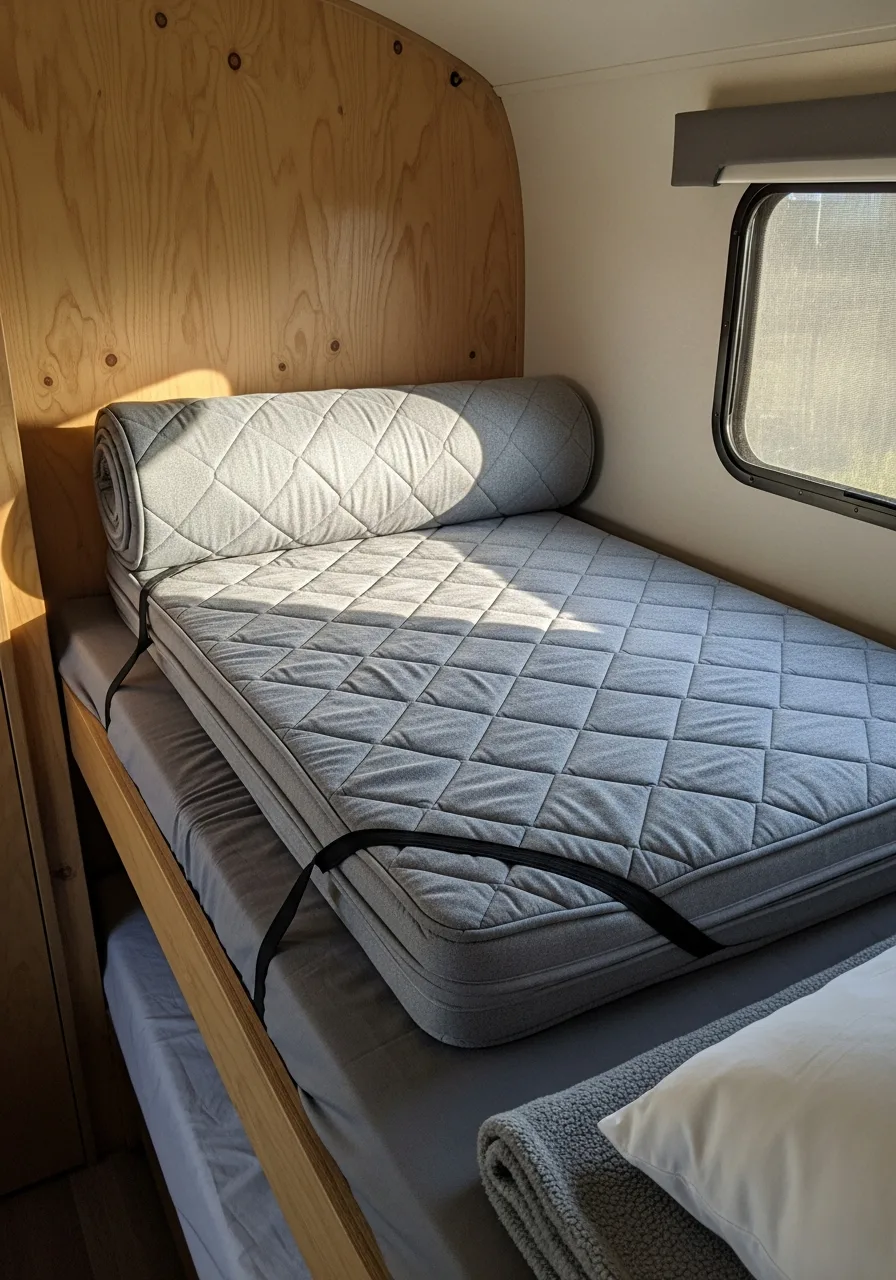
8. Memory Foam Toppers
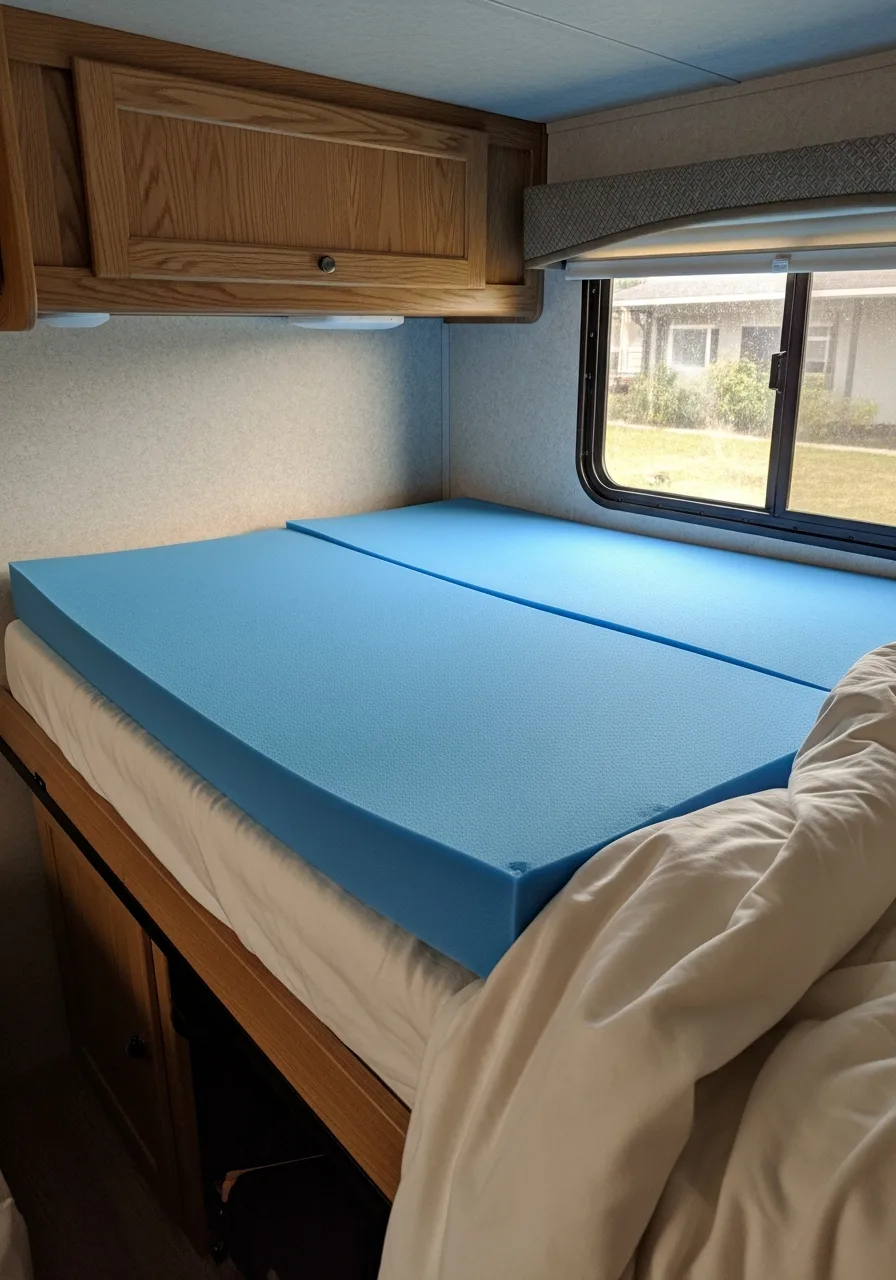
A memory foam topper adds a layer of cushion to thin camper mattresses. Most stock camper beds are too hard for a good night’s sleep.
I always recommend a two-inch thickness for the best comfort.
- Trim the foam with a knife.
- Use a fitted sheet to hold.
- Let it air out before use.
Pro Tip: Most people skip this: buy a cooling gel version for summer.
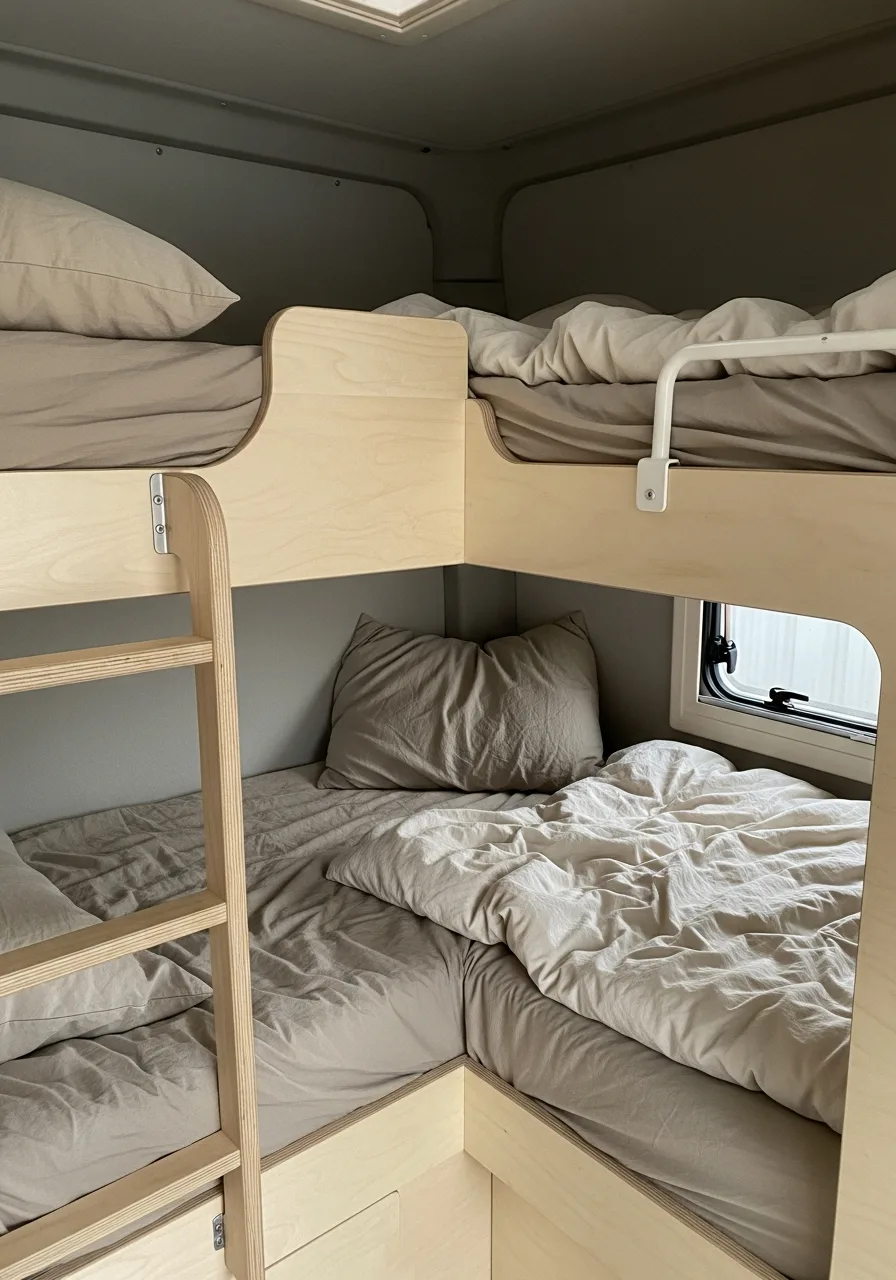
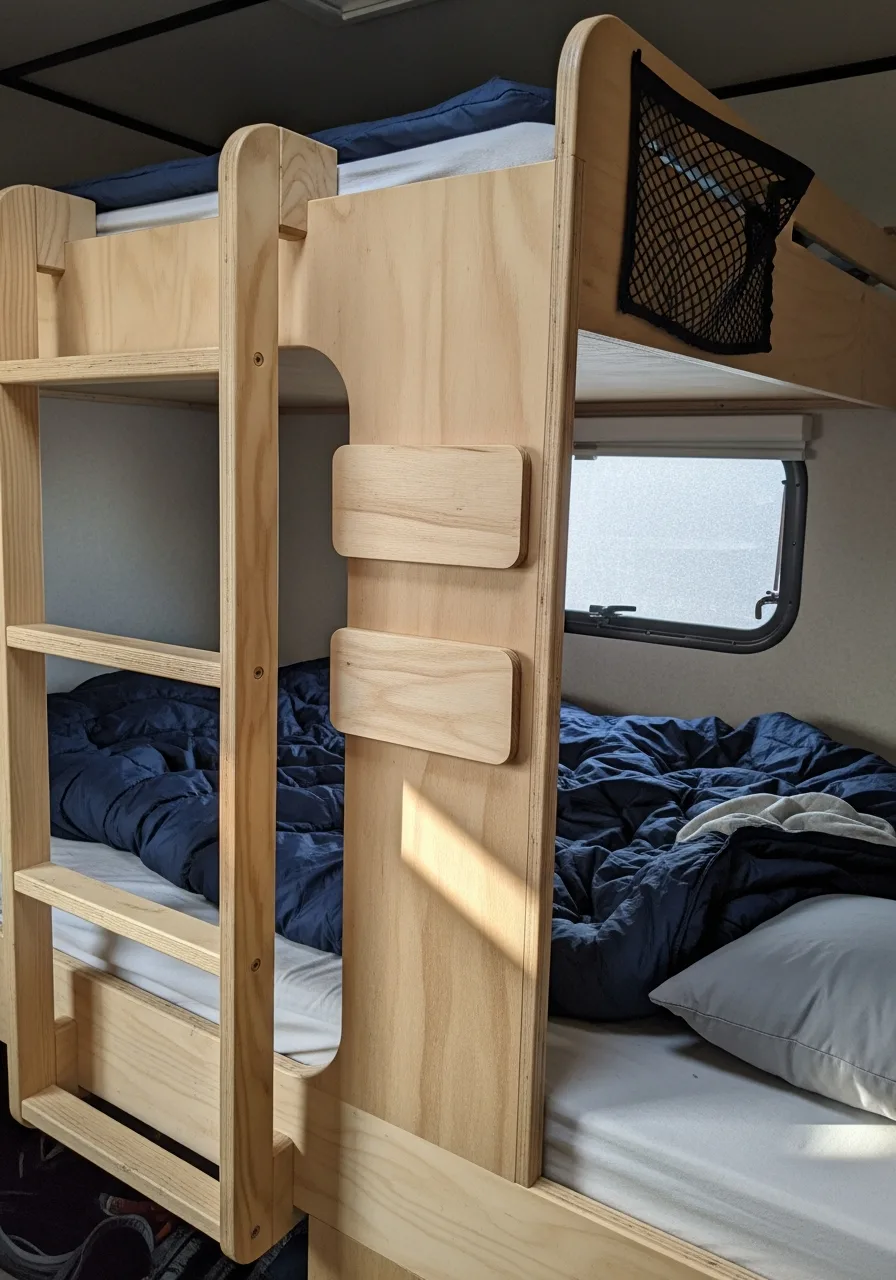
9. Collapsible Ladders
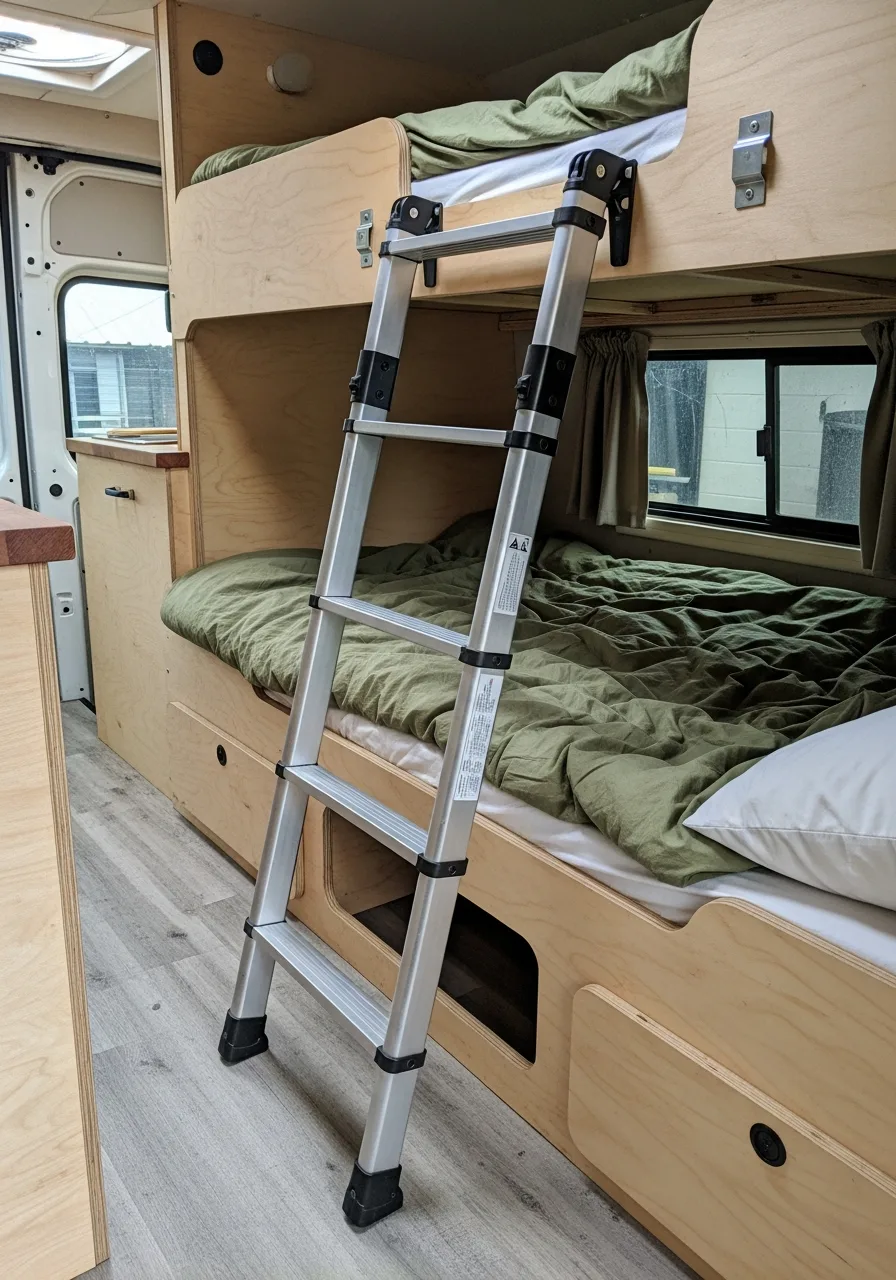
These ladders can be folded or removed when the camper is in motion. They save floor space and make it easier to reach the top bunk.
Honestly, a fixed ladder is usually just in the way.
- Check the weight limit first.
- Secure it with a travel latch.
- Add rubber feet for stability.
Pro Tip: Here’s what I do: store it under the bottom bunk.
10. Corner Toy Hammocks
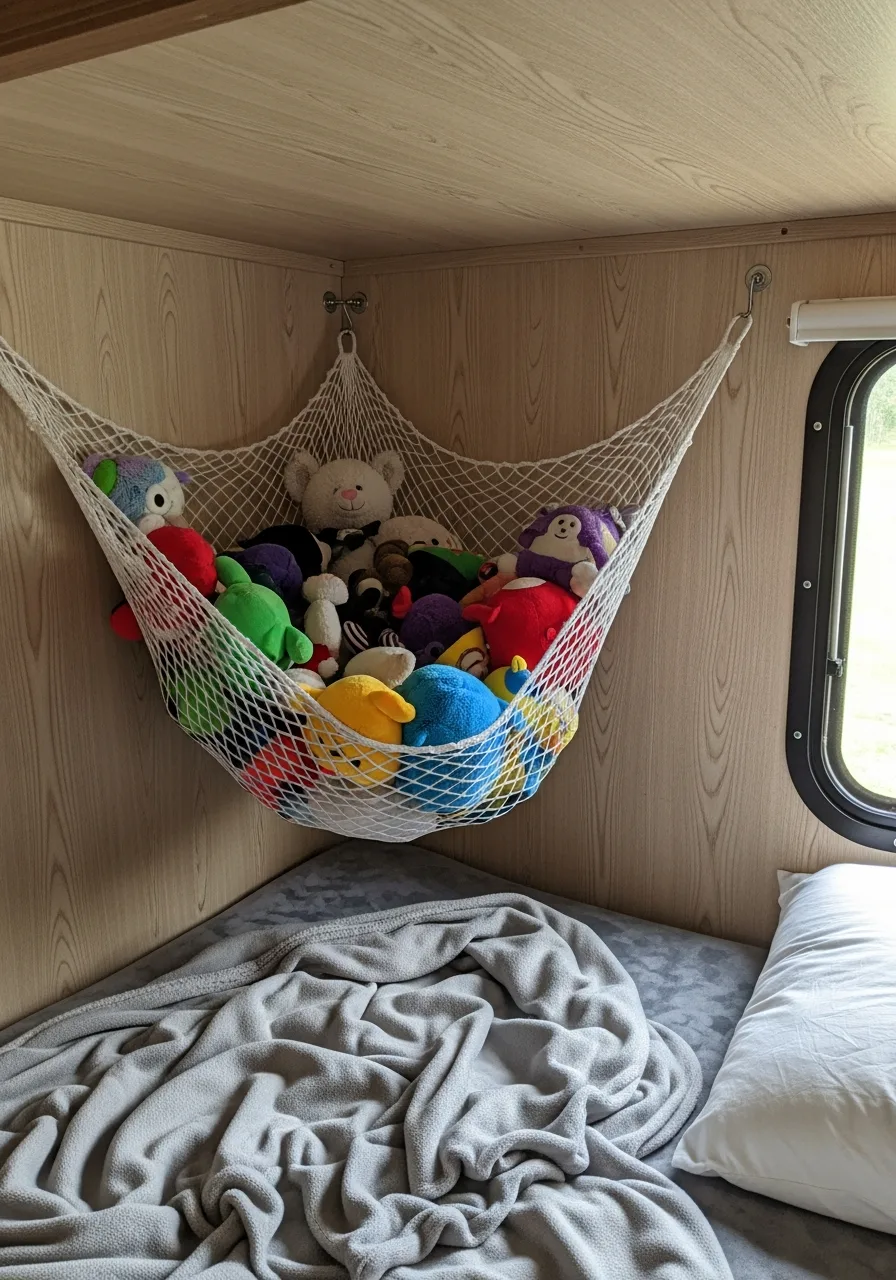
These small mesh nets hang in the corner of the bunk to hold stuffed animals. They keep toys off the mattress so there is more room to sleep.
My take: every kid’s bunk needs one of these to stay tidy.
- Screw the hooks into a stud.
- Don’t overfill the net.
- Keep it high to avoid heads.
Pro Tip: Most people skip this: use wall anchors if walls are thin.
11. Magnetic Phone Mounts
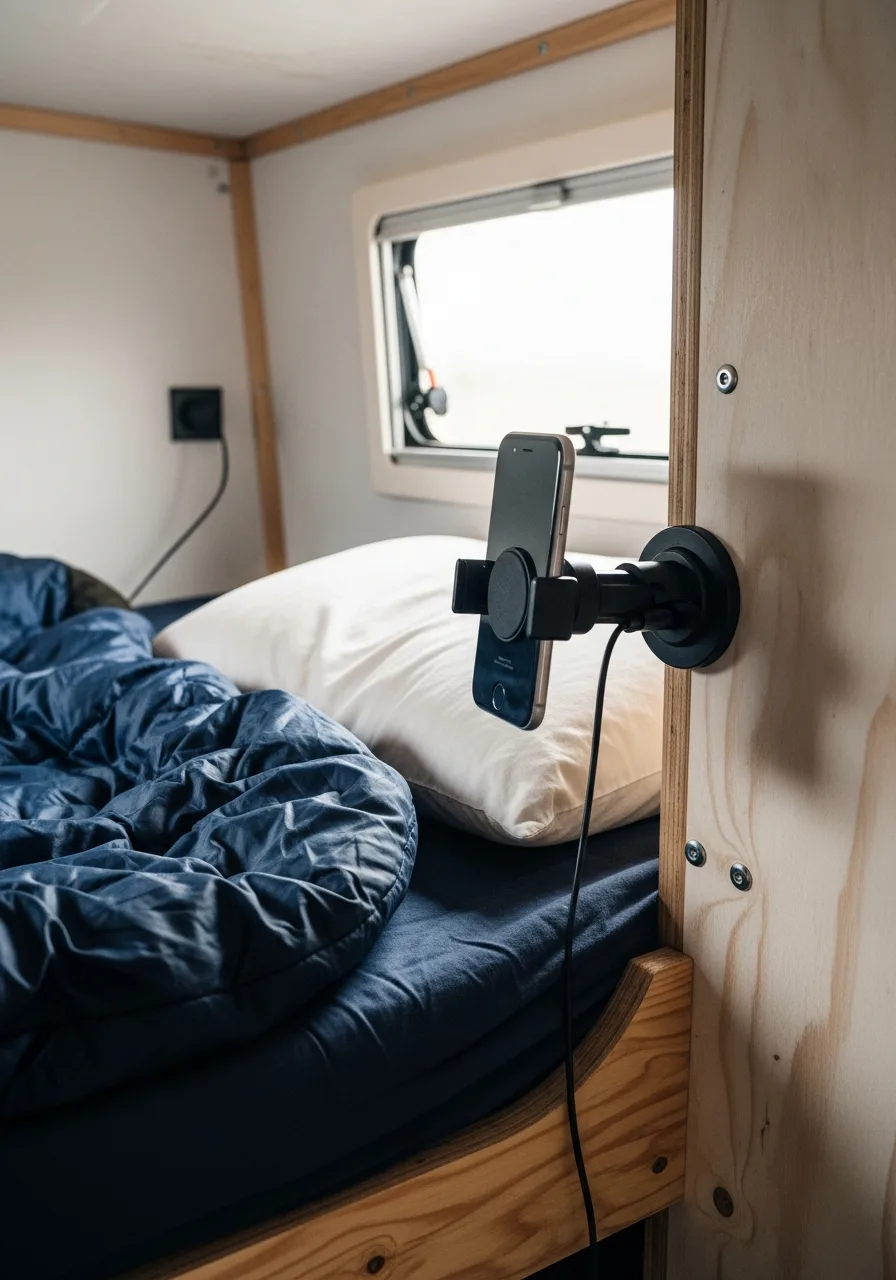
Magnetic mounts can be attached to the wall or the bed frame. They keep your phone secure and visible for watching movies or alarms.
My take: this is a smart way to keep tech safe.
- Use a strong magnet.
- Mount it away from your head.
- Check the adhesive strength.
Pro Tip: Quick win: use them for tablets on bottom bunks.
12. Floating Shelves
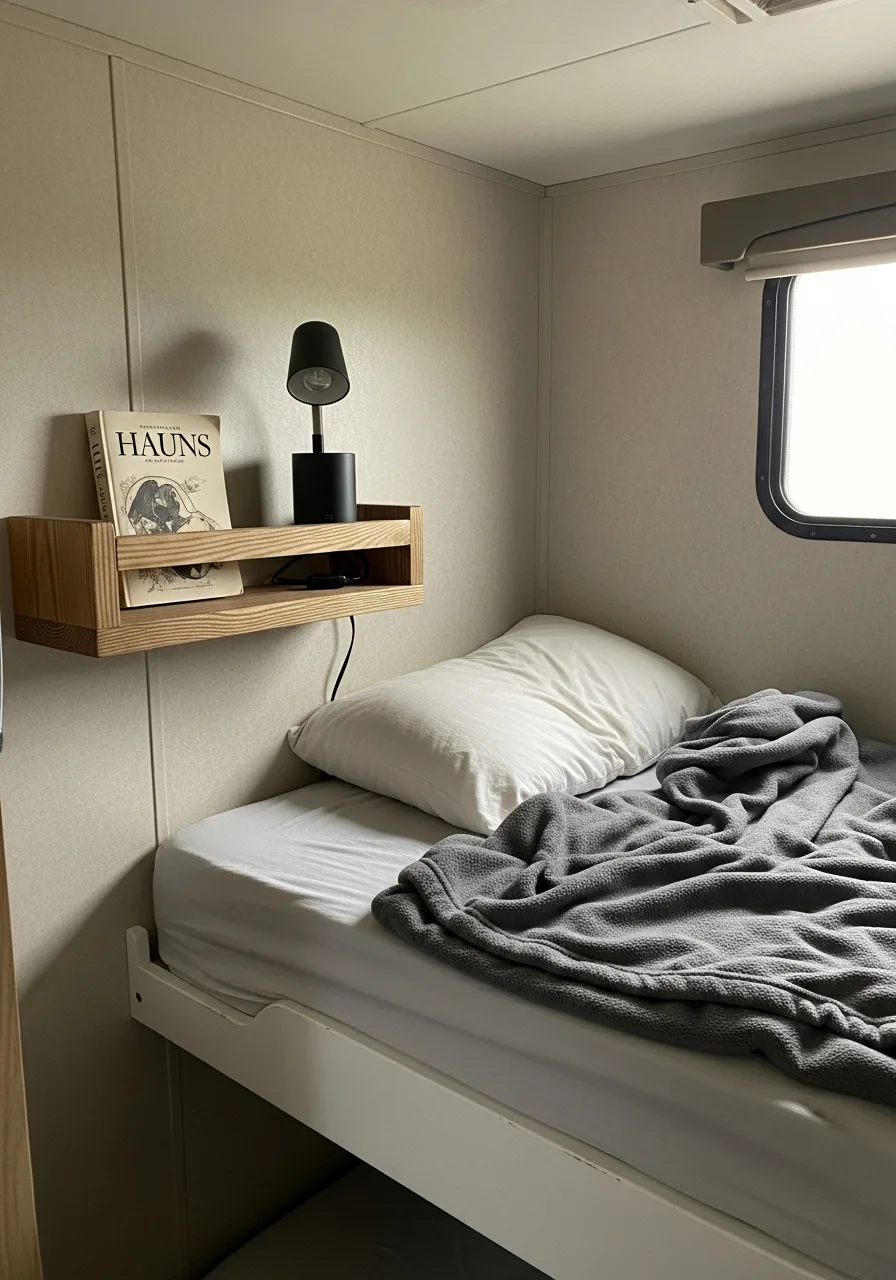
Small floating shelves provide a flat surface for a clock or water. They take up very little room but offer a huge convenience.
I always look for shelves with a lip to prevent sliding.
- Use lightweight wood or plastic.
- Screw them into the wall studs.
- Keep them narrow to avoid bumps.
Pro Tip: Most people skip this: add a non-slip liner to the top.
13. Zippered Bedding Sets
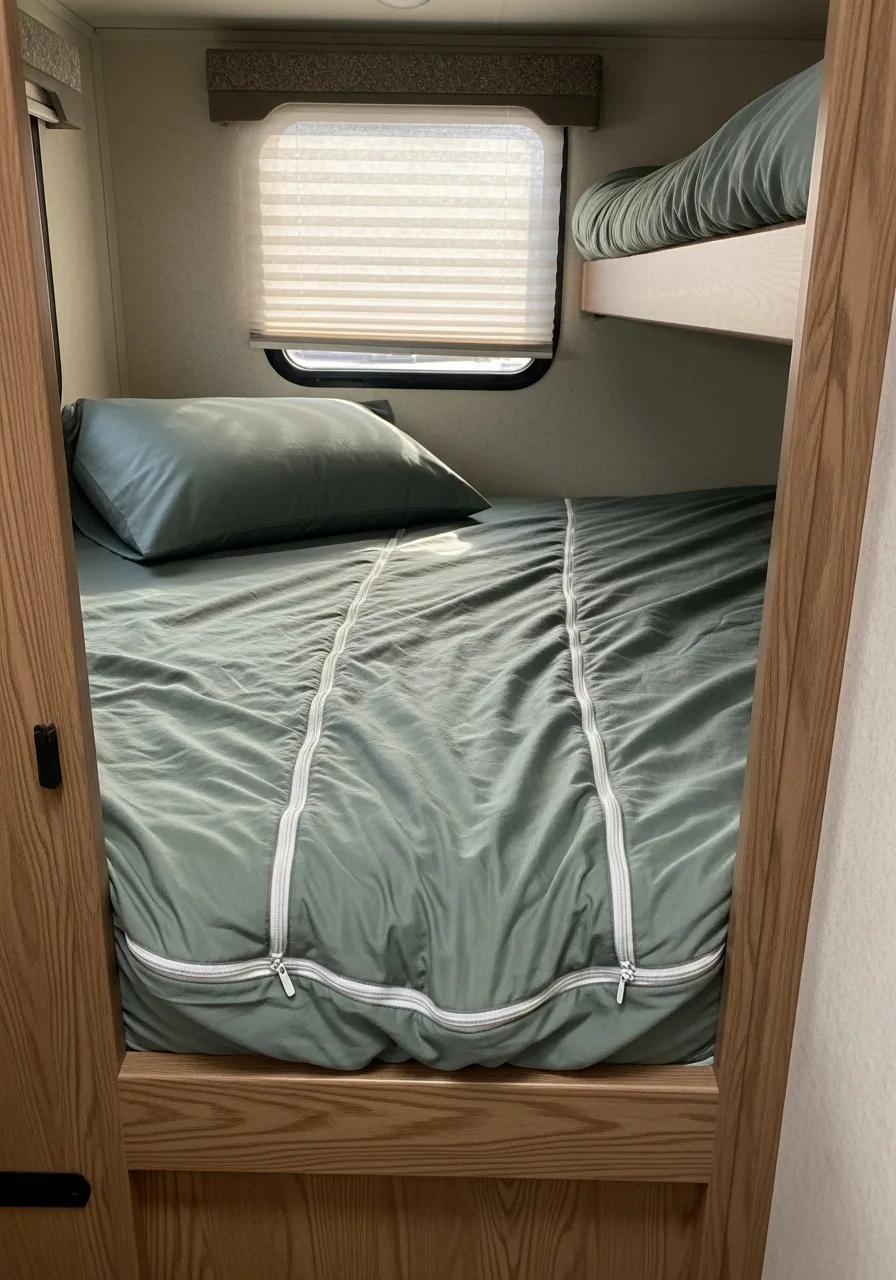
Zippered bedding is a one-piece set that zips up like a sleeping bag. Making a bunk bed in a tight space is nearly impossible without this design.
Honestly, I prefer zippered sets over traditional sheets.
- Choose breathable cotton fabrics.
- Wash the entire set monthly.
- Pick a color that hides dust.
Pro Tip: Most people skip this: check the zipper quality before buying.
14. Neutral Color Palettes
Using light grays, whites, or tans makes a small bunk feel larger. Dark colors can make a tiny camper bunk feel like a cave.
My take: stick to light colors to keep the space airy.
- Mix different textures for interest.
- Use colorful pillows for accents.
- Choose easy-to-clean fabrics.
Pro Tip: Here’s what I do: use white bedding to spot dirt.
15. Felt Storage Bins
Felt bins are soft-sided containers that fit into small cubbies or shelves. They won’t rattle or make noise while the camper is moving.
Honestly, I prefer felt over plastic for a quieter ride.
- Choose bins with handles.
- Label them with iron-on patches.
- Pick a size that fits snugly.
Pro Tip: Quick win: use them for clothes to save space.
16. Hook-on Bedside Caddies
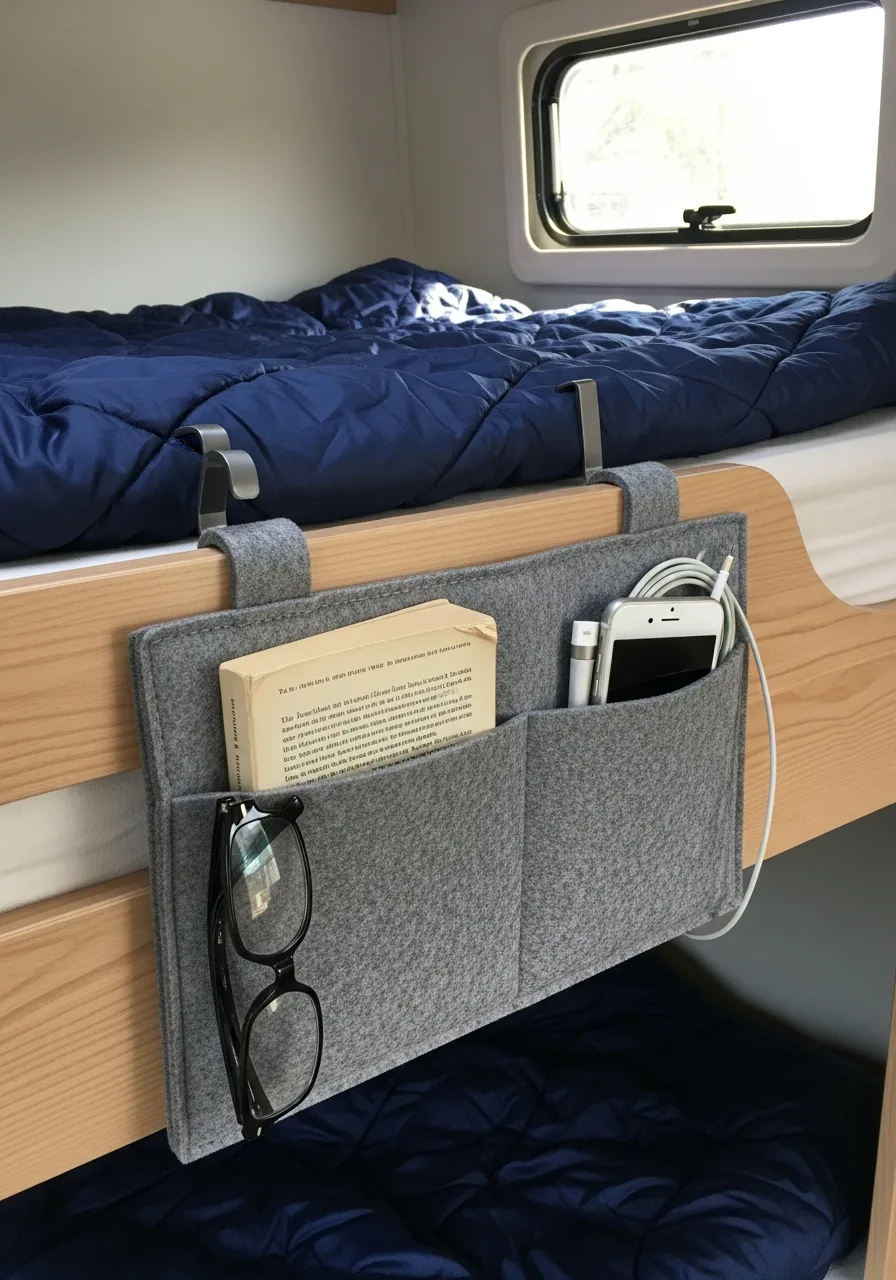
A fabric caddy hooks over the side rail to hold a phone or water bottle. It replaces a bulky nightstand that just won’t fit in a camper.
I always suggest these for the top bunk where space is tightest.
- Pick a caddy with multiple pockets.
- Secure it with zip ties.
- Choose a washable fabric.
Pro Tip: Quick win: put a heavy book inside to steady.
17. Padded Headboards
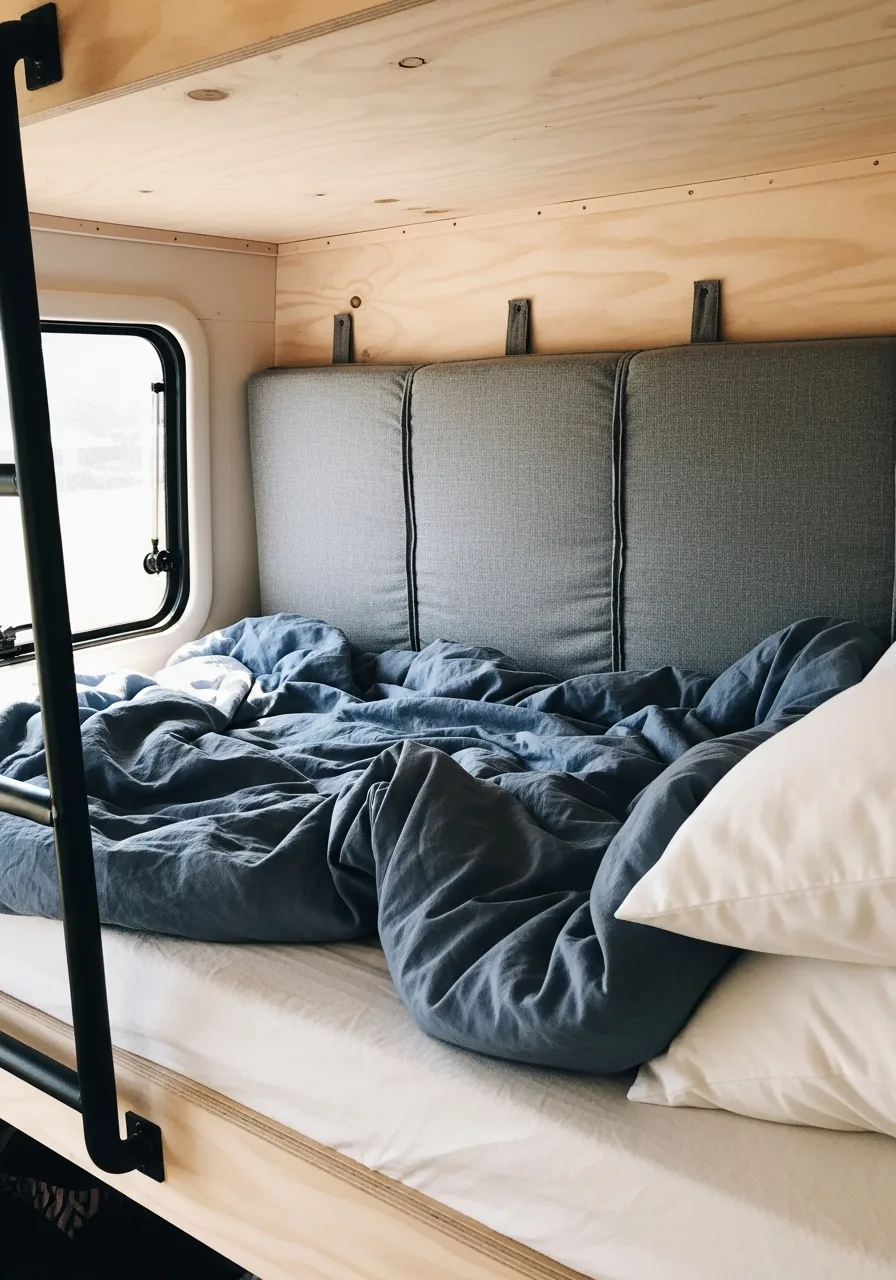
A padded headboard can be made from foam and fabric and mounted to the wall. It protects heads from hitting the hard walls of the camper.
My take: this makes sitting up in bed much more comfortable.
- Use a staple gun for assembly.
- Attach with heavy-duty velcro.
- Choose a dark, durable fabric.
Pro Tip: Most people skip this: use a wipeable vinyl for kids.
18. Personalized Name Plates
Small wooden or plastic signs with names are hung on the bunk frame. They give each person their own defined space in the camper.
Honestly, kids love having a spot that is truly theirs.
- Use command strips to hang.
- Keep the design simple.
- Use lightweight materials for safety.
Pro Tip: Quick win: use chalkboard paint for changing names.
19. Anti-Slip Ladder Tape
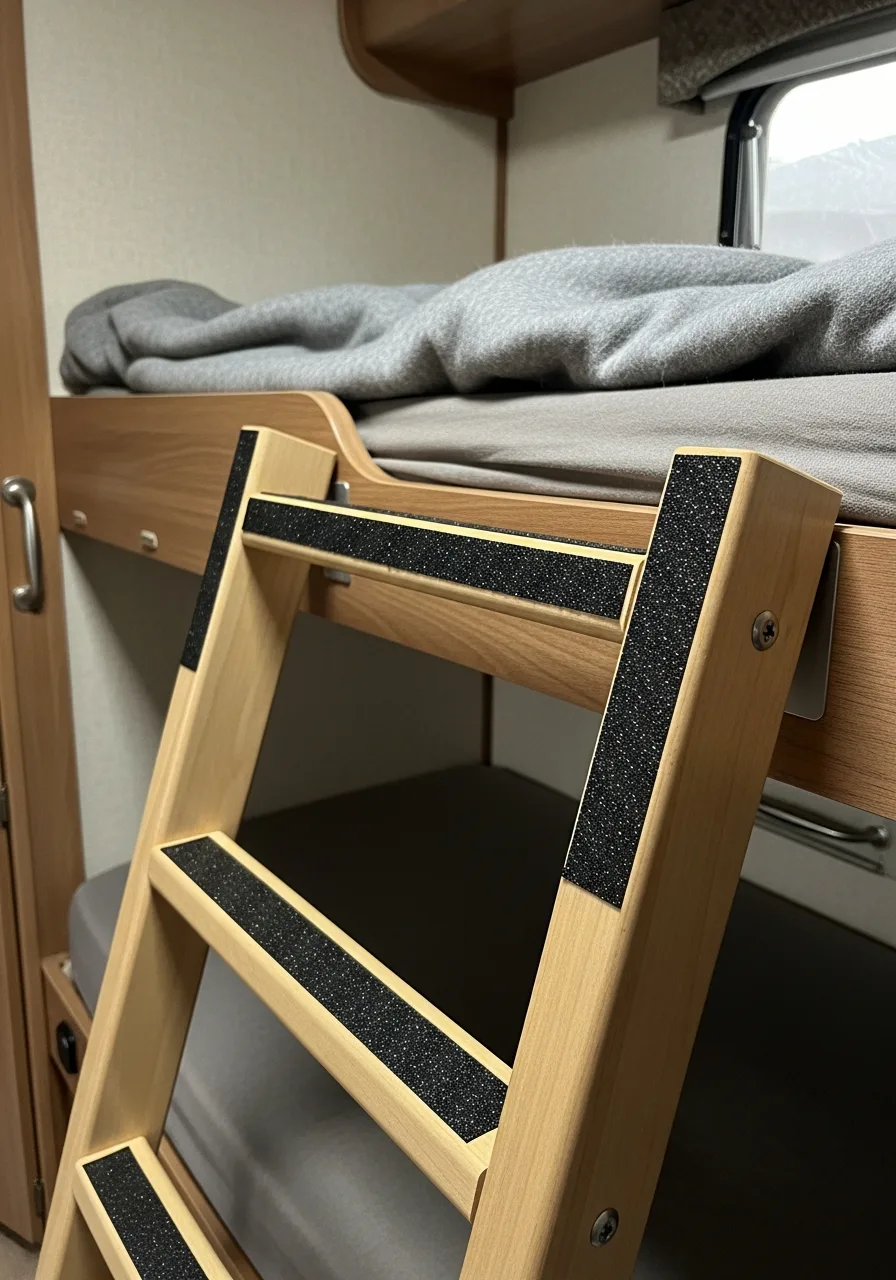
This textured tape is applied to the rungs of the bunk ladder. It provides extra grip for feet, especially when wearing socks.
I always put this on every ladder for safety.
- Clean the rungs before applying.
- Cut the tape to fit perfectly.
- Replace it when it looks worn.
Pro Tip: Quick win: use glow-in-the-dark tape for night use.
20. Small Ventilation Fans
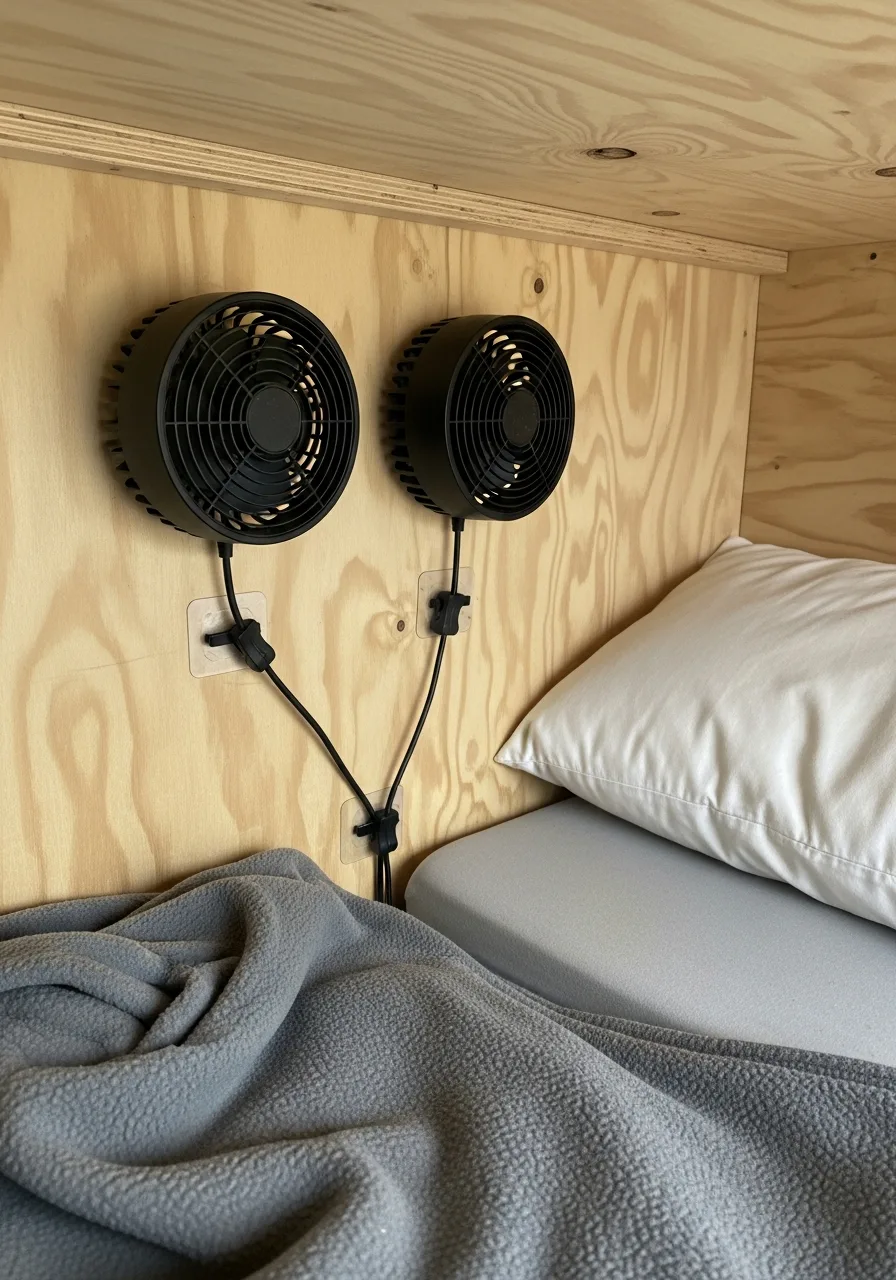
Battery-operated fans can be clipped onto the bed or a shelf. They keep the air moving in tight bunk spaces that get stuffy.
Honestly, a fan is essential for sleeping in warm weather.
- Look for a quiet motor.
- Choose a fan with a clip.
- Use a rechargeable model.
Pro Tip: Here’s what I do: point it toward the feet first.
21. Roll-up Mattress Pads
These thin pads can be rolled up and stored when not needed. They are perfect for turning a floor space into an extra bed.
My take: always have one for unexpected guests.
- Buy a pad with a strap.
- Choose a water-resistant cover.
- Roll it tight to save space.
Pro Tip: Most people skip this: use it as a lounge seat.
22. Slide-out Steps
Custom steps can be built to slide out from under the bed frame. They provide a safer way to climb than a narrow ladder.
Honestly, steps are much easier on your feet.
- Use heavy-duty drawer slides.
- Add a non-slip surface.
- Make sure they lock when closed.
Pro Tip: Here’s what I do: use the steps for storage.
23. Pegboard Wall Panels

Pegboards can be mounted to the wall at the end of the bunk. They allow you to hang baskets, hooks, or shelves that you can move around.
My take: this is the most flexible storage solution for any camper.
- Use plastic boards to save weight.
- Secure hooks with glue.
- Don’t hang heavy items while driving.
Pro Tip: Most people skip this: paint the board to match walls.
24. Tension Rod Dividers
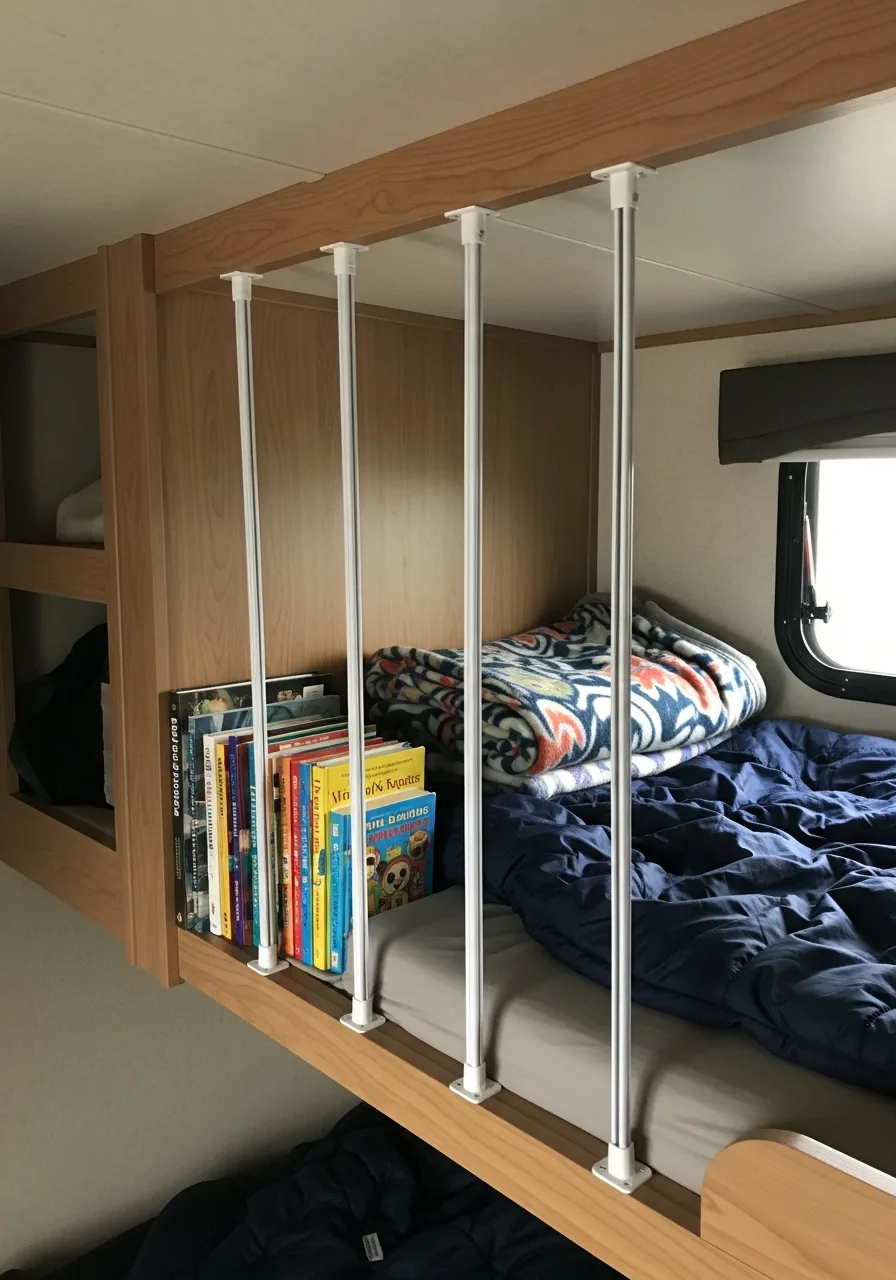
Tension rods can be placed vertically or horizontally to create sections. They help keep pillows or stuffed animals from falling out.
My take: these are the cheapest way to organize a bunk.
- Use rods with rubber ends.
- Don’t over-tighten on thin walls.
- Buy a pack of different sizes.
Pro Tip: Quick win: hang a small curtain on one.
25. String Light Accents
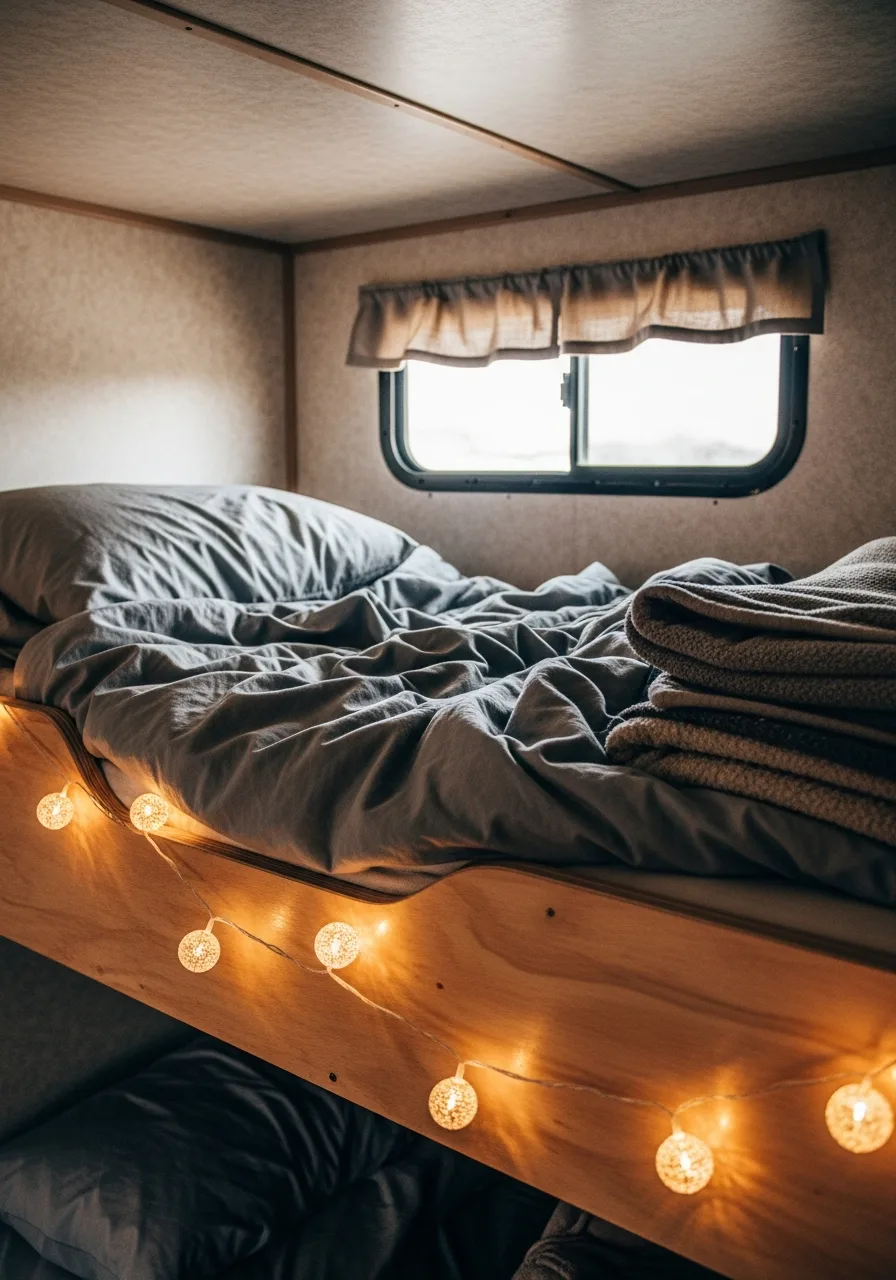
String lights provide a decorative glow around the bunk frame. They create a cozy atmosphere that makes the camper feel homey.
I always use battery-powered ones to avoid extra wiring.
- Use clear command hooks to hang.
- Choose warm white for soft looks.
- Keep them away from bedding.
Pro Tip: Most people skip this: use a timer to save power.
Making the most of a camper bunk is all about smart storage and comfort. You don’t need a huge budget to make these spaces work better for your family.
Focus on the small details and you will see a big difference.