30 Best Small Kitchen Storage Solutions
This post may contain affiliate links: full affiliate disclosure.
If your tiny kitchen is starting to feel more like a storage war zone than a cozy cooking haven, don’t sweat it!
We’ve gathered 30 practical, budget-friendly ideas to help you conquer clutter and squeeze major function out of every last inch.
Let’s make your small kitchen live large!
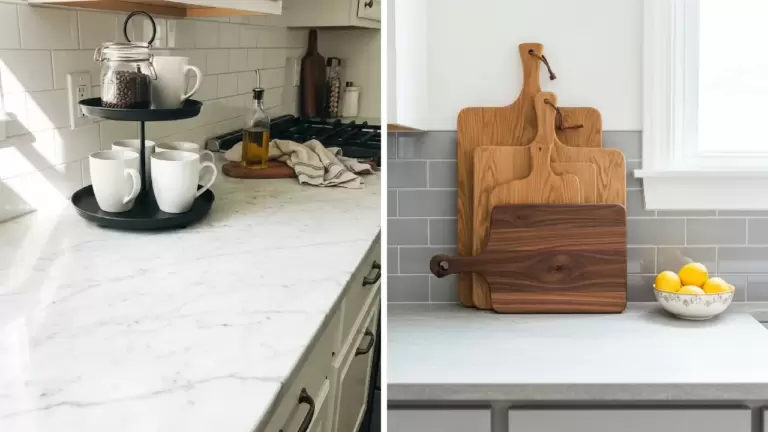
1. Floating Shelves Above the Counter
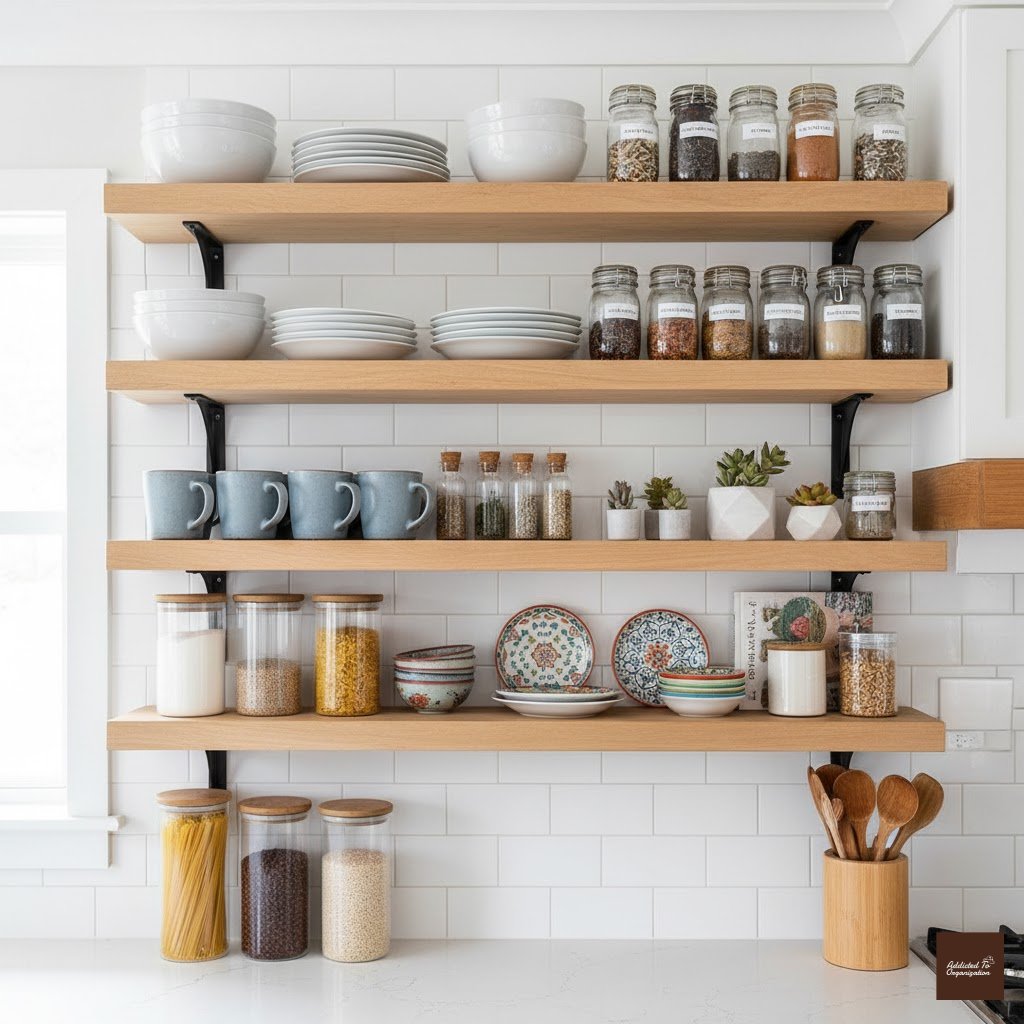
Add extra storage without cluttering your counters by installing floating shelves. Use them for everyday dishes, spices, or pretty jars to blend function with decor.
How-To (DIY): Measure and mark shelf placement above your backsplash or counter area. Use a stud finder to locate support beams, or use heavy-duty wall anchors designed for the shelf type. Secure the shelf brackets (or internal mounting hardware for true floating shelves) and place the shelf board.
2. Pull-Out Pantry Drawers

Transform narrow gaps beside your fridge or oven into pull-out pantry drawers. They’re perfect for storing canned goods, oils, and snacks while keeping everything accessible.
How-To (DIY): Purchase narrow rolling drawer units designed for small spaces. For a DIY built-in look, attach sturdy drawer slides to the interior side walls of a cabinet opening. Build or purchase narrow, shallow drawers to fit the slides, maximizing vertical storage.
3. Under-Sink Organizers
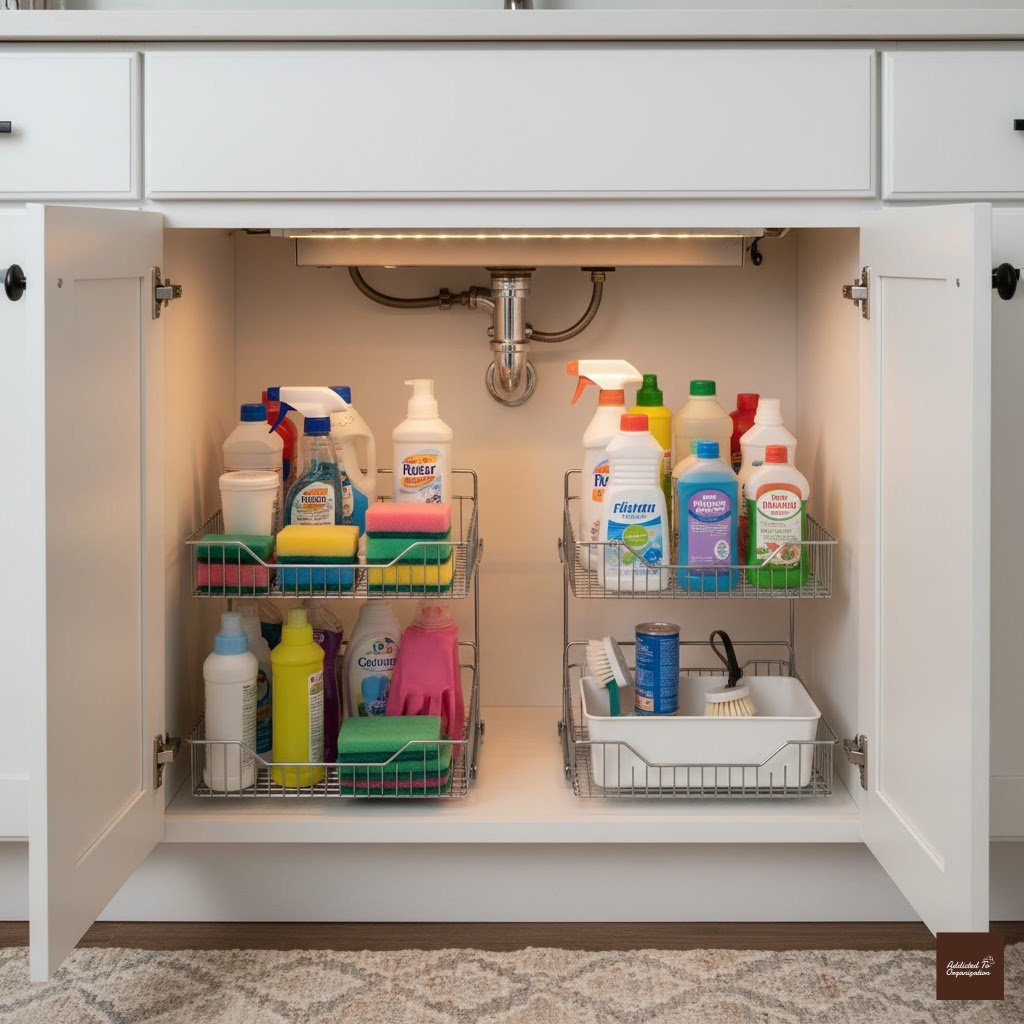
Make the most of unused space beneath your sink with pull-out bins or tiered racks. Store cleaning supplies neatly while keeping them hidden from sight.
How-To (DIY): Buy tiered, adjustable metal racks or plastic drawers designed to fit around sink plumbing. These typically require no tools, just stacking or snapping together. Ensure the height and depth clear the water lines and garbage disposal unit.
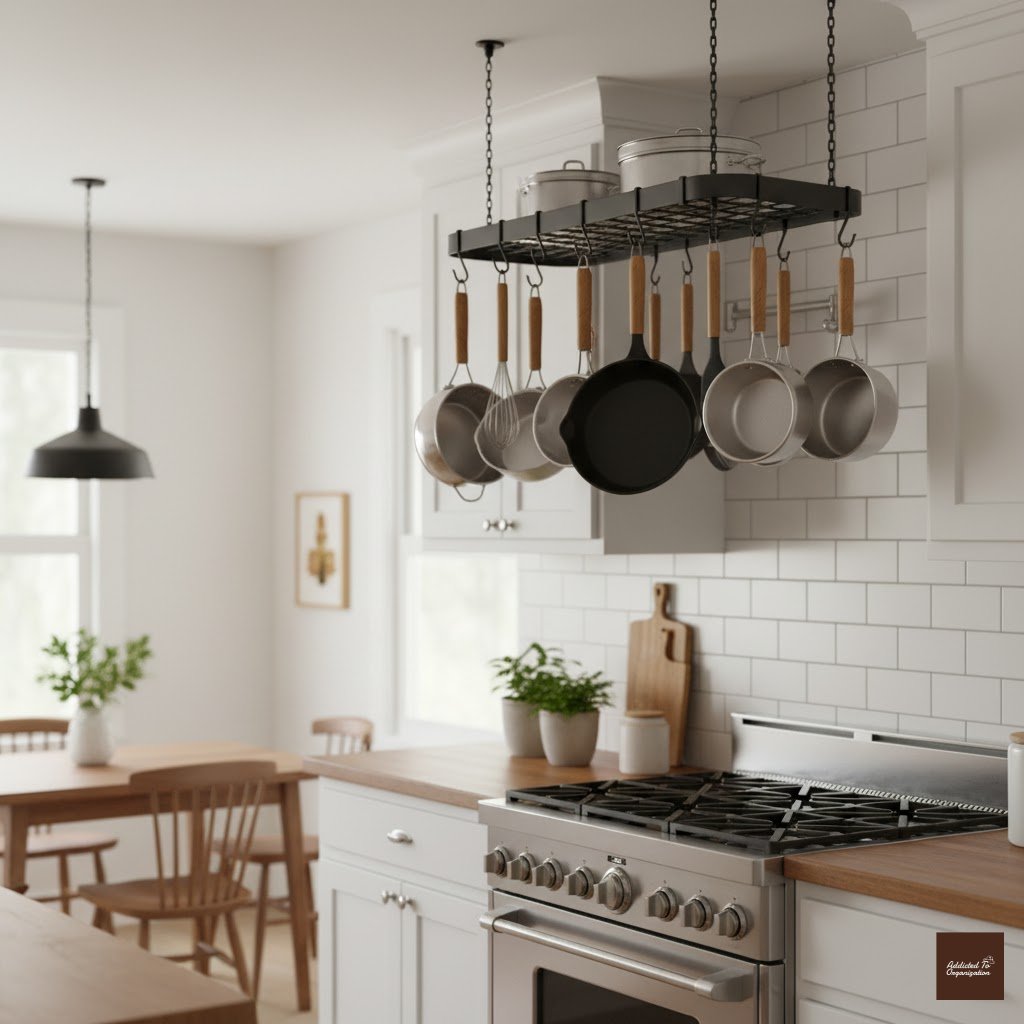
4. Hanging Pot Racks
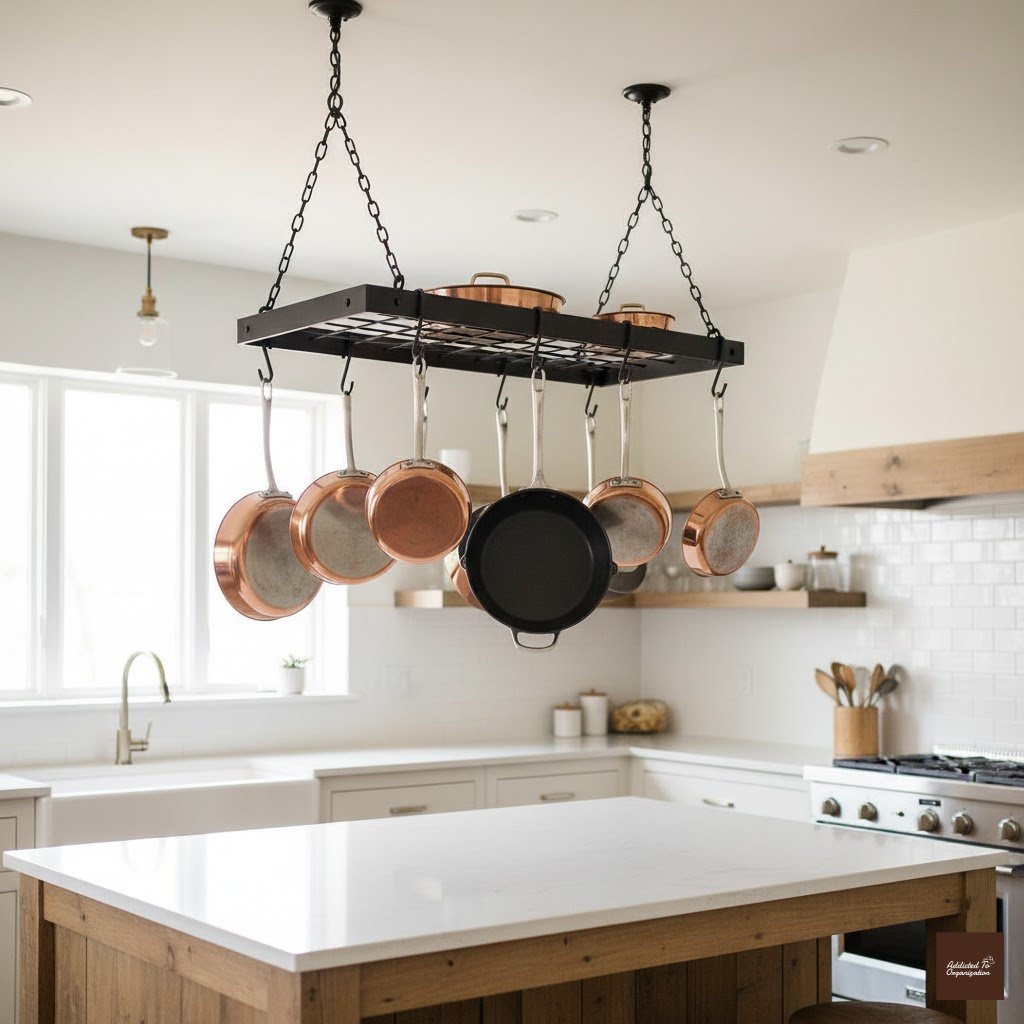
Free up cabinet space by hanging your pots and pans from a ceiling or wall-mounted rack. Choose copper or matte black finishes for a modern farmhouse touch.
How-To (DIY): Locate a ceiling joist using a stud finder (crucial for supporting weight!). Screw heavy-duty ceiling hooks or brackets into the joist. Use S-hooks and strong chains to hang the pot rack at a height where it won’t obstruct traffic, and hang pots and pans from the rack.
5. Magnetic Knife Strip
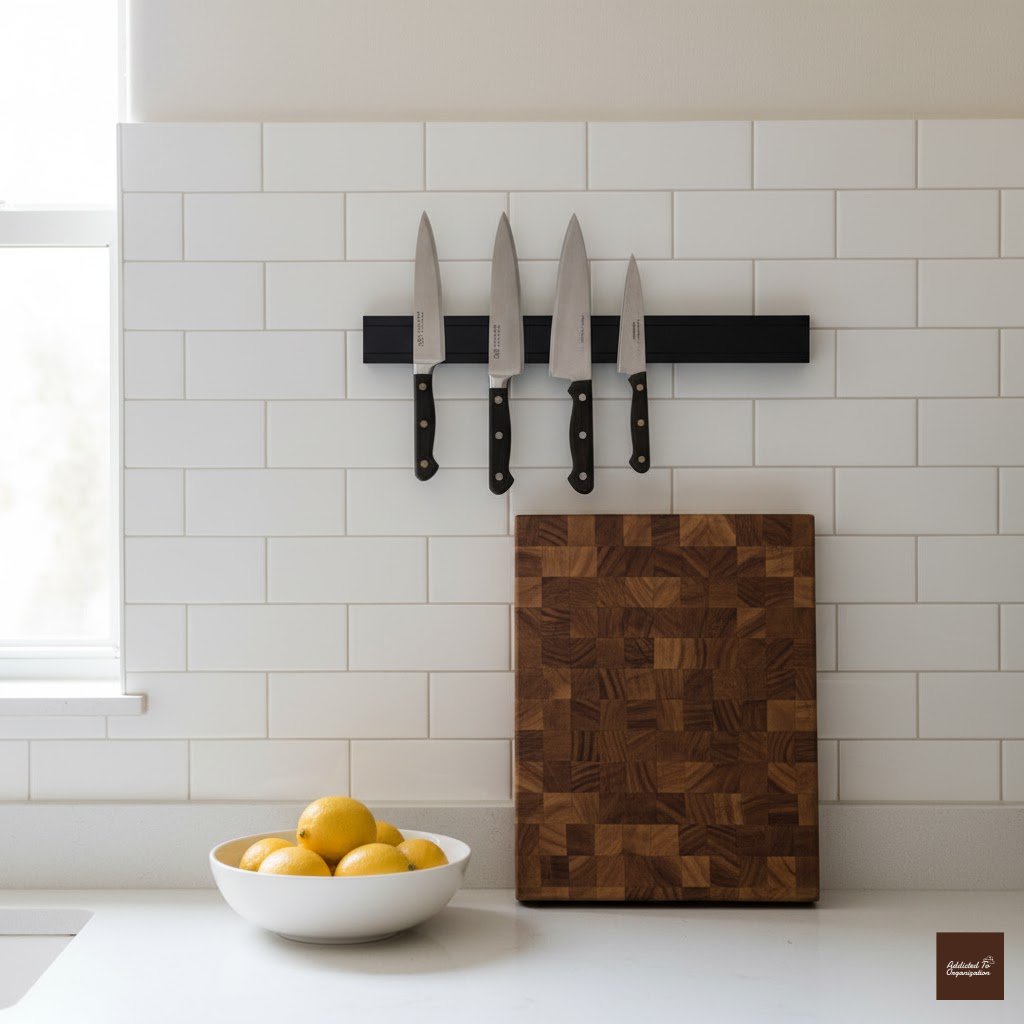
Skip the bulky knife block and mount a magnetic strip on your backsplash. It saves counter space and keeps your knives within easy reach.
How-To (DIY): Determine the ideal mounting height (usually eye-level, away from children). Use a level to ensure it’s straight. Mark the drilling points. Drill pilot holes and secure the magnetic strip to the wall or backsplash with the provided screws.
6. Over-the-Door Storage
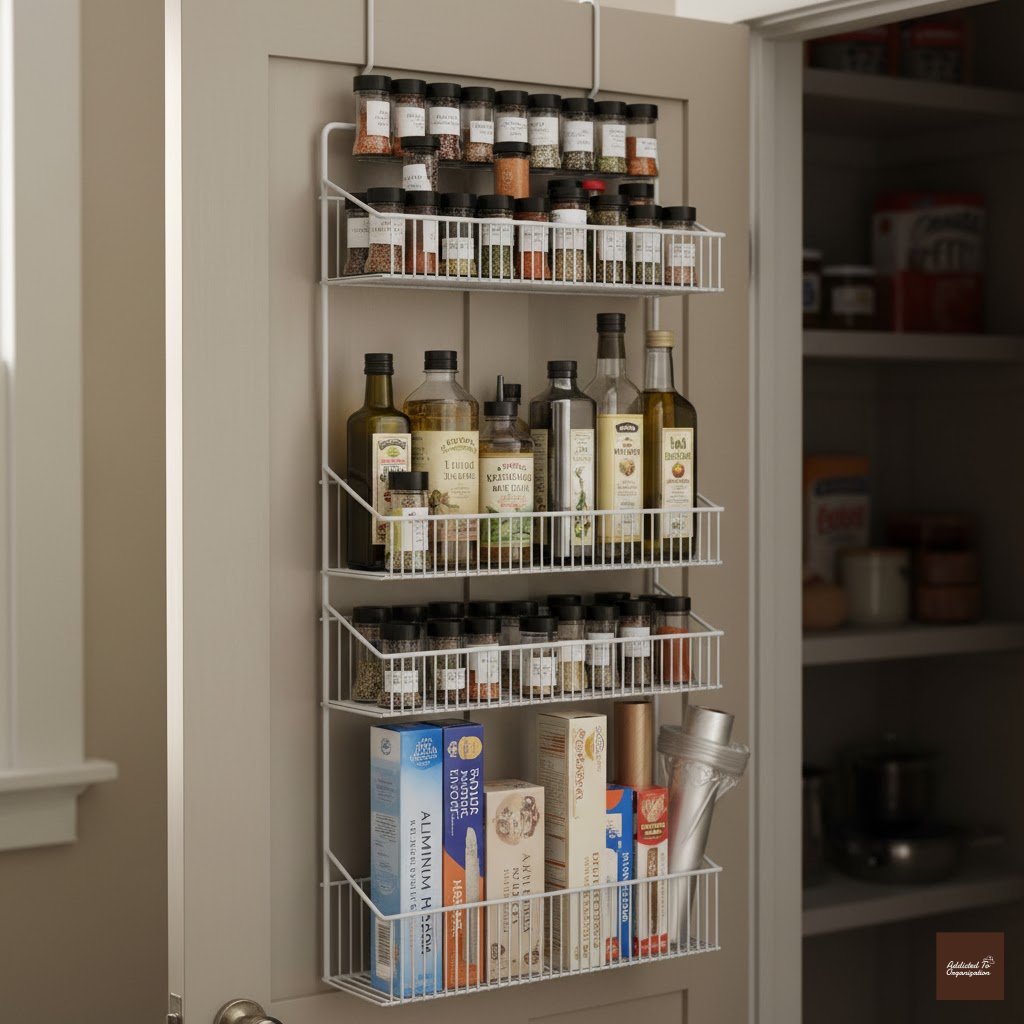
Use the back of cabinet or pantry doors to hang spice racks, towel holders, or cleaning supplies. It’s a smart way to turn hidden spaces into functional storage.
How-To (DIY): Purchase an over-the-door hanging wire rack (often designed for spices or wraps). Simply hang the rack over the top edge of your cabinet or pantry door. Add small adhesive pads or felt on the back to prevent the rack from rattling against the door.
7. Rolling Kitchen Cart
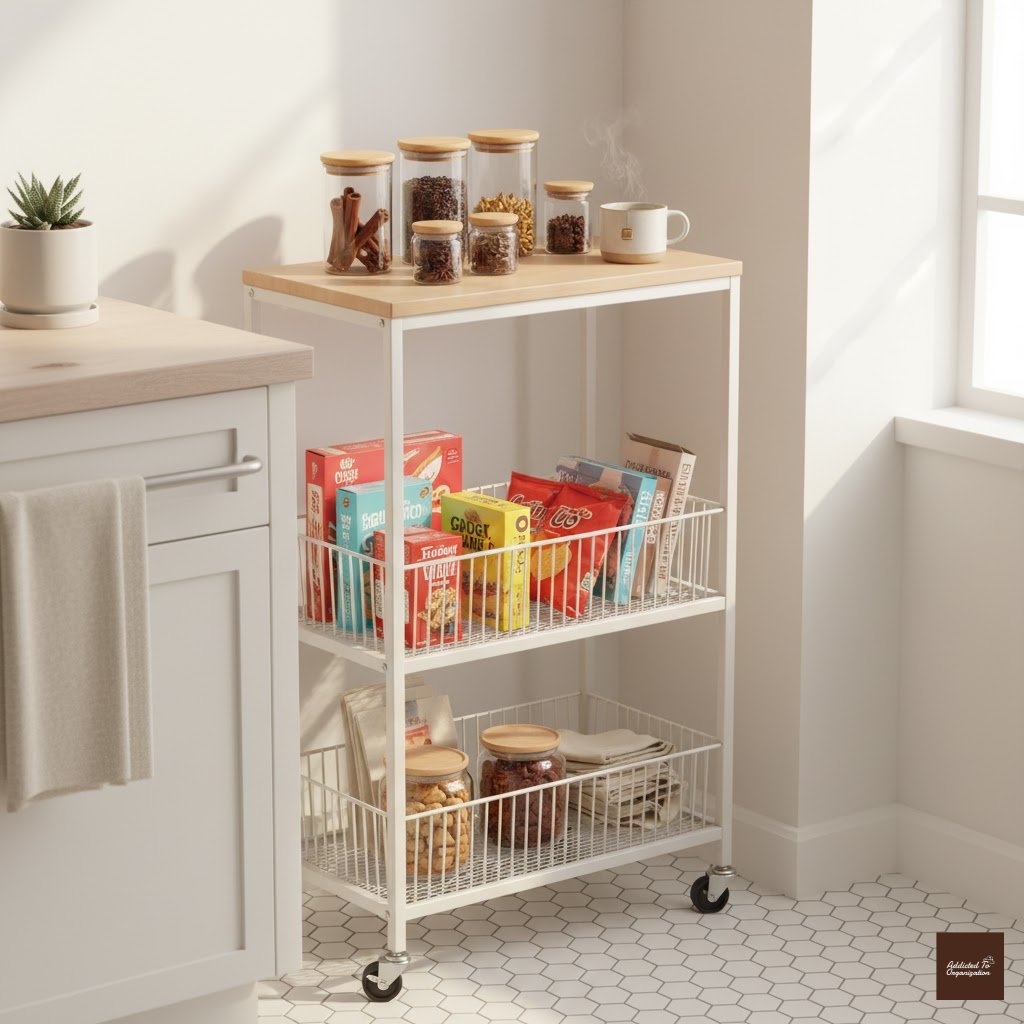
A slim rolling cart can act as a mobile pantry, coffee bar, or extra counter space. Roll it out when cooking and tuck it away when you’re done.
How-To (DIY): Purchase a narrow utility cart (metal, wood, or plastic) that fits your available space. Assembly usually involves attaching the shelves and the caster wheels with a screwdriver or Allen wrench. Keep the heaviest items on the bottom shelf for stability.
8. Stackable Containers
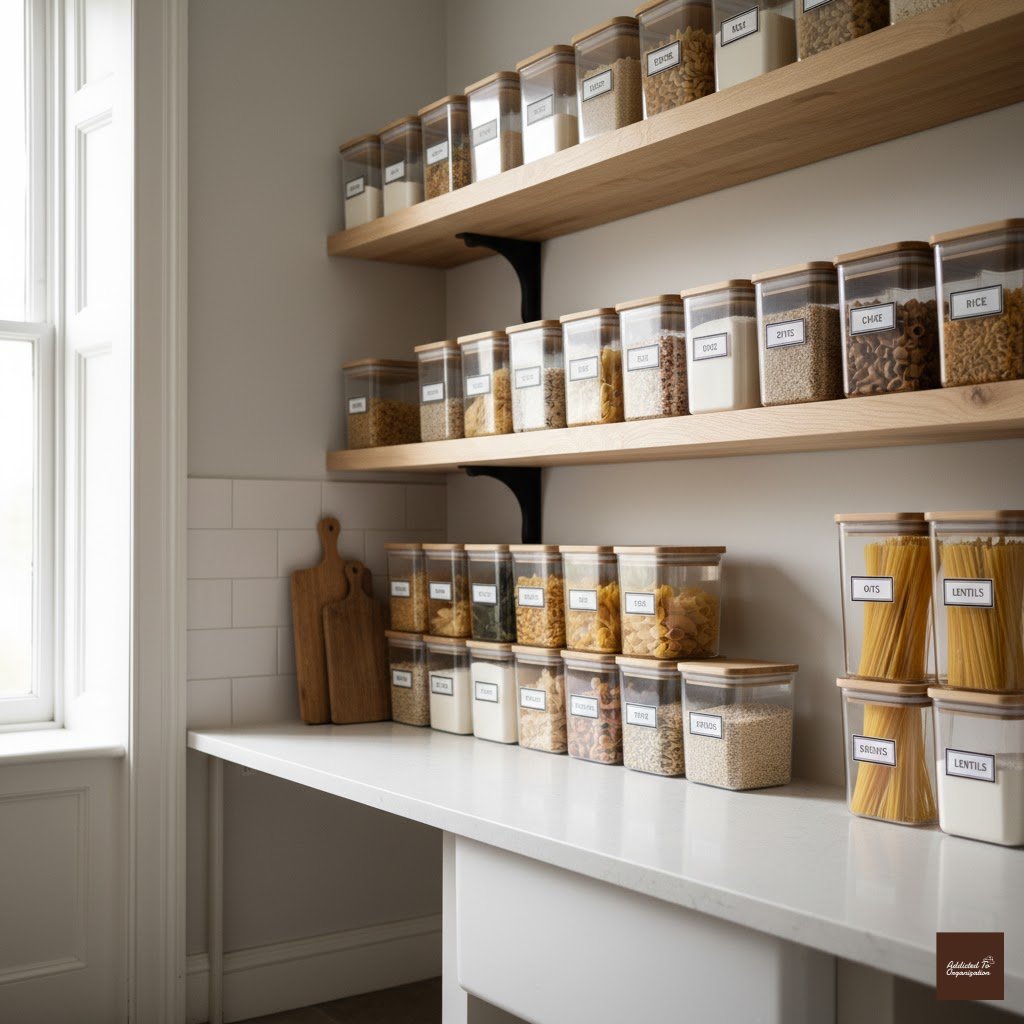
Invest in clear stackable containers to organize dry goods. They make your shelves look tidy and help you see exactly what you have at a glance.
How-To (DIY): Buy a set of airtight, square or rectangular containers (square shapes maximize shelf space better than round). Decant dry goods like flour, pasta, and cereals. Label the containers clearly before stacking them neatly on shelves.
9. Corner Shelving Units
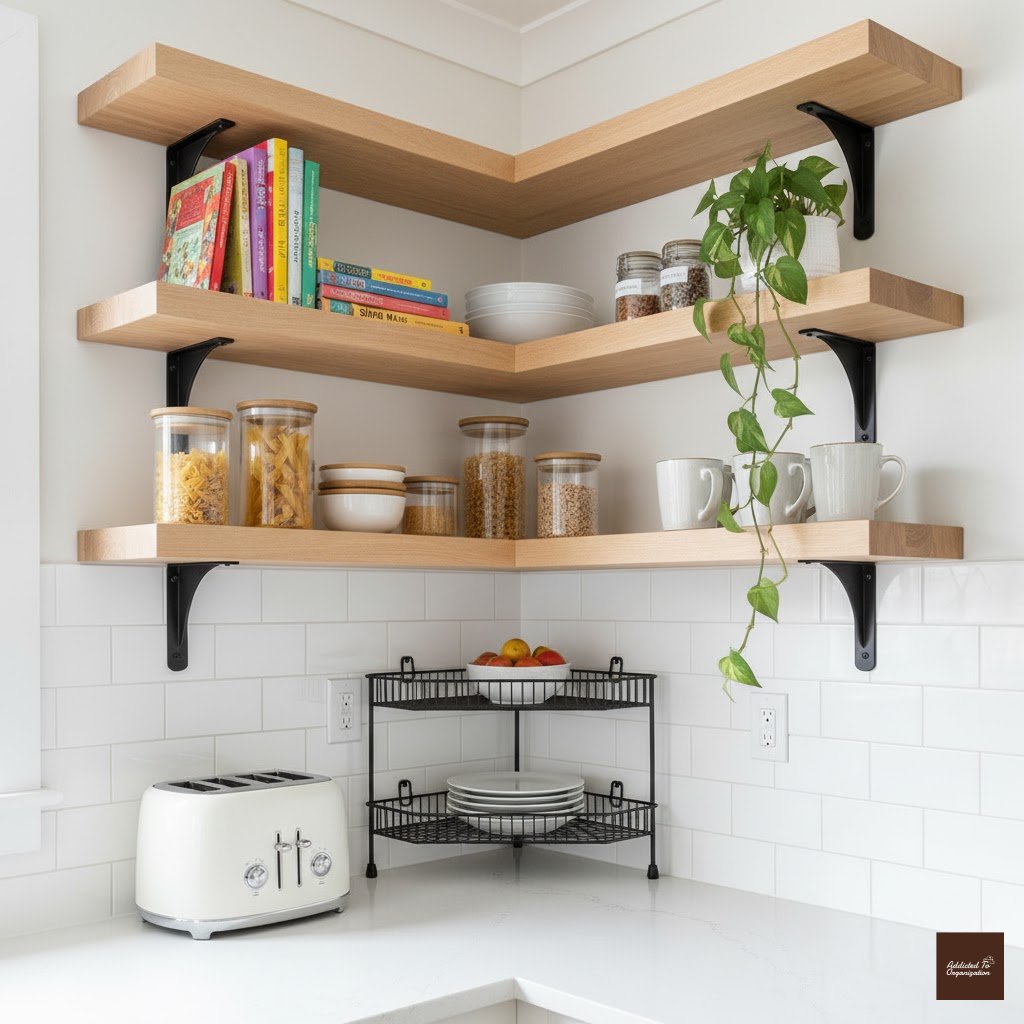
Corners are often wasted in small kitchens. Add triangular shelves or corner racks to store cookbooks, plants, or small appliances stylishly.
How-To (DIY): Purchase or build a three-sided, wedge-shaped shelf unit. If wall-mounted, secure it to the wall studs on both adjoining sides for maximum stability using long screws and anchors.
10. Pegboard Wall Organizer

Install a pegboard on an empty wall to hang utensils, mugs, or baskets. You can rearrange hooks anytime for a flexible and fun display.
How-To (DIY): Cut a piece of pegboard to size. Attach small wooden furring strips to the back perimeter of the pegboard (this creates the necessary gap for hooks). Screw the entire assembly securely into the wall studs, then insert hooks, baskets, and small shelves as needed.
11. Fold-Down Table
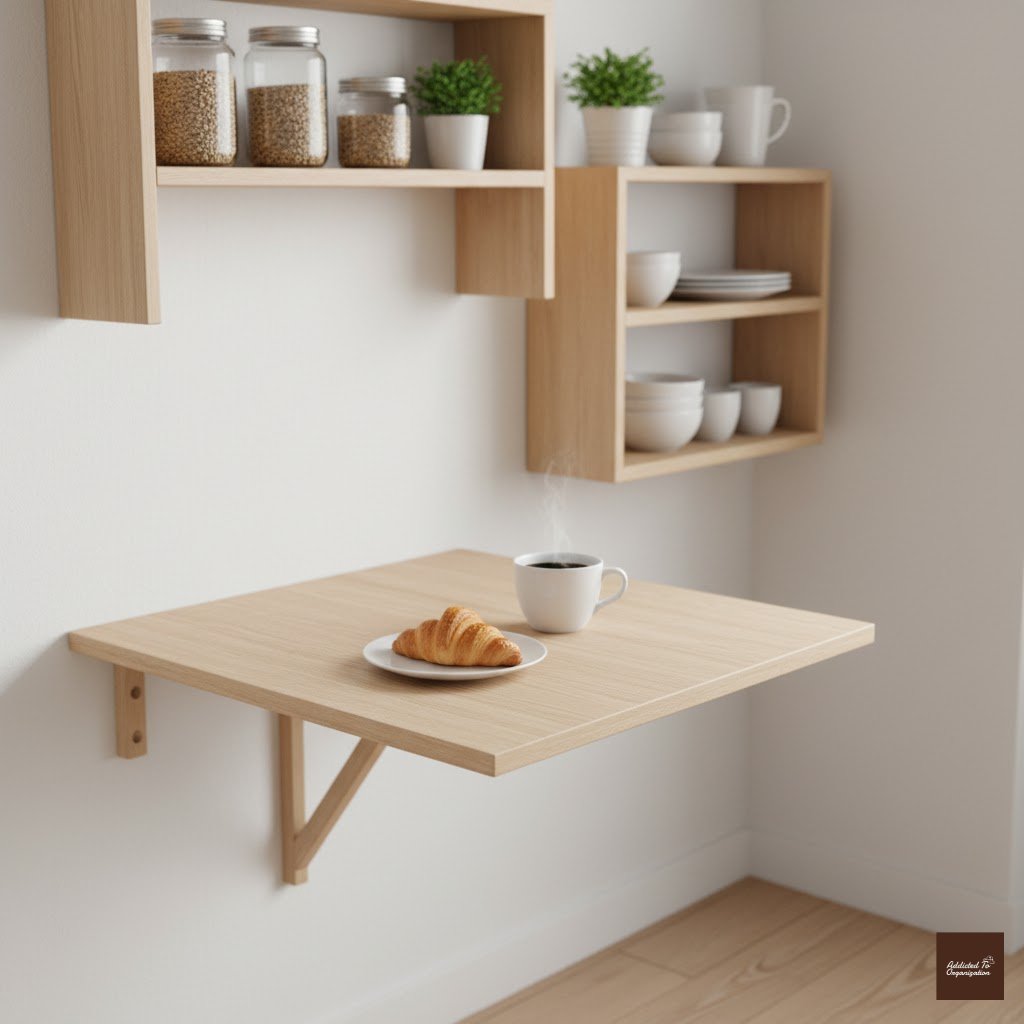
Opt for a wall-mounted fold-down table if you lack dining space. It doubles as a prep station and folds flat when not in use.
How-To (DIY): Purchase a wall-mounted drop-leaf table kit. Determine the comfortable dining or prep height. Locate wall studs for secure mounting. Screw the main wall bracket securely into the studs, ensuring it’s level, and then attach the folding table surface hardware.
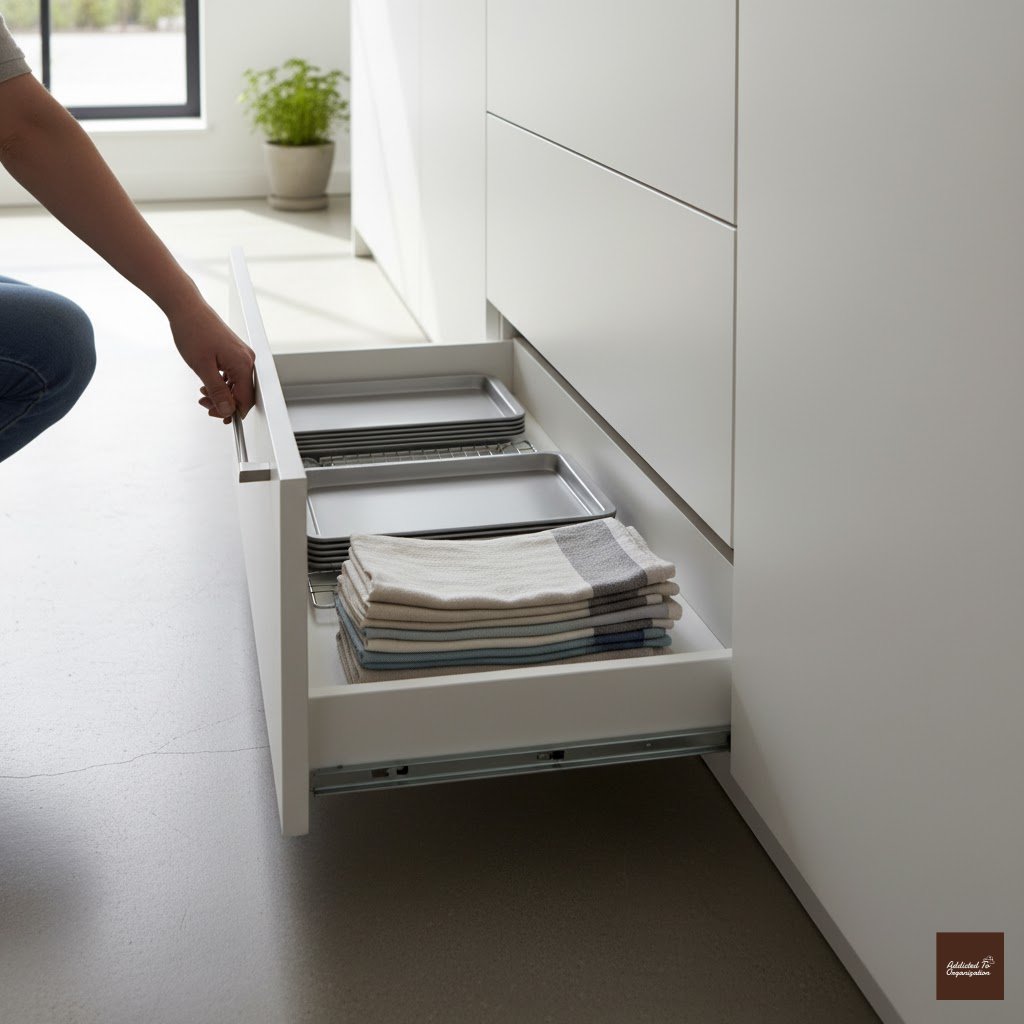
12. Drawer Dividers
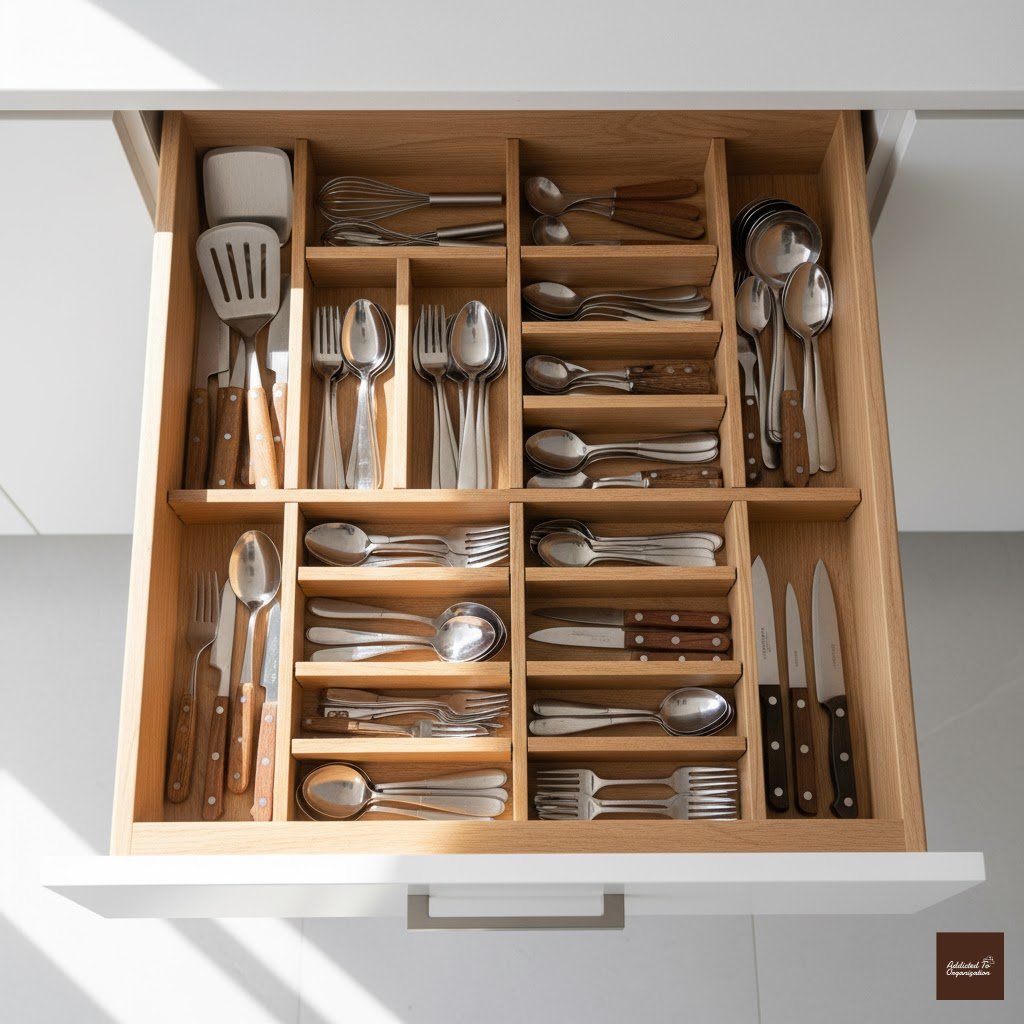
Organize utensils, tools, and gadgets with adjustable drawer dividers. No more rummaging — everything has a dedicated place.
How-To (DIY): Measure the interior depth and width of your drawers. Purchase spring-loaded, adjustable drawer dividers. Simply extend the dividers and lock them into place, creating custom compartments for silverware, spatulas, and other gadgets.
13. Lazy Susan Turntables
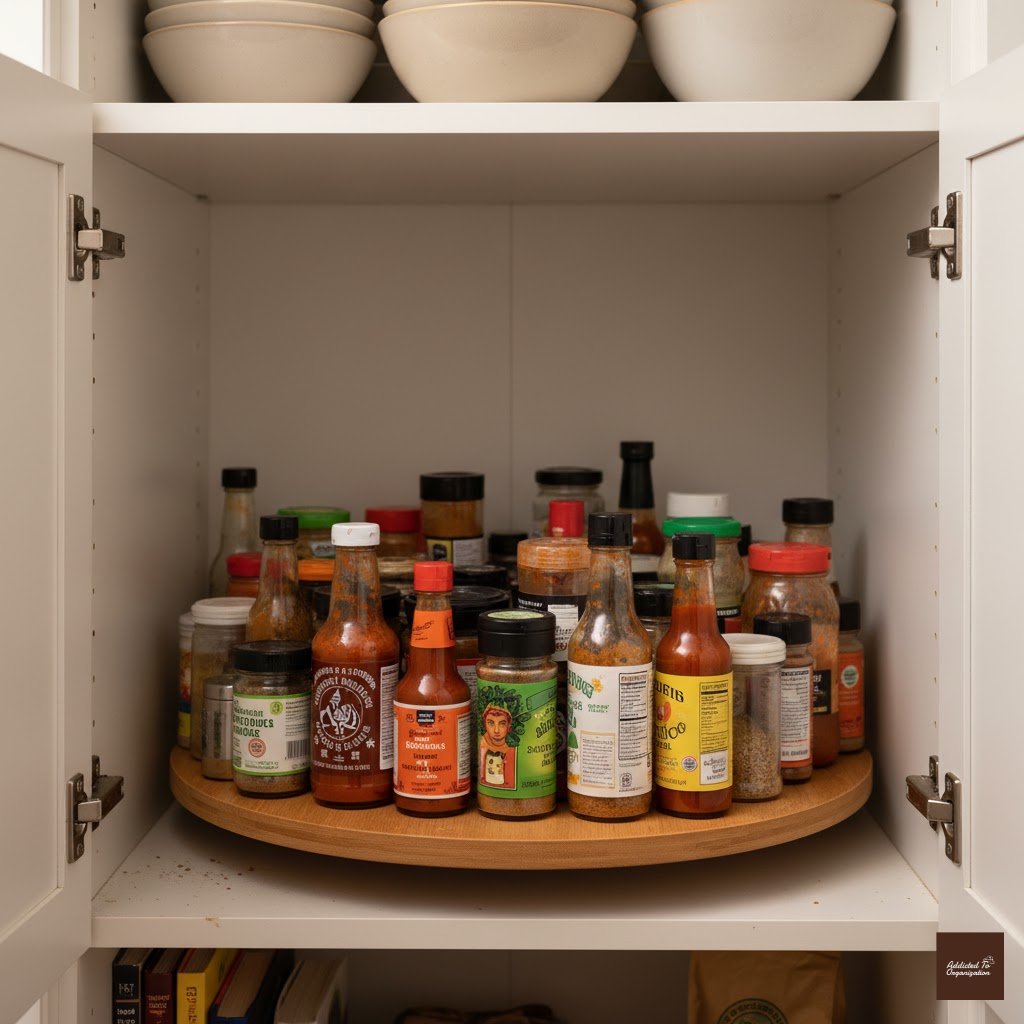
Place a lazy Susan in your cabinets or fridge to keep condiments, oils, and sauces easy to grab. Great for deep shelves where things get lost.
How-To (DIY): Measure the diameter of the turntable you need to ensure it fits without hitting the cabinet door hinges or sides. Simply place the lazy Susan inside a deep cabinet or on the corner of your pantry shelf and arrange jars or bottles on top.
14. Hanging Fruit Baskets
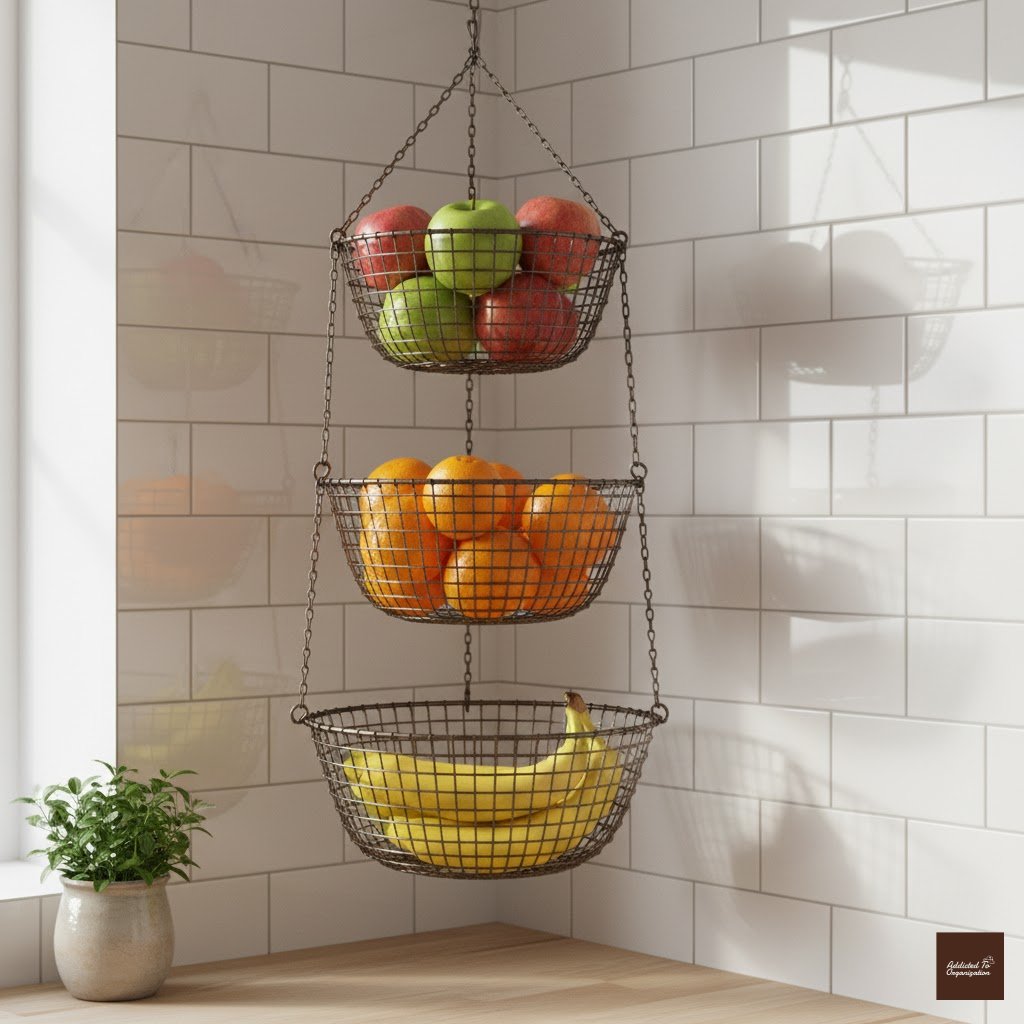
Replace bulky fruit bowls with hanging wire baskets. They add rustic charm and keep your counters open for cooking.
How-To (DIY): Use a ceiling hook or heavy-duty wall bracket (if mounting on the wall). For the ceiling, find a joist for support. Screw in the hook. Connect the tiered wire baskets using chain links, and hang the chain from the hook, adjusting the height for easy access.
15. Over-Sink Dish Rack
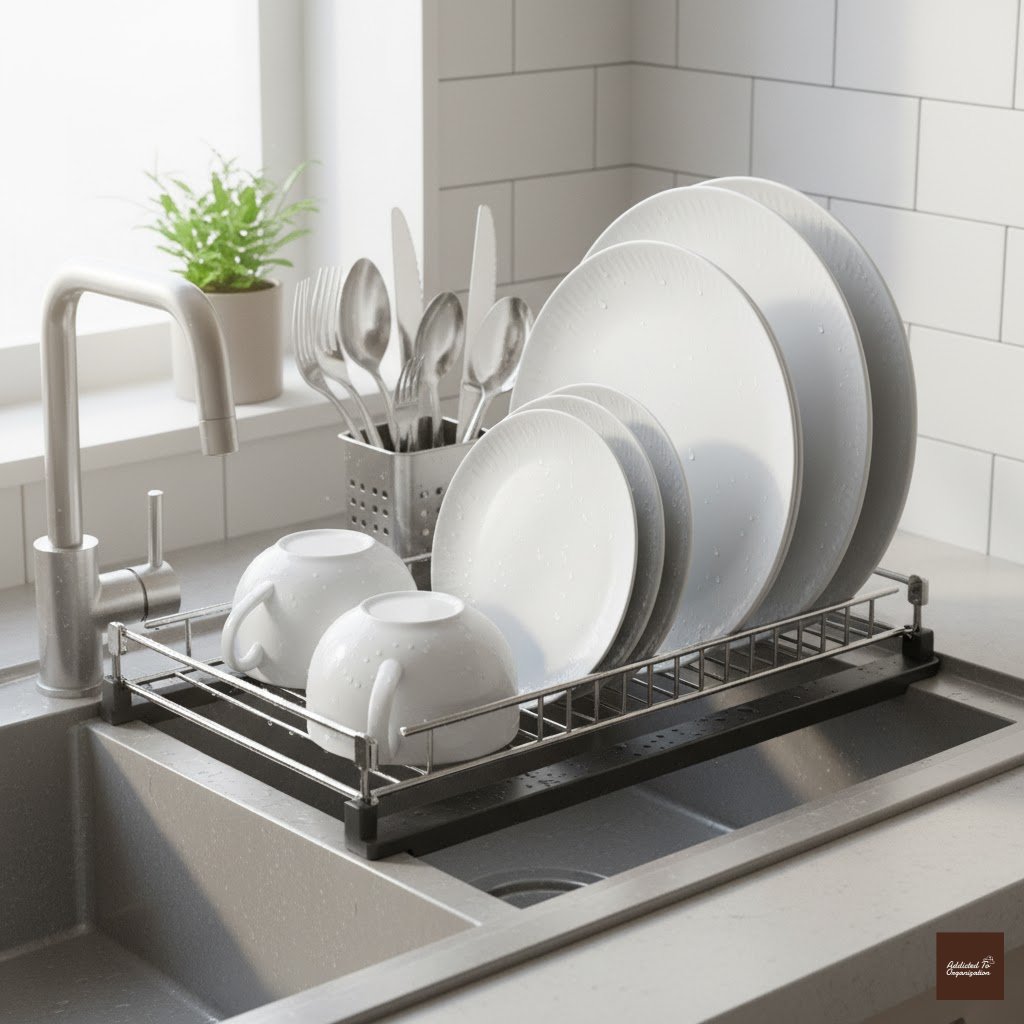
An over-sink drying rack frees up valuable counter space while letting water drip straight into the sink. Choose a sleek stainless steel design for modern kitchens.
How-To (DIY): Measure the width of your sink and the available height above your faucet. Purchase a rack designed to span the sink basin. Assembly usually involves snapping the side legs and crossbars together, then placing the dish and utensil trays on top.
16. Vertical Baking Sheet Storage
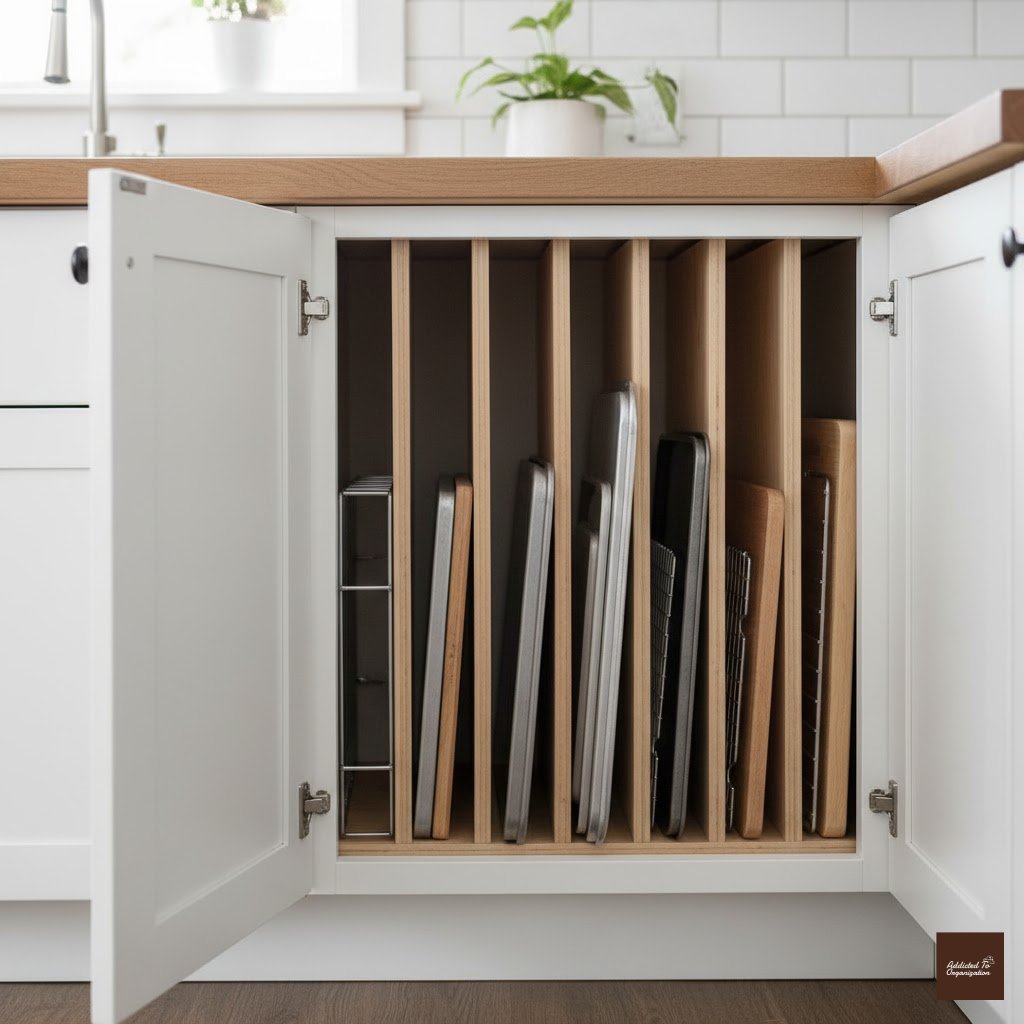
Store baking sheets, trays, and cutting boards vertically with tension rods or a rack divider. It saves space and keeps everything organized.
How-To (DIY): Use an existing deep cabinet. Purchase a wire rack designed for vertical storage, or create your own dividers using two parallel tension rods inside the cabinet, running from front to back, to hold thin items upright.
17. Stackable Shelf Risers
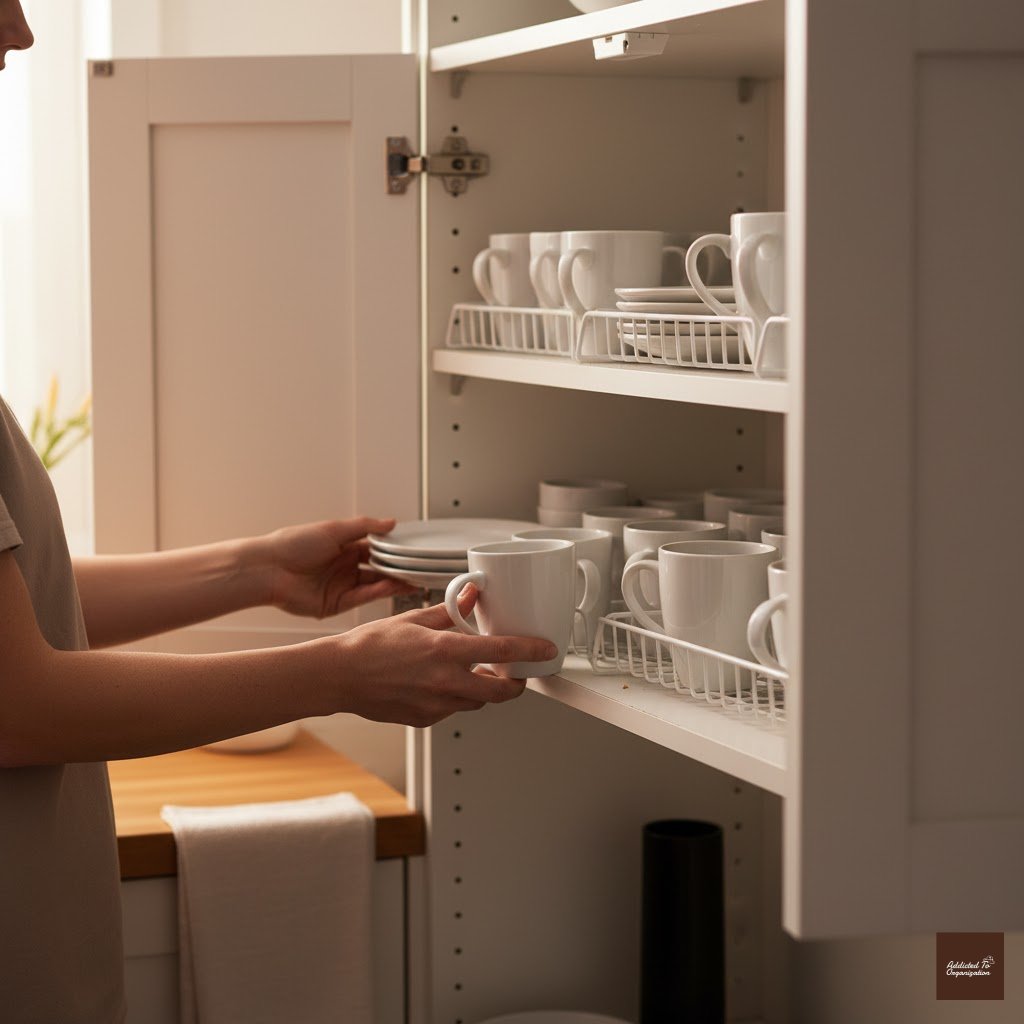
Double your cabinet space with simple shelf risers. Perfect for plates, bowls, or cups in small cabinets.
How-To (DIY): Buy simple metal or plastic shelf risers. Place the riser inside a tall cabinet. The riser creates a second level, allowing you to store plates underneath and bowls on top (or vice versa), instantly doubling the usable vertical space.
18. Mason Jar Wall Rack
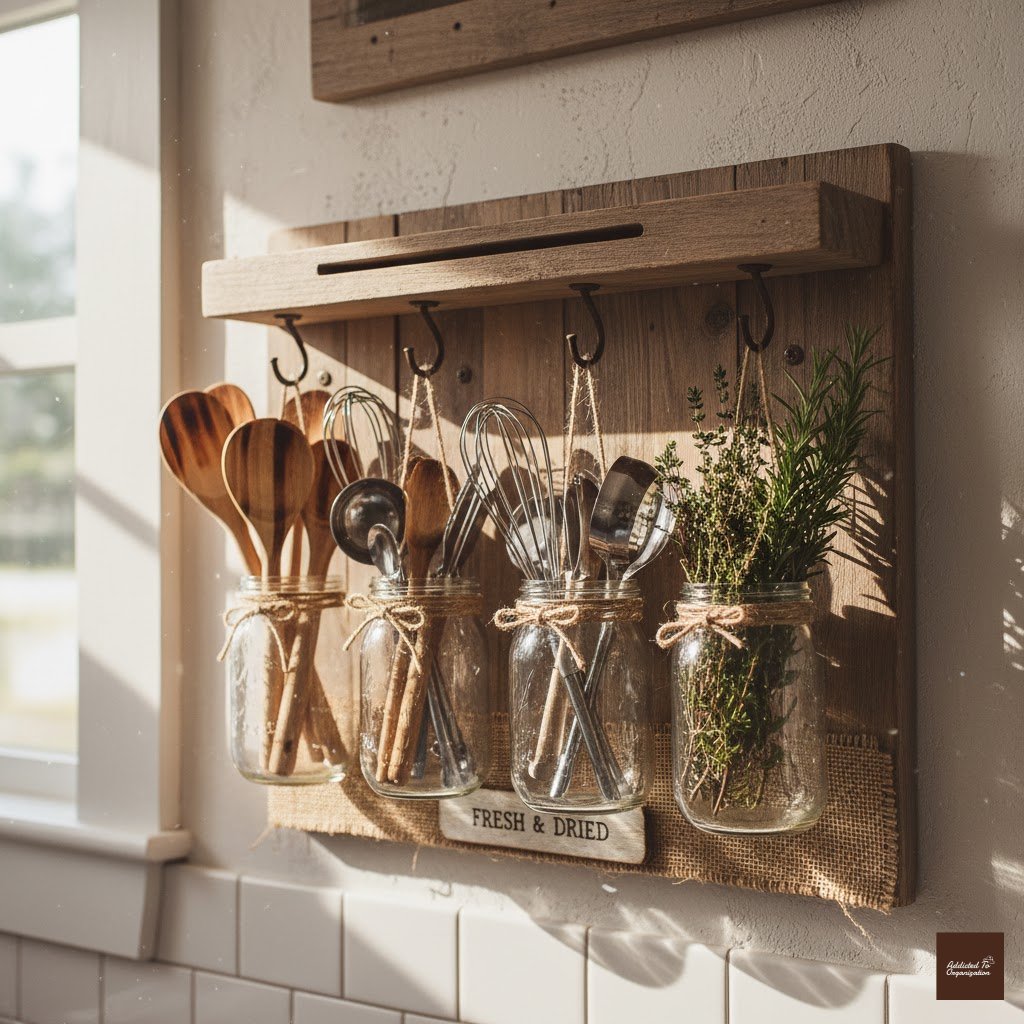
Mount a mason jar rack to hold utensils, dried herbs, or small snacks. It’s both practical and charming.
How-To (DIY): Secure a wooden board or metal rack with holes designed to hold jar lids to the wall studs. Alternatively, screw the jar lids themselves directly to the underside of an upper cabinet. Screw the jars (containing items) into the mounted lids.
19. Slim Trash Can Pull-Out

Hide your trash can inside a pull-out cabinet for a seamless look. It keeps your kitchen clean and visually uncluttered.
How-To (DIY): Purchase a pull-out track system kit designed for trash cans. Measure and secure the track system hardware to the floor of an existing base cabinet. Attach the can holder to the track.
20. Hooks Under Cabinets
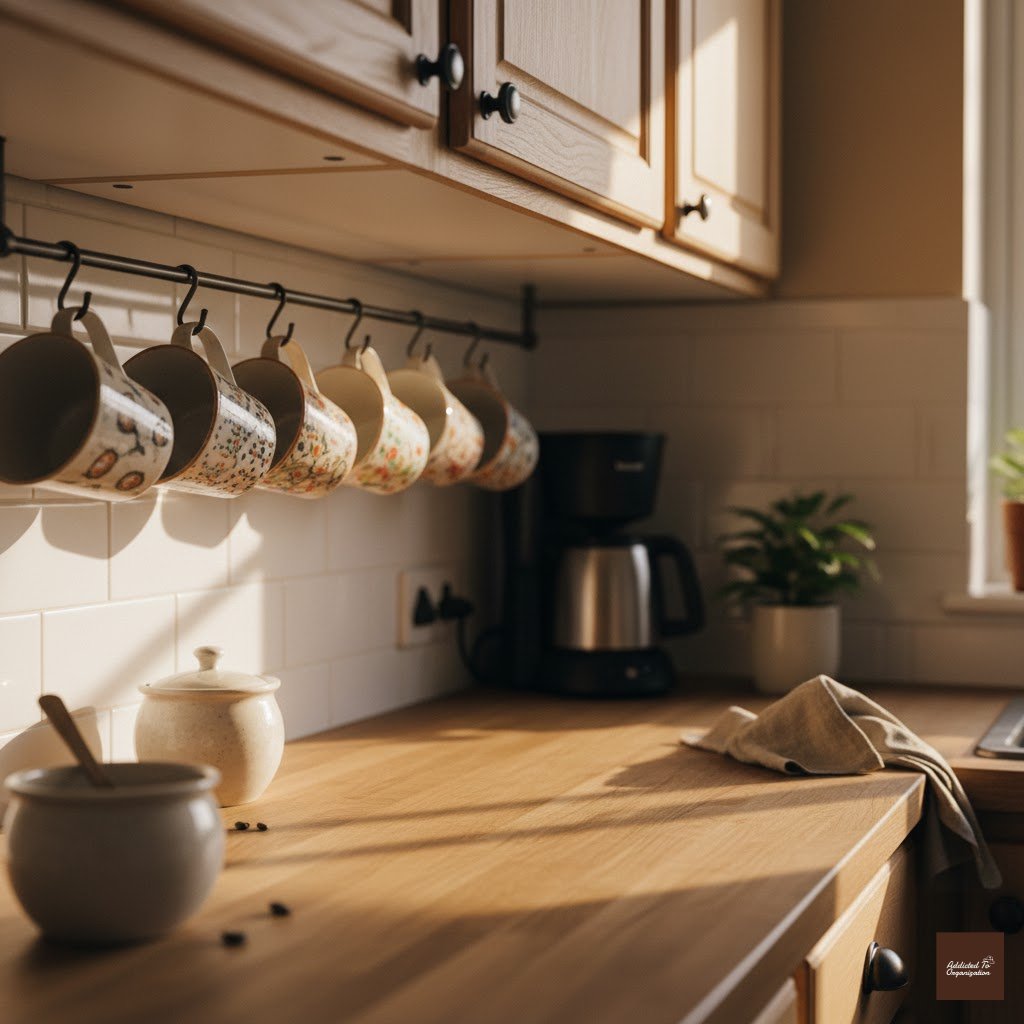
Attach small hooks underneath cabinets to hang mugs or cooking utensils. This tiny detail saves space and adds cozy café vibes.
How-To (DIY): Purchase small, screw-in cup hooks or adhesive hooks. Mark evenly spaced points underneath your upper cabinets (ensuring they won’t interfere with the cabinet opening). Screw the hooks directly into the cabinet base or peel and stick the adhesive hooks.
21. Slide-Out Cutting Board
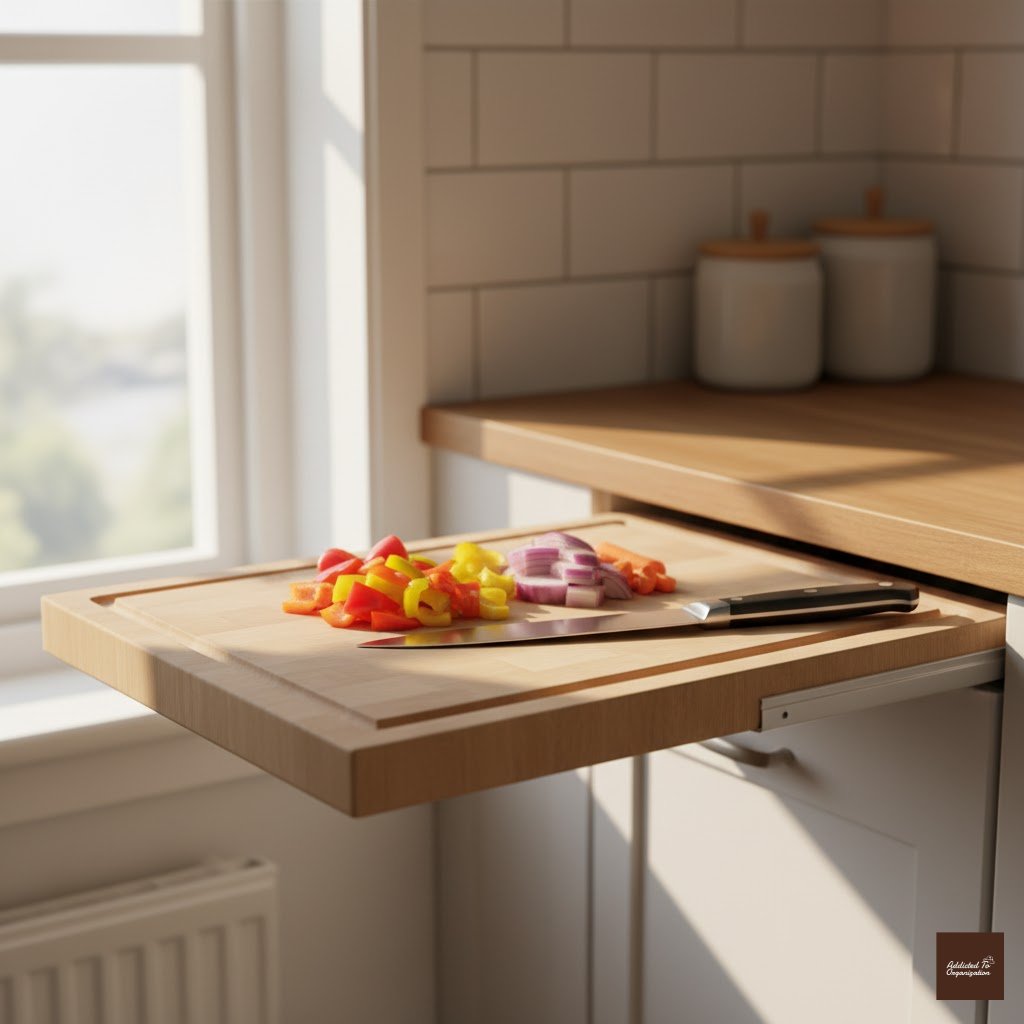
Install a pull-out cutting board above a drawer. It gives you an extra prep surface and slides away neatly when not needed.
How-To (DIY): This requires installing specialized drawer slides mounted horizontally just beneath a countertop or drawer frame. The cutting board itself is attached to the slides, allowing it to function like a shallow drawer that pulls out.
22. Ceiling-Mounted Pot Rail
Use the space above your stove or island for a hanging rail. It’s perfect for pots, pans, and even herbs in small planters.
How-To (DIY): Locate and mark ceiling joists. Drill and secure mounting brackets into the joists. Attach the long rail to the brackets and use S-hooks to hang your kitchen items.
23. Stackable Appliance Shelf
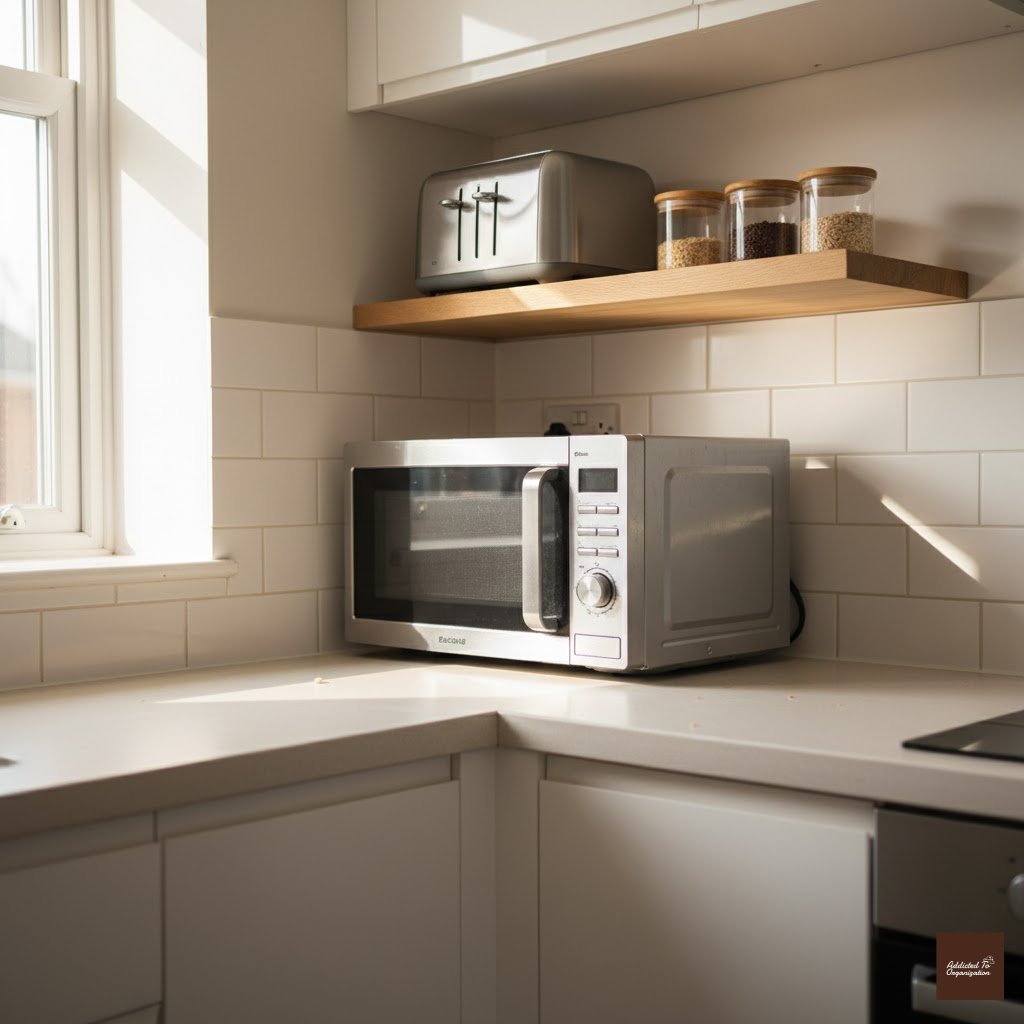
Place a mini shelf above your microwave or toaster to stack items. It turns unused air space into storage real estate.
How-To (DIY): Purchase a small, sturdy wire or metal shelf designed to sit on a countertop. Place it over a low-profile appliance like a microwave, using the space above the appliance to hold spices, bread, or small accessories.
24. Tiered Spice Organizer

Add a tiered rack inside your cabinet to see all your spices at once. No more searching behind dozens of jars.
How-To (DIY): Purchase an expandable tiered spice shelf (usually step-style). Place it inside a cabinet. Adjust the width to fit perfectly, creating stadium-style seating for your spices so every jar is visible.
25. Hidden Toe-Kick Drawers
Install drawers in the baseboard area beneath your cabinets. Ideal for flat items like baking sheets or extra linens.
How-To (DIY): This is an advanced DIY. Remove the existing toe-kick trim. Build a shallow drawer box and install undermount drawer slides designed to fit the narrow space. Attach the original toe-kick material to the front of the drawer box to hide it perfectly.
26. Pull-Out Corner Carousel
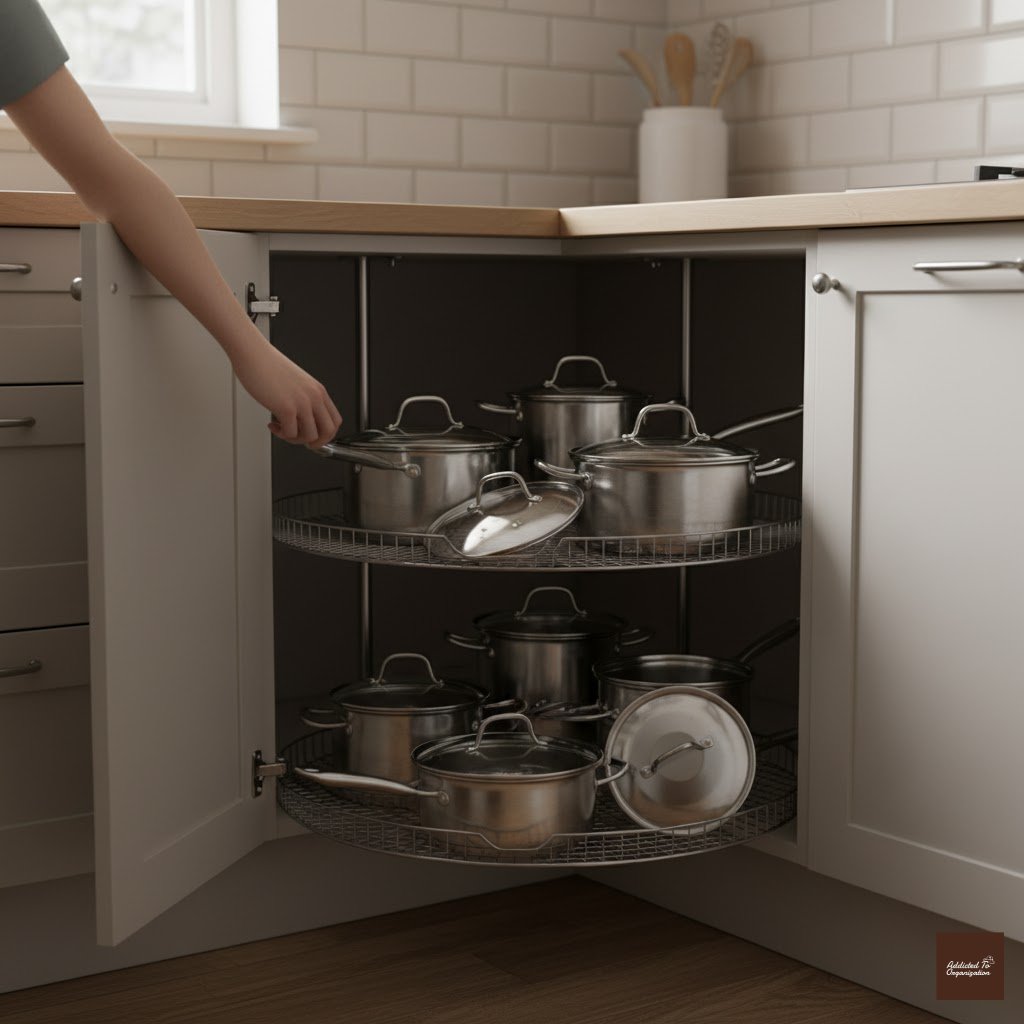
Turn awkward corner cabinets into functional storage with a rotating carousel. Every inch becomes accessible with a simple spin.
How-To (DIY): Corner cabinets usually require a specialized lazy Susan hardware kit (often called a ‘Half-Moon’ or ‘Full Circle’ system). Install the central pole system, attaching the rotating shelf pieces to the pole. Ensure the shelves rotate freely past the cabinet door frame.
27. Mounted Paper Towel Holder
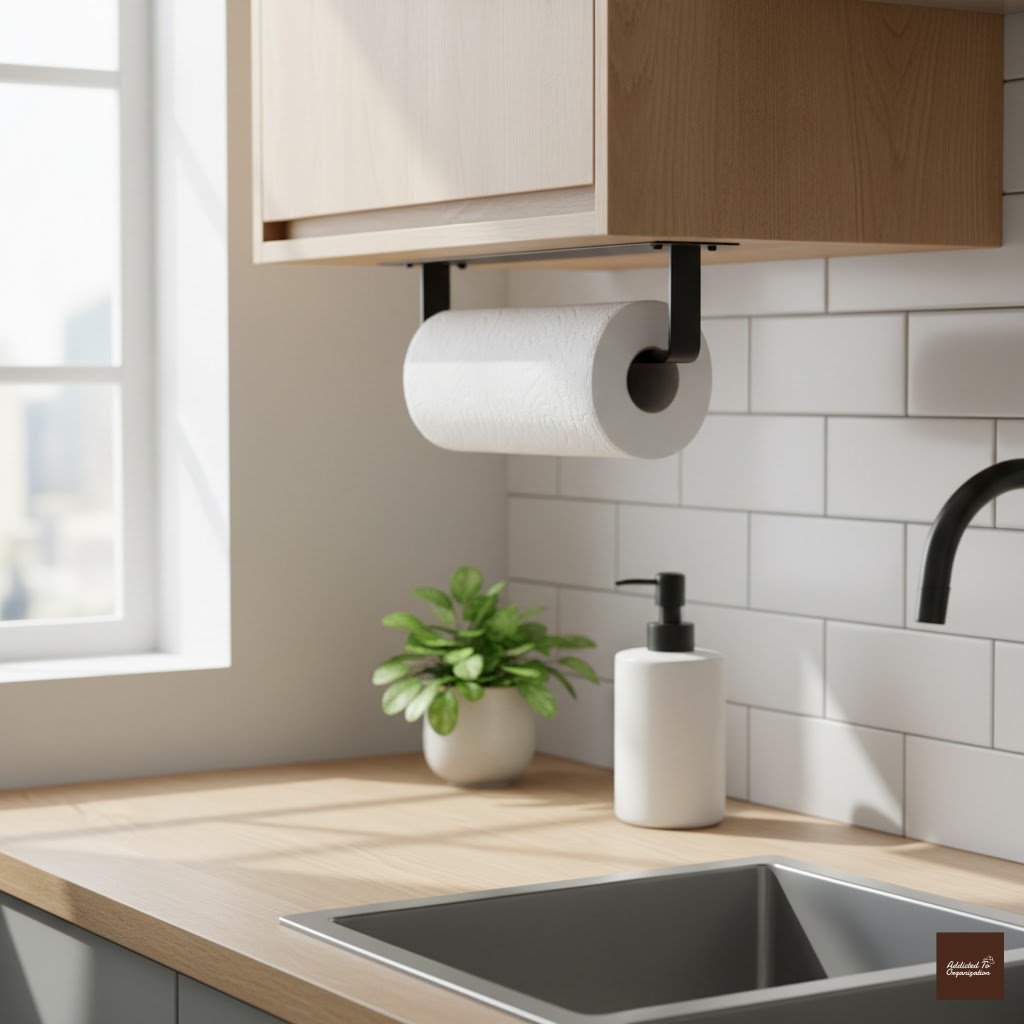
Free up counter space by mounting your paper towel holder under a cabinet or shelf. It’s practical and keeps surfaces clear.
How-To (DIY): Purchase a holder designed for under-cabinet mounting. Mark the mounting points on the underside of an upper cabinet. Drill pilot holes and secure the holder with screws.
28. Built-In Wine Rack
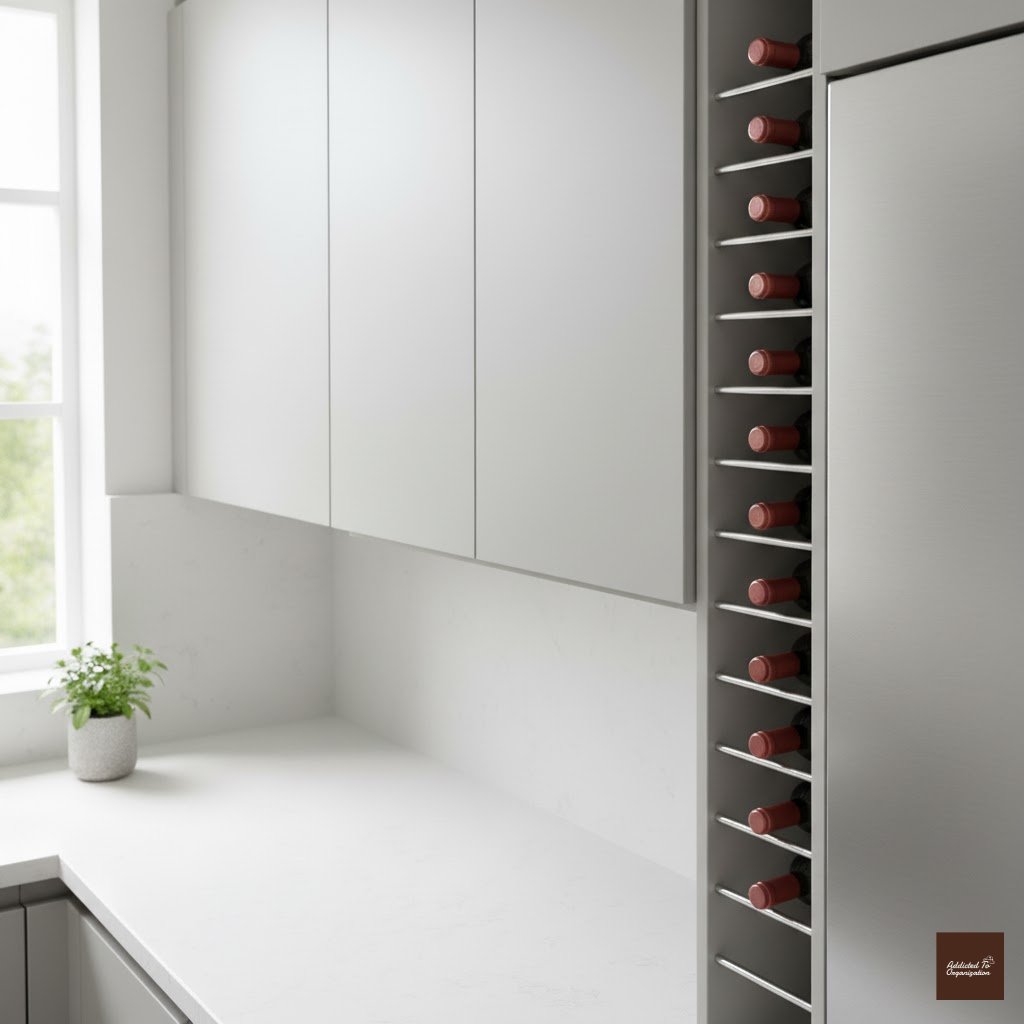
Add a narrow vertical wine rack between cabinets or next to your fridge. It looks elegant and saves space on your counters.
How-To (DIY): If you have a narrow vertical space (e.g., 6 inches wide) between cabinets, install thin shelf dividers horizontally and vertically to create cube openings for wine bottles. If building from scratch, buy a modular cube wine rack and slide it into the space.
29. Stack Baskets in the Pantry
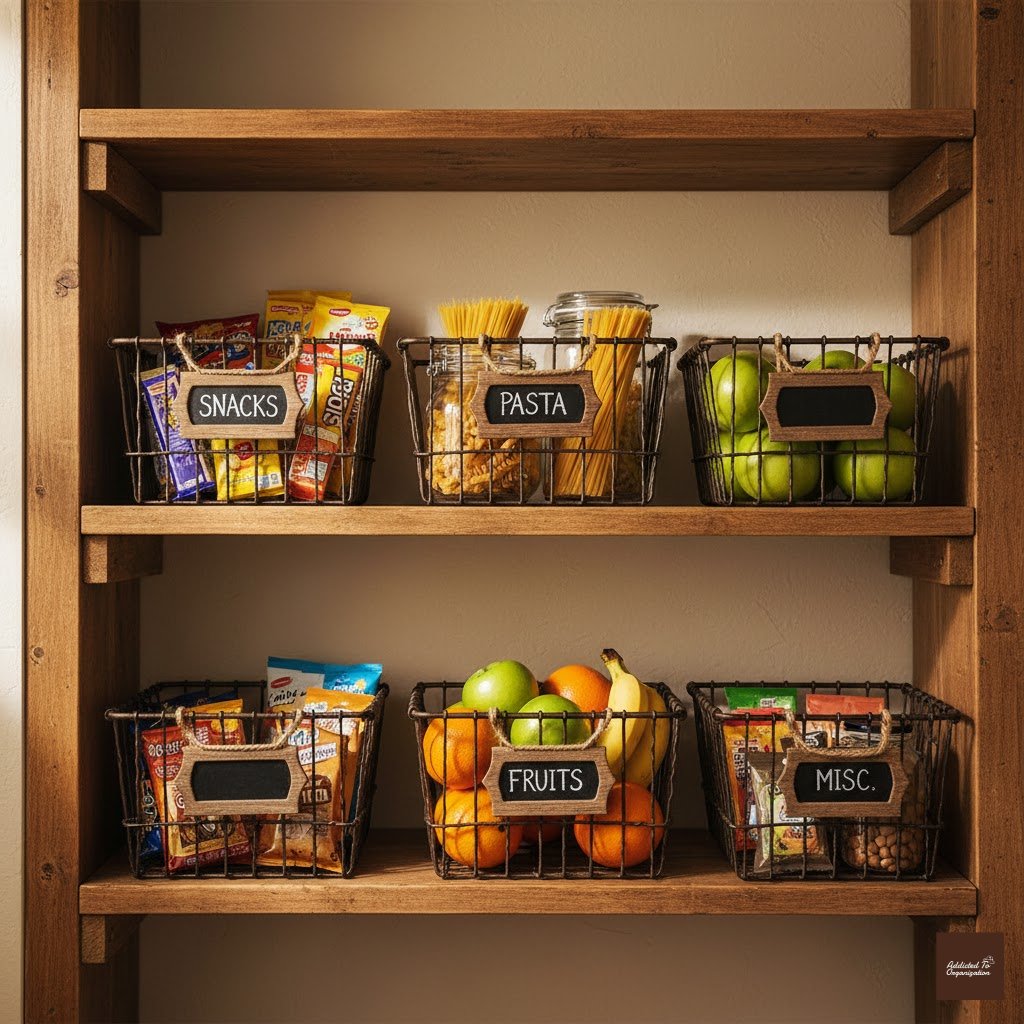
Wire or wicker baskets keep snacks, fruits, and dry goods organized. Label each one to make finding items quick and easy.
How-To (DIY): Choose sturdy, open-top baskets (wicker, wire, or canvas bins). Label each basket clearly (e.g., “Breakfast,” “Snacks,” “Baking”). Stack them on shelves where visibility isn’t critical, using them to contain small, loose items.
30. Floating Drawer Under Cabinets
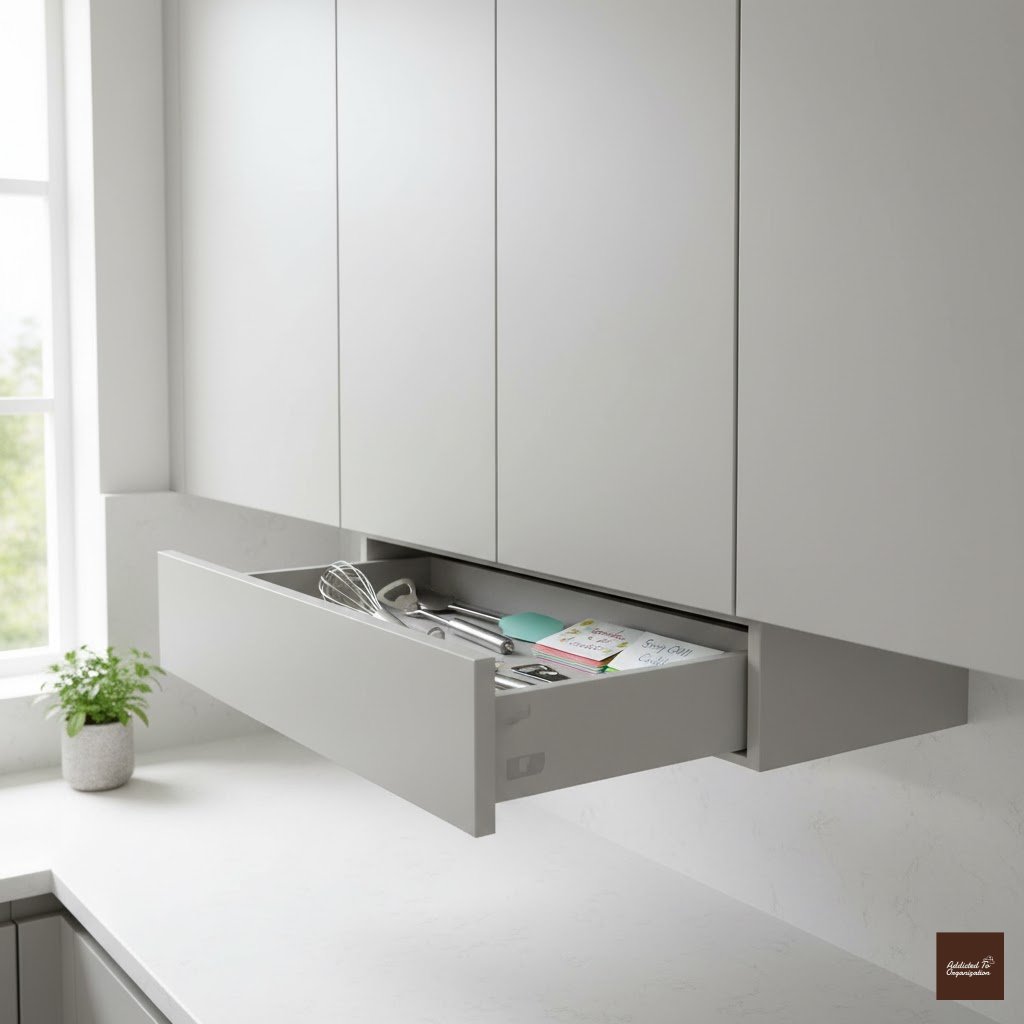
Add a slim drawer under your upper cabinets to store small tools or recipes. It’s a hidden gem for keeping clutter off the counter.
How-To (DIY): Purchase a shallow, slim drawer unit designed to be mounted underneath upper cabinets. Screw the mounting hardware securely to the underside of the cabinet frame, ensuring the drawer slides smoothly and is hidden from sight when closed.
We told you these were genius! It’s amazing how much function you can squeeze out of a tiny space with a few clever storage hacks.
Which idea are you tackling this weekend?
Let us know in the comments! If you found this list helpful, please share it with a friend who’s dealing with kitchen clutter, and don’t forget to pin it for your next DIY project!