30 Natural Christmas Decor Ideas
This post may contain affiliate links: full affiliate disclosure.
Tired of the glitter and plastic? This year, let’s bring the cozy, earthy beauty of the outdoors inside!
These 30 natural Christmas decor ideas are easy on your wallet, eco-friendly, and bring a truly authentic, timeless warmth to your home. Let’s get crafting!
1. Pinecone Garland

String pinecones together with twine for a rustic garland that drapes beautifully across mantels or stair railings. Add a dusting of faux snow for a wintry touch.
How To DIY It:
- Prep: Collect 30–50 dried pinecones.
- Loop: Attach a small loop of thin wire or sturdy twine to the base of each pinecone using hot glue. Alternatively, carefully screw a small eye-hook into the base of each pinecone.
- String: Measure a long piece of thick jute or hemp twine. Thread the main twine through the loops you created, spacing the pinecones every 4–6 inches. Secure with a knot or dab of glue if they tend to slide.
2. Dried Orange Slice Ornaments
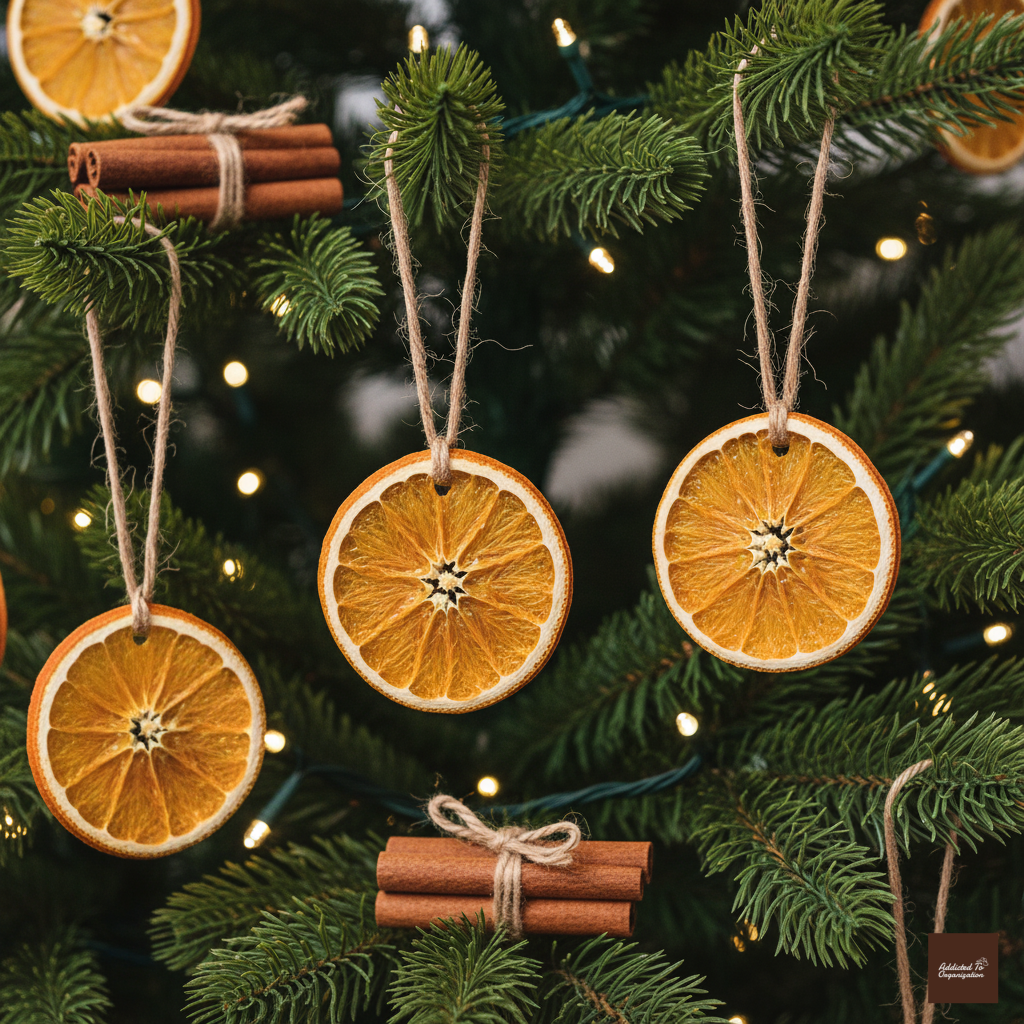
Thinly slice oranges, bake them until dry, and hang them with twine on the tree. They bring warm color and a sweet citrus scent.
How To DIY It:
- Slice: Cut oranges (navel or blood oranges work great) into thin slices, about 1/4 inch thick. Pat them dry with paper towels.
- Bake: Arrange slices on a parchment-lined baking sheet and bake at 200°F (93°C) for 3–6 hours, flipping occasionally, until they are dried and translucent but not burnt.
- Finish: Once cool, poke a hole near the top edge and thread a loop of twine or ribbon through to hang.
3. Evergreen Branch Centerpiece
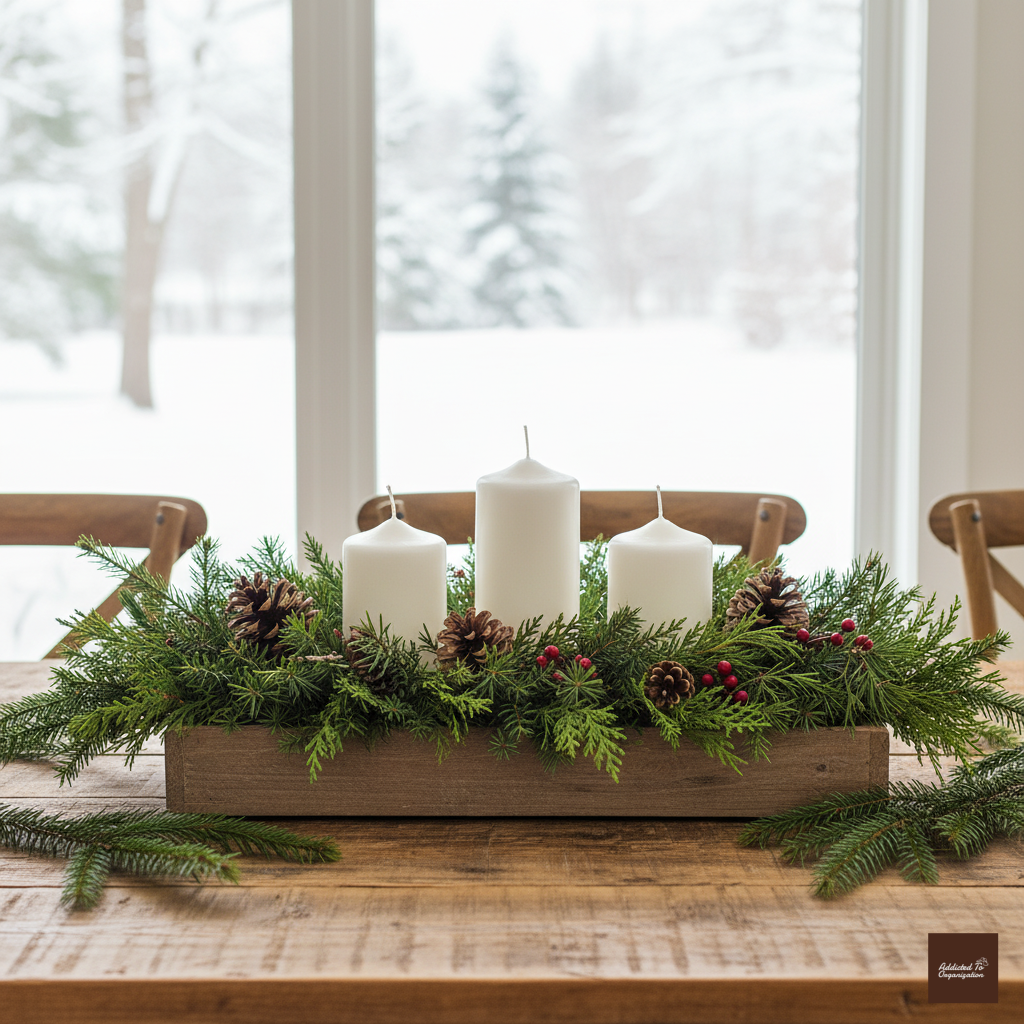
Fill a wooden tray with fresh evergreen cuttings, pinecones, and a few pillar candles for an effortless table centerpiece.
How To DIY It:
- Base: Select a shallow wooden tray or box.
- Greenery: Trim fresh pine, fir, or cedar branches to fit the length of the tray. Lay them down to create a lush base.
- Candles: Place 3–5 pillar candles (in protective glass sleeves for safety!) evenly throughout the greenery.
- Accents: Tuck in small handfuls of pinecones, acorns, or red berries for texture.
4. Cinnamon Stick Stars

Tie cinnamon sticks together in star shapes using twine. These ornaments add a rustic look and fill the air with a cozy holiday aroma.
How To DIY It:
- Arrange: Lay out five cinnamon sticks to form a star shape (a pentagram).
- Glue: Place a tiny dot of hot glue where the sticks overlap in the center and at the outer points to hold the shape temporarily.
- Wrap: Use thin, natural twine to tightly wrap the stick intersections, focusing on the center and the five outer points. Leave a loop of twine at the top for hanging.
5. Burlap Stockings

Swap shiny fabrics for burlap stockings. Add small sprigs of greenery tucked inside for a farmhouse vibe.
How To DIY It:
- Cut: Trace a stocking template onto burlap and cut out two mirror-image pieces per stocking.
- Sew: Sew the two pieces together, leaving the top edge open. Trim the seam allowance.
- Embellish: Turn the stocking right-side out. Attach a small burlap loop for hanging. Secure a small sprig of faux or real pine/cedar to the cuff with hot glue or safety pin.
6. Twine-Wrapped Ornaments
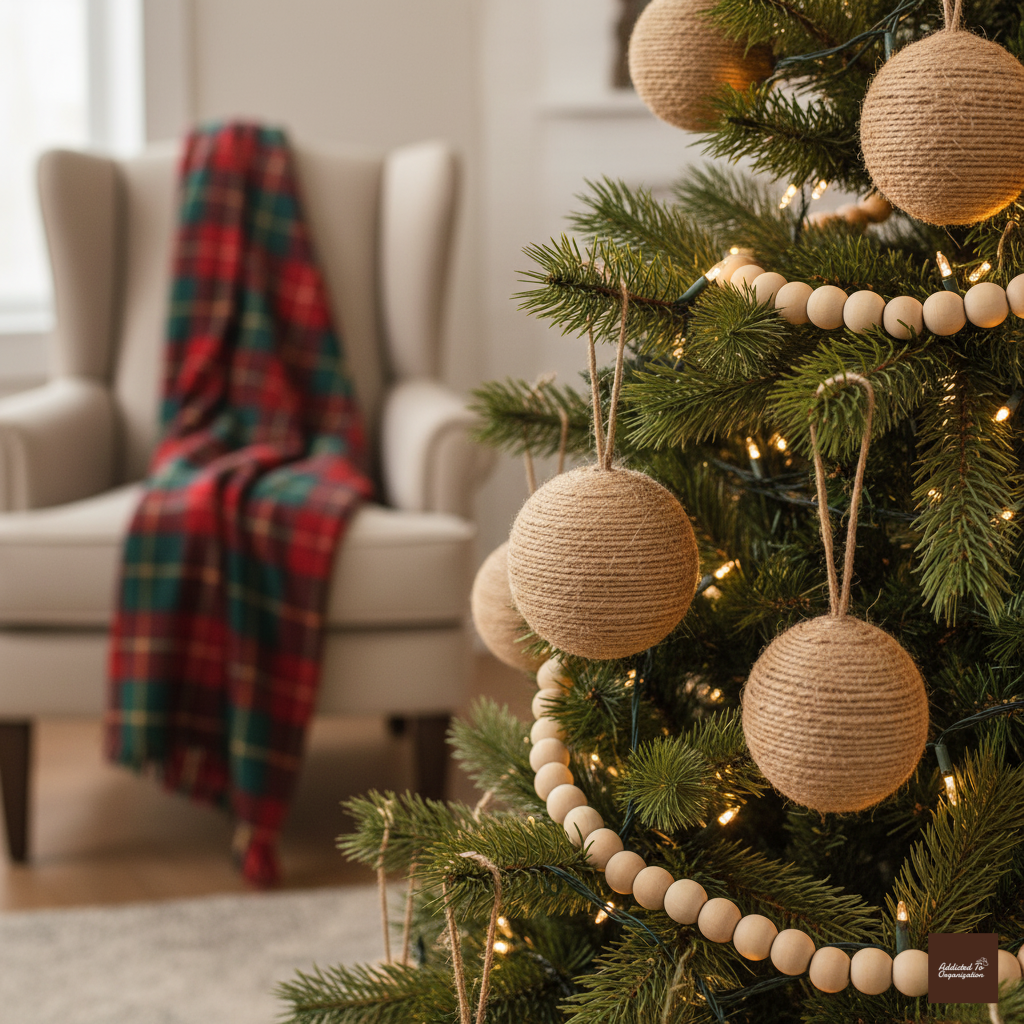
Wrap old baubles in natural jute or twine to give them a rustic makeover. They pair perfectly with wood and greenery.
How To DIY It:
- Start: Remove the hanging cap from a plain ornament. Apply a small amount of hot glue to the bottom center of the bauble.
- Wrap: Press the end of the twine into the glue and begin tightly wrapping the twine around the ornament, adding small lines of glue every inch or so to secure the twine to the glass.
- Finish: Once the ornament is fully covered, snip the twine and secure the end with a final dot of glue. Replace the hanging cap.
7. Wooden Bead Garland
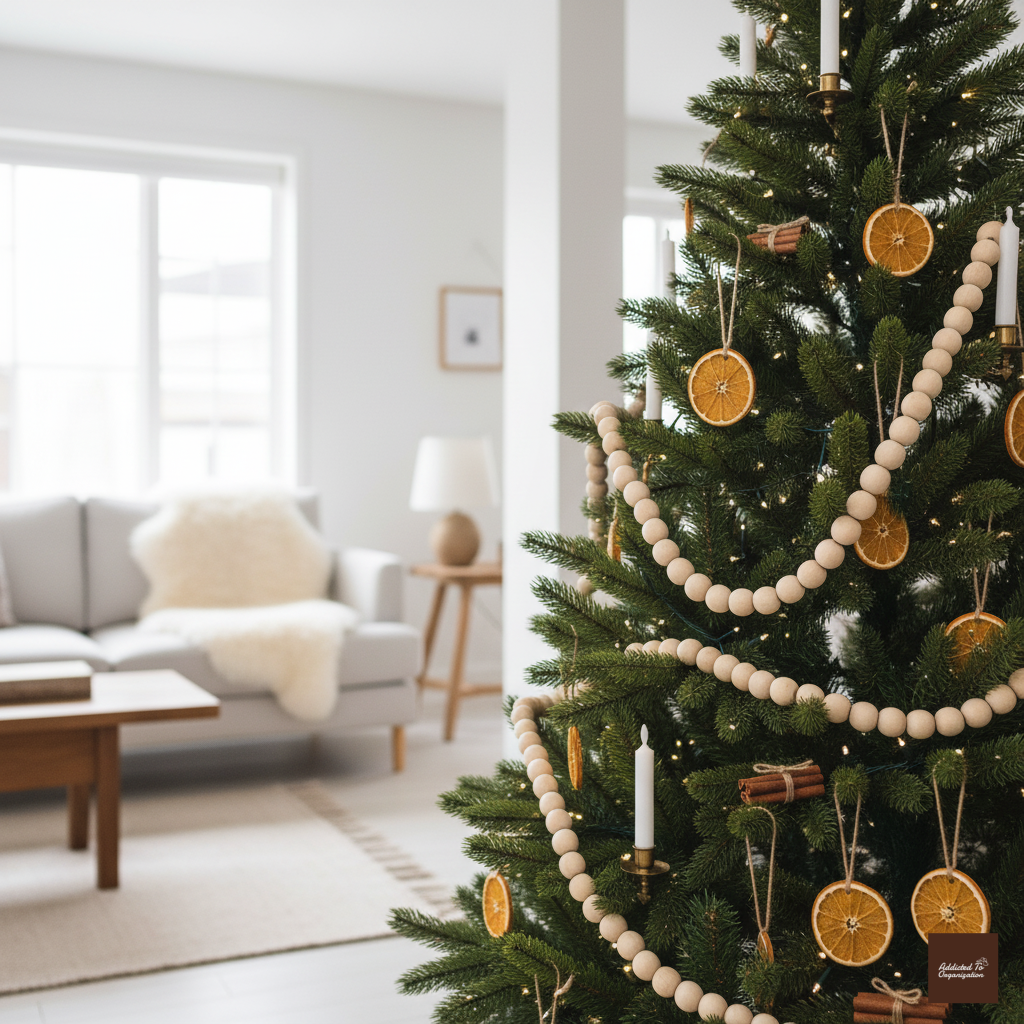
String natural wooden beads together for a simple, Scandinavian-inspired garland. It’s reusable and timeless.
How To DIY It:
- Gather: Purchase various sizes of unfinished wooden beads with pre-drilled holes.
- String: Use a thick needle and strong thread (like upholstery thread) or thin twine. String the beads together in your desired pattern.
- Secure: Tie a large loop at each end for easy hanging. For extra security, you can place a small knot every foot or so to prevent all the beads from sliding if the thread breaks.
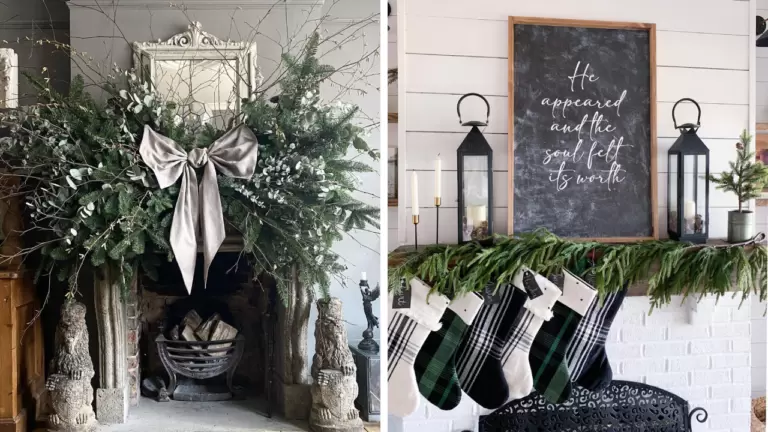
8. Eucalyptus Wreath
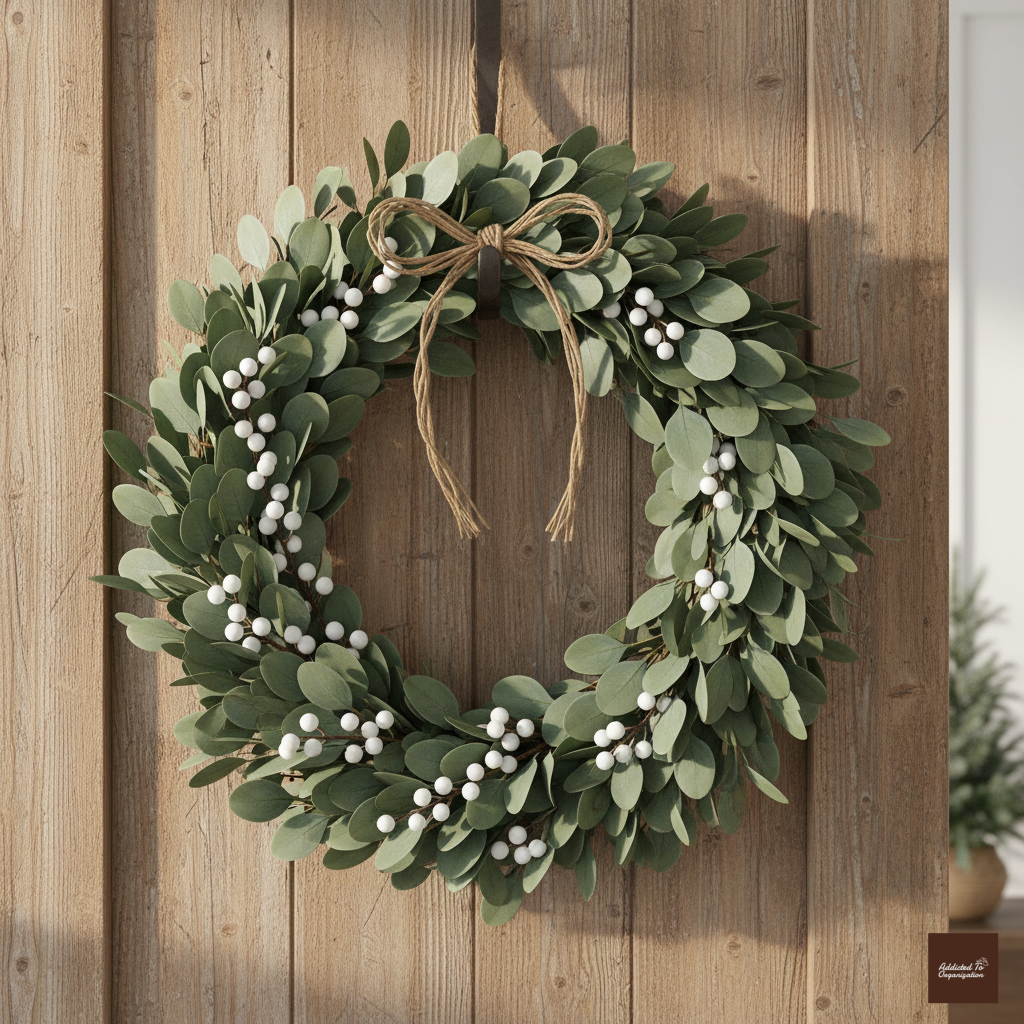
Use fresh or faux eucalyptus to make a chic wreath that looks natural and modern. Add white berries for extra charm.
How To DIY It:
- Base: Start with a wire wreath form.
- Attach: Using floral wire, attach bundles of eucalyptus branches to the form, layering them in one direction until the entire form is covered.
- Accessorize: Weave in small sprigs of faux white berries or other complementary natural elements, securing them with wire or hot glue.
9. Mason Jar Candle Holders
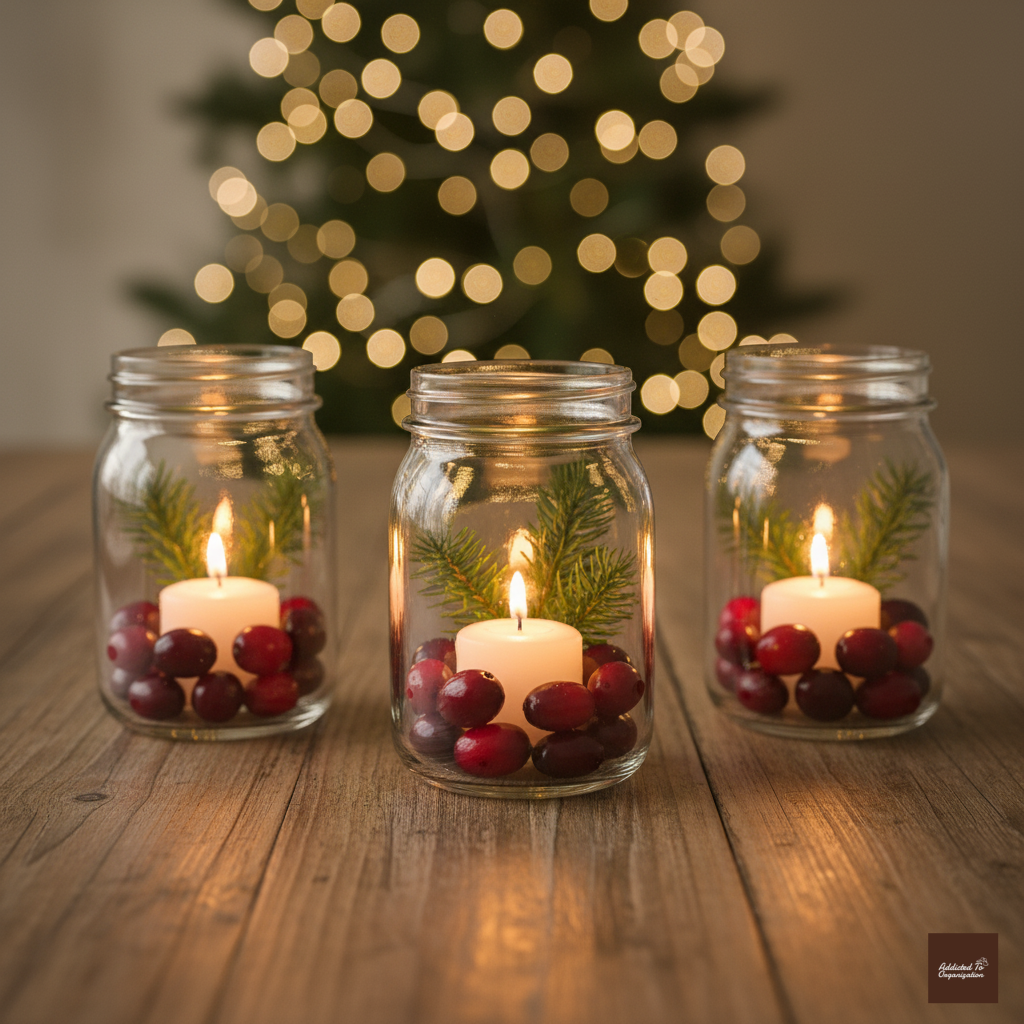
Fill mason jars with cranberries, greenery, and water, then top with a floating candle. They’re perfect for dining tables or windowsills.
How To DIY It:
- Layer: Place a small amount of fresh cranberries and a few sprigs of cedar or fir into the bottom of a mason jar.
- Fill: Fill the jar nearly to the top with water.
- Float: Carefully place a small, round floating candle on the surface of the water. Light when ready to display!
10. Birch Log Candle Holders
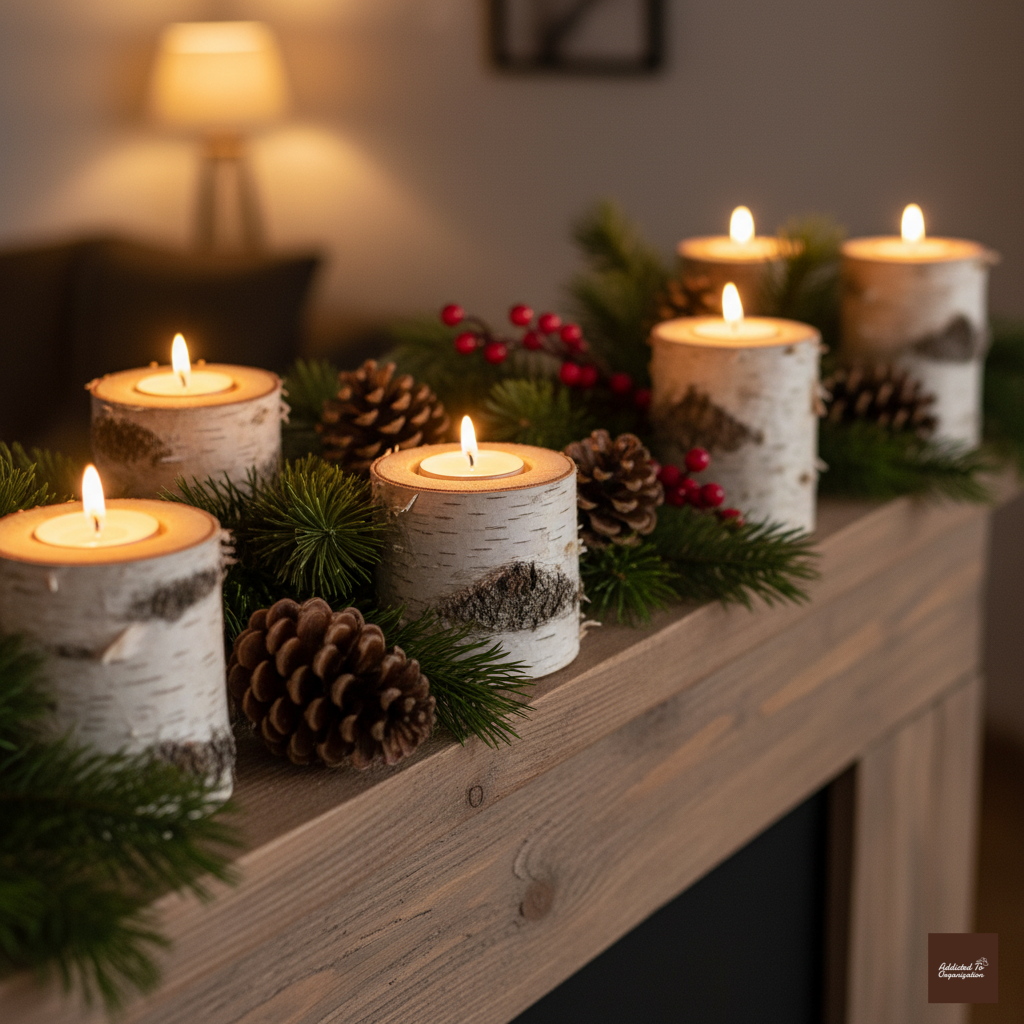
Drill small holes in birch logs to hold tea lights. They create a cozy woodland look when placed on mantels.
How To DIY It:
- Prep: Cut birch logs into varying heights (e.g., 4, 6, and 8 inches). Ensure the bottom is flat so they stand securely.
- Drill: Using a drill and a Forstner bit the same diameter as your tea lights, carefully drill a shallow hole (1/2 inch deep) in the center of the top of each log.
- Insert: Place a tea light candle into each drilled opening.
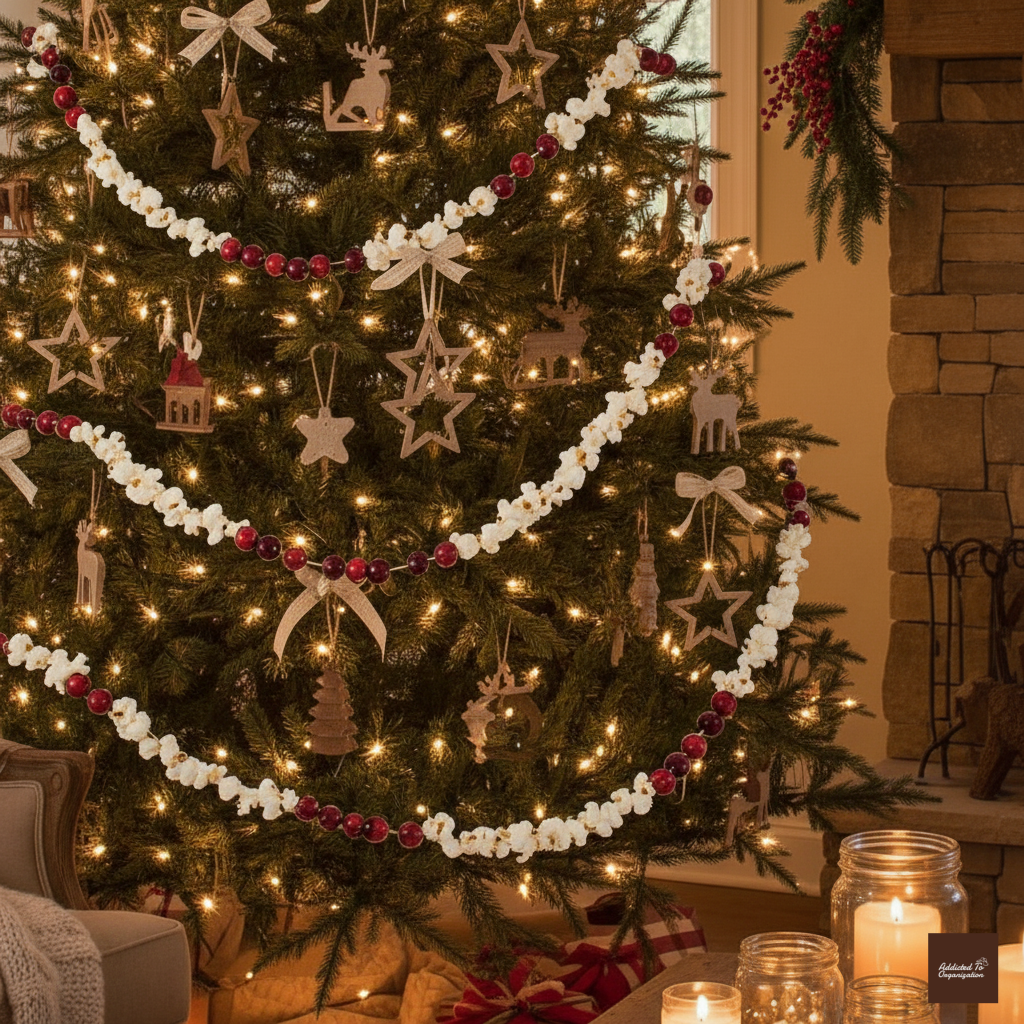
11. Popcorn & Cranberry Garland
Hand-string popcorn and cranberries for a nostalgic, all-natural tree garland. A fun family craft idea too.
How To DIY It:
- Cook: Pop about a gallon of popcorn (let it cool and ensure it’s fully dry—not buttery!).
- Gather: Get a bag of fresh cranberries.
- String: Use a large needle and strong, thin thread (like dental floss for durability). Alternate stringing popcorn kernels and cranberries until you reach the desired length. Pro Tip: Be patient; this takes time!
12. Pine Branch Table Runner
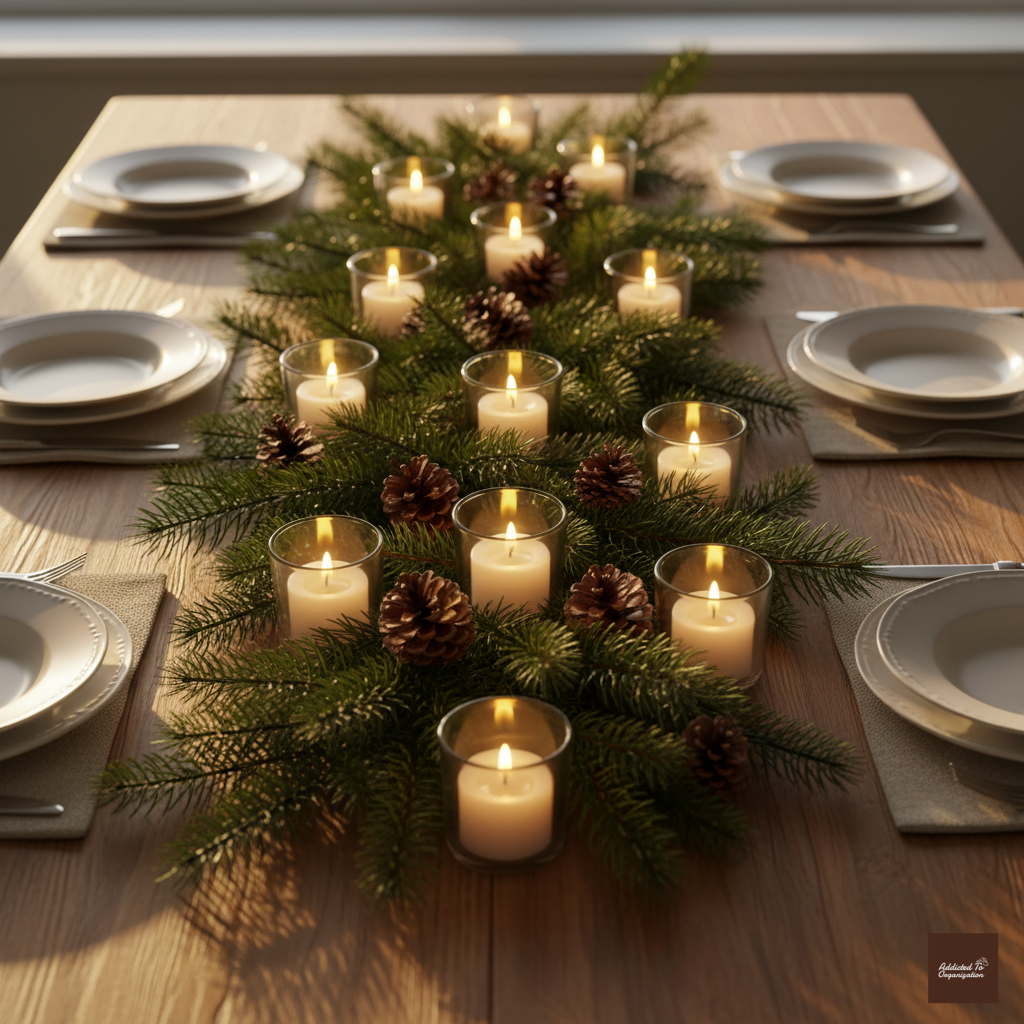
Lay fresh pine branches down the center of your table as a runner. Add pinecones and small candles for a fuller look.
How To DIY It:
- Lay Base: Gather long, relatively flat evergreen branches. Start laying them down the center of the table, overlapping the ends slightly for a continuous, lush look.
- Intersperse: Tuck in natural elements like clusters of pinecones, holly branches, or mistletoe.
- Light: Place small votive candles (again, in glass holders) throughout the runner for a warm glow.
13. Clay Ornaments

Make air-dry clay ornaments in star or tree shapes. Paint them with simple white or leave them natural for a handmade look.
How To DIY It:
- Roll: Roll out air-dry clay to about 1/4 inch thickness.
- Cut: Use cookie cutters to cut out shapes (stars, trees, circles).
- Hole: Use a skewer or straw to poke a hole near the top of each ornament for hanging.
- Dry & Hang: Let them dry completely (following the package instructions), then sand any rough edges and hang with twine.
14. Wooden Slice Coasters

Use wood slices as coasters or as mini placemats on your Christmas table. Add names for DIY place cards.
How To DIY It:
- Prep: Purchase small, unfinished wood slices from a craft store.
- Seal (Optional): Apply a clear wood sealer to protect the wood from moisture.
- Personalize: For place cards, use a thin black permanent marker or wood-burning tool to write guests’ names on the top of the slices.
15. Jute-Wrapped Vases
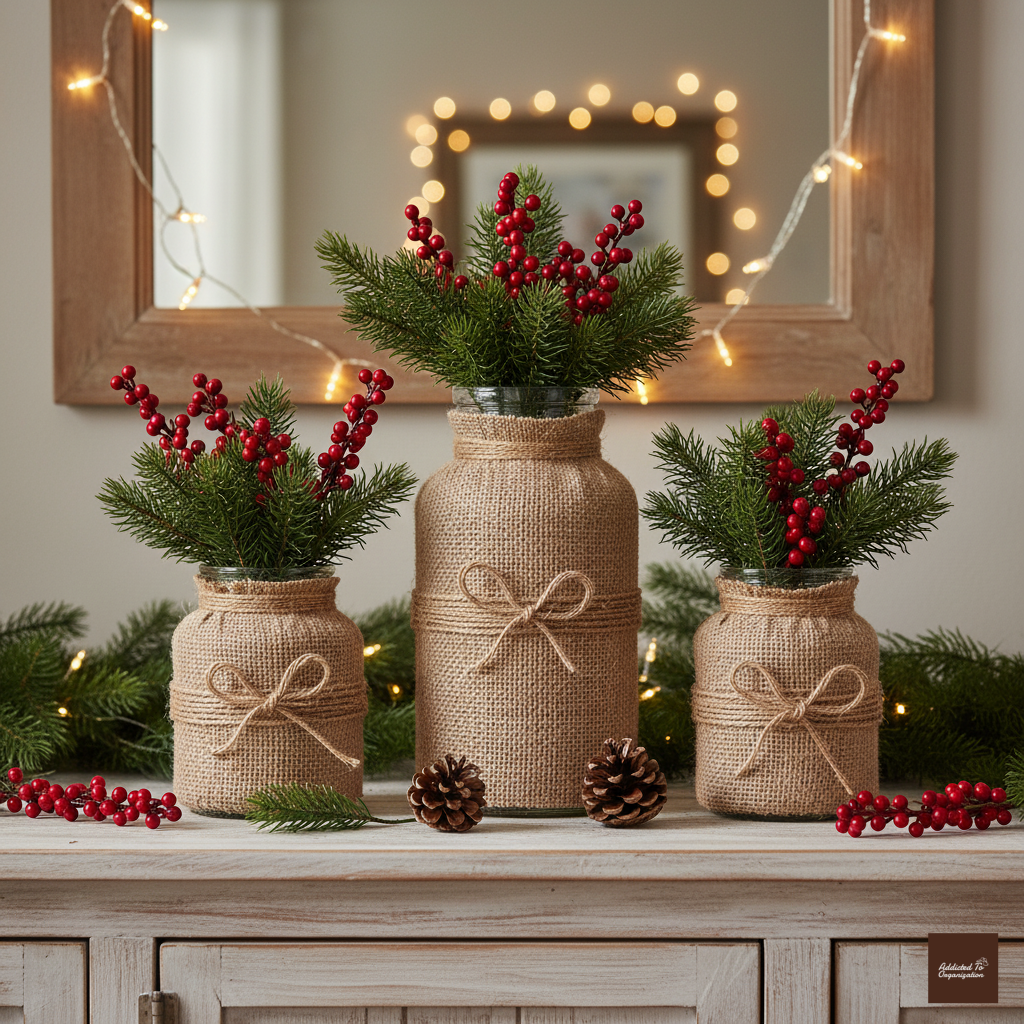
Wrap glass vases or jars in burlap or jute, then fill them with greenery or twigs for a natural holiday accent.
How To DIY It:
- Start: Apply hot glue to the bottom edge of your vase. Press the end of the jute rope or burlap fabric firmly into the glue.
- Wrap: Slowly wrap the jute around the vase, working your way up. Apply a thin line of hot glue every few rotations and keep the jute pulled tight to prevent gaps.
- Finish: Secure the end of the jute with a final dot of glue at the top edge of the vase.
16. Pinecone Place Cards
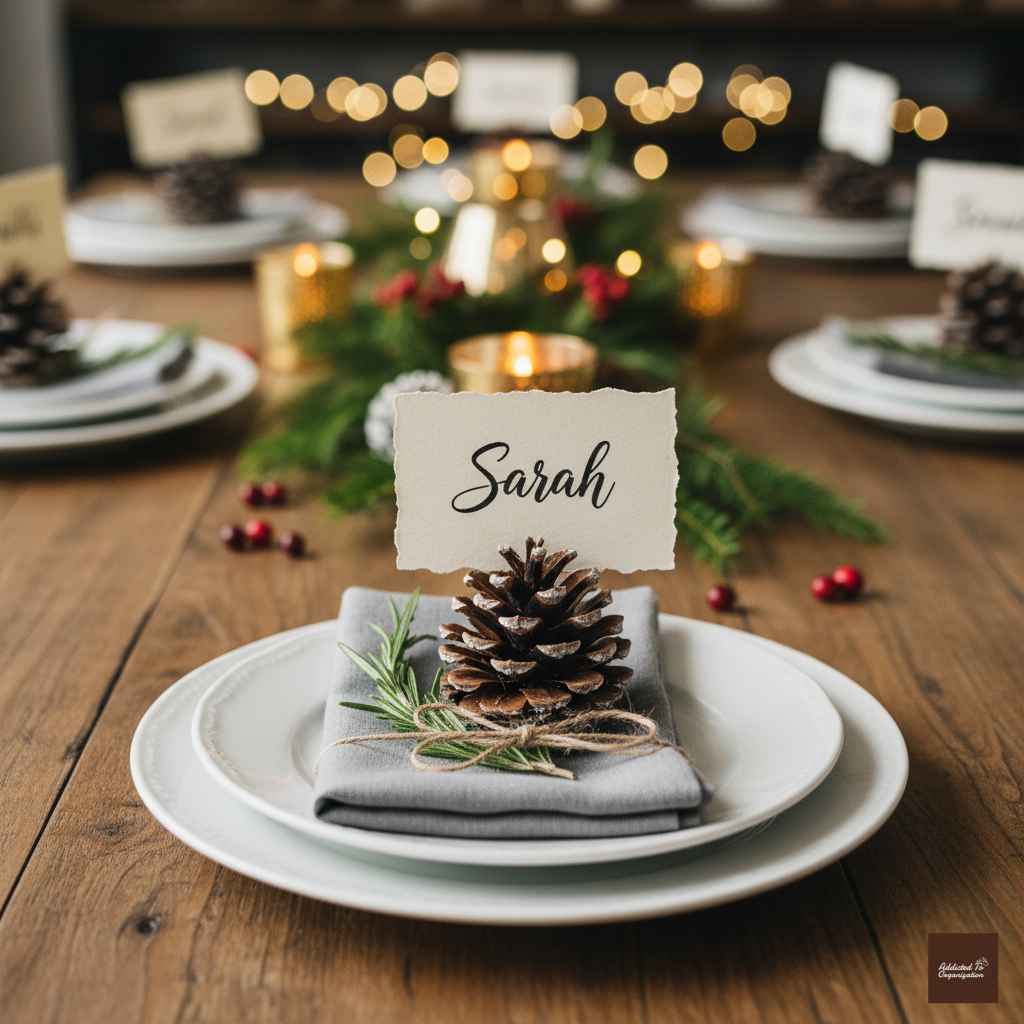
Glue a small slit into pinecones and tuck in name cards for a charming Christmas dinner detail.
How To DIY It:
- Gather: Use medium-sized pinecones.
- Prep: Cut small, rectangular paper cards and write guest names clearly.
- Insert: Find a naturally occurring gap or space between the top scales of the pinecone and gently tuck the bottom edge of the name card into it. If it’s too loose, a tiny drop of sticky tack or glue will hold it.
17. Rustic Twig Ornaments
Collect small twigs and hot glue them into stars, snowflakes, or tree shapes. Hang them on the tree with twine.
How To DIY It:
- Collect: Gather thin, straight twigs (about 1/8 inch thick) and break them into uniform lengths (e.g., 3 inches).
- Shape: Arrange the twigs on a protected surface into your chosen shape (star or snowflake).
- Glue: Carefully apply a small amount of hot glue at the center where all the twigs intersect. Add a loop of twine before the glue dries for hanging.
18. Fresh Garland Staircase

Wrap your staircase railing with a garland of fresh greenery. Add natural ribbon for a simple but stunning look.
How To DIY It:
- Measure: Get a fresh or high-quality faux garland that is at least 1.5 times the length of your railing.
- Secure: Begin at the top post. Secure the garland with floral wire. Drape the garland loosely, securing it at every other spindle or every foot.
- Embellish: Weave a simple ribbon (like velvet or linen) through the drape, or add strings of battery-operated warm white lights.
19. Wooden Sign Decor

Paint holiday phrases like “Joy” or “Merry” on reclaimed wood planks for rustic wall art.
How To DIY It:
- Prep: Source a flat piece of reclaimed wood or an unfinished wooden sign. Lightly sand the edges.
- Stain/Paint: Stain the wood a dark color or paint it with a light wash.
- Stencils: Use stencils or freehand the word (like “PEACE” or “NOEL”) onto the wood using white or metallic paint.
20. Pampas Grass Arrangement
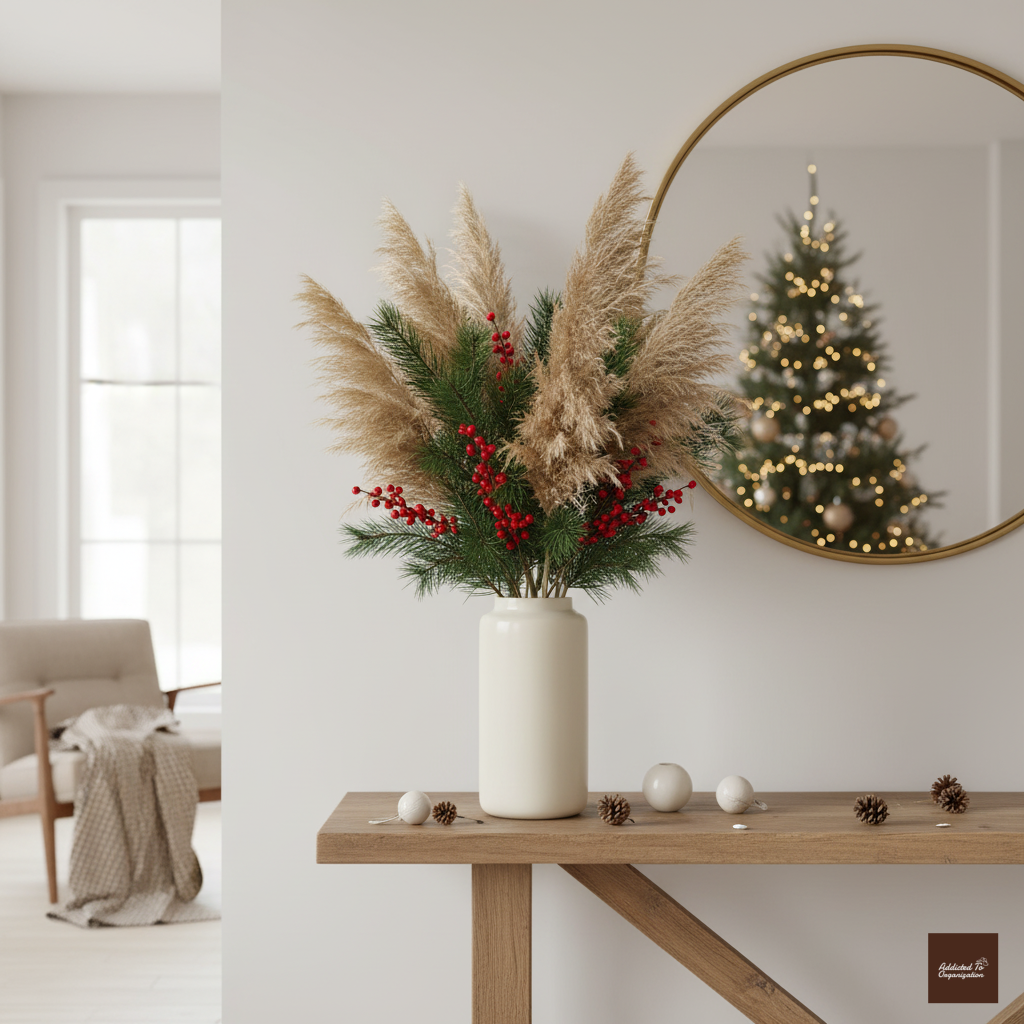
Add pampas grass to a vase with pine branches for a trendy, neutral-toned holiday arrangement.
How To DIY It:
- Vase: Choose a tall, simple ceramic or glass vase.
- Arrange: Place 3–5 large stems of dried pampas grass in the vase.
- Contrast: Fill in the spaces around the pampas with 3–5 freshly cut pine or cedar branches to provide contrast and holiday scent.
21. Handmade Fabric Ornaments
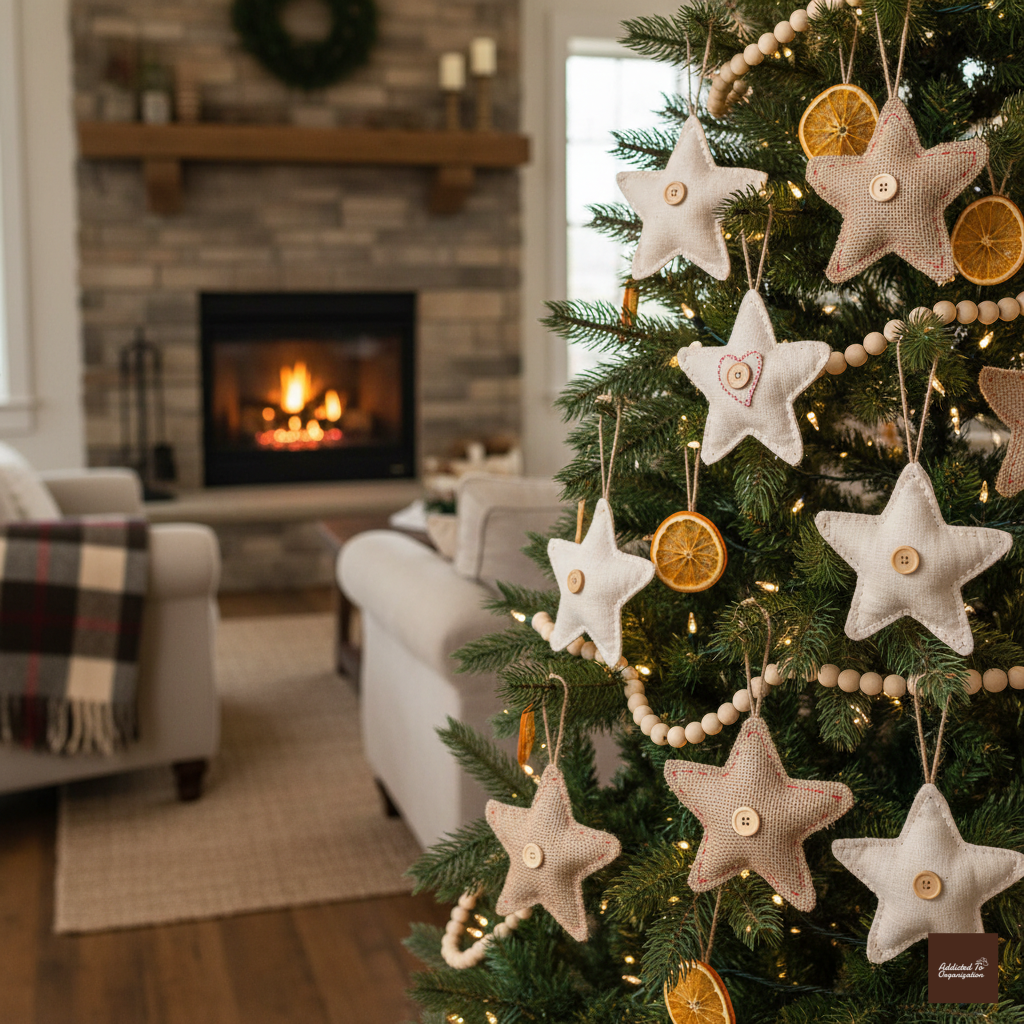
Use scraps of linen, cotton, or burlap to sew small ornament shapes like stars or hearts. Simple, soft, and eco-friendly.
How To DIY It:
- Cut: Cut two identical fabric shapes (heart, star, circle) per ornament.
- Sew: Sew the pieces together, leaving a small gap for stuffing.
- Stuff: Lightly stuff the shape with cotton batting or dried lavender. Sew the gap closed and attach a loop of thread or twine for hanging.
22. Rustic Wooden Advent Calendar
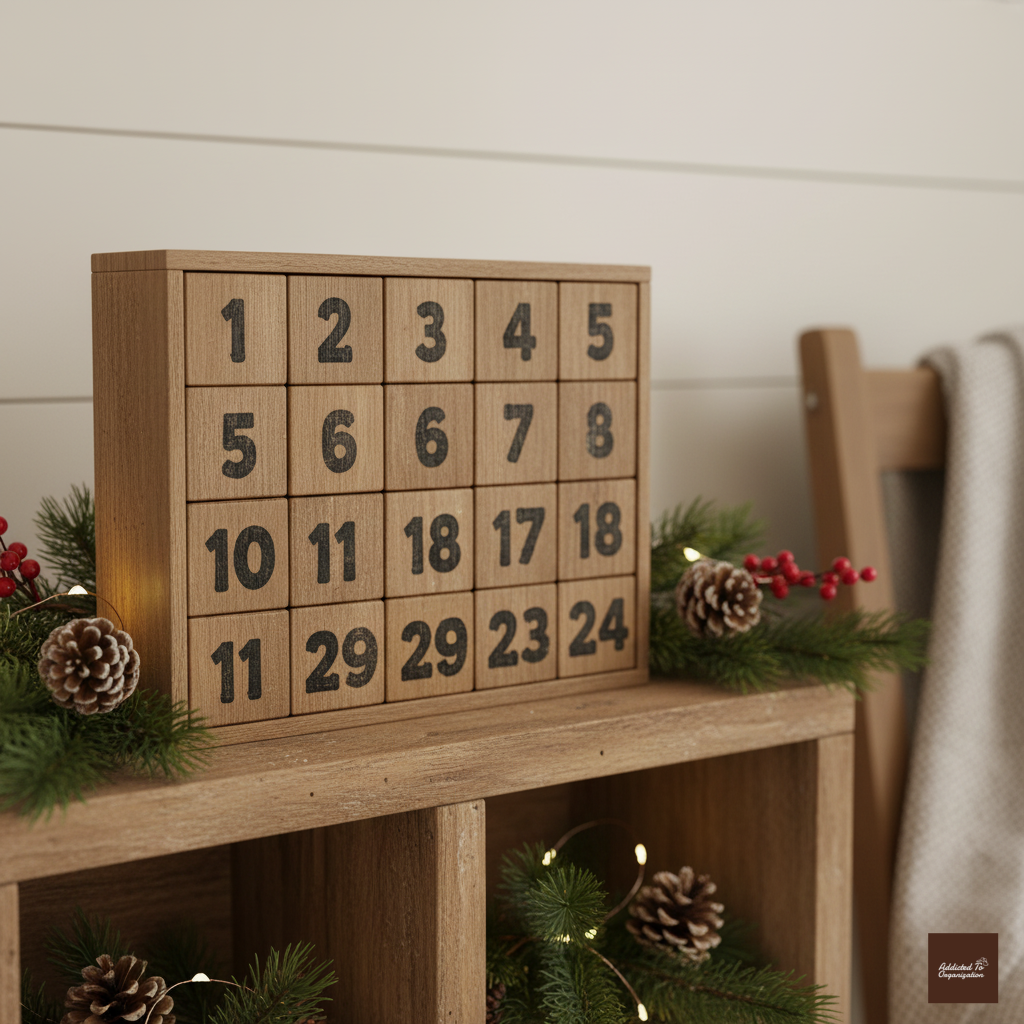
Build an advent calendar from small wood blocks or tiny burlap pouches strung along twine.
How To DIY It:
- Pockets: Purchase 24 small burlap pouches.
- Number: Use a permanent marker or iron-on stencils to label the bags 1 through 24.
- Display: String the bags randomly along 3-4 lines of twine or yarn hung on a wall or a decorative ladder. Fill with small treats or notes!
23. Woven Basket Tree Skirt

Replace the typical fabric tree skirt with a woven basket base or seagrass mat for a natural look.
How To DIY It:
- Shop: Find a wide, sturdy woven basket or hamper.
- Cut (Optional): If the basket isn’t wide enough to fit over your tree stand, you may need to carefully cut a vertical slit down one side and across the bottom center so it can wrap around the stand and trunk. Alternatively, use a wide seagrass mat you can simply lay underneath.
24. Greenery Wall Hanging
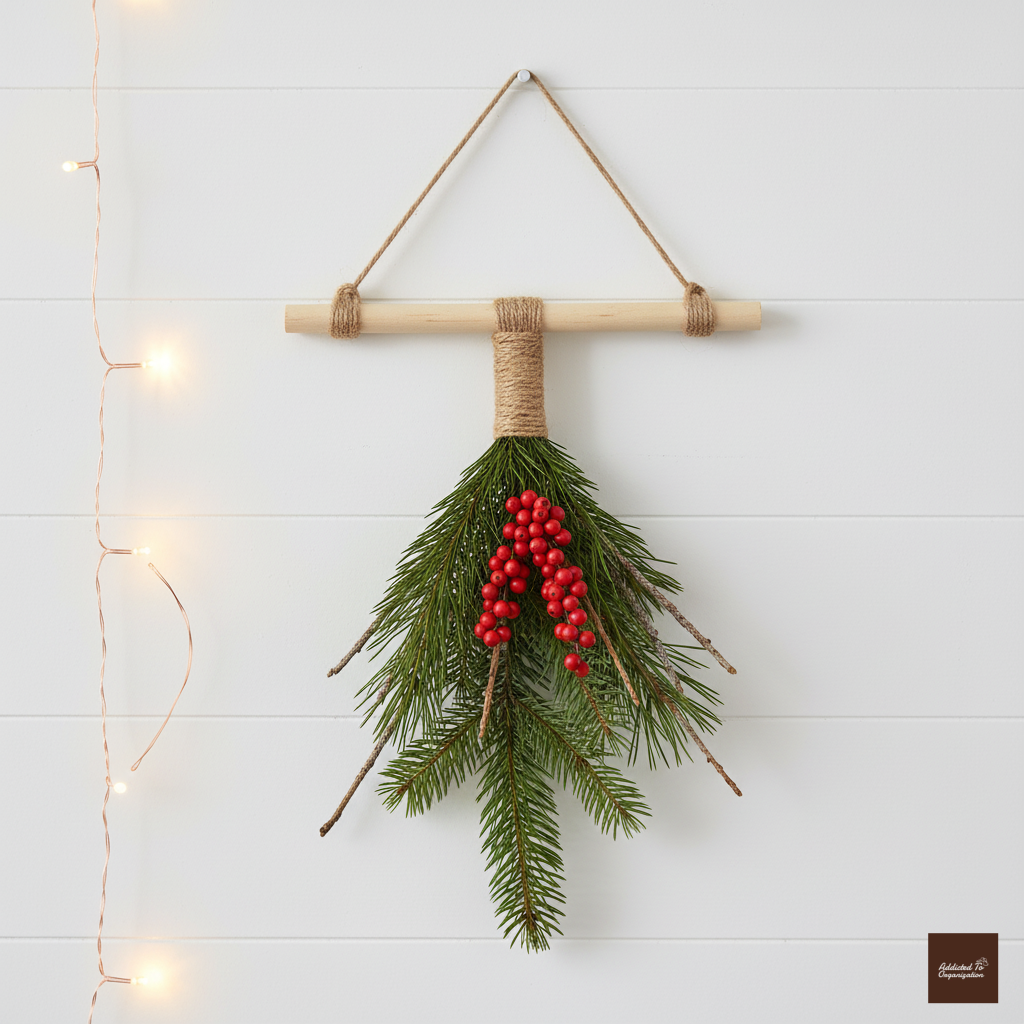
Tie branches, berries, and pinecones to a wooden dowel with jute for a nature-inspired wall hanging.
How To DIY It:
- Dowel: Get a smooth wooden dowel (18–36 inches long).
- Assemble: Cut varying lengths of jute twine (1–3 feet long). Secure bundles of greenery (pine, cedar, eucalyptus) and other natural accents (like clusters of faux berries) to the bottom of the twine pieces using floral wire.
- Hang: Tie the tops of the twine pieces to the dowel rod, spacing them out until you achieve a full, cascading look.
25. Rustic Lanterns with Greenery
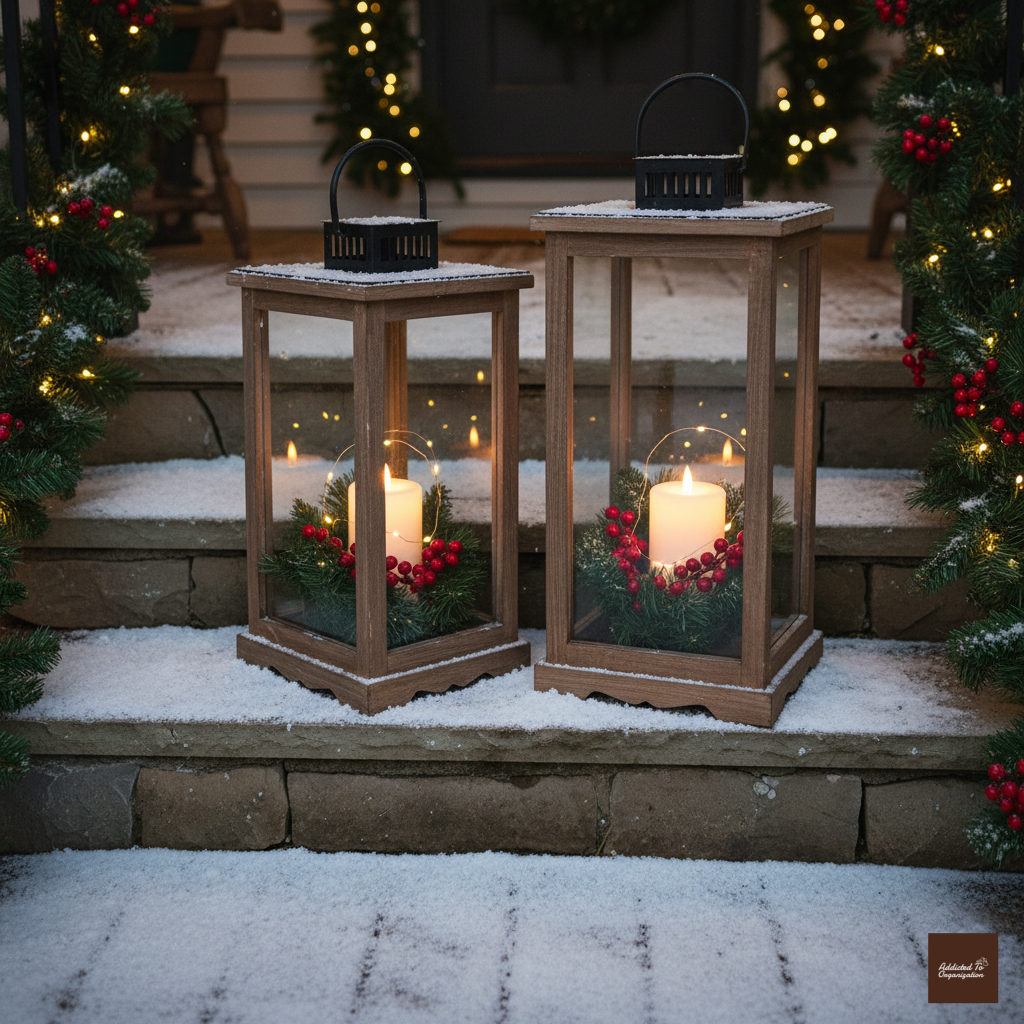
Fill metal or wooden lanterns with pine sprigs, berries, and candles for cozy porch decor.
How To DIY It:
- Base: Open a decorative lantern.
- Fill: Line the bottom with a small amount of faux moss or snow. Place a battery-operated pillar candle (safer for unattended displays) in the center.
- Accent: Tuck small, cut pieces of pine and berry sprigs around the candle base.
26. Homemade Salt Dough Ornaments

Mix flour, salt, and water to create DIY ornaments. Paint lightly or leave them raw for a natural look.
How To DIY It:
- Mix: Combine 2 cups flour, 1 cup salt, and 3/4 cup water. Knead into a smooth dough.
- Cut & Bake: Roll out the dough and use cookie cutters to make shapes. Don’t forget to poke a hole for hanging! Bake at 250°F (120°C) until hard (about 2–3 hours).
- Seal: Once cool, leave them raw or paint them with white paint. Seal with a matte spray sealant for durability.
27. Driftwood Christmas Tree

Stack driftwood branches into a tree shape for a coastal, natural take on the holiday tree.
How To DIY It:
- Base: Find a sturdy vertical stick or dowel to act as the trunk. Secure it to a flat base.
- Drill: Drill a hole through the center of several pieces of driftwood, from shortest to longest.
- Stack: Slide the driftwood pieces onto the vertical base, arranging them so the longest pieces are at the bottom and the shortest pieces are at the top, forming a tree shape. Secure pieces with a small nut or glue if needed.
28. Apple & Cinnamon Garland
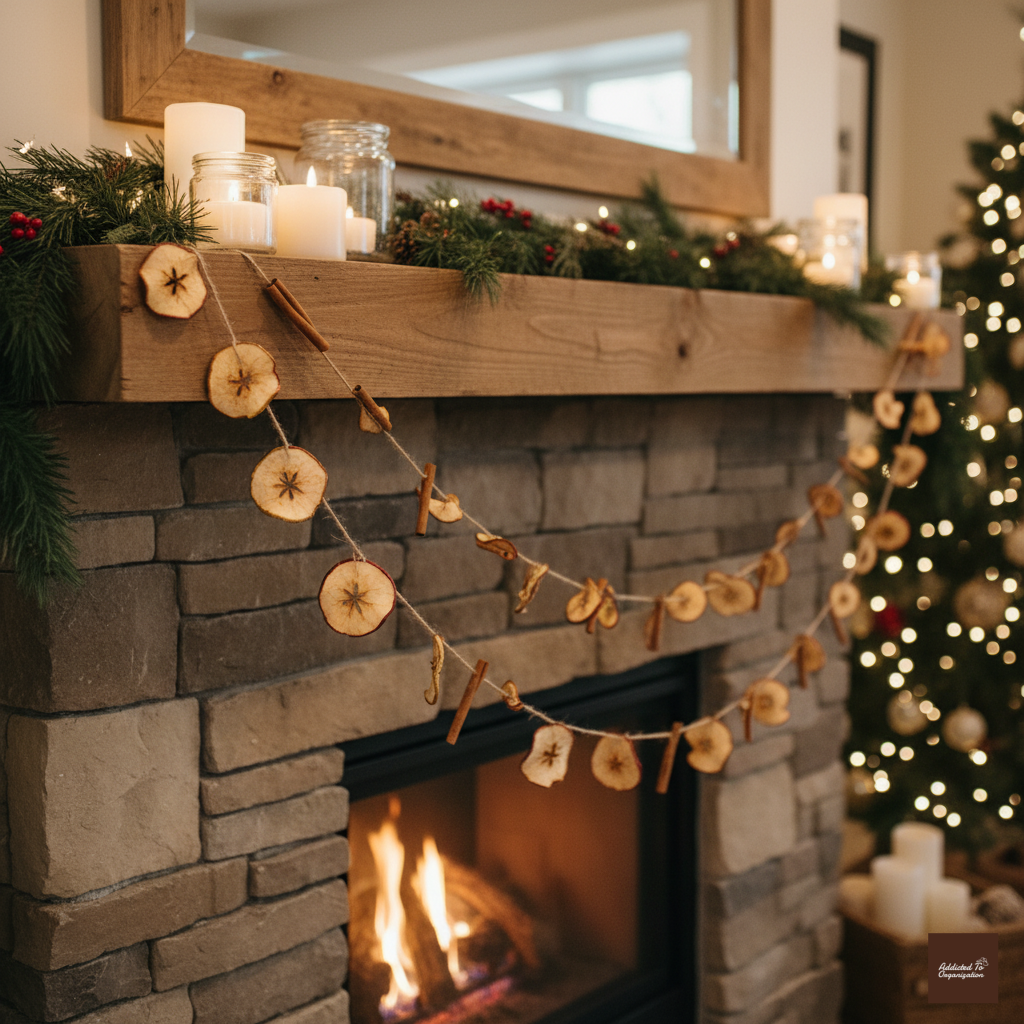
Slice apples into rings, dry them, and string them with cinnamon sticks for a fragrant, festive garland.
How To DIY It:
- Dry: Thinly slice apples and use an apple corer to remove the core. Dry them in the oven following the same method as the oranges (Idea #2).String: Alternate stringing a dried apple slice and a cinnamon stick onto thick thread or ribbon. The cinnamon sticks will keep the apples separated and add scent!
29. Simple Evergreen Vase

Place cut pine branches into a tall glass vase of water for a fresh and effortless holiday accent.
How To DIY It:
- Vase: Select a tall vase (cylindrical works well).
- Cut: Trim several long pine or fir branches, cutting them at an angle.
- Display: Fill the vase with water and arrange the branches. You can add a handful of stones or marbles to the bottom to help keep the branches upright.
30. Rustic Wooden Stars

Cut or buy unfinished wooden stars and hang them on your tree or wall. Keep them raw or stain them lightly for a cozy finish.
How To DIY It:
- Source: Purchase pre-cut, flat wooden stars in a few sizes.
- Finish: Lightly sand the edges. You can leave them raw, or use a natural wood stain to deepen the color and bring out the grain.
- Hang: Drill a small hole at the top point and string them with leather cord or hemp twine.
Now Go Get Cozy!
See? You don’t need a massive budget or a ton of plastic to create a stunning, cozy Christmas environment. Embracing these natural Christmas decor ideas brings such a timeless, lovely warmth that you and your guests will absolutely adore. Which one are you trying first?
I’d love to hear your favorite natural elements to decorate with! Leave a comment below and tell me what you’re crafting this season! If you loved these ideas, please share this post with a friend who needs some natural holiday inspiration, and don’t forget to pin it to your favorite Christmas boards!