30 Half Wall Between Kitchen and Living Room Ideas
This post may contain affiliate links: full affiliate disclosure.
Does that short wall feel boring or just plain in the way?
It’s a huge design opportunity! Stop letting that pony wall waste space.
Here are 30 simple, budget-friendly ideas to make it useful, beautiful, and the coolest spot in the house.
1. Add Vertical Shiplap
Install thin, vertical shiplap boards directly onto the drywall. This adds texture and height, making the wall feel purposeful and modern. Paint it bright white or a soft gray.
- Use thin MDF planks for low cost.
- A nail gun makes this job super fast.
- Run the planks all the way up to the counter cap.
Pro Tip: Only install shiplap on the living room side for a cleaner look that feels less country in the kitchen.
2. Install Butcher Block Cap
Replace the standard drywall cap with a thick slab of warm butcher block wood. This instantly makes the wall feel like a piece of furniture rather than just a structure. Seal it well, especially near the kitchen.
- Use a dark stain for a rich finish.
- Extend the wood 1 inch over the edges.
- Sand and oil the wood every year to keep it looking new.
Pro Tip: If you have kids, pick a durable wood like maple or oak, as pine scratches easily when used as a counter.
3. Built-In Bookshelf Niche
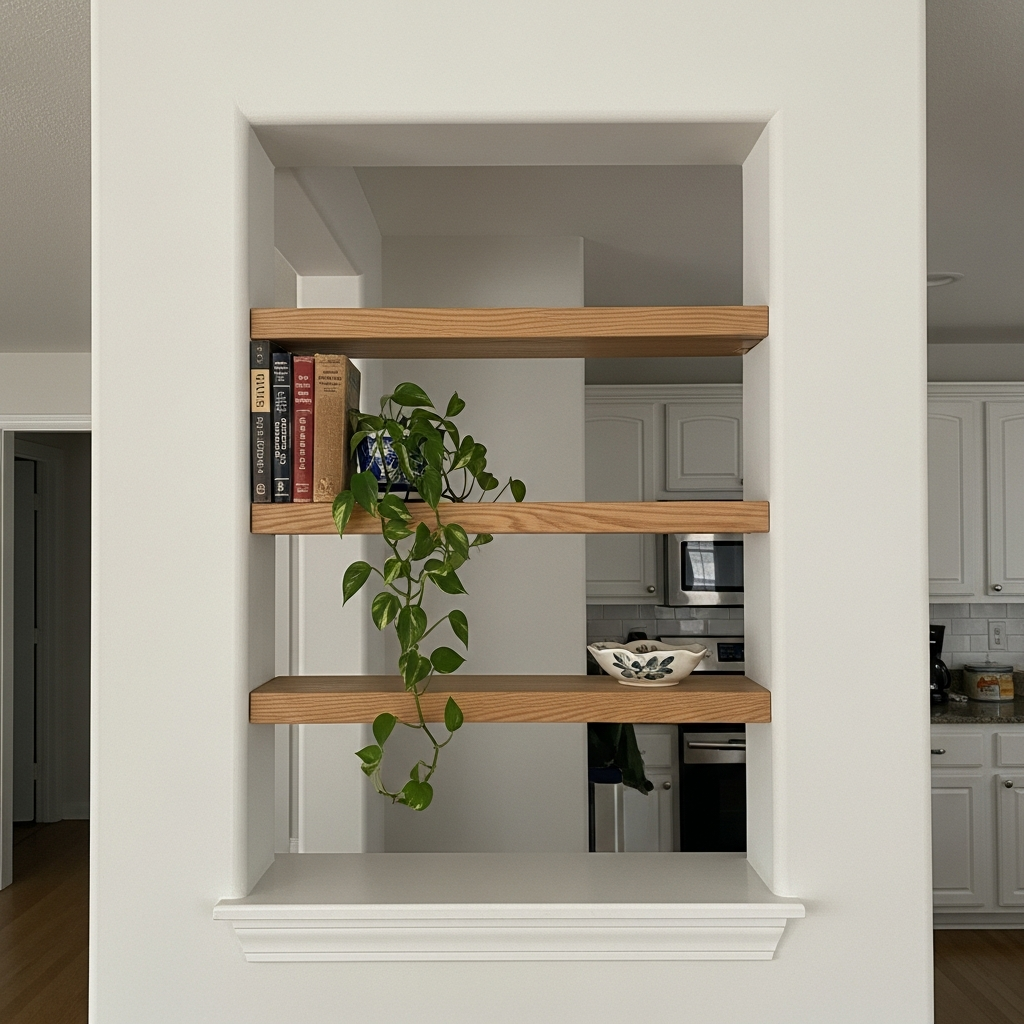
If your half wall is thick enough (6 inches or more), carve out a shallow niche on the living room side. Add two or three simple shelves to hold books, small plants, or decorative items.
- Paint the inside of the niche a dark color to make items pop.
- Keep the shelves shallow so they don’t block the walkway.
- Use this spot to store remote controls and magazines.
Pro Tip: Measure your thickest book before cutting the opening so you know it will fit easily.
4. Contrast Color Paint
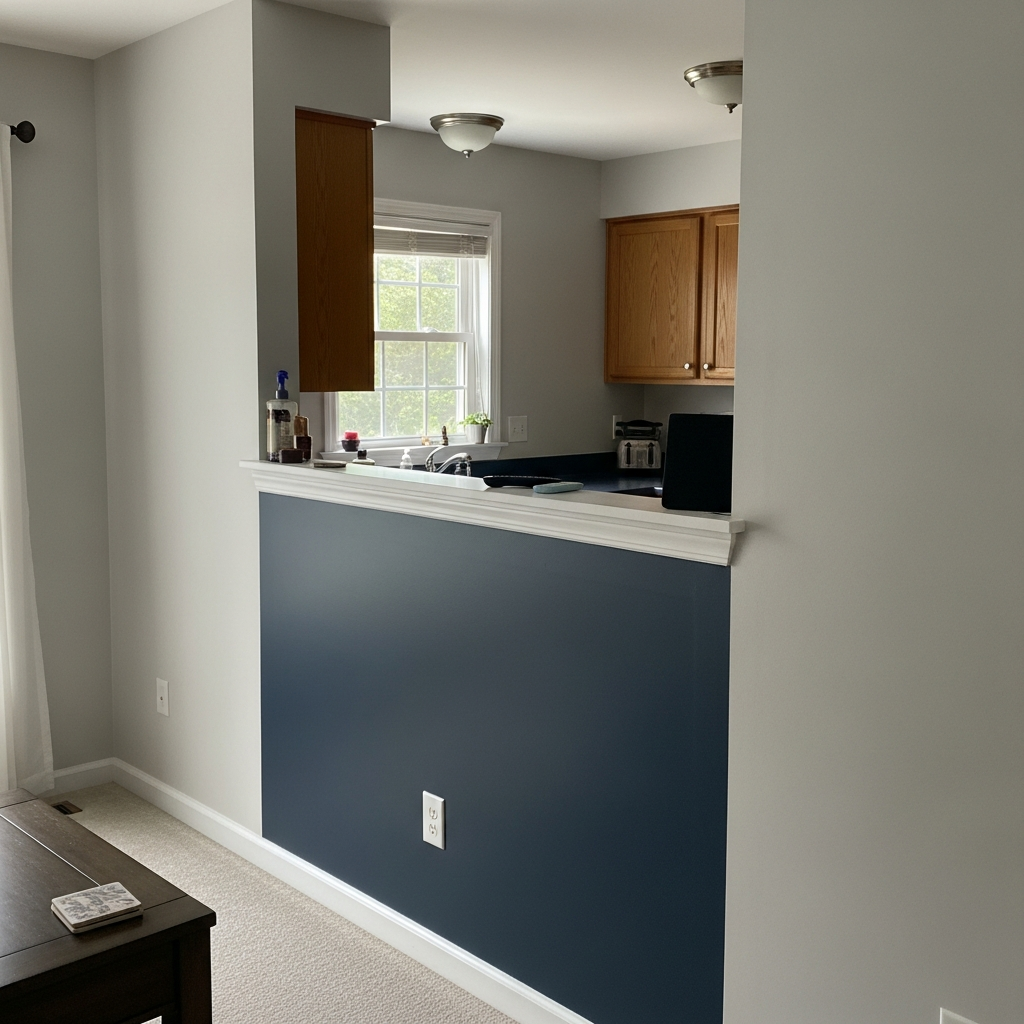
Paint the half wall a deep, dramatic color that contrasts with both the kitchen and living room walls. This makes it a focal point instead of just a divider. Navy blue or deep charcoal works well.
- Choose a high-gloss finish for easy cleaning.
- Use painter’s tape for crisp, clean lines.
- Coordinate the paint color with throw pillows or art nearby.
Pro Tip: If the wall connects to a doorway, paint the door frame the same color to create a unified architectural element.
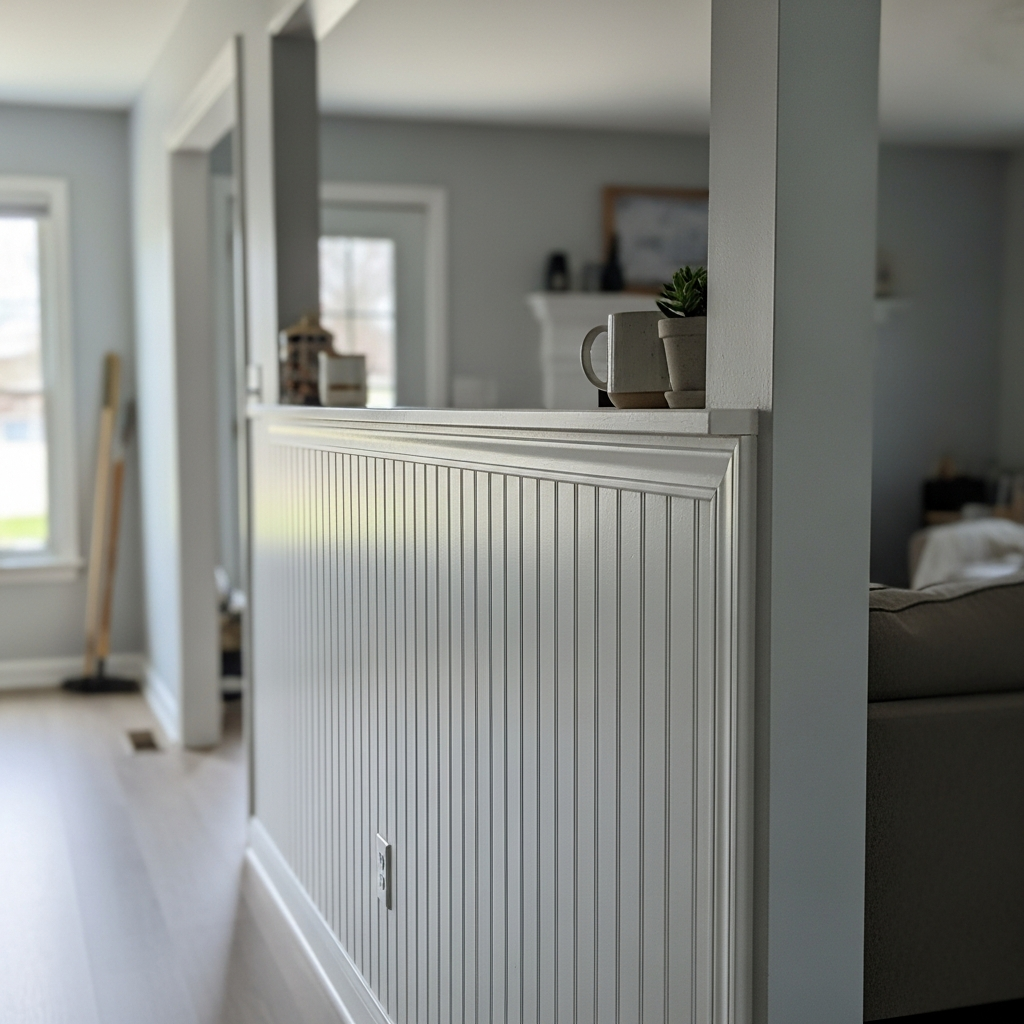
5. Add Board and Batten
Install simple vertical slats (battens) and horizontal trim (boards) on the lower two-thirds of the wall. This traditional look adds depth and structure. It’s a very beginner-friendly DIY project.
- Keep the battens spaced evenly.
- Paint the whole area white for a classic look.
- Use thin trim pieces to keep costs low.
Pro Tip: Apply wood glue before nailing the battens. This helps prevent them from warping over time.
6. Hidden Wall Charging Stations
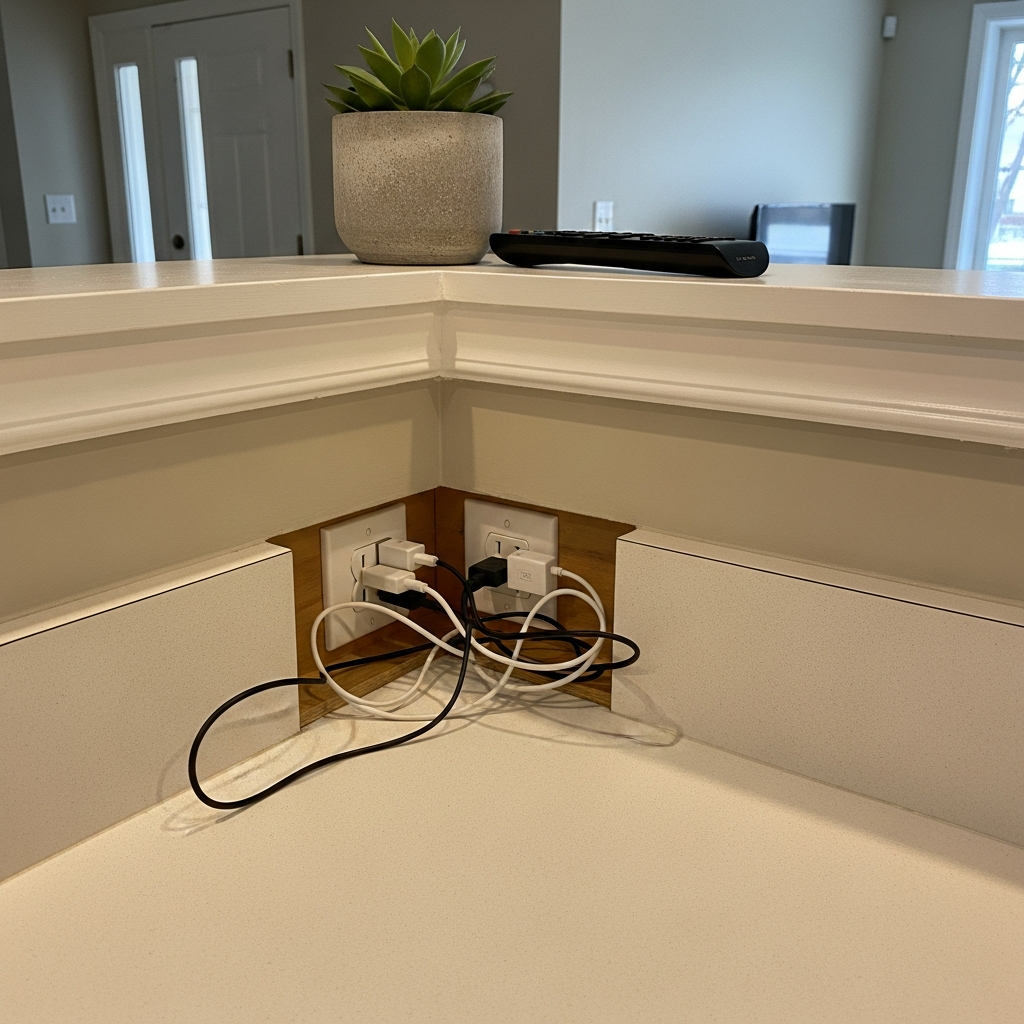
That half wall between the kitchen and living room is a magnet for charging cords. Instead of letting plugs hang out, hide them! Ask your electrician to install outlets inside a small cut-out area on the side of the wall. It keeps the counter clean and hides the mess.
- Identify the side of the half wall that is least visible (usually facing the living room floor).
- Have a small, shallow cubbyhole cut into the wall structure.
- Install the outlet *inside* the cubby, not flush on the wall.
- Use this secret spot to charge phones, tablets, or hide the plug for your kitchen blender when it’s not in use.
Pro Tip: If cutting into the wall is too much work, buy a decorative wooden box. Run a power strip inside the box and place it on top of the half wall. It looks like decoration but it’s actually a secret charging hub.
7. Faux Stone Veneer
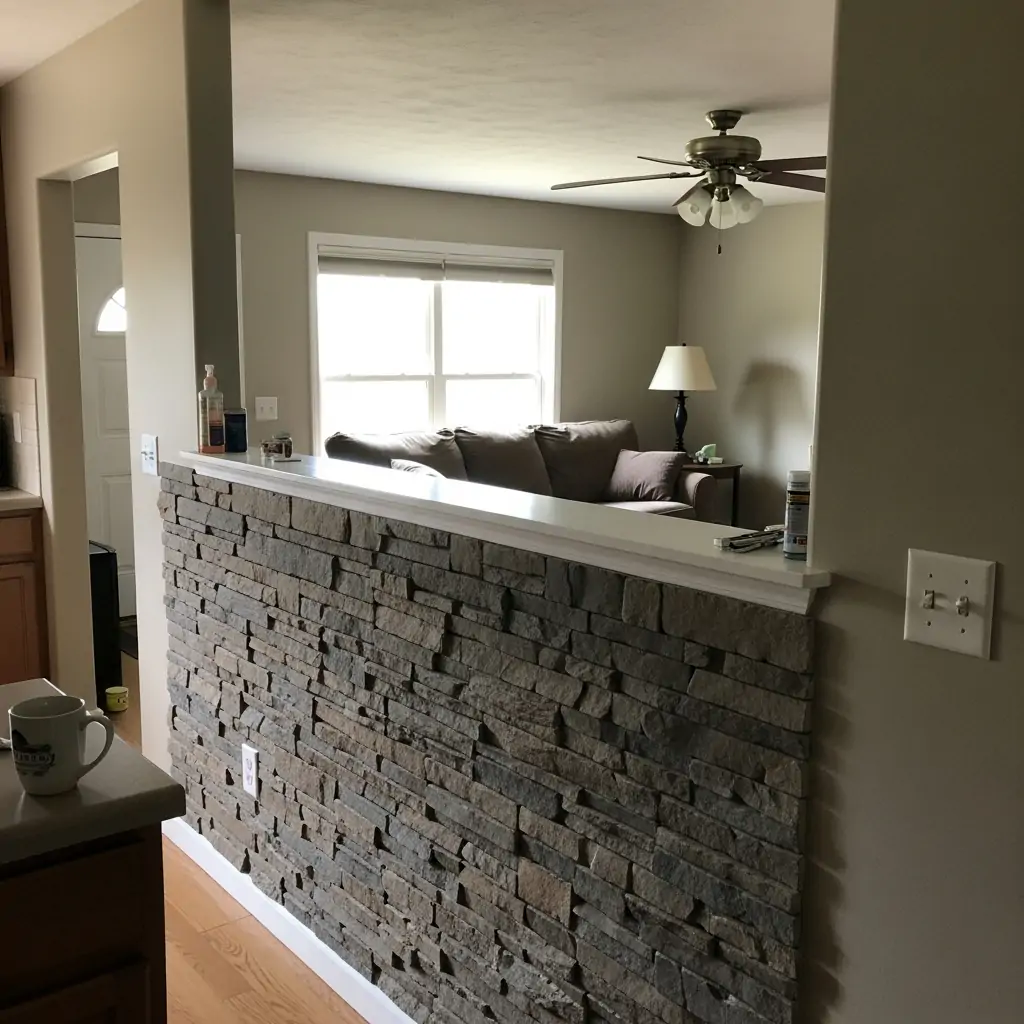
Use lightweight, peel-and-stick faux stone or brick veneer panels to cover the wall. This gives a rustic or industrial texture without the mess or weight of real stone. It looks great in natural light.
- Choose a light color stone to keep the area bright.
- Only cover the sides, leaving the top cap clean.
- Use a strong adhesive sealant on the edges.
Pro Tip: Dry fit all your panels first before peeling the backing to ensure the pattern flows correctly.
8. Create a Charging Station
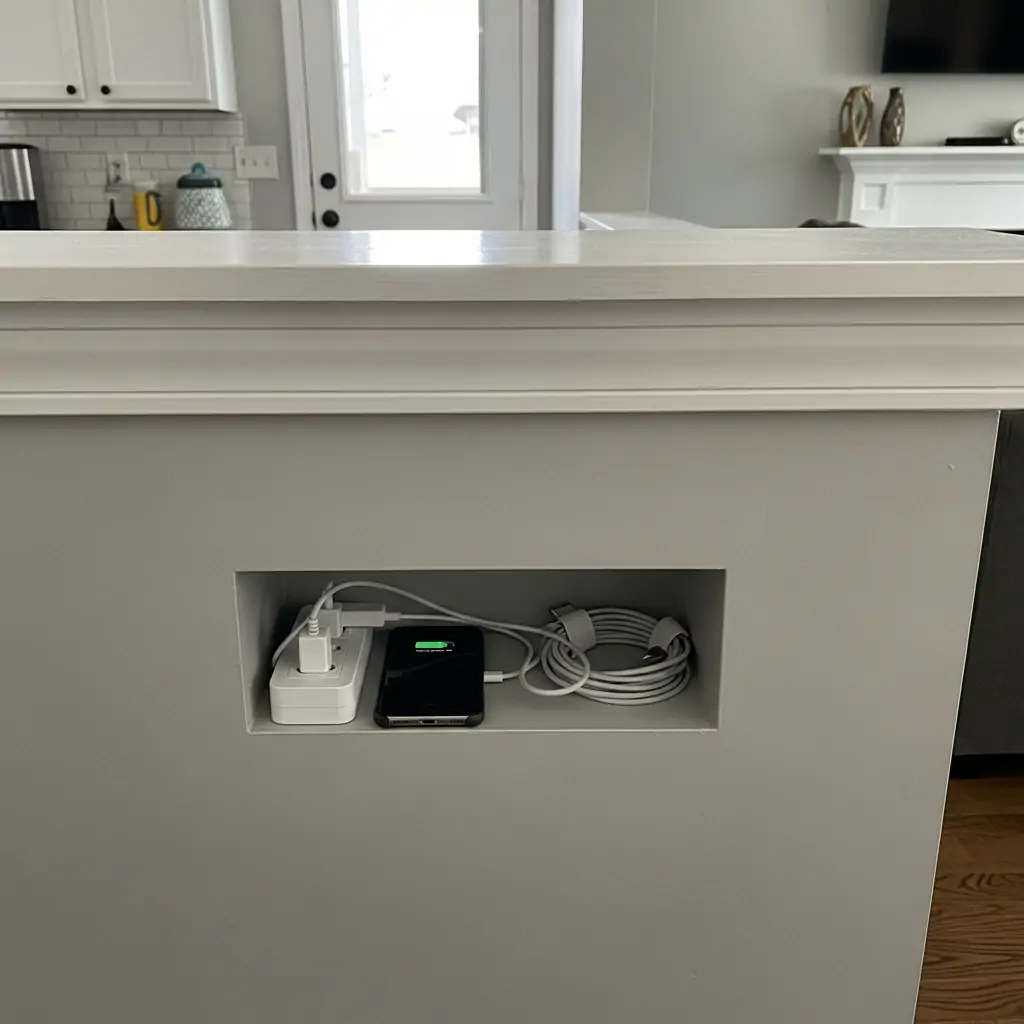
Cut a small, shallow pocket or cubby into the wall near the top cap. Install a small power strip inside this pocket. This keeps phones, tablets, and their ugly charging cords out of sight.
- Include a small hole in the cap for cords to drop down.
- Line the cubby with felt to protect screens.
- Use a timer outlet to shut off charging overnight.
Pro Tip: Make sure the pocket is just deep enough to hold a standard phone lying flat, usually about 3 inches.
9. Add Baseboard Heat
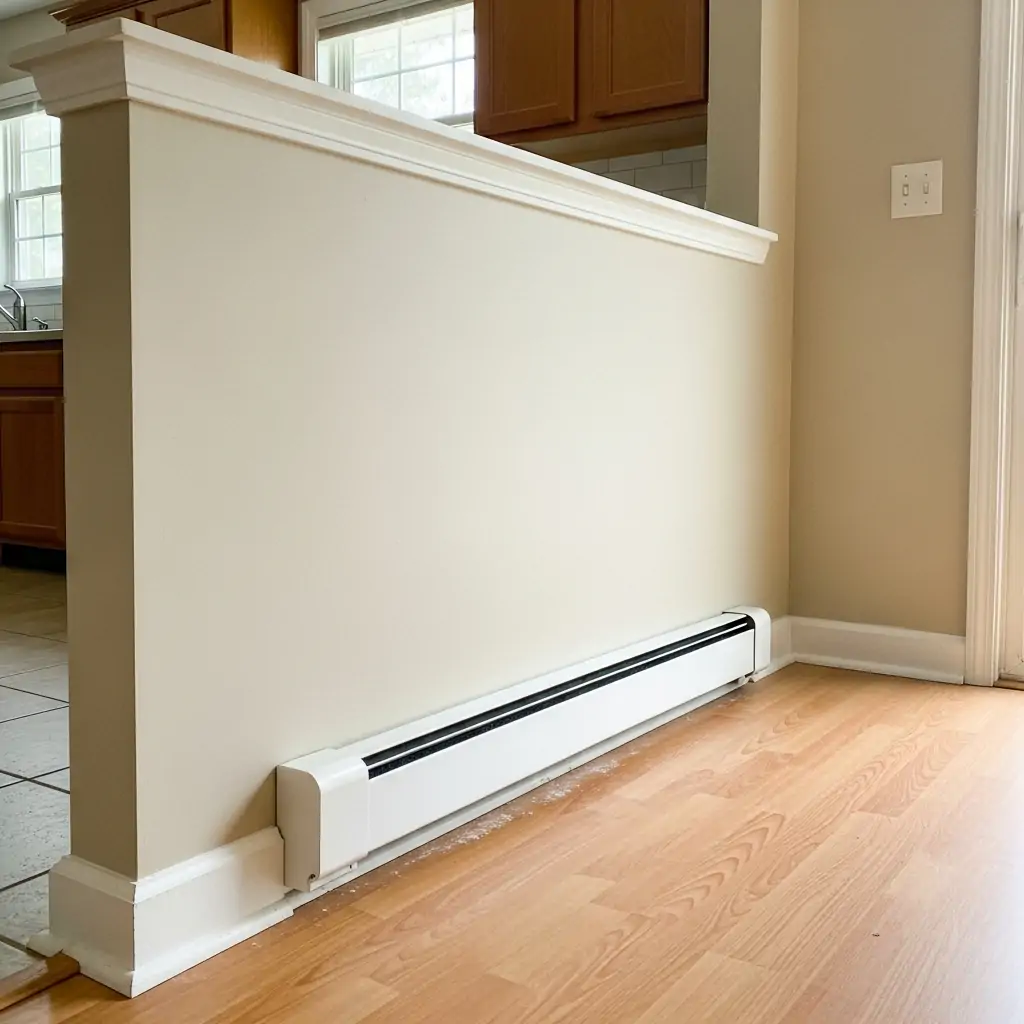
If your home needs extra heat, the half wall is a great spot for a low-profile baseboard heater. It keeps the floor space open and warms the rooms efficiently. Use electric units for easy install.
- Choose a narrow, modern heater design.
- Ensure the unit is safely away from curtains.
- Install a separate thermostat for this zone.
Pro Tip: Always hire a licensed electrician to connect new heating units to your home’s main power supply.
10. Mirror Panel Inserts
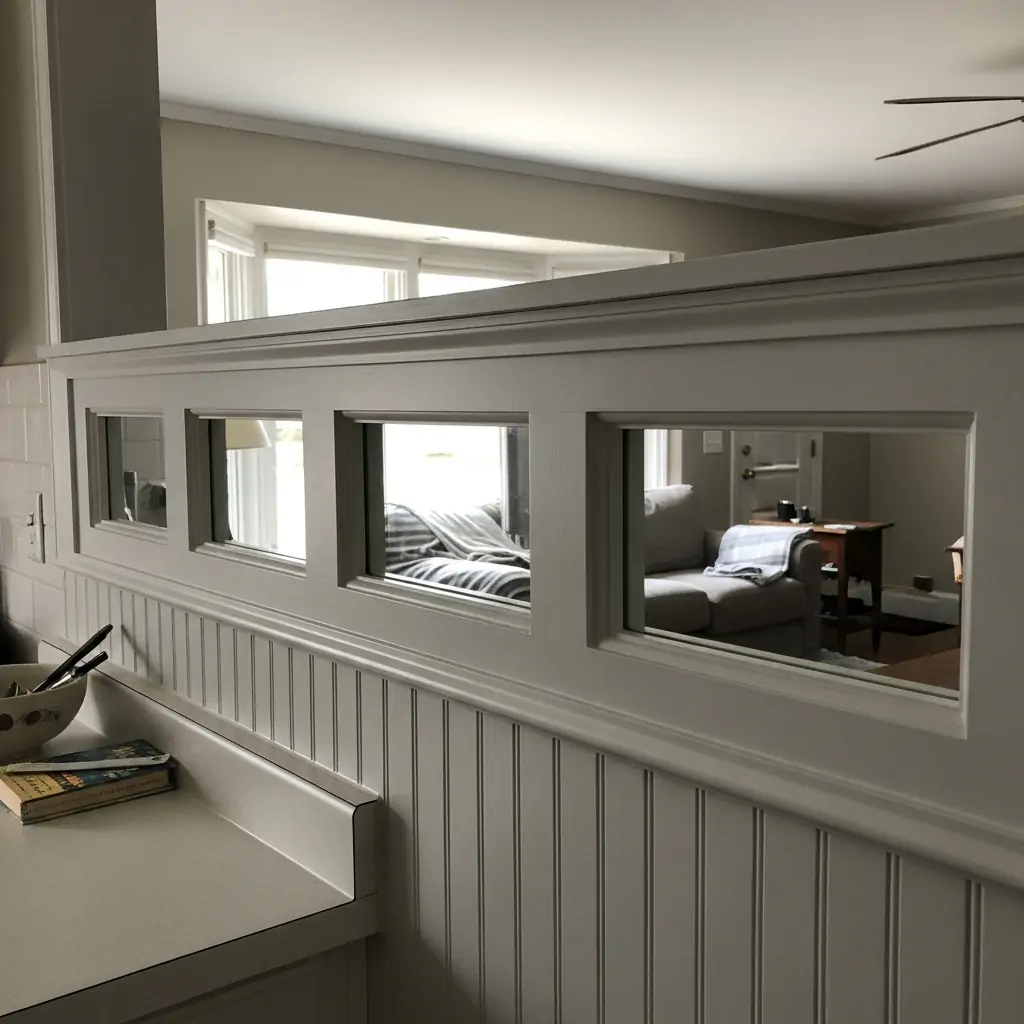
If the wall is split into panels (like wainscoting), insert thin, custom-cut mirror pieces into the center of each panel. This reflects light, makes the kitchen and living room look larger, and adds sparkle.
- Use safety mirror film if you have pets or kids.
- Clean the mirrors with glass cleaner and a microfiber cloth.
- Be careful where the mirrors face to avoid unwanted glare.
Pro Tip: Buy mirror tiles and cut them yourself using a scoring tool, which is much cheaper than custom glass.
11. Recessed Lighting Strip
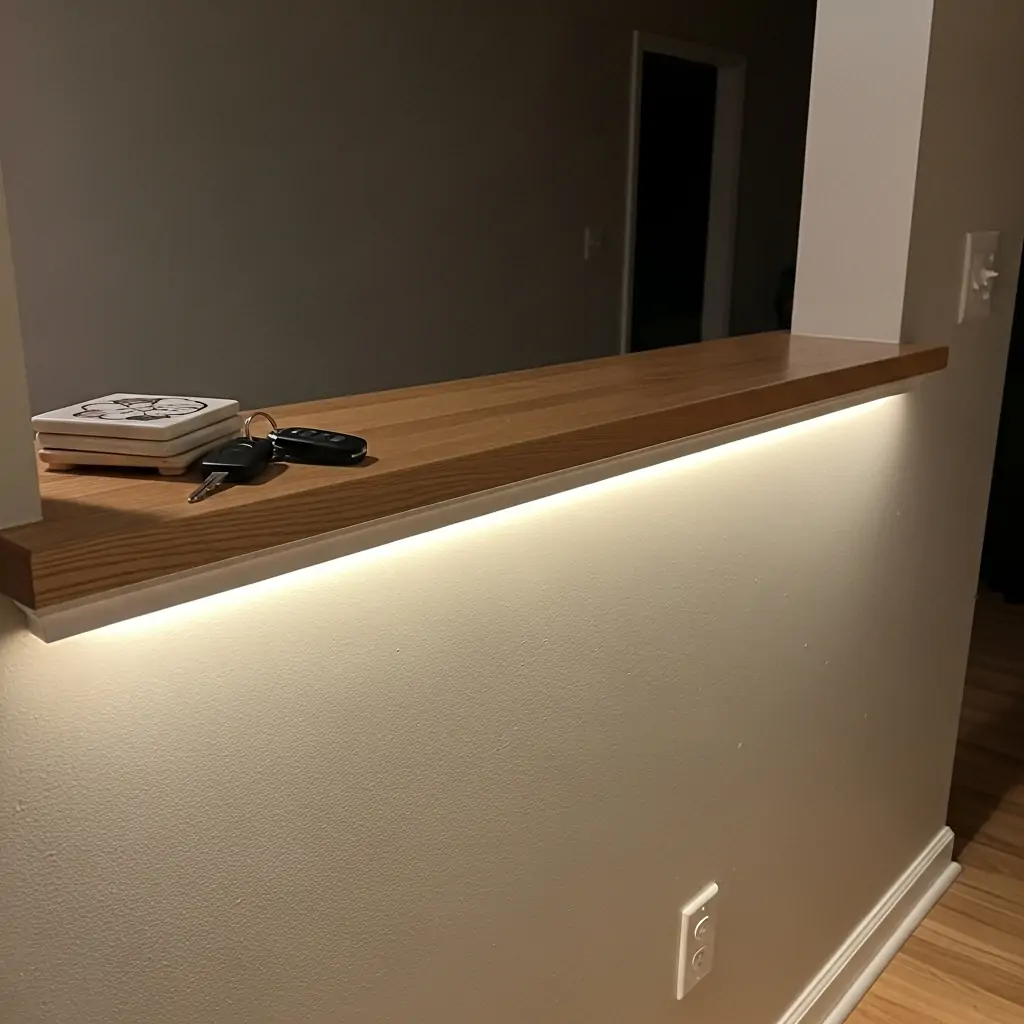
Install a thin strip of LED lighting directly underneath the top counter cap. This provides soft, low-level accent lighting that looks fancy at night. It’s great for safely walking through the area.
- Use warm white lights (2700K) for a cozy feel.
- Choose a strip that is dimmable.
- Hide the power cord inside the wall if possible.
Pro Tip: If you don’t want to wire it, battery-operated LED strips with motion sensors are a great cheap option.
12. Chalkboard Paint Side
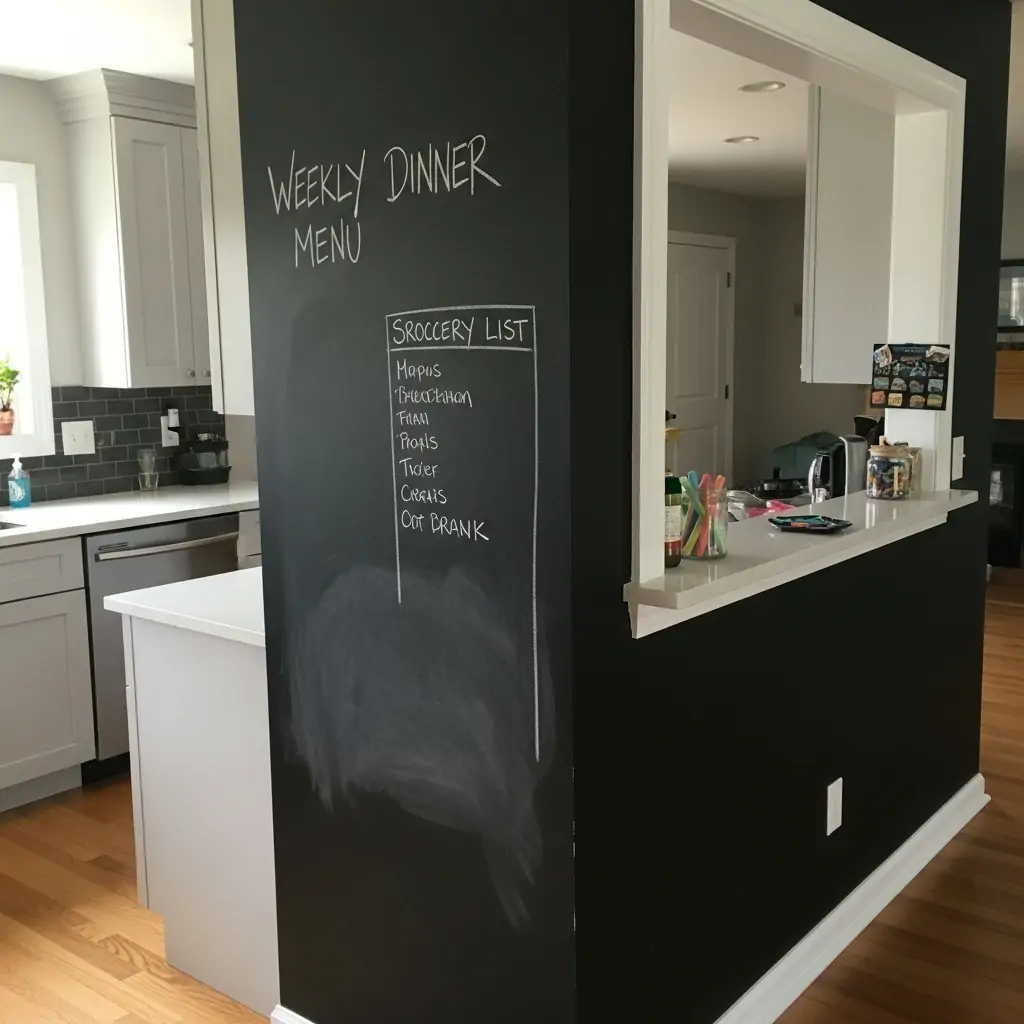
Paint the kitchen-facing side of the half wall with chalkboard paint. This is perfect for grocery lists, weekly menus, or drawing messages. It’s fun and incredibly functional for busy families.
- Use liquid chalk pens for less dust.
- Frame the chalkboard area with thin trim.
- Keep a small basket of chalk nearby.
Pro Tip: Before writing, rub the entire dried chalkboard surface with the side of a piece of chalk, then erase it. This ‘seasons’ the board and prevents ghosting.
13. Wine Rack Cubbies
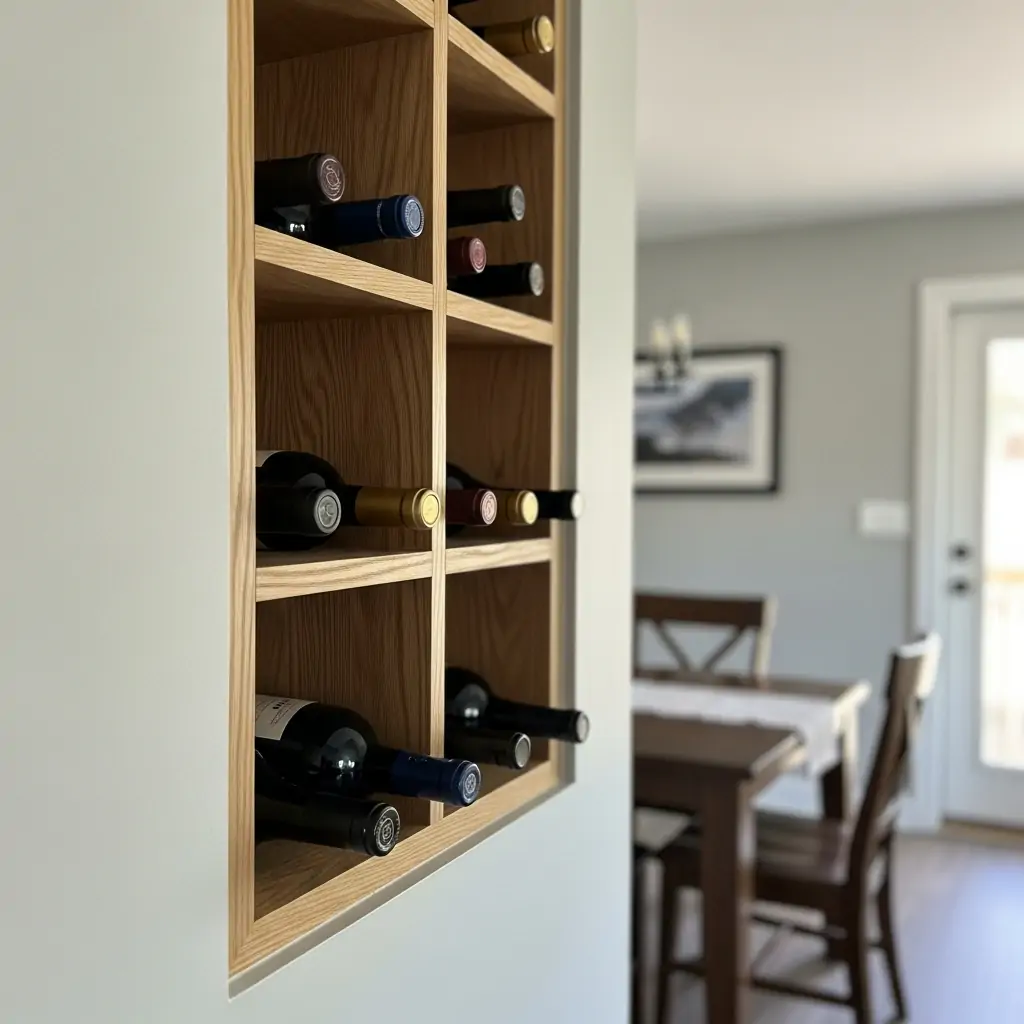
If the wall is deep enough, use the space to build small square cubbies perfect for storing wine bottles horizontally. Face the cubbies toward the kitchen or dining area for easy access.
- Measure bottles carefully before building.
- Line the cubbies with felt to prevent scraping.
- Keep the wine away from direct sunlight.
Pro Tip: You can buy ready-made wine rack inserts that slide right into a standard wall opening, making the DIY much easier.
14. Fluted Wood Texture
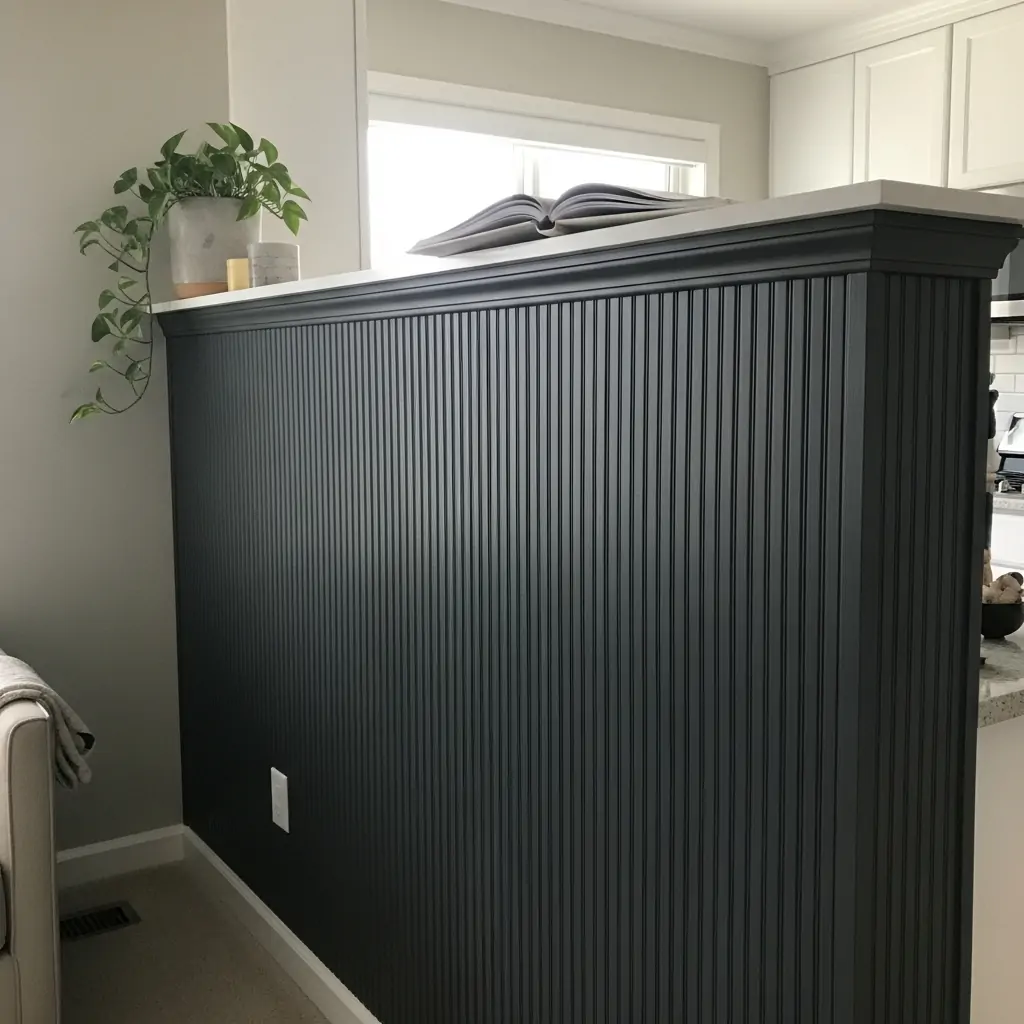
Cover the wall with thin, vertical fluted wood panels (often called dowel rods or pole wrap). This gives a very high-end, modern architectural look with deep texture. Paint it a solid color for extra impact.
- Use construction adhesive for installation.
- Cut the sheets with a sharp utility knife.
- It hides slightly uneven drywall well.
Pro Tip: Finish the edges with a thin piece of flat trim so the cuts aren’t visible where the wood ends.
15. Dog Feeding Station
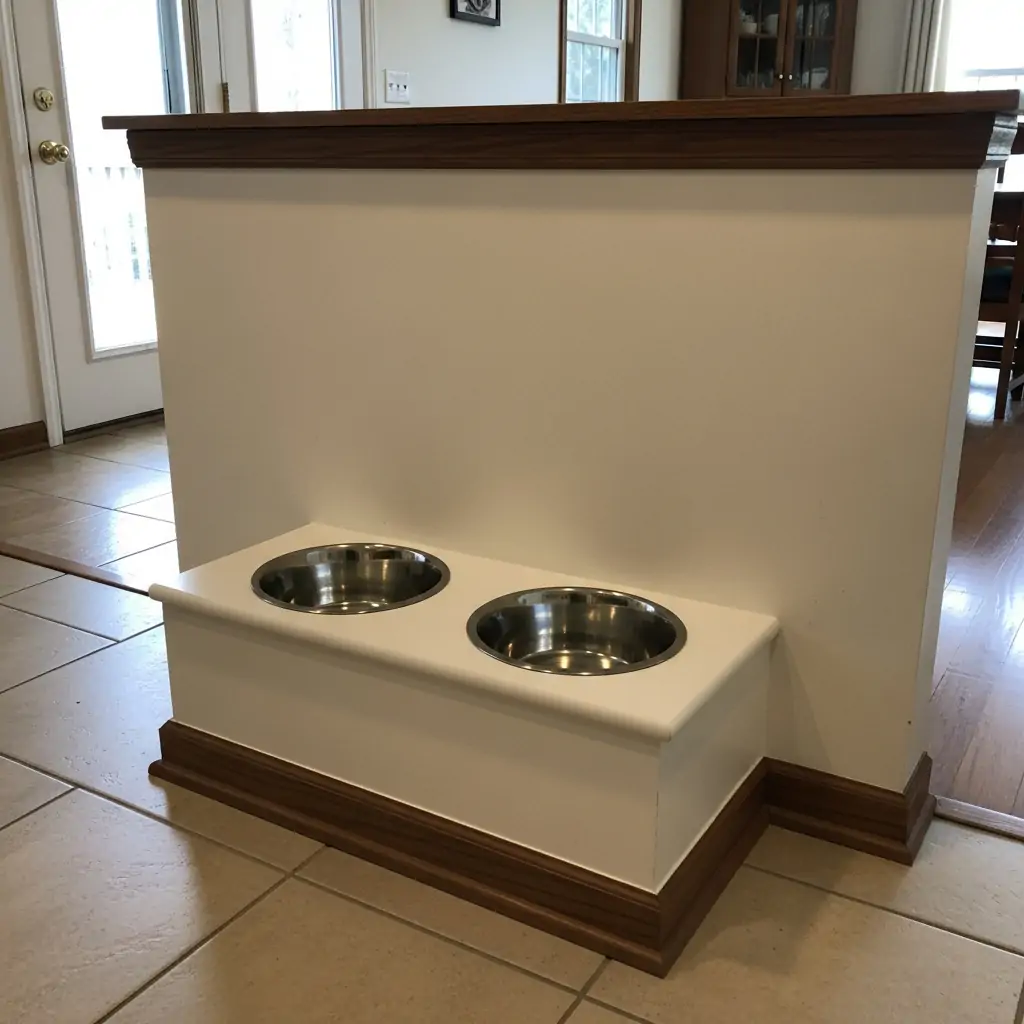
Cut two circular holes near the floor level on the kitchen side of the wall. Insert standard dog bowls so they sit flush with the wall. This keeps the bowls off the floor and out of the walking path.
- Use stainless steel bowls for hygiene.
- Ensure the height is comfortable for your pet.
- Seal the wood around the bowls against water spills.
Pro Tip: Use a jigsaw to cut the bowl openings, and sand the edges smooth before painting.
16. Floating Picture Ledge
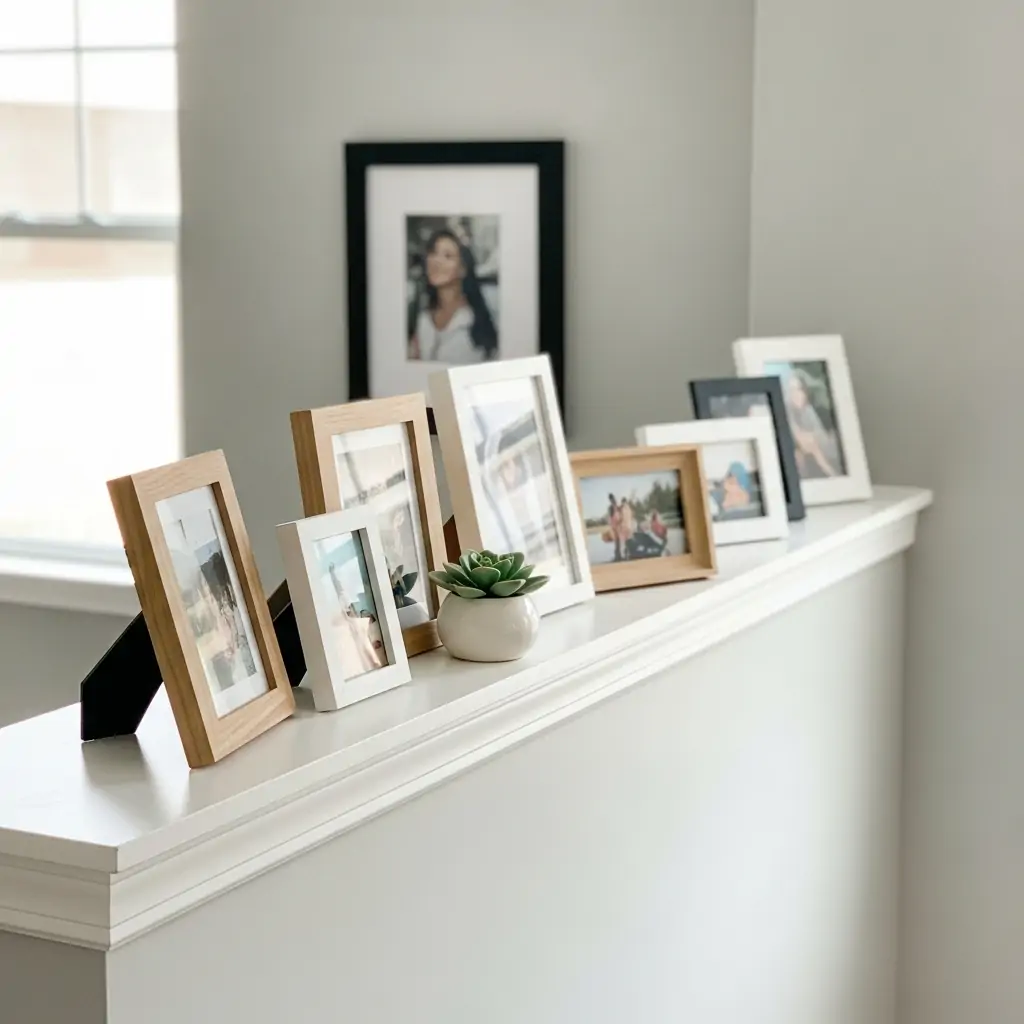
Screw a narrow picture ledge shelf (about 3 inches deep) onto the living room side, slightly below the top cap. This allows you to display small framed photos or art that can be easily swapped out.
- Choose lightweight frames for safety.
- Layer small pictures for visual interest.
- Use command strips to hold frames in place if you are worried about bumps.
Pro Tip: The best height for a picture ledge is eye-level when you are standing in the living room.
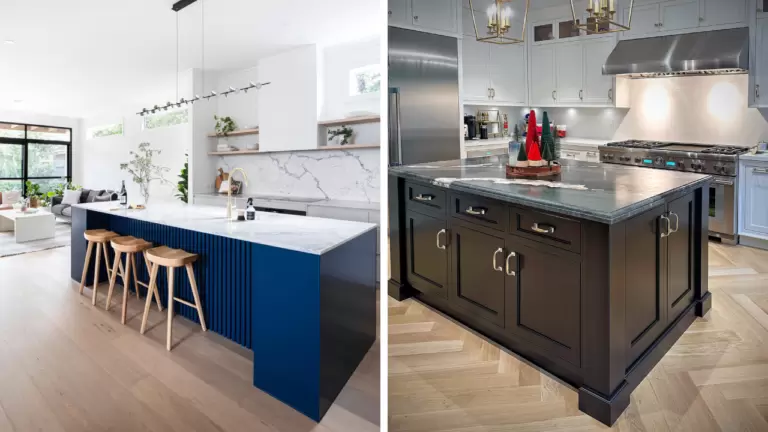
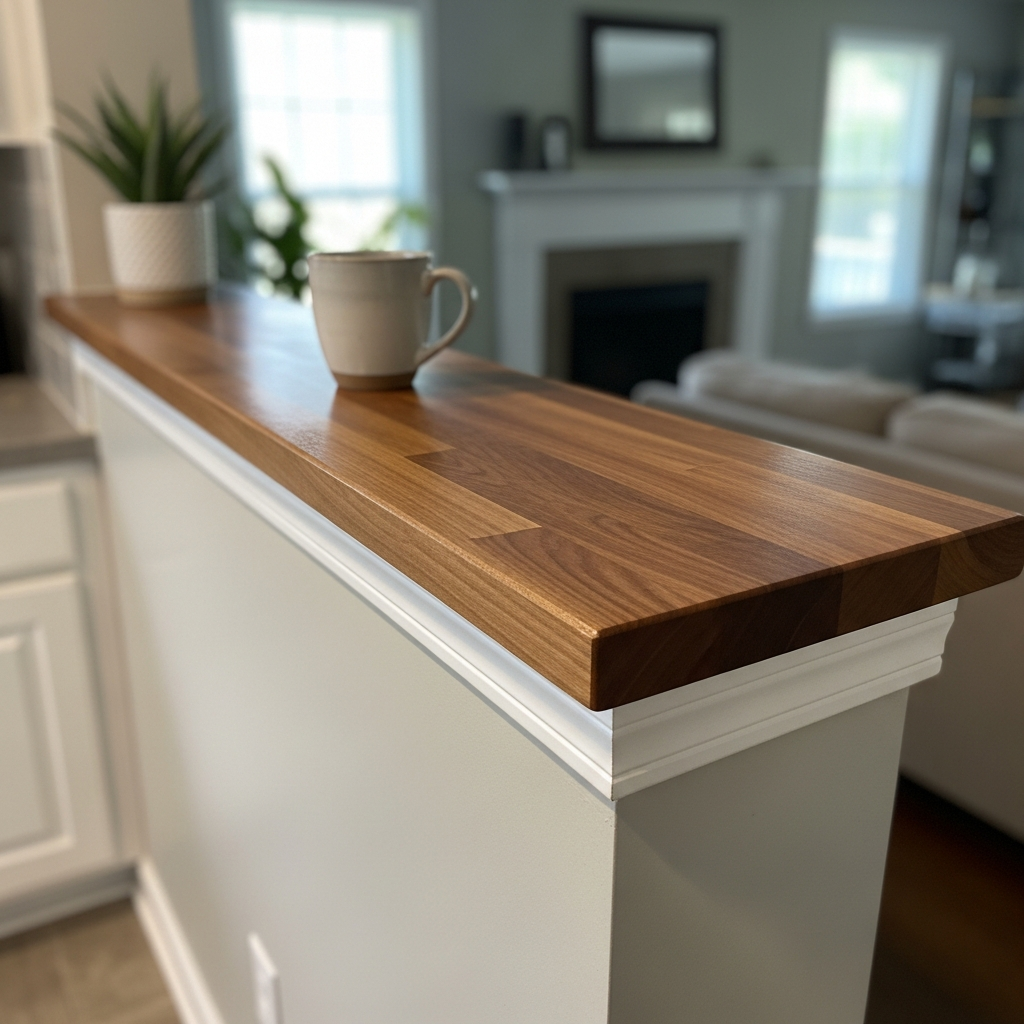
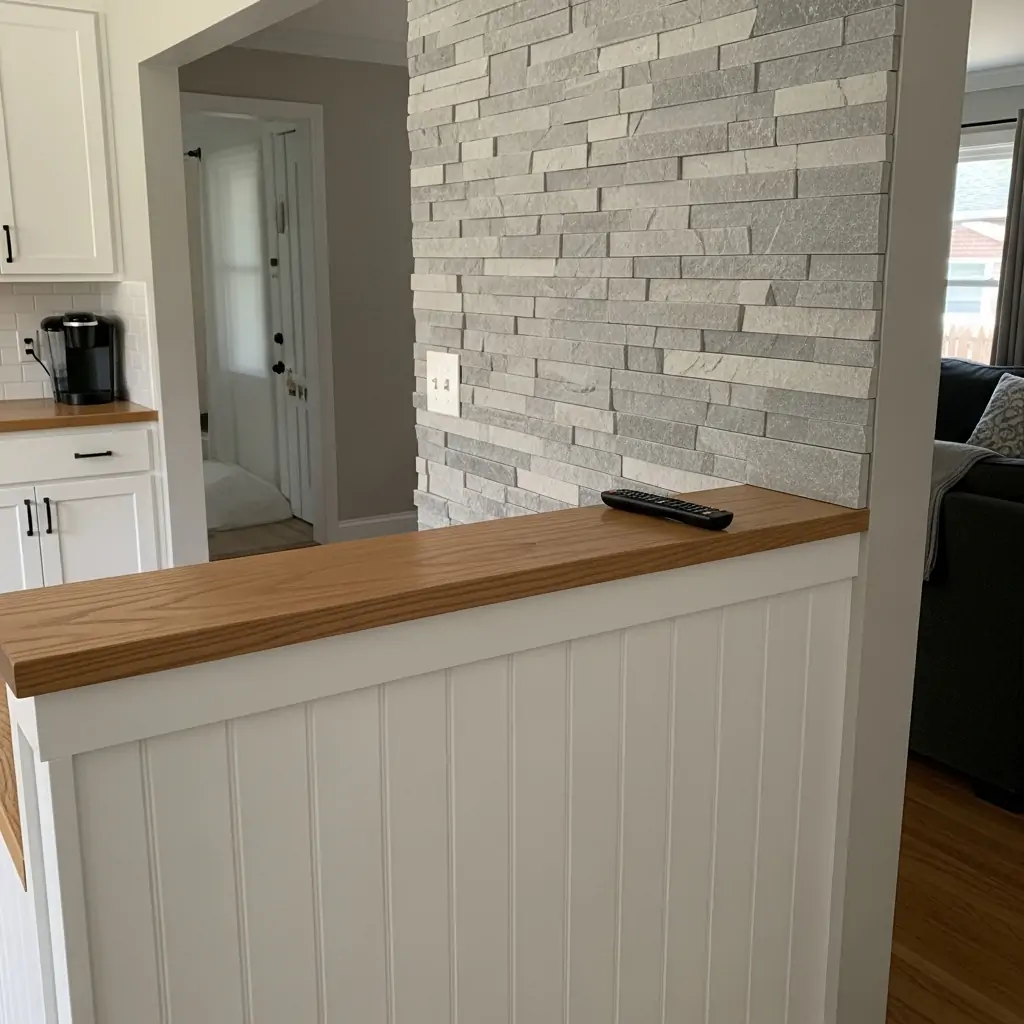
17. Extend the Countertop
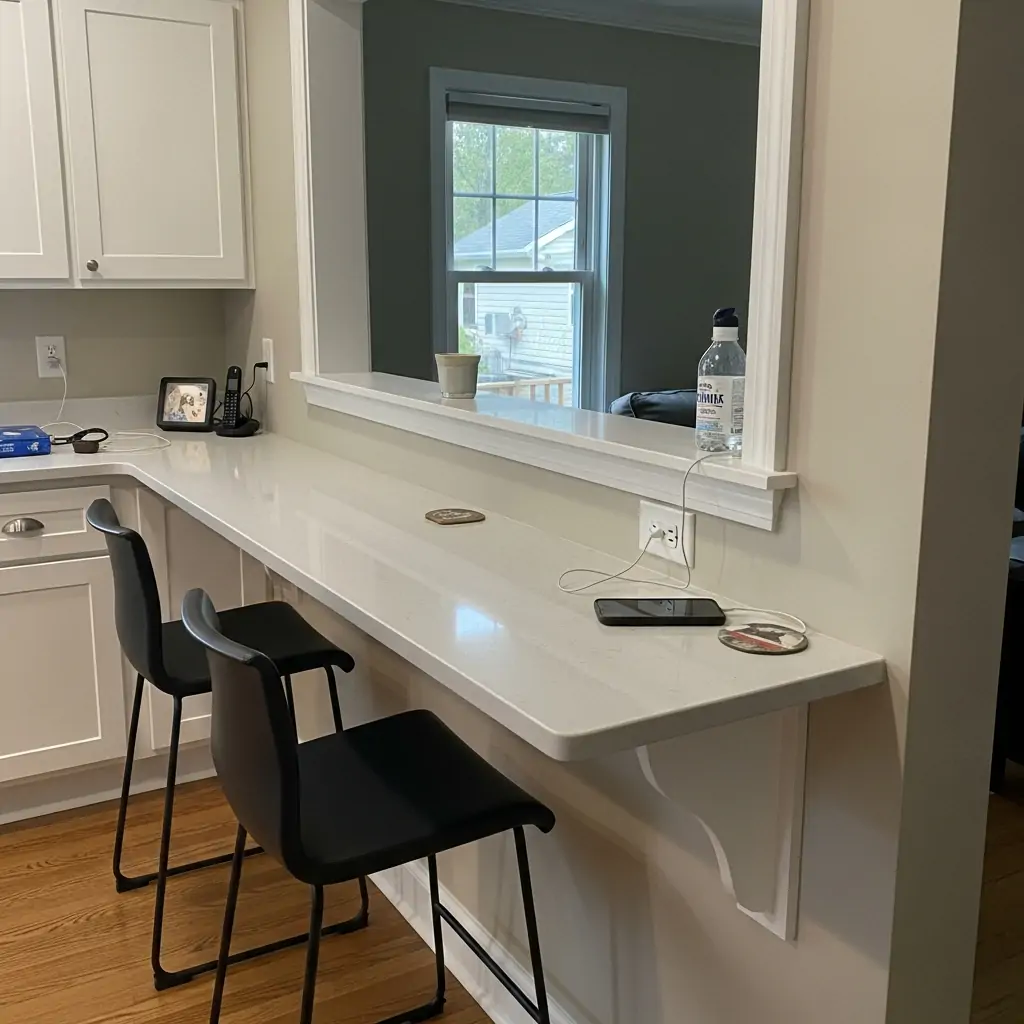
Install a counter cap that overhangs the wall significantly (6 to 10 inches) on the living room side. This creates a functional bar or serving ledge. You can tuck barstools underneath.
- Use heavy-duty brackets to support the overhang.
- Ensure the overhang is comfortable for seating.
- This is great for quick snacks or breakfast.
Pro Tip: If you use stone or quartz, make sure the overhang is supported every 2 feet to prevent cracking.
18. Temporary Wallpaper
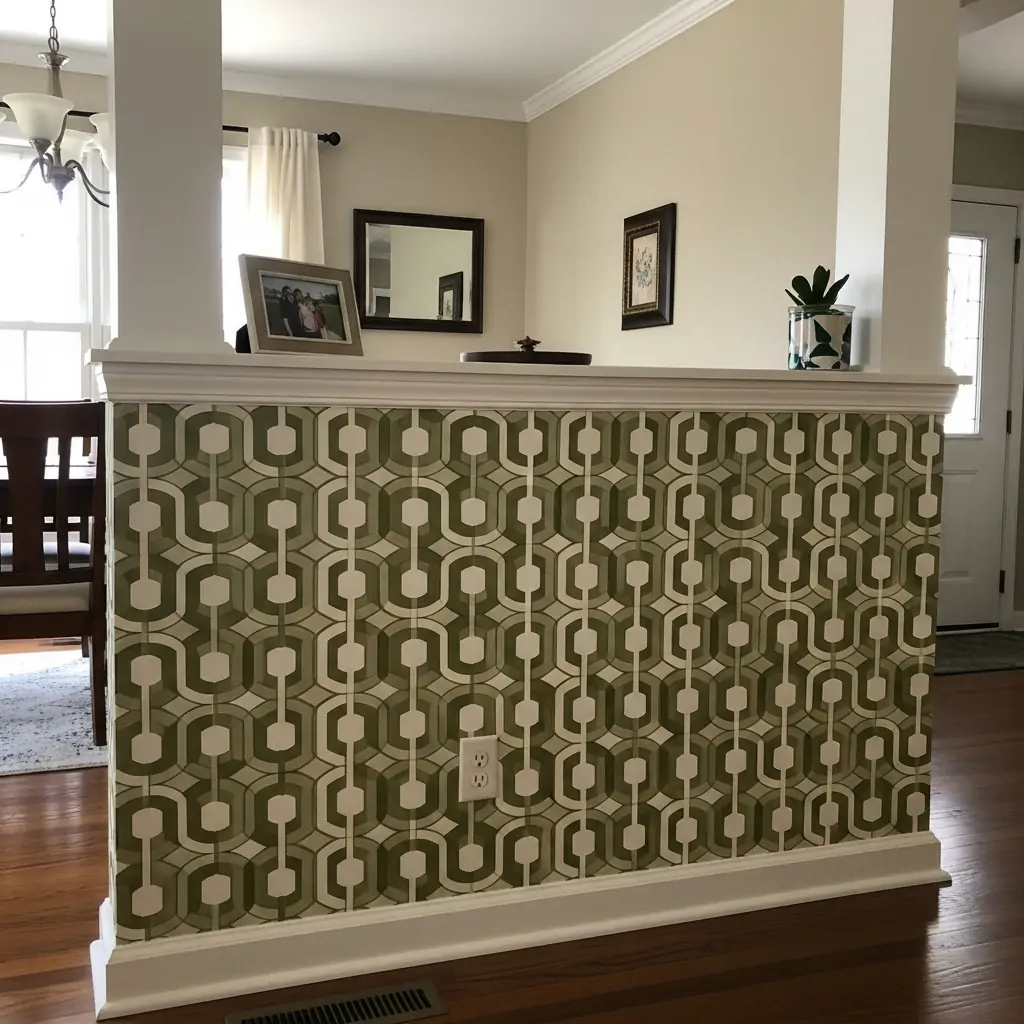
Apply peel-and-stick wallpaper to the wall panels. This is perfect if you like to change your style often. Choose a bold geometric pattern or a fun floral design to make the wall pop.
- Measure carefully to line up the pattern.
- A squeegee helps smooth out air bubbles.
- Choose vinyl wallpaper for better durability.
Pro Tip: Buy one extra roll of wallpaper just in case you mess up a piece or need to repair a spot later.
19. Half Wall Key Drop
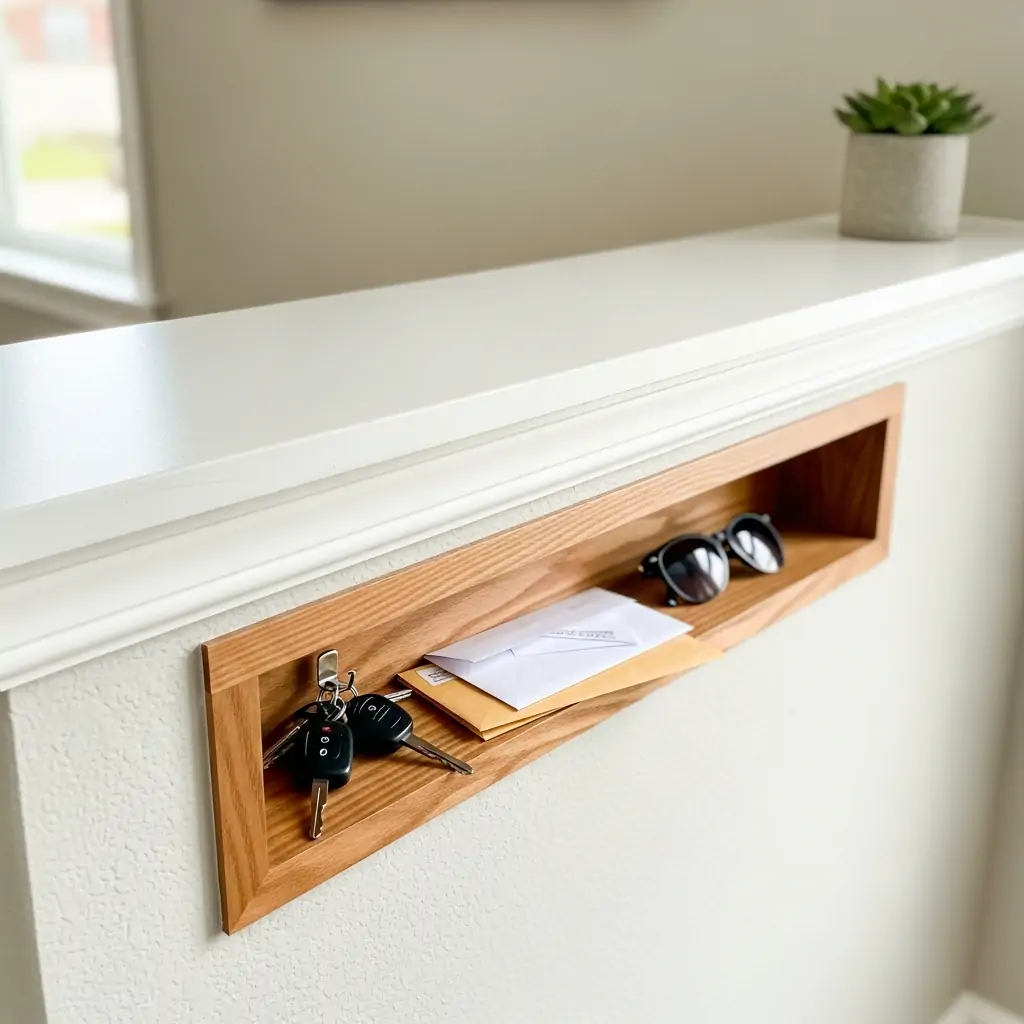
You know how the top of that little half wall always becomes the spot where keys, mail, and sunglasses pile up? Stop the clutter by cutting a dedicated drop spot *into* the wall itself. It keeps the top surface clear and gives you a hidden zone right where you need it.
- Cut a small, shallow rectangle out of the drywall on the living room side of the half wall (make sure you miss the studs!).
- Line the inside of the new ‘cubby’ with a simple piece of wood or even a cute patterned contact paper.
- Install one small magnetic strip inside the cubby for easy key hanging.
- This spot is perfect for hiding charging phones if you drill a small hole for the cord to run down the inside of the wall.
Pro Tip: Always mount this key drop on the *living room* side, not the kitchen side. That way, when you are standing in the kitchen, the wall looks perfectly clean and the clutter is slightly hidden from view.
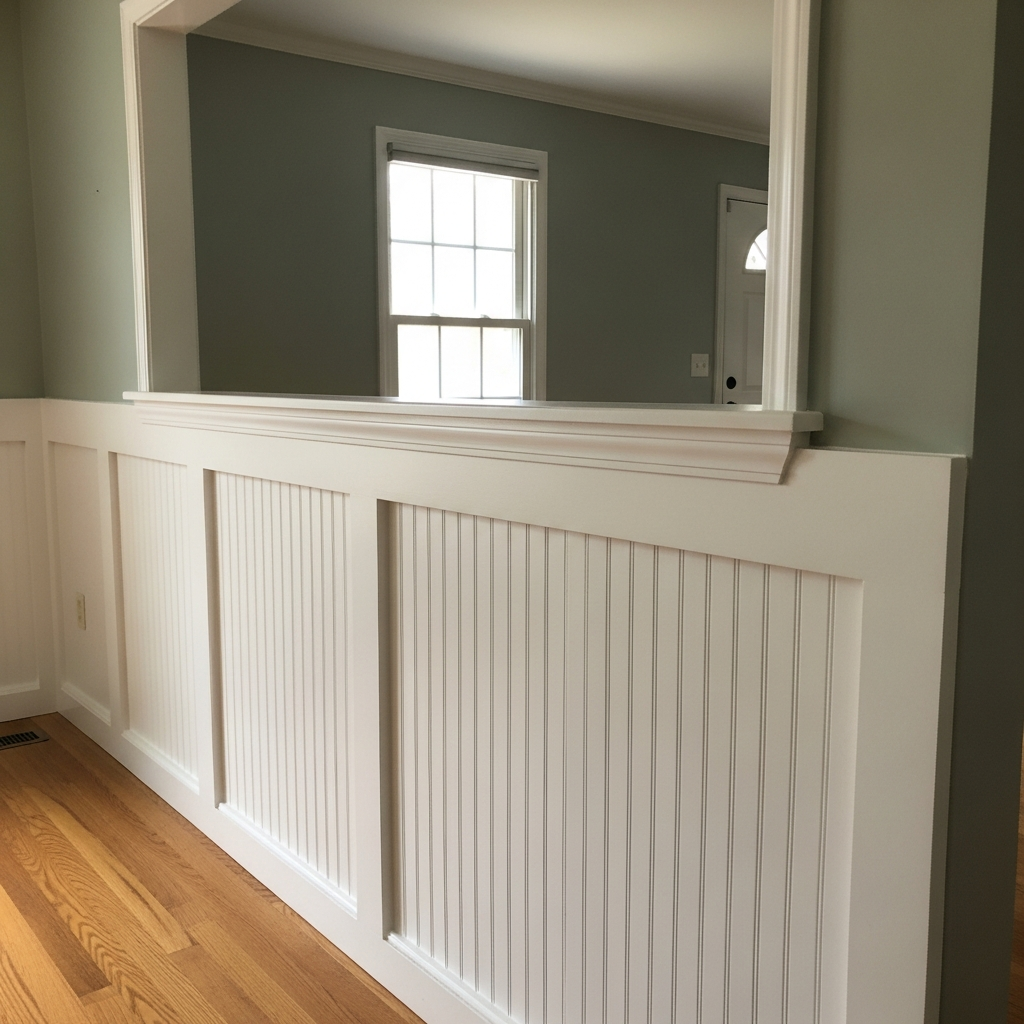
20. Wainscoting Panels
Use thin, pre-made wainscoting squares or rectangles and attach them to the wall, creating a paneled look. This adds traditional charm and visual interest below the cap.
- Space the panels evenly apart.
- Paint the panels and the wall the same color.
- Use liquid nails for quick installation.
Pro Tip: Use painter’s putty to fill all the small nail holes before painting for a truly smooth finish.
21. Add Corner Molding
Install decorative corner molding where the half wall meets the main wall. This small detail makes the wall look more finished and intentional, rather than just a plain box.
- Choose molding that matches your existing door trim.
- Miter the corners carefully (45-degree cuts).
- Paint the molding glossy white.
Pro Tip: Caulk the gap between the molding and the wall before painting—it makes the molding look like one solid piece.
22. Use a Live Edge Slab
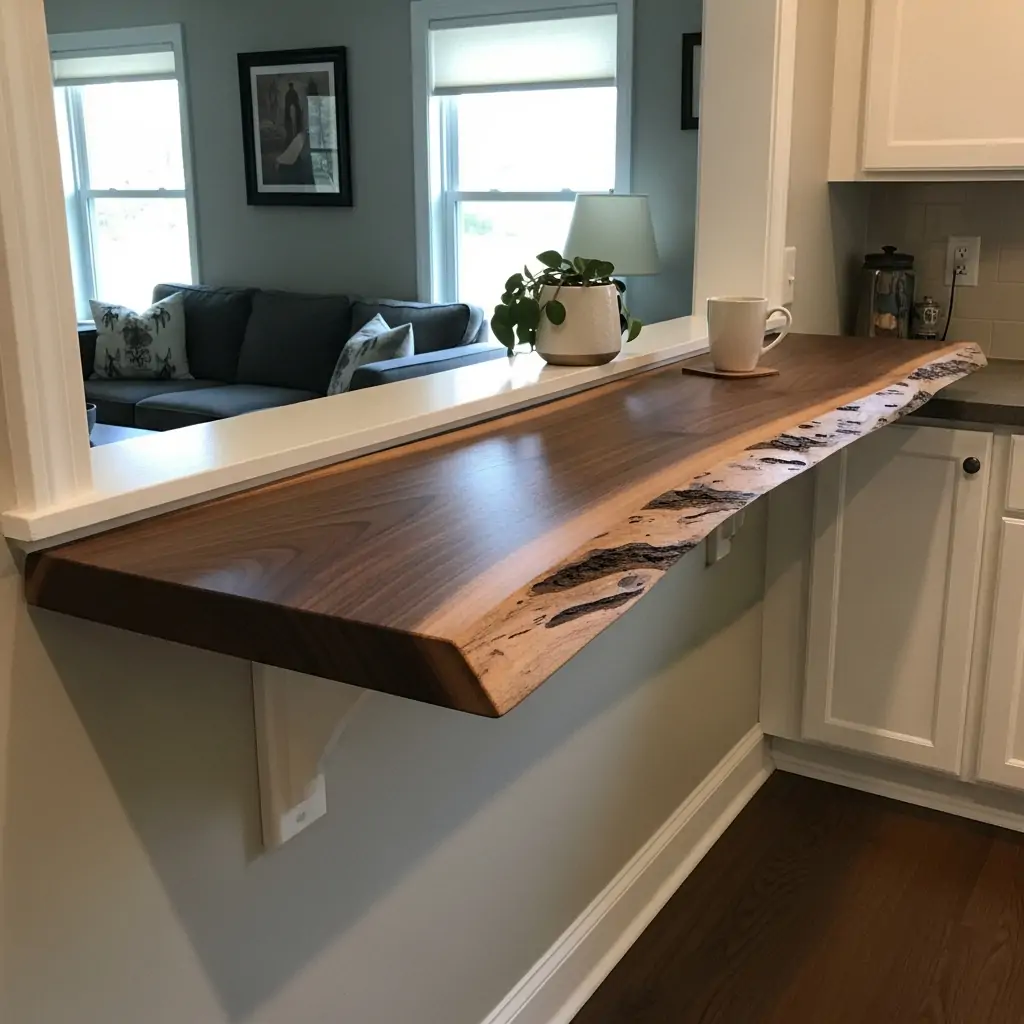
For the counter cap, use a thick piece of wood that still has its natural, curvy edge (a live edge). This brings a super trendy, organic, natural feel to the space. It’s a great conversation starter.
- Choose a slab that is already sealed.
- Pair it with simple black metal brackets.
- Let the natural imperfections show.
Pro Tip: Measure the width of the slab carefully, as the live edge will vary along the length.
23. Magnetic Spice Wall Storage
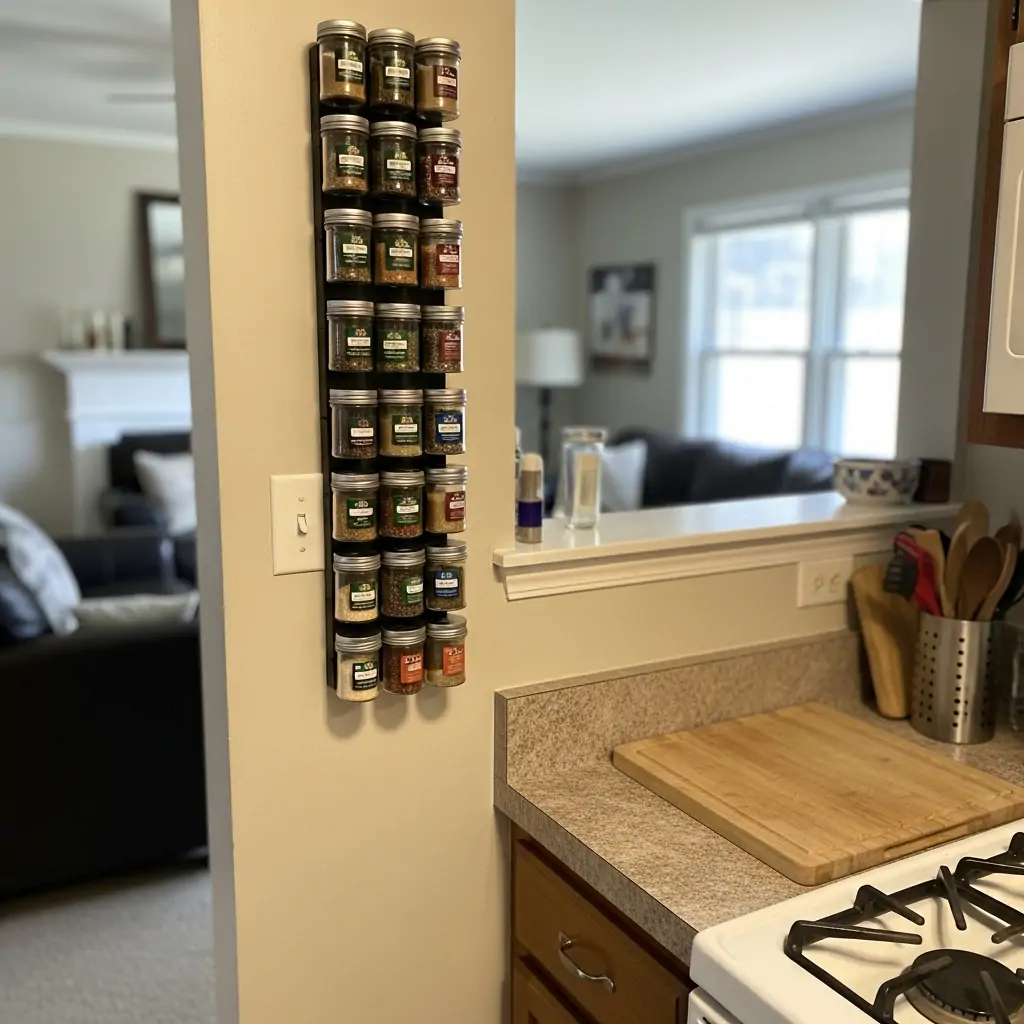
That half wall between your kitchen and living room is basically wasted space unless you use it vertically! If you are short on cabinet room, use the side of the half wall that faces the kitchen or the stove area. It keeps all your spices super close while cooking, but they are totally hidden from the living room view. It’s a genius trick for small kitchens.
- Buy thin metal strips or magnetic paint specifically made for organizing.
- Use small magnetic spice jars or tiny narrow shelves that hold standard jars.
- Make sure the rack is installed lower than the top ledge of the half wall so it doesn’t stick out into the walking path.
- Organize by color or frequency of use—whatever makes you happy!
Pro Tip: If you use those clear glass jars, remember the sun fading your spices. Keep the most used ones closer to the counter, or stick to metal tins to keep things fresh.
24. Shiplap and Stone Finish
If your half wall is just plain drywall, it’s a wasted opportunity! Changing the surface texture is the fastest way to make the wall look custom and expensive without tearing anything down. Pick a texture that matches the vibe of the room it faces.
- Install thin shiplap planks. This is a classic texture that instantly makes the room feel cozy and wider. Paint it a bright white for a modern farmhouse look.
- Try faux brick or stone veneer panels. These are super thin and lightweight materials you glue right onto the wall. This gives a grounding, dramatic texture to the living room side.
- Use peel-and-stick textured wallpaper. If you are renting or really hate commitment, find a wallpaper that mimics grasscloth, rattan, or wood grain. It peels right off later.
- Only texture the bottom half. If you are doing a bold texture, keep the top half painted the same as the surrounding walls so it doesn’t feel overwhelming.
Pro Tip: Don’t forget the cap! If you add texture like shiplap, the wall gets thicker. You might need to replace the flat board on top of the half wall (the cap) with a slightly wider one so it covers your new texture perfectly.
25. Single Sconce Lighting
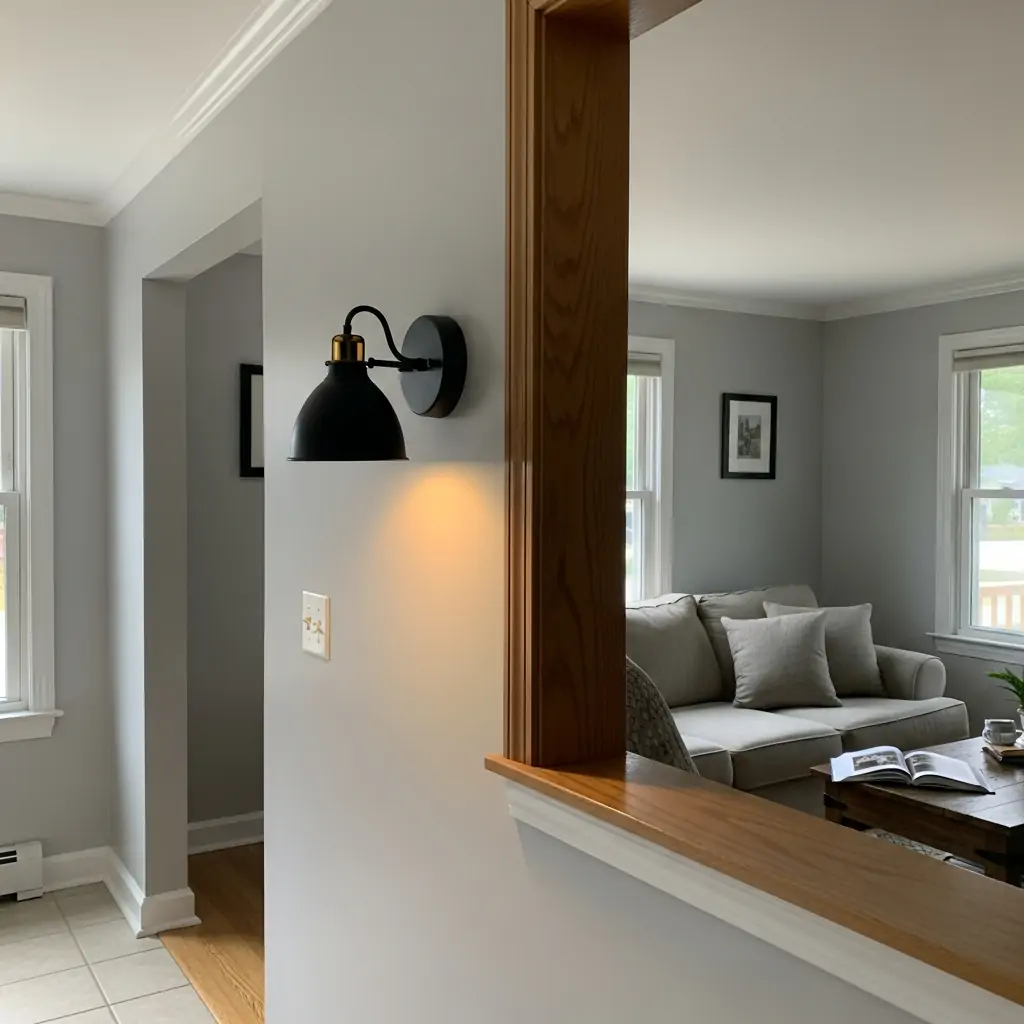
Install one stylish, small wall sconce light on the end of the half wall, facing the living room. This is a great way to add a bit of reading light or set a mood without needing a floor lamp.
- Choose a fixture that matches the kitchen hardware.
- Use a warm Edison bulb for a soft glow.
- Install a small switch nearby.
26. Faux Tile Backsplash
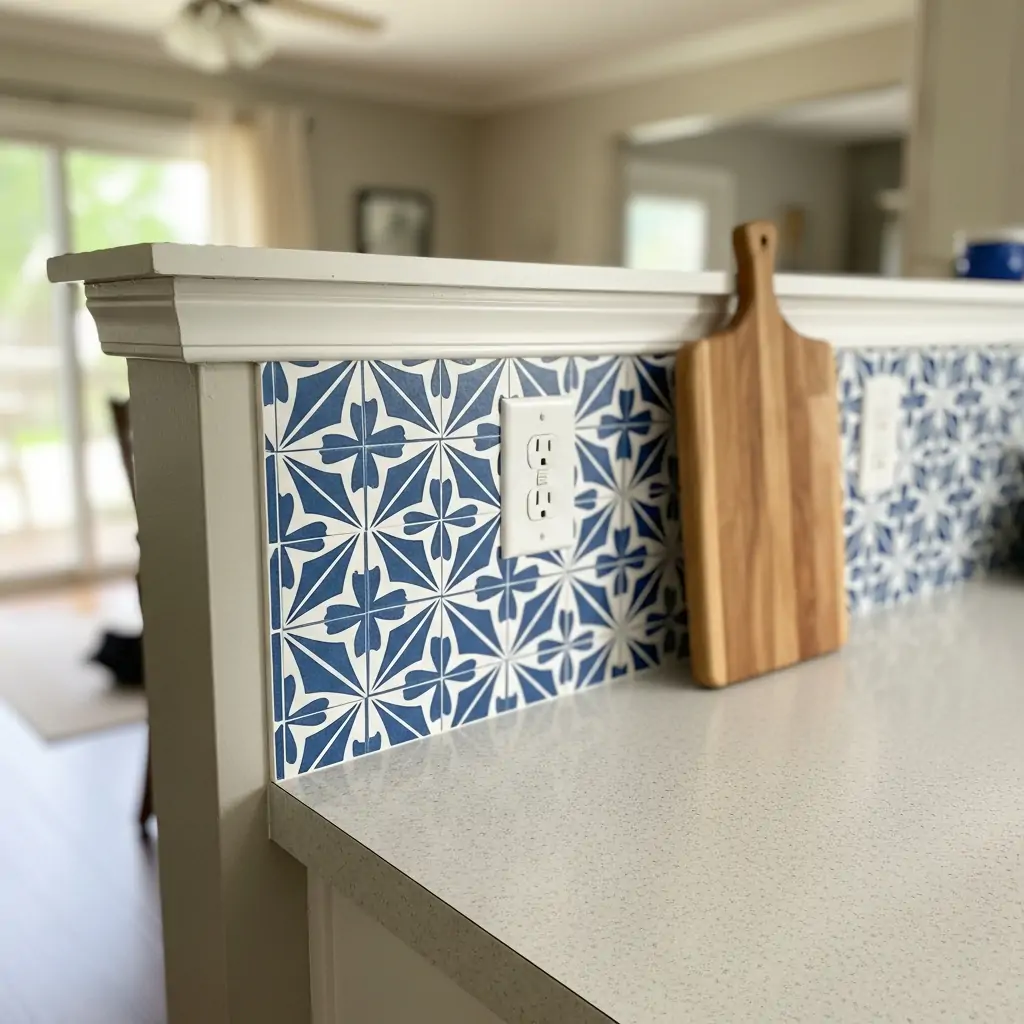
Use peel-and-stick vinyl tiles to cover the kitchen side of the wall. This is a quick way to add pattern and color. Choose a subway tile look or a fun geometric pattern that complements your kitchen counters.
- Clean the wall thoroughly before applying.
- Use a level to keep the tiles straight.
- Avoid placing tiles near direct heat sources.
Pro Tip: Run a bead of clear caulk around the top edge of the tiles to prevent water and grease from getting behind them.
27. Hidden Speaker Grille

Recess a small, flat speaker or soundbar into the wall cavity, facing the living room. Cover it with a thin, paintable speaker grille cloth. This gives you sound without bulky visible speakers.
- Ensure the speaker is rated for in-wall use.
- Paint the grille the same color as the wall.
- Connect the speaker wire through the floor or ceiling.
Pro Tip: Use a wireless Bluetooth receiver so you don’t need a receiver box sitting out in the open.
28. Plant Display Ledge
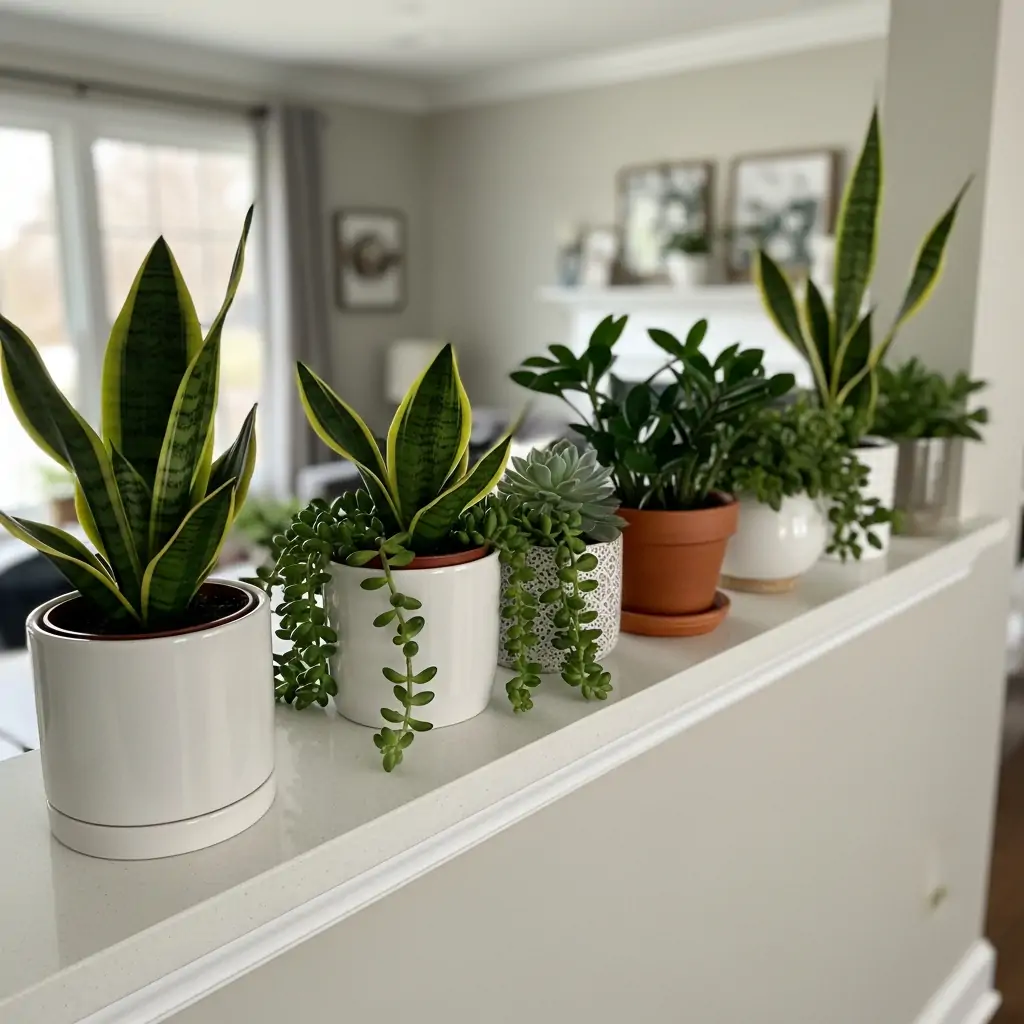
Use the top counter cap exclusively for a row of small, easy-to-care-for plants like succulents or snake plants. The plants add natural color and help clean the air flowing between the rooms.
- Use pots that have drainage trays.
- Choose plants that don’t need direct sun.
- Place the tallest plants near the ends.
Pro Tip: Use self-watering pots if you often forget to water them, as they keep the plants happier.
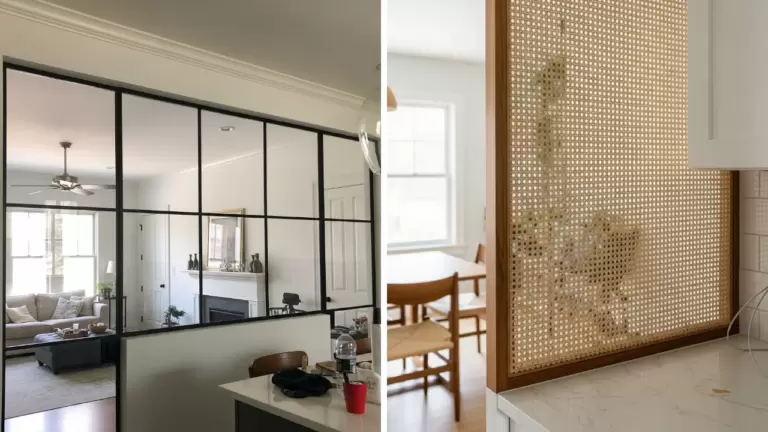
29. Use Glass Panel Top
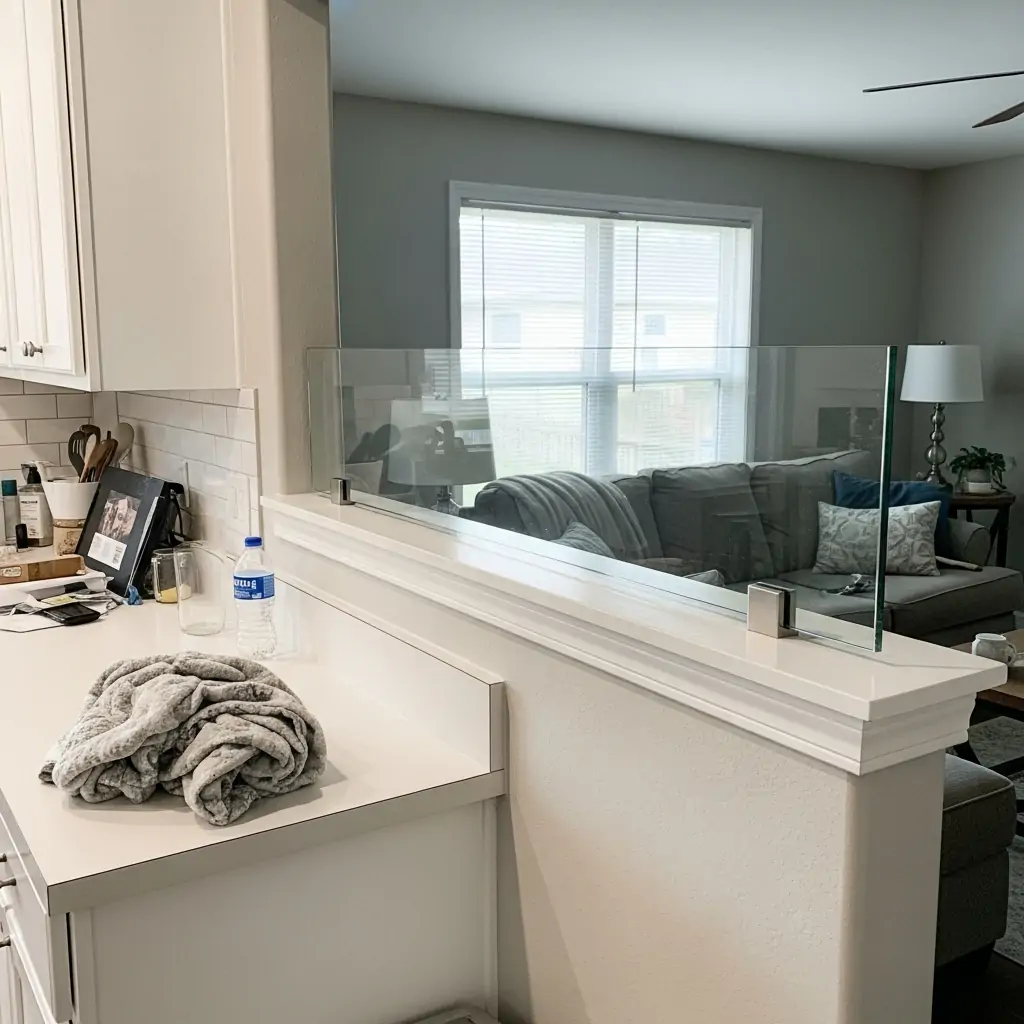
Instead of a solid cap, install a short, clear glass panel on top of the half wall. This separates the rooms visually while still allowing light and sight lines to flow freely, making the space feel open.
- Use tempered safety glass.
- Ensure the glass is secured with sturdy metal clamps.
- Keep the glass height around 12-18 inches.
Pro Tip: Choose ‘low iron’ glass if you want it to look crystal clear, as standard glass has a slight green tint.
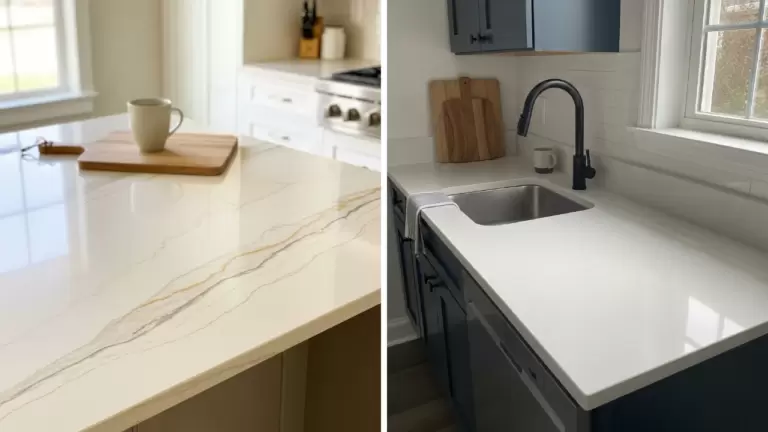
30. Match Kitchen Counters
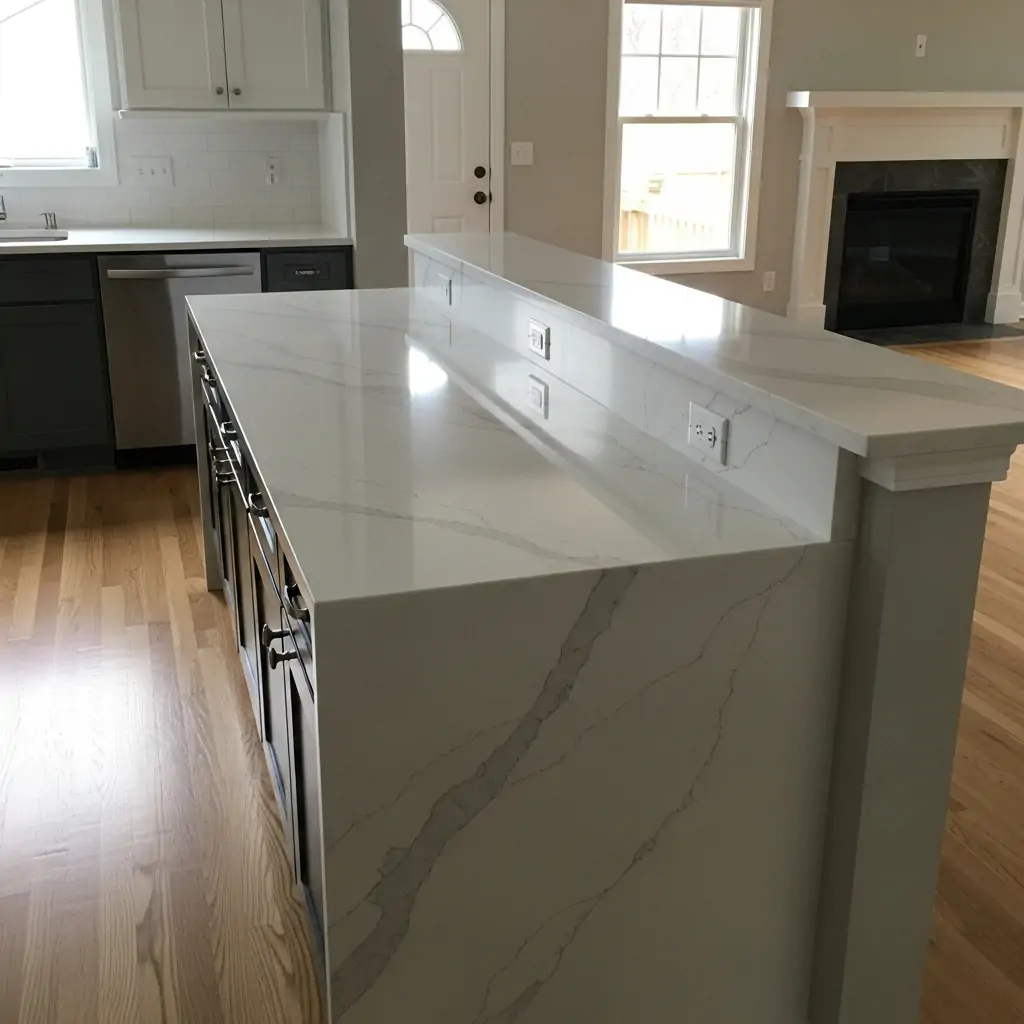
If your kitchen has stone or quartz counters, use the exact same material for the half wall’s cap. This makes the wall look like an extension of the kitchen, creating a unified and expensive feel.
- Ask the counter installer for remnants or cut-offs.
- Use the same edge profile (e.g., bullnose or straight).
- This works best if the half wall is the same height as the main counters.
Pro Tip: Even if the stone is expensive, this small piece usually only costs a few hundred dollars and makes a huge difference.
Your half wall doesn’t have to be a boring transition zone—it’s prime real estate! Pick one of these simple ideas and tackle it this weekend.
You’ll be amazed at how much better your kitchen and living room flow together.
Let me know which idea you pinned first!