50 Spooky Halloween Kitchen Decor Ideas
This post may contain affiliate links: full affiliate disclosure.
Bringing Halloween into the kitchen requires a balance between festive style and everyday cooking needs. Focus on vertical spaces and organized groupings to keep the counters clear for food preparation.
These ideas use color, texture, and smart placement to create a spooky atmosphere without adding clutter.
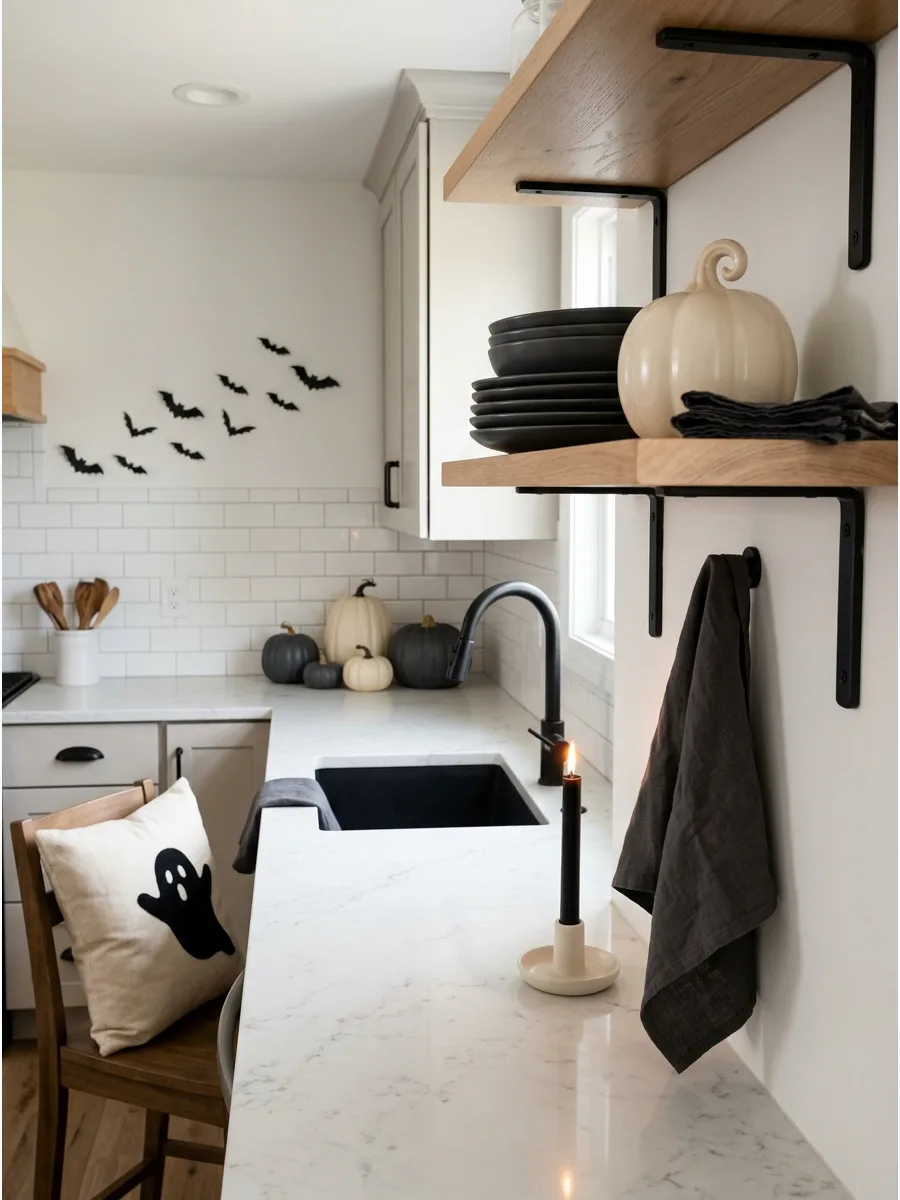
1. Create a Black-and-Orange Countertop Tray
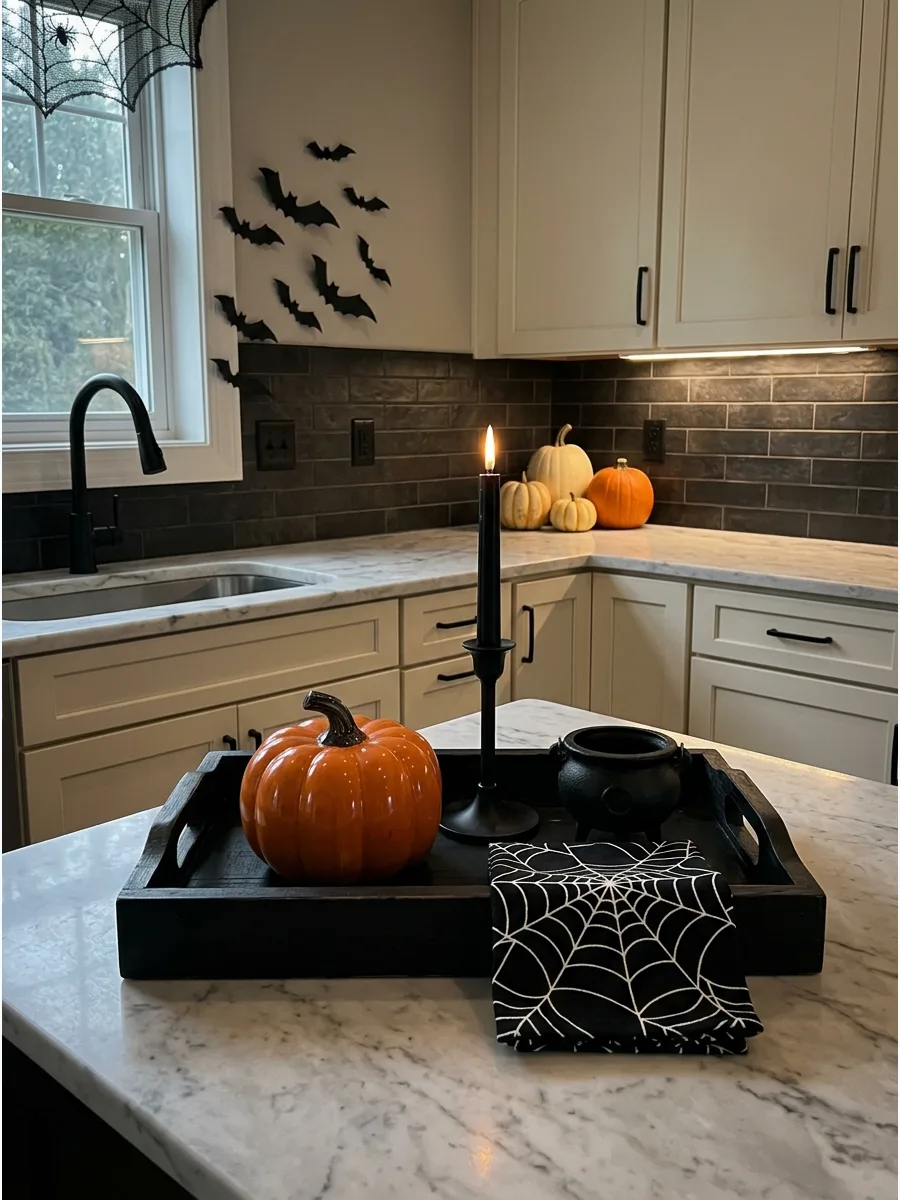
Grouping items on a tray keeps the kitchen organized while adding a festive touch. Use a wooden base to warm up the contrast between black and orange.
Corral a small pumpkin, a black candleholder, and a themed towel on a single tray to keep surfaces clear for food prep. This setup is much easier to move than individual knick-knacks when it is time to wipe down the counters.
- Takes 15 minutes to style using basic craft store finds.
- Place near the coffee station or sink to define a decor zone.
- Swap the towel weekly for a fresh look without moving the whole tray.
Quick win: Use a tray with handles so you can shift the entire display in one second when you need more workspace.
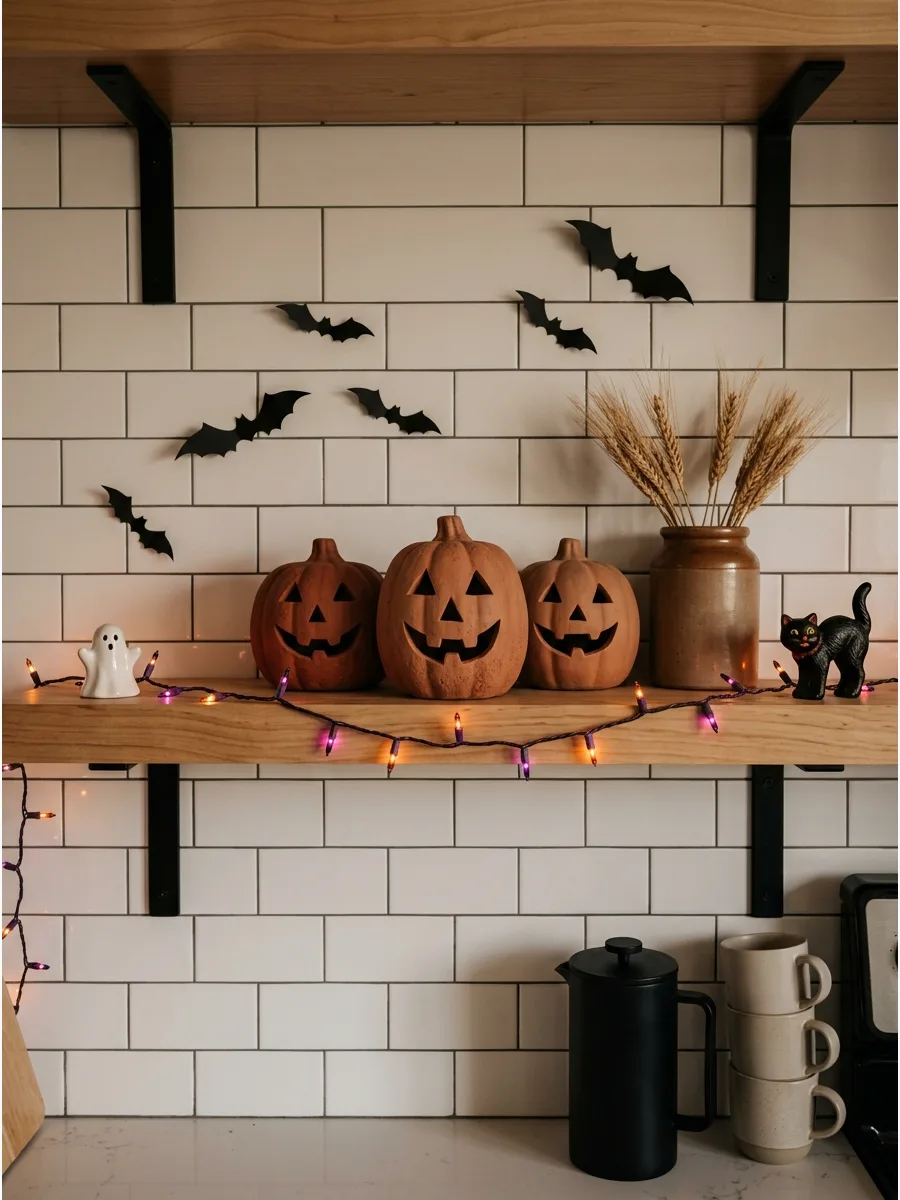
2. Decorate With a Vintage Jack-o’-Lantern Collection
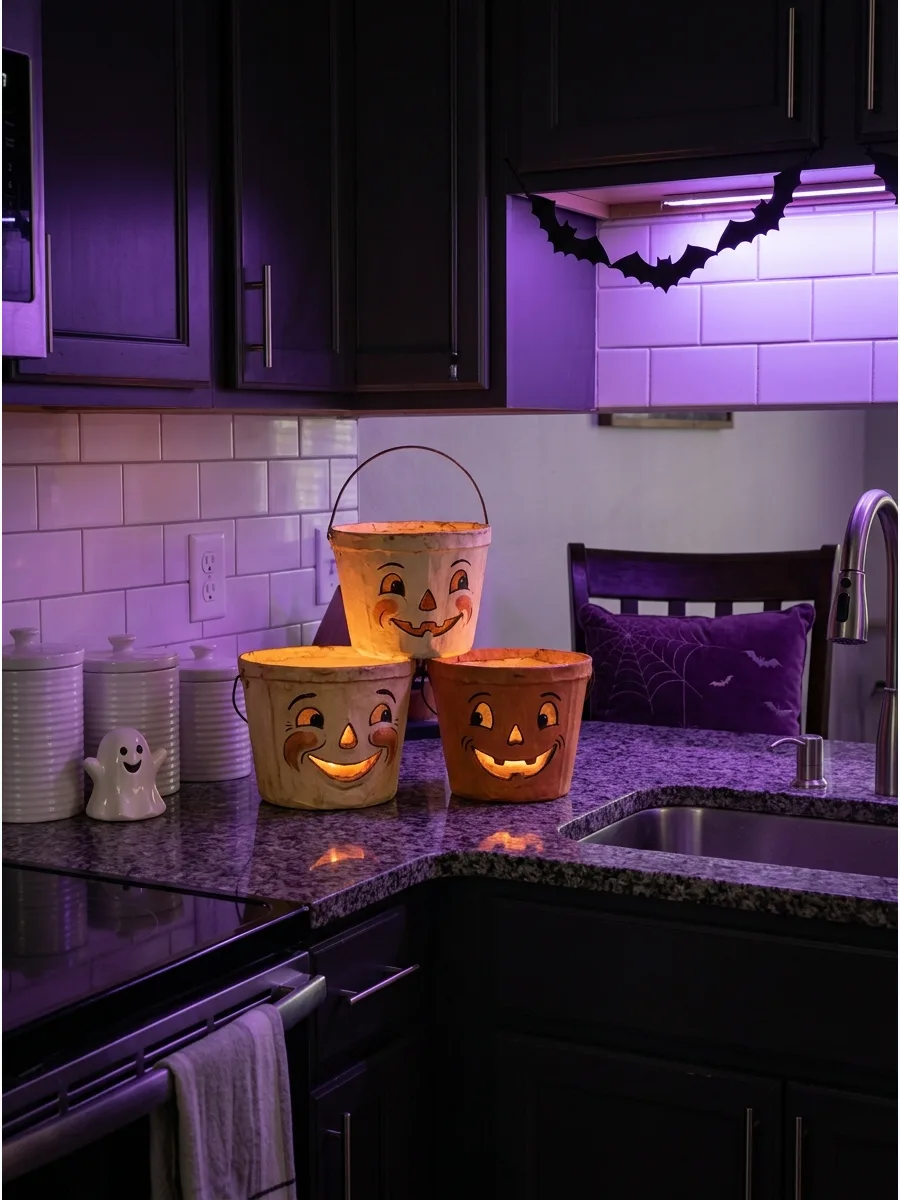
Retro decorations bring a sense of nostalgia that feels more high-end than modern plastic. Mix different heights to keep the eye moving across the display.
Cluster three to five vintage-style lanterns in a corner where they will not get splashed by the sink. The faded colors blend better with existing kitchen finishes than bright neon oranges.
- Sourced from antique shops or specialty decor stores for authentic texture.
- Group in odd numbers like three or five for the best visual balance.
- Use battery-operated tea lights instead of real candles for safety near wood cabinets.
Best shortcut: Look for pulp or paper mache lanterns to get that authentic 1950s texture without the vintage price tag.
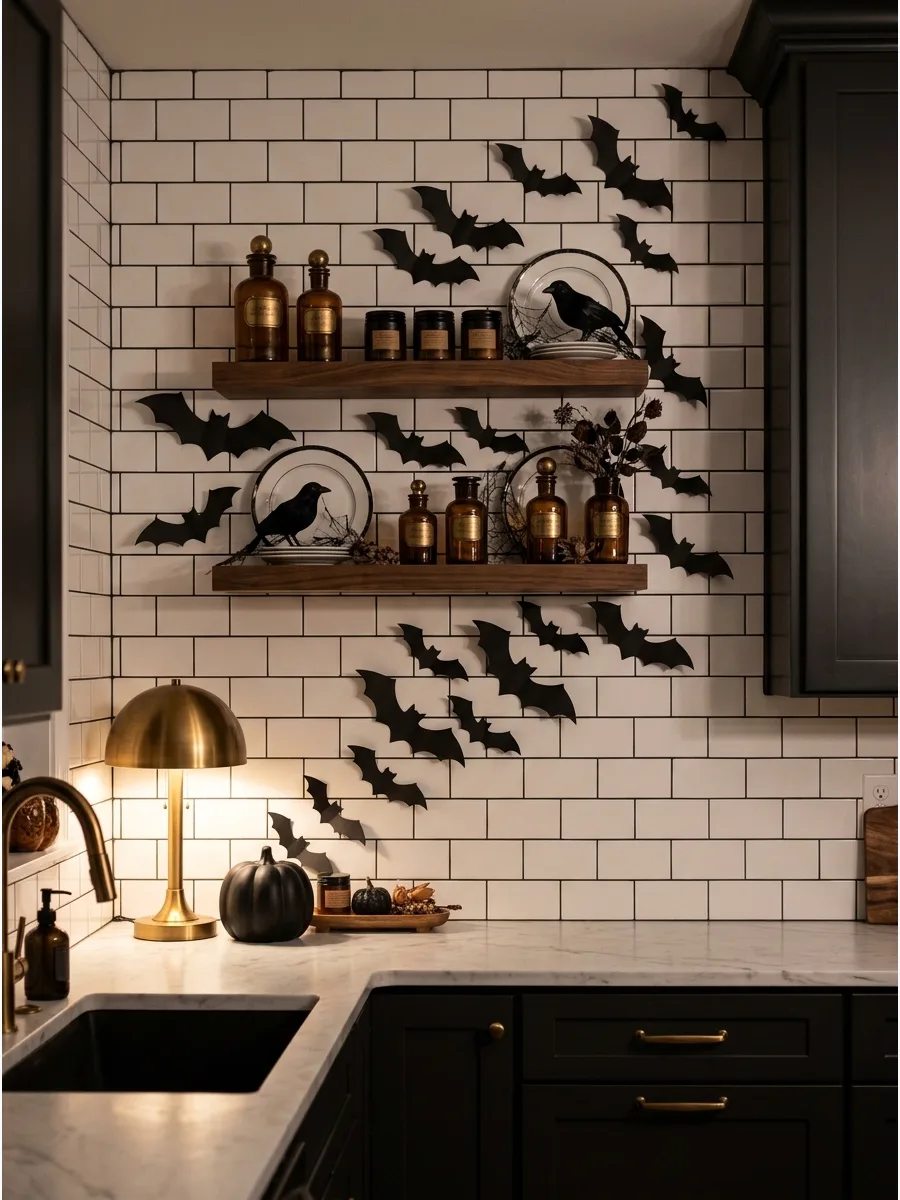
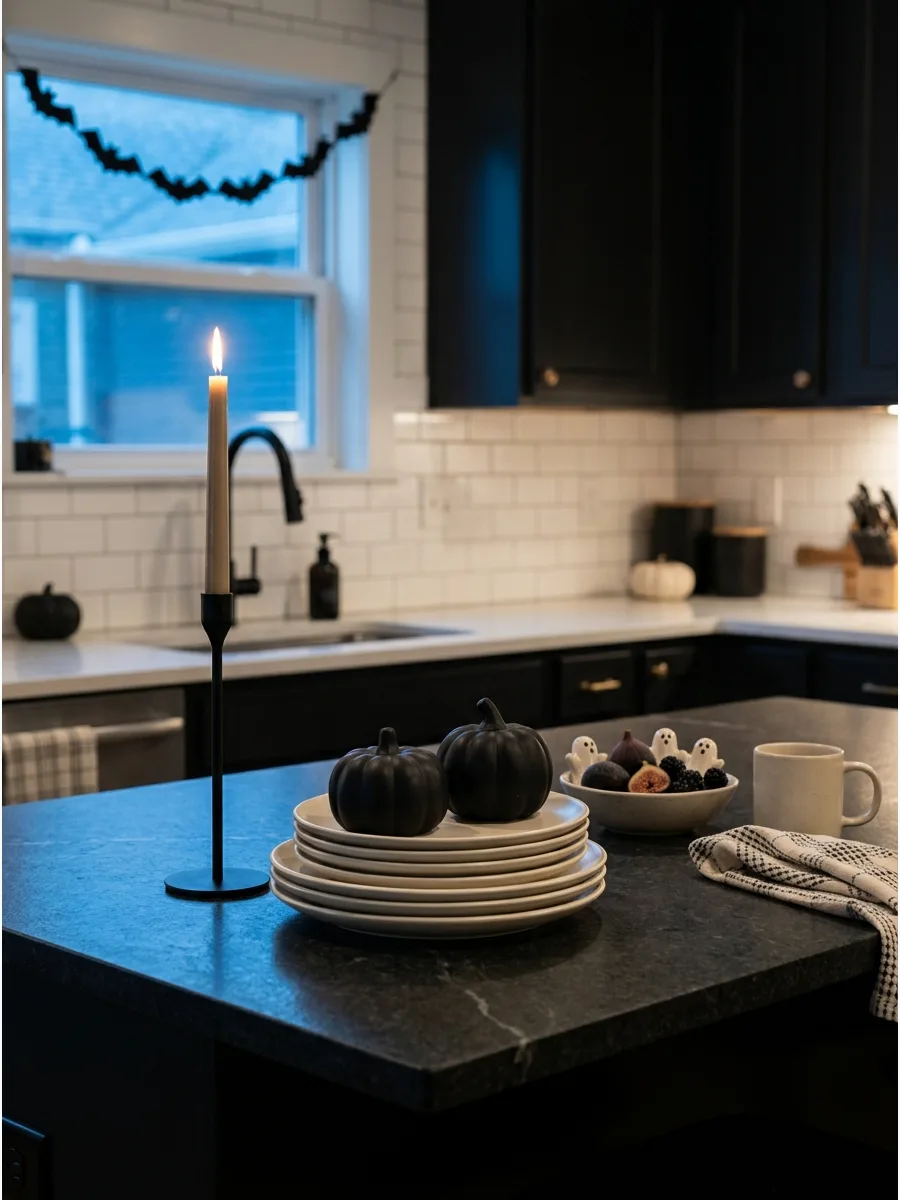
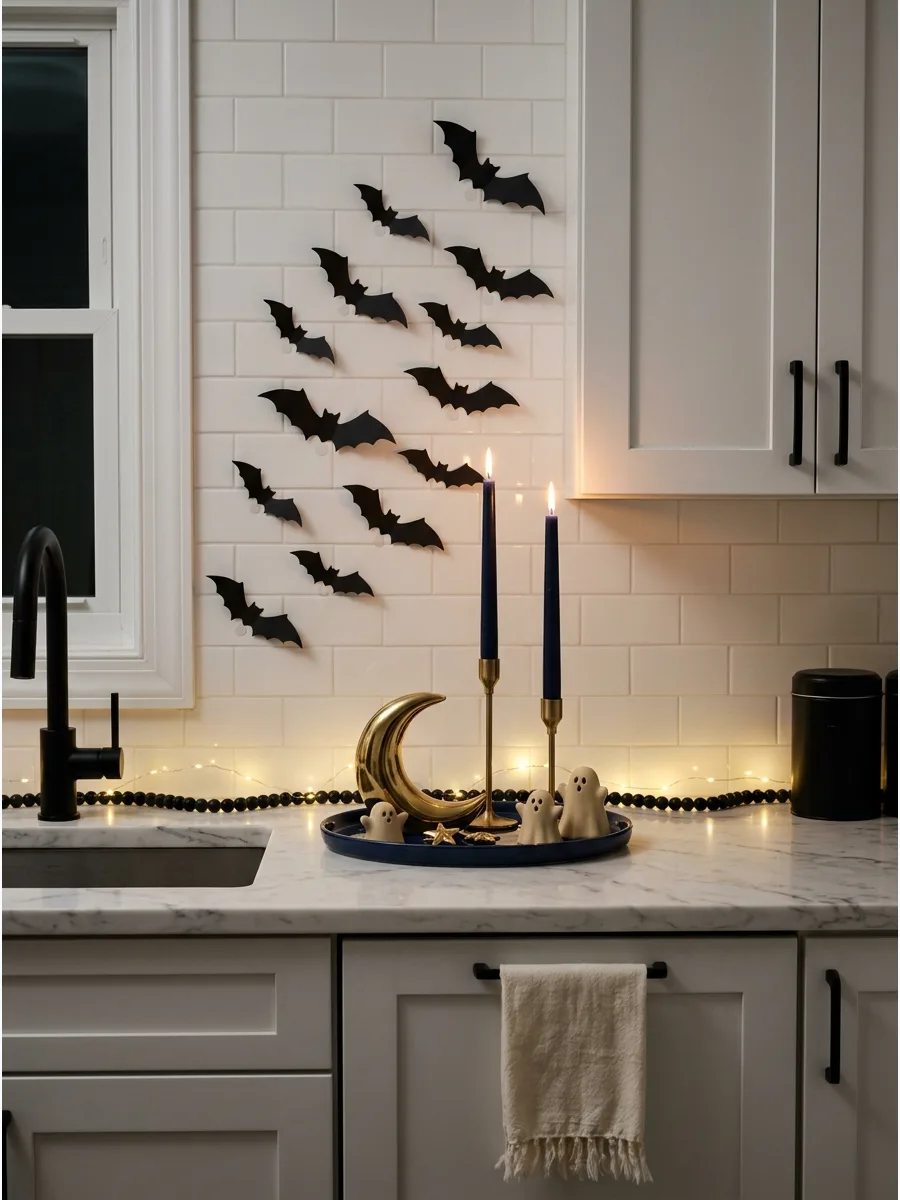
3. Add Flying Bats Across the Backsplash
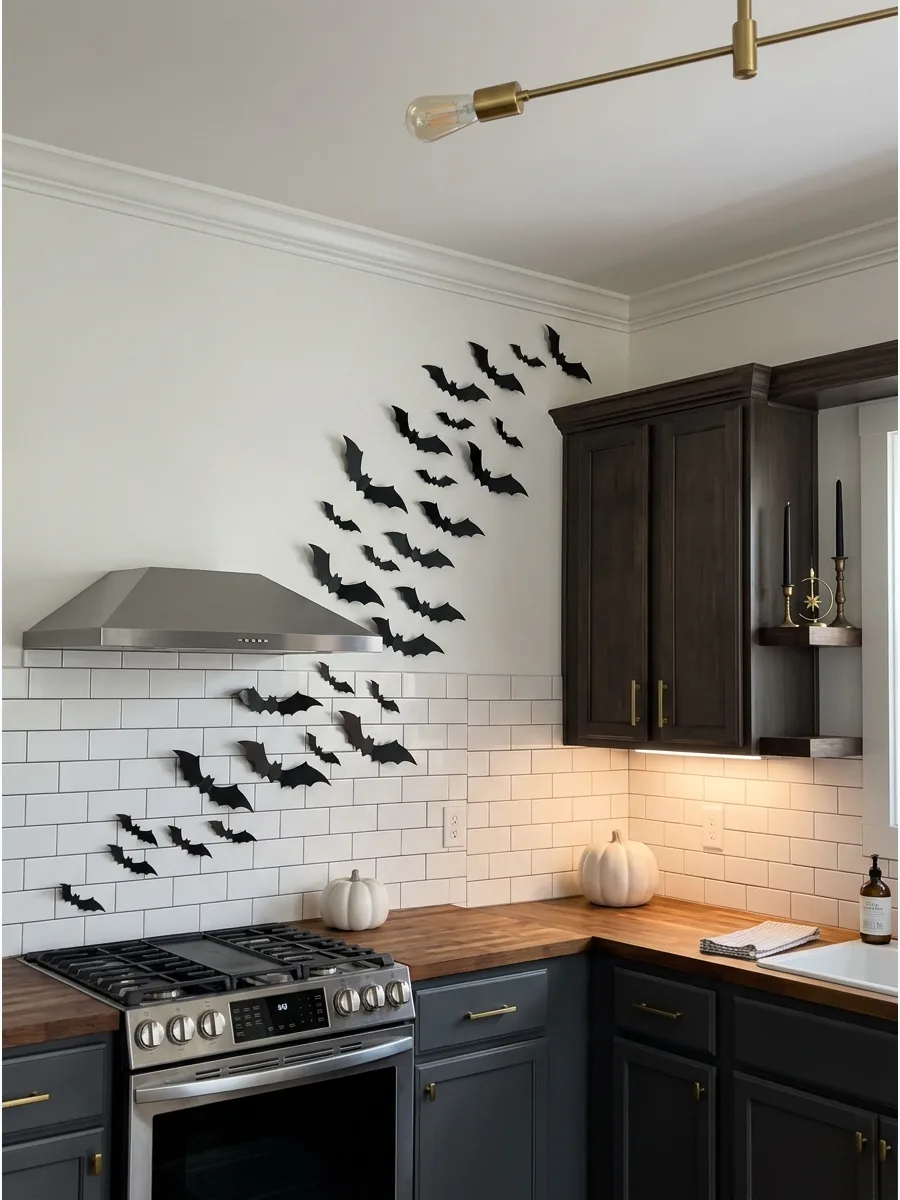
Wall decals are the best way to decorate a kitchen without losing an inch of counter space. Create a sense of motion by curving the path of the bats upward.
Apply removable black bat shapes in a diagonal line starting from the stovetop corner toward the upper cabinets. This draws the eye up and makes the ceiling feel higher.
- Takes 10 minutes to apply using painter's tape or included adhesive dots.
- Works perfectly for renters since the bats peel off without damaging tile or grout.
- Vary the sizes of the bats to create a realistic sense of distance and movement.
Quick win: Fold the wings of the plastic bats slightly forward before sticking them to the wall to create realistic shadows.
4. Style a Witchy Kitchen Corner
A dedicated theme in one corner prevents the whole room from looking cluttered. Use dark, moody textures like glass and iron to ground the space.
Nestle a small cauldron and a black crow figurine among dried branches to fill a dead corner area. This adds height and personality without blocking any drawers or appliance doors.
- Combine foraged backyard branches with store-bought figurines for a custom look.
- Keep the arrangement away from high-heat areas like the toaster or stove.
- Use command hooks to secure tall branches to the wall if they feel wobbly.
Most people skip this: Dust the black crow and cauldron every few days, as dark surfaces show flour and kitchen dust instantly.
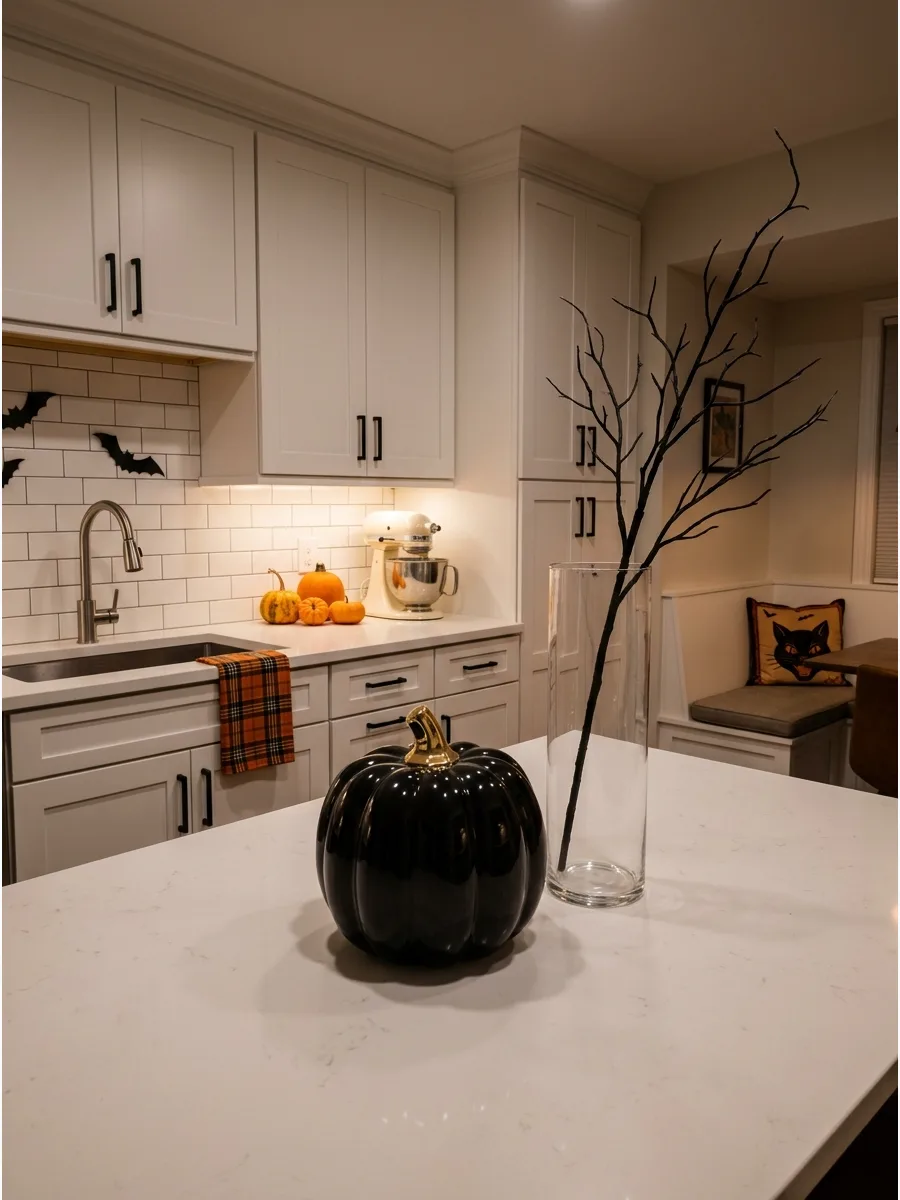
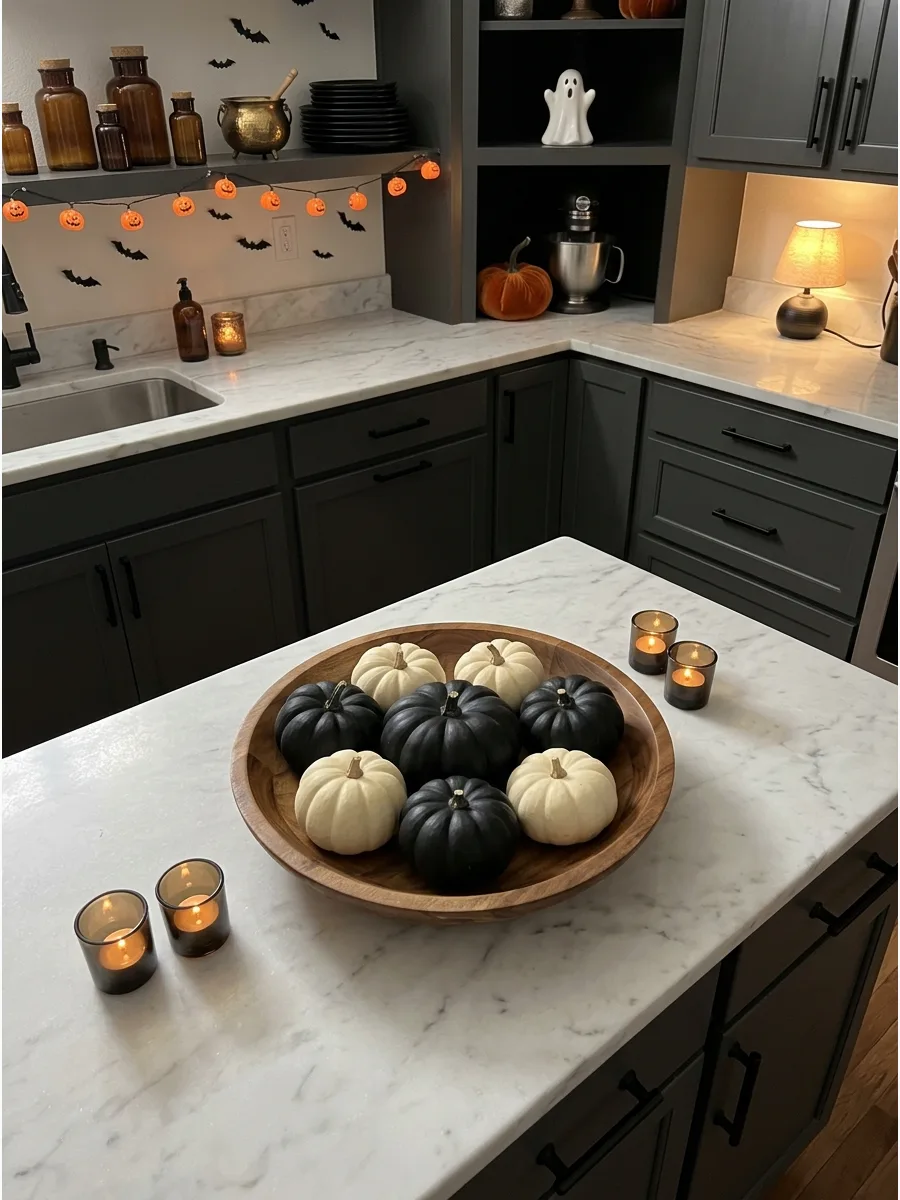
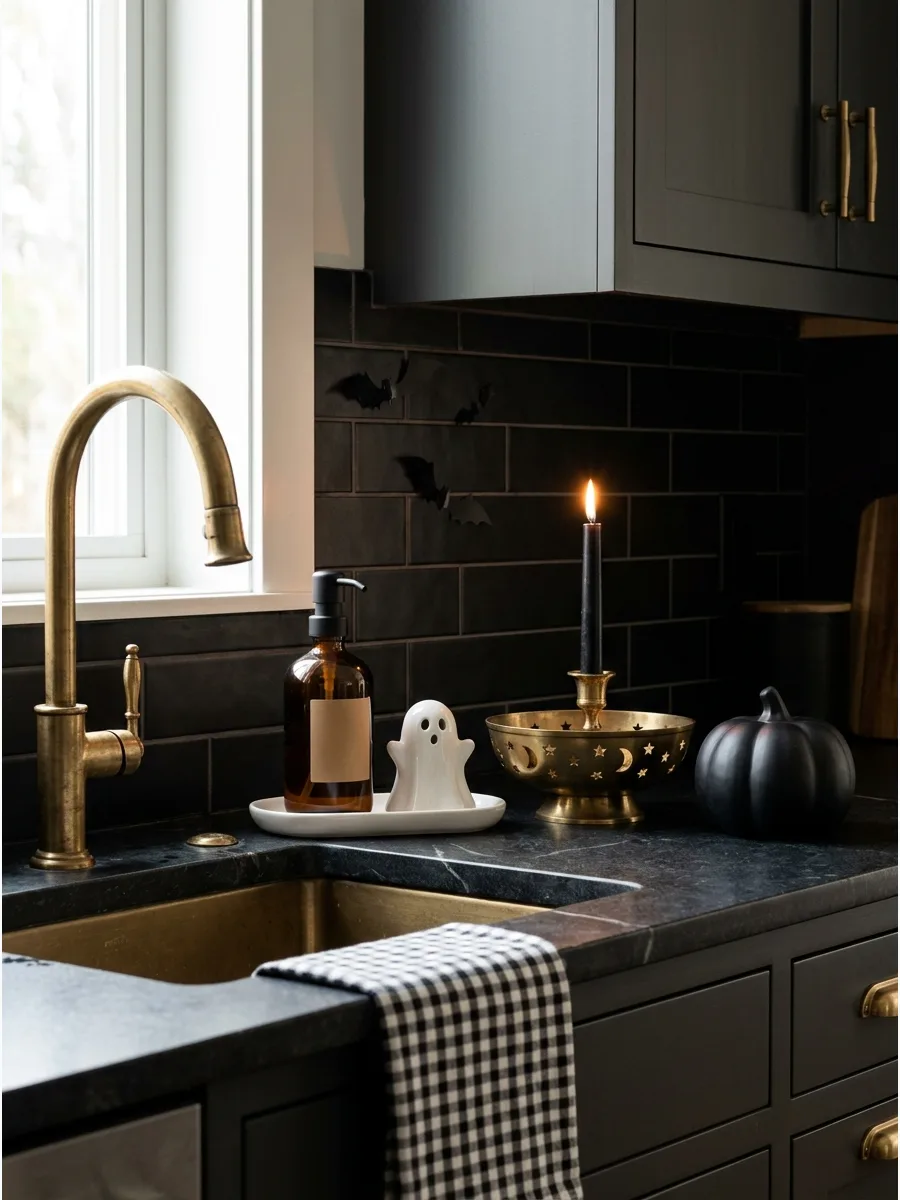
5. Display Black Pumpkins With Brass Accents
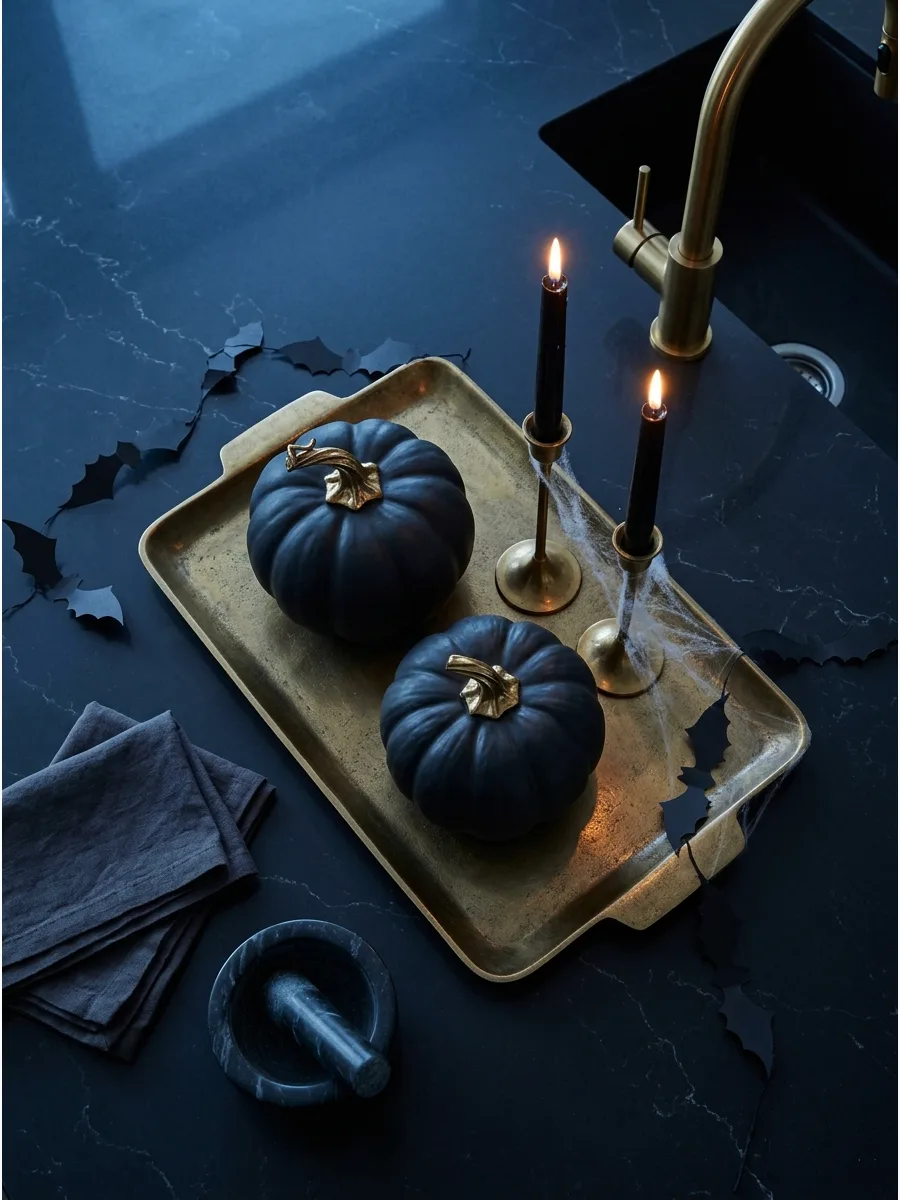
Mixing matte black with shiny metals creates a sophisticated look that fits modern kitchens. The brass reflects light, which keeps the dark pumpkins from looking like holes on the counter.
Set matte-black ceramic pumpkins next to aged-brass candlesticks for a high-contrast, elegant display. This combination feels intentional rather than just spooky.
- Mix different pumpkin textures like velvet and ceramic for more visual depth.
- Place on an island or breakfast bar where the brass can catch the light.
- Choose pumpkins in varying sizes to create a tiered effect on the tray.
Best shortcut: If you have old brass pieces that are too shiny, rub them with a little dark wax to give them an aged Halloween look.
6. Use Cream Pumpkins and Black Candles
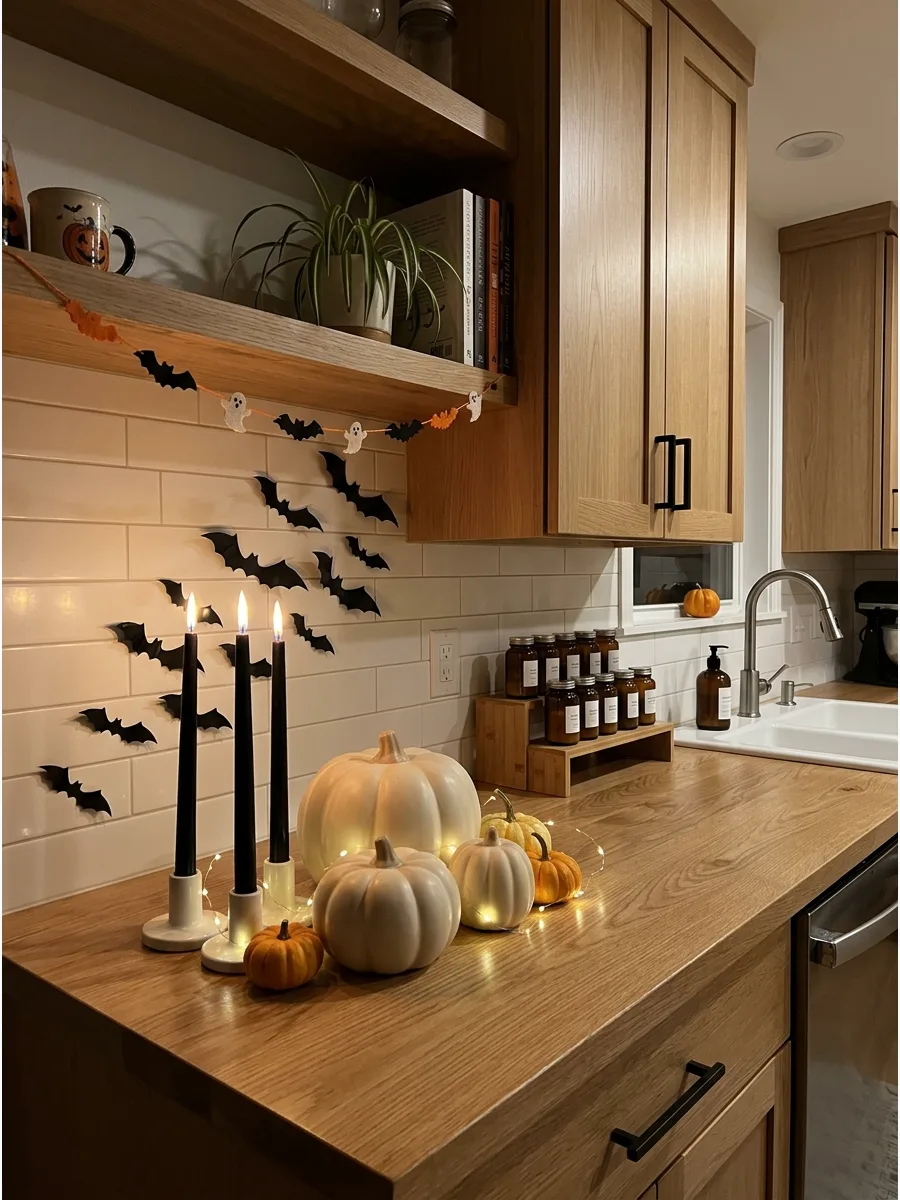
Neutral colors allow you to celebrate the season without clashing with your kitchen color scheme. This palette is especially effective in bright, airy spaces with light wood.
Arrange cream-colored pumpkins with tall black taper candles to create a striking but clean look. The dark candles provide just enough spooky edge to the soft white pumpkins.
- Easy to find at most home stores during the early fall season.
- Place near a window to catch natural light and emphasize the different textures.
- Transition this look into November by simply removing the black candles.
Quick win: Use dripless black candles to prevent waxy messes on your light-colored countertops or pumpkins.
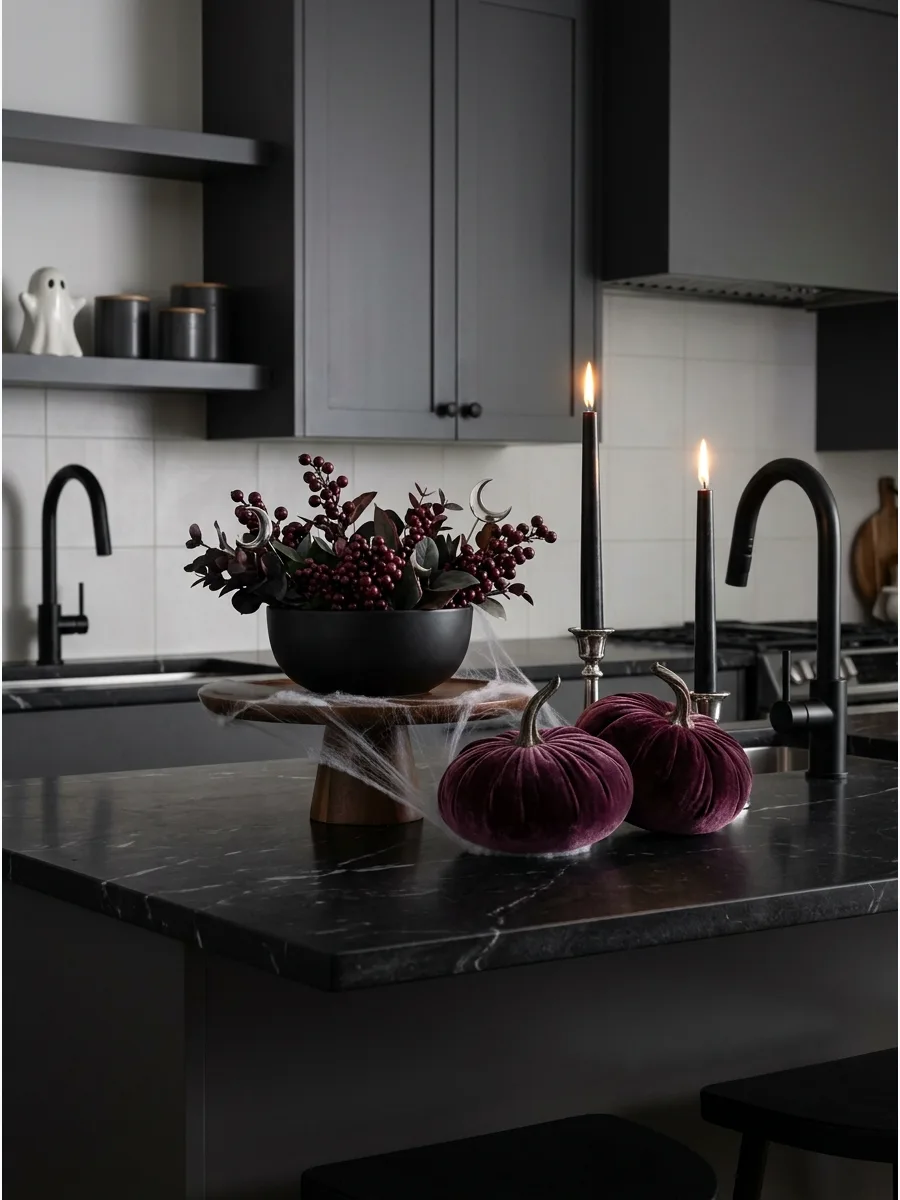
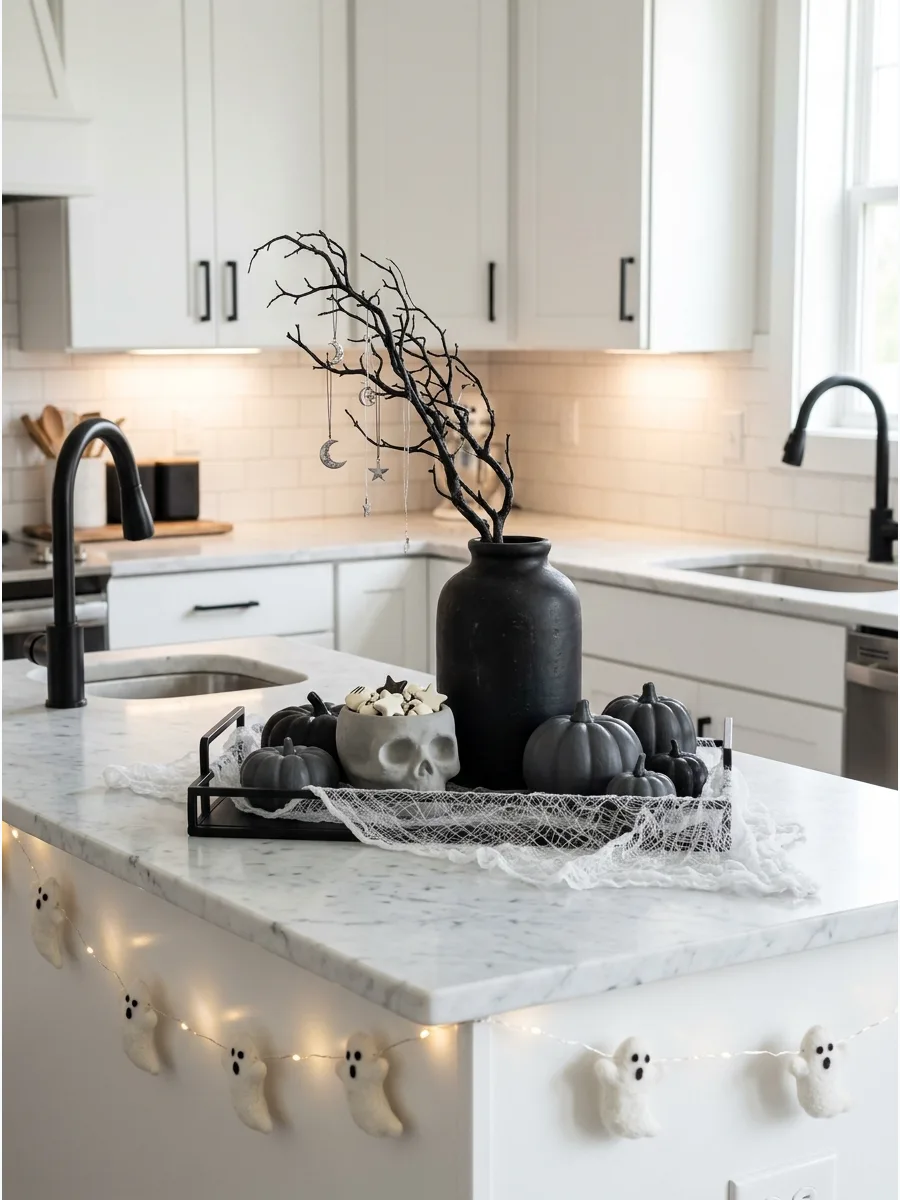
7. Create a Gothic Countertop Arrangement
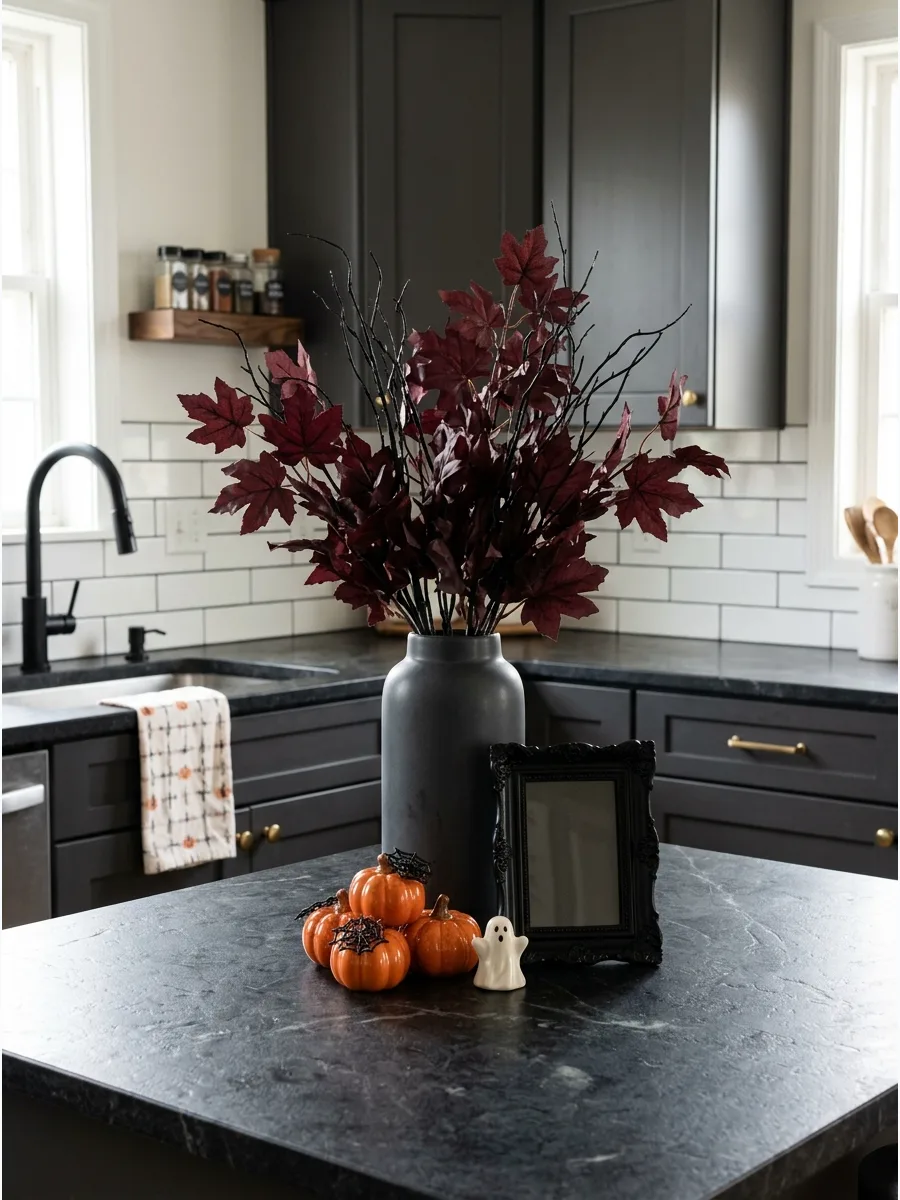
Deep purples and burgundies offer a moody alternative to the traditional orange. These colors feel sophisticated and pair perfectly with dark wood or stone.
Fill a heavy dark vase with burgundy silk leaves and bare branches to anchor a Gothic-inspired vignette. Adding an antique frame nearby completes the look without needing expensive props.
- Use high-quality silk florals to avoid the mess of falling dried leaves in a food-prep area.
- Best for large islands or wide counter sections that can handle vertical height.
- Keep the palette limited to three colors to maintain a curated, high-end feel.
Most people skip this: Stick to one hero color like plum or burgundy so the kitchen feels curated rather than chaotic.
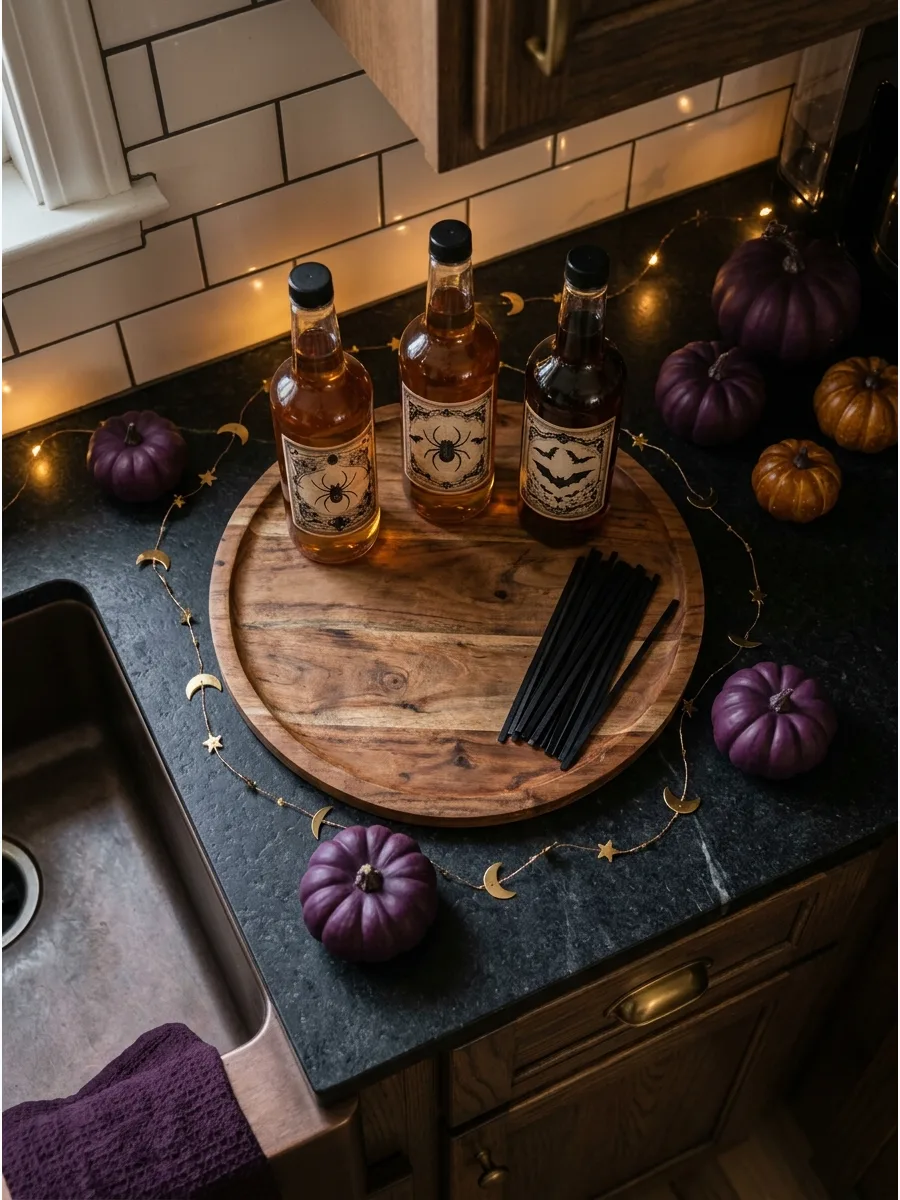
8. Build a Halloween Potion-Bottle Display
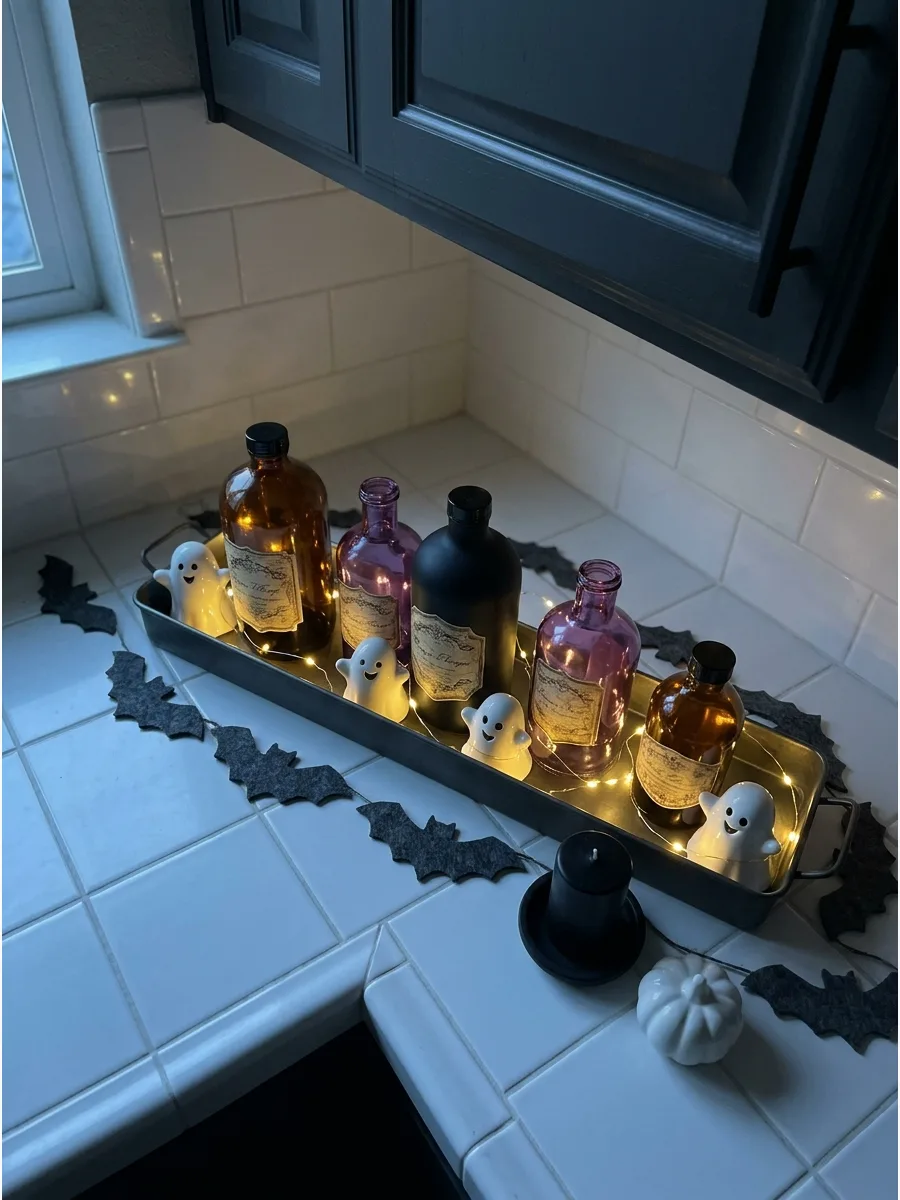
Glass bottles are a great way to use vertical space on a narrow counter. They catch the light and add a laboratory vibe that is perfect for a kitchen.
Line up amber and black glass bottles with vintage-style labels on a narrow tray near your spice rack. This keeps the theme consistent with the room's function as a place for mixing concoctions.
- Very budget-friendly if you reuse old glass jars and print labels from the internet.
- Group bottles in varying heights to keep the arrangement from looking like a flat line.
- Place the tray against the backsplash to leave the front of the counter open for work.
Quick win: Fill clear or purple bottles with water and a single drop of food coloring to make the potions look more realistic.
9. Decorate a Wooden Cutting-Board Backdrop
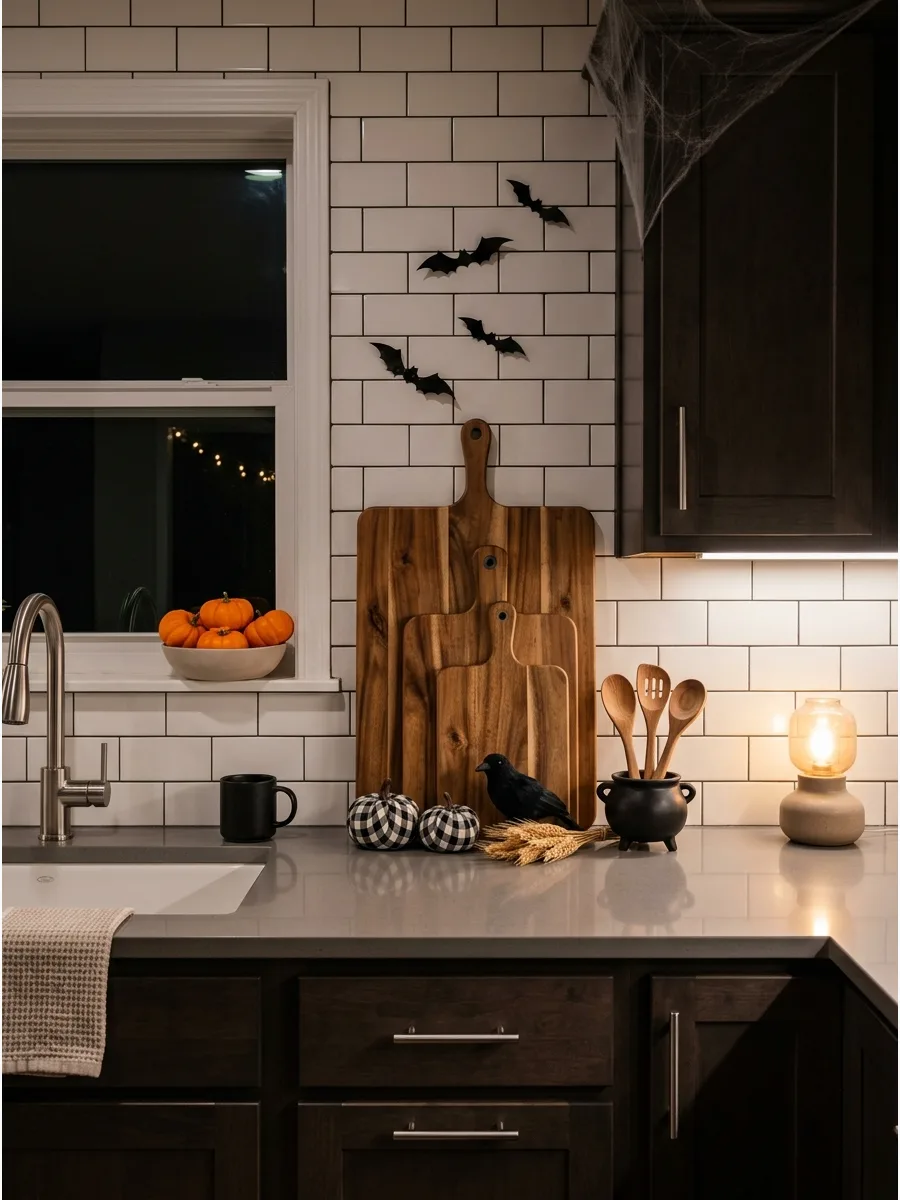
Layering decor in front of items you already own is a smart way to save money. Cutting boards provide a natural, warm background for small spooky accents.
Lean several wooden cutting boards against the backsplash and place small black-and-white pumpkins in front to create a layered, functional look. This keeps your most-used tools handy while adding a seasonal layer.
- Uses existing kitchen items, making it the most affordable decor option.
- Takes less than 5 minutes to set up or take down.
- Works well in small kitchens where counter space is at a premium.
Best shortcut: Use a small piece of poster putty to secure a paper bat or plastic crow to the board so it does not fall over.
10. Add a Halloween Cookbook Display
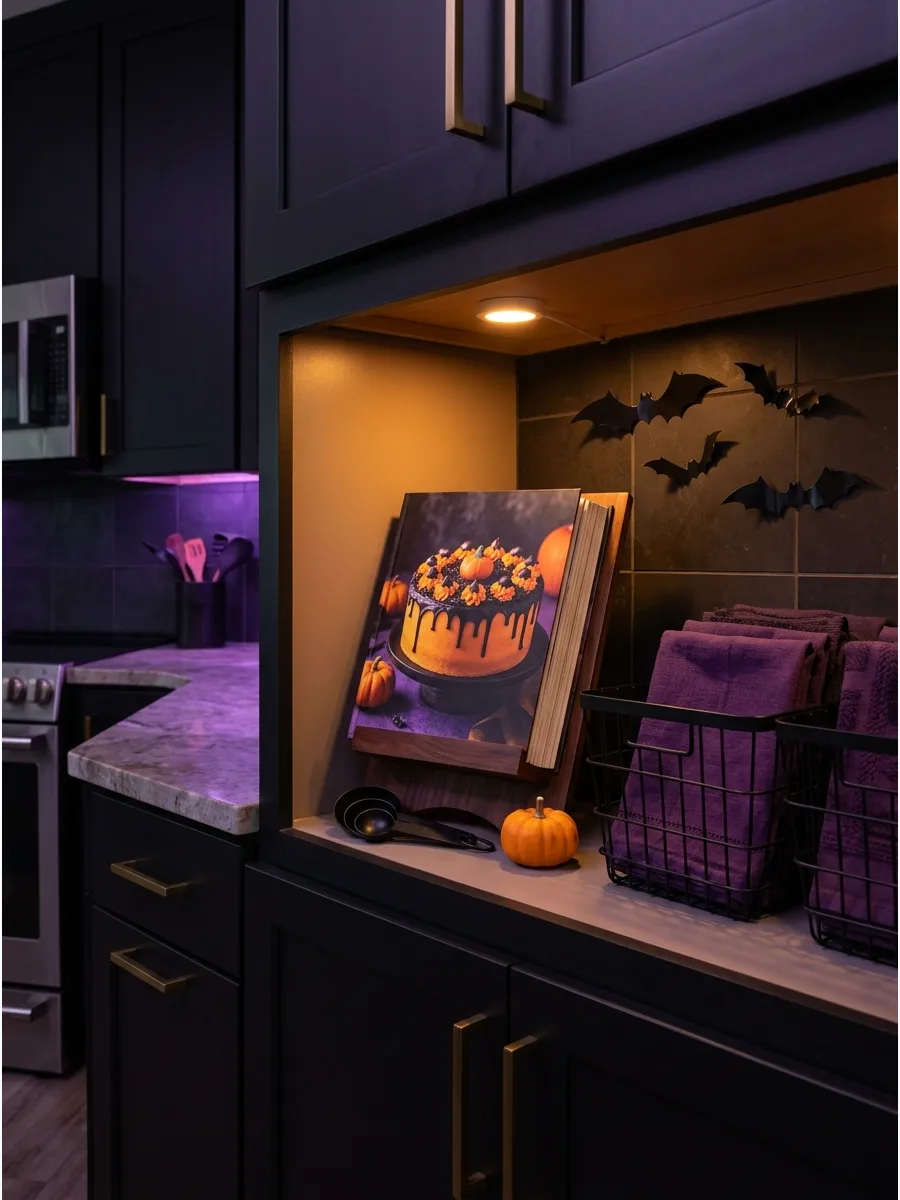
A cookbook is a functional piece of decor that fits perfectly in a kitchen environment. It suggests seasonal activity like baking pumpkin bread or themed treats.
Place a Halloween baking or seasonal recipe book on a wooden stand and surround it with black measuring spoons for a practical, themed display. This tells a story about the room without requiring extra storage space for large props.
- Costs nothing if you already own a seasonal book or a standard recipe stand.
- Place on a counter away from the sink to prevent water damage to the pages.
- Change the page every few days to keep the look fresh and discover new recipes.
Quick win: If you do not have a Halloween cookbook, print a vintage-style Witch's Brew recipe and clip it to a standard recipe holder.
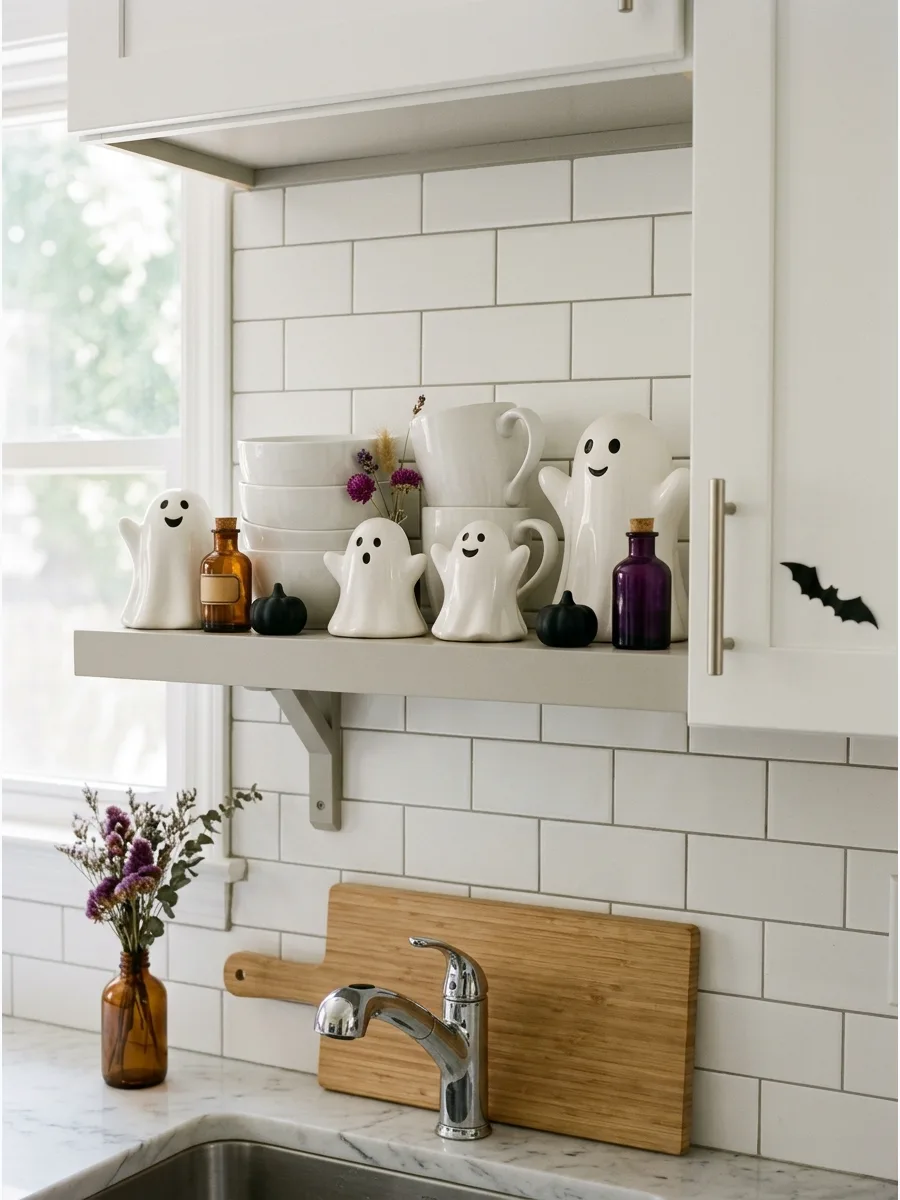
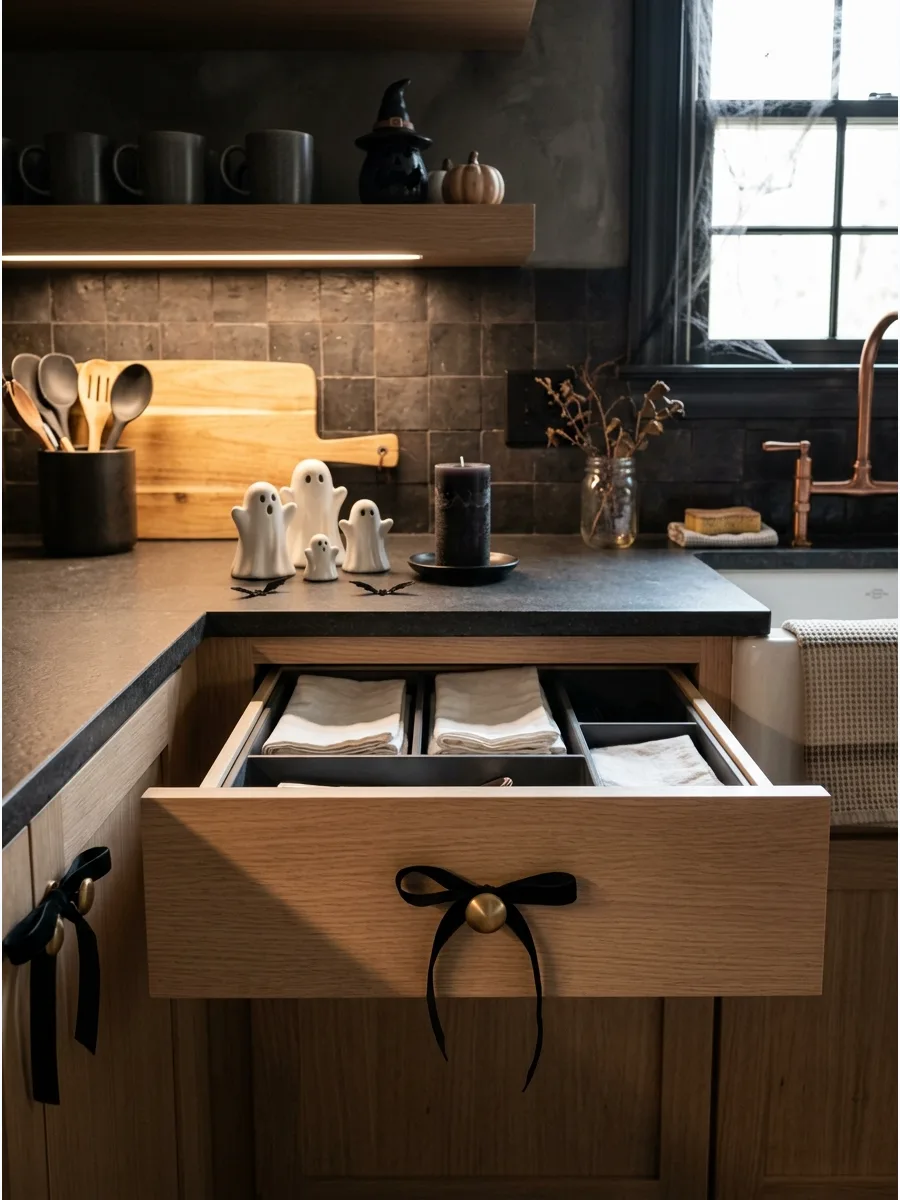
11. Create a Ghost-Themed Counter Corner
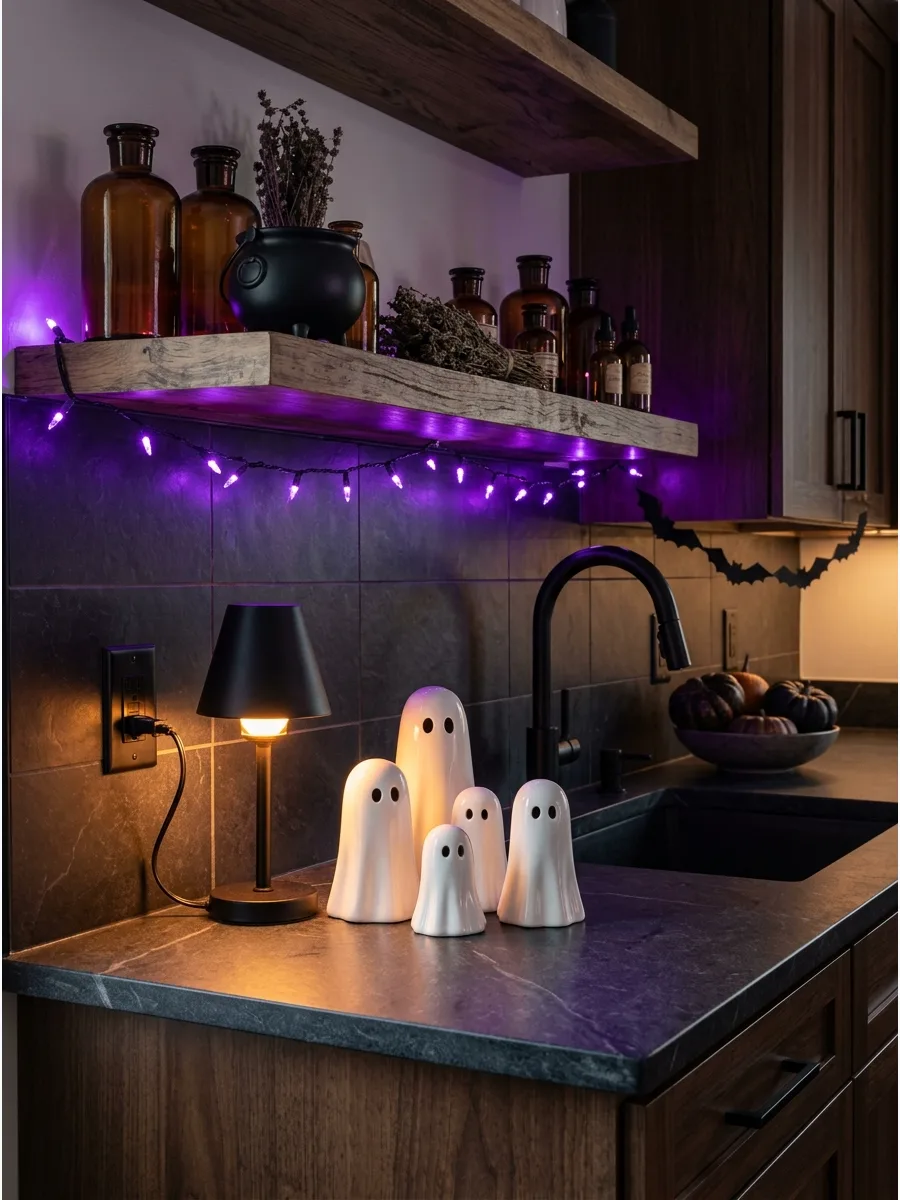
Minimalist ghosts are a popular way to add a cute spooky element that does not feel childish. Their simple shapes work well in modern or Scandinavian-style kitchens.
Place a few ceramic ghosts of different heights next to a small lamp to create a glowing focal point at night. The white ceramic pops beautifully against dark backsplashes or stone counters.
- Perfect for dark corners that need extra light during the shorter autumn days.
- Use matte finishes for a more modern, high-end feel rather than glossy plastic.
- Arrange them in a tight cluster so they look like a deliberate collection.
Most people skip this: Use battery-operated puck lights inside hollow ceramic ghosts to make them glow without messy power cords.
12. Style a Moody Burgundy Kitchen Display
Rich, dark colors create a cozy atmosphere that feels sophisticated for the whole autumn season. Plum and burgundy tones pair beautifully with black ceramics and dark wood.
Combine plum-colored pumpkins with black ceramic bowls and dark foliage for a moody, high-end look. This avoids the cheap look sometimes associated with bright plastic Halloween decor.
- Invest in high-quality velvet pumpkins for a texture that looks expensive.
- Works best in kitchens with dark cabinets or deep-toned countertops.
- Keep the arrangement on a pedestal to save actual counter footprint.
Best shortcut: Spray paint cheap orange pumpkins with a Black Cherry or Plum matte spray paint to get this look on a budget.
13. Make a Minimalist Halloween Countertop
You do not need many items to make a statement in a clean, modern kitchen. One or two high-quality pieces often look better than a dozen small ones.
Place one large sculptural black pumpkin beside a simple glass vase with a single branch to keep the workspace feeling open and intentional. Keeping the surfaces mostly empty ensures the kitchen remains fully functional for daily cooking.
- Very low effort setup that takes under five minutes to complete.
- Perfect for homeowners who prefer a clean, clutter-free aesthetic.
- Focus on the quality and unique shape of the items rather than the quantity.
Quick win: Choose a pumpkin with a unique texture, like ribbed glass or hammered metal, to add interest to a minimalist setup.
14. Decorate With Terracotta Halloween Pumpkins
Earthy tones like rust and clay feel more organic and grounded than traditional bright orange. These materials blend seamlessly with wooden cabinets and natural stone.
Mix terracotta pumpkins with dried wheat or stems to create a warm, rustic Halloween vibe. This style feels less like a costume and more like a natural extension of your home decor.
- Works beautifully in farmhouse, boho, or traditional style kitchens.
- Avoid placing terracotta directly on wet surfaces as the porous material can absorb moisture.
- Pair with warm-toned wood cutting boards or bowls to complete the look.
Most people skip this: If your terracotta pumpkins look too new, rub a little white flour or lime into the crevices to give them an aged garden look.
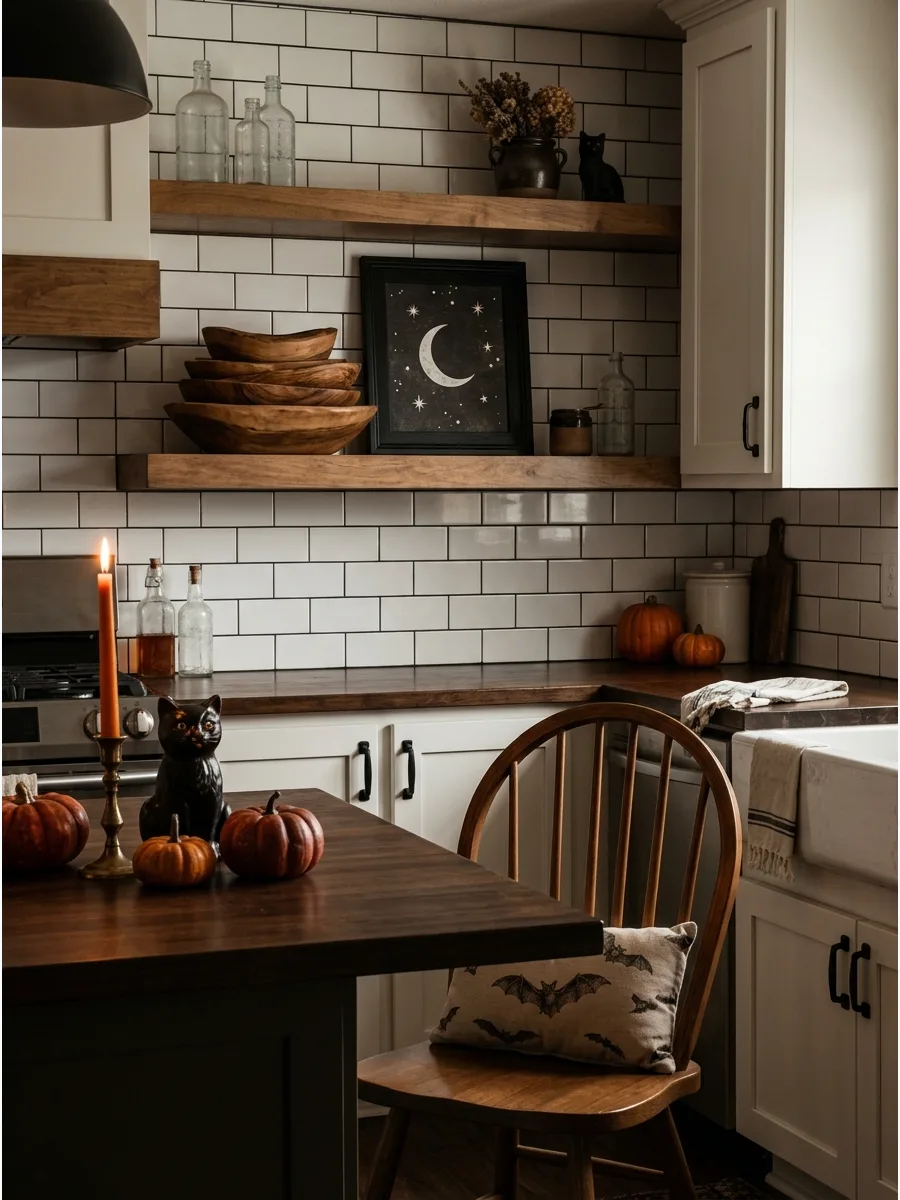
15. Create a Black Cat Kitchen Vignette
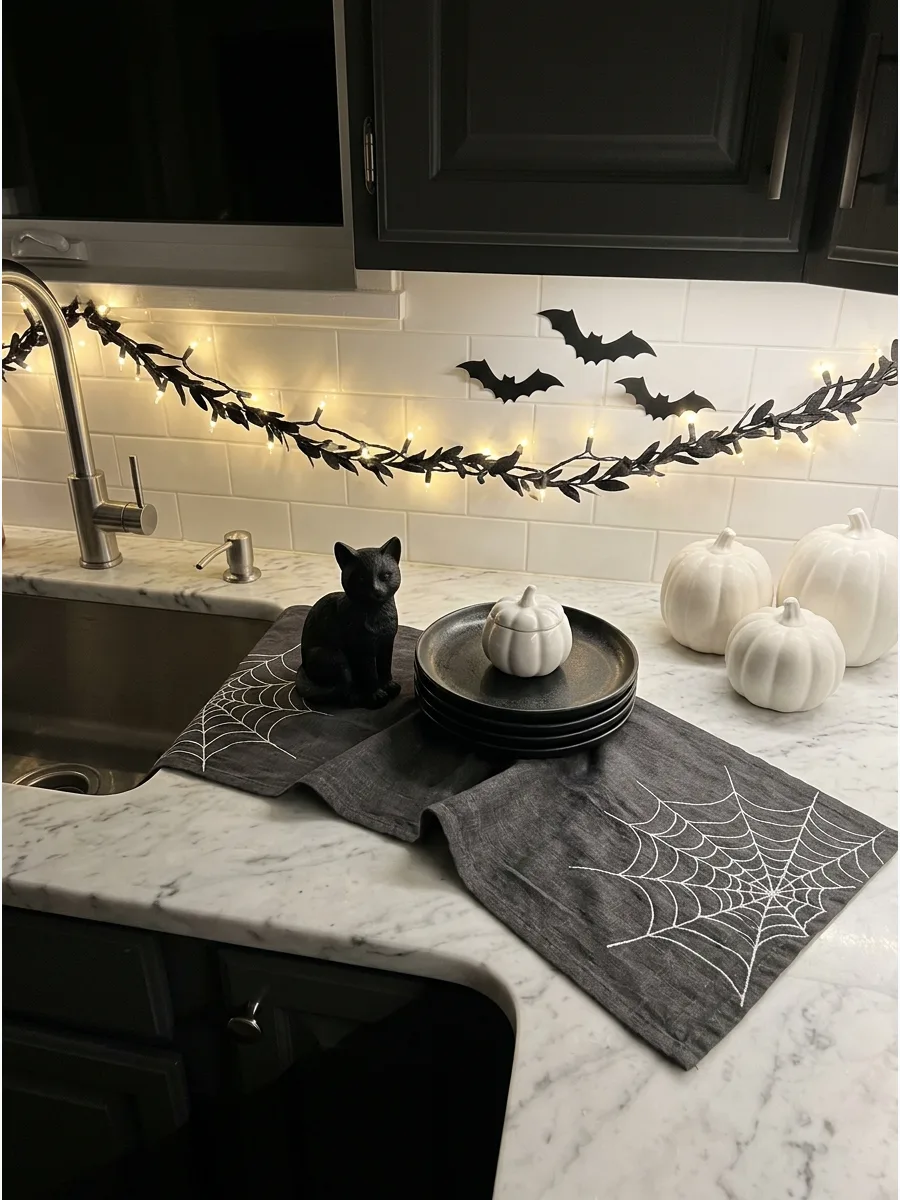
A small figurine can add a touch of personality to a functional area like a dish-stacking zone. Using black accents helps the theme feel unified across the kitchen.
Position a small black cat figurine near a stack of dark plates to create a subtle but playful Halloween scene. This works well in small kitchens where you cannot spare much counter space for large displays.
- Very affordable decor piece that is easy to store in the off-season.
- Place on open shelving or near the coffee bar to add a surprise element.
- Keep the figurine small, under six inches, so it does not get in the way of daily tasks.
Quick win: Use a pumpkin-shaped bowl or jar that you can actually use for sugar or salt to keep the decor functional.
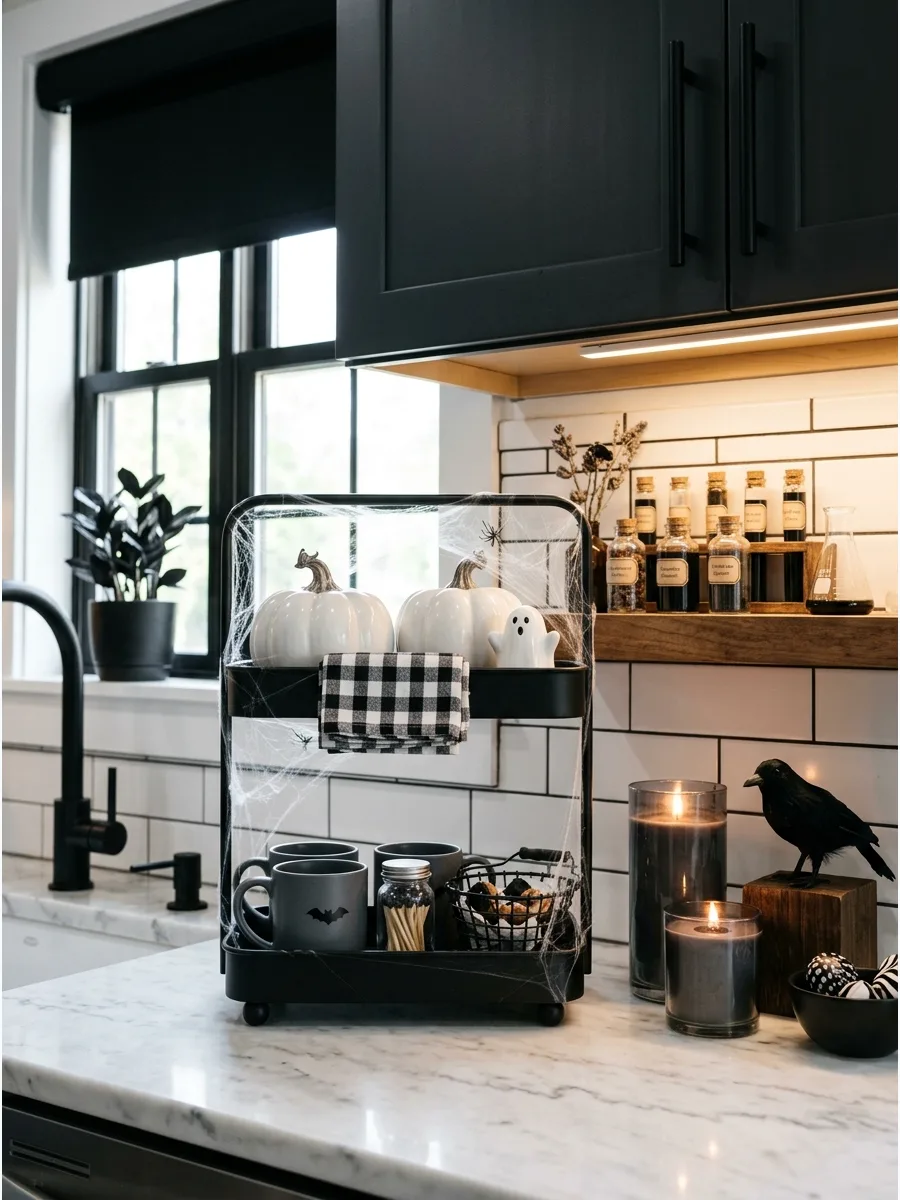
16. Build a Halloween Coffee Bar
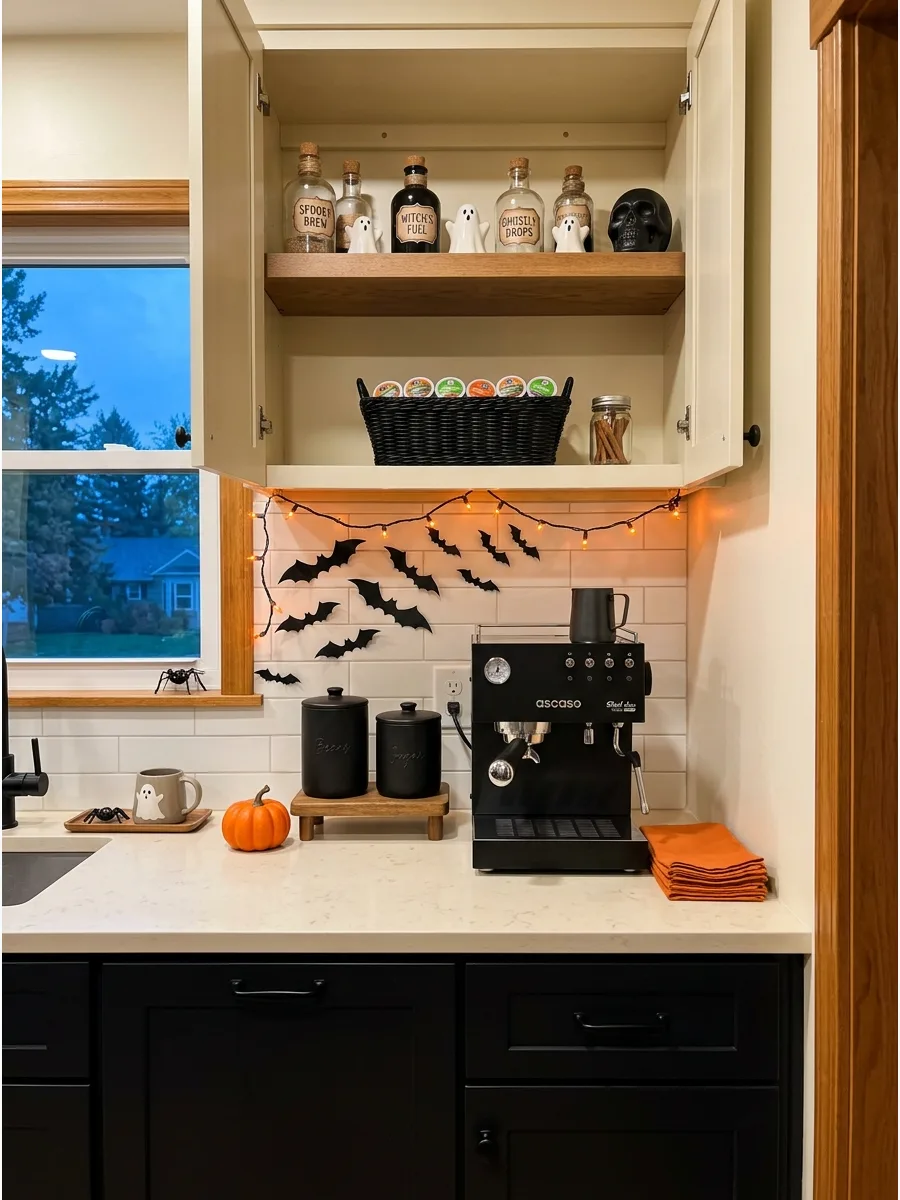
Decorating the coffee station with themed mugs and orange napkins brings instant holiday spirit to a morning routine. Keep coffee pods and spoons inside coordinated black canisters to ensure the setup remains functional for daily use. Cinnamon sticks in a small glass jar add a natural touch that bridges the gap between fall and Halloween.
A single small pumpkin on the side anchors the display without taking over the workspace. Functional decor is always superior to items that just get in the way of making a cup of coffee.
- Purchase orange napkins and a small pumpkin from a local grocery store or craft shop.
- Clear off the coffee counter and group canisters on one side to leave space for the machine.
- Swap standard napkins for themed ones to easily update the look for any season or holiday.
Most people skip this: Use a small tray to contain the canisters and pumpkin so you can wipe the counter underneath in one quick motion.
17. Create a Witch’s Brew Coffee Station
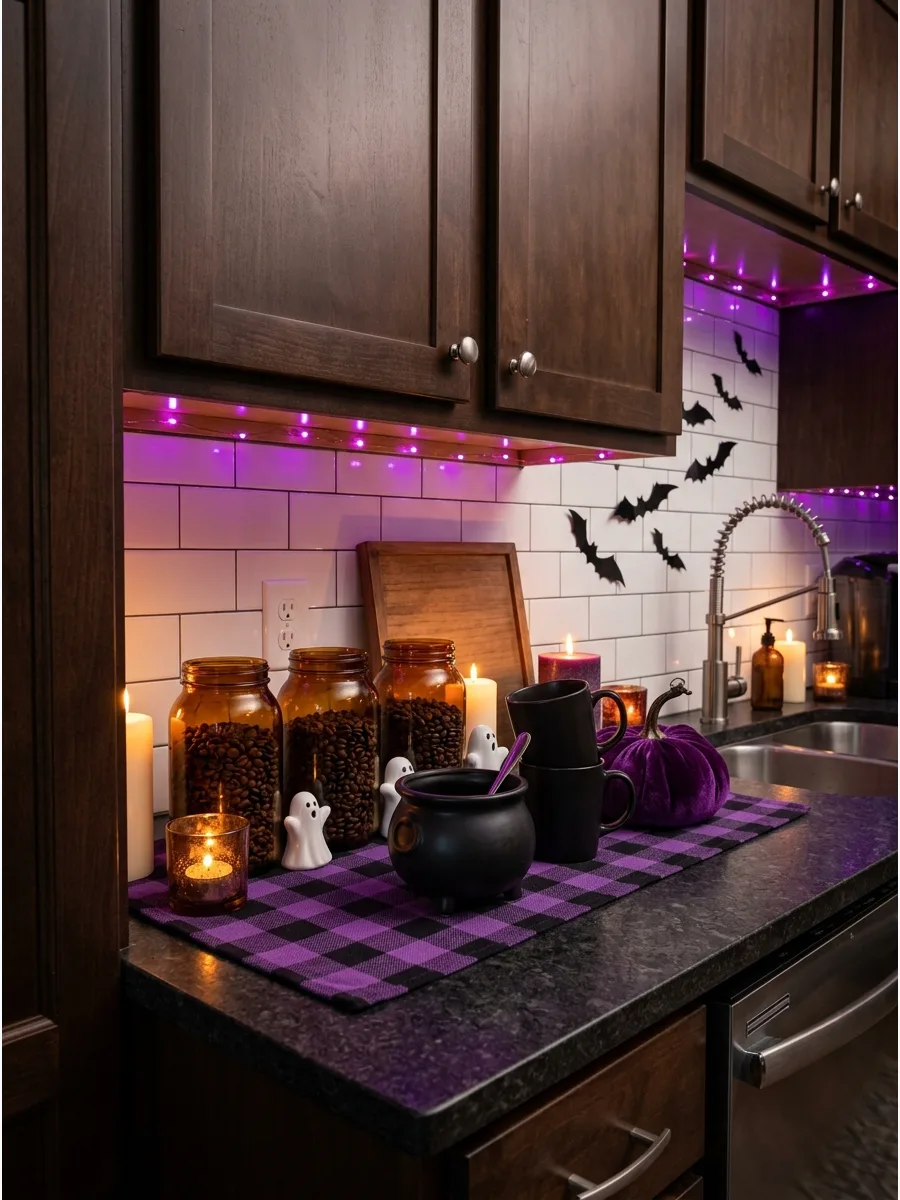
Identify the coffee area with a small sign to set a playful tone for the room. Use dark glass containers for coffee beans and a cauldron-shaped bowl for sugar to lean into the theme. Black mugs stacked nearby keep the look cohesive and ready for guests.
This approach turns a utilitarian corner into a focal point without requiring a full kitchen overhaul. Small, specific details like themed sugar bowls make the display feel more curated and less like random clutter.
- Look for cauldron-shaped bowls and amber glass jars at home goods stores or online.
- Place the sign against the wall and group the containers in front of it in order of height.
- Use a chalkboard sign if you want to change the message for different times of the year.
Quick win: Fill your amber jars with different shades of coffee beans or dark tea leaves to add natural texture to the shelf.
18. Style a Ghost Coffee Bar
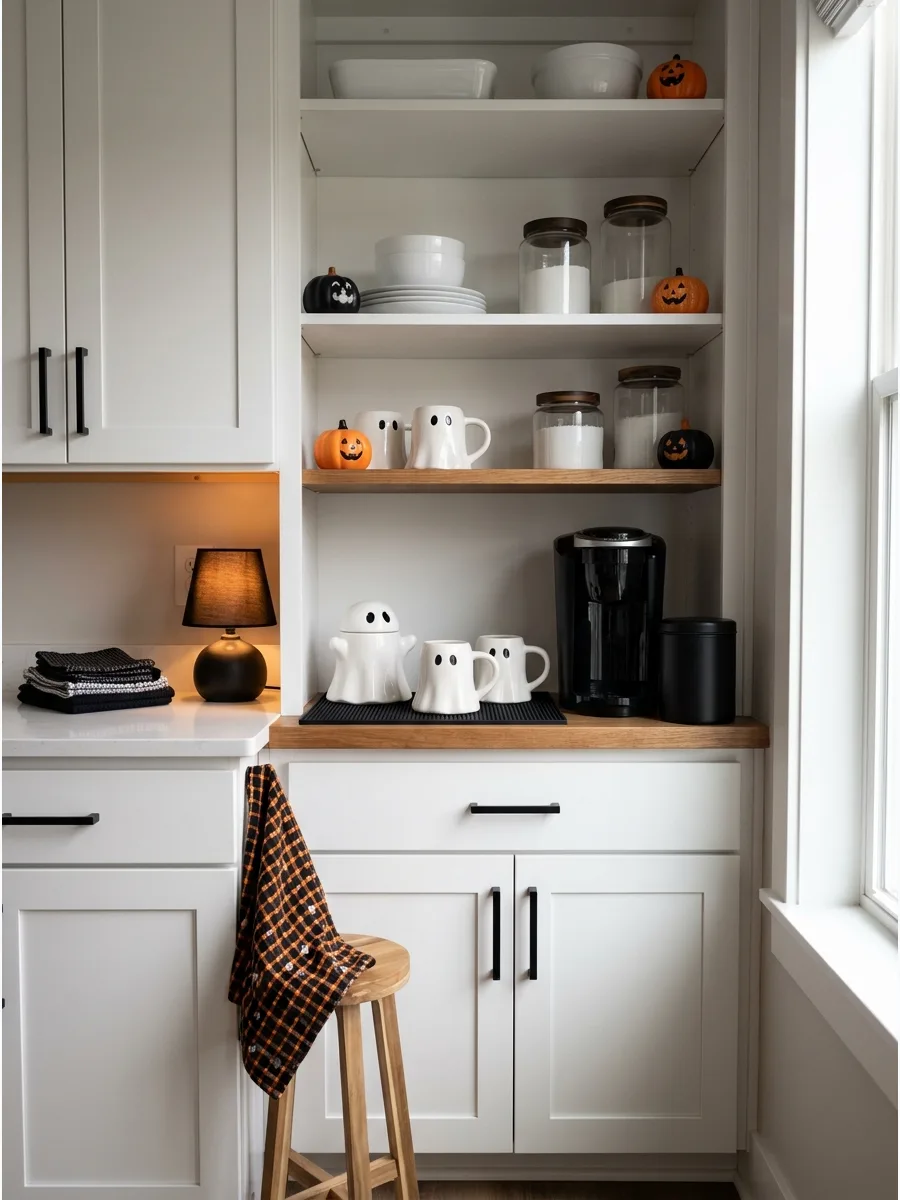
A white-and-black palette creates a clean, playful look that does not feel visually crowded. Display white ghost mugs and a ceramic ghost-shaped container next to a sleek black coffee maker. This high-contrast scheme works perfectly in modern kitchens with white cabinetry.
It is easier to maintain a tidy appearance when sticking to just two neutral colors. White ceramic ghosts blend in with standard dishes while still providing a clear seasonal message.
- Source ceramic ghost mugs and containers from seasonal decor aisles in early September.
- Arrange the mugs on a small black mat or tray to protect the counter from coffee drips.
- Add a black-and-white striped towel to the oven handle to carry the theme through the rest of the room.
Best shortcut: Stick to matte finishes for the black items to prevent the display from looking too shiny or cheap.
19. Add Halloween Syrup Bottle Labels
Swapping standard brand labels for spooky versions makes ordinary supplies part of the decoration. Apply removable Halloween labels to glass syrup bottles and arrange them on a wooden tray. Adding a miniature pumpkin or a few black coffee stirrers completes the curated look.
Glass bottles always look more expensive than plastic ones, even with simple sticker upgrades. This is a perfect way to decorate without adding any new items to a full counter.
- Download and print labels at home or buy pre-made stickers from online makers.
- Clean the glass bottles thoroughly with rubbing alcohol before applying new labels for a smooth finish.
- Use waterproof label paper if you plan to wash the bottles frequently throughout the season.
Most people skip this: Tie a small piece of black twine around the neck of each bottle to hide the plastic pump threads.
20. Decorate a Tiered Halloween Coffee Tray
A two-level tray maximizes vertical space while keeping the footprint small on a crowded counter. Fill the levels with mugs, small pumpkins, and folded napkins to create a dense but organized display. Repeating only two or three colors prevents the compact arrangement from looking messy.
Vertical storage is the best way to add personality to a kitchen with limited counter space. Grouping items on a tray makes the whole collection feel like one single decorative element.
- Choose a tiered tray that matches your kitchen hardware, such as matte black or brushed gold.
- Place larger items like mugs on the bottom tier and smaller figurines on the top tier for balance.
- Swap out the pumpkins for pinecones or ornaments to transition the tray into winter.
Quick win: Place a small bunch of dried wheat in a mug on the top tier to add height and a rustic feel.
21. Create a Pastel Halloween Coffee Bar
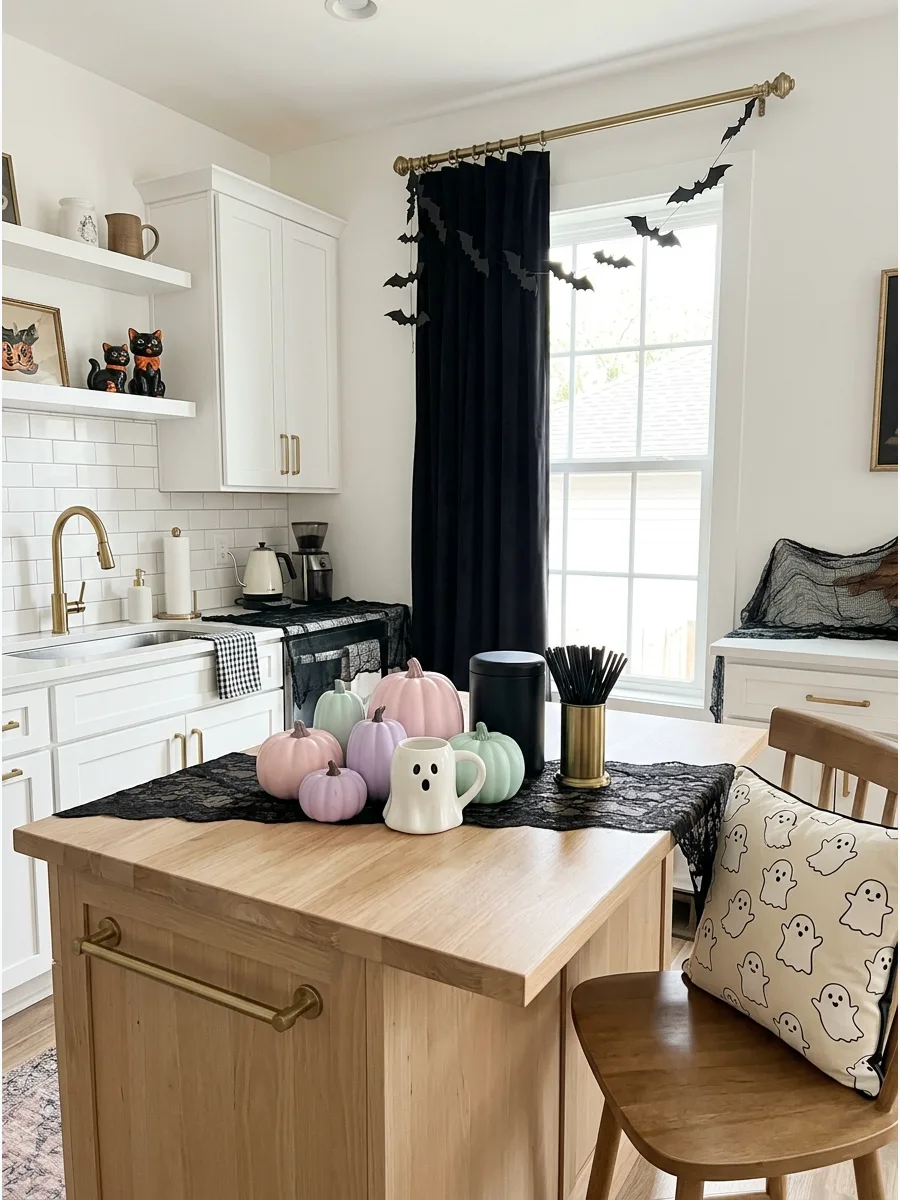
Pale pink, lavender, and mint pumpkins offer a fresh alternative to traditional dark colors. Combine these soft tones with playful ghost mugs and small black accents to ensure the theme remains recognizable. This style softens the kitchen environment and pairs well with light-colored countertops.
Black accents are necessary to prevent the pastel decor from looking like a spring or Easter display. A few black straws or a dark coffee canister will ground the lighter shades.
- Look for pastel pumpkins at modern home stores or paint orange ones with matte craft paint.
- Group the pumpkins in odd numbers like three or five to create a more natural arrangement.
- Use this palette if you have a white or light grey kitchen to maintain a bright, airy feeling.
Best shortcut: Use velvet-covered pumpkins in pastel shades to add a soft texture that contrasts with hard kitchen surfaces.
22. Style a Vintage Halloween Beverage Station
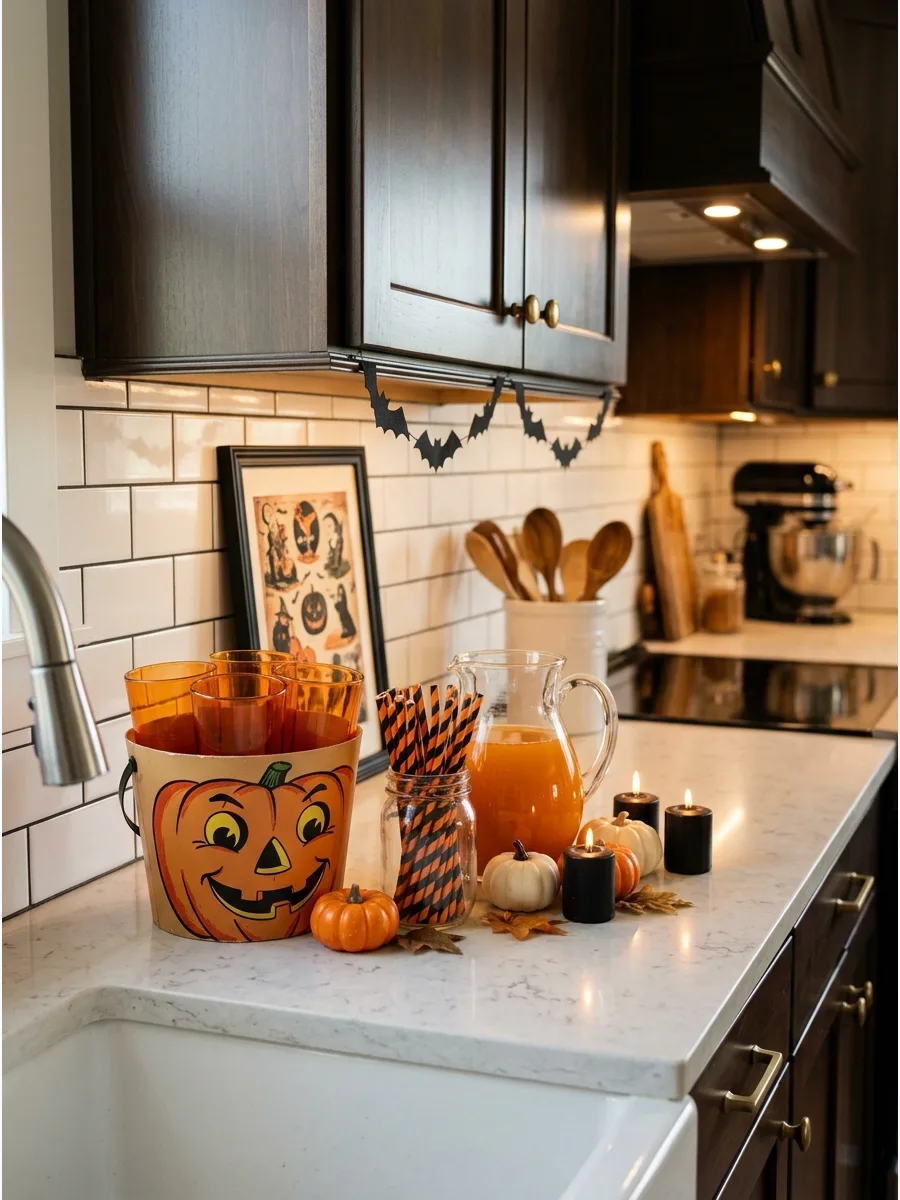
Mixing retro pumpkin containers with orange glassware creates a nostalgic, collected feel. Limit the display to one shelf or a single tray to prevent old-fashioned illustrations from feeling like clutter. Striped paper straws and classic Halloween prints add a layer of texture that modern decor often lacks.
Choosing items from a specific era makes the holiday feel more personal and less mass-produced. Orange glass catches the light beautifully when placed near a window or under-cabinet lighting.
- Search for authentic vintage pieces at antique malls or buy modern reproductions for durability.
- Use a glass jar to hold striped straws to keep them clean and visible as a decor element.
- Stick to a consistent orange and black color scheme to tie different vintage patterns together.
Most people skip this: Place a small battery-operated tea light inside vintage cardboard buckets to make them glow safely.
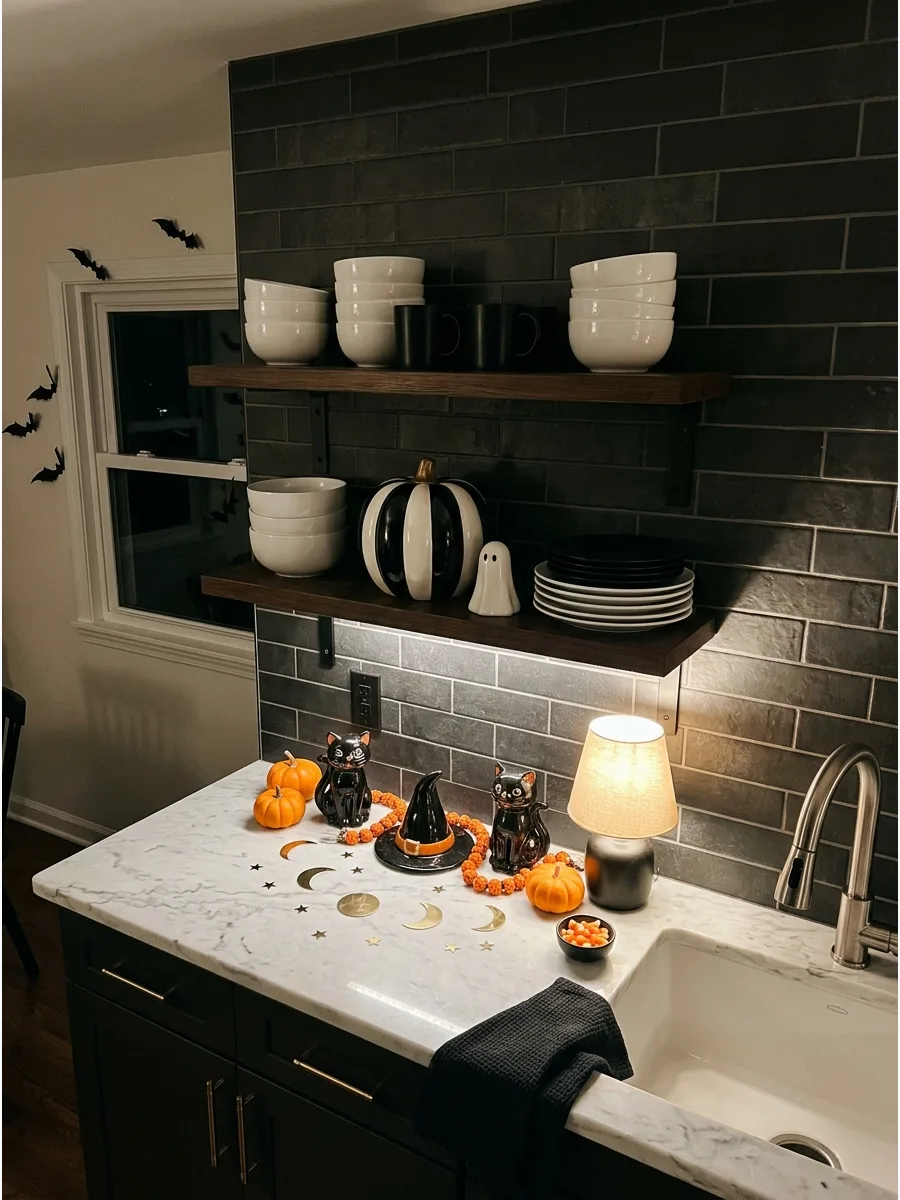
23. Add Black Bats to Open Kitchen Shelves
Removable bat stickers are an easy way to add movement to open shelving without permanent changes. Place the bats behind dishes and jars across two or three levels to connect the entire wall. This technique uses the vertical space of the kitchen without taking up any actual storage room.
Grouping them in a flight pattern makes the arrangement look intentional rather than random. It is an effective way to decorate without moving a single plate or bowl.
- Buy a pack of plastic or cardstock bats that come with wall-safe adhesive dots.
- Bend the wings slightly before sticking them to the wall to create a three-dimensional effect.
- Start the flight pattern in a lower corner and move upward across the shelves for the best visual flow.
Quick win: Vary the sizes of the bats, placing the largest ones at the bottom and the smallest ones at the top to mimic perspective.
24. Mix Halloween Pieces With Everyday Dishes
Integrating seasonal pieces with everyday dinnerware keeps the kitchen functional and festive. Tuck a few pumpkins or black candleholders between regular plates and bowls for a subtle seasonal shift. This avoids the hassle of packing away entire sets of dishes just for a short holiday.
Using varying heights creates a more interesting visual flow across the shelf. Neutral dishes provide the perfect backdrop for one or two bold Halloween accents.
- Pick two or three high-quality Halloween items rather than many small, cheap ones.
- Space the items out so the shelf does not look overstuffed or difficult to use.
- Choose accents that match the material of your dishes, such as ceramic pumpkins with ceramic plates.
Best shortcut: Use small black bowls as candy dishes tucked into your plate stacks for a functional and festive surprise.
25. Create Black-and-White Halloween Shelves
A monochrome palette is a sophisticated way to handle Halloween themes in a modern home. Arrange white dishes with black pumpkins and striped bowls to create a high-contrast look. Varying the shapes and textures keeps the limited color scheme from feeling flat or boring.
Sticking to two colors makes it much easier to shop for new pieces that will always match. This look is timeless and avoids the neon orange tones that can sometimes feel too loud.
- Audit your current cabinets for any black or white items that can be moved to the open shelves.
- Incorporate a pattern like stripes or polka dots to add visual interest to the solid colors.
- Use matte black items to provide a modern contrast against glossy white ceramic dishes.
Most people skip this: Add a single black-and-white framed photograph or art print to the shelf to anchor the monochrome theme.
26. Display Orange Glassware on Kitchen Shelves

Translucent amber or orange glass adds warmth and color without the spookiness of typical decor. Mix orange tumblers and bowls between neutral dishes to create a glowing effect when the kitchen lights are on. This style works well for the entire autumn season, not just the week of Halloween.
Glassware provides a pop of color that feels more integrated into a kitchen than plastic figurines. It is a practical way to decorate using items you can actually use for serving drinks.
- Look for vintage amber glass at thrift stores or modern sets at home retailers.
- Place the glassware on the shelf that receives the most light to highlight the color.
- Pair orange glass with grey or navy blue dishes for a sophisticated autumnal color palette.
Quick win: Use an amber glass pitcher as a vase for dried autumn leaves to double the impact on your shelf.
27. Build a Spooky Apothecary Shelf
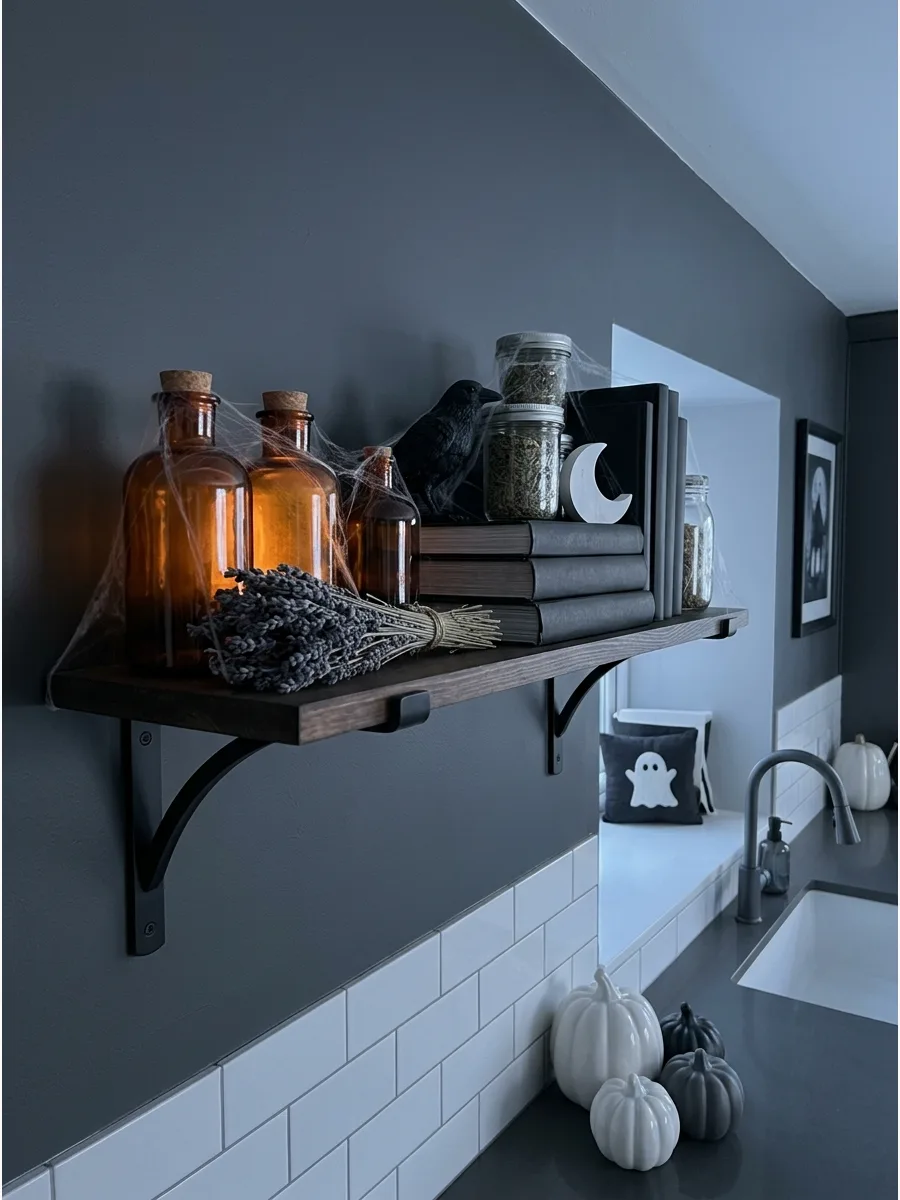
Transform a shelf into a mysterious lab using amber bottles and jars of dried herbs. Add a decorative raven or a small crescent moon sign to finalize the apothecary aesthetic. Using dark cookbooks as a base for smaller items helps create layers and height.
Real dried botanicals like lavender or eucalyptus look much better than plastic greenery for this specific theme. This look works best when the items are slightly crowded together to look like a busy workshop.
- Collect empty glass bottles and jars in various sizes and colors like amber, green, and clear.
- Print or buy aged paper labels to give the bottles a convincing vintage look.
- Store actual cooking spices in the jars to keep the shelf functional while it looks decorative.
Best shortcut: Use cork stoppers instead of plastic lids to give your bottles an authentic old-world apothecary feel.
28. Create a Ceramic Ghost Shelf Collection
Grouping ghosts in different shapes creates a playful and cohesive collection. Place the ceramic ghosts among stacked plates and mugs, ensuring they all share the same glossy or matte finish. This consistency makes the variety of shapes look like a curated set rather than a random pile.
Ghosts are the most versatile Halloween motif because they pair easily with any existing kitchen color. They add a whimsical touch that is perfect for families with children.
- Start with three ghosts of different sizes and add to the collection over time.
- Place them at the front of the shelf so they are visible but do not block access to dishes.
- Choose ghosts with simple faces to keep the look modern and uncluttered.
Quick win: Use a small piece of removable museum wax on the bottom of the ghosts to keep them from tipping over when you grab a plate.
29. Style a Gothic Victorian Kitchen Shelf
Dark floral patterns and brass accents bring a dramatic, old-world feel to the kitchen. Combine ornate frames with black glass and burgundy flowers to create a sophisticated Victorian look. This style is perfect for those who prefer a moody vibe over bright orange decorations.
Heavy textures and dark wood help ground the delicate brass elements. It creates a high-end look that feels more like a designed room than a temporary holiday setup.
- Find ornate frames at thrift stores and spray paint them gold or brass if needed.
- Use faux burgundy roses or dried flowers so the arrangement lasts the entire month.
- Keep the rest of the shelf simple with dark-colored dishes to let the decorative pieces stand out.
Most people skip this: Use a battery-operated taper candle in your brass holder to add a safe, flickering glow to the shelf at night.
30. Add Halloween Art to Floating Shelves
Leaning framed prints against the wall is a low-effort way to change the mood of the room. Layer a small framed bat or moon print behind everyday dishes to create a sense of depth. This is a great solution for renters who cannot hang heavy decor on the walls.
Small prints are easy to store flat once the season is over. Swapping art is the fastest way to change a kitchen's personality without buying new furniture or accessories.
- Select frames that are 5×7 or 8×10 to ensure they fit easily between shelves.
- Choose art with a simple subject like a single pumpkin or a bat to keep the shelf from looking busy.
- Use a Command strip on the bottom of the frame to prevent it from sliding on smooth shelf surfaces.
Best shortcut: Look for digital download art online so you can print it at home and put it in a frame you already own.
31. Decorate Glass-Front Cabinets From Inside
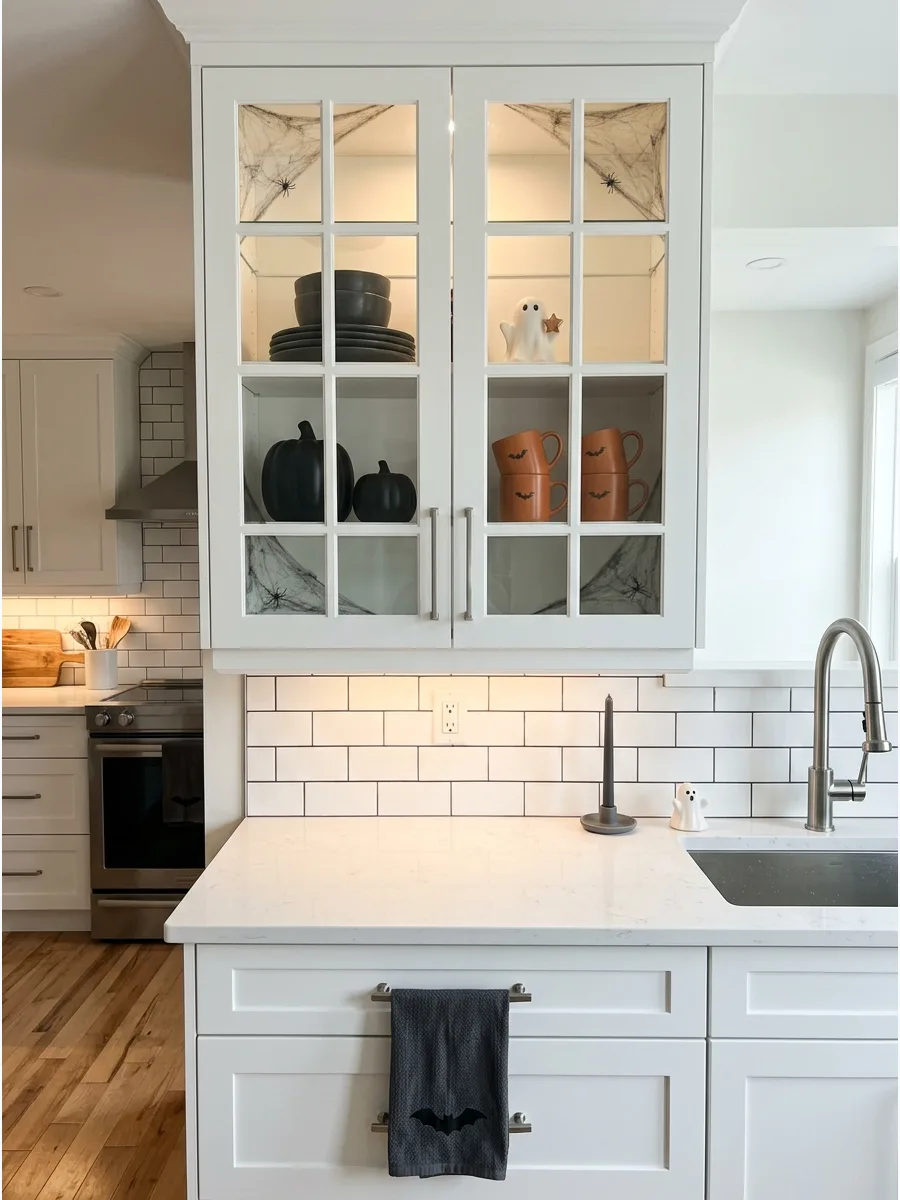
Placing decor inside glass-front cabinets keeps the kitchen counters clear for cooking and meal prep. Focus on the middle or top shelves to display seasonal items like black dishes or ceramic pumpkins without blocking your view of daily essentials.
Concentrate the decorations on one or two shelves so frequently used items remain accessible and the display looks intentional. This approach creates a curated look that stays safe from spills and splatters.
- Use existing orange or black mugs to save on the decor budget.
- Place larger items like pumpkins behind the glass but in front of stacked plates.
- Rotate items seasonally by swapping the pumpkins for winter greenery in December.
Quick win: Add battery-operated puck lights to the top of the cabinet to illuminate the spooky silhouettes and make them visible after dark.
32. Add Removable Bats to Cabinet Doors
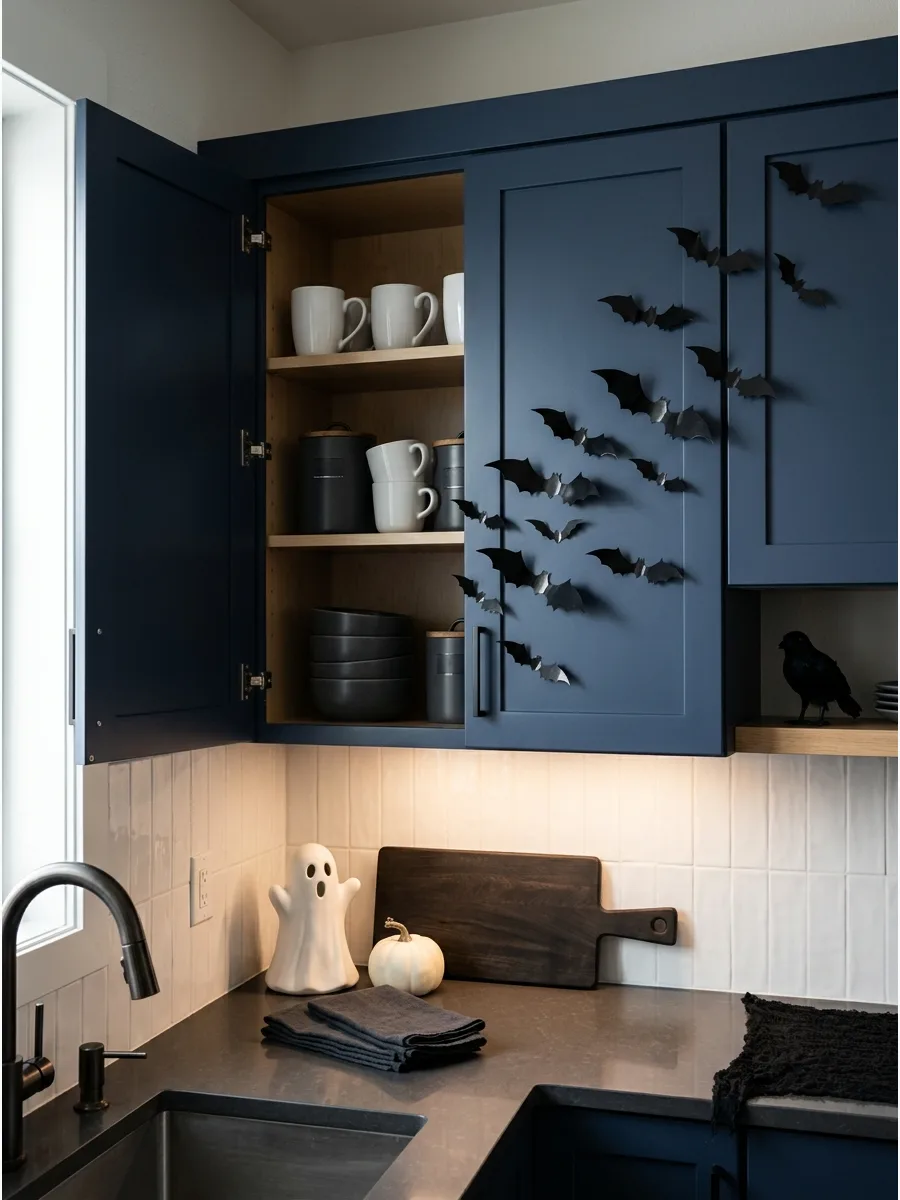
Applying bat shapes to cabinet doors is one of the fastest ways to change the mood of a kitchen. Avoid a stiff look by varying the sizes and angles of the bats as if they are flying across the room.
Arrange lightweight bat shapes across several upper cabinet doors in an irregular diagonal flight path for a dynamic look. Use removable adhesive to ensure the cabinet finish stays protected when the season ends.
- Purchase pre-cut plastic or cardstock bats for a 10-minute setup.
- Use painter's tape or poster putty to prevent damage to cabinet paint or stain.
- Cluster more bats in one corner and thin them out as they move across the wall.
Most people skip this: Fold the bat wings slightly before sticking them to the cabinets to create a 3D effect that casts realistic shadows.
33. Hang Mini Wreaths on Kitchen Cabinets
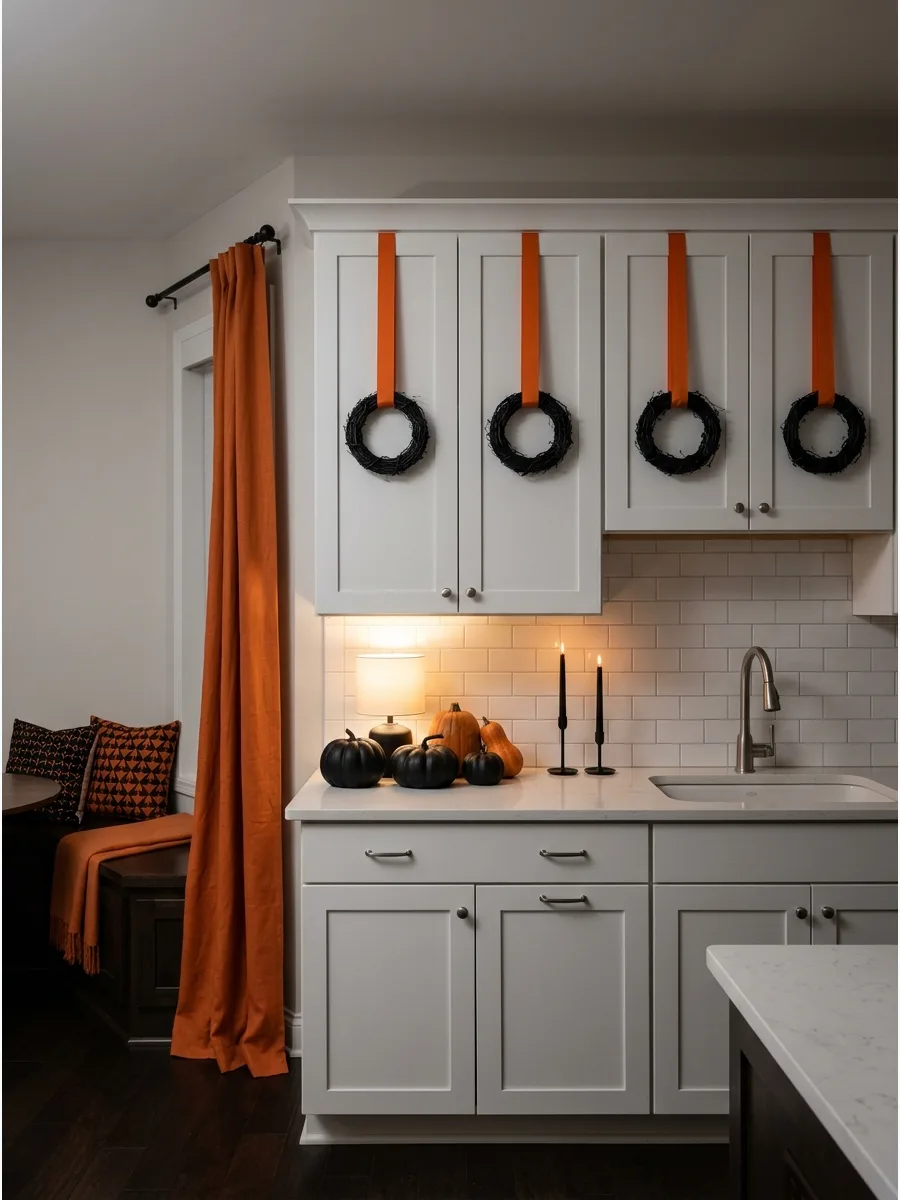
Small wreaths bring texture and a traditional festive feel to the upper half of the kitchen. Use black-leaf or twig wreaths to contrast against light-colored cabinetry for maximum impact.
Attach small black-leaf wreaths to selected cabinet doors with a wide satin ribbon draped over the top edge of the door. This keeps the wreaths secure without the need for nails or screws.
- Source 6-inch or 8-inch wreaths to ensure they fit the scale of a standard cabinet door.
- Secure the ribbon to the inside of the cabinet door with a removable command hook.
- Only decorate every other cabinet to avoid making a small kitchen look cluttered.
Best shortcut: Use thin floral wire to attach a single tiny plastic spider or a mini skull to the center of each wreath for a subtle scare.
34. Tie Halloween Ribbon Around Cabinet Handles
Adding ribbon to cabinet hardware is a low-cost way to introduce Halloween colors like orange, black, or purple. Choose velvet for a moody, gothic feel or gingham for a classic festive look.
Tie narrow black velvet or orange gingham ribbon into simple bows around a few cabinet knobs to add a soft touch to hard surfaces. Keep the ribbons away from the stove or sink to prevent them from getting dirty or damp.
- Buy ribbon by the spool at craft stores for the most affordable option.
- Cut the ends of the ribbon at a sharp angle to prevent fraying over time.
- Limit this to 3 or 4 knobs on a pantry or coffee station for a restrained look.
Most people skip this: Iron the ribbon pieces before tying them to ensure the loops of the bow stay crisp and professional-looking all month.
35. Add Mini Witch Hats to Kitchen Canisters
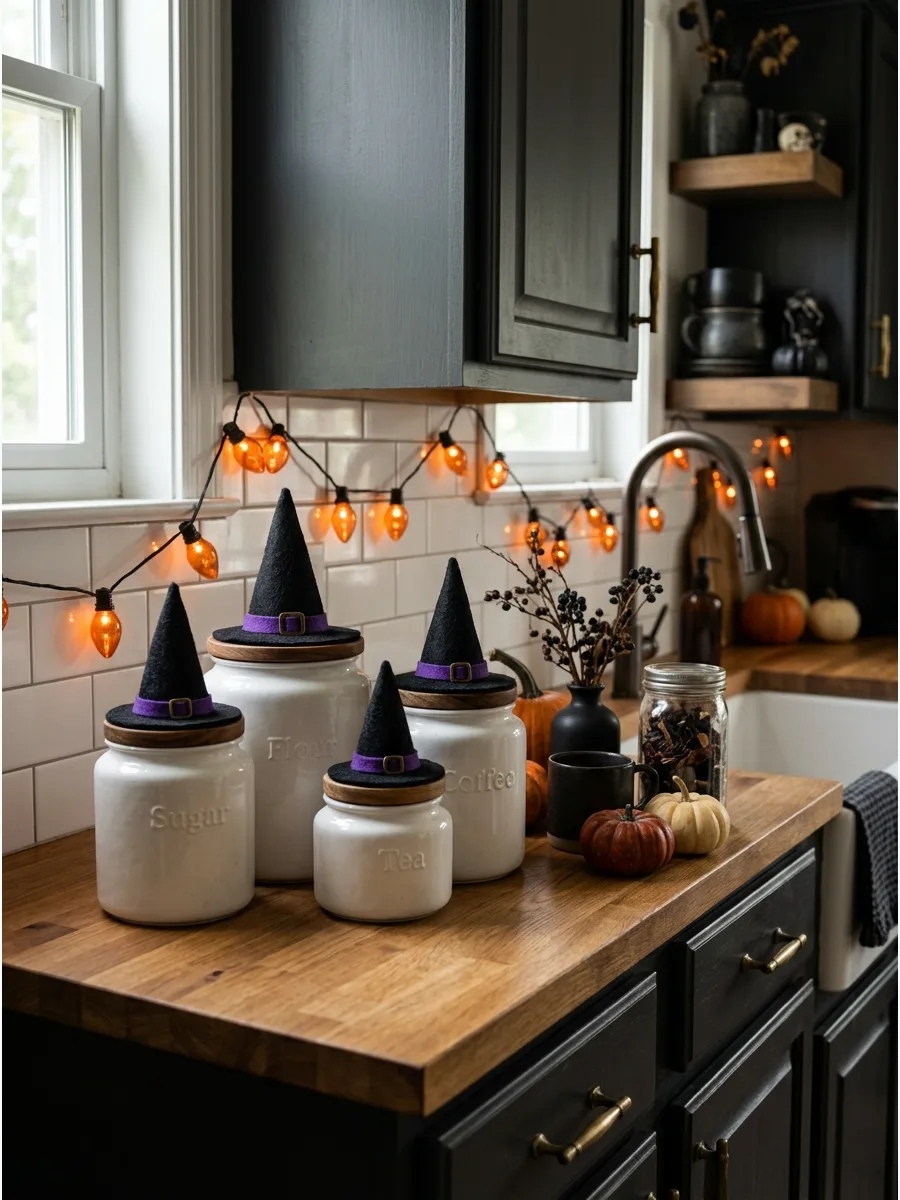
Everyday kitchen canisters can become part of the decor with a simple accessory swap. Miniature witch hats fit perfectly on top of round lids for flour, sugar, or coffee jars.
Place lightweight decorative witch hats over sugar bowls or sealed canisters for an instant character update that takes seconds to install. It is a playful way to use the vertical space on your countertops.
- Look for doll-sized or craft-sized witch hats that match your canister lid diameter.
- Ensure the hat sits securely on the lid so it does not fall off when the jar is moved.
- Stick to matte black hats to maintain a sophisticated look amidst other decor.
Quick win: If the hat is too small for the lid, tilt it to the side and secure it with a tiny piece of clear double-sided tape.
36. Create a Halloween Hutch Display

A hutch offers a large vertical canvas for a cohesive Halloween theme. Mix everyday black or white dishes with orange mugs and small ghost figurines to balance function and style.
Repeat the same colors on each shelf while leaving some open space around the objects to prevent a cluttered look. This keeps the display feeling intentional rather than messy.
- Group items in odd numbers like three mugs or five mini pumpkins for better balance.
- Use seasonal items you already own, such as black bowls or wood serving boards.
- Space items out so the back of the hutch is still visible between the objects.
Best shortcut: Line the back of the hutch with black-and-white striped contact paper for a temporary, high-contrast backdrop that makes the decor pop.
37. Decorate the Kitchen Island With a Pumpkin Bowl
The kitchen island is a high-traffic zone that needs a centerpiece that stays out of the way. A low-profile bowl filled with pumpkins adds seasonal color without blocking sightlines across the room.
Fill a broad wooden or ceramic bowl with a mix of black, cream, and orange pumpkins for a low-profile island centerpiece. This setup leaves plenty of room for food prep around the edges of the island.
- Sourced from grocery stores for real pumpkins or craft shops for reusable ones.
- Mix different textures like velvet, ceramic, and natural rinds for visual depth.
- Keep the arrangement under six inches tall to ensure it doesn't block conversation.
Most people skip this: Tuck a few dried eucalyptus leaves between the pumpkins to add a natural, earthy scent to the kitchen workspace.
38. Create a Halloween Island Tray
Trays are the best tool for organizing decor on a large surface like an island. They define a specific zone for spooky items so they don't drift across the whole counter.
Arrange a candle, a dark vase, and small pumpkins on a large tray so the entire display can be moved easily whenever you need more space. This makes cleaning the island much faster.
- Use a tray with handles to make it easy to lift and relocate during meal prep.
- Vary the heights of the items on the tray to create a professional look.
- Stick to a monochromatic palette like all black or all white for a modern feel.
Quick win: Place a small piece of non-slip shelf liner under the tray to keep it from sliding or scratching polished stone surfaces.
39. Use a Cauldron as an Island Centerpiece
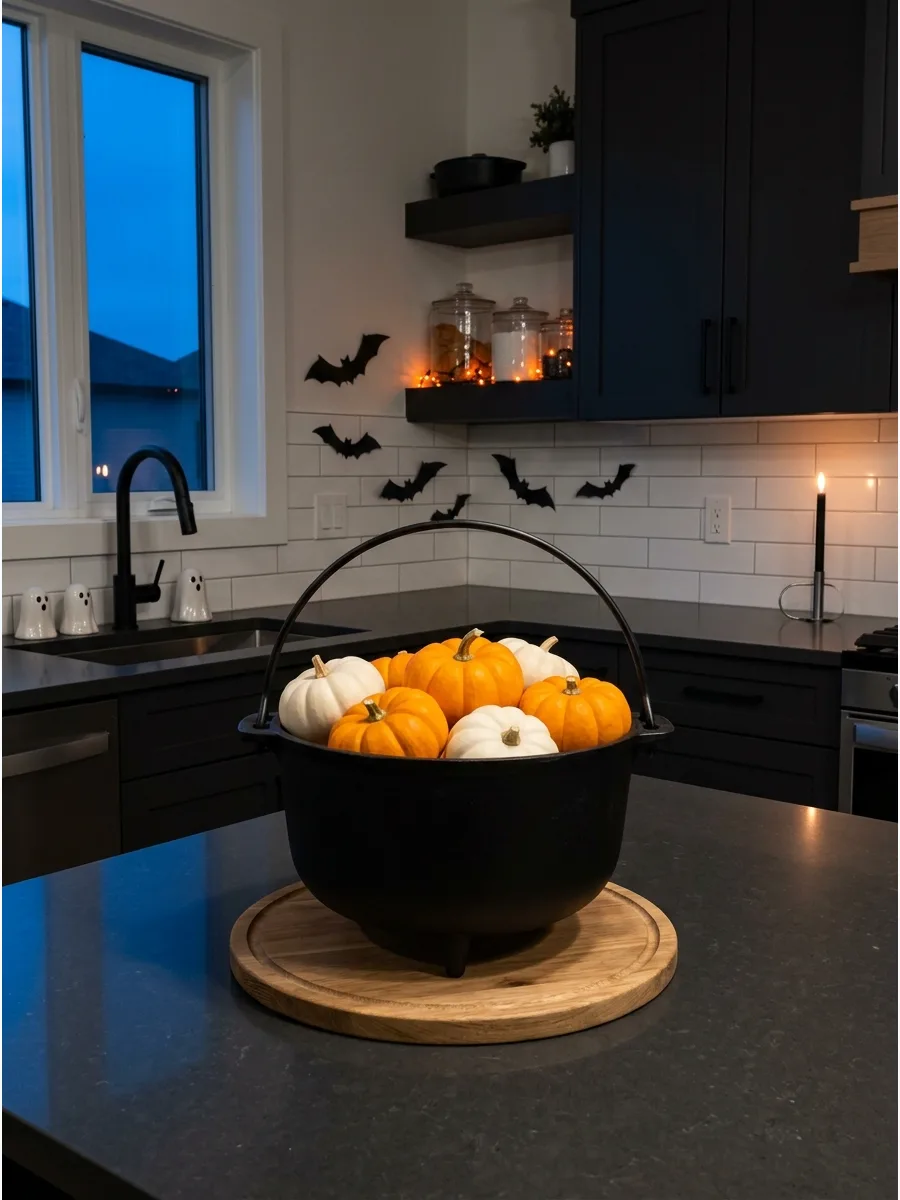
A cauldron is a classic Halloween symbol that fits naturally into a kitchen setting. It can serve as a functional bowl for holding snacks or a purely decorative vessel for autumn foliage.
Place a decorative cauldron on a protective board or tray to prevent scratches while holding a mix of miniature pumpkins or wrapped candy. It adds a playful, witchy vibe to the center of the room.
- Choose a ceramic cauldron for a more upscale look or plastic for a lightweight option.
- Fill the bottom of the cauldron with crumpled paper so you need fewer pumpkins to fill it.
- Ensure the cauldron is food-safe if you plan to use it for serving unwrapped treats.
Best shortcut: Place a small battery-operated tealight inside a bowl within the cauldron to create a subtle internal glow that mimics a fire.
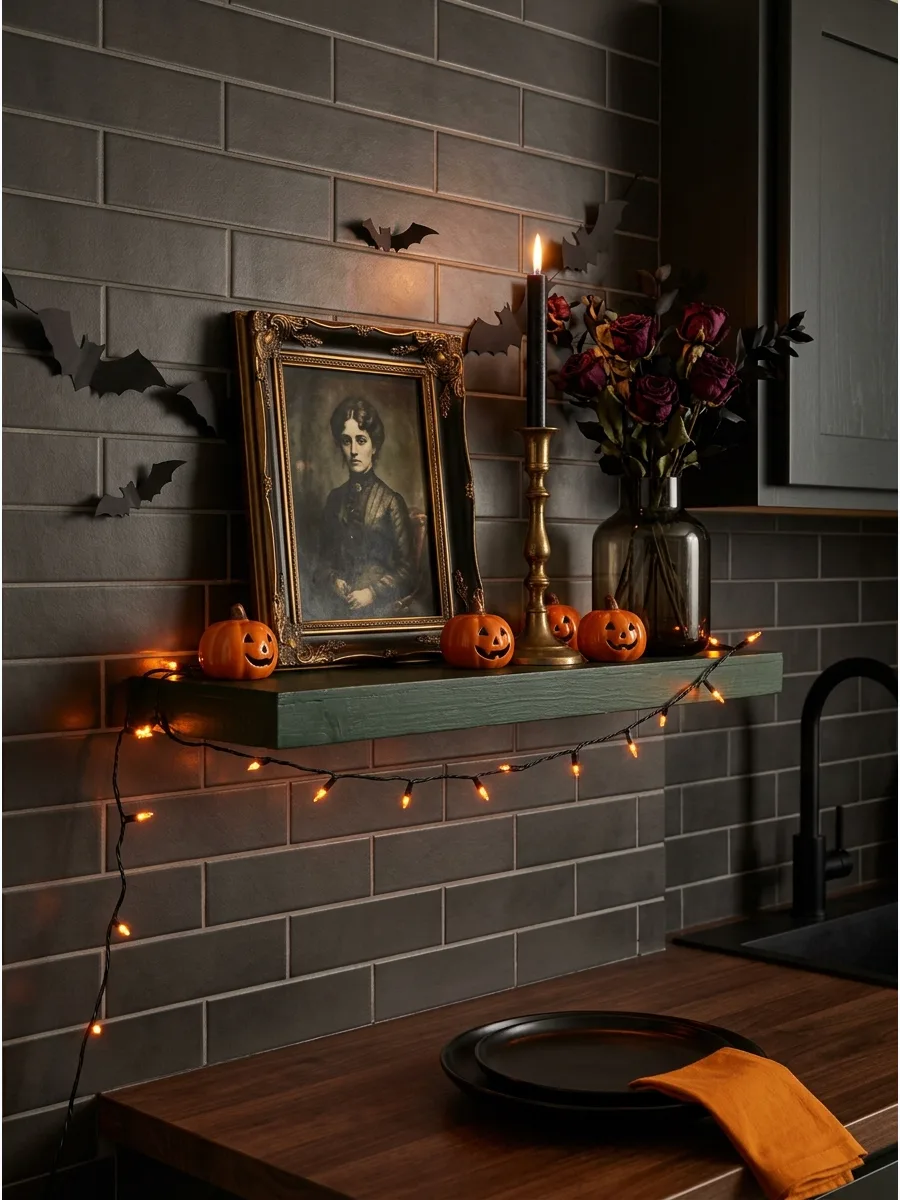
40. Add a Haunted Floral Arrangement
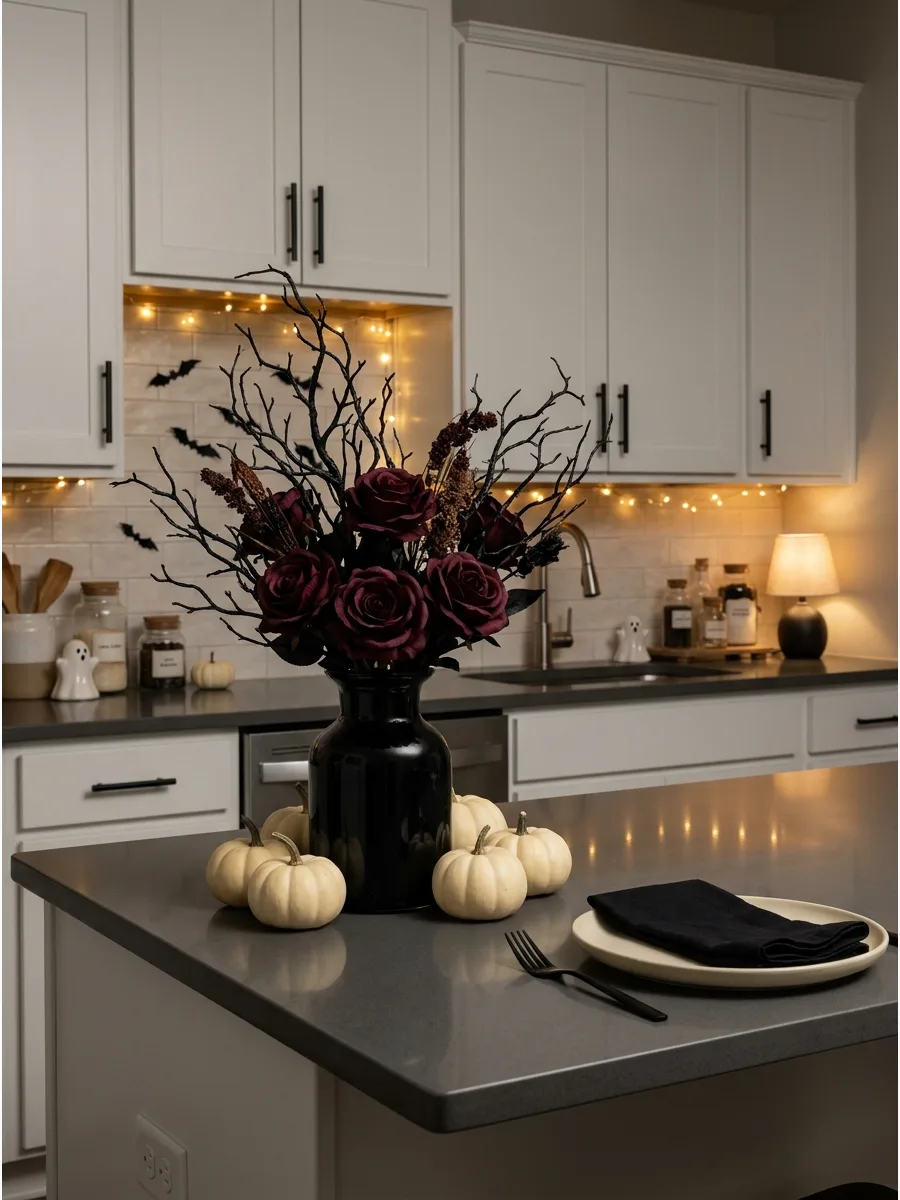
Floral arrangements in dark, moody colors bring a sophisticated Halloween feel to the kitchen. Deep reds, purples, and blacks look striking when paired with dried branches.
Position a black vase filled with burgundy flowers and bare branches in the center of the island for a dramatic focal point. This looks polished and avoids the kitsch of many seasonal decorations.
- Buy high-quality faux stems so you can reuse the arrangement every October.
- Use real branches from the yard and spray paint them black for a zero-cost addition.
- Keep the arrangement narrow enough that it doesn't spill over into the prep area.
Quick win: Spray paint real fallen branches matte black to get that 'haunted forest' look without spending extra money on specialty decor.
41. Create a Moon-and-Stars Kitchen Display
For a modern or celestial take on Halloween, swap out the orange for deep blues and golds. This theme feels magical and can transition easily into the winter months.
Use crescent moons, metallic stars, and navy candles instead of traditional orange décor for a magical nighttime theme that fits a modern kitchen. It is a sophisticated way to acknowledge the season.
- Look for celestial-themed objects in the home decor section rather than the holiday aisle.
- Pair navy blue accessories with brass or gold hardware for a high-end look.
- Use a few star-shaped cookie cutters as decorative accents near the display.
Most people skip this: Use star-shaped cookie cutters as mini stands for small tea lights to carry the celestial theme across the whole counter.
42. Style a Halloween Sink-Side Tray
The area around the sink is often overlooked for decor, but it is a high-visibility spot.
A small tray keeps essentials organized while leaving room for a tiny spooky accent. Arrange an amber soap dispenser and a small ghost figurine on a waterproof tray to keep the sink area festive and tidy. This keeps the decorations compact so they do not interfere with the faucet or soap use.
- Use a tray made of stone or ceramic that can handle water splashes.
- Choose a hand towel with a subtle spooky print to hang nearby for a finished look.
- Keep the decor items to the side of the faucet to maintain full handle movement.
Best shortcut: Swap your regular dish soap for one with a spicy pumpkin or apple scent to add an invisible layer of seasonal atmosphere.
43. Add Halloween Kitchen Towels
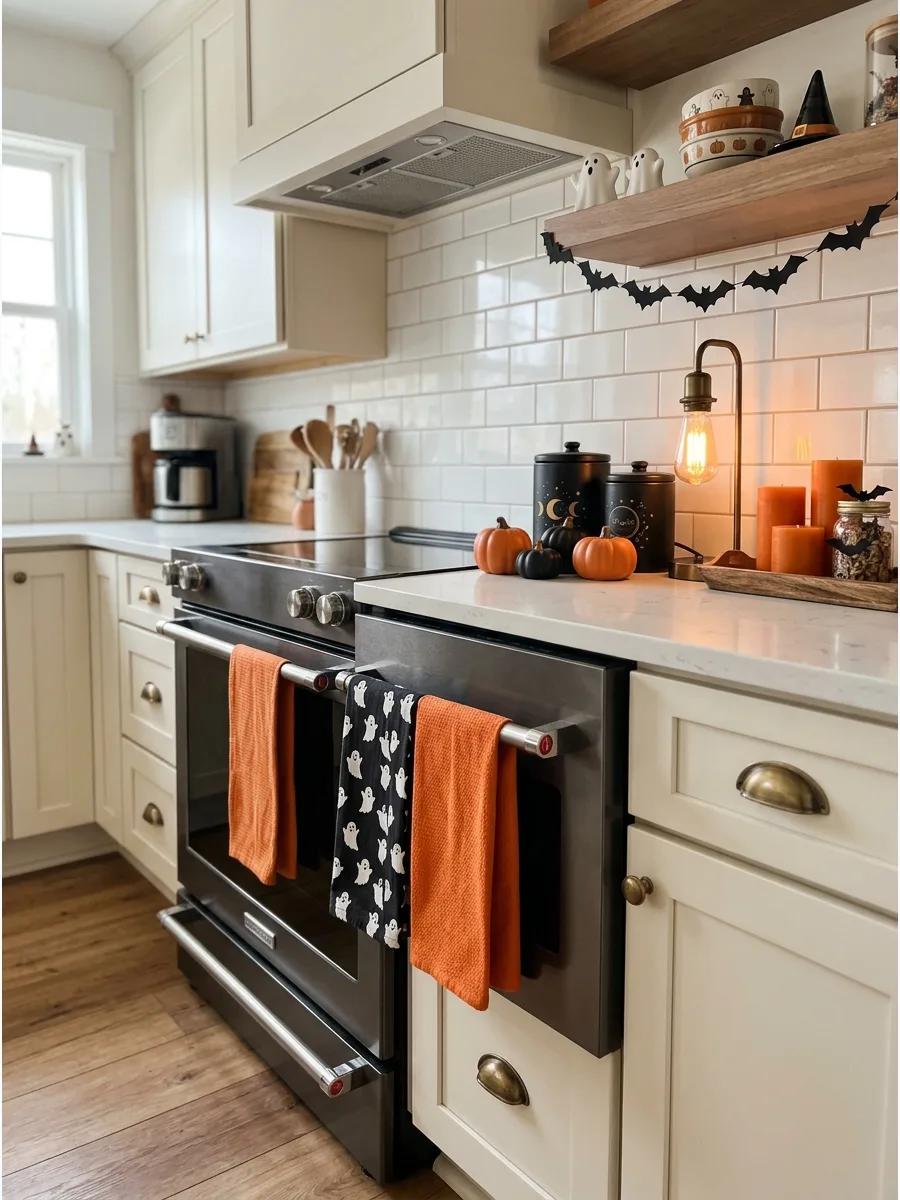
Kitchen towels are a practical way to introduce pattern and color without taking up any counter space. Hanging them on the oven handle or dishwasher bar creates a large block of seasonal color.
Hang pumpkin-patterned or ghost-themed towels from the oven handle to repeat the colors used elsewhere in the room. It is one of the easiest ways to refresh the space.
- Buy towels in multi-packs to get a coordinated set of patterns and solids.
- Wash new towels before hanging to ensure they are absorbent and hang flat.
- Layer a patterned towel over a solid one to give the oven handle a more styled look.
Most people skip this: Use a large binder clip on the back of the towel to keep it from slipping off the handle every time the oven is opened.
44. Decorate the Kitchen Window With Bats
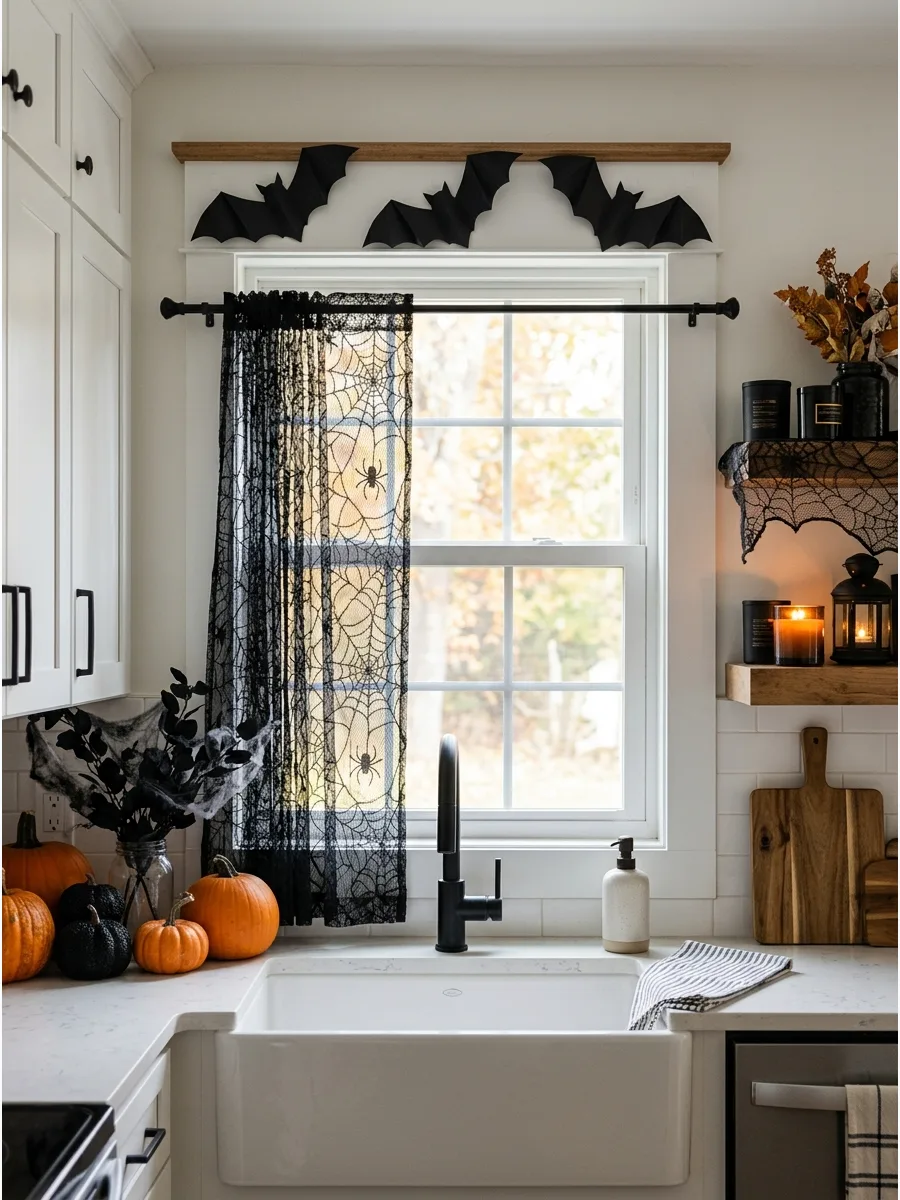
Windows are natural focal points that can be decorated without losing valuable workspace. Adding silhouettes to the frame or glass creates a spooky effect when the sun shines through.
Place removable bats or a lightweight silhouette garland around the window frame while keeping the center clear for natural light. This frames the view without darkening the room.
- Use static-cling decals for the glass to avoid any sticky residue.
- Avoid heavy garlands that might sag and block the operation of the window.
- Position the bats at the top or sides only to keep the view of the yard open.
Quick win: If using paper bats, place them on the window frame rather than the glass to avoid leaving oily fingerprints on the pane.
45. Create a Halloween Windowsill Garden
A windowsill garden combines the freshness of herbs with the fun of Halloween. Using dark-colored pots creates a moody backdrop for green plants.
Arrange small black planters containing herbs on the windowsill and add tiny ghost picks between the pots for a seasonal display. This keeps your herbs handy for cooking while adding a festive touch.
- Use 4-inch pots to ensure they fit securely on a standard kitchen windowsill.
- Add seasonal plant stakes or tiny plastic ghosts to the soil for a quick update.
- Ensure all pots have drainage saucers to protect the windowsill from water damage.
Best shortcut: Paint standard orange terracotta pots with black chalkboard paint so you can write 'poison' or 'elixir' on them with white chalk.
46. Style a Small Halloween Breakfast Nook

Update the breakfast area with black-and-orange cushions and a simple table runner to add a festive touch. Keep the decorations practical enough that the nook can still be used for everyday meals. A low centerpiece ensures people can see each other while eating.
Using fabric accents is a smart way to add color without taking up valuable table space.
- Buy seat cushions and runners at discount home stores in early September.
- Secure the runner with double-sided tape if the nook is used by children.
- Swap the orange runner for a deep green one to transition into Thanksgiving.
Most people skip this: Use outdoor-rated pillows for the nook to make cleaning up breakfast spills much easier during the holiday season.
47. Create an Elegant Halloween Tablescape
Set an elegant table with black plates, smoky glassware, and burgundy napkins for a sophisticated look. Add a few miniature pumpkins along the center rather than covering the whole table with decorations. This creates a moody vibe that works for both family dinners and parties.
Brass accents help lift the dark colors and prevent the table from looking too heavy.
- Invest in a set of matte black stoneware during end-of-summer sales.
- Space settings at least 24 inches apart to ensure guests have elbow room.
- Use white plates with black napkins if you want a higher-contrast modern look.
Quick win: Mix textures like velvet napkins with smooth ceramic to make a dark color palette feel layered rather than flat.
48. Build a Cute Halloween Candy Station
Set up a dedicated treat spot by filling clear jars with wrapped Halloween candy. Group the containers on one tray so the treats look organized and easy to serve. Using glass containers lets the colors of the candy act as the primary decor.
This keeps snacks in one place and prevents the kitchen from feeling like a mess of wrappers.
- Pick up bulk bags of themed candy from grocery stores in late October.
- Place the tray away from the stove to prevent chocolate from melting.
- Use plastic jars instead of glass if the station is accessible to small children.
Best shortcut: Stick to a specific candy color theme to make the station look curated instead of just a random pile of sugar.
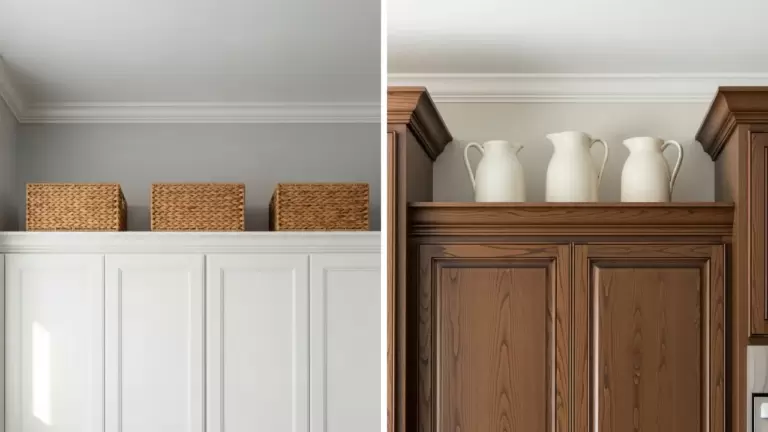
49. Decorate Above the Kitchen Cabinets
Add interest to the empty space above the cabinets with lightweight pumpkins or black branches. Leave space around each object and keep decorations away from vents, heat, and electrical fixtures. This draws the eye upward and makes the kitchen feel festive from every angle.
High-up decor should be oversized so it actually registers from the floor level.
- Look for lightweight foam pumpkins at craft stores to avoid heavy lifting.
- Use a sturdy stepladder and a second person to help spot you during placement.
- Renters can use command strips to keep lightweight items from sliding.
Most people skip this: Use museum putty on the bottom of high-up items to prevent them from shifting when you open and close cabinet doors below.
50. Coordinate the Entire Halloween Kitchen Palette
Coordinate the whole kitchen by picking a specific color scheme like charcoal and cream. Repeat those shades through towels, pumpkins, and dishes so the room feels connected without looking cluttered. This approach makes seasonal decor feel like a natural part of the home's design.
A consistent color story allows you to mix old and new items without the room looking chaotic.
- Use existing kitchen items like white bowls or black pans as the base of the palette.
- Distribute the accent color in at least three different spots to lead the eye through the room.
- Stick to neutral colors like cream and charcoal for a decor style that lasts all October.
Quick win: Pick one 'bridge' color, like gold or wood tones, to tie your Halloween palette back to your existing kitchen hardware.
Frequently Asked Questions
How can I decorate my kitchen counters for Halloween without losing prep space?
To maintain your workspace, use decorative trays to corral spooky accents into one spot rather than scattering them across the counter. You can also utilize 'dead zones' like back corners or the narrow ledge behind your sink to add festive touches that stay out of the way.
What are some sophisticated Halloween kitchen decor ideas that aren't tacky?
Achieve a moody, upscale look by incorporating matte black ceramics and arrangements of dark, dried florals. Adding vintage-style apothecary labels to your glass storage jars creates a curated and cohesive aesthetic that feels both seasonal and stylish.
How do I style a kitchen coffee bar for Halloween?
Swap out your standard cups for spooky mugs and transfer flavored syrups into glass bottles with 'potion' labels. Complete the scene by nesting small ghost figurines among your coffee pods for a charming, festive morning routine.
Are there ways to decorate kitchen cabinets for Halloween?
Dress up your cabinet doors by hanging small seasonal wreaths using festive ribbon for a classic look. For a more modern approach, apply removable 3D bat stickers to the cabinet faces to create the illusion of a colony taking flight across your kitchen.
What is the best way to light a kitchen for a Halloween party?
Create an eerie atmosphere by placing battery-operated tea lights inside lanterns on your island or dining table. You can also easily transform the entire mood by swapping your standard under-cabinet bulbs for purple or orange smart bulbs to set a perfectly spooky scene.