50 Vanity Organization Ideas
This post may contain affiliate links: full affiliate disclosure.
Does your vanity look like a makeup store exploded on it?
We all need more space and less mess, but organizing feels tough.
I’m sharing 50 simple, budget-friendly vanity organization ideas to help you get that clean, designer look today.
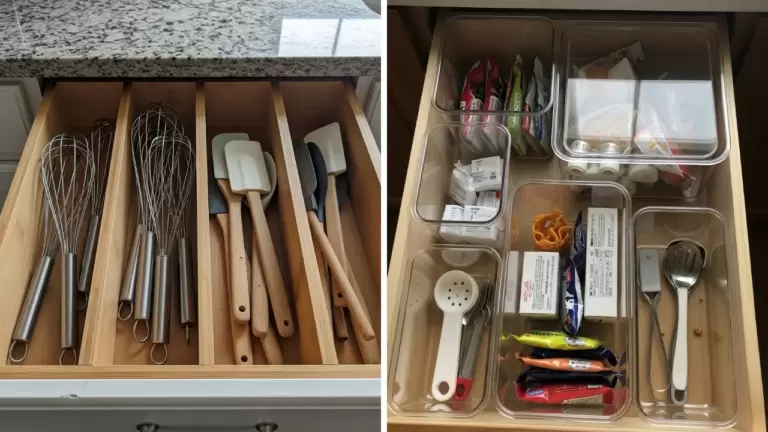
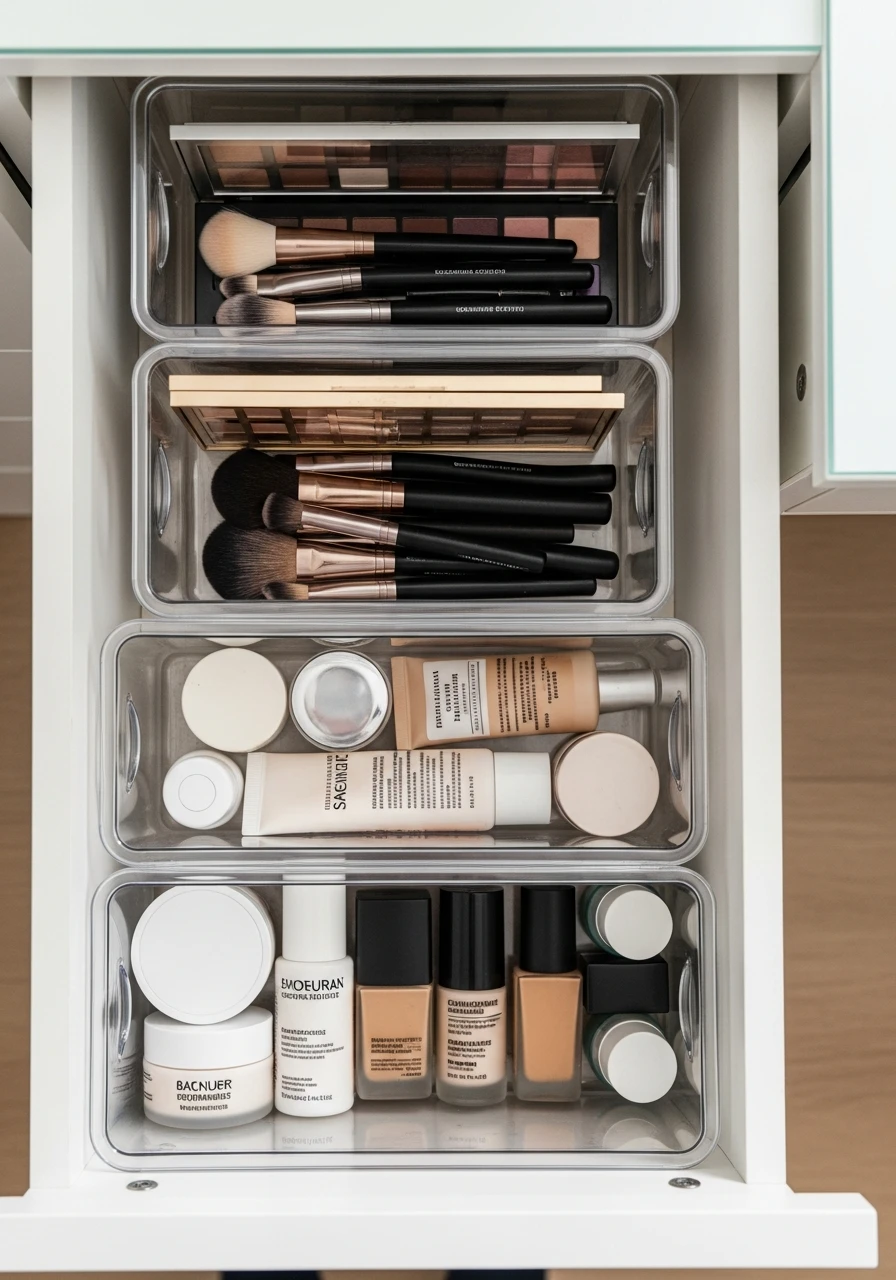
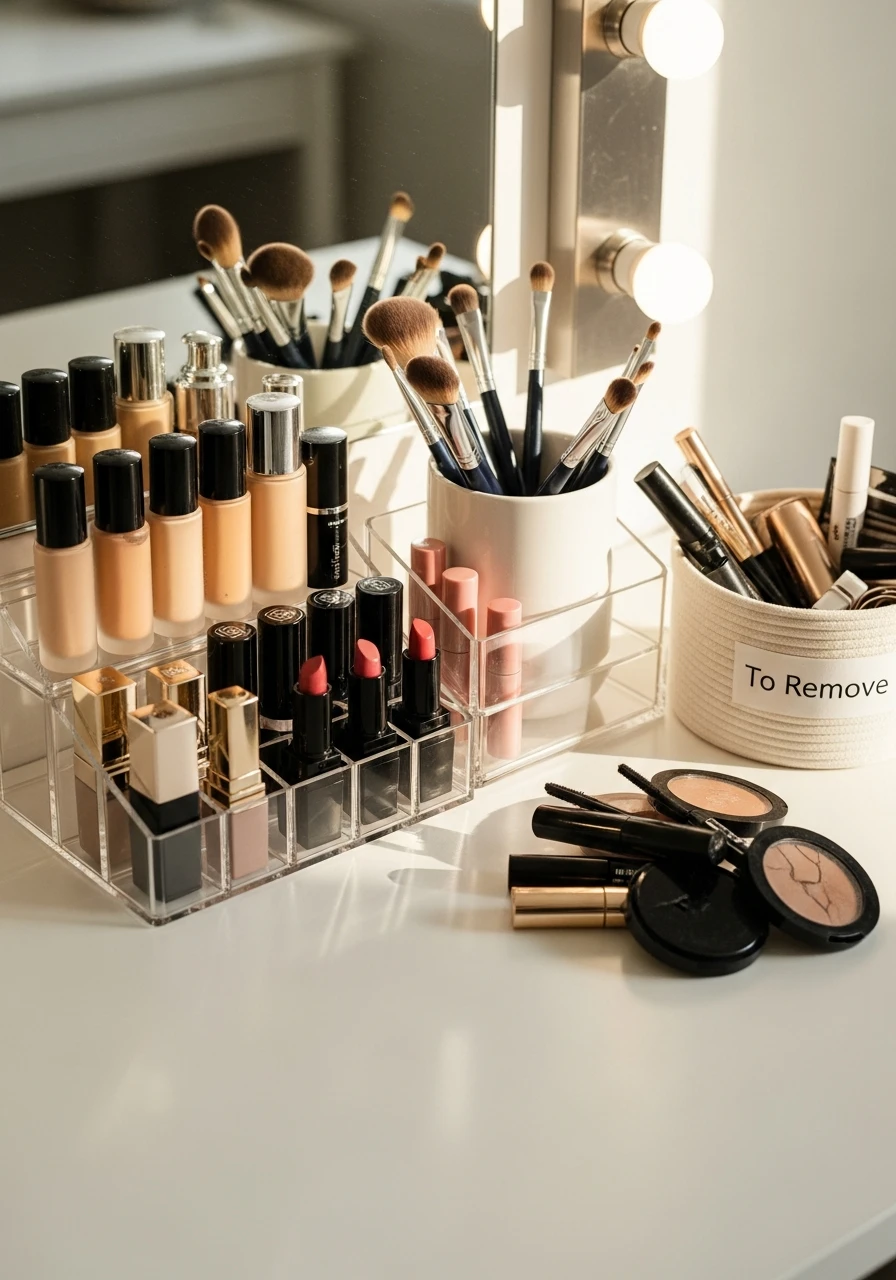
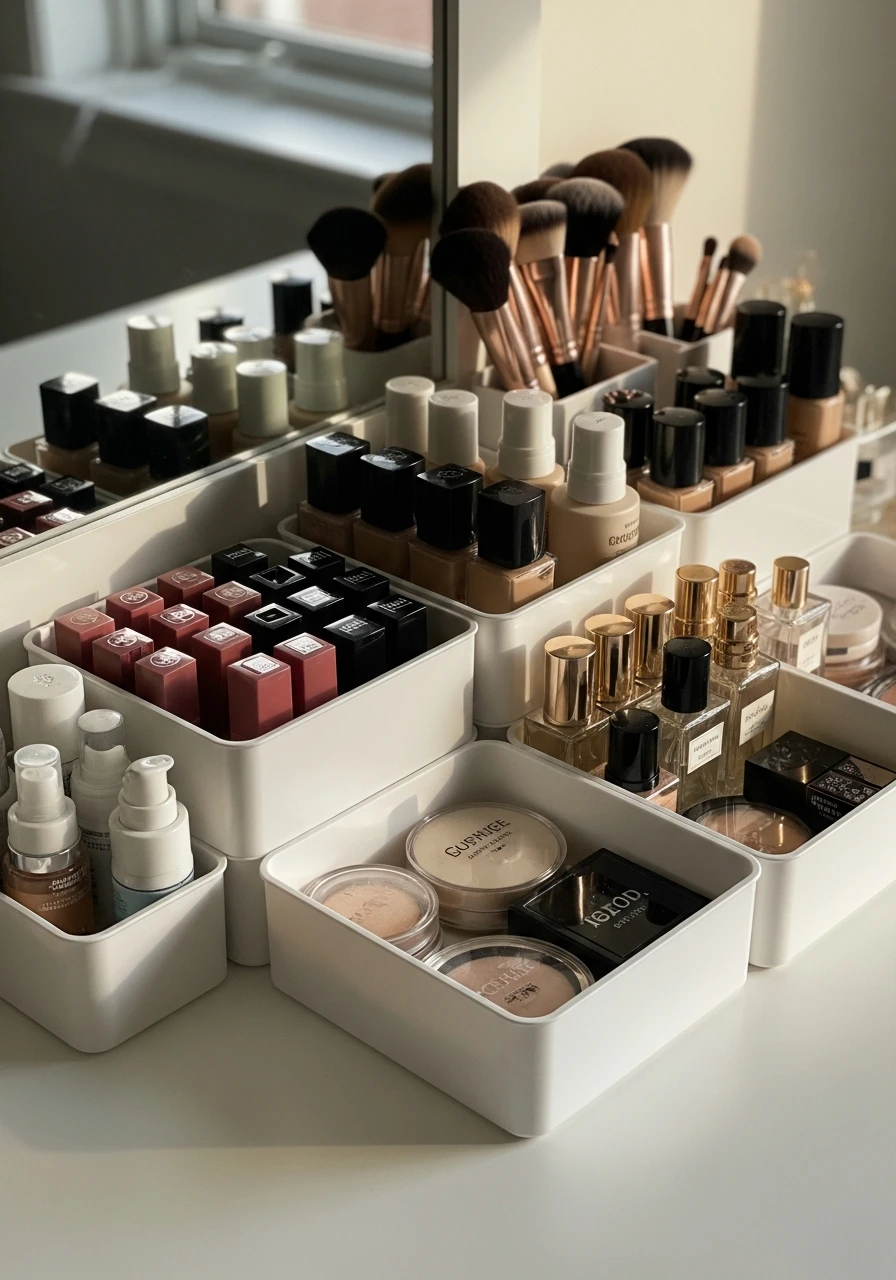
1. Use Adjustable Drawer Dividers
Install adjustable dividers to keep categories like face products, eye makeup, and lipsticks separate. This simple trick stops items from shifting and makes everything easy to find instantly.
- Separate face, eye, and lip products.
- Use tension rods for a cheap hack.
- Keep dividers secured tightly.
Pro Tip: Measure your drawer depth before buying any dividers.
2. Organize on Acrylic Trays

Place frequently used items like moisturizer and foundation on clear acrylic trays. This keeps the vanity surface tidy while still looking clean and modern, reducing visual clutter.
- Use clear trays for a floating look.
- Group only daily-use items here.
- Wipe trays down weekly.
Pro Tip: Trays make cleaning the counter easy—just lift the tray!
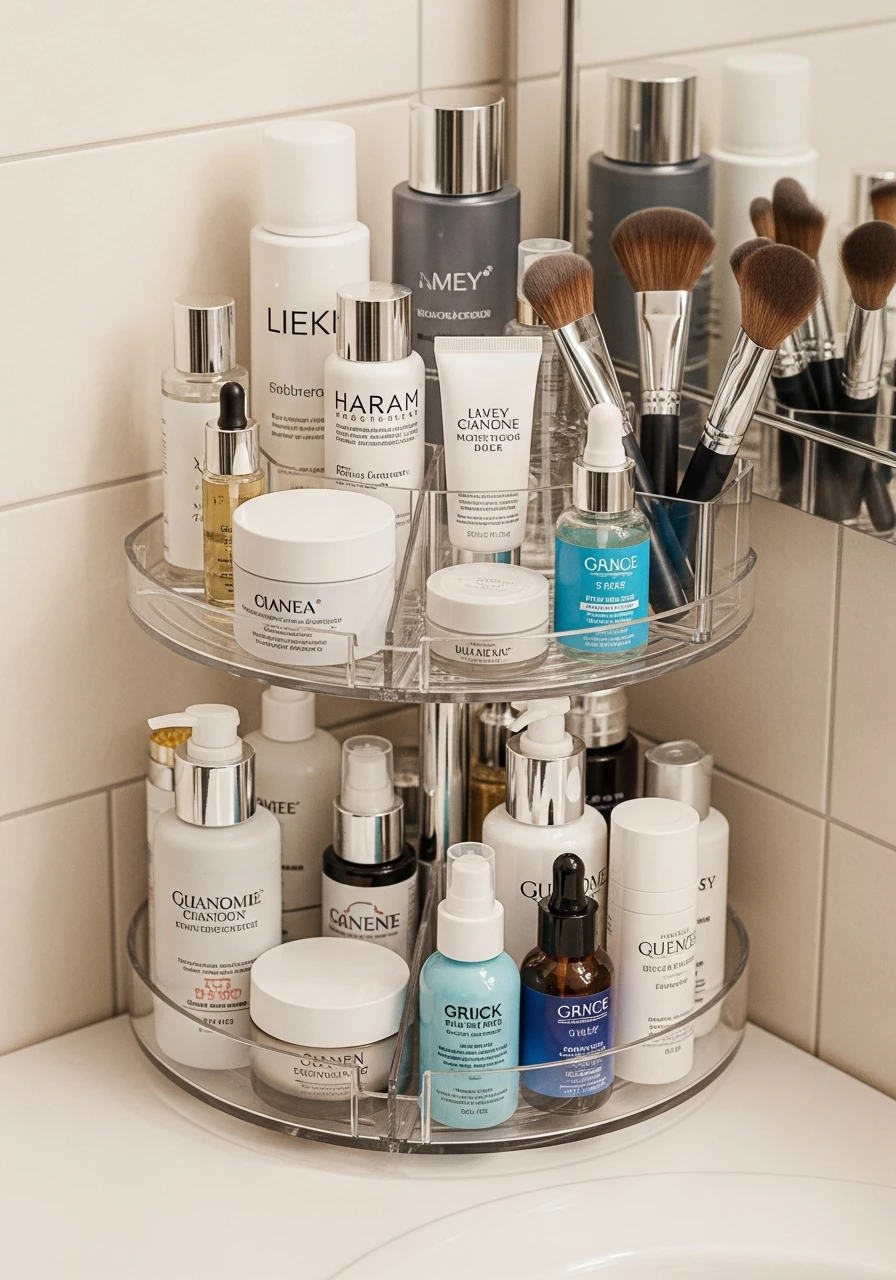
3. Display on Tiered Stands
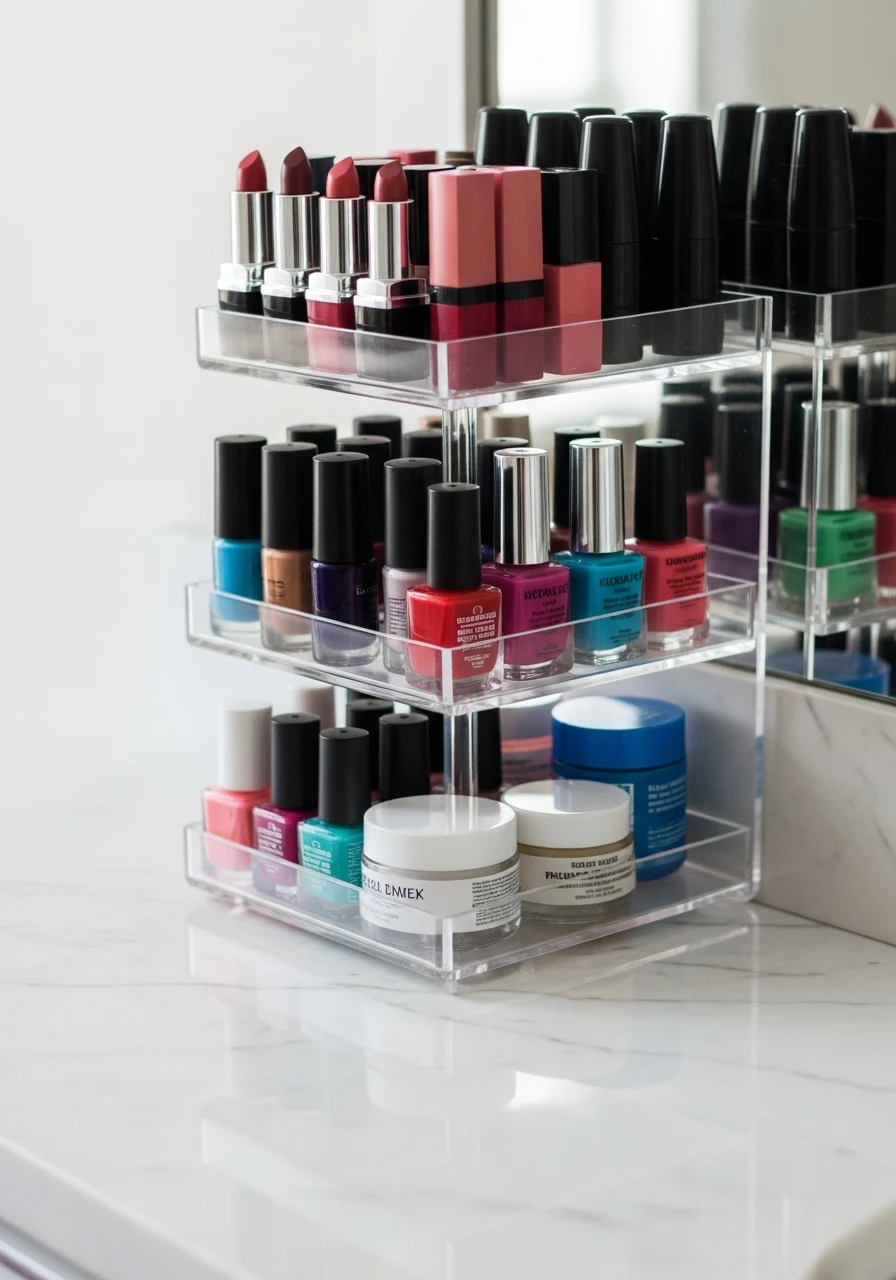
Use tiered stands to organize lipsticks, nail polish, or skincare vertically. This is a smart way to maximize counter space and keep smaller products visible and accessible.
- Perfect for tall skincare bottles.
- Use the top tier for brushes.
- Keep the stands near a mirror.
Pro Tip: Look for rotating tiered stands for even better access.
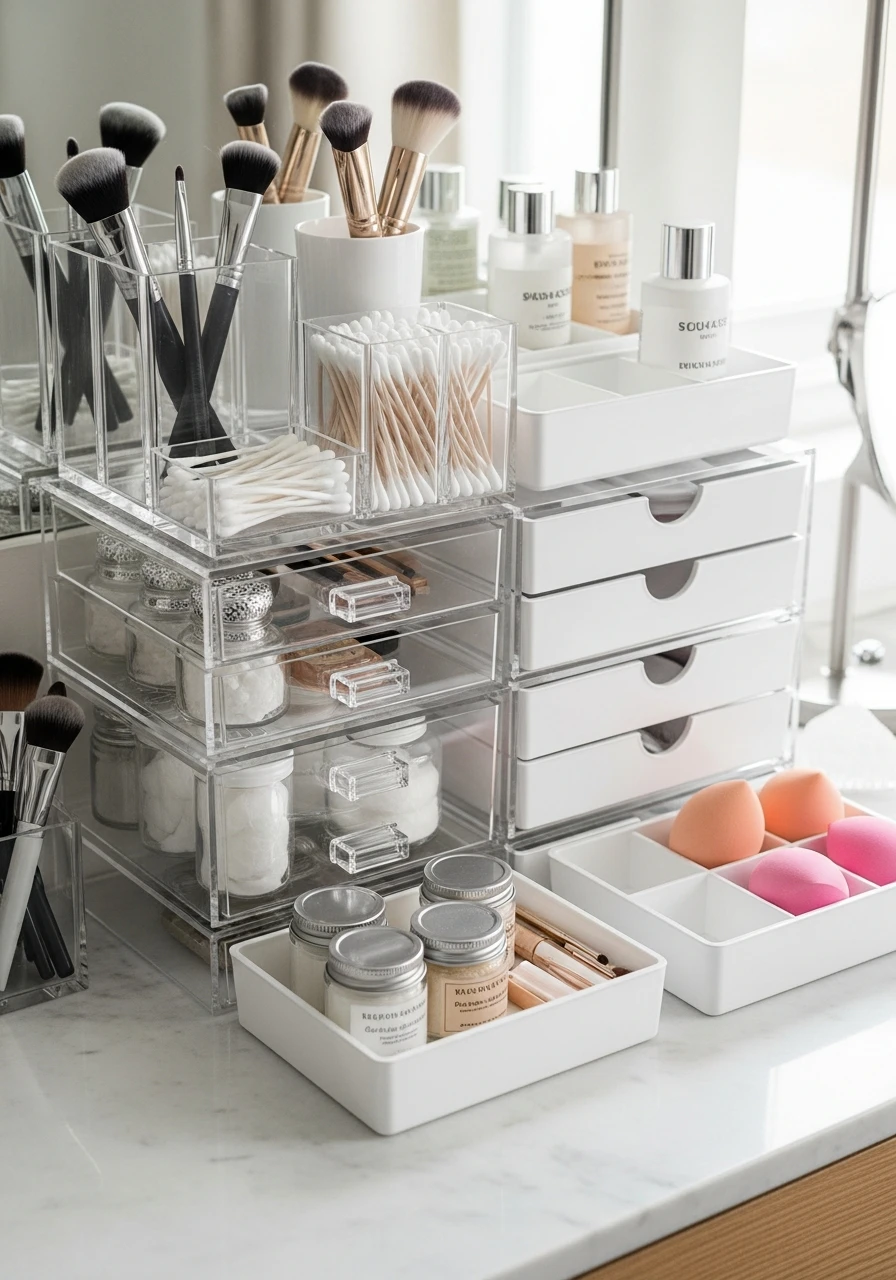
4. Store Cotton in Glass Jars
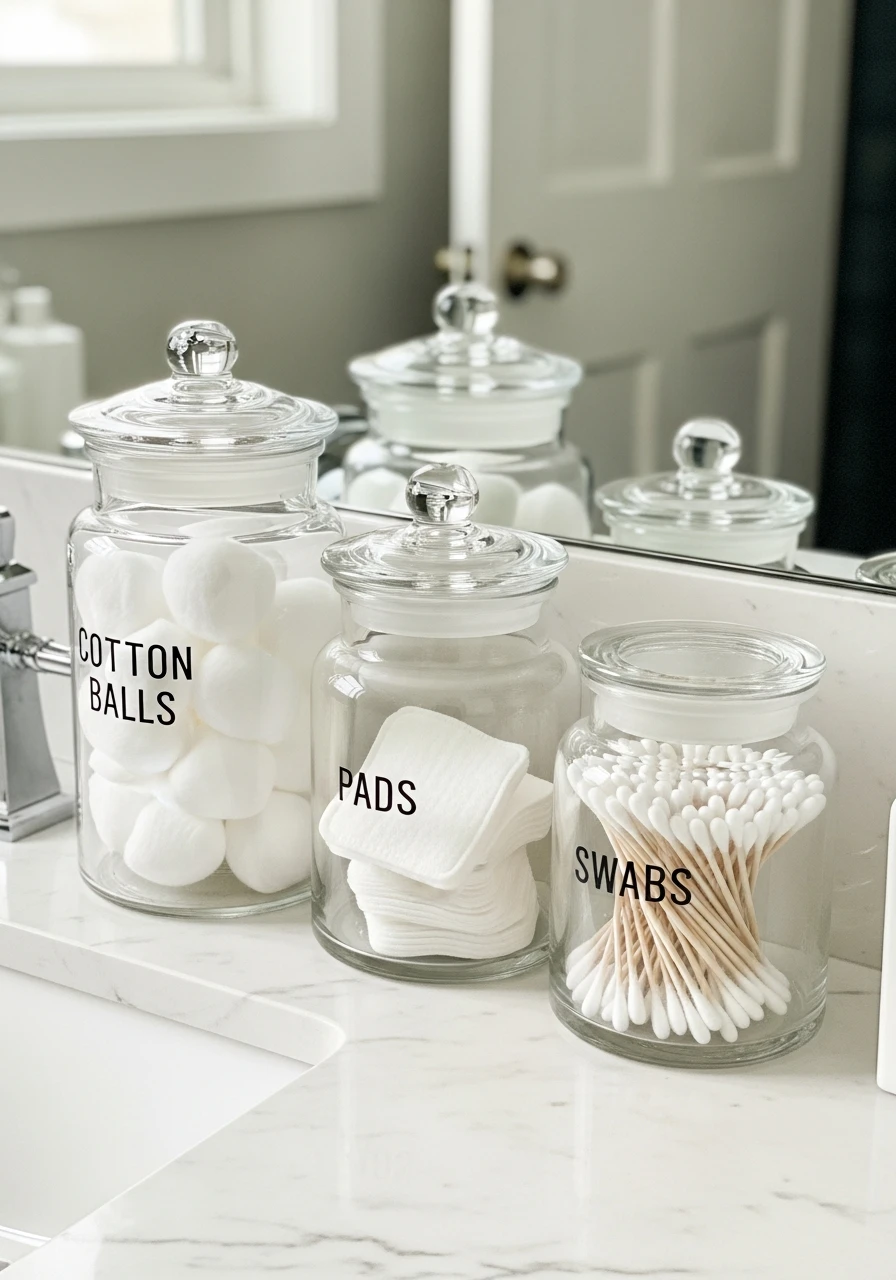
Keep cotton balls, pads, and swabs in labeled glass jars. This maintains hygiene and gives your vanity a polished, high-end, spa-like appearance without spending a fortune.
- Choose jars with tight lids.
- Add simple vinyl labels.
- Group jars on a small tray.
Pro Tip: Use matching glass jars for a cohesive look.
5. Group Items with Decorative Trays
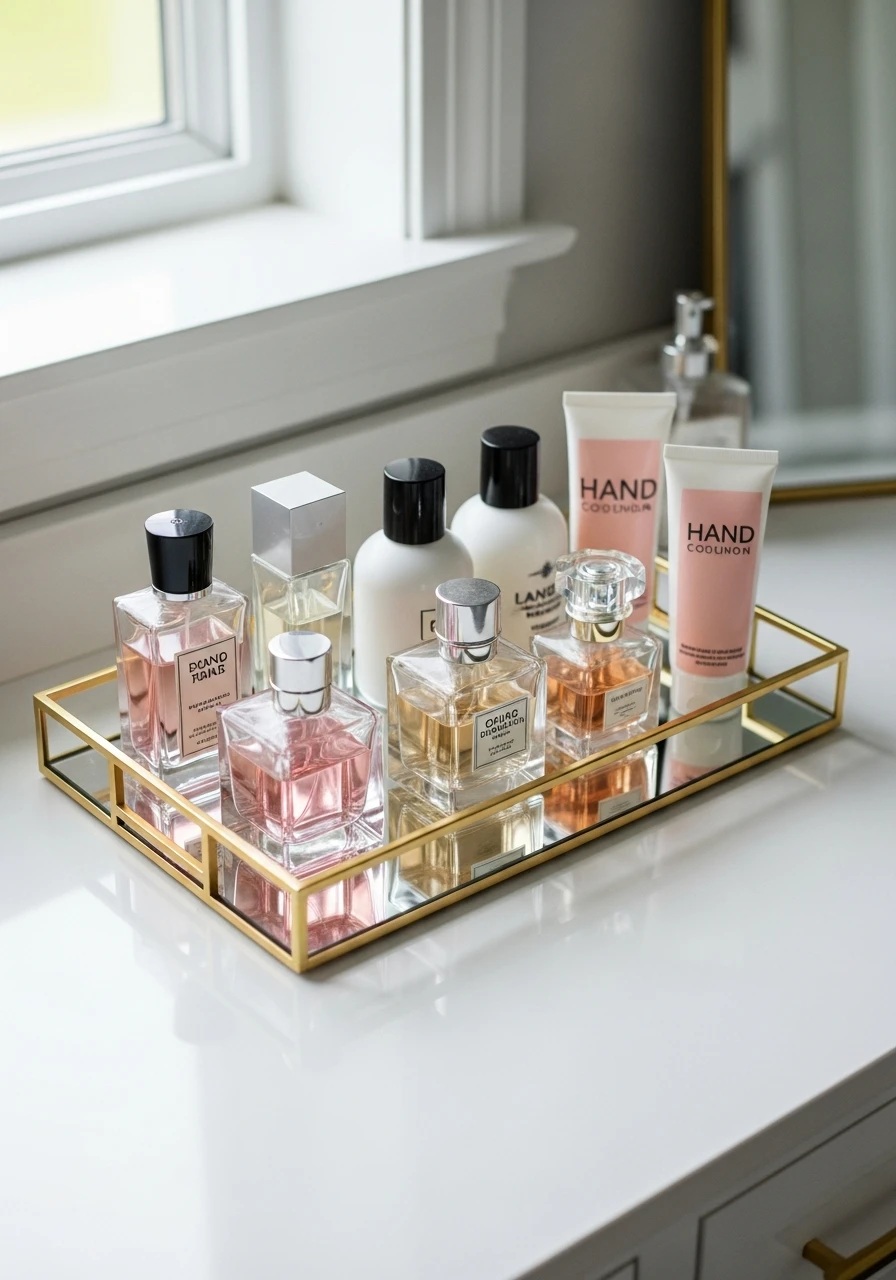
Decorative trays help group similar items together, like perfumes or hand lotions. This instantly reduces visual clutter and makes the entire vanity surface much easier to dust and clean.
- Choose marble or mirrored trays.
- Use one tray per product type.
- Keep the tray size manageable.
Pro Tip: A mirrored tray reflects light and makes the space look bigger.
6. Repurpose Holders for Brushes
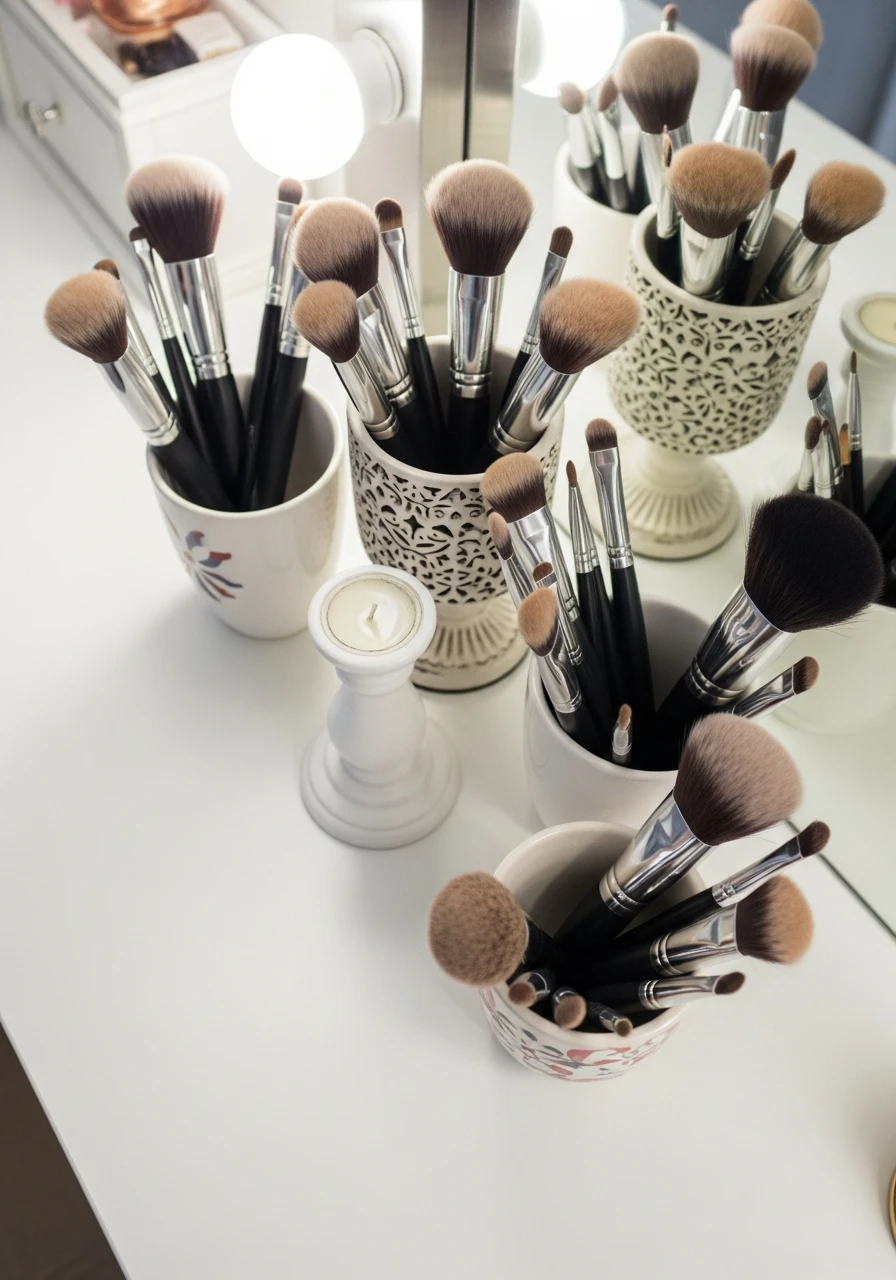
Use old candle holders or small cups to organize your makeup brushes upright. This protects the bristles from damage and improves accessibility during your daily routine.
- Fill the cup bottom with beads or rice.
- Use separate holders for face and eye brushes.
- Clean holders weekly.
Pro Tip: Candle holders often look fancier than dedicated brush cups.
7. Create a Perfume Display
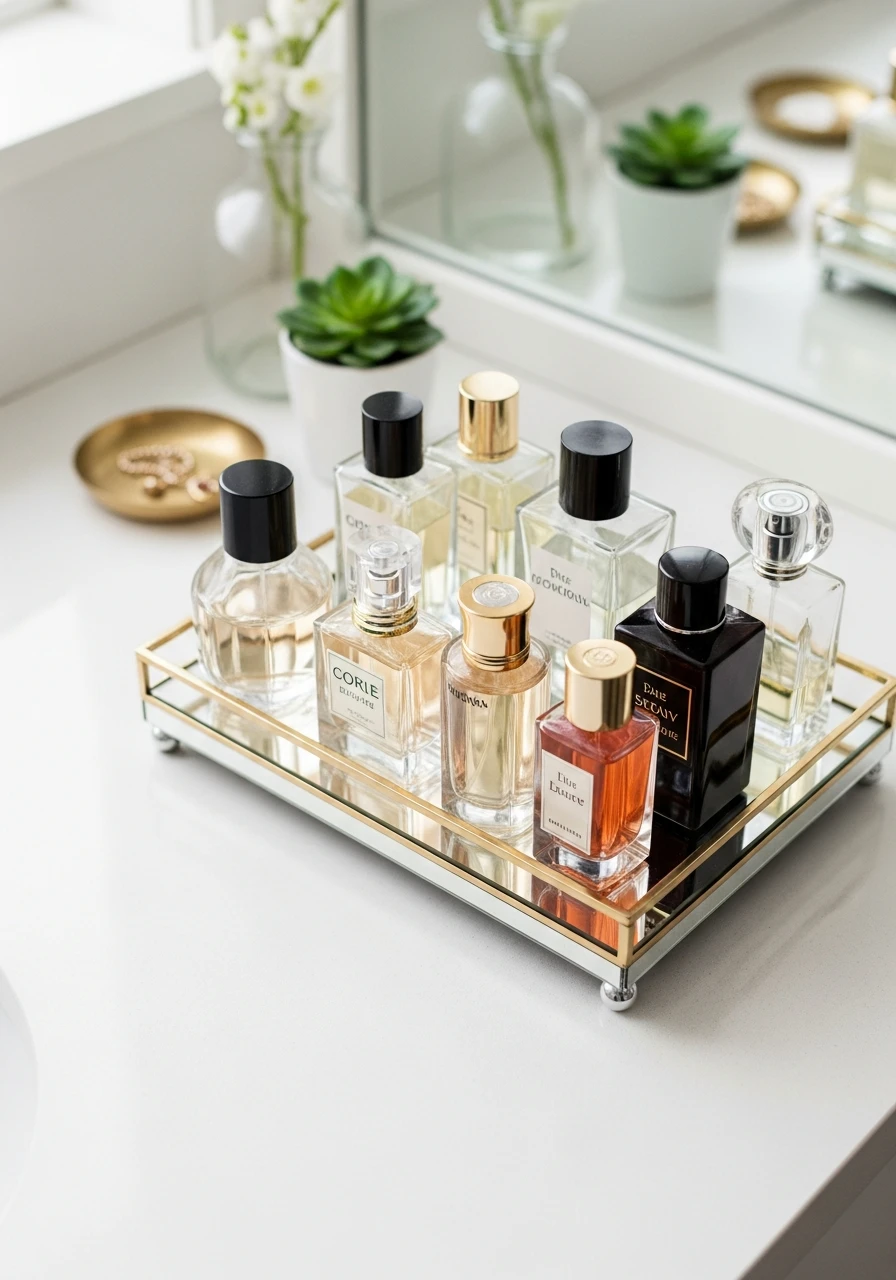
Arrange your favorite perfumes on a small tray or raised platform. This keeps the bottles organized and prevents sticky spills while adding a beautiful, decorative touch to the counter.
- Use a tiered cupcake stand.
- Group bottles by height.
- Keep the display near the mirror.
Pro Tip: Only display bottles you actually use regularly.
8. Use a Rotating Organizer
A rotating organizer allows quick access to frequently used products like creams or hair sprays. It maximizes corner space and prevents you from knocking over bottles while searching.
- Great for taller bottles.
- Keep it off the main counter.
- Spin it to find items fast.
Pro Tip: Look for clear acrylic versions to keep the look light.
9. Choose Lidded Containers
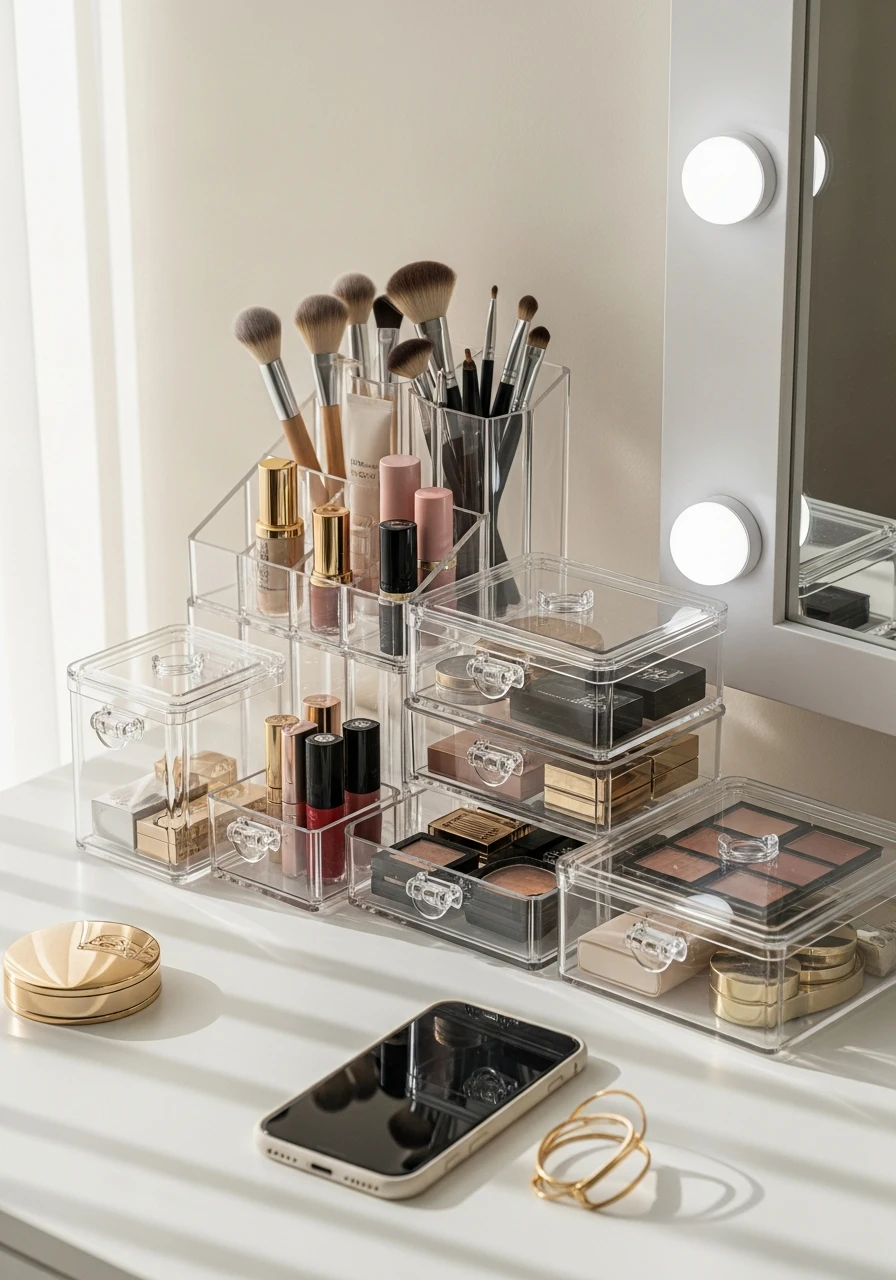
Clear containers with lids protect your makeup and tools from dust and moisture. They also allow easy visibility of the contents, keeping everything clean and accessible.
- Lids protect products from dust.
- Stack them to save space.
- Use them for backup supplies.
Pro Tip: Lidded containers are essential if your vanity is near the shower.
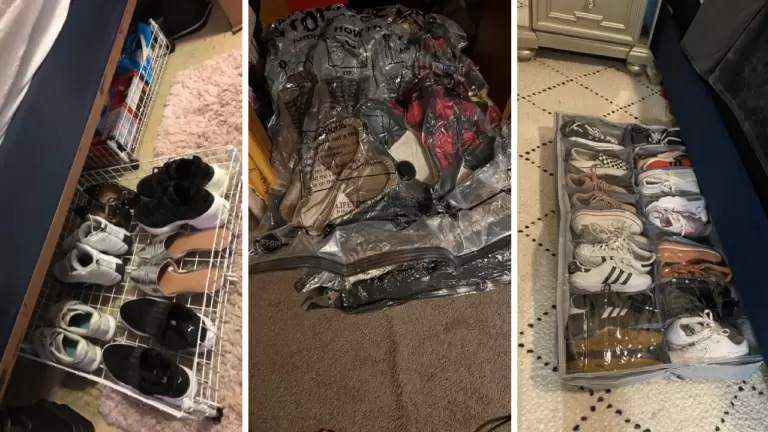
10. Group with Small Baskets
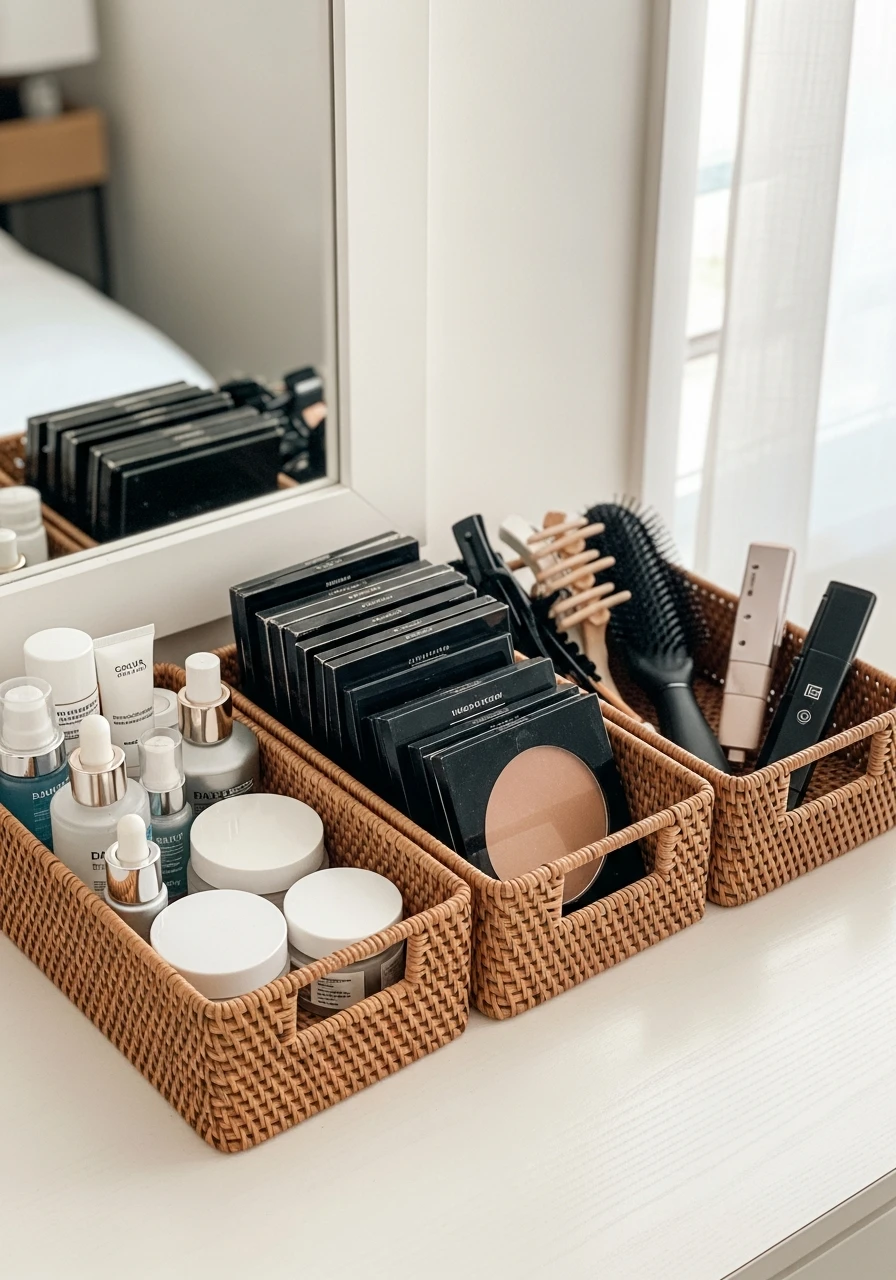
Use small woven or plastic baskets to group categories like skincare, hair tools, or makeup palettes. Baskets keep everything sorted and make the items easy to move when cleaning.
- Use woven baskets for texture.
- One basket per category.
- Choose baskets that fit your drawers.
Pro Tip: Natural woven baskets immediately add a high-end feel.
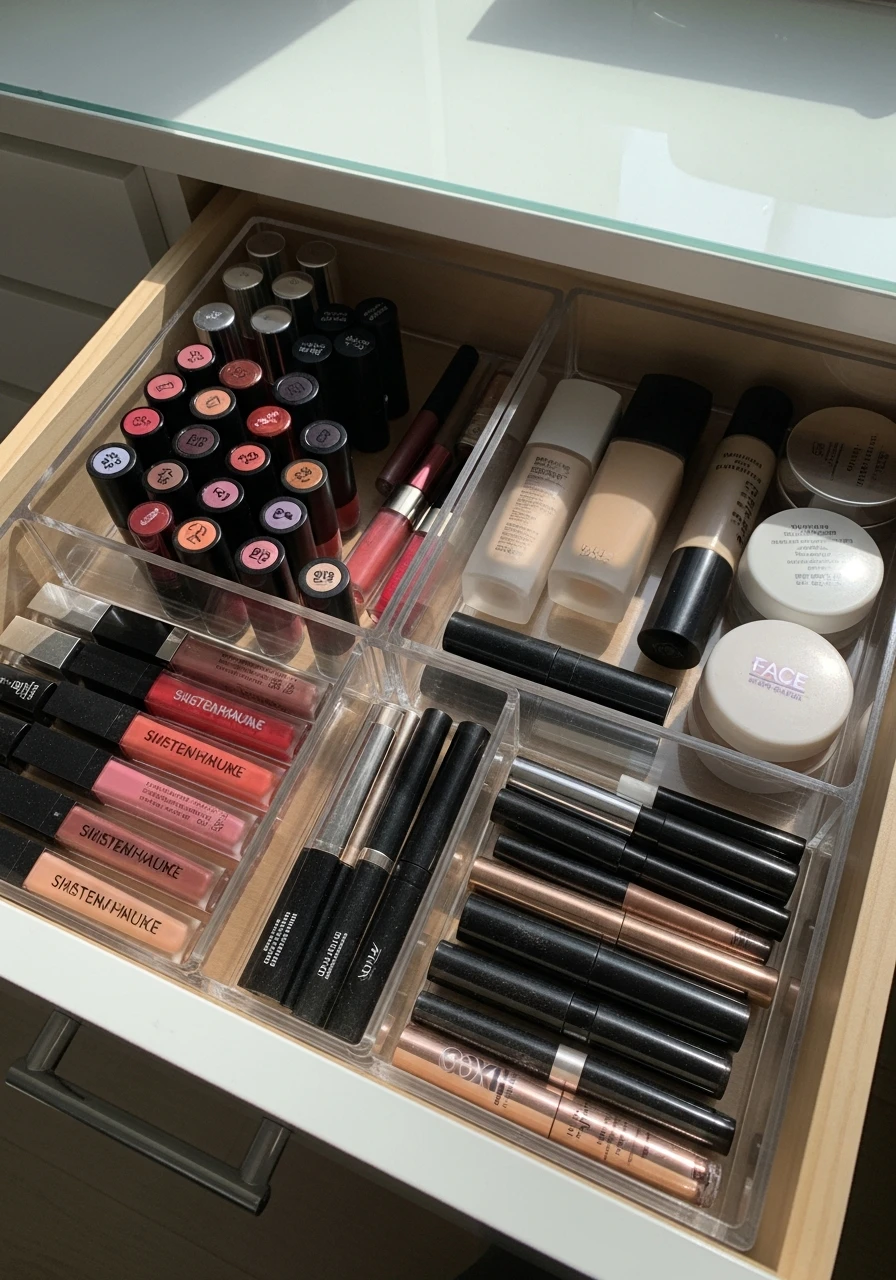
11. Install Modular Drawer Inserts
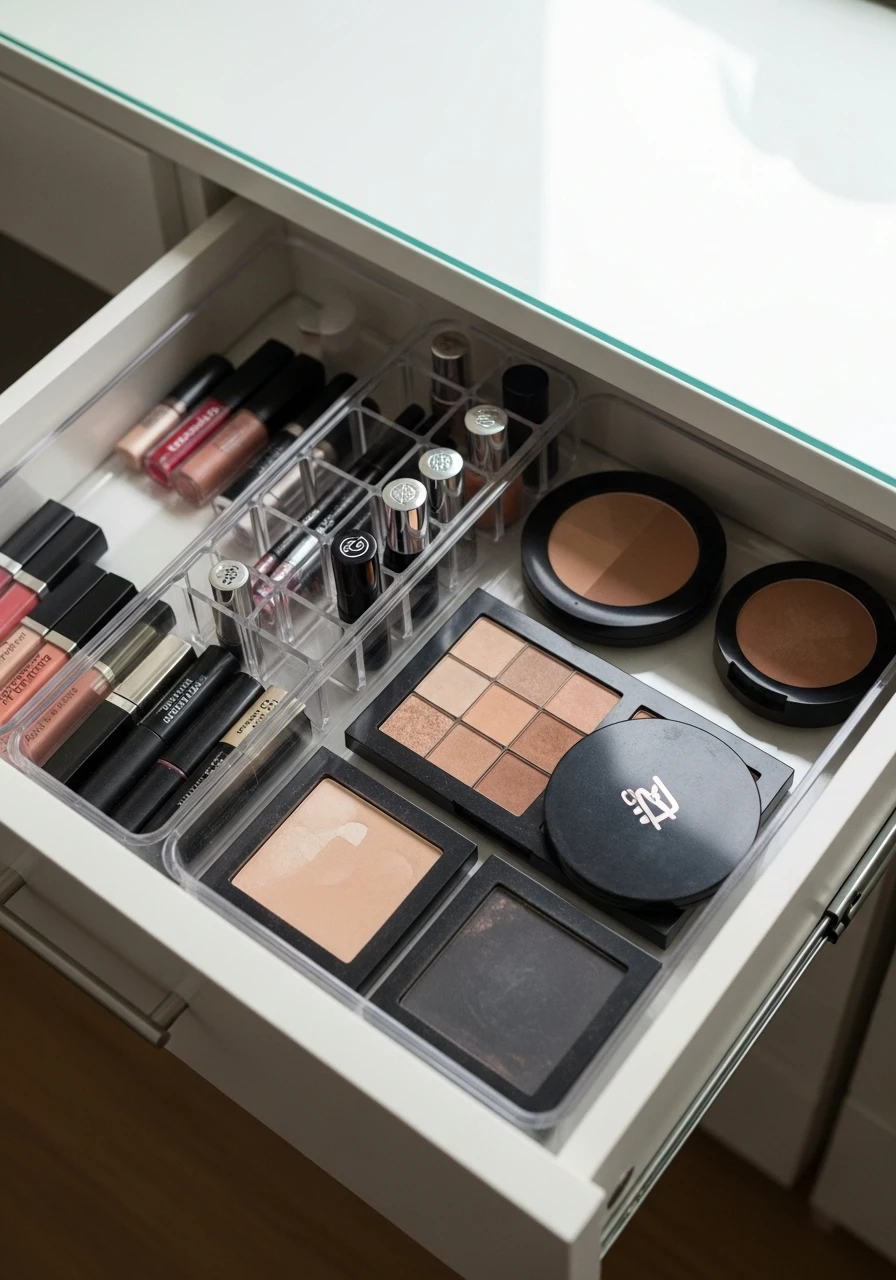
Modular inserts allow you to customize drawer layouts based on the size of your products. This is key for accommodating small lipsticks next to large compacts as your collection grows.
- Customize layout for odd shapes.
- Buy sets that snap together.
- Use them for small accessories.
Pro Tip: Modular systems are best for adapting to new products.
12. Separate Jewelry in Drawers
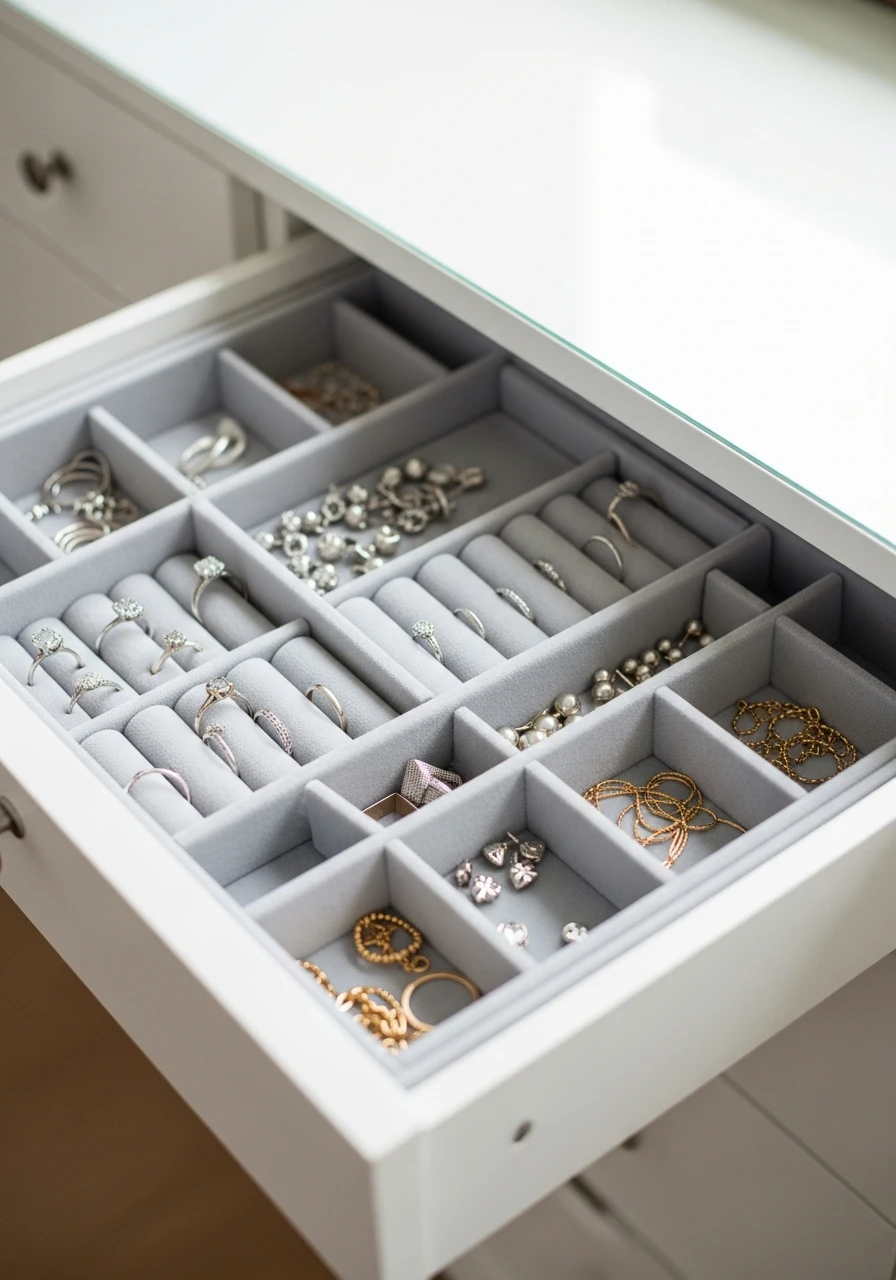
Use velvet or compartmentalized inserts specifically designed for jewelry. This keeps rings, earrings, and necklaces tangle-free and protected from dust and damage.
- Velvet lining prevents scratches.
- Assign a spot for every piece.
- Use shallow drawers for jewelry.
Pro Tip: Drawer storage keeps jewelry out of sight, reducing clutter.
13. Label Drawer Sections Clearly
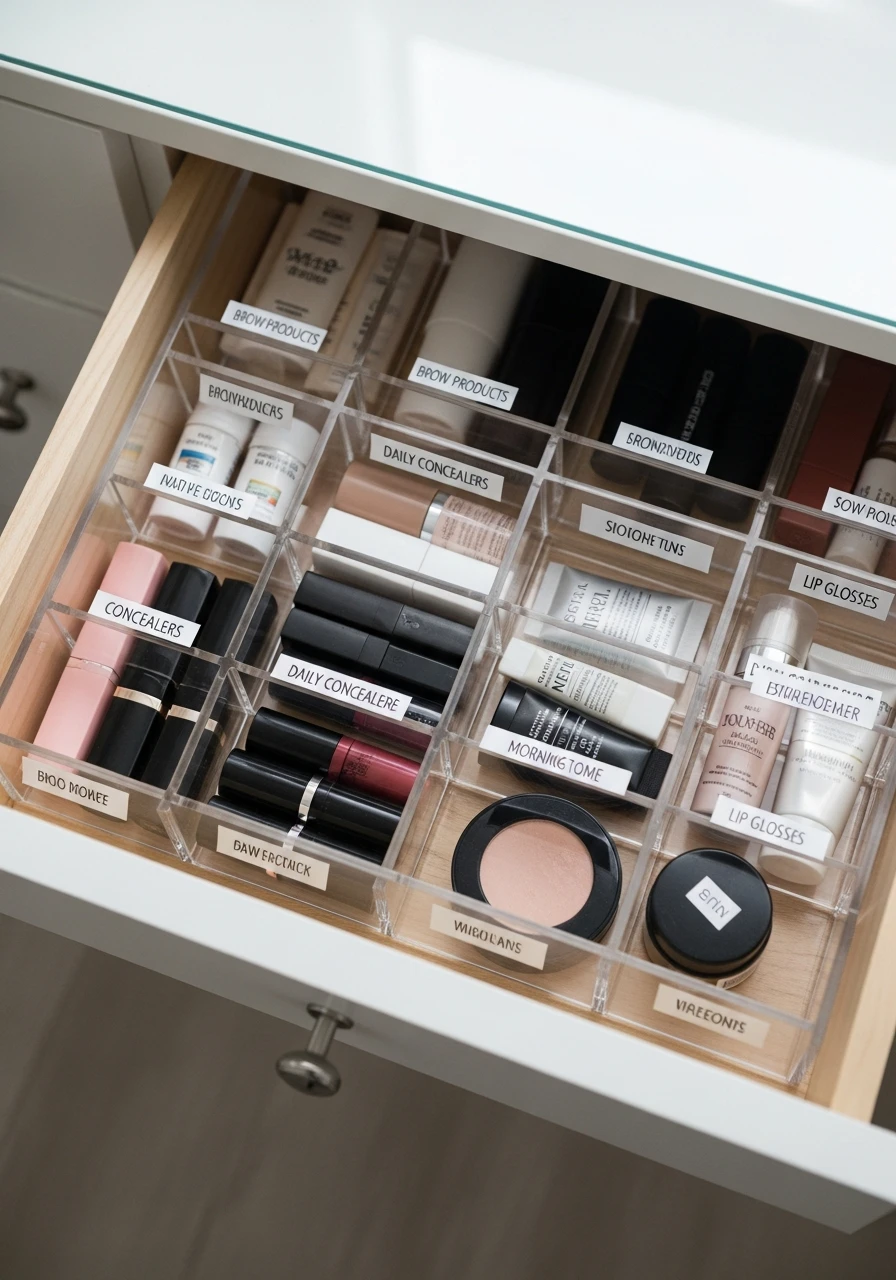
Adding clear labels to your drawer compartments helps maintain long-term organization. It speeds up your daily routines and ensures everyone puts things back where they belong.
- Use a label maker for consistency.
- Label categories, not specific items.
- Keep font simple and readable.
Pro Tip: Labels are the secret to keeping your system working forever.
14. Add Under-Sink Pull-Outs
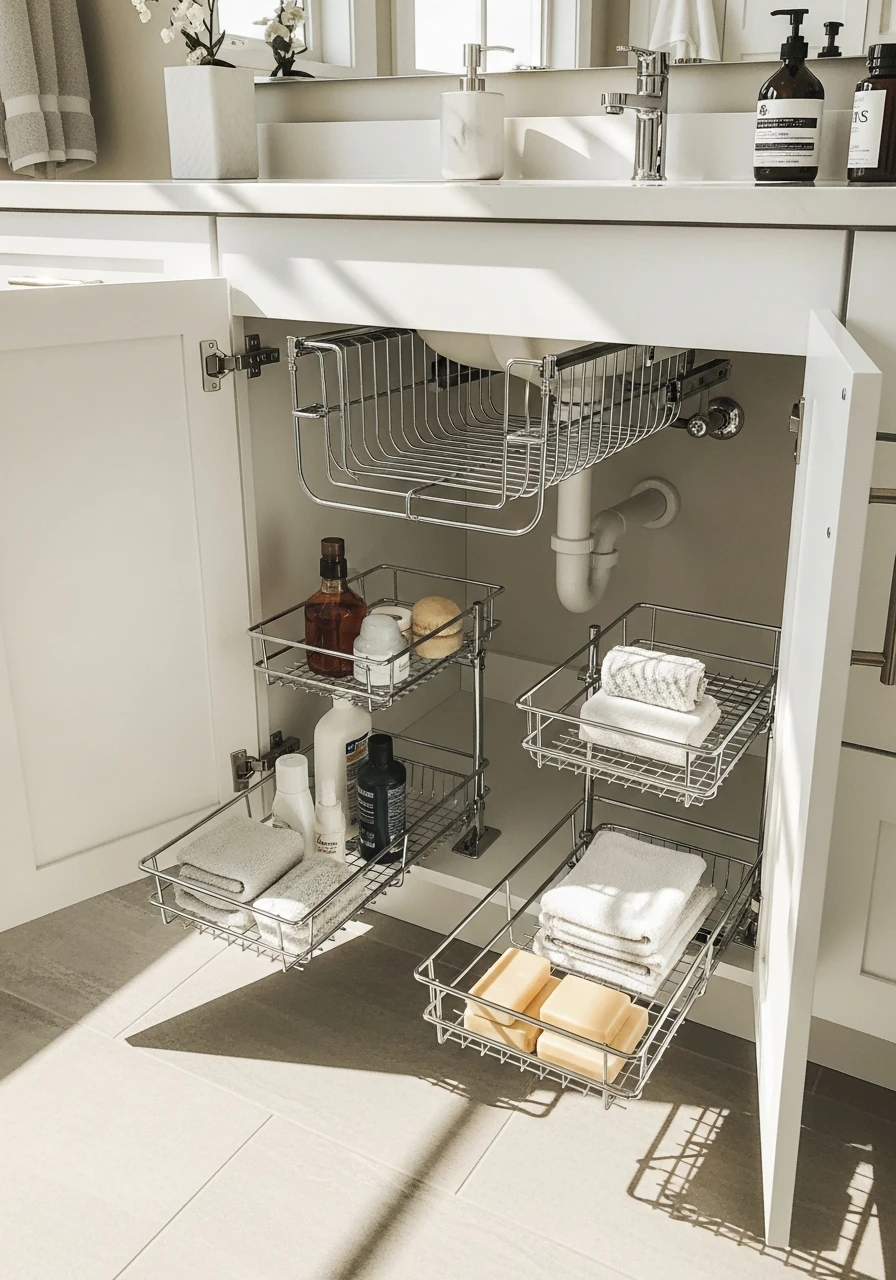
Install pull-out drawers or sliders under the vanity sink to maximize that unused space. These make hard-to-reach items like backup shampoo or cleaning supplies easily accessible.
- Use for tall cleaning bottles.
- Measure around the plumbing.
- Choose two-tier sliding units.
Pro Tip: Look for wire baskets that slide out smoothly.
15. Lazy Susans Inside Cabinets
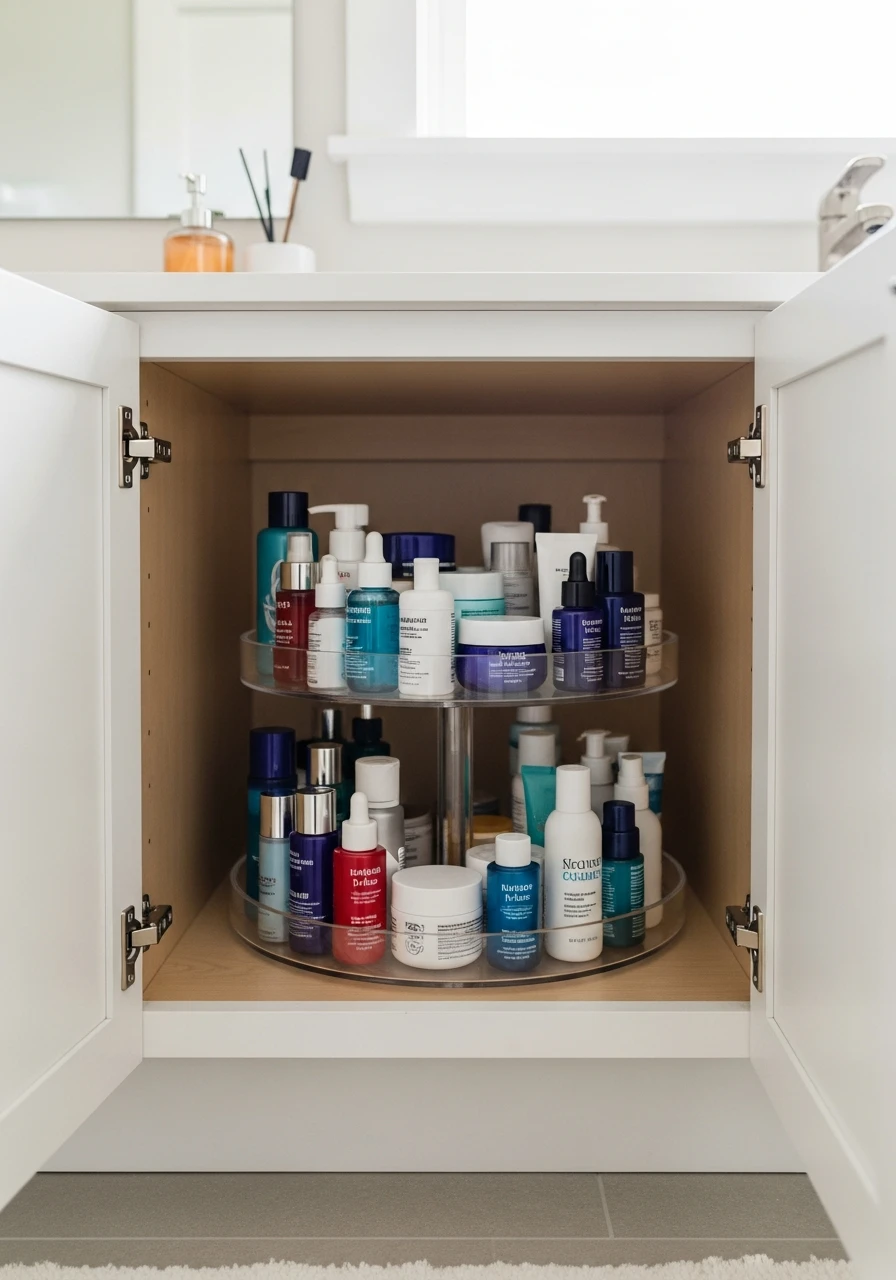
Turntables, or Lazy Susans, inside your cabinets make it easy to reach skincare bottles and hair products. You can spin them to find what you need without having to dig around the back.
- Great for round containers.
- Use for hair spray or lotion.
- Spin, don’t dig.
Pro Tip: Choose a model with a raised lip to prevent items from falling off.
16. Mount on Cabinet Doors
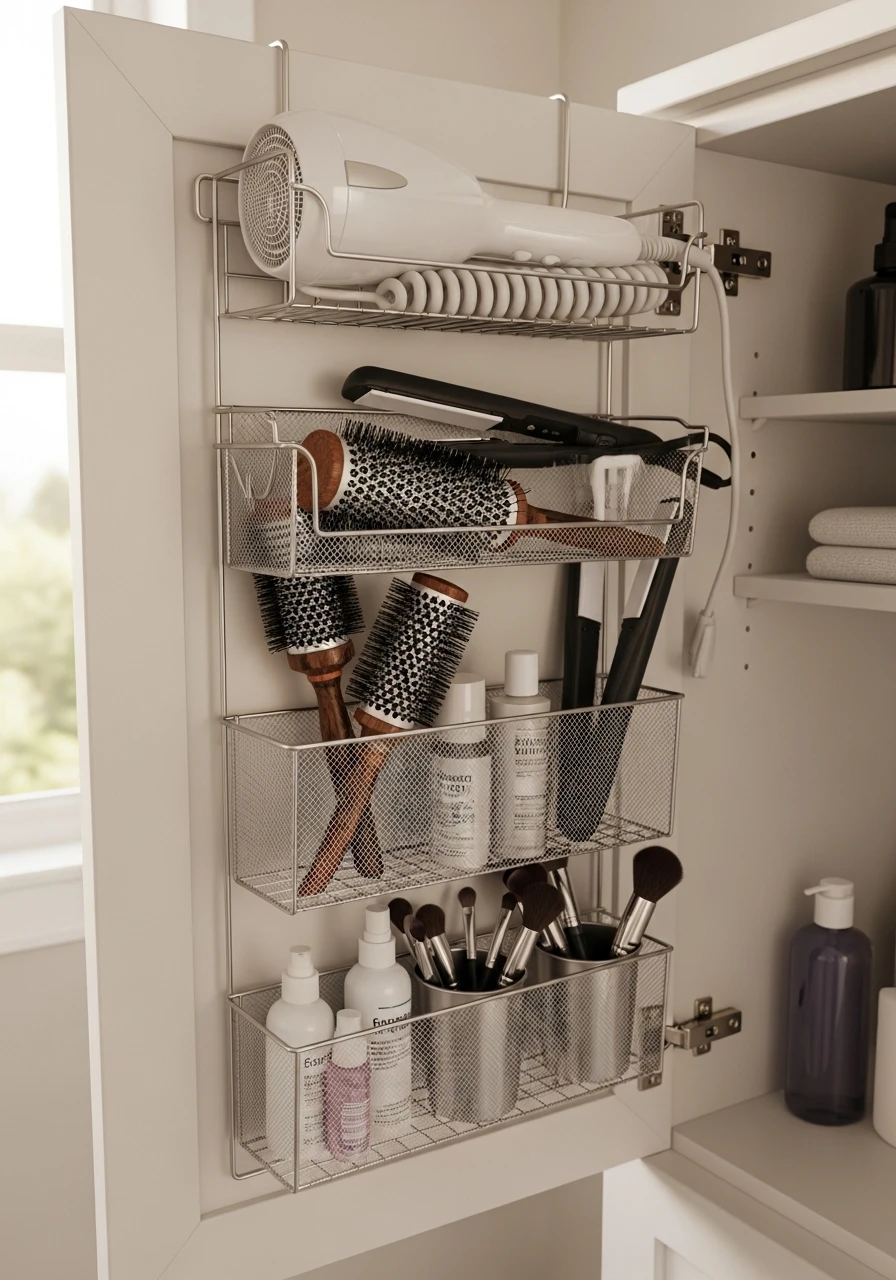
Over-the-door organizers utilize vertical space that is often wasted inside cabinets. They are perfect for storing hair tools, brushes, or small cleaning products.
- Use mesh baskets for visibility.
- Mount with small screws or adhesive.
- Perfect for flat irons and blow dryers.
Pro Tip: Make sure the organizer is shallow enough for the door to close fully.
17. Install Magnetic Strips
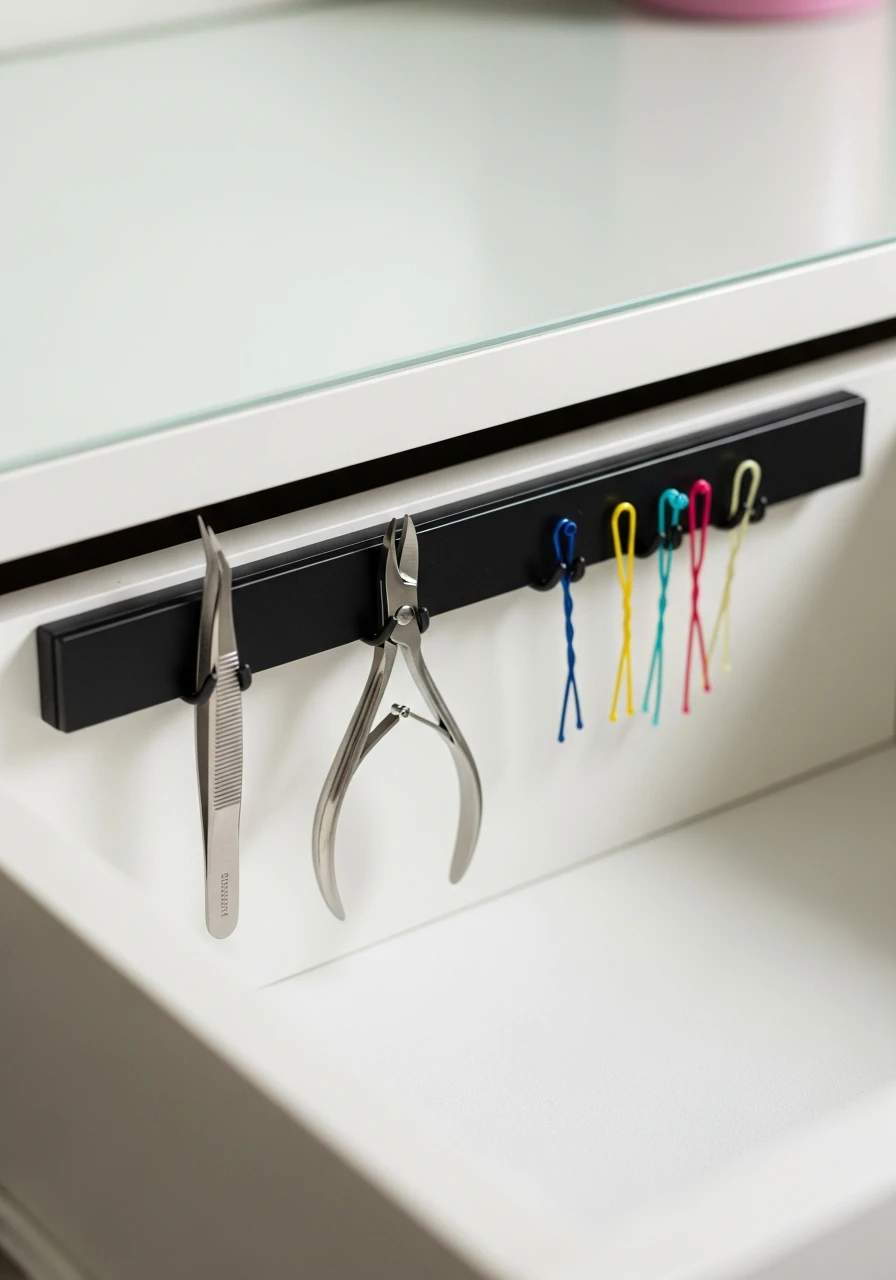
Magnetic strips installed inside drawers or on the wall keep metal tools organized and visible. This is great for tweezers, nail clippers, bobby pins, or even small metal compacts.
- Use for small metal tools.
- Mount inside shallow drawers.
- Keeps small items from rolling.
Pro Tip: Ensure the strip is strong enough to hold your items securely.
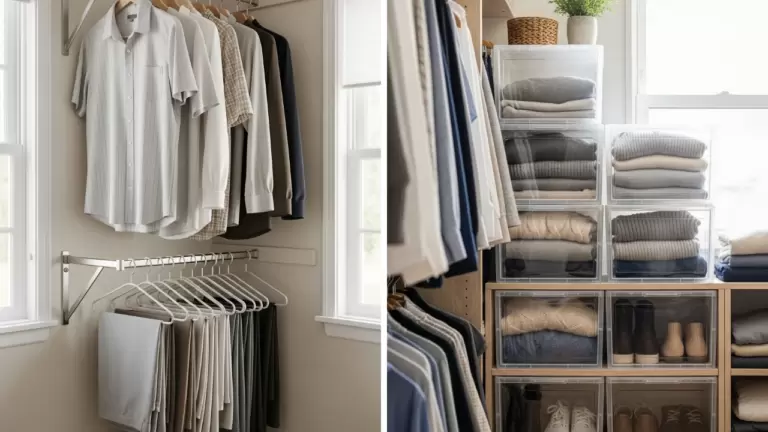
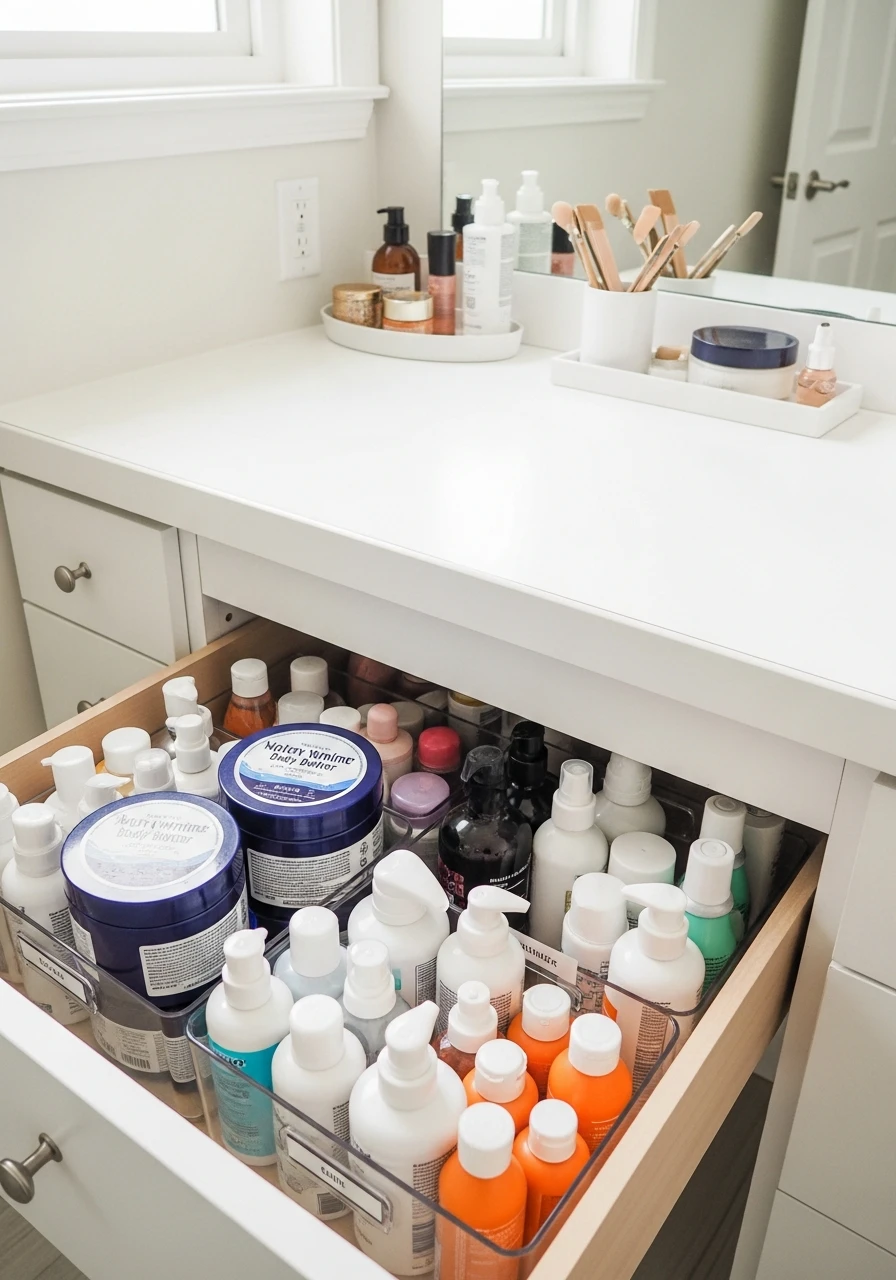
18. Stack Storage Bins
Stackable bins allow you to double your storage capacity in drawers or cabinets without adding clutter. Use them for storing backup products or seasonal items.
- Use clear bins for easy viewing.
- Stack only two high maximum.
- Label the contents of each bin.
Pro Tip: Stackable clear bins keep your backups sorted and dust-free.
19. Sort with Inner Drawer Boxes

Use tiny, inner boxes within your larger drawers to organize very small items. This works perfectly for travel-size products, samples, or individual sheet masks.
- Use for samples and minis.
- Choose velvet or sturdy cardboard.
- Keep them shallow.
Pro Tip: Small boxes prevent tiny items from getting lost under bigger ones.
20. Use Pull-Out Vanity Towers
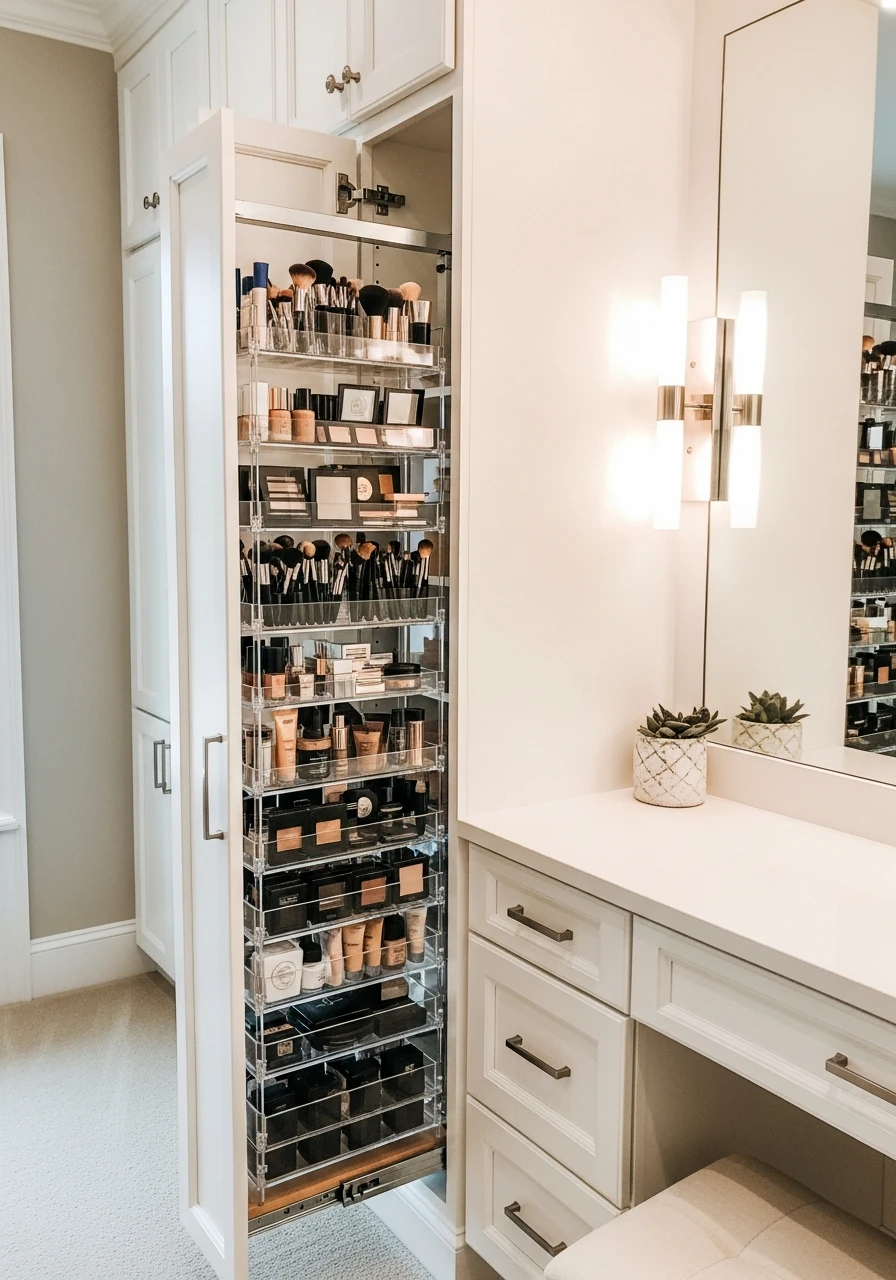
Vertical pull-out towers provide dedicated storage for large makeup collections while keeping the vanity streamlined. They slide away neatly when not in use.
- Best for narrow, deep spaces.
- Keep the most-used items on top.
- Look for deep adjustable shelves.
Pro Tip: This option is great if you have a lot of items but little width.
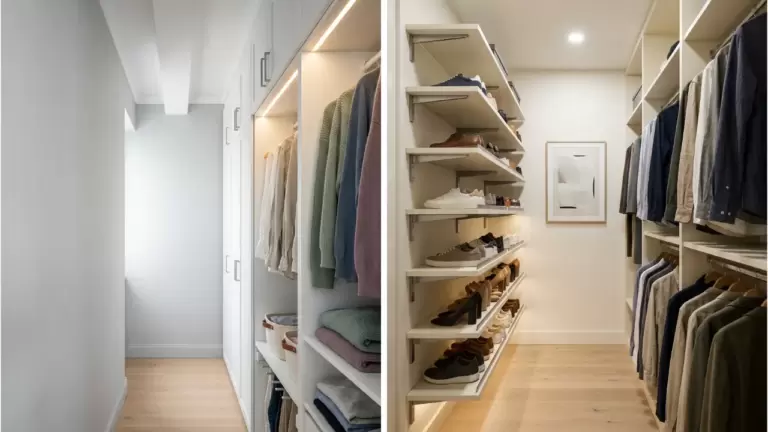
21. Add Floating Shelves
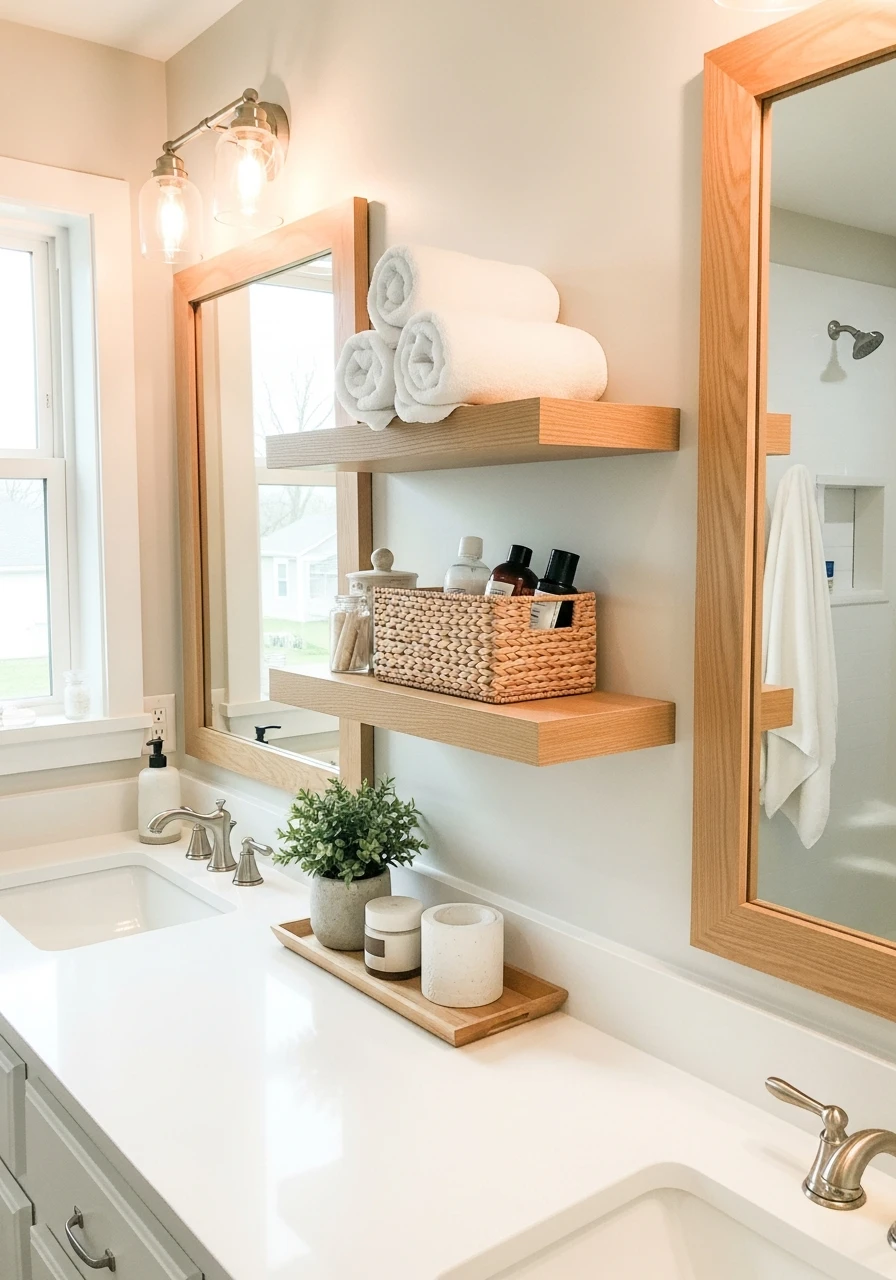
Floating shelves above the vanity provide extra storage for towels, small baskets, or decorative items. They free up floor space and make the room look custom-built.
- Install shelves at eye level.
- Use them for folded towels.
- Choose shelves matching your hardware.
Pro Tip: Install shelves slightly higher than you think to avoid head bumps.
22. Build Wall Niches
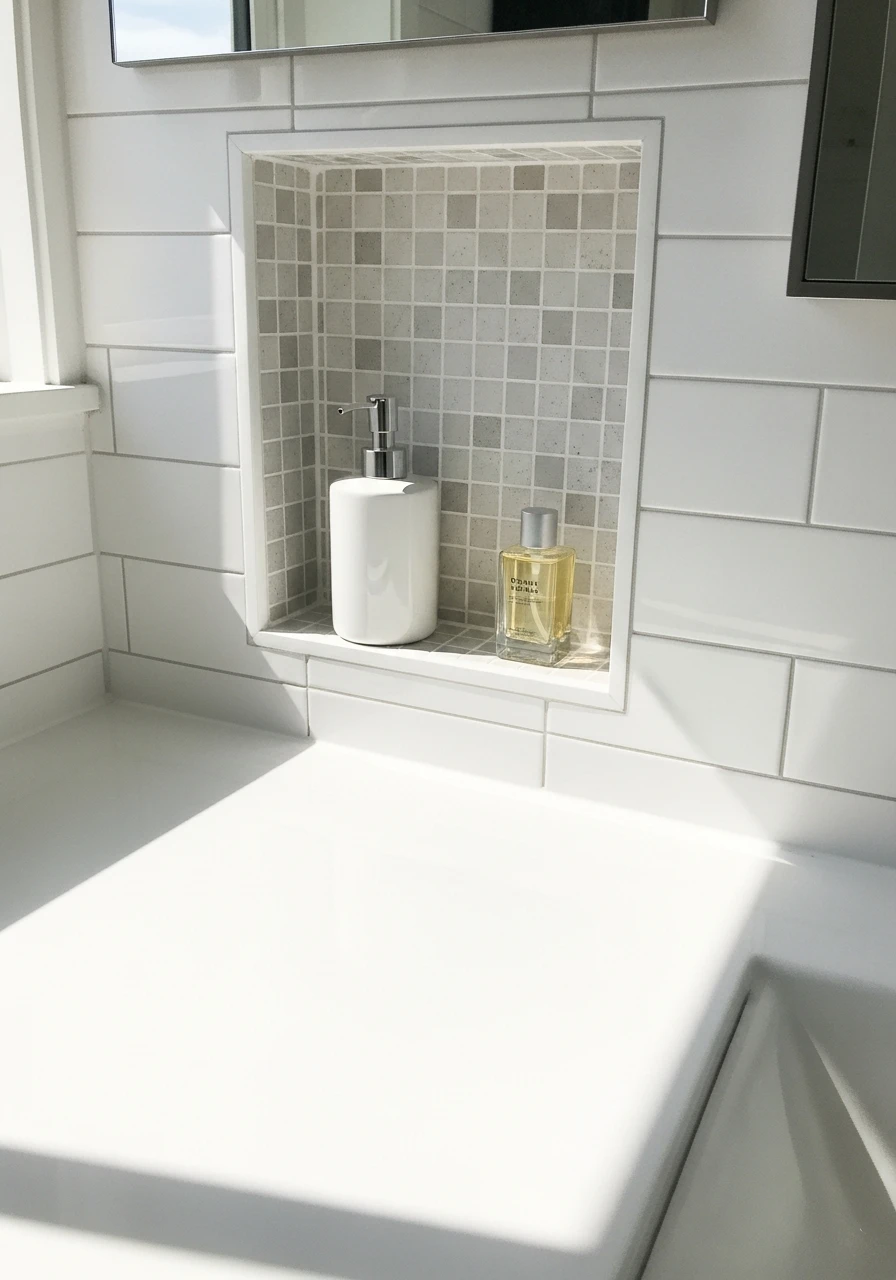
Wall niches offer built-in storage for daily essentials like lotion or soap. They reduce the need for bulky counter organizers and give a clean, permanent look.
- Requires some DIY or contractor help.
- Ideal for small bottles.
- Use materials matching the countertop.
Pro Tip: Niches are tricky but offer the highest-end look.
23. Use a Ladder Shelf
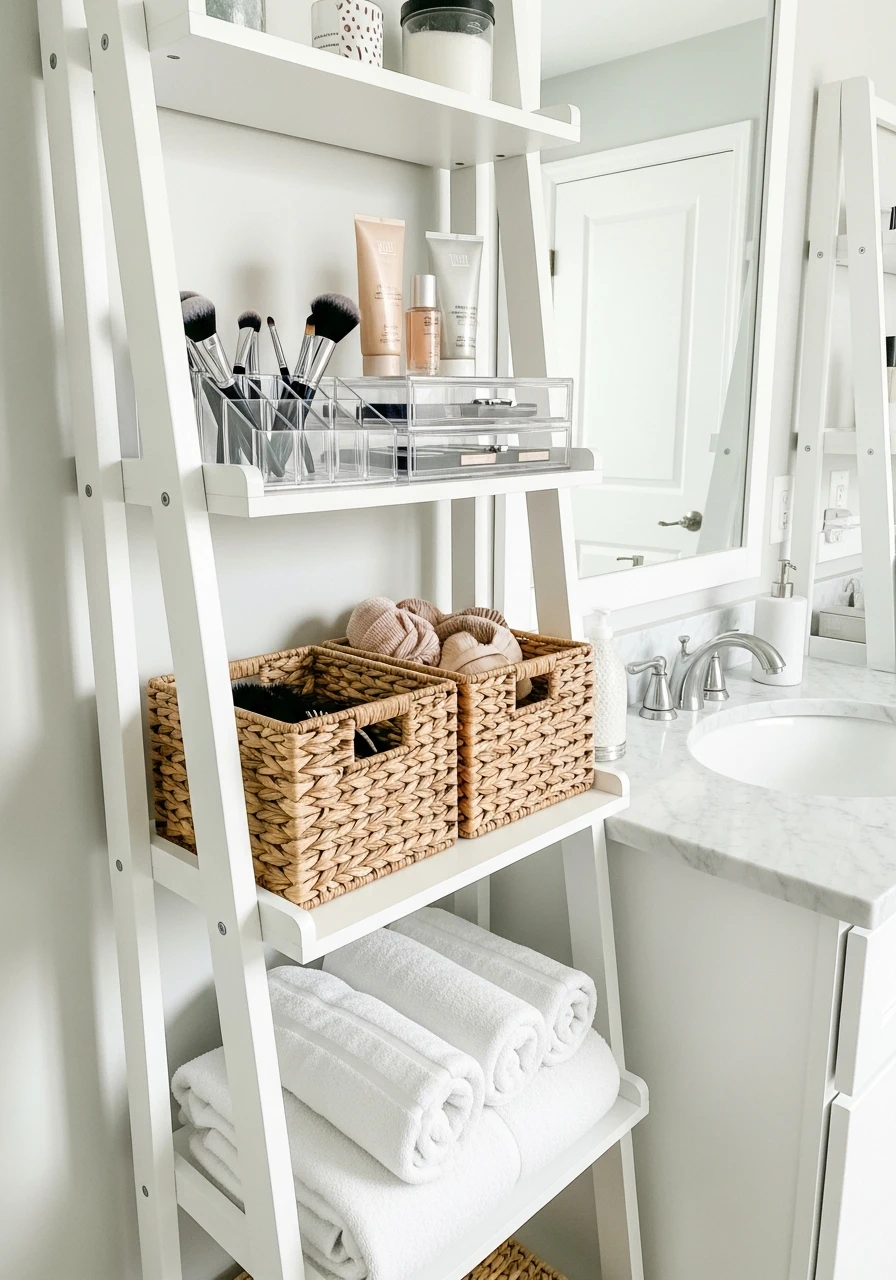
A leaning ladder shelf can hold baskets, towels, or beauty items while adding visual interest to the room. This works especially well in larger vanity areas.
- Use the bottom shelf for towels.
- Place baskets on upper shelves.
- Anchor it securely to the wall.
Pro Tip: This is a great option for renters since it is temporary.
24. Install Vertical Wall Organizers
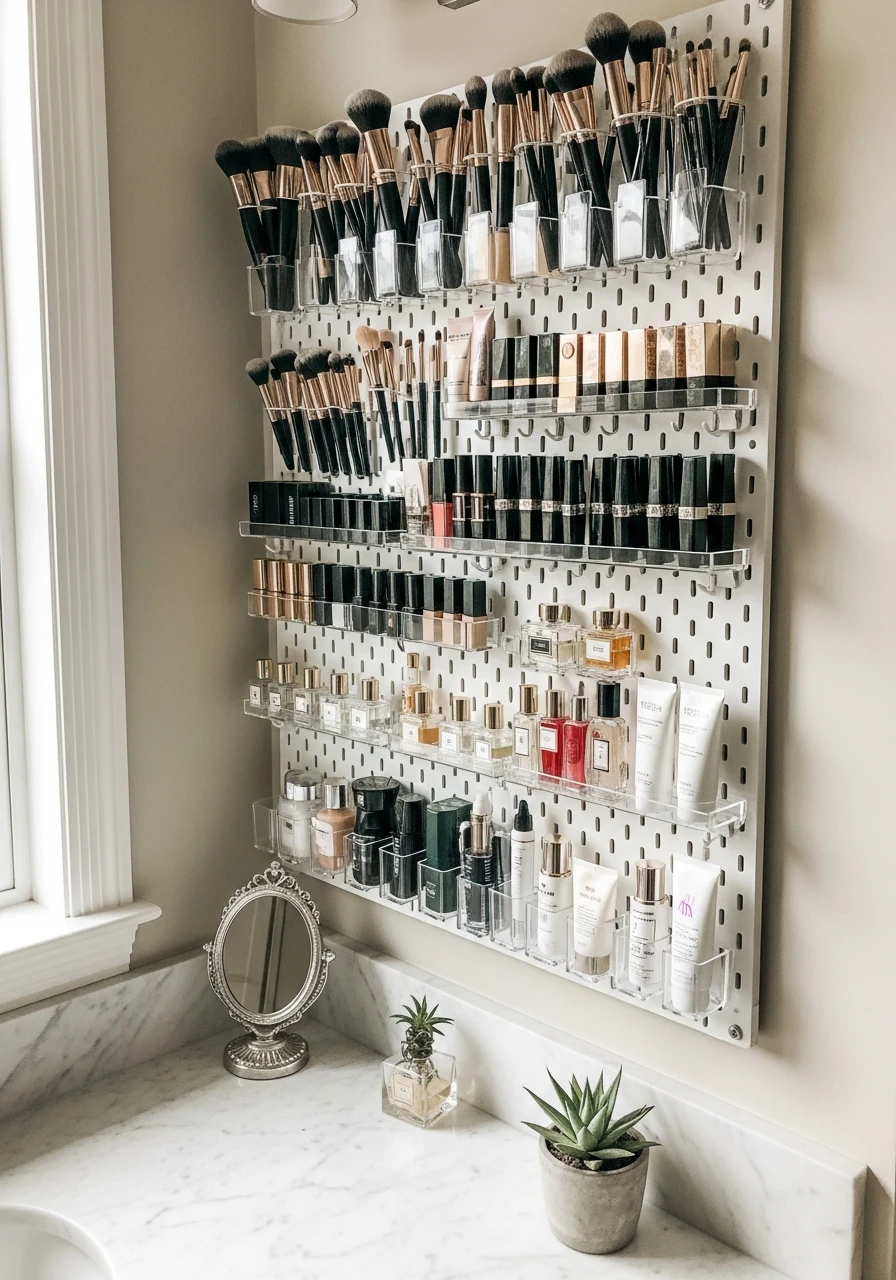
Wall-mounted panels or pegboards help store tools and accessories vertically. This frees up precious counter space instantly and keeps items visible.
- Use hooks for hair ties.
- Great for small tools.
- Customize the hook placement.
Pro Tip: Pegboards let you change the layout whenever you want.
25. Maximize with Tiered Racks
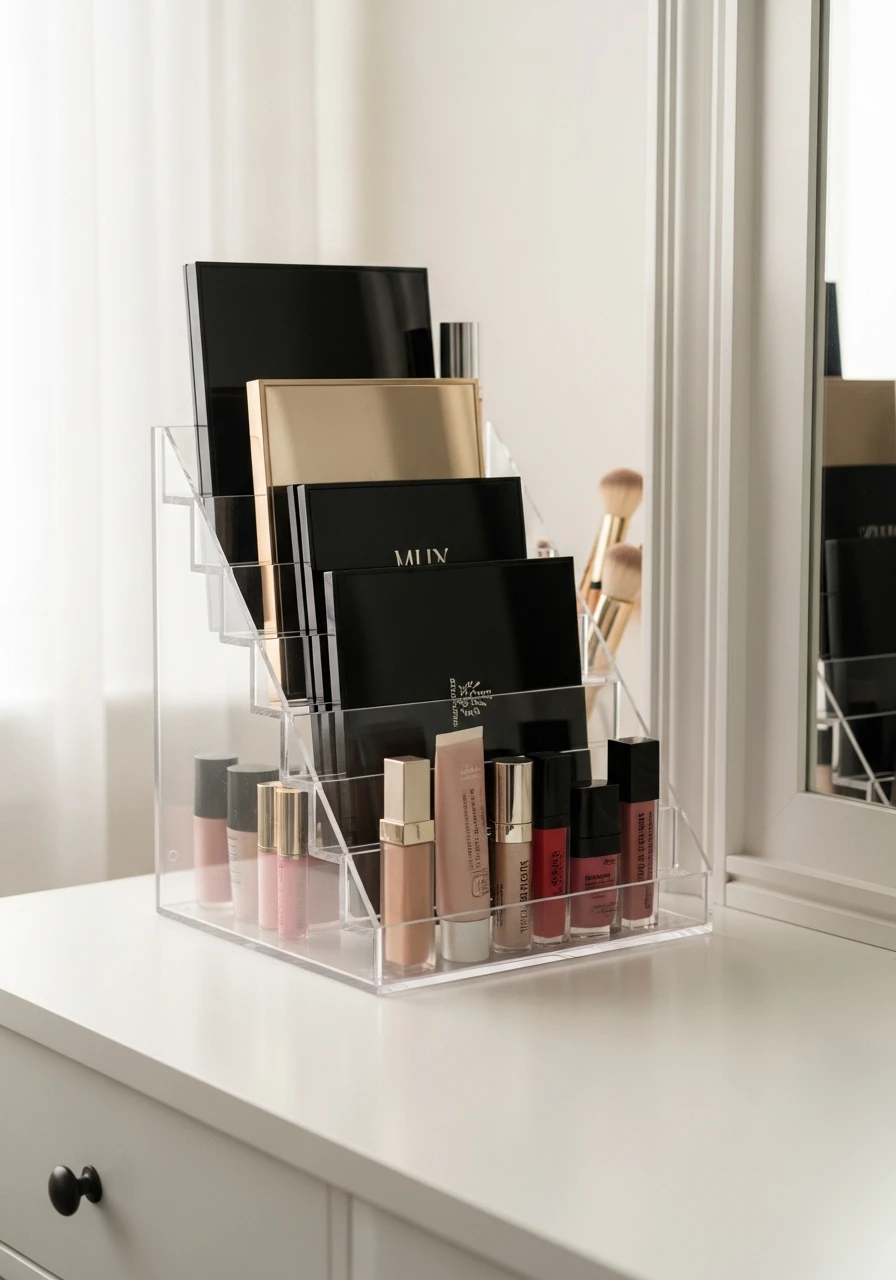
Tiered racks allow you to store multiple products vertically on the vanity without overcrowding the surface. This is perfect for makeup palettes or small tubes.
- Use for slim palettes.
- Keep the rack near the mirror.
- Look for clear acrylic versions.
Pro Tip: Racks are great for maximizing the vertical space between the counter and the mirror.
26. Use Corner Shelves
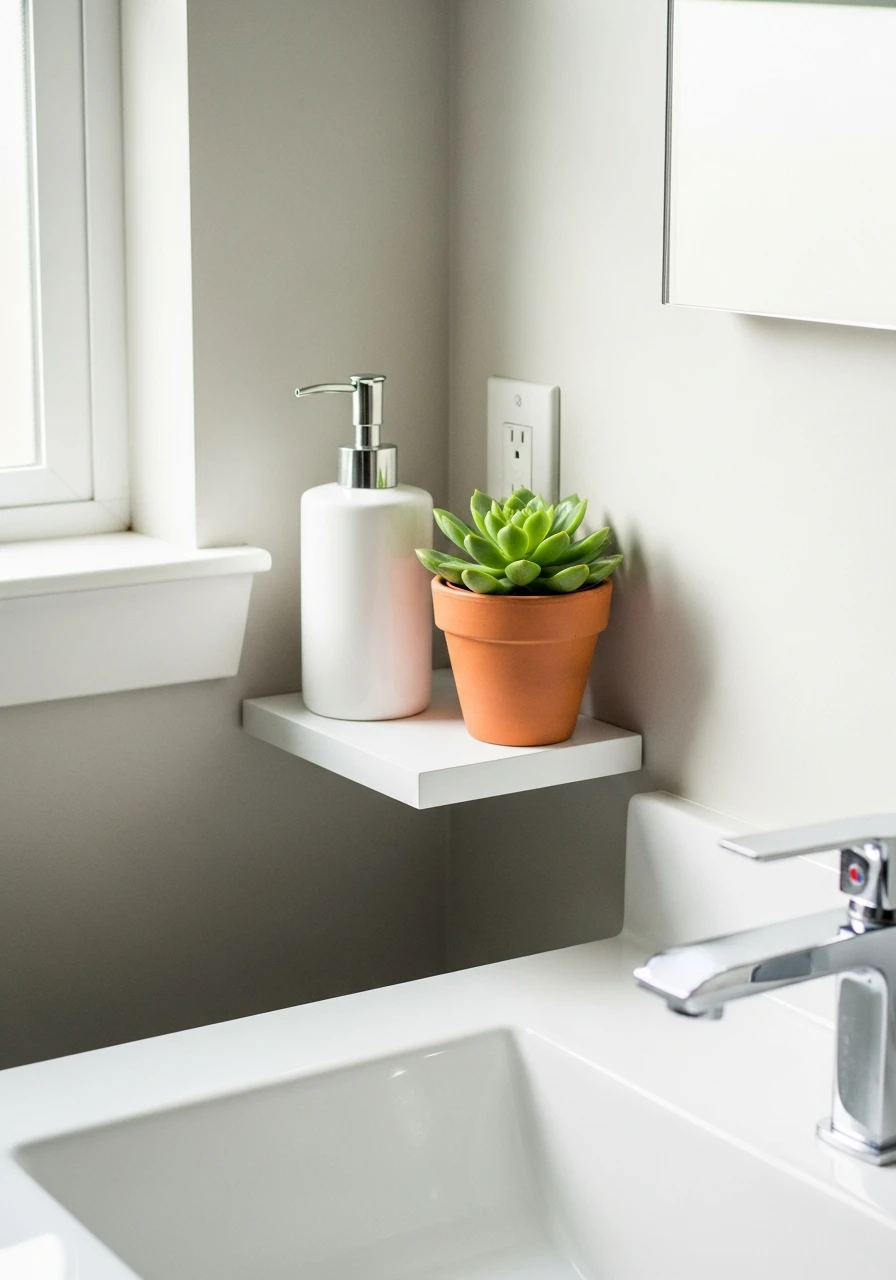
Corner shelves make use of awkward spaces that are often left empty in vanity areas. They are simple to install and hold items like soap dispensers or small plants.
- Choose floating corner shelves.
- Use for decor, not tools.
- Install two or three in a column.
Pro Tip: Corner space is often forgotten but very useful for storage.
27. Mirrors with Built-In Shelves
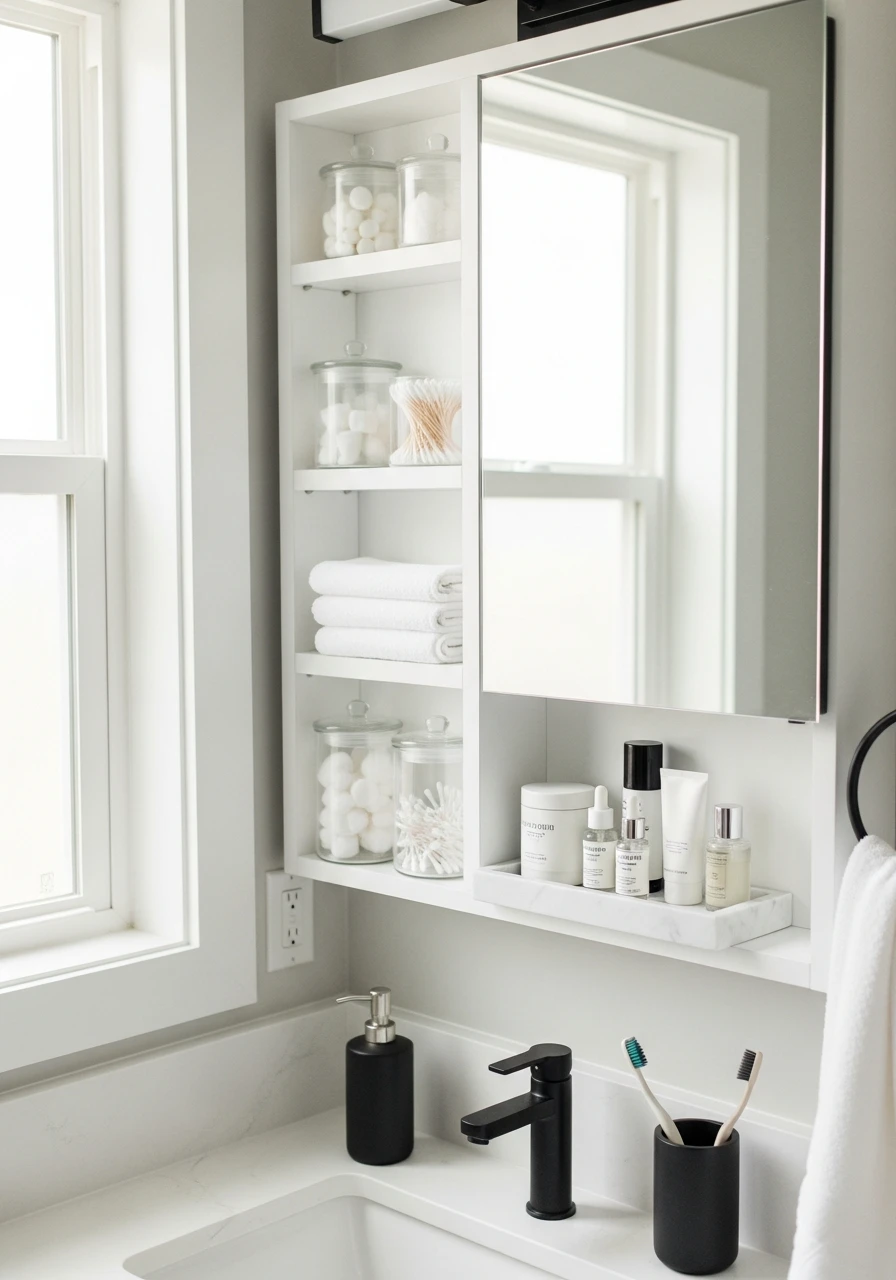
Choosing mirrors with integrated shelves combines function and storage in one compact solution. This is a smart choice for smaller bathrooms where space is tight.
- Saves wall space.
- Use shelves for daily essentials.
- Keeps the look unified.
Pro Tip: Look for recessed mirrored cabinets for the ultimate space saver.
28. Install Narrow Display Ledges
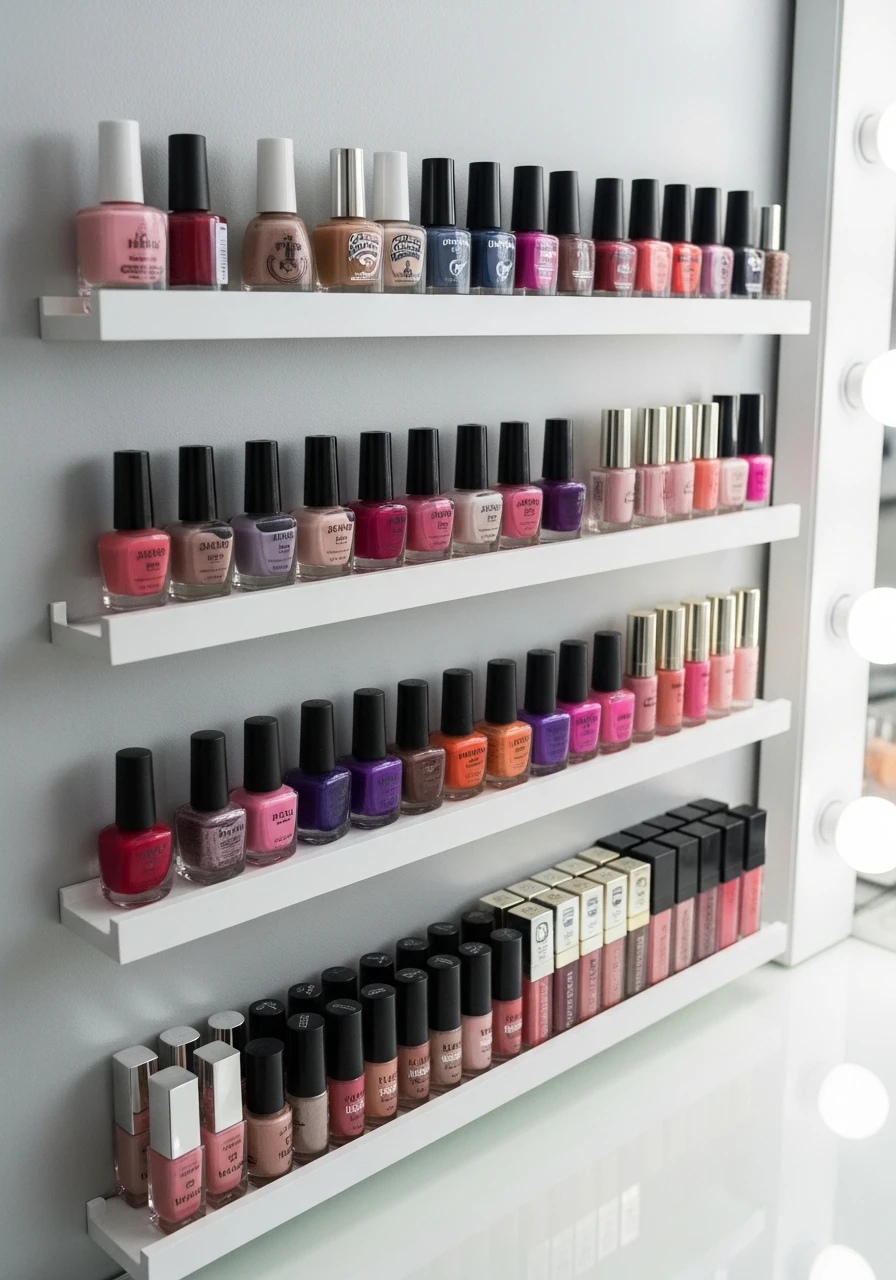
Slim ledges mounted on the wall hold makeup items without taking up much space. They are perfect for displaying nail polish or small lip gloss bottles neatly.
- Best for small, lightweight items.
- Install near good lighting.
- Use picture ledges as an alternative.
Pro Tip: Make sure the ledge has a small lip so items don’t slide off.
29. Store in Stacked Clear Boxes
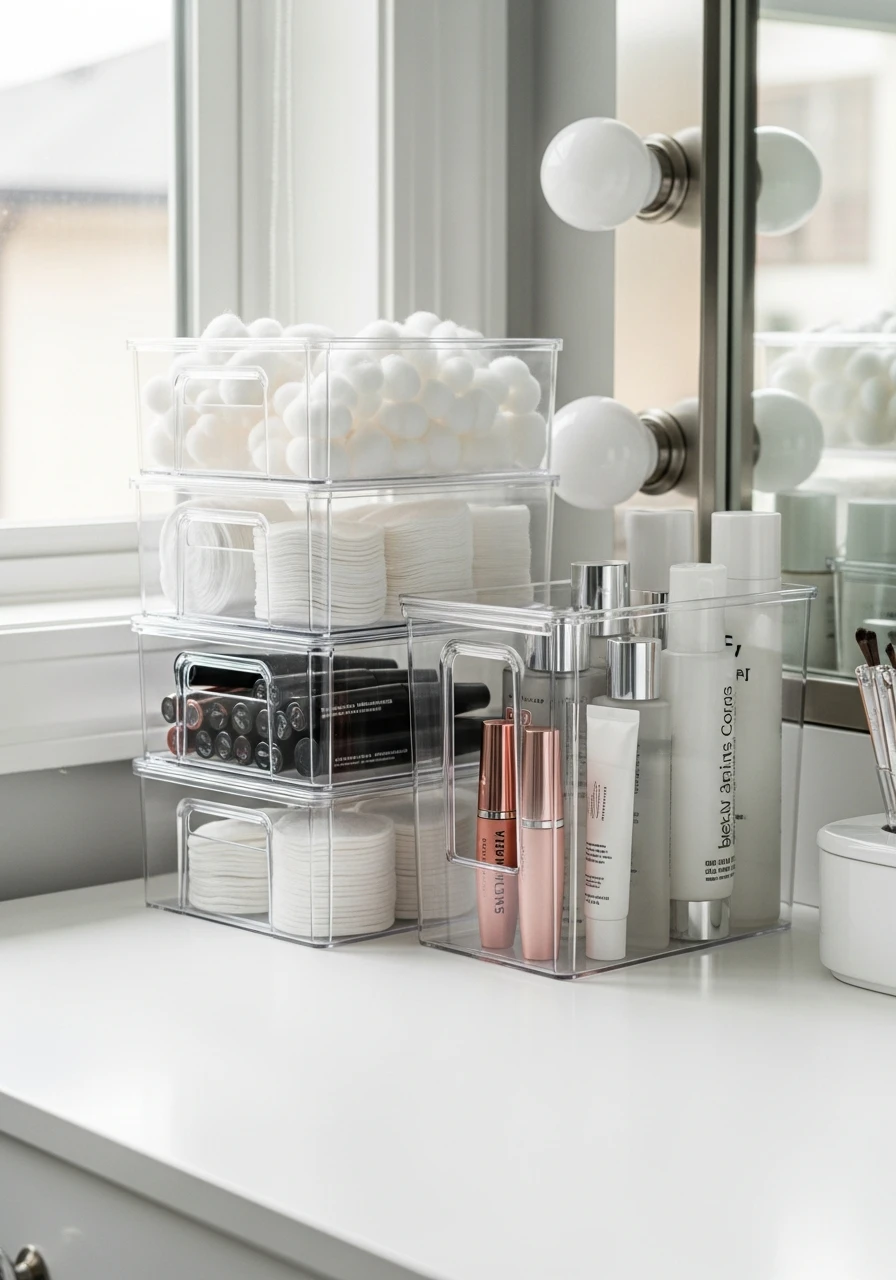
Clear stacked boxes keep items organized while making it easy to see what you own. This is a budget-friendly way to organize extra products or cotton items.
- Use uniform sizes for stacking.
- Stack vertically to save space.
- Only stack items you don’t need daily.
Pro Tip: Clear storage ensures you never forget what you actually have.
30. Add a Tall Storage Cabinet
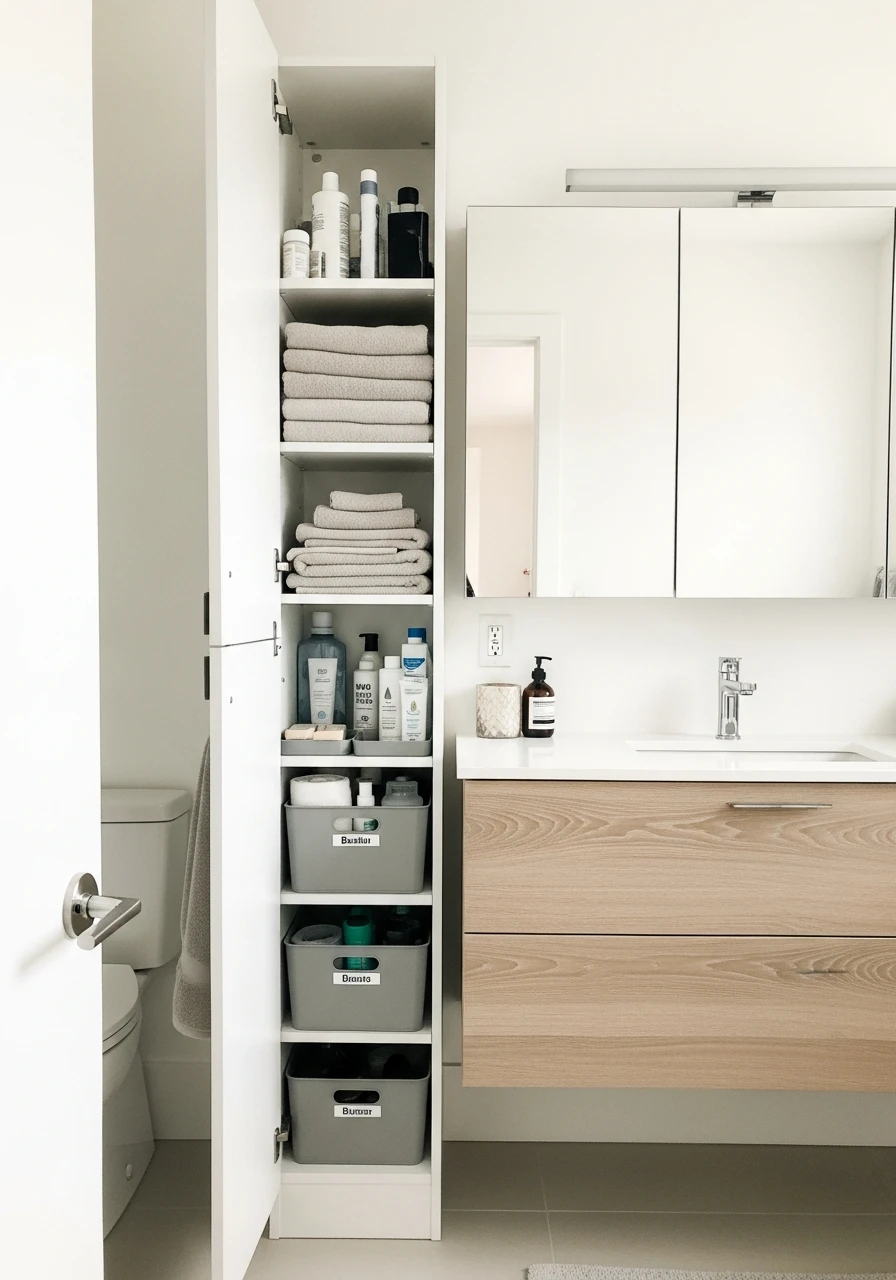
A tall cabinet beside the vanity provides serious extra storage for towels, backups, and rarely used products. This is essential if you have minimal drawer space.
- Choose a slim, tall profile.
- Use for bulk items.
- Anchor it to the wall.
Pro Tip: A cabinet with doors hides clutter completely.
31. Place a Countertop Lazy Susan
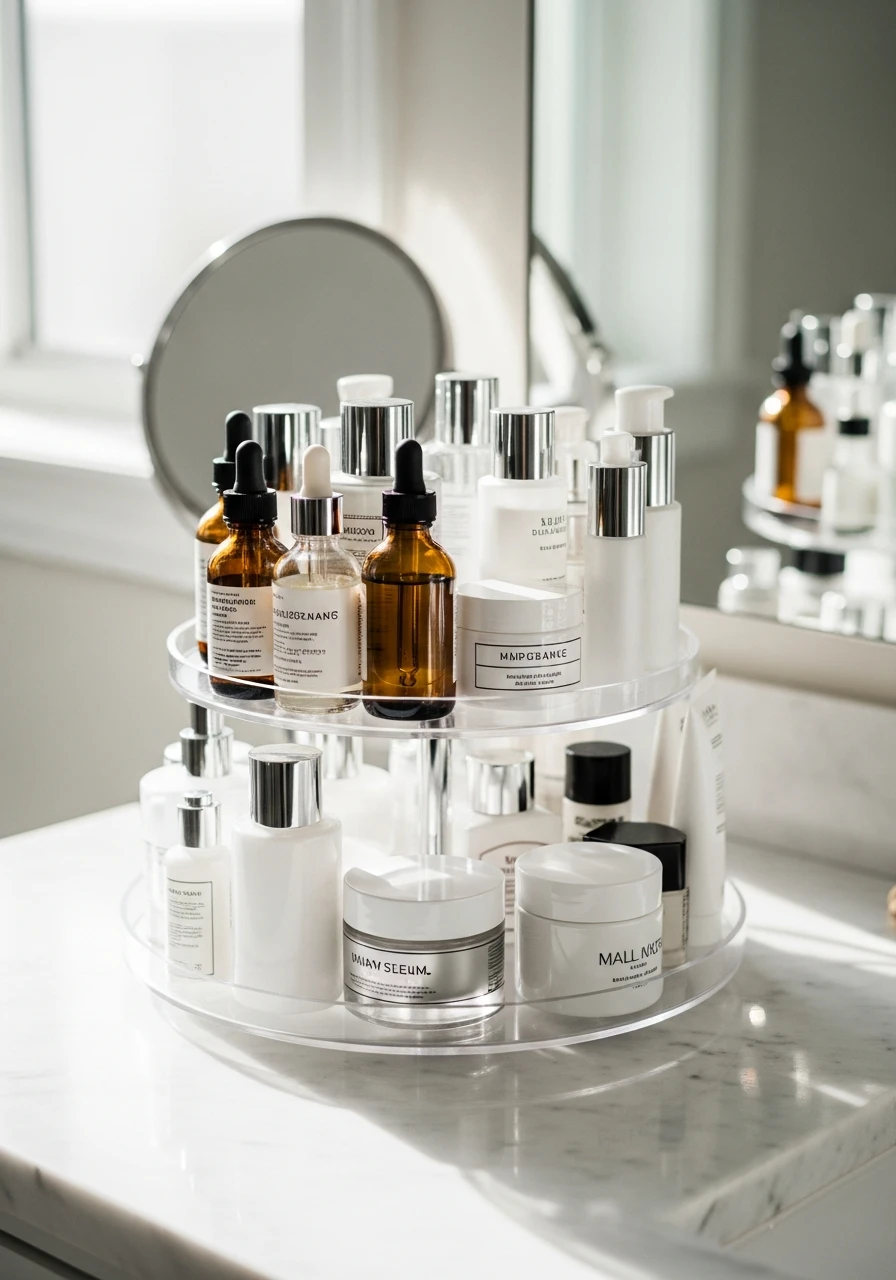
Countertop turntables keep daily essentials accessible while reducing surface clutter. They are fantastic for skincare routines that use multiple serums and creams.
- Keep it small and tidy.
- Use for your morning routine.
- Great for deep countertops.
Pro Tip: A small lazy susan is better than a large one on the counter.
32. Use Stackable Clear Bins

Clear bins make it easy to organize small items like samples, minis, or accessories inside drawers. When they are stackable, they maximize vertical space within the drawer itself.
- Ideal for tiny accessories.
- Buy bins designed to fit together.
- Sort by color or usage.
Pro Tip: Stackable bins keep your drawers organized even when they are full.
33. Magnetic Jars for Hair Accessories
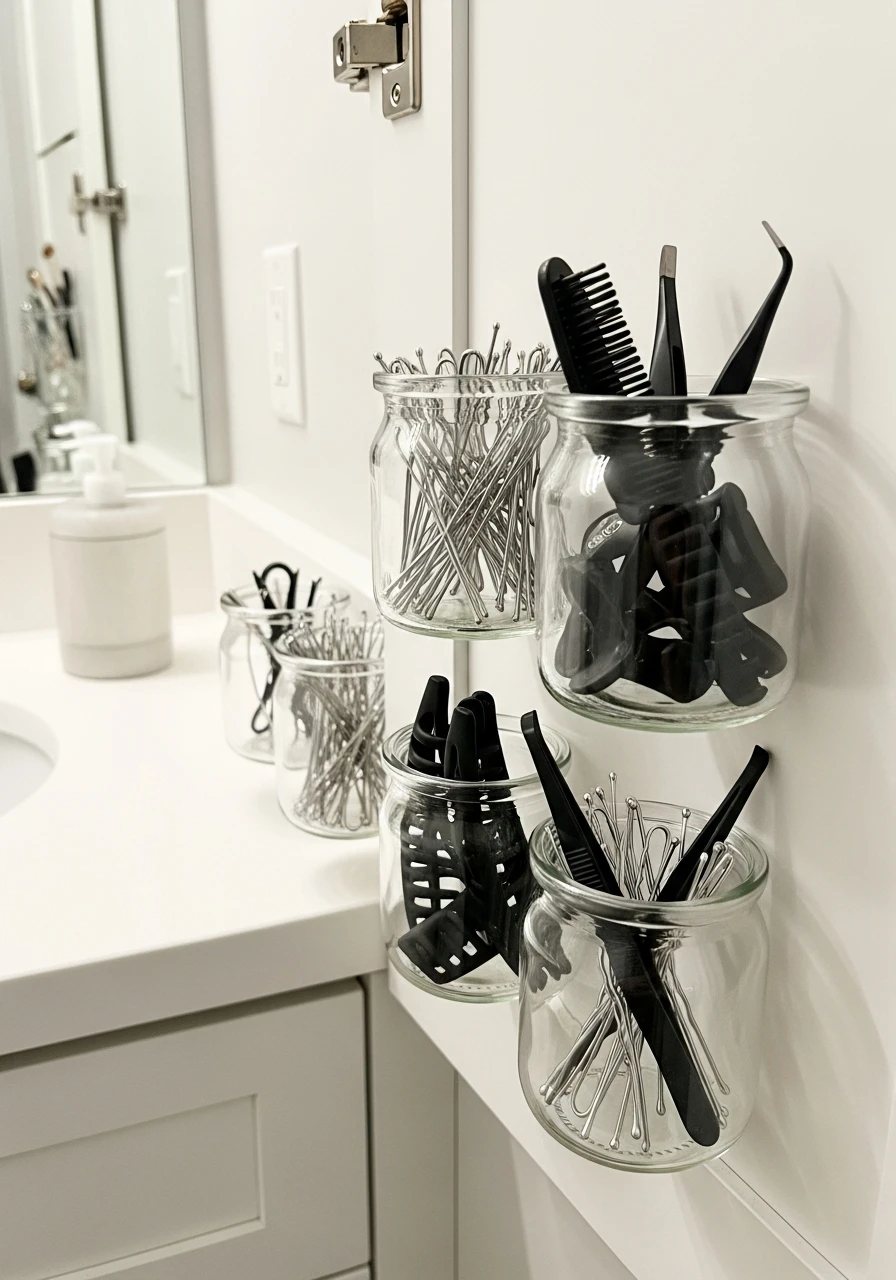
Magnetic jars mounted inside cabinet doors are ideal for pins, clips, and small tools. They keep these tiny items secured and off the counter surface entirely.
- Use for bobby pins and hair ties.
- Mount inside the medicine cabinet.
- Look for clear lids.
Pro Tip: Make sure the jars are lightweight and easy to open one-handed.
34. Mount a Nail Polish Rack

Wall-mounted or under-shelf nail polish racks keep bottles organized and easy to see. This prevents bottles from rolling around in drawers and saves space.
- Organize by color.
- Use a clear acrylic rack.
- Install on an unused wall.
Pro Tip: A clear rack looks like art when filled with colorful polish.
35. Secure Tools with Velcro
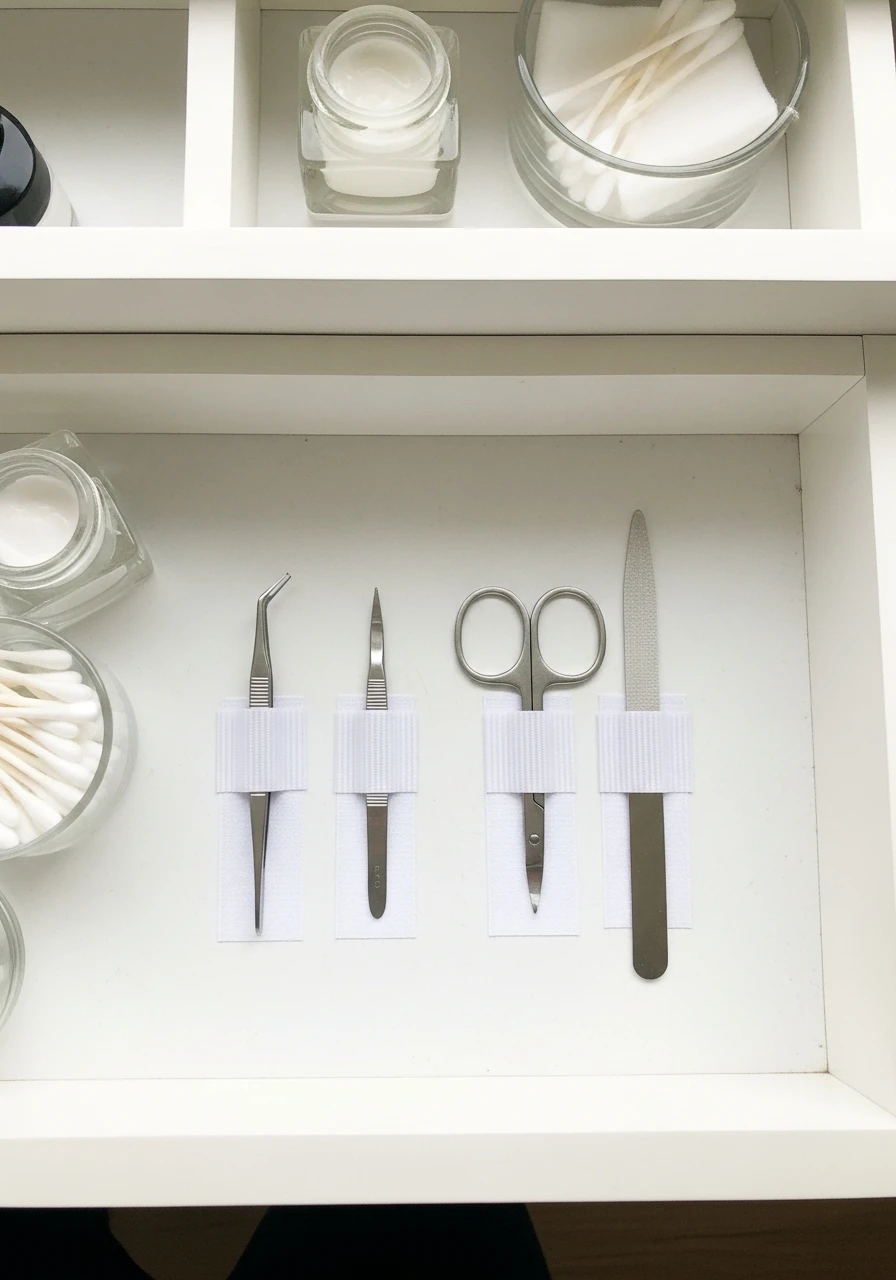
Velcro strips can hold lightweight tools like small scissors or files in place inside drawers or cabinets. This is a quick DIY fix to stop items from sliding around.
- Attach to lightweight tools.
- Use industrial strength Velcro.
- Great for makeup sponges.
Pro Tip: Use Velcro dots to secure the bottom of drawer inserts that tend to move.
36. Group Travel Products
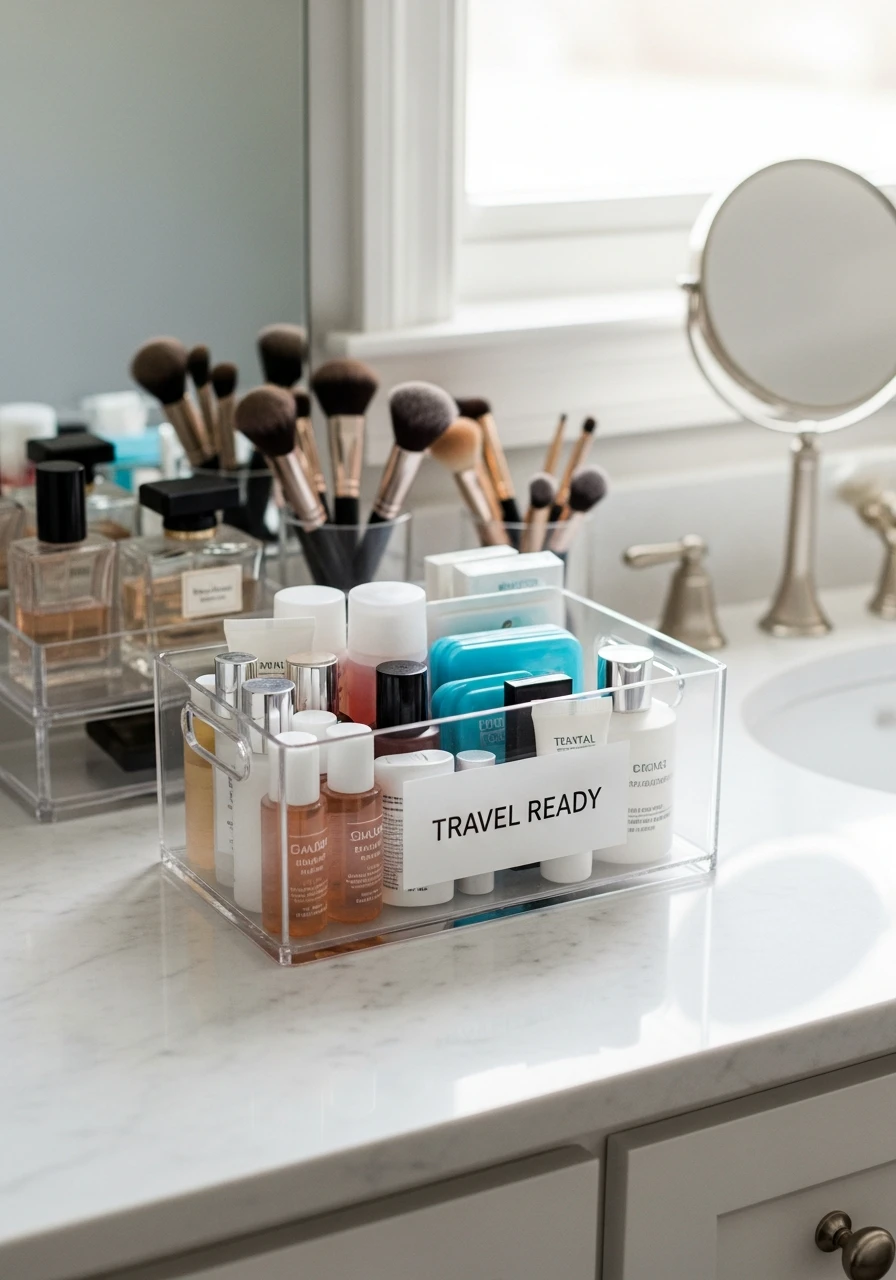
Store all travel-size items in one dedicated container or pouch. This way, they are easy to grab and pack quickly whenever you are heading out the door.
- Use a clear zippered pouch.
- Refill mini containers promptly.
- Keep the pouch near your suitcase.
Pro Tip: Use a brightly colored pouch so it is easy to spot in a hurry.
37. Use a Rolling Cart
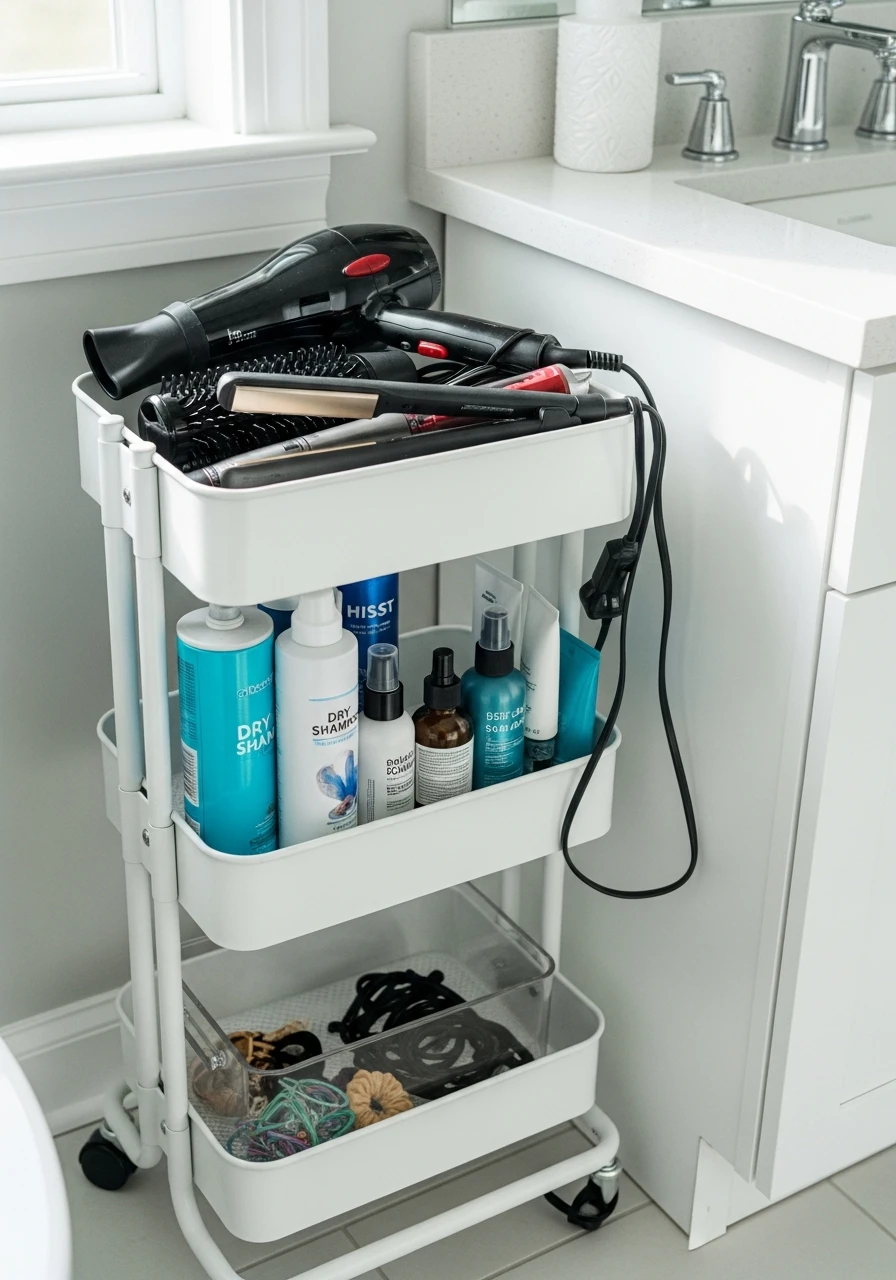
A rolling cart provides mobile storage that can be moved as needed in small spaces. Use it for hair tools or products you want nearby during your routine but tucked away afterward.
- Great for small spaces.
- Roll it into a closet when done.
- Use the top shelf for hair tools.
Pro Tip: A three-tier cart offers lots of flexible space.
38. Label Everything

Using a label maker ensures every item has a designated place, which is the key to maintaining long-term organization. It takes the guesswork out of putting things away.
- Label bins and baskets.
- Use simple, clear fonts.
- Update labels as needed.
Pro Tip: If you don’t label it, the system will fall apart fast.
39. Store Brushes in Clear Cups
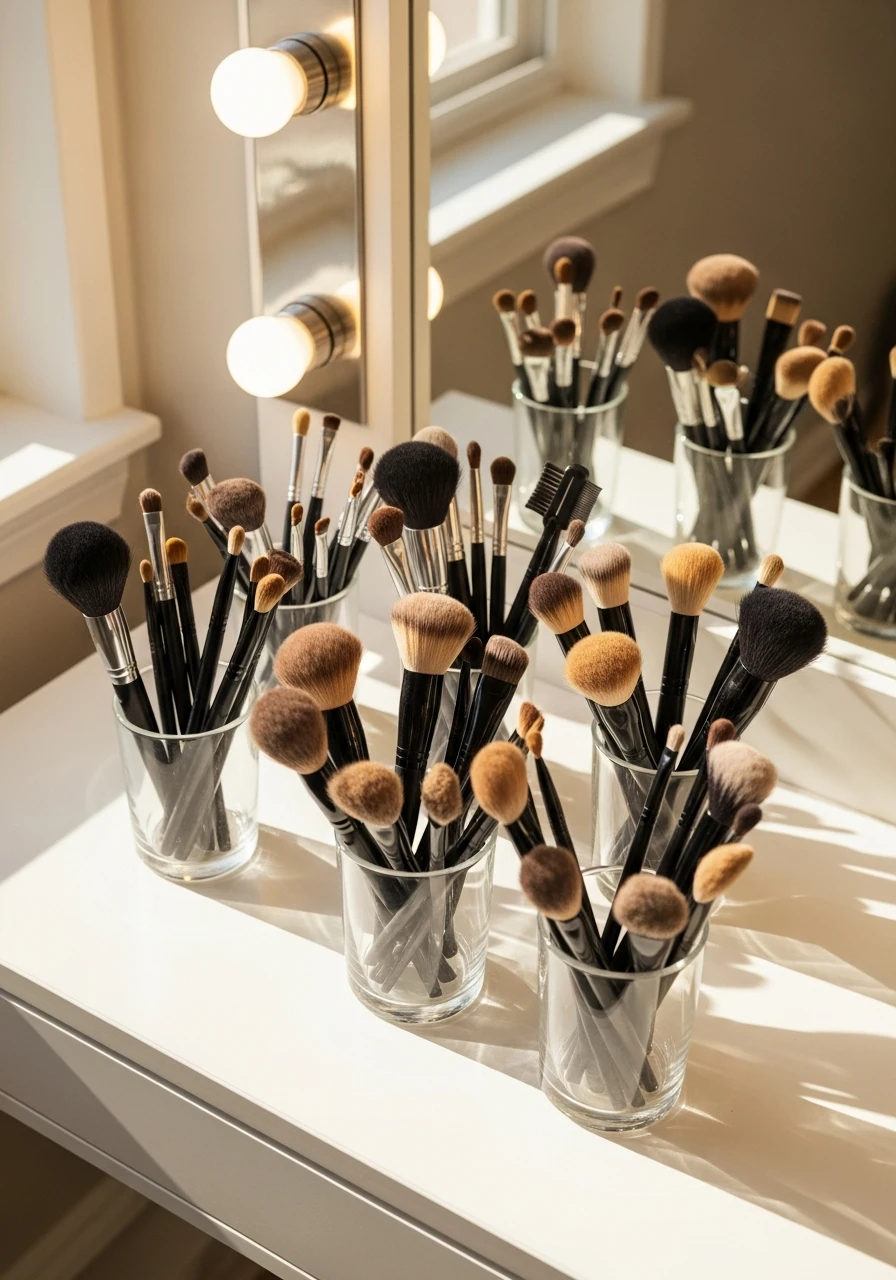
Clear cups allow brushes to dry properly after cleaning while making it easy to identify each one quickly. They are cheap, effective, and look neat on the counter.
- Use separate cups for clean and dirty brushes.
- Keep them uncovered to dry.
- Line the bottom with beads.
Pro Tip: Use glass cups for the most polished look.
40. Jewelry Dishes for Daily Wear
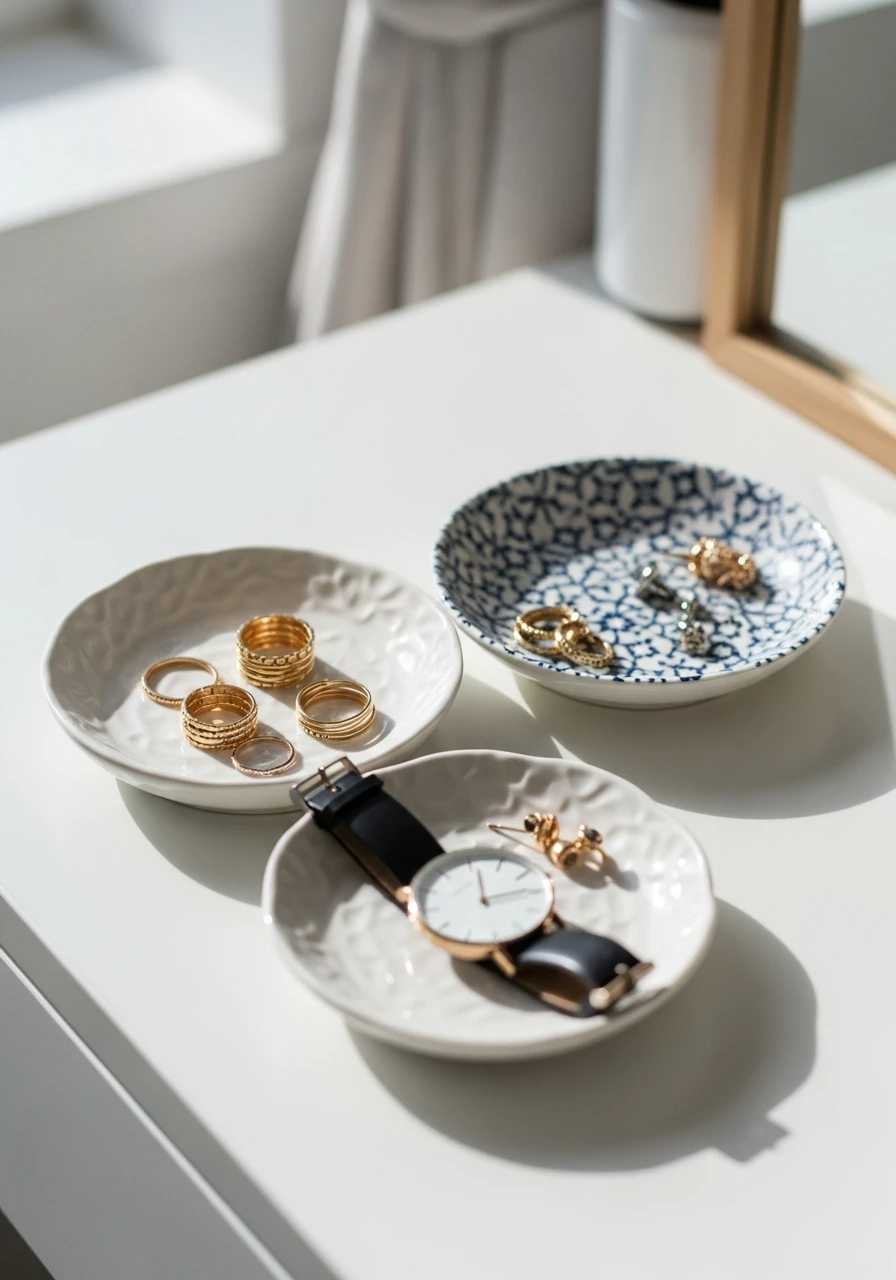
Small dishes prevent frequently worn jewelry from getting lost and keep them accessible on the counter. Use a pretty dish for rings, earrings, or your watch.
- Use a dedicated dish for rings.
- Choose ceramic or crystal options.
- Keep it near the sink.
Pro Tip: A small, decorative dish acts as cute counter decor.
41. Declutter Makeup Regularly
Remove expired or unused products to prevent overcrowding and maintain a clean vanity. A quick monthly declutter keeps your system working smoothly.
- Check expiration dates on liquids.
- Toss anything that smells weird.
- If you haven’t used it in 6 months, toss it.
Pro Tip: Start with mascara, which expires fastest.
42. Organize by Function

Grouping items by function, like ‘hair care’ or ‘morning routine,’ improves efficiency during your daily routines. This means you grab everything you need in one go.
- Group all face products together.
- Keep tools with their corresponding products.
- Store makeup away from hair items.
Pro Tip: Functional zones save you minutes every morning.
43. Coordinate Storage Colors
Matching your storage containers, whether they are clear or white, creates a cohesive and visually appealing vanity setup. This makes a budget organization system look custom.
- Stick to one color palette.
- Clear and white are the safest bets.
- Use uniform labels.
Pro Tip: Visual consistency is the secret to a high-end look.
44. Choose Decorative Boxes
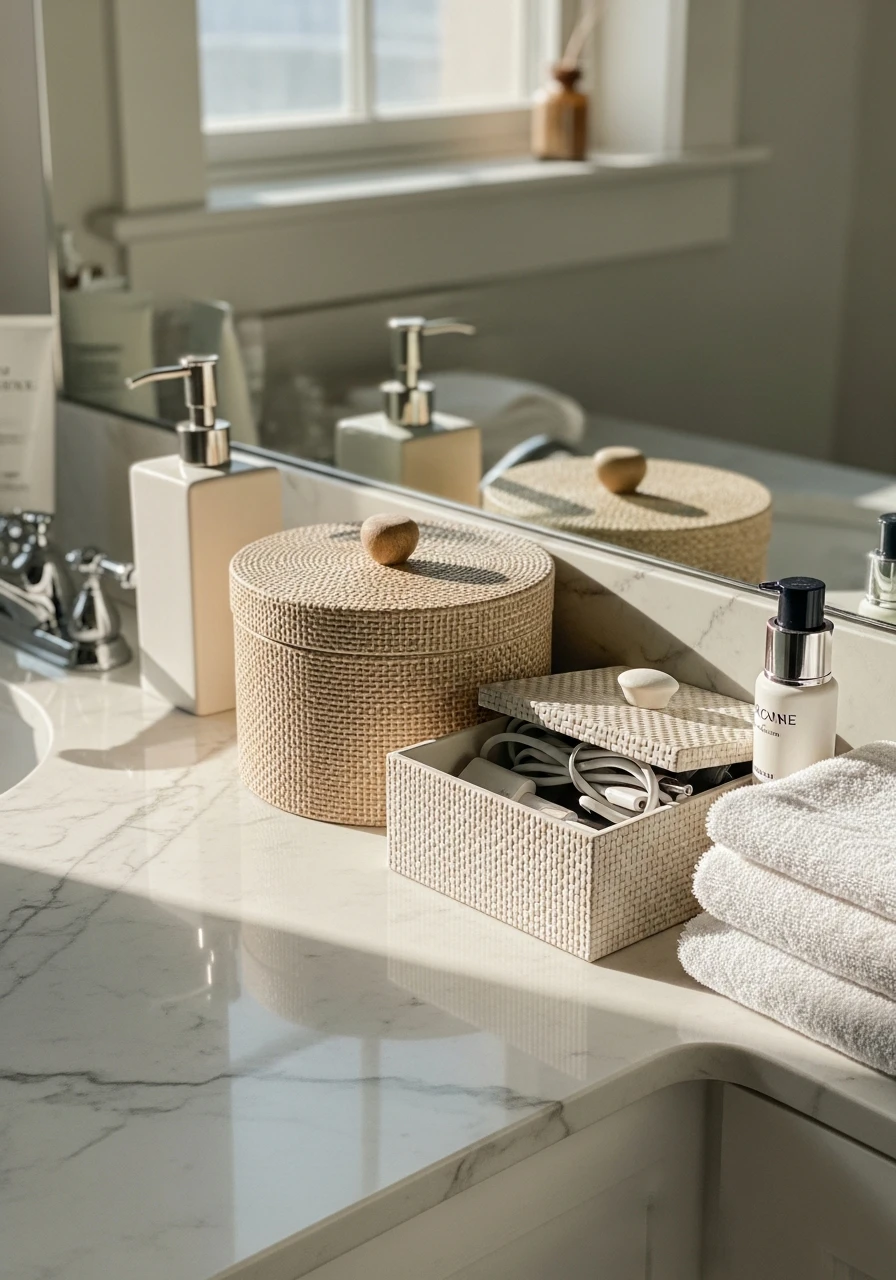
Stylish, decorative boxes hide clutter like charging cords, first aid items, or feminine products. This keeps the counter looking beautiful while storing necessary but unsightly items.
- Use patterned or textured boxes.
- Hide things you don’t want visible.
- Choose boxes with lids.
Pro Tip: A pretty box is the easiest way to hide messy items.
45. Rotate Seasonal Products
Store off-season products, like heavy winter creams or summer sunscreens, out of sight. This keeps your everyday items easily accessible and prevents clutter build-up.
- Use high shelves for seasonal items.
- Label seasonal bins clearly.
- Rotate twice a year.
Pro Tip: If you aren’t using it now, put it away.
46. Use Matching Organizer Sets
Buying consistent organizer styles, rather than mixing and matching, creates a clean, intentional look. This makes even cheap plastic bins look more expensive.
- Buy one large set of bins.
- Avoid mixing materials.
- Keep the same height containers.
Pro Tip: Consistency is key to making any space look organized.
47. Keep Daily Items Within Reach
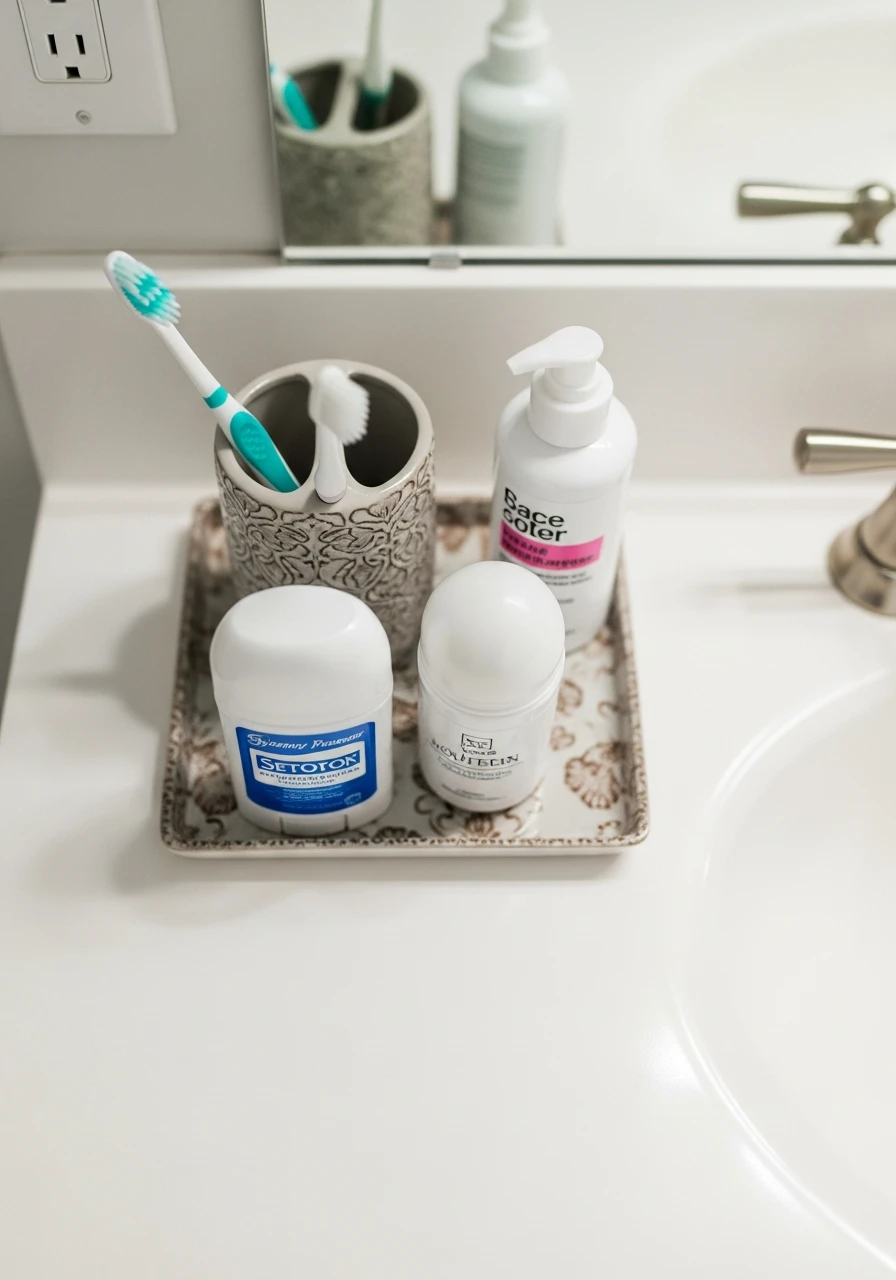
Place everyday essentials like toothbrush, deodorant, and moisturizer in the most accessible spots. This saves time and prevents you from digging through drawers daily.
- Use the top drawer for daily items.
- Keep them on the immediate counter surface.
- Put backups far away.
Pro Tip: The middle drawer is your prime real estate.
48. Add Simple Decorative Accents
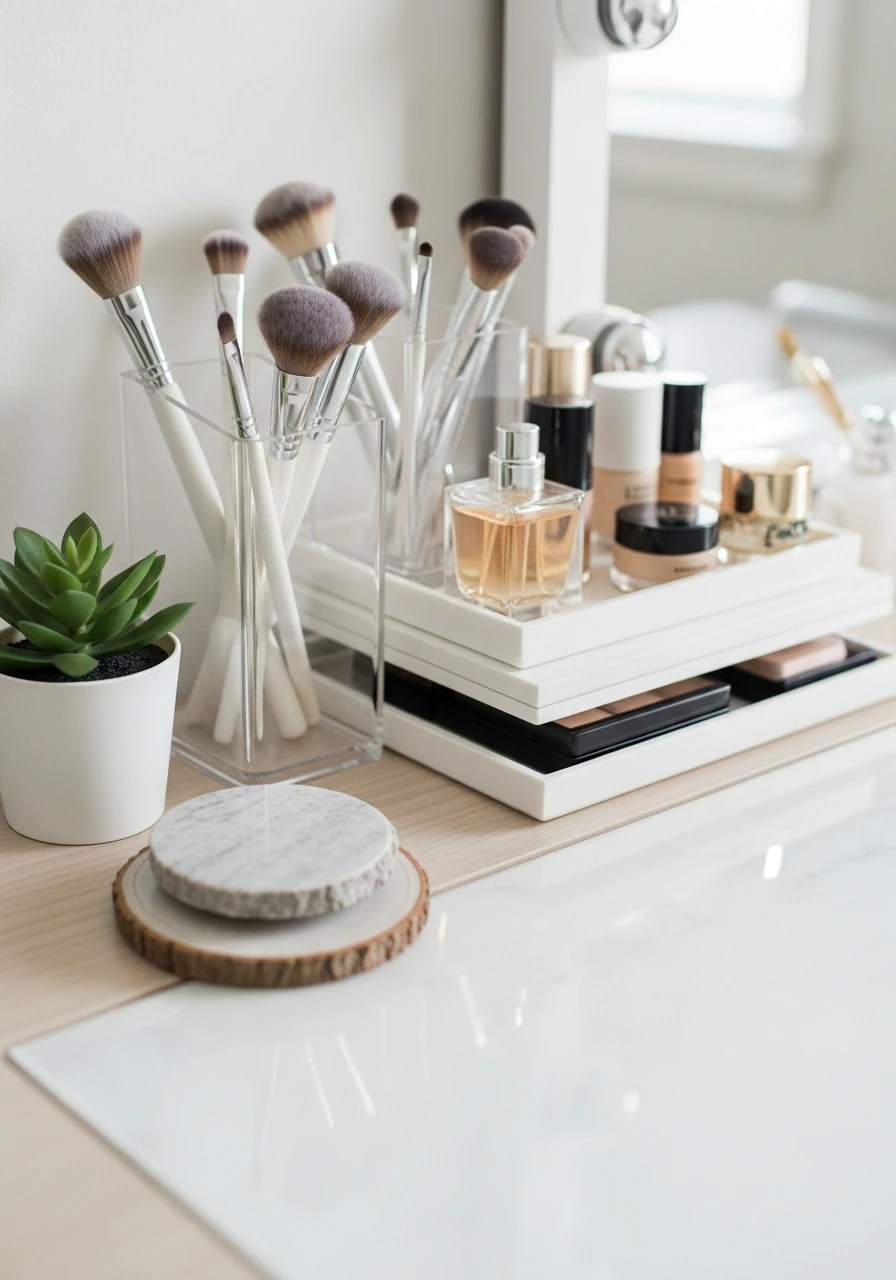
Minimal decor like a small plant, a candle, or a stone coaster enhances the vanity without causing clutter. Choose one or two items to elevate the space.
- Use a small faux succulent.
- Add one scented candle.
- Keep decor to one corner.
Pro Tip: Decor should not take up functional storage space.
49. Protect Surfaces with Trays
Placing trays under products prevents spills, makeup stains, and water damage on your vanity surface. This also makes daily cleaning much easier and faster.
- Use trays under liquid products.
- Choose waterproof materials.
- Wipe the trays often.
Pro Tip: A damp sponge can ruin wood vanities fast, so use trays!
50. Create a Zero-Clutter Zone
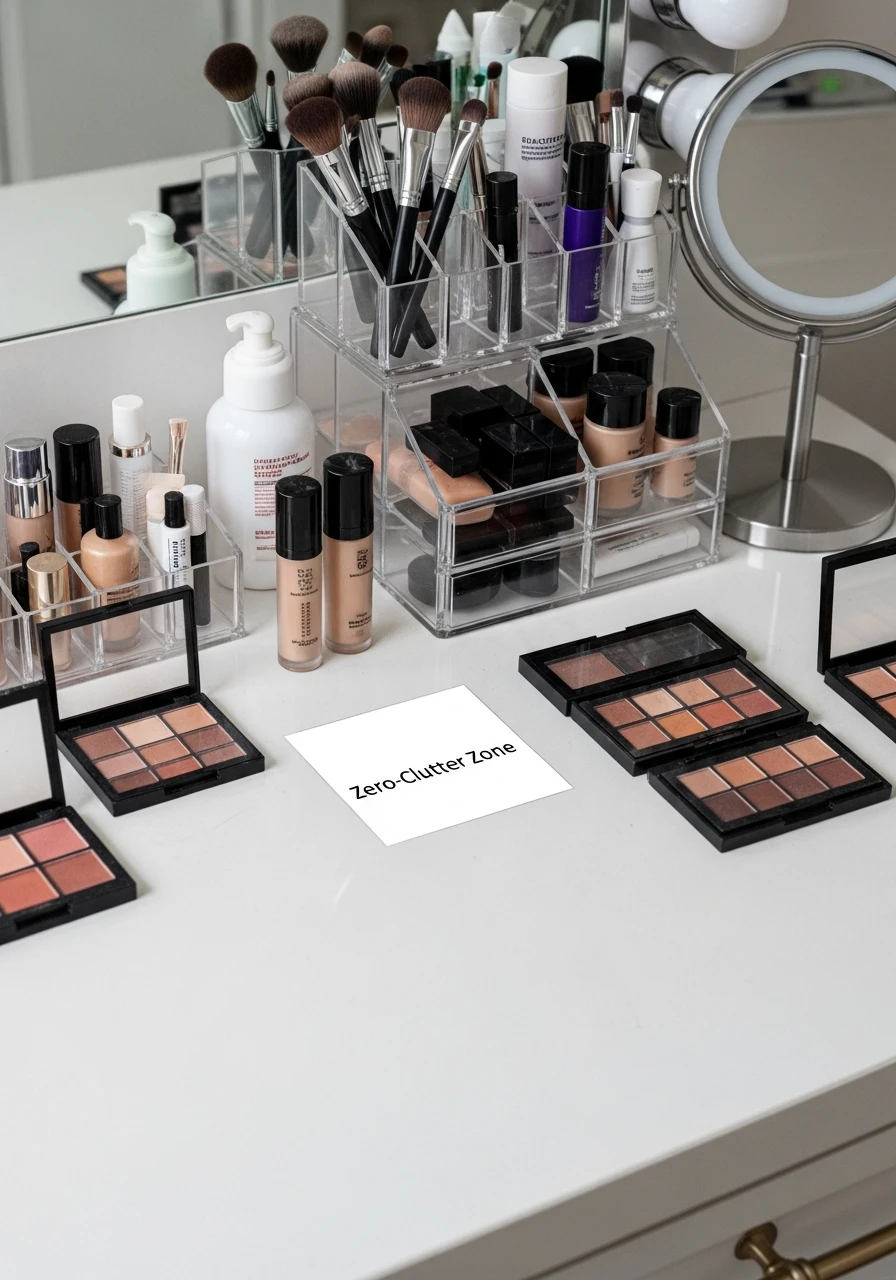
Designate one area of the vanity to stay completely clear of products and tools. This small patch of emptiness provides visual relief and creates a calm, organized feeling.
- Keep the area near the sink clear.
- Use this spot for a plant or candle.
- Enforce this zone strictly.
Pro Tip: A bit of blank space is just as important as storage.
Organizing your vanity doesn’t need to be stressful or expensive.
By using these simple tricks—from clear bins to adjustable dividers—you can enjoy a beautiful, clutter-free space every single day.
Start small and watch your morning routine get so much easier!