30 Creative DIY Christmas Ornaments Ideas
This post may contain affiliate links: full affiliate disclosure.
I hope these 30 wood craft ideas have you feeling inspired to grab some wood and get crafting!
Whether you make a few simple ornaments or an entire festive village, the most important thing is to have fun and create something you love.
Which of these projects are you most excited to try?
Let me know in the comments below! If you found this post helpful, be sure to share it with your fellow DIY enthusiasts and pin it for later. Happy crafting!
1. Cinnamon Stick Stars
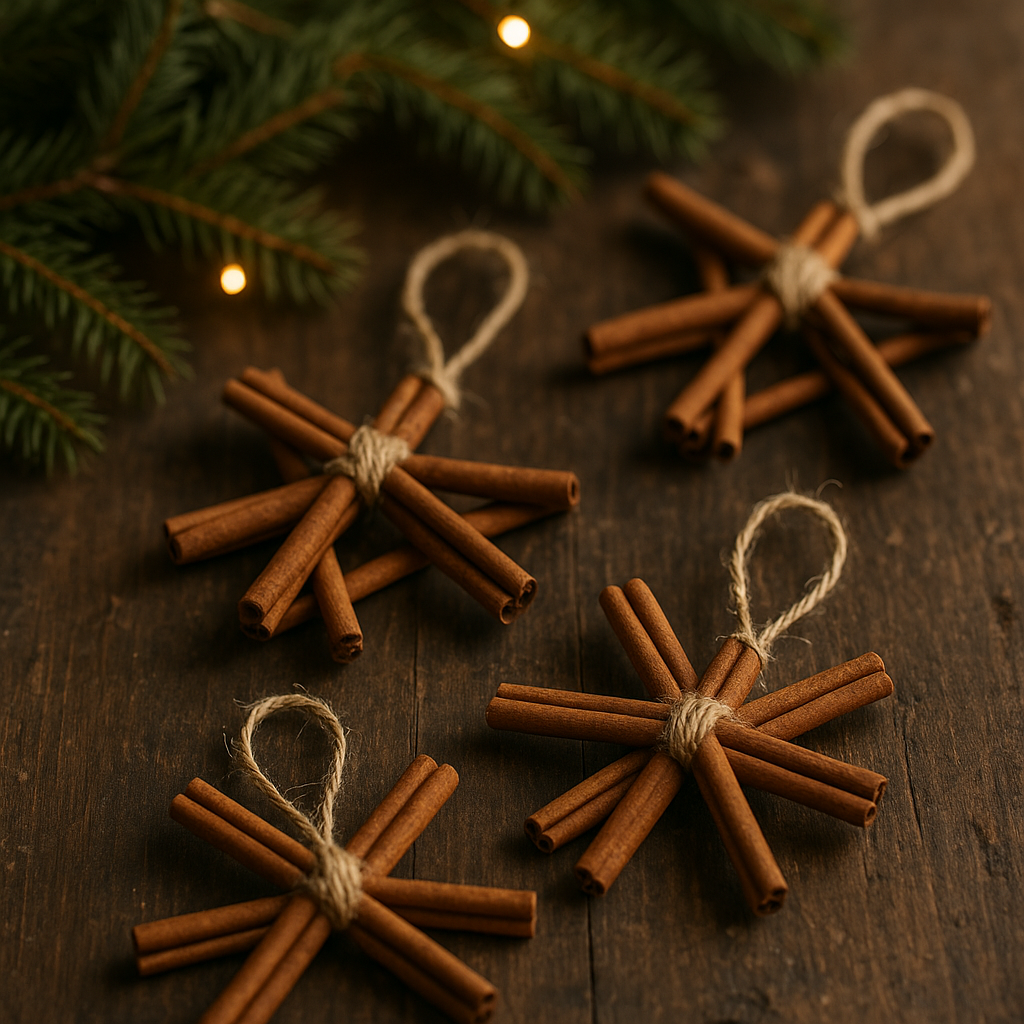
If you want your tree to smell as good as it looks, this is the ornament for you! These fragrant stars add a lovely, natural, and rustic feel while filling your home with the scent of Christmas baking. They’re simple, quick, and look great on any color scheme.
- Materials: Cinnamon sticks, hot glue, twine.
- How-to: Arrange cinnamon sticks in a star shape, glue the ends, and wrap with twine for a natural, fragrant ornament.
2. Burlap Ribbon Bows
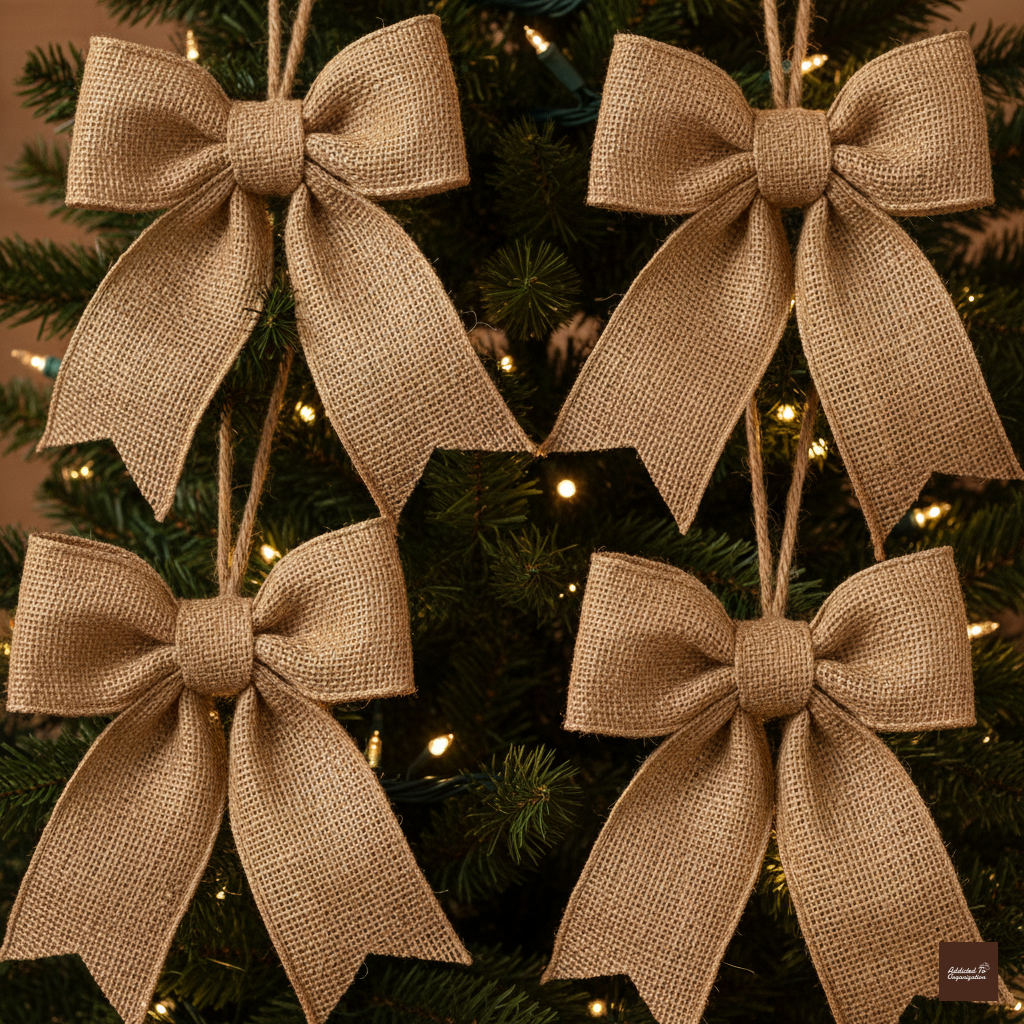
For a touch of farmhouse chic, you can’t go wrong with burlap. These bows are an effortless way to add texture and a cozy, homespun look to your Christmas decor. They also make great package toppers!
- Materials: Burlap ribbon, scissors, hot glue.
- How-to: Cut strips of burlap, form into simple bows, and attach to tree branches or other ornaments for a rustic touch.
3. Wood Slice Photo Ornaments
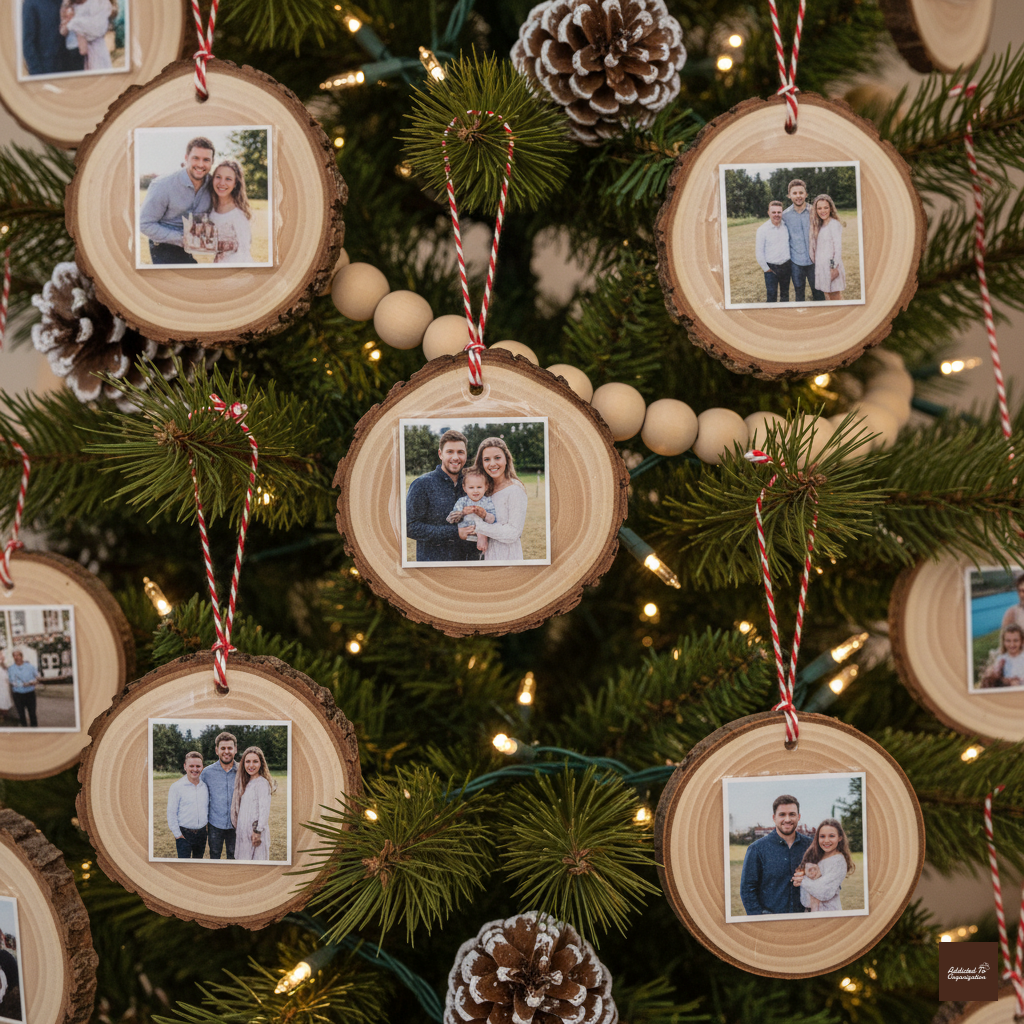
Turn last year’s family photos into timeless treasures! These wood slices give your memories a warm, natural frame. They are perfect for gifting to grandparents or keeping as annual mementos of how much the kids (or pets!) have grown.
- Materials: Wood slices, Mod Podge, printed photos, ribbon.
- How-to: Print small family photos, glue them on wood slices, seal with Mod Podge, and add a ribbon loop for hanging.
4. Mason Jar Lid Wreaths
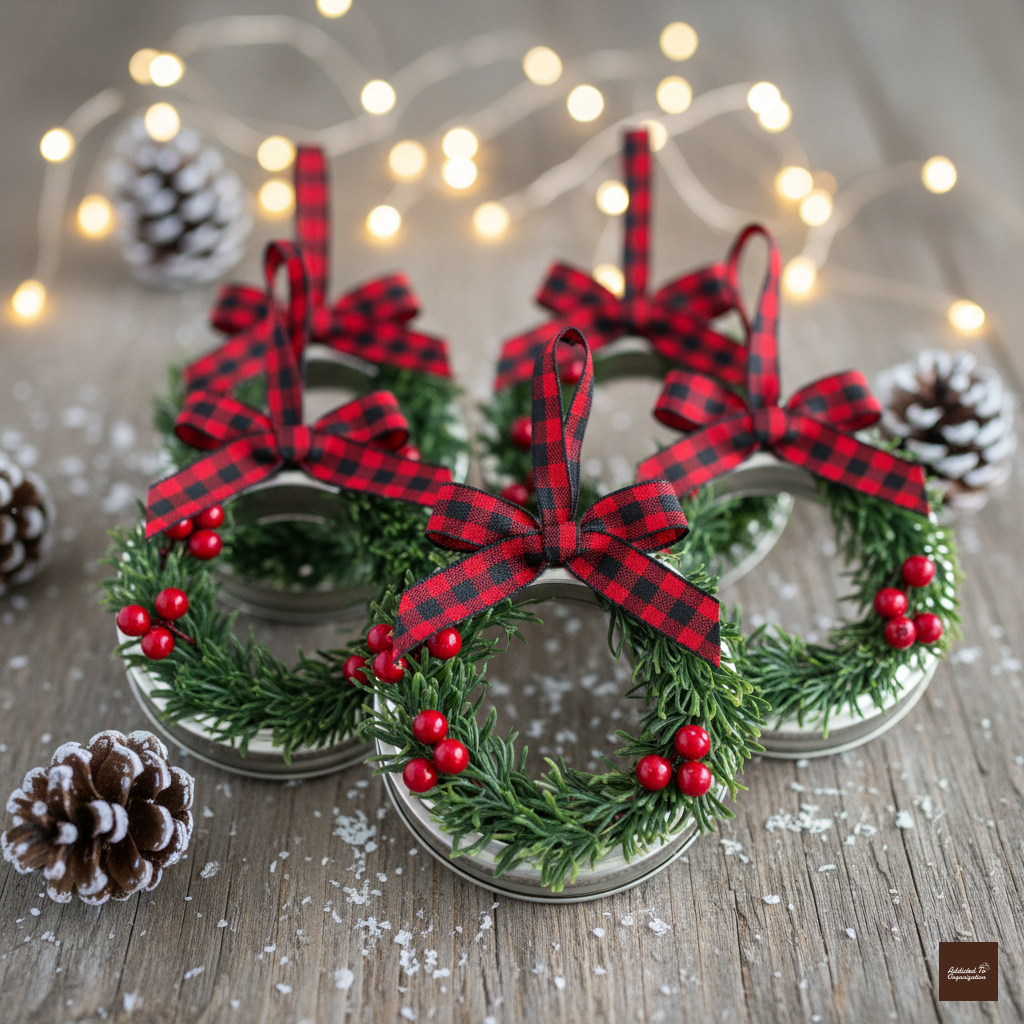
Who knew a plain old mason jar lid could look this festive? Upcycle those spare rings into adorable mini wreaths that look stunning dangling from branches or strung together as a garland.
- Materials: Mason jar lids, faux greenery, berries, hot glue.
- How-to: Wrap greenery around the lid ring, secure with glue, and tie a ribbon on top for a mini wreath.
5. Pinecone Reindeer
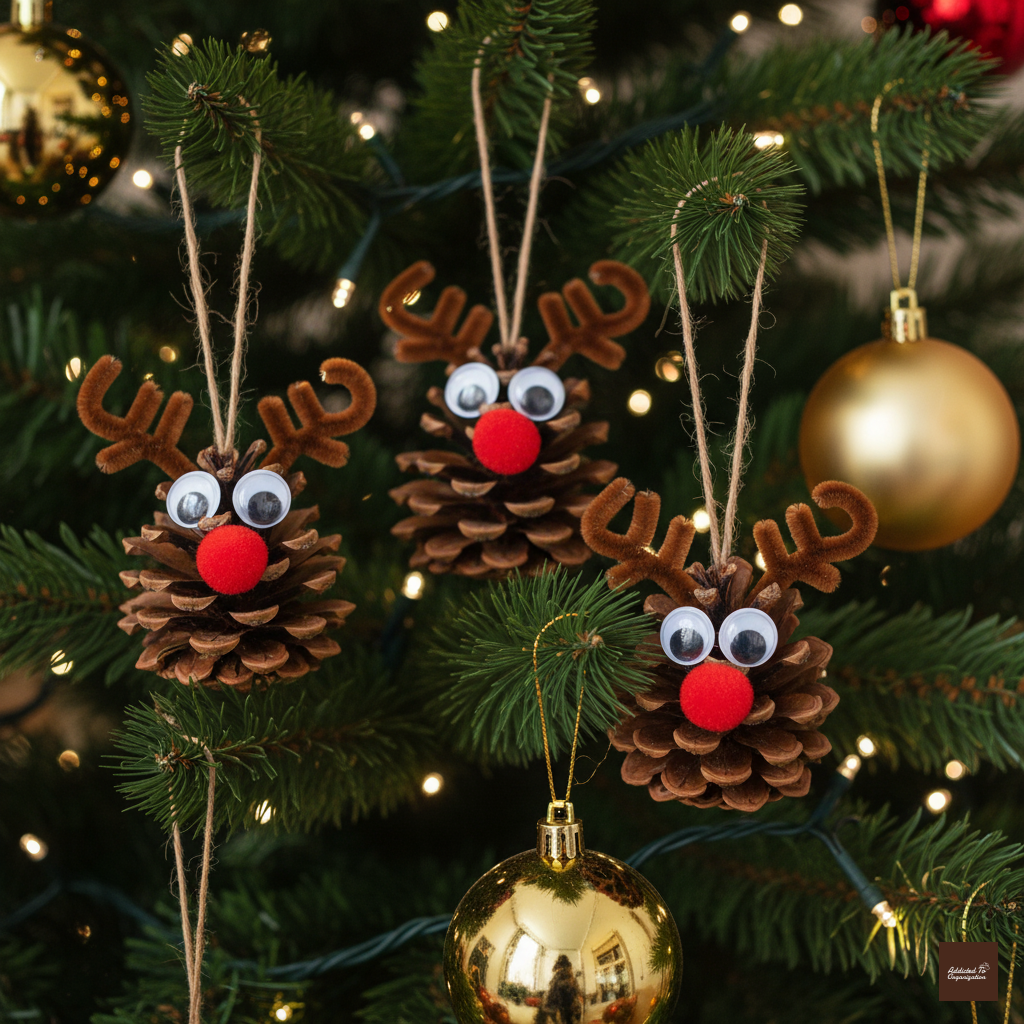
This classic craft is guaranteed to bring a smile to anyone who sees it! Giving a foraged pinecone a goofy personality with googly eyes and a bright red nose is a fantastic way to involve the kids in decorating.
- Materials: Pinecones, googly eyes, red pom-poms, pipe cleaners.
- How-to: Glue eyes and a red pom-pom nose on the pinecone, bend pipe cleaners into antlers, and attach to the top.
6. Clay Star Ornaments

Simple, elegant, and totally customizable. You can use any cookie cutter shape you like, but stars are always a holiday staple. These look beautiful when painted white for a minimalist look or dusted with fine glitter for extra sparkle.
- Materials: Air-dry clay, star-shaped cookie cutters, string.
- How-to: Roll out clay, cut star shapes, poke a hole for hanging, let dry, and paint white or leave natural.
7. Wood Bead Snowmen
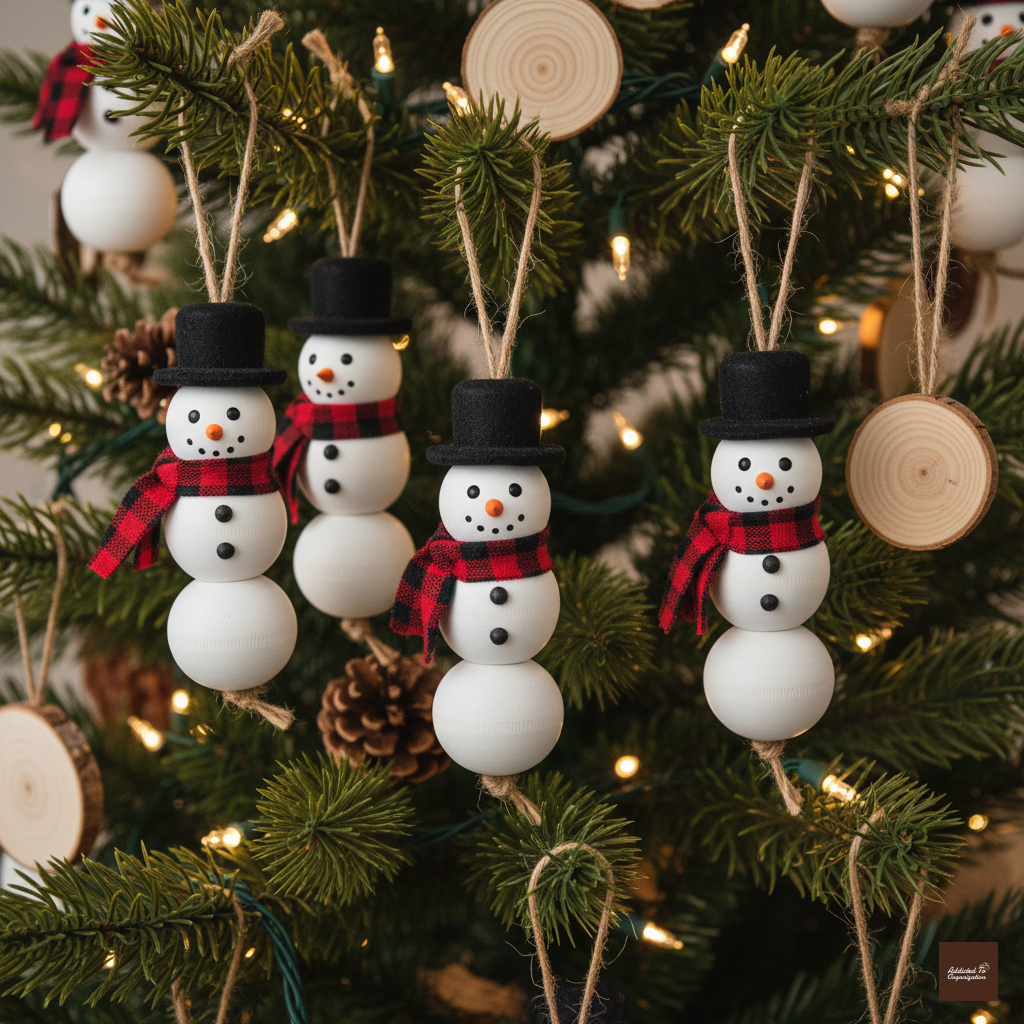
These sweet, little snowmen are perfect for a Scandinavian or minimalist tree theme. They’re incredibly easy to assemble and require just a few simple beads and a dab of paint for the face.
- Materials: Wooden beads, white paint, tiny felt scarves.
- How-to: Thread beads onto string, paint white, add a painted face and scarf for a simple snowman.
8. Twig Christmas Trees
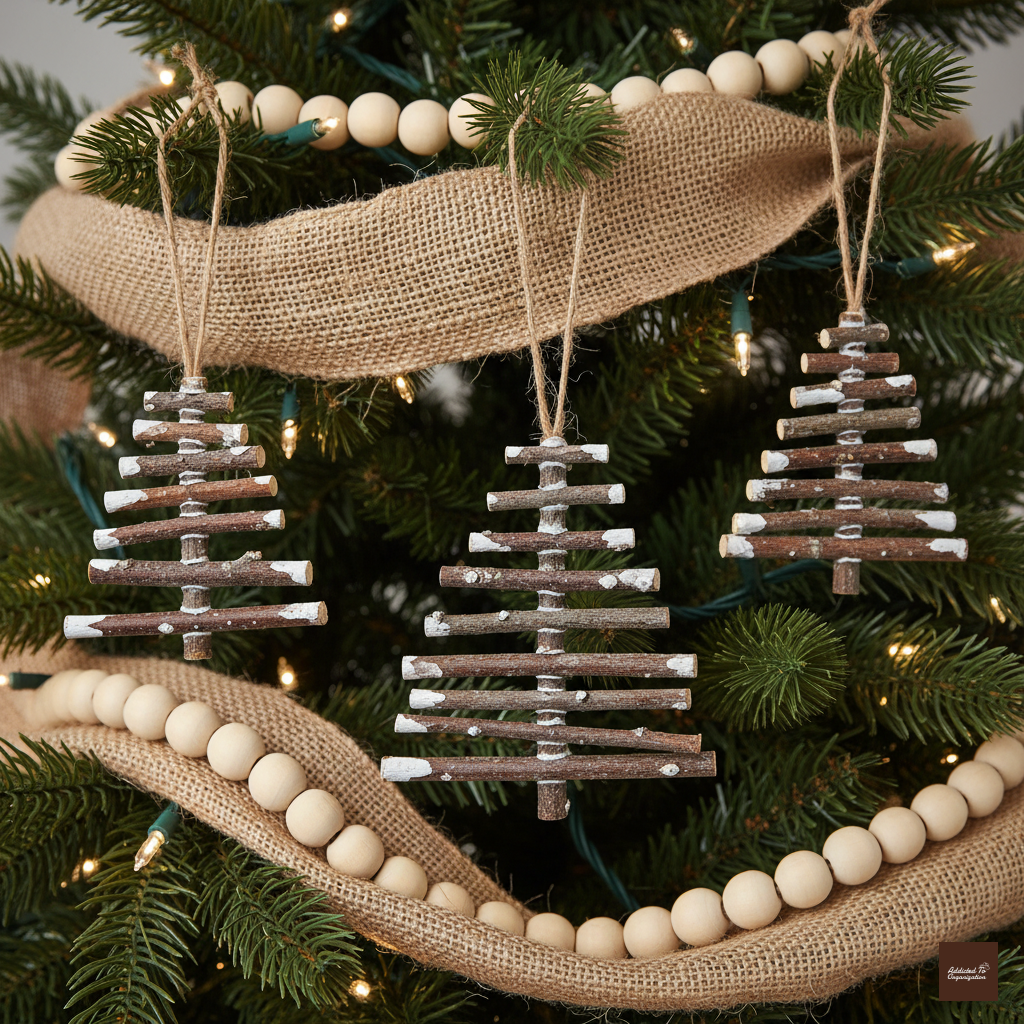
Bring a little bit of the winter forest inside! Gathering the materials for this is a fun outdoor activity, and the resulting mini trees are a charmingly imperfect and natural addition to your decor.
- Materials: Small twigs, glue, string.
- How-to: Glue twigs onto a longer stick in decreasing sizes, creating a tree shape. Add a twine loop for hanging.
9. Paper Straw Snowflakes

If you have spare paper straws from summer parties, now’s the time to use them! Cutting and gluing them into geometric snowflake shapes results in surprisingly modern and crisp-looking decorations.
- Materials: White paper straws, glue, scissors.
- How-to: Cut straws into small pieces, arrange into snowflake patterns, and glue in place.
10. Felt Heart Ornaments

Soft, cozy, and perfect for adding a pop of color. These stitched hearts are a great beginner sewing project. If you’re not into sewing, you can easily swap the needle and thread for fabric glue!
- Materials: Felt fabric, needle and thread, stuffing.
- How-to: Cut out two heart shapes, sew together, stuff lightly, and add a string for hanging.
11. Painted Glass Baubles
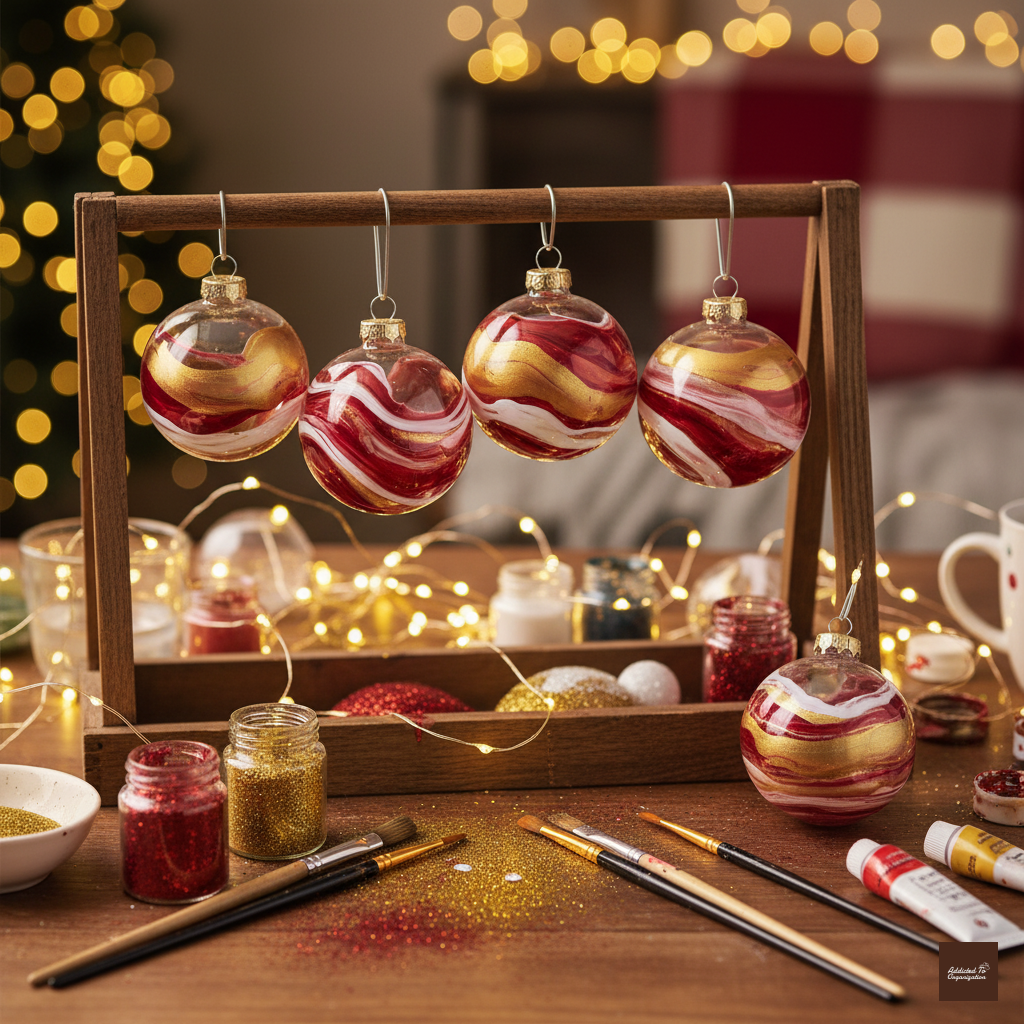
The beauty of this project is that every single ornament turns out completely unique! Swirling acrylic paint inside clear ornaments creates a stunning, custom marbled effect that looks professional.
- Materials: Clear glass ornaments, acrylic paint.
- How-to: Remove the top, pour paint inside, swirl for a marbled look, and let dry upside down.
12. Confetti-Filled Ornaments
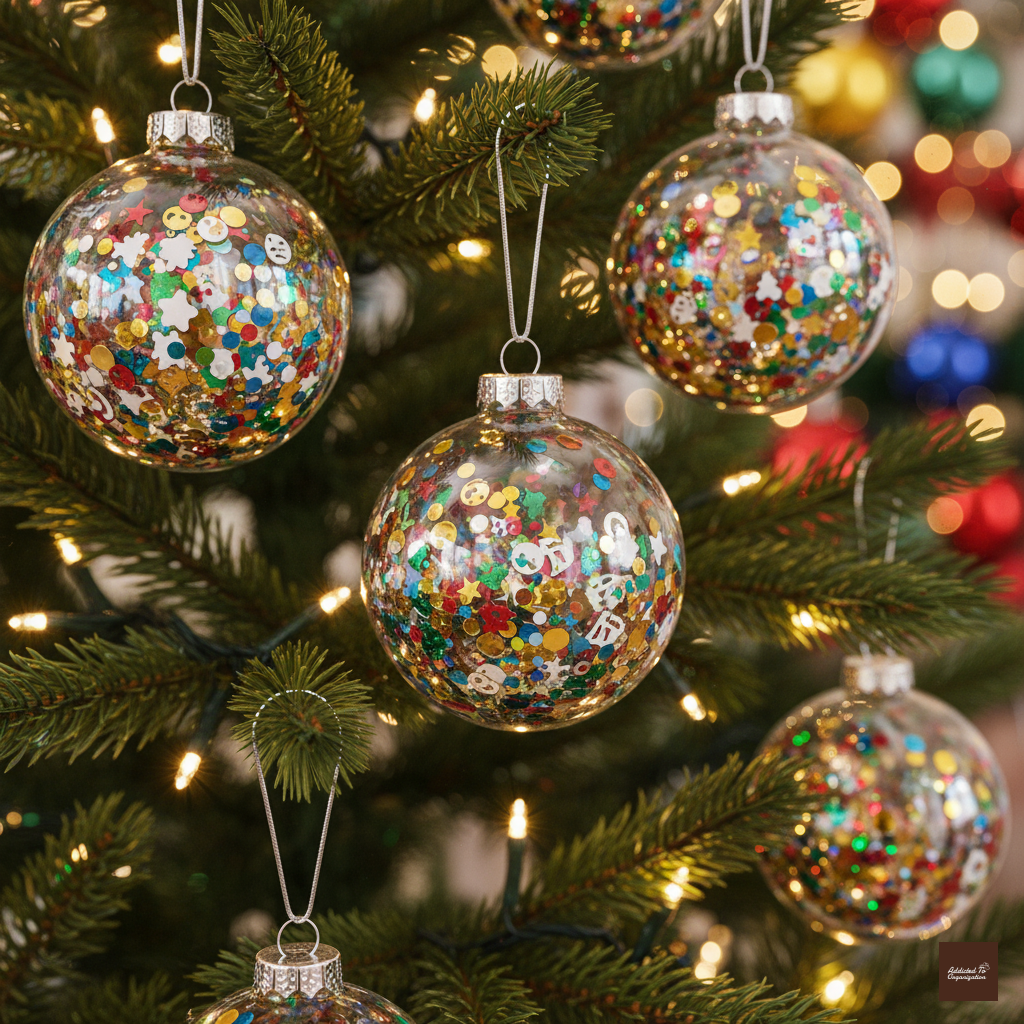
This is perhaps the fastest way to get maximum sparkle on your tree! Take clear ornaments and load them up with iridescent, star, or chunky glitter confetti for instant holiday cheer.
- Materials: Clear ornaments, confetti, funnel.
- How-to: Add colorful confetti inside clear ornaments for instant sparkle.
13. Candy Cane Reindeer
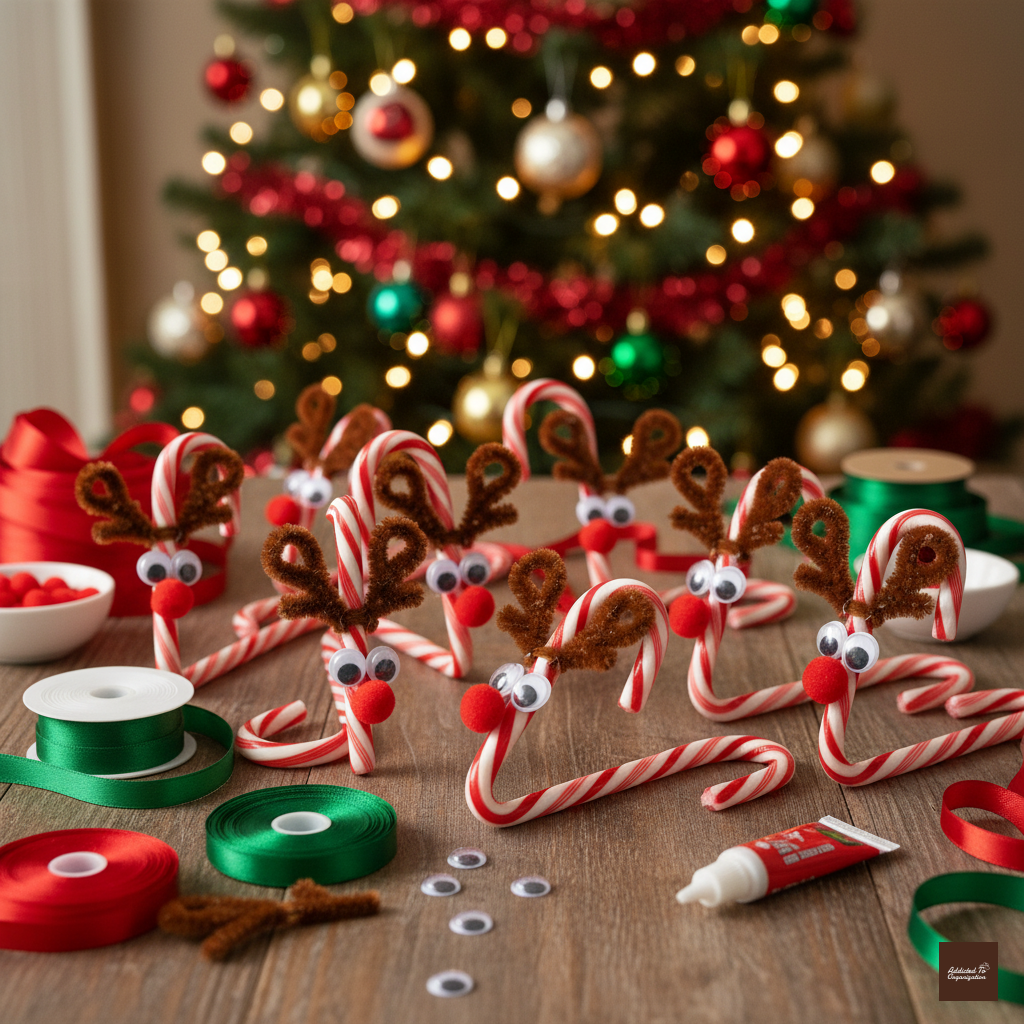
Need a quick and edible party favor or a last-minute addition to the tree? These candy cane reindeer are adorable, sweet, and fun to make—just be sure to resist eating the main component!
- Materials: Candy canes, googly eyes, pipe cleaners.
- How-to: Add antlers from pipe cleaners, eyes, and a red pom-pom nose to candy canes.
14. Pom-Pom Snowballs

Tired of the cold? Bring the fun of snowballs inside without the messy melt! Covering foam balls with white pom-poms gives your tree a soft, textured, and surprisingly elegant winter look.
- Materials: White pom-poms, glue, foam balls.
- How-to: Cover foam balls with glue and stick pom-poms all over to mimic snowballs.
15. String Art Ornaments
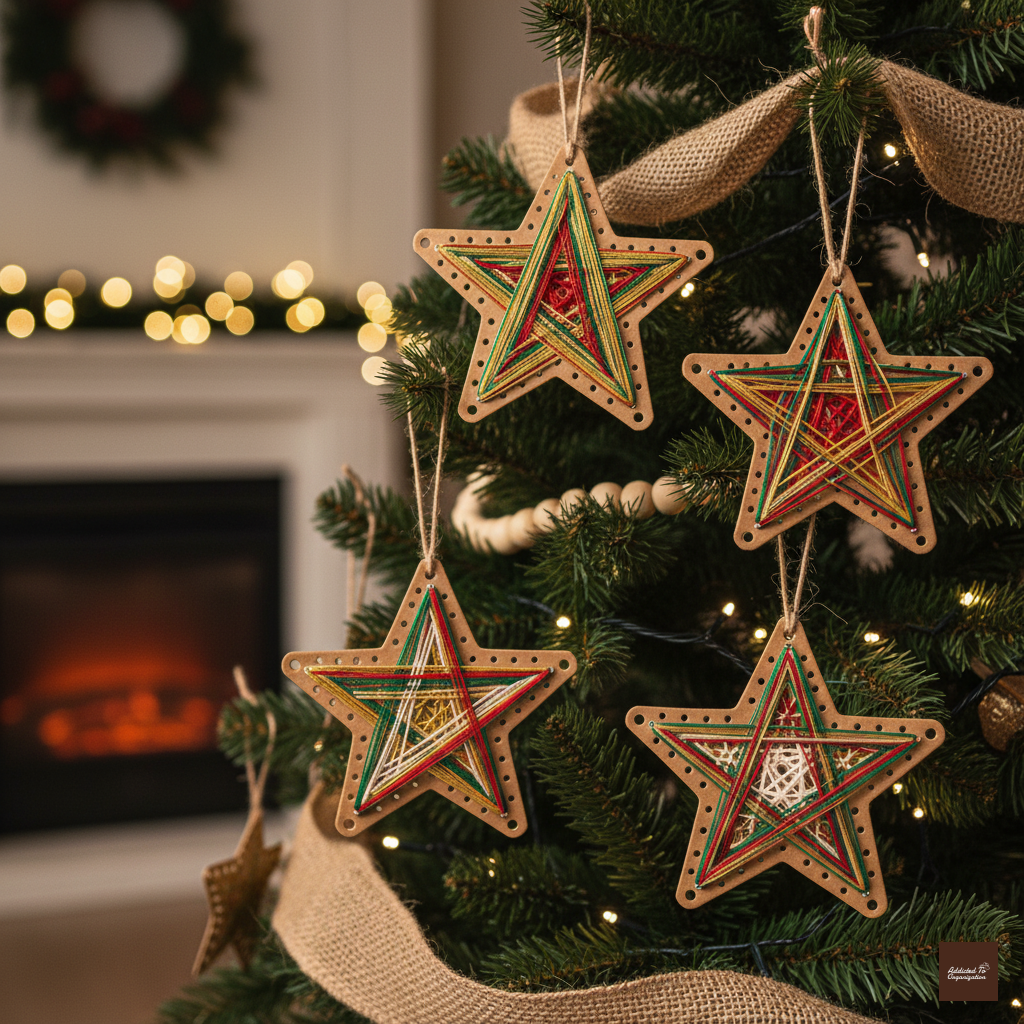
This trend is moving from wall decor right onto the Christmas tree! Cutting out simple shapes and wrapping them tightly with bright embroidery floss gives you a contemporary, colorful, and textured ornament.
- Materials: Cardboard, embroidery floss, glue.
- How-to: Cut shapes like stars or trees, wrap with colored string for a trendy ornament.
16. Dried Orange Slice Ornaments
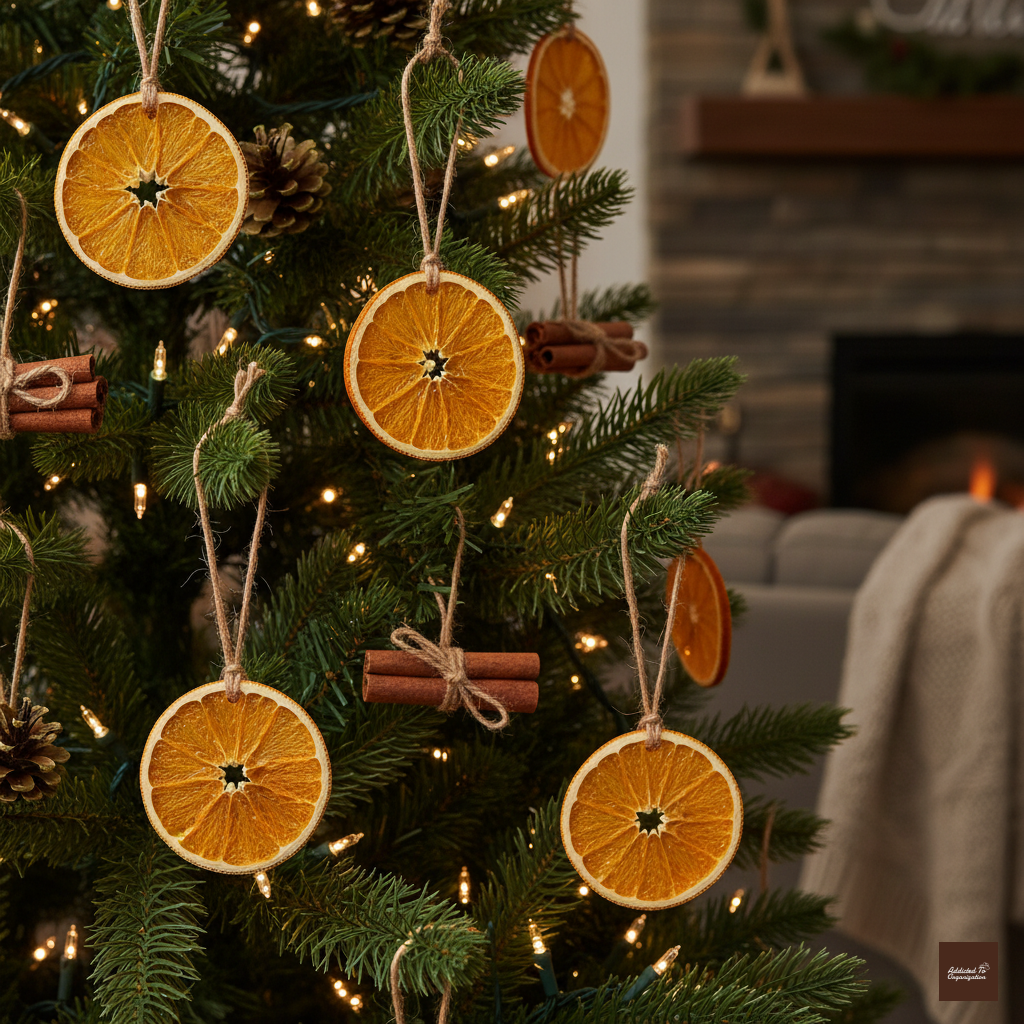
A true classic that looks straight out of a Victorian Christmas. When dried, orange slices become translucent and look like beautiful little stained glass pieces. Plus, the light scent is divine!
- Materials: Oranges, oven, twine.
- How-to: Slice oranges thin, bake at low heat until dry, then tie with twine for a fragrant decoration.
17. Recycled Cardboard Stars
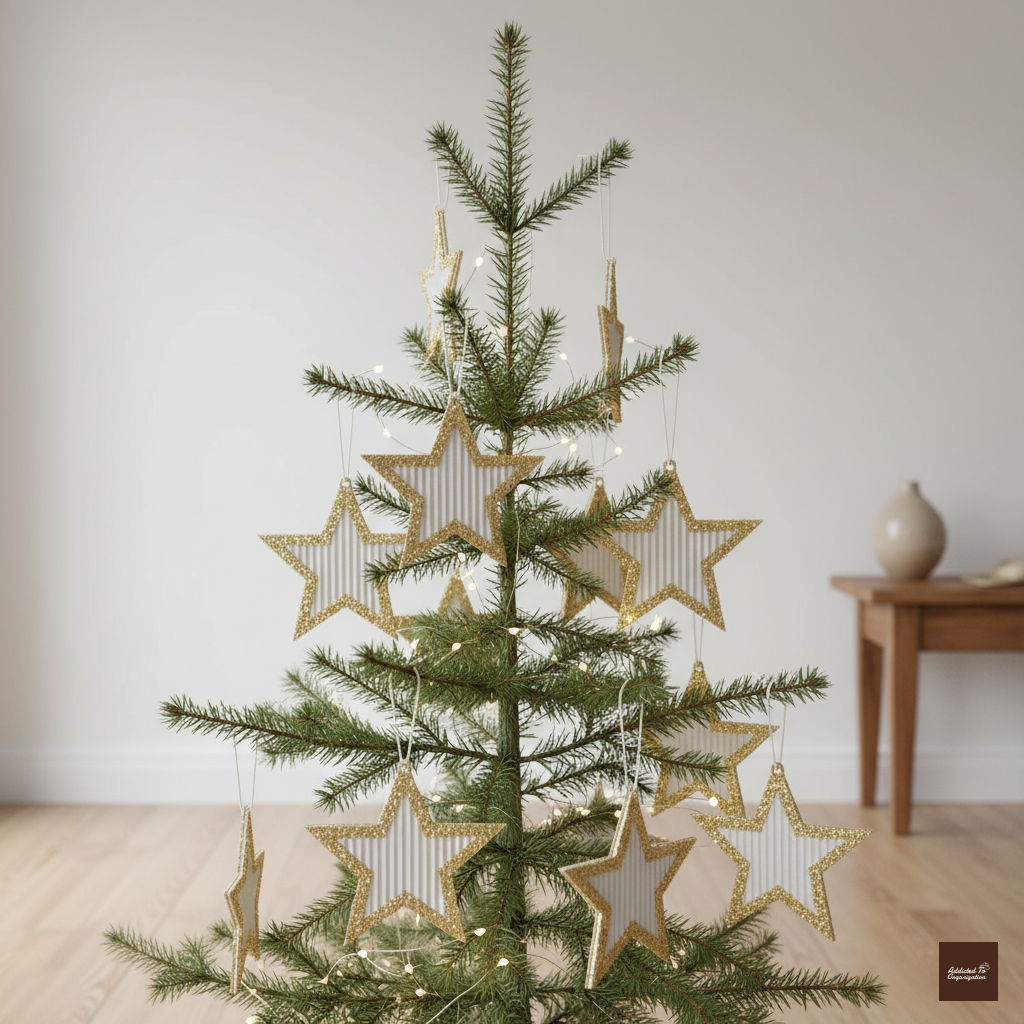
Save your delivery boxes and turn them into chic ornaments! Cardboard stars, especially when painted a stark white or metallic gold, offer a great structural contrast against soft, lush branches.
- Materials: Cardboard, scissors, paint.
- How-to: Cut star shapes, paint, and hang with twine for a rustic recycled option.
18. Old Sweater Ornaments
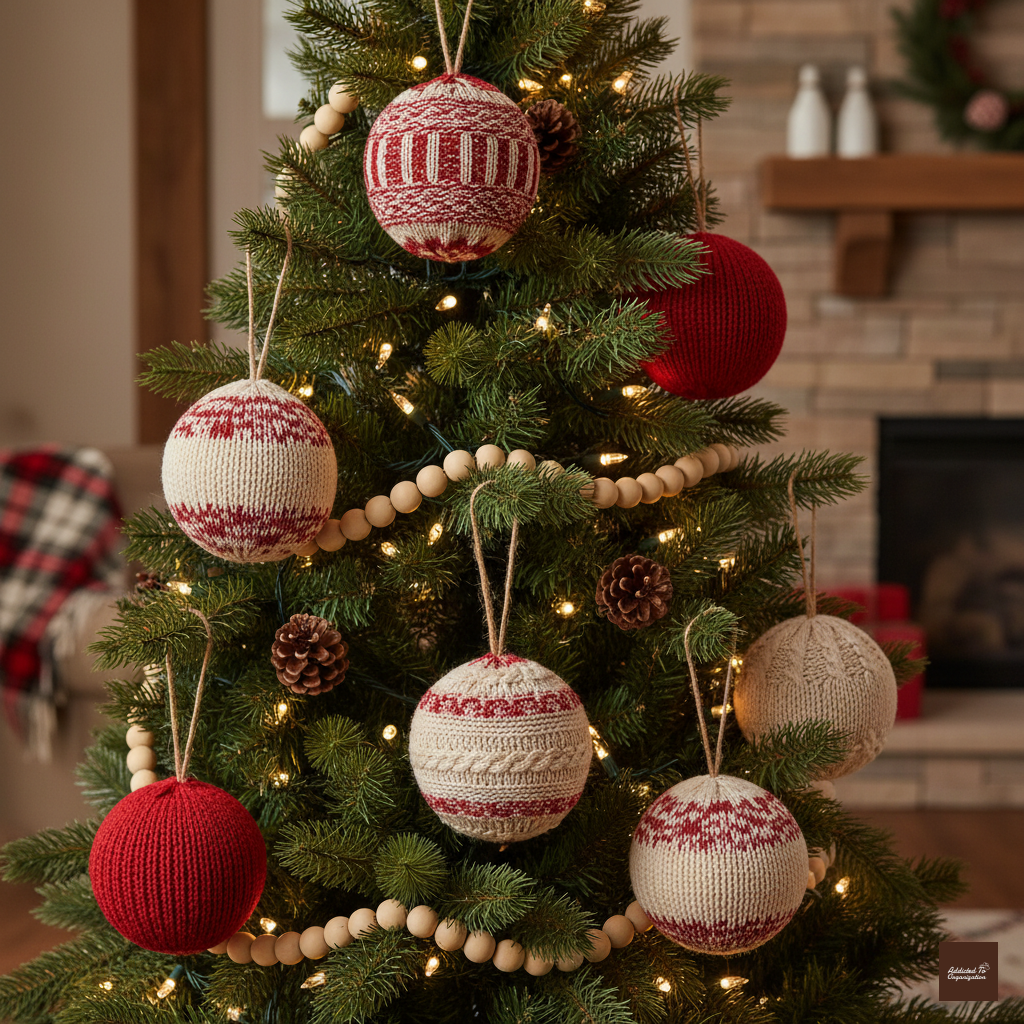
Got a moth-eaten or shrunken Christmas sweater you can’t wear anymore? Repurpose the fabric! The knit texture adds a wonderful cozy feeling to your tree when glued onto a sturdy cardboard backing.
- Materials: Old sweaters, cardboard, glue.
- How-to: Cut circles from sweater fabric, glue onto cardboard, and add a ribbon hanger.
19. Wine Cork Snowmen
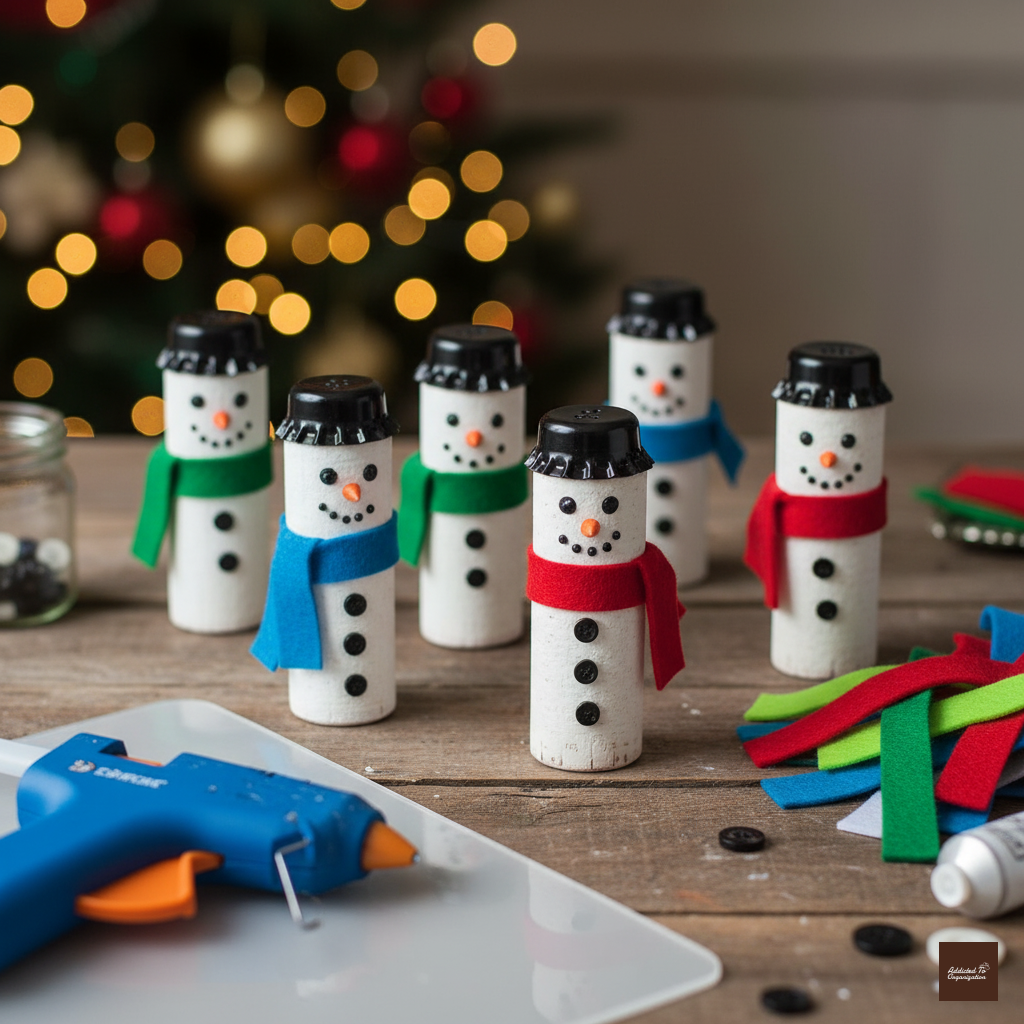
Next time you pop a bottle, save the cork! Gluing them into tiny snowmen is a charming, creative way to use materials you already have. They look especially cute with tiny little pipe cleaner ear muffs.
- Materials: Wine corks, paint, felt scraps.
- How-to: Stack and glue corks, paint faces, and dress with tiny felt scarves or hats.
20. Newspaper Baubles
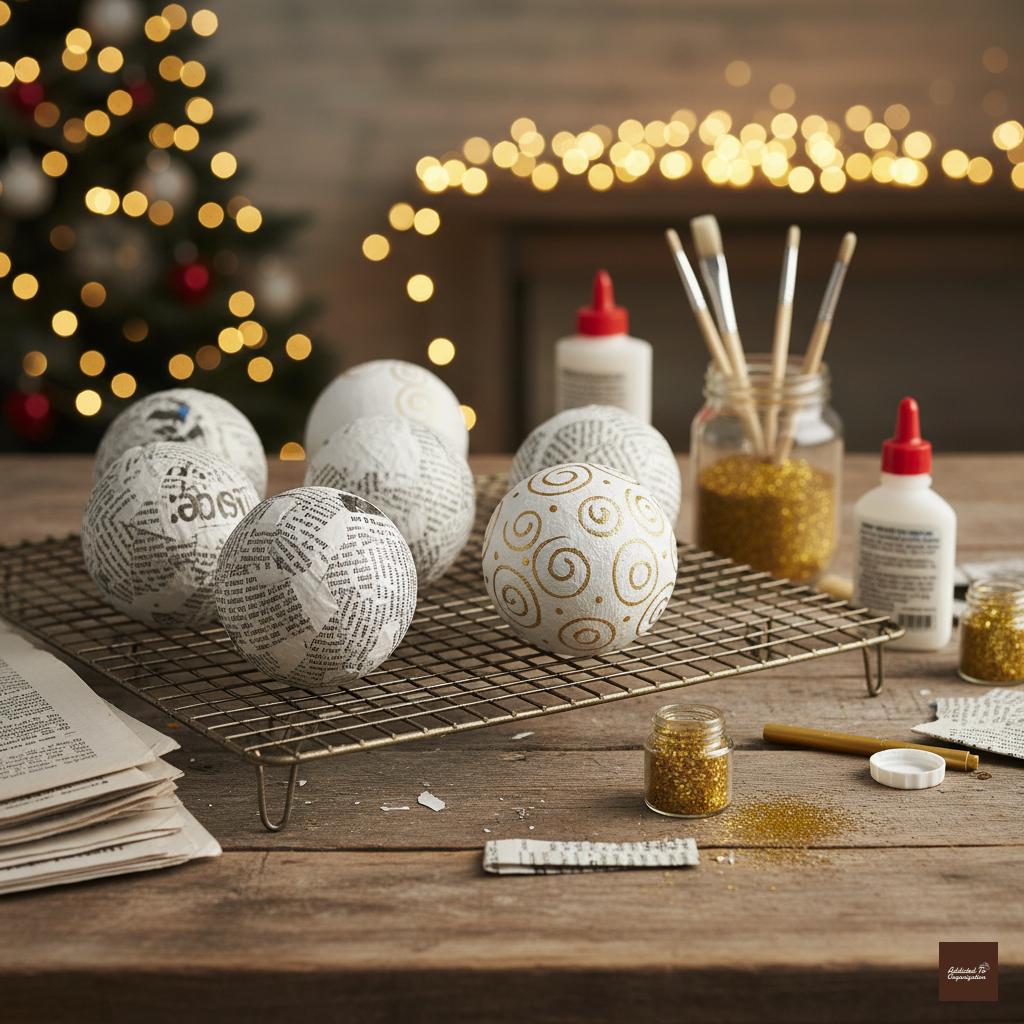
Who says papier-mâché is just for school projects? Covering balloons with newspaper strips and then painting them lets you create custom-sized ornaments that are incredibly lightweight and shatter-proof!
- Materials: Balloons, newspaper strips, glue, paint.
- How-to: Use papier-mâché to cover balloons, let dry, pop the balloon, then paint or glitter the sphere.
21. Handprint Salt Dough Ornaments
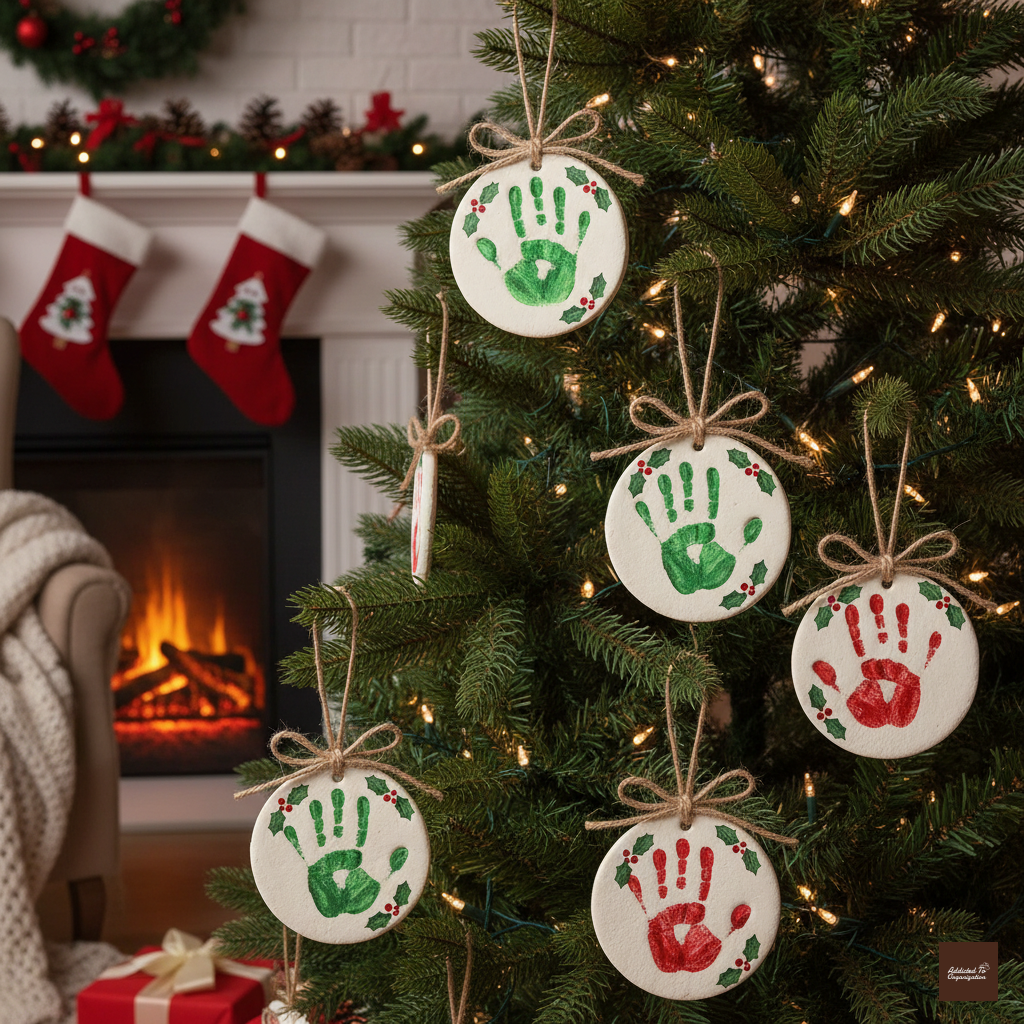
This is a must-do for anyone with little ones! Capturing a child’s handprint in salt dough is a wonderful tradition that makes for the most sentimental and cherished ornaments you’ll ever own.
- Materials: Salt, flour, water, paint.
- How-to: Mix dough, press a child’s handprint, bake until hard, and paint as desired.
22. Popsicle Stick Sleds
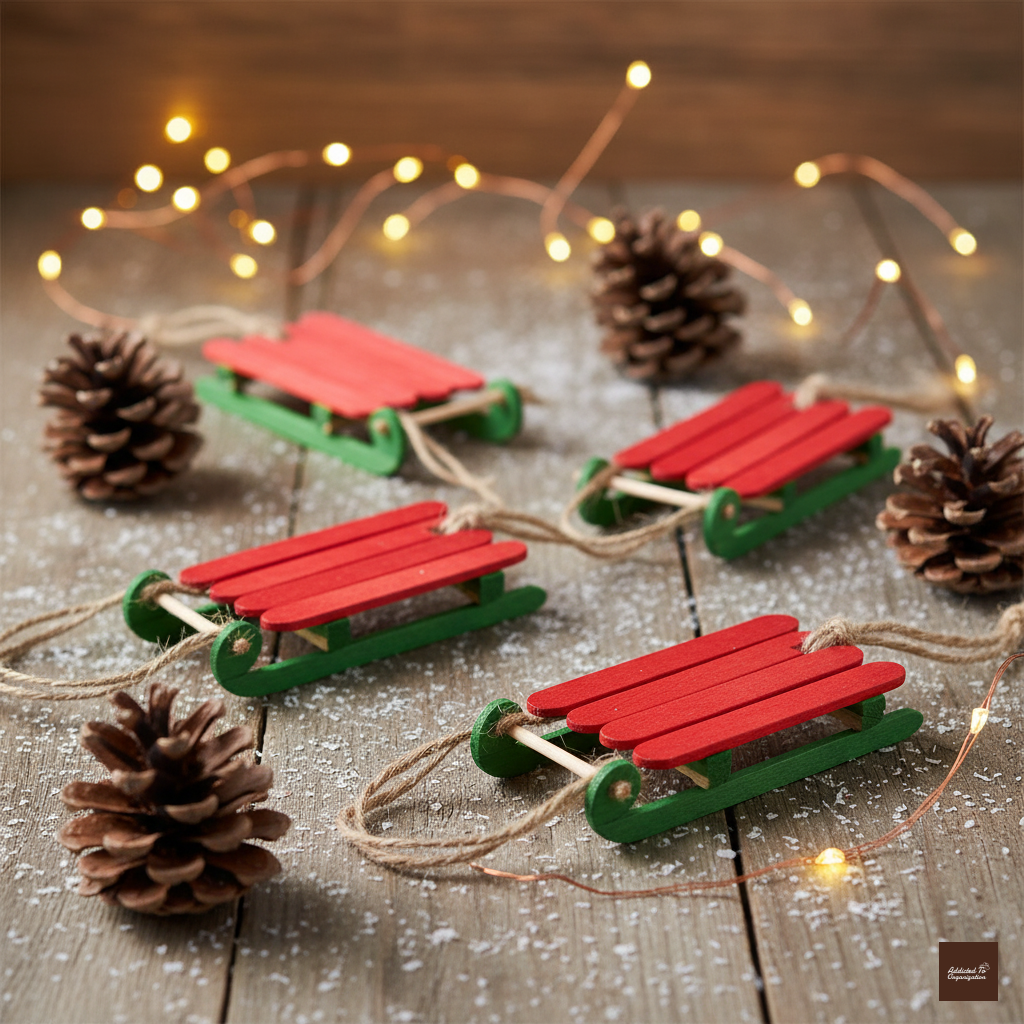
These tiny sleds look fantastic on a tree, especially if you set them against some faux snow or cotton fluff. They’re easy to build and the perfect canvas for bright, contrasting paints.
- Materials: Popsicle sticks, glue, paint.
- How-to: Glue sticks into a sled shape, paint in bright colors, and add string for hanging.
23. Paper Plate Angels
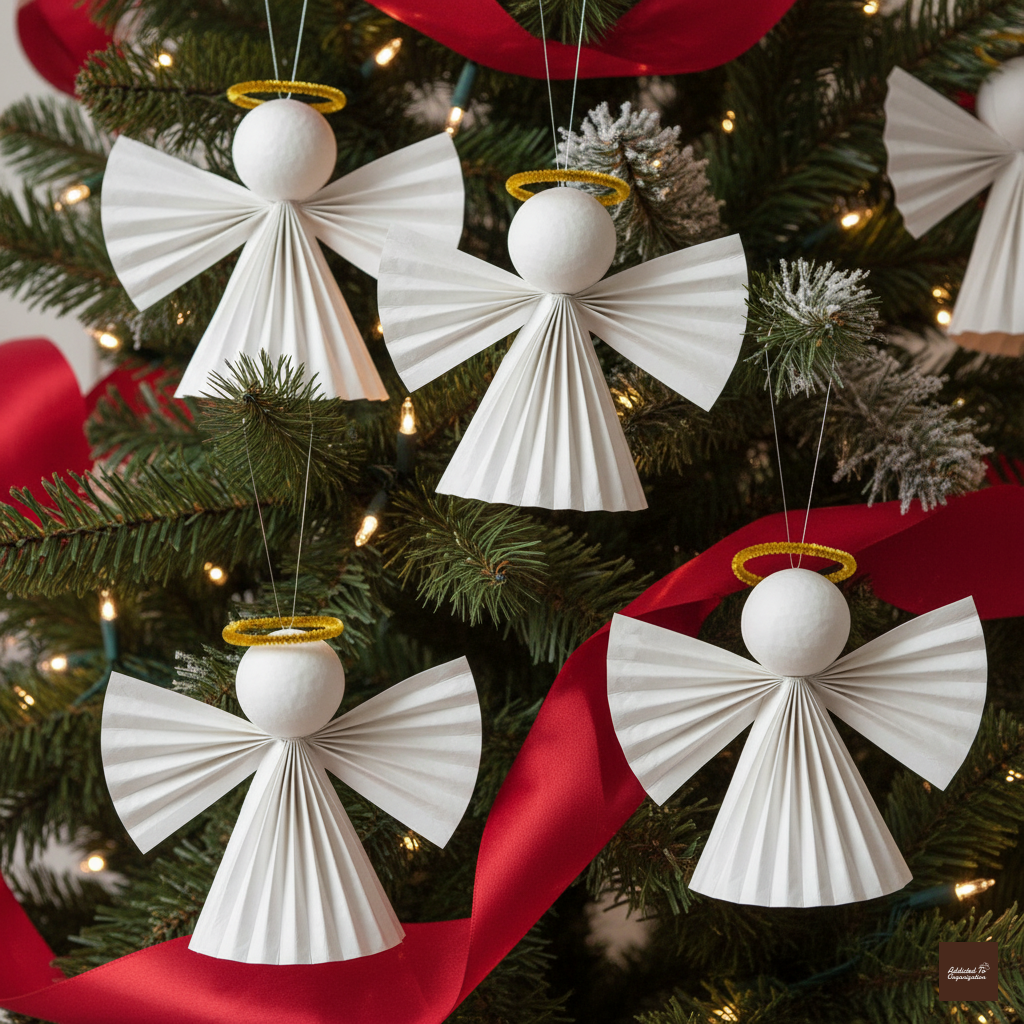
A classic kids’ craft! Simple paper plates can be cut, folded, and glittered into sweet, simple angels. Don’t forget the pipe cleaner halo for a glowing effect!
- Materials: Paper plates, glitter, pipe cleaners.
- How-to: Cut and fold plates into angels, decorate with glitter and halos.
24. Foam Ball Penguins
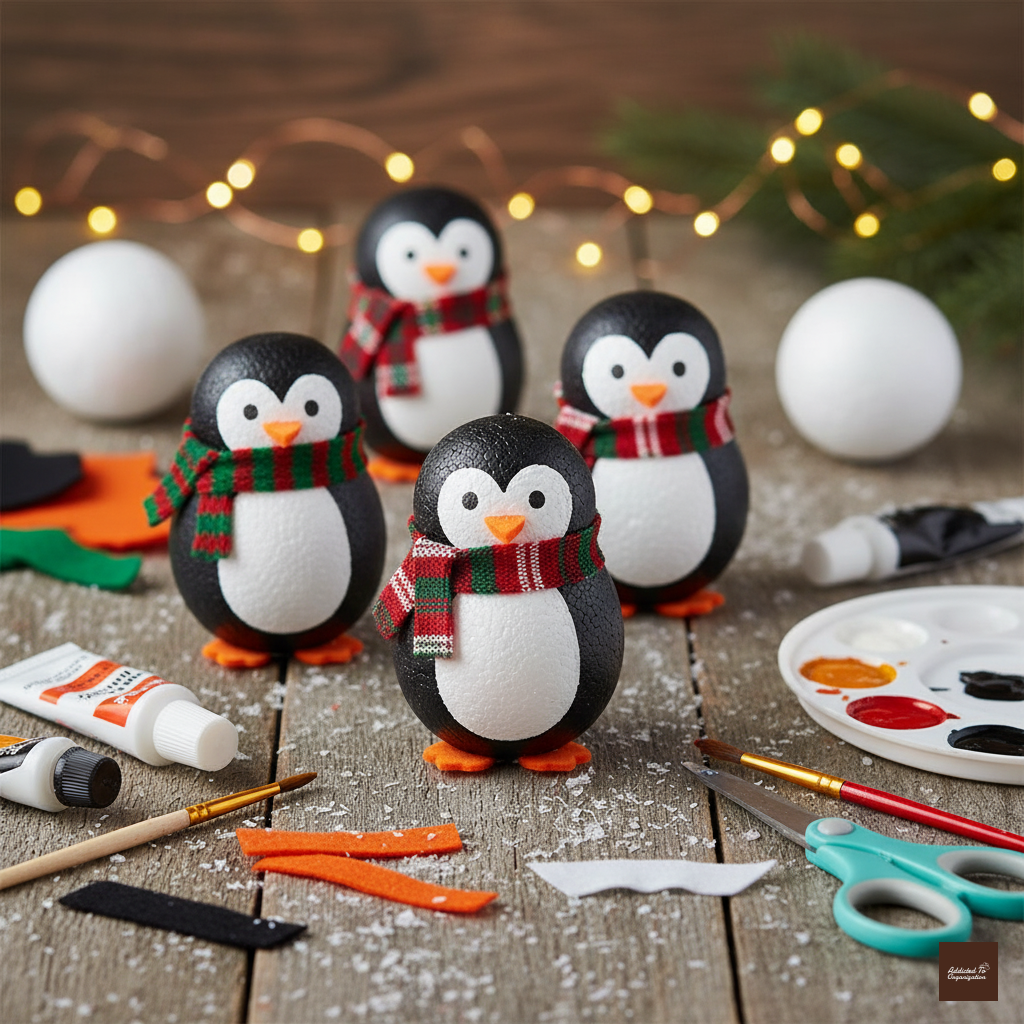
If you’re looking for a fun character craft, these foam ball penguins are winners. Painting the foam balls into black and white tuxedo layers and adding little felt wings makes them irresistibly cute.
- Materials: Foam balls, paint, felt.
- How-to: Paint balls black and white, add felt wings, beaks, and tiny eyes.
25. Button Christmas Trees
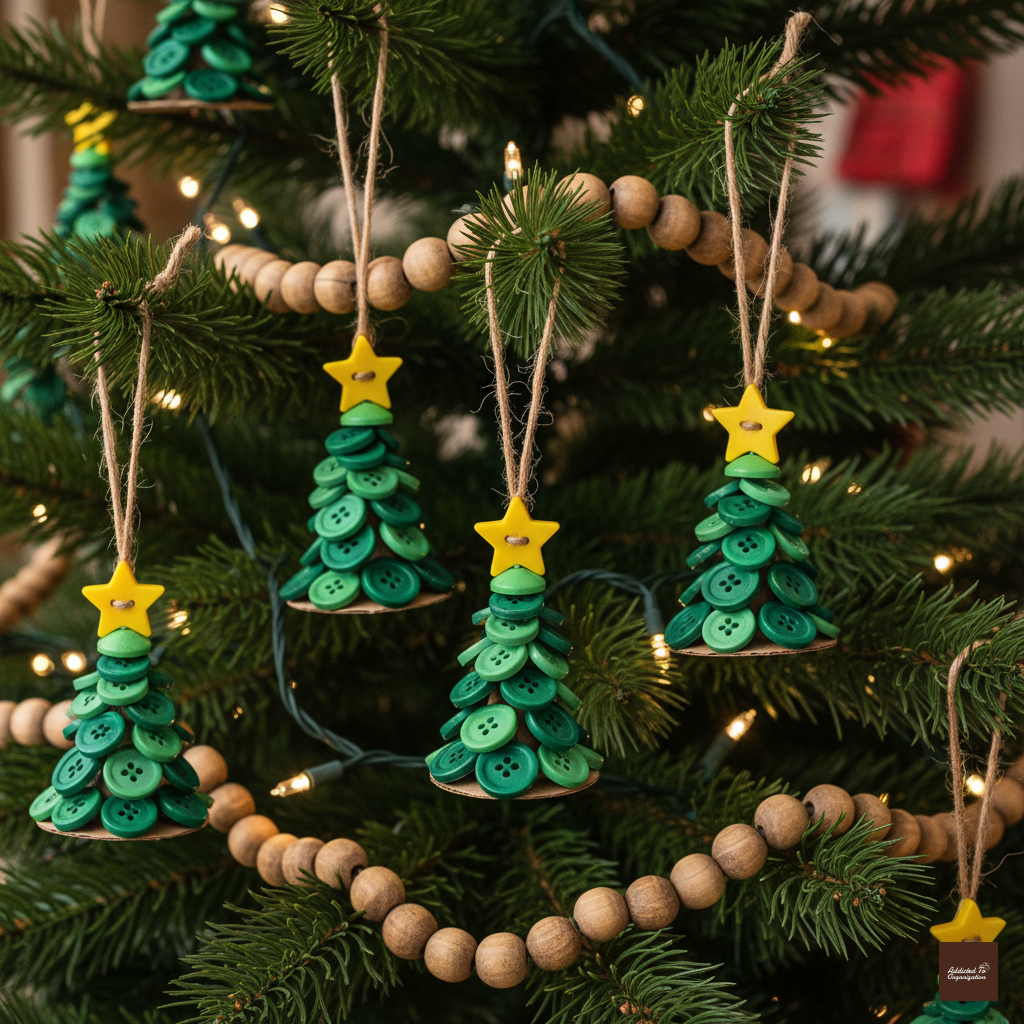
Raid your button jar for this one! Layering green buttons from large to small creates a delightful, textured, and dimensional mini Christmas tree effect.
- Materials: Green buttons, glue, cardboard.
- How-to: Arrange buttons into a Christmas tree shape, glue to cardboard, and add ribbon to hang.
26. Pearl Bead Ornaments
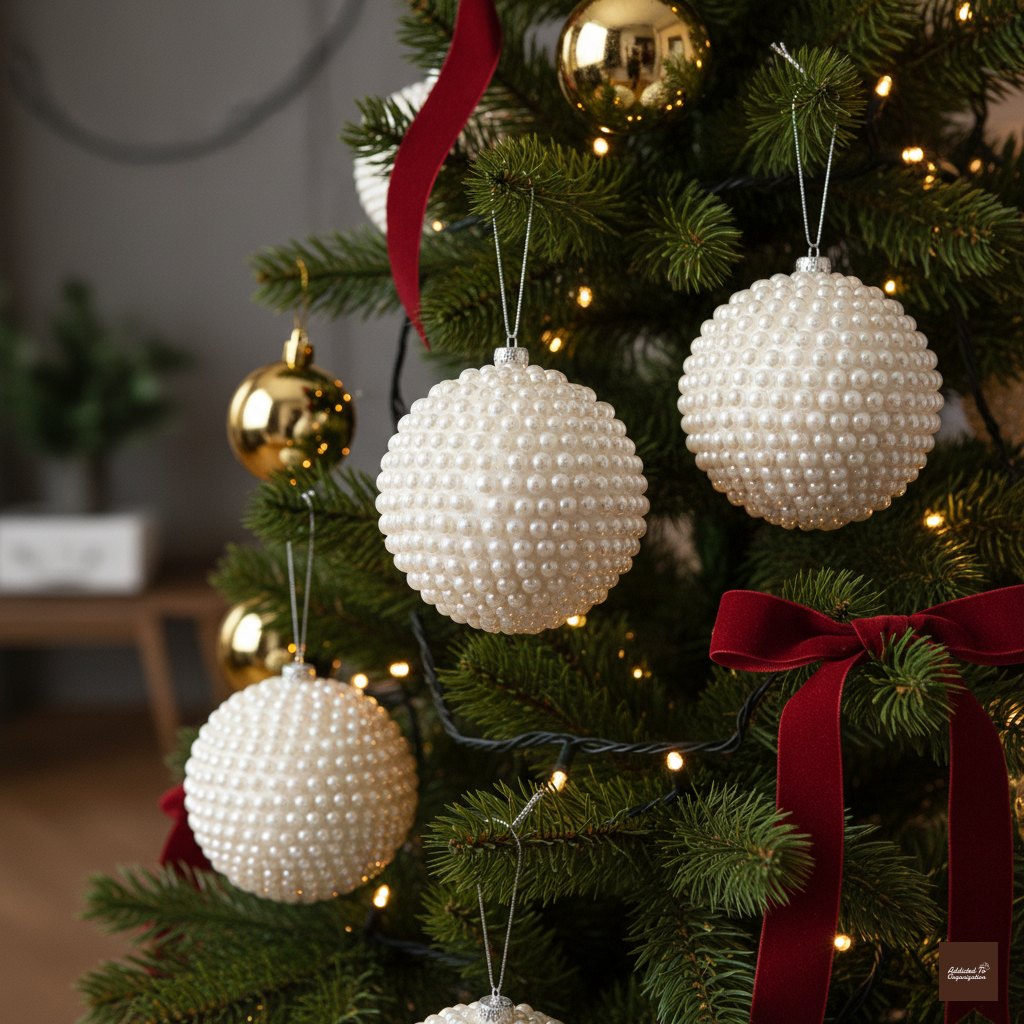
For a touch of vintage glamour, cover foam balls completely with pearl beads. The result is a stunning, sophisticated ornament that catches the light beautifully and looks absolutely priceless.
- Materials: Pearl beads, foam balls, hot glue.
- How-to: Cover foam balls with pearl beads for a classy, elegant look.
27. Gold Leaf Baubles
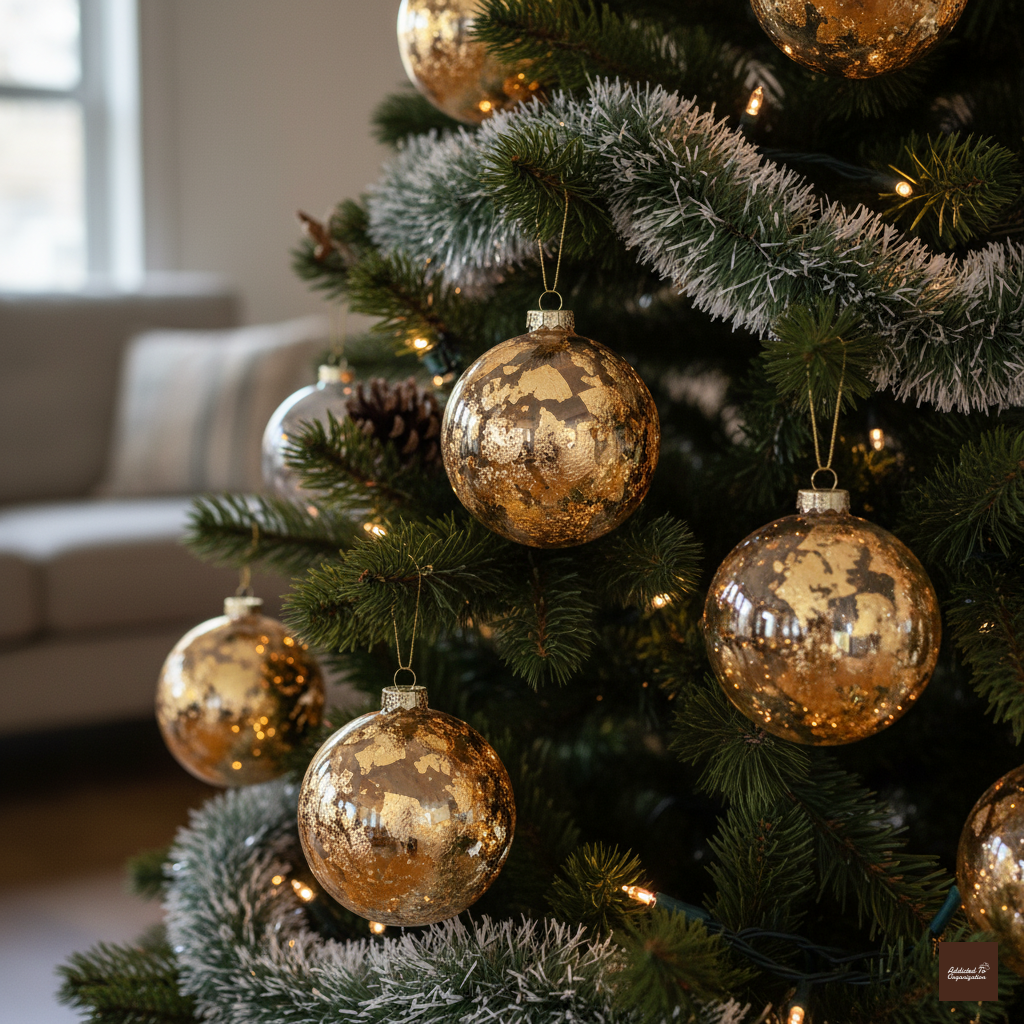
Go for a modern, high-end look with gold leaf. Applying it unevenly to clear ornaments creates a subtle, metallic shimmer that looks intentional and artistic. It’s easier than painting, too!
- Materials: Gold leaf, clear ornaments, adhesive.
- How-to: Apply gold leaf in patches to clear ornaments for a modern, metallic finish.
28. Ribbon Tassel Ornaments
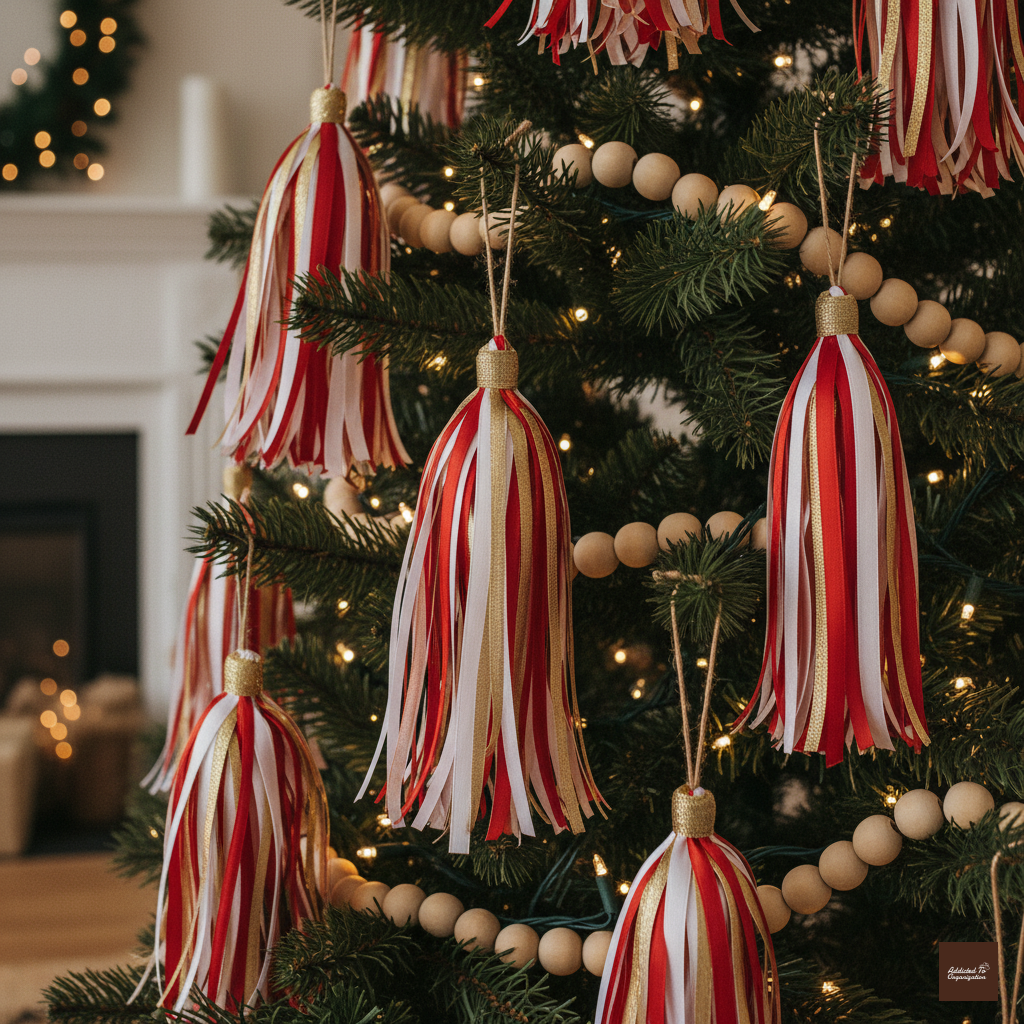
Tassels add great movement and a soft texture to your tree. Cut ribbons in varying shades of green, red, or metallic colors and tie them onto the branches for an elegant drape.
- Materials: Ribbons, scissors, string.
- How-to: Cut ribbons into strips, tie into tassels, and attach to the tree for soft movement.
29. Sequin Ball Ornaments
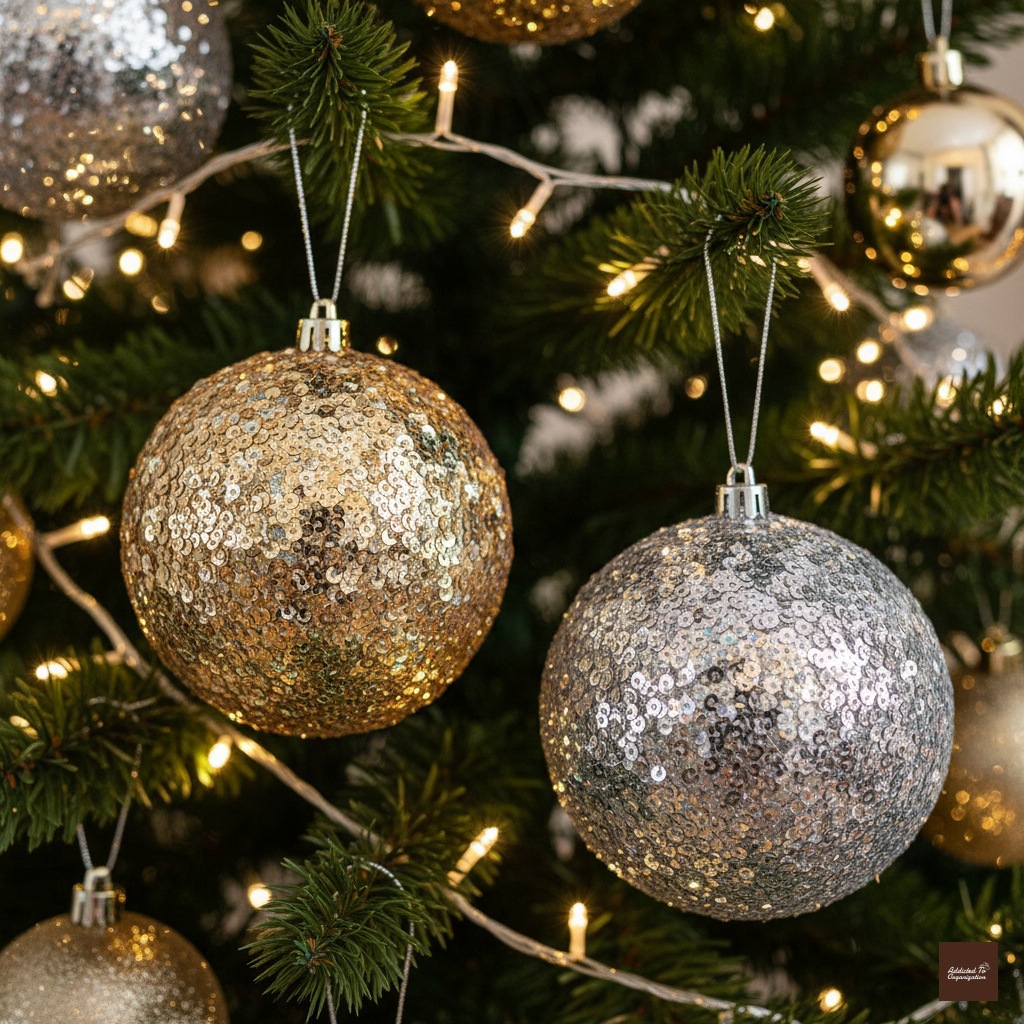
If you live by the motto “the more glitter, the better,” this is your ornament. Sequins, when fully covering a foam ball, create a dazzling disco-ball effect that truly shines under the tree lights.
- Materials: Sequins, foam balls, glue.
- How-to: Cover foam balls with sequins for a sparkling ornament that shines under the lights.
30. Crystal Snowflake Ornaments

These delicate, icy ornaments look like they were plucked right out of a fairytale. Shaping wire and threading tiny crystals and beads creates a stunning, intricate snowflake that adds true elegance.
- Materials: Craft wire, crystals, beads.
- How-to: Shape wire into a snowflake, add beads and crystals for an icy, elegant effect.
That’s 30 fantastic DIY Christmas ornament ideas ready to go! Which one are you trying first?
Drop a comment below and share your favorite homemade decoration—we’d love to see what you create!
If you found this list helpful, please share it with a fellow crafter, and don’t forget to pin it so you can easily find these ideas for years to come. Happy crafting!